Titration Workstations User’s Guide D21T043

Welcome message from author
This document is posted to help you gain knowledge. Please leave a comment to let me know what you think about it! Share it to your friends and learn new things together.
Transcript
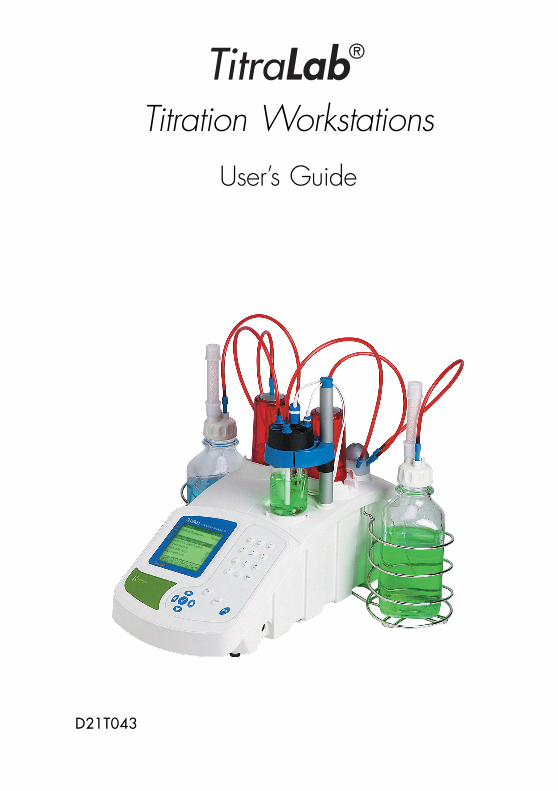
Titration WorkstationsUser’s Guide
D21T043

D21T043 • Printed by Radiometer Analytical SAS • 2008-09J
Safety inforSafety inforSafety inforSafety inforSafety informationmationmationmationmationPlease read this entire manual before unpacking, setting up, or operatingthis equipment. Pay attention to all danger and caution statements.Failure to do so could result in serious injury to the operator or damage tothe equipment. To ensure that the protection provided by this equipmentis not impaired, do not use and do not install this equipment in anymanner other than that specified in this manual.
Precautionary labelsPrecautionary labelsPrecautionary labelsPrecautionary labelsPrecautionary labels
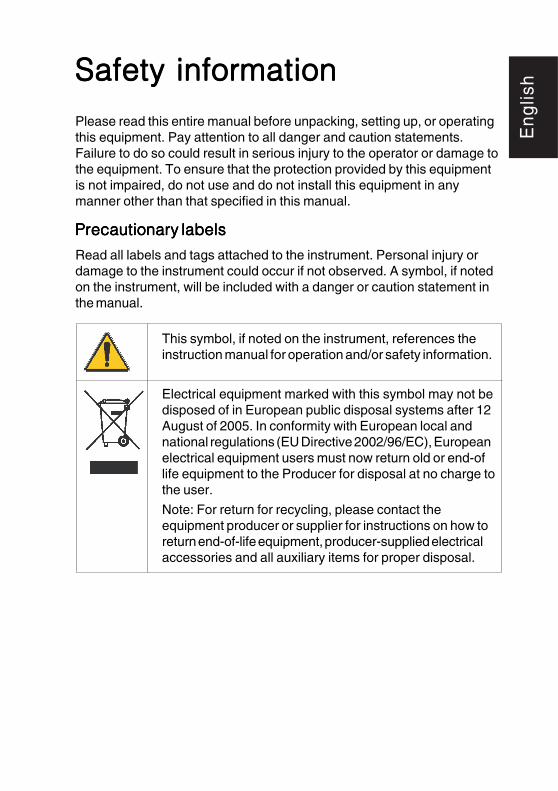
Read all labels and tags attached to the instrument. Personal injury ordamage to the instrument could occur if not observed. A symbol, if notedon the instrument, will be included with a danger or caution statement inthe manual.
This symbol, if noted on the instrument, references theinstruction manual for operation and/or safety information.
Electrical equipment marked with this symbol may not bedisposed of in European public disposal systems after 12August of 2005. In conformity with European local andnational regulations (EU Directive 2002/96/EC), Europeanelectrical equipment users must now return old or end-oflife equipment to the Producer for disposal at no charge tothe user.
Note: For return for recycling, please contact theequipment producer or supplier for instructions on how toreturn end-of-life equipment, producer-supplied electricalaccessories and all auxiliary items for proper disposal.
Eng
lish
ContentsContentsContentsContentsContents
Safety information ................................................................. 3
1. Introduction ........................................................................ 25
Read me! ........................................................................................... 25
2. Getting started .................................................................... 33
Keyboard ............................................................................................ 33
Basic principles ................................................................................. 34
Main window ...................................................................................... 36
Reagents window ............................................................................... 37
Electrodes window ............................................................................. 39
Cell window ........................................................................................ 41
System configuration ......................................................................... 43
3. Programming guidelines ................................................... 51
Create an electrode ............................................................................ 52
Edit electrode screen ......................................................................... 55
Programming electrode parameters .................................................... 57
Create a reagent ................................................................................ 58
Edit reagent screen ............................................................................ 59
Programming reagent parameters ...................................................... 61
Create a method ................................................................................ 62
Edit method screen ............................................................................ 63
Programming method parameters ...................................................... 66
4. Running analyses ............................................................... 67
Run electrode calibration .................................................................... 68
Run reagent calibration....................................................................... 68
Run method ....................................................................................... 69
Run direct measurement .................................................................... 69
Run manual dosing ............................................................................ 69
5. Viewing data ........................................................................ 71
Sample results ................................................................................... 72
Reagent calibration results ................................................................. 73
Electrode calibration results ............................................................... 74
Global variables ................................................................................. 75
6. Printing data ....................................................................... 77
Manual printouts ................................................................................ 78
Automatic printouts ............................................................................ 80
7. Connection of peripherals ................................................. 81
8. General information ........................................................... 83
Cleaning ............................................................................................. 83
Transporting the instrument ................................................................ 83
Servicing ............................................................................................ 83
International Standards ......................................................... 84
Introduction 25
1. Intr1. Intr1. Intr1. Intr1. Introductionoductionoductionoductionoduction
Warning !
The TitraLab 8xx system has been developed to meet the requirementsof volumetric titration applications. It is therefore aimed at experiencedusers who have the knowledge required to operate the instrument andimplement the security instructions enclosed. Please remember that theTitraLab 8xx system must not, under any circumstances, be used toperform tests on living beings.
We accept no responsibility for using the TitraLab 8xx system and itsperipheral devices under conditions that are not specified in thisUser's Guide.
Read me!Read me!Read me!Read me!Read me!The interface of the Titration Manager has been specially designed toclearly guide you through every step of the programming and running ofthe analyses, whether you are a supervisor or a routine user.
An important part of this interface is to check and control the presence ofdifferent elements necessary to run the defined application.
Working in Supervisor modeWorking in Supervisor modeWorking in Supervisor modeWorking in Supervisor modeWorking in Supervisor mode
When programming in “SUPERVISOR” mode, it is recommended to workin stages. These stages should be carried out in the order describedbelow:
To program a methodTo program a methodTo program a methodTo program a methodTo program a method
1. Define your electrode(s)
Identify electrodes (including temperature sensors) to be used for theanalysis.
Electrodes can be created from the following lists, Catalogue, Other orCopy from. When creating the electrode, define if electrode calibration isrequired (or not), if yes specify the “periodicity” of the calibrations and thepH standards to be used. Refer to chapter 3.
26 Chapter 1
2. Define reagent
Identify reagents to be used for the analysis.
Reagents can be created from the following lists, Catalogue, Other,Copy from. When creating the reagent, define if reagent calibration isrequired (or titre entered manually), if yes specify the “periodicity” of thecalibrations and the calibration method. Refer to chapter 3.
If you are to perform a calibration, make sure that the electrode(s)used for the calibration are the same as those used in the method.
Introduction 27
3. Create a new method or Edit a pre-programmed one
Create the measurement or titration method to be used for the analyses.Enter the parameters required to calculate the results, refer to chapter 3.
When you have finished programming, select the method or pre-programmed application, refer to Short-Form Reminder no. 3.
If a sample changer is to be used, define the sample changer in theConfiguration menu before selecting Working mode = SACsequence in the main window.
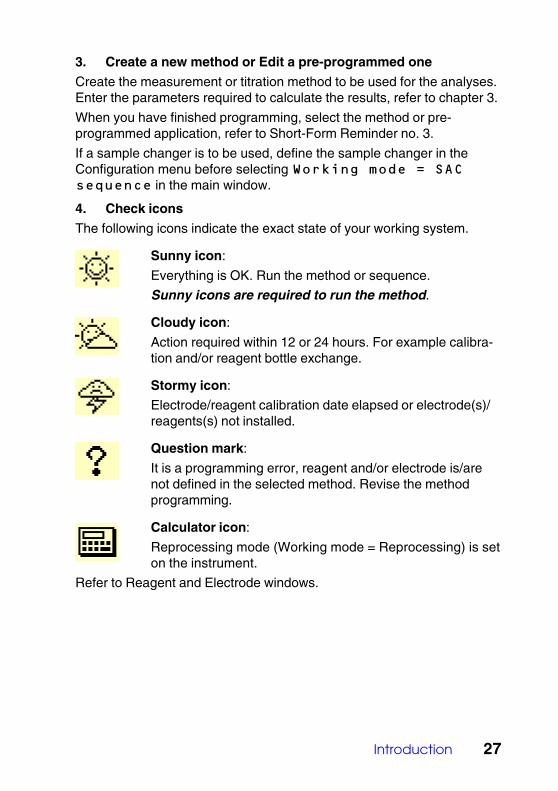
4. Check icons
The following icons indicate the exact state of your working system.
Sunny icon:
Everything is OK. Run the method or sequence.
Sunny icons are required to run the method.
Cloudy icon:
Action required within 12 or 24 hours. For example calibra-tion and/or reagent bottle exchange.
Stormy icon:
Electrode/reagent calibration date elapsed or electrode(s)/reagents(s) not installed.
Question mark:
It is a programming error, reagent and/or electrode is/arenot defined in the selected method. Revise the methodprogramming.
Calculator icon:
Reprocessing mode (Working mode = Reprocessing) is seton the instrument.
Refer to Reagent and Electrode windows.

28 Chapter 1
When Cloudy/Stormy/Question mark icons appear, Press 1“Check”. The Titration Manager will automatically guide youthrough the operations necessary to solve the errors encountered.
5. Running methods
To run a method or sequence, refer to chapter 4.
Introduction 29
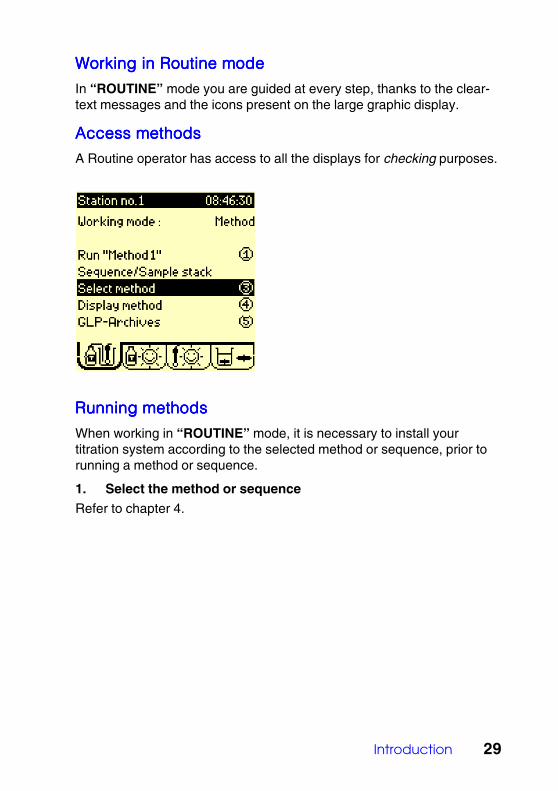
Working in Routine modeWorking in Routine modeWorking in Routine modeWorking in Routine modeWorking in Routine mode
In “ROUTINE” mode you are guided at every step, thanks to the clear-text messages and the icons present on the large graphic display.
Access methodsAccess methodsAccess methodsAccess methodsAccess methods
A Routine operator has access to all the displays for checking purposes.
Running methodsRunning methodsRunning methodsRunning methodsRunning methods
When working in “ROUTINE” mode, it is necessary to install yourtitration system according to the selected method or sequence, prior torunning a method or sequence.
1. Select the method or sequenceRefer to chapter 4.
30 Chapter 1
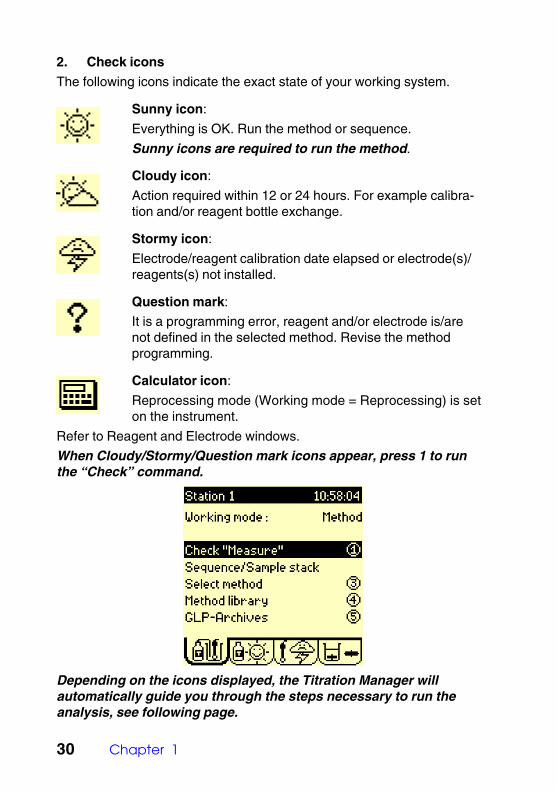
2. Check icons
The following icons indicate the exact state of your working system.
Sunny icon:
Everything is OK. Run the method or sequence.
Sunny icons are required to run the method.
Cloudy icon:
Action required within 12 or 24 hours. For example calibra-tion and/or reagent bottle exchange.
Stormy icon:
Electrode/reagent calibration date elapsed or electrode(s)/reagents(s) not installed.
Question mark:
It is a programming error, reagent and/or electrode is/arenot defined in the selected method. Revise the methodprogramming.
Calculator icon:
Reprocessing mode (Working mode = Reprocessing) is seton the instrument.
Refer to Reagent and Electrode windows.
When Cloudy/Stormy/Question mark icons appear, press 1 to runthe “Check” command.
Depending on the icons displayed, the Titration Manager willautomatically guide you through the steps necessary to run theanalysis, see following page.
Introduction 31
a. Connect/install the electrode(s)
Connect/install electrodes and temperature sensors, Refer tochapter 3.
b. Install reagents(s)
Check that the burette is installed, if not, the Titration Managerwill automatically guide you to the Install burette procedure.Press 3 to start. Refer to Short Form Reminder no. 2.
c. Calibrate electrode(s)
Run the electrode calibration, refer to chapter 4.
d. Calibrate reagent(s) or Enter titre
Run the reagent calibration, refer to Short Form Reminderno. 5 or enter the titre manually.
e. Run the method or the sequence, when Sunny icons aredisplayed,
Refer to Short Form Reminder no. 6 and 7.

32 Chapter 1
Getting started 33
2. Getting star2. Getting star2. Getting star2. Getting star2. Getting startedtedtedtedted
KeyboardKeyboardKeyboardKeyboardKeyboard
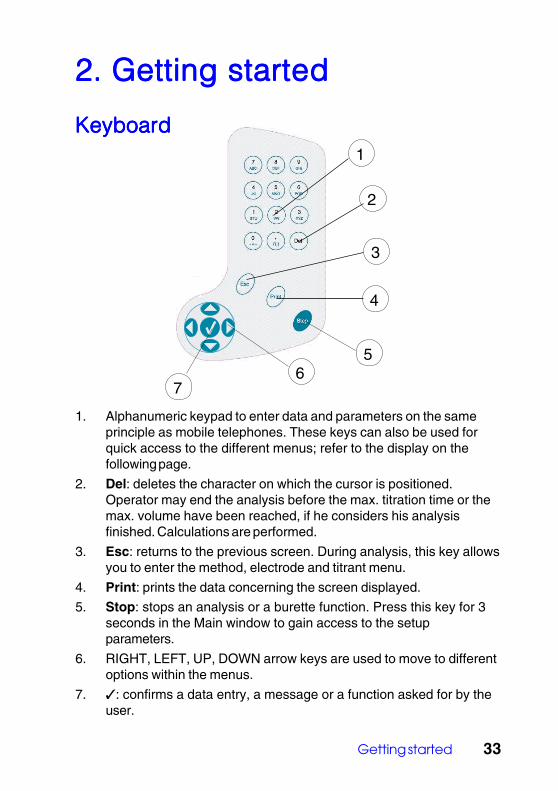
1. Alphanumeric keypad to enter data and parameters on the sameprinciple as mobile telephones. These keys can also be used forquick access to the different menus; refer to the display on thefollowing page.
2. Del: deletes the character on which the cursor is positioned.Operator may end the analysis before the max. titration time or themax. volume have been reached, if he considers his analysisfinished. Calculations are performed.
3. Esc: returns to the previous screen. During analysis, this key allowsyou to enter the method, electrode and titrant menu.
4. Print: prints the data concerning the screen displayed.
5. Stop: stops an analysis or a burette function. Press this key for 3seconds in the Main window to gain access to the setupparameters.
6. RIGHT, LEFT, UP, DOWN arrow keys are used to move to differentoptions within the menus.
7. : confirms a data entry, a message or a function asked for by theuser.
1
2
3
4
56
7
34 Chapter 2
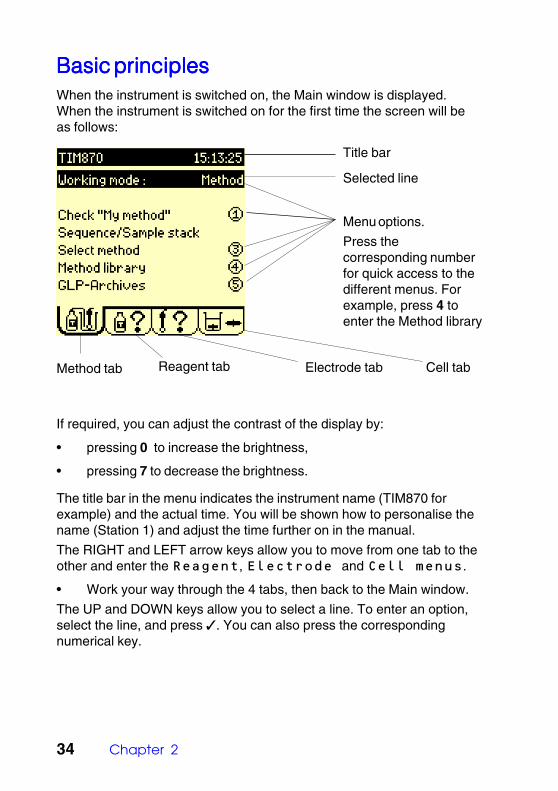
Basic principlesBasic principlesBasic principlesBasic principlesBasic principlesWhen the instrument is switched on, the Main window is displayed.When the instrument is switched on for the first time the screen will beas follows:
Title bar
Selected line
Menu options.
Press thecorresponding numberfor quick access to thedifferent menus. Forexample, press 4 toenter the Method library
Method tab Reagent tab Electrode tab Cell tab
If required, you can adjust the contrast of the display by:
• pressing 0 to increase the brightness,
• pressing 7 to decrease the brightness.
The title bar in the menu indicates the instrument name (TIM870 forexample) and the actual time. You will be shown how to personalise thename (Station 1) and adjust the time further on in the manual.
The RIGHT and LEFT arrow keys allow you to move from one tab to theother and enter the Reagent, Electrode and Cell menus.
• Work your way through the 4 tabs, then back to the Main window.
The UP and DOWN keys allow you to select a line. To enter an option,select the line, and press . You can also press the correspondingnumerical key.
Getting started 35
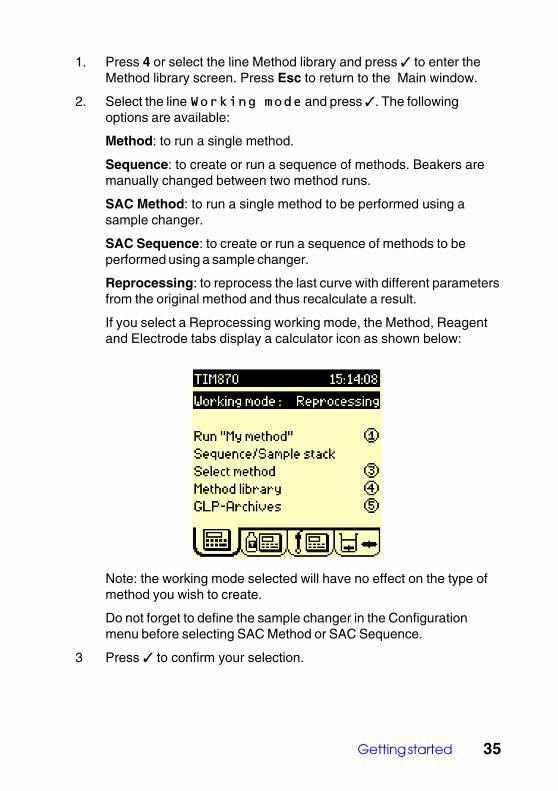
1. Press 4 or select the line Method library and press to enter theMethod library screen. Press Esc to return to the Main window.
2. Select the line Working mode and press . The followingoptions are available:
Method: to run a single method.
Sequence: to create or run a sequence of methods. Beakers aremanually changed between two method runs.
SAC Method: to run a single method to be performed using asample changer.
SAC Sequence: to create or run a sequence of methods to beperformed using a sample changer.
Reprocessing: to reprocess the last curve with different parametersfrom the original method and thus recalculate a result.
If you select a Reprocessing working mode, the Method, Reagentand Electrode tabs display a calculator icon as shown below:
Note: the working mode selected will have no effect on the type ofmethod you wish to create.
Do not forget to define the sample changer in the Configurationmenu before selecting SAC Method or SAC Sequence.
3 Press to confirm your selection.
36 Chapter 2
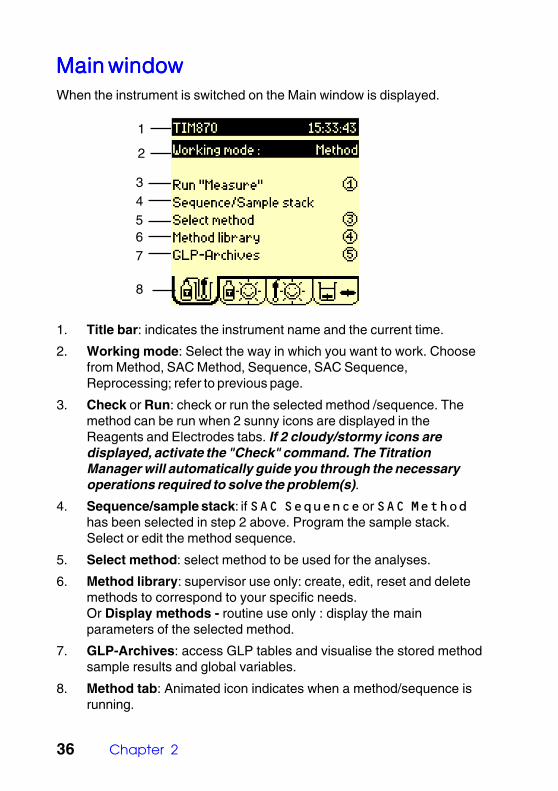
Main windowMain windowMain windowMain windowMain windowWhen the instrument is switched on the Main window is displayed.
1. Title bar: indicates the instrument name and the current time.
2. Working mode: Select the way in which you want to work. Choosefrom Method, SAC Method, Sequence, SAC Sequence,Reprocessing; refer to previous page.
3. Check or Run: check or run the selected method /sequence. Themethod can be run when 2 sunny icons are displayed in theReagents and Electrodes tabs. If 2 cloudy/stormy icons aredisplayed, activate the "Check" command. The TitrationManager will automatically guide you through the necessaryoperations required to solve the problem(s).
4. Sequence/sample stack: if SAC Sequence or SAC Methodhas been selected in step 2 above. Program the sample stack.Select or edit the method sequence.
5. Select method: select method to be used for the analyses.
6. Method library: supervisor use only: create, edit, reset and deletemethods to correspond to your specific needs.Or Display methods - routine use only : display the mainparameters of the selected method.
7. GLP-Archives: access GLP tables and visualise the stored methodsample results and global variables.
8. Method tab: Animated icon indicates when a method/sequence isrunning.
8
1
2
34567

Getting started 37
Reagents windowReagents windowReagents windowReagents windowReagents windowUse the RIGHT arrow key to move to this window.
1
2
45
7
9
3
8
1. Title bar: indicates the name of the window.
2. Calibrate/Enter titre: determine the concentration of the titrant(titre) by running a calibration or a calibration sequence or byentering the titre manually.
3. Install reagents: install or replace reagents in a method or se-quence.
4. Check reagents: verify the identification parameters of thereagents used in the working method or sequence.
5. Reagent library- supervisor use only: create, edit, reset and deletereagents to correspond to your specific needs.
6. Manual dosing: delivers a reagent at a given speed and measuresa signal at a connected electrode.
7. GLP-Archives: access GLP tables and visualise the stored reagentcalibration results.
8. Burette functions: fill, empty, flush, rinse and replace burette.Global flush of all installed burettes simultaneously.
9. Reagent tab: Reagent status icon indicates the state of the reagentsystem. Five types of icons can be displayed.
6
38 Chapter 2
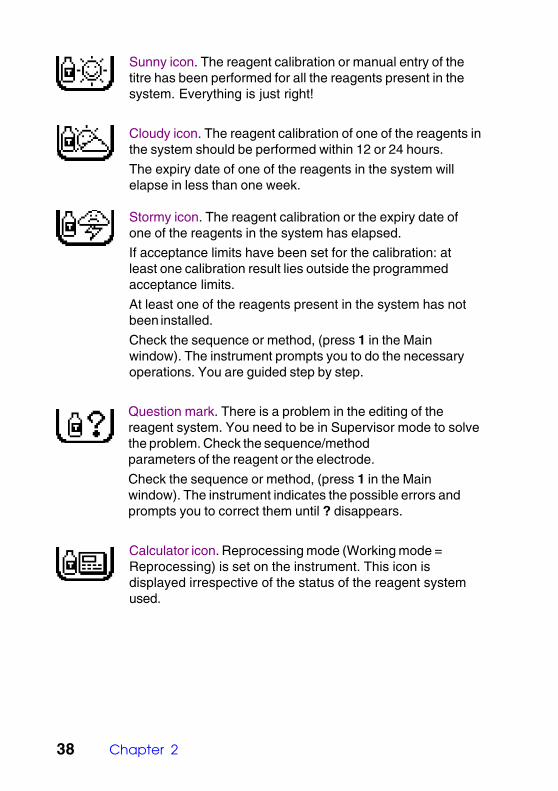
Sunny icon. The reagent calibration or manual entry of thetitre has been performed for all the reagents present in thesystem. Everything is just right!
Cloudy icon. The reagent calibration of one of the reagents inthe system should be performed within 12 or 24 hours.
The expiry date of one of the reagents in the system willelapse in less than one week.
Stormy icon. The reagent calibration or the expiry date ofone of the reagents in the system has elapsed.
If acceptance limits have been set for the calibration: atleast one calibration result lies outside the programmedacceptance limits.
At least one of the reagents present in the system has notbeen installed.
Check the sequence or method, (press 1 in the Mainwindow). The instrument prompts you to do the necessaryoperations. You are guided step by step.
Question mark. There is a problem in the editing of thereagent system. You need to be in Supervisor mode to solvethe problem. Check the sequence/methodparameters of the reagent or the electrode.
Check the sequence or method, (press 1 in the Mainwindow). The instrument indicates the possible errors andprompts you to correct them until ? disappears.
Calculator icon. Reprocessing mode (Working mode =Reprocessing) is set on the instrument. This icon isdisplayed irrespective of the status of the reagent systemused.
Getting started 39
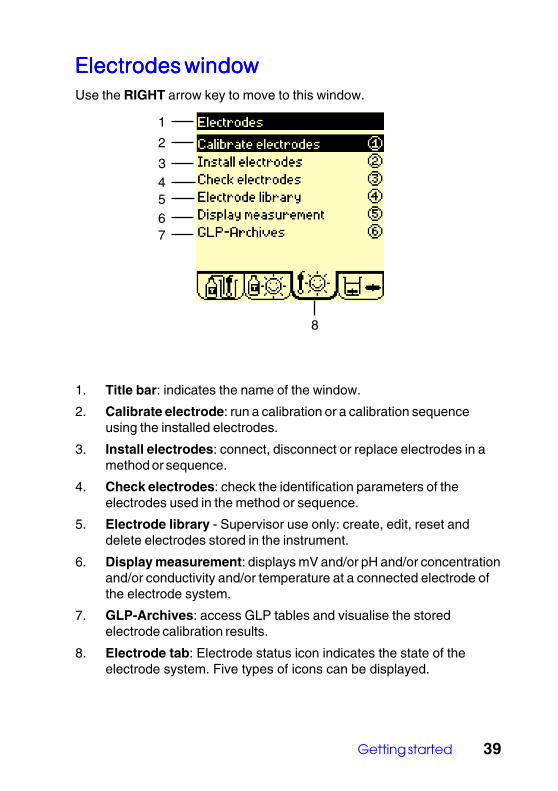
Electrodes windowElectrodes windowElectrodes windowElectrodes windowElectrodes windowUse the RIGHT arrow key to move to this window.
1
2
4567
8
3
1. Title bar: indicates the name of the window.
2. Calibrate electrode: run a calibration or a calibration sequenceusing the installed electrodes.
3. Install electrodes: connect, disconnect or replace electrodes in amethod or sequence.
4. Check electrodes: check the identification parameters of theelectrodes used in the method or sequence.
5. Electrode library - Supervisor use only: create, edit, reset anddelete electrodes stored in the instrument.
6. Display measurement: displays mV and/or pH and/or concentrationand/or conductivity and/or temperature at a connected electrode ofthe electrode system.
7. GLP-Archives: access GLP tables and visualise the storedelectrode calibration results.
8. Electrode tab: Electrode status icon indicates the state of theelectrode system. Five types of icons can be displayed.

40 Chapter 2
Sunny icon. The calibration has been performed on all theelectrodes present in the system. Everything is just right!
Cloudy icon. The electrode calibration of one of theelectrodes present in the system should be performed within12 or 24 hours.
Stormy icon. The calibration date has elapsed for one of theelectrodes present in the system.
If acceptance limits have been set for the calibration: atleast one calibration result lies outside the programmedacceptance limits.
At least one of the electrodes present in the system has notbeen installed.
Check the sequence or method, (press 1 in the Mainwindow). The instrument prompts you to do the necessaryoperations. You are guided step by step.
Question mark. There is a problem in the editing of theelectrode system. You need to be in Supervisor mode tosolve the problem. Check the sequence/methodparameters of the reagent or the electrode.
Check the sequence or method, (press 1 in the Mainwindow). The instrument indicates the possible errors andprompts you to correct them until ? disappears.
Calculator icon. Reprocessing mode (Working mode =Reprocessing) is set on the instrument. This icon isdisplayed irrespective of the status of the electrode systemused.
Getting started 41
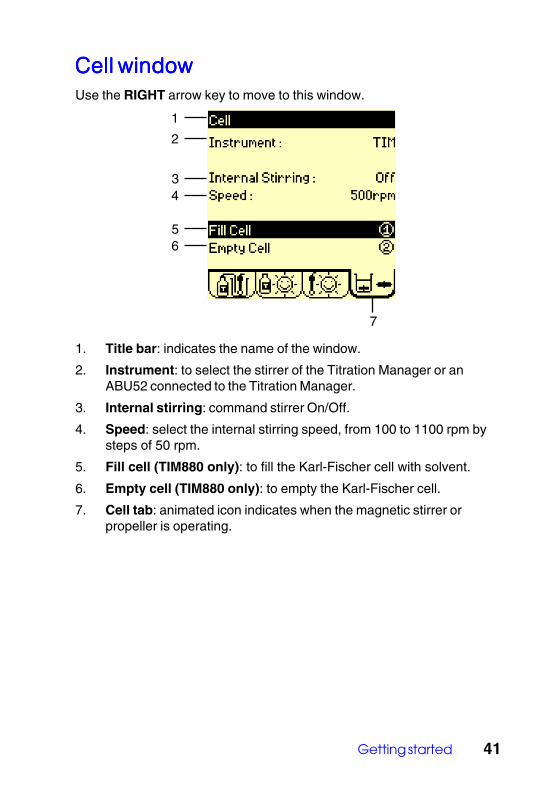
Cell windowCell windowCell windowCell windowCell windowUse the RIGHT arrow key to move to this window.
1
2
7
3
1. Title bar: indicates the name of the window.
2. Instrument: to select the stirrer of the Titration Manager or anABU52 connected to the Titration Manager.
3. Internal stirring: command stirrer On/Off.
4. Speed: select the internal stirring speed, from 100 to 1100 rpm bysteps of 50 rpm.
5. Fill cell (TIM880 only): to fill the Karl-Fischer cell with solvent.
6. Empty cell (TIM880 only): to empty the Karl-Fischer cell.
7. Cell tab: animated icon indicates when the magnetic stirrer orpropeller is operating.
4
56

42 Chapter 2
Apply internal stirringApply internal stirringApply internal stirringApply internal stirringApply internal stirring
1. For Instrument, select the stirrer of the Titration Manager or thestirrer of an ABU52 connected to the Titration Manager.
2. Select Internal stirring = ON,
3. Press in the field Speed and select a stirring speed.
Apply external stirringApply external stirringApply external stirringApply external stirringApply external stirring
1. Connect the Stirring Propeller, part no. 847-731, to the TitrationManager or ABU52 Propeller socket. Line 3 is automaticallyreplaced by External stirring.
2. For Instrument, select the stirrer of the Titration Manager or thestirrer of an ABU52 connected to the Titration Manager.
3. Select External stirring = ON.
4. Adjust stirring by turning the stirring propeller knob. You can consultthe corresponding table between the position (1 to 9) and the stirringspeed by pressing in the field Speed setting.
Fill the Karl-Fischer cell (TIM880 only)Fill the Karl-Fischer cell (TIM880 only)Fill the Karl-Fischer cell (TIM880 only)Fill the Karl-Fischer cell (TIM880 only)Fill the Karl-Fischer cell (TIM880 only)
1. For Instrument, select TIM.
2. Press 1 (Fill cell).
3. Press the TIM880 filling cell button then press .
Empty the Karl-Fischer cell (TIM880 only)Empty the Karl-Fischer cell (TIM880 only)Empty the Karl-Fischer cell (TIM880 only)Empty the Karl-Fischer cell (TIM880 only)Empty the Karl-Fischer cell (TIM880 only)
1. For Instrument, select TIM.
2. Press 2 (Empty cell).
3. Press the TIM880 emptying cell button then press .
Getting started 43
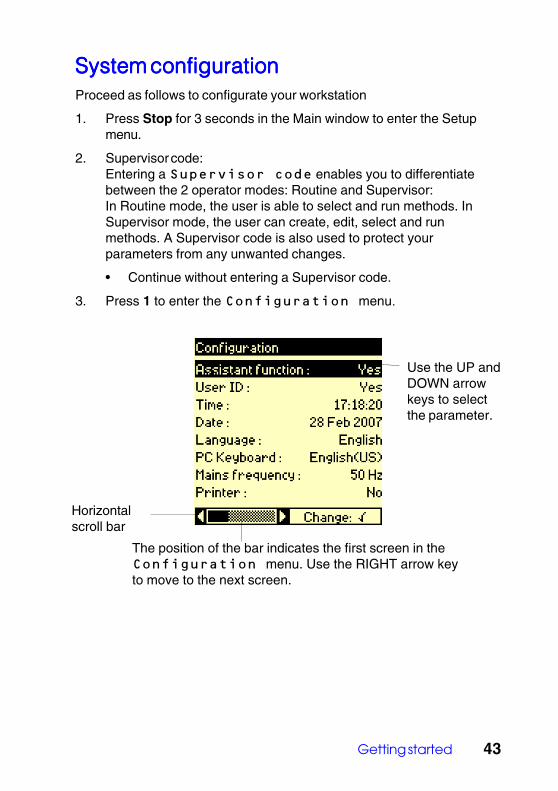
System configurationSystem configurationSystem configurationSystem configurationSystem configurationProceed as follows to configurate your workstation
1. Press Stop for 3 seconds in the Main window to enter the Setupmenu.
2. Supervisor code:Entering a Supervisor code enables you to differentiatebetween the 2 operator modes: Routine and Supervisor:In Routine mode, the user is able to select and run methods. InSupervisor mode, the user can create, edit, select and runmethods. A Supervisor code is also used to protect yourparameters from any unwanted changes.
• Continue without entering a Supervisor code.
3. Press 1 to enter the Configuration menu.
The position of the bar indicates the first screen in theConfiguration menu. Use the RIGHT arrow keyto move to the next screen.
Horizontalscroll bar
Use the UP andDOWN arrowkeys to selectthe parameter.
44 Chapter 2
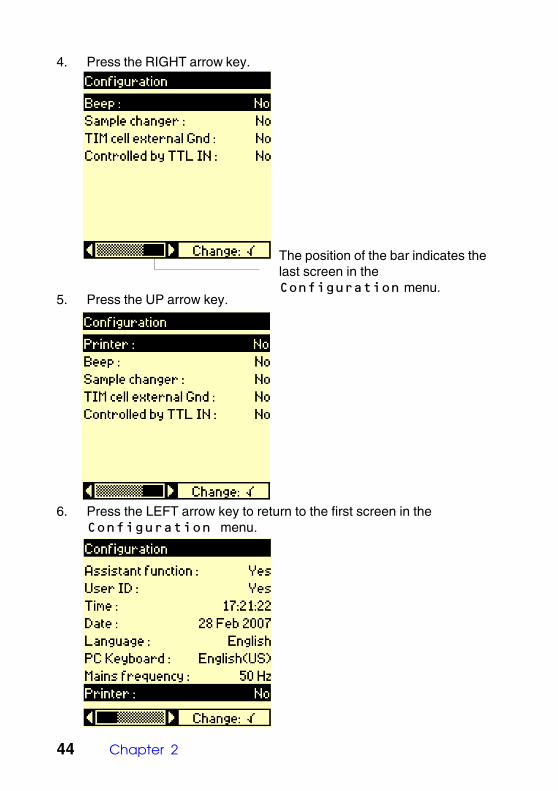
4. Press the RIGHT arrow key.
The position of the bar indicates thelast screen in theConfiguration menu.
5. Press the UP arrow key.
6. Press the LEFT arrow key to return to the first screen in theConfiguration menu.
Getting started 45
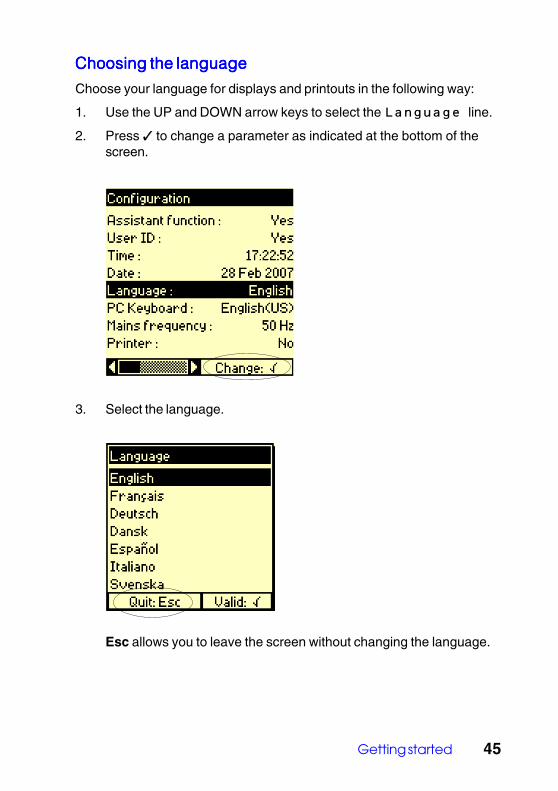
Choosing the languageChoosing the languageChoosing the languageChoosing the languageChoosing the language
Choose your language for displays and printouts in the following way:
1. Use the UP and DOWN arrow keys to select the Language line.
2. Press to change a parameter as indicated at the bottom of thescreen.
3. Select the language.
Esc allows you to leave the screen without changing the language.
46 Chapter 2
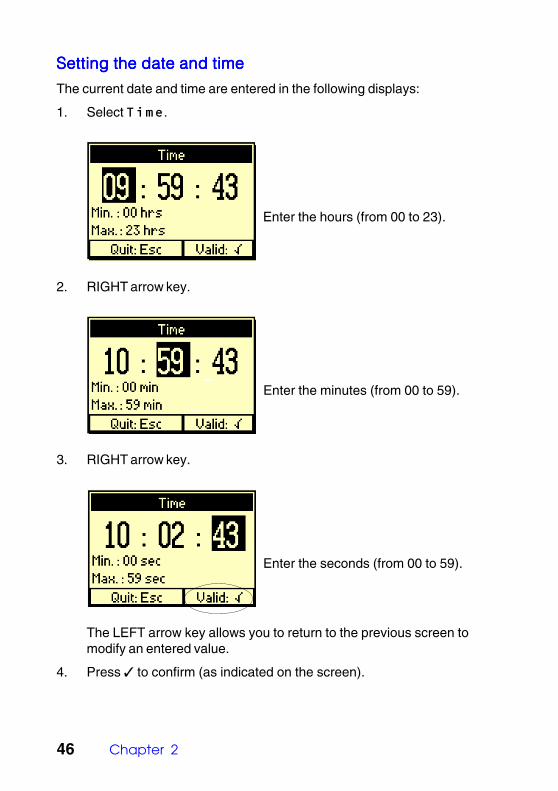
Setting the date and timeSetting the date and timeSetting the date and timeSetting the date and timeSetting the date and time
The current date and time are entered in the following displays:
1. Select Time.
Enter the hours (from 00 to 23).
2. RIGHT arrow key.
Enter the minutes (from 00 to 59).
3. RIGHT arrow key.
Enter the seconds (from 00 to 59).
The LEFT arrow key allows you to return to the previous screen tomodify an entered value.
4. Press to confirm (as indicated on the screen).
Getting started 47
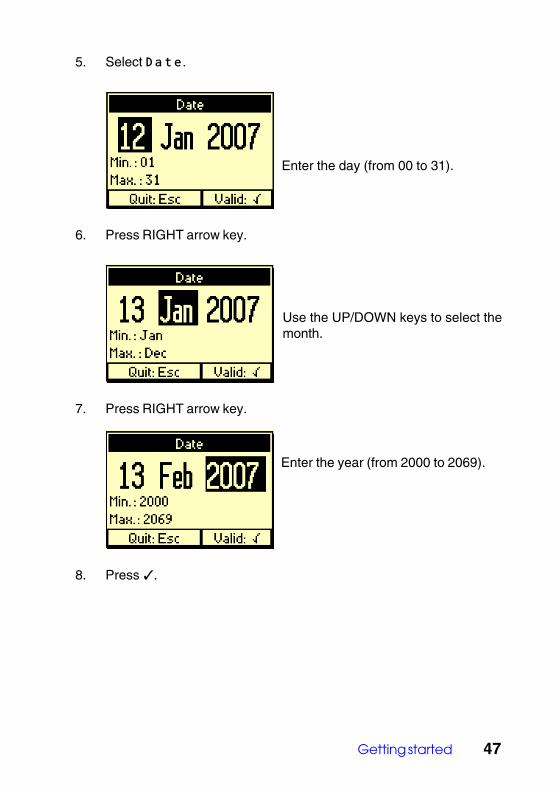
5. Select Date.
Enter the day (from 00 to 31).
6. Press RIGHT arrow key.
7. Press RIGHT arrow key.
Enter the year (from 2000 to 2069).
8. Press .
Use the UP/DOWN keys to select themonth.
48 Chapter 2
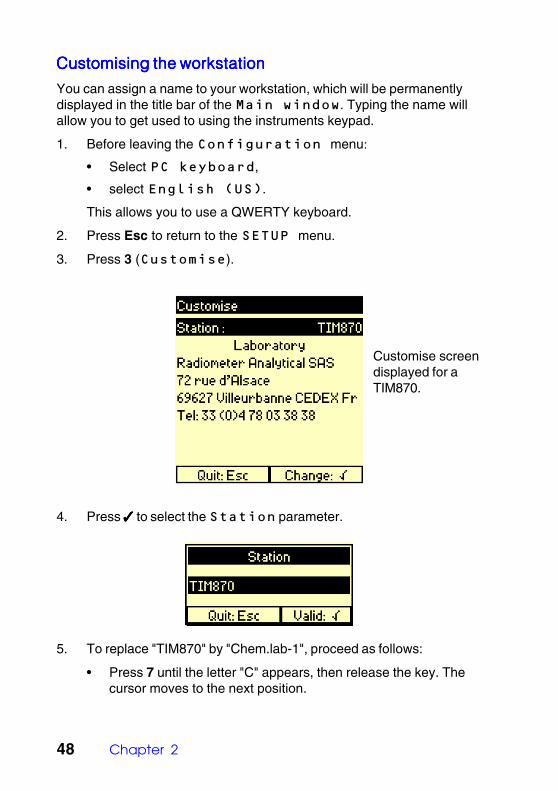
Customising the workstationCustomising the workstationCustomising the workstationCustomising the workstationCustomising the workstation
You can assign a name to your workstation, which will be permanentlydisplayed in the title bar of the Main window. Typing the name willallow you to get used to using the instruments keypad.
1. Before leaving the Configuration menu:
• Select PC keyboard,
• select English (US).
This allows you to use a QWERTY keyboard.
2. Press Esc to return to the SETUP menu.
3. Press 3 (Customise).
4. Press to select the Station parameter.
5. To replace "TIM870" by "Chem.lab-1", proceed as follows:
• Press 7 until the letter "C" appears, then release the key. Thecursor moves to the next position.
Customise screendisplayed for aTIM870.
Getting started 49
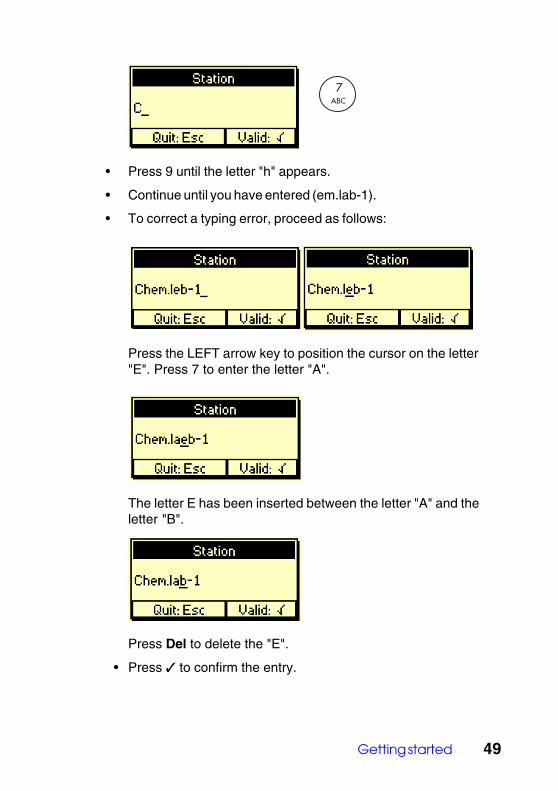
• Press 9 until the letter "h" appears.
• Continue until you have entered (em.lab-1).
• To correct a typing error, proceed as follows:
Press the LEFT arrow key to position the cursor on the letter"E". Press 7 to enter the letter "A".
The letter E has been inserted between the letter "A" and theletter "B".
Press Del to delete the "E".
• Press to confirm the entry.
7ABC
50 Chapter 2
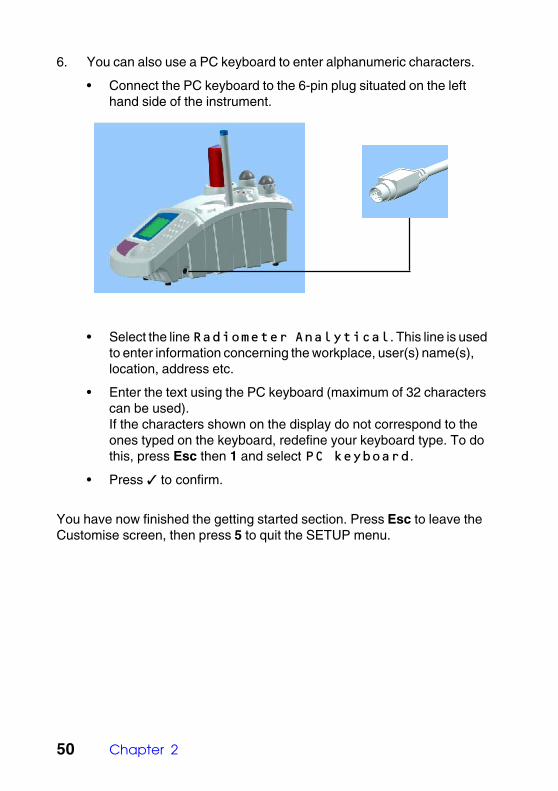
6. You can also use a PC keyboard to enter alphanumeric characters.
• Connect the PC keyboard to the 6-pin plug situated on the lefthand side of the instrument.
• Select the line Radiometer Analytical. This line is usedto enter information concerning the workplace, user(s) name(s),location, address etc.
• Enter the text using the PC keyboard (maximum of 32 characterscan be used).If the characters shown on the display do not correspond to theones typed on the keyboard, redefine your keyboard type. To dothis, press Esc then 1 and select PC keyboard.
• Press to confirm.
You have now finished the getting started section. Press Esc to leave theCustomise screen, then press 5 to quit the SETUP menu.

Programming guidelines 51
3. Pr3. Pr3. Pr3. Pr3. Programming guidelinesogramming guidelinesogramming guidelinesogramming guidelinesogramming guidelinesOnly the Supervisor is allowed to program the menus, Electrode, Reagent,and Method.
To select the Supervisor mode, press Stop for 3 seconds in the Mainwindow and enter the Supervisor code. Press 5 (Exit) and selectReturn in mode = Supervisor.
IMPORTANT For first time users, it is recommended to program the instrument asfollows:
1. Create the electrode(s) to be used to perform the measurements.
2. Create the reagent(s) to be used during the titration.
Then finally,
3. Create the method(s), which will consequently use the electrode(s)and reagent(s) created in the first two steps of programming.
Once you have finished programming, make sure that NO questionmarks "?" are displayed in the Reagent and Electrode tabs!
52 Chapter 3
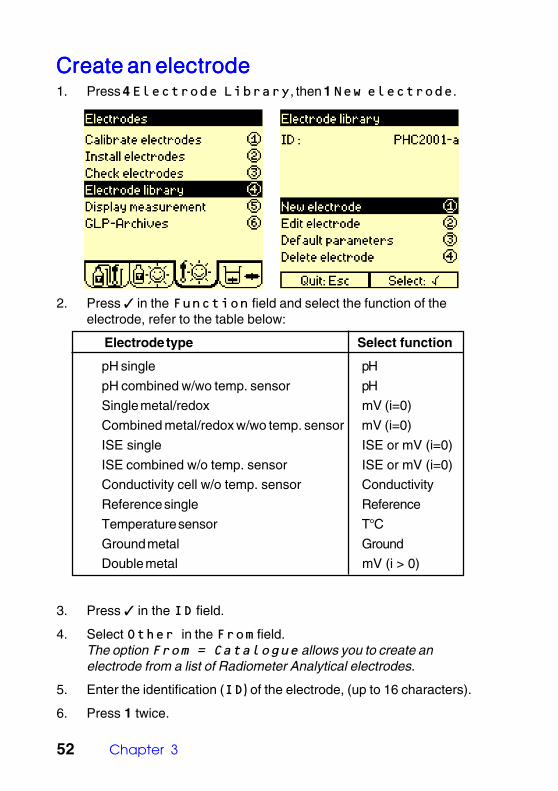
Create an electrodeCreate an electrodeCreate an electrodeCreate an electrodeCreate an electrode1. Press 4 Electrode Library, then 1 New electrode.
2. Press in the Function field and select the function of theelectrode, refer to the table below:
Electrode type Select function
pH single pH
pH combined w/wo temp. sensor pH
Single metal/redox mV (i=0)
Combined metal/redox w/wo temp. sensor mV (i=0)
ISE single ISE or mV (i=0)
ISE combined w/o temp. sensor ISE or mV (i=0)
Conductivity cell w/o temp. sensor Conductivity
Reference single Reference
Temperature sensor T°C
Ground metal Ground
Double metal mV (i > 0)
3. Press in the ID field.
4. Select Other in the From field.The option From = Catalogue allows you to create anelectrode from a list of Radiometer Analytical electrodes.
5. Enter the identification (ID) of the electrode, (up to 16 characters).
6. Press 1 twice.
Programming guidelines 53
7. Select the electrode Type, for electrodes with pH, mV or ISEfunctions:
• Single pH - pH electrode (no reference part),
• Combined pH - pH electrode with a reference part (with orwithout temperature sensor),
• Single metal/redox - mV (i=0) function electrode with a refer-ence part,
• Combined metal/redox - mV (i=0) function electrode with areference part (with or without temperature sensor),
• Single ISE - ISE or mV (i=0) function ion selective electrodewith no reference part,
• Combined ISE - ISE or mV (i=0) function ion selectiveelectrode with a reference part (with or without temperaturesensor).
8. When a combined electrode or a conductivity cell has beendefined, the instrument will prompt you to specify if it has a built-intemperature sensor or not.
When a single electrode has been defined, the instrument willprompt you to define a reference electrode in the Editelectrode screen.
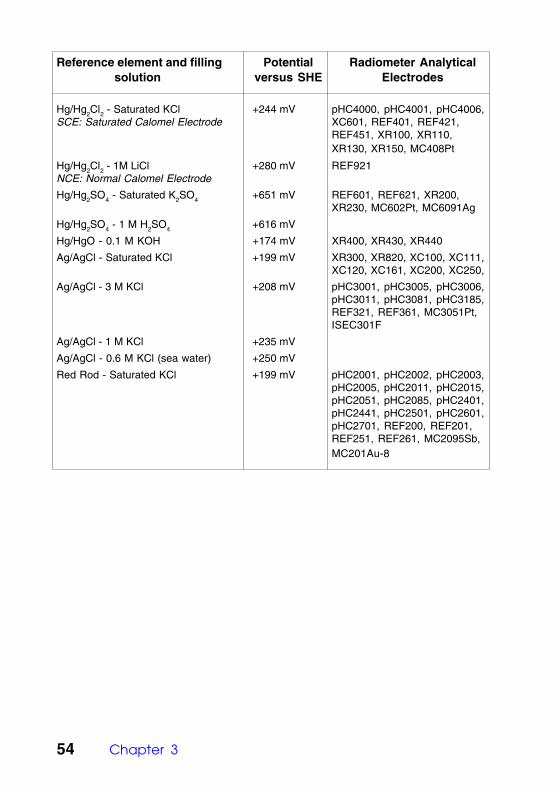
9. When a combined or a reference electrode has been defined,enter the potential (in mV) of the reference element versus theStandard Hydrogen Electrode (SHE).This parameter enables to run calibration with automatic bufferrecognition when working with different reference electrode systems.On the next page, see the table giving the potential at 25°C versusthe SHE of a few "reference elements/filling solution" couples.
10. When a combined pH or a single pH electrodes has been defined,enter the internal pH of the electrode (pH int).
11. For ISE electrodes only; enter the ion valency and molar weight(in g/mol).
12. For conductivity cells only; enter the cable resistance (in Ω) andcapacitance (in pF).
13. Press 1 to confirm.
14. Edit the electrode parameters.
54 Chapter 3
Reference element and filling Potential Radiometer Analytical solution versus SHE Electrodes
Hg/Hg2Cl2 - Saturated KCl +244 mV pHC4000, pHC4001, pHC4006,SCE: Saturated Calomel Electrode XC601, REF401, REF421,
REF451, XR100, XR110,XR130, XR150, MC408Pt
Hg/Hg2Cl2 - 1M LiCl +280 mV REF921NCE: Normal Calomel Electrode
Hg/Hg2SO4 - Saturated K2SO4 +651 mV REF601, REF621, XR200,XR230, MC602Pt, MC6091Ag
Hg/Hg2SO4 - 1 M H2SO4 +616 mV
Hg/HgO - 0.1 M KOH +174 mV XR400, XR430, XR440
Ag/AgCl - Saturated KCl +199 mV XR300, XR820, XC100, XC111,XC120, XC161, XC200, XC250,
Ag/AgCl - 3 M KCl +208 mV pHC3001, pHC3005, pHC3006,pHC3011, pHC3081, pHC3185,REF321, REF361, MC3051Pt,ISEC301F
Ag/AgCl - 1 M KCl +235 mV
Ag/AgCl - 0.6 M KCl (sea water) +250 mV
Red Rod - Saturated KCl +199 mV pHC2001, pHC2002, pHC2003,pHC2005, pHC2011, pHC2015,pHC2051, pHC2085, pHC2401,pHC2441, pHC2501, pHC2601,pHC2701, REF200, REF201,REF251, REF261, MC2095Sb,MC201Au-8
Programming guidelines 55
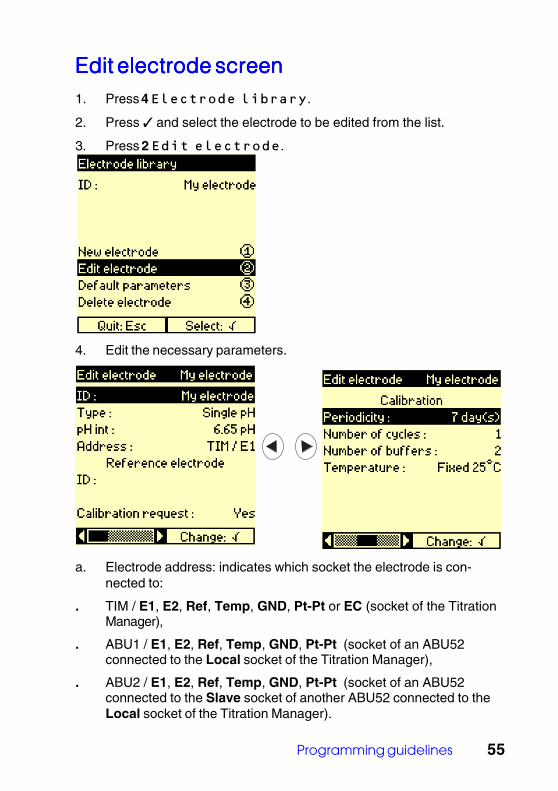
Edit electrode screenEdit electrode screenEdit electrode screenEdit electrode screenEdit electrode screen1. Press 4 Electrode library.
2. Press and select the electrode to be edited from the list.
3. Press 2 Edit electrode.
4. Edit the necessary parameters.
a. Electrode address: indicates which socket the electrode is con-nected to:
. TIM / E1, E2, Ref, Temp, GND, Pt-Pt or EC (socket of the TitrationManager),
. ABU1 / E1, E2, Ref, Temp, GND, Pt-Pt (socket of an ABU52connected to the Local socket of the Titration Manager),
. ABU2 / E1, E2, Ref, Temp, GND, Pt-Pt (socket of an ABU52connected to the Slave socket of another ABU52 connected to theLocal socket of the Titration Manager).
56 Chapter 3
b. Select whether the electrode should be calibrated or not(Calibration request = Yes or No).If Calibration request = No, the electrode parameteredition is completed.
c. Enter the Periodicity.
Indicates the maximum period of time between two calibrations. Ifthe period of time is exceeded:
- pH measurements can no longer be performed using this pHelectrode,
- concentration measurement using a Direct ISE method can nolonger be performed using this ISE electrode.
- conductivity measurements can no longer be performed usingthis conductivity cell.
In all cases, the electrode must be calibrated.
d. Enter the Number of cycles.
Enter the number of times the calibration should be repeated. Thisis the number of beakers to be prepared for a given standard. Foreach standard, the result will be calculated from the mean measuredvalue.
e. Enter the Number of buffers orNumber of solutions.
Enter the number of standards (1 to 5) to be used for thecalibration.
f. Specify if a temperature sensor is in use.
If a temperature sensor is in use, select Probe.
If the temperature is entered manually via the numeric keypad,select Entered.
If the calibration is to be performed at 25°C, select Fixed 25°C.
If you have selected Temperature = Probe, a temperaturesensor must have been selected in the Parameters screen.
Programming guidelines 57
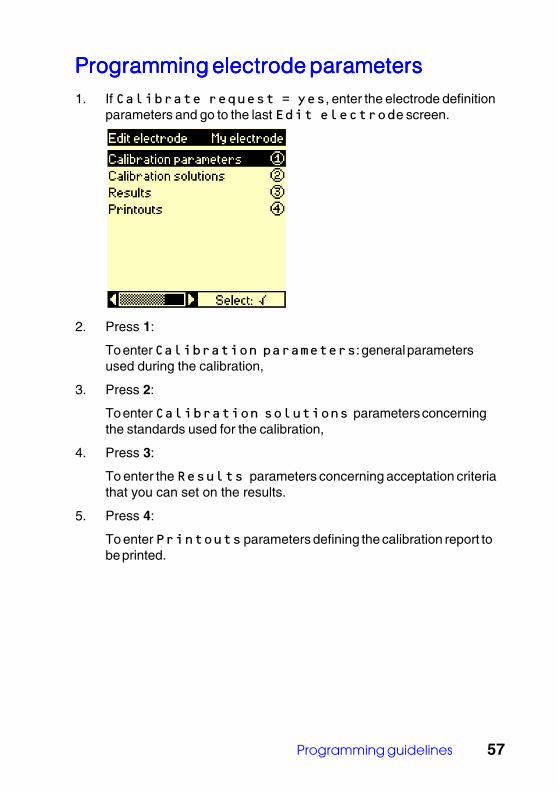
Programming electrode parametersProgramming electrode parametersProgramming electrode parametersProgramming electrode parametersProgramming electrode parameters1. If Calibrate request = yes, enter the electrode definition
parameters and go to the last Edit electrode screen.
2. Press 1:
To enter Calibration parameters: general parametersused during the calibration,
3. Press 2:
To enter Calibration solutions parameters concerningthe standards used for the calibration,
4. Press 3:
To enter the Results parameters concerning acceptation criteriathat you can set on the results.
5. Press 4:
To enter Printouts parameters defining the calibration report tobe printed.
58 Chapter 3
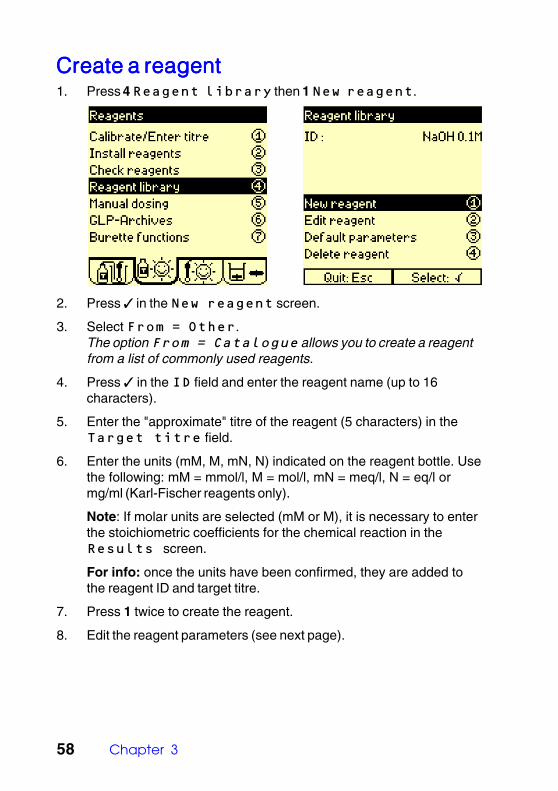
Create a reagentCreate a reagentCreate a reagentCreate a reagentCreate a reagent1. Press 4 Reagent library then 1 New reagent.
2. Press in the New reagent screen.
3. Select From = Other.The option From = Catalogue allows you to create a reagentfrom a list of commonly used reagents.
4. Press in the ID field and enter the reagent name (up to 16characters).
5. Enter the "approximate" titre of the reagent (5 characters) in theTarget titre field.
6. Enter the units (mM, M, mN, N) indicated on the reagent bottle. Usethe following: mM = mmol/l, M = mol/l, mN = meq/l, N = eq/l ormg/ml (Karl-Fischer reagents only).
Note: If molar units are selected (mM or M), it is necessary to enterthe stoichiometric coefficients for the chemical reaction in theResults screen.
For info: once the units have been confirmed, they are added tothe reagent ID and target titre.
7. Press 1 twice to create the reagent.
8. Edit the reagent parameters (see next page).
Programming guidelines 59
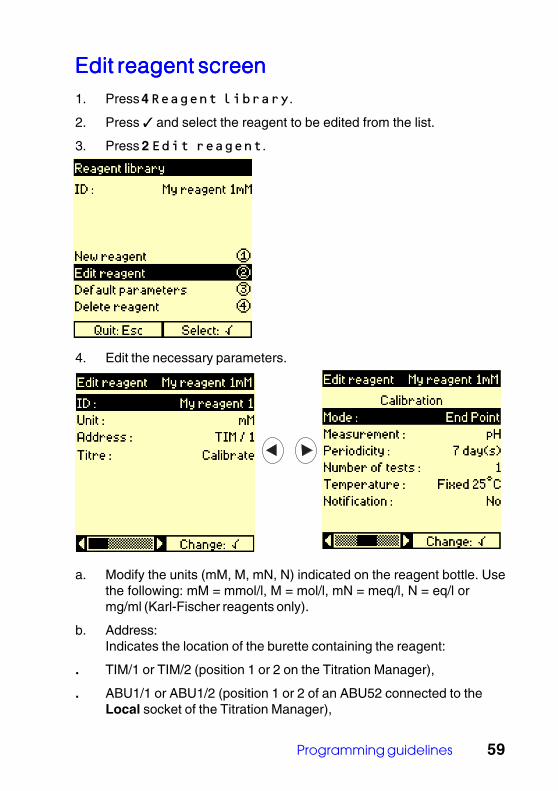
Edit reagent screenEdit reagent screenEdit reagent screenEdit reagent screenEdit reagent screen1. Press 4 Reagent library.
2. Press and select the reagent to be edited from the list.
3. Press 2 Edit reagent.
4. Edit the necessary parameters.
a. Modify the units (mM, M, mN, N) indicated on the reagent bottle. Usethe following: mM = mmol/l, M = mol/l, mN = meq/l, N = eq/l ormg/ml (Karl-Fischer reagents only).
b. Address:Indicates the location of the burette containing the reagent:
. TIM/1 or TIM/2 (position 1 or 2 on the Titration Manager),
. ABU1/1 or ABU1/2 (position 1 or 2 of an ABU52 connected to theLocal socket of the Titration Manager),
60 Chapter 3
. ABU2/1 or ABU2/2 (position 1 or 2 of an ABU52 connected to theSlave socket of another ABU52 connected to the Local socket ofthe Titration Manager).
c. Select Titre = Enter or Calibrate,Select Enter if you already know the titrant concentration anddo not wish to perform a calibration.Select Calibrate, if you wish to perform a calibration. Enter thecalibration parameters; see below.
d. Select the type of method for Mode. Depending on your TitrationManager, you have the choice between End Point, Monotonic IP,Dynamic IP, Continuous IP or Karl-Fischer.
e. Select the measurement mode for the calibration (pH, mV or mV atimposed current).
f. Enter the Periodicity.
Indicates the maximum period of time between two calibrations. Ifthe period of time has elapsed, calibrations can no longer beperformed using this titrant.
g. Enter the Number of tests.
This is the number of times the calibration method will be repeated,i.e. the number of beakers to prepare for the calibration.
h. Specify if a temperature sensor is in use.
If a temperature sensor is in use, select Probe.
If the temperature is entered manually via the numeric keypad,select Entered.
If the calibration is to be performed at 25°C, select Fixed 25°C.
If you have selected Temperature = Probe, a temperaturesensor must be selected in the Calibration parametersscreen.
i. If you want a message to be displayed upon starting the calibration,select Notification = Yes then enter the message (3 linesof 32 characters maximum).
Programming guidelines 61
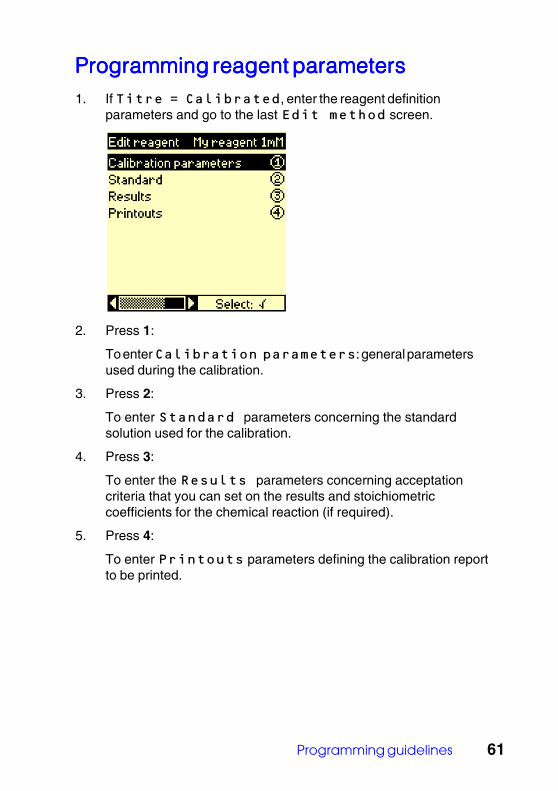
Programming reagent parametersProgramming reagent parametersProgramming reagent parametersProgramming reagent parametersProgramming reagent parameters1. If Titre = Calibrated, enter the reagent definition
parameters and go to the last Edit method screen.
2. Press 1:
To enter Calibration parameters: general parametersused during the calibration.
3. Press 2:
To enter Standard parameters concerning the standardsolution used for the calibration.
4. Press 3:
To enter the Results parameters concerning acceptationcriteria that you can set on the results and stoichiometriccoefficients for the chemical reaction (if required).
5. Press 4:
To enter Printouts parameters defining the calibration reportto be printed.
62 Chapter 3
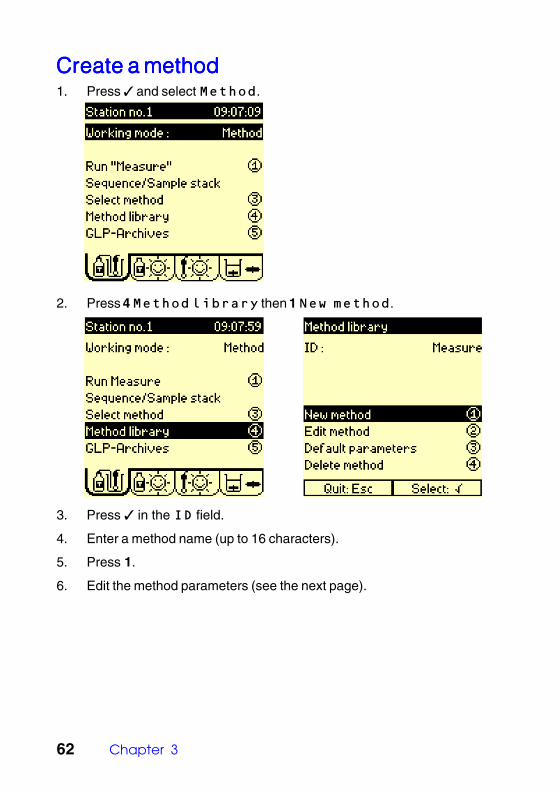
Create a methodCreate a methodCreate a methodCreate a methodCreate a method1. Press and select Method.
2. Press 4 Method library then 1 New method.
3. Press in the ID field.
4. Enter a method name (up to 16 characters).
5. Press 1.
6. Edit the method parameters (see the next page).
Programming guidelines 63
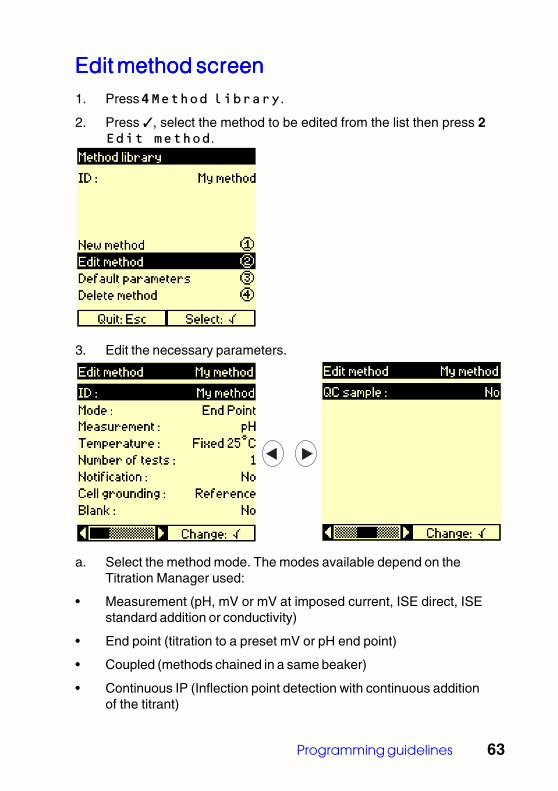
Edit method screenEdit method screenEdit method screenEdit method screenEdit method screen1. Press 4 Method library.
2. Press , select the method to be edited from the list then press 2Edit method.
3. Edit the necessary parameters.
a. Select the method mode. The modes available depend on theTitration Manager used:
• Measurement (pH, mV or mV at imposed current, ISE direct, ISEstandard addition or conductivity)
• End point (titration to a preset mV or pH end point)
• Coupled (methods chained in a same beaker)
• Continuous IP (Inflection point detection with continuous additionof the titrant)
64 Chapter 3
• Monotonic IP (Inflection point detection with incremental additionof the titrant, increments of equal size)
• Dynamic IP (Inflection point detection with incremental additionof the titrant, increments of varying size)
• Karl-Fischer
• Stat pH/mV (using modes Stat-PID, Proportional Integral andDerivative algorithm, Stat AAA, Adaptive Addition Algorithm andStat °C)
• Addition (1 to 3 additions of reagent. No measurements. Additionsare performed simultaneously or successively)
b. Select the measurement mode: pH, mV or mV at imposed current,ISE direct, ISE standard addition or conductivity
c. Select the way the temperature is to be measured.
• Probe: temperature sensor is required during measurements.
• Entered: temperature is to be entered manually using thekeypad.
• Fixed 25°C: measurements are assumed to be performedat 25°C.
d. Enter the Number of tests, i.e. the number of times themethod is to be repeated.
e. If you want a message to be displayed upon starting the method,select Notification = Yes then enter the message (3lines of 32 characters maximum).
f. Select the way the cell grounding of the measuring electrode will beperformed:
• Reference: reference electrode connected to the Refsocket on the titration system.
• Metal: metal electrode connected to the GND socket on thetitration system. For titrations in very resistant medium.
• Other: an electrode which does not belong to the electrodesystem.
Programming guidelines 65
g. Blank: A blank or blank sample is usually a solvent used to dissolveor dilute the sample. This blank may contain traces of the speciesyou are analysing. Select Yes for Blank when you want tosubtract the volume of titrant used to titrate the solvent from thevolume found for the dissolved or diluted sample.
h. QC sample: the concentration of a QC sample is known accuratelyand the composition is close as possible to that of the samples tobe analysed. QC measurements enable you to perform qualitycontrol tests on the method used. Refer to the Reference Manual formore information concerning this option. Select Yes for QCsample to perform measurements on QC samples.
66 Chapter 3
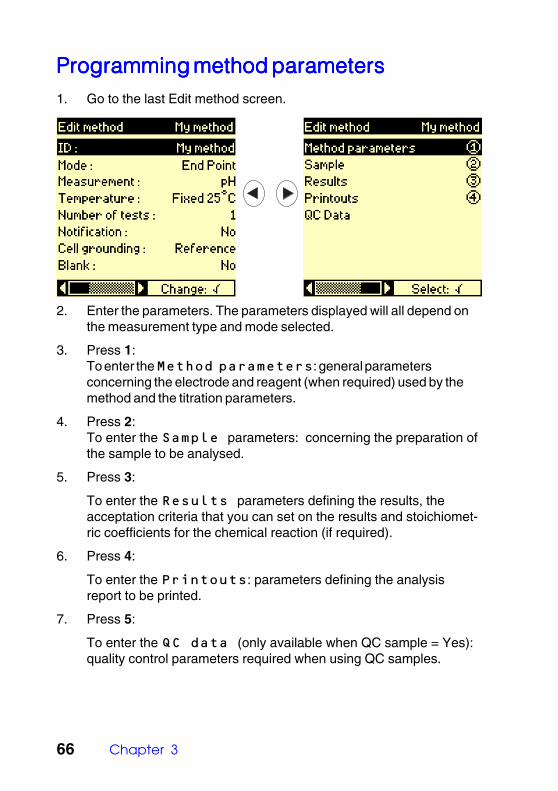
Programming method parametersProgramming method parametersProgramming method parametersProgramming method parametersProgramming method parameters1. Go to the last Edit method screen.
2. Enter the parameters. The parameters displayed will all depend onthe measurement type and mode selected.
3. Press 1:To enter the Method parameters: general parametersconcerning the electrode and reagent (when required) used by themethod and the titration parameters.
4. Press 2:To enter the Sample parameters: concerning the preparation ofthe sample to be analysed.
5. Press 3:
To enter the Results parameters defining the results, theacceptation criteria that you can set on the results and stoichiomet-ric coefficients for the chemical reaction (if required).
6. Press 4:
To enter the Printouts: parameters defining the analysisreport to be printed.
7. Press 5:
To enter the QC data (only available when QC sample = Yes):quality control parameters required when using QC samples.
Running analyses 67
4. Running analyses4. Running analyses4. Running analyses4. Running analyses4. Running analyses
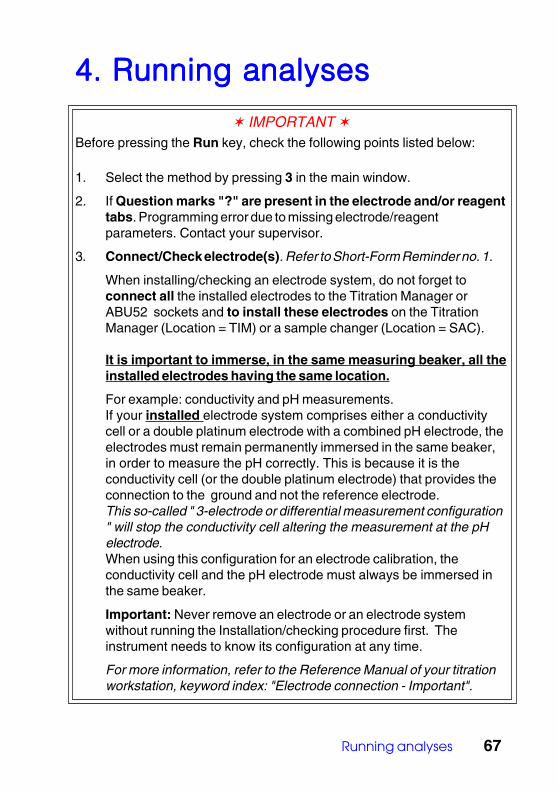
IMPORTANT Before pressing the Run key, check the following points listed below:
1. Select the method by pressing 3 in the main window.
2. If Question marks "?" are present in the electrode and/or reagenttabs. Programming error due to missing electrode/reagentparameters. Contact your supervisor.
3. Connect/Check electrode(s). Refer to Short-Form Reminder no. 1.
When installing/checking an electrode system, do not forget toconnect all the installed electrodes to the Titration Manager orABU52 sockets and to install these electrodes on the TitrationManager (Location = TIM) or a sample changer (Location = SAC).
It is important to immerse, in the same measuring beaker, all theinstalled electrodes having the same location.
For example: conductivity and pH measurements.If your installed electrode system comprises either a conductivitycell or a double platinum electrode with a combined pH electrode, theelectrodes must remain permanently immersed in the same beaker,in order to measure the pH correctly. This is because it is theconductivity cell (or the double platinum electrode) that provides theconnection to the ground and not the reference electrode.This so-called " 3-electrode or differential measurement configuration" will stop the conductivity cell altering the measurement at the pHelectrode.When using this configuration for an electrode calibration, theconductivity cell and the pH electrode must always be immersed inthe same beaker.
Important: Never remove an electrode or an electrode systemwithout running the Installation/checking procedure first. Theinstrument needs to know its configuration at any time.
For more information, refer to the Reference Manual of your titrationworkstation, keyword index: "Electrode connection - Important".
68 Chapter 4
4. Connect/Check reagent(s). Refer to Short-Form Reminder no. 2.
5. Run the analysis when Sunny icons are visible in the electrode andreagent tabs.
6. Run an electrode calibration when a Stormy icon appears in theelectrode tab.
7. Run a reagent calibration when a Stormy icon appears in thetitrant tab.
8. If you are unable to display the "Run" command due to the presenceof Cloudy/Stormy icons in the Reagent and Electrode windows,activate the "Check" command. The Titration Manager willautomatically guide you through the necessary operations requiredto solve the problem(s).
Run electrode calibrationRun electrode calibrationRun electrode calibrationRun electrode calibrationRun electrode calibrationRefer to Short-Form Reminder no. 4.
1. Select the method.
2. Install the electrode group.
3. Enter the Electrodes window.
4. Select 1 Calibrate electrode. Press to select theelectrode to be calibrated from the proposed list.
5. Press 1 to start the calibration.
Run reagent calibrationRun reagent calibrationRun reagent calibrationRun reagent calibrationRun reagent calibrationRefer to Short-Form Reminder no. 5.
1. Select the method.
2. Install the reagent to be calibrated.
3. Install the electrode group to be used to perform the calibration.
4. Enter the Reagents window.
5. Select 1 Calibrate/Enter titre. Press and select thereagent from the proposed list.
6. Press 1 to start the calibration.
Running analyses 69
Run methodRun methodRun methodRun methodRun methodRefer to Short-Form Reminder no. 6.
1. Select the method in the Method library.
2. Install the electrode then the reagent groups to be used to performthe analysis.
3. Display the Main window.
4. Press 1 to start the analysis.
Run direct measurementRun direct measurementRun direct measurementRun direct measurementRun direct measurementRefer to Short-Form Reminder no. 8.
1. Select the method.
2. Install the electrode group to be used to perform the measurement.
3. Prepare the sample solution and place on the sample stand.
4. Display the Electrodes window.
5. Press 5 to start the measurement.
6. Select the electrode in the list of connected electrodes. You canstop or start stirring by pressing 1.
Run manual dosingRun manual dosingRun manual dosingRun manual dosingRun manual dosingRefer to Short-Form Reminder no. 10.
1. Select the method.
2. Install the electrode group to be used to perform the measurement(if measurements are to be done).
3. Install the reagent group to be used to perform the manual dosing.
4. Prepare the sample solution and place on the sample stand.
5. Display the Reagents window and press 5.
6. Select the reagent in the list of installed reagents and select theelectrode in the list of connected electrodes (if measurements are tobe done).
7. Enter an increment size, increment speed and maximum volume tobe dosed.

70 Chapter 4
8. Select the type of measurement to be performed (pH, mV, mV (i>0)or no measurement).
9. Press 1 to start.
Viewing data 71
5. V5. V5. V5. V5. Viewing dataiewing dataiewing dataiewing dataiewing data
How to access?How to access?How to access?How to access?How to access?
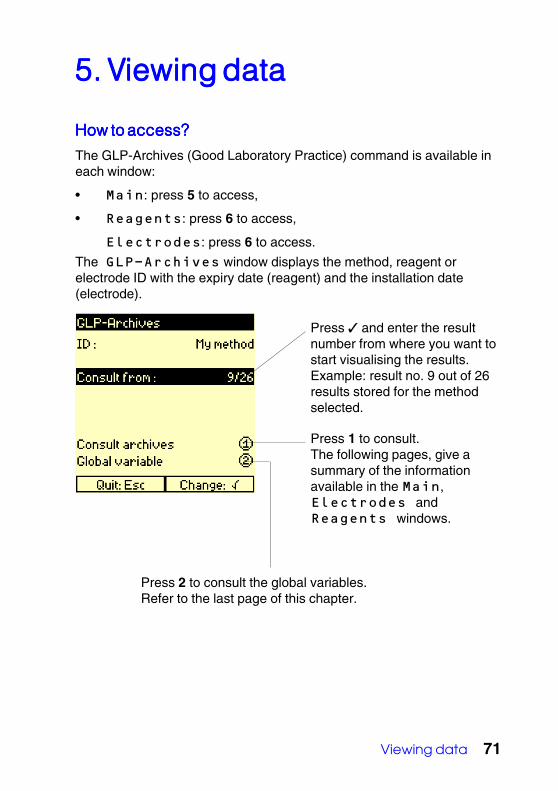
The GLP-Archives (Good Laboratory Practice) command is available ineach window:
• Main: press 5 to access,
• Reagents: press 6 to access,
Electrodes: press 6 to access.
The GLP-Archives window displays the method, reagent orelectrode ID with the expiry date (reagent) and the installation date(electrode).
Press and enter the resultnumber from where you want tostart visualising the results.Example: result no. 9 out of 26results stored for the methodselected.
Press 1 to consult.The following pages, give asummary of the informationavailable in the Main,Electrodes andReagents windows.
Press 2 to consult the global variables.Refer to the last page of this chapter.
72 Chapter 5
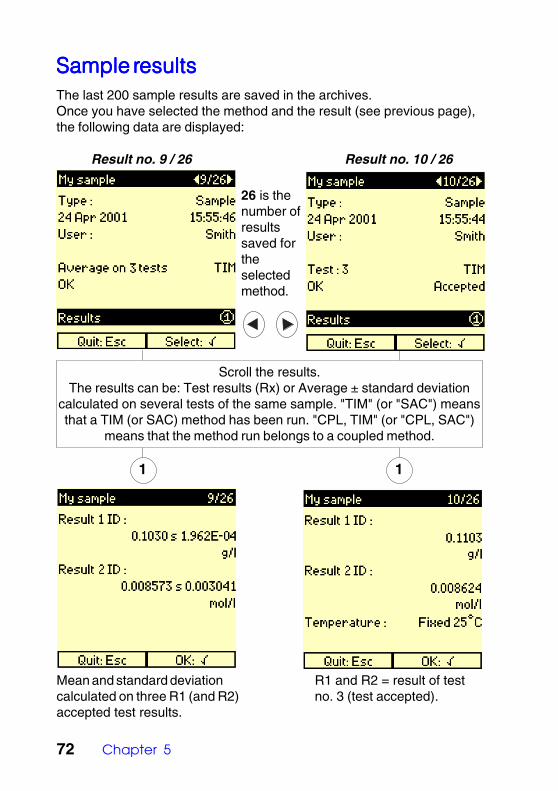
Sample rSample rSample rSample rSample resultsesultsesultsesultsesultsThe last 200 sample results are saved in the archives.Once you have selected the method and the result (see previous page),the following data are displayed:
Result no. 9 / 26 Result no. 10 / 26
1
Scroll the results.The results can be: Test results (Rx) or Average ± standard deviation
calculated on several tests of the same sample. "TIM" (or "SAC") meansthat a TIM (or SAC) method has been run. "CPL, TIM" (or "CPL, SAC")
means that the method run belongs to a coupled method.
Mean and standard deviationcalculated on three R1 (and R2)accepted test results.
1
R1 and R2 = result of testno. 3 (test accepted).
26 is thenumber ofresultssaved fortheselectedmethod.
Viewing data 73
1 1
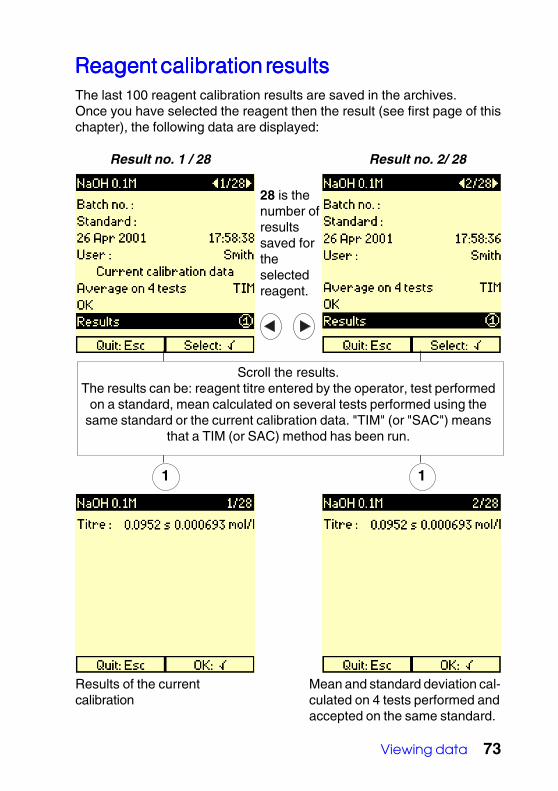
Reagent calibration rReagent calibration rReagent calibration rReagent calibration rReagent calibration resultsesultsesultsesultsesultsThe last 100 reagent calibration results are saved in the archives.Once you have selected the reagent then the result (see first page of thischapter), the following data are displayed:
Results of the currentcalibration
Mean and standard deviation cal-culated on 4 tests performed andaccepted on the same standard.
28 is thenumber ofresultssaved fortheselectedreagent.
Result no. 1 / 28 Result no. 2/ 28
Scroll the results.The results can be: reagent titre entered by the operator, test performed
on a standard, mean calculated on several tests performed using thesame standard or the current calibration data. "TIM" (or "SAC") means
that a TIM (or SAC) method has been run.
74 Chapter 5
1
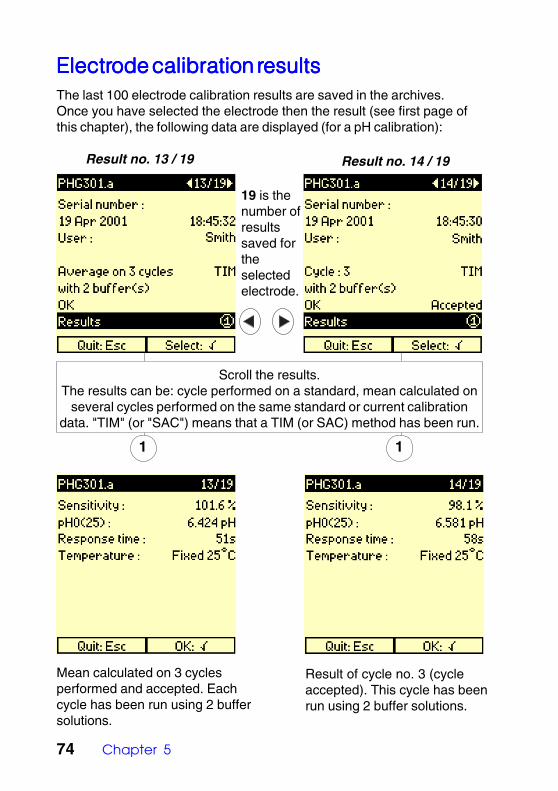
Result no. 13 / 19 Result no. 14 / 19
1
ElectrElectrElectrElectrElectrode calibration rode calibration rode calibration rode calibration rode calibration resultsesultsesultsesultsesultsThe last 100 electrode calibration results are saved in the archives.Once you have selected the electrode then the result (see first page ofthis chapter), the following data are displayed (for a pH calibration):
Mean calculated on 3 cyclesperformed and accepted. Eachcycle has been run using 2 buffersolutions.
Result of cycle no. 3 (cycleaccepted). This cycle has beenrun using 2 buffer solutions.
19 is thenumber ofresultssaved fortheselectedelectrode.
Scroll the results.The results can be: cycle performed on a standard, mean calculated on
several cycles performed on the same standard or current calibrationdata. "TIM" (or "SAC") means that a TIM (or SAC) method has been run.
Viewing data 75
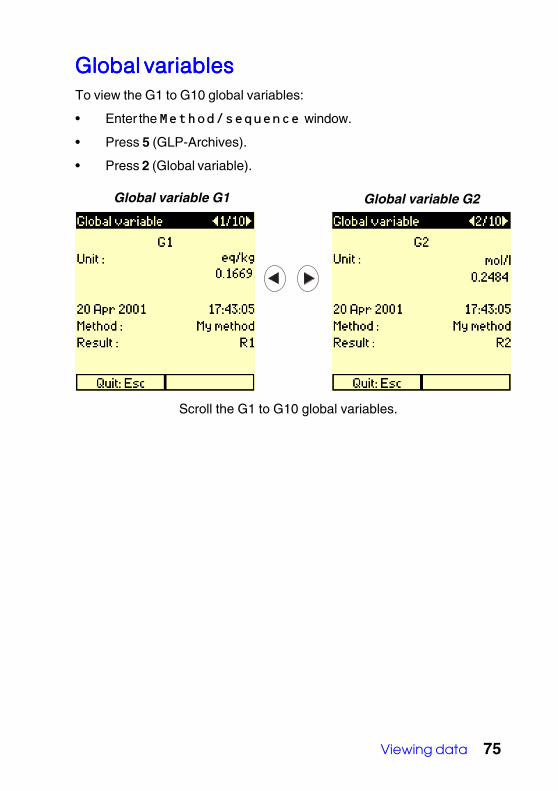
Scroll the G1 to G10 global variables.
Global variable G1 Global variable G2
Global variablesGlobal variablesGlobal variablesGlobal variablesGlobal variablesTo view the G1 to G10 global variables:
• Enter the Method/sequence window.
• Press 5 (GLP-Archives).
• Press 2 (Global variable).

76 Chapter 5
Printing data 77
6. Printing data6. Printing data6. Printing data6. Printing data6. Printing data
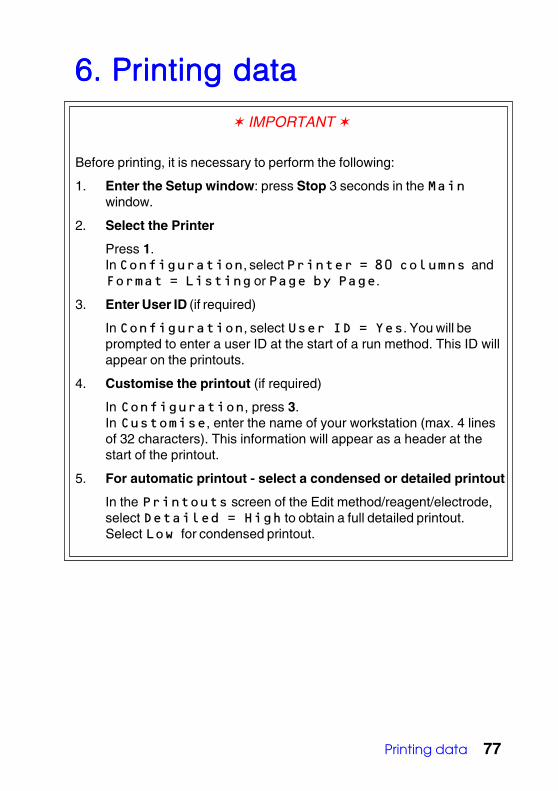
IMPORTANT
Before printing, it is necessary to perform the following:
1. Enter the Setup window: press Stop 3 seconds in the Mainwindow.
2. Select the Printer
Press 1.In Configuration, select Printer = 80 columns andFormat = Listing or Page by Page.
3. Enter User ID (if required)
In Configuration, select User ID = Yes. You will beprompted to enter a user ID at the start of a run method. This ID willappear on the printouts.
4. Customise the printout (if required)
In Configuration, press 3.In Customise, enter the name of your workstation (max. 4 linesof 32 characters). This information will appear as a header at thestart of the printout.
5. For automatic printout - select a condensed or detailed printout
In the Printouts screen of the Edit method/reagent/electrode,select Detailed = High to obtain a full detailed printout.Select Low for condensed printout.
78 Chapter 6
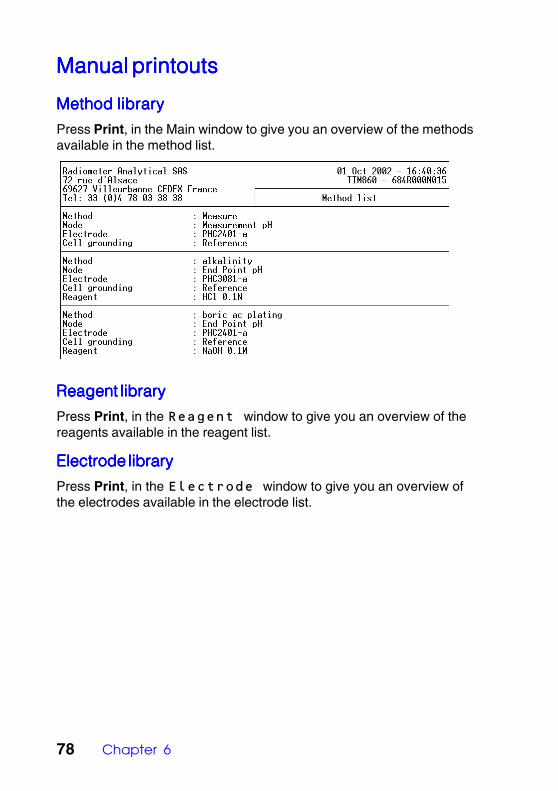
Manual printoutsManual printoutsManual printoutsManual printoutsManual printouts
Method libraryMethod libraryMethod libraryMethod libraryMethod library
Press Print, in the Main window to give you an overview of the methodsavailable in the method list.
Reagent libraryReagent libraryReagent libraryReagent libraryReagent library
Press Print, in the Reagent window to give you an overview of thereagents available in the reagent list.
Electrode libraryElectrode libraryElectrode libraryElectrode libraryElectrode library
Press Print, in the Electrode window to give you an overview ofthe electrodes available in the electrode list.

Printing data 79
Edit method dataEdit method dataEdit method dataEdit method dataEdit method data
In the Main window, press 4 Method library then Print to give youan overview of the parameters of the current programmed method. Theseare the parameters entered in the Edit method screen (press 2 toaccess).
Edit reagent dataEdit reagent dataEdit reagent dataEdit reagent dataEdit reagent data
Press 4 Reagent library in the Reagent window then Print togive you an overview of the parameters of the current programmedreagent. These are the parameters entered in the Edit reagentscreen (press 2 to access).
Edit electrode dataEdit electrode dataEdit electrode dataEdit electrode dataEdit electrode data
Press 4 Electrode library in the Electrode window thenPrint to give you an overview of the parameters of the currentprogrammed electrode. These are the parameters entered in the Editelectrode screen (press 2 to access).
80 Chapter 6
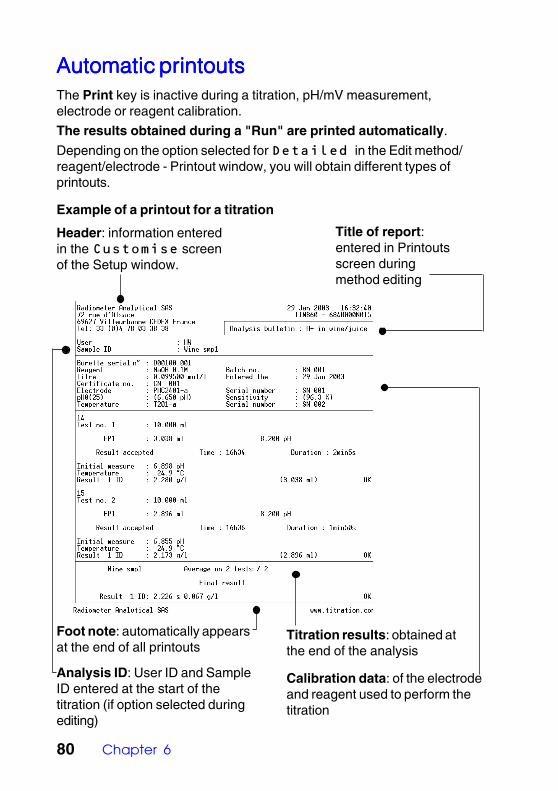
Header: information enteredin the Customise screenof the Setup window.
Title of report:entered in Printoutsscreen duringmethod editing
Analysis ID: User ID and SampleID entered at the start of thetitration (if option selected duringediting)
Calibration data: of the electrodeand reagent used to perform thetitration
Titration results: obtained atthe end of the analysis
Foot note: automatically appearsat the end of all printouts
Automatic printoutsAutomatic printoutsAutomatic printoutsAutomatic printoutsAutomatic printoutsThe Print key is inactive during a titration, pH/mV measurement,electrode or reagent calibration.
The results obtained during a "Run" are printed automatically.
Depending on the option selected for Detailed in the Edit method/reagent/electrode - Printout window, you will obtain different types ofprintouts.
Example of a printout for a titration
Connection of peripherals 81
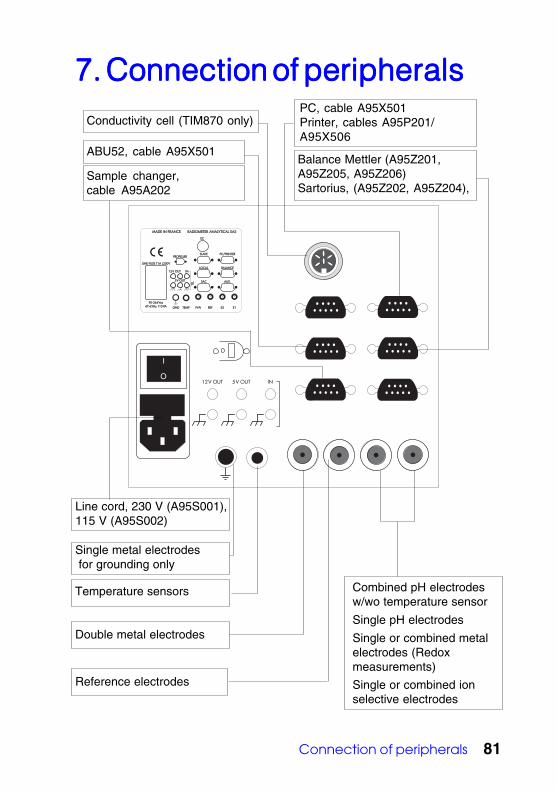
7. Connection of peripherals7. Connection of peripherals7. Connection of peripherals7. Connection of peripherals7. Connection of peripherals
Double metal electrodes
5V OUT12V OUT IN
E1E1E2E2TEMPTEMPGNDGND
PROPELLERPROPELLER
5V OUTV OUT
1212V OUTV OUT ININ
TTL
TTL
90-26490-264Vacac47-6347-63Hz 115Hz 115VAVA
MADE IN FRANCEMADE IN FRANCE RADIOMETER ANALYTICAL SASRADIOMETER ANALYTICAL SAS
REFREFPt-PtPt-Pt
LINE FUSE T1A L250VLINE FUSE T1A L250V
PC/PRINTERPC/PRINTER
BALANCEBALANCELOCALLOCAL
SACSAC AUX.AUX.
SLAVESLAVE
I
O
ECEC
Temperature sensors
Reference electrodes
Single metal electrodes for grounding only
PC, cable A95X501Printer, cables A95P201/A95X506
Combined pH electrodesw/wo temperature sensor
Single pH electrodes
Single or combined metalelectrodes (Redoxmeasurements)
Single or combined ionselective electrodes
Balance Mettler (A95Z201,A95Z205, A95Z206)Sartorius, (A95Z202, A95Z204),
Sample changer,cable A95A202
Line cord, 230 V (A95S001),115 V (A95S002)
ABU52, cable A95X501
Conductivity cell (TIM870 only)
General information 83
8. General infor8. General infor8. General infor8. General infor8. General informationmationmationmationmation
CleaningCleaningCleaningCleaningCleaningThe Titration Manager requires minimum maintenance. The exteriorsurface can be cleaned with tepid water and wiped dry with a soft cloth.Never use another solvent unless you have first consulted yourRadiometer Analytical representative
TTTTTransporransporransporransporransporting the instrumentting the instrumentting the instrumentting the instrumentting the instrumentAlways use the packaging supplied by the manufacturer.
IMPORTANT!
Remove the metal rod before transporting the instrument.
Never pick-up or carry the instrument by the metal rod.
ServicingServicingServicingServicingServicingDO NOT ATTEMPT TO SERVICE THIS PRODUCT YOURSELF, exceptas noted in the Reference Manual. For servicing, please contact yourRadiometer Analytical service representative.List available at http://www.radiometer-analytical.com/en_distributors.asp.
Your local contact:
_________________________________
_________________________________
_________________________________
_________________________________
84 Chapter 8
InterInterInterInterInternational Standarnational Standarnational Standarnational Standarnational Standardsdsdsdsds
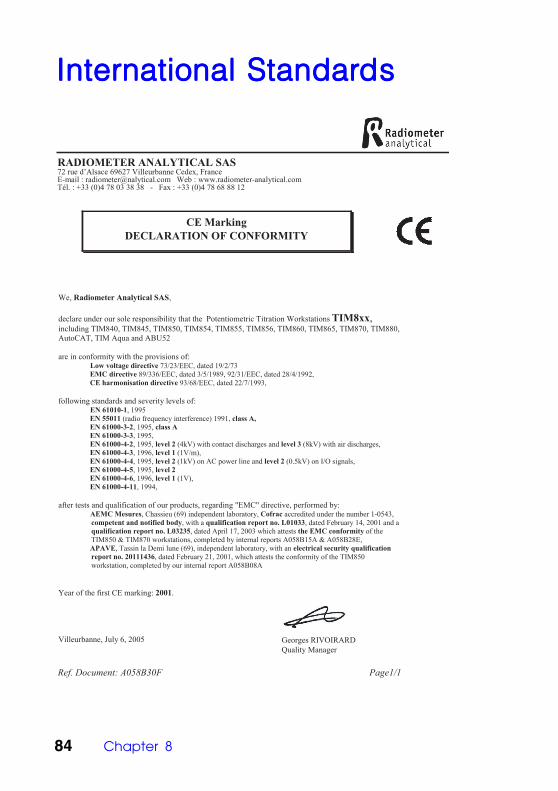
RADIOMETER ANALYTICAL SAS72 rue d’Alsace 69627 Villeurbanne Cedex, FranceE-mail : [email protected] Web : www.radiometer-analytical.comTél. : +33 (0)4 78 03 38 38 - Fax : +33 (0)4 78 68 88 12
CE MarkingDECLARATION OF CONFORMITY
We, Radiometer Analytical SAS,
declare under our sole responsibility that the Potentiometric Titration Workstations TIM8xx,including TIM840, TIM845, TIM850, TIM854, TIM855, TIM856, TIM860, TIM865, TIM870, TIM880,AutoCAT, TIM Aqua and ABU52
are in conformity with the provisions of: Low voltage directive 73/23/EEC, dated 19/2/73 EMC directive 89/336/EEC, dated 3/5/1989, 92/31/EEC, dated 28/4/1992, CE harmonisation directive 93/68/EEC, dated 22/7/1993,
following standards and severity levels of: EN 61010-1, 1995 EN 55011 (radio frequency interference) 1991, class A, EN 61000-3-2, 1995, class A EN 61000-3-3, 1995, EN 61000-4-2, 1995, level 2 (4kV) with contact discharges and level 3 (8kV) with air discharges, EN 61000-4-3, 1996, level 1 (1V/m), EN 61000-4-4, 1995, level 2 (1kV) on AC power line and level 2 (0.5kV) on I/O signals, EN 61000-4-5, 1995, level 2 EN 61000-4-6, 1996, level 1 (1V), EN 61000-4-11, 1994,
after tests and qualification of our products, regarding "EMC" directive, performed by: AEMC Mesures, Chassieu (69) independent laboratory, Cofrac accredited under the number 1-0543,competent and notified body, with a qualification report no. L01033, dated February 14, 2001 and aqualification report no. L03235, dated April 17, 2003 which attests the EMC conformity of theTIM850 & TIM870 workstations, completed by internal reports A058B15A & A058B28E,
APAVE, Tassin la Demi lune (69), independent laboratory, with an electrical security qualificationreport no. 20111436, dated February 21, 2001, which attests the conformity of the TIM850workstation, completed by our internal report A058B08A
Year of the first CE marking: 2001.
Villeurbanne, July 6, 2005 Georges RIVOIRARD Quality Manager
Ref. Document: A058B30F Page1/1

General information 85
The Titration Manager complies with the following standards:
UL 61010A - 1
CAN / CSA C22 2 N° 1010.1 - 92.
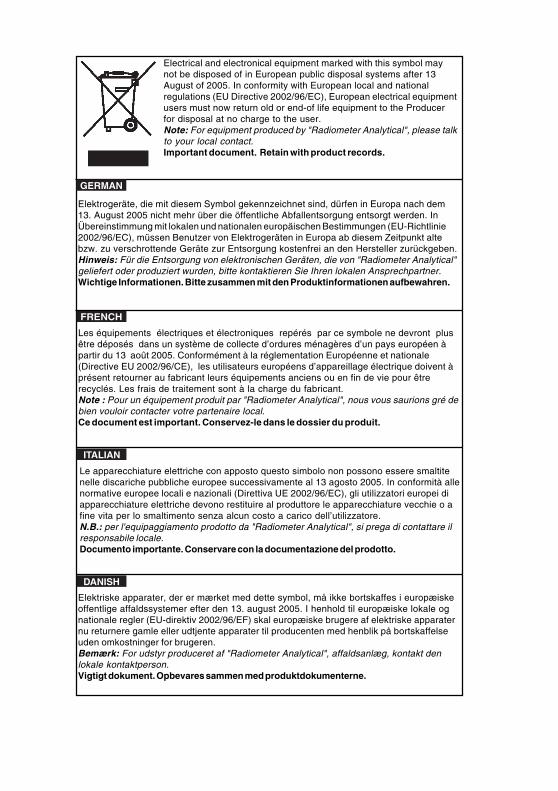
Electrical and electronical equipment marked with this symbol maynot be disposed of in European public disposal systems after 13August of 2005. In conformity with European local and nationalregulations (EU Directive 2002/96/EC), European electrical equipmentusers must now return old or end-of life equipment to the Producerfor disposal at no charge to the user.Note: For equipment produced by "Radiometer Analytical", please talkto your local contact.Important document. Retain with product records.
Elektrogeräte, die mit diesem Symbol gekennzeichnet sind, dürfen in Europa nach dem13. August 2005 nicht mehr über die öffentliche Abfallentsorgung entsorgt werden. InÜbereinstimmung mit lokalen und nationalen europäischen Bestimmungen (EU-Richtlinie2002/96/EC), müssen Benutzer von Elektrogeräten in Europa ab diesem Zeitpunkt altebzw. zu verschrottende Geräte zur Entsorgung kostenfrei an den Hersteller zurückgeben.Hinweis: Für die Entsorgung von elektronischen Geräten, die von "Radiometer Analytical"geliefert oder produziert wurden, bitte kontaktieren Sie Ihren lokalen Ansprechpartner.Wichtige Informationen. Bitte zusammen mit den Produktinformationen aufbewahren.
GERMAN
FRENCH
Les équipements électriques et électroniques repérés par ce symbole ne devront plusêtre déposés dans un système de collecte d’ordures ménagères d’un pays européen àpartir du 13 août 2005. Conformément à la réglementation Européenne et nationale(Directive EU 2002/96/CE), les utilisateurs européens d’appareillage électrique doivent àprésent retourner au fabricant leurs équipements anciens ou en fin de vie pour êtrerecyclés. Les frais de traitement sont à la charge du fabricant.Note : Pour un équipement produit par "Radiometer Analytical", nous vous saurions gré debien vouloir contacter votre partenaire local.Ce document est important. Conservez-le dans le dossier du produit.
ITALIAN
Le apparecchiature elettriche con apposto questo simbolo non possono essere smaltitenelle discariche pubbliche europee successivamente al 13 agosto 2005. In conformità allenormative europee locali e nazionali (Direttiva UE 2002/96/EC), gli utilizzatori europei diapparecchiature elettriche devono restituire al produttore le apparecchiature vecchie o afine vita per lo smaltimento senza alcun costo a carico dell’utilizzatore.N.B.: per l'equipaggiamento prodotto da "Radiometer Analytical", si prega di contattare ilresponsabile locale.Documento importante. Conservare con la documentazione del prodotto.
DANISH
Elektriske apparater, der er mærket med dette symbol, må ikke bortskaffes i europæiskeoffentlige affaldssystemer efter den 13. august 2005. I henhold til europæiske lokale ognationale regler (EU-direktiv 2002/96/EF) skal europæiske brugere af elektriske apparaternu returnere gamle eller udtjente apparater til producenten med henblik på bortskaffelseuden omkostninger for brugeren.Bemærk: For udstyr produceret af "Radiometer Analytical", affaldsanlæg, kontakt denlokale kontaktperson.Vigtigt dokument. Opbevares sammen med produktdokumenterne.

A partir del 13 de agosto de 2005, los equipos eléctricos que lleven este símbolo nodeberán ser desechados en los puntos limpios europeos. De conformidad con lasnormativas europeas locales y nacionales (Directiva de la UE 2002/96/EC), a partir deesa fecha, los usuarios europeos de equipos eléctricos deberán devolver los equiposusados u obsoletos al fabricante de los mismos para su reciclado, sin coste alguno parael usuario.Nota: Para equipos fabricados por "Radiometer Analytical", desechos, sírvase consultarcon el responsable para su zona.Documento importante. Guardar junto con los registros de los equipos.
SPANISH
DUTCH
Elektrische apparatuur die is voorzien van dit symbool mag na 13 augustus 2005 nietmeer worden afgevoerd naar Europese openbare afvalsystemen. Conform Europese lokaleen nationale wetgegeving (EU-richtlijn 2002/96/EC) dienen gebruikers van elektrischeapparaten voortaan hun oude of afgedankte apparatuur kosteloos voor recycling ofvernietiging naar de producent terug te brengen.Opmerking: neem voor apparatuur die wordt geproduceerd door "RadiometerAnalytical", gelieve contact op te nemen met uw lokale contacpersoon.Belangrijk document. Bewaar het bij de productpapieren.
POLISH
Elektronikutrustning som är märkt med denna symbol kanske inte kan lämnas in påeuropeiska offentliga sopstationer efter 2005-08-13. Enligt europeiska lokala ochnationella föreskrifter (EU-direktiv 2002/96/EC) måste användare av elektronikutrustning iEuropa nu återlämna gammal eller utrangerad utrustning till tillverkaren för kassering utankostnad för användaren.Observera: För utrustning som levererats eller tillverkats av "Radiometer Analytical", varsnäll och ta kontakt med den lokala representanten.Viktigt dokument. Spara tillsammans med dina produktbeskrivningar.
SWEDISH
PORTUGESE
Qualquer equipamento eléctrico que ostente este símbolo não poderá ser eliminadoatravés dos sistemas públicos europeus de tratamento de resíduos sólidos a partir de 13de Agosto de 2005. De acordo com as normas locais e europeias (Directiva Europeia2002/96/EC), os utilizadores europeus de equipamentos eléctricos deverão agoradevolver os seus equipamentos velhos ou em fim de vida ao produtor para o respectivotratamento sem quaisquer custos para o utilizador.Nota: Relativamente ao equipamento produzido por "Radiometer Analytical", é favorrecomendamos-vos que contacte o vosso parceiro local.Documento importante. Mantenha junto dos registos do produto.
Related Documents