pin designed by Prof. Dr. Bumann TAD Clinical Reference Guide A Case Study in Successful TAD Placement & Efficient Biomechanics Author: Sebastian Baumgaertel, D.M.D., M.S.D., FRCD(C) Contributing Authors: Dr. S. Jay Bowman Prof. Dr. Axel Bumann Dr. Frank Celenza Dr. Dwight Frey Dr. Joseph Petrey Dr. John Pobanz VERSION 3 Includes case pictures and step-by-step instructions for 18 difficult indications!

Welcome message from author
This document is posted to help you gain knowledge. Please leave a comment to let me know what you think about it! Share it to your friends and learn new things together.
Transcript

pin
des
ign
ed b
y Pr
of.
Dr.
Bu
man
n
TAD Clinical Reference Guide A Case Study in Successful TAD Placement & Efficient Biomechanics
Author: Sebastian Baumgaertel, D.M.D., M.S.D., FRCD(C)Contributing Authors:
Dr. S. Jay BowmanProf. Dr. Axel Bumann
Dr. Frank CelenzaDr. Dwight Frey
Dr. Joseph PetreyDr. John Pobanz
VERSION 3Includes case pictures
and step-by-step instructions for 18
difficult indications!

2 www.dentaurum.com · www.tomasforum.com · 800.523.39462 www.dentaurum.com · www.tomasforum.com · 800.523.3946
contributing authors
index
Prof. Dr. AxelBumann
Dr. Sebastian Baumgaertel
placement protocol
Step 1–Implant Site LocationPatient x-rays, models, and tomas® X-Marker can all be used to help identify the proper TAD insertion site. The ideal insertion sites should be in the buccal alveolus, the lingual alveolus of the maxilla or the palate.
Step 2–AnesthesiaUse a topical anesthetic with a potent formulation (e.g. TAC 20% Alternate), followed optionally by local infiltration anesthesia depending on the thickness of the soft tissue.(Dentaurum makes no representation regarding the type or dosage
of anesthetic to use when placing tomas® miniscrews.)
Step 3–Tissue Punch (optional)It is recommended to note the tissue depth with a probe. The tissue punch step is optional in attached gingiva and recommended in mucosa. It provides for clean tissue borders without compression trauma to the peri-implant soft tissues.
Step 4–CB Perforation (optional) Pre-drilling is not required when placing a self-drilling TAD, but it can be beneficial in some cases (especially in the mandible). Center drilling the bone can help the threads to engage easier and reduce slippage. In areas of increased cortical bone thickness, pre-drilling is advisable to reduce excessive bone compression.
Step 5–Preparation of TADRecord TAD information (i.e. lot number, etc.) in patient’s records. Open blister pack and hold packaging with colored applicator at bottom. Remove glass ampule and rubber stop. Use any tomas® driver to remove TAD from cradle.
Step 6–Final InsertionFinal insertion can be completed with any driver instrument in the tomas® system, such as the screwdriver, contra-angle driver, wheel & applicator, or torque ratchet & applicator, depending on your preference.
An orthodontic mini-implant can be inserted using multiple different protocols depending on your
individual preference and the anatomical relationships at the given insertion site. The following
recommendations are general guidelines to keep TAD insertion simple and successful.
To view TAD placement videos, visit www.tomasforum.com
3www.dentaurum.com · www.tomasforum.com · 800.523.3946
Dr. S. Jay Bowman
Dr. JohnPobanz
Dr. Joseph S.Petrey
Dr. FrankCelenza
Dr. DwightFrey
• 100+ Lectures & seminars on TADs • Diplomate of American Board of Orthodontics • Author of multiple articles in peer-reviewed journals • Co-editor of the textbook “Mini-implants in Orthodontics: Innovative Anchorage Concepts” • AJO-DO Editorial Review Board • National/international lecturer on TADs and CBCT technology
Clinical Associate Professor & Director of Skeletal Anchorage Clinic – CWRU Private Orthodontic Practice – Cleveland, OH
3
4
5
6
7
8
9
10
11
12
13
16
17
18
19
20
21
22
23
24
26
page
placement protocol ..................................................................................................
overview of starter kit ................................................................................... ..........
overview of auxiliaries..............................................................................................
case 1: molar distalization / indirect .............................. ........................................
case 2: molar distalization / direct...........................................................................
case 3: class II correction / step 1 ............................................................................
case 4: class II correction / step 2 .................................... ........................................
case 5: clear aligner therapy / distalizing molars .......... ........................................
case 6: clear aligner therapy / retracting anterior ......... ........................................
case 7: protracting molars / indirect .......................................................................
case 8: protracting molars / direct ..........................................................................
case 9: space closure ...............................................................................................
case 10: incisor intrusion / deep bite .......................................................................
case 11: posterior intrusion / single tooth ..............................................................
case 12: occlusal cant correction .............................................................................
case 13: open bite correction / indirect ...................................................................
case 14: open bite correction / direct .............................. ........................................
case 15: impacted canine / buccal.............................................................................
case 16: impacted canine / palatal............................................................................
case 17: molar uprighting.........................................................................................
case 18: missing laterals.....................................................................................
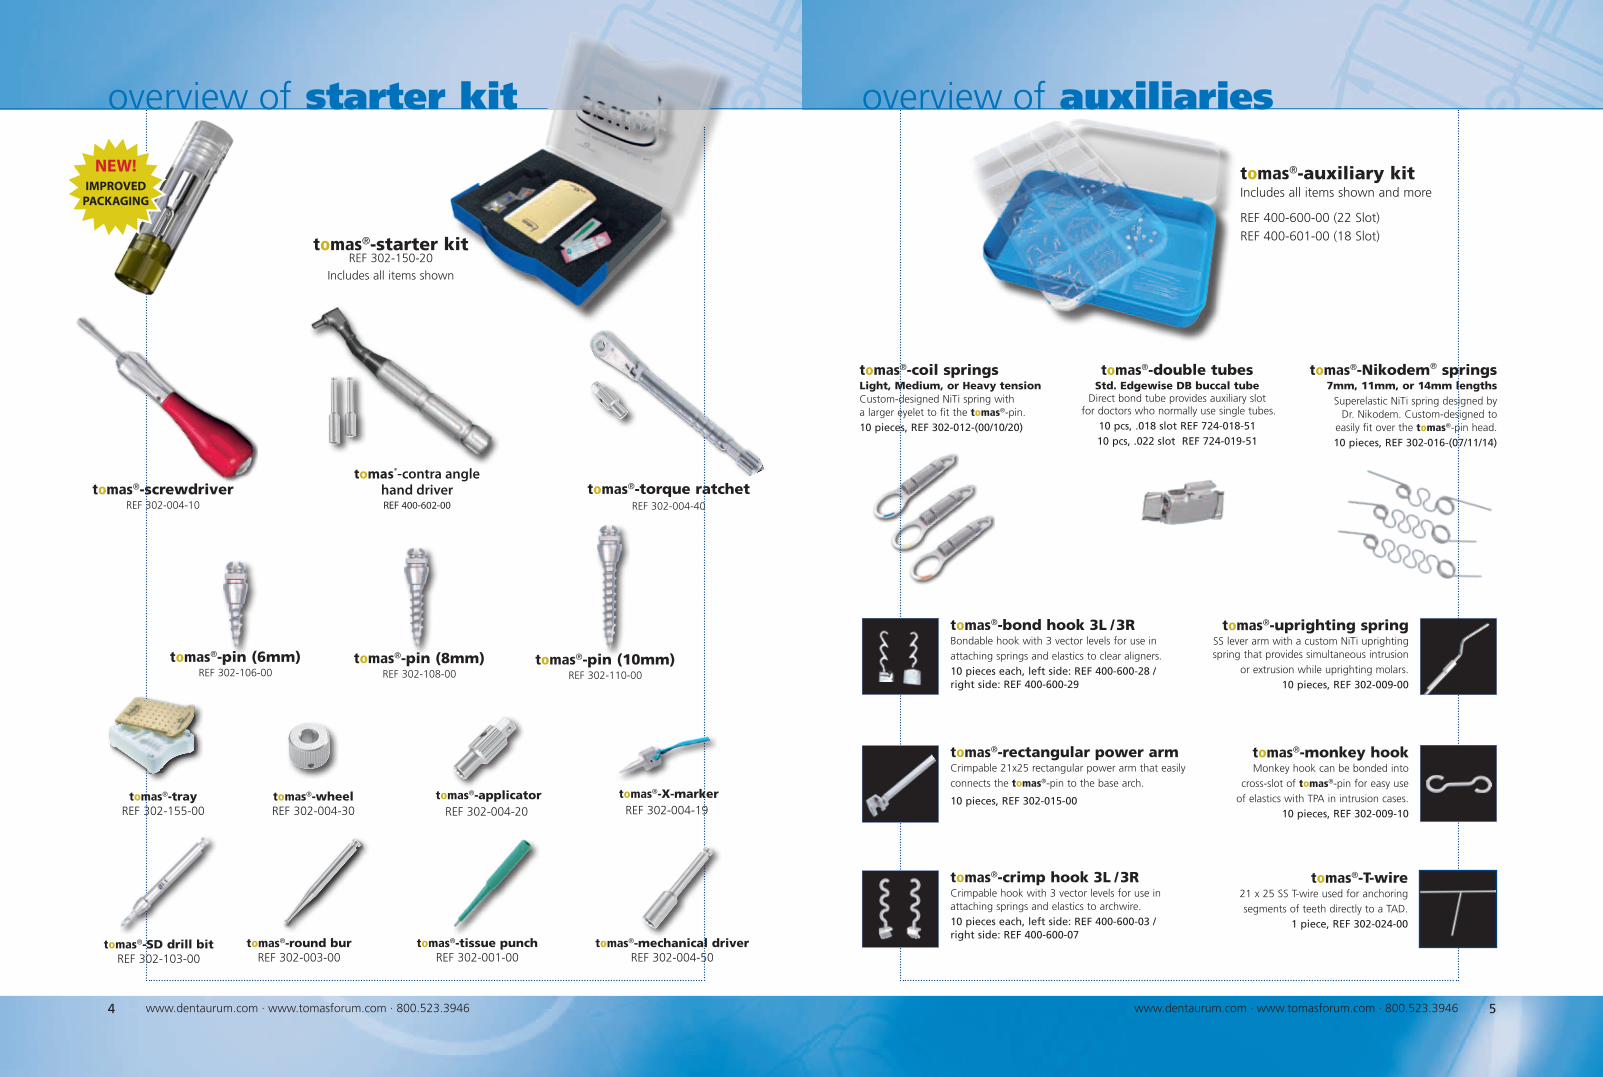
overview of starter kit
tomas®-wheel REF 302-004-30
tomas®-mechanical driverREF 302-004-50
tomas®-torque ratchetREF 302-004-40
tomas®-screwdriverREF 302-004-10
tomas®-SD drill bitREF 302-103-00
tomas®-trayREF 302-155-00
tomas®-round burREF 302-003-00
tomas®-tissue punchREF 302-001-00
tomas®-starter kitREF 302-150-20
Includes all items shown
4 www.dentaurum.com · www.tomasforum.com · 800.523.3946
tomas®-applicatorREF 302-004-20
tomas®-pin (6mm)REF 302-106-00
tomas®-pin (10mm)REF 302-110-00
tomas®-pin (8mm)REF 302-108-00
tomas®-X-markerREF 302-004-19
5www.dentaurum.com · www.tomasforum.com · 800.523.3946
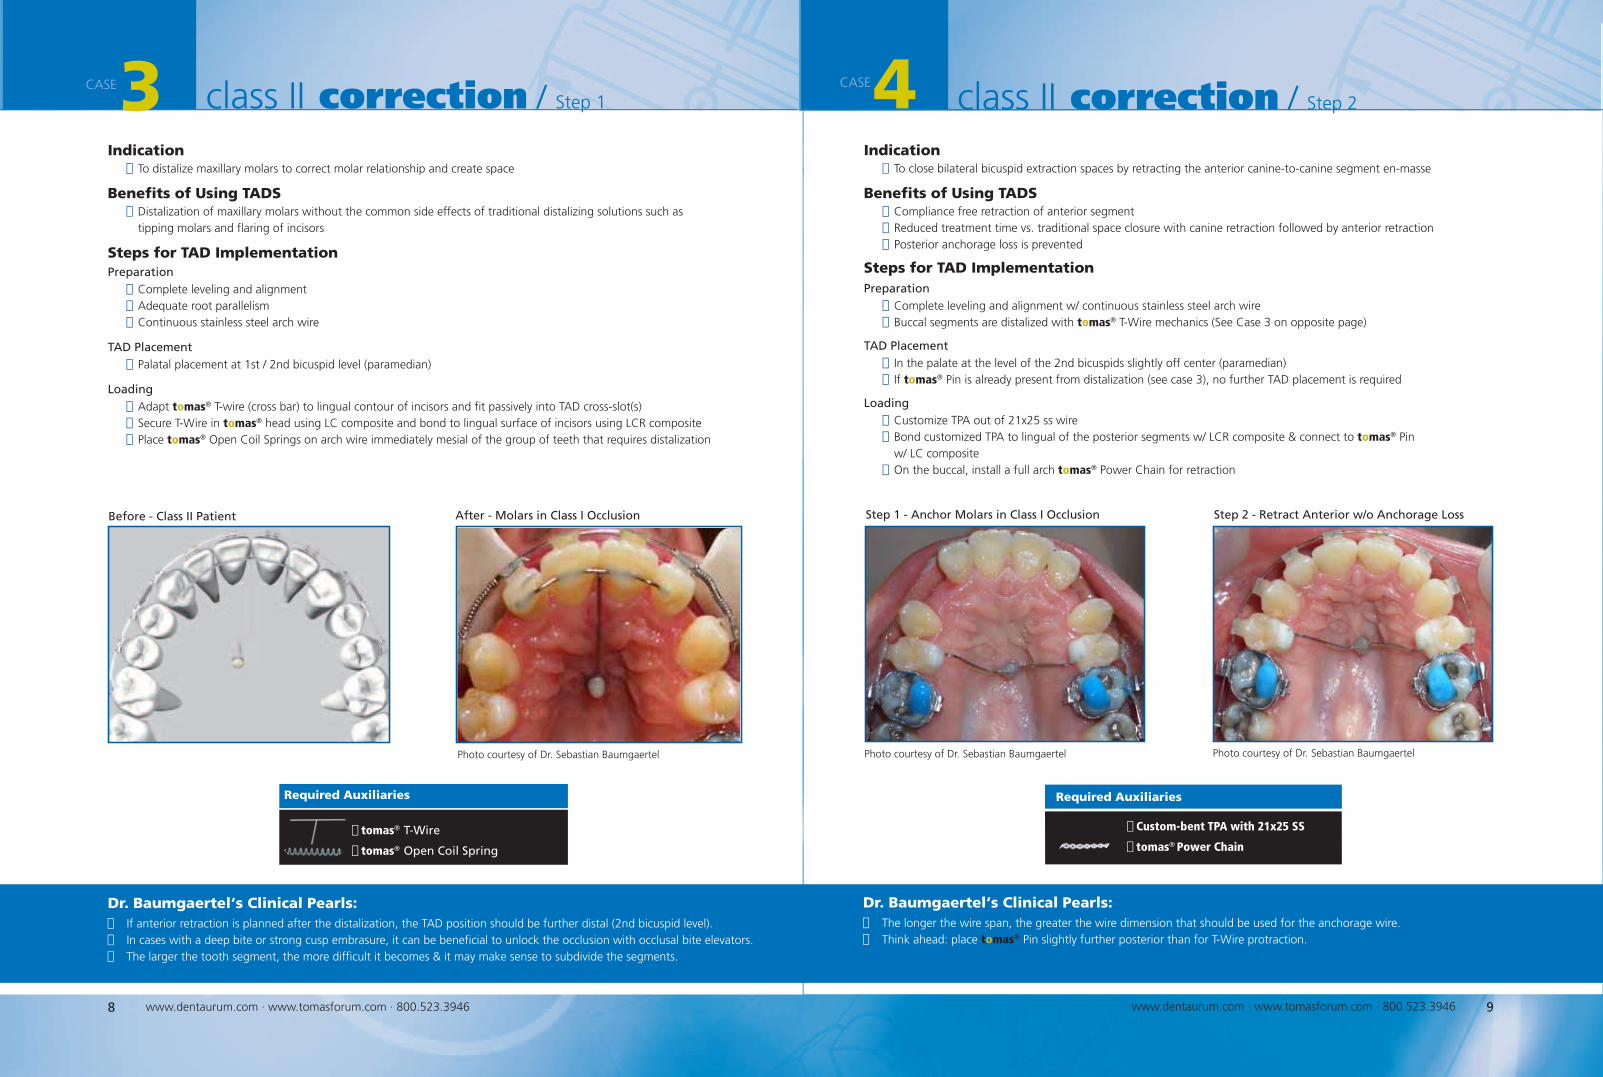
overview of auxiliaries
tomas®-rectangular power armCrimpable 21x25 rectangular power arm that easilyconnects the tomas®-pin to the base arch.
10 pieces, REF 302-015-00
tomas®-monkey hookMonkey hook can be bonded into
cross-slot of tomas®-pin for easy useof elastics with TPA in intrusion cases.
10 pieces, REF 302-009-10
tomas®-Nikodem® springs7mm, 11mm, or 14mm lengths
Superelastic NiTi spring designed by Dr. Nikodem. Custom-designed to
easily fit over the tomas®-pin head.10 pieces, REF 302-016-(07/11/14)
tomas®-uprighting springSS lever arm with a custom NiTi uprighting spring that provides simultaneous intrusion
or extrusion while uprighting molars.10 pieces, REF 302-009-00
tomas®-bond hook 3L / 3RBondable hook with 3 vector levels for use inattaching springs and elastics to clear aligners. 10 pieces each, left side: REF 400-600-28 / right side: REF 400-600-29
tomas®-coil springsLight, Medium, or Heavy tensionCustom-designed NiTi spring with a larger eyelet to fit the tomas®-pin.10 pieces, REF 302-012-(00/10/20)
tomas®-crimp hook 3L / 3RCrimpable hook with 3 vector levels for use in attaching springs and elastics to archwire. 10 pieces each, left side: REF 400-600-03 / right side: REF 400-600-07
tomas®-T-wire21 x 25 SS T-wire used for anchoring segments of teeth directly to a TAD.
1 piece, REF 302-024-00
tomas®-auxiliary kitIncludes all items shown and more
REF 400-600-00 (22 Slot)REF 400-601-00 (18 Slot)
tomas®-double tubesStd. Edgewise DB buccal tube
Direct bond tube provides auxiliary slot for doctors who normally use single tubes.
10 pcs, .018 slot REF 724-018-5110 pcs, .022 slot REF 724-019-51
tomas®-contra angle hand driverREF 400-602-00
NEW! IMPROVED
PACKAGING

Indication Class II subdivision
Benefits of Using TADS Non-extraction correction of class II subdivision
Steps for TAD ImplementationPreparation
Complete maxillary leveling and alignment Continuous stainless steel arch wire (rectangular)
TAD Placement
Palatal placement into alveolar process between maxillary 2nd bicuspid and 1st molar Insertion height should be at least 8 mm from the alveolar crest, angled slightly apical to allow retraction of 2nd bicuspid past tomas® Pin without interference
Loading
Bond retraction power arm to lingual of maxillary 1st molar with lingual retainer composite Load tomas® Pin directly with either tomas® closed coil spring or tomas® Power Chain On buccal, lace all teeth to 1st molar that should be distalized
molar distalization / direct
Before - Unilateral Class II Patient Before - Unilateral Class II (enlarged view)
Required Auxiliaries
tomas® Power Chain
tomas® Closed Coil Spring (alternatively)
7www.dentaurum.com · www.tomasforum.com · 800.523.3946
Dr. Baumgaertel‘s Clinical Pearls: If anterior retraction is planned, the TAD will interfere with tooth movement. It will need to be removed and re-positioned. Another option is to overcorrect distalization and thus account for anchorage loss during the retraction phase without TAD. This set-up can be used segmentally (treating one single quadrant) or on a continuous arch wire.
1 molar distalization / indirectCASE
Indication To distalize maxillary molars to correct molar relationship and create space
Benefits of Using TADS Distalization of mandibular molars without flaring of mandibular incisors
Steps for TAD ImplementationPreparation
Leveling and alignment (partial or complete) Adequate root parallelism Stainless steel arch wire (continuous or segmental)
TAD Placement
Buccal, between 1st and 2nd bicuspid
Loading
Option 1 - Crimp tomas® Rectangular Power Arm to base arch and position flush against mesial of premolar bracket Bond other end of tomas® Rectangular Power Arm into TAD w/ LC composite Option 2 - Bond tomas® T-Wire directly to premolars w/ LCR composite and into TAD w/ LC composite Place tomas® Open Coil Springs on arch wire between 2nd premolar and 1st molar
Add crimpable stops during each patient visit to compress coil spring and continue distalizing
Option 1 - Power Arm prevents mesial movement Option 2 - T-wire locks in bicuspids
6 www.dentaurum.com · www.tomasforum.com · 800.523.3946
Required Auxiliaries
tomas® Power Arm (Option 1)
tomas® Open Coil Spring
tomas® T-Wire (Option 2 )
Photos courtesy of Dr. Dwight FreyPhotos courtesy of Dr. Dwight Frey Photos courtesy of Dr. Sebastian BaumgaertelPhotos courtesy of Dr. Sebastian Baumgaertel
CASE2
Dr. Baumgaertel‘s Clinical Pearls: Although initially developed for unilateral distalization this approach can be used equally well for bilateral en-masse
retraction in a bilateral class II case he longer the wire span, the greater the wire dimension.
Indication To distalize maxillary molars to correct molar relationship and create space
Benefits of Using TADS Distalization of maxillary molars without the common side effects of traditional distalizing solutions such as tipping molars and flaring of incisors
Steps for TAD ImplementationPreparation
Complete leveling and alignment Adequate root parallelism Continuous stainless steel arch wire
TAD Placement
Palatal placement at 1st / 2nd bicuspid level (paramedian)
Loading
Adapt tomas® T-wire (cross bar) to lingual contour of incisors and fit passively into TAD cross-slot(s) Secure T-Wire in tomas® head using LC composite and bond to lingual surface of incisors using LCR composite Place tomas® Open Coil Springs on arch wire immediately mesial of the group of teeth that requires distalization
class II correction / Step 1CASE
Required Auxiliaries
tomas® T-Wire
tomas® Open Coil Spring
Before - Class II Patient After - Molars in Class I Occlusion
8 www.dentaurum.com · www.tomasforum.com · 800.523.3946
3 class II correction / Step 2
Step 1 - Anchor Molars in Class I Occlusion Step 2 - Retract Anterior w/o Anchorage Loss
Required Auxiliaries
Custom-bent TPA with 21x25 SS
tomas® Power Chain
9www.dentaurum.com · www.tomasforum.com · 800.523.3946
Indication To close bilateral bicuspid extraction spaces by retracting the anterior canine-to-canine segment en-masse
Benefits of Using TADS Compliance free retraction of anterior segment Reduced treatment time vs. traditional space closure with canine retraction followed by anterior retraction Posterior anchorage loss is prevented
Steps for TAD ImplementationPreparation
Complete leveling and alignment w/ continuous stainless steel arch wire
Buccal segments are distalized with tomas® T-Wire mechanics (See Case 3 on opposite page)
TAD Placement
In the palate at the level of the 2nd bicuspids slightly off center (paramedian)
If tomas® Pin is already present from distalization (see case 3), no further TAD placement is required
Loading
Customize TPA out of 21x25 ss wire Bond customized TPA to lingual of the posterior segments w/ LCR composite & connect to tomas® Pin w/ LC composite On the buccal, install a full arch tomas® Power Chain for retraction
Photo courtesy of Dr. Sebastian Baumgaertel Photo courtesy of Dr. Sebastian BaumgaertelPhoto courtesy of Dr. Sebastian Baumgaertel
CASE4
Dr. Baumgaertel‘s Clinical Pearls: If anterior retraction is planned after the distalization, the TAD position should be further distal (2nd bicuspid level). In cases with a deep bite or strong cusp embrasure, it can be beneficial to unlock the occlusion with occlusal bite elevators. The larger the tooth segment, the more difficult it becomes & it may make sense to subdivide the segments.
Dr. Baumgaertel‘s Clinical Pearls: The longer the wire span, the greater the wire dimension that should be used for the anchorage wire. Think ahead: place tomas® Pin slightly further posterior than for T-Wire protraction.
10 www.dentaurum.com · www.tomasforum.com · 800.523.3946
Indication Distal driving of posterior to correct unilateral Class II occlusion and alleviate anterior crowding
Benefits of Using TADS Provides force and anchorage for movement, while the aligner provides the guidance Reduces treatment time with en-masse movement Allows for the application of force at the level of the tooth center of resistance for bodily movement
Steps for TAD ImplementationPreparation
Submit patient records to aligner vendor with specific instructions prescribing the intended movement
Check fit and clearance of aligners
TAD Placement
Palatal placement between maxillary 1st molar & 2nd Molar Ideally the TAD should be angled slightly apical to allow retraction of 1st Molar past tomas® Pin without interference
Loading
Bond 3-level tomas® Power Arm for ideal force level through center of resistance Attach tomas® Closed Coil Springs or Power Chain to tomas® pin head and then to tomas® Bondable Power Arm
5 clear aligner therapy / distalizing molarsCASE
Required Auxiliaries
tomas® Bondable Power Arms
tomas® Closed Coil Spring
Dr. Baumgaertel‘s Clinical Pearls: The longer the wire span, the greater the wire dimension. Think ahead: place tomas® Pin slightly further posterior than for T-Wire protraction.
9www.dentaurum.com · www.tomasforum.com · 800.523.3946
Indication Space closure in an extraction case with TADs and clear aligners
Benefits of Using TADS Provides force and anchorage for movement, while the aligner provides the guidance Reduces treatment time with en-masse movement
Provides an extra-dental source of anchorage to prevent protraction of posterior teeth
Steps for TAD ImplementationPreparation
Submit patient records to aligner vendor with specific instructions prescribing the intended movement
Check fit and clearance of aligners
TAD Placement
Buccal, between 2nd bicuspid and 1st Molar
Loading Bond a 3-level tomas® Power Arm for ideal force through center of resistance Attach tomas® Closed Coil Springs or Power Chain to tomas® pin head and then to tomas® Bondable Power Arm
clear aligner therapy / retracting anteriorCASE
11www.dentaurum.com · www.tomasforum.com · 800.523.3946
Severe overjet and Class II Cuspids
6
Required Auxiliaries
tomas® Bondable Power Arms
tomas® Closed Coil Spring
Photo courtesy of Dr. Frank CelenzaPhoto courtesy of Dr. Frank Celenza
Before - Class II Case with Proclined Incisors 6 Mo. Progress - Space Closure & Retraction
Photo courtesy of Dr. Frank CelenzaPhoto courtesy of Dr. Frank Celenza
Bonded auxiliary on cuspid for retraction force
Unilateral Class II Occlusion Case
Photo courtesy of Dr. Frank Celenza
Before - Class II Case with Anterior Crowding 4 Mo. Progress - Anterior Crowding Alleviated
Dr. Celenza‘s Clinical Pearls: The tomas® bondable power arms were not available when I started this case, but they make it much easier to bond to
the tooth & pull through the center of resistance.
Dr. Celenza’s Clinical Pearls: The tomas® bondable power arms were not available when I started this case, but they make it much easier to bond to
the tooth & pull through the center of resistance.

Dr. Baumgaertel‘s Clinical Pearls: Indirect molar protraction can also be done segmentally, so a full arch bonding is not necessary if the only treatment
objective is the unilateral space closure. Bonding lingual buttons on the 1st bicuspid and the molar and attaching a tomas® Power Chain can reduce the rotational
moment and reduce friction.
molar protraction / indirectCASE
Option 1 - Using Rectangular Power Arm Option 2 - Using 19x25 SS Stabilization Wire
Required Auxiliaries
tomas® Closed Coil Spring
tomas® Rectangular Power Arm
tomas® Power Chain (alternatively)
12 www.dentaurum.com · www.tomasforum.com · 800.523.3946
Photo courtesy of Dr. Jon Silcox
Indication To close posterior spaces
Benefits of Using TADS Space closure without retraction (loss of anchorage) of the lower incisors and impact on overjet Potential savings on cost of implant to patient
Steps for TAD ImplementationPreparation
Complete leveling and alignment Adequate root parallelism Continuous stainless steel arch wire
TAD Placement
Buccal, between 1st and 2nd bicuspid
Loading
Option 1 - Crimp tomas® Rectangular Power Arm to base arch and position flush against distal of premolar bracket Bond other end of tomas® Rectangular Power Arm into TAD w/ LC composite Option 2 - Bond 19x25 stabilization wire directly to premolar w/ LCR composite and into TAD w/ LC composite (With this option, it is recommended to steel tie lower incisors due to distal drifting of base arch from friction) Place tomas® Closed Coil Spring on base arch from premolar to molar (alternatively power chain can be used)
Indication To close a posterior unilateral space by protraction of molars
Benefits of Using TADS Space closure without retraction (loss of anchorage) of the incisors and impact on overjet Avoids shift of midline due to anchorage lossAllows for Unilateral space closure with segmental mechanics (if desired) Potential savings on cost of implant to patient
Steps for TAD ImplementationPreparation
Complete leveling and alignment Adequate root parallelism Continuous stainless steel arch wire
TAD Placement
If 1st molar is missing: between 1st and 2nd bicuspid If 2nd bicuspid is missing: between canine and 1st bicuspid
Loading
Create protraction power arm with heavy gauge SS wire (as shown) and insert in auxiliary tube
Install tomas® Closed Coil Spring on TAD and protraction power arm
Dr. Petrey‘s Clinical Pearls: Direct molar protraction can also be achieved segmentally, so a full arch bonding may not be necessary. When not using a double buccal tube, protraction may be achieved by attaching the tomas® closed coil spring directly to the molar hook, however this may cause an excessive vertical force component, tipping of the molar, increased friction and clinical treatment time.
molar protraction / directCASE
Required Auxiliaries
tomas® Closed Coil Spring
tomas® Double Buccal Tube
Customized Protraction Power Arm
13www.dentaurum.com · www.tomasforum.com · 800.523.3946
Protracting 2nd Molar to prepare for Implant
Before After
7 8
Molar Protraction & Implant Restoration Completed
Photos courtesy of Dr. Joseph S. PetreyPhotos courtesy of Dr. Joseph S. Petrey

BGC
Clear. Easy. Free.
=Buy This. Get This.
BGC CREDITS
NEVER EXPIRE*
• NO COMPLICATED POINTS SCHEME
• EARN BGC CREDITS ON EVERY DOLLAR SPENT
• BGC CREDITS NEVER EXPIRE*
• BGC CREDITS REDEEMED AT DISCOUNTED RATES BUYING GROUP CLUB
FAQQ: What application or registration process is required to join the BGC?
A: None. Contact your local sales rep to learn about minimum purchase requirements to begin earning credits today!
Q: How many BGC credits will I earn on every dollar spent?
A: Bracket & band customers receive up to 50% and lab customers receive up to 35% in BGC credits on every dollar spent.
Q: How soon are the BGC credits earned on each purchase?
A: BGC credits are earned and available for use on the following Monday after each purchase.
Q: Are BGC credits redeemed at retail value?
A: No. BGC credits are redeemed at fairly discounted rates.
Q: Are any products excluded from redemption with BGC credits?
A: No. BGC credits can be used for any Dentaurum product, other than the main products being purchased to earn credits.
Q: Will my BGC credits ever expire?
A: No. As long as purchasing activity occurs within a 24-month period, the BGC credits will never expire.*
Dentaurum is very proud of our rich history in offering innovative & quality German-engineered products to the dental market for over 125 Years! We realize that this long history would not be possible, except for the loyal support of our key customers who select Dentaurum for the majority of the products they use.
Dentaurum USA has launched our Buying Group Club (BGC) with those specific customers in mind. This program allows each of our loyal customers the ability to earn free product credits in amount of 35-50% of EVERY dollar spent. In fact, the average BGC bracket & band customer earns over $7,500 in free product each year!
Many companies are offering confusing reward programs which employ tricks & gimmicks that greatly reduce the value of these programs. Dentaurum USA does not apply any exclusions on the use of credits, we do not offer confusing “point-based” rewards, our credits are not redeemed at retail value & most importantly our credit dollars do not expire, as long as you continue purchasing products from us!
Our BGC program is exactly what it sounds like - Buy your key products from us, we give you free products in return! *Please note: The Dentaurum BGC Program is only valid for customers of Dentaurum USA. This program is not valid in other countries.
BGC Clear. Easy. Free.
DENTAURUM BGC
800.523.3946 [email protected]
Earn Product!
What does your buying group do for you?
BGC

Indication To close posterior uni- or bilateral space by protraction of molars Extreme protraction in cases with multiple congenitally missing teeth
Benefits of Using TADS Space closure without retraction (loss of anchorage) of the incisors and impact on overjet Maxillary midline shift is all but avoided
Steps for TAD ImplementationPreparation
Complete leveling and alignment Adequate root parallelism Continuous stainless steel arch wire
TAD Placement Option 1 - For bilateral space closure, place tomas® Pin at level of 1st or 2nd bicuspids (paramedian) Option 2 - For unilateral space closure, place 2 tomas® Pins at paramedian location in sagittal orientation: First tomas® Pin at 1st bicuspid level; Second tomas® Pin at 2nd bicuspid level Slots lined up in sagittal orientation
Loading
Adapt tomas® T-wire (cross bar) to lingual contour of incisors and fit passively into TAD cross-slot(s) Secure T-Wire in tomas® head using LC composite and bond to lingual surface of incisors using LCR composite On the buccal, install full arch tomas® Power Chain for protraction
Dr. Baumgaertel‘s Clinical Pearls: The tomas® T-Wire should be used with occlusal bite elevators to protect the auxiliary and unlock the bite to decrease the hindering effects of a strongly interdigitated occlusion.
Rigidly connecting two TADs appears to lower failure rates according to a the current literature.
For protraction over longer distances crimpable hooks can be placed on the arch wire to attach tomas® Closed Coil Springs.
Option 1 - Bilateral space closure Option 2 - Unilateral space closure
Photos courtesy of Dr. Sebastian Baumgaertel
Required Auxiliaries
tomas® T-wire
tomas® Power Chain
space closure / indirectCASE
17www.dentaurum.com · www.tomasforum.com · 800.523.394616 www.dentaurum.com · www.tomasforum.com · 800.523.3946
Dr. Bowman‘s Clinical Pearls: Only light intrusion forces from the “utility” arms is required so rotational forces to the miniscrew are minimal.
These are the only incisor intrusion approaches that can truly prevent incisor flaring. When using the alternate method, cinch utility arch back to prevent incisor flaring.
incisor intrusion / deep biteCASE
Indication Multi-tasking to correct deep overbite, crowding, and protrusion by combination of indirect incisor intrusion and direct retraction
Benefits of Using TADS Intrusion of incisors without molar anchorage loss, extrusion, or tipping
Steps for TAD ImplementationPreparation Adequate root parallelism
TAD Placement
Bilaterally, buccal, between 2nd bicuspid and 1st molar
Loading Attach tomas® medium coil spring to the TAD Customize a “utility arm” with 17.5 x 17.5 Beta-Ti wire segment Bond “utility arm” & tomas® coil spring into TAD cross-slot w/ LC composite Use tomas® coil spring to retract teeth and apply tip back bends as needed in “utility arm” to intrude incisors Alternate Method: You can also anchor molars by bonding a 17x25 SS wire segment into the tomas® head and insert other end of wire into auxiliary tube on molar (as shown in image - above right) If no auxiliary tube is present, bond wire segment directly to buccal molar surface using lingual retainer composite Insert standard utility arch into main molar tube and load incisors to intrude
Before - Deep Bite Class II Patient After - Incisors Intruded & anterior retracted
Required Auxiliaries
Custom “Utility Arm” w/ Beta-Ti wire
Alternate: 17x25 SS Wire Segment & Standard Utility Arch
109
Photos courtesy of Dr. Sebastian Baumgaertel Photos courtesy of Dr. Sebastian Baumgaertel Photo courtesy of Dr. S. Jay Bowman Photo courtesy of Dr. S. Jay Bowman
Alternate method:Utility Arch intrudes & TAD anchors Molars
Dr. Baumgaertel‘s Clinical Pearls: To prevent buccal flaring of the molars as a side effect, install a transpalatal arch. It should have sufficient clearance to the
palate to not interfere with the intrusion.
11posterior intrusion / single toothCASE
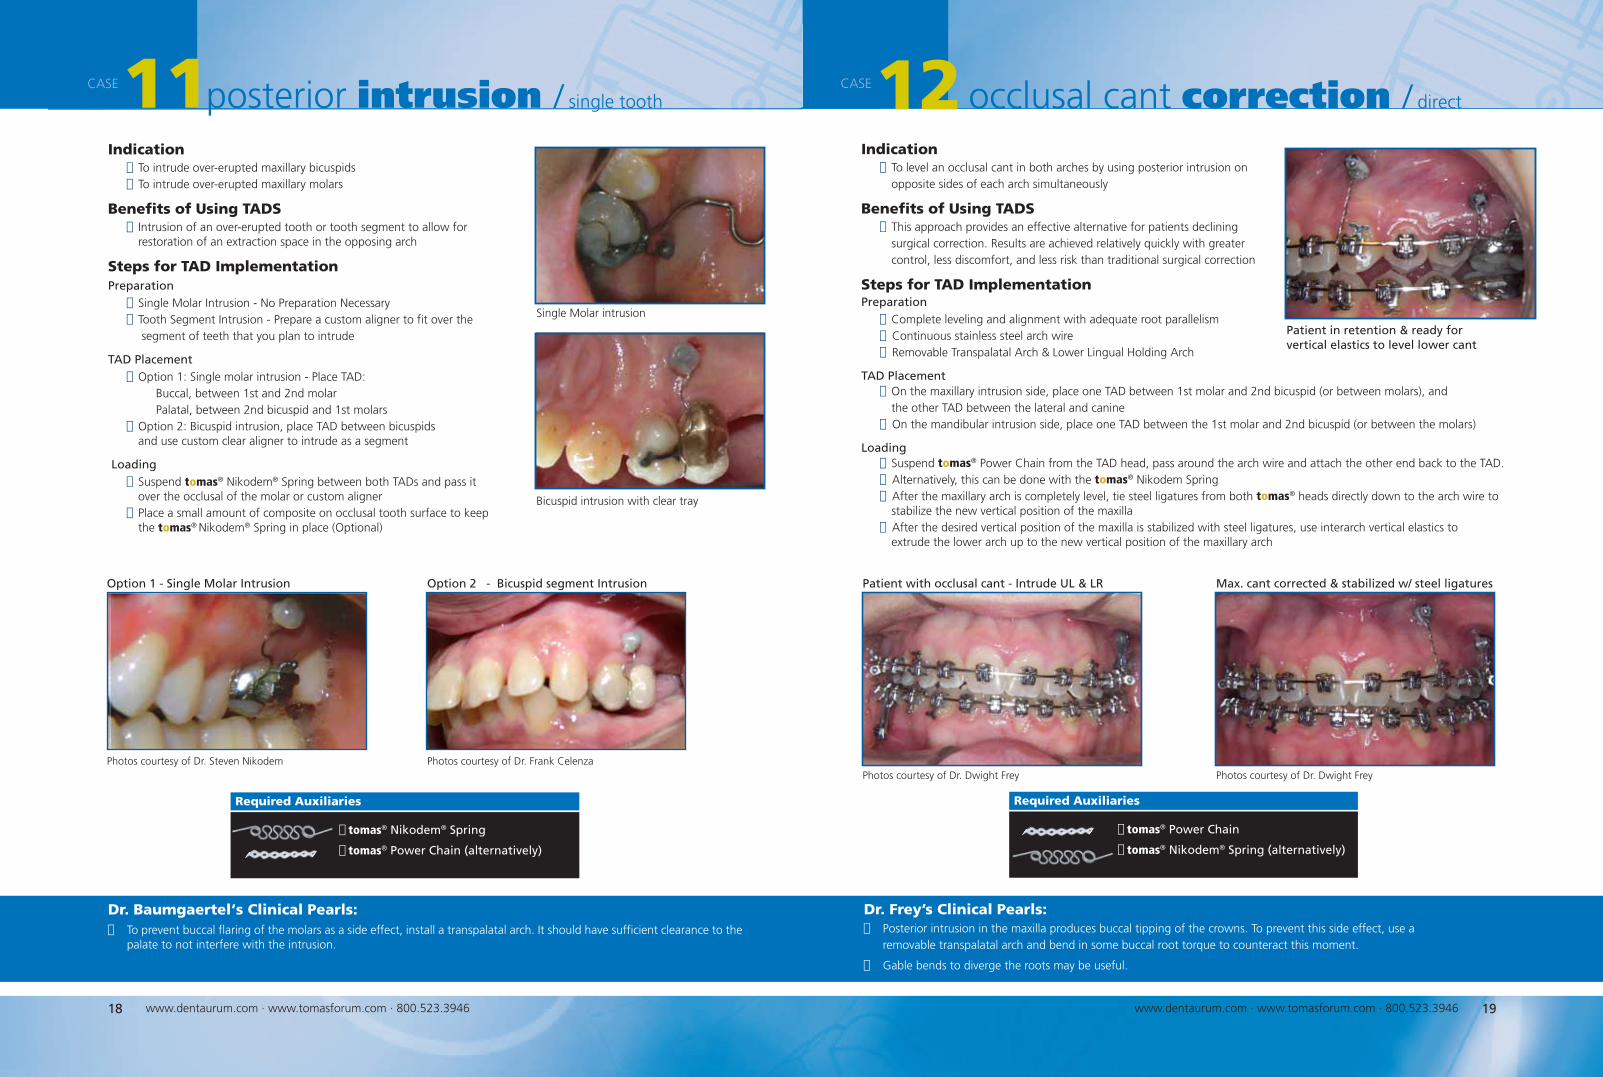
Indication To intrude over-erupted maxillary bicuspids
To intrude over-erupted maxillary molars
Benefits of Using TADS Intrusion of an over-erupted tooth or tooth segment to allow for
restoration of an extraction space in the opposing arch
Steps for TAD ImplementationPreparation
Single Molar Intrusion - No Preparation Necessary Tooth Segment Intrusion - Prepare a custom aligner to fit over the segment of teeth that you plan to intrude
TAD Placement
Option 1: Single molar intrusion - Place TAD: Buccal, between 1st and 2nd molar Palatal, between 2nd bicuspid and 1st molars
Option 2: Bicuspid intrusion, place TAD between bicuspids and use custom clear aligner to intrude as a segment
Loading
Suspend tomas® Nikodem® Spring between both TADs and pass it over the occlusal of the molar or custom aligner
Place a small amount of composite on occlusal tooth surface to keep the tomas® Nikodem® Spring in place (Optional)
Bicuspid intrusion with clear tray
Option 1 - Single Molar Intrusion Option 2 - Bicuspid segment Intrusion
18 www.dentaurum.com · www.tomasforum.com · 800.523.3946 19www.dentaurum.com · www.tomasforum.com · 800.523.3946
Photos courtesy of Dr. Steven Nikodem Photos courtesy of Dr. Frank Celenza
Indication To level an occlusal cant in both arches by using posterior intrusion on opposite sides of each arch simultaneously
Benefits of Using TADS This approach provides an effective alternative for patients declining surgical correction. Results are achieved relatively quickly with greater control, less discomfort, and less risk than traditional surgical correction
Steps for TAD ImplementationPreparation
Complete leveling and alignment with adequate root parallelism Continuous stainless steel arch wire Removable Transpalatal Arch &Lower Lingual Holding Arch
TAD Placement On the maxillary intrusion side, place one TADbetween 1st molar and 2nd bicuspid (or between molars), and the other TAD between the lateral and canine On the mandibular intrusion side, place one TAD between the 1st molar and 2nd bicuspid (or between the molars)
Loading Suspend tomas® Power Chain from the TAD head, pass around the arch wire and attach the other end back to the TAD. Alternatively, this can be done with the tomas® Nikodem Spring After the maxillary arch is completely level, tie steel ligatures from both tomas® heads directly down to the arch wire to stabilize the new vertical position of the maxilla After the desired vertical position of the maxilla is stabilized with steel ligatures, use interarch vertical elastics to extrude the lower arch up to the new vertical position of the maxillary arch
Dr. Frey’s Clinical Pearls: Posterior intrusion in the maxilla produces buccal tipping of the crowns. To prevent this side effect, use a removable transpalatal arch and bend in some buccal root torque to counteract this moment.
Gable bends to diverge the roots may be useful.
occlusal cant correction / direct
Patient with occlusal cant - Intrude UL & LR Max. cant corrected & stabilized w/ steel ligatures
CASE12
Required Auxiliaries
tomas® Power Chain
tomas® Nikodem® Spring (alternatively)
Photos courtesy of Dr. Dwight Frey Photos courtesy of Dr. Dwight Frey
Patient in retention & ready for vertical elastics to level lower cant
Required Auxiliaries
tomas® Nikodem® Spring
tomas® Power Chain (alternatively)
Single Molar intrusion
Indication Unilateral or bilateral intrusion of single teeth or entire tooth segments
Benefits of Using TADS Correction of open bite without surgery or patient compliance issues
Steps for TAD ImplementationPreparation
Segmental leveling of desired tooth segment for intrusion
TAD Placement
Buccal or palatal between 2nd bicuspid and 1st molar Alternate Option - Place between bicuspids
Loading
Bond short rigid anchorage wire directly to premolar w/ LCR composite and into TAD w/ LC composite Use 19x25 Beta-ti wire to intrude molars Place step bends in 19x25 Beta-ti wire (as needed) during follow-up patient visits to continue intruding
Dr. Baumgaertel‘s Clinical Pearls: Convertible tubes on 1st molars allow greater flexibility and simplify installation.
Adding lingual crown torque to intrusion segment will control intrusion of palatal/lingual cusps.
Step 1 - Anchor 2nd bi-cuspid to tomas pin Step 2 - Place step-bends to intrude molars
Required Auxiliaries
Rigid wire connector (min. wire dimension 17x25 ss)
19x25 TMA segmental intrusion wire
open bite correction / indirect
20 www.dentaurum.com · www.tomasforum.com · 800.523.3946 21www.dentaurum.com · www.tomasforum.com · 800.523.3946
13CASE CASE
Alternate: Ulysses Spring for anterior extrusion & elastic chain for posterior intrusion
Dr. Petrey‘s Clinical Pearls: Set-up can also be used for single tooth or segmental intrusion, or even possibly with no wires at all.
Subsequent adjustments simply include reactivation of powerchain lessening chair time and increasing patient comfort.
This avoids TPAs which can lead to patient comfort, speech, and hygiene issues, as well as added fabrication time and cost.
open bite correction / direct
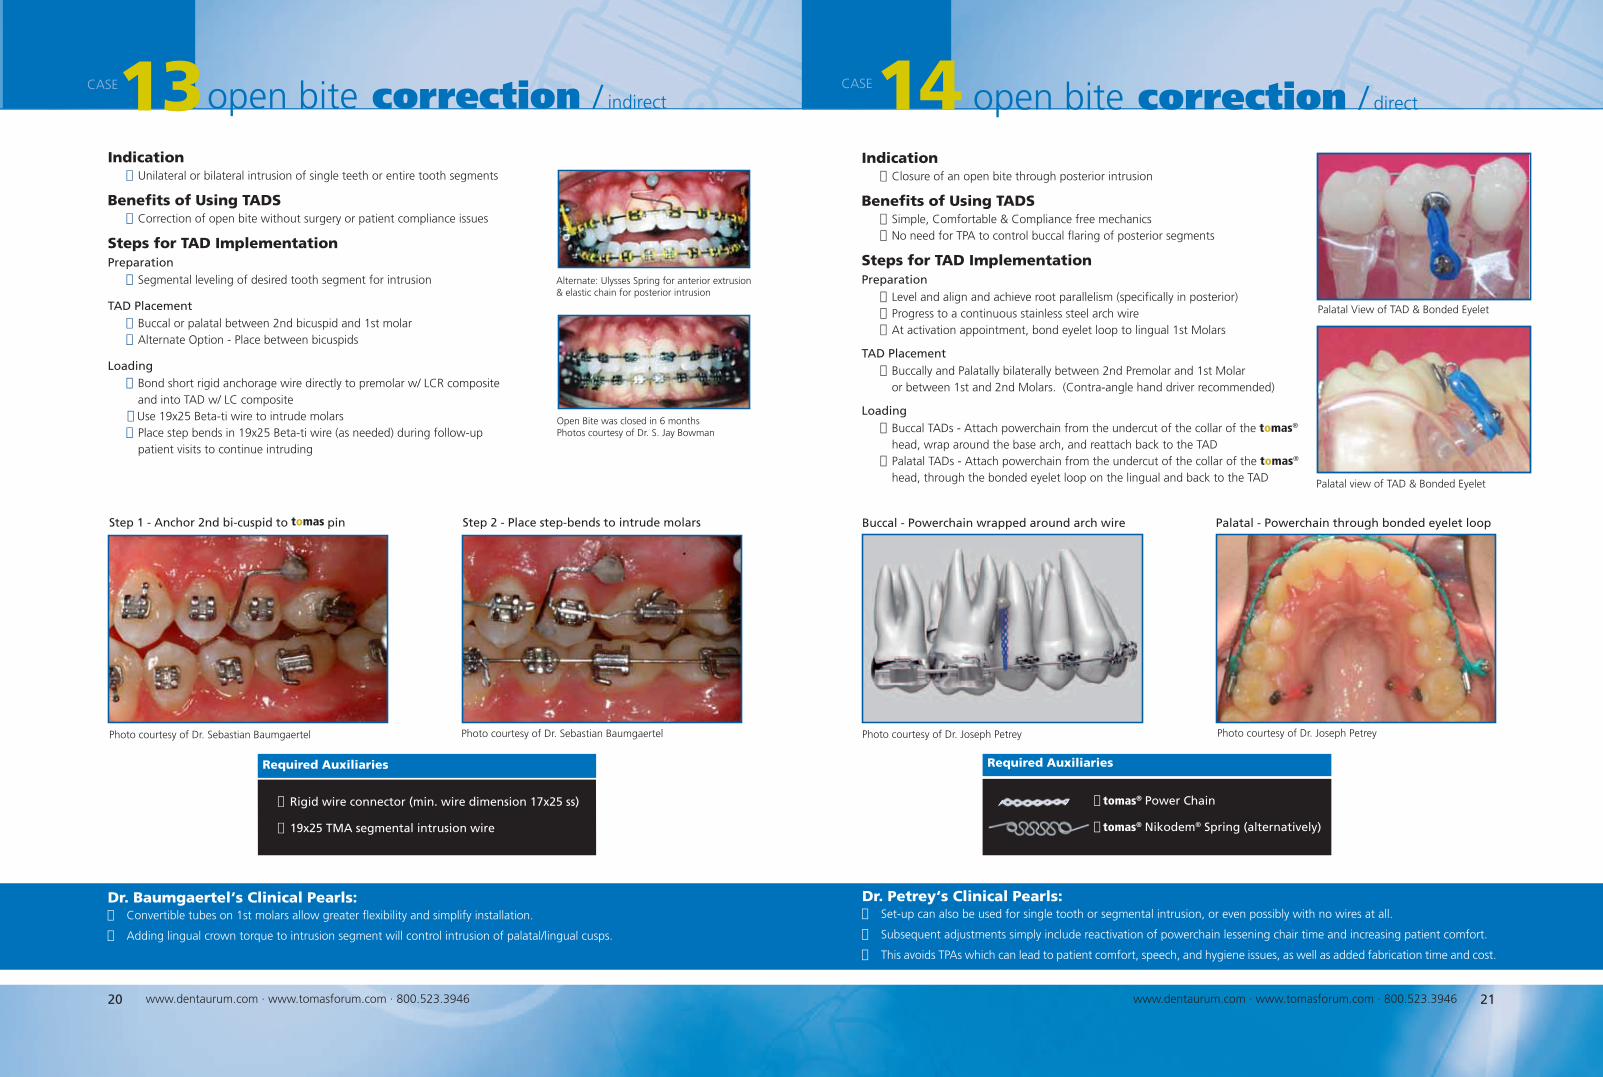
Indication Closure of an open bite through posterior intrusion
Benefits of Using TADS Simple, Comfortable & Compliance free mechanics No need for TPA to control buccal flaring of posterior segments
Steps for TAD ImplementationPreparation Level and align and achieve root parallelism (specifically in posterior) Progress to a continuous stainless steel arch wire At activation appointment, bond eyelet loop to lingual 1st Molars
TAD Placement Buccally and Palatally bilaterally between 2nd Premolar and 1st Molar or between 1st and 2nd Molars. (Contra-angle hand driver recommended)
Loading Buccal TADs - Attach powerchain from the undercut of the collar of the tomas®
head, wrap around the base arch, and reattach back to the TAD
Palatal TADs - Attach powerchain from the undercut of the collar of the tomas®
head, through the bonded eyelet loop on the lingual and back to the TAD
Required Auxiliaries
tomas® Power Chain
tomas® Nikodem® Spring (alternatively)
14
Photo courtesy of Dr. Sebastian Baumgaertel Photo courtesy of Dr. Sebastian Baumgaertel
Buccal - Powerchain wrapped around arch wire
Photo courtesy of Dr. Joseph Petrey Photo courtesy of Dr. Joseph Petrey
Palatal view of TAD & Bonded Eyelet
Palatal View of TAD & Bonded Eyelet
Palatal - Powerchain through bonded eyelet loop
Open Bite was closed in 6 monthsPhotos courtesy of Dr. S. Jay Bowman
22 www.dentaurum.com · www.tomasforum.com · 800.523.3946
Dr. Baumgaertel‘s Clinical Pearls: Often times root proximity exists at this site in the mandible so that the indirect approach should be chosen. Intruding incisors using this method will result in flaring of incisors.
CASE
Step 1
19www.dentaurum.com · www.tomasforum.com · 800.523.3946 23www.dentaurum.com · www.tomasforum.com · 800.523.3946
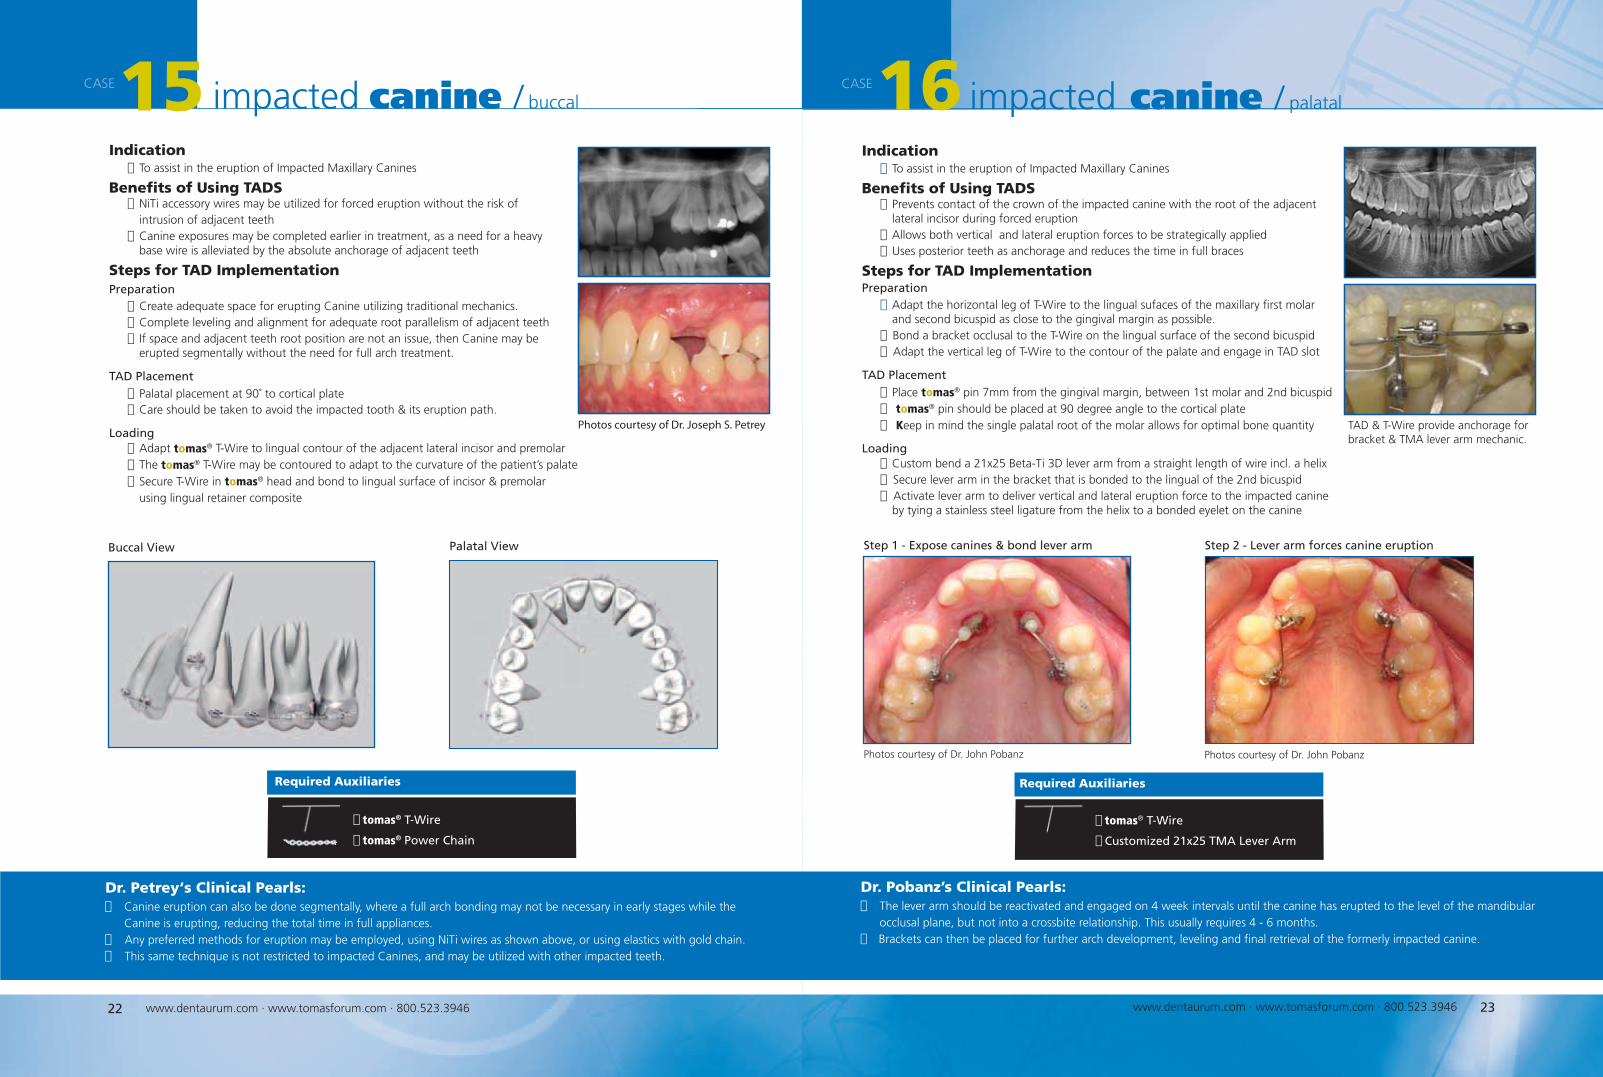
impacted canine / palatalCASE
Indication To assist in the eruption of Impacted Maxillary Canines
Benefits of Using TADS Prevents contact of the crown of the impacted canine with the root of the adjacent lateral incisor during forced eruption
Allows both vertical and lateral eruption forces to be strategically applied
Uses posterior teeth as anchorage and reduces the time in full braces
Steps for TAD ImplementationPreparation
Adapt the horizontal leg of T-Wire to the lingual sufaces of the maxillary first molar and second bicuspid as close to the gingival margin as possible. Bond a bracket occlusal to the T-Wire on the lingual surface of the second bicuspid Adapt the vertical leg of T-Wire to the contour of the palate and engage in TAD slot
TAD Placement
Place tomas® pin 7mm from the gingival margin, between 1st molar and 2nd bicuspid tomas® pin should be placed at 90 degree angle to the cortical plate Keep in mind the single palatal root of the molar allows for optimal bone quantity
Loading Custom bend a 21x25 Beta-Ti 3D lever arm from a straight length of wire incl. a helix Secure lever arm in the bracket that is bonded to the lingual of the 2nd bicuspid Activate lever arm to deliver vertical and lateral eruption force to the impacted canine by tying a stainless steel ligature from the helix to a bonded eyelet on the canine
Step 2 - Lever arm forces canine eruption
Required Auxiliaries
tomas® T-Wire
Customized 21x25 TMA Lever Arm
TAD & T-Wire provide anchorage for bracket & TMA lever arm mechanic.
Step 1 - Expose canines & bond lever arm
Photos courtesy of Dr. John Pobanz Photos courtesy of Dr. John Pobanz
Dr. Petrey‘s Clinical Pearls: Canine eruption can also be done segmentally, where a full arch bonding may not be necessary in early stages while the Canine is erupting, reducing the total time in full appliances. Any preferred methods for eruption may be employed, using NiTi wires as shown above, or using elastics with gold chain. This same technique is not restricted to impacted Canines, and may be utilized with other impacted teeth.
impacted canine / buccal
Indication To assist in the eruption of Impacted Maxillary Canines
Benefits of Using TADS NiTi accessory wires may be utilized for forced eruption without the risk of intrusion of adjacent teeth Canine exposures may be completed earlier in treatment, as a need for a heavy base wire is alleviated by the absolute anchorage of adjacent teeth
Steps for TAD ImplementationPreparation Create adequate space for erupting Canine utilizing traditional mechanics. Complete leveling and alignment for adequate root parallelism of adjacent teeth If space and adjacent teeth root position are not an issue, then Canine may be erupted segmentally without the need for full arch treatment.
TAD Placement Palatal placement at 90˚ to cortical plate Care should be taken to avoid the impacted tooth & its eruption path.
Loading Adapt tomas® T-Wire to lingual contour of the adjacent lateral incisor and premolar The tomas® T-Wire may be contoured to adapt to the curvature of the patient’s palate Secure T-Wire in tomas® head and bond to lingual surface of incisor & premolar using lingual retainer composite
Palatal View
Required Auxiliaries
tomas® T-Wire
tomas® Power Chain
Photos courtesy of Dr. Joseph S. Petrey
Buccal View
15 16 CASE
Dr. Pobanz’s Clinical Pearls: The lever arm should be reactivated and engaged on 4 week intervals until the canine has erupted to the level of the mandibular occlusal plane, but not into a crossbite relationship. This usually requires 4 - 6 months.Brackets can then be placed for further arch development, leveling and final retrieval of the formerly impacted canine.
Dr. Bumann‘s Clinical Pearls: If uprighting through distal tipping of the crown is desired, the set-up does not need to be modified. If uprighting through mesial tipping of the root is desired, the arch length must be fixed. This can be achieved by ligating a
stainless steel ligature wire from the TAD to the molar hook, or by annealing and cinching the end of the NiTi-segment.
17molar uprightingCASE
Indication To upright a mesially-inclined molar due to ectopic eruption of the molar or premature tooth loss of an adjacent tooth
Benefits of Using TADS Uprights molar without any undesired reciprocal movements (i.e.,
extrusion and/or mesialization) of the adjacent teeth Molar uprighting can occur without bonding of the entire dental arch
Steps for TAD ImplementationPreparation
None required
TAD Placement
If 2nd molar is to be uprighted: between 1st and 2nd bicuspid
If 1st molar is to be uprighted: between canine and 1st bicuspid
Loading
See opposite page for loading instructions
Before After - 4 Month Progress
Option 1 - with distal tipping of crown(See Dr. Bumann’s Clinical Pearl below)
Option 2 - with mesial tipping of root(See Dr. Bumann’s Clinical Pearl below)
Photo courtesy of Dr. Axel Bumann
Photo courtesy of Dr. Axel BumannPhoto courtesy of Dr. Axel Bumann
24 www.dentaurum.com · www.tomasforum.com · 800.523.3946
Option 3 - Uprighting with Intrusion· Place TAD approximately 10 mm from occlusal plane
· Insert a 45˚ intrusion bend into SS wire on distal side of TAD
· Insert uprighting spring into slot of TAD & buccal tube
· Extend NiTi wire out to achieve more uprighting force
· Secure uprighting spring into TAD with LC composite
· Place a crimp in center of crimping tube w/ heavy wire cutter
· To avoid rotation forces, place a 90˚ bend in SS wire at mesial
side of TAD & bond wire to tooth w/ lingual retainer composite
17molar uprighting CASE
Keys for use of tomas® uprighting spring
0˚ Bend in SS Wire
30˚ Bend in SS Wire
45˚ Bend in SS Wire
Required Auxiliaries
tomas® Uprighting Spring
Steel Ligature Wire (optional)
Option 1 - Uprighting with Extrusion· Place TAD approximately 10 mm from occlusal plane
· Insert uprighting spring into slot of TAD & buccal tube
· Extend NiTi wire out to achieve more uprighting force
· Secure uprighting spring into TAD with LC composite
· Place a crimp in center of crimping tube w/ heavy wire cutter
· Cut off excess SS wire to the mesial of the TAD
Option 2 - Uprighting with no vertical effect· Place TAD approximately 10 mm from occlusal plane
· Insert a 30˚ intrusion bend into SS wire on distal side of TAD
· Insert uprighting spring into slot of TAD & buccal tube
· Extend NiTi wire out to achieve more uprighting force
· Secure uprighting spring into TAD with LC composite
· Place a crimp in center of crimping tube w/ heavy wire cutter
· To avoid rotation forces, place a 90˚ bend in SS wire at mesial
side of TAD & bond wire to tooth w/ lingual retainer composite
25www.dentaurum.com · www.tomasforum.com · 800.523.3946
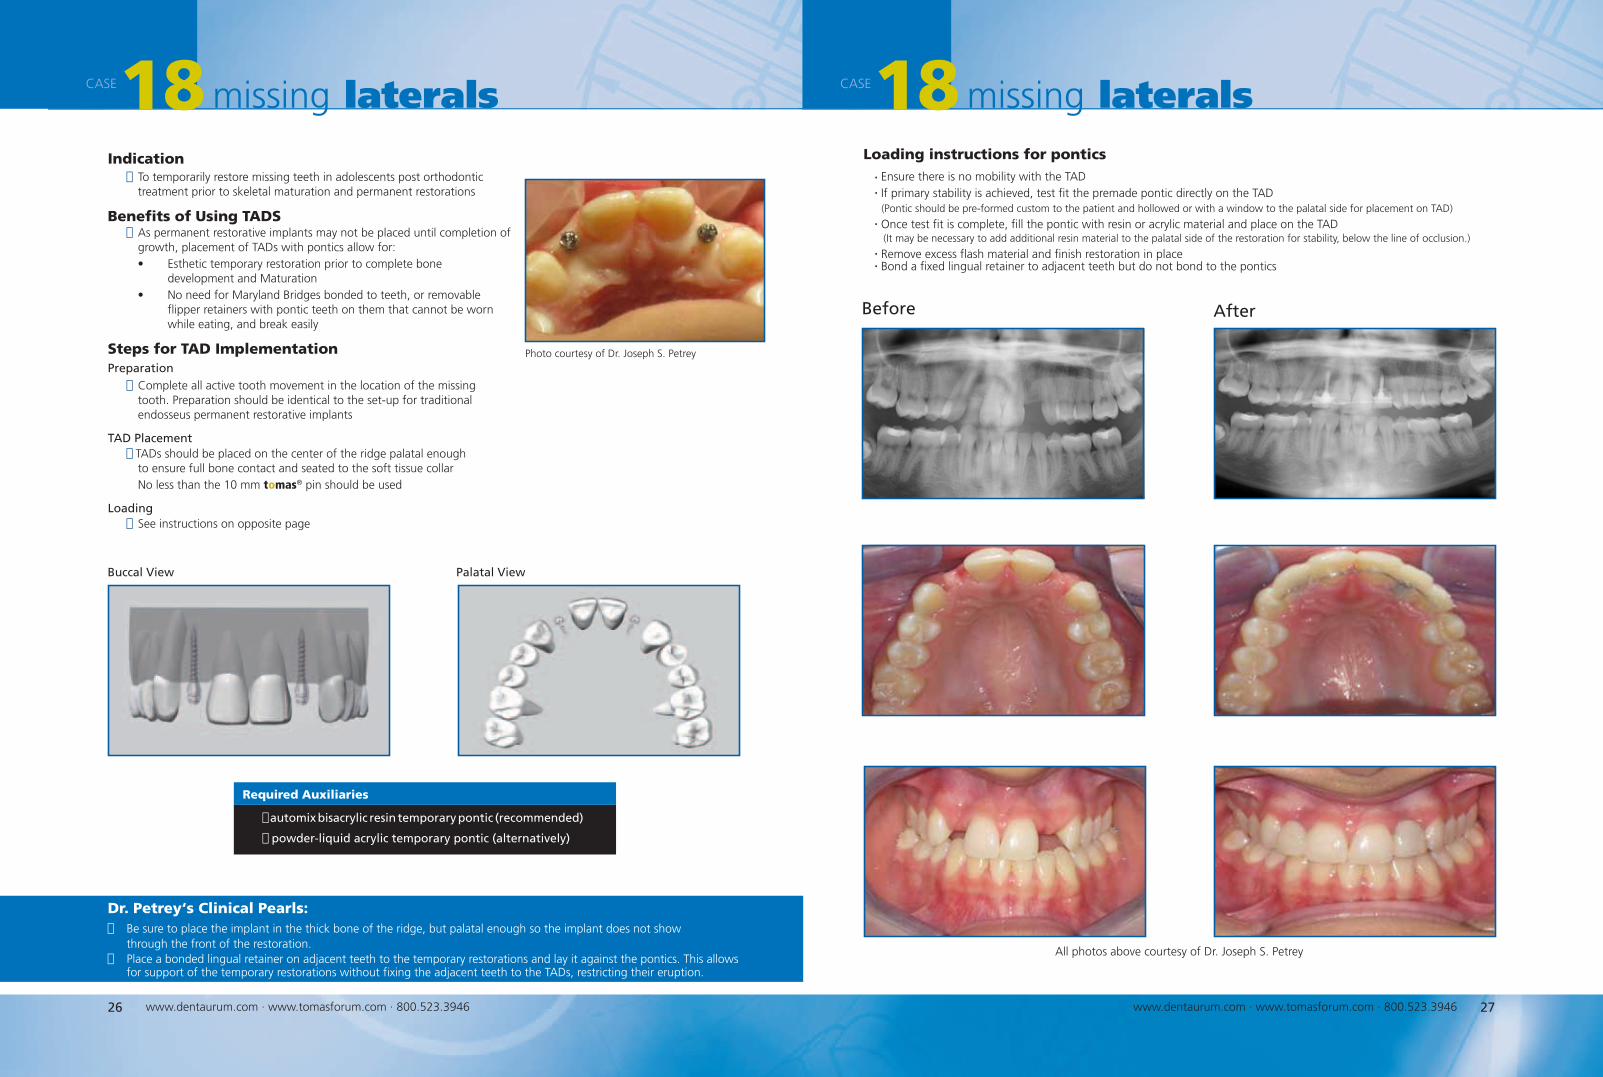
Indication To temporarily restore missing teeth in adolescents post orthodontic
treatment prior to skeletal maturation and permanent restorations
Benefits of Using TADS As permanent restorative implants may not be placed until completion of
growth, placement of TADs with pontics allow for:• Esthetic temporary restoration prior to complete bone
development and Maturation• No need for Maryland Bridges bonded to teeth, or removable
flipper retainers with pontic teeth on them that cannot be worn while eating, and break easily
Steps for TAD ImplementationPreparation
Complete all active tooth movement in the location of the missing tooth. Preparation should be identical to the set-up for traditional endosseus permanent restorative implants
TAD Placement TADs should be placed on the center of the ridge palatal enough to ensure full bone contact and seated to the soft tissue collar No less than the 10 mm tomas® pin should be used
Loading See instructions on opposite page
Dr. Petrey‘s Clinical Pearls: Be sure to place the implant in the thick bone of the ridge, but palatal enough so the implant does not show through the front of the restoration. Place a bonded lingual retainer on adjacent teeth to the temporary restorations and lay it against the pontics. This allows for support of the temporary restorations without fixing the adjacent teeth to the TADs, restricting their eruption.
18missing laterals CASE
Photo courtesy of Dr. Joseph S. Petrey
Buccal View Palatal View
27www.dentaurum.com · www.tomasforum.com · 800.523.3946
Required Auxiliaries
automix bisacrylic resin temporary pontic (recommended)
powder-liquid acrylic temporary pontic (alternatively)
18missing lateralsCASE
26 www.dentaurum.com · www.tomasforum.com · 800.523.3946
Loading instructions for pontics
· Ensure there is no mobility with the TAD · If primary stability is achieved, test fit the premade pontic directly on the TAD (Pontic should be pre-formed custom to the patient and hollowed or with a window to the palatal side for placement on TAD)
· Once test fit is complete, fill the pontic with resin or acrylic material and place on the TAD (It may be necessary to add additional resin material to the palatal side of the restoration for stability, below the line of occlusion.)
· Remove excess flash material and finish restoration in place · Bond a fixed lingual retainer to adjacent teeth but do not bond to the pontics
Before After
All photos above courtesy of Dr. Joseph S. Petrey
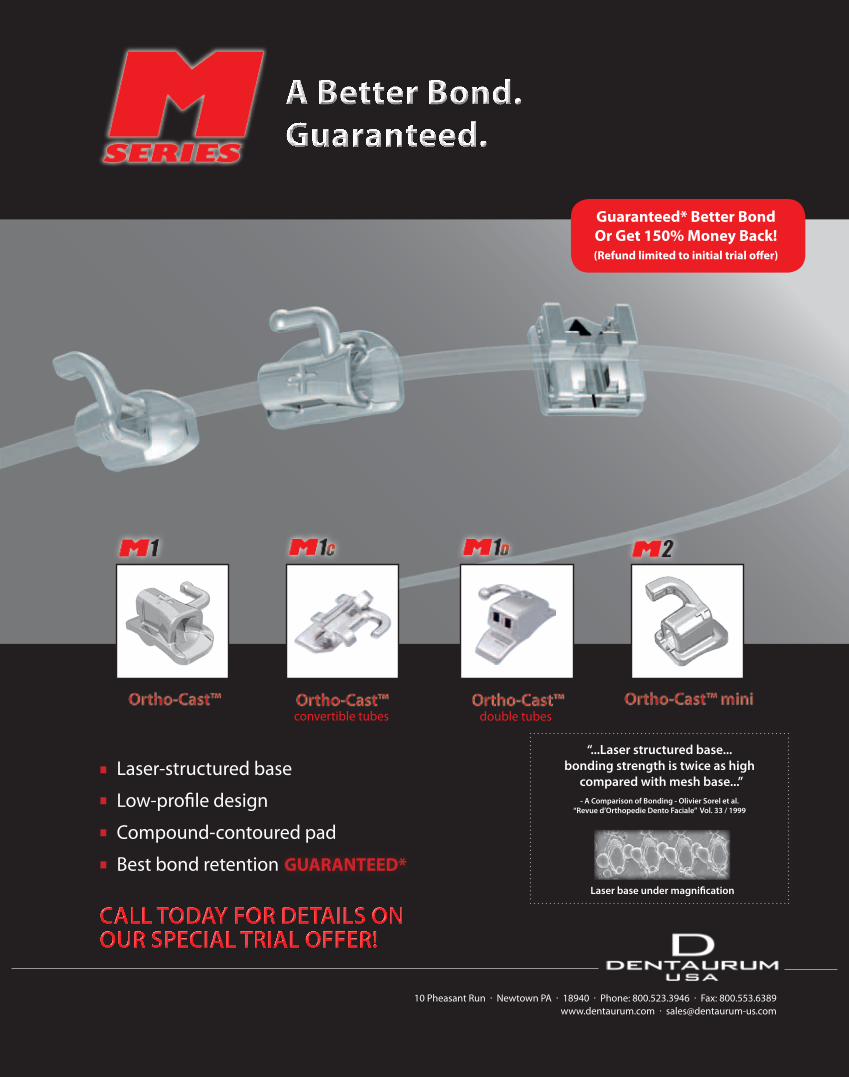
Laser-structured base
Low-profile design
Compound-contoured pad
Best bond retention
10 Pheasant Run · Newtown PA · 18940 · Phone: 800.523.3946 · Fax: 800.553.6389www.dentaurum.com · [email protected]
“...Laser structured base...bonding strength is twice as high
compared with mesh base...” - A Comparison of Bonding - Olivier Sorel et al.
“Revue d’Orthopedie Dento Faciale” Vol. 33 / 1999
Laser base under magnification
GUARANTEED*
Guaranteed* Better Bond Or Get 150% Money Back!(Refund limited to initial trial offer)
A Better Bond.Guaranteed.
CALL TODAY FOR DETAILS ON OUR SPECIAL TRIAL OFFER!
convertible tubes double tubes
Related Documents