SCS_sw3_IPCam.help 2021-02-01 v200 Page 1 of 30 SW3 IP Camera Manual Revision 200 01 February 2021

Welcome message from author
This document is posted to help you gain knowledge. Please leave a comment to let me know what you think about it! Share it to your friends and learn new things together.
Transcript
SCS_sw3_IPCam.help 2021-02-01 v200 Page 1 of 30
SW3 IP Camera Manual
Revision 200
01 February 2021

SCS_sw3_IPCam.help 2021-02-01 v200 Page 2 of 30
Revision History
Version Date Person Reason For Changes
01.00 2017-11-06 James Barretto Initial document
01.01 2018-07-04 James Barretto Add event driven image capture
01.02 2019-09-17 James Barretto Modify saving of image on event and SCS_Draw for compatibility with SCS_CamView
02.00 2021-02-02 Mark Liebenberg Reformat document
SCS_sw3_IPCam.help 2021-02-01 v200 Page 3 of 30
CONTENTS
1 SCOPE 4 2 APPLICABLE DOCUMENTS 4 3 FEATURES 5
3.1 SCS_Client / SCS_Visitor / SCS_CardMaker 5 3.2 SCS_CLIENT 5 3.3 SCS_DRAW 6
4 SETUP 8 4.1 IP Camera (SCS_Client, _CardMake, _Draw, _Visitor) 8 4.2 PROFILE-Photos (SCS_Client, _CardMake, _Visitor) 11 4.3 Photo width, height, format, folder (SCS_Client) 12 4.4 Photo width, height, format, folder (SCS_CARDMAKE) 13 4.5 Photo width, height, format, folder (SCS_Visitor) 14 4.6 automatically capture images on event 15
5 Use 19 5.1 SCS_Client (Card Photo) 19 5.2 SCS_CardMake 22 5.3 SCS_Visitor 24 5.4 SCS_Draw 26 5.5 SCS_Client (Event Driven Image Capture) 28
6 Trouble Shoot 29 6.1 General 29 6.2 SCS_Client (Card Photo) 29 6.3 SCS_CardMake (Card Photo) 29 6.4 SCS_Visitor (Card Photo) 29 6.5 SCS_Draw 30 6.6 SCS_Client (Event Driven) 30
SCS_sw3_IPCam.help 2021-02-01 v200 Page 4 of 30
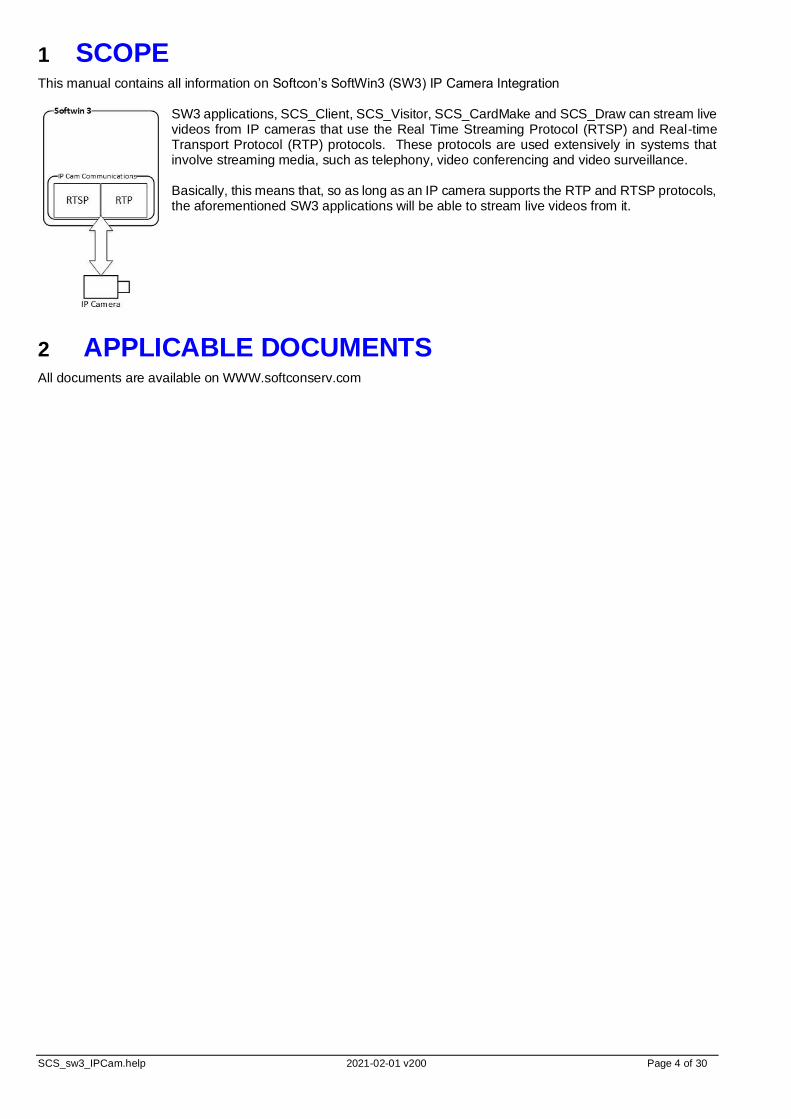
1 SCOPE This manual contains all information on Softcon’s SoftWin3 (SW3) IP Camera Integration
SW3 applications, SCS_Client, SCS_Visitor, SCS_CardMake and SCS_Draw can stream live videos from IP cameras that use the Real Time Streaming Protocol (RTSP) and Real-time Transport Protocol (RTP) protocols. These protocols are used extensively in systems that involve streaming media, such as telephony, video conferencing and video surveillance. Basically, this means that, so as long as an IP camera supports the RTP and RTSP protocols, the aforementioned SW3 applications will be able to stream live videos from it.
2 APPLICABLE DOCUMENTS All documents are available on WWW.softconserv.com
SCS_sw3_IPCam.help 2021-02-01 v200 Page 5 of 30
3 FEATURES SW3 incorporates the use of IP cameras in 4 of its applications, namely, SCS_Client, SCS_Visitor, SCS_CardMaker and SCS_Draw. SCS_Client, SCS_Visitor and SCS_CardMaker makes use of IP cameras similarly, to capture Users holders’ photos, whereas SCS_Draw uses it for monitoring and image grabs. Additionally, SCS_Client can be used to capture images via events. Details regarding the use of IP cameras in SW3 are as follows:
3.1 SCS_CLIENT / SCS_VISITOR / SCS_CARDMAKER
The use of IP cameras in lieu of USB cameras Allows for greater flexibility as it removes the cabling restrictions of USB cameras as well as the need for a dedicated enrolment station for capturing of photos, as any PC or laptop connected to the network and with the SW3 application installed can access the configured IP camera, which also reduces dealing with USB camera driver issues. Capture Users’ photos As with the use of USB cameras, IP cameras can be used to capture Users’ photos and works identically. Selectable IP camera to use The IP camera to use for capturing of User holders’ photos is configurable under the PC and Camera setup editors. This allows for some flexibility in terms of switching from 1 IP camera to another, which should in any case be rarely done, but does not distract or burden the system user in having to select the IP camera to use every time a photo is captured.
3.2 SCS_CLIENT
Event Driven Image Capture Images can be captured and stored in the system automatically via a SW3 event. The images’ width, height and storage folder are set per camera, while the images’ corresponding file names and format are generated in compliance with SCS_CamView’s naming convention. Filename (in compliance with SCS_CamView) Captured images are automatically stored in individual files, named in compliance with the SCS_CamView application. SCS_CamView naming convention is as follows: YYMMDD_hhmmss_rrrr_tt_nnnnn_ssss_xxxxxx_vvvvvv_a_zzzzz1_zzzzzz2_zzzzzz3.jpg
• YY – the last 2 digits of the year
• MM – the month in 2 digits, with single digit months padded with a ‘0’at the front (e.g. 01, 02 etc.)
• DD – the day in 2 digits, with single digit days padded with a ‘0’ at the front (e.g. 01, 02 etc.)
• hh – the hour in 24-hour format and in 2 digits, with single digit hours padded with a ‘0’ at the front (e.g. 01, 02 etc.)
• mm – the minute in 2 digits, with single digit minutes padded with a ‘0’ at the front (e.g. 01, 02 etc.)
• ss – the second in 2 digits, with single digit seconds padded with a ‘0’ at the front (e.g. 01, 02 etc.)
• rrrr – the camera reference number
• tt – the event type, which is always 5 (Camera event)
• nnnnn – the camera reference number
• ssss – the camera event status, which is always 530 (Camera Capture)
• xxxxxx – the Xref field of the event trigger (e.g. card reference when the trigger is a reader)
• vvvvvv – the value field of the event trigger (e.g. input level when the trigger is an input)
• a – the alarm status
• zzzzz1 – z1, the event type of the event trigger (i.e 1 = reader, 2 = input etc.)
• zzzzz2 – z2, the event sysno of the event trigger (i.e. reader reference, input reference etc.)
• zzzzz3 – z3, the event status of the event trigger (i.e. out of area, illegal open, etc.)
Image format (in compliance with SCS_CamView) In compliance with the SCS_CamView application, the image format is always a jpeg (jpg). Settable captured images’ width, height and storage folder The width and height of captured images are pre-configured per camera and automatically applied when an image is captured from an IP camera’s live video stream. The storage folder is also pre-configured per camera.
SCS_sw3_IPCam.help 2021-02-01 v200 Page 6 of 30
Overlay text onto live video streams and captured images Text can be overlaid onto captured images when an image is captured via an event. The text overlaid is automatically generated with the use of a text overlay mask and its color and position pre-configured. Text Overlay Mask The text to overlay onto the captured image is automatically generated with the use of a mask, set per event action, whenever an image is captured. If a mask is not configured, then texts are not overlaid onto captured images. Settable Text Overlay Colour The color of the overlaid text is pre-configured per camera and can be black, red, orange, yellow, green, blue, violet, or white. Settable Text Overlay Position The position of the overlaid text in the captured image is pre-configured per camera and can be positioned in the top left, top center, top right, bottom left, bottom center or bottom right.
3.3 SCS_DRAW
Monitor live video streams from multiple IP cameras Multiple live video streams can be concurrently displayed onto viewing windows, which behaves identically to all the other items in SCS_Draw. Resizable live video stream viewing windows The viewing windows are resizable for display/viewing purposes only and does not affect the size of the captured image, which is specifically configured per IP camera.
Capture images from IP cameras’ live video streams Images from IP cameras’ live video streams can be captured and stored in the system on the command of a system user. The images’ width, height and storage folder are set per camera, while the images’ corresponding file names and format are generated in compliance with SCS_CamView’s naming convention. Filename (in compliance with SCS_CamView) Captured images are automatically stored in individual files, named in compliance with the SCS_CamView application. SCS_CamView naming convention is as follows: yymmdd_HHMMSS_rrrr_tt_nnnnn_ssss_xxxxxx_vvvvvv_a_zzzzz1_zzzzzz2_zzzzzz3.jpg
• yy – the last 2 digits of the year
• mm – the month in 2 digits, with single digit months padded with a ‘0’at the front (e.g. 01, 02 etc.)
• dd – the day in 2 digits, with single digit days padded with a ‘0’ at the front (e.g. 01, 02 etc.)
• HH – the hour in 24 hour format and in 2 digits, with single digit hours padded with a ‘0’ at the front (e.g. 01, 02 etc.)
• MM – the minute in 2 digits, with single digit minutes padded with a ‘0’ at the front (e.g. 01, 02 etc.)
• SS – the second in 2 digits, with single digit seconds padded with a ‘0’ at the front (e.g. 01, 02 etc.)
• rrrr – the camera reference number
• tt – the event type, which is always 5 (Camera event)
• nnnnn – the camera reference number
• ssss – the camera event status, which is always 530 (Camera Capture)
• xxxxxx – the Xref field of the event trigger (e.g. card reference when the trigger is a reader)
• vvvvvv – the value field of the event trigger (e.g. input level when the trigger is an input)
• a – the alarm status
• zzzzz1 – z1, the event type of the event trigger (i.e 1 = reader, 2 = input etc.)
• zzzzz2 – z2, the event sysno of the event trigger (i.e. reader reference, input reference etc.)
• zzzzz3 – z3, the event status of the event trigger (i.e. out of area, illegal open, etc.)
•
Image format (in compliance with SCS_CamView) In compliance with the SCS_CamView application, the image format is always a jpeg (jpg). Settable captured images’ width, height and storage folder The width and height of captured images are pre-configured per camera and automatically applied when an image is captured from an IP camera’s live video stream. The storage folder is also pre-configured per camera.

SCS_sw3_IPCam.help 2021-02-01 v200 Page 7 of 30
Overlay text onto live video streams and captured images. Text can be overlaid onto live video streams’ viewing windows and captured images when an image is captured manually by a system user. The text overlaid is automatically generated with the use of a text overlay mask and its color and position pre-configured. Text Overlay Mask The text to overlay onto the viewing window or captured image is automatically generated with the use of a mask, set per camera, whenever an image is captured. If a mask is not configured, then texts are not overlaid onto viewing windows or captured images. Settable Text Overlay Colour The colour of the overlaid text is pre-configured per camera and can be black, red, orange, yellow, green, blue, violet or white. Settable Text Overlay Position The position of the overlaid text in the viewing window or captured image is pre-configured per camera and can be positioned in the top left, top centre, top right, bottom left, bottom center or bottom right.
SCS_sw3_IPCam.help 2021-02-01 v200 Page 8 of 30
4 SETUP
4.1 IP CAMERA (SCS_CLIENT, _CARDMAKE, _DRAW, _VISITOR)
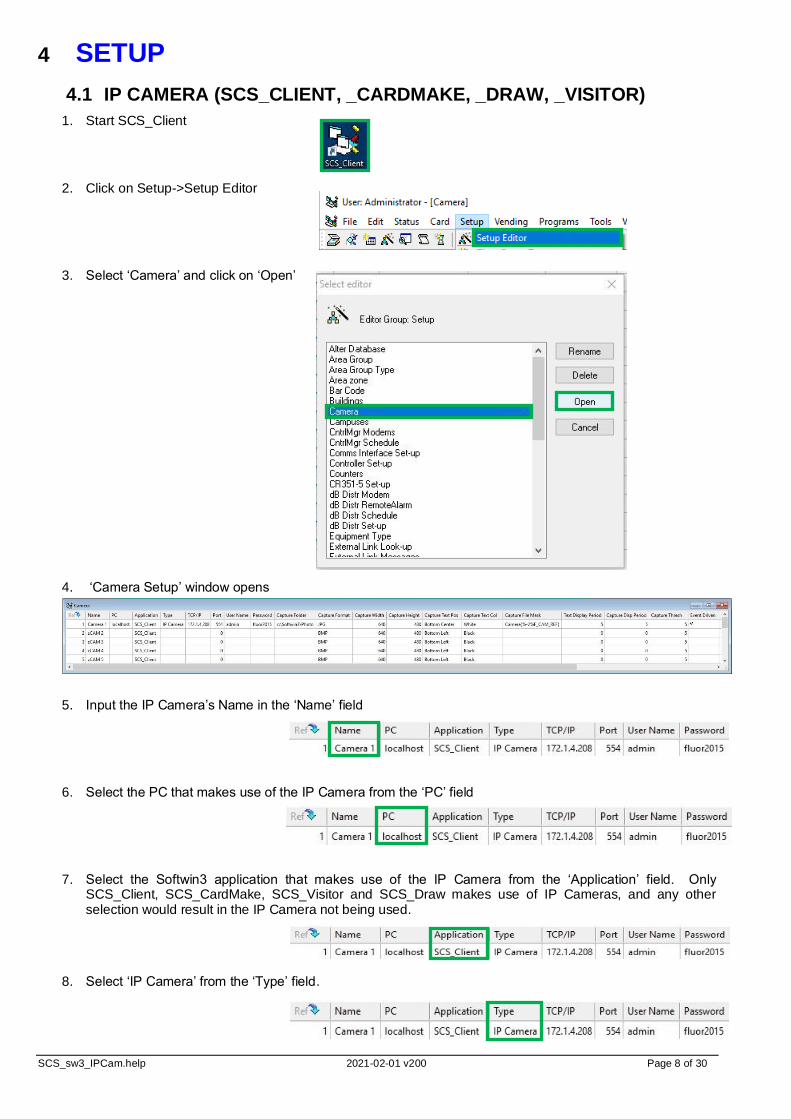
1. Start SCS_Client
2. Click on Setup->Setup Editor
3. Select ‘Camera’ and click on ‘Open’
4. ‘Camera Setup’ window opens
5. Input the IP Camera’s Name in the ‘Name’ field
6. Select the PC that makes use of the IP Camera from the ‘PC’ field
7. Select the Softwin3 application that makes use of the IP Camera from the ‘Application’ field. Only SCS_Client, SCS_CardMake, SCS_Visitor and SCS_Draw makes use of IP Cameras, and any other selection would result in the IP Camera not being used.
8. Select ‘IP Camera’ from the ‘Type’ field.
SCS_sw3_IPCam.help 2021-02-01 v200 Page 9 of 30
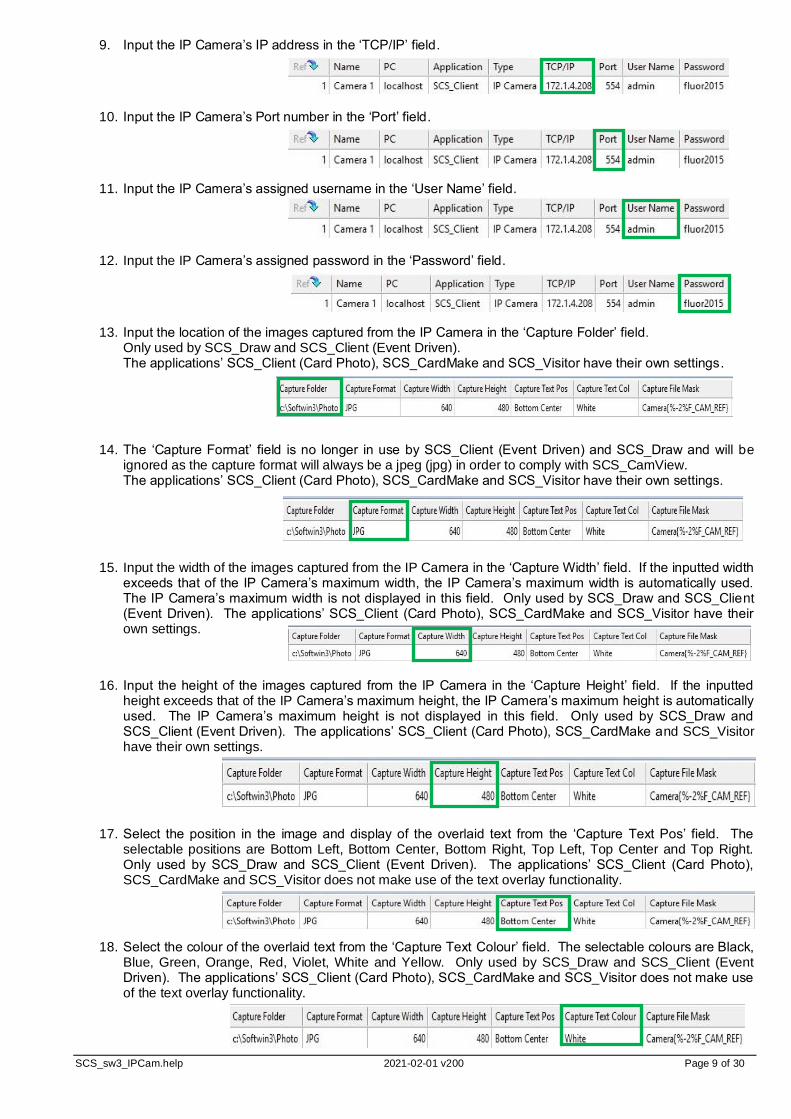
9. Input the IP Camera’s IP address in the ‘TCP/IP’ field.
10. Input the IP Camera’s Port number in the ‘Port’ field.
11. Input the IP Camera’s assigned username in the ‘User Name’ field.
12. Input the IP Camera’s assigned password in the ‘Password’ field.
13. Input the location of the images captured from the IP Camera in the ‘Capture Folder’ field. Only used by SCS_Draw and SCS_Client (Event Driven). The applications’ SCS_Client (Card Photo), SCS_CardMake and SCS_Visitor have their own settings.
14. The ‘Capture Format’ field is no longer in use by SCS_Client (Event Driven) and SCS_Draw and will be ignored as the capture format will always be a jpeg (jpg) in order to comply with SCS_CamView. The applications’ SCS_Client (Card Photo), SCS_CardMake and SCS_Visitor have their own settings.
15. Input the width of the images captured from the IP Camera in the ‘Capture Width’ field. If the inputted width exceeds that of the IP Camera’s maximum width, the IP Camera’s maximum width is automatically used. The IP Camera’s maximum width is not displayed in this field. Only used by SCS_Draw and SCS_Client (Event Driven). The applications’ SCS_Client (Card Photo), SCS_CardMake and SCS_Visitor have their own settings.
16. Input the height of the images captured from the IP Camera in the ‘Capture Height’ field. If the inputted height exceeds that of the IP Camera’s maximum height, the IP Camera’s maximum height is automatically used. The IP Camera’s maximum height is not displayed in this field. Only used by SCS_Draw and SCS_Client (Event Driven). The applications’ SCS_Client (Card Photo), SCS_CardMake and SCS_Visitor have their own settings.
17. Select the position in the image and display of the overlaid text from the ‘Capture Text Pos’ field. The selectable positions are Bottom Left, Bottom Center, Bottom Right, Top Left, Top Center and Top Right. Only used by SCS_Draw and SCS_Client (Event Driven). The applications’ SCS_Client (Card Photo), SCS_CardMake and SCS_Visitor does not make use of the text overlay functionality.
18. Select the colour of the overlaid text from the ‘Capture Text Colour’ field. The selectable colours are Black, Blue, Green, Orange, Red, Violet, White and Yellow. Only used by SCS_Draw and SCS_Client (Event Driven). The applications’ SCS_Client (Card Photo), SCS_CardMake and SCS_Visitor does not make use of the text overlay functionality.
SCS_sw3_IPCam.help 2021-02-01 v200 Page 10 of 30
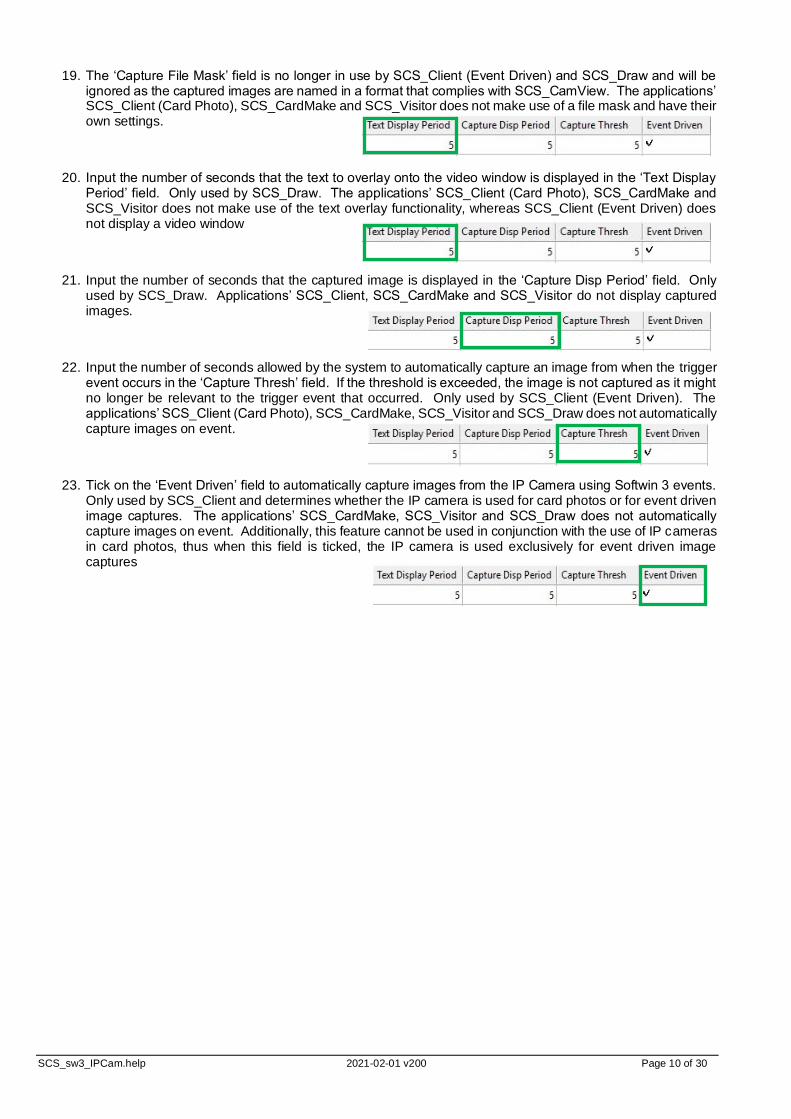
19. The ‘Capture File Mask’ field is no longer in use by SCS_Client (Event Driven) and SCS_Draw and will be ignored as the captured images are named in a format that complies with SCS_CamView. The applications’ SCS_Client (Card Photo), SCS_CardMake and SCS_Visitor does not make use of a file mask and have their own settings.
20. Input the number of seconds that the text to overlay onto the video window is displayed in the ‘Text Display Period’ field. Only used by SCS_Draw. The applications’ SCS_Client (Card Photo), SCS_CardMake and SCS_Visitor does not make use of the text overlay functionality, whereas SCS_Client (Event Driven) does not display a video window
21. Input the number of seconds that the captured image is displayed in the ‘Capture Disp Period’ field. Only used by SCS_Draw. Applications’ SCS_Client, SCS_CardMake and SCS_Visitor do not display captured images.
22. Input the number of seconds allowed by the system to automatically capture an image from when the trigger event occurs in the ‘Capture Thresh’ field. If the threshold is exceeded, the image is not captured as it might no longer be relevant to the trigger event that occurred. Only used by SCS_Client (Event Driven). The applications’ SCS_Client (Card Photo), SCS_CardMake, SCS_Visitor and SCS_Draw does not automatically capture images on event.
23. Tick on the ‘Event Driven’ field to automatically capture images from the IP Camera using Softwin 3 events. Only used by SCS_Client and determines whether the IP camera is used for card photos or for event driven image captures. The applications’ SCS_CardMake, SCS_Visitor and SCS_Draw does not automatically capture images on event. Additionally, this feature cannot be used in conjunction with the use of IP cameras in card photos, thus when this field is ticked, the IP camera is used exclusively for event driven image captures
SCS_sw3_IPCam.help 2021-02-01 v200 Page 11 of 30
4.2 PROFILE-PHOTOS (SCS_CLIENT, _CARDMAKE, _VISITOR)
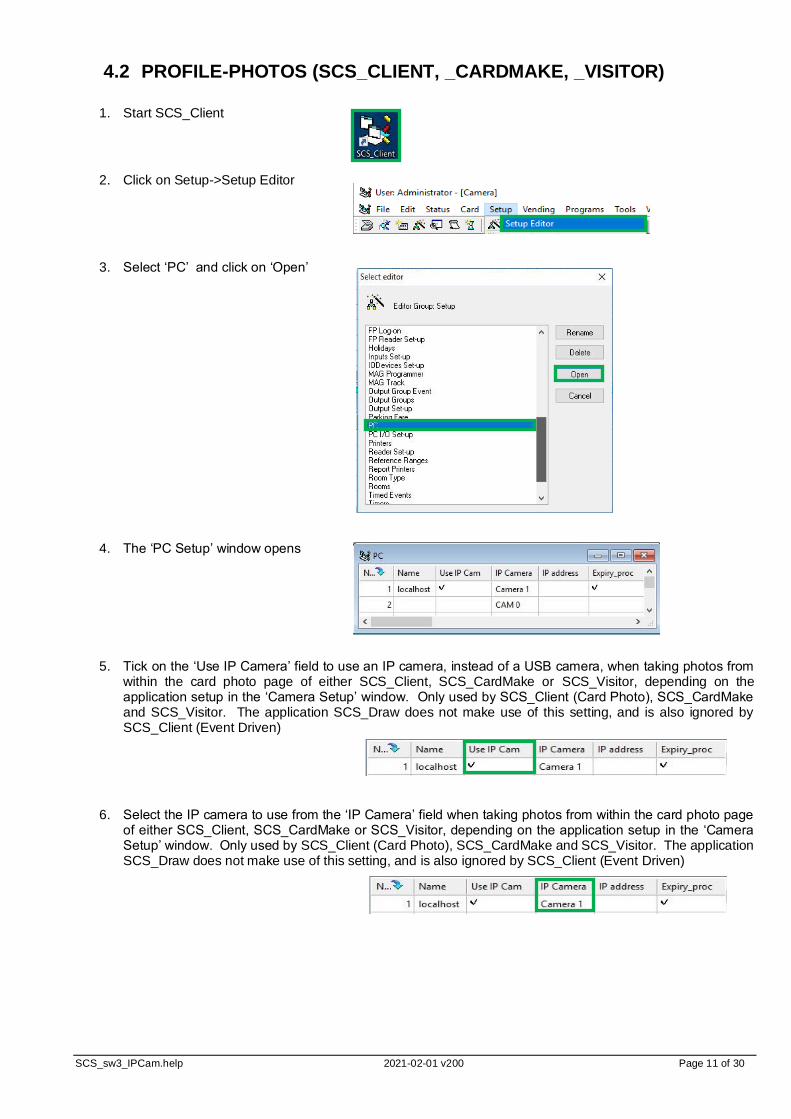
1. Start SCS_Client
2. Click on Setup->Setup Editor
3. Select ‘PC’ and click on ‘Open’
4. The ‘PC Setup’ window opens
5. Tick on the ‘Use IP Camera’ field to use an IP camera, instead of a USB camera, when taking photos from within the card photo page of either SCS_Client, SCS_CardMake or SCS_Visitor, depending on the application setup in the ‘Camera Setup’ window. Only used by SCS_Client (Card Photo), SCS_CardMake and SCS_Visitor. The application SCS_Draw does not make use of this setting, and is also ignored by SCS_Client (Event Driven)
6. Select the IP camera to use from the ‘IP Camera’ field when taking photos from within the card photo page
of either SCS_Client, SCS_CardMake or SCS_Visitor, depending on the application setup in the ‘Camera Setup’ window. Only used by SCS_Client (Card Photo), SCS_CardMake and SCS_Visitor. The application SCS_Draw does not make use of this setting, and is also ignored by SCS_Client (Event Driven)
SCS_sw3_IPCam.help 2021-02-01 v200 Page 12 of 30
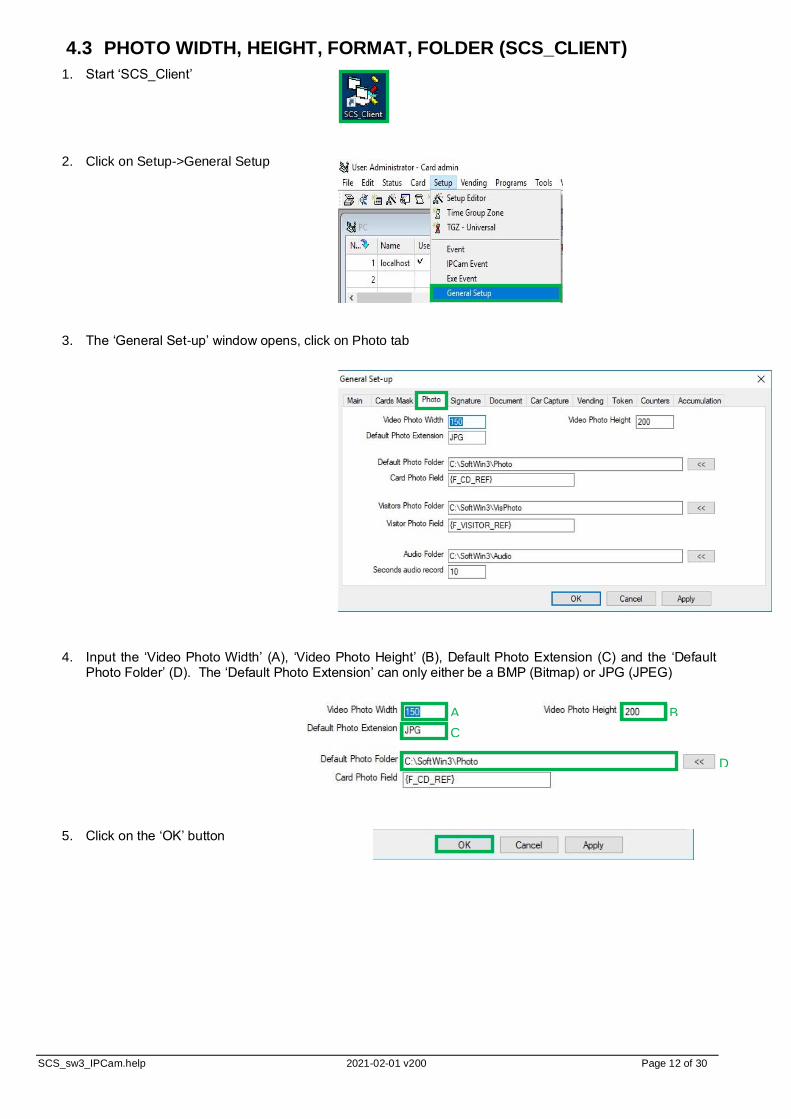
4.3 PHOTO WIDTH, HEIGHT, FORMAT, FOLDER (SCS_CLIENT)
1. Start ‘SCS_Client’
2. Click on Setup->General Setup
3. The ‘General Set-up’ window opens, click on Photo tab
4. Input the ‘Video Photo Width’ (A), ‘Video Photo Height’ (B), Default Photo Extension (C) and the ‘Default Photo Folder’ (D). The ‘Default Photo Extension’ can only either be a BMP (Bitmap) or JPG (JPEG)
5. Click on the ‘OK’ button
A
C
B
D
SCS_sw3_IPCam.help 2021-02-01 v200 Page 13 of 30
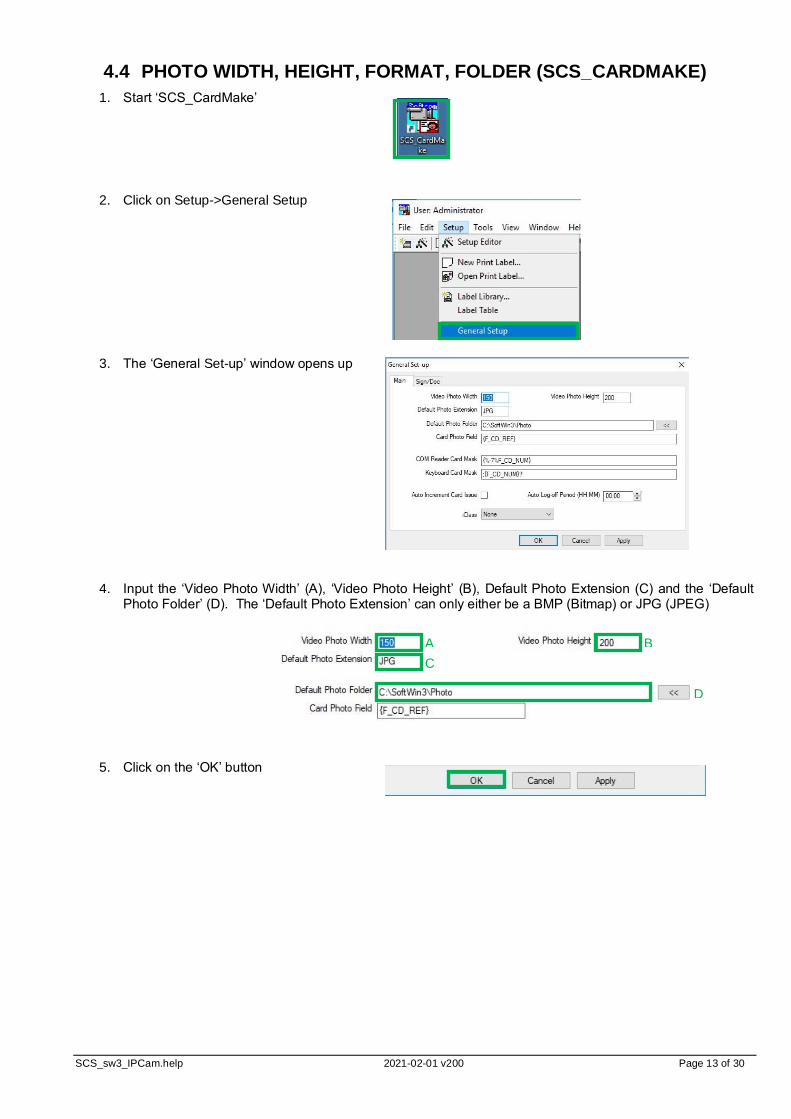
4.4 PHOTO WIDTH, HEIGHT, FORMAT, FOLDER (SCS_CARDMAKE)
1. Start ‘SCS_CardMake’
2. Click on Setup->General Setup
3. The ‘General Set-up’ window opens up
4. Input the ‘Video Photo Width’ (A), ‘Video Photo Height’ (B), Default Photo Extension (C) and the ‘Default Photo Folder’ (D). The ‘Default Photo Extension’ can only either be a BMP (Bitmap) or JPG (JPEG)
5. Click on the ‘OK’ button
A
C
B
D
SCS_sw3_IPCam.help 2021-02-01 v200 Page 14 of 30
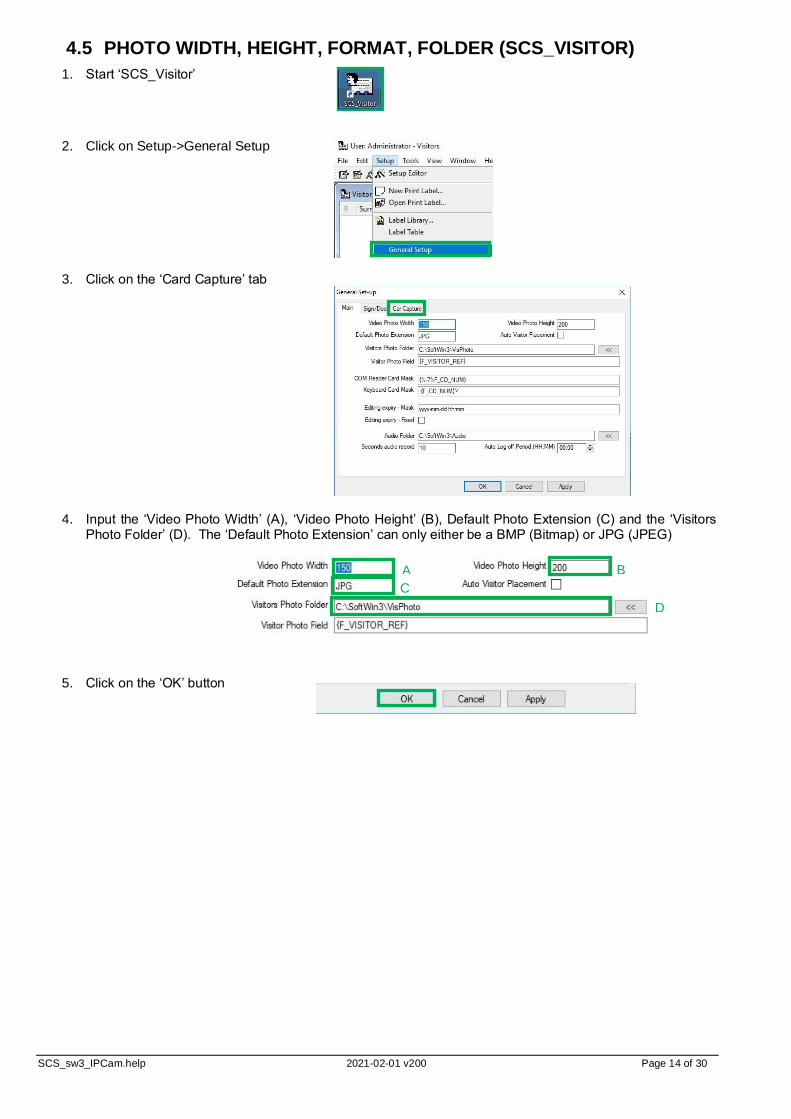
4.5 PHOTO WIDTH, HEIGHT, FORMAT, FOLDER (SCS_VISITOR)
1. Start ‘SCS_Visitor’
2. Click on Setup->General Setup
3. Click on the ‘Card Capture’ tab
4. Input the ‘Video Photo Width’ (A), ‘Video Photo Height’ (B), Default Photo Extension (C) and the ‘Visitors
Photo Folder’ (D). The ‘Default Photo Extension’ can only either be a BMP (Bitmap) or JPG (JPEG)
5. Click on the ‘OK’ button
C B
D
A
SCS_sw3_IPCam.help 2021-02-01 v200 Page 15 of 30
4.6 AUTOMATICALLY CAPTURE IMAGES ON EVENT
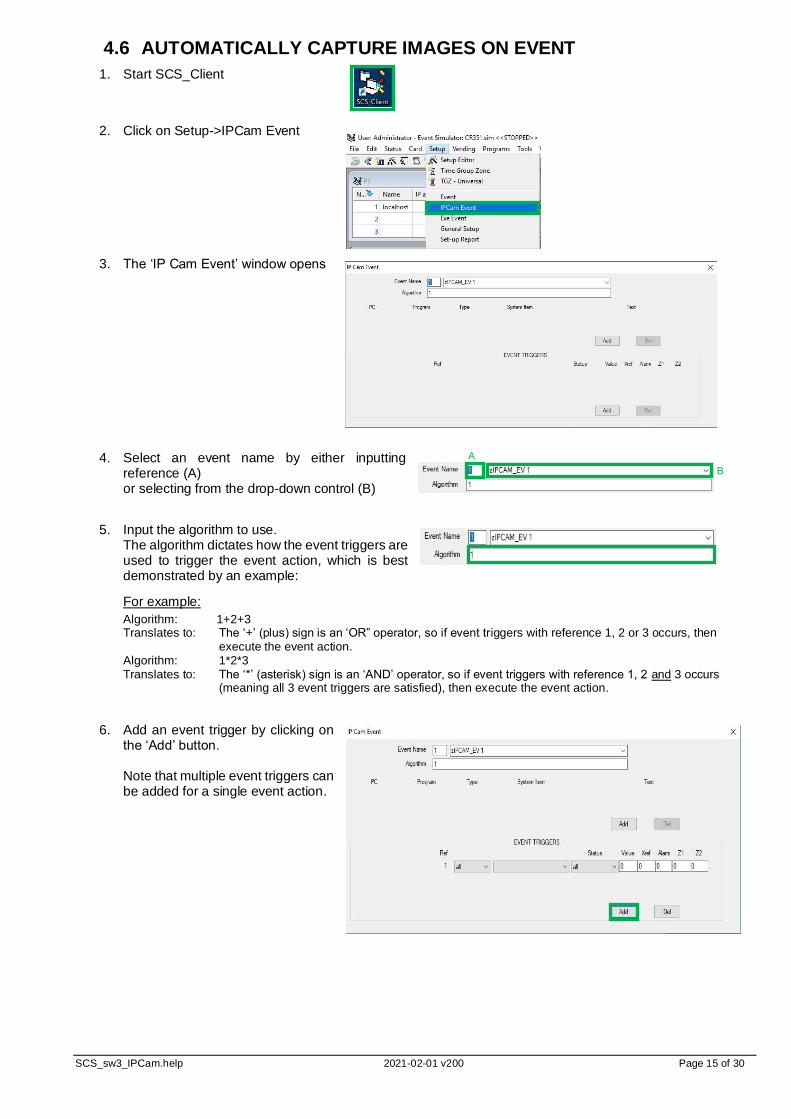
1. Start SCS_Client
2. Click on Setup->IPCam Event
3. The ‘IP Cam Event’ window opens
4. Select an event name by either inputting
reference (A) or selecting from the drop-down control (B)
5. Input the algorithm to use.
The algorithm dictates how the event triggers are used to trigger the event action, which is best demonstrated by an example:
For example:
Algorithm: 1+2+3 Translates to: The ‘+’ (plus) sign is an ‘OR” operator, so if event triggers with reference 1, 2 or 3 occurs, then
execute the event action. Algorithm: 1*2*3 Translates to: The ‘*’ (asterisk) sign is an ‘AND’ operator, so if event triggers with reference 1, 2 and 3 occurs
(meaning all 3 event triggers are satisfied), then execute the event action.
6. Add an event trigger by clicking on the ‘Add’ button. Note that multiple event triggers can be added for a single event action.
A
B
SCS_sw3_IPCam.help 2021-02-01 v200 Page 16 of 30
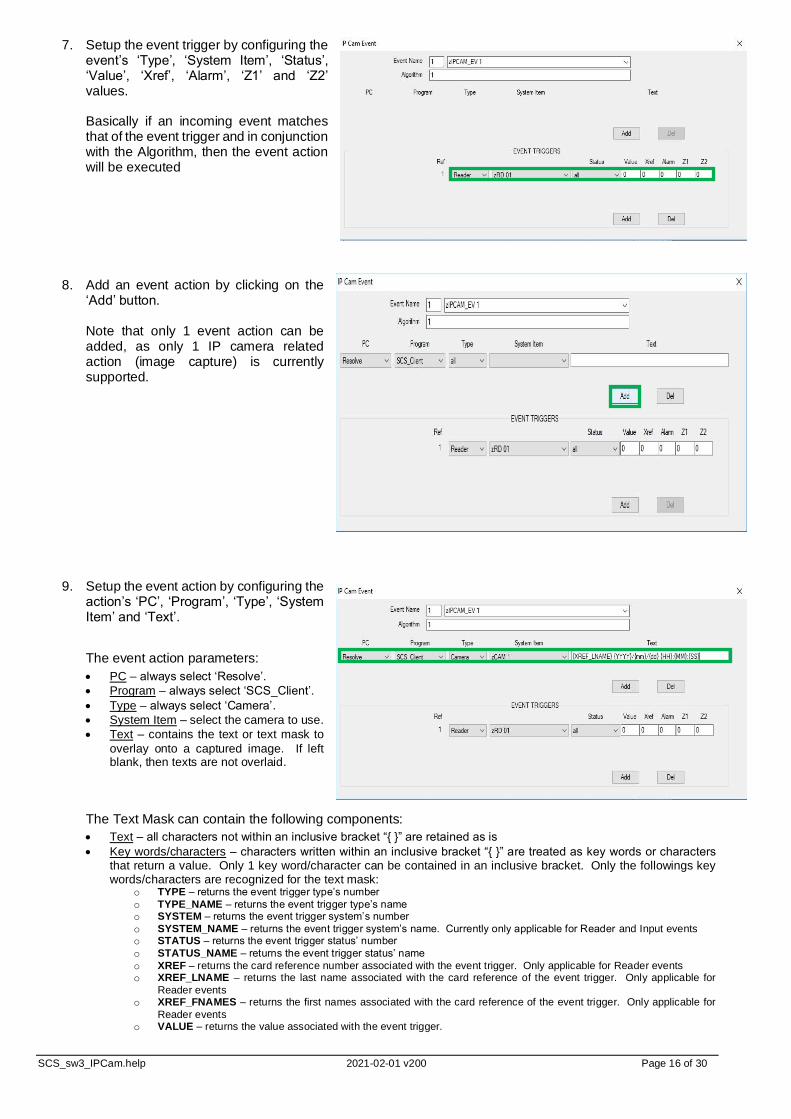
7. Setup the event trigger by configuring the event’s ‘Type’, ‘System Item’, ‘Status’, ‘Value’, ‘Xref’, ‘Alarm’, ‘Z1’ and ‘Z2’ values. Basically if an incoming event matches that of the event trigger and in conjunction with the Algorithm, then the event action will be executed
8. Add an event action by clicking on the ‘Add’ button. Note that only 1 event action can be added, as only 1 IP camera related action (image capture) is currently supported.
9. Setup the event action by configuring the
action’s ‘PC’, ‘Program’, ‘Type’, ‘System Item’ and ‘Text’.
The event action parameters:
• PC – always select ‘Resolve’.
• Program – always select ‘SCS_Client’.
• Type – always select ‘Camera’.
• System Item – select the camera to use.
• Text – contains the text or text mask to
overlay onto a captured image. If left blank, then texts are not overlaid.
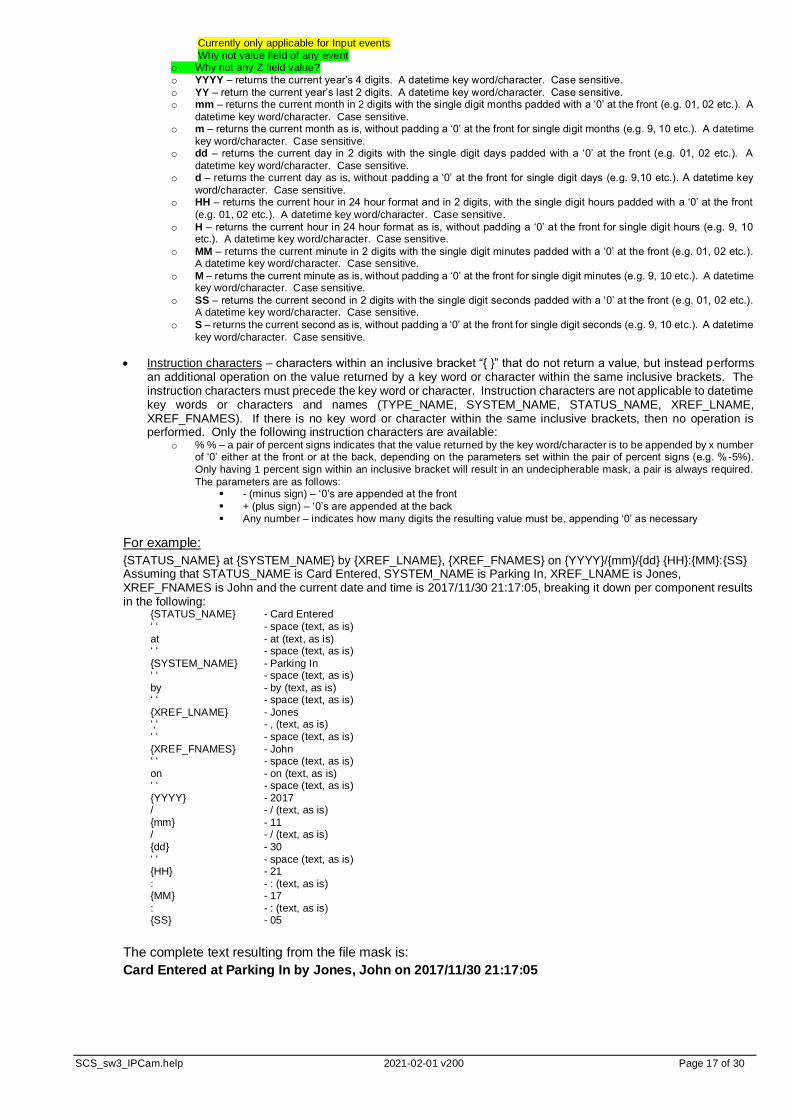
The Text Mask can contain the following components:
• Text – all characters not within an inclusive bracket “{ }” are retained as is
• Key words/characters – characters written within an inclusive bracket “{ }” are treated as key words or characters that return a value. Only 1 key word/character can be contained in an inclusive bracket. Only the followings key words/characters are recognized for the text mask:
o TYPE – returns the event trigger type’s number
o TYPE_NAME – returns the event trigger type’s name o SYSTEM – returns the event trigger system’s number
o SYSTEM_NAME – returns the event trigger system’s name. Currently only applicable for Reader and Input events o STATUS – returns the event trigger status’ number
o STATUS_NAME – returns the event trigger status’ name
o XREF – returns the card reference number associated with the event trigger. Only applicable for Reader events o XREF_LNAME – returns the last name associated with the card reference of the event trigger. Only applicable for
Reader events o XREF_FNAMES – returns the first names associated with the card reference of the event trigger. Only applicable for
Reader events o VALUE – returns the value associated with the event trigger.
SCS_sw3_IPCam.help 2021-02-01 v200 Page 17 of 30
Currently only applicable for Input events
Why not value field of any event o Why not any Z field value?
o YYYY – returns the current year’s 4 digits. A datetime key word/character. Case sensitive.
o YY – return the current year’s last 2 digits. A datetime key word/character. Case sensitive. o mm – returns the current month in 2 digits with the single digit months padded with a ‘0’ at the front (e.g. 01, 02 etc.). A
datetime key word/character. Case sensitive. o m – returns the current month as is, without padding a ‘0’ at the front for single digit months (e.g. 9, 10 etc.). A datetime
key word/character. Case sensitive. o dd – returns the current day in 2 digits with the single digit days padded with a ‘0’ at the front (e.g. 01, 02 etc.). A
datetime key word/character. Case sensitive. o d – returns the current day as is, without padding a ‘0’ at the front for single digit days (e.g. 9,10 etc.). A datetime key
word/character. Case sensitive. o HH – returns the current hour in 24 hour format and in 2 digits, with the single digit hours padded with a ‘0’ at the front
(e.g. 01, 02 etc.). A datetime key word/character. Case sensitive.
o H – returns the current hour in 24 hour format as is, without padding a ‘0’ at the front for single digit hours (e.g. 9, 10 etc.). A datetime key word/character. Case sensitive.
o MM – returns the current minute in 2 digits with the single digit minutes padded with a ‘0’ at the front (e.g. 01, 02 etc.). A datetime key word/character. Case sensitive.
o M – returns the current minute as is, without padding a ‘0’ at the front for single digit minutes (e.g. 9, 10 etc.). A datetime key word/character. Case sensitive.
o SS – returns the current second in 2 digits with the single digit seconds padded with a ‘0’ at the front (e.g. 01, 02 etc.). A datetime key word/character. Case sensitive.
o S – returns the current second as is, without padding a ‘0’ at the front for single digit seconds (e.g. 9, 10 etc.). A datetime
key word/character. Case sensitive.
• Instruction characters – characters within an inclusive bracket “{ }” that do not return a value, but instead performs an additional operation on the value returned by a key word or character within the same inclusive brackets. The instruction characters must precede the key word or character. Instruction characters are not applicable to datetime key words or characters and names (TYPE_NAME, SYSTEM_NAME, STATUS_NAME, XREF_LNAME, XREF_FNAMES). If there is no key word or character within the same inclusive brackets, then no operation is performed. Only the following instruction characters are available:
o % % – a pair of percent signs indicates that the value returned by the key word/character is to be appended by x number of ‘0’ either at the front or at the back, depending on the parameters set within the pair of percent signs (e.g. % -5%).
Only having 1 percent sign within an inclusive bracket will result in an undecipherable mask, a pair is always required.
The parameters are as follows: ▪ - (minus sign) – ‘0’s are appended at the front
▪ + (plus sign) – ‘0’s are appended at the back
▪ Any number – indicates how many digits the resulting value must be, appending ‘0’ as necessary
For example:
{STATUS_NAME} at {SYSTEM_NAME} by {XREF_LNAME}, {XREF_FNAMES} on {YYYY}/{mm}/{dd} {HH}:{MM}:{SS} Assuming that STATUS_NAME is Card Entered, SYSTEM_NAME is Parking In, XREF_LNAME is Jones, XREF_FNAMES is John and the current date and time is 2017/11/30 21:17:05, breaking it down per component results in the following:
{STATUS_NAME} - Card Entered
‘ ‘ - space (text, as is)
at - at (text, as is) ‘ ‘ - space (text, as is)
{SYSTEM_NAME} - Parking In ‘ ‘ - space (text, as is)
by - by (text, as is) ‘ ‘ - space (text, as is)
{XREF_LNAME} - Jones ‘,‘ - , (text, as is)
‘ ‘ - space (text, as is)
{XREF_FNAMES} - John ‘ ‘ - space (text, as is)
on - on (text, as is) ‘ ‘ - space (text, as is)
{YYYY} - 2017 / - / (text, as is)
{mm} - 11 / - / (text, as is)
{dd} - 30
‘ ‘ - space (text, as is) {HH} - 21
: - : (text, as is) {MM} - 17
: - : (text, as is) {SS} - 05
The complete text resulting from the file mask is:
Card Entered at Parking In by Jones, John on 2017/11/30 21:17:05
SCS_sw3_IPCam.help 2021-02-01 v200 Page 18 of 30
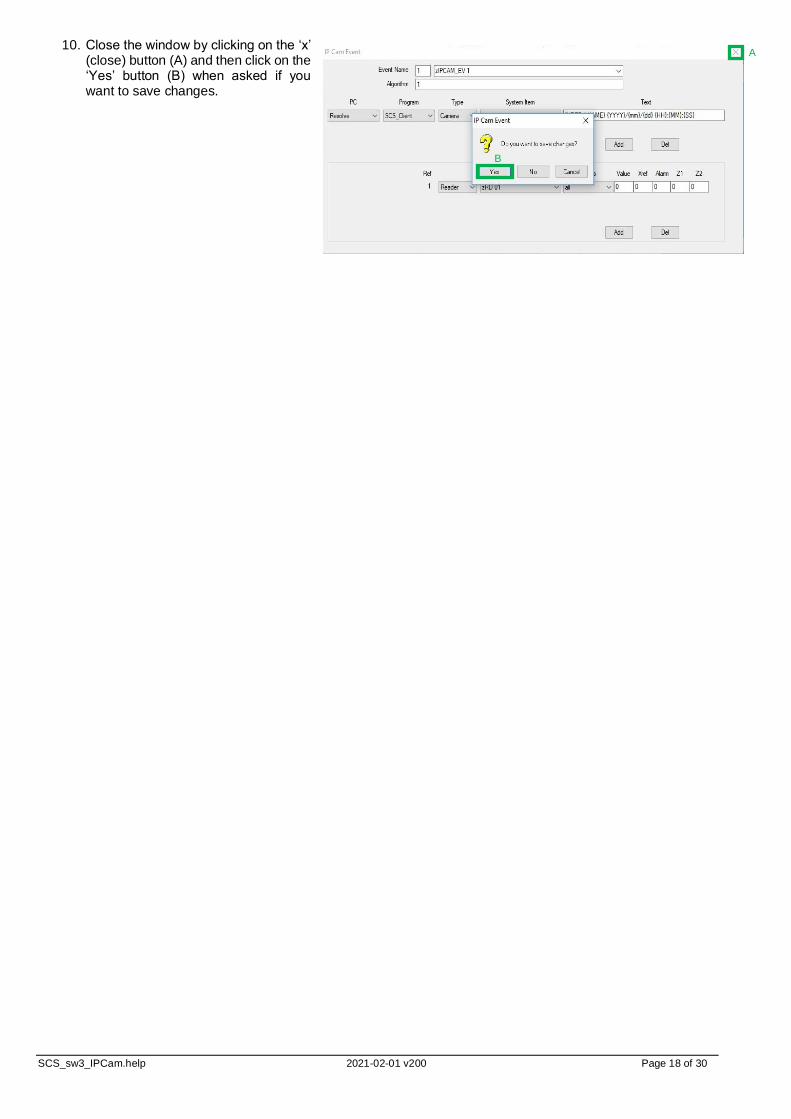
10. Close the window by clicking on the ‘x’ (close) button (A) and then click on the ‘Yes’ button (B) when asked if you want to save changes.
A
B
SCS_sw3_IPCam.help 2021-02-01 v200 Page 19 of 30
5 USE
5.1 SCS_CLIENT (CARD PHOTO)
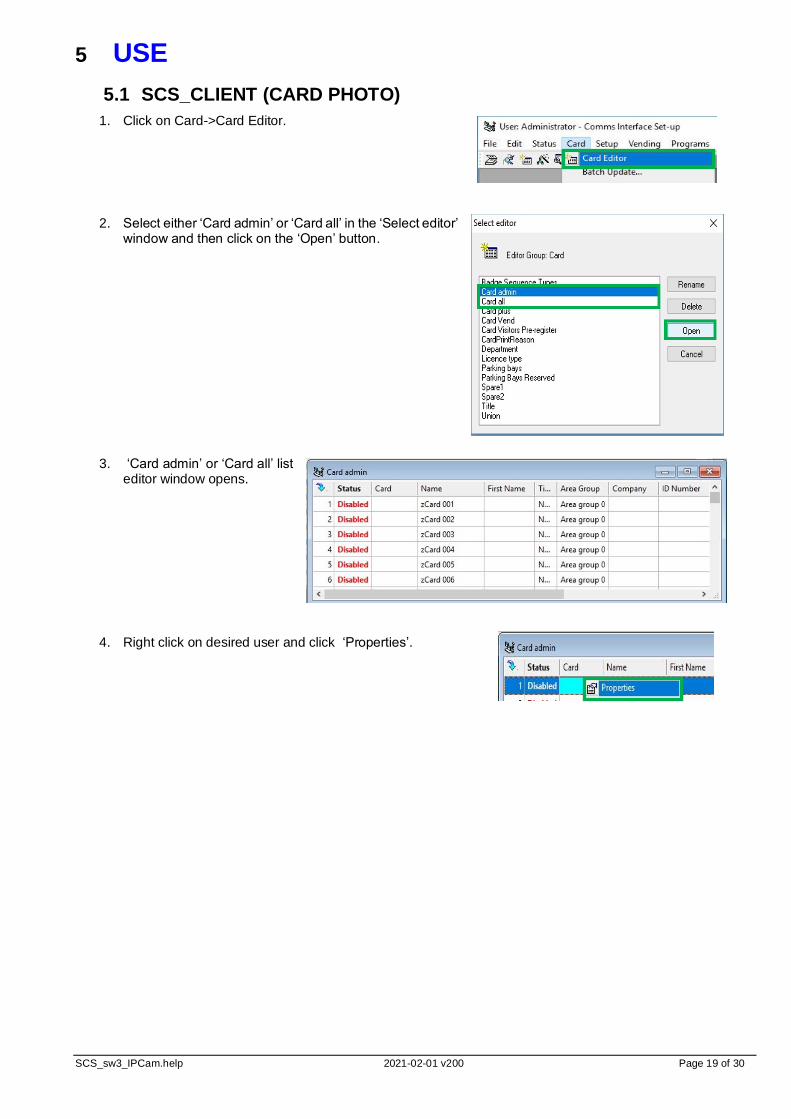
1. Click on Card->Card Editor.
2. Select either ‘Card admin’ or ‘Card all’ in the ‘Select editor’ window and then click on the ‘Open’ button.
3. ‘Card admin’ or ‘Card all’ list editor window opens.
4. Right click on desired user and click ‘Properties’.
SCS_sw3_IPCam.help 2021-02-01 v200 Page 20 of 30
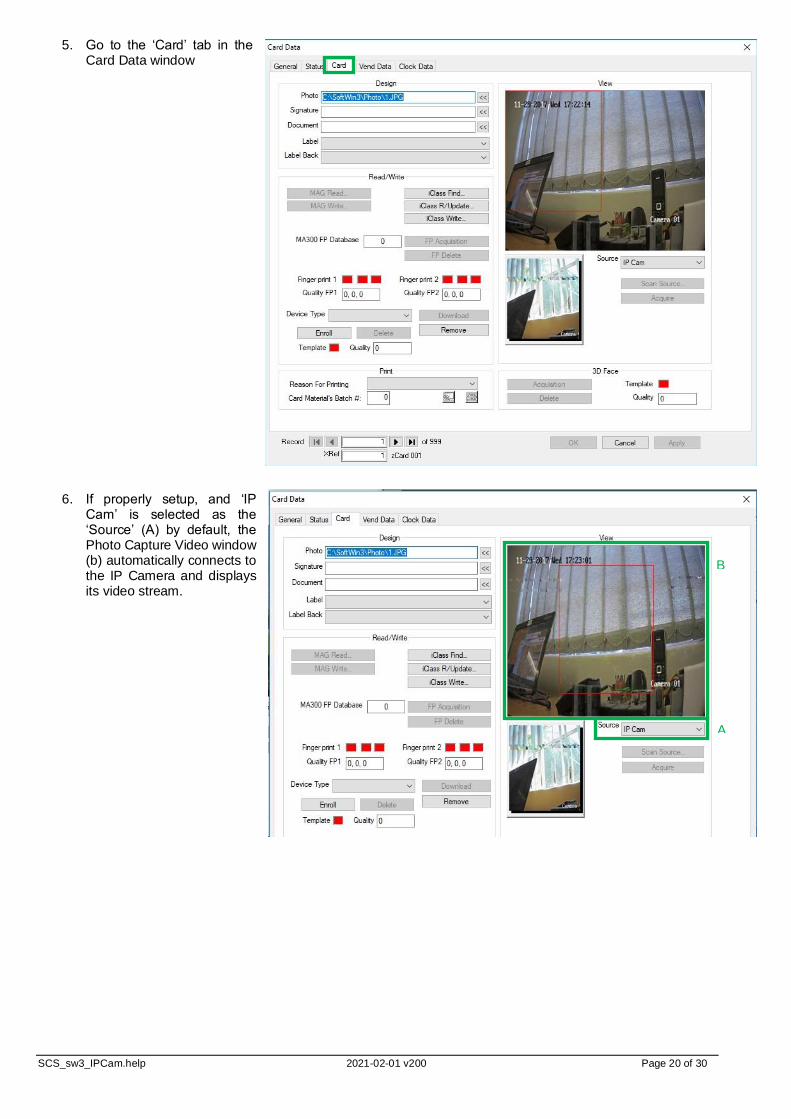
5. Go to the ‘Card’ tab in the Card Data window
6. If properly setup, and ‘IP
Cam’ is selected as the ‘Source’ (A) by default, the Photo Capture Video window (b) automatically connects to the IP Camera and displays its video stream.
A
B
SCS_sw3_IPCam.help 2021-02-01 v200 Page 21 of 30
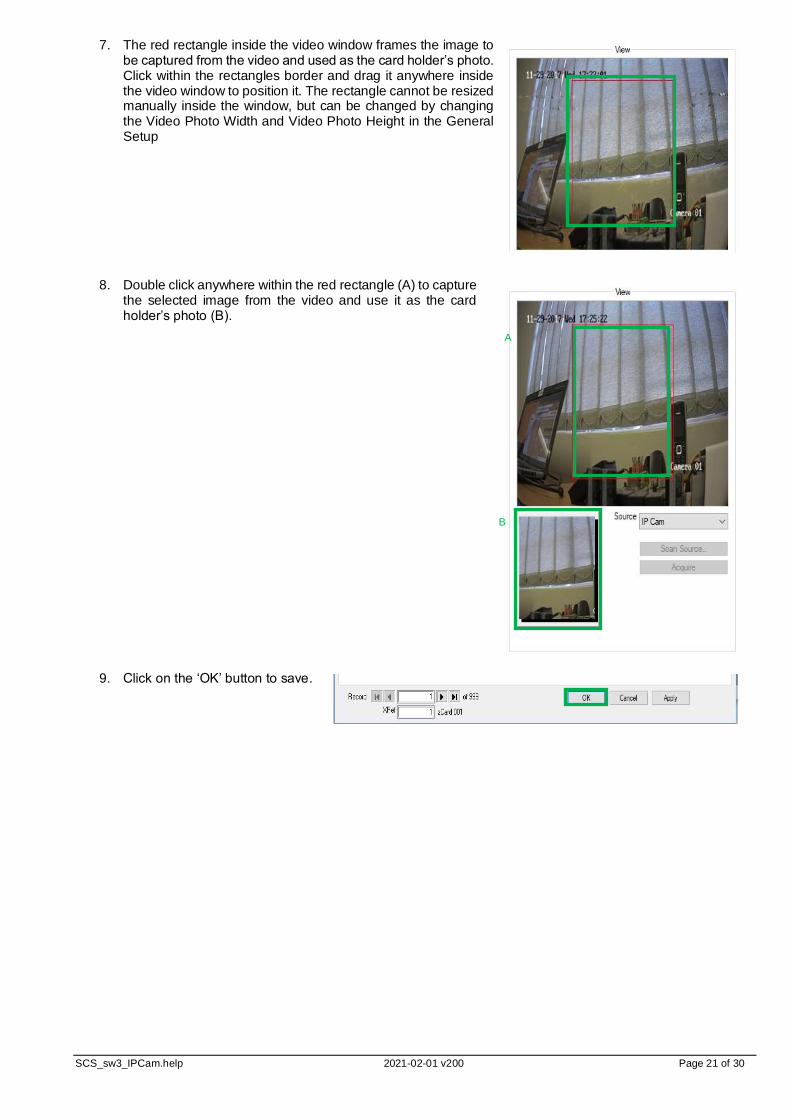
7. The red rectangle inside the video window frames the image to be captured from the video and used as the card holder’s photo. Click within the rectangles border and drag it anywhere inside the video window to position it. The rectangle cannot be resized manually inside the window, but can be changed by changing the Video Photo Width and Video Photo Height in the General Setup
8. Double click anywhere within the red rectangle (A) to capture
the selected image from the video and use it as the card holder’s photo (B).
9. Click on the ‘OK’ button to save.
B
A
SCS_sw3_IPCam.help 2021-02-01 v200 Page 22 of 30
5.2 SCS_CARDMAKE
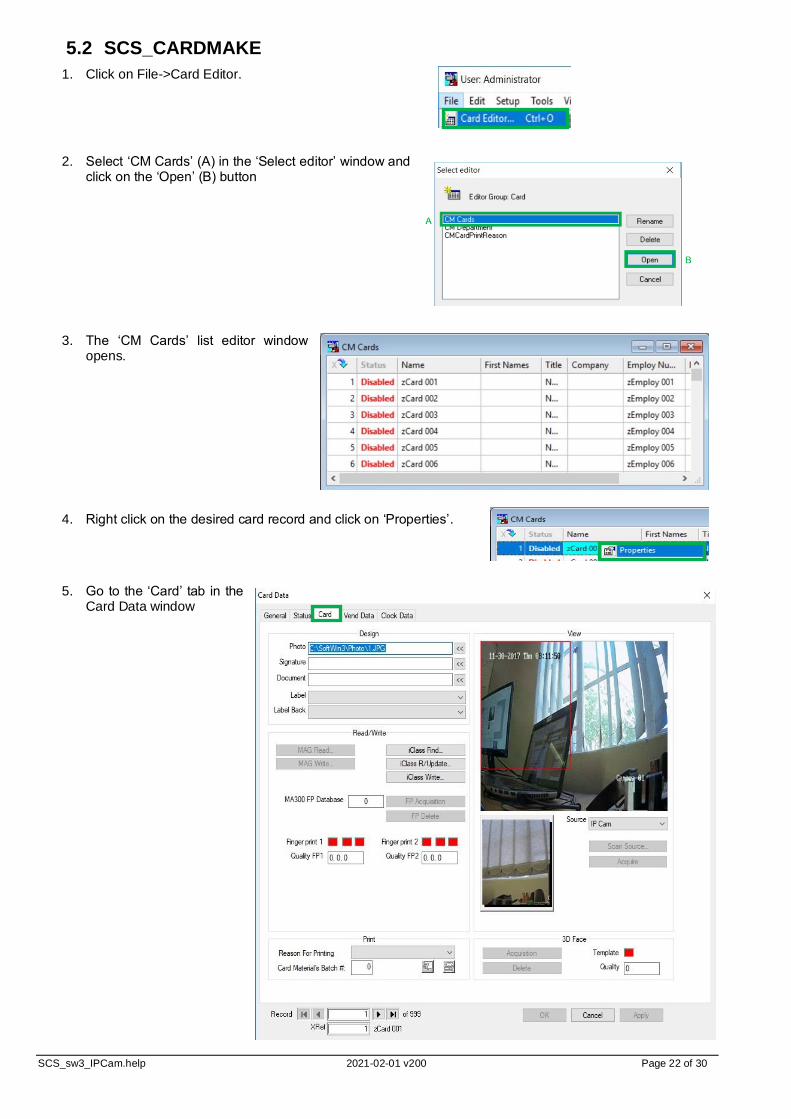
1. Click on File->Card Editor.
2. Select ‘CM Cards’ (A) in the ‘Select editor’ window and
click on the ‘Open’ (B) button
3. The ‘CM Cards’ list editor window opens.
4. Right click on the desired card record and click on ‘Properties’.
5. Go to the ‘Card’ tab in the
Card Data window
SCS_sw3_IPCam.help 2021-02-01 v200 Page 23 of 30
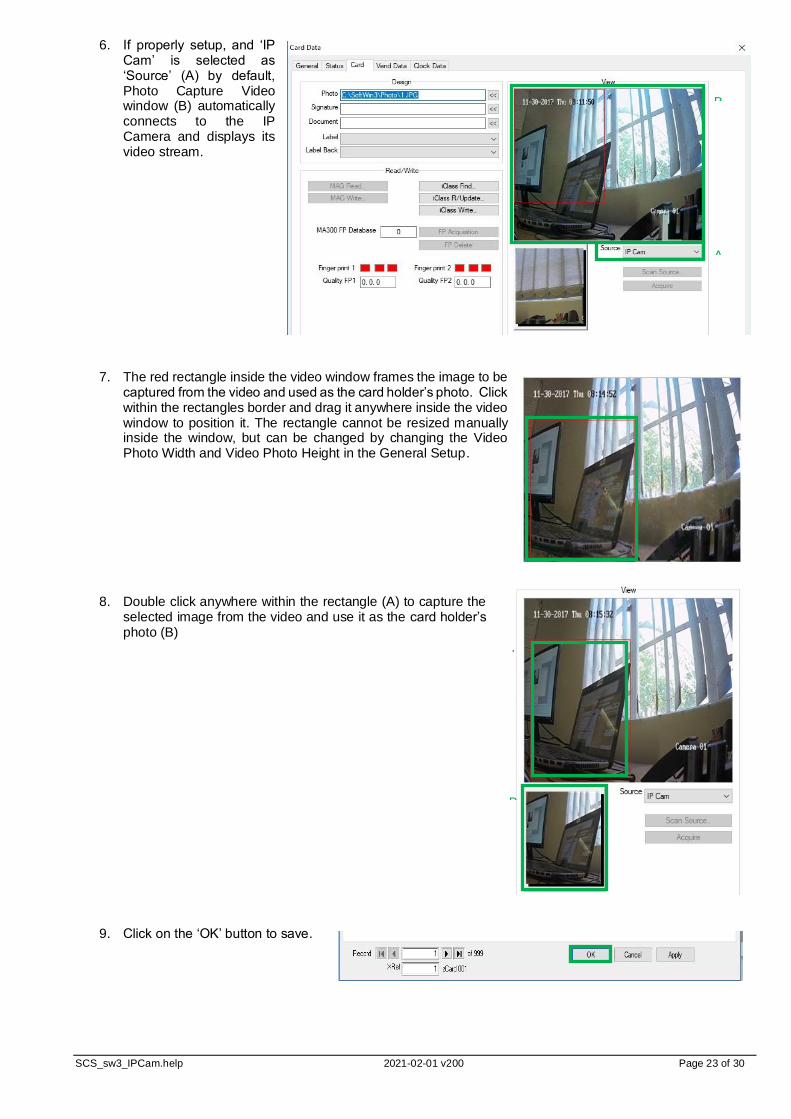
6. If properly setup, and ‘IP Cam’ is selected as ‘Source’ (A) by default, Photo Capture Video window (B) automatically connects to the IP Camera and displays its video stream.
7. The red rectangle inside the video window frames the image to be captured from the video and used as the card holder’s photo. Click within the rectangles border and drag it anywhere inside the video window to position it. The rectangle cannot be resized manually inside the window, but can be changed by changing the Video Photo Width and Video Photo Height in the General Setup.
8. Double click anywhere within the rectangle (A) to capture the
selected image from the video and use it as the card holder’s photo (B)
9. Click on the ‘OK’ button to save.
A
B
A
B
SCS_sw3_IPCam.help 2021-02-01 v200 Page 24 of 30
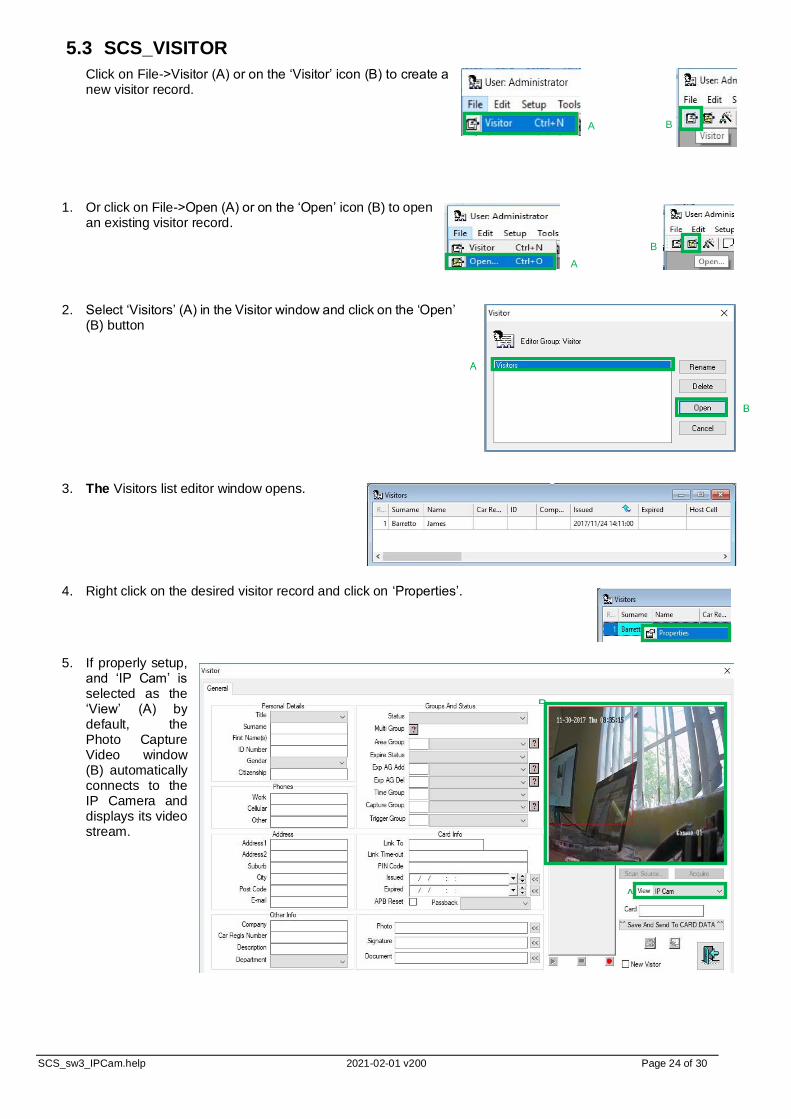
5.3 SCS_VISITOR
Click on File->Visitor (A) or on the ‘Visitor’ icon (B) to create a new visitor record.
1. Or click on File->Open (A) or on the ‘Open’ icon (B) to open an existing visitor record.
2. Select ‘Visitors’ (A) in the Visitor window and click on the ‘Open’ (B) button
3. The Visitors list editor window opens.
4. Right click on the desired visitor record and click on ‘Properties’.
5. If properly setup, and ‘IP Cam’ is selected as the ‘View’ (A) by default, the Photo Capture Video window (B) automatically connects to the IP Camera and displays its video stream.
A B
B
A
B
A
SCS_sw3_IPCam.help 2021-02-01 v200 Page 25 of 30
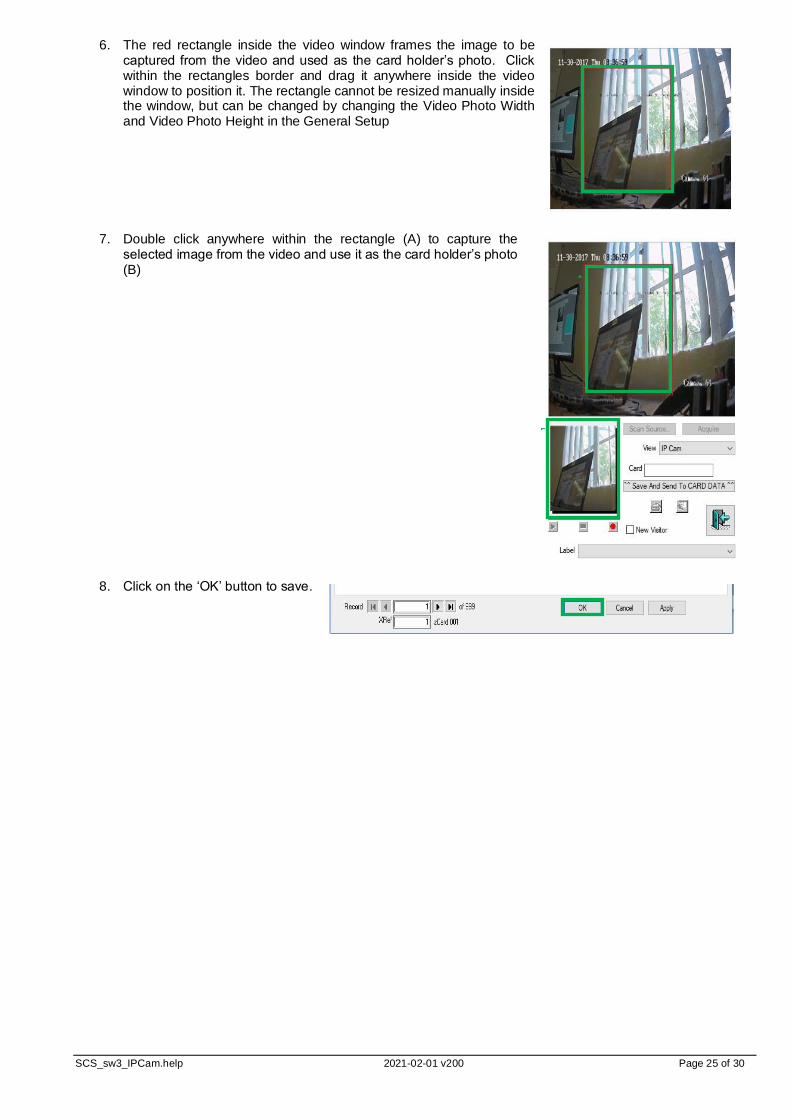
6. The red rectangle inside the video window frames the image to be captured from the video and used as the card holder’s photo. Click within the rectangles border and drag it anywhere inside the video window to position it. The rectangle cannot be resized manually inside the window, but can be changed by changing the Video Photo Width and Video Photo Height in the General Setup
7. Double click anywhere within the rectangle (A) to capture the selected image from the video and use it as the card holder’s photo (B)
8. Click on the ‘OK’ button to save.
B
A
SCS_sw3_IPCam.help 2021-02-01 v200 Page 26 of 30
5.4 SCS_DRAW
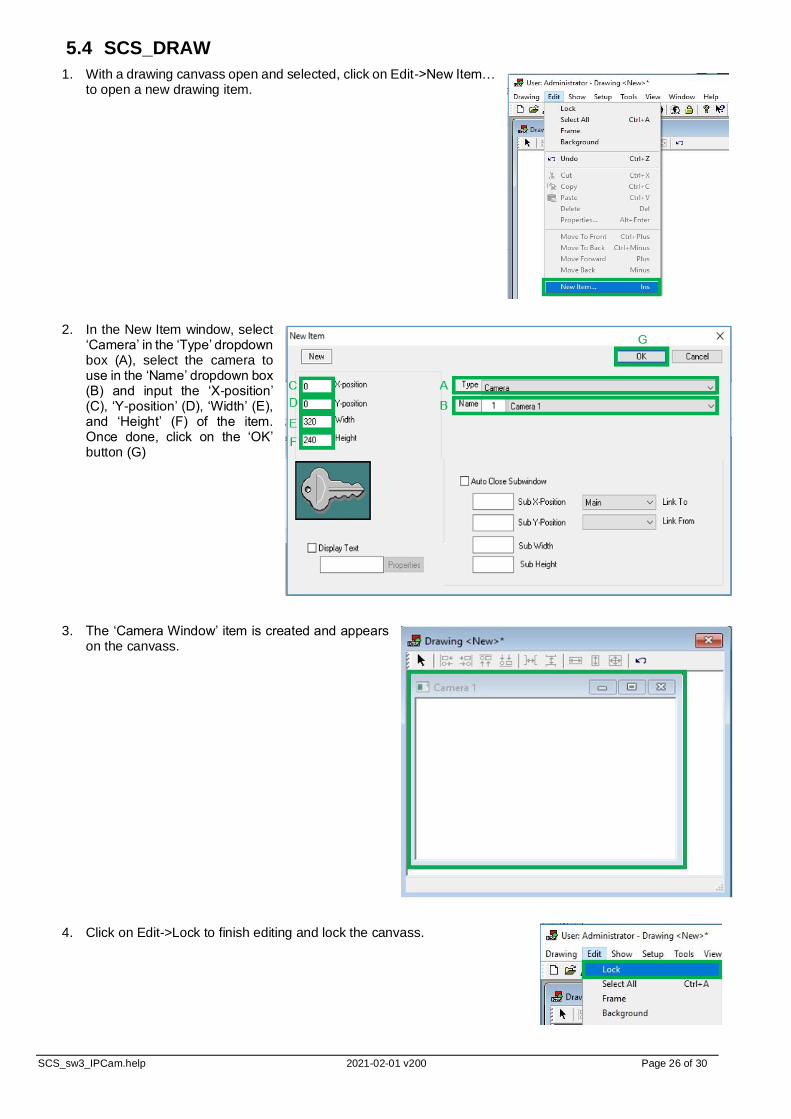
1. With a drawing canvass open and selected, click on Edit->New Item… to open a new drawing item.
2. In the New Item window, select
‘Camera’ in the ‘Type’ dropdown box (A), select the camera to use in the ‘Name’ dropdown box (B) and input the ‘X-position’ (C), ‘Y-position’ (D), ‘Width’ (E), and ‘Height’ (F) of the item. Once done, click on the ‘OK’ button (G)
3. The ‘Camera Window’ item is created and appears
on the canvass.
4. Click on Edit->Lock to finish editing and lock the canvass.
SCS_sw3_IPCam.help 2021-02-01 v200 Page 27 of 30
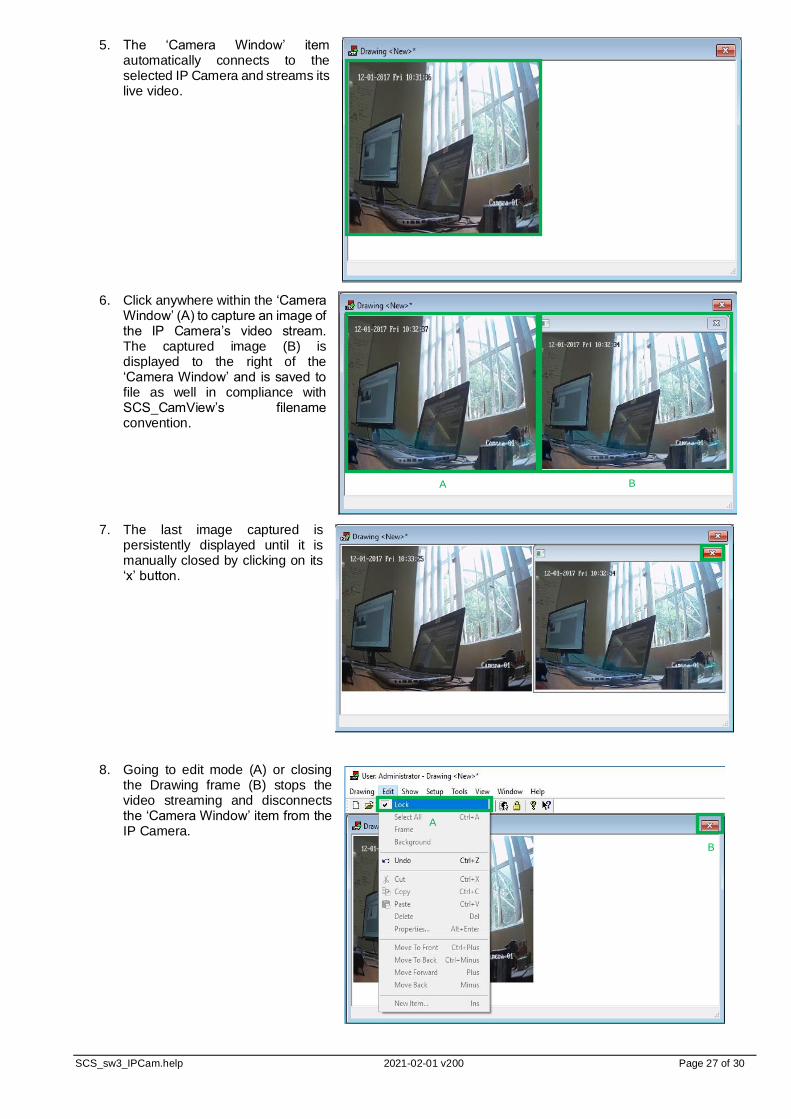
5. The ‘Camera Window’ item automatically connects to the selected IP Camera and streams its live video.
6. Click anywhere within the ‘Camera
Window’ (A) to capture an image of the IP Camera’s video stream. The captured image (B) is displayed to the right of the ‘Camera Window’ and is saved to file as well in compliance with SCS_CamView’s filename convention.
7. The last image captured is persistently displayed until it is manually closed by clicking on its ‘x’ button.
8. Going to edit mode (A) or closing the Drawing frame (B) stops the video streaming and disconnects the ‘Camera Window’ item from the IP Camera.
A B
A
B

SCS_sw3_IPCam.help 2021-02-01 v200 Page 28 of 30
5.5 SCS_CLIENT (EVENT DRIVEN IMAGE CAPTURE)
If the IP Camera’s event triggers and action are setup correctly and the system is setup to capture images on event, then images will automatically be captured by SCS_Client whenever a trigger event occurs. The images can be found in the Capture Folder as set in the Camera setup window.
SCS_sw3_IPCam.help 2021-02-01 v200 Page 29 of 30
6 TROUBLE SHOOT
6.1 GENERAL
1. Required 3rd party files (needs to be in the same folder as the SW3 executables): • avcodec-57.dll
• avdevice-57.dll
• avfilter-6.dll
• avformat-57.dll
• avutil-55.dll
• swresample-2.dll
• swscale-4.dll
2. Required Softcon database entries. • Refer to SW3 Readme file under Softwin3 Version 1.04.34 dated 2018-07-04.
6.2 SCS_CLIENT (CARD PHOTO)
1. IP Cam video not displayed in the View window. - Check if the IP camera is available in the network.
o Ping the IP camera. o Test the IP camera by connecting to it using a web browser (use the recommended browser by the
manufacturer). - Check if the IP camera is setup properly in SW3. - Check if the IP camera is setup properly in SW3 for use in the SCS_Client’s card photo page.
2. The ‘IP Cam’ item is not displayed in the Source drop down control. - Check if the IP camera is setup properly in SW3 for use in the SCS_Client’s card photo page.
3. The dimensions of the capture rectangle in the View window is wrong. - Check the Video Photo Width and Height in the ‘Photo’ tab in the ‘General Setup’ window.
6.3 SCS_CARDMAKE (CARD PHOTO)
1. IP Cam video not displayed in the View window. - Check if the IP camera is available in the network.
o Ping the IP camera. o Test the IP camera by connecting to it using a web browser (use the recommended browser by the
manufacturer). - Check if the IP camera is setup properly in SW3. - Check if the IP camera is setup properly in SW3 for use in the SCS_CardMake’s card photo page.
2. The ‘IP Cam’ item is not displayed in the Source drop down control. - Check if the IP camera is setup properly in SW3 for use in the SCS_CardMake’s card photo page.
3. The dimensions of the capture rectangle in the View window is wrong. - Check the Video Photo Width and Height in the ‘Photo’ tab in the ‘General Setup’ window.
6.4 SCS_VISITOR (CARD PHOTO)
1. IP Cam video not displayed in the View window. - Check if the IP camera is available in the network.
o Ping the IP camera. o Test the IP camera by connecting to it using a web browser (use the recommended browser by the
manufacturer). - Check if the IP camera is setup properly in SW3. - Check if the IP camera is setup properly in SW3 for use in the SCS_Visitor’s card photo page.
2. The ‘IP Cam’ item is not displayed in the Source drop down control. - Check if the IP camera is setup properly in SW3 for use in the SCS_Visitor’s card photo page.
3. The dimensions of the capture rectangle in the View window is wrong. - Check the Video Photo Width and Height in the ‘Photo’ tab in the ‘General Setup’ window.

SCS_sw3_IPCam.help 2021-02-01 v200 Page 30 of 30
6.5 SCS_DRAW
1. The type ‘Camera’ is not displayed in the Type drop down control in the ‘New Item’ window. - Check if the Camera type (type 5) is listed in the DRAW_TYPES table in Symbol.mdb.
2. The IP Camera frame window item does not display in the drawing canvass after creating it and exiting the ‘New Item’ window. - Check if the IP camera is setup properly in SW3 for use in SCS_Draw.
3. IP Cam video is not displayed when the drawing canvass is ‘locked’. - Check if the IP camera is available in the network.
o Ping the IP camera. o Test the IP camera by connecting to it using a web browser (use the recommended browser by the
manufacturer). - Check if the IP camera is setup properly in SW3. - Check if the IP camera is setup properly in SW3 for use in SCS_Draw.
4. The capture window is not appearing. - Check if the IP camera’s capture disp period is set to a value greater than 0.
5. The image capture file is not being generated. - Check if the IP camera’s capture folder is set correctly.
6. The dimension of the captured image is wrong. - Check if the IP camera’s capture width and height is setup correctly.
6.6 SCS_CLIENT (EVENT DRIVEN)
1. Image from IP camera is not captured. - Check if the IP camera is available in the network.
o Ping the IP camera. o Test the IP camera by connecting to it using a web browser (use the recommended browser by the
manufacturer). - Check if the IP camera is setup properly in SW3. - Check if the IP camera is setup properly in SW3 for use in SCS_Client’s event driven image capture. - Check if the IP camera event’s trigger-action is setup correctly. - It is possible that the time between the trigger event’s datetime and the datetime of the image capture is exceeding
the threshold set in the Camera’s capture thresh setting. Try increasing the threshold .
2. The dimensions of the captured image is wrong. - Check if the IP camera’s capture width and height is setup correctly.
3. Text is not overlaid onto the captured image. - Check if the text field in the IP camera’s event action contains an entry.
4. Text overlaid onto the captured images is wrong. - Check if the texts set in the IP camera’s event action is of the correct format (keywords, instructions etc)
5. The colour of the text overlaid onto the captured image is wrong. - Check if the IP camera’s capture text colour is setup correctly.
6. The position of the text overlaid onto the captured image is wrong. - Check if the IP camera’s capture text pos is setup correctly.
7. The link to the capture image’s file path and name is not displayed in the report. - Check if the Log Field ‘LK’ is ticked. - Check if the field ‘LK’ of the trigger event (i.e. reader, input etc.) in the log table is populated. If it is not empty, then
check the crystal report, otherwise if it is empty, then the captured image’s file path and name is not being logged .
Related Documents