EDITOR User Guide English Manual Version 1.1

Welcome message from author
This document is posted to help you gain knowledge. Please leave a comment to let me know what you think about it! Share it to your friends and learn new things together.
Transcript
EDITOR
User Guide English
Manual Version 1.1
2
Table of Contents
Introduction ............................................................................ 3
Support .............................................................................. 3
Installation ......................................................................... 3
Getting Started .................................................................. 3
Operation ................................................................................ 4
Overview ............................................................................ 4
Kit Editor ........................................................................ 4
Instrument Editor ........................................................... 5
Creating & Editing Kits ..................................................... 6
Effects ......................................................................... 11
Creating & Editing Instruments ..................................... 12
Quick Instruments ....................................................... 16
Auto-Mapping Samples to Instruments ...................... 17
File Management ............................................................ 18
Saving ......................................................................... 18
Exporting Your (User) Content .................................... 18
Importing Your (User) Content .................................... 19
Importing Updated (Preset) Content ........................... 19
Organizing Your Files .................................................. 20
Menu ................................................................................ 21
Trademarks & Licenses ....................................................... 22
3
Introduction
Support For the latest information about this product (system requirements, compatibility information, etc.) and product registration, visit alesis.com.
For additional product support, visit alesis.com/support.
Installation Follow these steps to install the Strike Editor:
1. Go to alesis.com and find the page for your Strike Kit or Strike Pro Kit.
2. Click the Downloads tab.
3. Download the latest Strike Performance Drum Module firmware. Open the .zip file you downloaded and follow the included instructions to update the module’s firmware.
4. Download the Strike Editor software package. Open the .zip file and double-click the installer application. Windows: Double-click the installer file (.exe), and follow the on-screen instructions. macOS: Double-click the disk image file (.dmg), and copy the application to your Applications folder.
By default, the Strike Editor will be installed in the following location: Windows: [your hard drive]\Program Files (x86)\Alesis macOS: Applications
Getting Started 1. Use a USB cable to connect your Strike Performance Drum Module to your computer.
2. Make sure the SD card with your instruments, kits, samples, and loops is inserted in the module’s SD card slot.
3. Power on your Strike module. Wait a moment for the first kit to finish loading (i.e., for the Streaming progress bar in the lower-right corner of the module’s display to reach 100% and disappear).
4. On your computer, open the Strike Editor.
By default, the Strike Editor will be installed in the following location: Windows: [your hard drive]\Program Files\Alesis macOS: Applications
Important Notes:
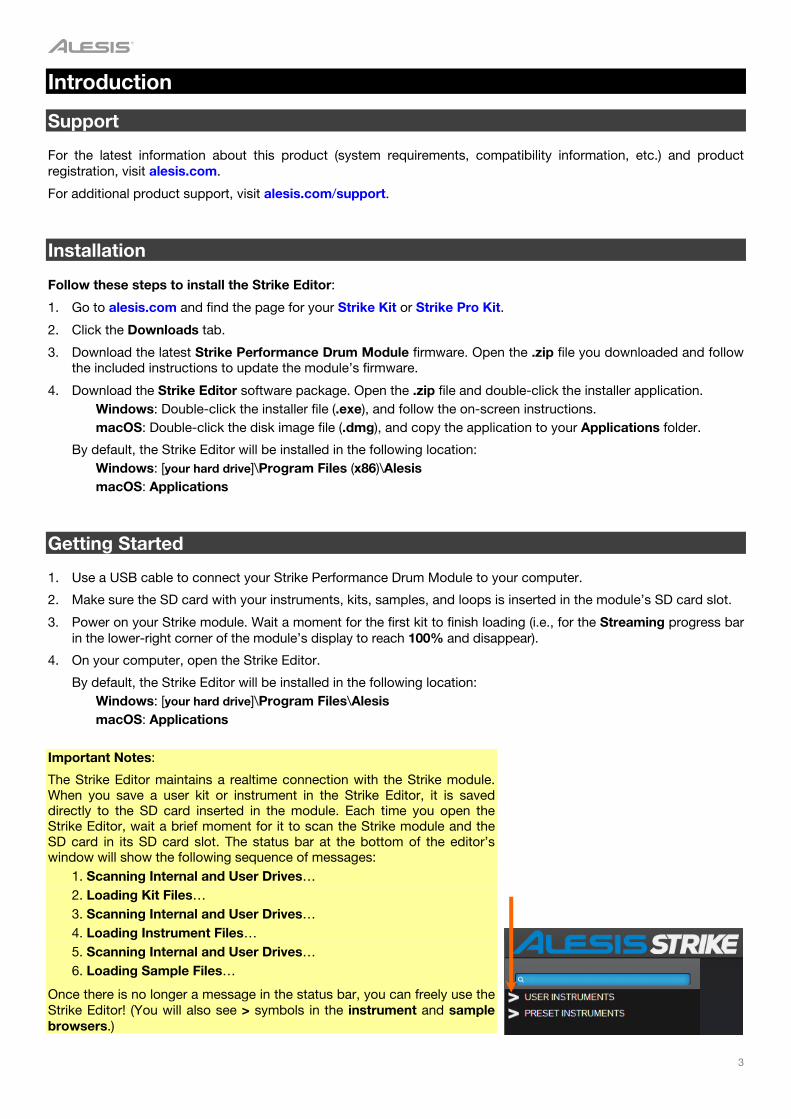
The Strike Editor maintains a realtime connection with the Strike module. When you save a user kit or instrument in the Strike Editor, it is saved directly to the SD card inserted in the module. Each time you open the Strike Editor, wait a brief moment for it to scan the Strike module and the SD card in its SD card slot. The status bar at the bottom of the editor’s window will show the following sequence of messages: • 1. Scanning Internal and User Drives… • 2. Loading Kit Files… • 3. Scanning Internal and User Drives… • 4. Loading Instrument Files… • 5. Scanning Internal and User Drives… • 6. Loading Sample Files…
Once there is no longer a message in the status bar, you can freely use the Strike Editor! (You will also see > symbols in the instrument and sample browsers.)
4
Operation
Overview
The Strike Editor has two main modes: the Kit Editor (shown here) and the Instrument Editor (shown here).
To enter either mode, click the Mode menu at the top of the window, and click Kit Editor or Instrument Editor.
Kit Editor
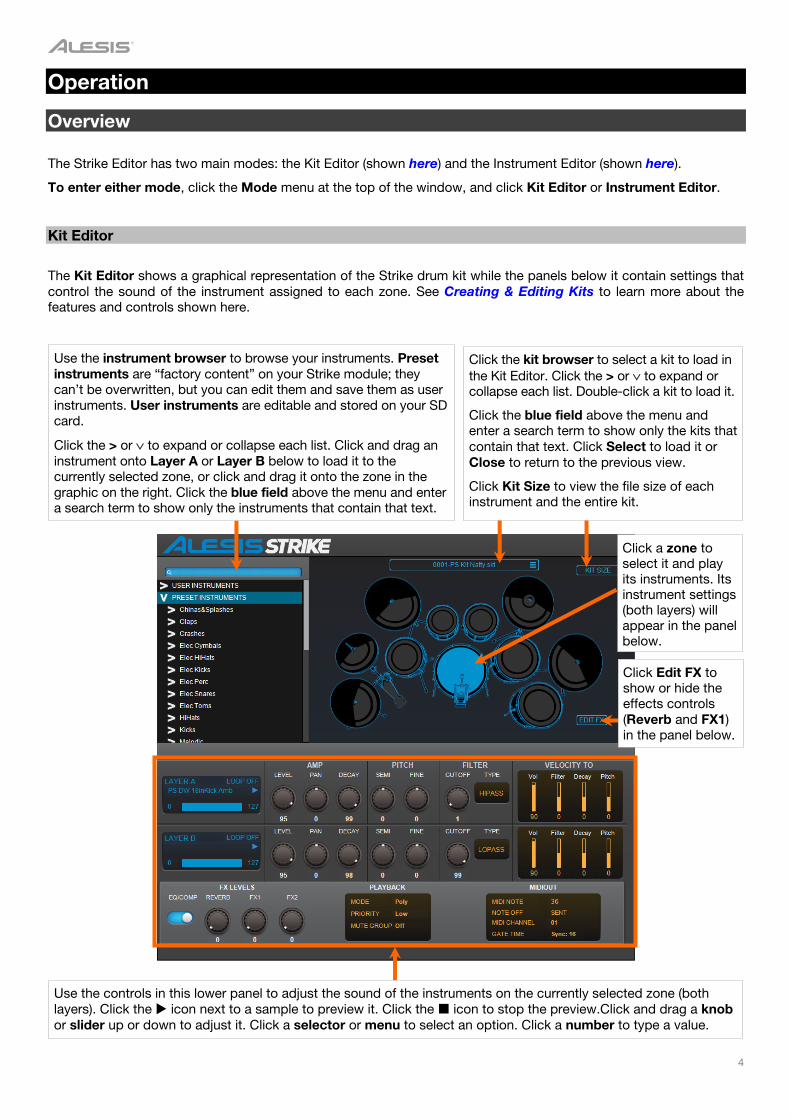
The Kit Editor shows a graphical representation of the Strike drum kit while the panels below it contain settings that control the sound of the instrument assigned to each zone. See Creating & Editing Kits to learn more about the features and controls shown here.
Click a zone to select it and play its instruments. Its instrument settings (both layers) will appear in the panel below.
Use the instrument browser to browse your instruments. Preset instruments are “factory content” on your Strike module; they can’t be overwritten, but you can edit them and save them as user instruments. User instruments are editable and stored on your SD card.
Click the > or ∨ to expand or collapse each list. Click and drag an instrument onto Layer A or Layer B below to load it to the currently selected zone, or click and drag it onto the zone in the graphic on the right. Click the blue field above the menu and enter a search term to show only the instruments that contain that text.
Click Edit FX to show or hide the effects controls (Reverb and FX1) in the panel below.
Use the controls in this lower panel to adjust the sound of the instruments on the currently selected zone (both layers). Click the icon next to a sample to preview it. Click the icon to stop the preview.Click and drag a knob or slider up or down to adjust it. Click a selector or menu to select an option. Click a number to type a value.
Click the kit browser to select a kit to load in the Kit Editor. Click the > or ∨ to expand or collapse each list. Double-click a kit to load it.
Click the blue field above the menu and enter a search term to show only the kits that contain that text. Click Select to load it or Close to return to the previous view.
Click Kit Size to view the file size of each instrument and the entire kit.
5
Instrument Editor
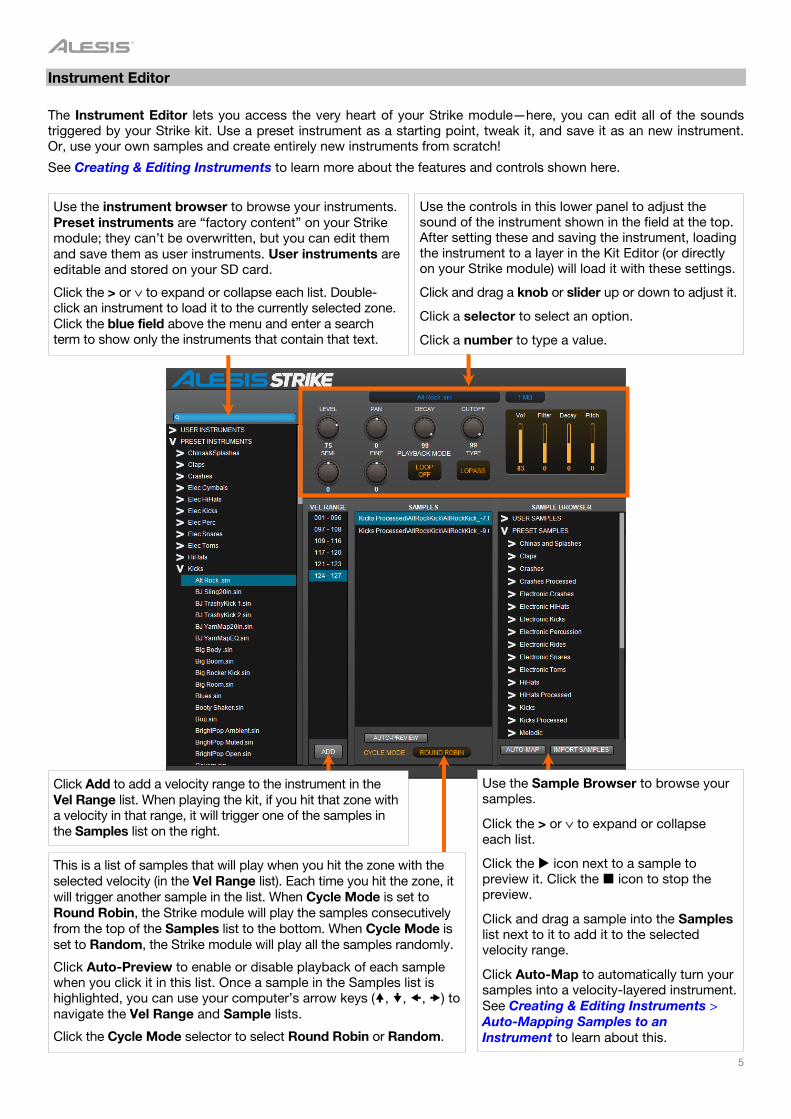
The Instrument Editor lets you access the very heart of your Strike module—here, you can edit all of the sounds triggered by your Strike kit. Use a preset instrument as a starting point, tweak it, and save it as an new instrument. Or, use your own samples and create entirely new instruments from scratch!
See Creating & Editing Instruments to learn more about the features and controls shown here.
Click Add to add a velocity range to the instrument in the Vel Range list. When playing the kit, if you hit that zone with a velocity in that range, it will trigger one of the samples in the Samples list on the right.
Use the Sample Browser to browse your samples.
Click the > or ∨ to expand or collapse each list.
Click the icon next to a sample to preview it. Click the icon to stop the preview.
Click and drag a sample into the Samples list next to it to add it to the selected velocity range.
Click Auto-Map to automatically turn your samples into a velocity-layered instrument. See Creating & Editing Instruments > Auto-Mapping Samples to an Instrument to learn about this.
Use the instrument browser to browse your instruments. Preset instruments are “factory content” on your Strike module; they can’t be overwritten, but you can edit them and save them as user instruments. User instruments are editable and stored on your SD card.
Click the > or ∨ to expand or collapse each list. Double-click an instrument to load it to the currently selected zone. Click the blue field above the menu and enter a search term to show only the instruments that contain that text.
Use the controls in this lower panel to adjust the sound of the instrument shown in the field at the top. After setting these and saving the instrument, loading the instrument to a layer in the Kit Editor (or directly on your Strike module) will load it with these settings.
Click and drag a knob or slider up or down to adjust it.
Click a selector to select an option.
Click a number to type a value.
This is a list of samples that will play when you hit the zone with the selected velocity (in the Vel Range list). Each time you hit the zone, it will trigger another sample in the list. When Cycle Mode is set to Round Robin, the Strike module will play the samples consecutively from the top of the Samples list to the bottom. When Cycle Mode is set to Random, the Strike module will play all the samples randomly.
Click Auto-Preview to enable or disable playback of each sample when you click it in this list. Once a sample in the Samples list is highlighted, you can use your computer’s arrow keys (, , , ) to navigate the Vel Range and Sample lists.
Click the Cycle Mode selector to select Round Robin or Random.
6
Creating & Editing Kits
The Kit Editor lets you create, edit, and save kits to use on your Strike module.
To show the Kit Editor, click the Mode menu at the top of the window, and select Kit Editor.
You can create a kit by starting with an empty kit or by selecting an existing kit and changing its instruments and/or settings.
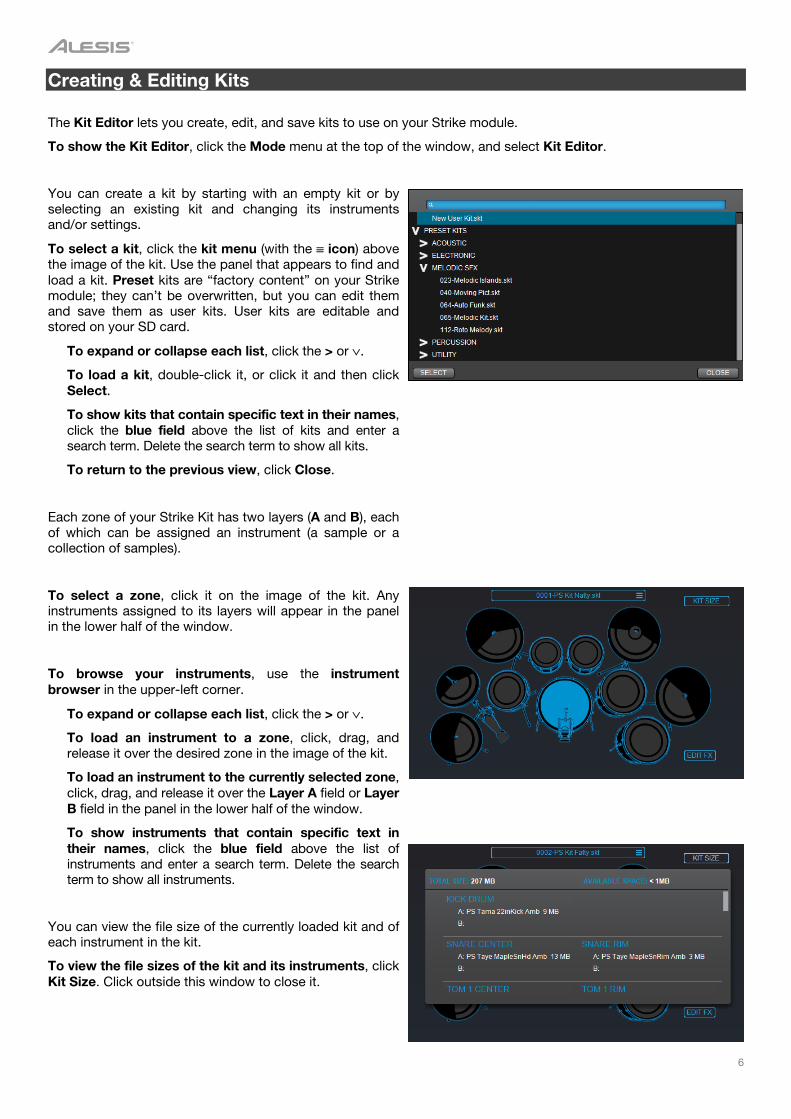
To select a kit, click the kit menu (with the ≡ icon) above the image of the kit. Use the panel that appears to find and load a kit. Preset kits are “factory content” on your Strike module; they can’t be overwritten, but you can edit them and save them as user kits. User kits are editable and stored on your SD card.
To expand or collapse each list, click the > or ∨.
To load a kit, double-click it, or click it and then click Select.
To show kits that contain specific text in their names, click the blue field above the list of kits and enter a search term. Delete the search term to show all kits.
To return to the previous view, click Close.
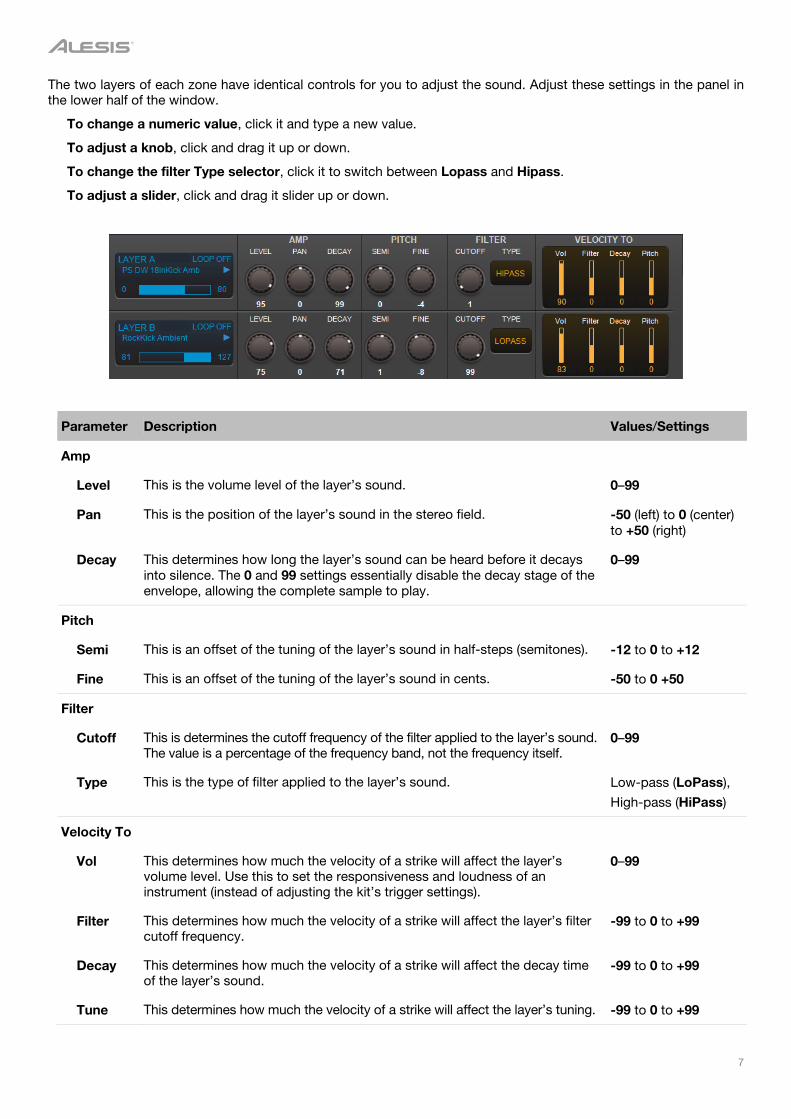
Each zone of your Strike Kit has two layers (A and B), each of which can be assigned an instrument (a sample or a collection of samples).
To select a zone, click it on the image of the kit. Any instruments assigned to its layers will appear in the panel in the lower half of the window.
To browse your instruments, use the instrument browser in the upper-left corner.
To expand or collapse each list, click the > or ∨.
To load an instrument to a zone, click, drag, and release it over the desired zone in the image of the kit.
To load an instrument to the currently selected zone, click, drag, and release it over the Layer A field or Layer B field in the panel in the lower half of the window.
To show instruments that contain specific text in their names, click the blue field above the list of instruments and enter a search term. Delete the search term to show all instruments.
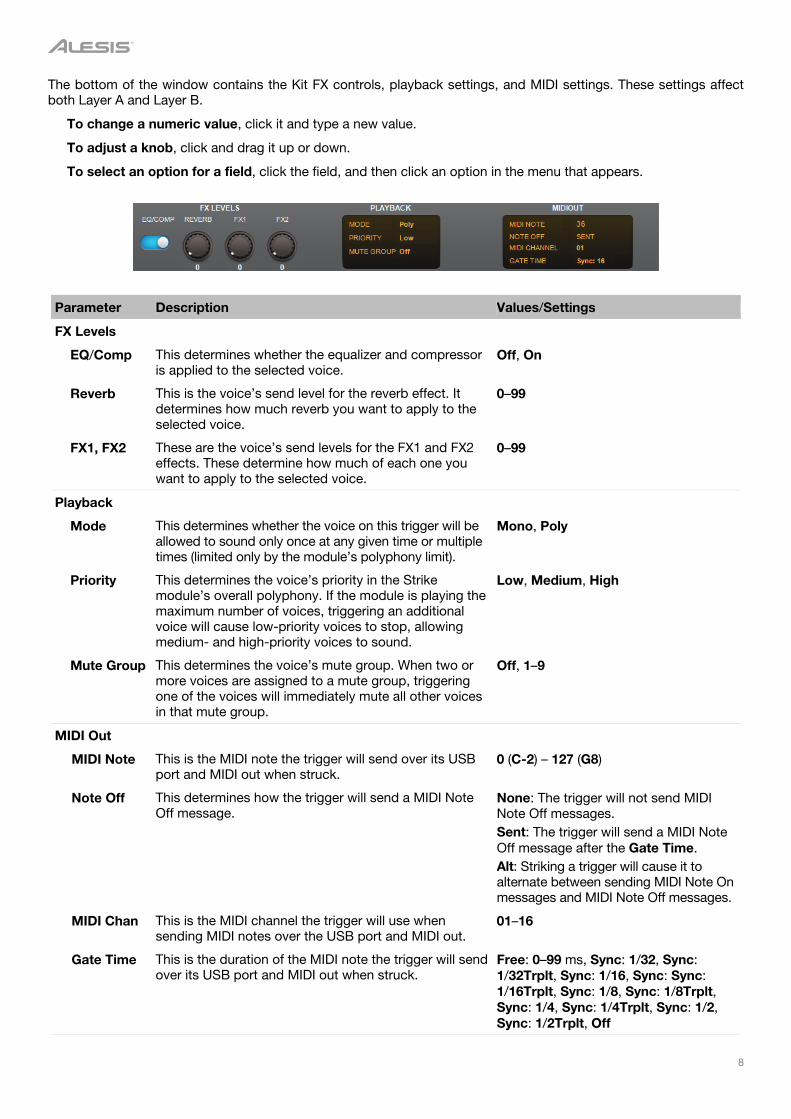
You can view the file size of the currently loaded kit and of each instrument in the kit.
To view the file sizes of the kit and its instruments, click Kit Size. Click outside this window to close it.
7
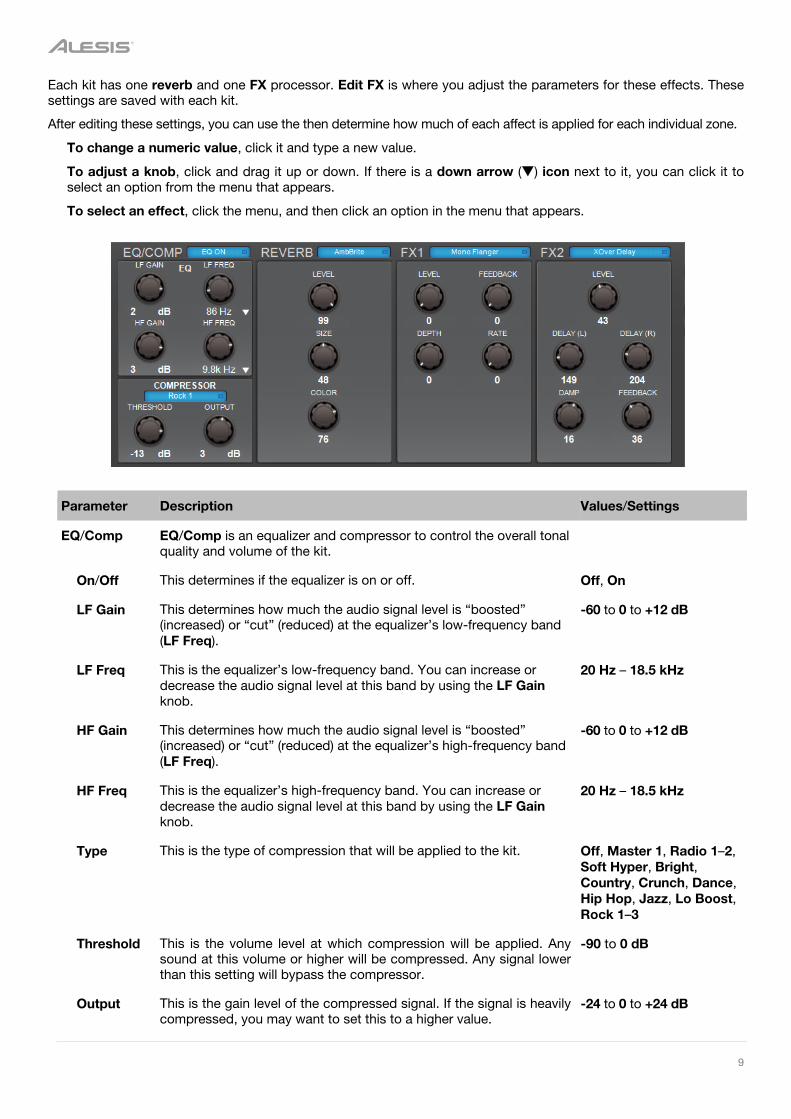
The two layers of each zone have identical controls for you to adjust the sound. Adjust these settings in the panel in the lower half of the window.
To change a numeric value, click it and type a new value.
To adjust a knob, click and drag it up or down.
To change the filter Type selector, click it to switch between Lopass and Hipass.
To adjust a slider, click and drag it slider up or down.
Parameter Description Values/Settings
Amp
Level This is the volume level of the layer’s sound. 0–99
Pan This is the position of the layer’s sound in the stereo field. -50 (left) to 0 (center) to +50 (right)
Decay This determines how long the layer’s sound can be heard before it decays into silence. The 0 and 99 settings essentially disable the decay stage of the envelope, allowing the complete sample to play.
0–99
Pitch
Semi This is an offset of the tuning of the layer’s sound in half-steps (semitones). -12 to 0 to +12
Fine This is an offset of the tuning of the layer’s sound in cents. -50 to 0 +50
Filter
Cutoff This is determines the cutoff frequency of the filter applied to the layer’s sound. The value is a percentage of the frequency band, not the frequency itself.
0–99
Type This is the type of filter applied to the layer’s sound. Low-pass (LoPass),
High-pass (HiPass)
Velocity To
Vol This determines how much the velocity of a strike will affect the layer’s volume level. Use this to set the responsiveness and loudness of an instrument (instead of adjusting the kit’s trigger settings).
0–99
Filter This determines how much the velocity of a strike will affect the layer’s filter cutoff frequency.
-99 to 0 to +99
Decay This determines how much the velocity of a strike will affect the decay time of the layer’s sound.
-99 to 0 to +99
Tune This determines how much the velocity of a strike will affect the layer’s tuning. -99 to 0 to +99
8
The bottom of the window contains the Kit FX controls, playback settings, and MIDI settings. These settings affect both Layer A and Layer B.
To change a numeric value, click it and type a new value.
To adjust a knob, click and drag it up or down.
To select an option for a field, click the field, and then click an option in the menu that appears.
Parameter Description Values/Settings
FX Levels
EQ/Comp This determines whether the equalizer and compressor is applied to the selected voice.
Off, On
Reverb This is the voice’s send level for the reverb effect. It determines how much reverb you want to apply to the selected voice.
0–99
FX1, FX2 These are the voice’s send levels for the FX1 and FX2 effects. These determine how much of each one you want to apply to the selected voice.
0–99
Playback
Mode This determines whether the voice on this trigger will be allowed to sound only once at any given time or multiple times (limited only by the module’s polyphony limit).
Mono, Poly
Priority This determines the voice’s priority in the Strike module’s overall polyphony. If the module is playing the maximum number of voices, triggering an additional voice will cause low-priority voices to stop, allowing medium- and high-priority voices to sound.
Low, Medium, High
Mute Group This determines the voice’s mute group. When two or more voices are assigned to a mute group, triggering one of the voices will immediately mute all other voices in that mute group.
Off, 1–9
MIDI Out
MIDI Note This is the MIDI note the trigger will send over its USB port and MIDI out when struck.
0 (C-2) – 127 (G8)
Note Off This determines how the trigger will send a MIDI Note Off message.
None: The trigger will not send MIDI Note Off messages. Sent: The trigger will send a MIDI Note Off message after the Gate Time. Alt: Striking a trigger will cause it to alternate between sending MIDI Note On messages and MIDI Note Off messages.
MIDI Chan This is the MIDI channel the trigger will use when sending MIDI notes over the USB port and MIDI out.
01–16
Gate Time This is the duration of the MIDI note the trigger will send over its USB port and MIDI out when struck.
Free: 0–99 ms, Sync: 1/32, Sync: 1/32Trplt, Sync: 1/16, Sync: Sync: 1/16Trplt, Sync: 1/8, Sync: 1/8Trplt, Sync: 1/4, Sync: 1/4Trplt, Sync: 1/2, Sync: 1/2Trplt, Off
9
Each kit has one reverb and one FX processor. Edit FX is where you adjust the parameters for these effects. These settings are saved with each kit.
After editing these settings, you can use the then determine how much of each affect is applied for each individual zone.
To change a numeric value, click it and type a new value.
To adjust a knob, click and drag it up or down. If there is a down arrow () icon next to it, you can click it to select an option from the menu that appears.
To select an effect, click the menu, and then click an option in the menu that appears.
Parameter Description Values/Settings
EQ/Comp EQ/Comp is an equalizer and compressor to control the overall tonal quality and volume of the kit.
On/Off This determines if the equalizer is on or off. Off, On
LF Gain This determines how much the audio signal level is “boosted” (increased) or “cut” (reduced) at the equalizer’s low-frequency band (LF Freq).
-60 to 0 to +12 dB
LF Freq This is the equalizer’s low-frequency band. You can increase or decrease the audio signal level at this band by using the LF Gain knob.
20 Hz – 18.5 kHz
HF Gain This determines how much the audio signal level is “boosted” (increased) or “cut” (reduced) at the equalizer’s high-frequency band (LF Freq).
-60 to 0 to +12 dB
HF Freq This is the equalizer’s high-frequency band. You can increase or decrease the audio signal level at this band by using the LF Gain knob.
20 Hz – 18.5 kHz
Type This is the type of compression that will be applied to the kit. Off, Master 1, Radio 1–2, Soft Hyper, Bright, Country, Crunch, Dance, Hip Hop, Jazz, Lo Boost, Rock 1–3
Threshold This is the volume level at which compression will be applied. Any sound at this volume or higher will be compressed. Any signal lower than this setting will bypass the compressor.
-90 to 0 dB
Output This is the gain level of the compressed signal. If the signal is heavily compressed, you may want to set this to a higher value.
-24 to 0 to +24 dB
10
Parameter Description Values/Settings
Reverb Reverb lets you apply different types of reverb to simulate your kit being played in a specific kind of space.
Type This is the type of space the reverb will emulate. 0–99
Level This is the level of the reverb effect. If you’ve already set how much reverb is applied to each trigger zone, you can use this setting to turn down the overall reverb level for the kit.
0–99
Size This is the size of the virtual space designated by the type of reverb. Higher values result in a longer reverb time.
0–99
Color This is the amount of high-frequency damping of the reverb, which affects its tone. Higher values result in a brighter reverb sound.
0–99
FX1 FX1 lets you select from different types of flanger, chorus, vibrato, and delay effects.
Type This is the type of effect. See Effects
Parameters The available parameters will depend on the type of effect. See Effects
FX2 FX2 lets you select from different types of flanger, chorus, vibrato, and delay effects.
Type This is the type of effect. See Effects
Parameters The available parameters will depend on the type of effect. See Effects
11
Effects
Effect Name Parameters
Off
Mono Flanger Rate Depth Feedback Level
Stereo Flanger Rate Depth Feedback Level
Xover Flanger Rate Depth Feedback Level
Mono Chorus 1 Rate Depth Feedback Level
Mono Chorus 2 Rate Depth Feedback Level
Stereo Chorus Rate Depth Feedback Level
XOver Chorus Rate Depth Feedback Level
Mono Vibrato Rate Depth Level
Vibrato Rate Depth Level
Mono Doubler Delay Level
Doubler Delay Level
Mono Slapback Delay Level
Slapback Delay Level
Mono Delay Delay Feedback Damp Level
Delay Delay L Feedback L Delay R Feedback R Damp Level
XOver Delay Delay L Delay R Feedback Damp Level
Ping Pong Delay Feedback Damp Level

12
Creating & Editing Instruments
When playing your kit, if you hit a drum pad, the zone will register its velocity from 1 to 127, and the instrument assigned to that zone will sound. An instrument can consist of multiple samples, and each of those samples can be assigned to different velocity ranges (1–127). This feature enables you to create a very realistic-sounding instrument by assigning “quieter” samples (strikes with low force) to low velocities and “louder” samples (strikes with high force) to high velocities.
Furthermore, you can assign multiple samples to a single velocity range. Each time you strike the zone with a velocity in that range, it will trigger a different sample assigned to that range. You can set whether each strike will trigger the next assigned sample in the list (“round robin”) or randomly. This feature provides just enough variance to the sound of a zone to prevent the “machine-gun” effect that occurs when striking a zone rapidly and repeatedly at the same velocity. You can also use this to create “sequenced” sounds where striking the zone multiple times causes a musical passage to play (some the preset instruments use this technique).
To load a preset instrument (to use as a starting point), double-click it in the instrument browser.
To create a new instrument:
1. Click the File menu, and click New.
2. In the window that appears, click the menu and select the type of instrument you want to create:
• Single: any instrument that is not a hi-hat.
• Hi-Hat Cymbal: an instrument designed specifically to be assigned to your HiHat Bow or HiHat Edge zones. Hi-Hat Cymbals are 3–5 separate instruments which play depending on the position of the hihat pedal.
• Hi-Hat Pedal: an instrument designed specifically to be assigned to the HiHat Foot zone. This is comprised of two instruments: the “splash” effect and the “chick” effect when you close the pedal.
3. Click OK to create the instrument or Cancel to cancel the operation.
Tip: You can use the Strike Editor to automatically import samples and convert them into instruments (as long as it will not be used as a hi-hat instrument). See Quick Instruments to learn about this.
13
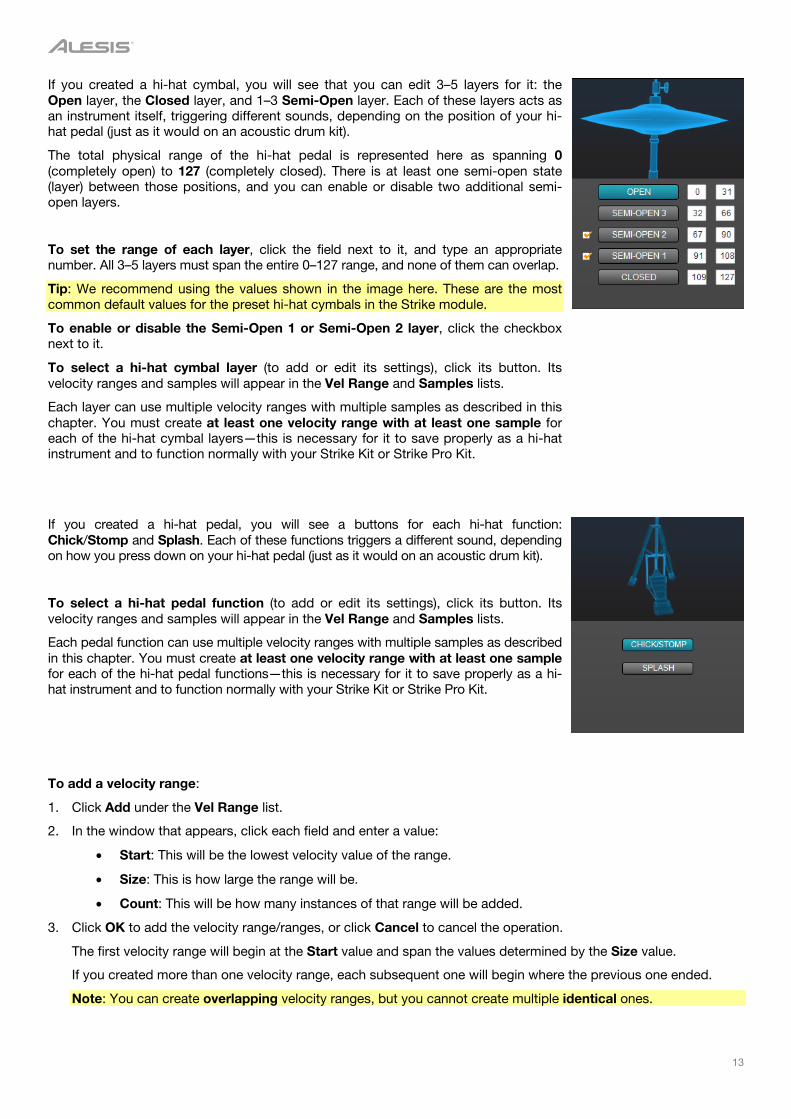
If you created a hi-hat cymbal, you will see that you can edit 3–5 layers for it: the Open layer, the Closed layer, and 1–3 Semi-Open layer. Each of these layers acts as an instrument itself, triggering different sounds, depending on the position of your hi-hat pedal (just as it would on an acoustic drum kit).
The total physical range of the hi-hat pedal is represented here as spanning 0 (completely open) to 127 (completely closed). There is at least one semi-open state (layer) between those positions, and you can enable or disable two additional semi-open layers.
To set the range of each layer, click the field next to it, and type an appropriate number. All 3–5 layers must span the entire 0–127 range, and none of them can overlap.
Tip: We recommend using the values shown in the image here. These are the most common default values for the preset hi-hat cymbals in the Strike module.
To enable or disable the Semi-Open 1 or Semi-Open 2 layer, click the checkbox next to it.
To select a hi-hat cymbal layer (to add or edit its settings), click its button. Its velocity ranges and samples will appear in the Vel Range and Samples lists.
Each layer can use multiple velocity ranges with multiple samples as described in this chapter. You must create at least one velocity range with at least one sample for each of the hi-hat cymbal layers—this is necessary for it to save properly as a hi-hat instrument and to function normally with your Strike Kit or Strike Pro Kit.
If you created a hi-hat pedal, you will see a buttons for each hi-hat function: Chick/Stomp and Splash. Each of these functions triggers a different sound, depending on how you press down on your hi-hat pedal (just as it would on an acoustic drum kit).
To select a hi-hat pedal function (to add or edit its settings), click its button. Its velocity ranges and samples will appear in the Vel Range and Samples lists.
Each pedal function can use multiple velocity ranges with multiple samples as described in this chapter. You must create at least one velocity range with at least one sample for each of the hi-hat pedal functions—this is necessary for it to save properly as a hi-hat instrument and to function normally with your Strike Kit or Strike Pro Kit.
To add a velocity range:
1. Click Add under the Vel Range list.
2. In the window that appears, click each field and enter a value:
• Start: This will be the lowest velocity value of the range.
• Size: This is how large the range will be.
• Count: This will be how many instances of that range will be added.
3. Click OK to add the velocity range/ranges, or click Cancel to cancel the operation.
The first velocity range will begin at the Start value and span the values determined by the Size value.
If you created more than one velocity range, each subsequent one will begin where the previous one ended.
Note: You can create overlapping velocity ranges, but you cannot create multiple identical ones.
14
To edit a velocity range:
1. Double-click or right-click a velocity range in the Vel Range list, and select Edit.
2. In the window that appears, click each field and enter a value:
• Start: This will be the lowest velocity value of the range.
• End: This will be the highest velocity value of the range.
3. Click OK to confirm your edits, or click Cancel to cancel the operation.
Note: You can create overlapping velocity ranges, but you cannot create multiple identical ones.
To delete a velocity range, do either of the following:
• Right-click a velocity range in the Vel Range list, and select Delete.
• Click a velocity range in the Vel Range list, and press Delete on your keyboard.
To add a sample to a velocity range:
1. Click the velocity range in the Vel Range list to select it.
2. Click and drag a sample from the Sample Browser onto the Samples list.
Repeat this step to add more samples to the same velocity range.
To add multiple adjacent samples at once, click the first sample in the Sample Browser, hold Shift on your keyboard, and then click and drag the last sample onto the Samples list.
To add multiple non-adjacent samples at once, hold Ctrl on your keyboard, and click each sample in the Sample Browser. While still holding Ctrl, click and drag the last sample onto the Samples list.
To play a sample, click the icon next to the sample in the Sample Browser. During playback, click the icon to stop it.
To enable or disable automatic playback of samples, click Auto-Preview under the Samples list. When enabled, clicking a sample in the Samples list will play it. This is useful for quickly auditioning multiple samples assigned to the same velocity range (to ensure they’re an appropriate sound and volume for that velocity).
Tip: Use and on your keyboard to move through the list rather than clicking each one individually.
To set the order in which multiple samples will be triggered with each hit, click the Cycle Mode selector to switch between Round Robin and Random:
Round Robin: Each strike will trigger the next assigned sample in the list, from top to bottom.
Random: Each strike will trigger a random assigned sample in the list.
To reorder the samples in the Samples list, click and drag a sample in the list to the desired location, and release it.
To move a sample to another velocity range, click and drag it over the desired range in the Vel Range column and release it.
15
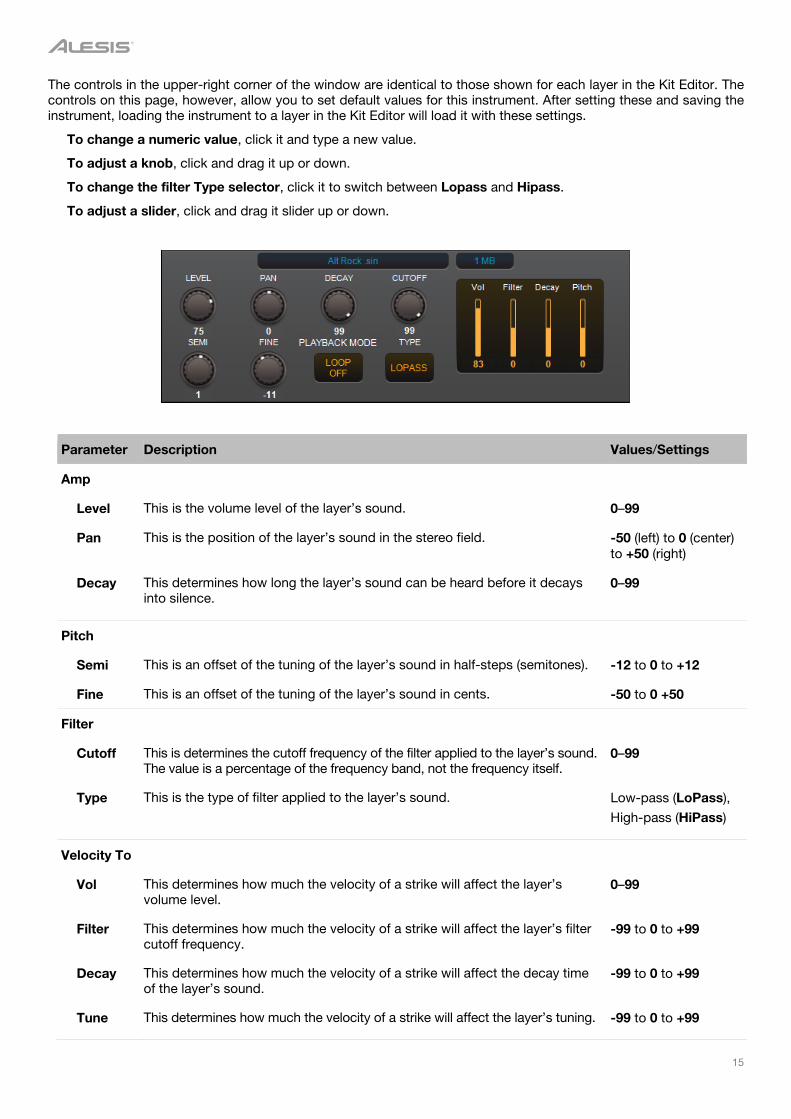
The controls in the upper-right corner of the window are identical to those shown for each layer in the Kit Editor. The controls on this page, however, allow you to set default values for this instrument. After setting these and saving the instrument, loading the instrument to a layer in the Kit Editor will load it with these settings.
To change a numeric value, click it and type a new value.
To adjust a knob, click and drag it up or down.
To change the filter Type selector, click it to switch between Lopass and Hipass.
To adjust a slider, click and drag it slider up or down.
Parameter Description Values/Settings
Amp
Level This is the volume level of the layer’s sound. 0–99
Pan This is the position of the layer’s sound in the stereo field. -50 (left) to 0 (center) to +50 (right)
Decay This determines how long the layer’s sound can be heard before it decays into silence.
0–99
Pitch
Semi This is an offset of the tuning of the layer’s sound in half-steps (semitones). -12 to 0 to +12
Fine This is an offset of the tuning of the layer’s sound in cents. -50 to 0 +50
Filter
Cutoff This is determines the cutoff frequency of the filter applied to the layer’s sound. The value is a percentage of the frequency band, not the frequency itself.
0–99
Type This is the type of filter applied to the layer’s sound. Low-pass (LoPass),
High-pass (HiPass)
Velocity To
Vol This determines how much the velocity of a strike will affect the layer’s volume level.
0–99
Filter This determines how much the velocity of a strike will affect the layer’s filter cutoff frequency.
-99 to 0 to +99
Decay This determines how much the velocity of a strike will affect the decay time of the layer’s sound.
-99 to 0 to +99
Tune This determines how much the velocity of a strike will affect the layer’s tuning. -99 to 0 to +99
16
Quick Instruments
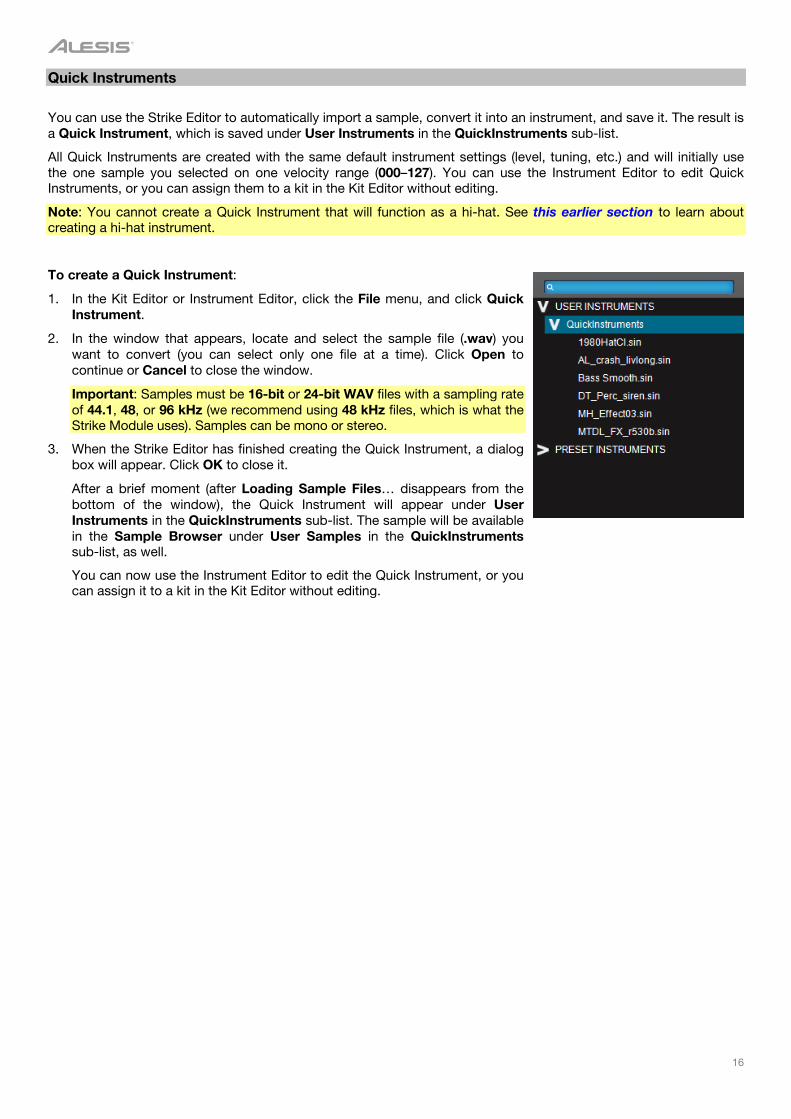
You can use the Strike Editor to automatically import a sample, convert it into an instrument, and save it. The result is a Quick Instrument, which is saved under User Instruments in the QuickInstruments sub-list.
All Quick Instruments are created with the same default instrument settings (level, tuning, etc.) and will initially use the one sample you selected on one velocity range (000–127). You can use the Instrument Editor to edit Quick Instruments, or you can assign them to a kit in the Kit Editor without editing.
Note: You cannot create a Quick Instrument that will function as a hi-hat. See this earlier section to learn about creating a hi-hat instrument.
To create a Quick Instrument:
1. In the Kit Editor or Instrument Editor, click the File menu, and click Quick Instrument.
2. In the window that appears, locate and select the sample file (.wav) you want to convert (you can select only one file at a time). Click Open to continue or Cancel to close the window.
Important: Samples must be 16-bit or 24-bit WAV files with a sampling rate of 44.1, 48, or 96 kHz (we recommend using 48 kHz files, which is what the Strike Module uses). Samples can be mono or stereo.
3. When the Strike Editor has finished creating the Quick Instrument, a dialog box will appear. Click OK to close it.
After a brief moment (after Loading Sample Files… disappears from the bottom of the window), the Quick Instrument will appear under User Instruments in the QuickInstruments sub-list. The sample will be available in the Sample Browser under User Samples in the QuickInstruments sub-list, as well.
You can now use the Instrument Editor to edit the Quick Instrument, or you can assign it to a kit in the Kit Editor without editing.
17
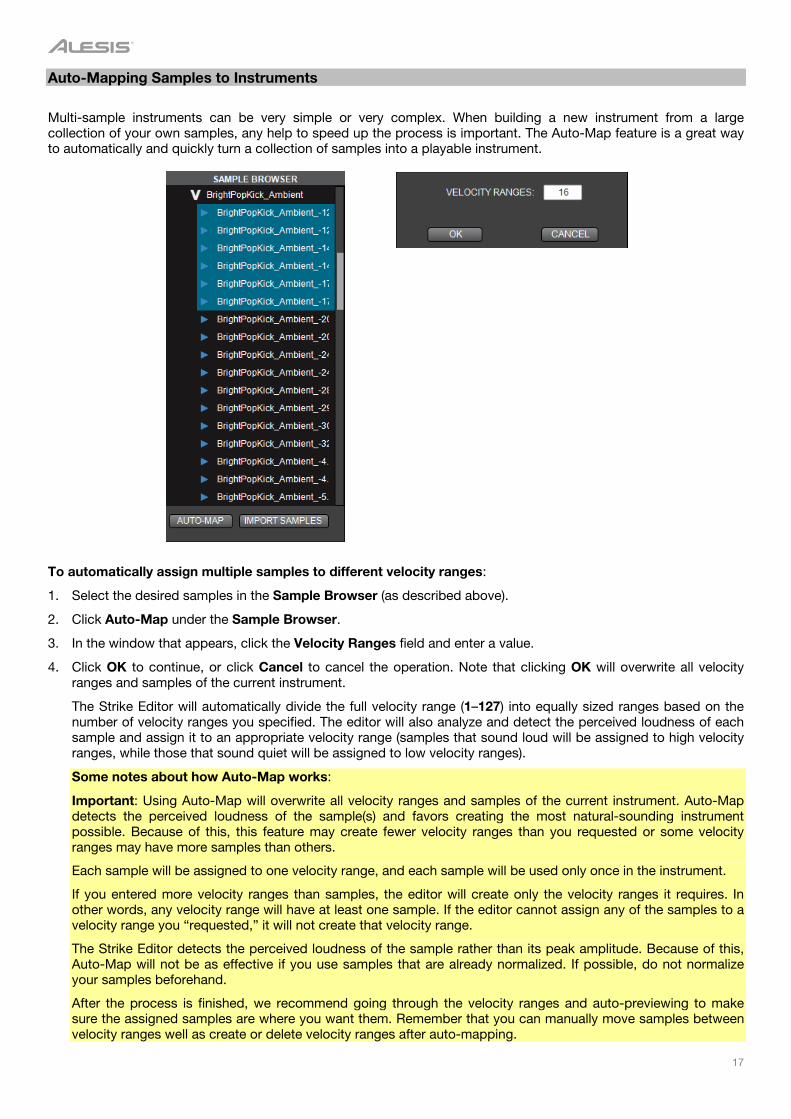
Auto-Mapping Samples to Instruments
Multi-sample instruments can be very simple or very complex. When building a new instrument from a large collection of your own samples, any help to speed up the process is important. The Auto-Map feature is a great way to automatically and quickly turn a collection of samples into a playable instrument.
To automatically assign multiple samples to different velocity ranges:
1. Select the desired samples in the Sample Browser (as described above).
2. Click Auto-Map under the Sample Browser.
3. In the window that appears, click the Velocity Ranges field and enter a value.
4. Click OK to continue, or click Cancel to cancel the operation. Note that clicking OK will overwrite all velocity ranges and samples of the current instrument.
The Strike Editor will automatically divide the full velocity range (1–127) into equally sized ranges based on the number of velocity ranges you specified. The editor will also analyze and detect the perceived loudness of each sample and assign it to an appropriate velocity range (samples that sound loud will be assigned to high velocity ranges, while those that sound quiet will be assigned to low velocity ranges).
Some notes about how Auto-Map works:
Important: Using Auto-Map will overwrite all velocity ranges and samples of the current instrument. Auto-Map detects the perceived loudness of the sample(s) and favors creating the most natural-sounding instrument possible. Because of this, this feature may create fewer velocity ranges than you requested or some velocity ranges may have more samples than others.
Each sample will be assigned to one velocity range, and each sample will be used only once in the instrument.
If you entered more velocity ranges than samples, the editor will create only the velocity ranges it requires. In other words, any velocity range will have at least one sample. If the editor cannot assign any of the samples to a velocity range you “requested,” it will not create that velocity range.
The Strike Editor detects the perceived loudness of the sample rather than its peak amplitude. Because of this, Auto-Map will not be as effective if you use samples that are already normalized. If possible, do not normalize your samples beforehand.
After the process is finished, we recommend going through the velocity ranges and auto-previewing to make sure the assigned samples are where you want them. Remember that you can manually move samples between velocity ranges well as create or delete velocity ranges after auto-mapping.
18
File Management
When you connect your Strike module to your computer via USB, your SD card (in the module’s SD card slot) will immediately appear on your desktop just as a typical storage device would.
Make sure to read Organizing Your Files to learn how to best save, name, import, and export your files.
Saving
You can use the Strike Editor to save samples, instruments, and kits onto your Strike module’s SD card.
In the Strike Editor, preset kits, instruments, and samples are “factory content” and will remain unchanged in your Strike module. When you save a kit or instrument, it is saved as a user kit or instrument. This way, you can use the preset kits, instruments, and samples as a starting point while keeping your own separate custom library.
Important: Saving a kit or instrument is different from exporting it. Also, you must save a kit before you export it.
• Saving a kit or instrument creates a kit file (.skt) or instrument file (.sin) that the Strike Editor references directly to use it.
• Exporting a kit or instrument creates a ZIP file that includes all of the necessary files that comprise that kit or instrument and places them in folder structure that the Strike Editor can access. You must import the ZIP file into the Strike Editor in order to use the exported kit or instrument.
To save a kit or instrument:
1. In the appropriate editor (Kit or Instrument), click the File menu and click Save As.
2. In the window that appears, enter a name for the file, and save it in the appropriate folder: save your kit files (.skt) in the Kits folder, and save your instrument files (.sin) in a subfolder in the Instruments folder (you can use the Save As window to create a subfolder). File names cannot be longer than 26 characters.
3. Click Save to save the file or Cancel to close the window without saving.
After you click Save, the module and editor will briefly refresh their respective drives so that you can start playing the kit or instrument immediately!
Note: If you save a kit on the Strike module while it is connected to your computer, your computer may show a “disk not ejected properly” message. This is normal for operating systems when an external device (instead of your computer) is saving to the SD card.
Please see Organizing Your Files to learn how to best save, name, import, and export your files.
Exporting Your (User) Content
You can export your user kits and instruments to your computer, so you can transfer or share them.
Important: Saving a kit or instrument is different from exporting it. Also, you must save a kit before you export it.
• Saving a kit or instrument creates a kit file (.skt) or instrument file (.sin) that the Strike Editor references directly to use it.
• Exporting a kit or instrument creates a ZIP file that includes all of the necessary files that comprise that kit or instrument and places them in folder structure that the Strike Editor can access. You must import the ZIP file into the Strike Editor in order to use it.
To export a kit or instrument:
1. In the Kit Editor or Instrument Editor, right-click a user kit (.skt) or user instrument (.sin), and click Export Kit File or Export Instrument File (respectively).
2. In the window that appears, enter a name for the file (.zip), and save it in the desired location. (The file name of the ZIP does not have to match the name of any kit or instrument.)
Note: The exported file is a standard ZIP file because the Strike Editor software automatically unzips this type of file when importing it.
3. Click Save to export the file or Cancel to close the window without saving.
Please see Organizing Your Files to learn how to best save, name, import, and export your files.
19
Importing Your (User) Content
When you connect your Strike module to your computer via USB—and both are powered on—your computer will automatically scan and display the SD card in your Strike module’s SD card slot. You can then use your computer to add or edit new kits, instruments, and samples to the SD card to use on your Strike module.
To import samples onto the SD card:
Tip: You can use the Strike Editor to automatically import samples and convert them into instruments (as long as it will not be used as a hi-hat instrument). See Creating & Editing Instruments > Quick Instruments to learn about this.
1. In the Instrument Editor, click Import Samples below the Sample Browser.
2. In the window that appears, locate and select the sample file/files (.wav). Click Open to continue or Cancel to close the window.
Important: Samples must be 16-bit or 24-bit WAV files with a sampling rate of 44.1, 48, or 96 kHz (we recommend using 48 kHz files, which is what the Strike Module uses). Samples can be mono or stereo.
3. In the window that appears, select a folder where you want to import your samples. You can click New Folder to create and name a new folder.
4. Click Select Folder to import the samples or X in the upper-right corner close the window without importing. The module and editor will briefly refresh their respective drives so that you can load the new samples from the Sample Browser.
To import kits or instruments onto the SD card:
1. In the Kit Editor or Instrument Editor, click the File menu, and then click Import User Content. (You can be in either the Kit Editor or Instrument Editor to import either kind of file. The Strike Editor will recognize it during the import process.)
2. In the window that appears, locate and select your previously exported kit or instrument (.zip).
3. Click Open to import the sample or Cancel to close the window without importing.
To use your computer’s Explorer (Windows) or Finder (macOS) to import kits, instruments, or samples onto the SD card, click and drag it from its current location into the folder that corresponds to the file type:
Place kit files (.skt) in the Kits folder.
Place instrument files (.sin) in a subfolder in the Instruments folder.
Place sample files (.wav) in a subfolder in the Samples folder.
Please see Organizing Your Files to learn how to best save, name, import, and export your files.
Importing Updated (Preset) Content
The Strike Editor can be also be used to update the preset content on your Strike module. These updates will come only from Alesis.
To import preset content into the Strike module:
1. Download the content update from alesis.com.
2. Click File and click Alesis Factory Content Update.
3. In the window that appears, locate and select the content update file (.bin) that you downloaded from the webpage for the Alesis Strike Kit or Strike Pro Kit.
4. Click Open to start the update or Cancel to close the window without updating.
Please see Organizing Your Files to learn how to best save, name, import, and export your files.
20
Organizing Your Files
When saving, naming, importing, and exporting files, please keep the following notes in mind:
• File names cannot be longer than 26 characters.
• On the Strike module, the Kits and Instruments folders will view only one subfolder level (i.e., one level of folders within the Kits or Instruments folders themselves). If you create folders with kit or instrument files on deeper levels, the files will still appear, but they will be shown only one subfolder level deep.
• You can place kit files (.skt) in the Kits folder without placing them in a subfolder. You cannot do this for instrument files (.sin), though—all instruments must be placed in a subfolder in the Instruments folder.
• If you create a subfolder in the Instruments folder but don’t place any instrument files (.sin) in it, they won’t appear in the instrument browser. There must be at least one instrument file in the subfolder for it to appear in the instrument browser.
• Each kit requires its component instruments to remain in the same location to function properly. Similarly, each instrument requires its component samples to remain in the same location. We highly recommend not moving, renaming, replacing, or deleting any instrument files or sample files. Doing so will cause the kits or instruments that use them to show a “path not found” message when the instrument is triggered (you can fix this by restoring the original file to its original location).
You can rename and move kits however you like (as long as their file names are no longer than 26 characters).
• When you record samples on the Strike module itself, these samples will appear in the root of the Samples folder.
Also, the sample file (.wav) will automatically include the name of its folder added to the file name (e.g., if you named a file 22 Kick when you saved it to the Acoustic subfolder, the actual file name will be Acoustic 22 Kick.wav).
Here are some more recommendations for keeping your files organized:
• When you add new samples to your Samples folder, we recommend organizing them by creating a subfolder for each instrument. This will make it easier to find in the Sample Browser—you can locate the folder with that instrument’s name and load all of its samples (rather than searching the Samples folder for one file at a time).
• We highly recommend not creating too many subfolder levels in the Samples folder. Adding more subfolder levels results in a longer time reading and loading samples.
21
Menu
Use the menu at the top of the window to access the following functions in the Strike Editor.
macOS users: The Alesis Strike Editor menu in the upper-left corner contains options for Quit Strike Editor and About Strike Editor, which are identical to the respective options for File > Exit and Help > About Strike Editor below.
File:
• New: In the Kit Editor, select this to create a new kit in the editor. In the Instrument Editor, select this to create a new instrument in the editor.
• Open: In the Kit Editor, select this to open an existing kit in the editor. In the Instrument Editor, select this to open an existing instrument in the editor. A window will appear so you can find and select the kit file (.skt) or instrument file (.sin).
• Save As: In the Kit Editor, select this to save the current kit in the editor. In the Instrument Editor, select this to save the current instrument in the editor. See File Management > Saving to learn how to do this.
• Alesis Factory Content Update: Select this to update the preset kits, instruments, and samples in the Strike module (after you have downloaded a content update from the Alesis website). A window will appear so you can find and select the content update file (.bin). You can use this feature only to update the preset content on the Strike module; you cannot add your own content to it.
• Exit: Select this to close the Strike Editor. (On macOS, the similar Quit Strike Editor option is in the Alesis Strike Editor menu.)
Mode:
• Kit Editor: Select this to enter the Kit Editor. If you are currently editing an instrument in the Instrument Editor, you will be asked if you want to save or discard your changes.
• Instrument Editor: Select this to enter the Instrument Editor. If you are currently editing a kit in the Kit Editor, you will be asked if you want to save or discard your changes.
Help:
• Open User Guide: Select this to open this user guide.
• About Strike Editor: Select this to show information about your current version of the editor. (On macOS, this option is in the Alesis Strike Editor menu.)

22
Trademarks & Licenses
Alesis is a trademark of inMusic Brands, Inc., registered in the U.S. and other countries.
macOS is a trademark of Apple Inc., registered in the U.S. and other countries.
Windows is a registered trademark of Microsoft Corporation in the United States and other countries.
All other product names, company names, trademarks, or trade names are those of their respective owners.

Related Documents