Sparkling Theme Documentation Home ą Support ą Sparkling Theme Documentation Table of Contents 1. Installation 2. Custom Menu 3. Custom Background 4. Custom Header Image (Logo) 5. Set up Homepage Featured Slider 6. Customization 7. How to Disable Page Comments 8. Recommended Image Sizes 9. How to set up Blog Page 10. Translation 11. Gallery 12. Footer Copyright 13. Call for Action 14. Custom Widgets 15. Social Media Icons 16. Widget Areas 1. Theme installation 1.1 Through Dashboard (Easy) 1. Go to Appearance -> Themes. 2. Click on Install Themes at the top. 3. Click on Upload tab 4. Upload “sparkling.zip” archive file via web interface 5. Activate newly installed theme 1.2 Manual Installation using FTP (Advanced) Go to Sparkling page at http://colorlib.com/wp/sparkling . Click on Download button to download theme on your Desktop. Unzip sparkling.zip on your Desktop. You should get folder called “sparkling”

Welcome message from author
This document is posted to help you gain knowledge. Please leave a comment to let me know what you think about it! Share it to your friends and learn new things together.
Transcript
Sparkling Theme Documentation Home ą Support ą Sparkling Theme Documentation
Table of Contents
1. Installation
2. Custom Menu
3. Custom Background
4. Custom Header Image (Logo)
5. Set up Homepage Featured Slider
6. Customization
7. How to Disable Page Comments
8. Recommended Image Sizes
9. How to set up Blog Page
10. Translation
11. Gallery
12. Footer Copyright
13. Call for Action
14. Custom Widgets
15. Social Media Icons
16. Widget Areas
1. Theme installation
1.1 Through Dashboard (Easy)
1. Go to Appearance -> Themes.
2. Click on Install Themes at the top.
3. Click on Upload tab
4. Upload “sparkling.zip” archive file via web interface
5. Activate newly installed theme
1.2 Manual Installation using FTP (Advanced)
Go to Sparkling page at http://colorlib.com/wp/sparkling .
Click on Download button to download theme on your Desktop.
Unzip sparkling.zip on your Desktop. You should get folder called “sparkling”
Access your host web server using your favorite FTP client (such as Cyberduck(Mac), FileZilla (Windows & Mac)
or other).
Navigate to /wp-content/themes/ and upload entire “sparkling” folder.
Now open WP Dashboard and go to Appearance -> Themes and activate Sparkling theme from there.
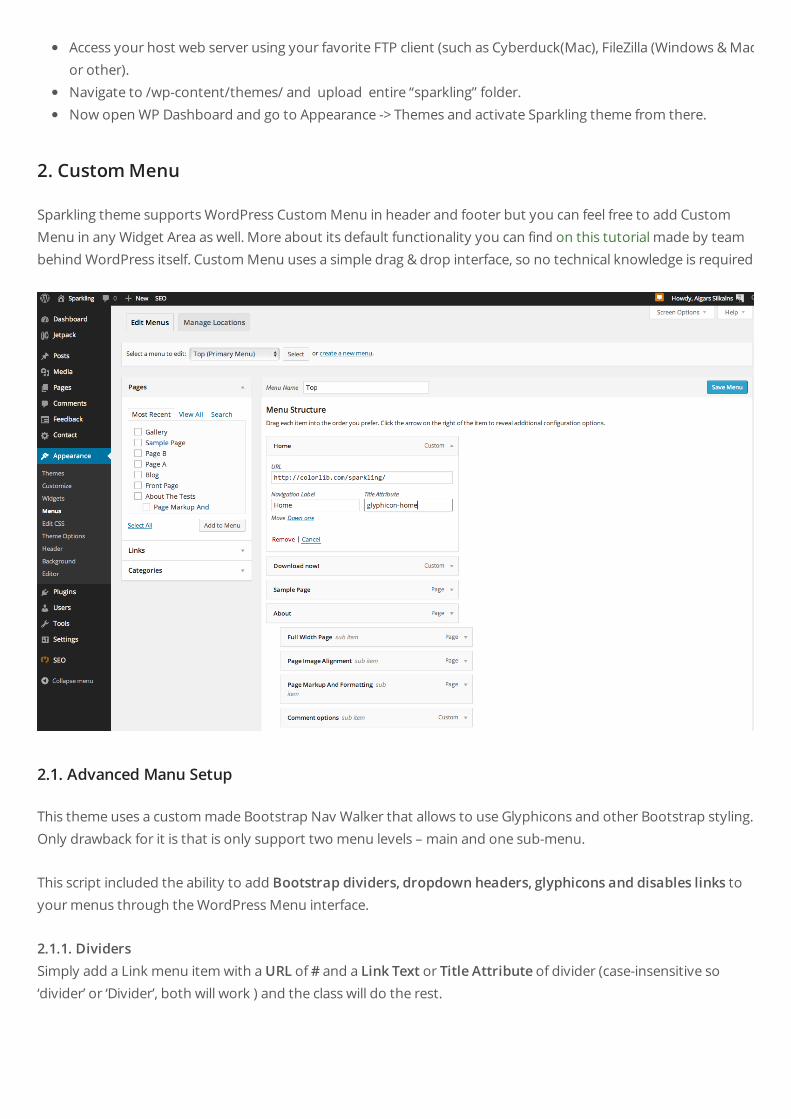
2. Custom Menu
Sparkling theme supports WordPress Custom Menu in header and footer but you can feel free to add Custom
Menu in any Widget Area as well. More about its default functionality you can find on this tutorial made by team
behind WordPress itself. Custom Menu uses a simple drag & drop interface, so no technical knowledge is required.
2.1. Advanced Manu Setup
This theme uses a custom made Bootstrap Nav Walker that allows to use Glyphicons and other Bootstrap styling.
Only drawback for it is that is only support two menu levels – main and one sub-menu.
This script included the ability to add Bootstrap dividers, dropdown headers, glyphicons and disables links to
your menus through the WordPress Menu interface.
2.1.1. DividersSimply add a Link menu item with a URL of # and a Link Text or Title Attribute of divider (case-insensitive so
‘divider’ or ‘Divider’, both will work ) and the class will do the rest.
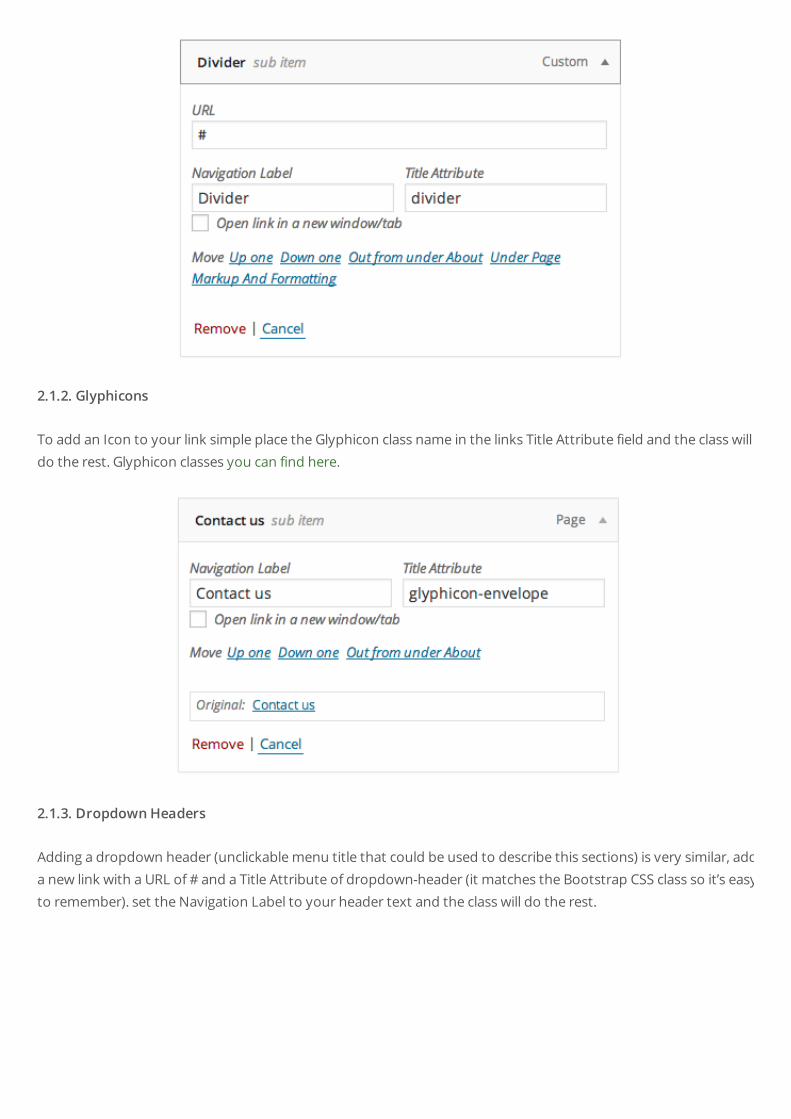
2.1.2. Glyphicons
To add an Icon to your link simple place the Glyphicon class name in the links Title Attribute field and the class willdo the rest. Glyphicon classes you can find here.
2.1.3. Dropdown Headers
Adding a dropdown header (unclickable menu title that could be used to describe this sections) is very similar, adda new link with a URL of # and a Title Attribute of dropdown-header (it matches the Bootstrap CSS class so it’s easyto remember). set the Navigation Label to your header text and the class will do the rest.
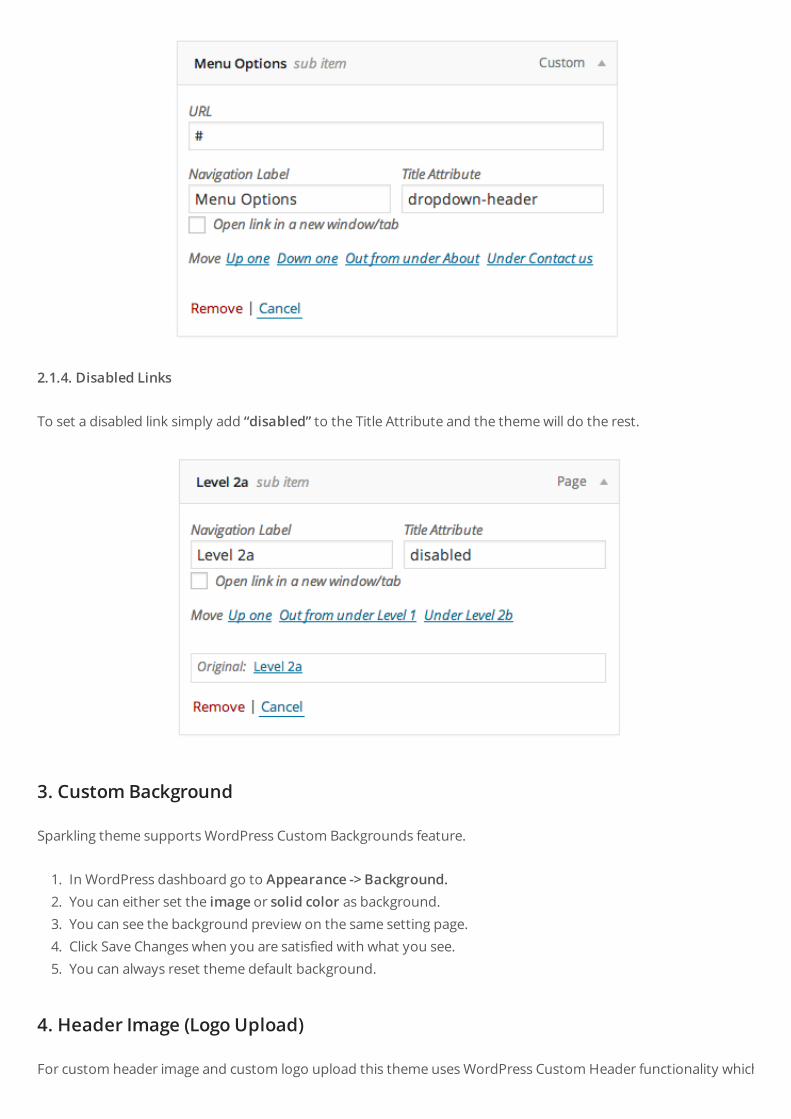
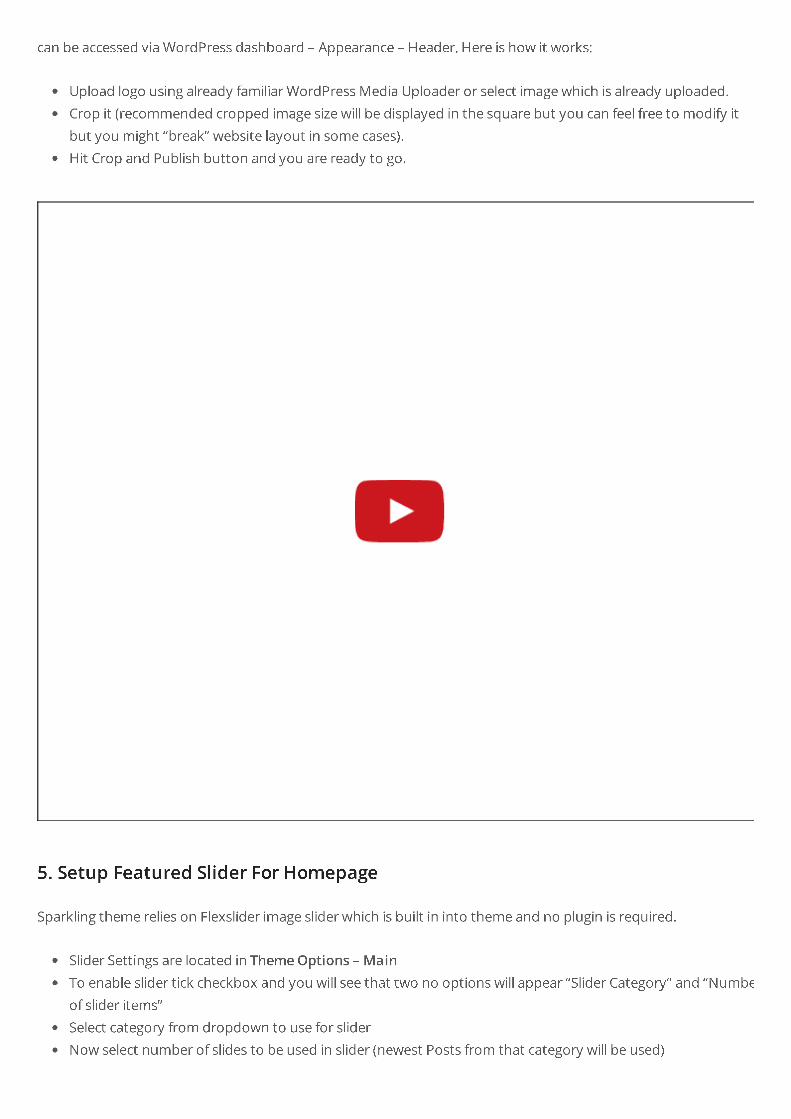
2.1.4. Disabled Links
To set a disabled link simply add “disabled” to the Title Attribute and the theme will do the rest.
3. Custom Background
Sparkling theme supports WordPress Custom Backgrounds feature.
1. In WordPress dashboard go to Appearance -> Background.
2. You can either set the image or solid color as background.
3. You can see the background preview on the same setting page.
4. Click Save Changes when you are satisfied with what you see.
5. You can always reset theme default background.
4. Header Image (Logo Upload)
For custom header image and custom logo upload this theme uses WordPress Custom Header functionality which
can be accessed via WordPress dashboard – Appearance – Header. Here is how it works:
Upload logo using already familiar WordPress Media Uploader or select image which is already uploaded.
Crop it (recommended cropped image size will be displayed in the square but you can feel free to modify it
but you might “break” website layout in some cases).
Hit Crop and Publish button and you are ready to go.
5. Setup Featured Slider For Homepage
Sparkling theme relies on Flexslider image slider which is built in into theme and no plugin is required.
Slider Settings are located in Theme Options – MainTo enable slider tick checkbox and you will see that two no options will appear “Slider Category” and “Number
of slider items”
Select category from dropdown to use for slider
Now select number of slides to be used in slider (newest Posts from that category will be used)
Make sure you have Featured Images uploaded and added for those Posts.
6. Customization
There are several customizations available for this theme via Appearance – Theme Options. You can changeelements color, link color, header menu style, footer color, social link color and many other aspects. If you feel thatyou can’t do something via web interface, please notify us via Support Forum.
7. How to Disable Comments for Page/Post
Open particular page on which you want to turn off comments via WP dashboard.Look for the Discussion box below the post editor box.It might be disabled but you can enable it via Screen Options on the upper right corner of Post/Page editscreen.Uncheck “Allow Comments” in the Discussion box and hit Update.
To disable Comments on posts “globally”. Go to Settings – Discussion – and untick “ Allow people to postcomments on new articles“. This will apply for new Posts. Post that are already published won’t be changed andwill still have open comments section.
8. Recommended Image Sizes
Featured Image (Blog and Single Post) is set to 750 by 410 pixels. Featured Slider Images. Personally I use 1920 by 550 pixel images for Sparkling Demo but you can feel free to useany other image size. Images won’t be scaled and you will get what you upload.
Please note! Images for slider is not resized and are displayed the same size you uploaded them. Other imagessuch as featured images for posts are resized automatically as you upload them.
9. How to set up Blog Page
Blog should be displayed by default on front page. If you have chosen to use Home Page as static like I have inTheme Demo you will have to setup blog page separately.
1. Create a new Page and name it “Blog” or whatever you feel right.2. Go to Setting – Reading and select “A static page (select below)”3. Now select previously created Page as “Posts page:”
10. Translation
Sparkling theme is translation ready and has translation files included. Please see this tutorial on how to translate
this or any other WordPress theme. Once you have translated Sparkling, please send translation files to use and
we will include them in the next theme update. We would really appreciate your contribution! You will also get
featured on our website and theme installation itself.
11. Gallery Page
Gallery page as on Sparkling Demo is created using Jetpack plugin, which is developed by the same team which is
behind WordPress itself.
1. Download and install Jetpack.
2. Enable function called “Tiled Galleries” via WordPress dashboard – Jetpack.
3. Create a Post/Page like you normally would.
4. Create WordPress gallery and set Tiled Mosaic under Gallery Settings on the right side of the Gallery Edit
Screen.
5. Now create gallery itselft (see video below)
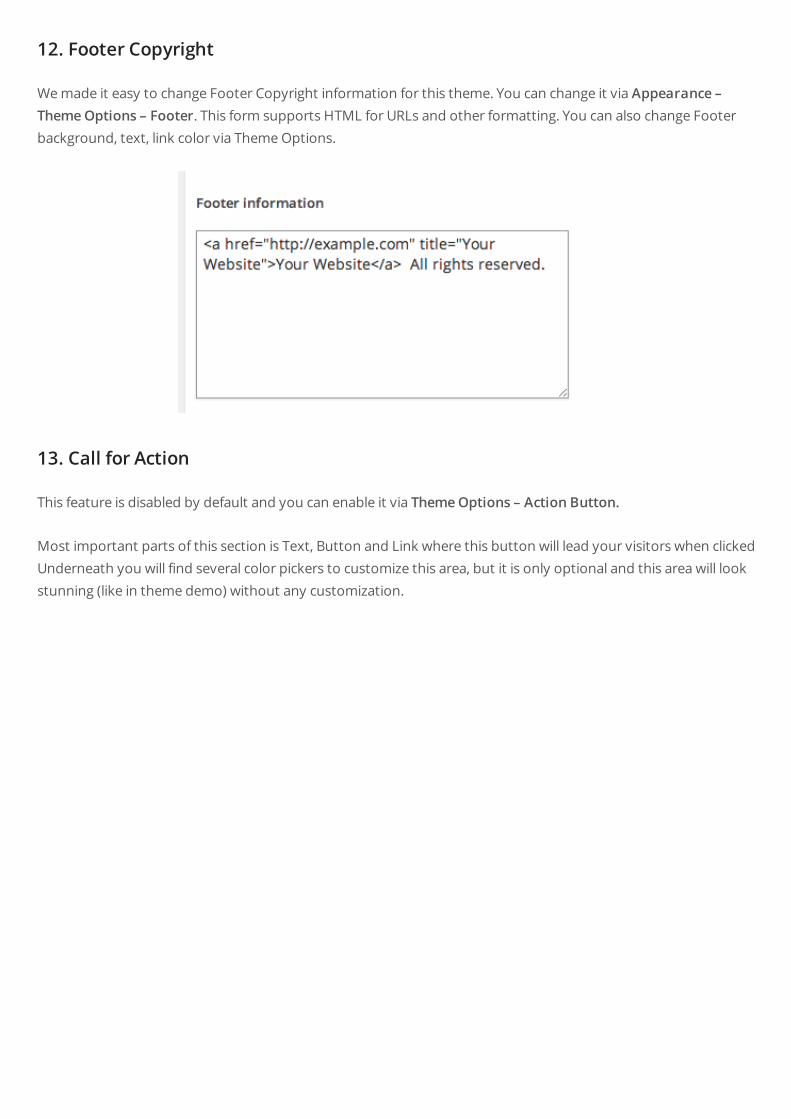
12. Footer Copyright
We made it easy to change Footer Copyright information for this theme. You can change it via Appearance –
Theme Options – Footer. This form supports HTML for URLs and other formatting. You can also change Footerbackground, text, link color via Theme Options.
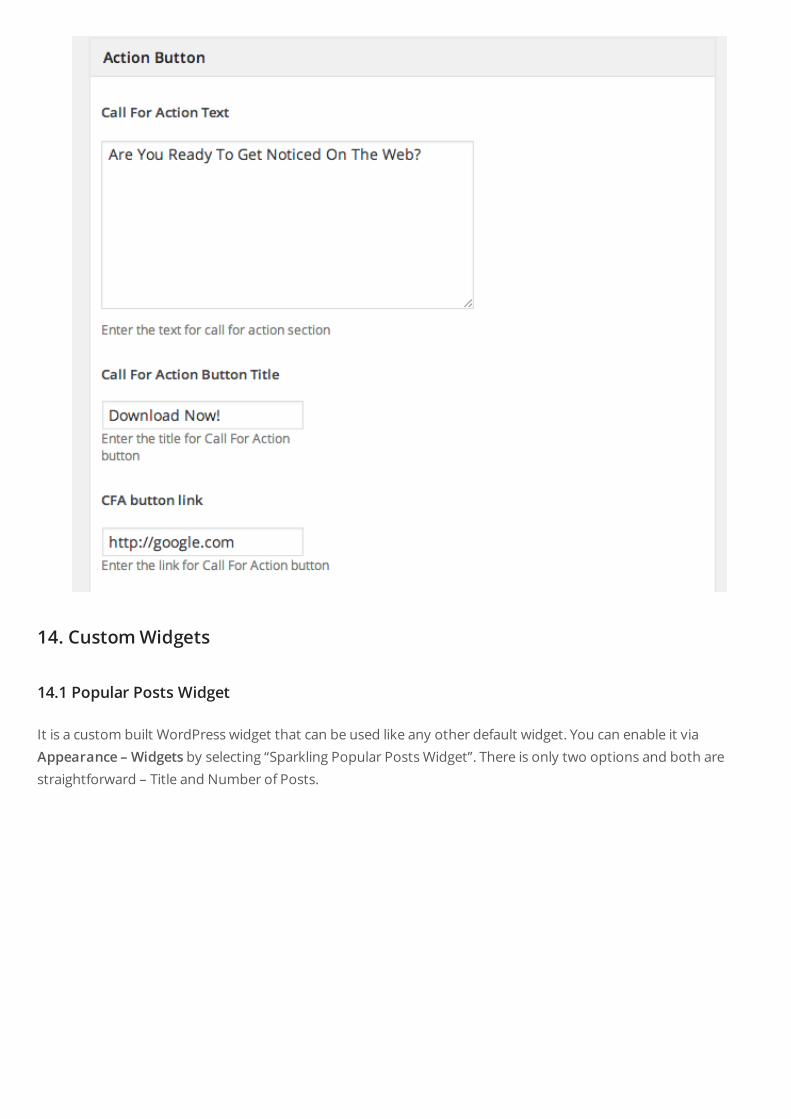
13. Call for Action
This feature is disabled by default and you can enable it via Theme Options – Action Button.
Most important parts of this section is Text, Button and Link where this button will lead your visitors when clicked.Underneath you will find several color pickers to customize this area, but it is only optional and this area will lookstunning (like in theme demo) without any customization.
14. Custom Widgets
14.1 Popular Posts Widget
It is a custom built WordPress widget that can be used like any other default widget. You can enable it viaAppearance – Widgets by selecting “Sparkling Popular Posts Widget”. There is only two options and both arestraightforward – Title and Number of Posts.
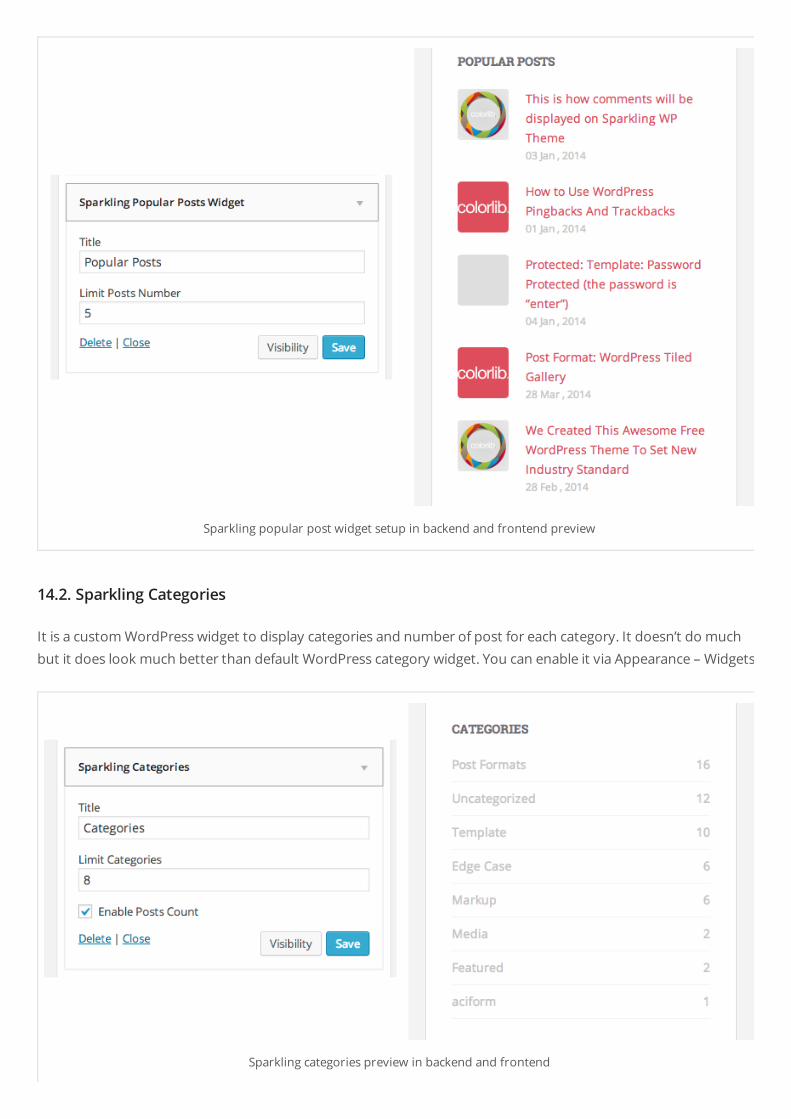
Sparkling popular post widget setup in backend and frontend preview
14.2. Sparkling Categories
It is a custom WordPress widget to display categories and number of post for each category. It doesn’t do muchbut it does look much better than default WordPress category widget. You can enable it via Appearance – Widgets.
Sparkling categories preview in backend and frontend
14.3. Sparkling Social Widget
Social Widget uses the same social profile links that you can configure via Theme Options – Social. This widget
doesn’t have any customization options except Title. It just works!
15. Social Media Icons
Social Media Icons can be enabled via Theme Options – Social. Below you will see several, one for each social
network. In those fields you should copy/paste URL to your actual social network profile. For example, our Twitter
URL would look like this “https://twitter.com/colorlib”. Now save changes and you are ready to go.
Social Media Icons by default will appear inside footer are but you can also use “Sparkling Social Widget” to add
them in other Widget Areas.
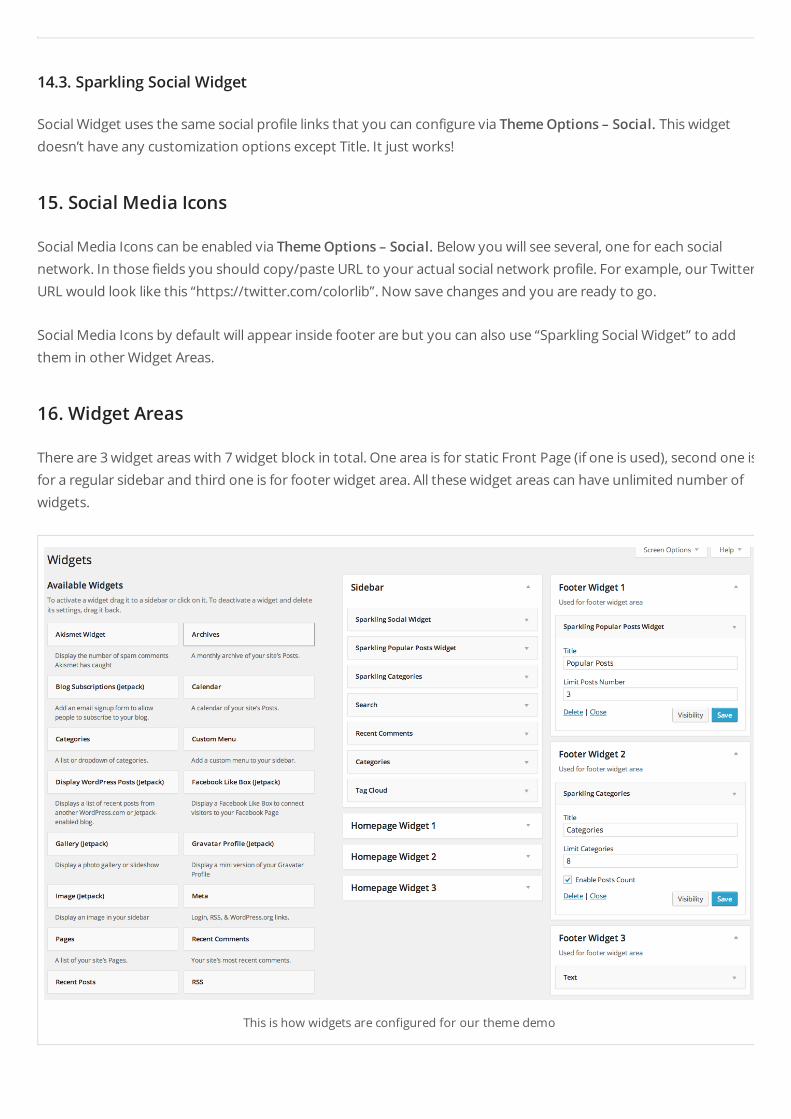
16. Widget Areas
There are 3 widget areas with 7 widget block in total. One area is for static Front Page (if one is used), second one is
for a regular sidebar and third one is for footer widget area. All these widget areas can have unlimited number of
widgets.
This is how widgets are configured for our theme demo
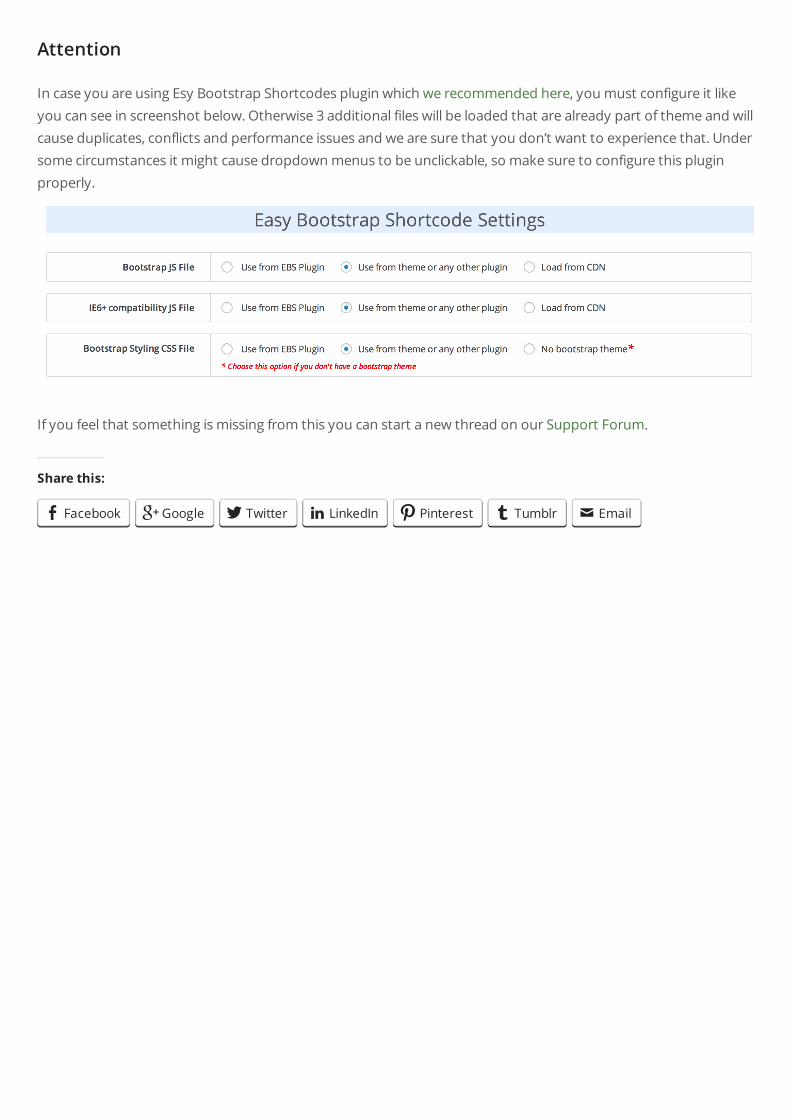
Attention
In case you are using Esy Bootstrap Shortcodes plugin which we recommended here, you must configure it like
you can see in screenshot below. Otherwise 3 additional files will be loaded that are already part of theme and will
cause duplicates, conflicts and performance issues and we are sure that you don’t want to experience that. Under
some circumstances it might cause dropdown menus to be unclickable, so make sure to configure this plugin
properly.
If you feel that something is missing from this you can start a new thread on our Support Forum.
Share this:
Facebook Google Twitter LinkedIn Pinterest Tumblr Email� � � � � � ;
Related Documents