SERVICE PROJECTS AMERICAN FORK HOSPITAL · PEDIATRICS ACTIVITY GRAB BAGS Please keep these as simple as possible. Put age appropriate contents in a gallon size zip-closeable bag. Please only include items that are BRAND NEW. Art supplies should also be non-toxic. Please do not put small pieces or small toys into bags for children ages 2 and up (items that could easily fit through a standard size tube from a roll of toilet paper), or items that have small pieces that could break off – these present a choking hazard. If these guidelines are not followed, we may not be able to accept your donation. Please label bags on the upper corner with a type written, adhesive, corresponding label in the upper right or left hand corner of the zip-closeable bag. A bag label for ages two and up should say, “Activity Grab Bag, Ages 2 and up with adult supervision”, and a bag label for ages four and up should say, “Activity Grab Bag, Ages 4 and up with adult supervision”. Try to include each of the suggested contents below. After using your best judgment, if you have questions about the age appropriateness of items, contact the child life office by email at [email protected] by phone at 801.855.3220. ACTIVITY GRAB BAG - AGES 2+ • Chubby crayons • Paper (plain or colored Xerox, card stock, or construction paper) • Stickers • Age appropriate toy (ex: stuffed animal, plastic animal figurines, etc) • PLEASE no beads or beading projects Please follow the guidelines regarding the activity bags. We may be unable to accept your donation if the guidelines are not met.

Welcome message from author
This document is posted to help you gain knowledge. Please leave a comment to let me know what you think about it! Share it to your friends and learn new things together.
Transcript

SERVICE PROJECTSAMERICAN FORK HOSPITAL · PEDIATRICS
ACTIVITY GRAB BAGSPlease keep these as simple as possible. Put age appropriate contents in a gallon size zip-closeable bag. Please only include items that are BRAND NEW. Art supplies should also be non-toxic.
Please do not put small pieces or small toys into bags for children ages 2 and up (items that could easily fit through a standard size tube from a roll of toilet paper), or items that have small pieces that could break off – these present a choking hazard.
If these guidelines are not followed, we may not be able to accept your donation.
Please label bags on the upper corner with a type written, adhesive, corresponding label in the upper right or left hand corner of the zip-closeable bag. A bag label for ages two and up should say, “Activity Grab Bag, Ages 2 and up with adult supervision”, and a bag label for ages four and up should say, “Activity Grab Bag, Ages 4 and up with adult supervision”.
Try to include each of the suggested contents below. After using your best judgment, if you have questions about the age appropriateness of items, contact the child life office by email at [email protected] by phone at 801.855.3220.
ACTIVITY GRAB BAG - AGES 2+
• Chubby crayons
• Paper (plain or colored Xerox, card stock, or construction paper)
• Stickers
• Age appropriate toy (ex: stuffed animal, plastic animal figurines, etc)
• PLEASE no beads or beading projects
Please follow the guidelines regarding the activity bags. We may be unable to accept your donation if the guidelines are not met.

ACTIVITY GRAB BAG - AGES 4+
• Crayons, colored pencils, or markers
• Paper (whatever is available: Xerox, card stock, construction, colored, etc)
• Stickers
• Age appropriate toys (ex: green combat figures, toy cars, bouncy balls, and bendable figures.) PLEASE NOTE: small, inexpensive toys can be found at www.orientaltrading.com, and can be ordered through any Partyland store to receive free shipping.
NOTE: Small, inexpensive toys can be found at www.orientaltrading.com and can be ordered through any Partyland store to receive free shipping.
• Chubby Crayons
• Crayons
• Paper (plain or colored Xerox, card stock, or construction paper)
• Coloring books
• Stickers
• Water color paints
• New, unused plush (stuffed animals)
• New board games
• New toys
• PLEASE no beads or beading projects
ART SUPPLIES FOR THE PEDIATRIC UNIT
NOTE: We do not accept beading projects (i.e. boondoggle kits, etc). These will be donated to the Boys and Girls Club in Provo.

PRE-SURGERY BAG
• Band-Aids
• Cotton balls
• Q-Tips
• Small pad of paper
• Pencil (not sharpened)
• 4” x 4” gauze sponge (Johnson & Johnson, Mirasorb)
• Tongue depressor, 2 (can be obtained at craft stores)
• Gloves
• Ear loop mask
These items are used in the Pre-Op Hop for children that will be having a surgical procedure. These bags let the children view some of the things that may be used on them, or that they may see during their procedure.
• New underwear – boys and girls
• New barrettes, hair bands
• New, unused plush (stuffed animals)
• New board games
• New toys
• Books – newer, gently used
PERSONAL ITEMS FOR THE ER AND PEDIATRIC UNIT

SEWN ITEMS
QUILT/BLANKETSIn consideration of the recipients, we appreciate blankets made in smoke-free, pet-free homes. Polar fleece blankets and tied or sewn quilts of all sizes (from crib to twin size) are welcome. Most donated quilts are given to patients to take home. The edges MUST be sewn and bound well.
HOSPITAL BUDDIESThese simple, stuffed muslin dolls are used for teaching children about medical procedures in a non-threatening and indirect way. Children are given these dolls for teaching, diversion, or to use for companionship when going to surgery. Children of all ages can personalize their own dolls by coloring them with markers provided by the hospital and eventually take them home. Pattern and instructions are on the following page.
FRO
NT
FRO
NT
BLANKET TYPE GOOD SIZE
Cribs 45” x 60”
Older kids 45” x 72”
Infants and babies 45” x 45”

PROCEDURE DOLL AND GOWNDolls can be made out of sheet-type fabric, preferably a light color, so the child can draw on the doll face. See the following pages for the pattern.
DOLL1. Cut out pattern piece B, leaving black outline on pattern. Fold B on fold line, tape or glue B to bottom of
A at placement line.2. Place pattern on fold of fabric and cut two: one for the front; one for the back.3. With right sides together, using a 1/4-inch seam, sew back and front together, leaving an opening as
shown on pattern. Back stitch to secure seams.4. Turn inside out and stuff with batting, starting with head, legs and arms. Stuff so doll is soft and
squeezable. Stuff body last.5. Hand sew the opening securely, being careful to fold seams into the doll.
GOWN1. Select fabric with a “happy print” (small flowers or striped design) for boys and girls.2. Each gown needs a piece of fabric measuring about 20” long and 16” wide.3. You will need bias tape, twill tape or ribbon for the neck, and one set of round Velcro (not adhesive
Velcro; Velcro will need to be sewn).4. Fold the piece of fabric in half evenly to measure 20” long and 8” wide.5. Line up pattern template on top of fabric with “front” on fold. Mark around and cut out.6. Place pattern template for “back” on fabric, mark and cut out two pieces.7. Zigzag or serge all raw edges.8. Start to sew at shoulder, then hem sleeve. Sew sides together, hem bottom and back opening (start
sewing from the bottom). Clip corners, curves as needed.9. Sew bias tape, twill tape, or ribbon to wrong side of neck, then top stitch down on right side.10. Sew circles of Velcro to close back.11. OPTIONAL: Make bow and attach to neck.

PROCEDURE DOLL GOWNMake a template
for each pieceRead complete instructions
before starting
Cut 1 on the fold
Cut 2
Front
Back

DOLL PATTERNPIECE A
PLACEMENTLINE FOR PIECE B
Place on FoldCUT 2
CUT 2
DOLL PATTERNPIECE B
FOLD LINE TOATTACH TO PIECE A
Plac
e on
Fol
d
CUTTIN
G LIN
E FOR LEG
S
HAND SEW
OPEN
ING
START STITCHING
PROCEDURE DOLLEN
D STITCHING

BOO-BOO BEARPlace pattern on fold x 2 for 1 bear.Two bears can be made from 1/3 yard of fabric.
1. Cut out front and back.2. Hand or machine stitch felt heart to the front of the bear.3. With right sides together, sew 1/4-inch seam around the
bear.4. Leave a 3-inch opening on a leg so it can be turned and
stuffed.5. Clip the curved edges. 6. Turn and stuff.7. Hand stitch the opening.

LEVEL II NURSERY GOODY BAGMoms with a baby in the Level II Nursery are given this goody bag to lift their spirits each day. The bag is simply a rectangle of fabric, folded longways, the sides sewn, and casing sewn on the top. A ribbon is then threaded through the casing.
The items for the bag are pictured, but you could load similar items. The idea is for the mom (and dad) to have a treat each day.
The image below is a printable form for the goody bag insert.
Almond Joy
Try to find the “joy” in the little things each day.
Peanuts Try not to go “nuts” under the stress of the Level II Nursery.
Extra Gum Take “extra” time for yourself.
Hand Lotion
To smooth the rough bumps along the way.
Life Savers Time away from the stress of the nursery can be a “lifesaver”.
Tootsie Rolls
Try and “roll” with the punches while on this roller coaster ride.
Hershey Hugs
A “hug” can keep you going.
Bubbles To “blow” your frustrations away.

COURAGE CAPESThese capes will be going to little boys and girls who are going through difficult or traumatic situations, who are in need of a little extra courage. Have fun and do your best work. The secret ingredient is love, so add plenty.
COURAGE CAPE INSTRUCTIONS• Cut thread into lengths of about 36” (this will be
easier to handle than longer lengths).
• Tie a knot at one end of the thread. Start between the layers of fabric to hide the knot.
• Take one stitch backwards before starting the running stitch (running stitch - - - - - -).
• When you are close to the end of your thread, take a stitch back and tie a knot between the fabric.
1. Center the yellow star on the red shield and pin it in place. Using yellow thread, sew the star onto the shield, using a running stitch, sewing close to edge of star. When finished, remove all pins.
2. Pin the shield 6” from the top and centered onto the front (shiny side) of the blue cape. To find the center, fold cape in half. With red thread sew the shield onto cape, using running stitch. When finished, remove pins.
3. Use the blue thread to make a 1/4” running stitch hem around the sides and bottom of the cape.
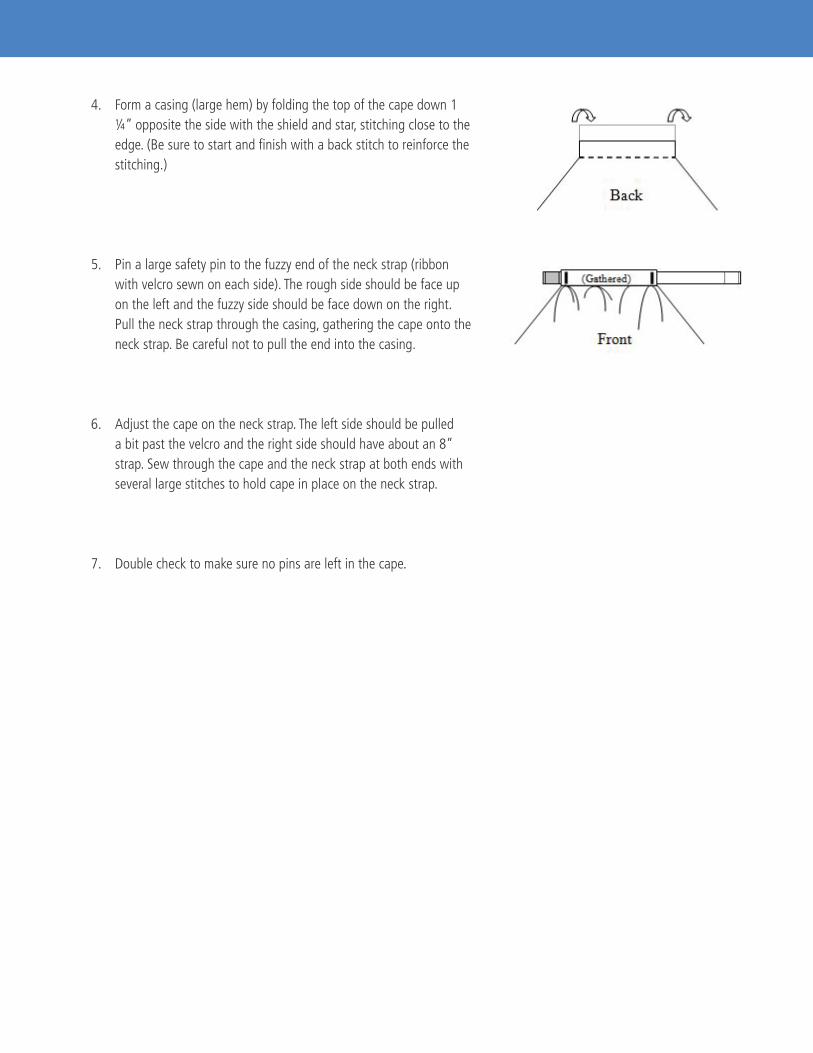
4. Form a casing (large hem) by folding the top of the cape down 1 ¼” opposite the side with the shield and star, stitching close to the edge. (Be sure to start and finish with a back stitch to reinforce the stitching.)
5. Pin a large safety pin to the fuzzy end of the neck strap (ribbon with velcro sewn on each side). The rough side should be face up on the left and the fuzzy side should be face down on the right. Pull the neck strap through the casing, gathering the cape onto the neck strap. Be careful not to pull the end into the casing.
6. Adjust the cape on the neck strap. The left side should be pulled a bit past the velcro and the right side should have about an 8” strap. Sew through the cape and the neck strap at both ends with several large stitches to hold cape in place on the neck strap.
7. Double check to make sure no pins are left in the cape.
Related Documents