WW-1 WIPER, WASHER & HORN K ELECTRICAL CONTENTS C D E F G H I J L M SECTION A B WW Revision: May 2004 2002 Altima PRECAUTION ........................................................... 2 Precautions for Supplemental Restraint System (SRS) “AIR BAG” and “SEAT BELT PRE-TEN- SIONER” ................................................................. 2 Wiring Diagrams and Trouble Diagnosis ................. 2 FRONT WIPER AND WASHER SYSTEM ................. 3 Components Parts and Harness Connector Loca- tion .......................................................................... 3 System Description ................................................. 3 LOW SPEED WIPER OPERATION ..................... 3 HI SPEED WIPER OPERATION .......................... 4 INTERMITTENT OPERATION ............................. 4 AUTO STOP OPERATION ................................... 4 WASHER OPERATION ........................................ 5 MIST OPERATION ............................................... 5 FAIL-SAFE FUNCTION ........................................ 5 CAN Communication System Description ............... 5 FOR TCS MODELS ............................................. 6 FOR A/T MODELS ............................................... 7 FOR M/T MODELS .............................................. 8 Wiring Diagram — WIPER — ............................... 10 Terminals and Reference Values for BCM ............ 12 Terminals and Reference Values for IPDM E/R .... 12 BCM Wiper Switch Reading Function ................... 13 OPERATION DESCRIPTION ............................. 13 TABLE OF BCM - COMBINATION SWITCH OPERATIONS .................................................... 14 SAMPLE OPERATION: (WIPER SWITCH TURNED TO LO POSITION) ............................. 14 OPERATING MODES ........................................ 15 INTERMITTENT OPERATION ........................... 16 Work Flow ............................................................. 16 Preliminary Inspection ........................................... 17 INSPECTION FOR POWER SUPPLY AND GROUND CIRCUIT ............................................ 17 CONSULT-II Functions .......................................... 17 CONSULT-II OPERATION ................................. 17 DATA MONITOR ................................................ 18 ACTIVE TEST .................................................... 19 Trouble Diagnosis ................................................. 19 FRONT WIPER DOES NOT OPERATE ............. 19 FRONT WIPER STOP POSITION IS INCOR- RECT .................................................................. 21 ONLY FRONT WIPER LOW DOES NOT OPER- ATE ..................................................................... 22 ONLY FRONT WIPER HI DOES NOT OPERATE ... 22 ONLY FRONT WIPER INT DOES NOT OPER- ATE ..................................................................... 23 FRONT WIPER INTERMITTENT OPERATION SWITCH POSITION CANNOT BE ADJUSTED ... 23 WIPERS DO NOT WIPE WHEN FRONT WASHER OPERATES ....................................... 24 Removal and Installation for Front Wiper Arms, Adjustment for Wiper Arms Stop Location ............. 24 Removal and Installation for Wiper Motor and Link- age ......................................................................... 25 REMOVAL .......................................................... 25 INSTALLATION .................................................. 25 Washer Nozzle Adjustment ................................... 26 Washer Tube Layout ............................................. 26 Removal and Installation for Wiper and Washer Switch .................................................................... 27 REMOVAL .......................................................... 27 INSTALLATION .................................................. 27 Removal and Installation for Washer Tank ............ 27 Removal and Installation for Washer Pump .......... 27 CIGARETTE LIGHTER ............................................ 28 Wiring Diagram — CIGAR — ................................ 28 Removal and Installation ....................................... 29 POWER SOCKET .................................................... 30 Wiring Diagram — CIGAR — ................................ 30 Removal and Installation ....................................... 31 HORN ....................................................................... 32 Wiring Diagram — HORN — ................................. 32 Removal and installation ....................................... 33 REMOVAL (HORN HIGH) .................................. 33 INSTALLATION (HORN HIGH) .......................... 33 REMOVAL (HORN LOW) ................................... 33 INSTALLATION (HORN LOW) ........................... 33

Welcome message from author
This document is posted to help you gain knowledge. Please leave a comment to let me know what you think about it! Share it to your friends and learn new things together.
Transcript
WW-1
WIPER, WASHER & HORN
K ELECTRICAL
CONTENTS
C
D
E
F
G
H
I
J
L
M
SECTION
A
B
WW
Revision: May 2004 2002 Altima
PRECAUTION ............................................................ 2Precautions for Supplemental Restraint System (SRS) “AIR BAG” and “SEAT BELT PRE-TEN-SIONER” .................................................................. 2Wiring Diagrams and Trouble Diagnosis .................. 2
FRONT WIPER AND WASHER SYSTEM .................. 3Components Parts and Harness Connector Loca-tion ........................................................................... 3System Description .................................................. 3
LOW SPEED WIPER OPERATION ...................... 3HI SPEED WIPER OPERATION ........................... 4INTERMITTENT OPERATION .............................. 4AUTO STOP OPERATION .................................... 4WASHER OPERATION ......................................... 5MIST OPERATION ................................................ 5FAIL-SAFE FUNCTION ......................................... 5
CAN Communication System Description ................ 5FOR TCS MODELS .............................................. 6FOR A/T MODELS ................................................ 7FOR M/T MODELS ............................................... 8
Wiring Diagram — WIPER — ................................ 10Terminals and Reference Values for BCM ............. 12Terminals and Reference Values for IPDM E/R ..... 12BCM Wiper Switch Reading Function .................... 13
OPERATION DESCRIPTION .............................. 13TABLE OF BCM - COMBINATION SWITCH OPERATIONS ..................................................... 14SAMPLE OPERATION: (WIPER SWITCH TURNED TO LO POSITION) .............................. 14OPERATING MODES ......................................... 15INTERMITTENT OPERATION ............................ 16
Work Flow .............................................................. 16Preliminary Inspection ............................................ 17
INSPECTION FOR POWER SUPPLY AND GROUND CIRCUIT ............................................. 17
CONSULT-II Functions ........................................... 17CONSULT-II OPERATION .................................. 17DATA MONITOR ................................................. 18ACTIVE TEST ..................................................... 19
Trouble Diagnosis .................................................. 19
FRONT WIPER DOES NOT OPERATE .............. 19FRONT WIPER STOP POSITION IS INCOR-RECT ................................................................... 21ONLY FRONT WIPER LOW DOES NOT OPER-ATE ...................................................................... 22ONLY FRONT WIPER HI DOES NOT OPERATE ... 22ONLY FRONT WIPER INT DOES NOT OPER-ATE ...................................................................... 23FRONT WIPER INTERMITTENT OPERATION SWITCH POSITION CANNOT BE ADJUSTED ... 23WIPERS DO NOT WIPE WHEN FRONT WASHER OPERATES ........................................ 24
Removal and Installation for Front Wiper Arms, Adjustment for Wiper Arms Stop Location .............. 24Removal and Installation for Wiper Motor and Link-age .......................................................................... 25
REMOVAL ........................................................... 25INSTALLATION ................................................... 25
Washer Nozzle Adjustment .................................... 26Washer Tube Layout .............................................. 26Removal and Installation for Wiper and Washer Switch ..................................................................... 27
REMOVAL ........................................................... 27INSTALLATION ................................................... 27
Removal and Installation for Washer Tank ............. 27Removal and Installation for Washer Pump ........... 27
CIGARETTE LIGHTER ............................................. 28Wiring Diagram — CIGAR — ................................. 28Removal and Installation ........................................ 29
POWER SOCKET ..................................................... 30Wiring Diagram — CIGAR — ................................. 30Removal and Installation ........................................ 31
HORN ........................................................................ 32Wiring Diagram — HORN — .................................. 32Removal and installation ........................................ 33
REMOVAL (HORN HIGH) ................................... 33INSTALLATION (HORN HIGH) ........................... 33REMOVAL (HORN LOW) .................................... 33INSTALLATION (HORN LOW) ............................ 33

WW-2
PRECAUTION
Revision: May 2004 2002 Altima
PRECAUTION PFP:00011
Precautions for Supplemental Restraint System (SRS) “AIR BAG” and “SEAT BELT PRE-TENSIONER” EKS002IH
The Supplemental Restraint System such as “AIR BAG” and “SEAT BELT PRE-TENSIONER”, used alongwith a front seat belt, helps to reduce the risk or severity of injury to the driver and front passenger for certaintypes of collision. Information necessary to service the system safely is included in the SRS and SB section ofthis Service Manual.WARNING:● To avoid rendering the SRS inoperative, which could increase the risk of personal injury or death
in the event of a collision which would result in air bag inflation, all maintenance must be per-formed by an authorized NISSAN/INFINITI dealer.
● Improper maintenance, including incorrect removal and installation of the SRS, can lead to per-sonal injury caused by unintentional activation of the system. For removal of Spiral Cable and AirBag Module, see the SRS section.
● Do not use electrical test equipment on any circuit related to the SRS unless instructed to in thisService Manual. SRS wiring harnesses can be identified by yellow and/or orange harnesses orharness connectors.
Wiring Diagrams and Trouble Diagnosis EKS002II
When you read wiring diagrams, refer to the following:● Refer to GI-12, "How to Read Wiring Diagrams" .● Refer to PG-3, "POWER SUPPLY ROUTING CIRCUIT" for power distribution circuit.When you perform trouble diagnosis, refer to the following:● Refer to GI-10, "HOW TO FOLLOW TEST GROUPS IN TROUBLE DIAGNOSES" .● Refer to GI-25, "How to Perform Efficient Diagnosis for an Electrical Incident" .

FRONT WIPER AND WASHER SYSTEM
WW-3
C
D
E
F
G
H
I
J
L
M
A
B
WW
Revision: May 2004 2002 Altima
FRONT WIPER AND WASHER SYSTEM PFP:28810
Components Parts and Harness Connector Location EKS002IJ
System Description EKS002IK
● All front wiper relays (HI, LO) are included in IPDM E/R.● Wiper switch (combination switch) is composed of a combination of 5 output terminals and 5 input termi-
nals. Terminal combination status is read by BCM when switch is turned ON.● BCM controls front wiper LO, HI, and INT (intermittent) operation.● IPDM E/R operates wiper motor according to CAN communication signals from BCM.
LOW SPEED WIPER OPERATIONPower is supplied at all times● from BCM (input 1) terminal 48● to combination switch terminal 1● to 20A fuse (No. 39, located in the IPDM E/R) and● through IPDM E/R terminal 42● to wiper motor terminal B.When the ignition switch is in the ON or START position, and front wiper switch is turned to LO position, front wiper LO contact in combination switch comes ON, and Power is supplied● through combination switch terminal 3● to BCM (output 3) terminal 50.When BCM determines that wiper switch is in LO position, it uses CAN communications andFront wiper request signal (LO) is sent ● from BCM terminals 70 and 71● to IPDM E/R terminals 48 and 49.When IPDM E/R receives front wiper request signal (LO), it turns ON front wiper relay (in IPDM E/R). Ground is supplied
WKIA0065E

WW-4
FRONT WIPER AND WASHER SYSTEM
Revision: May 2004 2002 Altima
● from wiper motor terminal L,● through IPDM E/R terminal 31 and front wiper relay ● to IPDM E/R terminal 16● through body grounds E15 and E24.With power and ground supplied, the front wiper motor operates at low speed.
HI SPEED WIPER OPERATIONPower is supplied at all times● from BCM (input 2) terminal 49● to combination switch terminal 2● to 20A fuse (No. 39, located in the IPDM E/R) and● through IPDM E/R terminal 42● to wiper motor terminal B.When the ignition switch is the ON or START position, and the front wiper switch is turned to HI position,front wiper HI contact in combination switch comes ON, andPower is supplied● through combination switch terminal 10● to BCM (output 3) terminal 41.When BCM determines that wiper switch is in HI position, it uses CAN communications andFront wiper request signal (HI) is sent to IPDM E/R● from BCM terminals 70 and 71 ● to IPDM E/R terminals 48 and 49.When the IPDM E/R receives front wiper request signal (HI), it energizes the front wiper relay and front wiperHI relay. Under this condition,Ground is supplied ● to front wiper motor terminal H ● through IPDM E/R terminal 30 and front wiper relay and front wiper HI relay● to IPDM E/R terminal 16● through body grounds E15 and E24.With power and ground supplied, the front wiper motor operates at high speed.
INTERMITTENT OPERATIONPower is supplied at all times● from BCM (input 2) terminal 49● to combination switch terminal 2.When the ignition switch is in ON or START position, and the front wiper switch is turned to INT position,the front wiper INT contact in the combination switch comes ON,and power is supplied● from combination switch terminal 1● to BCM (output 1) terminal 47.When BCM determines that combination switch status is front wiper INT ON, it performs the following opera-tions.● When BCM detects ON/OFF status of intermittent operation dial positions 1, 2, and 3 (in same way as
wiper INT), it determines wiper dial position status.● BCM calculates operation interval from wiper dial position and vehicle speed signal received from combi-
nation meter through CAN communications.● BCM sends front wiper request signal (INT) to IPDM E/R at calculated operation interval.When IPDM E/R receives front wiper request signal (INT), it turns ON internal front wiper relay. It then sendsauto-stop signal to BCM, and conducts intermittent front wiper motor operation.
AUTO STOP OPERATIONWith wiper switch turned OFF, wiper motor will continue to operate until wiper arms reach windshield base.When wiper arms are not located at base of windshield with wiper switch OFF, ground is provided

FRONT WIPER AND WASHER SYSTEM
WW-5
C
D
E
F
G
H
I
J
L
M
A
B
WW
Revision: May 2004 2002 Altima
● from terminal 31 of the IPDM E/R● to front wiper motor terminal L, in order to continue wiper motor operation at low speed.Ground is also supplied● through terminal 38 of the IPDM E/R● to front wiper motor terminal P● through terminal E of the front wiper motor and● through body grounds E15 and E24.When wiper arms reach base of windshield, front wiper motor terminals P and B are connected instead of ter-minals P and E. Then the IPDM E/R sends auto stop operation signal to BCM with CAN communication line.When BCM receives auto stop operation signal, BCM sends wiper stop signal to IPDM E/R with CAN commu-nication line.IPDM E/R stops wiper motor. Wiper motor will then stop wiper arms at the STOP position.
WASHER OPERATIONWhen the ignition switch is in ON or START position, power is supplied ● through 10A fuse (No. 46 located in the IPDM E/R)● through IPDM E/R terminal 18● to washer motor terminal +.When front wiper switch is turned to washer position,Ground is supplied ● to washer motor terminal -● through combination switch terminal 11 ● through combination switch terminal 12 ● from body grounds M57 and M61.With ground supplied, the front washer motor is operated, and at the same time, Power is supplied● through combination switch terminal 7 ● to BCM (output 2) terminal 40.When BCM detects that front washer motor has operated for 0.4 seconds or longer, BCM uses CAN commu-nication and sends wiper request signal to IPDM E/R for low speed operation of wipers.When BCM detects that washer switch is OFF, low speed operation cycles approximately 3 times and thenstops.
MIST OPERATIONWhen the wiper switch is turned to the mist position, wiper low speed operation cycles once and then stops.For additional information about wiper operation under this condition, refer to WW-3, "LOW SPEED WIPEROPERATION" .If the switch is held in the mist position, low speed operation continues.
FAIL-SAFE FUNCTIONBCM includes fail-safe function to prevent malfunction of electrical components controlled by CAN communi-cations if a malfunction in CAN communications occurs.BCM uses CAN communications to stop output of electrical components it controls.Until ignition switch is turned off, front wiper remains in same status as just before fail-safe control was initi-ated.(If wiper was in low speed operation just before fail-safe, it continues low speed operation until ignition switchis turned OFF.)When fail-safe status is initiated, BCM remains in standby until normal signals are received.When normal signals are received, fail-safe status is canceled.
CAN Communication System Description EKS002IL
CAN (Controller Area Network) is a serial communication line for real time application. It is an on-vehicle mul-tiplex communication line with high data communication speed and excellent error detection ability. Many elec-tronic control units are equipped onto a vehicle, and each control unit shares information and links with othercontrol units during operation (not independent). In CAN communication, control units are connected with 2

WW-6
FRONT WIPER AND WASHER SYSTEM
Revision: May 2004 2002 Altima
communication lines (CAN H line, CAN L line) allowing a high rate of information transmission with less wiring.Each control unit transmits/receives data but selectively reads required data only.
FOR TCS MODELSSystem Diagram
Input/Output Signal ChartT: Transmit R: Receive
LKIA0015E
Signals ECM TCMCOMBINA-
TION METER
BCMABS/TCS
control unitIPDM E/R
Engine speed signal T R R
Engine coolant temperature signal T R
Accelerator pedal position signal T
Fuel consumption monitor signal T R
A/T warning lamp signal T R
A/T position indicator signal R T R R(R range only) R
ABS operation signal R T
TCS operation signal R R T
Air conditioner switch signal R T
Air conditioner compressor signal R T
A/C compressor request signal T R
Cooling fan motor operation signal R T
Cooling fan speed request signal T R
Position lights request R T R
Position lights status R T
Low beam request T R
Low beam status R R T
High beam request R T R
High beam status R R T
Front fog lights request T R
Front fog light status R T
OD cancel switch signal R T R
Brake switch signal R T
Vehicle speed signalR T
R T R
Oil pressure switch R T
Sleep request1 R T
Sleep request2 T R
N range switch signal R T

FRONT WIPER AND WASHER SYSTEM
WW-7
C
D
E
F
G
H
I
J
L
M
A
B
WW
Revision: May 2004 2002 Altima
FOR A/T MODELSSystem Diagram
Input/Output Signal ChartT: Transmit R: Receive
P range switch signal R T
Seat belt buckle switch signal T R
Door switch signal R T R
Tail lamp request R T R
Turn indicator signal R T
Buzzer output signal R T
Trunk switch signal R T
ASCD main switch signal T R
ASCD cruise signal T R
Wiper operation R T
Wiper stop position signal R T
Rear window defogger switch signal T R
Rear window defogger control sig-nal
R R T
Signals ECM TCMCOMBINA-
TION METER
BCMABS/TCS
control unitIPDM E/R
LKIA0017E
Signals ECM TCMCOMBINATION
METERBCM IPDM E/R
Engine speed signal T R
Engine coolant temperature signal T R
Accelerator pedal position signal T R
Fuel consumption monitor signal T R
A/T warning lamp signal T R
A/T position indicator signal R T R R(R range only)
Air conditioner switch signal R T
Air conditioner compressor signal R T
A/C compressor request signal T R
Blower fan switch signal R(QR25DE) T
Cooling fan motor operation signal R T
Cooling fan speed request signal T R
Position lights request R T R
Position lights status R T
Low beam request T R

WW-8
FRONT WIPER AND WASHER SYSTEM
Revision: May 2004 2002 Altima
FOR M/T MODELSSystem Diagram
Input/Output Signal ChartT: Transmit R: Receive
Low beam status R R T
High beam request R T R
High beam status R R T
Front fog lights request T R
Front fog light status R T
OD cancel switch signal R T R
Brake switch signal R T
Vehicle speed signalR T
R T R
Oil pressure switch R T
Sleep request1 R T
Sleep request2 T R
N range switch signal R T
P range switch signal R T
Seat belt buckle switch signal T R
Door switch signal R T R
Tail lamp request R T R
Turn indicator signal R T
Buzzer output signal R T
Trunk switch signal R T
ASCD main switch signal T R
ASCD cruise signal T R
Wiper operation R T
Wiper stop position signal R T
Rear window defogger switch signal T R
Rear window defogger control signal R R T
Signals ECM TCMCOMBINATION
METERBCM IPDM E/R
LKIA0018E
Signals ECMCOMBINATION
METERBCM IPDM E/R
Engine speed signal T
Engine coolant temperature signal T
Fuel consumption monitor signal T
Air conditioner switch signal R T

FRONT WIPER AND WASHER SYSTEM
WW-9
C
D
E
F
G
H
I
J
L
M
A
B
WW
Revision: May 2004 2002 Altima
Air conditioner compressor signal R T
A/C compressor request signal T R
Blower fan switch signal R(QR25DE) T
Cooling fan motor operation signal R T
Cooling fan speed request signal T R
Position lights request R T R
Position lights status R T
Low beam request T R
Low beam status R R T
High beam request R T R
High beam status R R T
Front fog lights request T R
Front fog light status R T
Vehicle speed signal R T
Oil pressure switch R T
Sleep request1 R T
Sleep request2 T R
Seat belt buckle switch signal T R
Door switch signal R T R
Tail lamp request R T R
Turn indicator signal R T
Buzzer output signal R T
Trunk switch signal R T
ASCD main switch signal T R
ASCD cruise signal T R
Wiper operation R T
Wiper stop position signal R T
Rear window defogger switch signal T R
Rear window defogger control signal R R T
Signals ECMCOMBINATION
METERBCM IPDM E/R

WW-10
FRONT WIPER AND WASHER SYSTEM
Revision: May 2004 2002 Altima
Wiring Diagram — WIPER — EKS002IM
WKWA0116E

FRONT WIPER AND WASHER SYSTEM
WW-11
C
D
E
F
G
H
I
J
L
M
A
B
WW
Revision: May 2004 2002 Altima
WKWA0394E

WW-12
FRONT WIPER AND WASHER SYSTEM
Revision: May 2004 2002 Altima
Terminals and Reference Values for BCM EKS002IN
Terminals and Reference Values for IPDM E/R EKS002IO
Terminal No.
(Wire color)
Signal name
Measuring condition
Standard (V)Ignition switch
Operation or condition
7 (W/B) Battery ON — Approx. 12V
8 (B) Ground ON — Approx. 0
35 (G) IGN power ON — Approx. 12V
40 (R/B) Combination switch output 2 ON Light switch and wiper switch OFF
41 (R/G) Combination switch output 3 ON Light switch and wiper switch OFF
47 (R/W) Combination switch output 1 ON Light switch and wiper switch OFF
48 (G/W)Combination switch input 1
(Front washer, front wiper LO)ON Light switch and wiper switch OFF 4.5 or more
49 (G/B)Combination switch input 2 (Front wiper HI, front wiper
INT)ON Light switch and wiper switch OFF 4.5 or more
50 (G/R)Combination switch input 3 (intermittent operation dial
position 1) ON Light switch and wiper switch OFF 4.5 or more
51 (G/Y)Combination switch input 4 (intermittent operation dial
position 2) ON Light switch and wiper switch OFF 4.5 or more
52 (L/W)Combination switch input 5 (intermittent operation dial
position 3) ON Light switch and wiper switch OFF 4.5 or more
SKIA1119J
SKIA1119J
SKIA1119J
Terminal No.
(Wire color)
Signal name
Measuring conditionReference value (V)
(Approx.)Ignition switch
Operation or condition
14 (B) Ground ON — 0
18 (R/WL) Washer motor power ON Wiper switchOFF 12V
LO 0

FRONT WIPER AND WASHER SYSTEM
WW-13
C
D
E
F
G
H
I
J
L
M
A
B
WW
Revision: May 2004 2002 Altima
BCM Wiper Switch Reading Function EKS002IP
BCM reads combination switch (wiper switch) status, and controls front wipers based on the results.BCM is a combination of 5 output terminals (OUTPUT 1 - 5) and 5 input terminals (INPUT 1 - 5). It reads 20types of switch data and 5 types of diagnosis data.
OPERATION DESCRIPTIONBCM continuously outputs power voltage from input terminals (INPUT 1 - 5). At this time, output terminals(OUTPUT 1 - 5) operate transistors in sequence and carry current. If any switch (or switches) become ON atthis time, the input terminal corresponding to that switch detects current flowing, and BCM determines that theswitch is ON.
30 (L/B) Hi speed signal ON Wiper switchOFF 12V
HI 0
31 (L) Low speed signal ON Wiper switchOFF 12V
LO 0
38 (L/Y)Wiper position detection sig-
nalON Wiper switch: LO position
42 (R) Wiper motor power source ON — 12V
48 (L) CAN HI ON — —
49 (Y) CAN LO ON — —
Terminal No.
(Wire color)
Signal name
Measuring conditionReference value (V)
(Approx.)Ignition switch
Operation or condition
SKIA1132J
LKIA0095E

WW-14
FRONT WIPER AND WASHER SYSTEM
Revision: May 2004 2002 Altima
TABLE OF BCM - COMBINATION SWITCH OPERATIONSBCM reads operation status of combination switch using combinations shown in table below.
SAMPLE OPERATION: (WIPER SWITCH TURNED TO LO POSITION) ● When wiper switch is turned to LO position, front wiper LO contact inside combination switch becomes
ON. At this time, OUTPUT 3 transistor operates and BCM detects flow of current at INPUT 1.● When OUTPUT 3 transistor is ON and BCM detects current flowing at INPUT 1, BCM determines that
wiper switch is at LO. BCM uses CAN communication and sends front wiper signals to IPDM E/R.● When OUTPUT 3 transistor operates again and BCM again detects current flowing at INPUT 1, it confirms
that front wiper LO operation is continuing.
LKIA0097E

FRONT WIPER AND WASHER SYSTEM
WW-15
C
D
E
F
G
H
I
J
L
M
A
B
WW
Revision: May 2004 2002 Altima
NOTE:Each OUTPUT terminal transistor operates at 10 ms intervals. Therefore, a delay occurs between the switchbecoming ON and operation of the electric load. However, this delay is so small it is undetectable by humansenses.
OPERATING MODESThe following operation modes exist for combination switch reading function.
Normal statusWhen BCM is not in sleep status, OUTPUT terminals (1 - 5) each turn ON-OFF every 10 ms.
LKIA0100E
WW-16
FRONT WIPER AND WASHER SYSTEM
Revision: May 2004 2002 Altima
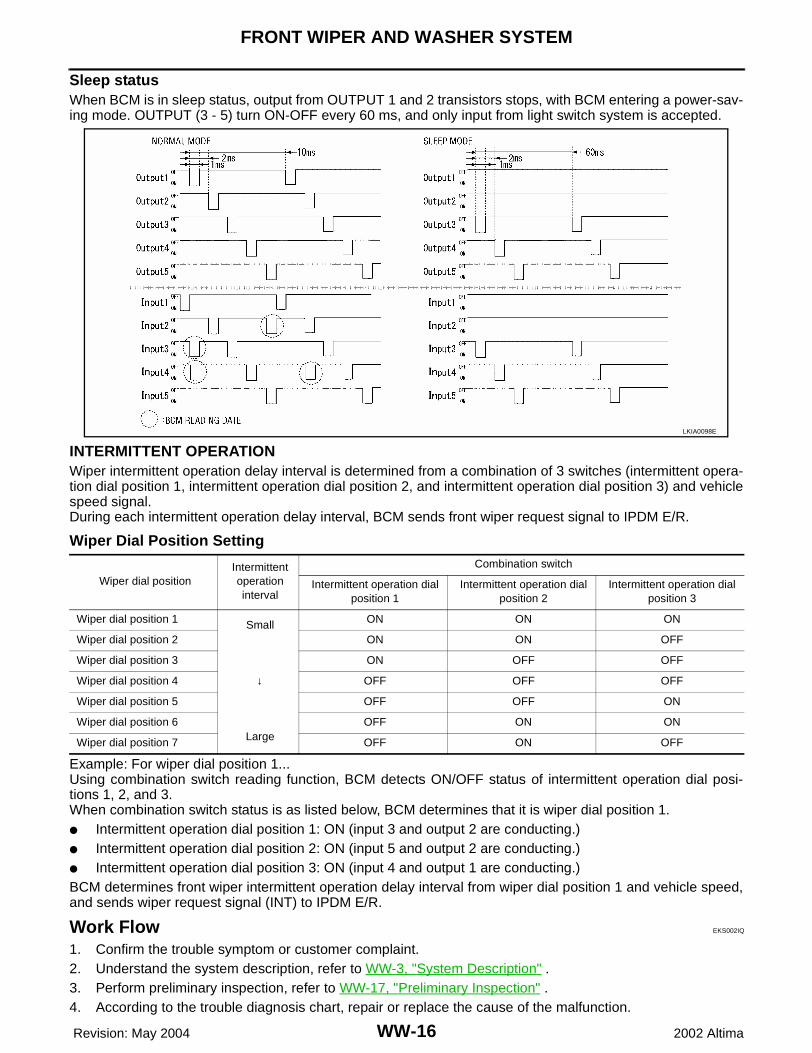
Sleep statusWhen BCM is in sleep status, output from OUTPUT 1 and 2 transistors stops, with BCM entering a power-sav-ing mode. OUTPUT (3 - 5) turn ON-OFF every 60 ms, and only input from light switch system is accepted.
INTERMITTENT OPERATIONWiper intermittent operation delay interval is determined from a combination of 3 switches (intermittent opera-tion dial position 1, intermittent operation dial position 2, and intermittent operation dial position 3) and vehiclespeed signal.During each intermittent operation delay interval, BCM sends front wiper request signal to IPDM E/R.
Wiper Dial Position Setting
Example: For wiper dial position 1...Using combination switch reading function, BCM detects ON/OFF status of intermittent operation dial posi-tions 1, 2, and 3. When combination switch status is as listed below, BCM determines that it is wiper dial position 1.● Intermittent operation dial position 1: ON (input 3 and output 2 are conducting.)● Intermittent operation dial position 2: ON (input 5 and output 2 are conducting.) ● Intermittent operation dial position 3: ON (input 4 and output 1 are conducting.) BCM determines front wiper intermittent operation delay interval from wiper dial position 1 and vehicle speed,and sends wiper request signal (INT) to IPDM E/R.
Work Flow EKS002IQ
1. Confirm the trouble symptom or customer complaint.2. Understand the system description, refer to WW-3, "System Description" .3. Perform preliminary inspection, refer to WW-17, "Preliminary Inspection" .4. According to the trouble diagnosis chart, repair or replace the cause of the malfunction.
LKIA0098E
Wiper dial positionIntermittent operation interval
Combination switch
Intermittent operation dial position 1
Intermittent operation dial position 2
Intermittent operation dial position 3
Wiper dial position 1 Small
↓
Large
ON ON ON
Wiper dial position 2 ON ON OFF
Wiper dial position 3 ON OFF OFF
Wiper dial position 4 OFF OFF OFF
Wiper dial position 5 OFF OFF ON
Wiper dial position 6 OFF ON ON
Wiper dial position 7 OFF ON OFF

FRONT WIPER AND WASHER SYSTEM
WW-17
C
D
E
F
G
H
I
J
L
M
A
B
WW
Revision: May 2004 2002 Altima
5. Does wiper function operate normally? If it operates normally, GO TO 6. If not, GO TO 4.6. End.
Preliminary Inspection EKS002IR
INSPECTION FOR POWER SUPPLY AND GROUND CIRCUITInspection procedure
1. CHECK FUSE
● Check if wiper and washer fuse is blown.
OK or NGOK >> GO TO 2.NG >> If fuse is blown, be sure to eliminate cause of problem before installing new fuse, refer to PG-3,
"POWER SUPPLY ROUTING CIRCUIT" .
2. GROUND CIRCUIT INSPECTION (BCM)
Check for continuity between the following terminals on BCM connector and body ground.
OK or NGOK >> Inspection endNG >> Replace the harness BCM ground circuit.
CONSULT-II Functions EKS002IS
CONSULT-II has functions for display of work support, self-diagnosis, data monitor, and active tests for eachpart, using received data and transmitted commands through communications lines from BCM.
CONSULT-II OPERATION1. With the ignition switch OFF, connect CONSULT-II to the vehi-
cle-side data link connector, then turn the ignition switch ON.2. Touch “START”.
Unit Power source Fuse No.
Front washer motor Ignition ON or START 46
Front wiper motor, front wiper relay, front wiper HI relay
Battery 39
Front wiper relay, front wiper HI relay Ignition ON or START 33
Unit (Connector)Terminals (wire color)
Ignition switch condition Continuity(+) (–)
BCM (E39) 8 (B)
Body ground OFF Continuity should existBCM (M20) 27 (B)
BCM (M18) 63 (B)
BCM diagnosis location
Check item, diagnosis mode
Description
WiperData monitor Displays BCM input data in real time.
Active test Load operation can be checked by applying a drive signal to load.
BBIA0002E

WW-18
FRONT WIPER AND WASHER SYSTEM
Revision: May 2004 2002 Altima
3. Touch “BCM” on the “SELECT SYSTEM” screen.
4. Select the desired part to be diagnosed on the “SELECT TESTITEM” screen.
DATA MONITOROperation Procedure1. Touch “WIPER” on the “SELECT TEST ITEM” screen.2. Touch “DATA MONITOR” on the “SELECT DIAG MODE” screen.3. Touch either “ALL SIGNALS” or “SELECTION FROM MENU” on the “DATA MONITOR” screen.
4. Touch “START”.5. When “SELECTION FROM MENU” is selected, touch items to be monitored. When “ALL SIGNALS” is
selected, all the items will be monitored.6. Touch “RECORD” while monitoring, then the status of the monitored item can be recorded. To stop
recording, touch “STOP”.
Display Item List
LIIA0033E
LKIA0099E
All signals Monitors all the items.
Selection from menu Selects and monitors the individual item selected.
Monitor item name “OPERATION OR UNIT”
Contents
IGN ON SW “ON/OFF”Displays “IGN Position (ON)/OFF, ACC Position (OFF)” status as judged from ignition switch signal.
FR WIPER INT “ON/OFF”Displays “Front Wiper INT (ON)/Other (OFF)” status as judged from wiper switch sig-nal.
FR WIPER LOW “ON/OFF”Displays “Front Wiper LOW (ON)/Other (OFF)” status as judged from wiper switch sig-nal.
FR WIPER HI “ON/OFF” Displays “Front Wiper HI (ON)/Other (OFF)” status as judged from wiper switch signal.
FR WASHER SW “ON/OFF”Displays “Front Washer Switch (ON)/Other (OFF)” status as judged from wiper switch signal.
INT VOLUME (1 - 7)Displays intermittent operation dial position setting (1 - 7) as judged from wiper switch signal.
VHCL SPEED SEN “ON/OFF” Displays “Driving (ON)/Stopped (OFF)” status as judged from vehicle speed signal.
FR WIPER STOP “ON/OFF” Displays “Stopped (ON)/Operating (OFF)” status as judged from the auto-stop signal.

FRONT WIPER AND WASHER SYSTEM
WW-19
C
D
E
F
G
H
I
J
L
M
A
B
WW
Revision: May 2004 2002 Altima
ACTIVE TESTOperation Procedure1. Touch “WIPERS” on the “SELECT TEST ITEM” screen.2. Touch “ACTIVE TEST” on the “SELECT DIAG MODE” screen.3. Touch item to be tested and check operation of the selected item.4. During the operation check, touching “BACK” deactivates the operation.
Display Item List
Trouble Diagnosis EKS002IT
FRONT WIPER DOES NOT OPERATE
1. IPDM E/R TO FRONT WIPERS (1) INSPECTION
1. Turn on front wipers using active test. Refer to WW-19, "ACTIVE TEST" . 2. Confirm front wiper operation.OK or NGOK >> GO TO 4.NG >> GO TO 2.
2. IPDM E/R TO FRONT WIPERS (2) INSPECTION
1. Disconnect IPDM E/R connector and front wiper motor connector.2. Check continuity between IPDM E/R harness connector termi-
nals and front wiper motor harness connector terminals.
3. Check continuity between IPDM E/R harness connector terminaland body ground.
OK or NGOK >> Connect connector. GO TO 3.NG >> ● Check for short circuit or open circuit in harness
between IPDM E/R and front wiper motor.● Check for open circuit in harness between IPDM E/R and body ground.
Test itemDisplay on CONSULT–II
screenDescription
Front wiper HI output FR WIPER (HI) Front wiper HI can be operated by any ON–OFF operation.
Front wiper LO output FR WIPER (LO) Front wiper LO can be operated by any ON-OFF operation.
Front wiper INT output FR WIPER (INT) Front wiper INT can be operated by any ON-OFF operation.
Terminals
ContinuityIPDM E/R Front wiper motor
ConnectorTerminal
(wire color)Connector
Terminal (wire color)
E122
30 (L/B)
E23
H (L/B)
YES31 (L) L (L)
38 (L/Y) P (L/Y)
Terminals Continuity
IPDM E/R
Body ground YESConnectorTerminal
(wire color)
E123 14 (B)
SKIA1160E
SKIA1161E

WW-20
FRONT WIPER AND WASHER SYSTEM
Revision: May 2004 2002 Altima
3. IPDM E/R INSPECTION
Select "FR WIPER HI" during active test. Refer to WW-19, "ACTIVETEST" . When front wiper relay, and front wiper HI relay are operat-ing, check voltage between IPDM E/R terminals and body ground.
OK or NGOK >> Replace wiper motor.NG >> Replace IPDM E/R.
4. COMBINATION SWITCH TO BCM (1) INSPECTION
Select BCM on Consult-II. Carry out self-diagnosis of “BCM C/U”.Displayed self-diagnosis resultsNo malfunction detected>> GO TO 5.CAN communications or CAN system>> Inspect the BCM CAN
communications system. Go to BCS-15, "CAN Commu-nication Inspection Using CONSULT-II (Self-Diagnosis)".
OPEN DETECT 1 - 5>>Combinations switch system malfunction.Go to BCS-16, "Combination Switch Inspection Accord-ing to Self-Diagnostic Results" .
5. COMBINATION SWITCH TO BCM (2) INSPECTION
Select BCM on Consult-II. With “WIPER” data monitor, check that“FR WIPER INT”, “FR WIPER LOW” and “FR WIPER HI” turn ON-OFF according to operation of wiper switch.OK or NGOK >> Replace BCM.NG >> Replace wiper switch.
Terminals
VoltageIPDM E/R(+)
Ground
ConditionConnector Terminal (wire color)
E122
31 (L)Stopped Battery voltage
LO operation Approx. 0V
30 (L/B)Stopped Battery voltage
HI operation Approx. 0V
42 (R) — Battery voltage
SKIA1162E
LKIA0106E
LKIA0102E

FRONT WIPER AND WASHER SYSTEM
WW-21
C
D
E
F
G
H
I
J
L
M
A
B
WW
Revision: May 2004 2002 Altima
FRONT WIPER STOP POSITION IS INCORRECT
1. IPDM E/R TO WIPER MOTOR (1) INSPECTION
Select BCM on Consult-II. With “WIPER” data monitor, check that“FR WIPER STOP” turns ON-OFF according to wiper operation.OK or NGOK >> Replace IPDM E/R.NG >> GO TO 2.
2. IPDM E/R TO WIPER MOTOR (2) INSPECTION
1. Disconnect IPDM E/R connector and front wiper motor connector.2. Check continuity between IPDM E/R harness connector terminal
and front wiper motor harness connector terminal.
3. Check continuity between front wiper motor harness connectorterminal E and body ground.
OK or NGOK >> Connect connector. GO TO 3.NG >> ● Check for short circuit or open circuit in harness
between IPDM E/R and front wiper motor.● Check for open circuit in harness between front wiper motor and body ground.
LKIA0102E
Terminals
ContinuityIPDM E/R Front wiper motor
ConnectorTerminal
(wire color)Connector
Terminal (wire color)
E122 38 (L/Y) E23 P (L/Y) YES
SKIA1163E
Terminals Continuity
IPDM E/R
Ground YESConnector Terminal (wire color)
E23 E (B)
SKIA1164E

WW-22
FRONT WIPER AND WASHER SYSTEM
Revision: May 2004 2002 Altima
3. IPDM E/R TO WIPER MOTOR (3) INSPECTION
While front wiper motor is stopped and while operating, measurevoltage between IPDM E/R terminal 38 and body ground.
OK or NGOK >> Replace IPDM E/R.NG >> Replace front wiper motor.
ONLY FRONT WIPER LOW DOES NOT OPERATE
1. COMBINATION SWITCH TO BCM INSPECTION
Select BCM on Consult–II. With “WIPER” data monitor, check that“FR WIPER LOW” turns ON-OFF according to operation of wiperswitch.OK or NGOK >> Replace BCM.NG >> Replace wiper switch.
ONLY FRONT WIPER HI DOES NOT OPERATE
1. IPDM E/R TO FRONT WIPERS (1) INSPECTION
1. Select "FR WIPER HI" during active test. Refer to WW-19, "ACTIVE TEST" .2. Verify that front wipers operate in HI operation mode.OK or NGOK >> GO TO 4.NG >> GO TO 2.
2. IPDM E/R TO FRONT WIPERS (2) INSPECTION
1. Disconnect IPDM E/R connector and front wiper motor connector.2. Check continuity between IPDM E/R vehicle side connector ter-
minals and front wiper motor harness connector terminals.
OK or NGOK >> Connect connector. GO TO 3.NG >> Check for short circuit or open circuit in harness between IPDM E/R and front wiper motor.
Terminals
Voltage(Approx.)
IPDM E/R (+)
Ground (–)
ConditionConnector
Terminal (wire color)
E122 38 (L/Y)Wiper operating 0V
Wiper stopped 12V
WKIA0171E
LKIA0102E
Terminals
ContinuityIPDM E/R Front wiper motor
ConnectorTerminal
(wire color)Connector
Terminal (wire color)
E12230 (L/B)
E23H (L/B)
YES42 (R) B (R)
SKIA1166E

FRONT WIPER AND WASHER SYSTEM
WW-23
C
D
E
F
G
H
I
J
L
M
A
B
WW
Revision: May 2004 2002 Altima
3. IPDM E/R INSPECTION
Select "FR WIPER HI" during active test. Refer to WW-19, "ACTIVETEST" . When front wiper relay (HI) is operating, check continuitybetween IPDM E/R terminal 30 and terminal 14.
OK or NGOK >> Replace wiper motor.NG >> Replace IPDM E/R.
4. COMBINATION SWITCH TO BCM INSPECTION
Select BCM on Consult-II. With “WIPER” data monitor, check that“FR WIPER HI” turns ON-OFF according to operation of wiperswitch.OK or NGOK >> Replace BCM.NG >> Replace wiper switch.
ONLY FRONT WIPER INT DOES NOT OPERATE
1. COMBINATION SWITCH TO BCM INSPECTION
Select BCM on Consult-II. With “WIPER” data monitor, check that“FR WIPER INT” turns ON-OFF according to operation of wiperswitch.OK or NGOK >> Replace BCM.NG >> Replace wiper switch.
FRONT WIPER INTERMITTENT OPERATION SWITCH POSITION CANNOT BE ADJUSTED
1. COMBINATION SWITCH TO BCM INSPECTION
Select BCM on Consult-II. With “WIPER” data monitor, check that“INT VOLUME” changes in order from 1 to 7 according to operationof the intermittent switch dial position.OK or NGOK >> Replace BCM.NG >> Replace wiper switch.
Terminals
ContinuityIPDM E/R
Connector Terminal (wire color) Terminal (wire color)
E122 30 (L/B) 14 (B) YES
WKIA0172E
LKIA0102E
LKIA0102E
LKIA0102E

WW-24
FRONT WIPER AND WASHER SYSTEM
Revision: May 2004 2002 Altima
WIPERS DO NOT WIPE WHEN FRONT WASHER OPERATES
1. COMBINATION SWITCH TO BCM INSPECTION
Select BCM on Consult-II. With “WIPER” data monitor, check that“FR WASHER SW” turns ON-OFF according to operation of frontwasher switch.OK or NGOK >> Replace BCM.NG >> Replace wiper switch.
Removal and Installation for Front Wiper Arms, Adjustment for Wiper Arms Stop Location EKS002IU
1. Prior to wiper arm installation, turn on wiper switch to operatewiper motor and then turn it “OFF” (Auto Stop).
2. Lift the blade up and then set it down onto glass surface to setthe blade center to clearance “L1” & “L2” immediately beforetightening nut.
3. Eject washer fluid. Turn on wiper switch to operate wiper motorand then turn it “OFF”.
4. Ensure that wiper blades stop within clearance “L1” & “L2”.
● Before reinstalling wiper arm, clean up the pivot area as illus-trated. This will reduce possibility of wiper arm looseness.
● Tighten wiper arm nuts to specified torque.
LKIA0102E
Clearance “L1” : 24.5 - 39.5 mm (0.965 - 1.555 in)Clearance “L2” : 32.5 - 47.5 mm (1.280 - 1.870 in)
Front wiper arm nuts
: 20.6 - 26.5 N·m(2.1 - 2.7 kg-m, 16 - 19 ft-lb)
SEL543TA
SEL024J

FRONT WIPER AND WASHER SYSTEM
WW-25
C
D
E
F
G
H
I
J
L
M
A
B
WW
Revision: May 2004 2002 Altima
Removal and Installation for Wiper Motor and Linkage EKS002IV
REMOVAL1. Operate the wiper motor, and stop it at the auto stop position.2. Remove wiper arm from the vehicle.3. Remove the cowl top cover, refer to EI-18, "Removal and Installation" .4. Disconnect wiper motor connector.5. Remove bracket and wiper motor assembly.
INSTALLATION1. Connect wiper motor to connector. Turn the wiper switch ON to operate wiper motor, then turn the wiper
switch OFF (auto stop).2. Disconnect wiper motor connector.3. Install wiper motor assembly to the vehicle.
4. Connect wiper motor connector. Turn the wiper switch ON to operate the wiper motor, then turn wiperswitch OFF (auto stop).
5. Install cowl top cover, refer to EI-18, "Removal and Installation" .6. Install wiper arms, refer to WW-24, "Removal and Installation for Front Wiper Arms, Adjustment for Wiper
Arms Stop Location" .CAUTION:● Do not drop the wiper motor or cause it to contact other parts.
WKIA0066E
1. Wiper link 2. Wiper link 3. Wiper frame
4. Wiper motor
WKIA0067E
Wiper motor assembly bolts
: 3.8 - 5.1 N·m (0.39 - 0.52 kg-m, 33.9 - 45.1 in-lb)

WW-26
FRONT WIPER AND WASHER SYSTEM
Revision: May 2004 2002 Altima
● Check the grease conditions of the motor arm and wiper link joint (at retainer). Apply grease ifnecessary.
Washer Nozzle Adjustment EKS002IW
● Adjust washer nozzle with suitable tool as shown.
Unit: mm (in)
Washer Tube Layout EKS002IX
Adjustable range: ±10°
SEL241P
*1 350 (13.78) *5 135 (5.31)
*2 190 (7.48) *6 230 (9.06)
*3 320 (12.60) *7 275 (10.83)
*4 135 (5.31) *8 440 (17.32)
SEL544T
WKIA0069E

FRONT WIPER AND WASHER SYSTEM
WW-27
C
D
E
F
G
H
I
J
L
M
A
B
WW
Revision: May 2004 2002 Altima
Removal and Installation for Wiper and Washer Switch EKS002IY
REMOVAL 1. Remove steering column cover.2. Remove wiper washer switch connector. 3. Pinch tabs at wiper and washer switch base and slide switch
away from steering column to remove.
INSTALLATION Installation is in the reverse order of removal.
Removal and Installation for Washer Tank EKS002IZ
1. Pull out washer tank inlet.
2. Remove fender protector, refer to EI-20, "Removal and Installa-tion" .
3. Remove washer pump connector.4. Remove washer tank installation screw.5. Remove washer hose, and remove the washer tank from the
vehicle.CAUTION:After installation, add water up to the upper level of the washertank inlet, and check for water leaks. Washer tank installation screw
Removal and Installation for Washer Pump EKS002J0
1. Remove fender protector, refer to EI-20, "Removal and Installation" .2. Remove washer pump connector and hose.3. Pull out washer pump in the direction of the arrow as shown,
and remove the washer pump from the washer tank.CAUTION:When installing washer pump, there should be no packingtwists, etc.
WKIA0071E
WKIA0072E
Tightening torque: 3.9 - 5.0 N·m(0.39 - 0.52 kg-m, 34 - 45 in-lb)
WKIA0073E
WKIA0282E

WW-28
CIGARETTE LIGHTER
Revision: May 2004 2002 Altima
CIGARETTE LIGHTER PFP:35330
Wiring Diagram — CIGAR — EKS002J1
WKWA0081E

CIGARETTE LIGHTER
WW-29
C
D
E
F
G
H
I
J
L
M
A
B
WW
Revision: May 2004 2002 Altima
Removal and Installation EKS002J2
1. Remove the A/T finisher (A/T models), refer to IP-14, "A/T Finisher" , or remove the M/T finisher (M/T models), refer to IP-14, "M/T Finisher" .
2. Remove console box finisher.3. Remove socket.4. Press out ring from the back of console box finisher.
WKIA0075E

WW-30
POWER SOCKET
Revision: May 2004 2002 Altima
POWER SOCKET PFP:253A2
Wiring Diagram — CIGAR — EKS002J3
WKWA0082E
POWER SOCKET
WW-31
C
D
E
F
G
H
I
J
L
M
A
B
WW
Revision: May 2004 2002 Altima
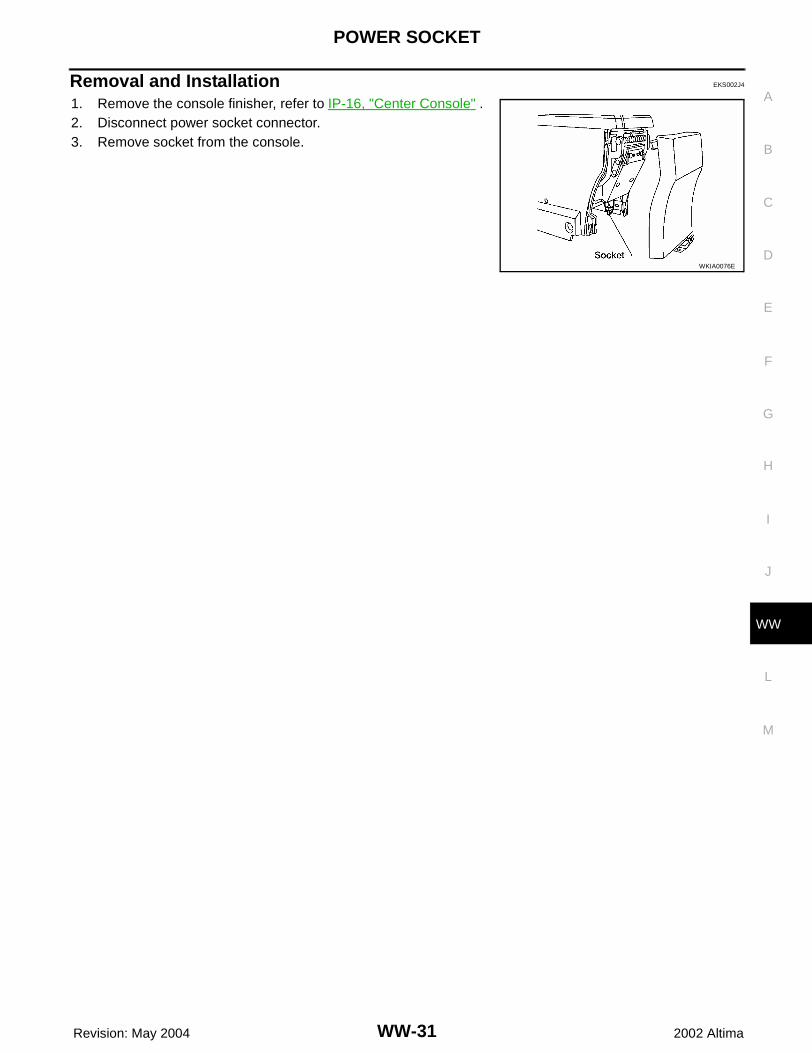
Removal and Installation EKS002J4
1. Remove the console finisher, refer to IP-16, "Center Console" .2. Disconnect power socket connector.3. Remove socket from the console.
WKIA0076E

WW-32
HORN
Revision: May 2004 2002 Altima
HORN PFP:25610
Wiring Diagram — HORN — EKS002J5
WKWA0083E

HORN
WW-33
C
D
E
F
G
H
I
J
L
M
A
B
WW
Revision: May 2004 2002 Altima
Removal and installation EKS002J6
REMOVAL (HORN HIGH)1. Remove right headlamp, refer to LT-25, "Removal and Installa-
tion" .2. Disconnect horn connector.3. Remove horn.
INSTALLATION (HORN HIGH)Tighten horn bolt to specified torque.
REMOVAL (HORN LOW)1. Remove left headlamp, refer to LT-25, "Removal and Installa-
tion" .2. Disconnect horn connector.3. Remove horn.
INSTALLATION (HORN LOW)Tighten horn bolt to specified torque.
WKIA0077E
Horn bolt : 15.6-18.6 N·m (1.6-1.8 kg-m, 12-13 ft-lb)
WKIA0078E
Horn bolt : 15.6-18.6 N·m (1.6-1.8 kg-m, 12-13 ft-lb)

WW-34
HORN
Revision: May 2004 2002 Altima
Related Documents


