Citrix ® Repeater 6.0 Quick Start Guide: Repeater 500/1000/1500/2000 for NetScaler ® SDX 11505/13505/17555/19555 Platform Citrix ® NetScaler ® 9.3.e

Repeater NS QuickStart SDX Guide
Dec 29, 2015
Welcome message from author
This document is posted to help you gain knowledge. Please leave a comment to let me know what you think about it! Share it to your friends and learn new things together.
Transcript
Citrix® Repeater 6.0 Quick StartGuide: Repeater 500/1000/1500/2000
for NetScaler® SDX11505/13505/17555/19555 Platform
Citrix® NetScaler® 9.3.e

Copyright and Trademark Notice© CITRIX SYSTEMS, INC., 2012. ALL RIGHTS RESERVED. NO PART OF THIS DOCUMENT MAY BEREPRODUCED OR TRANSMITTED IN ANY FORM OR BY ANY MEANS OR USED TO MAKE DERIVATIVE WORK(SUCH AS TRANSLATION, TRANSFORMATION, OR ADAPTATION) WITHOUT THE EXPRESS WRITTENPERMISSION OF CITRIX SYSTEMS, INC.
ALTHOUGH THE MATERIAL PRESENTED IN THIS DOCUMENT IS BELIEVED TO BE ACCURATE, IT ISPRESENTED WITHOUT WARRANTY OF ANY KIND, EXPRESS OR IMPLIED. USERS MUST TAKE ALLRESPONSIBILITY FOR THE USE OR APPLICATION OF THE PRODUCT(S) DESCRIBED IN THIS MANUAL.
CITRIX SYSTEMS, INC. OR ITS SUPPLIERS DO NOT ASSUME ANY LIABILITY THAT MAY OCCUR DUE TO THEUSE OR APPLICATION OF THE PRODUCT(S) DESCRIBED IN THIS DOCUMENT. INFORMATION IN THISDOCUMENT IS SUBJECT TO CHANGE WITHOUT NOTICE. COMPANIES, NAMES, AND DATA USED INEXAMPLES ARE FICTITIOUS UNLESS OTHERWISE NOTED.
The following information is for FCC compliance of Class A devices: This equipment has been tested and found tocomply with the limits for a Class A digital device, pursuant to part 15 of the FCC rules. These limits are designed toprovide reasonable protection against harmful interference when the equipment is operated in a commercialenvironment. This equipment generates, uses, and can radiate radio-frequency energy and, if not installed and used inaccordance with the instruction manual, may cause harmful interference to radio communications. Operation of thisequipment in a residential area is likely to cause harmful interference, in which case users will be required to correct theinterference at their own expense.
Modifying the equipment without Citrix' written authorization may result in the equipment no longer complying with FCCrequirements for Class A digital devices. In that event, your right to use the equipment may be limited by FCCregulations, and you may be required to correct any interference to radio or television communications at your ownexpense.
You can determine whether your equipment is causing interference by turning it off. If the interference stops, it wasprobably caused by the NetScaler appliance. If the NetScaler equipment causes interference, try to correct theinterference by using one or more of the following measures:
Move the NetScaler equipment to one side or the other of your equipment.
Move the NetScaler equipment farther away from your equipment.
Plug the NetScaler equipment into an outlet on a different circuit from your equipment. (Make sure the NetScalerequipment and your equipment are on circuits controlled by different circuit breakers or fuses.)
Modifications to this product not authorized by Citrix Systems, Inc., could void the FCC approval and negate yourauthority to operate the product.
BroadCom is a registered trademark of BroadCom Corporation. Fast Ramp, NetScaler, and NetScaler Request Switchare trademarks of Citrix Systems, Inc. Linux is a registered trademark of Linus Torvalds. Internet Explorer, Microsoft,PowerPoint, Windows and Windows product names such as Windows NT are trademarks or registered trademarks ofthe Microsoft Corporation. NetScape is a registered trademark of Netscape Communications Corporation. Red Hat is atrademark of Red Hat, Inc. Sun and Sun Microsystems are registered trademarks of Sun Microsystems, Inc. Otherbrand and product names may be registered trademarks or trademarks of their respective holders.
Software covered by the following third party copyrights may be included with this product and will also be subject to thesoftware license agreement: Copyright 1998 © Carnegie Mellon University. All rights reserved. Copyright © David L.Mills 1993, 1994. Copyright © 1992, 1993, 1994, 1997 Henry Spencer. Copyright © Jean-loup Gailly and Mark Adler.Copyright © 1999, 2000 by Jef Poskanzer. All rights reserved. Copyright © Markus Friedl, Theo de Raadt, Niels Provos,Dug Song, Aaron Campbell, Damien Miller, Kevin Steves. All rights reserved. Copyright © 1982, 1985, 1986,1988-1991, 1993 Regents of the University of California. All rights reserved. Copyright © 1995 Tatu Ylonen, Espoo,Finland. All rights reserved. Copyright © UNIX System Laboratories, Inc. Copyright © 2001 Mark R V Murray. Copyright1995-1998 © Eric Young. Copyright © 1995,1996,1997,1998. Lars Fenneberg. Copyright © 1992. LivingstonEnterprises, Inc. Copyright © 1992, 1993, 1994, 1995. The Regents of the University of Michigan and Merit Network,Inc. Copyright © 1991-2, RSA Data Security, Inc. Created 1991. Copyright © 1998 Juniper Networks, Inc. All rightsreserved. Copyright © 2001, 2002 Networks Associates Technology, Inc. All rights reserved. Copyright (c) 2002Networks Associates Technology, Inc. Copyright 1999-2001 © The Open LDAP Foundation. All Rights Reserved.Copyright © 1999 Andrzej Bialecki. All rights reserved. Copyright © 2000 The Apache Software Foundation. All rightsreserved. Copyright (C) 2001-2003 Robert A. van Engelen, Genivia inc. All Rights Reserved. Copyright (c) 1997-2004University of Cambridge. All rights reserved. Copyright (c) 1995. David Greenman. Copyright (c) 2001 Jonathan Lemon.All rights reserved. Copyright (c) 1997, 1998, 1999. Bill Paul. All rights reserved. Copyright (c) 1994-1997 Matt Thomas.

All rights reserved. Copyright © 2000 Jason L. Wright. Copyright © 2000 Theo de Raadt. Copyright © 2001 PatrikLindergren.
All rights reserved.
Last Updated: March 2012
Document code: May 15 2012 05:40:31

Quick Installation and Configuration
Welcome to the Citrix Repeater SDX product line, which consists of:
w Repeater 500 for NetScaler SDX 11505, with a maximum bandwidth of 500 Mbps, and
w Repeater 1000 for NetScaler SDX 13505, with a maximum bandwidth of 1,000 Mbps.
w Repeater 1500 for NetScaler SDX 17555, with a maximum bandwidth of 1,500 Mbps.
w Repeater 2000 for NetScaler SDX 19555, with a maximum bandwidth of 2,000 Mbps.
Please review the following information before proceeding with installation of theRepeater SDX appliance.
About Repeater SDXThe Repeater SDX appliances are the highest-performing products in Citrix' BranchRepeater Product line. The appliances achieve this performance by combining aNetScaler VPX load balancer with three to six Repeater VPX WAN accelerators, all in asingle high-performance server that meets the needs of busy datacenters.
About This Quick Start GuideThe purpose of this Quick Start Guide is to get your appliance up and running to thepoint where it can be configured through the Ethernet management interface.
Configuration beyond this point is described in the Citrix Repeater SDX AdministrationGuide and the Branch Repeater Family User's Guide, rel. 5.5-5.7.
This Quick Start Guide takes you through the following steps:
w Unpacking the Repeater SDX Appliance.
w Physical and Electrical Installation.
w Enabling the Management Interface.
Before you BeginVerify that the following components and accessories are included:
w One NetScaler SDX 11505, 13505, 17555, or 19555 appliance
w One accessory kit that contains:
• One short patch cable kit consisting of two SFP+ transceivers and an opticalcable.
5
• Two power cables
Note: Make sure that a power outlet is available for each cable.
w One mounting rail kit
Note: Other than the two transceivers in the SFP+ patch cable kit, SFP and SFP+transceivers are sold separately. Contact your Citrix sales representative to ordertransceivers for your appliance. Only transceivers supplied by Citrix are supported onthe appliance.
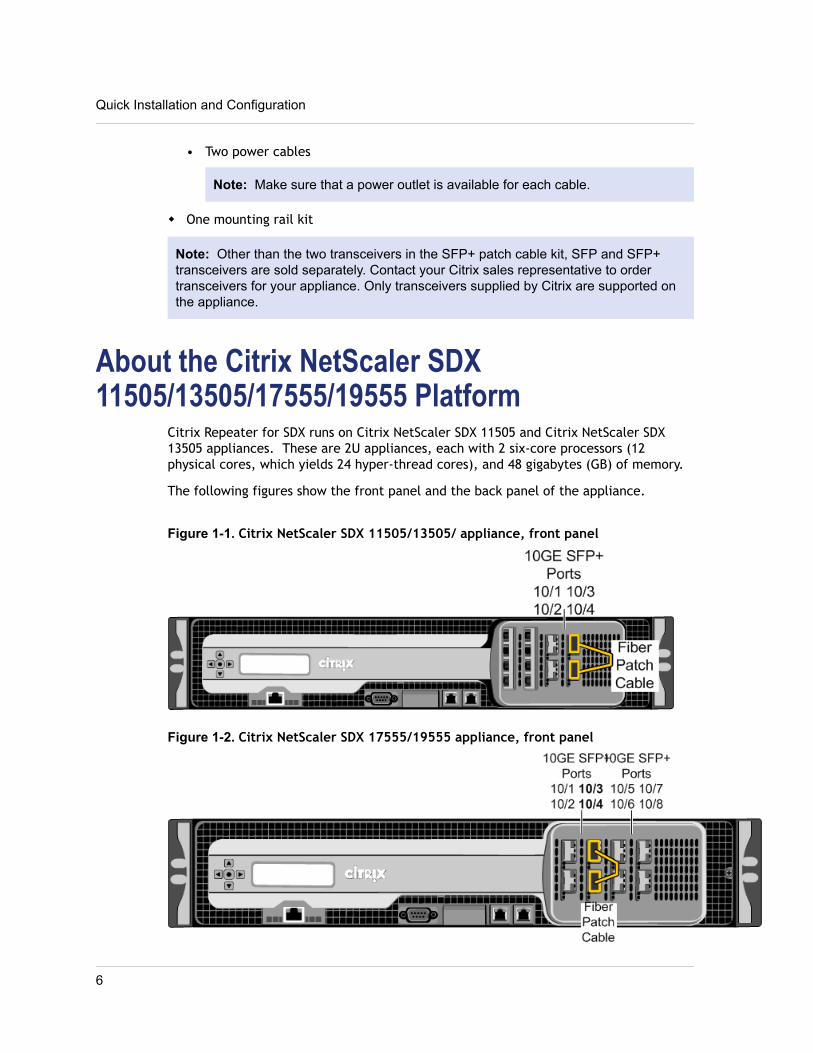
About the Citrix NetScaler SDX11505/13505/17555/19555 Platform
Citrix Repeater for SDX runs on Citrix NetScaler SDX 11505 and Citrix NetScaler SDX13505 appliances. These are 2U appliances, each with 2 six-core processors (12physical cores, which yields 24 hyper-thread cores), and 48 gigabytes (GB) of memory.
The following figures show the front panel and the back panel of the appliance.
Figure 1-1. Citrix NetScaler SDX 11505/13505/ appliance, front panel
Figure 1-2. Citrix NetScaler SDX 17555/19555 appliance, front panel
Quick Installation and Configuration
6
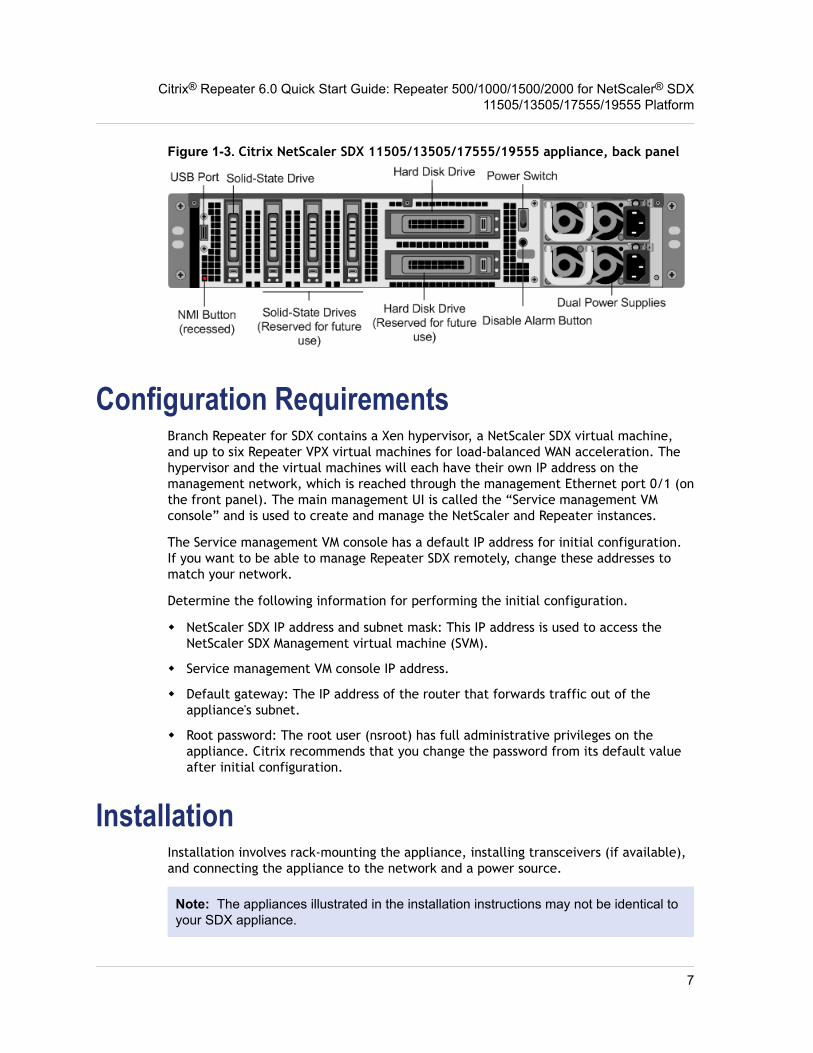
Figure 1-3. Citrix NetScaler SDX 11505/13505/17555/19555 appliance, back panel
Configuration RequirementsBranch Repeater for SDX contains a Xen hypervisor, a NetScaler SDX virtual machine,and up to six Repeater VPX virtual machines for load-balanced WAN acceleration. Thehypervisor and the virtual machines will each have their own IP address on themanagement network, which is reached through the management Ethernet port 0/1 (onthe front panel). The main management UI is called the “Service management VMconsole” and is used to create and manage the NetScaler and Repeater instances.
The Service management VM console has a default IP address for initial configuration.If you want to be able to manage Repeater SDX remotely, change these addresses tomatch your network.
Determine the following information for performing the initial configuration.
w NetScaler SDX IP address and subnet mask: This IP address is used to access theNetScaler SDX Management virtual machine (SVM).
w Service management VM console IP address.
w Default gateway: The IP address of the router that forwards traffic out of theappliance's subnet.
w Root password: The root user (nsroot) has full administrative privileges on theappliance. Citrix recommends that you change the password from its default valueafter initial configuration.
InstallationInstallation involves rack-mounting the appliance, installing transceivers (if available),and connecting the appliance to the network and a power source.
Note: The appliances illustrated in the installation instructions may not be identical toyour SDX appliance.
Citrix® Repeater 6.0 Quick Start Guide: Repeater 500/1000/1500/2000 for NetScaler® SDX11505/13505/17555/19555 Platform
7
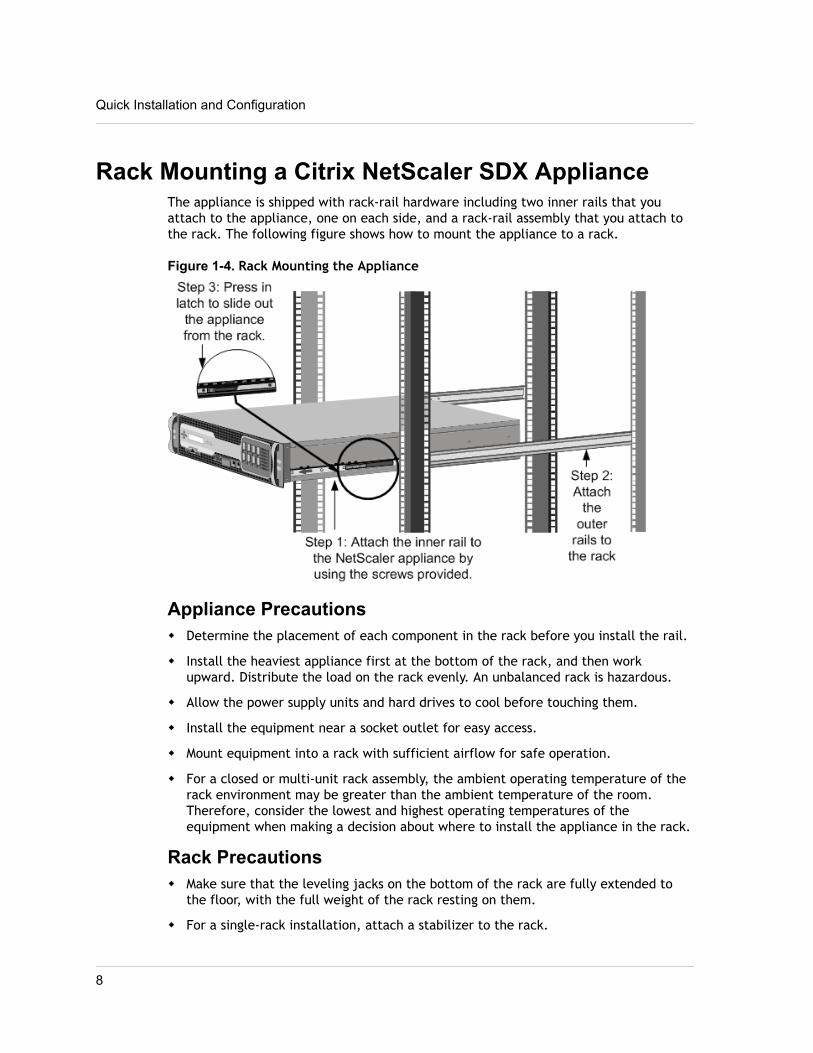
Rack Mounting a Citrix NetScaler SDX ApplianceThe appliance is shipped with rack-rail hardware including two inner rails that youattach to the appliance, one on each side, and a rack-rail assembly that you attach tothe rack. The following figure shows how to mount the appliance to a rack.
Figure 1-4. Rack Mounting the Appliance
Appliance Precautionsw Determine the placement of each component in the rack before you install the rail.
w Install the heaviest appliance first at the bottom of the rack, and then workupward. Distribute the load on the rack evenly. An unbalanced rack is hazardous.
w Allow the power supply units and hard drives to cool before touching them.
w Install the equipment near a socket outlet for easy access.
w Mount equipment into a rack with sufficient airflow for safe operation.
w For a closed or multi-unit rack assembly, the ambient operating temperature of therack environment may be greater than the ambient temperature of the room.Therefore, consider the lowest and highest operating temperatures of theequipment when making a decision about where to install the appliance in the rack.
Rack Precautionsw Make sure that the leveling jacks on the bottom of the rack are fully extended to
the floor, with the full weight of the rack resting on them.
w For a single-rack installation, attach a stabilizer to the rack.
Quick Installation and Configuration
8
w For a multiple-rack installation, couple (attach) the racks together.w Always make sure that the rack is stable before extending a component from the rack.w Extend only one component at a time. Extending two or more simultaneously may
cause the rack to become unstable.w The handles on the left and right of the front panel of the appliance should only be
used for extending the appliance out of the rack. These handles should not be usedfor mounting the appliance on the rack. Rack-rail hardware described later shouldbe used instead.
Installing TransceiversThe SDX appliances support only fiber transceivers in the SFP/SFP+ 10GE ports.
Warning: Do not install third-party transceivers.Only those transceivers provided byCitrix Systems, Inc. are supported. Attempting to use other transceivers voids thewarranty.
To install the transceiver (11505 and 13505 only)1. Carefully remove the transceiver from its box.2. Align the transceiver to the front of the transceiver slot on the front panel of the
appliance.3. Hold the transceiver between your thumb and index finger and insert it into the
transceiver slot, pressing it in until you hear the transceiver snap into place.4. Lock the transceiver.
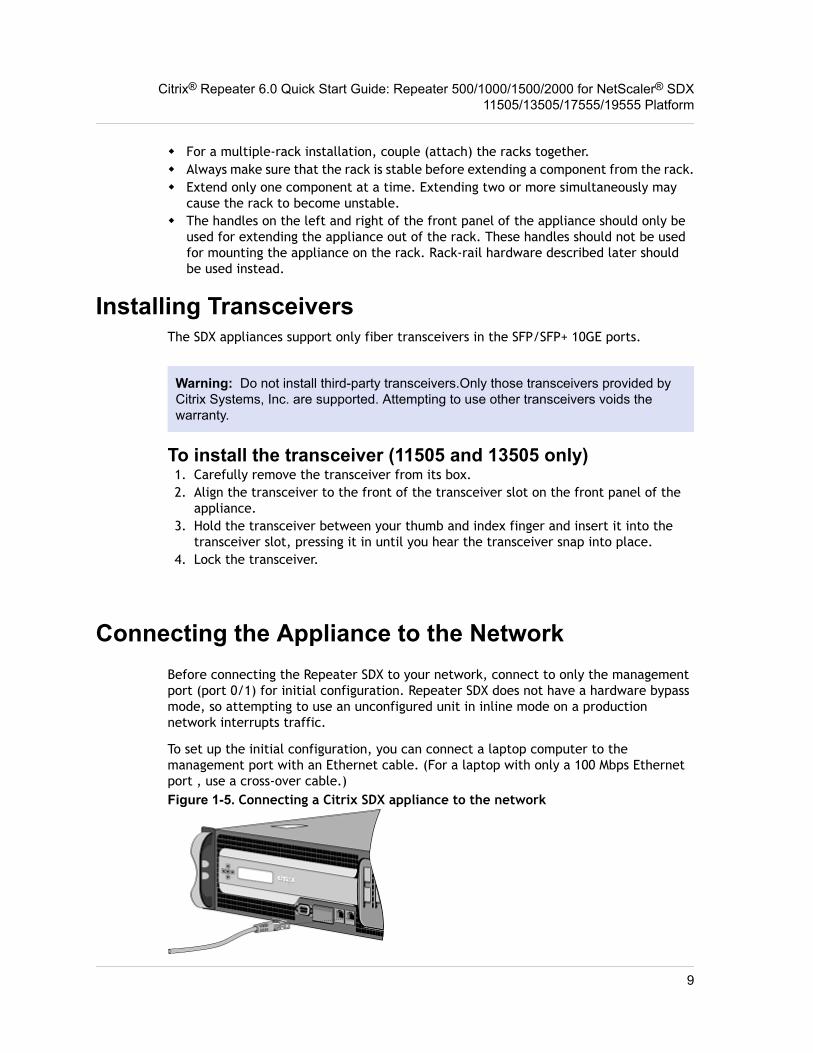
Connecting the Appliance to the NetworkBefore connecting the Repeater SDX to your network, connect to only the managementport (port 0/1) for initial configuration. Repeater SDX does not have a hardware bypassmode, so attempting to use an unconfigured unit in inline mode on a productionnetwork interrupts traffic.
To set up the initial configuration, you can connect a laptop computer to themanagement port with an Ethernet cable. (For a laptop with only a 100 Mbps Ethernetport , use a cross-over cable.)Figure 1-5. Connecting a Citrix SDX appliance to the network
Citrix® Repeater 6.0 Quick Start Guide: Repeater 500/1000/1500/2000 for NetScaler® SDX11505/13505/17555/19555 Platform
9
Warning: Connecting multiple network ports to the same switch or VLAN can result ina network loop.
By default, the ports on the SDX appliance are configured to use Ethernetautonegotiation. When you install a NetScaler appliance for the first time, be sure toconfigure your other equipment to use auto-negotiation for the port that is connectedto the NetScaler appliance. After initial logon and configuration, you can choose todisable auto-negotiation.
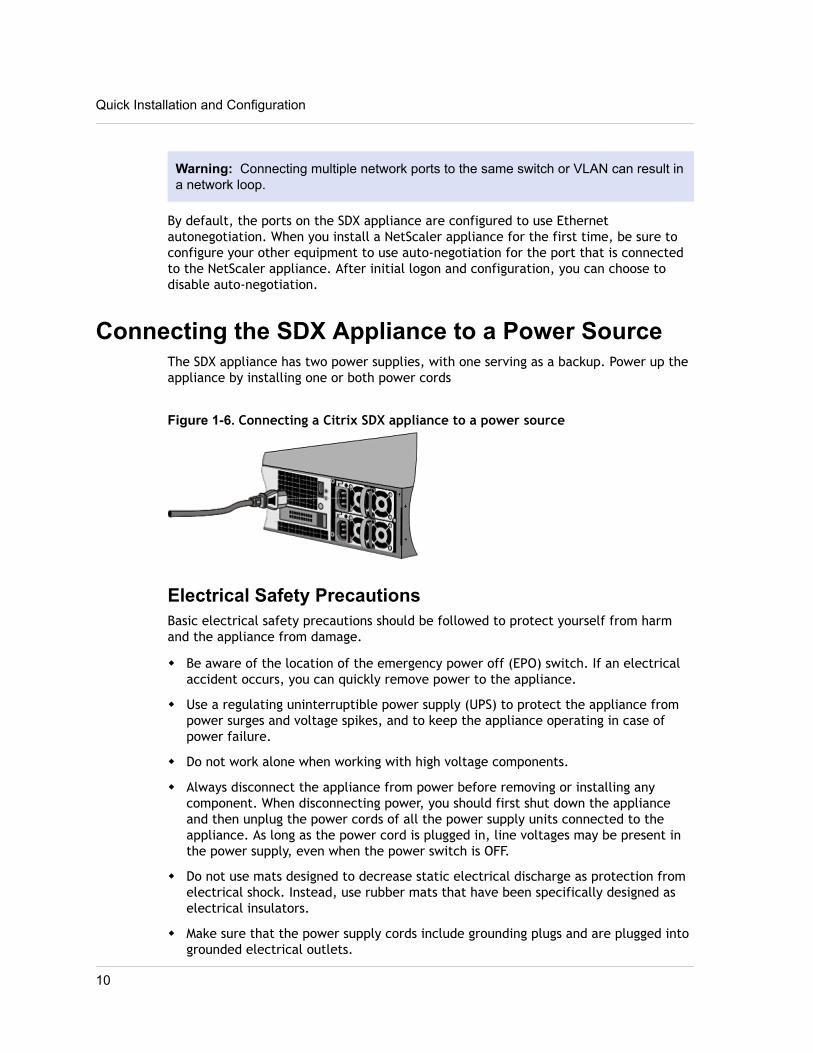
Connecting the SDX Appliance to a Power SourceThe SDX appliance has two power supplies, with one serving as a backup. Power up theappliance by installing one or both power cords
Figure 1-6. Connecting a Citrix SDX appliance to a power source
Electrical Safety PrecautionsBasic electrical safety precautions should be followed to protect yourself from harmand the appliance from damage.
w Be aware of the location of the emergency power off (EPO) switch. If an electricalaccident occurs, you can quickly remove power to the appliance.
w Use a regulating uninterruptible power supply (UPS) to protect the appliance frompower surges and voltage spikes, and to keep the appliance operating in case ofpower failure.
w Do not work alone when working with high voltage components.
w Always disconnect the appliance from power before removing or installing anycomponent. When disconnecting power, you should first shut down the applianceand then unplug the power cords of all the power supply units connected to theappliance. As long as the power cord is plugged in, line voltages may be present inthe power supply, even when the power switch is OFF.
w Do not use mats designed to decrease static electrical discharge as protection fromelectrical shock. Instead, use rubber mats that have been specifically designed aselectrical insulators.
w Make sure that the power supply cords include grounding plugs and are plugged intogrounded electrical outlets.
Quick Installation and Configuration
10
w Make sure that the power source can handle the appliance's maximum powerconsumption rating with no danger of an overload.
w A reliable ground must be maintained at all times. Therefore, the rack should begrounded. Pay particular attention to power supply connections other than thedirect connection to the branch circuit (for example, connections to power strips).
Setting Up ConnectivityAfter you have installed your appliance in a rack, you are ready to perform the initialconfiguration. To perform the initial configuration, you can use the ManagementService user interface or the serial console. You can access the Management Serviceuser interface from any computer that is on the same network as the new SDXappliance. If you do not have a computer on the same network, use the serial consoleto perform the initial configuration of the SDX appliance. Citrix recommends that, assoon as you complete the initial configuration, you change the root-user password. Forinformation about changing the root-user password, see Changing the Password of theDefault User Account.
Initial Configuration through the ManagementService User Interface
To set up the appliance by using the Management Service user interface, connect aworkstation or laptop to the same network as the appliance.
To change the management port's IP configuration1. Using an Ethernet cable, connect a laptop or other computer with a Web browser
to interface 0/1 on Repeater SDX.
2. Set the laptop’s IP address for its Ethernet port to 192.168.100.100.
3. Open a browser and type: http://192.168.100.1
Note: The NetScaler SDX Management Service is preconfigured with the IPaddress 192.168.100.1 and the XenServer hypervisor is preconfigured with the IPaddress 192.168.100.2.
4. In the User Name box, type nsroot.
5. In the Password box, type nsroot.
6. In the navigation pane, click System.
7. In the details pane, under System Administration, click Network Configurationand enter values for the following parameters:
• Interface*—The management interface that connects the appliance to amanagement workstation or network. Possible values: 0/1, 0/2. Default: 0/1.
• XenServer IP Address*—The IP address of the XenServer.
Citrix® Repeater 6.0 Quick Start Guide: Repeater 500/1000/1500/2000 for NetScaler® SDX11505/13505/17555/19555 Platform
11
• Management VM IP Address*—The IP address that is used to access theManagement Service by using a Web browser. The XenServer IP address andManagement Service IP address should be in the same subnet.
• Netmask*—The mask used to define the subnet in which the SDX appliance islocated.
• Gateway*—The IP address of the router that forwards traffic out of theappliance's subnet.
• DNS Server—The IP address of the DNS server.
*A required parameter
8. Click OK, and then click Close.
9. To confirm that the SDX appliance is configured correctly, you can either ping thenew Management Service IP address or use the new IP address to open the userinterface in a browser.
Note: After changing the network configuration, close all browser instances andopen a new browser instance to access the appliance.
Configuring the LOM PortFor initial configuration of the LOM (Lights-Out Management) port, connect to theport's default IP address and change it to the address that you want to use for remotemonitoring and management. Also specify the administrator credentials and thenetwork settings.
Note: The LEDs on the LOM port are unoperational by design.
To configure the LOM port1. In a Web browser, type the IP address of the LOM port. For initial configuration,
type the port’s default address: http://192.168.1.32. In the User Name and Password boxes, type the administrator credentials. You can
obtain the initial user name and password from your sales representative or fromCitrix Customer Service.
3. In the Menu bar, click Configuration.
4. Under Options, click Network and type values for the following parameters:
• IP Address—The IP address of the LOM port.
• Subnet Mask—The mask used to define the subnet of the LOM port.
• Default Gateway—The IP address of the router that connects the appliance tothe network.
Quick Installation and Configuration
12
5. Click Save.
Power Cycling the ApplianceYou can remotely turn off the appliance and turn it back on. The result is similar topressing the power button on the back panel of the appliance for less than four seconds.
Note: Power cycling the appliance by using the LOM port is not supported in thecurrent release.
To power cycle the appliance1. In a Web browser, type the IP address of the LOM port.
2. In the User Name and Password boxes, type the administrator credentials.
3. In the Menu bar, click Remote Control.
4. Under Options, click Power Control, and then click Power Cycle Server.
5. Click Perform Action.
System SpecificationsThe following table summarizes the specifications of the NetScaler SDX 11505/13505appliances.
Specifications SDX 11505/13505
Processor 2 six-core
Memory 48 GB
Number of power supplies 2
AC power supply input voltage,frequency, and current
100-240 VAC
50-60 Hz
6.5-3.5 A
Maximum power consumption 650 W
Heat dissipation 2200 BTU per hour
Citrix® Repeater 6.0 Quick Start Guide: Repeater 500/1000/1500/2000 for NetScaler® SDX11505/13505/17555/19555 Platform
13
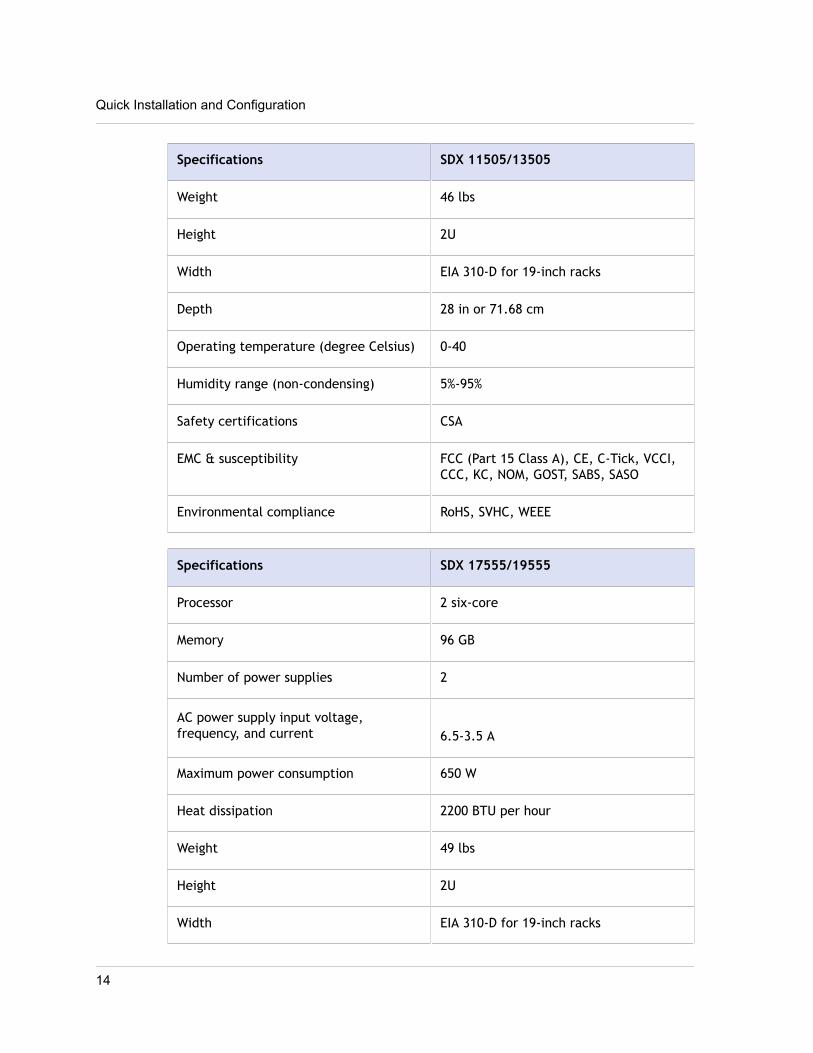
Specifications SDX 11505/13505
Weight 46 lbs
Height 2U
Width EIA 310-D for 19-inch racks
Depth 28 in or 71.68 cm
Operating temperature (degree Celsius) 0-40
Humidity range (non-condensing) 5%-95%
Safety certifications CSA
EMC & susceptibility FCC (Part 15 Class A), CE, C-Tick, VCCI,CCC, KC, NOM, GOST, SABS, SASO
Environmental compliance RoHS, SVHC, WEEE
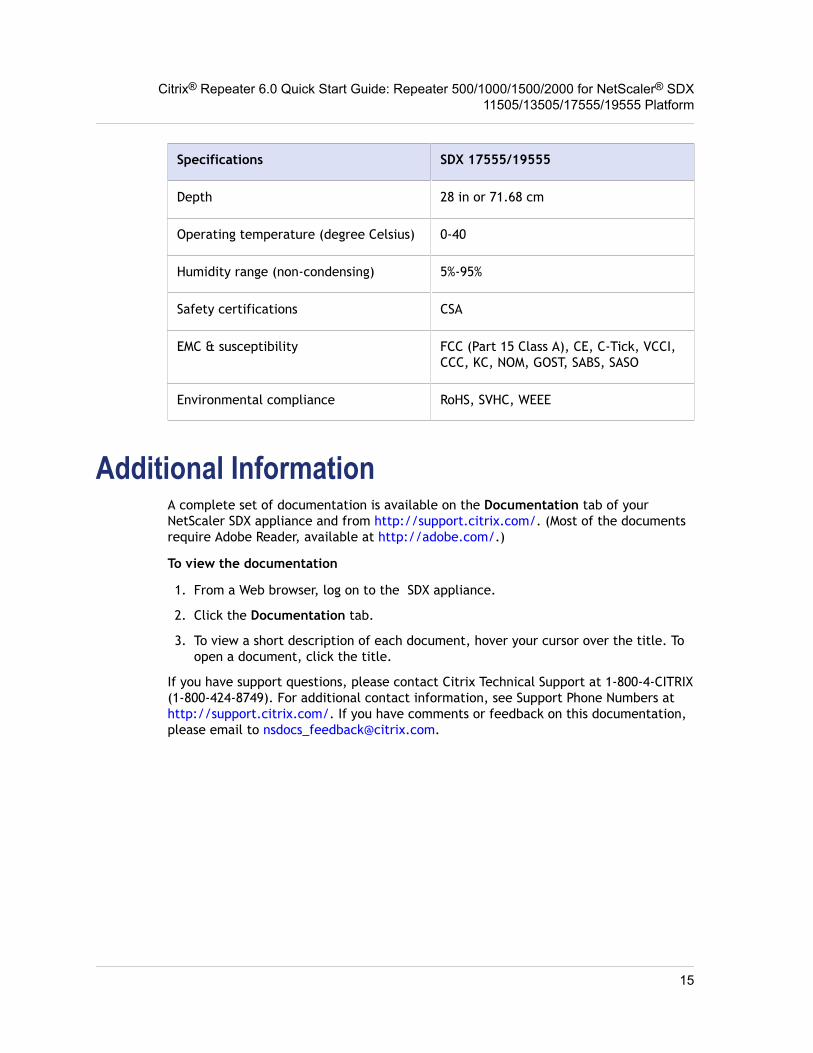
Specifications SDX 17555/19555
Processor 2 six-core
Memory 96 GB
Number of power supplies 2
AC power supply input voltage,frequency, and current 6.5-3.5 A
Maximum power consumption 650 W
Heat dissipation 2200 BTU per hour
Weight 49 lbs
Height 2U
Width EIA 310-D for 19-inch racks
Quick Installation and Configuration
14
Specifications SDX 17555/19555
Depth 28 in or 71.68 cm
Operating temperature (degree Celsius) 0-40
Humidity range (non-condensing) 5%-95%
Safety certifications CSA
EMC & susceptibility FCC (Part 15 Class A), CE, C-Tick, VCCI,CCC, KC, NOM, GOST, SABS, SASO
Environmental compliance RoHS, SVHC, WEEE
Additional InformationA complete set of documentation is available on the Documentation tab of yourNetScaler SDX appliance and from http://support.citrix.com/. (Most of the documentsrequire Adobe Reader, available at http://adobe.com/.)
To view the documentation
1. From a Web browser, log on to the SDX appliance.
2. Click the Documentation tab.
3. To view a short description of each document, hover your cursor over the title. Toopen a document, click the title.
If you have support questions, please contact Citrix Technical Support at 1-800-4-CITRIX(1-800-424-8749). For additional contact information, see Support Phone Numbers at http://support.citrix.com/. If you have comments or feedback on this documentation,please email to [email protected].
Citrix® Repeater 6.0 Quick Start Guide: Repeater 500/1000/1500/2000 for NetScaler® SDX11505/13505/17555/19555 Platform
15
Related Documents