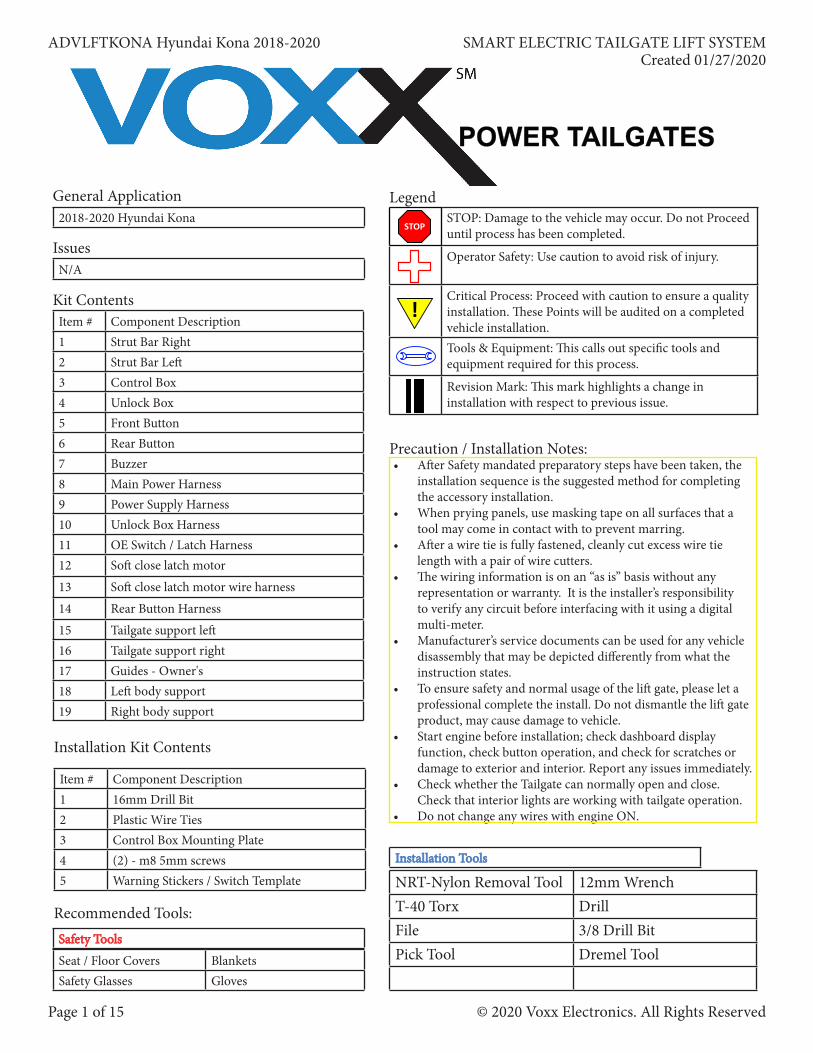
Page 1 of 15 © 2020 Voxx Electronics. All Rights Reserved ADVLFTKONA Hyundai Kona 2018-2020 SMART ELECTRIC TAILGATE LIFT SYSTEM Created 01/27/2020 POWER TAILGATES POWER TAILGATES Item # Component Description 1 Strut Bar Right 2 Strut Bar Leſt 3 Control Box 4 Unlock Box 5 Front Button 6 Rear Button 7 Buzzer 8 Main Power Harness 9 Power Supply Harness 10 Unlock Box Harness 11 OE Switch / Latch Harness 12 Soſt close latch motor 13 Soſt close latch motor wire harness 14 Rear Button Harness 15 Tailgate support leſt 16 Tailgate support right 17 Guides - Owner's 18 Leſt body support 19 Right body support 2018-2020 Hyundai Kona N/A Item # Component Description 1 16mm Drill Bit 2 Plastic Wire Ties 3 Control Box Mounting Plate 4 (2) - m8 5mm screws 5 Warning Stickers / Switch Template General Application Issues Kit Contents Installation Kit Contents STOP: Damage to the vehicle may occur. Do not Proceed until process has been completed. Operator Safety: Use caution to avoid risk of injury. Critical Process: Proceed with caution to ensure a quality installation. ese Points will be audited on a completed vehicle installation. Tools & Equipment: is calls out specific tools and equipment required for this process. Revision Mark: is mark highlights a change in installation with respect to previous issue. Legend Recommended Tools: Safety Tools Safety Tools Seat / Floor Covers Blankets Safety Glasses Gloves Installation Tools Installation Tools STOP ! • Aſter Safety mandated preparatory steps have been taken, the installation sequence is the suggested method for completing the accessory installation. • When prying panels, use masking tape on all surfaces that a tool may come in contact with to prevent marring. • Aſter a wire tie is fully fastened, cleanly cut excess wire tie length with a pair of wire cutters. • e wiring information is on an “as is” basis without any representation or warranty. It is the installer’s responsibility to verify any circuit before interfacing with it using a digital multi-meter. • Manufacturer’s service documents can be used for any vehicle disassembly that may be depicted differently from what the instruction states. • To ensure safety and normal usage of the liſt gate, please let a professional complete the install. Do not dismantle the liſt gate product, may cause damage to vehicle. • Start engine before installation; check dashboard display function, check button operation, and check for scratches or damage to exterior and interior. Report any issues immediately. • Check whether the Tailgate can normally open and close. Check that interior lights are working with tailgate operation. • Do not change any wires with engine ON. Precaution / Installation Notes: NRT-Nylon Removal Tool 12mm Wrench T-40 Torx Drill File 3/8 Drill Bit Pick Tool Dremel Tool

Welcome message from author
This document is posted to help you gain knowledge. Please leave a comment to let me know what you think about it! Share it to your friends and learn new things together.
Transcript
Page 1 of 15 © 2020 Voxx Electronics. All Rights Reserved
ADVLFTKONA Hyundai Kona 2018-2020 SMART ELECTRIC TAILGATE LIFT SYSTEMCreated 01/27/2020
POWER TAILGATESPOWER TAILGATES
Item # Component Description1 Strut Bar Right2 Strut Bar Left3 Control Box4 Unlock Box5 Front Button6 Rear Button7 Buzzer8 Main Power Harness9 Power Supply Harness10 Unlock Box Harness11 OE Switch / Latch Harness12 Soft close latch motor
13 Soft close latch motor wire harness
14 Rear Button Harness
15 Tailgate support left16 Tailgate support right17 Guides - Owner's18 Left body support19 Right body support
2018-2020 Hyundai Kona
N/A
Item # Component Description1 16mm Drill Bit2 Plastic Wire Ties3 Control Box Mounting Plate4 (2) - m8 5mm screws5 Warning Stickers / Switch Template
General Application
Issues
Kit Contents
Installation Kit Contents
STOP: Damage to the vehicle may occur. Do not Proceed until process has been completed.
Operator Safety: Use caution to avoid risk of injury.
Critical Process: Proceed with caution to ensure a quality installation. These Points will be audited on a completed vehicle installation.Tools & Equipment: This calls out specific tools and equipment required for this process.
Revision Mark: This mark highlights a change in installation with respect to previous issue.
Legend
Recommended Tools:Safety ToolsSafety ToolsSeat / Floor Covers BlanketsSafety Glasses Gloves
Installation ToolsInstallation Tools
STOP
!
• After Safety mandated preparatory steps have been taken, the installation sequence is the suggested method for completing the accessory installation.
• When prying panels, use masking tape on all surfaces that a tool may come in contact with to prevent marring.
• After a wire tie is fully fastened, cleanly cut excess wire tie length with a pair of wire cutters.
• The wiring information is on an “as is” basis without any representation or warranty. It is the installer’s responsibility to verify any circuit before interfacing with it using a digital multi-meter.
• Manufacturer’s service documents can be used for any vehicle disassembly that may be depicted differently from what the instruction states.
• To ensure safety and normal usage of the lift gate, please let a professional complete the install. Do not dismantle the lift gate product, may cause damage to vehicle.
• Start engine before installation; check dashboard display function, check button operation, and check for scratches or damage to exterior and interior. Report any issues immediately.
• Check whether the Tailgate can normally open and close. Check that interior lights are working with tailgate operation.
• Do not change any wires with engine ON.
Precaution / Installation Notes:
NRT-Nylon Removal Tool 12mm WrenchT-40 Torx DrillFile 3/8 Drill BitPick Tool Dremel Tool
ADVLFTHKONA Hyundai Kona 2018-2020 SMART ELECTRIC TAILGATE LIFT SYSTEM
Page 2 of 15© 2020 Voxx Electronics. All Rights Reserved
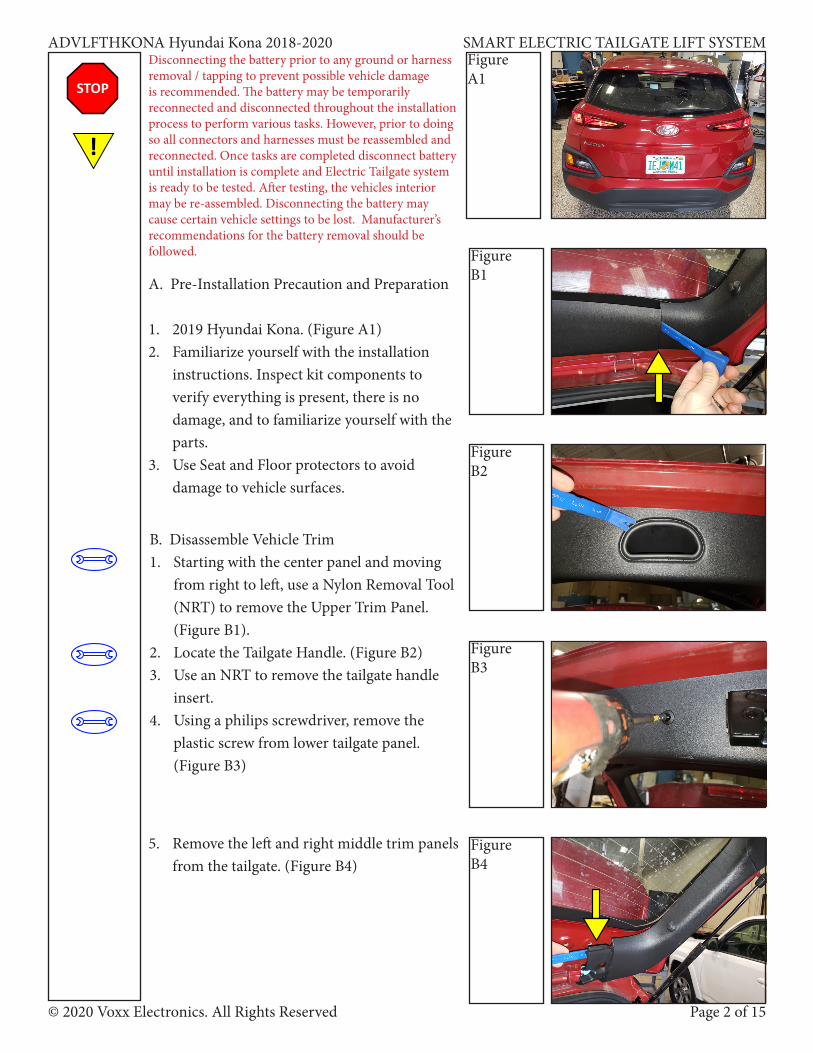
5. Remove the left and right middle trim panels from the tailgate. (Figure B4)
FigureA1
FigureB1
FigureB2
FigureB3
A. Pre-Installation Precaution and Preparation
1. 2019 Hyundai Kona. (Figure A1)2. Familiarize yourself with the installation
instructions. Inspect kit components to verify everything is present, there is no damage, and to familiarize yourself with the parts.
3. Use Seat and Floor protectors to avoid damage to vehicle surfaces.
Disconnecting the battery prior to any ground or harness removal / tapping to prevent possible vehicle damage is recommended. The battery may be temporarily reconnected and disconnected throughout the installation process to perform various tasks. However, prior to doing so all connectors and harnesses must be reassembled and reconnected. Once tasks are completed disconnect battery until installation is complete and Electric Tailgate system is ready to be tested. After testing, the vehicles interior may be re-assembled. Disconnecting the battery may cause certain vehicle settings to be lost. Manufacturer’s recommendations for the battery removal should be followed.
B. Disassemble Vehicle Trim1. Starting with the center panel and moving
from right to left, use a Nylon Removal Tool (NRT) to remove the Upper Trim Panel. (Figure B1).
2. Locate the Tailgate Handle. (Figure B2)3. Use an NRT to remove the tailgate handle
insert.4. Using a philips screwdriver, remove the
plastic screw from lower tailgate panel. (Figure B3)
STOP
!
FigureB4
Page 3 of 15 © 2020 Voxx Electronics. All Rights Reserved
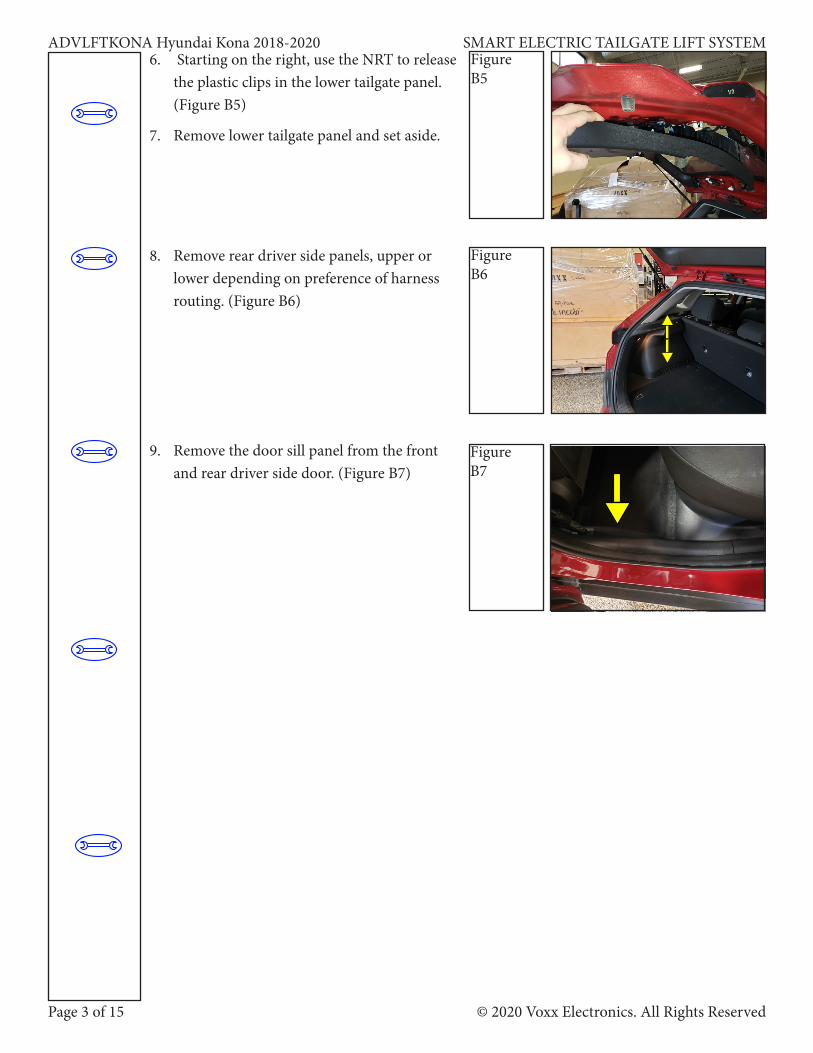
ADVLFTKONA Hyundai Kona 2018-2020 SMART ELECTRIC TAILGATE LIFT SYSTEM6. Starting on the right, use the NRT to release
the plastic clips in the lower tailgate panel. (Figure B5)
FigureB5
7. Remove lower tailgate panel and set aside.
8. Remove rear driver side panels, upper or lower depending on preference of harness routing. (Figure B6)
9. Remove the door sill panel from the front and rear driver side door. (Figure B7)
FigureB7
FigureB6
ADVLFTHKONA Hyundai Kona 2018-2020 SMART ELECTRIC TAILGATE LIFT SYSTEM
Page 4 of 15© 2020 Voxx Electronics. All Rights Reserved
FigureB10a
FigureB10b
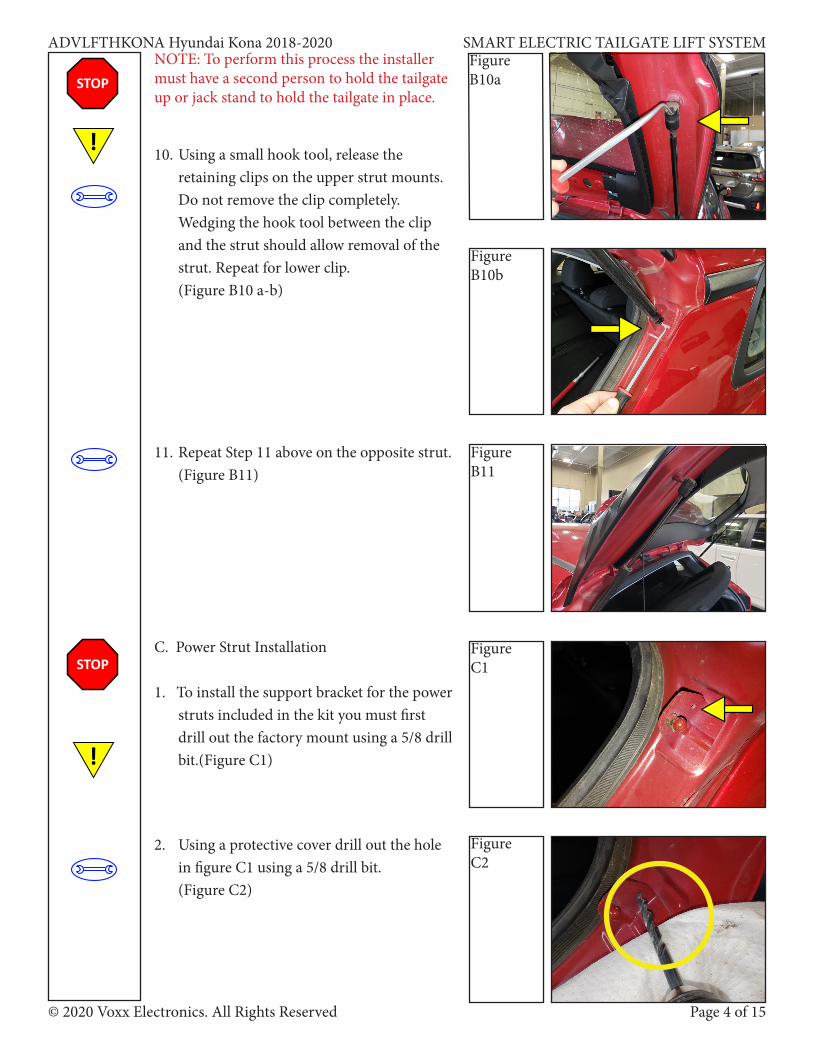
10. Using a small hook tool, release the retaining clips on the upper strut mounts. Do not remove the clip completely. Wedging the hook tool between the clip and the strut should allow removal of the strut. Repeat for lower clip.
(Figure B10 a-b)
11. Repeat Step 11 above on the opposite strut. (Figure B11)
NOTE: To perform this process the installer must have a second person to hold the tailgate up or jack stand to hold the tailgate in place.
STOP
!
C. Power Strut Installation
1. To install the support bracket for the power struts included in the kit you must first drill out the factory mount using a 5/8 drill bit.(Figure C1)
FigureC1
FigureC2
2. Using a protective cover drill out the hole in figure C1 using a 5/8 drill bit.
(Figure C2)
STOP
!
FigureB11
Page 5 of 15 © 2020 Voxx Electronics. All Rights Reserved
ADVLFTKONA Hyundai Kona 2018-2020 SMART ELECTRIC TAILGATE LIFT SYSTEM
FigureC4
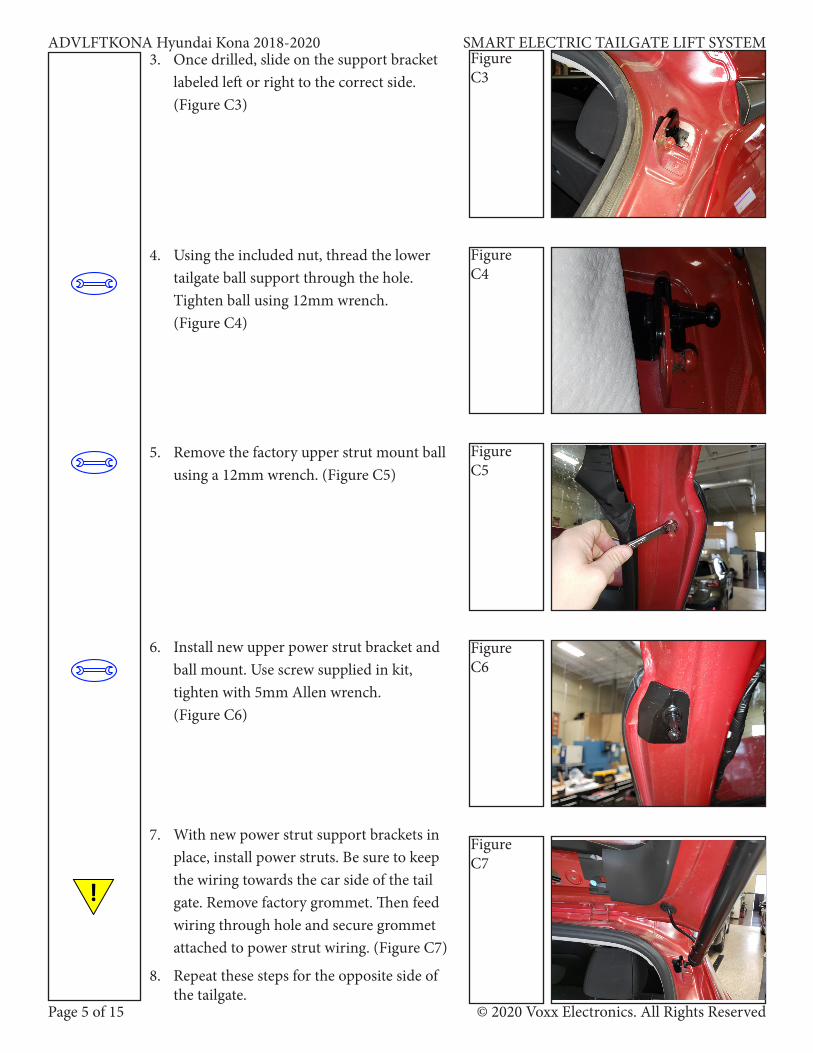
3. Once drilled, slide on the support bracket labeled left or right to the correct side. (Figure C3)
5. Remove the factory upper strut mount ball using a 12mm wrench. (Figure C5)
!
FigureC3
FigureC5
4. Using the included nut, thread the lower tailgate ball support through the hole. Tighten ball using 12mm wrench.
(Figure C4)
6. Install new upper power strut bracket and ball mount. Use screw supplied in kit, tighten with 5mm Allen wrench.
(Figure C6)
FigureC6
7. With new power strut support brackets in place, install power struts. Be sure to keep the wiring towards the car side of the tail gate. Remove factory grommet. Then feed wiring through hole and secure grommet attached to power strut wiring. (Figure C7)
FigureC7
8. Repeat these steps for the opposite side of the tailgate.
ADVLFTHKONA Hyundai Kona 2018-2020 SMART ELECTRIC TAILGATE LIFT SYSTEM
Page 6 of 15© 2020 Voxx Electronics. All Rights Reserved
FigureD3
FigureD4
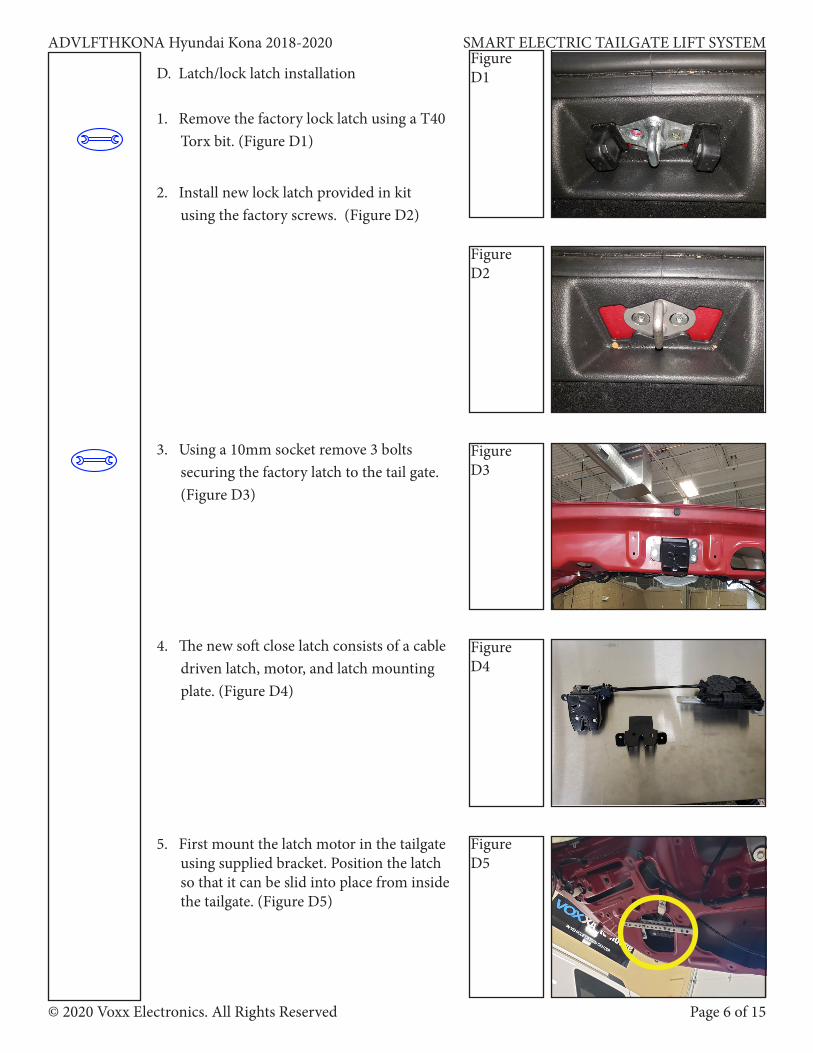
4. The new soft close latch consists of a cable driven latch, motor, and latch mounting plate. (Figure D4)
FigureD5
5. First mount the latch motor in the tailgate using supplied bracket. Position the latch so that it can be slid into place from inside the tailgate. (Figure D5)
FigureD1
FigureD2
D. Latch/lock latch installation
1. Remove the factory lock latch using a T40 Torx bit. (Figure D1)
3. Using a 10mm socket remove 3 bolts securing the factory latch to the tail gate.
(Figure D3)
2. Install new lock latch provided in kit using the factory screws. (Figure D2)
Page 7 of 15 © 2020 Voxx Electronics. All Rights Reserved
ADVLFTKONA Hyundai Kona 2018-2020 SMART ELECTRIC TAILGATE LIFT SYSTEMFigureD6
FigureD7
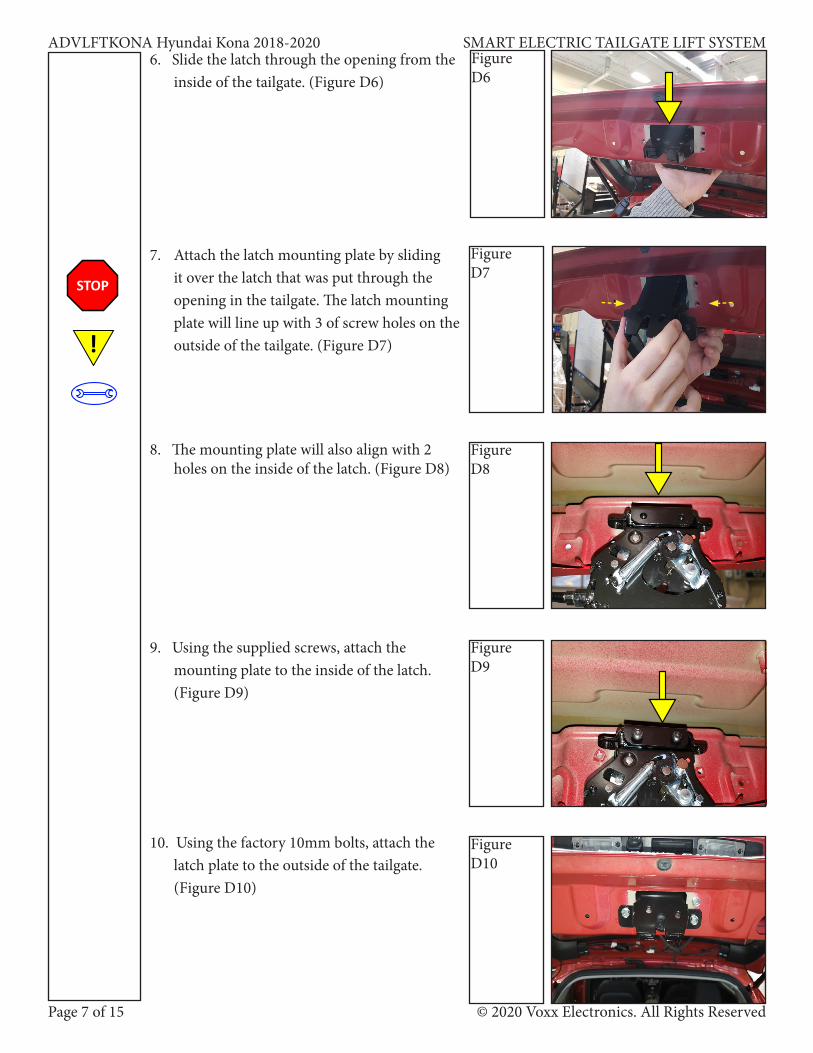
6. Slide the latch through the opening from the inside of the tailgate. (Figure D6)
7. Attach the latch mounting plate by sliding it over the latch that was put through the opening in the tailgate. The latch mounting plate will line up with 3 of screw holes on the outside of the tailgate. (Figure D7)
STOP
!
8. The mounting plate will also align with 2 holes on the inside of the latch. (Figure D8)
FigureD8
FigureD9
FigureD10
9. Using the supplied screws, attach the mounting plate to the inside of the latch. (Figure D9)
10. Using the factory 10mm bolts, attach the latch plate to the outside of the tailgate. (Figure D10)
ADVLFTHKONA Hyundai Kona 2018-2020 SMART ELECTRIC TAILGATE LIFT SYSTEM
Page 8 of 15© 2020 Voxx Electronics. All Rights Reserved
FigureE1
E Control Box Installation
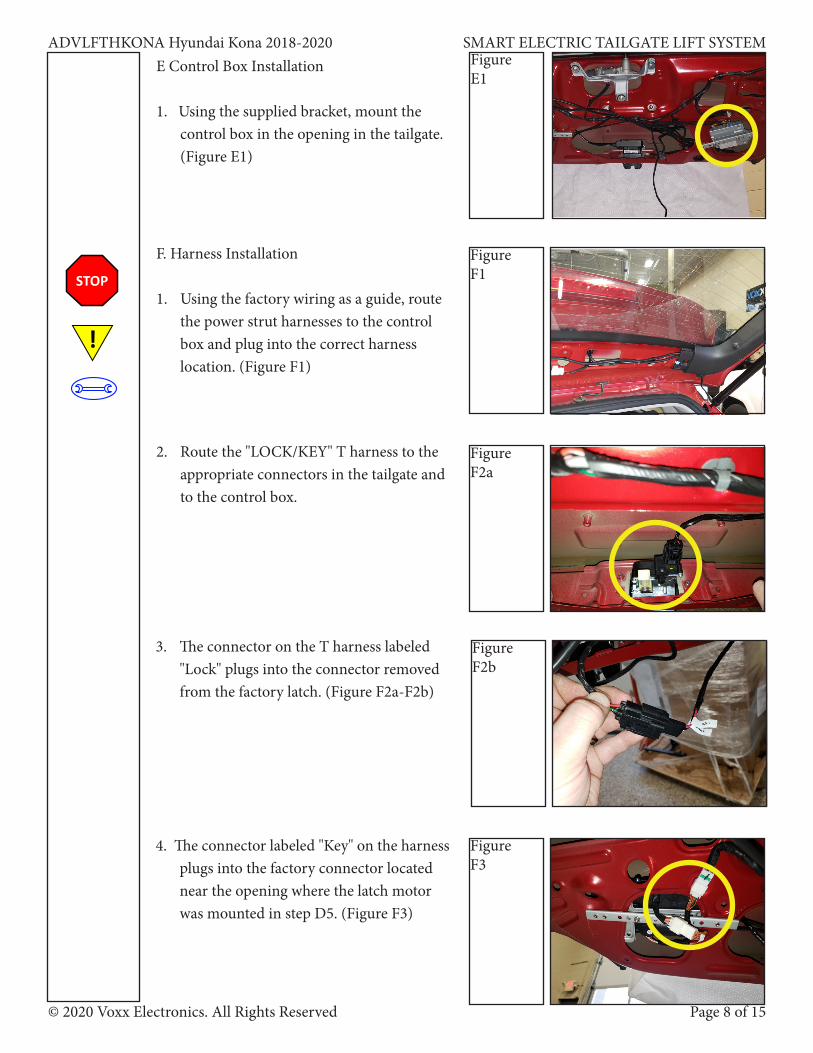
1. Using the supplied bracket, mount the control box in the opening in the tailgate. (Figure E1)
STOP
!
FigureF1
F. Harness Installation
1. Using the factory wiring as a guide, route the power strut harnesses to the control box and plug into the correct harness location. (Figure F1)
2. Route the "LOCK/KEY" T harness to the appropriate connectors in the tailgate and to the control box.
FigureF2b
3. The connector on the T harness labeled "Lock" plugs into the connector removed from the factory latch. (Figure F2a-F2b)
FigureF2a
FigureF3
4. The connector labeled "Key" on the harness plugs into the factory connector located near the opening where the latch motor was mounted in step D5. (Figure F3)
Page 9 of 15 © 2020 Voxx Electronics. All Rights Reserved
ADVLFTKONA Hyundai Kona 2018-2020 SMART ELECTRIC TAILGATE LIFT SYSTEM
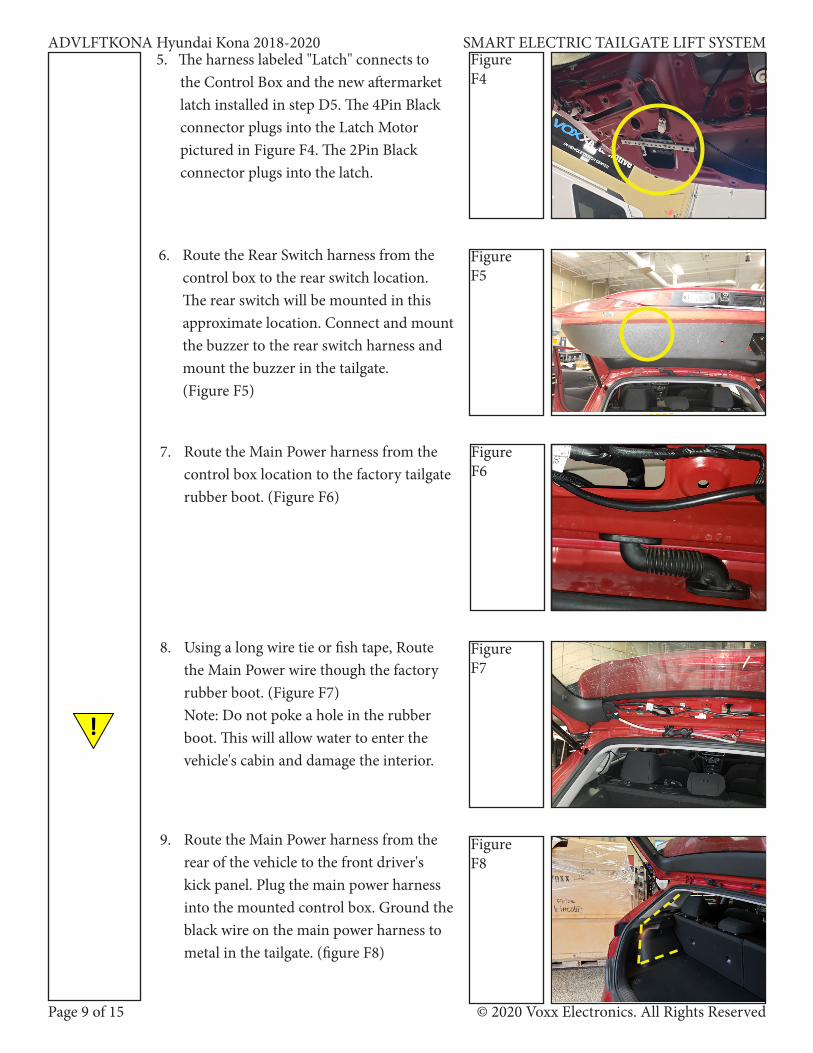
6. Route the Rear Switch harness from the control box to the rear switch location. The rear switch will be mounted in this approximate location. Connect and mount the buzzer to the rear switch harness and mount the buzzer in the tailgate.
(Figure F5)
FigureF5
FigureF6
7. Route the Main Power harness from the control box location to the factory tailgate rubber boot. (Figure F6)
FigureF7
8. Using a long wire tie or fish tape, Route the Main Power wire though the factory rubber boot. (Figure F7)
Note: Do not poke a hole in the rubber boot. This will allow water to enter the vehicle's cabin and damage the interior.
FigureF8
9. Route the Main Power harness from the rear of the vehicle to the front driver's kick panel. Plug the main power harness into the mounted control box. Ground the black wire on the main power harness to metal in the tailgate. (figure F8)
!
FigureF4
5. The harness labeled "Latch" connects to the Control Box and the new aftermarket latch installed in step D5. The 4Pin Black connector plugs into the Latch Motor pictured in Figure F4. The 2Pin Black connector plugs into the latch.
ADVLFTHKONA Hyundai Kona 2018-2020 SMART ELECTRIC TAILGATE LIFT SYSTEM
Page 10 of 15© 2020 Voxx Electronics. All Rights Reserved
STOP
!
FigureF10
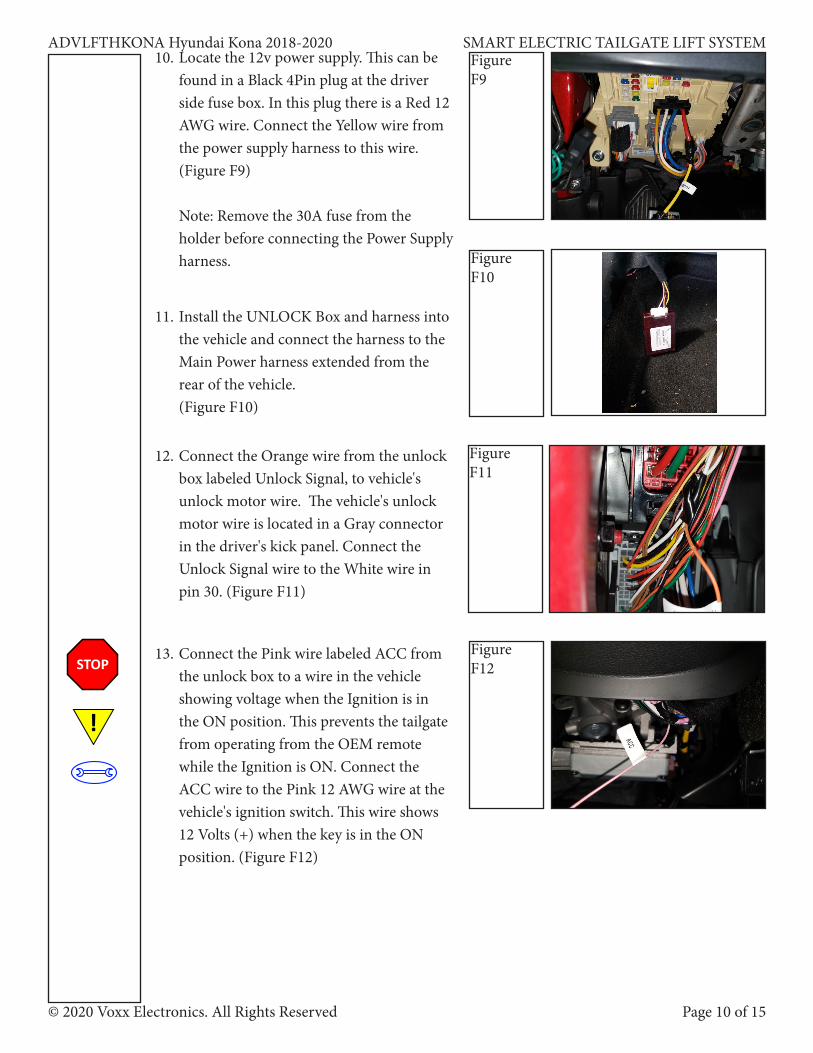
11. Install the UNLOCK Box and harness into the vehicle and connect the harness to the Main Power harness extended from the rear of the vehicle.
(Figure F10)
12. Connect the Orange wire from the unlock box labeled Unlock Signal, to vehicle's unlock motor wire. The vehicle's unlock motor wire is located in a Gray connector in the driver's kick panel. Connect the Unlock Signal wire to the White wire in pin 30. (Figure F11)
FigureF11
FigureF12
13. Connect the Pink wire labeled ACC from the unlock box to a wire in the vehicle showing voltage when the Ignition is in the ON position. This prevents the tailgate from operating from the OEM remote while the Ignition is ON. Connect the ACC wire to the Pink 12 AWG wire at the vehicle's ignition switch. This wire shows 12 Volts (+) when the key is in the ON position. (Figure F12)
FigureF9
10. Locate the 12v power supply. This can be found in a Black 4Pin plug at the driver side fuse box. In this plug there is a Red 12 AWG wire. Connect the Yellow wire from the power supply harness to this wire.(Figure F9)
Note: Remove the 30A fuse from the holder before connecting the Power Supply harness.
Page 11 of 15 © 2020 Voxx Electronics. All Rights Reserved
ADVLFTKONA Hyundai Kona 2018-2020 SMART ELECTRIC TAILGATE LIFT SYSTEM
STOP
!
FigureG2
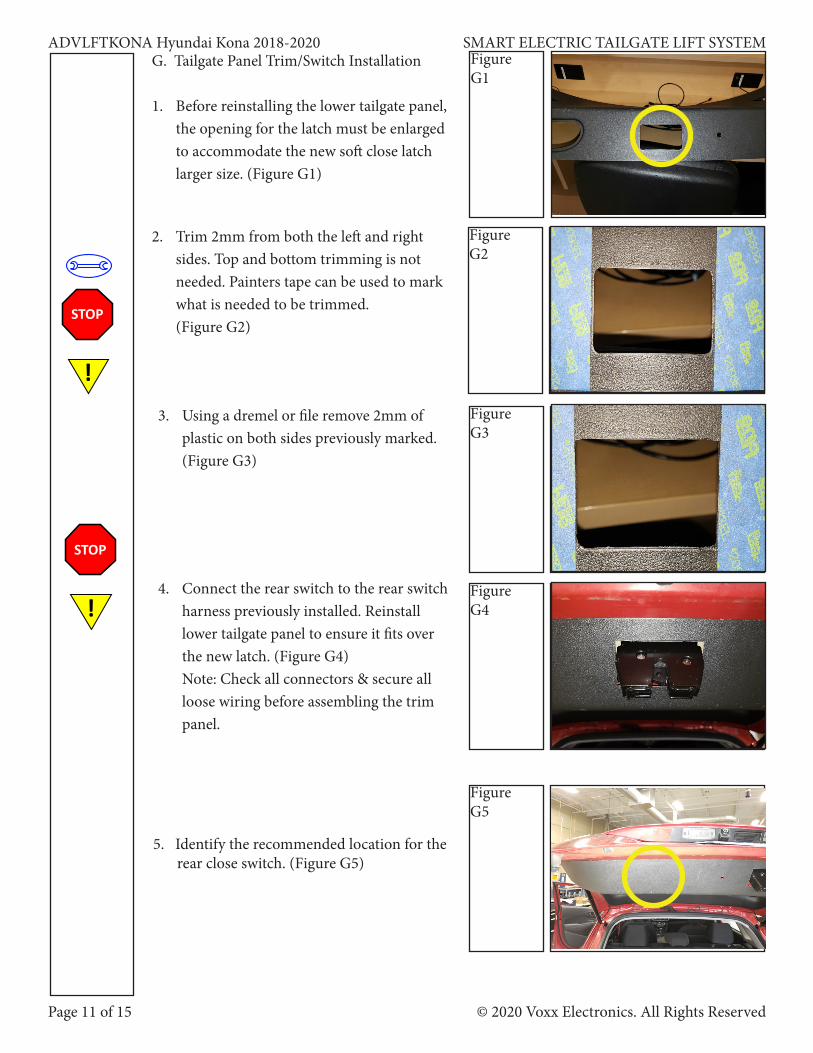
2. Trim 2mm from both the left and right sides. Top and bottom trimming is not needed. Painters tape can be used to mark what is needed to be trimmed.
(Figure G2)
STOP
!
G. Tailgate Panel Trim/Switch Installation
1. Before reinstalling the lower tailgate panel, the opening for the latch must be enlarged to accommodate the new soft close latch larger size. (Figure G1)
FigureG1
FigureG3
3. Using a dremel or file remove 2mm of plastic on both sides previously marked.
(Figure G3)
4. Connect the rear switch to the rear switch harness previously installed. Reinstall lower tailgate panel to ensure it fits over the new latch. (Figure G4)
Note: Check all connectors & secure all loose wiring before assembling the trim panel.
FigureG4
FigureG5
5. Identify the recommended location for the rear close switch. (Figure G5)
ADVLFTHKONA Hyundai Kona 2018-2020 SMART ELECTRIC TAILGATE LIFT SYSTEM
Page 12 of 15© 2020 Voxx Electronics. All Rights Reserved
STOP
!
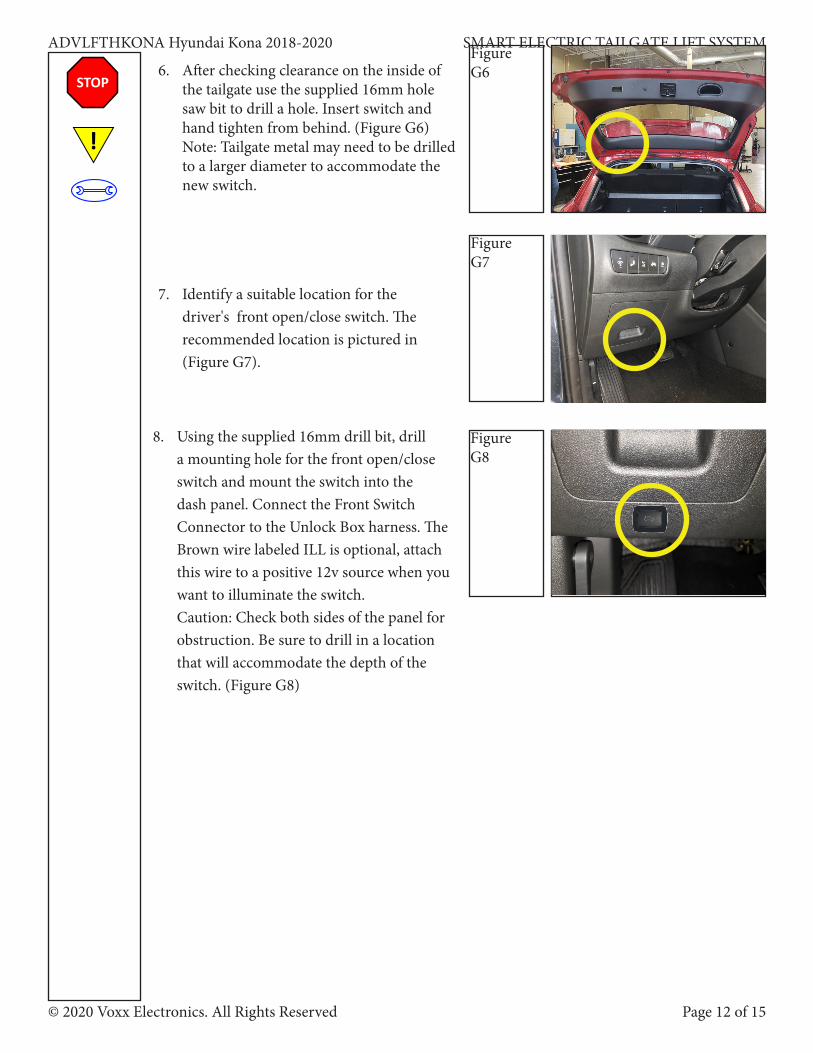
8. Using the supplied 16mm drill bit, drill a mounting hole for the front open/close switch and mount the switch into the dash panel. Connect the Front Switch Connector to the Unlock Box harness. The Brown wire labeled ILL is optional, attach this wire to a positive 12v source when you want to illuminate the switch.
Caution: Check both sides of the panel for obstruction. Be sure to drill in a location that will accommodate the depth of the switch. (Figure G8)
FigureG8
7. Identify a suitable location for the driver's front open/close switch. The recommended location is pictured in (Figure G7).
FigureG7
FigureG66. After checking clearance on the inside of
the tailgate use the supplied 16mm hole saw bit to drill a hole. Insert switch and hand tighten from behind. (Figure G6)
Note: Tailgate metal may need to be drilled to a larger diameter to accommodate the new switch.
Page 13 of 15 © 2020 Voxx Electronics. All Rights Reserved
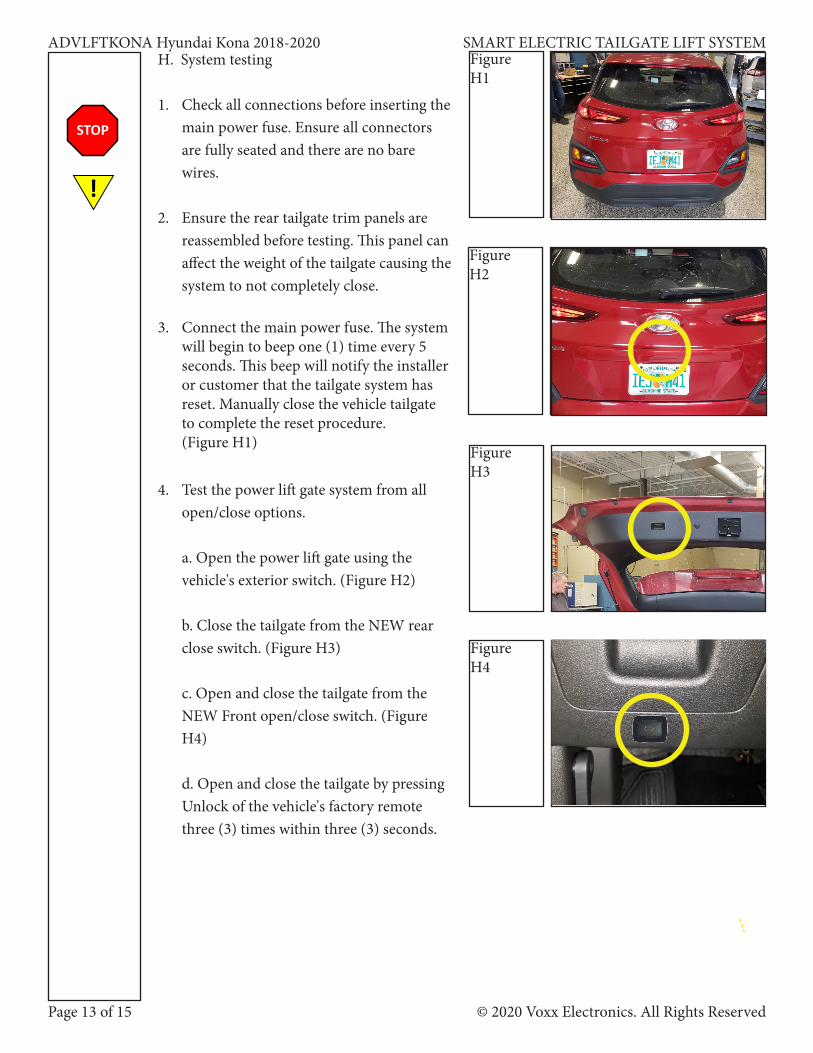
ADVLFTKONA Hyundai Kona 2018-2020 SMART ELECTRIC TAILGATE LIFT SYSTEMH. System testing
1. Check all connections before inserting the main power fuse. Ensure all connectors are fully seated and there are no bare wires.
2. Ensure the rear tailgate trim panels are reassembled before testing. This panel can affect the weight of the tailgate causing the system to not completely close.
3. Connect the main power fuse. The system will begin to beep one (1) time every 5 seconds. This beep will notify the installer or customer that the tailgate system has reset. Manually close the vehicle tailgate to complete the reset procedure.
(Figure H1)
FigureH1
FigureH4
4. Test the power lift gate system from all open/close options.
a. Open the power lift gate using the vehicle's exterior switch. (Figure H2)
b. Close the tailgate from the NEW rear close switch. (Figure H3)
c. Open and close the tailgate from the NEW Front open/close switch. (Figure H4)
d. Open and close the tailgate by pressing Unlock of the vehicle's factory remote three (3) times within three (3) seconds.
FigureH3
FigureH2
STOP
!
ADVLFTHKONA Hyundai Kona 2018-2020 SMART ELECTRIC TAILGATE LIFT SYSTEM
Page 14 of 15© 2020 Voxx Electronics. All Rights Reserved
FigureI1
FigureI2
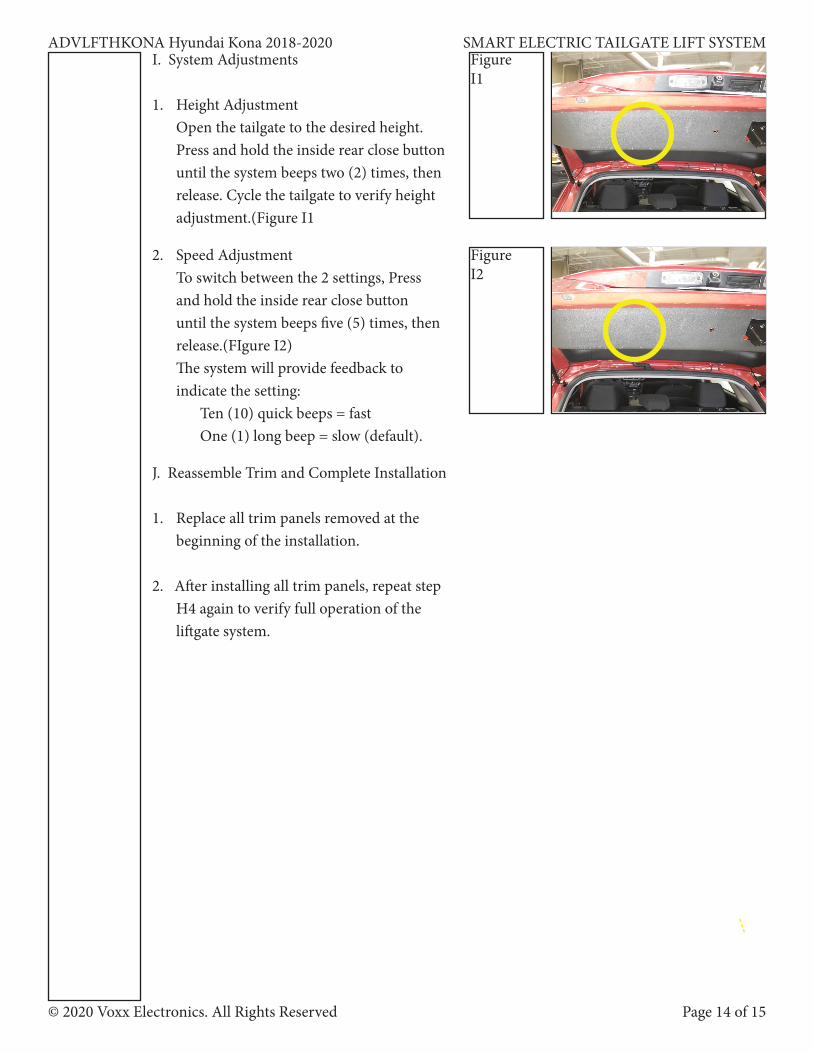
2. Speed Adjustment To switch between the 2 settings, Press
and hold the inside rear close button until the system beeps five (5) times, then release.(FIgure I2)
The system will provide feedback to indicate the setting:
Ten (10) quick beeps = fast One (1) long beep = slow (default).
J. Reassemble Trim and Complete Installation
1. Replace all trim panels removed at the beginning of the installation.
2. After installing all trim panels, repeat step H4 again to verify full operation of the liftgate system.
I. System Adjustments
1. Height Adjustment Open the tailgate to the desired height.
Press and hold the inside rear close button until the system beeps two (2) times, then release. Cycle the tailgate to verify height adjustment.(Figure I1
Page 15 of 15 © 2020 Voxx Electronics. All Rights Reserved
ADVLFTKONA Hyundai Kona 2018-2020 SMART ELECTRIC TAILGATE LIFT SYSTEM
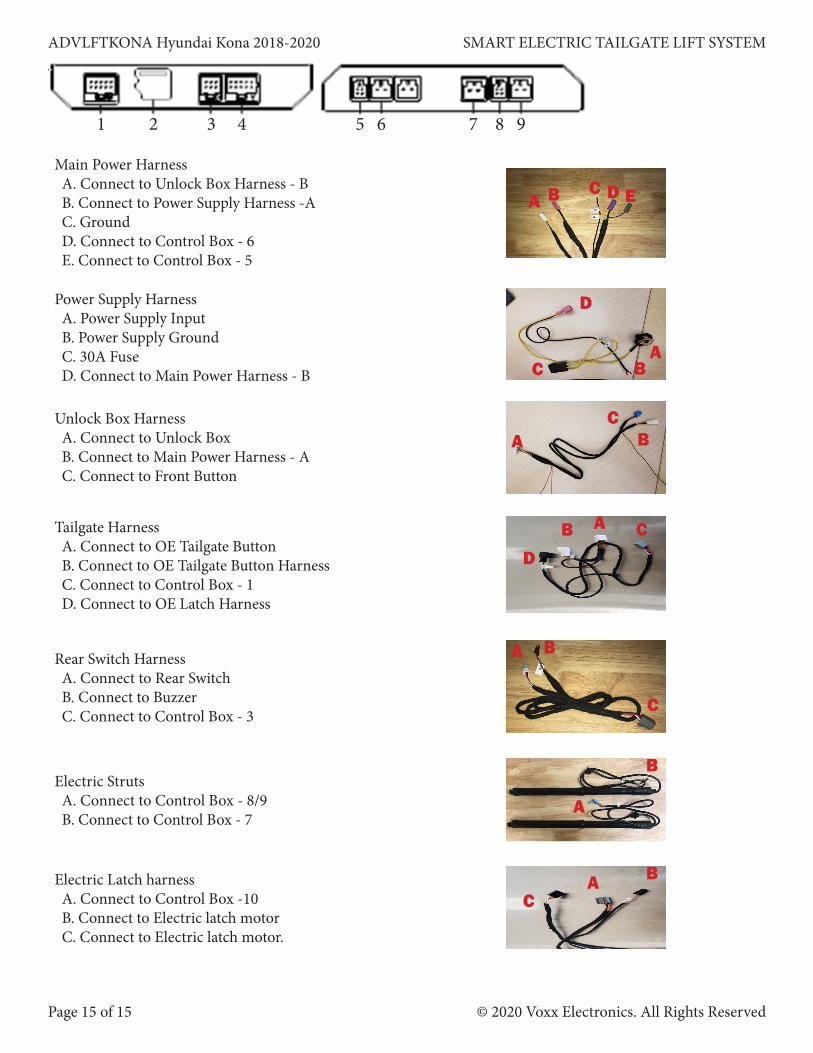
Main Power Harness A. Connect to Unlock Box Harness - B B. Connect to Power Supply Harness -A C. Ground D. Connect to Control Box - 6 E. Connect to Control Box - 5
Power Supply Harness A. Power Supply Input B. Power Supply Ground C. 30A Fuse D. Connect to Main Power Harness - B
Unlock Box Harness A. Connect to Unlock Box B. Connect to Main Power Harness - A C. Connect to Front Button
Tailgate Harness A. Connect to OE Tailgate Button B. Connect to OE Tailgate Button Harness C. Connect to Control Box - 1 D. Connect to OE Latch Harness
Rear Switch Harness A. Connect to Rear Switch B. Connect to Buzzer C. Connect to Control Box - 3
1 2 3 4 5 6 7 8 9
A B C D E
A BC
AB C
Electric Struts A. Connect to Control Box - 8/9 B. Connect to Control Box - 7
A B
C
A
B
ABC
D
D
Electric Latch harness A. Connect to Control Box -10 B. Connect to Electric latch motor C. Connect to Electric latch motor.
A BC
Related Documents