Planning and Control Using Oracle ® Primavera ® P6 Versions 8 to 19 PPM Professional This publication is only sold as a bound book, no parts may be reproduced by any means, e.g. electronic, video or print. © Eastwood Harris Pty Ltd i PLANNING AND CONTROL USING ORACLE ® PRIMAVERA ® P6 VERSIONS 8 to 19 PPM PROFESSIONAL Planning and Progressing Project Schedules With and Without Roles and Resources in an Established Database BY PAUL EASTWOOD HARRIS SAMPLE BOOK WITH TWO CHAPTER ONLY

Welcome message from author
This document is posted to help you gain knowledge. Please leave a comment to let me know what you think about it! Share it to your friends and learn new things together.
Transcript

Planning and Control Using Oracle® Primavera® P6 Versions 8 to 19 PPM Professional
This publication is only sold as a bound book, no parts may be reproduced by any means, e.g. electronic, video or print. © Eastwood Harris Pty Ltd i
PLANNING AND CONTROL
USING
ORACLE® PRIMAVERA® P6
VERSIONS 8 to 19 PPM PROFESSIONAL
Planning and Progressing Project Schedules
With and Without Roles and Resources
in an
Established Database
BY
PAUL EASTWOOD HARRIS
SAMPLE BOOK WITH TWO CHAPTER ONLY
Planning and Control Using Oracle® Primavera® P6 Versions 8 to 19 PPM Professional
This publication is only sold as a bound book, no parts may be reproduced by any means, e.g. electronic, video or print. © Eastwood Harris Pty Ltd ii
©Copyright 2020 by Eastwood Harris Pty Ltd. No part of this publication may be reproduced or used in any form or by any method without the written permission of the author.
Oracle and Primavera are registered trademarks of Oracle and/or its affiliates.
Windows, Microsoft® Office Project Standard 2016, Microsoft®Office Project Professional 2016, Microsoft® Office Project Standard 2019, Microsoft®Office Project Professional 2019, Microsoft® Office Project Standard 2013, Microsoft®Office Project Professional 2013 Windows, Microsoft® Office Project Standard 2010, Microsoft®Office Project Professional 2010, Microsoft® Office Project Standard 2007, Microsoft® Office Project Professional 2007 and Excel are registered trademarks of Microsoft Corporation.
Elecosoft Powerproject is a registered trademark of Elecosoft®.
Adobe® and Acrobat® are registered trademarks of Adobe Systems Incorporated.
All other company or product names may be trademarks of their respective owners.
Screen captures reprinted with authorization from Oracle Corporation.
This publication was created by Eastwood Harris Pty Ltd and is not a product of Oracle Corporation.
DISCLAIMER
The information contained in this publication is to the best of the author’s knowledge true and correct. The author has made every effort to ensure accuracy of this publication, but may not be held responsible for any loss or damage arising from any information in this publication. Furthermore, Oracle Corporation reserves the right in their documentation to make changes to any products to improve reliability, function, or design. Thus, the application of Service Packs or the use of upgraded software may result in the software operating differently from the descriptions in this publication.
AUTHOR AND PUBLISHER
Paul E Harris Eastwood Harris Pty Ltd PO Box 4032 Doncaster Heights, 3109 Victoria, Australia
e-mail: [email protected] Web: http://www.eh.com.au Tel: +61 (0) 4 1118 7701
Please send any comments on this publication to the author.
ISBN 978-1-925185-72-0 (1-925185-72-9) – Letter Paperback
ISBN 978-1-925185-73-7 (1-925185-73-7) – Letter Spiral
ISBN 978-1-925185-74-4 (1-925185-74-5) – eBook
2 April 2020
SAMPLE BOOK WITH TWO CHAPTER ONLY
Planning and Control Using Oracle® Primavera® P6 Versions 8 to 19 PPM Professional
This publication is only sold as a bound book, no parts may be reproduced by any means, e.g. electronic, video or print. © Eastwood Harris Pty Ltd iii
INTRODUCTION This publication is an upgrade of the Project Planning & Control Using Primavera P6 Version 7 and has been written to enable new users to learn the planning and scheduling functions of Primavera Version 8, 15, 16, 17 or 18. Please note there are no versions 9 to 14 and Oracle changed their naming convention with the release of 15.1 so the name is the same as the year of the release. Due to the changes in the menus in this release, it is not possible to make the book backward compatible to earlier versions of the software.
Many users will have prior experience with SureTrak, P3, Elecosoft (Asta) Powerproject or Microsoft Project and the author explains where there are differences in the products’ functionality.
The author would appreciate any constructive comments on how this publication may be improved.
SUMMARY The publication may be used as:
A training manual for a three-day training course, or
A self-teach book, or
A reference manual.
The screen shots for this publication are taken from Primavera Versions 8.1 or 8.2 or 8.3 or 8.4 or 15.1 or 15.2 or 16.1 or 16.2 or 17 or 18 or 19.
One-day, two-day, or three-day training courses may be run using this publication and it includes exercises for the students to complete at the end of each chapter. After the course, students may use this publication as a reference book. Instructors’ PowerPoint presentations are available from Eastwood Harris web sites.
This publication is ideal for people who would like to quickly gain an understanding of how the software operates and explains how the software differs from Primavera P3, SureTrak and Microsoft Project, thus making it ideal for people who wish to convert from these products.
CUSTOMIZATION FOR TRAINING COURSES Training organizations or companies that wish to conduct their own training may have this publication tailored to suit their requirements. This may be achieved removing, reordering or adding content to the publication and by writing their own exercises. Please contact the author to discuss this service.
AUTHOR’S COMMENT As a project controls consultant I have used a number of planning and scheduling software packages for the management of a range of project types and sizes. The first publications I published were user guides/training manuals for Primavera SureTrak, P3 and Microsoft Project users. These were well received by professional project managers and schedulers, so I decided to turn my attention to Primavera Enterprise, which is now called Primavera P6. This publication follows the same proven layout of my previous publications. I trust this publication will assist you in understanding how to use Primavera P6 on your projects.
APPRECIATION I would like thank Michael Jack for his assistance in writing this book and Thomas Grant for his assistance in proof reading parts of the book.
SAMPLE BOOK WITH TWO CHAPTER ONLY
Planning and Control Using Oracle® Primavera® P6 Versions 8 to 19 PPM Professional
This publication is only sold as a bound book, no parts may be reproduced by any means, e.g. electronic, video or print. © Eastwood Harris Pty Ltd iv
CURRENT BOOKS PUBLISHED BY EASTWOOD HARRIS Planning and Control Using Oracle Primavera P6 Versions 8 to 19 PPM Professional Oracle Primavera P6 Version 16 EPPM Web Administrators Guide Planning and Control Using Oracle Primavera P6 Versions 16 EPPM Web Create and Update an Unresourced Project Using Powerproject Version 15 Planning and Control Using Microsoft Project® 2013, 2016 and 2019 99 Tricks and Traps for Microsoft® Project 2013, 2016 and 2019 Planning and Control Using Microsoft® Project 2013, 2016 and 2019 and PMBOK® Guide Sixth Edition Planificación y Control Usando Oracle Primavera P6 Versiones 8.1 a 15.1 PPM Profesional 规划和控制 Oracle Primavera P6 应用 版本 8.1-15.1 PPM 专业版
SUPERSEDED BOOKS BY THE AUTHOR Planning and Scheduling Using Microsoft® Project 2000 Planning and Scheduling Using Microsoft® Project 2002 Planning and Scheduling Using Microsoft® Project 2003 Planning and Scheduling Using Microsoft® Office Project 2007 Planning and Scheduling Using Microsoft Office Project 2007 - Including Microsoft Project 2000 to 2003 - Revised 2009 Planning and Control Using Microsoft Project and PMBOK® Guide Fourth Edition Planning and Control Using Microsoft Project 2010 and PMBOK® Guide Fourth Edition Planning and Scheduling Using Microsoft Project 2010 - Updated 2013 Including Revised Workshops Planning and Control Using Microsoft Project 2010 & PMBOK® Guide Fifth Edition 99 Tricks and Traps for Microsoft Office Project - Including Microsoft Project 2000 to 2007 PRINCE2TM Planning and Control Using Microsoft® Project Planning and Control Using Microsoft® Project and PMBOK® Guide Third Edition Project Planning and Scheduling Using Primavera Enterprise® – Team Play Version 3.5 Project Planning and Scheduling Using Primavera Enterprise® – P3e & P3e/c Version 3.5 Project Planning and Scheduling Using Primavera® Version 4.1 for IT Project Project Planning and Scheduling Using Primavera® Version 4.1 or E&C Planning and Scheduling Using Primavera® Version 5.0 – For IT Project Office Planning and Scheduling Using Primavera® Version 5.0 – For Engineering & Construction Project Planning & Control Using Primavera® P6 – Updated for Version 6.2 Project Planning and Scheduling Using Primavera Contractor Version 6.1 - Including Versions 4.1, 5.0 and 6.1 Planning Using Primavera Project Planner P3® Version 2.0 Planning Using Primavera Project Planner P3® Version 3.0 Planning Using Primavera Project Planner P3® Version 3.1 Project Planning Using SureTrak® for Windows Version 2.0 Planning Using Primavera SureTrak® Project Manager Version 3.0 Planning Using Primavera Project Planner P3 Version 3.1 - Revised 2006 Planning Using Primavera SureTrak Project Manager Version 3.0 - Revised 2006 Planning and Control Using Oracle Primavera P6 - Version 8.1 Professional Client & Optional Client Planning & Control Using Primavera® P6TM For all industries including Versions 4 to 7 Planning and Control Using Oracle Primavera P6 - Versions 8.2 EPPM Web Planning and Control Using Oracle Primavera P6 - Versions 8.2 & 8.3 EPPM Web Planning and Control Using Oracle Primavera P6 - Version 8.1 & 8.2 Professional Client & Optional Client Planning and Control Using Oracle Primavera P6 - Version 8.1, 8.2 & 8.3 Professional Client & Optional Client Project Planning and Control Using Oracle Primavera P6 - Versions 8.1, 8.2 & 8.3 Professional Client & Optional Client Planificación y Control de Proyectos Usando Oracle Primavera P6 - Versiones 8.1, 8.2 y 8.3 Cliente Profesional y Opcional 项目规划和控制 ORACLE PRIMAVERA P6 应用 - 版本 8.1, 8.2 & 8.3 专业&可选客户端 Project Planning and Control Using Oracle Primavera P6 - Versions 8.1 to 8.4 Professional Client & Optional Client Planning and Control Using Oracle Primavera P6 - Versions 8.2 to 8.4 EPPM Web Planificación y Control de Proyectos Usando Oracle Primavera P6 Versiones 8.1 a 8.4 Cliente Profesional & Cliente Opcional 规划和控制 ORACLE® PRIMAVERA® P6 应用 版本 8.1-8.4 专业&可选客户端 Planning and Control Using Oracle Primavera P6 - Versions 8.2 to 15.1 EPPM Web Planning and Control Using Oracle Primavera P6 Versions 8.1 to 15.1 PPM Professional Project Planning & Control Using Primavera P6 Version 7 - For all industries including Versions 4 to 7 Updated 2012 Planning and Control Using Microsoft Project 2013 Planning and Control Using Microsoft Project 2013 & PMBOK® Guide Fifth Edition - No Subtitle Planning and Control Using Oracle Primavera P6 - Versions 8.2 & 8.3 EPPM Web 99 Tricks and Traps for Microsoft Project 2013 Planning and Control Using Oracle Primavera P6 Versions 8, 15 and 16 EPPM Web Planning and Control Using Oracle Primavera P6 Versions 8, 15 and 16 PPM Professional Oracle Primavera P6 Version 8, 15 and 16 EPPM Web Administrators Guide Planning and Control Using Oracle Primavera P6 Versions 8 to 17 PPM Professional Planning and Control Using Microsoft® Project 2013 and 2016 99 Tricks and Traps for Microsoft® Project 2013 and 2016 Planning and Control Using Microsoft Project 2013 or 2016 and PMBOK® Guide Fifth Edition
SAMPLE BOOK WITH TWO CHAPTER ONLY
Planning and Control Using Oracle® Primavera® P6 Versions 8 to 19 PPM Professional
This publication is only sold as a bound book, no parts may be reproduced by any means, e.g. electronic, video or print. © Eastwood Harris Pty Ltd v
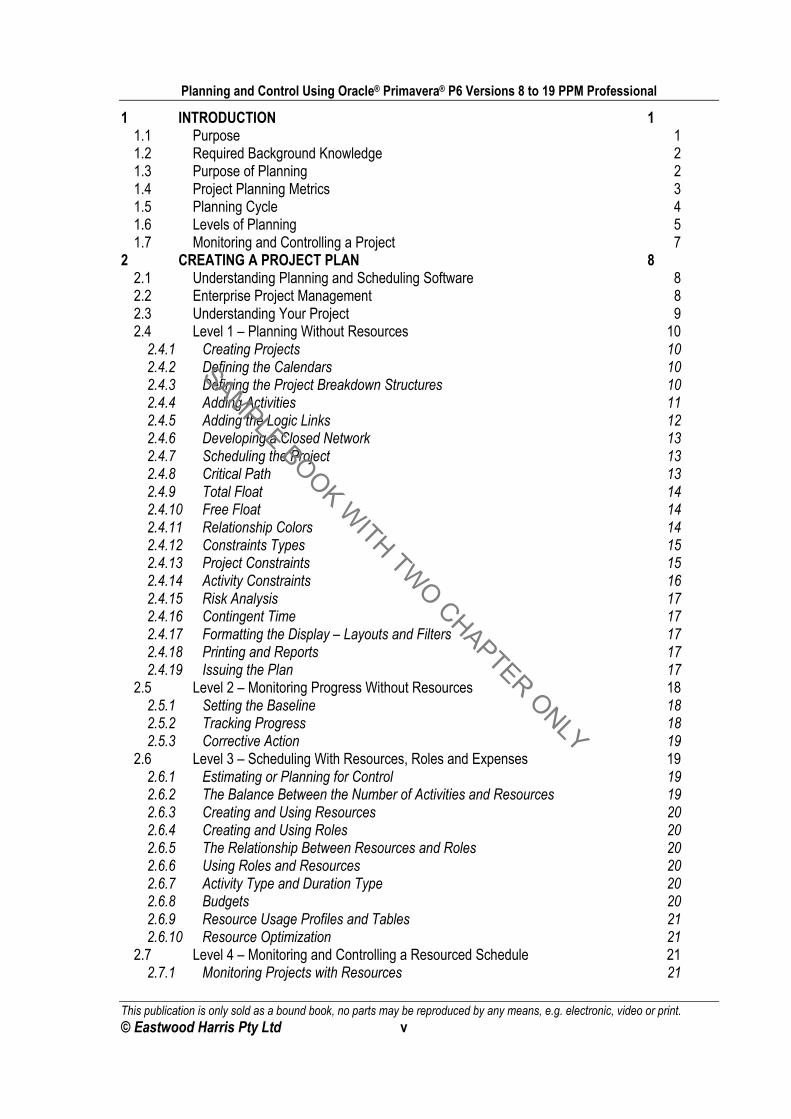
1 INTRODUCTION 1 1.1 Purpose 1 1.2 Required Background Knowledge 2 1.3 Purpose of Planning 2 1.4 Project Planning Metrics 3 1.5 Planning Cycle 4 1.6 Levels of Planning 5 1.7 Monitoring and Controlling a Project 7
2 CREATING A PROJECT PLAN 8 2.1 Understanding Planning and Scheduling Software 8 2.2 Enterprise Project Management 8 2.3 Understanding Your Project 9 2.4 Level 1 – Planning Without Resources 10
2.4.1 Creating Projects 10 2.4.2 Defining the Calendars 10 2.4.3 Defining the Project Breakdown Structures 10 2.4.4 Adding Activities 11 2.4.5 Adding the Logic Links 12 2.4.6 Developing a Closed Network 13 2.4.7 Scheduling the Project 13 2.4.8 Critical Path 13 2.4.9 Total Float 14 2.4.10 Free Float 14 2.4.11 Relationship Colors 14 2.4.12 Constraints Types 15 2.4.13 Project Constraints 15 2.4.14 Activity Constraints 16 2.4.15 Risk Analysis 17 2.4.16 Contingent Time 17 2.4.17 Formatting the Display – Layouts and Filters 17 2.4.18 Printing and Reports 17 2.4.19 Issuing the Plan 17
2.5 Level 2 – Monitoring Progress Without Resources 18 2.5.1 Setting the Baseline 18 2.5.2 Tracking Progress 18 2.5.3 Corrective Action 19
2.6 Level 3 – Scheduling With Resources, Roles and Expenses 19 2.6.1 Estimating or Planning for Control 19 2.6.2 The Balance Between the Number of Activities and Resources 19 2.6.3 Creating and Using Resources 20 2.6.4 Creating and Using Roles 20 2.6.5 The Relationship Between Resources and Roles 20 2.6.6 Using Roles and Resources 20 2.6.7 Activity Type and Duration Type 20 2.6.8 Budgets 20 2.6.9 Resource Usage Profiles and Tables 21 2.6.10 Resource Optimization 21
2.7 Level 4 – Monitoring and Controlling a Resourced Schedule 21 2.7.1 Monitoring Projects with Resources 21
SAMPLE BOOK WITH TWO CHAPTER ONLY

Planning and Control Using Oracle® Primavera® P6 Versions 8 to 19 PPM Professional
This publication is only sold as a bound book, no parts may be reproduced by any means, e.g. electronic, video or print. © Eastwood Harris Pty Ltd vi
2.7.2 Controlling a Project with Resources 21 3 STARTING UP AND NAVIGATION 22
3.1 Logging In 23 3.2 The Projects Window 24
3.2.1 Project Window Top Pane 24 3.2.2 Project Window Bottom Pane Details Tab 25
3.3 Opening One or More Projects 25 3.4 Displaying the Activities Window 26 3.5 Opening a Portfolio 27 3.6 Introduction to Layouts 27 3.7 User Interface Update 30
3.7.1 New Customizable Toolbars 30 3.7.2 Customizable menus 32 3.7.3 Status Bar 32
3.8 User Preferences 33 3.8.1 Time Unit Formatting 33 3.8.2 Date Formatting 33
3.9 Starting Day of Week 34 3.10 Admin Preferences – Set Industry Type 35 3.11 Application of Options within Forms 37 3.12 Do Not Ask Me About This Again 38 3.13 Right-clicking with the Mouse 38 3.14 Accessing Help 38 3.15 Refresh Data – F5 Key 40 3.16 Commit Changes – F10 Key 40 3.17 Send Project 40 3.18 Closing Down 40 3.19 Workshop 1 – Navigating Around the Windows 41
4 CREATING A NEW PROJECT 47 4.1 Creating a Blank Project 47 4.2 Copy an Existing Project 48 4.3 Importing a Project 49
4.3.1 Primavera File Types 49 4.3.2 Non Primavera File Types 49
4.4 Setting Up a New Project 50 4.5 Project Dates 51 4.6 Saving Additional Project and EPS Information – Notebook Topics 52 4.7 Workshop 2 – Creating Your Project 53
5 DEFINING CALENDARS 55 5.1 Database Default Calendar 56 5.2 Accessing Global and Project Calendars 56 5.3 The Project Default Calendar 56
5.3.1 Understanding the Project Default Calendar 56 5.3.2 Assigning a Default Project Calendar 57
5.4 Creating a New Global or Project Calendar 57 5.5 Resource Calendars 58
5.5.1 Creating a New Shared Resource Calendar 58 5.5.2 Creating New Personal Resource Calendars 58 5.5.3 Personal and Shared Calendars Calculation and Display 60
SAMPLE BOOK WITH TWO CHAPTER ONLY
Planning and Control Using Oracle® Primavera® P6 Versions 8 to 19 PPM Professional
This publication is only sold as a bound book, no parts may be reproduced by any means, e.g. electronic, video or print. © Eastwood Harris Pty Ltd vii
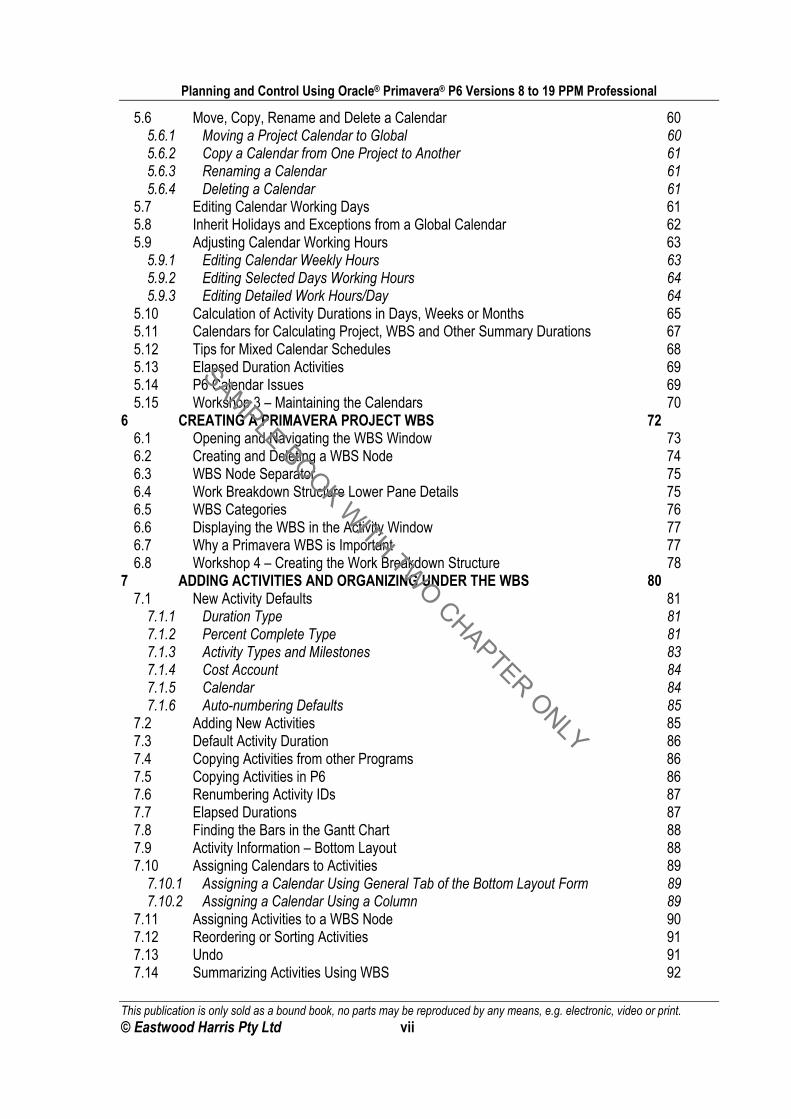
5.6 Move, Copy, Rename and Delete a Calendar 60 5.6.1 Moving a Project Calendar to Global 60 5.6.2 Copy a Calendar from One Project to Another 61 5.6.3 Renaming a Calendar 61 5.6.4 Deleting a Calendar 61
5.7 Editing Calendar Working Days 61 5.8 Inherit Holidays and Exceptions from a Global Calendar 62 5.9 Adjusting Calendar Working Hours 63
5.9.1 Editing Calendar Weekly Hours 63 5.9.2 Editing Selected Days Working Hours 64 5.9.3 Editing Detailed Work Hours/Day 64
5.10 Calculation of Activity Durations in Days, Weeks or Months 65 5.11 Calendars for Calculating Project, WBS and Other Summary Durations 67 5.12 Tips for Mixed Calendar Schedules 68 5.13 Elapsed Duration Activities 69 5.14 P6 Calendar Issues 69 5.15 Workshop 3 – Maintaining the Calendars 70
6 CREATING A PRIMAVERA PROJECT WBS 72 6.1 Opening and Navigating the WBS Window 73 6.2 Creating and Deleting a WBS Node 74 6.3 WBS Node Separator 75 6.4 Work Breakdown Structure Lower Pane Details 75 6.5 WBS Categories 76 6.6 Displaying the WBS in the Activity Window 77 6.7 Why a Primavera WBS is Important 77 6.8 Workshop 4 – Creating the Work Breakdown Structure 78
7 ADDING ACTIVITIES AND ORGANIZING UNDER THE WBS 80 7.1 New Activity Defaults 81
7.1.1 Duration Type 81 7.1.2 Percent Complete Type 81 7.1.3 Activity Types and Milestones 83 7.1.4 Cost Account 84 7.1.5 Calendar 84 7.1.6 Auto-numbering Defaults 85
7.2 Adding New Activities 85 7.3 Default Activity Duration 86 7.4 Copying Activities from other Programs 86 7.5 Copying Activities in P6 86 7.6 Renumbering Activity IDs 87 7.7 Elapsed Durations 87 7.8 Finding the Bars in the Gantt Chart 88 7.9 Activity Information – Bottom Layout 88 7.10 Assigning Calendars to Activities 89
7.10.1 Assigning a Calendar Using General Tab of the Bottom Layout Form 89 7.10.2 Assigning a Calendar Using a Column 89
7.11 Assigning Activities to a WBS Node 90 7.12 Reordering or Sorting Activities 91 7.13 Undo 91 7.14 Summarizing Activities Using WBS 92
SAMPLE BOOK WITH TWO CHAPTER ONLY
Planning and Control Using Oracle® Primavera® P6 Versions 8 to 19 PPM Professional
This publication is only sold as a bound book, no parts may be reproduced by any means, e.g. electronic, video or print. © Eastwood Harris Pty Ltd viii
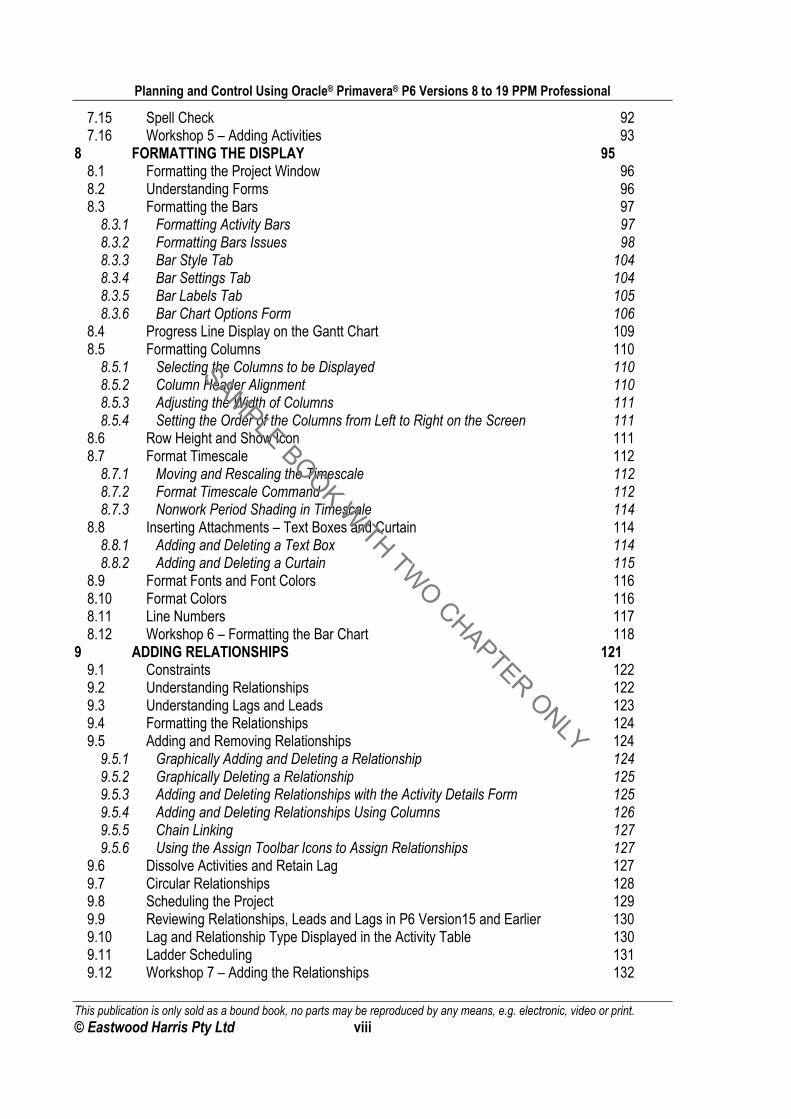
7.15 Spell Check 92 7.16 Workshop 5 – Adding Activities 93
8 FORMATTING THE DISPLAY 95 8.1 Formatting the Project Window 96 8.2 Understanding Forms 96 8.3 Formatting the Bars 97
8.3.1 Formatting Activity Bars 97 8.3.2 Formatting Bars Issues 98 8.3.3 Bar Style Tab 104 8.3.4 Bar Settings Tab 104 8.3.5 Bar Labels Tab 105 8.3.6 Bar Chart Options Form 106
8.4 Progress Line Display on the Gantt Chart 109 8.5 Formatting Columns 110
8.5.1 Selecting the Columns to be Displayed 110 8.5.2 Column Header Alignment 110 8.5.3 Adjusting the Width of Columns 111 8.5.4 Setting the Order of the Columns from Left to Right on the Screen 111
8.6 Row Height and Show Icon 111 8.7 Format Timescale 112
8.7.1 Moving and Rescaling the Timescale 112 8.7.2 Format Timescale Command 112 8.7.3 Nonwork Period Shading in Timescale 114
8.8 Inserting Attachments – Text Boxes and Curtain 114 8.8.1 Adding and Deleting a Text Box 114 8.8.2 Adding and Deleting a Curtain 115
8.9 Format Fonts and Font Colors 116 8.10 Format Colors 116 8.11 Line Numbers 117 8.12 Workshop 6 – Formatting the Bar Chart 118
9 ADDING RELATIONSHIPS 121 9.1 Constraints 122 9.2 Understanding Relationships 122 9.3 Understanding Lags and Leads 123 9.4 Formatting the Relationships 124 9.5 Adding and Removing Relationships 124
9.5.1 Graphically Adding and Deleting a Relationship 124 9.5.2 Graphically Deleting a Relationship 125 9.5.3 Adding and Deleting Relationships with the Activity Details Form 125 9.5.4 Adding and Deleting Relationships Using Columns 126 9.5.5 Chain Linking 127 9.5.6 Using the Assign Toolbar Icons to Assign Relationships 127
9.6 Dissolve Activities and Retain Lag 127 9.7 Circular Relationships 128 9.8 Scheduling the Project 129 9.9 Reviewing Relationships, Leads and Lags in P6 Version15 and Earlier 130 9.10 Lag and Relationship Type Displayed in the Activity Table 130 9.11 Ladder Scheduling 131 9.12 Workshop 7 – Adding the Relationships 132
SAMPLE BOOK WITH TWO CHAPTER ONLY
Planning and Control Using Oracle® Primavera® P6 Versions 8 to 19 PPM Professional
This publication is only sold as a bound book, no parts may be reproduced by any means, e.g. electronic, video or print. © Eastwood Harris Pty Ltd ix
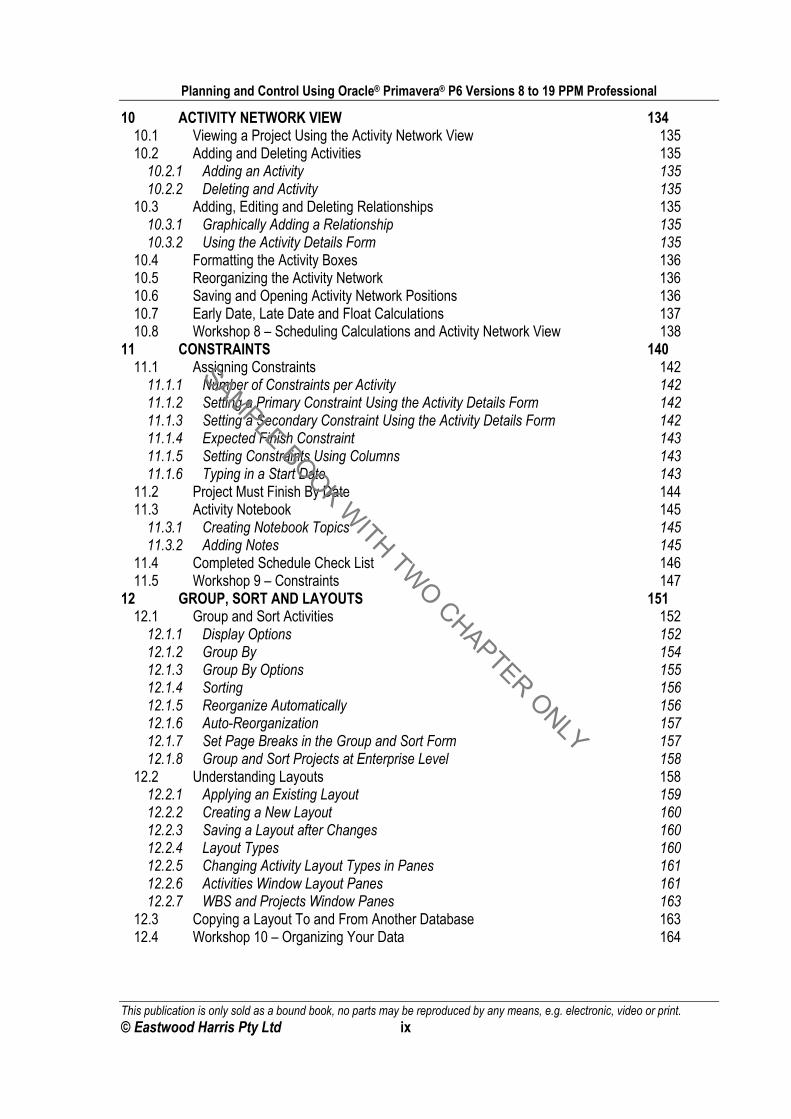
10 ACTIVITY NETWORK VIEW 134 10.1 Viewing a Project Using the Activity Network View 135 10.2 Adding and Deleting Activities 135
10.2.1 Adding an Activity 135 10.2.2 Deleting and Activity 135
10.3 Adding, Editing and Deleting Relationships 135 10.3.1 Graphically Adding a Relationship 135 10.3.2 Using the Activity Details Form 135
10.4 Formatting the Activity Boxes 136 10.5 Reorganizing the Activity Network 136 10.6 Saving and Opening Activity Network Positions 136 10.7 Early Date, Late Date and Float Calculations 137 10.8 Workshop 8 – Scheduling Calculations and Activity Network View 138
11 CONSTRAINTS 140 11.1 Assigning Constraints 142
11.1.1 Number of Constraints per Activity 142 11.1.2 Setting a Primary Constraint Using the Activity Details Form 142 11.1.3 Setting a Secondary Constraint Using the Activity Details Form 142 11.1.4 Expected Finish Constraint 143 11.1.5 Setting Constraints Using Columns 143 11.1.6 Typing in a Start Date 143
11.2 Project Must Finish By Date 144 11.3 Activity Notebook 145
11.3.1 Creating Notebook Topics 145 11.3.2 Adding Notes 145
11.4 Completed Schedule Check List 146 11.5 Workshop 9 – Constraints 147
12 GROUP, SORT AND LAYOUTS 151 12.1 Group and Sort Activities 152
12.1.1 Display Options 152 12.1.2 Group By 154 12.1.3 Group By Options 155 12.1.4 Sorting 156 12.1.5 Reorganize Automatically 156 12.1.6 Auto-Reorganization 157 12.1.7 Set Page Breaks in the Group and Sort Form 157 12.1.8 Group and Sort Projects at Enterprise Level 158
12.2 Understanding Layouts 158 12.2.1 Applying an Existing Layout 159 12.2.2 Creating a New Layout 160 12.2.3 Saving a Layout after Changes 160 12.2.4 Layout Types 160 12.2.5 Changing Activity Layout Types in Panes 161 12.2.6 Activities Window Layout Panes 161 12.2.7 WBS and Projects Window Panes 163
12.3 Copying a Layout To and From Another Database 163 12.4 Workshop 10 – Organizing Your Data 164
SAMPLE BOOK WITH TWO CHAPTER ONLY
Planning and Control Using Oracle® Primavera® P6 Versions 8 to 19 PPM Professional
This publication is only sold as a bound book, no parts may be reproduced by any means, e.g. electronic, video or print. © Eastwood Harris Pty Ltd x
13 FILTERS 166 13.1 Understanding Filters 166 13.2 Applying a Filter 167
13.2.1 Filters Form 167 13.2.2 Applying a Single Filter 167 13.2.3 Applying a Combination Filter 167
13.3 Creating and Modifying a Filter 168 13.3.1 Creating a New Filter 168 13.3.2 One Parameter Filter 168 13.3.3 Two Parameter Filter 169 13.3.4 Multiple Parameter Filter 170 13.3.5 Editing and Organizing Filter Parameters 170 13.3.6 Understanding Resource Filters 170
13.4 Workshop 11 – Filters 171 14 PRINTING, REPORTS AND VISUALIZER 174
14.1 Printing 174 14.1.1 Print Preview 175 14.1.2 Page Setup 176 14.1.3 Print Form 180 14.1.4 Print Setup Form 180
14.2 Reports 180 14.2.1 Running Reports 181 14.2.2 Editing Reports 181
14.3 Publish to a Web Site 181 14.4 Visualizer 182
14.4.1 Understanding Visualizer 182 14.4.2 Starting Visualizer 183 14.4.3 Create a New TSLD – Timescaled Logic Diagram 184 14.4.4 Create a New Gantt Diagram 187 14.4.5 Open an Existing TSLD or Gantt Chart 189 14.4.6 Manage Layouts 190
14.5 Claim Digger – Schedule Comparison 191 14.6 Workshop 12 – Printing 192
15 SCHEDULE OPTIONS AND SETTING A BASELINE 194 15.1 Understanding Date Fields 195
15.1.1 Early Start and Early Finish 195 15.1.2 Late Start and Late Finish 195 15.1.3 Actual Start and Finish 196 15.1.4 Start and Finish 196 15.1.5 Planned Dates 196 15.1.6 Planned Dates Issues 197 15.1.7 Remaining Early Start and Finish 198 15.1.8 Remaining Late Start and Finish 199
15.2 Schedule Options – General Tab 199 15.2.1 Ignore relationships to and from other projects 200 15.2.2 Make open-ended activities critical 201 15.2.3 Use Expected Finish Dates 202 15.2.4 Schedule automatically when a change affects dates 203 15.2.5 Level resources during scheduling 203
SAMPLE BOOK WITH TWO CHAPTER ONLY
Planning and Control Using Oracle® Primavera® P6 Versions 8 to 19 PPM Professional
This publication is only sold as a bound book, no parts may be reproduced by any means, e.g. electronic, video or print. © Eastwood Harris Pty Ltd xi
15.2.6 Recalculate resource costs after scheduling 203 15.2.7 When scheduling progressed activities use 204 15.2.8 Calculate start-to-start lag from 205 15.2.9 Define critical activities as 206 15.2.10 Calculate float based on finish date 207 15.2.11 Compute Total Float as 207 15.2.12 Calendar for scheduling Relationship Lag 208 15.2.13 Schedule Options – Advanced Tab 208
15.3 Setting the Baseline 209 15.3.1 Creating a Baseline 210 15.3.2 Deleting a Baseline 210 15.3.3 Restoring a Baseline to the Database as an Active Project 210 15.3.4 Update Baselines 211 15.3.5 Copying a Project with Baselines 212 15.3.6 Setting the Baseline Project 212 15.3.7 Understanding the <Current Project> Baseline 213 15.3.8 Displaying the Baseline Data 215
15.4 Limitation on Viewing Baseline Data 216 15.5 Workshop 13 – WBS, LOEs and Setting the Baseline 217
16 UPDATING AN UNRESOURCED SCHEDULE 221 16.1 Practical Methods of Recording Progress 222 16.2 Understanding the Concepts 223
16.2.1 Activity Lifecycle 223 16.2.2 Assigning an Actual Start Date and Time of an Activity 223 16.2.3 Assigning an Actual Finish Date and Time of an Activity 224 16.2.4 Calculation of Durations of an In-Progress Activity 224 16.2.5 Summary Bars Progress Calculation 226 16.2.6 Understanding the Current Data Date 226
16.3 Updating the Schedule 227 16.3.1 Updating Activities Using the Status Tab of the Details Form 227 16.3.2 Updating Activities Using Columns 228
16.4 Progress Spotlight and Update Progress 228 16.4.1 Highlighting Activities for Updating by Dragging the Data Date 228 16.4.2 Spotlighting Activities Using Spotlight Icon 229 16.4.3 Updating a Project Using Update Progress 229
16.5 Suspend and Resume 231 16.6 Scheduling the Project 232 16.7 Comparing Progress with Baseline 232 16.8 Progress Line Display on the Gantt Chart 233 16.9 Check List before Updating a Schedule 234 16.10 In-Progress Schedule Check List 234 16.11 Corrective Action 235 16.12 Workshop 14 – Progressing and Baseline Comparison 236
17 USER AND ADMINISTRATION PREFERENCES 239 17.1 User Preferences 239
17.1.1 Time Units Tab 239 17.1.2 Dates Tab 240 17.1.3 Currency Tab 240 17.1.4 E-Mail Tab 241
SAMPLE BOOK WITH TWO CHAPTER ONLY

Planning and Control Using Oracle® Primavera® P6 Versions 8 to 19 PPM Professional
This publication is only sold as a bound book, no parts may be reproduced by any means, e.g. electronic, video or print. © Eastwood Harris Pty Ltd xii
17.1.5 Assistance Tab 241 17.1.6 Application Tab 241 17.1.7 Password Tab 242 17.1.8 Resource Analysis Tab 242 17.1.9 Calculations Tab 243 17.1.10 Startup Filters Tab 244 17.1.11 Personal Information Tab 245
17.2 Admin Menu 245 17.2.1 Users 246 17.2.2 Security Profiles 247 17.2.3 Currencies 247 17.2.4 Financial Periods 248 17.2.5 Timesheet Dates 248
17.3 Admin Preferences 248 17.3.1 General Tab 249 17.3.2 Timesheets Tab 249 17.3.3 Data Limits Tab 249 17.3.4 ID Lengths Tab 249 17.3.5 Time Periods Tab 250 17.3.6 Earned Value Tab 250 17.3.7 Reports Tab 251 17.3.8 Options Tab 251 17.3.9 Rate Types Tab 251 17.3.10 Industry Tab 252
17.4 Consent Notice 253 17.5 Status of User Acceptance 253 17.6 Admin Categories 254 17.7 Miscellaneous Defaults 254
17.7.1 Default Project 254 17.7.2 Set Language 255
18 CREATING ROLES AND RESOURCES 256 18.1 Understanding Resources and Roles 257
18.1.1 Individual Resources 257 18.1.2 Group Resources 257 18.1.3 Input and Output Resources 257 18.1.4 Understanding Roles 258
18.2 Creating Roles 259 18.3 Creating Resources and the Resources Window 261
18.3.1 Resource Breakdown Structure – RBS 261 18.3.2 Formatting the Resources Window 262 18.3.3 Adding Resources 262 18.3.4 General Tab 262 18.3.5 Codes Tab 263 18.3.6 Details Tab 263 18.3.7 Units and Prices Tab 266 18.3.8 Roles Tab 267 18.3.9 Notes Tab 267 18.3.10 Progress Reporter Tab 267
18.4 Workshop 15 – Adding Resources to the Database 268
SAMPLE BOOK WITH TWO CHAPTER ONLY
Planning and Control Using Oracle® Primavera® P6 Versions 8 to 19 PPM Professional
This publication is only sold as a bound book, no parts may be reproduced by any means, e.g. electronic, video or print. © Eastwood Harris Pty Ltd xiii
19 ASSIGNING ROLES, RESOURCES AND EXPENSES 271 19.1 Understanding Resource Calculations and Terminology 272 19.2 Project Window Resource Preferences 273
19.2.1 Resources Tab 273 19.2.2 Understanding Resource Option to Drive Activity Dates 274 19.2.3 Calculations Tab 275
19.3 User Preferences Applicable to Assigning Resources 276 19.3.1 Units/Time Format 276 19.3.2 Resource Assignments 276 19.3.3 Assignment Staffing 277
19.4 Activities Window Resource Preferences and Defaults 277 19.4.1 Details Status Form 277 19.4.2 Activity Type 278 19.4.3 Duration Type 281
19.5 Assigning and Removing Roles 284 19.6 Assigning and Removing Resources 285
19.6.1 Assigning a Resource to an Assigned Role 285 19.6.2 Assigning a Resource to an Activity Without a Role 286 19.6.3 Removing a Resource 286 19.6.4 Assigning a Resource to an Activity More Than Once 287
19.7 Resource and Activity Duration Calculation and Resource Lags 288 19.7.1 Activity Duration 288 19.7.2 Resource Lag 288
19.8 Expenses 289 19.8.1 Expenses Window 289 19.8.2 Expenses Tab in the Activities Window 290
19.9 Suggested Setup for Creating a Resourced Schedule 291 19.10 Workshop 16 – Assigning Resources and Expenses to Activities 292
20 RESOURCE OPTIMIZATION 295 20.1 Reviewing Resource Loading 295
20.1.1 Activity Usage Spreadsheet 295 20.1.2 Activity Usage Profile 297 20.1.3 Resource Usage Spreadsheet 298 20.1.4 Editing the Resource Usage Spreadsheet – Bucket Planning 298 20.1.5 Resource Usage Profile displaying a Resource Histogram 299 20.1.6 Activity Usage Profile Displaying S-Curves 299
20.2 Resource Assignments Window 300 20.3 Copying and Pasting into Excel 300 20.4 Other Tools for Histograms and Tables 301 20.5 Methods of Resolving Resource Peaks and Conflicts 301 20.6 Resource Leveling 301
20.6.1 Methods of Resource Leveling 301 20.6.2 Resource Leveling Function 302 20.6.3 Level Resources Form 302
20.7 Leveling Examples 303 20.7.1 Leveling with Positive Float 304 20.7.2 Leveling without Positive Float 305
SAMPLE BOOK WITH TWO CHAPTER ONLY
Planning and Control Using Oracle® Primavera® P6 Versions 8 to 19 PPM Professional
This publication is only sold as a bound book, no parts may be reproduced by any means, e.g. electronic, video or print. © Eastwood Harris Pty Ltd xiv
20.8 Resource Shifts 307 20.8.1 Creating Shifts: 308 20.8.2 Assigning Shifts to Resources 308 20.8.3 Leveling With Shifts 309
20.9 Guidelines for Leveling 312 20.10 What to look for if Resources are Not Leveling 313 20.11 Resource Curves 313 20.12 Workshop 17 – Resources Optimization 316
21 UPDATING A RESOURCED SCHEDULE 321 21.1 Understanding Budget Values and Baseline Projects 321
21.1.1 Cost and Units Budget Values 321 21.1.2 Baseline Project and Values 322
21.2 Understanding the Current Data Date 323 21.3 Information Required to Update a Resourced Schedule 323 21.4 Project Window Defaults for Updating a Resourced Schedule 324 21.5 Activities Window – Percent Complete Types 326
21.5.1 Assigning the Project Default Percent Complete Type 326 21.5.2 Physical Percent Complete Type 327 21.5.3 Duration Percent Complete Type 328 21.5.4 Units Percent Complete Type 329
21.6 Using Steps to Calculate Activity Percent Complete 329 21.7 Updating the Schedule 330
21.7.1 Preferences, Defaults and Options for Updating a Project 330 21.7.2 Updating Dates and Percentage Complete 332
21.8 Updating Resources 332 21.8.1 Resources Tab 333 21.8.2 Status Tab 333 21.8.3 Applying Actuals 333
21.9 Updating Expenses 335 21.10 Workshop 18 – Updating a Resourced Schedule 336
22 OTHER METHODS OF ORGANIZING PROJECT DATA 340 22.1 Understanding Project Breakdown Structures 340 22.2 Activity Codes 340
22.2.1 Understanding Activity Codes 341 22.2.2 Activity Code Creation 342 22.2.3 Defining Activity Code Values and Descriptions 343 22.2.4 Assigning Activity Code Values to Activities 343 22.2.5 Add Activity Codes When Assigning Codes 344 22.2.6 Grouping, Sorting and Filtering with Activity Codes 344 22.2.7 Importing Activity Codes with Excel 344
22.3 User Defined Fields 345 22.4 WBS Category or Project Phase 348 22.5 Resource Codes 348 22.6 Cost Accounts 349 22.7 Owner Activity Attribute 349 22.8 Workshop 19 – Activity Codes and User Defined Fields 350
SAMPLE BOOK WITH TWO CHAPTER ONLY
Planning and Control Using Oracle® Primavera® P6 Versions 8 to 19 PPM Professional
This publication is only sold as a bound book, no parts may be reproduced by any means, e.g. electronic, video or print. © Eastwood Harris Pty Ltd xv
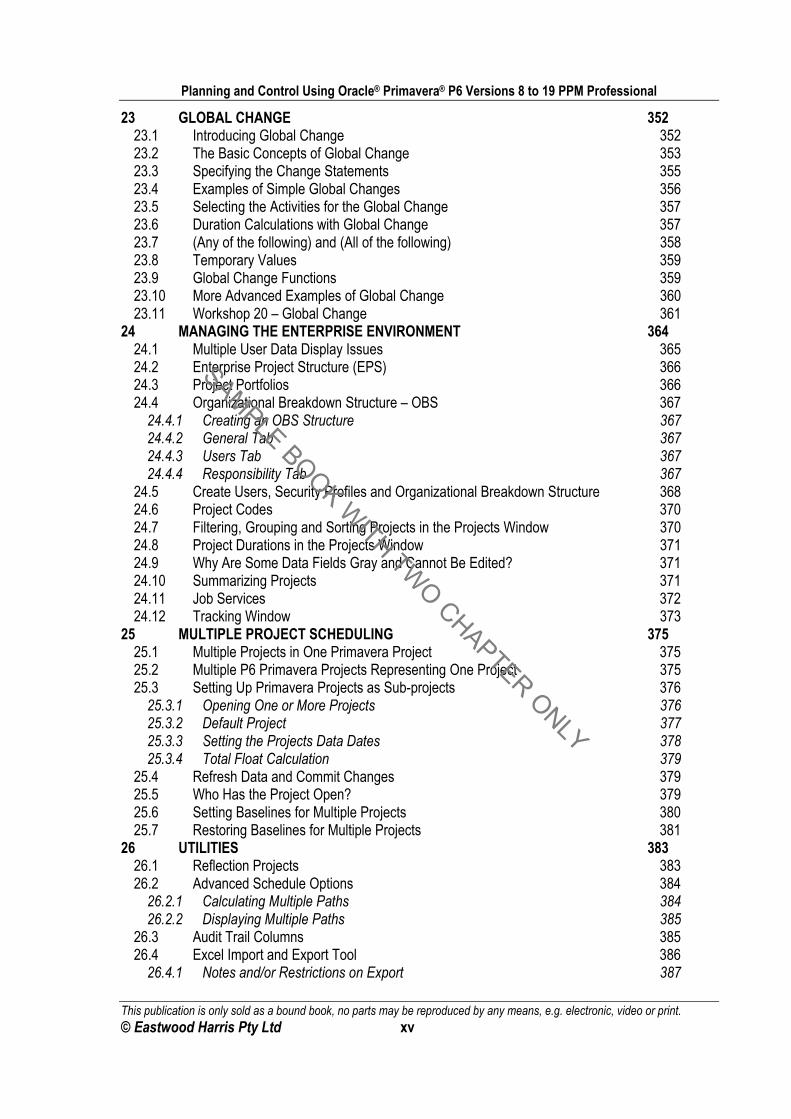
23 GLOBAL CHANGE 352 23.1 Introducing Global Change 352 23.2 The Basic Concepts of Global Change 353 23.3 Specifying the Change Statements 355 23.4 Examples of Simple Global Changes 356 23.5 Selecting the Activities for the Global Change 357 23.6 Duration Calculations with Global Change 357 23.7 (Any of the following) and (All of the following) 358 23.8 Temporary Values 359 23.9 Global Change Functions 359 23.10 More Advanced Examples of Global Change 360 23.11 Workshop 20 – Global Change 361
24 MANAGING THE ENTERPRISE ENVIRONMENT 364 24.1 Multiple User Data Display Issues 365 24.2 Enterprise Project Structure (EPS) 366 24.3 Project Portfolios 366 24.4 Organizational Breakdown Structure – OBS 367
24.4.1 Creating an OBS Structure 367 24.4.2 General Tab 367 24.4.3 Users Tab 367 24.4.4 Responsibility Tab 367
24.5 Create Users, Security Profiles and Organizational Breakdown Structure 368 24.6 Project Codes 370 24.7 Filtering, Grouping and Sorting Projects in the Projects Window 370 24.8 Project Durations in the Projects Window 371 24.9 Why Are Some Data Fields Gray and Cannot Be Edited? 371 24.10 Summarizing Projects 371 24.11 Job Services 372 24.12 Tracking Window 373
25 MULTIPLE PROJECT SCHEDULING 375 25.1 Multiple Projects in One Primavera Project 375 25.2 Multiple P6 Primavera Projects Representing One Project 375 25.3 Setting Up Primavera Projects as Sub-projects 376
25.3.1 Opening One or More Projects 376 25.3.2 Default Project 377 25.3.3 Setting the Projects Data Dates 378 25.3.4 Total Float Calculation 379
25.4 Refresh Data and Commit Changes 379 25.5 Who Has the Project Open? 379 25.6 Setting Baselines for Multiple Projects 380 25.7 Restoring Baselines for Multiple Projects 381
26 UTILITIES 383 26.1 Reflection Projects 383 26.2 Advanced Schedule Options 384
26.2.1 Calculating Multiple Paths 384 26.2.2 Displaying Multiple Paths 385
26.3 Audit Trail Columns 385 26.4 Excel Import and Export Tool 386
26.4.1 Notes and/or Restrictions on Export 387
SAMPLE BOOK WITH TWO CHAPTER ONLY
Planning and Control Using Oracle® Primavera® P6 Versions 8 to 19 PPM Professional
This publication is only sold as a bound book, no parts may be reproduced by any means, e.g. electronic, video or print. © Eastwood Harris Pty Ltd xvi
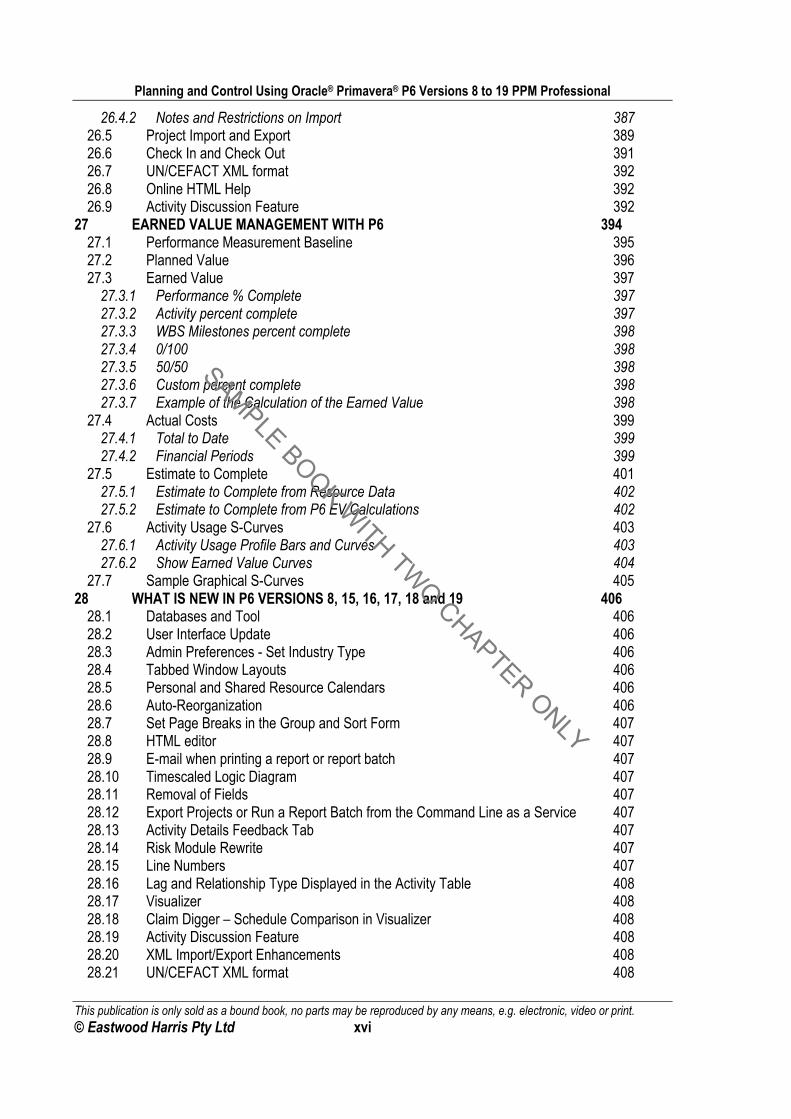
26.4.2 Notes and Restrictions on Import 387 26.5 Project Import and Export 389 26.6 Check In and Check Out 391 26.7 UN/CEFACT XML format 392 26.8 Online HTML Help 392 26.9 Activity Discussion Feature 392
27 EARNED VALUE MANAGEMENT WITH P6 394 27.1 Performance Measurement Baseline 395 27.2 Planned Value 396 27.3 Earned Value 397
27.3.1 Performance % Complete 397 27.3.2 Activity percent complete 397 27.3.3 WBS Milestones percent complete 398 27.3.4 0/100 398 27.3.5 50/50 398 27.3.6 Custom percent complete 398 27.3.7 Example of the Calculation of the Earned Value 398
27.4 Actual Costs 399 27.4.1 Total to Date 399 27.4.2 Financial Periods 399
27.5 Estimate to Complete 401 27.5.1 Estimate to Complete from Resource Data 402 27.5.2 Estimate to Complete from P6 EV Calculations 402
27.6 Activity Usage S-Curves 403 27.6.1 Activity Usage Profile Bars and Curves 403 27.6.2 Show Earned Value Curves 404
27.7 Sample Graphical S-Curves 405 28 WHAT IS NEW IN P6 VERSIONS 8, 15, 16, 17, 18 and 19 406
28.1 Databases and Tool 406 28.2 User Interface Update 406 28.3 Admin Preferences - Set Industry Type 406 28.4 Tabbed Window Layouts 406 28.5 Personal and Shared Resource Calendars 406 28.6 Auto-Reorganization 406 28.7 Set Page Breaks in the Group and Sort Form 407 28.8 HTML editor 407 28.9 E-mail when printing a report or report batch 407 28.10 Timescaled Logic Diagram 407 28.11 Removal of Fields 407 28.12 Export Projects or Run a Report Batch from the Command Line as a Service 407 28.13 Activity Details Feedback Tab 407 28.14 Risk Module Rewrite 407 28.15 Line Numbers 407 28.16 Lag and Relationship Type Displayed in the Activity Table 408 28.17 Visualizer 408 28.18 Claim Digger – Schedule Comparison in Visualizer 408 28.19 Activity Discussion Feature 408 28.20 XML Import/Export Enhancements 408 28.21 UN/CEFACT XML format 408
SAMPLE BOOK WITH TWO CHAPTER ONLY
Planning and Control Using Oracle® Primavera® P6 Versions 8 to 19 PPM Professional
This publication is only sold as a bound book, no parts may be reproduced by any means, e.g. electronic, video or print. © Eastwood Harris Pty Ltd xvii
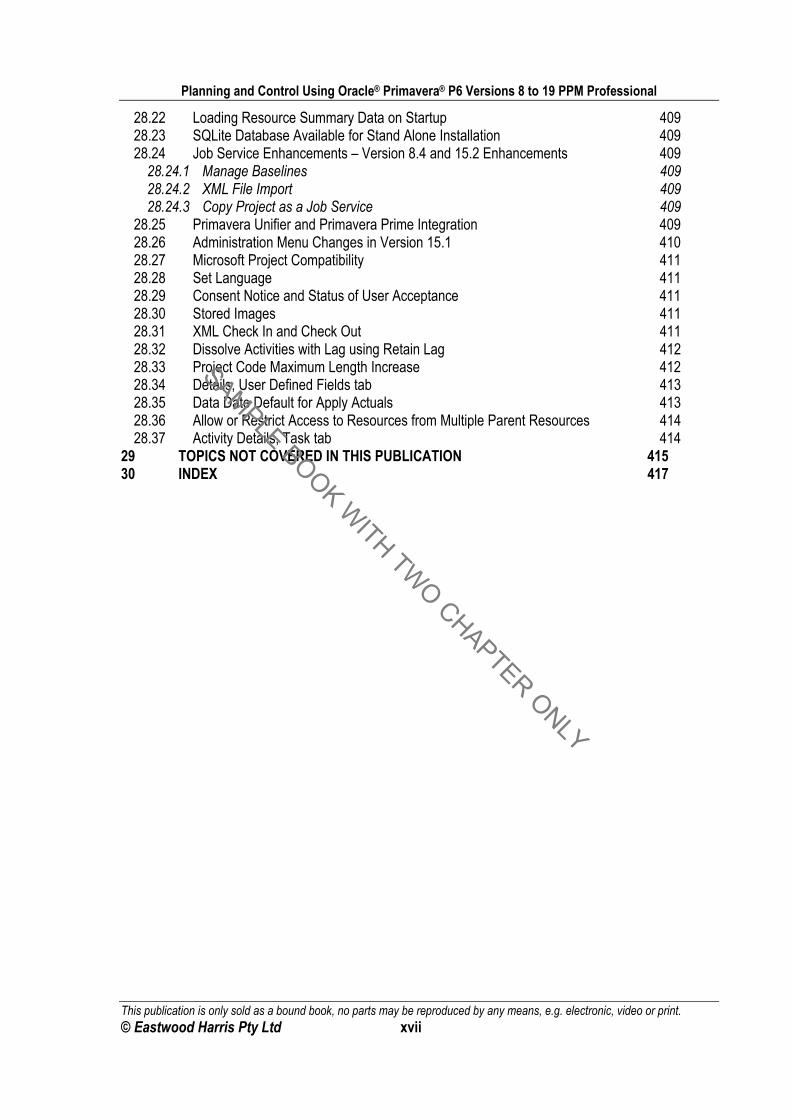
28.22 Loading Resource Summary Data on Startup 409 28.23 SQLite Database Available for Stand Alone Installation 409 28.24 Job Service Enhancements – Version 8.4 and 15.2 Enhancements 409
28.24.1 Manage Baselines 409 28.24.2 XML File Import 409 28.24.3 Copy Project as a Job Service 409
28.25 Primavera Unifier and Primavera Prime Integration 409 28.26 Administration Menu Changes in Version 15.1 410 28.27 Microsoft Project Compatibility 411 28.28 Set Language 411 28.29 Consent Notice and Status of User Acceptance 411 28.30 Stored Images 411 28.31 XML Check In and Check Out 411 28.32 Dissolve Activities with Lag using Retain Lag 412 28.33 Project Code Maximum Length Increase 412 28.34 Details, User Defined Fields tab 413 28.35 Data Date Default for Apply Actuals 413 28.36 Allow or Restrict Access to Resources from Multiple Parent Resources 414 28.37 Activity Details, Task tab 414
29 TOPICS NOT COVERED IN THIS PUBLICATION 415 30 INDEX 417
SAMPLE BOOK WITH TWO CHAPTER ONLY
Planning and Control Using Oracle® Primavera® P6 Versions 8 to 19 PPM Professional
This publication is only sold as a bound book, no parts may be reproduced by any means, e.g. electronic, video or print. © Eastwood Harris Pty Ltd 95
8 FORMATTING THE DISPLAY This chapter shows you how to set up the on-screen presentation so that the schedule will be easier to read and more consistent. This chapter covers the following display and customizing topics:
Topic Menu Command
• Formatting Columns
Open the Column form:
• Select View, Columns, Customize…, or
• Click on the icon.
• Formatting Activity Bars
Open the Bar form:
• Select View, Bars, , or
• Click on the icon.
• Format Gridlines Bar Chart Gridlines are formatted in the View, Bar, form, Sightlines tab.
• Format Data Date The Data Date is formatted in the Bar Chart Options form, Data Date tab.
• Formatting Row Height
Open the Table, Font and Row form by:
• Selecting View, Table Font and Row.
• Formatting Colors There are limited options for formatting colors:
• Text colors are formatted in the Color form accessed from the Table, Font and Row form which is opened by selecting View, Table Font and
Row, icon.
• Bar Colors are covered in the Formatting the Bars paragraph of this chapter.
• Band colors are selected as part of the formatting of the layout by
selecting View, Group and Sort by or clicking on the icon.
• Formatting Fonts There are limited options for formatting fonts:
• Text fonts are formatted in the Font form accessed from the Table, Font and Row form which is opened by selecting View, Table Font and Row,
icon.
• Notebook entries may be formatted when edited.
• Format Timescale • Click on the icon, or
• Select View, Timescale, or
• Right-click in the Bar Chart area and select Timescale.
The formatting is applied to the current Layout and this formatting may be automatically saved as part of the Layout when another Layout is selected; the system will prompt. Views are covered in the Group, Sort and Layouts chapter.
Beware of clicking the button in any form; this does not save your edits, but re-sets the form back to the Primavera defaults, destroying your hard work.
SAMPLE BOOK WITH TWO CHAPTER ONLY
Planning and Control Using Oracle® Primavera® P6 Versions 8 to 19 PPM Professional
This publication is only sold as a bound book, no parts may be reproduced by any means, e.g. electronic, video or print. © Eastwood Harris Pty Ltd 96
8.1 Formatting the Project Window The formatting of the Project Window is very similar to the formatting of the Activities Window and will not be covered separately. Formatting, Filters and Layouts all work in the same way, except one is dealing with projects and not activities.
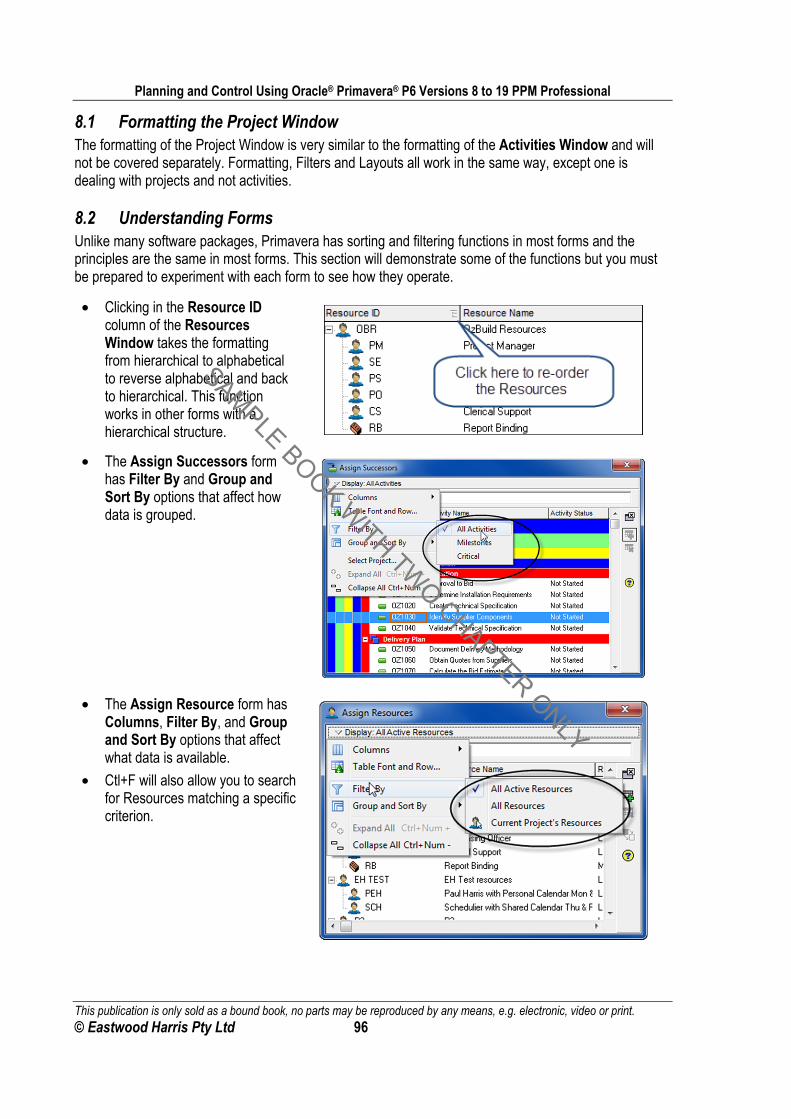
8.2 Understanding Forms Unlike many software packages, Primavera has sorting and filtering functions in most forms and the principles are the same in most forms. This section will demonstrate some of the functions but you must be prepared to experiment with each form to see how they operate.
• Clicking in the Resource ID column of the Resources Window takes the formatting from hierarchical to alphabetical to reverse alphabetical and back to hierarchical. This function works in other forms with a hierarchical structure.
• The Assign Successors form has Filter By and Group and Sort By options that affect how data is grouped.
• The Assign Resource form has Columns, Filter By, and Group and Sort By options that affect what data is available.
• Ctl+F will also allow you to search for Resources matching a specific criterion.
SAMPLE BOOK WITH TWO CHAPTER ONLY
Planning and Control Using Oracle® Primavera® P6 Versions 8 to 19 PPM Professional
This publication is only sold as a bound book, no parts may be reproduced by any means, e.g. electronic, video or print. © Eastwood Harris Pty Ltd 97
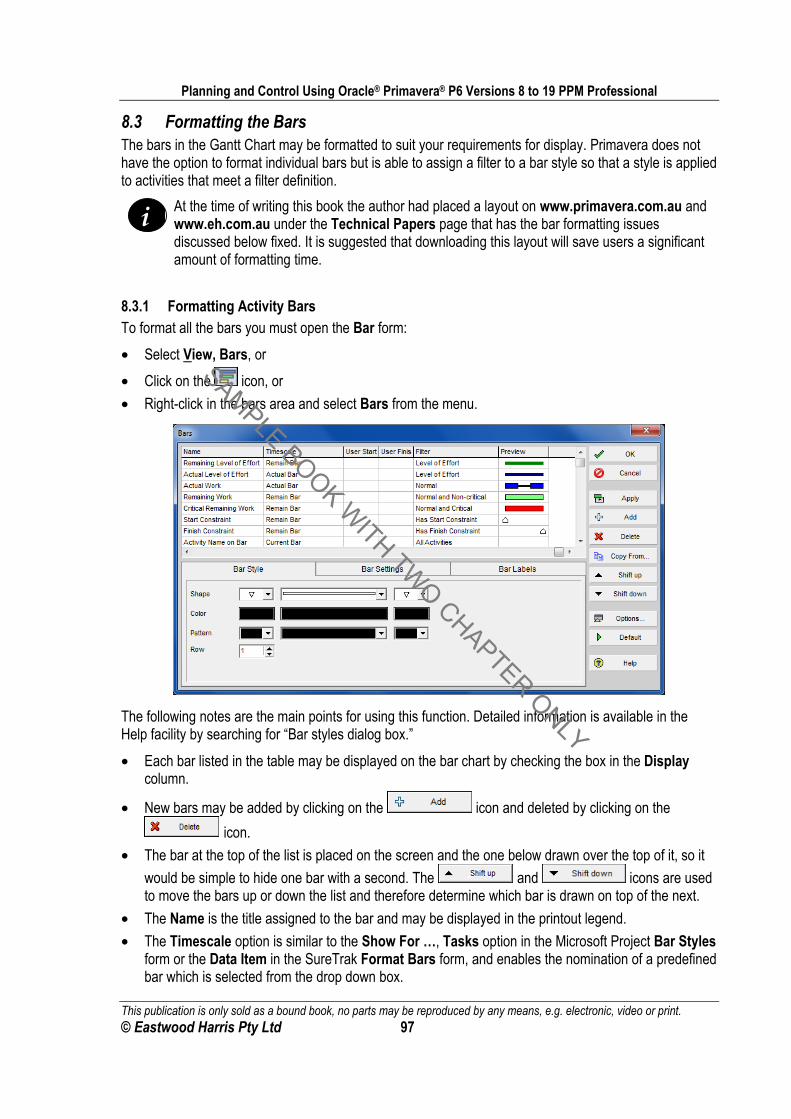
8.3 Formatting the Bars The bars in the Gantt Chart may be formatted to suit your requirements for display. Primavera does not have the option to format individual bars but is able to assign a filter to a bar style so that a style is applied to activities that meet a filter definition.
i
At the time of writing this book the author had placed a layout on www.primavera.com.au and www.eh.com.au under the Technical Papers page that has the bar formatting issues discussed below fixed. It is suggested that downloading this layout will save users a significant amount of formatting time.
8.3.1 Formatting Activity Bars To format all the bars you must open the Bar form:
• Select View, Bars, or
• Click on the icon, or
• Right-click in the bars area and select Bars from the menu.
The following notes are the main points for using this function. Detailed information is available in the Help facility by searching for “Bar styles dialog box.”
• Each bar listed in the table may be displayed on the bar chart by checking the box in the Display column.
• New bars may be added by clicking on the icon and deleted by clicking on the
icon.
• The bar at the top of the list is placed on the screen and the one below drawn over the top of it, so it
would be simple to hide one bar with a second. The and icons are used to move the bars up or down the list and therefore determine which bar is drawn on top of the next.
• The Name is the title assigned to the bar and may be displayed in the printout legend.
• The Timescale option is similar to the Show For …, Tasks option in the Microsoft Project Bar Styles form or the Data Item in the SureTrak Format Bars form, and enables the nomination of a predefined bar which is selected from the drop down box.
SAMPLE BOOK WITH TWO CHAPTER ONLY
Planning and Control Using Oracle® Primavera® P6 Versions 8 to 19 PPM Professional
This publication is only sold as a bound book, no parts may be reproduced by any means, e.g. electronic, video or print. © Eastwood Harris Pty Ltd 98
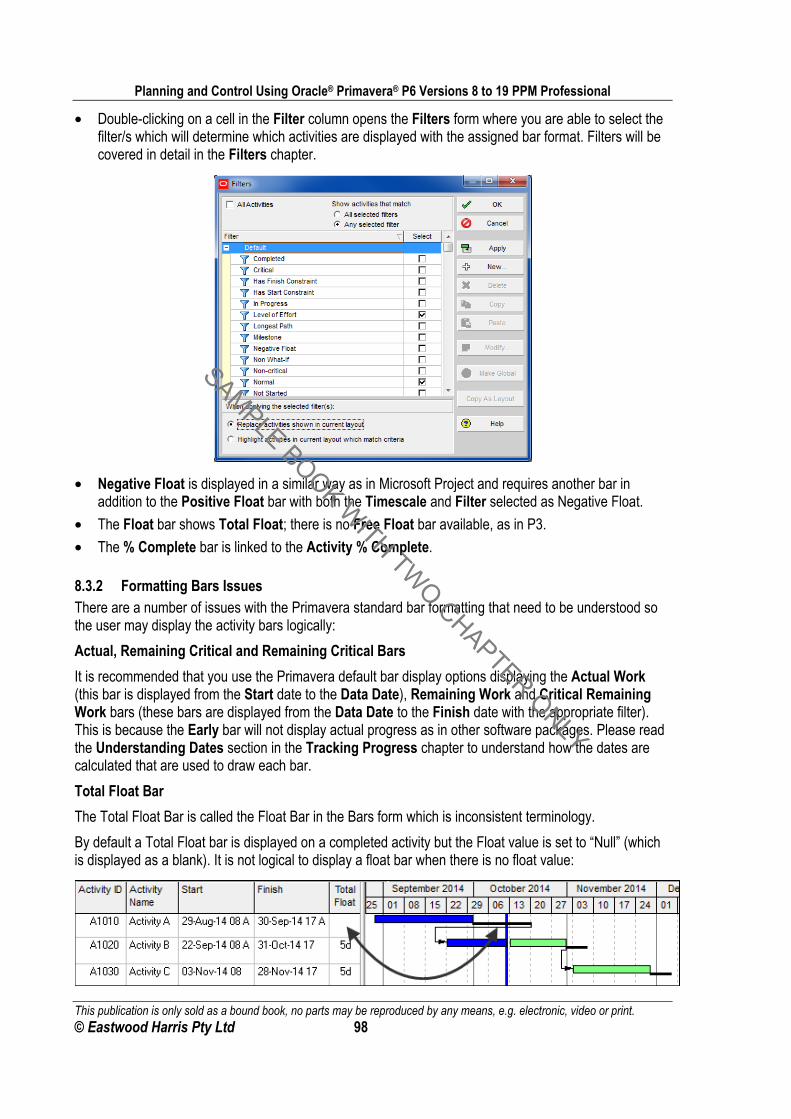
• Double-clicking on a cell in the Filter column opens the Filters form where you are able to select the filter/s which will determine which activities are displayed with the assigned bar format. Filters will be covered in detail in the Filters chapter.
• Negative Float is displayed in a similar way as in Microsoft Project and requires another bar in addition to the Positive Float bar with both the Timescale and Filter selected as Negative Float.
• The Float bar shows Total Float; there is no Free Float bar available, as in P3.
• The % Complete bar is linked to the Activity % Complete.
8.3.2 Formatting Bars Issues There are a number of issues with the Primavera standard bar formatting that need to be understood so the user may display the activity bars logically:
Actual, Remaining Critical and Remaining Critical Bars
It is recommended that you use the Primavera default bar display options displaying the Actual Work (this bar is displayed from the Start date to the Data Date), Remaining Work and Critical Remaining Work bars (these bars are displayed from the Data Date to the Finish date with the appropriate filter). This is because the Early bar will not display actual progress as in other software packages. Please read the Understanding Dates section in the Tracking Progress chapter to understand how the dates are calculated that are used to draw each bar.
Total Float Bar
The Total Float Bar is called the Float Bar in the Bars form which is inconsistent terminology.
By default a Total Float bar is displayed on a completed activity but the Float value is set to “Null” (which is displayed as a blank). It is not logical to display a float bar when there is no float value:
SAMPLE BOOK WITH TWO CHAPTER ONLY
Planning and Control Using Oracle® Primavera® P6 Versions 8 to 19 PPM Professional
This publication is only sold as a bound book, no parts may be reproduced by any means, e.g. electronic, video or print. © Eastwood Harris Pty Ltd 99
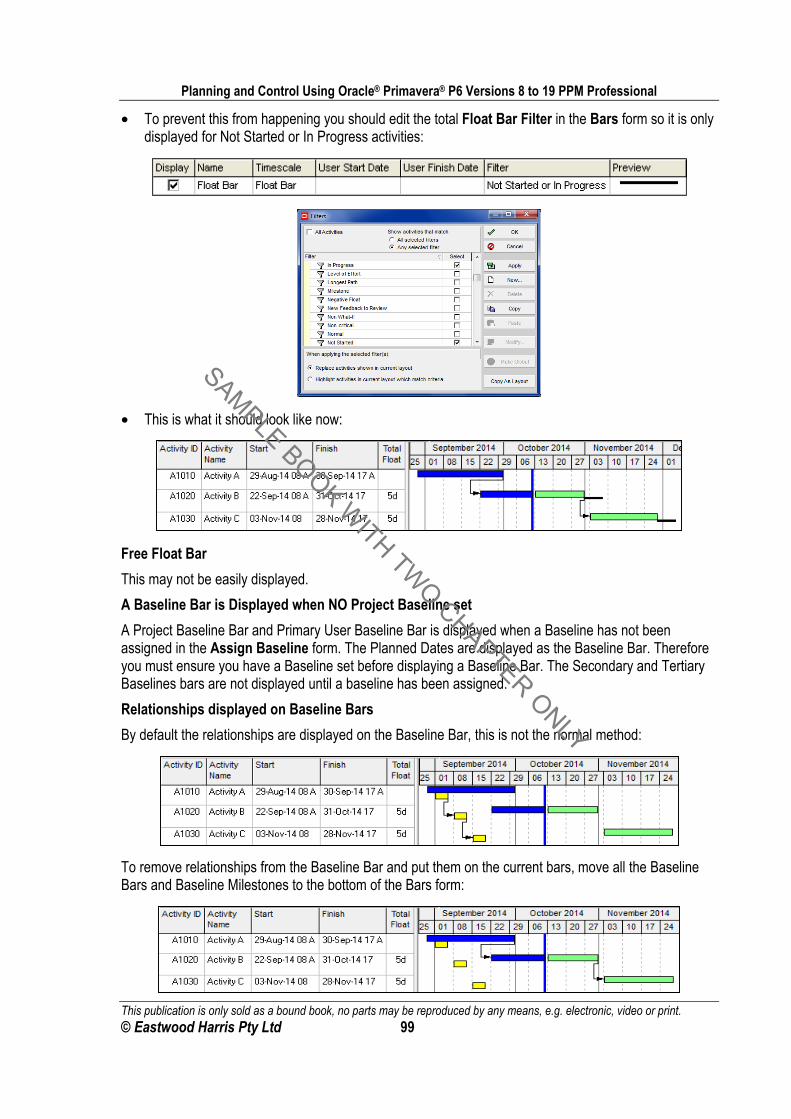
• To prevent this from happening you should edit the total Float Bar Filter in the Bars form so it is only displayed for Not Started or In Progress activities:
• This is what it should look like now:
Free Float Bar
This may not be easily displayed.
A Baseline Bar is Displayed when NO Project Baseline set
A Project Baseline Bar and Primary User Baseline Bar is displayed when a Baseline has not been assigned in the Assign Baseline form. The Planned Dates are displayed as the Baseline Bar. Therefore you must ensure you have a Baseline set before displaying a Baseline Bar. The Secondary and Tertiary Baselines bars are not displayed until a baseline has been assigned.
Relationships displayed on Baseline Bars
By default the relationships are displayed on the Baseline Bar, this is not the normal method:
To remove relationships from the Baseline Bar and put them on the current bars, move all the Baseline Bars and Baseline Milestones to the bottom of the Bars form:
SAMPLE BOOK WITH TWO CHAPTER ONLY
Planning and Control Using Oracle® Primavera® P6 Versions 8 to 19 PPM Professional
This publication is only sold as a bound book, no parts may be reproduced by any means, e.g. electronic, video or print. © Eastwood Harris Pty Ltd 100
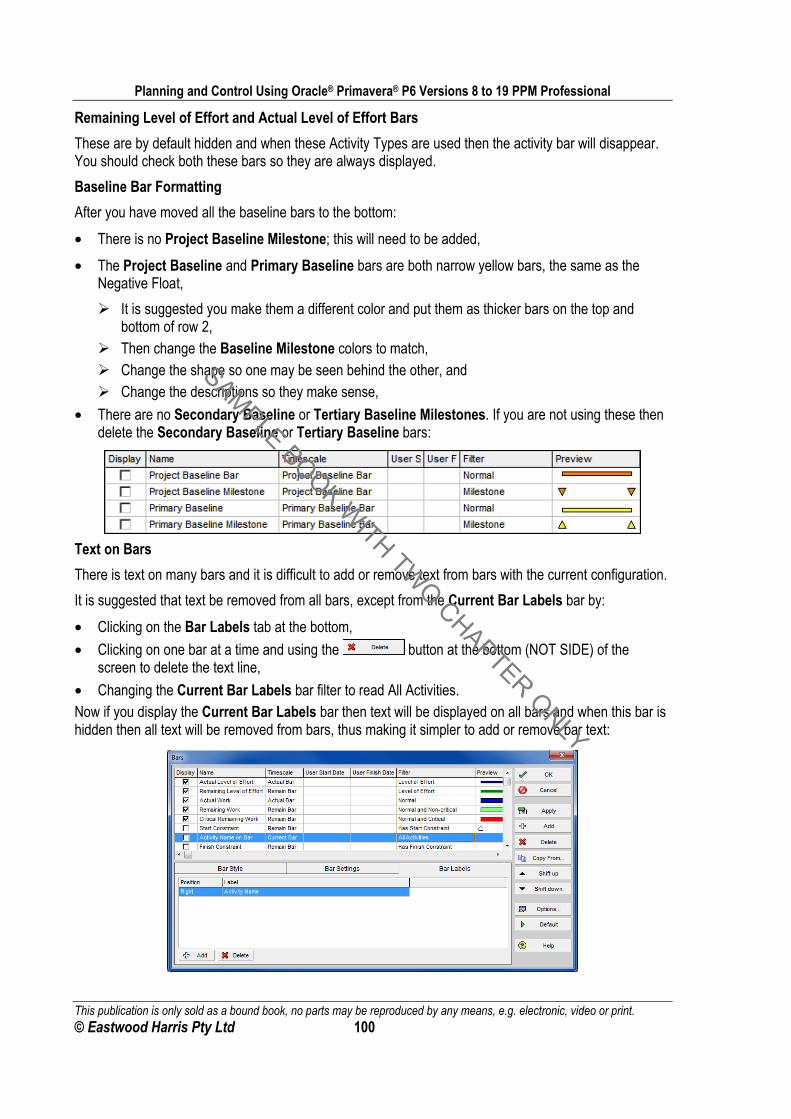
Remaining Level of Effort and Actual Level of Effort Bars
These are by default hidden and when these Activity Types are used then the activity bar will disappear. You should check both these bars so they are always displayed.
Baseline Bar Formatting
After you have moved all the baseline bars to the bottom:
• There is no Project Baseline Milestone; this will need to be added,
• The Project Baseline and Primary Baseline bars are both narrow yellow bars, the same as the Negative Float,
It is suggested you make them a different color and put them as thicker bars on the top and bottom of row 2,
Then change the Baseline Milestone colors to match, Change the shape so one may be seen behind the other, and Change the descriptions so they make sense,
• There are no Secondary Baseline or Tertiary Baseline Milestones. If you are not using these then delete the Secondary Baseline or Tertiary Baseline bars:
Text on Bars
There is text on many bars and it is difficult to add or remove text from bars with the current configuration.
It is suggested that text be removed from all bars, except from the Current Bar Labels bar by:
• Clicking on the Bar Labels tab at the bottom,
• Clicking on one bar at a time and using the button at the bottom (NOT SIDE) of the screen to delete the text line,
• Changing the Current Bar Labels bar filter to read All Activities. Now if you display the Current Bar Labels bar then text will be displayed on all bars and when this bar is hidden then all text will be removed from bars, thus making it simpler to add or remove bar text:
SAMPLE BOOK WITH TWO CHAPTER ONLY
Planning and Control Using Oracle® Primavera® P6 Versions 8 to 19 PPM Professional
This publication is only sold as a bound book, no parts may be reproduced by any means, e.g. electronic, video or print. © Eastwood Harris Pty Ltd 101
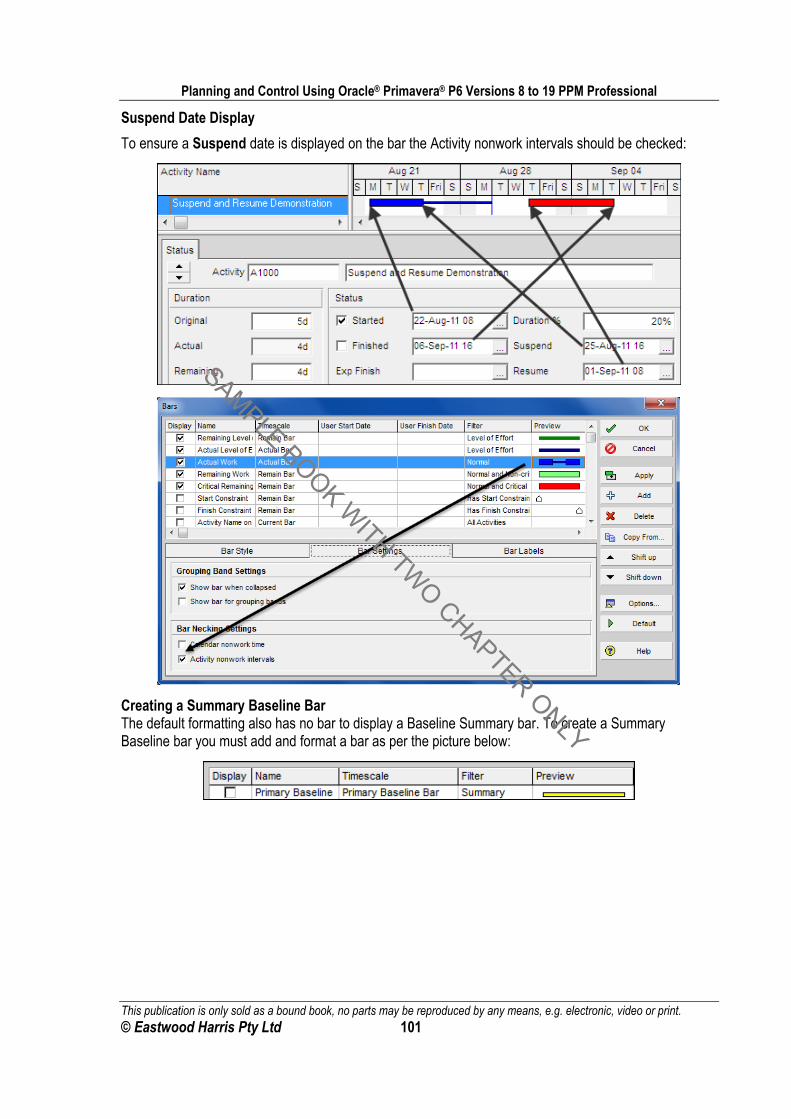
Suspend Date Display
To ensure a Suspend date is displayed on the bar the Activity nonwork intervals should be checked:
Creating a Summary Baseline Bar The default formatting also has no bar to display a Baseline Summary bar. To create a Summary Baseline bar you must add and format a bar as per the picture below:
SAMPLE BOOK WITH TWO CHAPTER ONLY
Planning and Control Using Oracle® Primavera® P6 Versions 8 to 19 PPM Professional
This publication is only sold as a bound book, no parts may be reproduced by any means, e.g. electronic, video or print. © Eastwood Harris Pty Ltd 102
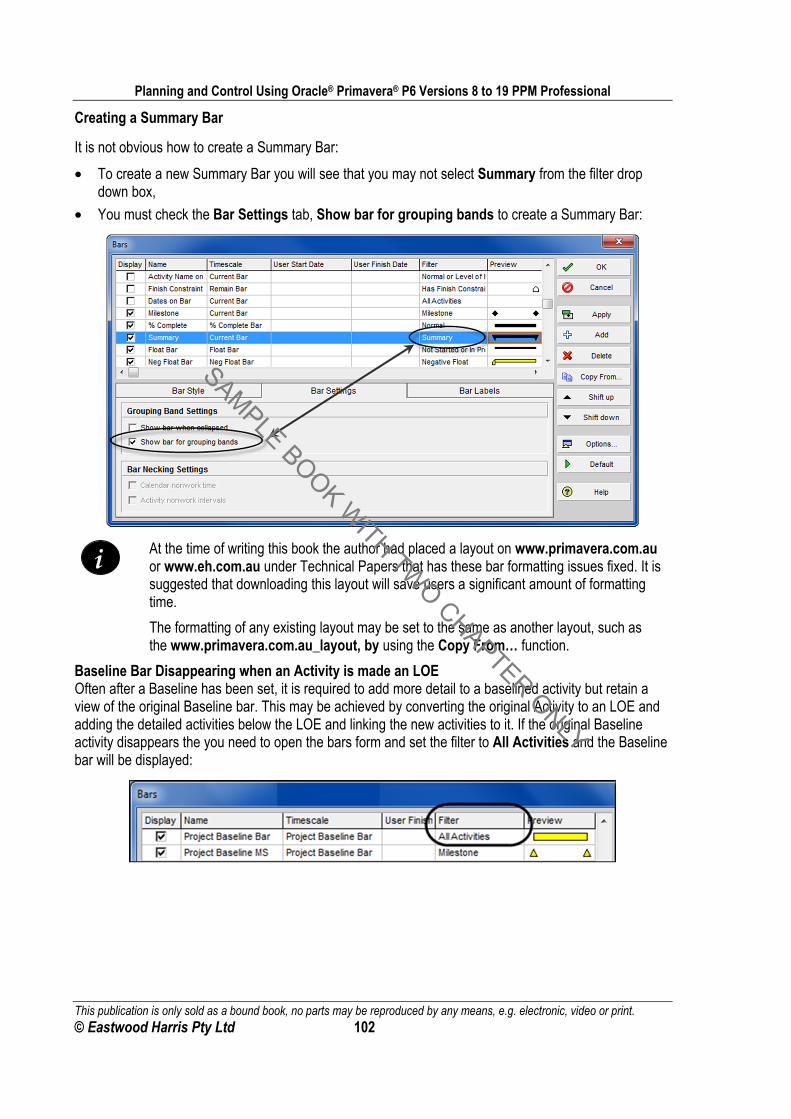
Creating a Summary Bar
It is not obvious how to create a Summary Bar:
• To create a new Summary Bar you will see that you may not select Summary from the filter drop down box,
• You must check the Bar Settings tab, Show bar for grouping bands to create a Summary Bar:
i
At the time of writing this book the author had placed a layout on www.primavera.com.au or www.eh.com.au under Technical Papers that has these bar formatting issues fixed. It is suggested that downloading this layout will save users a significant amount of formatting time.
The formatting of any existing layout may be set to the same as another layout, such as the www.primavera.com.au_layout, by using the Copy From… function.
Baseline Bar Disappearing when an Activity is made an LOE Often after a Baseline has been set, it is required to add more detail to a baselined activity but retain a view of the original Baseline bar. This may be achieved by converting the original Activity to an LOE and adding the detailed activities below the LOE and linking the new activities to it. If the original Baseline activity disappears the you need to open the bars form and set the filter to All Activities and the Baseline bar will be displayed:
SAMPLE BOOK WITH TWO CHAPTER ONLY
Planning and Control Using Oracle® Primavera® P6 Versions 8 to 19 PPM Professional
This publication is only sold as a bound book, no parts may be reproduced by any means, e.g. electronic, video or print. © Eastwood Harris Pty Ltd 103
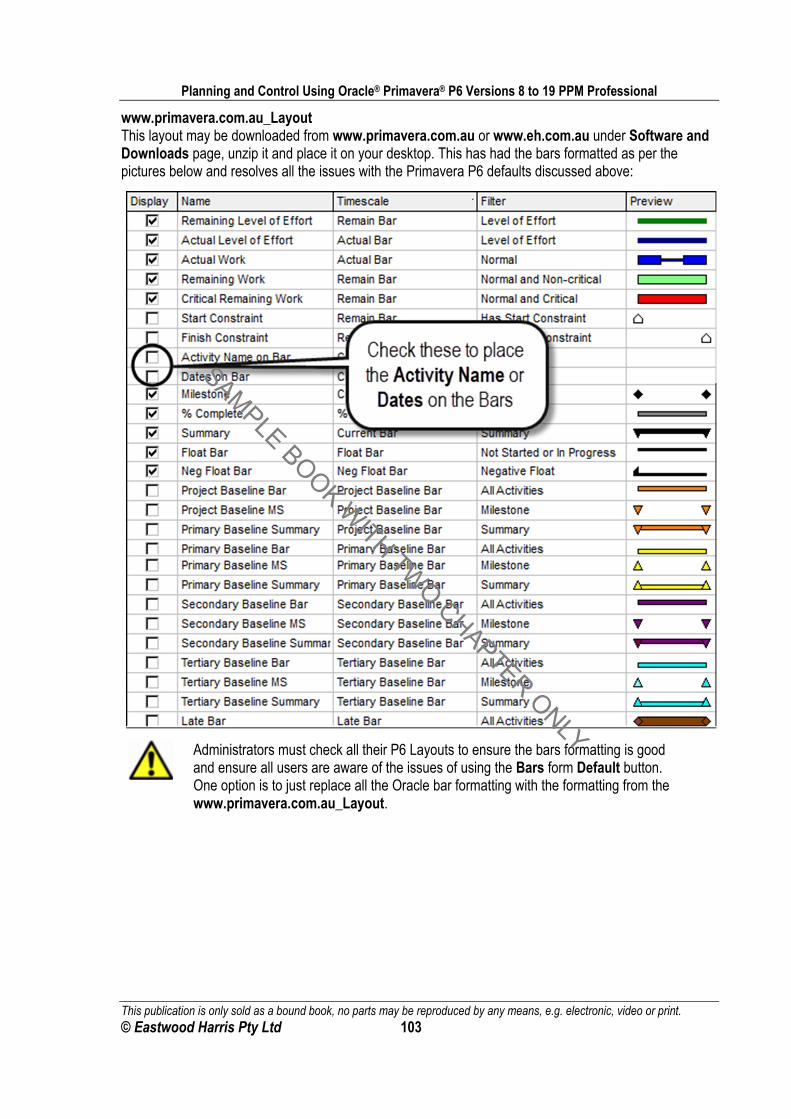
www.primavera.com.au_Layout This layout may be downloaded from www.primavera.com.au or www.eh.com.au under Software and Downloads page, unzip it and place it on your desktop. This has had the bars formatted as per the pictures below and resolves all the issues with the Primavera P6 defaults discussed above:
Administrators must check all their P6 Layouts to ensure the bars formatting is good and ensure all users are aware of the issues of using the Bars form Default button. One option is to just replace all the Oracle bar formatting with the formatting from the www.primavera.com.au_Layout.
SAMPLE BOOK WITH TWO CHAPTER ONLY
Planning and Control Using Oracle® Primavera® P6 Versions 8 to 19 PPM Professional
This publication is only sold as a bound book, no parts may be reproduced by any means, e.g. electronic, video or print. © Eastwood Harris Pty Ltd 104
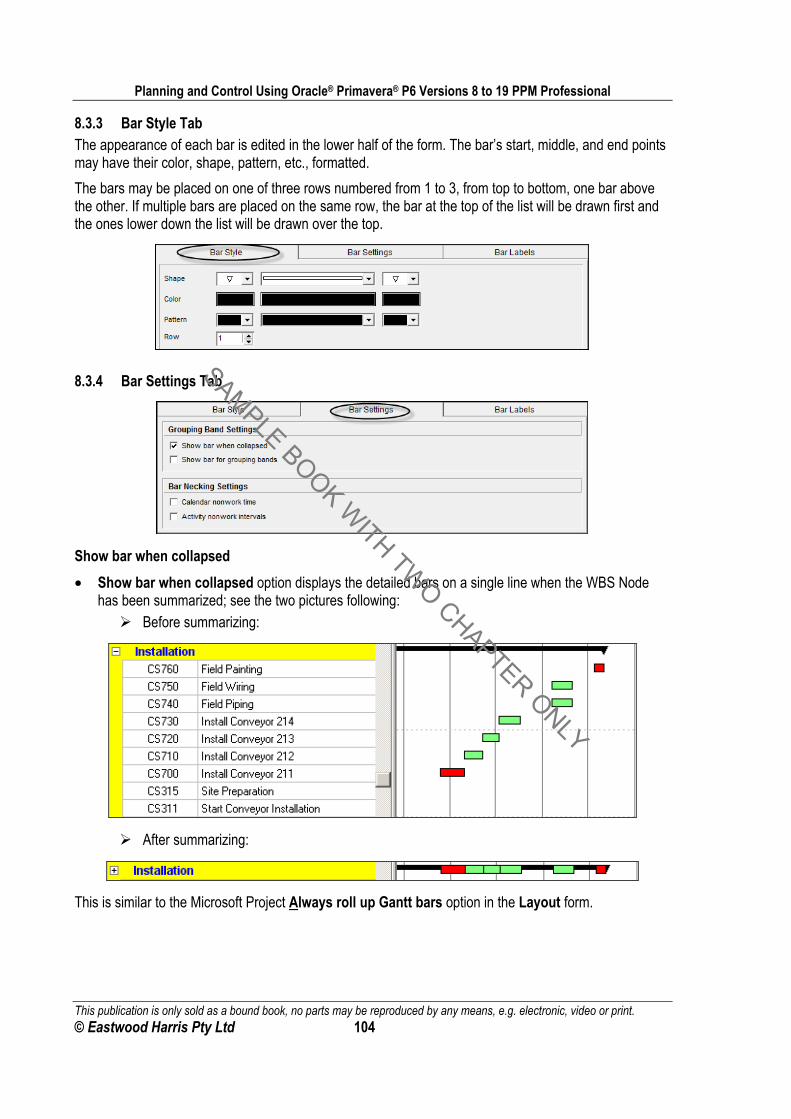
8.3.3 Bar Style Tab The appearance of each bar is edited in the lower half of the form. The bar’s start, middle, and end points may have their color, shape, pattern, etc., formatted.
The bars may be placed on one of three rows numbered from 1 to 3, from top to bottom, one bar above the other. If multiple bars are placed on the same row, the bar at the top of the list will be drawn first and the ones lower down the list will be drawn over the top.
8.3.4 Bar Settings Tab
Show bar when collapsed
• Show bar when collapsed option displays the detailed bars on a single line when the WBS Node has been summarized; see the two pictures following: Before summarizing:
After summarizing:
This is similar to the Microsoft Project Always roll up Gantt bars option in the Layout form.
SAMPLE BOOK WITH TWO CHAPTER ONLY
Planning and Control Using Oracle® Primavera® P6 Versions 8 to 19 PPM Professional
This publication is only sold as a bound book, no parts may be reproduced by any means, e.g. electronic, video or print. © Eastwood Harris Pty Ltd 105
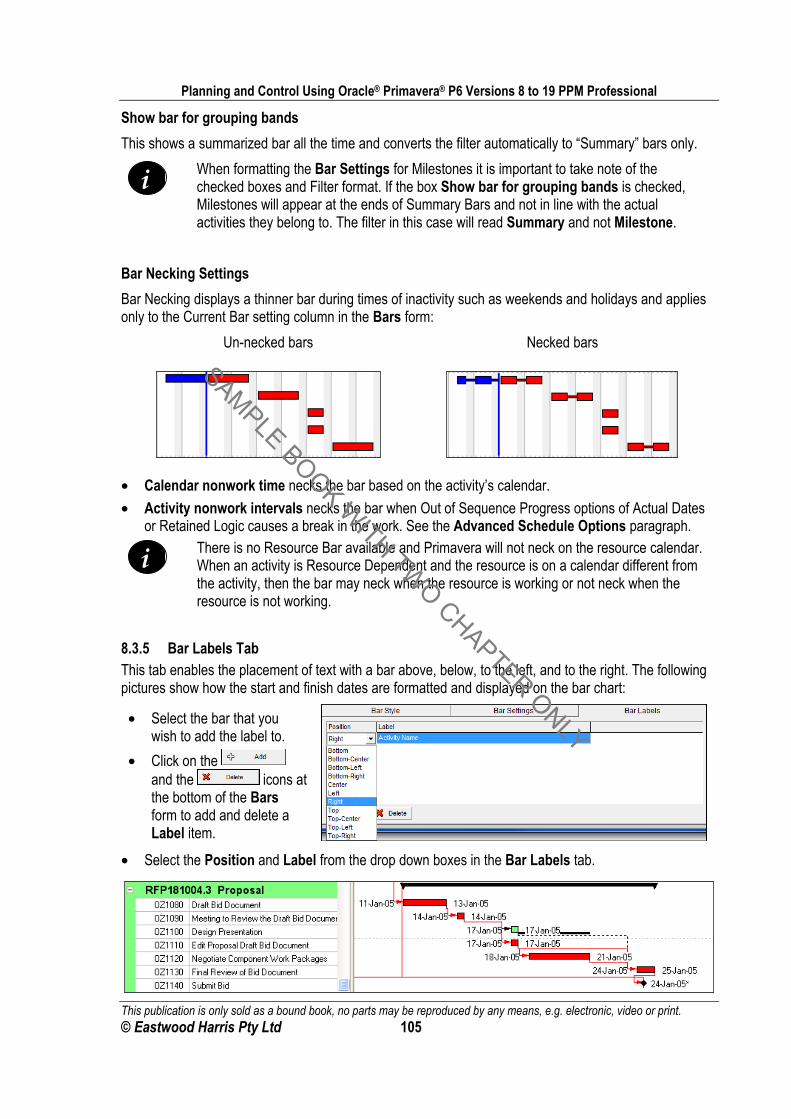
Show bar for grouping bands
This shows a summarized bar all the time and converts the filter automatically to “Summary” bars only.
i
When formatting the Bar Settings for Milestones it is important to take note of the checked boxes and Filter format. If the box Show bar for grouping bands is checked, Milestones will appear at the ends of Summary Bars and not in line with the actual activities they belong to. The filter in this case will read Summary and not Milestone.
Bar Necking Settings
Bar Necking displays a thinner bar during times of inactivity such as weekends and holidays and applies only to the Current Bar setting column in the Bars form:
Un-necked bars Necked bars
• Calendar nonwork time necks the bar based on the activity’s calendar.
• Activity nonwork intervals necks the bar when Out of Sequence Progress options of Actual Dates or Retained Logic causes a break in the work. See the Advanced Schedule Options paragraph.
i
There is no Resource Bar available and Primavera will not neck on the resource calendar. When an activity is Resource Dependent and the resource is on a calendar different from the activity, then the bar may neck when the resource is working or not neck when the resource is not working.
8.3.5 Bar Labels Tab This tab enables the placement of text with a bar above, below, to the left, and to the right. The following pictures show how the start and finish dates are formatted and displayed on the bar chart:
• Select the bar that you wish to add the label to.
• Click on the and the icons at the bottom of the Bars form to add and delete a Label item.
• Select the Position and Label from the drop down boxes in the Bar Labels tab.
SAMPLE BOOK WITH TWO CHAPTER ONLY
Planning and Control Using Oracle® Primavera® P6 Versions 8 to 19 PPM Professional
This publication is only sold as a bound book, no parts may be reproduced by any means, e.g. electronic, video or print. © Eastwood Harris Pty Ltd 106
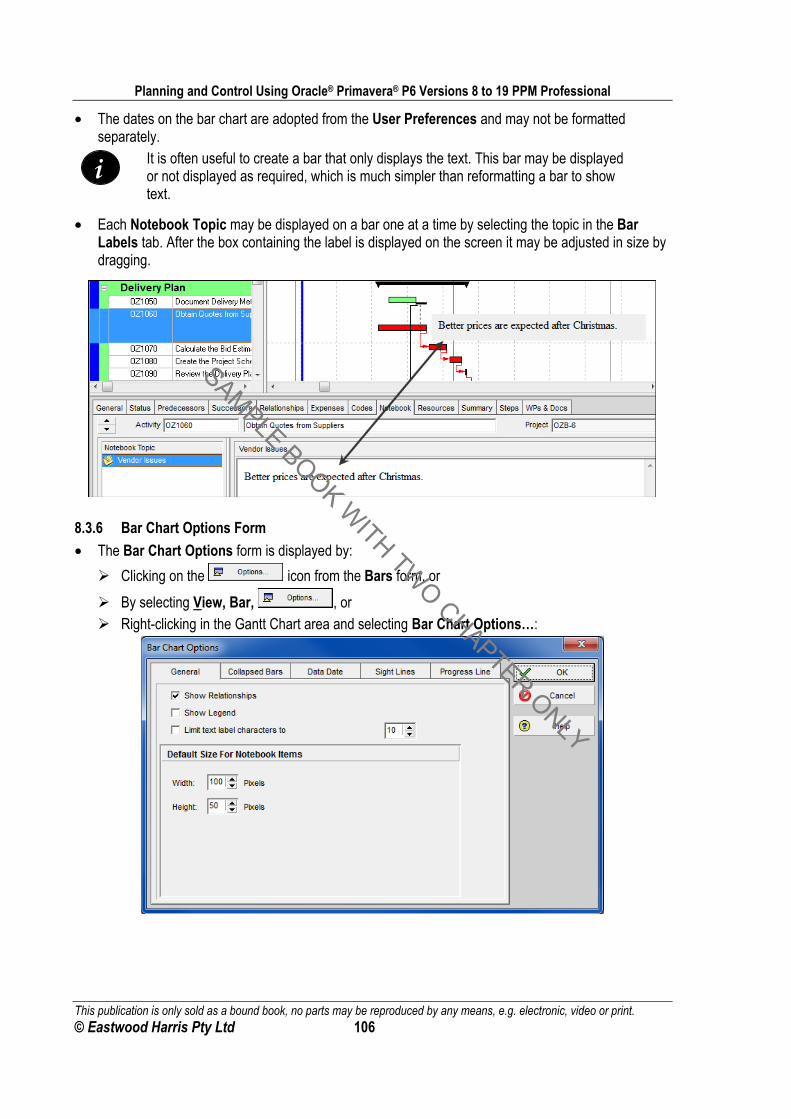
• The dates on the bar chart are adopted from the User Preferences and may not be formatted separately.
i
It is often useful to create a bar that only displays the text. This bar may be displayed or not displayed as required, which is much simpler than reformatting a bar to show text.
• Each Notebook Topic may be displayed on a bar one at a time by selecting the topic in the Bar Labels tab. After the box containing the label is displayed on the screen it may be adjusted in size by dragging.
8.3.6 Bar Chart Options Form
• The Bar Chart Options form is displayed by:
Clicking on the icon from the Bars form, or
By selecting View, Bar, , or Right-clicking in the Gantt Chart area and selecting Bar Chart Options…:
SAMPLE BOOK WITH TWO CHAPTER ONLY
Planning and Control Using Oracle® Primavera® P6 Versions 8 to 19 PPM Professional
This publication is only sold as a bound book, no parts may be reproduced by any means, e.g. electronic, video or print. © Eastwood Harris Pty Ltd 107
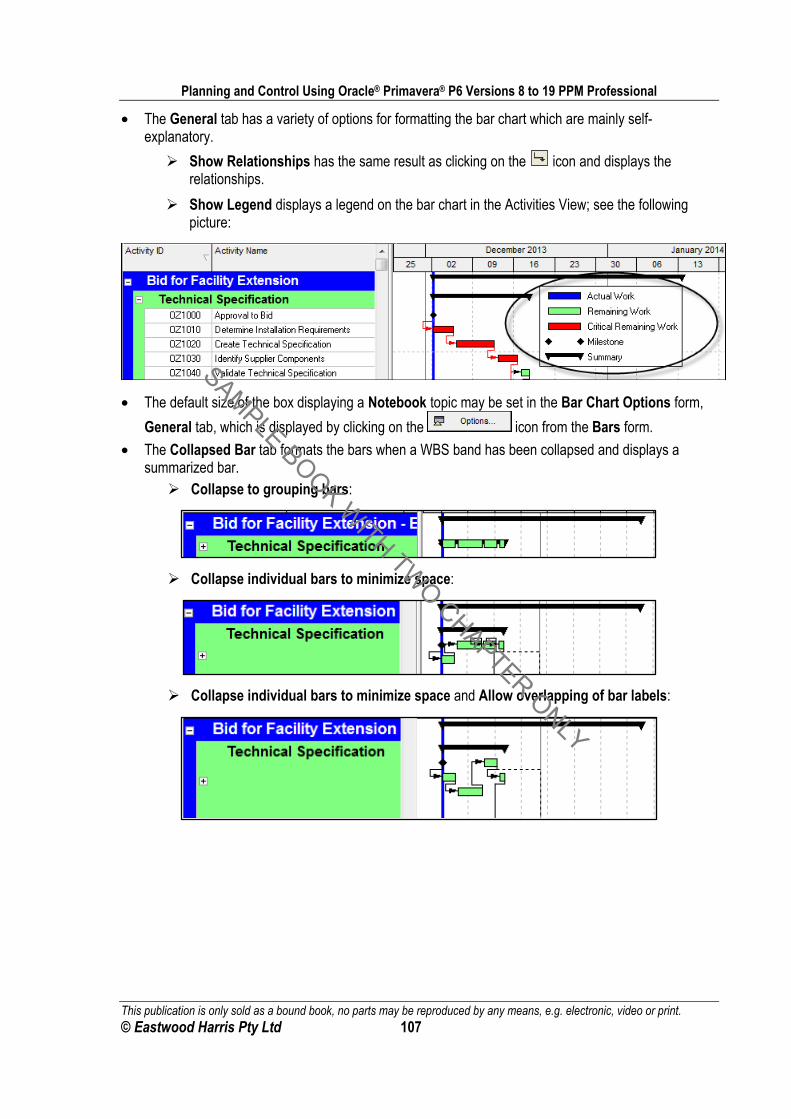
• The General tab has a variety of options for formatting the bar chart which are mainly self-explanatory.
Show Relationships has the same result as clicking on the icon and displays the relationships.
Show Legend displays a legend on the bar chart in the Activities View; see the following picture:
• The default size of the box displaying a Notebook topic may be set in the Bar Chart Options form,
General tab, which is displayed by clicking on the icon from the Bars form.
• The Collapsed Bar tab formats the bars when a WBS band has been collapsed and displays a summarized bar. Collapse to grouping bars:
Collapse individual bars to minimize space:
Collapse individual bars to minimize space and Allow overlapping of bar labels:
SAMPLE BOOK WITH TWO CHAPTER ONLY
Planning and Control Using Oracle® Primavera® P6 Versions 8 to 19 PPM Professional
This publication is only sold as a bound book, no parts may be reproduced by any means, e.g. electronic, video or print. © Eastwood Harris Pty Ltd 108
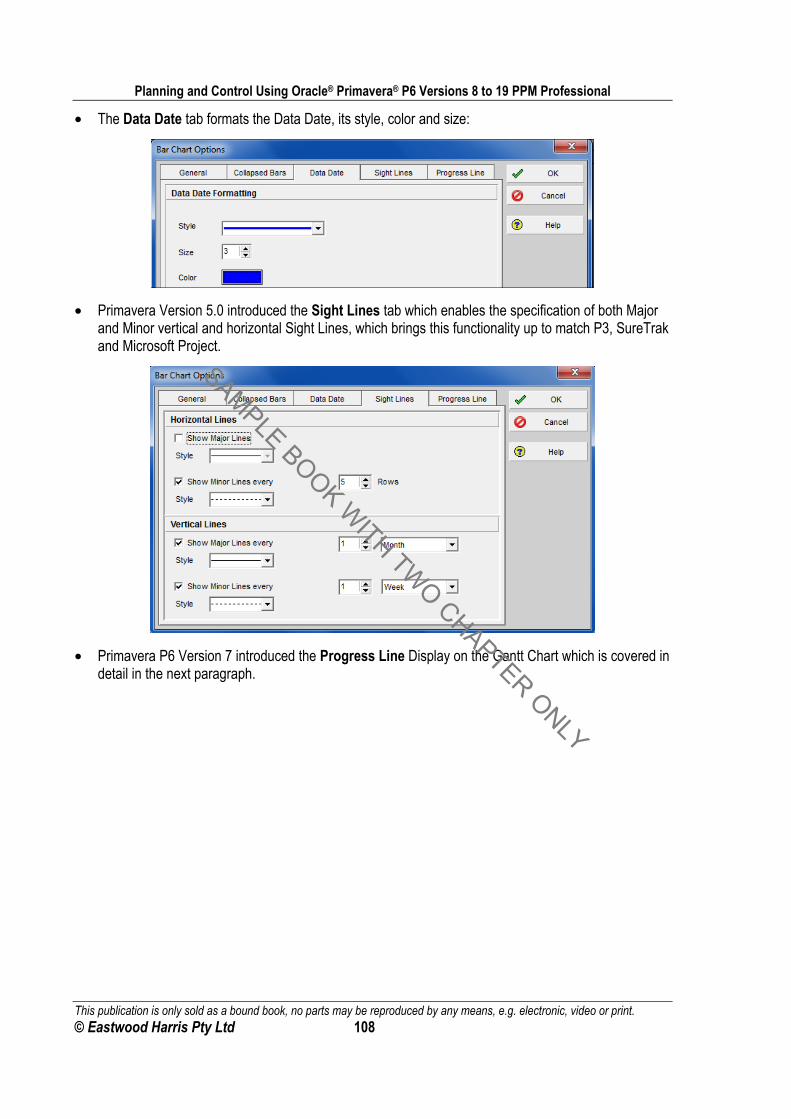
• The Data Date tab formats the Data Date, its style, color and size:
• Primavera Version 5.0 introduced the Sight Lines tab which enables the specification of both Major and Minor vertical and horizontal Sight Lines, which brings this functionality up to match P3, SureTrak and Microsoft Project.
• Primavera P6 Version 7 introduced the Progress Line Display on the Gantt Chart which is covered in detail in the next paragraph.
SAMPLE BOOK WITH TWO CHAPTER ONLY
Planning and Control Using Oracle® Primavera® P6 Versions 8 to 19 PPM Professional
This publication is only sold as a bound book, no parts may be reproduced by any means, e.g. electronic, video or print. © Eastwood Harris Pty Ltd 109
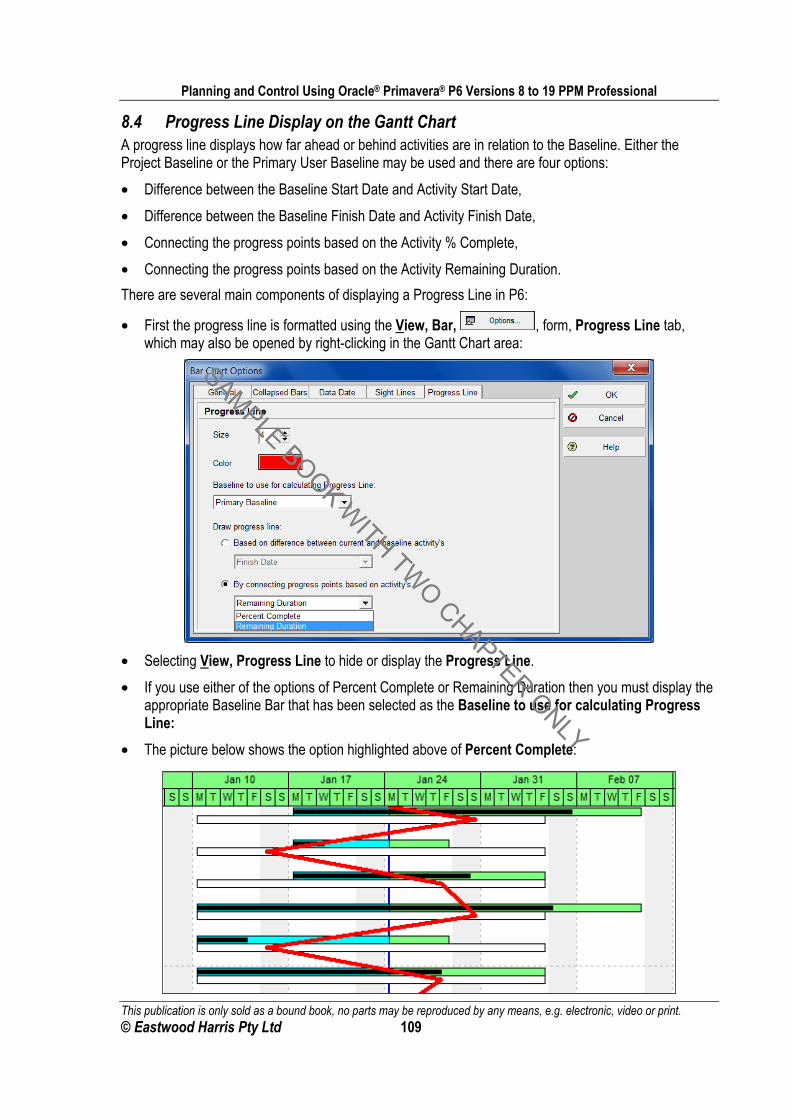
8.4 Progress Line Display on the Gantt Chart A progress line displays how far ahead or behind activities are in relation to the Baseline. Either the Project Baseline or the Primary User Baseline may be used and there are four options:
• Difference between the Baseline Start Date and Activity Start Date,
• Difference between the Baseline Finish Date and Activity Finish Date,
• Connecting the progress points based on the Activity % Complete,
• Connecting the progress points based on the Activity Remaining Duration.
There are several main components of displaying a Progress Line in P6:
• First the progress line is formatted using the View, Bar, , form, Progress Line tab, which may also be opened by right-clicking in the Gantt Chart area:
• Selecting View, Progress Line to hide or display the Progress Line.
• If you use either of the options of Percent Complete or Remaining Duration then you must display the appropriate Baseline Bar that has been selected as the Baseline to use for calculating Progress Line:
• The picture below shows the option highlighted above of Percent Complete:
SAMPLE BOOK WITH TWO CHAPTER ONLY
Planning and Control Using Oracle® Primavera® P6 Versions 8 to 19 PPM Professional
This publication is only sold as a bound book, no parts may be reproduced by any means, e.g. electronic, video or print. © Eastwood Harris Pty Ltd 110
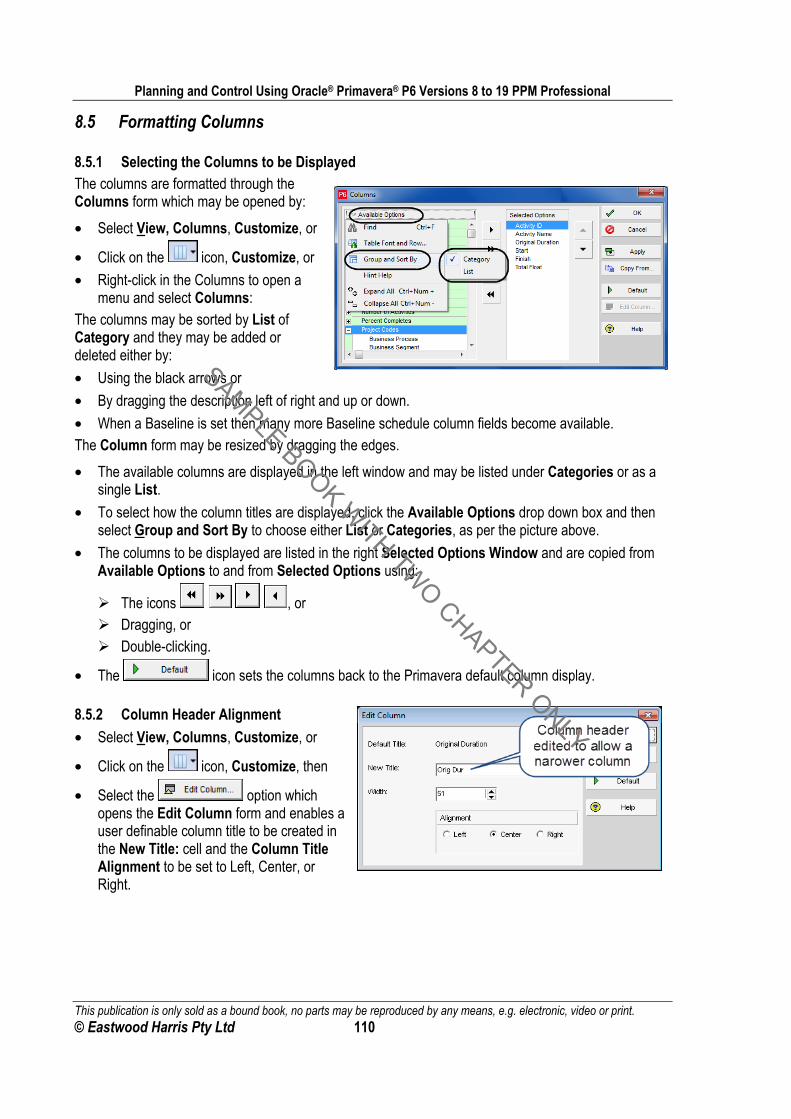
8.5 Formatting Columns
8.5.1 Selecting the Columns to be Displayed The columns are formatted through the Columns form which may be opened by:
• Select View, Columns, Customize, or
• Click on the icon, Customize, or
• Right-click in the Columns to open a menu and select Columns:
The columns may be sorted by List of Category and they may be added or deleted either by:
• Using the black arrows or
• By dragging the description left of right and up or down.
• When a Baseline is set then many more Baseline schedule column fields become available. The Column form may be resized by dragging the edges.
• The available columns are displayed in the left window and may be listed under Categories or as a single List.
• To select how the column titles are displayed, click the Available Options drop down box and then select Group and Sort By to choose either List or Categories, as per the picture above.
• The columns to be displayed are listed in the right Selected Options Window and are copied from Available Options to and from Selected Options using:
The icons , or Dragging, or Double-clicking.
• The icon sets the columns back to the Primavera default column display.
8.5.2 Column Header Alignment
• Select View, Columns, Customize, or
• Click on the icon, Customize, then
• Select the option which opens the Edit Column form and enables a user definable column title to be created in the New Title: cell and the Column Title Alignment to be set to Left, Center, or Right.
SAMPLE BOOK WITH TWO CHAPTER ONLY
Planning and Control Using Oracle® Primavera® P6 Versions 8 to 19 PPM Professional
This publication is only sold as a bound book, no parts may be reproduced by any means, e.g. electronic, video or print. © Eastwood Harris Pty Ltd 111
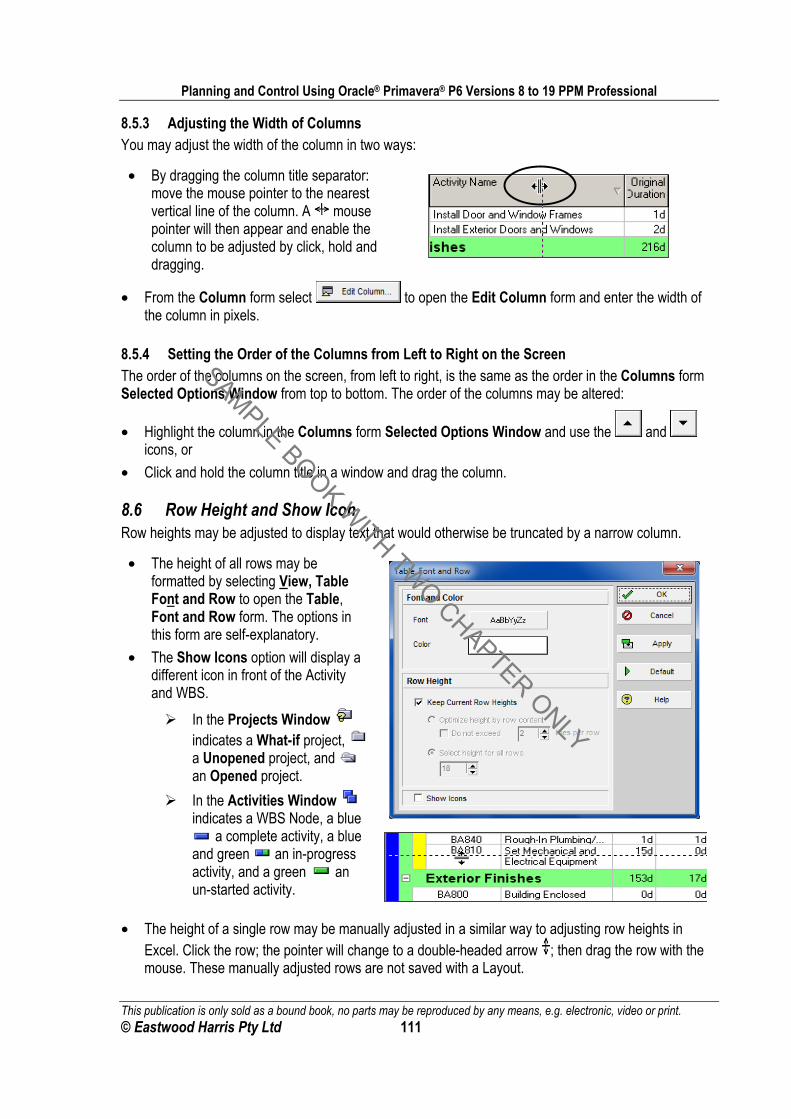
8.5.3 Adjusting the Width of Columns You may adjust the width of the column in two ways:
• By dragging the column title separator: move the mouse pointer to the nearest vertical line of the column. A mouse pointer will then appear and enable the column to be adjusted by click, hold and dragging.
• From the Column form select to open the Edit Column form and enter the width of the column in pixels.
8.5.4 Setting the Order of the Columns from Left to Right on the Screen The order of the columns on the screen, from left to right, is the same as the order in the Columns form Selected Options Window from top to bottom. The order of the columns may be altered:
• Highlight the column in the Columns form Selected Options Window and use the and icons, or
• Click and hold the column title in a window and drag the column.
8.6 Row Height and Show Icon Row heights may be adjusted to display text that would otherwise be truncated by a narrow column.
• The height of all rows may be formatted by selecting View, Table Font and Row to open the Table, Font and Row form. The options in this form are self-explanatory.
• The Show Icons option will display a different icon in front of the Activity and WBS.
In the Projects Window indicates a What-if project, a Unopened project, and an Opened project.
In the Activities Window indicates a WBS Node, a blue
a complete activity, a blue and green an in-progress activity, and a green an un-started activity.
• The height of a single row may be manually adjusted in a similar way to adjusting row heights in Excel. Click the row; the pointer will change to a double-headed arrow ; then drag the row with the mouse. These manually adjusted rows are not saved with a Layout.
SAMPLE BOOK WITH TWO CHAPTER ONLY
Planning and Control Using Oracle® Primavera® P6 Versions 8 to 19 PPM Professional
This publication is only sold as a bound book, no parts may be reproduced by any means, e.g. electronic, video or print. © Eastwood Harris Pty Ltd 112
8.7 Format Timescale
8.7.1 Moving and Rescaling the Timescale To display hidden parts of the schedule the timescale may be grabbed and moved by placing the cursor in the top half of the Timescale. The cursor will turn into a ; left-click and drag left or right.
The timescale may be rescaled, therefore increasing or decreasing the length of the bars and displaying more or less of the schedule, by placing the cursor in the bottom half of the Timescale. The cursor will turn into a ; click, hold and drag left to make the bars shorter and right to make the bars longer.
When there are no bars in view when you are viewing a time ahead or behind the activity dates, you may double-click in the Gantt Chart area to bring them back into view.
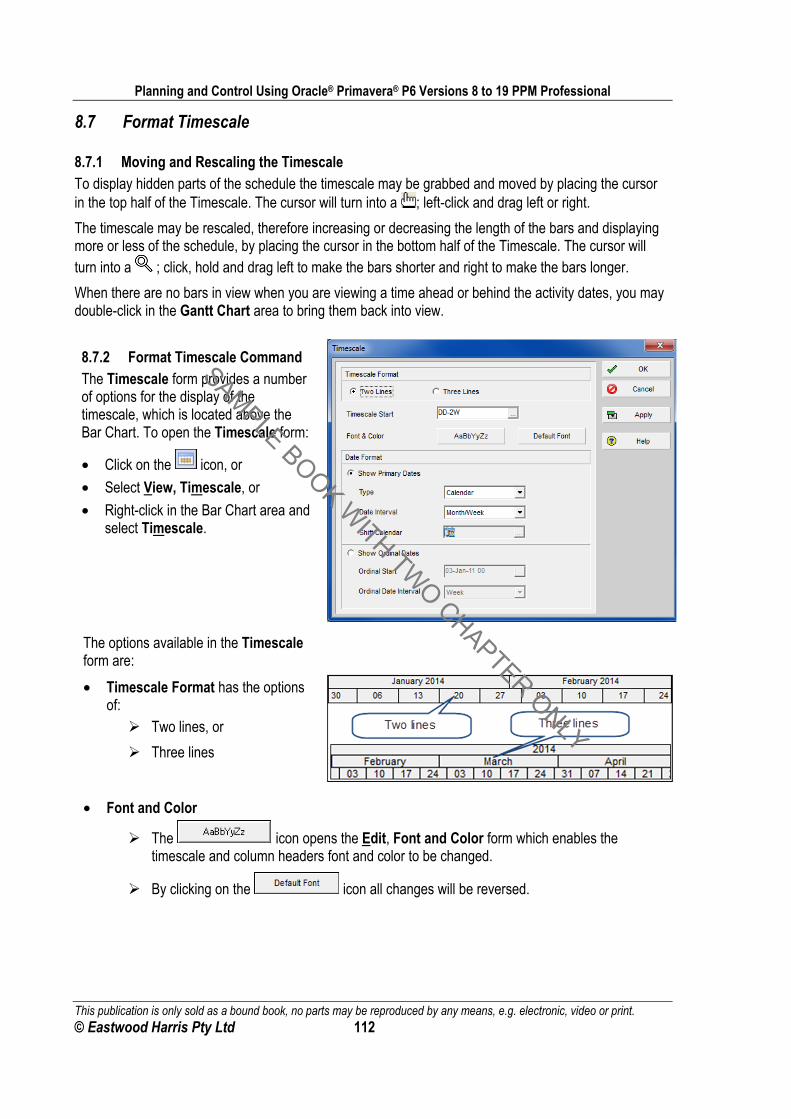
8.7.2 Format Timescale Command The Timescale form provides a number of options for the display of the timescale, which is located above the Bar Chart. To open the Timescale form:
• Click on the icon, or
• Select View, Timescale, or
• Right-click in the Bar Chart area and select Timescale.
The options available in the Timescale form are:
• Timescale Format has the options of: Two lines, or
Three lines
• Font and Color
The icon opens the Edit, Font and Color form which enables the timescale and column headers font and color to be changed.
By clicking on the icon all changes will be reversed.
SAMPLE BOOK WITH TWO CHAPTER ONLY
Planning and Control Using Oracle® Primavera® P6 Versions 8 to 19 PPM Professional
This publication is only sold as a bound book, no parts may be reproduced by any means, e.g. electronic, video or print. © Eastwood Harris Pty Ltd 113
Date Format
• Type Calendar displays a normal calendar.
Fiscal Year displays the fiscal year in the year line. The Fiscal Year Start Month is set in the Settings tab of the Project Details form in the Projects Window.
Week of the Year displays the week of the year starting from “1” for the first week in January and is often termed Manufacturing Week.
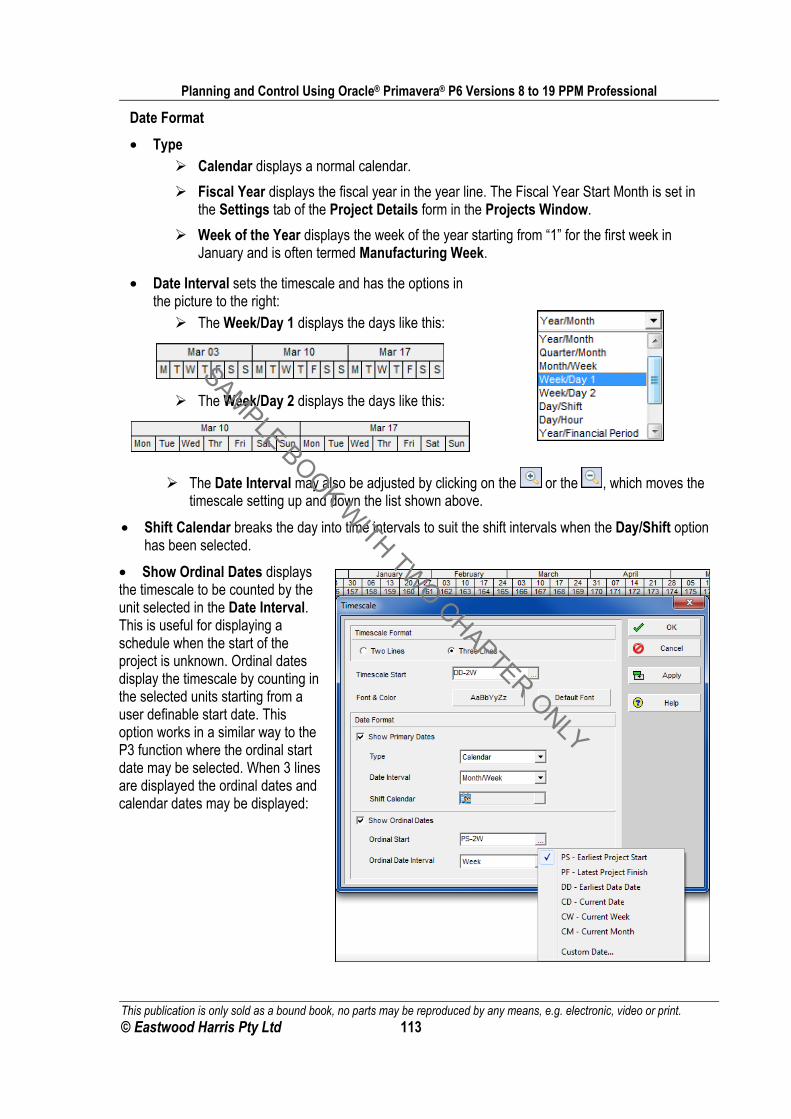
• Date Interval sets the timescale and has the options in the picture to the right: The Week/Day 1 displays the days like this:
The Week/Day 2 displays the days like this:
The Date Interval may also be adjusted by clicking on the or the , which moves the timescale setting up and down the list shown above.
• Shift Calendar breaks the day into time intervals to suit the shift intervals when the Day/Shift option has been selected.
• Show Ordinal Dates displays the timescale to be counted by the unit selected in the Date Interval. This is useful for displaying a schedule when the start of the project is unknown. Ordinal dates display the timescale by counting in the selected units starting from a user definable start date. This option works in a similar way to the P3 function where the ordinal start date may be selected. When 3 lines are displayed the ordinal dates and calendar dates may be displayed:
SAMPLE BOOK WITH TWO CHAPTER ONLY
Planning and Control Using Oracle® Primavera® P6 Versions 8 to 19 PPM Professional
This publication is only sold as a bound book, no parts may be reproduced by any means, e.g. electronic, video or print. © Eastwood Harris Pty Ltd 114
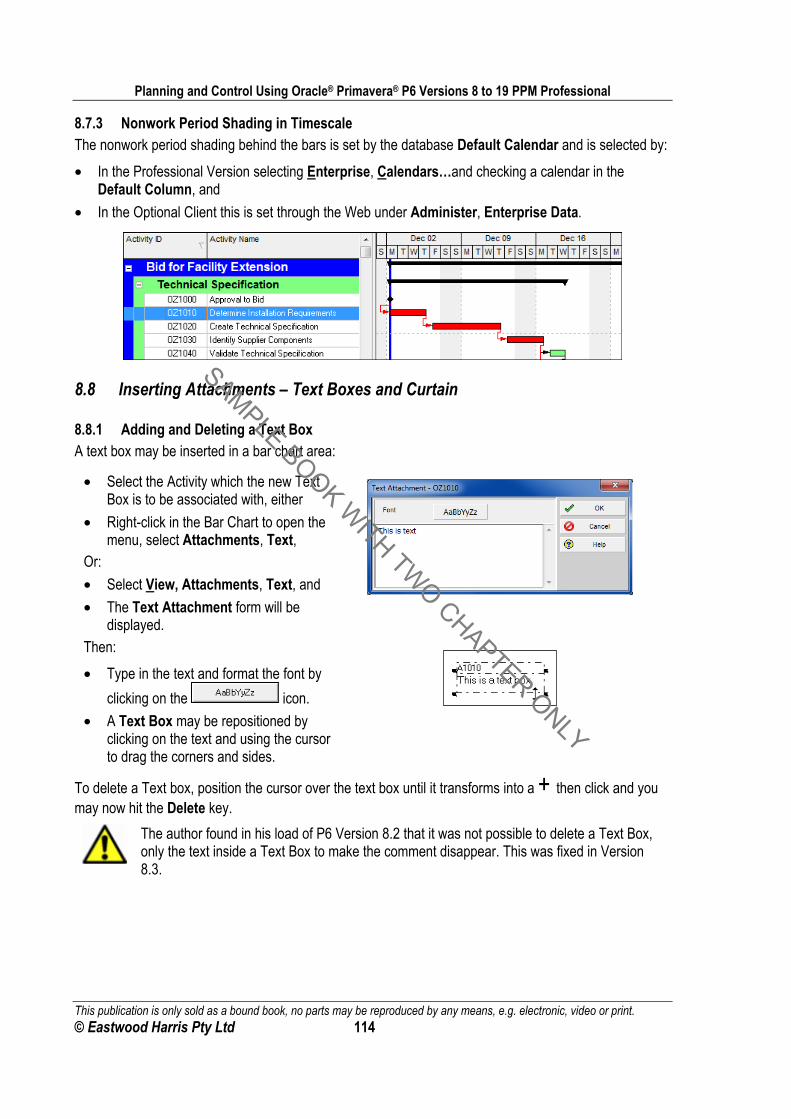
8.7.3 Nonwork Period Shading in Timescale The nonwork period shading behind the bars is set by the database Default Calendar and is selected by:
• In the Professional Version selecting Enterprise, Calendars…and checking a calendar in the Default Column, and
• In the Optional Client this is set through the Web under Administer, Enterprise Data.
8.8 Inserting Attachments – Text Boxes and Curtain
8.8.1 Adding and Deleting a Text Box A text box may be inserted in a bar chart area:
• Select the Activity which the new Text Box is to be associated with, either
• Right-click in the Bar Chart to open the menu, select Attachments, Text,
Or:
• Select View, Attachments, Text, and
• The Text Attachment form will be displayed.
Then:
• Type in the text and format the font by
clicking on the icon.
• A Text Box may be repositioned by clicking on the text and using the cursor to drag the corners and sides.
To delete a Text box, position the cursor over the text box until it transforms into a + then click and you may now hit the Delete key.
The author found in his load of P6 Version 8.2 that it was not possible to delete a Text Box, only the text inside a Text Box to make the comment disappear. This was fixed in Version 8.3.
SAMPLE BOOK WITH TWO CHAPTER ONLY
Planning and Control Using Oracle® Primavera® P6 Versions 8 to 19 PPM Professional
This publication is only sold as a bound book, no parts may be reproduced by any means, e.g. electronic, video or print. © Eastwood Harris Pty Ltd 115
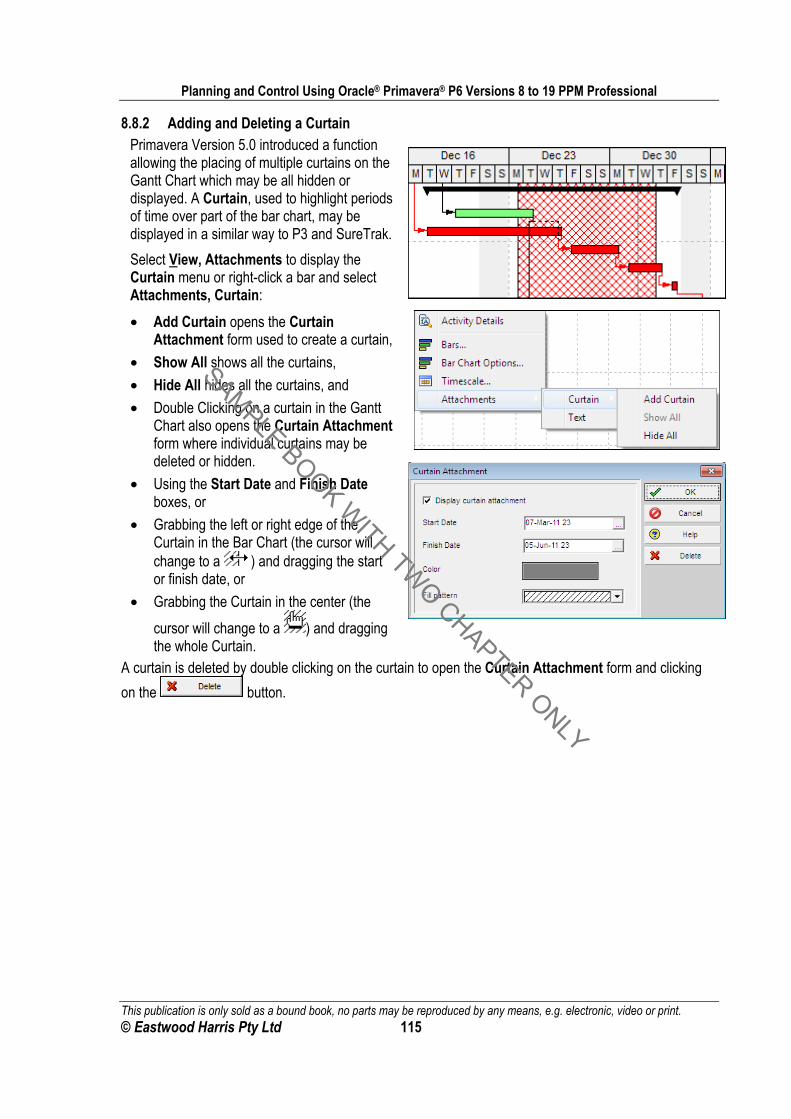
8.8.2 Adding and Deleting a Curtain Primavera Version 5.0 introduced a function allowing the placing of multiple curtains on the Gantt Chart which may be all hidden or displayed. A Curtain, used to highlight periods of time over part of the bar chart, may be displayed in a similar way to P3 and SureTrak.
Select View, Attachments to display the Curtain menu or right-click a bar and select Attachments, Curtain:
• Add Curtain opens the Curtain Attachment form used to create a curtain,
• Show All shows all the curtains,
• Hide All hides all the curtains, and
• Double Clicking on a curtain in the Gantt Chart also opens the Curtain Attachment form where individual curtains may be deleted or hidden.
• Using the Start Date and Finish Date boxes, or
• Grabbing the left or right edge of the Curtain in the Bar Chart (the cursor will change to a ) and dragging the start or finish date, or
• Grabbing the Curtain in the center (the
cursor will change to a ) and dragging the whole Curtain.
A curtain is deleted by double clicking on the curtain to open the Curtain Attachment form and clicking
on the button.
SAMPLE BOOK WITH TWO CHAPTER ONLY
Planning and Control Using Oracle® Primavera® P6 Versions 8 to 19 PPM Professional
This publication is only sold as a bound book, no parts may be reproduced by any means, e.g. electronic, video or print. © Eastwood Harris Pty Ltd 116
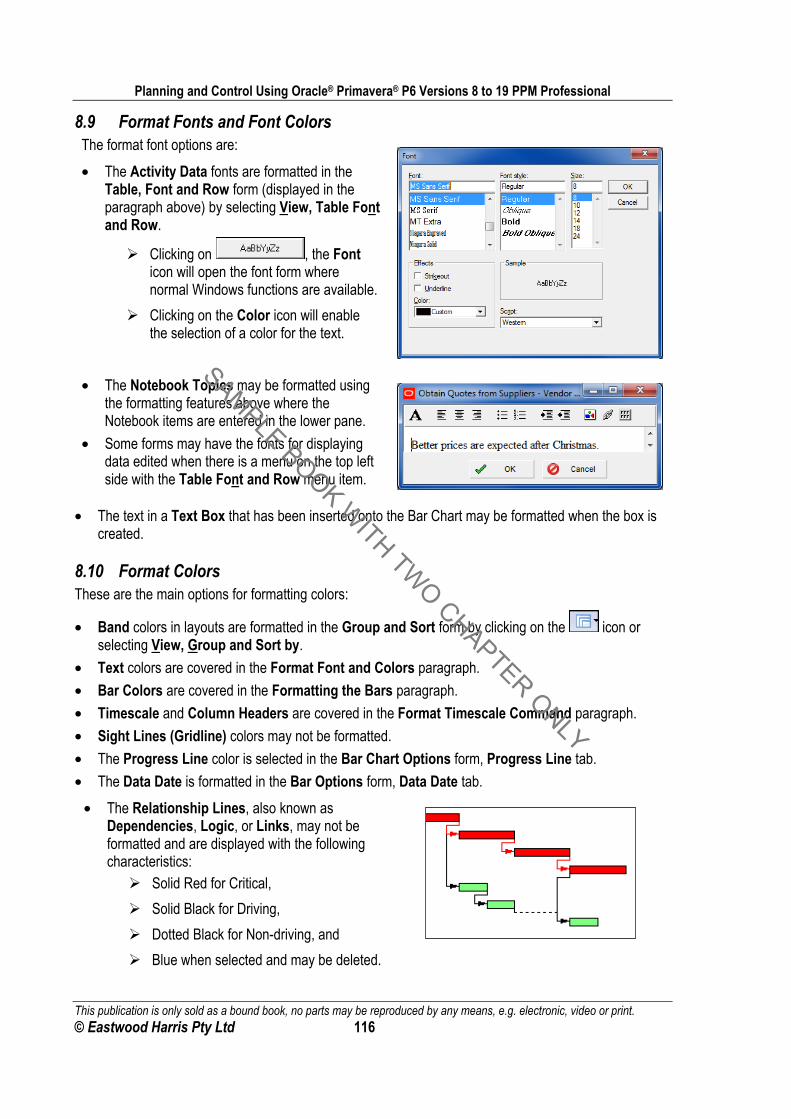
8.9 Format Fonts and Font Colors The format font options are:
• The Activity Data fonts are formatted in the Table, Font and Row form (displayed in the paragraph above) by selecting View, Table Font and Row.
Clicking on , the Font icon will open the font form where normal Windows functions are available.
Clicking on the Color icon will enable the selection of a color for the text.
• The Notebook Topics may be formatted using the formatting features above where the Notebook items are entered in the lower pane.
• Some forms may have the fonts for displaying data edited when there is a menu on the top left side with the Table Font and Row menu item.
• The text in a Text Box that has been inserted onto the Bar Chart may be formatted when the box is created.
8.10 Format Colors These are the main options for formatting colors:
• Band colors in layouts are formatted in the Group and Sort form by clicking on the icon or selecting View, Group and Sort by.
• Text colors are covered in the Format Font and Colors paragraph.
• Bar Colors are covered in the Formatting the Bars paragraph.
• Timescale and Column Headers are covered in the Format Timescale Command paragraph.
• Sight Lines (Gridline) colors may not be formatted.
• The Progress Line color is selected in the Bar Chart Options form, Progress Line tab.
• The Data Date is formatted in the Bar Options form, Data Date tab.
• The Relationship Lines, also known as Dependencies, Logic, or Links, may not be formatted and are displayed with the following characteristics: Solid Red for Critical,
Solid Black for Driving,
Dotted Black for Non-driving, and
Blue when selected and may be deleted.
SAMPLE BOOK WITH TWO CHAPTER ONLY
Planning and Control Using Oracle® Primavera® P6 Versions 8 to 19 PPM Professional
This publication is only sold as a bound book, no parts may be reproduced by any means, e.g. electronic, video or print. © Eastwood Harris Pty Ltd 117
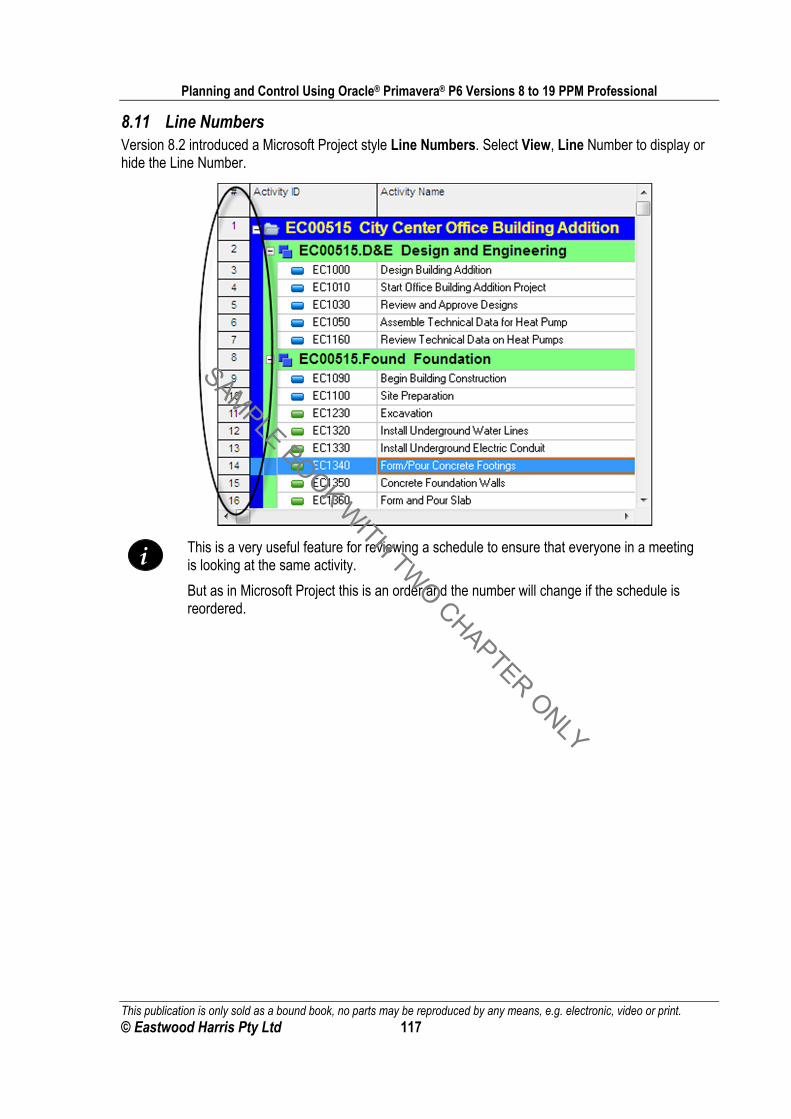
8.11 Line Numbers Version 8.2 introduced a Microsoft Project style Line Numbers. Select View, Line Number to display or hide the Line Number.
This is a very useful feature for reviewing a schedule to ensure that everyone in a meeting is looking at the same activity.
But as in Microsoft Project this is an order and the number will change if the schedule is reordered.
i
SAMPLE BOOK WITH TWO CHAPTER ONLY
Planning and Control Using Oracle® Primavera® P6 Versions 8 to 19 PPM Professional
This publication is only sold as a bound book, no parts may be reproduced by any means, e.g. electronic, video or print. © Eastwood Harris Pty Ltd 118
8.12 Workshop 6 – Formatting the Bar Chart
Background
Management has received your draft report and requests that some changes be made to the presentation.
Assignment
Format your schedule as follows, but depending on the default settings, your Gantt Chart View may differ from that shown, e.g., there may be no summary bars:
1. You will not have to complete the Step 2 of this workshop if you have internet access and are able to download a layout from www.primavera.com.au.
• If you have downloaded and applied the www.primavera.com_Layout.plf move to Step 3, DO NOT COMPLETE Step 2.
• If you have NOT downloaded and applied the www.primavera.com_Layout.plf complete Step 2.
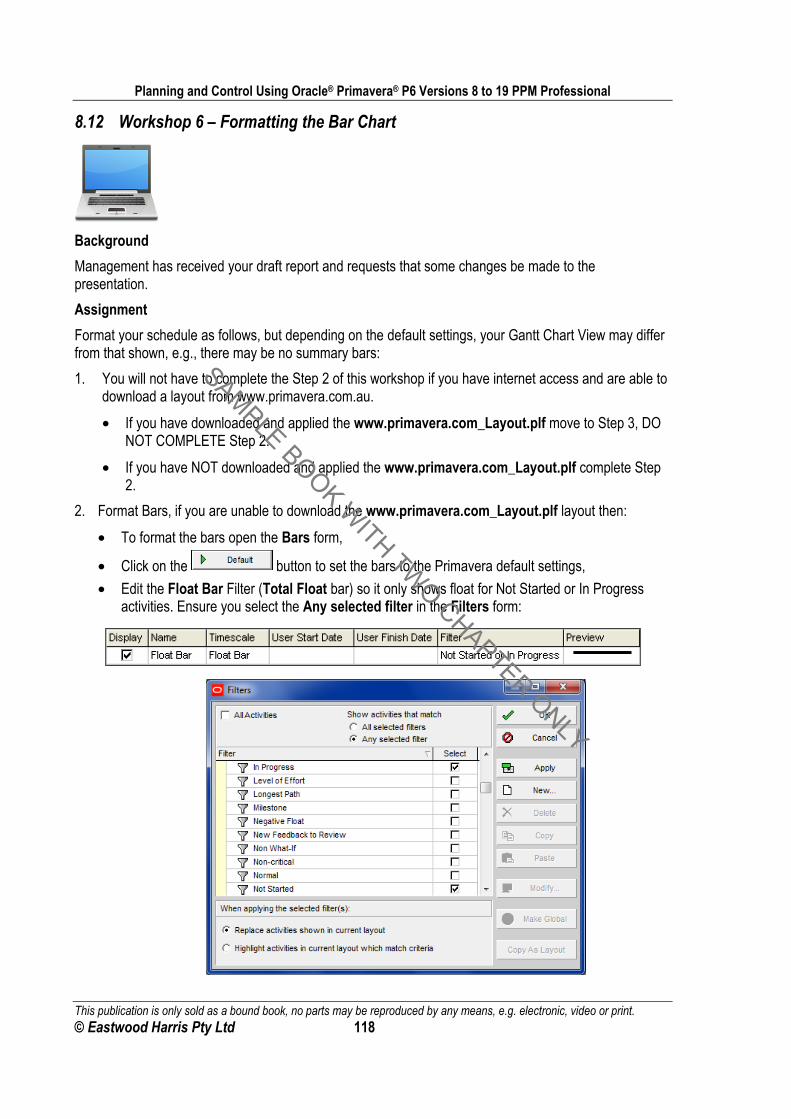
2. Format Bars, if you are unable to download the www.primavera.com_Layout.plf layout then:
• To format the bars open the Bars form,
• Click on the button to set the bars to the Primavera default settings,
• Edit the Float Bar Filter (Total Float bar) so it only shows float for Not Started or In Progress activities. Ensure you select the Any selected filter in the Filters form:
SAMPLE BOOK WITH TWO CHAPTER ONLY
Planning and Control Using Oracle® Primavera® P6 Versions 8 to 19 PPM Professional
This publication is only sold as a bound book, no parts may be reproduced by any means, e.g. electronic, video or print. © Eastwood Harris Pty Ltd 119
• Delete the Secondary Baseline & Tertiary Baseline bars,
• Move the Baseline bars and Baseline Milestones to the bottom of the Bars form to remove relationships on the Baseline bars,
• Add missing Project Baseline Milestone and format the Baseline bars as per the picture below, making them different colors:
• Remove all text from all bars, except from the Current Bar Labels bar, by: Clicking on the Bar Labels tab at the bottom,
Clicking on one bar at a time and using the button at the bottom (NOT SIDE) of the screen to delete the text line,
Change the Current Bar Labels bar filter to read All Activities and do not display. 3. Display the following bars:
• Remaining Level of Effort
• Actual Level of Effort
• Actual Work
• Remaining Work
• Remaining Critical Work
• Milestones
• % Complete
• Summary Bar
• Float Bar (Total Float)
• Negative Float Bar 4. Adding Columns:
• Add Calendar and Activity Type columns, from the General section of the Columns form, to the right of the Activity Name column.
• Adjust the column widths to a best fit by dragging the column header divider lines.
• Display the Total Float column if not displayed.
5. Press the F9 key and click the button which will schedule the project and calculate the float.
6. Adjusting Row Heights:
• Change the Row Height to 30 points by selecting View, Table Font and Row and apply,
• Now check the Optimize height by row content box, not exceeding 1 line per row and apply,
• Now change the setting to 18 point height for all rows and apply.
• Click on to close the form.
SAMPLE BOOK WITH TWO CHAPTER ONLY
Planning and Control Using Oracle® Primavera® P6 Versions 8 to 19 PPM Professional
This publication is only sold as a bound book, no parts may be reproduced by any means, e.g. electronic, video or print. © Eastwood Harris Pty Ltd 120
7. Format Timescale to Year and Month, then Week and Day (two options), then Month and Week by
using the buttons.
8. Format the Vertical lines with a solid Major line every month and a Minor line every week by
selecting View, Bars and clicking on the button and selecting the Sight Lines tab, or right-clicking in the Gantt Chart area and selecting Bar Chart Options… and selecting the Sight Lines tab.
9. Expand and contract the timescale and adjust it so that all the bars are visible.
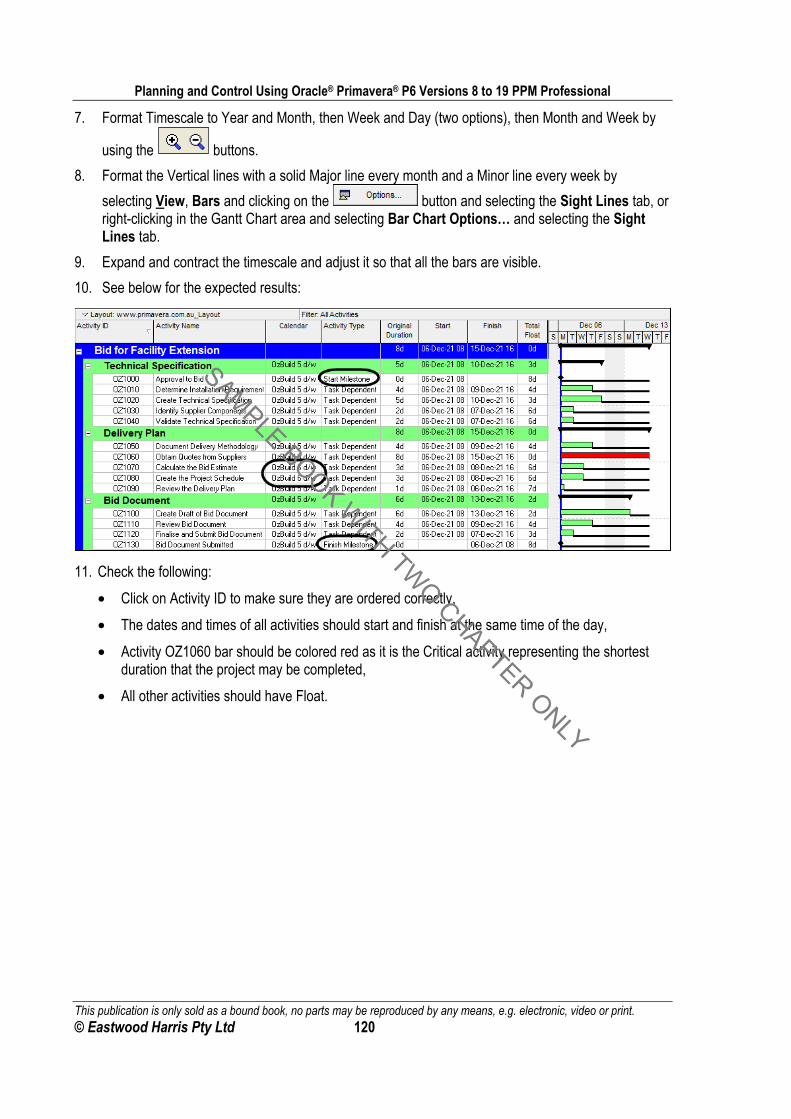
10. See below for the expected results:
11. Check the following:
• Click on Activity ID to make sure they are ordered correctly,
• The dates and times of all activities should start and finish at the same time of the day,
• Activity OZ1060 bar should be colored red as it is the Critical activity representing the shortest duration that the project may be completed,
• All other activities should have Float.
SAMPLE BOOK WITH TWO CHAPTER ONLY
Planning and Control Using Oracle® Primavera® P6 Versions 8 to 19 PPM Professional
This publication is only sold as a bound book, no parts may be reproduced by any means, e.g. electronic, video or print. © Eastwood Harris Pty Ltd 166
13 FILTERS This chapter covers the ability of Primavera to control which activities are displayed, both on the screen and in printouts, by using Filters.
13.1 Understanding Filters Primavera has an ability to display activities that meet specific criteria. You may want to see only the incomplete activities, or the work scheduled for the next couple of months or weeks, or the activities that are in-progress.
Primavera defaults to displaying all activities. There are a number of pre-defined filters available that you may use or edit. You may also create one or more of your own.
A filter may be applied to display or to highlight only those activities that meet a criterion.
There are four types of filters:
• Default filters which are supplied with the system and may not be edited or deleted but may be copied and then edited or modified and are often used in conjunction with the display of bars.
• Global filters which are made available to anyone working in the database,
• User Defined filters which are defined by a user and available only to that user unless it is made into a Global filter, and
• Layout filters which make a copy of the filter only available when the current layout is applied. NOTE: If the current layout is a Project layout then this effectively makes the Layout filter a project filter.
The following types of filters are not available:
• Drop down or Auto filters as in Excel and Microsoft Project.
• Interactive filters as available in SureTrak and Microsoft Project. This is when a filter is applied and the user is offered choices from a drop down list. The lack of this function may result in an excessive quantity of filters being generated or the user continually editing frequently used filters.
• Project filters, but copying all the filters used in a project to all the Project Layouts effectively creates Project filters but this is a lot of administration.
On the other hand, P6 does allow multiple filters to be applied at the same time.
i
There are no dedicated project filters (except by creating a Layout filter) available in Primavera, so you might consider placing the project name or number at the start of a filter name so you may identify which filters belong to which projects. This is especially helpful when you have a number of User Filters or there are a number of Global Filters.
Topic Menu Command
• To apply, edit, create, or delete a filter open the Filters form.
• Click on the icon, or
• Select View, Filter By…, Customize, or
• Right-click in the columns area and select Filters….
SAMPLE BOOK WITH TWO CHAPTER ONLY
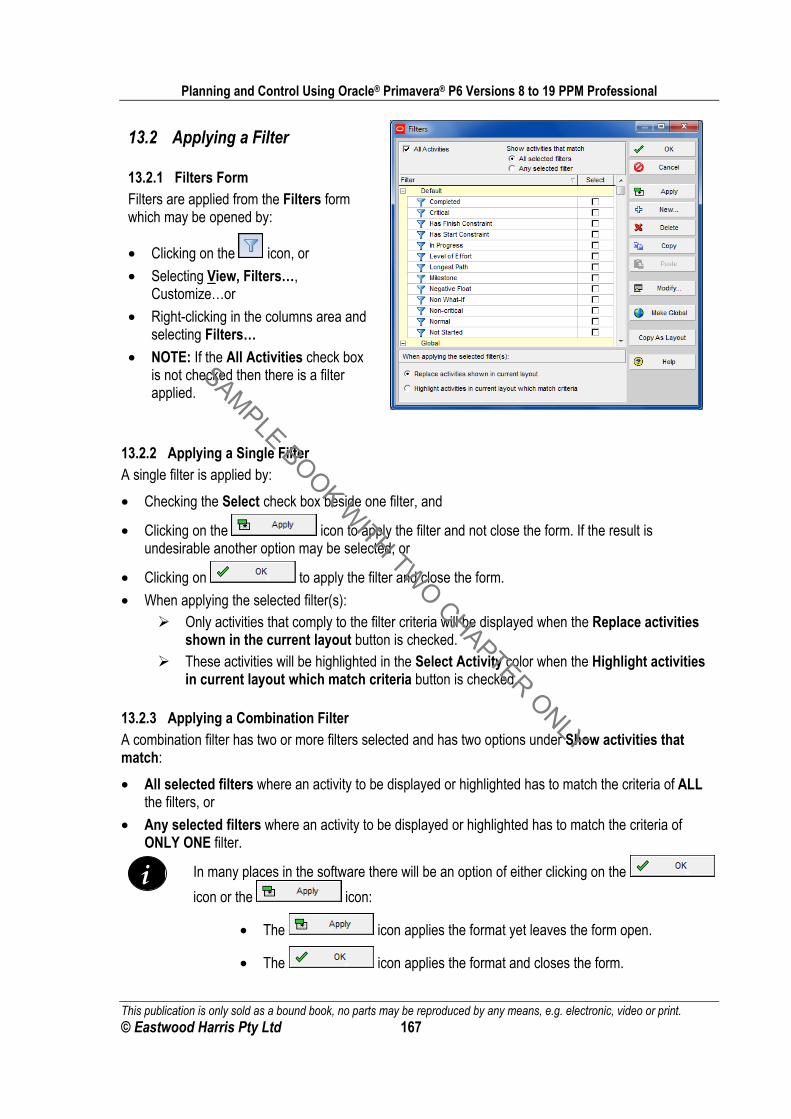
Planning and Control Using Oracle® Primavera® P6 Versions 8 to 19 PPM Professional
This publication is only sold as a bound book, no parts may be reproduced by any means, e.g. electronic, video or print. © Eastwood Harris Pty Ltd 167
13.2 Applying a Filter
13.2.1 Filters Form Filters are applied from the Filters form which may be opened by:
• Clicking on the icon, or
• Selecting View, Filters…, Customize…or
• Right-clicking in the columns area and selecting Filters…
• NOTE: If the All Activities check box is not checked then there is a filter applied.
13.2.2 Applying a Single Filter A single filter is applied by:
• Checking the Select check box beside one filter, and
• Clicking on the icon to apply the filter and not close the form. If the result is undesirable another option may be selected, or
• Clicking on to apply the filter and close the form.
• When applying the selected filter(s): Only activities that comply to the filter criteria will be displayed when the Replace activities
shown in the current layout button is checked. These activities will be highlighted in the Select Activity color when the Highlight activities
in current layout which match criteria button is checked.
13.2.3 Applying a Combination Filter A combination filter has two or more filters selected and has two options under Show activities that match:
• All selected filters where an activity to be displayed or highlighted has to match the criteria of ALL the filters, or
• Any selected filters where an activity to be displayed or highlighted has to match the criteria of ONLY ONE filter.
i In many places in the software there will be an option of either clicking on the
icon or the icon:
• The icon applies the format yet leaves the form open.
• The icon applies the format and closes the form.
SAMPLE BOOK WITH TWO CHAPTER ONLY
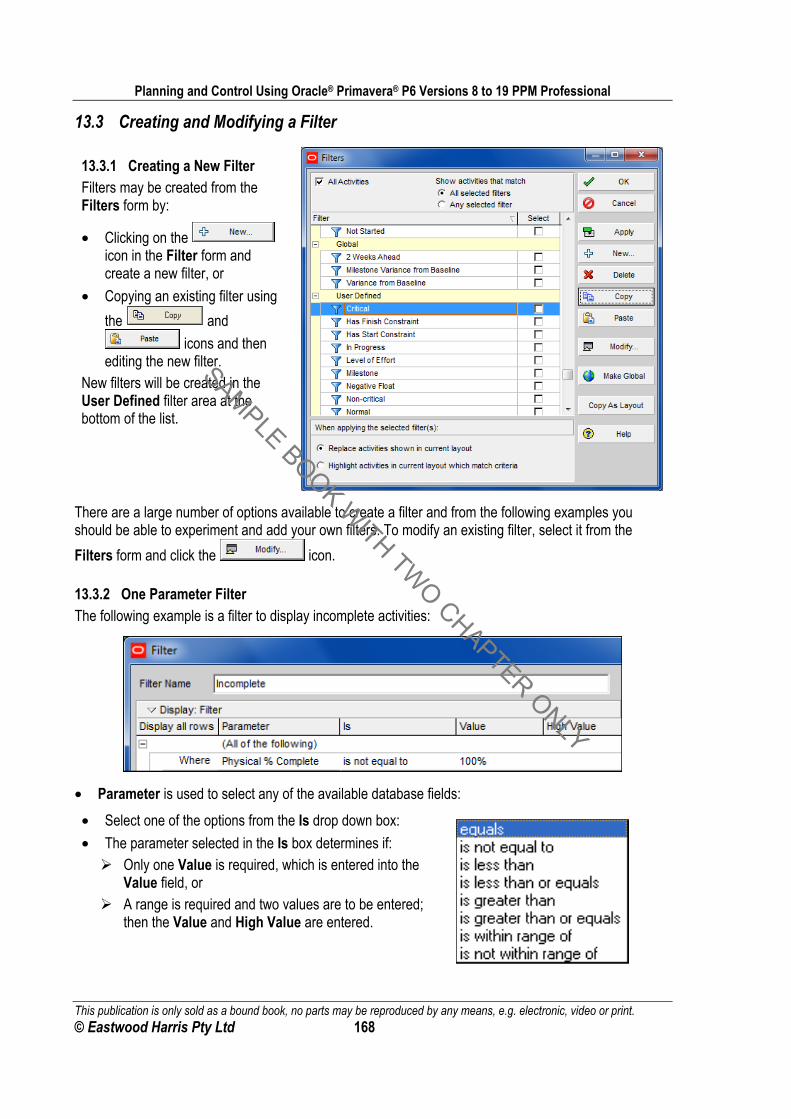
Planning and Control Using Oracle® Primavera® P6 Versions 8 to 19 PPM Professional
This publication is only sold as a bound book, no parts may be reproduced by any means, e.g. electronic, video or print. © Eastwood Harris Pty Ltd 168
13.3 Creating and Modifying a Filter
13.3.1 Creating a New Filter Filters may be created from the Filters form by:
• Clicking on the icon in the Filter form and create a new filter, or
• Copying an existing filter using
the and
icons and then editing the new filter.
New filters will be created in the User Defined filter area at the bottom of the list.
There are a large number of options available to create a filter and from the following examples you should be able to experiment and add your own filters. To modify an existing filter, select it from the
Filters form and click the icon.
13.3.2 One Parameter Filter The following example is a filter to display incomplete activities:
• Parameter is used to select any of the available database fields:
• Select one of the options from the Is drop down box:
• The parameter selected in the Is box determines if: Only one Value is required, which is entered into the
Value field, or A range is required and two values are to be entered;
then the Value and High Value are entered.
SAMPLE BOOK WITH TWO CHAPTER ONLY
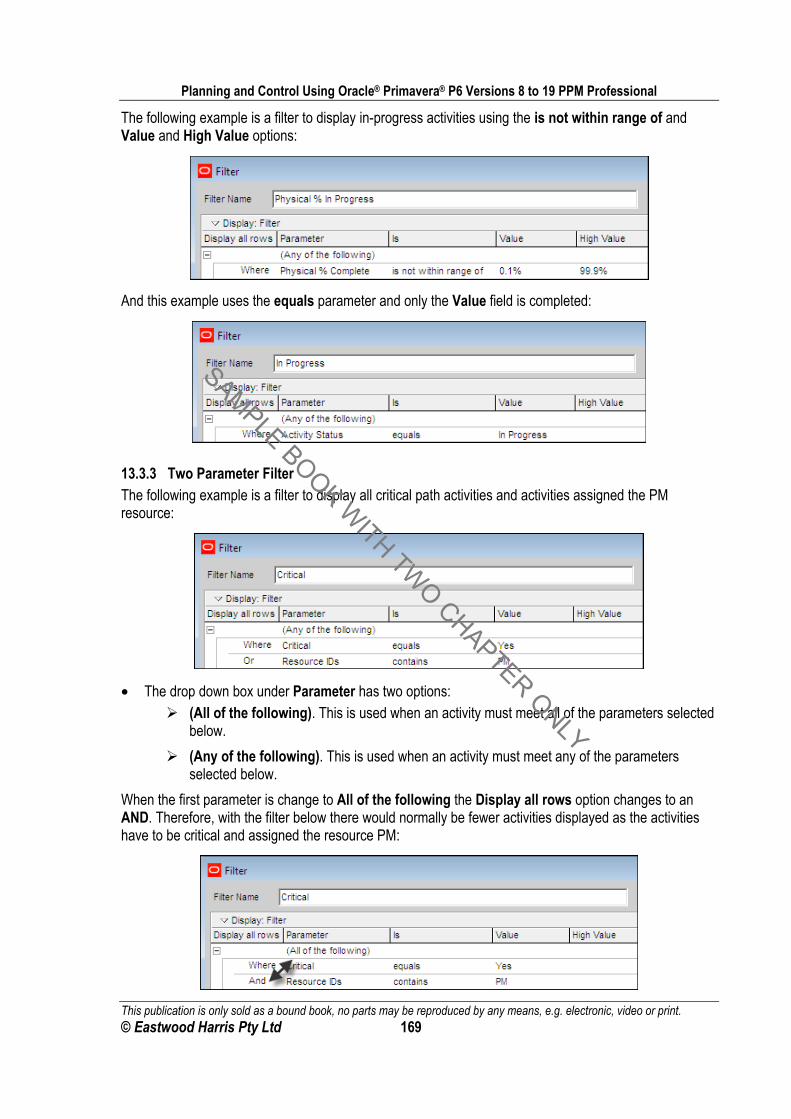
Planning and Control Using Oracle® Primavera® P6 Versions 8 to 19 PPM Professional
This publication is only sold as a bound book, no parts may be reproduced by any means, e.g. electronic, video or print. © Eastwood Harris Pty Ltd 169
The following example is a filter to display in-progress activities using the is not within range of and Value and High Value options:
And this example uses the equals parameter and only the Value field is completed:
13.3.3 Two Parameter Filter The following example is a filter to display all critical path activities and activities assigned the PM resource:
• The drop down box under Parameter has two options: (All of the following). This is used when an activity must meet all of the parameters selected
below.
(Any of the following). This is used when an activity must meet any of the parameters selected below.
When the first parameter is change to All of the following the Display all rows option changes to an AND. Therefore, with the filter below there would normally be fewer activities displayed as the activities have to be critical and assigned the resource PM:
SAMPLE BOOK WITH TWO CHAPTER ONLY
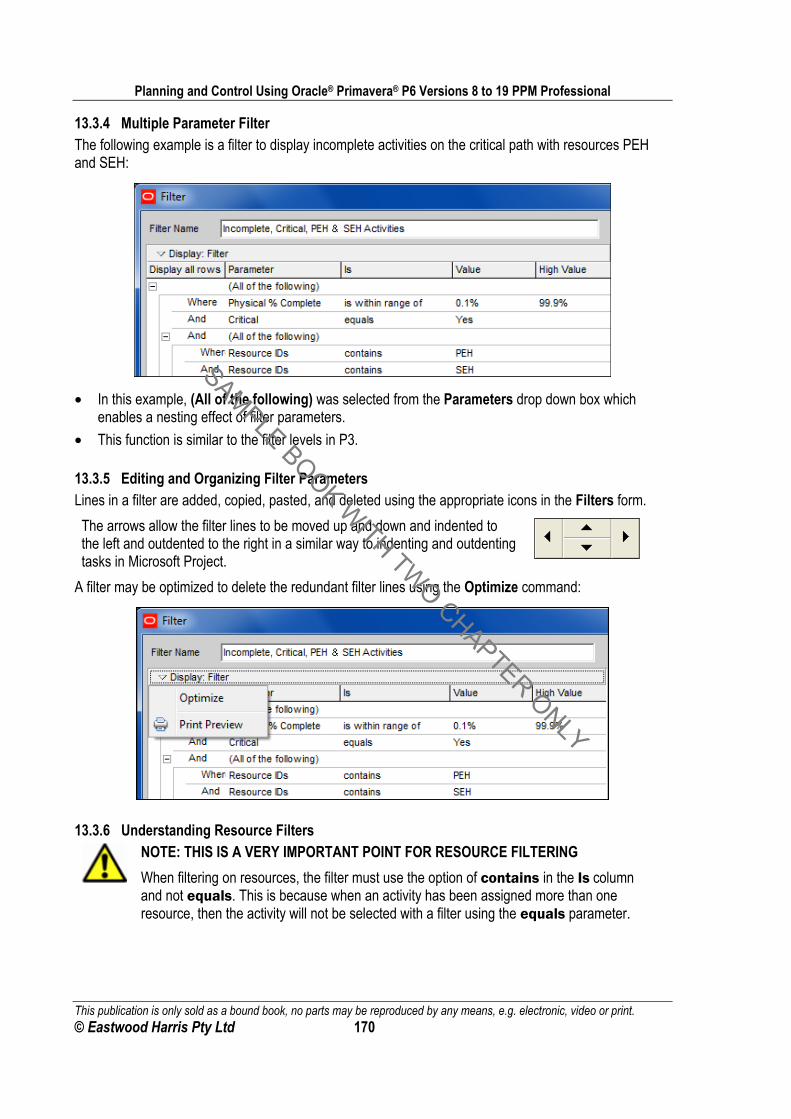
Planning and Control Using Oracle® Primavera® P6 Versions 8 to 19 PPM Professional
This publication is only sold as a bound book, no parts may be reproduced by any means, e.g. electronic, video or print. © Eastwood Harris Pty Ltd 170
13.3.4 Multiple Parameter Filter The following example is a filter to display incomplete activities on the critical path with resources PEH and SEH:
• In this example, (All of the following) was selected from the Parameters drop down box which enables a nesting effect of filter parameters.
• This function is similar to the filter levels in P3.
13.3.5 Editing and Organizing Filter Parameters Lines in a filter are added, copied, pasted, and deleted using the appropriate icons in the Filters form.
The arrows allow the filter lines to be moved up and down and indented to the left and outdented to the right in a similar way to indenting and outdenting tasks in Microsoft Project.
A filter may be optimized to delete the redundant filter lines using the Optimize command:
13.3.6 Understanding Resource Filters
NOTE: THIS IS A VERY IMPORTANT POINT FOR RESOURCE FILTERING
When filtering on resources, the filter must use the option of contains in the Is column and not equals. This is because when an activity has been assigned more than one resource, then the activity will not be selected with a filter using the equals parameter.
SAMPLE BOOK WITH TWO CHAPTER ONLY
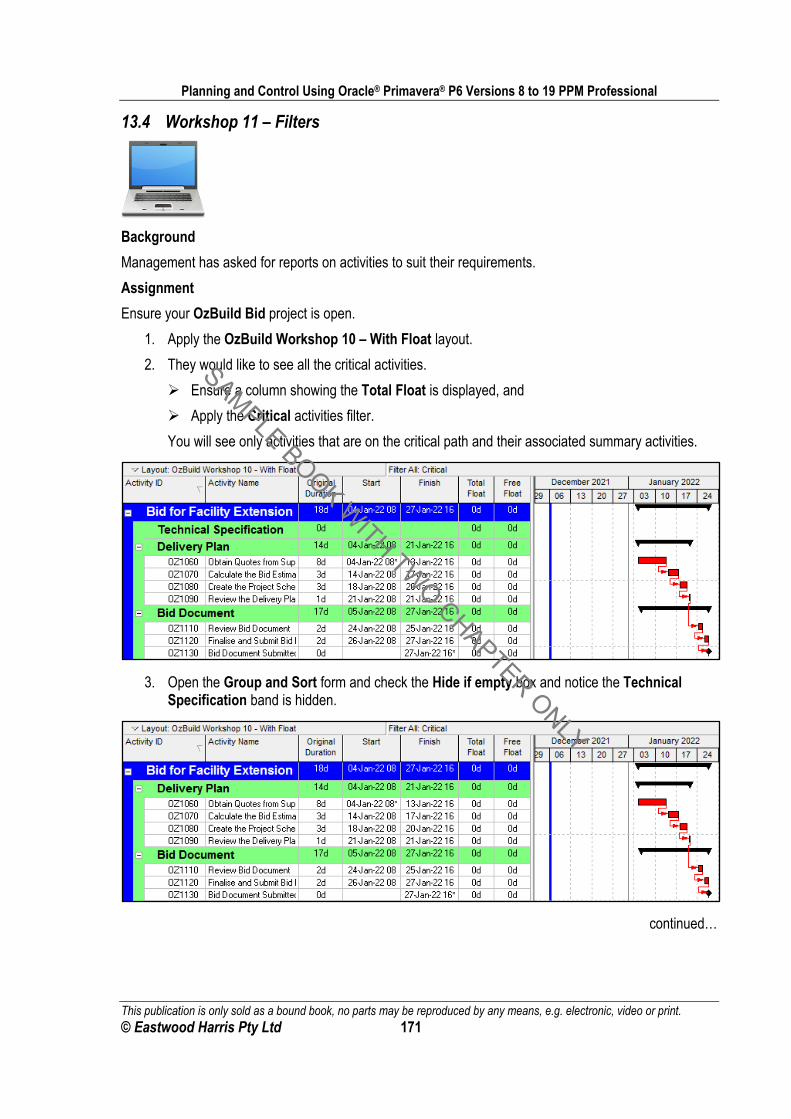
Planning and Control Using Oracle® Primavera® P6 Versions 8 to 19 PPM Professional
This publication is only sold as a bound book, no parts may be reproduced by any means, e.g. electronic, video or print. © Eastwood Harris Pty Ltd 171
13.4 Workshop 11 – Filters
Background
Management has asked for reports on activities to suit their requirements.
Assignment
Ensure your OzBuild Bid project is open.
1. Apply the OzBuild Workshop 10 – With Float layout.
2. They would like to see all the critical activities.
Ensure a column showing the Total Float is displayed, and
Apply the Critical activities filter.
You will see only activities that are on the critical path and their associated summary activities.
3. Open the Group and Sort form and check the Hide if empty box and notice the Technical Specification band is hidden.
continued…
SAMPLE BOOK WITH TWO CHAPTER ONLY
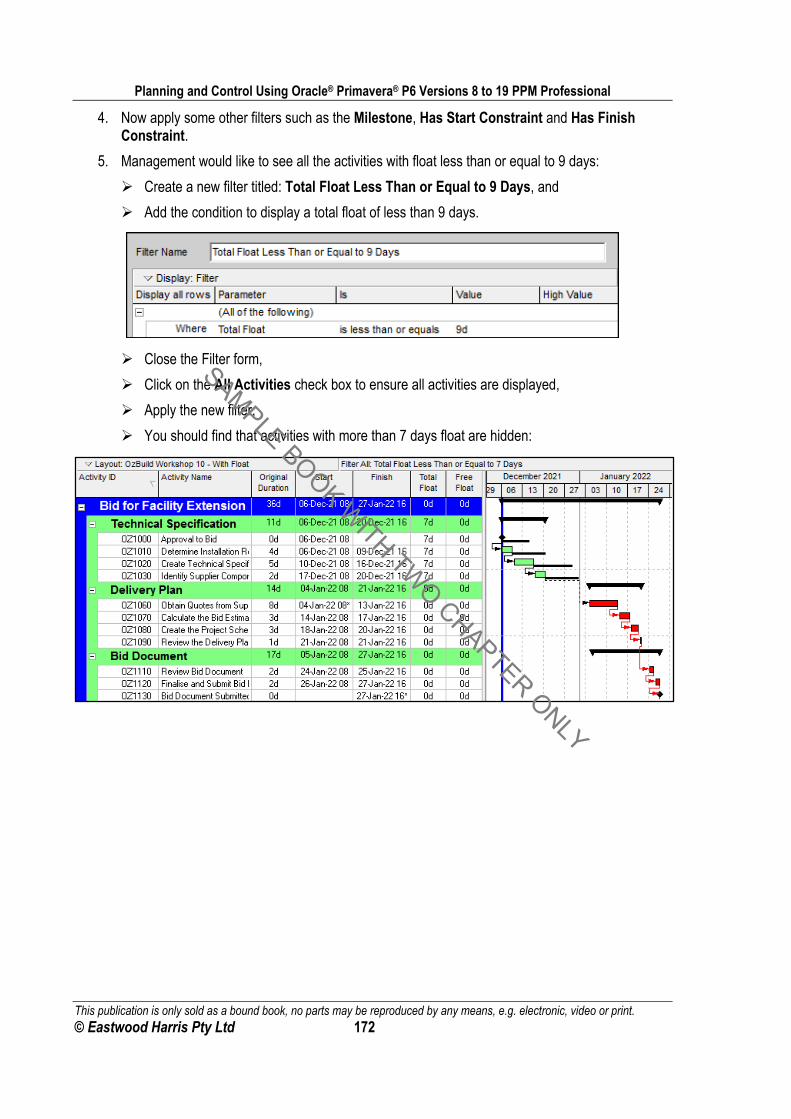
Planning and Control Using Oracle® Primavera® P6 Versions 8 to 19 PPM Professional
This publication is only sold as a bound book, no parts may be reproduced by any means, e.g. electronic, video or print. © Eastwood Harris Pty Ltd 172
4. Now apply some other filters such as the Milestone, Has Start Constraint and Has Finish Constraint.
5. Management would like to see all the activities with float less than or equal to 9 days:
Create a new filter titled: Total Float Less Than or Equal to 9 Days, and
Add the condition to display a total float of less than 9 days.
Close the Filter form,
Click on the All Activities check box to ensure all activities are displayed,
Apply the new filter,
You should find that activities with more than 7 days float are hidden:
SAMPLE BOOK WITH TWO CHAPTER ONLY
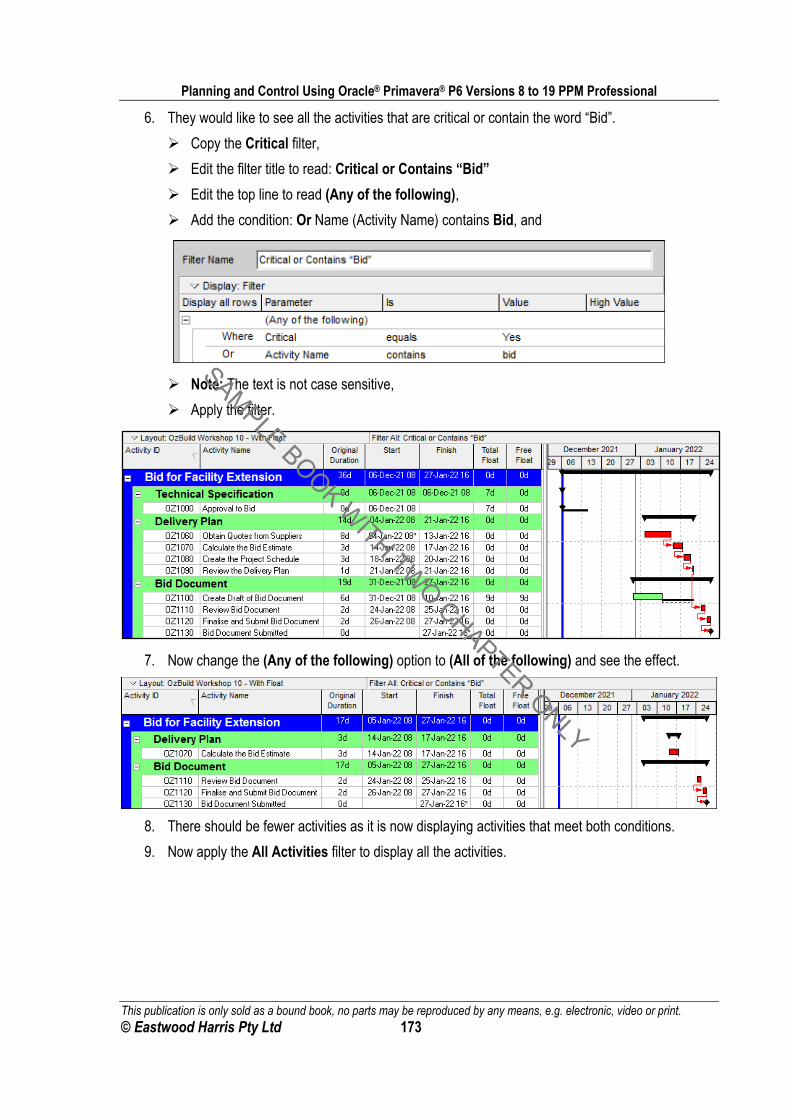
Planning and Control Using Oracle® Primavera® P6 Versions 8 to 19 PPM Professional
This publication is only sold as a bound book, no parts may be reproduced by any means, e.g. electronic, video or print. © Eastwood Harris Pty Ltd 173
6. They would like to see all the activities that are critical or contain the word “Bid”.
Copy the Critical filter,
Edit the filter title to read: Critical or Contains “Bid”
Edit the top line to read (Any of the following),
Add the condition: Or Name (Activity Name) contains Bid, and
Note: The text is not case sensitive,
Apply the filter.
7. Now change the (Any of the following) option to (All of the following) and see the effect.
8. There should be fewer activities as it is now displaying activities that meet both conditions.
9. Now apply the All Activities filter to display all the activities.
SAMPLE BOOK WITH TWO CHAPTER ONLY
Related Documents