Illustration: Engine Design Website: www.engine-design.co.uk 44 February 2002 Photoshop ART67.pshop 11/1/02 12:26 pm Page 44

Welcome message from author
This document is posted to help you gain knowledge. Please leave a comment to let me know what you think about it! Share it to your friends and learn new things together.
Transcript
Illu
stra
tio
n: E
ngin
e D
esig
nW
eb
site
: ww
w.e
ngin
e-de
sign
.co.
uk
44 February 2002
Ph
oto
sh
op
ART67.pshop 11/1/02 12:26 pm Page 44
Ph
oto
sh
op
Pho
tosh
op S
kills
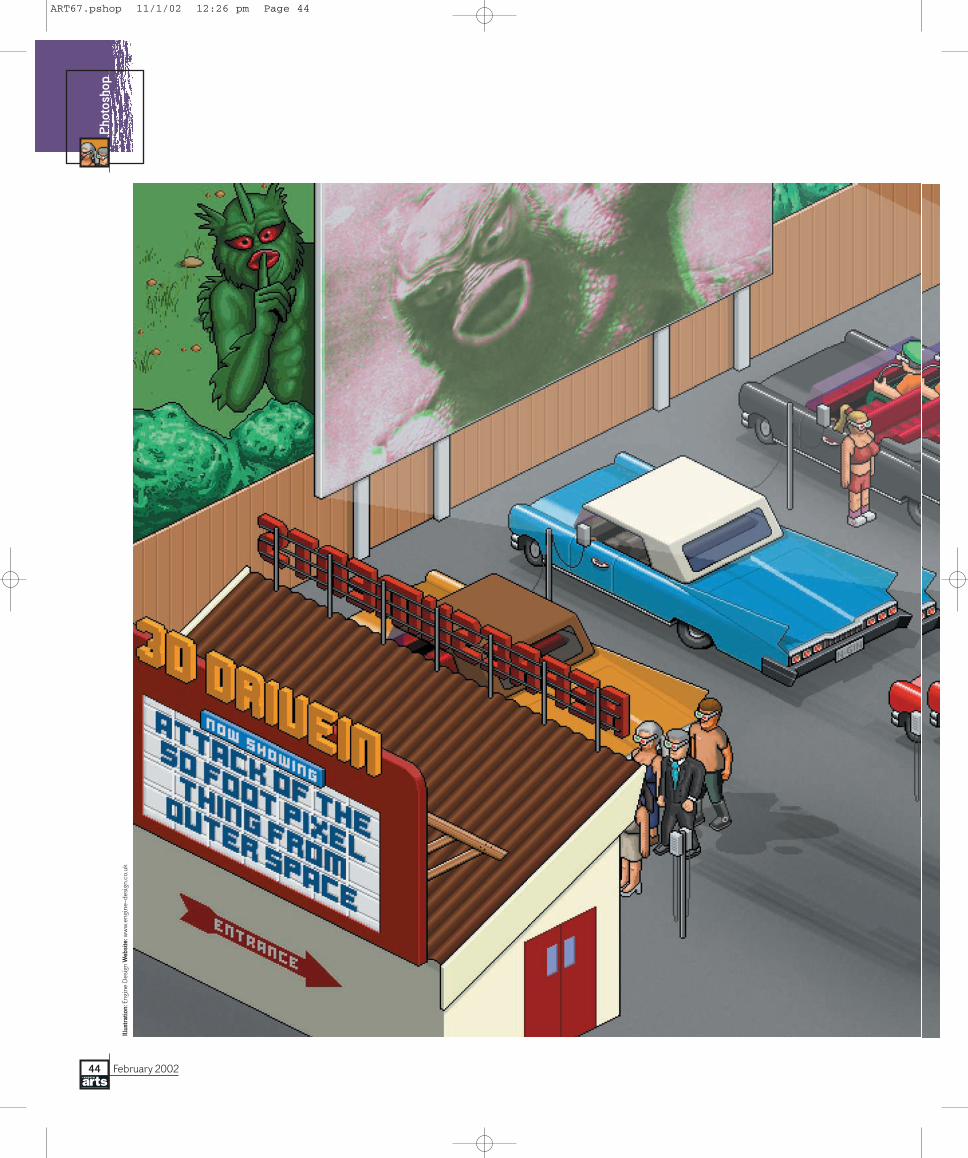
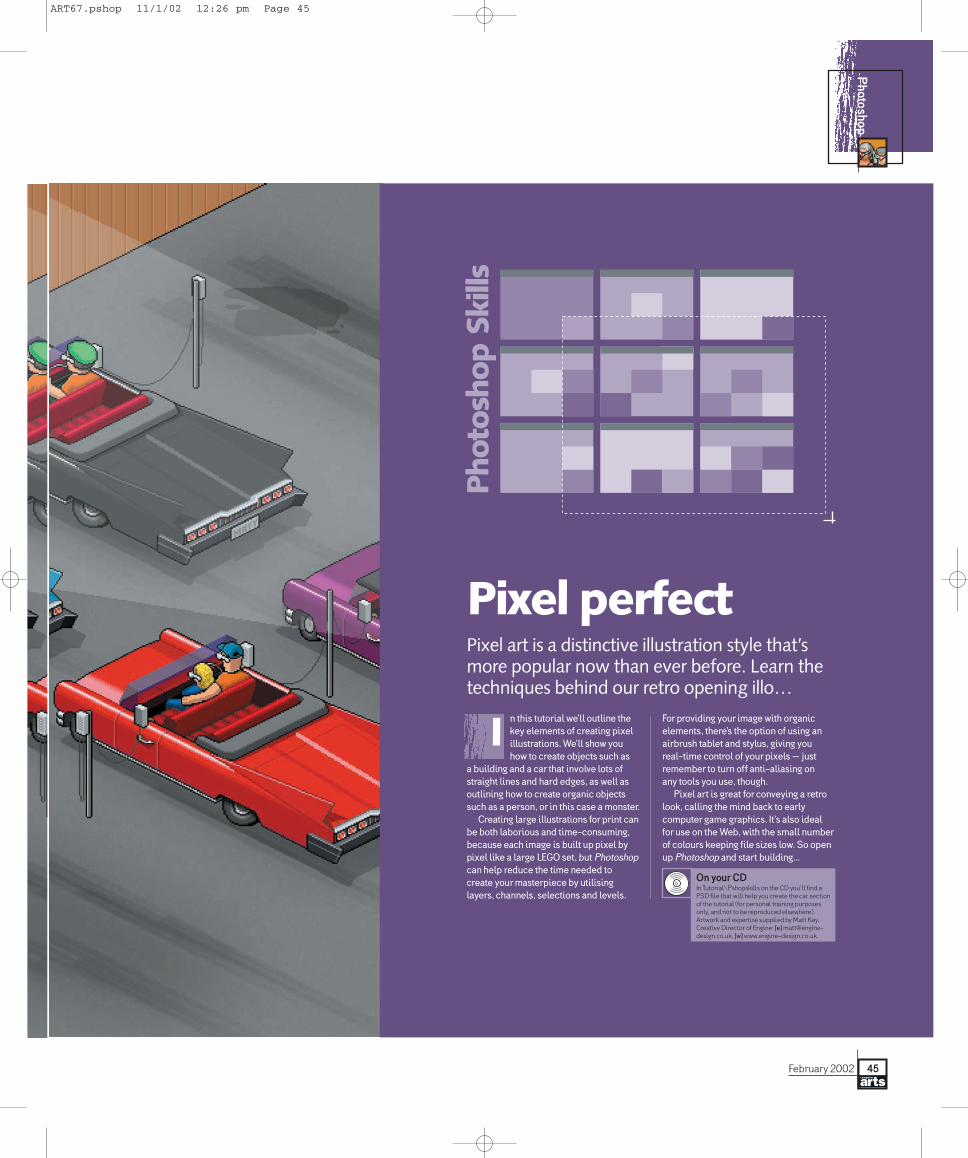
Pixel perfectPixel art is a distinctive illustration style that’smore popular now than ever before. Learn thetechniques behind our retro opening illo…
n this tutorial we’ll outline thekey elements of creating pixelillustrations. We’ll show youhow to create objects such as
a building and a car that involve lots ofstraight lines and hard edges, as well asoutlining how to create organic objectssuch as a person, or in this case a monster.
Creating large illustrations for print canbe both laborious and time-consuming,because each image is built up pixel bypixel like a large LEGO set, but Photoshopcan help reduce the time needed tocreate your masterpiece by utilisinglayers, channels, selections and levels.
For providing your image with organicelements, there’s the option of using anairbrush tablet and stylus, giving you real-time control of your pixels – justremember to turn off anti-aliasing on any tools you use, though.
Pixel art is great for conveying a retrolook, calling the mind back to earlycomputer game graphics. It’s also idealfor use on the Web, with the small numberof colours keeping file sizes low. So openup Photoshop and start building…
I
On your CDIn Tutorial\Pshopskills on the CD you’ll find aPSD file that will help you create the car sectionof the tutorial (for personal training purposesonly, and not to be reproduced elsewhere).Artwork and expertise supplied by Matt Key,Creative Director of Engine: [e] [email protected], [w] www.engine-design.co.uk.
45February 2002
ART67.pshop 11/1/02 12:26 pm Page 45
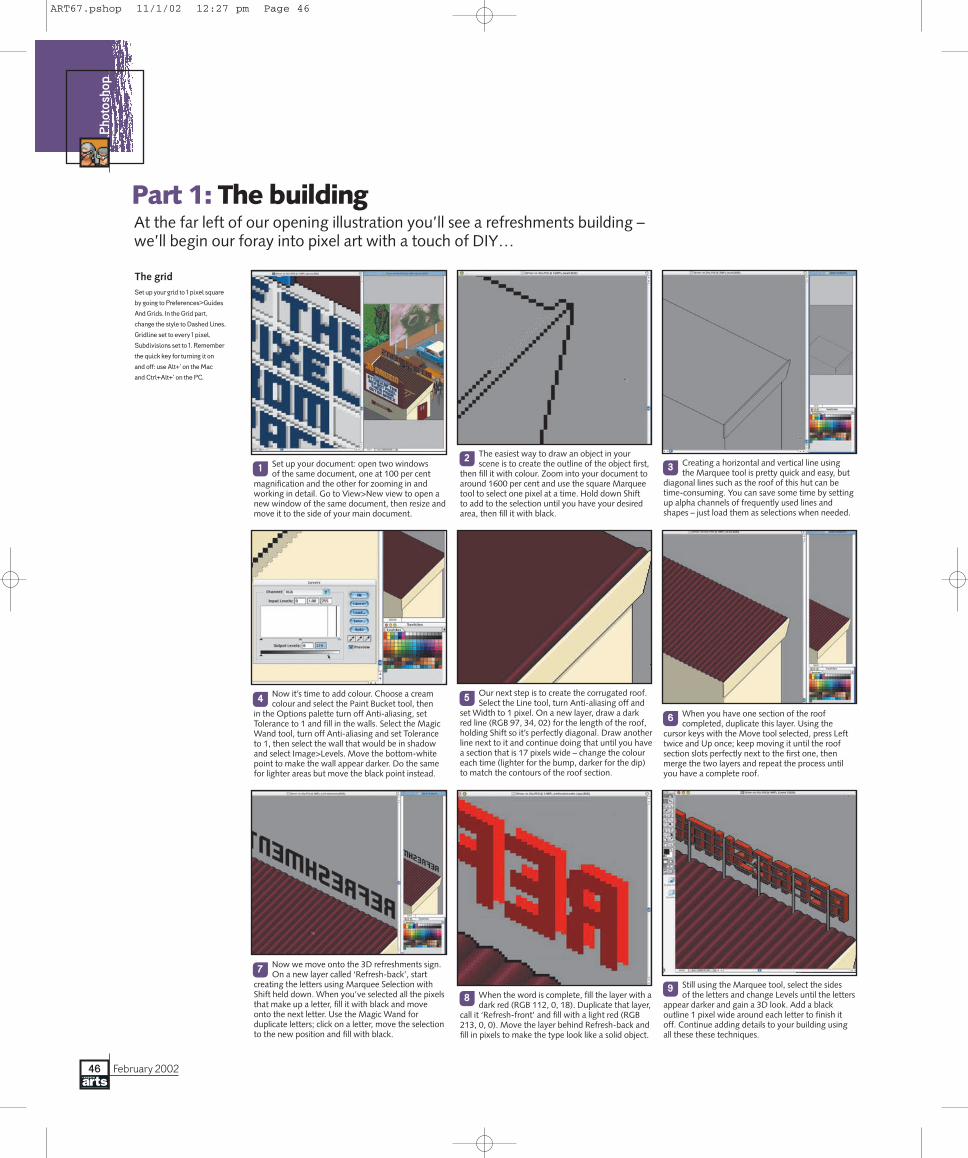
Part 1: The buildingAt the far left of our opening illustration you’ll see a refreshments building –we’ll begin our foray into pixel art with a touch of DIY…
Creating a horizontal and vertical line using the Marquee tool is pretty quick and easy, but
diagonal lines such as the roof of this hut can betime-consuming. You can save some time by settingup alpha channels of frequently used lines andshapes – just load them as selections when needed.
The easiest way to draw an object in yourscene is to create the outline of the object first,
then fill it with colour. Zoom into your document toaround 1600 per cent and use the square Marqueetool to select one pixel at a time. Hold down Shift to add to the selection until you have your desiredarea, then fill it with black.
Set up your document: open two windows of the same document, one at 100 per cent
magnification and the other for zooming in andworking in detail. Go to View>New view to open anew window of the same document, then resize andmove it to the side of your main document.
The gridSet up your grid to 1 pixel square
by going to Preferences>Guides
And Grids. In the Grid part,
change the style to Dashed Lines,
Gridline set to every 1 pixel,
Subdivisions set to 1. Remember
the quick key for turning it on
and off: use Alt+’ on the Mac
and Ctrl+Alt+’ on the PC.
46 February 2002
Ph
oto
sh
op
When you have one section of the roofcompleted, duplicate this layer. Using the
cursor keys with the Move tool selected, press Lefttwice and Up once; keep moving it until the roofsection slots perfectly next to the first one, thenmerge the two layers and repeat the process untilyou have a complete roof.
Our next step is to create the corrugated roof.Select the Line tool, turn Anti-aliasing off and
set Width to 1 pixel. On a new layer, draw a darkred line (RGB 97, 34, 02) for the length of the roof,holding Shift so it’s perfectly diagonal. Draw anotherline next to it and continue doing that until you havea section that is 17 pixels wide – change the coloureach time (lighter for the bump, darker for the dip)to match the contours of the roof section.
Now it’s time to add colour. Choose a creamcolour and select the Paint Bucket tool, then
in the Options palette turn off Anti-aliasing, setTolerance to 1 and fill in the walls. Select the MagicWand tool, turn off Anti-aliasing and set Toleranceto 1, then select the wall that would be in shadowand select Image>Levels. Move the bottom-whitepoint to make the wall appear darker. Do the samefor lighter areas but move the black point instead.
Still using the Marquee tool, select the sides of the letters and change Levels until the letters
appear darker and gain a 3D look. Add a blackoutline 1 pixel wide around each letter to finish itoff. Continue adding details to your building usingall these these techniques.
When the word is complete, fill the layer with adark red (RGB 112, 0, 18). Duplicate that layer,
call it ‘Refresh-front’ and fill with a light red (RGB213, 0, 0). Move the layer behind Refresh-back andfill in pixels to make the type look like a solid object.
Now we move onto the 3D refreshments sign.On a new layer called ‘Refresh-back’, start
creating the letters using Marquee Selection withShift held down. When you’ve selected all the pixelsthat make up a letter, fill it with black and moveonto the next letter. Use the Magic Wand forduplicate letters; click on a letter, move the selectionto the new position and fill with black.
12
3
4 5
6
7
89
ART67.pshop 11/1/02 12:27 pm Page 46
47February 2002
Ph
oto
sh
op
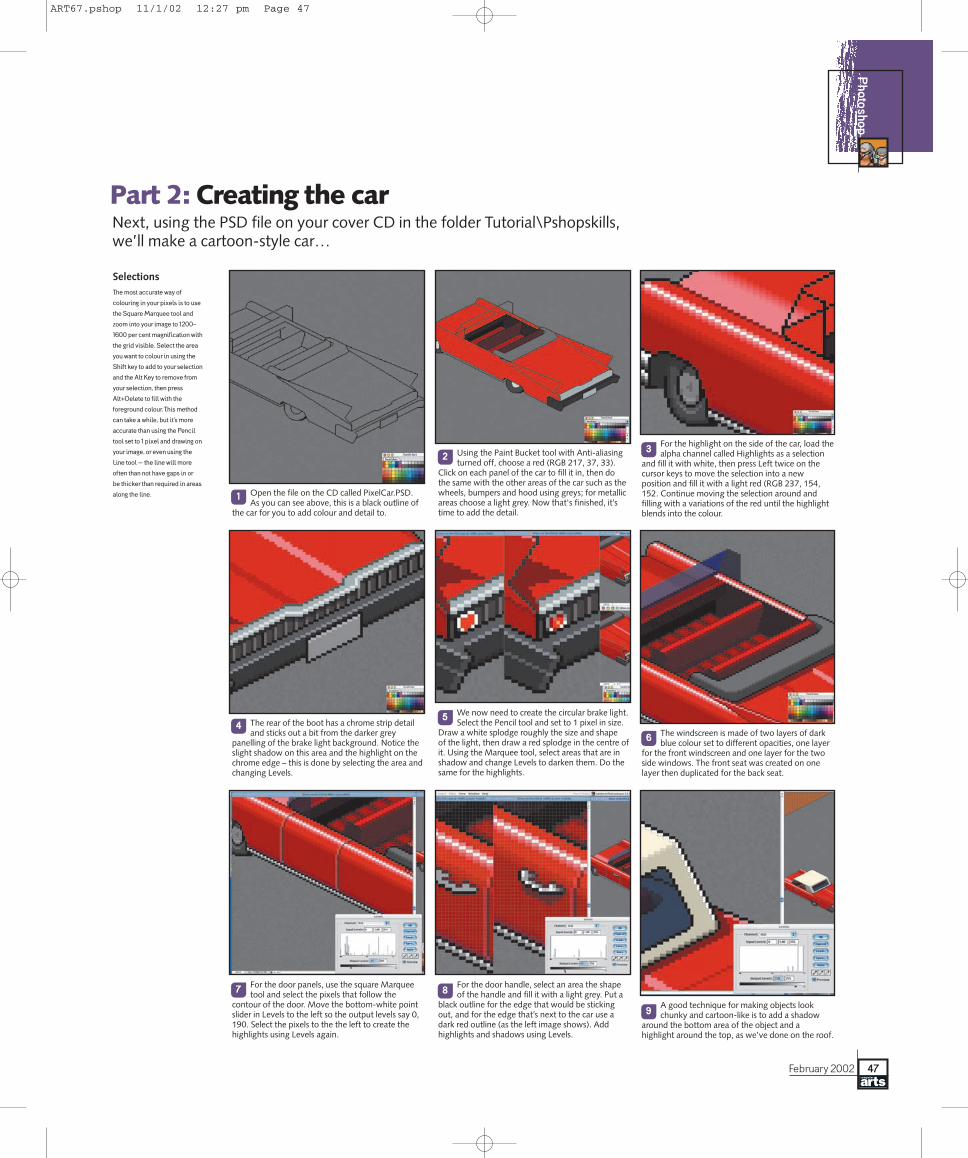
Part 2: Creating the carNext, using the PSD file on your cover CD in the folder Tutorial\Pshopskills,we’ll make a cartoon-style car…
For the highlight on the side of the car, load thealpha channel called Highlights as a selection
and fill it with white, then press Left twice on thecursor keys to move the selection into a newposition and fill it with a light red (RGB 237, 154,152. Continue moving the selection around andfilling with a variations of the red until the highlightblends into the colour.
Using the Paint Bucket tool with Anti-aliasingturned off, choose a red (RGB 217, 37, 33).
Click on each panel of the car to fill it in, then do the same with the other areas of the car such as thewheels, bumpers and hood using greys; for metallicareas choose a light grey. Now that's finished, it’stime to add the detail.
Open the file on the CD called PixelCar.PSD. As you can see above, this is a black outline of
the car for you to add colour and detail to.
SelectionsThe most accurate way of
colouring in your pixels is to use
the Square Marquee tool and
zoom into your image to 1200-
1600 per cent magnification with
the grid visible. Select the area
you want to colour in using the
Shift key to add to your selection
and the Alt Key to remove from
your selection, then press
Alt+Delete to fill with the
foreground colour. This method
can take a while, but it’s more
accurate than using the Pencil
tool set to 1 pixel and drawing on
your image, or even using the
Line tool – the line will more
often than not have gaps in or
be thicker than required in areas
along the line.
The windscreen is made of two layers of darkblue colour set to different opacities, one layer
for the front windscreen and one layer for the twoside windows. The front seat was created on onelayer then duplicated for the back seat.
We now need to create the circular brake light.Select the Pencil tool and set to 1 pixel in size.
Draw a white splodge roughly the size and shape of the light, then draw a red splodge in the centre ofit. Using the Marquee tool, select areas that are inshadow and change Levels to darken them. Do thesame for the highlights.
The rear of the boot has a chrome strip detailand sticks out a bit from the darker grey
panelling of the brake light background. Notice theslight shadow on this area and the highlight on thechrome edge – this is done by selecting the area andchanging Levels.
A good technique for making objects lookchunky and cartoon-like is to add a shadow
around the bottom area of the object and ahighlight around the top, as we’ve done on the roof.
For the door handle, select an area the shapeof the handle and fill it with a light grey. Put a
black outline for the edge that would be stickingout, and for the edge that’s next to the car use adark red outline (as the left image shows). Addhighlights and shadows using Levels.
For the door panels, use the square Marqueetool and select the pixels that follow the
contour of the door. Move the bottom-white pointslider in Levels to the left so the output levels say 0,190. Select the pixels to the the left to create thehighlights using Levels again.
1
23
45
6
7 8
9
ART67.pshop 11/1/02 12:27 pm Page 47
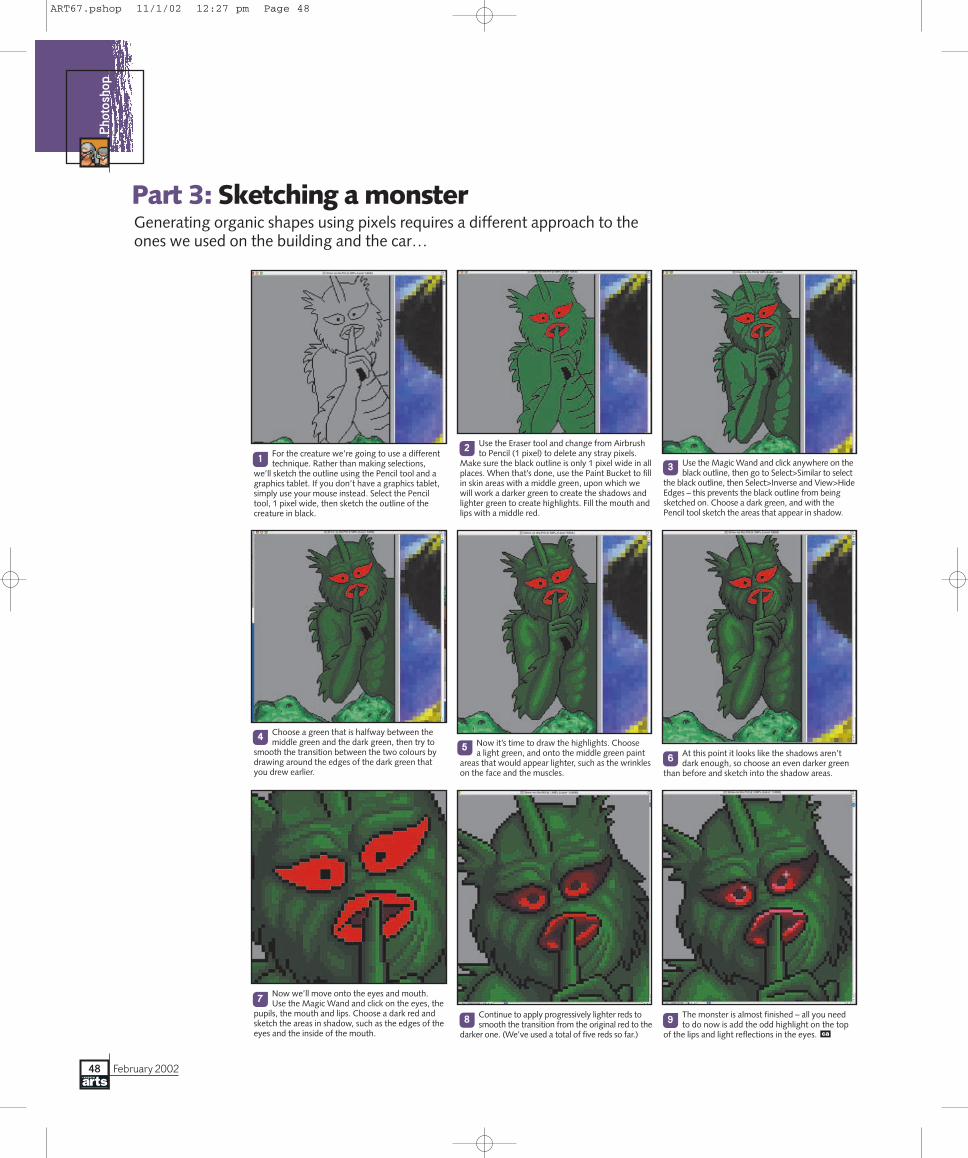
Part 3: Sketching a monsterGenerating organic shapes using pixels requires a different approach to theones we used on the building and the car…
Use the Magic Wand and click anywhere on theblack outline, then go to Select>Similar to select
the black outline, then Select>Inverse and View>HideEdges – this prevents the black outline from beingsketched on. Choose a dark green, and with thePencil tool sketch the areas that appear in shadow.
Use the Eraser tool and change from Airbrushto Pencil (1 pixel) to delete any stray pixels.
Make sure the black outline is only 1 pixel wide in allplaces. When that’s done, use the Paint Bucket to fillin skin areas with a middle green, upon which wewill work a darker green to create the shadows andlighter green to create highlights. Fill the mouth andlips with a middle red.
For the creature we’re going to use a differenttechnique. Rather than making selections,
we’ll sketch the outline using the Pencil tool and agraphics tablet. If you don’t have a graphics tablet,simply use your mouse instead. Select the Penciltool, 1 pixel wide, then sketch the outline of thecreature in black.
48 February 2002
Ph
oto
sh
op
At this point it looks like the shadows aren’tdark enough, so choose an even darker green
than before and sketch into the shadow areas.
Now it’s time to draw the highlights. Choose a light green, and onto the middle green paint
areas that would appear lighter, such as the wrinkleson the face and the muscles.
Choose a green that is halfway between themiddle green and the dark green, then try to
smooth the transition between the two colours bydrawing around the edges of the dark green thatyou drew earlier.
The monster is almost finished – all you need to do now is add the odd highlight on the top
of the lips and light reflections in the eyes. ca
Continue to apply progressively lighter reds tosmooth the transition from the original red to the
darker one. (We’ve used a total of five reds so far.)
Now we’ll move onto the eyes and mouth. Use the Magic Wand and click on the eyes, the
pupils, the mouth and lips. Choose a dark red andsketch the areas in shadow, such as the edges of theeyes and the inside of the mouth.
12
3
45
6
7
8 9
ART67.pshop 11/1/02 12:27 pm Page 48
Related Documents