Perceptive TransForm iFiller Installation and Setup Guide Version: 8.x Date: February 2017

Welcome message from author
This document is posted to help you gain knowledge. Please leave a comment to let me know what you think about it! Share it to your friends and learn new things together.
Transcript
Perceptive TransForm iFiller Installation and Setup Guide Version: 8.x Date: February 2017

© 2017 Lexmark. All rights reserved.
Lexmark is a trademark of Lexmark International Inc., registered in the U.S. and/or other countries. All other trademarks are the property of their respective owners. No part of this publication may be reproduced, stored, or transmitted in any form without the prior written permission of Lexmark.
Perceptive TransForm iFiller Installation and Setup Guide
Table of Contents Introduction ................................................................................................................................................. 5
Intended audience ..................................................................................................................................... 5
Related resources and documentation ...................................................................................................... 5 Before you install ........................................................................................................................................ 5
Overview .................................................................................................................................................... 5
System Requirements ............................................................................................................................... 5 Server..................................................................................................................................................... 6
Client ...................................................................................................................................................... 6
Install iFiller ................................................................................................................................................. 7
Installation process .................................................................................................................................... 7
Complete the Installation ........................................................................................................................... 8 Configure server properties ................................................................................................................... 9
Start iFiller service ................................................................................................................................. 9
Configure E-Forms Manager for iFiller ................................................................................................ 10 Upgrade iFiller ........................................................................................................................................... 10
Upgrade Process ..................................................................................................................................... 10
Complete the upgrade ............................................................................................................................. 11 Configure iFiller Server ............................................................................................................................ 11
iFiller Server configuration files ............................................................................................................... 11
Settings in the ifiller.properties file ........................................................................................................... 12 iFiller Service ........................................................................................................................................... 14
Start or stop the iFiller service ............................................................................................................. 14
Create and/or remove the iFiller Service ............................................................................................. 15
Change the iFiller HTTP Listen Port ........................................................................................................ 16
Run iFiller over HTTPS or SSL ............................................................................................................... 17 Standalone installation ......................................................................................................................... 17 E-Forms Manager Hosted installation ................................................................................................. 24
Run a Standalone iFiller Server in a reverse proxy configuration ........................................................... 25 Application maintenance .......................................................................................................................... 27
Log file maintenance ............................................................................................................................... 27 Uninstall iFiller .......................................................................................................................................... 27 Appendix A: Performance considerations and guidelines ................................................................... 28
Source of metrics used in these guidelines ............................................................................................. 28
3

Perceptive TransForm iFiller Installation and Setup Guide
Analysis of test results ............................................................................................................................. 29
Summary of test results ........................................................................................................................... 30 General conclusions ............................................................................................................................ 30 Specific recommendations ................................................................................................................... 31
4
Perceptive TransForm iFiller Installation and Setup Guide
Introduction This guide provides instructions on how to install, configure, and use the Perceptive TransForm iFiller application software. After having read and followed these instructions you should have an iFiller application running and configured for your environment and be familiar with the important ways in which iFiller’s configuration settings can be customized to conform to your environment requirements.
Upgrades and new versions of iFiller are periodically released. Before using these instructions, ensure that they pertain to the version of the software that you plan to install, upgrade to, or have currently in use. This guide pertains to all 8.x versions of iFiller, unless otherwise noted.
If, after using this document, you find that the iFiller application does not function properly or as expected, contact your Perceptive TransForm representative.
Intended audience This guide is intended for system administrators who are responsible for installing software and maintaining the servers and network of the organization into which the software installation and configuration steps will be performed.
Related resources and documentation Before performing a new installation or upgrade of the iFiller software, refer to the corresponding release notes for detailed information about the features included in that release.
Before you install
Overview The installation package for iFiller is distributed as an executable setup program. The installation process uses a standard Windows wizard with prompts that guide you through the installation process. You can cancel the installation, however some parts of the installation cannot be cancelled immediately and must complete before the rest of the installation can be exited. The installation package contains the resources necessary for performing new installations or for upgrading prior versions of the software to the current version.
The installation program deploys the necessary software onto the system to a drive location specified during the installation process. Depending on the type of installation you perform, it may also create a Windows service by which the application runs automatically. This service controls the running of the HTTP server process, which is employed by the Standalone-type installation of iFiller.
Certain configuration files that specify environment-specific runtime settings for the iFiller application are deployed with default settings, which can be adjusted or customized by following steps outlined later in this document. Variations on some of these files are provided by the installer and can be used as examples for custom configuration.
Before running the installer, ensure that the system on which you intend to install meets the requirements outlined in the following section.
System Requirements For proper operation of the iFiller server application, the server and client systems should meet the following requirements.
5
Perceptive TransForm iFiller Installation and Setup Guide
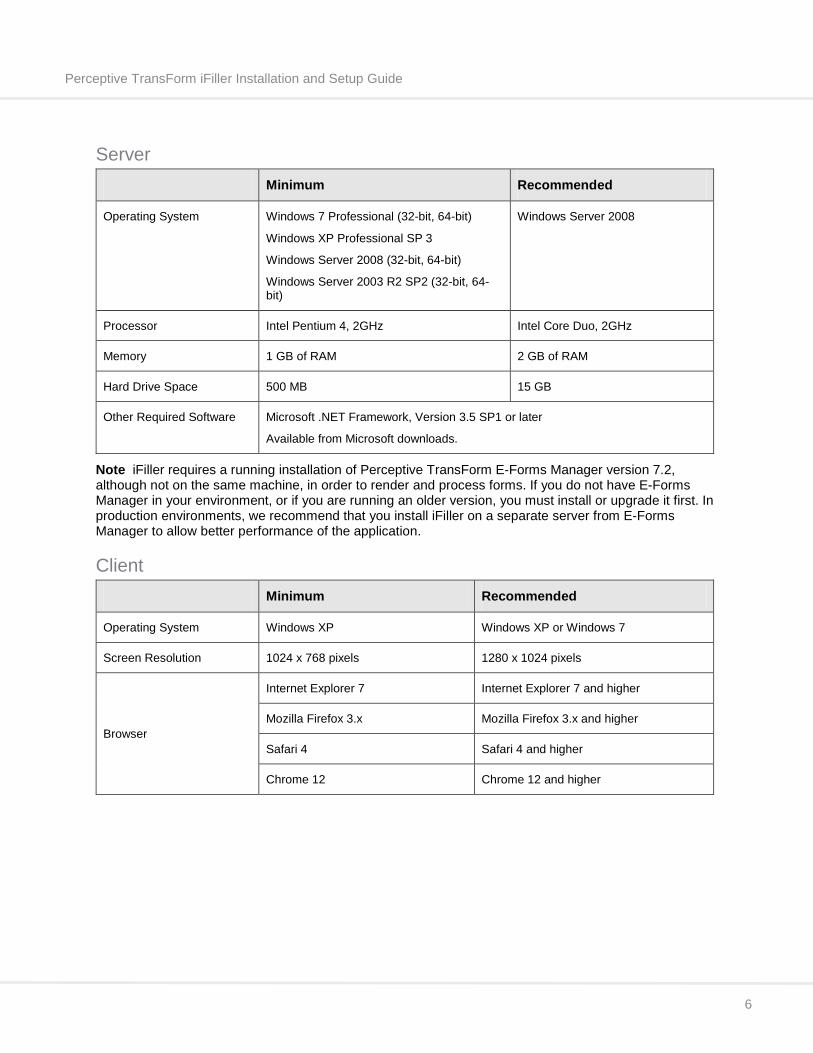
Server Minimum Recommended
Operating System Windows 7 Professional (32-bit, 64-bit)
Windows XP Professional SP 3
Windows Server 2008 (32-bit, 64-bit)
Windows Server 2003 R2 SP2 (32-bit, 64-bit)
Windows Server 2008
Processor Intel Pentium 4, 2GHz Intel Core Duo, 2GHz
Memory 1 GB of RAM 2 GB of RAM
Hard Drive Space 500 MB 15 GB
Other Required Software Microsoft .NET Framework, Version 3.5 SP1 or later
Available from Microsoft downloads.
Note iFiller requires a running installation of Perceptive TransForm E-Forms Manager version 7.2, although not on the same machine, in order to render and process forms. If you do not have E-Forms Manager in your environment, or if you are running an older version, you must install or upgrade it first. In production environments, we recommend that you install iFiller on a separate server from E-Forms Manager to allow better performance of the application.
Client Minimum Recommended
Operating System Windows XP Windows XP or Windows 7
Screen Resolution 1024 x 768 pixels 1280 x 1024 pixels
Browser
Internet Explorer 7 Internet Explorer 7 and higher
Mozilla Firefox 3.x Mozilla Firefox 3.x and higher
Safari 4 Safari 4 and higher
Chrome 12 Chrome 12 and higher
6
Perceptive TransForm iFiller Installation and Setup Guide
Install iFiller The iFiller application is distributed as an executable setup program that deploys the software, creates a service for it to run from, and registers the software with the Windows operating system for subsequent maintenance upgrade and uninstall.
The following two installation options are available.
• Standalone installation. This includes a HTTP server engine onto which the iFiller application is deployed by the installation. The server engine, which is an implementation of Apache Tomcat, is automatically configured to run as a Windows service. Once installed, a few configuration settings may be changed to customize behavior of the application and to point it to the E-Forms Manager instance with which it will interface for form retrieval and automation. This is the recommended type of installation, and can only be performed on a system that does not already have E-Forms Manager installed.
• E-Forms Manager Hosted installation. This installs the iFiller application components on an existing E-Forms Manager, version 7.2.0 or higher, server application. If the iFiller installation program is run on a system in which E-Forms Manager is already installed, then only this installation option is allowed. This type of installation can be useful for demonstration, testing, or other scenarios that involve only moderate usage. For one example, when installed on E-Forms Manager, iFiller relies on the same Windows service as E-Forms Manager to start, stop, and run its process, meaning that starting and stopping the iFiller application necessitates the starting and stopping of E-Forms Manager as well. For another example, having them deployed on the same application engine requires both E-Forms Manager and iFiller to share memory and processor resources.
Important If you plan to install iFiller and E-Forms Manager on the same machine, you must install E-Forms Manager first. If a version of E-Forms Manager already exists on the system, ensure it is version 7.2 or higher. If a prior version, upgrade first.
When the installation program runs, it checks the system to determine which type of installation that can be performed, only allowing the E-Forms Manager Hosted installation to take place on a system on which E-Forms Manager is already installed, and allowing only the Standalone type when an E-Forms Manager server is not present on the same machine.
Regardless of the type of installation, iFiller communicates with an E-Forms Manager application in order to retrieve forms as requested from iFiller users and to handle communications between the form session and E-Forms Manager for submission, signing, Autofill and other requests implemented using Remote commands in the form design.
For production scenarios in which moderate to heavy usage is expected, only the standalone type of installation should be used. The E-Forms Manager based installation is appropriate only for demonstrating the software, for test environments, or for scenarios in which light usage, such as less than 20 concurrent users, is expected. See Appendix A for more information on estimating load and for recommendations on handling expected usage.
Installation process To perform a new installation of the iFiller application, complete the following steps.
1. Close any open programs.
2. If you have not done so already, download the latest version of iFiller.
3. Run the setup program for TransForm-iFiller-8.x-Setup.exe.
4. A wizard launches to begin the installation process. Click the Next button to continue.
7

Perceptive TransForm iFiller Installation and Setup Guide
5. The Perceptive TransForm iFiller End User License Agreement screen appears. Read the license agreement. If you accept the terms of the license agreement, select the I Accept box and click the Next button.
6. After accepting the license agreement, the installer looks at the system to determine whether an installation of E-Forms Manager exists on the system or whether an existing installation of iFiller (Standalone or EFM-based) is present. Based on what was found, the next screen provides a message on the type of installation that will be performed. See the following different types of new installations.
• New Standalone Server installation. This installation performs the deployment of a HTTP server engine that runs an instance of the iFiller application. With this type of installation, a Windows Service called Perceptive TransForm iFiller Server is created to control the starting and stopping of the server engine. This type of installation is performed only when no previously installed iFiller application is present on the system and no E-Forms Manager server is present on the system.
• New E-Forms Manager Hosted installation. This type of installation is performed when an E-Forms Manager server of version 7.2 or greater is already present and the iFiller application has not been previously deployed there. This installation deploys the iFiller application on the E-Forms Manager server that exists on the system.
7. Before proceeding, read the message on the Installation Type Notice page carefully to ensure that the installation type about to be performed is what you expect. If it is not, click Cancel to exit the installation. Otherwise, click the Next button to acknowledge the installation type and move to the next step.
8. If you are performing a new Standalone installation of iFiller, the next screen allows you to choose the installation folder for the application. Otherwise, this screen will not appear and you can skip this step.
9. The default location where iFiller is installed is C:\Program Files\Perceptive TransForm\iFiller. If you want to install iFiller into a different location than shown on the screen, click the Browse button to choose the location you want. When you are finished, or to retain the default location, click the Next button.
10. The next screen allows you to verify and confirm the installation location. Verify that the location is correct and click the Next button.
11. If you are performing a new Standalone installation, then the routine involves the installation of a Java Runtime Environment (JRE) that will be used by the iFiller server. This portion of the installation can take several minutes, so wait until it completes. This step is skipped for upgrades or E-Forms Manager Hosted installations.
12. When the installation is finished, the last window of the installer appears, indicating that the installation was successful.
13. Click the Finish button to close the installation program.
Complete the Installation At this point, iFiller is installed. Before iFiller can be used to view forms managed by E-Forms Manager, you must complete the following post-installation steps.
1. Configure server properties
2. Start iFiller service
3. Configure E-Forms Manager for iFiller
8

Perceptive TransForm iFiller Installation and Setup Guide
Configure server properties Complete the follow steps to configure the server properties.
1. Browse to the conf directory of the installation directory. This is iFillerServer\conf in a Standalone installation or FSBServer\conf in an E-Forms Manager Hosted installation.
2. Open the ifiller.properties file for edit using Notepad or another text editor. The following steps describe the initial changes you may want to make. For a full description of this file and its valid settings, see Settings in the ifiller.properties file.
1. Change the allow.form.open value to false if you do not want users to be able to upload forms they have saved from an iFiller session to continue working on them. Otherwise you can leave this setting at its default value.
Note Only those forms that have been obtained from the E-Forms Manager server to which iFiller is connected, and only those that are currently in the catalog will be rendered by iFiller under any circumstances. A user cannot obtain a form from one iFiller or E-Forms Manager server and open it in another.
2. Change the efm.url value to a URL that represents the base web context of the E-Forms Manger server with which this iFiller application will be associated. If you are running iFiller hosted on an E-Forms Manager server, then you can leave the default setting. Otherwise, you should change it to contain the host name or IP address of a valid, running instance of E-Forms Manager, which is at least version 7.2. You should leave the /efm/ portion of the URL intact unless you have set up a reverse proxy configuration for E-Forms Manager that is referenced externally by a different name.
Important It is important that this property is correctly set to the URL of an E-Forms Manager version 7.2 or higher. Otherwise, the iFiller application will not operate correctly.
3. Change the max.form.attachments value if you want to allow forms with attachments enabled to accept more or less than 1MB per form session.
4. Change the max.forms.per.application value to one that represents the maximum number of forms that the application should have open at any one time across all users. Note that using a large number does not mean that the number of forms can be in use simultaneously. The capacity of the application is determined by a number of factors, including available system resources and the size and complexity of the forms in use. Instead, this value allows you to enforce a limit, above which users attempting to get forms are shown a message that the system is busy and they should try again in a few minutes. The purpose of this setting is to help you avoid situations where too many users attempting to use the system at or around the same time cause degradation of performance or interruption of service. This setting is important in regulating traffic to any single iFiller application and should be considered when dealing with potential high-traffic scenarios. For more information, see Performance considerations and guidelines.
5. Set the max.forms.per.user value to a number that seems reasonable for any one user in your organization to have open at any given time.
3. Save and close the ifiller.properties file.
Start iFiller service After the server properties have been configured, start the iFiller service. The name of the Windows service that needs to be started depends on the type of iFiller installation that was performed. See Start or stop the iFiller service and follow the instructions to start the appropriate service for your installation type.
9
Perceptive TransForm iFiller Installation and Setup Guide
Once the iFiller service has been started, the last step to complete the installation is to configure E-Forms Manager for iFiller.
Configure E-Forms Manager for iFiller In order to present forms to users and to have a mechanism for processing them, an iFiller installation needs to have access to an E-Forms Manager server that has the feature licensed, enabled, and configured. The configuration steps within E-Forms Manager are simple, and consist mainly of enabling the feature, providing the location or URL by which iFiller is referenced, and then enabling forms in the catalog individually for iFiller use.
The iFiller menu in the Administration area of E-Forms Manager allows you to enable the iFiller feature, allowing users to interact with published forms through a browser instead of, or in addition to, the Filler client. This is done by providing the base URL by which the iFiller interface will be referenced.
To enable iFiller in E-Forms Manager and to configure it for iFiller, complete the following steps.
1. Launch the E-Forms Manager Administration Console and log in using an account with administrative privileges.
2. Go to the Administration section of the console and choose the iFiller menu item. The iFiller Settings screen displays.
Important If your menu does not have the iFiller option, either you do not have a current version of E-Forms Manager, or you have upgraded but have not obtained a new license. If you know you have the current version of the software, contact your Perceptive TransForm representative to get a license that will activate the iFiller component.
3. Check the Enable iFiller box to enable the feature.
4. Enter a URL that contains the protocol, host name, and port by which the iFiller application can be found in a browser. The end of the URL should contain a web application context of iFiller (case sensitive), followed by a trailing slash. See the following example. http://localhost:8080/iFiller/ https://localhost/iFiller/ http://forms.acme.com/iFiller/
The URL value provides a reference by which forms published in E-Forms Manager can be opened through the iFiller interface. Enabling iFiller sets the base URL that identifies the iFiller application location, so that when users request a form from a link on the E-Forms Manager interface the request can be sent to the iFiller context instead of into E-Forms Manager itself.
5. Once these steps are completed, test the URL by pasting it into a browser, adding iFiller.jsp to the end. See the following example. http://forms.acme.com/iFiller/iFiller.jsp
Upgrade iFiller This section describes how to upgrade an older version of iFiller to the current version.
Upgrade Process To upgrade iFiller complete the following steps.
1. Close any open programs.
2. If you have not done so already, download the latest version of iFiller.
10
Perceptive TransForm iFiller Installation and Setup Guide
3. Run the setup program for TransForm-iFiller-8.x-Setup.exe.
4. A wizard launches to begin the installation process. Click the Next button to continue.
5. The Perceptive TransForm iFiller End User License Agreement screen appears. Read the license agreement. If you accept the terms of the license agreement, select the I Accept box and click the Next button.
6. At this point, the installer looks at the system to determine whether an installation of E-Forms Manager exists on the system or whether an existing installation of iFiller (Standalone or EFM-based) is present. Based on what was found, the next screen provides a message on the type of upgrade that is performed. See the following different types of upgrades.
• Standalone iFiller upgrade. If an existing Standalone installation of iFiller exists on the system, this type of upgrade is performed. It updates the application with the current version contained in the installation package.
• E-Forms Manager-based iFiller upgrade. If an iFiller application already exists on an E-Forms Manager server on the system, this type of upgrade is performed. It updates the iFiller application on the EFM server with the current version contained in the installation package.
7. Before you proceed, read the message on this screen carefully to ensure that the upgrade type about to be performed is what you expect. If it is not, click Cancel to exit the upgrade. Otherwise, click the Next button to acknowledge the upgrade type and move to the next step.
8. The next screen allows you to verify and confirm the location of the current installation. Verify that the location is correct and click the Next button.
9. The upgrade process begins at this point. When the upgrade is finished, the screen indicates that the upgrade was successful. Click the Finish button to close the setup program.
Complete the upgrade Once the upgrade has been completed, the iFiller service needs to be started. Refer to Start or stop the iFiller service for more information on how to start the Windows service that runs iFiller.
Configure iFiller Server When iFiller is installed, it is configured automatically with default settings that define characteristics of the application and the server process it uses, such as its listen port for HTTP requests, memory used by the service, and more. These default settings allow the server to start up after installation, and in some environments may not need to be changed. In some circumstances though, it may be necessary to make changes to configurations such as the port that the iFiller server listens on, or others. This section of the guide provides details on how to properly change these types of settings, as well as general guidelines on different deployment scenarios.
Note Some information in this section pertains to Standalone installations of iFiller only. For information on server configuration related to E-Forms Manager Hosted installations, see the Perceptive TransForm E-Forms Manager 8.x Installation and Configuration Guide
iFiller Server configuration files The iFiller server process relies on a couple of files that are part of the iFiller installation, and which control the server-level processing of the software. These files are referenced in the following instructions in parts of the configuration changes described. The table lists these and describes these files, and provides their locations so that the instructions that follow will not have to provide this information each
11
Perceptive TransForm iFiller Installation and Setup Guide
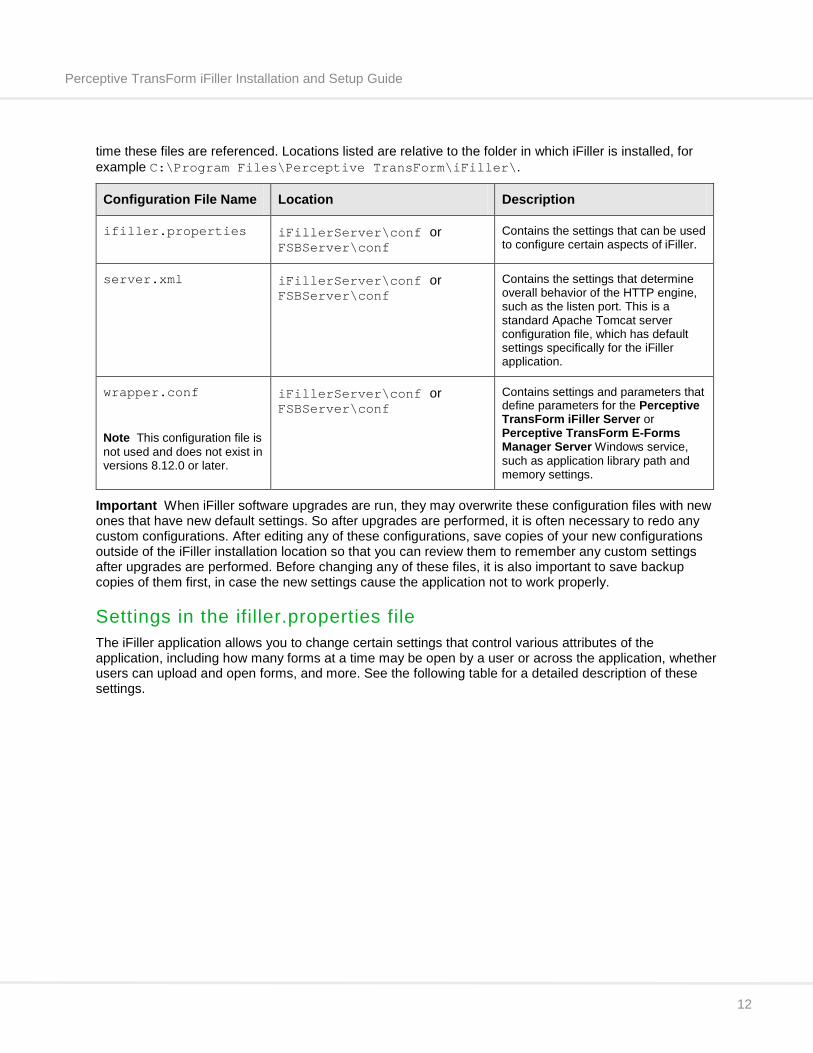
time these files are referenced. Locations listed are relative to the folder in which iFiller is installed, for example C:\Program Files\Perceptive TransForm\iFiller\.
Configuration File Name Location Description
ifiller.properties iFillerServer\conf or FSBServer\conf
Contains the settings that can be used to configure certain aspects of iFiller.
server.xml iFillerServer\conf or FSBServer\conf
Contains the settings that determine overall behavior of the HTTP engine, such as the listen port. This is a standard Apache Tomcat server configuration file, which has default settings specifically for the iFiller application.
wrapper.conf
Note This configuration file is not used and does not exist in versions 8.12.0 or later.
iFillerServer\conf or FSBServer\conf
Contains settings and parameters that define parameters for the Perceptive TransForm iFiller Server or Perceptive TransForm E-Forms Manager Server Windows service, such as application library path and memory settings.
Important When iFiller software upgrades are run, they may overwrite these configuration files with new ones that have new default settings. So after upgrades are performed, it is often necessary to redo any custom configurations. After editing any of these configurations, save copies of your new configurations outside of the iFiller installation location so that you can review them to remember any custom settings after upgrades are performed. Before changing any of these files, it is also important to save backup copies of them first, in case the new settings cause the application not to work properly.
Settings in the ifiller.properties file The iFiller application allows you to change certain settings that control various attributes of the application, including how many forms at a time may be open by a user or across the application, whether users can upload and open forms, and more. See the following table for a detailed description of these settings.
12
Perceptive TransForm iFiller Installation and Setup Guide
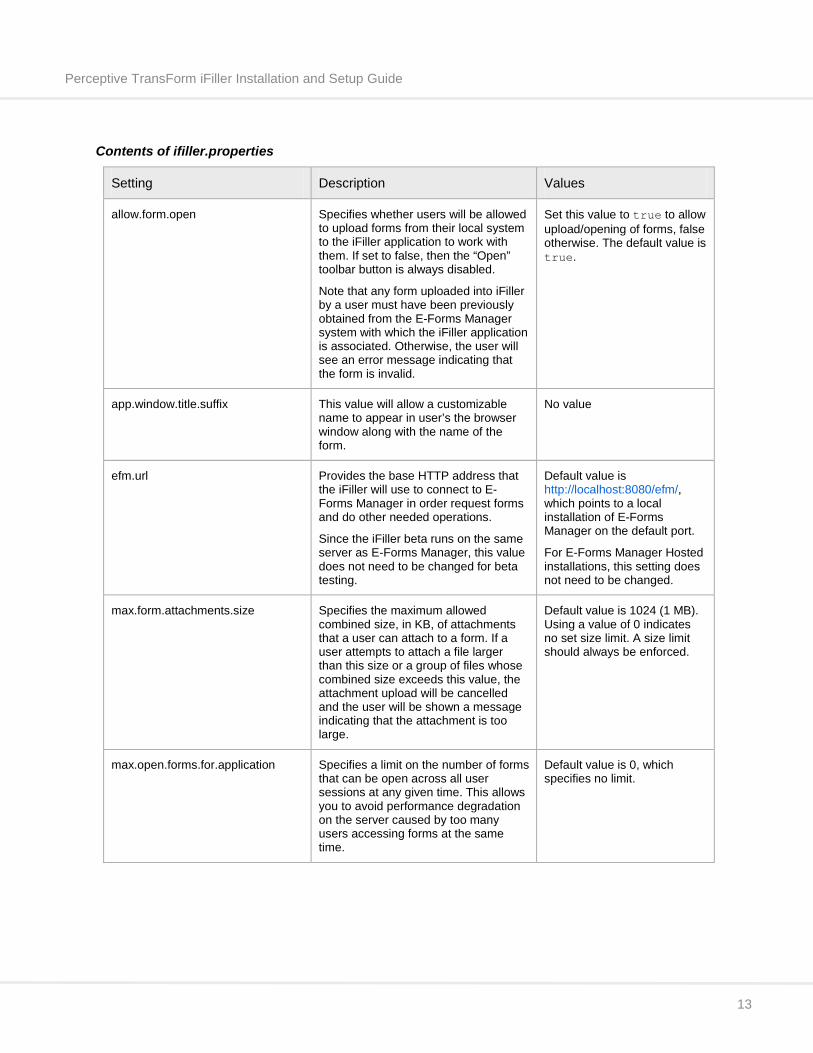
Contents of ifiller.properties
Setting Description Values
allow.form.open Specifies whether users will be allowed to upload forms from their local system to the iFiller application to work with them. If set to false, then the “Open” toolbar button is always disabled.
Note that any form uploaded into iFiller by a user must have been previously obtained from the E-Forms Manager system with which the iFiller application is associated. Otherwise, the user will see an error message indicating that the form is invalid.
Set this value to true to allow upload/opening of forms, false otherwise. The default value is true.
app.window.title.suffix This value will allow a customizable name to appear in user’s the browser window along with the name of the form.
No value
efm.url Provides the base HTTP address that the iFiller will use to connect to E-Forms Manager in order request forms and do other needed operations.
Since the iFiller beta runs on the same server as E-Forms Manager, this value does not need to be changed for beta testing.
Default value is http://localhost:8080/efm/, which points to a local installation of E-Forms Manager on the default port.
For E-Forms Manager Hosted installations, this setting does not need to be changed.
max.form.attachments.size Specifies the maximum allowed combined size, in KB, of attachments that a user can attach to a form. If a user attempts to attach a file larger than this size or a group of files whose combined size exceeds this value, the attachment upload will be cancelled and the user will be shown a message indicating that the attachment is too large.
Default value is 1024 (1 MB). Using a value of 0 indicates no set size limit. A size limit should always be enforced.
max.open.forms.for.application Specifies a limit on the number of forms that can be open across all user sessions at any given time. This allows you to avoid performance degradation on the server caused by too many users accessing forms at the same time.
Default value is 0, which specifies no limit.
13

Perceptive TransForm iFiller Installation and Setup Guide
max.open.forms.per.user Specifies a limit on the number of forms any one user can have open across at any given time. This allows you to avoid performance degradation on the server caused by individual users accessing having too many forms open at the same time.
Default value is 2, which limits each user to 2 open forms at a time. Setting this value to 0 indicates no per-user form limit.
temp.dir Specifies a temporary directory, relative to the installation folder’s iFilllerServer/bin (or FSBServer/bin for EFM-hosted installations) directory temporarily write files for certain operations. The contents of this directory are managed automatically by the application, and this value should not be changed.
../temp
iFiller Service The iFiller application, whether it has been installed as an E-Forms Manager Hosted installation or standalone, relies on a Windows service for management of the application process. As a standalone installation, iFiller runs from a service called Perceptive TransForm iFiller Server. When installed on E-Forms Manager, it relies on the E-Forms Manager server service, called Perceptive TransForm E-Forms Manager Server.
Start or stop the iFiller service Certain administrative tasks, such as making application configuration changes, performing upgrades, or uninstalling the iFiller software require that you stop and/or start the Windows service that runs the iFiller application. The instructions that follow describe how to locate the iFiller service to perform these tasks.
Start or stop the Standalone iFiller service A Standalone iFiller server application has its own service, whose name is Perceptive TransForm iFiller Server. To find and start or stop this service, complete the following steps.
1. Go to the Windows Control Panel. Choose Administrative Tools then Services. Check the list of services for a service called Perceptive TransForm iFiller Server.
2. Click to highlight the E-Forms Manager service. Use the controls on the services console to start or stop it.
Start or stop the E-Forms Manager service When iFiller is running on E-Forms Manager, the two applications share the same service. To find and start or stop this service, complete the following steps.
1. Go to the Windows Control Panel. Choose Administrative Tools then Services. Check the list of services for a service called Perceptive TransForm E-Forms Manager Server.
2. Click to highlight the E-Forms Manager service. Use the controls on the services console to start or stop it.
14
Perceptive TransForm iFiller Installation and Setup Guide
Create and/or remove the iFiller Service Creating and removing the iFiller service is handled automatically through the installation and uninstall routines for the software. However, in order to change certain configuration settings it is sometimes necessary to manually remove and create the iFiller service. Removal of the iFiller service for both the Standalone and E-Forms Manager Hosted installations requires the execution of a Windows command. Creation of them uses a utility that is installed with both iFiller and E-Forms Manager. To remove an iFiller service, complete the following the steps.
Remove the Standalone iFiller service When iFiller is installed as a standalone server, the installation registers it with the name Perceptive TransForm_iFiller_Server. To remove this service, complete the following steps.
1. Stop the iFiller service.
2. Open a command (console) window in any directory.
3. Run the command sc delete Perceptive TransForm_iFiller_Server.
4. The console should display a message indicating that the service was successfully removed.
Remove the E-Forms Manager Service When iFiller is installed as hosted on E-Forms Manager, it relies on the E-Forms Manager service to run. This service is registered on the system with the name Perceptive TransFormEFMServer. To remove this service, complete the following steps.
1. Stop the E-Forms Manager service.
2. Open a command (console) window in any directory.
3. Run the command sc delete Perceptive TransFormEFMServer.
4. The console should display a message indicating that the service was successfully removed.
Create the Standalone iFiller service If you need to re-create a standalone iFiller service that has been removed, complete the following steps.
1. Open Windows Explorer and browse to the folder located at iFillerServer\service relative to the installation iFiller was installed to. The default installation location is C:\Program Files\Perceptive TransForm\iFiller\iFillerServer\service.
2. Find the file Install-iFiller-Service.bat and double-click it or run it from the command line.
3. Check the Windows services console. The service should show up in the list with the name Perceptive TransForm iFiller Server.
Create the E-Forms Manager service If you need to re-create an E-Forms Manager service that has been removed, complete the following steps.
1. Open Windows Explorer and browse to the folder located at FSBServer\service relative to the installation E-Forms Manager was installed to. The default installation location is C:\Program Files\Perceptive TransForm\EFM\FSBServer\service.
2. Find the file Install-EFM-Service.bat and double-click it or run it from the command line.
15
Perceptive TransForm iFiller Installation and Setup Guide
3. Check the Windows services console. The service should show up in the list with the name Perceptive TransForm E-Forms Manager Server.
Change the iFiller HTTP Listen Port iFiller runs on a Java-based HTTP Servlet/JSP engine which, by default, accepts HTTP requests on port 8080. In some environments, it may be necessary to change this listen port to another port, such as 80 or 443. To change the iFiller server listen port to accept requests on a port other than 8080, complete the following steps.
Note Changing the iFiller listen port is not a required configuration step. It is an optional task that should be done only when your environment requires that it use a port other than the default of 8080.
1. Ensure that the port you want to use is not already in use by another process on the server. For example, if an Apache or IIS web server is installed and running on the same machine as the E-Forms Manager server, then port 80 is most likely being used. If iFiller is configured to run on a port that is already in use, either it fails to start correctly or it will cause problems with the other process that is using that port.
2. Open the Services console on the server and stop the Perceptive TransForm iFiller Server service. For more information on how to do this, see Start or stop the iFiller service.
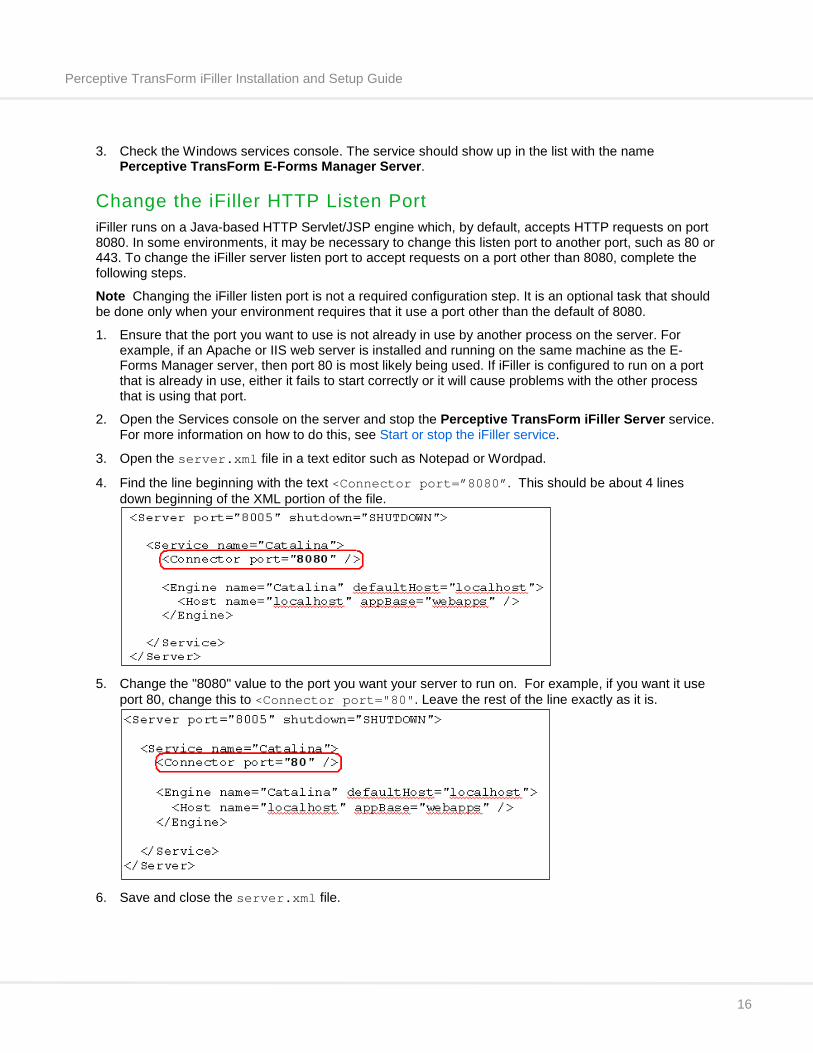
3. Open the server.xml file in a text editor such as Notepad or Wordpad.
4. Find the line beginning with the text <Connector port=”8080”. This should be about 4 lines down beginning of the XML portion of the file.
5. Change the "8080" value to the port you want your server to run on. For example, if you want it use
port 80, change this to <Connector port="80". Leave the rest of the line exactly as it is.
6. Save and close the server.xml file.
16
Perceptive TransForm iFiller Installation and Setup Guide
Run iFiller over HTTPS or SSL The process to configure access to iFiller over HTTPS (HTTP over SSL) depends on the type of iFiller installation. The following sections provide configuration information for Standalone and E-Forms Manager Hosted installations.
Standalone installation In order to configure an iFiller Standalone installation to run over HTTPS or SSL, complete the following steps.
1. Obtain a SSL Certificate
2. Update iFiller Server Configuration
3. Update iFiller Service Configuration
4. Update iFiller-related Settings in E-Forms Manager
Obtain a SSL Certificate The HTTP server software on which iFiller runs is a Java-based servlet/JSP engine. This type of server uses a specific type of SSL certificate in order to encrypt its communications with client browsers. All of the Certificate Authorities (CA’s) that issue digital certificates provide this type, but it is important when requesting the certificate that you specify the type of tool that was used to generate the request. If this is done properly, then the correct type of certificate can be issued. The steps that follow will give examples of the specific types of information to provide.
All of the steps in this section should be performed on the server on which iFiller is installed. These steps are performed using a set of scripts provided with the iFiller installation, located in the utilities\ssl folder directly under the iFiller installation location. For example, C:\Program Files\Perceptive TransForm\iFiller\utilities\ssl. These scripts should be run from this directory in order to work properly.
Step 1: Generate a local certificate
This step generates a local certificate store and certificate that will be used to create a request for an SSL certificate from a certificate authority.
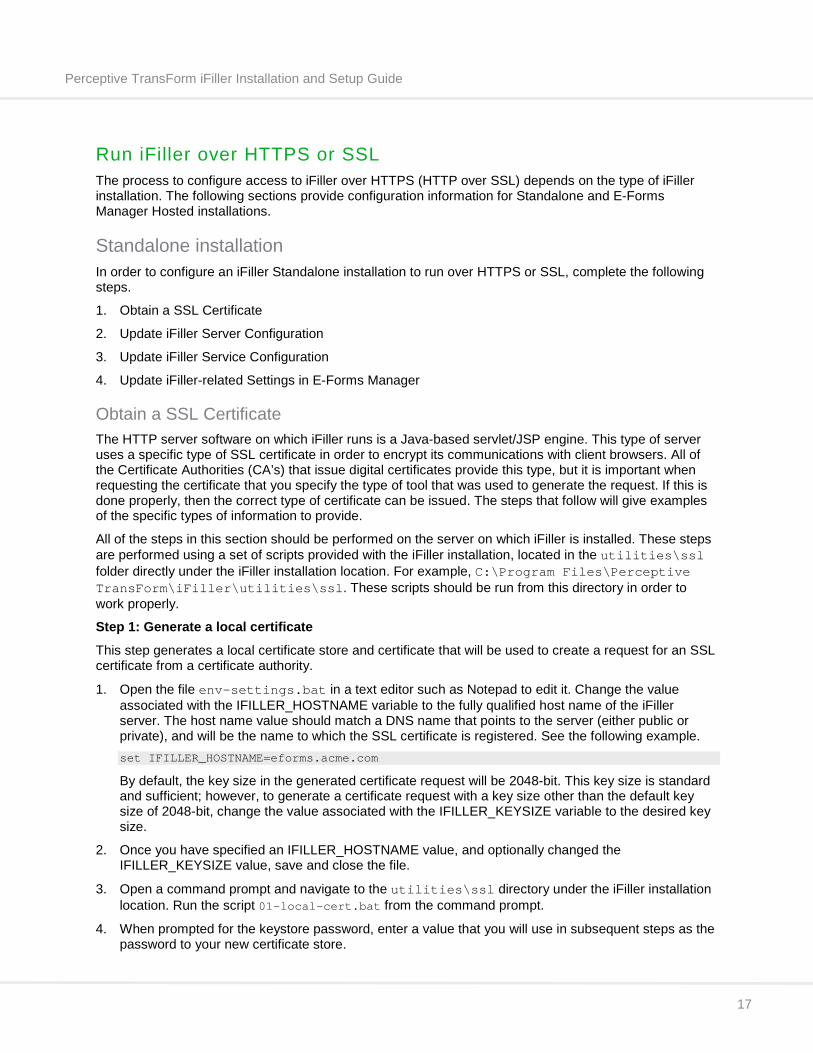
1. Open the file env-settings.bat in a text editor such as Notepad to edit it. Change the value associated with the IFILLER_HOSTNAME variable to the fully qualified host name of the iFiller server. The host name value should match a DNS name that points to the server (either public or private), and will be the name to which the SSL certificate is registered. See the following example. set IFILLER_HOSTNAME=eforms.acme.com
By default, the key size in the generated certificate request will be 2048-bit. This key size is standard and sufficient; however, to generate a certificate request with a key size other than the default key size of 2048-bit, change the value associated with the IFILLER_KEYSIZE variable to the desired key size.
2. Once you have specified an IFILLER_HOSTNAME value, and optionally changed the IFILLER_KEYSIZE value, save and close the file.
3. Open a command prompt and navigate to the utilities\ssl directory under the iFiller installation location. Run the script 01-local-cert.bat from the command prompt.
4. When prompted for the keystore password, enter a value that you will use in subsequent steps as the password to your new certificate store.
17

Perceptive TransForm iFiller Installation and Setup Guide
Important Remember or write down this password, as it will be required in subsequent steps, and by your server configuration.
5. After you enter the password, you are prompted with the following questions.
• What is your first and last name? Enter the host name of your server. This should match exactly the value that you specified for IFILLER_HOSTNAME in step 1. For example, eforms.acme.com
• What is the name of your organizational unit? Enter a value that reflects your department or role. For example, Information Technology.
• What is the name of your organization? Enter your organization name. For example, Acme Corporation.
• What is the name of your City or Locality? Enter the city portion of your organization’s address. For example, Fairfax
• What is the name of your State or Province? Enter the state portion of your organization’s address. For example, Virginia
• What is the two-letter country code for this unit? Enter US if you are in the United States.
6. You are prompted to verify that what you entered is correct. If so, type yes after the prompt and press Enter. You will then be prompted for your keystore password. Enter the value that you specified above, and press Enter.
At the completion of the steps above, a file called ifillerkeystore.jks is created in the utilities\ssl directory. This file contains a digital certificate that was generated using the information you entered. The next set of steps will use this key store file to generate a Certificate Signing Request (CSR) that must be provided to a Certificate Authority (CA) who can provide back a signed digital certificate.
Step 2: Generate a Certificate Signing Request
Now that you have created a local certificate with the name of the server’s host name, you must generate a signing request that can be used by a certificate authority (CA) to sign your new certificate. To generate a signing request, complete the following step.
• From the command prompt, run the script 02-create-csr.bat. This will create a file called certreq.csr and place it into the current directory. This file will be used to send to the CA to get a set of signed certificates back.
Note The script in this step also creates a certs subdirectory, which will be used in subsequent steps to hold certificate files once received back from the CA.
Step 3: Submit the Certificate Signing Request to a CA
This step involves submitting the certificate request that was created in previous step and giving it to a Certificate Authority to be signed. Each CA has a different set of steps for providing SSL certificates, and options and costs vary among them. Before proceeding with these steps, you should decide which CA you want to use.
1. Go to the web site of the certificate authority you plan to use. For example, http://www.verisign.com.
2. Open the certificate request (certreq.csr) that you created in the previous step in Notepad or another text editor.
18

Perceptive TransForm iFiller Installation and Setup Guide
3. When the CA site asks you for the certificate request, copy the contents of the CSR file from the editor to the clipboard and paste them into the appropriate text field in the CA website.
4. Provide all of the other information requested by the CA.
5. If prompted for the type of tool or software that was used to generate the certificate request, choose Java / Sun Microsystems, Apache, or the option that most closely matches this. If the available options do not match those options, you should be able to select an option stating that your server type does not appear in the list.
6. If asked to provide information on what the certificate will be used for, choose Web Server or Intranet.
7. When the CA interface displays the name of the certificate and/or the host with which it will be registered, ensure that the information is correct and matches the DNS or host name of the server on which it will be installed.
8. Wait for your certificates to be returned from the CA. You will likely receive a zip file that contains several files, or an email with links to certificate text or files including the following.
• A root CA certificate
• One or more intermediate certificates
• A signed certificate specifically for your server
9. Follow the instructions provided by the CA to obtain the root, intermediate, and server certificates. Place the certificate files, unzipping them if necessary, into the utilities\ssl\certs directory.
Now that you have a signed certificate in X.509 format, you will need to import the certificate and its associated root and intermediate certificates into the key store that you generated in the steps above. To do this, follow steps 4 through 6 below.
Step 4: Import the Root Certificate
10. From the command prompt, with the current directory set to utilities\ssl as in the prior steps, run the script 03-import-root-cert.bat, passing as a parameter the name of the file in the certs directory containing the root certificate received from the CA. See the following example. 03-import-root-cert.bat verisign-root-cert.cer.crt
11. When prompted for the keystore password, enter the password you specified when generating the original certificate for signing. See the following example. Enter keystore password: mypass
12. When prompted as to whether or not to trust the certificate, type yes and press Enter. See the following example. Trust this certificate? [no]: yes
13. You should see the following message. Certificate was added to keystore.
Step 5: Import the Intermediate Certificate
This step imports the intermediate certificate(s) received from the CA into the key store. Some may provide more than one intermediate certificate.
Run the script 04-import-inter-cert.bat for each intermediate certificate received from the CA. This script takes the following two parameters.
• The name of the intermediate certificate file, found in the certs directory.
19

Perceptive TransForm iFiller Installation and Setup Guide
• An alias for the certificate so that it can be referenced in the keystore, for example, INTER1. Provide a different alias each time you run this command.
See the following for an example of the two calls made when using a certificate received from PositiveSSL. 04-import-inter-cert.bat PositiveSSLCA.crt INTER1 04-import-inter-cert.bat UTNAddTrustServerCA.crt INTER2
1. When prompted for the keystore password, enter the password you specified when generating the original certificate for signing. See the following example. Enter keystore password: mypass
2. If prompted as to whether or not to trust the certificate, type yes and press Enter. See the following example. Trust this certificate [no]: yes
3. You should see the following message. Certificate was added to keystore
Step 6: Import the Server Certificate
The final step in creating the certificate store imports the certificate you generated at the beginning of this process, which has been signed by a CA, into the key store.
1. From the command prompt, run the script 05-import-server-cert.bat, passing as a parameter the file name of the server certificate received from the CA, which should be located in the certs directory. See the following example. 05-import-server-cert.bat server1_acme_com.crt
2. When prompted for the keystore password, enter the password you specified when generating the original certificate for signing. See the following example. Enter keystore password: mypass
3. You should see the following message. Certificate reply was installed in keystore
Step 6a: Import the E-Forms Manager Server Certificate
If the E-Forms Manager instance that this iFiller instance will be associated with also runs over HTTPS, then E-Forms Manager server certificate must be added to the iFiller server’s keystore to allow iFiller to connect to E-Forms Manager. If the E-Forms Manager instance does not run over HTTPS, then this step should be skipped.
1. Copy the E-Forms Manager server certificate file, for example efm_server.crt, to the utilities\ssl\certs directory under the iFiller installation location.
2. From the command prompt, run the script 06-import-efm-server-cert.bat, passing in the name of the E-Forms Manager server certificate file as the first parameter and the E-Forms Manager host name as the second parameter. See the following example. 06-import-efmserver-cert.bat efm_server.crt eforms.acme.com
3. When prompted for the keystore password, enter the password you specified when generating the original certificate for signing. See the following example. Enter keystore password: mypass
4. You should see the following message.
20
Perceptive TransForm iFiller Installation and Setup Guide
Certificate reply was installed in keystore
5. The generation of the certificate store is now complete. It is contained in the file named ifillerkeystore.jks, which is in the directory from which the scripts above were run.
Update iFiller Server configuration Step 1: Update server.xml
This step updates the iFiller server configuration to listen on the standard SSL port 443, or a port of your choice, and reference this keystore so that its certificates may be used in securing communications.
Note If another web server, such as IIS, is running on the same machine as iFiller and is listening on port 443 then iFiller will fail to start correctly due to the port conflict. If you want to have iFiller listen on the standard SSL port 443, you must first make sure that no other process is using this port. Alternatively, you can specify another port, such as 8443, for iFiller.
The iFiller installation contains a sample server configuration file called server-ssl-sample.xml, which is located in the iFillerServer\conf folder of the iFiller server installation. The server settings used to reference the keystore and to run the server as an SSL server are contained in this file.
The settings used by the iFiller server are located in the file server.xml, located in the same folder. Following the steps below, you will back up and modify this configuration file, using a configuration portion of the example file and setting specific to your environment.
1. Create a directory on the server to hold the trusted certificate store, such as C:\ \Perceptive TransForm\Certificates.
2. Copy or move the ifillerkeystore.jks file that was created in the previous set of steps into this directory.
3. Stop your iFiller server if it is running, by stopping the Windows service called Perceptive TransForm iFiller Server. See Start or stop the iFiller service for more information.
4. Make a backup copy of the server.xml file, by copying and renaming the copy in the same directory, or by copying it off to another location.
5. Open server.xml in Notepad or another text editor.
6. Open the server-ssl-sample.xml file in Notepad or another text editor.
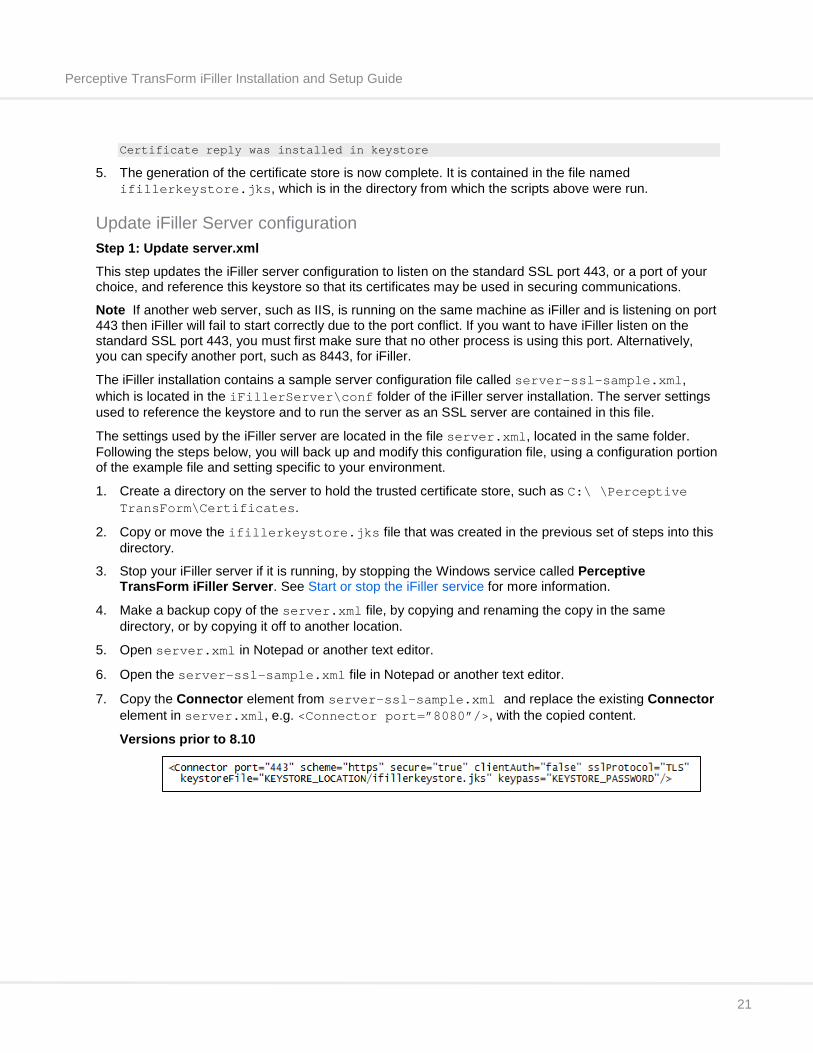
7. Copy the Connector element from server-ssl-sample.xml and replace the existing Connector element in server.xml, e.g. <Connector port=”8080”/>, with the copied content.
Versions prior to 8.10
21
Perceptive TransForm iFiller Installation and Setup Guide
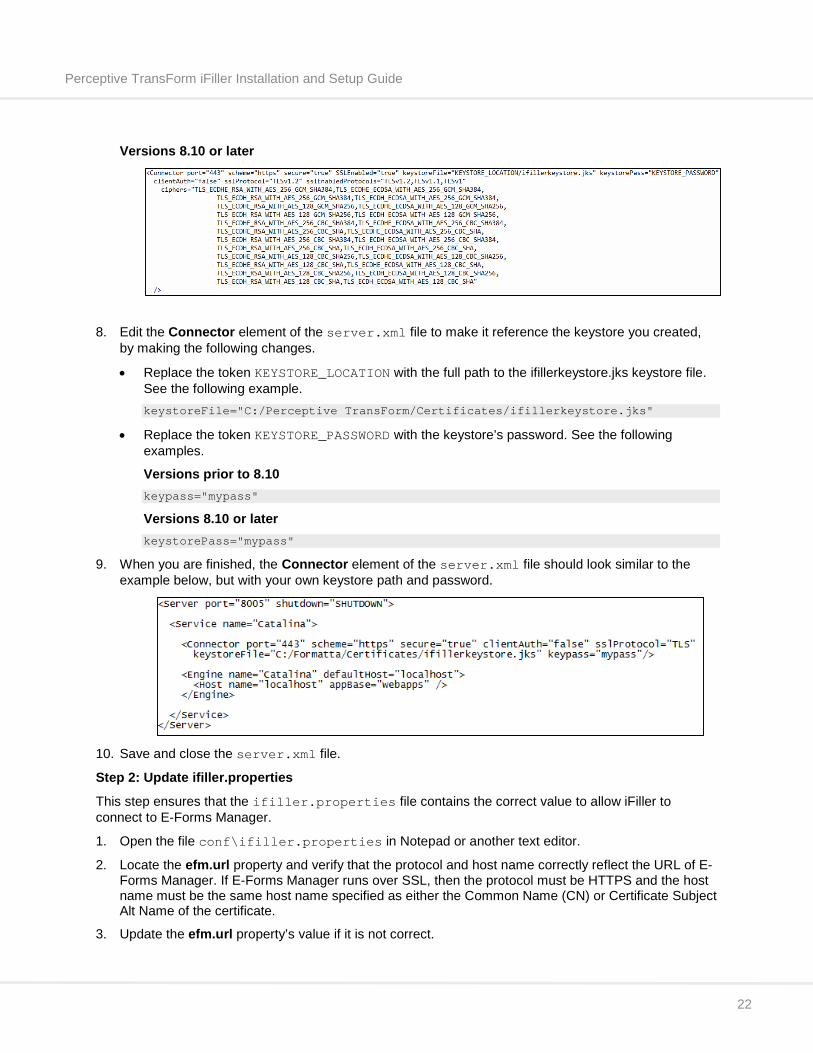
Versions 8.10 or later
8. Edit the Connector element of the server.xml file to make it reference the keystore you created, by making the following changes.
• Replace the token KEYSTORE_LOCATION with the full path to the ifillerkeystore.jks keystore file. See the following example. keystoreFile="C:/Perceptive TransForm/Certificates/ifillerkeystore.jks"
• Replace the token KEYSTORE_PASSWORD with the keystore’s password. See the following examples.
Versions prior to 8.10 keypass="mypass"
Versions 8.10 or later keystorePass="mypass"
9. When you are finished, the Connector element of the server.xml file should look similar to the example below, but with your own keystore path and password.
10. Save and close the server.xml file.
Step 2: Update ifiller.properties
This step ensures that the ifiller.properties file contains the correct value to allow iFiller to connect to E-Forms Manager.
1. Open the file conf\ifiller.properties in Notepad or another text editor.
2. Locate the efm.url property and verify that the protocol and host name correctly reflect the URL of E-Forms Manager. If E-Forms Manager runs over SSL, then the protocol must be HTTPS and the host name must be the same host name specified as either the Common Name (CN) or Certificate Subject Alt Name of the certificate.
3. Update the efm.url property’s value if it is not correct.
22
Perceptive TransForm iFiller Installation and Setup Guide
4. Save and close the ifiller.properties file.
Update iFiller service configuration If the E-Forms Manager instance that this iFiller instance will be associated with also runs over HTTPS, then the iFiller service configuration must be updated to allow iFiller to securely connect to E-Forms Manager. If the E-Forms Manager instance does not run over HTTPS, then the iFiller service configuration does not need to be updated and this step may be skipped. To update the iFiller service configuration, complete the following.
Versions prior to 8.12
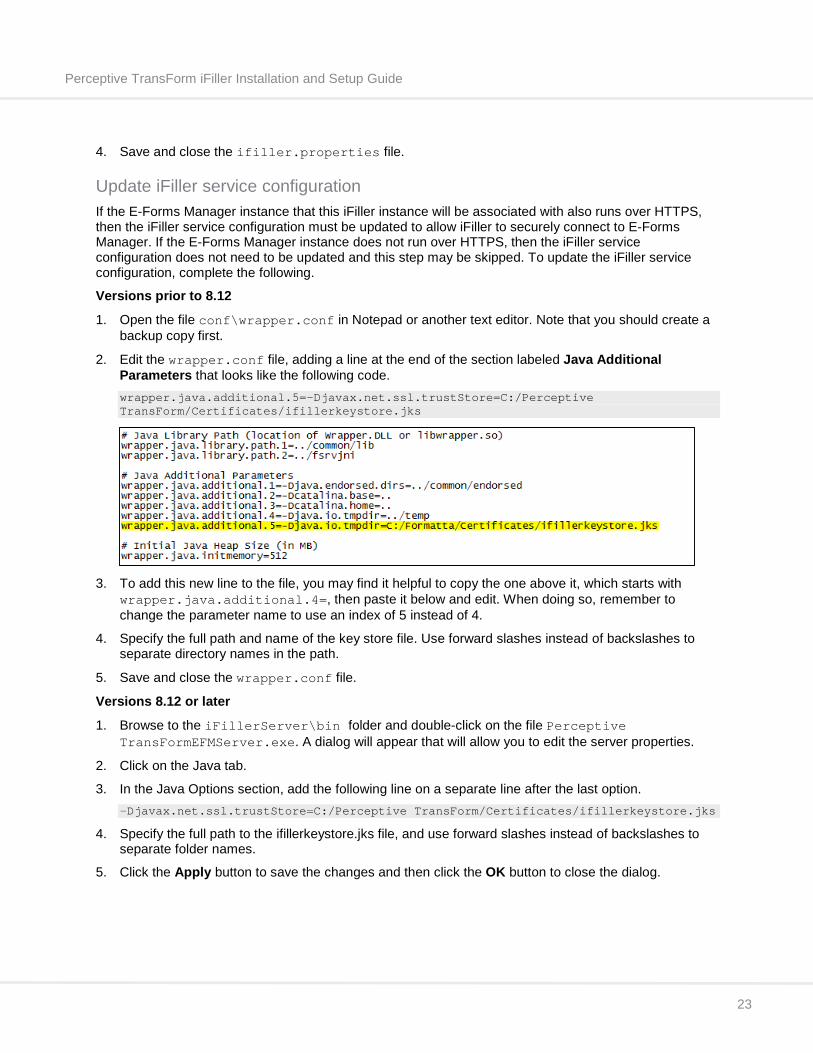
1. Open the file conf\wrapper.conf in Notepad or another text editor. Note that you should create a backup copy first.
2. Edit the wrapper.conf file, adding a line at the end of the section labeled Java Additional Parameters that looks like the following code. wrapper.java.additional.5=-Djavax.net.ssl.trustStore=C:/Perceptive TransForm/Certificates/ifillerkeystore.jks
3. To add this new line to the file, you may find it helpful to copy the one above it, which starts with
wrapper.java.additional.4=, then paste it below and edit. When doing so, remember to change the parameter name to use an index of 5 instead of 4.
4. Specify the full path and name of the key store file. Use forward slashes instead of backslashes to separate directory names in the path.
5. Save and close the wrapper.conf file.
Versions 8.12 or later
1. Browse to the iFillerServer\bin folder and double-click on the file Perceptive TransFormEFMServer.exe. A dialog will appear that will allow you to edit the server properties.
2. Click on the Java tab.
3. In the Java Options section, add the following line on a separate line after the last option. -Djavax.net.ssl.trustStore=C:/Perceptive TransForm/Certificates/ifillerkeystore.jks
4. Specify the full path to the ifillerkeystore.jks file, and use forward slashes instead of backslashes to separate folder names.
5. Click the Apply button to save the changes and then click the OK button to close the dialog.
23
Perceptive TransForm iFiller Installation and Setup Guide
Update iFiller-related settings in E-Forms Manager You must update the iFiller-related settings in E-Forms Manager to reflect that it is now accepting requests over an SSL connection. To update the settings, complete the following steps.
1. Start the Perceptive TransForm E-Forms Manager Server service, if it is not already running.
2. Launch the E-Forms Manager Administration Console and log in using an account with administrative privileges. Select the Administration tab and select the iFiller menu item.
3. The iFiller Settings screen displays.
4. Change the value in the Server URL field to point to the iFiller server, using the HTTPS protocol and port. If you set the server for port 443, you may leave the port component out of the URL.
5. Click the Save Changes button at the bottom of the screen.
6. Test your changes by going to the E-Forms Manager catalog and attempting to open and use any iFiller-enabled form. If any of the configuration settings are incorrect, you will see error messages indicating a problem connecting to the server.
E-Forms Manager Hosted installation In order to configure an E-Forms Manager Hosted installation to run over HTTPS or SSL, complete the following steps.
1. Update E-Forms Manager Server configuration
2. Update E-Forms Manager Service configuration
3. Update iFiller-related settings in E-Forms Manager
Update E-Forms Manager Server configuration This step ensures that the ifiller.properties file contains the correct value to allow iFiller to connect to E-Forms Manager.
1. Open the file conf\ifiller.properties in Notepad or another text editor.
Locate the efm.url property and verify that the protocol and host name correctly reflect the URL of E-Forms Manager. If E-Forms Manager runs over SSL, then the protocol must be HTTPS and the host name must be the same host name specified as either the Common Name (CN) or Certificate Subject Alt Name of the certificate.
2. Update the efm.url property’s value if it is not correct.
3. Save and close the ifiller.properties file.
Update E-Forms Manager Service configuration This step ensures that E-Forms Manager service configuration contains the correct parameters to allow iFiller to securely connect to E-Forms Manager. The additional parameter below may have been added to the service configuration during the configuration of E-Forms Manager. To check if the service configuration already contains the additional parameter, complete the following steps.
1. Open the file conf\wrapper.conf in Notepad or another text editor.
2. Check that the Java Additional Parameters section contains a line that begins with wrapper.java.additional.5.
24

Perceptive TransForm iFiller Installation and Setup Guide
3. If this line is not present, add a line at the end of the section labeled Java Additional Parameters. See the following example. wrapper.java.additional.5=-Djavax.net.ssl.trustStore=C:/Perceptive TransForm/Certificates/efmkeystore.jks
4. To add this new line to the file, copy the one above it, starts with wrapper.java.additional.4=,
then paste it below and edit. When doing so, remember to change the parameter name to use an index of 5 instead of 4.
5. Specify the full path and name of the key store file. Use forward slashes instead of backslashes to separate directory names in the path.
6. Save and close the wrapper.conf file.
Update iFiller-related settings in E-Forms Manager Finally, you must update the iFiller-related settings in E-Forms Manager to reflect that it is now accepting requests over an SSL connection. To update the settings, complete the following steps.
1. Start the Perceptive TransForm E-Forms Manager Server service, if it is not already running.
2. Launch the E-Forms Manager Administration Console and log in using an account with administrative privileges. Select the Administration tab and choose the iFiller menu item. The iFiller settings screen displays.
3. Change the value in the Server URL field to point to the iFiller server, using the HTTPS protocol and port. If you set the server for port 443, you may leave the port component out of the URL.
4. Click the Save Changes button at the bottom of the screen.
5. Test your changes by going to the E-Forms Manager catalog and attempting to open and use any iFiller-enabled form. If any of the configuration settings are incorrect, you will see error messages indicating a problem connecting to the server.
Run a Standalone iFiller Server in a reverse proxy configuration Many organizations employ reverse proxy configurations in their web infrastructure in order to more easily provide and manage security and load distribution where multiple applications or web servers are part of the environment. With such configurations, all connections coming from the internet or an intranet addressed to one of the web servers or applications are routed through the proxy server, which may either deal with the request itself or pass the request wholly or partially to the specified destination servers. The reverse proxy presents a single interface to the caller, allowing it to manage the routing of traffic to its intended destination. See the following common benefits of reverse proxy configurations.
• Security. The proxy server hides or obfuscates the details of the servers farther down the chain, and can provide access only to specific contexts on those servers.
25
Perceptive TransForm iFiller Installation and Setup Guide
• Encryption. In environments that require one or more web applications to be secured with SSL encryption, it often makes sense to configure SSL encryption on the reverse proxy server instead of setting it up for each application down the chain.
• Load distribution. Some servers that provide reverse proxy capability also have the ability to provide load balancing among servers that act as nodes for the same application.
The Apache HTTP Server is probably the most commonly used technology for providing reverse proxy capability. For more information on Apache and its proxy module configuration, see the Apache website.
When exposing an iFiller installation to the internet, a reverse proxy configuration is a simple and recommended way to provide security and encryption for its web-based functionality, especially for organizations that are using Apache or other proxy-capable software in their web environments. It can be simpler than configuring iFiller as an SSL server, especially if such a configuration already exists in the environment.
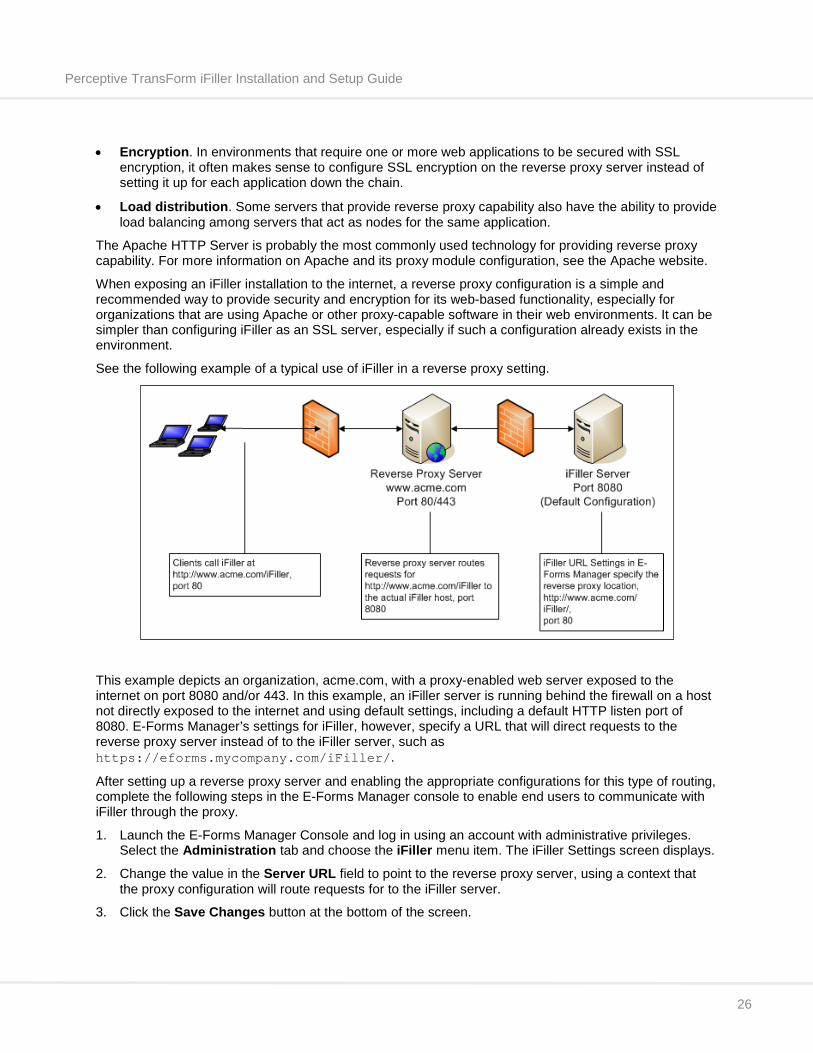
See the following example of a typical use of iFiller in a reverse proxy setting.
This example depicts an organization, acme.com, with a proxy-enabled web server exposed to the internet on port 8080 and/or 443. In this example, an iFiller server is running behind the firewall on a host not directly exposed to the internet and using default settings, including a default HTTP listen port of 8080. E-Forms Manager’s settings for iFiller, however, specify a URL that will direct requests to the reverse proxy server instead of to the iFiller server, such as https://eforms.mycompany.com/iFiller/.
After setting up a reverse proxy server and enabling the appropriate configurations for this type of routing, complete the following steps in the E-Forms Manager console to enable end users to communicate with iFiller through the proxy.
1. Launch the E-Forms Manager Console and log in using an account with administrative privileges. Select the Administration tab and choose the iFiller menu item. The iFiller Settings screen displays.
2. Change the value in the Server URL field to point to the reverse proxy server, using a context that the proxy configuration will route requests for to the iFiller server.
3. Click the Save Changes button at the bottom of the screen.
26
Perceptive TransForm iFiller Installation and Setup Guide
4. Test your changes by going to the E-Forms Manager catalog and attempting to open and use any iFiller-enabled form. If any of the configuration settings are incorrect, you will see error messages indicating a problem connecting to the server.
Application maintenance
Log file maintenance As it runs, the iFiller application writes to a log file called ifiller.log. When installed as Standalone, this file is located in the iFillerServer\logs folder relative to the iFiller installation location. When installed on E-Forms Manager, it is located in the FSBServer\logs directory relative to the E-Forms Manager installation location.
This file is meant to collect information that could be useful in troubleshooting errors with the system. Often, it is helpful to support personnel to review its contents in attempts to identify.
Under normal circumstances, this file should be small and grow very slowly. It is normal to see a small amount of information written to it on a daily basis, as user connections can often be interrupted, causing operations to fail mid-stream. If one appears to be extraordinarily large, such as more than 200 KB, this can be a sign that there is something wrong with the system and that users are experiencing the results. When this occurs, read the file and try to ascertain from the language contained whether they are related to network issues, which are usually identified by timeouts and “unknown host name” entries. These will usually specify a host or service that cannot be reached. If you cannot determine the nature of the problem, keep the file so that you can send it to someone who can review it.
By default, the iFiller logging mechanism begins a new file daily, taking the previous day’s file and renaming it to include a date in the name. Over time, large numbers of these files can accumulate in the log directory if they are not routinely removed. We recommend as part of your standard maintenance procedure to check the log directory regularly, but do not delete the current day’s log file, as the application is writing to it.
Uninstall iFiller To perform a complete uninstall of the iFiller software and services, complete the follow steps.
1. Stop the Windows service that is running iFiller. For more information, see Start or stop the iFiller service.
2. Go to the control panel and choose Add/Remove Programs. In the list of programs, select Perceptive TransForm iFiller <version> and click Change/Remove.
3. A wizard opens to begin the uninstall process. On the first screen, choose the Automatic option and click the Next button. The uninstall de-registers the software and services and removes application files. You are notified when it is complete.
27

Perceptive TransForm iFiller Installation and Setup Guide
Appendix A: Performance considerations and guidelines Before configuring an iFiller application in your environment, it is recommended that you read this section in order to get an understanding of what you should expect in terms of performance from a single or distributed iFiller installation. More importantly, every organization creates and publishes forms that have different visual and behavioral characteristics as well as varying automation configurations. Therefore, the purpose of this section is to provide tips and guidelines on how you can try to maximize the performance of your iFiller installation.
Source of metrics used in these guidelines In order to provide specific information about iFiller performance-related considerations and settings, it was necessary for us to perform a series of tests in a controlled environment, resulting in metrics based on a number of different scenarios meant to resemble real-life use cases. The purpose of these tests was to identify any defects that were not caught during system testing, ones that may only manifest themselves under high load or system stress, and to ensure that the application can perform in a reliable and stable manner in a production environment. In addition, these tests were also used as a basis to synthesize deployment guidance for Perceptive TransForm iFiller customers in order to help minimize deployment costs while providing the best possible end user experience with the iFiller application.
The tests performed involved a number of different Perceptive TransForm forms that were designed and published in an E-Forms Manager system. These forms were of different sizes and page counts, ranging from 1 to 6 pages in length and from 34 to 111KB in size. The forms contained a variety of graphical components, data entry controls, formulas, validations, and commands, many of which made remote calls into an E-Forms Manager server to perform operations such as submission, signing, and Autofill. Within E-Forms Manager, these forms were configured to allow various types of Autofill calls and included configurations for multiple digital signing and submission operations.
Perceptive TransForm iFiller and E-Forms Manager are not traditional web applications. Instead, they provide a framework for electronic form authoring, publishing and processing. Therefore, a single test would be inadequate to cover all of the possible deployment possibilities and retain some semblance of a real world use case. Since a Perceptive TransForm E-Form can be designed and published to perform a wide array of capabilities, results can differ drastically among uses cases even for similar forms. By using multiple Perceptive TransForm E-Forms, each with its own unique characteristics in multiple playback scenarios, every attempt in the testing process was made to make the scenarios as “real world” as possible, but eliminating examples of any extraordinarily large or complicated forms or processing. Each test scenario was run on its own as well as simultaneously with other playback scenarios.
The test scenarios simulated varying numbers of virtual users who would open the forms from E-Forms Manager, or upload from a client, page through them, perform data entry into the form fields, and execute commands to perform operations such as adding attachments, running validations, and making calls to E-Forms Manager to Autofill, sign, and submit the forms at various rates. The test cases were designed to be realistic in terms of the amount of time elapsed between field updates, page loads, and command execution. During the testing process, the different forms and scenarios were run in different combinations, most often involving all of the scenarios running simultaneously but with varying overall virtual user counts and distribution among the cases.
Important Before reading and applying the conclusions gained from the tests described, it is essential that you understand that, since the very purpose of Perceptive TransForm software products is to enable the creation of highly customized e-forms and related processes, it is impossible for this document to accurately provide specific recommendations regarding your own use case scenarios. Therefore, unless otherwise noted, you should consider the information that follows as general guidelines that you should follow which may or may not apply precisely to your own environment and usage of the software.
28

Perceptive TransForm iFiller Installation and Setup Guide
Analysis of test results The results of load and concurrency tests described above were analyzed and several general and specific conclusions were derived from them. First, a set of base and recommended system requirements for proper operation of the iFiller application as a Standalone Server installation was compiled and confirmed. See the System requirements section of this guide for more information. Next, an effort was made to arrive at values representing maximum capacity in terms of number of concurrent users per iFiller instance within normal e-form publication and automation scenarios, which would allow for a satisfactory user experience. These values can then be used to help determine whether one or more installations of iFiller are required to handle an expected number of users at sustained and peak utilization. For proper perspective on these values, however, it is necessary to have a description of what was considered a “normal” set of use cases. For the sake of simplicity, a sampling of seven the test cases performed was summarized to represent what was considered normal usage. This summary is provided below.
Scenario
File Size (kb)
Open
Close
Page Loads
# of fields updated
Num
ber of Signatures
Num
ber of A
utoFills
Num
ber of Subm
its
TIFF
Auth
Attachm
ent
Attachm
ent Size
1 3 1 1 3 2 0 0 0 0 N N NA
2 34 1 1 1 31 0 0 1 N N N NA
3 32 1 1 4 24 0 0 1 N N N NA
4 7 1 1 4 7 0 0 1 N N Y 31KB
5 31 1 1 1 4 1 3 1 N Y (2) N NA
6 34 / 111 2 2 6 90 0 0 1 N N N NA
7 81 1 1 3 5 1 0 1 Y Y(1) N NA
This table lists vertically seven of the test cases that were run. Columns in the table represent the following, from left to right.
• File size of the forms used, which were either requested through the E-Forms Manager or iFiller publication URL or opened via client upload to the iFiller interface
• Number of times a form was opened through EFM request or upload
• Number of times the form was closed by completion of the test case
• Number of page loads performed through page navigation in the iFiller interface or by opening a form
• Number of form fields updated
• Number of signing operations performed
• Number of Autofill operations performed
• Number of submissions performed
• Number of TIFF image downloads from the iFiller interface
29

Perceptive TransForm iFiller Installation and Setup Guide
• Whether, and how many, operations required user authentication
• Whether attachments were uploaded to the form
• Size of attachment(s) uploaded
Each of the samples where run under varying mixtures and load scenarios, and the results of what were considered long-running tests that showed a satisfactory user experience were analyzed and used arrive at the summary that follows. The Characteristics of a satisfactory user experience were enumerated as the following.
• No unexpected errors, interruptions, or visual anomalies
• Less than 5 seconds to completely open a form page
• Field updates accepted and rendered visually within 4 seconds
Summary of test results The sampling of scenarios described above that provided a satisfactory user experience resulted in the following general and specific conclusions.
General conclusions The conclusions and recommendations in this section can be understood to apply generally in any environment.
Maximum Concurrent Users – Standalone iFiller instance
Under no circumstances is it recommended that a single standalone iFiller instance service more than 200 concurrent users.
In the context of iFiller, concurrent users is understood as the number of users who have forms open in their browsers and are working on them at any given time. Therefore, even though your organization may have hundreds or even thousands of users, you only need to consider those who will be accessing and using e-forms through iFiller at the same time. Consider the following major factors when estimating concurrent users.
• Deadline-oriented processes. When e-forms are used in processes that have deadlines, such as event registrations, timesheet, or expense report submissions, you can expect many users to access the system in days or hours approaching the deadline for submission.
• Length and complexity of forms. When forms take a long time to complete, there is higher probability of user session overlap on a server.
Depending on the size and complexity of the forms you make available in iFiller, your actual maximum may need to be well below the recommended 200 user limit. Remember that iFiller is not a standard web application, and its ability to render custom forms in a realistic manner and provide dynamic user interaction requires significant memory and processing. The iFiller configuration allows you to provide settings that determine the maximum number of concurrent users the application will serve. This enables your system to provide a satisfactory experience to everyone using it, without performance degradation caused by too many users on the system. If your business needs must allow more concurrent users than a single iFiller instance will support, you can deploy additional standalone iFiller applications in a load-balanced fashion and achieve a linear increase in supported users. Keep in mind, however, that there is a limit to the number of forms that E-Forms Manager can process concurrently.
30
Perceptive TransForm iFiller Installation and Setup Guide
Maximum concurrent users – E-Forms Manager hosted iFiller instance
Running iFiller on the E-Forms Manager server is really only recommended for testing and demonstration purposes or for production scenarios that would involve no more than 25 concurrent users. On an E-Forms Manager system, additional factors related to performance need to be considered due to the customized form processing configurations that are often employed. Therefore, as a general practice, iFiller should only be run along with E-Forms Manager in light concurrent usage situations. When installed in this fashion, you also have the ability to control the maximum number of sessions that the application will allow at any given time.
Form Design factors related to performance
By comparing memory and processor utilization across tests that involved forms and operations that were run individually, the following factors related to the design of the forms tested were shown to have significant impact on memory, response time, and CPU utilization, relative to others.
• Large graphics or form file size. Forms that have file sizes more than 100Kb in size, which most often occurs due to the presence of large logos or other graphics embedded in the design, use more memory on the iFiller server. Under light load, there is generally no noticeable performance impact. However, when large numbers of them are in use at the same time, large forms can negatively affect overall performance. When making forms available in iFiller, it is recommended that you make every effort to keep their file sizes small by eliminating unnecessary graphics or by optimizing large graphics that they contain.
• Attachments. The addition of attachments to forms will also require more memory on the server. You should only accept attachments in iFiller-enabled forms that support business processes that require attachments. The iFiller configuration allows you to specify a maximum allowed combined attachment size (in Kb) for forms that it serves.
• Number of fields on a form page. Form pages that contain large numbers of fields, most often found where large table controls are present that can contain dozens or hundreds of fields, load slower and require more resources on the server. You may be able to enhance performance for forms that have many fields on a page by spreading the fields across multiple pages. That being said, forms with lots of pages may also require more server resources.
Form automation factors related to performance
The following factors related to form automation settings and processes were noted to have a relatively significant impact on individual and application-wide performance.
• Autofill operations with large result sets. When performing Autofill calls from a form that return multiple results for presentation in a popup list and also return large numbers of records, such as 200 or more, were shown to be comparatively resource-intensive.
Specific recommendations Again, since every iFiller implementation involves custom-made forms and processing, these results need to be viewed in terms of the scenarios described above. However, see the following recommendations that may prove helpful in ensuring that your iFiller installation performs well and provides a good user experience.
• Adhere to the maximum concurrent user guidelines described above, and set each iFiller application’s maximum open forms configuration to a value that pertains to your environment. Use a load-balanced configuration with multiple iFiller installations if necessary. More than anything else, this can ensure that heavy load on the system does not adversely affect each user’s session.
31

Perceptive TransForm iFiller Installation and Setup Guide
• Optimize your forms in terms of size, graphics, page counts, and fields per page. In many cases, especially those in which forms may take a long time to complete, users can benefit anyway from the client Filler option since the form can be used offline and saved locally.
• Set a reasonable limit on the size of attachments that can be added to a form, and only enable attachments for form designs where they would be an essential feature. In iFiller, attachment operations involve uploads and downloads which of course require bandwidth. Attachments themselves, especially large ones, can consume valuable resources on the server.
32
Related Documents