The Agricultural Development Project in Kambia in the Republic of Sierra Leone Final Report Agricultural Technical Support Guidelines Part II Agricultural Technical Package March 2009 JAPAN INTERNATIONAL COOPERATION AGENCY RECS International Inc. Ministry of Agriculture, Forestry and Food Security The Republic of Sierra Leone

Welcome message from author
This document is posted to help you gain knowledge. Please leave a comment to let me know what you think about it! Share it to your friends and learn new things together.
Transcript
The Agricultural Development Project in Kambia
in the Republic of Sierra Leone
Final Report
Agricultural Technical Support Guidelines
Part II
Agricultural Technical Package
March 2009
JAPAN INTERNATIONAL COOPERATION AGENCY
RECS International Inc.
Ministry of Agriculture, Forestry and Food Security The Republic of Sierra Leone
List of Reports
Part I Main Report Chapter 1 Introduction
Chapter 2 Background of the Agricultural Technical Support Guidelines
Chapter 3 Formulation of Agricultural Technical Packages and Manuals
Chapter 4 Proposed Dissemination Plan of the Agricultural Technical Packages
Chapter 5 Recommendations
Part II Agricultural Technical Packages
Chapter 1 Introduction
Chapter 2 Technical Package on Rice Production
Chapter 3 Technical Package on Vegetable Production
Part III Agricultural Technical Manuals
Chapter 1 Introduction
Chapter 2 Rice Cultivation Manual
Chapter 3 Manual for Post Harvest Handling of Rice
Chapter 4 Vegetable Cultivation Manual
Part IV Annexes
Annex 1 Pilot Project for Rice Production
Annex 2 Pilot Trial of Vegetable Production for the Support of Women’s Group
Annex 3 Field Survey Report
Annex 4 Training for the Sierra Leonean Counterparts
Annex 5 Radio Extension Program
Annex 6 Minutes of Meetings

KKaammbbiiaa DDiissttrriicctt
TThhee RReeppuubblliicc ooff SSiieerrrraa LLeeoonnee
Village
River/stream
Main road – tarred
Main road – untarred
Track
Trail
Chiefdom
Legend
Port Loko District
Bombali District
Rep. of Guinea
Pilot project site
Rice Research Station at Rokupr
District capital (Kambia)
Kalintin
Macoth
Gbinleh Dixing
Mambolo
Samu
Magbema
Tonko Limba Bramaia
Masungbala
Robat
Project Location Map
Kunthai
Sabuya
Rosinor
Robennah
Pilot trial site
Mathon
Makatick
i
The Agricultural Development Project in Kambia in the Republic of Sierra Leone
Final Report
Agricultural Technical Support Guidelines
Part II Agricultural Technical Packages
Location Map
List of Tables, Figures and Photos
Abbreviations
CONTENTS
Chapter 1 Introduction......................................................................................... 1-1 1.1 Composition of the Agricultural Technical Packages ....................... 1-1
1.1.1 Technical Package on rice production .................................. 1-1
1.1.2 Technical Package on vegetable production ......................... 1-2
1.2 Utilization of the Agricultural Technical Packages........................... 1-2
1.3 Issues to Be Considered and Addressed ........................................... 1-2
Chapter 2 Technical Package on Rice Production .............................................. 2-1 2.1 Rice Cultivation ............................................................................. 2-1
2.1.1 Introduction ......................................................................... 2-1
2.1.2 Crop establishment............................................................... 2-6
2.1.3 Weed and pest control ..........................................................2-15
2.1.4 Fertilizer management..........................................................2-18
2.1.5 Harvesting............................................................................2-20
2.1.6 Seed handling.......................................................................2-20
2.1.7 Terminology and conversion rates........................................2-22
2.2 Cost-Benefit Analysis ....................................................................2-24
2.2.1 Procedures of cost-benefit analysis ......................................2-24
2.2.2 Calculation of profitability ...................................................2-24
2.2.3 Breakeven point ...................................................................2-27
2.3 Post-harvest Handling of Rice ........................................................2-27
2.3.1 Introduction .........................................................................2-27
2.3.2 Handling of rice ...................................................................2-29
2.3.3 Processing............................................................................2-31
2.3.4 Storage .................................................................................2-33
2.3.5 Issues on the introduction of post-harvest machinery ...........2-34
ii
Chapter 3 Technical Package on Vegetable Production...................................... 3-1 3.1 Vegetable Cultivation....................................................................... 3-1
3.1.1 Introduction ......................................................................... 3-1
3.1.2 Watermelon Cultivation ....................................................... 3-2
3.1.3 Eggplant Cultivation ............................................................3-12
3.1.4 Pepper Cultivation ...............................................................3-18
3.2 Cost-Benefit Analysis ......................................................................3-23
3.2.1 Precondition for calculation of profitability .........................3-23
3.2.2 Calculation of profitability ...................................................3-24
iii
List of Tables
Table 2.1-1 Seed Requirement to Transplant the Seedlings in the Main Field ..............................................................................................2-10
Table 2.1-2 Frequent Occurrence of Weed and Pest Damages in Various Agro-ecologies of Rice Cultivation ...................................2-15
Table 2.1-3 Some Traits of Selected ROK Varieties..........................................2-22
Table 2.2-1 Estimated Profitability under the No Fertilizer Application Condition .......................................................................................2-26
Table 2.2-2 Estimated Profitability under Fertilizer Application Condition .....................................................................................2-26
Table 2.2-3 Estimated Breakeven Points in the Yield and the Price ...................2-27
Table 2.3-1 Post-harvest Handling Process and Operations ...............................2-28
Table 2.3-2 Post-harvest Losses Estimated by Farmers in the Pilot Project Villages..............................................................................2-28
Table 2.3-3 General Characteristics of Two Hulling Methods ...........................2-32
Table 3.1-1 Major Pest Insects for Watermelon and Control Measures .............. 3-9
Table 3.1-2 Major Diseases for Watermelon and Control Measures................... 3-9
Table 3.1-3 Major Pest Insects for Eggplant and Control Measures...................3-17
Table 3.1-4 Major Diseases for Eggplant and Control Measures .......................3-17
Table 3.1-5 Major Pest Insects for Pepper and Control Measures ......................3-22
Table 3.1-6 Major Diseases for Pepper and Control Measures...........................3-23
Table 3.2-1 Estimated Profitability: Watermelon ...............................................3-25
Table 3.2-2 Estimated Profitability: Eggplant....................................................3-25
List of Figures
Figure 2.1-1 Growth of the Rice Plants and the Main Farming Activities in the Two Methods of Planting................................................................ 2-2
Figure 2.1-2 Schematic Diagram of the Process of the Yield and Yield
Components Formation in Rice Plants ............................................ 2-4
Figure 2.1-3 Poor and Good Puddling ................................................................2-12
Figure 2.1-4 Tiller Development by Shallow and Deep Transplanting ................2-14
Figure 2.1-5 Folded Stem of a Seedlings Due to the Improper Use of Planting
Fork ................................................................................................2-15
Figure 3.1-1 Raising Seedlings in Pots................................................................ 3-4
Figure 3.1-2 Plant Spacing for Watermelon......................................................... 3-5
Figure 3.1-3 Male and Female Flowers ............................................................... 3-7
iv
Figure 3.1-4 Thinning out, Training of Vines and Fruit Setting for Watermelon . 3-8
Figure 3.1-5 Plant Spacing for Eggplant .............................................................3-14
Figure 3.1-6 Thinning out and Stem Training for Eggplant .................................3-16
Figure 3.1-8 Thinning out and Stem Training for Pepper ....................................3-22
List of Photos
Photo 2.1-1 Rice Plant at the 4th Leaf Stage ......................................................2-12
Photo 2.1-2 Elongated Mesocotyle Due to Deep Transplanting..........................2-15
Photo 2.1-3 Brown Spot.....................................................................................2-18
Photo 2.1-4 Leaf-scald .......................................................................................2-18
Photo 3.1-1 Taking out Seedling from Pot ......................................................... 3-5
Photo 3.1-2 Seedling Taken out from Pot ........................................................... 3-5
v
Abbreviations
FAO Food and Agriculture Organization
FEW Frontline extension worker
IVS Inland valley swamp
JICA Japan International Cooperation Agency
MAFFS-K Ministry of Agriculture, Forestry and Food Security Kambia District Office
PMMoV Pepper mild mottle virus
PP Pilot project
PT Pilot trial
RRS-R Rice Research Station at Rokupr
TP Agricultural Technical Package
T-Pan Three pence pan
TMV Tobacco mosaic virus
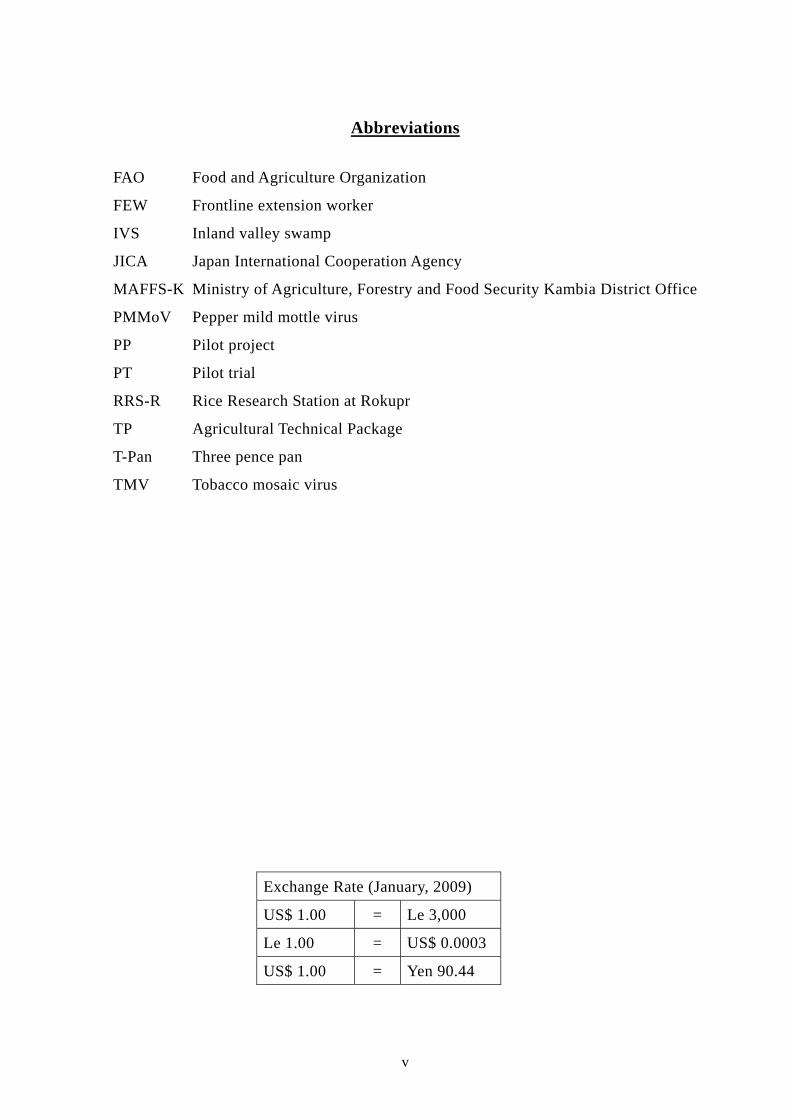
Exchange Rate (January, 2009)
US$ 1.00 = Le 3,000
Le 1.00 = US$ 0.0003
US$ 1.00 = Yen 90.44

Chapter 1 Introduction
Part II Agricultural Technical Packages
1-1
Chapter 1 Introduction
Agricultural Technical Packages (TPs) were developed through a series of field trials to
contribute to the enhancement of the livelihood of farmers by improving the productivity
of rice and vegetable crops. The TPs are designed to present farming practices and
activities that improve crop yields and profits along with cost-benefit analysis of farming
activities. The TPs highlight those practices and activities to which the farmers should
pay attention while explaining the theories behind. The users of the TPs should bear in
mind that the present TPs are only a prototype and it is therefore intended that they be
revised to reflect further field experience.
1.1 Composition of the Agricultural Technical Packages
The TPs are divided into two parts: (i) TP on rice production, and (ii) TP on vegetable
production. The former presents recommended farming practices in rice cultivation,
cost-benefit analysis and recommended post-harvest handling techniques. The latter,
offers recommended cultivation techniques for three vegetables and cost-benefit analysis
of their production.
1.1.1 Technical Package on rice production
The TP on rice production starts with rice cultivation techniques, followed by cost-benefit
analysis and post harvest handling. In the sections on the rice cultivation techniques, an
overall view of the life cycle of rice is presented with reference to the timing of farming
practices in upland and lowland, followed by an explanation of the yield components of
rice production. This provides readers with the basic information to understand the
importance of respecting the cropping calendar in farming – the reasons for pursuing
timely farming practices. Then the key recommended techniques to improve the grain
yield of rice are presented.
Individual farming practices such as land preparation, nursery preparation and sowing,
transplanting, weeding, water management, fertilizer application, bird scaring, pest control,
and harvesting follow according to the sequence of farming practices. The improvement
of rice culture practices is emphasized, especially the operation of the nursery at the
vegetative growth stage when the number of tillers is determined, which is an important
factor in assessing the yield.
In the section on cost-benefit analysis, the financial aspects of rice cultivation are
explained. It introduces the concept of the break-even point in rice cultivation to enable
the farmers involved to consider farming as a business. The effects of fertilizer
application on the rice yield as well as farm incomes are also analyzed based on the results
of the pilot projects.
Part II Agricultural Technical Packages
1-2
The section for the post-harvest handling of rice describes the ways to minimize losses at
harvest time, post-harvest activities (e.g., drying), threshing, and winnowing, processing
(e.g., parboiling and milling), and storage. Appropriate tasks to be carried out in each
process are described.
As most post-harvest and handling works are similar regardless of the agro-ecologies,
explanations presented in this section apply to all the agro-ecologies, unless otherwise
mentioned. Issues regarding agricultural equipment and machinery that were introduced
in the pilot projects are again raised in this section.
1.1.2 Technical Package on vegetable production
The TP on vegetable production deals with three crops: watermelons, eggplants and
peppers. It starts with a presentation of the key techniques that have proven to be
effective in increasing the yield for each crop. Then the cultivation techniques for each
vegetable crop are explained through the sequence of farming practices from nursery
preparation to harvesting.
Practices include raising seedlings in nurseries, transplanting, fertilizer application, pruning,
and the use of products of the neem tree for insect control. The system of cost-benefit
analysis is also presented for each vegetable crop based on the results of the pilot trials.
1.2 Utilization of the Agricultural Technical Packages
The TPs are intended primarily for the use of frontline extension workers (FEWs) who
work closely with farmers at the grassroots level. These extension workers are required
to understand the background theory in order to recommend farming practices and
techniques and explain the introduced techniques to the farmers with confidence.
Advanced or educated farmers may also use the TPs as a guide to adopting new techniques.
The TPs are more effective when accompanied by Agricultural Technical Manuals (Part
III), especially when the extension workers explain them to the farmers.
1.3 Issues to Be Considered and Addressed
(1) Measurement units used in the text
In the TPs, metric units are used as the primary measurement units. However, other
measurement units commonly used in the rural areas of Kambia District are also included
along with the metric units. As mentioned in the previous section, the TPs are intended
primarily for the use of FEWs, who are expected to disseminate the TPs to the farmers.
Since the rural farmers are not familiar with metric units, FEWs need to convert metric
units into other measurement units commonly used in the area when they explain to the
farmers. However, during the implementation of the pilot projects, it was revealed that

Part II Agricultural Technical Packages
1-3
not many FEWs could do such calculations. To deal with this variation in measurement
units, several measurement units such as bushels, three-pence pans (T-pan), buttercups,
bags, etc., are used throughout the text along with their equivalent in the units of
measurement of the metric system.
(2) Issues on measurement units
Agricultural commodities are exclusively measured by volume in Sierra Leone. As for
rough rice (paddy), the official volumetric weight is defined as 25 kg per bushel. The
farmers estimate a cropped area by the quantity of seeds sown for rice: the planted area
sown with one bushel of seeds is considered to be equivalent to one acre, irrespective of
the planting methods (direct sowing or transplanting). However, in reality, there is a wide
variation in the volumetric weight of rough rice measured using a T-pan, a small container
widely used in Kambia District.
The conversion rate between the T-pan and the bushel varies from 11 to 22 T-pans per
bushel, while the volumetric weight of one T-pan of rough rice also varies from 2.2 to 3.5
kg, according to a survey of the seven pilot project villages. As a result, the volumetric
weight of rough rice ranges from 30 kg to 52 kg per bushel. It is obvious that the official
volumetric weight measurement is grossly inadequate in Kambia District. The detailed
survey results have been compiled and are attached in Part IV Annex 3.6.
The above findings imply that the farmers use more seed rice than the recommended
dosages or that the farmers sell rice for prices less than they should be paid. It also could
be that errors might have occurred in converting the number of T-pans into bushels,
bushels into kilograms, bushels into acres, etc., as was the case in the Baseline Survey
results. It is fervently hoped that the volumetric weight measurement system will be
standardized and strictly applied throughout the country.
(3) Purity of seed rice as an important determinant of the yield
In the pilot project implementation, several varieties of seed rice were procured from the
Seed Multiplication Project at Kobia in the first year (2007), and the Rice Research Station
at Rokupr (RRS-R) in the second year (2008). However, in both years the purity of the
seed rice was dubious, for it was found that seeds of different varieties were mixed. If such
seeds were planted together in the same field at the same time, timely harvest would be
difficult since some plants reach maturity faster than other plants.
If this matured rice is harvested, the younger plants become disturbed, resulting in a loss in
the overall yield. On the other hand, if these younger panicles are allowed to mature, the
panicles that have already matured will shatter and the rice grains from them will be lost.
In the TP on rice cultivation, the use of fertilizer is not recommended. Through the pilot
projects, it was proven that the grain yield of rice increased by 0.5 to 1.0 ton/ha due to the
Part II Agricultural Technical Packages
1-4
application of fertilizer. However, this yield increase is not sufficient to cover the cost of
the fertilizer under the current economic conditions. To ensure that the application of
fertilizer is feasible, crop management, including timely farming and water control, should
be improved so that the yield can be further increased.
In addition for better crop management, pure seeds must be secured to reduce losses at
harvest time. The Government is responsible for controlling the quality of the seed rice.
Seed multiplication should be carefully supervised and regulated to ensure the supply of
pure seed rice to the farmers.
Chapter 2 Technical Package on
Rice Production
Part II Agricultural Technical Packages
2-1
Chapter 2 Technical Package on Rice Production
2.1 Rice Cultivation
2.1.1 Introduction
(1) Planting methods focused on
This section focuses on two methods of planting rice: (i) direct sowing on uplands and (ii)
transplanting in the lowlands (IVS, boliland and mangrove swamp areas). The cultivation
of rice in these agro-ecological systems is widely practiced by the farmers in Kambia
District during the main cropping season (i.e., the rainy season). Since the two methods
differ in their crop management from land preparation to sowing or transplanting, they are
described separately under the sub-section describing crop establishment.
Once the rice plants are established in the main fields, the subsequent variation in crop
management (e.g., pest control and fertilizer management) is less between the two methods,
so they are described together. Seed handling, an important subject in rice cultivation, is
described in the final section. Although nutritional disorders are an important
determinant of plant growth in the region, they are not discussed in detail here since there
are no practical remedies. They are briefly referred to in the sub-sections on diseases
(2.1.3) and fertilizer management (2.1.4).
(2) Plant growth and yield component analysis
1) Growth development and farming activities
Rice plants sown or transplanted in the field develop a new leaf successively every
5 to 7 days under wet tropical conditions and produce tillers, grow taller, and
increase their body weight. A turning point in this development occurs with
panicle initiation (about 30 days before heading or flowering), after which the
plants develop their panicles and their reproductive organs to be consumed by
humans for food. Crop management refers to what the farmers do to provide
favorable conditions for the crops in order to grow healthy and strong so that they
can produce a high yield of grain. To accomplish this goal, any changes in the
plants should be carefully observed throughout their growth and timely and
necessary action should also be taken to ensure this.
In the case of upland rice cultivation, farmers have long experience in the
management of rice plants, and their rice farms are relatively well maintained,
although grain yields are still very low. One of the key points in upland rice
cultivation is timely weeding (Figure 2.1-1, upper part). Among various crops,
rice is particularly susceptible to weed competition: rice is always the first crop to
be cultivated after forest clearing or fallow-bush, and the farmers would never grow
it where weeds thrive in the second year after the farm has been cleared.
Part II Agricultural Technical Packages
2-2
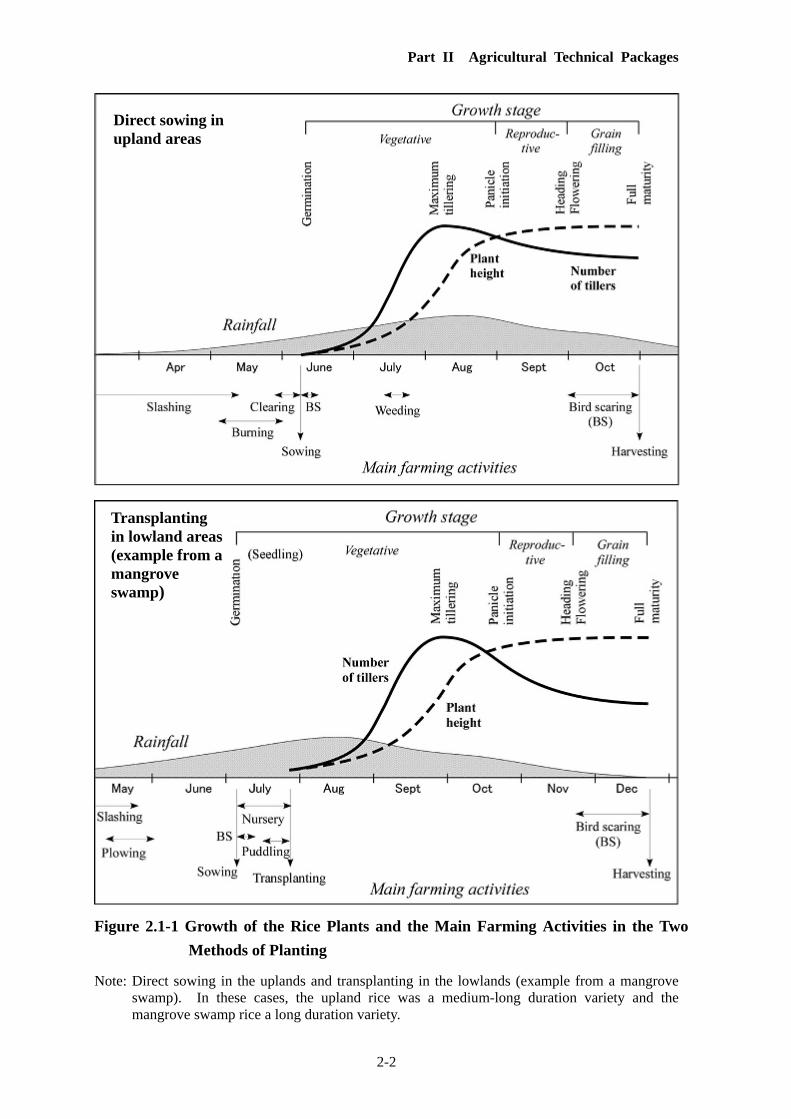
Figure 2.1-1 Growth of the Rice Plants and the Main Farming Activities in the Two
Methods of Planting
Note: Direct sowing in the uplands and transplanting in the lowlands (example from a mangrove swamp). In these cases, the upland rice was a medium-long duration variety and the mangrove swamp rice a long duration variety.
Direct sowing in upland areas
Transplanting in lowland areas (example from a mangrove swamp)
Part II Agricultural Technical Packages
2-3
As for transplanted lowland rice cultivation, the timely transplanting of healthy
seedlings is of primary importance in ensuring good production (Figure 2.1-1,
lower part). The optimal nursery period is three weeks (4 weeks for cultivation in
mangrove swamp areas to enhance salt tolerance). In practice, however, the
transplanting of old seedlings, sometimes two months old, is not unusual mainly
due to delays in land preparation, especially plowing.
Farmers frequently sow the seeds in a nursery before completing land preparation.
All the field activities should be planned in advance before the planting season,
taking into account the availability of labor and the area of land to be cultivated.
In planning these activities, first the transplanting date is set and, counting
backwards from the nursery period, the sowing date in the nursery is determined.
The plowing of the main field should be completed before sowing the seeds in the
nursery since plowing is the most laborious and time-consuming work in lowland
rice cultivation.
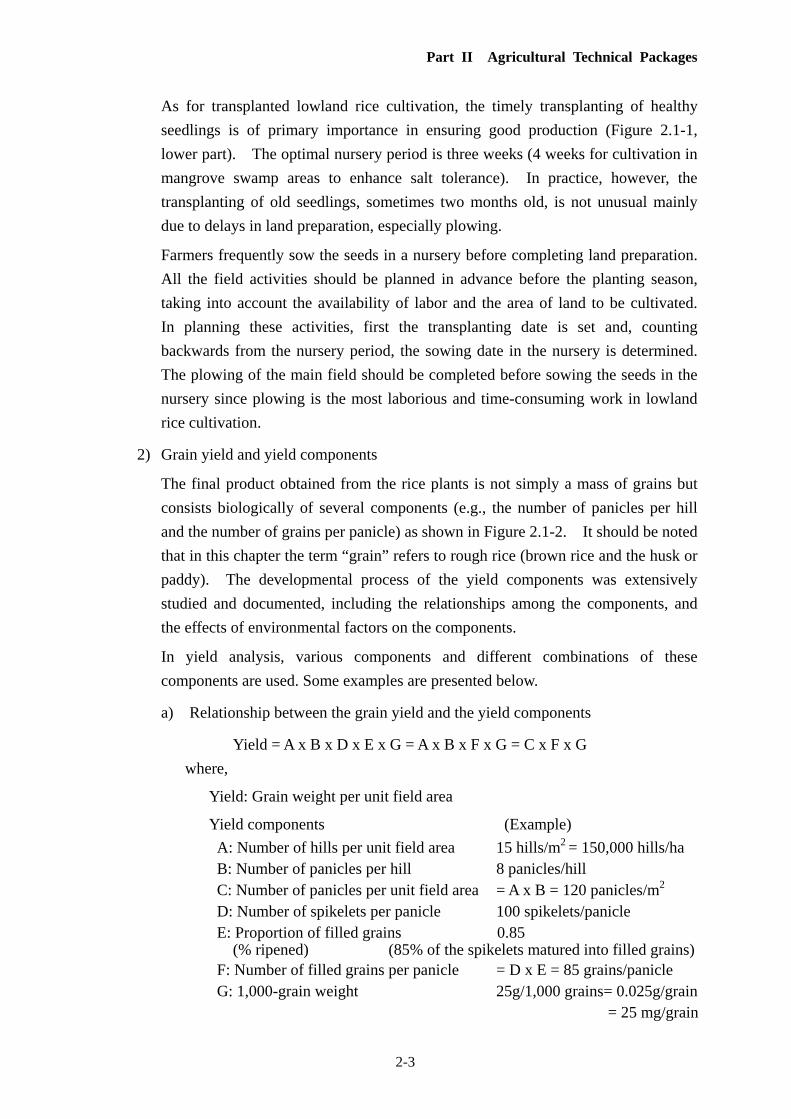
2) Grain yield and yield components
The final product obtained from the rice plants is not simply a mass of grains but
consists biologically of several components (e.g., the number of panicles per hill
and the number of grains per panicle) as shown in Figure 2.1-2. It should be noted
that in this chapter the term “grain” refers to rough rice (brown rice and the husk or
paddy). The developmental process of the yield components was extensively
studied and documented, including the relationships among the components, and
the effects of environmental factors on the components.
In yield analysis, various components and different combinations of these
components are used. Some examples are presented below.
a) Relationship between the grain yield and the yield components
Yield = A x B x D x E x G = A x B x F x G = C x F x G
where,
Yield: Grain weight per unit field area
Yield components (Example)
A: Number of hills per unit field area 15 hills/m2 = 150,000 hills/ha B: Number of panicles per hill 8 panicles/hill C: Number of panicles per unit field area = A x B = 120 panicles/m2 D: Number of spikelets per panicle 100 spikelets/panicle E: Proportion of filled grains 0.85 (% ripened) (85% of the spikelets matured into filled grains) F: Number of filled grains per panicle = D x E = 85 grains/panicle G: 1,000-grain weight 25g/1,000 grains= 0.025g/grain
= 25 mg/grain
Part II Agricultural Technical Packages
2-4
b) In actuality, the yield = A x B x F x G = 15 x 8 x 85 x 0.025
= 255 g/m2 = 2.55 ton/ha = ca. 41 bu/acre (as 1 bu = 25 kg)
It should be noted that the unit of the bushel (bu) for grains is converted at the
official rate of 25 kg/bu.
Figure 2.1-2 Schematic Diagram of the Processes of the Yield
and Yield Component Formation in Rice Plants (Based on Matsushima, 1959)
Note: The positive (blank areas) and negative (hatched areas) represent the effects of the environment.
c) Formula to estimate the number of filled grains per panicle (F):
F = Yield / (A x B x G) = 255 / (15 x 8 x 0.025) = 85 grains per panicle
The grain size (commonly measured in terms of the 1,000-grain weight) varies
a little with the culture practices (e.g., plant density and fertilizer application).
Thus the number of grains either per hill (or per plant) or per unit field area is
the dominant factor contributing to the grain yield. The number of grains is
first determined by the number of panicles and second by the number of grains
per panicle. In other words, crop management to help plant growth at the
beginning is important since the number of tillers (eventually panicles)
produced at the early stage of growth is the key determinant of grain yield.
Part II Agricultural Technical Packages
2-5
(3) Summary of the pilot project on rice cultivation
1) Goal
The pilot project aimed at obtaining 1.0 to 1.5 ton/ha (= 16-24 bu/acre) of grain
yield by improving rice culture practices, since the average yield was about 0.5
ton/ha (= 8 bu/acre) in the past (JICA et al., 2007).
2) Key techniques introduced
a) Timely farming activities based on a well-planned cropping calendar
b) Rational seeding rates
c) Proper land preparation
d) Proper water control such as dike (bund) construction
e) Efficient fertilizer application
f) Appropriate transplanting in the lowlands with:
f-1) Use of young (3-week-old) seedlings
f-2) Shallow planting (2 to 3 cm deep)
f-3) Reduced number of seedlings per hill (2 to 3 per hill)
In addition, a short-stature variety (ROK 14) was planted on a trial basis to pursue
higher yields in the fertile soil of an associated mangrove swamp.
3) Main results
The main results obtained in the pilot projects (2007 and 2008) were as follows.
The details results of the pilot projects are described in Part IV Annex 1.
a) A grain yield of 1 ton/ha (= 16 bu/acre) was attained at almost every sites in the
different agro-ecologies with the improvement of rice culture practices (without
fertilizer application).
b) The fertilizer response was about 0.5 ton/ha (= 8 bu/acre) at an application rate
of 4 bags/ha (= about 1.5 bags/acre: 50 kg/bag): the low fertilizer response was
a result of poor water management and improper crop management.
c) Plant growth and the grain yield were not reduced with a fewer number of
seedlings per hill, which helped the farmers to substantially save on seed costs
(1/4 or 1/5 of the present).
d) Nearly 4 ton/ha (= 64 bu/acre) of grain yield was feasible with the short-stature
variety combined with improved crop management.
It should be borne in mind that no single factor was responsible for raising yields,
but this involved an integrated approach that led to yield increases under low-input
conditions.
Part II Agricultural Technical Packages
2-6
2.1.2 Crop establishment
2.1.2.1 Upland rice cultivation
(1) Site selection
A suitable area of bush is first located that has been fallow for at least 7 to 10 years and
where the majority of gramineous seeds have died out. A gentle slope of 4 to 5% at the
maximum should be selected for upland crops. Clearing a steep slope may cause soil
erosion and nutrient leaching, which could lead to soil degradation.
The density of palms around the cultivated fields affects the growth and yield of the rice if
it is higher than about 25 trees/ha (20 m x 20 m). Palm trees block the sunlight and may
hinder rice growth. On the other hand, the shading mitigates drought stress that affects
the rice plants.
(2) Land preparation - slashing, burning, and clearing
In the selected area of fallow bush, (i) the undergrowth is slashed (brushed out), (ii) the
trees are felled and (iii) the vegetation is allowed to dry. This operation spans from
January to May.
The direction of the burning of the slashed trees and shrubs is from the lower to the upper
slopes. Unburned branches and trunks are removed from the fields. (The farmers utilize
these branches as firewood.) The fields should be burned no later than May before the
period of heavy rainfall starts. All sprouting should be cut back and the field should be
thoroughly cleared shortly before sowing.
(3) Sowing
1) Seeding rates
A seeding rate of 60 to 80 kg/ha is recommended for direct sowing in upland and
boliland areas (MAFS, 2005; RRS-R, 2005). Currently, a seeding rate of one
bu/acre (= 63 kg/ha) is widely adopted by the farmers, which is within the
recommended range and thus not necessarily high for the direct sowing cultivation
of rice.
2) Pre-treatment of the seeds
Seed selection using water (or salt water with a specific gravity of 1.05) is
unnecessary as long as the seeds are properly winnowed. By eliminating this
process the extra work required to dry the moistened seeds can be avoided, since
dried seeds are essential for uniform broadcasting. Incubation of the seeds is not
recommended. If the seeds are incubated, their sprouting (emergence of the
juvenile plants in the field) will be greatly inhibited if rain does not occur at the
right time, resulting in low plant standing.
Part II Agricultural Technical Packages
2-7
3) Seed broadcasting and tillage
The seeds are broadcasted in the fields and covered by shallow tillage at a depth of
a few centimeters. A small hoe is the most convenient tool since it does not
excessively disturb the topsoil, in which the roots of the shrubs and trees are able to
develop to prevent soil erosion. The farmers commonly mix sorghum seeds with
the rice seeds. This mixture does not affect the rice yield as long as the mixing
rate is 1% (10 g sorghum seeds to 10 kg of rice seeds) or less.
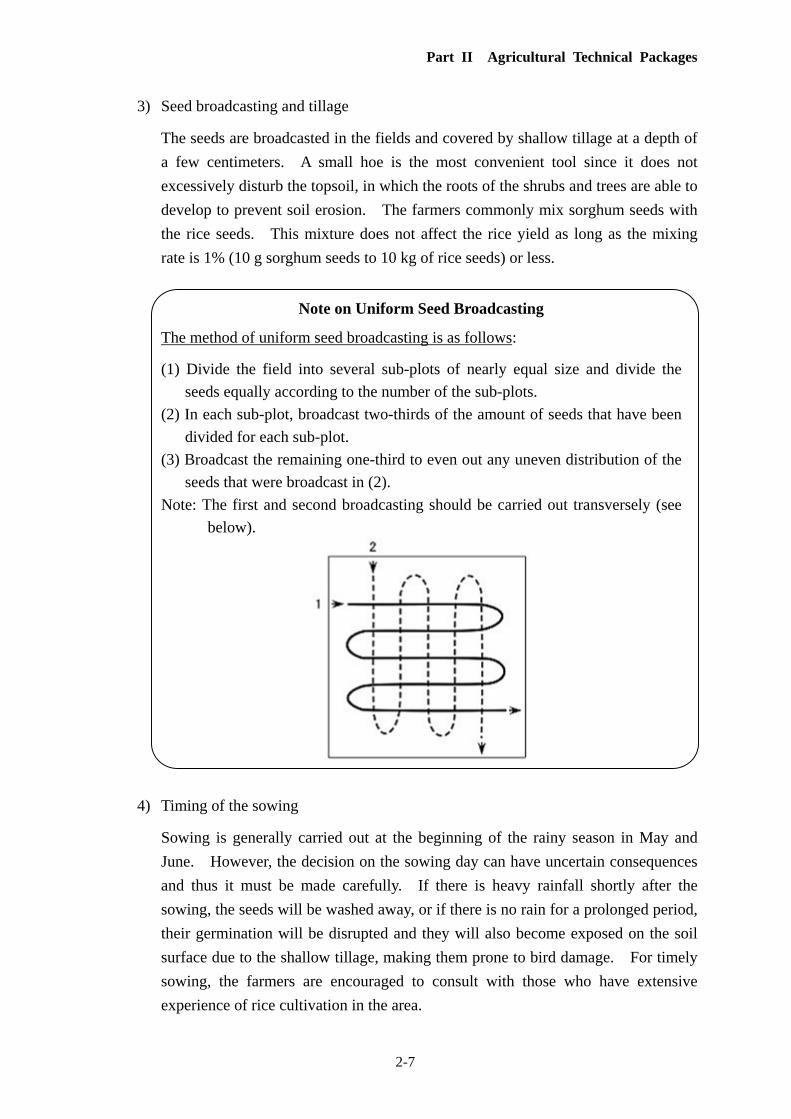
Note on Uniform Seed Broadcasting
The method of uniform seed broadcasting is as follows:
(1) Divide the field into several sub-plots of nearly equal size and divide the
seeds equally according to the number of the sub-plots.
(2) In each sub-plot, broadcast two-thirds of the amount of seeds that have been
divided for each sub-plot.
(3) Broadcast the remaining one-third to even out any uneven distribution of the
seeds that were broadcast in (2).
Note: The first and second broadcasting should be carried out transversely (see
below).
4) Timing of the sowing
Sowing is generally carried out at the beginning of the rainy season in May and
June. However, the decision on the sowing day can have uncertain consequences
and thus it must be made carefully. If there is heavy rainfall shortly after the
sowing, the seeds will be washed away, or if there is no rain for a prolonged period,
their germination will be disrupted and they will also become exposed on the soil
surface due to the shallow tillage, making them prone to bird damage. For timely
sowing, the farmers are encouraged to consult with those who have extensive
experience of rice cultivation in the area.
Part II Agricultural Technical Packages
2-8
2.1.2.2 Lowland rice cultivation
(1) Site selection
In the lowlands, the farmers grow rice in the same fields every year and thus fully
understand the gradations in soil fertility in the area and the potential problems (e.g., weed
infestation, pests, and flooding).
(2) Land preparation
1) Slashing the vegetation and weed handling
The traditional method of land preparation is acceptable. It reflects the outcome
of trial and error by the farmers over the years and their extensive knowledge and
experience of the conditions in their fields. The vegetation in the field is slashed
(brushed out), dried and then burned.
If there are early rains or the slashing is delayed, the slashed weeds are removed to
an area outside the main field or heaped at designated spots (see “Note on Weed
Handling” below).
Note on Weed Handling
Weed control plays a key role in rice cultivation regardless of whether it is in the
uplands or lowlands. By plowing organic matter (e.g., the weeds) into the soil,
nutrients are released as this matter is decomposed. However, this only applies
where there are well-aerated conditions, as in upland cultivation.
Under oxygen-deficient conditions as in case of submergence, the decomposition
of organic matter leads to an increase in iron in the soil, which the rice plant can
absorb (as ferrous is converted into ferric iron), especially when there is a
deficiency of minerals in the soil.
A healthy rice plant can tolerate a certain level of iron since it actively expels
ferric iron. When the ferric concentration in the soil exceeds the threshold or
when the nutritional conditions of the plant are unfavorable, however, the plant
will suffer from iron toxicity since this is prevalent in many lowlands, especially
in IVS areas.
Drainage helps to wash out and oxidize ferric iron, but it is difficult to drain
water from fields in the lower areas of lowlands and this requires lengthy and
laborious work. The farmers should try to remove as many of the weeds from
the main field as possible to keep them from being mixed into the soil and
prevent iron toxicity where it is expected.
Part II Agricultural Technical Packages
2-9
2) Dike (bund) construction
Running water in rice fields causes the soil to erode, nutrients to leach from the
component soil minerals and applied fertilizer, and transplanted seedlings to flow
away. Nutrient supply carried in by water is limited in such areas. To avoid or
minimize the negative effects of running water, the water should be controlled.
Small-scale dikes and drainage structures are recommended in IVS, boliland and
associated mangrove swamp areas. Firstly, water drainage needs to be considered.
Dikes are constructed after slashing or plowing and before puddling. Because
there is no hydrological data for Kambia District at present, the farmers and experts
should work together in the field utilizing the farmers' experience and observation
as a source of hydrological information.
3) Plowing (digging)
The plowing practices currently adopted by the farmers are acceptable, in which
soils are plowed using a long-handled large hoe designed for the heavy clay soils in
the area. Deep plowing (20 to 30 cm deep) is recommended, although it is often
difficult to plow beyond 10 cm deep with manual plowing.
The main field should be plowed before sowing in the nursery. In the mangrove
swamp areas, the rice fields should be plowed well before nursery preparation starts
to allow sufficient time for any accumulated salts to be washed out of the soil.
4) Seedling raising in the nurseries
In the transplanting method, the first step in attaining a high yield is to raise healthy
and sturdy seedlings. Such seedlings are ready to extend new roots into the soil of
the main field with sufficiently accumulated carbohydrate and mineral nutrients,
and autonomous growth will start within a few days after transplanting. Excessive
elongation of the shoots (etiolation) should be avoided, for etiolated seedlings lack
nutrient accumulation in their body even though they grow tall.
a) Nursery preparation: Since nursery preparation does not require much labor, it
should be started after plowing is completed. For rice cultivation in the
mangrove swamp areas, first the transplanting date is determined during a
low-tide period and then the date of sowing in the nursery is set counting
backwards from the transplantation, based on the optimum duration (4 weeks)
to raise the seedlings.
b) Location: A spot well exposed to the sun should be selected for the nursery. If
the nursery is shaded, the seedlings will become etiolated.
c) Nursing period: The seedling quality deteriorates if the nursery period is too

Part II Agricultural Technical Packages
2-10
long. The recommended nursing period is three weeks for IVS and boliland
areas and four weeks for mangrove swamp areas as older seedlings have greater
salt tolerance.
d) Seed requirements and the nursery area (Table 2.1-1): Assuming that the
germination rate is 80%, the plant density is 20 hills/m2, the number of
seedlings is three per hill, the emerging (sprouting) rate in situ is 75%, and the
1,000-grain weight is 25 g, the quantity of seeds needed in order to cover one
hectare (= 2.5 acre) of land is calculated as follows:
20 x 3 x 25 / (1,000 x 0.8 x 0.75) = ca. 25 kg/ha (eq. 1)
= ca.10 kg/acre = 0.4 bu/acre
When the planned field area is large and transplanting cannot be completed
within a few days, it is prudent to sow the seeds in the nurseries on different
days according to the transplanting schedule. It should be borne in mind again
that the first priority is to keep the seedling in the nurseries for just the right
period of time so that they are at the optimal level of maturity for transplanting.
Table 2.1-1 Seed Requirements to Transplant the Seedlings in the Main Field
e) Seeding rate: A seeding rate of one bu/acre (= 63 kg/ha) is adopted for lowland
rice transplanting, which is the same as that for upland areas. However, this
rate is too high since it is based on the number of seedlings for transplanting at
a rate of 6 to 10 per hill. Transplanting 2 to 3 seedlings/hill is sufficient to
produce the necessary number of panicles for a reasonably high yield. It
should be kept in mind that one advantage of transplanting is to save seed rice.
Seed requirement (kg/ha)
(a)
Nursery area (m2)
Seed requirement (kg/ha)
(a)
Nursery area
(sq.yard)1,000-grain weight (g) 1,000-grain weight(g)
No. of seedlings
/hill 20 25 30 (b) 20 25 30 (b)
1 7 8 10 120 0.1 0.1 0.2 60
2 13 17 20 250 0.2 0.3 0.3 120
3 20 25 30 350 0.3 0.4 0.5 170
4 27 33 40 500 0.4 0.5 0.6 230
6 40 50 60 700 0.6 0.8 1.0 350
10 67 83 100 1,200 1.1 1.3 1.6 570 (a) Calculated on the basis of 20 hill/m2 as hill density, 80% germination by
incubation, and 75% emergence (sprout) in nursery. Conversion rate; 1 bu (bushel) = 25kg (official rate): 1acre = ca. 0.4 ha: 1 square (sq.) yard = 0.836 m2.
(b) The given nursery area is only applicable to 3-week-old seedlings with a variation allowance of 20%.
Part II Agricultural Technical Packages
2-11
f) Nursery size: The information on the nursery size in Table 2.1-1 is for reference
only, since the sprouting rate of seeds in nurseries is unstable. The sprouting
rate is highly site-specific and is prone to be affected by the properties of the
soil and climatic conditions.
In general, a sparse density (wider nursery area for a given quantity of seeds) is
favorable for the healthy growth of the seedlings since there is less competition
for light and nutrients. For mangrove swamps, the nursery area for
4-week-old seedlings should be 1.5 times that shown in Table 2.1-1.
g) Dry versus wet nurseries: As long as the land is available, a dry nursery is
strongly recommended. A suitable area of dry land is located and a nursery is
prepared with fine tillage. Based on the Pilot Project (Part IV Annex 1) and
observations of the farmers' nurseries, various disadvantages of a wet nursery
have been noted, such as the frequent occurrence of iron toxicity, diseases and
seedling etiolation. In Kambia District, a few farmers sow the seeds under
water, but many farmers do so on the lower ground near lowlands.
The nursery is dry at the sowing time but it soon becomes saturated or
submerged by rain or water seepage. Such seedling beds can be broadly
categorized as a wet nursery. In wet nurseries, iron toxicity is prevalent due to
soil reduction caused by submergence. In addition, the high level of moisture
leads to fungal diseases and, combined with high temperatures, promotes
etiolation of the seedlings.
h) Uniform broadcasting and tillage: For uniform broadcasting, the seeds are
divided into three at a 1:2 ratio, of which 2/3 is broadcast first and the
remaining 1/3 is used to even out any uneven distribution of the seeds in the
field (see the details in the note on "Uniform Seed Broadcasting" for upland
rice). The field is shallow-tilled immediately after the broadcasting.
i) Mulching: Mulching with palm fronds, etc., for a few days after sowing is
recommended to protect the seedlings from heavy rains, as has been practiced
by many farmers. This practice also helps prevent bird damage.
j) Bird scaring: Birds should be scared away for a week or so, starting
immediately after sowing.
k) Weeding: Timely weeding is advised as necessary. If the seeding rate is
appropriate, regular weeding will not be necessary.
Part II Agricultural Technical Packages
2-12
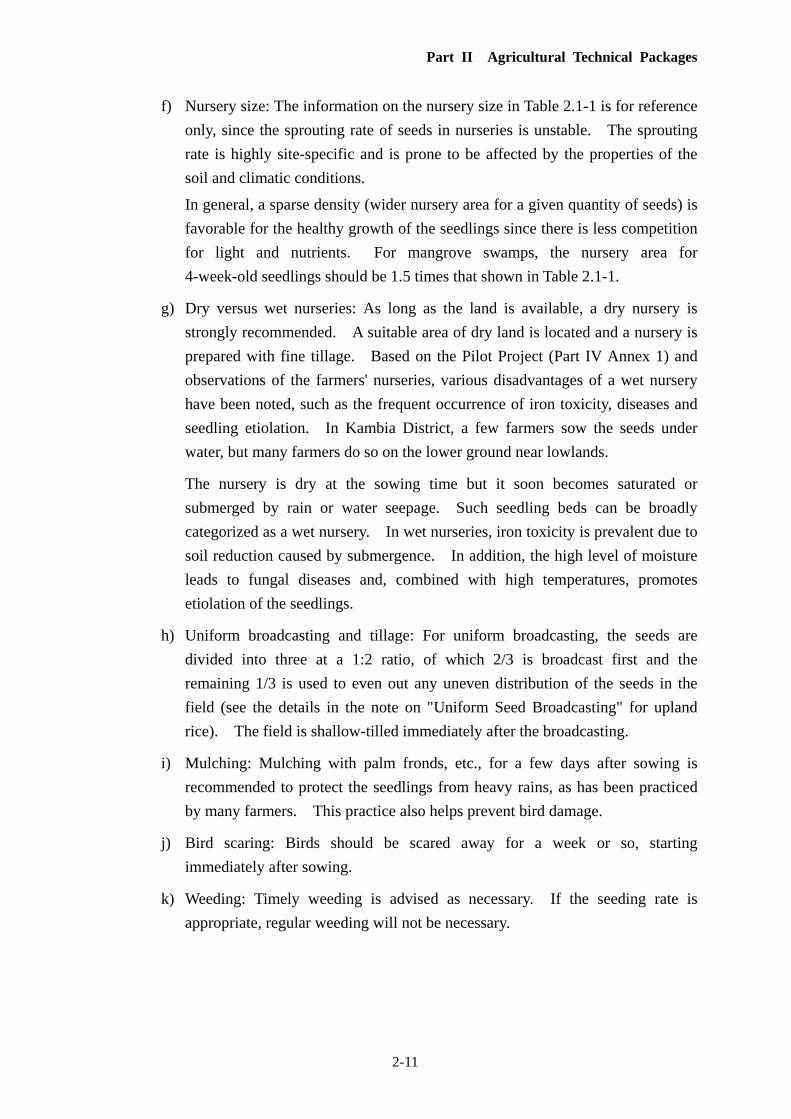
5) Puddling
Sufficient puddling is essential for shallow planting (Figure 2.1-3) that allows first
the new roots and then the tillers to develop rapidly and vigorously. For efficient
transplanting, large clods should be broken into small pieces until they become like
mud. However, proper puddling is rarely observed in Kambia District.
The farmers generally stop after breaking the large clods (20 to 40 cm) made by
plowing into smaller clods (5 to 20 cm). (They call this activity 'turn-over'.)
Some farmers do better by stamping their feet on the clods to further break them
down into mud over the spot (a few square meters) required for a handful of
seedlings.
Figure 2.1-3 Poor and Good Puddling Note: Shallow transplanting is possible only when the main field is well puddled.
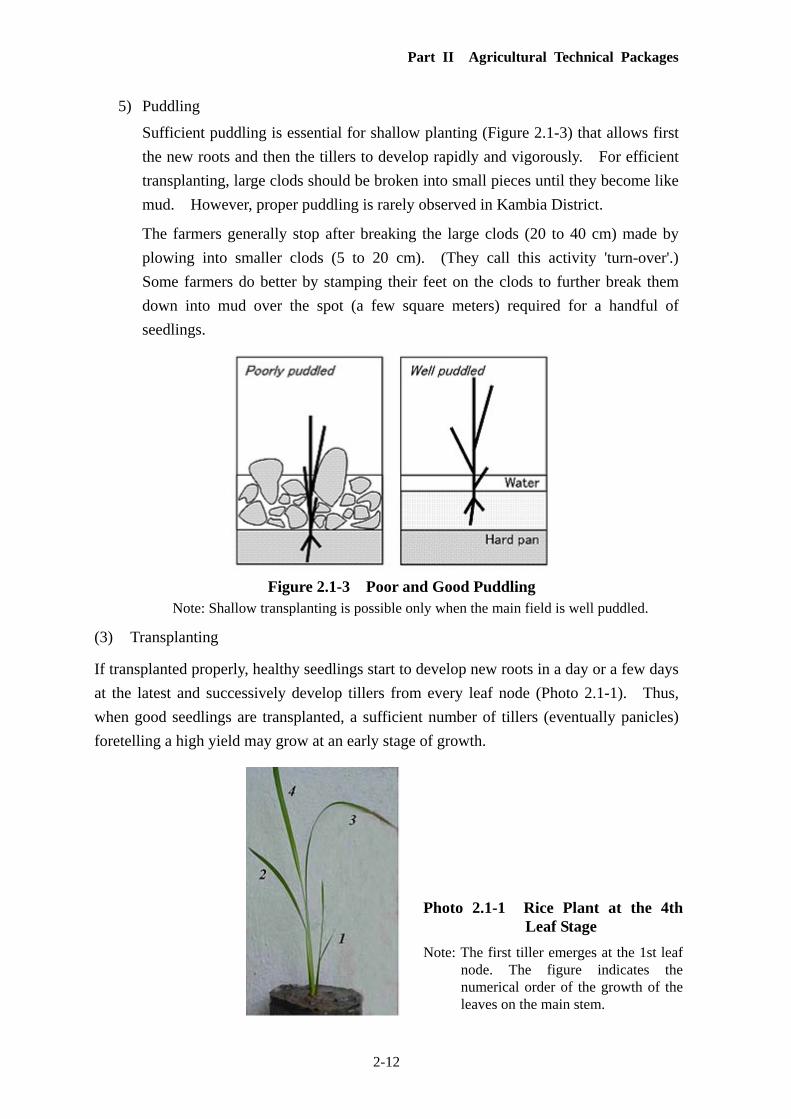
(3) Transplanting
If transplanted properly, healthy seedlings start to develop new roots in a day or a few days
at the latest and successively develop tillers from every leaf node (Photo 2.1-1). Thus,
when good seedlings are transplanted, a sufficient number of tillers (eventually panicles)
foretelling a high yield may grow at an early stage of growth.
Photo 2.1-1 Rice Plant at the 4thLeaf Stage
Note: The first tiller emerges at the 1st leafnode. The figure indicates thenumerical order of the growth of theleaves on the main stem.
Part II Agricultural Technical Packages
2-13
1) Date and timing of transplanting
In IVS and boliland, the seedlings can be transplanted at any time between June
and September, depending on the growth duration of the varieties used, the
environmental conditions (especially water availability at the late grain-filling
period), and the preference of the farmer. In the mangrove swamp areas, on the
other hand, the transplanting season is from late July to early September after the
salts have been washed out of the soil.
The time of transplanting should be during a neap tide, which allows shallow
transplanting. The tidal movement is predictable according to the phase of the
moon with a waxing or waning crescent at a low tide. Although it is within the
season, late August should be avoided since heavy rain is expected and the planted
seedlings may be swept away by flooding.
2) Uprooting
The seedlings should be uprooted from the nursery beds on the same day they are
to be transplanted. If old and tall seedlings must be used for any reason, they
should be trimmed since trimming lessens the water loss from transpiration and
mitigates damage after transplanting.
The roots of the seedlings developed in the nursery become inactive as new roots
develop from the stem base and extend into the soil to take a firm hold in the main
field. The stem base should therefore not to be damaged, and attention should be
paid to avoid knocking the seedlings hard with the hands or feet when the mud is
being removed from them.
It is prudent to pick only a few seedlings at a time so that by gently shaking or
brushing them the mud can be removed, as some farmers do. It is an easy and fast
way to remove the mud, and it is almost as fast as pulling out a handful of seedlings
at a time. Trimming the roots does not affect the quality of the seedlings.
Washing the roots in water is also an appropriate way to remove the soil.
3) Planting (hill) density
The recommended planting density is about 20 hill/m2 (hill spacing: 20 cm x 25
cm) for medium to late growth duration varieties. Because the tillering ability of
many varieties currently used in the area is high, they adapt themselves to irregular
plant spacing. Nevertheless, spacing them too close should be avoided.
The number of panicles per unit field area does not increase in proportion to any
increase in the planting density: it is controlled by the availability of nutrients and
solar radiation, in addition to the varietal traits. Besides, close spacing induces
vertical growth in the plant, rendering it susceptible to lodging. However, slightly
Part II Agricultural Technical Packages
2-14
closer spacing can be recommended for short duration (90 to 100 days) varieties
(e.g., Buttercup, Kissy fundy, etc.). Line transplanting makes weeding easy.
However, it is optional because it is more time consuming and labor intensive than
random transplanting.
4) Number of seedlings per hill
The recommended number of seedlings per hill is 2 to 3 regardless of the
agro-ecological regime, including mangrove swamp areas. The number of
panicles per unit field area (eventually grain yield) does not increase with the
number of seedlings per hill. The reason is the same as for the planting density
mentioned above. Using fewer seedlings means economizing on seeds. By
planting fewer seedlings per hill, the farmers can easily cut their seed costs by up to
1/4 or 1/5 of the present cost of planting 10 seedlings/hill or even some who plant a
higher number per hill (Table 2.1-1).
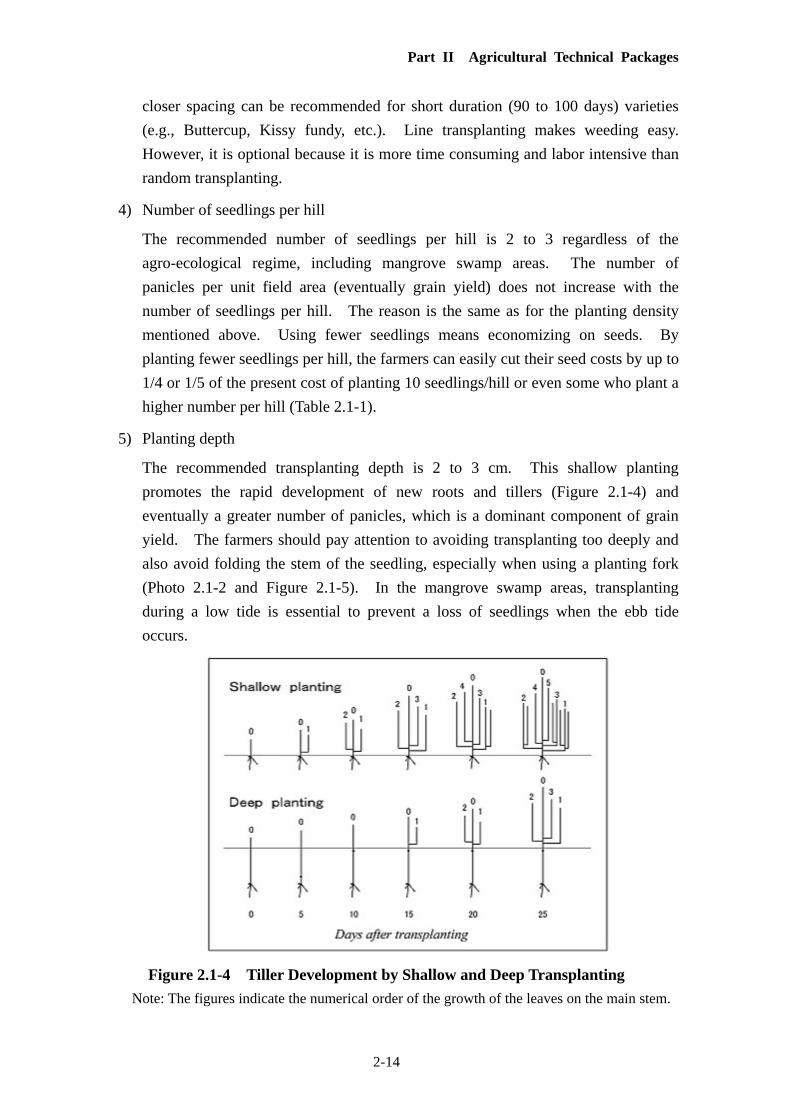
5) Planting depth
The recommended transplanting depth is 2 to 3 cm. This shallow planting
promotes the rapid development of new roots and tillers (Figure 2.1-4) and
eventually a greater number of panicles, which is a dominant component of grain
yield. The farmers should pay attention to avoiding transplanting too deeply and
also avoid folding the stem of the seedling, especially when using a planting fork
(Photo 2.1-2 and Figure 2.1-5). In the mangrove swamp areas, transplanting
during a low tide is essential to prevent a loss of seedlings when the ebb tide
occurs.
Figure 2.1-4 Tiller Development by Shallow and Deep Transplanting
Note: The figures indicate the numerical order of the growth of the leaves on the main stem.
Part II Agricultural Technical Packages
2-15
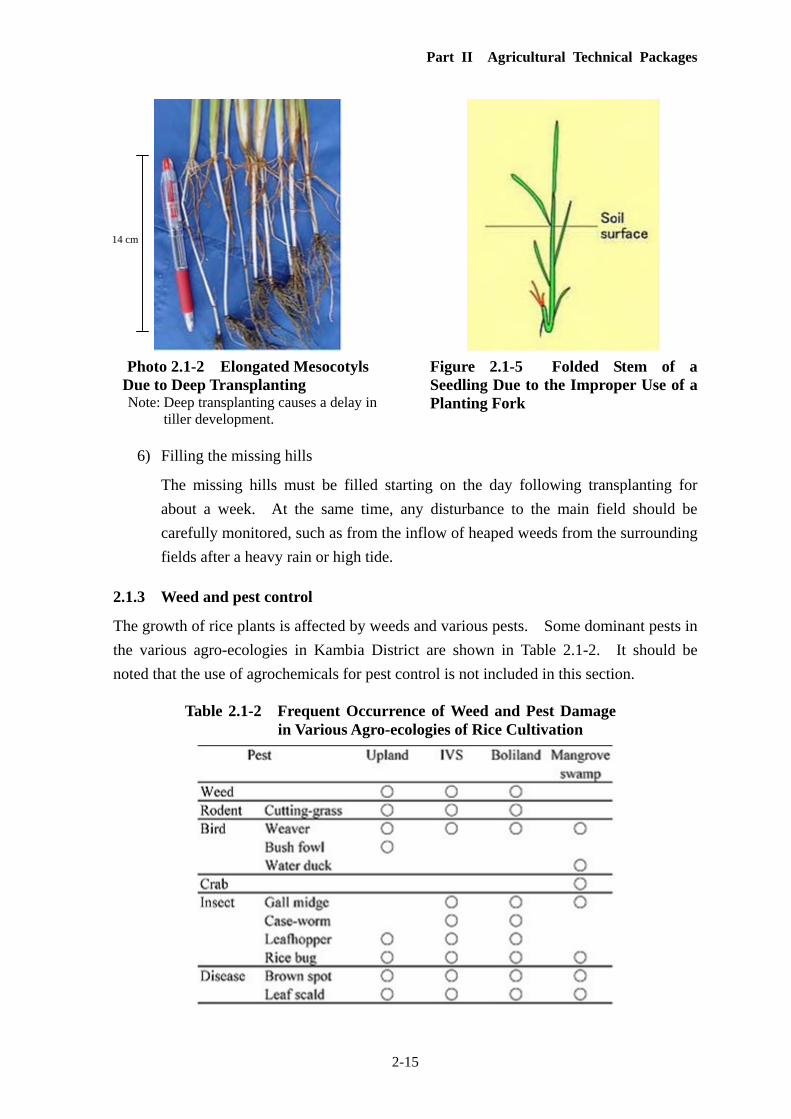
Photo 2.1-2 Elongated Mesocotyls
Due to Deep Transplanting Note: Deep transplanting causes a delay in
tiller development.
Figure 2.1-5 Folded Stem of a Seedling Due to the Improper Use of a Planting Fork
6) Filling the missing hills
The missing hills must be filled starting on the day following transplanting for
about a week. At the same time, any disturbance to the main field should be
carefully monitored, such as from the inflow of heaped weeds from the surrounding
fields after a heavy rain or high tide.
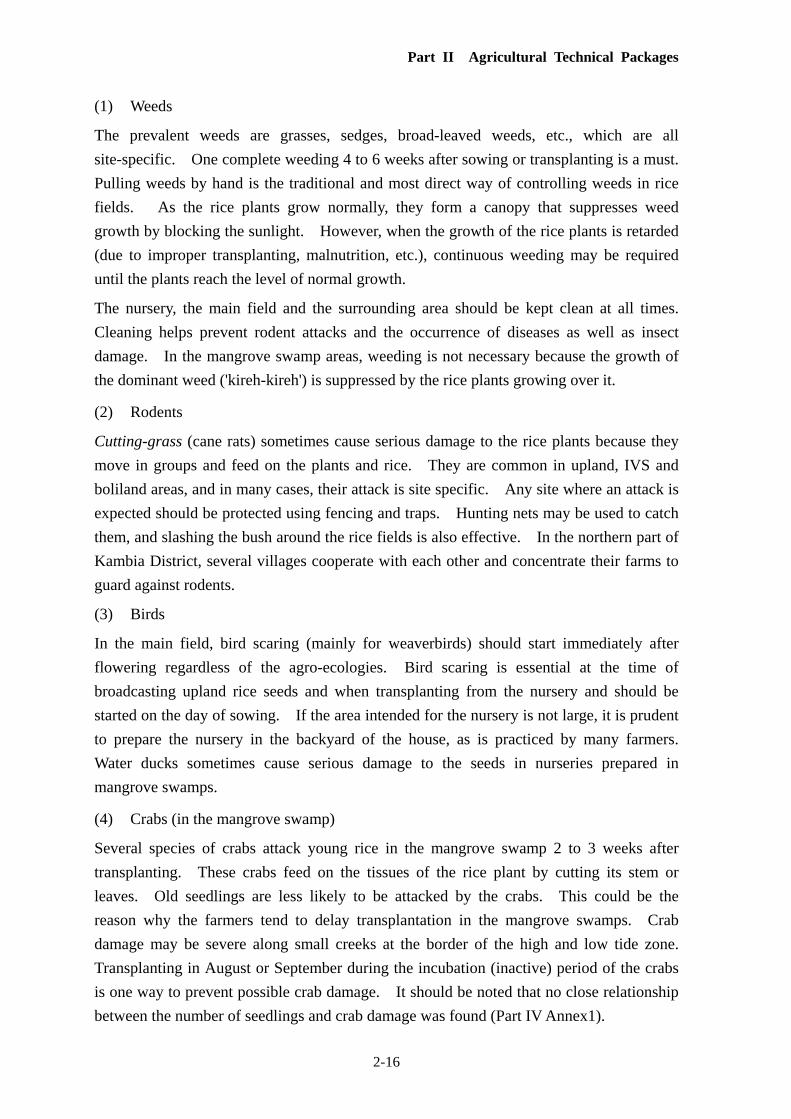
2.1.3 Weed and pest control
The growth of rice plants is affected by weeds and various pests. Some dominant pests in
the various agro-ecologies in Kambia District are shown in Table 2.1-2. It should be
noted that the use of agrochemicals for pest control is not included in this section.
Table 2.1-2 Frequent Occurrence of Weed and Pest Damage in Various Agro-ecologies of Rice Cultivation
14 cm
Part II Agricultural Technical Packages
2-16
(1) Weeds
The prevalent weeds are grasses, sedges, broad-leaved weeds, etc., which are all
site-specific. One complete weeding 4 to 6 weeks after sowing or transplanting is a must.
Pulling weeds by hand is the traditional and most direct way of controlling weeds in rice
fields. As the rice plants grow normally, they form a canopy that suppresses weed
growth by blocking the sunlight. However, when the growth of the rice plants is retarded
(due to improper transplanting, malnutrition, etc.), continuous weeding may be required
until the plants reach the level of normal growth.
The nursery, the main field and the surrounding area should be kept clean at all times.
Cleaning helps prevent rodent attacks and the occurrence of diseases as well as insect
damage. In the mangrove swamp areas, weeding is not necessary because the growth of
the dominant weed ('kireh-kireh') is suppressed by the rice plants growing over it.
(2) Rodents
Cutting-grass (cane rats) sometimes cause serious damage to the rice plants because they
move in groups and feed on the plants and rice. They are common in upland, IVS and
boliland areas, and in many cases, their attack is site specific. Any site where an attack is
expected should be protected using fencing and traps. Hunting nets may be used to catch
them, and slashing the bush around the rice fields is also effective. In the northern part of
Kambia District, several villages cooperate with each other and concentrate their farms to
guard against rodents.
(3) Birds
In the main field, bird scaring (mainly for weaverbirds) should start immediately after
flowering regardless of the agro-ecologies. Bird scaring is essential at the time of
broadcasting upland rice seeds and when transplanting from the nursery and should be
started on the day of sowing. If the area intended for the nursery is not large, it is prudent
to prepare the nursery in the backyard of the house, as is practiced by many farmers.
Water ducks sometimes cause serious damage to the seeds in nurseries prepared in
mangrove swamps.
(4) Crabs (in the mangrove swamp)
Several species of crabs attack young rice in the mangrove swamp 2 to 3 weeks after
transplanting. These crabs feed on the tissues of the rice plant by cutting its stem or
leaves. Old seedlings are less likely to be attacked by the crabs. This could be the
reason why the farmers tend to delay transplantation in the mangrove swamps. Crab
damage may be severe along small creeks at the border of the high and low tide zone.
Transplanting in August or September during the incubation (inactive) period of the crabs
is one way to prevent possible crab damage. It should be noted that no close relationship
between the number of seedlings and crab damage was found (Part IV Annex1).

Part II Agricultural Technical Packages
2-17
(5) Insects
Generally, the occurrence of insect damage in Kambia District is low, possibly due to the
heavy rains during the cropping season. Nevertheless, two species of insect are
frequently observed.
1) Gall midge
The maggot-like larva of the gall midge, a small fly similar in appearance and size to
a mosquito, feeds on the rice plant inside its developing tillers, causing their base to
swell as galls (Reissig, et al., 1986) and the leaves to turn into an onion-like form.
As long as the extent of the infection is confined to 10% of the total number of hills
and 1 to 2 tillers per hill at the maximum (usual in Kambia District), its effects on the
final yield will be minimal since other or new tillers compensate for the loss.
Nevertheless, the damage can be serious, as farmers in some parts of Samu chiefdom
reportedly abandoned the affected rice fields because of gall midge damage.
Varieties resistant to the insect are available; however, there are many biotypes of the
gall midge and the selected variety may be vulnerable to the type of gall midge in the
area (Reissing, et al., 1986).
2) Caseworm
The larvae of the caseworm cut parts of the leaves of young rice plants and roll them
into tubes called cases (Reissing, et al., 1986). The pattern of caseworm damage in
the fields is not uniform since the larvae living in their cases are often carried from
one side of the rice field to another by the wind or water currents. The damage can
be controlled by early planting and drainage.
Infection by the aforementioned two insect species occurs only up to the active tillering
stage of the rice plant. Other pest insects of rice include the leafhopper and rice bug.
Stem-borer and stalked-eye fly can be observed, but are rare.
(6) Diseases
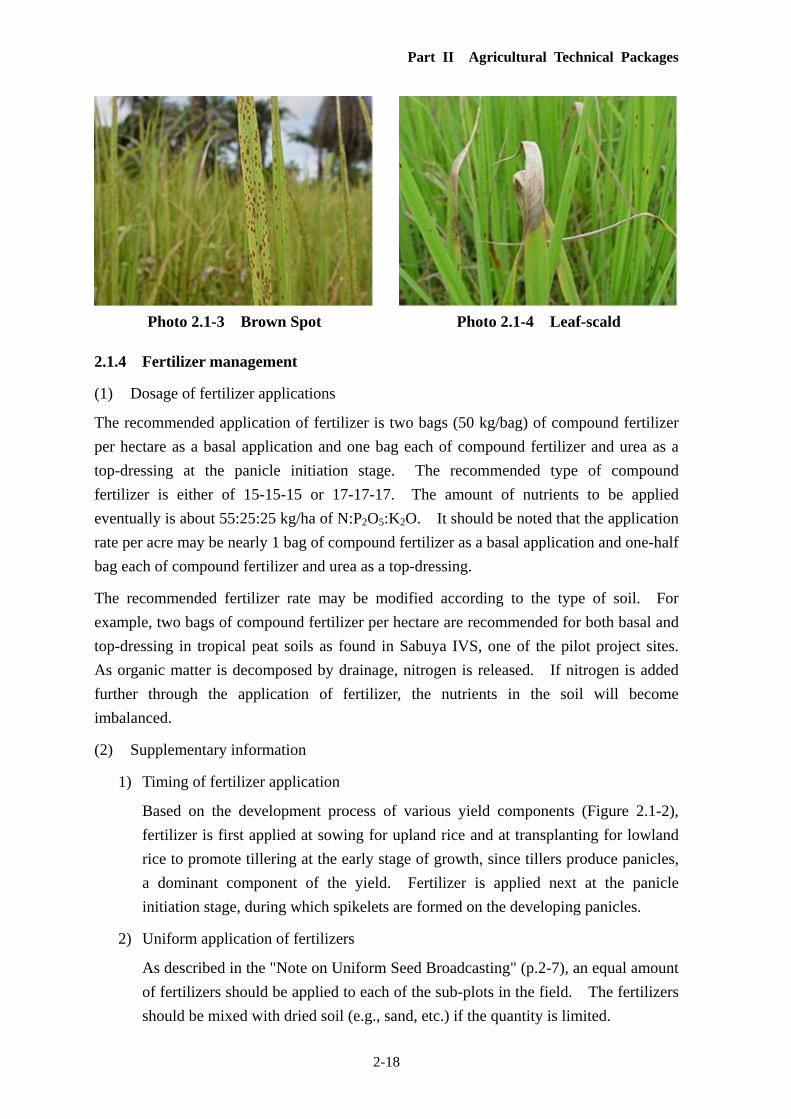
Brown spot and related fungal diseases are common and found across all the rice
agro-ecologies. Brown spot (Photo 2.1-3) is a physiological disease, caused by a nutrient
imbalance in the rice plant. It is rare in rice plants grown in fertile soils (IRRI, 1986).
The leaves of a rice plant affected by brown spot often show potassium deficiency
symptoms and low potassium concentration. Potassium fertilizer or NPK compound
fertilizer is effective in remedying the disease.
Leaf-scald (Photo 2.1-4) is a fungal as well as a physiological disease. To prevent this
disease, the sole use of nitrogenous fertilizer should be avoided. Rice blast is often found
in old seedlings in nurseries but is not common in upland rice possibly because of the
favorable rainfall in the uplands. Viral diseases such as rice yellow mottle virus disease
are rare in Kambia District.
Part II Agricultural Technical Packages
2-18
Photo 2.1-3 Brown Spot Photo 2.1-4 Leaf-scald
2.1.4 Fertilizer management
(1) Dosage of fertilizer applications
The recommended application of fertilizer is two bags (50 kg/bag) of compound fertilizer
per hectare as a basal application and one bag each of compound fertilizer and urea as a
top-dressing at the panicle initiation stage. The recommended type of compound
fertilizer is either of 15-15-15 or 17-17-17. The amount of nutrients to be applied
eventually is about 55:25:25 kg/ha of N:P2O5:K2O. It should be noted that the application
rate per acre may be nearly 1 bag of compound fertilizer as a basal application and one-half
bag each of compound fertilizer and urea as a top-dressing.
The recommended fertilizer rate may be modified according to the type of soil. For
example, two bags of compound fertilizer per hectare are recommended for both basal and
top-dressing in tropical peat soils as found in Sabuya IVS, one of the pilot project sites.
As organic matter is decomposed by drainage, nitrogen is released. If nitrogen is added
further through the application of fertilizer, the nutrients in the soil will become
imbalanced.
(2) Supplementary information
1) Timing of fertilizer application
Based on the development process of various yield components (Figure 2.1-2),
fertilizer is first applied at sowing for upland rice and at transplanting for lowland
rice to promote tillering at the early stage of growth, since tillers produce panicles,
a dominant component of the yield. Fertilizer is applied next at the panicle
initiation stage, during which spikelets are formed on the developing panicles.
2) Uniform application of fertilizers
As described in the "Note on Uniform Seed Broadcasting" (p.2-7), an equal amount
of fertilizers should be applied to each of the sub-plots in the field. The fertilizers
should be mixed with dried soil (e.g., sand, etc.) if the quantity is limited.
Part II Agricultural Technical Packages
2-19
3) Nutrient status of soils and plants
The recommended dose of fertilizers somewhat emphasizes the importance of
phosphorus and potassium, reflecting the general nutritional status of soils and
plants. Firstly, the nutritional status of the soils in Kambia District (that are
probably similar in other parts of Sierra Leone) is generally poor (Part IV Annex 3,
3.2). Not only nitrogen, but also potassium, phosphorus and micronutrients are
lacking in many soils. Since plant growth is limited by the nutrient that is in the
least supply, it is necessary to find the limiting nutrient to identify the optimal
combination of fertilizer elements. Besides, the limiting nutrient varies from
place to place. Without chemical analysis, the nutrient levels of the plants and
soils can hardly be diagnosed. However, such facilities are not easily accessible at
present.
Secondly, several nutritional disorders have been identified based on the results of
chemical analysis of plants and soils (Part IV Annex 3, 3.2), in the pilot projects
(Part IV Annex 1) and also as a result of observation of the plants in the farmers'
fields. Potassium deficiency is most common, resulting in the prevalence of
brown spot. Leaf discoloration to yellow-orange is also common, likely induced
by phosphorus deficiency.
In addition, iron toxicity is observed in the lowlands. It is caused by a lack of
oxygen derived from the decomposition of organic matter (weeds) in the soil along
with a shortage of minerals in the soil and the malnutrition in the plants. In some
patches close to the fringe of a mangrove swamp, hydrogen sulfide (H2S) toxicity is
found, which disturbs the respiratory metabolism of plants killing them even at a
low level. Because the areas affected by H2S are specific and identified and also
mitigation measures are costly, it is advised not to grow rice in such areas.
4) Water control for fertilizer application
It should be common knowledge that the majority of chemical fertilizers easily
dissolve in water. Chemical fertilizers must not be put into running water, since
the effects are disastrous. Heavy rains also cause runoff. To prevent such water
losses, dikes (bunds) must be constructed in IVS and boliland areas. In the
mangrove swamp areas, high tides during the spring tide period cannot be
controlled by ordinary dikes. Fertilizers can be applied only to limited areas
where the soil surface is not submerged by tidewater for at least one week in the
neap tide period. Such areas should be identified before the fertilizers are applied.
5) Cost-benefit ratio with fertilizer applications
Through the Pilot Project in 2007 and 2008, the fertilizer response of grain yield
Part II Agricultural Technical Packages
2-20
was found to be about 0.5 ton/ha (= 8 bu/acre) on average and 1.0 ton/ha (= 16
bu/acre) at the maximum (Part IV Annex 1). The fertilizer costs cannot be
covered by such a low increment in the rice yield under the present economic
conditions in Sierra Leone.
The yield response can be increased with improvements in crop management.
Yield increases of up to 1 ton/ha at the maximum are possible with the
recommended use of fertilizer. It should be kept in mind that fertilizer itself is not
a universal remedy and its full benefits are gained only with good cultivation
practices.
(2) Fertilizer application to nurseries
In general, fertilizer application to nurseries is not recommended although some dose of
fertilizer may be applied to seedbeds. The use of fertilizer in the nursery should be
carefully considered. Fertilizer application is acceptable when it is sunny but it should be
avoided when cloudy days continue or the seedlings are growing in wet conditions.
Under such conditions, the seedlings become etiolated and prone to diseases. The sole
use of nitrogenous fertilizer is not recommended. Instead, PK or NPK compound
fertilizers (e.g., 15-15-15) should be used, if necessary.
2.1.5 Harvesting
The maturity of the grains can be inferred from some indicators: (a) when the majority
(about 85%) of the grains turns brown or golden in color, (b) dryness and hardness judging
from biting them (c) the degree of grain shattering, and (d) when the color at the panicle
base and uppermost internode turns to yellow (or a dried state). When the color of the
husk (hull) turns brown, violet or black, any one of the latter three indicators above ((b),
(c) or (d)) or a combination of these indicators may be used.
Matured grains should be harvested early in the morning if they are fully ripe. Harvesting
in the mid afternoon especially during the harmattan period predisposes the panicles to
grain shattering or panicle breakage. It is strongly advised to sharpen knives frequently
during harvesting as is practiced by many farmers.
2.1.6 Seed handling
(1) Germination test
The germination rate of seed rice should always be tested to estimate the quantity of the
seeds needed and to evaluate their viability as well. The rate should preferably be higher
than 80%. If it is less than 80%, it is advisable to discard the stock and try to find better
quality seeds.
A germination test is performed as follows.
Part II Agricultural Technical Packages
2-21
a) Place a sheet of clean absorbent paper or cloth in a shallow container (100 to 200
mm in diameter).
b) Select 100 seeds randomly from a stock and spread them evenly on the paper or
cloth in the container.
c) Pour a sufficient amount of water for the seeds to become soaked and cover the
container with any material that prevents excess evaporation.
d) Leave the container in a room for 4 to 5 days.
e) Count the number of germinated seeds in the container.
(2) Seed production
1) Securing pure seeds
All subsistence farmers should rely on the seeds that they produce themselves.
Only the farmers themselves can guarantee the purity and viability of the seeds.
For the present level of grain yield (2 to 3 ton/ha at the maximum), mixing varieties
would not affect the production substantially despite different maturation periods
and physical characteristics. Because of this, many farmers do not pay much
attention to the purity of the seeds they use.
Mixing seeds of different varieties, however, makes it difficult to determine the
timing of the harvest. Under the present conditions in which the rate of grain
shattering is high in many varieties grown in Kambia District and panicle
harvesting is not common, the farmers are destined to lose part of the expected
production of either early or late maturing varieties if the seeds that they use are
impure.
The surest way to obtain pure seeds is to visit a rice field regularly (e.g., twice a
month throughout the rice growth) and pull out or rogue any off-type plants that are
different from the majority of the plants in the field, as soon as they are found. At
present, the farmers sometimes rogue off-type plants (often by cutting the panicles
only) shortly before the harvesting time and use them for food (to save wastage of
the transplanted plants). With this practice, late maturing genotypes cannot be
rouged since the grains of these types are able to germinate even though they are
not fully matured.
2) Self supply of seed stock
Seed supply is the lifeline of the farmers. If the required quantity of seeds cannot
be stocked in a single year, the farmer must make efforts to stock at least a portion
of the required quantity every year. Through such efforts, farmers will eventually
be able to secure their own seeds in a few years.
Part II Agricultural Technical Packages
2-22
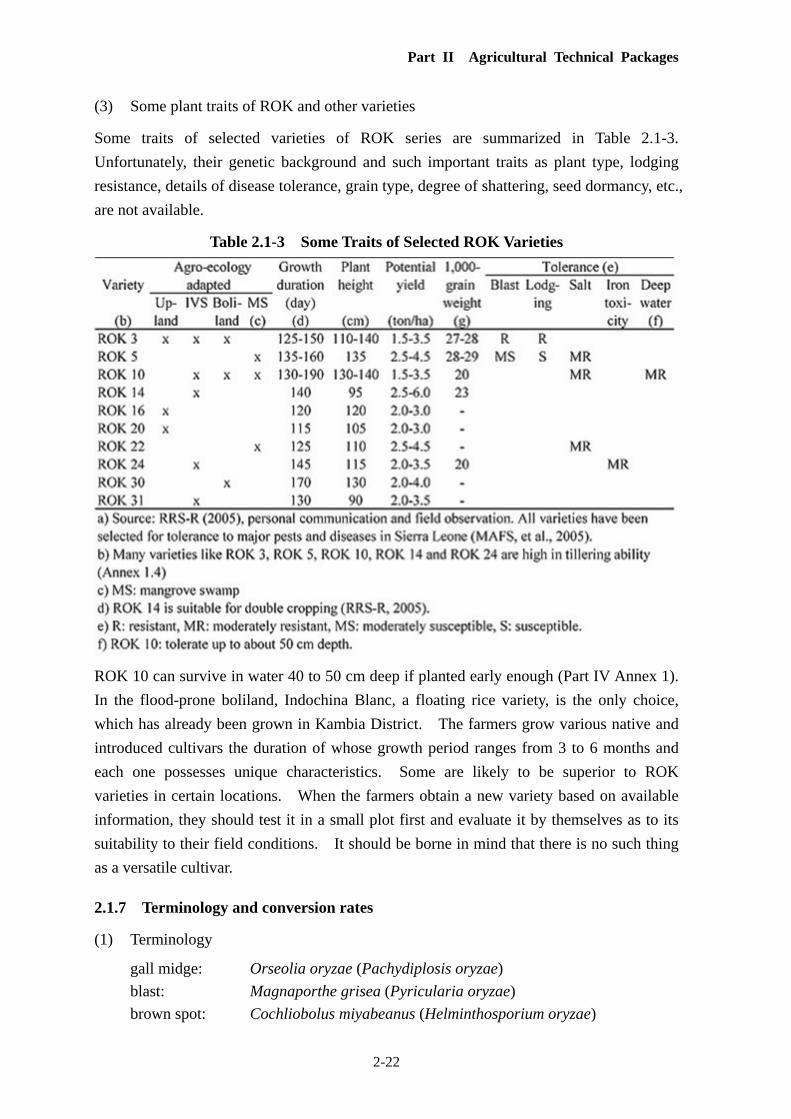
(3) Some plant traits of ROK and other varieties
Some traits of selected varieties of ROK series are summarized in Table 2.1-3.
Unfortunately, their genetic background and such important traits as plant type, lodging
resistance, details of disease tolerance, grain type, degree of shattering, seed dormancy, etc.,
are not available.
Table 2.1-3 Some Traits of Selected ROK Varieties
ROK 10 can survive in water 40 to 50 cm deep if planted early enough (Part IV Annex 1).
In the flood-prone boliland, Indochina Blanc, a floating rice variety, is the only choice,
which has already been grown in Kambia District. The farmers grow various native and
introduced cultivars the duration of whose growth period ranges from 3 to 6 months and
each one possesses unique characteristics. Some are likely to be superior to ROK
varieties in certain locations. When the farmers obtain a new variety based on available
information, they should test it in a small plot first and evaluate it by themselves as to its
suitability to their field conditions. It should be borne in mind that there is no such thing
as a versatile cultivar.
2.1.7 Terminology and conversion rates
(1) Terminology
gall midge: Orseolia oryzae (Pachydiplosis oryzae)
blast: Magnaporthe grisea (Pyricularia oryzae)
brown spot: Cochliobolus miyabeanus (Helminthosporium oryzae)
Part II Agricultural Technical Packages
2-23
bush fowl: Francolins bicolcoratus
case-worm: Nymphula depunctalis, Parapoynx stagnalis
cutting-grass: Thyronomis swinderiannus. In other regions of West Africa, it is called grass-cutter.
crawling grass: Paspalum vaginatum, indigenous species in the area. In the local language, 'kireh-kireh (or kiri-kiri)'.
leaf scald: Metasphaeria albescens, Fusariumn ivale & Rhynchosporium oryzae
leafhopper: Nephotettix spp.
oil palm: Elaeis guineensis
rice bug: Scotinophra spp.
plant-hopper: Nilaparvata spp., Sogatella spp.
stalked-eye fly: Diopsis thoracica
stem-borer: Chilo spp., Maliarpha spp.
water duck: 'ealele' in Temne
weaver: Ploceus cucullatus, Quelea quelea
(2) Conversion rates
bu (bushel): The official rate is 25 kg/bu for rough rice (brown rice with husk or paddy).
However, the going rate is 32 to 33 kg/bu in Mambolo, Samu, Gbinleh Dixing and
Magbema chiefdoms and 48 to 52 kg/bu in Masungbala, Tonko Limba and Bramaia
chiefdoms (Part IV, Annex 3.6).
1 bag of fertilizer = 50 kg
1 ha = ca. 2.5 acre, or 1 acre = ca. 0.4 ha
References
Ministry of Agriculture and Food Security (MAFS), etc. (assisted by FAO): Crop
Production Guidelines for Sierra Leone. 2005
Japan International Cooperation Agency (JICA), Ministry of Agriculture, Forestry and
Food Security (MAFFS), and Rice Research Station, Rokupr (RRS-R): Farm Management
and Rural Socio-Economic Survey in Kambia District, Sierra Leone (Baseline Survey).
2007
Reissig, W.H., et al.: Illustrated Guide to Integrated Pest Management in Rice in Tropical
Asia, International Rice Research Institute (IRRI). 1986
Rice Research Station, Rokupr (RRSR. presently Rokupr Agricultural Research Center
(RARC)): Summary of Rice Technology. 2005
Vergara, B.S.: A Farmer’s Primer on Growing Rice, International Rice Research Institute
(IRRI). 1992
Part II Agricultural Technical Packages
2-24
2.2 Cost-Benefit Analysis
2.2.1 Procedures for conducting a cost-benefit analysis
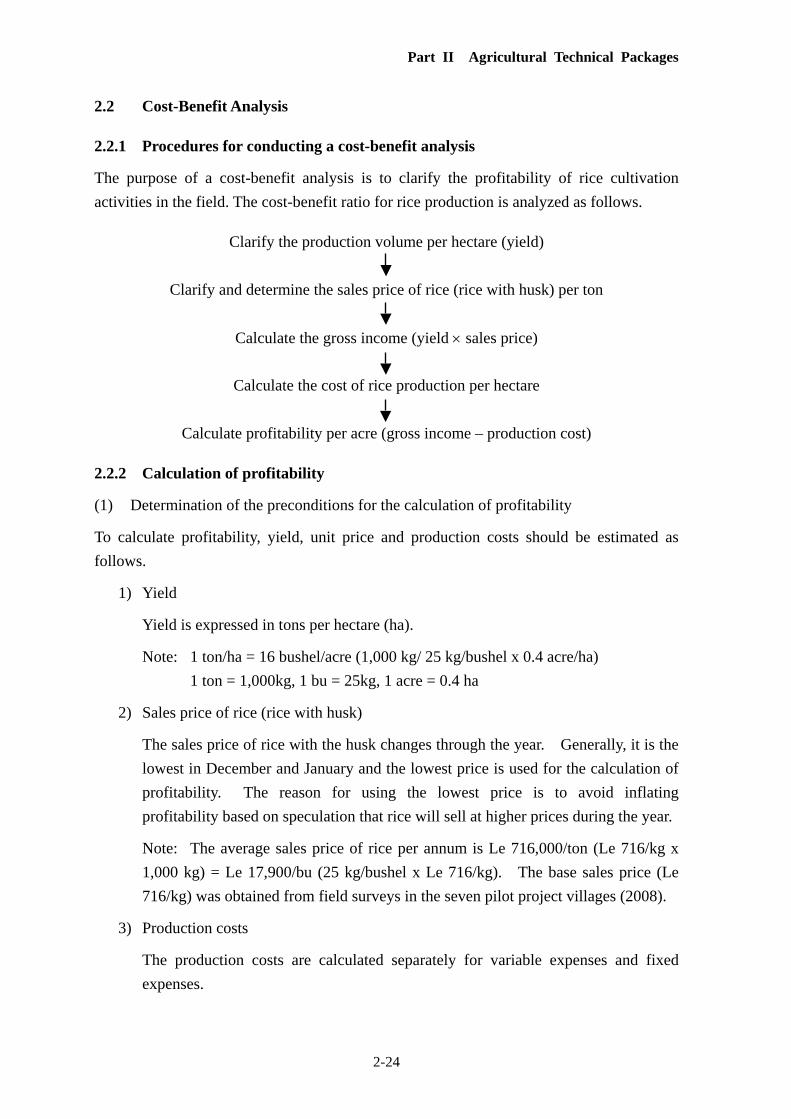
The purpose of a cost-benefit analysis is to clarify the profitability of rice cultivation
activities in the field. The cost-benefit ratio for rice production is analyzed as follows.
Clarify the production volume per hectare (yield)
Clarify and determine the sales price of rice (rice with husk) per ton
Calculate the gross income (yield sales price)
Calculate the cost of rice production per hectare
Calculate profitability per acre (gross income – production cost)
2.2.2 Calculation of profitability
(1) Determination of the preconditions for the calculation of profitability
To calculate profitability, yield, unit price and production costs should be estimated as
follows.
1) Yield
Yield is expressed in tons per hectare (ha).
Note: 1 ton/ha = 16 bushel/acre (1,000 kg/ 25 kg/bushel x 0.4 acre/ha)
1 ton = 1,000kg, 1 bu = 25kg, 1 acre = 0.4 ha
2) Sales price of rice (rice with husk)
The sales price of rice with the husk changes through the year. Generally, it is the
lowest in December and January and the lowest price is used for the calculation of
profitability. The reason for using the lowest price is to avoid inflating
profitability based on speculation that rice will sell at higher prices during the year.
Note: The average sales price of rice per annum is Le 716,000/ton (Le 716/kg x
1,000 kg) = Le 17,900/bu (25 kg/bushel x Le 716/kg). The base sales price (Le
716/kg) was obtained from field surveys in the seven pilot project villages (2008).
3) Production costs
The production costs are calculated separately for variable expenses and fixed
expenses.
Part II Agricultural Technical Packages
2-25
(a) Variable expenses
Seed rice
The price of seed rice adopted is Le 50,000 per 25 kg, which was the purchase
price in Kobia in 2007.
Note: The seed price/kg is Le 2,000 (Le 50,000/25 kg). The sowing rate/ha
is 75 kg in the pilot projects. Converted into bu/acre, it is 1.2 bu/acre (75
kg/ha x 0.4 = 30 kg/acre; 30 kg/acre/25 kg per bushel =1.2 bushel/acre).
Fertilizer
The purchase price of fertilizer used is Le 145,000/bag (50kg) in the Barmoi
Luma market (2008).
Note: Fertilizer inputs 4 bags/ha = 200 kg/ha (50 kg x 4 bags) in the pilot
projects (i.e., 200 kg/bu (25 kg) = 8 bu/acre).
Labor costs
Labor costs are based on the results of interviews conducted in the seven pilot
project villages in 2008. The average labor requirement in one cropping
season for rice is about 55 persons from land preparation until harvest. The
wage for a laborer per day ranges from Le 3,000 to Le 5,000. Family labor
costs are excluded from the production costs.
(b) Fixed expenses
Farming tools
The cost of farming tools is obtained from MAFFS-K field survey data in 2008,
which is Le 35,000/ha (Le 35,000 x 0.4 = Le 14,000/acre).
(2) Profitability estimate
Tables 2.2-1 and 2.2-2 show the estimated profitability of rice cultivation per hectare in
different cases of yield. The following can be pointed out from the tables.
a) It is important to disseminate those techniques that will lead to yield increases
without significant labor costs, which account for 75% of the total production costs
under the no fertilizer application condition.
b) To reduce labor costs, the introduction of agricultural machinery is an option.
However, the farmers generally cannot afford this under their present economic
conditions, so it is not a feasible option.
c) Under the fertilizer application condition, the share of the production costs is about
the same for labor costs and fertilizer costs. If the yield reached two tons or more
Part II Agricultural Technical Packages
2-26
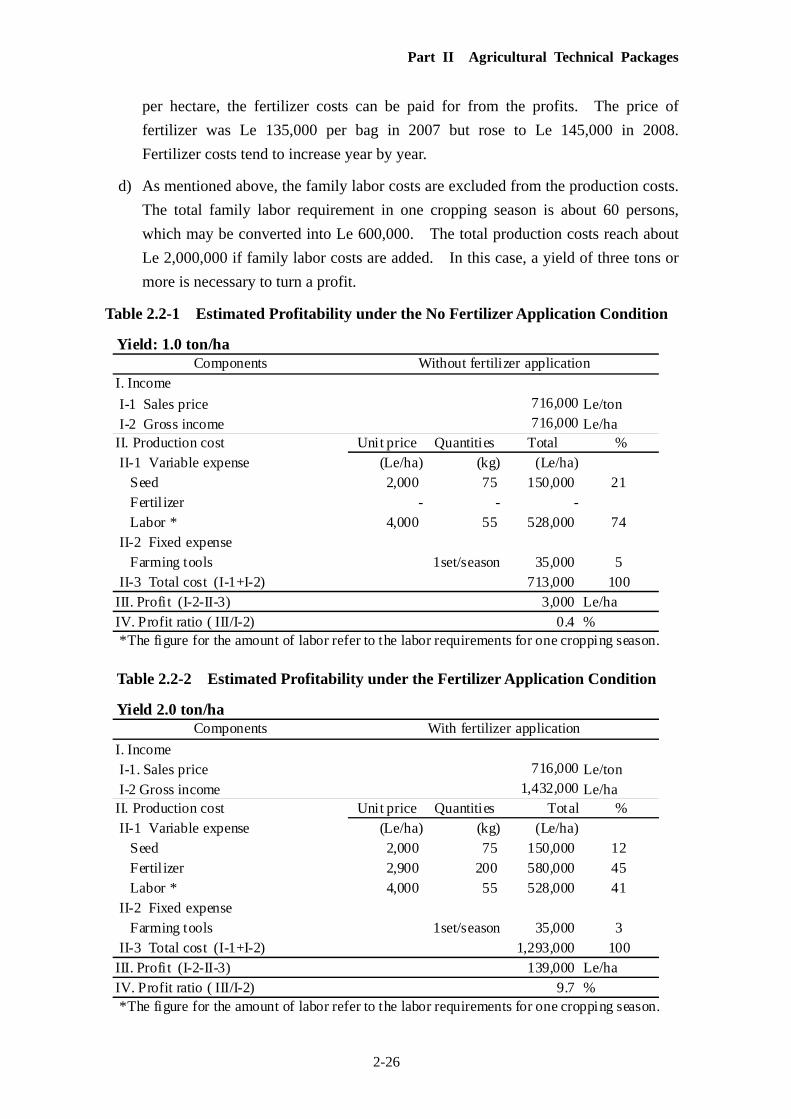
Yield: 1.0 ton/ha
I-1 Sales price 716,000 Le/ton I-2 Gross income 716,000 Le/haII. Production cost Unit price Quantities Total % II-1 Variable expense (Le/ha) (kg) (Le/ha)
2,000 75 150,000 21- - -
4,000 55 528,000 74 II-2 Fixed expense Farming tools 1set/season 35,000 5 II-3 Total cost (I-1+I-2) 713,000 100III. Profit (I-2-II-3) 3,000 Le/haIV. Profit ratio ( III/I-2) 0.4 % *The figure for the amount of labor refer to the labor requirements for one cropping season.
Components Without fertilizer application
Seed Fertil izer Labor *
I. Income
per hectare, the fertilizer costs can be paid for from the profits. The price of
fertilizer was Le 135,000 per bag in 2007 but rose to Le 145,000 in 2008.
Fertilizer costs tend to increase year by year.
d) As mentioned above, the family labor costs are excluded from the production costs.
The total family labor requirement in one cropping season is about 60 persons,
which may be converted into Le 600,000. The total production costs reach about
Le 2,000,000 if family labor costs are added. In this case, a yield of three tons or
more is necessary to turn a profit.
Table 2.2-1 Estimated Profitability under the No Fertilizer Application Condition
Table 2.2-2 Estimated Profitability under the Fertilizer Application Condition
Yield 2.0 ton/ha
I. Income I-1. Sales price 716,000 Le/ton I-2 Gross income 1,432,000 Le/haII. Production cost Unit price Quantities Total % II-1 Variable expense (Le/ha) (kg) (Le/ha) Seed 2,000 75 150,000 12 Fertil izer 2,900 200 580,000 45 Labor * 4,000 55 528,000 41 II-2 Fixed expense Farming tools 1set/season 35,000 3 II-3 Total cost (I-1+I-2) 1,293,000 100III. Profit (I-2-II-3) 139,000 Le/haIV. Profit ratio ( III/I-2) 9.7 % *The figure for the amount of labor refer to the labor requirements for one cropping season.
With fertilizer applicationComponents
Part II Agricultural Technical Packages
2-27
2.2.3 Breakeven point
Through the calculation of profitability, the breakeven point between the yield and the
price can be estimated as follows.
a) The breakeven point in the yield represents the level of yield necessary to cover all
the production costs given a fixed price for the rice. Through a breakeven
analysis, the level of the yield required to produce a profit can be determined
according to the sales price as presented below.
Breakeven point in yield = Total production costs/rice sales price
b) The breakeven point in the price represents the sales price of rice necessary to
cover all the production costs given a fixed level of yield. In the breakeven
analysis, the price that is required in order to secure a profit can be determined from
the level of the yield as presented below.
Breakeven point in price = Total production costs/yield
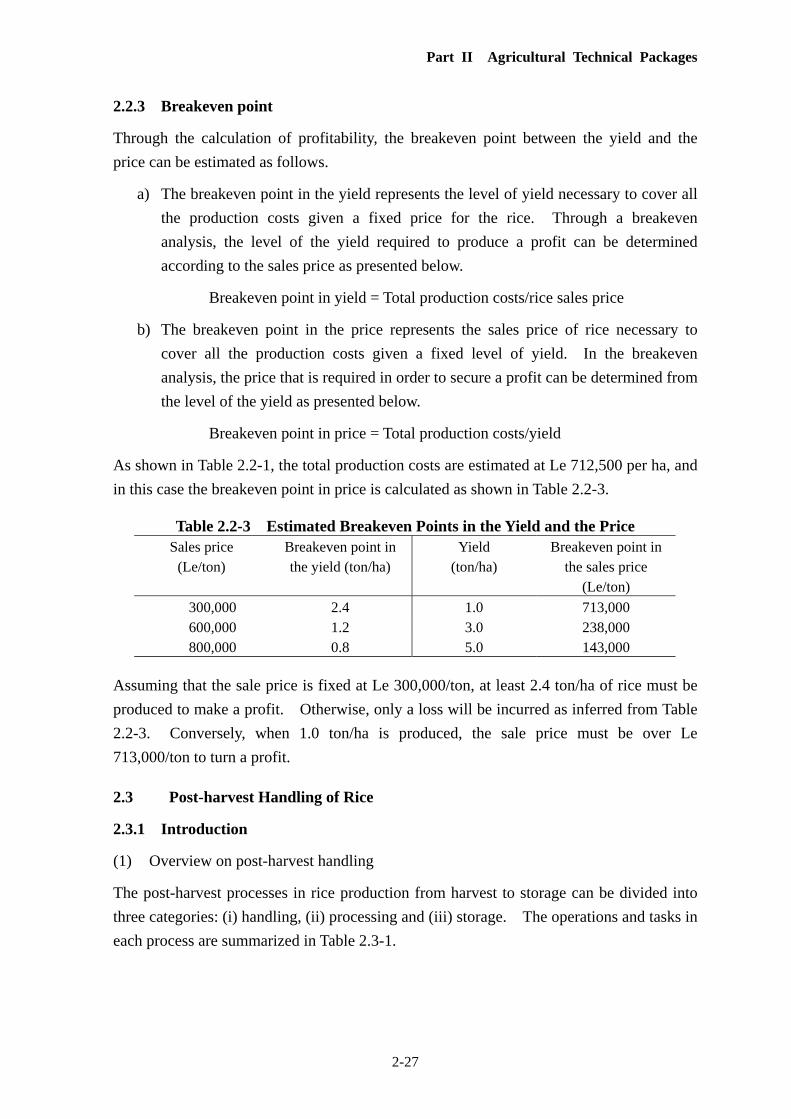
As shown in Table 2.2-1, the total production costs are estimated at Le 712,500 per ha, and
in this case the breakeven point in price is calculated as shown in Table 2.2-3.
Table 2.2-3 Estimated Breakeven Points in the Yield and the Price Sales price
(Le/ton) Breakeven point in the yield (ton/ha)
Yield (ton/ha)
Breakeven point in the sales price
(Le/ton)
300,000 2.4 1.0 713,000 600,000 1.2 3.0 238,000 800,000 0.8 5.0 143,000
Assuming that the sale price is fixed at Le 300,000/ton, at least 2.4 ton/ha of rice must be
produced to make a profit. Otherwise, only a loss will be incurred as inferred from Table
2.2-3. Conversely, when 1.0 ton/ha is produced, the sale price must be over Le
713,000/ton to turn a profit.
2.3 Post-harvest Handling of Rice
2.3.1 Introduction
(1) Overview on post-harvest handling
The post-harvest processes in rice production from harvest to storage can be divided into
three categories: (i) handling, (ii) processing and (iii) storage. The operations and tasks in
each process are summarized in Table 2.3-1.
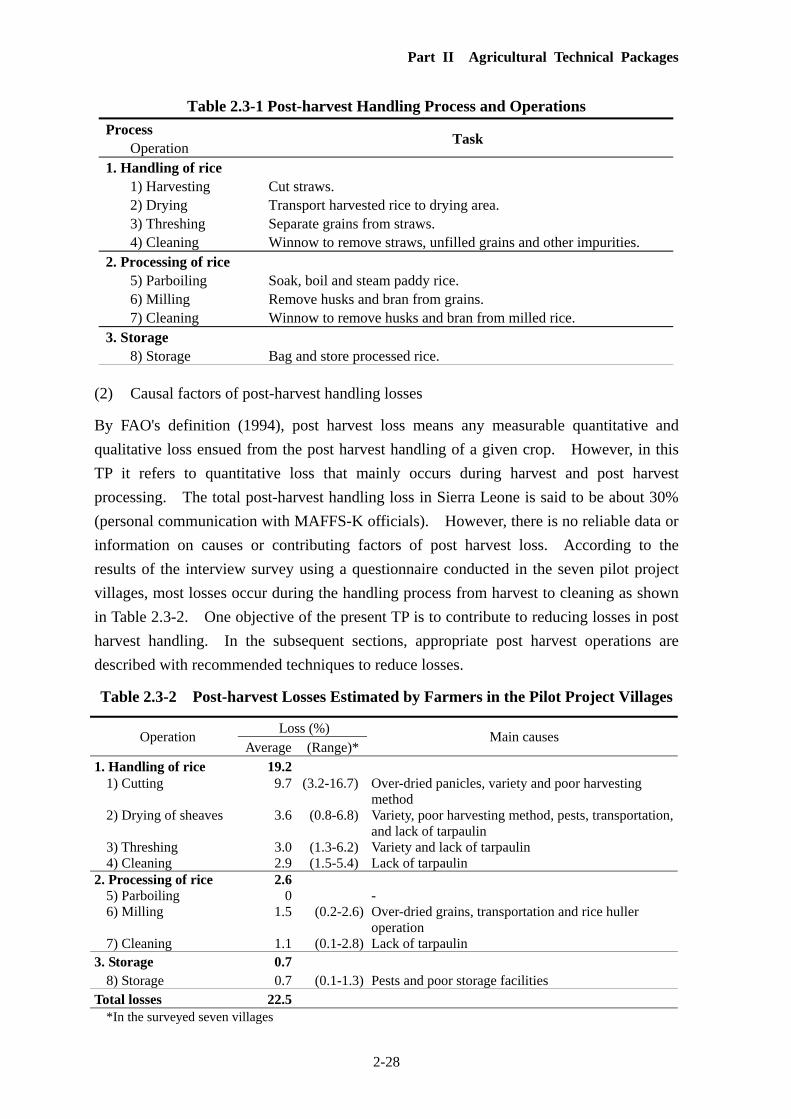
Part II Agricultural Technical Packages
2-28
Table 2.3-1 Post-harvest Handling Process and Operations
Process Operation
Task
1. Handling of rice 1) Harvesting Cut straws. 2) Drying Transport harvested rice to drying area. 3) Threshing Separate grains from straws. 4) Cleaning Winnow to remove straws, unfilled grains and other impurities.
2. Processing of rice 5) Parboiling Soak, boil and steam paddy rice. 6) Milling Remove husks and bran from grains. 7) Cleaning Winnow to remove husks and bran from milled rice.
3. Storage 8) Storage Bag and store processed rice.
(2) Causal factors of post-harvest handling losses
By FAO's definition (1994), post harvest loss means any measurable quantitative and
qualitative loss ensued from the post harvest handling of a given crop. However, in this
TP it refers to quantitative loss that mainly occurs during harvest and post harvest
processing. The total post-harvest handling loss in Sierra Leone is said to be about 30%
(personal communication with MAFFS-K officials). However, there is no reliable data or
information on causes or contributing factors of post harvest loss. According to the
results of the interview survey using a questionnaire conducted in the seven pilot project
villages, most losses occur during the handling process from harvest to cleaning as shown
in Table 2.3-2. One objective of the present TP is to contribute to reducing losses in post
harvest handling. In the subsequent sections, appropriate post harvest operations are
described with recommended techniques to reduce losses.
Table 2.3-2 Post-harvest Losses Estimated by Farmers in the Pilot Project Villages
*In the surveyed seven villages
Loss (%) Operation
Average (Range)*Main causes
1. Handling of rice 19.2 1) Cutting 9.7 (3.2-16.7) Over-dried panicles, variety and poor harvesting
method 2) Drying of sheaves 3.6 (0.8-6.8) Variety, poor harvesting method, pests, transportation,
and lack of tarpaulin 3) Threshing 3.0 (1.3-6.2) Variety and lack of tarpaulin 4) Cleaning 2.9 (1.5-5.4) Lack of tarpaulin
2. Processing of rice 2.6 5) Parboiling 0 - 6) Milling 1.5 (0.2-2.6) Over-dried grains, transportation and rice huller
operation 7) Cleaning 1.1 (0.1-2.8) Lack of tarpaulin
3. Storage 0.7 8) Storage 0.7 (0.1-1.3) Pests and poor storage facilities
Total losses 22.5
Part II Agricultural Technical Packages
2-29
2.3.2 Handling of rice
(1) Cutting
1) Timely cutting
Proper cutting at the right time is essential in attaining the maximum grain yield with
the minimum grain losses and quality deterioration. The day of harvest must be
carefully determined and the work on the day should be planned in advance. If the
optimal time were missed, grains would shatter. The right harvest time is when
80-85% of the grains are straw (yellow) colored (GSI-FAO-Rome, 1999).
The rice field should be visited frequently as the end of the maturity period of rice
approaches, and the harvest time is determined from the plant conditions in the field.
The work schedule for rice handling on the harvest day should be planned in advance.
Accordingly, a suitable site for drying and threshing should be located, and laborers
for the handling tasks should be mobilized beforehand.
2) Cutting and making bunches
A typical manual cutting method is to grasp straws at about two third of the straw
length above the ground and them with a small straight knife. To minimize the risk
of shattering grains, knives should be sharpened before cutting and during cutting as
necessary. The cut panicles with straw are held in one hand and as more panicles
are cut, they are added to the bundle in the hand. When the bundle is large enough,
it is tied with a wisp of straw, and when there are six or seven bundles, they are
carried to the drying place.
Straws should be cut a little longer so that the panicles lower on the stems are not
rolled in the bunch. By doing this, ventilation to the panicles is improved so that
they can be dried faster. Also, with longer straws, the panicles can be threshed by
not only a pedal-thresher but also beating or trampling (cf. “field drying”). Then,
the bundles or bunches of rice are bound before they are carried to the drying place.
It is recommended that binding be done in a container such as large pan or basket, for
rice is likely to fall from the bundled panicles during the work. The use of the
container is to reduce shattering loss while binding.
(2) Drying of sheaves
1) Transporting
The bound bundles of rice are carried to the place where they are dried. To
transport the bundles, a big pan, basket or cloth is recommended for shattering rice as
in case of bundling mentioned in the previous section. If the drying place is far
away and the crop needs to be transported a long distance, however, there is a risk of
handling loss.
Part II Agricultural Technical Packages
2-30
2) Field drying
The drying place should be clean and as flat and leveled as possible. Use of
bamboo or palm leaf mats for underlay is recommended not only to collect shattered
grains but also to prevent the grains from mixing with gravel. Tarpaulin sheets may
also be used as underlay but care should be taken not to use them when rain is
expected since tarpaulin does not let water through. If there are not enough
tarpaulin sheets for both drying and threshing, they should be used for threshing that
has priority.
Bunches are collected and stacked at the drying place but they must not be laid
directly on the ground, especially in the rainy season. The inside of the stack
becomes hot and that would degrade the rice quality because a) molds grow
quickly and infest the grains, b) discoloration of the grains may result within the
first day of field drying, and c) dry grains may absorb moisture again from wet
straw, causing the grains to crack, thereby leading to less head rice after milling.
(3) Threshing
As soon as the bunched rice panicles are adequately dried, they are threshed (to separate
grains from straw). The ground preparation for threshing is the same as for drying with
bamboo or palm leaf mats over the level ground (that may be covered with tarpaulin).
Threshing methods are as follows.
a) Foot threshing or trampling: By trampling on the crop spread on the ground with bare
feet
b) Beating against a threshing rack: By striking the crop against a mortar or any hard
object (e.g., steel oil drum) set on the ground
c) Beating with stick: By striking the crop spread on the ground with a stick
Any of the above methods is fine as long as the ground is clean and level. Use of
tarpaulin would help prevent contamination with impurities (e.g., sand and small stones).
(4) Cleaning
Cleaning works include a) hand sorting and sifting of the bits of straws, chaff and other
large and dense materials from the grain piles; b) drying of grains for a few hours; c)
winnowing by winnowers (Kateme in Temne) or by dropping grains from a basket through
a crosswind (practiced mainly in Mambolo and Samu chiefdoms).
Tarpaulin, bamboo mats and palm leaf mats are recommended as underlay to reduce
handling losses of rice. For example, tarpaulin on the ground makes it easy collect the
paddy and helps prevent contamination of the paddy with impurities.
Part II Agricultural Technical Packages
2-31
2.3.3 Processing
(1) Parboiling
In Sierra Leone, rice is mainly sold and consumed as food in the form of parboiled rice.
Although the parboiling process is labor intensive, the farmers prefer parboiling rice for the
following reasons.
a) Parboiled rice is less likely to break during milling than unprocessed rice.
b) Parboiled rice has better marketing potential (since there is consumers' demand).
c) Parboiling increases the volume of rice through the processing.
The parboiling process has three important steps as follows:
a) Soaking paddy in water to increase its moisture content (to about 30%)
b) Steaming to complete gelatinization
c) Drying paddy to a moisture level safe for milling
Proper drying after gelatinization of starch makes the grains hard and resistant to breakage
during milling. Overheating rice by excess boiling or steaming spoils gelatinization.
Overheated parboiled rice is thus more prone to breakage after milling than appropriately
parboiled rice. Steaming or boiling of grains must be stopped as soon as their husks start
to split.
The following steps are indispensable to stop gelatinizing after boiling and steaming:
a) After boiling, remove all the grains and put them in another container.
b) Add fresh cold water until the grains are completely submerged to cool down.
c) Remove all the grains from the container and put them in another container.
d) Add some water and heat it until the steam is visible over the grains in the container.
e) Remove all the grains from the container and allow them to cool down on a mat,
tarpaulin or drying floor.
(2) Hulling
Hulling is the process of removing or separating husks (hulls) and bran from the grains to
produce the edible portion for consumption. In long-grain varieties, the hull accounts for
18-28% of the grain weight and the brown rice for 72-83%. The brown rice consists of
5-8% bran, 2-3% embryo and 89-94% edible portion. After industrial milling, 100 kg of
rough rice yields about 60 kg of white rice, 10 kg of broken grains, 10 kg of bran and flour,
and 20 kg of hulls (AGSI-FAO, 1999). In other words, the weight of rice decreases by
40% after hulling (head rice). There are two types of hulling methods observed in
Kambia District, manual hulling by pestle and mortar and mechanized hulling by rice
huller. In manual hulling, grains are dehulled and whitened gradually as they are ground
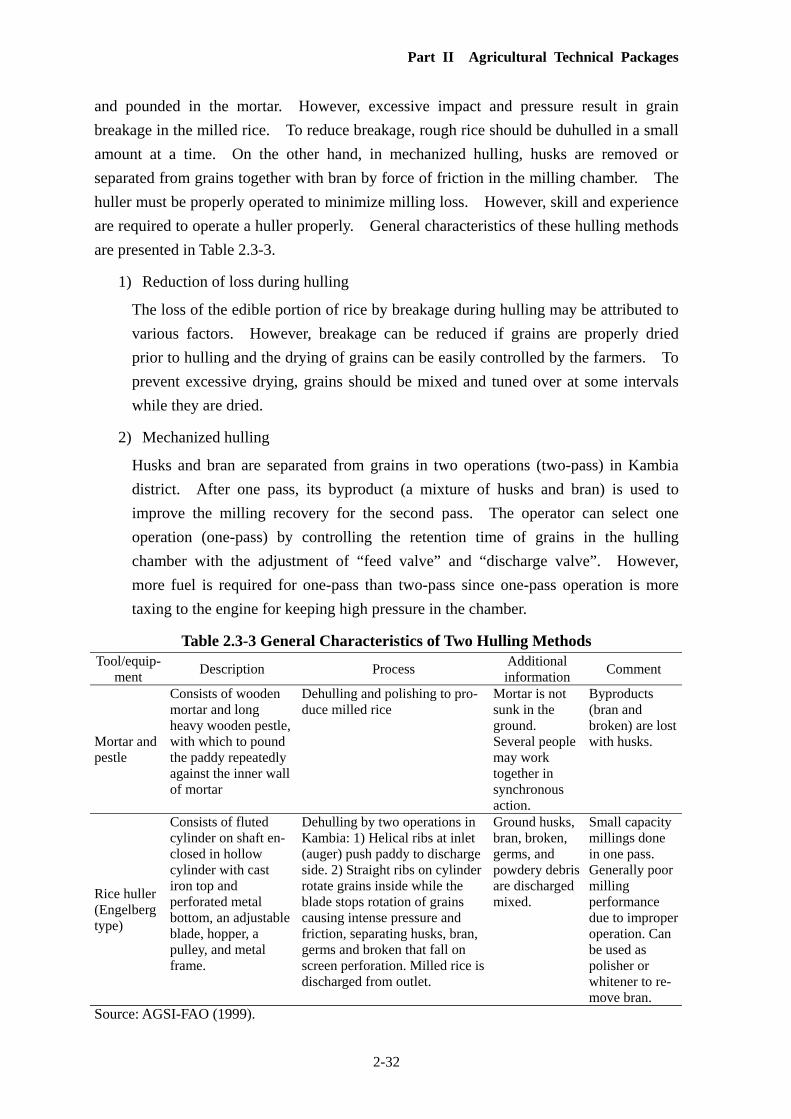
Part II Agricultural Technical Packages
2-32
and pounded in the mortar. However, excessive impact and pressure result in grain
breakage in the milled rice. To reduce breakage, rough rice should be duhulled in a small
amount at a time. On the other hand, in mechanized hulling, husks are removed or
separated from grains together with bran by force of friction in the milling chamber. The
huller must be properly operated to minimize milling loss. However, skill and experience
are required to operate a huller properly. General characteristics of these hulling methods
are presented in Table 2.3-3.
1) Reduction of loss during hulling
The loss of the edible portion of rice by breakage during hulling may be attributed to
various factors. However, breakage can be reduced if grains are properly dried
prior to hulling and the drying of grains can be easily controlled by the farmers. To
prevent excessive drying, grains should be mixed and tuned over at some intervals
while they are dried.
2) Mechanized hulling
Husks and bran are separated from grains in two operations (two-pass) in Kambia
district. After one pass, its byproduct (a mixture of husks and bran) is used to
improve the milling recovery for the second pass. The operator can select one
operation (one-pass) by controlling the retention time of grains in the hulling
chamber with the adjustment of “feed valve” and “discharge valve”. However,
more fuel is required for one-pass than two-pass since one-pass operation is more
taxing to the engine for keeping high pressure in the chamber.
Table 2.3-3 General Characteristics of Two Hulling Methods Tool/equip-
ment Description Process
Additional information
Comment
Mortar and pestle
Consists of wooden mortar and long heavy wooden pestle, with which to pound the paddy repeatedly against the inner wall of mortar
Dehulling and polishing to pro-duce milled rice
Mortar is not sunk in the ground. Several people may work together in synchronous action.
Byproducts (bran and broken) are lost with husks.
Rice huller (Engelberg type)
Consists of fluted cylinder on shaft en-closed in hollow cylinder with cast iron top and perforated metal bottom, an adjustable blade, hopper, a pulley, and metal frame.
Dehulling by two operations in Kambia: 1) Helical ribs at inlet (auger) push paddy to discharge side. 2) Straight ribs on cylinder rotate grains inside while the blade stops rotation of grains causing intense pressure and friction, separating husks, bran, germs and broken that fall on screen perforation. Milled rice is discharged from outlet.
Ground husks, bran, broken, germs, and powdery debris are discharged mixed.
Small capacity millings done in one pass. Generally poor milling performance due to improper operation. Can be used as polisher or whitener to re-move bran.
Source: AGSI-FAO (1999).
Part II Agricultural Technical Packages
2-33
2.3.4 Storage
The following measures should be taken to reduce losses during storage in Kambia district.
1) Proper drying before storage
Biting the grain is a popular method to test its dryness practiced by the farmers.
The grain moisture, however, can be checked more reliably by the following method.
a) Place a handful of grains in a small glass jar (with a screw top if possible).
b) Sprinkle a spoonful of ordinary salt over the grains at the bottom and seal the top
of the jar.
c) Store for 24 hours.
d) Examine the contents of the jar. If the salt clumps together, the grains are too
moist to mill or store. If the salt remains dispersed, the grains have moisture
content of 15% or less and can safely be milled or stored in bags.
2) Use of pallet
Bags filled with grains should be placed on a pallet but never directly on the floor.
Pallets are indispensable for keeping the bags away from moisture seeping through
the storage floor. If a pallet is not available, timbers are collected and assembled
side by side on the floor to put the bags on.
3) Rodents control
To keep rodents off, the storage should be properly managed as follows.
a) Keep the storage place free of fallen grains, garbage, cloths, etc. so that there is
nothing for the rodents to feed on, hide or nest in/under.
b) Store bags on pallets, ensuring that grains in the bags remain dry.
4) Insects control
Low humidity generally slows down or even stops reproduction of pest insects. If
insects are found in storage bags, the grains should be taken out of the bags and dried
under the sun.
5) Microorganisms control
Microorganisms also thrive in humid environment. They can be controlled by:
a) Drying the grains properly before storage
b) Checking the grain in the storage regularly.
c) Drying the grains immediately if they are wet

Part II Agricultural Technical Packages
2-34
2.3.5 Issues on introduction of post-harvest machinery
Given the chronic labor shortage and farmers’ excess workload in Kambia district,
mechanization of agricultural activities is a must in the long-term development strategy,
although the present economic conditions in the rural areas do not allow immediate or
drastic change.
In the Project, three types of agro-machinery were introduced to ease the farmers'
workload: pedal thresher, manual winnower and motorized rice huller. With no or little
experience in handling these machines, it will take some time for the rural farmers to
develop skills in and become accustomed to operating them.
(1) Pedal thresher
A pedal thresher consists of a threshing drum, base, transmission unit, and a foot crank.
When pedaled, the threshing drum rotates, and as panicles are pushed into the rotating
drum, they are threshed. Because small straws, chaff and foreign matters are mixed in
with the threshed grains, subsequent winnowing is a must to separate the grains from other
objects. The amount and frequency of the mixing of impurities becomes less as the
farmers develop their knack for handling the machine.
Covering the threshing drum with tarpaulin prevents rough rice from scattering out of the
thresher, and laying a sheet over the ground under the thresher reduces contamination of
the grains with impurities from the ground and makes it easy to collect the threshed grains
that fall off the thresher.
For the smooth, safe and efficient operation of a pedal thresher, straws should be cut longer
than they are at present. It should be noted that the current model of pedal thresher needs
further improvement. It is too heavy to carry to a threshing place far away from the
village. To make it more mobile, the size and weight can be reduced modifying the
design as well as using other materials for the parts.
(2) Manual winnower
The farmers seem to accept winnowers more easily for its simple structure, easy handling
and effectiveness. It can be utilized for not only separating straws and unfilled grains
from filled grains after threshing but also cleaning rice bran and husks of the grains after
milling.
However, the efficiency of the currently available winnower can be improved further. In
the present model, the wind created by the fan does not pass effectively. Also, the
partition separating the two outlets is too low and inflexible, and the handle to rotate the
fan is attached directly to the axis so that it takes some effort to turn it. Moreover, it can
be downsized and made lighter.
Part II Agricultural Technical Packages
2-35
(3) Motorized rice huller
As mentioned in section 2.3.3 (2), the operation of a motorized rice huller requires
experience and skill. It will take time and effort for ordinary farmers to become familiar
with its use. Furthermore, for the management of a rice huller, knowledge and skill in
bookkeeping is necessary since it involves running and maintenance costs (e.g., fuel, spare
parts, etc.). Management skill is much more difficult for the farmers to obtain.
Community owned motorized hullers tend to have shorter lives than those privately owned
according to the results of the agricultural machinery survey (Part IV Annex 3.3). The
accountability and responsibility for the management of the machine must be clearly
understood and shared by the community members should agricultural machinery be
owned communally.
References
IRRI: Post Production, Course, Rice knowledge bank, 2005
IRRI: Training Manual Harvesting Rice, 2005
MAFS, etc., (assisted by FAO): Crop Production Guideline for Sierra Leone, 2005
FAO: Agricultural engineering in development, Agricultural Service Bulletin, No.93, 1994
Peace Corps: A Training Manual and Field Guide to Small-Farm Irrigated Rice
Production, ed. Michael L. Moris, 1980
AGSI-FAO: Post-harvest Operations Compendium, Post-harvest Management Group,
1999
Chapter 3 Technical Package on Vegetable
Production
Part II Agricultural Technical Packages
3-1
Chapter 3 Technical Package on Vegetable Production
3.1 Vegetable Cultivation
3.1.1 Introduction
(1) Focused crops
The Agricultural Technical Package on vegetable cultivation (hereinafter TP-V) deals with
three vegetable crops: watermelon, eggplant and pepper. Eggplant and pepper are
commonly cultivated in Kambia district, and watermelon is expected to have high profit
potential.
(2) Key techniques
Expansion in vegetable production is expected to contribute to the improvement of the
nutritional conditions as well as cash income of the farmers and eventually lead to
advancement of women because they are the main producer of vegetables in the area.
The TP-V offers low input, simple techniques that can be easily adopted by women’s
groups. The contents of TP-V include key techniques formulated through the pilot trial
(hereinafter PT) focusing on the following.
1) Raising quality seedlings
Raising quality seedlings is the most important process in vegetable cultivation. The
quality of seedlings determines later growth after transplanting and affects yield
substantially. Raising seedlings in pots is introduced for watermelon, while drilling
seeds on the nursery with proper sowing rates for eggplant and pepper. Nursery
management methods are also introduced.
2) Thinning out
Thinning out (pinching off) corrects the posture of plants for better growth and higher
yield. This technique doesn’t seem to be practiced in Kambia district. Techniques
on thinning out superfluous vines, shoots or fruits are introduced.
3) Rational use of chemical fertilizer
Because of low soil fertility, application of fertilizer is unavoidable to obtain higher
yield of vegetables. However, chemical fertilizers are too expensive for most farmers
to afford in a large quantity. The TP-V introduces effective and efficient methods of
fertilizer application, by which the farmers can attain maximum yield with minimum
use of fertilizer.
4) Bio-pesticide using locally available materials
Chemical pest control agents work on vegetables immediately but they also have
Part II Agricultural Technical Packages
3-2
many harmful effects on human health. Also, they are often expensive and
unaffordable. On the other hand, bio-insecticides are easily prepared with locally
available materials, environmentally safe and not harmful to human and animals.
As they take effect slowly, the farmers can use them as a preventive measure. Thus,
a bio-insecticide made of neem extract is introduced as low cost pest control.
3.1.2 Watermelon cultivation
(1) Fruits and flowers
Watermelon fruits grow from on the vine and the plant has separate male and female
flowers. The fruit grows from a pollinated female flower. Normally, the female flowers
appear on every five nodes and the male flowers occupy on other nodes, but the sex of a
flower is affected by environmental and nutritional conditions as well as plant vigor.
(2) Obtaining seeds
It is recommended to obtain watermelon seeds from harvested fruits, which are considered
to be more viable and reliable in germination than commercial seeds. Otherwise, they can
be collected from fresh fruits available in the market. As a final option during the
off-season when fresh fruits are not found, commercial seeds can be purchased in Freetown.
In any case, a germination test is recommended to examine the viability of seeds prior to
sowing. Take 10 seeds randomly, sow them into any container with sufficient water and
count the number of seeds germinated after a week. If more than 4 seeds germinate, it can
be said viable.
Treatment of seeds from fresh fruits:
(a) Obtain several fresh fruits. Keep seeds in separate container. One fruit contains
200 to 400 seeds in general.
(b) Wash the seeds thoroughly to remove fruit pulp and juice. Put the seeds in socks
or wrap them with a cloth, and rub them in fresh water.
Note: If fruit pulp or juice remains on the seeds, they will not germinate. They
must be washed several times changing water.
(c) Dry the seeds under sunlight.
(d) After drying, the seeds are ready for sowing.
(3) Growth duration and planting time
Under the climatic conditions in Kambia district, watermelon can grow all year round. It
takes 100 to 120 days from sowing to harvest. The planting time should be determined
considering the availability of irrigation water, occurrences of diseases and insects
especially melonfly, distribution of land and labor for other crops as well as market price.
Most farmers in Kambia District plant watermelon in October and November immediately
Part II Agricultural Technical Packages
3-3
after rice is harvested, while some farmers do earlier between July and September.
(4) Procedure for raising seedlings
1) Nursery conditions
The location of a nursery is the most important determinant of the quality of
seedlings. The watermelon seedling requires full sunlight and it becomes elongated
even in the shade of a tree, house or anything that blocks sunlight. Soil can be
brought from other places if original soil is not enough fertile.
Another important factor is accessibility to a water source. Frequent watering is
required almost every day. It is advisable to locate the nursery near a residential
area so that seedling can be easily accessed and well kept.
2) Shade and rain shelter
A shade or rain shelter is not necessary for the nursery.
3) Raising seedlings
Watermelon is sensitive to transplant shock, which sometimes causes the plant
damage beyond recovery. By using pots, the seedlings can be transplanted with a
complete soil block without damaging the root system.
A small plastic cup of 50 mm (top) and 35 mm (bottom) in diameter and about 50
mm in height can be utilized as a planting pot for raising seedlings so that the root
system can be fully protected. The size of the cup may vary depending on the
availability but it should be no larger than a butter cup and no smaller than a tomato
tin.
4) Preparation of nursery soil
Topsoil with low clay content and not much contamination with pathogenic fungi is
recommended. It’s better to use manure with low organic contents for the
prevention of disease infection
Procedure
(a) For 100 pots, collect 10 liter (half a bucket) of virgin soil for topsoil.
(b) Sieve the soil with a fishing net or any screen net.
(c) Add 200 g (3 hand grips or 3 tomato tins) of compound fertilizer (15:15:15) and mix
it with the soil well by a shovel.
Notes:
(a) A colored cup is more suitable for the root development because roots elongate to
dark condition.
(b) A few holes must be made in the bottom of the pot for draining by a nail head
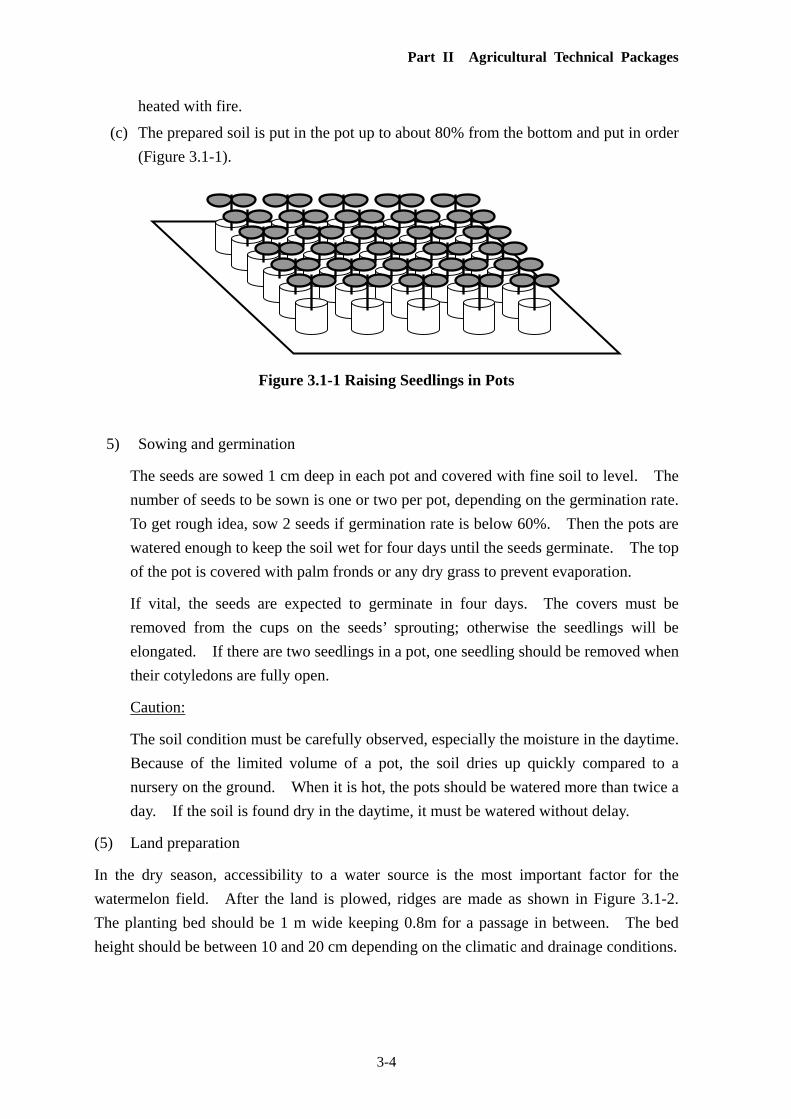
Part II Agricultural Technical Packages
3-4
heated with fire.
(c) The prepared soil is put in the pot up to about 80% from the bottom and put in order
(Figure 3.1-1).
Figure 3.1-1 Raising Seedlings in Pots
5) Sowing and germination
The seeds are sowed 1 cm deep in each pot and covered with fine soil to level. The
number of seeds to be sown is one or two per pot, depending on the germination rate.
To get rough idea, sow 2 seeds if germination rate is below 60%. Then the pots are
watered enough to keep the soil wet for four days until the seeds germinate. The top
of the pot is covered with palm fronds or any dry grass to prevent evaporation.
If vital, the seeds are expected to germinate in four days. The covers must be
removed from the cups on the seeds’ sprouting; otherwise the seedlings will be
elongated. If there are two seedlings in a pot, one seedling should be removed when
their cotyledons are fully open.
Caution:
The soil condition must be carefully observed, especially the moisture in the daytime.
Because of the limited volume of a pot, the soil dries up quickly compared to a
nursery on the ground. When it is hot, the pots should be watered more than twice a
day. If the soil is found dry in the daytime, it must be watered without delay.
(5) Land preparation
In the dry season, accessibility to a water source is the most important factor for the
watermelon field. After the land is plowed, ridges are made as shown in Figure 3.1-2.
The planting bed should be 1 m wide keeping 0.8m for a passage in between. The bed
height should be between 10 and 20 cm depending on the climatic and drainage conditions.
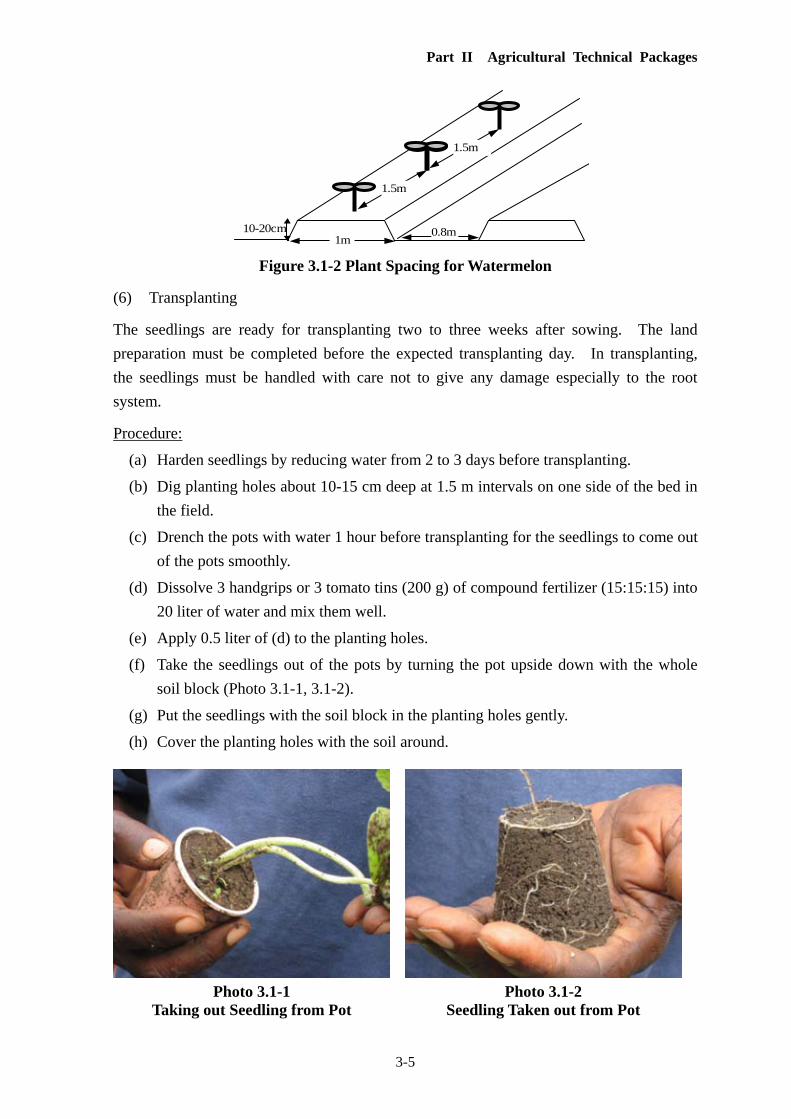
Part II Agricultural Technical Packages
3-5
Figure 3.1-2 Plant Spacing for Watermelon
(6) Transplanting
The seedlings are ready for transplanting two to three weeks after sowing. The land
preparation must be completed before the expected transplanting day. In transplanting,
the seedlings must be handled with care not to give any damage especially to the root
system.
Procedure:
(a) Harden seedlings by reducing water from 2 to 3 days before transplanting.
(b) Dig planting holes about 10-15 cm deep at 1.5 m intervals on one side of the bed in
the field.
(c) Drench the pots with water 1 hour before transplanting for the seedlings to come out
of the pots smoothly.
(d) Dissolve 3 handgrips or 3 tomato tins (200 g) of compound fertilizer (15:15:15) into
20 liter of water and mix them well.
(e) Apply 0.5 liter of (d) to the planting holes.
(f) Take the seedlings out of the pots by turning the pot upside down with the whole
soil block (Photo 3.1-1, 3.1-2).
(g) Put the seedlings with the soil block in the planting holes gently.
(h) Cover the planting holes with the soil around.
Photo 3.1-1 Taking out Seedling from Pot
Photo 3.1-2 Seedling Taken out from Pot
10-20cm
1.5m
1m
150cm
0.8m
1.5m
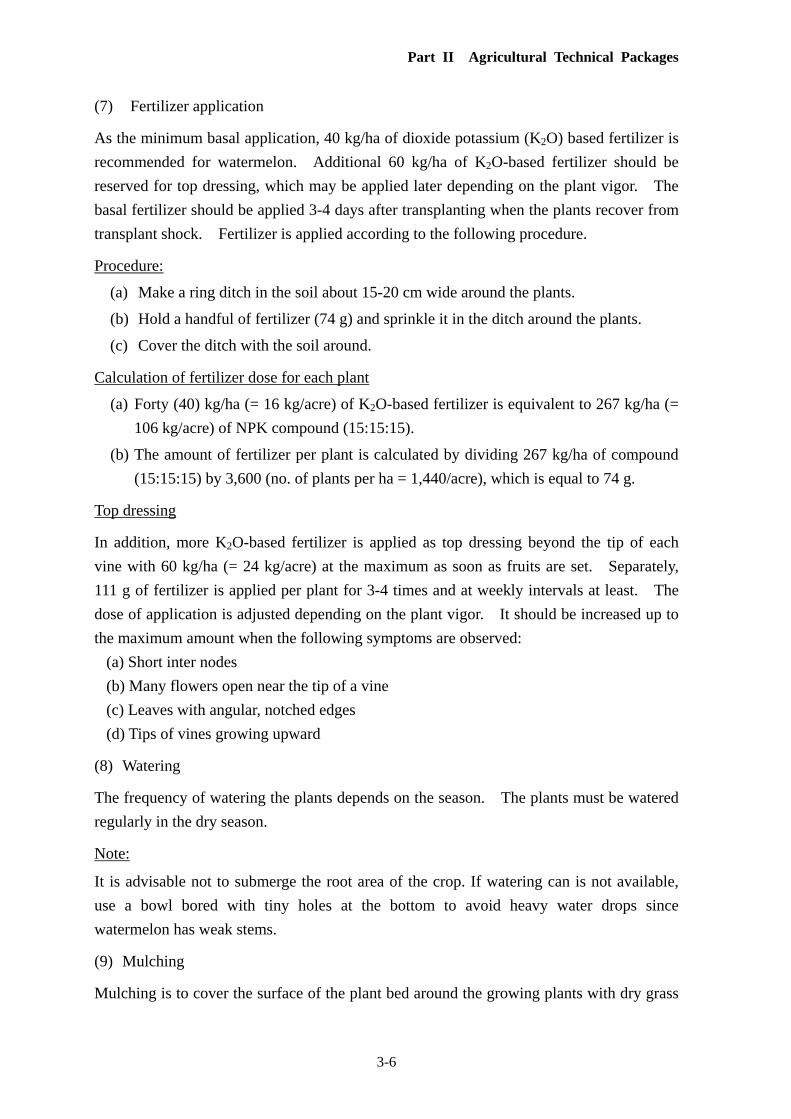
Part II Agricultural Technical Packages
3-6
(7) Fertilizer application
As the minimum basal application, 40 kg/ha of dioxide potassium (K2O) based fertilizer is
recommended for watermelon. Additional 60 kg/ha of K2O-based fertilizer should be
reserved for top dressing, which may be applied later depending on the plant vigor. The
basal fertilizer should be applied 3-4 days after transplanting when the plants recover from
transplant shock. Fertilizer is applied according to the following procedure.
Procedure:
(a) Make a ring ditch in the soil about 15-20 cm wide around the plants.
(b) Hold a handful of fertilizer (74 g) and sprinkle it in the ditch around the plants.
(c) Cover the ditch with the soil around.
Calculation of fertilizer dose for each plant
(a) Forty (40) kg/ha (= 16 kg/acre) of K2O-based fertilizer is equivalent to 267 kg/ha (=
106 kg/acre) of NPK compound (15:15:15).
(b) The amount of fertilizer per plant is calculated by dividing 267 kg/ha of compound
(15:15:15) by 3,600 (no. of plants per ha = 1,440/acre), which is equal to 74 g.
Top dressing
In addition, more K2O-based fertilizer is applied as top dressing beyond the tip of each
vine with 60 kg/ha (= 24 kg/acre) at the maximum as soon as fruits are set. Separately,
111 g of fertilizer is applied per plant for 3-4 times and at weekly intervals at least. The
dose of application is adjusted depending on the plant vigor. It should be increased up to
the maximum amount when the following symptoms are observed:
(a) Short inter nodes
(b) Many flowers open near the tip of a vine
(c) Leaves with angular, notched edges
(d) Tips of vines growing upward
(8) Watering
The frequency of watering the plants depends on the season. The plants must be watered
regularly in the dry season.
Note:
It is advisable not to submerge the root area of the crop. If watering can is not available,
use a bowl bored with tiny holes at the bottom to avoid heavy water drops since
watermelon has weak stems.
(9) Mulching
Mulching is to cover the surface of the plant bed around the growing plants with dry grass
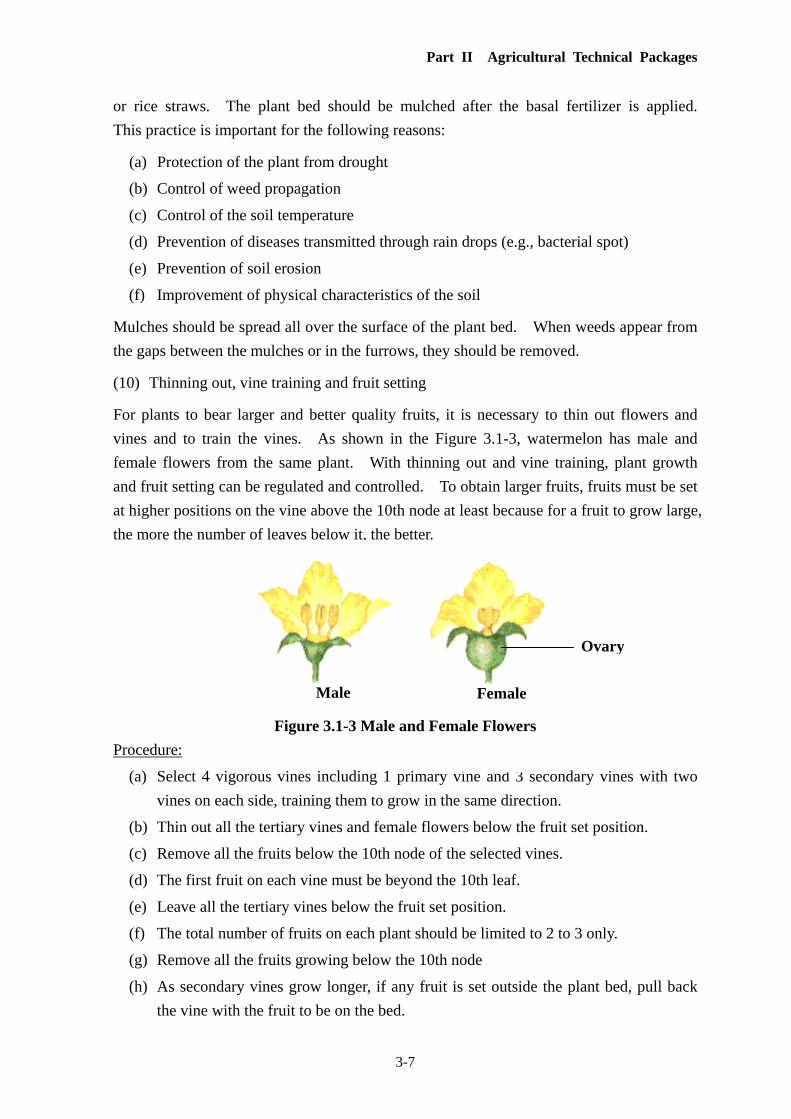
Part II Agricultural Technical Packages
3-7
or rice straws. The plant bed should be mulched after the basal fertilizer is applied.
This practice is important for the following reasons:
(a) Protection of the plant from drought
(b) Control of weed propagation
(c) Control of the soil temperature
(d) Prevention of diseases transmitted through rain drops (e.g., bacterial spot)
(e) Prevention of soil erosion
(f) Improvement of physical characteristics of the soil
Mulches should be spread all over the surface of the plant bed. When weeds appear from
the gaps between the mulches or in the furrows, they should be removed.
(10) Thinning out, vine training and fruit setting
For plants to bear larger and better quality fruits, it is necessary to thin out flowers and
vines and to train the vines. As shown in the Figure 3.1-3, watermelon has male and
female flowers from the same plant. With thinning out and vine training, plant growth
and fruit setting can be regulated and controlled. To obtain larger fruits, fruits must be set
at higher positions on the vine above the 10th node at least because for a fruit to grow large,
the more the number of leaves below it, the better.
Figure 3.1-3 Male and Female Flowers
Procedure:
(a) Select 4 vigorous vines including 1 primary vine and 3 secondary vines with two
vines on each side, training them to grow in the same direction.
(b) Thin out all the tertiary vines and female flowers below the fruit set position.
(c) Remove all the fruits below the 10th node of the selected vines.
(d) The first fruit on each vine must be beyond the 10th leaf.
(e) Leave all the tertiary vines below the fruit set position.
(f) The total number of fruits on each plant should be limited to 2 to 3 only.
(g) Remove all the fruits growing below the 10th node
(h) As secondary vines grow longer, if any fruit is set outside the plant bed, pull back
the vine with the fruit to be on the bed.
Male Female
Ovary
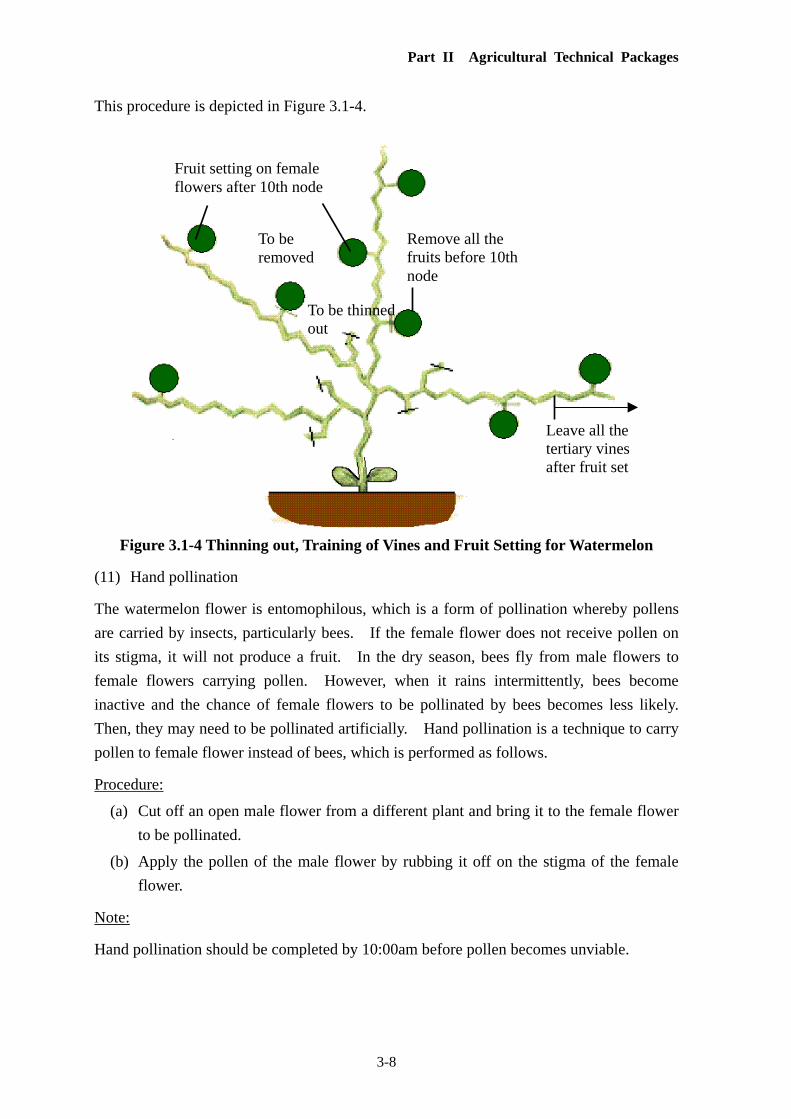
Part II Agricultural Technical Packages
3-8
Fruit setting on female flowers after 10th node
Remove all the fruits before 10th node
To be removed
To be thinned out
Leave all the tertiary vines after fruit set
This procedure is depicted in Figure 3.1-4.
Figure 3.1-4 Thinning out, Training of Vines and Fruit Setting for Watermelon
(11) Hand pollination
The watermelon flower is entomophilous, which is a form of pollination whereby pollens
are carried by insects, particularly bees. If the female flower does not receive pollen on
its stigma, it will not produce a fruit. In the dry season, bees fly from male flowers to
female flowers carrying pollen. However, when it rains intermittently, bees become
inactive and the chance of female flowers to be pollinated by bees becomes less likely.
Then, they may need to be pollinated artificially. Hand pollination is a technique to carry
pollen to female flower instead of bees, which is performed as follows.
Procedure:
(a) Cut off an open male flower from a different plant and bring it to the female flower
to be pollinated.
(b) Apply the pollen of the male flower by rubbing it off on the stigma of the female
flower.
Note:
Hand pollination should be completed by 10:00am before pollen becomes unviable.
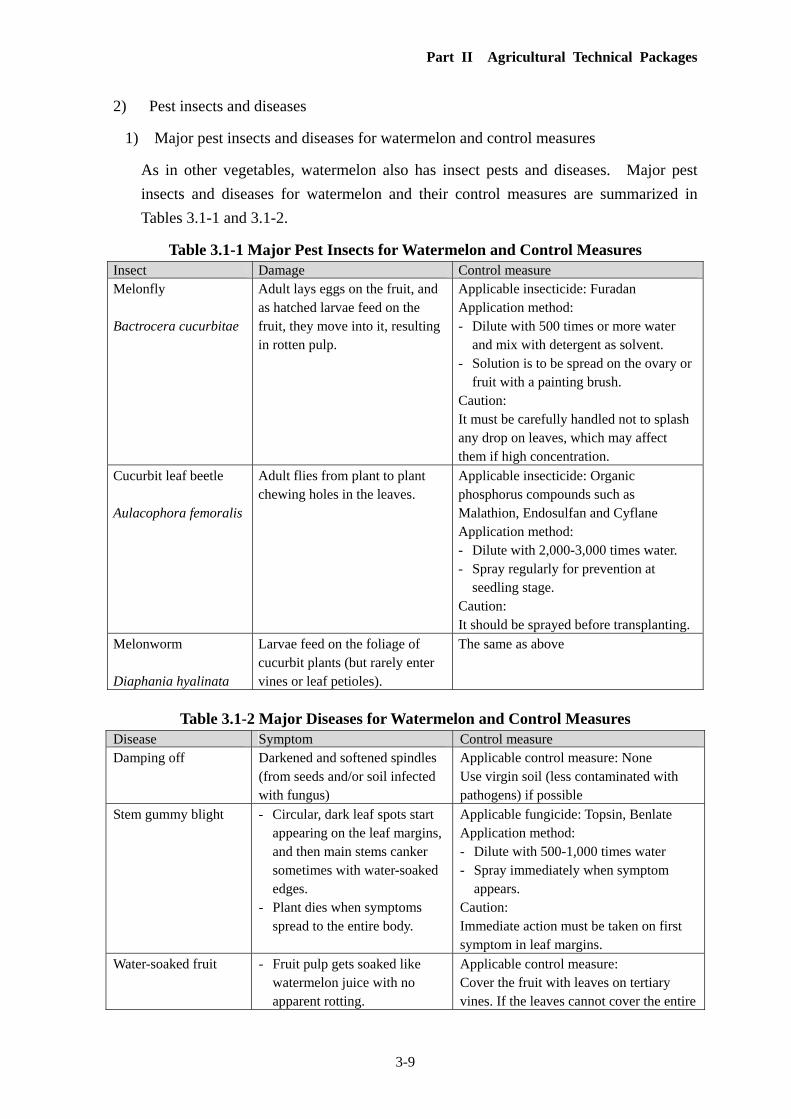
Part II Agricultural Technical Packages
3-9
2) Pest insects and diseases
1) Major pest insects and diseases for watermelon and control measures
As in other vegetables, watermelon also has insect pests and diseases. Major pest
insects and diseases for watermelon and their control measures are summarized in
Tables 3.1-1 and 3.1-2.
Table 3.1-1 Major Pest Insects for Watermelon and Control Measures Insect Damage Control measure Melonfly Bactrocera cucurbitae
Adult lays eggs on the fruit, and as hatched larvae feed on the fruit, they move into it, resulting in rotten pulp.
Applicable insecticide: Furadan Application method: - Dilute with 500 times or more water
and mix with detergent as solvent. - Solution is to be spread on the ovary or
fruit with a painting brush. Caution: It must be carefully handled not to splash any drop on leaves, which may affect them if high concentration.
Cucurbit leaf beetle Aulacophora femoralis
Adult flies from plant to plant chewing holes in the leaves.
Applicable insecticide: Organic phosphorus compounds such as Malathion, Endosulfan and Cyflane Application method: - Dilute with 2,000-3,000 times water. - Spray regularly for prevention at
seedling stage. Caution: It should be sprayed before transplanting.
Melonworm Diaphania hyalinata
Larvae feed on the foliage of cucurbit plants (but rarely enter vines or leaf petioles).
The same as above
Table 3.1-2 Major Diseases for Watermelon and Control Measures Disease Symptom Control measure Damping off Darkened and softened spindles
(from seeds and/or soil infected with fungus)
Applicable control measure: None Use virgin soil (less contaminated with pathogens) if possible
Stem gummy blight - Circular, dark leaf spots start appearing on the leaf margins, and then main stems canker sometimes with water-soaked edges.
- Plant dies when symptoms spread to the entire body.
Applicable fungicide: Topsin, Benlate Application method: - Dilute with 500-1,000 times water - Spray immediately when symptom
appears. Caution: Immediate action must be taken on first symptom in leaf margins.
Water-soaked fruit - Fruit pulp gets soaked like watermelon juice with no apparent rotting.
Applicable control measure: Cover the fruit with leaves on tertiary vines. If the leaves cannot cover the entire
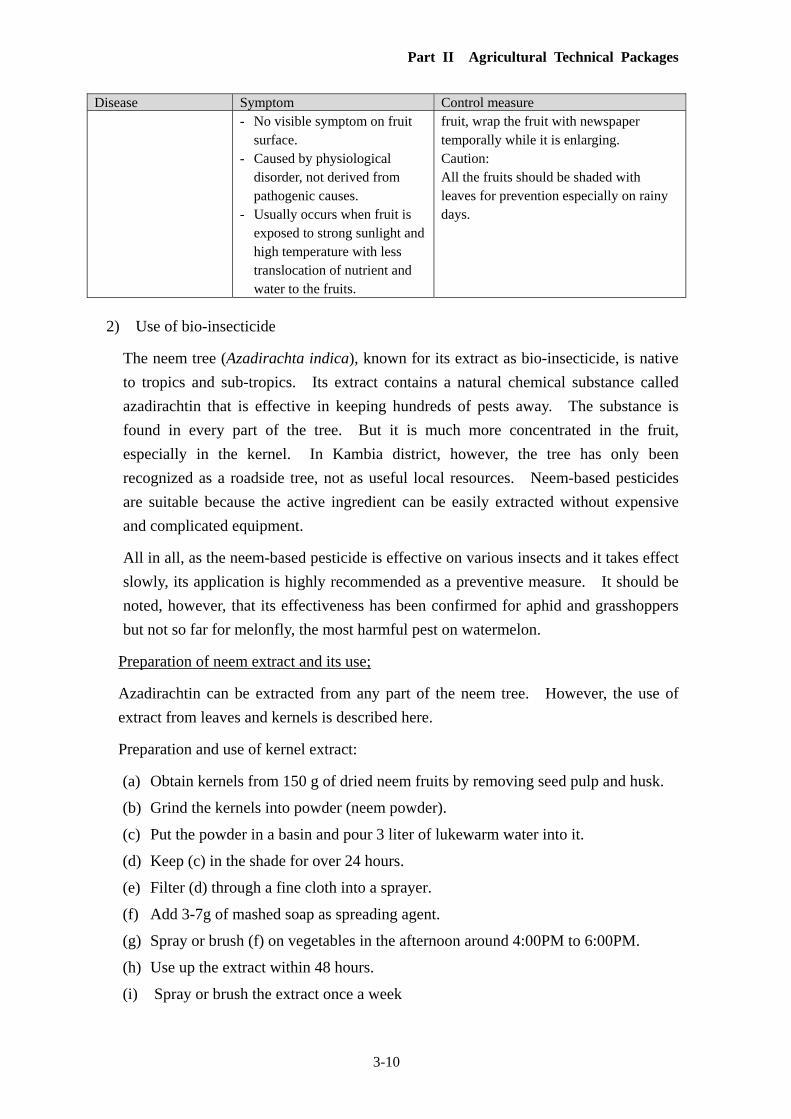
Part II Agricultural Technical Packages
3-10
Disease Symptom Control measure - No visible symptom on fruit
surface. - Caused by physiological
disorder, not derived from pathogenic causes.
- Usually occurs when fruit is exposed to strong sunlight and high temperature with less translocation of nutrient and water to the fruits.
fruit, wrap the fruit with newspaper temporally while it is enlarging. Caution: All the fruits should be shaded with leaves for prevention especially on rainy days.
2) Use of bio-insecticide
The neem tree (Azadirachta indica), known for its extract as bio-insecticide, is native
to tropics and sub-tropics. Its extract contains a natural chemical substance called
azadirachtin that is effective in keeping hundreds of pests away. The substance is
found in every part of the tree. But it is much more concentrated in the fruit,
especially in the kernel. In Kambia district, however, the tree has only been
recognized as a roadside tree, not as useful local resources. Neem-based pesticides
are suitable because the active ingredient can be easily extracted without expensive
and complicated equipment.
All in all, as the neem-based pesticide is effective on various insects and it takes effect
slowly, its application is highly recommended as a preventive measure. It should be
noted, however, that its effectiveness has been confirmed for aphid and grasshoppers
but not so far for melonfly, the most harmful pest on watermelon.
Preparation of neem extract and its use;
Azadirachtin can be extracted from any part of the neem tree. However, the use of
extract from leaves and kernels is described here.
Preparation and use of kernel extract:
(a) Obtain kernels from 150 g of dried neem fruits by removing seed pulp and husk.
(b) Grind the kernels into powder (neem powder).
(c) Put the powder in a basin and pour 3 liter of lukewarm water into it.
(d) Keep (c) in the shade for over 24 hours.
(e) Filter (d) through a fine cloth into a sprayer.
(f) Add 3-7g of mashed soap as spreading agent.
(g) Spray or brush (f) on vegetables in the afternoon around 4:00PM to 6:00PM.
(h) Use up the extract within 48 hours.
(i) Spray or brush the extract once a week
Part II Agricultural Technical Packages
3-11
Notes:
(a) Three liter of kernel extract is enough for spraying 70 plants of watermelon twice
after transplantation and once in the fruit growth stage.
(b) Because neem extract is greasy, the spray bottle should be used exclusively for the
extract.
Preparation of leaf extract;
(a) Grind 1.5 kg of dried neem leaves and 10-17 dried pepper fruits together.
(b) Put the powder (a) in a basin and pour 3 liter of lukewarm water into it.
(c) The processes and use of leaf extract hereafter are the same as (d)-(i) above for
kernel extract.
3) Chemical control
The main problem found in the field after transplanting is melonfly damage to the
fruits. This insect damage occurs after fruit setting. There is a chemical called
Furadan, which is used exclusively for melonfly control and readily available in Sierra
Leone. Because of melonfly, the use of this chemical insecticide is indispensable for
watermelon production as a preventive measure.
Other major insects are cucurbit leaf beetle and melonworm. Damage by these
insects is mostly to young plants, for they feed on fresh and soft leaves. They should
be thoroughly controlled by spraying insecticide in the nursery before transplanting.
Although it was not observed in PT, stem gummy blight caused by a fungus is widely
spread in the tropics. Since the climatic conditions in Kambia district are favorable
for this fungous disease, it is advised to keep at least one fungicide such as Benlate
ready in case of urgent use.
Regardless, chemicals could be extremely dangerous if poorly managed or handled.
They should not be touched with bare hands or breathed in and must be kept out of
reach of children. Also, chemical application should be stopped at least two weeks
prior to harvest because of residues.
(13) Harvesting
The best harvesting time can be determined by the number of days after flowering. In the
climatic condition of Kambia district, it normally takes about 40-45 days for fruits to
mature after flowering. The disappearance of stripes on the fruit surface is also an
indicator of the harvesting time. Normally, 10-14 days after the stripes disappear is
considered to be the right time. The farmers have also relied on the fruit size and the
sound the fruit makes when knocked to make a decision on the timing of harvest.
Part II Agricultural Technical Packages
3-12
3.1.3 Eggplant cultivation
(1) Growth habit
Eggplant is an indeterminate crop, which develops into some stems that do not top off and
continue developing until the end of its life. This growth habit is different from pepper
that tops off and develops into some other stems that also top off. The first flower of
eggplant appears between the 8th and 10th nodes on the main stem, and the lateral shoots
that emerge under the first flowers are normally more vigorous than others. Under
normal conditions, flowers appear every two to four leaves toward the upper side on each
stem.
(2) Growth duration and planting time
Eggplant is one of the most commonly produced vegetables by the local farmers all year
around. Eggplant can be harvested continuously over a long period if carefully managed.
This makes it quite a practical option for the farmers to incorporate eggplant production in
their farming activities as a supplemental income source.
Eggplant fruits can be harvested 50-60 days after transplanting or 80-90 days from sowing.
The time of planting should be determined considering availability of irrigation water,
disease and insect occurrence, and land and labor distribution with regard to other crops as
well as market price.
(3) Procedure for raising seedlings
1) Nursery conditions
The sunlight is an essential factor in photosynthesis and generally vegetable seedlings
should be grown under sufficient sunlight. Unlike watermelon, however, eggplant
does not require full sunlight at the seedling stage since they take longer time to
develop stems and leaves.
Soil texture and condition are an important factor for an eggplant nursery because
seedlings are grown in the ground soil. A nursery should be located where the soil is
as little contaminated with pathogens as possible. For that, a plot that has never been
used for crop cultivation is recommended since its soil is less likely to be
contaminated with pathogens than the soil of farmland. If the soil is not fertile
enough, nutrients can be supplemented by fertilizer application. The fertilizer cost
could be justified considering the potential loss from the disease infection to which
eggplant is prone.
2) Shade and rain shelter
A shade or rain shelter is not necessary for the nursery.
Part II Agricultural Technical Packages
3-13
3) Raising seedlings
In Kambia district, at present the farmers pay less attention to the quality of seedlings
than the germination of seeds in the nursery. However, it is the former that
determines the quality and quantity of fruits to be harvested eventually. The purpose
of raising seedlings is to grow healthy seedlings that will produce many good fruits
through intensive and careful nursery management. In other words, by raising
quality seedlings, the farmers have a better chance of making profits in the end though
it takes time and effort on their part. Therefore, the farmers should be made aware
of the importance of raising seedlings.
4) Preparation of nursery and sowing
If possible, a plot that has never been cultivated for crops is used for the nursery.
Once the nursery location is determined, fertilizer is applied to the soil.
The area of the nursery is calculated from the following indices:
- Volume of seeds: 15cc (1 spoon)
- Number of seeds: 1,200-1,500
- Nursery area necessary for sowing: 1 m2 (1m×1m)
Before the nursery preparation, the germination rate of seeds also must be considered.
If enough seeds can be procured, it is advised to sow twice as many seeds as the
number of seedlings that will be transplanted.
The procedure of nursery preparation and sowing is as follows.
Procedure:
(a) Determine the size of the nursery from the amount of seeds to be sowed.
(b) Remove stones and weeds from the area.
(c) Apply 200 g/m2 (3 hand grips or 3 tomato tins) of NPK compound (15:15:15) and
mix it with the soil well digging up the seedbed at least 10 cm deep.
(d) Heap up the soil about 10-20 cm high depending on the season and level the
seedbed for sowing.
(e) Dig ditches for drainage around the seedbed.
(f) Dig 5 sowing holes/m2 1-1.5 cm deep at 20 cm intervals on the seedbed.
(g) Drill the measured seeds uniformly in the holes.
(h) Cover the holes with the soil around.
(i) Shade the nursery with palm fronds or any dry grass.
(j) Water the seedbed sufficiently for 5-6 days until the seeds germinate.
(k) Remove the shade immediately after the seeds’ germination.
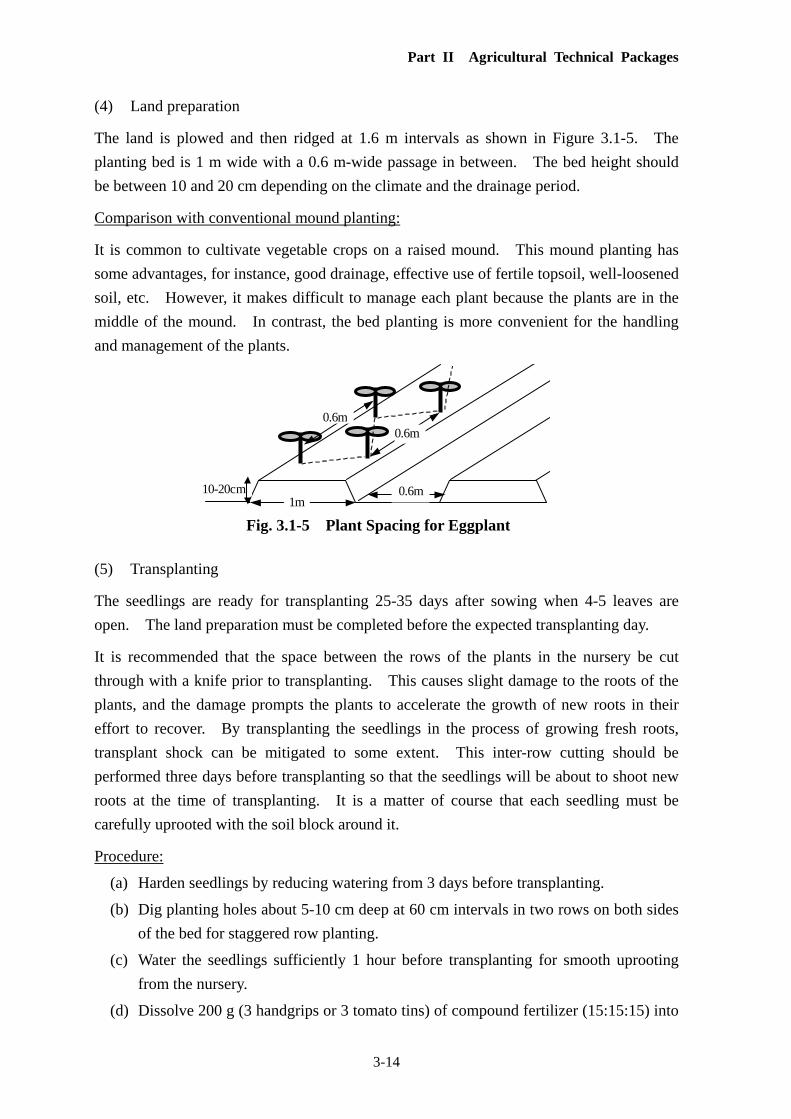
Part II Agricultural Technical Packages
3-14
(4) Land preparation
The land is plowed and then ridged at 1.6 m intervals as shown in Figure 3.1-5. The
planting bed is 1 m wide with a 0.6 m-wide passage in between. The bed height should
be between 10 and 20 cm depending on the climate and the drainage period.
Comparison with conventional mound planting:
It is common to cultivate vegetable crops on a raised mound. This mound planting has
some advantages, for instance, good drainage, effective use of fertile topsoil, well-loosened
soil, etc. However, it makes difficult to manage each plant because the plants are in the
middle of the mound. In contrast, the bed planting is more convenient for the handling
and management of the plants.
(5) Transplanting
The seedlings are ready for transplanting 25-35 days after sowing when 4-5 leaves are
open. The land preparation must be completed before the expected transplanting day.
It is recommended that the space between the rows of the plants in the nursery be cut
through with a knife prior to transplanting. This causes slight damage to the roots of the
plants, and the damage prompts the plants to accelerate the growth of new roots in their
effort to recover. By transplanting the seedlings in the process of growing fresh roots,
transplant shock can be mitigated to some extent. This inter-row cutting should be
performed three days before transplanting so that the seedlings will be about to shoot new
roots at the time of transplanting. It is a matter of course that each seedling must be
carefully uprooted with the soil block around it.
Procedure:
(a) Harden seedlings by reducing watering from 3 days before transplanting.
(b) Dig planting holes about 5-10 cm deep at 60 cm intervals in two rows on both sides
of the bed for staggered row planting.
(c) Water the seedlings sufficiently 1 hour before transplanting for smooth uprooting
from the nursery.
(d) Dissolve 200 g (3 handgrips or 3 tomato tins) of compound fertilizer (15:15:15) into
Fig. 3.1-5 Plant Spacing for Eggplant
0.6m
1m
0.6m
0.6m10-20cm
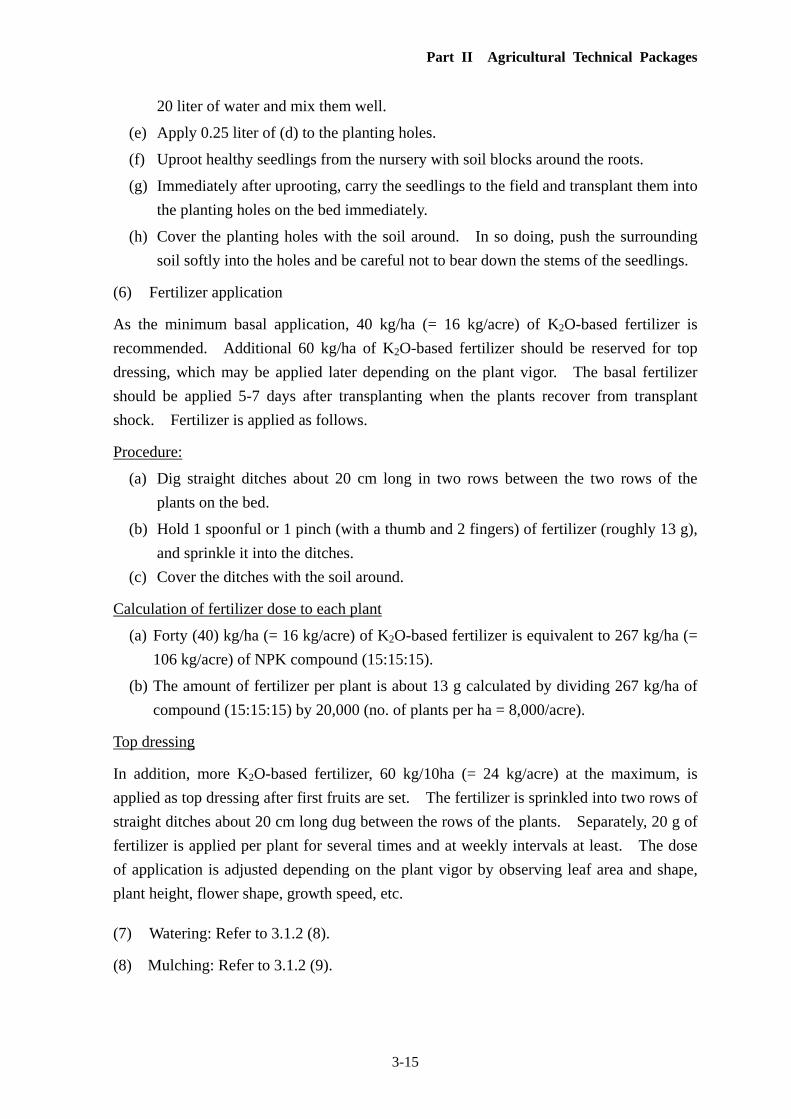
Part II Agricultural Technical Packages
3-15
20 liter of water and mix them well.
(e) Apply 0.25 liter of (d) to the planting holes.
(f) Uproot healthy seedlings from the nursery with soil blocks around the roots.
(g) Immediately after uprooting, carry the seedlings to the field and transplant them into
the planting holes on the bed immediately.
(h) Cover the planting holes with the soil around. In so doing, push the surrounding
soil softly into the holes and be careful not to bear down the stems of the seedlings.
(6) Fertilizer application
As the minimum basal application, 40 kg/ha (= 16 kg/acre) of K2O-based fertilizer is
recommended. Additional 60 kg/ha of K2O-based fertilizer should be reserved for top
dressing, which may be applied later depending on the plant vigor. The basal fertilizer
should be applied 5-7 days after transplanting when the plants recover from transplant
shock. Fertilizer is applied as follows.
Procedure:
(a) Dig straight ditches about 20 cm long in two rows between the two rows of the
plants on the bed.
(b) Hold 1 spoonful or 1 pinch (with a thumb and 2 fingers) of fertilizer (roughly 13 g),
and sprinkle it into the ditches.
(c) Cover the ditches with the soil around.
Calculation of fertilizer dose to each plant
(a) Forty (40) kg/ha (= 16 kg/acre) of K2O-based fertilizer is equivalent to 267 kg/ha (=
106 kg/acre) of NPK compound (15:15:15).
(b) The amount of fertilizer per plant is about 13 g calculated by dividing 267 kg/ha of
compound (15:15:15) by 20,000 (no. of plants per ha = 8,000/acre).
Top dressing
In addition, more K2O-based fertilizer, 60 kg/10ha (= 24 kg/acre) at the maximum, is
applied as top dressing after first fruits are set. The fertilizer is sprinkled into two rows of
straight ditches about 20 cm long dug between the rows of the plants. Separately, 20 g of
fertilizer is applied per plant for several times and at weekly intervals at least. The dose
of application is adjusted depending on the plant vigor by observing leaf area and shape,
plant height, flower shape, growth speed, etc.
(7) Watering: Refer to 3.1.2 (8).
(8) Mulching: Refer to 3.1.2 (9).
Part II Agricultural Technical Packages
3-16
No thinning
Thin out lateral shoots here at early stage.
Thin out leaves after harvesting the first fruit
First flower
Main stem
Extend lateral shoot below first flower.
Extend lateral shoot 2 stems below first flower.
(9) Thinning out, training of stems and fruit setting
Lateral shoots should be thinned out and stems should be trained to facilitate growth and
increase the fruit set ratio. According to the results of PT, by training 3-4 stems on a plant
the best performance in plant vigor, yield and fruit quality was achieved with less
occurrence of disease due to ventilation through the inter-row space between the plants.
The procedure for thinning out, training and fruit setting is as follows.
Procedure:
(a) Thin out all the lateral shoots under the first flower leaving 2 shoots just below the
flower and one more shoot under that.
(b) Train 3 stems including the main stem and 2 stems under the first flower.
(c) Leave all the lateral shoots from the trained 3 stems for fruit set.
(d) Pinch off old leaves for ventilation and exposure as necessary when leaves start to
grow over each other.
(e) Do not pinch the first flower since it regulates plant growth and make sure to set a
fruit on the first flower.
Thinning out and stem training for eggplant are depicted in Figure 3.1-6.
Figure 3.1-6 Thinning out and Stem Training for Eggplant
(10) Pest insects and diseases
1) Major pest insects and disease for eggplant and control measures
Major pest insects and disease for eggplant and their control measures are
summarized in Tables 3.1-3 and 3.1-4.
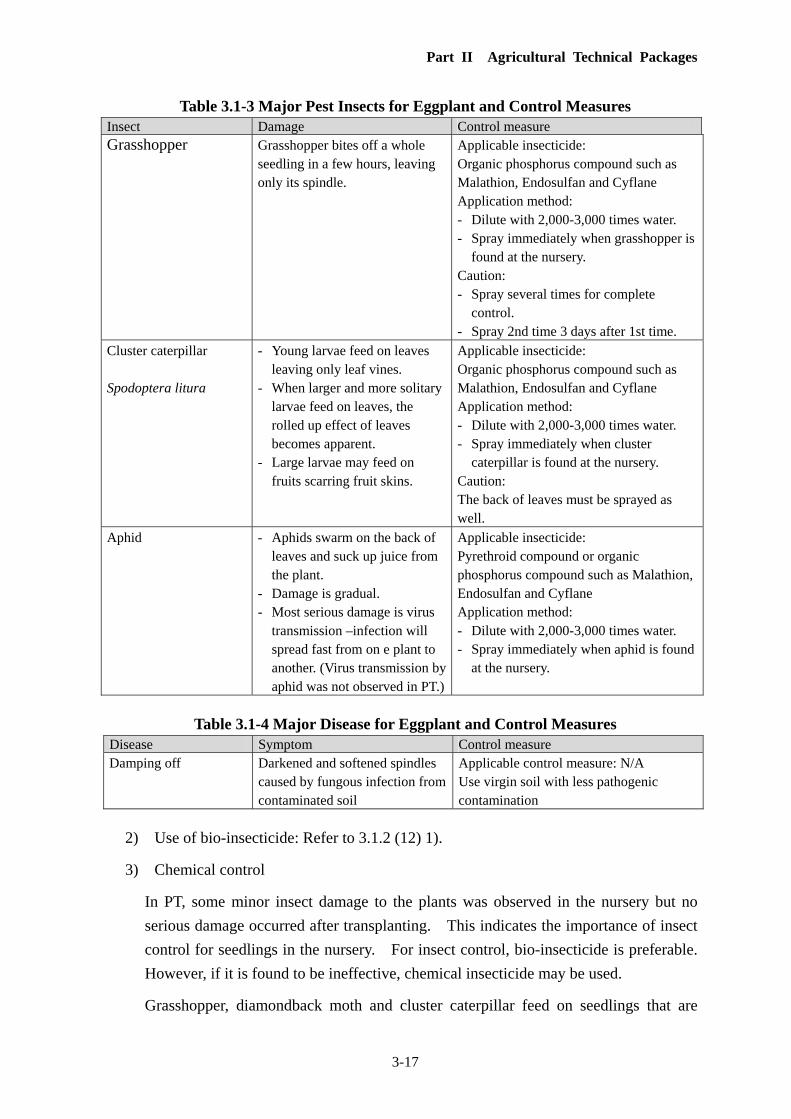
Part II Agricultural Technical Packages
3-17
Table 3.1-3 Major Pest Insects for Eggplant and Control Measures Insect Damage Control measure Grasshopper Grasshopper bites off a whole
seedling in a few hours, leaving only its spindle.
Applicable insecticide: Organic phosphorus compound such as Malathion, Endosulfan and Cyflane Application method: - Dilute with 2,000-3,000 times water. - Spray immediately when grasshopper is
found at the nursery. Caution: - Spray several times for complete
control. - Spray 2nd time 3 days after 1st time.
Cluster caterpillar Spodoptera litura
- Young larvae feed on leaves leaving only leaf vines.
- When larger and more solitary larvae feed on leaves, the rolled up effect of leaves becomes apparent.
- Large larvae may feed on fruits scarring fruit skins.
Applicable insecticide: Organic phosphorus compound such as Malathion, Endosulfan and Cyflane Application method: - Dilute with 2,000-3,000 times water. - Spray immediately when cluster
caterpillar is found at the nursery. Caution: The back of leaves must be sprayed as well.
Aphid - Aphids swarm on the back of leaves and suck up juice from the plant.
- Damage is gradual. - Most serious damage is virus
transmission –infection will spread fast from on e plant to another. (Virus transmission by aphid was not observed in PT.)
Applicable insecticide: Pyrethroid compound or organic phosphorus compound such as Malathion, Endosulfan and Cyflane Application method: - Dilute with 2,000-3,000 times water. - Spray immediately when aphid is found
at the nursery.
Table 3.1-4 Major Disease for Eggplant and Control Measures Disease Symptom Control measure Damping off Darkened and softened spindles
caused by fungous infection from contaminated soil
Applicable control measure: N/A Use virgin soil with less pathogenic contamination
2) Use of bio-insecticide: Refer to 3.1.2 (12) 1).
3) Chemical control
In PT, some minor insect damage to the plants was observed in the nursery but no
serious damage occurred after transplanting. This indicates the importance of insect
control for seedlings in the nursery. For insect control, bio-insecticide is preferable.
However, if it is found to be ineffective, chemical insecticide may be used.
Grasshopper, diamondback moth and cluster caterpillar feed on seedlings that are
Part II Agricultural Technical Packages
3-18
fresh and soft. Grasshopper is the worst insect of all for eggplant because it can kill
its seedlings. Still, all these pest insects including grasshopper can be controlled by
intensive chemical spraying. Chemical application should be stopped, however, two
weeks before harvest because of residues.
(11) Harvesting
The first fruit can be harvested 50-60 days after transplanting. As mentioned above, the
first fruit on the first flower must be carefully set and grown. The first fruit setting
contributes to regulating plant growth and facilitating smooth reproductive growth by
inhibiting excessive vegetative growth.
3.1.4 Pepper Cultivation
(1) Growth habit
Pepper is a determinate crop, which tops off and develops into some more stems that top
off again, branching out many lateral stems one after another. This growth habit is
different from that of cucurbit crops such as watermelon and eggplant. The first flower
appears between the 8th and 10th nodes on the main stem. The lateral shoot just below
the first flower is normally more vigorous. In normal conditions, flowers appear in every
node continuously.
(2) Growth duration and planting time
Pepper can be planted all year round. Viral infection is a limiting factor for the plant life.
However, the farmers often continue to cultivate pepper even in face of virus infection that
wilts the plants in the field.
It takes 55-70 days for pepper to grow from transplanting to harvest. The planting time
should be determined considering various factors such as climatic conditions, market price,
land and labor distribution with other crops, availability of irrigation, and field vacancy.
(3) Procedure for raising seedlings
Basically, the method of raising pepper seedlings is same as eggplant seedlings, for both
belong to the same Solanaceae family. Nevertheless, the procedure for raising pepper
seedlings is described below.
1) Nursery conditions
The requirements of the nursery location are as follows.
(a) Sufficient exposure to sunlight
(b) Soil with less pathogenic contamination, relatively fine and light
(c) Easy access to a water source for frequent irrigation
All these requirements should be met. Soil fertility is not an important factor in

Part II Agricultural Technical Packages
3-19
selecting the location for a nursery since nutrients in the soil can be supplemented by
fertilizer application. For the soil suitable for pepper cultivation, such factors as the
level of pathogenic contamination and the physical property (e.g., low rock content)
are more important. If a plot near a water source that has never been cultivated for
crops were available, it would be ideal for the nursery. Otherwise, a plot that is not
in much contact with human life is appropriate, for it is less likely for byproducts of
human activities to have contaminated the soil. It should be kept in mind that soil
borne diseases infected in the nursery incur serious damage to the seedlings.
2) Raising seedlings
In Kambia district, the farmers have long history of pepper cultivation. However, as
mentioned in Section 3.1.3 (3), 3) on eggplant seedlings, at present they are less concerned
about raising seedlings than germination. To reiterate the previous section, the farmers
should become aware that the nursery is not a place to germinate seeds only.
3) Shade and rain shelter: Refer to 3.1.3 (3) 2)
4) Preparation of nursery and sowing: Refer to 3.1.3 (3) 4)
The area of the nursery is determined by the necessary amount of seeds to be sown
and the number of plants to be transplanted in the field. The area is calculated based
on the following indices.
- Volume of seeds: 15 cc (1 spoon)
- Number of seeds: 1,200 to 1,500
- Nursery area necessary for sowing: 1 m2 (1 m×1 m)
- Number of plants to be transplanted: About 25,000 plants/ha
As in case of eggplant, the germination rate of seeds also must be considered before
the nursery preparation. If the farmers can obtain enough seeds, they should sow
twice as many seeds as the number of seedlings to be transplanted.
The procedure of nursery preparation and sowing for pepper is as follows.
Procedure:
(a) Plot the area for the nursery based on the amount of seeds to be sowed.
(b) Remove stones and weeds from the area
(c) Apply 200 g/m2 (3 hand grips or 3 tomato tins) of NPK compound (15:15:15) and
mix it with the soil well, digging up the seedbed at least 10 cm deep.
(d) Heap up about 10 to 20 cm high depending on season, and level the area for
sowing
(e) Excavate ditch for drainage around the bed
(f) Dig 5 sowing holes/m2 1-1.5 cm deep at 20 cm intervals on the seedbed.
Part II Agricultural Technical Packages
3-20
(g) Drill the measured seeds uniformly in the holes.
(h) Cover the holes with the soil around.
(i) Shade the nursery with palm fronds or any dry grass.
(j) Water the seedbed sufficiently for 5-6 days until the seeds germinate.
(k) Remove the shade immediately after the seeds’ germination.
(4) Land preparation
Pepper is more sensitive to transplanting than eggplant. The land must be prepared to
good condition so that transplant shock can be mitigated to certain extent. The land
should be plowed and then ridged at 1.6 m intervals. The planting bed is 1 m wide with a
0.6 m-wide passage in between. The bed height should be 10-20 cm high depending on
the climate and the drainage period. The land preparation is the same for pepper and
eggplant as depicted in Figure 3.1-5.
(5) Transplanting
The seedlings are ready for transplanting 25-35 days after sowing when 6-7 leaves are
open. The field must be fully prepared by the expected day of transplanting. Cutting
through the space between the rows of plants on the bed by knife is recommended prior to
transplanting as in case of eggplant (cf. 3.1.3 (5)).
Procedure:
(a) Harden seedlings by reducing watering from 3 days before transplanting.
(b) Dig planting holes about 5-10 cm deep at 45 cm intervals in two rows on both sides
of the bed for staggered row planting.
(c) Water the seedlings sufficiently 1 hour before transplanting for smooth uprooting
from the nursery
(d) Dissolve 200 g (3 handgrips or 3 tomato tins) of compound fertilizer (15:15:15) into
20 liter of water and mix them well.
(e) Apply 0.25 liter of (d) to the planting holes.
(f) Uproot healthy seedlings from the nursery with soil block around the roots.
(g) Carry the uprooted seedlings to the field and transplant them into the planting holes
on the bed immediately.
(h) Cover the planting holes with the soil around. In so doing, push the surrounding
soil softly into the holes and be careful not to bear down the stems of the seedlings.
(6) Fertilizer application
As the minimum basal application, 40 kg/ha (= 16 kg/acre) of K2O-based fertilizer is
recommended. Additional 60 kg/ha of K2O-based fertilizer should be reserved for top
dressing, which may be applied later depending on the plant vigor. The basal fertilizer
Part II Agricultural Technical Packages
3-21
should be applied 7-10 days after transplanting when the plants recover from transplant
shock. Fertilizer is applied according to the following procedure.
Procedure:
(a) Dig straight ditches about 20 cm long in two rows between the two rows of the
plants on the bed.
(b) Hold 1 spoonful or 1 pinch (with a thumb and 2 fingers) of fertilizer (roughly 11 g),
and apply it to the ditches.
(c) Cover the ditches with the soil around.
Calculation of fertilizer dose to each plant
(a) Forty (40) kg/ha (= 16 kg/acre) of K2O-based fertilizer is equivalent to 267 kg/ha (=
106 kg/acre) of NPK compound (15:15:15).
(b) The amount of fertilizer per plant is about 11 g calculated by dividing 267 kg/ha of
compound (15:15:15) by 25,000 (no. of plants per ha = 10,000/acre).
Top dressing
In addition, more K2O-based fertilizer, 60 kg/10ha (= 24 kg/acre) at the maximum, is
applied as top dressing after first fruits are set. The fertilizer is sprinkled into two rows of
straight ditches about 20 cm long dug between the rows of the plants. Separately, 16 g of
fertilizer is applied per plant for several times and at weekly intervals at least. The dose
of application is adjusted depending on the plant vigor by observing leaf area and shape,
plant height, flower shape, growth speed, etc.
(7) Watering: Refer to 3.1.2 (8).
(8) Mulching: Refer to 3.1.2 (9).
(9) Thinning out, training of stems and fruit setting
Lateral shoots should be thinned out and stems should be trained to facilitate growth and
increase the fruit set ratio. According to the results of PT, by training 4 stems on a plant
the best performance in plant vigor, yield and fruit quality was achieved. The procedure
for thinning out, training and fruit setting is described below.
Procedure:
(a) Thin out all the lateral shoots under the first flower leaving 1 shoot just below the
flower and one more shoot under that.
(b) Train 4 stems including the main stem, the secondary stem, one from the second
node on the main stem and the other from the first node on the secondary stem.
(c) Leave all the lateral shoots from the 4 trained stems for fruit set.
(d) Pinch off old leaves for ventilation and exposure as necessary when leaves start to
grow over each other.
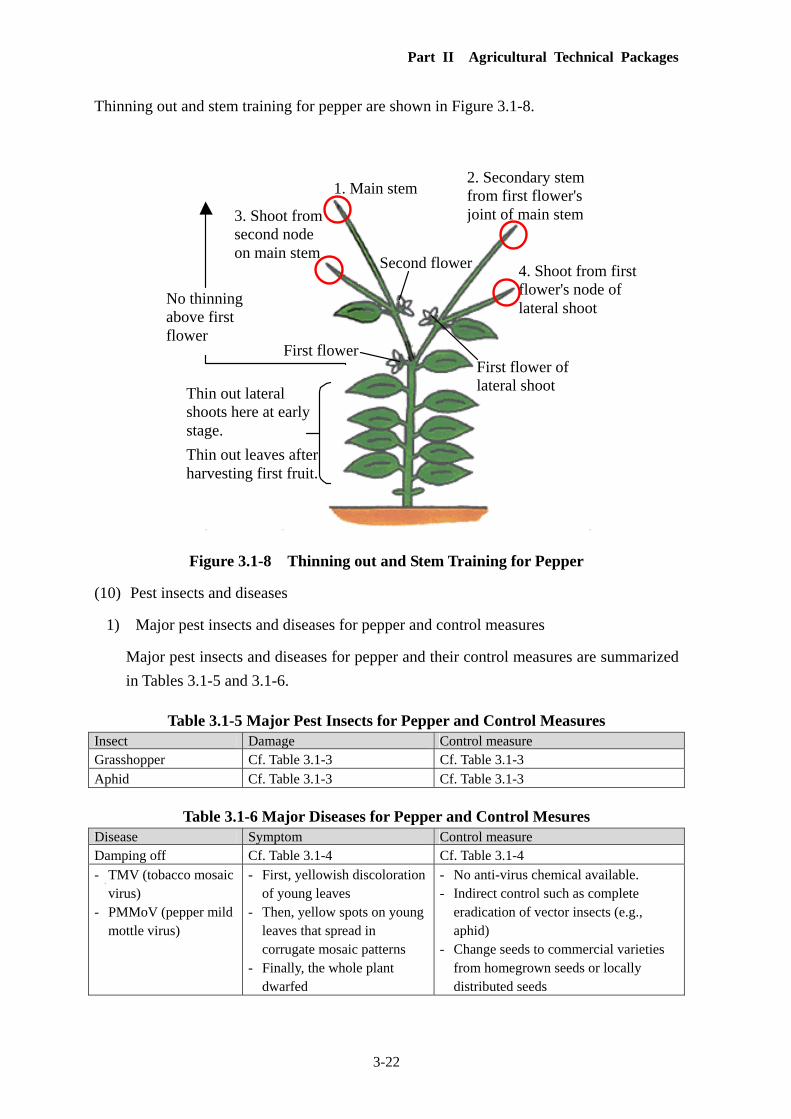
Part II Agricultural Technical Packages
3-22
No thinning above first flower
First flower
Second flower
First flower of lateral shootThin out lateral
shoots here at early stage.
Thin out leaves after harvesting first fruit.
1. Main stem2. Secondary stem from first flower's joint of main stem
4. Shoot from first flower's node of lateral shoot
3. Shoot from second node on main stem
Thinning out and stem training for pepper are shown in Figure 3.1-8.
Figure 3.1-8 Thinning out and Stem Training for Pepper
(10) Pest insects and diseases
1) Major pest insects and diseases for pepper and control measures
Major pest insects and diseases for pepper and their control measures are summarized
in Tables 3.1-5 and 3.1-6.
Table 3.1-5 Major Pest Insects for Pepper and Control Measures Insect Damage Control measure Grasshopper Cf. Table 3.1-3 Cf. Table 3.1-3 Aphid Cf. Table 3.1-3 Cf. Table 3.1-3
Table 3.1-6 Major Diseases for Pepper and Control Mesures Disease Symptom Control measure Damping off Cf. Table 3.1-4 Cf. Table 3.1-4 - TMV (tobacco mosaic
virus) - PMMoV (pepper mild
mottle virus)
- First, yellowish discoloration of young leaves
- Then, yellow spots on young leaves that spread in corrugate mosaic patterns
- Finally, the whole plant dwarfed
- No anti-virus chemical available. - Indirect control such as complete
eradication of vector insects (e.g., aphid)
- Change seeds to commercial varieties from homegrown seeds or locally distributed seeds
Part II Agricultural Technical Packages
3-23
2) Use of bio- insecticide: Refer to 3.1.2 (12) 1).
3) Chemical control
Virus occurrence discouraged the farmers who participated in PT on pepper plants in
both the dry and rainy seasons. Virus infection is the most serious problem in pepper
cultivation. Yield of pepper is drastically affected by the degree to which the plants
in the field are damaged by virus infection. Unfortunately, however, there is no
chemical agent available that is effective in treating virus infection.
Infection by a seed-borne virus is immediately apparent from the appearance of the
symptoms on the plant, and it is most likely by Tobacco Mosaic Virus (TMV or also
called PMMoV) particularly common in pepper. TMV is a very strong infectious
virus, which can be transmitted even by contact through soil and seeds as well as
vector insects such as aphid. Therefore, the virus is difficult to control unless the
seeds are replaced by varieties free of the virus or resistant to infection by the virus.
Probably, aphid control is the only practical measure for this virus infection.
Intensive control should be executed in the nursery by spraying a chemical insecticide.
However, as a matter of course, the use of the chemical agent should be stopped two
weeks before harvest because of the residues.
(11) Harvesting
The first fruit can be harvested 55-70 days after transplanting or 85-100 days after sowing.
Harvesting should be timely when fruits are fully mature.
3.2 Cost-Benefit Analysis
3.2.1 Preconditions for calculation of profitability
The target crops for cost-benefit analysis are watermelon and eggplant cultivated in the
pilot project (PP). Pepper was excluded from the analysis because its yield was too small
to be used for the calculation. The preconditions for the calculation of profitability are as
follows.
1) Yield
Yield is estimated based on the number of fruits harvested per 100m2.
2) Sales price of vegetables
The sales price of vegetables fluctuates throughout the year. The sales price of
watermelon ranges from Le 1,500 to Le 3,000 per fruit. On the other hand, the range
of sales price per fruit for eggplant is Le 500-600 in Makatick and Le 30-200 in
Mathon. In the calculation, a lower price is usually adopted to reflect the reality that
the sales price is not always high. Nevertheless, an intermediate price of Le 350 is
Part II Agricultural Technical Packages
3-24
adopted for eggplant due to the considerable gap in the price range between Makatick
and Mathon.
3) Production cost
The composition of the production cost is as follows.
Seed
For watermelon, the farmers obtain seeds from a fruit purchased at a local market, which
contains enough seeds to sow 100 m2. Thus, the seed cost is the purchase price of one
watermelon that is Le 5,000 (in 2008). For eggplant, on the other hand, the farmers
obtain seeds from the fruits that they produce, and thus there is no seed cost.
Fertilizer
The purchase price of fertilizer at Barmoi Luma market is Le 145,000/bag (50 kg) in
2008. The amount of fertilizer required for 100 m2 is 4 kg and thus the fertilizer cost is
Le 11,600 (i.e., 145,000/50 x 4), which is the same for both watermelon and eggplant.
Farming tools
The cost of farming tools is based on the field study data obtained by MAFFS-K, which
is Le 35,000/ha (i.e., Le 35,000 x 0.01ha = Le 350). For watermelon, the cost of plastic
cups (Le 6,500 for 100 cups) is added and the total cost of farming tools is Le 6,850 ((Le
350 + Le 6,500).
3.2.2 Calculation of profitability
The estimated profitability of watermelon and eggplant is presented in Table 3.2-1 and
3.2-2, and the results of the cost-benefit analysis for watermelon and eggplant are
summarized as follows.
1) The profit margins for watermelon and eggplant are well over 60%.
2) The profit margin can be further increased through reducing the costs of fertilizer
and farming tools (e.g., plastic cups for watermelon).
3) Labor cost is not included because the cultivation area is small.
4) Vegetable production is labor intensive. Expansion of the cultivation area
increases labor cost and decreases profitability. As implied by the cost-benefit
analysis, vegetables should be produced in a small area that can be managed by the
farmer’s family members only.
5) Family labor expenses are excluded from the production cost. The total family
labor requirements for one cropping season are about 10 persons, whose cost can be
converted to Le 50,000. Therefore, for watermelon, the estimated profitability is
Le 850 and the profit ratio is 1.1 % whereas for eggplant, the estimated profitability
is Le –9,100 and the profit ratio is –17.0 %.
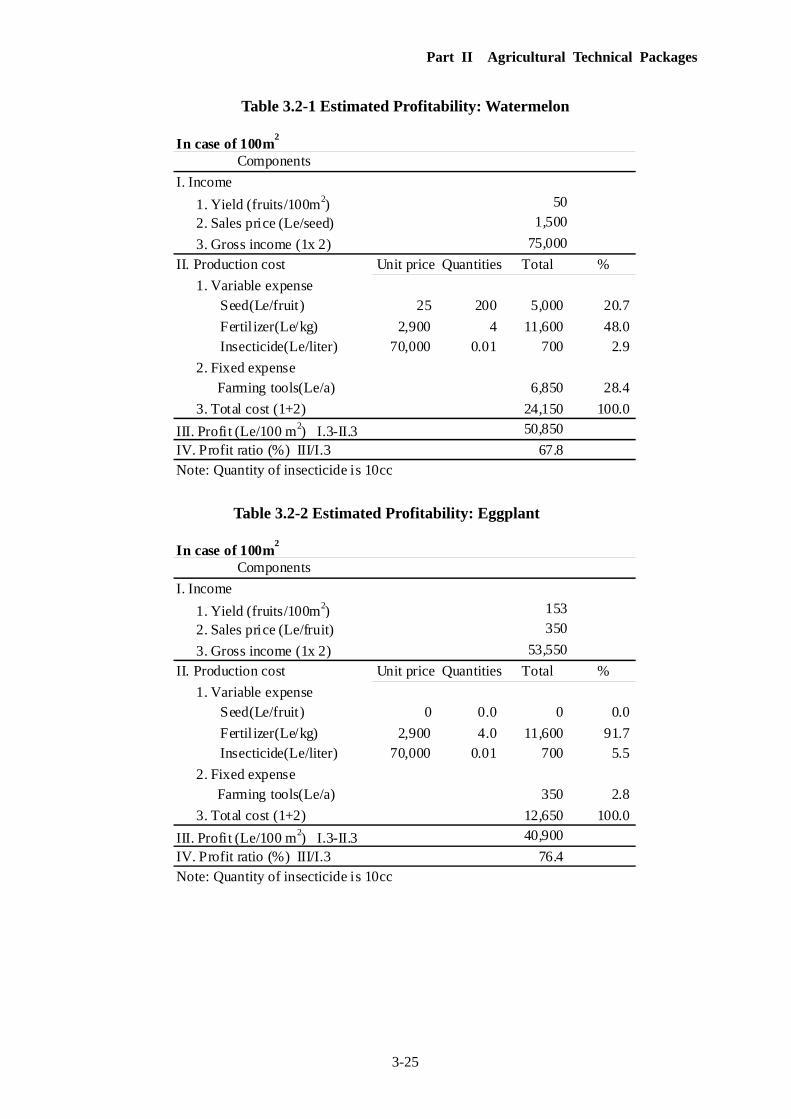
Part II Agricultural Technical Packages
3-25
In case of 100m2
I. Income
1. Yield (fruits/100m2) 50
2. Sales price (Le/seed) 1,500
3. Gross income (1x 2) 75,000
II. Production cost Unit price Quantities Total %
1. Variable expense Seed(Le/fruit) 25 200 5,000 20.7
Fertil izer(Le/kg) 2,900 4 11,600 48.0 Insecticide(Le/liter) 70,000 0.01 700 2.9
2. Fixed expense Farming tools(Le/a) 6,850 28.4
3. Total cost (1+2) 24,150 100.0
III. Profit (Le/100 m2) I.3-II.3 50,850
IV. Profit ratio (%) III/I.3 67.8Note: Quantity of insecticide is 10cc
Components
In case of 100m2
I. Income
1. Yield (fruits/100m2) 153
2. Sales price (Le/fruit) 350
3. Gross income (1x 2) 53,550
II. Production cost Unit price Quantities Total %
1. Variable expense Seed(Le/fruit) 0 0.0 0 0.0
Fertil izer(Le/kg) 2,900 4.0 11,600 91.7 Insecticide(Le/liter) 70,000 0.01 700 5.5
2. Fixed expense Farming tools(Le/a) 350 2.8
3. Total cost (1+2) 12,650 100.0
III. Profit (Le/100 m2) I.3-II.3 40,900
IV. Profit ratio (%) III/I.3 76.4Note: Quantity of insecticide is 10cc
Components
Table 3.2-1 Estimated Profitability: Watermelon
Table 3.2-2 Estimated Profitability: Eggplant
Related Documents