PARTNER LAB SOFTWARE TRAINING MANUAL • Partner Lab Software Overview • Align Support App • Case Manager • Login to MyAligntech • Opening a Case • Moving the model • Tools available in the Partner Lab Software N12673 Rev 1

Welcome message from author
This document is posted to help you gain knowledge. Please leave a comment to let me know what you think about it! Share it to your friends and learn new things together.
Transcript
Partner Lab Software training ManuaL
• Partner Lab Software overview• align Support app• Case Manager• Login to Myaligntech• opening a Case• Moving the model• tools available in the Partner Lab Software
N12673 Rev 1
Partner Lab training ManuaL 1 of 26
www.ITERO.cOm
Partner Lab Software Service Overview
the itero Partner Lab Software service provides lab users with a quick method of reviewing and processing itero cases. this application provides the following capabilities:
• View and edit treatment info parameters (rx)
• Case Manager tool
• Creation of detachable teeth*
• Perform full 3D viewing of model
• edit margin lines
• edit ditch function
• extensions
• review occlusal clearance
• review insertion path undercuts
• Send cases to our itero milling site
• use itero export tools to export cases to 3rd party CaD/CaM systems
Lab Support Department 800-577-8767option number 5 for labs
*a nominal fee will apply. Please see the itero Lab Sales order agreement for a complete price guide or contact your local territory manager.
Partner Lab training ManuaL 2 of 26
www.ITERO.cOm
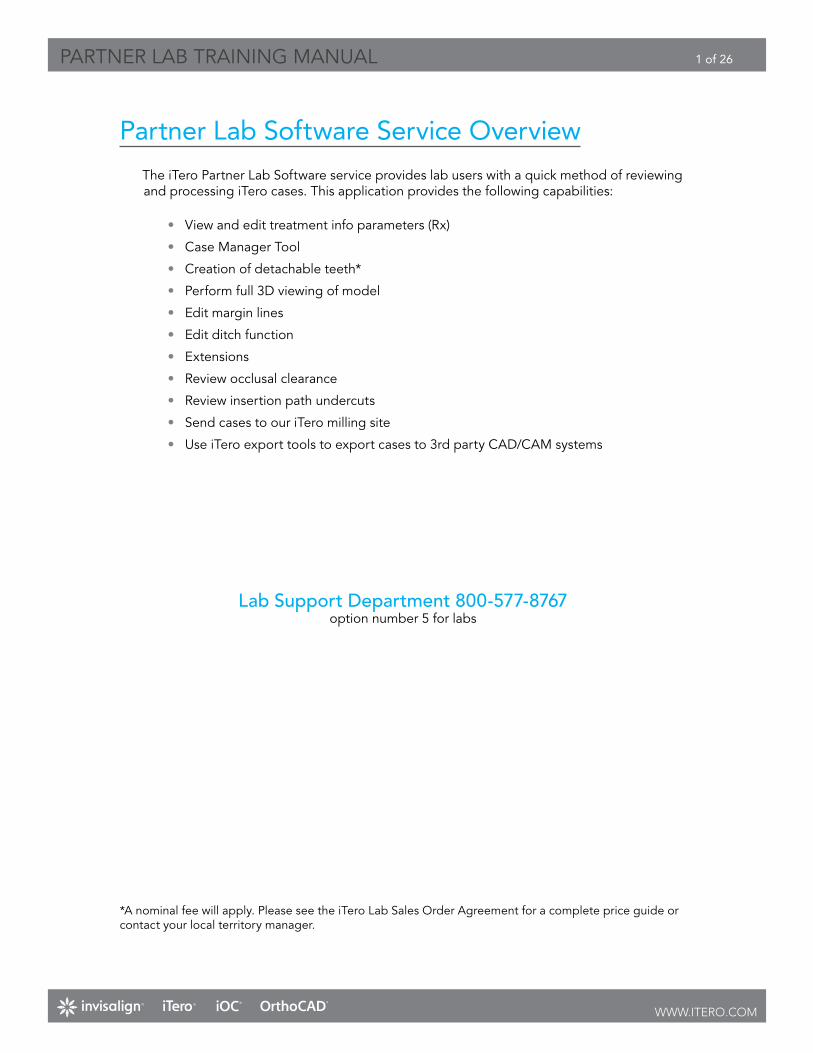
Align Support App
align support application will help the itero support team to remotely view the lab’s work station and provide better support. the lab technician is to follow these steps:
1. Double click on the align support app link that is on your desktop.
2. Click on the plus sign that is next to the align uS option.
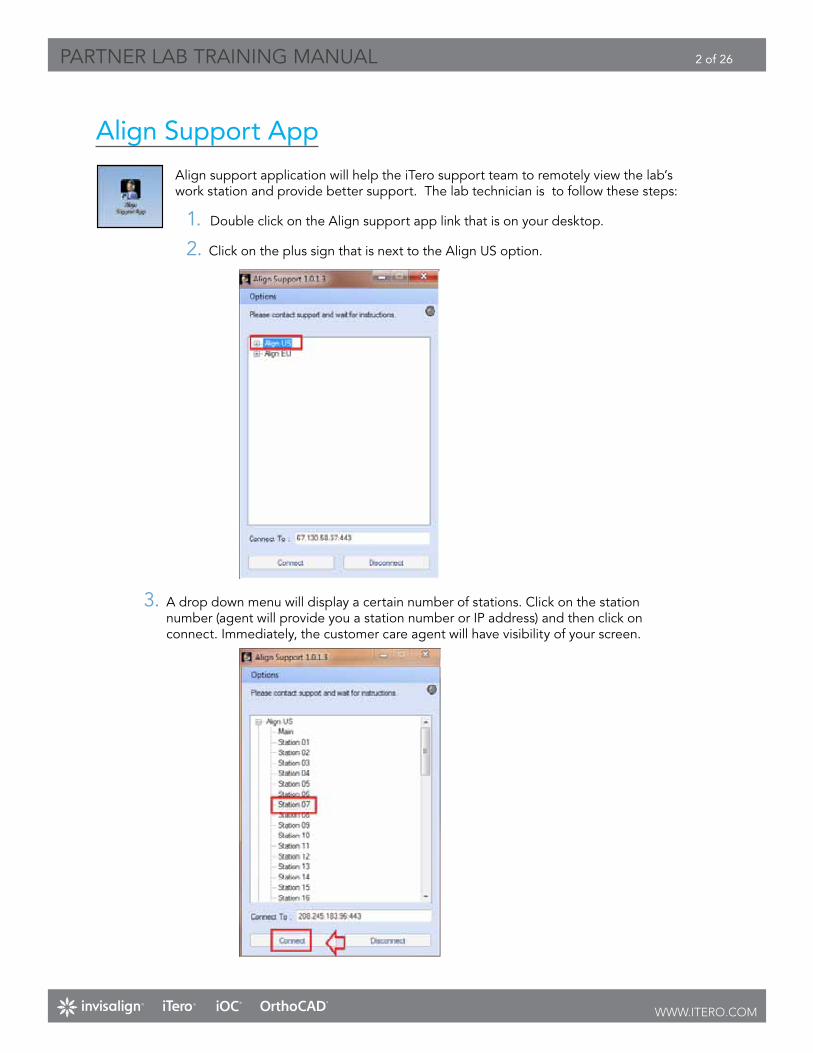
3. a drop down menu will display a certain number of stations. Click on the station number (agent will provide you a station number or iP address) and then click on connect. immediately, the customer care agent will have visibility of your screen.
Partner Lab training ManuaL 3 of 26
www.ITERO.cOm
CASe MAnAger
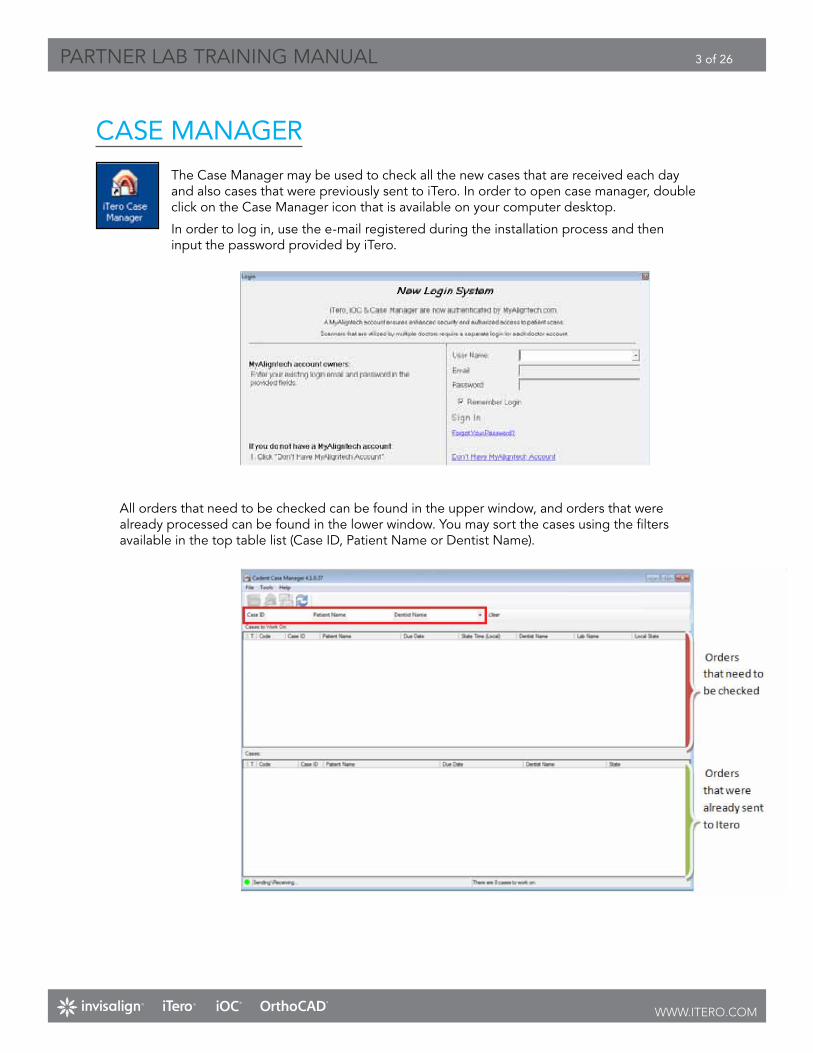
the Case Manager may be used to check all the new cases that are received each day and also cases that were previously sent to itero. in order to open case manager, double click on the Case Manager icon that is available on your computer desktop.
in order to log in, use the e-mail registered during the installation process and then input the password provided by itero.
all orders that need to be checked can be found in the upper window, and orders that were already processed can be found in the lower window. You may sort the cases using the filters available in the top table list (Case iD, Patient name or Dentist name).
Partner Lab training ManuaL 4 of 26
www.ITERO.cOm
Opening a Case Using Case Manager
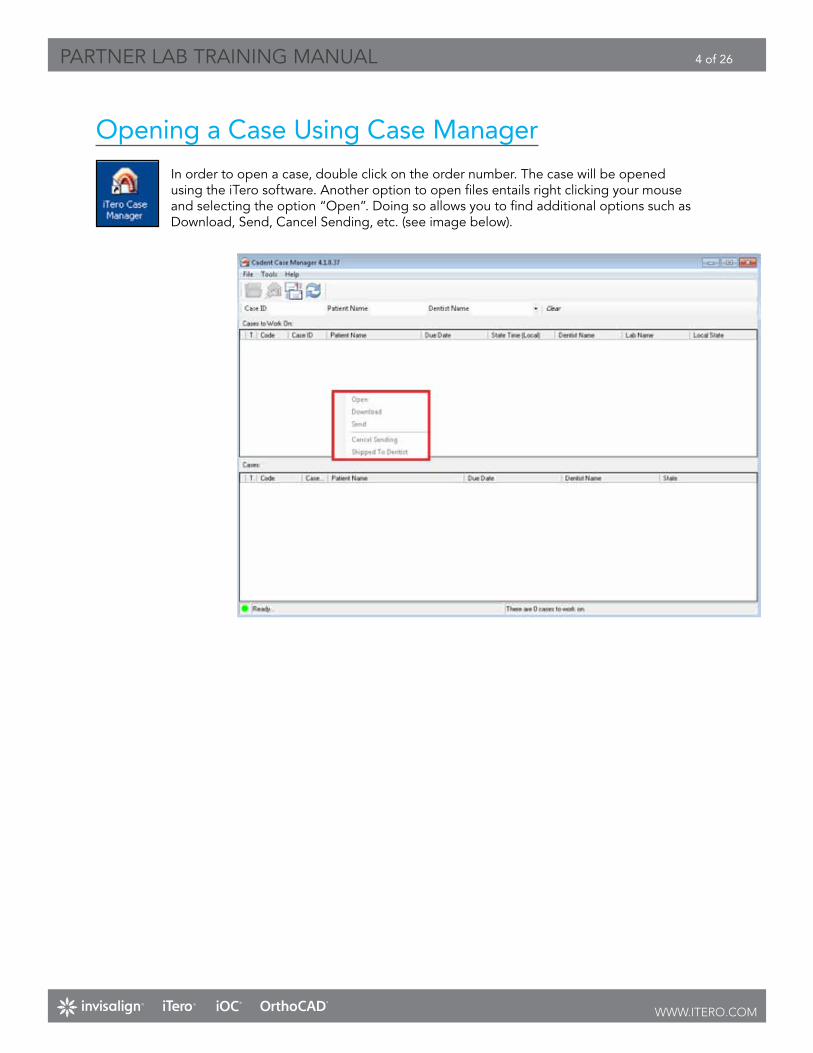
in order to open a case, double click on the order number. the case will be opened using the itero software. another option to open files entails right clicking your mouse and selecting the option “open”. Doing so allows you to find additional options such as Download, Send, Cancel Sending, etc. (see image below).
Partner Lab training ManuaL 5 of 26
www.ITERO.cOm
Login to MyAligntech
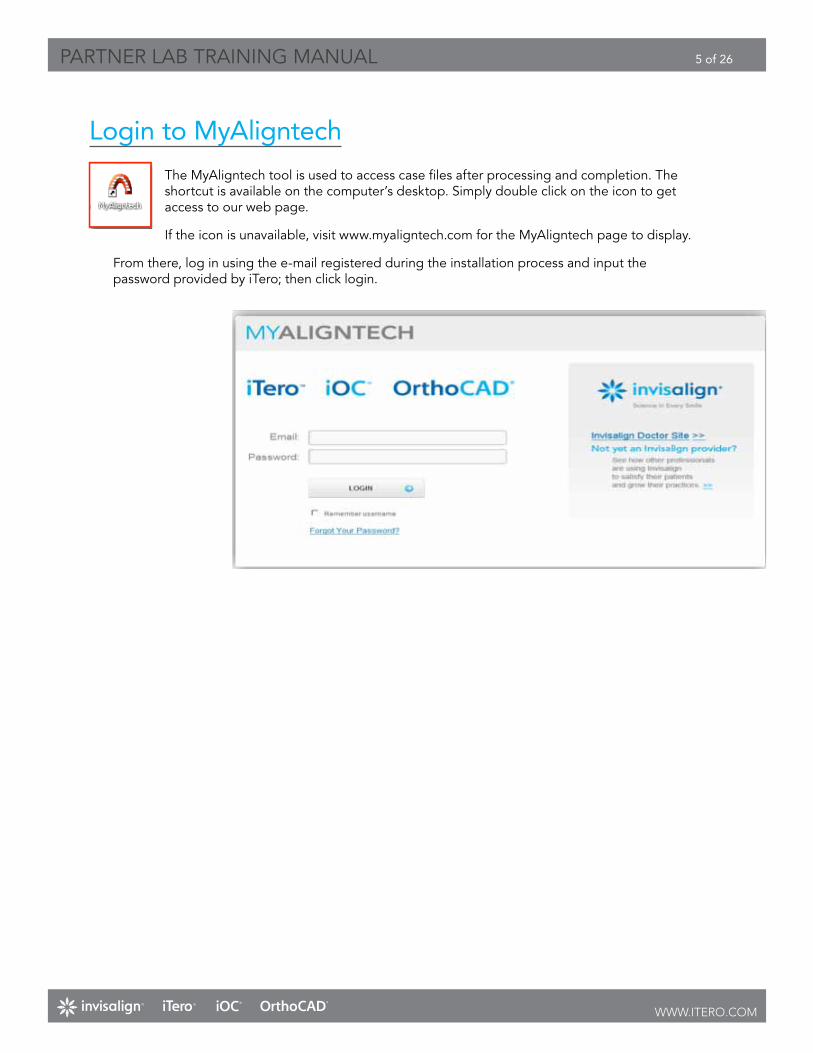
the Myaligntech tool is used to access case files after processing and completion. the shortcut is available on the computer’s desktop. Simply double click on the icon to get access to our web page.
if the icon is unavailable, visit www.myaligntech.com for the Myaligntech page to display.
from there, log in using the e-mail registered during the installation process and input the password provided by itero; then click login.

Partner Lab training ManuaL 6 of 26
www.ITERO.cOm
Opening a Case Using MyAligntech
a Clinical orders List window will be displayed as soon as you login. in order to check the patients’ cases, click on the orders link that is available in the upper left corner.
remember to check all the cases that are in the Lab review state. to open the cases, double click on the blue code. order information window will be displayed. there you will find rx details, the patient’s info and the open file shortcut. Clicking on open file icon will open the case with the itero software.
Partner Lab training ManuaL 7 of 26
www.ITERO.cOm
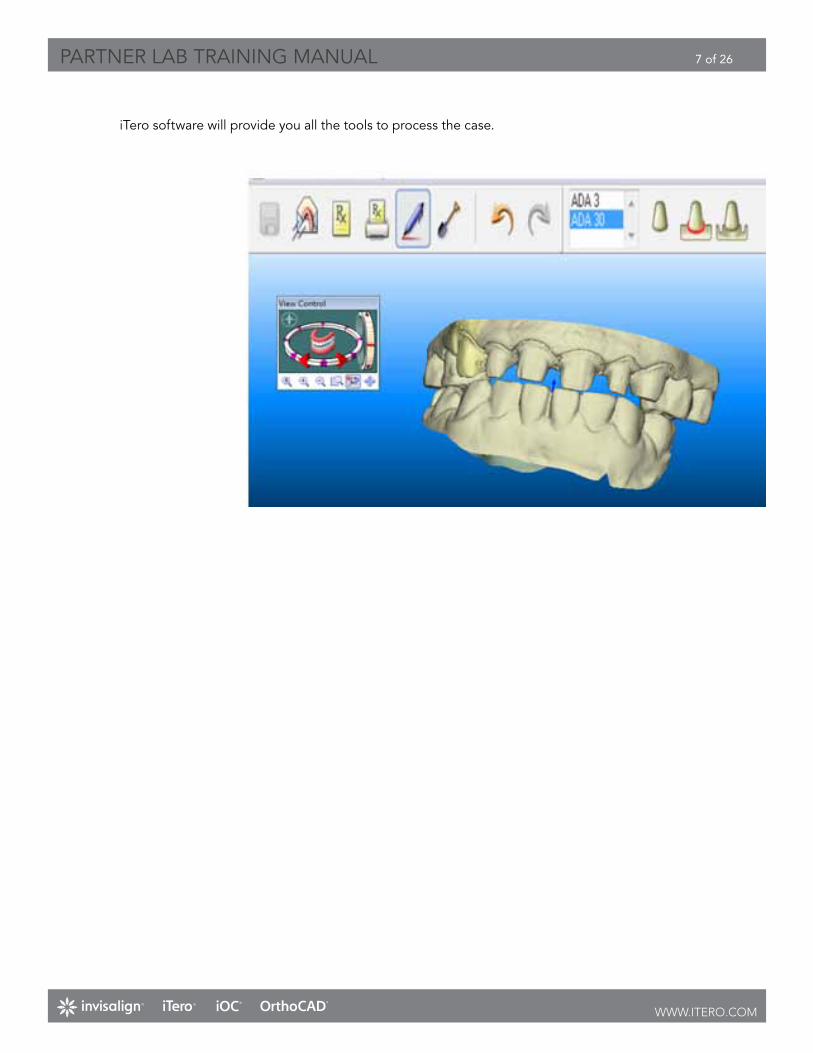
itero software will provide you all the tools to process the case.

Partner Lab training ManuaL 8 of 26
www.ITERO.cOm
Moving the Model

Partner Lab training ManuaL 9 of 26
www.ITERO.cOm
Keyboard-Mouse Usage
the following operations can be performed using keyboard/mouse sequences.
Partner Lab training ManuaL 10 of 26
www.ITERO.cOm
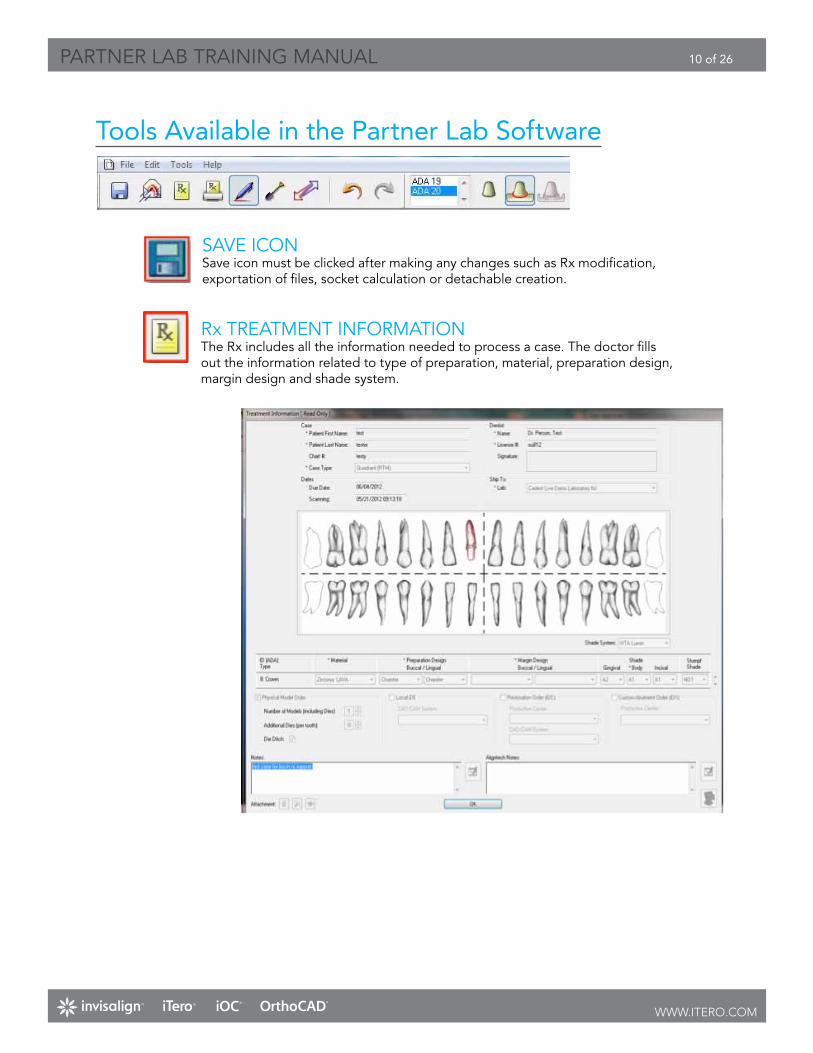
Tools Available in the Partner Lab Software
SaVe iCon Save icon must be clicked after making any changes such as rx modification, exportation of files, socket calculation or detachable creation.
rx treatMent inforMation the rx includes all the information needed to process a case. the doctor fills out the information related to type of preparation, material, preparation design, margin design and shade system.
Partner Lab training ManuaL 11 of 26
www.ITERO.cOm
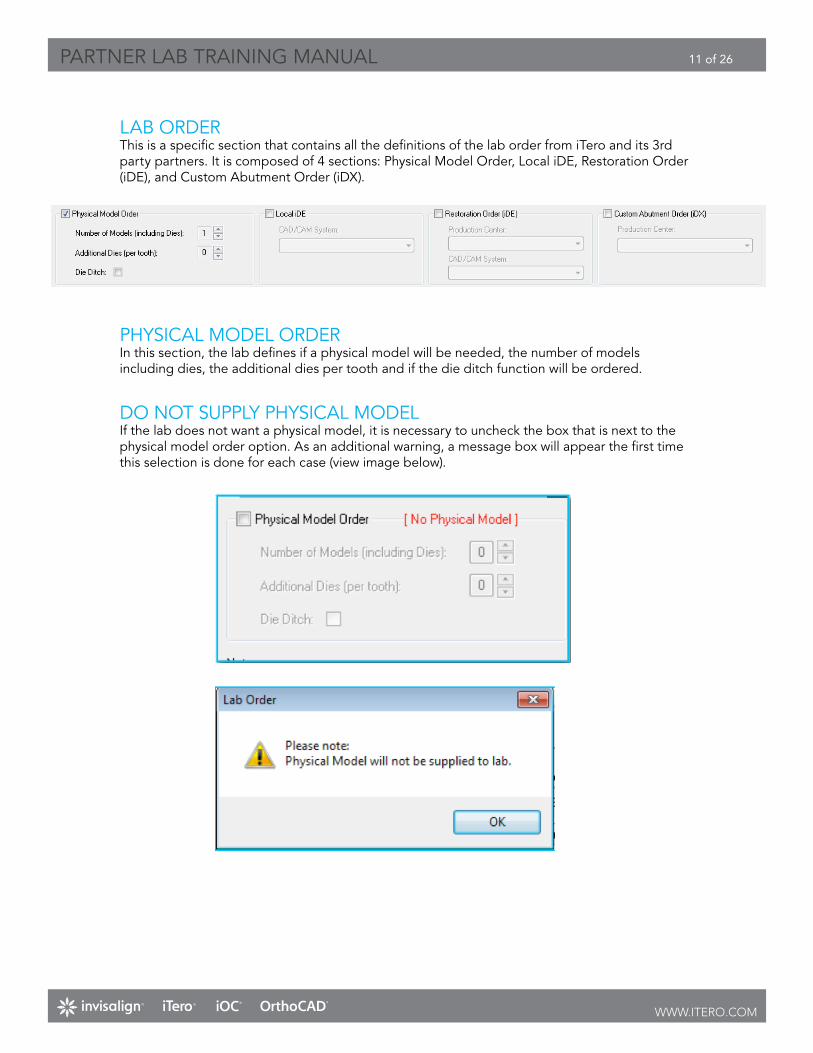
Lab orDer this is a specific section that contains all the definitions of the lab order from itero and its 3rd party partners. it is composed of 4 sections: Physical Model order, Local iDe, restoration order (iDe), and Custom abutment order (iDX).
PhYSiCaL MoDeL orDerin this section, the lab defines if a physical model will be needed, the number of models including dies, the additional dies per tooth and if the die ditch function will be ordered.
Do not SuPPLY PhYSiCaL MoDeLif the lab does not want a physical model, it is necessary to uncheck the box that is next to the physical model order option. as an additional warning, a message box will appear the first time this selection is done for each case (view image below).
Partner Lab training ManuaL 12 of 26
www.ITERO.cOm
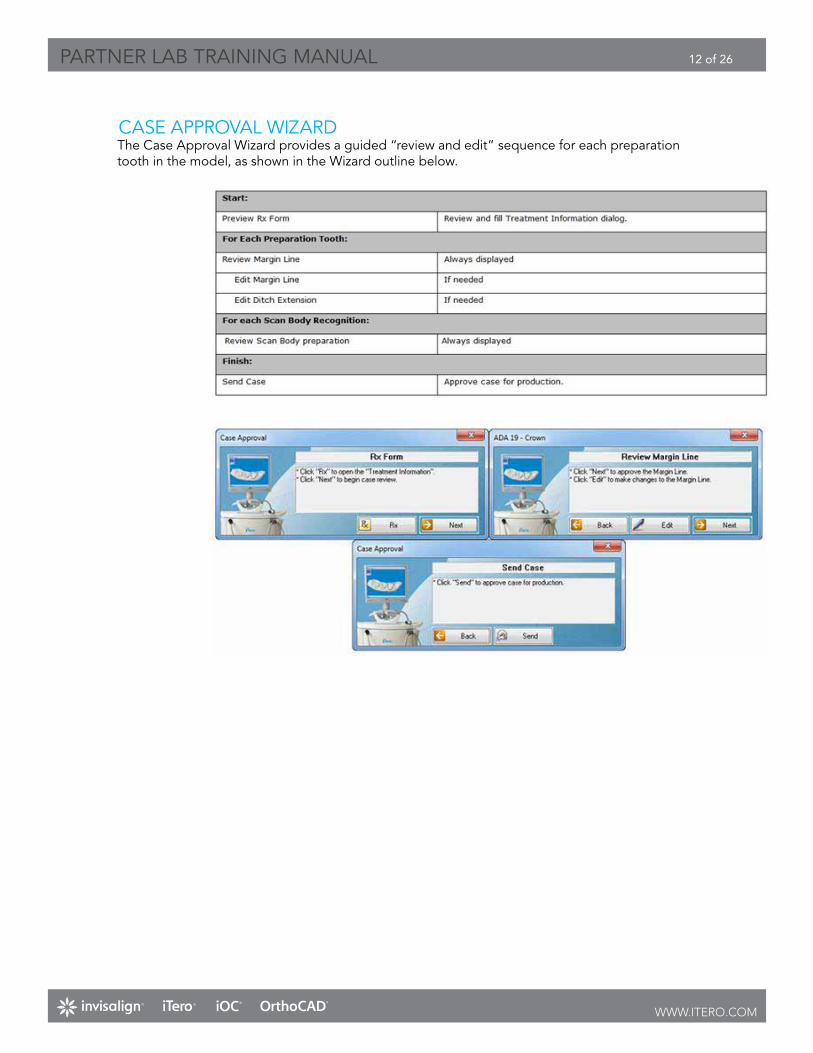
CaSe aPProVaL wizarDthe Case approval wizard provides a guided “review and edit” sequence for each preparation tooth in the model, as shown in the wizard outline below.
Partner Lab training ManuaL 13 of 26
www.ITERO.cOm
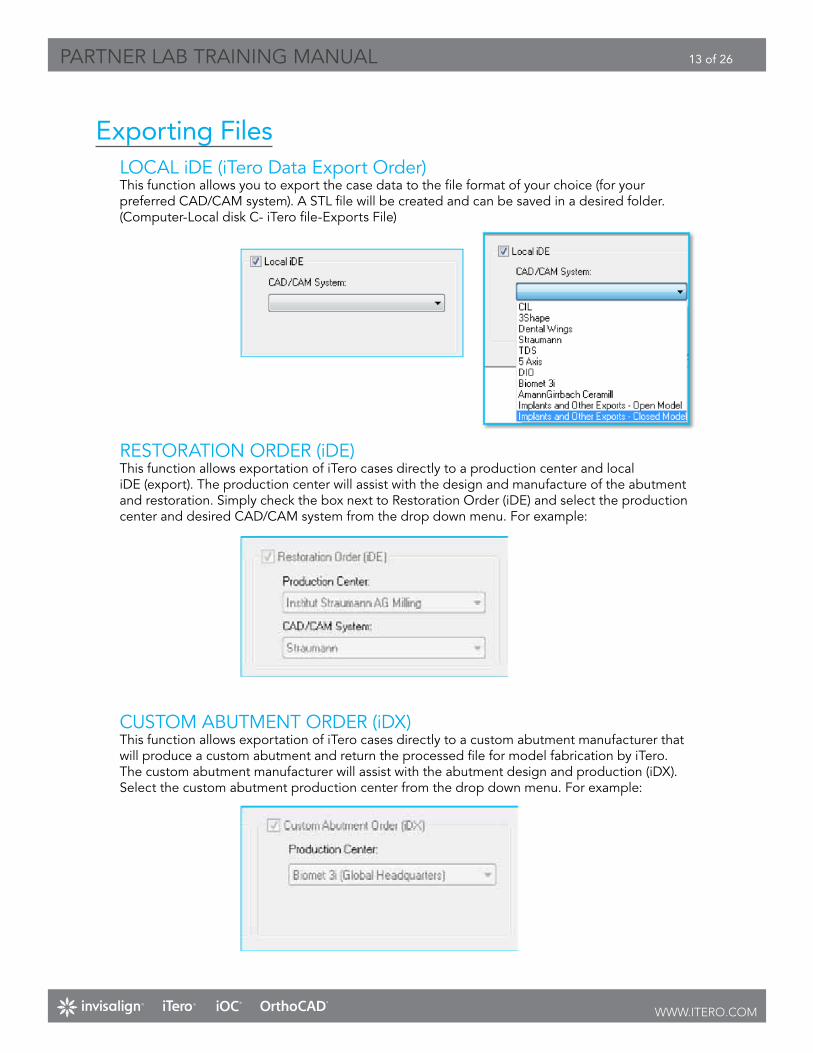
exporting FilesLoCaL iDe (itero Data export order) this function allows you to export the case data to the file format of your choice (for your preferred CaD/CaM system). a StL file will be created and can be saved in a desired folder. (Computer-Local disk C- itero file-exports file)
reStoration orDer (iDe) this function allows exportation of itero cases directly to a production center and localiDe (export). the production center will assist with the design and manufacture of the abutment and restoration. Simply check the box next to restoration order (iDe) and select the productioncenter and desired CaD/CaM system from the drop down menu. for example:
CuStoM abutMent orDer (iDX) this function allows exportation of itero cases directly to a custom abutment manufacturer thatwill produce a custom abutment and return the processed file for model fabrication by itero. the custom abutment manufacturer will assist with the abutment design and production (iDX). Select the custom abutment production center from the drop down menu. for example:
Partner Lab training ManuaL 14 of 26
www.ITERO.cOm
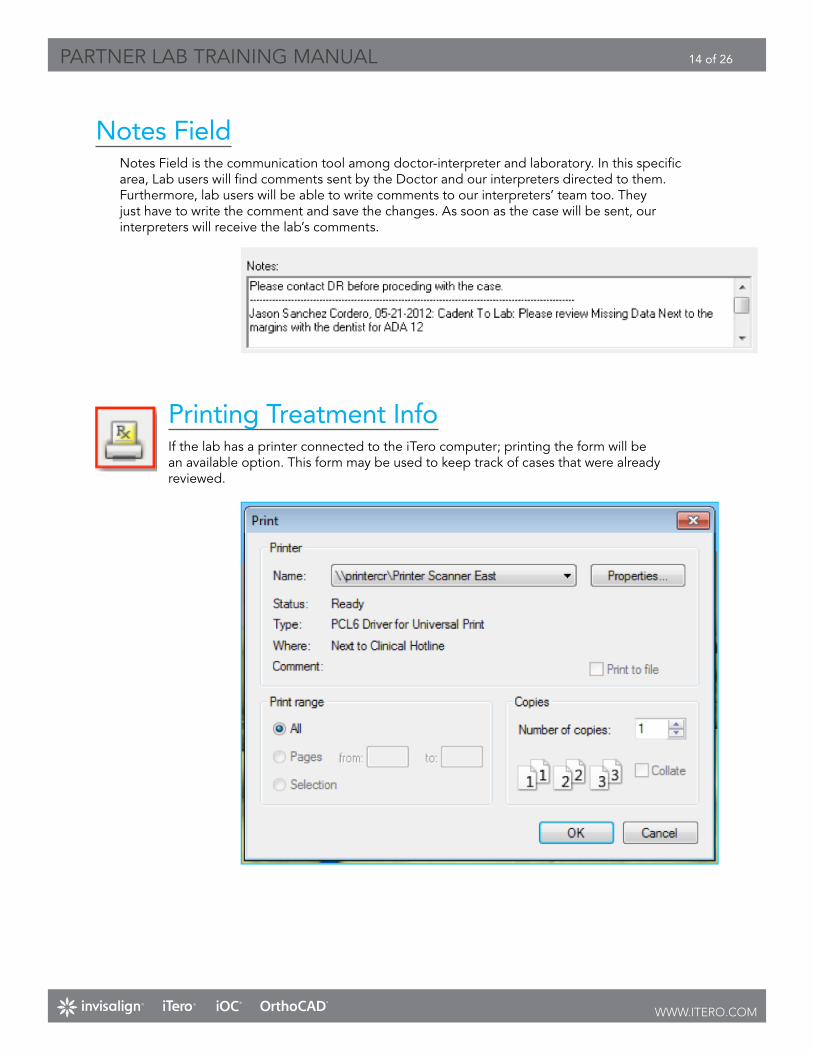
notes Fieldnotes field is the communication tool among doctor-interpreter and laboratory. in this specific area, Lab users will find comments sent by the Doctor and our interpreters directed to them. furthermore, lab users will be able to write comments to our interpreters’ team too. they just have to write the comment and save the changes. as soon as the case will be sent, our interpreters will receive the lab’s comments.
Printing Treatment Infoif the lab has a printer connected to the itero computer; printing the form will be an available option. this form may be used to keep track of cases that were already reviewed.
Partner Lab training ManuaL 15 of 26
www.ITERO.cOm
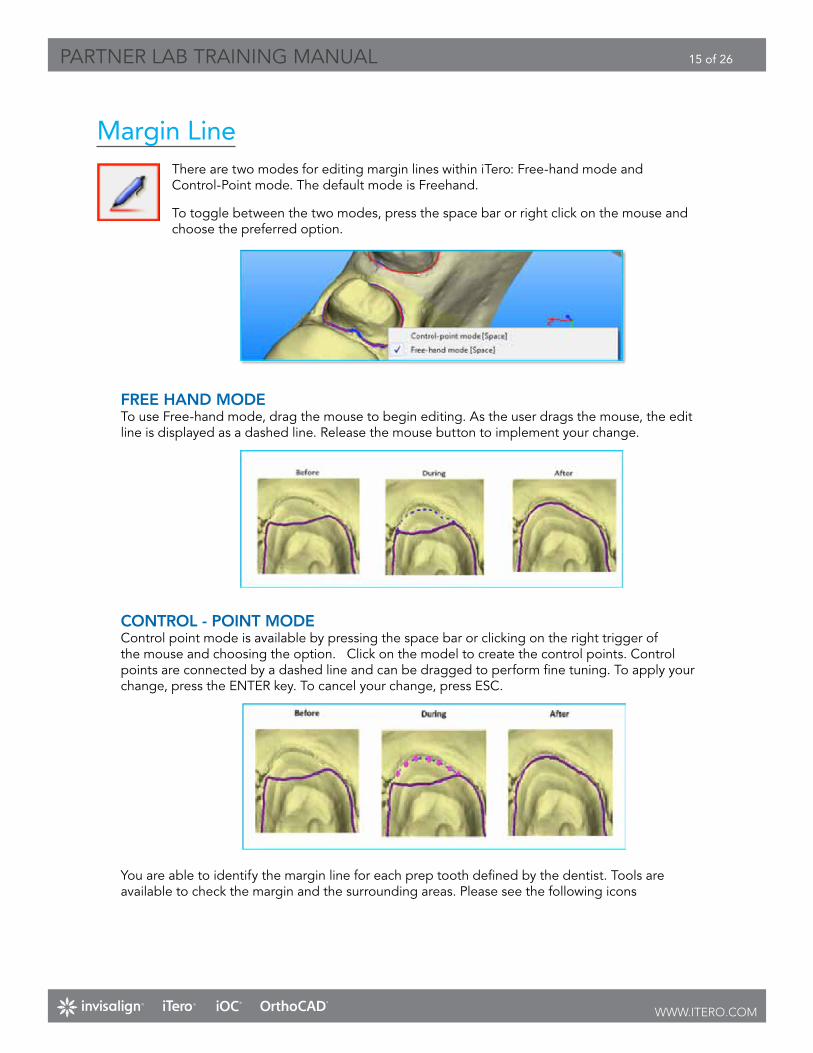
Margin Linethere are two modes for editing margin lines within itero: free-hand mode and Control-Point mode. the default mode is freehand.
to toggle between the two modes, press the space bar or right click on the mouse and choose the preferred option.
FreeHandModeto use free-hand mode, drag the mouse to begin editing. as the user drags the mouse, the edit line is displayed as a dashed line. release the mouse button to implement your change.
Control-PointModeControl point mode is available by pressing the space bar or clicking on the right trigger of the mouse and choosing the option. Click on the model to create the control points. Control points are connected by a dashed line and can be dragged to perform fine tuning. to apply your change, press the enter key. to cancel your change, press eSC.
You are able to identify the margin line for each prep tooth defined by the dentist. tools are available to check the margin and the surrounding areas. Please see the following icons
Partner Lab training ManuaL 16 of 26
www.ITERO.cOm
SurrounDing SurfaCeS this button can hide or show the surrounding surfaces around the prep tooth.
Margin Line this button can hide or show the margin line traced by our interpreters. this allows you to have visibility of the doctor’s margin design, as well as itero’s margin.
DitCh this button can hide or show the ditch created for the preparation. the model ditch is the space between the prep and the model. this icon must be enabled to export the
case to all CaD systems. that said, all the preps that will be exported must have the model ditch.
Creating a Detachable Tooth
You may request that a regular tooth be manufactured as detachable.
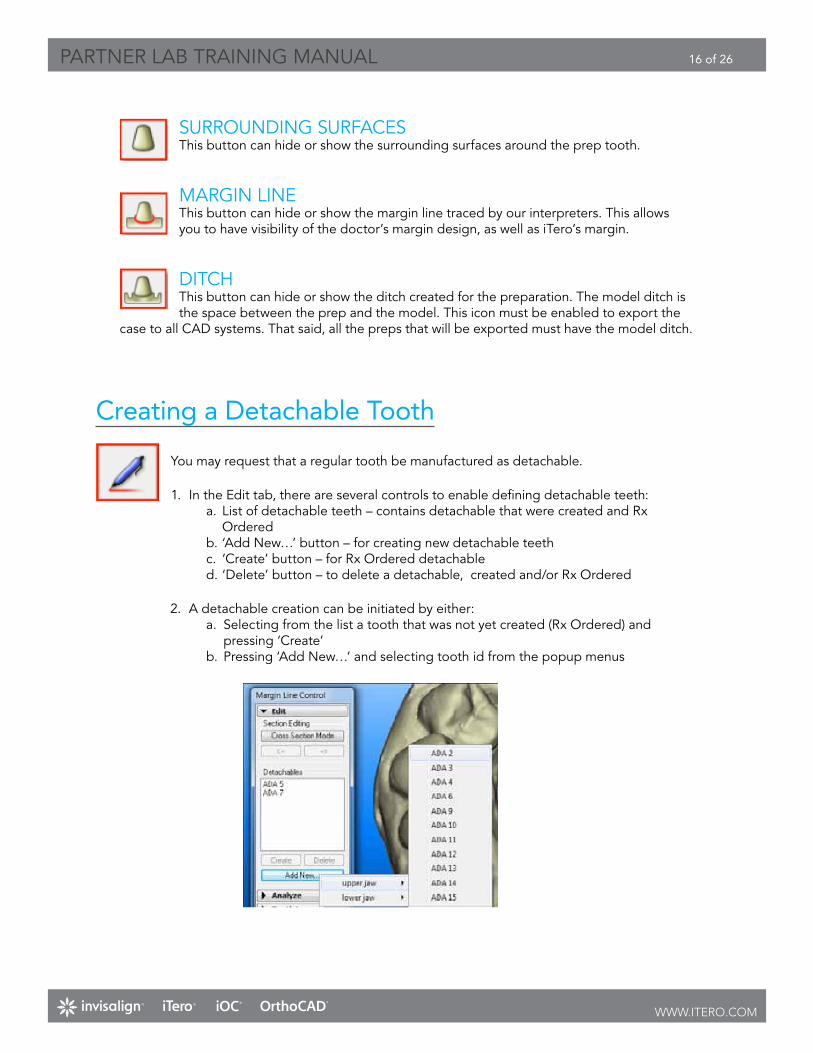
1. in the edit tab, there are several controls to enable defining detachable teeth:a. List of detachable teeth – contains detachable that were created and rx
orderedb. ‘add new…’ button – for creating new detachable teethc. ‘Create’ button – for rx ordered detachabled. ‘Delete’ button – to delete a detachable, created and/or rx ordered
2. a detachable creation can be initiated by either:a. Selecting from the list a tooth that was not yet created (rx ordered) and
pressing ‘Create’b. Pressing ‘add new…’ and selecting tooth id from the popup menus
Partner Lab training ManuaL 17 of 26
www.ITERO.cOm
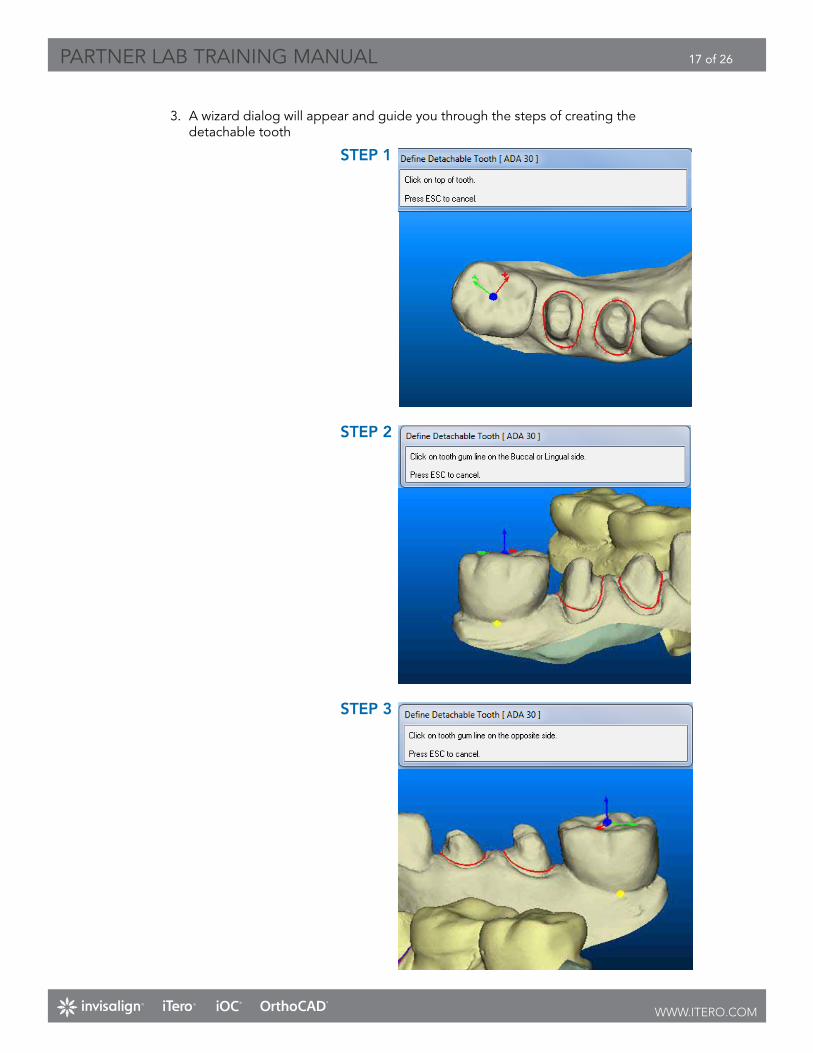
3. a wizard dialog will appear and guide you through the steps of creating the detachable tooth
SteP1
SteP2
SteP3
Partner Lab training ManuaL 18 of 26
www.ITERO.cOm
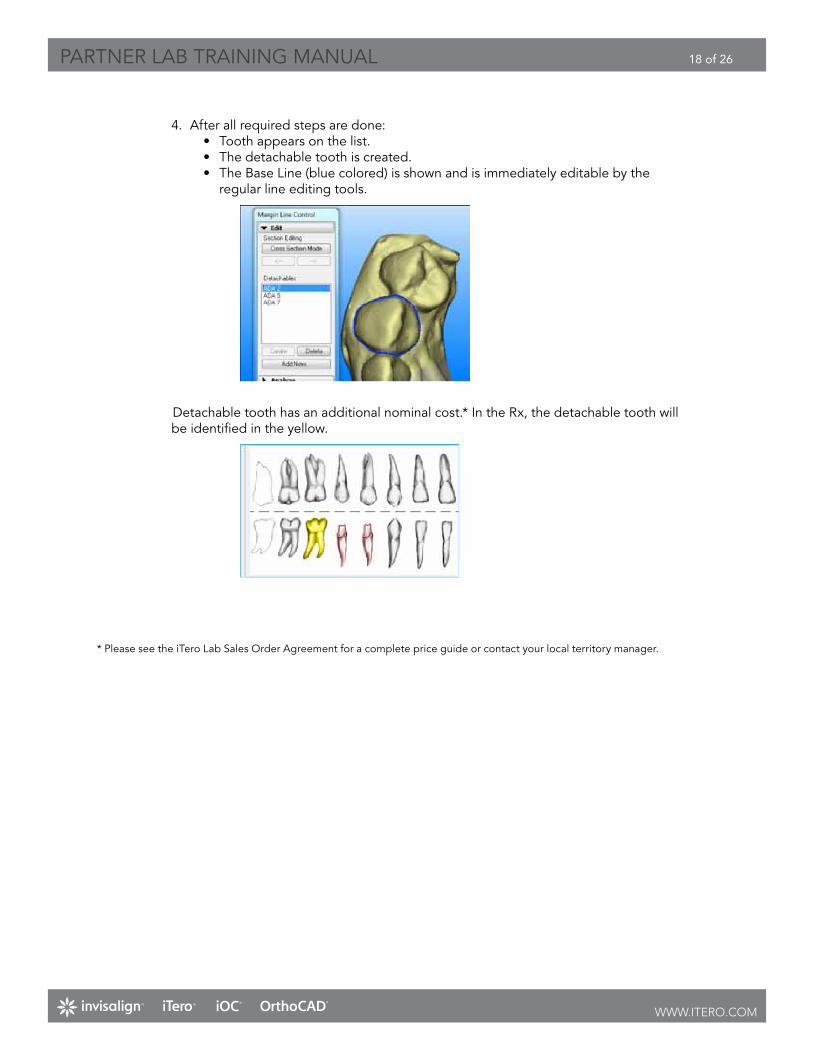
4. after all required steps are done:• tooth appears on the list.• the detachable tooth is created.• the base Line (blue colored) is shown and is immediately editable by the
regular line editing tools.
Detachable tooth has an additional nominal cost.* in the rx, the detachable tooth will be identified in the yellow.
* Please see the itero Lab Sales order agreement for a complete price guide or contact your local territory manager.
Partner Lab training ManuaL 19 of 26
www.ITERO.cOm
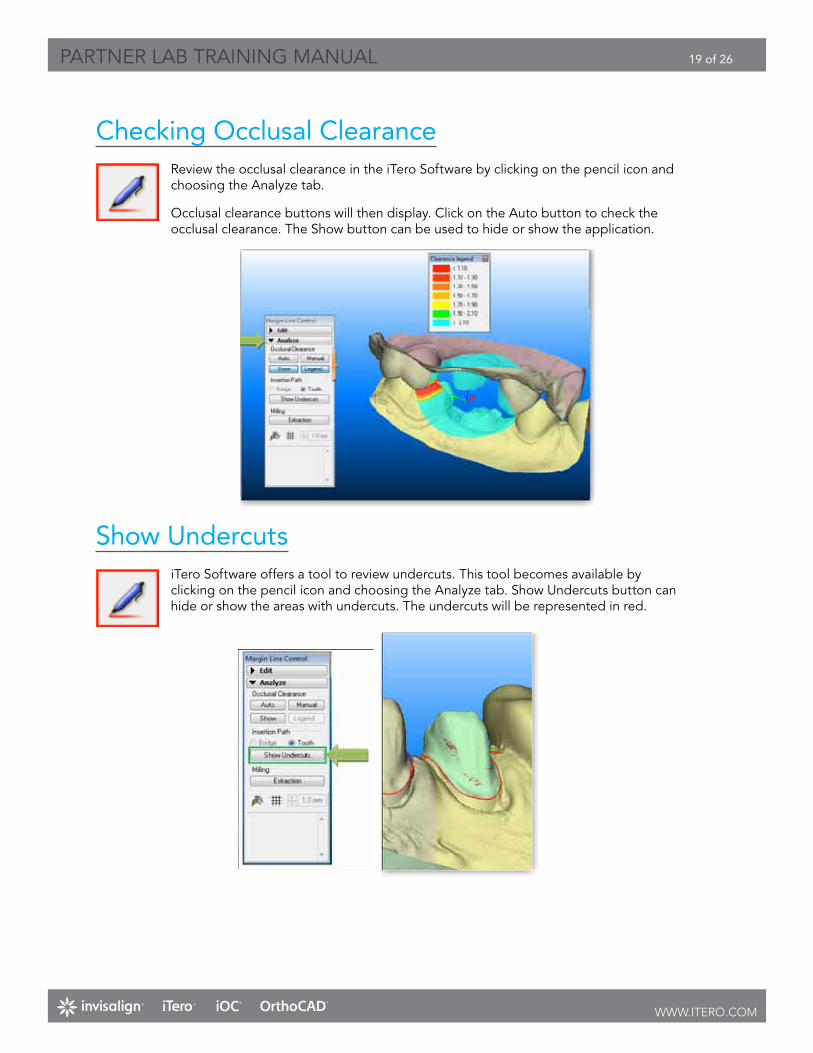
Checking Occlusal Clearancereview the occlusal clearance in the itero Software by clicking on the pencil icon and choosing the analyze tab.
occlusal clearance buttons will then display. Click on the auto button to check the occlusal clearance. the Show button can be used to hide or show the application.
Show Undercutsitero Software offers a tool to review undercuts. this tool becomes available byclicking on the pencil icon and choosing the analyze tab. Show undercuts button canhide or show the areas with undercuts. the undercuts will be represented in red.
Partner Lab training ManuaL 20 of 26
www.ITERO.cOm
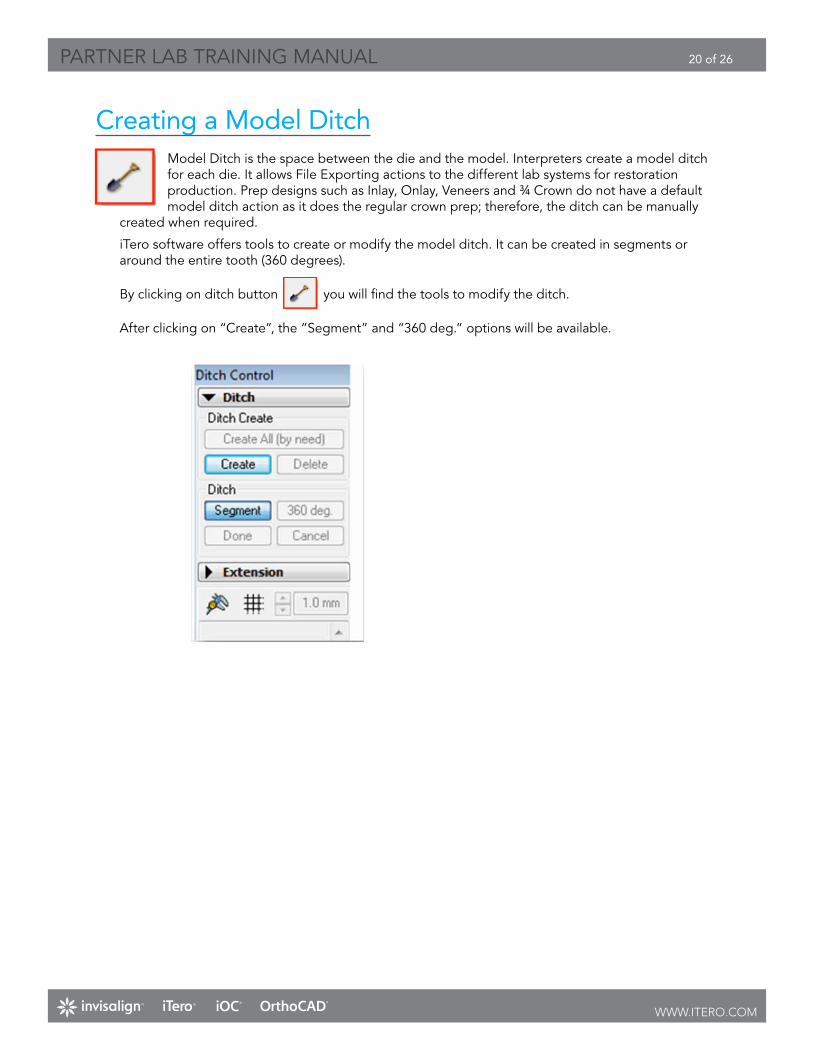
Creating a Model DitchModel Ditch is the space between the die and the model. interpreters create a model ditch for each die. it allows file exporting actions to the different lab systems for restoration production. Prep designs such as inlay, onlay, Veneers and ¾ Crown do not have a default model ditch action as it does the regular crown prep; therefore, the ditch can be manually
created when required.
itero software offers tools to create or modify the model ditch. it can be created in segments or around the entire tooth (360 degrees).
by clicking on ditch button you will find the tools to modify the ditch.
after clicking on “Create”, the ”Segment” and “360 deg.” options will be available.
Partner Lab training ManuaL 21 of 26
www.ITERO.cOm
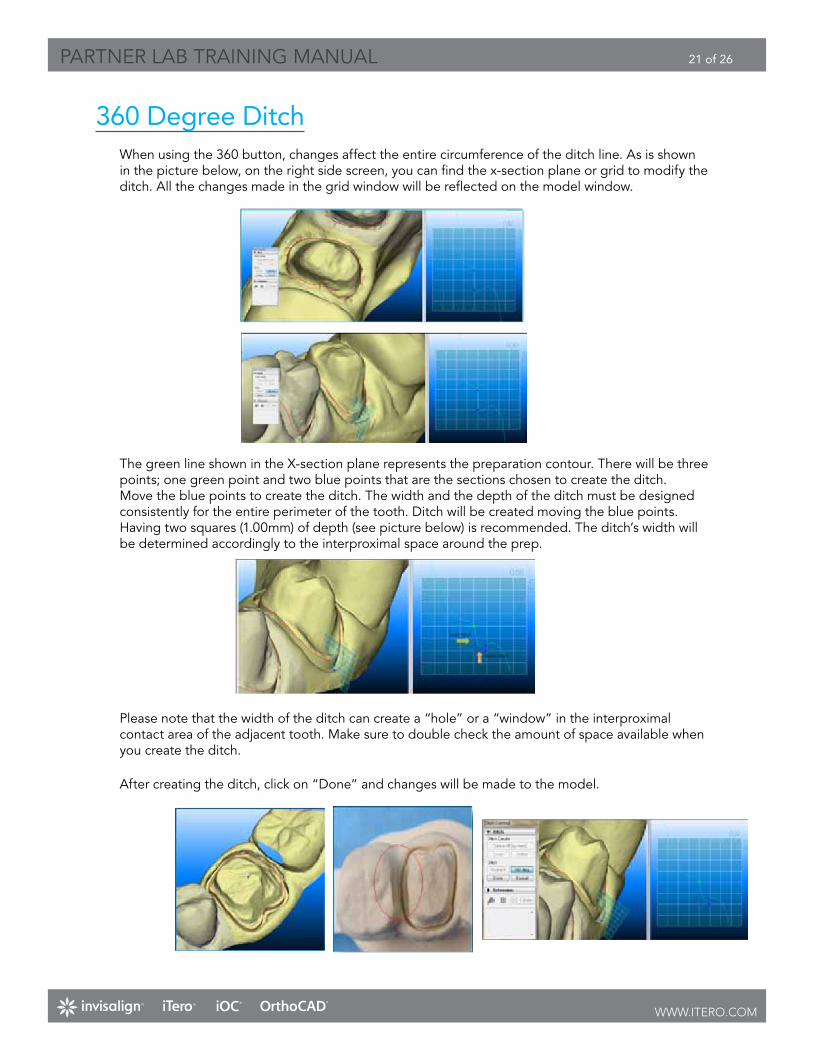
Please note that the width of the ditch can create a “hole” or a “window” in the interproximal contact area of the adjacent tooth. Make sure to double check the amount of space available when you create the ditch.
after creating the ditch, click on “Done” and changes will be made to the model.
360 Degree Ditchwhen using the 360 button, changes affect the entire circumference of the ditch line. as is shown in the picture below, on the right side screen, you can find the x-section plane or grid to modify the ditch. all the changes made in the grid window will be reflected on the model window.
the green line shown in the X-section plane represents the preparation contour. there will be three points; one green point and two blue points that are the sections chosen to create the ditch.Move the blue points to create the ditch. the width and the depth of the ditch must be designed consistently for the entire perimeter of the tooth. Ditch will be created moving the blue points. having two squares (1.00mm) of depth (see picture below) is recommended. the ditch’s width will be determined accordingly to the interproximal space around the prep.
Partner Lab training ManuaL 22 of 26
www.ITERO.cOm
when the changes are performed, click on “Done” to keep the modifications in the model, or click “Cancel” to start over again. Please remember always save the changes using the save button available in the tool bar.
Before After
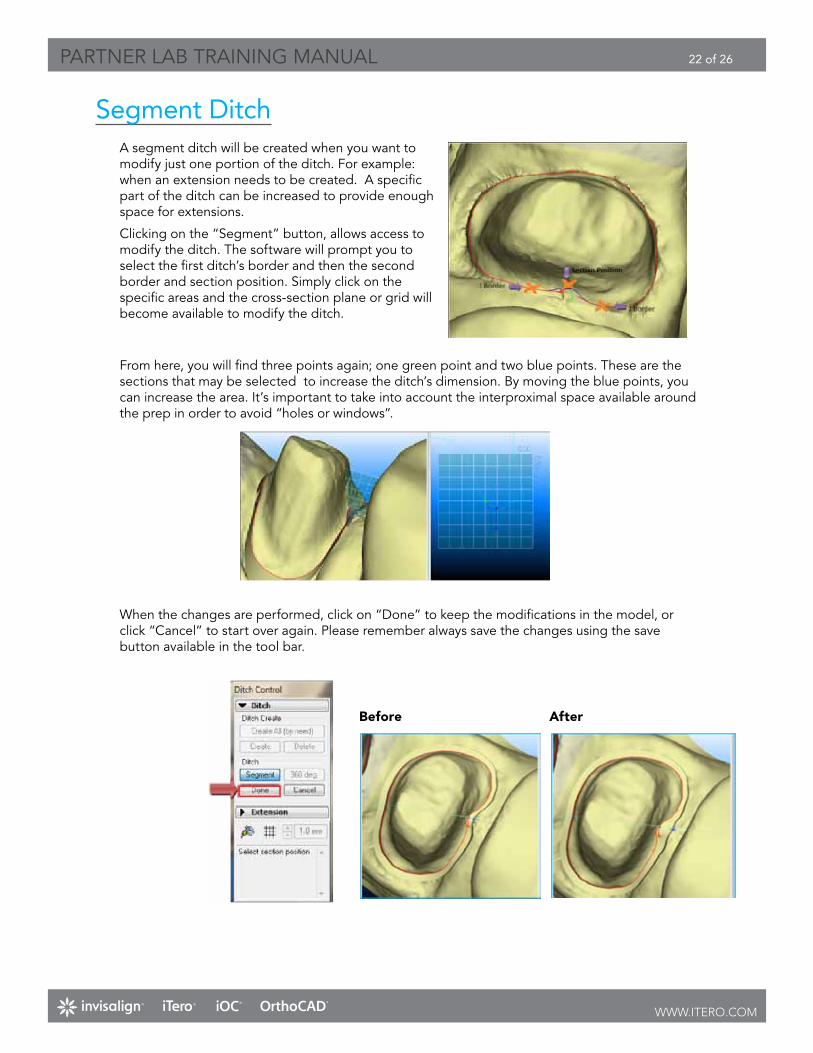
Segment Ditcha segment ditch will be created when you want to modify just one portion of the ditch. for example: when an extension needs to be created. a specific part of the ditch can be increased to provide enough space for extensions.
Clicking on the “Segment” button, allows access to modify the ditch. the software will prompt you to select the first ditch’s border and then the second border and section position. Simply click on the specific areas and the cross-section plane or grid will become available to modify the ditch.
from here, you will find three points again; one green point and two blue points. these are the sections that may be selected to increase the ditch’s dimension. by moving the blue points, you can increase the area. it’s important to take into account the interproximal space available around the prep in order to avoid “holes or windows”.
Partner Lab training ManuaL 23 of 26
www.ITERO.cOm
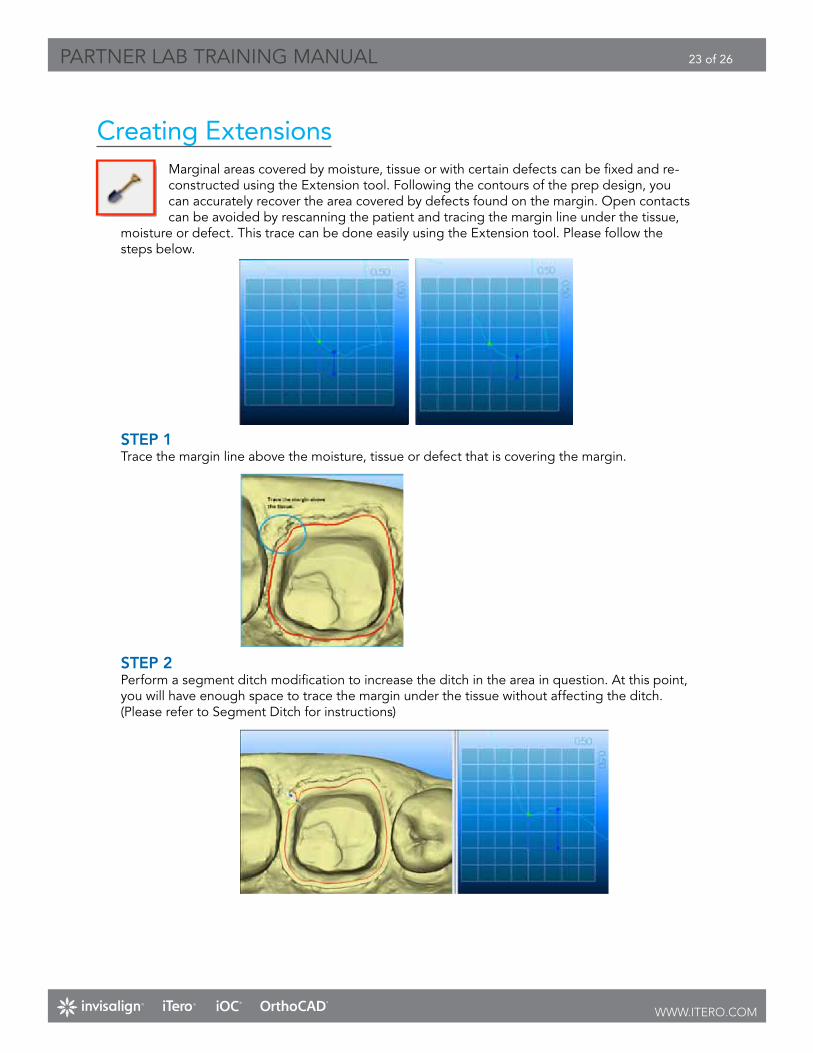
Creating extensionsMarginal areas covered by moisture, tissue or with certain defects can be fixed and re-constructed using the extension tool. following the contours of the prep design, you can accurately recover the area covered by defects found on the margin. open contacts can be avoided by rescanning the patient and tracing the margin line under the tissue,
moisture or defect. this trace can be done easily using the extension tool. Please follow the steps below.
SteP1trace the margin line above the moisture, tissue or defect that is covering the margin.
SteP2Perform a segment ditch modification to increase the ditch in the area in question. at this point, you will have enough space to trace the margin under the tissue without affecting the ditch. (Please refer to Segment Ditch for instructions)
Partner Lab training ManuaL 24 of 26
www.ITERO.cOm
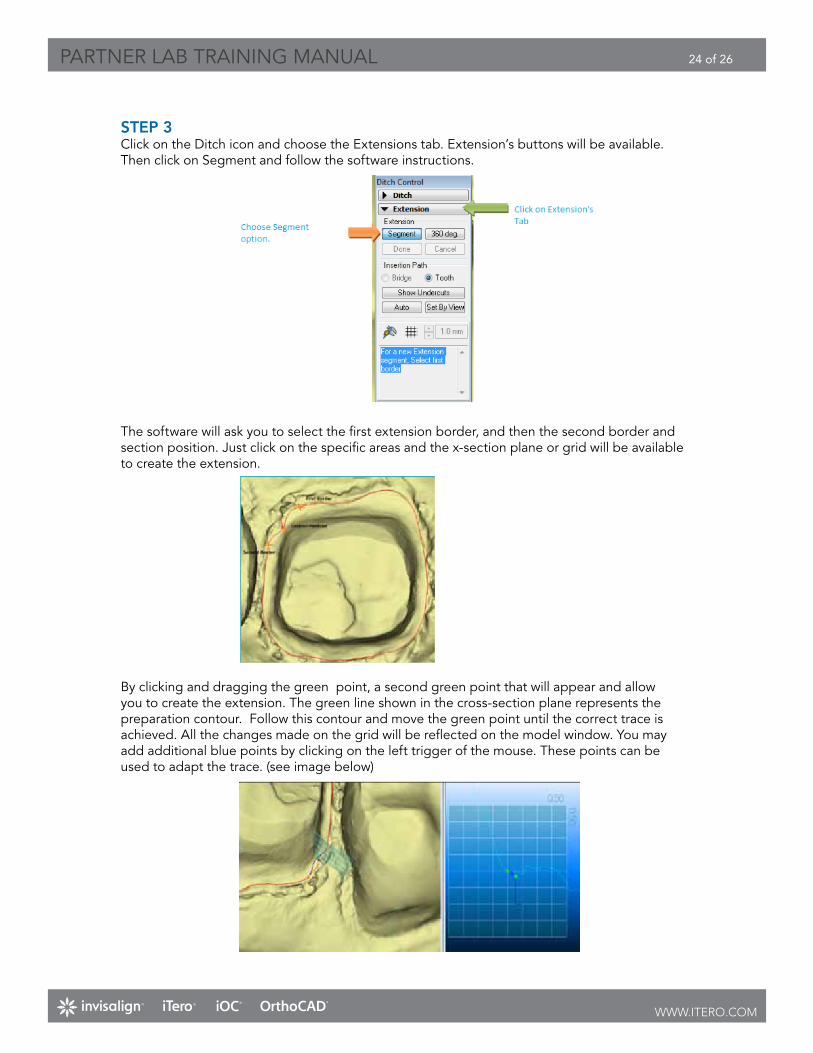
SteP3Click on the Ditch icon and choose the extensions tab. extension’s buttons will be available. then click on Segment and follow the software instructions.
the software will ask you to select the first extension border, and then the second border and section position. Just click on the specific areas and the x-section plane or grid will be available to create the extension.
by clicking and dragging the green point, a second green point that will appear and allow you to create the extension. the green line shown in the cross-section plane represents the preparation contour. follow this contour and move the green point until the correct trace is achieved. all the changes made on the grid will be reflected on the model window. You may add additional blue points by clicking on the left trigger of the mouse. these points can be used to adapt the trace. (see image below)
Partner Lab training ManuaL 25 of 26
www.ITERO.cOm
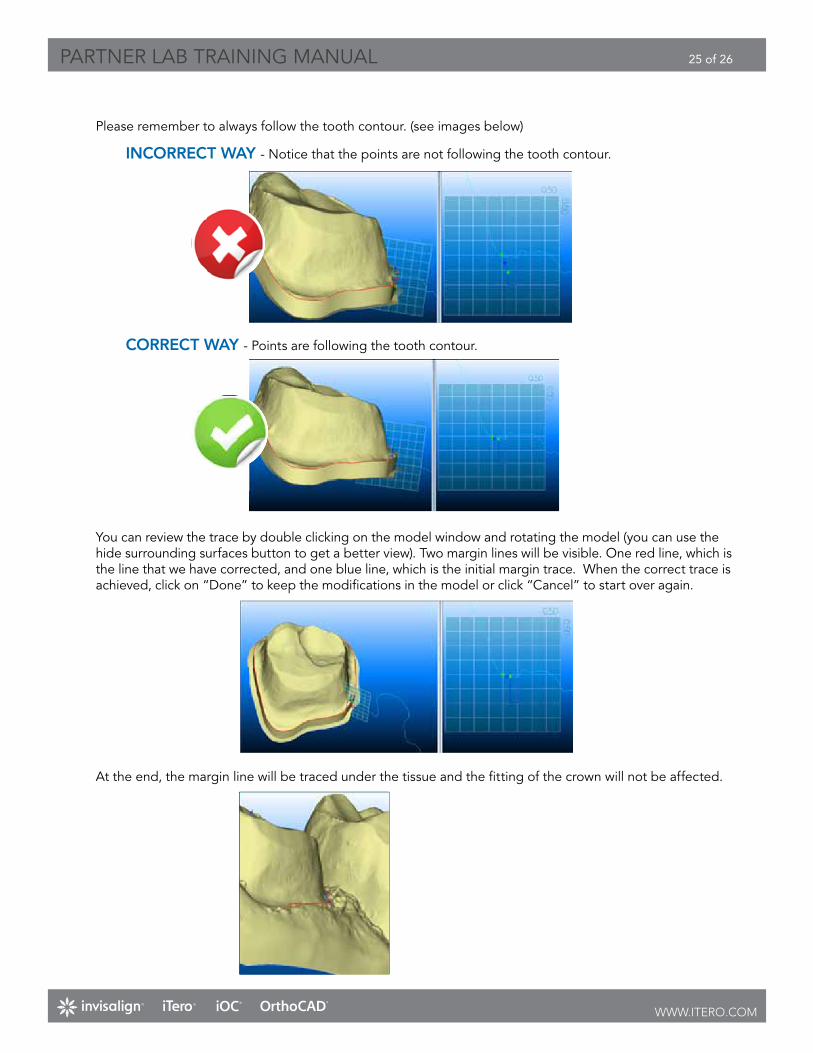
Please remember to always follow the tooth contour. (see images below)
inCorreCtway- notice that the points are not following the tooth contour.
CorreCtway- Points are following the tooth contour.
You can review the trace by double clicking on the model window and rotating the model (you can use the hide surrounding surfaces button to get a better view). two margin lines will be visible. one red line, which is the line that we have corrected, and one blue line, which is the initial margin trace. when the correct trace is achieved, click on “Done” to keep the modifications in the model or click “Cancel” to start over again.
at the end, the margin line will be traced under the tissue and the fitting of the crown will not be affected.
Partner Lab training ManuaL 26 of 26
www.ITERO.cOm
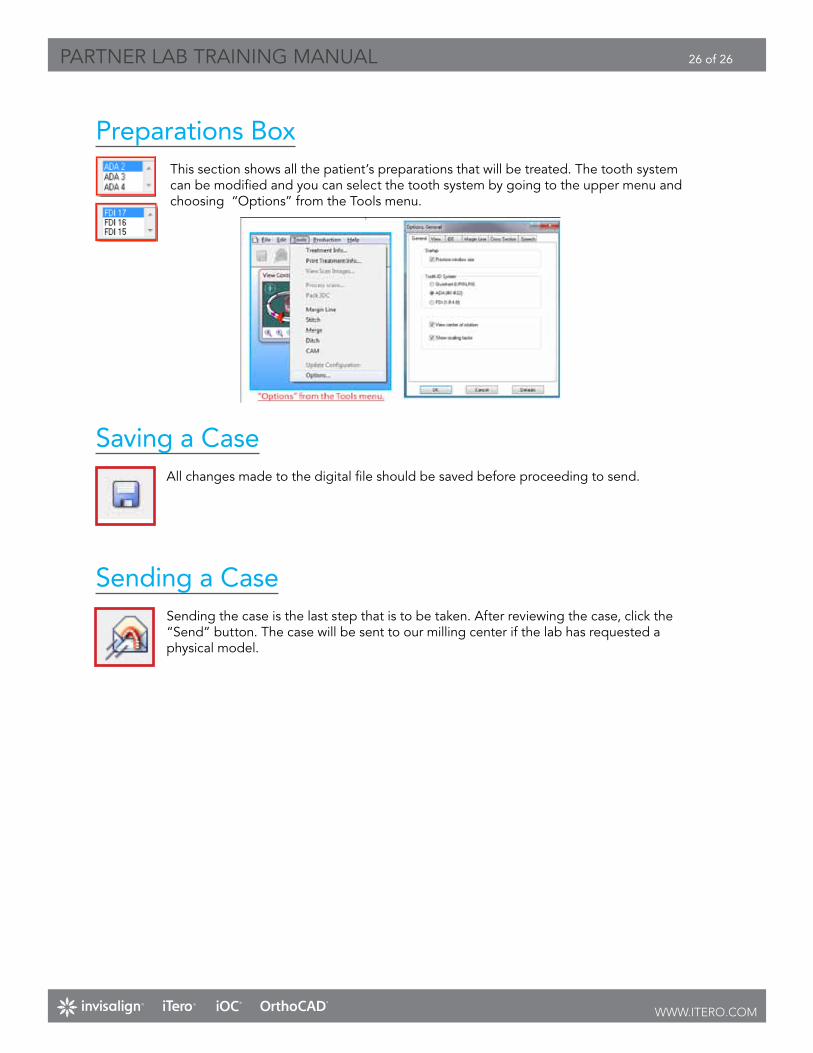
Preparations Boxthis section shows all the patient’s preparations that will be treated. the tooth system can be modified and you can select the tooth system by going to the upper menu and choosing “options” from the tools menu.
Saving a Caseall changes made to the digital file should be saved before proceeding to send.
Sending a CaseSending the case is the last step that is to be taken. after reviewing the case, click the “Send” button. the case will be sent to our milling center if the lab has requested a physical model.
Related Documents