JP 90 Printer SERVICE MANUAL Code 681640J-00

Olivetti Dot Matrix Printer JP-90 Parts and Service Manual
Oct 27, 2015
Olivetti
Welcome message from author
This document is posted to help you gain knowledge. Please leave a comment to let me know what you think about it! Share it to your friends and learn new things together.
Transcript
JP 90Printer
SERVICE MANUAL
Code 681640J-00
JP 90Stampante - Printer
CATALOGO PARTI DI RICAMBIOSPARE PARTS CATALOGUE
Code 681650L-00
IMPORTANTE
PUBBLICAZIONE REDATTA DA OLIVETTI LEXIKON (GESTIONE RICAMBI E SCORTE).QUESTO CATALOGO È L' UNICO DOCUMENTO AL QUALE FARE RIFERIMENTO PERORDINARE LE PARTI DI RICAMBIO.
PER EVENTUALI INFORMAZIONI RIVOLGERSI AL NUMERO:FAX: +39.125.524025
IMPORTANT
THIS PUBLICATION IS WRITTEN BY OLIVETTI LEXIKON (SPARE PARTS DEPARTMENT).THIS CATALOGUE IS THE ONLY DOCUMENT TO WHICH REFERENCE MAY BE MADEFOR ORDERING SPARE PARTS.
REQUESTS FOR ADDITIONAL INFORMATION SHOULD BE FAXED TO THE FOLLOWINGNUMBER:FAX: +39.125.524025.

PUBBLICAZIONE EMESSA DA:PUBLICATION ISSUED BY:
Olivetti Lexikon, S.p.A.Documentazione77, Via Jervis - 10015 Ivrea (Italy)
Copyright © 1996, by Olivetti LexikonAll rights reserved
Printed in Italy by:
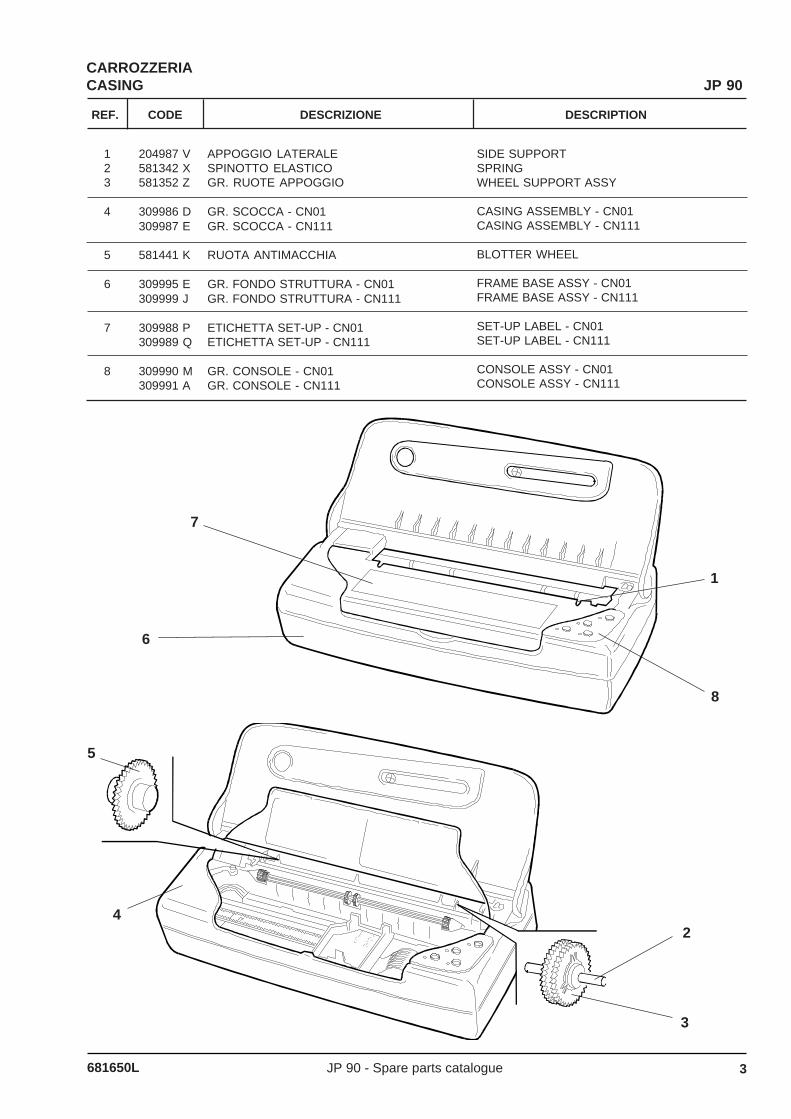
REF. CODE DESCRIZIONE DESCRIPTION
JP 90 - Spare parts catalogue681650L 1
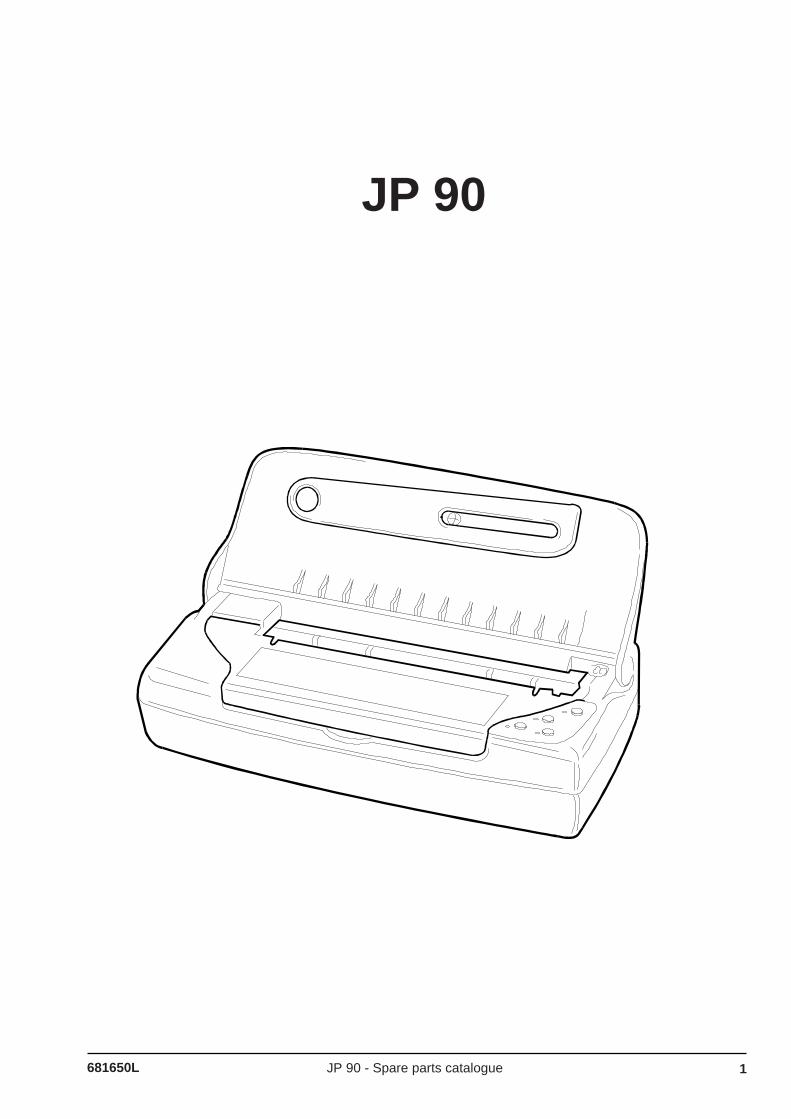
JP 90

REF. CODE DESCRIZIONE DESCRIPTION
JP 90 - Spare parts catalogue2 681650L
INDICECARROZZERIA ................................................................................................................................. Pag. 3STRUTTURA ..................................................................................................................................... " 4GRUPPO STAMPA ............................................................................................................................ " 5POMPA - TRASPORTO CARTA ....................................................................................................... " 6GRUPPO TRASPORTO CARRELLO ................................................................................................ " 7GRUPPO A.S.F. E MOLLE TORSIONE ............................................................................................ " 8ALIMENTATORE ............................................................................................................................... " 9PIASTRA ............................................................................................................................................ " 10
INDICE GENERALE DEI CODICI ........................................................................................ Pag. 11
INDEXCASING ............................................................................................................................................. Pag. 3FRAME............................................................................................................................................... " 4PRINTING GROUP ............................................................................................................................ " 5PUMP - TRANSPORT PAPER .......................................................................................................... " 6CARRIAGE TRANSPORT ASSEMBLY ............................................................................................. " 7A.S.F. ASSEMBLY AND TORSION SPRINGS ................................................................................. " 8POWER SUPPLY .............................................................................................................................. " 9BOARD .............................................................................................................................................. " 10
GENERAL INDEX ................................................................................................................ Pag. 11
REF. CODE DESCRIZIONE DESCRIPTION
JP 90 - Spare parts catalogue681650L 3
123
4
5
6
7
8
SIDE SUPPORTSPRINGWHEEL SUPPORT ASSY
CASING ASSEMBLY - CN01CASING ASSEMBLY - CN111
BLOTTER WHEEL
FRAME BASE ASSY - CN01FRAME BASE ASSY - CN111
SET-UP LABEL - CN01SET-UP LABEL - CN111
CONSOLE ASSY - CN01CONSOLE ASSY - CN111
APPOGGIO LATERALESPINOTTO ELASTICOGR. RUOTE APPOGGIO
GR. SCOCCA - CN01GR. SCOCCA - CN111
RUOTA ANTIMACCHIA
GR. FONDO STRUTTURA - CN01GR. FONDO STRUTTURA - CN111
ETICHETTA SET-UP - CN01ETICHETTA SET-UP - CN111
GR. CONSOLE - CN01GR. CONSOLE - CN111
JP 90CARROZZERIACASING
1
8
7
6
4
5
3
2
204987 V581342 X581352 Z
309986 D309987 E
581441 K
309995 E309999 J
309988 P309989 Q
309990 M309991 A
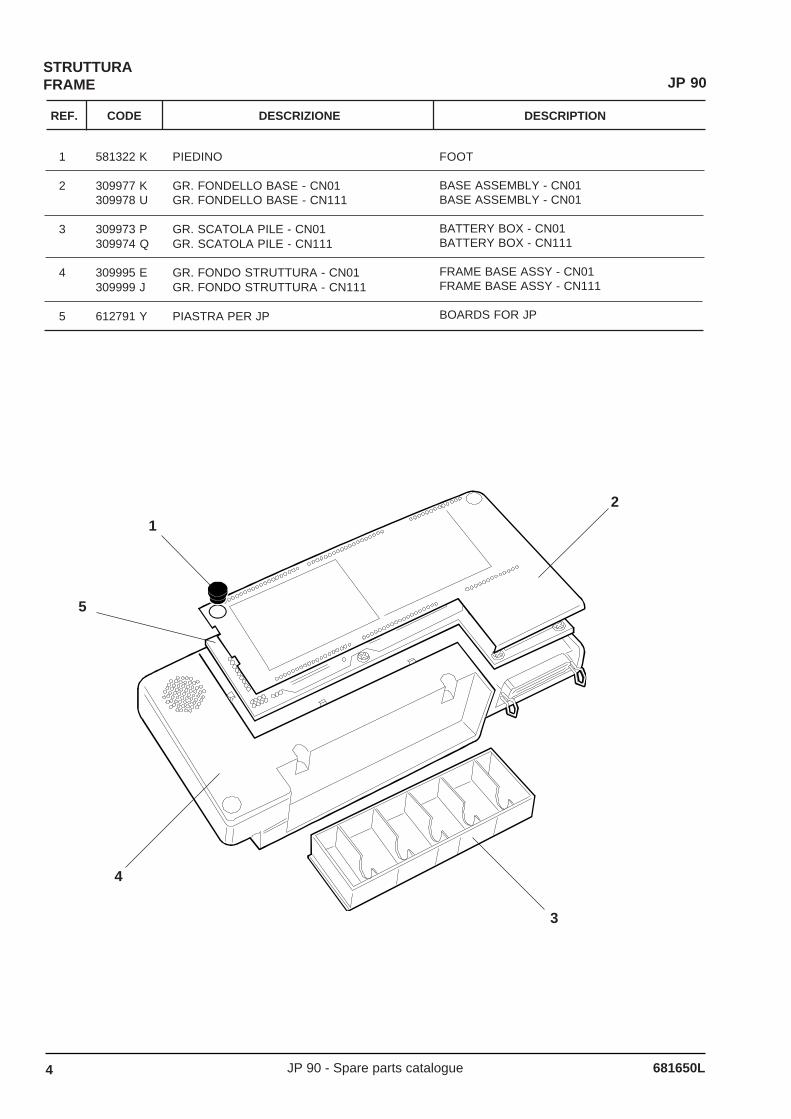
REF. CODE DESCRIZIONE DESCRIPTION
JP 90 - Spare parts catalogue4 681650L
STRUTTURAFRAME JP 90
1
2
3
4
5
PIEDINO
GR. FONDELLO BASE - CN01GR. FONDELLO BASE - CN111
GR. SCATOLA PILE - CN01GR. SCATOLA PILE - CN111
GR. FONDO STRUTTURA - CN01GR. FONDO STRUTTURA - CN111
PIASTRA PER JP
FOOT
BASE ASSEMBLY - CN01BASE ASSEMBLY - CN01
BATTERY BOX - CN01BATTERY BOX - CN111
FRAME BASE ASSY - CN01FRAME BASE ASSY - CN111
BOARDS FOR JP
1
5
4
3
2
581322 K
309977 K309978 U
309973 P309974 Q
309995 E309999 J
612791 Y
REF. CODE DESCRIZIONE DESCRIPTION
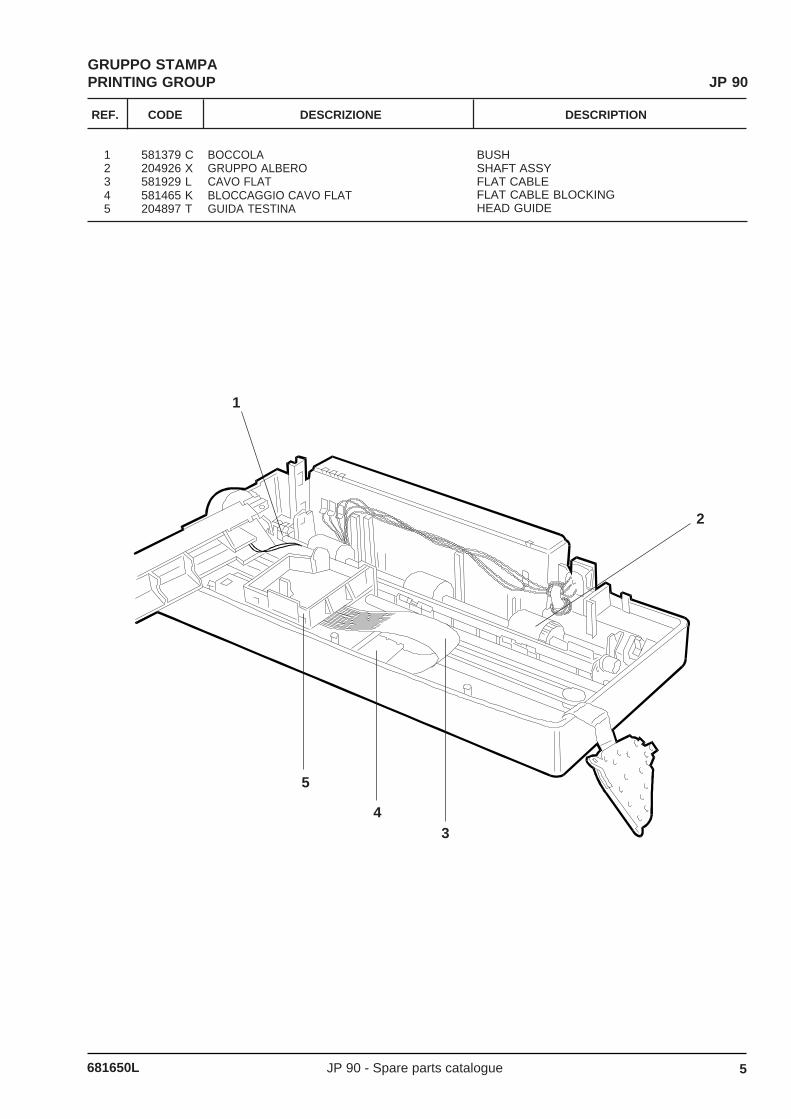
JP 90 - Spare parts catalogue681650L 5
GRUPPO STAMPAPRINTING GROUP JP 90
BUSHSHAFT ASSYFLAT CABLEFLAT CABLE BLOCKINGHEAD GUIDE
BOCCOLAGRUPPO ALBEROCAVO FLATBLOCCAGGIO CAVO FLATGUIDA TESTINA
12345
1
2
34
5
581379 C204926 X581929 L581465 K204897 T

REF. CODE DESCRIZIONE DESCRIPTION
JP 90 - Spare parts catalogue6 681650L
POMPA - TRASPORTO CARTAPUMP - TRANSPORT PAPER JP 90
PUMP ASSEMBLYCAM SHAFT ASSEMBLYSELECTOR FOR TRANSPORTECARRIAGE SHAFTINTERMEDIATE WHEEL (B)PAPER ADVANCEMENT MOTORINTERMEDIATE WHEEL (A)PRINTING SUPPORT
GRUPPO POMPAGRUPPO ALBERO A CAMMESELETTORE PER TRASCINATOREALBERO CARRELLORUOTA INTERMEDIA (B)MOTORE AVANZAMENTO CARTARUOTA INTERMEDIA (A)GRUPPO SUPPORTO SCRITTURA
12345678
3
4
5
6
7
21
8
204933 W581402 M581413 F581464 J581433 B581431 H581434 C204928 H
REF. CODE DESCRIZIONE DESCRIPTION
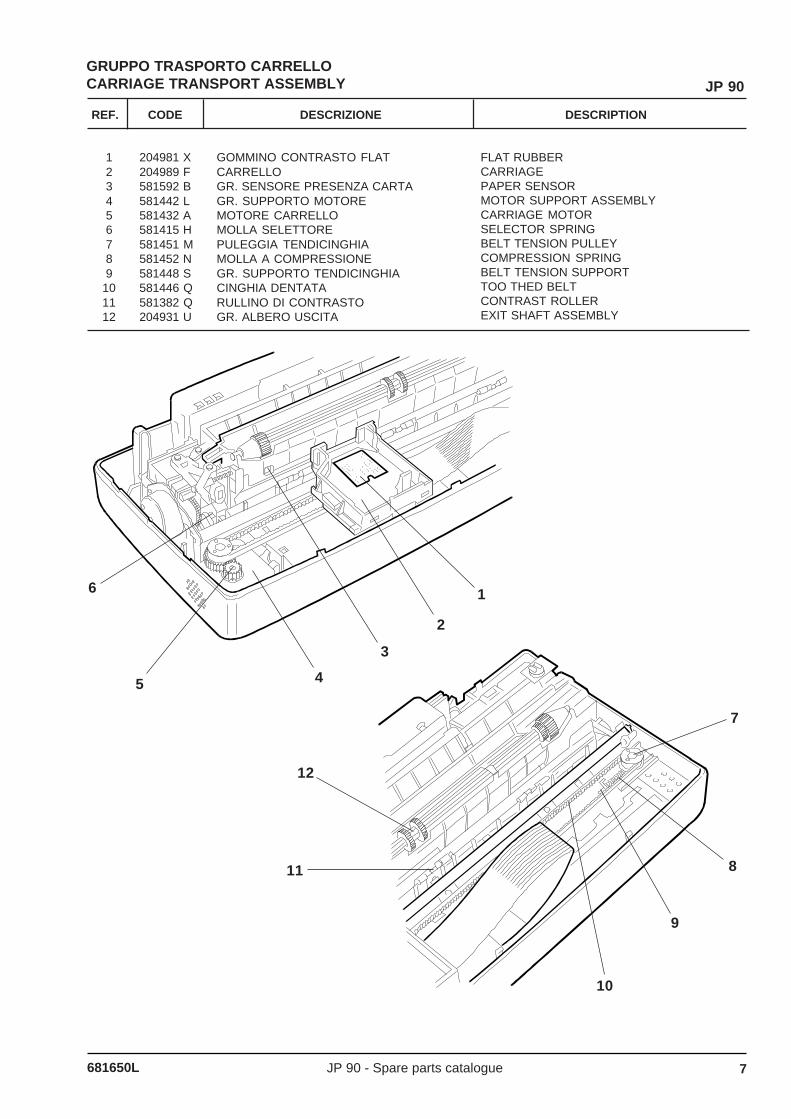
JP 90 - Spare parts catalogue681650L 7
GRUPPO TRASPORTO CARRELLOCARRIAGE TRANSPORT ASSEMBLY JP 90
FLAT RUBBERCARRIAGEPAPER SENSORMOTOR SUPPORT ASSEMBLYCARRIAGE MOTORSELECTOR SPRINGBELT TENSION PULLEYCOMPRESSION SPRINGBELT TENSION SUPPORTTOO THED BELTCONTRAST ROLLEREXIT SHAFT ASSEMBLY
GOMMINO CONTRASTO FLATCARRELLOGR. SENSORE PRESENZA CARTAGR. SUPPORTO MOTOREMOTORE CARRELLOMOLLA SELETTOREPULEGGIA TENDICINGHIAMOLLA A COMPRESSIONEGR. SUPPORTO TENDICINGHIACINGHIA DENTATARULLINO DI CONTRASTOGR. ALBERO USCITA
123456789
101112
1
2
3
5
6
4
11
12
10
9
8
7
204981 X204989 F581592 B581442 L581432 A581415 H581451 M581452 N581448 S581446 Q581382 Q204931 U
REF. CODE DESCRIZIONE DESCRIPTION
JP 90 - Spare parts catalogue8 681650L
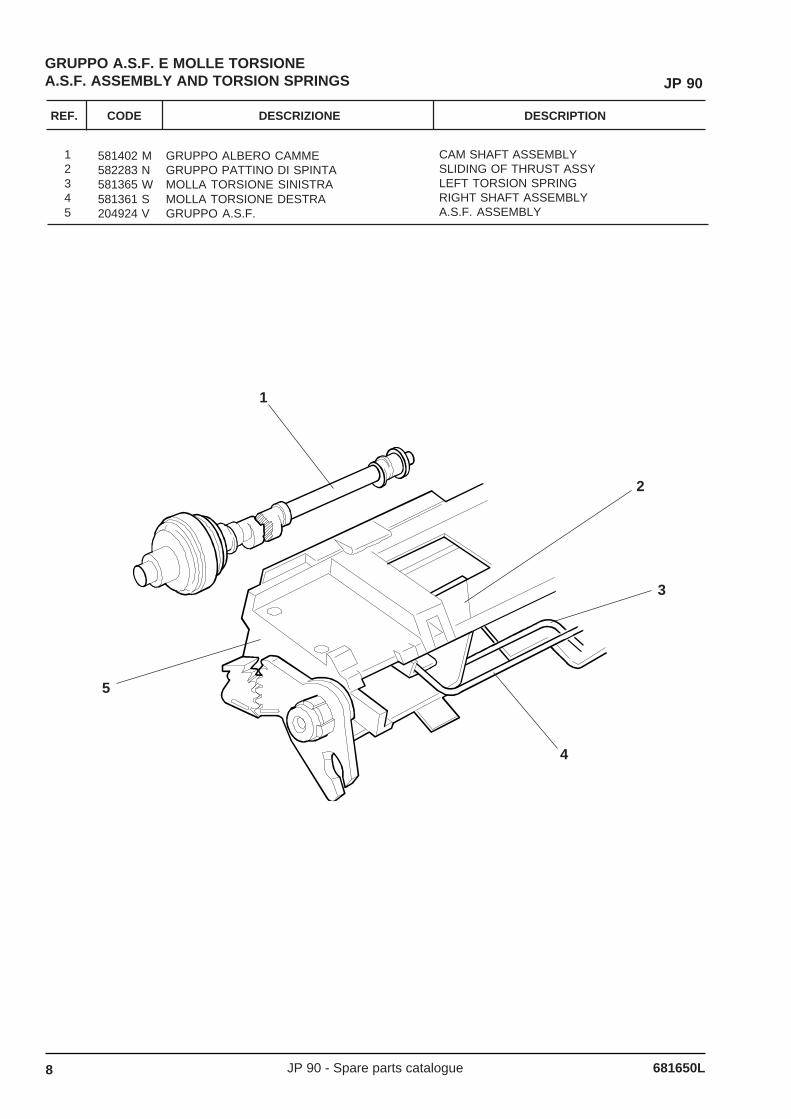
GRUPPO A.S.F. E MOLLE TORSIONEA.S.F. ASSEMBLY AND TORSION SPRINGS JP 90
CAM SHAFT ASSEMBLYSLIDING OF THRUST ASSYLEFT TORSION SPRINGRIGHT SHAFT ASSEMBLYA.S.F. ASSEMBLY
12345
GRUPPO ALBERO CAMMEGRUPPO PATTINO DI SPINTAMOLLA TORSIONE SINISTRAMOLLA TORSIONE DESTRAGRUPPO A.S.F.
1
5
4
3
2
581402 M582283 N581365 W581361 S204924 V

REF. CODE DESCRIZIONE DESCRIPTION
JP 90 - Spare parts catalogue681650L 9
ALIMENTATOREPOWER SUPPLY JP 90
581553 K581554 L581555 M581556 N581557 P
P.S. 220V/50Hz EUROPEP.S. 115V/60Hz USAP.S. 240V/50Hz U.K.P.S. 240V/50Hz AUSTRALIAP.S. 220V/50Hz SOUTH AFRICA
1 ALI 220V/50Hz EUROPAALI 115V/60Hz USAALI 240V/50Hz U.K.ALI 240V/50Hz AUSTRALIAALI 220V/50Hz SUD AFRICA
1
REF. CODE DESCRIZIONE DESCRIPTION
JP 90 - Spare parts catalogue10 681650L
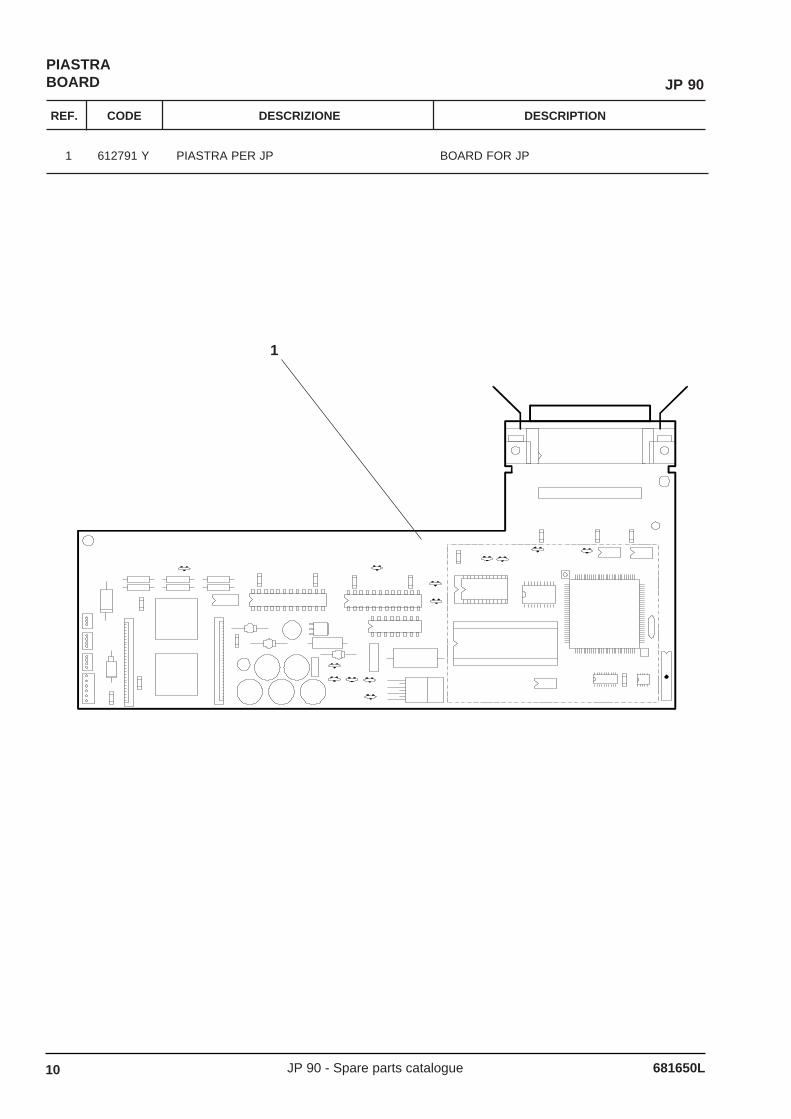
PIASTRABOARD JP 90
612791 Y BOARD FOR JPPIASTRA PER JP1
1

REF. CODE DESCRIZIONE DESCRIPTION
JP 90 - Spare parts catalogue681650L 11
INDICE GENERALE DEI CODICIGENERAL CODES INDEX
REF. CODE DESCRIZIONE DESCRIPTION
JP 90 - Spare parts catalogue12 681650L
INDICE GENERALE DEI CODICI - GENERAL CODES INDEX
CODICE PAGINACODE PAGE
CODICE PAGINACODE PAGE
CODICE PAGINACODE PAGE
204897T 5 204924V 8 204926X 5 204928H 6 204931U 7 204933W 6 204981X 7 204987V 3 204989F 7 309973P 4 309974Q 4 309977K 4 309978U 4 309986D 3 309987E 3 309988P 3 309989Q 3 309990M 3 309991A 3 309995E 3 309995E 4 309999J 3 309999J 4 581322K 4 581342X 3 581352Z 3 581361S 8 581365W 8 581379C 5 581382Q 7 581402M 6 581402M 8 581413F 6 581415H 7 581431H 6 581432A 7 581433B 6 581434C 6 581441K 3 581442L 7 581446Q 7 581448S 7 581451M 7 581452N 7 581464J 6 581465K 5 581553K 9 581554L 9 581555M 9 581556N 9 581557P 9 581592B 7 581929L 5 582283N 8 612791Y 4 612791Y 10

09/1996 1a EDIZIONE - 1st EDITION 17 681650L-00
STSTSTSTSTAAAAATTTTTO DI AO DI AO DI AO DI AO DI AGGIORNAMENTGGIORNAMENTGGIORNAMENTGGIORNAMENTGGIORNAMENTOOOOOUPDUPDUPDUPDUPDAAAAATING STTING STTING STTING STTING STAAAAATUSTUSTUSTUSTUS
DATA PAGINE AGGIORNATE PAGINE CODICEDATE UPDATED PAGES PAGES CODE
PUBLICATION ISSUED BY:
Olivetti Lexikon, S.p.A.Documentation77, Via Jervis - 10015 Ivrea (Italy)
Copyright © 1996, OlivettiAll rights reserved
TRADEMARKS
CENTRONICS is a trademark of Centronics Data Computer Corporation.EPSON and LQ 850 are trademarks of Epson Seiko Corporation.HP, DeskJet and PCL III+ are trademarks of Hewlett-Packard Company.IBM and Proprinter 4207 are trademarks of International Business Machine Corporation.MS-DOS and MS-WINDOWS are trademarks of Microsoft Corporation.
Printed in Italy by:
681640J JP 90 - Service Manual iii.
PREFACE
This Service Manual gives the mechanical and electronic information needed to service the JP 90 ink-jetprinter.
Refer to this manual only if the failure has not been corrected after following the troubleshooting stepsexplained in the User's Guide.
SUMMARY
This manual is divided into chapters.The chapters are ordered in a way to develop an autonomous and gradual approach to the printer
functions.Certain paragraphs in this manual are highlighted with a screen background so as to bring particularly
important information or procedures to your attention.Disregarding the information explained in these paragraphs could cause printer failures.
SECTOR/RANGE PRODUCT: Q6 JP 90
DISTRIBUTION: General (G)
FIRST EDITION: October 1996

v681640J JP 90 - Service Manual
TABLE OF CONTENTS
1. OVERVIEW
1-1 1.1 MAJOR CHARACTERISTICS1-2 1.2 GENERAL BLOCK DIAGRAM1-3 1.3 LOCATING THE FUNCTIONAL COMPONENTS1-4 1.4 FIRMWARE AND CHARACTER GENERATORS1-6 1.5 OPTIONS1-6 1.6 ACCESSORIES1-7 1.7 INK-JET PRINT HEAD OPERATION1-11 1.8 COLOR INK-JET PRINT HEAD OPERATION
2. OPERATING COMMANDS
2-1 2-1 CONSOLE
3. INSTALLATION
3-1 3.1 GENERAL RULES3-2 3.2 UNPACKING THE PRINTER3-2 3.3 PLUGGING THE AC/DC ADAPTER TO THE ELECTRICAL POWER OUTLET3-3 3.4 INSTALLING THE PRINT HEAD3-5 3.5 INSERTING THE BATTERIES3-6 3.6 INSERTING THE BATTERY PACK3-7 3.7 LOADING PAPER3-9 3.8 PRINT TEST3-9 3.9 CONNECTING THE PRINTER TO THE SYSTEM3-9 3.10 POWERING OFF THE PRINTER
4. SOFTWARE INSTALLATION AND USAGE
4-1 4.1 THE WINDOWS ENVIRONMENT4-2 4.2 THE DOS ENVIRONMENT
5. AUTODIAGNOSTICS, TESTING PROCEDURES AND TROUBLESHOOTINGGUIDE
5-1 5.1 POWER ON DIAGNOSTICS5-1 5.2 MONOCHROME PRINT TEST5-2 5.3 DATASCOPE PRINTING (HEX DUMP)5-3 5.4 TROUBLESHOOTING GUIDE
6. ELECTRICAL CONNECTIONS
6-1 6.1 MAJOR COMPONENTS ON THE XP28 CPU BOARD6-2 6.2 POWER SUPPLY CIRCUIT6-3 6.3 CONNECTOR SIGNALS
7. MAINTENANCE
7-1 7.1 CLEANING THE PRINT HEAD AN NOZZLES
vi 681640J
8. DISASSEMBLY/REASSEMBLY PROCEDURES
8-1 8.1 PRELIMINARY WARNINGS8-2 8.2 PRINTER CASING8-4 8.3 ASF ASSEMBLY8-7 8.4 INTAKE UNIT8-8 8-5 PAPER FEED SHAFT8-9 8.6 MAIN BOARD8-10 8.7 PAPER FEED MOTOR8-11 8.8 BELT AND PRINT HEAD CARRIAGE8-14 8.9 CARRIAGE MOTOR8-15 8.10 PAPER DETECTION PHOTOSENSOR8-16 8.11 CONSOLE
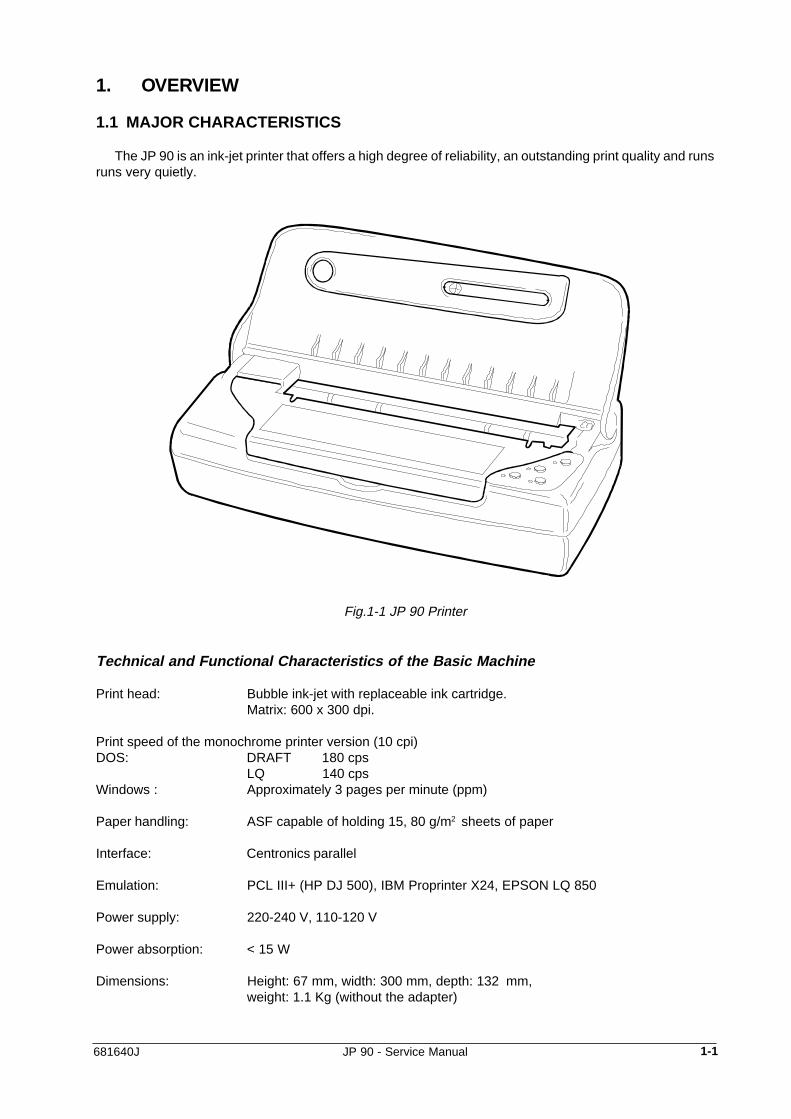
681640J 1-1 JP 90 - Service Manual
1. OVERVIEW
1.1 MAJOR CHARACTERISTICS
The JP 90 is an ink-jet printer that offers a high degree of reliability, an outstanding print quality and runsruns very quietly.
Technical and Functional Characteristics of the Basic Machine
Print head: Bubble ink-jet with replaceable ink cartridge.Matrix: 600 x 300 dpi.
Print speed of the monochrome printer version (10 cpi)DOS: DRAFT 180 cps
LQ 140 cpsWindows : Approximately 3 pages per minute (ppm)
Paper handling: ASF capable of holding 15, 80 g/m2 sheets of paper
Interface: Centronics parallel
Emulation: PCL III+ (HP DJ 500), IBM Proprinter X24, EPSON LQ 850
Power supply: 220-240 V, 110-120 V
Power absorption: < 15 W
Dimensions: Height: 67 mm, width: 300 mm, depth: 132 mm,weight: 1.1 Kg (without the adapter)
Fig.1-1 JP 90 Printer
1-2 681640J
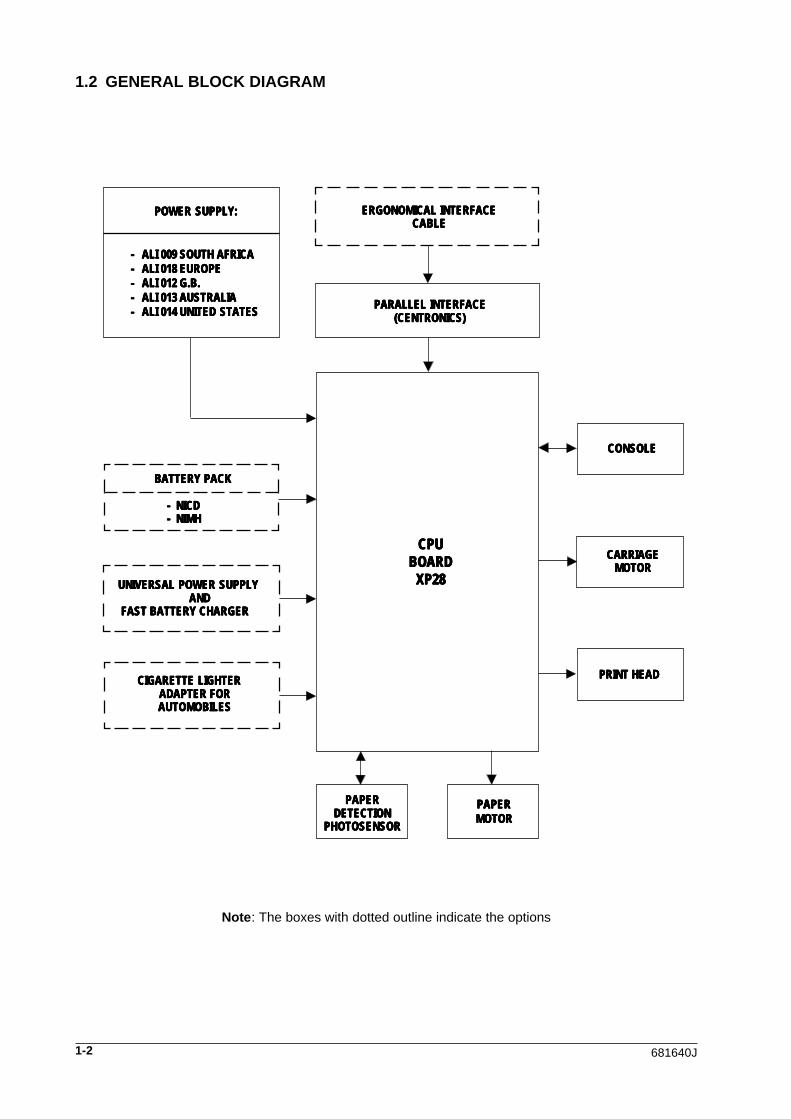
1.2 GENERAL BLOCK DIAGRAM
ERGONOMICAL INTERFACEERGONOMICAL INTERFACEERGONOMICAL INTERFACEERGONOMICAL INTERFACEERGONOMICAL INTERFACECABLECABLECABLECABLECABLE
PARALLEL INTERFACEPARALLEL INTERFACEPARALLEL INTERFACEPARALLEL INTERFACEPARALLEL INTERFACE(CENTRONICS)(CENTRONICS)(CENTRONICS)(CENTRONICS)(CENTRONICS)
CONSOLECONSOLECONSOLECONSOLECONSOLE
CARRIAGECARRIAGECARRIAGECARRIAGECARRIAGEMOTORMOTORMOTORMOTORMOTOR
POWER SUPPLY:POWER SUPPLY:POWER SUPPLY:POWER SUPPLY:POWER SUPPLY:
----- ALIALIALIALIALI 009009009009009 SOUTH AFRICASOUTH AFRICASOUTH AFRICASOUTH AFRICASOUTH AFRICA----- ALIALIALIALIALI 018018018018018 EUROPEEUROPEEUROPEEUROPEEUROPE----- ALIALIALIALIALI 012012012012012 G.B.G.B.G.B.G.B.G.B.----- ALIALIALIALIALI 013013013013013 AUSTRALIAAUSTRALIAAUSTRALIAAUSTRALIAAUSTRALIA----- ALIALIALIALIALI 014014014014014 UNITED STATESUNITED STATESUNITED STATESUNITED STATESUNITED STATES
BATTERY PACKBATTERY PACKBATTERY PACKBATTERY PACKBATTERY PACK
----- NICDNICDNICDNICDNICD----- NIMHNIMHNIMHNIMHNIMH
UNIVERSAL POWER SUPPLYUNIVERSAL POWER SUPPLYUNIVERSAL POWER SUPPLYUNIVERSAL POWER SUPPLYUNIVERSAL POWER SUPPLY AND AND AND AND AND FAST BATTERY CHARGER FAST BATTERY CHARGER FAST BATTERY CHARGER FAST BATTERY CHARGER FAST BATTERY CHARGER
PAPERPAPERPAPERPAPERPAPERDETECTIONDETECTIONDETECTIONDETECTIONDETECTION
PHOTOSENSORPHOTOSENSORPHOTOSENSORPHOTOSENSORPHOTOSENSOR
PAPERPAPERPAPERPAPERPAPERMOTORMOTORMOTORMOTORMOTOR
Note : The boxes with dotted outline indicate the options
CPUCPUCPUCPUCPUBOARDBOARDBOARDBOARDBOARD
XP28XP28XP28XP28XP28
CIGARETTE LIGHTERCIGARETTE LIGHTERCIGARETTE LIGHTERCIGARETTE LIGHTERCIGARETTE LIGHTERADAPTER FORADAPTER FORADAPTER FORADAPTER FORADAPTER FORAUTOMOBILESAUTOMOBILESAUTOMOBILESAUTOMOBILESAUTOMOBILES
PRINT HEADPRINT HEADPRINT HEADPRINT HEADPRINT HEAD
681640J 1-3 JP 90 - Service Manual
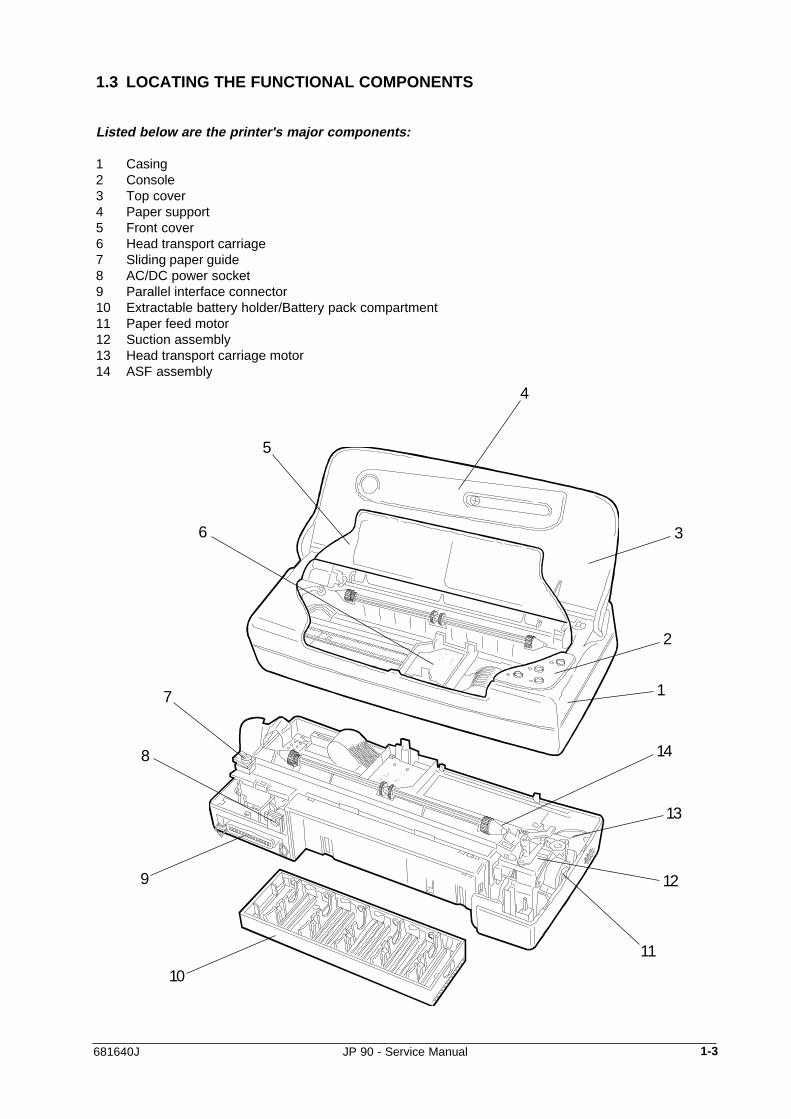
1.3 LOCATING THE FUNCTIONAL COMPONENTS
Listed below are the printer's major components:
1 Casing2 Console3 Top cover4 Paper support5 Front cover6 Head transport carriage7 Sliding paper guide8 AC/DC power socket9 Parallel interface connector10 Extractable battery holder/Battery pack compartment11 Paper feed motor12 Suction assembly13 Head transport carriage motor14 ASF assembly
6
5
4
3
2
1
14
13
12
11
9
8
7
10
1-4 681640J
1.4 FIRMWARE AND CHARACTER GENERATORS
Basic Emulation:
The basic firmware is stored in a 4 MB EPROM installed on the XP28 CPU board. It emulates the HPDeskjet 500 (PCL III +), IBM Proprinter X24 and EPSON LQ 850 printers, with all the related charactergenerators.
The JP 90 selectes between these emulations via software.
Character Generator:
The character generator assigns a specific printable character to each code in the graphic set.
The first 128 codes in the ISO table (0-127) are standard and represent the USA ASCII character set.National variants and semigraphic symbols are not included in this code group.
The allocation of codes from the second ISO character set table (128-255) differs depending on the countryand product.
Character Sets:
The following character sets are available in a PCL III+ emulated machine:
CP 437 International ROMAN 8 Turkish alphabet: CP 857; ISO 8859/9 PC8 Denmark/Norway CP-850 Multilingual Cyrillic alphabet: CP 866; CP 855; ISO 8859/5ECMA 94 LATINO 1 ISO Nb 4 United Kingdom Greek alphabet: CP 210; CP 851; ISO 8859/7ISO Nb 21 Germany ISO Nb 69 France Hebrew alphabet: CP 862; ISO 8859/8ISO Nb 15 Italia ISO Nb 60 Norway 1 PC Slovenia: CP 852; ISO 8859/2ISO Nb 61 Norway 2 ISO Nb 11 Sweden: Names Windows 3.1 ANSIISO Nb 10 Sweden ISO Nb 17 Spain Windows 3.1 Eastern EuropeISO Nb 6 USA (ASCII) ISO Nb 2 IRV Windows 3.1 TurkeyISO Nb 16 Portugal ISO Nb 14 JIS ASCII Windows 3.1 CyrillicLegal CP 860 Portugal Windows 3.1 GreeceDenmark OPE 1 UNIX InternationalDenmark OPE 2 Spain 2CP 863 French-Canadian
The following character sets are available in an IBM Proprinter X24 emulated machine:
International 1 International 2Denmark OPE 1 Denmark OPE 2Spain 2 CP 850CP 860
The following character sets are available in an EPSON LQ 850 emulated machine:
ITALICS Table GRAPHICS Table:USA France USAGernamy Great Britain MultilingualDenmark 1 Denmark 2 PortugalSweden Italy French-CanadianSpain 1 Spain 2 NorwayJapan NorwayLatin America CoreaLegal
681640J 1-5 JP 90 - Service Manual
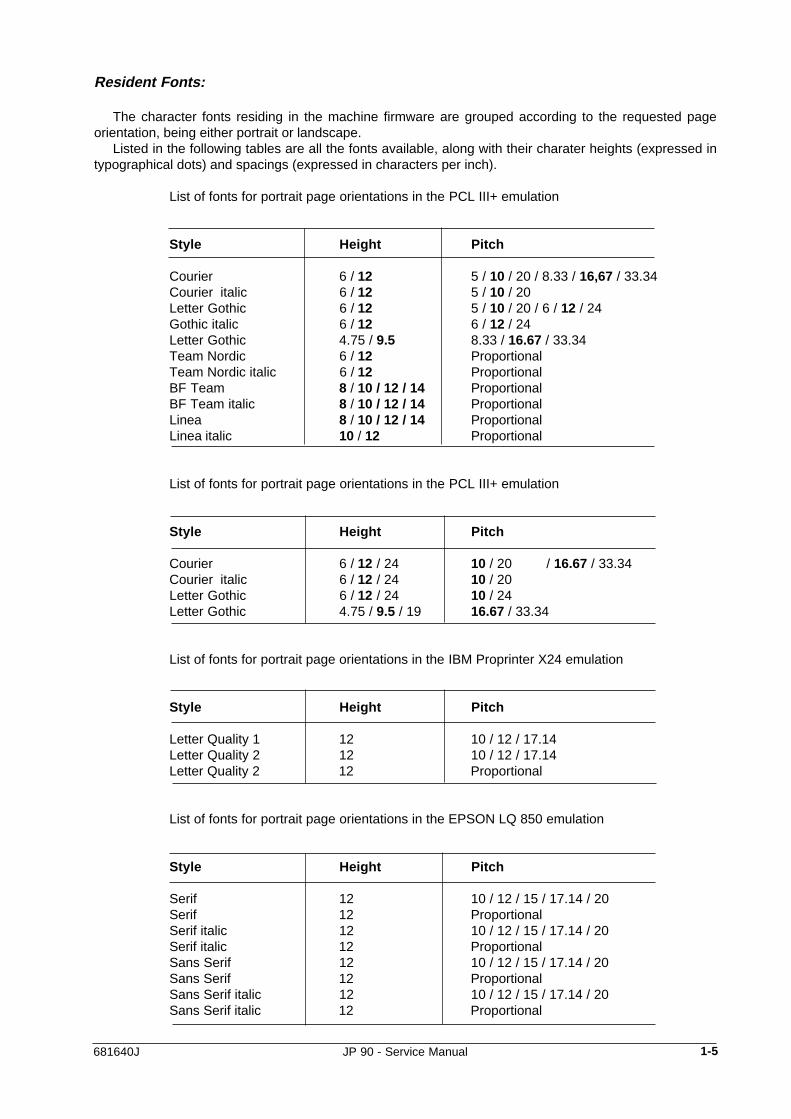
Resident Fonts:
The character fonts residing in the machine firmware are grouped according to the requested pageorientation, being either portrait or landscape.
Listed in the following tables are all the fonts available, along with their charater heights (expressed intypographical dots) and spacings (expressed in characters per inch).
List of fonts for portrait page orientations in the PCL III+ emulation
Style Height Pitch
Courier 6 / 12 5 / 10 / 20 / 8.33 / 16,67 / 33.34Courier italic 6 / 12 5 / 10 / 20Letter Gothic 6 / 12 5 / 10 / 20 / 6 / 12 / 24Gothic italic 6 / 12 6 / 12 / 24Letter Gothic 4.75 / 9.5 8.33 / 16.67 / 33.34Team Nordic 6 / 12 ProportionalTeam Nordic italic 6 / 12 ProportionalBF Team 8 / 10 / 12 / 14 ProportionalBF Team italic 8 / 10 / 12 / 14 ProportionalLinea 8 / 10 / 12 / 14 ProportionalLinea italic 10 / 12 Proportional
List of fonts for portrait page orientations in the PCL III+ emulation
Style Height Pitch
Courier 6 / 12 / 24 10 / 20 / 16.67 / 33.34Courier italic 6 / 12 / 24 10 / 20Letter Gothic 6 / 12 / 24 10 / 24Letter Gothic 4.75 / 9.5 / 19 16.67 / 33.34
List of fonts for portrait page orientations in the IBM Proprinter X24 emulation
Style Height Pitch
Letter Quality 1 12 10 / 12 / 17.14Letter Quality 2 12 10 / 12 / 17.14Letter Quality 2 12 Proportional
List of fonts for portrait page orientations in the EPSON LQ 850 emulation
Style Height Pitch
Serif 12 10 / 12 / 15 / 17.14 / 20Serif 12 ProportionalSerif italic 12 10 / 12 / 15 / 17.14 / 20Serif italic 12 ProportionalSans Serif 12 10 / 12 / 15 / 17.14 / 20Sans Serif 12 ProportionalSans Serif italic 12 10 / 12 / 15 / 17.14 / 20Sans Serif italic 12 Proportional

1-6 681640J
1.5 OPTIONS
All the options can be installed directly by the user by following the instructions provided in the individualpackagings.
BATTERY PACK (BP 50/6 - BP 50/12)
As an alternative to using the AC/DC power supply and mains voltage, or batteries, the printer can alsobe powered by a battery pack.
Two battery packs are available, each of which are automatically recognized once inserted into the printer:- a 12 Volt Ni-Cd (nichel-cadium) battery pack that guarantees an operating autonomy of approximately
80 pages;- a 12 Volt Ni-MH (nichel and metal hydrate) battery pack that guarantees an operating autonomy of
approximately 140 pages.
UNIVERSAL AC/DC ADAPTER AND FAST CHARGER (GU 50)
With this adapter the printer can be connected to any electrical power supply providing a voltage rangingbetween 98 and 254 Volts.
Through this adapter, an appropriate holder allows the fast charging of battery packs. Charge times areapproximately 40 minutes for the NiCd battery pack and approximately 1 hour for the NiMH battery pack.
CIGARETTE LIGHTER ADAPTER (CL 90)
By using the optional automobile adapter the printer can also be powered by the 12 Volts provided by theautomobile cigarette lighter. The battery packs can also be charged through this adapter. Charge times areapproximately 6 hours for the NiCd battery pack and 12 hours for the NiMH battery pack.
PARALLEL INTERFACE ERGONOMICAL CABLE (IC 50)
This special cable is used to connect the printer.
CK 90
Color kit
1.6 ACCESSORIES
Code 82077 F - Blister with: a refillable monochrome print head and three refills
Code 82078 S - Blister with: Two sets of three refills (total of six refills)
Code 84435 E - Blister with: single-block monochrome print head
Code B0039 H - Blister with: color print head and two refills
Code B0040 N - Color kit including a color print head and four refills
Code 82044 V - Printer cover
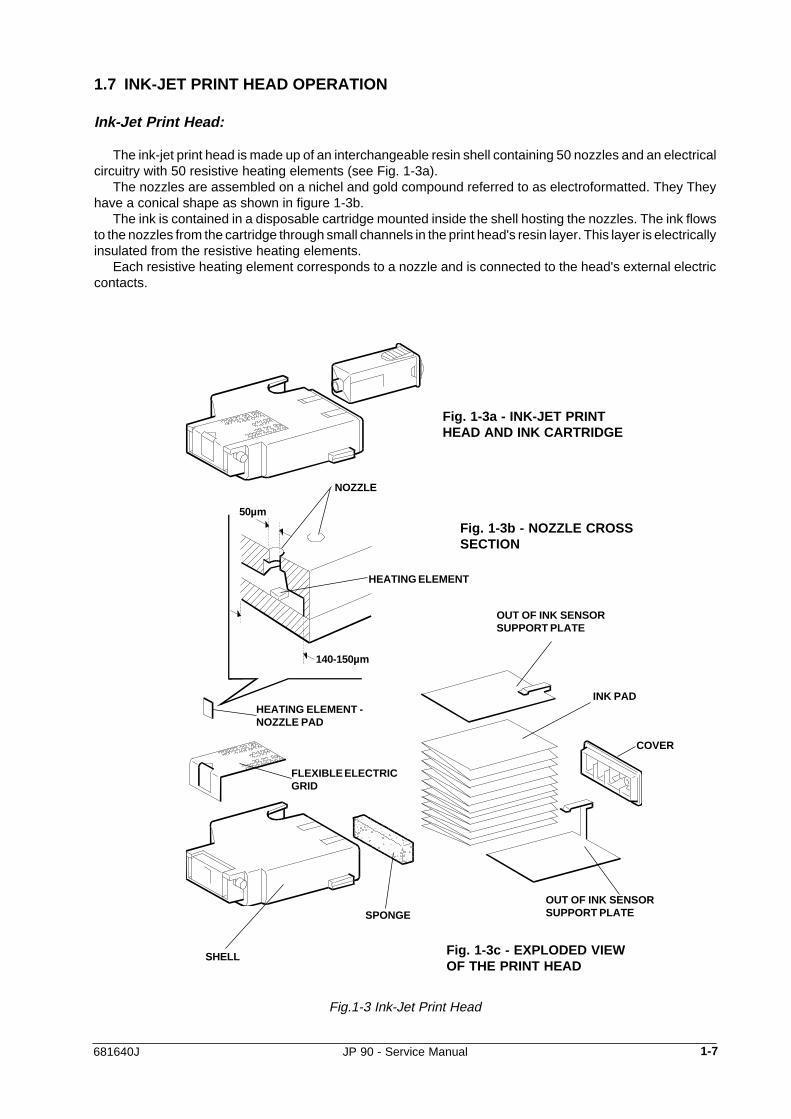
681640J 1-7 JP 90 - Service Manual
Fig. 1-3c - EXPLODED VIEWOF THE PRINT HEAD
Fig. 1-3a - INK-JET PRINTHEAD AND INK CARTRIDGE
Fig.1-3 Ink-Jet Print Head
1.7 INK-JET PRINT HEAD OPERATION
Ink-Jet Print Head:
The ink-jet print head is made up of an interchangeable resin shell containing 50 nozzles and an electricalcircuitry with 50 resistive heating elements (see Fig. 1-3a).
The nozzles are assembled on a nichel and gold compound referred to as electroformatted. They Theyhave a conical shape as shown in figure 1-3b.
The ink is contained in a disposable cartridge mounted inside the shell hosting the nozzles. The ink flowsto the nozzles from the cartridge through small channels in the print head's resin layer. This layer is electricallyinsulated from the resistive heating elements.
Each resistive heating element corresponds to a nozzle and is connected to the head's external electriccontacts.
NOZZLE
HEATING ELEMENT
140-150µm
50µm
HEATING ELEMENT -NOZZLE PAD
FLEXIBLE ELECTRICGRID
SPONGEOUT OF INK SENSORSUPPORT PLATE
COVER
INK PAD
Fig. 1-3b - NOZZLE CROSSSECTION
OUT OF INK SENSORSUPPORT PLATE
SHELL
1-8 681640J
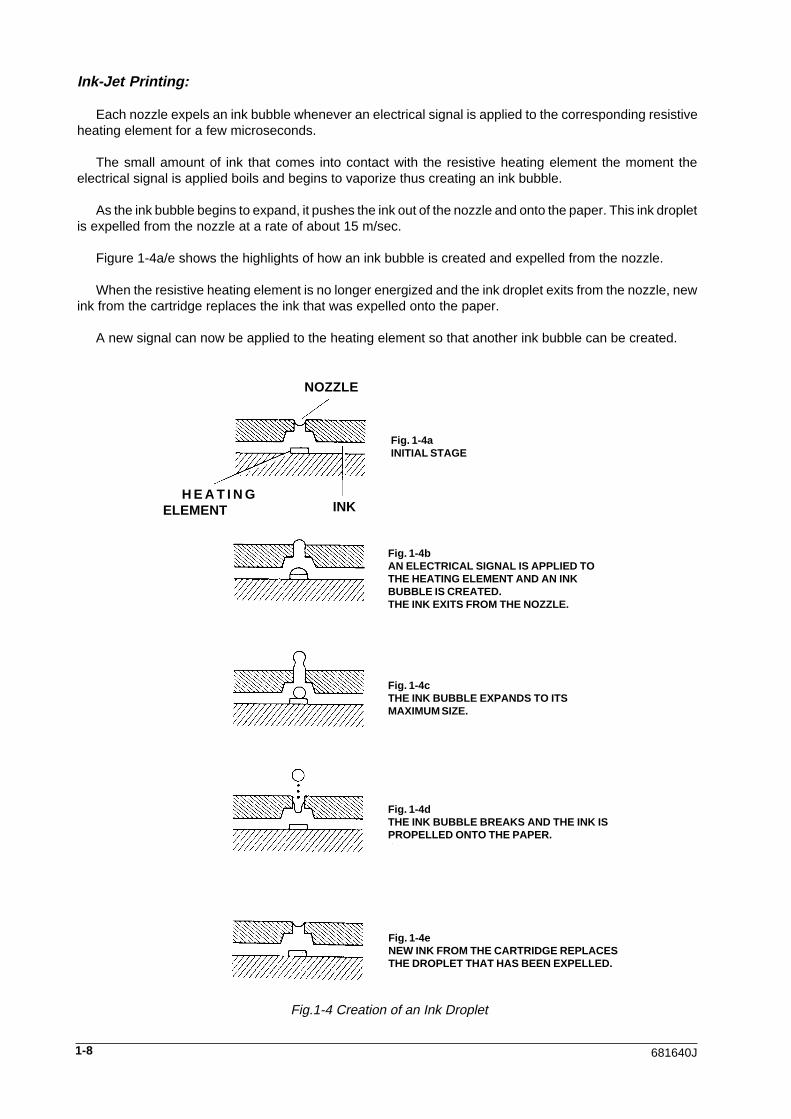
Ink-Jet Printing:
Each nozzle expels an ink bubble whenever an electrical signal is applied to the corresponding resistiveheating element for a few microseconds.
The small amount of ink that comes into contact with the resistive heating element the moment theelectrical signal is applied boils and begins to vaporize thus creating an ink bubble.
As the ink bubble begins to expand, it pushes the ink out of the nozzle and onto the paper. This ink dropletis expelled from the nozzle at a rate of about 15 m/sec.
Figure 1-4a/e shows the highlights of how an ink bubble is created and expelled from the nozzle.
When the resistive heating element is no longer energized and the ink droplet exits from the nozzle, newink from the cartridge replaces the ink that was expelled onto the paper.
A new signal can now be applied to the heating element so that another ink bubble can be created.
NOZZLE
H E A T I N GELEMENT
Fig. 1-4aINITIAL STAGE
Fig. 1-4eNEW INK FROM THE CARTRIDGE REPLACESTHE DROPLET THAT HAS BEEN EXPELLED.
Fig. 1-4dTHE INK BUBBLE BREAKS AND THE INK ISPROPELLED ONTO THE PAPER.
Fig. 1-4cTHE INK BUBBLE EXPANDS TO ITSMAXIMUM SIZE.
Fig. 1-4bAN ELECTRICAL SIGNAL IS APPLIED TOTHE HEATING ELEMENT AND AN INKBUBBLE IS CREATED.THE INK EXITS FROM THE NOZZLE.
Fig.1-4 Creation of an Ink Droplet
INK
681640J 1-9 JP 90 - Service Manual
GR
OU
P A
(12)
GR
OU
P B
(13)
GR
OU
P C
(13)
GR
OU
P D
(12)
Fig.1-5 Nozzle Matrix
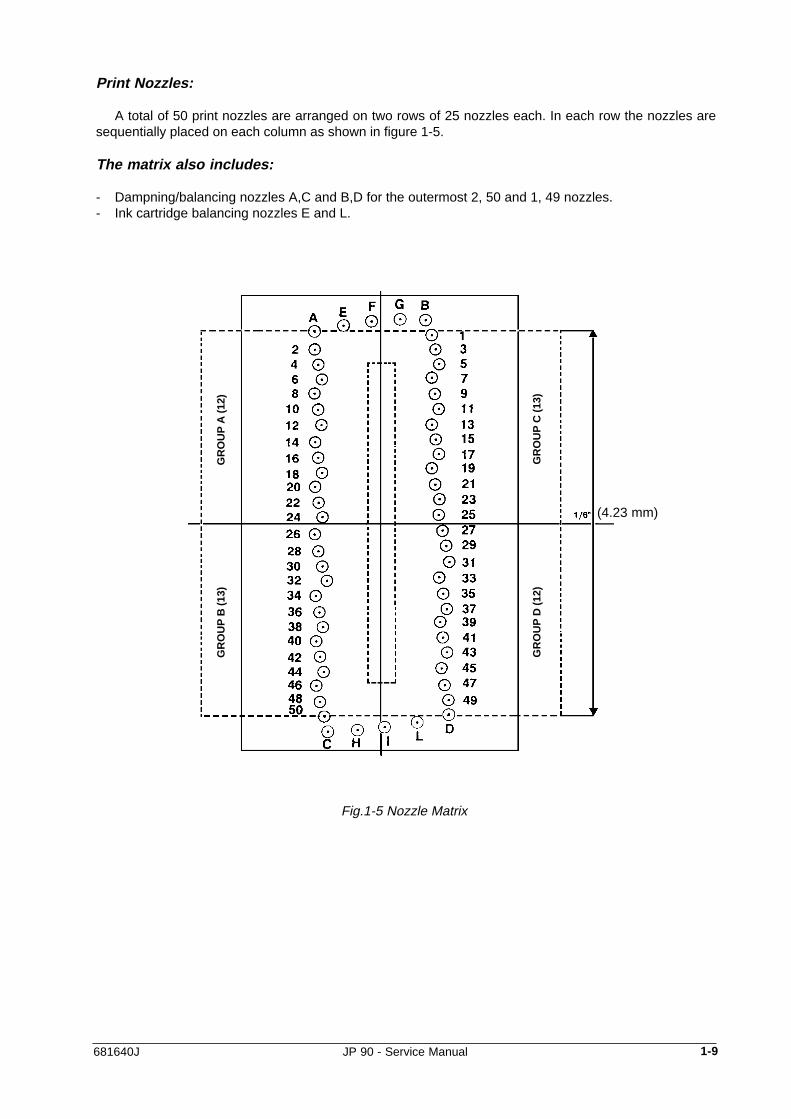
Print Nozzles:
A total of 50 print nozzles are arranged on two rows of 25 nozzles each. In each row the nozzles aresequentially placed on each column as shown in figure 1-5.
The matrix also includes:
- Dampning/balancing nozzles A,C and B,D for the outermost 2, 50 and 1, 49 nozzles.- Ink cartridge balancing nozzles E and L.
(4.23 mm)
1-10 681640J
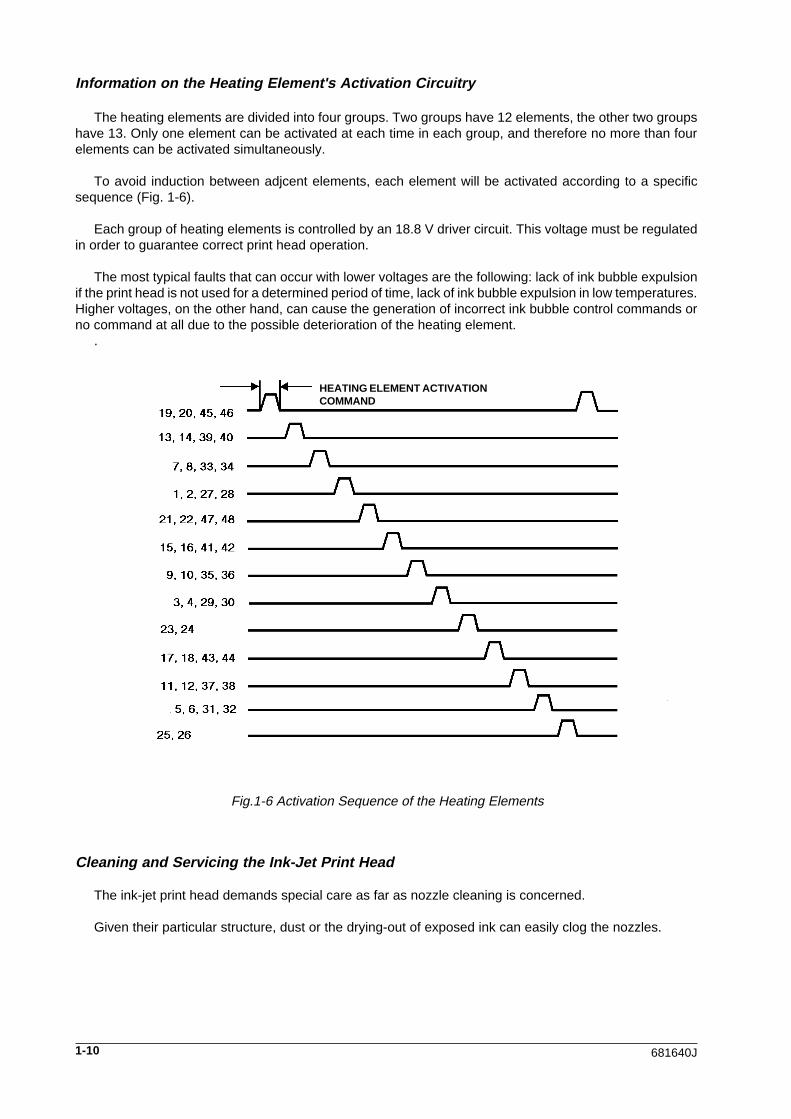
Information on the Heating Element's Activation Circuitry
The heating elements are divided into four groups. Two groups have 12 elements, the other two groupshave 13. Only one element can be activated at each time in each group, and therefore no more than fourelements can be activated simultaneously.
To avoid induction between adjcent elements, each element will be activated according to a specificsequence (Fig. 1-6).
Each group of heating elements is controlled by an 18.8 V driver circuit. This voltage must be regulatedin order to guarantee correct print head operation.
The most typical faults that can occur with lower voltages are the following: lack of ink bubble expulsionif the print head is not used for a determined period of time, lack of ink bubble expulsion in low temperatures.Higher voltages, on the other hand, can cause the generation of incorrect ink bubble control commands orno command at all due to the possible deterioration of the heating element.
.
Cleaning and Servicing the Ink-Jet Print Head
The ink-jet print head demands special care as far as nozzle cleaning is concerned.
Given their particular structure, dust or the drying-out of exposed ink can easily clog the nozzles.
Fig.1-6 Activation Sequence of the Heating Elements
HEATING ELEMENT ACTIVATIONCOMMAND
681640J 1-11 JP 90 - Service Manual
Listed below are some useful tips that will guarantee the optimum use of the print head:
- Remove the print head from its sealed container only when you are about to install it in the printer. Theprint head has an 18-month warranty if stored in a sealed container, otherwise the warranty is reducedto about six months (both warranty periods are cumulative).
- Never rest the print head on its nozzle or electric contact sides. Never rest the head on heat sources, airconditioners, nor on dirty or dusty surfaces.
- If necessary (when the nozzles are clogged), run the nozzle cleaning function (turn to section 7.1).This function forces ink through the nozzles to clear the passages, and will have to be run whenever oneor more nozzles clog.
- After a print job, tightly seal the nozzle bay so the nozzles are protected against dust and to avoid the inlkfrom drying-out when exposed for a certain period of time. Since on the JP 90 this operation is carried outautomatically after a few minutes of printer inactivity, wait a few seconds before powering off the machineafter a print job.If a blackout occurs while the printer is on, power off the printer and manually push the print head to itsfarthest right-hand position.
Note: If after a print job the personal computer is powered off before the printer, the printer will reset itself.If the printer is powered off during its reset phase, chances are that the print head may come to astop outside of its parking position.It is therefore suggested to power off the printer before the personal computer.
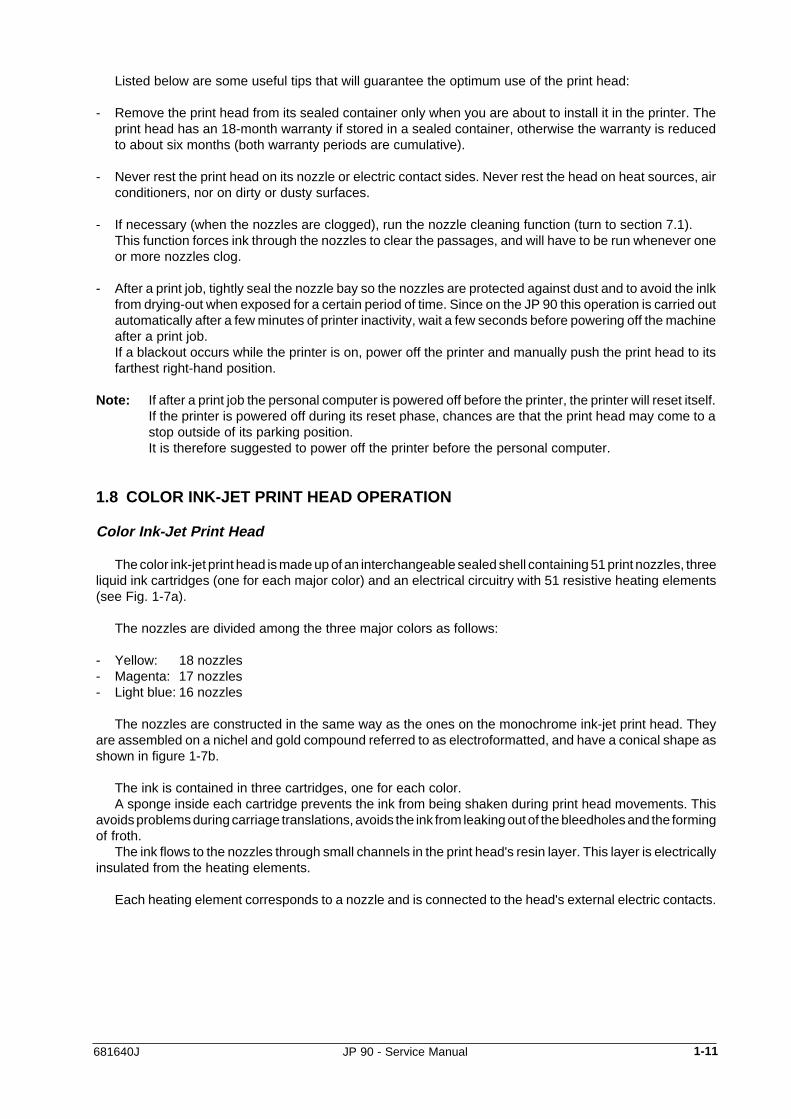
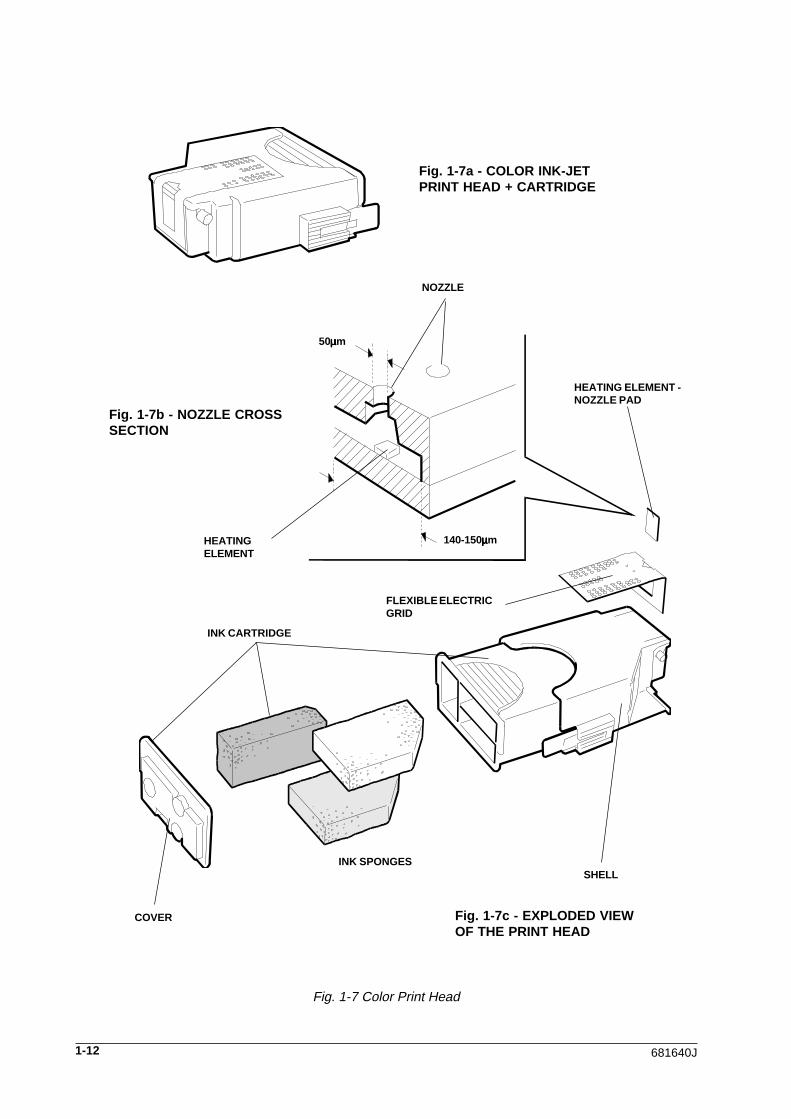
1.8 COLOR INK-JET PRINT HEAD OPERATION
Color Ink-Jet Print Head
The color ink-jet print head is made up of an interchangeable sealed shell containing 51 print nozzles, threeliquid ink cartridges (one for each major color) and an electrical circuitry with 51 resistive heating elements(see Fig. 1-7a).
The nozzles are divided among the three major colors as follows:
- Yellow: 18 nozzles- Magenta: 17 nozzles- Light blue: 16 nozzles
The nozzles are constructed in the same way as the ones on the monochrome ink-jet print head. Theyare assembled on a nichel and gold compound referred to as electroformatted, and have a conical shape asshown in figure 1-7b.
The ink is contained in three cartridges, one for each color.A sponge inside each cartridge prevents the ink from being shaken during print head movements. This
avoids problems during carriage translations, avoids the ink from leaking out of the bleedholes and the formingof froth.
The ink flows to the nozzles through small channels in the print head's resin layer. This layer is electricallyinsulated from the heating elements.
Each heating element corresponds to a nozzle and is connected to the head's external electric contacts.
1-12 681640J
Fig. 1-7a - COLOR INK-JETPRINT HEAD + CARTRIDGE
Fig. 1-7b - NOZZLE CROSSSECTION
50µµµµµm
140-150µµµµµm
NOZZLE
HEATING ELEMENT -NOZZLE PAD
FLEXIBLE ELECTRICGRID
Fig. 1-7c - EXPLODED VIEWOF THE PRINT HEAD
INK SPONGES
Fig. 1-7 Color Print Head
HEATINGELEMENT
INK CARTRIDGE
SHELL
COVER

681640J 1-13 JP 90 - Service Manual
Ink-Jet Printing
Turn to section 1.8 for a full explanation on ink-jet printing.
Print Nozzles
A total of 51 print nozzles are arranged on two vertical rows of 25 and 26 nozzles and are dividedhorizontally in three groups, one for each color.
Figure 1-8 shows how the nozzles are placed on each row.
YE
LLO
WM
AG
EN
TAB
LUE
2468
1357
19212325
20222426
45474951
44464850
Fig.1-8 Nozzle Matrix
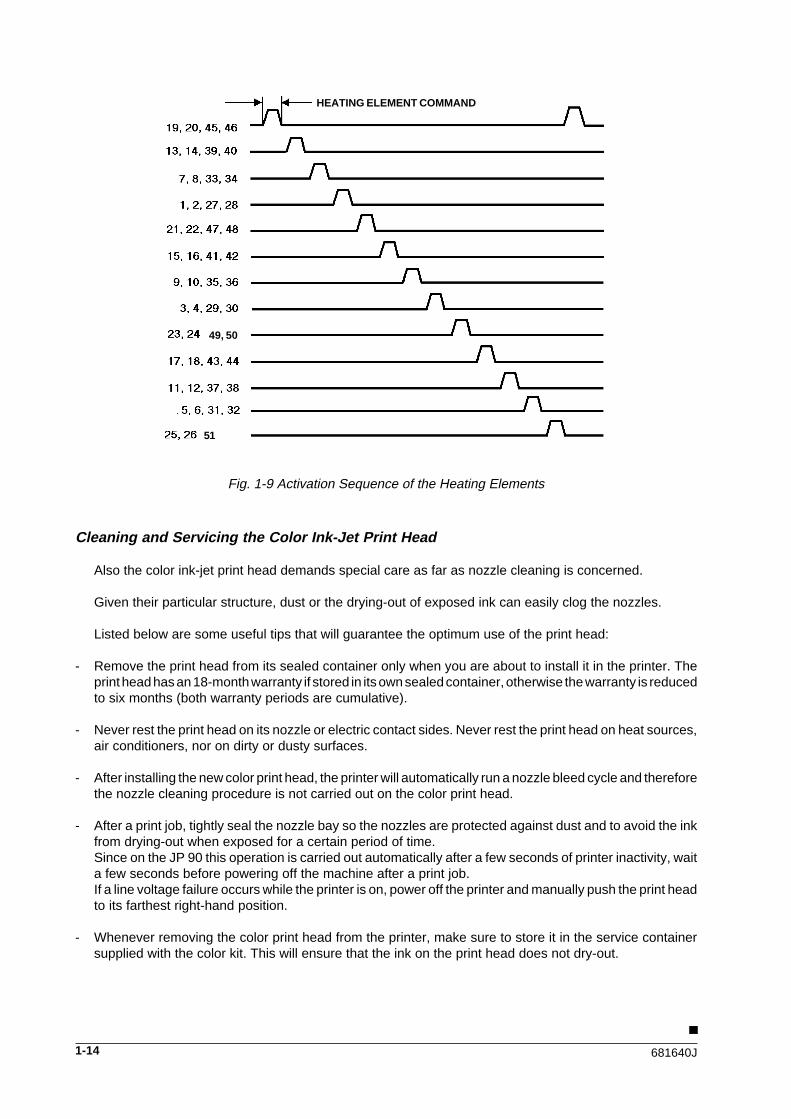
Information on the Heating Element Activation Circuitry
The heating elements are divided into four groups. Two groups have 12 elements and the other two groupshave 13. Only one element can be activated at each time in each group, and therefore no more than fourelements can be activated simultaneously.
To avoid induction between adjacent elements, each element will be activated according to a specificsequence (see figure 1-9).
Each group of heating elements is controlled by an 18.8 V driver circuit. This voltage must be regulatedin order to guarantee correct print head operation.
The most typical faults that may occur with lower voltages are the following: lack of ink bubble expulsionif the print head is not used for a determined period of time, lack of bubble expulsion in low temperatures.
Higher voltages, on the other hand, can cause the generation of incorrect ink bubble control commandsor no command at all due to the possible deterioration of the heating element.
1-14 681640J
Cleaning and Servicing the Color Ink-Jet Print Head
Also the color ink-jet print head demands special care as far as nozzle cleaning is concerned.
Given their particular structure, dust or the drying-out of exposed ink can easily clog the nozzles.
Listed below are some useful tips that will guarantee the optimum use of the print head:
- Remove the print head from its sealed container only when you are about to install it in the printer. Theprint head has an 18-month warranty if stored in its own sealed container, otherwise the warranty is reducedto six months (both warranty periods are cumulative).
- Never rest the print head on its nozzle or electric contact sides. Never rest the print head on heat sources,air conditioners, nor on dirty or dusty surfaces.
- After installing the new color print head, the printer will automatically run a nozzle bleed cycle and thereforethe nozzle cleaning procedure is not carried out on the color print head.
- After a print job, tightly seal the nozzle bay so the nozzles are protected against dust and to avoid the inkfrom drying-out when exposed for a certain period of time.Since on the JP 90 this operation is carried out automatically after a few seconds of printer inactivity, waita few seconds before powering off the machine after a print job.If a line voltage failure occurs while the printer is on, power off the printer and manually push the print headto its farthest right-hand position.
- Whenever removing the color print head from the printer, make sure to store it in the service containersupplied with the color kit. This will ensure that the ink on the print head does not dry-out.
51
49, 50
Fig. 1-9 Activation Sequence of the Heating Elements
HEATING ELEMENT COMMAND
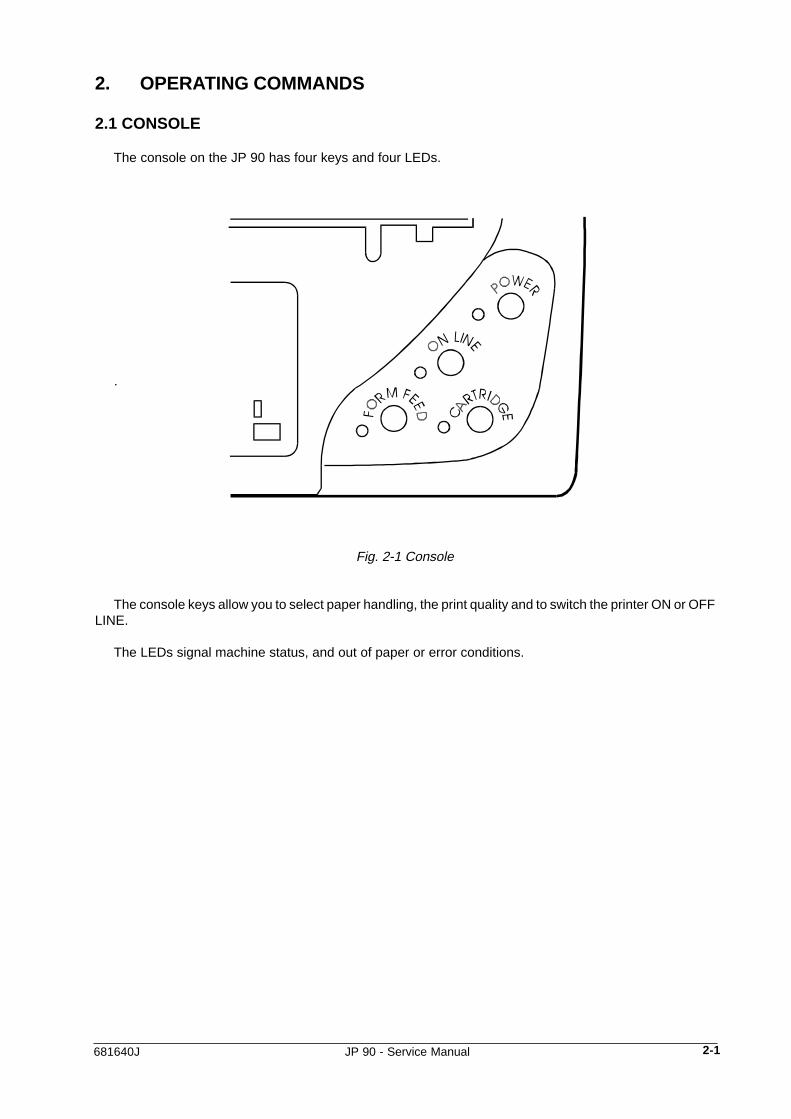
2-1681640J JP 90 - Service Manual
2. OPERATING COMMANDS
2.1 CONSOLE
The console on the JP 90 has four keys and four LEDs.
.
Fig. 2-1 Console
The console keys allow you to select paper handling, the print quality and to switch the printer ON or OFFLINE.
The LEDs signal machine status, and out of paper or error conditions.

2-2 681640J
LED Functions
The table below gives the meaning of the LED signals.
LED MEANING
POWER ON LINE FORM FEED CARTRIDGE
S Printer not powered on
A A Printer powered and ONLINE
A S Printer powered and OFFLINE
L Battery pack or batteries nearly low
LV Low battery pack charge
A L Data reception
A L Out of paper condition
A L Out of ink condition
A LV No head, or head not installed correctly
AS AS AS AS Printer being powered
LS3 LS3 LS3 LS3 Operator error
S S S S Printer in standby
LS LS LS LS Batteries being recharged
ACS ACS ACS ACS NiCd batteries being discharged
S= OffA= OnL= FlashingLV= Flashing rapidlyAS= On in sequence, one LED at a timeLS3= Simultaneous flashing three timesLS= Flashing sequentiallyACS= All the LEDs ON simultaneously with the consequent turn off of one LED at a time in a continuous order
2-3681640J JP 90 - Service Manual
Functions of the Keys
The following table describes the functions of the keys in the different printer operating modes.
Some of the functions are obtained by pressing one or more keys simultaneously.
POWER When pressed for less than four seconds powers the printer ON or OFF.
When pressed for more than four seconds activates the battery charging function.The printer switches back to ONLINE when battery charging ends.
ON LINE When pressed for less than four seconds switches the printer OFFLINE.(LED on) The print head carriage moves to its parking position.
ON LINE When pressed for less than four seconds switches the printer ONLINE.(LED off)
FORM FEED Feeds the paper to the first print line (TOF).Expels the paper that is already loaded in the printer.
If there is no paper in the printer and and the FORM FEED LED is flashing, afterloading paper in the printer press this key to print the data stored in the buffer.
When pressed for more than four seconds allows jammed paper to be removed.
CARTRIGDE When pressed once moves the print head carriage to the print head installation/replacement. Pressed a second time moves the print head carriage to its parkingposition.
POWER With the printer powered OFF, pressing these two keys simultaneously and then+ releasing first the POWER key followed by the FORM FED key will print all the data
FORM FEED in hexadecimal format.Power off the printer to exit from this print mode.
ON LINE Pressing these two keys simultaneously for more than four seconds activates the+ fast discharging of the NiCd batteries.
FORM FEED
POWER With the printer powered OFF, pressing these two keys simultaneously and then+ releasing first the POWER key followed by the CARTRIDGE key automatically
CARTRIDGE activates the print test.
ON LINE Pressing these two keys simultaneously for more than four seconds automatically+ prints the demo page.
CARTRIDGE
.

681640J 3-1 JP 90 - Service Manual
3. INSTALLATION
3.1 GENERAL RULES
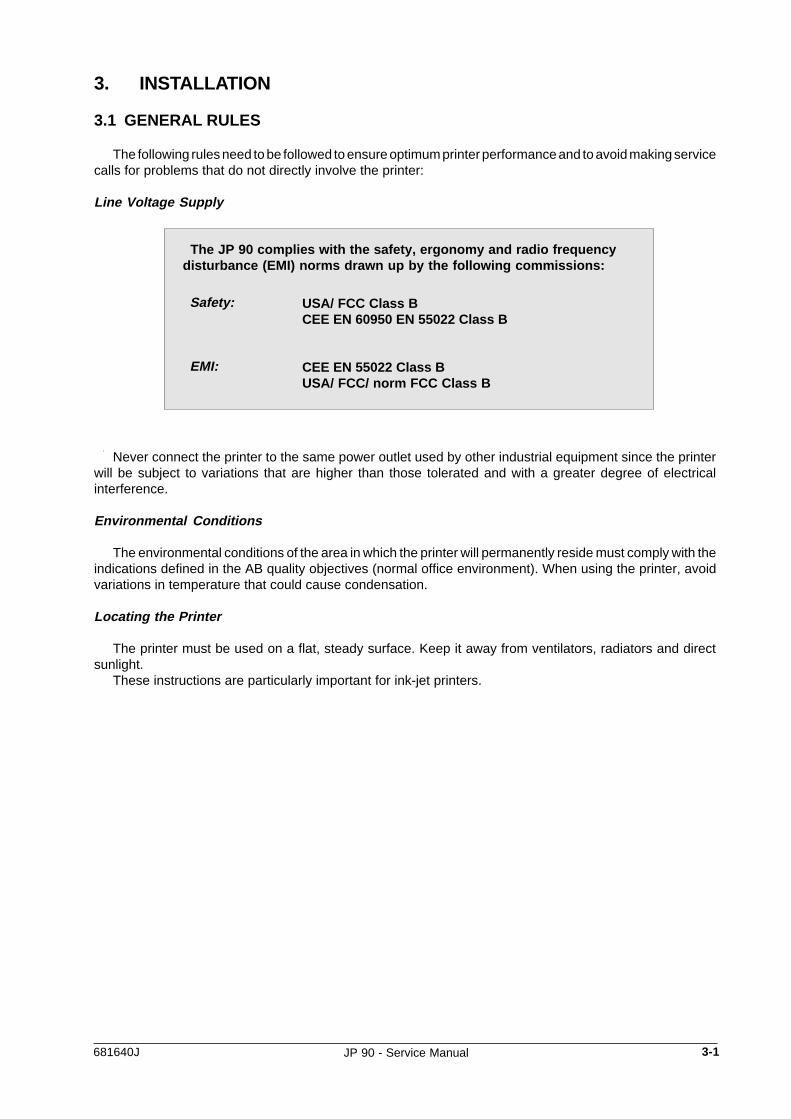
The following rules need to be followed to ensure optimum printer performance and to avoid making servicecalls for problems that do not directly involve the printer:
Line Voltage Supply
The JP 90 complies with the safety, ergonomy and radio frequencydisturbance (EMI) norms drawn up by the following commissions:
Safety:
EMI:
USA/ FCC Class BCEE EN 60950 EN 55022 Class B
CEE EN 55022 Class BUSA/ FCC/ norm FCC Class B
Never connect the printer to the same power outlet used by other industrial equipment since the printerwill be subject to variations that are higher than those tolerated and with a greater degree of electricalinterference.
Environmental Conditions
The environmental conditions of the area in which the printer will permanently reside must comply with theindications defined in the AB quality objectives (normal office environment). When using the printer, avoidvariations in temperature that could cause condensation.
Locating the Printer
The printer must be used on a flat, steady surface. Keep it away from ventilators, radiators and directsunlight.
These instructions are particularly important for ink-jet printers.
3-2 681640J
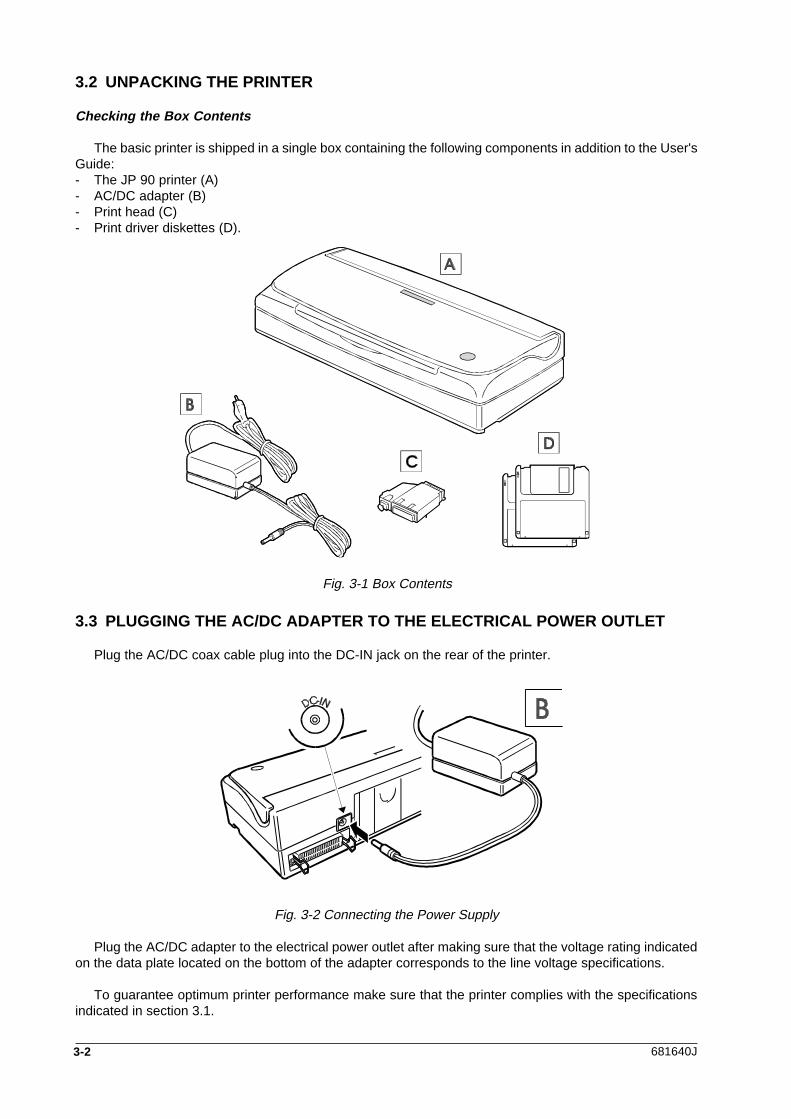
3.2 UNPACKING THE PRINTER
Checking the Box Contents
The basic printer is shipped in a single box containing the following components in addition to the User'sGuide:- The JP 90 printer (A)- AC/DC adapter (B)- Print head (C)- Print driver diskettes (D).
3.3 PLUGGING THE AC/DC ADAPTER TO THE ELECTRICAL POWER OUTLET
Plug the AC/DC coax cable plug into the DC-IN jack on the rear of the printer.
Fig. 3-1 Box Contents
Fig. 3-2 Connecting the Power Supply
Plug the AC/DC adapter to the electrical power outlet after making sure that the voltage rating indicatedon the data plate located on the bottom of the adapter corresponds to the line voltage specifications.
To guarantee optimum printer performance make sure that the printer complies with the specificationsindicated in section 3.1.
681640J 3-3 JP 90 - Service Manual
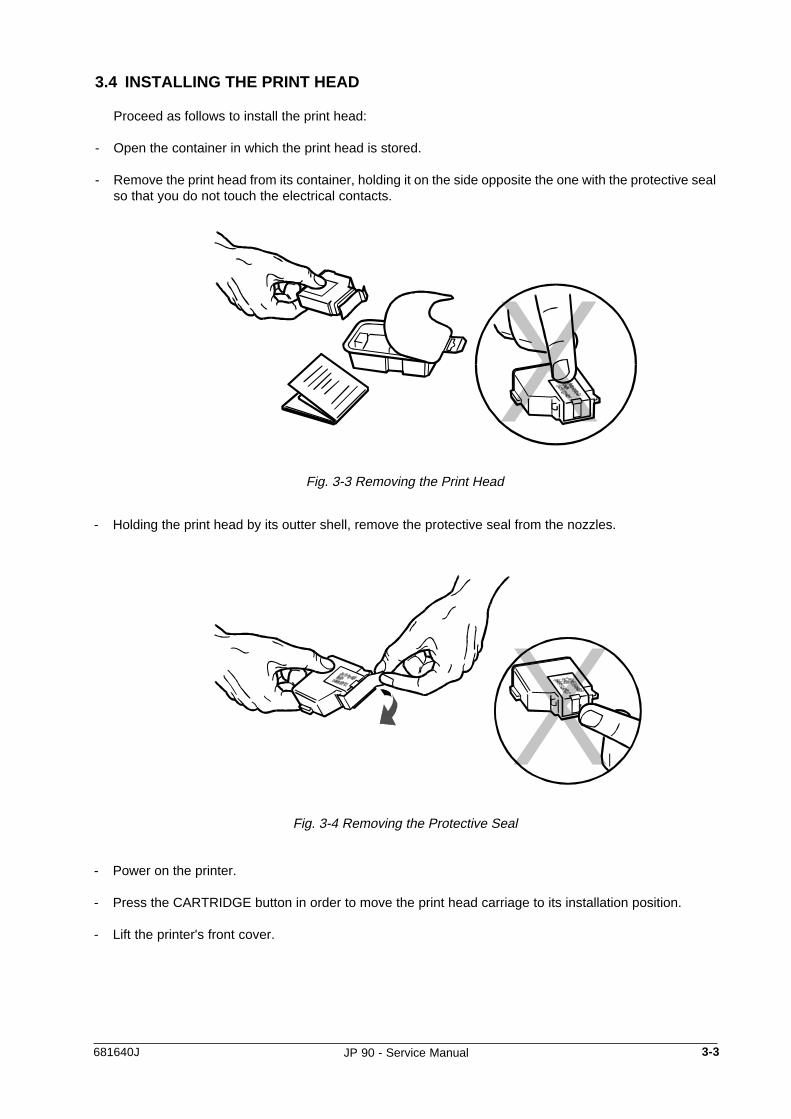
3.4 INSTALLING THE PRINT HEAD
Proceed as follows to install the print head:
- Open the container in which the print head is stored.
- Remove the print head from its container, holding it on the side opposite the one with the protective sealso that you do not touch the electrical contacts.
- Holding the print head by its outter shell, remove the protective seal from the nozzles.
Fig. 3-3 Removing the Print Head
Fig. 3-4 Removing the Protective Seal
- Power on the printer.
- Press the CARTRIDGE button in order to move the print head carriage to its installation position.
- Lift the printer's front cover.

3-4 681640J
- Direct the print head electrical contacts towards the corresponding contacts on the carriage.
Fig. 3-5 Positioning the Print Head
- Insert the print head into its slot by pushing it downwards until it snaps into place.
- Close the front cover.
- Press the CARTRIDGE key to return the print head to its parking position.
Fig. 3-6 Inserting the Print Head
681640J 3-5 JP 90 - Service Manual
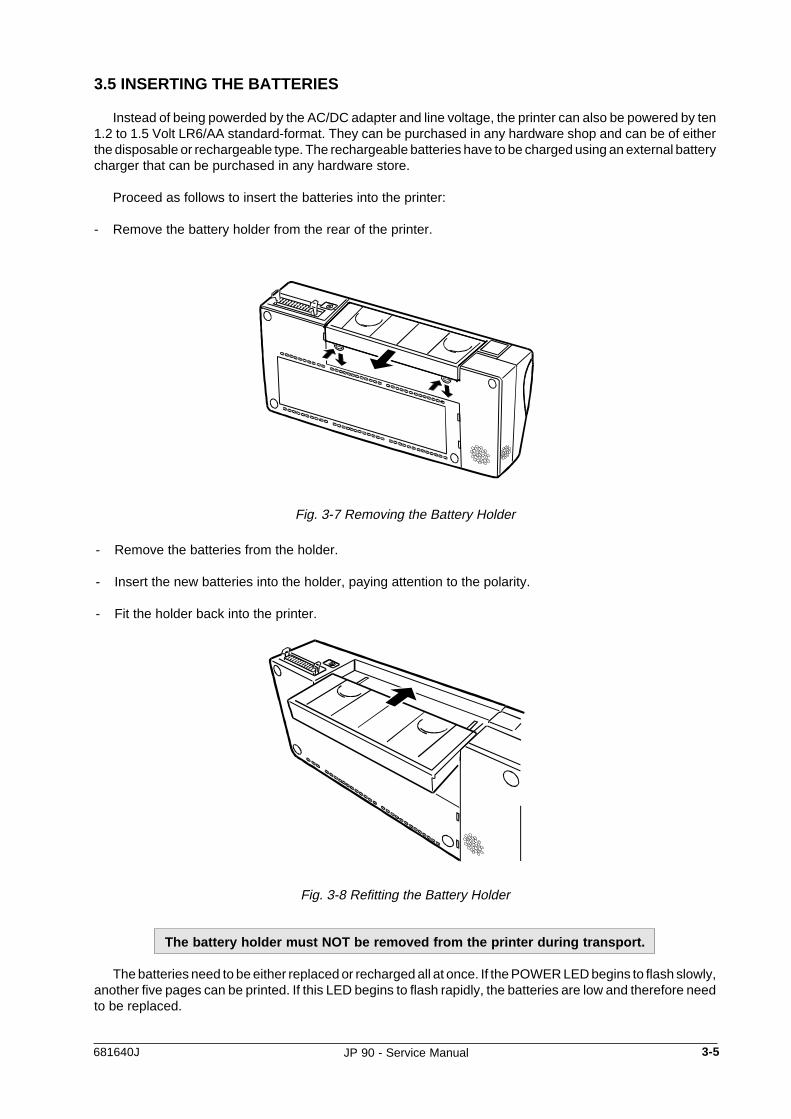
3.5 INSERTING THE BATTERIES
Instead of being powerded by the AC/DC adapter and line voltage, the printer can also be powered by ten1.2 to 1.5 Volt LR6/AA standard-format. They can be purchased in any hardware shop and can be of eitherthe disposable or rechargeable type. The rechargeable batteries have to be charged using an external batterycharger that can be purchased in any hardware store.
Proceed as follows to insert the batteries into the printer:
- Remove the battery holder from the rear of the printer.
Fig. 3-7 Removing the Battery Holder
- Remove the batteries from the holder.
- Insert the new batteries into the holder, paying attention to the polarity.
- Fit the holder back into the printer.
The battery holder must NOT be removed from the printer during transport.
The batteries need to be either replaced or recharged all at once. If the POWER LED begins to flash slowly,another five pages can be printed. If this LED begins to flash rapidly, the batteries are low and therefore needto be replaced.
Fig. 3-8 Refitting the Battery Holder
3-6 681640J
3.6 INSERTING THE BATTERY PACK
The battery pack can be used as an alternative to the AC/DC adapter and batteries. Two battery packscan be used:
a 12 Volt 600 mAh Ni-Cd battery pack granting an operating autonomy of approximately 80 pages;a 12 Volt 1 Ah Ni-MH battery pack granting an operating autonomy of approximately 140 pages.
Proceed as follows to insert the battery pack into the printer:
- Remove the battery holder from the rear of the printer and store it in the plastic bag provided with the batterypack.
- Insert the battery pack where you removed the battery holder, and make sure that its contacts fit perfectlywith those of the printer.
The battery pack must NOT be removed from the printer during transportation.
For safety reasons new battery packs are never charged; consequently thebattery pack needs to be charged before it can be used.
If the POWER LED begins to flash slowly when using the battery pack, another five pages can be printed.If this LED begins to flash rapidly, the battery pack is low so you will need to either recharge the battery packor replace it.
Charging or Recharging the Battery Pack
Both types of battery packs can be recharged without needing to remove them from the printer. Therecharge time required for the NiCd battery pack is approximately six hours, while it is 12 hours for the NiMHbattery pack.
Proceed as follows to begin recharging the battery pack:
- Attach the printer to the electrical outlet through the AC/DC adapter.
- Power on the printer.
Recharge can be:
- Automatic, in the event a battery low condition is detected or if a NiCd battery pack is being used.Pressing the FORM FEED and ONLINE keys simultaneously interrupts the recharge and returns theprinter ONLINE.
- Manual, by pressing the POWER key for more than four seconds the battery pack is recharged for theentire period of time that the printer remains idle.Whenever the printer receives an operating command, the recharge is automatically interrupted to be thenresumed as soon as the printer returns idle again.
Note : Using the optional fast charger considerably reduces battery recharge times.
681640J 3-7 JP 90 - Service Manual
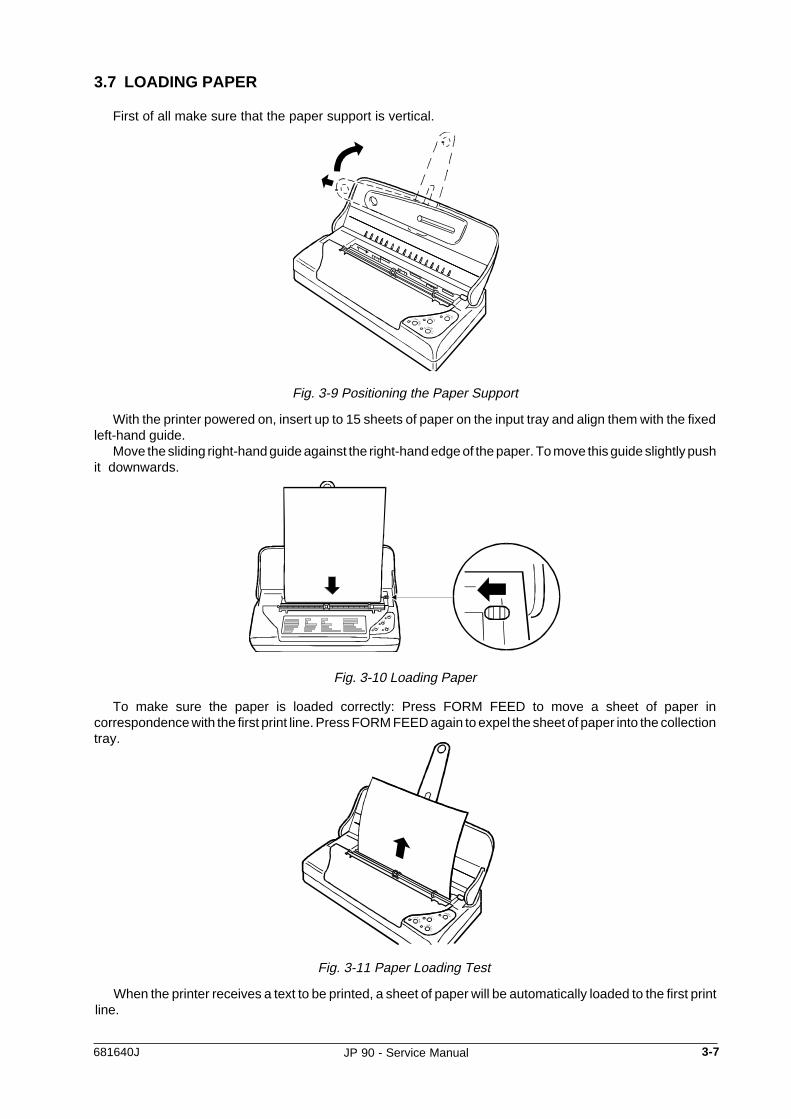
3.7 LOADING PAPER
First of all make sure that the paper support is vertical.
With the printer powered on, insert up to 15 sheets of paper on the input tray and align them with the fixedleft-hand guide.
Move the sliding right-hand guide against the right-hand edge of the paper. To move this guide slightly pushit downwards.
To make sure the paper is loaded correctly: Press FORM FEED to move a sheet of paper incorrespondence with the first print line. Press FORM FEED again to expel the sheet of paper into the collectiontray.
Fig. 3-11 Paper Loading Test
When the printer receives a text to be printed, a sheet of paper will be automatically loaded to the first printline.
Fig. 3-10 Loading Paper
Fig. 3-9 Positioning the Paper Support
3-8 681640J
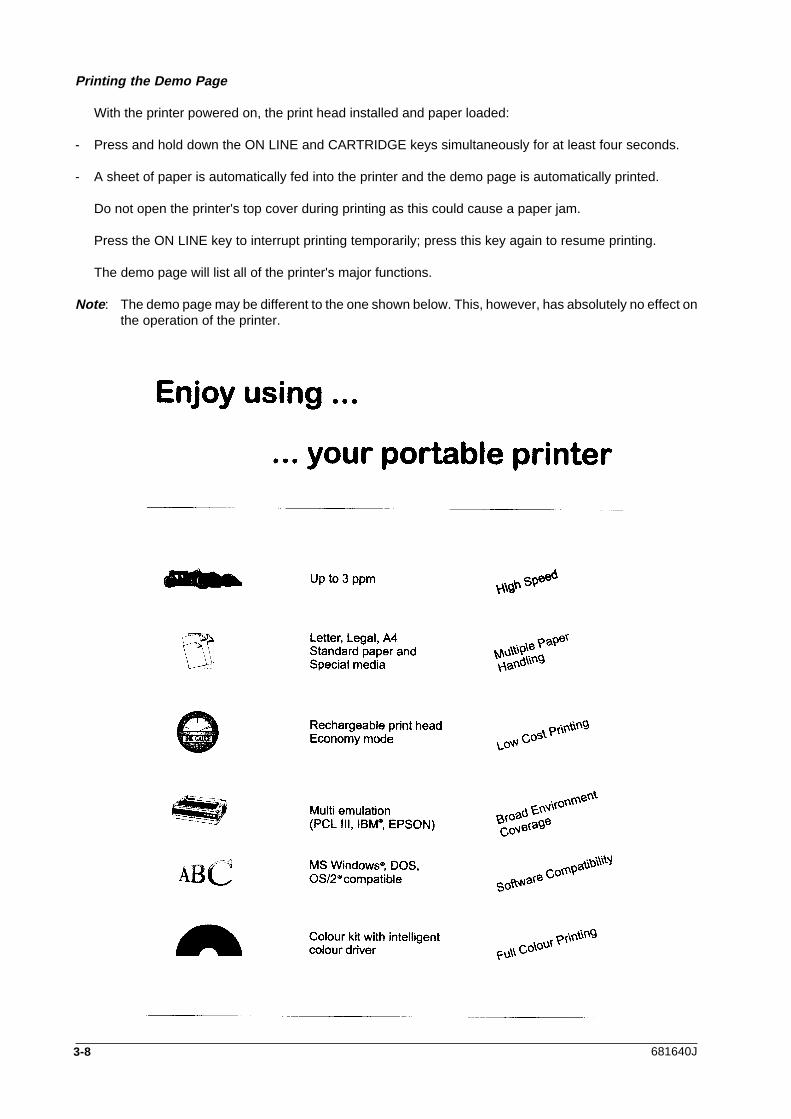
Printing the Demo Page
With the printer powered on, the print head installed and paper loaded:
- Press and hold down the ON LINE and CARTRIDGE keys simultaneously for at least four seconds.
- A sheet of paper is automatically fed into the printer and the demo page is automatically printed.
Do not open the printer's top cover during printing as this could cause a paper jam.
Press the ON LINE key to interrupt printing temporarily; press this key again to resume printing.
The demo page will list all of the printer's major functions.
Note : The demo page may be different to the one shown below. This, however, has absolutely no effect onthe operation of the printer.
681640J 3-9 JP 90 - Service Manual
3.8 PRINT TEST
To make sure the printer is installed correctly, simply run a print test as follows:
- Make sure there is paper in the input tray.
- With the printer powered off, press the POWER and CARTRIDGE keys simultaneously; release then thePOWER key followed by the CARTRIDGE key.
- The printer will load paper and print the print test on up to three sheets of paper.
- Upon completion of the print test the printer is ready for connection to the system.
With this test you can check whether the printer works correctly, obtain a printout of the printer'sconfiguration data and check that the print head nozzles work correctly.
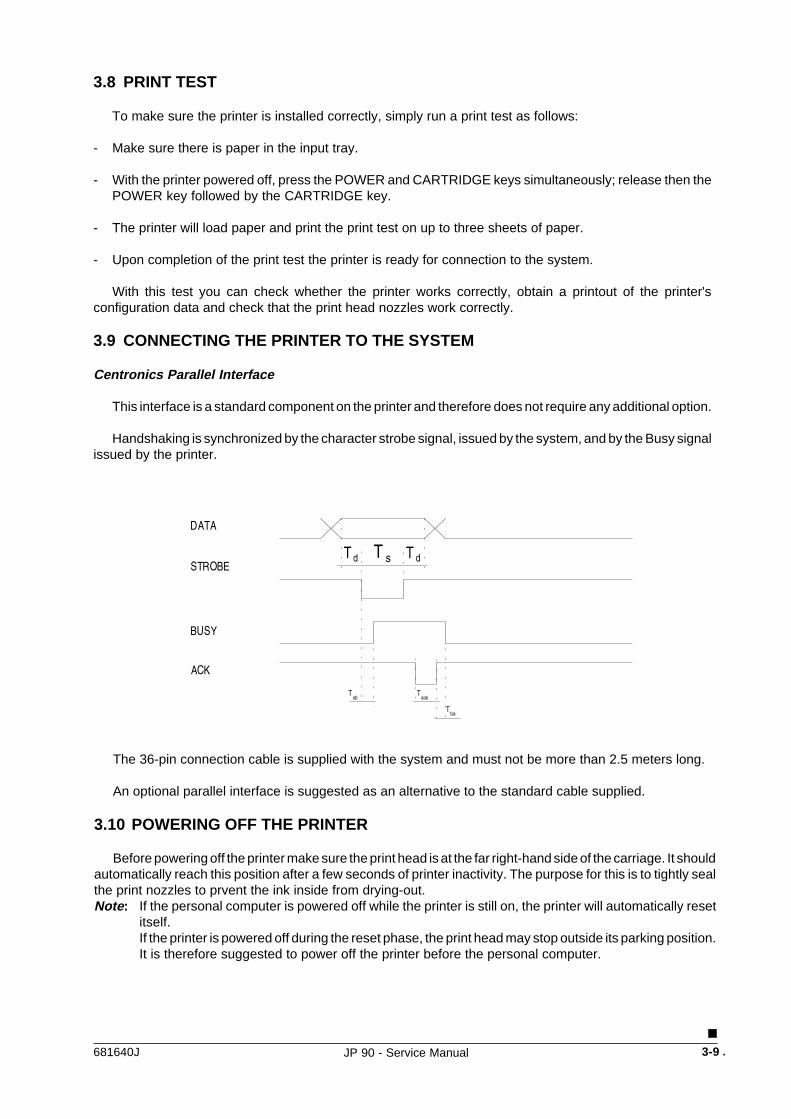
3.9 CONNECTING THE PRINTER TO THE SYSTEM
Centronics Parallel Interface
This interface is a standard component on the printer and therefore does not require any additional option.
Handshaking is synchronized by the character strobe signal, issued by the system, and by the Busy signalissued by the printer.
The 36-pin connection cable is supplied with the system and must not be more than 2.5 meters long.
An optional parallel interface is suggested as an alternative to the standard cable supplied.
3.10 POWERING OFF THE PRINTER
Before powering off the printer make sure the print head is at the far right-hand side of the carriage. It shouldautomatically reach this position after a few seconds of printer inactivity. The purpose for this is to tightly sealthe print nozzles to prvent the ink inside from drying-out.Note: If the personal computer is powered off while the printer is still on, the printer will automatically reset
itself.If the printer is powered off during the reset phase, the print head may stop outside its parking position.It is therefore suggested to power off the printer before the personal computer.
DATA
STROBE
BUSY
ACK
Tack
Ts
T dT d
Tsb
Tba
.


4-1681640J JP 90 - Service Manual
4. SOFTWARE INSTALLATION AND USAGE
The disks provided with the printer contain the following:
- A multilingual monochrome driver for Windows 95.
- A multilingual monochrome driver for Windows 3.1/3.11 and the printer configuration utility (for customizingthe settings in DOS).
The contents of the disks guarantees compatibility with the specific operating environments and providesan easy-to-use interface through which the printer can be programmed. The disks include a Readme filecontaining updated information on the driver.
4.1 THE WINDOWS ENVIRONMENT
The multilingual monochrome drivers for Windows stored on the disks supplied optimize printerperformance and functionality. First of all, however, the printer driver needs to be installed in your specificlanguage version and then a check needs to be made to see whether the driver's predefined parametersprovide the type of printout required.
If the driver was installed by means of the Plug and Play feature, the monochrome driver can be configuredby opening the Printer folder, highlighting the printer icon and clicking in Properties.
On the contrary, proceed as follows:
- Launch Windows.
- In Program Manager , activate the Main group followed by Control Panel by double clicking on therelative icons.
- From the Control Panel , activate the Printers window in the same way.
- To change the default settings, click on Set; the following parameters will be displayed so that their valuescan be changed:
Resolution (dpi): select the graphic density (600, 300,150, 75dpi).
Paper size: A4, Letter, Legal, A5 (default setting: A4 or Letter , depending on the country of destination).
Paper feed: ASF, Manual (semi-automatic).
Orientation: Portrait or Landscape.
- Clicking on Options... from the Set dialog box displays a second series of parameters:
Paper quality: Normal paper or Film.
Print quality: LQ, Economy, Draft.
Reticulation: defines the color mixtures (defult setting: Thick).
Intensity control: increases/decreases the clearness of grapical images (default setting: Normal).
The Reticulation and Intensity Control parameters are only active when monochrome-generated filesare printed.
4-2 681640J
Fonts
Scalable and/or TrueType fonts are avaulable with the Microsoft Windows 3.1 driver or later. Printing canbe obtained with the Windows TrueType fonts or with the Portrait fonts residing in the printer (the printer'sLandscape fonts cannot be used under Windows).
Print Quality
LQ Combines speed and quality.
Presentation Provides the best quality at a lower speed.
Bozza Provides fast printing.
Economy Saves ink.
Paper Quality
By selecting Film, the quality will be LQ regardless of the setting made.
4.2 THE DOS ENVIRONMENT
The printer can use the following emulations: PCL III+ (predefined), IBM Proprinter X24 Mod. 4207/1 andEPSON LQ 850:
- PCL III+ mode:Select the PCL III+ driver during the configuration of the application driver. If PCL III+ is not available, selectHP DeskJet 500C or HP DeskJet 500. The PCL III+ mode also supports color printing.
- IBM Proprinter X24 mode:Select the IBM Proprinter X24 Mod. 4207/1 driver during the configuration of the application driver. Thismode only supports monochrome printing. The printer will enter an error condition if an attempt is madeto print using a color print head. A demo page is not available for this type of emulation.
- EPSON LQ 850 mode:Select the EPSON LQ 850 driver during the configuration of the application software. This mode onlysupports monochrome printing. The printer will enter an error condition if an attempt is made to print usinga color print head. A demo page is not available for this type of emulation.
5-1681640J JP 90 - Service Manual
5. AUTODIAGNOSTICS, TESTING PROCEDURES ANDTROUBLESHOOTING GUIDE
5.1 POWER ON DIAGNOSTICS
The machine firmware has been designed so that a check is made on the printer's major functions at eachpower on.
The console LEDs will inform the user if errors are detected during this autodiagnostic phase.
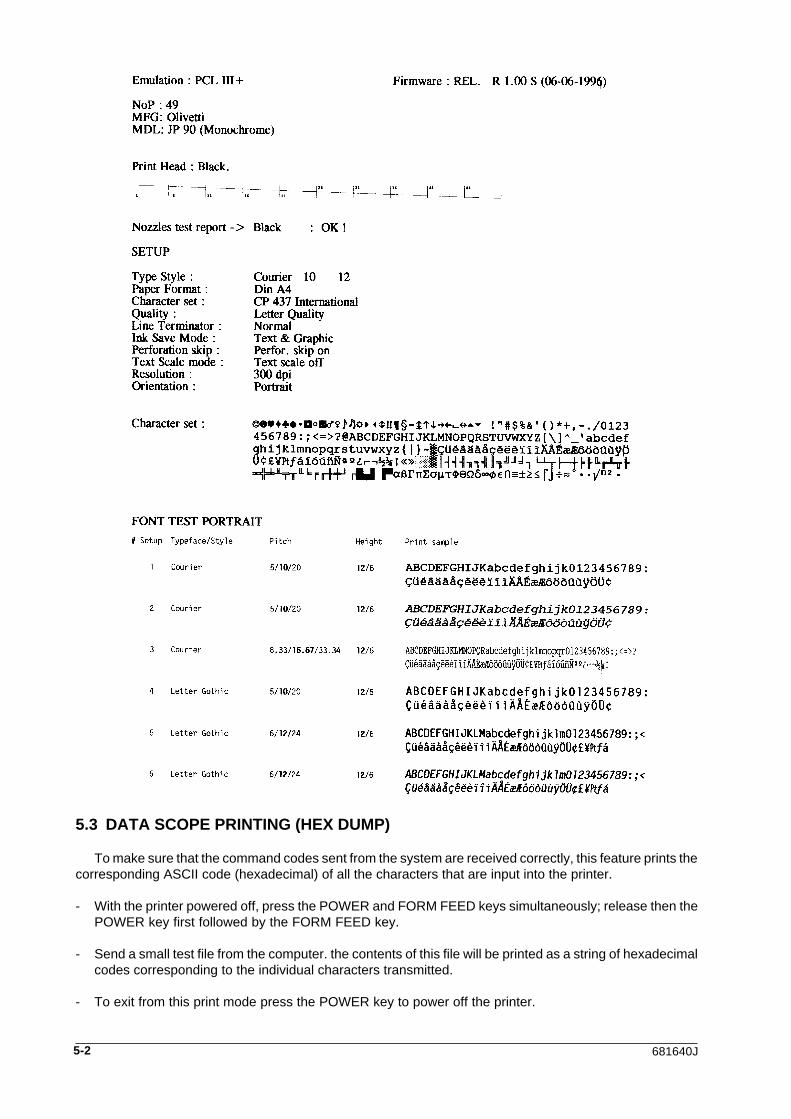
5.2 MONOCHROME PRINT TEST
This test checks whether the print head operates correctly, displays the printer's operating parameters andreviews the character fonts available in the printer.
The following information is provided:
- the first two lines provide information on the printer, in particular the type of emulation selected and thefirmware release provided with the printer.
- the third line (Print Head Test) checks whether dots that should have been printed are missing. The testindicates:
the type of print head being used;
a diagonal line indicating the operation of the print head nozzles;
the results of the test which indicates Monochrome or Color, followed by OK if all the nozzles workcorrectly or by the number of faulty nozzles in case one or more may be blocked;
If one or more nozzles are blocked, turn to section (7-1).
- After the print test, information on printer configuration (the operating parameters currently selected) theselected character set and the portrait or landscape fonts, depending on how the Orientation parameteris set, are provided. The contents of this part of the test varies depending on the selected emulation.
In the majority of cases, the operating parameters will be determined by the printer driver and will havepriority over the printer's internal configuration.
Proceed as follows to carry out this test:
- Make sure there is paper in the ASF.
- With the machine powered off, press the POWER and CARTRIDGE keys simultaneously; then releasethe POWER key first followed by the CARTRIDGE key.
- The printer will load paper and print the print test shown on the next page, on up to three sheets of paper.
5-2 681640J
5.3 DATA SCOPE PRINTING (HEX DUMP)
To make sure that the command codes sent from the system are received correctly, this feature prints thecorresponding ASCII code (hexadecimal) of all the characters that are input into the printer.
- With the printer powered off, press the POWER and FORM FEED keys simultaneously; release then thePOWER key first followed by the FORM FEED key.
- Send a small test file from the computer. the contents of this file will be printed as a string of hexadecimalcodes corresponding to the individual characters transmitted.
- To exit from this print mode press the POWER key to power off the printer.
5-3681640J JP 90 - Service Manual
5.4 TROUBLESHOOTING GUIDE
This section talks about some of the most significant faults that could be detected, along with their probablecause and corrective action.
These faults have been divided as follows:
- Problems at Power On:
These faults concern the Vac/Vdc power and control circuits.
If the printer does not power on (the POWER LED is off and there are no mechanical movements), makesure the line voltage is available. Power the printer off and then on again to check whether this fault persists.
When using batteries or a battery pack, make sure these power devices do not have to be replaced/recharged.
If the fault has not been cleared, check that the fuse on the power supply board has not blown, then checkthe voltage input to the XP28 CPU board.
Replace the XP28 CPU board as last resort.
If the printer powers on but does not go through its initialization process (printer initialization is run at eachpower on and resets the printer), make sure the print carriage moves freely and that there is no paperjammed inside the printer. Disconnect the printer from the system.Try powering the printer off and then on again.
If the POWER LED begins to flash rapidly, replace the XP28 CPU board.
- Inacceptabile Print Quality
These faults do not stop the printer from operating but cause considerable deterioration of the print quality.
If the printout is incomplete because one or more dots are missing (the print test shown in section 5.2 canbe used for a comparison), try cleaning the nozzles as explained in section 7.1.
If the Nozzle Test shows that one or more nozzles are not receiving the electrical signal, remove the printhead remove the print head and clean the electric contacts on both the carriage and print head using a cleanbrush or a cloth dampened with an alcohol solution.If the fault persists, replace the print head with a new one.If this does not work, try replacing the print carriage and related flat cables. Replace the X28 CPU boardas last resort.
If incorrect or smeared characters are printed, make sure the print carriage moves freely.
Bear in mind that an excessive increase in the printer's environmental temperature can cause the printedcharacters to smear or the generation of irregular ink droplets.
- Incorrect Paper Feed
These faults include paper jams, irregular paper feed or no paper feed at all.
Paper movement is controlled by a stepper motor. If the paper is not loaded in the printer, check themechanisms that transfer motion from the motor to the paper feed rollers. If the problem persists checkthe motor cabling. Replace the XP28 CPU board as last resort.

5-4 681640J
Paper or other obstructions along the paper path can cause paper jams or irregular paper feeds. To aviodpaper jams it is suggested tha you load paper in the ASF only when it is empty. When loading new paperin the ASF or after removing a jammed piece of paper, always remove the sheets already present in theASF and then reload the entire block again.
- Incorrect Data Transmission
Make sure you are using the correct interface cable and that it is not too long (up to 2.5 m for a parallelinterface cable)
Make sure that the printer and personal computer are connected together correctly.
Also make sure that the printer's configuration parameters have been correctly defined.
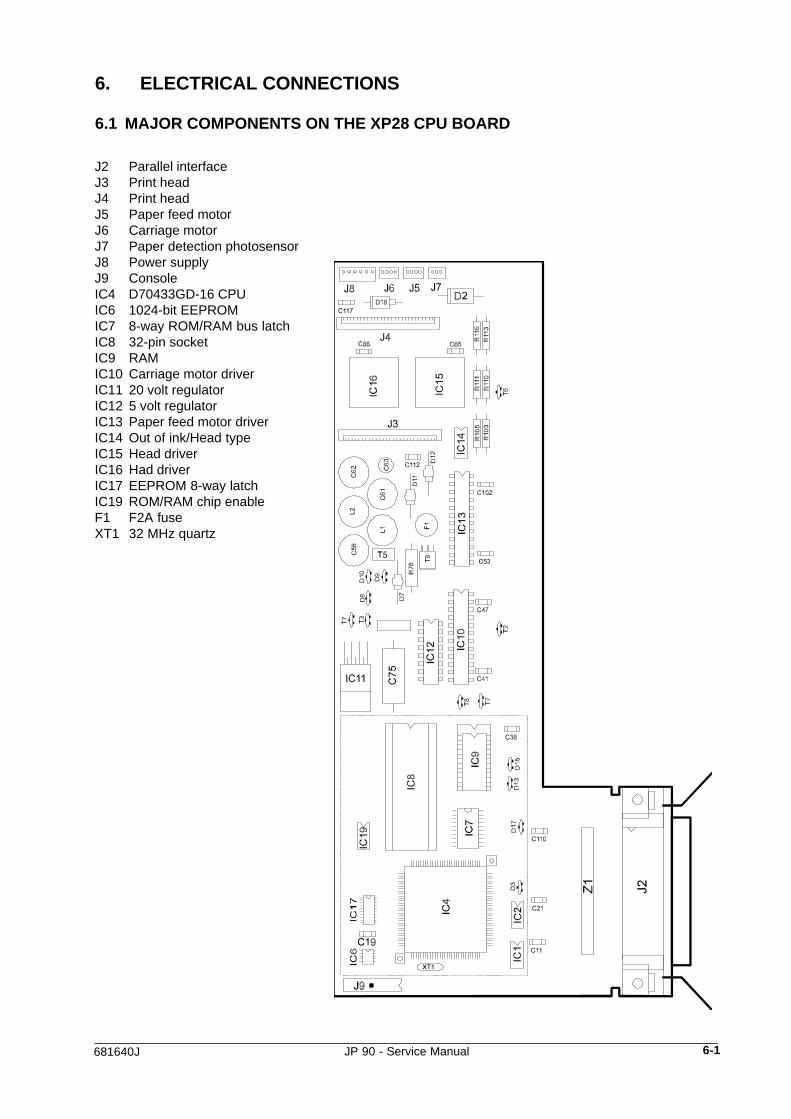
6-1681640J JP 90 - Service Manual
J2 Parallel interfaceJ3 Print headJ4 Print headJ5 Paper feed motorJ6 Carriage motorJ7 Paper detection photosensorJ8 Power supplyJ9 ConsoleIC4 D70433GD-16 CPUIC6 1024-bit EEPROMIC7 8-way ROM/RAM bus latchIC8 32-pin socketIC9 RAMIC10 Carriage motor driverIC11 20 volt regulatorIC12 5 volt regulatorIC13 Paper feed motor driverIC14 Out of ink/Head typeIC15 Head driverIC16 Had driverIC17 EEPROM 8-way latchIC19 ROM/RAM chip enableF1 F2A fuseXT1 32 MHz quartz
6. ELECTRICAL CONNECTIONS
6.1 MAJOR COMPONENTS ON THE XP28 CPU BOARD
6-2 681640J
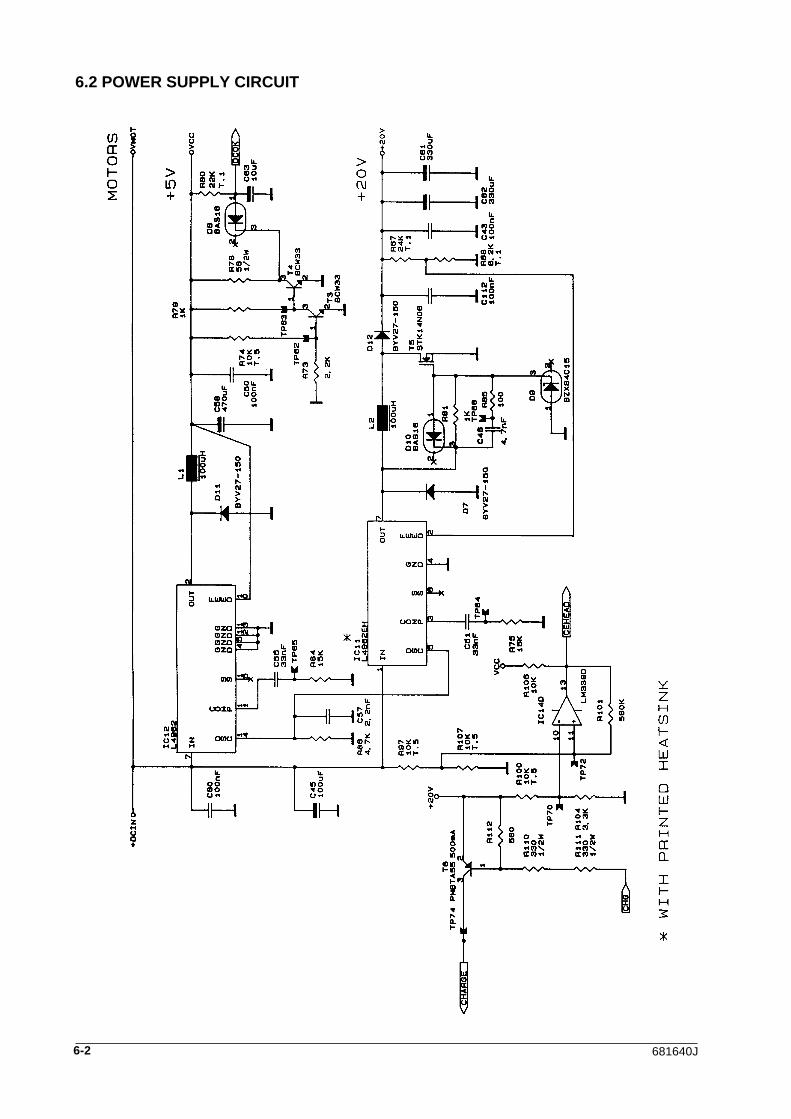
6.2 POWER SUPPLY CIRCUIT
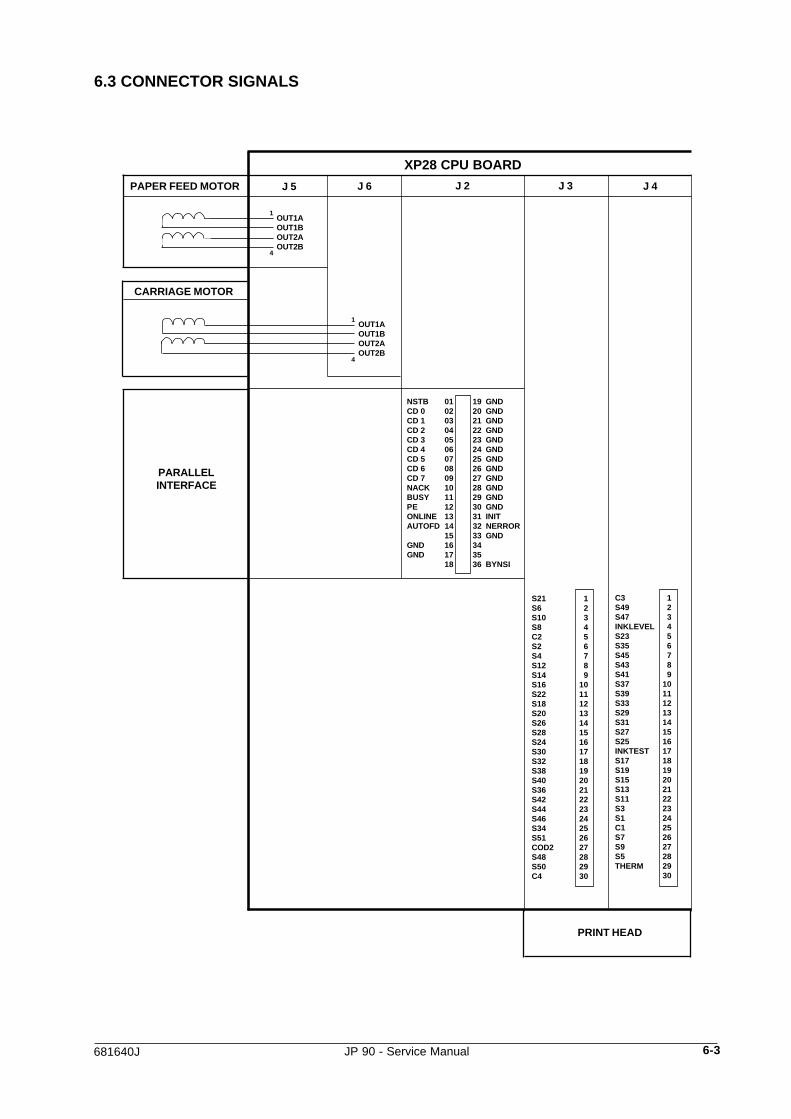
6-3681640J JP 90 - Service Manual
NSTB 01 19 GNDCD 0 02 20 GNDCD 1 03 21 GNDCD 2 04 22 GNDCD 3 05 23 GNDCD 4 06 24 GNDCD 5 07 25 GNDCD 6 08 26 GNDCD 7 09 27 GNDNACK 10 28 GNDBUSY 11 29 GNDPE 12 30 GNDONLINE 13 31 INITAUTOFD 14 32 NERROR
15 33 GNDGND 16 34GND 17 35
18 36 BYNSI
OUT1AOUT1BOUT2AOUT2B
6.3 CONNECTOR SIGNALS
CARRIAGE MOTOR
PARALLELINTERFACE
1
4
PRINT HEAD
XP28 CPU BOARD
OUT1AOUT1BOUT2AOUT2B
1
4
J 5 J 6 J 2 J 3 J 4
C3 1S49 2S47 3INKLEVEL 4S23 5S35 6S45 7S43 8S41 9S37 10S39 11S33 12S29 13S31 14S27 15S25 16INKTEST 17S17 18S19 19S15 20S13 21S11 22S3 23S1 24C1 25S7 26S9 27S5 28THERM 29
30
S21 1S6 2S10 3S8 4C2 5S2 6S4 7S12 8S14 9S16 10S22 11S18 12S20 13S26 14S28 15S24 16S30 17S32 18S38 19S40 20S36 21S42 22S44 23S46 24S34 25S51 26COD2 27S48 28S50 29C4 30
PAPER FEED MOTOR
6-4 681640J
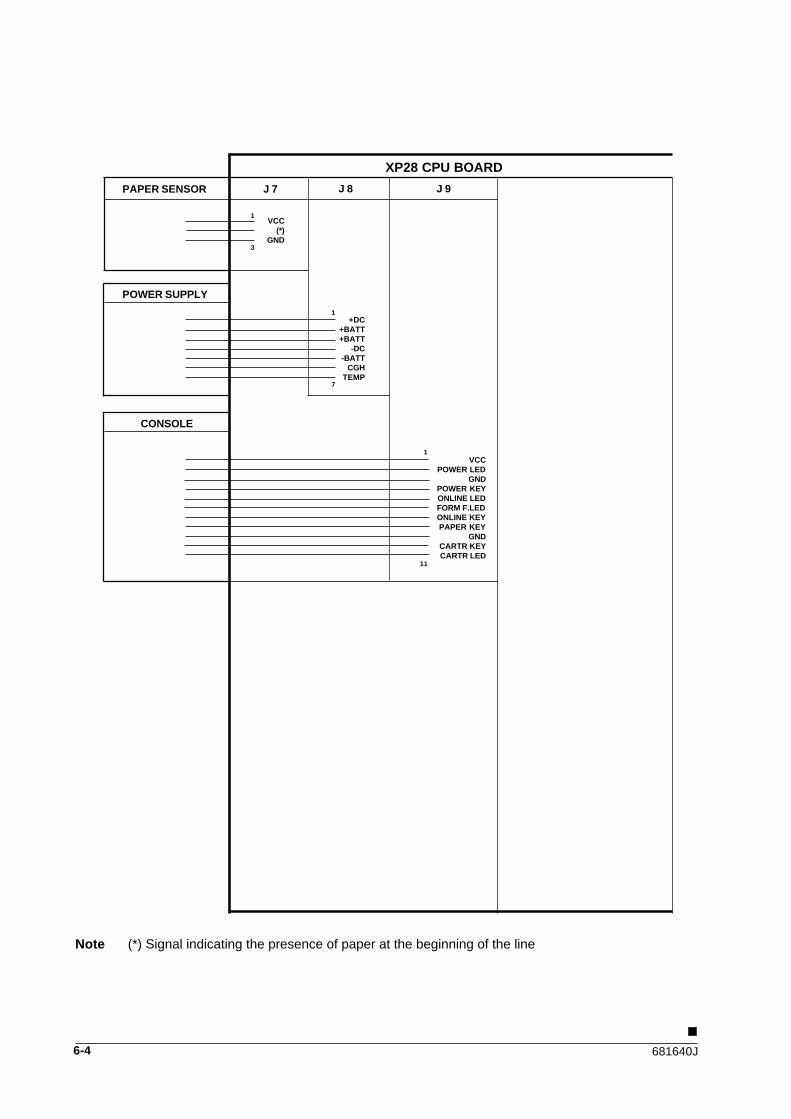
VCC(*)
GND
POWER SUPPLY
1
3
XP28 CPU BOARD
PAPER SENSOR J 7 J 8
1
7
+DC+BATT+BATT
-DC-BATT
CGHTEMP
CONSOLE
1
11
VCCPOWER LED
GNDPOWER KEYONLINE LEDFORM F.LEDONLINE KEYPAPER KEY
GNDCARTR KEYCARTR LED
J 9
Note (*) Signal indicating the presence of paper at the beginning of the line
7-1681640J JP 90 - Service Manual
7. MAINTENANCE
7.1 CLEANING THE PRINT HEAD AND NOZZLES
A print head initialization is performed periodically during printer operation. This operation consists ofcleaning the print head nozzles to make sure that the ink flows freely.
If the print quality is still unacceptable even after the automatic cleaning of the nozzles, remove the printhead and clean it as follows:
- Press the CARRIAGE key to move the print head carriage to the print head installation position.
- Lift the top cover, release and remove the print head.
- Clean the electrical contacts on the print head and in its slot using a lint-free damp cloth and avoiding totouch the nozzles.
- Reinsert the print head into the printer, close the printer top cover and press the CARTRIDGE key to returnthe carriage to its parking position.
If the print quality does not improve, try cleaning the nozzles on the print head.
Proceed as follows to clean the nozzles:
- Dampen a cloth with distilled water and then wring the cloth to get rid of any excess water.
- Remove the print head from the printer.
- Holding the print head with the nozzles facing downwards, slide it on the cloth while pressing gently.
- Repeat this action a few times on different sections of the cloth to clean the nozzles.
- Reinsert the print head back into the printer and run a print test for a quality check.
Note: The cleaning of the nozzles must not be systematically repeated since it damages the print head;this operation must only be carried out as last resort before replacing the print head.
.


8-1681640J JP 90 - Service Manual
8. DISASSEMBLY/REASSEMBLY PROCEDURES
8.1 PRELIMINARY WARNINGS
TO ENSURE MAXIMUM SAFETY, POWER OFF THE PRINTER AND UNPLUG IT FROM THEELECTRICAL OUTLET BEFORE BEGINNING ANY OPERATION.
ALL OPERATIONS MUST BE CARRIED OUT IN A CLEAN AND CLEAR AREA.
MAKE SURE THE PRINT HEAD IS IN ITS PARKING POSITION BEFORE POWERING OFFTHE PRINTER.
WHEN REMOVING THE PRINT HEAD FROM THE PRINTER, NEVER RESET IT ON ITSELECTRIC CONTACTS NOR ON THE NOZZLES; NEVER TOUCH THESE PARTS.
NO ADJUSTMENTS NEED TO BE MADE TO THE PARTS AFTER THEIR DISASSEMBLY/REASSEMBLY. TO REASSEMBLE THE PARTS FOLLOW THEIR DISASSEMBLYPROCEDURES IN REVERSE ORDER. MAKE SURE ALL THE CONNECTORS ARE FITTEDPROPERLY
WHEN FINISHED, TEST THE PRINTER TO MAKE SURE THAT THE FAULT IS CORRECTED.
8-2 681640J
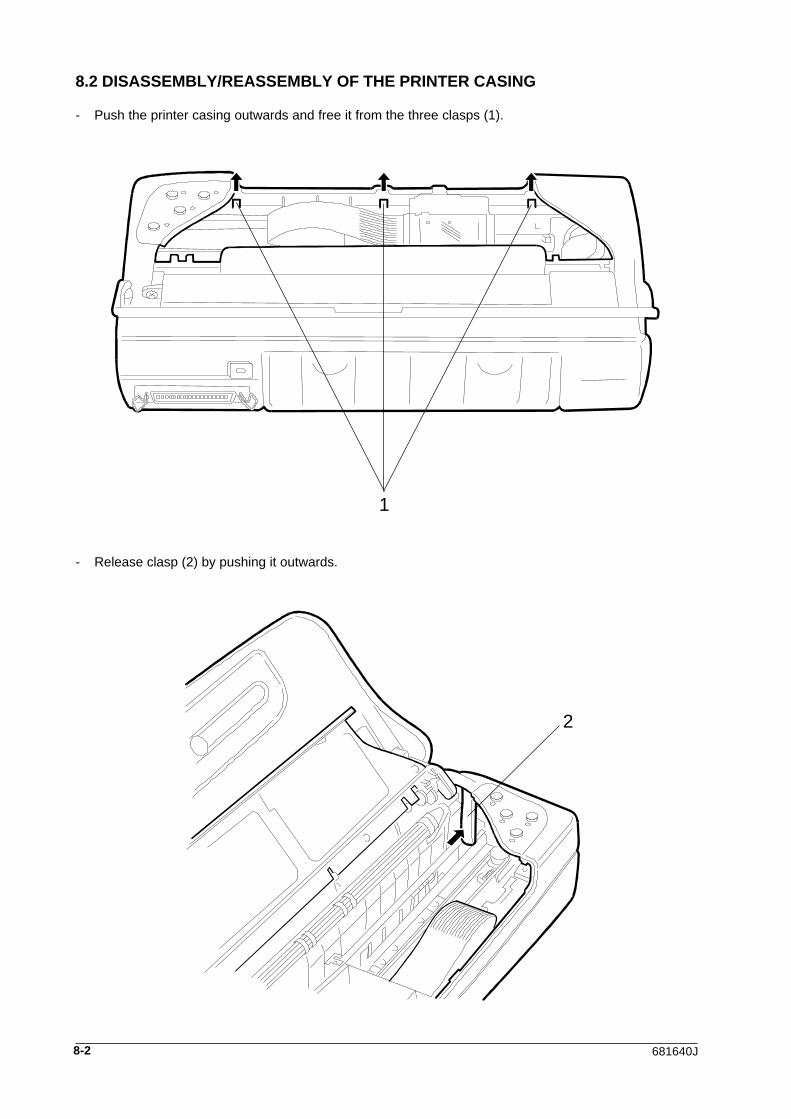
8.2 DISASSEMBLY/REASSEMBLY OF THE PRINTER CASING
- Push the printer casing outwards and free it from the three clasps (1).
- Release clasp (2) by pushing it outwards.
2
1
8-3681640J JP 90 - Service Manual
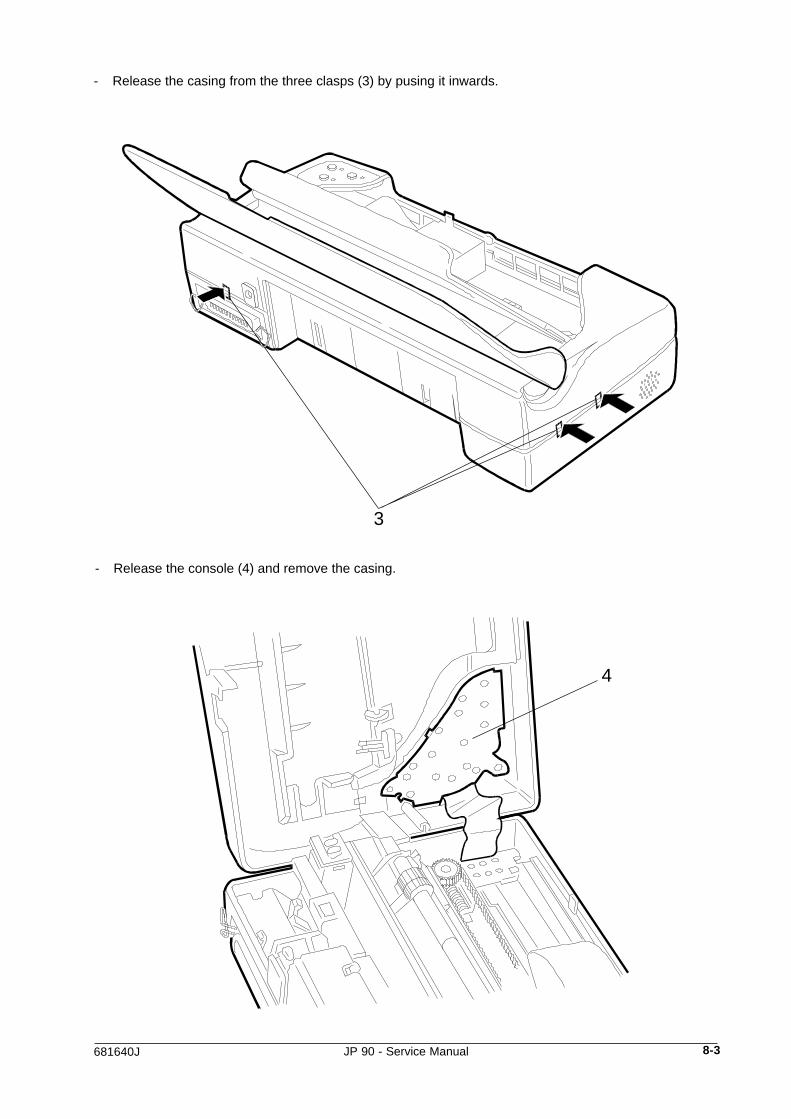
- Release the casing from the three clasps (3) by pusing it inwards.
3
- Release the console (4) and remove the casing.
4
8-4 681640J
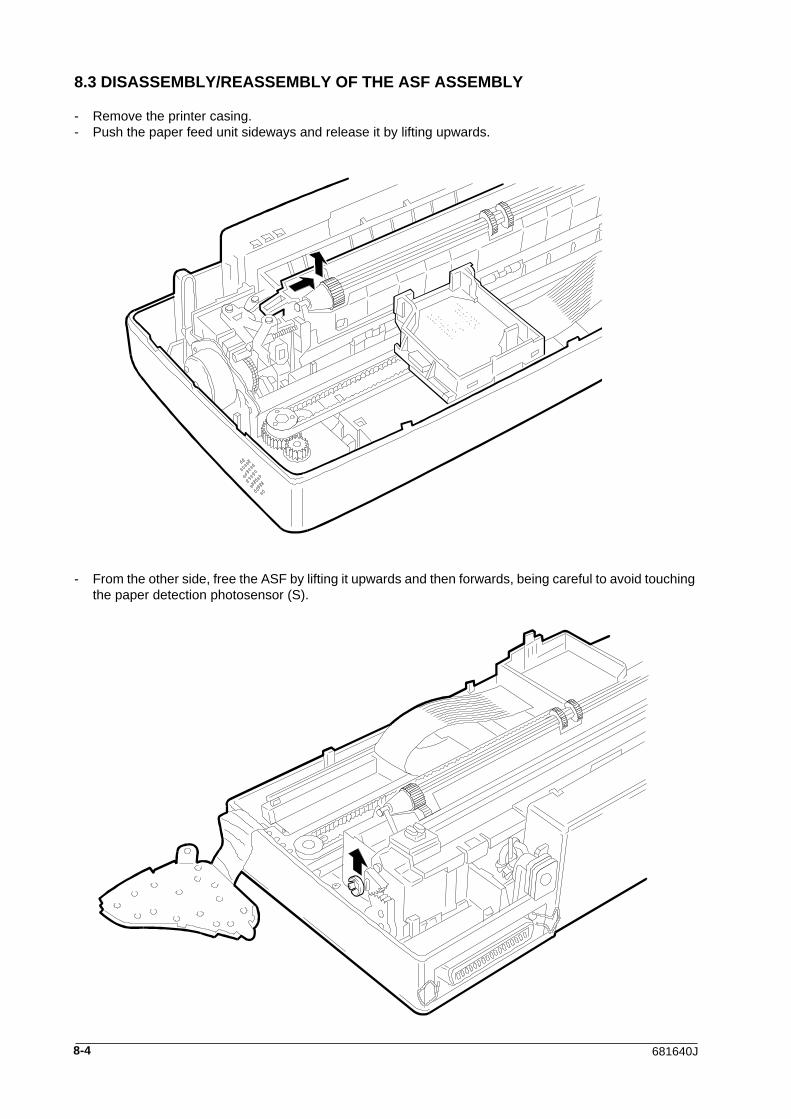
8.3 DISASSEMBLY/REASSEMBLY OF THE ASF ASSEMBLY
- Remove the printer casing.- Push the paper feed unit sideways and release it by lifting upwards.
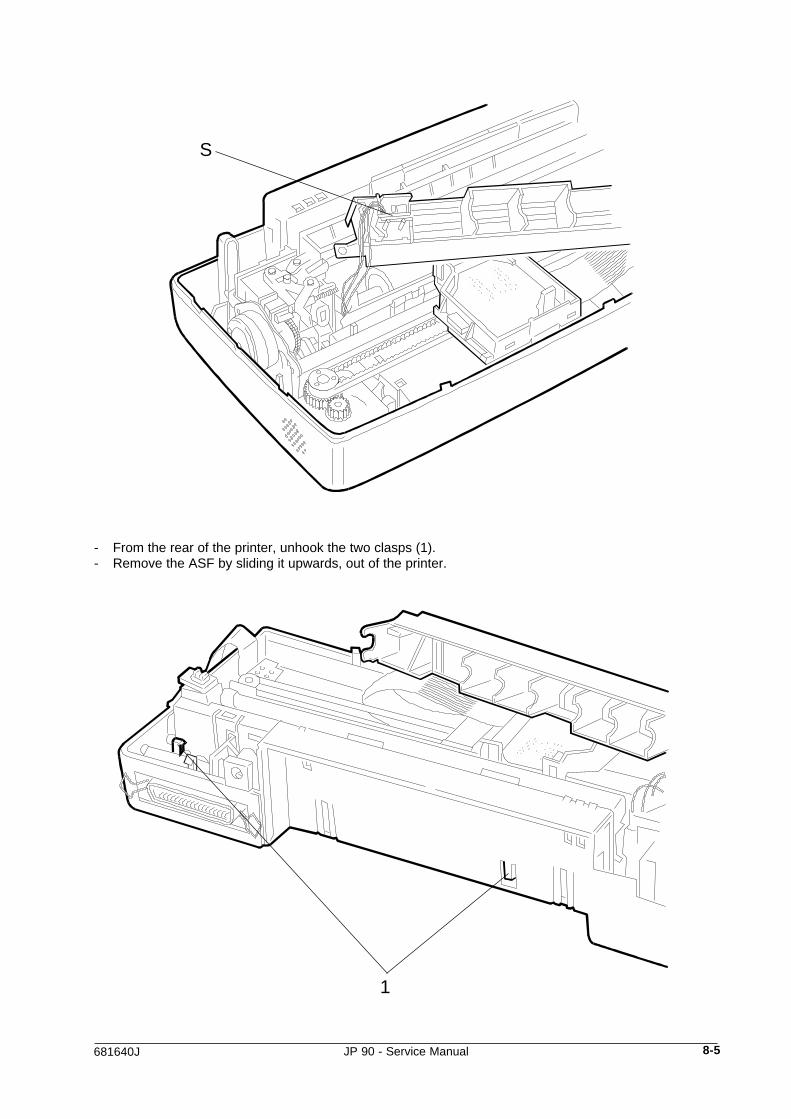
- From the other side, free the ASF by lifting it upwards and then forwards, being careful to avoid touchingthe paper detection photosensor (S).
8-5681640J JP 90 - Service Manual
S
- From the rear of the printer, unhook the two clasps (1).- Remove the ASF by sliding it upwards, out of the printer.
1
8-6 681640J
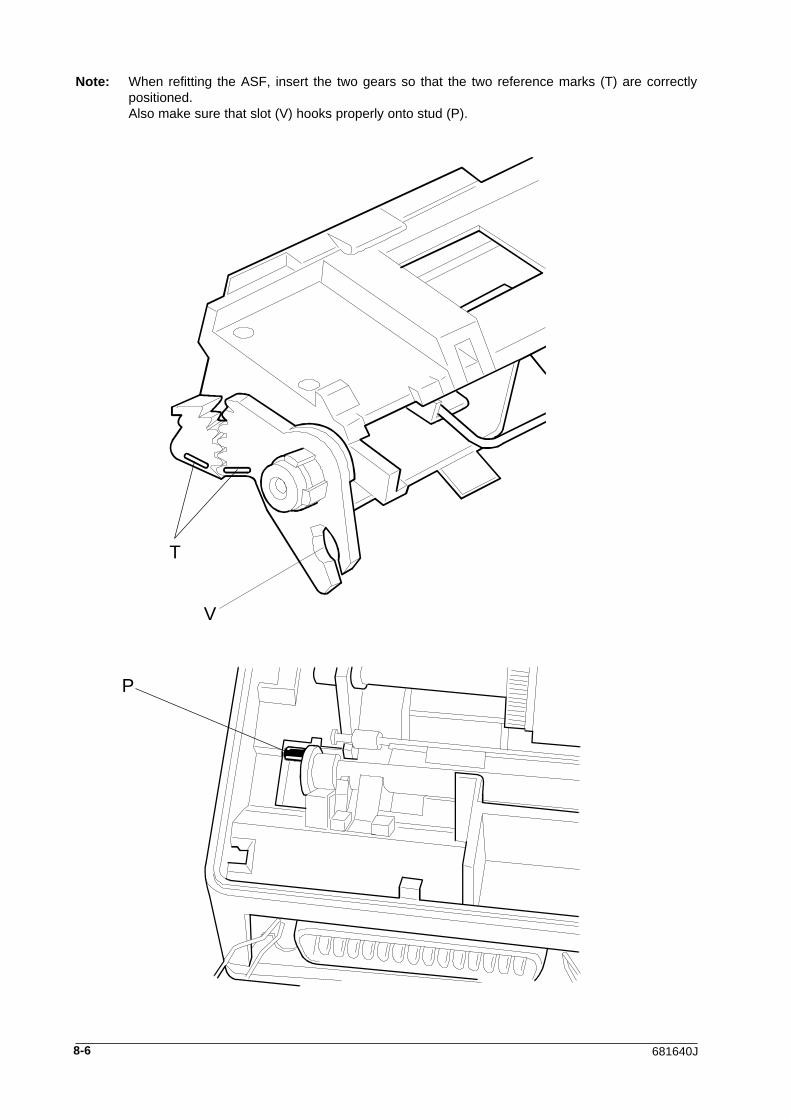
Note: When refitting the ASF, insert the two gears so that the two reference marks (T) are correctlypositioned.Also make sure that slot (V) hooks properly onto stud (P).
T
V
P
8-7681640J JP 90 - Service Manual
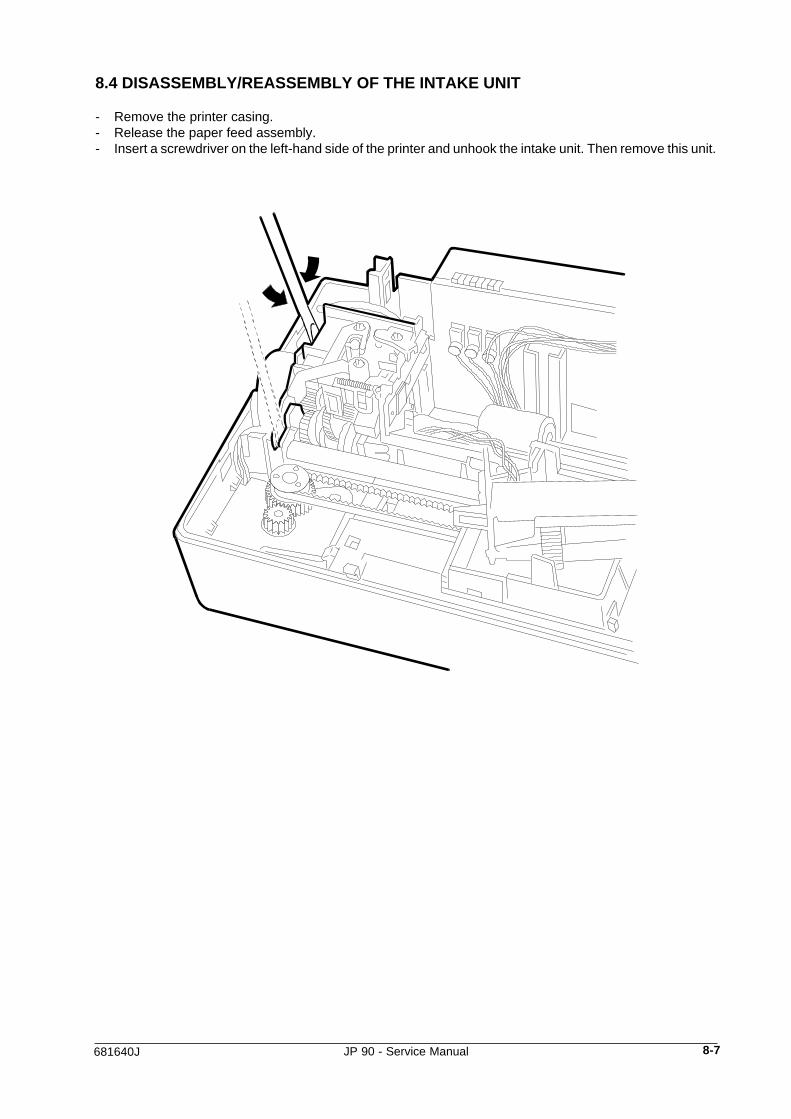
8.4 DISASSEMBLY/REASSEMBLY OF THE INTAKE UNIT
- Remove the printer casing.- Release the paper feed assembly.- Insert a screwdriver on the left-hand side of the printer and unhook the intake unit. Then remove this unit.

8-8 681640J
8.5 DISASSEMBLY/REASSEMBLY OF THE PAPER FEED SHAFT
- Remove the printer casing.- Release the paper feed assembly.- Remove the ASF.- Remove the intake unit.- Using a screwdriver, slide the bushing studs on both sides from their slots.- Turn the bushings and remove the shaft.
8-9681640J JP 90 - Service Manual
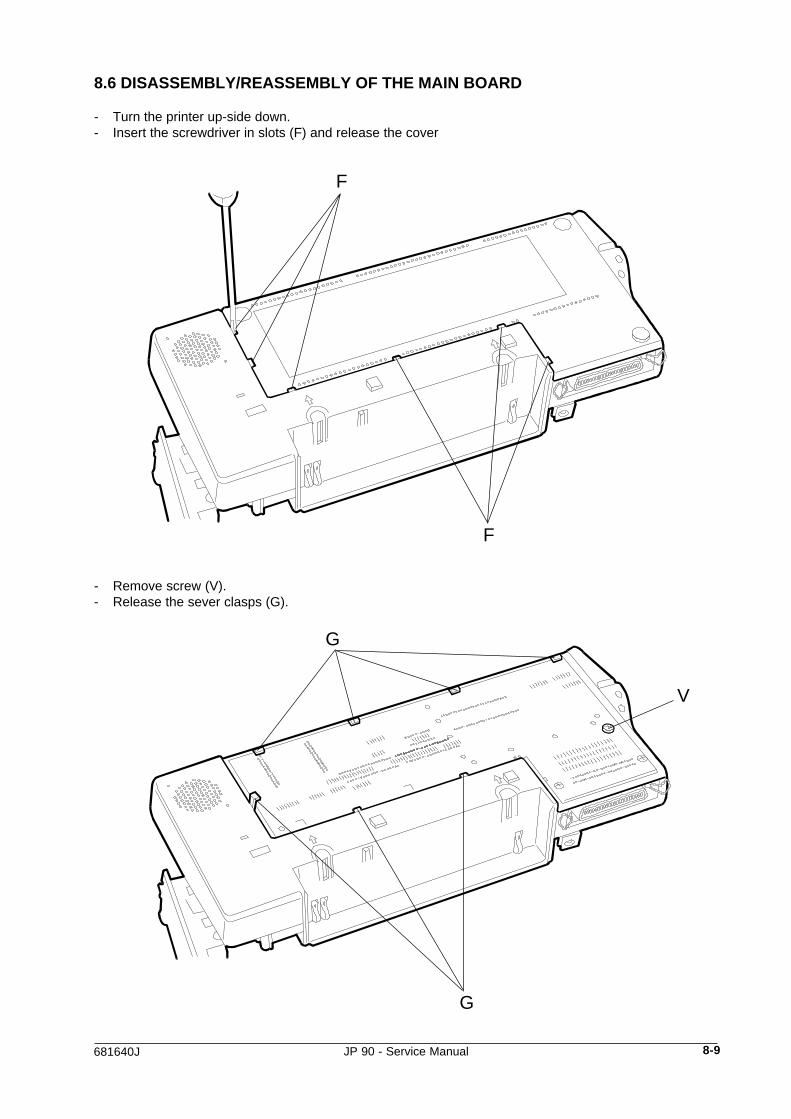
8.6 DISASSEMBLY/REASSEMBLY OF THE MAIN BOARD
- Turn the printer up-side down.- Insert the screwdriver in slots (F) and release the cover
- Remove screw (V).- Release the sever clasps (G).
F
F
G
G
V
8-10 681640J
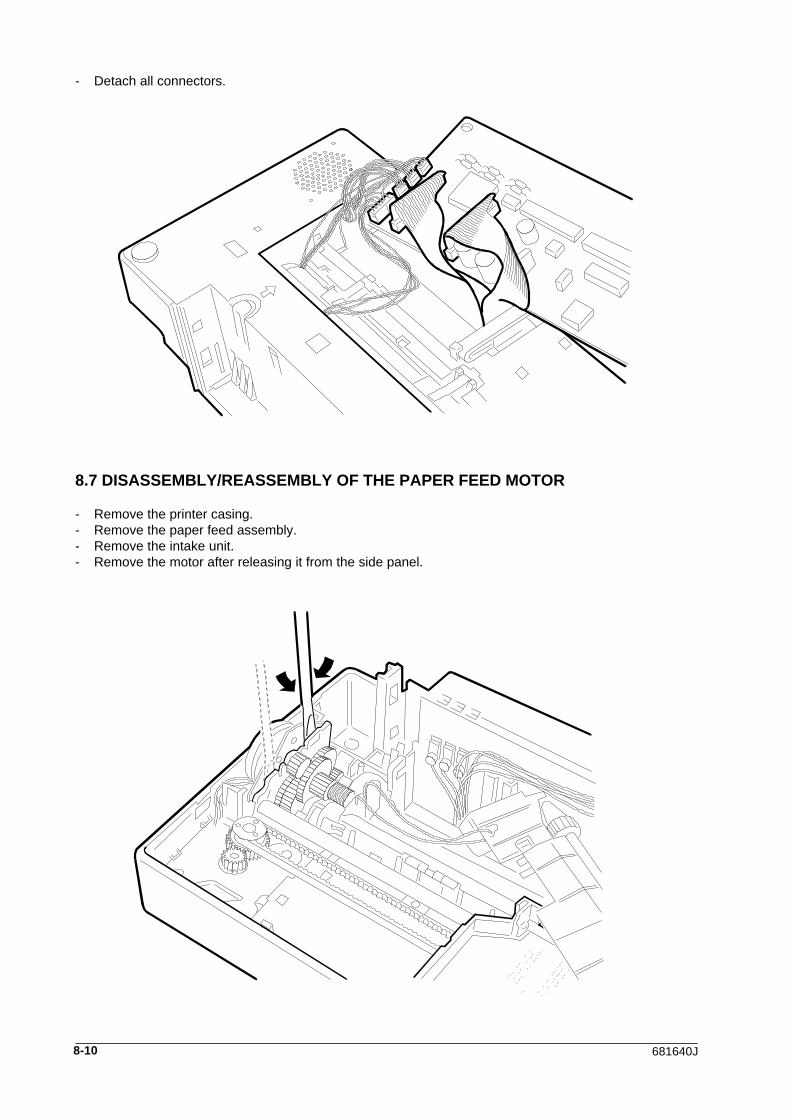
- Detach all connectors.
8.7 DISASSEMBLY/REASSEMBLY OF THE PAPER FEED MOTOR
- Remove the printer casing.- Remove the paper feed assembly.- Remove the intake unit.- Remove the motor after releasing it from the side panel.
8-11681640J JP 90 - Service Manual
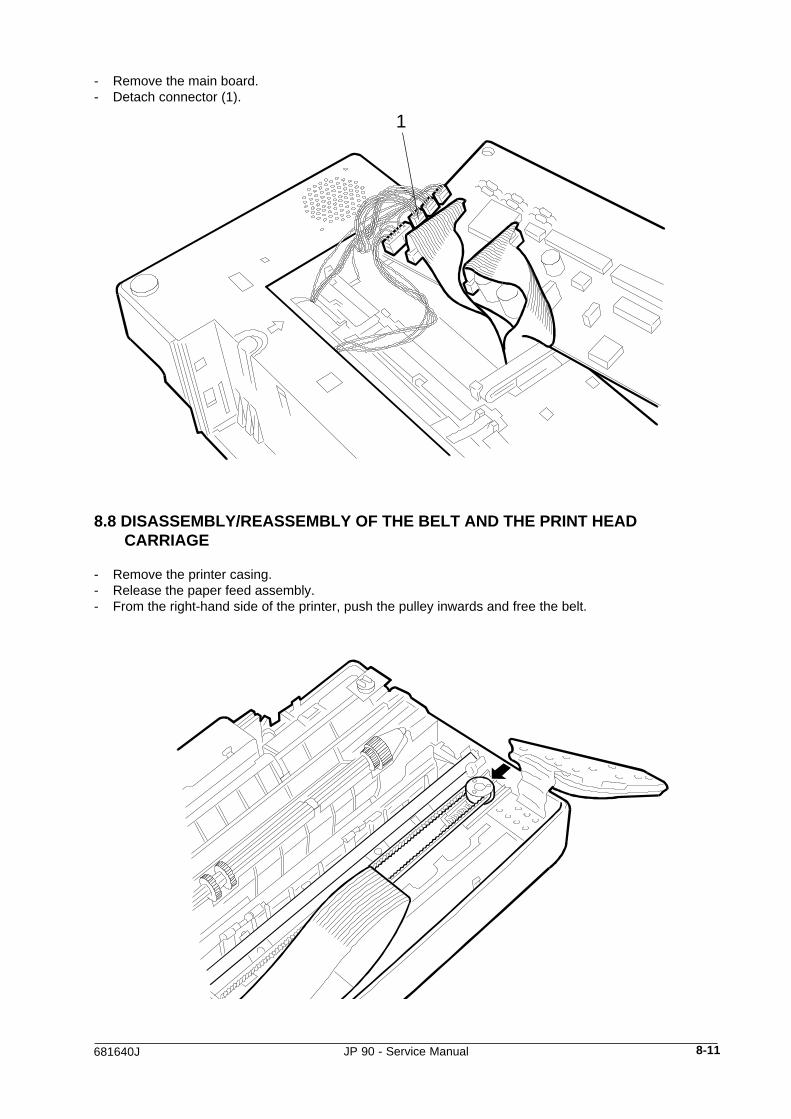
- Remove the main board.- Detach connector (1).
1
8.8 DISASSEMBLY/REASSEMBLY OF THE BELT AND THE PRINT HEADCARRIAGE
- Remove the printer casing.- Release the paper feed assembly.- From the right-hand side of the printer, push the pulley inwards and free the belt.
8-12 681640J
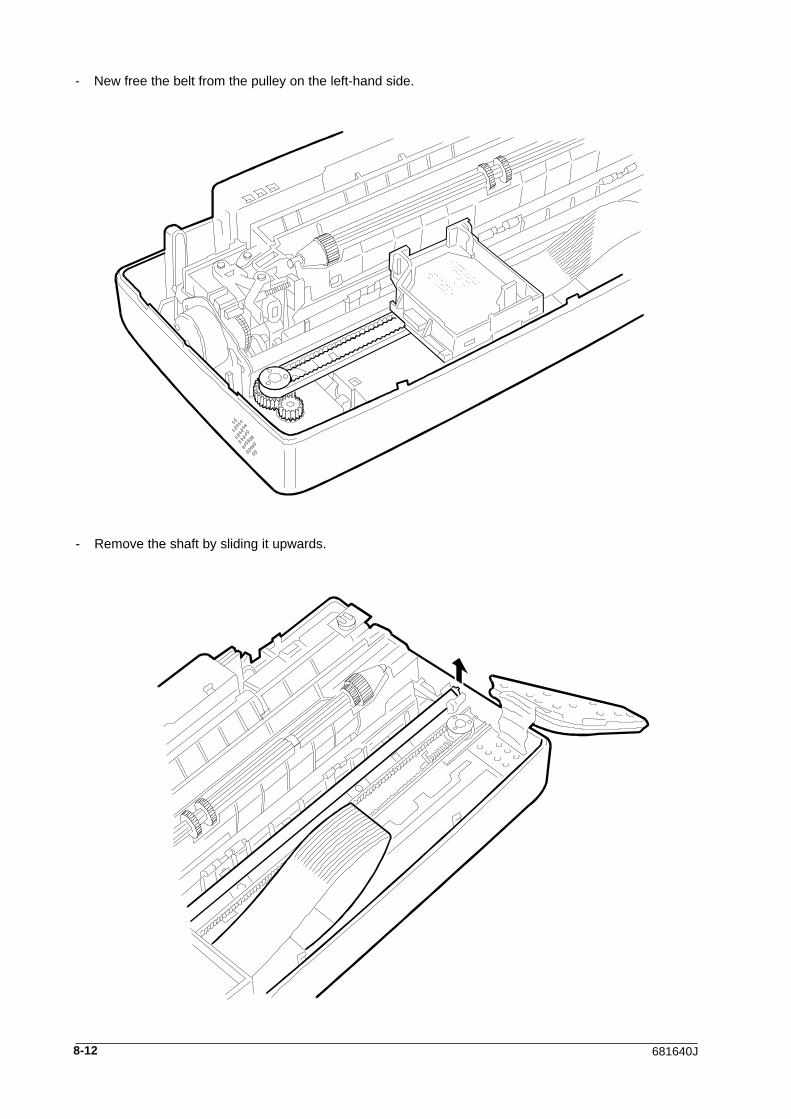
- New free the belt from the pulley on the left-hand side.
- Remove the shaft by sliding it upwards.
8-13681640J JP 90 - Service Manual
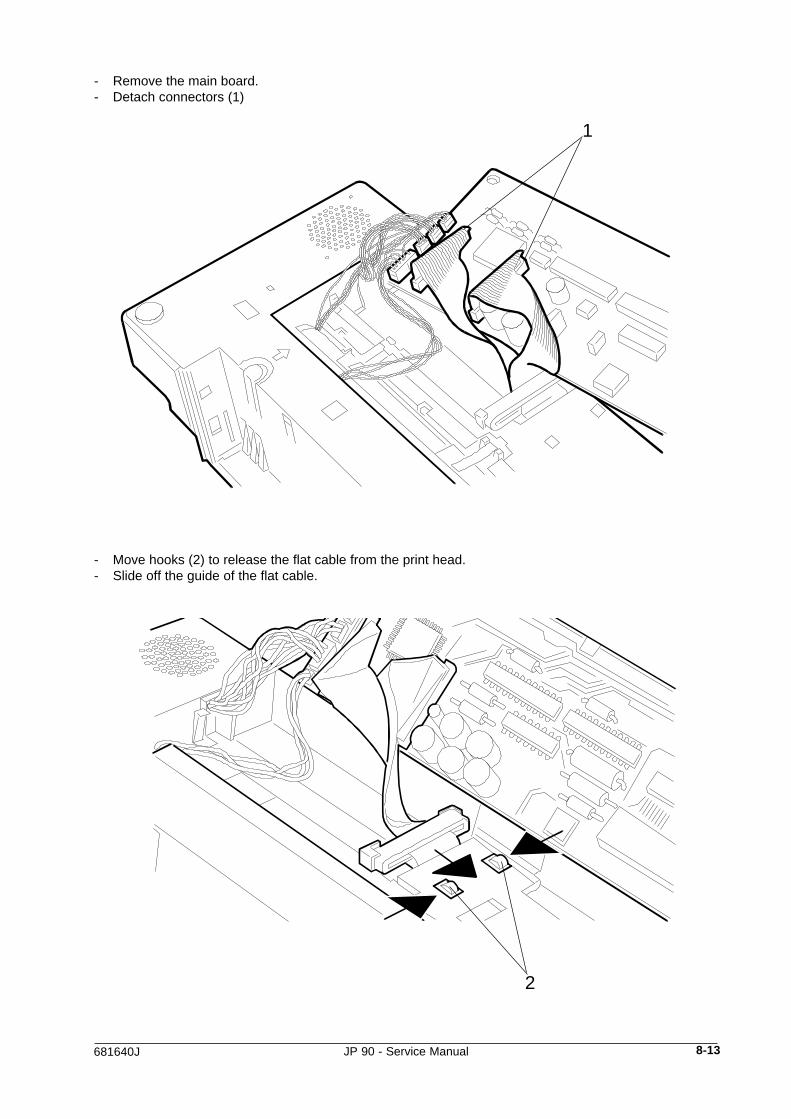
- Remove the main board.- Detach connectors (1)
- Move hooks (2) to release the flat cable from the print head.- Slide off the guide of the flat cable.
1
2
8-14 681640J
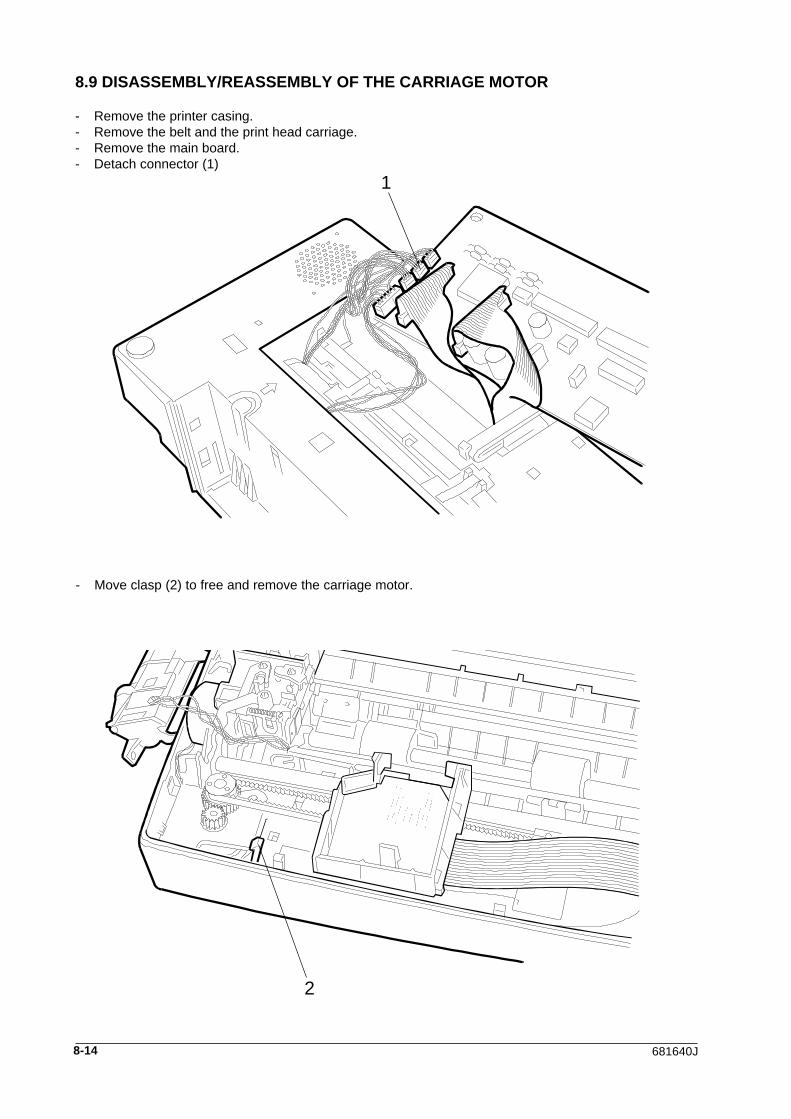
8.9 DISASSEMBLY/REASSEMBLY OF THE CARRIAGE MOTOR
- Remove the printer casing.- Remove the belt and the print head carriage.- Remove the main board.- Detach connector (1)
- Move clasp (2) to free and remove the carriage motor.
1
2
8-15681640J JP 90 - Service Manual
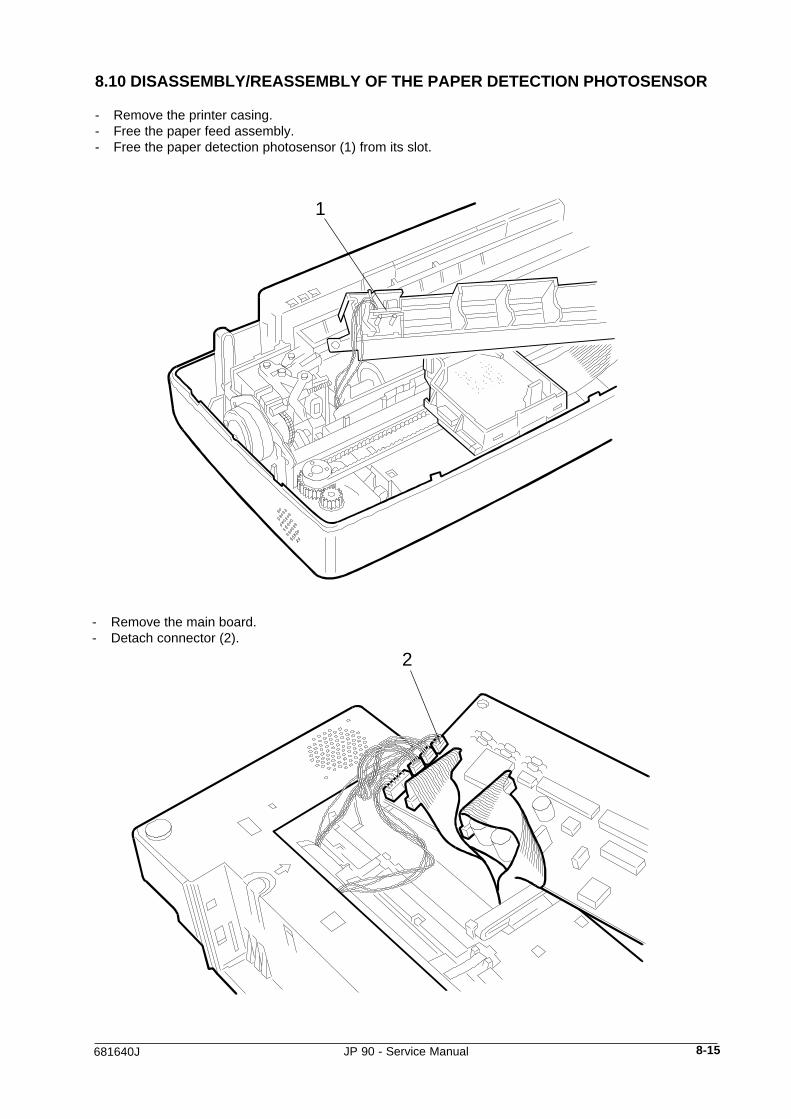
8.10 DISASSEMBLY/REASSEMBLY OF THE PAPER DETECTION PHOTOSENSOR
- Remove the printer casing.- Free the paper feed assembly.- Free the paper detection photosensor (1) from its slot.
- Remove the main board.- Detach connector (2).
1
2
8-16 681640J
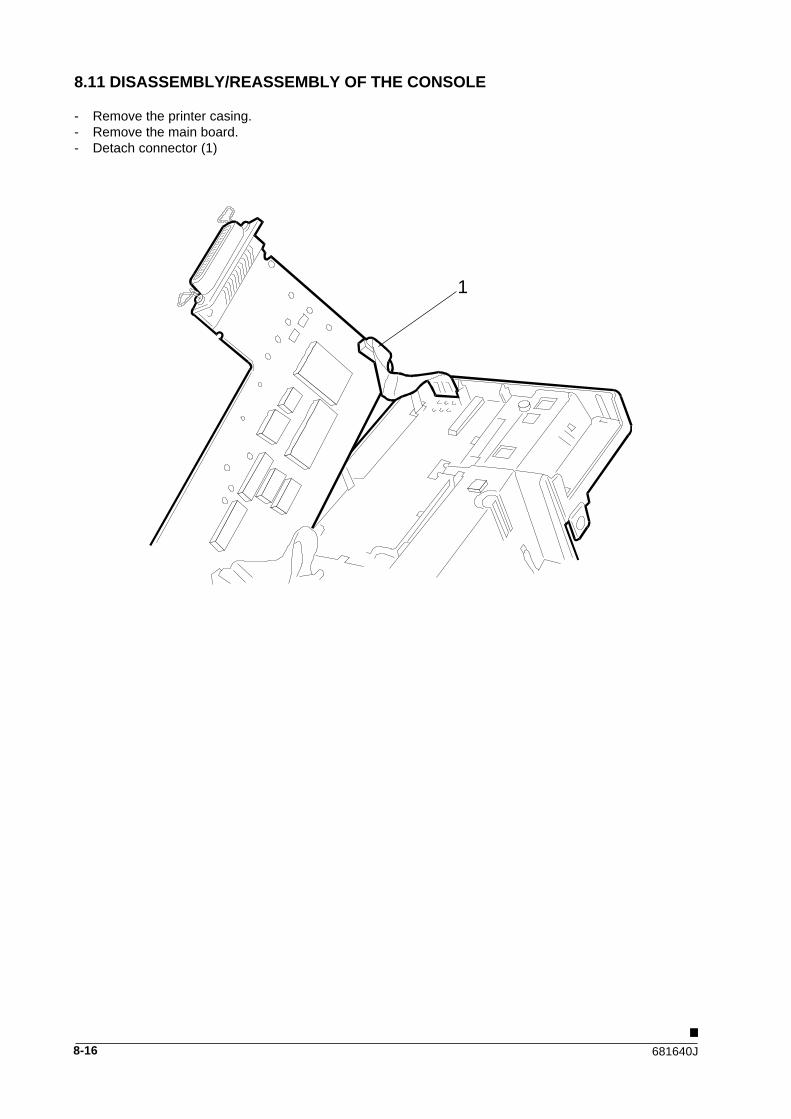
8.11 DISASSEMBLY/REASSEMBLY OF THE CONSOLE
- Remove the printer casing.- Remove the main board.- Detach connector (1)
1
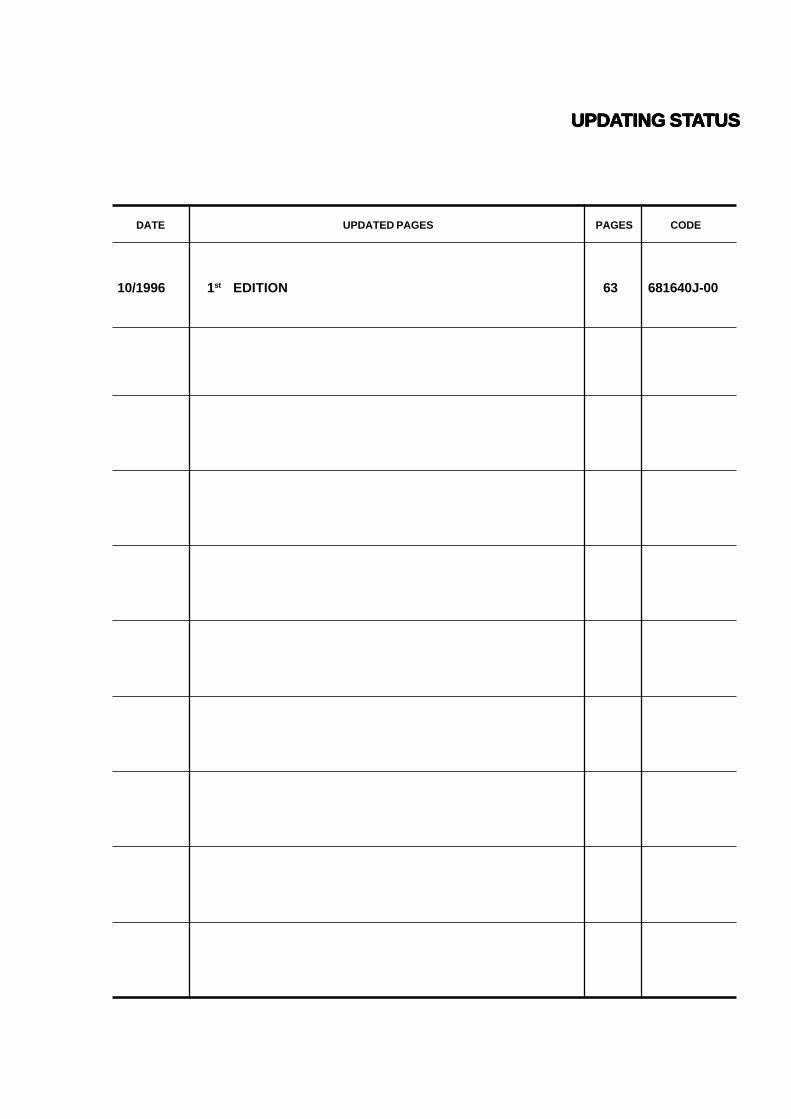
UPDUPDUPDUPDUPDAAAAATING STTING STTING STTING STTING STAAAAATUSTUSTUSTUSTUS
DATE UPDATED PAGES PAGES CODE
10/1996 1st EDITION 63 681640J-00
Related Documents