F D GB NL I E PL P DK CZ Montageanleitung Crosstrainer „CROSS P”; „CURO P“; „CRONOS P““ Art.-Nr. 07648-9X0 Abb. ähnlich Auf 100% Altpapier gedruckt! 30 – 45 Min. A 150 cm B 67,5 cm C 169 cm 57 kg max. 130 kg A C B

Welcome message from author
This document is posted to help you gain knowledge. Please leave a comment to let me know what you think about it! Share it to your friends and learn new things together.
Transcript
F
D
GB
NL
I
E
PL
P
DK
CZ
Montageanleitung Crosstrainer „CROSS P”; „CURO P“; „CRONOS P““
Art.-Nr. 07648-9X0
Abb. ähnlichAuf 100% Altpapier gedruckt!
30 – 45 Min.
A 150 cmB 67,5 cmC 169 cm
57 kg max.130 kg
A
C
B
Please read these instructions carefully prior to carrying out assembly and using for the first time. They containinformation which is important for your safety as well as for the use and maintenance of the appliance. Keep theseinstructions in a safe place for reference purposes, maintenance work and to assist you when ordering spare parts.
For Your SafetyRISK! While assembly of the product keep off children’s reach
(Choking hazard - contains small parts).RISK! Any other use of the equipment is prohibited and may
be dangerous. The manufacturer cannot be held liable fordamage or injury caused by improper use of the equipment.RISK! Instruct people using the equipment (in particular children)
on possible sources of danger during exercising.RISK! Incorrect repairs and structural modifications (e.g. removal
or replacement of original parts) may endanger the safety of theuser.RISK! Heart rate monitoring systems may be inaccurate. Overexercise may result in serious injury or death. If you feel faintstop exercising immediately.WARNING! The training device should be used only for its
intended purpose, i.e. for physical exercise by adult people.WARNING! Before beginning your program of training, study
the instructions for training carefully.WARNING! Any interference with parts of the product that arenot described within the manual may cause damage, or endangerthe person using this machine. Extensive repairs must only becarried out by KETTLER service staff or qualified personnel trainedby KETTLER.
• The training device has been designed in accordance with thelatest standards of safety. Any features which may have been apossible cause of injury have been avoided or made as safe aspossible.
• The training device corresponds with DIN EN 957 -1/-9, classHB. It is therefore unsuitable for therapeutic use.
• In case of enquiry, please contact your KETTLER dealer.• If the equipment is in regular use, check all its components tho-roughly every 1–2 months. Pay particular attention to the tightnessof bolts and nuts. This is particularly true for the attachment ofgrip strap, running plate and fastening of the handlebar and fronttube.
• Before beginning your program of exercise, consult your doctorto ensure that you are fit enough to use the equipment.
!
!
!
!
!
!
!
! Base your program of exercise on the advice given by your doctor.Incorrect or excessive exercise may damage your health!
• Before use, always check all screws and plug-in connections aswell as respective safety devices fit correctly.
• Always wear suitable shoes when using.• Our products are subject to a constant innovative quality assu-
rance. We reserve the right to perform technical modifications.• In choosing the location of the apparatus, ensure a sufficient safety
distance from any obstacles. The apparatus must not be mountedin the immediate vicinity of main passageways (paths, doorways,corridors).
• Always observe the general safety rules and precautions forworking with electrical equipment.
• All electric appliances emit electromagnetic radiation when inoperation. Please do not leave especially radiation-intensiveappliances (e.g. mobile telephones) directly next to the cockpitor the electronic controlsystem as otherwise values displayed mightbe distorted (e.g. pulse measurement.
• The product is not suitable for use by persons weighing over 130kg.
• Nobody may be in the moving range of a training person duringtraining
• This exercise machine may only be used for exercises indicatedin the training instructions.
• The surface on which the unit is placed must be firm and even.Place rubber or straw mats under it to deaden any noise orimpacts. Only for appliances with weights. Avoid powerful oscil-lations of the dumbbells!
• When mounting the product please take the recommendedtorque information into account (M = xx Nm).
Instructions for AssemblyRISK Ensure that your working area is free of possible sources
of danger, for example don’t leave any tools lying around.Always dispose packaging material in such a way that it maynot cause any danger. There is always a risk of suffocation ifchildren play with plastic bags!WARNING! Please note that there is always a danger of
injury when working with tools or doing manual work. The-refore please be careful when assembling this machine.
• Ensure that you have received all the parts required (see checklist) and that they are undamaged. Should you have any causefor complaint, please contact your KETTLER dealer.
• Before assembling the equipment, study the drawings carefullyand carry out the operations in the order shown by the diagrams.The correct sequence is given in capital letters.
• The equipment must be assembled with due care by an adult
!
! person. If in doubt call upon the help of a second person, if pos-sible technically talented.
• The fastening material required for each assembly step is shownin the diagram inset. Use the fastening material exactly asinstructed. The required tools are supplied with the equipment.
• Bolt all the parts together loosely at first, and check that they havebeen assembled correctly. Tighten the locknuts by hand until resis-tance is felt, then use spanner to finally tighten nuts completelyagainst resistance (locking device). Then check that all screw con-nections have been tightened firmly. Attention: once locknuts havebeen unscrewed they no longer function correctly (the lockingdevice is destroyed), and must be replaced.
• For technical reasons, we reserve the right to carry out preliminaryassembly work (e.g. addition of tubing plugs).
Important InstructionsGB
4
Handling the equipment• Before using the equipment for exercise, check carefully to
ensure that it has been correctly assembled.• It is not recommended to use or store the apparatus in a damp
room as this may cause it to rust. Please ensure that no part ofthe machine comes in contact with liquids (drinks, perspirationetc.). This may cause corrosion.
• The machine is designed for use by adults and children shouldnot be allowed to play with it. Children at play behave unpre-dictably and dangerous situations may occur for which themanufacturer cannot be held liable. If, in spite of this, childrenare allowed to use the equipment, ensure that they are instructedin its proper use and supervised accordingly.
• This device is an RPM-independent training device.• A slight production of noise at the bearing of the centrifugal mass
is due to the construction and has no negative effect upon ope-ration. Possibly occurring noise during reverse pedalling resultfrom engineering and are absolutely safe.
• The training device has a magnetic brake system.• To operate correctly, the pulse function requires a minimum
voltage of 2,7 volts (only for computers working with batteries).
• Before beginning your first training session, familiarize yourselfthoroughly with all the functions and settings of the unit.
Care and maintenance• Damaged components may endanger your safety or reduce the
lifetime of the equipment. For this reason, worn or damaged partsshould be replaced immediately and the equipment taken out ofuse until this has been done. Use only original KETTLER spareparts.
• To ensure that the safety level is kept to the highest possiblestandard, determined by its construction, this product should beserviced regulary (once a year) by specialist retailers.
• Use for your regular cleaning, maintenance and care ourappliance maintenance set (Article no. 07921-000) specificallylicensed for KETTLER Sports apparatus and available from theSport specialized trade.
• Please ensure that liquids or perspiration never enter the machineor the electronics.
List of spare parts page 30-31When ordering spare parts, always state the full article number,spare-partnumber, the quantity required and the S/N of the product(see handling).Example order: Art. no. 07648-800 / spare-part no. 68009100/ 1 pieces / S/N .................... Please keep original packagingof this article, so that it may be used for transport at a later date,if necessary.Goods may only be returned after prior arrangement and in(internal) packaging, which is safe for transportation, in the originalbox if possible. It is important to provide a detailed defect description/ damage report!Important: spare part prices do not include fastening material; iffastening material (bolts, nuts, washers etc.) is required, this shouldbe clearly stated on the order by adding the words „with fasteningmaterial“.
Waste DisposalKETTLER products are recyclable. At the end of its useful life pleasedispose of this article correctly and safely (local refuse sites).
KETTLER GB Ltd.Kettler House, Merse RoadNorth Moons Moat Redditch, Worcestershire B98 9HL
+44 1527 591901 +44 1527 62423www.kettler.co.uk Mail: [email protected]
KETTLER International Inc.1355 London Bridge Road +1 888 253 8853Virginia Beach, VA 23453 +1 888 222 9333
www.kettlerusa.com
GB
USA
GB
5
22
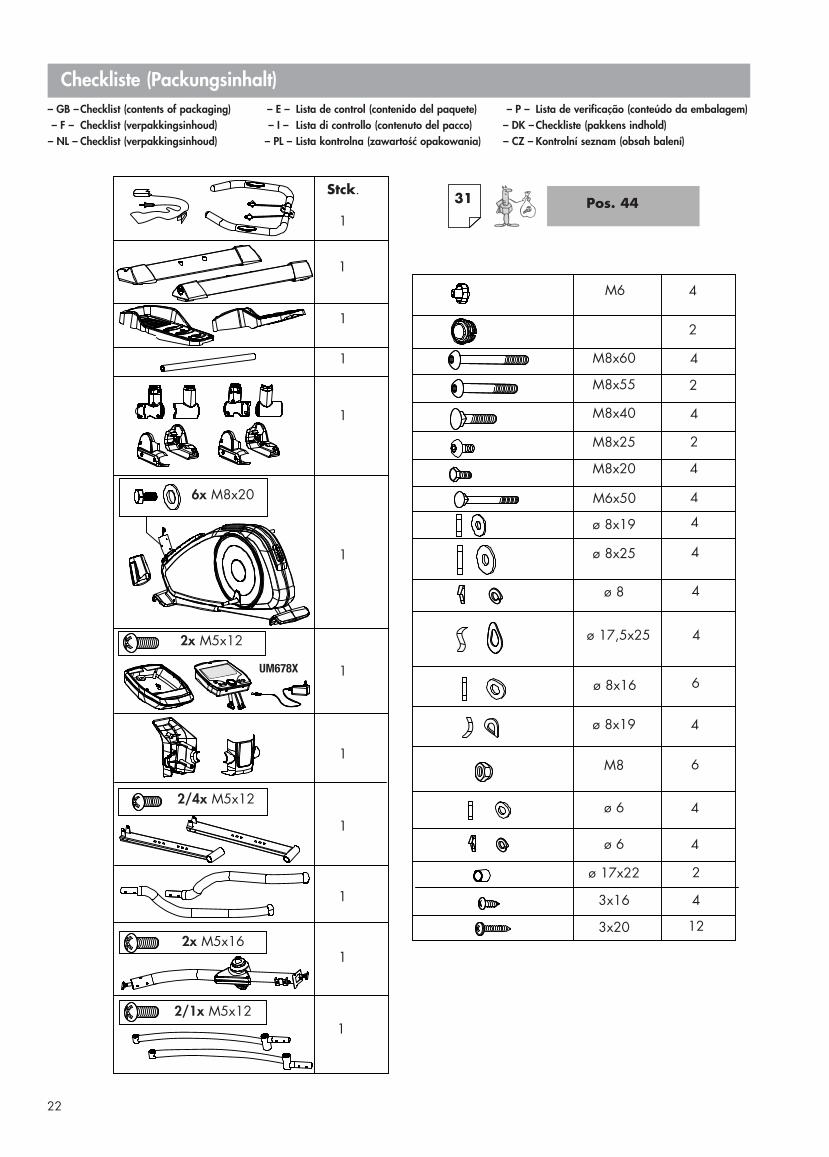
Checkliste (Packungsinhalt)– GB –Checklist (contents of packaging) – F – Checklist (verpakkingsinhoud)
– NL – Checklist (verpakkingsinhoud)
– E – Lista de control (contenido del paquete)– I – Lista di controllo (contenuto del pacco)
– PL – Lista kontrolna (zawartość opakowania)
– P – Lista de verificação (conteúdo da embalagem)– DK – Checkliste (pakkens indhold)– CZ – Kontrolní seznam (obsah balení)
4
Stck.31 Pos. 44
1
1
4
4
1
1
1
1
1
1
1
1
1
1
6
4
6M8
ø 17x22 2
4
12
3x16
3x20
M6
M8x60
M8x40
M8x25
M6x50
4ø 8x19
ø 17,5x25
ø 8
ø 8x25
ø 8x16
2
4
M8x55 2
4
4
6x M8x20
2/4x M5x12
2x M5x12
2/1x M5x12
2x M5x16
4ø 8x19
4ø 6
4ø 6
2
M8x20 4
UM678X
23
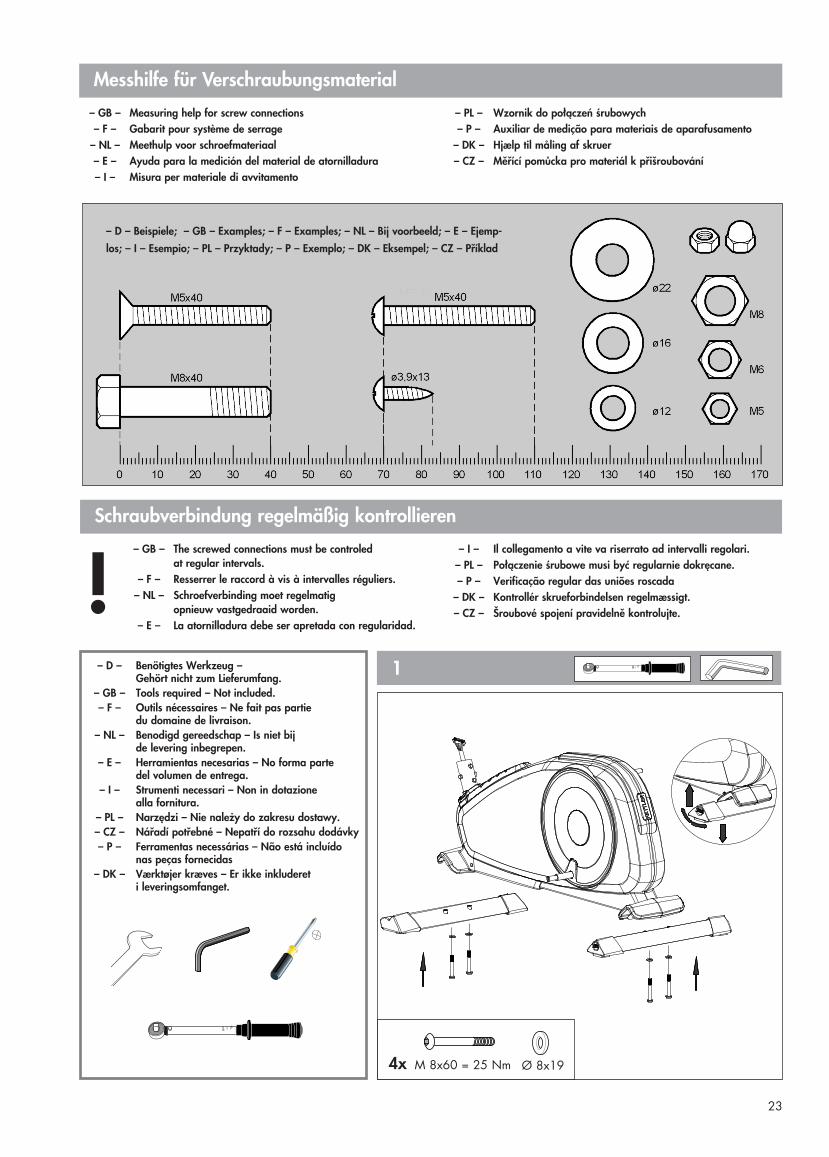
Messhilfe für Verschraubungsmaterial
– GB – Measuring help for screw connections– F – Gabarit pour système de serrage
– NL – Meethulp voor schroefmateriaal– E – Ayuda para la medición del material de atornilladura– I – Misura per materiale di avvitamento
– PL – Wzornik do połączeń śrubowych– P – Auxiliar de medição para materiais de aparafusamento
– DK – Hjælp til måling af skruer– CZ – Měřící pomůcka pro materiál k přišroubování
1
– D – Beispiele; – GB – Examples; – F – Examples; – NL – Bij voorbeeld; – E – Ejemp-los; – I – Esempio; – PL – Przyktady; – P – Exemplo; – DK – Eksempel; – CZ – Příklad
Schraubverbindung regelmäßig kontrollieren
– GB – The screwed connections must be controled at regular intervals.
– F – Resserrer le raccord à vis à intervalles réguliers.– NL – Schroefverbinding moet regelmatig
opnieuw vastgedraaid worden.– E – La atornilladura debe ser apretada con regularidad.
– I – Il collegamento a vite va riserrato ad intervalli regolari.– PL – Połączenie śrubowe musi być regularnie dokręcane.– P – Verificação regular das uniões roscada
– DK – Kontrollér skrueforbindelsen regelmæssigt.– CZ – Šroubové spojení pravidelně kontrolujte.!
Ø 8x19M 8x60 = 25 Nm4x
– D – Benötigtes Werkzeug –Gehört nicht zum Lieferumfang.
– GB – Tools required – Not included.– F – Outils nécessaires – Ne fait pas partie
du domaine de livraison. – NL – Benodigd gereedschap – Is niet bij
de levering inbegrepen.– E – Herramientas necesarias – No forma parte
del volumen de entrega.– I – Strumenti necessari – Non in dotazione
alla fornitura. – PL – Narzędzi – Nie należy do zakresu dostawy.– CZ – Nářadí potřebné – Nepatří do rozsahu dodávky– P – Ferramentas necessárias – Não está incluído
nas peças fornecidas– DK – Værktøjer kræves – Er ikke inkluderet
i leveringsomfanget.
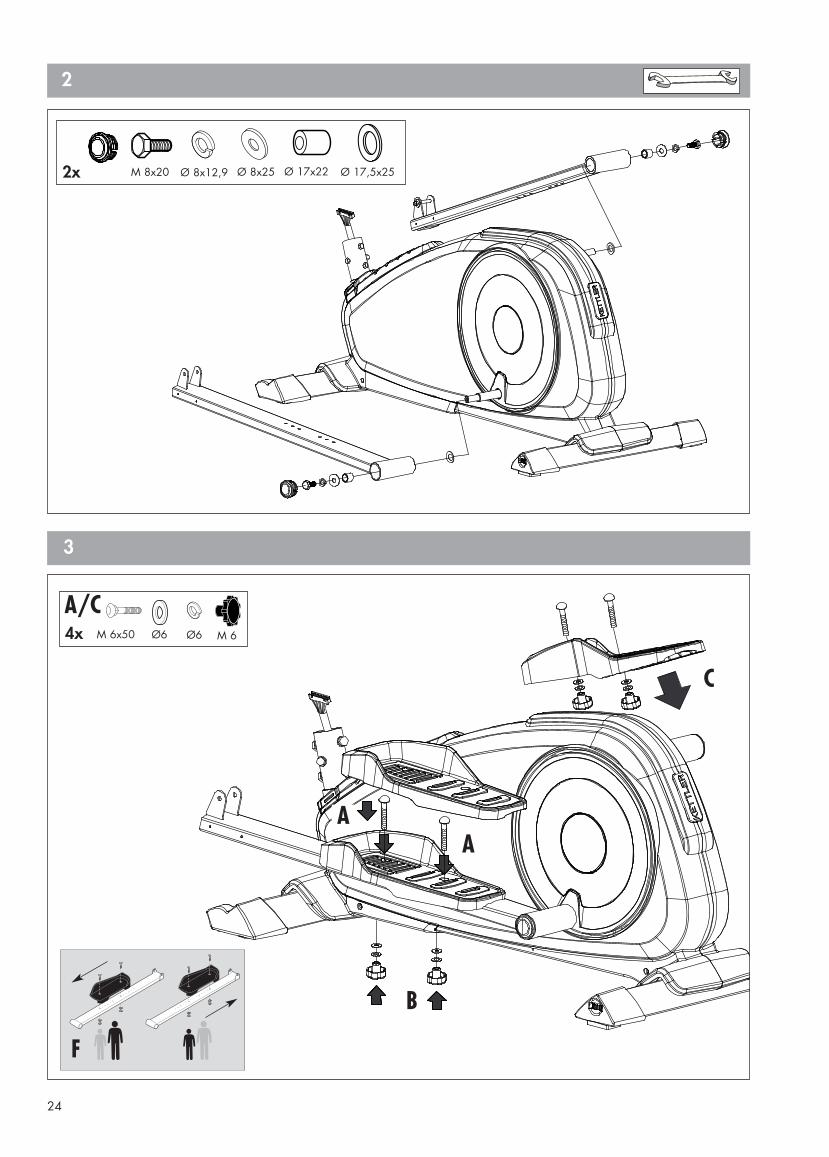
24
2
3
F
M 6x50 M 6Ø64x Ø6
A/C
AA
C
B
M 8x20 Ø 8x12,9 Ø 8x25 Ø 17x22 Ø 17,5x252x

25
4
6x Ø 8M 8x20 = 25 Nm
B C
AD
D
E A/D
5
AB
C
M 8x252x Ø 8
A
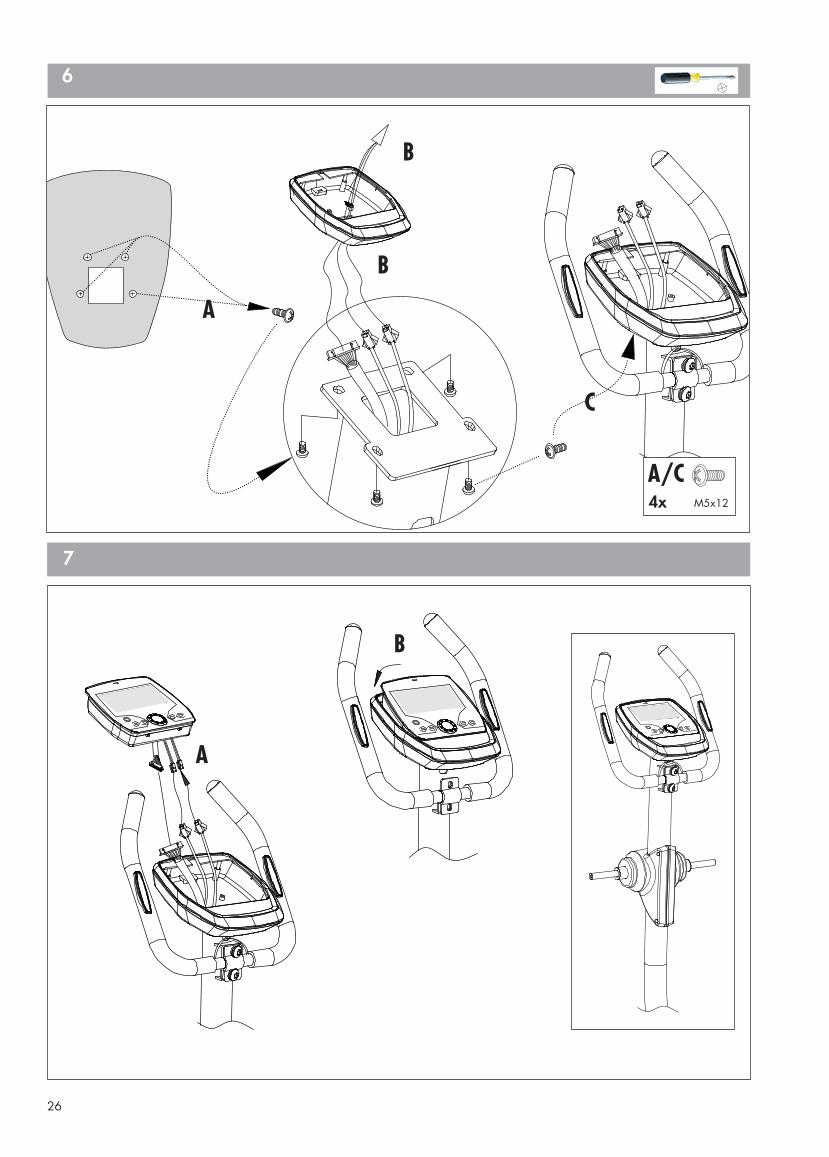
26
6
M5x124x
A
B
B
C
A/C
7
A
B
27
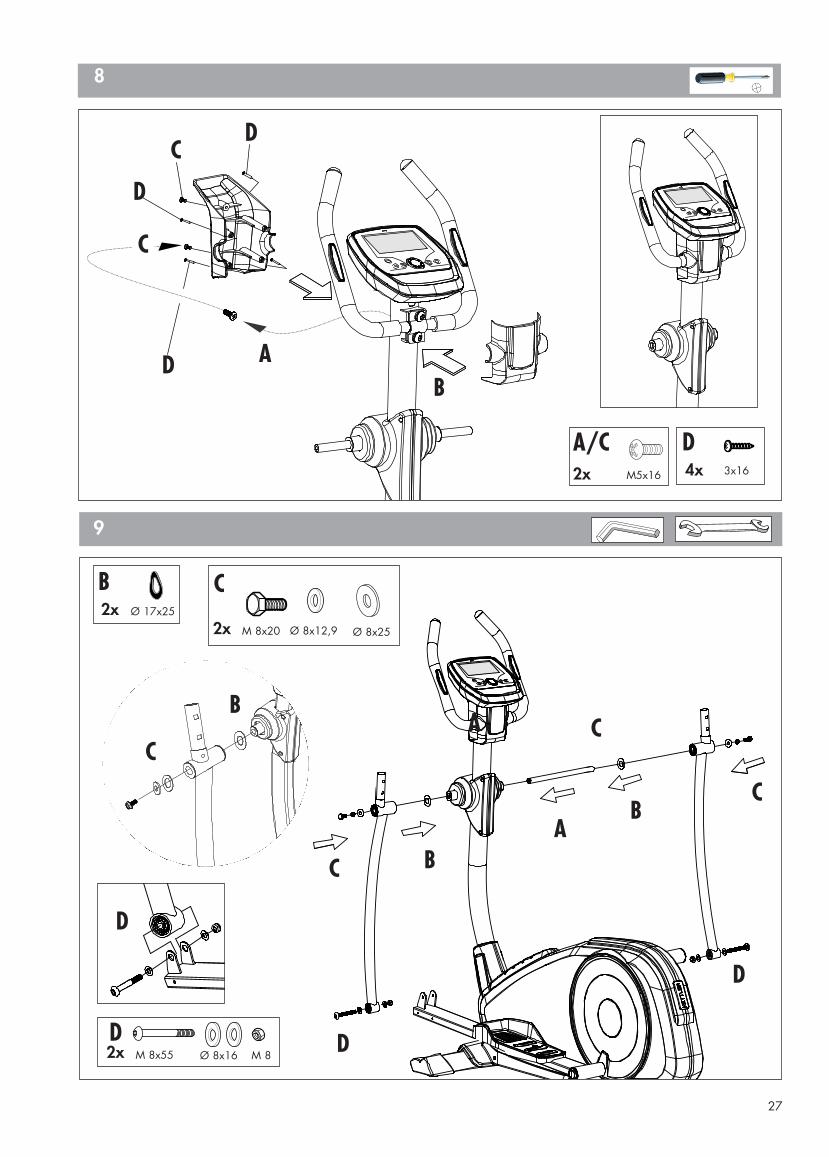
8
3x164xM5x162x
A
C
C
D
D
D
B
A/C D
9
A
C
D
D
D
B
C
M 8x20 Ø 8x12,92x2x Ø 17x25
AC
B
Ø 8x25
C
B
C
B
M 8x55 M 8Ø 8x162xD
28
11
M8x404x
A
AB
B
B8x19 M8
10
3x202xM5x128x
A
B
C
D
B
A/C D
C
3x2010xD
29
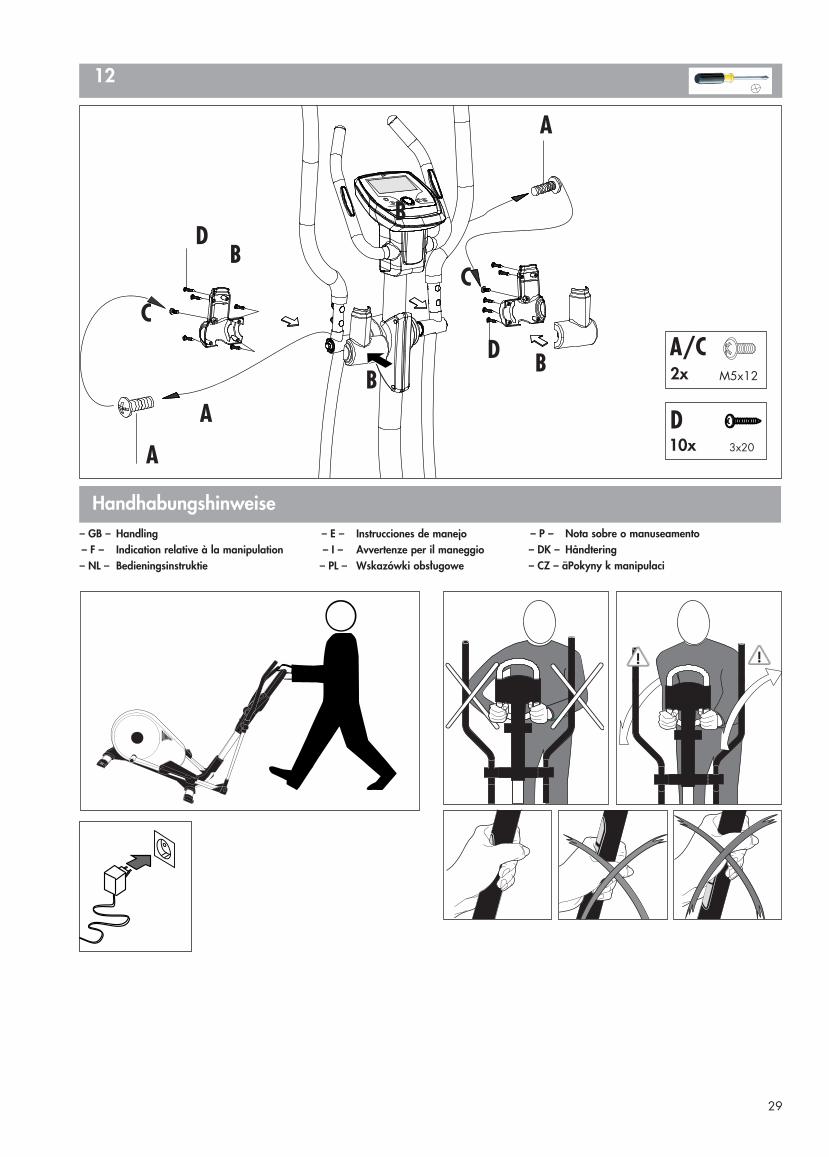
12
M5x122x
A
A
A
B
B
BB
CC
D
D A/C
!!
Handhabungshinweise– P – Nota sobre o manuseamento– DK – Håndtering– CZ – āPokyny k manipulaci
– GB – Handling– F – Indication relative à la manipulation– NL – Bedieningsinstruktie
– E – Instrucciones de manejo– I – Avvertenze per il maneggio
– PL – Wskazówki obsługowe
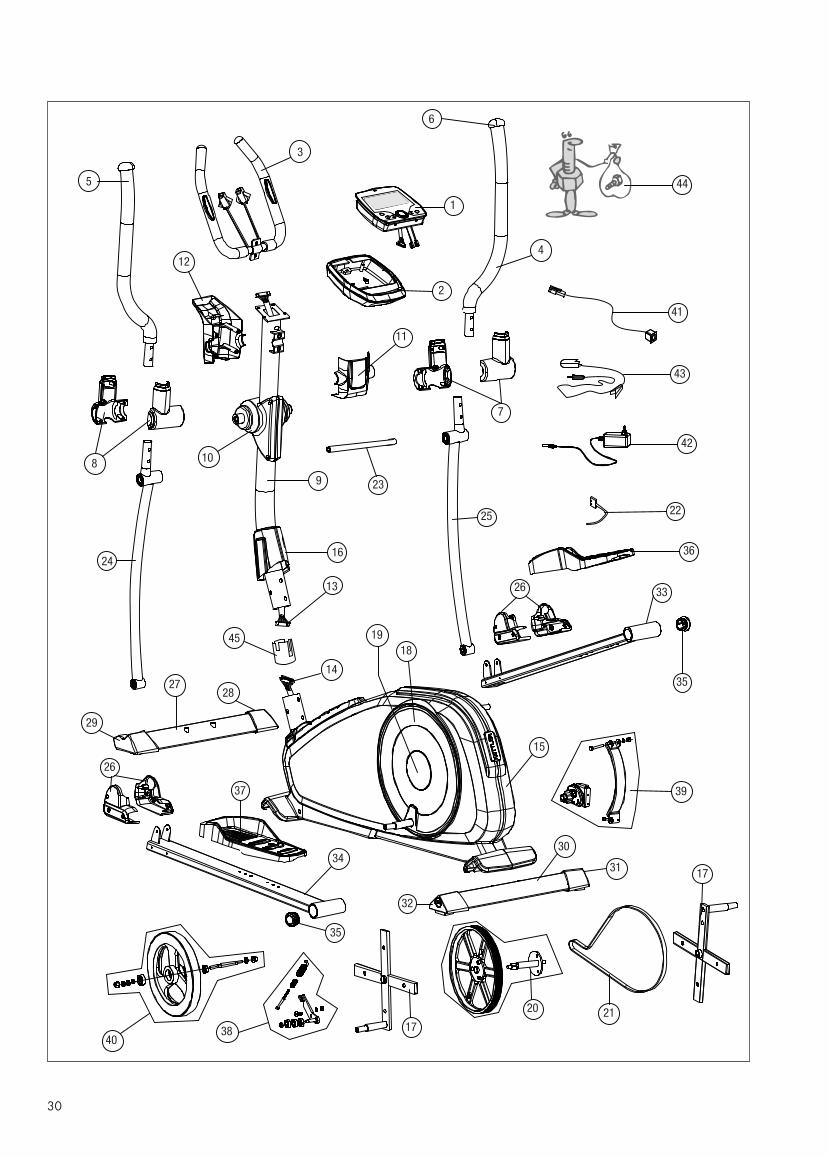
30
5
1042
3
1
6
11
12
25
23
13
16
18
41
43
32
35
4
44
2
7
98
26
14
28
45
24
19
36
33
35
2120
1738
39
30
33 3134
40
26
29
37
15
27
17
22

31
– D – Ersatzteilbestellung– GB – Spare parts order– F – Commande de pièces de rechange
– NL – Bestelling van reserveonderdelen
– E – Pedido de recambios– I – Ordine di pezzi di ricambio
– PL – Zamówiene części zamiennych
– P – Encomenda de peças sobressalentes– DK – Bestilling af reservedele– CZ – Objednání náhradních dílů
1 1x 68009380 68009540 68009540
2 1x 68009330 68009541 68009550
3 1x 68009331 68009331 68009331
4 1x 68009332 68009332 68009332
5 1x 68009333 68009333 68009333
6 1x 68009107 68009107 68009107
7 1x 68009334 68009512 68009512
8 1x 68009335 68009513 68009513
9 1x 68009381 68009381 68009381
10 1x 68009337 68009514 68009514
11 1x 68009382 68009542 68009551
12 1x 68009383 68009543 68009552
13 1x 68009113 68009113 68009113
14 1x 68009114 68009114 68009114
15 1x 68009385 68009545 68009553
16 1x 68009384 68009544 68009544
17 2x 68009394 68009394 68009394
18 1x 68009386 68009546 68009546
19 1x 68009387 68009387 68009387
20 1x 68009120 68009120 68009120
21 1x 68009121 68009121 68009121
22 1x 68009122 68009122 68009122
23 1x 98009123 68009123 68009123
24 1x 68009388 68009388 68009388
25 1x 68009389 68009389 68009389
26 1x 68009346 68009547 68009547
27 1x 68009347 68009347 68009347
28 1x 68009018 68009018 68009018
29 1x 68009019 68009019 68009019
30 1x 68009348 68009348 68009348
31 1x 68009021 68009021 68009021
32 1x 68009022 68009022 68009022
33 1x 68009390 68009390 68009390
34 1x 68009391 68009391 68009391
35 2x 68009135 68009135 68009135
36 1x 68009136 68009554 68009536
37 1x 68009137 68009555 68009537
38 1x 68009138 68009138 68009138
39 1x 68009139 68009139 68009139
40 1x 68009140 68009140 68009140
41 1x 68009116 68009116 68009116
42 1x 68009376 68009376 68009376
43 1x 68003531 68003531 68003531
44 1x 68009392 68009392 68009392
45 1x 68009073 68009073 68009073
CROSS P CURO P CRONOS P07648-900 07648-920 07648-950
– D – Farbliche Abweichungen beiNachbestellungen sind mög-lich und stellen keinen Rekla-mationsgrund dar.
– GB – Colours may vary with repeatorders and this does not con-stitute grounds for complaint.
– F – Des écarts de coloris sont pos-sibles lors de commandes ul-térieures et ne sont pas motifà réclamation.
– NL – Bij nabestellingen kunnen erkleurafwijkingen voorkomen,dit is geen reden voor recla-matie.
– E – Es posible que, en pedidos po-steriores, los colores de la má-quina varíen, hecho que no seconsidera causa de reclama-ción.
– I – In caso di ordini successivi,sono possibili variazioni di co-lore che non rappresentano unmotivo di reclamo.
– PL – Przy zamówieniach dodatko-wych mogą wystapić różnicew kolorze, które nie stanowiąpodstaw do reklamacji.
– P – Existe a possibilidade de des-vios nas cores de peças enco-mendadas posteriormente etal não constitui motivo dereclamação.
– DK – Afvigende farver er mulig vedefterbestillinger og er ingenreklamationsgrund.
– CZ – Barevné odchylky při doobjed-návání jsou možné a nepřed-stavují žádný důvod k rekla-maci.

HEINZ KETTLER GmbH & Co. KG · Postfach 1020 · D-59463 Ense-Parsitwww.kettler.net
docu 3812/05.15
Related Documents