Microsoft Office OneNote 2016 for Windows Introduction to OneNote Learning Technologies, Training & Audiovisual Outreach University Information Technology Services

Welcome message from author
This document is posted to help you gain knowledge. Please leave a comment to let me know what you think about it! Share it to your friends and learn new things together.
Transcript

Microsoft Office
OneNote 2016 for Windows Introduction to OneNote
Learning Technologies, Training & Audiovisual Outreach
University Information Technology Services
Copyright © 2016 KSU Division of University Information Technology Services
This document may be downloaded, printed, or copied for educational use without further permission of the
University Information Technology Services Division (UITS), provided the content is not modified and this
statement is not removed. Any use not stated above requires the written consent of the UITS Division. The
distribution of a copy of this document via the Internet or other electronic medium without the written
permission of the KSU - UITS Division is expressly prohibited.
Published by Kennesaw State University – UITS 2016
The publisher makes no warranties as to the accuracy of the material contained in this document and
therefore is not responsible for any damages or liabilities incurred from UITS use.
Microsoft product screenshot(s) reprinted with permission from Microsoft Corporation.
Microsoft, Microsoft Office, and Microsoft OneNote are trademarks of the Microsoft Corporation.
University Information Technology Services
Microsoft Office: OneNote 2016 for Windows
Introduction to OneNote
Table of Contents
Introduction ............................................................................................................................................................ 5
Learning Objectives ................................................................................................................................................. 5
OneNote 2016 Interface ......................................................................................................................................... 6
The Quick Access Toolbar ................................................................................................................................... 7
Customize the Quick Access Toolbar .............................................................................................................. 7
The Ribbon .......................................................................................................................................................... 8
The File Tab ......................................................................................................................................................... 9
Creating a Notebook ............................................................................................................................................. 10
Notebook .......................................................................................................................................................... 10
Section............................................................................................................................................................... 11
Create a Section ............................................................................................................................................ 11
Rename a Section ......................................................................................................................................... 12
Move a Section ............................................................................................................................................. 13
Delete a Section ............................................................................................................................................ 13
Pages ................................................................................................................................................................. 14
Create a Page ................................................................................................................................................ 14
Name a Page ................................................................................................................................................. 14
Move a Page .................................................................................................................................................. 15
Delete a Page ................................................................................................................................................ 15
Page Templates ............................................................................................................................................. 16
Adding Content ..................................................................................................................................................... 18
Text.................................................................................................................................................................... 18
Entering Text ................................................................................................................................................. 18
Formatting Text ............................................................................................................................................. 19
Tags ................................................................................................................................................................... 19
Add Tags ........................................................................................................................................................ 19
Find Tags ....................................................................................................................................................... 20
Remove Tags ................................................................................................................................................. 21
File Attachment ................................................................................................................................................. 21
Images ............................................................................................................................................................... 23
Screen Clipping.............................................................................................................................................. 23
Pictures ......................................................................................................................................................... 24
Links .................................................................................................................................................................. 25
Typing a Website URL ................................................................................................................................... 25
Hyperlinking Text .......................................................................................................................................... 25
Linking to Another Section or Page .............................................................................................................. 26
Recording Audio or Video ................................................................................................................................. 27
Record Audio ................................................................................................................................................. 27
Record Video ................................................................................................................................................. 29
Drawing ............................................................................................................................................................. 31
History ................................................................................................................................................................... 32
Recent Edits ...................................................................................................................................................... 32
Page Versions .................................................................................................................................................... 33
Notebook Recycle Bin ....................................................................................................................................... 34
Searching ............................................................................................................................................................... 35
Additional Help ..................................................................................................................................................... 36

Revised 6/28/2016 Page 5 of 36
Introduction
This booklet is the companion document to the OneNote 2016 workshop. OneNote is an application that will
let you take notes and store them in a digital notebook. This booklet will show users how to navigate the
interface, create, format, edit, insert content, organize notebooks, and easily find content.
Learning Objectives
After completing the instructions in this booklet, you will be able to:
Identify the components of the OneNote 2016 interface
Create a new notebook, sections, and pages
Add and change the formatting of your notes
Insert different types of content
Use the draw tools
Review your notebook with the history and review tools
Easily search your notebooks to find your notes
Page 6 of 36
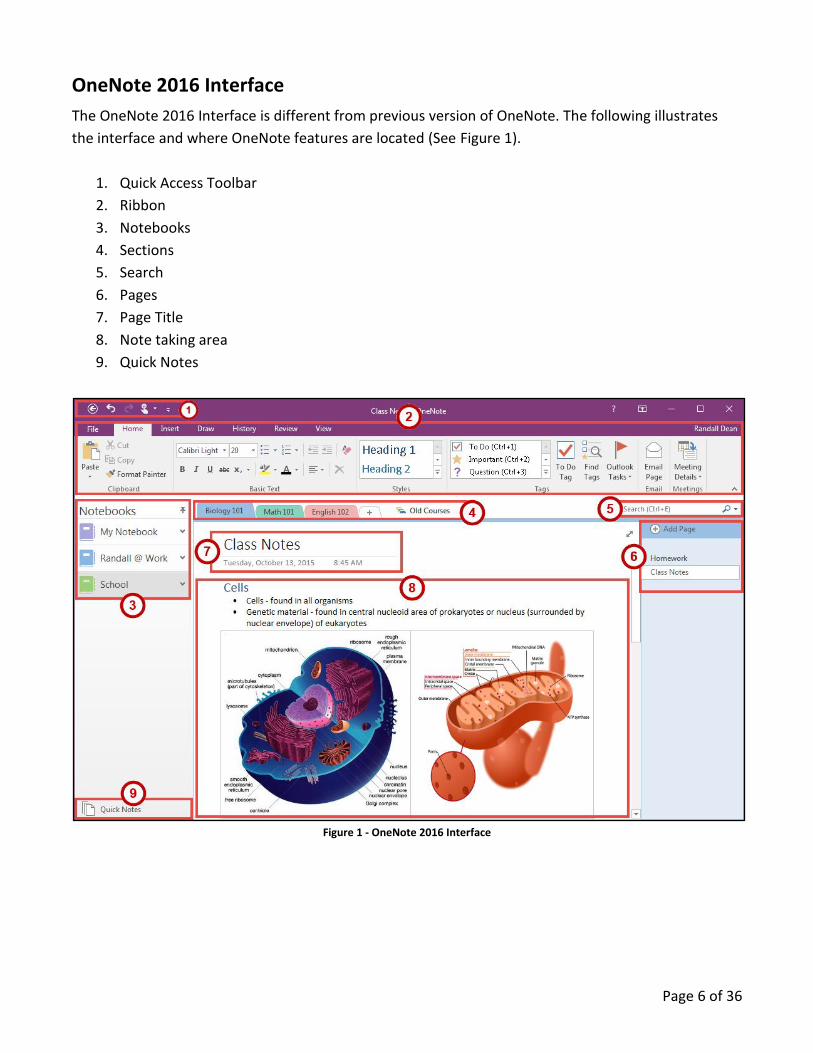
OneNote 2016 Interface
The OneNote 2016 Interface is different from previous version of OneNote. The following illustrates
the interface and where OneNote features are located (See Figure 1).
1. Quick Access Toolbar
2. Ribbon
3. Notebooks
4. Sections
5. Search
6. Pages
7. Page Title
8. Note taking area
9. Quick Notes
Figure 1 - OneNote 2016 Interface
Page 7 of 36
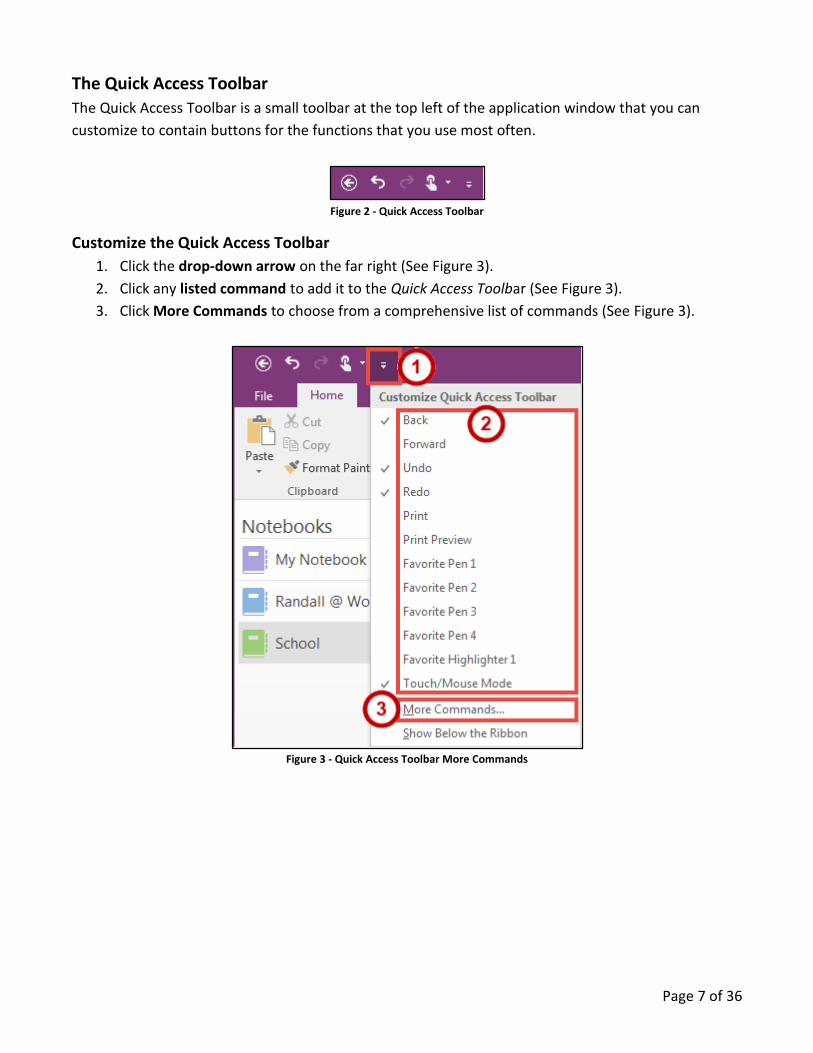
The Quick Access Toolbar
The Quick Access Toolbar is a small toolbar at the top left of the application window that you can
customize to contain buttons for the functions that you use most often.
Figure 2 - Quick Access Toolbar
Customize the Quick Access Toolbar
1. Click the drop-down arrow on the far right (See Figure 3).
2. Click any listed command to add it to the Quick Access Toolbar (See Figure 3).
3. Click More Commands to choose from a comprehensive list of commands (See Figure 3).
Figure 3 - Quick Access Toolbar More Commands
Page 8 of 36
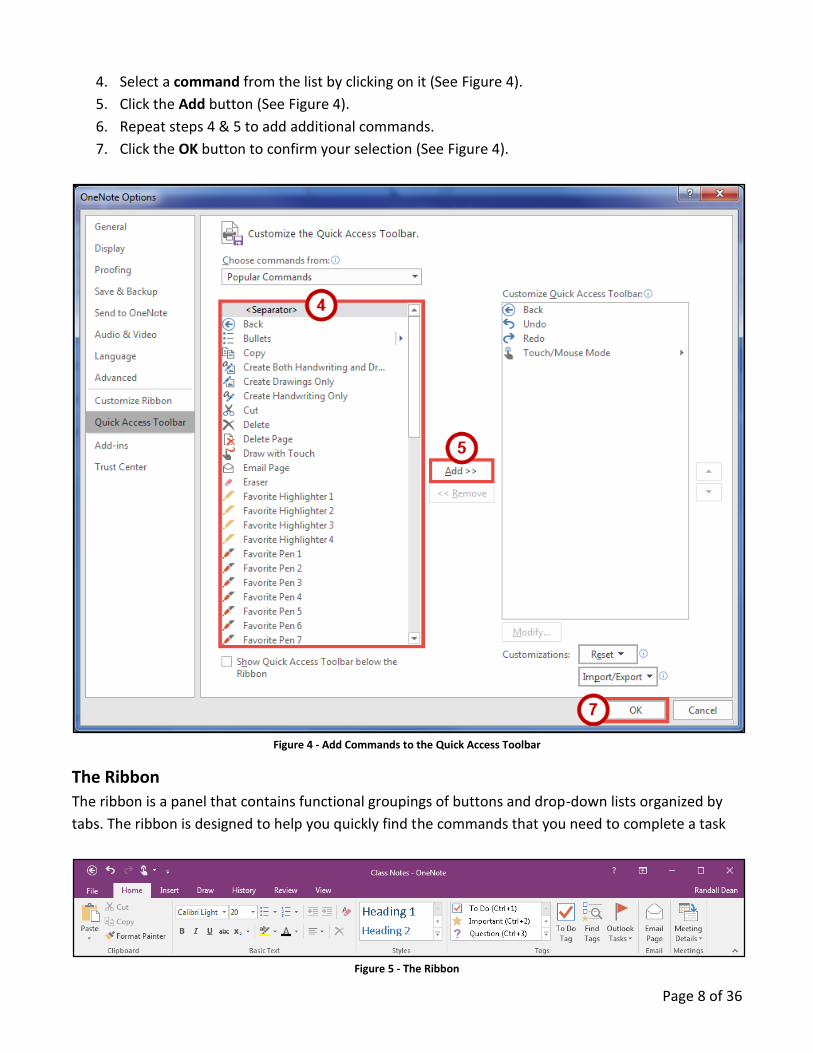
4. Select a command from the list by clicking on it (See Figure 4).
5. Click the Add button (See Figure 4).
6. Repeat steps 4 & 5 to add additional commands.
7. Click the OK button to confirm your selection (See Figure 4).
Figure 4 - Add Commands to the Quick Access Toolbar
The Ribbon
The ribbon is a panel that contains functional groupings of buttons and drop-down lists organized by
tabs. The ribbon is designed to help you quickly find the commands that you need to complete a task
Figure 5 - The Ribbon
Page 9 of 36
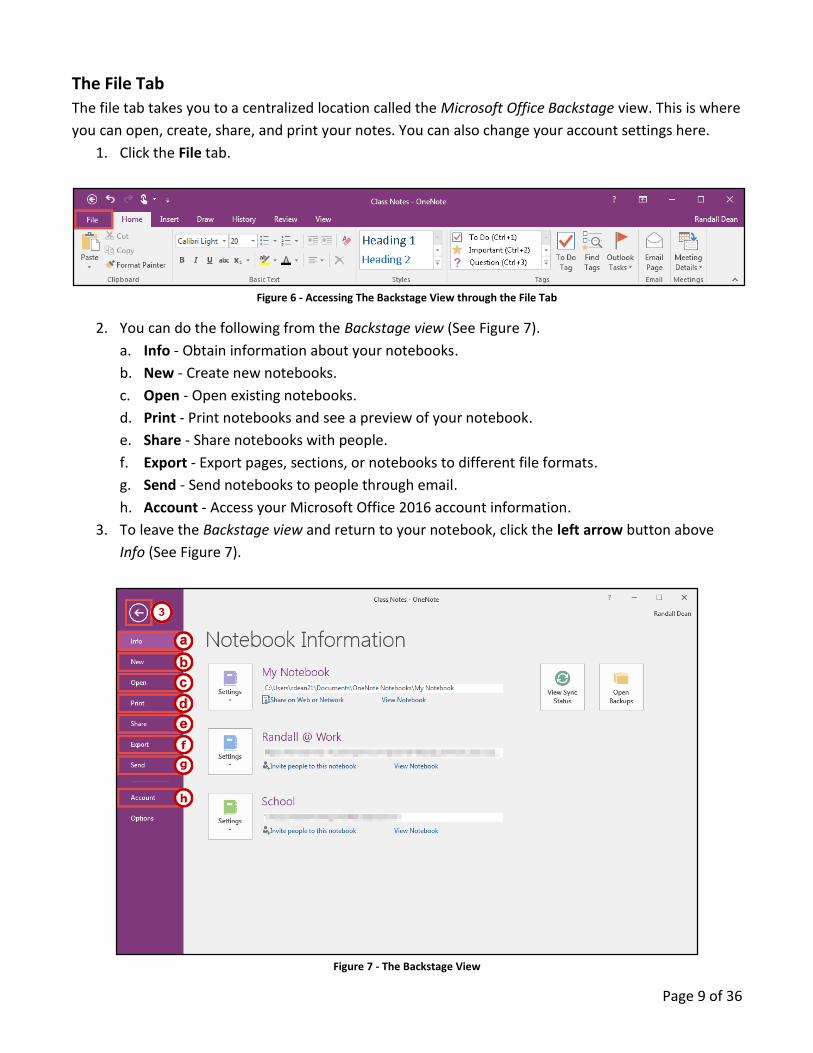
The File Tab
The file tab takes you to a centralized location called the Microsoft Office Backstage view. This is where
you can open, create, share, and print your notes. You can also change your account settings here.
1. Click the File tab.
Figure 6 - Accessing The Backstage View through the File Tab
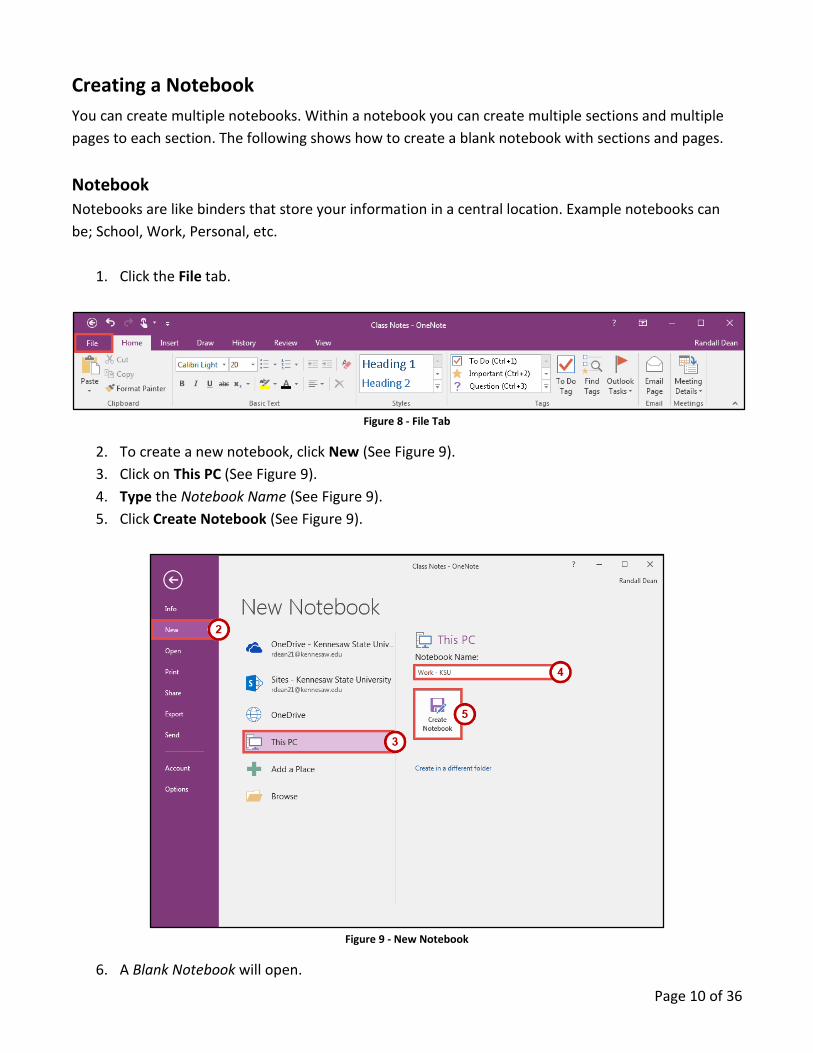
2. You can do the following from the Backstage view (See Figure 7).
a. Info - Obtain information about your notebooks.
b. New - Create new notebooks.
c. Open - Open existing notebooks.
d. Print - Print notebooks and see a preview of your notebook.
e. Share - Share notebooks with people.
f. Export - Export pages, sections, or notebooks to different file formats.
g. Send - Send notebooks to people through email.
h. Account - Access your Microsoft Office 2016 account information.
3. To leave the Backstage view and return to your notebook, click the left arrow button above
Info (See Figure 7).
Figure 7 - The Backstage View
Page 10 of 36
Creating a Notebook
You can create multiple notebooks. Within a notebook you can create multiple sections and multiple
pages to each section. The following shows how to create a blank notebook with sections and pages.
Notebook
Notebooks are like binders that store your information in a central location. Example notebooks can
be; School, Work, Personal, etc.
1. Click the File tab.
Figure 8 - File Tab
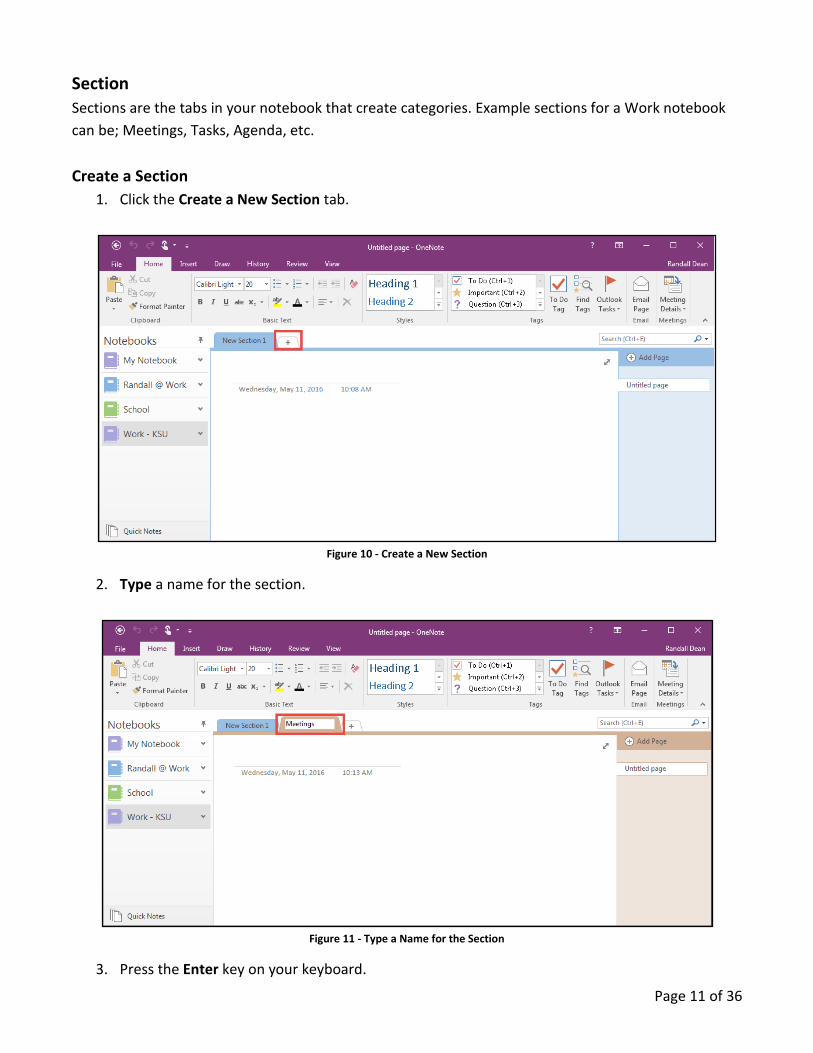
2. To create a new notebook, click New (See Figure 9).
3. Click on This PC (See Figure 9).
4. Type the Notebook Name (See Figure 9).
5. Click Create Notebook (See Figure 9).
Figure 9 - New Notebook
6. A Blank Notebook will open.
Page 11 of 36
Section
Sections are the tabs in your notebook that create categories. Example sections for a Work notebook
can be; Meetings, Tasks, Agenda, etc.
Create a Section
1. Click the Create a New Section tab.
Figure 10 - Create a New Section
2. Type a name for the section.
Figure 11 - Type a Name for the Section
3. Press the Enter key on your keyboard.
Page 12 of 36
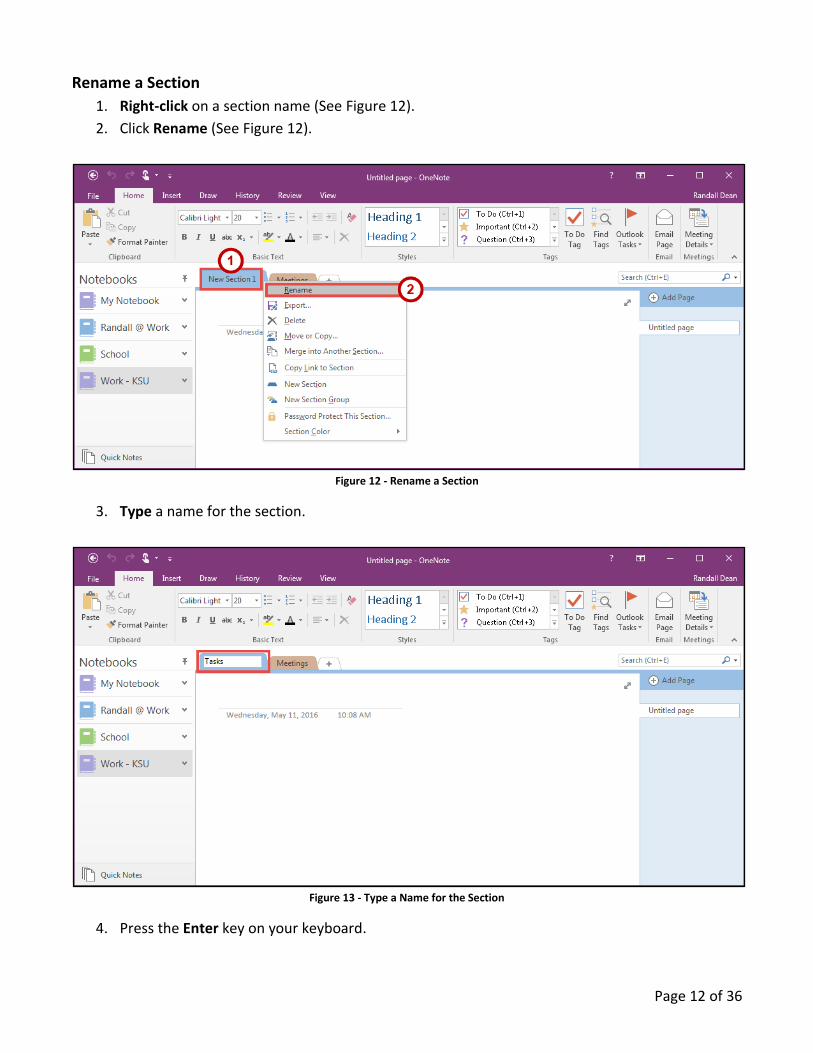
Rename a Section
1. Right-click on a section name (See Figure 12).
2. Click Rename (See Figure 12).
Figure 12 - Rename a Section
3. Type a name for the section.
Figure 13 - Type a Name for the Section
4. Press the Enter key on your keyboard.
Page 13 of 36
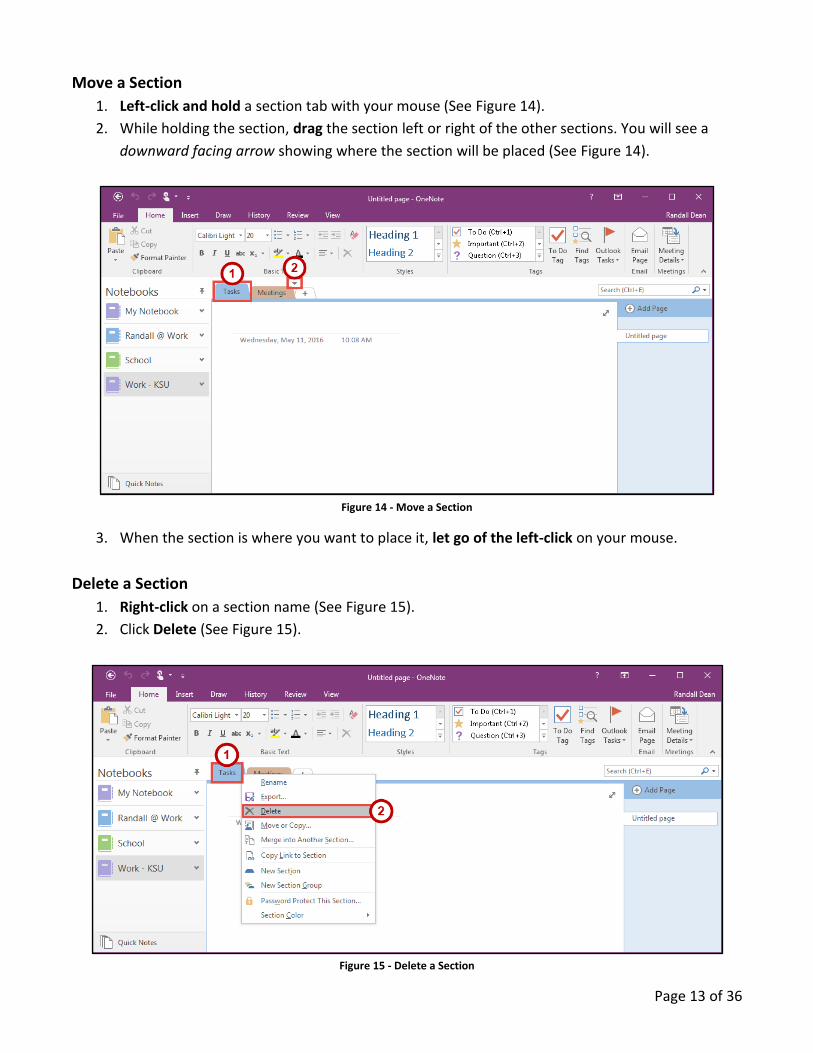
Move a Section
1. Left-click and hold a section tab with your mouse (See Figure 14).
2. While holding the section, drag the section left or right of the other sections. You will see a
downward facing arrow showing where the section will be placed (See Figure 14).
Figure 14 - Move a Section
3. When the section is where you want to place it, let go of the left-click on your mouse.
Delete a Section
1. Right-click on a section name (See Figure 15).
2. Click Delete (See Figure 15).
Figure 15 - Delete a Section

Page 14 of 36
Pages
Pages hold the notes in your sections for your notebook. Example pages for the Meetings section in a
Work notebook can be; Group Meeting, Team Meeting, Department Meeting, etc.
Create a Page
1. Click on the section where you want to create a Page (See Figure 16).
2. Click on the Add Page button (See Figure 16).
Figure 16 - Add a Page
Name a Page
1. Click on a page that you want to give a name (See Figure 17).
2. Click on the Page Title textbox (See Figure 17).
Figure 17 - Select a Page
3. Type a name for the page.
Page 15 of 36
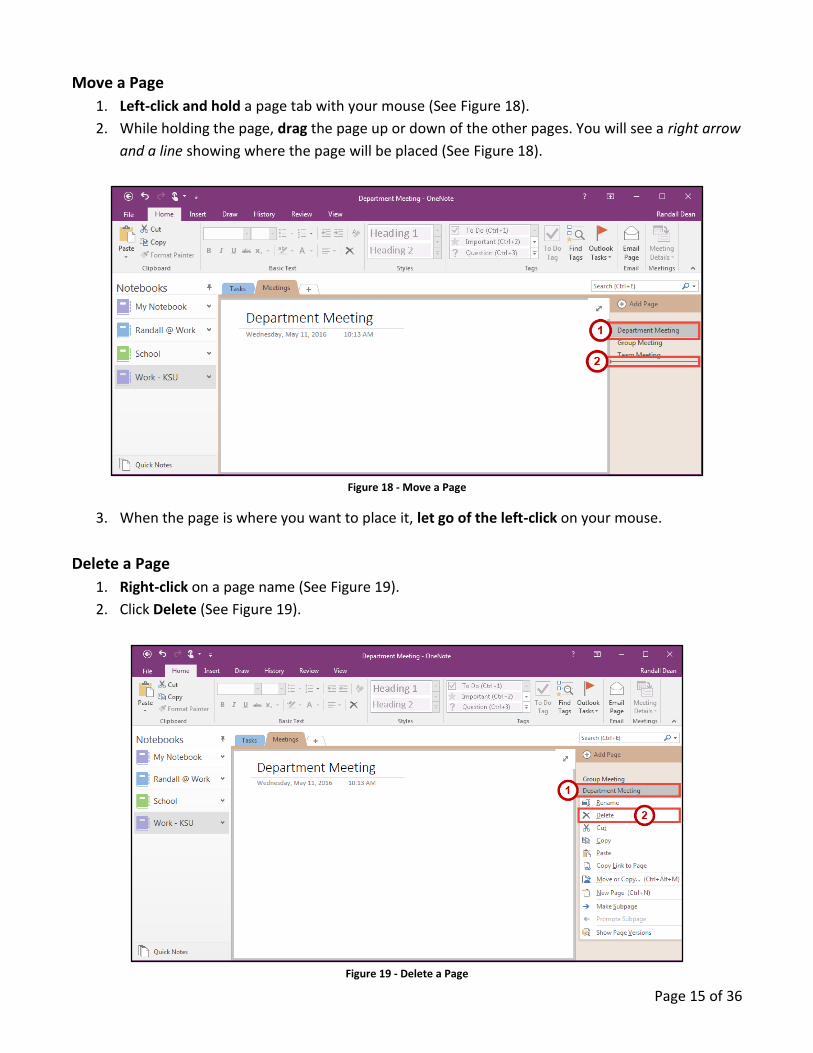
Move a Page
1. Left-click and hold a page tab with your mouse (See Figure 18).
2. While holding the page, drag the page up or down of the other pages. You will see a right arrow
and a line showing where the page will be placed (See Figure 18).
Figure 18 - Move a Page
3. When the page is where you want to place it, let go of the left-click on your mouse.
Delete a Page
1. Right-click on a page name (See Figure 19).
2. Click Delete (See Figure 19).
Figure 19 - Delete a Page
Page 16 of 36
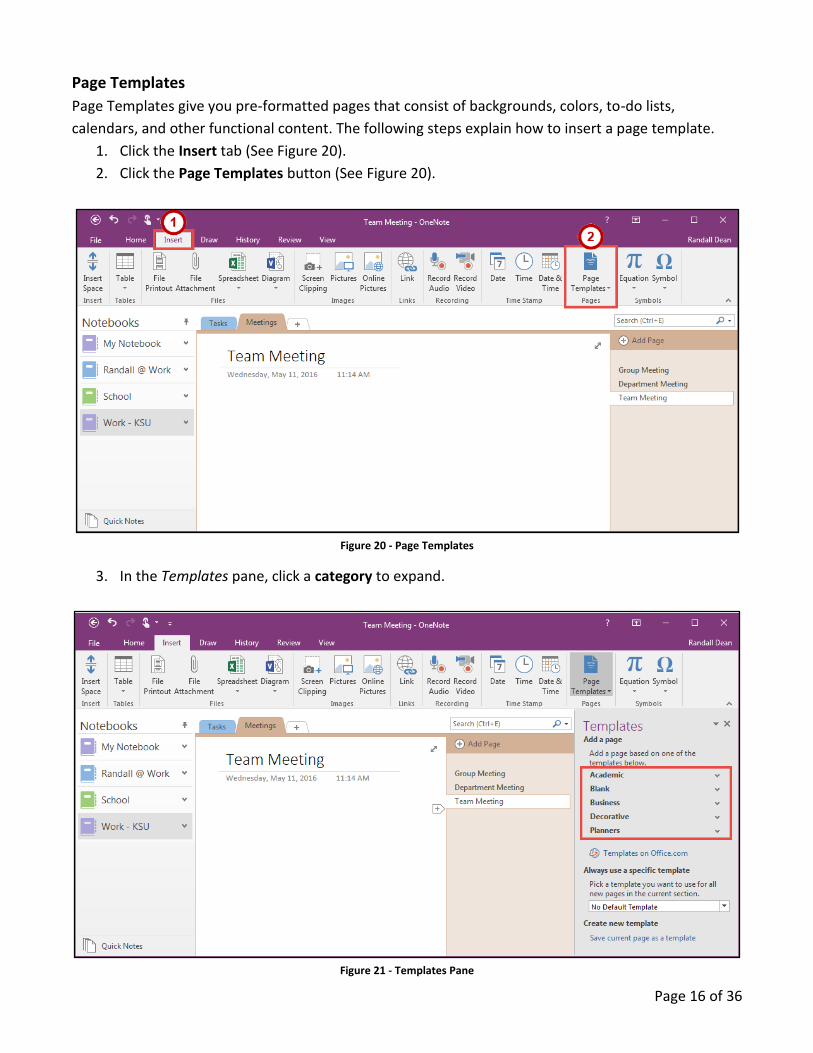
Page Templates
Page Templates give you pre-formatted pages that consist of backgrounds, colors, to-do lists,
calendars, and other functional content. The following steps explain how to insert a page template.
1. Click the Insert tab (See Figure 20).
2. Click the Page Templates button (See Figure 20).
Figure 20 - Page Templates
3. In the Templates pane, click a category to expand.
Figure 21 - Templates Pane
Page 17 of 36
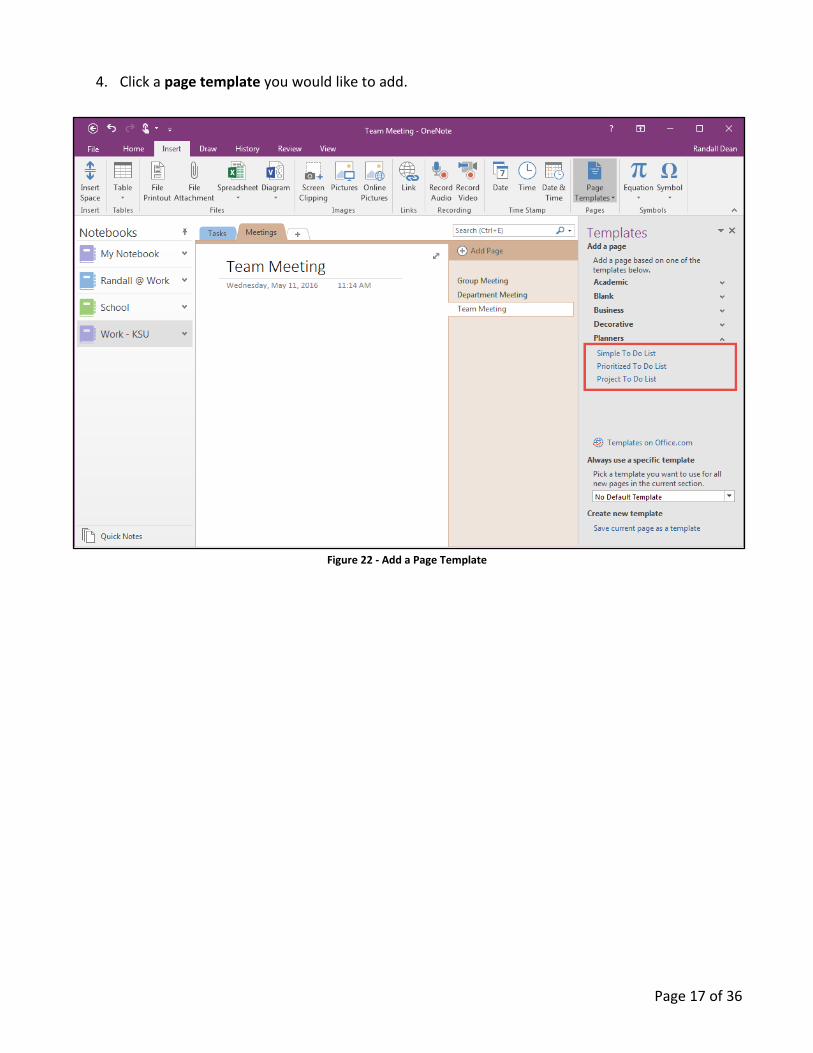
4. Click a page template you would like to add.
Figure 22 - Add a Page Template

Page 18 of 36
Adding Content
With OneNote, you can add different types of content onto a page such as text, links, tags, screen
clippings, pictures, audio and video recordings, and drawings.
Text
Text can be added anywhere on the page. You can also change the formatting of the text.
Entering Text
1. Click where you want to enter text on the page (See Figure 23).
2. Left-click anywhere on the page (See Figure 23).
3. When you see a cursor flashing, type your text (See Figure 23).
Figure 23 - Type Text
4. After you start typing, you will see a text placeholder.
Figure 24 - Text Placeholder
Page 19 of 36
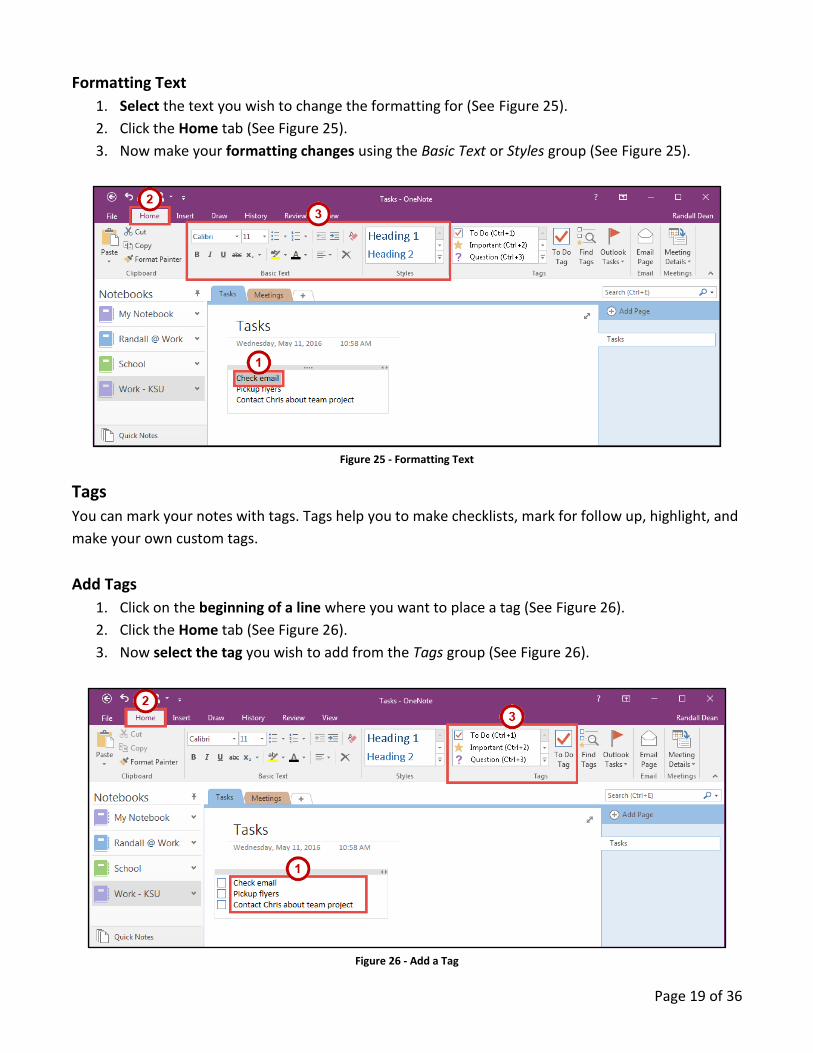
Formatting Text
1. Select the text you wish to change the formatting for (See Figure 25).
2. Click the Home tab (See Figure 25).
3. Now make your formatting changes using the Basic Text or Styles group (See Figure 25).
Figure 25 - Formatting Text
Tags
You can mark your notes with tags. Tags help you to make checklists, mark for follow up, highlight, and
make your own custom tags.
Add Tags
1. Click on the beginning of a line where you want to place a tag (See Figure 26).
2. Click the Home tab (See Figure 26).
3. Now select the tag you wish to add from the Tags group (See Figure 26).
Figure 26 - Add a Tag
Page 20 of 36
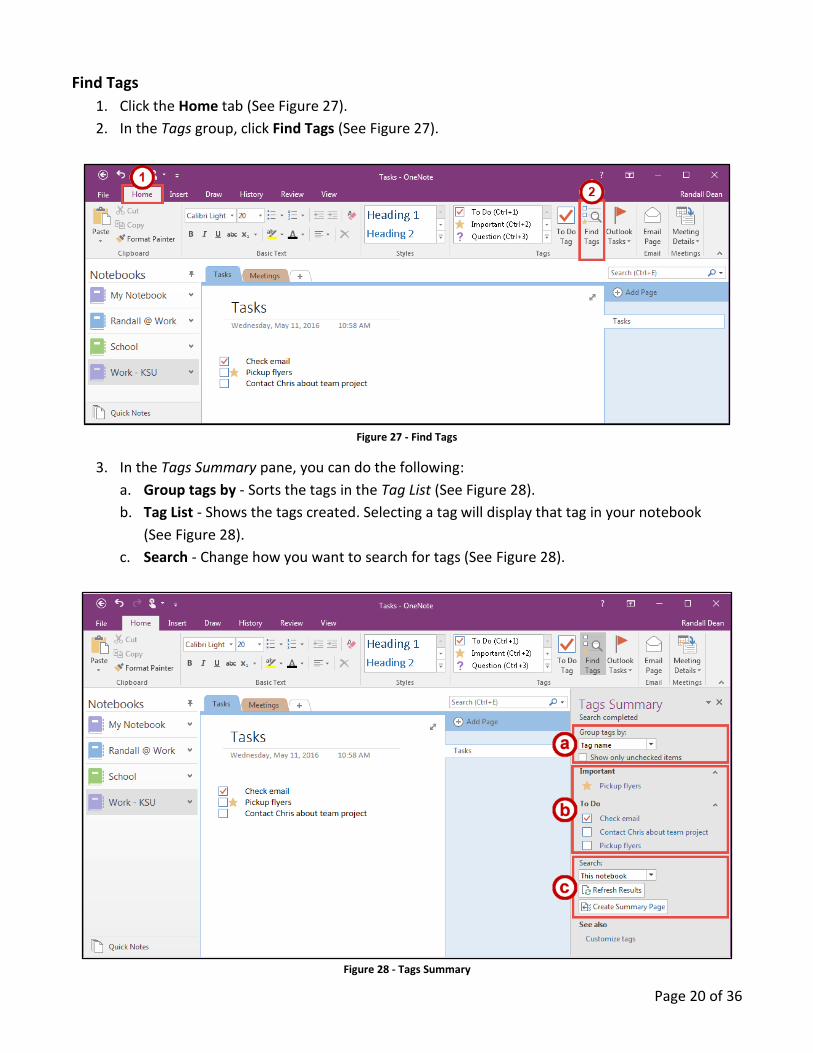
Find Tags
1. Click the Home tab (See Figure 27).
2. In the Tags group, click Find Tags (See Figure 27).
Figure 27 - Find Tags
3. In the Tags Summary pane, you can do the following:
a. Group tags by - Sorts the tags in the Tag List (See Figure 28).
b. Tag List - Shows the tags created. Selecting a tag will display that tag in your notebook
(See Figure 28).
c. Search - Change how you want to search for tags (See Figure 28).
Figure 28 - Tags Summary
Page 21 of 36
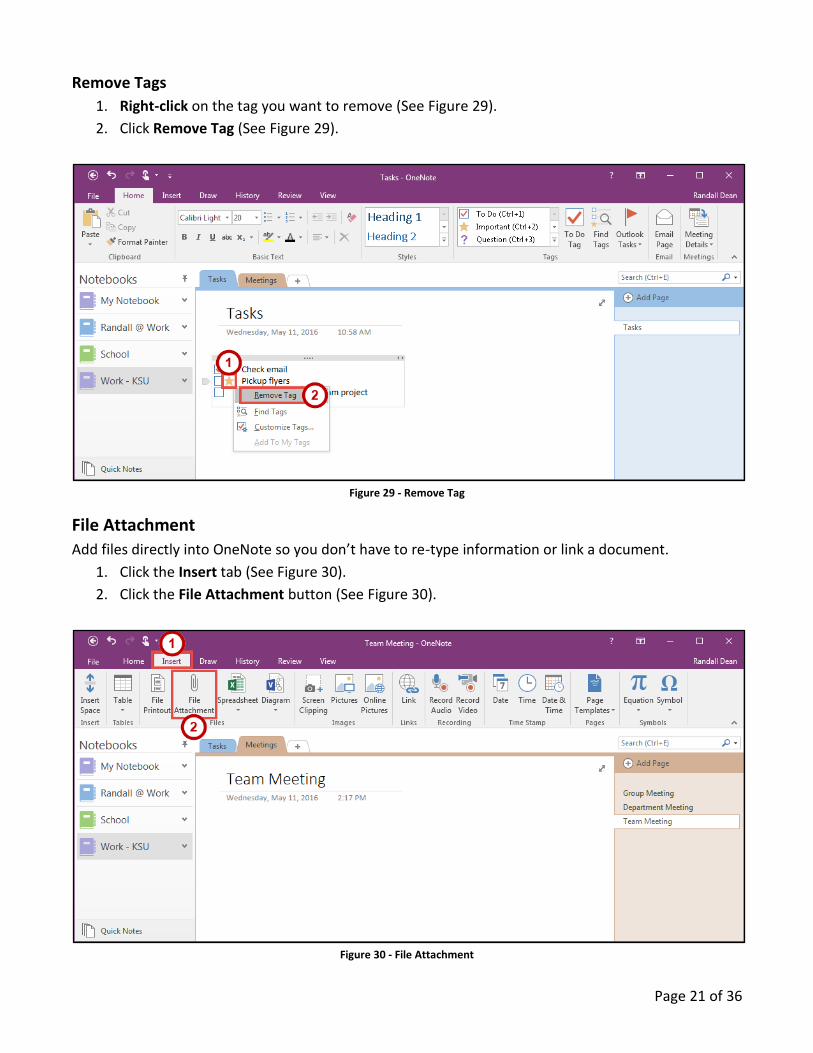
Remove Tags
1. Right-click on the tag you want to remove (See Figure 29).
2. Click Remove Tag (See Figure 29).
Figure 29 - Remove Tag
File Attachment
Add files directly into OneNote so you don’t have to re-type information or link a document.
1. Click the Insert tab (See Figure 30).
2. Click the File Attachment button (See Figure 30).
Figure 30 - File Attachment
Page 22 of 36
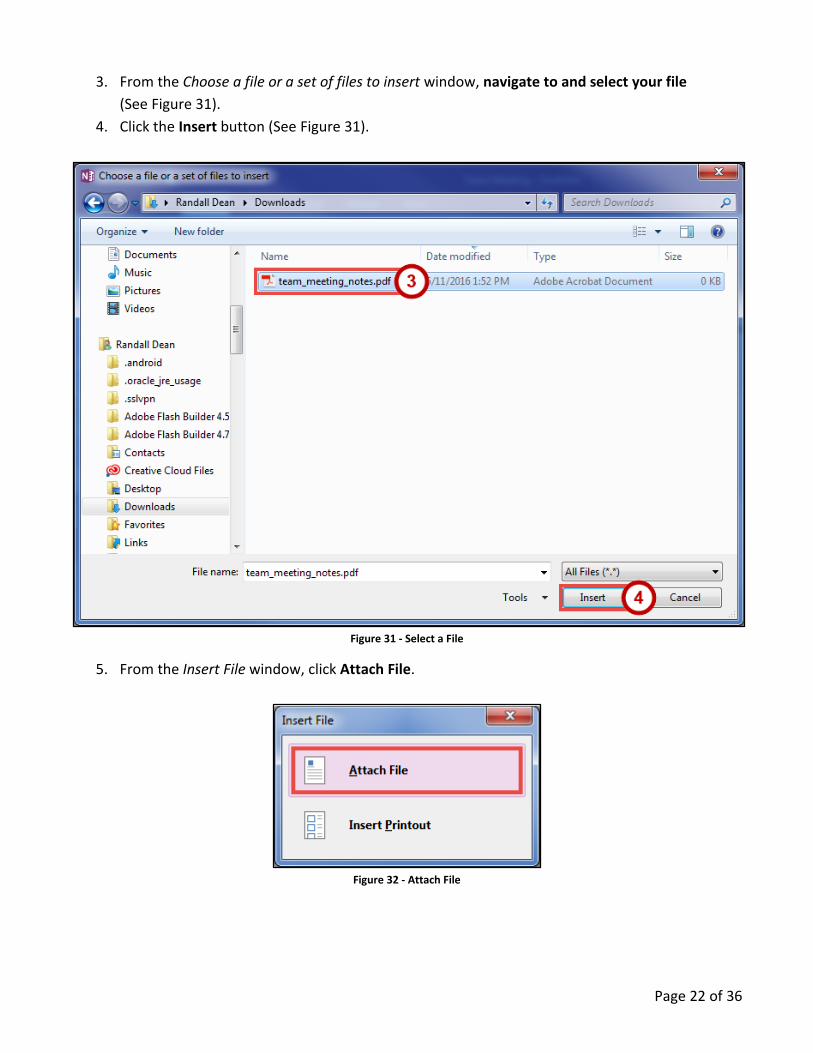
3. From the Choose a file or a set of files to insert window, navigate to and select your file
(See Figure 31).
4. Click the Insert button (See Figure 31).
Figure 31 - Select a File
5. From the Insert File window, click Attach File.
Figure 32 - Attach File

Page 23 of 36
Images
Insert images from a screen clipping, pictures saved on your machine, online pictures, or a scanned
image.
Screen Clipping
1. Click the Insert tab (See Figure 33).
2. Click the Screen Clipping button (See Figure 33).
Figure 33 - Insert Screen Clipping
3. Select what you want to capture on your computer screen.
Figure 34 - Select Screen Clipping

Page 24 of 36
Pictures
1. Click the Insert tab (See Figure 35).
2. Click the Pictures button (See Figure 35).
Figure 35 - Insert Picture
3. From the Insert Picture window, navigate to the picture.
a. Click on the file to select it (See Figure 36).
b. Click the Insert button (See Figure 36).
Figure 36 - Select Picture to Insert
Page 25 of 36
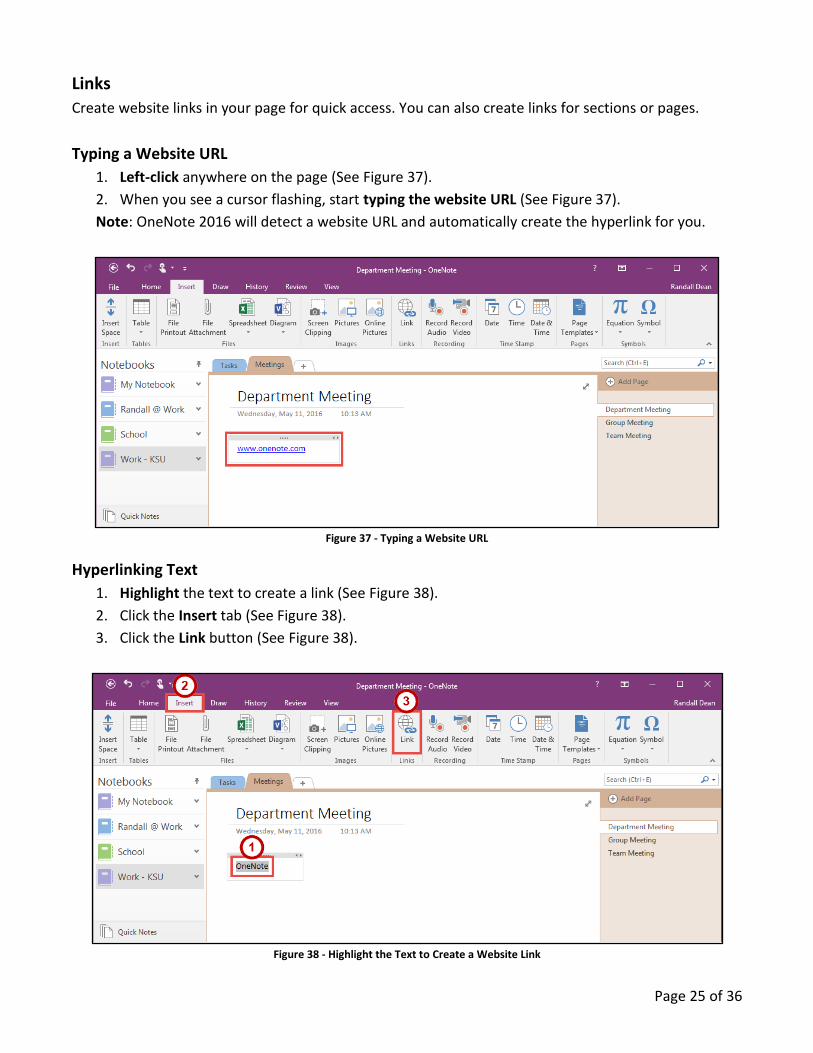
Links
Create website links in your page for quick access. You can also create links for sections or pages.
Typing a Website URL
1. Left-click anywhere on the page (See Figure 37).
2. When you see a cursor flashing, start typing the website URL (See Figure 37).
Note: OneNote 2016 will detect a website URL and automatically create the hyperlink for you.
Figure 37 - Typing a Website URL
Hyperlinking Text
1. Highlight the text to create a link (See Figure 38).
2. Click the Insert tab (See Figure 38).
3. Click the Link button (See Figure 38).
Figure 38 - Highlight the Text to Create a Website Link
Page 26 of 36
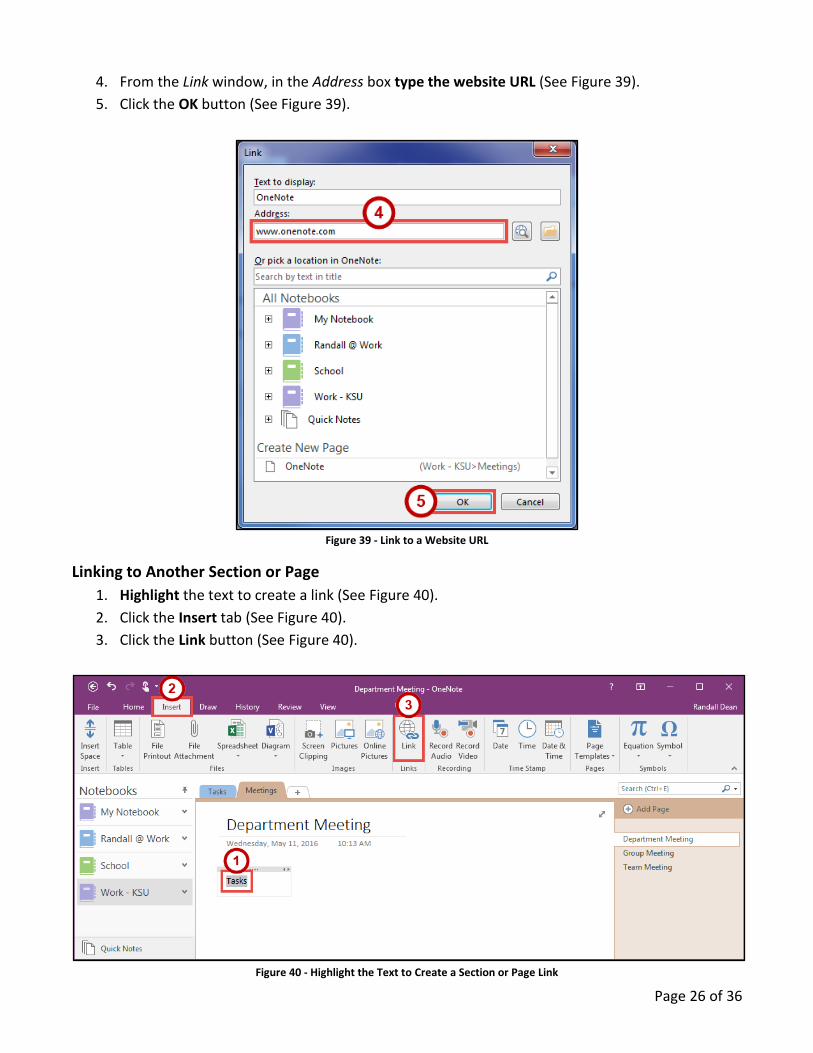
4. From the Link window, in the Address box type the website URL (See Figure 39).
5. Click the OK button (See Figure 39).
Figure 39 - Link to a Website URL
Linking to Another Section or Page
1. Highlight the text to create a link (See Figure 40).
2. Click the Insert tab (See Figure 40).
3. Click the Link button (See Figure 40).
Figure 40 - Highlight the Text to Create a Section or Page Link
Page 27 of 36
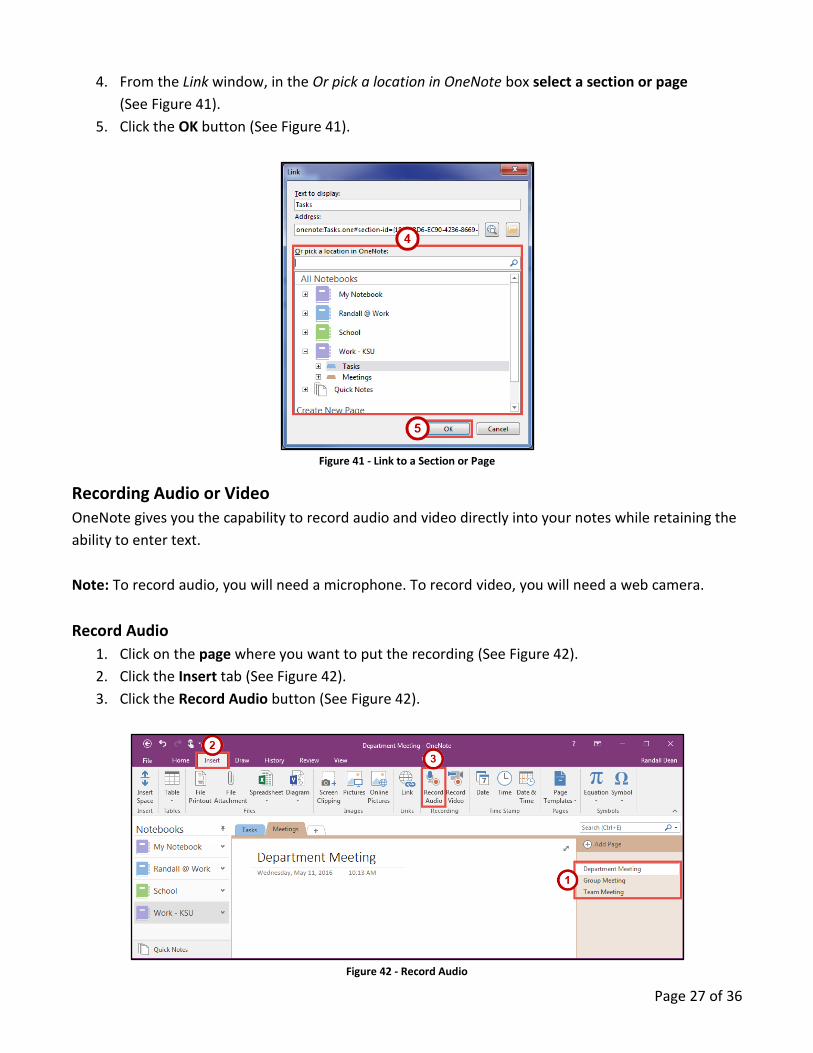
4. From the Link window, in the Or pick a location in OneNote box select a section or page
(See Figure 41).
5. Click the OK button (See Figure 41).
Figure 41 - Link to a Section or Page
Recording Audio or Video
OneNote gives you the capability to record audio and video directly into your notes while retaining the
ability to enter text.
Note: To record audio, you will need a microphone. To record video, you will need a web camera.
Record Audio
1. Click on the page where you want to put the recording (See Figure 42).
2. Click the Insert tab (See Figure 42).
3. Click the Record Audio button (See Figure 42).
Figure 42 - Record Audio

Page 28 of 36
4. It will start recording and open up the Recording tab (See Figure 43).
a. To pause the recording, press the Pause button (See Figure 43). To resume the recording,
press the Pause button once again (See Figure 43).
b. To stop the recording, press the Stop button (See Figure 43).
Figure 43 - Audio & Video Recording Tab
5. After pressing the Stop button, the Recording tab will change to the Playback tab
(See Figure 44).
6. Use the Playback buttons to listen to your recorded audio (See Figure 44).
Figure 44 - Audio & Video Playback Tab

Page 29 of 36
Record Video
1. Click on the page where you want to put the recording (See Figure 45).
2. Click the Insert tab (See Figure 45).
3. Click the Record Video button (See Figure 45).
Figure 45 - Record Video
4. It will start recording and open up the Recording tab (See Figure 46) and a preview Video
window (See Figure 47).
a. To pause the recording, press the Pause button (See Figure 46). To resume the recording,
press the Pause button (See Figure 46).
b. To stop the recording, press the Stop button (See Figure 46).
Figure 46 - Audio & Video Recording Tab
Figure 47 - Record Video Preview Window

Page 30 of 36
5. After pressing the Stop button, the Recording tab will change to the Playback tab
(See Figure 48).
6. Use the Playback buttons to watch to your recorded video (See Figure 48).
Figure 48 - Audio & Video Playback Tab
Page 31 of 36
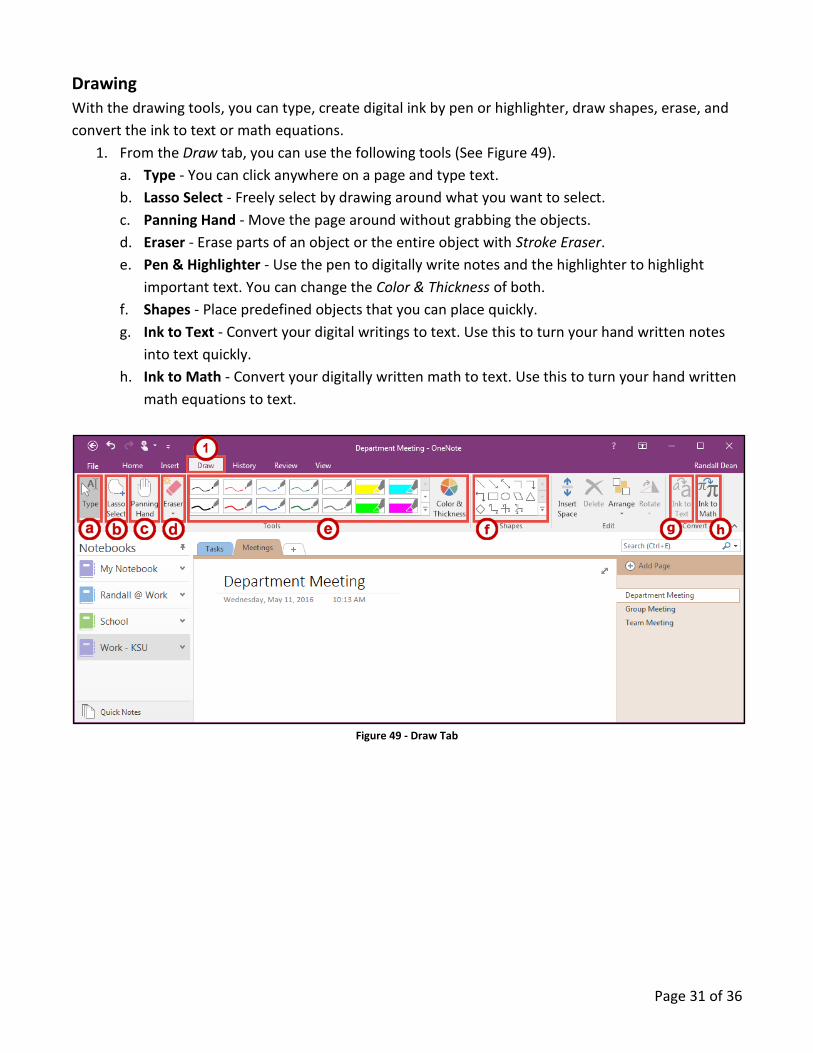
Drawing
With the drawing tools, you can type, create digital ink by pen or highlighter, draw shapes, erase, and
convert the ink to text or math equations.
1. From the Draw tab, you can use the following tools (See Figure 49).
a. Type - You can click anywhere on a page and type text.
b. Lasso Select - Freely select by drawing around what you want to select.
c. Panning Hand - Move the page around without grabbing the objects.
d. Eraser - Erase parts of an object or the entire object with Stroke Eraser.
e. Pen & Highlighter - Use the pen to digitally write notes and the highlighter to highlight
important text. You can change the Color & Thickness of both.
f. Shapes - Place predefined objects that you can place quickly.
g. Ink to Text - Convert your digital writings to text. Use this to turn your hand written notes
into text quickly.
h. Ink to Math - Convert your digitally written math to text. Use this to turn your hand written
math equations to text.
Figure 49 - Draw Tab

Page 32 of 36
History
Tracking activity can be found in this tab. You can see who edited, view versions of pages where
something has been changed, and restore or delete pages or sections that were deleted in the past.
Recent Edits
1. Click the History tab (See Figure 50).
2. Click the Recent Edits button (See Figure 50).
3. Select a date range to search for Recent Edits (See Figure 50).
Figure 50 - Recent Edits
4. In the Search Results pane for Recent Edits, you can do the following.
a. Search - Search by Section, Section Group, Notebook, or All Notebooks (See Figure 51).
b. Sort - Sort by Section, Title, Date Modified, or Author (See Figure 51).
c. List - Displays a list of pages and when they were last edited (See Figure 51).
Figure 51 - Search Results for Recent Edits
Page 33 of 36
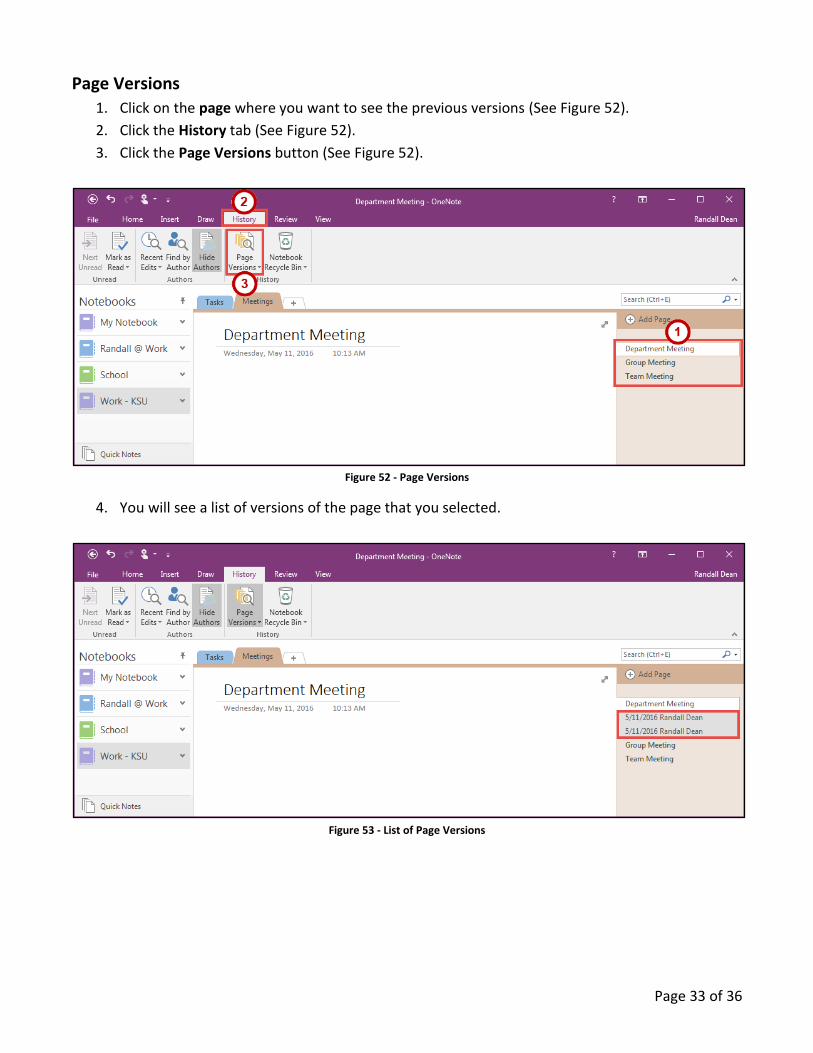
Page Versions
1. Click on the page where you want to see the previous versions (See Figure 52).
2. Click the History tab (See Figure 52).
3. Click the Page Versions button (See Figure 52).
Figure 52 - Page Versions
4. You will see a list of versions of the page that you selected.
Figure 53 - List of Page Versions
Page 34 of 36
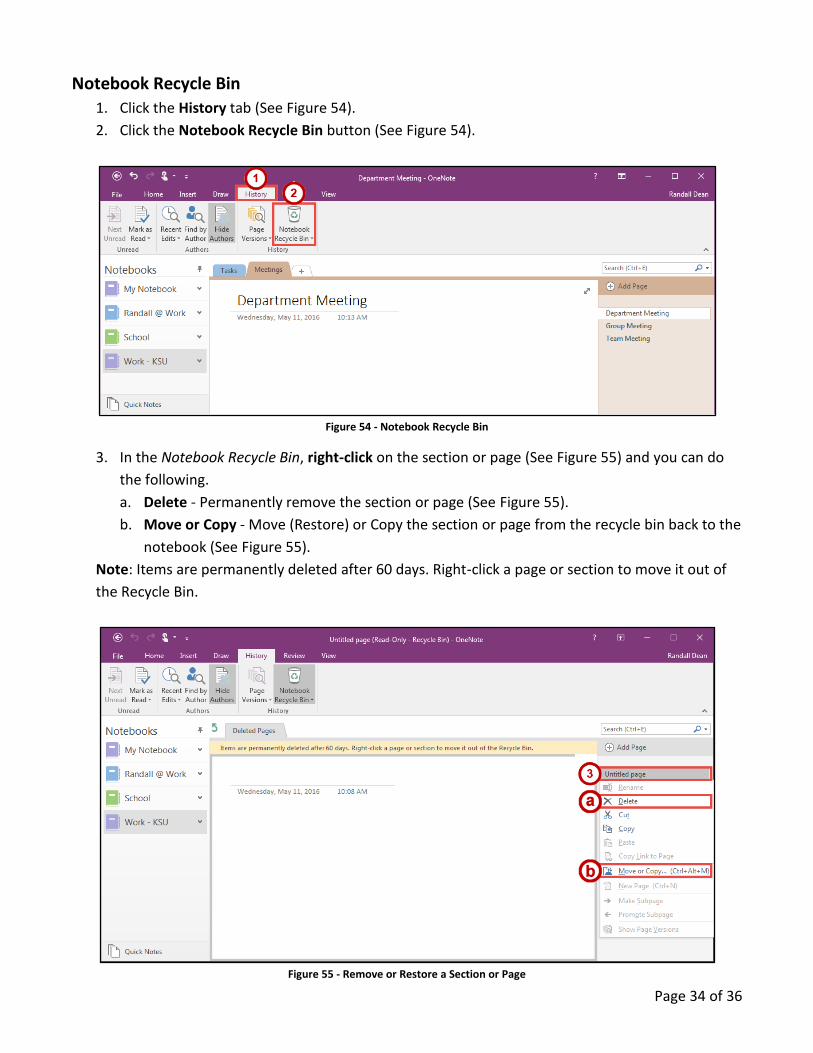
Notebook Recycle Bin
1. Click the History tab (See Figure 54).
2. Click the Notebook Recycle Bin button (See Figure 54).
Figure 54 - Notebook Recycle Bin
3. In the Notebook Recycle Bin, right-click on the section or page (See Figure 55) and you can do
the following.
a. Delete - Permanently remove the section or page (See Figure 55).
b. Move or Copy - Move (Restore) or Copy the section or page from the recycle bin back to the
notebook (See Figure 55).
Note: Items are permanently deleted after 60 days. Right-click a page or section to move it out of
the Recycle Bin.
Figure 55 - Remove or Restore a Section or Page
Page 35 of 36
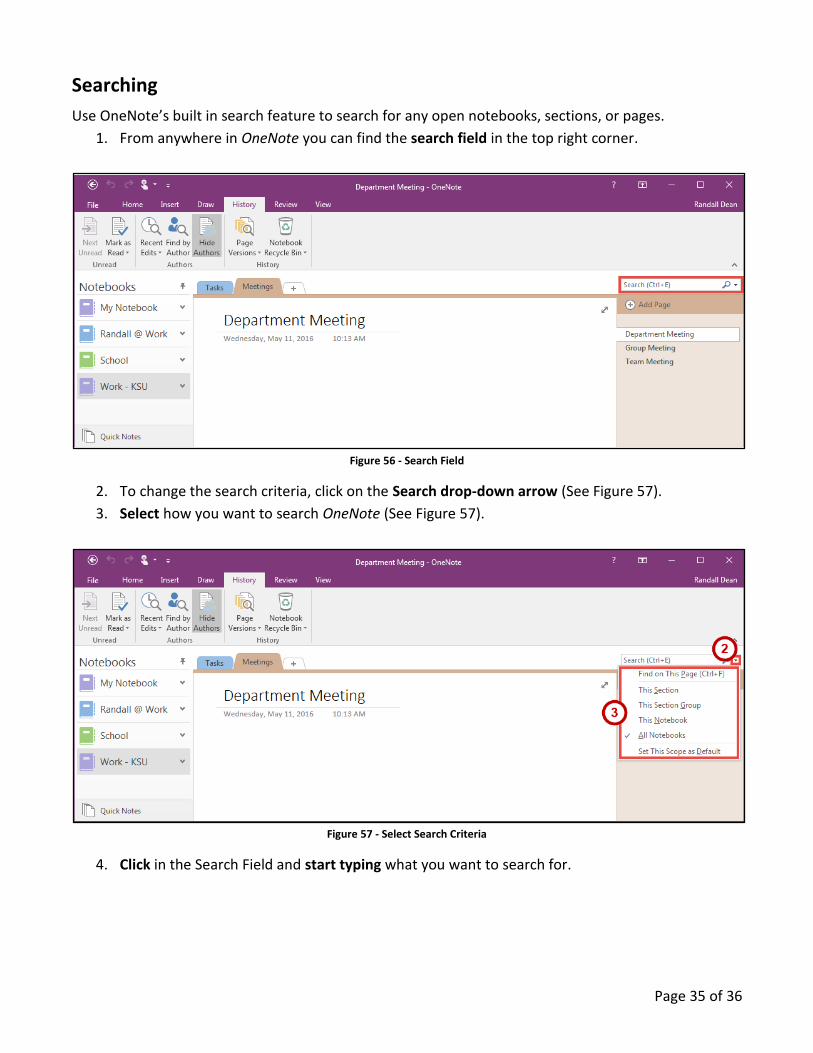
Searching
Use OneNote’s built in search feature to search for any open notebooks, sections, or pages.
1. From anywhere in OneNote you can find the search field in the top right corner.
Figure 56 - Search Field
2. To change the search criteria, click on the Search drop-down arrow (See Figure 57).
3. Select how you want to search OneNote (See Figure 57).
Figure 57 - Select Search Criteria
4. Click in the Search Field and start typing what you want to search for.
Page 36 of 36
Additional Help
For additional support, please contact the KSU Service Desk:
KSU Service Desk for Faculty & Staff
Phone: 470-578-6999
Email: [email protected]
Website: http://uits.kennesaw.edu
KSU Student Helpdesk
Phone: 470-578-3555
Email: [email protected]
Website: http://uits.kennesaw.edu
Related Documents