L:\Timetables\Circulars\Circulars 2013\WTT Circulars\WT13-2009 Addenda-rolling Stock.doc METROPOLITAN WORKING TIMETABLE SYSTEM DESRIPTION - ADDENDA COMMENCING FORTHWITH The following alterations and corrections are to be made to the Working Timetable commencing on the date shown above. SYSTEM DESCRIPTION (ADDENDA) The following alterations commence forthwith. Page A 112 Add the following under the following heading: CHICAGO FREIGHT CAR LEASING Co. AUSTRALIA — FREIGHT VEHICLES Class Description of Vehicle Max. Speed Km/h Max Tare Mass (Tns) Nominal Carrying Capacity Evenly distributed (Tonnes) Per- miss- ible Over- Load (Kg) Length over Pulling Lines nearest 100mm Gauge (mm) Avail- able for Bogie Ex- chang e Old Class Deck Ht. (mm) REMARKS/RESTRICTIONS CQIY Container Flat 80 16.7 67.3 14.580 1600 No - 1195 Nos. 601-608. CQXY Container Flat – 2 pack 80 35.4 132.6 28.251 1600 No - 1158 Nos. 1501-1575 All concerned to note, amend the Working Timetable, and arrange. SCOTT SHORT MANAGER, NETWORK STRATEGY & SCHEDULING PER:– Network Planning Level 2, 595 Collins Street Melbourne, Victoria 11598-pnm 26 th September 2013 WTT.2009/13 WTT.2009/13

Welcome message from author
This document is posted to help you gain knowledge. Please leave a comment to let me know what you think about it! Share it to your friends and learn new things together.
Transcript
L:\Timetables\Circulars\Circulars 2013\WTT Circulars\WT13-2009 Addenda-rolling Stock.doc
METROPOLITAN WORKING TIMETABLE
SYSTEM DESRIPTION - ADDENDA
COMMENCING FORTHWITH
The following alterations and corrections are to be made to the Working Timetablecommencing on the date shown above.
SYSTEM DESCRIPTION (ADDENDA)
The following alterations commence forthwith.
Page A 112
Add the following under the following heading:
CHICAGO FREIGHT CAR LEASING Co. AUSTRALIA — FREIGHT VEHICLES
Class Descriptionof Vehicle
Max.SpeedKm/h
MaxTareMass(Tns)
NominalCarryingCapacityEvenly
distributed(Tonnes)
Per-miss-ible
Over-Load(Kg)
Lengthover
PullingLines
nearest100mm
Gauge(mm)
Avail-ablefor
BogieEx-
change
OldClass
DeckHt.
(mm)REMARKS/RESTRICTIONS
CQIY Container Flat 80 16.7 67.3 14.580 1600 No - 1195 Nos. 601-608.
CQXY Container Flat – 2 pack 80 35.4 132.6 28.251 1600 No - 1158 Nos. 1501-1575
All concerned to note, amend the Working Timetable, and arrange.
SCOTT SHORTMANAGER, NETWORK STRATEGY & SCHEDULINGPER:–
Network PlanningLevel 2, 595 Collins StreetMelbourne, Victoria 11598-pnm26th September 2013
WTT.2009/13WTT.2009/13
Metro Melbourne - System Description [WTT Addenda] 1
WWOORRKKIINNGG TTIIMMEETTAABBLLEE
SSYYSSTTEEMM
DDEESSCCRRIIPPTTIIOONN
[[WWTTTT AADDDDEENNDDAA]]
AASS FFRROOMM
1188tthh
SSEEPPTTEEMMBBEERR,, 22001133
SCOTT SHORT
MANAGER, NETWORK STRATEGY AND SCHEDULING
PER:-
Metro Melbourne - System Description [WTT Addenda] A 1 19/09/2013
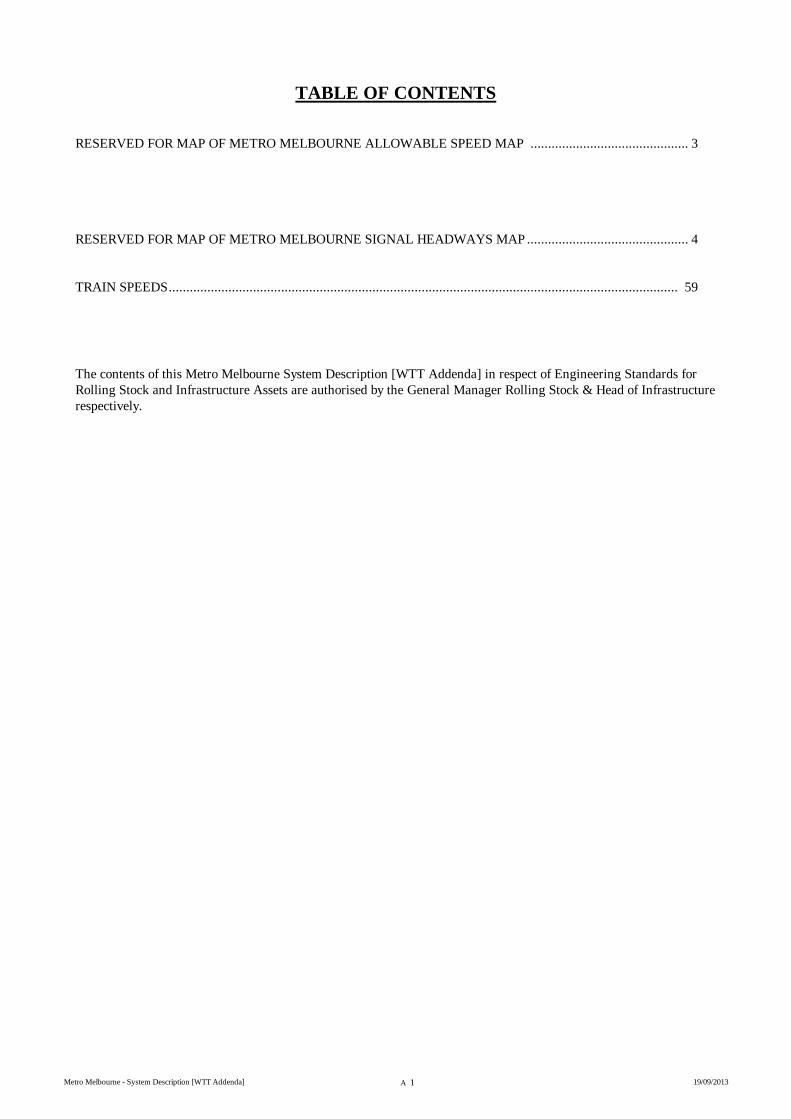
TABLE OF CONTENTS
RESERVED FOR MAP OF METRO MELBOURNE ALLOWABLE SPEED MAP ............................................. 3
RESERVED FOR MAP OF METRO MELBOURNE SIGNAL HEADWAYS MAP .............................................. 4
TRAIN SPEEDS ................................................................................................................................................. 59
The contents of this Metro Melbourne System Description [WTT Addenda] in respect of Engineering Standards for
Rolling Stock and Infrastructure Assets are authorised by the General Manager Rolling Stock & Head of Infrastructure
respectively.
Metro Melbourne - System Description [WTT Addenda] A 2 19/09/2013
RESERVED FOR MAP OF METRO MELBOURNE SYSTEM

Metro Melbourne - System Description [WTT Addenda] A 3 19/09/2013
RESERVED FOR MAP OF METRO MELBOURNE ALLOWABLE SPEED MAP

Metro Melbourne - System Description [WTT Addenda] A 4 19/09/2013
RESERVED FOR MAP OF METRO MELBOURNE SIGNAL HEADWAYS MAP
Metro Melbourne - System Description [WTT Addenda] A 5 19/09/2013
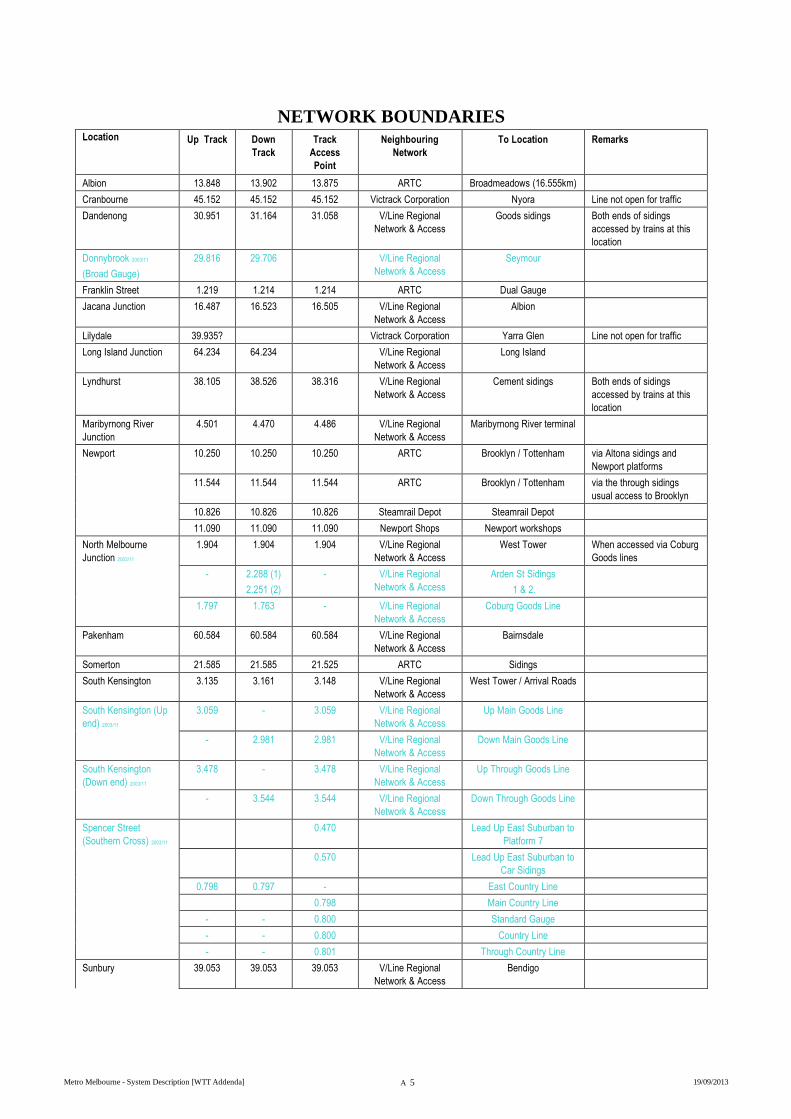
NETWORK BOUNDARIES
Location Up Track Down
Track
Track
Access
Point
Neighbouring
Network
To Location Remarks
Albion 13.848 13.902 13.875 ARTC Broadmeadows (16.555km)
Cranbourne 45.152 45.152 45.152 Victrack Corporation Nyora Line not open for traffic
Dandenong 30.951 31.164 31.058 V/Line Regional
Network & Access
Goods sidings Both ends of sidings
accessed by trains at this
location
Donnybrook 2003/11
(Broad Gauge)
29.816
29.706
V/Line Regional
Network & Access
Seymour
Franklin Street 1.219 1.214 1.214 ARTC Dual Gauge
Jacana Junction 16.487 16.523 16.505 V/Line Regional
Network & Access
Albion
Lilydale 39.935? Victrack Corporation Yarra Glen Line not open for traffic
Long Island Junction 64.234 64.234 V/Line Regional
Network & Access
Long Island
Lyndhurst 38.105 38.526 38.316 V/Line Regional
Network & Access
Cement sidings Both ends of sidings
accessed by trains at this
location
Maribyrnong River
Junction
4.501 4.470 4.486 V/Line Regional
Network & Access
Maribyrnong River terminal
Newport 10.250 10.250 10.250 ARTC Brooklyn / Tottenham via Altona sidings and
Newport platforms
11.544 11.544 11.544 ARTC Brooklyn / Tottenham via the through sidings
usual access to Brooklyn
10.826 10.826 10.826 Steamrail Depot Steamrail Depot
11.090 11.090 11.090 Newport Shops Newport workshops
North Melbourne
Junction 2003/11
1.904 1.904 1.904 V/Line Regional
Network & Access
West Tower When accessed via Coburg
Goods lines
- 2.288 (1)
2.251 (2)
- V/Line Regional
Network & Access
Arden St Sidings
1 & 2.
1.797 1.763 - V/Line Regional
Network & Access
Coburg Goods Line
Pakenham 60.584 60.584 60.584 V/Line Regional
Network & Access
Bairnsdale
Somerton 21.585 21.585 21.525 ARTC Sidings
South Kensington 3.135 3.161 3.148 V/Line Regional
Network & Access
West Tower / Arrival Roads
South Kensington (Up
end) 2003/11
3.059 - 3.059 V/Line Regional
Network & Access
Up Main Goods Line
- 2.981 2.981 V/Line Regional
Network & Access
Down Main Goods Line
South Kensington
(Down end) 2003/11
3.478 - 3.478 V/Line Regional
Network & Access
Up Through Goods Line
- 3.544 3.544 V/Line Regional
Network & Access
Down Through Goods Line
Spencer Street
(Southern Cross) 2003/11
0.470 Lead Up East Suburban to
Platform 7
0.570 Lead Up East Suburban to
Car Sidings
0.798 0.797 - East Country Line
0.798 Main Country Line
- - 0.800 Standard Gauge
- - 0.800 Country Line
- - 0.801 Through Country Line
Sunbury 39.053 39.053 39.053 V/Line Regional
Network & Access
Bendigo
Metro Melbourne - System Description [WTT Addenda] A 6 19/09/2013
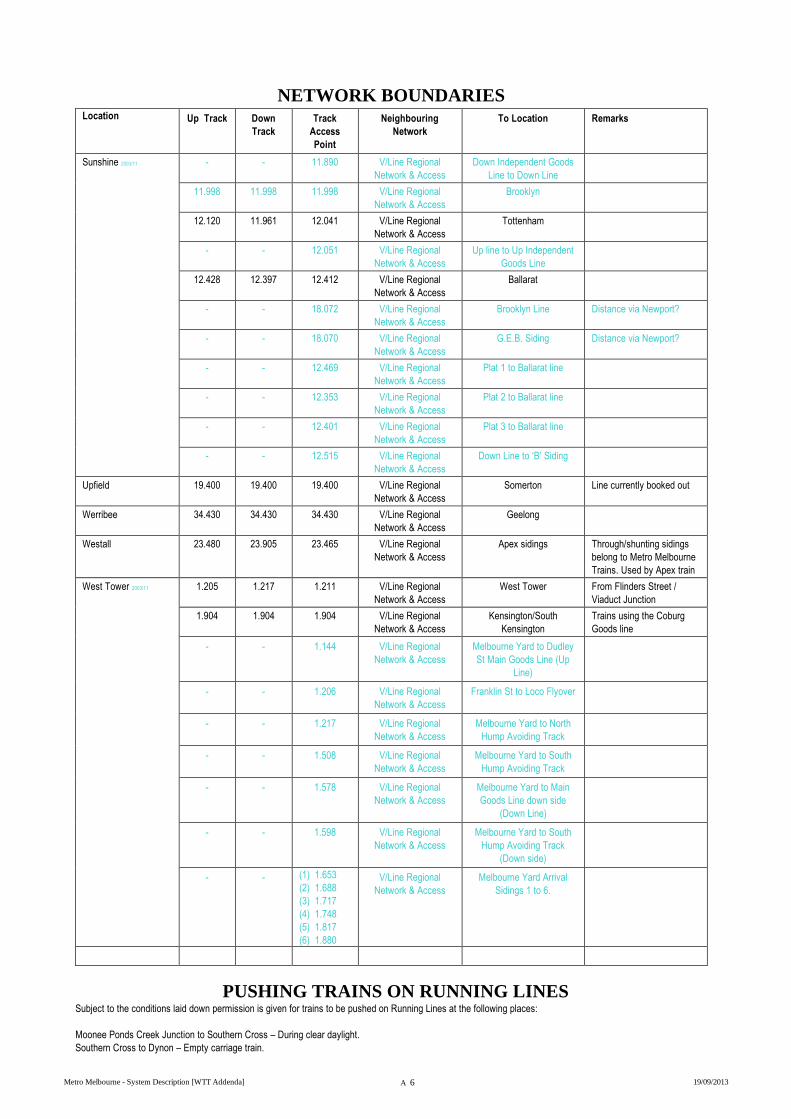
NETWORK BOUNDARIES
Location Up Track Down
Track
Track
Access
Point
Neighbouring
Network
To Location Remarks
Sunshine 2003/11 - - 11.890 V/Line Regional
Network & Access
Down Independent Goods
Line to Down Line
11.998 11.998 11.998 V/Line Regional
Network & Access
Brooklyn
12.120 11.961 12.041 V/Line Regional
Network & Access
Tottenham
- - 12.051 V/Line Regional
Network & Access
Up line to Up Independent
Goods Line
12.428 12.397 12.412 V/Line Regional
Network & Access
Ballarat
- - 18.072 V/Line Regional
Network & Access
Brooklyn Line Distance via Newport?
- - 18.070 V/Line Regional
Network & Access
G.E.B. Siding Distance via Newport?
- - 12.469 V/Line Regional
Network & Access
Plat 1 to Ballarat line
- - 12.353 V/Line Regional
Network & Access
Plat 2 to Ballarat line
- - 12.401 V/Line Regional
Network & Access
Plat 3 to Ballarat line
- - 12.515 V/Line Regional
Network & Access
Down Line to ‘B’ Siding
Upfield 19.400 19.400 19.400 V/Line Regional
Network & Access
Somerton Line currently booked out
Werribee 34.430 34.430 34.430 V/Line Regional
Network & Access
Geelong
Westall 23.480 23.905 23.465 V/Line Regional
Network & Access
Apex sidings Through/shunting sidings
belong to Metro Melbourne
Trains. Used by Apex train
West Tower 2003/11 1.205 1.217 1.211 V/Line Regional
Network & Access
West Tower From Flinders Street /
Viaduct Junction
1.904 1.904 1.904 V/Line Regional
Network & Access
Kensington/South
Kensington
Trains using the Coburg
Goods line
- - 1.144 V/Line Regional
Network & Access
Melbourne Yard to Dudley
St Main Goods Line (Up
Line)
- - 1.206 V/Line Regional
Network & Access
Franklin St to Loco Flyover
- - 1.217 V/Line Regional
Network & Access
Melbourne Yard to North
Hump Avoiding Track
- - 1.508 V/Line Regional
Network & Access
Melbourne Yard to South
Hump Avoiding Track
- - 1.578 V/Line Regional
Network & Access
Melbourne Yard to Main
Goods Line down side
(Down Line)
- - 1.598 V/Line Regional
Network & Access
Melbourne Yard to South
Hump Avoiding Track
(Down side)
- - (1) 1.653
(2) 1.688
(3) 1.717
(4) 1.748
(5) 1.817
(6) 1.880
V/Line Regional
Network & Access
Melbourne Yard Arrival
Sidings 1 to 6.
PUSHING TRAINS ON RUNNING LINES Subject to the conditions laid down permission is given for trains to be pushed on Running Lines at the following places:
Moonee Ponds Creek Junction to Southern Cross – During clear daylight.
Southern Cross to Dynon – Empty carriage train.
Metro Melbourne - System Description [WTT Addenda] A 7 19/09/2013
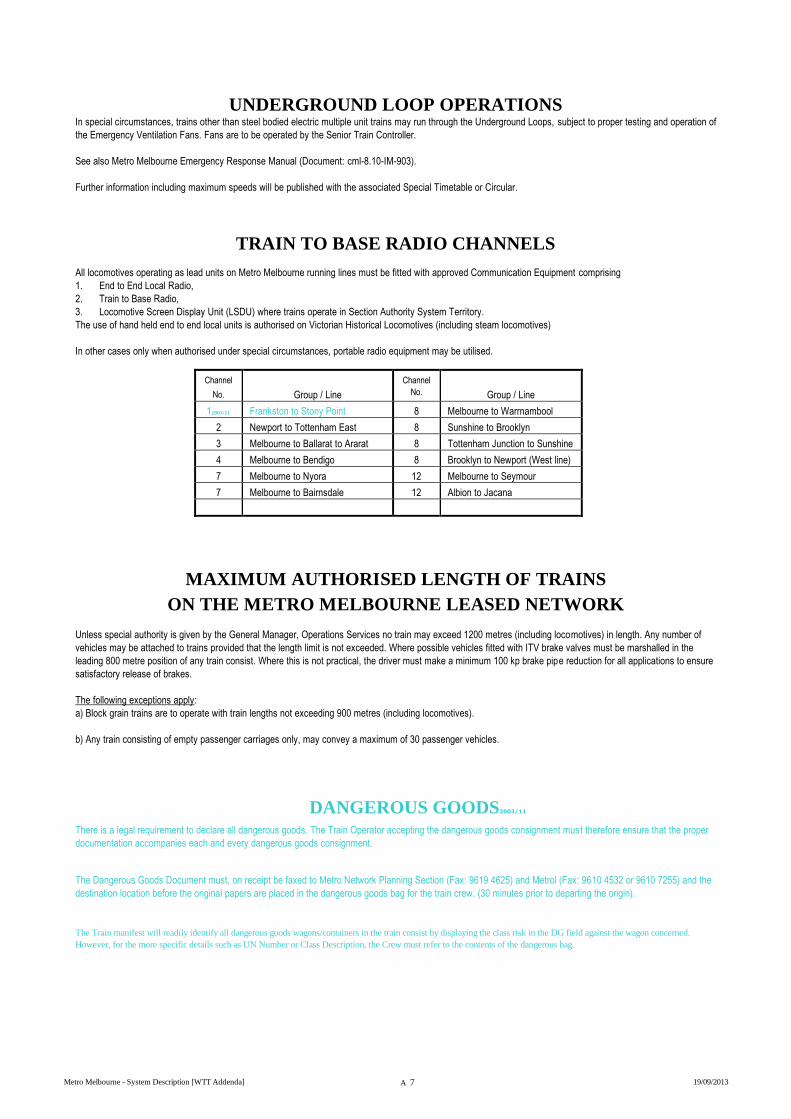
UNDERGROUND LOOP OPERATIONS In special circumstances, trains other than steel bodied electric multiple unit trains may run through the Underground Loops, subject to proper testing and operation of
the Emergency Ventilation Fans. Fans are to be operated by the Senior Train Controller.
See also Metro Melbourne Emergency Response Manual (Document: cml-8.10-IM-903).
Further information including maximum speeds will be published with the associated Special Timetable or Circular.
TRAIN TO BASE RADIO CHANNELS
All locomotives operating as lead units on Metro Melbourne running lines must be fitted with approved Communication Equipment comprising
1. End to End Local Radio,
2. Train to Base Radio,
3. Locomotive Screen Display Unit (LSDU) where trains operate in Section Authority System Territory.
The use of hand held end to end local units is authorised on Victorian Historical Locomotives (including steam locomotives)
In other cases only when authorised under special circumstances, portable radio equipment may be utilised.
Channel
No.
Group / Line
Channel
No.
Group / Line
12003/11 Frankston to Stony Point 8 Melbourne to Warrnambool
2 Newport to Tottenham East 8 Sunshine to Brooklyn
3 Melbourne to Ballarat to Ararat 8 Tottenham Junction to Sunshine
4 Melbourne to Bendigo 8 Brooklyn to Newport (West line)
7 Melbourne to Nyora 12 Melbourne to Seymour
7 Melbourne to Bairnsdale 12 Albion to Jacana
MAXIMUM AUTHORISED LENGTH OF TRAINS
ON THE METRO MELBOURNE LEASED NETWORK
Unless special authority is given by the General Manager, Operations Services no train may exceed 1200 metres (including locomotives) in length. Any number of
vehicles may be attached to trains provided that the length limit is not exceeded. Where possible vehicles fitted with ITV brake valves must be marshalled in the
leading 800 metre position of any train consist. Where this is not practical, the driver must make a minimum 100 kp brake pipe reduction for all applications to ensure
satisfactory release of brakes.
The following exceptions apply:
a) Block grain trains are to operate with train lengths not exceeding 900 metres (including locomotives).
b) Any train consisting of empty passenger carriages only, may convey a maximum of 30 passenger vehicles.
DANGEROUS GOODS2003/11 There is a legal requirement to declare all dangerous goods. The Train Operator accepting the dangerous goods consignment must therefore ensure that the proper
documentation accompanies each and every dangerous goods consignment.
The Dangerous Goods Document must, on receipt be faxed to Metro Network Planning Section (Fax: 9619 4625) and Metrol (Fax: 9610 4532 or 9610 7255) and the
destination location before the original papers are placed in the dangerous goods bag for the train crew. (30 minutes prior to departing the origin).
The Train manifest will readily identify all dangerous goods wagons/containers in the train consist by displaying the class risk in the DG field against the wagon concerned.
However, for the more specific details such as UN Number or Class Description, the Crew must refer to the contents of the dangerous bag.
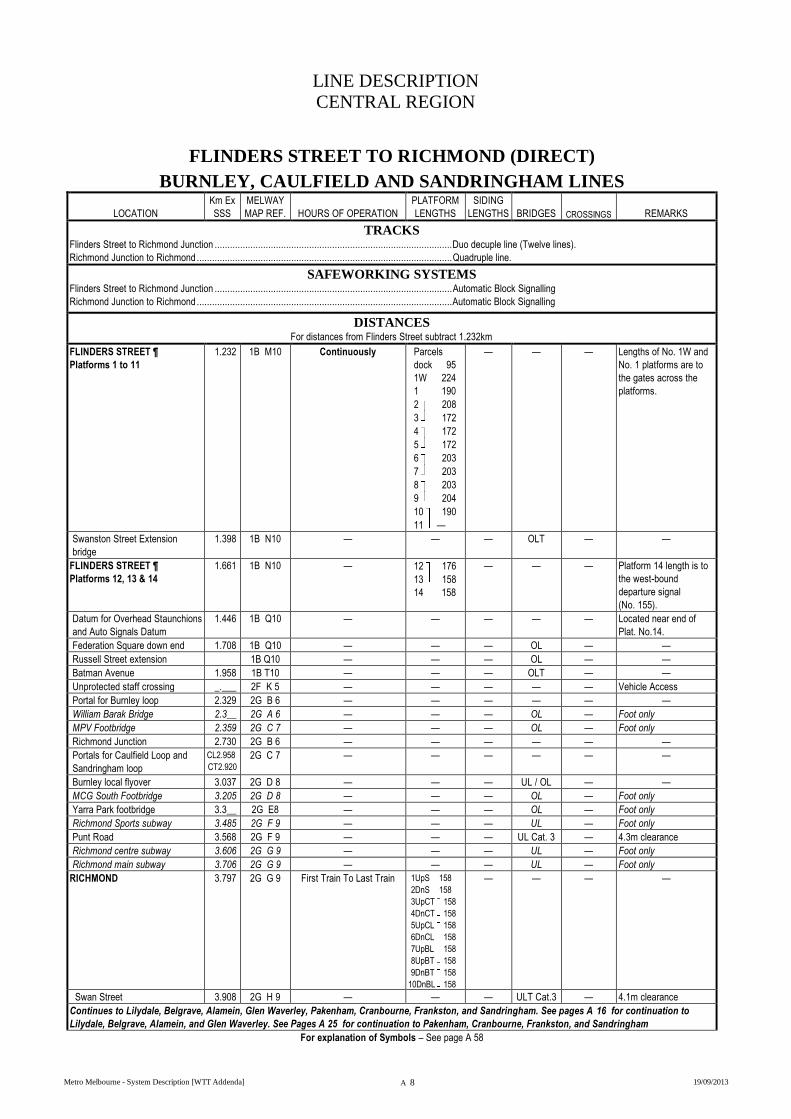
LINE DESCRIPTION
CENTRAL REGION
Metro Melbourne - System Description [WTT Addenda] A 8 19/09/2013
FLINDERS STREET TO RICHMOND (DIRECT)
BURNLEY, CAULFIELD AND SANDRINGHAM LINES
LOCATION
Km Ex
SSS
MELWAY
MAP REF. HOURS OF OPERATION
PLATFORM
LENGTHS
SIDING
LENGTHS BRIDGES CROSSINGS REMARKS
TRACKS Flinders Street to Richmond Junction ............................................................................................. Duo decuple line (Twelve lines).
Richmond Junction to Richmond .................................................................................................... Quadruple line.
SAFEWORKING SYSTEMS Flinders Street to Richmond Junction ............................................................................................. Automatic Block Signalling
Richmond Junction to Richmond .................................................................................................... Automatic Block Signalling
DISTANCES For distances from Flinders Street subtract 1.232km
FLINDERS STREET 
Platforms 1 to 11
1.232 1B M10 Continuously Parcels
dock 95
1W 224
1 190
2 208
3 172
4 172
5 172
6 203
7 203
8 203
9 204
10 190
11 —
— — — Lengths of No. 1W and
No. 1 platforms are to
the gates across the
platforms.
Swanston Street Extension
bridge
1.398 1B N10 — — — OLT — —
FLINDERS STREET 
Platforms 12, 13 & 14
1.661 1B N10 — 12 176
13 158
14 158
— — — Platform 14 length is to
the west-bound
departure signal
(No. 155).
Datum for Overhead Staunchions
and Auto Signals Datum
1.446 1B Q10 — — — — — Located near end of
Plat. No.14.
Federation Square down end 1.708 1B Q10 — — — OL — —
Russell Street extension 1B Q10 — — — OL — —
Batman Avenue 1.958 1B T10 — — — OLT — —
Unprotected staff crossing _.___ 2F K 5 — — — — — Vehicle Access
Portal for Burnley loop 2.329 2G B 6 — — — — — —
William Barak Bridge 2.3__ 2G A 6 — — — OL — Foot only
MPV Footbridge 2.359 2G C 7 — — — OL — Foot only
Richmond Junction 2.730 2G B 6 — — — — — —
Portals for Caulfield Loop and
Sandringham loop
CL2.958
CT2.920
2G C 7 — — — — — —
Burnley local flyover 3.037 2G D 8 — — — UL / OL — —
MCG South Footbridge 3.205 2G D 8 — — — OL — Foot only
Yarra Park footbridge 3.3__ 2G E8 — — — OL — Foot only
Richmond Sports subway 3.485 2G F 9 — — — UL — Foot only
Punt Road 3.568 2G F 9 — — — UL Cat. 3 — 4.3m clearance
Richmond centre subway 3.606 2G G 9 — — — UL — Foot only
Richmond main subway 3.706 2G G 9 — — — UL — Foot only
RICHMOND 3.797 2G G 9 First Train To Last Train 1UpS 158
2DnS 158
3UpCT 158
4DnCT 158
5UpCL 158
6DnCL 158
7UpBL 158
8UpBT 158
9DnBT 158
10DnBL 158
— — — —
Swan Street 3.908 2G H 9 — — — ULT Cat.3 — 4.1m clearance
Continues to Lilydale, Belgrave, Alamein, Glen Waverley, Pakenham, Cranbourne, Frankston, and Sandringham. See pages A 16 for continuation to
Lilydale, Belgrave, Alamein, and Glen Waverley. See Pages A 25 for continuation to Pakenham, Cranbourne, Frankston, and Sandringham
For explanation of Symbols – See page A 58
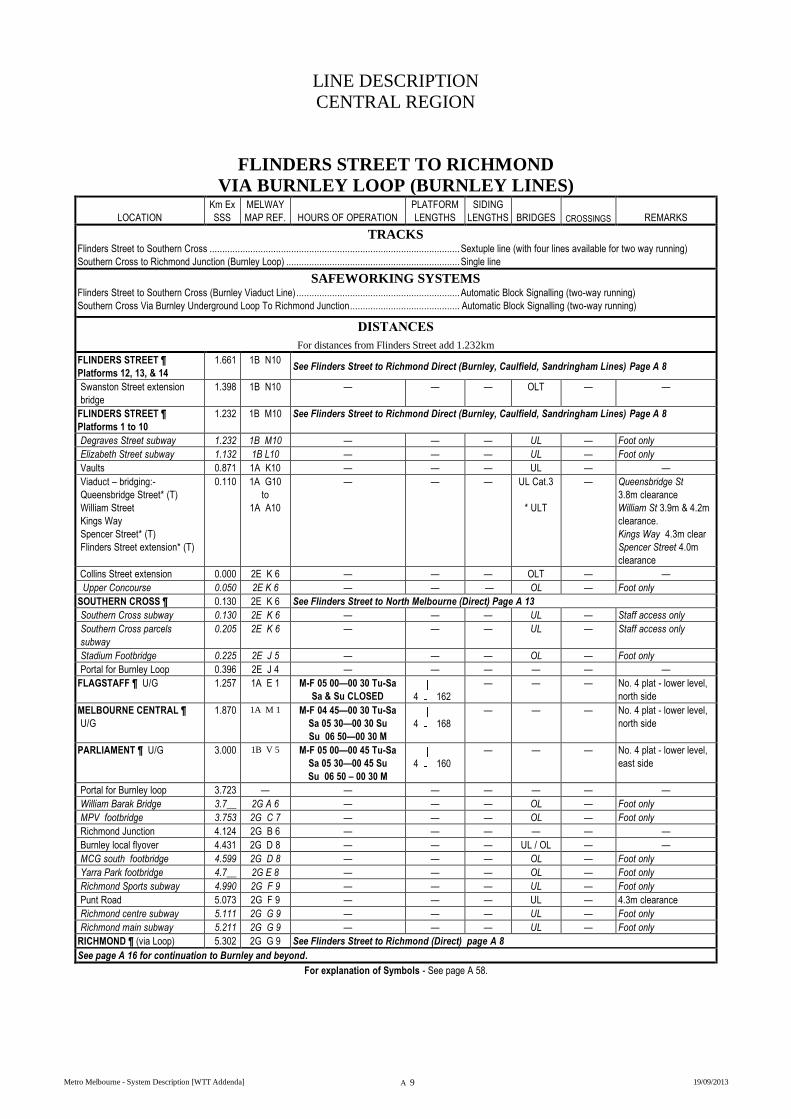
LINE DESCRIPTION
CENTRAL REGION
Metro Melbourne - System Description [WTT Addenda] A 9 19/09/2013
FLINDERS STREET TO RICHMOND
VIA BURNLEY LOOP (BURNLEY LINES)
LOCATION
Km Ex
SSS
MELWAY
MAP REF. HOURS OF OPERATION
PLATFORM
LENGTHS
SIDING
LENGTHS BRIDGES CROSSINGS REMARKS
TRACKS Flinders Street to Southern Cross .................................................................................................. Sextuple line (with four lines available for two way running)
Southern Cross to Richmond Junction (Burnley Loop) .................................................................... Single line
SAFEWORKING SYSTEMS Flinders Street to Southern Cross (Burnley Viaduct Line) ................................................................ Automatic Block Signalling (two-way running)
Southern Cross Via Burnley Underground Loop To Richmond Junction ........................................... Automatic Block Signalling (two-way running)
DISTANCES
For distances from Flinders Street add 1.232km
FLINDERS STREET 
Platforms 12, 13, & 14
1.661 1B N10 See Flinders Street to Richmond Direct (Burnley, Caulfield, Sandringham Lines) Page A 8
Swanston Street extension
bridge
1.398 1B N10 — — — OLT — —
FLINDERS STREET 
Platforms 1 to 10
1.232 1B M10 See Flinders Street to Richmond Direct (Burnley, Caulfield, Sandringham Lines) Page A 8
Degraves Street subway 1.232 1B M10 — — — UL — Foot only
Elizabeth Street subway 1.132 1B L10 — — — UL — Foot only
Vaults 0.871 1A K10 — — — UL — —
Viaduct – bridging:-
Queensbridge Street* (T)
William Street
Kings Way
Spencer Street* (T)
Flinders Street extension* (T)
0.110 1A G10
to
1A A10
— — — UL Cat.3
* ULT
— Queensbridge St
3.8m clearance
William St 3.9m & 4.2m
clearance.
Kings Way 4.3m clear
Spencer Street 4.0m
clearance
Collins Street extension 0.000 2E K 6 — — — OLT — —
Upper Concourse 0.050 2E K 6 — — — OL — Foot only
SOUTHERN CROSS ¶ 0.130 2E K 6 See Flinders Street to North Melbourne (Direct) Page A 13
Southern Cross subway 0.130 2E K 6 — — — UL — Staff access only
Southern Cross parcels
subway
0.205 2E K 6 — — — UL — Staff access only
Stadium Footbridge 0.225 2E J 5 — — — OL — Foot only
Portal for Burnley Loop 0.396 2E J 4 — — — — — —
FLAGSTAFF ¶ U/G 1.257 1A E 1 M-F 05 00—00 30 Tu-Sa
Sa & Su CLOSED
4 162
— —
— No. 4 plat - lower level,
north side
MELBOURNE CENTRAL 
U/G
1.870 1A M 1 M-F 04 45—00 30 Tu-Sa
Sa 05 30—00 30 Su
Su 06 50—00 30 M
4 168
— — — No. 4 plat - lower level,
north side
PARLIAMENT ¶ U/G 3.000 1B V 5 M-F 05 00—00 45 Tu-Sa
Sa 05 30—00 45 Su
Su 06 50 – 00 30 M
4 160
— — — No. 4 plat - lower level,
east side
Portal for Burnley loop 3.723 — — — — — — —
William Barak Bridge 3.7__ 2G A 6 — — — OL — Foot only
MPV footbridge 3.753 2G C 7 — — — OL — Foot only
Richmond Junction 4.124 2G B 6 — — — — — —
Burnley local flyover 4.431 2G D 8 — — — UL / OL — —
MCG south footbridge 4.599 2G D 8 — — — OL — Foot only
Yarra Park footbridge 4.7__ 2G E 8 — — — OL — Foot only
Richmond Sports subway 4.990 2G F 9 — — — UL — Foot only
Punt Road 5.073 2G F 9 — — — UL — 4.3m clearance
Richmond centre subway 5.111 2G G 9 — — — UL — Foot only
Richmond main subway 5.211 2G G 9 — — — UL — Foot only
RICHMOND ¶ (via Loop) 5.302 2G G 9 See Flinders Street to Richmond (Direct) page A 8
See page A 16 for continuation to Burnley and beyond.
For explanation of Symbols - See page A 58.
LINE DESCRIPTION
CENTRAL REGION
Metro Melbourne - System Description [WTT Addenda] A 10 19/09/2013
FLINDERS STREET TO RICHMOND
VIA CAULFIELD LOOP (CAULFIELD LINES)
LOCATION
Km Ex
SSS
MELWAY
MAP REF. HOURS OF OPERATION
PLATFORM
LENGTHS
SIDING
LENGTHS BRIDGES CROSSINGS REMARKS
TRACKS Flinders Street to Southern Cross .................................................................................................. Sextuple line (with four lines available for two way running)
Southern Cross to Richmond Junction (Caulfield Loop) .................................................................. Single line
SAFEWORKING SYSTEMS Flinders Street to Southern Cross (Caulfield Viaduct Line) .............................................................. Automatic Block Signalling (two-way running)
Southern Cross Via Caulfield Underground Loop To Richmond Junction ......................................... Automatic Block Signalling (two-way running)
DISTANCES
For distances from Flinders Street subtract 1.232km
FLINDERS STREET 
Platforms 12, 13, & 14
1.661 1B N10 See Flinders Street to Richmond Direct (Burnley, Caulfield, Sandringham Lines) Page A 8
Swanston Street extension
bridge
1.398 1B N10 — — — OLT — —
FLINDERS STREET ¶ 1.232 1B M10 See Flinders Street to Richmond Direct (Burnley, Caulfield, Sandringham Lines) Page A 8
Degraves Street subway 1.232 1B M10 — — — UL — Foot only
Elizabeth Street subway 1.132 1B L10 — — — UL — Foot only
Vaults 0.871 1A K10 — — — UL — —
Viaduct – bridging:-
Queensbridge Street (T)
William Street
Kings Way * (T)
Spencer Street. * (T)
Flinders Street extension* (T)
0.110 1A G10
to
1A A10
— — — UL Cat.3
* ULT
— Queensbridge St
3.8m clearance
William St 3.9m & 4.2m
clearance.
Kings Way 4.3m clear
Spencer Street 4.0m
clearance
Collins Street extension 0.000 2E K 6 — — — OLT — —
Upper Concourse 0.050 2E K 6 — — — OL — Foot only
SOUTHERN CROSS ¶ 0.130 2E K 6 See Flinders Street to North Melbourne (Direct) – Page A 13
Southern Cross subway 0.130 2E K 6 — — — UL — Staff access only
Southern Cross goods subway 0.205 2E K 6 — — — UL — Staff access only
Stadium Footbridge 0.225 2E J 5 — — — OL — Foot only
Portal for Caulfield Loop 0.435 2E J 4 — — — — — —
FLAGSTAFF ¶ U/G 1.290 1A E 1 See Flinders St. to
Richmond via Burnley Loop
page A 9
2 162
— —
— No. 2 plat - upper level,
north side
MELBOURNE CENTRAL 
U/G
1.903 1A M 1 See Flinders St. to
Richmond via Burnley Loop
page A 9
2 168
— — — No. 2 plat - upper level,
north side
PARLIAMENT ¶ U/G 3.032 1B V 5 See Flinders St. to
Richmond via Burnley Loop
page A 9.
2 160
— — — No. 2 plat - upper level,
east side
Junction for portals of Caulfield
and Sandringham lines
4.150 2F K 5 — — — — — —
Portal for Caulfield lines CT4.459
CL4.489
2G A 5 — — — — — —
MPV footbridge 4.___ 2G A 6 — — — OL — Foot only
MCG south footbridge 4.498 2G D 8 — — — OL — Foot only
Yarra Park footbridge 4.5__ 2G E 8 — — — OL — Foot only
Richmond Sports subway 4.778 2G F 9 — — — UL — Foot only
Punt Road 4.861 2G F 9 — — — UL — 4.3m clearance
Richmond centre subway 5.010 2G G 9 — — — UL — Foot only
Richmond main subway 5.110 2G G 9 — — — UL — Foot only
RICHMOND ¶ (via Loop) 5.201 2G G 9 See Flinders Street to Richmond (Direct) Page A 8
For continuation to South Yarra and beyond see page A 25
For explanation of Symbols - See page A 58.
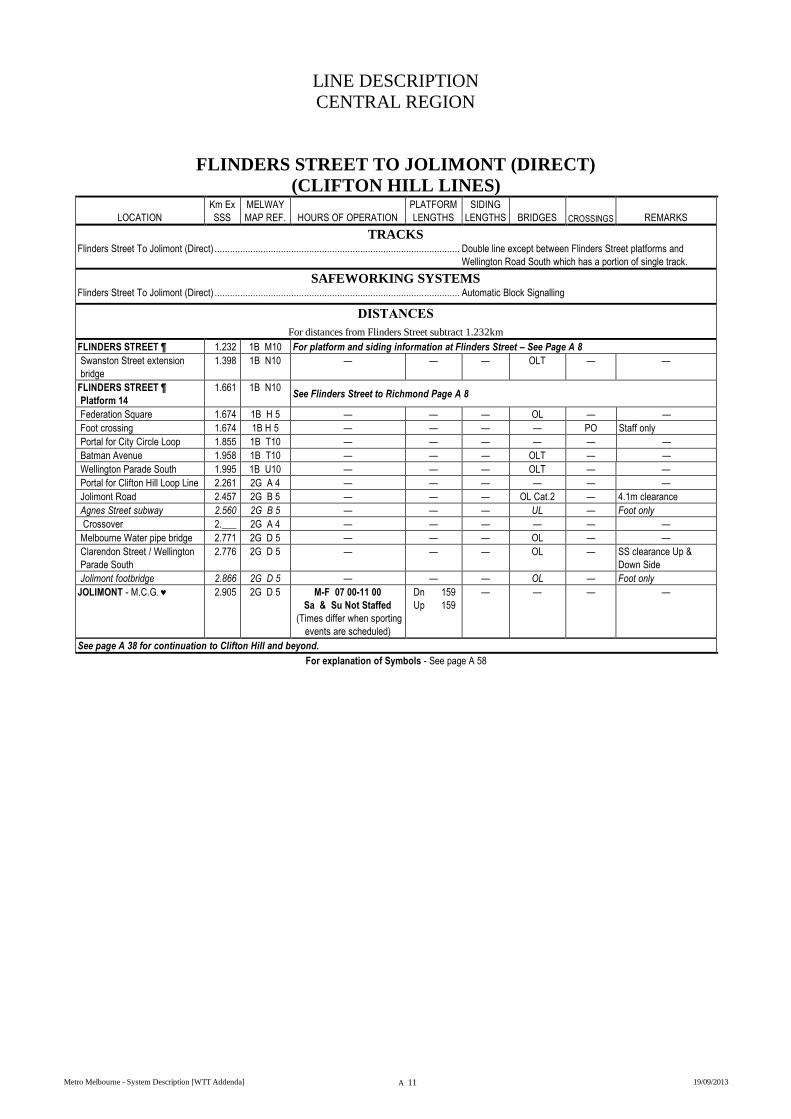
LINE DESCRIPTION
CENTRAL REGION
Metro Melbourne - System Description [WTT Addenda] A 11 19/09/2013
FLINDERS STREET TO JOLIMONT (DIRECT)
(CLIFTON HILL LINES)
LOCATION
Km Ex
SSS
MELWAY
MAP REF. HOURS OF OPERATION
PLATFORM
LENGTHS
SIDING
LENGTHS BRIDGES CROSSINGS REMARKS
TRACKS Flinders Street To Jolimont (Direct) ................................................................................................ Double line except between Flinders Street platforms and
Wellington Road South which has a portion of single track.
SAFEWORKING SYSTEMS Flinders Street To Jolimont (Direct) ................................................................................................ Automatic Block Signalling
DISTANCES
For distances from Flinders Street subtract 1.232km
FLINDERS STREET ¶ 1.232 1B M10 For platform and siding information at Flinders Street – See Page A 8
Swanston Street extension
bridge
1.398 1B N10 — — — OLT — —
FLINDERS STREET 
Platform 14
1.661 1B N10 See Flinders Street to Richmond Page A 8
Federation Square 1.674 1B H 5 — — — OL — —
Foot crossing 1.674 1B H 5 — — — — PO Staff only
Portal for City Circle Loop 1.855 1B T10 — — — — — —
Batman Avenue 1.958 1B T10 — — — OLT — —
Wellington Parade South 1.995 1B U10 — — — OLT — —
Portal for Clifton Hill Loop Line 2.261 2G A 4 — — — — — —
Jolimont Road 2.457 2G B 5 — — — OL Cat.2 — 4.1m clearance
Agnes Street subway 2.560 2G B 5 — — — UL — Foot only
Crossover 2.___ 2G A 4 — — — — — —
Melbourne Water pipe bridge 2.771 2G D 5 — — — OL — —
Clarendon Street / Wellington
Parade South
2.776 2G D 5 — — — OL — SS clearance Up &
Down Side
Jolimont footbridge 2.866 2G D 5 — — — OL — Foot only
JOLIMONT - M.C.G. ♥ 2.905 2G D 5 M-F 07 00-11 00
Sa & Su Not Staffed
(Times differ when sporting
events are scheduled)
Dn 159
Up 159
— — — —
See page A 38 for continuation to Clifton Hill and beyond.
For explanation of Symbols - See page A 58
LINE DESCRIPTION
CENTRAL REGION
Metro Melbourne - System Description [WTT Addenda] A 12 19/09/2013
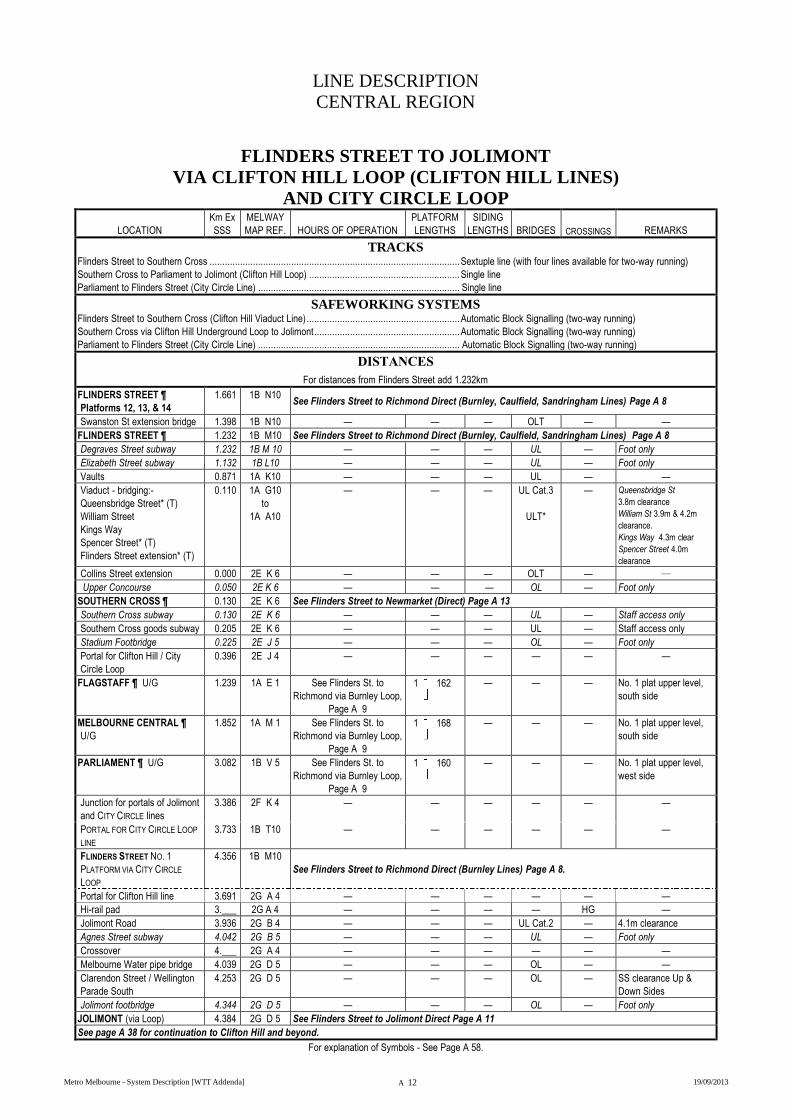
FLINDERS STREET TO JOLIMONT
VIA CLIFTON HILL LOOP (CLIFTON HILL LINES)
AND CITY CIRCLE LOOP
LOCATION
Km Ex
SSS
MELWAY
MAP REF. HOURS OF OPERATION
PLATFORM
LENGTHS
SIDING
LENGTHS BRIDGES CROSSINGS REMARKS
TRACKS Flinders Street to Southern Cross .................................................................................................. Sextuple line (with four lines available for two-way running)
Southern Cross to Parliament to Jolimont (Clifton Hill Loop) ........................................................... Single line
Parliament to Flinders Street (City Circle Line) ............................................................................... Single line
SAFEWORKING SYSTEMS Flinders Street to Southern Cross (Clifton Hill Viaduct Line) ............................................................ Automatic Block Signalling (two-way running)
Southern Cross via Clifton Hill Underground Loop to Jolimont ......................................................... Automatic Block Signalling (two-way running)
Parliament to Flinders Street (City Circle Line) ............................................................................... Automatic Block Signalling (two-way running)
DISTANCES
For distances from Flinders Street add 1.232km
FLINDERS STREET 
Platforms 12, 13, & 14
1.661 1B N10 See Flinders Street to Richmond Direct (Burnley, Caulfield, Sandringham Lines) Page A 8
Swanston St extension bridge 1.398 1B N10 — — — OLT — —
FLINDERS STREET ¶ 1.232 1B M10 See Flinders Street to Richmond Direct (Burnley, Caulfield, Sandringham Lines) Page A 8
Degraves Street subway 1.232 1B M 10 — — — UL — Foot only
Elizabeth Street subway 1.132 1B L10 — — — UL — Foot only
Vaults 0.871 1A K10 — — — UL — —
Viaduct - bridging:-
Queensbridge Street* (T)
William Street
Kings Way
Spencer Street* (T)
Flinders Street extension* (T)
0.110 1A G10
to
1A A10
— — — UL Cat.3
ULT*
— Queensbridge St
3.8m clearance
William St 3.9m & 4.2m
clearance.
Kings Way 4.3m clear
Spencer Street 4.0m
clearance
Collins Street extension 0.000 2E K 6 — — — OLT — —
Upper Concourse 0.050 2E K 6 — — — OL — Foot only
SOUTHERN CROSS ¶ 0.130 2E K 6 See Flinders Street to Newmarket (Direct) Page A 13
Southern Cross subway 0.130 2E K 6 — — — UL — Staff access only
Southern Cross goods subway 0.205 2E K 6 — — — UL — Staff access only
Stadium Footbridge 0.225 2E J 5 — — — OL — Foot only
Portal for Clifton Hill / City
Circle Loop
0.396 2E J 4 — — — — — —
FLAGSTAFF ¶ U/G 1.239 1A E 1 See Flinders St. to
Richmond via Burnley Loop,
Page A 9
1 162
— —
— No. 1 plat upper level,
south side
MELBOURNE CENTRAL 
U/G
1.852 1A M 1 See Flinders St. to
Richmond via Burnley Loop,
Page A 9
1 168
— — — No. 1 plat upper level,
south side
PARLIAMENT ¶ U/G 3.082 1B V 5 See Flinders St. to
Richmond via Burnley Loop,
Page A 9
1 160
— — — No. 1 plat upper level,
west side
Junction for portals of Jolimont
and CITY CIRCLE lines
3.386 2F K 4 — — — — — —
PORTAL FOR CITY CIRCLE LOOP
LINE
3.733 1B T10 — — — — — —
FLINDERS STREET NO. 1
PLATFORM VIA CITY CIRCLE
LOOP
4.356 1B M10
See Flinders Street to Richmond Direct (Burnley Lines) Page A 8.
Portal for Clifton Hill line 3.691 2G A 4 — — — — — —
Hi-rail pad 3.___ 2G A 4 — — — — HG —
Jolimont Road 3.936 2G B 4 — — — UL Cat.2 — 4.1m clearance
Agnes Street subway 4.042 2G B 5 — — — UL — Foot only
Crossover 4.___ 2G A 4 — — — — — —
Melbourne Water pipe bridge 4.039 2G D 5 — — — OL — —
Clarendon Street / Wellington
Parade South
4.253 2G D 5 — — — OL — SS clearance Up &
Down Sides
Jolimont footbridge 4.344 2G D 5 — — — OL — Foot only
JOLIMONT (via Loop) 4.384 2G D 5 See Flinders Street to Jolimont Direct Page A 11
See page A 38 for continuation to Clifton Hill and beyond.
For explanation of Symbols - See Page A 58.
LINE DESCRIPTION
CENTRAL REGION
Metro Melbourne - System Description [WTT Addenda] A 13 19/09/2013
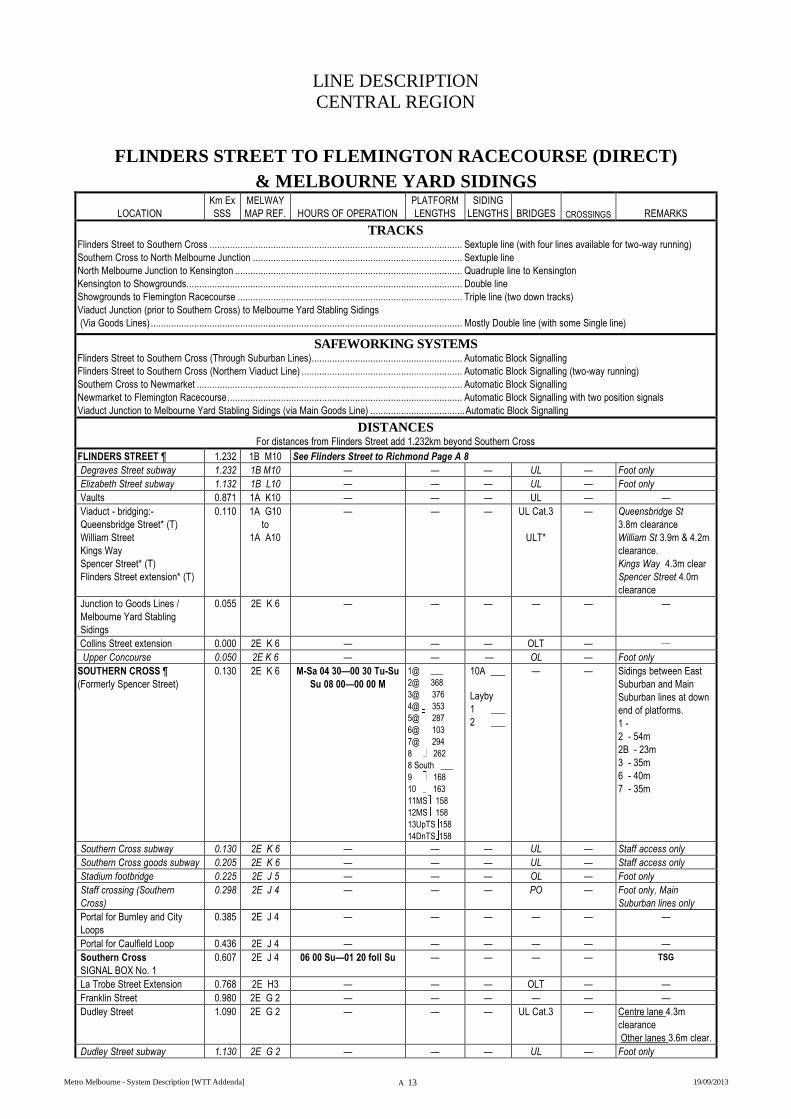
FLINDERS STREET TO FLEMINGTON RACECOURSE (DIRECT)
& MELBOURNE YARD SIDINGS
LOCATION
Km Ex
SSS
MELWAY
MAP REF. HOURS OF OPERATION
PLATFORM
LENGTHS
SIDING
LENGTHS BRIDGES CROSSINGS REMARKS
TRACKS Flinders Street to Southern Cross ................................................................................................... Sextuple line (with four lines available for two-way running)
Southern Cross to North Melbourne Junction .................................................................................. Sextuple line
North Melbourne Junction to Kensington ......................................................................................... Quadruple line to Kensington
Kensington to Showgrounds............................................................................................................ Double line
Showgrounds to Flemington Racecourse ........................................................................................ Triple line (two down tracks)
Viaduct Junction (prior to Southern Cross) to Melbourne Yard Stabling Sidings
(Via Goods Lines) .......................................................................................................................... Mostly Double line (with some Single line)
SAFEWORKING SYSTEMS Flinders Street to Southern Cross (Through Suburban Lines) ........................................................... Automatic Block Signalling
Flinders Street to Southern Cross (Northern Viaduct Line) ............................................................... Automatic Block Signalling (two-way running)
Southern Cross to Newmarket ........................................................................................................ Automatic Block Signalling
Newmarket to Flemington Racecourse ............................................................................................ Automatic Block Signalling with two position signals
Viaduct Junction to Melbourne Yard Stabling Sidings (via Main Goods Line) ..................................... Automatic Block Signalling
DISTANCES For distances from Flinders Street add 1.232km beyond Southern Cross
FLINDERS STREET ¶ 1.232 1B M10 See Flinders Street to Richmond Page A 8
Degraves Street subway 1.232 1B M10 — — — UL — Foot only
Elizabeth Street subway 1.132 1B L10 — — — UL — Foot only
Vaults 0.871 1A K10 — — — UL — —
Viaduct - bridging:-
Queensbridge Street* (T)
William Street
Kings Way
Spencer Street* (T)
Flinders Street extension* (T)
0.110 1A G10
to
1A A10
— — — UL Cat.3
ULT*
— Queensbridge St
3.8m clearance
William St 3.9m & 4.2m
clearance.
Kings Way 4.3m clear
Spencer Street 4.0m
clearance
Junction to Goods Lines /
Melbourne Yard Stabling
Sidings
0.055 2E K 6 — — — — — —
Collins Street extension 0.000 2E K 6 — — — OLT — —
Upper Concourse 0.050 2E K 6 — — — OL — Foot only
SOUTHERN CROSS 
(Formerly Spencer Street)
0.130 2E K 6 M-Sa 04 30—00 30 Tu-Su
Su 08 00—00 00 M
1@ ___
2@ 368
3@ 376
4@ 353
5@ 287
6@ 103
7@ 294
8 262
8 South ___
9 168
10 163
11MS 158
12MS 158
13UpTS 158
14DnTS 158
10A ___
Layby
1 ___
2 ___
— — Sidings between East
Suburban and Main
Suburban lines at down
end of platforms.
1 -
2 - 54m
2B - 23m
3 - 35m
6 - 40m
7 - 35m
Southern Cross subway 0.130 2E K 6 — — — UL — Staff access only
Southern Cross goods subway 0.205 2E K 6 — — — UL — Staff access only
Stadium footbridge 0.225 2E J 5 — — — OL — Foot only
Staff crossing (Southern
Cross)
0.298 2E J 4 — — — PO — Foot only, Main
Suburban lines only
Portal for Burnley and City
Loops
0.385 2E J 4 — — — — — —
Portal for Caulfield Loop 0.436 2E J 4 — — — — — —
Southern Cross
SIGNAL BOX No. 1
0.607 2E J 4 06 00 Su—01 20 foll Su — — — — TSG
La Trobe Street Extension 0.768 2E H3 — — — OLT — —
Franklin Street 0.980 2E G 2 — — — — — —
Dudley Street 1.090 2E G 2 — — — UL Cat.3 — Centre lane 4.3m
clearance
Other lanes 3.6m clear.
Dudley Street subway 1.130 2E G 2 — — — UL — Foot only
LINE DESCRIPTION
CENTRAL REGION
Metro Melbourne - System Description [WTT Addenda] A 14 19/09/2013
FLINDERS STREET TO FLEMINGTON RACECOURSE (DIRECT)
& MELBOURNE YARD SIDINGS
LOCATION
Km Ex
SSS
MELWAY
MAP REF. HOURS OF OPERATION
PLATFORM
LENGTHS
SIDING
LENGTHS BRIDGES CROSSINGS REMARKS
Portal for Northern Loop line 1.342 2E F 1 — — — — — —
Standard Gauge & Broad
Gauge flyover
1.440 2A F12 — — — OL — SS clearance ES, Up
side.
Station footbridge 1.615 2A E11 — — — OL — Under construction
NORTH MELBOURNE ¶ 1.715 2A E11 Error! AutoText entry not
defined.
1UpES 159
2DnES 159
3UpMS 159
4DnMS 159
5UpTS 170
6DnTS 170
— — — —
Dynon Road footbridge 1.800 2A E11 — — — OL — Foot and station
Dynon Road 1.893 2A E11 — — — OL — —
MELBOURNE YARD
STABLING SIDINGS
(Accessed only via Main
Goods lines at Viaduct
Junction, Southern Cross)
1.680 2A E12 — — 1 183
2 219
3 183
4 153
5 154
6 221
7 203
8 187
9 170
10 169
Wash___
— — —
Macaulay employee Footbridge 2.374 2A C 9 — — — OL — Foot only
Junction to Upfield - For continuation to Upfield. – see page A 56
City Link 2.450 2A C 9 — — — OL — —
Moonee Ponds Creek 2.453 2A C 9 — — — UL — —
Junction to Sunbury - For continuation to Sunbury. – see page A 50
Main Suburban and Through
Suburban lines overpass
2.696 2A A 8 — — — UL — BMS suburban lines
Lloyd Street — high level (BS)
— low level (ES)
2.796 2A A 8 — — — UL Cat.1
UL Cat.3
—
3.4m clearance
Arden Street 2.993 2A A 7 — — — OL — Foot only SS clearance
up Side
Goodman & Fielder Siding 3.416 2T K 5 — — A1-363@
A2-363@
B 38@
— — Siding on up side of
main line.
Kensington SIGNAL BOX 3.464 2T K 5 Su 07 40—01 30 Su — — — — TSG
Macaulay Road 3.500 2T K 5 — — — — BB+PO —
Macaulay Road subway 3.510 2T K 5 — — — UL — —
KENSINGTON 3.575 2T K 4 M-F 07 30-09 30
Sa & Su – Not Staffed
1Up 159
2Dn 159
— — — —
Smith Street subway 3.886 2T K 3 — — — UL — Foot only
Racecourse Road 4.204 2T J 1 — — — ULT Cat.3 — 3.6m clearance
NEWMARKET 4.301 2T J 1 M-F 06 30-10 30
Sa & Su – Not Staffed
1Up 147
2Dn 161
— — — —
Newmarket subway 4.335 2T J 1 — — — UL — Foot only
Junction toCraigieburn — See page A 53
Ascot Vale Road 5.136 28 H12 — — — — BB+PG —
Epsom Road 5.633 28 G12 — — — ULT Cat.2 — 3.9m clearance
Epsom Road SIGNAL BOX As required TSG (Formerly H Box)
SHOWGROUNDS 5.733 28 G12 As required 205 Refuge
___
— — —
SIGNAL BOX As required TSG
Racecourse subway 6.558 28 E12 — — — UL — Foot only
FLEMINGTON RACECOURSE 6.588 2S J 1 As required Dn 302
Up 279
2Tk ___
3Tk ___
— — Sidings 2 and 3 located
between down and up
platforms
SIGNAL BOX M-F 08 45-17 00
Sa & Su As required
TSG
End of track 6.78_ 2S J 1
For explanation of Symbols - See Page A 58
LINE DESCRIPTION
CENTRAL REGION
Metro Melbourne - System Description [WTT Addenda] A 15 19/09/2013
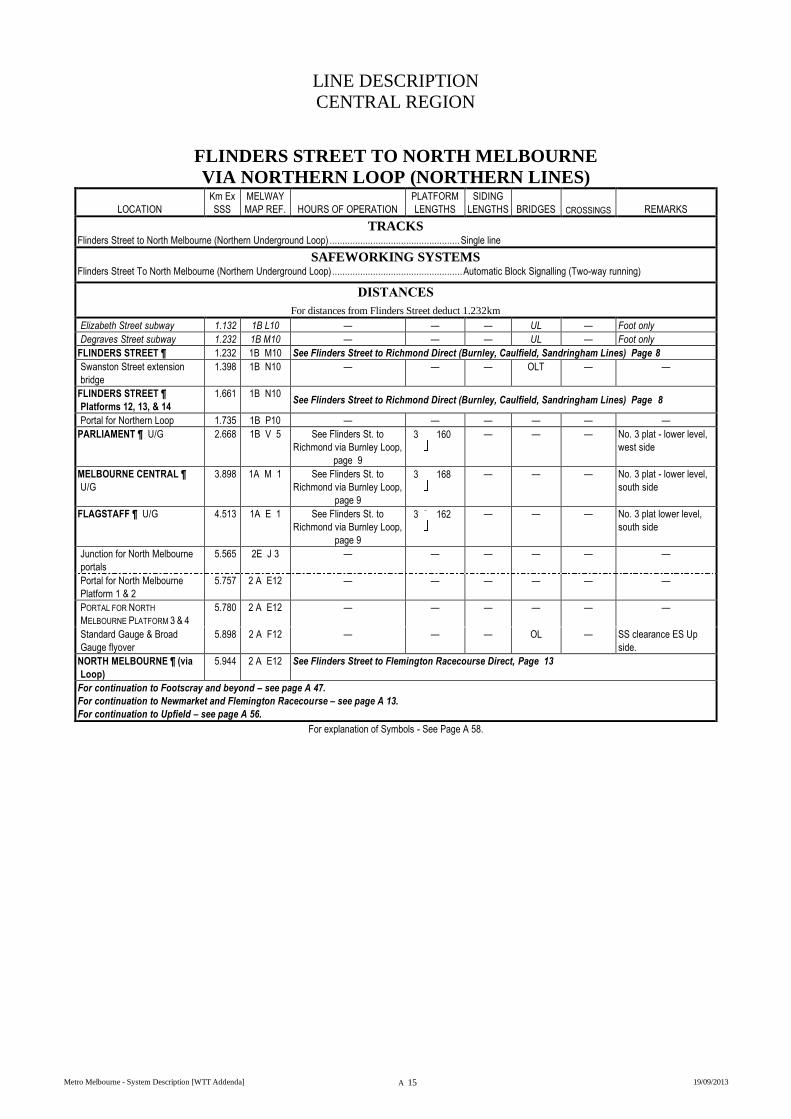
FLINDERS STREET TO NORTH MELBOURNE
VIA NORTHERN LOOP (NORTHERN LINES)
LOCATION
Km Ex
SSS
MELWAY
MAP REF. HOURS OF OPERATION
PLATFORM
LENGTHS
SIDING
LENGTHS BRIDGES CROSSINGS REMARKS
TRACKS Flinders Street to North Melbourne (Northern Underground Loop) ................................................... Single line
SAFEWORKING SYSTEMS Flinders Street To North Melbourne (Northern Underground Loop) ................................................... Automatic Block Signalling (Two-way running)
DISTANCES
For distances from Flinders Street deduct 1.232km
Elizabeth Street subway 1.132 1B L10 — — — UL — Foot only
Degraves Street subway 1.232 1B M10 — — — UL — Foot only
FLINDERS STREET ¶ 1.232 1B M10 See Flinders Street to Richmond Direct (Burnley, Caulfield, Sandringham Lines) Page 8
Swanston Street extension
bridge
1.398 1B N10 — — — OLT — —
FLINDERS STREET 
Platforms 12, 13, & 14
1.661 1B N10 See Flinders Street to Richmond Direct (Burnley, Caulfield, Sandringham Lines) Page 8
Portal for Northern Loop 1.735 1B P10 — — — — — —
PARLIAMENT ¶ U/G 2.668 1B V 5 See Flinders St. to
Richmond via Burnley Loop,
page 9
3 160
— — — No. 3 plat - lower level,
west side
MELBOURNE CENTRAL 
U/G
3.898 1A M 1 See Flinders St. to
Richmond via Burnley Loop,
page 9
3 168
— — — No. 3 plat - lower level,
south side
FLAGSTAFF ¶ U/G 4.513 1A E 1 See Flinders St. to
Richmond via Burnley Loop,
page 9
3 162
— — — No. 3 plat lower level,
south side
Junction for North Melbourne
portals
5.565 2E J 3 — — — — — —
Portal for North Melbourne
Platform 1 & 2
5.757 2 A E12 — — — — — —
PORTAL FOR NORTH
MELBOURNE PLATFORM 3 & 4
5.780 2 A E12 — — — — — —
Standard Gauge & Broad
Gauge flyover
5.898 2 A F12 — — — OL — SS clearance ES Up
side.
NORTH MELBOURNE ¶ (via
Loop)
5.944 2 A E12 See Flinders Street to Flemington Racecourse Direct, Page 13
For continuation to Footscray and beyond – see page A 47.
For continuation to Newmarket and Flemington Racecourse – see page A 13.
For continuation to Upfield – see page A 56.
For explanation of Symbols - See Page A 58.
LINE DESCRIPTION
BURNLEY GROUP
Metro Melbourne - System Description [WTT Addenda] A 16 19/09/2013
RICHMOND TO LILYDALE
LOCATION
Km Ex
SSS
MELWAY
MAP REF. HOURS OF OPERATION
PLATFORM
LENGTHS
SIDING
LENGTHS BRIDGES CROSSINGS REMARKS
TRACKS Richmond to Burnley ..................................................................................................................... Quadruple line.
Burnley to Box Hill ......................................................................................................................... Triple line to Box Hill (centre line available for two-way running)
Box Hill to Blackburn...................................................................................................................... Double line. (Provision for centre line – not built)
Blackburn to Ringwood .................................................................................................................. Double line.
Ringwood to Mooroolbark .............................................................................................................. Double line.
Mooroolbark to Lilydale .................................................................................................................. Single line.
SAFEWORKING SYSTEMS Richmond to Mooroolbark .............................................................................................................. Automatic Block Signalling
Burnley to Camberwell (Centre line only) and Camberwell to Box Hill (Centre line only) ................... Automatic and Track Control
Mooroolbark to Lilydale
(all points and signals at Mooroolbark are operated by remote control from Lilydale) ...................... Automatic and Track Control
DISTANCES For distances from Southern Cross beyond Richmond via the Burnley Loop add 1.505km (from Flinders Street add 2.737km)
For direct distances from Flinders Street subtract 1.232km
RICHMOND ¶ 3.797 2G G 9 See CENTRAL Region – Flinders Street to Richmond page A 8 (Direct), A 9(Loop) .
Swan Street 3.908 2G H 9 — — — ULT Cat.2 — 4.1m clearance
Junction to Dandenong, Cranbourne, Pakenham, Frankston, and Sandringham – See page A 25
Green Street subway 4.204 2G J10 — — — UL — Foot only
EAST RICHMOND 4.367 2G K10 Error! AutoText entry not
defined.
1UpBL 159
2DnBL 159
— — — Platforms only on local
lines
Church Street 4.436 2G K10 — — — OLT — —
Brighton Street 4.577 2H A10 — — — OL — Foot only
Mary Street 4.715 2H B10 — — — OL — —
Coppin Street 4.838 2H C11 — — — OL — —
BURNLEY SIGNAL BOX 5.240 2H E11 06 45 Su—02 10 foll. Su — — — — TSG
Burnley Street 5.250 2H E11 — — — OL — —
Burnley St subway 5.262 2H E11 — — — UL — Foot only
BURNLEY ¶ 5.332 2H E11 Error! AutoText entry not
defined.
1UpBL 160
2UpBT 160
3DnBT 160
4DnBL 160
A 171 — —
Stawell St subway 5.457 2H F11 — — — UL — Foot only
Junction to Glen Waverley — See page A 23
Burnley flyover 5.758 2H G11 — — — OL — C & U lines
Swan Street 5.862 2H H11 — — — OLT — —
Yarra Boulevard
Yarra River
6.195 2H J10 — — — UL Cat.2 — 4.2m clearance
Yarra Street 6.550 45 A11 — — — OL — —
Hawthorn subway 6.794 45 A10 — — — UL — —
Hawthorn footbridge 6.883 45 A10 — — — OL — Foot only
HAWTHORN 6.886 45 A10 M-F 07 00-09 30
Sa & Su - Not Staffed
1Up 159
2 159
3 Dn 174
— — — —
Burwood Road 6.988 45 A10 — — — OLT — SS clearance Up side
Elgin Street 7.118 45 B10 — — — OL — —
Power Street 7.234 45 B10 — — — OL — SS clearance Up side
Grace Park drain 7.377 45 B10 — — — UL — —
Site of Junction to Kew. 7.___ 45 C10 Line closed 13/ 5/1957. Dismantled c.11/1958.
Golding St subway 7.734 45 B10 — — — UL — Foot only
Glenferrie Road 8.032 45 C10 — — — ULT
Cat.2
— 4.0m clearance
Glenferrie subway 8.116 45 D10 — — — UL — Foot only
GLENFERRIE 
(SWINBURNE)
8.120 45 D10 Error! AutoText entry not
defined.
1Up 159
2 159
3Dn 159
— — — —
John Street 8.345 45 E10 — — — UL — 3.5m clearance
William Street 8.419 45 E10 — — — UL Cat.2 — 3.8m clearance
Henry Street 8.644 45 F10 — — — UL Cat.2 — —
Auburn Road 8.874 45 F10 — — — UL Cat.2 — 4.4m clearance
AUBURN 8.960 45 F10 M-F 07 00-11 00
Sa & Su - Not Staffed
1Up 161
2 161
3Dn 159
— — — —
LINE DESCRIPTION
BURNLEY GROUP
Metro Melbourne - System Description [WTT Addenda] A 17 19/09/2013
RICHMOND TO LILYDALE
LOCATION
Km Ex
SSS
MELWAY
MAP REF. HOURS OF OPERATION
PLATFORM
LENGTHS
SIDING
LENGTHS BRIDGES CROSSINGS REMARKS
Auburn subway 8.970 45 F10 — — — UL — Foot only
Albert Street 9.202 45 G10 — — — UL Cat.2 — 3.7m clearance
Burwood Road 9.728 45 H10 — — — OL — —
Burke Road 10.119 45 J11 — — — OLT — —
CAMBERWELL ¶ 10.205 45 J11 Error! AutoText entry not
defined.
1Up 160
2 160
3Dn 160
A 99
B 171
C 170
D 156
E 152
— PO —
SIGNAL BOX Su 06 45—02 05 foll. Su TSG
Camberwell footbridge 10.239 45 J11 — — — OL — Foot only
Staff foot crossing 10.300 45 J11 — — — — PO Up line only. Foot only
Junction to Alamein — See page A 22
Stanhope Grove 10.777 46 A11 — — — OL — —
Alamein (Y) line flyover 10.787 46 A11 — — — OL — —
EAST CAMBERWELL 11.075 46 A11 Not staffed
1Up 159
2 159
3Dn 159
— — — —
East Camberwell subway 11.086 46 B11 — — — UL — Foot only
Underpass for Outer Circle line 11.___ 46 B 11 — — — — — Line closed 7/ 9/1943.
Filled in c.195_.
Myrtle Road 11.324 46 B11 — — — UL Cat.2 — 4.0m clearance
Kendall Street 11.794 46 C11 — — — UL Cat.3 — 3.2m clearance
Logan Street subway 11.998 46 D11 — — — UL — Foot only
CANTERBURY 12.185 46 D11 M-F 07 30-09 30
Sa & Su - Not Staffed
1Up 159
2 159
3Dn 159
— — — —
Canterbury Road 12.263 46 D11 — — — UL Cat.2 — —
Chatham subway 12.937 46 F11 — — — UL — Foot only
CHATHAM 12.947 46 F11 Error! AutoText entry not
defined.
1Up 159
2 159
3Dn 160
— — — —
Robinson Road 13.358 46 G11 — — — UL Cat.3 — 2.5m clearance
Union Road 13.734 46 H11 — — — — BB+PG T
Union Road subway 13.746 46 H11 — — — UL — Foot only
Surrey Hills subway 13.828 46 H11 — — — UL — Foot only
SURREY HILLS ¶ 13.835 46 H11 Error! AutoText entry not
defined.
1Up 157
2 157
3Dn 160
— — — —
Mont Albert Road 14.377 46 J10 — — — — BB+PG T
Mont Albert subway 14.616 46 K10 — — — UL — Foot only
MONT ALBERT 14.626 46 K 9 Error! AutoText entry not
defined.
1Up 163
2 160
3Dn 160
— — — —
Creswick Lane 15.255 47 A 9 — — — UL Cat.3 — 2.6m clearance
Elgar Road 15.471 47 B 9 — — — UL Cat.3 — —
BOX HILL (U/G) ¶ 16.163 47 D 9 Error! AutoText entry not
defined.
1 CLOSED
2Up 163
3 163
4Dn 163
— — — —
SIGNAL BOX M-F 06 00—12 50
M-F 14 00—19 00
Other times As req’d by
Metrol
CSM
Station Street 16.265 47 D 9 — — — OL — —
William Street 16.694 47 E10 — — — — PG Foot only
Middleborough Road 17.558 47 G10 — — — OL — —
LABURNUM 17.815 47 H10 Error! AutoText entry not
defined.
1Up 160
2Dn 160
— — — —
Laburnum Street 17.873 47 H10 — — — UL Cat.3 — 4.2m clearance
BLACKBURN ¶ 18.674 47 K10 Error! AutoText entry not
defined.
1Up 163
2 163
3Dn 163
— — — —
SIGNAL BOX M-F 06 30—12 30
M-F 15 15—18 30
Other times as req’d
CSM
Blackburn subway 18.707 47 K10 — — — UL — Foot only
Blackburn Road 18.926 48 A10 — — — — BB+PG —
Cottage Street 19.310 48 A10 — — — — PG Foot only

LINE DESCRIPTION
BURNLEY GROUP
Metro Melbourne - System Description [WTT Addenda] A 18 19/09/2013
RICHMOND TO LILYDALE
LOCATION
Km Ex
SSS
MELWAY
MAP REF. HOURS OF OPERATION
PLATFORM
LENGTHS
SIDING
LENGTHS BRIDGES CROSSINGS REMARKS
Oliver Avenue 19.901 48 C10 — — — — PO Foot only
NUNAWADING ¶ 20.772 48 F10 Error! AutoText entry not
defined.
1Up 160
2Dn 160
— — — —
Springvale Road 20.946 48 F10 — — — — BB+PG —
Rooks Road 21.811 48 H 9 — — — — BB+PG —
Crossover 22.299 48 J 9 — — — — — —
MITCHAM ¶ 22.408 48 J 9 Error! AutoText entry not
defined.
1Up 158
2Dn 158
— — —
CSM
SIGNAL BOX As Required
Down end of platform 22.497 48 J 9 — — — — PG Foot only
Mitcham Road 22.570 48 K 9 — — — — BB+PG —
Cochrane Street 23.301 49 B 9 — — — UL Cat.3 — —
HEATHERDALE 24.211 49 D 9 M-F 06 00-10 00
Sa & Su - Not Staffed
1Up 162
2Dn 162
— — — —
Heatherdale Road 24.302 49 D 9 — — — — BB+PG —
Transmission line 24.412 49 D 9 — — — OL — —
Eastlink 24.635 49 E 9 — — — UL — —
New Street 24.919 49 F 9 — — — UL Cat.3 — 3.5m clearance
Wantirna Road 25.550 49 G 9 — — — UL Cat.3 — 3.6m clearance
RINGWOOD ¶ 25.756 49 H 9 Error! AutoText entry not
defined.
1Up 160
2 160
3Dn 160
– See
Stabling
Sidings
— — —
SIGNAL BOX Su 06 45—02 10 foll. Su TSG
Ringwood footbridge 25.777 49 H 9 — — — OL — Foot only
Staff Crossing 25.858 — — — — — PO Foot only
Junction to Belgrave — See page A 20
Warrandyte Road 25.956 49 H 8 — — — UL Cat.2 — 3.4m clearance
RINGWOOD STABLING
SIDINGS
49 J 8 — — 1 386
2 386
3 432
4 305
5 312
6 312
— — Sidings between Lilydale
and Belgrave mainlines.
Nos. 1 to 4 beside
Belgrave line. Nos. 5 &
6 beside Lilydale line.
Ringwood Lake bike track 26.466 49 J 8 — — — — PG Foot only
Hill Street 26.923 49 K 8 — — — — PG Foot only
Dublin Road 27.462 50 B 7 — — — — BB+PBB T
Up end of platform 27.754 50 B 7 — — — — PBB Foot only
RINGWOOD EAST 27.763 50 B 7 Not staffed 1Up 159
2Dn 159
— — — —
Down end of platform 27.874 50 C 7 — — — — PG Foot only
Eastfield Road 28.463 50 D 7 — — — OL — —
Mount Dandenong Rd 30.141 50 H 5 — — — UL Cat.1 — —
Alto Avenue 30.770 50 J 3 — — — — PG Foot only
Up end of platform 30.961 50 J 3 — — — — PG Foot only
CROYDON ¶ 31.032 50 J 3 Error! AutoText entry not
defined.
1Up 151
2Dn 158
— — — —
Kent Avenue 31.217 50 K 3 — — — — PG Foot only
Cool Store Road 31.306 50 K 3 — — — — BB+PO T
Creek 31.725 51 A 2 — — — UL — —
Surrey Road 31.986 51 A 1 — — — — PG Foot only
Dorset Road 32.465 51 B 1 — — — OL — —
Chessman Street 33.144 37 D12 — — — — PO Foot only
Brushy Creek 33.890 37 E12 — — — UL — —
Manchester Road 34.247 37 F12 — — — — BB+PG T
MOOROOLBARK ¶ 34.376 37 G12 Error! AutoText entry not
defined.
1Up 160
2Dn 148
— — — —
Down end of platform 34.472 37 G12 — — — — PG Foot only
Creek 34.535 37 G12 — — — UL — —
Creek 34.605 37 K10 — — — UL — Pipe
Mooroolbark Road 36.319 37 K 9 — — — UL Cat.3 — 3.4m clearance
By pass road 38.3__ 37 C 5 — — — — — Proposed
Cave Hill Road / Melba Avenue 38.354 38 C 5 — — — — BB+PBB T
John Street 38.746 38 D 4 — — — UL Cat.3 — 2.7m clearance
LINE DESCRIPTION
BURNLEY GROUP
Metro Melbourne - System Description [WTT Addenda] A 19 19/09/2013
RICHMOND TO LILYDALE
LOCATION
Km Ex
SSS
MELWAY
MAP REF. HOURS OF OPERATION
PLATFORM
LENGTHS
SIDING
LENGTHS BRIDGES CROSSINGS REMARKS
Creek 38.874 38 D 4 — — — UL — —
Crossing 38.874 38 D 4 — — — — PBB Foot only
Maroondah Highway 38.917 38 D 4 — — — — BB+PBB+PG —
Up end of platform 39.000 38 D 4 — — — — PG No. 1 Track only. Foot
only
LILYDALE 
39.069 38 D 4 Error! AutoText entry not
defined.
1 159
2 172
3 193?
4 336@
— — —
SIGNAL BOX M-F 04 10—08 30,
M-F 16 05—20 30,
Tu-Sa 00 20—01 20.
Sa 04 10—20 20.
Su 00 15—02 20,
Su 06 25—21 00,
Su 23 00—00 45 M.
CSM
Down end of platform No. 1
Track only
39.172 38 E 4 — — — — PO Foot and staff road
access
STABLING SIDINGS 39.251 38 E 4 — — A 167
B 283
C 283
D 268
E 265
— — —
End of overhead (baulk) 39.935? 38 E 4 Lilydale to Coldstream@ service suspended 10/12/1991.
Coldstream to Yarra Glen@ last used 1985? reverted to PTC control by 7/1991 - not available for traffic.
Yarra Glen to Healesville@ under the control of the Yarra Valley Tourist Railway.
Lilydale to Warburton closed 28/ 7/1965.
For explanation of Symbols – See Page A 58.
LINE DESCRIPTION
BURNLEY GROUP
Metro Melbourne - System Description [WTT Addenda] A 20 19/09/2013
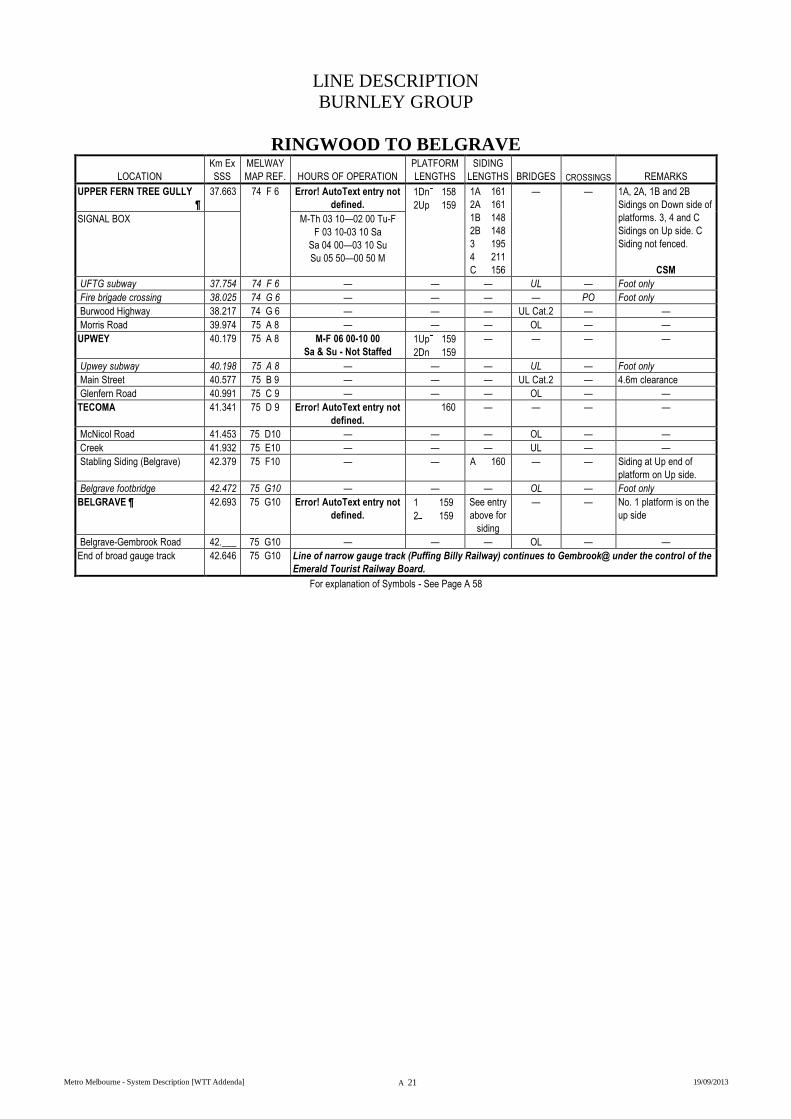
RINGWOOD TO BELGRAVE
LOCATION
Km Ex
SSS
MELWAY
MAP REF. HOURS OF OPERATION
PLATFORM
LENGTHS
SIDING
LENGTHS BRIDGES CROSSINGS REMARKS
TRACKS Ringwood to Fern Tree Gully ....................................................................................... Double line.
Fern Tree Gully to Belgrave ......................................................................................... Single line with crossing stations at Upper Fern Tree Gully and Upwey.
SAFEWORKING SYSTEMS Ringwood to Fern Tree Gully ....................................................................................... Automatic Block Signalling
(all mainline points and signals at Bayswater are operated by remote control from Ringwood)
Fern Tree Gully to Belgrave ........................................................................................ Automatic and Track Control
(all points and signals being operated by remote control from Upper Fern Tree Gully)
DISTANCES
For distances from Southern Cross beyond Richmond via the Burnley Loop add 1.505km (from Flinders Street add 2.737km)
For direct distances from Flinders Street subtract 1.232km
For FLINDERS STREET TO RINGWOOD
— See FLINDERS STREET TO RICHMOND page A 8 (Direct) or A 9 (Loop) and RICHMOND TO LILYDALE page A 16
RINGWOOD ¶ 25.756 49 H 8 See Richmond to Lilydale Page A 18.
Staff Crossing 25.858 49 H 8 — — — — PO Foot only
Warrandyte Road 25.956 49 H 8 — — — UL Cat.2 — 3.4m clearance
Junction to Lilydale. See Page A 18.
Bedford Road 26.663 49 K 9 — — — — BB+PG T
Crossing 27.665 50 A11 — — — — PO Foot only
Up end of platform 28.023 50 A12 — — — — PG Foot only
HEATHMONT 28.123 50 A12 Not staffed 1Up 158
2Dn 158
— — — —
Canterbury Road 28.240 50 A12 — — — OL — —
Allens Road 28.772 64 B 1 — — — — PG Foot only
Armstrong Road 29.290 64 D 1 — — — — PG Foot only
Bungalook Creek 29.625 64 D 2 — — — UL — Pipe
Proposed Healesville Freeway 29.___ 64 E 2 — — — (OL) — —
Dandenong Creek 30.051 64 E 2 — — — UL — —
Dandenong Ck subway 30.134 64 E 2 — — — UL — Pipe. Foot only
Crossover 30.576 64 F 3 — — — — — —
Mountain Highway 30.683 64 F 3 — — — — BB+PBB —
BAYSWATER ¶ 30.844 64 G 4 Error! AutoText entry not
defined.
1Up 157
2Dn 159
— — — Crossover and access
to Sidings controlled by
Ringwood.
BAYSWATER MAINTENANCE
CENTRE SIDINGS
— — 3 255
4 253
5 158
6 158
7 161
3 Nth 79
4 Nth 79
— — Siding area controlled by
Mainco (United Group
Limited).
Bayswater subway 30.844 64 G 4 — — — UL — Up side only.Foot only
Workshops access 30.851 64 G 4 — — — — PO Down line only. Foot
only
Scoresby Road 31.154 64 G 4 — — — — BB+PBB —
Devenish Road 32.590 64 J 7 — — — — PO Foot only
Chandler Road 33.326 64 K 8 — — — OL — —
BORONIA ¶ 33.379 64 K 9 Error! AutoText entry not
defined.
1Up 168
2Dn 168
— — — —
Station footbridge 33.380 64 K 9 — — — OL — Foot only
Boronia Road / Dorset Road 33.587 65 A 9 — — — OL — —
Bike track 34.818 65 B12 — — — UL — Foot only
Blind Creek 35.478 74 B 1 — — — UL — —
Bowen Street 35.586 74 B 2 — — — — PG Foot only
FERN TREE GULLY ¶ 35.892 74 C 2 Error! AutoText entry not
defined.
1Up 158
2Dn 158
— — — —
Down end of platform 35.983 74 C 2 — — — — PG Foot only
Alpine Street 36.088 74 C 3 — — — — BB+PG —
Forest Road 36.265 74 C 3 — — — — PO Foot only
Forest Road 36.372 74 C 4 — — — UL Cat.2 — 4.0m clearance
Hill Top Road 37.502 74 E 5 — — — — BB+PBB —
LINE DESCRIPTION
BURNLEY GROUP
Metro Melbourne - System Description [WTT Addenda] A 21 19/09/2013
RINGWOOD TO BELGRAVE
LOCATION
Km Ex
SSS
MELWAY
MAP REF. HOURS OF OPERATION
PLATFORM
LENGTHS
SIDING
LENGTHS BRIDGES CROSSINGS REMARKS
UPPER FERN TREE GULLY
37.663 74 F 6 Error! AutoText entry not
defined.
1Dn 158
2Up 159
1A 161
2A 161
1B 148
2B 148
3 195
4 211
C 156
— — 1A, 2A, 1B and 2B
Sidings on Down side of
platforms. 3, 4 and C
Sidings on Up side. C
Siding not fenced.
CSM
SIGNAL BOX M-Th 03 10—02 00 Tu-F
F 03 10-03 10 Sa
Sa 04 00—03 10 Su
Su 05 50—00 50 M
UFTG subway 37.754 74 F 6 — — — UL — Foot only
Fire brigade crossing 38.025 74 G 6 — — — — PO Foot only
Burwood Highway 38.217 74 G 6 — — — UL Cat.2 — —
Morris Road 39.974 75 A 8 — — — OL — —
UPWEY 40.179 75 A 8 M-F 06 00-10 00
Sa & Su - Not Staffed
1Up 159
2Dn 159
— — — —
Upwey subway 40.198 75 A 8 — — — UL — Foot only
Main Street 40.577 75 B 9 — — — UL Cat.2 — 4.6m clearance
Glenfern Road 40.991 75 C 9 — — — OL — —
TECOMA 41.341 75 D 9 Error! AutoText entry not
defined.
160 — — — —
McNicol Road 41.453 75 D10 — — — OL — —
Creek 41.932 75 E10 — — — UL — —
Stabling Siding (Belgrave) 42.379 75 F10 — — A 160 — — Siding at Up end of
platform on Up side.
Belgrave footbridge 42.472 75 G10 — — — OL — Foot only
BELGRAVE ¶ 42.693 75 G10 Error! AutoText entry not
defined.
1 159
2 159
See entry
above for
siding
— — No. 1 platform is on the
up side
Belgrave-Gembrook Road 42.___ 75 G10 — — — OL — —
End of broad gauge track 42.646 75 G10 Line of narrow gauge track (Puffing Billy Railway) continues to Gembrook@ under the control of the
Emerald Tourist Railway Board.
For explanation of Symbols - See Page A 58
LINE DESCRIPTION
BURNLEY GROUP
Metro Melbourne - System Description [WTT Addenda] A 22 19/09/2013
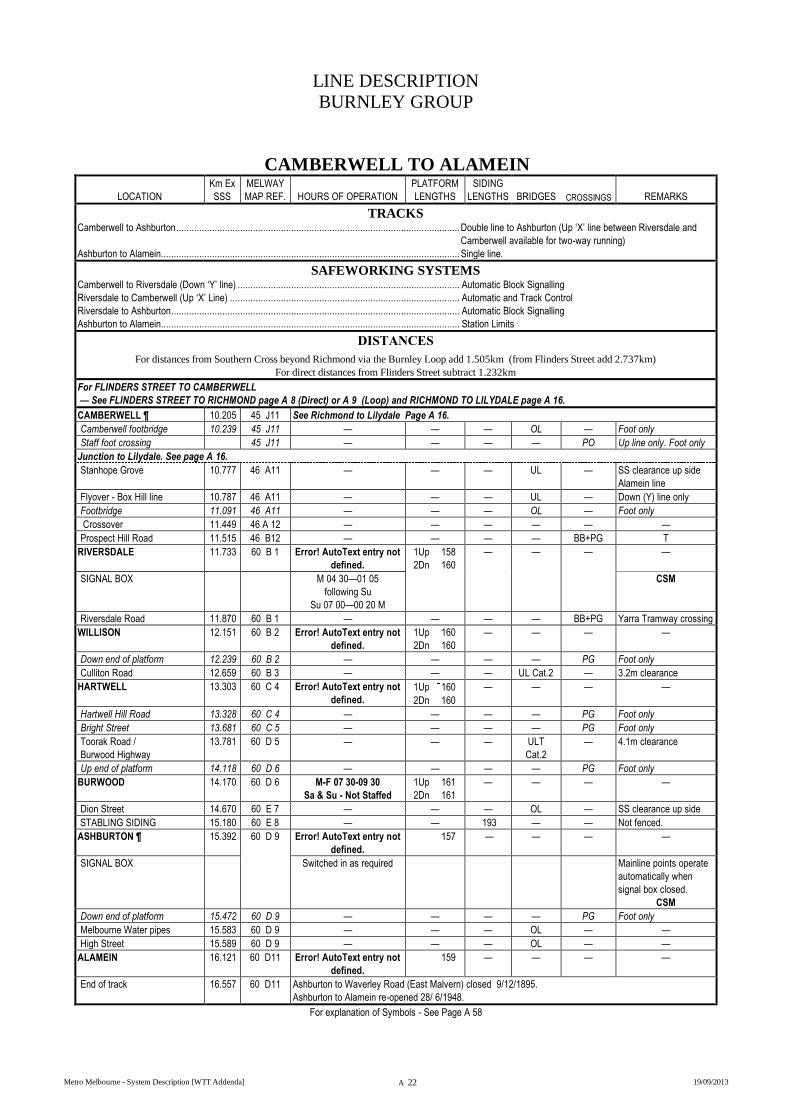
CAMBERWELL TO ALAMEIN
LOCATION
Km Ex
SSS
MELWAY
MAP REF. HOURS OF OPERATION
PLATFORM
LENGTHS
SIDING
LENGTHS BRIDGES CROSSINGS REMARKS
TRACKS Camberwell to Ashburton ............................................................................................................... Double line to Ashburton (Up ‘X’ line between Riversdale and
Camberwell available for two-way running)
Ashburton to Alamein..................................................................................................................... Single line.
SAFEWORKING SYSTEMS Camberwell to Riversdale (Down ‘Y’ line) ....................................................................................... Automatic Block Signalling
Riversdale to Camberwell (Up ‘X’ Line) .......................................................................................... Automatic and Track Control
Riversdale to Ashburton ................................................................................................................. Automatic Block Signalling
Ashburton to Alamein..................................................................................................................... Station Limits
DISTANCES
For distances from Southern Cross beyond Richmond via the Burnley Loop add 1.505km (from Flinders Street add 2.737km)
For direct distances from Flinders Street subtract 1.232km
For FLINDERS STREET TO CAMBERWELL
— See FLINDERS STREET TO RICHMOND page A 8 (Direct) or A 9 (Loop) and RICHMOND TO LILYDALE page A 16.
CAMBERWELL ¶ 10.205 45 J11 See Richmond to Lilydale Page A 16.
Camberwell footbridge 10.239 45 J11 — — — OL — Foot only
Staff foot crossing 45 J11 — — — — PO Up line only. Foot only
Junction to Lilydale. See page A 16.
Stanhope Grove 10.777 46 A11 — — — UL — SS clearance up side
Alamein line
Flyover - Box Hill line 10.787 46 A11 — — — UL — Down (Y) line only
Footbridge 11.091 46 A11 — — — OL — Foot only
Crossover 11.449 46 A 12 — — — — — —
Prospect Hill Road 11.515 46 B12 — — — — BB+PG T
RIVERSDALE 11.733 60 B 1 Error! AutoText entry not
defined.
1Up 158
2Dn 160
— — — —
SIGNAL BOX M 04 30—01 05
following Su
Su 07 00—00 20 M
CSM
Riversdale Road 11.870 60 B 1 — — — — BB+PG Yarra Tramway crossing
WILLISON 12.151 60 B 2 Error! AutoText entry not
defined.
1Up 160
2Dn 160
— — — —
Down end of platform 12.239 60 B 2 — — — — PG Foot only
Culliton Road 12.659 60 B 3 — — — UL Cat.2 — 3.2m clearance
HARTWELL 13.303 60 C 4 Error! AutoText entry not
defined.
1Up 160
2Dn 160
— — — —
Hartwell Hill Road 13.328 60 C 4 — — — — PG Foot only
Bright Street 13.681 60 C 5 — — — — PG Foot only
Toorak Road /
Burwood Highway
13.781 60 D 5 — — — ULT
Cat.2
— 4.1m clearance
Up end of platform 14.118 60 D 6 — — — — PG Foot only
BURWOOD 14.170 60 D 6 M-F 07 30-09 30
Sa & Su - Not Staffed
1Up 161
2Dn 161
— — — —
Dion Street 14.670 60 E 7 — — — OL — SS clearance up side
STABLING SIDING 15.180 60 E 8 — — 193 — — Not fenced.
ASHBURTON ¶ 15.392 60 D 9 Error! AutoText entry not
defined.
157 — — — —
SIGNAL BOX Switched in as required Mainline points operate
automatically when
signal box closed.
CSM
Down end of platform 15.472 60 D 9 — — — — PG Foot only
Melbourne Water pipes 15.583 60 D 9 — — — OL — —
High Street 15.589 60 D 9 — — — OL — —
ALAMEIN 16.121 60 D11 Error! AutoText entry not
defined.
159 — — — —
End of track 16.557 60 D11 Ashburton to Waverley Road (East Malvern) closed 9/12/1895.
Ashburton to Alamein re-opened 28/ 6/1948.
For explanation of Symbols - See Page A 58
LINE DESCRIPTION
BURNLEY GROUP
Metro Melbourne - System Description [WTT Addenda] A 23 19/09/2013
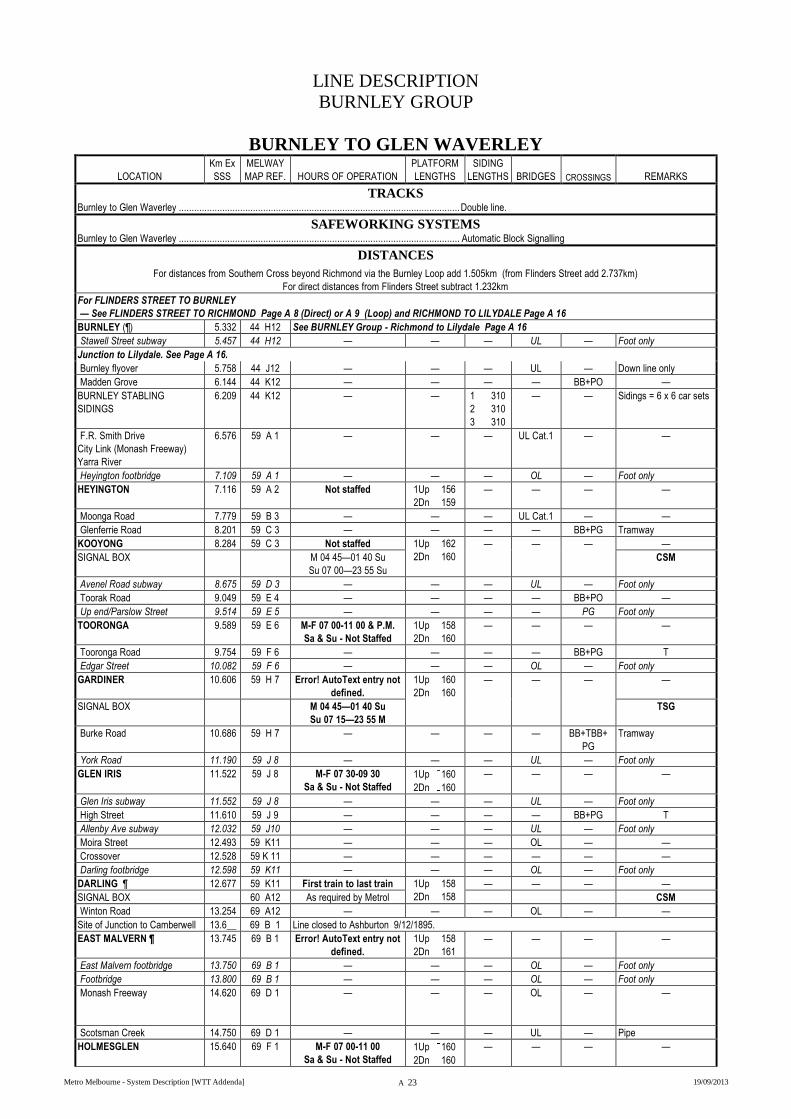
BURNLEY TO GLEN WAVERLEY
LOCATION
Km Ex
SSS
MELWAY
MAP REF. HOURS OF OPERATION
PLATFORM
LENGTHS
SIDING
LENGTHS BRIDGES CROSSINGS REMARKS
TRACKS Burnley to Glen Waverley .............................................................................................................. Double line.
SAFEWORKING SYSTEMS Burnley to Glen Waverley .............................................................................................................. Automatic Block Signalling
DISTANCES
For distances from Southern Cross beyond Richmond via the Burnley Loop add 1.505km (from Flinders Street add 2.737km)
For direct distances from Flinders Street subtract 1.232km
For FLINDERS STREET TO BURNLEY
— See FLINDERS STREET TO RICHMOND Page A 8 (Direct) or A 9 (Loop) and RICHMOND TO LILYDALE Page A 16
BURNLEY (¶) 5.332 44 H12 See BURNLEY Group - Richmond to Lilydale Page A 16
Stawell Street subway 5.457 44 H12 — — — UL — Foot only
Junction to Lilydale. See Page A 16.
Burnley flyover 5.758 44 J12 — — — UL — Down line only
Madden Grove 6.144 44 K12 — — — — BB+PO —
BURNLEY STABLING
SIDINGS
6.209 44 K12 — — 1 310
2 310
3 310
— — Sidings = 6 x 6 car sets
F.R. Smith Drive
City Link (Monash Freeway)
Yarra River
6.576 59 A 1 — — — UL Cat.1 — —
Heyington footbridge 7.109 59 A 1 — — — OL — Foot only
HEYINGTON 7.116 59 A 2 Not staffed
1Up 156
2Dn 159
— — — —
Moonga Road 7.779 59 B 3 — — — UL Cat.1 — —
Glenferrie Road 8.201 59 C 3 — — — — BB+PG Tramway
KOOYONG 8.284 59 C 3 Not staffed 1Up 162
2Dn 160
— — — —
SIGNAL BOX M 04 45—01 40 Su
Su 07 00—23 55 Su
CSM
Avenel Road subway 8.675 59 D 3 — — — UL — Foot only
Toorak Road 9.049 59 E 4 — — — — BB+PO —
Up end/Parslow Street 9.514 59 E 5 — — — — PG Foot only
TOORONGA 9.589 59 E 6 M-F 07 00-11 00 & P.M.
Sa & Su - Not Staffed
1Up 158
2Dn 160
— — — —
Tooronga Road 9.754 59 F 6 — — — — BB+PG T
Edgar Street 10.082 59 F 6 — — — OL — Foot only
GARDINER 10.606 59 H 7 Error! AutoText entry not
defined.
1Up 160
2Dn 160
— — — —
SIGNAL BOX M 04 45—01 40 Su
Su 07 15—23 55 M
TSG
Burke Road 10.686 59 H 7 — — — — BB+TBB+
PG
Tramway
York Road 11.190 59 J 8 — — — UL — Foot only
GLEN IRIS 11.522 59 J 8 M-F 07 30-09 30
Sa & Su - Not Staffed
1Up 160
2Dn 160
— — — —
Glen Iris subway 11.552 59 J 8 — — — UL — Foot only
High Street 11.610 59 J 9 — — — — BB+PG T
Allenby Ave subway 12.032 59 J10 — — — UL — Foot only
Moira Street 12.493 59 K11 — — — OL — —
Crossover 12.528 59 K 11 — — — — — —
Darling footbridge 12.598 59 K11 — — — OL — Foot only
DARLING ¶ 12.677 59 K11 First train to last train 1Up 158
2Dn 158
— — — —
SIGNAL BOX 60 A12 As required by Metrol CSM
Winton Road 13.254 69 A12 — — — OL — —
Site of Junction to Camberwell 13.6__ 69 B 1 Line closed to Ashburton 9/12/1895.
EAST MALVERN ¶ 13.745 69 B 1 Error! AutoText entry not
defined.
1Up 158
2Dn 161
— — — —
East Malvern footbridge 13.750 69 B 1 — — — OL — Foot only
Footbridge 13.800 69 B 1 — — — OL — Foot only
Monash Freeway 14.620 69 D 1 — — — OL — —
Scotsman Creek 14.750 69 D 1 — — — UL — Pipe
HOLMESGLEN 15.640 69 F 1 M-F 07 00-11 00
Sa & Su - Not Staffed
1Up 160
2Dn 160
— — — —
LINE DESCRIPTION
BURNLEY GROUP
Metro Melbourne - System Description [WTT Addenda] A 24 19/09/2013
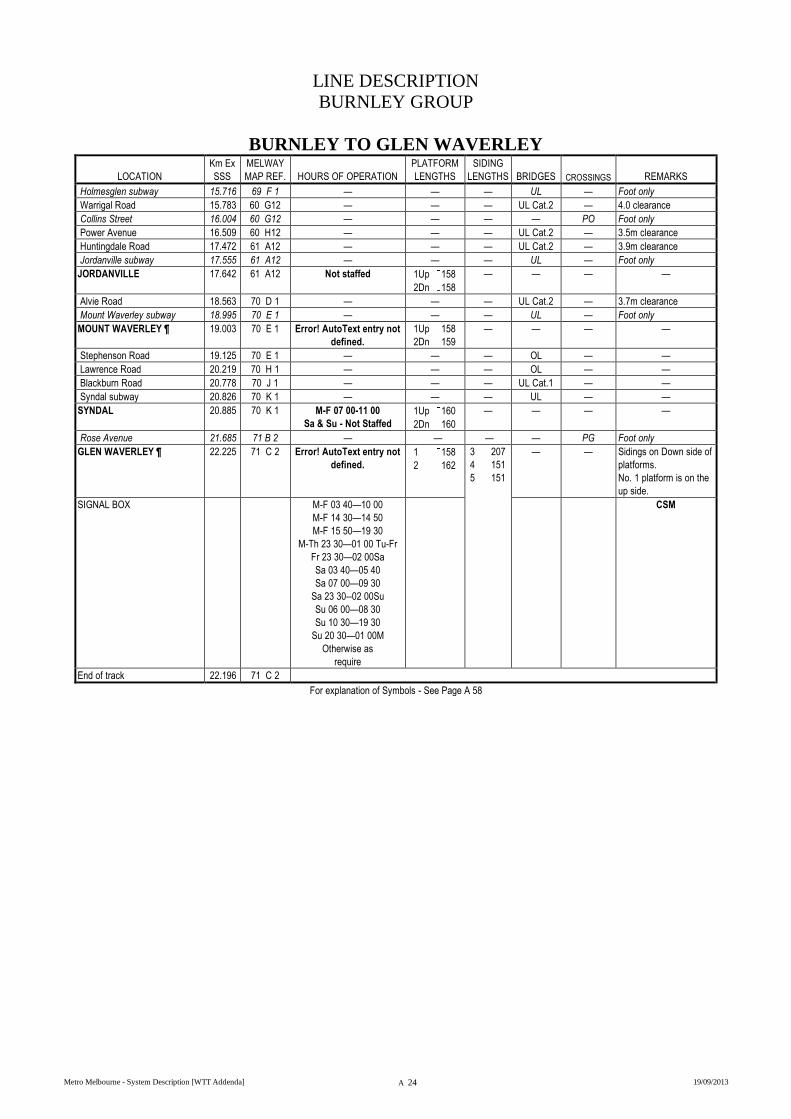
BURNLEY TO GLEN WAVERLEY
LOCATION
Km Ex
SSS
MELWAY
MAP REF. HOURS OF OPERATION
PLATFORM
LENGTHS
SIDING
LENGTHS BRIDGES CROSSINGS REMARKS
Holmesglen subway 15.716 69 F 1 — — — UL — Foot only
Warrigal Road 15.783 60 G12 — — — UL Cat.2 — 4.0 clearance
Collins Street 16.004 60 G12 — — — — PO Foot only
Power Avenue 16.509 60 H12 — — — UL Cat.2 — 3.5m clearance
Huntingdale Road 17.472 61 A12 — — — UL Cat.2 — 3.9m clearance
Jordanville subway 17.555 61 A12 — — — UL — Foot only
JORDANVILLE 17.642 61 A12 Not staffed
1Up 158
2Dn 158
— — — —
Alvie Road 18.563 70 D 1 — — — UL Cat.2 — 3.7m clearance
Mount Waverley subway 18.995 70 E 1 — — — UL — Foot only
MOUNT WAVERLEY ¶ 19.003 70 E 1 Error! AutoText entry not
defined.
1Up 158
2Dn 159
— — — —
Stephenson Road 19.125 70 E 1 — — — OL — —
Lawrence Road 20.219 70 H 1 — — — OL — —
Blackburn Road 20.778 70 J 1 — — — UL Cat.1 — —
Syndal subway 20.826 70 K 1 — — — UL — —
SYNDAL 20.885 70 K 1 M-F 07 00-11 00
Sa & Su - Not Staffed
1Up 160
2Dn 160
— — — —
Rose Avenue 21.685 71 B 2 — — — — PG Foot only
GLEN WAVERLEY ¶ 22.225 71 C 2 Error! AutoText entry not
defined.
1 158
2 162
3 207
4 151
5 151
— — Sidings on Down side of
platforms.
No. 1 platform is on the
up side.
SIGNAL BOX M-F 03 40—10 00
M-F 14 30—14 50
M-F 15 50—19 30
M-Th 23 30—01 00 Tu-Fr
Fr 23 30—02 00Sa
Sa 03 40—05 40
Sa 07 00—09 30
Sa 23 30--02 00Su
Su 06 00—08 30
Su 10 30—19 30
Su 20 30—01 00M
Otherwise as
require
CSM
End of track 22.196 71 C 2
For explanation of Symbols - See Page A 58
LINE DESCRIPTION
CAULFIELD GROUP
Metro Melbourne - System Description [WTT Addenda] A 25 19/09/2013
RICHMOND TO PAKENHAM
LOCATION
Km Ex
SSS
MELWAY
MAP REF. HOURS OF OPERATION
PLATFORM
LENGTHS
SIDING
LENGTHS BRIDGES CROSSINGS REMARKS
TRACKS Richmond to Caulfield ....................................................................................................................................... Quadruple line.
Caulfield to Springvale ...................................................................................................................................... Double line. (Proposed Triple line)
Springvale to Pakenham ................................................................................................................................... Double line.
SAFEWORKING SYSTEMS Richmond to Pakenham .................................................................................................................................... Automatic Block Signalling
DISTANCES
For distances from Southern Cross beyond Richmond via the Caulfield Loop add 1.404km (from Flinders Street add 2.636km)
For direct distances from Flinders Street subtract 1.232km
RICHMOND ¶ 3.797 2G G 9 Flinders Street to Richmond – See Central Region Page A 8 (Direct) or A 9 (Loop)
Swan Street 3.908 2G H 9 — — — ULT
Cat.3
— 4.1m clearance.
SS clearance Down side
Through Line
Junction to Lilydale, Glen Waverley, Alamein and Belgrave lines. See page A 16
City Link Burnley Tunnel 4.091 2 G H 10 — — — — — Underground
Dunn Street 4.227 2G J11 — — — UL Cat.2 — 3.5m clearance
Balmain Street 4.539 2G J12 — — — UL Cat.2 — 3.5m clearance
City Link (Monash Freeway)
Yarra River / Cremorne Bridge
/ Alexandra Ave
4.859 2L H 2 — — — UL Cat. 2 — City Link 4.8m
clearance
Alexandra Ave
4.0m clearance
SOUTH YARRA ¶ 5.413 2L H 5 Error! AutoText entry not
defined.
1Up S 176
2Dn S 176
3Up CT 158
4Dn CT 158
5Up CL 158
6Dn CL 158
— — — —
Toorak Road 5.529 2L H 5 — — — OLT — SS clearance Up side
Local Line
Junction to Sandringham. See page A 36
William Street 5.721 2L H 6 — — — OL — —
Chapel Street 5.948 2L J 7 — — — OLT — SS clearance Up &
Down Side Through
Lines
Jam Factory _.___ 2L J 7 — — — OL — —
Surrey Road 6.316 2M A 7 — — — UL Cat.2 — 3.5m clearance
Cromwell Road 6.445 2M B 8 — — — OL — SS clearance Down
Side Through & Local
Lines
HAWKSBURN 6.633 2M B 8 M-F 07 30-09 30
Sa & Su - Not Staffed
1Up CT 160
2Dn CT 160
3Up CL 160
4Dn CL 160
— — — —
Hawksburn footbridge 6.669 2M B 8 — — — OL — Foot only
Williams Road 6.803 2M C 9 — — — OL — —
Mathoura Road 7.135 2M E 9 — — — OL — SS clearance Up Side
Through Lines
Canterbury Road footbridge 7.378 2M F10 — — — OL — Foot only
Orrong Road/ Malvern Road 7.674 2M G11 — — — OLT — SS clearance Up Side
Through & Local Lines
TOORAK 7.908 2M H12 M-F 07 30-09 30
Sa & Su - Not Staffed
1Up CT 158
2Dn CT 159
3Up CL 159
4Dn CL 160
— — — —
Toorak footbridge 7.940 2M H12 — — — OL — Foot only
High Street 8.503 58 K 7 — — — OLT — SS clearance Up Side
Local Line, Down Side
Through & Local Lines
ARMADALE 8.665 58 K 7 M-F 06 30-10 30
Sa & Su - Not Staffed
1Up CT 161
2Dn CT 161
3Up CL 161
4Dn CL 161
— — — —
Armadale footbridge 8.705 58 K 7 — — — OL — Foot only
Kooyong Road 8.827 59 A 8 — — — OL — SS clearance Up Side
Through Line
Alleyne Avenue footbridge 9.139 59 A 8 — — — OL — Foot only
Wattletree Road 9.463 59 B 9 — — — OLT — SS clearance Down
Side Local Lines
LINE DESCRIPTION
CAULFIELD GROUP
Metro Melbourne - System Description [WTT Addenda] A 26 19/09/2013
RICHMOND TO PAKENHAM
LOCATION
Km Ex
SSS
MELWAY
MAP REF. HOURS OF OPERATION
PLATFORM
LENGTHS
SIDING
LENGTHS BRIDGES CROSSINGS REMARKS
Glenferrie Road 9.892 59 B10 — — — OLT — SS clearance Up Side
Through Line
Malvern footbridge 10.064 59 C10 — — — OL — Foot only
MALVERN 10.105 59 C10 M-F 07 00-11 00
Sa & Su - Not Staffed
1Up CT 159
2Dn CT 160
3Up CL 160
4DnCL 160
— — — —
Dandenong Road subway 10.385 59 C11 — — — UL — Foot only
Dandenong Road 10.413 59 C11 — — — UL Cat.3 — —
Finlayson Street 10.882 59 D12 — — — UL Cat.3 — 4.0m clearance
Tooronga Road subway 11.254 59 E12 — — — UL — Foot only
Smith Street 11.466 68 E 1 — — — ULT Cat.3 — 3.9m clearance
Caulfield subway 11.738 68 E 1 — — — UL — Foot only
CAULFIELD¶ 11.786 68 F 1 Error! AutoText entry not
defined.
1Up 160
2 159
3 159
4Dn 160
Works 81
Up
Through
CFD
663
No. 1 Stab
223
— — Sidings located on up
side of Frankston line
between junction and
Grange Rd.
SIGNAL BOX Su 07 10—02 05
following Su
TSG
Queens Avenue 12.022 68 F 2 — — — UL Cat.3 — 3.4m clearance
Junction to Frankston and Stony Point. See page A 31.
Grange Road 12.574 68 G 2 — — — — BB+PG T
Cosy Gum Road 12.839 68 H 3 — — — — PG Foot only
Koornang Road 13.447 68 J 4 — — — — BB+PG T
Koornang Road subway 13.454 68 J 4 — — — UL — Foot only
CARNEGIE 13.533 68 J 4 M-F 06 30-10 30
Sa & Su - Not Staffed
1Up 159
2Dn 159
— — — —
Blackwood Street 13.664 68 J 4 — — — — PG Foot only
Murrumbeena Road 14.338 69 A 5 — — — — BB+PG —
MURRUMBEENA 14.422 69 A 5 M-F 06 30-10 30
Sa & Su - Not Staffed
1Up 159
2Dn 160
— — — —
Murrumbeena footbridge 14.433 69 A 5 — — — OL — Foot only
Site of Junction to East Malvern 15.244 69 C 6 Line closed Oakleigh (Hughesdale) to Ashburton 9/12/1895.
Poath Road 15.377 69 C 6 — — — — BB+PO —
HUGHESDALE 15.475 69 D 6 M-F 07 30-09 30
Sa & Su - Not Staffed
1Up 158
2Dn 158
— — — —
Site of Junction to Elsternwick 15.750 69 D 6 Rosstown Private Railway. Oakleigh to Elsternwick, closed c.1891. Dismantled 1915.
Richardson Street /
Paddington Road
16.213 69 E 7 — — — — PG Foot only
Warrigal Road 16.434 69 F 7 — — — OL — —
Oakleigh subway 16.560 69 F 8 — — — UL — Foot only
OAKLEIGH ¶ 16.586 69 F 8 Error! AutoText entry not
defined.
1Up 159
2 159
3Dn 159
B 177
C 278
— — B and C sidings
between Up and Centre
lines.
SIGNAL BOX M-F 06 45 – 09 00
M-F 16 00 – 18 40
As required other times
CSM
Hanover Street / Golf Links
Avenue
16.977 69 G 8 — — — OL — —
HUNTINGDALE 18.283 69 J10 M-F 06 30-10 30
Sa & Su - Not Staffed
1Up 165
2Dn 165
— — — —
Huntingdale subway 18.356 69 J10 — — — UL — Foot only
North Road 18.392 69 J11 — — — OL — —
Flora Road 19.854 79 B 1 — — — — PO Foot only
Clayton Road 20.425 79 C 2 — — — — BB+PBB T
CLAYTON ¶ 20.512 79 C 2 Error! AutoText entry not
defined.
1Up 161
2Dn 161
— — — —
Pullyn Street 20.825 79 D 3 — — — — PG Foot only
Kanooka Grove 20.945 79 D 3 — — — — PO Foot only
Centre Road 21.278 79 E 4 — — — — BB+PO T
Wordsworth Avenue 21.981 79 F 5 — — — — PG Foot only
Moore Avenue 22.380 79 G 5 — — — — PO Foot only
Bridge 22.498 79 G 6? — — — UL? — —
WESTALL ¶ 22.638 79 G 6 Error! AutoText entry not
defined.
1Up 159
2 Dn 159
3 Dn ___
— — — —
Westall Road 22.912 79 H 6 — — — OL — —
LINE DESCRIPTION
CAULFIELD GROUP
Metro Melbourne - System Description [WTT Addenda] A 27 19/09/2013
RICHMOND TO PAKENHAM
LOCATION
Km Ex
SSS
MELWAY
MAP REF. HOURS OF OPERATION
PLATFORM
LENGTHS
SIDING
LENGTHS BRIDGES CROSSINGS REMARKS
Westall Maintenance Depot 22.979 79 H 7 — Thru Gds
804
Shunt trk
___
1 290
2 83
3 83
4 273
5 274
6 161
7 145
8 148
9 148
Bowater
@ ___
Apex
1@ ___
2@ ___
— — Apex Sidings controlled
by VRNA.
Lewis Street Footbridge 23.855 79 J 8 — — — — OL Foot only
Springvale Road 24.419 79 K 9 — — — — BB+PBB —
SPRINGVALE ¶ 24.496 80 A 9 Error! AutoText entry not
defined.
1Up 160
2Dn 159
— — — —
SIGNAL BOX SU 06 00 – 01 50 foll SU TSG
Site of Junction to Cemetery 24.686 80 A 9 Springvale to Springvale Cemetery line closed 19/12/1951. B Siding booked out 29/10/2002, removed
10/ 8/2008.
Crossover 24.756 80 A 9 — — — — — —
Racecourse subway 25.512 80 C11 — — — UL — Filled in
SANDOWN PARK 25.683 80 C11 M-F 07 30 – 09 30
Sa & Su Not Staffed
1Up 160
2Dn 160
— — — —
Sandown Park subway 25.732 80 C11 — — — UL — Foot Only
Corrigan Road 26.406 80 D12 — — — — BB+PBB T
Heatherton Road 26.995 89 E 1 — — — — BB+PG T - Truck route OD 5
NOBLE PARK ¶ 27.376 89 F 2 Error! AutoText entry not
defined.
1Up 159
2Dn 159
— — — —
Noble Park subway 27.384 89 F 2 — — — UL — Foot only
Callaghan Street subway 27.887 89 G 3 — — — UL — Foot only
Mile Creek 28.148 89 G 3 — — — UL — —
Chandler Road 28.422 89 H 4 — — — — BB+PG T
YARRAMAN 29.039 89 J 5 Error! AutoText entry not
defined.
1Up 166
2Dn 166
— — — —
Yarraman footbridge 29.113 89 J 5 — — — OL — Foot only
Eastlink 29.163 89 J5 — — — OL — —
Yarraman Creek 29.669 89 K 6 — — — UL — —
Bennett Street / Jones Road 30.079 90 A 6 — — — OL — —
George Street 30.5__ 91A A 7 — — — (OL) — Proposed
Stabling Siding Crossing 30.590 91A A 7 — — — — PO Foot only
Pickett Street / Brighton Road
subway
30.844 91A A 7 — — — UL — Foot only
STABLING SIDINGS 31.043 91A A 7 — — 1 726
2 317
3 165
4 165
— — 1 and 2 sidings on down
side, 3 and 4 siding on
up side of main line
DANDENONG ¶ 31.194 91A C 8 Error! AutoText entry not
defined.
1Up 161
2 161
3Dn 162
4trk 284
5trk 375
6trk 288
— — Stabling of electric trains
in No. 4 track not
permitted.
SIGNAL BOX Su 06 25—02 20
following Su
TSG
Dandenong footbridge 31.194 91A C 8 — — — OL — Foot only
Staff foot crossing 31.290 91A C 8 — — — — — Foot only, Nos. 1 & 2
tracks
Cheltenham Road 31.381 91A D 9 — — — UL Cat.3 — 3.7m clearance
Asphalt Footpaths (two of) 31.405 91A D 9 — — — — PO Foot only. Down and up
Pakenham lines only.
Dandenong Creek 31.648 91A E 9 — — — UL — —
Webster Street 31.729 91A E10 — — — — BB+PG —
Dandenong/Frankston Road 32.410 91A G12 — — — OL — SS clearance Down side
Junction to Cranbourne - See Page A 30.
LINE DESCRIPTION
CAULFIELD GROUP
Metro Melbourne - System Description [WTT Addenda] A 28 19/09/2013
RICHMOND TO PAKENHAM
LOCATION
Km Ex
SSS
MELWAY
MAP REF. HOURS OF OPERATION
PLATFORM
LENGTHS
SIDING
LENGTHS BRIDGES CROSSINGS REMARKS
Dandenong Creek overflow 32.697 90 F11 — — — UL — —
South Gippsland Highway 33.168 90 G11 — — — — BB+PBB T
Eumemmerring Creek 34.086 95 J 1 — — — UL — —
Progress Street 34.159 95 J 1 — — — — BB —
Site of GENERAL MOTORS 35.075 96 A 2 CLOSED (1Up 159)
(2Dn 160)
— — — Closed 28/ 7/2002
GMH footbridge 35.079 96 A 2 — — — OL — —
Bridge 35.550 96 B 2 — — — UL — —
South Gippsland Freeway 35.591 96 B 2 — — — OL — —
Bridge 35.861 96 C 3 — — — UL — —
Bridge 36.888 96 C 3 — — — UL — —
HALLAM 37.452 96 G 4 Error! AutoText entry not
defined.
1Up 160
2Dn 160
— — — —
Hallam South Road 37.546 96 G 4 — — — — BB+PBB T
Bridge 37.691 96 G 4 — — — UL — —
Troups Creek 38.989 96 K 4 — — — UL — —
Transmission line 39.305 96 K 4 — — — OL — —
Webb Street 40.609 110 D 6 — — — — BB+PG T
NARRE WARREN ¶ 40.800 110 D 6 First train to last train 1Up 161
2Dn 161
— — — —
Narre Warren Creek 40.817 110 E 7 — — — UL — —
Narre Warren - Cranbourne
Road
40.981 110 E 7 — — — UL —
Princes Freeway 42.874 110 K 8 — — — OL — —
JT Hunter undercrossing 43.423 110 K 8? — — — UL — —
Clyde (Berwick-Cranbourne)
Road
44.322 111 C 9 — — — — BB+PG T
Up end of platform 44.520 111 D10 — — — — PG Foot only
BERWICK ¶ 44.576 111 D10 Error! AutoText entry not
defined.
1Up 157
2Dn 157
— — — —
SIGNAL BOX As required by Metrol CSM
Crossover 44.___ 111 D10 — — — — — —
Bryn Mawr Boulevard 46.36_ 111 G12 — — — (OL) — Proposed
Bridge 46.725 111 D10 — — — UL — —
Beaconsfield Avenue / Wood
Street / Cardinia Creek
46.860 131 H 1 — — — UL Cat.2 — 2.2m clearance
Up end of platform 46.910 131 H 1 — — — — PG Foot only
BEACONSFIELD 46.989 131 H 1 Not Staffed 1Up 159
2Dn 159
— — — —
Kenilworth Road / Station St 47.345 131 J 1 — — — — BB T
Cranbourne pipe line 47.843 131 K 1 — — — UL — —
Princes Highway 48.205 214 A 3 — — — OL — —
Brunt Road 49.344 214 C 4 — — — — BB —
Bridge 51.074 214 H 5 — — — UL — —
Officer South Road / Station St 51.218 214 H 5 — — — — BB —
Officer South drain 51.229 214 H 5 — — — UL — —
Up end of platform 51.384 214 H 5 — — — — PG Foot only
OFFICER 51.449 214 H 5 Error! AutoText entry not
defined.
1Up 159
2Dn 159
— — — —
Gum Scrub Creek 51.620 214 H 5 — — — UL — —
Gum Scrub Creek floodway 52.187 214 K 5 — — — UL — —
Gum Scrub Creek floodway 52.623 215 A 6 — — — UL — —
Bridge 53.466 215 D 6 — — — UL — —
Cardinia Road 53.636 215 D 6 — — — — BB T
CARDINIA ROAD 53.796 215 G 7 Not Staffed 1Up 160
2Dn 160
— — — —
Bridge 54.950 215 H 7 — — — UL — —
Toomuc Creek 55.461 215 J 7 — — — UL — —
Bridge 57.031 317 C 8 — — — UL — —
McGregor Road 57.071 317 C 8 — — — — BB+PBB+PG T
Savage Street 57.499 317 D 9 — — — — PO Foot only
Start of Train Protection &
Warning System (Down trains -
Country)
57.650 317 D 9 — — — — — Overhead structure
No. 1839
Main Street 58.023 317 E 9 — — — — BB+PBB T
Up end of platform (down line) 58.130 317 E 9 — — — — PB Foot only
LINE DESCRIPTION
CAULFIELD GROUP
Metro Melbourne - System Description [WTT Addenda] A 29 19/09/2013
RICHMOND TO PAKENHAM
LOCATION
Km Ex
SSS
MELWAY
MAP REF. HOURS OF OPERATION
PLATFORM
LENGTHS
SIDING
LENGTHS BRIDGES CROSSINGS REMARKS
Up end of platform
(up line and sidings)
58.130 317 E 9 — — — — G Foot only
PAKENHAM ¶ 58.193 317 E 9 Error! AutoText entry not
defined.
1Up 166
2Dn 166
3 334
4 241
5 159
Work Sdg
51
— — Sidings on up side of
main line.
SIGNAL BOX M-Th 03 50—01 40 Tu-F
F 03 50-02 40Sa
Sa 03 50—02 40 Su
Su 06 10—01 40 M
TSG
Racecourse Road 58.751 317 G 9 — — — — BB T
End of Train Protection &
Warning System (Up trains -
Country)
59.000 317 G 9 — — — — — Overhead structure
No. 1887.
Creek 59.560 317 J10 — — — UL — —
Deep Creek 59.720 317 J10 — — — UL — —
Ryan Road 60.524 318 A10 — — — — — —
V/Line Regional Network &
Access boundary
60.584 318 A10 — — — — — —
End of Overhead 60.635 318 B10 — — — — — —
Pakenham by-pass road 60.774 318 B10 — — — OL — —
- - - Track and V/Line Passenger services continue to Bairnsdale.
For explanation of Symbols - See Page A 58
LINE DESCRIPTION
CAULFIELD GROUP
Metro Melbourne - System Description [WTT Addenda] A 30 19/09/2013
DANDENONG TO CRANBOURNE
LOCATION
Km Ex
SSS
MELWAY
MAP REF. HOURS OF OPERATION
PLATFORM
LENGTHS
SIDING
LENGTHS BRIDGES CROSSINGS REMARKS
TRACKS Dandenong to Cranbourne ................................................................................................................................ Single line with intermediate crossing loop.
SAFEWORKING SYSTEMS Dandenong to Cranbourne (all points and signals being operated by remote control from Dandenong) .............. Automatic and Track Control.
DISTANCES
For distances from Southern Cross beyond Richmond via the Caulfield Loop add 1.404km (from Flinders Street add 2.636km)
For direct distances from Flinders Street subtract 1.232km
For FLINDERS STREET TO DANDENONG
— See FLINDERS STREET TO RICHMOND page A 8 (Direct) or A 9 (Loop) and RICHMOND TO PAKENHAM page A 25
DANDENONG ¶ 31.194 91A C 8 See Flinders Street to Pakenham Page A 25.
Dandenong footbridge 31.194 91A C 8 — — — UL — Foot only
Staff foot crossing 31.290 91A C 8 — — — — — Foot only, Nos. 1 & 2
tracks only
Cheltenham Road 31.381 91A D 9 — — — UL Cat.3 — 4.0m clearance
Asphalt Footpaths (Two of) 31.482 91A D 9 — — — — PO Foot only. Down and up
Pakenham lines only.
Dandenong Creek 31.648 91A E 9 — — — UL — —
Webster Street 31.729 91A E10 — — — — BB+PG —
Dandenong – Frankston Road 32.410 91A G12 — — — OL — —
Junction to Pakenham. See Page A 28.
Dandenong Southern By-pass 33.200 90 G12 — — — OL — —
Bombardier Transport Siding 33.419 90 F12 — — ___@ — — On Up side of mainline.
Kimberley Clark siding 34.000 95 G 1 — — ___@ — — On Up side of mainline.
Greens Road 34.742 95 H 3 — — — — BB —
Site of Australian Window
Glass Siding
34.742 95 G 3 CLOSED — — — — On Up side of mainline.
Removed by 30/ 7/2002
Eumemmerring Creek 35.337 95 H 5 — — — UL — —
Remington Drive / Pound Road
West
35.857 95 J 6 — — — (OL) — Proposed
Abbotts Road 36.914 95 K 8 — — — — BB —
LYNDHURST 38.362 96 A12 CLOSED — 421@ — — Not open for
passengers. Cement
siding on Up side of
mainline, controlled by
VRNA.
Dandenong—Hastings
(Lyndhurst) Road
38.590 96 A12 — — — OL — —
LYNDBROOK LOOP Up end 38.795 129 A 1 — — — — — —
LYNBROOK 39.585 129 B 2 Not Staffed 1Up 160
2Dn 160
— — — —
Crossing 39.679 129 B 2 — — — UL — Foot only
Alymer Road 39.695 129 B 3 — — — — ? Proposed
Glasscocks Road 40.327 129 C 4 — — — (OL) — Proposed
LYNDBROOK LOOP Down
end
40.982 129 C 6 — — — — — —
Evans Road 41.593 129 D 7 — — — — BB —
MERINDA PARK 42.350 129 E 9 Not Staffed 160 — — — —
Down end of platform 42.425 129 E 9 — — — — PG Foot only
Thompsons Road 42.526 129 F 9 — — — — BB+PG —
Transmission line 43.446 129 G11 — — — OL — —
Camms Road 44.679 133 H 1 — — — — BB+PG —
CRANBOURNE ¶ 45.122 133 J 2 Error! AutoText entry not
defined.
1 160
2 160
3 - 176
4 - 176
5 - 176
6 – 176
7 - 176
8 - 176
— — Sidings located on down
side of mainline.
Vic Track boundary 45.152 133 J 2 — — — — — —
Foot crossing 45.269 133 J 2 — — — — PO Foot only
South Gippsland Highway 45.277 133 J 2 — — — — FL+PO —
End of overhead 45.472 133 K 2 Track continues to Leongatha. Track between Cranbourne and Nyora is booked out of use.
Nyora to Leongatha is under the control of the South Gippsland Tourist Railway.
For explanation of Symbols - See Page A 58.
LINE DESCRIPTION
CAULFIELD GROUP
Metro Melbourne - System Description [WTT Addenda] A 31 19/09/2013
CAULFIELD TO STONY POINT
LOCATION
Km Ex
SSS
MELWAY
MAP REF. HOURS OF OPERATION
PLATFORM
LENGTHS
SIDING
LENGTHS BRIDGES CROSSINGS REMARKS
TRACKS Caulfield to Moorabbin ................................................................................................................... Triple line (centre line available for two-way running).
Moorabbin to Frankston ................................................................................................................. Double line.
Frankston to Stony Point@ ............................................................................................................ Single line. Crossing station at Somerville. Crossing station
tracks booked out at Hastings and Crib Point.
SAFEWORKING SYSTEMS Caulfield to Frankston (except Centre Line Caulfield-Moorabbin) .................................................... Automatic Block Signalling
Caulfield to Moorabbin (Centre Line - two way running) .................................................................. Automatic Block Signalling
(Controlled from Caulfield Signal Box.)
Frankston to Stony Point@ ........................................................................................................... Automatic & Track Control System
DISTANCES
For distances from Southern Cross beyond Richmond via the Caulfield Loop add 1.404km (from Flinders Street add 2.636km)
For direct distances from Flinders Street subtract 1.232km
For FLINDERS STREET TO CAULFIELD
— See FLINDERS STREET TO RICHMOND page A 8 (Direct) or A 9 (Loop) and RICHMOND TO PAKENHAM page A 25.
CAULFIELD ¶ 11.786 68 F 1 See Flinders Street to Pakenham Page A 26.
Queens Avenue 12.022 68 F 2 — — — UL Cat.3 — 3.4m clearance
Junction to Dandenong / Pakenham / Cranbourne. See page A 26
Moodie Street 12.437 68 F 3 — — — UL — Foot only
Neerim Road 13.079 68 F 4 — — — — BB+PG —
SIGNAL BOX 13.368 68 F 4 M-Th 03 45—00 45 Tu-F
F 03 45-01 30 Sa
Sa 03 45-01 30 Su
Su 07 10—00 45 M
— — — — TSG
Glenhuntly Road 13.371 68 E 5 — — — — BB+PG Tram crossing
GLENHUNTLY 13.459 68 E 5 M-F 06 30-10 30
Sa & Su - Not Staffed
1Up 154
2 154
3Dn 159
— — — —
Wattle Avenue 13.885 68 E 6 — — — — PG Foot only
Dorothy Avenue / Woodville
Avenue
14.260 68 E 7 — — — UL Cat.3 — 3.6m clearance
Former Rosstown Rw
ORMOND 14.902 68 E 8 M-F 06 30-10 30
Sa & Su - Not Staffed
1Up 159
2 159
3Dn 158
— — — —
Ormond subway 14.980 68 E 8 — — — UL — Foot only
North Road 14.994 68 E 8 — — — — BB+PG —
McKINNON 15.716 68 E10 M-F 07 30-09 30
Sa & Su - Not Staffed
1Up 159
2 159
3Dn 158
— — — —
McKinnon subway 15.786 68 E10 — — — UL — Foot only
McKinnon Road 15.796 68 E10 — — — — BB+PG T
BENTLEIGH ¶ 16.522 68 D12 Error! AutoText entry not
defined.
1Up 159
2 159
3Dn 160
— — — —
Bentleigh station subway 16.589 68 D12 — — — — — Filled in.
Centre Road 16.599 68 D12 — — — — BB+PG —
Bridge 16.620 68 D12 — — — UL — —
Brewer Road 17.023 77 D 1 — — — OL — —
Elster Creek branch 17.171 77 D 2 — — — UL — —
PATTERSON 17.385 77 D 2 Error! AutoText entry not
defined.
1Up 159
2 159
3Dn 150
— — — —
Patterson Road 17.429 77 D 2 — — — UL Cat.2 — 3.2m clearance
South Rd North footbridge 18.304 77 D 5 — — — OL — Foot only
South Road 18.309 77 D 5 — — — OL — Truck route OD5
South Rd South footbridge 18.340 77 D 5 — — — OL — Foot only
MOORABBIN ¶ 18.446 77 D 5 Error! AutoText entry not
defined.
1Up 154
2 151
3Dn 160
— — — —
Moorabbin footbridge 18.446 77 D 5 — — — OL — Foot only
Nepean Highway 18.559 77 D 5 — — — OL — —
Exley Road 18.885 77 D 6 — — — — PG Foot only
Dane Road 19.131 77 D 7 — — — OL — —
Wickham Road 19.630 77 E 8 — — — — BB+PG 2 crossings
LINE DESCRIPTION
CAULFIELD GROUP
Metro Melbourne - System Description [WTT Addenda] A 32 19/09/2013
CAULFIELD TO STONY POINT
LOCATION
Km Ex
SSS
MELWAY
MAP REF. HOURS OF OPERATION
PLATFORM
LENGTHS
SIDING
LENGTHS BRIDGES CROSSINGS REMARKS
HIGHETT 20.063 77 E 9 Error! AutoText entry not
defined.
Dn 158
Up 159
— — — —
Highett Road 20.140 77 E 9 — — — — BB+PG —
Bay Road 21.168 77 G11 — — — UL Cat.3 — 4.2m clearance
SOUTHLAND 21.298 77 G12 — — — — — Possible station site
Heather Grove 21.831 77 H12 — — — — PO Foot only
Park Road 22.216 86 H 1 — — — — BB+PG —
CHELTENHAM ¶ 22.425 86 H 2 Error! AutoText entry not
defined.
1 159
2Up 162
3Dn 158
— — — —
SIGNAL BOX As required
Otherwise
M-F 1615-1650
CSM
Charman Road 22.534 86 H 2 — — — — BB+PBB —
Latrobe Street 23.359 86 J 4 — — — — BB+PG —
Patty Street 23.817 86 K 5 — — — — PO Foot only
Balcombe Road 24.259 87 A 6 — — — — BB+PG —
MENTONE ¶ 24.358 87 A 6 First train to last train Dn 159
Up 159
— — — —
Mentone subway 24.366 87 A 6 — — — UL — Foot only
Mitchell Street 24.568 87 A 6 — — — — PG Foot only
Cremona Street 24.869 87 A 7 — — — — PG Foot only
Warrigal Road 25.142 87 B 7 — — — — BB+PBB —
Antibes Street 25.620 87 C 8 — — — — PG Foot only
Up end of platform / Bethell
Avenue / Alameda Street
25.815 87 C 9 — — — — PG Foot only
PARKDALE 25.929 87 C 9 M-F 06 00-10 00
Sa & Su - Not Staffed
Dn 157
Up 158
— — — —
Parkers Road 26.015 87 C 9 — — — — BB+PBB —
McIndoe Pde / Elm Gve 26.317 87 D10 — — — — PO Foot only
White Street 26.639 87 D10 — — — — PG Foot only
Nepean Highway 27.053 87 E11 — — — UL Cat.2 — —
McDonald Street 27.583 87 F12 — — — — BB+PG —
MORDIALLOC ¶ 27.693 92 F 1 Error! AutoText entry not
defined.
Dn 157
Up 159
1A ___
See other
entry for
stabling
sidings
— — Track 1A is located
between down and up
main lines.
SIGNAL BOX M-F 05 00-09 35
M-F 15 00-19 45
Sa 09 45-11 00
Sa 19 10-20 35
Su 01 30-01 45
Su 09 30-11 20
Su 19 20-2040
Mo 00 40-00 50
CSM
Mordialloc subway 27.693 92 F 1 — — — UL — Foot only
Bear Street 27.802 92 F 1 — — — — BB+PG —
STABLING SIDINGS 27.876 92 F 1 — — 3 156
4 170
5 147
6 147
— — All sidings located on
the down side of the
main line.
Mordialloc Ck subway 28.116 92 F 2 — — — UL — Foot only
Mordialloc Creek - Up track 28.156 92 F 2 — — — UL — —
Mordialloc Creek - Down track 28.166 92 F 2 — — — UL — —
Station Street 28.407 92 F 2 — — — — BB+PBB T
Pine Crescent 28.724 92 G 3 — — — — PG Foot only
Anchor Street 29.154 92 H 4 — — — — PO Foot only
Retreat Avenue / Wyuna Lane 29.459 92 H 4 — — — — PG Foot only
Ideal Avenue 29.730 92 H 5 — — — — PO Foot only
Aspendale subway 30.312 92 J 6 — — — UL — Foot only
ASPENDALE 30.312 92 J 6 Error! AutoText entry not
defined.
Dn 158
Up 158
— — — —
Groves Street 30.411 92 J 6 — — — — BB+PG T
Birdwood Street 30.664 92 J 7 — — — — PO Foot only
Second Avenue 30.846 92 J 7 — — — — PO Foot only
Lochiel Avenue 31.206 92 K 8 — — — — BB+PBB —
Sinclair Ave / Denman Avenue 31.505 92 K 9 — — — — PO Foot only
EDITHVALE 31.665 92 K 9 Error! AutoText entry not
defined.
Dn 160
Up 160
— — — —
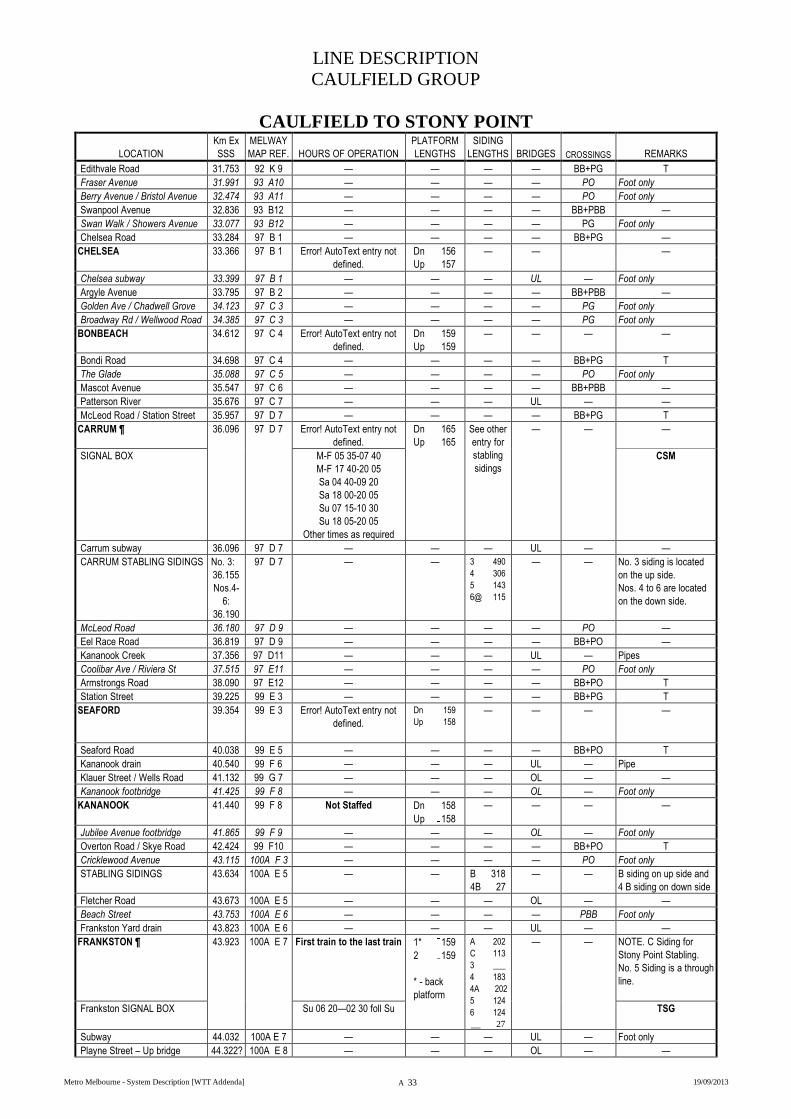
LINE DESCRIPTION
CAULFIELD GROUP
Metro Melbourne - System Description [WTT Addenda] A 33 19/09/2013
CAULFIELD TO STONY POINT
LOCATION
Km Ex
SSS
MELWAY
MAP REF. HOURS OF OPERATION
PLATFORM
LENGTHS
SIDING
LENGTHS BRIDGES CROSSINGS REMARKS
Edithvale Road 31.753 92 K 9 — — — — BB+PG T
Fraser Avenue 31.991 93 A10 — — — — PO Foot only
Berry Avenue / Bristol Avenue 32.474 93 A11 — — — — PO Foot only
Swanpool Avenue 32.836 93 B12 — — — — BB+PBB —
Swan Walk / Showers Avenue 33.077 93 B12 — — — — PG Foot only
Chelsea Road 33.284 97 B 1 — — — — BB+PG —
CHELSEA 33.366 97 B 1 Error! AutoText entry not
defined.
Dn 156
Up 157
— — —
Chelsea subway 33.399 97 B 1 — — — UL — Foot only
Argyle Avenue 33.795 97 B 2 — — — — BB+PBB —
Golden Ave / Chadwell Grove 34.123 97 C 3 — — — — PG Foot only
Broadway Rd / Wellwood Road 34.385 97 C 3 — — — — PG Foot only
BONBEACH 34.612 97 C 4 Error! AutoText entry not
defined.
Dn 159
Up 159
— — — —
Bondi Road 34.698 97 C 4 — — — — BB+PG T
The Glade 35.088 97 C 5 — — — — PO Foot only
Mascot Avenue 35.547 97 C 6 — — — — BB+PBB —
Patterson River 35.676 97 C 7 — — — UL — —
McLeod Road / Station Street 35.957 97 D 7 — — — — BB+PG T
CARRUM ¶ 36.096 97 D 7 Error! AutoText entry not
defined.
Dn 165
Up 165
See other
entry for
stabling
sidings
— — —
SIGNAL BOX M-F 05 35-07 40
M-F 17 40-20 05
Sa 04 40-09 20
Sa 18 00-20 05
Su 07 15-10 30
Su 18 05-20 05
Other times as required
CSM
Carrum subway 36.096 97 D 7 — — — UL — —
CARRUM STABLING SIDINGS No. 3:
36.155
Nos.4-
6:
36.190
97 D 7 — — 3 490
4 306
5 143
6@ 115
— — No. 3 siding is located
on the up side.
Nos. 4 to 6 are located
on the down side.
McLeod Road 36.180 97 D 9 — — — — PO —
Eel Race Road 36.819 97 D 9 — — — — BB+PO —
Kananook Creek 37.356 97 D11 — — — UL — Pipes
Coolibar Ave / Riviera St 37.515 97 E11 — — — — PO Foot only
Armstrongs Road 38.090 97 E12 — — — — BB+PO T
Station Street 39.225 99 E 3 — — — — BB+PG T
SEAFORD
39.354 99 E 3 Error! AutoText entry not
defined.
Dn 159
Up 158 — — — —
Seaford Road 40.038 99 E 5 — — — — BB+PO T
Kananook drain 40.540 99 F 6 — — — UL — Pipe
Klauer Street / Wells Road 41.132 99 G 7 — — — OL — —
Kananook footbridge 41.425 99 F 8 — — — OL — Foot only
KANANOOK 41.440 99 F 8 Not Staffed Dn 158
Up 158
— — — —
Jubilee Avenue footbridge 41.865 99 F 9 — — — OL — Foot only
Overton Road / Skye Road 42.424 99 F10 — — — — BB+PO T
Cricklewood Avenue 43.115 100A F 3 — — — — PO Foot only
STABLING SIDINGS 43.634 100A E 5 — — B 318
4B 27
— — B siding on up side and
4 B siding on down side
Fletcher Road 43.673 100A E 5 — — — OL — —
Beach Street 43.753 100A E 6 — — — — PBB Foot only
Frankston Yard drain 43.823 100A E 6 — — — UL — —
FRANKSTON ¶ 43.923 100A E 7 First train to the last train 1* 159
2 159
* - back
platform
A 202
C 113
3 ___
4 183
4A 202
5 124
6 124
__ 27
— — NOTE. C Siding for
Stony Point Stabling.
No. 5 Siding is a through
line.
Frankston SIGNAL BOX Su 06 20—02 30 foll Su TSG
Subway 44.032 100A E 7 — — — UL — Foot only
Playne Street – Up bridge 44.322? 100A E 8 — — — OL — —
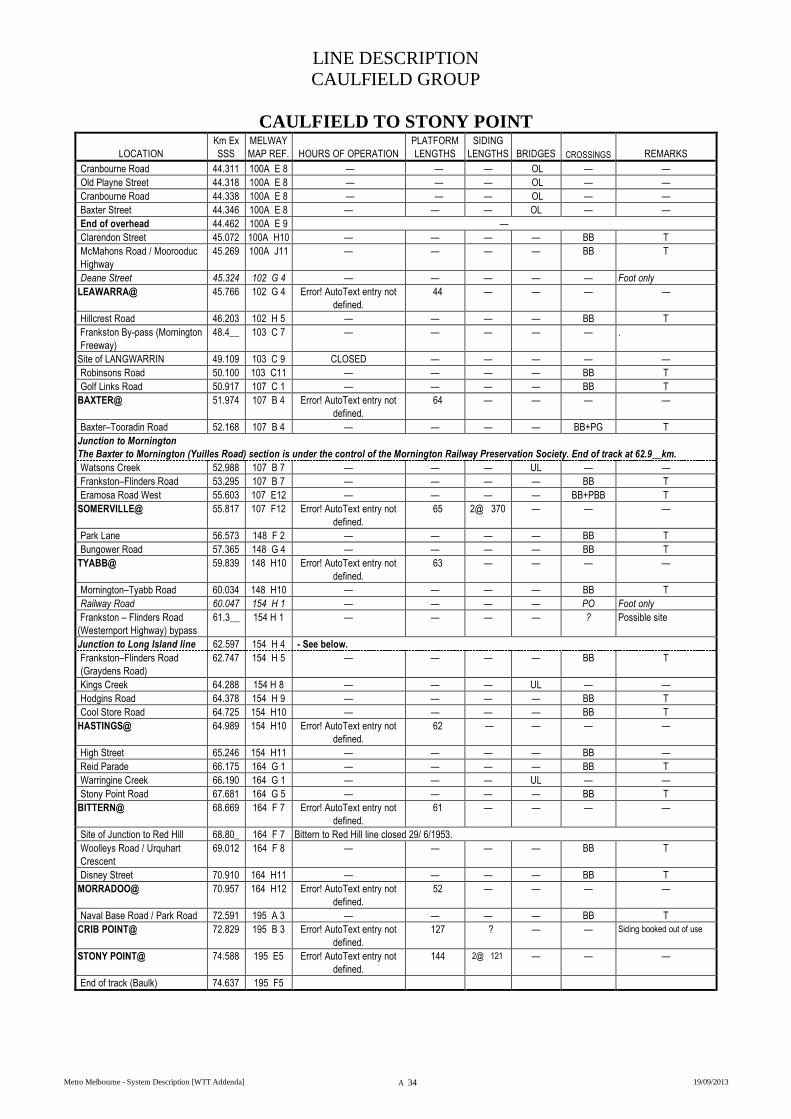
LINE DESCRIPTION
CAULFIELD GROUP
Metro Melbourne - System Description [WTT Addenda] A 34 19/09/2013
CAULFIELD TO STONY POINT
LOCATION
Km Ex
SSS
MELWAY
MAP REF. HOURS OF OPERATION
PLATFORM
LENGTHS
SIDING
LENGTHS BRIDGES CROSSINGS REMARKS
Cranbourne Road 44.311 100A E 8 — — — OL — —
Old Playne Street 44.318 100A E 8 — — — OL — —
Cranbourne Road 44.338 100A E 8 — — — OL — —
Baxter Street 44.346 100A E 8 — — — OL — —
End of overhead 44.462 100A E 9 —
Clarendon Street 45.072 100A H10 — — — — BB T
McMahons Road / Moorooduc
Highway
45.269 100A J11 — — — — BB T
Deane Street 45.324 102 G 4 — — — — — Foot only
LEAWARRA@ 45.766 102 G 4 Error! AutoText entry not
defined.
44 — — — —
Hillcrest Road 46.203 102 H 5 — — — — BB T
Frankston By-pass (Mornington
Freeway)
48.4__ 103 C 7 — — — — — .
Site of LANGWARRIN 49.109 103 C 9 CLOSED — — — — —
Robinsons Road 50.100 103 C11 — — — — BB T
Golf Links Road 50.917 107 C 1 — — — — BB T
BAXTER@ 51.974 107 B 4 Error! AutoText entry not
defined.
64 — — — —
Baxter–Tooradin Road 52.168 107 B 4 — — — — BB+PG T
Junction to Mornington
The Baxter to Mornington (Yuilles Road) section is under the control of the Mornington Railway Preservation Society. End of track at 62.9__km.
Watsons Creek 52.988 107 B 7 — — — UL — —
Frankston–Flinders Road 53.295 107 B 7 — — — — BB T
Eramosa Road West 55.603 107 E12 — — — — BB+PBB T
SOMERVILLE@ 55.817 107 F12 Error! AutoText entry not
defined.
65 2@ 370 — — —
Park Lane 56.573 148 F 2 — — — — BB T
Bungower Road 57.365 148 G 4 — — — — BB T
TYABB@ 59.839 148 H10 Error! AutoText entry not
defined.
63 — — — —
Mornington–Tyabb Road 60.034 148 H10 — — — — BB T
Railway Road 60.047 154 H 1 — — — — PO Foot only
Frankston – Flinders Road
(Westernport Highway) bypass
61.3__ 154 H 1 — — — — ? Possible site
Junction to Long Island line 62.597 154 H 4 - See below.
Frankston–Flinders Road
(Graydens Road)
62.747 154 H 5 — — — — BB T
Kings Creek 64.288 154 H 8 — — — UL — —
Hodgins Road 64.378 154 H 9 — — — — BB T
Cool Store Road 64.725 154 H10 — — — — BB T
HASTINGS@ 64.989 154 H10 Error! AutoText entry not
defined.
62 — — — —
High Street 65.246 154 H11 — — — — BB —
Reid Parade 66.175 164 G 1 — — — — BB T
Warringine Creek 66.190 164 G 1 — — — UL — —
Stony Point Road 67.681 164 G 5 — — — — BB T
BITTERN@ 68.669 164 F 7 Error! AutoText entry not
defined.
61 — — — —
Site of Junction to Red Hill 68.80_ 164 F 7 Bittern to Red Hill line closed 29/ 6/1953.
Woolleys Road / Urquhart
Crescent
69.012 164 F 8 — — — — BB T
Disney Street 70.910 164 H11 — — — — BB T
MORRADOO@ 70.957 164 H12 Error! AutoText entry not
defined.
52 — — — —
Naval Base Road / Park Road 72.591 195 A 3 — — — — BB T
CRIB POINT@ 72.829 195 B 3 Error! AutoText entry not
defined.
127 ? — — Siding booked out of use
STONY POINT@ 74.588 195 E5 Error! AutoText entry not
defined.
144 2@ 121 — — —
End of track (Baulk) 74.637 195 F5
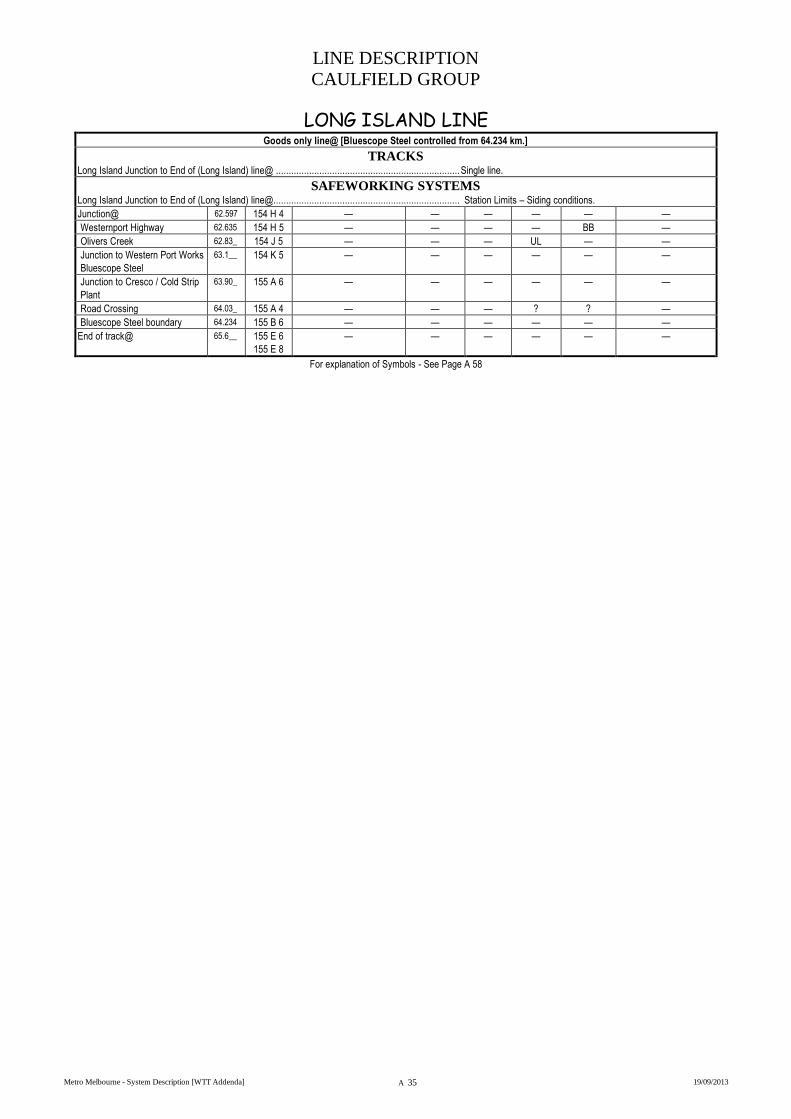
LINE DESCRIPTION
CAULFIELD GROUP
Metro Melbourne - System Description [WTT Addenda] A 35 19/09/2013
LONG ISLAND LINE Goods only line@ [Bluescope Steel controlled from 64.234 km.]
TRACKS Long Island Junction to End of (Long Island) line@ ........................................................................ Single line.
SAFEWORKING SYSTEMS Long Island Junction to End of (Long Island) line@......................................................................... Station Limits – Siding conditions.
Junction@ 62.597 154 H 4 — — — — — —
Westernport Highway 62.635 154 H 5 — — — — BB —
Olivers Creek 62.83_ 154 J 5 — — — UL — —
Junction to Western Port Works
Bluescope Steel
63.1__ 154 K 5 — — — — — —
Junction to Cresco / Cold Strip
Plant
63.90_ 155 A 6 — — — — — —
Road Crossing 64.03_ 155 A 4 — — — ? ? —
Bluescope Steel boundary 64.234 155 B 6 — — — — — —
End of track@ 65.6__ 155 E 6
155 E 8
— — — — — —
For explanation of Symbols - See Page A 58
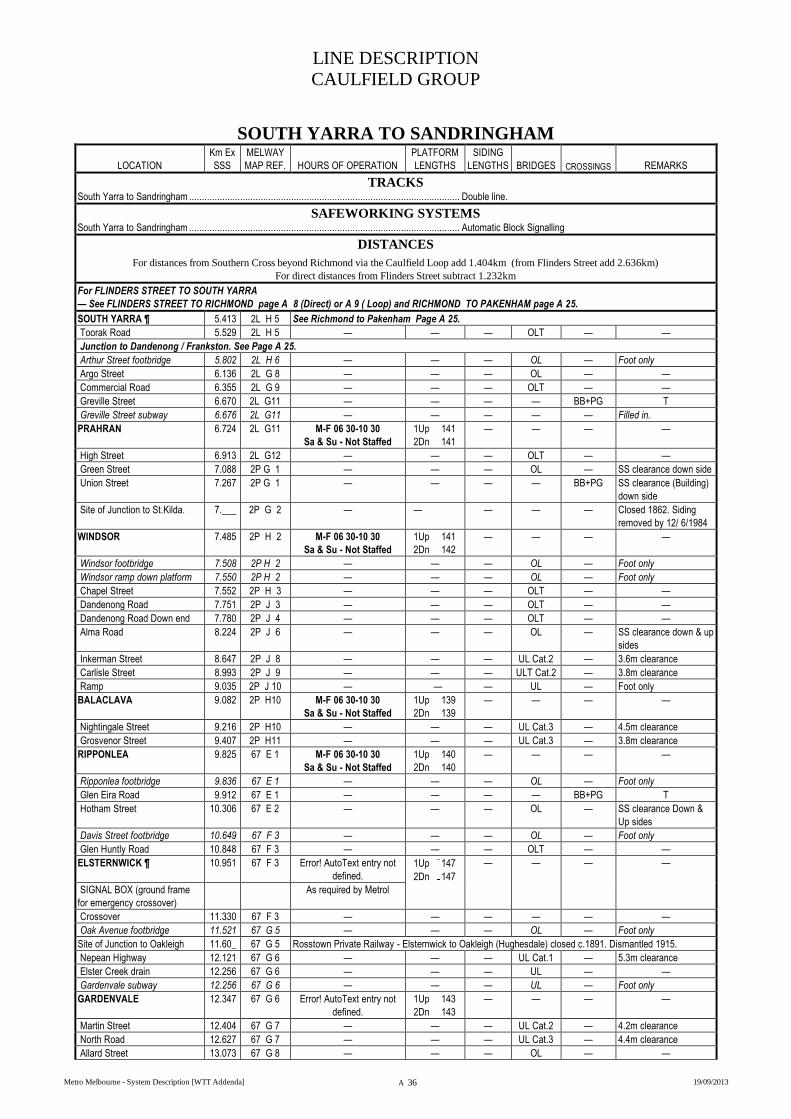
LINE DESCRIPTION
CAULFIELD GROUP
Metro Melbourne - System Description [WTT Addenda] A 36 19/09/2013
SOUTH YARRA TO SANDRINGHAM
LOCATION
Km Ex
SSS
MELWAY
MAP REF. HOURS OF OPERATION
PLATFORM
LENGTHS
SIDING
LENGTHS BRIDGES CROSSINGS REMARKS
TRACKS South Yarra to Sandringham .......................................................................................................... Double line.
SAFEWORKING SYSTEMS South Yarra to Sandringham .......................................................................................................... Automatic Block Signalling
DISTANCES
For distances from Southern Cross beyond Richmond via the Caulfield Loop add 1.404km (from Flinders Street add 2.636km)
For direct distances from Flinders Street subtract 1.232km
For FLINDERS STREET TO SOUTH YARRA
— See FLINDERS STREET TO RICHMOND page A 8 (Direct) or A 9 ( Loop) and RICHMOND TO PAKENHAM page A 25.
SOUTH YARRA ¶ 5.413 2L H 5 See Richmond to Pakenham Page A 25.
Toorak Road 5.529 2L H 5 — — — OLT — —
Junction to Dandenong / Frankston. See Page A 25.
Arthur Street footbridge 5.802 2L H 6 — — — OL — Foot only
Argo Street 6.136 2L G 8 — — — OL — —
Commercial Road 6.355 2L G 9 — — — OLT — —
Greville Street 6.670 2L G11 — — — — BB+PG T
Greville Street subway 6.676 2L G11 — — — — — Filled in.
PRAHRAN 6.724 2L G11 M-F 06 30-10 30
Sa & Su - Not Staffed
1Up 141
2Dn 141
— — — —
High Street 6.913 2L G12 — — — OLT — —
Green Street 7.088 2P G 1 — — — OL — SS clearance down side
Union Street 7.267 2P G 1 — — — — BB+PG SS clearance (Building)
down side
Site of Junction to St.Kilda. 7.___ 2P G 2 — — — — — Closed 1862. Siding
removed by 12/ 6/1984
WINDSOR 7.485 2P H 2 M-F 06 30-10 30
Sa & Su - Not Staffed
1Up 141
2Dn 142
— — — —
Windsor footbridge 7.508 2P H 2 — — — OL — Foot only
Windsor ramp down platform 7.550 2P H 2 — — — OL — Foot only
Chapel Street 7.552 2P H 3 — — — OLT — —
Dandenong Road 7.751 2P J 3 — — — OLT — —
Dandenong Road Down end 7.780 2P J 4 — — — OLT — —
Alma Road 8.224 2P J 6 — — — OL — SS clearance down & up
sides
Inkerman Street 8.647 2P J 8 — — — UL Cat.2 — 3.6m clearance
Carlisle Street 8.993 2P J 9 — — — ULT Cat.2 — 3.8m clearance
Ramp 9.035 2P J 10 — — — UL — Foot only
BALACLAVA 9.082 2P H10 M-F 06 30-10 30
Sa & Su - Not Staffed
1Up 139
2Dn 139
— — — —
Nightingale Street 9.216 2P H10 — — — UL Cat.3 — 4.5m clearance
Grosvenor Street 9.407 2P H11 — — — UL Cat.3 — 3.8m clearance
RIPPONLEA 9.825 67 E 1 M-F 06 30-10 30
Sa & Su - Not Staffed
1Up 140
2Dn 140
— — — —
Ripponlea footbridge 9.836 67 E 1 — — — OL — Foot only
Glen Eira Road 9.912 67 E 1 — — — — BB+PG T
Hotham Street 10.306 67 E 2 — — — OL — SS clearance Down &
Up sides
Davis Street footbridge 10.649 67 F 3 — — — OL — Foot only
Glen Huntly Road 10.848 67 F 3 — — — OLT — —
ELSTERNWICK ¶ 10.951 67 F 3 Error! AutoText entry not
defined.
1Up 147
2Dn 147
— — — —
SIGNAL BOX (ground frame
for emergency crossover)
As required by Metrol
Crossover 11.330 67 F 3 — — — — — —
Oak Avenue footbridge 11.521 67 G 5 — — — OL — Foot only
Site of Junction to Oakleigh 11.60_ 67 G 5 Rosstown Private Railway - Elsternwick to Oakleigh (Hughesdale) closed c.1891. Dismantled 1915.
Nepean Highway 12.121 67 G 6 — — — UL Cat.1 — 5.3m clearance
Elster Creek drain 12.256 67 G 6 — — — UL — —
Gardenvale subway 12.256 67 G 6 — — — UL — Foot only
GARDENVALE 12.347 67 G 6 Error! AutoText entry not
defined.
1Up 143
2Dn 143
— — — —
Martin Street 12.404 67 G 7 — — — UL Cat.2 — 4.2m clearance
North Road 12.627 67 G 7 — — — UL Cat.3 — 4.4m clearance
Allard Street 13.073 67 G 8 — — — OL — —
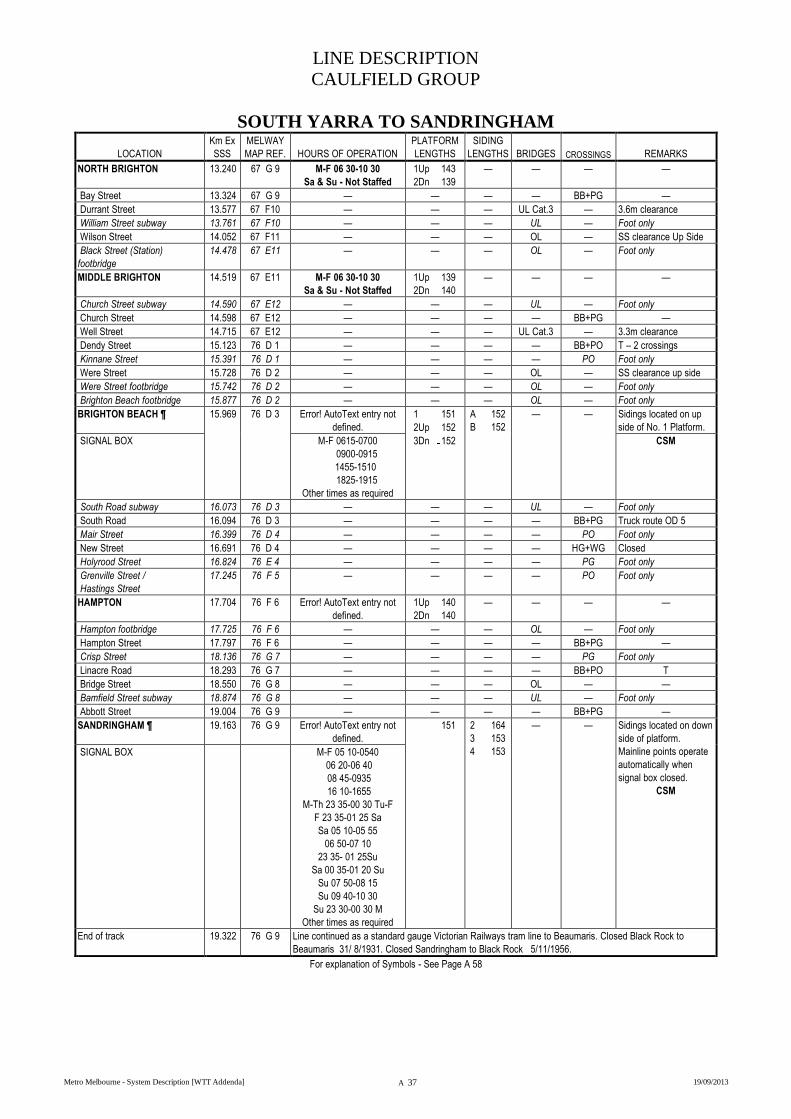
LINE DESCRIPTION
CAULFIELD GROUP
Metro Melbourne - System Description [WTT Addenda] A 37 19/09/2013
SOUTH YARRA TO SANDRINGHAM
LOCATION
Km Ex
SSS
MELWAY
MAP REF. HOURS OF OPERATION
PLATFORM
LENGTHS
SIDING
LENGTHS BRIDGES CROSSINGS REMARKS
NORTH BRIGHTON 13.240 67 G 9 M-F 06 30-10 30
Sa & Su - Not Staffed
1Up 143
2Dn 139
— — — —
Bay Street 13.324 67 G 9 — — — — BB+PG —
Durrant Street 13.577 67 F10 — — — UL Cat.3 — 3.6m clearance
William Street subway 13.761 67 F10 — — — UL — Foot only
Wilson Street 14.052 67 F11 — — — OL — SS clearance Up Side
Black Street (Station)
footbridge
14.478 67 E11 — — — OL — Foot only
MIDDLE BRIGHTON 14.519 67 E11 M-F 06 30-10 30
Sa & Su - Not Staffed
1Up 139
2Dn 140
— — — —
Church Street subway 14.590 67 E12 — — — UL — Foot only
Church Street 14.598 67 E12 — — — — BB+PG —
Well Street 14.715 67 E12 — — — UL Cat.3 — 3.3m clearance
Dendy Street 15.123 76 D 1 — — — — BB+PO T – 2 crossings
Kinnane Street 15.391 76 D 1 — — — — PO Foot only
Were Street 15.728 76 D 2 — — — OL — SS clearance up side
Were Street footbridge 15.742 76 D 2 — — — OL — Foot only
Brighton Beach footbridge 15.877 76 D 2 — — — OL — Foot only
BRIGHTON BEACH ¶ 15.969 76 D 3 Error! AutoText entry not
defined.
1 151
2Up 152
3Dn 152
A 152
B 152
— — Sidings located on up
side of No. 1 Platform.
SIGNAL BOX M-F 0615-0700
0900-0915
1455-1510
1825-1915
Other times as required
CSM
South Road subway 16.073 76 D 3 — — — UL — Foot only
South Road 16.094 76 D 3 — — — — BB+PG Truck route OD 5
Mair Street 16.399 76 D 4 — — — — PO Foot only
New Street 16.691 76 D 4 — — — — HG+WG Closed
Holyrood Street 16.824 76 E 4 — — — — PG Foot only
Grenville Street /
Hastings Street
17.245 76 F 5 — — — — PO Foot only
HAMPTON 17.704 76 F 6 Error! AutoText entry not
defined.
1Up 140
2Dn 140
— — — —
Hampton footbridge 17.725 76 F 6 — — — OL — Foot only
Hampton Street 17.797 76 F 6 — — — — BB+PG —
Crisp Street 18.136 76 G 7 — — — — PG Foot only
Linacre Road 18.293 76 G 7 — — — — BB+PO T
Bridge Street 18.550 76 G 8 — — — OL — —
Bamfield Street subway 18.874 76 G 8 — — — UL — Foot only
Abbott Street 19.004 76 G 9 — — — — BB+PG —
SANDRINGHAM ¶ 19.163 76 G 9 Error! AutoText entry not
defined.
151 2 164
3 153
4 153
— — Sidings located on down
side of platform.
Mainline points operate
automatically when
signal box closed.
CSM
SIGNAL BOX M-F 05 10-0540
06 20-06 40
08 45-0935
16 10-1655
M-Th 23 35-00 30 Tu-F
F 23 35-01 25 Sa
Sa 05 10-05 55
06 50-07 10
23 35- 01 25Su
Sa 00 35-01 20 Su
Su 07 50-08 15
Su 09 40-10 30
Su 23 30-00 30 M
Other times as required
End of track 19.322 76 G 9 Line continued as a standard gauge Victorian Railways tram line to Beaumaris. Closed Black Rock to
Beaumaris 31/ 8/1931. Closed Sandringham to Black Rock 5/11/1956.
For explanation of Symbols - See Page A 58
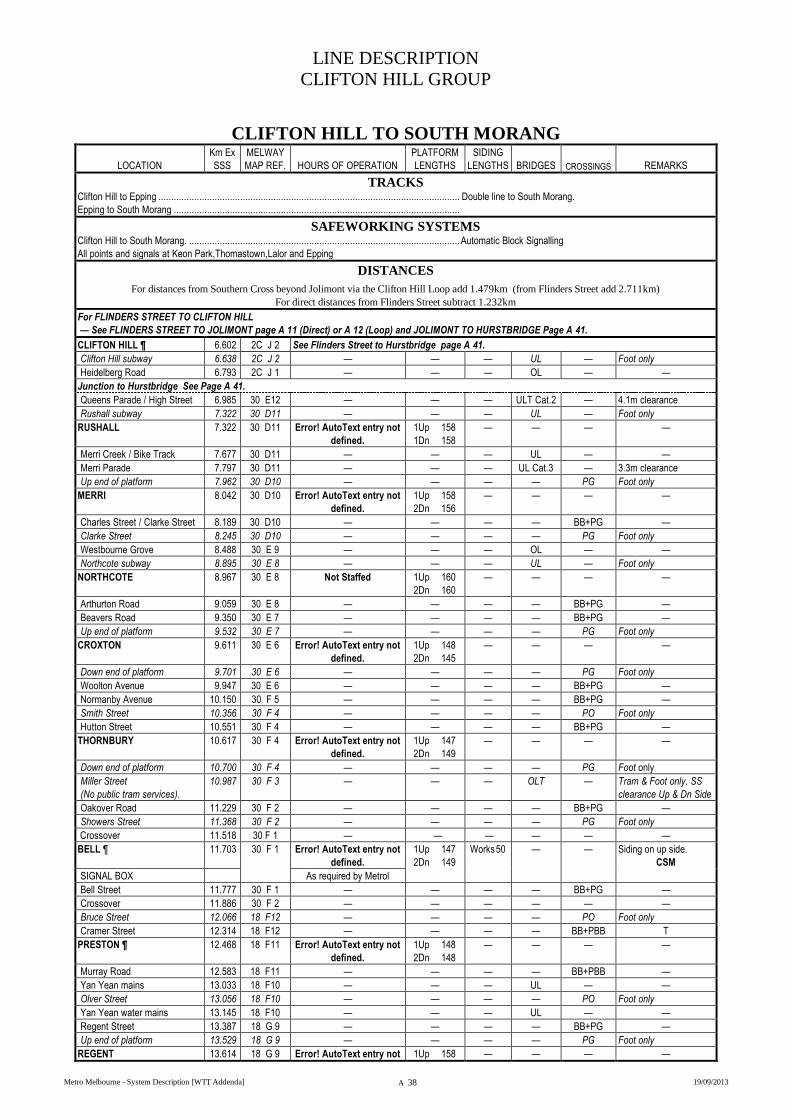
LINE DESCRIPTION
CLIFTON HILL GROUP
Metro Melbourne - System Description [WTT Addenda] A 38 19/09/2013
CLIFTON HILL TO SOUTH MORANG
LOCATION
Km Ex
SSS
MELWAY
MAP REF. HOURS OF OPERATION
PLATFORM
LENGTHS
SIDING
LENGTHS BRIDGES CROSSINGS REMARKS
TRACKS Clifton Hill to Epping ...................................................................................................................... Double line to South Morang.
Epping to South Morang ................................................................................................................
SAFEWORKING SYSTEMS Clifton Hill to South Morang. .......................................................................................................... Automatic Block Signalling
All points and signals at Keon Park,Thomastown,Lalor and Epping
DISTANCES
For distances from Southern Cross beyond Jolimont via the Clifton Hill Loop add 1.479km (from Flinders Street add 2.711km)
For direct distances from Flinders Street subtract 1.232km
For FLINDERS STREET TO CLIFTON HILL
— See FLINDERS STREET TO JOLIMONT page A 11 (Direct) or A 12 (Loop) and JOLIMONT TO HURSTBRIDGE Page A 41.
CLIFTON HILL ¶ 6.602 2C J 2 See Flinders Street to Hurstbridge page A 41.
Clifton Hill subway 6.638 2C J 2 — — — UL — Foot only
Heidelberg Road 6.793 2C J 1 — — — OL — —
Junction to Hurstbridge See Page A 41.
Queens Parade / High Street 6.985 30 E12 — — — ULT Cat.2 — 4.1m clearance
Rushall subway 7.322 30 D11 — — — UL — Foot only
RUSHALL 7.322 30 D11 Error! AutoText entry not
defined.
1Up 158
1Dn 158
— — — —
Merri Creek / Bike Track 7.677 30 D11 — — — UL — —
Merri Parade 7.797 30 D11 — — — UL Cat.3 — 3.3m clearance
Up end of platform 7.962 30 D10 — — — — PG Foot only
MERRI 8.042 30 D10 Error! AutoText entry not
defined.
1Up 158
2Dn 156
— — — —
Charles Street / Clarke Street 8.189 30 D10 — — — — BB+PG —
Clarke Street 8.245 30 D10 — — — — PG Foot only
Westbourne Grove 8.488 30 E 9 — — — OL — —
Northcote subway 8.895 30 E 8 — — — UL — Foot only
NORTHCOTE 8.967 30 E 8 Not Staffed 1Up 160
2Dn 160
— — — —
Arthurton Road 9.059 30 E 8 — — — — BB+PG —
Beavers Road 9.350 30 E 7 — — — — BB+PG —
Up end of platform 9.532 30 E 7 — — — — PG Foot only
CROXTON 9.611 30 E 6 Error! AutoText entry not
defined.
1Up 148
2Dn 145
— — — —
Down end of platform 9.701 30 E 6 — — — — PG Foot only
Woolton Avenue 9.947 30 E 6 — — — — BB+PG —
Normanby Avenue 10.150 30 F 5 — — — — BB+PG —
Smith Street 10.356 30 F 4 — — — — PO Foot only
Hutton Street 10.551 30 F 4 — — — — BB+PG —
THORNBURY 10.617 30 F 4 Error! AutoText entry not
defined.
1Up 147
2Dn 149
— — — —
Down end of platform 10.700 30 F 4 — — — — PG Foot only
Miller Street
(No public tram services).
10.987 30 F 3 — — — OLT — Tram & Foot only. SS
clearance Up & Dn Side
Oakover Road 11.229 30 F 2 — — — — BB+PG —
Showers Street 11.368 30 F 2 — — — — PG Foot only
Crossover 11.518 30 F 1 — — — — — —
BELL ¶ 11.703 30 F 1 Error! AutoText entry not
defined.
1Up 147
2Dn 149
Works 50 — — Siding on up side.
CSM
SIGNAL BOX As required by Metrol
Bell Street 11.777 30 F 1 — — — — BB+PG —
Crossover 11.886 30 F 2 — — — — — —
Bruce Street 12.066 18 F12 — — — — PO Foot only
Cramer Street 12.314 18 F12 — — — — BB+PBB T
PRESTON ¶ 12.468 18 F11 Error! AutoText entry not
defined.
1Up 148
2Dn 148
— — — —
Murray Road 12.583 18 F11 — — — — BB+PBB —
Yan Yean mains 13.033 18 F10 — — — UL — —
Olver Street 13.056 18 F10 — — — — PO Foot only
Yan Yean water mains 13.145 18 F10 — — — UL — —
Regent Street 13.387 18 G 9 — — — — BB+PG —
Up end of platform 13.529 18 G 9 — — — — PG Foot only
REGENT 13.614 18 G 9 Error! AutoText entry not 1Up 158 — — — —

LINE DESCRIPTION
CLIFTON HILL GROUP
Metro Melbourne - System Description [WTT Addenda] A 39 19/09/2013
CLIFTON HILL TO SOUTH MORANG
LOCATION
Km Ex
SSS
MELWAY
MAP REF. HOURS OF OPERATION
PLATFORM
LENGTHS
SIDING
LENGTHS BRIDGES CROSSINGS REMARKS
defined. 2Dn 158
Wild Street 13.696 18 G 8 — — — — PG Foot only
Powell Street 13.823 18 G 8 — — — — PO Foot only
Yan Yean water mains 14.166 18 G 8 — — — UL — —
RESERVOIR ¶ 14.943 18 H 6 Error! AutoText entry not
defined.
1Up 147
2Dn 149
— — — —
Down end of platform 15.027 18 H 6 — — — — PG Foot only
High Street (Pedestrian Cross) 15.123 18 H 6 — — — — PG Foot only
High Street 15.142 18 H 6 — — — — BB —
Gladstone Street 15.656 18 H 4 — — — — PO Foot only
RUTHVEN 15.945 18 H 3 Error! AutoText entry not
defined.
1Up 156
2Dn 156
— — — —
Ruthven subway 15.965 18 H 3 — — — UL — Foot only
Hickford Street / Church St 16.781 18 H 1 — — — — PG Foot only
Mahoneys Road / Keon Pde 17.442 8 J11 — — — — BB+PG T
KEON PARK 17.536 8 J11 Error! AutoText entry not
defined.
1Up 163
2Dn 150
— — — —
SIGNAL BOX TSM
Transmission line 17.657 8 J11 — — — OL — —
Transmission line 17.820 8 J11 — — — OL — —
Settlement Road 18.289 8 J 9 — — — — BB+PG T
Western Ring Road 18.500 8 J 9 — — — OL — —
Heyington Avenue 18.933 8 J 8 — — — — BB+PBB T
THOMASTOWN ¶ 19.135 8 J 7 Error! AutoText entry not
defined.
1Up 160
2Dn 160
— — — Platform on down side
Down end of platform 19.215 8 J 7 — — — — PG Foot only
Messmate Street 19.824 8 J 6 — — — — PG Foot only
Manns Crossing 20.001 8 K 5 — — — — BB+PG T
Derrick Street 20.195 8 K 5 — — — — PG Foot only
Station Street / Paschke Cres. 20.705 8 K 4 — — — — BB+PBB T
LALOR 20.814 8 K 3 Error! AutoText entry not
defined.
1Up 160
2Dn 160
— — — —
TSM
Partridge Street 21.083 8 K 3 — — — — PO Foot only
Childs Road 21.500 9 A 2 — — — — BB+PBB —
EPPING MAINTENANCE
DEPOT SIDINGS
21.744 9 A 2 — — 3 77
3A 154
3B 154
3C 154
3D 154
4 76
5 96
6 96
7 77
8 77
9 77
10 77
11 193
12 160
13 157
14 203
15 173
16 187
17 —
18 Wash
Shed
19 149
20 ___
21 155
22 155
23 150
24 150
25 158
26 150
— — Sidings located on the
down side of the line.
Mainco (United Group
Limited).SW.010/2012
SIGNAL BOX Continuously TSM
Cooper Street 22.626 182 C12 — — — OL - —
EPPING 22.816 182 C12 Error! AutoText entry not
defined.
1 160
2 160
Darebin Creek 23.095 182 D12 UL

LINE DESCRIPTION
CLIFTON HILL GROUP
Metro Melbourne - System Description [WTT Addenda] A 40 19/09/2013
CLIFTON HILL TO SOUTH MORANG
LOCATION
Km Ex
SSS
MELWAY
MAP REF. HOURS OF OPERATION
PLATFORM
LENGTHS
SIDING
LENGTHS BRIDGES CROSSINGS REMARKS
Henderson Drain 23.720 182 E12 UL
Pindari Avenue 24.483 182 G12 OL
McDonalds Drain 25.176 182 J11 UL
Civic Drive 25.909 183 A11 OL
SOUTH MORANG 25.989 183 B11 Error! AutoText entry not
defined.
1 174
2 174
End of Line 26.076 183 A11
Line formation continues to Whittlesea. Lalor to Whittlesea closed 29/11/1959. Lalor to Epping re-opened 30/11/1964.
Epping to South Morang re-open 22/ 4/2012..
For explanation of Symbols - See Page A 58
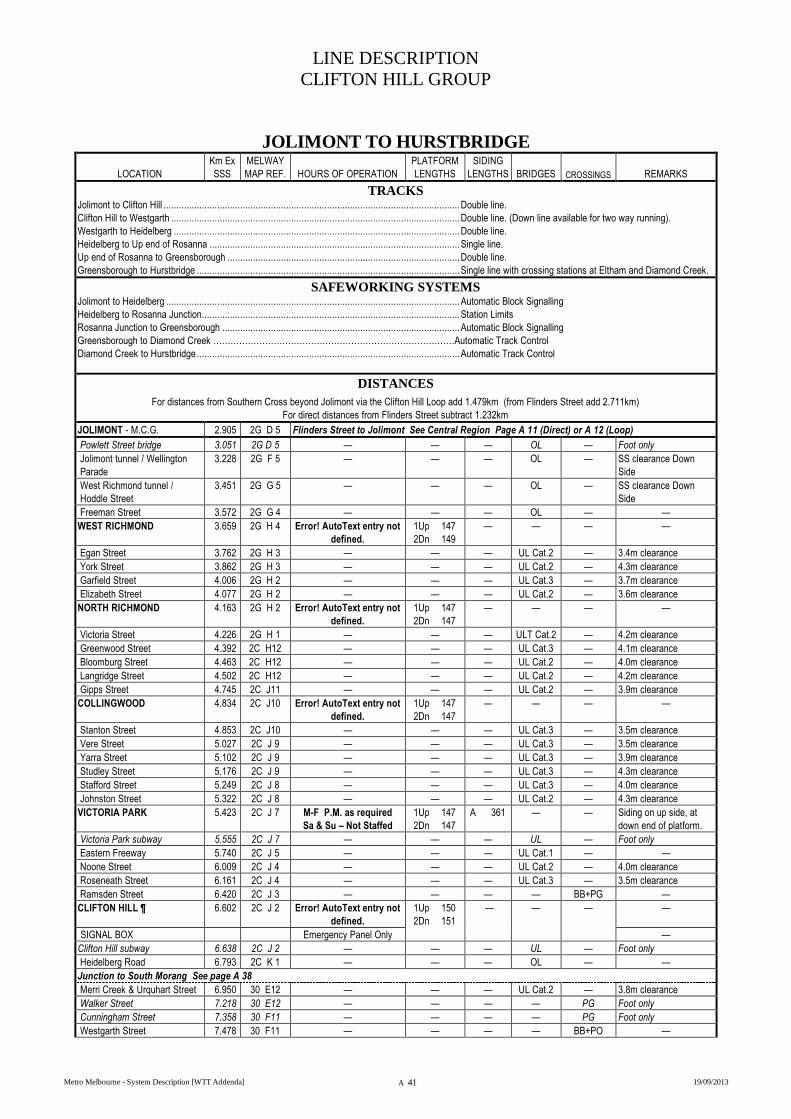
LINE DESCRIPTION
CLIFTON HILL GROUP
Metro Melbourne - System Description [WTT Addenda] A 41 19/09/2013
JOLIMONT TO HURSTBRIDGE
LOCATION
Km Ex
SSS
MELWAY
MAP REF. HOURS OF OPERATION
PLATFORM
LENGTHS
SIDING
LENGTHS BRIDGES CROSSINGS REMARKS
TRACKS Jolimont to Clifton Hill .................................................................................................................... Double line.
Clifton Hill to Westgarth ................................................................................................................. Double line. (Down line available for two way running).
Westgarth to Heidelberg ................................................................................................................ Double line.
Heidelberg to Up end of Rosanna .................................................................................................. Single line.
Up end of Rosanna to Greensborough ........................................................................................... Double line.
Greensborough to Hurstbridge ....................................................................................................... Single line with crossing stations at Eltham and Diamond Creek.
SAFEWORKING SYSTEMS Jolimont to Heidelberg ................................................................................................................... Automatic Block Signalling
Heidelberg to Rosanna Junction..................................................................................................... Station Limits
Rosanna Junction to Greensborough ............................................................................................. Automatic Block Signalling
Greensborough to Diamond Creek …………………………………………………………………………Automatic Track Control
Diamond Creek to Hurstbridge ....................................................................................................... Automatic Track Control
DISTANCES
For distances from Southern Cross beyond Jolimont via the Clifton Hill Loop add 1.479km (from Flinders Street add 2.711km)
For direct distances from Flinders Street subtract 1.232km
JOLIMONT - M.C.G. 2.905 2G D 5 Flinders Street to Jolimont See Central Region Page A 11 (Direct) or A 12 (Loop)
Powlett Street bridge 3.051 2G D 5 — — — OL — Foot only
Jolimont tunnel / Wellington
Parade
3.228 2G F 5 — — — OL — SS clearance Down
Side
West Richmond tunnel /
Hoddle Street
3.451 2G G 5 — — — OL — SS clearance Down
Side
Freeman Street 3.572 2G G 4 — — — OL — —
WEST RICHMOND 3.659 2G H 4 Error! AutoText entry not
defined.
1Up 147
2Dn 149
— — — —
Egan Street 3.762 2G H 3 — — — UL Cat.2 — 3.4m clearance
York Street 3.862 2G H 3 — — — UL Cat.2 — 4.3m clearance
Garfield Street 4.006 2G H 2 — — — UL Cat.3 — 3.7m clearance
Elizabeth Street 4.077 2G H 2 — — — UL Cat.2 — 3.6m clearance
NORTH RICHMOND 4.163 2G H 2 Error! AutoText entry not
defined.
1Up 147
2Dn 147
— — — —
Victoria Street 4.226 2G H 1 — — — ULT Cat.2 — 4.2m clearance
Greenwood Street 4.392 2C H12 — — — UL Cat.3 — 4.1m clearance
Bloomburg Street 4.463 2C H12 — — — UL Cat.2 — 4.0m clearance
Langridge Street 4.502 2C H12 — — — UL Cat.2 — 4.2m clearance
Gipps Street 4.745 2C J11 — — — UL Cat.2 — 3.9m clearance
COLLINGWOOD 4.834 2C J10 Error! AutoText entry not
defined.
1Up 147
2Dn 147
— — — —
Stanton Street 4.853 2C J10 — — — UL Cat.3 — 3.5m clearance
Vere Street 5.027 2C J 9 — — — UL Cat.3 — 3.5m clearance
Yarra Street 5.102 2C J 9 — — — UL Cat.3 — 3.9m clearance
Studley Street 5.176 2C J 9 — — — UL Cat.3 — 4.3m clearance
Stafford Street 5.249 2C J 8 — — — UL Cat.3 — 4.0m clearance
Johnston Street 5.322 2C J 8 — — — UL Cat.2 — 4.3m clearance
VICTORIA PARK 5.423 2C J 7 M-F P.M. as required
Sa & Su – Not Staffed
1Up 147
2Dn 147
A 361 — — Siding on up side, at
down end of platform.
Victoria Park subway 5.555 2C J 7 — — — UL — Foot only
Eastern Freeway 5.740 2C J 5 — — — UL Cat.1 — —
Noone Street 6.009 2C J 4 — — — UL Cat.2 — 4.0m clearance
Roseneath Street 6.161 2C J 4 — — — UL Cat.3 — 3.5m clearance
Ramsden Street 6.420 2C J 3 — — — — BB+PG —
CLIFTON HILL ¶ 6.602 2C J 2 Error! AutoText entry not
defined.
1Up 150
2Dn 151
— — — —
SIGNAL BOX Emergency Panel Only —
Clifton Hill subway 6.638 2C J 2 — — — UL — Foot only
Heidelberg Road 6.793 2C K 1 — — — OL — —
Junction to South Morang See page A 38
Merri Creek & Urquhart Street 6.950 30 E12 — — — UL Cat.2 — 3.8m clearance
Walker Street 7.218 30 E12 — — — — PG Foot only
Cunningham Street 7.358 30 F11 — — — — PG Foot only
Westgarth Street 7.478 30 F11 — — — — BB+PO —
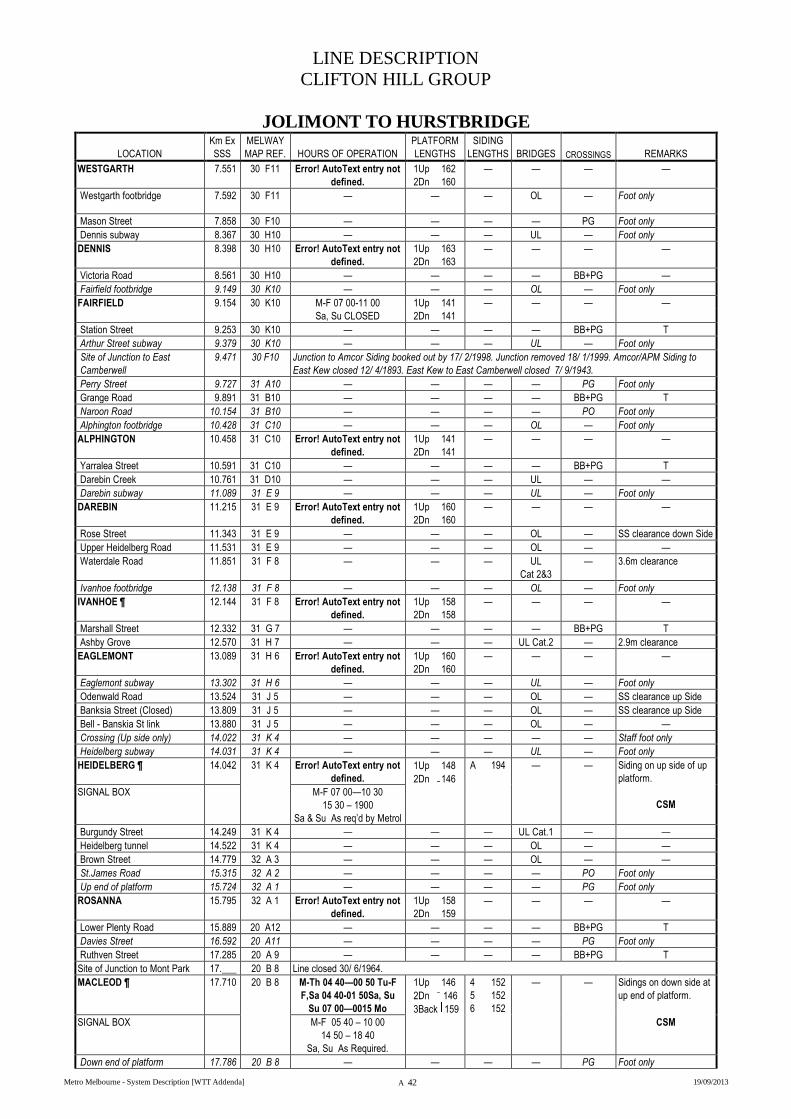
LINE DESCRIPTION
CLIFTON HILL GROUP
Metro Melbourne - System Description [WTT Addenda] A 42 19/09/2013
JOLIMONT TO HURSTBRIDGE
LOCATION
Km Ex
SSS
MELWAY
MAP REF. HOURS OF OPERATION
PLATFORM
LENGTHS
SIDING
LENGTHS BRIDGES CROSSINGS REMARKS
WESTGARTH 7.551 30 F11 Error! AutoText entry not
defined.
1Up 162
2Dn 160
— — — —
Westgarth footbridge 7.592 30 F11 — — — OL — Foot only
Mason Street 7.858 30 F10 — — — — PG Foot only
Dennis subway 8.367 30 H10 — — — UL — Foot only
DENNIS 8.398 30 H10 Error! AutoText entry not
defined.
1Up 163
2Dn 163
— — — —
Victoria Road 8.561 30 H10 — — — — BB+PG —
Fairfield footbridge 9.149 30 K10 — — — OL — Foot only
FAIRFIELD 9.154 30 K10 M-F 07 00-11 00
Sa, Su CLOSED
1Up 141
2Dn 141
— — — —
Station Street 9.253 30 K10 — — — — BB+PG T
Arthur Street subway 9.379 30 K10 — — — UL — Foot only
Site of Junction to East
Camberwell
9.471 30 F10 Junction to Amcor Siding booked out by 17/ 2/1998. Junction removed 18/ 1/1999. Amcor/APM Siding to
East Kew closed 12/ 4/1893. East Kew to East Camberwell closed 7/ 9/1943.
Perry Street 9.727 31 A10 — — — — PG Foot only
Grange Road 9.891 31 B10 — — — — BB+PG T
Naroon Road 10.154 31 B10 — — — — PO Foot only
Alphington footbridge 10.428 31 C10 — — — OL — Foot only
ALPHINGTON 10.458 31 C10 Error! AutoText entry not
defined.
1Up 141
2Dn 141
— — — —
Yarralea Street 10.591 31 C10 — — — — BB+PG T
Darebin Creek 10.761 31 D10 — — — UL — —
Darebin subway 11.089 31 E 9 — — — UL — Foot only
DAREBIN 11.215 31 E 9 Error! AutoText entry not
defined.
1Up 160
2Dn 160
— — — —
Rose Street 11.343 31 E 9 — — — OL — SS clearance down Side
Upper Heidelberg Road 11.531 31 E 9 — — — OL — —
Waterdale Road 11.851 31 F 8 — — — UL
Cat 2&3
— 3.6m clearance
Ivanhoe footbridge 12.138 31 F 8 — — — OL — Foot only
IVANHOE ¶ 12.144 31 F 8 Error! AutoText entry not
defined.
1Up 158
2Dn 158
— — — —
Marshall Street 12.332 31 G 7 — — — — BB+PG T
Ashby Grove 12.570 31 H 7 — — — UL Cat.2 — 2.9m clearance
EAGLEMONT 13.089 31 H 6 Error! AutoText entry not
defined.
1Up 160
2Dn 160
— — — —
Eaglemont subway 13.302 31 H 6 — — — UL — Foot only
Odenwald Road 13.524 31 J 5 — — — OL — SS clearance up Side
Banksia Street (Closed) 13.809 31 J 5 — — — OL — SS clearance up Side
Bell - Banskia St link 13.880 31 J 5 — — — OL — —
Crossing (Up side only) 14.022 31 K 4 — — — — — Staff foot only
Heidelberg subway 14.031 31 K 4 — — — UL — Foot only
HEIDELBERG ¶ 14.042 31 K 4 Error! AutoText entry not
defined.
1Up 148
2Dn 146
A 194 — — Siding on up side of up
platform.
CSM
SIGNAL BOX M-F 07 00—10 30
15 30 – 1900
Sa & Su As req’d by Metrol
Burgundy Street 14.249 31 K 4 — — — UL Cat.1 — —
Heidelberg tunnel 14.522 31 K 4 — — — OL — —
Brown Street 14.779 32 A 3 — — — OL — —
St.James Road 15.315 32 A 2 — — — — PO Foot only
Up end of platform 15.724 32 A 1 — — — — PG Foot only
ROSANNA 15.795 32 A 1 Error! AutoText entry not
defined.
1Up 158
2Dn 159
— — — —
Lower Plenty Road 15.889 20 A12 — — — — BB+PG T
Davies Street 16.592 20 A11 — — — — PG Foot only
Ruthven Street 17.285 20 A 9 — — — — BB+PG T
Site of Junction to Mont Park 17.___ 20 B 8 Line closed 30/ 6/1964.
MACLEOD ¶ 17.710 20 B 8 M-Th 04 40—00 50 Tu-F
F,Sa 04 40-01 50Sa, Su
Su 07 00—0015 Mo
1Up 146
2Dn 146
3Back 159
4 152
5 152
6 152
— — Sidings on down side at
up end of platform.
SIGNAL BOX M-F 05 40 – 10 00
14 50 – 18 40
Sa, Su As Required.
CSM
Down end of platform 17.786 20 B 8 — — — — PG Foot only

LINE DESCRIPTION
CLIFTON HILL GROUP
Metro Melbourne - System Description [WTT Addenda] A 43 19/09/2013
JOLIMONT TO HURSTBRIDGE
LOCATION
Km Ex
SSS
MELWAY
MAP REF. HOURS OF OPERATION
PLATFORM
LENGTHS
SIDING
LENGTHS BRIDGES CROSSINGS REMARKS
Highview Crescent subway 18.400 20 B 7 — — — UL — Foot only
Wattle Drive / Somers Avenue 19.136 20 D 5 — — — — PO Foot only
Watsonia Road 19.739 20 E 4 — — — OL — —
WATSONIA ¶ 19.921 20 E 4 First train to last train 1Up 159
2Dn 159
— — — —
Station footbridge 19.900 20 E 4 — — — OL — Foot only
Transmission line 19.990 20 E 4 — — — OL — —
Greensborough Highway 20.328 20 F 3 — — — OL — —
Grimshaw Street 21.027 20 G 2 — — — OL — —
William Street footbridge 21.629 20 H 1 — — — OL — Foot only
Kilparrin Ave / Church Street 22.307 20 J 1 — — — UL Cat.3 — 4.5m clearance
Main Street 22.675 20 K 1 — — — OL — —
Greensborough footbridge 22.923 20 K 2 — — — OL — Foot only
GREENSBOROUGH
22.934 20 K 2 Error! AutoText entry not
defined.
1Up 144
2Dn 148
— — — CSM
Signalling remotely
controlled from
Epping
Alexandra Street 23.229 21 A 2 — — — — PO Foot only
Plenty River / Railway Road 23.349 21 A 3 — — — UL Cat.3 — 3.2m clearance
Sherbourne Road 23.999 21 B 4 — — — OL — —
Up end of platform 24.668 21 C 5 — — — — PO Foot only
MONTMORENCY 24.746 21 C 5 Error! AutoText entry not
defined.
161 — — — Platform up side
Mountain View Road 25.004 21 D 5 — — — OL — —
Sherbourne Rd subway 25.984 21 F 5 — — — UL — Pipe. Foot only
Sherbourne Road 25.990 21 F 5 — — — UL Cat.3 — —
Silver Street 26.549 21 H 5 — — — OL — —
Diamond Creek viaduct /
Panther Place
26.847 21 J 5 — — — UL Cat.1 — 3.7m clearance
Eltham subway 27.384 21 J 5 — — — UL — Foot only
ELTHAM 
27.389 21 J 5 Error! AutoText entry not
defined.
1Back 160
2Dn 156
A5 182
— — Sidings on down side of
down platform.
CSM
Signalling remotely
controlled from
Epping
Eltham subway 27.457 21 J 4 — — — UL — Foot only
Diamond Street 27.615 21 K 4 — — — — BB+PG T
Elsa Street / Railway Parade 27.810 21 K 4 — — — — PO Foot only
Railway Road 28.311 21 K 2 — — — — BB T
Wattletree Road 28.657 22 A 2 — — — — BB+PO T
Research Creek 28.822 22 A 1 — — — UL — Pipe
Occupation crossing 29.826 12 A10 — — — — FHG —
Transmission line 29.995 12 A11 — — — OL — —
Allandale Road 30.544 12 A10 — — — — BB T
Diamond Creek 30.852 12 A 9 — — — UL — Pipe
Diamond Creek 31.107 12 A 8 — — — UL — —
Diamond Creek 31.264 12 A 8 — — — UL — —
Diamond Creek 31.453 11 K 8 — — — UL — Pipe
Hurstbridge Road 32.456 12 A 6 — — — — BB+PBB T
Up end of platform 32.574 12 B 5 — — — — PG Foot only
DIAMOND CREEK 32.630 12 B 5 M-F see Signal Box
Sa & Su Error! AutoText
entry not defined.
2Up 148
1Dn 148
— — — —
SIGNAL BOX Error! AutoText entry not
defined.
CSM
Occupation crossing
(Emergency)
32.807 12 B 5 — — — — HG Locked gates
Bridge 33.120 12 C 5 — — — UL — Pipe.
Diamond Valley Secondary
College Occupation crossing
33.361 12 D 5 — — — — FHG Wire gate
Occupation crossing 33.615 12 D 5 — — — — FHG —
Occupation crossing 33.719 12 D 5 — — — — FHG —
Occupation crossing 33.882 12 E 4 — — — — FHG No. 225 Main Road
Transmission line 34.1__ 12 A11 — — — OL — —
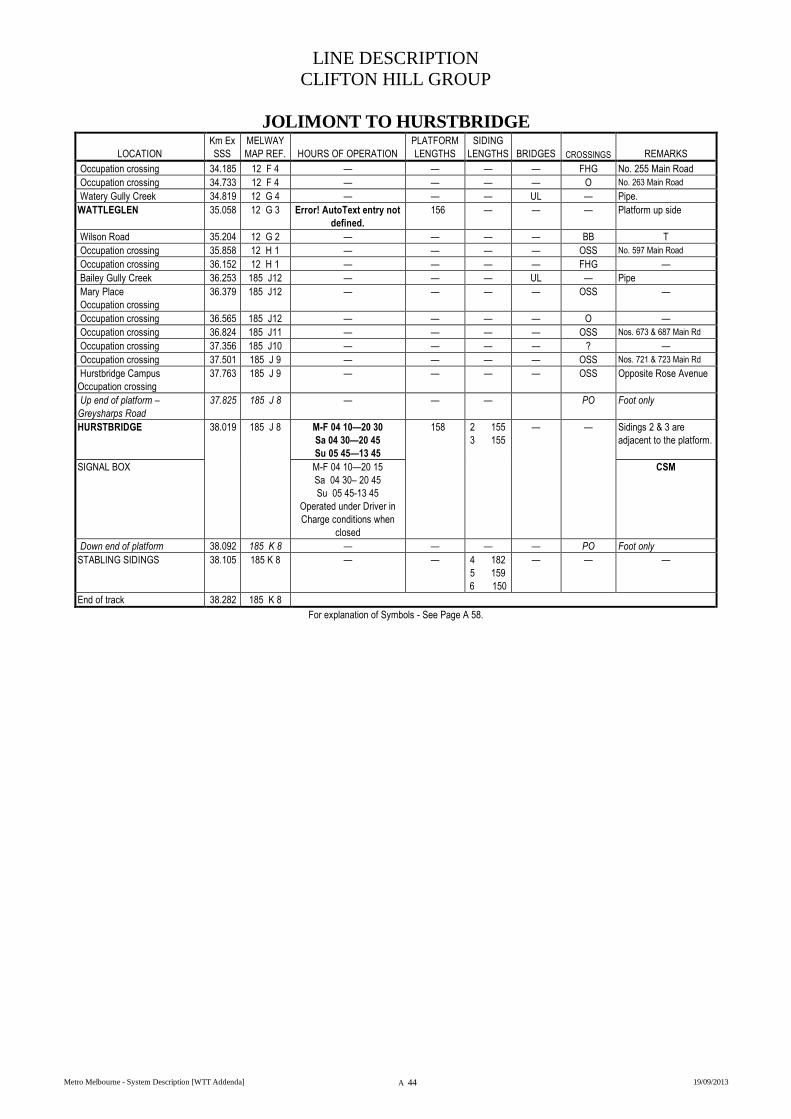
LINE DESCRIPTION
CLIFTON HILL GROUP
Metro Melbourne - System Description [WTT Addenda] A 44 19/09/2013
JOLIMONT TO HURSTBRIDGE
LOCATION
Km Ex
SSS
MELWAY
MAP REF. HOURS OF OPERATION
PLATFORM
LENGTHS
SIDING
LENGTHS BRIDGES CROSSINGS REMARKS
Occupation crossing 34.185 12 F 4 — — — — FHG No. 255 Main Road
Occupation crossing 34.733 12 F 4 — — — — O No. 263 Main Road
Watery Gully Creek 34.819 12 G 4 — — — UL — Pipe.
WATTLEGLEN 35.058 12 G 3 Error! AutoText entry not
defined.
156 — — — Platform up side
Wilson Road 35.204 12 G 2 — — — — BB T
Occupation crossing 35.858 12 H 1 — — — — OSS No. 597 Main Road
Occupation crossing 36.152 12 H 1 — — — — FHG —
Bailey Gully Creek 36.253 185 J12 — — — UL — Pipe
Mary Place
Occupation crossing
36.379 185 J12 — — — — OSS —
Occupation crossing 36.565 185 J12 — — — — O —
Occupation crossing 36.824 185 J11 — — — — OSS Nos. 673 & 687 Main Rd
Occupation crossing 37.356 185 J10 — — — — ? —
Occupation crossing 37.501 185 J 9 — — — — OSS Nos. 721 & 723 Main Rd
Hurstbridge Campus
Occupation crossing
37.763 185 J 9 — — — — OSS Opposite Rose Avenue
Up end of platform –
Greysharps Road
37.825 185 J 8 — — — PO Foot only
HURSTBRIDGE
38.019 185 J 8 M-F 04 10—20 30
Sa 04 30—20 45
Su 05 45—13 45
158 2 155
3 155
— — Sidings 2 & 3 are
adjacent to the platform.
SIGNAL BOX M-F 04 10—20 15
Sa 04 30– 20 45
Su 05 45-13 45
Operated under Driver in
Charge conditions when
closed
CSM
Down end of platform 38.092 185 K 8 — — — — PO Foot only
STABLING SIDINGS 38.105 185 K 8 — — 4 182
5 159
6 150
— — —
End of track 38.282 185 K 8
For explanation of Symbols - See Page A 58.
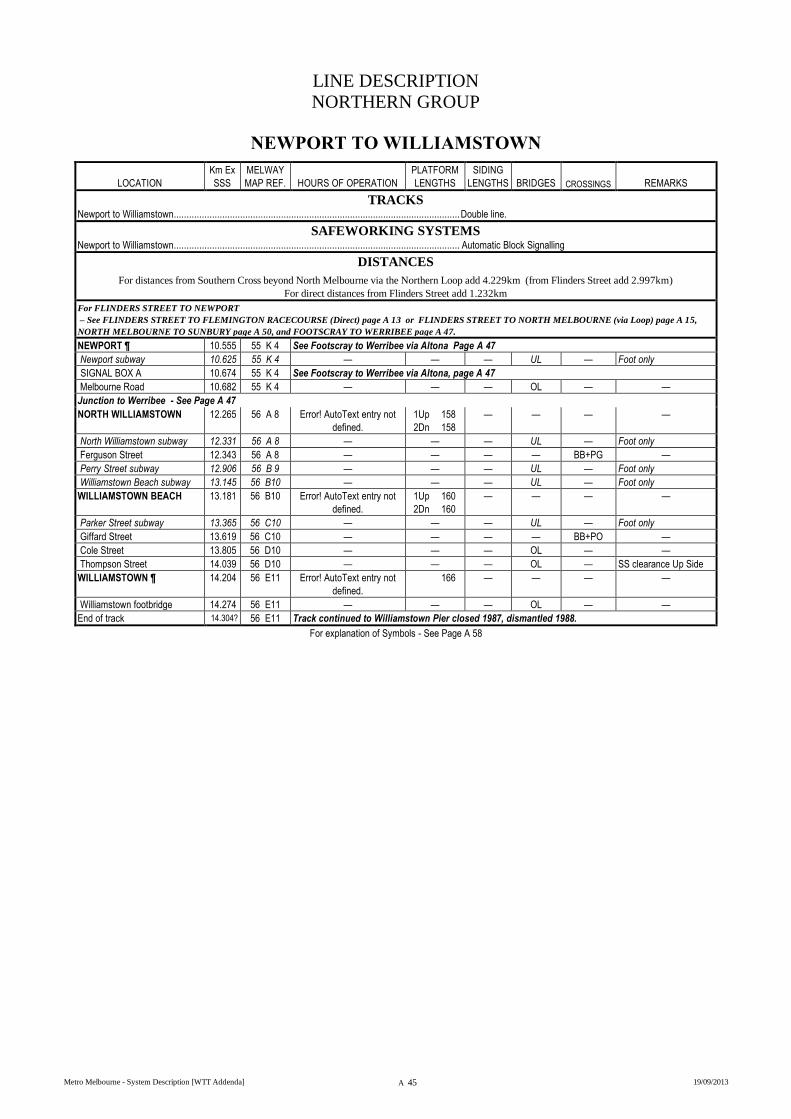
LINE DESCRIPTION
NORTHERN GROUP
Metro Melbourne - System Description [WTT Addenda] A 45 19/09/2013
NEWPORT TO WILLIAMSTOWN
LOCATION
Km Ex
SSS
MELWAY
MAP REF. HOURS OF OPERATION
PLATFORM
LENGTHS
SIDING
LENGTHS BRIDGES CROSSINGS REMARKS
TRACKS Newport to Williamstown................................................................................................................ Double line.
SAFEWORKING SYSTEMS Newport to Williamstown................................................................................................................ Automatic Block Signalling
DISTANCES
For distances from Southern Cross beyond North Melbourne via the Northern Loop add 4.229km (from Flinders Street add 2.997km)
For direct distances from Flinders Street add 1.232km
For FLINDERS STREET TO NEWPORT
– See FLINDERS STREET TO FLEMINGTON RACECOURSE (Direct) page A 13 or FLINDERS STREET TO NORTH MELBOURNE (via Loop) page A 15,
NORTH MELBOURNE TO SUNBURY page A 50, and FOOTSCRAY TO WERRIBEE page A 47.
NEWPORT ¶ 10.555 55 K 4 See Footscray to Werribee via Altona Page A 47
Newport subway 10.625 55 K 4 — — — UL — Foot only
SIGNAL BOX A 10.674 55 K 4 See Footscray to Werribee via Altona, page A 47
Melbourne Road 10.682 55 K 4 — — — OL — —
Junction to Werribee - See Page A 47
NORTH WILLIAMSTOWN 12.265 56 A 8 Error! AutoText entry not
defined.
1Up 158
2Dn 158
— — — —
North Williamstown subway 12.331 56 A 8 — — — UL — Foot only
Ferguson Street 12.343 56 A 8 — — — — BB+PG —
Perry Street subway 12.906 56 B 9 — — — UL — Foot only
Williamstown Beach subway 13.145 56 B10 — — — UL — Foot only
WILLIAMSTOWN BEACH 13.181 56 B10 Error! AutoText entry not
defined.
1Up 160
2Dn 160
— — — —
Parker Street subway 13.365 56 C10 — — — UL — Foot only
Giffard Street 13.619 56 C10 — — — — BB+PO —
Cole Street 13.805 56 D10 — — — OL — —
Thompson Street 14.039 56 D10 — — — OL — SS clearance Up Side
WILLIAMSTOWN ¶ 14.204 56 E11 Error! AutoText entry not
defined.
166 — — — —
Williamstown footbridge 14.274 56 E11 — — — OL — —
End of track 14.304? 56 E11 Track continued to Williamstown Pier closed 1987, dismantled 1988.
For explanation of Symbols - See Page A 58
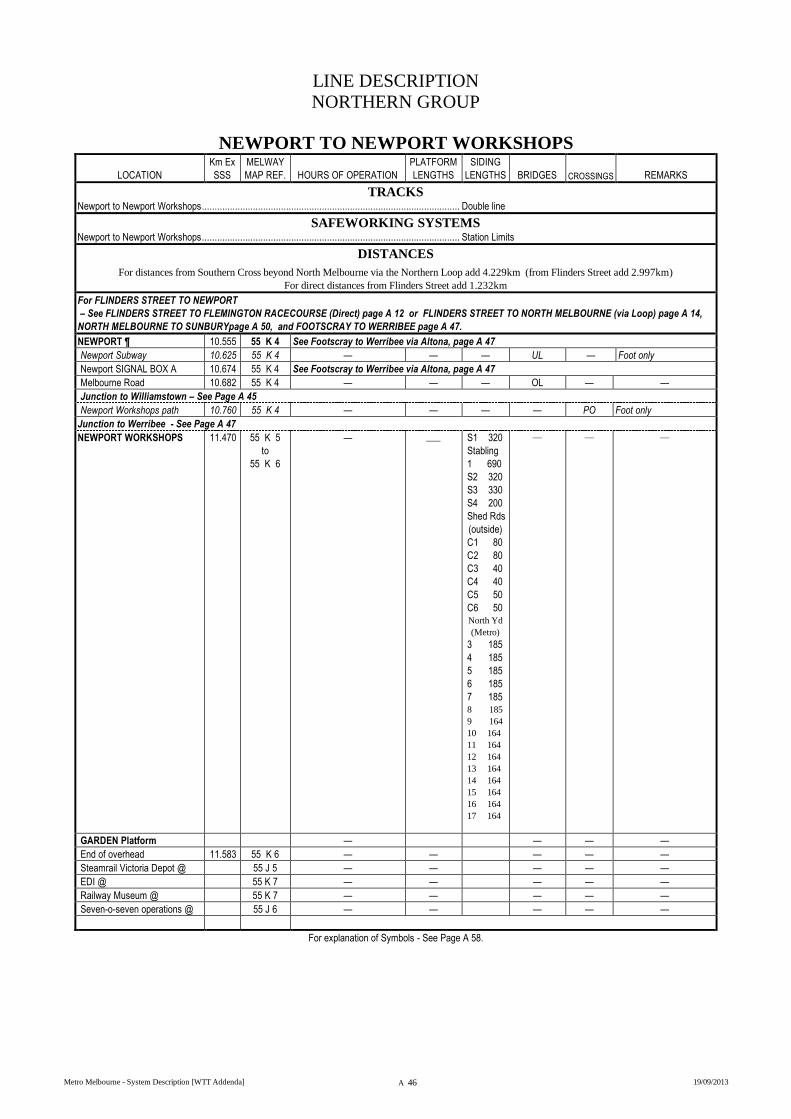
LINE DESCRIPTION
NORTHERN GROUP
Metro Melbourne - System Description [WTT Addenda] A 46 19/09/2013
NEWPORT TO NEWPORT WORKSHOPS
LOCATION
Km Ex
SSS
MELWAY
MAP REF. HOURS OF OPERATION
PLATFORM
LENGTHS
SIDING
LENGTHS BRIDGES CROSSINGS REMARKS
TRACKS Newport to Newport Workshops ..................................................................................................... Double line
SAFEWORKING SYSTEMS Newport to Newport Workshops ..................................................................................................... Station Limits
DISTANCES
For distances from Southern Cross beyond North Melbourne via the Northern Loop add 4.229km (from Flinders Street add 2.997km)
For direct distances from Flinders Street add 1.232km
For FLINDERS STREET TO NEWPORT
– See FLINDERS STREET TO FLEMINGTON RACECOURSE (Direct) page A 12 or FLINDERS STREET TO NORTH MELBOURNE (via Loop) page A 14,
NORTH MELBOURNE TO SUNBURYpage A 50, and FOOTSCRAY TO WERRIBEE page A 47.
NEWPORT ¶ 10.555 55 K 4 See Footscray to Werribee via Altona, page A 47
Newport Subway 10.625 55 K 4 — — — UL — Foot only
Newport SIGNAL BOX A 10.674 55 K 4 See Footscray to Werribee via Altona, page A 47
Melbourne Road 10.682 55 K 4 — — — OL — —
Junction to Williamstown – See Page A 45
Newport Workshops path 10.760 55 K 4 — — — — PO Foot only
Junction to Werribee - See Page A 47
NEWPORT WORKSHOPS 11.470 55 K 5
to
55 K 6
— ___ S1 320
Stabling
1 690
S2 320
S3 330
S4 200
Shed Rds
(outside)
C1 80
C2 80
C3 40
C4 40
C5 50
C6 50 North Yd
(Metro)
3 185
4 185
5 185
6 185
7 185 8 185
9 164
10 164
11 164
12 164
13 164
14 164
15 164
16 164
17 164
— — —
GARDEN Platform — — — —
End of overhead 11.583 55 K 6 — — — — —
Steamrail Victoria Depot @ 55 J 5 — — — — —
EDI @ 55 K 7 — — — — —
Railway Museum @ 55 K 7 — — — — —
Seven-o-seven operations @ 55 J 6 — — — — —
For explanation of Symbols - See Page A 58.
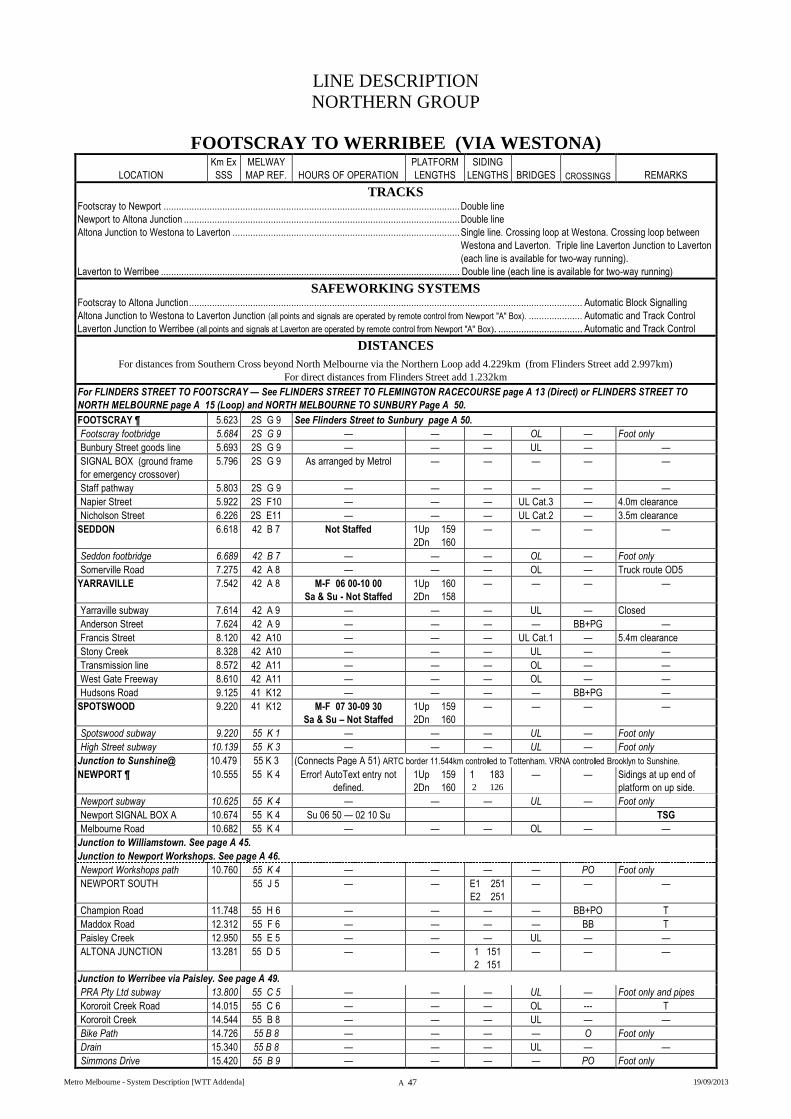
LINE DESCRIPTION
NORTHERN GROUP
Metro Melbourne - System Description [WTT Addenda] A 47 19/09/2013
FOOTSCRAY TO WERRIBEE (VIA WESTONA)
LOCATION
Km Ex
SSS
MELWAY
MAP REF. HOURS OF OPERATION
PLATFORM
LENGTHS
SIDING
LENGTHS BRIDGES CROSSINGS REMARKS
TRACKS Footscray to Newport .................................................................................................................... Double line
Newport to Altona Junction ............................................................................................................ Double line
Altona Junction to Westona to Laverton ......................................................................................... Single line. Crossing loop at Westona. Crossing loop between
Westona and Laverton. Triple line Laverton Junction to Laverton
(each line is available for two-way running).
Laverton to Werribee ..................................................................................................................... Double line (each line is available for two-way running)
SAFEWORKING SYSTEMS Footscray to Altona Junction .......................................................................................................................................................... Automatic Block Signalling
Altona Junction to Westona to Laverton Junction (all points and signals are operated by remote control from Newport "A" Box). ..................... Automatic and Track Control
Laverton Junction to Werribee (all points and signals at Laverton are operated by remote control from Newport "A" Box). ................................. Automatic and Track Control
DISTANCES
For distances from Southern Cross beyond North Melbourne via the Northern Loop add 4.229km (from Flinders Street add 2.997km)
For direct distances from Flinders Street add 1.232km
For FLINDERS STREET TO FOOTSCRAY — See FLINDERS STREET TO FLEMINGTON RACECOURSE page A 13 (Direct) or FLINDERS STREET TO
NORTH MELBOURNE page A 15 (Loop) and NORTH MELBOURNE TO SUNBURY Page A 50.
FOOTSCRAY ¶ 5.623 2S G 9 See Flinders Street to Sunbury page A 50.
Footscray footbridge 5.684 2S G 9 — — — OL — Foot only
Bunbury Street goods line 5.693 2S G 9 — — — UL — —
SIGNAL BOX (ground frame
for emergency crossover)
5.796 2S G 9 As arranged by Metrol — — — — —
Staff pathway 5.803 2S G 9 — — — — — —
Napier Street 5.922 2S F10 — — — UL Cat.3 — 4.0m clearance
Nicholson Street 6.226 2S E11 — — — UL Cat.2 — 3.5m clearance
SEDDON 6.618 42 B 7 Not Staffed 1Up 159
2Dn 160
— — — —
Seddon footbridge 6.689 42 B 7 — — — OL — Foot only
Somerville Road 7.275 42 A 8 — — — OL — Truck route OD5
YARRAVILLE 7.542 42 A 8 M-F 06 00-10 00
Sa & Su - Not Staffed
1Up 160
2Dn 158
— — — —
Yarraville subway 7.614 42 A 9 — — — UL — Closed
Anderson Street 7.624 42 A 9 — — — — BB+PG —
Francis Street 8.120 42 A10 — — — UL Cat.1 — 5.4m clearance
Stony Creek 8.328 42 A10 — — — UL — —
Transmission line 8.572 42 A11 — — — OL — —
West Gate Freeway 8.610 42 A11 — — — OL — —
Hudsons Road 9.125 41 K12 — — — — BB+PG —
SPOTSWOOD 9.220 41 K12 M-F 07 30-09 30
Sa & Su – Not Staffed
1Up 159
2Dn 160
— — — —
Spotswood subway 9.220 55 K 1 — — — UL — Foot only
High Street subway 10.139 55 K 3 — — — UL — Foot only
Junction to Sunshine@ 10.479 55 K 3 (Connects Page A 51) ARTC border 11.544km controlled to Tottenham. VRNA controlled Brooklyn to Sunshine.
NEWPORT ¶ 10.555 55 K 4 Error! AutoText entry not
defined.
1Up 159
2Dn 160
1 183 2 126
— — Sidings at up end of
platform on up side.
Newport subway 10.625 55 K 4 — — — UL — Foot only
Newport SIGNAL BOX A 10.674 55 K 4 Su 06 50 — 02 10 Su TSG
Melbourne Road 10.682 55 K 4 — — — OL — —
Junction to Williamstown. See page A 45.
Junction to Newport Workshops. See page A 46.
Newport Workshops path 10.760 55 K 4 — — — — PO Foot only
NEWPORT SOUTH 55 J 5 — — E1 251
E2 251
— — —
Champion Road 11.748 55 H 6 — — — — BB+PO T
Maddox Road 12.312 55 F 6 — — — — BB T
Paisley Creek 12.950 55 E 5 — — — UL — —
ALTONA JUNCTION
13.281 55 D 5 — — 1 151
2 151
— — —
Junction to Werribee via Paisley. See page A 49.
PRA Pty Ltd subway 13.800 55 C 5 — — — UL — Foot only and pipes
Kororoit Creek Road 14.015 55 C 6 — — — OL --- T
Kororoit Creek 14.544 55 B 8 — — — UL — —
Bike Path 14.726 55 B 8 — — — — O Foot only
Drain 15.340 55 B 8 — — — UL — —
Simmons Drive 15.420 55 B 9 — — — — PO Foot only
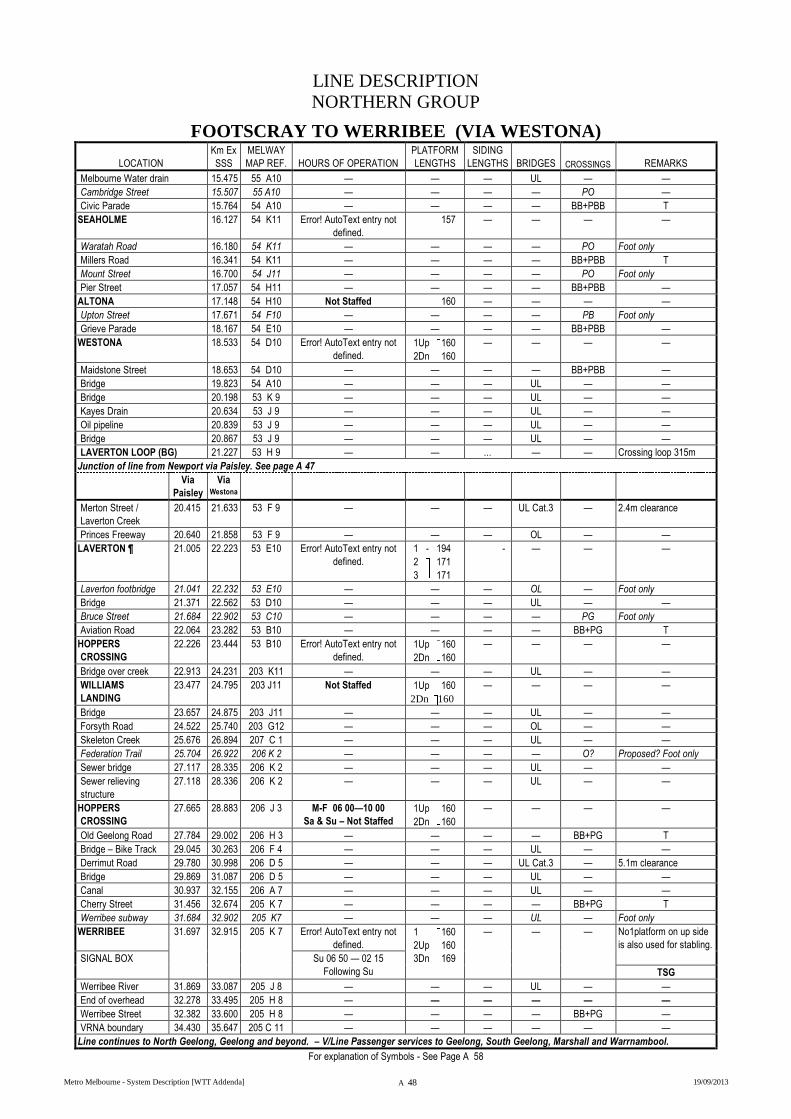
LINE DESCRIPTION
NORTHERN GROUP
Metro Melbourne - System Description [WTT Addenda] A 48 19/09/2013
FOOTSCRAY TO WERRIBEE (VIA WESTONA)
LOCATION
Km Ex
SSS
MELWAY
MAP REF. HOURS OF OPERATION
PLATFORM
LENGTHS
SIDING
LENGTHS BRIDGES CROSSINGS REMARKS
Melbourne Water drain 15.475 55 A10 — — — UL — —
Cambridge Street 15.507 55 A10 — — — — PO —
Civic Parade 15.764 54 A10 — — — — BB+PBB T
SEAHOLME 16.127 54 K11 Error! AutoText entry not
defined.
157 — — — —
Waratah Road 16.180 54 K11 — — — — PO Foot only
Millers Road 16.341 54 K11 — — — — BB+PBB T
Mount Street 16.700 54 J11 — — — — PO Foot only
Pier Street 17.057 54 H11 — — — — BB+PBB —
ALTONA 17.148 54 H10 Not Staffed 160 — — — —
Upton Street 17.671 54 F10 — — — — PB Foot only
Grieve Parade 18.167 54 E10 — — — — BB+PBB —
WESTONA 18.533 54 D10 Error! AutoText entry not
defined.
1Up 160
2Dn 160
— — — —
Maidstone Street 18.653 54 D10 — — — — BB+PBB —
Bridge 19.823 54 A10 — — — UL — —
Bridge 20.198 53 K 9 — — — UL — —
Kayes Drain 20.634 53 J 9 — — — UL — —
Oil pipeline 20.839 53 J 9 — — — UL — —
Bridge 20.867 53 J 9 — — — UL — —
LAVERTON LOOP (BG) 21.227 53 H 9 — — ... — — Crossing loop 315m
Junction of line from Newport via Paisley. See page A 47
Via
Paisley
Via Westona
Merton Street /
Laverton Creek
20.415 21.633 53 F 9 — — — UL Cat.3 — 2.4m clearance
Princes Freeway 20.640 21.858 53 F 9 — — — OL — —
LAVERTON ¶ 21.005 22.223 53 E10 Error! AutoText entry not
defined.
1 - 194
2 171
3 171
- — — —
Laverton footbridge 21.041 22.232 53 E10 — — — OL — Foot only
Bridge 21.371 22.562 53 D10 — — — UL — —
Bruce Street 21.684 22.902 53 C10 — — — — PG Foot only
Aviation Road 22.064 23.282 53 B10 — — — — BB+PG T
HOPPERS
CROSSING
22.226 23.444 53 B10 Error! AutoText entry not
defined.
1Up 160
2Dn 160
— — — —
Bridge over creek 22.913 24.231 203 K11 — — — UL — —
WILLIAMS
LANDING
23.477 24.795 203 J11 Not Staffed 1Up 160
2Dn 160
— — — —
Bridge 23.657 24.875 203 J11 — — — UL — —
Forsyth Road 24.522 25.740 203 G12 — — — OL — —
Skeleton Creek 25.676 26.894 207 C 1 — — — UL — —
Federation Trail 25.704 26.922 206 K 2 — — — — O? Proposed? Foot only
Sewer bridge 27.117 28.335 206 K 2 — — — UL — —
Sewer relieving
structure
27.118 28.336 206 K 2 — — — UL — —
HOPPERS
CROSSING
27.665 28.883 206 J 3 M-F 06 00—10 00
Sa & Su – Not Staffed
1Up 160
2Dn 160
— — — —
Old Geelong Road 27.784 29.002 206 H 3 — — — — BB+PG T
Bridge – Bike Track 29.045 30.263 206 F 4 — — — UL — —
Derrimut Road 29.780 30.998 206 D 5 — — — UL Cat.3 — 5.1m clearance
Bridge 29.869 31.087 206 D 5 — — — UL — —
Canal 30.937 32.155 206 A 7 — — — UL — —
Cherry Street 31.456 32.674 205 K 7 — — — — BB+PG T
Werribee subway 31.684 32.902 205 K7 — — — UL — Foot only
WERRIBEE 31.697 32.915 205 K 7 Error! AutoText entry not
defined.
1 160
2Up 160
3Dn 169
— — — No1platform on up side
is also used for stabling.
SIGNAL BOX Su 06 50 — 02 15
Following Su TSG
Werribee River 31.869 33.087 205 J 8 — — — UL — —
End of overhead 32.278 33.495 205 H 8 — — — — — —
Werribee Street 32.382 33.600 205 H 8 — — — — BB+PG —
VRNA boundary 34.430 35.647 205 C 11 — — — — — —
Line continues to North Geelong, Geelong and beyond. – V/Line Passenger services to Geelong, South Geelong, Marshall and Warrnambool.
For explanation of Symbols - See Page A 58
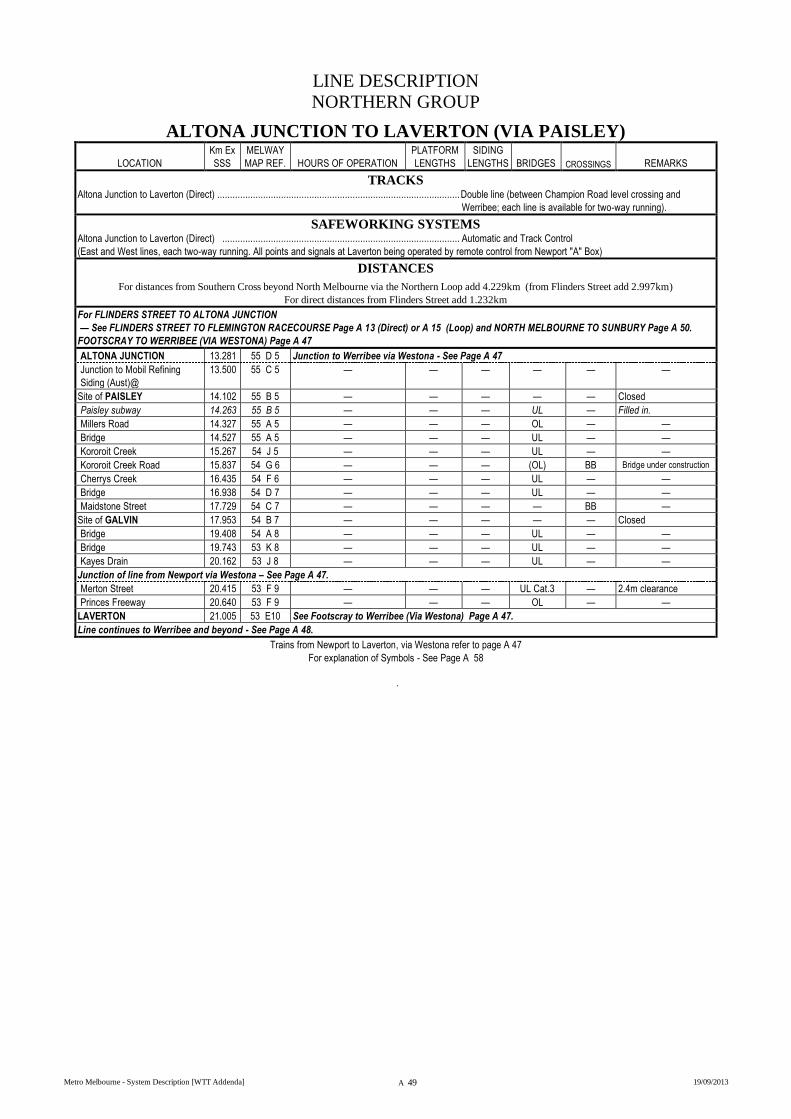
LINE DESCRIPTION
NORTHERN GROUP
Metro Melbourne - System Description [WTT Addenda] A 49 19/09/2013
ALTONA JUNCTION TO LAVERTON (VIA PAISLEY)
LOCATION
Km Ex
SSS
MELWAY
MAP REF. HOURS OF OPERATION
PLATFORM
LENGTHS
SIDING
LENGTHS BRIDGES CROSSINGS REMARKS
TRACKS Altona Junction to Laverton (Direct) ............................................................................................... Double line (between Champion Road level crossing and
Werribee; each line is available for two-way running).
SAFEWORKING SYSTEMS Altona Junction to Laverton (Direct) ............................................................................................. Automatic and Track Control
(East and West lines, each two-way running. All points and signals at Laverton being operated by remote control from Newport "A" Box)
DISTANCES
For distances from Southern Cross beyond North Melbourne via the Northern Loop add 4.229km (from Flinders Street add 2.997km)
For direct distances from Flinders Street add 1.232km
For FLINDERS STREET TO ALTONA JUNCTION
— See FLINDERS STREET TO FLEMINGTON RACECOURSE Page A 13 (Direct) or A 15 (Loop) and NORTH MELBOURNE TO SUNBURY Page A 50.
FOOTSCRAY TO WERRIBEE (VIA WESTONA) Page A 47
ALTONA JUNCTION 13.281 55 D 5 Junction to Werribee via Westona - See Page A 47
Junction to Mobil Refining
Siding (Aust)@
13.500 55 C 5 — — — — — —
Site of PAISLEY 14.102 55 B 5 — — — — — Closed
Paisley subway 14.263 55 B 5 — — — UL — Filled in.
Millers Road 14.327 55 A 5 — — — OL — —
Bridge 14.527 55 A 5 — — — UL — —
Kororoit Creek 15.267 54 J 5 — — — UL — —
Kororoit Creek Road 15.837 54 G 6 — — — (OL) BB Bridge under construction
Cherrys Creek 16.435 54 F 6 — — — UL — —
Bridge 16.938 54 D 7 — — — UL — —
Maidstone Street 17.729 54 C 7 — — — — BB —
Site of GALVIN 17.953 54 B 7 — — — — — Closed
Bridge 19.408 54 A 8 — — — UL — —
Bridge 19.743 53 K 8 — — — UL — —
Kayes Drain 20.162 53 J 8 — — — UL — —
Junction of line from Newport via Westona – See Page A 47.
Merton Street 20.415 53 F 9 — — — UL Cat.3 — 2.4m clearance
Princes Freeway 20.640 53 F 9 — — — OL — —
LAVERTON 21.005 53 E10 See Footscray to Werribee (Via Westona) Page A 47.
Line continues to Werribee and beyond - See Page A 48.
Trains from Newport to Laverton, via Westona refer to page A 47
For explanation of Symbols - See Page A 58
.
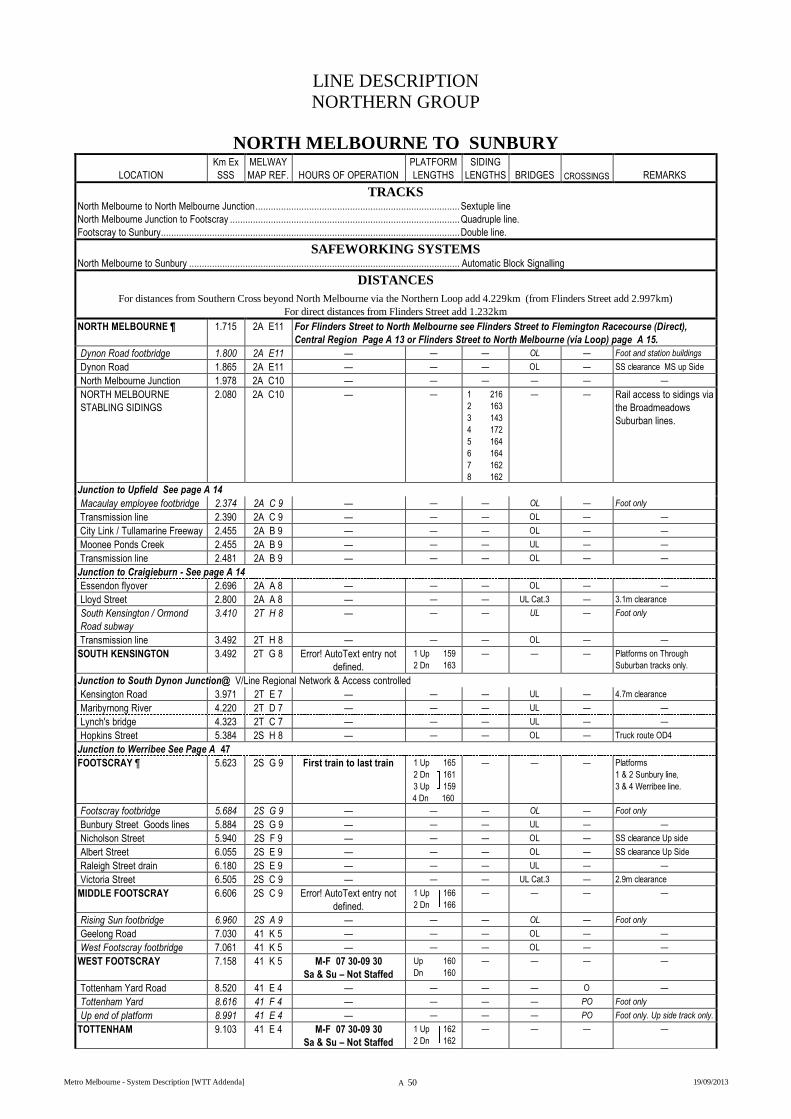
LINE DESCRIPTION
NORTHERN GROUP
Metro Melbourne - System Description [WTT Addenda] A 50 19/09/2013
NORTH MELBOURNE TO SUNBURY
LOCATION
Km Ex
SSS
MELWAY
MAP REF. HOURS OF OPERATION
PLATFORM
LENGTHS
SIDING
LENGTHS BRIDGES CROSSINGS REMARKS
TRACKS North Melbourne to North Melbourne Junction ................................................................................ Sextuple line
North Melbourne Junction to Footscray .......................................................................................... Quadruple line.
Footscray to Sunbury..................................................................................................................... Double line.
SAFEWORKING SYSTEMS North Melbourne to Sunbury .......................................................................................................... Automatic Block Signalling
DISTANCES
For distances from Southern Cross beyond North Melbourne via the Northern Loop add 4.229km (from Flinders Street add 2.997km)
For direct distances from Flinders Street add 1.232km
NORTH MELBOURNE ¶ 1.715 2A E11 For Flinders Street to North Melbourne see Flinders Street to Flemington Racecourse (Direct),
Central Region Page A 13 or Flinders Street to North Melbourne (via Loop) page A 15.
Dynon Road footbridge 1.800 2A E11 — — — OL — Foot and station buildings
Dynon Road 1.865 2A E11 — — — OL — SS clearance MS up Side
North Melbourne Junction 1.978 2A C10 — — — — — —
NORTH MELBOURNE
STABLING SIDINGS
2.080 2A C10 — — 1 216
2 163
3 143
4 172
5 164
6 164
7 162
8 162
— — Rail access to sidings via
the Broadmeadows
Suburban lines.
Junction to Upfield See page A 14
Macaulay employee footbridge 2.374 2A C 9 — — — OL — Foot only
Transmission line 2.390 2A C 9 — — — OL — —
City Link / Tullamarine Freeway 2.455 2A B 9 — — — OL — —
Moonee Ponds Creek 2.455 2A B 9 — — — UL — —
Transmission line 2.481 2A B 9 — — — OL — —
Junction to Craigieburn - See page A 14
Essendon flyover 2.696 2A A 8 — — — OL — —
Lloyd Street 2.800 2A A 8 — — — UL Cat.3 — 3.1m clearance
South Kensington / Ormond
Road subway
3.410 2T H 8 — — — UL — Foot only
Transmission line 3.492 2T H 8 — — — OL — —
SOUTH KENSINGTON 3.492 2T G 8 Error! AutoText entry not
defined.
1 Up 159
2 Dn 163
— — — Platforms on Through
Suburban tracks only.
Junction to South Dynon Junction@ V/Line Regional Network & Access controlled
Kensington Road 3.971 2T E 7 — — — UL — 4.7m clearance
Maribyrnong River 4.220 2T D 7 — — — UL — —
Lynch's bridge 4.323 2T C 7 — — — UL — —
Hopkins Street 5.384 2S H 8 — — — OL — Truck route OD4
Junction to Werribee See Page A 47
FOOTSCRAY ¶ 5.623 2S G 9 First train to last train 1 Up 165
2 Dn 161
3 Up 159
4 Dn 160
— — — Platforms
1 & 2 Sunbury line,
3 & 4 Werribee line.
Footscray footbridge 5.684 2S G 9 — — — OL — Foot only
Bunbury Street Goods lines 5.884 2S G 9 — — — UL — —
Nicholson Street 5.940 2S F 9 — — — OL — SS clearance Up side
Albert Street 6.055 2S E 9 — — — OL — SS clearance Up Side
Raleigh Street drain 6.180 2S E 9 — — — UL — —
Victoria Street 6.505 2S C 9 — — — UL Cat.3 — 2.9m clearance
MIDDLE FOOTSCRAY 6.606 2S C 9 Error! AutoText entry not
defined.
1 Up 166
2 Dn 166
— — — —
Rising Sun footbridge 6.960 2S A 9 — — — OL — Foot only
Geelong Road 7.030 41 K 5 — — — OL — —
West Footscray footbridge 7.061 41 K 5 — — — OL — —
WEST FOOTSCRAY 7.158 41 K 5 M-F 07 30-09 30
Sa & Su – Not Staffed
Up 160
Dn 160
— — — —
Tottenham Yard Road 8.520 41 E 4 — — — — O —
Tottenham Yard 8.616 41 F 4 — — — — PO Foot only
Up end of platform 8.991 41 E 4 — — — — PO Foot only. Up side track only.
TOTTENHAM 9.103 41 E 4 M-F 07 30-09 30
Sa & Su – Not Staffed
1 Up 162
2 Dn 162
— — — —
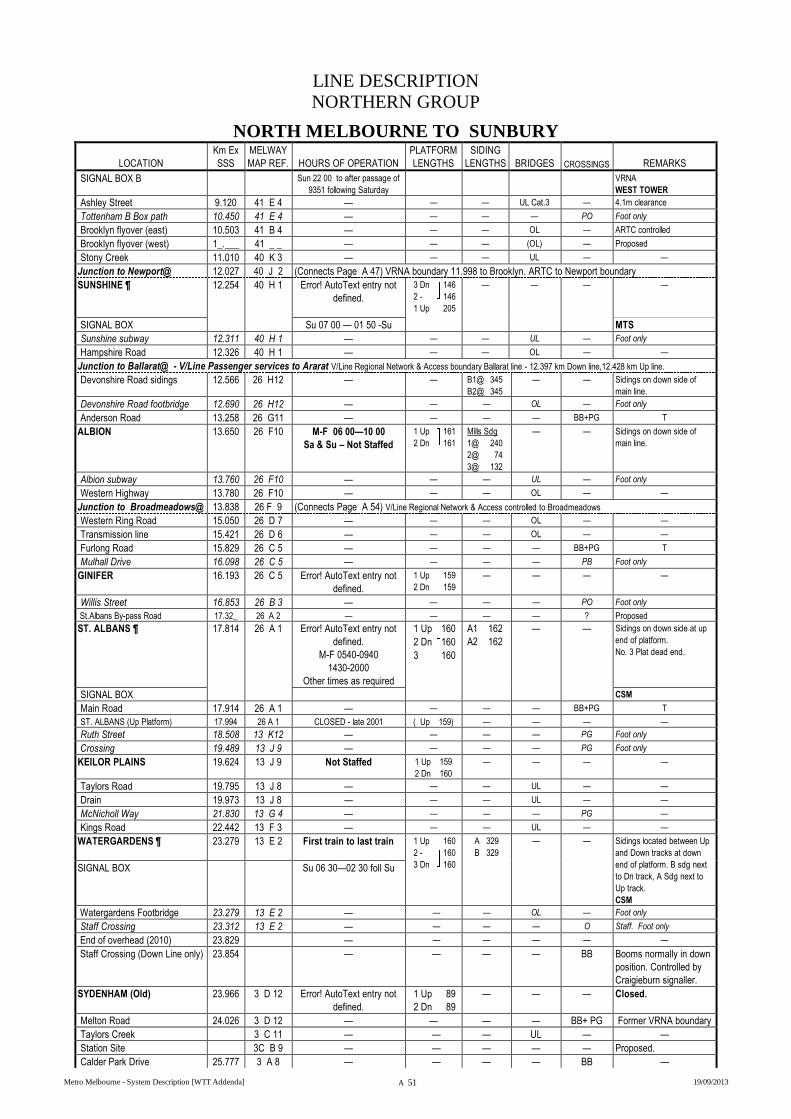
LINE DESCRIPTION
NORTHERN GROUP
Metro Melbourne - System Description [WTT Addenda] A 51 19/09/2013
NORTH MELBOURNE TO SUNBURY
LOCATION
Km Ex
SSS
MELWAY
MAP REF. HOURS OF OPERATION
PLATFORM
LENGTHS
SIDING
LENGTHS BRIDGES CROSSINGS REMARKS
SIGNAL BOX B Sun 22 00 to after passage of
9351 following Saturday
VRNA
WEST TOWER
Ashley Street 9.120 41 E 4 — — — UL Cat.3 — 4.1m clearance
Tottenham B Box path 10.450 41 E 4 — — — — PO Foot only
Brooklyn flyover (east) 10.503 41 B 4 — — — OL — ARTC controlled
Brooklyn flyover (west) 1_.___ 41 _ _ — — — (OL) — Proposed
Stony Creek 11.010 40 K 3 — — — UL — —
Junction to Newport@ 12.027 40 J 2 (Connects Page A 47) VRNA boundary 11.998 to Brooklyn. ARTC to Newport boundary
SUNSHINE ¶ 12.254 40 H 1 Error! AutoText entry not
defined.
3 Dn 146
2 - 146
1 Up 205
— — — —
SIGNAL BOX Su 07 00 — 01 50 -Su MTS
Sunshine subway 12.311 40 H 1 — — — UL — Foot only
Hampshire Road 12.326 40 H 1 — — — OL — —
Junction to Ballarat@ - V/Line Passenger services to Ararat V/Line Regional Network & Access boundary Ballarat line - 12.397 km Down line,12.428 km Up line.
Devonshire Road sidings 12.566 26 H12 — — B1@ 345
B2@ 345
— — Sidings on down side of
main line.
Devonshire Road footbridge 12.690 26 H12 — — — OL — Foot only
Anderson Road 13.258 26 G11 — — — — BB+PG T
ALBION 13.650 26 F10 M-F 06 00—10 00
Sa & Su – Not Staffed
1 Up 161
2 Dn 161
Mills Sdg
1@ 240
2@ 74
3@ 132
— — Sidings on down side of
main line.
Albion subway 13.760 26 F10 — — — UL — Foot only
Western Highway 13.780 26 F10 — — — OL — —
Junction to Broadmeadows@ 13.838 26 F 9 (Connects Page A 54) V/Line Regional Network & Access controlled to Broadmeadows
Western Ring Road 15.050 26 D 7 — — — OL — —
Transmission line 15.421 26 D 6 — — — OL — —
Furlong Road 15.829 26 C 5 — — — — BB+PG T
Mulhall Drive 16.098 26 C 5 — — — — PB Foot only
GINIFER 16.193 26 C 5 Error! AutoText entry not
defined.
1 Up 159
2 Dn 159
— — — —
Willis Street 16.853 26 B 3 — — — — PO Foot only
St.Albans By-pass Road 17.32_ 26 A 2 — — — — ? Proposed
ST. ALBANS ¶ 17.814 26 A 1 Error! AutoText entry not
defined.
M-F 0540-0940
1430-2000
Other times as required
1 Up 160
2 Dn 160
3 160
A1 162
A2 162
— — Sidings on down side at up
end of platform.
No. 3 Plat dead end.
SIGNAL BOX CSM
Main Road 17.914 26 A 1 — — — — BB+PG T
ST. ALBANS (Up Platform) 17.994 26 A 1 CLOSED - late 2001 ( Up 159) — — — —
Ruth Street 18.508 13 K12 — — — — PG Foot only
Crossing 19.489 13 J 9 — — — — PG Foot only
KEILOR PLAINS 19.624 13 J 9 Not Staffed 1 Up 159
2 Dn 160
— — — —
Taylors Road 19.795 13 J 8 — — — UL — —
Drain 19.973 13 J 8 — — — UL — —
McNicholl Way 21.830 13 G 4 — — — — PG —
Kings Road 22.442 13 F 3 — — — UL — —
WATERGARDENS 
23.279 13 E 2 First train to last train 1 Up 160
2 - 160
3 Dn 160
A 329
B 329
— — Sidings located between Up
and Down tracks at down
end of platform. B sdg next
to Dn track, A Sdg next to
Up track.
CSM
SIGNAL BOX Su 06 30—02 30 foll Su
Watergardens Footbridge 23.279 13 E 2 — — — OL — Foot only
Staff Crossing 23.312 13 E 2 — — — — O Staff. Foot only
End of overhead (2010) 23.829 — — — — — —
Staff Crossing (Down Line only) 23.854 — — — — BB Booms normally in down
position. Controlled by
Craigieburn signaller.
SYDENHAM (Old) 23.966 3 D 12 Error! AutoText entry not
defined.
1 Up 89
2 Dn 89
— — — Closed.
Melton Road 24.026 3 D 12 — — — — BB+ PG Former VRNA boundary
Taylors Creek 3 C 11 — — — UL — —
Station Site 3C B 9 — — — — — Proposed.
Calder Park Drive 25.777 3 A 8 — — — — BB —
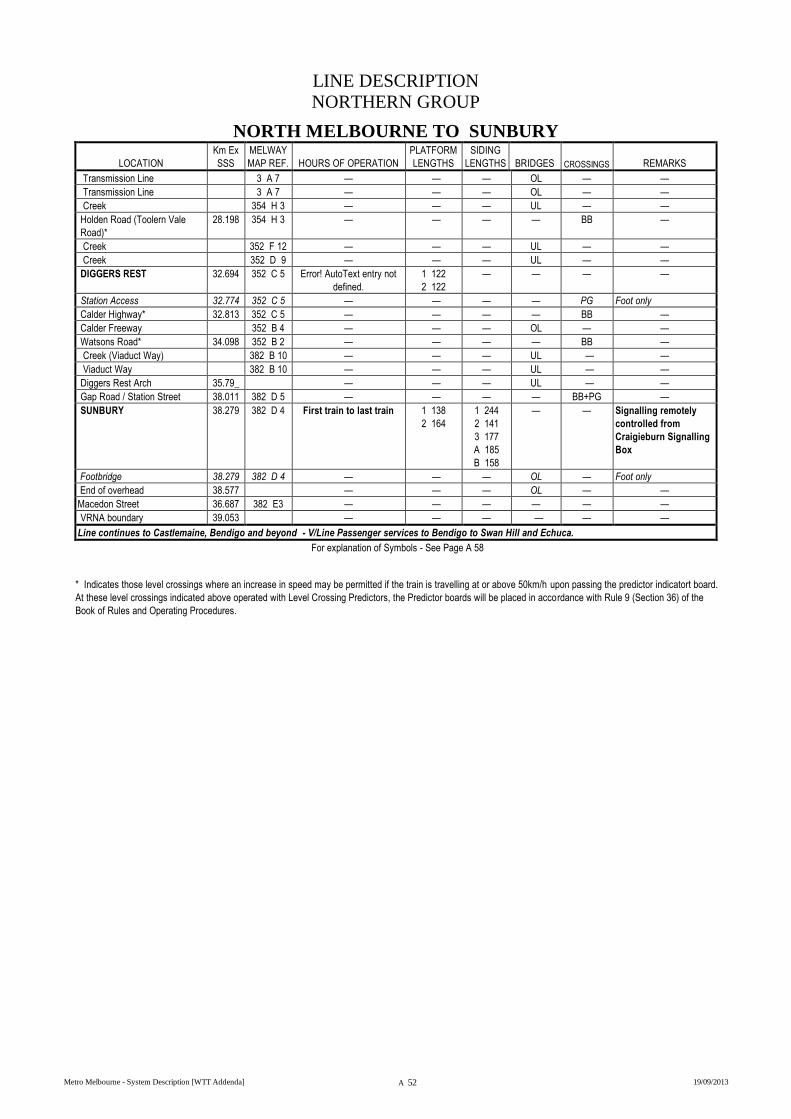
LINE DESCRIPTION
NORTHERN GROUP
Metro Melbourne - System Description [WTT Addenda] A 52 19/09/2013
NORTH MELBOURNE TO SUNBURY
LOCATION
Km Ex
SSS
MELWAY
MAP REF. HOURS OF OPERATION
PLATFORM
LENGTHS
SIDING
LENGTHS BRIDGES CROSSINGS REMARKS
Transmission Line 3 A 7 — — — OL — —
Transmission Line 3 A 7 — — — OL — —
Creek 354 H 3 — — — UL — —
Holden Road (Toolern Vale
Road)*
28.198 354 H 3 — — — — BB —
Creek 352 F 12 — — — UL — —
Creek 352 D 9 — — — UL — —
DIGGERS REST 32.694 352 C 5 Error! AutoText entry not
defined.
1 122
2 122
— — — —
Station Access 32.774 352 C 5 — — — — PG Foot only
Calder Highway* 32.813 352 C 5 — — — — BB —
Calder Freeway 352 B 4 — — — OL — —
Watsons Road* 34.098 352 B 2 — — — — BB —
Creek (Viaduct Way) 382 B 10 — — — UL — —
Viaduct Way 382 B 10 — — — UL — —
Diggers Rest Arch 35.79_ — — — UL — —
Gap Road / Station Street 38.011 382 D 5 — — — — BB+PG —
SUNBURY 38.279 382 D 4 First train to last train 1 138
2 164
1 244
2 141
3 177
A 185
B 158
— — Signalling remotely
controlled from
Craigieburn Signalling
Box
Footbridge 38.279 382 D 4 — — — OL — Foot only
End of overhead 38.577 — — — OL — —
Macedon Street 36.687 382 E3 — — — — — —
VRNA boundary 39.053 — — — — — —
Line continues to Castlemaine, Bendigo and beyond - V/Line Passenger services to Bendigo to Swan Hill and Echuca.
For explanation of Symbols - See Page A 58
* Indicates those level crossings where an increase in speed may be permitted if the train is travelling at or above 50km/h upon passing the predictor indicatort board.
At these level crossings indicated above operated with Level Crossing Predictors, the Predictor boards will be placed in accordance with Rule 9 (Section 36) of the
Book of Rules and Operating Procedures.
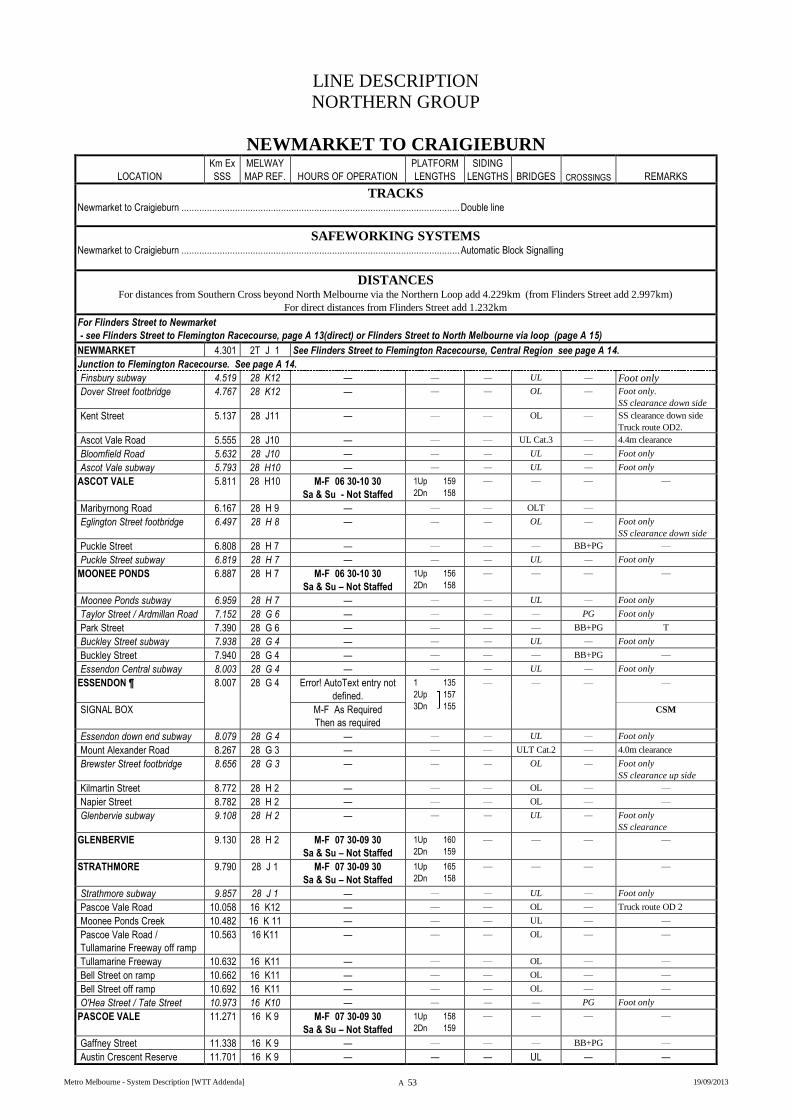
LINE DESCRIPTION
NORTHERN GROUP
Metro Melbourne - System Description [WTT Addenda] A 53 19/09/2013
NEWMARKET TO CRAIGIEBURN
LOCATION
Km Ex
SSS
MELWAY
MAP REF. HOURS OF OPERATION
PLATFORM
LENGTHS
SIDING
LENGTHS BRIDGES CROSSINGS REMARKS
TRACKS Newmarket to Craigieburn ............................................................................................................. Double line
SAFEWORKING SYSTEMS Newmarket to Craigieburn ............................................................................................................. Automatic Block Signalling
DISTANCES For distances from Southern Cross beyond North Melbourne via the Northern Loop add 4.229km (from Flinders Street add 2.997km)
For direct distances from Flinders Street add 1.232km
For Flinders Street to Newmarket
- see Flinders Street to Flemington Racecourse, page A 13(direct) or Flinders Street to North Melbourne via loop (page A 15)
NEWMARKET 4.301 2T J 1 See Flinders Street to Flemington Racecourse, Central Region see page A 14.
Junction to Flemington Racecourse. See page A 14.
Finsbury subway 4.519 28 K12 — — — UL — Foot only
Dover Street footbridge 4.767 28 K12 — — — OL — Foot only.
SS clearance down side
Kent Street 5.137 28 J11 — — — OL — SS clearance down side
Truck route OD2.
Ascot Vale Road 5.555 28 J10 — — — UL Cat.3 — 4.4m clearance
Bloomfield Road 5.632 28 J10 — — — UL — Foot only
Ascot Vale subway 5.793 28 H10 — — — UL — Foot only
ASCOT VALE 5.811 28 H10 M-F 06 30-10 30
Sa & Su - Not Staffed
1Up 159
2Dn 158
— — — —
Maribyrnong Road 6.167 28 H 9 — — — OLT —
Eglington Street footbridge 6.497 28 H 8 — — — OL — Foot only
SS clearance down side
Puckle Street 6.808 28 H 7 — — — — BB+PG —
Puckle Street subway 6.819 28 H 7 — — — UL — Foot only
MOONEE PONDS 6.887 28 H 7 M-F 06 30-10 30
Sa & Su – Not Staffed
1Up 156
2Dn 158
— — — —
Moonee Ponds subway 6.959 28 H 7 — — — UL — Foot only
Taylor Street / Ardmillan Road 7.152 28 G 6 — — — — PG Foot only
Park Street 7.390 28 G 6 — — — — BB+PG T
Buckley Street subway 7.938 28 G 4 — — — UL — Foot only
Buckley Street 7.940 28 G 4 — — — — BB+PG —
Essendon Central subway 8.003 28 G 4 — — — UL — Foot only
ESSENDON ¶ 8.007 28 G 4 Error! AutoText entry not
defined.
1 135
2Up 157
3Dn 155
— — — —
SIGNAL BOX M-F As Required
Then as required
CSM
Essendon down end subway 8.079 28 G 4 — — — UL — Foot only
Mount Alexander Road 8.267 28 G 3 — — — ULT Cat.2 — 4.0m clearance
Brewster Street footbridge 8.656 28 G 3 — — — OL — Foot only
SS clearance up side
Kilmartin Street 8.772 28 H 2 — — — OL — —
Napier Street 8.782 28 H 2 — — — OL — —
Glenbervie subway 9.108 28 H 2 — — — UL — Foot only
SS clearance
GLENBERVIE 9.130 28 H 2 M-F 07 30-09 30
Sa & Su – Not Staffed
1Up 160
2Dn 159
— — — —
STRATHMORE 9.790 28 J 1 M-F 07 30-09 30
Sa & Su – Not Staffed
1Up 165
2Dn 158
— — — —
Strathmore subway 9.857 28 J 1 — — — UL — Foot only
Pascoe Vale Road 10.058 16 K12 — — — OL — Truck route OD 2
Moonee Ponds Creek 10.482 16 K 11 — — — UL — —
Pascoe Vale Road /
Tullamarine Freeway off ramp
10.563 16 K11 — — — OL — —
Tullamarine Freeway 10.632 16 K11 — — — OL — —
Bell Street on ramp 10.662 16 K11 — — — OL — —
Bell Street off ramp 10.692 16 K11 — — — OL — —
O'Hea Street / Tate Street 10.973 16 K10 — — — — PG Foot only
PASCOE VALE 11.271 16 K 9 M-F 07 30-09 30
Sa & Su – Not Staffed
1Up 158
2Dn 159
— — — —
Gaffney Street 11.338 16 K 9 — — — — BB+PG —
Austin Crescent Reserve 11.701 16 K 9 — — — UL — —

LINE DESCRIPTION
NORTHERN GROUP
Metro Melbourne - System Description [WTT Addenda] A 54 19/09/2013
NEWMARKET TO CRAIGIEBURN
LOCATION
Km Ex
SSS
MELWAY
MAP REF. HOURS OF OPERATION
PLATFORM
LENGTHS
SIDING
LENGTHS BRIDGES CROSSINGS REMARKS
Devon Road 12.438 16 J 7 — — — — BB+PG T
OAK PARK 12.875 16 H 6 M-F 07 30-09 30
Sa & Su – Not Staffed
1Up 160
2Dn 160
— — — —
Oak Park subway 12.875 16 H 6 — — — UL — Foot only
Barina Road subway 13.205 16 H 5 — — — UL — Foot only
Glenroy Road 14.208 16 G 2 — — — — BB+PG T
Glenroy subway 14.323 16 G 2 — — — UL — Foot only
GLENROY ¶ 14.400 16 G 2 Error! AutoText entry not
defined.
1Up 162
2Dn 159
— — — —
JACANA 15.430 6 G12 Error! AutoText entry not
defined.
1Up 160
2Dn 160
— — — —
Jacana footbridge 15.480 6 G11 — — — OL — Foot only
Western Ring Road 15.500 6 G11 — — — UL Cat.3 — Truck route OD 8
Standard Gauge flyover 15.960 6 G11 — — — OL — —
Junction to Albion@ 16.555 6 G10 (Connects Page A 51) V/Line Regional Network & Access controlled to Albion
Camp Road 16.576 6 G 9 — — — OL — —
Broadmeadows subway 16.728 6 H 8 — — — UL — Foot only
BROADMEADOWS ¶ 16.848 6 H 8 Error! AutoText entry not
defined.
1Dn 162
2Up 160
A 145
C 465
D 125@
— — A Sdg is at the up end of
the down plat. Siding C and
D Sidings are at the Dn end
of the Dn plat.
Controlled from Craigieburn.
Riggal Street 17.763 6 J 6 — — — OL — —
Smeaton Avenue 18.327 6 J 5 — — — — PG Foot only
Barry Road 19.010 6 J 3 — — — OL — —
COOLAROO
19.308 6 J 3 Not Staffed 1Up 160
2Dn 160
— OL —
Footbridge 19.308 6 J 3 — — — OL — Foot only
Lovat Court / Dunkeld Street 20.268 179 K 12 — — — — PG Foot only
Junction to Somerton
Sidings and Upfield @
21.456 180 A 9 (Connects Page A 57) Controlled from
Craigieburn.
Somerton Road 21.697 180 A 9 — — — OL — —
ROXBURGH PARK 22.075 180 A 9 Not Staffed 1Up 160
2Dn 160
— — — —
Footbridge 22.075 180 A9 — — — OL — Foot only
Transmission line 23.20_ 180 B 5 — — — OL — —
Patullos Lane 24.000 180 B 3 — — — — — Road closed
Aitkens Creek 25.504 387 C12 — — — UL — —
Crossover 25.564 387 C12 — — — — — —
CRAIGIEBURN ¶ 26.098 387 C10 First Train To Last 1@ Up 160
2 Dn 160
— — Sidings are located
beyond Hume Highway
SIGNAL BOX Su 06 30 – 02 10 foll Su TSG
Crossing 26.187 387 C10 — — — PG Foot only
Hume Highway / Sydney Rd 26.383 387 C10 — — — OL — —
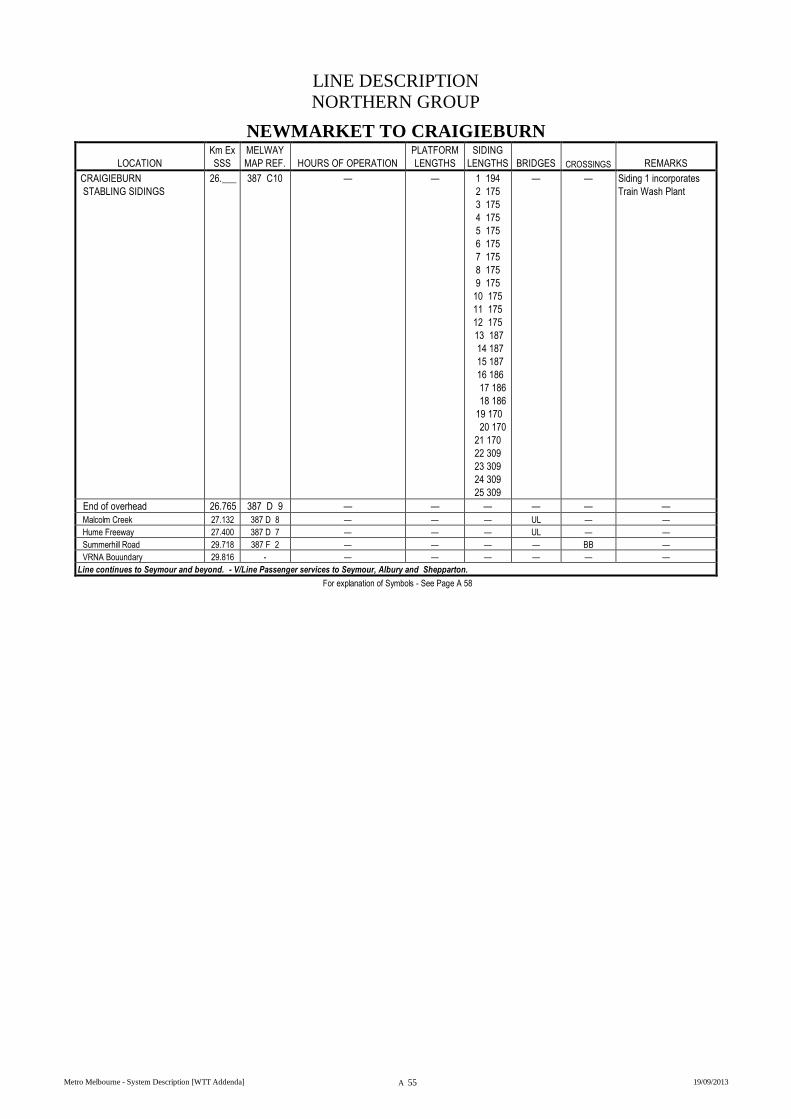
LINE DESCRIPTION
NORTHERN GROUP
Metro Melbourne - System Description [WTT Addenda] A 55 19/09/2013
NEWMARKET TO CRAIGIEBURN
LOCATION
Km Ex
SSS
MELWAY
MAP REF. HOURS OF OPERATION
PLATFORM
LENGTHS
SIDING
LENGTHS BRIDGES CROSSINGS REMARKS
CRAIGIEBURN
STABLING SIDINGS
26.___ 387 C10 — — 1 194
2 175
3 175
4 175
5 175
6 175
7 175
8 175
9 175
10 175
11 175
12 175
13 187
14 187
15 187
16 186
17 186
18 186
19 170
20 170
21 170
22 309
23 309
24 309
25 309
— — Siding 1 incorporates
Train Wash Plant
End of overhead 26.765 387 D 9 — — — — — —
Malcolm Creek 27.132 387 D 8 — — — UL — —
Hume Freeway 27.400 387 D 7 — — — UL — —
Summerhill Road 29.718 387 F 2 — — — — BB —
VRNA Bouundary 29.816 - — — — — — —
Line continues to Seymour and beyond. - V/Line Passenger services to Seymour, Albury and Shepparton.
For explanation of Symbols - See Page A 58
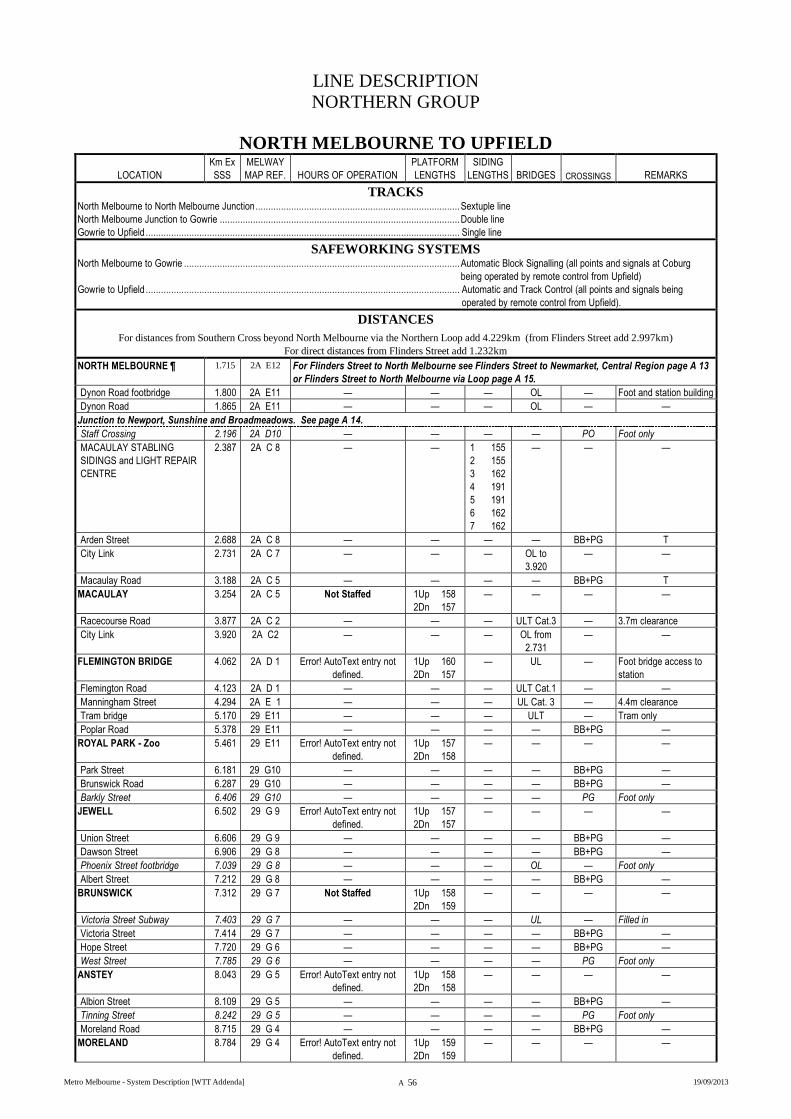
LINE DESCRIPTION
NORTHERN GROUP
Metro Melbourne - System Description [WTT Addenda] A 56 19/09/2013
NORTH MELBOURNE TO UPFIELD
LOCATION
Km Ex
SSS
MELWAY
MAP REF. HOURS OF OPERATION
PLATFORM
LENGTHS
SIDING
LENGTHS BRIDGES CROSSINGS REMARKS
TRACKS North Melbourne to North Melbourne Junction ................................................................................ Sextuple line
North Melbourne Junction to Gowrie .............................................................................................. Double line
Gowrie to Upfield ........................................................................................................................... Single line
SAFEWORKING SYSTEMS North Melbourne to Gowrie ............................................................................................................ Automatic Block Signalling (all points and signals at Coburg
being operated by remote control from Upfield)
Gowrie to Upfield ........................................................................................................................... Automatic and Track Control (all points and signals being
operated by remote control from Upfield).
DISTANCES
For distances from Southern Cross beyond North Melbourne via the Northern Loop add 4.229km (from Flinders Street add 2.997km)
For direct distances from Flinders Street add 1.232km
NORTH MELBOURNE ¶ 1.715 2A E12 For Flinders Street to North Melbourne see Flinders Street to Newmarket, Central Region page A 13
or Flinders Street to North Melbourne via Loop page A 15.
Dynon Road footbridge 1.800 2A E11 — — — OL — Foot and station building
Dynon Road 1.865 2A E11 — — — OL — —
Junction to Newport, Sunshine and Broadmeadows. See page A 14.
Staff Crossing 2.196 2A D10 — — — — PO Foot only
MACAULAY STABLING
SIDINGS and LIGHT REPAIR
CENTRE
2.387 2A C 8 — — 1 155
2 155
3 162
4 191
5 191
6 162
7 162
— — —
Arden Street 2.688 2A C 8 — — — — BB+PG T
City Link 2.731 2A C 7 — — — OL to
3.920
— —
Macaulay Road 3.188 2A C 5 — — — — BB+PG T
MACAULAY 3.254 2A C 5 Not Staffed 1Up 158
2Dn 157
— — — —
Racecourse Road 3.877 2A C 2 — — — ULT Cat.3 — 3.7m clearance
City Link 3.920 2A C2 — — — OL from
2.731
— —
FLEMINGTON BRIDGE 4.062 2A D 1 Error! AutoText entry not
defined.
1Up 160
2Dn 157
— UL — Foot bridge access to
station
Flemington Road 4.123 2A D 1 — — — ULT Cat.1 — —
Manningham Street 4.294 2A E 1 — — — UL Cat. 3 — 4.4m clearance
Tram bridge 5.170 29 E11 — — — ULT — Tram only
Poplar Road 5.378 29 E11 — — — — BB+PG —
ROYAL PARK - Zoo 5.461 29 E11 Error! AutoText entry not
defined.
1Up 157
2Dn 158
— — — —
Park Street 6.181 29 G10 — — — — BB+PG —
Brunswick Road 6.287 29 G10 — — — — BB+PG —
Barkly Street 6.406 29 G10 — — — — PG Foot only
JEWELL 6.502 29 G 9 Error! AutoText entry not
defined.
1Up 157
2Dn 157
— — — —
Union Street 6.606 29 G 9 — — — — BB+PG —
Dawson Street 6.906 29 G 8 — — — — BB+PG —
Phoenix Street footbridge 7.039 29 G 8 — — — OL — Foot only
Albert Street 7.212 29 G 8 — — — — BB+PG —
BRUNSWICK 7.312 29 G 7 Not Staffed 1Up 158
2Dn 159
— — — —
Victoria Street Subway 7.403 29 G 7 — — — UL — Filled in
Victoria Street 7.414 29 G 7 — — — — BB+PG —
Hope Street 7.720 29 G 6 — — — — BB+PG —
West Street 7.785 29 G 6 — — — — PG Foot only
ANSTEY 8.043 29 G 5 Error! AutoText entry not
defined.
1Up 158
2Dn 158
— — — —
Albion Street 8.109 29 G 5 — — — — BB+PG —
Tinning Street 8.242 29 G 5 — — — — PG Foot only
Moreland Road 8.715 29 G 4 — — — — BB+PG —
MORELAND 8.784 29 G 4 Error! AutoText entry not
defined.
1Up 159
2Dn 159
— — — —
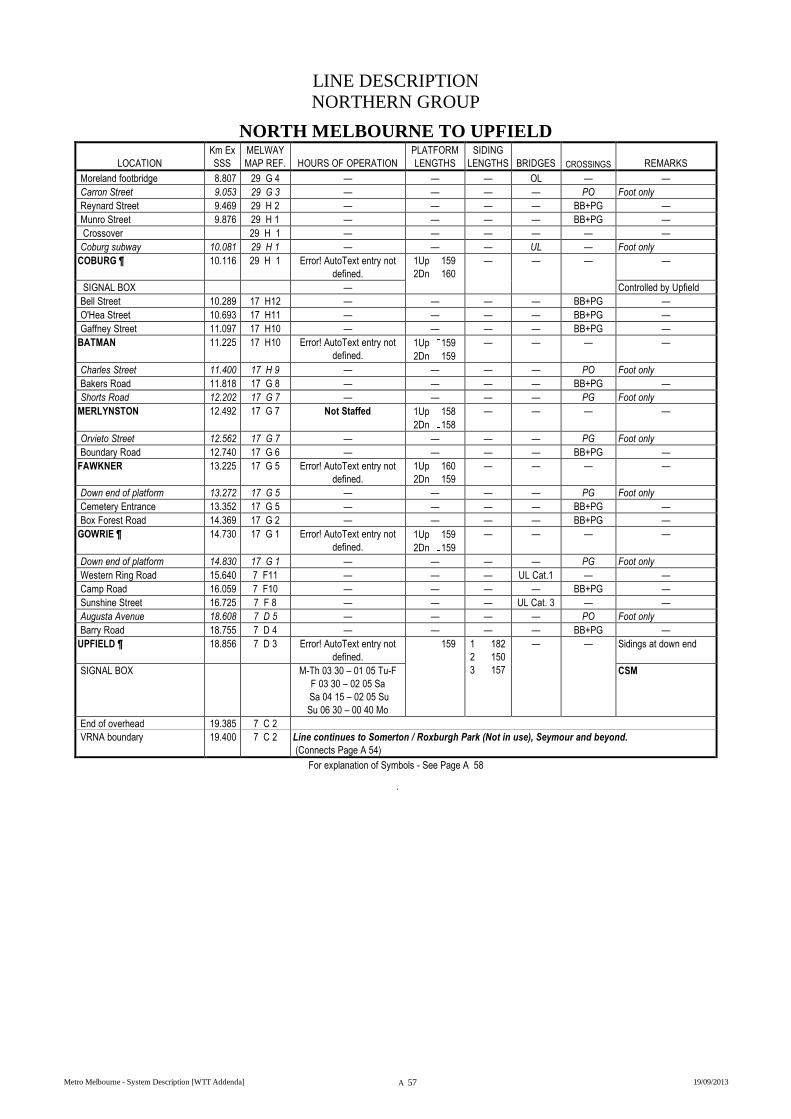
LINE DESCRIPTION
NORTHERN GROUP
Metro Melbourne - System Description [WTT Addenda] A 57 19/09/2013
NORTH MELBOURNE TO UPFIELD
LOCATION
Km Ex
SSS
MELWAY
MAP REF. HOURS OF OPERATION
PLATFORM
LENGTHS
SIDING
LENGTHS BRIDGES CROSSINGS REMARKS
Moreland footbridge 8.807 29 G 4 — — — OL — —
Carron Street 9.053 29 G 3 — — — — PO Foot only
Reynard Street 9.469 29 H 2 — — — — BB+PG —
Munro Street 9.876 29 H 1 — — — — BB+PG —
Crossover 29 H 1 — — — — — —
Coburg subway 10.081 29 H 1 — — — UL — Foot only
COBURG ¶ 10.116 29 H 1 Error! AutoText entry not
defined.
1Up 159
2Dn 160
— — — —
SIGNAL BOX — Controlled by Upfield
Bell Street 10.289 17 H12 — — — — BB+PG —
O'Hea Street 10.693 17 H11 — — — — BB+PG —
Gaffney Street 11.097 17 H10 — — — — BB+PG —
BATMAN 11.225 17 H10 Error! AutoText entry not
defined.
1Up 159
2Dn 159
— — — —
Charles Street 11.400 17 H 9 — — — — PO Foot only
Bakers Road 11.818 17 G 8 — — — — BB+PG —
Shorts Road 12.202 17 G 7 — — — — PG Foot only
MERLYNSTON 12.492 17 G 7 Not Staffed 1Up 158
2Dn 158
— — — —
Orvieto Street 12.562 17 G 7 — — — — PG Foot only
Boundary Road 12.740 17 G 6 — — — — BB+PG —
FAWKNER 13.225 17 G 5 Error! AutoText entry not
defined.
1Up 160
2Dn 159
— — — —
Down end of platform 13.272 17 G 5 — — — — PG Foot only
Cemetery Entrance 13.352 17 G 5 — — — — BB+PG —
Box Forest Road 14.369 17 G 2 — — — — BB+PG —
GOWRIE ¶ 14.730 17 G 1 Error! AutoText entry not
defined.
1Up 159
2Dn 159
— — — —
Down end of platform 14.830 17 G 1 — — — — PG Foot only
Western Ring Road 15.640 7 F11 — — — UL Cat.1 — —
Camp Road 16.059 7 F10 — — — — BB+PG —
Sunshine Street 16.725 7 F 8 — — — UL Cat. 3 — —
Augusta Avenue 18.608 7 D 5 — — — — PO Foot only
Barry Road 18.755 7 D 4 — — — — BB+PG —
UPFIELD ¶ 18.856
7 D 3 Error! AutoText entry not
defined.
159 1 182
2 150
3 157
— — Sidings at down end
SIGNAL BOX M-Th 03 30 – 01 05 Tu-F
F 03 30 – 02 05 Sa
Sa 04 15 – 02 05 Su
Su 06 30 – 00 40 Mo
CSM
End of overhead 19.385 7 C 2
VRNA boundary 19.400 7 C 2 Line continues to Somerton / Roxburgh Park (Not in use), Seymour and beyond.
(Connects Page A 54)
For explanation of Symbols - See Page A 58
.
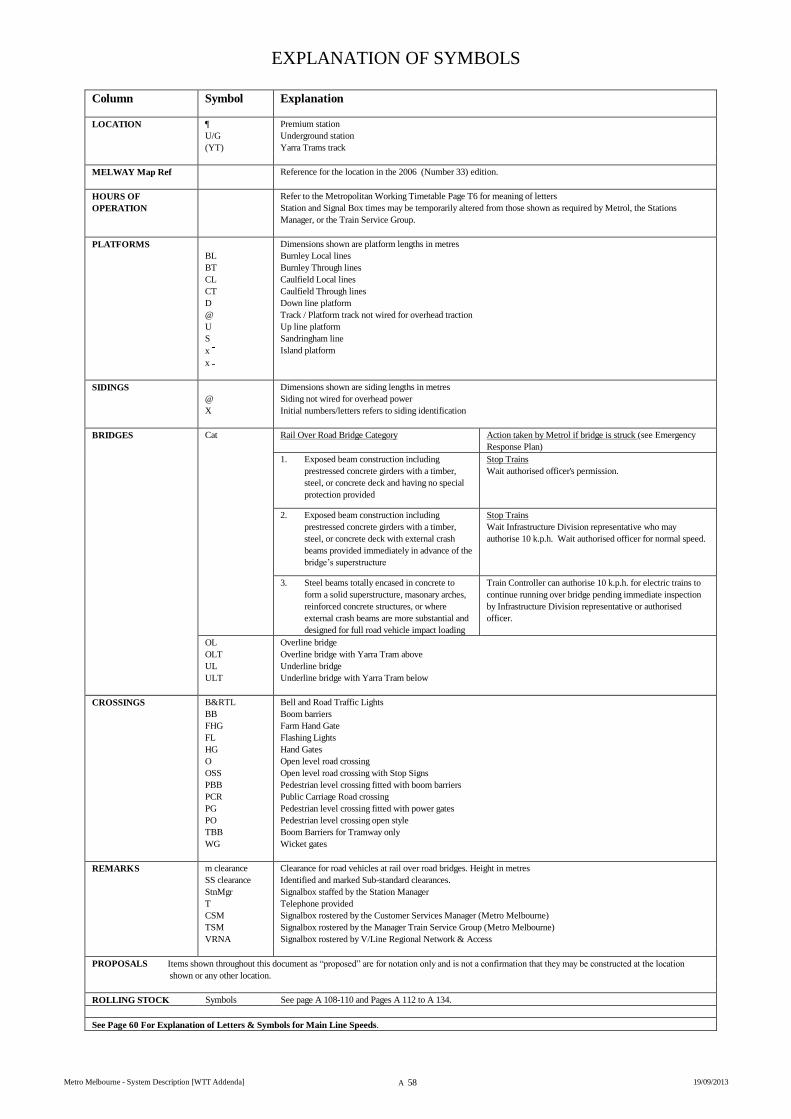
EXPLANATION OF SYMBOLS
Metro Melbourne - System Description [WTT Addenda] A 58 19/09/2013
Column Symbol Explanation
LOCATION 
U/G
(YT)
Premium station
Underground station
Yarra Trams track
MELWAY Map Ref Reference for the location in the 2006 (Number 33) edition.
HOURS OF
OPERATION
Refer to the Metropolitan Working Timetable Page T6 for meaning of letters
Station and Signal Box times may be temporarily altered from those shown as required by Metrol, the Stations
Manager, or the Train Service Group.
PLATFORMS
BL
BT
CL
CT
D
@
U
S
x
x
Dimensions shown are platform lengths in metres
Burnley Local lines
Burnley Through lines
Caulfield Local lines
Caulfield Through lines
Down line platform
Track / Platform track not wired for overhead traction
Up line platform
Sandringham line
Island platform
SIDINGS
@
X
Dimensions shown are siding lengths in metres
Siding not wired for overhead power
Initial numbers/letters refers to siding identification
BRIDGES Cat Rail Over Road Bridge Category Action taken by Metrol if bridge is struck (see Emergency
Response Plan)
1. Exposed beam construction including
prestressed concrete girders with a timber,
steel, or concrete deck and having no special
protection provided
Stop Trains
Wait authorised officer's permission.
2. Exposed beam construction including
prestressed concrete girders with a timber,
steel, or concrete deck with external crash
beams provided immediately in advance of the
bridge’s superstructure
Stop Trains
Wait Infrastructure Division representative who may
authorise 10 k.p.h. Wait authorised officer for normal speed.
3. Steel beams totally encased in concrete to
form a solid superstructure, masonary arches,
reinforced concrete structures, or where
external crash beams are more substantial and
designed for full road vehicle impact loading
Train Controller can authorise 10 k.p.h. for electric trains to
continue running over bridge pending immediate inspection
by Infrastructure Division representative or authorised
officer.
OL
OLT
UL
ULT
Overline bridge
Overline bridge with Yarra Tram above
Underline bridge
Underline bridge with Yarra Tram below
CROSSINGS B&RTL
BB
FHG
FL
HG
O
OSS
PBB
PCR
PG
PO
TBB
WG
Bell and Road Traffic Lights
Boom barriers
Farm Hand Gate
Flashing Lights
Hand Gates
Open level road crossing
Open level road crossing with Stop Signs
Pedestrian level crossing fitted with boom barriers
Public Carriage Road crossing
Pedestrian level crossing fitted with power gates
Pedestrian level crossing open style
Boom Barriers for Tramway only
Wicket gates
REMARKS m clearance
SS clearance
StnMgr
T
CSM
TSM
VRNA
Clearance for road vehicles at rail over road bridges. Height in metres
Identified and marked Sub-standard clearances.
Signalbox staffed by the Station Manager
Telephone provided
Signalbox rostered by the Customer Services Manager (Metro Melbourne)
Signalbox rostered by the Manager Train Service Group (Metro Melbourne)
Signalbox rostered by V/Line Regional Network & Access
PROPOSALS Items shown throughout this document as “proposed” are for notation only and is not a confirmation that they may be constructed at the location
shown or any other location.
ROLLING STOCK Symbols See page A 108-110 and Pages A 112 to A 134.
See Page 60 For Explanation of Letters & Symbols for Main Line Speeds.
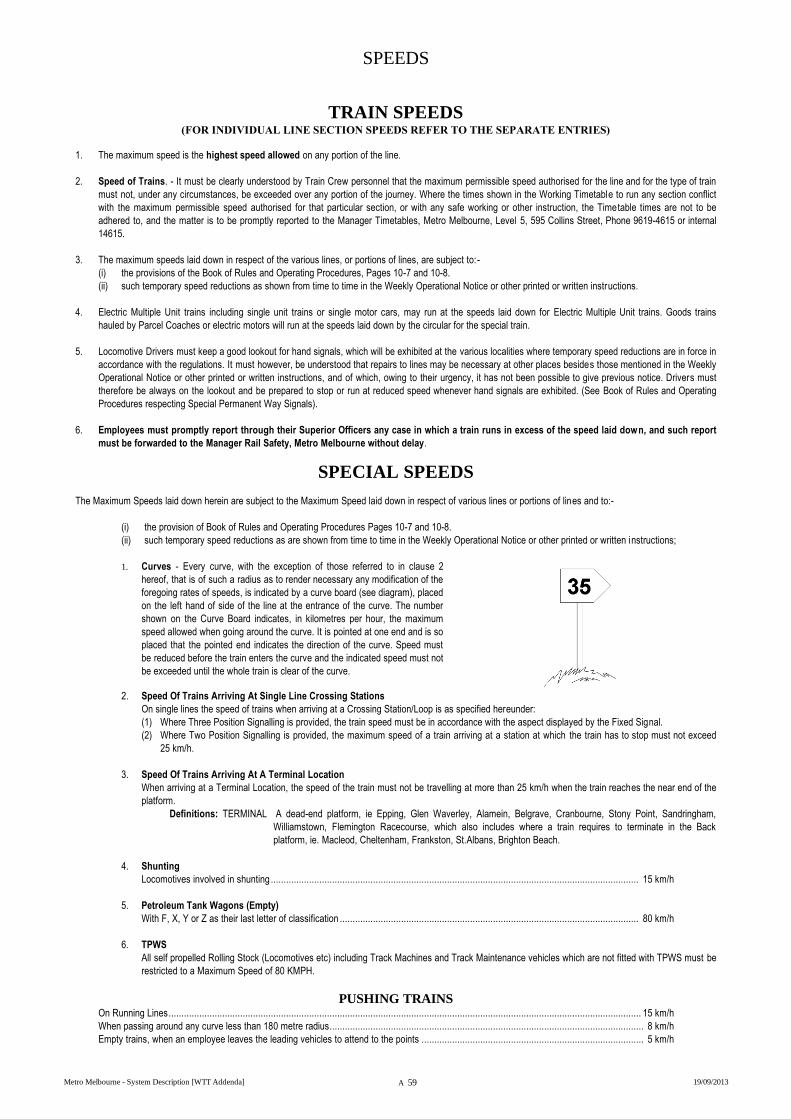
SPEEDS
Metro Melbourne - System Description [WTT Addenda] A 59 19/09/2013
TRAIN SPEEDS (FOR INDIVIDUAL LINE SECTION SPEEDS REFER TO THE SEPARATE ENTRIES)
1. The maximum speed is the highest speed allowed on any portion of the line.
2. Speed of Trains. - It must be clearly understood by Train Crew personnel that the maximum permissible speed authorised for the line and for the type of train
must not, under any circumstances, be exceeded over any portion of the journey. Where the times shown in the Working Timetable to run any section conflict
with the maximum permissible speed authorised for that particular section, or with any safe working or other instruction, the Timetable times are not to be
adhered to, and the matter is to be promptly reported to the Manager Timetables, Metro Melbourne, Level 5, 595 Collins Street, Phone 9619-4615 or internal
14615.
3. The maximum speeds laid down in respect of the various lines, or portions of lines, are subject to:-
(i) the provisions of the Book of Rules and Operating Procedures, Pages 10-7 and 10-8.
(ii) such temporary speed reductions as shown from time to time in the Weekly Operational Notice or other printed or written instructions.
4. Electric Multiple Unit trains including single unit trains or single motor cars, may run at the speeds laid down for Electric Multiple Unit trains. Goods trains
hauled by Parcel Coaches or electric motors will run at the speeds laid down by the circular for the special train.
5. Locomotive Drivers must keep a good lookout for hand signals, which will be exhibited at the various localities where temporary speed reductions are in force in
accordance with the regulations. It must however, be understood that repairs to lines may be necessary at other places besides those mentioned in the Weekly
Operational Notice or other printed or written instructions, and of which, owing to their urgency, it has not been possible to give previous notice. Drivers must
therefore be always on the lookout and be prepared to stop or run at reduced speed whenever hand signals are exhibited. (See Book of Rules and Operating
Procedures respecting Special Permanent Way Signals).
6. Employees must promptly report through their Superior Officers any case in which a train runs in excess of the speed laid down, and such report
must be forwarded to the Manager Rail Safety, Metro Melbourne without delay.
SPECIAL SPEEDS
The Maximum Speeds laid down herein are subject to the Maximum Speed laid down in respect of various lines or portions of lines and to:-
(i) the provision of Book of Rules and Operating Procedures Pages 10-7 and 10-8.
(ii) such temporary speed reductions as are shown from time to time in the Weekly Operational Notice or other printed or written instructions;
1. Curves - Every curve, with the exception of those referred to in clause 2
hereof, that is of such a radius as to render necessary any modification of the
foregoing rates of speeds, is indicated by a curve board (see diagram), placed
on the left hand of side of the line at the entrance of the curve. The number
shown on the Curve Board indicates, in kilometres per hour, the maximum
speed allowed when going around the curve. It is pointed at one end and is so
placed that the pointed end indicates the direction of the curve. Speed must
be reduced before the train enters the curve and the indicated speed must not
be exceeded until the whole train is clear of the curve.
2. Speed Of Trains Arriving At Single Line Crossing Stations
On single lines the speed of trains when arriving at a Crossing Station/Loop is as specified hereunder:
(1) Where Three Position Signalling is provided, the train speed must be in accordance with the aspect displayed by the Fixed Signal.
(2) Where Two Position Signalling is provided, the maximum speed of a train arriving at a station at which the train has to stop must not exceed
25 km/h.
3. Speed Of Trains Arriving At A Terminal Location
When arriving at a Terminal Location, the speed of the train must not be travelling at more than 25 km/h when the train reaches the near end of the
platform.
Definitions: TERMINAL A dead-end platform, ie Epping, Glen Waverley, Alamein, Belgrave, Cranbourne, Stony Point, Sandringham,
Williamstown, Flemington Racecourse, which also includes where a train requires to terminate in the Back
platform, ie. Macleod, Cheltenham, Frankston, St.Albans, Brighton Beach.
4. Shunting
Locomotives involved in shunting ................................................................................................................................................ 15 km/h
5. Petroleum Tank Wagons (Empty)
With F, X, Y or Z as their last letter of classification ..................................................................................................................... 80 km/h
6. TPWS
All self propelled Rolling Stock (Locomotives etc) including Track Machines and Track Maintenance vehicles which are not fitted with TPWS must be
restricted to a Maximum Speed of 80 KMPH.
PUSHING TRAINS On Running Lines ......................................................................................................................................................................................... 15 km/h
When passing around any curve less than 180 metre radius ........................................................................................................................... 8 km/h
Empty trains, when an employee leaves the leading vehicles to attend to the points ....................................................................................... 5 km/h
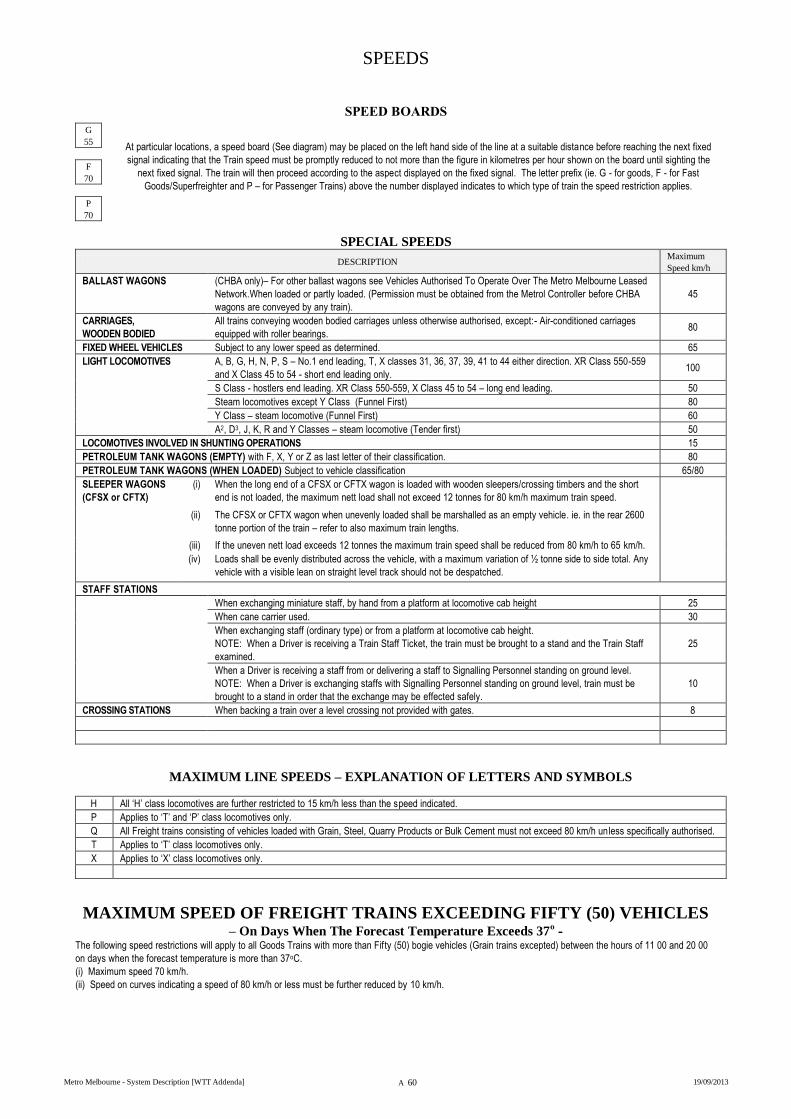
SPEEDS
Metro Melbourne - System Description [WTT Addenda] A 60 19/09/2013
SPEED BOARDS
G
55 At particular locations, a speed board (See diagram) may be placed on the left hand side of the line at a suitable distance before reaching the next fixed
signal indicating that the Train speed must be promptly reduced to not more than the figure in kilometres per hour shown on the board until sighting the
next fixed signal. The train will then proceed according to the aspect displayed on the fixed signal. The letter prefix (ie. G - for goods, F - for Fast
Goods/Superfreighter and P – for Passenger Trains) above the number displayed indicates to which type of train the speed restriction applies.
F
70
P
70
SPECIAL SPEEDS
DESCRIPTION Maximum
Speed km/h
BALLAST WAGONS (CHBA only)– For other ballast wagons see Vehicles Authorised To Operate Over The Metro Melbourne Leased
Network.When loaded or partly loaded. (Permission must be obtained from the Metrol Controller before CHBA
wagons are conveyed by any train).
45
CARRIAGES,
WOODEN BODIED
All trains conveying wooden bodied carriages unless otherwise authorised, except:- Air-conditioned carriages
equipped with roller bearings. 80
FIXED WHEEL VEHICLES Subject to any lower speed as determined. 65
LIGHT LOCOMOTIVES A, B, G, H, N, P, S – No.1 end leading, T, X classes 31, 36, 37, 39, 41 to 44 either direction. XR Class 550-559
and X Class 45 to 54 - short end leading only. 100
S Class - hostlers end leading. XR Class 550-559, X Class 45 to 54 – long end leading. 50
Steam locomotives except Y Class (Funnel First) 80
Y Class – steam locomotive (Funnel First) 60
A2, D3, J, K, R and Y Classes – steam locomotive (Tender first) 50
LOCOMOTIVES INVOLVED IN SHUNTING OPERATIONS 15
PETROLEUM TANK WAGONS (EMPTY) with F, X, Y or Z as last letter of their classification. 80
PETROLEUM TANK WAGONS (WHEN LOADED) Subject to vehicle classification 65/80
SLEEPER WAGONS
(CFSX or CFTX)
(i) When the long end of a CFSX or CFTX wagon is loaded with wooden sleepers/crossing timbers and the short
end is not loaded, the maximum nett load shall not exceed 12 tonnes for 80 km/h maximum train speed.
(ii) The CFSX or CFTX wagon when unevenly loaded shall be marshalled as an empty vehicle. ie. in the rear 2600
tonne portion of the train – refer to also maximum train lengths.
(iii) If the uneven nett load exceeds 12 tonnes the maximum train speed shall be reduced from 80 km/h to 65 km/h.
(iv) Loads shall be evenly distributed across the vehicle, with a maximum variation of ½ tonne side to side total. Any
vehicle with a visible lean on straight level track should not be despatched.
STAFF STATIONS
When exchanging miniature staff, by hand from a platform at locomotive cab height 25
When cane carrier used. 30
When exchanging staff (ordinary type) or from a platform at locomotive cab height.
NOTE: When a Driver is receiving a Train Staff Ticket, the train must be brought to a stand and the Train Staff
examined.
25
When a Driver is receiving a staff from or delivering a staff to Signalling Personnel standing on ground level.
NOTE: When a Driver is exchanging staffs with Signalling Personnel standing on ground level, train must be
brought to a stand in order that the exchange may be effected safely.
10
CROSSING STATIONS When backing a train over a level crossing not provided with gates. 8
MAXIMUM LINE SPEEDS – EXPLANATION OF LETTERS AND SYMBOLS
H All ‘H’ class locomotives are further restricted to 15 km/h less than the speed indicated.
P Applies to ‘T’ and ‘P’ class locomotives only.
Q All Freight trains consisting of vehicles loaded with Grain, Steel, Quarry Products or Bulk Cement must not exceed 80 km/h unless specifically authorised.
T Applies to ‘T’ class locomotives only.
X Applies to ‘X’ class locomotives only.
MAXIMUM SPEED OF FREIGHT TRAINS EXCEEDING FIFTY (50) VEHICLES – On Days When The Forecast Temperature Exceeds 37
o -
The following speed restrictions will apply to all Goods Trains with more than Fifty (50) bogie vehicles (Grain trains excepted) between the hours of 11 00 and 20 00
on days when the forecast temperature is more than 37oC.
(i) Maximum speed 70 km/h.
(ii) Speed on curves indicating a speed of 80 km/h or less must be further reduced by 10 km/h.
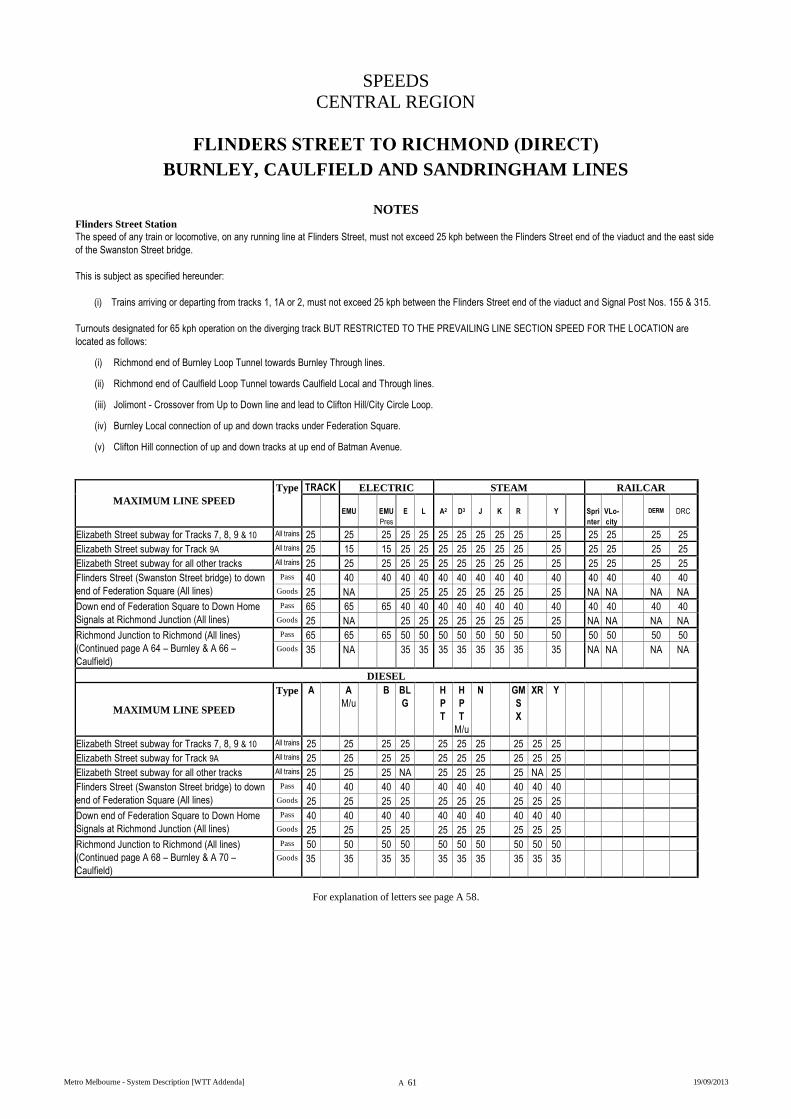
SPEEDS
CENTRAL REGION
Metro Melbourne - System Description [WTT Addenda] A 61 19/09/2013
FLINDERS STREET TO RICHMOND (DIRECT)
BURNLEY, CAULFIELD AND SANDRINGHAM LINES
NOTES Flinders Street Station
The speed of any train or locomotive, on any running line at Flinders Street, must not exceed 25 kph between the Flinders Street end of the viaduct and the east side
of the Swanston Street bridge.
This is subject as specified hereunder:
(i) Trains arriving or departing from tracks 1, 1A or 2, must not exceed 25 kph between the Flinders Street end of the viaduct and Signal Post Nos. 155 & 315.
Turnouts designated for 65 kph operation on the diverging track BUT RESTRICTED TO THE PREVAILING LINE SECTION SPEED FOR THE LOCATION are
located as follows:
(i) Richmond end of Burnley Loop Tunnel towards Burnley Through lines.
(ii) Richmond end of Caulfield Loop Tunnel towards Caulfield Local and Through lines.
(iii) Jolimont - Crossover from Up to Down line and lead to Clifton Hill/City Circle Loop.
(iv) Burnley Local connection of up and down tracks under Federation Square.
(v) Clifton Hill connection of up and down tracks at up end of Batman Avenue.
MAXIMUM LINE SPEED
Type TRACK ELECTRIC STEAM RAILCAR
EMU
EMU
Pres
E
L
A2
D3
J
K
R
Y
Spri
nter
VLo-
city
DERM
DRC
Elizabeth Street subway for Tracks 7, 8, 9 & 10 All trains 25 25 25 25 25 25 25 25 25 25 25 25 25 25 25
Elizabeth Street subway for Track 9A All trains 25 15 15 25 25 25 25 25 25 25 25 25 25 25 25
Elizabeth Street subway for all other tracks All trains 25 25 25 25 25 25 25 25 25 25 25 25 25 25 25
Flinders Street (Swanston Street bridge) to down
end of Federation Square (All lines)
Pass 40 40 40 40 40 40 40 40 40 40 40 40 40 40 40
Goods 25 NA 25 25 25 25 25 25 25 25 NA NA NA NA
Down end of Federation Square to Down Home
Signals at Richmond Junction (All lines)
Pass 65 65 65 40 40 40 40 40 40 40 40 40 40 40 40
Goods 25 NA 25 25 25 25 25 25 25 25 NA NA NA NA
Richmond Junction to Richmond (All lines)
(Continued page A 64 – Burnley & A 66 –
Caulfield)
Pass 65 65 65 50 50 50 50 50 50 50 50 50 50 50 50
Goods 35 NA 35 35 35 35 35 35 35 35 NA NA NA NA
DIESEL
MAXIMUM LINE SPEED
Type A A
M/u
B BL
G
H
P
T
H
P
T
M/u
N
GM
S
X
XR
Y
Elizabeth Street subway for Tracks 7, 8, 9 & 10 All trains 25 25 25 25 25 25 25 25 25 25
Elizabeth Street subway for Track 9A All trains 25 25 25 25 25 25 25 25 25 25
Elizabeth Street subway for all other tracks All trains 25 25 25 NA 25 25 25 25 NA 25
Flinders Street (Swanston Street bridge) to down
end of Federation Square (All lines)
Pass 40 40 40 40 40 40 40 40 40 40
Goods 25 25 25 25 25 25 25 25 25 25
Down end of Federation Square to Down Home
Signals at Richmond Junction (All lines)
Pass 40 40 40 40 40 40 40 40 40 40
Goods 25 25 25 25 25 25 25 25 25 25
Richmond Junction to Richmond (All lines)
(Continued page A 68 – Burnley & A 70 –
Caulfield)
Pass 50 50 50 50 50 50 50 50 50 50
Goods 35 35 35 35 35 35 35 35 35 35
For explanation of letters see page A 58.
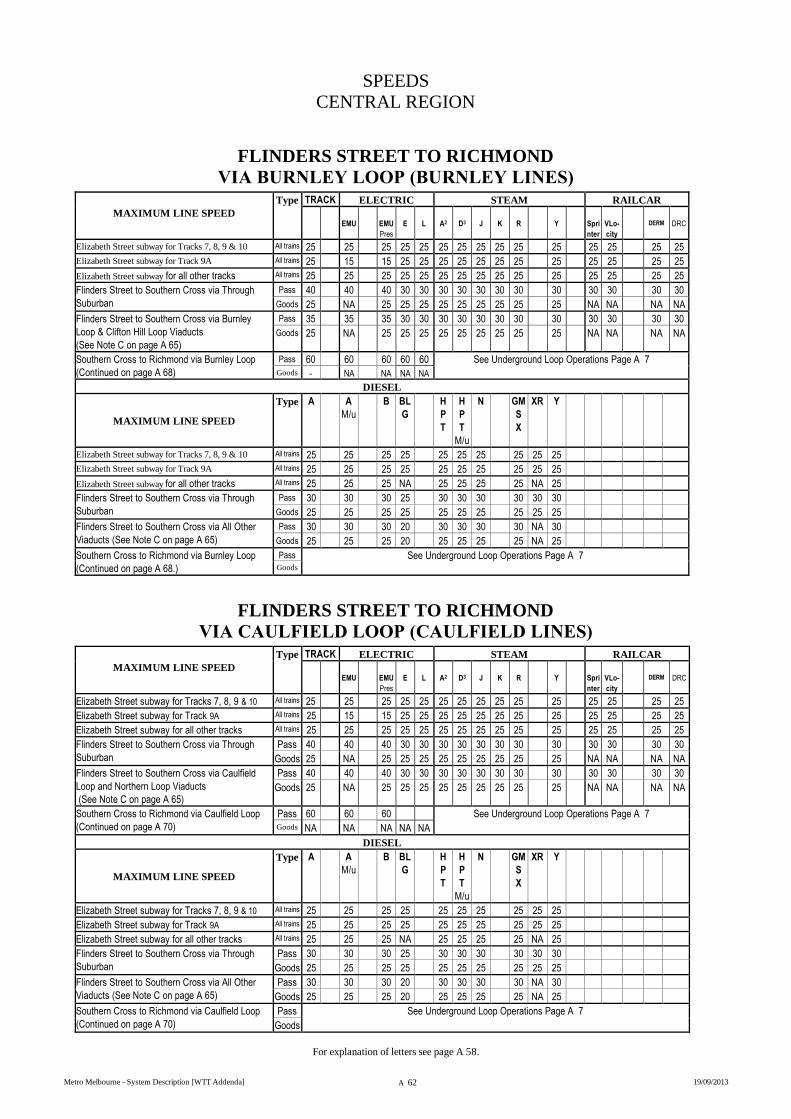
SPEEDS
CENTRAL REGION
Metro Melbourne - System Description [WTT Addenda] A 62 19/09/2013
FLINDERS STREET TO RICHMOND
VIA BURNLEY LOOP (BURNLEY LINES)
MAXIMUM LINE SPEED
Type TRACK ELECTRIC STEAM RAILCAR
EMU
EMU
Pres
E
L
A2
D3
J
K
R
Y
Spri
nter
VLo-
city
DERM
DRC
Elizabeth Street subway for Tracks 7, 8, 9 & 10 All trains 25 25 25 25 25 25 25 25 25 25 25 25 25 25 25
Elizabeth Street subway for Track 9A All trains 25 15 15 25 25 25 25 25 25 25 25 25 25 25 25
Elizabeth Street subway for all other tracks All trains 25 25 25 25 25 25 25 25 25 25 25 25 25 25 25
Flinders Street to Southern Cross via Through
Suburban
Pass 40 40 40 30 30 30 30 30 30 30 30 30 30 30 30
Goods 25 NA 25 25 25 25 25 25 25 25 25 NA NA NA NA
Flinders Street to Southern Cross via Burnley
Loop & Clifton Hill Loop Viaducts
(See Note C on page A 65)
Pass 35 35 35 30 30 30 30 30 30 30 30 30 30 30 30
Goods 25 NA 25 25 25 25 25 25 25 25 25 NA NA NA NA
Southern Cross to Richmond via Burnley Loop
(Continued on page A 68)
Pass 60 60 60 60 60 See Underground Loop Operations Page A 7
Goods - NA NA NA NA
DIESEL
MAXIMUM LINE SPEED
Type A A
M/u
B BL
G
H
P
T
H
P
T
M/u
N
GM
S
X
XR
Y
Elizabeth Street subway for Tracks 7, 8, 9 & 10 All trains 25 25 25 25 25 25 25 25 25 25
Elizabeth Street subway for Track 9A All trains 25 25 25 25 25 25 25 25 25 25
Elizabeth Street subway for all other tracks All trains 25 25 25 NA 25 25 25 25 NA 25
Flinders Street to Southern Cross via Through
Suburban
Pass 30 30 30 25 30 30 30 30 30 30
Goods 25 25 25 25 25 25 25 25 25 25
Flinders Street to Southern Cross via All Other
Viaducts (See Note C on page A 65)
Pass 30 30 30 20 30 30 30 30 NA 30
Goods 25 25 25 20 25 25 25 25 NA 25
Southern Cross to Richmond via Burnley Loop
(Continued on page A 68.)
Pass See Underground Loop Operations Page A 7 Goods
FLINDERS STREET TO RICHMOND
VIA CAULFIELD LOOP (CAULFIELD LINES)
MAXIMUM LINE SPEED
Type TRACK ELECTRIC STEAM RAILCAR
EMU
EMU
Pres
E
L
A2
D3
J
K
R
Y
Spri
nter
VLo-
city
DERM
DRC
Elizabeth Street subway for Tracks 7, 8, 9 & 10 All trains 25 25 25 25 25 25 25 25 25 25 25 25 25 25 25
Elizabeth Street subway for Track 9A All trains 25 15 15 25 25 25 25 25 25 25 25 25 25 25 25
Elizabeth Street subway for all other tracks All trains 25 25 25 25 25 25 25 25 25 25 25 25 25 25 25
Flinders Street to Southern Cross via Through
Suburban
Pass 40 40 40 30 30 30 30 30 30 30 30 30 30 30 30
Goods 25 NA 25 25 25 25 25 25 25 25 25 NA NA NA NA
Flinders Street to Southern Cross via Caulfield
Loop and Northern Loop Viaducts
(See Note C on page A 65)
Pass 40 40 40 30 30 30 30 30 30 30 30 30 30 30 30
Goods 25 NA 25 25 25 25 25 25 25 25 25 NA NA NA NA
Southern Cross to Richmond via Caulfield Loop
(Continued on page A 70)
Pass 60 60 60 See Underground Loop Operations Page A 7
Goods NA NA NA NA NA
DIESEL
MAXIMUM LINE SPEED
Type A A
M/u
B BL
G
H
P
T
H
P
T
M/u
N
GM
S
X
XR Y
Elizabeth Street subway for Tracks 7, 8, 9 & 10 All trains 25 25 25 25 25 25 25 25 25 25
Elizabeth Street subway for Track 9A All trains 25 25 25 25 25 25 25 25 25 25
Elizabeth Street subway for all other tracks All trains 25 25 25 NA 25 25 25 25 NA 25
Flinders Street to Southern Cross via Through
Suburban
Pass 30 30 30 25 30 30 30 30 30 30
Goods 25 25 25 25 25 25 25 25 25 25
Flinders Street to Southern Cross via All Other
Viaducts (See Note C on page A 65)
Pass 30 30 30 20 30 30 30 30 NA 30
Goods 25 25 25 20 25 25 25 25 NA 25
Southern Cross to Richmond via Caulfield Loop
(Continued on page A 70)
Pass See Underground Loop Operations Page A 7
Goods
For explanation of letters see page A 58.
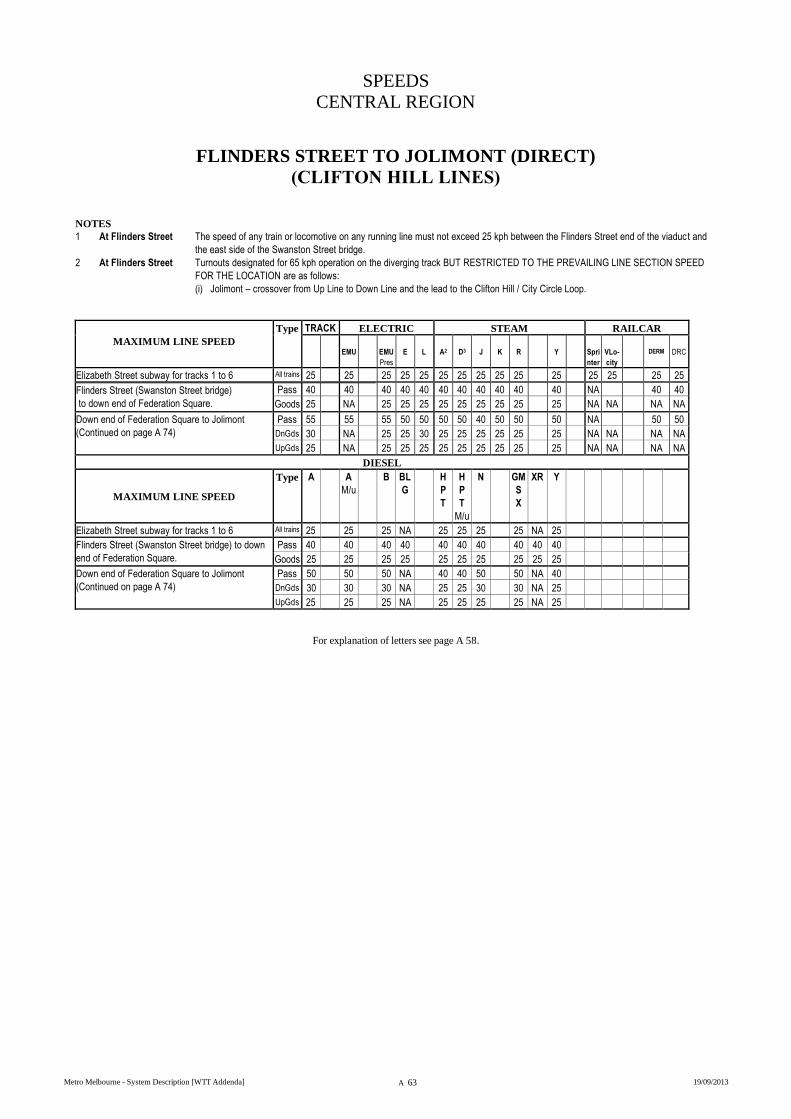
SPEEDS
CENTRAL REGION
Metro Melbourne - System Description [WTT Addenda] A 63 19/09/2013
FLINDERS STREET TO JOLIMONT (DIRECT)
(CLIFTON HILL LINES)
NOTES
1 At Flinders Street The speed of any train or locomotive on any running line must not exceed 25 kph between the Flinders Street end of the viaduct and
the east side of the Swanston Street bridge.
2 At Flinders Street Turnouts designated for 65 kph operation on the diverging track BUT RESTRICTED TO THE PREVAILING LINE SECTION SPEED
FOR THE LOCATION are as follows:
(i) Jolimont – crossover from Up Line to Down Line and the lead to the Clifton Hill / City Circle Loop.
MAXIMUM LINE SPEED
Type TRACK ELECTRIC STEAM RAILCAR
EMU
EMU
Pres
E
L
A2
D3
J
K
R
Y
Spri
nter
VLo-
city
DERM
DRC
Elizabeth Street subway for tracks 1 to 6 All trains 25 25 25 25 25 25 25 25 25 25 25 25 25 25 25
Flinders Street (Swanston Street bridge)
to down end of Federation Square.
Pass 40 40 40 40 40 40 40 40 40 40 40 NA 40 40
Goods 25 NA 25 25 25 25 25 25 25 25 25 NA NA NA NA
Down end of Federation Square to Jolimont
(Continued on page A 74)
Pass 55 55 55 50 50 50 50 40 50 50 50 NA 50 50
DnGds 30 NA 25 25 30 25 25 25 25 25 25 NA NA NA NA
UpGds 25 NA 25 25 25 25 25 25 25 25 25 NA NA NA NA
DIESEL
MAXIMUM LINE SPEED
Type A A
M/u
B BL
G
H
P
T
H
P
T
M/u
N
GM
S
X
XR Y
Elizabeth Street subway for tracks 1 to 6 All trains 25 25 25 NA 25 25 25 25 NA 25
Flinders Street (Swanston Street bridge) to down
end of Federation Square.
Pass 40 40 40 40 40 40 40 40 40 40
Goods 25 25 25 25 25 25 25 25 25 25
Down end of Federation Square to Jolimont
(Continued on page A 74)
Pass 50 50 50 NA 40 40 50 50 NA 40
DnGds 30 30 30 NA 25 25 30 30 NA 25
UpGds 25 25 25 NA 25 25 25 25 NA 25
For explanation of letters see page A 58.
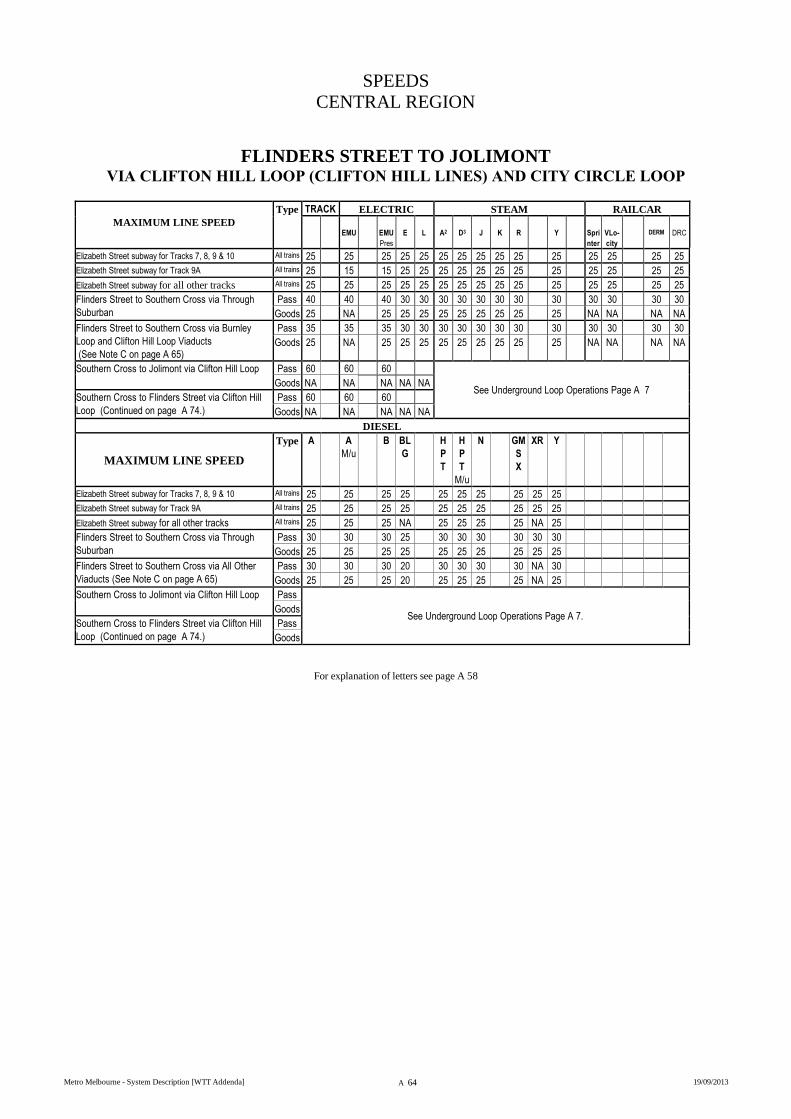
SPEEDS
CENTRAL REGION
Metro Melbourne - System Description [WTT Addenda] A 64 19/09/2013
FLINDERS STREET TO JOLIMONT VIA CLIFTON HILL LOOP (CLIFTON HILL LINES) AND CITY CIRCLE LOOP
MAXIMUM LINE SPEED
Type TRACK ELECTRIC STEAM RAILCAR
EMU
EMU
Pres
E
L
A2
D3
J
K
R
Y
Spri
nter
VLo-
city
DERM
DRC
Elizabeth Street subway for Tracks 7, 8, 9 & 10 All trains 25 25 25 25 25 25 25 25 25 25 25 25 25 25 25
Elizabeth Street subway for Track 9A All trains 25 15 15 25 25 25 25 25 25 25 25 25 25 25 25
Elizabeth Street subway for all other tracks All trains 25 25 25 25 25 25 25 25 25 25 25 25 25 25 25
Flinders Street to Southern Cross via Through
Suburban
Pass 40 40 40 30 30 30 30 30 30 30 30 30 30 30 30
Goods 25 NA 25 25 25 25 25 25 25 25 25 NA NA NA NA
Flinders Street to Southern Cross via Burnley
Loop and Clifton Hill Loop Viaducts
(See Note C on page A 65)
Pass 35 35 35 30 30 30 30 30 30 30 30 30 30 30 30
Goods 25 NA 25 25 25 25 25 25 25 25 25 NA NA NA NA
Southern Cross to Jolimont via Clifton Hill Loop Pass 60 60 60
See Underground Loop Operations Page A 7 Goods NA NA NA NA NA
Southern Cross to Flinders Street via Clifton Hill
Loop (Continued on page A 74.)
Pass 60 60 60
Goods NA NA NA NA NA
DIESEL
MAXIMUM LINE SPEED
Type A A
M/u
B BL
G
H
P
T
H
P
T
M/u
N
GM
S
X
XR Y
Elizabeth Street subway for Tracks 7, 8, 9 & 10 All trains 25 25 25 25 25 25 25 25 25 25
Elizabeth Street subway for Track 9A All trains 25 25 25 25 25 25 25 25 25 25
Elizabeth Street subway for all other tracks All trains 25 25 25 NA 25 25 25 25 NA 25
Flinders Street to Southern Cross via Through
Suburban
Pass 30 30 30 25 30 30 30 30 30 30
Goods 25 25 25 25 25 25 25 25 25 25
Flinders Street to Southern Cross via All Other
Viaducts (See Note C on page A 65)
Pass 30 30 30 20 30 30 30 30 NA 30
Goods 25 25 25 20 25 25 25 25 NA 25
Southern Cross to Jolimont via Clifton Hill Loop Pass
See Underground Loop Operations Page A 7. Goods
Southern Cross to Flinders Street via Clifton Hill
Loop (Continued on page A 74.)
Pass
Goods
For explanation of letters see page A 58
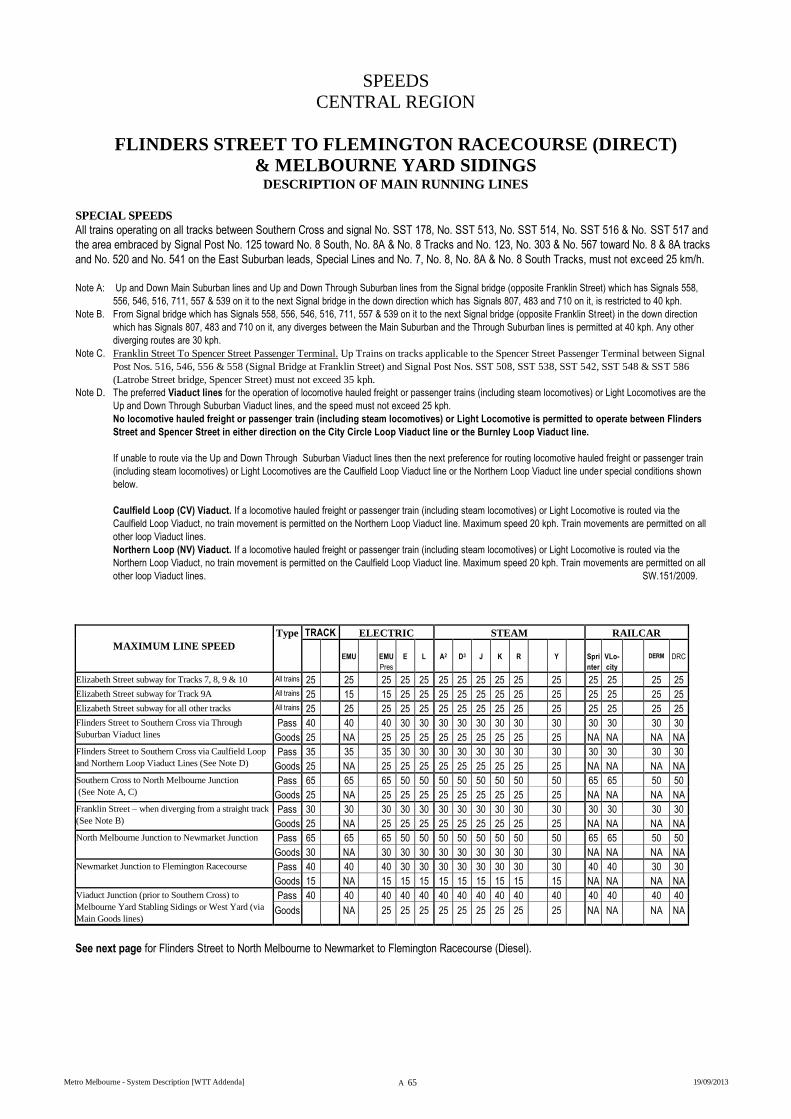
SPEEDS
CENTRAL REGION
Metro Melbourne - System Description [WTT Addenda] A 65 19/09/2013
FLINDERS STREET TO FLEMINGTON RACECOURSE (DIRECT)
& MELBOURNE YARD SIDINGS DESCRIPTION OF MAIN RUNNING LINES
SPECIAL SPEEDS
All trains operating on all tracks between Southern Cross and signal No. SST 178, No. SST 513, No. SST 514, No. SST 516 & No. SST 517 and
the area embraced by Signal Post No. 125 toward No. 8 South, No. 8A & No. 8 Tracks and No. 123, No. 303 & No. 567 toward No. 8 & 8A tracks
and No. 520 and No. 541 on the East Suburban leads, Special Lines and No. 7, No. 8, No. 8A & No. 8 South Tracks, must not exceed 25 km/h.
Note A: Up and Down Main Suburban lines and Up and Down Through Suburban lines from the Signal bridge (opposite Franklin Street) which has Signals 558,
556, 546, 516, 711, 557 & 539 on it to the next Signal bridge in the down direction which has Signals 807, 483 and 710 on it, is restricted to 40 kph.
Note B. From Signal bridge which has Signals 558, 556, 546, 516, 711, 557 & 539 on it to the next Signal bridge (opposite Franklin Street) in the down direction
which has Signals 807, 483 and 710 on it, any diverges between the Main Suburban and the Through Suburban lines is permitted at 40 kph. Any other
diverging routes are 30 kph.
Note C. Franklin Street To Spencer Street Passenger Terminal. Up Trains on tracks applicable to the Spencer Street Passenger Terminal between Signal
Post Nos. 516, 546, 556 & 558 (Signal Bridge at Franklin Street) and Signal Post Nos. SST 508, SST 538, SST 542, SST 548 & SST 586
(Latrobe Street bridge, Spencer Street) must not exceed 35 kph.
Note D. The preferred Viaduct lines for the operation of locomotive hauled freight or passenger trains (including steam locomotives) or Light Locomotives are the
Up and Down Through Suburban Viaduct lines, and the speed must not exceed 25 kph.
No locomotive hauled freight or passenger train (including steam locomotives) or Light Locomotive is permitted to operate between Flinders
Street and Spencer Street in either direction on the City Circle Loop Viaduct line or the Burnley Loop Viaduct line.
If unable to route via the Up and Down Through Suburban Viaduct lines then the next preference for routing locomotive hauled freight or passenger train
(including steam locomotives) or Light Locomotives are the Caulfield Loop Viaduct line or the Northern Loop Viaduct line under special conditions shown
below.
Caulfield Loop (CV) Viaduct. If a locomotive hauled freight or passenger train (including steam locomotives) or Light Locomotive is routed via the
Caulfield Loop Viaduct, no train movement is permitted on the Northern Loop Viaduct line. Maximum speed 20 kph. Train movements are permitted on all
other loop Viaduct lines.
Northern Loop (NV) Viaduct. If a locomotive hauled freight or passenger train (including steam locomotives) or Light Locomotive is routed via the
Northern Loop Viaduct, no train movement is permitted on the Caulfield Loop Viaduct line. Maximum speed 20 kph. Train movements are permitted on all
other loop Viaduct lines. SW.151/2009.
MAXIMUM LINE SPEED
Type TRACK ELECTRIC STEAM RAILCAR
EMU
EMU
Pres
E
L
A2
D3
J
K
R
Y
Spri
nter
VLo-
city
DERM
DRC
Elizabeth Street subway for Tracks 7, 8, 9 & 10 All trains 25 25 25 25 25 25 25 25 25 25 25 25 25 25 25
Elizabeth Street subway for Track 9A All trains 25 15 15 25 25 25 25 25 25 25 25 25 25 25 25
Elizabeth Street subway for all other tracks All trains 25 25 25 25 25 25 25 25 25 25 25 25 25 25 25
Flinders Street to Southern Cross via Through
Suburban Viaduct lines
Pass 40 40 40 30 30 30 30 30 30 30 30 30 30 30 30
Goods 25 NA 25 25 25 25 25 25 25 25 25 NA NA NA NA
Flinders Street to Southern Cross via Caulfield Loop
and Northern Loop Viaduct Lines (See Note D)
Pass 35 35 35 30 30 30 30 30 30 30 30 30 30 30 30
Goods 25 NA 25 25 25 25 25 25 25 25 25 NA NA NA NA
Southern Cross to North Melbourne Junction
(See Note A, C)
Pass 65 65 65 50 50 50 50 50 50 50 50 65 65 50 50
Goods 25 NA 25 25 25 25 25 25 25 25 25 NA NA NA NA
Franklin Street – when diverging from a straight track
(See Note B)
Pass 30 30 30 30 30 30 30 30 30 30 30 30 30 30 30
Goods 25 NA 25 25 25 25 25 25 25 25 25 NA NA NA NA
North Melbourne Junction to Newmarket Junction Pass 65 65 65 50 50 50 50 50 50 50 50 65 65 50 50
Goods 30 NA 30 30 30 30 30 30 30 30 30 NA NA NA NA
Newmarket Junction to Flemington Racecourse Pass 40 40 40 30 30 30 30 30 30 30 30 40 40 30 30
Goods 15 NA 15 15 15 15 15 15 15 15 15 NA NA NA NA
Viaduct Junction (prior to Southern Cross) to
Melbourne Yard Stabling Sidings or West Yard (via
Main Goods lines)
Pass 40 40 40 40 40 40 40 40 40 40 40 40 40 40 40
Goods NA 25 25 25 25 25 25 25 25 25 NA NA NA NA
See next page for Flinders Street to North Melbourne to Newmarket to Flemington Racecourse (Diesel).
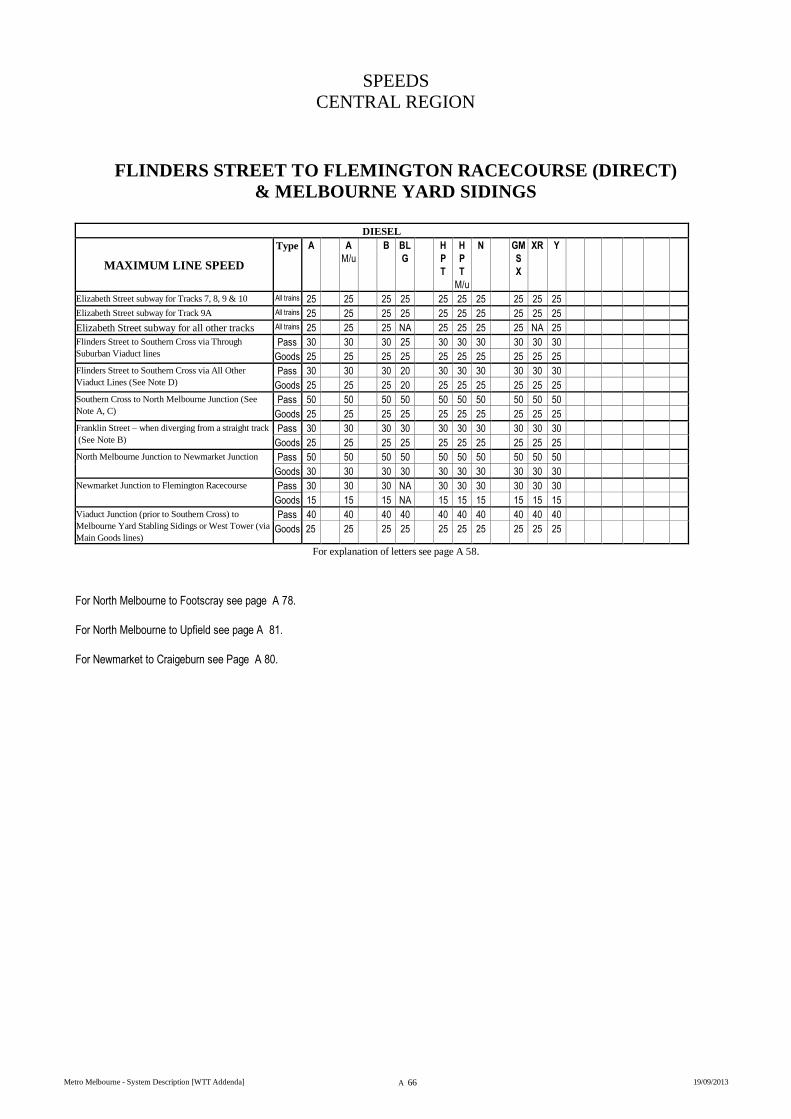
SPEEDS
CENTRAL REGION
Metro Melbourne - System Description [WTT Addenda] A 66 19/09/2013
FLINDERS STREET TO FLEMINGTON RACECOURSE (DIRECT)
& MELBOURNE YARD SIDINGS
DIESEL
MAXIMUM LINE SPEED
Type A A
M/u
B BL
G
H
P
T
H
P
T
M/u
N
GM
S
X
XR Y
Elizabeth Street subway for Tracks 7, 8, 9 & 10 All trains 25 25 25 25 25 25 25 25 25 25
Elizabeth Street subway for Track 9A All trains 25 25 25 25 25 25 25 25 25 25
Elizabeth Street subway for all other tracks All trains 25 25 25 NA 25 25 25 25 NA 25
Flinders Street to Southern Cross via Through
Suburban Viaduct lines
Pass 30 30 30 25 30 30 30 30 30 30
Goods 25 25 25 25 25 25 25 25 25 25
Flinders Street to Southern Cross via All Other
Viaduct Lines (See Note D)
Pass 30 30 30 20 30 30 30 30 30 30
Goods 25 25 25 20 25 25 25 25 25 25
Southern Cross to North Melbourne Junction (See
Note A, C)
Pass 50 50 50 50 50 50 50 50 50 50
Goods 25 25 25 25 25 25 25 25 25 25
Franklin Street – when diverging from a straight track
(See Note B)
Pass 30 30 30 30 30 30 30 30 30 30
Goods 25 25 25 25 25 25 25 25 25 25
North Melbourne Junction to Newmarket Junction Pass 50 50 50 50 50 50 50 50 50 50
Goods 30 30 30 30 30 30 30 30 30 30
Newmarket Junction to Flemington Racecourse Pass 30 30 30 NA 30 30 30 30 30 30
Goods 15 15 15 NA 15 15 15 15 15 15
Viaduct Junction (prior to Southern Cross) to
Melbourne Yard Stabling Sidings or West Tower (via
Main Goods lines)
Pass 40 40 40 40 40 40 40 40 40 40
Goods 25 25 25 25 25 25 25 25 25 25
For explanation of letters see page A 58.
For North Melbourne to Footscray see page A 78.
For North Melbourne to Upfield see page A 81.
For Newmarket to Craigeburn see Page A 80.
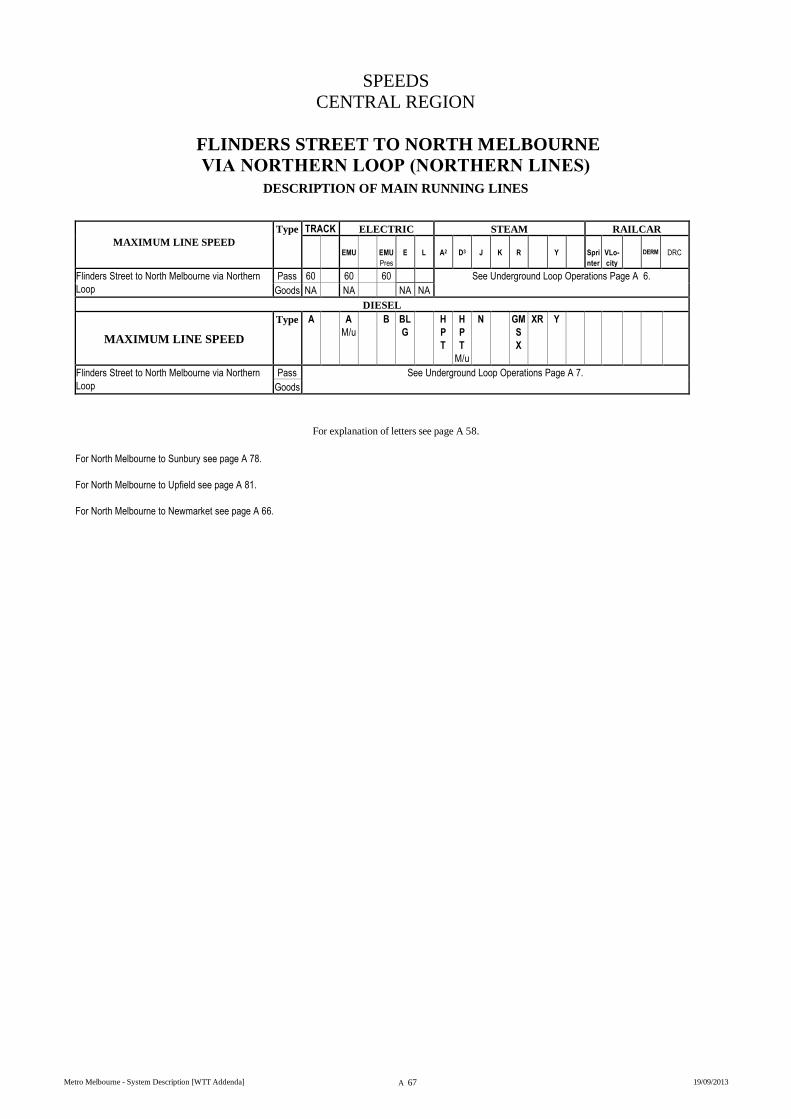
SPEEDS
CENTRAL REGION
Metro Melbourne - System Description [WTT Addenda] A 67 19/09/2013
FLINDERS STREET TO NORTH MELBOURNE
VIA NORTHERN LOOP (NORTHERN LINES)
DESCRIPTION OF MAIN RUNNING LINES
MAXIMUM LINE SPEED
Type TRACK ELECTRIC STEAM RAILCAR
EMU
EMU
Pres
E
L
A2
D3
J
K
R
Y
Spri
nter
VLo-
city
DERM
DRC
Flinders Street to North Melbourne via Northern
Loop
Pass 60 60 60 See Underground Loop Operations Page A 6.
Goods NA NA NA NA
DIESEL
MAXIMUM LINE SPEED
Type A A
M/u
B BL
G
H
P
T
H
P
T
M/u
N
GM
S
X
XR Y
Flinders Street to North Melbourne via Northern
Loop
Pass See Underground Loop Operations Page A 7.
Goods
For explanation of letters see page A 58.
For North Melbourne to Sunbury see page A 78.
For North Melbourne to Upfield see page A 81.
For North Melbourne to Newmarket see page A 66.
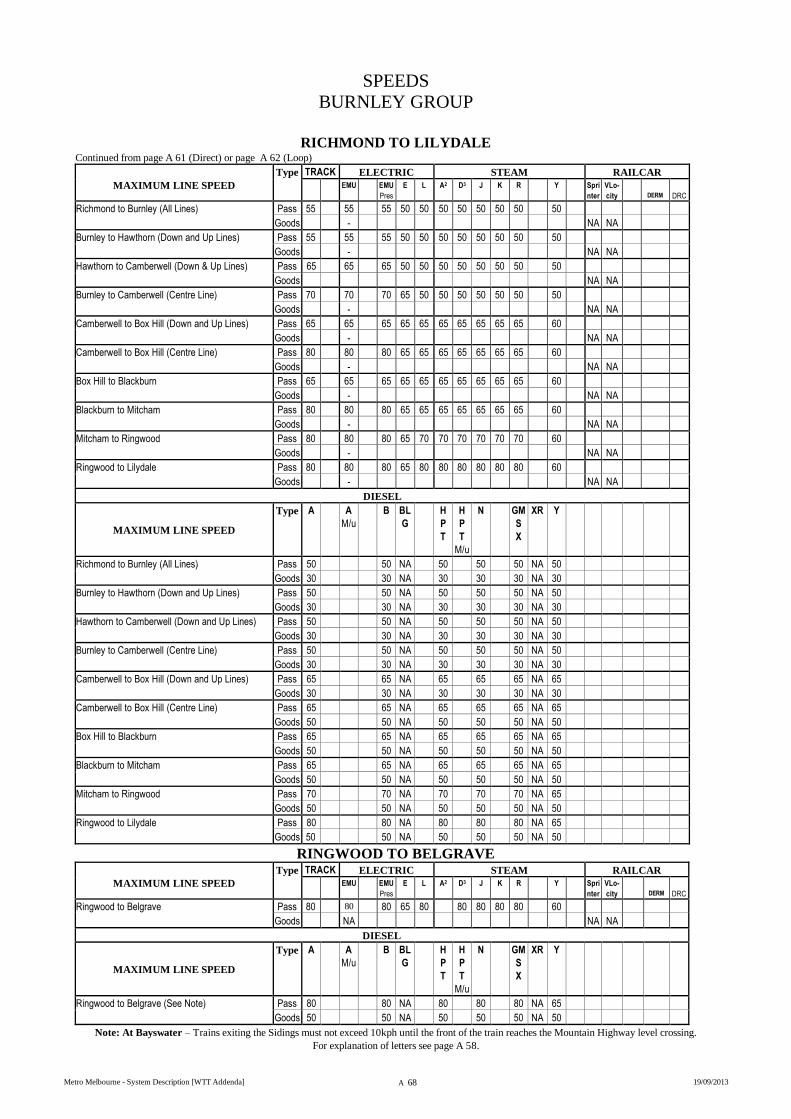
SPEEDS
BURNLEY GROUP
Metro Melbourne - System Description [WTT Addenda] A 68 19/09/2013
RICHMOND TO LILYDALE Continued from page A 61 (Direct) or page A 62 (Loop)
MAXIMUM LINE SPEED
Type TRACK ELECTRIC STEAM RAILCAR
EMU
EMU
Pres
E L A2 D3
J K R Y Spri
nter
VLo-
city
DERM
DRC
Richmond to Burnley (All Lines) Pass 55 55 55 50 50 50 50 50 50 50 50
Goods - NA NA
Burnley to Hawthorn (Down and Up Lines) Pass 55 55 55 50 50 50 50 50 50 50 50
Goods - NA NA
Hawthorn to Camberwell (Down & Up Lines) Pass 65 65 65 50 50 50 50 50 50 50 50
Goods NA NA
Burnley to Camberwell (Centre Line) Pass 70 70 70 65 50 50 50 50 50 50 50
Goods - NA NA
Camberwell to Box Hill (Down and Up Lines) Pass 65 65 65 65 65 65 65 65 65 65 60
Goods - NA NA
Camberwell to Box Hill (Centre Line) Pass 80 80 80 65 65 65 65 65 65 65 60
Goods - NA NA
Box Hill to Blackburn Pass 65 65 65 65 65 65 65 65 65 65 60
Goods - NA NA
Blackburn to Mitcham Pass 80 80 80 65 65 65 65 65 65 65 60
Goods - NA NA
Mitcham to Ringwood Pass 80 80 80 65 70 70 70 70 70 70 60
Goods - NA NA
Ringwood to Lilydale Pass 80 80 80 65 80 80 80 80 80 80 60
Goods - NA NA
DIESEL
MAXIMUM LINE SPEED
Type A A
M/u
B BL
G
H
P
T
H
P
T
M/u
N
GM
S
X
XR Y
Richmond to Burnley (All Lines) Pass 50 50 NA 50 50 50 NA 50
Goods 30 30 NA 30 30 30 NA 30
Burnley to Hawthorn (Down and Up Lines) Pass 50 50 NA 50 50 50 NA 50
Goods 30 30 NA 30 30 30 NA 30
Hawthorn to Camberwell (Down and Up Lines) Pass 50 50 NA 50 50 50 NA 50
Goods 30 30 NA 30 30 30 NA 30
Burnley to Camberwell (Centre Line) Pass 50 50 NA 50 50 50 NA 50
Goods 30 30 NA 30 30 30 NA 30
Camberwell to Box Hill (Down and Up Lines) Pass 65 65 NA 65 65 65 NA 65
Goods 30 30 NA 30 30 30 NA 30
Camberwell to Box Hill (Centre Line) Pass 65 65 NA 65 65 65 NA 65
Goods 50 50 NA 50 50 50 NA 50
Box Hill to Blackburn Pass 65 65 NA 65 65 65 NA 65
Goods 50 50 NA 50 50 50 NA 50
Blackburn to Mitcham Pass 65 65 NA 65 65 65 NA 65
Goods 50 50 NA 50 50 50 NA 50
Mitcham to Ringwood Pass 70 70 NA 70 70 70 NA 65
Goods 50 50 NA 50 50 50 NA 50
Ringwood to Lilydale Pass 80 80 NA 80 80 80 NA 65
Goods 50 50 NA 50 50 50 NA 50
RINGWOOD TO BELGRAVE
MAXIMUM LINE SPEED
Type TRACK ELECTRIC STEAM RAILCAR
EMU EMU
Pres
E L A2 D3
J K R Y Spri
nter
VLo-
city
DERM
DRC
Ringwood to Belgrave Pass 80 80 80 65 80 80 80 80 80 60
Goods NA NA NA
DIESEL
MAXIMUM LINE SPEED
Type A A
M/u
B BL
G
H
P
T
H
P
T
M/u
N
GM
S
X
XR Y
Ringwood to Belgrave (See Note) Pass 80 80 NA 80 80 80 NA 65
Goods 50 50 NA 50 50 50 NA 50
Note: At Bayswater – Trains exiting the Sidings must not exceed 10kph until the front of the train reaches the Mountain Highway level crossing.
For explanation of letters see page A 58.
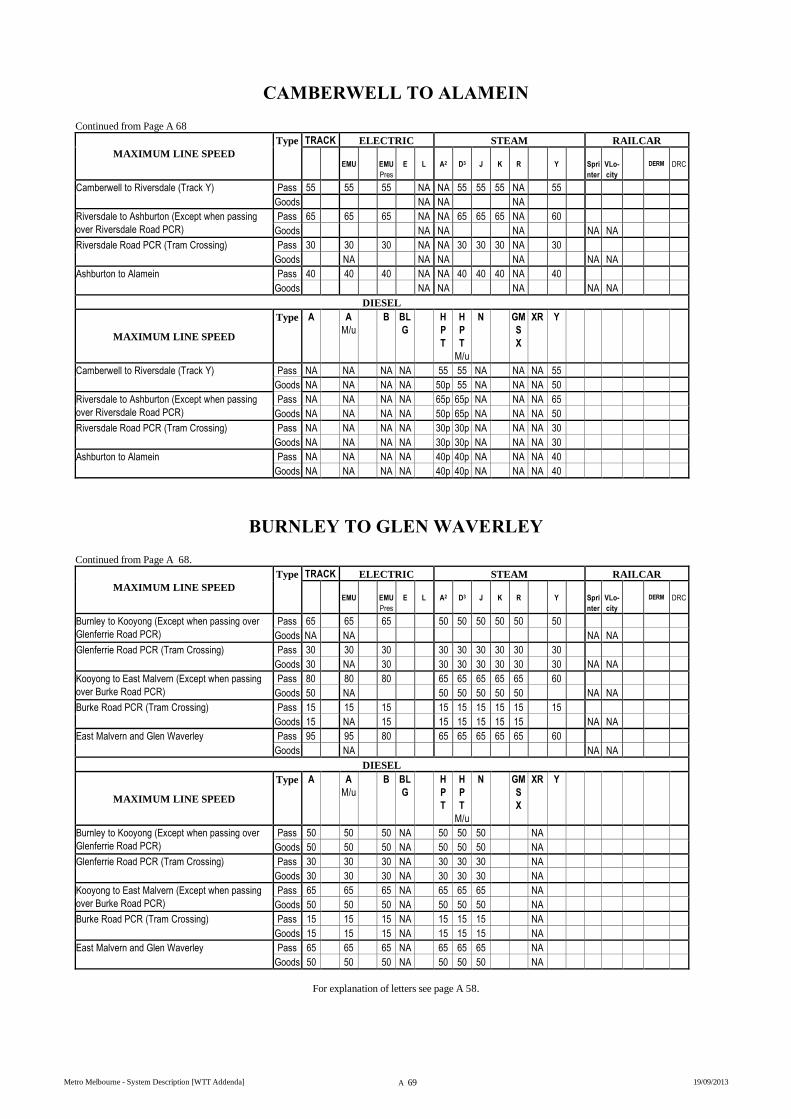
Metro Melbourne - System Description [WTT Addenda] A 69 19/09/2013
CAMBERWELL TO ALAMEIN
Continued from Page A 68
MAXIMUM LINE SPEED
Type TRACK ELECTRIC STEAM RAILCAR
EMU
EMU
Pres
E
L
A2
D3
J
K
R
Y
Spri
nter
VLo-
city
DERM
DRC
Camberwell to Riversdale (Track Y) Pass 55 55 55 NA NA 55 55 55 NA 55
Goods NA NA NA
Riversdale to Ashburton (Except when passing
over Riversdale Road PCR)
Pass 65 65 65 NA NA 65 65 65 NA 60
Goods NA NA NA NA NA
Riversdale Road PCR (Tram Crossing) Pass 30 30 30 NA NA 30 30 30 NA 30
Goods NA NA NA NA NA NA
Ashburton to Alamein Pass 40 40 40 NA NA 40 40 40 NA 40
Goods NA NA NA NA NA
DIESEL
MAXIMUM LINE SPEED
Type A A
M/u
B BL
G
H
P
T
H
P
T
M/u
N
GM
S
X
XR Y
Camberwell to Riversdale (Track Y) Pass NA NA NA NA 55 55 NA NA NA 55
Goods NA NA NA NA 50p 55 NA NA NA 50
Riversdale to Ashburton (Except when passing
over Riversdale Road PCR)
Pass NA NA NA NA 65p 65p NA NA NA 65
Goods NA NA NA NA 50p 65p NA NA NA 50
Riversdale Road PCR (Tram Crossing) Pass NA NA NA NA 30p 30p NA NA NA 30
Goods NA NA NA NA 30p 30p NA NA NA 30
Ashburton to Alamein Pass NA NA NA NA 40p 40p NA NA NA 40
Goods NA NA NA NA 40p 40p NA NA NA 40
BURNLEY TO GLEN WAVERLEY
Continued from Page A 68.
MAXIMUM LINE SPEED
Type TRACK ELECTRIC STEAM RAILCAR
EMU
EMU
Pres
E
L
A2
D3
J
K
R
Y
Spri
nter
VLo-
city
DERM
DRC
Burnley to Kooyong (Except when passing over
Glenferrie Road PCR)
Pass 65 65 65 50 50 50 50 50 50
Goods NA NA NA NA
Glenferrie Road PCR (Tram Crossing) Pass 30 30 30 30 30 30 30 30 30
Goods 30 NA 30 30 30 30 30 30 30 NA NA
Kooyong to East Malvern (Except when passing
over Burke Road PCR)
Pass 80 80 80 65 65 65 65 65 60
Goods 50 NA 50 50 50 50 50 NA NA
Burke Road PCR (Tram Crossing) Pass 15 15 15 15 15 15 15 15 15
Goods 15 NA 15 15 15 15 15 15 NA NA
East Malvern and Glen Waverley Pass 95 95 80 65 65 65 65 65 60
Goods NA NA NA
DIESEL
MAXIMUM LINE SPEED
Type A A
M/u
B BL
G
H
P
T
H
P
T
M/u
N
GM
S
X
XR Y
Burnley to Kooyong (Except when passing over
Glenferrie Road PCR)
Pass 50 50 50 NA 50 50 50 NA
Goods 50 50 50 NA 50 50 50 NA
Glenferrie Road PCR (Tram Crossing) Pass 30 30 30 NA 30 30 30 NA
Goods 30 30 30 NA 30 30 30 NA
Kooyong to East Malvern (Except when passing
over Burke Road PCR)
Pass 65 65 65 NA 65 65 65 NA
Goods 50 50 50 NA 50 50 50 NA
Burke Road PCR (Tram Crossing) Pass 15 15 15 NA 15 15 15 NA
Goods 15 15 15 NA 15 15 15 NA
East Malvern and Glen Waverley Pass 65 65 65 NA 65 65 65 NA
Goods 50 50 50 NA 50 50 50 NA
For explanation of letters see page A 58.
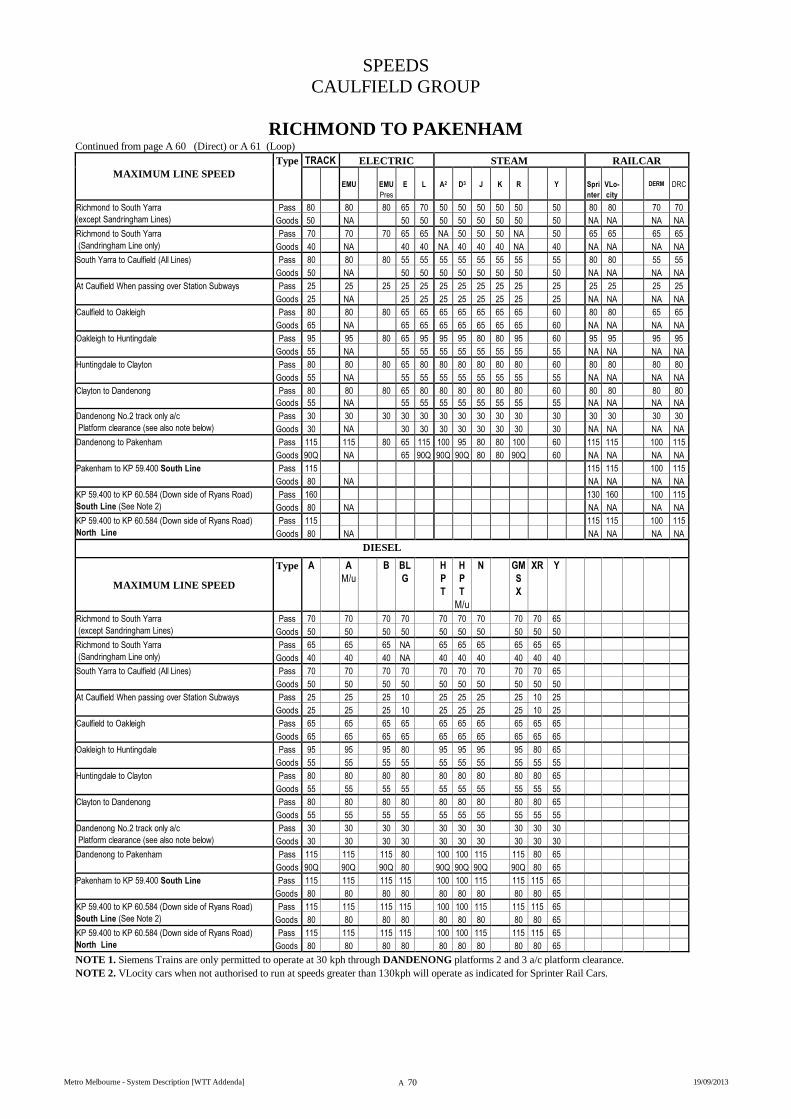
SPEEDS
CAULFIELD GROUP
Metro Melbourne - System Description [WTT Addenda] A 70 19/09/2013
RICHMOND TO PAKENHAM Continued from page A 60 (Direct) or A 61 (Loop)
MAXIMUM LINE SPEED
Type TRACK ELECTRIC STEAM RAILCAR
EMU
EMU
Pres
E
L
A2
D3
J
K
R
Y
Spri
nter
VLo-
city
DERM
DRC
Richmond to South Yarra
(except Sandringham Lines)
Pass 80 80 80 65 70 50 50 50 50 50 50 80 80 70 70
Goods 50 NA 50 50 50 50 50 50 50 50 NA NA NA NA
Richmond to South Yarra
(Sandringham Line only)
Pass 70 70 70 65 65 NA 50 50 50 NA 50 65 65 65 65
Goods 40 NA 40 40 NA 40 40 40 NA 40 NA NA NA NA
South Yarra to Caulfield (All Lines)
Pass 80 80 80 55 55 55 55 55 55 55 55 80 80 55 55
Goods 50 NA 50 50 50 50 50 50 50 50 NA NA NA NA
At Caulfield When passing over Station Subways
Pass 25 25 25 25 25 25 25 25 25 25 25 25 25 25 25
Goods 25 NA 25 25 25 25 25 25 25 25 NA NA NA NA
Caulfield to Oakleigh
Pass 80 80 80 65 65 65 65 65 65 65 60 80 80 65 65
Goods 65 NA 65 65 65 65 65 65 65 60 NA NA NA NA
Oakleigh to Huntingdale Pass 95 95 80 65 95 95 95 80 80 95 60 95 95 95 95
Goods 55 NA 55 55 55 55 55 55 55 55 NA NA NA NA
Huntingdale to Clayton Pass 80 80 80 65 80 80 80 80 80 80 60 80 80 80 80
Goods 55 NA 55 55 55 55 55 55 55 55 NA NA NA NA
Clayton to Dandenong
Pass 80 80 80 65 80 80 80 80 80 80 60 80 80 80 80
Goods 55 NA 55 55 55 55 55 55 55 55 NA NA NA NA
Dandenong No.2 track only a/c
Platform clearance (see also note below)
Pass 30 30 30 30 30 30 30 30 30 30 30 30 30 30 30
Goods 30 NA 30 30 30 30 30 30 30 30 NA NA NA NA
Dandenong to Pakenham
Pass 115 115 80 65 115 100 95 80 80 100 60 115 115 100 115
Goods 90Q NA 65 90Q 90Q 90Q 80 80 90Q 60 NA NA NA NA
Pakenham to KP 59.400 South Line Pass 115 115 115 100 115
Goods 80 NA NA NA NA NA
KP 59.400 to KP 60.584 (Down side of Ryans Road)
South Line (See Note 2)
Pass 160 130 160 100 115
Goods 80 NA NA NA NA NA
KP 59.400 to KP 60.584 (Down side of Ryans Road)
North Line
Pass 115 115 115 100 115
Goods 80 NA NA NA NA NA
DIESEL
MAXIMUM LINE SPEED
Type A A
M/u
B BL
G
H
P
T
H
P
T
M/u
N
GM
S
X
XR Y
Richmond to South Yarra
(except Sandringham Lines)
Pass 70 70 70 70 70 70 70 70 70 65
Goods 50 50 50 50 50 50 50 50 50 50
Richmond to South Yarra
(Sandringham Line only)
Pass 65 65 65 NA 65 65 65 65 65 65
Goods 40 40 40 NA 40 40 40 40 40 40
South Yarra to Caulfield (All Lines)
Pass 70 70 70 70 70 70 70 70 70 65
Goods 50 50 50 50 50 50 50 50 50 50
At Caulfield When passing over Station Subways
Pass 25 25 25 10 25 25 25 25 10 25
Goods 25 25 25 10 25 25 25 25 10 25
Caulfield to Oakleigh
Pass 65 65 65 65 65 65 65 65 65 65
Goods 65 65 65 65 65 65 65 65 65 65
Oakleigh to Huntingdale
Pass 95 95 95 80 95 95 95 95 80 65
Goods 55 55 55 55 55 55 55 55 55 55
Huntingdale to Clayton Pass 80 80 80 80 80 80 80 80 80 65
Goods 55 55 55 55 55 55 55 55 55 55
Clayton to Dandenong
Pass 80 80 80 80 80 80 80 80 80 65
Goods 55 55 55 55 55 55 55 55 55 55
Dandenong No.2 track only a/c
Platform clearance (see also note below)
Pass 30 30 30 30 30 30 30 30 30 30
Goods 30 30 30 30 30 30 30 30 30 30
Dandenong to Pakenham
Pass 115 115 115 80 100 100 115 115 80 65
Goods 90Q 90Q 90Q 80 90Q 90Q 90Q 90Q 80 65
Pakenham to KP 59.400 South Line Pass 115 115 115 115 100 100 115 115 115 65
Goods 80 80 80 80 80 80 80 80 80 65
KP 59.400 to KP 60.584 (Down side of Ryans Road)
South Line (See Note 2)
Pass 115 115 115 115 100 100 115 115 115 65
Goods 80 80 80 80 80 80 80 80 80 65
KP 59.400 to KP 60.584 (Down side of Ryans Road)
North Line
Pass 115 115 115 115 100 100 115 115 115 65
Goods 80 80 80 80 80 80 80 80 80 65
NOTE 1. Siemens Trains are only permitted to operate at 30 kph through DANDENONG platforms 2 and 3 a/c platform clearance.
NOTE 2. VLocity cars when not authorised to run at speeds greater than 130kph will operate as indicated for Sprinter Rail Cars.
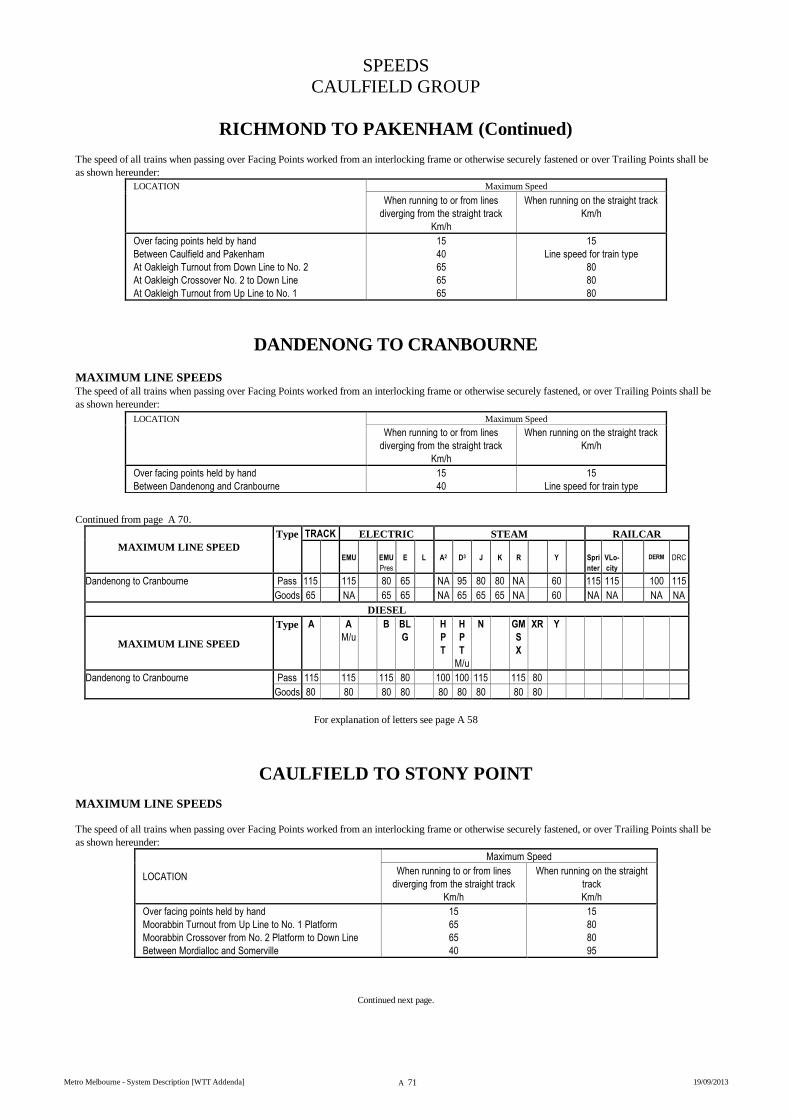
SPEEDS
CAULFIELD GROUP
Metro Melbourne - System Description [WTT Addenda] A 71 19/09/2013
RICHMOND TO PAKENHAM (Continued)
The speed of all trains when passing over Facing Points worked from an interlocking frame or otherwise securely fastened or over Trailing Points shall be
as shown hereunder:
LOCATION Maximum Speed
When running to or from lines
diverging from the straight track
Km/h
When running on the straight track
Km/h
Over facing points held by hand
Between Caulfield and Pakenham
At Oakleigh Turnout from Down Line to No. 2
At Oakleigh Crossover No. 2 to Down Line
At Oakleigh Turnout from Up Line to No. 1
15
40
65
65
65
15
Line speed for train type
80
80
80
DANDENONG TO CRANBOURNE
MAXIMUM LINE SPEEDS The speed of all trains when passing over Facing Points worked from an interlocking frame or otherwise securely fastened, or over Trailing Points shall be
as shown hereunder:
Continued from page A 70.
MAXIMUM LINE SPEED
Type TRACK ELECTRIC STEAM RAILCAR
EMU
EMU
Pres
E
L
A2
D3
J
K
R
Y
Spri
nter
VLo-
city
DERM
DRC
Dandenong to Cranbourne Pass 115 115 80 65 NA 95 80 80 NA 60 115 115 100 115
Goods 65 NA 65 65 NA 65 65 65 NA 60 NA NA NA NA
DIESEL
MAXIMUM LINE SPEED
Type A A
M/u
B BL
G
H
P
T
H
P
T
M/u
N
GM
S
X
XR Y
Dandenong to Cranbourne Pass 115 115 115 80 100 100 115 115 80
Goods 80 80 80 80 80 80 80 80 80
For explanation of letters see page A 58
CAULFIELD TO STONY POINT
MAXIMUM LINE SPEEDS
The speed of all trains when passing over Facing Points worked from an interlocking frame or otherwise securely fastened, or over Trailing Points shall be
as shown hereunder:
LOCATION
Maximum Speed
When running to or from lines
diverging from the straight track
Km/h
When running on the straight
track
Km/h
Over facing points held by hand
Moorabbin Turnout from Up Line to No. 1 Platform
Moorabbin Crossover from No. 2 Platform to Down Line
Between Mordialloc and Somerville
15
65
65
40
15
80
80
95
Continued next page.
LOCATION Maximum Speed
When running to or from lines
diverging from the straight track
Km/h
When running on the straight track
Km/h
Over facing points held by hand
Between Dandenong and Cranbourne
15
40
15
Line speed for train type
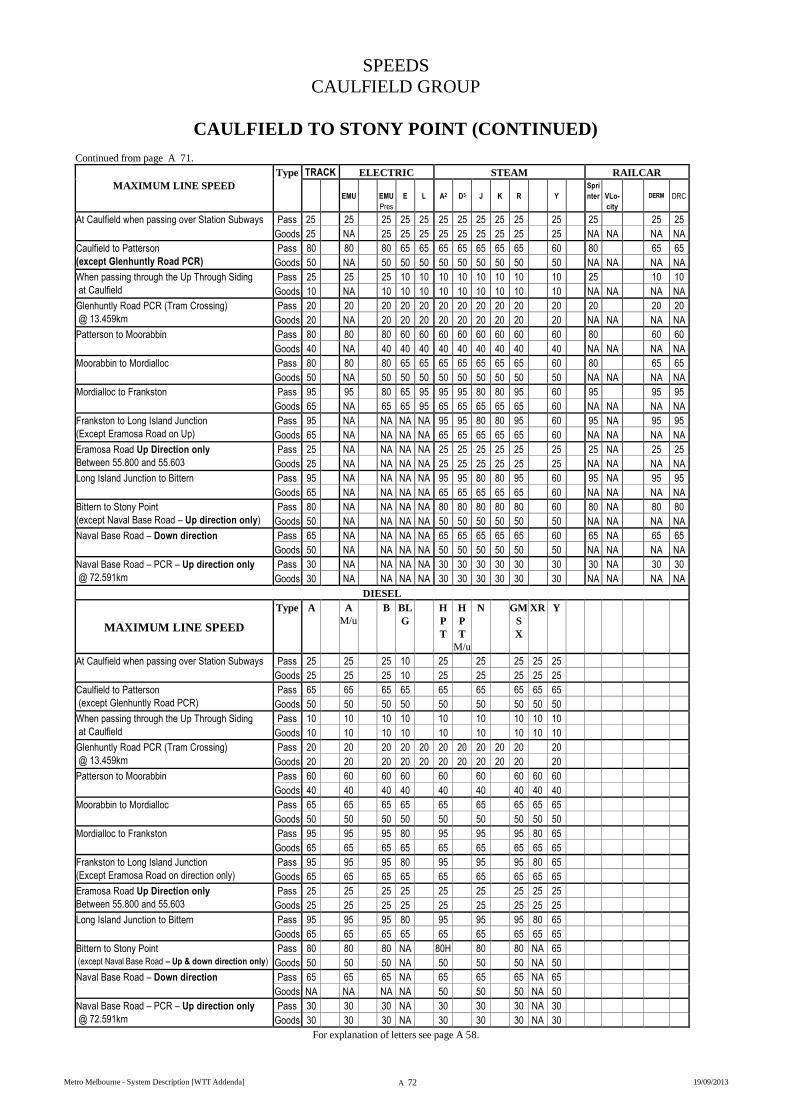
SPEEDS
CAULFIELD GROUP
Metro Melbourne - System Description [WTT Addenda] A 72 19/09/2013
CAULFIELD TO STONY POINT (CONTINUED)
Continued from page A 71.
MAXIMUM LINE SPEED
Type TRACK ELECTRIC STEAM RAILCAR
EMU
EMU
Pres
E
L
A2
D3
J
K
R
Y
Spri
nter
VLo-
city
DERM
DRC
At Caulfield when passing over Station Subways
Pass 25 25 25 25 25 25 25 25 25 25 25 25 25 25
Goods 25 NA 25 25 25 25 25 25 25 25 25 NA NA NA NA
Caulfield to Patterson
(except Glenhuntly Road PCR)
Pass 80 80 80 65 65 65 65 65 65 65 60 80 65 65
Goods 50 NA 50 50 50 50 50 50 50 50 50 NA NA NA NA
When passing through the Up Through Siding
at Caulfield
Pass 25 25 25 10 10 10 10 10 10 10 10 25 10 10
Goods 10 NA 10 10 10 10 10 10 10 10 10 NA NA NA NA
Glenhuntly Road PCR (Tram Crossing)
@ 13.459km
Pass 20 20 20 20 20 20 20 20 20 20 20 20 20 20
Goods 20 NA 20 20 20 20 20 20 20 20 20 NA NA NA NA
Patterson to Moorabbin Pass 80 80 80 60 60 60 60 60 60 60 60 80 60 60
Goods 40 NA 40 40 40 40 40 40 40 40 40 NA NA NA NA
Moorabbin to Mordialloc Pass 80 80 80 65 65 65 65 65 65 65 60 80 65 65
Goods 50 NA 50 50 50 50 50 50 50 50 50 NA NA NA NA
Mordialloc to Frankston Pass 95 95 80 65 95 95 95 80 80 95 60 95 95 95
Goods 65 NA 65 65 95 65 65 65 65 65 60 NA NA NA NA
Frankston to Long Island Junction
(Except Eramosa Road on Up)
Pass 95 NA NA NA NA 95 95 80 80 95 60 95 NA 95 95
Goods 65 NA NA NA NA 65 65 65 65 65 60 NA NA NA NA
Eramosa Road Up Direction only
Between 55.800 and 55.603
Pass 25 NA NA NA NA 25 25 25 25 25 25 25 NA 25 25
Goods 25 NA NA NA NA 25 25 25 25 25 25 NA NA NA NA
Long Island Junction to Bittern Pass 95 NA NA NA NA 95 95 80 80 95 60 95 NA 95 95
Goods 65 NA NA NA NA 65 65 65 65 65 60 NA NA NA NA
Bittern to Stony Point
(except Naval Base Road – Up direction only)
Pass 80 NA NA NA NA 80 80 80 80 80 60 80 NA 80 80
Goods 50 NA NA NA NA 50 50 50 50 50 50 NA NA NA NA
Naval Base Road – Down direction Pass 65 NA NA NA NA 65 65 65 65 65 60 65 NA 65 65
Goods 50 NA NA NA NA 50 50 50 50 50 50 NA NA NA NA
Naval Base Road – PCR – Up direction only
@ 72.591km
Pass 30 NA NA NA NA 30 30 30 30 30 30 30 NA 30 30
Goods 30 NA NA NA NA 30 30 30 30 30 30 NA NA NA NA
DIESEL
MAXIMUM LINE SPEED
Type A A
M/u
B BL
G
H
P
T
H
P
T
M/u
N
GM
S
X
XR Y
At Caulfield when passing over Station Subways
Pass 25 25 25 10 25 25 25 25 25
Goods 25 25 25 10 25 25 25 25 25
Caulfield to Patterson
(except Glenhuntly Road PCR)
Pass 65 65 65 65 65 65 65 65 65
Goods 50 50 50 50 50 50 50 50 50
When passing through the Up Through Siding
at Caulfield
Pass 10 10 10 10 10 10 10 10 10
Goods 10 10 10 10 10 10 10 10 10
Glenhuntly Road PCR (Tram Crossing)
@ 13.459km
Pass 20 20 20 20 20 20 20 20 20 20 20
Goods 20 20 20 20 20 20 20 20 20 20 20
Patterson to Moorabbin Pass 60 60 60 60 60 60 60 60 60
Goods 40 40 40 40 40 40 40 40 40
Moorabbin to Mordialloc Pass 65 65 65 65 65 65 65 65 65
Goods 50 50 50 50 50 50 50 50 50
Mordialloc to Frankston Pass 95 95 95 80 95 95 95 80 65
Goods 65 65 65 65 65 65 65 65 65
Frankston to Long Island Junction
(Except Eramosa Road on direction only)
Pass 95 95 95 80 95 95 95 80 65
Goods 65 65 65 65 65 65 65 65 65
Eramosa Road Up Direction only
Between 55.800 and 55.603
Pass 25 25 25 25 25 25 25 25 25
Goods 25 25 25 25 25 25 25 25 25
Long Island Junction to Bittern
Pass 95 95 95 80 95 95 95 80 65
Goods 65 65 65 65 65 65 65 65 65
Bittern to Stony Point
(except Naval Base Road – Up & down direction only)
Pass 80 80 80 NA 80H 80 80 NA 65
Goods 50 50 50 NA 50 50 50 NA 50
Naval Base Road – Down direction Pass 65 65 65 NA 65 65 65 NA 65
Goods NA NA NA NA 50 50 50 NA 50
Naval Base Road – PCR – Up direction only
@ 72.591km
Pass 30 30 30 NA 30 30 30 NA 30
Goods 30 30 30 NA 30 30 30 NA 30
For explanation of letters see page A 58.
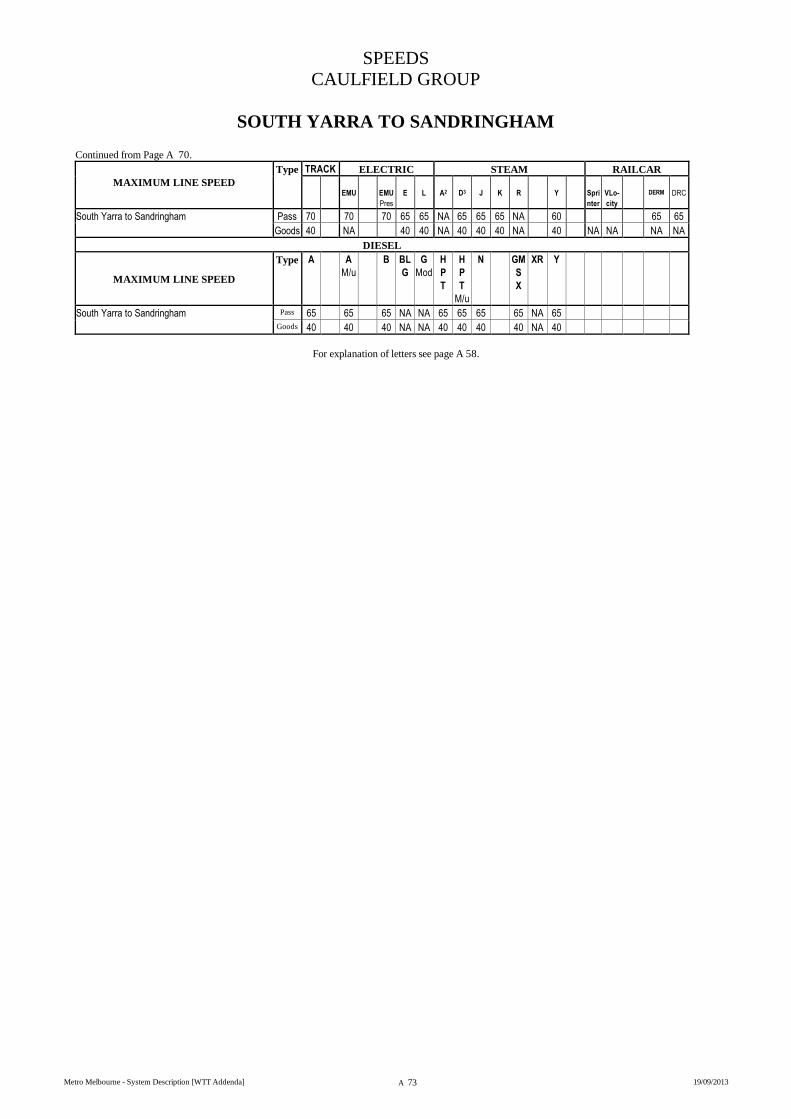
SPEEDS
CAULFIELD GROUP
Metro Melbourne - System Description [WTT Addenda] A 73 19/09/2013
SOUTH YARRA TO SANDRINGHAM
Continued from Page A 70.
MAXIMUM LINE SPEED
Type TRACK ELECTRIC STEAM RAILCAR
EMU
EMU
Pres
E
L
A2
D3
J
K
R
Y
Spri
nter
VLo-
city
DERM
DRC
South Yarra to Sandringham
Pass 70 70 70 65 65 NA 65 65 65 NA 60 65 65
Goods 40 NA 40 40 NA 40 40 40 NA 40 NA NA NA NA
DIESEL
MAXIMUM LINE SPEED
Type A A
M/u
B BL
G
G
Mod
H
P
T
H
P
T
M/u
N
GM
S
X
XR Y
South Yarra to Sandringham Pass 65 65 65 NA NA 65 65 65 65 NA 65
Goods 40 40 40 NA NA 40 40 40 40 NA 40
For explanation of letters see page A 58.
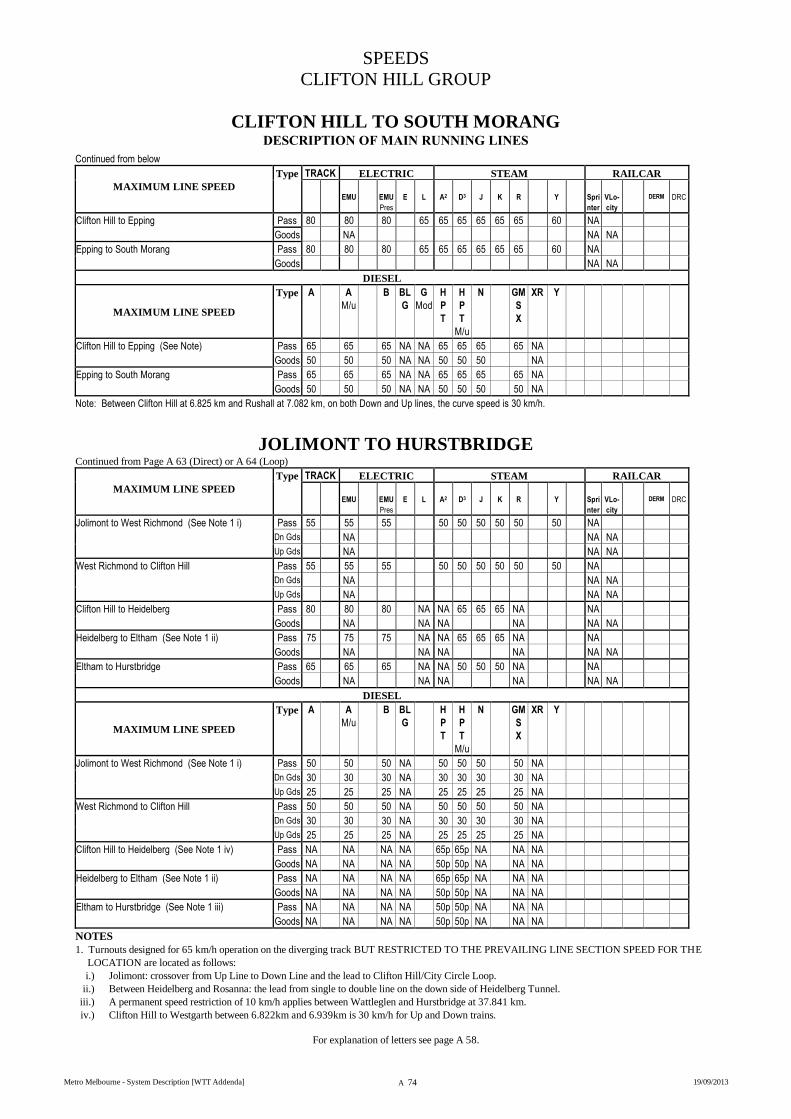
SPEEDS
CLIFTON HILL GROUP
Metro Melbourne - System Description [WTT Addenda] A 74 19/09/2013
CLIFTON HILL TO SOUTH MORANG DESCRIPTION OF MAIN RUNNING LINES
Continued from below
MAXIMUM LINE SPEED
Type TRACK ELECTRIC STEAM RAILCAR
EMU
EMU
Pres
E
L
A2
D3
J
K
R
Y
Spri
nter
VLo-
city
DERM
DRC
Clifton Hill to Epping
Pass 80 80 80 65 65 65 65 65 65 60 NA
Goods NA NA NA
Epping to South Morang
Pass 80 80 80 65 65 65 65 65 65 60 NA
Goods NA NA
DIESEL
MAXIMUM LINE SPEED
Type A A
M/u
B BL
G
G
Mod
H
P
T
H
P
T
M/u
N
GM
S
X
XR Y
Clifton Hill to Epping (See Note) Pass 65 65 65 NA NA 65 65 65 65 NA
Goods 50 50 50 NA NA 50 50 50 NA
Epping to South Morang
Pass 65 65 65 NA NA 65 65 65 65 NA
Goods 50 50 50 NA NA 50 50 50 50 NA
Note: Between Clifton Hill at 6.825 km and Rushall at 7.082 km, on both Down and Up lines, the curve speed is 30 km/h.
JOLIMONT TO HURSTBRIDGE
Continued from Page A 63 (Direct) or A 64 (Loop)
MAXIMUM LINE SPEED
Type TRACK ELECTRIC STEAM RAILCAR
EMU
EMU
Pres
E
L
A2
D3
J
K
R
Y
Spri
nter
VLo-
city
DERM
DRC
Jolimont to West Richmond (See Note 1 i) Pass 55 55 55 50 50 50 50 50 50 NA
Dn Gds NA NA NA
Up Gds NA NA NA
West Richmond to Clifton Hill Pass 55 55 55 50 50 50 50 50 50 NA
Dn Gds NA NA NA
Up Gds NA NA NA
Clifton Hill to Heidelberg Pass 80 80 80 NA NA 65 65 65 NA NA
Goods NA NA NA NA NA NA
Heidelberg to Eltham (See Note 1 ii) Pass 75 75 75 NA NA 65 65 65 NA NA
Goods NA NA NA NA NA NA
Eltham to Hurstbridge Pass 65 65 65 NA NA 50 50 50 NA NA
Goods NA NA NA NA NA NA
DIESEL
MAXIMUM LINE SPEED
Type A A
M/u
B BL
G
H
P
T
H
P
T
M/u
N
GM
S
X
XR Y
Jolimont to West Richmond (See Note 1 i) Pass 50 50 50 NA 50 50 50 50 NA
Dn Gds 30 30 30 NA 30 30 30 30 NA
Up Gds 25 25 25 NA 25 25 25 25 NA
West Richmond to Clifton Hill Pass 50 50 50 NA 50 50 50 50 NA
Dn Gds 30 30 30 NA 30 30 30 30 NA
Up Gds 25 25 25 NA 25 25 25 25 NA
Clifton Hill to Heidelberg (See Note 1 iv) Pass NA NA NA NA 65p 65p NA NA NA
Goods NA NA NA NA 50p 50p NA NA NA
Heidelberg to Eltham (See Note 1 ii) Pass NA NA NA NA 65p 65p NA NA NA
Goods NA NA NA NA 50p 50p NA NA NA
Eltham to Hurstbridge (See Note 1 iii) Pass NA NA NA NA 50p 50p NA NA NA
Goods NA NA NA NA 50p 50p NA NA NA
NOTES
1. Turnouts designed for 65 km/h operation on the diverging track BUT RESTRICTED TO THE PREVAILING LINE SECTION SPEED FOR THE
LOCATION are located as follows:
i.) Jolimont: crossover from Up Line to Down Line and the lead to Clifton Hill/City Circle Loop.
ii.) Between Heidelberg and Rosanna: the lead from single to double line on the down side of Heidelberg Tunnel.
iii.) A permanent speed restriction of 10 km/h applies between Wattleglen and Hurstbridge at 37.841 km.
iv.) Clifton Hill to Westgarth between 6.822km and 6.939km is 30 km/h for Up and Down trains.
For explanation of letters see page A 58.
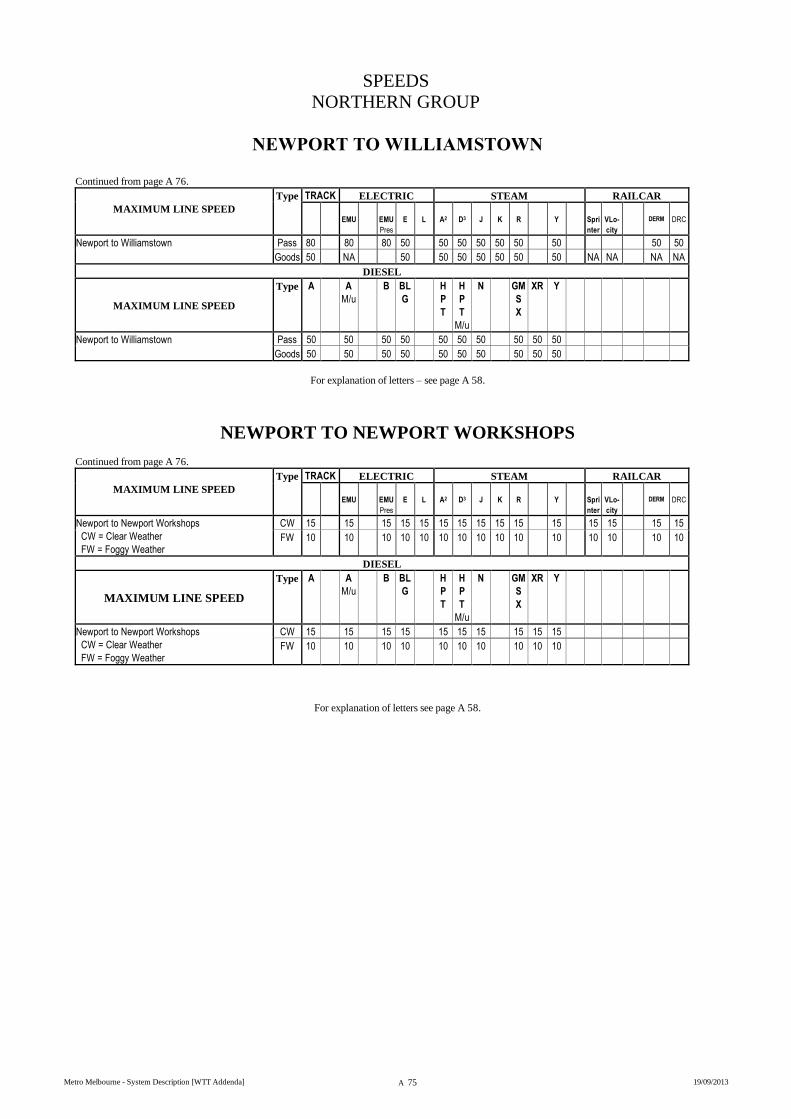
SPEEDS
NORTHERN GROUP
Metro Melbourne - System Description [WTT Addenda] A 75 19/09/2013
NEWPORT TO WILLIAMSTOWN
Continued from page A 76.
MAXIMUM LINE SPEED
Type TRACK ELECTRIC STEAM RAILCAR
EMU
EMU
Pres
E
L
A2
D3
J
K
R
Y
Spri
nter
VLo-
city
DERM
DRC
Newport to Williamstown
Pass 80 80 80 50 50 50 50 50 50 50 50 50
Goods 50 NA 50 50 50 50 50 50 50 NA NA NA NA
DIESEL
MAXIMUM LINE SPEED
Type A A
M/u
B BL
G
H
P
T
H
P
T
M/u
N
GM
S
X
XR Y
Newport to Williamstown Pass 50 50 50 50 50 50 50 50 50 50
Goods 50 50 50 50 50 50 50 50 50 50
For explanation of letters – see page A 58.
NEWPORT TO NEWPORT WORKSHOPS
Continued from page A 76.
MAXIMUM LINE SPEED
Type TRACK ELECTRIC STEAM RAILCAR
EMU
EMU
Pres
E
L
A2
D3
J
K
R
Y
Spri
nter
VLo-
city
DERM
DRC
Newport to Newport Workshops
CW = Clear Weather
FW = Foggy Weather
CW 15 15 15 15 15 15 15 15 15 15 15 15 15 15 15
FW 10 10 10 10 10 10 10 10 10 10 10 10 10 10 10
DIESEL
MAXIMUM LINE SPEED
Type A A
M/u
B BL
G
H
P
T
H
P
T
M/u
N
GM
S
X
XR Y
Newport to Newport Workshops
CW = Clear Weather
FW = Foggy Weather
CW 15 15 15 15 15 15 15 15 15 15
FW 10 10 10 10 10 10 10 10 10 10
For explanation of letters see page A 58.
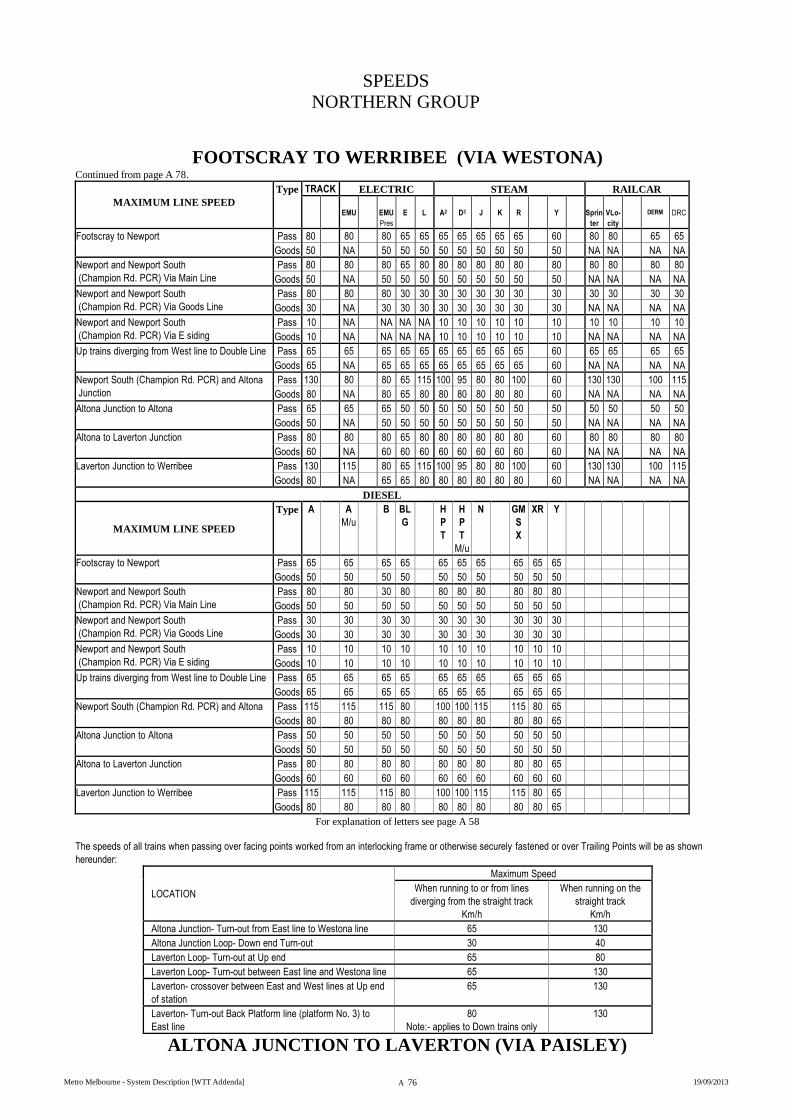
SPEEDS
NORTHERN GROUP
Metro Melbourne - System Description [WTT Addenda] A 76 19/09/2013
FOOTSCRAY TO WERRIBEE (VIA WESTONA)
Continued from page A 78.
MAXIMUM LINE SPEED
Type TRACK ELECTRIC STEAM RAILCAR
EMU
EMU
Pres
E
L
A2
D3
J
K
R
Y
Sprin
ter
VLo-
city
DERM
DRC
Footscray to Newport Pass 80 80 80 65 65 65 65 65 65 65 60 80 80 65 65
Goods 50 NA 50 50 50 50 50 50 50 50 50 NA NA NA NA
Newport and Newport South
(Champion Rd. PCR) Via Main Line
Pass 80 80 80 65 80 80 80 80 80 80 80 80 80 80 80
Goods 50 NA 50 50 50 50 50 50 50 50 50 NA NA NA NA
Newport and Newport South
(Champion Rd. PCR) Via Goods Line
Pass 80 80 80 30 30 30 30 30 30 30 30 30 30 30 30
Goods 30 NA 30 30 30 30 30 30 30 30 30 NA NA NA NA
Newport and Newport South
(Champion Rd. PCR) Via E siding
Pass 10 NA NA NA NA 10 10 10 10 10 10 10 10 10 10
Goods 10 NA NA NA NA 10 10 10 10 10 10 NA NA NA NA
Up trains diverging from West line to Double Line Pass 65 65 65 65 65 65 65 65 65 65 60 65 65 65 65
Goods 65 NA 65 65 65 65 65 65 65 65 60 NA NA NA NA
Newport South (Champion Rd. PCR) and Altona
Junction
Pass 130 80 80 65 115 100 95 80 80 100 60 130 130 100 115
Goods 80 NA 80 65 80 80 80 80 80 80 60 NA NA NA NA
Altona Junction to Altona Pass 65 65 65 50 50 50 50 50 50 50 50 50 50 50 50
Goods 50 NA 50 50 50 50 50 50 50 50 50 NA NA NA NA
Altona to Laverton Junction Pass 80 80 80 65 80 80 80 80 80 80 60 80 80 80 80
Goods 60 NA 60 60 60 60 60 60 60 60 60 NA NA NA NA
Laverton Junction to Werribee Pass 130 115 80 65 115 100 95 80 80 100 60 130 130 100 115
Goods 80 NA 65 65 80 80 80 80 80 80 60 NA NA NA NA
DIESEL
MAXIMUM LINE SPEED
Type A A
M/u
B BL
G
H
P
T
H
P
T
M/u
N
GM
S
X
XR Y
Footscray to Newport Pass 65 65 65 65 65 65 65 65 65 65
Goods 50 50 50 50 50 50 50 50 50 50
Newport and Newport South
(Champion Rd. PCR) Via Main Line
Pass 80 80 30 80 80 80 80 80 80 80
Goods 50 50 50 50 50 50 50 50 50 50
Newport and Newport South
(Champion Rd. PCR) Via Goods Line
Pass 30 30 30 30 30 30 30 30 30 30
Goods 30 30 30 30 30 30 30 30 30 30
Newport and Newport South
(Champion Rd. PCR) Via E siding
Pass 10 10 10 10 10 10 10 10 10 10
Goods 10 10 10 10 10 10 10 10 10 10
Up trains diverging from West line to Double Line Pass 65 65 65 65 65 65 65 65 65 65
Goods 65 65 65 65 65 65 65 65 65 65
Newport South (Champion Rd. PCR) and Altona
Pass 115 115 115 80 100 100 115 115 80 65
Goods 80 80 80 80 80 80 80 80 80 65
Altona Junction to Altona Pass 50 50 50 50 50 50 50 50 50 50
Goods 50 50 50 50 50 50 50 50 50 50
Altona to Laverton Junction Pass 80 80 80 80 80 80 80 80 80 65
Goods 60 60 60 60 60 60 60 60 60 60
Laverton Junction to Werribee Pass 115 115 115 80 100 100 115 115 80 65
Goods 80 80 80 80 80 80 80 80 80 65
For explanation of letters see page A 58
The speeds of all trains when passing over facing points worked from an interlocking frame or otherwise securely fastened or over Trailing Points will be as shown
hereunder:
LOCATION
Maximum Speed
When running to or from lines
diverging from the straight track
Km/h
When running on the
straight track
Km/h
Altona Junction- Turn-out from East line to Westona line 65 130
Altona Junction Loop- Down end Turn-out 30 40
Laverton Loop- Turn-out at Up end 65 80
Laverton Loop- Turn-out between East line and Westona line 65 130
Laverton- crossover between East and West lines at Up end
of station
65 130
Laverton- Turn-out Back Platform line (platform No. 3) to
East line
80
Note:- applies to Down trains only
130
ALTONA JUNCTION TO LAVERTON (VIA PAISLEY)
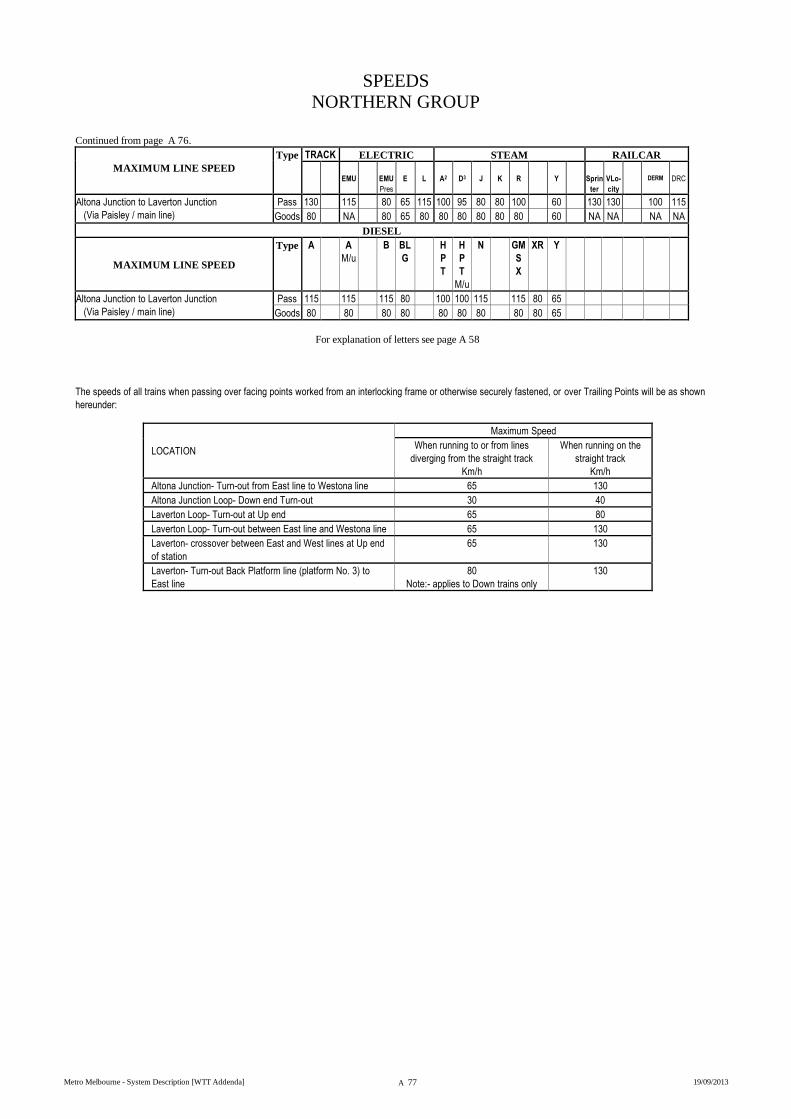
SPEEDS
NORTHERN GROUP
Metro Melbourne - System Description [WTT Addenda] A 77 19/09/2013
Continued from page A 76.
MAXIMUM LINE SPEED
Type TRACK ELECTRIC STEAM RAILCAR
EMU
EMU
Pres
E
L
A2
D3
J
K
R
Y
Sprin
ter
VLo-
city
DERM
DRC
Altona Junction to Laverton Junction
(Via Paisley / main line)
Pass 130 115 80 65 115 100 95 80 80 100 60 130 130 100 115
Goods 80 NA 80 65 80 80 80 80 80 80 60 NA NA NA NA
DIESEL
MAXIMUM LINE SPEED
Type A A
M/u
B BL
G
H
P
T
H
P
T
M/u
N
GM
S
X
XR Y
Altona Junction to Laverton Junction
(Via Paisley / main line)
Pass 115 115 115 80 100 100 115 115 80 65
Goods 80 80 80 80 80 80 80 80 80 65
For explanation of letters see page A 58
The speeds of all trains when passing over facing points worked from an interlocking frame or otherwise securely fastened, or over Trailing Points will be as shown
hereunder:
LOCATION
Maximum Speed
When running to or from lines
diverging from the straight track
Km/h
When running on the
straight track
Km/h
Altona Junction- Turn-out from East line to Westona line 65 130
Altona Junction Loop- Down end Turn-out 30 40
Laverton Loop- Turn-out at Up end 65 80
Laverton Loop- Turn-out between East line and Westona line 65 130
Laverton- crossover between East and West lines at Up end
of station
65 130
Laverton- Turn-out Back Platform line (platform No. 3) to
East line
80
Note:- applies to Down trains only
130
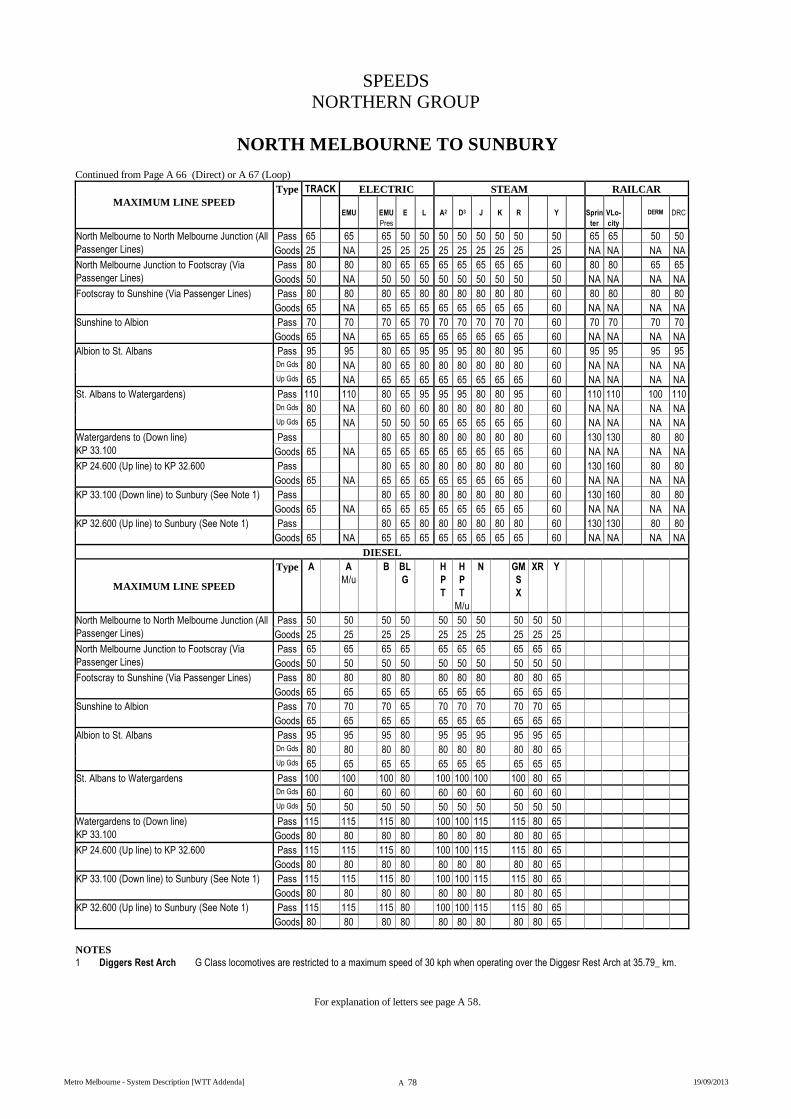
SPEEDS
NORTHERN GROUP
Metro Melbourne - System Description [WTT Addenda] A 78 19/09/2013
NORTH MELBOURNE TO SUNBURY
Continued from Page A 66 (Direct) or A 67 (Loop)
MAXIMUM LINE SPEED
Type TRACK ELECTRIC STEAM RAILCAR
EMU
EMU
Pres
E
L
A2
D3
J
K
R
Y
Sprin
ter
VLo-
city
DERM
DRC
North Melbourne to North Melbourne Junction (All
Passenger Lines)
Pass 65 65 65 50 50 50 50 50 50 50 50 65 65 50 50
Goods 25 NA 25 25 25 25 25 25 25 25 25 NA NA NA NA
North Melbourne Junction to Footscray (Via
Passenger Lines)
Pass 80 80 80 65 65 65 65 65 65 65 60 80 80 65 65
Goods 50 NA 50 50 50 50 50 50 50 50 50 NA NA NA NA
Footscray to Sunshine (Via Passenger Lines) Pass 80 80 80 65 80 80 80 80 80 80 60 80 80 80 80
Goods 65 NA 65 65 65 65 65 65 65 65 60 NA NA NA NA
Sunshine to Albion Pass 70 70 70 65 70 70 70 70 70 70 60 70 70 70 70
Goods 65 NA 65 65 65 65 65 65 65 65 60 NA NA NA NA
Albion to St. Albans Pass 95 95 80 65 95 95 95 80 80 95 60 95 95 95 95
Dn Gds 80 NA 80 65 80 80 80 80 80 80 60 NA NA NA NA
Up Gds 65 NA 65 65 65 65 65 65 65 65 60 NA NA NA NA
St. Albans to Watergardens) Pass 110 110 80 65 95 95 95 80 80 95 60 110 110 100 110
Dn Gds 80 NA 60 60 60 80 80 80 80 80 60 NA NA NA NA
Up Gds 65 NA 50 50 50 65 65 65 65 65 60 NA NA NA NA
Watergardens to (Down line)
KP 33.100
Pass 80 65 80 80 80 80 80 80 60 130 130 80 80
Goods 65 NA 65 65 65 65 65 65 65 65 60 NA NA NA NA
KP 24.600 (Up line) to KP 32.600 Pass 80 65 80 80 80 80 80 80 60 130 160 80 80
Goods 65 NA 65 65 65 65 65 65 65 65 60 NA NA NA NA
KP 33.100 (Down line) to Sunbury (See Note 1) Pass 80 65 80 80 80 80 80 80 60 130 160 80 80
Goods 65 NA 65 65 65 65 65 65 65 65 60 NA NA NA NA
KP 32.600 (Up line) to Sunbury (See Note 1) Pass 80 65 80 80 80 80 80 80 60 130 130 80 80
Goods 65 NA 65 65 65 65 65 65 65 65 60 NA NA NA NA
DIESEL
MAXIMUM LINE SPEED
Type A A
M/u
B BL
G
H
P
T
H
P
T
M/u
N
GM
S
X
XR Y
North Melbourne to North Melbourne Junction (All
Passenger Lines)
Pass 50 50 50 50 50 50 50 50 50 50
Goods 25 25 25 25 25 25 25 25 25 25
North Melbourne Junction to Footscray (Via
Passenger Lines)
Pass 65 65 65 65 65 65 65 65 65 65
Goods 50 50 50 50 50 50 50 50 50 50
Footscray to Sunshine (Via Passenger Lines) Pass 80 80 80 80 80 80 80 80 80 65
Goods 65 65 65 65 65 65 65 65 65 65
Sunshine to Albion Pass 70 70 70 65 70 70 70 70 70 65
Goods 65 65 65 65 65 65 65 65 65 65
Albion to St. Albans Pass 95 95 95 80 95 95 95 95 95 65
Dn Gds 80 80 80 80 80 80 80 80 80 65
Up Gds 65 65 65 65 65 65 65 65 65 65
St. Albans to Watergardens Pass 100 100 100 80 100 100 100 100 80 65
Dn Gds 60 60 60 60 60 60 60 60 60 60
Up Gds 50 50 50 50 50 50 50 50 50 50
Watergardens to (Down line)
KP 33.100
Pass 115 115 115 80 100 100 115 115 80 65
Goods 80 80 80 80 80 80 80 80 80 65
KP 24.600 (Up line) to KP 32.600 Pass 115 115 115 80 100 100 115 115 80 65
Goods 80 80 80 80 80 80 80 80 80 65
KP 33.100 (Down line) to Sunbury (See Note 1) Pass 115 115 115 80 100 100 115 115 80 65
Goods 80 80 80 80 80 80 80 80 80 65
KP 32.600 (Up line) to Sunbury (See Note 1) Pass 115 115 115 80 100 100 115 115 80 65
Goods 80 80 80 80 80 80 80 80 80 65
NOTES
1 Diggers Rest Arch G Class locomotives are restricted to a maximum speed of 30 kph when operating over the Diggesr Rest Arch at 35.79_ km.
For explanation of letters see page A 58.
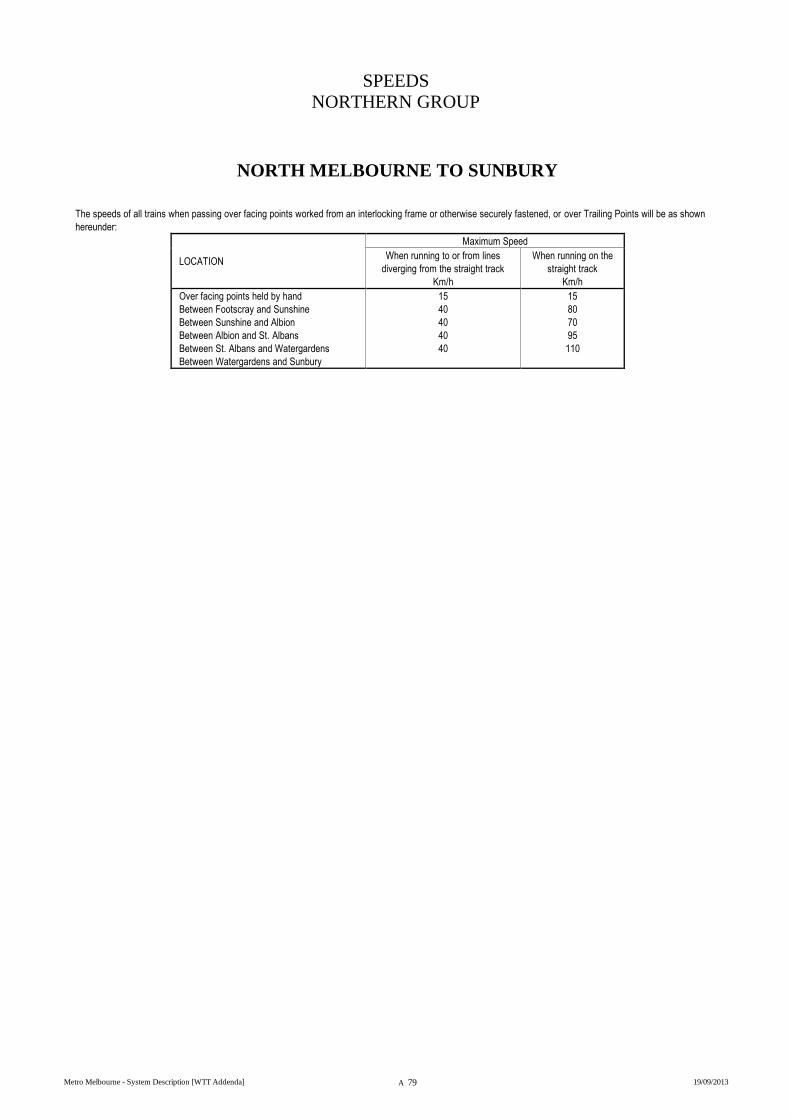
SPEEDS
NORTHERN GROUP
Metro Melbourne - System Description [WTT Addenda] A 79 19/09/2013
NORTH MELBOURNE TO SUNBURY
The speeds of all trains when passing over facing points worked from an interlocking frame or otherwise securely fastened, or over Trailing Points will be as shown
hereunder:
LOCATION
Maximum Speed
When running to or from lines
diverging from the straight track
Km/h
When running on the
straight track
Km/h
Over facing points held by hand
Between Footscray and Sunshine
Between Sunshine and Albion
Between Albion and St. Albans
Between St. Albans and Watergardens
Between Watergardens and Sunbury
15
40
40
40
40
15
80
70
95
110
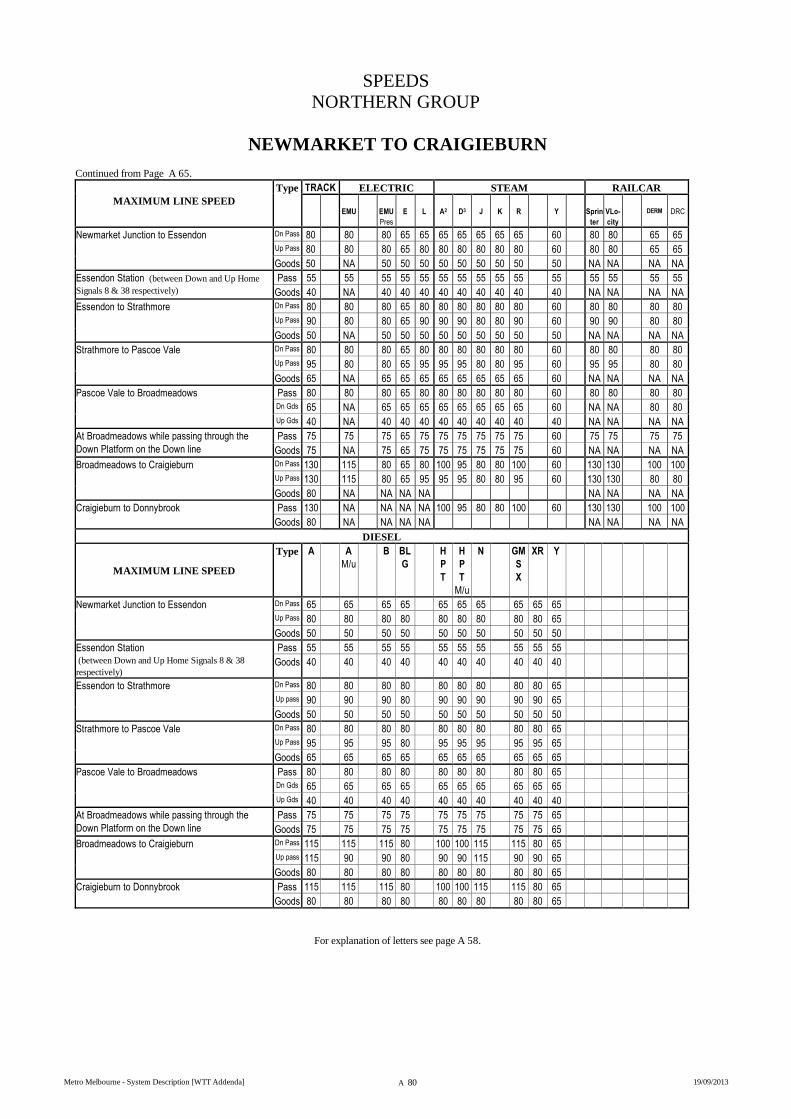
SPEEDS
NORTHERN GROUP
Metro Melbourne - System Description [WTT Addenda] A 80 19/09/2013
NEWMARKET TO CRAIGIEBURN
Continued from Page A 65.
MAXIMUM LINE SPEED
Type TRACK ELECTRIC STEAM RAILCAR
EMU
EMU
Pres
E
L
A2
D3
J
K
R
Y
Sprin
ter
VLo-
city
DERM
DRC
Newmarket Junction to Essendon Dn Pass 80 80 80 65 65 65 65 65 65 65 60 80 80 65 65
Up Pass 80 80 80 65 80 80 80 80 80 80 60 80 80 65 65
Goods 50 NA 50 50 50 50 50 50 50 50 50 NA NA NA NA
Essendon Station (between Down and Up Home
Signals 8 & 38 respectively)
Pass 55 55 55 55 55 55 55 55 55 55 55 55 55 55 55
Goods 40 NA 40 40 40 40 40 40 40 40 40 NA NA NA NA
Essendon to Strathmore Dn Pass 80 80 80 65 80 80 80 80 80 80 60 80 80 80 80
Up Pass 90 80 80 65 90 90 90 80 80 90 60 90 90 80 80
Goods 50 NA 50 50 50 50 50 50 50 50 50 NA NA NA NA
Strathmore to Pascoe Vale Dn Pass 80 80 80 65 80 80 80 80 80 80 60 80 80 80 80
Up Pass 95 80 80 65 95 95 95 80 80 95 60 95 95 80 80
Goods 65 NA 65 65 65 65 65 65 65 65 60 NA NA NA NA
Pascoe Vale to Broadmeadows Pass 80 80 80 65 80 80 80 80 80 80 60 80 80 80 80
Dn Gds 65 NA 65 65 65 65 65 65 65 65 60 NA NA 80 80
Up Gds 40 NA 40 40 40 40 40 40 40 40 40 NA NA NA NA
At Broadmeadows while passing through the
Down Platform on the Down line
Pass 75 75 75 65 75 75 75 75 75 75 60 75 75 75 75
Goods 75 NA 75 65 75 75 75 75 75 75 60 NA NA NA NA
Broadmeadows to Craigieburn Dn Pass 130 115 80 65 80 100 95 80 80 100 60 130 130 100 100
Up Pass 130 115 80 65 95 95 95 80 80 95 60 130 130 80 80
Goods 80 NA NA NA NA NA NA NA NA
Craigieburn to Donnybrook Pass 130 NA NA NA NA 100 95 80 80 100 60 130 130 100 100
Goods 80 NA NA NA NA NA NA NA NA
DIESEL
MAXIMUM LINE SPEED
Type A A
M/u
B BL
G
H
P
T
H
P
T
M/u
N
GM
S
X
XR Y
Newmarket Junction to Essendon Dn Pass 65 65 65 65 65 65 65 65 65 65
Up Pass 80 80 80 80 80 80 80 80 80 65
Goods 50 50 50 50 50 50 50 50 50 50
Essendon Station (between Down and Up Home Signals 8 & 38
respectively)
Pass 55 55 55 55 55 55 55 55 55 55
Goods 40 40 40 40 40 40 40 40 40 40
Essendon to Strathmore Dn Pass 80 80 80 80 80 80 80 80 80 65
Up pass 90 90 90 80 90 90 90 90 90 65
Goods 50 50 50 50 50 50 50 50 50 50
Strathmore to Pascoe Vale Dn Pass 80 80 80 80 80 80 80 80 80 65
Up Pass 95 95 95 80 95 95 95 95 95 65
Goods 65 65 65 65 65 65 65 65 65 65
Pascoe Vale to Broadmeadows Pass 80 80 80 80 80 80 80 80 80 65
Dn Gds 65 65 65 65 65 65 65 65 65 65
Up Gds 40 40 40 40 40 40 40 40 40 40
At Broadmeadows while passing through the
Down Platform on the Down line
Pass 75 75 75 75 75 75 75 75 75 65
Goods 75 75 75 75 75 75 75 75 75 65
Broadmeadows to Craigieburn Dn Pass 115 115 115 80 100 100 115 115 80 65
Up pass 115 90 90 80 90 90 115 90 90 65
Goods 80 80 80 80 80 80 80 80 80 65
Craigieburn to Donnybrook Pass 115 115 115 80 100 100 115 115 80 65
Goods 80 80 80 80 80 80 80 80 80 65
For explanation of letters see page A 58.
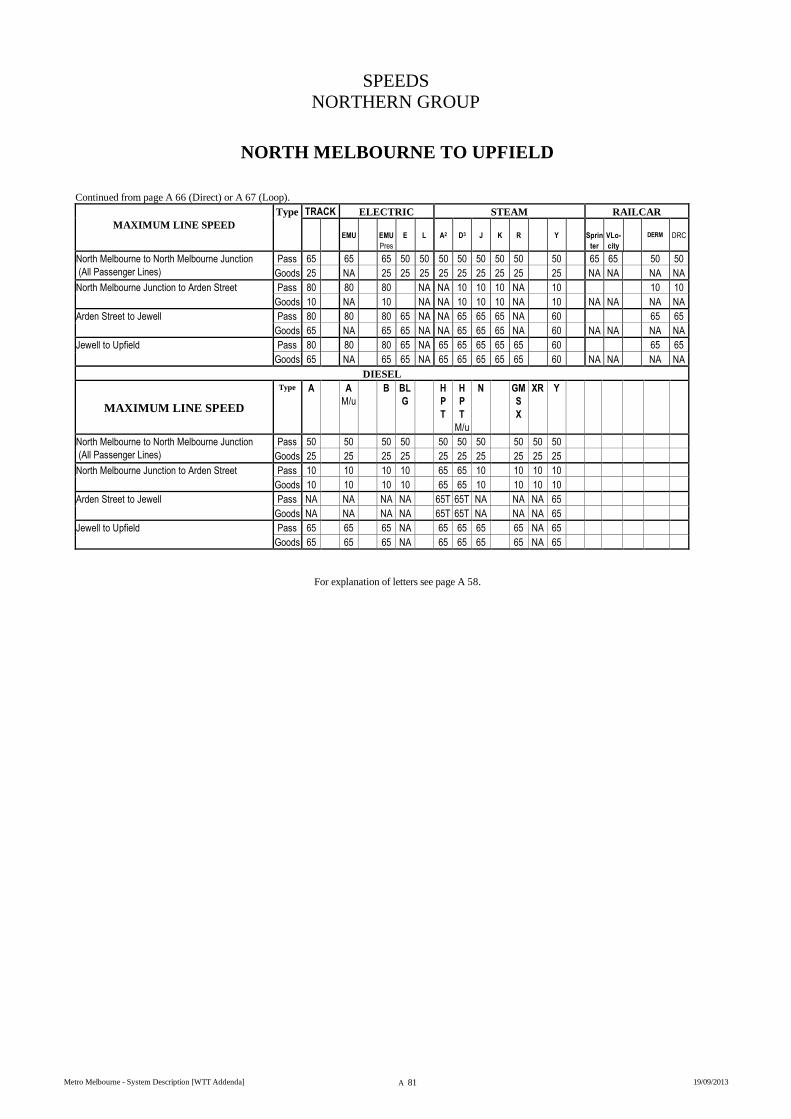
SPEEDS
NORTHERN GROUP
Metro Melbourne - System Description [WTT Addenda] A 81 19/09/2013
NORTH MELBOURNE TO UPFIELD
Continued from page A 66 (Direct) or A 67 (Loop).
MAXIMUM LINE SPEED
Type TRACK ELECTRIC STEAM RAILCAR
EMU
EMU
Pres
E
L
A2
D3
J
K
R
Y
Sprin
ter
VLo-
city
DERM
DRC
North Melbourne to North Melbourne Junction
(All Passenger Lines)
Pass 65 65 65 50 50 50 50 50 50 50 50 65 65 50 50
Goods 25 NA 25 25 25 25 25 25 25 25 25 NA NA NA NA
North Melbourne Junction to Arden Street Pass 80 80 80 NA NA 10 10 10 NA 10 10 10
Goods 10 NA 10 NA NA 10 10 10 NA 10 NA NA NA NA
Arden Street to Jewell Pass 80 80 80 65 NA NA 65 65 65 NA 60 65 65
Goods 65 NA 65 65 NA NA 65 65 65 NA 60 NA NA NA NA
Jewell to Upfield Pass 80 80 80 65 NA 65 65 65 65 65 60 65 65
Goods 65 NA 65 65 NA 65 65 65 65 65 60 NA NA NA NA
DIESEL
MAXIMUM LINE SPEED
Type A A
M/u
B BL
G
H
P
T
H
P
T
M/u
N
GM
S
X
XR Y
North Melbourne to North Melbourne Junction
(All Passenger Lines)
Pass 50 50 50 50 50 50 50 50 50 50
Goods 25 25 25 25 25 25 25 25 25 25
North Melbourne Junction to Arden Street Pass 10 10 10 10 65 65 10 10 10 10
Goods 10 10 10 10 65 65 10 10 10 10
Arden Street to Jewell Pass NA NA NA NA 65T 65T NA NA NA 65
Goods NA NA NA NA 65T 65T NA NA NA 65
Jewell to Upfield Pass 65 65 65 NA 65 65 65 65 NA 65
Goods 65 65 65 NA 65 65 65 65 NA 65
For explanation of letters see page A 58.
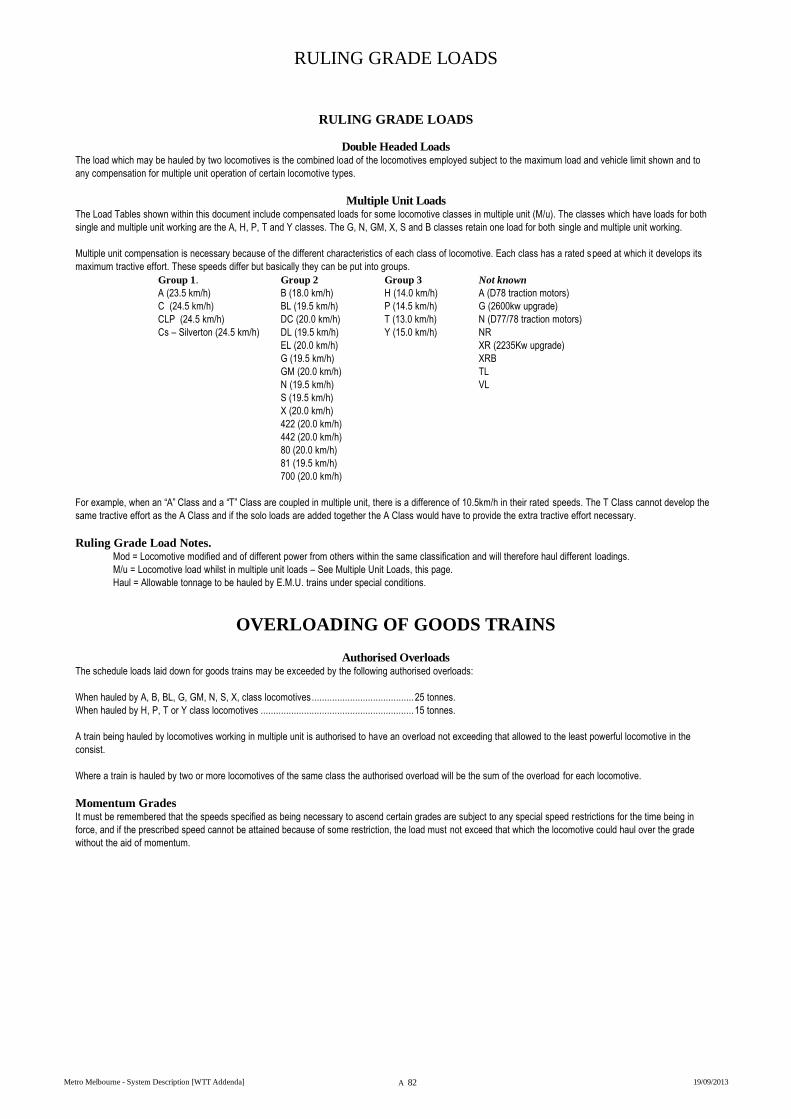
RULING GRADE LOADS
Metro Melbourne - System Description [WTT Addenda] A 82 19/09/2013
RULING GRADE LOADS
Double Headed Loads The load which may be hauled by two locomotives is the combined load of the locomotives employed subject to the maximum load and vehicle limit shown and to
any compensation for multiple unit operation of certain locomotive types.
Multiple Unit Loads The Load Tables shown within this document include compensated loads for some locomotive classes in multiple unit (M/u). The classes which have loads for both
single and multiple unit working are the A, H, P, T and Y classes. The G, N, GM, X, S and B classes retain one load for both single and multiple unit working.
Multiple unit compensation is necessary because of the different characteristics of each class of locomotive. Each class has a rated speed at which it develops its
maximum tractive effort. These speeds differ but basically they can be put into groups.
Group 1. Group 2 Group 3 Not known
A (23.5 km/h) B (18.0 km/h) H (14.0 km/h) A (D78 traction motors)
C (24.5 km/h) BL (19.5 km/h) P (14.5 km/h) G (2600kw upgrade)
CLP (24.5 km/h) DC (20.0 km/h) T (13.0 km/h) N (D77/78 traction motors)
Cs – Silverton (24.5 km/h) DL (19.5 km/h) Y (15.0 km/h) NR
EL (20.0 km/h) XR (2235Kw upgrade)
G (19.5 km/h) XRB
GM (20.0 km/h) TL
N (19.5 km/h) VL
S (19.5 km/h)
X (20.0 km/h)
422 (20.0 km/h)
442 (20.0 km/h)
80 (20.0 km/h)
81 (19.5 km/h)
700 (20.0 km/h)
For example, when an “A” Class and a “T” Class are coupled in multiple unit, there is a difference of 10.5km/h in their rated speeds. The T Class cannot develop the
same tractive effort as the A Class and if the solo loads are added together the A Class would have to provide the extra tractive effort necessary.
Ruling Grade Load Notes. Mod = Locomotive modified and of different power from others within the same classification and will therefore haul different loadings.
M/u = Locomotive load whilst in multiple unit loads – See Multiple Unit Loads, this page.
Haul = Allowable tonnage to be hauled by E.M.U. trains under special conditions.
OVERLOADING OF GOODS TRAINS
Authorised Overloads The schedule loads laid down for goods trains may be exceeded by the following authorised overloads:
When hauled by A, B, BL, G, GM, N, S, X, class locomotives ........................................ 25 tonnes.
When hauled by H, P, T or Y class locomotives ............................................................ 15 tonnes.
A train being hauled by locomotives working in multiple unit is authorised to have an overload not exceeding that allowed to the least powerful locomotive in the
consist.
Where a train is hauled by two or more locomotives of the same class the authorised overload will be the sum of the overload for each locomotive.
Momentum Grades It must be remembered that the speeds specified as being necessary to ascend certain grades are subject to any special speed restrictions for the time being in
force, and if the prescribed speed cannot be attained because of some restriction, the load must not exceed that which the locomotive could haul over the grade
without the aid of momentum.
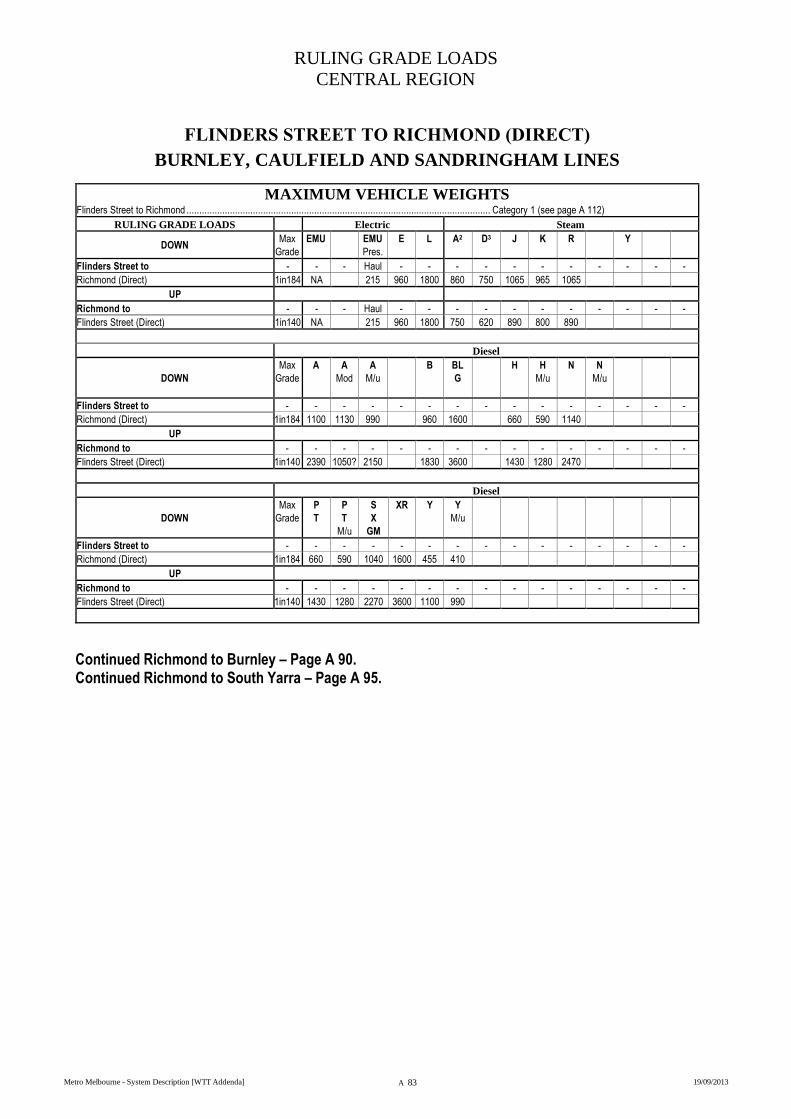
RULING GRADE LOADS
CENTRAL REGION
Metro Melbourne - System Description [WTT Addenda] A 83 19/09/2013
FLINDERS STREET TO RICHMOND (DIRECT)
BURNLEY, CAULFIELD AND SANDRINGHAM LINES
MAXIMUM VEHICLE WEIGHTS Flinders Street to Richmond ....................................................................................................................... Category 1 (see page A 112)
RULING GRADE LOADS Electric Steam
DOWN Max
Grade
EMU
EMU
Pres.
E L A2 D3 J K R Y
Flinders Street to - - - Haul - - - - - - - - - - -
Richmond (Direct) 1in184 NA 215 960 1800 860 750 1065 965 1065
UP
Richmond to - - - Haul - - - - - - - - - - -
Flinders Street (Direct) 1in140 NA 215 960 1800 750 620 890 800 890
Diesel
DOWN
Max
Grade
A
A
Mod
A
M/u
B BL
G
H H
M/u
N
N
M/u
Flinders Street to - - - - - - - - - - - - - - -
Richmond (Direct) 1in184 1100 1130 990 960 1600 660 590 1140
UP
Richmond to - - - - - - - - - - - - - - -
Flinders Street (Direct) 1in140 2390 1050? 2150 1830 3600 1430 1280 2470
Diesel
DOWN
Max
Grade
P
T
P
T
M/u
S
X
GM
XR Y
Y
M/u
Flinders Street to - - - - - - - - - - - - - - -
Richmond (Direct) 1in184 660 590 1040 1600 455 410
UP
Richmond to - - - - - - - - - - - - - - -
Flinders Street (Direct) 1in140 1430 1280 2270 3600 1100 990
Continued Richmond to Burnley – Page A 90. Continued Richmond to South Yarra – Page A 95.
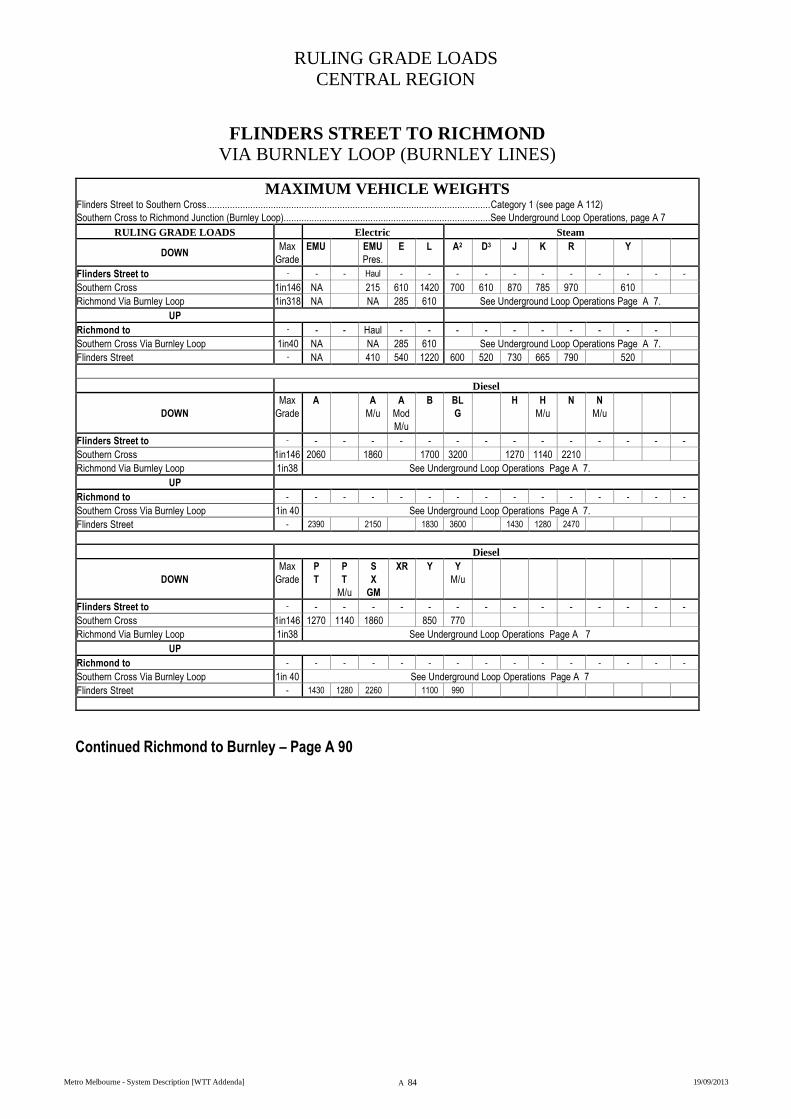
RULING GRADE LOADS
CENTRAL REGION
Metro Melbourne - System Description [WTT Addenda] A 84 19/09/2013
FLINDERS STREET TO RICHMOND
VIA BURNLEY LOOP (BURNLEY LINES)
MAXIMUM VEHICLE WEIGHTS Flinders Street to Southern Cross ............................................................................................................... Category 1 (see page A 112)
Southern Cross to Richmond Junction (Burnley Loop).................................................................................See Underground Loop Operations, page A 7
RULING GRADE LOADS Electric Steam
DOWN Max
Grade
EMU
EMU
Pres.
E L A2 D3 J K R Y
Flinders Street to - - - Haul - - - - - - - - - - -
Southern Cross 1in146 NA 215 610 1420 700 610 870 785 970 610
Richmond Via Burnley Loop 1in318 NA NA 285 610 See Underground Loop Operations Page A 7.
UP
Richmond to - - - Haul - - - - - - - - - -
Southern Cross Via Burnley Loop 1in40 NA NA 285 610 See Underground Loop Operations Page A 7.
Flinders Street - NA 410 540 1220 600 520 730 665 790 520
Diesel
DOWN
Max
Grade
A
A
M/u
A
Mod
M/u
B BL
G
H H
M/u
N N
M/u
Flinders Street to - - - - - - - - - - - - - - -
Southern Cross 1in146 2060 1860 1700 3200 1270 1140 2210
Richmond Via Burnley Loop 1in38 See Underground Loop Operations Page A 7.
UP
Richmond to - - - - - - - - - - - - - - -
Southern Cross Via Burnley Loop 1in 40 See Underground Loop Operations Page A 7.
Flinders Street - 2390 2150 1830 3600 1430 1280 2470
Diesel
DOWN
Max
Grade
P
T
P
T
M/u
S
X
GM
XR Y
Y
M/u
Flinders Street to - - - - - - - - - - - - - - -
Southern Cross 1in146 1270 1140 1860 850 770
Richmond Via Burnley Loop 1in38 See Underground Loop Operations Page A 7
UP
Richmond to - - - - - - - - - - - - - - -
Southern Cross Via Burnley Loop 1in 40 See Underground Loop Operations Page A 7
Flinders Street - 1430 1280 2260 1100 990
Continued Richmond to Burnley – Page A 90
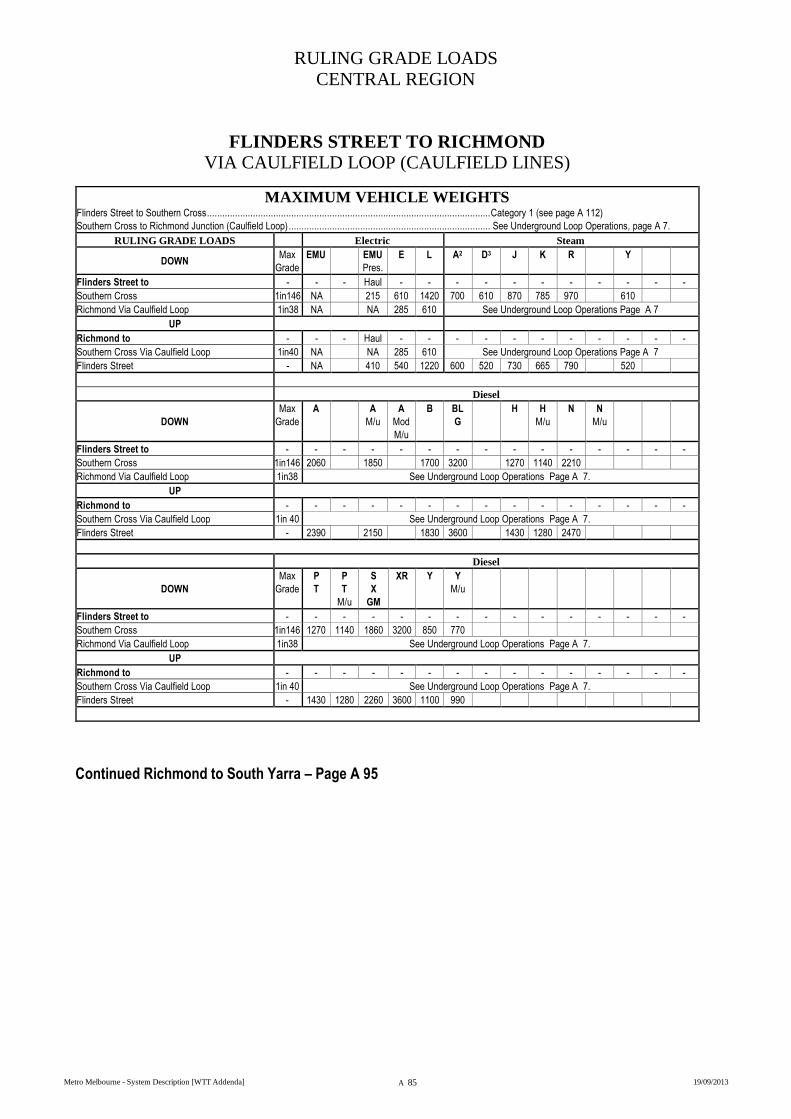
RULING GRADE LOADS
CENTRAL REGION
Metro Melbourne - System Description [WTT Addenda] A 85 19/09/2013
FLINDERS STREET TO RICHMOND
VIA CAULFIELD LOOP (CAULFIELD LINES)
MAXIMUM VEHICLE WEIGHTS Flinders Street to Southern Cross ............................................................................................................... Category 1 (see page A 112)
Southern Cross to Richmond Junction (Caulfield Loop) ............................................................................... See Underground Loop Operations, page A 7.
RULING GRADE LOADS Electric Steam
DOWN Max
Grade
EMU
EMU
Pres.
E L A2 D3 J K R Y
Flinders Street to - - - Haul - - - - - - - - - - -
Southern Cross 1in146 NA 215 610 1420 700 610 870 785 970 610
Richmond Via Caulfield Loop 1in38 NA NA 285 610 See Underground Loop Operations Page A 7
UP
Richmond to - - - Haul - - - - - - - - - - -
Southern Cross Via Caulfield Loop 1in40 NA NA 285 610 See Underground Loop Operations Page A 7
Flinders Street - NA 410 540 1220 600 520 730 665 790 520
Diesel
DOWN
Max
Grade
A
A
M/u
A
Mod
M/u
B BL
G
H H
M/u
N
N
M/u
Flinders Street to - - - - - - - - - - - - - - -
Southern Cross 1in146 2060 1850 1700 3200 1270 1140 2210
Richmond Via Caulfield Loop 1in38 See Underground Loop Operations Page A 7.
UP
Richmond to - - - - - - - - - - - - - - -
Southern Cross Via Caulfield Loop 1in 40 See Underground Loop Operations Page A 7.
Flinders Street - 2390 2150 1830 3600 1430 1280 2470
Diesel
DOWN
Max
Grade
P
T
P
T
M/u
S
X
GM
XR Y
Y
M/u
Flinders Street to - - - - - - - - - - - - - - -
Southern Cross 1in146 1270 1140 1860 3200 850 770
Richmond Via Caulfield Loop 1in38 See Underground Loop Operations Page A 7.
UP
Richmond to - - - - - - - - - - - - - - -
Southern Cross Via Caulfield Loop 1in 40 See Underground Loop Operations Page A 7.
Flinders Street - 1430 1280 2260 3600 1100 990
Continued Richmond to South Yarra – Page A 95
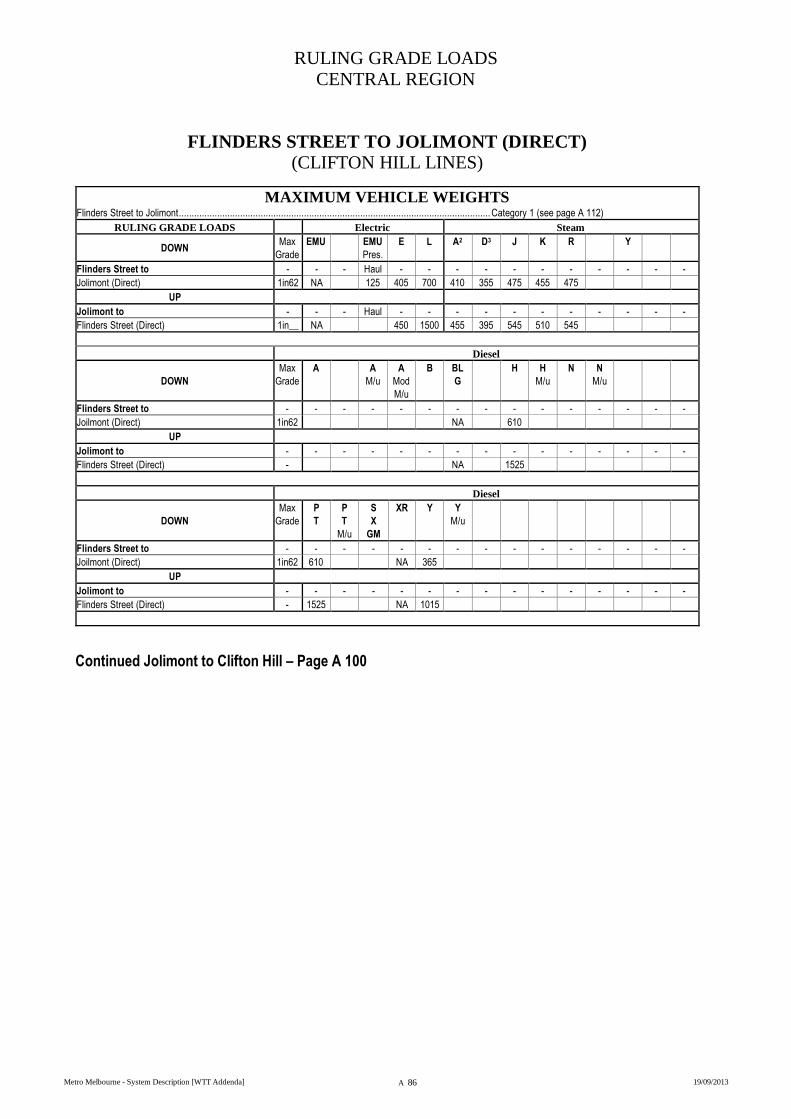
RULING GRADE LOADS
CENTRAL REGION
Metro Melbourne - System Description [WTT Addenda] A 86 19/09/2013
FLINDERS STREET TO JOLIMONT (DIRECT)
(CLIFTON HILL LINES)
MAXIMUM VEHICLE WEIGHTS Flinders Street to Jolimont .......................................................................................................................... Category 1 (see page A 112)
RULING GRADE LOADS Electric Steam
DOWN Max
Grade
EMU
EMU
Pres.
E L A2 D3 J K R Y
Flinders Street to - - - Haul - - - - - - - - - - -
Jolimont (Direct) 1in62 NA 125 405 700 410 355 475 455 475
UP
Jolimont to - - - Haul - - - - - - - - - - -
Flinders Street (Direct) 1in__ NA 450 1500 455 395 545 510 545
Diesel
DOWN
Max
Grade
A
A
M/u
A
Mod
M/u
B BL
G
H H
M/u
N
N
M/u
Flinders Street to - - - - - - - - - - - - - - -
Joilmont (Direct) 1in62 NA 610
UP
Jolimont to - - - - - - - - - - - - - - -
Flinders Street (Direct) - NA 1525
Diesel
DOWN
Max
Grade
P
T
P
T
M/u
S
X
GM
XR Y
Y
M/u
Flinders Street to - - - - - - - - - - - - - - -
Joilmont (Direct) 1in62 610 NA 365
UP
Jolimont to - - - - - - - - - - - - - - -
Flinders Street (Direct) - 1525 NA 1015
Continued Jolimont to Clifton Hill – Page A 100
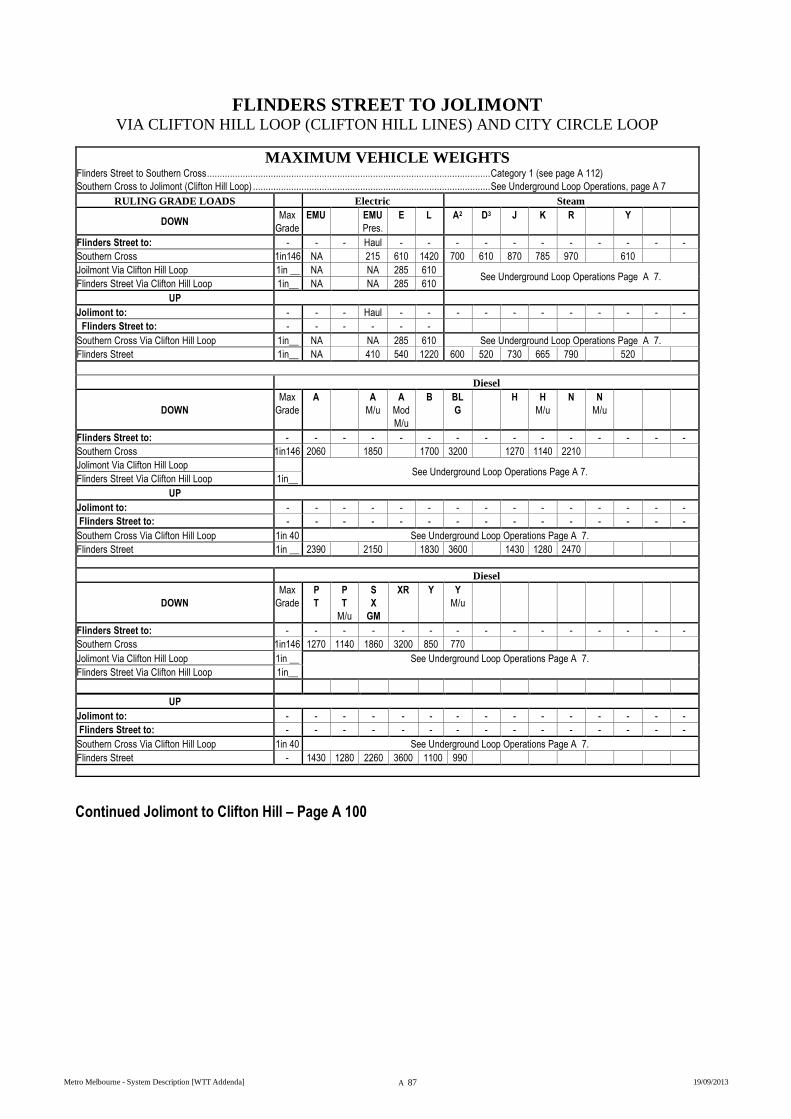
Metro Melbourne - System Description [WTT Addenda] A 87 19/09/2013
FLINDERS STREET TO JOLIMONT VIA CLIFTON HILL LOOP (CLIFTON HILL LINES) AND CITY CIRCLE LOOP
MAXIMUM VEHICLE WEIGHTS Flinders Street to Southern Cross ............................................................................................................... Category 1 (see page A 112)
Southern Cross to Jolimont (Clifton Hill Loop) ............................................................................................. See Underground Loop Operations, page A 7
RULING GRADE LOADS Electric Steam
DOWN Max
Grade
EMU
EMU
Pres.
E L A2 D3 J K R Y
Flinders Street to: - - - Haul - - - - - - - - - - -
Southern Cross 1in146 NA 215 610 1420 700 610 870 785 970 610
Joilmont Via Clifton Hill Loop 1in __ NA NA 285 610 See Underground Loop Operations Page A 7.
Flinders Street Via Clifton Hill Loop 1in__ NA NA 285 610
UP
Jolimont to: - - - Haul - - - - - - - - - - -
Flinders Street to: - - - - - -
Southern Cross Via Clifton Hill Loop 1in__ NA NA 285 610 See Underground Loop Operations Page A 7.
Flinders Street 1in__ NA 410 540 1220 600 520 730 665 790 520
Diesel
DOWN
Max
Grade
A
A
M/u
A
Mod
M/u
B BL
G
H H
M/u
N
N
M/u
Flinders Street to: - - - - - - - - - - - - - - -
Southern Cross 1in146 2060 1850 1700 3200 1270 1140 2210
Jolimont Via Clifton Hill Loop See Underground Loop Operations Page A 7.
Flinders Street Via Clifton Hill Loop 1in__
UP
Jolimont to: - - - - - - - - - - - - - - -
Flinders Street to: - - - - - - - - - - - - - - -
Southern Cross Via Clifton Hill Loop 1in 40 See Underground Loop Operations Page A 7.
Flinders Street 1in __ 2390 2150 1830 3600 1430 1280 2470
Diesel
DOWN
Max
Grade
P
T
P
T
M/u
S
X
GM
XR Y
Y
M/u
Flinders Street to: - - - - - - - - - - - - - - -
Southern Cross 1in146 1270 1140 1860 3200 850 770
Jolimont Via Clifton Hill Loop 1in __ See Underground Loop Operations Page A 7.
Flinders Street Via Clifton Hill Loop 1in__
UP
Jolimont to: - - - - - - - - - - - - - - -
Flinders Street to: - - - - - - - - - - - - - - -
Southern Cross Via Clifton Hill Loop 1in 40 See Underground Loop Operations Page A 7.
Flinders Street - 1430 1280 2260 3600 1100 990
Continued Jolimont to Clifton Hill – Page A 100
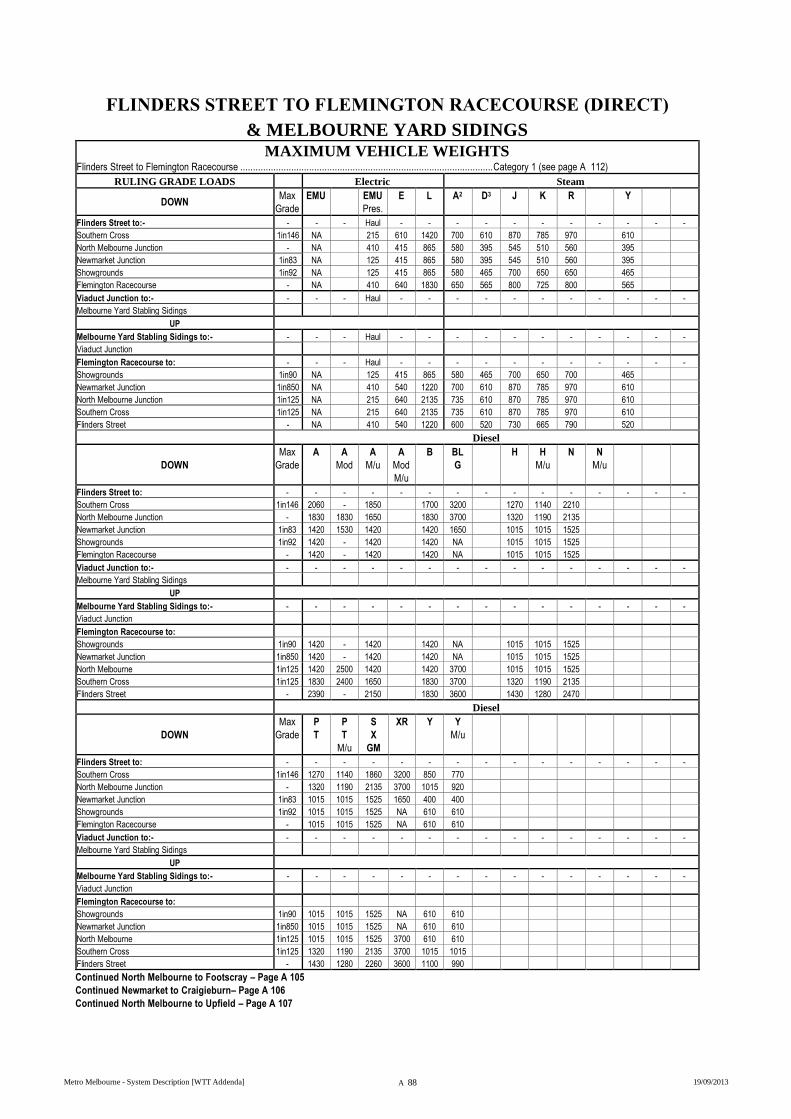
Metro Melbourne - System Description [WTT Addenda] A 88 19/09/2013
FLINDERS STREET TO FLEMINGTON RACECOURSE (DIRECT)
& MELBOURNE YARD SIDINGS
MAXIMUM VEHICLE WEIGHTS Flinders Street to Flemington Racecourse ................................................................................................... Category 1 (see page A 112)
RULING GRADE LOADS Electric Steam
DOWN Max
Grade
EMU
EMU
Pres.
E L A2 D3 J K R Y
Flinders Street to:- - - - Haul - - - - - - - - - - -
Southern Cross 1in146 NA 215 610 1420 700 610 870 785 970 610
North Melbourne Junction - NA 410 415 865 580 395 545 510 560 395
Newmarket Junction 1in83 NA 125 415 865 580 395 545 510 560 395
Showgrounds 1in92 NA 125 415 865 580 465 700 650 650 465
Flemington Racecourse - NA 410 640 1830 650 565 800 725 800 565
Viaduct Junction to:- - - - Haul - - - - - - - - - - -
Melbourne Yard Stabling Sidings
UP
Melbourne Yard Stabling Sidings to:- - - - Haul - - - - - - - - - - -
Viaduct Junction
Flemington Racecourse to: - - - Haul - - - - - - - - - - -
Showgrounds 1in90 NA 125 415 865 580 465 700 650 700 465
Newmarket Junction 1in850 NA 410 540 1220 700 610 870 785 970 610
North Melbourne Junction 1in125 NA 215 640 2135 735 610 870 785 970 610
Southern Cross 1in125 NA 215 640 2135 735 610 870 785 970 610
Flinders Street - NA 410 540 1220 600 520 730 665 790 520
Diesel
DOWN
Max
Grade
A
A
Mod
A
M/u
A
Mod
M/u
B BL
G
H H
M/u
N
N
M/u
Flinders Street to: - - - - - - - - - - - - - - -
Southern Cross 1in146 2060 - 1850 1700 3200 1270 1140 2210
North Melbourne Junction - 1830 1830 1650 1830 3700 1320 1190 2135
Newmarket Junction 1in83 1420 1530 1420 1420 1650 1015 1015 1525
Showgrounds 1in92 1420 - 1420 1420 NA 1015 1015 1525
Flemington Racecourse - 1420 - 1420 1420 NA 1015 1015 1525
Viaduct Junction to:- - - - - - - - - - - - - - - -
Melbourne Yard Stabling Sidings
UP
Melbourne Yard Stabling Sidings to:- - - - - - - - - - - - - - - -
Viaduct Junction
Flemington Racecourse to:
Showgrounds 1in90 1420 - 1420 1420 NA 1015 1015 1525
Newmarket Junction 1in850 1420 - 1420 1420 NA 1015 1015 1525
North Melbourne 1in125 1420 2500 1420 1420 3700 1015 1015 1525
Southern Cross 1in125 1830 2400 1650 1830 3700 1320 1190 2135
Flinders Street - 2390 - 2150 1830 3600 1430 1280 2470
Diesel
DOWN
Max
Grade
P
T
P
T
M/u
S
X
GM
XR Y
Y
M/u
Flinders Street to: - - - - - - - - - - - - - - -
Southern Cross 1in146 1270 1140 1860 3200 850 770
North Melbourne Junction - 1320 1190 2135 3700 1015 920
Newmarket Junction 1in83 1015 1015 1525 1650 400 400
Showgrounds 1in92 1015 1015 1525 NA 610 610
Flemington Racecourse - 1015 1015 1525 NA 610 610
Viaduct Junction to:- - - - - - - - - - - - - - - -
Melbourne Yard Stabling Sidings
UP
Melbourne Yard Stabling Sidings to:- - - - - - - - - - - - - - - -
Viaduct Junction
Flemington Racecourse to:
Showgrounds 1in90 1015 1015 1525 NA 610 610
Newmarket Junction 1in850 1015 1015 1525 NA 610 610
North Melbourne 1in125 1015 1015 1525 3700 610 610
Southern Cross 1in125 1320 1190 2135 3700 1015 1015
Flinders Street - 1430 1280 2260 3600 1100 990
Continued North Melbourne to Footscray – Page A 105
Continued Newmarket to Craigieburn– Page A 106
Continued North Melbourne to Upfield – Page A 107

Metro Melbourne - System Description [WTT Addenda] A 89 19/09/2013
FLINDERS STREET TO NORTH MELBOURNE
VIA NORTHERN LOOP (NORTHERN LINES)
MAXIMUM VEHICLE WEIGHTS Flinders Street to North Melbourne (Northern Loop) .................................................................................... See Underground Loop Operations, page A 7
RULING GRADE LOADS Electric Steam
DOWN Max
Grade
EMU
EMU
Pres.
E L A2 D3 J K R Y
Flinders Street to - - - Haul - - See Underground Loop Operations Page A 7.
North Melbourne via Northern Loop 1in38 NA 215 285 610
UP
North Melbourne to - - - Haul - - See Underground Loop Operations Page A 7.
Flinders Street via Northern Loop 1in38 NA NA 285 610
Diesel
DOWN Max
Grade
A A
M/u
A
Mod
M/u
B BL
G
H H
M/u
N N
M/u
Flinders Street to - - - - - - - - - - - - - - -
North Melbourne via Northern Loop 1in38 See Underground Operations Page A 7.
UP
North Melbourne to - - - - - - - - - - - - - - -
Flinders Street Via Northern Loop 1in38 See Underground Loop Operations Page A 7.
Diesel
DOWN Max
Grade
P
T
P
T
M/u
S
X
GM
XR Y Y
M/u
Flinders Street to - - - - - - - - - - - - - - -
North Melbourne via Northern Loop 1in38 See Underground Operations Page A 7.
UP
North Melbourne to - - - - - - - - - - - - - - -
Flinders Street Via Northern Loop 1in38 See Underground Loop Operations Page A 7.
Continued North Melbourne to Footscray – Page A 105. Continued North Melbourne to Upfield – Page A 107
Continued North Melbourne to Newmarket – Page A 88.
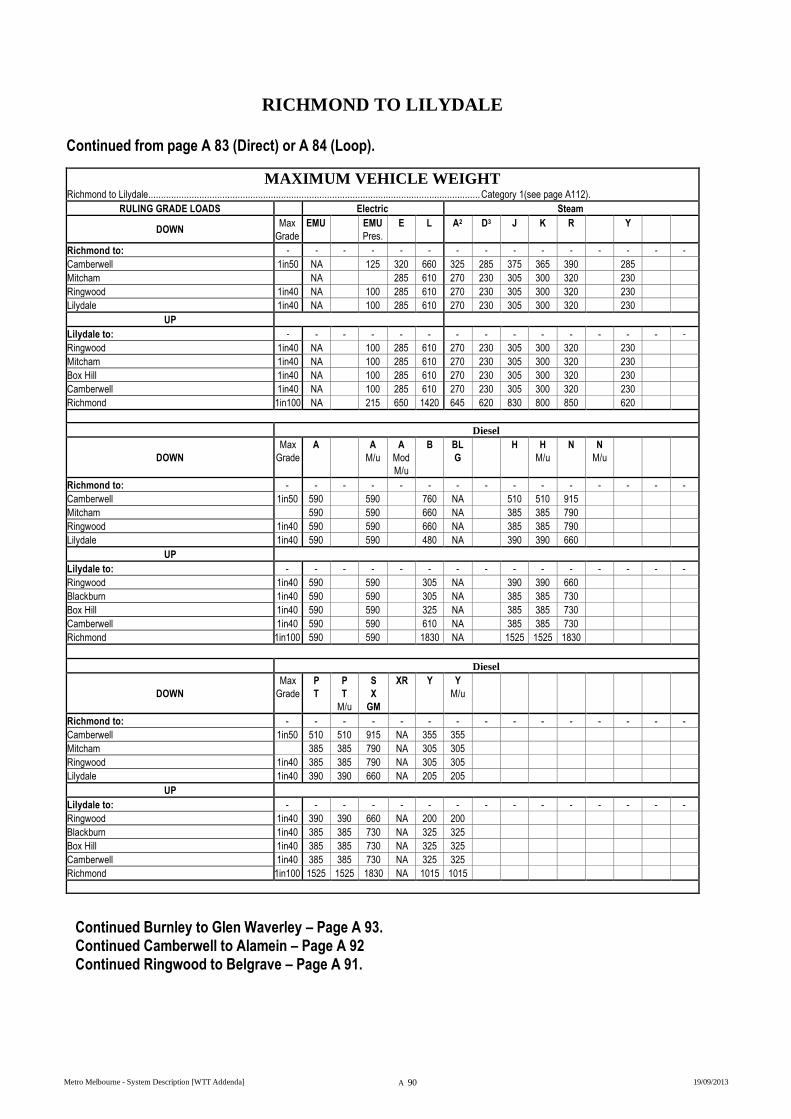
Metro Melbourne - System Description [WTT Addenda] A 90 19/09/2013
RICHMOND TO LILYDALE
Continued from page A 83 (Direct) or A 84 (Loop).
MAXIMUM VEHICLE WEIGHT Richmond to Lilydale.................................................................................................................................. Category 1(see page A112).
RULING GRADE LOADS Electric Steam
DOWN Max
Grade
EMU
EMU
Pres.
E L A2 D3 J K R Y
Richmond to: - - - - - - - - - - - - - - -
Camberwell 1in50 NA 125 320 660 325 285 375 365 390 285
Mitcham NA 285 610 270 230 305 300 320 230
Ringwood 1in40 NA 100 285 610 270 230 305 300 320 230
Lilydale 1in40 NA 100 285 610 270 230 305 300 320 230
UP
Lilydale to: - - - - - - - - - - - - - - -
Ringwood 1in40 NA 100 285 610 270 230 305 300 320 230
Mitcham 1in40 NA 100 285 610 270 230 305 300 320 230
Box Hill 1in40 NA 100 285 610 270 230 305 300 320 230
Camberwell 1in40 NA 100 285 610 270 230 305 300 320 230
Richmond 1in100 NA 215 650 1420 645 620 830 800 850 620
Diesel
DOWN
Max
Grade
A
A
M/u
A
Mod
M/u
B BL
G
H H
M/u
N
N
M/u
Richmond to: - - - - - - - - - - - - - - -
Camberwell 1in50 590 590 760 NA 510 510 915
Mitcham 590 590 660 NA 385 385 790
Ringwood 1in40 590 590 660 NA 385 385 790
Lilydale 1in40 590 590 480 NA 390 390 660
UP
Lilydale to: - - - - - - - - - - - - - - -
Ringwood 1in40 590 590 305 NA 390 390 660
Blackburn 1in40 590 590 305 NA 385 385 730
Box Hill 1in40 590 590 325 NA 385 385 730
Camberwell 1in40 590 590 610 NA 385 385 730
Richmond 1in100 590 590 1830 NA 1525 1525 1830
Diesel
DOWN
Max
Grade
P
T
P
T
M/u
S
X
GM
XR Y
Y
M/u
Richmond to: - - - - - - - - - - - - - - -
Camberwell 1in50 510 510 915 NA 355 355
Mitcham 385 385 790 NA 305 305
Ringwood 1in40 385 385 790 NA 305 305
Lilydale 1in40 390 390 660 NA 205 205
UP
Lilydale to: - - - - - - - - - - - - - - -
Ringwood 1in40 390 390 660 NA 200 200
Blackburn 1in40 385 385 730 NA 325 325
Box Hill 1in40 385 385 730 NA 325 325
Camberwell 1in40 385 385 730 NA 325 325
Richmond 1in100 1525 1525 1830 NA 1015 1015
Continued Burnley to Glen Waverley – Page A 93. Continued Camberwell to Alamein – Page A 92 Continued Ringwood to Belgrave – Page A 91.
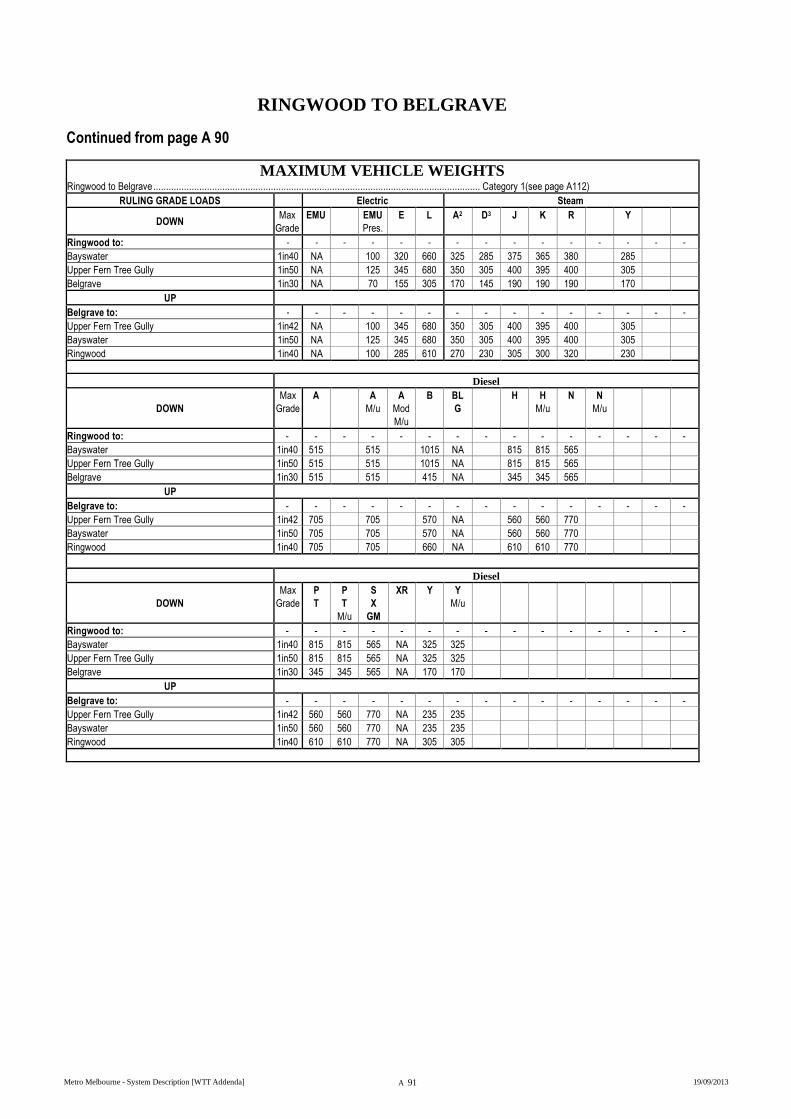
Metro Melbourne - System Description [WTT Addenda] A 91 19/09/2013
RINGWOOD TO BELGRAVE
Continued from page A 90
MAXIMUM VEHICLE WEIGHTS Ringwood to Belgrave ................................................................................................................................ Category 1(see page A112)
RULING GRADE LOADS Electric Steam
DOWN Max
Grade
EMU
EMU
Pres.
E L A2 D3 J K R Y
Ringwood to: - - - - - - - - - - - - - - -
Bayswater 1in40 NA 100 320 660 325 285 375 365 380 285
Upper Fern Tree Gully 1in50 NA 125 345 680 350 305 400 395 400 305
Belgrave 1in30 NA 70 155 305 170 145 190 190 190 170
UP
Belgrave to: - - - - - - - - - - - - - - -
Upper Fern Tree Gully 1in42 NA 100 345 680 350 305 400 395 400 305
Bayswater 1in50 NA 125 345 680 350 305 400 395 400 305
Ringwood 1in40 NA 100 285 610 270 230 305 300 320 230
Diesel
DOWN
Max
Grade
A
A
M/u
A
Mod
M/u
B BL
G
H H
M/u
N
N
M/u
Ringwood to: - - - - - - - - - - - - - - -
Bayswater 1in40 515 515 1015 NA 815 815 565
Upper Fern Tree Gully 1in50 515 515 1015 NA 815 815 565
Belgrave 1in30 515 515 415 NA 345 345 565
UP
Belgrave to: - - - - - - - - - - - - - - -
Upper Fern Tree Gully 1in42 705 705 570 NA 560 560 770
Bayswater 1in50 705 705 570 NA 560 560 770
Ringwood 1in40 705 705 660 NA 610 610 770
Diesel
DOWN
Max
Grade
P
T
P
T
M/u
S
X
GM
XR Y
Y
M/u
Ringwood to: - - - - - - - - - - - - - - -
Bayswater 1in40 815 815 565 NA 325 325
Upper Fern Tree Gully 1in50 815 815 565 NA 325 325
Belgrave 1in30 345 345 565 NA 170 170
UP
Belgrave to: - - - - - - - - - - - - - - -
Upper Fern Tree Gully 1in42 560 560 770 NA 235 235
Bayswater 1in50 560 560 770 NA 235 235
Ringwood 1in40 610 610 770 NA 305 305
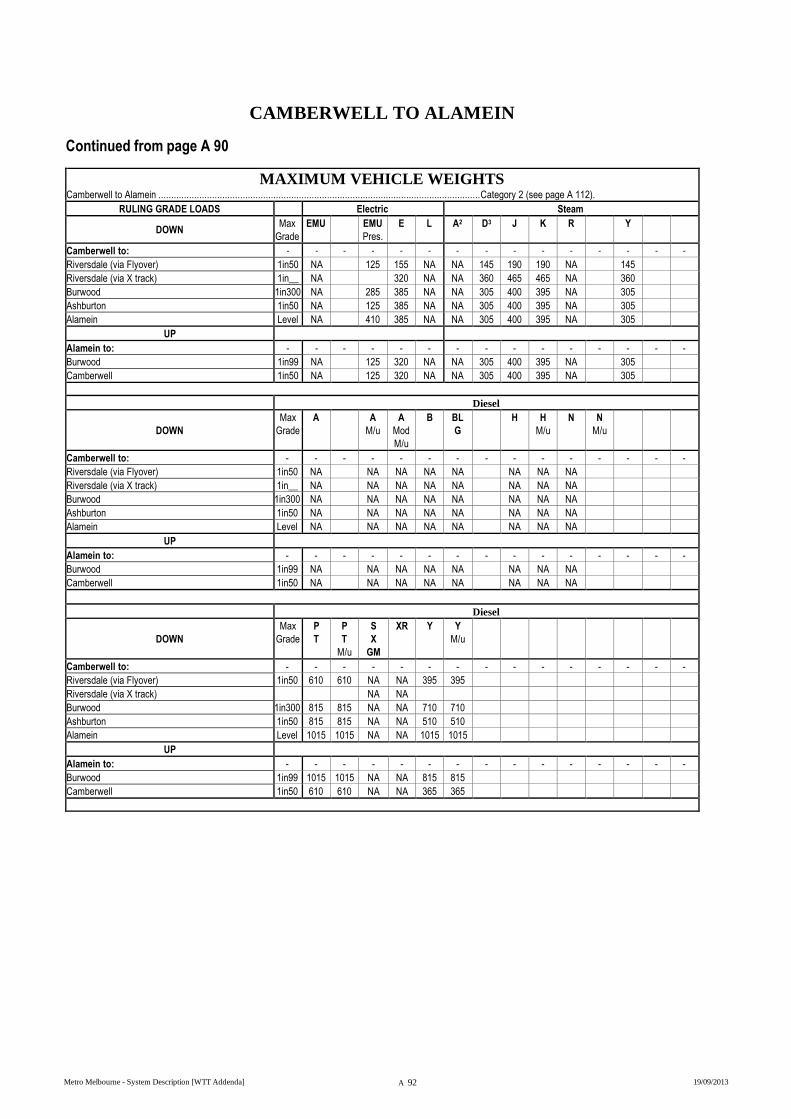
Metro Melbourne - System Description [WTT Addenda] A 92 19/09/2013
CAMBERWELL TO ALAMEIN
Continued from page A 90
MAXIMUM VEHICLE WEIGHTS Camberwell to Alamein .............................................................................................................................. Category 2 (see page A 112).
RULING GRADE LOADS Electric Steam
DOWN Max
Grade
EMU
EMU
Pres.
E L A2 D3 J K R Y
Camberwell to: - - - - - - - - - - - - - - -
Riversdale (via Flyover) 1in50 NA 125 155 NA NA 145 190 190 NA 145
Riversdale (via X track) 1in__ NA 320 NA NA 360 465 465 NA 360
Burwood 1in300 NA 285 385 NA NA 305 400 395 NA 305
Ashburton 1in50 NA 125 385 NA NA 305 400 395 NA 305
Alamein Level NA 410 385 NA NA 305 400 395 NA 305
UP
Alamein to: - - - - - - - - - - - - - - -
Burwood 1in99 NA 125 320 NA NA 305 400 395 NA 305
Camberwell 1in50 NA 125 320 NA NA 305 400 395 NA 305
Diesel
DOWN
Max
Grade
A
A
M/u
A
Mod
M/u
B BL
G
H H
M/u
N
N
M/u
Camberwell to: - - - - - - - - - - - - - - -
Riversdale (via Flyover) 1in50 NA NA NA NA NA NA NA NA
Riversdale (via X track) 1in__ NA NA NA NA NA NA NA NA
Burwood 1in300 NA NA NA NA NA NA NA NA
Ashburton 1in50 NA NA NA NA NA NA NA NA
Alamein Level NA NA NA NA NA NA NA NA
UP
Alamein to: - - - - - - - - - - - - - - -
Burwood 1in99 NA NA NA NA NA NA NA NA
Camberwell 1in50 NA NA NA NA NA NA NA NA
Diesel
DOWN
Max
Grade
P
T
P
T
M/u
S
X
GM
XR Y
Y
M/u
Camberwell to: - - - - - - - - - - - - - - -
Riversdale (via Flyover) 1in50 610 610 NA NA 395 395
Riversdale (via X track) NA NA
Burwood 1in300 815 815 NA NA 710 710
Ashburton 1in50 815 815 NA NA 510 510
Alamein Level 1015 1015 NA NA 1015 1015
UP
Alamein to: - - - - - - - - - - - - - - -
Burwood 1in99 1015 1015 NA NA 815 815
Camberwell 1in50 610 610 NA NA 365 365
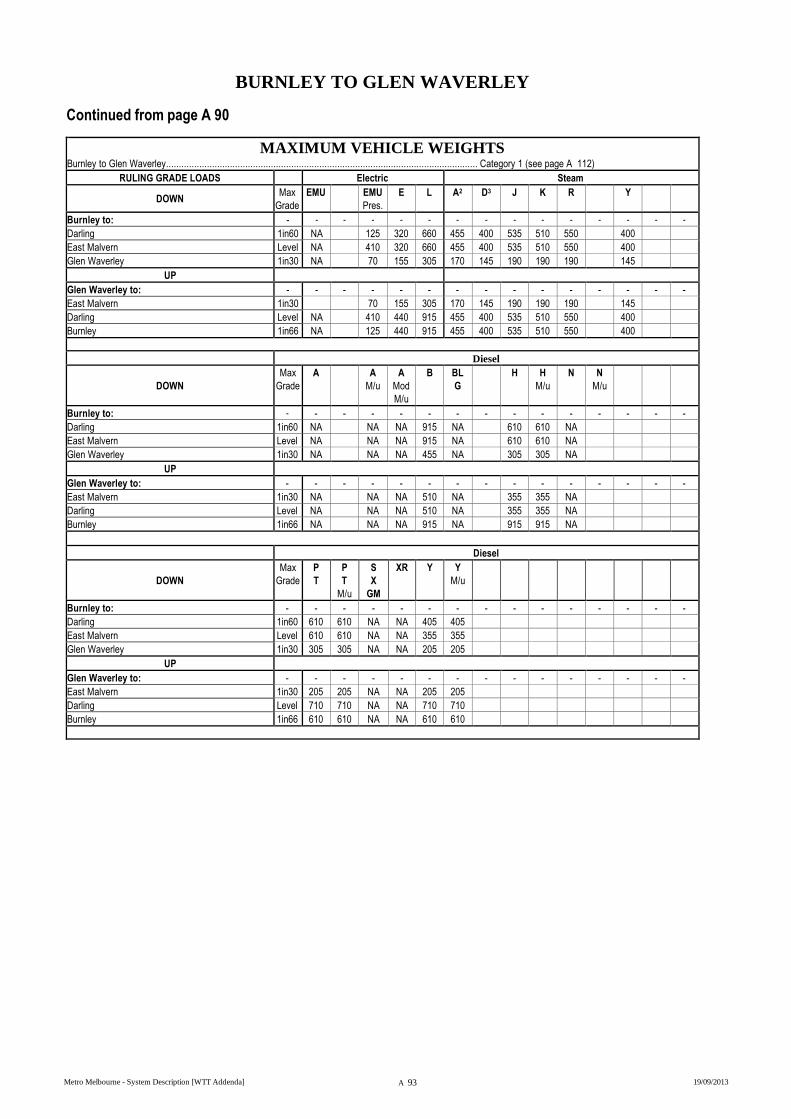
Metro Melbourne - System Description [WTT Addenda] A 93 19/09/2013
BURNLEY TO GLEN WAVERLEY
Continued from page A 90
MAXIMUM VEHICLE WEIGHTS Burnley to Glen Waverley.......................................................................................................................... Category 1 (see page A 112)
RULING GRADE LOADS Electric Steam
DOWN Max
Grade
EMU
EMU
Pres.
E L A2 D3 J K R Y
Burnley to: - - - - - - - - - - - - - - -
Darling 1in60 NA 125 320 660 455 400 535 510 550 400
East Malvern Level NA 410 320 660 455 400 535 510 550 400
Glen Waverley 1in30 NA 70 155 305 170 145 190 190 190 145
UP
Glen Waverley to: - - - - - - - - - - - - - - -
East Malvern 1in30 70 155 305 170 145 190 190 190 145
Darling Level NA 410 440 915 455 400 535 510 550 400
Burnley 1in66 NA 125 440 915 455 400 535 510 550 400
Diesel
DOWN
Max
Grade
A
A
M/u
A
Mod
M/u
B BL
G
H H
M/u
N
N
M/u
Burnley to: - - - - - - - - - - - - - - -
Darling 1in60 NA NA NA 915 NA 610 610 NA
East Malvern Level NA NA NA 915 NA 610 610 NA
Glen Waverley 1in30 NA NA NA 455 NA 305 305 NA
UP
Glen Waverley to: - - - - - - - - - - - - - - -
East Malvern 1in30 NA NA NA 510 NA 355 355 NA
Darling Level NA NA NA 510 NA 355 355 NA
Burnley 1in66 NA NA NA 915 NA 915 915 NA
Diesel
DOWN
Max
Grade
P
T
P
T
M/u
S
X
GM
XR Y
Y
M/u
Burnley to: - - - - - - - - - - - - - - -
Darling 1in60 610 610 NA NA 405 405
East Malvern Level 610 610 NA NA 355 355
Glen Waverley 1in30 305 305 NA NA 205 205
UP
Glen Waverley to: - - - - - - - - - - - - - - -
East Malvern 1in30 205 205 NA NA 205 205
Darling Level 710 710 NA NA 710 710
Burnley 1in66 610 610 NA NA 610 610
Metro Melbourne - System Description [WTT Addenda] A 94 19/09/2013
RICHMOND TO PAKENHAM
Continued from page A 83 (Direct) or A 85 (Loop).
MAXIMUM VEHICLE WEIGHTS Flinders Street to Pakenham ...................................................................................................................... Category 1 (see page A 112)
RULING GRADE LOADS Electric Steam
DOWN Max
Grade
EMU
EMU
Pres
E L A2 D3 J K R Y
Richmond to: - - - Haul - - - - - - - - - - -
Caulfield (See footnote - b) 1in63 NA 125 415 865 425 365 495 470 505 365
Westall (See footnote – b) 1in54 NA 125 510 1120 555 480 665 615 710 480
Dandenong 1in183 NA 215 815 1220 845 735 955 945 1010 735
Pakenham 1in51 NA 125 345 610 350 305 405 390 400 305
UP
Pakenham to - - - Haul - - - - - - - - - - -
Dandenong 1in110 NA 215 610 1830 635 555 770 710 800 555
Westall 1in76 NA 125 610 1830 715 610 870 785 970 610
Caulfield 1in78 NA 125 610 1420 715 610 870 785 970 610
Richmond 1in130 NA 215 610 1420 715 610 870 785 970 610
Diesel
DOWN Max
Grade
A A
Mod
A
M/u
A
Mod
M/u
B BL
G
H H
M/u
N N
M/u
Richmond to: - - - - - - - - - - - - - - -
Caulfield (See footnote – b) 1in63 1100 1130? 990 960 1600b 660 590 1140
Westall (See footnote – b) 1in54 1250 1130 1015 1620b 740 670b 1300
Dandenong 1in183 2800 2520 1940 1620 1300 1170 2490
Pakenham 1in51 910 1130? 820 760 1850 560 500 2490
UP
Pakenham to - - - - - - - - - - - - - - -
Dandenong 1in110 1900 1050 1710 1530 2910 1190 1070 2260
Westall 1in76 1220 1050 1220 1000 2180 860 770 1370
Caulfield 1in78 1900 1050 1710 1440 2500 1000 900 1980
Richmond 1in130 2390 1050 2150 1830 3600 1430 1280 2470
Diesel
DOWN Max
Grade
P
T
P
T
M/u
S
X
GM
XR Y Y
M/u
Richmond to: - - - - - - - - - - - - - - -
Caulfield (See footnote – b) 1in63 660 590b 1040b 1600b 455 410
Westall (See footnote – b) 1in54 740 670b 1190b 1620b 455 410
Dandenong 1in183 1300 1170 2590 1620 980 880
Pakenham 1in51 560 500 900 1850 405 360
UP
Pakenham to: - - - - - - - - - - - - - - -
Dandenong 1in110 1190 1070 1900 2910 730 660
Westall 1in76 860 770 1240 2180 680 610
Caulfield 1in78 1000 900 1780 2500 810 730
Richmond 1in130 1430 1280 2260 3600 1100 990
NOTES: b – Block Quarry Trains up to 1700 tonnes may be hauled Flinders Street to Westall Apex Quarry Siding by one G or XR Class locomotive and up to 1650
tonnes by combinations of X and T, or S and T Class locomotives.
Continued South Yarra to Sandringham – Page A 98. Continued Caulfield to Stony Point – Page A 97. Continued Dandenong to Cranbourne – Page A 96.
Metro Melbourne - System Description [WTT Addenda] A 95 19/09/2013
DANDENONG TO CRANBOURNE
Continued from page A 94.
MAXIMUM VEHICLE WEIGHTS Dandenong to Cranbourne ......................................................................................................................... Category 1(see page A 112).
RULING GRADE LOADS Electric Steam
DOWN Max
Grade
EMU
EMU
Pres.
E L A2 D3 J K R Y
Dandenong to: - - - Haul - - - - - - - - - - -
Lyndhurst Level NA 355 680 430 375 560 480 615 375
Cranbourne 1in50 NA 125 355 680 430 375 560 480 615 375
UP
Cranbourne to: - - - Haul - - - - - - - - - - -
Lyndhurst Level NA 815 1520 1015 880 1250 1130 1250 880
Dandenong 1in119 NA 215 815 1520 1015 880 1250 1130 1250 880
Diesel
DOWN
Max
Grade
A
A
M/u
A
Mod
M/u
B BL
G
H H
M/u
N
N
M/u
Dandenong to: - - - - - - - - - - - - - - -
Lyndhurst Level 3800 3800 3000 3800 2410 2170 3800
Cranbourne 1in50 1200 1200 1050 1680 850 760 1250
UP
Cranbourne to: - - - - - - - - - - - - - - -
Lyndhurst Level 3800 3800 3800 3800 3590 3230 3800
Dandenong 1in119 3800 3800 3800 3800 2960 2660 3800
Diesel
DOWN
Max
Grade
P
T
P
T
M/u
S
X
GM
XR Y
Y
M/u
Dandenong to: - - - - - - - - - - - - - - -
Lyndhurst Level 2410 2170 3800 3800 1750 1580
Cranbourne 1in50 850 760 1140 1680 600 540
UP
Cranbourne to: - - - - - - - - - - - - - - -
Lyndhurst Level 3590 3230 3800 3800 2540 2290
Dandenong 1in119 2960 2660 3800 3800 1690 1520
Metro Melbourne - System Description [WTT Addenda] A 96 19/09/2013
CAULFIELD TO STONY POINT
Continued from page A 94.
MAXIMUM VEHICLE WEIGHTS Caulfield to Stony Point .............................................................................................................................. Category 1 (see page A 112)
RULING GRADE LOADS Electric Steam
DOWN Max
Grade
EMU
EMU
Pres.
E L A2 D3 J K R Y
Caulfield to: - - - Haul - - - - - - - - - - -
Moorabbin 1in50 NA 125 510 1220 650 565 800 725 885 565
Cheltenham 1in__ NA 510 1220 650 565 800 725 885 565
Mordialloc 1in__ NA 510 1220 650 565 800 725 885 565
Frankston 1in__ NA 580 1220 845 735 1045 945 1190 735
Somerville 1in50 NA NA NA NA 350 305 405 390 400 305
Long Island Junction 1in66 NA NA NA NA 415 360 490 465 500 360
Stony Point 1in50 NA NA NA NA 480 420 575 540 590 420
UP
Stony Point to: - - - Haul - - - - - - - - - - -
Long Island Junctiom 1in50 NA NA NA NA 350 305 405 390 400 305
Somerville 1in50 NA NA NA NA 550 480 665 615 680 480
Frankston 1in50 NA NA NA NA 350 305 405 390 400 305
Mordialloc 1in__ NA 815 1520 845 735 1045 945 1190 735
Moorabbin 1in__ NA 495 1220 410 355 475 460 480 355
Caulfield 1in50 NA 125 495 1220 410 355 475 460 480 355
Diesel
DOWN Max
Grade
A
A
M/u
A
Mod
M/u
B BL
G
H H
M/u
N N
M/u
Caulfield to: - - - - - - - - - - - - - - -
Moorabbin 1in50 1000 900 1830 1690 660 590 2030
Cheltenham 1in__ 1000 900 1830 1690 1525 1525 2030
Mordialloc 1in__ 1000 900 1830 1690 1525 1525 2030
Frankston 1in__ 1000 900 1830 1690 1525 1525 2030
Somerville 1in50 1000 900 720 1690 600 600 1050
Long Island Junction 1in66 1000 900 720 1690 1000 1000 1700
Stony Point 1in50 1000 900 1120 NA 690 690 1400
UP
Stony Point to: - - - - - - - - - - - - - - -
Long Island Junction 1in50 850 850 760 NA 510 510 915
Somerville 1in50 1000 900 760 1690 510 510 1050
Frankston 1in50 1000 900 780 1690 600 540 1050
Mordialloc 1in__ 1550 1400 1830 1690 1120 1120 1830
Moorabbin 1in__ 1550 1400 1830 1690 1120 1120 1830
Caulfield 1in50 1550 1400 1830 1690 1120 1120 1830
Diesel
DOWN Max
Grade
P
T
P
T
M/u
S
X
GM
XR Y Y
M/u
Caulfield to: - - - - - - - - - - - - - - -
Moorabbin 1in50 660 590 2030 1690 660 660
Cheltenham 1in__ 1525 1525 2030 1690 815 815
Mordialloc 1in__ 1525 1525 2030 1690 1015 1015
Frankston 1in__ 1525 1525 2030 1690 1015 1015
Somerville 1in50 600 540 970 1690 365 365
Long Island Junction 1in66 1000 1000 1700 1690 700 700
Stony Point 1in50 690 690 1400 NA 510 510
UP
Stony Point to: - - - - - - - - - - - - - - -
Long Island Junction 1in50 510 510 915 NA 865? 865?
Somerville 1in50 510 510 970 1690 865? 865?
Frankston 1in50 600 540 970 1690 365 365
Mordialloc 1in__ 1120 920 1830 1690 530 530
Moorabbin 1in__ 1120 920 1830 1690 530 530
Caulfield 1in50 1120 920 1830 1690 530 530
Metro Melbourne - System Description [WTT Addenda] A 97 19/09/2013
SOUTH YARRA TO SANDRINGHAM
Continued from page A 94.
MAXIMUM VEHICLE WEIGHTS South Yarra to Sandringham ..................................................................................................................... Category 2 (see page A 112)
RULING GRADE LOADS Electric Steam
DOWN Max
Grade
EMU
EMU
Pres.
E L A2 D3 J K R Y
South Yarra to: - - - Haul - - - - - - - - - - -
Sandringham 1in93 NA 125 620 1220 NA 600 855 770 NA 600
UP
Sandringham to: - - - Haul - - - - - - - - - - -
South Yarra 1in100 NA 215 620 1220 NA 600 855 770 NA 600
Diesel
DOWN
Max
Grade
A
A
M/u
A
Mod
M/u
B BL
G
G
Mod
H H
M/u
N
N
M/u
South Yarra to: - - - - - - - - - - - - - - -
Sandringham 1in93 2060 1850 1830 NA NA 1270 1270 2135
UP
Sandringham to: - - - - - - - - - - - - - - -
South Yarra 1in100 1550 1400 1830 NA NA 1525 1525 1760
Diesel
DOWN
Max
Grade
P
T
P
T
M/u
S
X
GM
XR Y
Y
M/u
Y
Mod
Y
Mod
M/u
South Yarra to: - - - - - - - - - - - - - - -
Sandringham 1in93 1270 1270 1860 NA 610 610
UP
Sandringham to: - - - - - - - - - - - - - - -
South Yarra 1in100 1525 1525 1760 NA 1015 1015
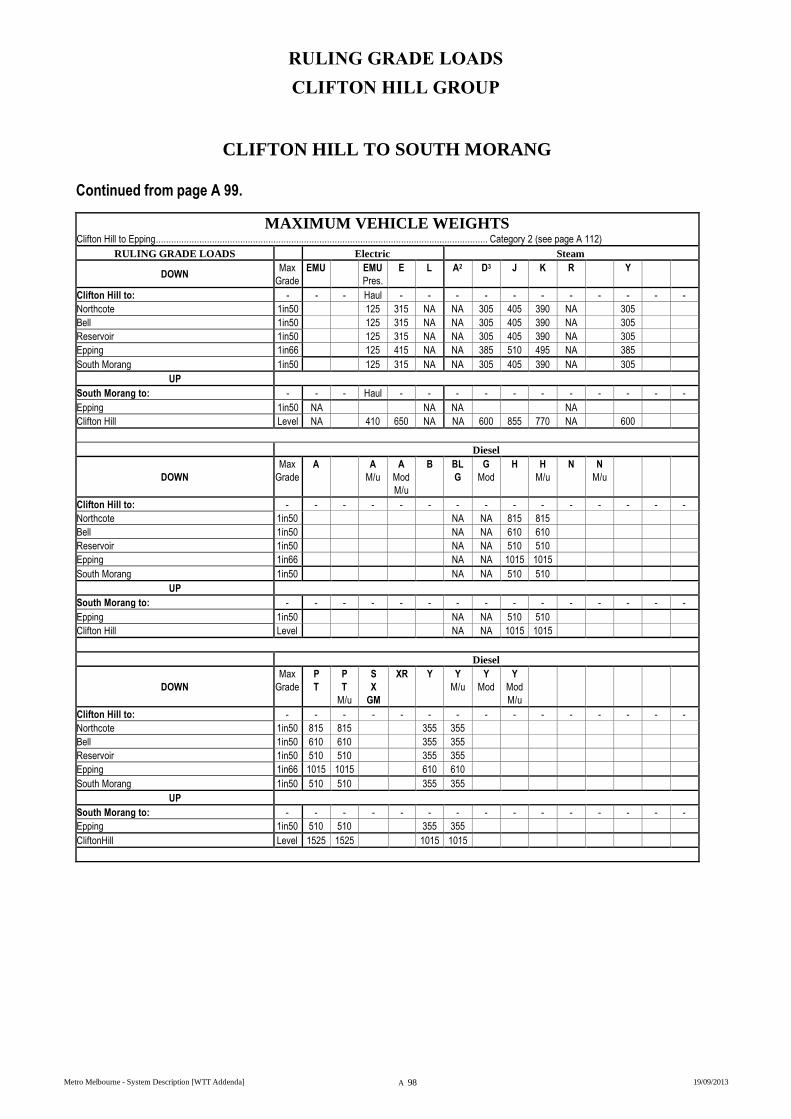
RULING GRADE LOADS
CLIFTON HILL GROUP
Metro Melbourne - System Description [WTT Addenda] A 98 19/09/2013
CLIFTON HILL TO SOUTH MORANG
Continued from page A 99.
MAXIMUM VEHICLE WEIGHTS Clifton Hill to Epping .................................................................................................................................. Category 2 (see page A 112)
RULING GRADE LOADS Electric Steam
DOWN Max
Grade
EMU
EMU
Pres.
E L A2 D3 J K R Y
Clifton Hill to: - - - Haul - - - - - - - - - - -
Northcote 1in50 125 315 NA NA 305 405 390 NA 305
Bell 1in50 125 315 NA NA 305 405 390 NA 305
Reservoir 1in50 125 315 NA NA 305 405 390 NA 305
Epping 1in66 125 415 NA NA 385 510 495 NA 385
South Morang 1in50 125 315 NA NA 305 405 390 NA 305
UP
South Morang to: - - - Haul - - - - - - - - - - -
Epping 1in50 NA NA NA NA
Clifton Hill Level NA 410 650 NA NA 600 855 770 NA 600
Diesel
DOWN
Max
Grade
A
A
M/u
A
Mod
M/u
B BL
G
G
Mod
H H
M/u
N
N
M/u
Clifton Hill to: - - - - - - - - - - - - - - -
Northcote 1in50 NA NA 815 815
Bell 1in50 NA NA 610 610
Reservoir 1in50 NA NA 510 510
Epping 1in66 NA NA 1015 1015
South Morang 1in50 NA NA 510 510
UP
South Morang to: - - - - - - - - - - - - - - -
Epping 1in50 NA NA 510 510
Clifton Hill Level NA NA 1015 1015
Diesel
DOWN
Max
Grade
P
T
P
T
M/u
S
X
GM
XR Y
Y
M/u
Y
Mod
Y
Mod
M/u
Clifton Hill to: - - - - - - - - - - - - - - -
Northcote 1in50 815 815 355 355
Bell 1in50 610 610 355 355
Reservoir 1in50 510 510 355 355
Epping 1in66 1015 1015 610 610
South Morang 1in50 510 510 355 355
UP
South Morang to: - - - - - - - - - - - - - - -
Epping 1in50 510 510 355 355
CliftonHill Level 1525 1525 1015 1015
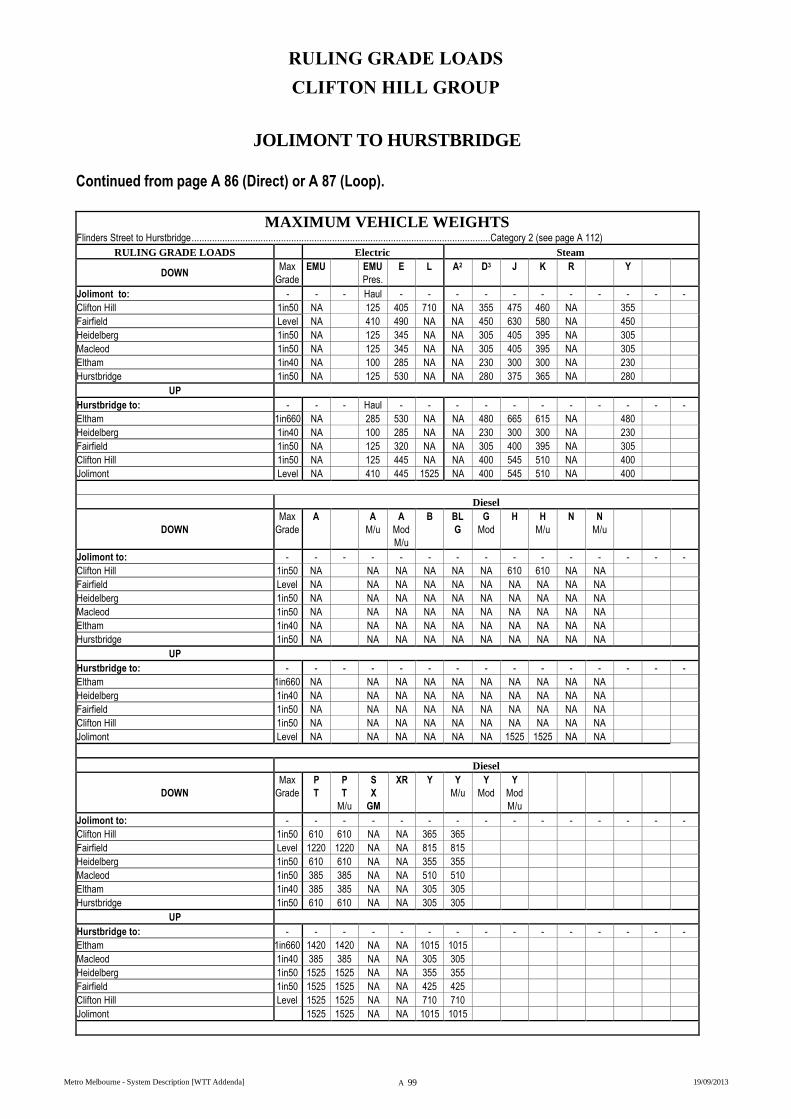
RULING GRADE LOADS
CLIFTON HILL GROUP
Metro Melbourne - System Description [WTT Addenda] A 99 19/09/2013
JOLIMONT TO HURSTBRIDGE
Continued from page A 86 (Direct) or A 87 (Loop).
MAXIMUM VEHICLE WEIGHTS
Flinders Street to Hurstbridge .....................................................................................................................Category 2 (see page A 112)
RULING GRADE LOADS Electric Steam
DOWN Max
Grade
EMU
EMU
Pres.
E L A2 D3 J K R Y
Jolimont to: - - - Haul - - - - - - - - - - -
Clifton Hill 1in50 NA 125 405 710 NA 355 475 460 NA 355
Fairfield Level NA 410 490 NA NA 450 630 580 NA 450
Heidelberg 1in50 NA 125 345 NA NA 305 405 395 NA 305
Macleod 1in50 NA 125 345 NA NA 305 405 395 NA 305
Eltham 1in40 NA 100 285 NA NA 230 300 300 NA 230
Hurstbridge 1in50 NA 125 530 NA NA 280 375 365 NA 280
UP
Hurstbridge to: - - - Haul - - - - - - - - - - -
Eltham 1in660 NA 285 530 NA NA 480 665 615 NA 480
Heidelberg 1in40 NA 100 285 NA NA 230 300 300 NA 230
Fairfield 1in50 NA 125 320 NA NA 305 400 395 NA 305
Clifton Hill 1in50 NA 125 445 NA NA 400 545 510 NA 400
Jolimont Level NA 410 445 1525 NA 400 545 510 NA 400
Diesel
DOWN
Max
Grade
A
A
M/u
A
Mod
M/u
B BL
G
G
Mod
H H
M/u
N
N
M/u
Jolimont to: - - - - - - - - - - - - - - -
Clifton Hill 1in50 NA NA NA NA NA NA 610 610 NA NA
Fairfield Level NA NA NA NA NA NA NA NA NA NA
Heidelberg 1in50 NA NA NA NA NA NA NA NA NA NA
Macleod 1in50 NA NA NA NA NA NA NA NA NA NA
Eltham 1in40 NA NA NA NA NA NA NA NA NA NA
Hurstbridge 1in50 NA NA NA NA NA NA NA NA NA NA
UP
Hurstbridge to: - - - - - - - - - - - - - - -
Eltham 1in660 NA NA NA NA NA NA NA NA NA NA
Heidelberg 1in40 NA NA NA NA NA NA NA NA NA NA
Fairfield 1in50 NA NA NA NA NA NA NA NA NA NA
Clifton Hill 1in50 NA NA NA NA NA NA NA NA NA NA
Jolimont Level NA NA NA NA NA NA 1525 1525 NA NA
Diesel
DOWN
Max
Grade
P
T
P
T
M/u
S
X
GM
XR Y
Y
M/u
Y
Mod
Y
Mod
M/u
Jolimont to: - - - - - - - - - - - - - - -
Clifton Hill 1in50 610 610 NA NA 365 365
Fairfield Level 1220 1220 NA NA 815 815
Heidelberg 1in50 610 610 NA NA 355 355
Macleod 1in50 385 385 NA NA 510 510
Eltham 1in40 385 385 NA NA 305 305
Hurstbridge 1in50 610 610 NA NA 305 305
UP
Hurstbridge to: - - - - - - - - - - - - - - -
Eltham 1in660 1420 1420 NA NA 1015 1015
Macleod 1in40 385 385 NA NA 305 305
Heidelberg 1in50 1525 1525 NA NA 355 355
Fairfield 1in50 1525 1525 NA NA 425 425
Clifton Hill Level 1525 1525 NA NA 710 710
Jolimont 1525 1525 NA NA 1015 1015
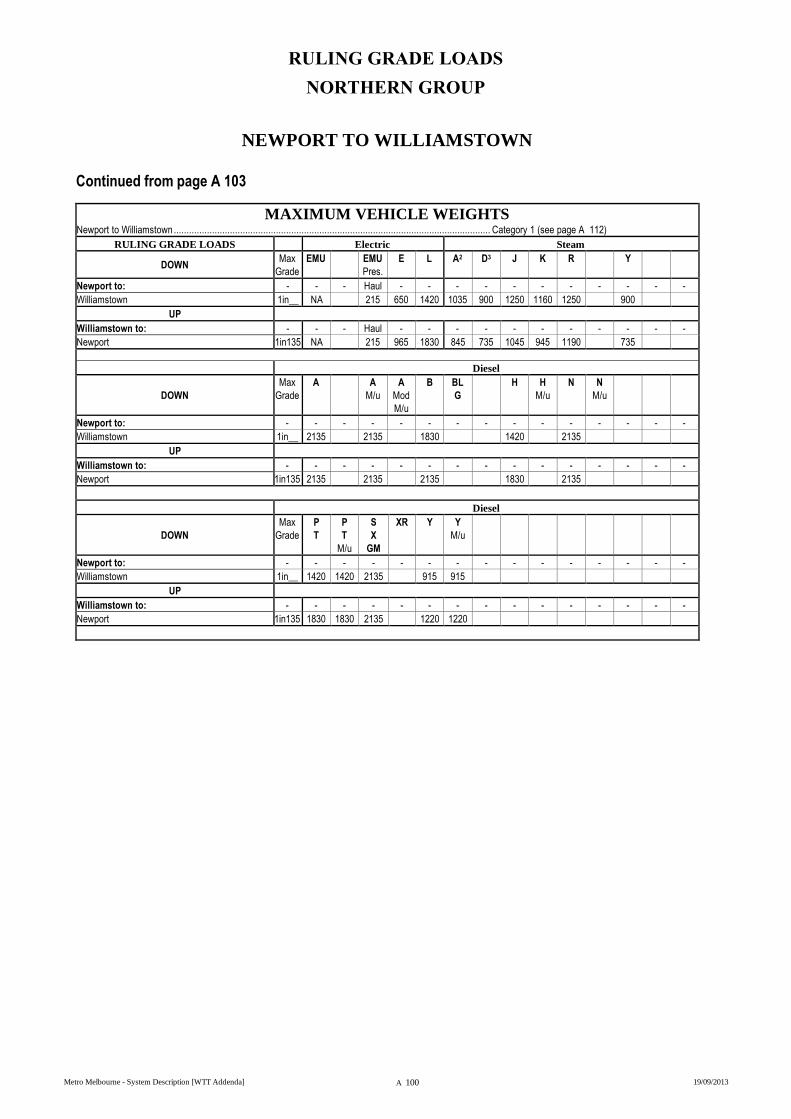
RULING GRADE LOADS
NORTHERN GROUP
Metro Melbourne - System Description [WTT Addenda] A 100 19/09/2013
NEWPORT TO WILLIAMSTOWN
Continued from page A 103
MAXIMUM VEHICLE WEIGHTS Newport to Williamstown ............................................................................................................................ Category 1 (see page A 112)
RULING GRADE LOADS Electric Steam
DOWN Max
Grade
EMU
EMU
Pres.
E L A2 D3 J K R Y
Newport to: - - - Haul - - - - - - - - - - -
Williamstown 1in__ NA 215 650 1420 1035 900 1250 1160 1250 900
UP
Williamstown to: - - - Haul - - - - - - - - - - -
Newport 1in135 NA 215 965 1830 845 735 1045 945 1190 735
Diesel
DOWN
Max
Grade
A
A
M/u
A
Mod
M/u
B BL
G
H H
M/u
N
N
M/u
Newport to: - - - - - - - - - - - - - - -
Williamstown 1in__ 2135 2135 1830 1420 2135
UP
Williamstown to: - - - - - - - - - - - - - - -
Newport 1in135 2135 2135 2135 1830 2135
Diesel
DOWN
Max
Grade
P
T
P
T
M/u
S
X
GM
XR Y
Y
M/u
Newport to: - - - - - - - - - - - - - - -
Williamstown 1in__ 1420 1420 2135 915 915
UP
Williamstown to: - - - - - - - - - - - - - - -
Newport 1in135 1830 1830 2135 1220 1220
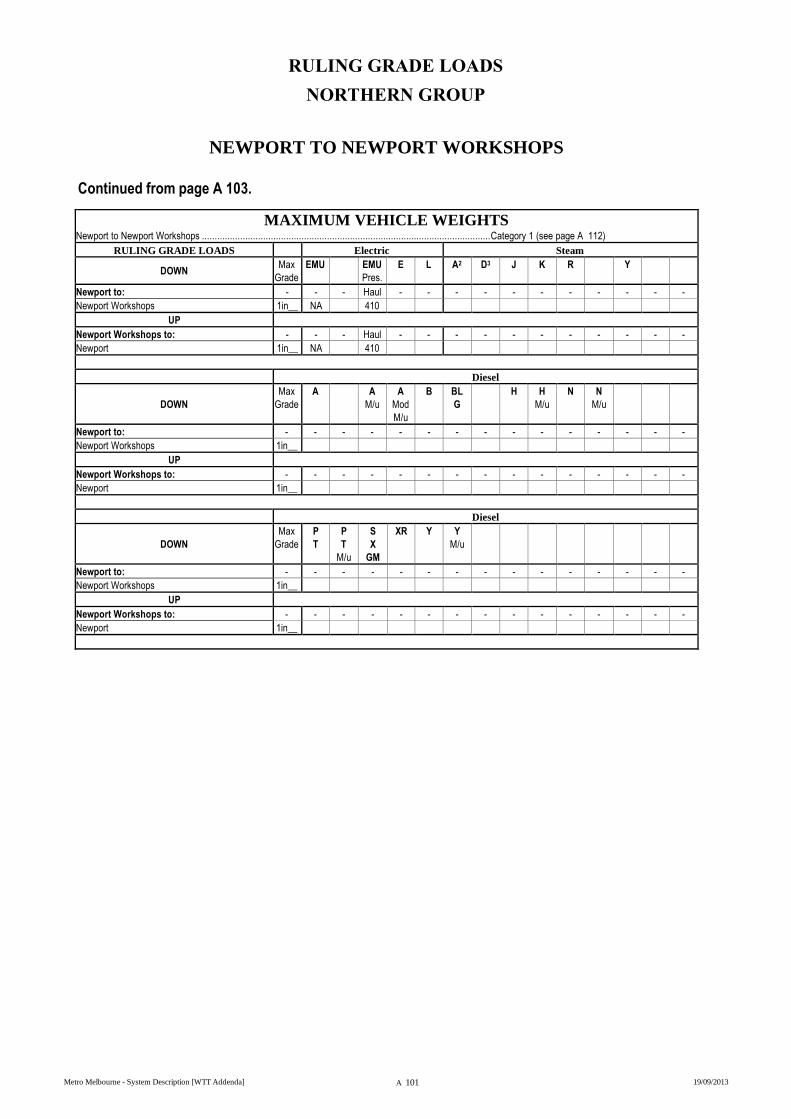
RULING GRADE LOADS
NORTHERN GROUP
Metro Melbourne - System Description [WTT Addenda] A 101 19/09/2013
NEWPORT TO NEWPORT WORKSHOPS
Continued from page A 103.
MAXIMUM VEHICLE WEIGHTS Newport to Newport Workshops ................................................................................................................. Category 1 (see page A 112)
RULING GRADE LOADS Electric Steam
DOWN Max
Grade
EMU
EMU
Pres.
E L A2 D3 J K R Y
Newport to: - - - Haul - - - - - - - - - - -
Newport Workshops 1in__ NA 410
UP
Newport Workshops to: - - - Haul - - - - - - - - - - -
Newport 1in__ NA 410
Diesel
DOWN
Max
Grade
A
A
M/u
A
Mod
M/u
B BL
G
H H
M/u
N
N
M/u
Newport to: - - - - - - - - - - - - - - -
Newport Workshops 1in__
UP
Newport Workshops to: - - - - - - - - - - - - - - -
Newport 1in__
Diesel
DOWN
Max
Grade
P
T
P
T
M/u
S
X
GM
XR Y
Y
M/u
Newport to: - - - - - - - - - - - - - - -
Newport Workshops 1in__
UP
Newport Workshops to: - - - - - - - - - - - - - - -
Newport 1in__
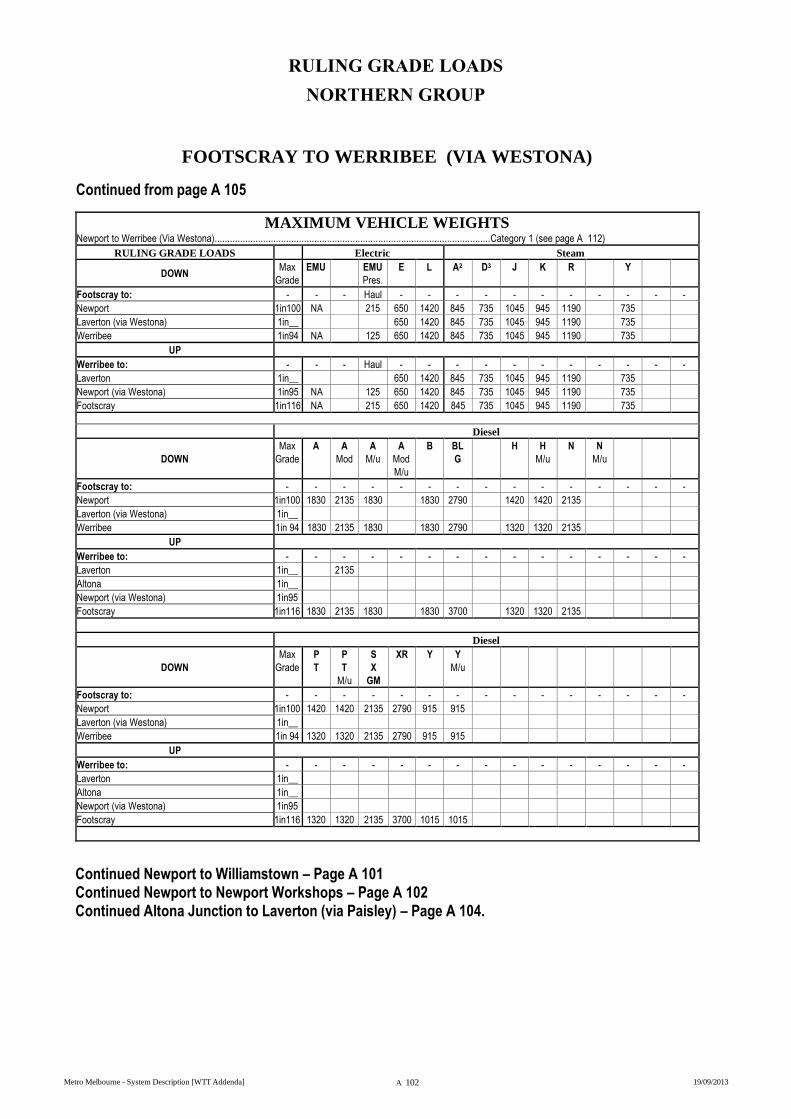
RULING GRADE LOADS
NORTHERN GROUP
Metro Melbourne - System Description [WTT Addenda] A 102 19/09/2013
FOOTSCRAY TO WERRIBEE (VIA WESTONA)
Continued from page A 105
MAXIMUM VEHICLE WEIGHTS Newport to Werribee (Via Westona)............................................................................................................Category 1 (see page A 112)
RULING GRADE LOADS Electric Steam
DOWN Max
Grade
EMU
EMU
Pres.
E L A2 D3 J K R Y
Footscray to: - - - Haul - - - - - - - - - - -
Newport 1in100 NA 215 650 1420 845 735 1045 945 1190 735
Laverton (via Westona) 1in__ 650 1420 845 735 1045 945 1190 735
Werribee 1in94 NA 125 650 1420 845 735 1045 945 1190 735
UP
Werribee to: - - - Haul - - - - - - - - - - -
Laverton 1in__ 650 1420 845 735 1045 945 1190 735
Newport (via Westona) 1in95 NA 125 650 1420 845 735 1045 945 1190 735
Footscray 1in116 NA 215 650 1420 845 735 1045 945 1190 735
Diesel
DOWN
Max
Grade
A
A
Mod
A
M/u
A
Mod
M/u
B BL
G
H H
M/u
N
N
M/u
Footscray to: - - - - - - - - - - - - - - -
Newport 1in100 1830 2135 1830 1830 2790 1420 1420 2135
Laverton (via Westona) 1in__
Werribee 1in 94 1830 2135 1830 1830 2790 1320 1320 2135
UP
Werribee to: - - - - - - - - - - - - - - -
Laverton 1in__ 2135
Altona 1in__
Newport (via Westona) 1in95
Footscray 1in116 1830 2135 1830 1830 3700 1320 1320 2135
Diesel
DOWN
Max
Grade
P
T
P
T
M/u
S
X
GM
XR Y
Y
M/u
Footscray to: - - - - - - - - - - - - - - -
Newport 1in100 1420 1420 2135 2790 915 915
Laverton (via Westona) 1in__
Werribee 1in 94 1320 1320 2135 2790 915 915
UP
Werribee to: - - - - - - - - - - - - - - -
Laverton 1in__
Altona 1in__
Newport (via Westona) 1in95
Footscray 1in116 1320 1320 2135 3700 1015 1015
Continued Newport to Williamstown – Page A 101 Continued Newport to Newport Workshops – Page A 102 Continued Altona Junction to Laverton (via Paisley) – Page A 104.
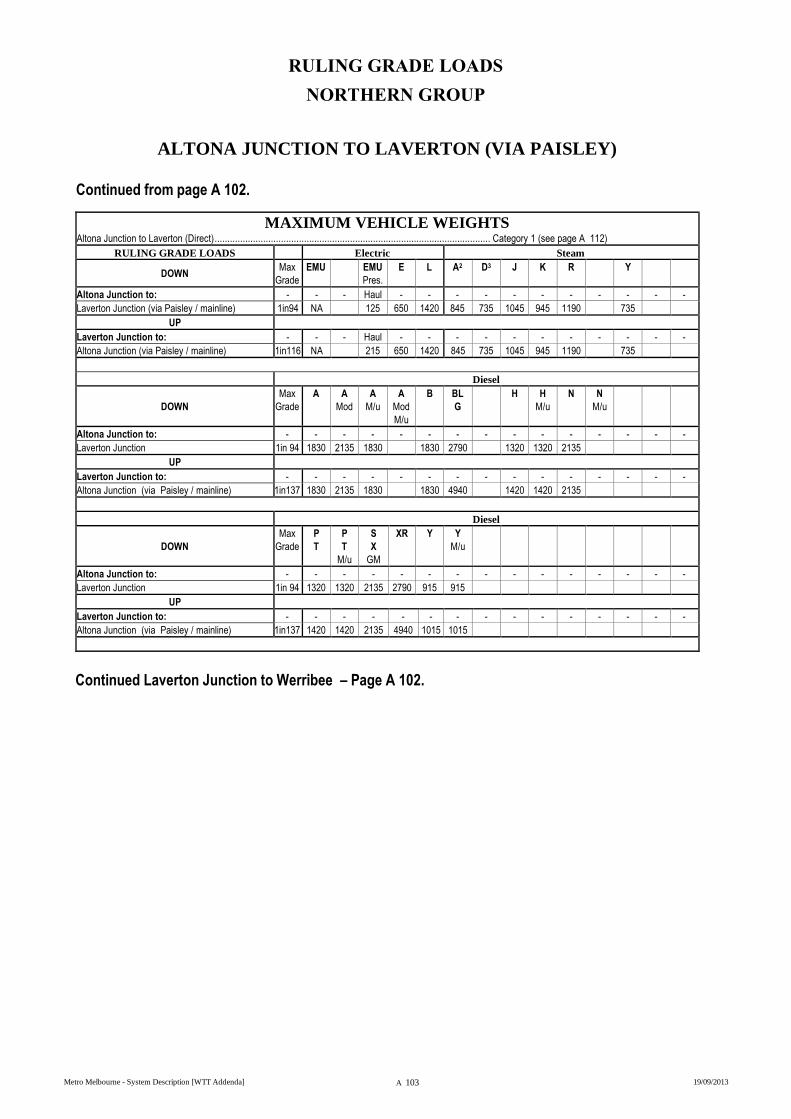
RULING GRADE LOADS
NORTHERN GROUP
Metro Melbourne - System Description [WTT Addenda] A 103 19/09/2013
ALTONA JUNCTION TO LAVERTON (VIA PAISLEY)
Continued from page A 102.
MAXIMUM VEHICLE WEIGHTS Altona Junction to Laverton (Direct) ............................................................................................................ Category 1 (see page A 112)
RULING GRADE LOADS Electric Steam
DOWN Max
Grade
EMU
EMU
Pres.
E L A2 D3 J K R Y
Altona Junction to: - - - Haul - - - - - - - - - - -
Laverton Junction (via Paisley / mainline) 1in94 NA 125 650 1420 845 735 1045 945 1190 735
UP
Laverton Junction to: - - - Haul - - - - - - - - - - -
Altona Junction (via Paisley / mainline) 1in116 NA 215 650 1420 845 735 1045 945 1190 735
Diesel
DOWN
Max
Grade
A
A
Mod
A
M/u
A
Mod
M/u
B BL
G
H H
M/u
N
N
M/u
Altona Junction to: - - - - - - - - - - - - - - -
Laverton Junction 1in 94 1830 2135 1830 1830 2790 1320 1320 2135
UP
Laverton Junction to: - - - - - - - - - - - - - - -
Altona Junction (via Paisley / mainline) 1in137 1830 2135 1830 1830 4940 1420 1420 2135
Diesel
DOWN
Max
Grade
P
T
P
T
M/u
S
X
GM
XR Y
Y
M/u
Altona Junction to: - - - - - - - - - - - - - - -
Laverton Junction 1in 94 1320 1320 2135 2790 915 915
UP
Laverton Junction to: - - - - - - - - - - - - - - -
Altona Junction (via Paisley / mainline) 1in137 1420 1420 2135 4940 1015 1015
Continued Laverton Junction to Werribee – Page A 102.
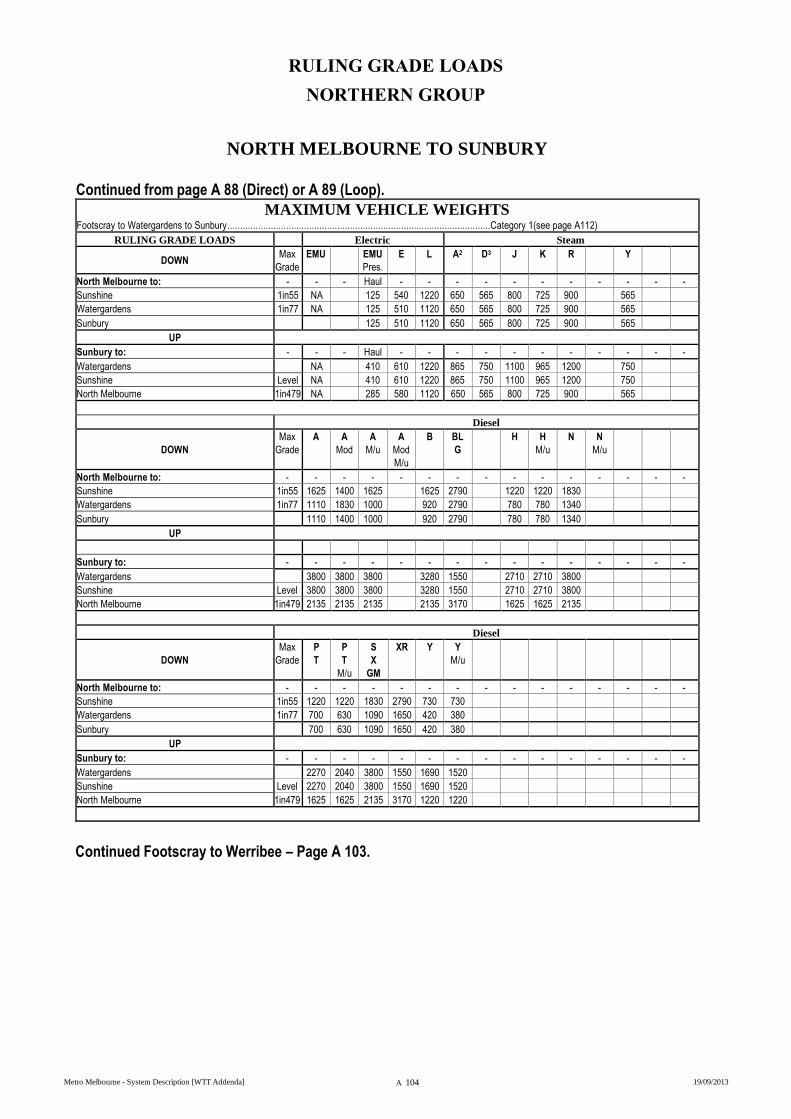
RULING GRADE LOADS
NORTHERN GROUP
Metro Melbourne - System Description [WTT Addenda] A 104 19/09/2013
NORTH MELBOURNE TO SUNBURY
Continued from page A 88 (Direct) or A 89 (Loop).
MAXIMUM VEHICLE WEIGHTS Footscray to Watergardens to Sunbury .......................................................................................................Category 1(see page A112)
RULING GRADE LOADS Electric Steam
DOWN Max
Grade
EMU
EMU
Pres.
E L A2 D3 J K R Y
North Melbourne to: - - - Haul - - - - - - - - - - -
Sunshine 1in55 NA 125 540 1220 650 565 800 725 900 565
Watergardens 1in77 NA 125 510 1120 650 565 800 725 900 565
Sunbury 125 510 1120 650 565 800 725 900 565
UP
Sunbury to: - - - Haul - - - - - - - - - - -
Watergardens NA 410 610 1220 865 750 1100 965 1200 750
Sunshine Level NA 410 610 1220 865 750 1100 965 1200 750
North Melbourne 1in479 NA 285 580 1120 650 565 800 725 900 565
Diesel
DOWN
Max
Grade
A
A
Mod
A
M/u
A
Mod
M/u
B BL
G
H H
M/u
N
N
M/u
North Melbourne to: - - - - - - - - - - - - - - -
Sunshine 1in55 1625 1400 1625 1625 2790 1220 1220 1830
Watergardens 1in77 1110 1830 1000 920 2790 780 780 1340
Sunbury 1110 1400 1000 920 2790 780 780 1340
UP
Sunbury to: - - - - - - - - - - - - - - -
Watergardens 3800 3800 3800 3280 1550 2710 2710 3800
Sunshine Level 3800 3800 3800 3280 1550 2710 2710 3800
North Melbourne 1in479 2135 2135 2135 2135 3170 1625 1625 2135
Diesel
DOWN
Max
Grade
P
T
P
T
M/u
S
X
GM
XR Y
Y
M/u
North Melbourne to: - - - - - - - - - - - - - - -
Sunshine 1in55 1220 1220 1830 2790 730 730
Watergardens 1in77 700 630 1090 1650 420 380
Sunbury 700 630 1090 1650 420 380
UP
Sunbury to: - - - - - - - - - - - - - - -
Watergardens 2270 2040 3800 1550 1690 1520
Sunshine Level 2270 2040 3800 1550 1690 1520
North Melbourne 1in479 1625 1625 2135 3170 1220 1220
Continued Footscray to Werribee – Page A 103.
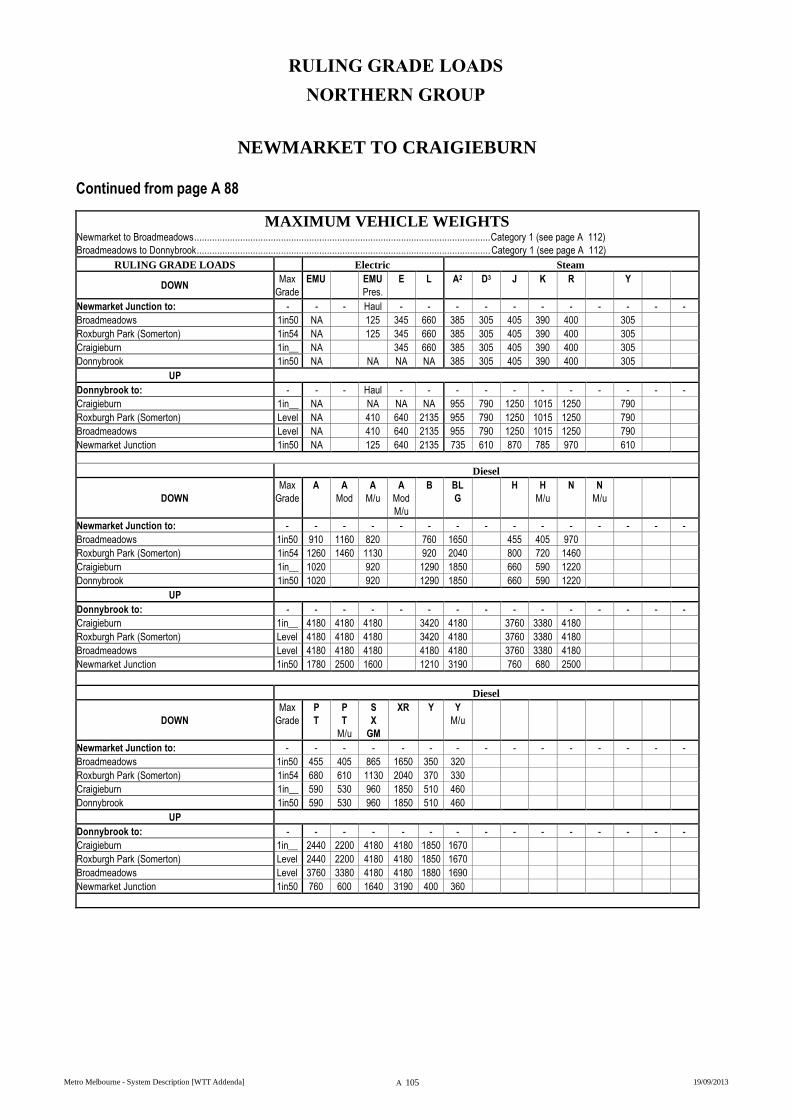
RULING GRADE LOADS
NORTHERN GROUP
Metro Melbourne - System Description [WTT Addenda] A 105 19/09/2013
NEWMARKET TO CRAIGIEBURN
Continued from page A 88
MAXIMUM VEHICLE WEIGHTS Newmarket to Broadmeadows .................................................................................................................... Category 1 (see page A 112)
Broadmeadows to Donnybrook ................................................................................................................... Category 1 (see page A 112)
RULING GRADE LOADS Electric Steam
DOWN Max
Grade
EMU
EMU
Pres.
E L A2 D3 J K R Y
Newmarket Junction to: - - - Haul - - - - - - - - - - -
Broadmeadows 1in50 NA 125 345 660 385 305 405 390 400 305
Roxburgh Park (Somerton) 1in54 NA 125 345 660 385 305 405 390 400 305
Craigieburn 1in__ NA 345 660 385 305 405 390 400 305
Donnybrook 1in50 NA NA NA NA 385 305 405 390 400 305
UP
Donnybrook to: - - - Haul - - - - - - - - - - -
Craigieburn 1in__ NA NA NA NA 955 790 1250 1015 1250 790
Roxburgh Park (Somerton) Level NA 410 640 2135 955 790 1250 1015 1250 790
Broadmeadows Level NA 410 640 2135 955 790 1250 1015 1250 790
Newmarket Junction 1in50 NA 125 640 2135 735 610 870 785 970 610
Diesel
DOWN
Max
Grade
A
A
Mod
A
M/u
A
Mod
M/u
B BL
G
H H
M/u
N
N
M/u
Newmarket Junction to: - - - - - - - - - - - - - - -
Broadmeadows 1in50 910 1160 820 760 1650 455 405 970
Roxburgh Park (Somerton) 1in54 1260 1460 1130 920 2040 800 720 1460
Craigieburn 1in__ 1020 920 1290 1850 660 590 1220
Donnybrook 1in50 1020 920 1290 1850 660 590 1220
UP
Donnybrook to: - - - - - - - - - - - - - - -
Craigieburn 1in__ 4180 4180 4180 3420 4180 3760 3380 4180
Roxburgh Park (Somerton) Level 4180 4180 4180 3420 4180 3760 3380 4180
Broadmeadows Level 4180 4180 4180 4180 4180 3760 3380 4180
Newmarket Junction 1in50 1780 2500 1600 1210 3190 760 680 2500
Diesel
DOWN
Max
Grade
P
T
P
T
M/u
S
X
GM
XR Y
Y
M/u
Newmarket Junction to: - - - - - - - - - - - - - - -
Broadmeadows 1in50 455 405 865 1650 350 320
Roxburgh Park (Somerton) 1in54 680 610 1130 2040 370 330
Craigieburn 1in__ 590 530 960 1850 510 460
Donnybrook 1in50 590 530 960 1850 510 460
UP
Donnybrook to: - - - - - - - - - - - - - - -
Craigieburn 1in__ 2440 2200 4180 4180 1850 1670
Roxburgh Park (Somerton) Level 2440 2200 4180 4180 1850 1670
Broadmeadows Level 3760 3380 4180 4180 1880 1690
Newmarket Junction 1in50 760 600 1640 3190 400 360

RULING GRADE LOADS
NORTHERN GROUP
Metro Melbourne - System Description [WTT Addenda] A 106 19/09/2013
NORTH MELBOURNE TO UPFIELD
Continued from page A 88 (Direct) or A 89 (Loop).
MAXIMUM VEHICLE WEIGHTS North Melbourne to Macaulay ..................................................................................................................... Category 1(see page A112)
Macaulay to Royal Park.............................................................................................................................. Category 2 (see page A 112)
Royal Park to Upfield.................................................................................................................................. Category 1(see page A112)
RULING GRADE LOADS Electric Steam
DOWN Max
Grade
EMU
EMU
Pres.
E L A2 D3 J K R Y
North Melbourne to: - - - Haul - - - - - - - - - - -
Arden Street 1in__ NA 345 660 310 270 360 350 NA 270
Jewell 1in50 NA 125 345 660 NA 270 360 350 NA 270
Moreland 1in126 NA 215 580 1120 NA 340 455 435 NA 340
Coburg 1in150 NA 215 580 1120 390 340 455 435 NA 340
Fawkner 1in50 NA 125 415 865 425 365 495 470 NA 365
Upfield 1in50 NA 125 345 660 350 305 405 395 NA 305
UP
Upfield to: - - - Haul - - - - - - - - - - -
Jewell 1in50 NA 125 580 1120 NA 600 855 770 NA 600
Arden Street 1in125 NA 215 580 1120 NA 600 855 770 NA 600
North Melbourne 1in125 NA 215 580 1120 680 600 855 770 NA 600
Diesel
DOWN
Max
Grade
A A
M/u
A
Mod
M/u
B BL
G
H
H
M/u
N
N
M/u
North Melbourne to: - - - - - - - - - - - - - - -
Arden Street 1in__ 1830 1650 1830 3700 1320 1190 2135
Jewell 1in50 NA NA NA NA NA NA NA NA
Moreland 1in126 NA NA NA NA NA NA NA NA
Coburg 1in150 NA NA NA NA NA NA NA NA
Fawkner 1in50 NA NA NA NA NA NA NA NA
Upfield 1in50 NA NA NA NA NA NA NA NA
UP
Upfield to: - - - - - - - - - - - - - - -
Jewell 1in50 4180 4180 4180 NA 3760 3760 4180
Arden Street 1in125 NA NA NA NA NA NA NA NA
North Melbourne 1in125 1830 1650 1830 3700 1320 1190 2135
Diesel
DOWN
Max
Grade
P
T
P
T
M/u
S
X
GM
XR Y Y
M/u
North Melbourne to: - - - - - - - - - - - - - - -
Arden Street 1in__ 1320 1190 2135 3700 1015 920
Jewell 1in50 510 510 NA NA 280 280
Moreland 1in126 1220 1220 NA NA 760 760
Coburg 1in150 1220 1220 NA NA 915 915
Fawkner 1in50 760 760 NA NA 490 490
Upfield 1in50 510 510 NA NA 280 250
UP
Upfield to: - - - - - - - - - - - - - - -
Jewell 1in50 3760 3670 4180 NA 1880 1690
Arden Street 1in125 1625 1625 NA NA 865 865
North Melbourne 1in125 1320 1190 2135 3700 1015 920
Ruling Grade Loads for Electric and Steam Locomotives supplied by Steamrail Victoria.
RULING GRADE LOADS
NORTHERN GROUP
Metro Melbourne - System Description [WTT Addenda] A 107 19/09/2013
BLANK PAGE
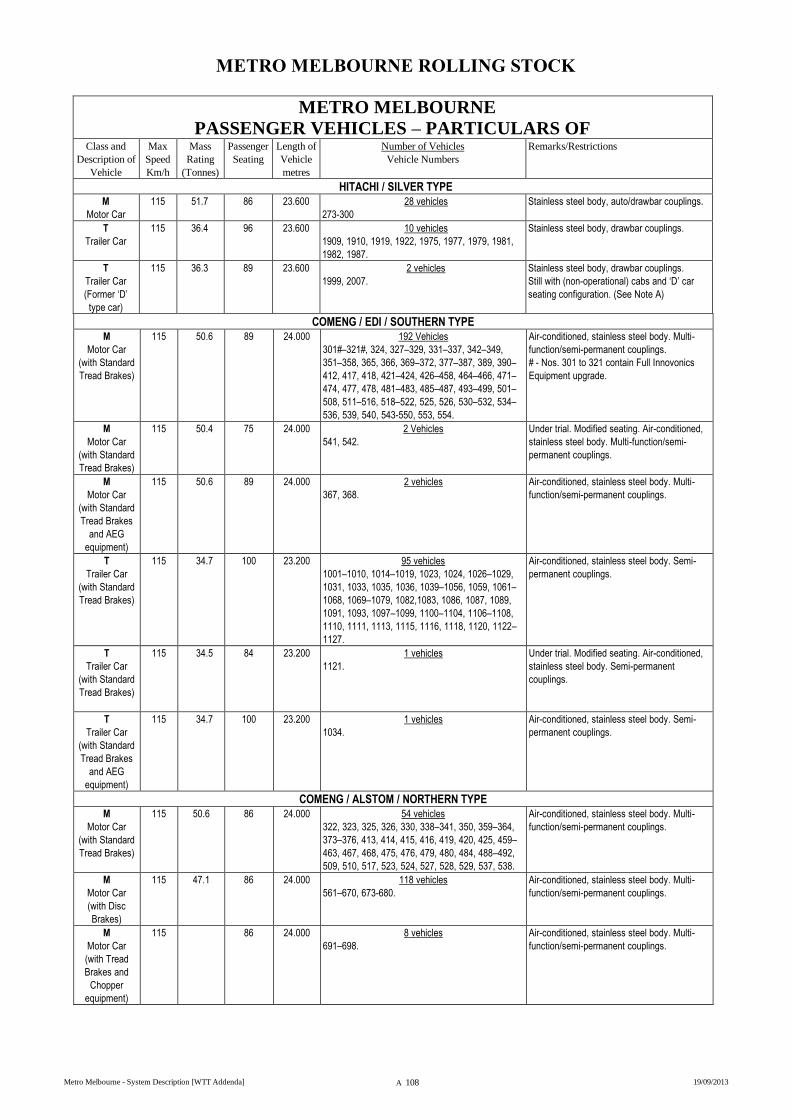
METRO MELBOURNE ROLLING STOCK
Metro Melbourne - System Description [WTT Addenda] A 108 19/09/2013
METRO MELBOURNE
PASSENGER VEHICLES – PARTICULARS OF
Class and
Description of
Vehicle
Max
Speed
Km/h
Mass
Rating
(Tonnes)
Passenger
Seating
Length of
Vehicle
metres
Number of Vehicles
Vehicle Numbers
Remarks/Restrictions
HITACHI / SILVER TYPE M
Motor Car
115 51.7 86 23.600 28 vehicles
273-300
Stainless steel body, auto/drawbar couplings.
T
Trailer Car
115 36.4 96 23.600 10 vehicles
1909, 1910, 1919, 1922, 1975, 1977, 1979, 1981,
1982, 1987.
Stainless steel body, drawbar couplings.
T
Trailer Car
(Former ‘D’
type car)
115 36.3 89 23.600 2 vehicles
1999, 2007.
Stainless steel body, drawbar couplings.
Still with (non-operational) cabs and ‘D’ car
seating configuration. (See Note A)
COMENG / EDI / SOUTHERN TYPE M
Motor Car
(with Standard
Tread Brakes)
115 50.6 89 24.000 192 Vehicles
301#–321#, 324, 327–329, 331–337, 342–349,
351–358, 365, 366, 369–372, 377–387, 389, 390–
412, 417, 418, 421–424, 426–458, 464–466, 471–
474, 477, 478, 481–483, 485–487, 493–499, 501–
508, 511–516, 518–522, 525, 526, 530–532, 534–
536, 539, 540, 543-550, 553, 554.
Air-conditioned, stainless steel body. Multi-
function/semi-permanent couplings.
# - Nos. 301 to 321 contain Full Innovonics
Equipment upgrade.
M
Motor Car
(with Standard
Tread Brakes)
115 50.4 75 24.000 2 Vehicles
541, 542.
Under trial. Modified seating. Air-conditioned,
stainless steel body. Multi-function/semi-
permanent couplings.
M
Motor Car
(with Standard
Tread Brakes
and AEG
equipment)
115 50.6 89 24.000 2 vehicles
367, 368.
Air-conditioned, stainless steel body. Multi-
function/semi-permanent couplings.
T
Trailer Car
(with Standard
Tread Brakes)
115 34.7 100 23.200 95 vehicles
1001–1010, 1014–1019, 1023, 1024, 1026–1029,
1031, 1033, 1035, 1036, 1039–1056, 1059, 1061–
1068, 1069–1079, 1082,1083, 1086, 1087, 1089,
1091, 1093, 1097–1099, 1100–1104, 1106–1108,
1110, 1111, 1113, 1115, 1116, 1118, 1120, 1122–
1127.
Air-conditioned, stainless steel body. Semi-
permanent couplings.
T
Trailer Car
(with Standard
Tread Brakes)
115 34.5 84 23.200 1 vehicles
1121.
Under trial. Modified seating. Air-conditioned,
stainless steel body. Semi-permanent
couplings.
T
Trailer Car
(with Standard
Tread Brakes
and AEG
equipment)
115 34.7 100 23.200 1 vehicles
1034.
Air-conditioned, stainless steel body. Semi-
permanent couplings.
COMENG / ALSTOM / NORTHERN TYPE M
Motor Car
(with Standard
Tread Brakes)
115 50.6 86 24.000 54 vehicles
322, 323, 325, 326, 330, 338–341, 350, 359–364,
373–376, 413, 414, 415, 416, 419, 420, 425, 459–
463, 467, 468, 475, 476, 479, 480, 484, 488–492,
509, 510, 517, 523, 524, 527, 528, 529, 537, 538.
Air-conditioned, stainless steel body. Multi-
function/semi-permanent couplings.
M
Motor Car
(with Disc
Brakes)
115 47.1 86 24.000 118 vehicles
561–670, 673-680.
Air-conditioned, stainless steel body. Multi-
function/semi-permanent couplings.
M
Motor Car
(with Tread
Brakes and
Chopper
equipment)
115 86 24.000 8 vehicles
691–698.
Air-conditioned, stainless steel body. Multi-
function/semi-permanent couplings.
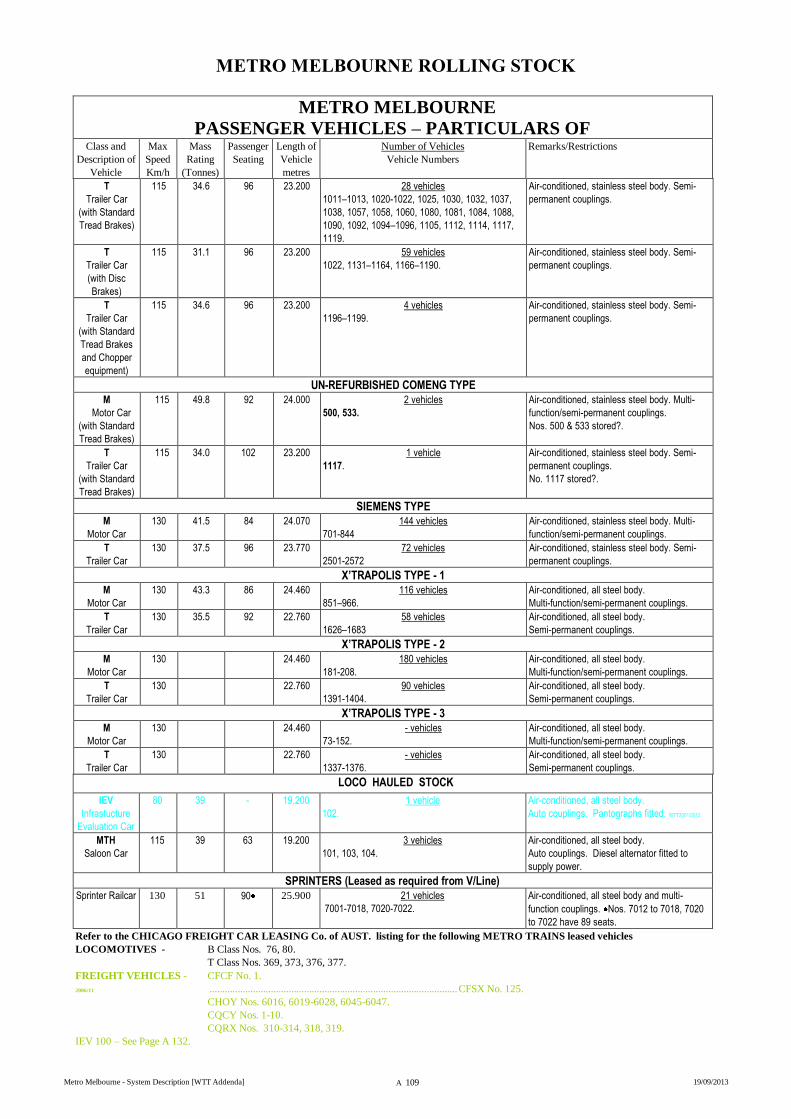
METRO MELBOURNE ROLLING STOCK
Metro Melbourne - System Description [WTT Addenda] A 109 19/09/2013
METRO MELBOURNE
PASSENGER VEHICLES – PARTICULARS OF
Class and
Description of
Vehicle
Max
Speed
Km/h
Mass
Rating
(Tonnes)
Passenger
Seating
Length of
Vehicle
metres
Number of Vehicles
Vehicle Numbers
Remarks/Restrictions
T
Trailer Car
(with Standard
Tread Brakes)
115 34.6 96 23.200 28 vehicles
1011–1013, 1020-1022, 1025, 1030, 1032, 1037,
1038, 1057, 1058, 1060, 1080, 1081, 1084, 1088,
1090, 1092, 1094–1096, 1105, 1112, 1114, 1117,
1119.
Air-conditioned, stainless steel body. Semi-
permanent couplings.
T
Trailer Car
(with Disc
Brakes)
115 31.1 96 23.200 59 vehicles
1022, 1131–1164, 1166–1190.
Air-conditioned, stainless steel body. Semi-
permanent couplings.
T
Trailer Car
(with Standard
Tread Brakes
and Chopper
equipment)
115 34.6 96 23.200 4 vehicles
1196–1199.
Air-conditioned, stainless steel body. Semi-
permanent couplings.
UN-REFURBISHED COMENG TYPE M
Motor Car
(with Standard
Tread Brakes)
115 49.8 92 24.000 2 vehicles
500, 533.
Air-conditioned, stainless steel body. Multi-
function/semi-permanent couplings.
Nos. 500 & 533 stored?.
T
Trailer Car
(with Standard
Tread Brakes)
115 34.0 102 23.200 1 vehicle
1117.
Air-conditioned, stainless steel body. Semi-
permanent couplings.
No. 1117 stored?.
SIEMENS TYPE M
Motor Car
130 41.5 84 24.070 144 vehicles
701-844
Air-conditioned, stainless steel body. Multi-
function/semi-permanent couplings.
T
Trailer Car
130 37.5 96 23.770 72 vehicles
2501-2572
Air-conditioned, stainless steel body. Semi-
permanent couplings.
X’TRAPOLIS TYPE - 1 M
Motor Car
130 43.3 86 24.460 116 vehicles
851–966.
Air-conditioned, all steel body.
Multi-function/semi-permanent couplings.
T
Trailer Car
130 35.5 92 22.760 58 vehicles
1626–1683
Air-conditioned, all steel body.
Semi-permanent couplings.
X’TRAPOLIS TYPE - 2 M
Motor Car
130 24.460 180 vehicles
181-208.
Air-conditioned, all steel body.
Multi-function/semi-permanent couplings.
T
Trailer Car
130 22.760 90 vehicles
1391-1404.
Air-conditioned, all steel body.
Semi-permanent couplings.
X’TRAPOLIS TYPE - 3
M
Motor Car
130 24.460 - vehicles
73-152.
Air-conditioned, all steel body.
Multi-function/semi-permanent couplings.
T
Trailer Car
130 22.760 - vehicles
1337-1376.
Air-conditioned, all steel body.
Semi-permanent couplings.
LOCO HAULED STOCK
IEV
Infrastucture
Evaluation Car
80 39 - 19.200 1 vehicle
102.
Air-conditioned, all steel body.
Auto couplings. Pantographs fitted. WTT2001/2012
MTH
Saloon Car
115 39 63 19.200 3 vehicles
101, 103, 104.
Air-conditioned, all steel body.
Auto couplings. Diesel alternator fitted to
supply power.
SPRINTERS (Leased as required from V/Line) Sprinter Railcar
130 51 90
25.900 21 vehicles
7001-7018, 7020-7022.
Air-conditioned, all steel body and multi-
function couplings. Nos. 7012 to 7018, 7020
to 7022 have 89 seats.
Refer to the CHICAGO FREIGHT CAR LEASING Co. of AUST. listing for the following METRO TRAINS leased vehicles
LOCOMOTIVES - B Class Nos. 76, 80.
T Class Nos. 369, 373, 376, 377.
FREIGHT VEHICLES - CFCF No. 1.
2006/11 ................................................................................................. CFSX No. 125.
CHOY Nos. 6016, 6019-6028, 6045-6047.
CQCY Nos. 1-10.
CQRX Nos. 310-314, 318, 319.
IEV 100 – See Page A 132.
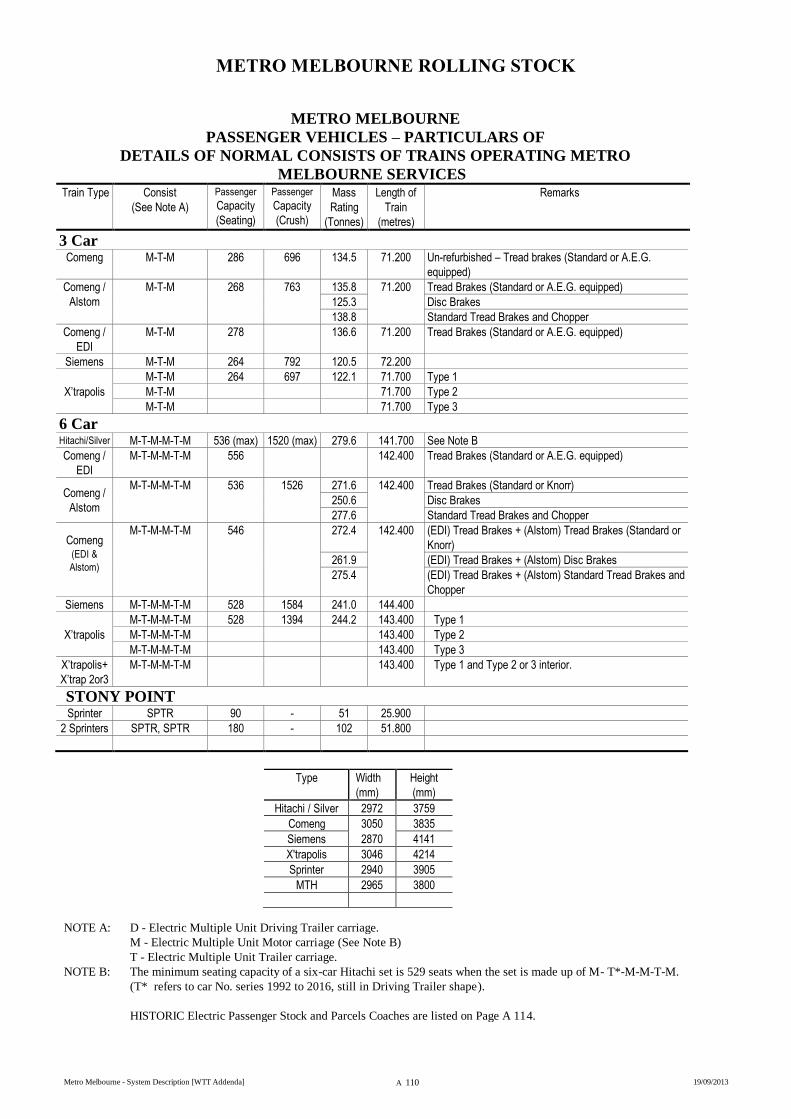
METRO MELBOURNE ROLLING STOCK
Metro Melbourne - System Description [WTT Addenda] A 110 19/09/2013
METRO MELBOURNE
PASSENGER VEHICLES – PARTICULARS OF
DETAILS OF NORMAL CONSISTS OF TRAINS OPERATING METRO
MELBOURNE SERVICES Train Type Consist
(See Note A)
Passenger
Capacity
(Seating)
Passenger
Capacity
(Crush)
Mass
Rating
(Tonnes)
Length of
Train
(metres)
Remarks
3 Car Comeng M-T-M 286 696 134.5 71.200 Un-refurbished – Tread brakes (Standard or A.E.G.
equipped)
Comeng /
Alstom
M-T-M 268 763 135.8 71.200 Tread Brakes (Standard or A.E.G. equipped)
125.3 Disc Brakes
138.8 Standard Tread Brakes and Chopper
Comeng /
EDI
M-T-M 278 136.6 71.200 Tread Brakes (Standard or A.E.G. equipped)
Siemens M-T-M 264 792 120.5 72.200
X’trapolis
M-T-M 264 697 122.1 71.700 Type 1
M-T-M 71.700 Type 2
M-T-M 71.700 Type 3
6 Car Hitachi/Silver M-T-M-M-T-M 536 (max) 1520 (max) 279.6 141.700 See Note B
Comeng /
EDI
M-T-M-M-T-M 556 142.400 Tread Brakes (Standard or A.E.G. equipped)
Comeng /
Alstom
M-T-M-M-T-M 536 1526 271.6 142.400 Tread Brakes (Standard or Knorr)
250.6 Disc Brakes
277.6 Standard Tread Brakes and Chopper
Comeng (EDI &
Alstom)
M-T-M-M-T-M 546 272.4 142.400 (EDI) Tread Brakes + (Alstom) Tread Brakes (Standard or
Knorr)
261.9 (EDI) Tread Brakes + (Alstom) Disc Brakes
275.4 (EDI) Tread Brakes + (Alstom) Standard Tread Brakes and
Chopper
Siemens M-T-M-M-T-M 528 1584 241.0 144.400
X’trapolis
M-T-M-M-T-M 528 1394 244.2 143.400 Type 1
M-T-M-M-T-M 143.400 Type 2
M-T-M-M-T-M 143.400 Type 3
X’trapolis+
X’trap 2or3
M-T-M-M-T-M 143.400 Type 1 and Type 2 or 3 interior.
STONY POINT
Sprinter SPTR 90 - 51 25.900
2 Sprinters SPTR, SPTR 180 - 102 51.800
Type Width
(mm)
Height
(mm)
Hitachi / Silver 2972 3759
Comeng 3050 3835
Siemens 2870 4141
X'trapolis 3046 4214
Sprinter 2940 3905
MTH 2965 3800
NOTE A: D - Electric Multiple Unit Driving Trailer carriage.
M - Electric Multiple Unit Motor carriage (See Note B)
T - Electric Multiple Unit Trailer carriage.
NOTE B: The minimum seating capacity of a six-car Hitachi set is 529 seats when the set is made up of M- T*-M-M-T-M.
(T* refers to car No. series 1992 to 2016, still in Driving Trailer shape).
HISTORIC Electric Passenger Stock and Parcels Coaches are listed on Page A 114.
VEHICLES AUTHORISED TO OPERATE OVER THE METRO MELBOURNE LEASED
NETWORK
Metro Melbourne - System Description [WTT Addenda] A 111 19/09/2013
* All Locomotives, Carriages, Wagons and Track Machines listed in this section are subject to being authorised by
the General Manager, Operations Services to operate once fleet infrastructure and safety requirements have been
met on the Metro Melbourne Network. Before running on the Metro Melbourne Network all vehicles must be
authorised and accredited by Metro Melbourne for operation.
ANY VEHICLE OR FREIGHT VEHICLE CLASS NOT LISTED IN THIS SECTION IS NOT
PERMITTED TO OPERATE ON METRO MELBOURNE LEASED TRACKS WITHOUT BEING
AUTHORISED BY THE APPROPRIATE METRO MELBOURNE CIRCULAR OR THE MANAGER
FLEET, METRO MELBOURNE.
LINE CATEGORIES FOR VEHICLE WEIGHTS Category 1: Diesel locomotives are limited to a maximum axle load weight of 23 tonnes and a gross weight of 130 tonnes. This includes
the following diesel locomotive classes: G, B, A, N, S, X, XR, XRB, P, T, and H. Steam locomotives allowed to run include
the following classes: R, J, K, Y, and D3. The gross weight of wagons shall be 80 tonnes maximum with 20-tonne maximum
axle weights.
NOTE: BL, G, XR and XRB Class locomotives are not permitted to use the following:
1/ Tracks 1 to 6 at Flinders
Street.
2/ Between Newmarket Junction and Flemington
Racecourse.
3/ Between Long Island Junction and Stony Point.
Category 2: Diesel locomotives are limited to a maximum axle load weight of 20 tonnes and a gross weight of 80 tonnes. This includes
the following diesel locomotive classes: P, T, and H. Steam locomotives allowed to run include the following classes: J, K,
Y, and D3. The gross weight of wagons shall be 80 tonnes maximum with 20-tonne maximum axle weights.
VIGILANCE CONTROL EQUIPMENT ON LOCOMOTIVES
All locomotives operating as lead units on the Metro Melbourne running lines network must be fitted with approved Vigilance Control Equipment.
DRIVER ONLY locomotives must be fitted with operational Vigilance Control Equipment.
Locomotives not fitted with Vigilance Control Equipment will not be permitted to operate over any portion of the Metro Melbourne Network except
in the case of:- Y Class diesel electric locomotives
Victorian Historical Locomotives (including steam locomotives) not fitted with Vigilance Control Equipment.
Rail Tractors authorised to shunt on the Mainline within station limits.
RAIL TRACTORS. When Rail Tractors are hauled as part of a goods train, the following will apply:
(i) As Rail Tractors do not have an air brake, but are through piped, all instructions regarding non air-braked vehicles must be complied with.
(ii) The driving chains must be removed and placed in the cabin, the cabin doors unlocked and a card attached advising that the Rail Tractor is
not air braked.
(iii) The Rail Tractor is to be marshalled next to the locomotive and the maximum load of the train behind the Tractor will be limited to 2400
tonnes.
(iv) The maximum speed of the train will be 65 km/h.
9 foot 10 inch (3 metre) CONTAINERS 9ft 10in (3 metre) high containers are banned on the Metro Trains Melbourne Network with the exception of the Maryvale Paper Train which may
operate between Melbourne Yard and Pakenham only under the following conditions:
The hours of operation are restricted between the following times:- Sunday 19:00 and Monday 05:00. Monday to Thursday 21:00 and
05:00 next day. Friday 21:00 and 07:00 Saturday. Saturday 19:00 and Sunday 07:00.
The vehicles are restricted to a maximum speed of 40 km/h when operating between Caulfield and South Yarra in both directions.
The maximum height of any vehicle/container combination must not exceed 4192mm.
GPS transceivers are placed in the locomotive cabs for the purpose of speed monitoring. [SW.211/2013]
10 foot 6 inch (3200mm) CONTAINERS The 10ft 6in (3200mm) high containers are only permitted on the following tracks at Flinders Street:
Up and Down Sandringham lines
Via Platforms 8 & 9 and the Up and Down Special lines
Via Platforms 3 & 4 and the Up and Down Burnley Local lines
CLIFTON HILL LINE Vehicles marked © here-in are not permitted to operate between Flinders Street and Clifton Hill.
MAXIMUM LOADS OF PASSENGER TRAINS The maximum load of any Passenger Train consisting of automatic coupled vehicles only is 915 tonnes.
VEHICLES AUTHORISED TO OPERATE OVER THE METRO MELBOURNE LEASED
NETWORK
Metro Melbourne - System Description [WTT Addenda] A 112 19/09/2013
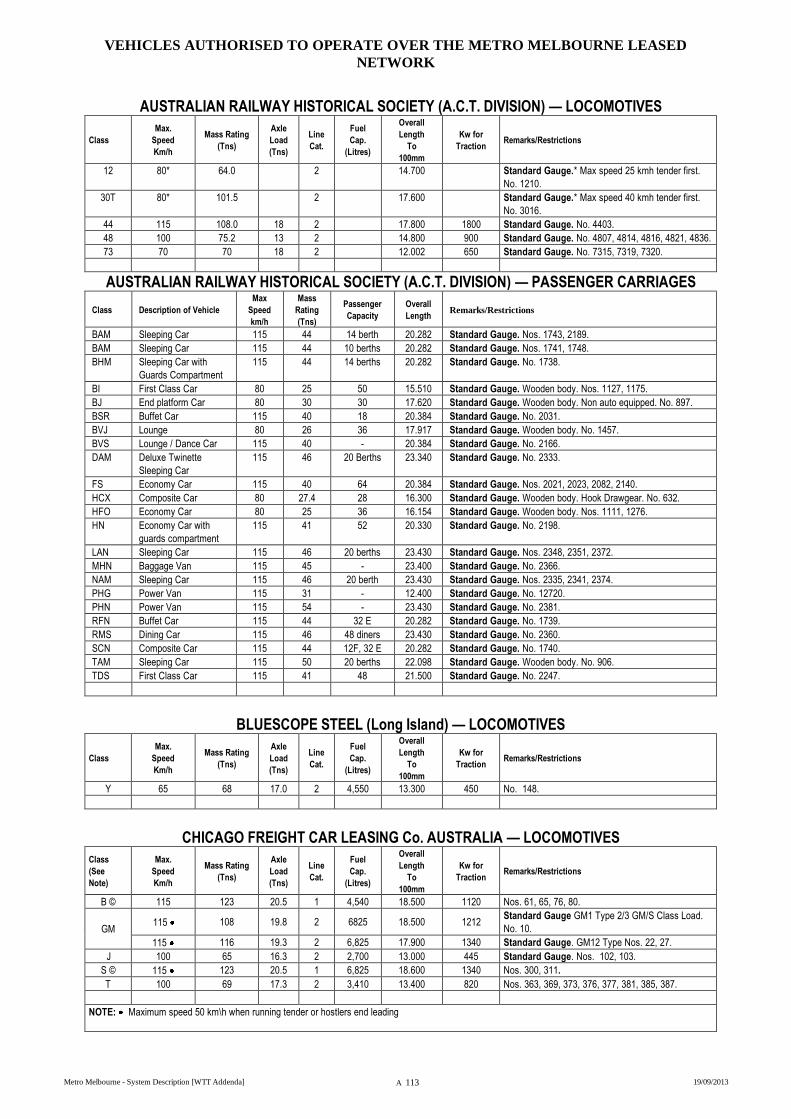
VEHICLES AUTHORISED TO OPERATE OVER THE METRO MELBOURNE LEASED
NETWORK
Metro Melbourne - System Description [WTT Addenda] A 113 19/09/2013
AUSTRALIAN RAILWAY HISTORICAL SOCIETY (A.C.T. DIVISION) — LOCOMOTIVES
Class
Max.
Speed
Km/h
Mass Rating
(Tns)
Axle
Load
(Tns)
Line
Cat.
Fuel
Cap.
(Litres)
Overall
Length
To
100mm
Kw for
Traction Remarks/Restrictions
12 80* 64.0 2 14.700 Standard Gauge.* Max speed 25 kmh tender first.
No. 1210.
30T 80* 101.5 2 17.600 Standard Gauge.* Max speed 40 kmh tender first.
No. 3016.
44 115 108.0 18 2 17.800 1800 Standard Gauge. No. 4403.
48 100 75.2 13 2 14.800 900 Standard Gauge. No. 4807, 4814, 4816, 4821, 4836.
73 70 70 18 2 12.002 650 Standard Gauge. No. 7315, 7319, 7320.
AUSTRALIAN RAILWAY HISTORICAL SOCIETY (A.C.T. DIVISION) — PASSENGER CARRIAGES
Class Description of Vehicle
Max
Speed
km/h
Mass
Rating
(Tns)
Passenger
Capacity
Overall
Length Remarks/Restrictions
BAM Sleeping Car 115 44 14 berth 20.282 Standard Gauge. Nos. 1743, 2189.
BAM Sleeping Car 115 44 10 berths 20.282 Standard Gauge. Nos. 1741, 1748.
BHM Sleeping Car with
Guards Compartment
115 44 14 berths 20.282 Standard Gauge. No. 1738.
BI First Class Car 80 25 50 15.510 Standard Gauge. Wooden body. Nos. 1127, 1175.
BJ End platform Car 80 30 30 17.620 Standard Gauge. Wooden body. Non auto equipped. No. 897.
BSR Buffet Car 115 40 18 20.384 Standard Gauge. No. 2031.
BVJ Lounge 80 26 36 17.917 Standard Gauge. Wooden body. No. 1457.
BVS Lounge / Dance Car 115 40 - 20.384 Standard Gauge. No. 2166.
DAM Deluxe Twinette
Sleeping Car
115 46 20 Berths 23.340 Standard Gauge. No. 2333.
FS Economy Car 115 40 64 20.384 Standard Gauge. Nos. 2021, 2023, 2082, 2140.
HCX Composite Car 80 27.4 28 16.300 Standard Gauge. Wooden body. Hook Drawgear. No. 632.
HFO Economy Car 80 25 36 16.154 Standard Gauge. Wooden body. Nos. 1111, 1276.
HN Economy Car with
guards compartment
115 41 52 20.330 Standard Gauge. No. 2198.
LAN Sleeping Car 115 46 20 berths 23.430 Standard Gauge. Nos. 2348, 2351, 2372.
MHN Baggage Van 115 45 - 23.400 Standard Gauge. No. 2366.
NAM Sleeping Car 115 46 20 berth 23.430 Standard Gauge. Nos. 2335, 2341, 2374.
PHG Power Van 115 31 - 12.400 Standard Gauge. No. 12720.
PHN Power Van 115 54 - 23.430 Standard Gauge. No. 2381.
RFN Buffet Car 115 44 32 E 20.282 Standard Gauge. No. 1739.
RMS Dining Car 115 46 48 diners 23.430 Standard Gauge. No. 2360.
SCN Composite Car 115 44 12F, 32 E 20.282 Standard Gauge. No. 1740.
TAM Sleeping Car 115 50 20 berths 22.098 Standard Gauge. Wooden body. No. 906.
TDS First Class Car 115 41 48 21.500 Standard Gauge. No. 2247.
BLUESCOPE STEEL (Long Island) — LOCOMOTIVES
Class
Max.
Speed
Km/h
Mass Rating
(Tns)
Axle
Load
(Tns)
Line
Cat.
Fuel
Cap.
(Litres)
Overall
Length
To
100mm
Kw for
Traction Remarks/Restrictions
Y 65 68 17.0 2 4,550 13.300 450 No. 148.
CHICAGO FREIGHT CAR LEASING Co. AUSTRALIA — LOCOMOTIVES
Class
(See
Note)
Max.
Speed
Km/h
Mass Rating
(Tns)
Axle
Load
(Tns)
Line
Cat.
Fuel
Cap.
(Litres)
Overall
Length
To
100mm
Kw for
Traction Remarks/Restrictions
B © 115 123 20.5 1 4,540 18.500 1120 Nos. 61, 65, 76, 80.
GM 115 108 19.8 2 6825 18.500 1212
Standard Gauge GM1 Type 2/3 GM/S Class Load.
No. 10.
115 116 19.3 2 6,825 17.900 1340 Standard Gauge. GM12 Type Nos. 22, 27.
J 100 65 16.3 2 2,700 13.000 445 Standard Gauge. Nos. 102, 103.
S © 115 123 20.5 1 6,825 18.600 1340 Nos. 300, 311.
T 100 69 17.3 2 3,410 13.400 820 Nos. 363, 369, 373, 376, 377, 381, 385, 387.
NOTE: Maximum speed 50 km\h when running tender or hostlers end leading
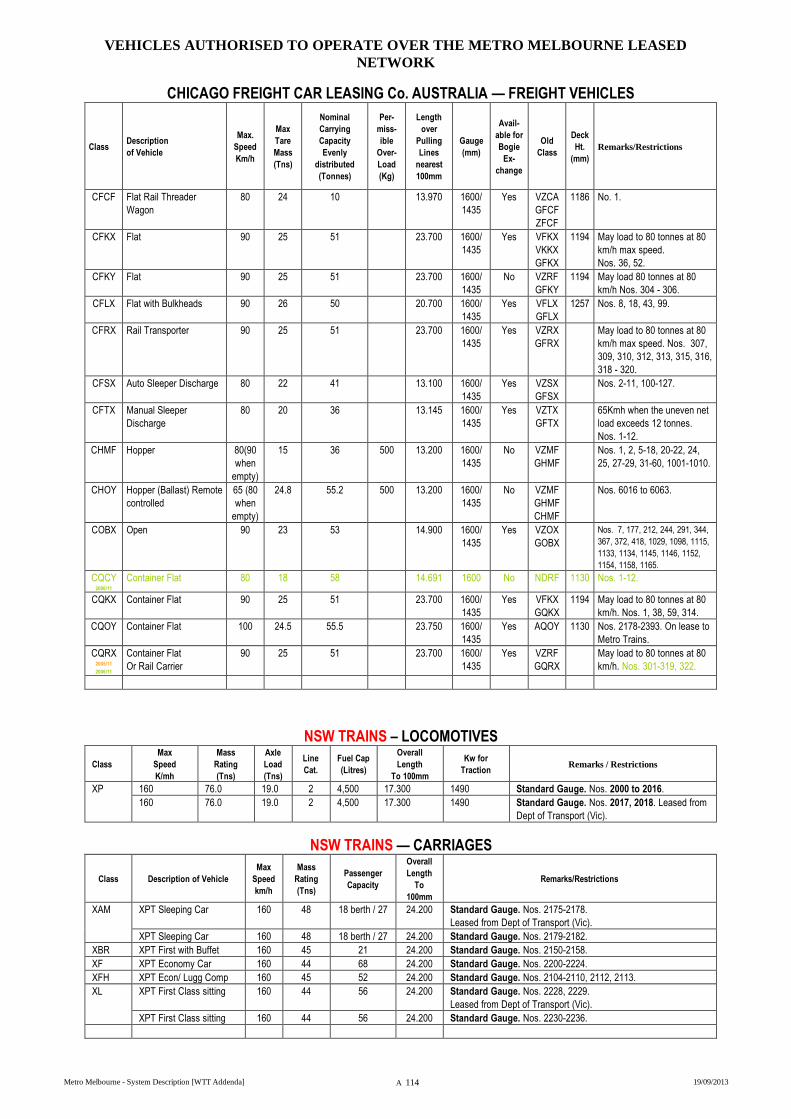
VEHICLES AUTHORISED TO OPERATE OVER THE METRO MELBOURNE LEASED
NETWORK
Metro Melbourne - System Description [WTT Addenda] A 114 19/09/2013
CHICAGO FREIGHT CAR LEASING Co. AUSTRALIA — FREIGHT VEHICLES
Class Description
of Vehicle
Max.
Speed
Km/h
Max
Tare
Mass
(Tns)
Nominal
Carrying
Capacity
Evenly
distributed
(Tonnes)
Per-
miss-
ible
Over-
Load
(Kg)
Length
over
Pulling
Lines
nearest
100mm
Gauge
(mm)
Avail-
able for
Bogie
Ex-
change
Old
Class
Deck
Ht.
(mm)
Remarks/Restrictions
CFCF Flat Rail Threader
Wagon
80 24 10 13.970 1600/
1435
Yes VZCA
GFCF
ZFCF
1186 No. 1.
CFKX Flat 90 25 51 23.700 1600/
1435
Yes VFKX
VKKX
GFKX
1194 May load to 80 tonnes at 80
km/h max speed.
Nos. 36, 52.
CFKY Flat 90 25 51 23.700 1600/
1435
No VZRF
GFKY
1194 May load 80 tonnes at 80
km/h Nos. 304 - 306.
CFLX Flat with Bulkheads 90 26 50 20.700 1600/
1435
Yes VFLX
GFLX
1257 Nos. 8, 18, 43, 99.
CFRX Rail Transporter 90 25 51 23.700 1600/
1435
Yes VZRX
GFRX
May load to 80 tonnes at 80
km/h max speed. Nos. 307,
309, 310, 312, 313, 315, 316,
318 - 320.
CFSX Auto Sleeper Discharge 80 22 41 13.100 1600/
1435
Yes VZSX
GFSX
Nos. 2-11, 100-127.
CFTX Manual Sleeper
Discharge
80 20 36 13.145 1600/
1435
Yes VZTX
GFTX
65Kmh when the uneven net
load exceeds 12 tonnes.
Nos. 1-12.
CHMF Hopper 80(90
when
empty)
15 36 500 13.200 1600/
1435
No VZMF
GHMF
Nos. 1, 2, 5-18, 20-22, 24,
25, 27-29, 31-60, 1001-1010.
CHOY Hopper (Ballast) Remote
controlled
65 (80
when
empty)
24.8 55.2 500 13.200 1600/
1435
No VZMF
GHMF
CHMF
Nos. 6016 to 6063.
COBX Open 90 23 53 14.900 1600/
1435
Yes VZOX
GOBX
Nos. 7, 177, 212, 244, 291, 344,
367, 372, 418, 1029, 1098, 1115,
1133, 1134, 1145, 1146, 1152,
1154, 1158, 1165.
CQCY 2006/11
Container Flat 80 18 58 14.691 1600 No NDRF 1130 Nos. 1-12.
CQKX Container Flat 90 25 51 23.700 1600/
1435
Yes VFKX
GQKX
1194 May load to 80 tonnes at 80
km/h. Nos. 1, 38, 59, 314.
CQOY Container Flat 100 24.5 55.5 23.750 1600/
1435
Yes AQOY 1130 Nos. 2178-2393. On lease to
Metro Trains.
CQRX 2005/11
2006/11
Container Flat
Or Rail Carrier
90 25 51 23.700 1600/
1435
Yes VZRF
GQRX
May load to 80 tonnes at 80
km/h. Nos. 301-319, 322.
NSW TRAINS – LOCOMOTIVES
Class
Max
Speed
K/mh
Mass
Rating
(Tns)
Axle
Load
(Tns)
Line
Cat.
Fuel Cap
(Litres)
Overall
Length
To 100mm
Kw for
Traction Remarks / Restrictions
XP 160 76.0 19.0 2 4,500 17.300 1490 Standard Gauge. Nos. 2000 to 2016.
160 76.0 19.0 2 4,500 17.300 1490 Standard Gauge. Nos. 2017, 2018. Leased from
Dept of Transport (Vic).
NSW TRAINS — CARRIAGES
Class Description of Vehicle
Max
Speed
km/h
Mass
Rating
(Tns)
Passenger
Capacity
Overall
Length
To
100mm
Remarks/Restrictions
XAM XPT Sleeping Car 160 48 18 berth / 27 24.200 Standard Gauge. Nos. 2175-2178.
Leased from Dept of Transport (Vic).
XPT Sleeping Car 160 48 18 berth / 27 24.200 Standard Gauge. Nos. 2179-2182.
XBR XPT First with Buffet 160 45 21 24.200 Standard Gauge. Nos. 2150-2158.
XF XPT Economy Car 160 44 68 24.200 Standard Gauge. Nos. 2200-2224.
XFH XPT Econ/ Lugg Comp 160 45 52 24.200 Standard Gauge. Nos. 2104-2110, 2112, 2113.
XL XPT First Class sitting 160 44 56 24.200 Standard Gauge. Nos. 2228, 2229.
Leased from Dept of Transport (Vic).
XPT First Class sitting 160 44 56 24.200 Standard Gauge. Nos. 2230-2236.
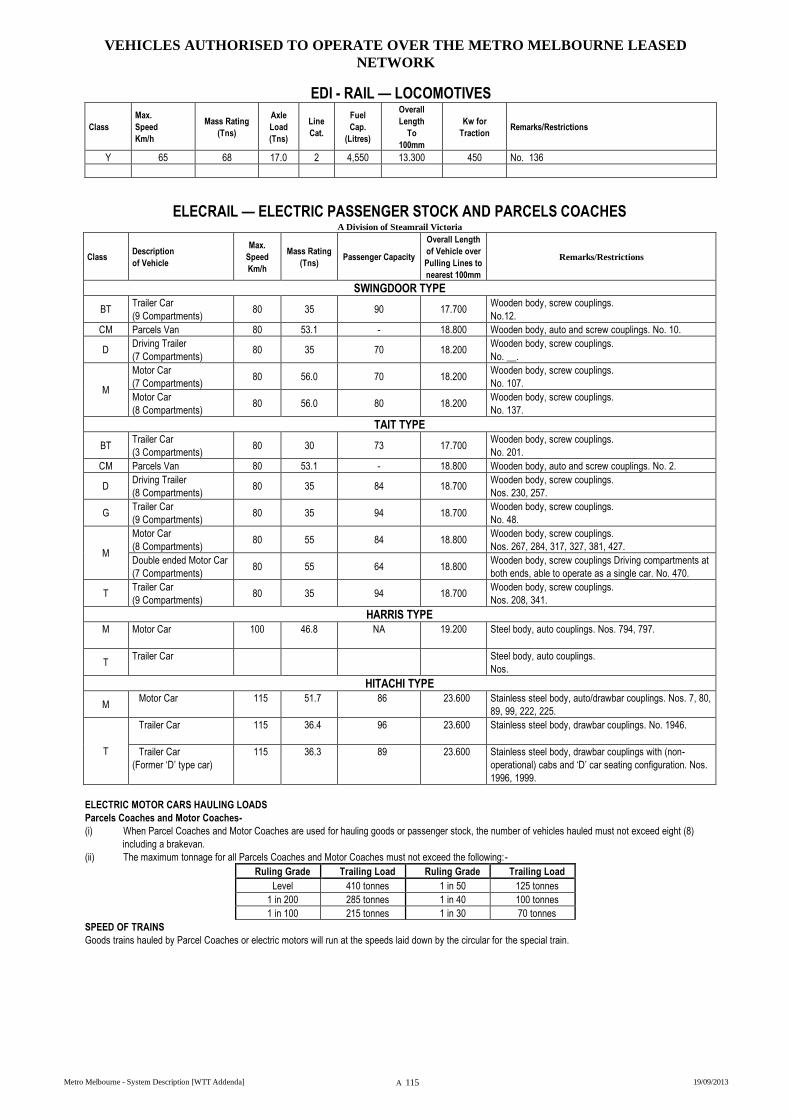
VEHICLES AUTHORISED TO OPERATE OVER THE METRO MELBOURNE LEASED
NETWORK
Metro Melbourne - System Description [WTT Addenda] A 115 19/09/2013
EDI - RAIL — LOCOMOTIVES
Class
Max.
Speed
Km/h
Mass Rating
(Tns)
Axle
Load
(Tns)
Line
Cat.
Fuel
Cap.
(Litres)
Overall
Length
To
100mm
Kw for
Traction Remarks/Restrictions
Y 65 68 17.0 2 4,550 13.300 450 No. 136
ELECRAIL — ELECTRIC PASSENGER STOCK AND PARCELS COACHES A Division of Steamrail Victoria
Class Description
of Vehicle
Max.
Speed
Km/h
Mass Rating
(Tns) Passenger Capacity
Overall Length
of Vehicle over
Pulling Lines to
nearest 100mm
Remarks/Restrictions
SWINGDOOR TYPE
BT Trailer Car
(9 Compartments) 80 35 90 17.700
Wooden body, screw couplings.
No.12.
CM Parcels Van 80 53.1 - 18.800 Wooden body, auto and screw couplings. No. 10.
D Driving Trailer
(7 Compartments) 80 35 70 18.200
Wooden body, screw couplings.
No. __.
M
Motor Car
(7 Compartments) 80 56.0 70 18.200
Wooden body, screw couplings.
No. 107.
Motor Car
(8 Compartments) 80 56.0 80 18.200
Wooden body, screw couplings.
No. 137.
TAIT TYPE
BT Trailer Car
(3 Compartments) 80 30 73 17.700
Wooden body, screw couplings.
No. 201.
CM Parcels Van 80 53.1 - 18.800 Wooden body, auto and screw couplings. No. 2.
D Driving Trailer
(8 Compartments) 80 35 84 18.700
Wooden body, screw couplings.
Nos. 230, 257.
G Trailer Car
(9 Compartments) 80 35 94 18.700
Wooden body, screw couplings.
No. 48.
M
Motor Car
(8 Compartments) 80 55 84 18.800
Wooden body, screw couplings.
Nos. 267, 284, 317, 327, 381, 427.
Double ended Motor Car
(7 Compartments) 80 55 64 18.800
Wooden body, screw couplings Driving compartments at
both ends, able to operate as a single car. No. 470.
T Trailer Car
(9 Compartments) 80 35 94 18.700
Wooden body, screw couplings.
Nos. 208, 341.
HARRIS TYPE
M
Motor Car
100 46.8 NA 19.200 Steel body, auto couplings. Nos. 794, 797.
T Trailer Car Steel body, auto couplings.
Nos.
HITACHI TYPE
M Motor Car 115 51.7 86 23.600 Stainless steel body, auto/drawbar couplings. Nos. 7, 80,
89, 99, 222, 225.
T
Trailer Car 115 36.4 96 23.600 Stainless steel body, drawbar couplings. No. 1946.
Trailer Car
(Former ‘D’ type car)
115 36.3 89 23.600 Stainless steel body, drawbar couplings with (non-
operational) cabs and ‘D’ car seating configuration. Nos.
1996, 1999.
ELECTRIC MOTOR CARS HAULING LOADS
Parcels Coaches and Motor Coaches-
(i) When Parcel Coaches and Motor Coaches are used for hauling goods or passenger stock, the number of vehicles hauled must not exceed eight (8)
including a brakevan.
(ii) The maximum tonnage for all Parcels Coaches and Motor Coaches must not exceed the following:-
Ruling Grade Trailing Load Ruling Grade Trailing Load
Level 410 tonnes 1 in 50 125 tonnes
1 in 200 285 tonnes 1 in 40 100 tonnes
1 in 100 215 tonnes 1 in 30 70 tonnes
SPEED OF TRAINS
Goods trains hauled by Parcel Coaches or electric motors will run at the speeds laid down by the circular for the special train.
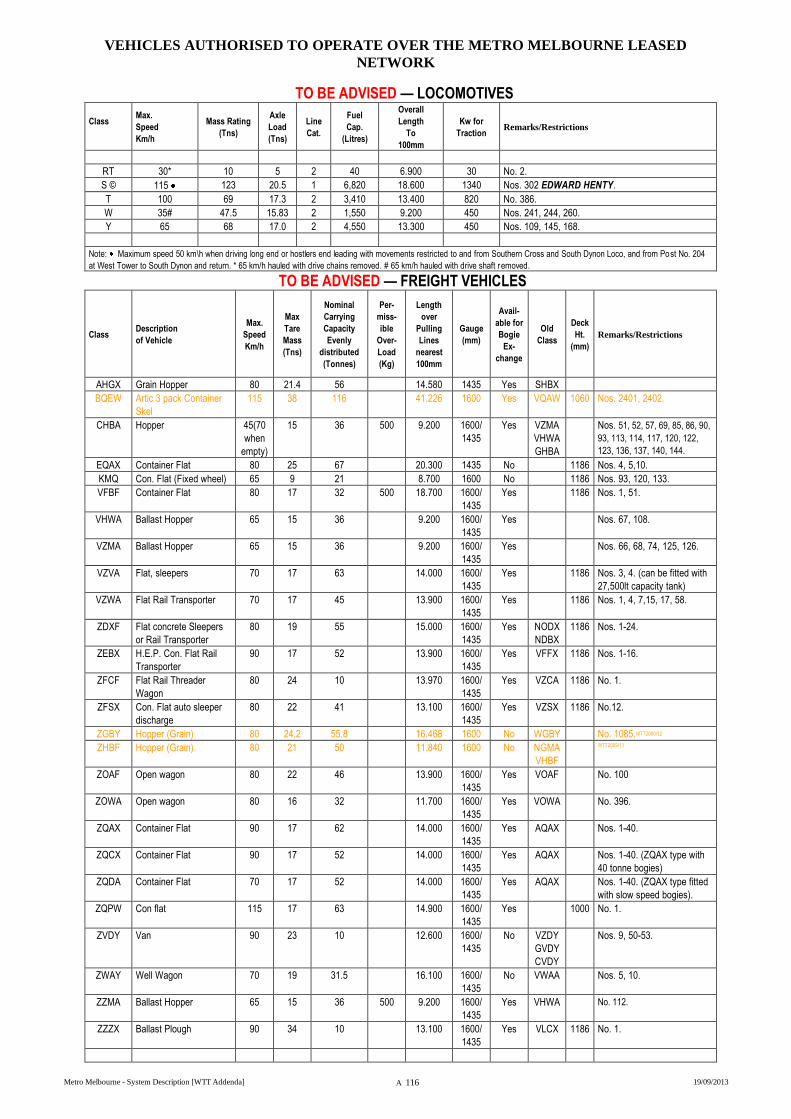
VEHICLES AUTHORISED TO OPERATE OVER THE METRO MELBOURNE LEASED
NETWORK
Metro Melbourne - System Description [WTT Addenda] A 116 19/09/2013
TO BE ADVISED — LOCOMOTIVES
Class
Max.
Speed
Km/h
Mass Rating
(Tns)
Axle
Load
(Tns)
Line
Cat.
Fuel
Cap.
(Litres)
Overall
Length
To
100mm
Kw for
Traction Remarks/Restrictions
RT 30* 10 5 2 40 6.900 30 No. 2.
S © 115 123 20.5 1 6,820 18.600 1340 Nos. 302 EDWARD HENTY.
T 100 69 17.3 2 3,410 13.400 820 No. 386.
W 35# 47.5 15.83 2 1,550 9.200 450 Nos. 241, 244, 260.
Y 65 68 17.0 2 4,550 13.300 450 Nos. 109, 145, 168.
Note: Maximum speed 50 km\h when driving long end or hostlers end leading with movements restricted to and from Southern Cross and South Dynon Loco, and from Post No. 204
at West Tower to South Dynon and return. * 65 km/h hauled with drive chains removed. # 65 km/h hauled with drive shaft removed.
TO BE ADVISED — FREIGHT VEHICLES
Class Description
of Vehicle
Max.
Speed
Km/h
Max
Tare
Mass
(Tns)
Nominal
Carrying
Capacity
Evenly
distributed
(Tonnes)
Per-
miss-
ible
Over-
Load
(Kg)
Length
over
Pulling
Lines
nearest
100mm
Gauge
(mm)
Avail-
able for
Bogie
Ex-
change
Old
Class
Deck
Ht.
(mm)
Remarks/Restrictions
AHGX Grain Hopper 80 21.4 56 14.580 1435 Yes SHBX
BQEW Artic 3 pack Container
Skel
115 38 116 41.226 1600 Yes VQAW 1060 Nos. 2401, 2402.
CHBA Hopper 45(70
when
empty)
15 36 500 9.200 1600/
1435
Yes VZMA
VHWA
GHBA
Nos. 51, 52, 57, 69, 85, 86, 90,
93, 113, 114, 117, 120, 122,
123, 136, 137, 140, 144.
EQAX Container Flat 80 25 67 20.300 1435 No 1186 Nos. 4, 5,10.
KMQ Con. Flat (Fixed wheel) 65 9 21 8.700 1600 No 1186 Nos. 93, 120, 133.
VFBF Container Flat 80 17 32 500 18.700 1600/
1435
Yes 1186 Nos. 1, 51.
VHWA Ballast Hopper 65 15 36 9.200 1600/
1435
Yes Nos. 67, 108.
VZMA Ballast Hopper 65 15 36 9.200 1600/
1435
Yes Nos. 66, 68, 74, 125, 126.
VZVA Flat, sleepers 70 17 63 14.000 1600/
1435
Yes 1186 Nos. 3, 4. (can be fitted with
27,500lt capacity tank)
VZWA Flat Rail Transporter 70 17 45 13.900 1600/
1435
Yes 1186 Nos. 1, 4, 7,15, 17, 58.
ZDXF Flat concrete Sleepers
or Rail Transporter
80 19 55 15.000 1600/
1435
Yes NODX
NDBX
1186 Nos. 1-24.
ZEBX H.E.P. Con. Flat Rail
Transporter
90 17 52 13.900 1600/
1435
Yes VFFX 1186 Nos. 1-16.
ZFCF Flat Rail Threader
Wagon
80 24 10 13.970 1600/
1435
Yes VZCA 1186 No. 1.
ZFSX Con. Flat auto sleeper
discharge
80 22 41 13.100 1600/
1435
Yes VZSX 1186 No.12.
ZGBY Hopper (Grain) 80 24.2 55.8 16.468 1600 No WGBY No. 1085.WTT2000/12
ZHBF Hopper (Grain) 80 21 50 11.840 1600 No NGMA
VHBF
WTT2009/11
ZOAF Open wagon 80 22 46 13.900 1600/
1435
Yes VOAF No. 100
ZOWA Open wagon 80 16 32 11.700 1600/
1435
Yes VOWA No. 396.
ZQAX Container Flat 90 17 62 14.000 1600/
1435
Yes AQAX Nos. 1-40.
ZQCX Container Flat 90 17 52 14.000 1600/
1435
Yes AQAX Nos. 1-40. (ZQAX type with
40 tonne bogies)
ZQDA Container Flat 70 17 52 14.000 1600/
1435
Yes AQAX Nos. 1-40. (ZQAX type fitted
with slow speed bogies).
ZQPW Con flat 115 17 63 14.900 1600/
1435
Yes 1000 No. 1.
ZVDY Van 90 23 10 12.600 1600/
1435
No VZDY
GVDY
CVDY
Nos. 9, 50-53.
ZWAY Well Wagon 70 19 31.5 16.100 1600/
1435
No VWAA Nos. 5, 10.
ZZMA Ballast Hopper 65 15 36 500 9.200 1600/
1435
Yes VHWA No. 112.
ZZZX
Ballast Plough 90 34 10 13.100 1600/
1435
Yes VLCX 1186 No. 1.

VEHICLES AUTHORISED TO OPERATE OVER THE METRO MELBOURNE LEASED
NETWORK
Metro Melbourne - System Description [WTT Addenda] A 117 19/09/2013
GREAT SOUTHERN RAILWAY — CARRIAGES
Class Description of Vehicle
Max
Speed
km/h
Mass
Rating
(Tns)
Passenger
Capacity
Overall
Length
To
100mm
Remarks/Restrictions
ACC Conference Car 115 48.7 35 23.826 Stainless Steel body, Air-conditioned, Auto couplings. No. 223.
AEC Entertainment Car 115 48.7 32 23.826 Stainless Steel body, Air-conditioned, Auto couplings. No. 222.
AFC Lounge Car 115 41.3 53 23.826 Stainless Steel body, Air-conditioned, Auto couplings.
Nos. 213, 301, 305-307, 936, 937, 938, 939.
AG First class Sitting Car 115 46.8 62 23.850 Stainless Steel body, Air-conditioned, Auto couplings.
Nos. 369, 372-376.
AJ First class Sitting Car 115 45.9 48 23.850 Steel body Air-conditioned, Auto couplings. Nos. 1-3.
AOB Lounge Car 115 44.1 54 23.826 Stainless Steel body, Air-conditioned, Auto couplings. No. 265.
ARJ First class Roomette
Sleeping Car
115 47.5 18 23.826 Stainless Steel body, Air-conditioned, Auto couplings.
Nos. 242, 243, 272, 282, 941, 945, 973, 984.
ARL First class Twinette
Sleeping Car
115 47.8 18 23.826 Stainless Steel body, Air-conditioned, Auto couplings.
Nos. 246, 248, 249,250,289, 291, 293, 308, 309, 310, 324, 326,
920, 921, 922,923, 925, 961, 962, 963, 992.
ARM First class Twinette
Sleeping Car
115 47.7 16 23.826 Stainless Steel body, Air-conditioned, Auto couplings.
Nos. 288, 947,951-953, 987, 990.
BG Economy class Sitting
Car
115 46.8 68 23.850 Nos. 368, 370, 371.
BJ Economy class Sitting
Car
115 45.4 64 23.850 Steel body, Air-conditioned, Auto couplings.
Nos. 4-10.
BMC Special Car 115 48 23.900 Steel body, Air-conditioned, Auto couplings. Nos. 1-2.
BRG Twinette Sleeping Car 115 49.3 32 23.826 Stainless Steel body, Air-conditioned, Auto couplings.
Nos. 168, 170, 171, 173, 175, 969, 972, 974.
BRJ Twinette Sleeping Car 115 48.7 32 23.826 Stainless Steel body, Air-conditioned, Auto couplings.
Nos. 221, 267-271, 302, 303, 912, 915-919, 999.
CDF Dining Car 115 44.1 54 23.826 Stainless Steel body, Air-conditioned, Auto couplings.
Nos. 225, 226, 227, 924, 928, 929, 966.
CLUB
(CCL)
Lounge Car 115 43.0 43 23.900 Steel body Air-conditioned, Auto couplings. Nos. 2, 3.
DF Dining Car 115 47.3 48 23.826 Stainless Steel body, Air-conditioned, Auto couplings.
Nos. 231, 232, 233, 294, 304, 927, 930, 934, 964.
ER Dormitory Car 115 47.0 20 23.826 Stainless Steel body, Air-conditioned, Auto couplings.
Nos. 207, 313, 906, 909,
HGM Power / Luggage Van 115 56.6 - 23.826 Stainless Steel body, Air-conditioned, Auto couplings.
Nos. 296, 297, 298, 317, 900, 902, 903, 904.
HM Baggage Van 115 39.6 - 23.826 Stainless Steel body, Air-conditioned, Auto couplings.
Nos. 255, 256, 312, 318, 901, 957, 958, 959.
HRGB Powervan / Crew Car 115 59.5 - 23.826 Airconditioned, Auto couplings. No. 116.
JRB Roomette Sleeping
Car
115 48 20 Berths 23.900 Steel body, Air-conditioned, Auto couplings. Nos. 1, 2.
JTB Twinette Sleeping Car 115 48 20 Berths 23.900 Steel body, Air-conditioned, Auto couplings. Nos. 1-4.
PCO Power Car 115 Steel body, Air-conditioned, Auto couplings. No. 4.
PHN Power Van 115 48 - 23.430 Stainless Steel body. No. 2369.
RBJ Economy Sitting Car
with buffet
115 46.7 34 23.850 Steel body, Air-conditioned, Auto couplings. Nos. 1-3.
SSA Excursion Sleeping
Lounge Car
115 Stainless Steel body, Air-conditioned, Auto couplings. No. 260.
INTERAIL AUSTRALIA PTY LTD (AURIZON) – LOCOMOTIVES
Class
Max
Speed
K/mh
Mass
Rating
(Tns)
Axle
Load
(Tns)
Line
Cat.
Fuel Cap
(Litres)
Overall
Length
To 100mm
Kw for
Traction Remarks / Restrictions
G © 115 127 21.2 1 9,600 19.800 2240 Fitted with Super-series traction equipment.
Nos. 516, 534.
X 115 118 19.7 2 6,820 18.400 1490 Series 3. Nos. 53, 54.
NOTE: Maximum speed 50 km\h when running tender or hostlers end leading
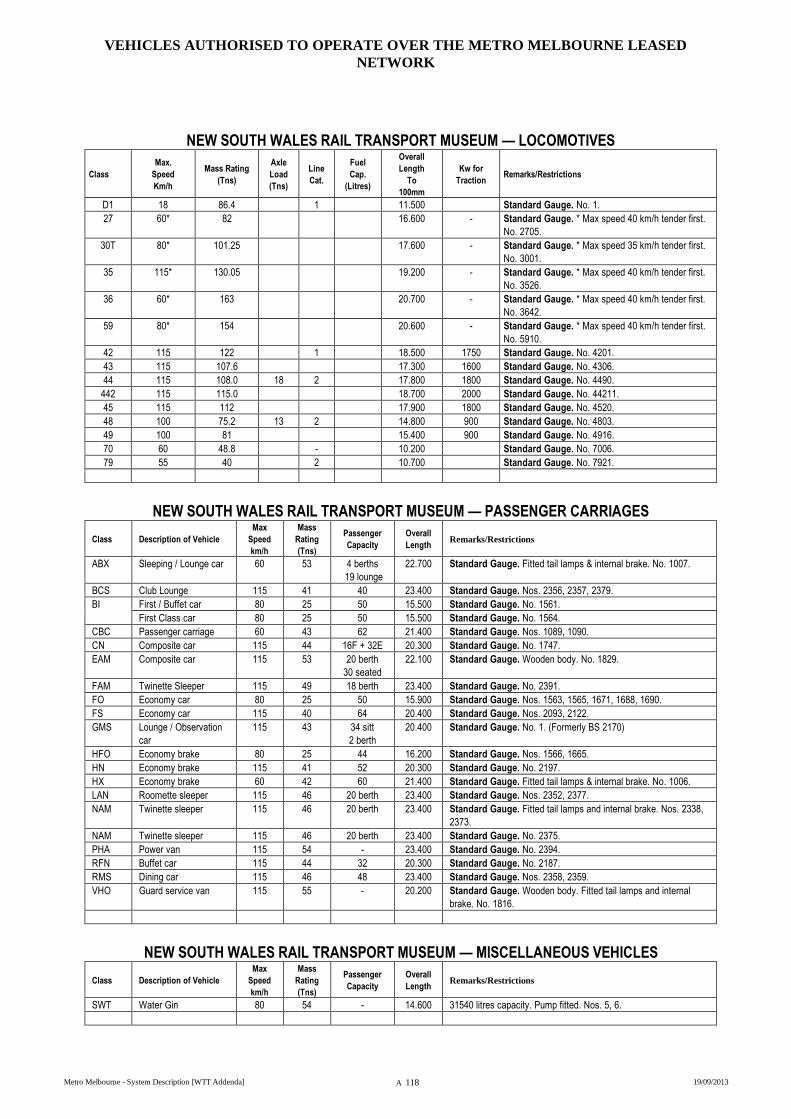
VEHICLES AUTHORISED TO OPERATE OVER THE METRO MELBOURNE LEASED
NETWORK
Metro Melbourne - System Description [WTT Addenda] A 118 19/09/2013
NEW SOUTH WALES RAIL TRANSPORT MUSEUM — LOCOMOTIVES
Class
Max.
Speed
Km/h
Mass Rating
(Tns)
Axle
Load
(Tns)
Line
Cat.
Fuel
Cap.
(Litres)
Overall
Length
To
100mm
Kw for
Traction Remarks/Restrictions
D1 18 86.4 1 11.500 Standard Gauge. No. 1.
27 60* 82 16.600 - Standard Gauge. * Max speed 40 km/h tender first.
No. 2705.
30T 80* 101.25 17.600 - Standard Gauge. * Max speed 35 km/h tender first.
No. 3001.
35 115* 130.05 19.200 - Standard Gauge. * Max speed 40 km/h tender first.
No. 3526.
36 60* 163 20.700 - Standard Gauge. * Max speed 40 km/h tender first.
No. 3642.
59 80* 154 20.600 - Standard Gauge. * Max speed 40 km/h tender first.
No. 5910.
42 115 122 1 18.500 1750 Standard Gauge. No. 4201.
43 115 107.6 17.300 1600 Standard Gauge. No. 4306.
44 115 108.0 18 2 17.800 1800 Standard Gauge. No. 4490.
442 115 115.0 18.700 2000 Standard Gauge. No. 44211.
45 115 112 17.900 1800 Standard Gauge. No. 4520.
48 100 75.2 13 2 14.800 900 Standard Gauge. No. 4803.
49 100 81 15.400 900 Standard Gauge. No. 4916.
70 60 48.8 - 10.200 Standard Gauge. No. 7006.
79 55 40 2 10.700 Standard Gauge. No. 7921.
NEW SOUTH WALES RAIL TRANSPORT MUSEUM — PASSENGER CARRIAGES
Class Description of Vehicle
Max
Speed
km/h
Mass
Rating
(Tns)
Passenger
Capacity
Overall
Length Remarks/Restrictions
ABX Sleeping / Lounge car 60 53 4 berths
19 lounge
22.700 Standard Gauge. Fitted tail lamps & internal brake. No. 1007.
BCS Club Lounge 115 41 40 23.400 Standard Gauge. Nos. 2356, 2357, 2379.
BI First / Buffet car 80 25 50 15.500 Standard Gauge. No. 1561.
First Class car 80 25 50 15.500 Standard Gauge. No. 1564.
CBC Passenger carriage 60 43 62 21.400 Standard Gauge. Nos. 1089, 1090.
CN Composite car 115 44 16F + 32E 20.300 Standard Gauge. No. 1747.
EAM Composite car 115 53 20 berth
30 seated
22.100 Standard Gauge. Wooden body. No. 1829.
FAM Twinette Sleeper 115 49 18 berth 23.400 Standard Gauge. No. 2391.
FO Economy car 80 25 50 15.900 Standard Gauge. Nos. 1563, 1565, 1671, 1688, 1690.
FS Economy car 115 40 64 20.400 Standard Gauge. Nos. 2093, 2122.
GMS Lounge / Observation
car
115 43 34 sitt
2 berth
20.400 Standard Gauge. No. 1. (Formerly BS 2170)
HFO Economy brake 80 25 44 16.200 Standard Gauge. Nos. 1566, 1665.
HN Economy brake 115 41 52 20.300 Standard Gauge. No. 2197.
HX Economy brake 60 42 60 21.400 Standard Gauge. Fitted tail lamps & internal brake. No. 1006.
LAN Roomette sleeper 115 46 20 berth 23.400 Standard Gauge. Nos. 2352, 2377.
NAM Twinette sleeper 115 46 20 berth 23.400 Standard Gauge. Fitted tail lamps and internal brake. Nos. 2338,
2373.
NAM Twinette sleeper 115 46 20 berth 23.400 Standard Gauge. No. 2375.
PHA Power van 115 54 - 23.400 Standard Gauge. No. 2394.
RFN Buffet car 115 44 32 20.300 Standard Gauge. No. 2187.
RMS Dining car 115 46 48 23.400 Standard Gauge. Nos. 2358, 2359.
VHO Guard service van 115 55 - 20.200 Standard Gauge. Wooden body. Fitted tail lamps and internal
brake. No. 1816.
NEW SOUTH WALES RAIL TRANSPORT MUSEUM — MISCELLANEOUS VEHICLES
Class Description of Vehicle
Max
Speed
km/h
Mass
Rating
(Tns)
Passenger
Capacity
Overall
Length Remarks/Restrictions
SWT Water Gin 80 54 - 14.600 31540 litres capacity. Pump fitted. Nos. 5, 6.
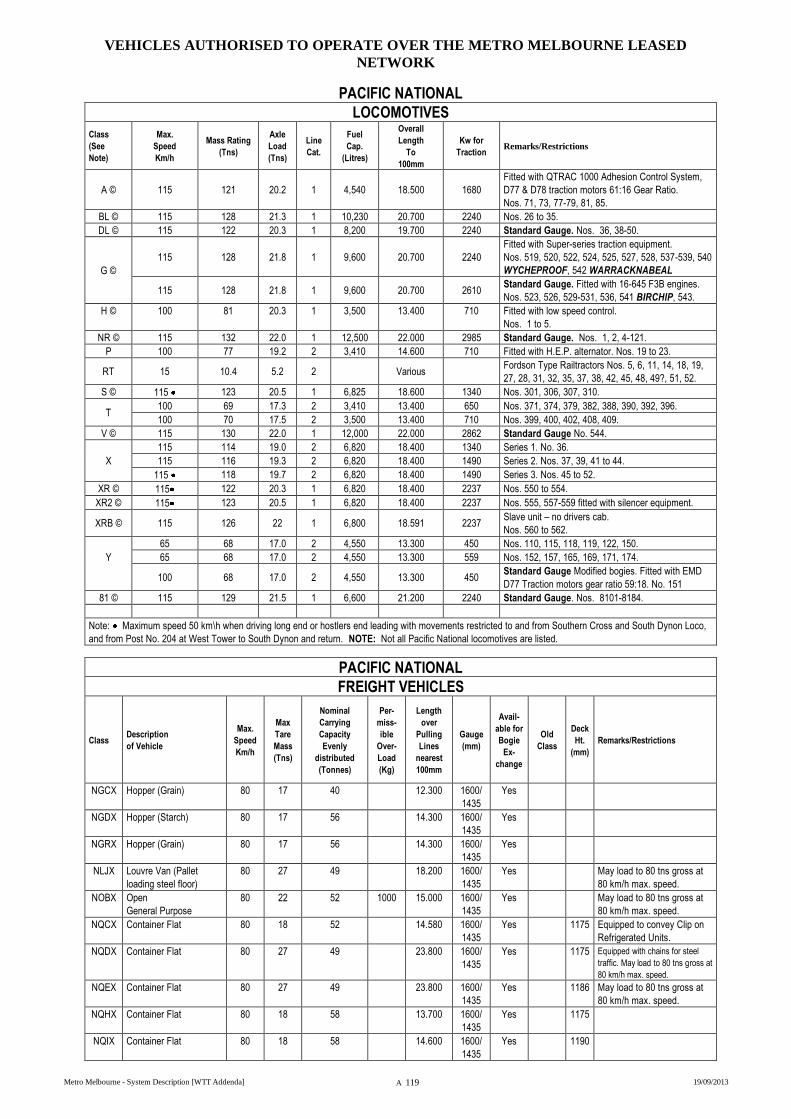
VEHICLES AUTHORISED TO OPERATE OVER THE METRO MELBOURNE LEASED
NETWORK
Metro Melbourne - System Description [WTT Addenda] A 119 19/09/2013
PACIFIC NATIONAL
LOCOMOTIVES
Class
(See
Note)
Max.
Speed
Km/h
Mass Rating
(Tns)
Axle
Load
(Tns)
Line
Cat.
Fuel
Cap.
(Litres)
Overall
Length
To
100mm
Kw for
Traction Remarks/Restrictions
A © 115 121
20.2
1 4,540 18.500 1680
Fitted with QTRAC 1000 Adhesion Control System,
D77 & D78 traction motors 61:16 Gear Ratio.
Nos. 71, 73, 77-79, 81, 85.
BL © 115 128 21.3 1 10,230 20.700 2240 Nos. 26 to 35.
DL © 115 122 20.3 1 8,200 19.700 2240 Standard Gauge. Nos. 36, 38-50.
G ©
115 128 21.8 1 9,600 20.700 2240
Fitted with Super-series traction equipment.
Nos. 519, 520, 522, 524, 525, 527, 528, 537-539, 540
WYCHEPROOF, 542 WARRACKNABEAL
115 128 21.8 1 9,600 20.700 2610 Standard Gauge. Fitted with 16-645 F3B engines.
Nos. 523, 526, 529-531, 536, 541 BIRCHIP, 543.
H ©
100 81 20.3 1 3,500 13.400 710 Fitted with low speed control.
Nos. 1 to 5.
NR © 115 132 22.0 1 12,500 22.000 2985 Standard Gauge. Nos. 1, 2, 4-121.
P 100 77 19.2 2 3,410 14.600 710 Fitted with H.E.P. alternator. Nos. 19 to 23.
RT 15 10.4 5.2 2 Various Fordson Type Railtractors Nos. 5, 6, 11, 14, 18, 19,
27, 28, 31, 32, 35, 37, 38, 42, 45, 48, 49?, 51, 52.
S © 115 123 20.5 1 6,825 18.600 1340 Nos. 301, 306, 307, 310.
T 100 69 17.3 2 3,410 13.400 650 Nos. 371, 374, 379, 382, 388, 390, 392, 396.
100 70 17.5 2 3,500 13.400 710 Nos. 399, 400, 402, 408, 409.
V © 115 130 22.0 1 12,000 22.000 2862 Standard Gauge No. 544.
X
115 114 19.0 2 6,820 18.400 1340 Series 1. No. 36.
115 116 19.3 2 6,820 18.400 1490 Series 2. Nos. 37, 39, 41 to 44.
115 118 19.7 2 6,820 18.400 1490 Series 3. Nos. 45 to 52.
XR © 115 122 20.3 1 6,820 18.400 2237 Nos. 550 to 554.
XR2 © 115 123 20.5 1 6,820 18.400 2237 Nos. 555, 557-559 fitted with silencer equipment.
XRB © 115 126 22 1 6,800 18.591 2237 Slave unit – no drivers cab.
Nos. 560 to 562.
Y
65 68 17.0 2 4,550 13.300 450 Nos. 110, 115, 118, 119, 122, 150.
65 68 17.0 2 4,550 13.300 559 Nos. 152, 157, 165, 169, 171, 174.
100 68 17.0 2 4,550 13.300 450 Standard Gauge Modified bogies. Fitted with EMD
D77 Traction motors gear ratio 59:18. No. 151
81 © 115 129 21.5 1 6,600 21.200 2240 Standard Gauge. Nos. 8101-8184.
Note: Maximum speed 50 km\h when driving long end or hostlers end leading with movements restricted to and from Southern Cross and South Dynon Loco,
and from Post No. 204 at West Tower to South Dynon and return. NOTE: Not all Pacific National locomotives are listed.
PACIFIC NATIONAL
FREIGHT VEHICLES
Class Description
of Vehicle
Max.
Speed
Km/h
Max
Tare
Mass
(Tns)
Nominal
Carrying
Capacity
Evenly
distributed
(Tonnes)
Per-
miss-
ible
Over-
Load
(Kg)
Length
over
Pulling
Lines
nearest
100mm
Gauge
(mm)
Avail-
able for
Bogie
Ex-
change
Old
Class
Deck
Ht.
(mm)
Remarks/Restrictions
NGCX Hopper (Grain) 80 17 40 12.300 1600/
1435
Yes
NGDX Hopper (Starch) 80 17 56 14.300 1600/
1435
Yes
NGRX Hopper (Grain) 80 17 56 14.300 1600/
1435
Yes
NLJX Louvre Van (Pallet
loading steel floor)
80 27 49 18.200 1600/
1435
Yes May load to 80 tns gross at
80 km/h max. speed.
NOBX Open
General Purpose
80 22 52 1000 15.000 1600/
1435
Yes May load to 80 tns gross at
80 km/h max. speed.
NQCX Container Flat 80 18 52 14.580 1600/
1435
Yes 1175 Equipped to convey Clip on
Refrigerated Units.
NQDX Container Flat 80 27 49 23.800 1600/
1435
Yes 1175 Equipped with chains for steel
traffic. May load to 80 tns gross at
80 km/h max. speed.
NQEX Container Flat 80 27 49 23.800 1600/
1435
Yes 1186 May load to 80 tns gross at
80 km/h max. speed.
NQHX Container Flat 80 18 58 13.700 1600/
1435
Yes 1175
NQIX Container Flat 80 18 58 14.600 1600/
1435
Yes 1190
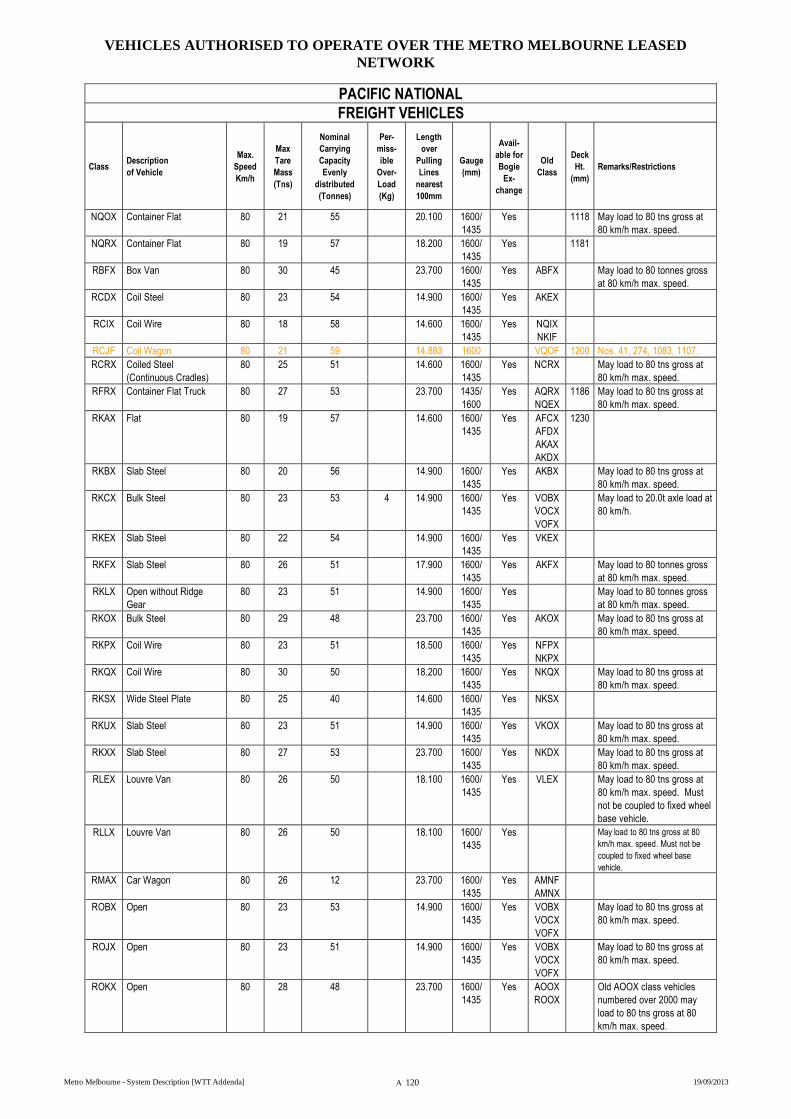
VEHICLES AUTHORISED TO OPERATE OVER THE METRO MELBOURNE LEASED
NETWORK
Metro Melbourne - System Description [WTT Addenda] A 120 19/09/2013
PACIFIC NATIONAL
FREIGHT VEHICLES
Class Description
of Vehicle
Max.
Speed
Km/h
Max
Tare
Mass
(Tns)
Nominal
Carrying
Capacity
Evenly
distributed
(Tonnes)
Per-
miss-
ible
Over-
Load
(Kg)
Length
over
Pulling
Lines
nearest
100mm
Gauge
(mm)
Avail-
able for
Bogie
Ex-
change
Old
Class
Deck
Ht.
(mm)
Remarks/Restrictions
NQOX Container Flat 80 21 55 20.100 1600/
1435
Yes 1118 May load to 80 tns gross at
80 km/h max. speed.
NQRX Container Flat 80 19 57 18.200 1600/
1435
Yes 1181
RBFX Box Van 80 30 45 23.700 1600/
1435
Yes ABFX May load to 80 tonnes gross
at 80 km/h max. speed.
RCDX Coil Steel 80 23 54 14.900 1600/
1435
Yes AKEX
RCIX Coil Wire 80 18 58 14.600 1600/
1435
Yes NQIX
NKIF
RCJF Coil Wagon 80 21 59 14.883 1600 VQOF 1200 Nos. 41, 274, 1083, 1107.
RCRX Coiled Steel
(Continuous Cradles)
80 25 51 14.600 1600/
1435
Yes NCRX May load to 80 tns gross at
80 km/h max. speed.
RFRX Container Flat Truck 80 27 53 23.700 1435/
1600
Yes AQRX
NQEX
1186 May load to 80 tns gross at
80 km/h max. speed.
RKAX Flat 80 19 57 14.600 1600/
1435
Yes AFCX
AFDX
AKAX
AKDX
1230
RKBX Slab Steel 80 20 56 14.900 1600/
1435
Yes AKBX May load to 80 tns gross at
80 km/h max. speed.
RKCX Bulk Steel 80 23 53 4 14.900 1600/
1435
Yes VOBX
VOCX
VOFX
May load to 20.0t axle load at
80 km/h.
RKEX Slab Steel 80 22 54 14.900 1600/
1435
Yes VKEX
RKFX Slab Steel 80 26 51 17.900 1600/
1435
Yes AKFX May load to 80 tonnes gross
at 80 km/h max. speed.
RKLX Open without Ridge
Gear
80 23 51 14.900 1600/
1435
Yes May load to 80 tonnes gross
at 80 km/h max. speed.
RKOX Bulk Steel 80 29 48 23.700 1600/
1435
Yes AKOX May load to 80 tns gross at
80 km/h max. speed.
RKPX Coil Wire 80 23 51 18.500 1600/
1435
Yes NFPX
NKPX
RKQX Coil Wire 80 30 50 18.200 1600/
1435
Yes NKQX May load to 80 tns gross at
80 km/h max. speed.
RKSX Wide Steel Plate 80 25 40 14.600 1600/
1435
Yes NKSX
RKUX Slab Steel 80 23 51 14.900 1600/
1435
Yes VKOX May load to 80 tns gross at
80 km/h max. speed.
RKXX Slab Steel 80 27 53 23.700 1600/
1435
Yes NKDX May load to 80 tns gross at
80 km/h max. speed.
RLEX Louvre Van 80 26 50 18.100 1600/
1435
Yes VLEX May load to 80 tns gross at
80 km/h max. speed. Must
not be coupled to fixed wheel
base vehicle.
RLLX Louvre Van 80 26 50 18.100 1600/
1435
Yes May load to 80 tns gross at 80
km/h max. speed. Must not be
coupled to fixed wheel base
vehicle.
RMAX Car Wagon 80 26 12 23.700 1600/
1435
Yes AMNF
AMNX
ROBX Open 80 23 53 14.900 1600/
1435
Yes VOBX
VOCX
VOFX
May load to 80 tns gross at
80 km/h max. speed.
ROJX Open 80 23 51 14.900 1600/
1435
Yes VOBX
VOCX
VOFX
May load to 80 tns gross at
80 km/h max. speed.
ROKX Open 80 28 48 23.700 1600/
1435
Yes AOOX
ROOX
Old AOOX class vehicles
numbered over 2000 may
load to 80 tns gross at 80
km/h max. speed.
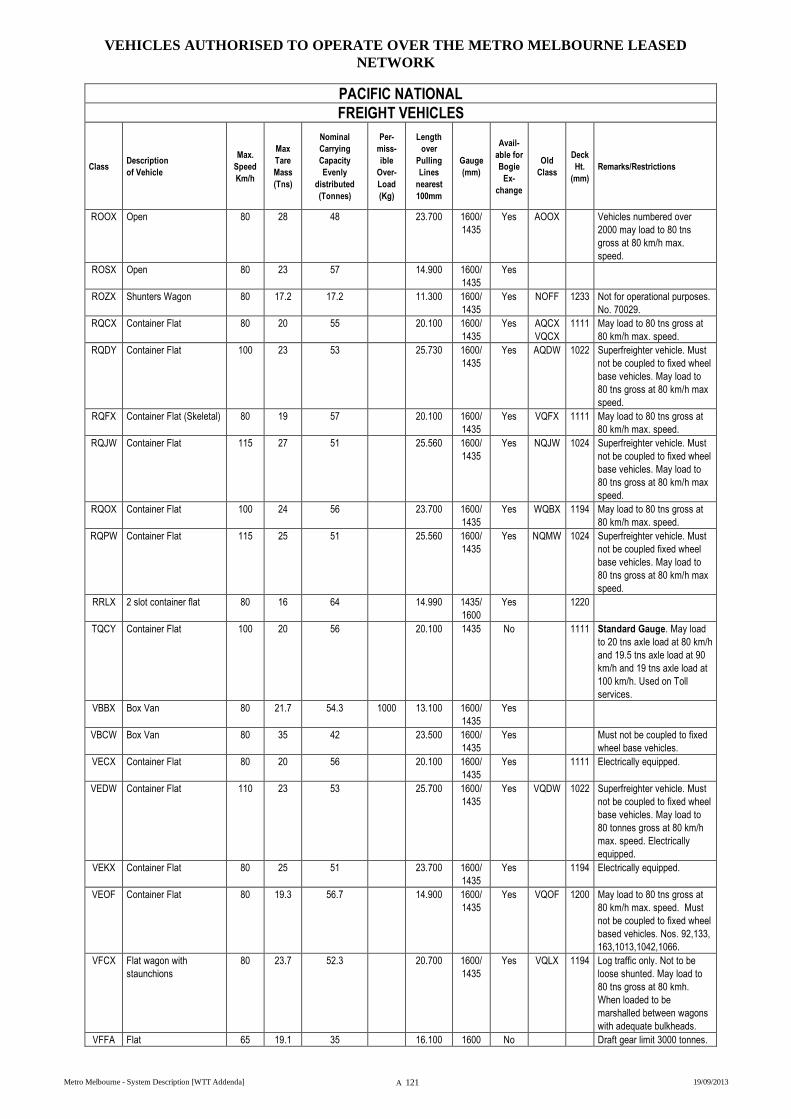
VEHICLES AUTHORISED TO OPERATE OVER THE METRO MELBOURNE LEASED
NETWORK
Metro Melbourne - System Description [WTT Addenda] A 121 19/09/2013
PACIFIC NATIONAL
FREIGHT VEHICLES
Class Description
of Vehicle
Max.
Speed
Km/h
Max
Tare
Mass
(Tns)
Nominal
Carrying
Capacity
Evenly
distributed
(Tonnes)
Per-
miss-
ible
Over-
Load
(Kg)
Length
over
Pulling
Lines
nearest
100mm
Gauge
(mm)
Avail-
able for
Bogie
Ex-
change
Old
Class
Deck
Ht.
(mm)
Remarks/Restrictions
ROOX Open 80 28 48 23.700 1600/
1435
Yes AOOX Vehicles numbered over
2000 may load to 80 tns
gross at 80 km/h max.
speed.
ROSX Open 80 23 57 14.900 1600/
1435
Yes
ROZX Shunters Wagon 80 17.2 17.2 11.300 1600/
1435
Yes NOFF 1233 Not for operational purposes.
No. 70029.
RQCX Container Flat 80 20 55 20.100 1600/
1435
Yes AQCX
VQCX
1111 May load to 80 tns gross at
80 km/h max. speed.
RQDY Container Flat 100 23 53 25.730 1600/
1435
Yes AQDW 1022 Superfreighter vehicle. Must
not be coupled to fixed wheel
base vehicles. May load to
80 tns gross at 80 km/h max
speed.
RQFX Container Flat (Skeletal) 80 19 57 20.100 1600/
1435
Yes VQFX 1111 May load to 80 tns gross at
80 km/h max. speed.
RQJW Container Flat 115 27 51 25.560 1600/
1435
Yes NQJW 1024 Superfreighter vehicle. Must
not be coupled to fixed wheel
base vehicles. May load to
80 tns gross at 80 km/h max
speed.
RQOX Container Flat 100 24 56 23.700 1600/
1435
Yes WQBX 1194 May load to 80 tns gross at
80 km/h max. speed.
RQPW Container Flat 115 25 51 25.560 1600/
1435
Yes NQMW 1024 Superfreighter vehicle. Must
not be coupled fixed wheel
base vehicles. May load to
80 tns gross at 80 km/h max
speed.
RRLX 2 slot container flat 80 16 64 14.990 1435/
1600
Yes 1220
TQCY Container Flat 100 20 56 20.100 1435 No 1111 Standard Gauge. May load
to 20 tns axle load at 80 km/h
and 19.5 tns axle load at 90
km/h and 19 tns axle load at
100 km/h. Used on Toll
services.
VBBX Box Van 80 21.7 54.3 1000 13.100 1600/
1435
Yes
VBCW Box Van 80 35 42 23.500 1600/
1435
Yes Must not be coupled to fixed
wheel base vehicles.
VECX Container Flat 80 20 56 20.100 1600/
1435
Yes 1111 Electrically equipped.
VEDW Container Flat 110 23 53 25.700 1600/
1435
Yes VQDW 1022 Superfreighter vehicle. Must
not be coupled to fixed wheel
base vehicles. May load to
80 tonnes gross at 80 km/h
max. speed. Electrically
equipped.
VEKX Container Flat 80 25 51 23.700 1600/
1435
Yes 1194 Electrically equipped.
VEOF Container Flat 80 19.3 56.7 14.900 1600/
1435
Yes VQOF 1200 May load to 80 tns gross at
80 km/h max. speed. Must
not be coupled to fixed wheel
based vehicles. Nos. 92,133,
163,1013,1042,1066.
VFCX Flat wagon with
staunchions
80 23.7 52.3 20.700 1600/
1435
Yes VQLX 1194 Log traffic only. Not to be
loose shunted. May load to
80 tns gross at 80 kmh.
When loaded to be
marshalled between wagons
with adequate bulkheads.
VFFA Flat 65 19.1 35 16.100 1600 No Draft gear limit 3000 tonnes.
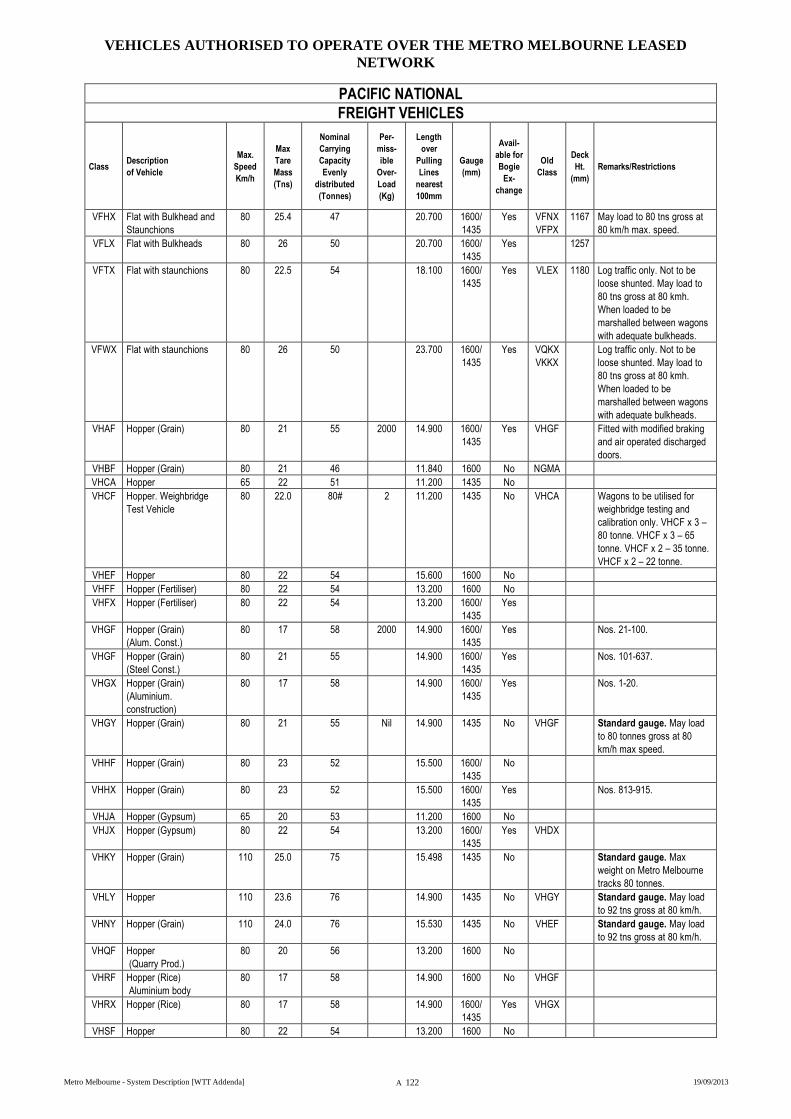
VEHICLES AUTHORISED TO OPERATE OVER THE METRO MELBOURNE LEASED
NETWORK
Metro Melbourne - System Description [WTT Addenda] A 122 19/09/2013
PACIFIC NATIONAL
FREIGHT VEHICLES
Class Description
of Vehicle
Max.
Speed
Km/h
Max
Tare
Mass
(Tns)
Nominal
Carrying
Capacity
Evenly
distributed
(Tonnes)
Per-
miss-
ible
Over-
Load
(Kg)
Length
over
Pulling
Lines
nearest
100mm
Gauge
(mm)
Avail-
able for
Bogie
Ex-
change
Old
Class
Deck
Ht.
(mm)
Remarks/Restrictions
VFHX Flat with Bulkhead and
Staunchions
80 25.4 47 20.700 1600/
1435
Yes VFNX
VFPX
1167 May load to 80 tns gross at
80 km/h max. speed.
VFLX Flat with Bulkheads 80 26 50 20.700 1600/
1435
Yes 1257
VFTX Flat with staunchions 80 22.5 54 18.100 1600/
1435
Yes VLEX 1180 Log traffic only. Not to be
loose shunted. May load to
80 tns gross at 80 kmh.
When loaded to be
marshalled between wagons
with adequate bulkheads.
VFWX Flat with staunchions 80 26 50 23.700 1600/
1435
Yes VQKX
VKKX
Log traffic only. Not to be
loose shunted. May load to
80 tns gross at 80 kmh.
When loaded to be
marshalled between wagons
with adequate bulkheads.
VHAF Hopper (Grain) 80 21 55 2000 14.900 1600/
1435
Yes VHGF Fitted with modified braking
and air operated discharged
doors.
VHBF Hopper (Grain) 80 21 46 11.840 1600 No NGMA
VHCA Hopper 65 22 51 11.200 1435 No
VHCF Hopper. Weighbridge
Test Vehicle
80 22.0 80# 2 11.200 1435 No VHCA Wagons to be utilised for
weighbridge testing and
calibration only. VHCF x 3 –
80 tonne. VHCF x 3 – 65
tonne. VHCF x 2 – 35 tonne.
VHCF x 2 – 22 tonne.
VHEF Hopper 80 22 54 15.600 1600 No
VHFF Hopper (Fertiliser) 80 22 54 13.200 1600 No
VHFX Hopper (Fertiliser) 80 22 54 13.200 1600/
1435
Yes
VHGF Hopper (Grain)
(Alum. Const.)
80 17 58 2000 14.900 1600/
1435
Yes Nos. 21-100.
VHGF Hopper (Grain)
(Steel Const.)
80 21 55 14.900 1600/
1435
Yes Nos. 101-637.
VHGX Hopper (Grain)
(Aluminium.
construction)
80 17 58 14.900 1600/
1435
Yes Nos. 1-20.
VHGY Hopper (Grain) 80 21 55 Nil 14.900 1435 No VHGF Standard gauge. May load
to 80 tonnes gross at 80
km/h max speed.
VHHF
Hopper (Grain) 80 23 52 15.500 1600/
1435
No
VHHX Hopper (Grain) 80 23 52 15.500 1600/
1435
Yes Nos. 813-915.
VHJA Hopper (Gypsum) 65 20 53 11.200 1600 No
VHJX Hopper (Gypsum) 80 22 54 13.200 1600/
1435
Yes VHDX
VHKY Hopper (Grain) 110 25.0 75 15.498 1435 No Standard gauge. Max
weight on Metro Melbourne
tracks 80 tonnes.
VHLY Hopper 110 23.6 76 14.900 1435 No VHGY Standard gauge. May load
to 92 tns gross at 80 km/h.
VHNY Hopper (Grain) 110 24.0 76 15.530 1435 No VHEF
Standard gauge. May load
to 92 tns gross at 80 km/h.
VHQF Hopper
(Quarry Prod.)
80 20 56 13.200 1600 No
VHRF Hopper (Rice)
Aluminium body
80 17 58 14.900 1600 No VHGF
VHRX Hopper (Rice) 80 17 58 14.900 1600/
1435
Yes VHGX
VHSF Hopper 80 22 54 13.200 1600 No
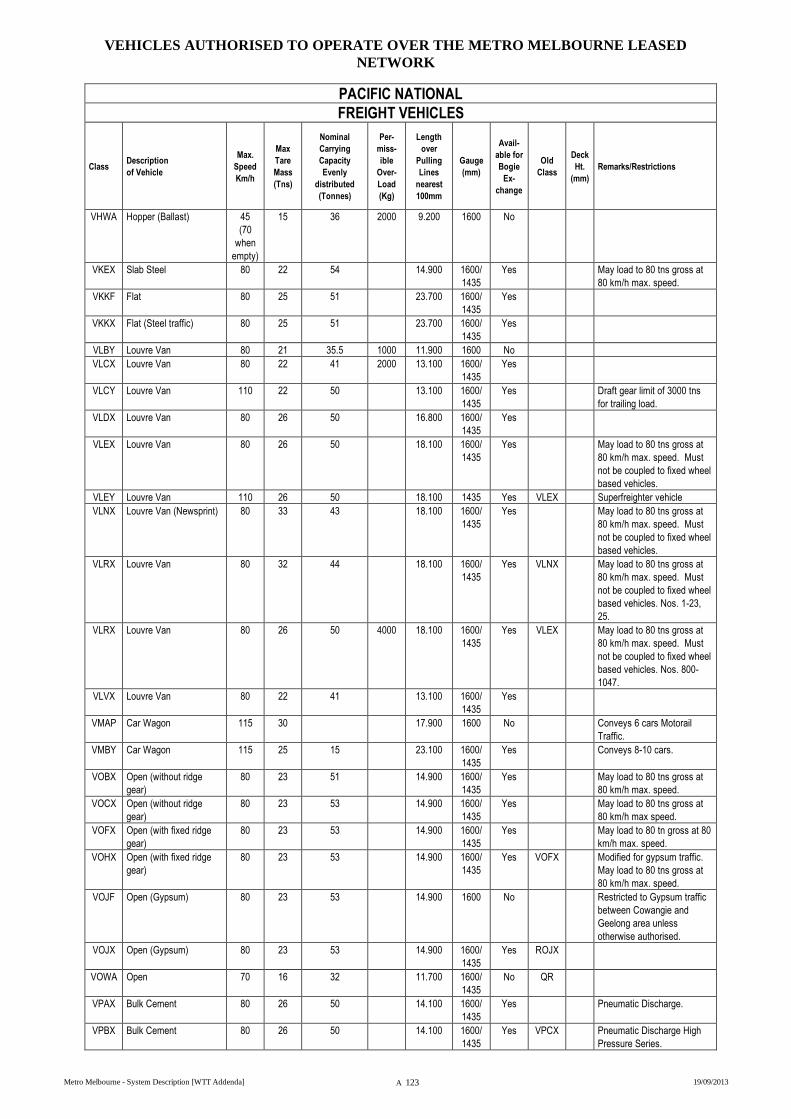
VEHICLES AUTHORISED TO OPERATE OVER THE METRO MELBOURNE LEASED
NETWORK
Metro Melbourne - System Description [WTT Addenda] A 123 19/09/2013
PACIFIC NATIONAL
FREIGHT VEHICLES
Class Description
of Vehicle
Max.
Speed
Km/h
Max
Tare
Mass
(Tns)
Nominal
Carrying
Capacity
Evenly
distributed
(Tonnes)
Per-
miss-
ible
Over-
Load
(Kg)
Length
over
Pulling
Lines
nearest
100mm
Gauge
(mm)
Avail-
able for
Bogie
Ex-
change
Old
Class
Deck
Ht.
(mm)
Remarks/Restrictions
VHWA Hopper (Ballast) 45
(70
when
empty)
15 36 2000 9.200 1600 No
VKEX Slab Steel 80 22 54 14.900 1600/
1435
Yes May load to 80 tns gross at
80 km/h max. speed.
VKKF Flat 80 25 51 23.700 1600/
1435
Yes
VKKX Flat (Steel traffic) 80 25 51 23.700 1600/
1435
Yes
VLBY Louvre Van 80 21 35.5 1000 11.900 1600 No
VLCX Louvre Van 80 22 41 2000 13.100 1600/
1435
Yes
VLCY Louvre Van 110 22 50 13.100 1600/
1435
Yes Draft gear limit of 3000 tns
for trailing load.
VLDX Louvre Van 80 26 50 16.800 1600/
1435
Yes
VLEX Louvre Van 80 26 50 18.100 1600/
1435
Yes May load to 80 tns gross at
80 km/h max. speed. Must
not be coupled to fixed wheel
based vehicles.
VLEY Louvre Van 110 26 50 18.100 1435 Yes VLEX Superfreighter vehicle
VLNX Louvre Van (Newsprint)
80 33 43 18.100 1600/
1435
Yes May load to 80 tns gross at
80 km/h max. speed. Must
not be coupled to fixed wheel
based vehicles.
VLRX Louvre Van 80 32 44 18.100 1600/
1435
Yes VLNX May load to 80 tns gross at
80 km/h max. speed. Must
not be coupled to fixed wheel
based vehicles. Nos. 1-23,
25.
VLRX Louvre Van 80 26 50 4000 18.100 1600/
1435
Yes VLEX May load to 80 tns gross at
80 km/h max. speed. Must
not be coupled to fixed wheel
based vehicles. Nos. 800-
1047.
VLVX Louvre Van 80 22 41 13.100 1600/
1435
Yes
VMAP Car Wagon 115 30 17.900 1600 No Conveys 6 cars Motorail
Traffic.
VMBY Car Wagon 115 25 15 23.100 1600/
1435
Yes Conveys 8-10 cars.
VOBX Open (without ridge
gear)
80 23 51 14.900
1600/
1435
Yes May load to 80 tns gross at
80 km/h max. speed.
VOCX Open (without ridge
gear)
80 23 53 14.900 1600/
1435
Yes May load to 80 tns gross at
80 km/h max speed.
VOFX Open (with fixed ridge
gear)
80 23 53 14.900 1600/
1435
Yes May load to 80 tn gross at 80
km/h max. speed.
VOHX Open (with fixed ridge
gear)
80 23 53 14.900 1600/
1435
Yes VOFX Modified for gypsum traffic.
May load to 80 tns gross at
80 km/h max. speed.
VOJF Open (Gypsum) 80 23 53 14.900 1600 No Restricted to Gypsum traffic
between Cowangie and
Geelong area unless
otherwise authorised.
VOJX Open (Gypsum) 80 23 53 14.900 1600/
1435
Yes ROJX
VOWA Open 70 16 32 11.700 1600/
1435
No QR
VPAX Bulk Cement 80 26 50 14.100 1600/
1435
Yes Pneumatic Discharge.
VPBX Bulk Cement 80 26 50 14.100 1600/
1435
Yes VPCX Pneumatic Discharge High
Pressure Series.
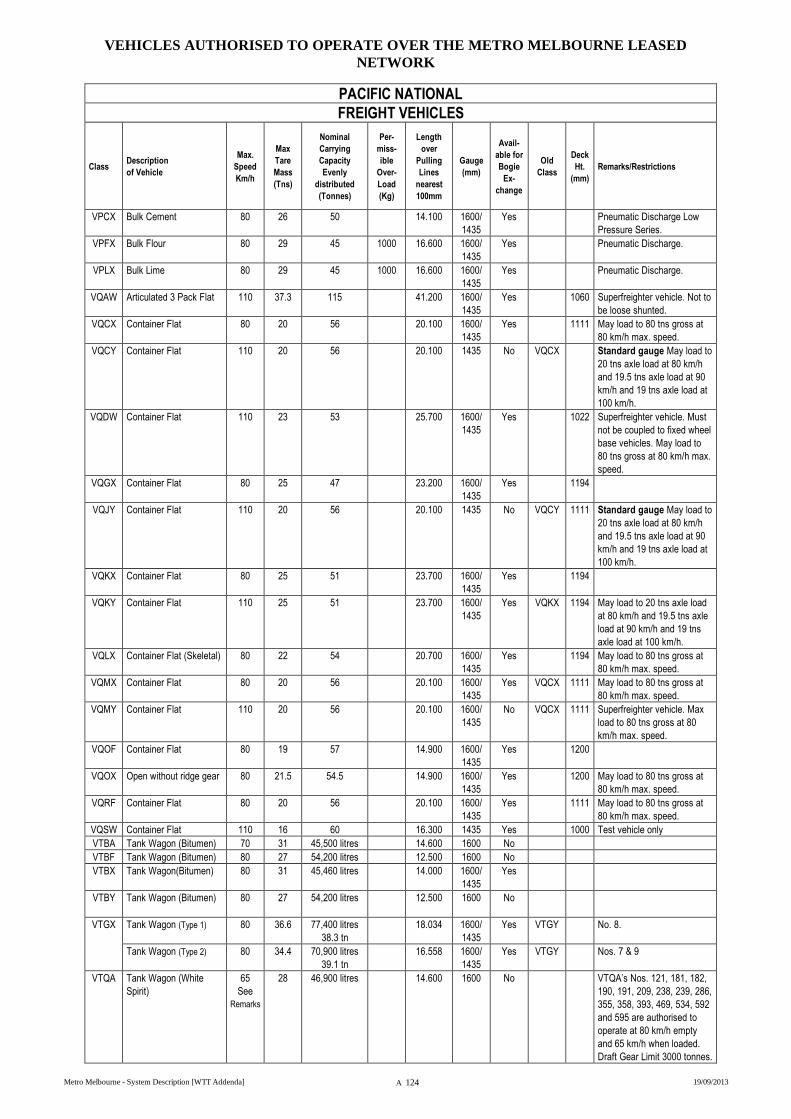
VEHICLES AUTHORISED TO OPERATE OVER THE METRO MELBOURNE LEASED
NETWORK
Metro Melbourne - System Description [WTT Addenda] A 124 19/09/2013
PACIFIC NATIONAL
FREIGHT VEHICLES
Class Description
of Vehicle
Max.
Speed
Km/h
Max
Tare
Mass
(Tns)
Nominal
Carrying
Capacity
Evenly
distributed
(Tonnes)
Per-
miss-
ible
Over-
Load
(Kg)
Length
over
Pulling
Lines
nearest
100mm
Gauge
(mm)
Avail-
able for
Bogie
Ex-
change
Old
Class
Deck
Ht.
(mm)
Remarks/Restrictions
VPCX Bulk Cement 80 26 50 14.100 1600/
1435
Yes Pneumatic Discharge Low
Pressure Series.
VPFX Bulk Flour 80 29 45 1000 16.600 1600/
1435
Yes Pneumatic Discharge.
VPLX Bulk Lime 80 29 45 1000 16.600 1600/
1435
Yes Pneumatic Discharge.
VQAW Articulated 3 Pack Flat 110 37.3 115 41.200 1600/
1435
Yes 1060 Superfreighter vehicle. Not to
be loose shunted.
VQCX Container Flat 80 20 56 20.100 1600/
1435
Yes 1111 May load to 80 tns gross at
80 km/h max. speed.
VQCY Container Flat 110 20 56 20.100 1435 No VQCX Standard gauge May load to
20 tns axle load at 80 km/h
and 19.5 tns axle load at 90
km/h and 19 tns axle load at
100 km/h.
VQDW Container Flat 110 23 53 25.700 1600/
1435
Yes 1022 Superfreighter vehicle. Must
not be coupled to fixed wheel
base vehicles. May load to
80 tns gross at 80 km/h max.
speed.
VQGX Container Flat 80 25 47 23.200 1600/
1435
Yes 1194
VQJY Container Flat 110 20 56 20.100 1435 No VQCY 1111 Standard gauge May load to
20 tns axle load at 80 km/h
and 19.5 tns axle load at 90
km/h and 19 tns axle load at
100 km/h.
VQKX Container Flat 80 25 51 23.700 1600/
1435
Yes 1194
VQKY Container Flat 110 25 51 23.700 1600/
1435
Yes VQKX 1194 May load to 20 tns axle load
at 80 km/h and 19.5 tns axle
load at 90 km/h and 19 tns
axle load at 100 km/h.
VQLX Container Flat (Skeletal) 80 22 54 20.700 1600/
1435
Yes 1194 May load to 80 tns gross at
80 km/h max. speed.
VQMX Container Flat 80 20 56 20.100 1600/
1435
Yes VQCX 1111 May load to 80 tns gross at
80 km/h max. speed.
VQMY Container Flat 110 20 56 20.100 1600/
1435
No VQCX 1111 Superfreighter vehicle. Max
load to 80 tns gross at 80
km/h max. speed.
VQOF Container Flat 80 19 57 14.900 1600/
1435
Yes 1200
VQOX Open without ridge gear 80 21.5 54.5 14.900 1600/
1435
Yes 1200 May load to 80 tns gross at
80 km/h max. speed.
VQRF Container Flat 80 20 56 20.100 1600/
1435
Yes 1111 May load to 80 tns gross at
80 km/h max. speed.
VQSW Container Flat 110 16 60 16.300 1435 Yes 1000 Test vehicle only
VTBA Tank Wagon (Bitumen) 70 31 45,500 litres 14.600 1600 No
VTBF Tank Wagon (Bitumen) 80 27 54,200 litres 12.500 1600 No
VTBX Tank Wagon(Bitumen) 80 31 45,460 litres 14.000 1600/
1435
Yes
VTBY Tank Wagon (Bitumen) 80
27 54,200 litres 12.500 1600 No
VTGX
Tank Wagon (Type 1) 80 36.6 77,400 litres
38.3 tn
18.034 1600/
1435
Yes VTGY No. 8.
Tank Wagon (Type 2) 80 34.4 70,900 litres
39.1 tn
16.558 1600/
1435
Yes VTGY Nos. 7 & 9
VTQA Tank Wagon (White
Spirit)
65
See
Remarks
28 46,900 litres 14.600 1600 No VTQA’s Nos. 121, 181, 182,
190, 191, 209, 238, 239, 286,
355, 358, 393, 469, 534, 592
and 595 are authorised to
operate at 80 km/h empty
and 65 km/h when loaded.
Draft Gear Limit 3000 tonnes.
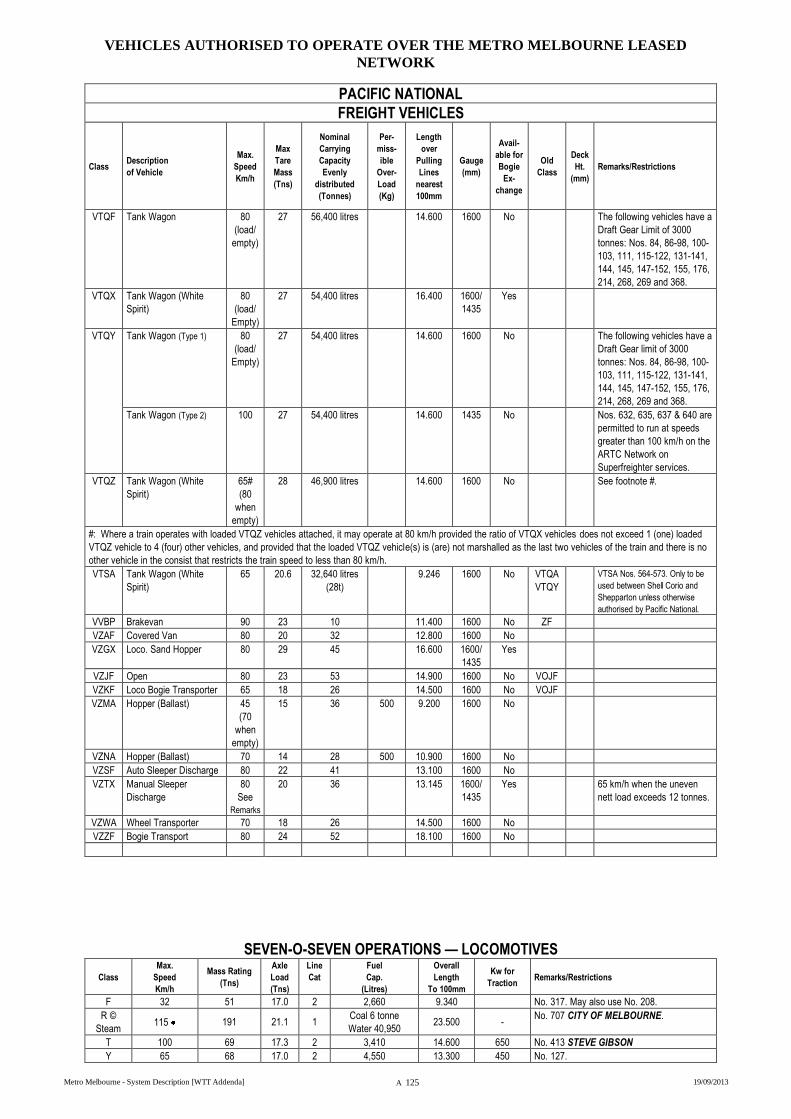
VEHICLES AUTHORISED TO OPERATE OVER THE METRO MELBOURNE LEASED
NETWORK
Metro Melbourne - System Description [WTT Addenda] A 125 19/09/2013
PACIFIC NATIONAL
FREIGHT VEHICLES
Class Description
of Vehicle
Max.
Speed
Km/h
Max
Tare
Mass
(Tns)
Nominal
Carrying
Capacity
Evenly
distributed
(Tonnes)
Per-
miss-
ible
Over-
Load
(Kg)
Length
over
Pulling
Lines
nearest
100mm
Gauge
(mm)
Avail-
able for
Bogie
Ex-
change
Old
Class
Deck
Ht.
(mm)
Remarks/Restrictions
VTQF Tank Wagon 80
(load/
empty)
27 56,400 litres 14.600 1600 No The following vehicles have a
Draft Gear Limit of 3000
tonnes: Nos. 84, 86-98, 100-
103, 111, 115-122, 131-141,
144, 145, 147-152, 155, 176,
214, 268, 269 and 368.
VTQX Tank Wagon (White
Spirit)
80
(load/
Empty)
27 54,400 litres 16.400 1600/
1435
Yes
VTQY
Tank Wagon (Type 1) 80
(load/
Empty)
27 54,400 litres 14.600 1600 No The following vehicles have a
Draft Gear limit of 3000
tonnes: Nos. 84, 86-98, 100-
103, 111, 115-122, 131-141,
144, 145, 147-152, 155, 176,
214, 268, 269 and 368.
Tank Wagon (Type 2) 100 27 54,400 litres 14.600 1435 No Nos. 632, 635, 637 & 640 are
permitted to run at speeds
greater than 100 km/h on the
ARTC Network on
Superfreighter services.
VTQZ Tank Wagon (White
Spirit)
65#
(80
when
empty)
28 46,900 litres 14.600 1600 No See footnote #.
#: Where a train operates with loaded VTQZ vehicles attached, it may operate at 80 km/h provided the ratio of VTQX vehicles does not exceed 1 (one) loaded
VTQZ vehicle to 4 (four) other vehicles, and provided that the loaded VTQZ vehicle(s) is (are) not marshalled as the last two vehicles of the train and there is no
other vehicle in the consist that restricts the train speed to less than 80 km/h.
VTSA Tank Wagon (White
Spirit)
65 20.6 32,640 litres
(28t)
9.246 1600 No VTQA
VTQY
VTSA Nos. 564-573. Only to be
used between Shell Corio and
Shepparton unless otherwise
authorised by Pacific National.
VVBP Brakevan 90 23 10 11.400 1600 No ZF
VZAF Covered Van 80 20 32 12.800 1600 No
VZGX Loco. Sand Hopper 80 29 45 16.600 1600/
1435
Yes
VZJF Open 80 23 53 14.900 1600 No VOJF
VZKF Loco Bogie Transporter 65 18 26 14.500 1600 No VOJF
VZMA Hopper (Ballast) 45
(70
when
empty)
15 36 500 9.200 1600 No
VZNA Hopper (Ballast) 70 14 28 500 10.900 1600 No
VZSF Auto Sleeper Discharge 80 22 41 13.100 1600 No
VZTX Manual Sleeper
Discharge
80
See
Remarks
20 36 13.145 1600/
1435
Yes 65 km/h when the uneven
nett load exceeds 12 tonnes.
VZWA Wheel Transporter 70 18 26 14.500 1600 No
VZZF Bogie Transport 80 24 52 18.100 1600 No
SEVEN-O-SEVEN OPERATIONS — LOCOMOTIVES
Class
Max.
Speed
Km/h
Mass Rating
(Tns)
Axle
Load
(Tns)
Line
Cat
Fuel
Cap.
(Litres)
Overall
Length
To 100mm
Kw for
Traction Remarks/Restrictions
F 32 51 17.0 2 2,660 9.340 No. 317. May also use No. 208.
R ©
Steam 115 191 21.1 1
Coal 6 tonne
Water 40,950 23.500 -
No. 707 CITY OF MELBOURNE.
T 100 69 17.3 2 3,410 14.600 650 No. 413 STEVE GIBSON
Y 65 68 17.0 2 4,550 13.300 450 No. 127.
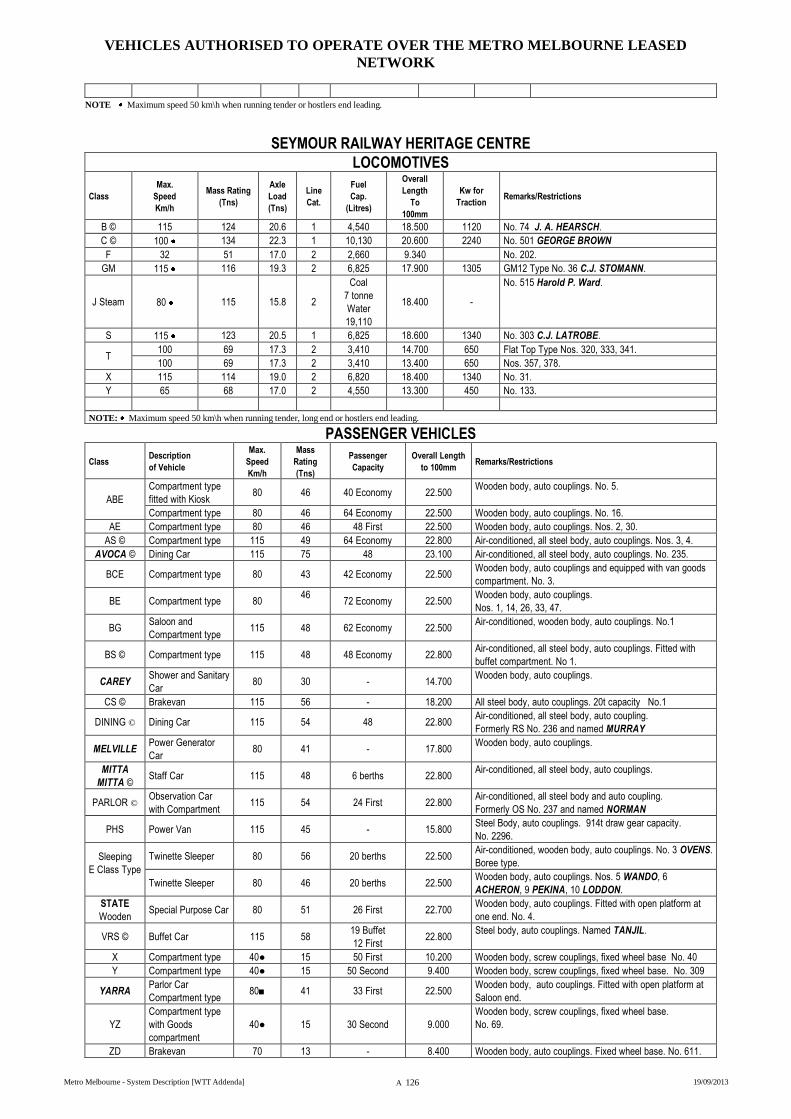
VEHICLES AUTHORISED TO OPERATE OVER THE METRO MELBOURNE LEASED
NETWORK
Metro Melbourne - System Description [WTT Addenda] A 126 19/09/2013
NOTE Maximum speed 50 km\h when running tender or hostlers end leading.
SEYMOUR RAILWAY HERITAGE CENTRE
LOCOMOTIVES
Class
Max.
Speed
Km/h
Mass Rating
(Tns)
Axle
Load
(Tns)
Line
Cat.
Fuel
Cap.
(Litres)
Overall
Length
To
100mm
Kw for
Traction Remarks/Restrictions
B © 115 124 20.6 1 4,540 18.500 1120 No. 74 J. A. HEARSCH.
C © 100 134 22.3 1 10,130 20.600 2240 No. 501 GEORGE BROWN
F 32 51 17.0 2 2,660 9.340 No. 202.
GM 115 116 19.3 2 6,825 17.900 1305 GM12 Type No. 36 C.J. STOMANN.
J Steam 80 115 15.8 2
Coal
7 tonne
Water
19,110
18.400 -
No. 515 Harold P. Ward.
S 115 123 20.5 1 6,825 18.600 1340 No. 303 C.J. LATROBE.
T 100 69 17.3 2 3,410 14.700 650 Flat Top Type Nos. 320, 333, 341.
100 69 17.3 2 3,410 13.400 650 Nos. 357, 378.
X 115 114 19.0 2 6,820 18.400 1340 No. 31.
Y 65 68 17.0 2 4,550 13.300 450 No. 133.
NOTE: Maximum speed 50 km\h when running tender, long end or hostlers end leading.
PASSENGER VEHICLES
Class Description
of Vehicle
Max.
Speed
Km/h
Mass
Rating
(Tns)
Passenger
Capacity
Overall Length
to 100mm Remarks/Restrictions
ABE
Compartment type
fitted with Kiosk 80 46 40 Economy 22.500
Wooden body, auto couplings. No. 5.
Compartment type 80 46 64 Economy 22.500 Wooden body, auto couplings. No. 16.
AE Compartment type 80 46 48 First 22.500 Wooden body, auto couplings. Nos. 2, 30.
AS © Compartment type 115 49 64 Economy 22.800 Air-conditioned, all steel body, auto couplings. Nos. 3, 4.
AVOCA © Dining Car 115 75 48 23.100 Air-conditioned, all steel body, auto couplings. No. 235.
BCE Compartment type 80 43 42 Economy 22.500 Wooden body, auto couplings and equipped with van goods
compartment. No. 3.
BE Compartment type 80 46
72 Economy 22.500
Wooden body, auto couplings.
Nos. 1, 14, 26, 33, 47.
BG Saloon and
Compartment type 115 48 62 Economy 22.500
Air-conditioned, wooden body, auto couplings. No.1
BS © Compartment type 115 48 48 Economy 22.800 Air-conditioned, all steel body, auto couplings. Fitted with
buffet compartment. No 1.
CAREY Shower and Sanitary
Car 80 30 - 14.700
Wooden body, auto couplings.
CS © Brakevan 115 56 - 18.200 All steel body, auto couplings. 20t capacity No.1
DINING © Dining Car 115 54 48 22.800 Air-conditioned, all steel body, auto coupling.
Formerly RS No. 236 and named MURRAY
MELVILLE Power Generator
Car 80 41 - 17.800
Wooden body, auto couplings.
MITTA
MITTA © Staff Car 115 48 6 berths 22.800
Air-conditioned, all steel body, auto couplings.
PARLOR © Observation Car
with Compartment 115 54 24 First 22.800
Air-conditioned, all steel body and auto coupling.
Formerly OS No. 237 and named NORMAN
PHS Power Van 115 45 - 15.800 Steel Body, auto couplings. 914t draw gear capacity.
No. 2296.
Sleeping
E Class Type
Twinette Sleeper 80 56 20 berths 22.500 Air-conditioned, wooden body, auto couplings. No. 3 OVENS.
Boree type.
Twinette Sleeper 80 46 20 berths 22.500 Wooden body, auto couplings. Nos. 5 WANDO, 6
ACHERON, 9 PEKINA, 10 LODDON.
STATE
Wooden Special Purpose Car 80 51 26 First 22.700
Wooden body, auto couplings. Fitted with open platform at
one end. No. 4.
VRS © Buffet Car 115 58 19 Buffet
12 First 22.800
Steel body, auto couplings. Named TANJIL.
X Compartment type 40● 15 50 First 10.200 Wooden body, screw couplings, fixed wheel base No. 40
Y Compartment type 40● 15 50 Second 9.400 Wooden body, screw couplings, fixed wheel base. No. 309
YARRA Parlor Car
Compartment type 80■ 41 33 First 22.500
Wooden body, auto couplings. Fitted with open platform at
Saloon end.
YZ
Compartment type
with Goods
compartment
40● 15 30 Second 9.000
Wooden body, screw couplings, fixed wheel base.
No. 69.
ZD Brakevan 70 13 - 8.400 Wooden body, auto couplings. Fixed wheel base. No. 611.
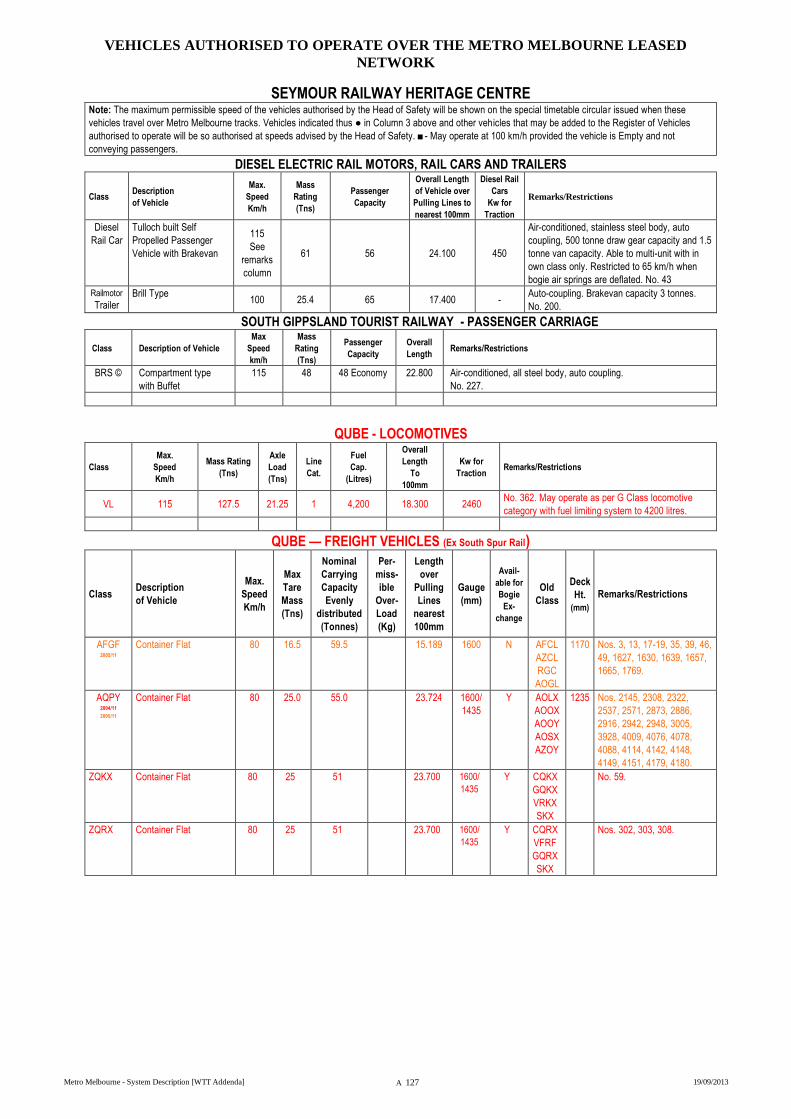
VEHICLES AUTHORISED TO OPERATE OVER THE METRO MELBOURNE LEASED
NETWORK
Metro Melbourne - System Description [WTT Addenda] A 127 19/09/2013
SEYMOUR RAILWAY HERITAGE CENTRE Note: The maximum permissible speed of the vehicles authorised by the Head of Safety will be shown on the special timetable circular issued when these
vehicles travel over Metro Melbourne tracks. Vehicles indicated thus ● in Column 3 above and other vehicles that may be added to the Register of Vehicles
authorised to operate will be so authorised at speeds advised by the Head of Safety. ■- May operate at 100 km/h provided the vehicle is Empty and not
conveying passengers.
DIESEL ELECTRIC RAIL MOTORS, RAIL CARS AND TRAILERS
Class Description
of Vehicle
Max.
Speed
Km/h
Mass
Rating
(Tns)
Passenger
Capacity
Overall Length
of Vehicle over
Pulling Lines to
nearest 100mm
Diesel Rail
Cars
Kw for
Traction
Remarks/Restrictions
Diesel
Rail Car
Tulloch built Self
Propelled Passenger
Vehicle with Brakevan
115
See
remarks
column
61 56 24.100 450
Air-conditioned, stainless steel body, auto
coupling, 500 tonne draw gear capacity and 1.5
tonne van capacity. Able to multi-unit with in
own class only. Restricted to 65 km/h when
bogie air springs are deflated. No. 43
Railmotor
Trailer Brill Type
100 25.4 65 17.400 - Auto-coupling. Brakevan capacity 3 tonnes.
No. 200.
SOUTH GIPPSLAND TOURIST RAILWAY - PASSENGER CARRIAGE
Class Description of Vehicle
Max
Speed
km/h
Mass
Rating
(Tns)
Passenger
Capacity
Overall
Length Remarks/Restrictions
BRS © Compartment type
with Buffet
115 48 48 Economy 22.800 Air-conditioned, all steel body, auto coupling.
No. 227.
QUBE - LOCOMOTIVES
Class
Max.
Speed
Km/h
Mass Rating
(Tns)
Axle
Load
(Tns)
Line
Cat.
Fuel
Cap.
(Litres)
Overall
Length
To
100mm
Kw for
Traction Remarks/Restrictions
VL 115 127.5 21.25 1 4,200 18.300 2460 No. 362. May operate as per G Class locomotive
category with fuel limiting system to 4200 litres.
QUBE — FREIGHT VEHICLES (Ex South Spur Rail)
Class Description
of Vehicle
Max.
Speed
Km/h
Max
Tare
Mass
(Tns)
Nominal
Carrying
Capacity
Evenly
distributed
(Tonnes)
Per-
miss-
ible
Over-
Load
(Kg)
Length
over
Pulling
Lines
nearest
100mm
Gauge
(mm)
Avail-
able for
Bogie
Ex-
change
Old
Class
Deck
Ht.
(mm)
Remarks/Restrictions
AFGF 2005/11
Container Flat 80 16.5 59.5 15.189 1600 N AFCL
AZCL
RGC
AOGL
1170 Nos. 3, 13, 17-19, 35, 39, 46,
49, 1627, 1630, 1639, 1657,
1665, 1769.
AQPY 2004/11
2005/11
Container Flat 80 25.0 55.0 23.724 1600/
1435
Y AOLX
AOOX
AOOY
AOSX
AZOY
1235 Nos. 2145, 2308, 2322,
2537, 2571, 2873, 2886,
2916, 2942, 2948, 3005,
3928, 4009, 4076, 4078,
4088, 4114, 4142, 4148,
4149, 4151, 4179, 4180.
ZQKX Container Flat 80 25 51 23.700 1600/
1435
Y CQKX
GQKX
VRKX
SKX
No. 59.
ZQRX
Container Flat
80 25 51 23.700 1600/
1435
Y CQRX
VFRF
GQRX
SKX
Nos. 302, 303, 308.
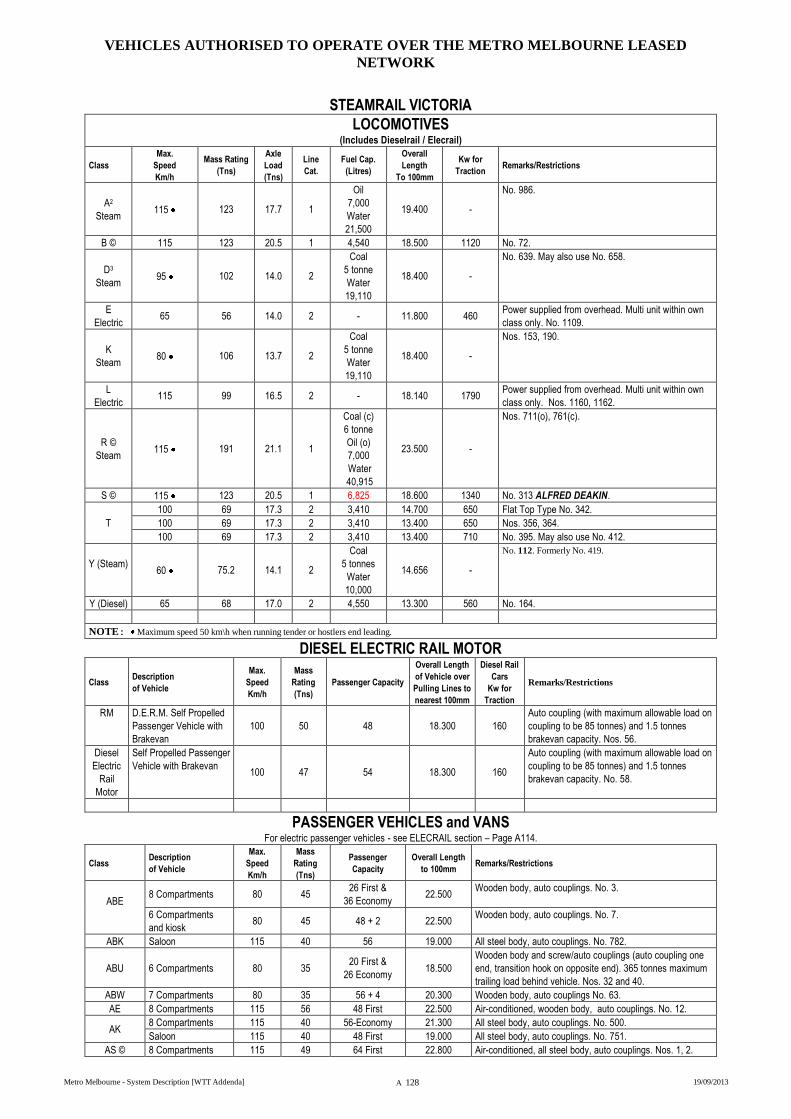
VEHICLES AUTHORISED TO OPERATE OVER THE METRO MELBOURNE LEASED
NETWORK
Metro Melbourne - System Description [WTT Addenda] A 128 19/09/2013
STEAMRAIL VICTORIA
LOCOMOTIVES (Includes Dieselrail / Elecrail)
Class
Max.
Speed
Km/h
Mass Rating
(Tns)
Axle
Load
(Tns)
Line
Cat.
Fuel Cap.
(Litres)
Overall
Length
To 100mm
Kw for
Traction Remarks/Restrictions
A2
Steam 115 123 17.7 1
Oil
7,000
Water
21,500
19.400 -
No. 986.
B © 115 123 20.5 1 4,540 18.500 1120 No. 72.
D3
Steam 95 102 14.0 2
Coal
5 tonne
Water
19,110
18.400 -
No. 639. May also use No. 658.
E
Electric 65 56 14.0 2 - 11.800 460
Power supplied from overhead. Multi unit within own
class only. No. 1109.
K
Steam 80 106 13.7 2
Coal
5 tonne
Water
19,110
18.400 -
Nos. 153, 190.
L
Electric 115 99 16.5 2 - 18.140 1790
Power supplied from overhead. Multi unit within own
class only. Nos. 1160, 1162.
R ©
Steam 115 191 21.1 1
Coal (c)
6 tonne
Oil (o)
7,000
Water
40,915
23.500 -
Nos. 711(o), 761(c).
S © 115 123 20.5 1 6,825 18.600 1340 No. 313 ALFRED DEAKIN.
T
100 69 17.3 2 3,410 14.700 650 Flat Top Type No. 342.
100 69 17.3 2 3,410 13.400 650 Nos. 356, 364.
100 69 17.3 2 3,410 13.400 710 No. 395. May also use No. 412.
Y (Steam)
60 75.2 14.1 2
Coal
5 tonnes
Water
10,000
14.656 -
No. 112. Formerly No. 419.
Y (Diesel) 65 68 17.0 2 4,550 13.300 560 No. 164.
NOTE: Maximum speed 50 km\h when running tender or hostlers end leading.
DIESEL ELECTRIC RAIL MOTOR
Class Description
of Vehicle
Max.
Speed
Km/h
Mass
Rating
(Tns)
Passenger Capacity
Overall Length
of Vehicle over
Pulling Lines to
nearest 100mm
Diesel Rail
Cars
Kw for
Traction
Remarks/Restrictions
RM D.E.R.M. Self Propelled
Passenger Vehicle with
Brakevan
100 50 48 18.300 160
Auto coupling (with maximum allowable load on
coupling to be 85 tonnes) and 1.5 tonnes
brakevan capacity. Nos. 56.
Diesel
Electric
Rail
Motor
Self Propelled Passenger
Vehicle with Brakevan 100 47 54 18.300 160
Auto coupling (with maximum allowable load on
coupling to be 85 tonnes) and 1.5 tonnes
brakevan capacity. No. 58.
PASSENGER VEHICLES and VANS For electric passenger vehicles - see ELECRAIL section – Page A114.
Class Description
of Vehicle
Max.
Speed
Km/h
Mass
Rating
(Tns)
Passenger
Capacity
Overall Length
to 100mm Remarks/Restrictions
ABE
8 Compartments 80 45 26 First &
36 Economy 22.500
Wooden body, auto couplings. No. 3.
6 Compartments
and kiosk 80 45 48 + 2 22.500
Wooden body, auto couplings. No. 7.
ABK Saloon 115 40 56 19.000 All steel body, auto couplings. No. 782.
ABU 6 Compartments 80 35 20 First &
26 Economy 18.500
Wooden body and screw/auto couplings (auto coupling one
end, transition hook on opposite end). 365 tonnes maximum
trailing load behind vehicle. Nos. 32 and 40.
ABW 7 Compartments 80 35 56 + 4 20.300 Wooden body, auto couplings No. 63.
AE 8 Compartments 115 56 48 First 22.500 Air-conditioned, wooden body, auto couplings. No. 12.
AK 8 Compartments 115 40 56-Economy 21.300 All steel body, auto couplings. No. 500.
Saloon 115 40 48 First 19.000 All steel body, auto couplings. No. 751.
AS © 8 Compartments 115 49 64 First 22.800 Air-conditioned, all steel body, auto couplings. Nos. 1, 2.
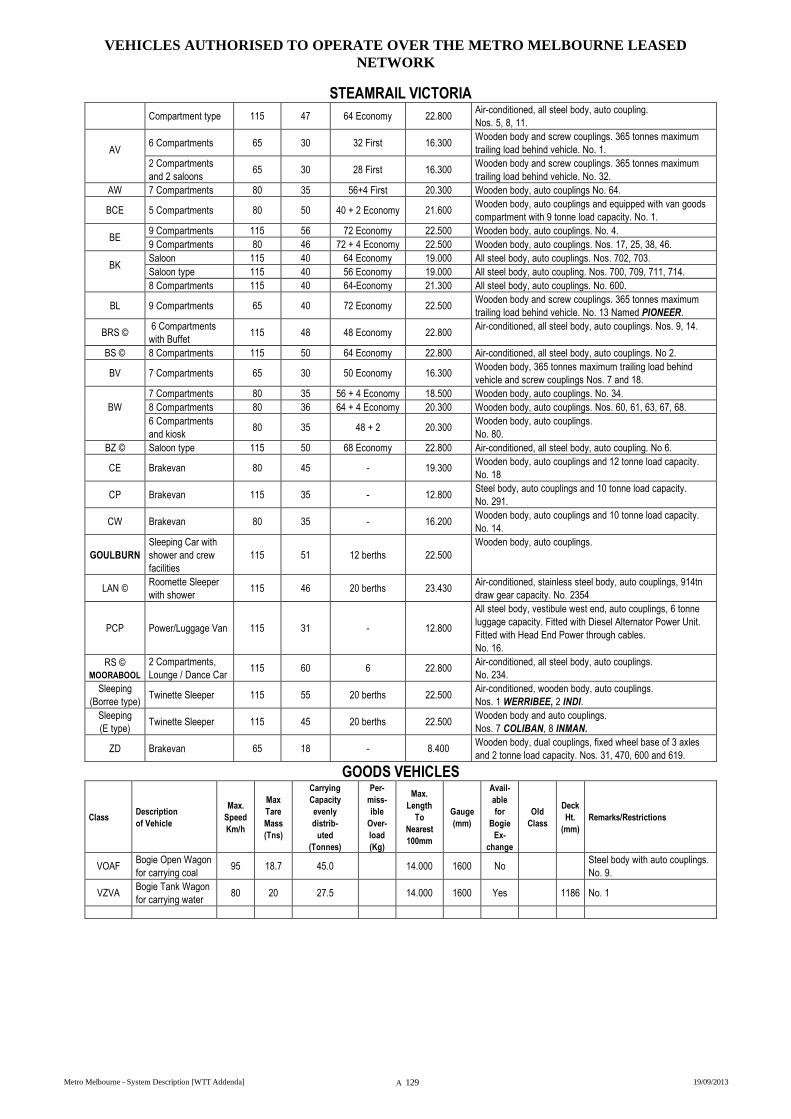
VEHICLES AUTHORISED TO OPERATE OVER THE METRO MELBOURNE LEASED
NETWORK
Metro Melbourne - System Description [WTT Addenda] A 129 19/09/2013
STEAMRAIL VICTORIA
Compartment type 115 47 64 Economy 22.800 Air-conditioned, all steel body, auto coupling.
Nos. 5, 8, 11.
AV
6 Compartments 65 30 32 First 16.300 Wooden body and screw couplings. 365 tonnes maximum
trailing load behind vehicle. No. 1.
2 Compartments
and 2 saloons 65 30 28 First 16.300
Wooden body and screw couplings. 365 tonnes maximum
trailing load behind vehicle. No. 32.
AW 7 Compartments 80 35 56+4 First 20.300 Wooden body, auto couplings No. 64.
BCE 5 Compartments 80 50 40 + 2 Economy 21.600 Wooden body, auto couplings and equipped with van goods
compartment with 9 tonne load capacity. No. 1.
BE 9 Compartments 115 56 72 Economy 22.500 Wooden body, auto couplings. No. 4.
9 Compartments 80 46 72 + 4 Economy 22.500 Wooden body, auto couplings. Nos. 17, 25, 38, 46.
BK
Saloon 115 40 64 Economy 19.000 All steel body, auto couplings. Nos. 702, 703.
Saloon type 115 40 56 Economy 19.000 All steel body, auto coupling. Nos. 700, 709, 711, 714.
8 Compartments 115 40 64-Economy 21.300 All steel body, auto couplings. No. 600.
BL 9 Compartments 65 40 72 Economy 22.500 Wooden body and screw couplings. 365 tonnes maximum
trailing load behind vehicle. No. 13 Named PIONEER.
BRS © 6 Compartments
with Buffet 115 48 48 Economy 22.800
Air-conditioned, all steel body, auto couplings. Nos. 9, 14.
BS © 8 Compartments 115 50 64 Economy 22.800 Air-conditioned, all steel body, auto couplings. No 2.
BV 7 Compartments 65 30 50 Economy 16.300 Wooden body, 365 tonnes maximum trailing load behind
vehicle and screw couplings Nos. 7 and 18.
BW
7 Compartments 80 35 56 + 4 Economy 18.500 Wooden body, auto couplings. No. 34.
8 Compartments 80 36 64 + 4 Economy 20.300 Wooden body, auto couplings. Nos. 60, 61, 63, 67, 68.
6 Compartments
and kiosk 80 35 48 + 2 20.300
Wooden body, auto couplings.
No. 80.
BZ © Saloon type 115 50 68 Economy 22.800 Air-conditioned, all steel body, auto coupling. No 6.
CE Brakevan 80 45 - 19.300 Wooden body, auto couplings and 12 tonne load capacity.
No. 18
CP Brakevan 115 35 - 12.800 Steel body, auto couplings and 10 tonne load capacity.
No. 291.
CW Brakevan 80 35 - 16.200 Wooden body, auto couplings and 10 tonne load capacity.
No. 14.
GOULBURN
Sleeping Car with
shower and crew
facilities
115 51 12 berths 22.500
Wooden body, auto couplings.
LAN © Roomette Sleeper
with shower 115 46 20 berths 23.430
Air-conditioned, stainless steel body, auto couplings, 914tn
draw gear capacity. No. 2354
PCP Power/Luggage Van 115 31 - 12.800
All steel body, vestibule west end, auto couplings, 6 tonne
luggage capacity. Fitted with Diesel Alternator Power Unit.
Fitted with Head End Power through cables.
No. 16.
RS ©
MOORABOOL
2 Compartments,
Lounge / Dance Car 115 60 6 22.800
Air-conditioned, all steel body, auto couplings.
No. 234.
Sleeping
(Borree type) Twinette Sleeper 115 55 20 berths 22.500
Air-conditioned, wooden body, auto couplings.
Nos. 1 WERRIBEE, 2 INDI.
Sleeping
(E type) Twinette Sleeper 115 45 20 berths 22.500
Wooden body and auto couplings.
Nos. 7 COLIBAN, 8 INMAN.
ZD Brakevan 65 18 - 8.400 Wooden body, dual couplings, fixed wheel base of 3 axles
and 2 tonne load capacity. Nos. 31, 470, 600 and 619.
GOODS VEHICLES
Class Description
of Vehicle
Max.
Speed
Km/h
Max
Tare
Mass
(Tns)
Carrying
Capacity
evenly
distrib-
uted
(Tonnes)
Per-
miss-
ible
Over-
load
(Kg)
Max.
Length
To
Nearest
100mm
Gauge
(mm)
Avail-
able
for
Bogie
Ex-
change
Old
Class
Deck
Ht.
(mm)
Remarks/Restrictions
VOAF Bogie Open Wagon
for carrying coal 95 18.7 45.0 14.000 1600 No
Steel body with auto couplings.
No. 9.
VZVA Bogie Tank Wagon
for carrying water 80 20 27.5 14.000 1600 Yes 1186 No. 1
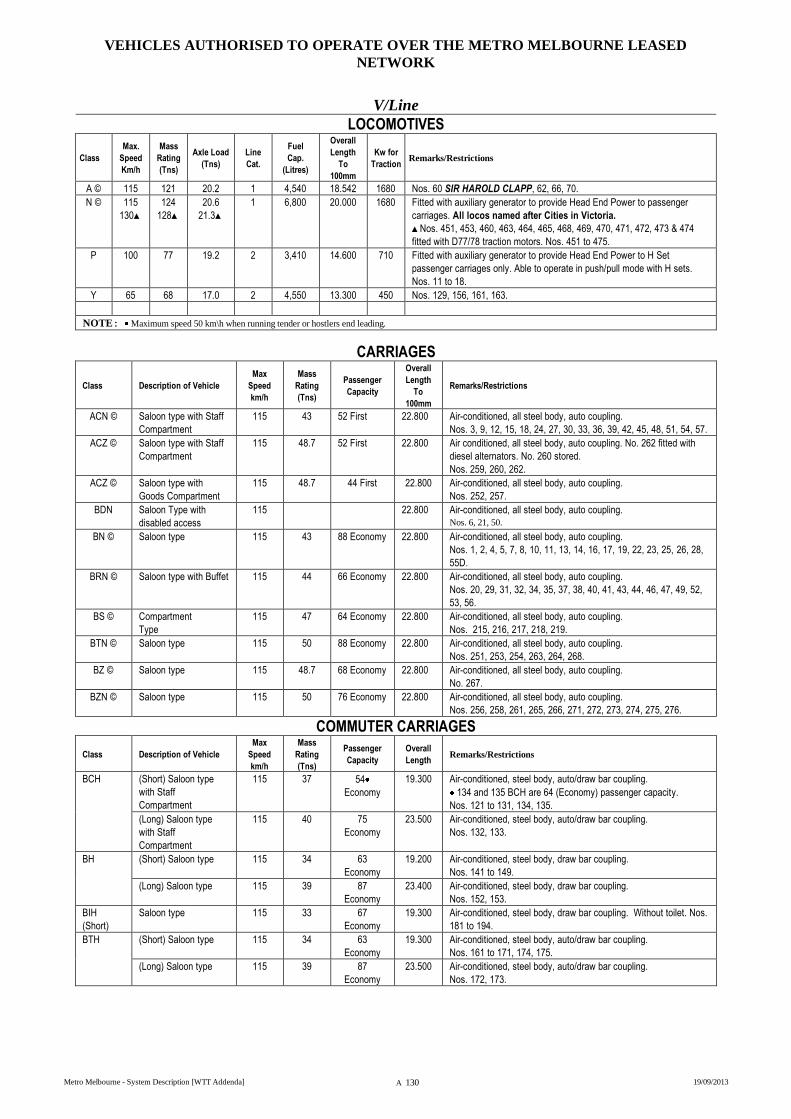
VEHICLES AUTHORISED TO OPERATE OVER THE METRO MELBOURNE LEASED
NETWORK
Metro Melbourne - System Description [WTT Addenda] A 130 19/09/2013
V/Line
LOCOMOTIVES
Class
Max.
Speed
Km/h
Mass
Rating
(Tns)
Axle Load
(Tns)
Line
Cat.
Fuel
Cap.
(Litres)
Overall
Length
To
100mm
Kw for
Traction Remarks/Restrictions
A © 115 121 20.2 1 4,540 18.542 1680 Nos. 60 SIR HAROLD CLAPP, 62, 66, 70.
N © 115
130▲
124
128▲
20.6
21.3▲
1 6,800 20.000 1680 Fitted with auxiliary generator to provide Head End Power to passenger
carriages. All locos named after Cities in Victoria.
▲Nos. 451, 453, 460, 463, 464, 465, 468, 469, 470, 471, 472, 473 & 474
fitted with D77/78 traction motors. Nos. 451 to 475.
P 100 77 19.2 2 3,410 14.600 710 Fitted with auxiliary generator to provide Head End Power to H Set
passenger carriages only. Able to operate in push/pull mode with H sets.
Nos. 11 to 18.
Y 65 68 17.0 2 4,550 13.300 450 Nos. 129, 156, 161, 163.
NOTE: Maximum speed 50 km\h when running tender or hostlers end leading.
CARRIAGES
Class Description of Vehicle
Max
Speed
km/h
Mass
Rating
(Tns)
Passenger
Capacity
Overall
Length
To
100mm
Remarks/Restrictions
ACN © Saloon type with Staff
Compartment
115 43 52 First 22.800 Air-conditioned, all steel body, auto coupling.
Nos. 3, 9, 12, 15, 18, 24, 27, 30, 33, 36, 39, 42, 45, 48, 51, 54, 57.
ACZ © Saloon type with Staff
Compartment
115 48.7 52 First 22.800 Air conditioned, all steel body, auto coupling. No. 262 fitted with
diesel alternators. No. 260 stored.
Nos. 259, 260, 262.
ACZ © Saloon type with
Goods Compartment
115 48.7 44 First 22.800 Air-conditioned, all steel body, auto coupling.
Nos. 252, 257.
BDN Saloon Type with
disabled access
115 22.800 Air-conditioned, all steel body, auto coupling. Nos. 6, 21, 50.
BN © Saloon type 115 43 88 Economy 22.800 Air-conditioned, all steel body, auto coupling.
Nos. 1, 2, 4, 5, 7, 8, 10, 11, 13, 14, 16, 17, 19, 22, 23, 25, 26, 28,
55D.
BRN © Saloon type with Buffet 115 44 66 Economy 22.800 Air-conditioned, all steel body, auto coupling.
Nos. 20, 29, 31, 32, 34, 35, 37, 38, 40, 41, 43, 44, 46, 47, 49, 52,
53, 56.
BS © Compartment
Type
115 47 64 Economy 22.800 Air-conditioned, all steel body, auto coupling.
Nos. 215, 216, 217, 218, 219.
BTN © Saloon type 115 50 88 Economy 22.800 Air-conditioned, all steel body, auto coupling.
Nos. 251, 253, 254, 263, 264, 268.
BZ © Saloon type 115 48.7 68 Economy 22.800 Air-conditioned, all steel body, auto coupling.
No. 267.
BZN ©
Saloon type 115 50 76 Economy 22.800 Air-conditioned, all steel body, auto coupling.
Nos. 256, 258, 261, 265, 266, 271, 272, 273, 274, 275, 276.
COMMUTER CARRIAGES
Class Description of Vehicle
Max
Speed
km/h
Mass
Rating
(Tns)
Passenger
Capacity
Overall
Length Remarks/Restrictions
BCH (Short) Saloon type
with Staff
Compartment
115 37 54
Economy
19.300 Air-conditioned, steel body, auto/draw bar coupling.
134 and 135 BCH are 64 (Economy) passenger capacity.
Nos. 121 to 131, 134, 135.
(Long) Saloon type
with Staff
Compartment
115 40 75
Economy
23.500 Air-conditioned, steel body, auto/draw bar coupling.
Nos. 132, 133.
BH (Short) Saloon type 115 34 63
Economy
19.200 Air-conditioned, steel body, draw bar coupling.
Nos. 141 to 149.
(Long) Saloon type 115 39 87
Economy
23.400 Air-conditioned, steel body, draw bar coupling.
Nos. 152, 153.
BIH
(Short)
Saloon type 115 33 67
Economy
19.300 Air-conditioned, steel body, draw bar coupling. Without toilet. Nos.
181 to 194.
BTH (Short) Saloon type 115 34 63
Economy
19.300 Air-conditioned, steel body, auto/draw bar coupling.
Nos. 161 to 171, 174, 175.
(Long) Saloon type 115 39 87
Economy
23.500 Air-conditioned, steel body, auto/draw bar coupling.
Nos. 172, 173.
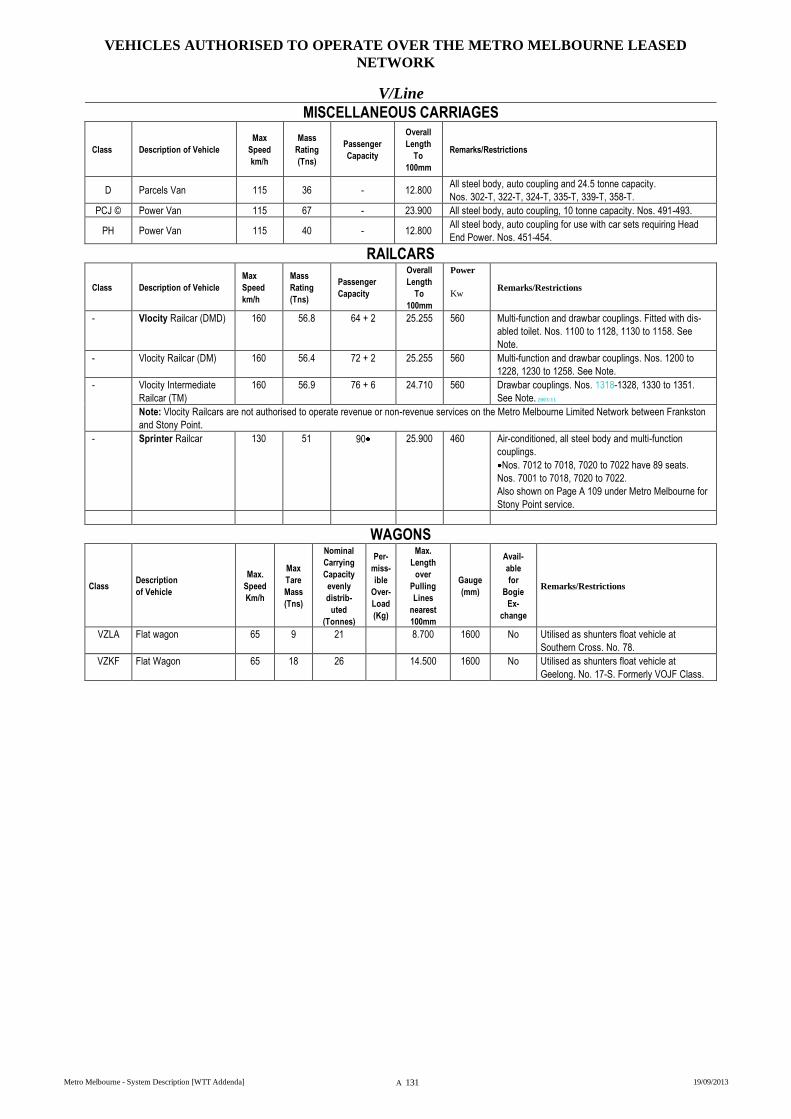
VEHICLES AUTHORISED TO OPERATE OVER THE METRO MELBOURNE LEASED
NETWORK
Metro Melbourne - System Description [WTT Addenda] A 131 19/09/2013
V/Line
MISCELLANEOUS CARRIAGES
Class Description of Vehicle
Max
Speed
km/h
Mass
Rating
(Tns)
Passenger
Capacity
Overall
Length
To
100mm
Remarks/Restrictions
D Parcels Van 115 36 - 12.800 All steel body, auto coupling and 24.5 tonne capacity.
Nos. 302-T, 322-T, 324-T, 335-T, 339-T, 358-T.
PCJ © Power Van 115 67 - 23.900 All steel body, auto coupling, 10 tonne capacity. Nos. 491-493.
PH Power Van 115 40 - 12.800 All steel body, auto coupling for use with car sets requiring Head
End Power. Nos. 451-454.
RAILCARS
Class Description of Vehicle
Max
Speed
km/h
Mass
Rating
(Tns)
Passenger
Capacity
Overall
Length
To
100mm
Power
Kw Remarks/Restrictions
- Vlocity Railcar (DMD) 160 56.8 64 + 2 25.255 560 Multi-function and drawbar couplings. Fitted with dis-
abled toilet. Nos. 1100 to 1128, 1130 to 1158. See
Note.
- Vlocity Railcar (DM) 160 56.4 72 + 2 25.255 560 Multi-function and drawbar couplings. Nos. 1200 to
1228, 1230 to 1258. See Note.
-
Vlocity Intermediate
Railcar (TM)
160 56.9 76 + 6 24.710 560 Drawbar couplings. Nos. 1318-1328, 1330 to 1351.
See Note. 2003/11
Note: Vlocity Railcars are not authorised to operate revenue or non-revenue services on the Metro Melbourne Limited Network between Frankston
and Stony Point.
- Sprinter Railcar 130 51 90
25.900 460 Air-conditioned, all steel body and multi-function
couplings.
Nos. 7012 to 7018, 7020 to 7022 have 89 seats.
Nos. 7001 to 7018, 7020 to 7022.
Also shown on Page A 109 under Metro Melbourne for
Stony Point service.
WAGONS
Class Description
of Vehicle
Max.
Speed
Km/h
Max
Tare
Mass
(Tns)
Nominal
Carrying
Capacity
evenly
distrib-
uted
(Tonnes)
Per-
miss-
ible
Over-
Load
(Kg)
Max.
Length
over
Pulling
Lines
nearest
100mm
Gauge
(mm)
Avail-
able
for
Bogie
Ex-
change
Remarks/Restrictions
VZLA Flat wagon 65 9 21 8.700 1600 No Utilised as shunters float vehicle at
Southern Cross. No. 78.
VZKF Flat Wagon 65 18 26 14.500 1600 No Utilised as shunters float vehicle at
Geelong. No. 17-S. Formerly VOJF Class.
VEHICLES AUTHORISED TO OPERATE OVER THE METRO MELBOURNE LEASED
NETWORK
Metro Melbourne - System Description [WTT Addenda] A 132 19/09/2013
VIC TRACK
MISCELLANEOUS CARRIAGES
Class Description of Vehicle
Max
Speed
km/h
Mass
Rating
(Tns)
Passenger
Capacity
Overall
Length
To
100mm
Remarks/Restrictions
CLUB © Club Car 115 43 43 23.800 Air-conditioned, all steel body, auto coupling.
No. 1. Named VICTORIA
DN Parcels Van 115 36 - 12.800 All steel body, auto coupling and 24.5 tonne capacity.
Nos. 403-T. Stored.
SJ ©
Roomette Sleeping
Car 115 50 20 Berths 23.900
Air-conditioned, all steel body, auto coupling.
No. 282. Stored.
Twinette Sleeping Car 115 52 20 Berths 23.900 Air-conditioned, all steel body, auto coupling.
Nos. 283, 284. Stored.
SZ © Twinette Sleeping Car 115 53 20 Berths 23.800 Air-conditioned, all steel body, auto coupling. No. 287. Stored
DIESEL ELECTRIC RAIL MOTORS, RAIL CARS AND TRAILERS
Class Description
of Vehicle
Max.
Speed
Km/h
Mass
Rating
(Tns)
Passenger
Capacity
Overall
Length of
Vehicle
over
Pulling
Lines to
nearest
100mm
Diesel Rail
Cars
Kw for
Traction
Remarks/Restrictions
Diesel
Electric
Rail
Motor
Self Propelled
Passenger Vehicle with
Brakevan
100
See
remarks
column
47 54
18.300 160
Auto coupling (with maximum allowable load on coupling to be 85
tonnes) and 1.5 tonnes brakevan capacity. – Maximum speed of
100 km/h when hauled on any passenger train. Nos. 60, 64.
GOODS VEHICLES
Class Description
of Vehicle
Max.
Speed
Km/h
Max
Tare
Mass
(Tns)
Nominal
Carrying
Capacity
evenly
distrib-
uted
(Tonnes)
Per-
miss-
ible
Over-
load
(Kg)
Max.
Length
Over
Pulling
Lines
Nearest
100mm
Gauge
(mm)
Avail-
able
for
Bogie
Ex-
change
Old
Class
Deck
Ht.
(mm)
Remarks/Restrictions
B Box Van
(Fixed Wheel) 65 11 14.0 7.800 1600 No No. 10.
G Open Wagon
(Fixed Wheel) 65 12 22.5 508 7.600 1600 No Nos. 1016, 3888, 16114.
GY Open Wagon
(Fixed Wheel) 65 9 22.5 508 7.600 1600 No No. 6127.
L Livestock
(Fixed Wheel) 65 10 10.0 7.000 1600 No No. 1324.
M Livestock
(Fixed Wheel) 65 9 10.0 7.400 1600 No No. 815.
Q Flat Wagon 65 18 32.0 500 16.100 1600 No No. 124.
RY Open Wagon
(Fixed Wheel) 65 10 22.5 508 7.600 1600 No No. 1504.
U Louvre
(Fixed Wheel) 65 12 16.0 508 8.700 1600 No No. 892.
VLBF Louvre 90 21 35.5 1000 11.900 1600 No Nos. 109, 145.
VLBY Louvre 90 21 35.5 1000 11.900 1600 No Nos. 108, 138.
VSPY Horse Box 90 25 Max. 12
Horses 14.500 1600 No FP No.7.
VWAA Well Wagon 70 20 32 16.100 1600 No QB
VWBA Well Wagon
See
remarks
column
94 153 28.800 1600 No Special Instructions regarding
loading/operating speeds only.
VWCY Well Wagon
See
remarks
column
34 61 16.500 1600 No Special Instructions regarding
loading/operating speeds only.
W Workman’s Sleeper 70 15 10.147 1600 No No. 70.
WT Water Tank
(Fixed Wheel) 65 10.5 13,600 litres 7.540 1600 No No. 236.

VEHICLES AUTHORISED TO OPERATE OVER THE METRO MELBOURNE LEASED
NETWORK
Metro Melbourne - System Description [WTT Addenda] A 133 19/09/2013
PARTICULARS OF TRACK MACHINES
RADIO REQUIREMENTS WITHIN THE METRO MELBOURNE LEASED NETWORK
When operating within the Metro Melbourne leased network all track machines must have an operating metropolitan
trunked radio for contact with Metrol (Metropolitan Train Control Centre).
The metropolitan trunked radio may either be part of the equipment of the track machine or a portable unit carried by the
Competent Person accompanying the track machine.
Mobile telephones are not to be used for track machines operating on running lines unless authorised by the General
Manager, Operations Services . When track machines travel in convoy the leading track machine must have the
metropolitan trunked radio.
When there are in excess of four (4) track machines travelling in convoy, as well as the Competent Person travelling on
the leading track machine, an additional Competent Person must accompany the trailing track machine and there must be
radio communication between the Competent Persons on the leading and trailing track machines.
A Competent Person is defined as a person who holds a current “On Track Maintenance Machine Competent Person’s Certificate”.
COLEMAN RAIL WTT 2009/11
Machine Type
Class Road Numbers Make/Model Length
(Metres)
Mass
(Tonnes)
Maximum
Speed
(Km/h)
Schedule
Speed
(Km/h)
Remarks
Ballast Tamper 6700s CR-T1 Harsco 6700s 14.850 32.500 72
Ballast Regulator 26-3 CR-R1 Kershaw 26-3 9.703 14.515 51.2
DOWNER EDI WORKS
Machine Type
Class Road Numbers Make/Model Length
(Metres)
Mass
(Tonnes)
Maximum
Speed
(Km/h)
Schedule
Speed
(Km/h)
Remarks
Ballast Tamper TA 001, 002, 004. Pandrol Jackson
6700S 13.264 31.750 72 50
Ballast Regulator BR 001–003, 005, 006.
Knox Kershaw
KBR850 Ballast
Regulator
11.160 18.200 72 50
Sleeper Inserter /
Extractor SI 005 Nordco 12.000 18.000 30
Ballast Compactor CO 001. Plasser PIV 800 8.600 20.000 60 WTT.2002/12
JOHN HOLLAND PTY LTD
Machine Type Road
Numbers
Plant
Numbers Gauge Make / Model
Length
(Metres)
Mass
(Tonnes)
Maximum
Speed
(Km/h)
Schedule
Speed
(Km/h)
Remarks
Cleaner (Ballast) ▲ 6-40-001 41601 1600 Plasser RM 74 28 75 80 50
Cleaner
(Shoulder Ballast)
NA 41603 1435 Loram BC7 60 160 40 30
Compactor
(Crib & Shoulder)
6-57-001 41303 1600 Tamper CSC-2 7.0 14 50 40
6-57-003 41305 1600 Tamper CSC-2 7.0 14 50 40
6-57-005 41306 1600 Tamper CSC-2 7.0 14 50 40
6-57-006 41307 1600 Tamper CSC-2 7.0 14 50 40
6-57-008 41308 1600 Tamper CSC-2 7.0 14 50 40
6-57-007 41309 1600 Tamper CSC-2 7.0 14 50 40
Flass Butt Welder ▲ 6-62-001 41502 Dual Plasser K355PT 16.5 52 70 35
Hi Rail (Road/Rail)
4WD Truck NA 326265
1600)
1435)
1067)
Isuzu NPS300 KLD 6.1 6.6
Refer to Book Of
Rules And Operating
Procedures.
Rail Grinder
NA 41701 1435 Loram RG7 90 350 90 80
NA 326118
41702
41703
1600)
1435)
1067)
11.44 30
55 45
Power car
Loram RG8 4.87 8 Grind unit
4.87 8 Grind unit
2.50 Rear cab
Total 25.7 56
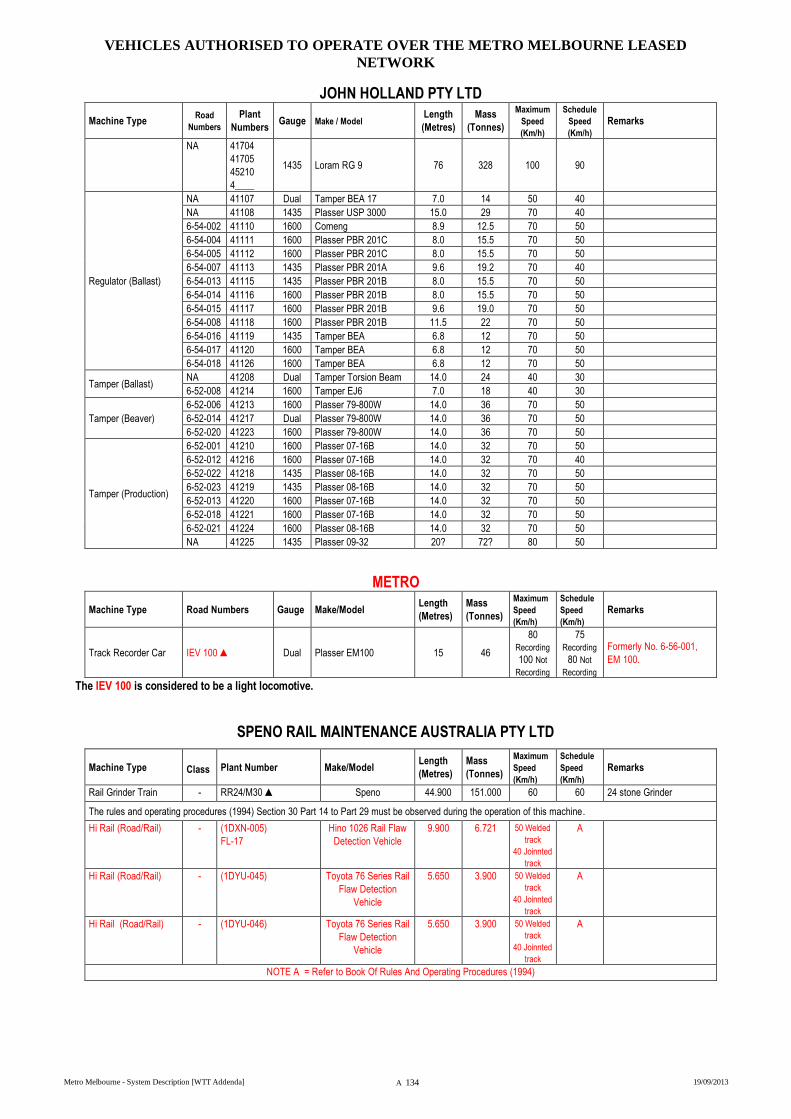
VEHICLES AUTHORISED TO OPERATE OVER THE METRO MELBOURNE LEASED
NETWORK
Metro Melbourne - System Description [WTT Addenda] A 134 19/09/2013
JOHN HOLLAND PTY LTD
Machine Type Road
Numbers
Plant
Numbers Gauge Make / Model
Length
(Metres)
Mass
(Tonnes)
Maximum
Speed
(Km/h)
Schedule
Speed
(Km/h)
Remarks
NA 41704
41705
45210
4____
1435 Loram RG 9 76 328 100 90
Regulator (Ballast)
NA 41107 Dual Tamper BEA 17 7.0 14 50 40
NA 41108 1435 Plasser USP 3000 15.0 29 70 40
6-54-002 41110 1600 Comeng 8.9 12.5 70 50
6-54-004 41111 1600 Plasser PBR 201C 8.0 15.5 70 50
6-54-005 41112 1600 Plasser PBR 201C 8.0 15.5 70 50
6-54-007 41113 1435 Plasser PBR 201A 9.6 19.2 70 40
6-54-013 41115 1435 Plasser PBR 201B 8.0 15.5 70 50
6-54-014 41116 1600 Plasser PBR 201B 8.0 15.5 70 50
6-54-015 41117 1600 Plasser PBR 201B 9.6 19.0 70 50
6-54-008 41118 1600 Plasser PBR 201B 11.5 22 70 50
6-54-016 41119 1435 Tamper BEA 6.8 12 70 50
6-54-017 41120 1600 Tamper BEA 6.8 12 70 50
6-54-018 41126 1600 Tamper BEA 6.8 12 70 50
Tamper (Ballast) NA 41208 Dual Tamper Torsion Beam 14.0 24 40 30
6-52-008 41214 1600 Tamper EJ6 7.0 18 40 30
Tamper (Beaver)
6-52-006 41213 1600 Plasser 79-800W 14.0 36 70 50
6-52-014 41217 Dual Plasser 79-800W 14.0 36 70 50
6-52-020 41223 1600 Plasser 79-800W 14.0 36 70 50
Tamper (Production)
6-52-001 41210 1600 Plasser 07-16B 14.0 32 70 50
6-52-012 41216 1600 Plasser 07-16B 14.0 32 70 40
6-52-022 41218 1435 Plasser 08-16B 14.0 32 70 50
6-52-023 41219 1435 Plasser 08-16B 14.0 32 70 50
6-52-013 41220 1600 Plasser 07-16B 14.0 32 70 50
6-52-018 41221 1600 Plasser 07-16B 14.0 32 70 50
6-52-021 41224 1600 Plasser 08-16B 14.0 32 70 50
NA 41225 1435 Plasser 09-32 20? 72? 80 50
METRO
Machine Type Road Numbers Gauge Make/Model Length
(Metres)
Mass
(Tonnes)
Maximum
Speed
(Km/h)
Schedule
Speed
(Km/h)
Remarks
Track Recorder Car IEV 100 ▲ Dual Plasser EM100 15 46
80
Recording
100 Not
Recording
75
Recording
80 Not
Recording
Formerly No. 6-56-001,
EM 100.
The IEV 100 is considered to be a light locomotive.
SPENO RAIL MAINTENANCE AUSTRALIA PTY LTD
Machine Type
Class Plant Number Make/Model Length
(Metres)
Mass
(Tonnes)
Maximum
Speed
(Km/h)
Schedule
Speed
(Km/h)
Remarks
Rail Grinder Train - RR24/M30 ▲ Speno 44.900 151.000 60 60 24 stone Grinder
The rules and operating procedures (1994) Section 30 Part 14 to Part 29 must be observed during the operation of this machine.
Hi Rail (Road/Rail) - (1DXN-005)
FL-17
Hino 1026 Rail Flaw
Detection Vehicle
9.900 6.721 50 Welded
track
40 Joinnted
track
A
Hi Rail (Road/Rail) - (1DYU-045) Toyota 76 Series Rail
Flaw Detection
Vehicle
5.650
3.900 50 Welded
track
40 Joinnted
track
A
Hi Rail (Road/Rail) - (1DYU-046) Toyota 76 Series Rail
Flaw Detection
Vehicle
5.650
3.900 50 Welded
track
40 Joinnted
track
A
NOTE A = Refer to Book Of Rules And Operating Procedures (1994)
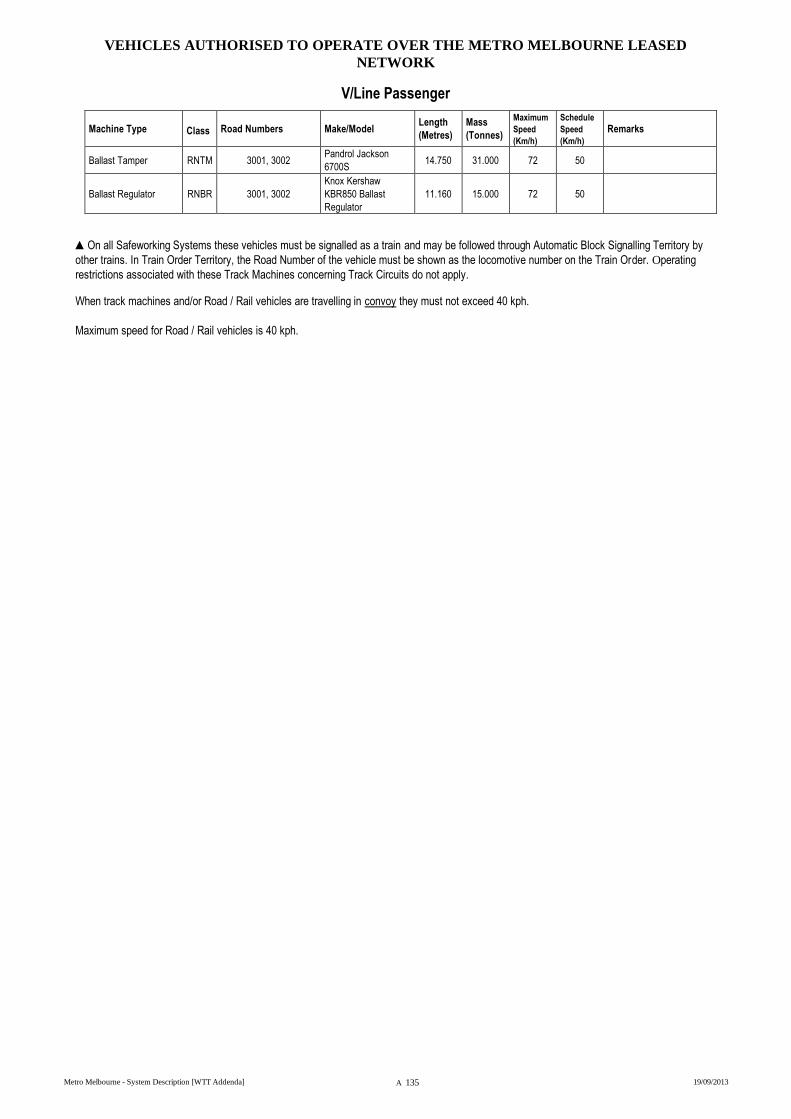
VEHICLES AUTHORISED TO OPERATE OVER THE METRO MELBOURNE LEASED
NETWORK
Metro Melbourne - System Description [WTT Addenda] A 135 19/09/2013
V/Line Passenger
Machine Type
Class Road Numbers Make/Model Length
(Metres)
Mass
(Tonnes)
Maximum
Speed
(Km/h)
Schedule
Speed
(Km/h)
Remarks
Ballast Tamper RNTM 3001, 3002 Pandrol Jackson
6700S 14.750 31.000 72 50
Ballast Regulator RNBR 3001, 3002
Knox Kershaw
KBR850 Ballast
Regulator
11.160 15.000 72 50
▲On all Safeworking Systems these vehicles must be signalled as a train and may be followed through Automatic Block Signalling Territory by
other trains. In Train Order Territory, the Road Number of the vehicle must be shown as the locomotive number on the Train Order. Operating
restrictions associated with these Track Machines concerning Track Circuits do not apply.
When track machines and/or Road / Rail vehicles are travelling in convoy they must not exceed 40 kph.
Maximum speed for Road / Rail vehicles is 40 kph.
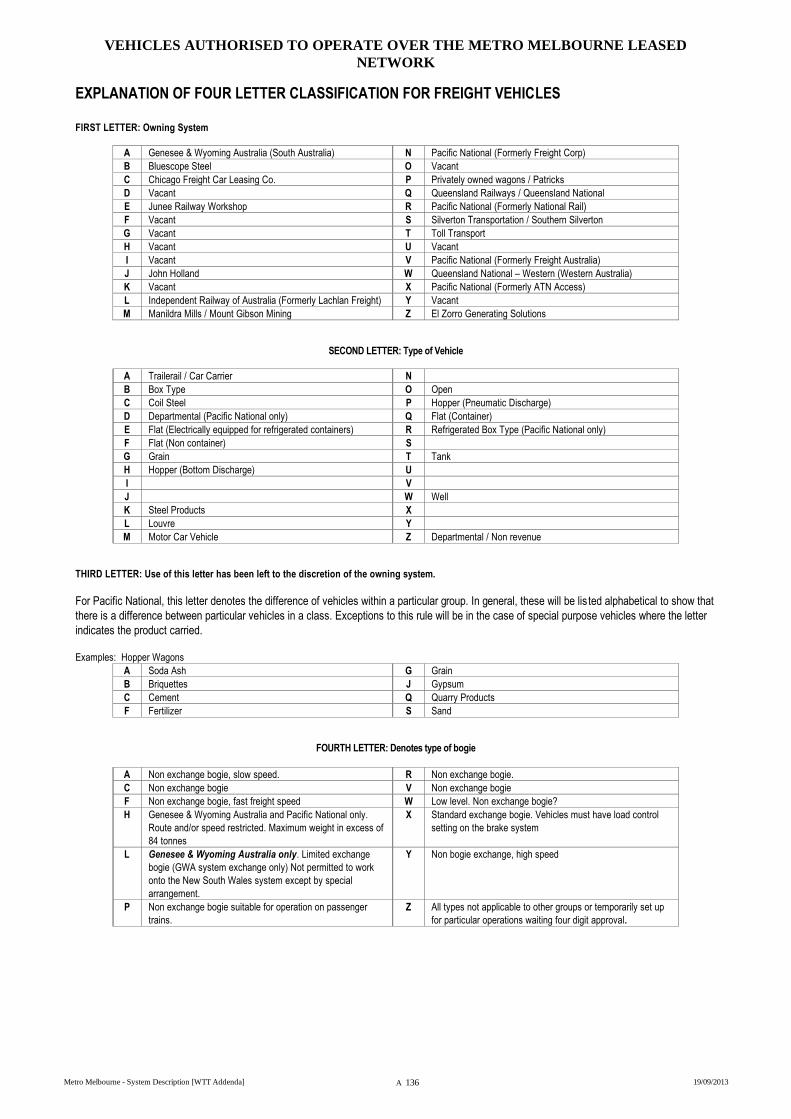
VEHICLES AUTHORISED TO OPERATE OVER THE METRO MELBOURNE LEASED
NETWORK
Metro Melbourne - System Description [WTT Addenda] A 136 19/09/2013
EXPLANATION OF FOUR LETTER CLASSIFICATION FOR FREIGHT VEHICLES
FIRST LETTER: Owning System
A Genesee & Wyoming Australia (South Australia) N Pacific National (Formerly Freight Corp)
B Bluescope Steel O Vacant
C Chicago Freight Car Leasing Co. P Privately owned wagons / Patricks
D Vacant Q Queensland Railways / Queensland National
E Junee Railway Workshop R Pacific National (Formerly National Rail)
F Vacant S Silverton Transportation / Southern Silverton
G Vacant T Toll Transport
H Vacant U Vacant
I Vacant V Pacific National (Formerly Freight Australia)
J John Holland W Queensland National – Western (Western Australia)
K Vacant X Pacific National (Formerly ATN Access)
L Independent Railway of Australia (Formerly Lachlan Freight) Y Vacant
M Manildra Mills / Mount Gibson Mining Z El Zorro Generating Solutions
SECOND LETTER: Type of Vehicle
A Trailerail / Car Carrier N
B Box Type O Open
C Coil Steel P Hopper (Pneumatic Discharge)
D Departmental (Pacific National only) Q Flat (Container)
E Flat (Electrically equipped for refrigerated containers) R Refrigerated Box Type (Pacific National only)
F Flat (Non container) S
G Grain T Tank
H Hopper (Bottom Discharge) U
I V
J W Well
K Steel Products X
L Louvre Y
M Motor Car Vehicle Z Departmental / Non revenue
THIRD LETTER: Use of this letter has been left to the discretion of the owning system.
For Pacific National, this letter denotes the difference of vehicles within a particular group. In general, these will be lis ted alphabetical to show that
there is a difference between particular vehicles in a class. Exceptions to this rule will be in the case of special purpose vehicles where the letter
indicates the product carried.
Examples: Hopper Wagons
A Soda Ash G Grain
B Briquettes J Gypsum
C Cement Q Quarry Products
F Fertilizer S Sand
FOURTH LETTER: Denotes type of bogie
A Non exchange bogie, slow speed. R Non exchange bogie.
C Non exchange bogie V Non exchange bogie
F Non exchange bogie, fast freight speed W Low level. Non exchange bogie?
H Genesee & Wyoming Australia and Pacific National only.
Route and/or speed restricted. Maximum weight in excess of
84 tonnes
X Standard exchange bogie. Vehicles must have load control
setting on the brake system
L Genesee & Wyoming Australia only. Limited exchange
bogie (GWA system exchange only) Not permitted to work
onto the New South Wales system except by special
arrangement.
Y Non bogie exchange, high speed
P Non exchange bogie suitable for operation on passenger
trains.
Z All types not applicable to other groups or temporarily set up
for particular operations waiting four digit approval.
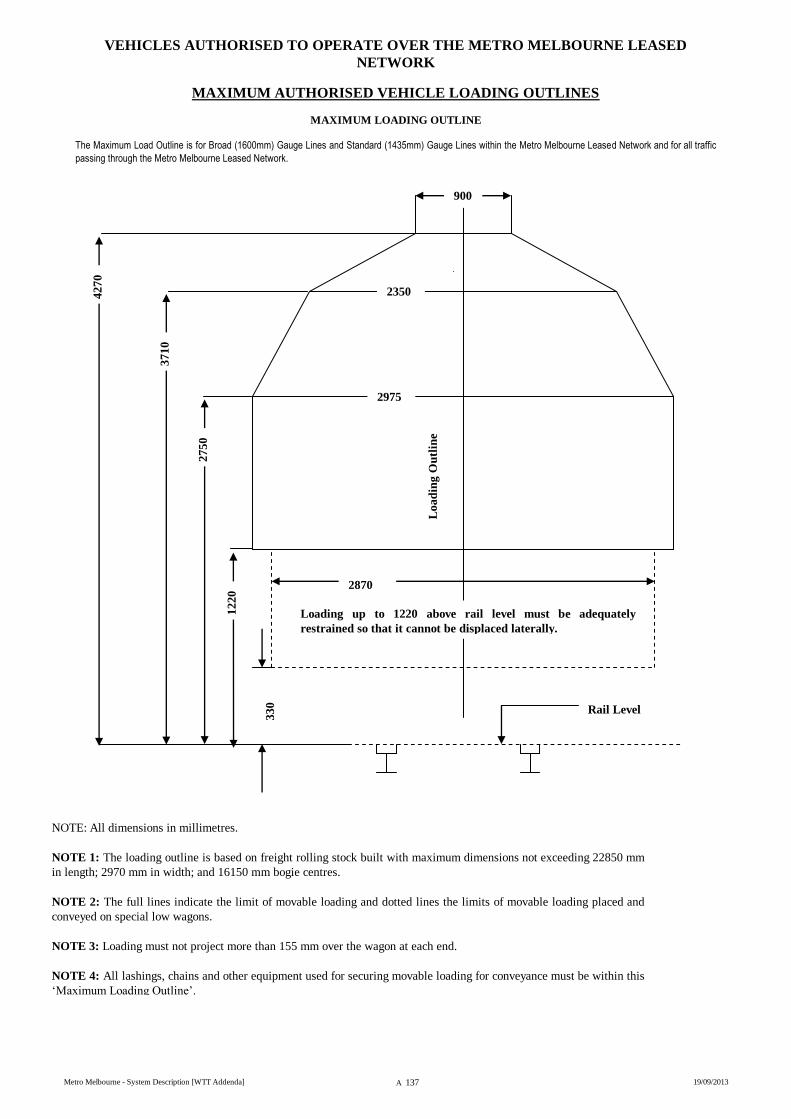
VEHICLES AUTHORISED TO OPERATE OVER THE METRO MELBOURNE LEASED
NETWORK
Metro Melbourne - System Description [WTT Addenda] A 137 19/09/2013
MAXIMUM AUTHORISED VEHICLE LOADING OUTLINES
MAXIMUM LOADING OUTLINE
The Maximum Load Outline is for Broad (1600mm) Gauge Lines and Standard (1435mm) Gauge Lines within the Metro Melbourne Leased Network and for all traffic
passing through the Metro Melbourne Leased Network.
NOTE: All dimensions in millimetres.
NOTE 1: The loading outline is based on freight rolling stock built with maximum dimensions not exceeding 22850 mm
in length; 2970 mm in width; and 16150 mm bogie centres.
NOTE 2: The full lines indicate the limit of movable loading and dotted lines the limits of movable loading placed and
conveyed on special low wagons.
NOTE 3: Loading must not project more than 155 mm over the wagon at each end.
NOTE 4: All lashings, chains and other equipment used for securing movable loading for conveyance must be within this
‘Maximum Loading Outline’.
900
2350
2975
Load
ing O
utl
ine
2870
Loading up to 1220 above rail level must be adequately
restrained so that it cannot be displaced laterally.
4270
3710
2750
1220
330
Rail Level
CIRCULAR RECORD
Metro Melbourne - System Description [WTT Addenda] A 138 19/09/2013
Timetable amendments will be issued in the form of W.T.T. Circulars, numbered consecutively. Other amendments
will be issued in the form of an “SW” Circular. All alterations should be made neatly in ink as soon as practicable after receipt of
the amending notices.
To ensure that all amending Circulars have been received particulars should be recorded here below.
Number of
Circular
Date
Alteration
Commenced Summary of Amendments

CIRCULAR RECORD
Metro Melbourne - System Description [WTT Addenda] A 139 19/09/2013
GENERAL INDEX For explanation of Symbols - See Page A 58
Metro Melbourne - System Description [WTT Addenda] A 140 19/09/2013
CIRCULAR RECORD ............................................................. A 139
CONTAINERS – 10 foot 6 inch (3200mm) high ................. A 113
ELECTRIC TRAIN SPEEDS
General Notes ........................................................ A 59
Pushing Trains ....................................................... A 59
Speed Boards ......................................................... A 60
Special Speeds ....................................................... A 60
DOUBLE HEADED LOADS ..................................................... A 82
EXPLANATION OF SYMBOLS ............................................. A 58
LINE CATEGORIES FOR VEHICLE WEIGHTS ......... A 112
LINE DESCRIPTION.................................................................... A 8
Altona Junction To Laverton (Via Paisley) ........................A 49
Burnley To Glen Waverley .................................................A 23
Camberwell To Alamein .....................................................A 22
Caulfield To Stony Point.....................................................A 31
Clifton Hill To South Morang…………………………..A 38
Dandenong To Cranbourne .................................................A 30
Flinders Street To Flemington Racecourse (Direct)
& Melbourne Yard Sidings ...........................................A 13
Flinders Street To Jolimont (Direct) ..................................A 11
Flinders Street to Jolimont - Via Clifton Hill Loop
& City Circle Loop........................................................A 12
Flinders Street To North Melbourne – Via Northern Loop ......
.............................................................................................A 15
Flinders Street To Richmond (Direct) .................................A 8
Flinders Street To Richmond - Via Burnley Loop ...............A 9
Flinders Street To Richmond – Via Caulfield Loop ..........A 10
Footscray To Werribee (Via Westona) ...............................A 47
Jolimont To Hurstbridge .....................................................A 41
Long Island Line…………………………………………A 35
Newmarket To Craigieburn………………………… A 53
Newport To Newport Workshops .......................................A 46
Newport To Williamstown .................................................A 45
North Melbourne To Sunbury .............................................A 50
North Melbourne To Upfield ..............................................A 56
Richmond To Lilydale ........................................................A 16
Richmond To Pakenham .....................................................A 25
Ringwood To Belgrave .......................................................A 20
South Yarra To Sandringham ..............................................A 36
LOCOMOTIVES, ROLLINGSTOCK AND TRACK MACHINES
Australian Railway Historical Society (ACT)...................A 113
Bluescope Steel .................................................................A 113
Chicago Freight Car Leasing of Australia .........................A 113
Metro Melbourne ..............................................................A 109
New South Wales trains……………………………….A 114
Downer EDI Works ..........................................................A 133
EDI Rail ............................................................................A 115
Elecrail (Steamrail) ..........................................................A 115
TO BE ADVISED ............................................................A 116
Four Letter Classification ..................................................A 136
Great Southern Railway ....................................................A 117
Historic Vehicles (Miscellaneous)....................................A 129
Interail Australia Pty Ltd ...................................................A 117
John Holland......................................................................A 133
Loading Diagram ...............................................................A 137
New South Wales Rail Transport Museum ......................A 118
Pacific National .................................................................A 119
Seven-O-Seven Operations ...............................................A 126
Seymour Railway Heritage Centre ....................................A 126
South Gippsland Tourist Railway .....................................A 127
Qube ..................................................................................A 127
Steamrail Victoria .............................................................A 128
Vic Track ...........................................................................A 132
V/Line ...............................................................................A 130
LOCOMOTIVE HAULED TRAINS
Double Headed Loads ........................................... A 82
Maximum Speed Of Freight Trains ...................... A 59
Maximum Train Lengths ........................................ A 7
Multiple Unit Loads .............................................. A 82
Overloading Of Goods Trains ............................... A 82
Pushing Trains On Running Lines ........................ A 59
Rail Tractors ........................................................ A 112
Ruling Grade Loads .............................................. A 82
Special Speeds ....................................................... A 59
Train To Base Radio Channels ............................... A 7
Vigilance Control Equipment.............................. A 111
MAXIMUM LENGTH OF TRAINS ON METRO MELBOURNE
............................................................................................................... A 7
MAXIMUM LINE SPEEDS ...................................................... A 59
MELBOURNE LEASED NETWORK ..................................... A 7
MULTIPLE UNIT LOADS ........................................................ A 82
NETWORK BOUNDARIES ........................................................ A 6
NETWORK MAPS ......................................................................... A 2
OVERLOADING OF GOODS TRAINS ................................ A 82
PARTICULARS OF TRACK MACHINES RADIO
REQUIREMENTS WITHIN THE METRO MELBOURNE
MELBOURNE LEASED NETWORK ............................ A 133
PUSHING TRAINS ON RUNNING LINES ............................ A 6
RAIL TRACTORS ..................................................................... A 112
RULING GRADE LOADS ......................................................... A 82
Altona Junction To Laverton (Via Paisley) ......................A 104
Burnley To Glen Waverley .................................................A 93
Camberwell To Alamein .....................................................A 92
Caulfield To Stony Point.....................................................A 96
Clifton Hill To South Morang…………………………..A 99
Dandenong To Cranbourne .................................................A 96
Flinders Street To Flemington Racecourse (Direct)
& Melbourne Yard Sidings ...........................................A 88
Flinders Street To Jolimont (Direct) ..................................A 86
Flinders Street to Jolimont - Via Clifton Hill Loop
& City Circle Loop........................................................A 87
Flinders Street To North Melbourne – Via Northern Loop ......
.............................................................................................A 89
Flinders Street To Richmond (Direct) ...............................A 83
Flinders Street To Richmond - Via Burnley Loop .............A 84
Flinders Street To Richmond – Via Caulfield Loop ..........A 85
Footscray To Werribee (Via Westona) .............................A 103
Jolimont To Hurstbridge ...................................................A 100
Newmarket To Cragieburn` ..............................................A 106
Newport To Newport Workshops .....................................A 102
Newport To Williamstown ...............................................A 101
North Melbourne To Sunbury ...........................................A 105
North Melbourne To Upfield ............................................A 107
Richmond To Lilydale ........................................................A 90
Richmond To Pakenham .....................................................A 95
Ringwood To Belgrave .......................................................A 91
South Yarra To Sandringham ..............................................A 97
SPEED BOARDS ........................................................................... A 60
SPEEDS ............................................................................... A 61
Altona Junction To Laverton (Via Paisley) ........................A 77
Burnley To Glen Waverley .................................................A 69
Camberwell To Alamein .....................................................A 69
Caulfield To Stony Point.....................................................A 71
Clifton Hill To South Morang…………………………..A 74
Dandenong To Cranbourne .................................................A 71
Flinders Street To Flemington Racecourse (Direct)
& Melbourne Yard Sidings ...........................................A 65
Flinders Street To Jolimont (Direct) ..................................A 63
Flinders Street to Jolimont - Via Clifton Hill Loop
& City Circle Loop........................................................A 64
Flinders Street To North Melbourne – Via Northern Loop ......
.............................................................................................A 67
Flinders Street To Richmond (Direct) ...............................A 61
Flinders Street To Richmond - Via Burnley Loop .............A 62
Flinders Street To Richmond – Via Caulfield Loop ..........A 63
Footscray To Werribee (Via Westona) ...............................A 76
Jolimont To Hurstbridge .....................................................A 74
Newmarket To Craigieburn…………………………….A 80
Newport To Newport Workshops .......................................A 75
Newport To Williamstown .................................................A 75
North Melbourne To Sunbury .............................................A 78
North Melbourne To Upfield ..............................................A 81
Richmond To Lilydale ........................................................A 68
Richmond To Pakenham .....................................................A 70
Ringwood To Belgrave .......................................................A 68
South Yarra To Sandringham ..............................................A 73
TRAIN TO BASE RADIO CHANNELS .......................... A 7
UNDERGROUND LOOP OPERATIONS ...................... A 7
VEHICLES AUTHORISED TO OPERATE OVER THE
METRO MELBOURNE LEASED NETWORK ........ A 112
Index of Stations, Sidings, Signal Boxes, Road and Creek Crossings and Tunnels
For explanation of Symbols - See Page A 58
Metro Melbourne - System Description [WTT Addenda] A 141 19/09/2013
Abbott Street (Sandringham) ............................................ 37
Abbotts Road (Lyndhurst) ................................................. 30
Agnes Street Subway ....................................................... 11
AIRCRAFT ....................................................................... 48
Aitkens Creek................................................................... 54
Alameda Street ................................................................ 32
ALAMEIN ......................................................................... 22
Alamein Line Flyover (East Camberwell) .......................... 17
Albert Street (Auburn)....................................................... 17
Albert Street (Brunswick) .................................................. 56
Albert Street (Footscray)................................................... 50
ALBION ♥ ........................................................................ 51
Albion Street .................................................................... 56
Alexandra Ave (South Yarra) ............................................ 25
Alexandra Street (Greensborough) ................................... 43
Allandale Road................................................................. 43
Allard Street ..................................................................... 36
Allenby Ave subway ......................................................... 23
Allens Road ..................................................................... 20
Alleyne Avenue Footbridge ............................................... 25
Alma Road ....................................................................... 36
ALPHINGTON ................................................................. 42
Alpine Street .................................................................... 20
Alto Avenue ..................................................................... 18
ALTONA ♣ ...................................................................... 48
ALTONA JUNCTION ........................................................ 47
Alvie Road ....................................................................... 24
Alymer Road .................................................................... 30
Anchor Street ................................................................... 32
Anderson Road (Albion) ................................................... 51
Anderson Street (Yarraville) .............................................. 47
ANSTEY .......................................................................... 56
Antibes Street .................................................................. 32
Arden Street (Kensington) ................................................ 14
Arden Street (Macaulay) ................................................... 56
Ardmillan Road ................................................................ 53
Argo Street....................................................................... 36
Argyle Avenue .................................................................. 33
ARMADALE ♥ ................................................................. 25
Armstrong Road (Heathmont) ........................................... 20
Armstrongs Road (Seaford) .............................................. 33
Arthur Street Footbridge (South Yarra).............................. 36
Arthur Street Subway (Fairfield) ........................................ 42
Arthurton Road ................................................................. 38
ASCOT VALE ♥ ............................................................... 53
Ascot Vale Road (Ascot Vale)........................................... 53
Ascot Vale Road (Showgrounds line) ................................ 14
ASHBURTON ¶ ............................................................... 22
Ashburton Signal Box ....................................................... 22
Ashby Grove .................................................................... 42
Ashley Street ................................................................... 51
ASPENDALE ................................................................... 32
AUBURN ♥ ...................................................................... 16
Auburn Road .................................................................... 16
Augusta Avenue ............................................................... 57
Austin Cresent Reserve .................................................... 53
Australian Window Glass Siding ....................................... 30
Auto Signals Datum ........................................................... 8
Avenel Road subway ........................................................ 23
Aviation Road................................................................... 48
Bakers Road .................................................................... 57
BALACLAVA ♥ ................................................................ 36
Balcombe Road................................................................ 32
Balmain Street ................................................................. 25
Bamfield Street Subway ................................................... 37
Banksia Street .................................................................. 42
Barina Road subway ........................................................ 54
Barkly Street .................................................................... 56
Barry Road (Broadmeadows) ............................................ 54
Barry Road (Upfield) ......................................................... 57
BATMAN .......................................................................... 57
Batman Avenue (Melbourne) .............................................. 8
BAXTER .......................................................................... 34
Baxter Street .................................................................... 34
Baxter–Tooradin Road...................................................... 34
Bay Road (Highett) ........................................................... 32
Bay Street (North Brighton)............................................... 37
BAYSWATER ¶ ............................................................... 20
BAYSWATER MAINTENANCE CENTRE ......................... 20
Beach Street .................................................................... 33
BEACONSFIELD ♣.......................................................... 28
Beaconsfield Avenue ........................................................ 28
Bear Street ....................................................................... 32
Beavers Road .................................................................. 38
Bedford Road ................................................................... 20
BELGRAVE ¶ .................................................................. 21
Belgrave-Gembrook Road ................................................ 21
BELL ................................................................................ 38
Bell - Banskia St Link ....................................................... 42
Bell Signal Box ................................................................. 38
Bell Street (Bell) ............................................................... 38
Bell Street (Coburg) .......................................................... 57
Bell Street Off Ramp ........................................................ 53
Bell Street On Ramp ........................................................ 53
Bennett Street .................................................................. 27
BENTLEIGH ¶ ................................................................. 31
Berry Avenue ................................................................... 33
BERWICK ¶ ..................................................................... 28
Berwick Signal Box........................................................... 28
Bethell Avenue ................................................................. 32
Birdwood Street................................................................ 32
BITTERN ......................................................................... 34
Black Street (station) Footbridge ....................................... 37
BLACKBURN ¶ ................................................................ 17
Blackburn Road (Blackburn) ............................................. 17
Blackburn Road (Mount Waverley).................................... 24
Blackburn Signal Box ....................................................... 17
Blackwood Street ............................................................. 26
Blind Creek ...................................................................... 20
Bloomburg Street ............................................................. 41
Bloomfield Road ............................................................... 53
Bombardier Transport Siding ............................................ 30
BONBEACH ..................................................................... 33
Bondi Road ...................................................................... 33
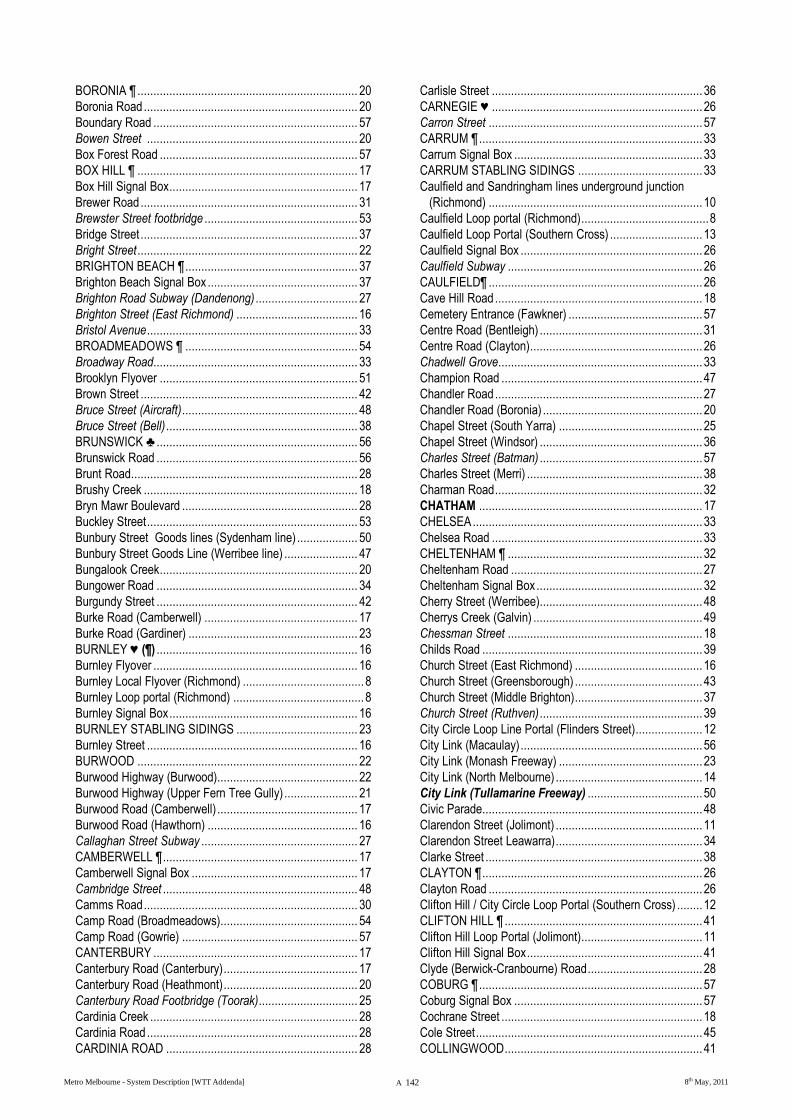
Metro Melbourne - System Description [WTT Addenda] A 142 8th May, 2011
BORONIA ¶ ..................................................................... 20
Boronia Road ................................................................... 20
Boundary Road ................................................................ 57
Bowen Street .................................................................. 20
Box Forest Road .............................................................. 57
BOX HILL ¶ ..................................................................... 17
Box Hill Signal Box ........................................................... 17
Brewer Road .................................................................... 31
Brewster Street footbridge ................................................ 53
Bridge Street .................................................................... 37
Bright Street ..................................................................... 22
BRIGHTON BEACH ¶ ...................................................... 37
Brighton Beach Signal Box ............................................... 37
Brighton Road Subway (Dandenong) ................................ 27
Brighton Street (East Richmond) ...................................... 16
Bristol Avenue .................................................................. 33
BROADMEADOWS ¶ ...................................................... 54
Broadway Road................................................................ 33
Brooklyn Flyover .............................................................. 51
Brown Street .................................................................... 42
Bruce Street (Aircraft) ....................................................... 48
Bruce Street (Bell) ............................................................ 38
BRUNSWICK ♣ ............................................................... 56
Brunswick Road ............................................................... 56
Brunt Road....................................................................... 28
Brushy Creek ................................................................... 18
Bryn Mawr Boulevard ....................................................... 28
Buckley Street .................................................................. 53
Bunbury Street Goods lines (Sydenham line) ................... 50
Bunbury Street Goods Line (Werribee line) ....................... 47
Bungalook Creek .............................................................. 20
Bungower Road ............................................................... 34
Burgundy Street ............................................................... 42
Burke Road (Camberwell) ................................................ 17
Burke Road (Gardiner) ..................................................... 23
BURNLEY ♥ (¶) ............................................................... 16
Burnley Flyover ................................................................ 16
Burnley Local Flyover (Richmond) ...................................... 8
Burnley Loop portal (Richmond) ......................................... 8
Burnley Signal Box ........................................................... 16
BURNLEY STABLING SIDINGS ...................................... 23
Burnley Street .................................................................. 16
BURWOOD ..................................................................... 22
Burwood Highway (Burwood)............................................ 22
Burwood Highway (Upper Fern Tree Gully) ....................... 21
Burwood Road (Camberwell) ............................................ 17
Burwood Road (Hawthorn) ............................................... 16
Callaghan Street Subway ................................................. 27
CAMBERWELL ¶ ............................................................. 17
Camberwell Signal Box .................................................... 17
Cambridge Street ............................................................. 48
Camms Road ................................................................... 30
Camp Road (Broadmeadows)........................................... 54
Camp Road (Gowrie) ....................................................... 57
CANTERBURY ................................................................ 17
Canterbury Road (Canterbury) .......................................... 17
Canterbury Road (Heathmont) .......................................... 20
Canterbury Road Footbridge (Toorak) ............................... 25
Cardinia Creek ................................................................. 28
Cardinia Road .................................................................. 28
CARDINIA ROAD ............................................................ 28
Carlisle Street .................................................................. 36
CARNEGIE ♥ .................................................................. 26
Carron Street ................................................................... 57
CARRUM ¶ ...................................................................... 33
Carrum Signal Box ........................................................... 33
CARRUM STABLING SIDINGS ....................................... 33
Caulfield and Sandringham lines underground junction
(Richmond) ................................................................... 10
Caulfield Loop portal (Richmond) ........................................ 8
Caulfield Loop Portal (Southern Cross) ............................. 13
Caulfield Signal Box ......................................................... 26
Caulfield Subway ............................................................. 26
CAULFIELD¶ ................................................................... 26
Cave Hill Road ................................................................. 18
Cemetery Entrance (Fawkner) .......................................... 57
Centre Road (Bentleigh) ................................................... 31
Centre Road (Clayton) ...................................................... 26
Chadwell Grove................................................................ 33
Champion Road ............................................................... 47
Chandler Road ................................................................. 27
Chandler Road (Boronia) .................................................. 20
Chapel Street (South Yarra) ............................................. 25
Chapel Street (Windsor) ................................................... 36
Charles Street (Batman) ................................................... 57
Charles Street (Merri) ....................................................... 38
Charman Road ................................................................. 32
CHATHAM ...................................................................... 17
CHELSEA ........................................................................ 33
Chelsea Road .................................................................. 33
CHELTENHAM ¶ ............................................................. 32
Cheltenham Road ............................................................ 27
Cheltenham Signal Box .................................................... 32
Cherry Street (Werribee)................................................... 48
Cherrys Creek (Galvin) ..................................................... 49
Chessman Street ............................................................. 18
Childs Road ..................................................................... 39
Church Street (East Richmond) ........................................ 16
Church Street (Greensborough) ........................................ 43
Church Street (Middle Brighton) ........................................ 37
Church Street (Ruthven) ................................................... 39
City Circle Loop Line Portal (Flinders Street)..................... 12
City Link (Macaulay) ......................................................... 56
City Link (Monash Freeway) ............................................. 23
City Link (North Melbourne) .............................................. 14
City Link (Tullamarine Freeway) .................................... 50
Civic Parade..................................................................... 48
Clarendon Street (Jolimont) .............................................. 11
Clarendon Street Leawarra) .............................................. 34
Clarke Street .................................................................... 38
CLAYTON ¶ ..................................................................... 26
Clayton Road ................................................................... 26
Clifton Hill / City Circle Loop Portal (Southern Cross) ........ 12
CLIFTON HILL ¶ .............................................................. 41
Clifton Hill Loop Portal (Jolimont)...................................... 11
Clifton Hill Signal Box ....................................................... 41
Clyde (Berwick-Cranbourne) Road .................................... 28
COBURG ¶ ...................................................................... 57
Coburg Signal Box ........................................................... 57
Cochrane Street ............................................................... 18
Cole Street ....................................................................... 45
COLLINGWOOD .............................................................. 41
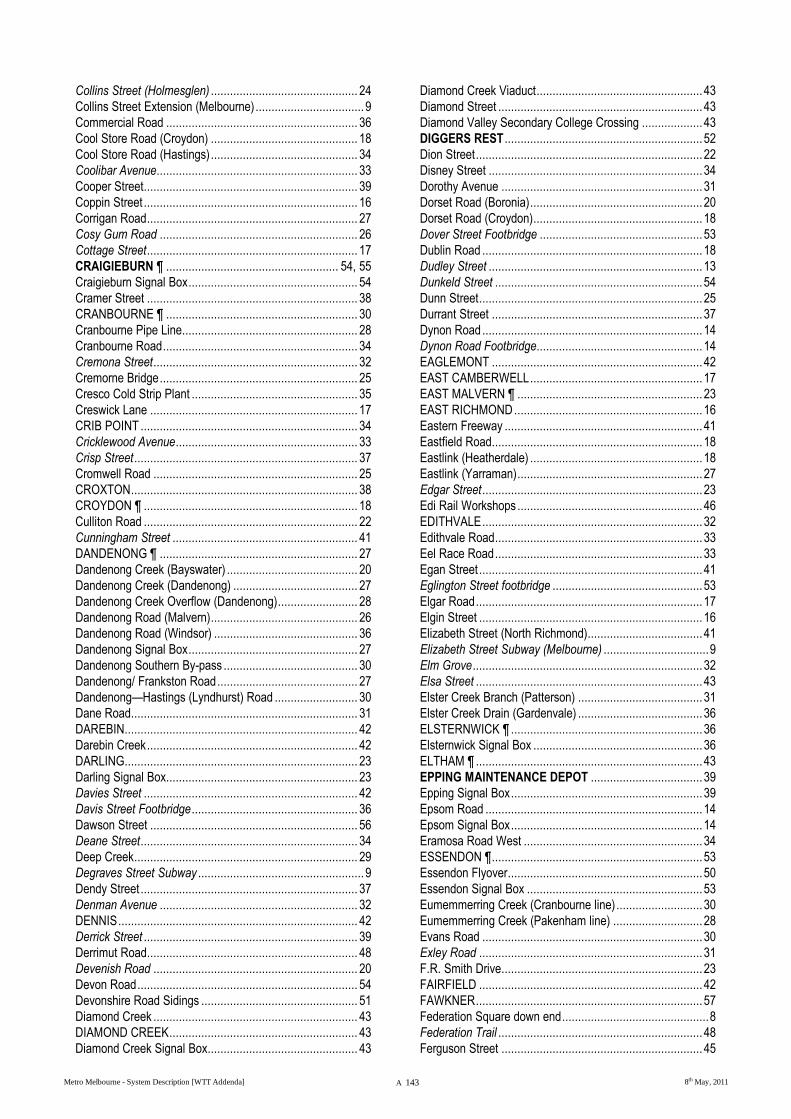
Metro Melbourne - System Description [WTT Addenda] A 143 8th May, 2011
Collins Street (Holmesglen) .............................................. 24
Collins Street Extension (Melbourne) .................................. 9
Commercial Road ............................................................ 36
Cool Store Road (Croydon) .............................................. 18
Cool Store Road (Hastings) .............................................. 34
Coolibar Avenue............................................................... 33
Cooper Street................................................................... 39
Coppin Street ................................................................... 16
Corrigan Road .................................................................. 27
Cosy Gum Road .............................................................. 26
Cottage Street .................................................................. 17
CRAIGIEBURN ¶ ...................................................... 54, 55
Craigieburn Signal Box ..................................................... 54
Cramer Street .................................................................. 38
CRANBOURNE ¶ ............................................................ 30
Cranbourne Pipe Line....................................................... 28
Cranbourne Road ............................................................. 34
Cremona Street ................................................................ 32
Cremorne Bridge .............................................................. 25
Cresco Cold Strip Plant .................................................... 35
Creswick Lane ................................................................. 17
CRIB POINT .................................................................... 34
Cricklewood Avenue ......................................................... 33
Crisp Street ...................................................................... 37
Cromwell Road ................................................................ 25
CROXTON ....................................................................... 38
CROYDON ¶ ................................................................... 18
Culliton Road ................................................................... 22
Cunningham Street .......................................................... 41
DANDENONG ¶ .............................................................. 27
Dandenong Creek (Bayswater) ......................................... 20
Dandenong Creek (Dandenong) ....................................... 27
Dandenong Creek Overflow (Dandenong) ......................... 28
Dandenong Road (Malvern) .............................................. 26
Dandenong Road (Windsor) ............................................. 36
Dandenong Signal Box ..................................................... 27
Dandenong Southern By-pass .......................................... 30
Dandenong/ Frankston Road ............................................ 27
Dandenong—Hastings (Lyndhurst) Road .......................... 30
Dane Road....................................................................... 31
DAREBIN......................................................................... 42
Darebin Creek .................................................................. 42
DARLING......................................................................... 23
Darling Signal Box............................................................ 23
Davies Street ................................................................... 42
Davis Street Footbridge .................................................... 36
Dawson Street ................................................................. 56
Deane Street .................................................................... 34
Deep Creek ...................................................................... 29
Degraves Street Subway .................................................... 9
Dendy Street .................................................................... 37
Denman Avenue .............................................................. 32
DENNIS ........................................................................... 42
Derrick Street ................................................................... 39
Derrimut Road.................................................................. 48
Devenish Road ................................................................ 20
Devon Road ..................................................................... 54
Devonshire Road Sidings ................................................. 51
Diamond Creek ................................................................ 43
DIAMOND CREEK ........................................................... 43
Diamond Creek Signal Box............................................... 43
Diamond Creek Viaduct .................................................... 43
Diamond Street ................................................................ 43
Diamond Valley Secondary College Crossing ................... 43
DIGGERS REST .............................................................. 52
Dion Street ....................................................................... 22
Disney Street ................................................................... 34
Dorothy Avenue ............................................................... 31
Dorset Road (Boronia) ...................................................... 20
Dorset Road (Croydon) ..................................................... 18
Dover Street Footbridge ................................................... 53
Dublin Road ..................................................................... 18
Dudley Street ................................................................... 13
Dunkeld Street ................................................................. 54
Dunn Street ...................................................................... 25
Durrant Street .................................................................. 37
Dynon Road ..................................................................... 14
Dynon Road Footbridge.................................................... 14
EAGLEMONT .................................................................. 42
EAST CAMBERWELL ...................................................... 17
EAST MALVERN ¶ .......................................................... 23
EAST RICHMOND ........................................................... 16
Eastern Freeway .............................................................. 41
Eastfield Road.................................................................. 18
Eastlink (Heatherdale) ...................................................... 18
Eastlink (Yarraman) .......................................................... 27
Edgar Street ..................................................................... 23
Edi Rail Workshops .......................................................... 46
EDITHVALE ..................................................................... 32
Edithvale Road ................................................................. 33
Eel Race Road ................................................................. 33
Egan Street ...................................................................... 41
Eglington Street footbridge ............................................... 53
Elgar Road ....................................................................... 17
Elgin Street ...................................................................... 16
Elizabeth Street (North Richmond).................................... 41
Elizabeth Street Subway (Melbourne) ................................. 9
Elm Grove ........................................................................ 32
Elsa Street ....................................................................... 43
Elster Creek Branch (Patterson) ....................................... 31
Elster Creek Drain (Gardenvale) ....................................... 36
ELSTERNWICK ¶ ............................................................ 36
Elsternwick Signal Box ..................................................... 36
ELTHAM ¶ ....................................................................... 43
EPPING MAINTENANCE DEPOT ................................... 39
Epping Signal Box ............................................................ 39
Epsom Road .................................................................... 14
Epsom Signal Box ............................................................ 14
Eramosa Road West ........................................................ 34
ESSENDON ¶ .................................................................. 53
Essendon Flyover ............................................................. 50
Essendon Signal Box ....................................................... 53
Eumemmerring Creek (Cranbourne line) ........................... 30
Eumemmerring Creek (Pakenham line) ............................ 28
Evans Road ..................................................................... 30
Exley Road ...................................................................... 31
F.R. Smith Drive............................................................... 23
FAIRFIELD ...................................................................... 42
FAWKNER ....................................................................... 57
Federation Square down end .............................................. 8
Federation Trail ................................................................ 48
Ferguson Street ............................................................... 45
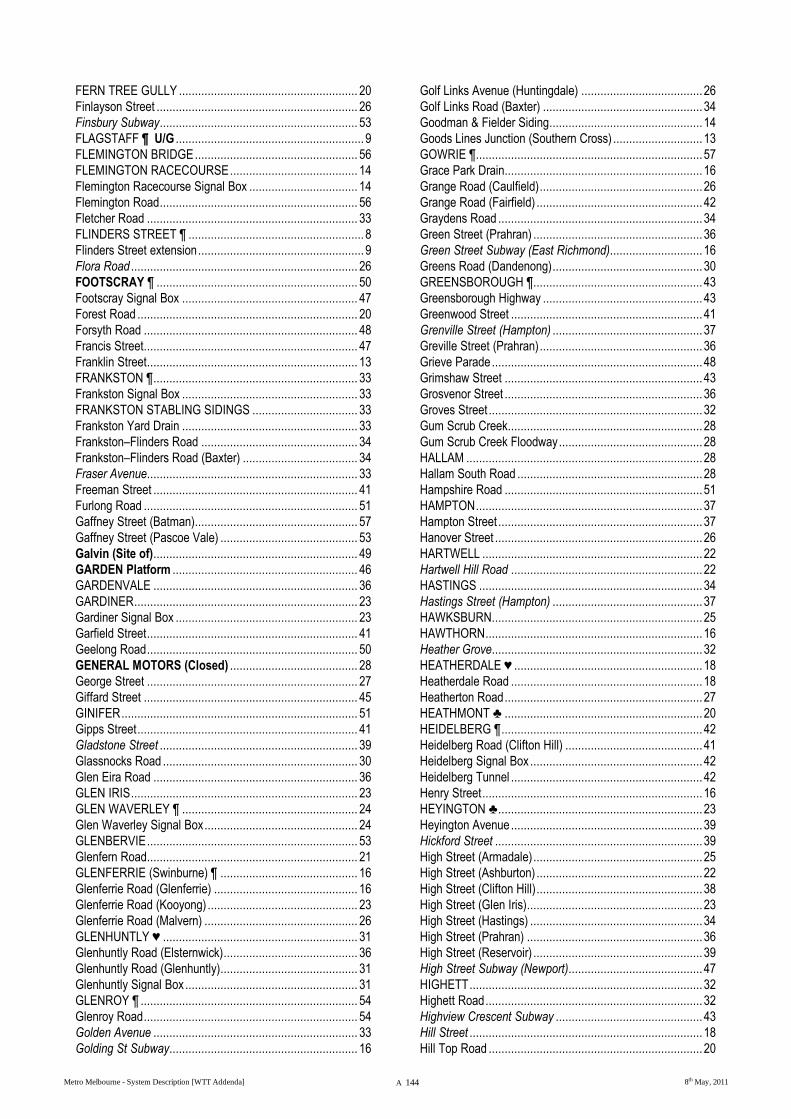
Metro Melbourne - System Description [WTT Addenda] A 144 8th May, 2011
FERN TREE GULLY ........................................................ 20
Finlayson Street ............................................................... 26
Finsbury Subway .............................................................. 53
FLAGSTAFF ¶ U/G ........................................................... 9
FLEMINGTON BRIDGE ................................................... 56
FLEMINGTON RACECOURSE ........................................ 14
Flemington Racecourse Signal Box .................................. 14
Flemington Road .............................................................. 56
Fletcher Road .................................................................. 33
FLINDERS STREET ¶ ....................................................... 8
Flinders Street extension .................................................... 9
Flora Road ....................................................................... 26
FOOTSCRAY ¶ ............................................................... 50
Footscray Signal Box ....................................................... 47
Forest Road ..................................................................... 20
Forsyth Road ................................................................... 48
Francis Street................................................................... 47
Franklin Street.................................................................. 13
FRANKSTON ¶ ................................................................ 33
Frankston Signal Box ....................................................... 33
FRANKSTON STABLING SIDINGS ................................. 33
Frankston Yard Drain ....................................................... 33
Frankston–Flinders Road ................................................. 34
Frankston–Flinders Road (Baxter) .................................... 34
Fraser Avenue.................................................................. 33
Freeman Street ................................................................ 41
Furlong Road ................................................................... 51
Gaffney Street (Batman)................................................... 57
Gaffney Street (Pascoe Vale) ........................................... 53
Galvin (Site of) ................................................................ 49
GARDEN Platform .......................................................... 46
GARDENVALE ................................................................ 36
GARDINER ...................................................................... 23
Gardiner Signal Box ......................................................... 23
Garfield Street .................................................................. 41
Geelong Road .................................................................. 50
GENERAL MOTORS (Closed) ........................................ 28
George Street .................................................................. 27
Giffard Street ................................................................... 45
GINIFER .......................................................................... 51
Gipps Street ..................................................................... 41
Gladstone Street .............................................................. 39
Glassnocks Road ............................................................. 30
Glen Eira Road ................................................................ 36
GLEN IRIS ....................................................................... 23
GLEN WAVERLEY ¶ ....................................................... 24
Glen Waverley Signal Box ................................................ 24
GLENBERVIE .................................................................. 53
Glenfern Road.................................................................. 21
GLENFERRIE (Swinburne) ¶ ........................................... 16
Glenferrie Road (Glenferrie) ............................................. 16
Glenferrie Road (Kooyong) ............................................... 23
Glenferrie Road (Malvern) ................................................ 26
GLENHUNTLY ♥ ............................................................. 31
Glenhuntly Road (Elsternwick) .......................................... 36
Glenhuntly Road (Glenhuntly)........................................... 31
Glenhuntly Signal Box ...................................................... 31
GLENROY ¶ .................................................................... 54
Glenroy Road ................................................................... 54
Golden Avenue ................................................................ 33
Golding St Subway........................................................... 16
Golf Links Avenue (Huntingdale) ...................................... 26
Golf Links Road (Baxter) .................................................. 34
Goodman & Fielder Siding................................................ 14
Goods Lines Junction (Southern Cross) ............................ 13
GOWRIE ¶....................................................................... 57
Grace Park Drain.............................................................. 16
Grange Road (Caulfield) ................................................... 26
Grange Road (Fairfield) .................................................... 42
Graydens Road ................................................................ 34
Green Street (Prahran) ..................................................... 36
Green Street Subway (East Richmond)............................. 16
Greens Road (Dandenong) ............................................... 30
GREENSBOROUGH ¶..................................................... 43
Greensborough Highway .................................................. 43
Greenwood Street ............................................................ 41
Grenville Street (Hampton) ............................................... 37
Greville Street (Prahran) ................................................... 36
Grieve Parade .................................................................. 48
Grimshaw Street .............................................................. 43
Grosvenor Street .............................................................. 36
Groves Street ................................................................... 32
Gum Scrub Creek............................................................. 28
Gum Scrub Creek Floodway ............................................. 28
HALLAM .......................................................................... 28
Hallam South Road .......................................................... 28
Hampshire Road .............................................................. 51
HAMPTON ....................................................................... 37
Hampton Street ................................................................ 37
Hanover Street ................................................................. 26
HARTWELL ..................................................................... 22
Hartwell Hill Road ............................................................ 22
HASTINGS ...................................................................... 34
Hastings Street (Hampton) ............................................... 37
HAWKSBURN.................................................................. 25
HAWTHORN .................................................................... 16
Heather Grove.................................................................. 32
HEATHERDALE ♥ ........................................................... 18
Heatherdale Road ............................................................ 18
Heatherton Road .............................................................. 27
HEATHMONT ♣ .............................................................. 20
HEIDELBERG ¶ ............................................................... 42
Heidelberg Road (Clifton Hill) ........................................... 41
Heidelberg Signal Box ...................................................... 42
Heidelberg Tunnel ............................................................ 42
Henry Street ..................................................................... 16
HEYINGTON ♣ ................................................................ 23
Heyington Avenue ............................................................ 39
Hickford Street ................................................................. 39
High Street (Armadale) ..................................................... 25
High Street (Ashburton) .................................................... 22
High Street (Clifton Hill) .................................................... 38
High Street (Glen Iris) ....................................................... 23
High Street (Hastings) ...................................................... 34
High Street (Prahran) ....................................................... 36
High Street (Reservoir) ..................................................... 39
High Street Subway (Newport).......................................... 47
HIGHETT ......................................................................... 32
Highett Road .................................................................... 32
Highview Crescent Subway .............................................. 43
Hill Street ......................................................................... 18
Hill Top Road ................................................................... 20
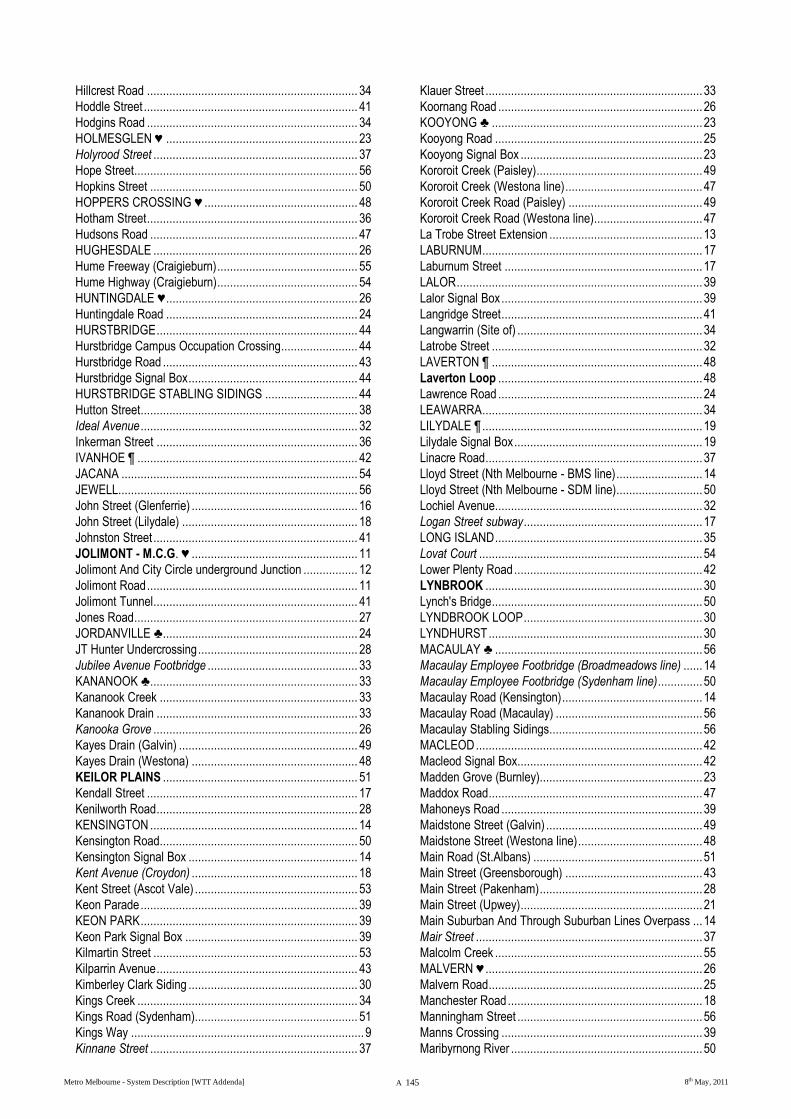
Metro Melbourne - System Description [WTT Addenda] A 145 8th May, 2011
Hillcrest Road .................................................................. 34
Hoddle Street ................................................................... 41
Hodgins Road .................................................................. 34
HOLMESGLEN ♥ ............................................................ 23
Holyrood Street ................................................................ 37
Hope Street...................................................................... 56
Hopkins Street ................................................................. 50
HOPPERS CROSSING ♥ ................................................ 48
Hotham Street .................................................................. 36
Hudsons Road ................................................................. 47
HUGHESDALE ................................................................ 26
Hume Freeway (Craigieburn) ............................................ 55
Hume Highway (Craigieburn) ............................................ 54
HUNTINGDALE ♥ ............................................................ 26
Huntingdale Road ............................................................ 24
HURSTBRIDGE ............................................................... 44
Hurstbridge Campus Occupation Crossing........................ 44
Hurstbridge Road ............................................................. 43
Hurstbridge Signal Box ..................................................... 44
HURSTBRIDGE STABLING SIDINGS ............................. 44
Hutton Street.................................................................... 38
Ideal Avenue .................................................................... 32
Inkerman Street ............................................................... 36
IVANHOE ¶ ..................................................................... 42
JACANA .......................................................................... 54
JEWELL........................................................................... 56
John Street (Glenferrie) .................................................... 16
John Street (Lilydale) ....................................................... 18
Johnston Street ................................................................ 41
JOLIMONT - M.C.G. ♥ .................................................... 11
Jolimont And City Circle underground Junction ................. 12
Jolimont Road .................................................................. 11
Jolimont Tunnel................................................................ 41
Jones Road ...................................................................... 27
JORDANVILLE ♣............................................................. 24
JT Hunter Undercrossing .................................................. 28
Jubilee Avenue Footbridge ............................................... 33
KANANOOK ♣................................................................. 33
Kananook Creek .............................................................. 33
Kananook Drain ............................................................... 33
Kanooka Grove ................................................................ 26
Kayes Drain (Galvin) ........................................................ 49
Kayes Drain (Westona) .................................................... 48
KEILOR PLAINS ............................................................. 51
Kendall Street .................................................................. 17
Kenilworth Road ............................................................... 28
KENSINGTON ................................................................. 14
Kensington Road.............................................................. 50
Kensington Signal Box ..................................................... 14
Kent Avenue (Croydon) .................................................... 18
Kent Street (Ascot Vale) ................................................... 53
Keon Parade .................................................................... 39
KEON PARK .................................................................... 39
Keon Park Signal Box ...................................................... 39
Kilmartin Street ................................................................ 53
Kilparrin Avenue ............................................................... 43
Kimberley Clark Siding ..................................................... 30
Kings Creek ..................................................................... 34
Kings Road (Sydenham)................................................... 51
Kings Way ......................................................................... 9
Kinnane Street ................................................................. 37
Klauer Street .................................................................... 33
Koornang Road ................................................................ 26
KOOYONG ♣ .................................................................. 23
Kooyong Road ................................................................. 25
Kooyong Signal Box ......................................................... 23
Kororoit Creek (Paisley) .................................................... 49
Kororoit Creek (Westona line) ........................................... 47
Kororoit Creek Road (Paisley) .......................................... 49
Kororoit Creek Road (Westona line).................................. 47
La Trobe Street Extension ................................................ 13
LABURNUM ..................................................................... 17
Laburnum Street .............................................................. 17
LALOR ............................................................................. 39
Lalor Signal Box ............................................................... 39
Langridge Street ............................................................... 41
Langwarrin (Site of) .......................................................... 34
Latrobe Street .................................................................. 32
LAVERTON ¶ .................................................................. 48
Laverton Loop ................................................................ 48
Lawrence Road ................................................................ 24
LEAWARRA ..................................................................... 34
LILYDALE ¶ ..................................................................... 19
Lilydale Signal Box ........................................................... 19
Linacre Road .................................................................... 37
Lloyd Street (Nth Melbourne - BMS line) ........................... 14
Lloyd Street (Nth Melbourne - SDM line) ........................... 50
Lochiel Avenue................................................................. 32
Logan Street subway ........................................................ 17
LONG ISLAND ................................................................. 35
Lovat Court ...................................................................... 54
Lower Plenty Road ........................................................... 42
LYNBROOK .................................................................... 30
Lynch's Bridge .................................................................. 50
LYNDBROOK LOOP ........................................................ 30
LYNDHURST ................................................................... 30
MACAULAY ♣ ................................................................. 56
Macaulay Employee Footbridge (Broadmeadows line) ...... 14
Macaulay Employee Footbridge (Sydenham line) .............. 50
Macaulay Road (Kensington) ............................................ 14
Macaulay Road (Macaulay) .............................................. 56
Macaulay Stabling Sidings................................................ 56
MACLEOD ....................................................................... 42
Macleod Signal Box.......................................................... 42
Madden Grove (Burnley)................................................... 23
Maddox Road ................................................................... 47
Mahoneys Road ............................................................... 39
Maidstone Street (Galvin) ................................................. 49
Maidstone Street (Westona line) ....................................... 48
Main Road (St.Albans) ..................................................... 51
Main Street (Greensborough) ........................................... 43
Main Street (Pakenham) ................................................... 28
Main Street (Upwey) ......................................................... 21
Main Suburban And Through Suburban Lines Overpass ... 14
Mair Street ....................................................................... 37
Malcolm Creek ................................................................. 55
MALVERN ♥ .................................................................... 26
Malvern Road ................................................................... 25
Manchester Road ............................................................. 18
Manningham Street .......................................................... 56
Manns Crossing ............................................................... 39
Maribyrnong River ............................................................ 50
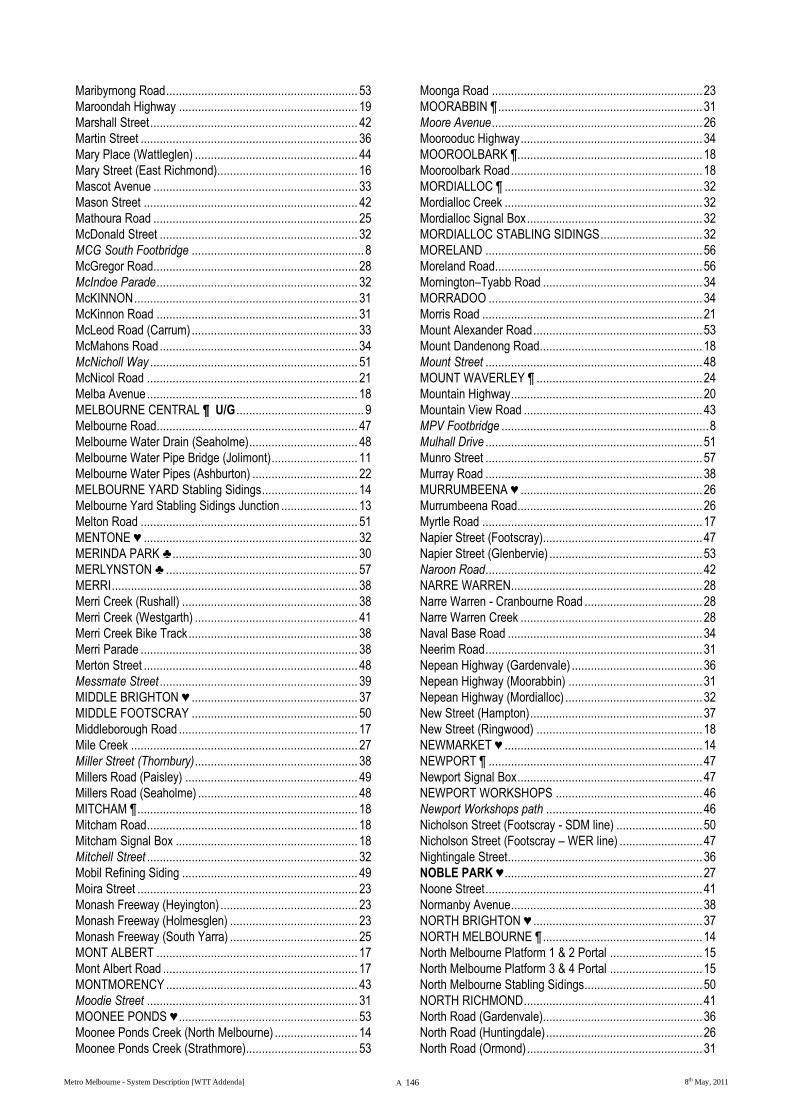
Metro Melbourne - System Description [WTT Addenda] A 146 8th May, 2011
Maribyrnong Road ............................................................ 53
Maroondah Highway ........................................................ 19
Marshall Street ................................................................. 42
Martin Street .................................................................... 36
Mary Place (Wattleglen) ................................................... 44
Mary Street (East Richmond)............................................ 16
Mascot Avenue ................................................................ 33
Mason Street ................................................................... 42
Mathoura Road ................................................................ 25
McDonald Street .............................................................. 32
MCG South Footbridge ...................................................... 8
McGregor Road................................................................ 28
McIndoe Parade ............................................................... 32
McKINNON ...................................................................... 31
McKinnon Road ............................................................... 31
McLeod Road (Carrum) .................................................... 33
McMahons Road .............................................................. 34
McNicholl Way ................................................................. 51
McNicol Road .................................................................. 21
Melba Avenue .................................................................. 18
MELBOURNE CENTRAL ¶ U/G ........................................ 9
Melbourne Road............................................................... 47
Melbourne Water Drain (Seaholme) .................................. 48
Melbourne Water Pipe Bridge (Jolimont) ........................... 11
Melbourne Water Pipes (Ashburton) ................................. 22
MELBOURNE YARD Stabling Sidings .............................. 14
Melbourne Yard Stabling Sidings Junction ........................ 13
Melton Road .................................................................... 51
MENTONE ♥ ................................................................... 32
MERINDA PARK ♣ .......................................................... 30
MERLYNSTON ♣ ............................................................ 57
MERRI ............................................................................. 38
Merri Creek (Rushall) ....................................................... 38
Merri Creek (Westgarth) ................................................... 41
Merri Creek Bike Track ..................................................... 38
Merri Parade .................................................................... 38
Merton Street ................................................................... 48
Messmate Street .............................................................. 39
MIDDLE BRIGHTON ♥ .................................................... 37
MIDDLE FOOTSCRAY .................................................... 50
Middleborough Road ........................................................ 17
Mile Creek ....................................................................... 27
Miller Street (Thornbury) ................................................... 38
Millers Road (Paisley) ...................................................... 49
Millers Road (Seaholme) .................................................. 48
MITCHAM ¶ ..................................................................... 18
Mitcham Road .................................................................. 18
Mitcham Signal Box ......................................................... 18
Mitchell Street .................................................................. 32
Mobil Refining Siding ....................................................... 49
Moira Street ..................................................................... 23
Monash Freeway (Heyington) ........................................... 23
Monash Freeway (Holmesglen) ........................................ 23
Monash Freeway (South Yarra) ........................................ 25
MONT ALBERT ............................................................... 17
Mont Albert Road ............................................................. 17
MONTMORENCY ............................................................ 43
Moodie Street .................................................................. 31
MOONEE PONDS ♥ ........................................................ 53
Moonee Ponds Creek (North Melbourne) .......................... 14
Moonee Ponds Creek (Strathmore)................................... 53
Moonga Road .................................................................. 23
MOORABBIN ¶ ................................................................ 31
Moore Avenue .................................................................. 26
Moorooduc Highway ......................................................... 34
MOOROOLBARK ¶.......................................................... 18
Mooroolbark Road ............................................................ 18
MORDIALLOC ¶ .............................................................. 32
Mordialloc Creek .............................................................. 32
Mordialloc Signal Box ....................................................... 32
MORDIALLOC STABLING SIDINGS ................................ 32
MORELAND .................................................................... 56
Moreland Road................................................................. 56
Mornington–Tyabb Road .................................................. 34
MORRADOO ................................................................... 34
Morris Road ..................................................................... 21
Mount Alexander Road ..................................................... 53
Mount Dandenong Road................................................... 18
Mount Street .................................................................... 48
MOUNT WAVERLEY ¶ .................................................... 24
Mountain Highway ............................................................ 20
Mountain View Road ........................................................ 43
MPV Footbridge ................................................................. 8
Mulhall Drive .................................................................... 51
Munro Street .................................................................... 57
Murray Road .................................................................... 38
MURRUMBEENA ♥ ......................................................... 26
Murrumbeena Road.......................................................... 26
Myrtle Road ..................................................................... 17
Napier Street (Footscray).................................................. 47
Napier Street (Glenbervie) ................................................ 53
Naroon Road .................................................................... 42
NARRE WARREN............................................................ 28
Narre Warren - Cranbourne Road ..................................... 28
Narre Warren Creek ......................................................... 28
Naval Base Road ............................................................. 34
Neerim Road .................................................................... 31
Nepean Highway (Gardenvale) ......................................... 36
Nepean Highway (Moorabbin) .......................................... 31
Nepean Highway (Mordialloc) ........................................... 32
New Street (Hampton) ...................................................... 37
New Street (Ringwood) .................................................... 18
NEWMARKET ♥ .............................................................. 14
NEWPORT ¶ ................................................................... 47
Newport Signal Box .......................................................... 47
NEWPORT WORKSHOPS .............................................. 46
Newport Workshops path ................................................. 46
Nicholson Street (Footscray - SDM line) ........................... 50
Nicholson Street (Footscray – WER line) .......................... 47
Nightingale Street............................................................. 36
NOBLE PARK ♥ .............................................................. 27
Noone Street .................................................................... 41
Normanby Avenue ............................................................ 38
NORTH BRIGHTON ♥ ..................................................... 37
NORTH MELBOURNE ¶ .................................................. 14
North Melbourne Platform 1 & 2 Portal ............................. 15
North Melbourne Platform 3 & 4 Portal ............................. 15
North Melbourne Stabling Sidings ..................................... 50
NORTH RICHMOND ........................................................ 41
North Road (Gardenvale).................................................. 36
North Road (Huntingdale) ................................................. 26
North Road (Ormond) ....................................................... 31
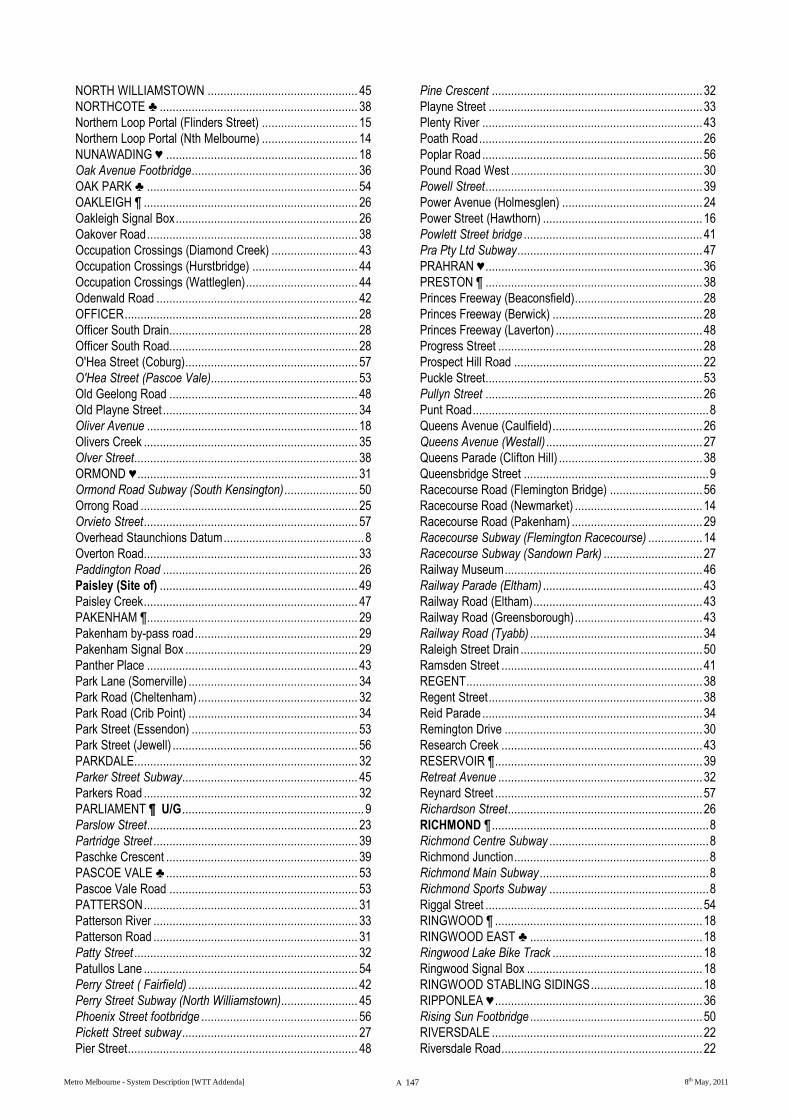
Metro Melbourne - System Description [WTT Addenda] A 147 8th May, 2011
NORTH WILLIAMSTOWN ............................................... 45
NORTHCOTE ♣ .............................................................. 38
Northern Loop Portal (Flinders Street) .............................. 15
Northern Loop Portal (Nth Melbourne) .............................. 14
NUNAWADING ♥ ............................................................ 18
Oak Avenue Footbridge .................................................... 36
OAK PARK ♣ .................................................................. 54
OAKLEIGH ¶ ................................................................... 26
Oakleigh Signal Box ......................................................... 26
Oakover Road .................................................................. 38
Occupation Crossings (Diamond Creek) ........................... 43
Occupation Crossings (Hurstbridge) ................................. 44
Occupation Crossings (Wattleglen) ................................... 44
Odenwald Road ............................................................... 42
OFFICER ......................................................................... 28
Officer South Drain........................................................... 28
Officer South Road........................................................... 28
O'Hea Street (Coburg) ...................................................... 57
O'Hea Street (Pascoe Vale).............................................. 53
Old Geelong Road ........................................................... 48
Old Playne Street ............................................................. 34
Oliver Avenue .................................................................. 18
Olivers Creek ................................................................... 35
Olver Street...................................................................... 38
ORMOND ♥ ..................................................................... 31
Ormond Road Subway (South Kensington) ....................... 50
Orrong Road .................................................................... 25
Orvieto Street ................................................................... 57
Overhead Staunchions Datum ............................................ 8
Overton Road................................................................... 33
Paddington Road ............................................................. 26
Paisley (Site of) .............................................................. 49
Paisley Creek ................................................................... 47
PAKENHAM ¶.................................................................. 29
Pakenham by-pass road ................................................... 29
Pakenham Signal Box ...................................................... 29
Panther Place .................................................................. 43
Park Lane (Somerville) ..................................................... 34
Park Road (Cheltenham) .................................................. 32
Park Road (Crib Point) ..................................................... 34
Park Street (Essendon) .................................................... 53
Park Street (Jewell) .......................................................... 56
PARKDALE...................................................................... 32
Parker Street Subway....................................................... 45
Parkers Road ................................................................... 32
PARLIAMENT ¶ U/G ......................................................... 9
Parslow Street.................................................................. 23
Partridge Street ................................................................ 39
Paschke Crescent ............................................................ 39
PASCOE VALE ♣ ............................................................ 53
Pascoe Vale Road ........................................................... 53
PATTERSON ................................................................... 31
Patterson River ................................................................ 33
Patterson Road ................................................................ 31
Patty Street ...................................................................... 32
Patullos Lane ................................................................... 54
Perry Street ( Fairfield) ..................................................... 42
Perry Street Subway (North Williamstown)........................ 45
Phoenix Street footbridge ................................................. 56
Pickett Street subway ....................................................... 27
Pier Street ........................................................................ 48
Pine Crescent .................................................................. 32
Playne Street ................................................................... 33
Plenty River ..................................................................... 43
Poath Road ...................................................................... 26
Poplar Road ..................................................................... 56
Pound Road West ............................................................ 30
Powell Street .................................................................... 39
Power Avenue (Holmesglen) ............................................ 24
Power Street (Hawthorn) .................................................. 16
Powlett Street bridge ........................................................ 41
Pra Pty Ltd Subway .......................................................... 47
PRAHRAN ♥ .................................................................... 36
PRESTON ¶ .................................................................... 38
Princes Freeway (Beaconsfield) ........................................ 28
Princes Freeway (Berwick) ............................................... 28
Princes Freeway (Laverton) .............................................. 48
Progress Street ................................................................ 28
Prospect Hill Road ........................................................... 22
Puckle Street.................................................................... 53
Pullyn Street .................................................................... 26
Punt Road .......................................................................... 8
Queens Avenue (Caulfield) ............................................... 26
Queens Avenue (Westall) ................................................. 27
Queens Parade (Clifton Hill) ............................................. 38
Queensbridge Street .......................................................... 9
Racecourse Road (Flemington Bridge) ............................. 56
Racecourse Road (Newmarket) ........................................ 14
Racecourse Road (Pakenham) ......................................... 29
Racecourse Subway (Flemington Racecourse) ................. 14
Racecourse Subway (Sandown Park) ............................... 27
Railway Museum .............................................................. 46
Railway Parade (Eltham) .................................................. 43
Railway Road (Eltham) ..................................................... 43
Railway Road (Greensborough) ........................................ 43
Railway Road (Tyabb) ...................................................... 34
Raleigh Street Drain ......................................................... 50
Ramsden Street ............................................................... 41
REGENT .......................................................................... 38
Regent Street ................................................................... 38
Reid Parade ..................................................................... 34
Remington Drive .............................................................. 30
Research Creek ............................................................... 43
RESERVOIR ¶ ................................................................. 39
Retreat Avenue ................................................................ 32
Reynard Street ................................................................. 57
Richardson Street............................................................. 26
RICHMOND ¶ .................................................................... 8
Richmond Centre Subway .................................................. 8
Richmond Junction ............................................................. 8
Richmond Main Subway ..................................................... 8
Richmond Sports Subway .................................................. 8
Riggal Street .................................................................... 54
RINGWOOD ¶ ................................................................. 18
RINGWOOD EAST ♣ ...................................................... 18
Ringwood Lake Bike Track ............................................... 18
Ringwood Signal Box ....................................................... 18
RINGWOOD STABLING SIDINGS ................................... 18
RIPPONLEA ♥ ................................................................. 36
Rising Sun Footbridge ...................................................... 50
RIVERSDALE .................................................................. 22
Riversdale Road ............................................................... 22
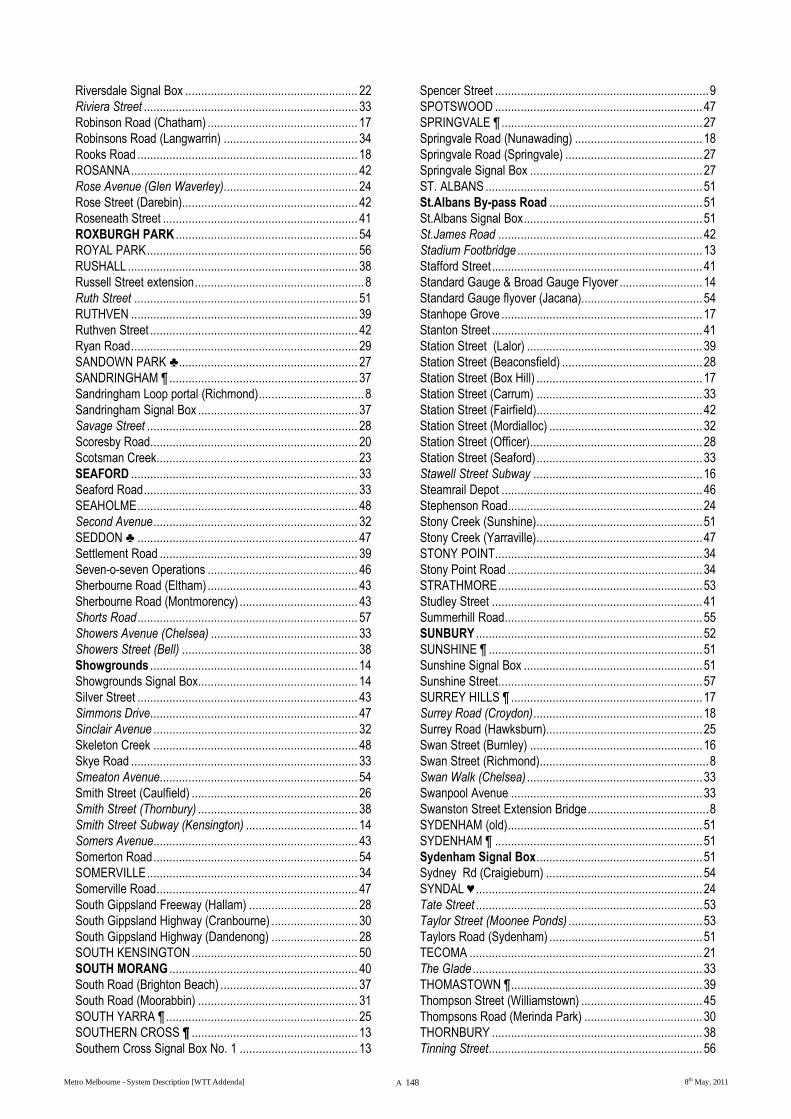
Metro Melbourne - System Description [WTT Addenda] A 148 8th May, 2011
Riversdale Signal Box ...................................................... 22
Riviera Street ................................................................... 33
Robinson Road (Chatham) ............................................... 17
Robinsons Road (Langwarrin) .......................................... 34
Rooks Road ..................................................................... 18
ROSANNA ....................................................................... 42
Rose Avenue (Glen Waverley).......................................... 24
Rose Street (Darebin)....................................................... 42
Roseneath Street ............................................................. 41
ROXBURGH PARK ......................................................... 54
ROYAL PARK .................................................................. 56
RUSHALL ........................................................................ 38
Russell Street extension ..................................................... 8
Ruth Street ...................................................................... 51
RUTHVEN ....................................................................... 39
Ruthven Street ................................................................. 42
Ryan Road ....................................................................... 29
SANDOWN PARK ♣ ........................................................ 27
SANDRINGHAM ¶ ........................................................... 37
Sandringham Loop portal (Richmond) ................................. 8
Sandringham Signal Box .................................................. 37
Savage Street .................................................................. 28
Scoresby Road................................................................. 20
Scotsman Creek............................................................... 23
SEAFORD ....................................................................... 33
Seaford Road ................................................................... 33
SEAHOLME ..................................................................... 48
Second Avenue ................................................................ 32
SEDDON ♣ ..................................................................... 47
Settlement Road .............................................................. 39
Seven-o-seven Operations ............................................... 46
Sherbourne Road (Eltham) ............................................... 43
Sherbourne Road (Montmorency) ..................................... 43
Shorts Road ..................................................................... 57
Showers Avenue (Chelsea) .............................................. 33
Showers Street (Bell) ....................................................... 38
Showgrounds ................................................................. 14
Showgrounds Signal Box.................................................. 14
Silver Street ..................................................................... 43
Simmons Drive................................................................. 47
Sinclair Avenue ................................................................ 32
Skeleton Creek ................................................................ 48
Skye Road ....................................................................... 33
Smeaton Avenue.............................................................. 54
Smith Street (Caulfield) .................................................... 26
Smith Street (Thornbury) .................................................. 38
Smith Street Subway (Kensington) ................................... 14
Somers Avenue................................................................ 43
Somerton Road ................................................................ 54
SOMERVILLE .................................................................. 34
Somerville Road ............................................................... 47
South Gippsland Freeway (Hallam) .................................. 28
South Gippsland Highway (Cranbourne) ........................... 30
South Gippsland Highway (Dandenong) ........................... 28
SOUTH KENSINGTON .................................................... 50
SOUTH MORANG ........................................................... 40
South Road (Brighton Beach) ........................................... 37
South Road (Moorabbin) .................................................. 31
SOUTH YARRA ¶ ............................................................ 25
SOUTHERN CROSS ¶ .................................................... 13
Southern Cross Signal Box No. 1 ..................................... 13
Spencer Street ................................................................... 9
SPOTSWOOD ................................................................. 47
SPRINGVALE ¶ ............................................................... 27
Springvale Road (Nunawading) ........................................ 18
Springvale Road (Springvale) ........................................... 27
Springvale Signal Box ...................................................... 27
ST. ALBANS .................................................................... 51
St.Albans By-pass Road ................................................ 51
St.Albans Signal Box ........................................................ 51
St.James Road ................................................................ 42
Stadium Footbridge .......................................................... 13
Stafford Street .................................................................. 41
Standard Gauge & Broad Gauge Flyover .......................... 14
Standard Gauge flyover (Jacana)...................................... 54
Stanhope Grove ............................................................... 17
Stanton Street .................................................................. 41
Station Street (Lalor) ....................................................... 39
Station Street (Beaconsfield) ............................................ 28
Station Street (Box Hill) .................................................... 17
Station Street (Carrum) .................................................... 33
Station Street (Fairfield).................................................... 42
Station Street (Mordialloc) ................................................ 32
Station Street (Officer) ...................................................... 28
Station Street (Seaford) .................................................... 33
Stawell Street Subway ..................................................... 16
Steamrail Depot ............................................................... 46
Stephenson Road............................................................. 24
Stony Creek (Sunshine) .................................................... 51
Stony Creek (Yarraville) .................................................... 47
STONY POINT................................................................. 34
Stony Point Road ............................................................. 34
STRATHMORE ................................................................ 53
Studley Street .................................................................. 41
Summerhill Road.............................................................. 55
SUNBURY ....................................................................... 52
SUNSHINE ¶ ................................................................... 51
Sunshine Signal Box ........................................................ 51
Sunshine Street................................................................ 57
SURREY HILLS ¶ ............................................................ 17
Surrey Road (Croydon) ..................................................... 18
Surrey Road (Hawksburn)................................................. 25
Swan Street (Burnley) ...................................................... 16
Swan Street (Richmond)..................................................... 8
Swan Walk (Chelsea) ....................................................... 33
Swanpool Avenue ............................................................ 33
Swanston Street Extension Bridge ...................................... 8
SYDENHAM (old) ............................................................. 51
SYDENHAM ¶ ................................................................. 51
Sydenham Signal Box .................................................... 51
Sydney Rd (Craigieburn) ................................................. 54
SYNDAL ♥ ....................................................................... 24
Tate Street ....................................................................... 53
Taylor Street (Moonee Ponds) .......................................... 53
Taylors Road (Sydenham) ................................................ 51
TECOMA ......................................................................... 21
The Glade ........................................................................ 33
THOMASTOWN ¶ ............................................................ 39
Thompson Street (Williamstown) ...................................... 45
Thompsons Road (Merinda Park) ..................................... 30
THORNBURY .................................................................. 38
Tinning Street................................................................... 56
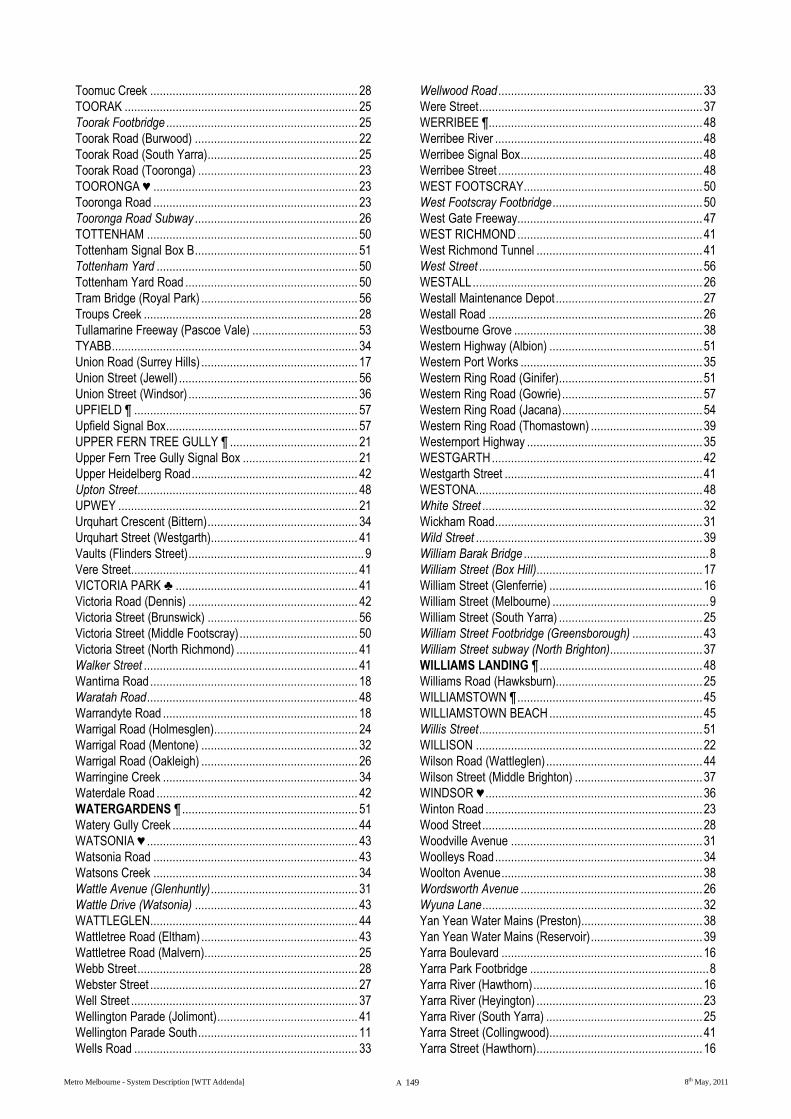
Metro Melbourne - System Description [WTT Addenda] A 149 8th May, 2011
Toomuc Creek ................................................................. 28
TOORAK ......................................................................... 25
Toorak Footbridge ............................................................ 25
Toorak Road (Burwood) ................................................... 22
Toorak Road (South Yarra) ............................................... 25
Toorak Road (Tooronga) .................................................. 23
TOORONGA ♥ ................................................................ 23
Tooronga Road ................................................................ 23
Tooronga Road Subway ................................................... 26
TOTTENHAM .................................................................. 50
Tottenham Signal Box B ................................................... 51
Tottenham Yard ............................................................... 50
Tottenham Yard Road ...................................................... 50
Tram Bridge (Royal Park) ................................................. 56
Troups Creek ................................................................... 28
Tullamarine Freeway (Pascoe Vale) ................................. 53
TYABB ............................................................................. 34
Union Road (Surrey Hills) ................................................. 17
Union Street (Jewell) ........................................................ 56
Union Street (Windsor) ..................................................... 36
UPFIELD ¶ ...................................................................... 57
Upfield Signal Box ............................................................ 57
UPPER FERN TREE GULLY ¶ ........................................ 21
Upper Fern Tree Gully Signal Box .................................... 21
Upper Heidelberg Road .................................................... 42
Upton Street..................................................................... 48
UPWEY ........................................................................... 21
Urquhart Crescent (Bittern) ............................................... 34
Urquhart Street (Westgarth).............................................. 41
Vaults (Flinders Street) ....................................................... 9
Vere Street....................................................................... 41
VICTORIA PARK ♣ ......................................................... 41
Victoria Road (Dennis) ..................................................... 42
Victoria Street (Brunswick) ............................................... 56
Victoria Street (Middle Footscray) ..................................... 50
Victoria Street (North Richmond) ...................................... 41
Walker Street ................................................................... 41
Wantirna Road ................................................................. 18
Waratah Road .................................................................. 48
Warrandyte Road ............................................................. 18
Warrigal Road (Holmesglen)............................................. 24
Warrigal Road (Mentone) ................................................. 32
Warrigal Road (Oakleigh) ................................................. 26
Warringine Creek ............................................................. 34
Waterdale Road ............................................................... 42
WATERGARDENS ¶ ....................................................... 51
Watery Gully Creek .......................................................... 44
WATSONIA ♥ .................................................................. 43
Watsonia Road ................................................................ 43
Watsons Creek ................................................................ 34
Wattle Avenue (Glenhuntly) .............................................. 31
Wattle Drive (Watsonia) ................................................... 43
WATTLEGLEN................................................................. 44
Wattletree Road (Eltham) ................................................. 43
Wattletree Road (Malvern)................................................ 25
Webb Street ..................................................................... 28
Webster Street ................................................................. 27
Well Street ....................................................................... 37
Wellington Parade (Jolimont) ............................................ 41
Wellington Parade South .................................................. 11
Wells Road ...................................................................... 33
Wellwood Road ................................................................ 33
Were Street ...................................................................... 37
WERRIBEE ¶................................................................... 48
Werribee River ................................................................. 48
Werribee Signal Box ......................................................... 48
Werribee Street ................................................................ 48
WEST FOOTSCRAY........................................................ 50
West Footscray Footbridge ............................................... 50
West Gate Freeway.......................................................... 47
WEST RICHMOND .......................................................... 41
West Richmond Tunnel .................................................... 41
West Street ...................................................................... 56
WESTALL ........................................................................ 26
Westall Maintenance Depot .............................................. 27
Westall Road ................................................................... 26
Westbourne Grove ........................................................... 38
Western Highway (Albion) ................................................ 51
Western Port Works ......................................................... 35
Western Ring Road (Ginifer)............................................. 51
Western Ring Road (Gowrie) ............................................ 57
Western Ring Road (Jacana) ............................................ 54
Western Ring Road (Thomastown) ................................... 39
Westernport Highway ....................................................... 35
WESTGARTH .................................................................. 42
Westgarth Street .............................................................. 41
WESTONA....................................................................... 48
White Street ..................................................................... 32
Wickham Road ................................................................. 31
Wild Street ....................................................................... 39
William Barak Bridge .......................................................... 8
William Street (Box Hill).................................................... 17
William Street (Glenferrie) ................................................ 16
William Street (Melbourne) ................................................. 9
William Street (South Yarra) ............................................. 25
William Street Footbridge (Greensborough) ...................... 43
William Street subway (North Brighton)............................. 37
WILLIAMS LANDING ¶ ................................................... 48
Williams Road (Hawksburn).............................................. 25
WILLIAMSTOWN ¶ .......................................................... 45
WILLIAMSTOWN BEACH ................................................ 45
Willis Street ...................................................................... 51
WILLISON ....................................................................... 22
Wilson Road (Wattleglen) ................................................. 44
Wilson Street (Middle Brighton) ........................................ 37
WINDSOR ♥ .................................................................... 36
Winton Road .................................................................... 23
Wood Street ..................................................................... 28
Woodville Avenue ............................................................ 31
Woolleys Road ................................................................. 34
Woolton Avenue ............................................................... 38
Wordsworth Avenue ......................................................... 26
Wyuna Lane ..................................................................... 32
Yan Yean Water Mains (Preston)...................................... 38
Yan Yean Water Mains (Reservoir) ................................... 39
Yarra Boulevard ............................................................... 16
Yarra Park Footbridge ........................................................ 8
Yarra River (Hawthorn) ..................................................... 16
Yarra River (Heyington) .................................................... 23
Yarra River (South Yarra) ................................................. 25
Yarra Street (Collingwood)................................................ 41
Yarra Street (Hawthorn) .................................................... 16
Metro Melbourne - System Description [WTT Addenda] A 150 8th May, 2011
Yarralea Street ................................................................. 42
YARRAMAN .................................................................... 27
Yarraman Creek ............................................................... 27
YARRAVILLE ♥ ............................................................... 47
York Road (Glen Iris) ........................................................ 23
York Street (West Richmond) ........................................... 41
THE END
Related Documents