Copyright© 2005-2007 1 Quick Start Guide Managing Your Domain Names Managing Your Domain Names Using the Domain Control Center to manage your domain names. Managing your domain names may seem like a big job with many tasks to complete. This guide will help you simplify your domain management and walk you step-by-step through the most common tasks that you may need to perform for your domain names using the Domain Control Center. The new Domain Control Center simplifies the domain management process. You can easily access all aspects of domain management with the click of your mouse. All of the domains in your account can be managed from one location. Using this guide, you can complete the following tasks in the Domain Control Center: ¢ Changing Name Servers for Your Domain(s) ¢ Forwardi ng a Domain Name ¢ Modifying the Contact Information for Your Domain ¢ Upgrading Your Domain Names ¢ Renewing Your Domain Names ¢ Monitoring and Accepting Domain Transfers ¢ Managing Account Changes ¢ Managing 100 or More Domain Names If you need further information regarding any aspect of your account or your domain names, please check out our Help Center, which you can access from your Account Manager or from our Home page.

Welcome message from author
This document is posted to help you gain knowledge. Please leave a comment to let me know what you think about it! Share it to your friends and learn new things together.
Transcript
8/8/2019 Managing Domains
http://slidepdf.com/reader/full/managing-domains 1/17
Copyright© 2005-2007 1
Quick Start Guide Managing Your Domain Names
Managing YourDomain NamesUsing the Domain Control Center to manage your domain names.Managing your domain names may seem like a big job with many tasks tocomplete. This guide will help you simplify your domain management andwalk you step-by-step through the most common tasks that you may needto perform for your domain names using the Domain Control Center.
The new Domain Control Center simplifies the domain management process. You
can easily access all aspects of domain management with the click of your mouse.All of the domains in your account can be managed from one location.
Using this guide, you can complete the following tasks in the Domain Control
Center:
¢ Changing Name Servers for Your Domain(s)
¢ Forwarding a Domain Name
¢ Modifying the Contact Information for Your Domain
¢ Upgrading Your Domain Names
¢ Renewing Your Domain Names
¢ Monitoring and Accepting Domain Transfers
¢ Managing Account Changes
¢ Managing 100 or More Domain Names
If you need further information regarding any aspect of your account or yourdomain names, please check out our Help Center, which you can access from
your Account Manager or from our Home page.
8/8/2019 Managing Domains
http://slidepdf.com/reader/full/managing-domains 2/17
Quick Start Guide Managing Your Domain Names
Copyright© 2005-2006 2
CHANGING NAME SERVERS FOR YOUR DOMAIN(S)
Name servers are the Internet's equivalent to phone books. A name server main-
tains a directory of domain names that match certain IP addresses (computers).
The information from all the name servers across the Internet is gathered in acentral registry. This makes it possible for people across the Internet to access
your Web site using a familiar domain name, instead of having to remember a
series of numbers.
} To Change the Name Servers for Your Domain(s)
1. Log in to your Account Manager.
2. From the Domain Names menu, select Manage Domains. The Domain
Control Center opens.
3. Select the checkbox next to the domain name(s) you want to modify.
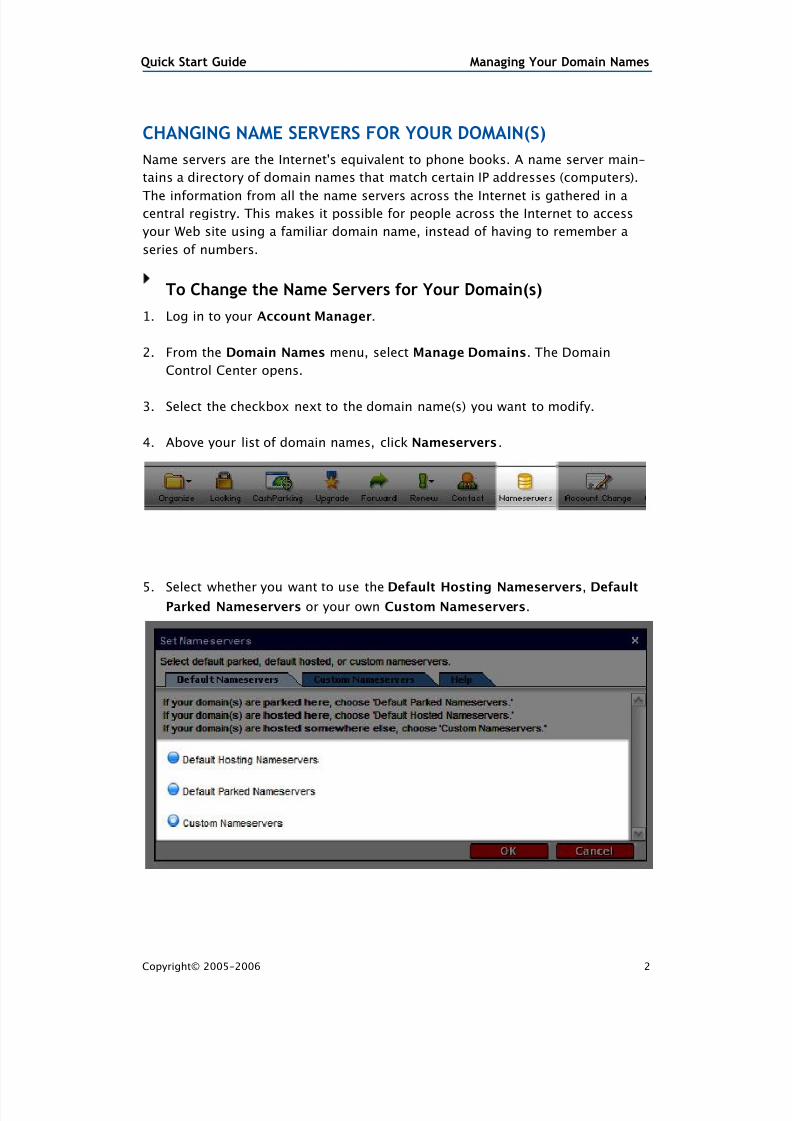
4. Above your list of domain names, click Nameservers.
5. Select whether you want to use the Default Hosting Nameservers, DefaultParked Nameservers or your own Custom Nameservers.
8/8/2019 Managing Domains
http://slidepdf.com/reader/full/managing-domains 3/17
Quick Start Guide Managing Your Domain Names
Copyright© 2005-2006 3
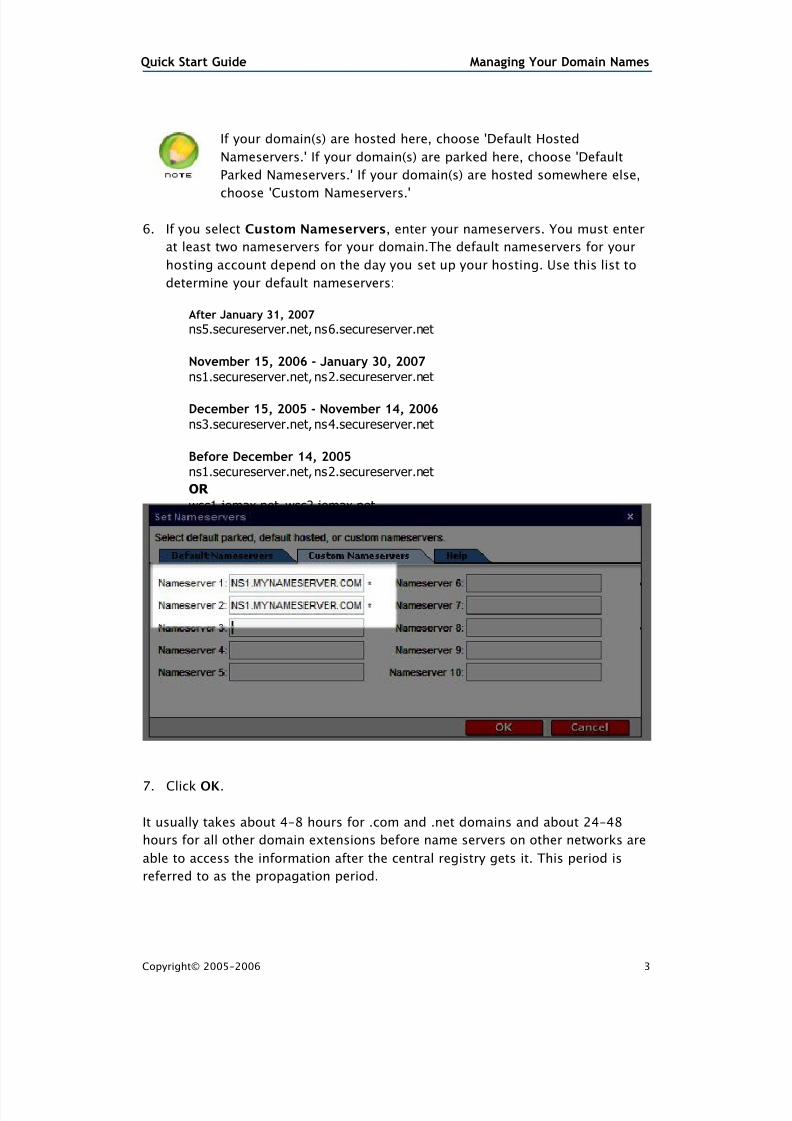
6. If you select Custom Nameservers, enter your nameservers. You must enter
at least two nameservers for your domain.The default nameservers for your
hosting account depend on the day you set up your hosting. Use this list to
determine your default nameservers:
After January 31, 2007
ns5.secureserver.net, ns6.secureserver.net
November 15, 2006 ‐ January 30, 2007ns1.secureserver.net, ns2.secureserver.net
December 15, 2005 ‐ November 14, 2006ns3.secureserver.net, ns4.secureserver.net
Before December 14, 2005ns1.secureserver.net, ns2.secureserver.net
OR
wsc1.jomax.net, wsc2.jomax.net
7. Click OK.
It usually takes about 4-8 hours for .com and .net domains and about 24-48
hours for all other domain extensions before name servers on other networks are
able to access the information after the central registry gets it. This period is
referred to as the propagation period.
If your domain(s) are hosted here, choose 'Default Hosted
Nameservers.' If your domain(s) are parked here, choose 'Default
Parked Nameservers.' If your domain(s) are hosted somewhere else,
choose 'Custom Nameservers.'
8/8/2019 Managing Domains
http://slidepdf.com/reader/full/managing-domains 4/17
Quick Start Guide Managing Your Domain Names
Copyright© 2005-2006 4
FORWARDING A DOMAIN NAME
Forwarding a domain name enables you to direct incoming traffic from a parked
domain to an already existing Web site. When someone attempts to access your
domain, their Web browser automatically redirects them to your main Web site.
Forwarding with Masking prevents visitors from knowing that they have been
redirected by making sure that your domain name remains in their Web browser's
address bar. You can also add a title and meta tags to your masked domain.
} To Forward a Domain
1. Log in to your Account Manager.
2. From the Domain Names menu, select Manage Domains. The Domain
Control Center opens.
3. Select the checkbox next to the domain name(s) you want to forward.
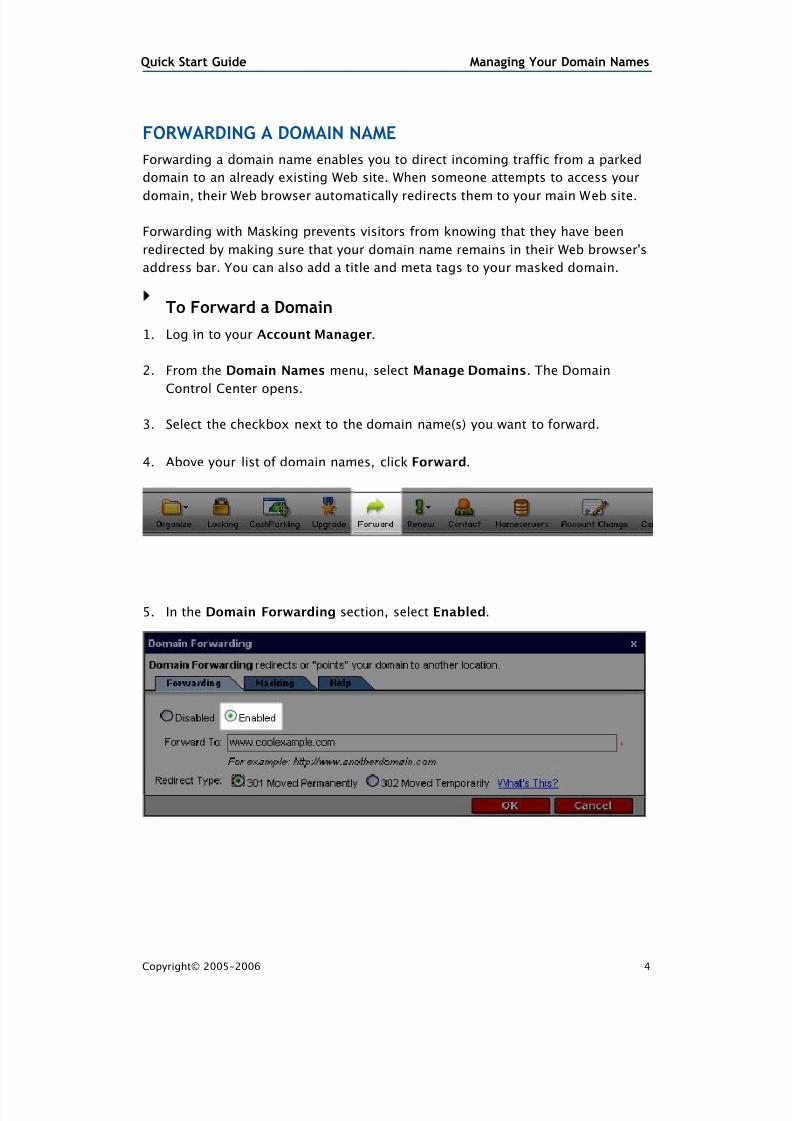
4. Above your list of domain names, click Forward.
5. In the Domain Forwarding section, select Enabled.
8/8/2019 Managing Domains
http://slidepdf.com/reader/full/managing-domains 5/17
Quick Start Guide Managing Your Domain Names
Copyright© 2005-2006 5
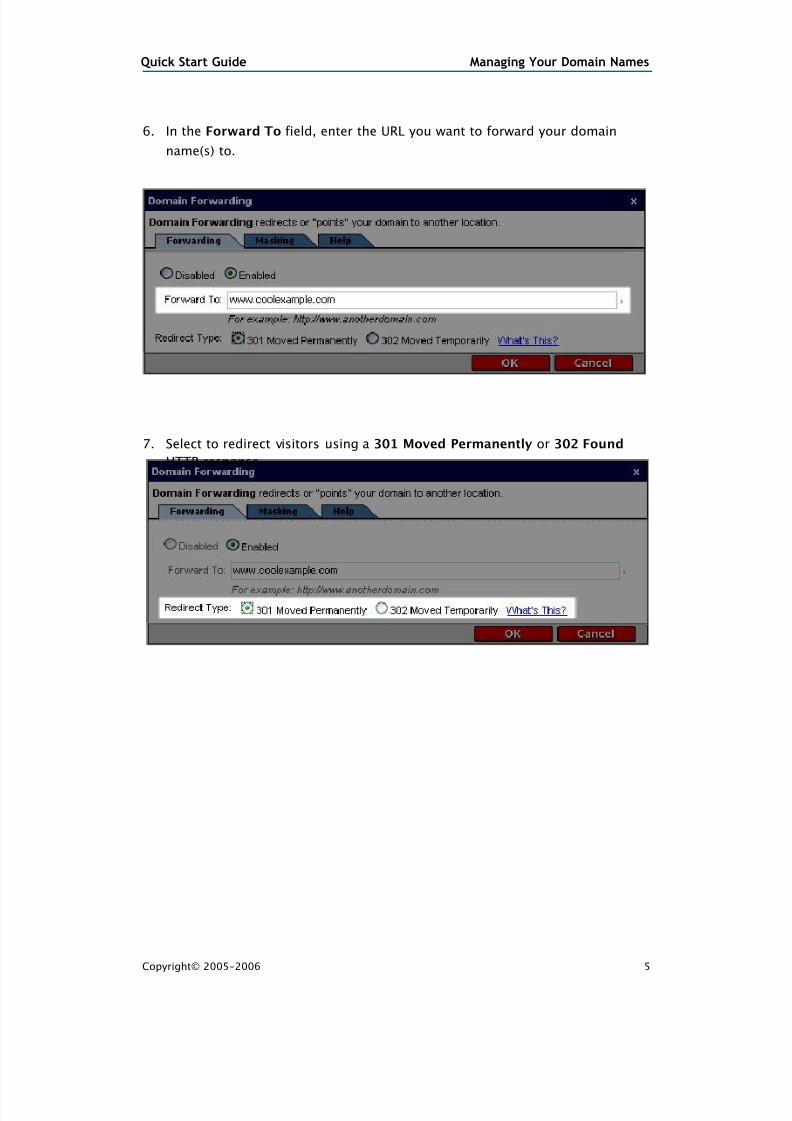
6. In the Forward To field, enter the URL you want to forward your domain
name(s) to.
7. Select to redirect visitors using a 301 Moved Permanently or 302 Found
HTTP response.
8/8/2019 Managing Domains
http://slidepdf.com/reader/full/managing-domains 6/17
Quick Start Guide Managing Your Domain Names
Copyright© 2005-2006 6
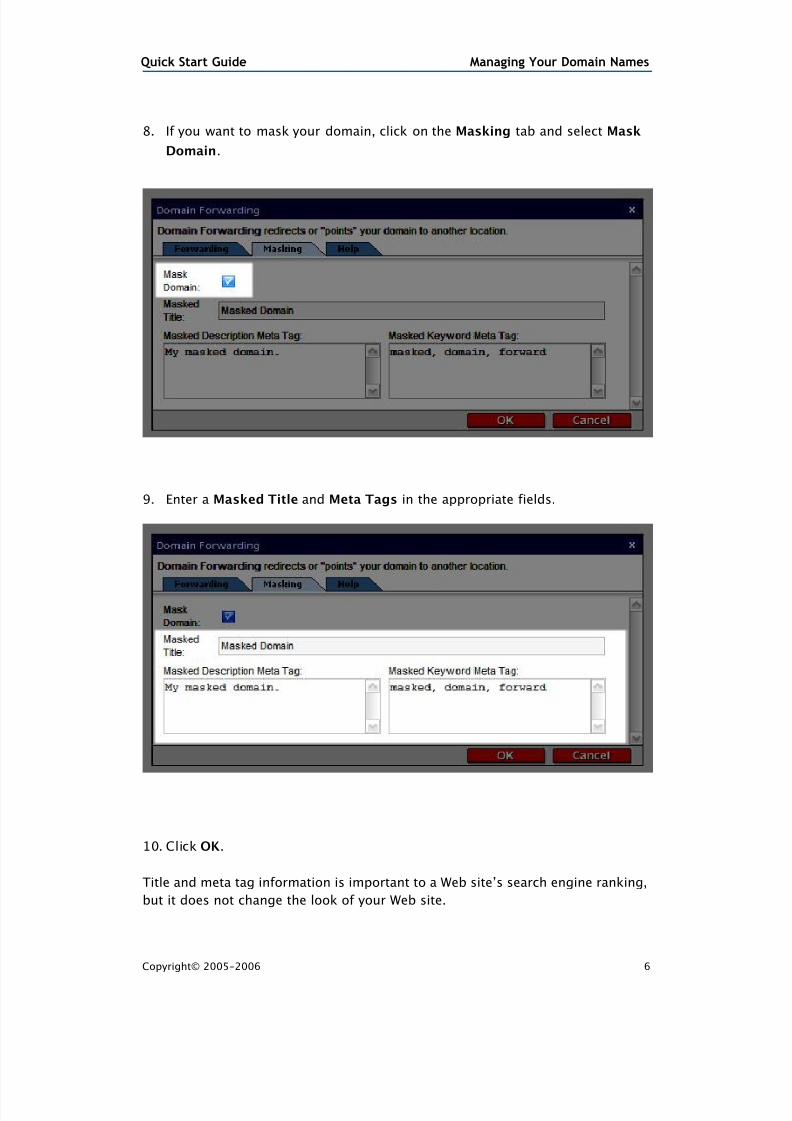
8. If you want to mask your domain, click on the Masking tab and select Mask
Domain.
9. Enter a Masked Title and Meta Tags in the appropriate fields.
10. Click OK.
Title and meta tag information is important to a Web site’s search engine ranking,
but it does not change the look of your Web site.
8/8/2019 Managing Domains
http://slidepdf.com/reader/full/managing-domains 7/17
Quick Start Guide Managing Your Domain Names
Copyright© 2005-2006 7
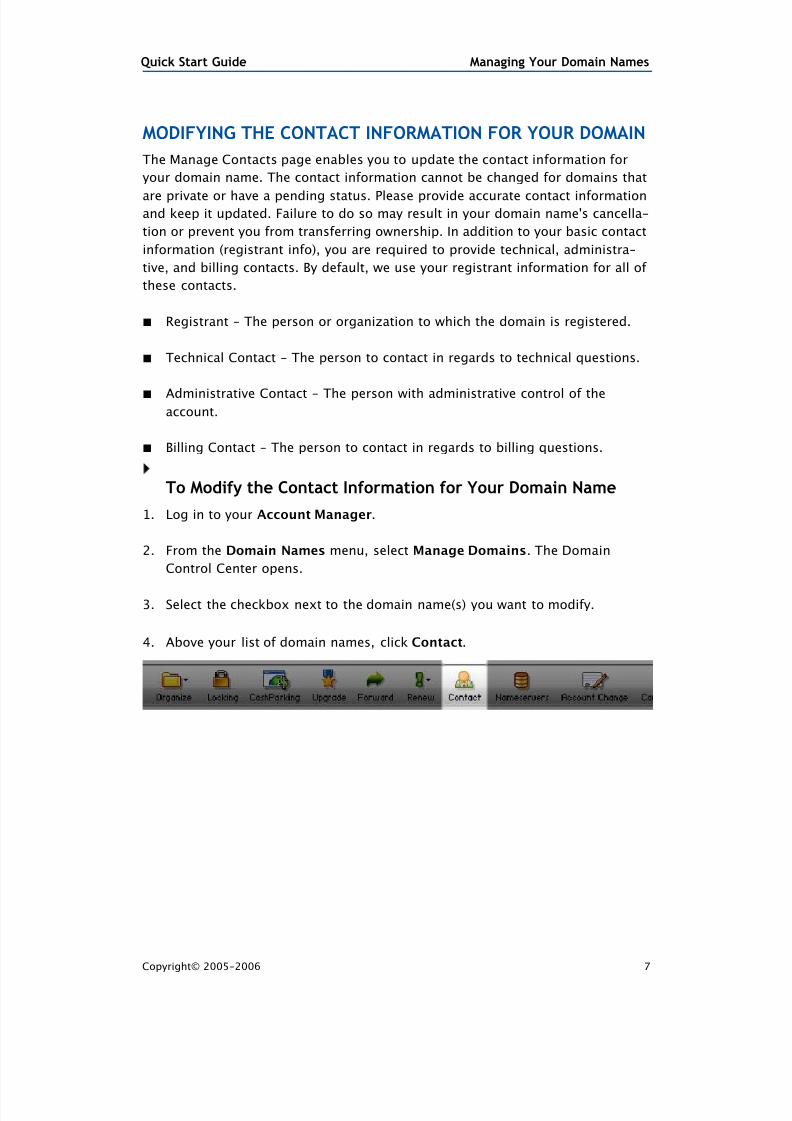
MODIFYING THE CONTACT INFORMATION FOR YOUR DOMAIN
The Manage Contacts page enables you to update the contact information for
your domain name. The contact information cannot be changed for domains that
are private or have a pending status. Please provide accurate contact informationand keep it updated. Failure to do so may result in your domain name's cancella-
tion or prevent you from transferring ownership. In addition to your basic contact
information (registrant info), you are required to provide technical, administra-
tive, and billing contacts. By default, we use your registrant information for all of
these contacts.
¢ Registrant - The person or organization to which the domain is registered.
¢ Technical Contact - The person to contact in regards to technical questions.
¢ Administrative Contact - The person with administrative control of theaccount.
¢ Billing Contact - The person to contact in regards to billing questions.
} To Modify the Contact Information for Your Domain Name
1. Log in to your Account Manager.
2. From the Domain Names menu, select Manage Domains. The Domain
Control Center opens.
3. Select the checkbox next to the domain name(s) you want to modify.
4. Above your list of domain names, click Contact.
8/8/2019 Managing Domains
http://slidepdf.com/reader/full/managing-domains 8/17
Quick Start Guide Managing Your Domain Names
Copyright© 2005-2006 8
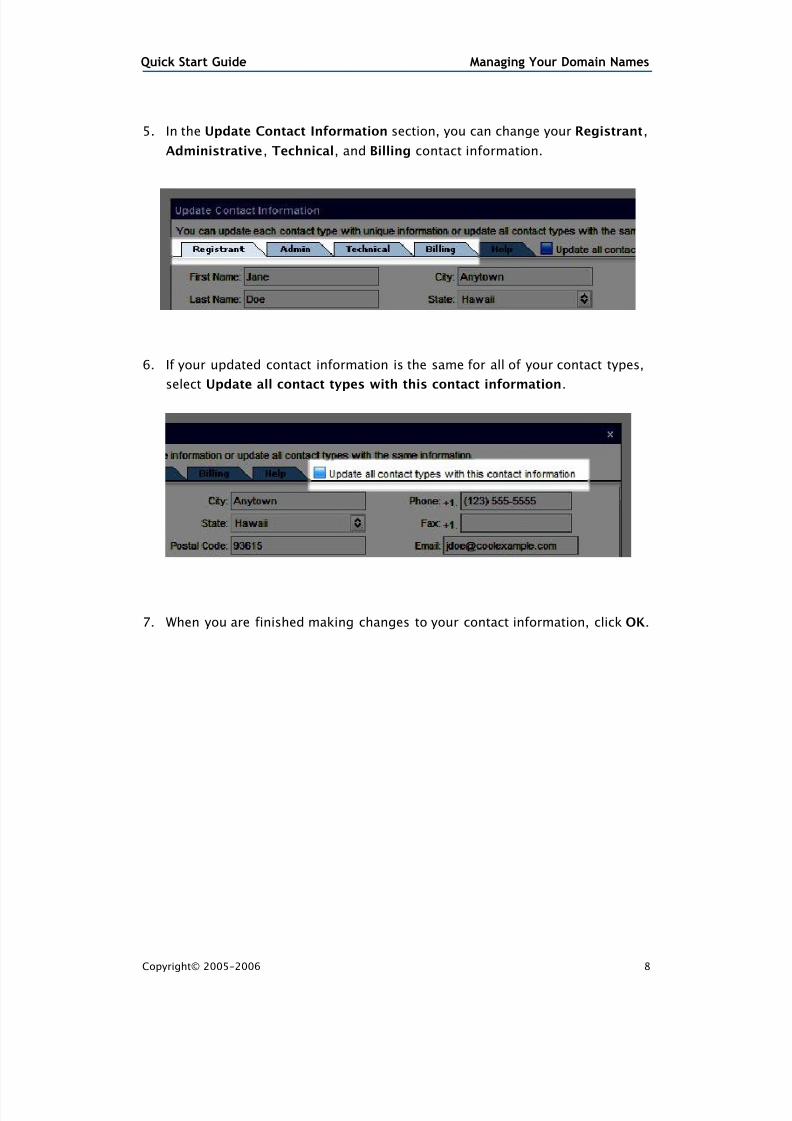
5. In the Update Contact Information section, you can change your Registrant,
Administrative, Technical, and Billing contact information.
6. If your updated contact information is the same for all of your contact types,
select Update all contact types with this contact information.
7. When you are finished making changes to your contact information, click OK.
8/8/2019 Managing Domains
http://slidepdf.com/reader/full/managing-domains 9/17
Quick Start Guide Managing Your Domain Names
Copyright© 2005-2006 9
UPGRADING YOUR DOMAIN NAMES
We offer a number of upgrade options that you can apply to your domain using
the Domain Control Center.
The upgrades available depend on what features you might have already added to
your domain name.
} To Upgrade Your Domain Name
1. Log in to your Account Manager.
2. From the Domain Names menu, select Manage Domains. The Domain
Control Center opens.
3. Select the checkbox next to the domain name(s) you want to add privacy to.
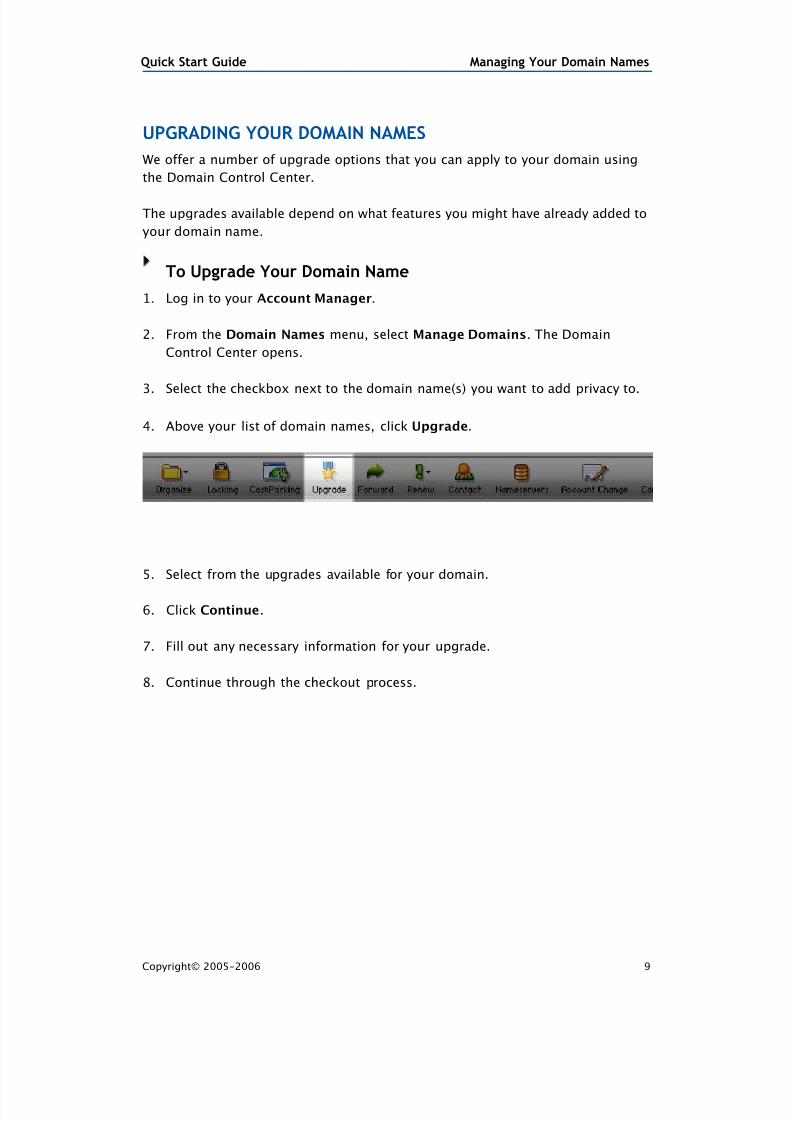
4. Above your list of domain names, click Upgrade.
5. Select from the upgrades available for your domain.
6. Click Continue.
7. Fill out any necessary information for your upgrade.
8. Continue through the checkout process.
8/8/2019 Managing Domains
http://slidepdf.com/reader/full/managing-domains 10/17
Quick Start Guide Managing Your Domain Names
Copyright© 2005-2006 10
RENEWING YOUR DOMAIN NAMES
You can renew one or all of your domain names using the Domain Control Center.
} To Renew Your Domain Name
1. Log in to your Account Manager.
2. From the Domain Names menu, select Manage Domains. The Domain
Control Center opens.
3. Select the checkbox next to the domain name(s) you want to renew.
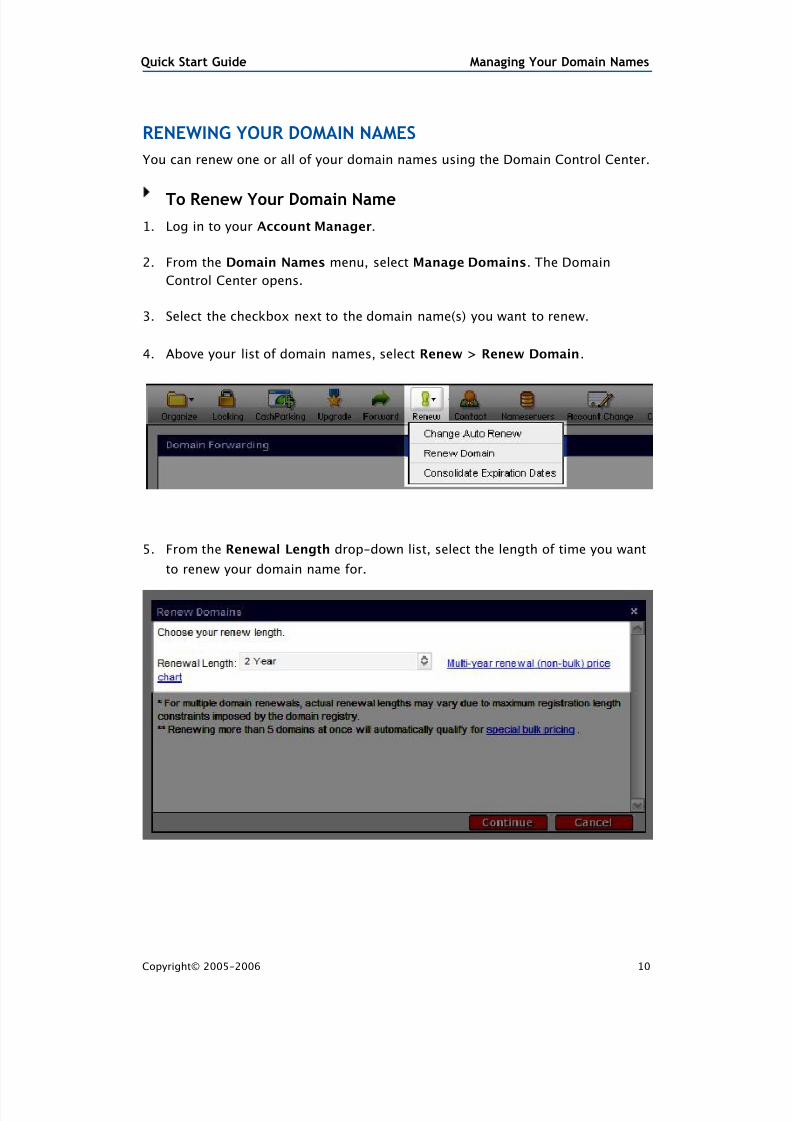
4. Above your list of domain names, select Renew > Renew Domain.
5. From the Renewal Length drop-down list, select the length of time you want
to renew your domain name for.
8/8/2019 Managing Domains
http://slidepdf.com/reader/full/managing-domains 11/17
Quick Start Guide Managing Your Domain Names
Copyright© 2005-2006 11
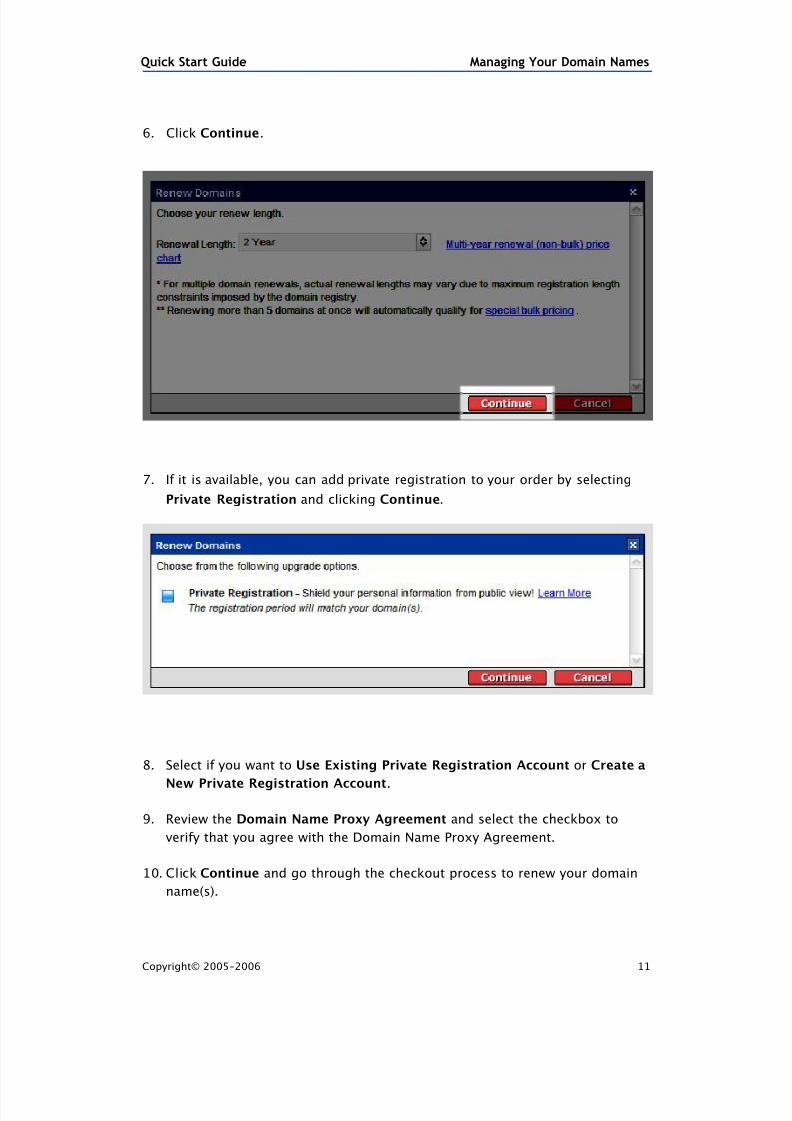
6. Click Continue.
7. If it is available, you can add private registration to your order by selecting
Private Registration and clicking Continue.
8. Select if you want to Use Existing Private Registration Account or Create a
New Private Registration Account.
9. Review the Domain Name Proxy Agreement and select the checkbox to
verify that you agree with the Domain Name Proxy Agreement.
10. Click Continue and go through the checkout process to renew your domain
name(s).
8/8/2019 Managing Domains
http://slidepdf.com/reader/full/managing-domains 12/17
Quick Start Guide Managing Your Domain Names
Copyright© 2005-2006 12
MONITORING AND ACCEPTING DOMAIN TRANSFERS
The Pending Transfers page allows you to easily monitor the progress of domain
transfer requests for domains being transferred to and from your account. The
status displays in the status column next to your domain name(s). Certain actionswill become available to you as a transfer progresses. Most likely you will not
need to use these options. However, they are available in the event that the
approval email is accidentally deleted or the transfer fails and needs to be retried.
If the transaction remains pending for an extended period of time, you may:
¢ Retry Transfer - Resubmits, to the registry, a transfer request that has failed.
You are not required to reauthorize the transfer – the request will be submit-
ted to the registry immediately. This option is only available for domains with
a status of ‘Transfer Interrupted,’ ‘Invalid Auth Code,’ or ‘Transfer Failed.’
¢ Reinitiate - Restarts a transfer that is trapped in a pending status. You are
required to reauthorize the transfer. This option is only available for domains
with a status of ‘Invalid Contact Information,’ Authorization Required,’ or
‘Pending Unlock or Hold Release.’
¢ Resend Email - Sends a reminder email to the email address of the Adminis-
trative Contact for the domain. It is up to that person to take the appropriate
action. This option is only available for domains with a status of ‘Invalid Con-
tact Information’ or ‘Authorization Required.’
¢ Cancel - Cancels the transaction. If the transaction is canceled, the personwho was to receive the domain names will be unable to accept the transfer.
This option is only available for domains with a status of ‘Invalid Contact
Information,’ ‘Authorization Required,’ ‘Pending Unlock or Hold Release,’ or
‘Awaiting Transfer Date.’
¢ Accept/Decline - Allows you to accept or decline the transfer of a domain
name from your account. This option is only available for domains with a sta-
tus of ‘Transfer Away Accept/Decline Required.’
} To Accept a Request to Transfer a Domain Away From Your
Account
Transfers are accepted automatically if no action is taken within 5 days. In order
to expedite the process, you can manually accept the transfer request by follow-
ing the steps below.
1. Log in to your Account Manager.
8/8/2019 Managing Domains
http://slidepdf.com/reader/full/managing-domains 13/17
Quick Start Guide Managing Your Domain Names
Copyright© 2005-2006 13
2. From the Domain Names menu, select Manage Domains. The Domain
Control Center opens.
3. In your folder list, click Pending Transfers.
4. Select the domain name you want to approve and click Accept/Decline above
your list of domain names.
5. Select Accept and then click OK.
Notification is sent to the Registry that you have approved the domain name
to be transferred away from your account. After the Registry accepts the
transfer you will receive a confirmation email that the transfer is complete.
} To Decline a Request to Transfer a Domain Away From Your
Account1. Log in to your Account Manager.
2. From the Domain Names menu, select Manage Domains. The Domain
Control Center opens.
3. In your folder list, click Pending Transfers.
4. Select the domain name you want to decline and click Accept/Decline above
your list of domain names.
5. Select Decline and then click OK.
Notification is sent to the Registry that you have declined for the domain
name to be transferred away from your account. If you do not explicitly
decline the transfer, the transfer is automatically accepted after 5 days.
} To Authorize a Domain Transfer to Your Account
1. Log in to your Account Manager.
2. From the Domain Names menu, select Manage Domains. The Domain
Control Center opens.
3. In your folder list, click Pending Transfers.
4. Click Authorization above your list of Pending Transfers.
5. In the Transfer Authorization section, enter your Transaction ID and Security
Code from the email notification you received regarding this transfer and
click Continue.
8/8/2019 Managing Domains
http://slidepdf.com/reader/full/managing-domains 14/17
Quick Start Guide Managing Your Domain Names
Copyright© 2005-2006 14
6. If applicable, enter your Authorization Code that you received from the
current Registrar and click Continue.
MANAGING ACCOUNT CHANGES
The Pending Account Changes page displays the list of domain names that you
have requested to move out of your account. If you are on the receiving end of a
Change Account Request, you will receive an email with instructions on how to
complete the process and assume registration of the domain name(s). From the
Pending Account Changes page, you can:
¢ Resend Email - This will resend the account change notification to the email
address listed for the contact under Sent To. It will be up to that person to
enter their account and accept the account changes.
¢ Cancel - If you click cancel, the transaction will be canceled, and if the person
who was to receive the domain names attempts to accept the account change,
they will receive an error message.
} To Initiate an Account Change
1. Log in to your Account Manager.
2. From the Domain Names menu, select Manage Domains. The Domain
Control Center opens.
3. In your list of domain names, use the checkboxes to select the domain
name(s) that you want to move to a different account.
4. Above your list of domain names, click Account Change.
5. In the Initiate Account Change section, enter the new registrant’s contact
information, select the checkbox to accept the Domain Name Change
Registrant Agreement, and click OK.
An email containing the Transaction ID and Security Code to complete the
account change is sent to the new registrant’s email address. If necessary, youcan resend the email with the account change information.
} To Resend an Account Change Email
1. Log in to your Account Manager.
8/8/2019 Managing Domains
http://slidepdf.com/reader/full/managing-domains 15/17
Quick Start Guide Managing Your Domain Names
Copyright© 2005-2006 15
2. From the Domain Names menu, select Manage Domains. The Domain
Control Center opens.
3. In your folder list, click Pending Account Changes.
4. Select the domain name(s) that you want to resend the email for.
5. Above your list of domain names, click Resend Email.
} To Cancel an Account Change
1. Log in to your Account Manager.
2. From the Domain Names menu, select Manage Domains. The Domain
Control Center opens.
3. In your folder list, click Pending Account Changes.
4. Select the domain name(s) that you want to cancel the account change for.
5. Above your list of domain names, click Cancel.
} To Accept an Account Change
1. Log in to your Account Manager.
2. From the Domain Names menu, select Manage Domains. The DomainControl Center opens.
3. In your folder list, click Pending Account Changes.
4. In the upper right hand corner, click Accept Account Change.
5. In the Accept Account Change section, enter the Transaction ID and
Security Code that you received in the Confirm Account Change email you
received when the account change was initiated, and then click Continue.
6. Select the checkboxes to accept the Transfer of Registration Agreement and the Domain Registration Agreement, and then click Continue.
8/8/2019 Managing Domains
http://slidepdf.com/reader/full/managing-domains 16/17
Quick Start Guide Managing Your Domain Names
Copyright© 2005-2006 16
MANAGING 100 OR MORE DOMAIN NAMES
If you have 100 or more domain names in your account, some additional naviga-
tion and organizational features are available to assist you in managing your
domains.
} To use Bulk Search to Find Specific Domain Names
1. Click Bulk above your folder list.
2. Type the exact domain name(s) that you want to view. You can enter as many
domain names and you want, one domain name per line.
3. Once you have entered all of the domain names you want to manage, click OK
to display only those names in your domain names list.
} To Find a Domain Name Based on Spelling
¢ With your list of domain names sorted by Domain Name, in the Jump To field
above your list of domain names, enter one or more letters of the domain
name and click Go.
The domain names beginning with the specified letters move to the current
page.
¢ Scroll through an alphabetized list of your domain names by clicking the right
and left arrows in the upper left corner above your list of domain names. Your
current location in the alphabetized list is indicated between the arrows (i.e.,
Displaying aaa.com - bbb.com).
} To Find a Domain Name Based on Expiration Date
¢ With your list of domain names sorted by Expires, in the Jump To field above
your list of domain names, enter an expiration date and click Go.
The domain names with the specified expiration date move to the current
page.
¢ Scroll through your domain names, sorted by expiration date, by clicking the
right and left arrows in the upper left corner above your list of domain names.
Your current location in the list is indicated between the arrows (i.e., Display-
ing 08/17/08 - 07/21/07).
} To Organize Your Domain Names Into Folders
1. Select Create New Folder at the top of the folder list on the right.
2. On the General tab, enter a Folder name and description and click Apply.
8/8/2019 Managing Domains
http://slidepdf.com/reader/full/managing-domains 17/17
Quick Start Guide Managing Your Domain Names
Copyright© 2005-2006 17
3. Optionally, on the AccountExec tab, select an AccountExec (which you
previously created in your Account Manager) or select New AccountExec (to
go to the Account Manager and create a new AccountExec), assign a role that
grants varying levels of access to the domains in the folder, and then click
OK. (You can create as many folders as you need and you can assign multiple
AccountExecs to a folder.)
4. Click OK and then return to your list of domains by clicking All My Domains
in your folder list.
5. In your list of domain names, select the domains that you want to add to a
folder and then select Organize > Copy to Folder above your list of domain
names.
6. Select the folder from the drop-down menu that you want to move the
selected domains into.
7. Click OK.
} To Edit a Domain Folder
1. In your folder list, expand the All My Domains folder.
2. Click Edit next to the domain folder that you want to edit.
3. On the General tab, you can change the Folder name and description. Click
Apply when you are finished making your changes.
4. On the AccountExec tab, you can modify, add, or remove AccountExecs from
a folder or change the assigned roles of AccountExecs for the folder. Click OK
when you are finished making your changes.
} To Delete a Domain Folder
1. In your folder list, expand the All My Domains folder.
2. Click Edit next to the domain folder that you want to delete.
3. On the General tab, below the Description field, select the checkbox next to
Delete Folder and then click OK.
Related Documents