Leica ES2 Leica EZ4 Leica EZ4 E Leica EZ4 W User Manual

Welcome message from author
This document is posted to help you gain knowledge. Please leave a comment to let me know what you think about it! Share it to your friends and learn new things together.
Transcript
Leica ES2Leica EZ4Leica EZ4 ELeica EZ4 WUser Manual
Leica E Series User Manual 2
Congratulations!
You have just purchased a Leica E Series stereo microscope – an excellent choice! Viewing entire objects under magnification imparts perspectives and discoveries that would not be possible with the naked eye.
In developing our stereo microscopes, we have placed great emphasis on simple, self-explana-tory operation. However, please take the time to read the instruction manual and the notes on operating safety, to learn about all the features and capabilities of your instrument so that you can use it safely and to its best advantage. Should you have any questions, please consult your local Leica representative. We are gladly at your service!
Leica E Series User Manual 3
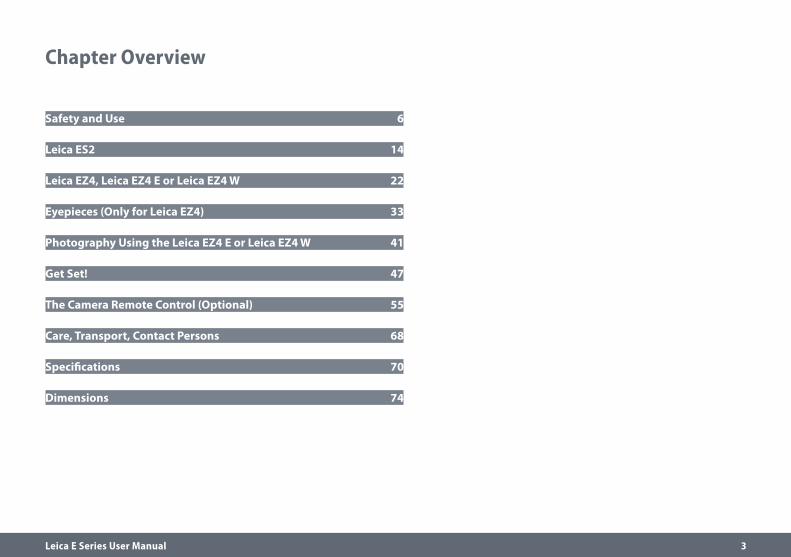
Chapter Overview
Safety and Use 6
Leica ES2 14
Leica EZ4, Leica EZ4 E or Leica EZ4 W 22
Eyepieces (Only for Leica EZ4) 33
Photography Using the Leica EZ4 E or Leica EZ4 W 41
Get Set! 47
The Camera Remote Control (Optional) 55
Care, Transport, Contact Persons 68
Specifications 70
Dimensions 74
Leica E Series User Manual 4
Congratulations! 2Chapter Overview 3Contents 4
Safety and Use Symbols Used 7Safety Instructions 8Regulatory Compliance Information (Regarding Leica EZ4 W Only) 10Instructions for Use 12
Leica ES2 Overview: Leica ES2 15Transport, Placement and Storage 16The Correct Interpupillary Distance 17Using the LED Illuminator 18Focusing 19Magnification Display 20Adjusting the Resistance of the Focus Drive 21
Leica EZ4, Leica EZ4 E or Leica EZ4 W 22Overview: Leica EZ4 23Instrument Variant: Leica EZ4 E or Leica EZ4 W 24Transport, Placement and Storage 25
Contents
The Correct Interpupillary Distance 26Switching on the LED Illuminator 27Controlling the Automatic Shutoff 28Illumination Types 29Focusing 30Magnification Display 31Adjusting the Resistance of the Focus Drive 32
Eyepieces (Only for Leica EZ4) Changing Eyepieces (Only for Leica EZ4, Open Version) 34Eyepieces and Eyecups (Only for Leica EZ4, Open Version) 35Dioptric Correction (Only for Leica EZ4, Open Version) 36Graticules (Only for Leica EZ4, Open Version) 38Graticules: Preparation 39Inserting the Graticules 40
Photography Using the Leica EZ4 E or Leica EZ4 W Introduction 42The Basics 43Leica EZ4 E or Leica EZ4 W: Overview 44Unpacking 46
Leica E Series User Manual 5
Contents (Continued)
Get Set! USB Mode – Capturing and Adjusting Images Using a Computer 48SD Mode – Capturing Images Without a Computer or Without a Wireless Device 50Adjusting Settings While in SD Mode 52WiFi Mode – Capturing and Adjusting Images Using a Wireless Device (Only Available for Leica EZ4 W) 53Ethernet Mode – Capturing and Adjusting Images Using a Network 54
The Camera Remote Control (Optional) Optional Remote Control 56Viewing Images and Movies With the Optional Remote Control 57Calling up the Camera Menu 58COLOR (Automatic White Balance) 59COLOR (Manual White Balance) 60EXPOSURE 61RESOLUTION 62SETUP CAMERA (Camera Settings) 63SETUP USER 64SETUP ETHERNET 65SETUP WiFi (Only for Leica EZ4 W) 66Pairing Cameras With Remotes 67
Care, Transport, Contact Persons Care, Transport, Contact Persons 69
Specifications Specifications 71Specifications (Only for Leica EZ4 W) 72Certificates (Only for Leica EZ4 W) 73
Dimensions Leica ES2 75Leica EZ4 E or Leica EZ4 W 77Leica EZ4, 10× Eyepieces 79Leica EZ4 Without Eyepieces 81

Leica E Series User Manual Safety and Use 6
Safety and Use
Leica E Series User Manual Safety and Use 7
Symbols Used
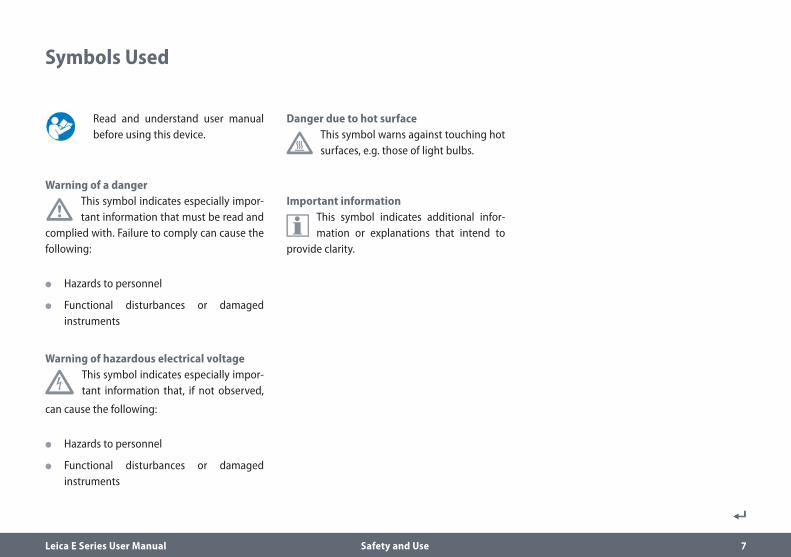
Read and understand user manual before using this device.
Warning of a danger
• This symbol indicates especially impor-tant information that must be read and
complied with. Failure to comply can cause the following:
O Hazards to personnel
O Functional disturbances or damaged instruments
Warning of hazardous electrical voltage
This symbol indicates especially impor-tant information that, if not observed,
can cause the following:
O Hazards to personnel
O Functional disturbances or damaged instruments
Danger due to hot surface
This symbol warns against touching hot surfaces, e.g. those of light bulbs.
Important information
This symbol indicates additional infor-mation or explanations that intend to
provide clarity.
Leica E Series User Manual Safety and Use 8
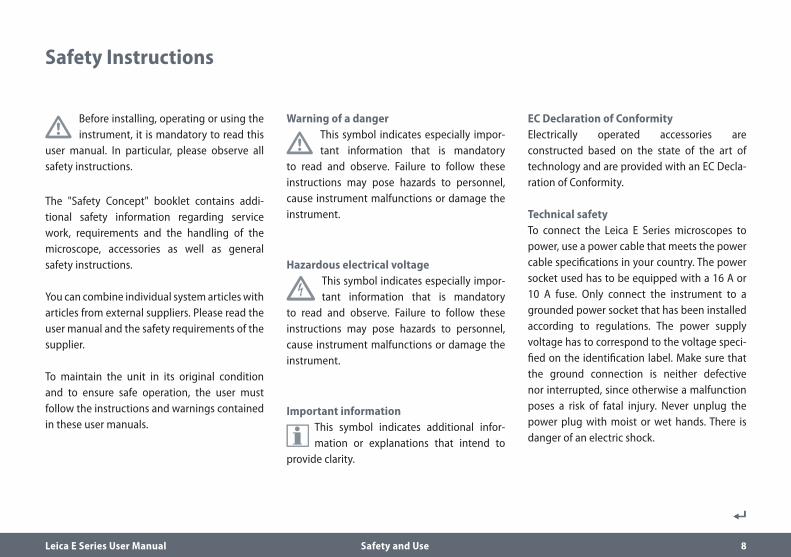
Before installing, operating or using the instrument, it is mandatory to read this
user manual. In particular, please observe all safety instructions.
The "Safety Concept" booklet contains addi-tional safety information regarding service work, requirements and the handling of the microscope, accessories as well as general safety instructions.
You can combine individual system articles with articles from external suppliers. Please read the user manual and the safety requirements of the supplier.
To maintain the unit in its original condition and to ensure safe operation, the user must follow the instructions and warnings contained in these user manuals.
Warning of a danger
This symbol indicates especially impor-tant information that is mandatory
to read and observe. Failure to follow these instructions may pose hazards to personnel, cause instrument malfunctions or damage the instrument.
Hazardous electrical voltage
This symbol indicates especially impor-tant information that is mandatory
to read and observe. Failure to follow these instructions may pose hazards to personnel, cause instrument malfunctions or damage the instrument.
Important information
This symbol indicates additional infor-mation or explanations that intend to
provide clarity.
EC Declaration of ConformityElectrically operated accessories are constructed based on the state of the art of technology and are provided with an EC Decla-ration of Conformity.
Technical safetyTo connect the Leica E Series microscopes to power, use a power cable that meets the power cable specifications in your country. The power socket used has to be equipped with a 16 A or 10 A fuse. Only connect the instrument to a grounded power socket that has been installed according to regulations. The power supply voltage has to correspond to the voltage speci-fied on the identification label. Make sure that the ground connection is neither defective nor interrupted, since otherwise a malfunction poses a risk of fatal injury. Never unplug the power plug with moist or wet hands. There is danger of an electric shock.
Safety Instructions
Leica E Series User Manual Safety and Use 9
Safety Instructions (Continued)
Instrument safety and EMCOur device has been designed, produced and tested in compliance with
O IEC EN 61010-1: Electrical equipment for measurement, control and laboratory use – Safety – Part one: general requirements
O EN 60950-1: Information technology equip-ment – Safety – Part one: general require-ments
O Radio interference suppression in compli-ance with EN 55011 class B
O Noise immunity in compliance with DIN EN 61326-1.
The device meets the requirements of EU directives
O 2014/35/EU Low voltage directive
O 2014/30/EU EMC directive
O 2011/65/EU RoHS directive
and carries the CE mark.
The device must be disposed of in accordance with 2012/19/EU WEEE
directive.
Intended for indoor use only in all EU member states, EFTA states and Switzerland.
Leica EZ4 W O EN 300328: Electromagnetic compatibility
and Radio spectrum Matters (ERM); Wide-band transmission systems; Data transmis-sion equipment operating in the 2.4 GHz ISM band and using wide band modulation techniques; Harmonized EN covering essen-tial requirements under article 3.2 of the RED directive.
Leica E Series User Manual Safety and Use 10
Regulatory Compliance Information (Regarding Leica EZ4 W Only)FCC Requirements for Operation in the United States
FCC radio frequency interference warnings and instructionsThis equipment has been tested and found to comply with the limits for a Class B digital device, pursuant to Part 15 of the FCC Rules. These limits are designed to provide reason-able protection against harmful interference in a residential installation. This equipment generates, uses and can radiate radio frequency energy and, if not installed and used in accor-dance with the instructions, may cause harm-ful interference to radio communications. However, there is no guarantee that interfer-ence will not occur in a particular installation. If this equipment does cause harmful interfer-ence to radio or television reception, which can be determined by turning the equipment off and on, the user is encouraged to try to correct the interference by one or more of the follow-ing measures:
O Reorient or relocate the receiving antenna.
O Increase the separation between the equip-ment and receiver.
O Connect the equipment into an outlet on a circuit different from that to which the receiver is connected.
O Consult the dealer or an experienced radio/TV technician for help.
FCC information to userThis product does not contain any user service-able components and is to be used with approved antennas only.
Any product changes or modifications will invalidate all applicable regulatory certifica-tions and approvals.
FCC guidelines for human exposureThis equipment complies with FCC radiation exposure limits set forth for an uncontrolled environment. This equipment should be installed and operated with minimum distance of 20 cm between the radiator and your body.This transmitter must not be co-located or oper-ating in conjunction with any other antenna or transmitter.
FCC caution O Any changes or modifications not expressly
approved by the party responsible for compliance could void the user's authority to operate this equipment.
O This device complies with Part 15 of the FCC Rules. Operation is subject to the following two conditions: (1) This device may not cause harmful interference, and (2) this device must accept any interference received, including interference that may cause undesired operation.
O This device and its antenna(s) must not be co-located or operation in conjunction with any other antenna or transmitter.
Leica E Series User Manual Safety and Use 11
Canada (IC)This device complies with Industry Canada licence-exempt RSS standard(s). Operation is subject to the following two conditions: (1) this device may not cause interference, and (2) this device must accept any interference, including interference that may cause unde-sired operation of the device.
Canada (IC)Le présent appareil est conforme aux CNR d'Industrie Canada applicables aux appareils radio exempts de licence. L'exploitation est autorisée aux deux conditions suivantes: (1) l'appareil ne doit pas produire de brouillage, et (2) l'utilisateur de l'appareil doit accepter tout brouillage radioélectrique subi, même si le brouillage est susceptible d'en compromettre le fonctionnement.
Australia and New Zealand NoticesThis device equipment complies with the Australian and New Zealand regulatory approv-als requirements.
Notice for users in KoreaA급기기(업무용 방송통신기자재): 이 기기
는 업무용 환경에서 사용할 목적으로 적합성
평가를 받은 기기로서 가정용 환경에서 사용
하는 경우 전파간섭의 우려가 있습니다.
Regulatory Compliance Information (Regarding Leica EZ4 W Only) (Continued)
Brasil
1160-16-2673
Este equipamento opera em caráter secundário, isto é, não tem direito a proteção contra inter-ferência prejudicial, mesmo de estações do mesmo tipo, e não pode causar interferência a sistemas operando em caráter primário.
Leica E Series User Manual Safety and Use 12
Intended useThe E Series microscopes are optical instru-ments for improving the visibility of objects through magnification and illumination. It is used for observing and documenting.
Place of useUse the instrument in enclosed, dust-free rooms at +10 °C to +40 °C only. Protect it from oil, chemicals and extreme humidity. It must be at least 10 cm from the wall and away from flammable substances.
InterferenceAvoid large temperature fluctuations, direct sunlight and vibrations. These conditions can distort measurements and micrographic images.
In warm and warm-damp climatic zones, the individual components require
special care in order to prevent the build-up of fungus.
Use in clean roomsLeica E Series microscopes can be used in clean rooms without any problems.
Handling electrical components
Never install any other plug (NEMA 5-15P) or unscrew any mechanical
components unless expressly instructed to do so in the instructions.
The microscope must be connected to a grounded outlet.
Always position the microscope so that you can disconnect it from the power
supply at any time. The power cable is provided as the power disconnect device.
Instructions for Use
Leica E Series User Manual Safety and Use 13
Intervention from the user
The microscopes of the E Series contain no components that can be main-
tained or repaired by the user. Exceptions are mentioned specifically in this manual.
Unless otherwise specified in this manual, repair and service work may
be carried out by authorized Leica technicians only.
Unauthorized alterations to the instru-ment or noncompliant use shall void all
rights to any warranty claims.
Maintenance
Leica E Series microscopes are basically maintenance-free. To ensure that it
always operates safely and reliably, we recom-mend that you take the precaution of contact-ing the responsible service organization. Here you can arrange for periodic inspections and conclude a maintenance contract (recom-mended).
AccessoriesOnly those accessories may be used that are listed in this user manual or for which safe use has been confirmed by Leica Microsystems.
Danger of infection
Direct contact with eyepieces is a poten-tial transmission method for bacterial
and viral infections of the eye. The risk can be kept to a minimum by using personal eyepieces for each individual or detachable eyecups.
Dangers during useThe microscope illumination is in the exempt group (risk group 0) according to EN 62471:2008 when used according to its intended use.
• Never look directly into the LED beam of the illumination equipment – either
with or without optical instruments – as this increases the risk class. Failure to observe this notice poses a risk of eye damage.
Instructions for Use (Continued)
Leica E Series User Manual Leica ES2 14
Leica ES2
Leica E Series User Manual Leica ES2 15
Overview: Leica ES2
1
2
3
5
7
6
4
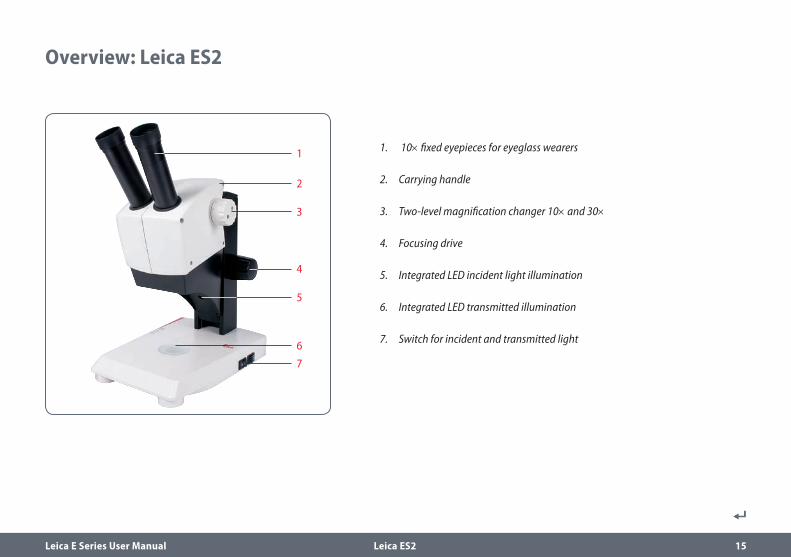
1. 10× fixed eyepieces for eyeglass wearers
2. Carrying handle
3. Two-level magnification changer 10× and 30×
4. Focusing drive
5. Integrated LED incident light illumination
6. Integrated LED transmitted illumination
7. Switch for incident and transmitted light
Leica E Series User Manual Leica ES2 16
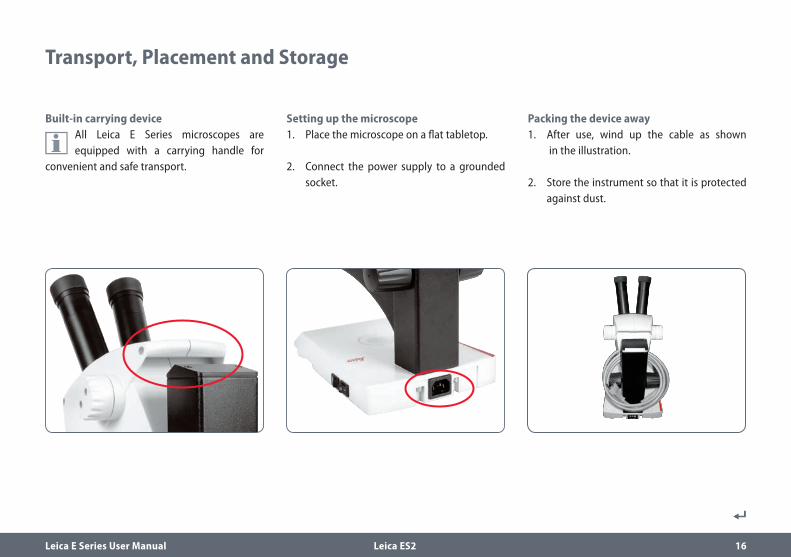
Built-in carrying device
All Leica E Series microscopes are equipped with a carrying handle for
convenient and safe transport.
Setting up the microscope1. Place the microscope on a flat tabletop.
2. Connect the power supply to a grounded socket.
Transport, Placement and Storage
Packing the device away1. After use, wind up the cable as shown
in the illustration.
2. Store the instrument so that it is protected against dust.
Leica E Series User Manual Leica ES2 17
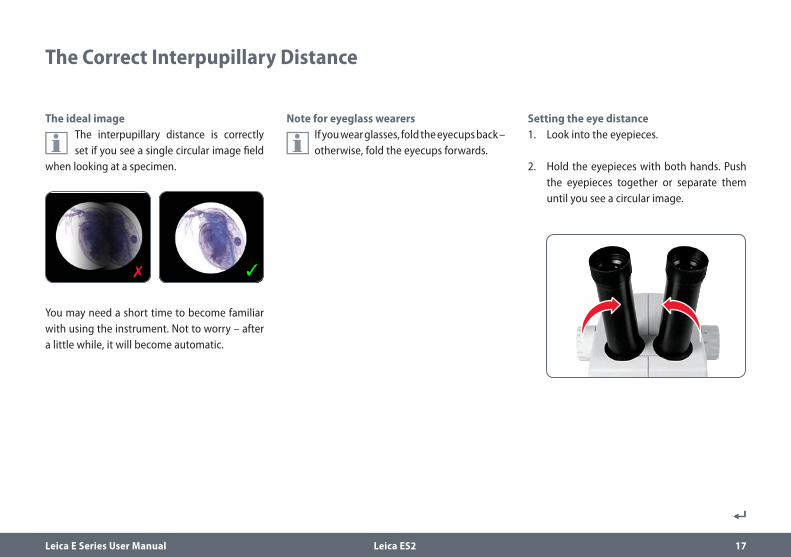
Setting the eye distance1. Look into the eyepieces.
2. Hold the eyepieces with both hands. Push the eyepieces together or separate them until you see a circular image.
Note for eyeglass wearers
If you wear glasses, fold the eyecups back – otherwise, fold the eyecups forwards.
The Correct Interpupillary Distance
The ideal image
The interpupillary distance is correctly set if you see a single circular image field
when looking at a specimen.
You may need a short time to become familiar with using the instrument. Not to worry – after a little while, it will become automatic.

Leica E Series User Manual Leica ES2 18
Iluminating the specimen1. Position a specimen in the middle of the
baseplate.
2. Switch the two LED illuminators on or off as desired.
After switching off, the LEDs remain lit for about another 4 seconds.
Tips on use O Use incident light for plastic, opaque
objects.
O Use transmitted light for transmitted light specimens or transparent objects.
O Use the combination of both LED illumina-tors for partially transparent objects.
Using the LED Illuminator

Leica E Series User Manual Leica ES2 19
Focusing raises and lowers the stereo-microscope using the focusing drive. The
specimen is brought into sharp focus as soon as it is in the focal point of the objective.
The focusing drive can be operated either left- or right-handed.
Focusing1. Set the magnification changer to the lowest
level (10).
2. Set the working distance to approx. 100 mm for coarse focusing.
3. Set the magnification changer to the second level (30).
4. Use the focusing drive once again for fine focus.
After you have adjusted the image sharpness at high magnification, it
is maintained even if you switch to a lower magnification (parfocal).
Focusing
Focusing drive torque
Leica E Series User Manual Leica ES2 20
Magnification Display
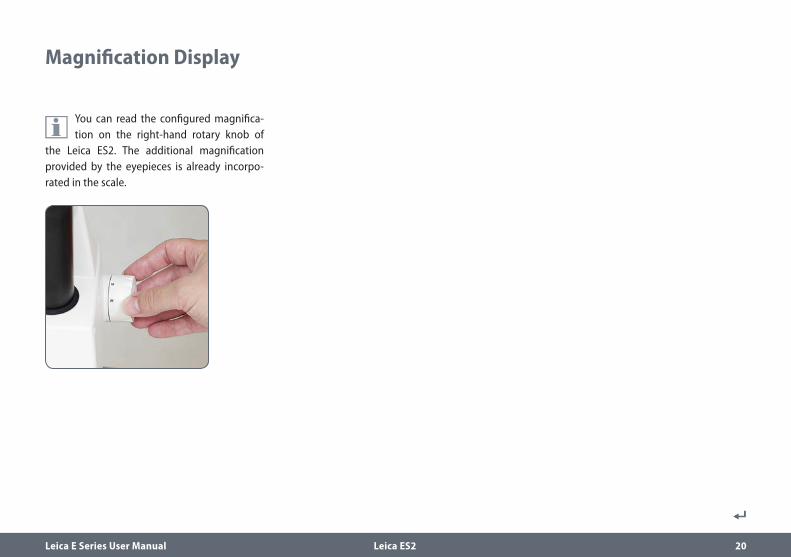
You can read the configured magnifica-tion on the right-hand rotary knob of
the Leica ES2. The additional magnification provided by the eyepieces is already incorpo-rated in the scale.

Leica E Series User Manual Leica ES2 21
Adjusting the Resistance of the Focus Drive
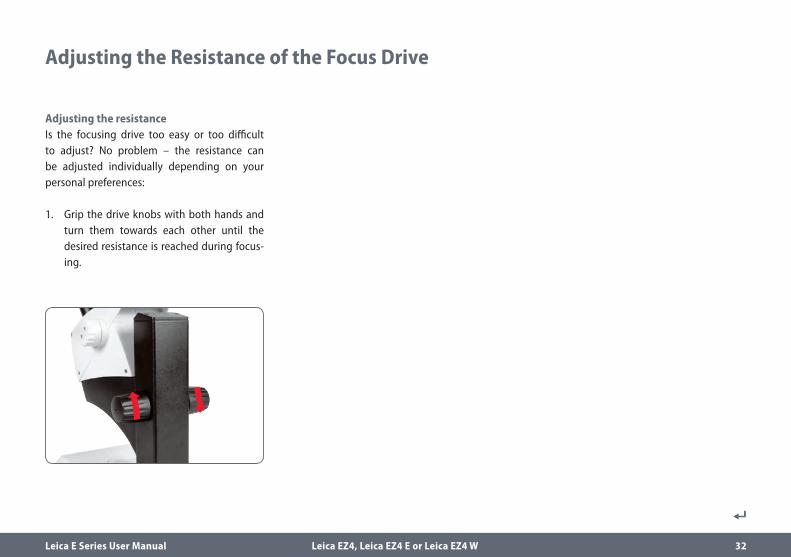
Adjusting the resistanceIs the focusing drive too easy or too difficult to adjust? No problem – the resistance can be adjusted individually depending on your personal preferences:
1. Grip the drive knobs with both hands and turn them towards each other until the desired resistance is reached during focusing.
Leica E Series User Manual Leica EZ4, Leica EZ4 E or Leica EZ4 W 22
Leica EZ4, Leica EZ4 E or Leica EZ4 W
Leica E Series User Manual Leica EZ4, Leica EZ4 E or Leica EZ4 W 23
Overview: Leica EZ4
1
2
3
5
76
4
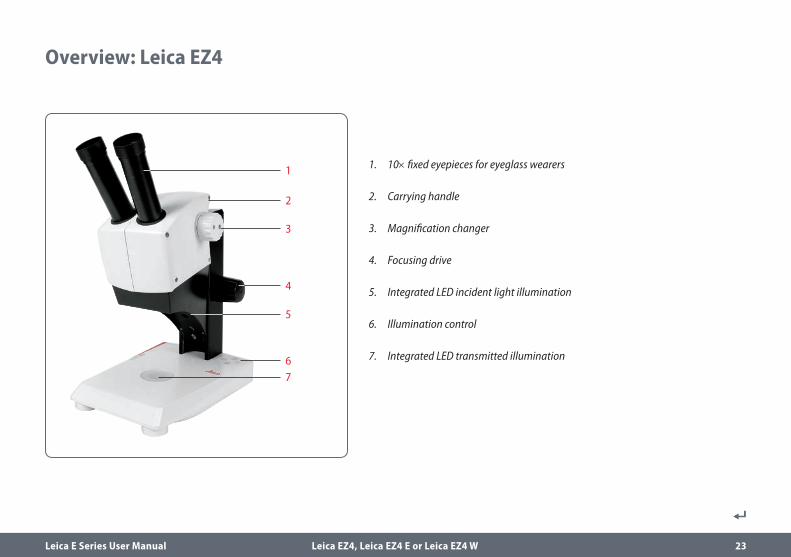
1. 10× fixed eyepieces for eyeglass wearers
2. Carrying handle
3. Magnification changer
4. Focusing drive
5. Integrated LED incident light illumination
6. Illumination control
7. Integrated LED transmitted illumination
Leica E Series User Manual Leica EZ4, Leica EZ4 E or Leica EZ4 W 24
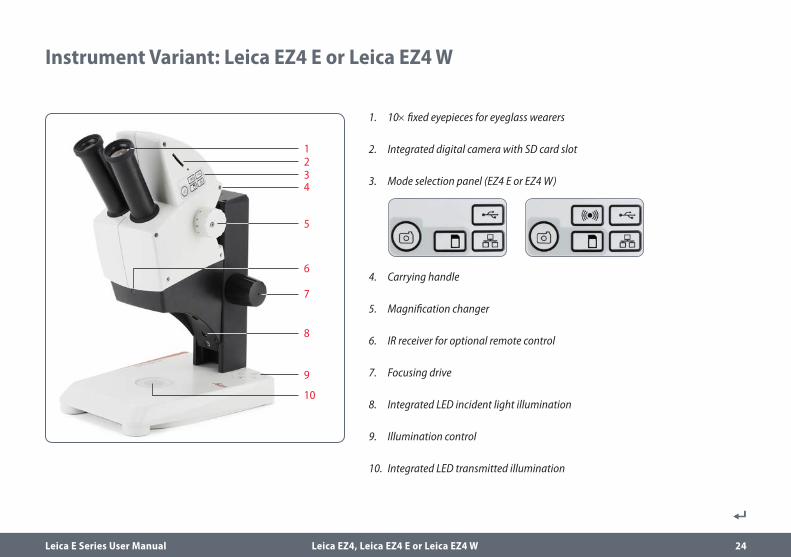
Instrument Variant: Leica EZ4 E or Leica EZ4 W
123
6
7
10
9
8
5
1. 10× fixed eyepieces for eyeglass wearers
2. Integrated digital camera with SD card slot
3. Mode selection panel (EZ4 E or EZ4 W)
4. Carrying handle
5. Magnification changer
6. IR receiver for optional remote control
7. Focusing drive
8. Integrated LED incident light illumination
9. Illumination control
10. Integrated LED transmitted illumination
4
Leica E Series User Manual Leica EZ4, Leica EZ4 E or Leica EZ4 W 25
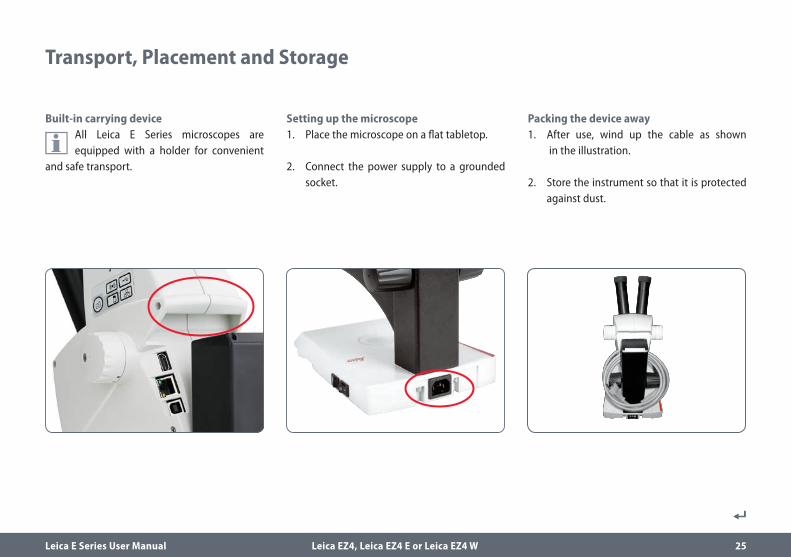
Built-in carrying device
All Leica E Series microscopes are equipped with a holder for convenient
and safe transport.
Setting up the microscope1. Place the microscope on a flat tabletop.
2. Connect the power supply to a grounded socket.
Transport, Placement and Storage
Packing the device away1. After use, wind up the cable as shown
in the illustration.
2. Store the instrument so that it is protected against dust.
Leica E Series User Manual Leica EZ4, Leica EZ4 E or Leica EZ4 W 26
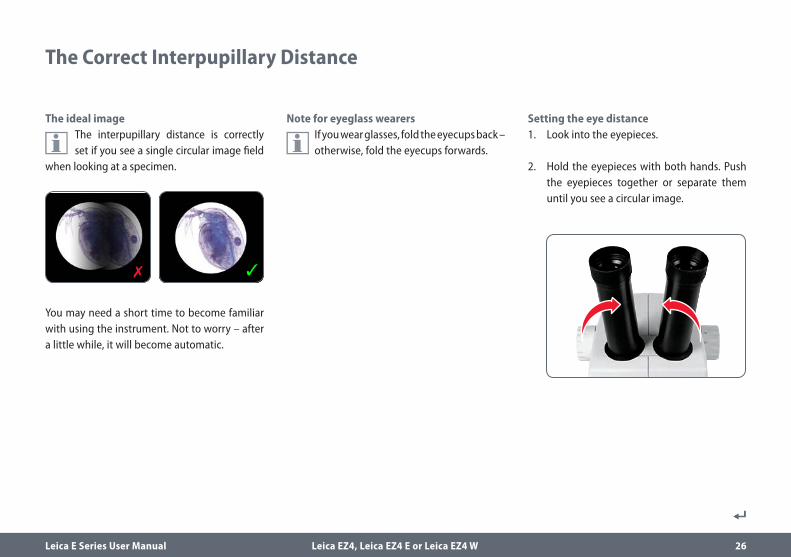
The Correct Interpupillary Distance
Setting the eye distance1. Look into the eyepieces.
2. Hold the eyepieces with both hands. Push the eyepieces together or separate them until you see a circular image.
Note for eyeglass wearers
If you wear glasses, fold the eyecups back – otherwise, fold the eyecups forwards.
The ideal image
The interpupillary distance is correctly set if you see a single circular image field
when looking at a specimen.
You may need a short time to become familiar with using the instrument. Not to worry – after a little while, it will become automatic.
Leica E Series User Manual Leica EZ4, Leica EZ4 E or Leica EZ4 W 27
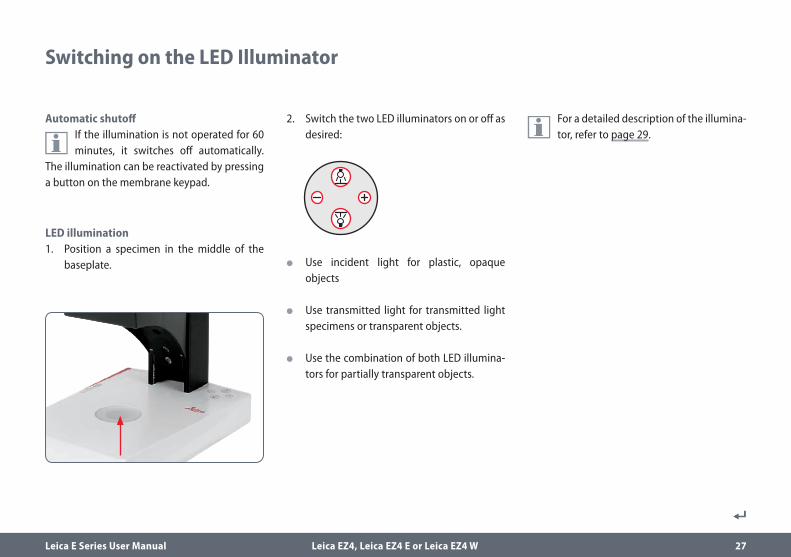
Automatic shutoff
If the illumination is not operated for 60 minutes, it switches off automatically.
The illumination can be reactivated by pressing a button on the membrane keypad.
LED illumination1. Position a specimen in the middle of the
baseplate.
2. Switch the two LED illuminators on or off as desired:
O Use incident light for plastic, opaque objects
O Use transmitted light for transmitted light specimens or transparent objects.
O Use the combination of both LED illumina-tors for partially transparent objects.
For a detailed description of the illumina-tor, refer to page 29.
Switching on the LED Illuminator
Leica E Series User Manual Leica EZ4, Leica EZ4 E or Leica EZ4 W 28
Disabling the automatic shutoffTo disable the automatic shutoff, follow these steps:1. Switch the microscope off.
2. Press and hold the and buttons on the light control unit simultaneously while you switch on the microscope.
The LEDs flash twice slowly and then remain switched on. The automatic shutoff is now disabled.
Controlling the Automatic Shutoff
Automatic shutoff
The factory settings of the EZ4 models switch the instrument off automatically
after one hour without user interaction. This automatic shutoff helps to conserve the light-emitting diodes and save energy.
Enabling the automatic shutoffTo re-enable the automatic shutoff, follow these steps:1. Switch the microscope off.
2. Press and hold the and buttons on the light control unit simultaneously while you switch on the microscope.
The LEDs flash three times slowly and then remain switched on. The automatic shutoff is now re-enabled.
Leica E Series User Manual Leica EZ4, Leica EZ4 E or Leica EZ4 W 29
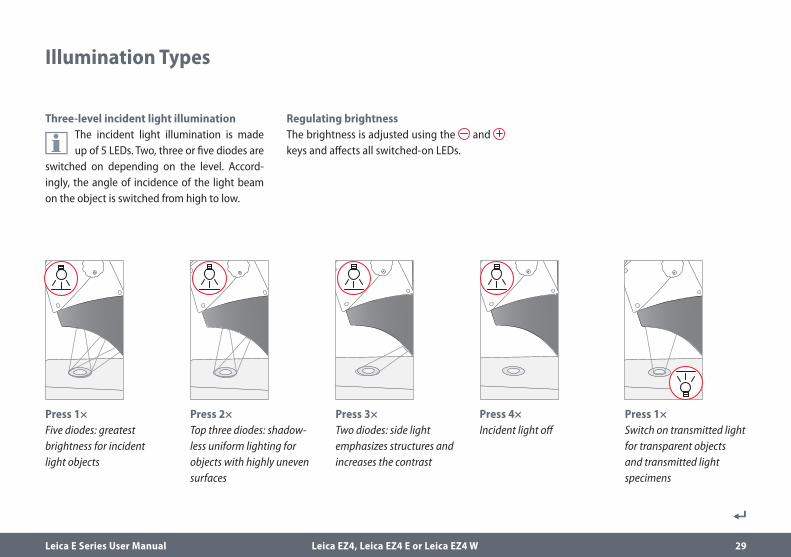
Three-level incident light illumination
The incident light illumination is made up of 5 LEDs. Two, three or five diodes are
switched on depending on the level. Accord-ingly, the angle of incidence of the light beam on the object is switched from high to low.
Illumination Types
Press 1×Five diodes: greatest brightness for incident light objects
Press 2×Top three diodes: shadow-less uniform lighting for objects with highly uneven surfaces
Press 3×Two diodes: side light emphasizes structures and increases the contrast
Press 1×Switch on transmitted light for transparent objects and transmitted light specimens
Press 4×Incident light off
Regulating brightnessThe brightness is adjusted using the and keys and affects all switched-on LEDs.
Leica E Series User Manual Leica EZ4, Leica EZ4 E or Leica EZ4 W 30
Focusing
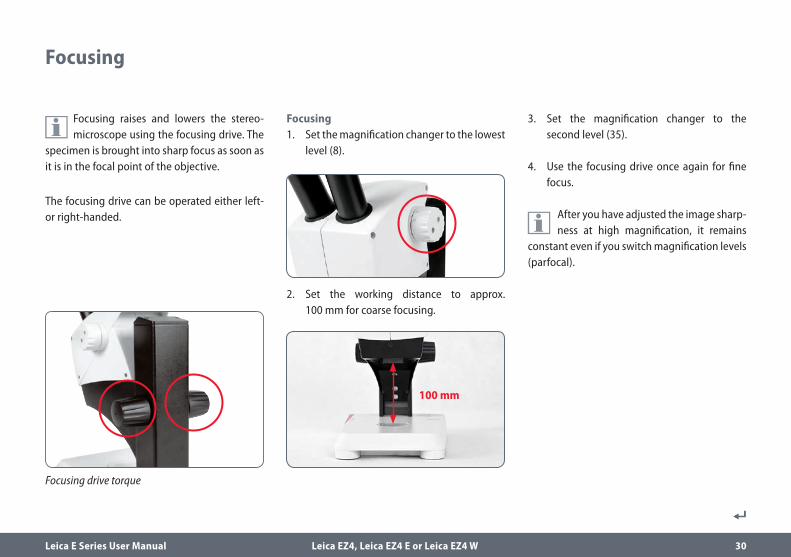
Focusing raises and lowers the stereo-microscope using the focusing drive. The
specimen is brought into sharp focus as soon as it is in the focal point of the objective.
The focusing drive can be operated either left- or right-handed.
Focusing1. Set the magnification changer to the lowest
level (8).
2. Set the working distance to approx. 100 mm for coarse focusing.
3. Set the magnification changer to the second level (35).
4. Use the focusing drive once again for fine focus.
After you have adjusted the image sharp-ness at high magnification, it remains
constant even if you switch magnification levels (parfocal).
Focusing drive torque
Leica E Series User Manual Leica EZ4, Leica EZ4 E or Leica EZ4 W 31
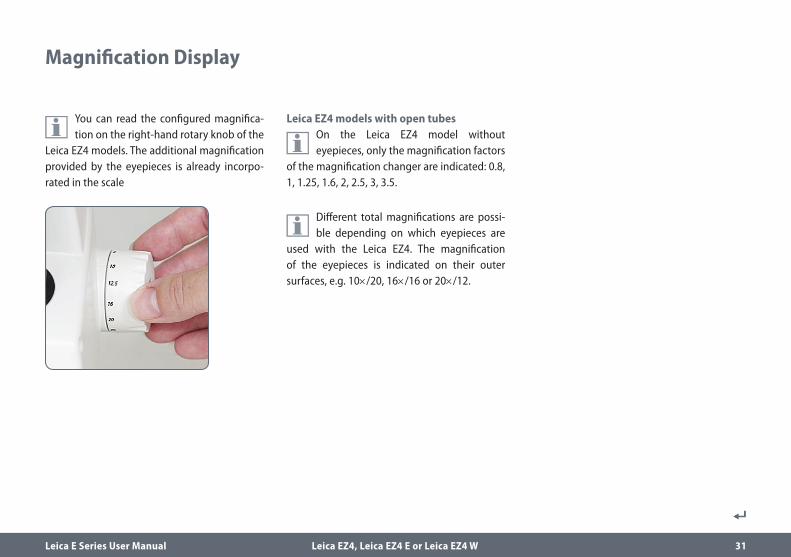
Magnification Display
You can read the configured magnifica-tion on the right-hand rotary knob of the
Leica EZ4 models. The additional magnification provided by the eyepieces is already incorpo-rated in the scale
Leica EZ4 models with open tubes
On the Leica EZ4 model without eyepieces, only the magnification factors
of the magnification changer are indicated: 0.8, 1, 1.25, 1.6, 2, 2.5, 3, 3.5.
Different total magnifications are possi-ble depending on which eyepieces are
used with the Leica EZ4. The magnification of the eyepieces is indicated on their outer surfaces, e.g. 10×/20, 16×/16 or 20×/12.
Leica E Series User Manual Leica EZ4, Leica EZ4 E or Leica EZ4 W 32
Adjusting the Resistance of the Focus Drive
Adjusting the resistanceIs the focusing drive too easy or too difficult to adjust? No problem – the resistance can be adjusted individually depending on your personal preferences:
1. Grip the drive knobs with both hands and turn them towards each other until the desired resistance is reached during focus-ing.

Leica E Series User Manual Eyepieces (Only for Leica EZ4) 33
Eyepieces (Only for Leica EZ4)
Leica E Series User Manual Eyepieces (Only for Leica EZ4) 34
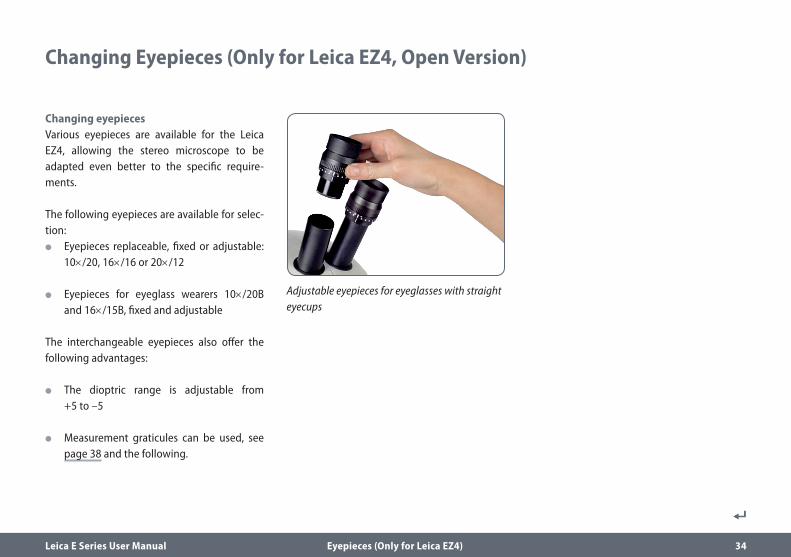
Changing eyepiecesVarious eyepieces are available for the Leica EZ4, allowing the stereo microscope to be adapted even better to the specific require-ments.
The following eyepieces are available for selec-tion:
O Eyepieces replaceable, fixed or adjustable: 10×/20, 16×/16 or 20×/12
O Eyepieces for eyeglass wearers 10×/20B and 16×/15B, fixed and adjustable
The interchangeable eyepieces also offer the following advantages:
O The dioptric range is adjustable from +5 to –5
O Measurement graticules can be used, see page 38 and the following.
Changing Eyepieces (Only for Leica EZ4, Open Version)
Adjustable eyepieces for eyeglasses with straight eyecups
Leica E Series User Manual Eyepieces (Only for Leica EZ4) 35
Eyepieces and Eyecups (Only for Leica EZ4, Open Version)
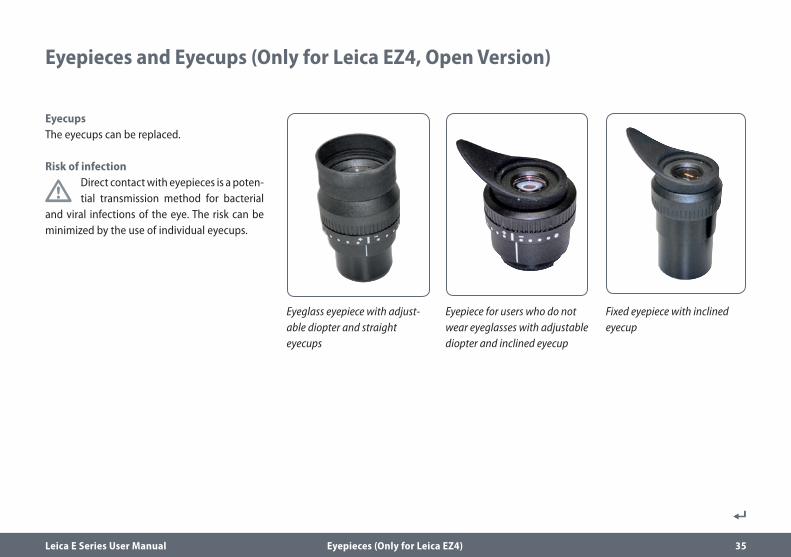
Eyeglass eyepiece with adjust-able diopter and straight eyecups
Eyepiece for users who do not wear eyeglasses with adjustable diopter and inclined eyecup
Fixed eyepiece with inclined eyecup
EyecupsThe eyecups can be replaced.
Risk of infection
Direct contact with eyepieces is a poten-tial transmission method for bacterial
and viral infections of the eye. The risk can be minimized by the use of individual eyecups.
Leica E Series User Manual Eyepieces (Only for Leica EZ4) 36
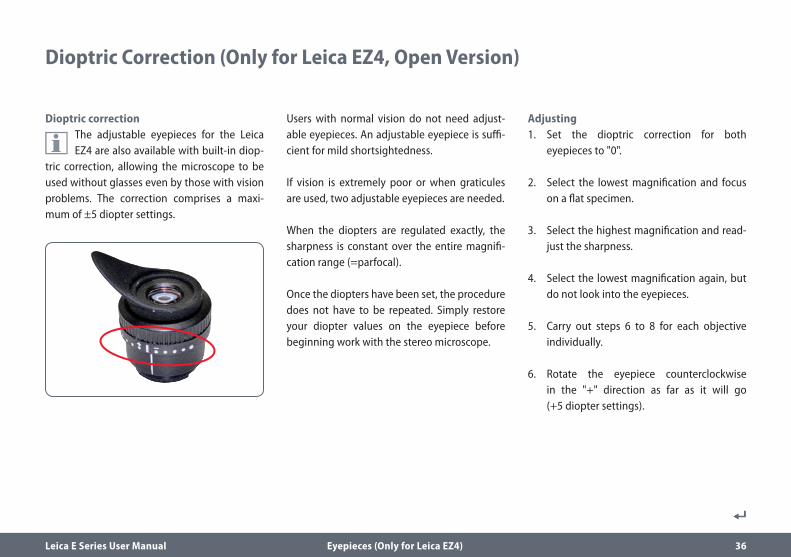
Dioptric correction
The adjustable eyepieces for the Leica EZ4 are also available with built-in diop-
tric correction, allowing the microscope to be used without glasses even by those with vision problems. The correction comprises a maxi-mum of ±5 diopter settings.
Users with normal vision do not need adjust-able eyepieces. An adjustable eyepiece is suffi-cient for mild shortsightedness.
If vision is extremely poor or when graticules are used, two adjustable eyepieces are needed.
When the diopters are regulated exactly, the sharpness is constant over the entire magnifi-cation range (=parfocal).
Once the diopters have been set, the procedure does not have to be repeated. Simply restore your diopter values on the eyepiece before beginning work with the stereo microscope.
Adjusting1. Set the dioptric correction for both
eyepieces to "0".
2. Select the lowest magnification and focus on a flat specimen.
3. Select the highest magnification and read-just the sharpness.
4. Select the lowest magnification again, but do not look into the eyepieces.
5. Carry out steps 6 to 8 for each objective individually.
6. Rotate the eyepiece counterclockwise in the "+" direction as far as it will go (+5 diopter settings).
Dioptric Correction (Only for Leica EZ4, Open Version)
Leica E Series User Manual Eyepieces (Only for Leica EZ4) 37
Dioptric Correction (Continued)
7. Look into the eyepiece.
8. Slowly rotate the eyepiece individually in the "–" direction until the eye sees the object sharply imaged.
9. Select the highest magnification and refocus if necessary.
Now, if you adjust the magnification from the highest to the lowest level, the specimen is always brought into sharp focus. If not, repeat the process.

Leica E Series User Manual Eyepieces (Only for Leica EZ4) 38
Graticules (Only for Leica EZ4, Open Version)
Graticules
The transparent graticules can be inserted in the adjustable eyepieces of
the Leica EZ4. They enable easy measurements at the specimen.
For equipment with a graticule in one eyepiece, two adjustable eyepieces
are needed. Since one eye is focussed on the eyepiece with the graticule, it needs a second, adjustable eyepiece so that it can be aligned optically with the first.
Available eyepiece inserts
Graticules 10 mm/ 0.1 mm
5 mm/ 0.1 mm
5 mm/ 0.05 mm
100 Div / 0.002"
100 Div / 0.001"
150 Div / 0.0005"
Stage micrometers 50 mm (0.1 / 0.01 mm graduation)
1" (0.001" graduation)
Crosshairs Crosshairs
Leica E Series User Manual Eyepieces (Only for Leica EZ4) 39
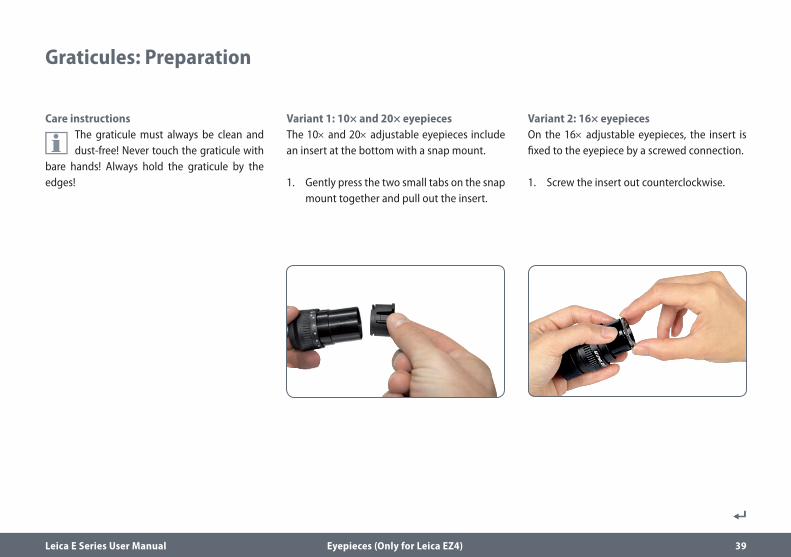
Variant 2: 16× eyepiecesOn the 16× adjustable eyepieces, the insert is fixed to the eyepiece by a screwed connection.
1. Screw the insert out counterclockwise.
Variant 1: 10× and 20× eyepiecesThe 10× and 20× adjustable eyepieces include an insert at the bottom with a snap mount.
1. Gently press the two small tabs on the snap mount together and pull out the insert.
Graticules: Preparation
Care instructions
The graticule must always be clean and dust-free! Never touch the graticule with
bare hands! Always hold the graticule by the edges!
Leica E Series User Manual Eyepieces (Only for Leica EZ4) 40
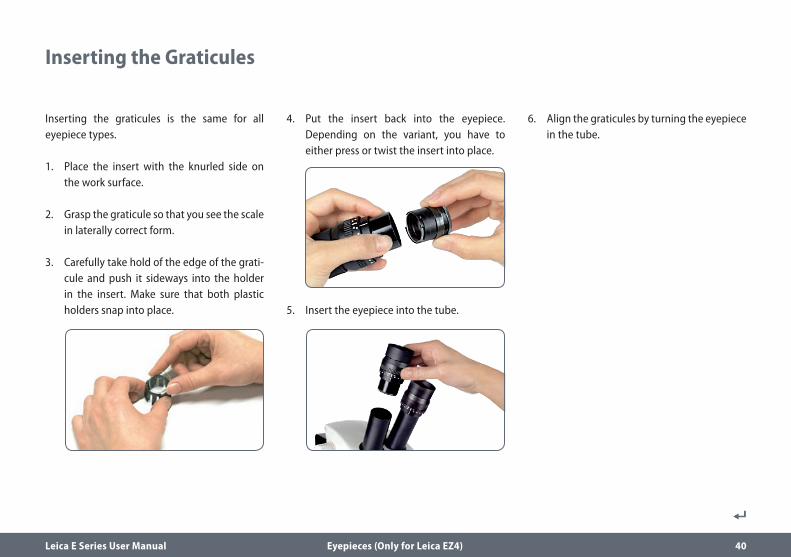
Inserting the graticules is the same for all eyepiece types.
1. Place the insert with the knurled side on the work surface.
2. Grasp the graticule so that you see the scale in laterally correct form.
3. Carefully take hold of the edge of the grati-cule and push it sideways into the holder in the insert. Make sure that both plastic holders snap into place.
4. Put the insert back into the eyepiece. Depending on the variant, you have to either press or twist the insert into place.
5. Insert the eyepiece into the tube.
6. Align the graticules by turning the eyepiece in the tube.
Inserting the Graticules
Leica E Series User Manual Photography Using the Leica EZ4 E or Leica EZ4 W 41
Photography Using the Leica EZ4 E or Leica EZ4 W
Leica E Series User Manual Photography Using the Leica EZ4 E or Leica EZ4 W 42
Thank you for purchasing the Leica EZ4 E or Leica EZ4 W by Leica Microsystems. The special design of the Leica EZ4 E or EZ4 W makes it a universal, highly versatile tool for viewing microscopic specimens and capturing still images or video.
Firmware for cameras is constantly being updated. Be sure to keep your camera up-to-date by checking the download section on the camera's web page. There you'll find new firmware and instructions on how to update your camera. You may also contact your Leica representative for help.
Introduction

Leica E Series User Manual Photography Using the Leica EZ4 E or Leica EZ4 W 43
Your Leica HD camera has many possibili-ties for various applications and condi-
tions of use. Below are some basic concepts to help you get the most performance for your application.
Modes of use
1. SD mode O capture onto SD card
O use remote control
2. WiFi mode (only available for EZ4 W) O Wireless connection to wireless device (tablet,
phone, PC)
3. USB mode O Cabled connection to PC
4. Ethernet mode O Cabled connection to external network
5. Capture button O Captures image onto the SD card
The Basics
Note direct connection to an HD display is possible in all modes. Aspect ratio is
16:9 except in USB mode where the aspect ratio is 4:3.
1 32 4
5
Leica E Series User Manual Photography Using the Leica EZ4 E or Leica EZ4 W 44
Leica EZ4 E or Leica EZ4 W: Overview
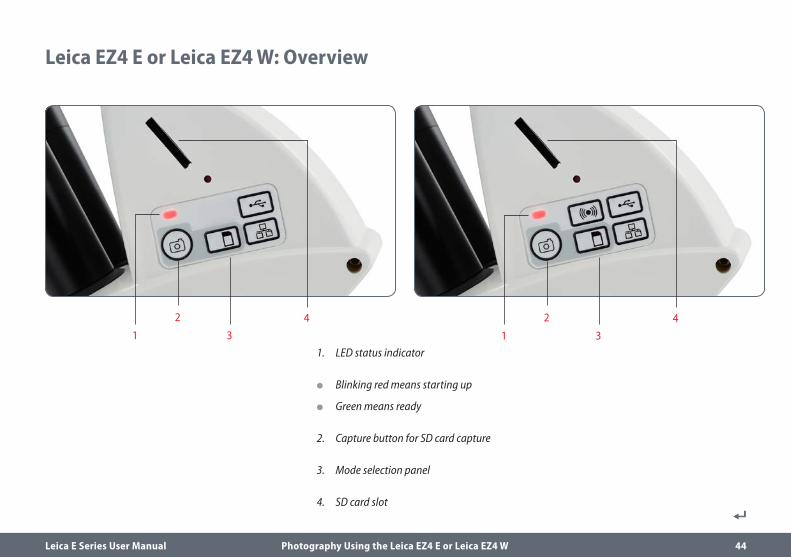
1. LED status indicator
O Blinking red means starting up
O Green means ready
2. Capture button for SD card capture
3. Mode selection panel
4. SD card slot
1
2 4
3 1
2 4
3
Leica E Series User Manual Photography Using the Leica EZ4 E or Leica EZ4 W 45
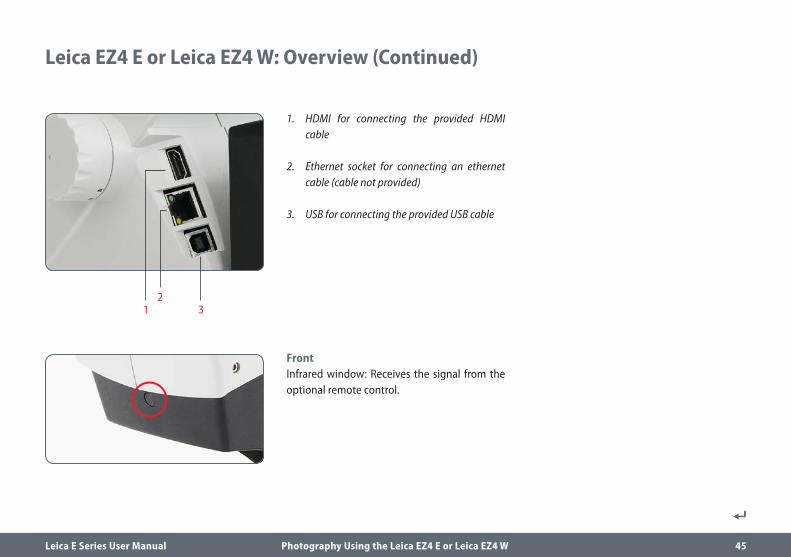
1. HDMI for connecting the provided HDMI cable
2. Ethernet socket for connecting an ethernet cable (cable not provided)
3. USB for connecting the provided USB cable
FrontInfrared window: Receives the signal from the optional remote control.
Leica EZ4 E or Leica EZ4 W: Overview (Continued)
1 32
Leica E Series User Manual Photography Using the Leica EZ4 E or Leica EZ4 W 46
Unpacking
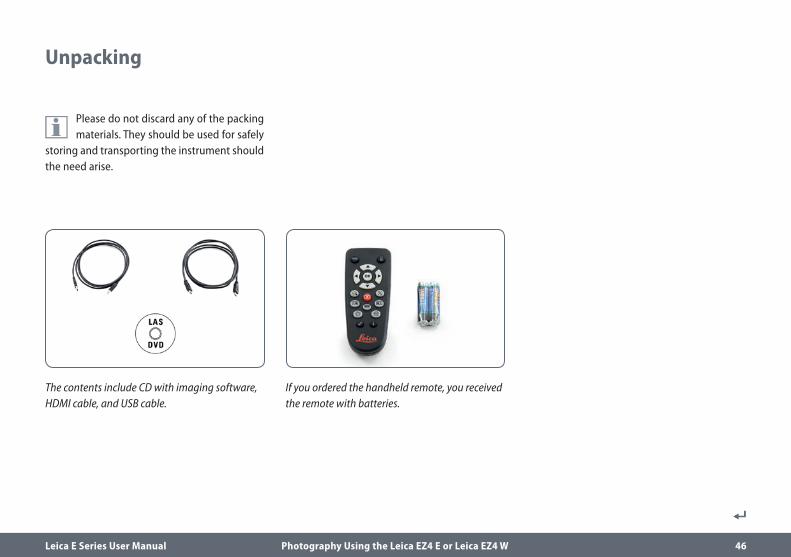
If you ordered the handheld remote, you received the remote with batteries.
The contents include CD with imaging software, HDMI cable, and USB cable.
Please do not discard any of the packing materials. They should be used for safely
storing and transporting the instrument should the need arise.

Leica E Series User Manual Get Set! 47
Get Set!
Leica E Series User Manual Get Set! 48
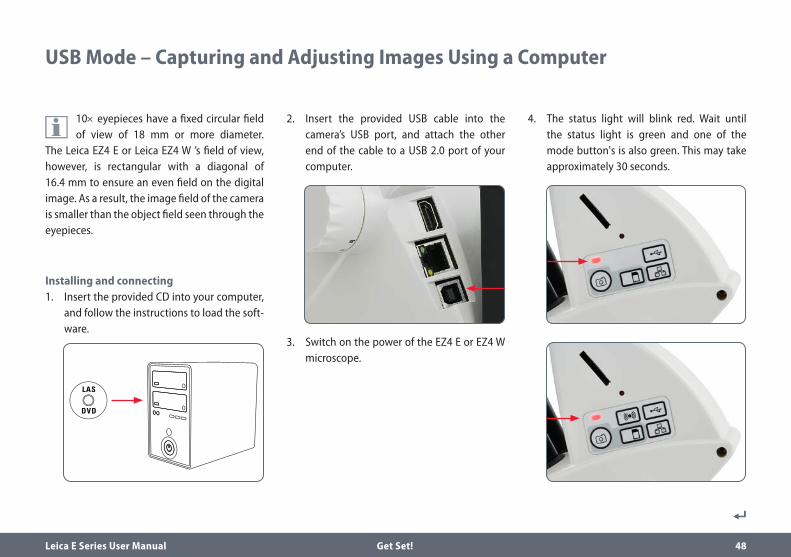
10× eyepieces have a fixed circular field of view of 18 mm or more diameter.
The Leica EZ4 E or Leica EZ4 W ’s field of view, however, is rectangular with a diagonal of 16.4 mm to ensure an even field on the digital image. As a result, the image field of the camera is smaller than the object field seen through the eyepieces.
Installing and connecting1. Insert the provided CD into your computer,
and follow the instructions to load the soft-ware.
2. Insert the provided USB cable into the camera’s USB port, and attach the other end of the cable to a USB 2.0 port of your computer.
3. Switch on the power of the EZ4 E or EZ4 W microscope.
4. The status light will blink red. Wait until the status light is green and one of the mode button's is also green. This may take approximately 30 seconds.
USB Mode – Capturing and Adjusting Images Using a Computer
LAS
DVD
Leica E Series User Manual Get Set! 49
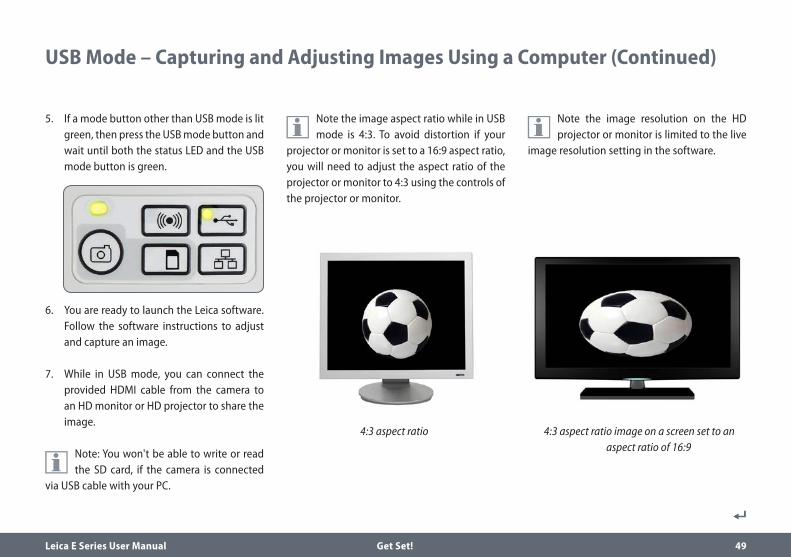
5. If a mode button other than USB mode is lit green, then press the USB mode button and wait until both the status LED and the USB mode button is green.
6. You are ready to launch the Leica software. Follow the software instructions to adjust and capture an image.
7. While in USB mode, you can connect the provided HDMI cable from the camera to an HD monitor or HD projector to share the image.
Note: You won't be able to write or read the SD card, if the camera is connected
via USB cable with your PC.
Note the image aspect ratio while in USB mode is 4:3. To avoid distortion if your
projector or monitor is set to a 16:9 aspect ratio, you will need to adjust the aspect ratio of the projector or monitor to 4:3 using the controls of the projector or monitor.
USB Mode – Capturing and Adjusting Images Using a Computer (Continued)
Note the image resolution on the HD projector or monitor is limited to the live
image resolution setting in the software.
4:3 aspect ratio 4:3 aspect ratio image on a screen set to an aspect ratio of 16:9
Leica E Series User Manual Get Set! 50
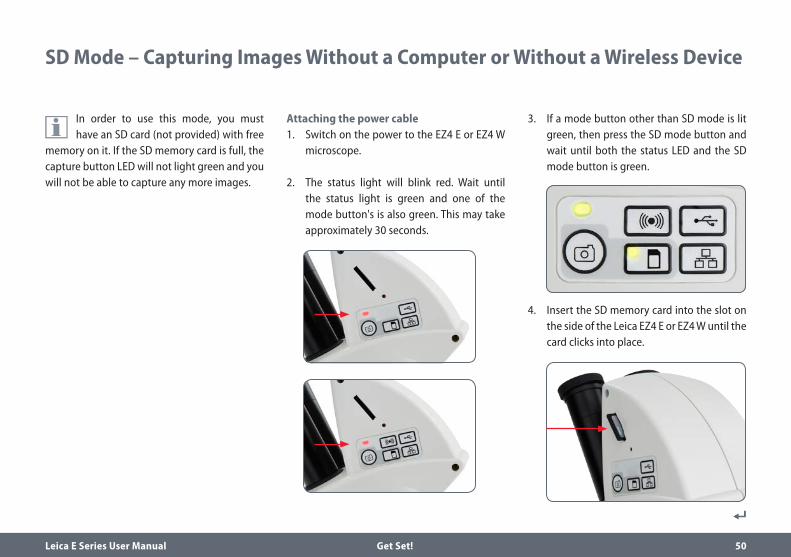
In order to use this mode, you must have an SD card (not provided) with free
memory on it. If the SD memory card is full, the capture button LED will not light green and you will not be able to capture any more images.
Attaching the power cable1. Switch on the power to the EZ4 E or EZ4 W
microscope.
2. The status light will blink red. Wait until the status light is green and one of the mode button's is also green. This may take approximately 30 seconds.
SD Mode – Capturing Images Without a Computer or Without a Wireless Device
3. If a mode button other than SD mode is lit green, then press the SD mode button and wait until both the status LED and the SD mode button is green.
4. Insert the SD memory card into the slot on the side of the Leica EZ4 E or EZ4 W until the card clicks into place.
Leica E Series User Manual Get Set! 51
SD Mode – Capturing Images Without a Computer or Without a Wireless Device (Continued)
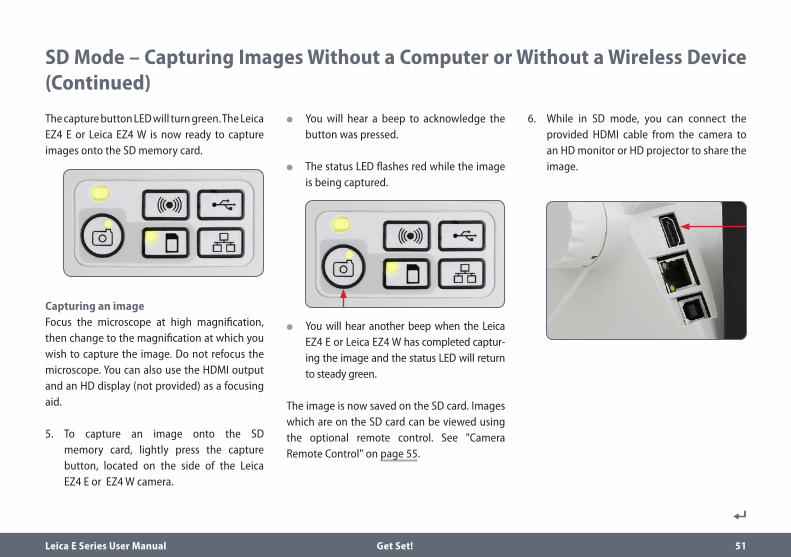
The capture button LED will turn green. The Leica EZ4 E or Leica EZ4 W is now ready to capture images onto the SD memory card.
Capturing an imageFocus the microscope at high magnification, then change to the magnification at which you wish to capture the image. Do not refocus the microscope. You can also use the HDMI output and an HD display (not provided) as a focusing aid.
5. To capture an image onto the SD memory card, lightly press the capture button, located on the side of the Leica EZ4 E or EZ4 W camera.
O You will hear a beep to acknowledge the button was pressed.
O The status LED flashes red while the image is being captured.
O You will hear another beep when the Leica EZ4 E or Leica EZ4 W has completed captur-ing the image and the status LED will return to steady green.
The image is now saved on the SD card. Images which are on the SD card can be viewed using the optional remote control. See "Camera Remote Control" on page 55.
6. While in SD mode, you can connect the provided HDMI cable from the camera to an HD monitor or HD projector to share the image.
Leica E Series User Manual Get Set! 52
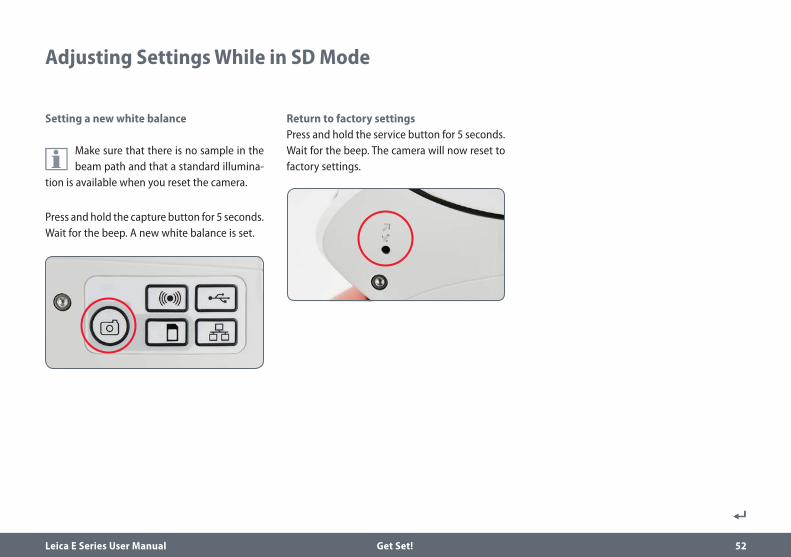
Return to factory settingsPress and hold the service button for 5 seconds. Wait for the beep. The camera will now reset to factory settings.
Adjusting Settings While in SD Mode
Setting a new white balance
Make sure that there is no sample in the beam path and that a standard illumina-
tion is available when you reset the camera.
Press and hold the capture button for 5 seconds. Wait for the beep. A new white balance is set.
Leica E Series User Manual Get Set! 53
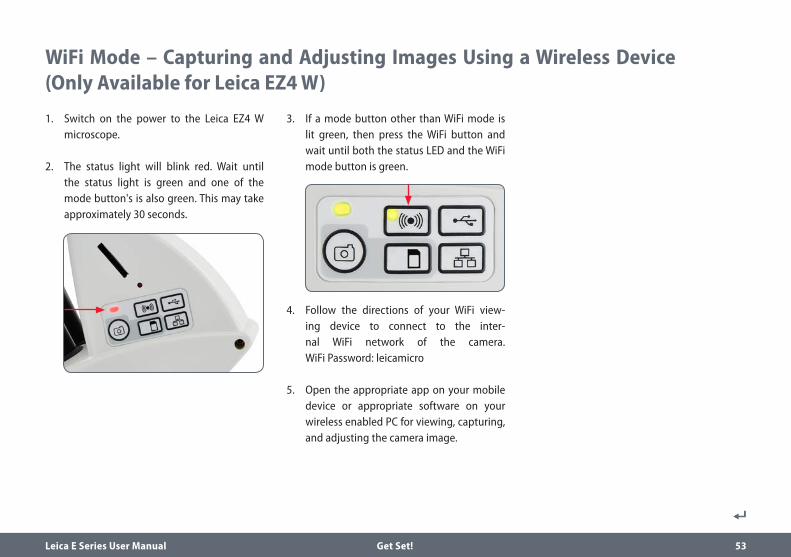
WiFi Mode – Capturing and Adjusting Images Using a Wireless Device (Only Available for Leica EZ4 W)
1. Switch on the power to the Leica EZ4 W microscope.
2. The status light will blink red. Wait until the status light is green and one of the mode button's is also green. This may take approximately 30 seconds.
3. If a mode button other than WiFi mode is lit green, then press the WiFi button and wait until both the status LED and the WiFi mode button is green.
4. Follow the directions of your WiFi view-ing device to connect to the inter-nal WiFi network of the camera. WiFi Password: leicamicro
5. Open the appropriate app on your mobile device or appropriate software on your wireless enabled PC for viewing, capturing, and adjusting the camera image.
Leica E Series User Manual Get Set! 54
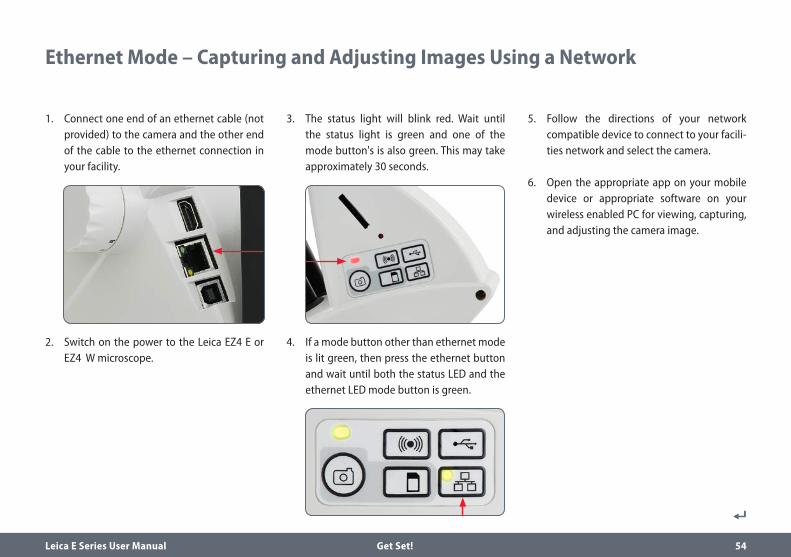
Ethernet Mode – Capturing and Adjusting Images Using a Network
1. Connect one end of an ethernet cable (not provided) to the camera and the other end of the cable to the ethernet connection in your facility.
2. Switch on the power to the Leica EZ4 E or EZ4 W microscope.
3. The status light will blink red. Wait until the status light is green and one of the mode button's is also green. This may take approximately 30 seconds.
4. If a mode button other than ethernet mode is lit green, then press the ethernet button and wait until both the status LED and the ethernet LED mode button is green.
5. Follow the directions of your network compatible device to connect to your facili-ties network and select the camera.
6. Open the appropriate app on your mobile device or appropriate software on your wireless enabled PC for viewing, capturing, and adjusting the camera image.
Leica E Series User Manual The Camera Remote Control (Optional) 55
The Camera Remote Control (Optional)
The remote control is designed to work only when the camera is in SD mode
and when the camera is used in combination with an HD display.
The only function which works in any mode is the "Info" function which shows details about the camera.
Leica E Series User Manual The Camera Remote Control (Optional) 56
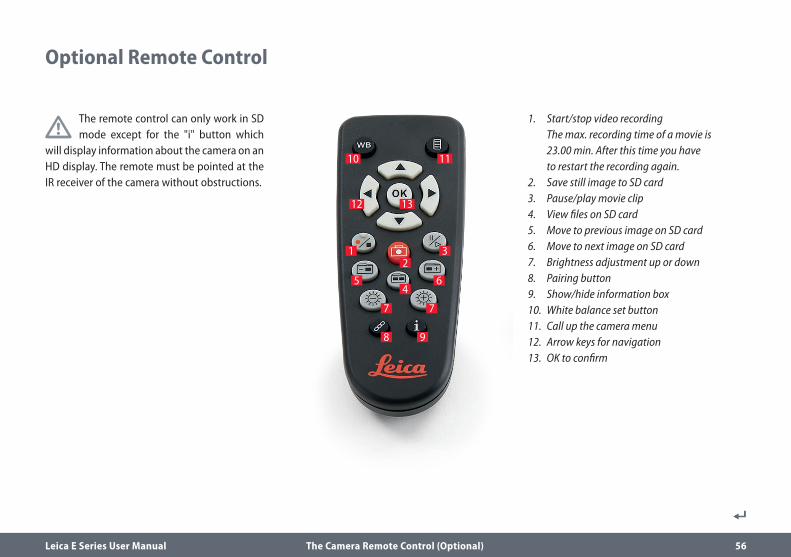
The remote control can only work in SD mode except for the "i" button which
will display information about the camera on an HD display. The remote must be pointed at the IR receiver of the camera without obstructions.
1. Start/stop video recording The max. recording time of a movie is 23.00 min. After this time you have to restart the recording again.
2. Save still image to SD card3. Pause/play movie clip4. View files on SD card5. Move to previous image on SD card6. Move to next image on SD card7. Brightness adjustment up or down8. Pairing button9. Show/hide information box10. White balance set button11. Call up the camera menu12. Arrow keys for navigation13. OK to confirm
1 3
5
2
46
7
8 9
Optional Remote Control
10 11
12 13
7
Leica E Series User Manual The Camera Remote Control (Optional) 57
Viewing Images and Movies With the Optional Remote Control
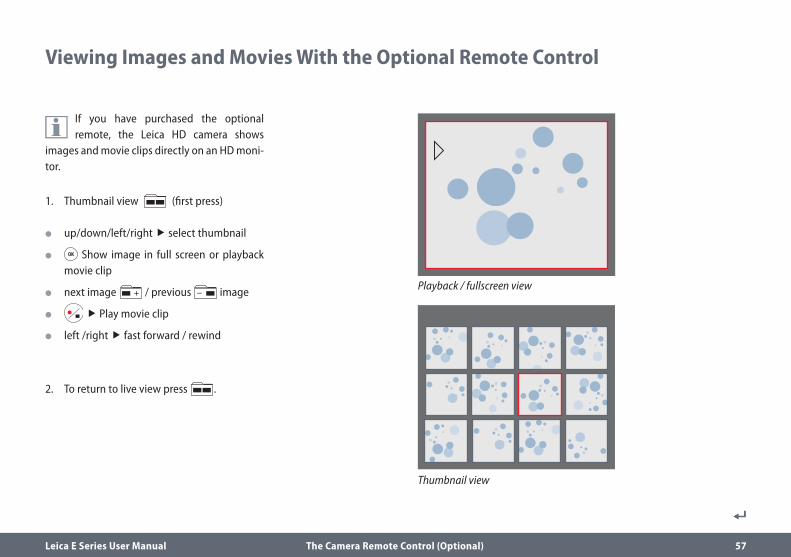
If you have purchased the optional remote, the Leica HD camera shows
images and movie clips directly on an HD moni-tor.
1. Thumbnail view (first press)
O up/down/left/right select thumbnail
O Show image in full screen or playback movie clip
O next image / previous image
O Play movie clip
O left /right fast forward / rewind
2. To return to live view press .
Thumbnail view
Playback / fullscreen view
Leica E Series User Manual The Camera Remote Control (Optional) 58
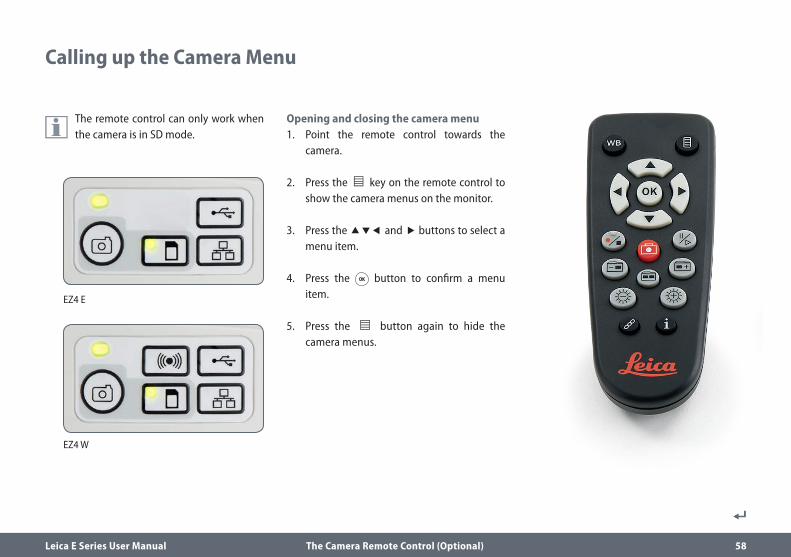
The remote control can only work when the camera is in SD mode.
Opening and closing the camera menu1. Point the remote control towards the
camera.
2. Press the key on the remote control to show the camera menus on the monitor.
3. Press the and buttons to select a menu item.
4. Press the button to confirm a menu item.
5. Press the button again to hide the camera menus.
Calling up the Camera Menu
EZ4 E
EZ4 W
Leica E Series User Manual The Camera Remote Control (Optional) 59
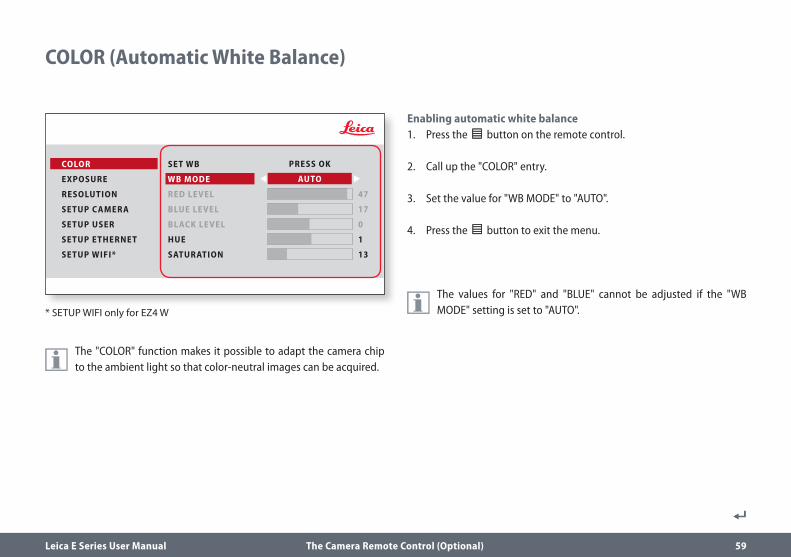
Enabling automatic white balance1. Press the button on the remote control.
2. Call up the "COLOR" entry.
3. Set the value for "WB MODE" to "AUTO".
4. Press the button to exit the menu.
The values for "RED" and "BLUE" cannot be adjusted if the "WB MODE" setting is set to "AUTO".
COLOR (Automatic White Balance)
The "COLOR" function makes it possible to adapt the camera chip to the ambient light so that color-neutral images can be acquired.
* SETUP WIFI only for EZ4 W
COLOR
EXPOSURE
RESOLUTION
SETUP CAMERA
SETUP USER
SETUP ETHERNET
SET WB
WB MODE
RED LEVEL
BLUE LEVEL
BLACK LEVEL
HUE
PRESS OK
AUTO
SATURATION
47
17
0
1
13
SETUP WIFI*
Leica E Series User Manual The Camera Remote Control (Optional) 60
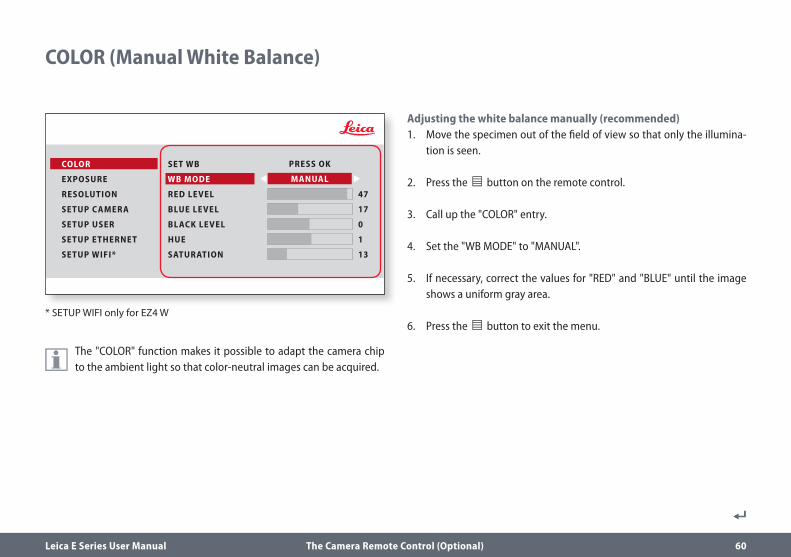
The "COLOR" function makes it possible to adapt the camera chip to the ambient light so that color-neutral images can be acquired.
Adjusting the white balance manually (recommended)1. Move the specimen out of the field of view so that only the illumina-
tion is seen.
2. Press the button on the remote control.
3. Call up the "COLOR" entry.
4. Set the "WB MODE" to "MANUAL".
5. If necessary, correct the values for "RED" and "BLUE" until the image shows a uniform gray area.
6. Press the button to exit the menu.
COLOR (Manual White Balance)
* SETUP WIFI only for EZ4 W
COLOR
EXPOSURE
RESOLUTION
SETUP CAMERA
SETUP USER
SETUP ETHERNET
SET WB
WB MODE
RED LEVEL
BLUE LEVEL
BLACK LEVEL
HUE
PRESS OK
MANUAL
SATURATION
47
17
0
1
13
SETUP WIFI*
Leica E Series User Manual The Camera Remote Control (Optional) 61
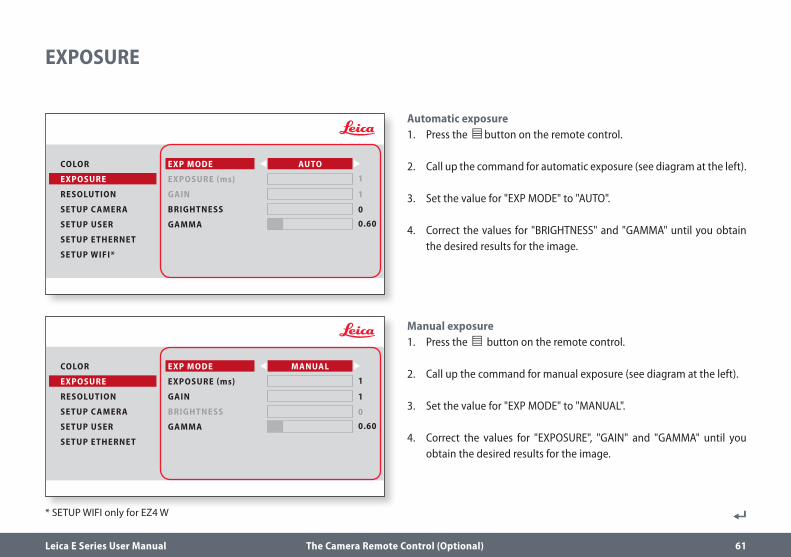
Automatic exposure1. Press the button on the remote control.
2. Call up the command for automatic exposure (see diagram at the left).
3. Set the value for "EXP MODE" to "AUTO".
4. Correct the values for "BRIGHTNESS" and "GAMMA" until you obtain the desired results for the image.
Manual exposure1. Press the button on the remote control.
2. Call up the command for manual exposure (see diagram at the left).
3. Set the value for "EXP MODE" to "MANUAL".
4. Correct the values for "EXPOSURE", "GAIN" and "GAMMA" until you obtain the desired results for the image.
EXPOSURE
* SETUP WIFI only for EZ4 W
COLOR
EXPOSURE
RESOLUTION
SETUP CAMERA
SETUP USER
SETUP ETHERNET
EXP MODE
EXPOSURE (ms)
GAIN
BRIGHTNESS
GAMMA
AUTO
1
1
0
0.60
SETUP WIFI*
COLOR
EXPOSURE
RESOLUTION
SETUP CAMERA
SETUP USER
SETUP ETHERNET
EXP MODE
EXPOSURE (ms)
GAIN
BRIGHTNESS
GAMMA
MANUAL
1
1
0
0.60
Leica E Series User Manual The Camera Remote Control (Optional) 62
RESOLUTION
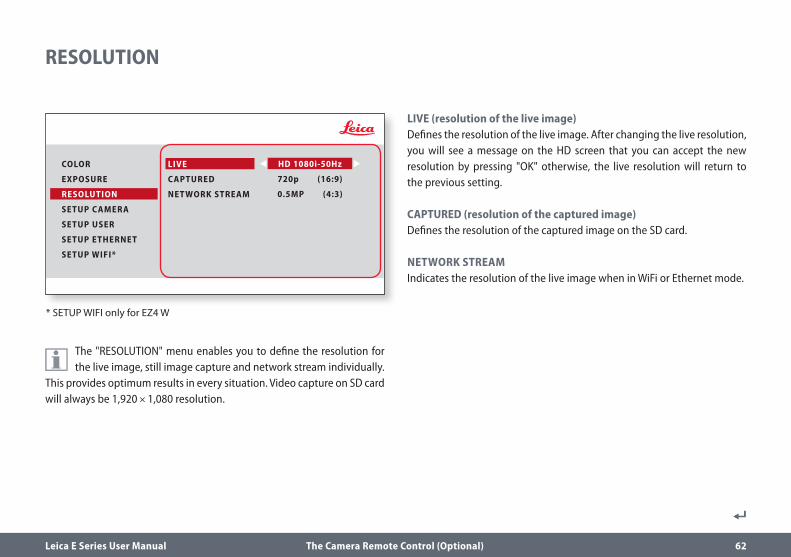
The "RESOLUTION" menu enables you to define the resolution for the live image, still image capture and network stream individually.
This provides optimum results in every situation. Video capture on SD card will always be 1,920 × 1,080 resolution.
LIVE (resolution of the live image)Defines the resolution of the live image. After changing the live resolution, you will see a message on the HD screen that you can accept the new resolution by pressing "OK" otherwise, the live resolution will return to the previous setting.
CAPTURED (resolution of the captured image)Defines the resolution of the captured image on the SD card.
NETWORK STREAMIndicates the resolution of the live image when in WiFi or Ethernet mode.
COLOR
EXPOSURE
RESOLUTION
SETUP CAMERA
SETUP USER
SETUP ETHERNET
LIVE
CAPTURED
NET WORK STREAM
HD 1080i-50Hz
720p (16:9)
0.5MP (4:3)
* SETUP WIFI only for EZ4 W
SETUP WIFI*
Leica E Series User Manual The Camera Remote Control (Optional) 63
SETUP CAMERA (Camera Settings)
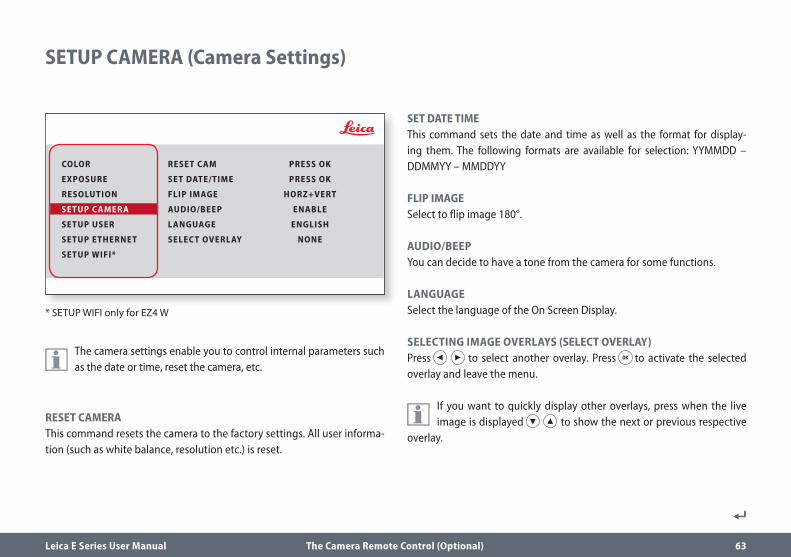
The camera settings enable you to control internal parameters such as the date or time, reset the camera, etc.
RESET CAMERAThis command resets the camera to the factory settings. All user informa-tion (such as white balance, resolution etc.) is reset.
SET DATE TIMEThis command sets the date and time as well as the format for display-ing them. The following formats are available for selection: YYMMDD – DDMMYY – MMDDYY
FLIP IMAGESelect to flip image 180°.
AUDIO/BEEP You can decide to have a tone from the camera for some functions.
LANGUAGE Select the language of the On Screen Display.
SELECTING IMAGE OVERLAYS (SELECT OVERLAY)Press to select another overlay. Press to activate the selected overlay and leave the menu.
If you want to quickly display other overlays, press when the live image is displayed to show the next or previous respective
overlay.
* SETUP WIFI only for EZ4 W
COLOR
EXPOSURE
RESOLUTION
SETUP CAMERA
SETUP USER
SETUP ETHERNET
RESET CAM
SET DATE/TIME
FLIP IMAGE
AUDIO/BEEP
PRESS OK
PRESS OK
HORZ+VERT
ENABLE
LANGUAGE
SELEC T OVERLAY
ENGLISH
NONE
SETUP WIFI*
Leica E Series User Manual The Camera Remote Control (Optional) 64
SETUP USER
* SETUP WIFI only for EZ4 W
COLOR
EXPOSURE
RESOLUTION
SETUP CAMERA
SETUP USER
SETUP ETHERNET
SHOW MENU 10 SECONDS
SETUP WIFI*
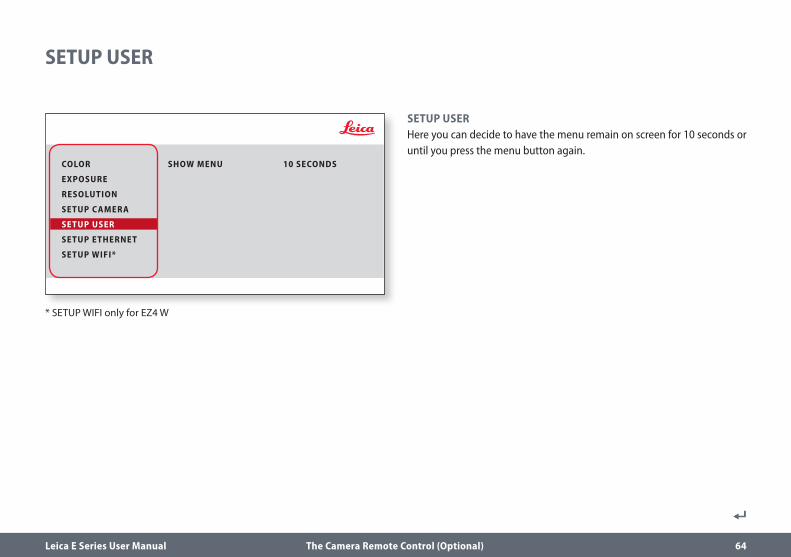
SETUP USERHere you can decide to have the menu remain on screen for 10 seconds or until you press the menu button again.
Leica E Series User Manual The Camera Remote Control (Optional) 65
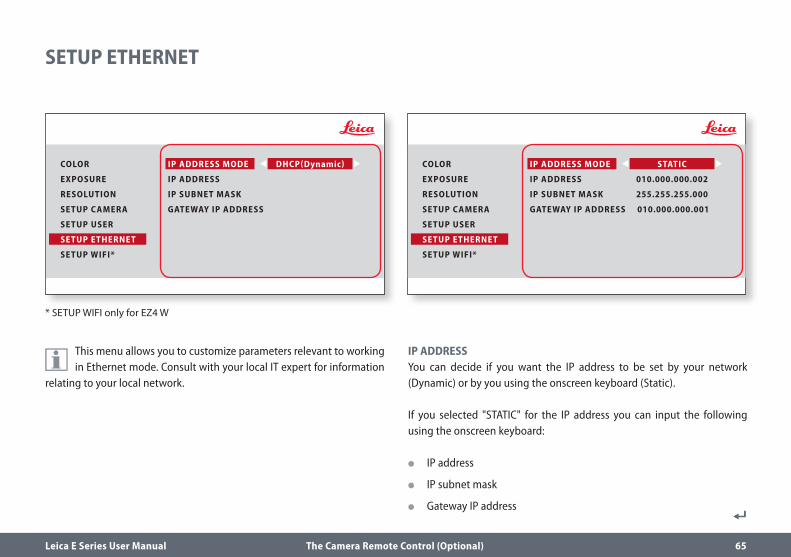
This menu allows you to customize parameters relevant to working in Ethernet mode. Consult with your local IT expert for information
relating to your local network.
IP ADDRESSYou can decide if you want the IP address to be set by your network (Dynamic) or by you using the onscreen keyboard (Static).
If you selected "STATIC" for the IP address you can input the following using the onscreen keyboard:
O IP address
O IP subnet mask
O Gateway IP address
SETUP ETHERNET
* SETUP WIFI only for EZ4 W
COLOR
EXPOSURE
RESOLUTION
SETUP CAMERA
SETUP USER
SETUP ETHERNET
IP ADDRESS MODE
IP ADDRESS
IP SUBNET MASK
GATEWAY IP ADDRESS
DHCP(Dynamic) COLOR
EXPOSURE
RESOLUTION
SETUP CAMERA
SETUP USER
SETUP ETHERNET
IP ADDRESS MODE
IP ADDRESS
IP SUBNET MASK
GATEWAY IP ADDRESS
STATIC
010.000.000.002
255.255.255.000
010.000.000.001
SETUP WIFI* SETUP WIFI*
Leica E Series User Manual The Camera Remote Control (Optional) 66
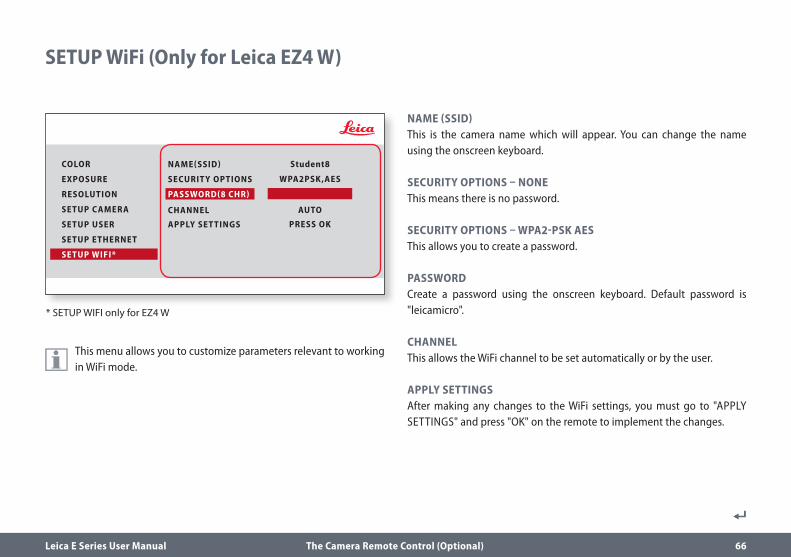
This menu allows you to customize parameters relevant to working in WiFi mode.
NAME (SSID)This is the camera name which will appear. You can change the name using the onscreen keyboard.
SECURITY OPTIONS – NONEThis means there is no password.
SECURITY OPTIONS – WPA2-PSK AESThis allows you to create a password.
PASSWORDCreate a password using the onscreen keyboard. Default password is "leicamicro".
CHANNELThis allows the WiFi channel to be set automatically or by the user.
APPLY SETTINGSAfter making any changes to the WiFi settings, you must go to "APPLY SETTINGS" and press "OK" on the remote to implement the changes.
SETUP WiFi (Only for Leica EZ4 W)
COLOR
EXPOSURE
RESOLUTION
SETUP CAMERA
SETUP USER
SETUP ETHERNET
SECURIT Y OPTIONS
CHANNEL
WPA2PSK,AES
AUTO
* SETUP WIFI only for EZ4 W
SETUP WIFI*
PASSWORD(8 CHR)
NAME(SSID) Student8
APPLY SET TINGS PRESS OK
Leica E Series User Manual The Camera Remote Control (Optional) 67
Pairing Cameras With Remotes
Pairing
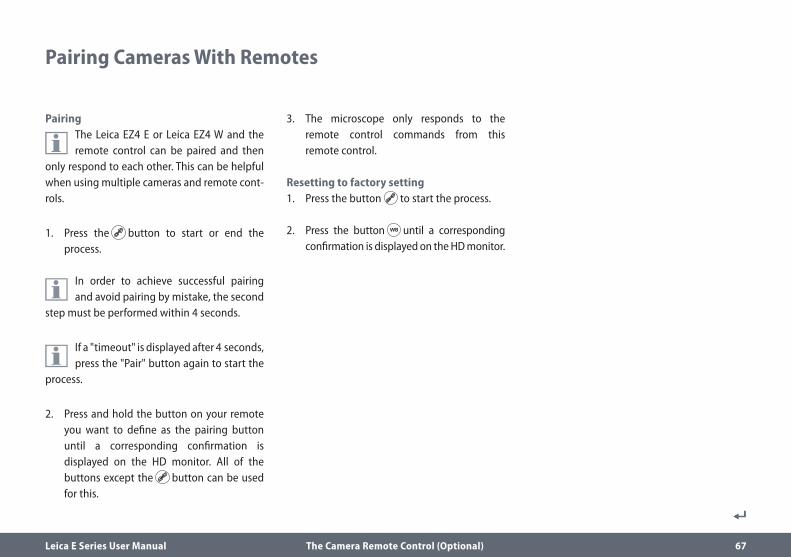
The Leica EZ4 E or Leica EZ4 W and the remote control can be paired and then
only respond to each other. This can be helpful when using multiple cameras and remote cont-rols.
1. Press the button to start or end the process.
In order to achieve successful pairing and avoid pairing by mistake, the second
step must be performed within 4 seconds.
If a "timeout" is displayed after 4 seconds, press the "Pair" button again to start the
process.
2. Press and hold the button on your remote you want to define as the pairing button until a corresponding confirmation is displayed on the HD monitor. All of the buttons except the button can be used for this.
3. The microscope only responds to the remote control commands from this remote control.
Resetting to factory setting1. Press the button to start the process.
2. Press the button until a corresponding confirmation is displayed on the HD monitor.

Leica E Series User Manual Care, Transport, Contact Persons 68
Care, Transport, Contact Persons

Leica E Series User Manual Care, Transport, Contact Persons 69
General Instructions O Keeping all optical components clean is
important for maintaining good optical performance.
O Always protect the microscope and camera with the plastic cover when the instrument is not in use. (Included in the delivery pack-age of the microscope.) Be sure power to the camera is off when the dust cover is in place.
O If any optical surface becomes badly coated with dust or dirt, it should be cleaned by blowing the surface with a syringe or brush-ing it off with a camel hair brush before attempting to wipe the surface clean.
O Optical surfaces should be cleaned using a lint-free cloth, lens cloth or cotton swab moistened with a commercially available glass cleaner. Do not use alcohol.
O Avoid excessive use of solvents. The lint-free cloth, lens cloth or cotton swab should be soaked with solvent, but not so wet that solvent runs over the lens.
O Protect the microscope from moisture, fumes and acids and from alkaline, caustic and corrosive materials. Do not store chemicals in the vicinity.
O Protect the microscope from oil and grease. Never grease or oil mechanical parts or sliding surfaces.
O It is advisable to enter a service agreement with Leica Service.
Transport
Always use both hands to carry the microscope. There is a handle on the
back of the microscope and an undercut in the front for this purpose.
Contact address If your instrument no longer works perfectly, contact your Leica representative. You can find information on worldwide Leica representatives on the Leica website: www.leica-microsystems.com.
Leica Microsystems (Switzerland) Ltd. Max Schmidheiny Strasse 201 CH-9435 Heerbrugg (Switzerland)
Care, Transport, Contact Persons
Leica E Series User Manual Specifications 70
SpecificationsDue to the technology of the camera, the speci- fications are changing regularly. Please visit our website www.leica-microsystems.com/ education for the latest brochure downloads to find the up to date specifications.
Leica E Series User Manual Specifications 71
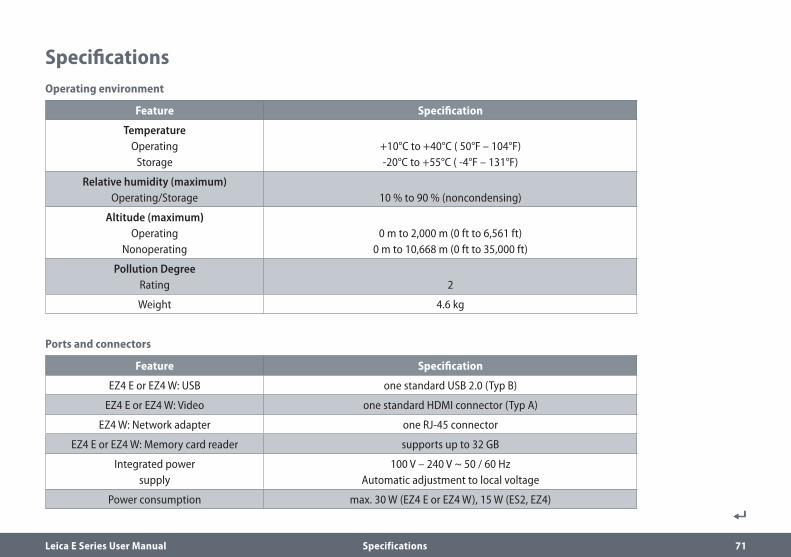
SpecificationsOperating environment
Feature Specification
TemperatureOperating
Storage+10°C to +40°C ( 50°F – 104°F)-20°C to +55°C ( -4°F – 131°F)
Relative humidity (maximum)Operating/Storage
10 % to 90 % (noncondensing)
Altitude (maximum)Operating
Nonoperating
0 m to 2,000 m (0 ft to 6,561 ft)
0 m to 10,668 m (0 ft to 35,000 ft)
Pollution DegreeRating
2
Weight 4.6 kg
Ports and connectors
Feature Specification
EZ4 E or EZ4 W: USB one standard USB 2.0 (Typ B)
EZ4 E or EZ4 W: Video one standard HDMI connector (Typ A)
EZ4 W: Network adapter one RJ-45 connector
EZ4 E or EZ4 W: Memory card reader supports up to 32 GB
Integrated powersupply
100 V – 240 V ~ 50 / 60 Hz Automatic adjustment to local voltage
Power consumption max. 30 W (EZ4 E or EZ4 W), 15 W (ES2, EZ4)
Leica E Series User Manual Specifications 72
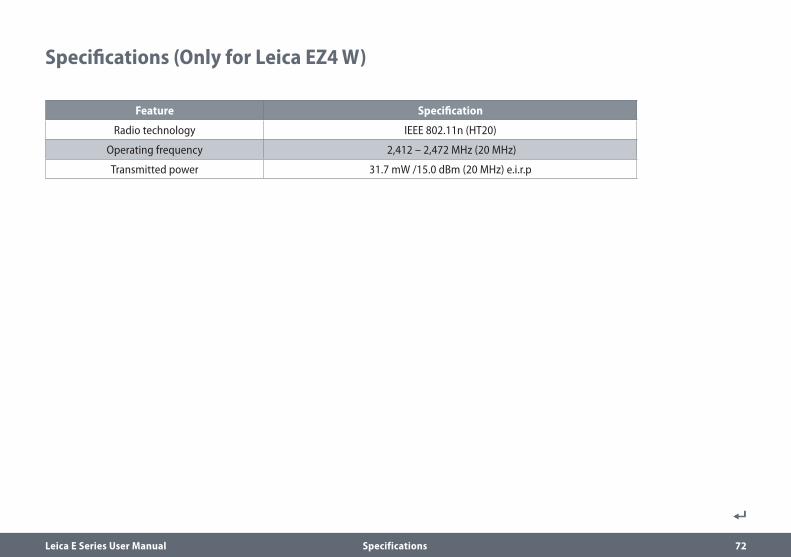
Specifications (Only for Leica EZ4 W)
Feature Specification
Radio technology IEEE 802.11n (HT20)
Operating frequency 2,412 – 2,472 MHz (20 MHz)
Transmitted power 31.7 mW /15.0 dBm (20 MHz) e.i.r.p
Leica E Series User Manual Specifications 73
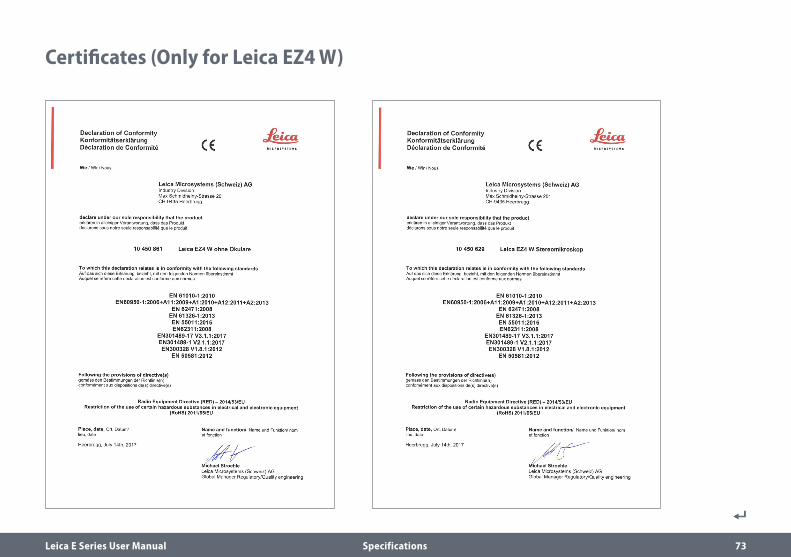
Certificates (Only for Leica EZ4 W)
Leica E Series User Manual Dimensions 74
Dimensions
Leica E Series User Manual Dimensions 75
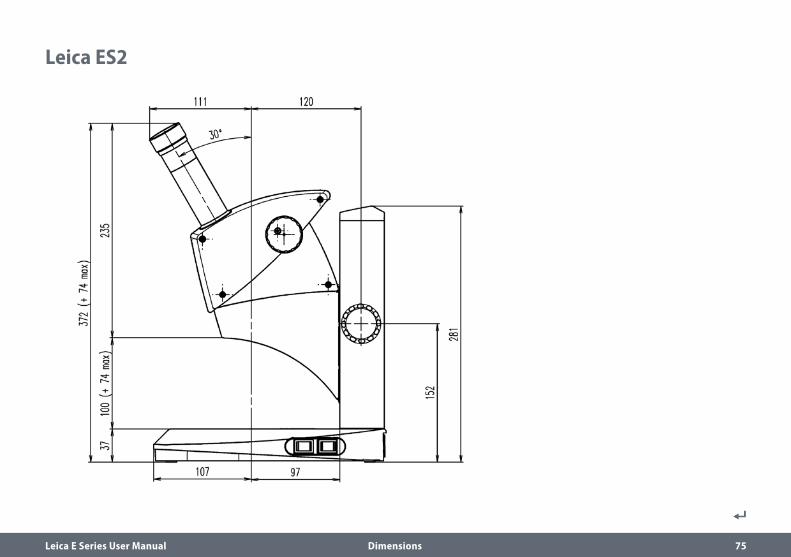
Leica ES2
Leica E Series User Manual Dimensions 76
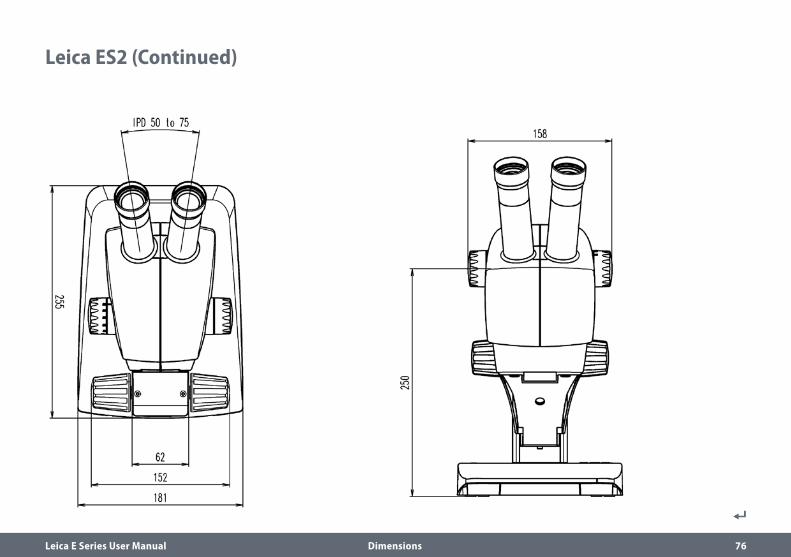
Leica ES2 (Continued)
Leica E Series User Manual Dimensions 77
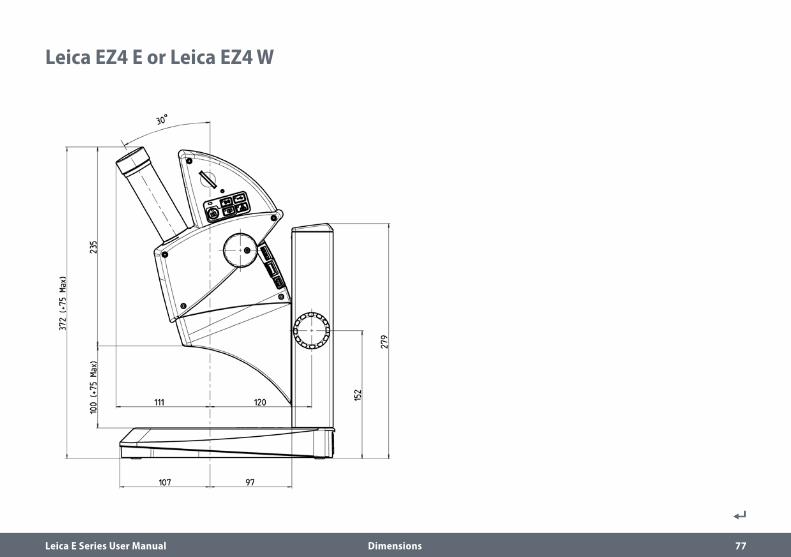
Leica EZ4 E or Leica EZ4 W
Leica E Series User Manual Dimensions 78
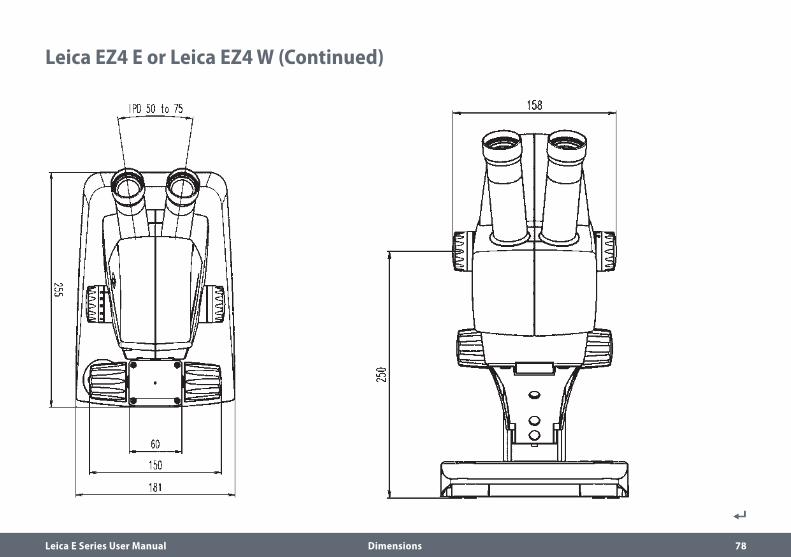
Leica EZ4 E or Leica EZ4 W (Continued)
Leica E Series User Manual Dimensions 79
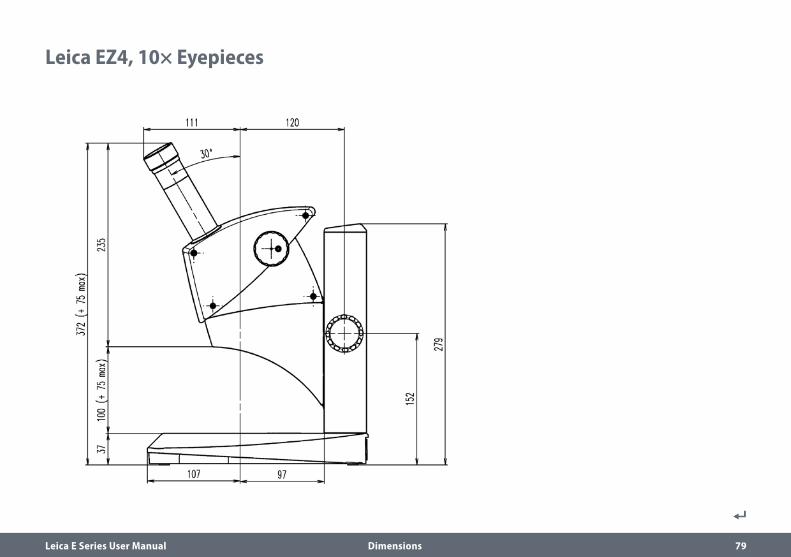
Leica EZ4, 10× Eyepieces
Leica E Series User Manual Dimensions 80
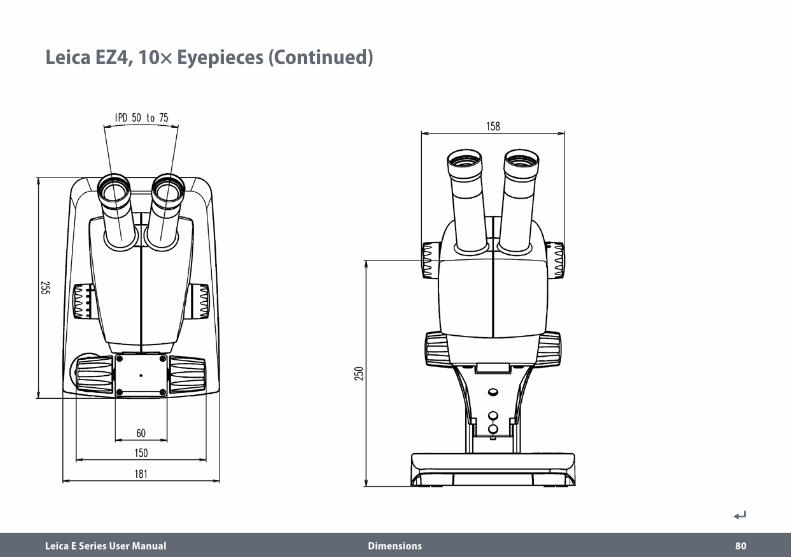
Leica EZ4, 10× Eyepieces (Continued)
Leica E Series User Manual Dimensions 81
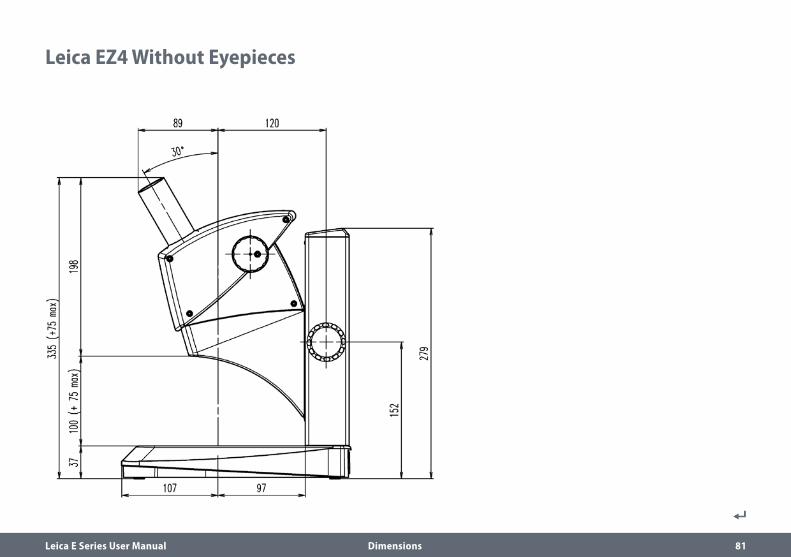
Leica EZ4 Without Eyepieces
Leica E Series User Manual Dimensions 82
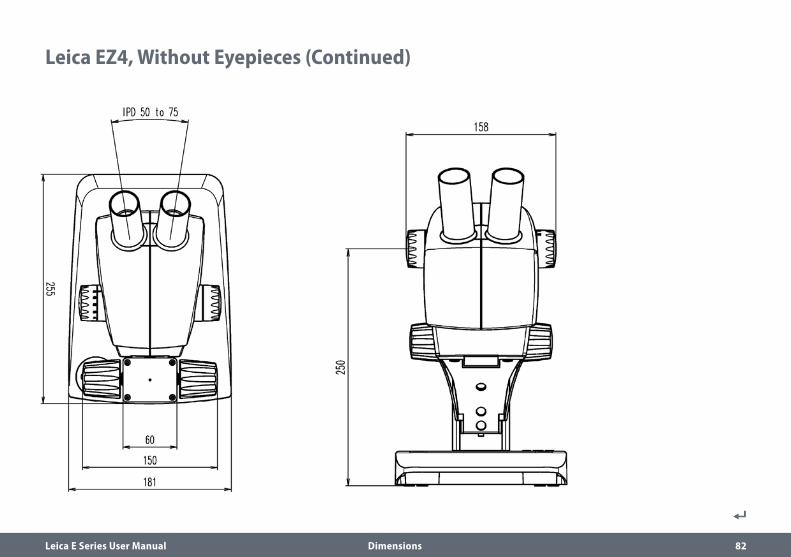
Leica EZ4, Without Eyepieces (Continued)
8/20
17 ·
Orde
r no.
: 13I
DE10
060E
N_5
· ©
201
7 by
Lei
ca M
icro
syst
ems
GmbH
.Su
bjec
t to
mod
ifica
tions
. LEI
CA a
nd th
e Le
ica
Logo
are
regi
ster
ed tr
adem
arks
of L
eica
Mic
rosy
stem
s IR
Gm
bH.
CONNECT
WITH US!
www.leica-microsystems.com
Leica Microsystems (Schweiz) AG · Max-Schmidheiny-Strasse 201 · 9435 Heerbrugg, Switzerland
T +41 71 726 34 34 · F +41 71 726 34 44
Related Documents