KACE K2000 System Deployment Appliance Demo Guide Product Domain: Cloud Client Computing Author: Dan Coleman Version: 1.01

Welcome message from author
This document is posted to help you gain knowledge. Please leave a comment to let me know what you think about it! Share it to your friends and learn new things together.
Transcript
KACE K2000 System Deployment Appliance Demo Guide
Product Domain: Cloud Client Computing
Author: Dan Coleman
Version: 1.01
Table of Contents 1 Product Overview ............................................................................................................................................ 3
1.1 Lab Preparation Considerations and Caveats .................................................................................. 3
2 Introduction ..................................................................................................................................................... 4
2.1 Lab Topology and Essential Information ......................................................................................... 4
2.1.1 Lab Addressing and Login Details ..................................................................................................... 4
3 KACE K2000 System Deployment Appliance ............................................................................................ 6
3.1.1 Pre-requisite Information ................................................................................................................... 6
3.1.2 Capture user state data from Windows XP System ....................................................................... 9
4 Scripted installation / Win7 Migration Exercise ........................................................................................ 13
5 Imaging Exercise ........................................................................................................................................... 28

1 Product Overview The KACE K2000 Deployment Appliance fulfills your software distribution needs with fast, efficient provisioning:
Disk imaging — Save image creation and maintenance time by automating these steps in the deployment process.
Image deployment — Improve provisioning consistency and reliability with a global, centralized deployment library that ensures that the correct image or setup is always deployed to the appropriate systems.
Task automation engine — Reduce complexity and improve reliability with the K2000’s powerful automated deployment tools, including the task sequencing engine, the task scheduling engine and the feedback engine
Multicasting — Improve the speed and reliability of large-scale deployments, freeing up network resources and bandwidth.
Windows deployment and updates — Easily migrate files and settings and manage Windows updates. Conduct driver updates for all the machines you support with one click.
Network OS install — Streamline the installation of operating systems across your network, perform systems deployment and maintain up-to-date gold master images across diverse hardware platforms.
Remote site management — Deploy systems from a central location, eliminating unnecessary travel or the shipment of media and systems, and reduce the time and complexity associated with managing multiple remote sites.
Administration — Streamline systems provisioning, systems recovery and deployment with an easy-to-use, web-based interface with built-in reporting and automated maintenance.
1.1 Lab Preparation Considerations and Caveats
It is in your best interests to ensure the demo environment you will be demonstrating is clean & tidy before
you begin. For this reason we would recommend, where possible, you log in to your demo at least 15 minutes
prior to delivery and check the following;
1. Familiarize yourself with the environment during this time and check any specific features you
are expecting to demo.
2. Most importantly, be crystal clear with yourself on what it is you plan to show. A full demo of
every feature described below (with questions) can take several hours. If you only have a short
time slot be sure to focus on the key points that address the customer’s pain points and will drive
value home to them.
3. Ensure that you have scheduled the demo for sufficient time so as not to have the demo end
before you are finished with the customer.
2 Introduction The K2000 Demo Environment @ Demo Center allows you to use and manage all features of the appliance
with the exception of remote site management. The environment has been pre-configured to ensure a quick
and seamless experience to the user.
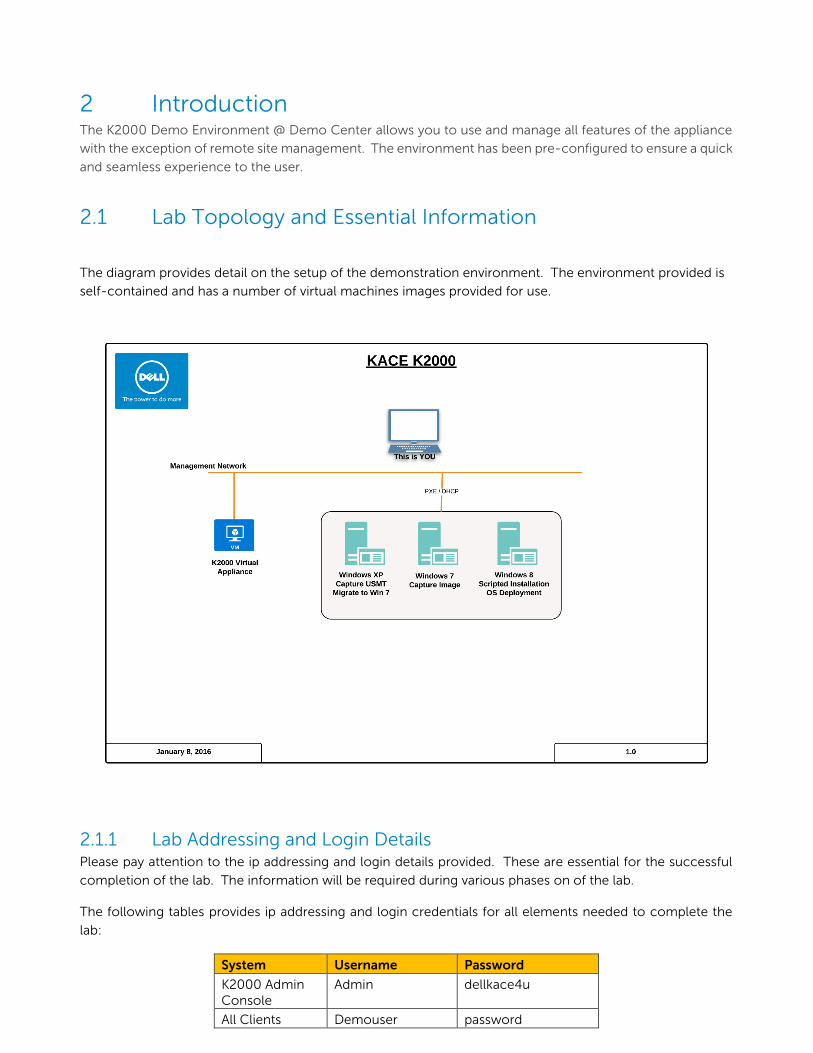
2.1 Lab Topology and Essential Information
The diagram provides detail on the setup of the demonstration environment. The environment provided is
self-contained and has a number of virtual machines images provided for use.
2.1.1 Lab Addressing and Login Details Please pay attention to the ip addressing and login details provided. These are essential for the successful
completion of the lab. The information will be required during various phases on of the lab.
The following tables provides ip addressing and login credentials for all elements needed to complete the
lab:
System Username Password
K2000 Admin Console
Admin dellkace4u
All Clients Demouser password
The following 2 tasks have been pre-setup for use: Appliance Setup – Deploying operating systems to client computers requires that the target systems boot from your network. For Windows systems, you do this with a K2000 Boot Environment (KBE). (Demo video available)
Deployment Library - The K2000 Deployment Library is the central repository for all system deployment
assets. This library allows you to create and manage the re-usable assets and tasks used for scripting
operating system installations and system image deployments. (Demo video available)
The available demo script provides the user with step-by-step instructions to carry out the following
tasks:
User State Capture – Scan a Windows XP system for User State data prior to migration.
Windows 7 Migration – Migrate and existing Windows XP system to Windows 7 and deploy User data
and settings. Image Capture – Capture a Gold Image of Windows 7 system. Windows 8 Deployment –
Create and deploy a Scripted Installation of Windows 8.
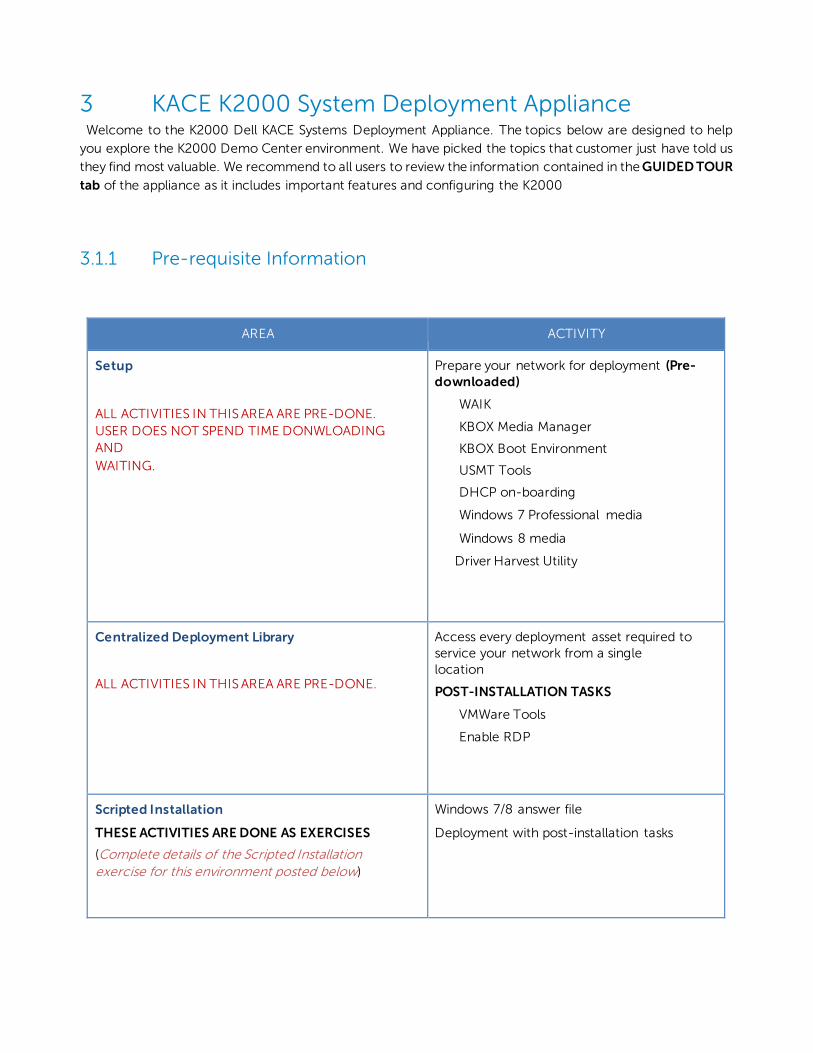
3 KACE K2000 System Deployment Appliance Welcome to the K2000 Dell KACE Systems Deployment Appliance. The topics below are designed to help
you explore the K2000 Demo Center environment. We have picked the topics that customer just have told us
they find most valuable. We recommend to all users to review the information contained in the GUIDED TOUR
tab of the appliance as it includes important features and configuring the K2000
3.1.1 Pre-requisite Information
AREA
ACTIVITY
Setup
ALL ACTIVITIES IN THIS AREA ARE PRE-DONE.
USER DOES NOT SPEND TIME DONWLOADING
AND
WAITING.
Prepare your network for deployment (Pre- downloaded)
WAIK
KBOX Media Manager
KBOX Boot Environment
USMT Tools
DHCP on-boarding
Windows 7 Professional media
Windows 8 media
Driver Harvest Utility
Centralized Deployment Library
ALL ACTIVITIES IN THIS AREA ARE PRE-DONE.
Access every deployment asset required to service your network from a single location
POST-INSTALLATION TASKS
VMWare Tools
Enable RDP
Scripted Installation
THESE ACTIVITIES ARE DONE AS EXERCISES
(Complete details of the Scripted Installation exercise for this environment posted below)
Windows 7/8 answer file Deployment with post-installation tasks
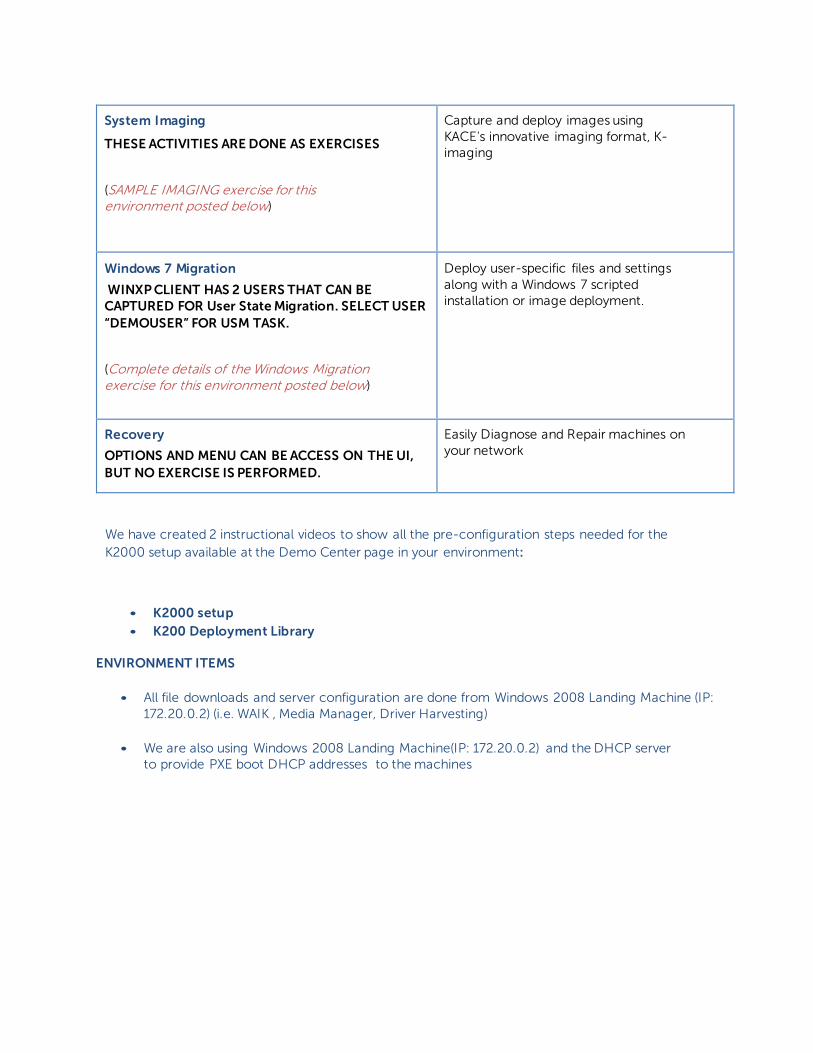
System Imaging
THESE ACTIVITIES ARE DONE AS EXERCISES
(SAMPLE IMAGING exercise for this environment posted below)
Capture and deploy images using KACE's innovative imaging format, K-imaging
Windows 7 Migration
WINXP CLIENT HAS 2 USERS THAT CAN BE CAPTURED FOR User State Migration. SELECT USER
“DEMOUSER” FOR USM TASK.
(Complete details of the Windows Migration exercise for this environment posted below)
Deploy user-specific files and settings along with a Windows 7 scripted installation or image deployment.
Recovery
OPTIONS AND MENU CAN BE ACCESS ON THE UI,
BUT NO EXERCISE IS PERFORMED.
Easily Diagnose and Repair machines on your network
We have created 2 instructional videos to show all the pre-configuration steps needed for the
K2000 setup available at the Demo Center page in your environment:
• K2000 setup
• K200 Deployment Library
ENVIRONMENT ITEMS
• All file downloads and server configuration are done from Windows 2008 Landing Machine (IP:
172.20.0.2) (i.e. WAIK , Media Manager, Driver Harvesting)
• We are also using Windows 2008 Landing Machine(IP: 172.20.0.2) and the DHCP server
to provide PXE boot DHCP addresses to the machines

• IE browser on Landing Machine (IP: 172.20.0.2) is configured to go the K2000 admin console
• We are using WINXP CLIENT to deploy a Scripted Installation of Windows 7 Professional with Pre
& post installation tasks including a User State Migration
• ALL clients have a user: demouser pwd: password defined
• User demouser/password is defined on WINXP CLIENT (IP: 172.20.0.11) for User State
Migration
• For performance reasons, user desktop background is not migrated on this virtual hosted
environment
• All exercises are run from the K2000 Admin Console Web UI accessed via the Landing machine
Credentials: ALL
Clients
User: demouser
Pwd: password
K2000 Admin Console
User: admin
Pwd: dellkace4u
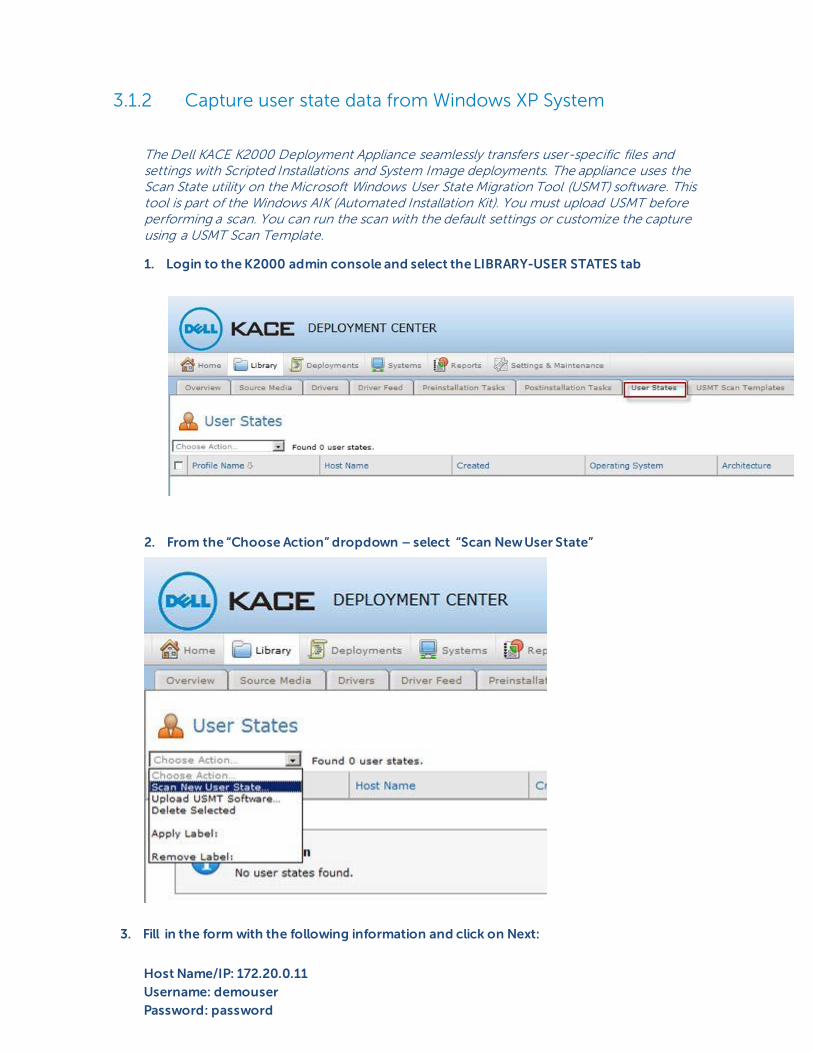
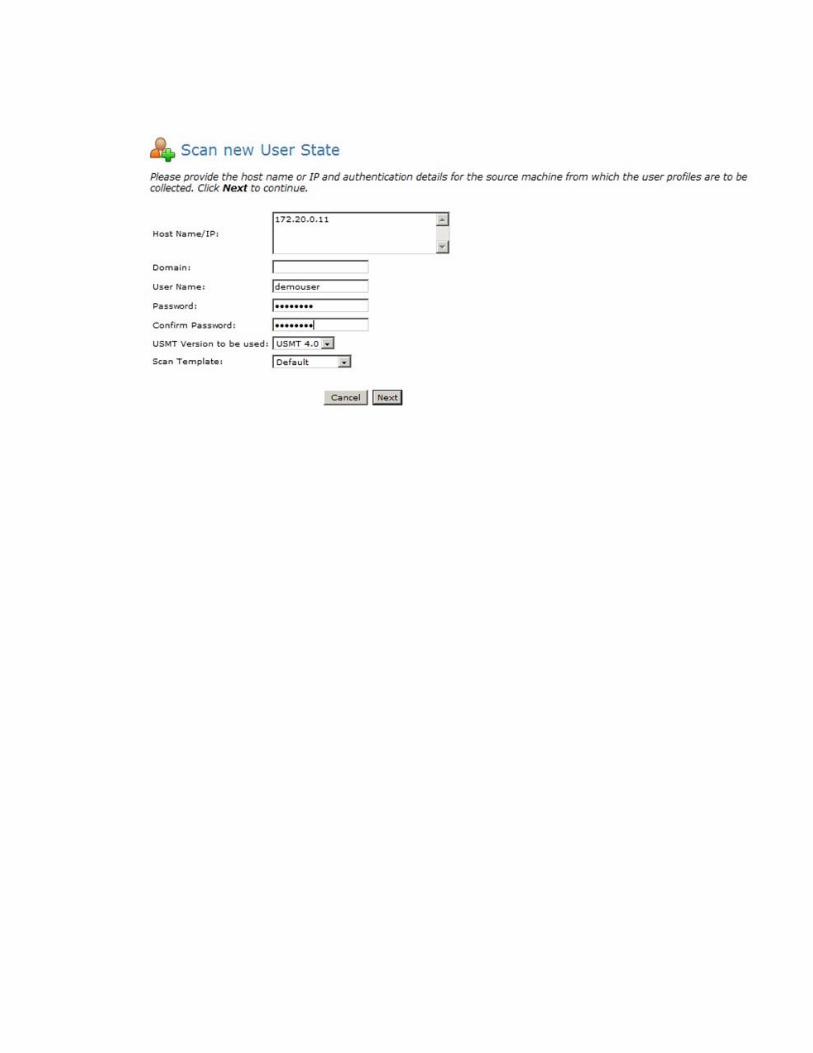
3.1.2 Capture user state data from Windows XP System
The Dell KACE K2000 Deployment Appliance seamlessly transfers user-specific files and settings with Scripted Installations and System Image deployments. The appliance uses the Scan State utility on the Microsoft Windows User State Migration Tool (USMT) software. This tool is part of the Windows AIK (Automated Installation Kit). You must upload USMT before performing a scan. You can run the scan with the default settings or customize the capture using a USMT Scan Template.
1. Login to the K2000 admin console and select the LIBRARY-USER STATES tab
2. From the “Choose Action” dropdown – select “Scan New User State”
3. Fill in the form with the following information and click on Next:
Host Name/IP: 172.20.0.11
Username: demouser
Password: password
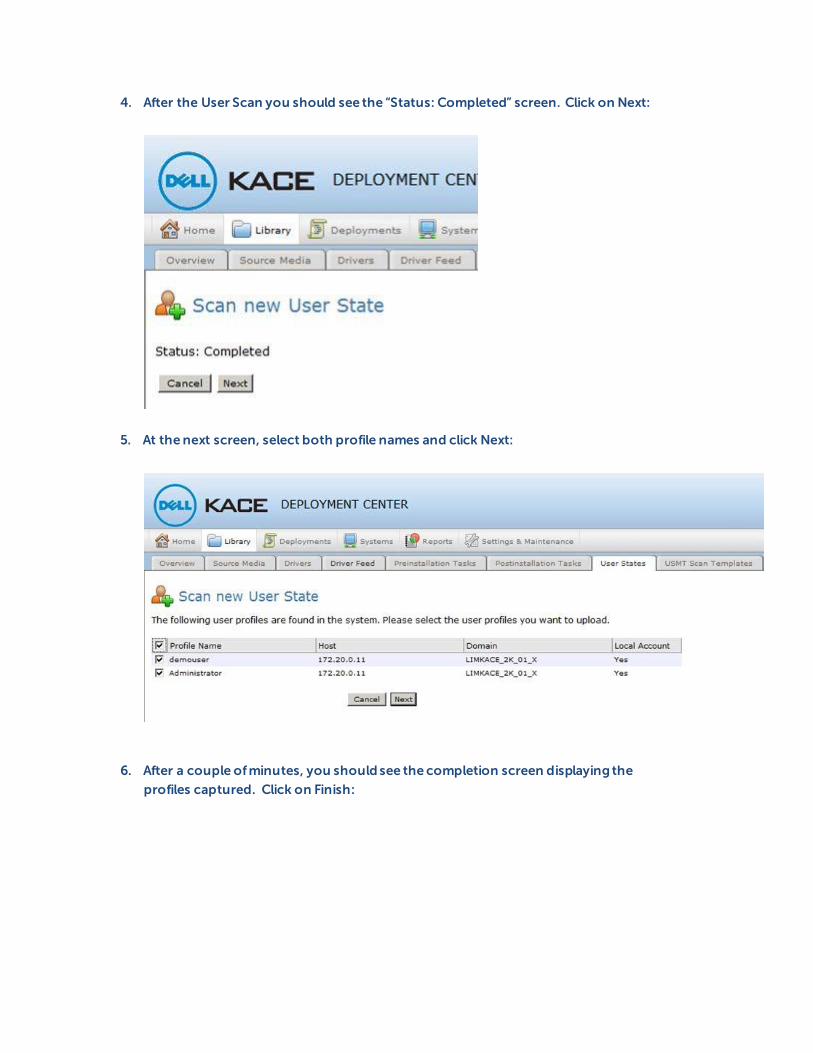
4. After the User Scan you should see the “Status: Completed” screen. Click on Next:
5. At the next screen, select both profile names and click Next:
6. After a couple of minutes, you should see the completion screen displaying the
profiles captured. Click on Finish:
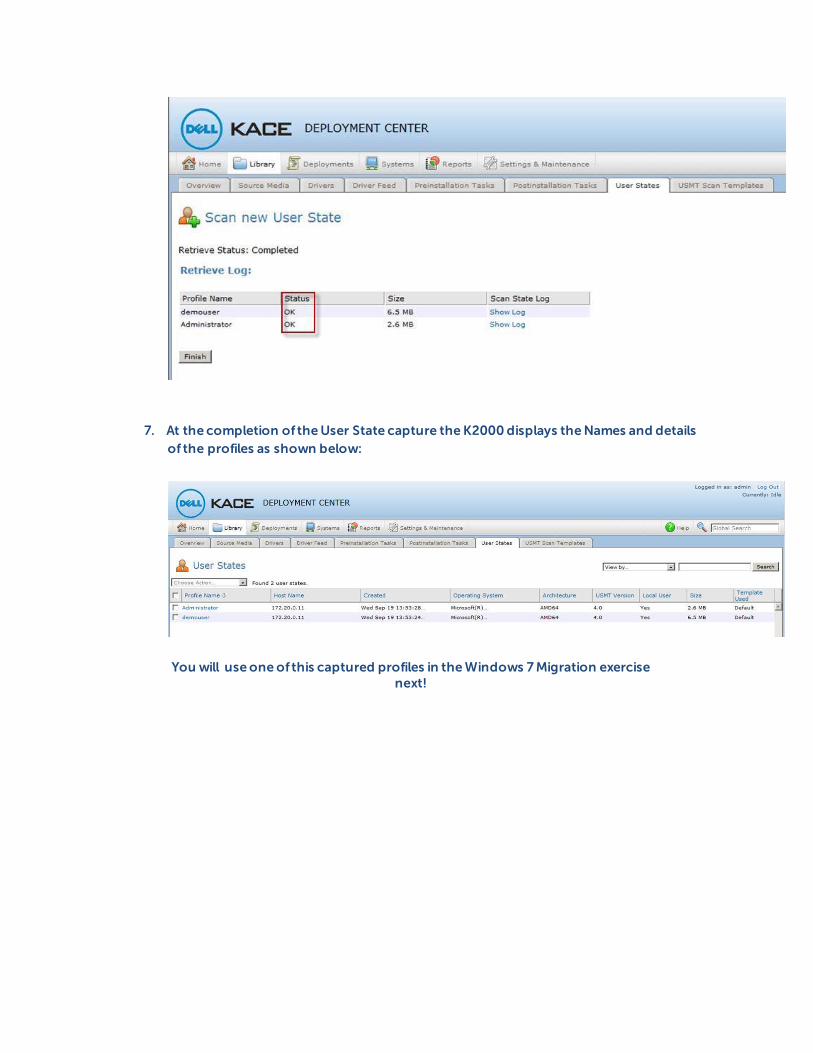
7. At the completion of the User State capture the K2000 displays the Names and details
of the profiles as shown below:
You will use one of this captured profiles in the Windows 7 Migration exercise next!
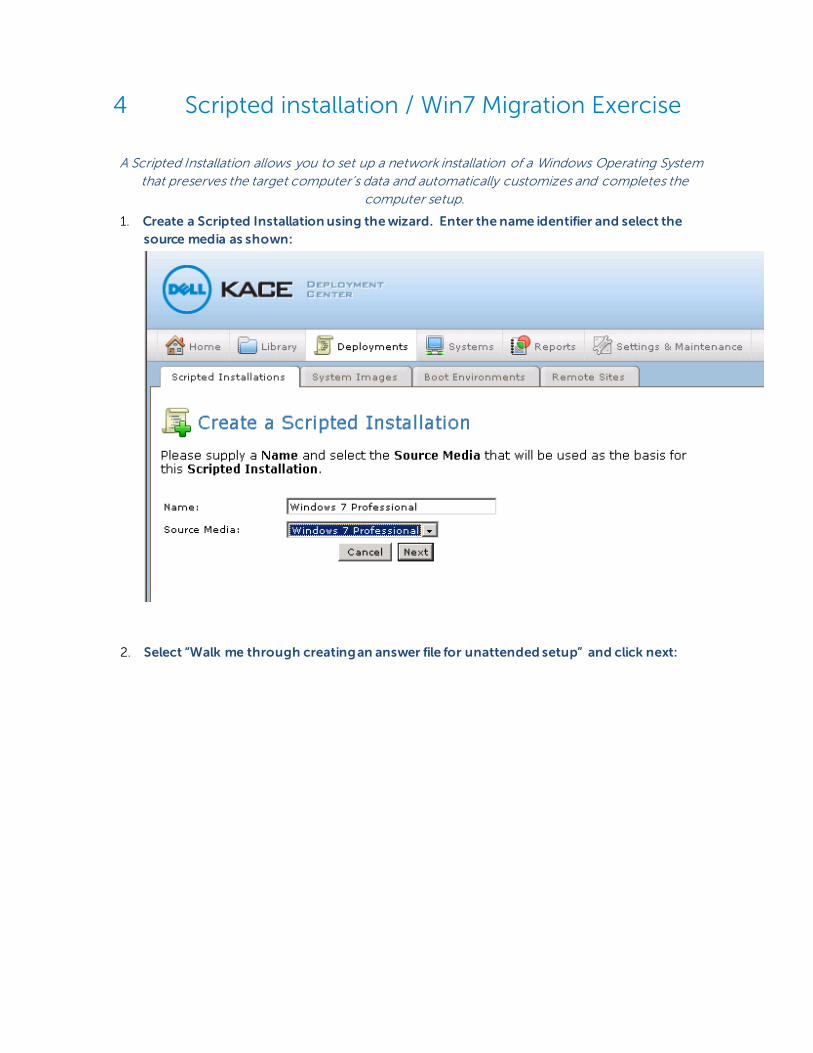
4 Scripted installation / Win7 Migration Exercise
A Scripted Installation allows you to set up a network installation of a Windows Operating System
that preserves the target computer’s data and automatically customizes and completes the
computer setup.
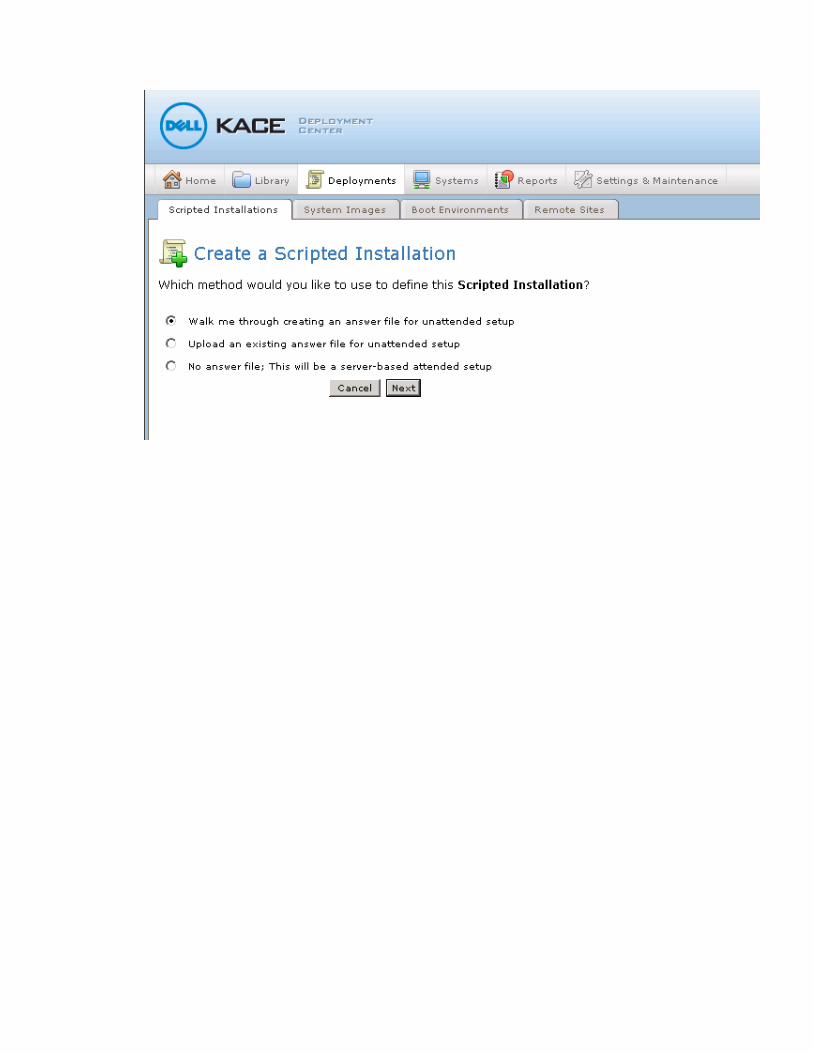
1. Create a Scripted Installation using the wizard. Enter the name identifier and select the
source media as shown:
2. Select “Walk me through creating an answer file for unattended setup” and click next:
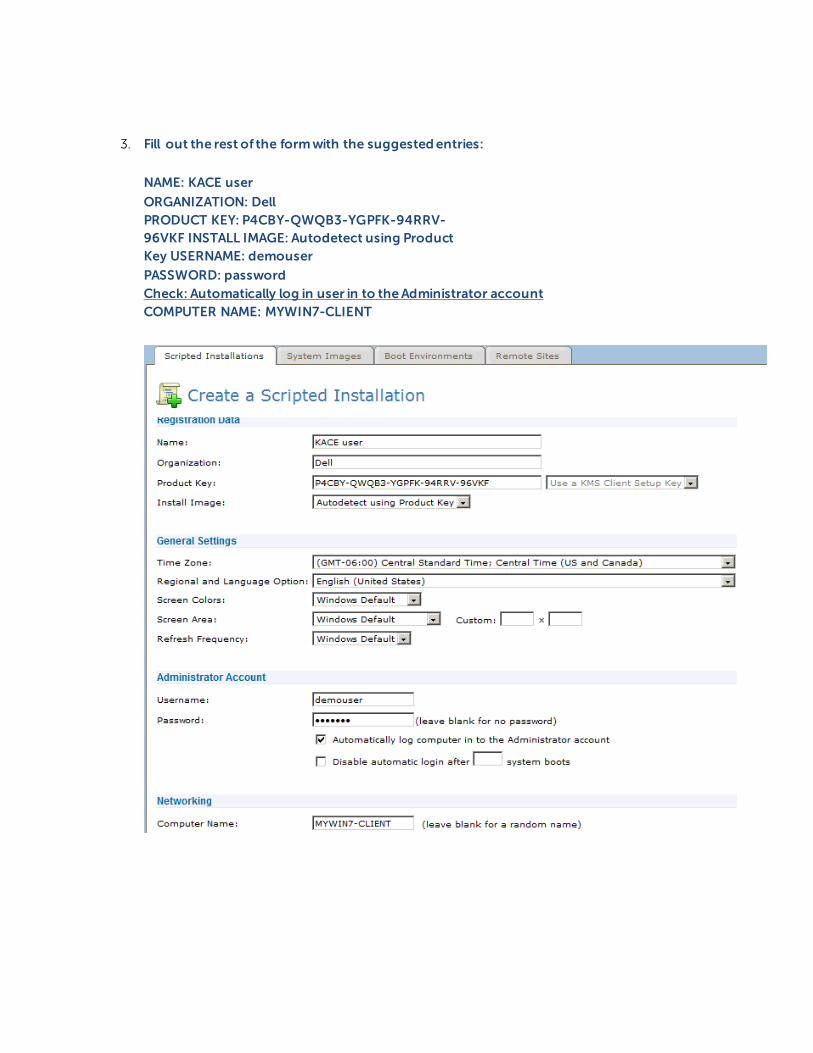
3. Fill out the rest of the form with the suggested entries:
NAME: KACE user
ORGANIZATION: Dell
PRODUCT KEY: P4CBY-QWQB3-YGPFK-94RRV-
96VKF INSTALL IMAGE: Autodetect using Product
Key USERNAME: demouser
PASSWORD: password
Check: Automatically log in user in to the Administrator account
COMPUTER NAME: MYWIN7-CLIENT
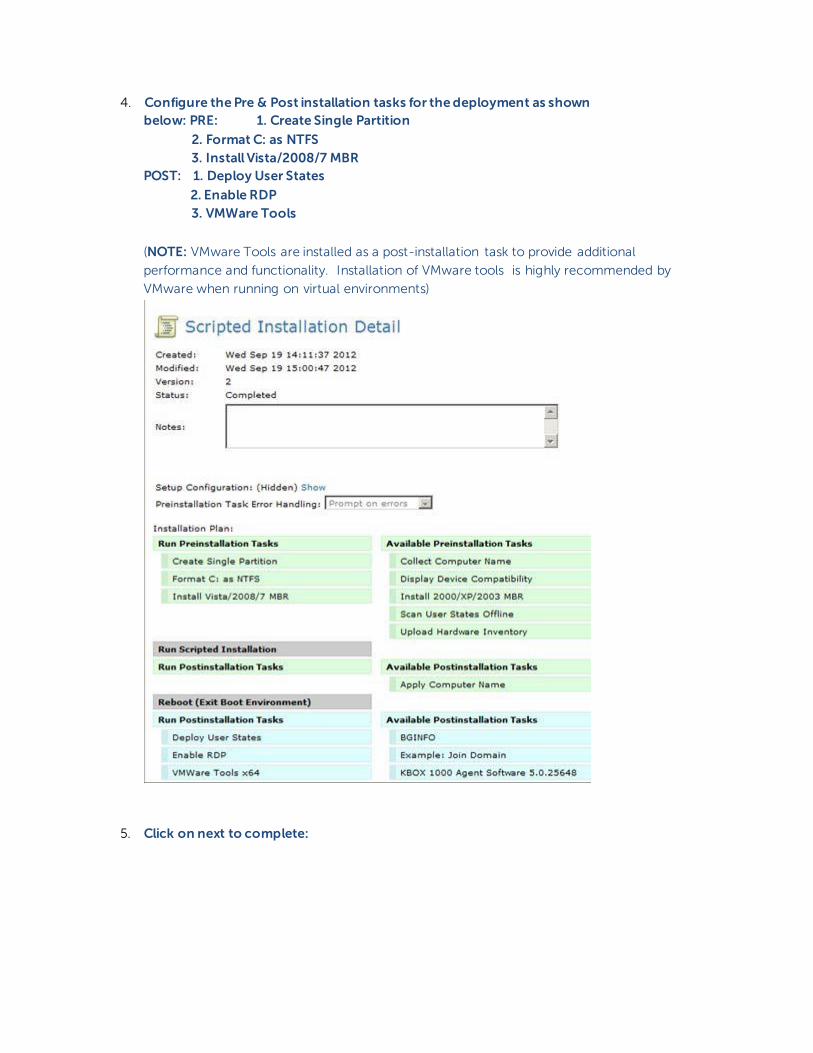
4. Configure the Pre & Post installation tasks for the deployment as shown
below: PRE: 1. Create Single Partition
2. Format C: as NTFS
3. Install Vista/2008/7 MBR
POST: 1. Deploy User States
2. Enable RDP
3. VMWare Tools
(NOTE: VMware Tools are installed as a post-installation task to provide additional
performance and functionality. Installation of VMware tools is highly recommended by
VMware when running on virtual environments)
5. Click on next to complete:
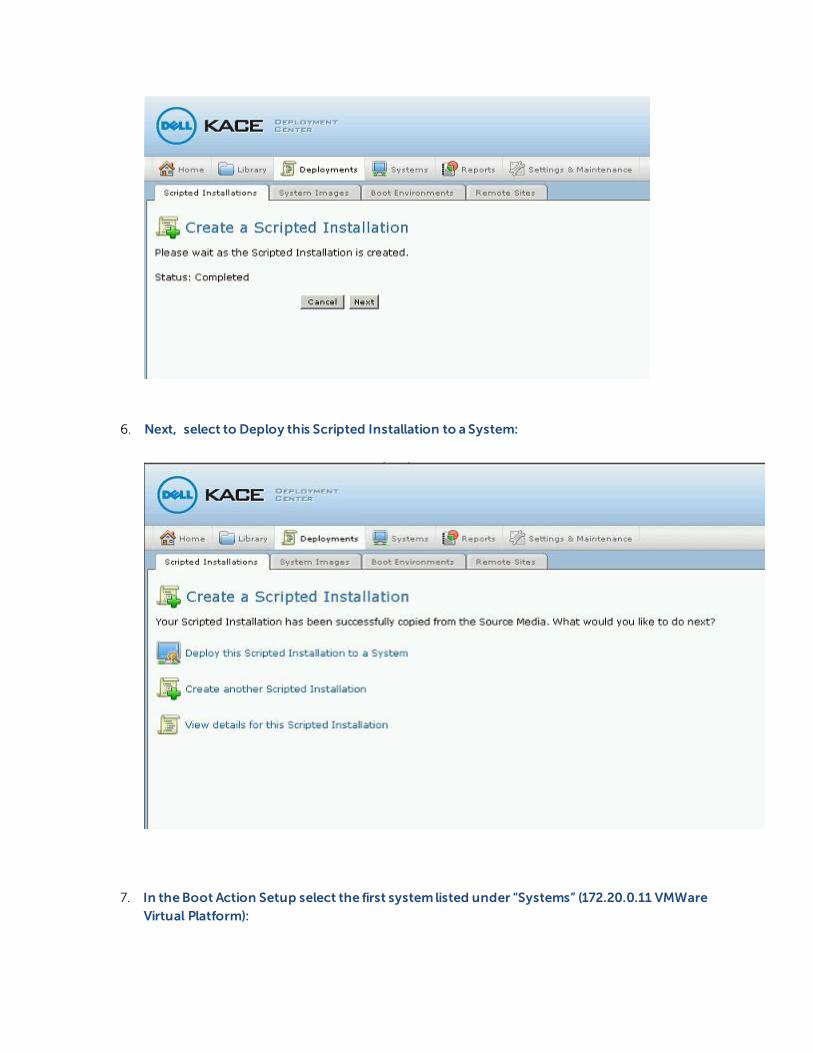
6. Next, select to Deploy this Scripted Installation to a System:
7. In the Boot Action Setup select the first system listed under “Systems” (172.20.0.11 VMWare
Virtual Platform):
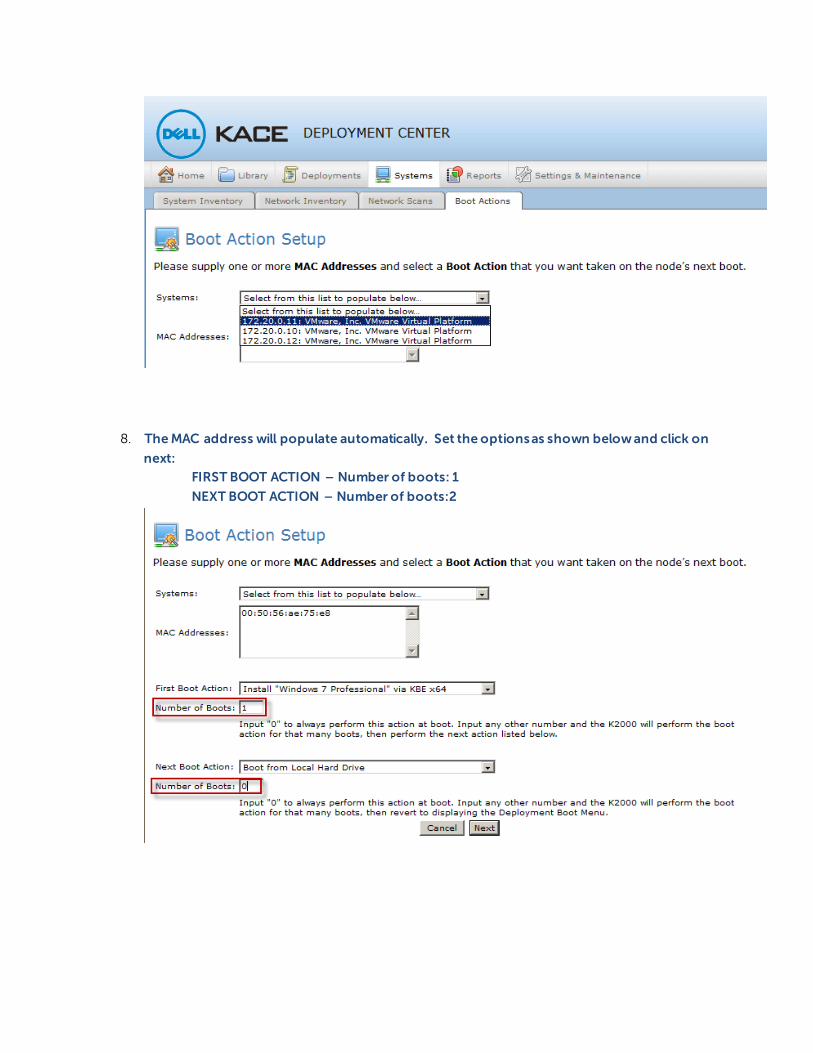
8. The MAC address will populate automatically. Set the options as shown below and click on
next:
FIRST BOOT ACTION – Number of boots: 1
NEXT BOOT ACTION – Number of boots:2
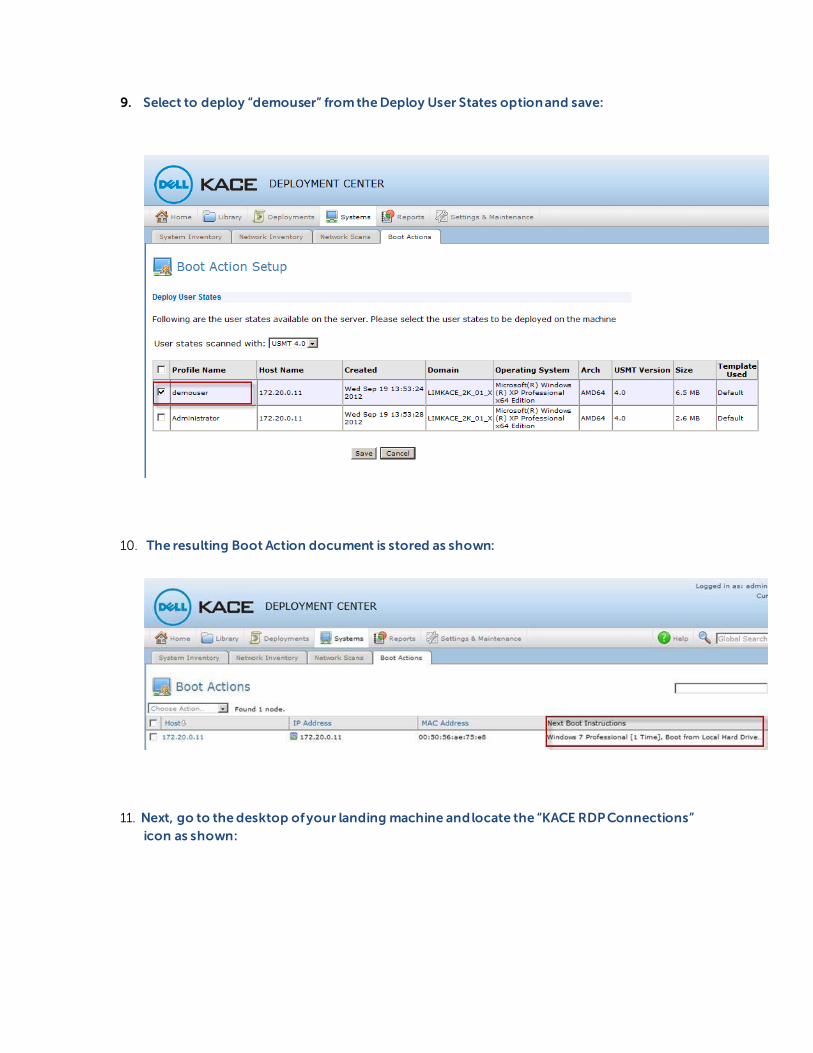
9. Select to deploy “demouser” from the Deploy User States option and save:
10. The resulting Boot Action document is stored as shown:
11. Next, go to the desktop of your landing machine and locate the “KACE RDP Connections”
icon as shown:

From the left navigator, double-click on the XP64 machine to initiate a remote desktop
session to this system:
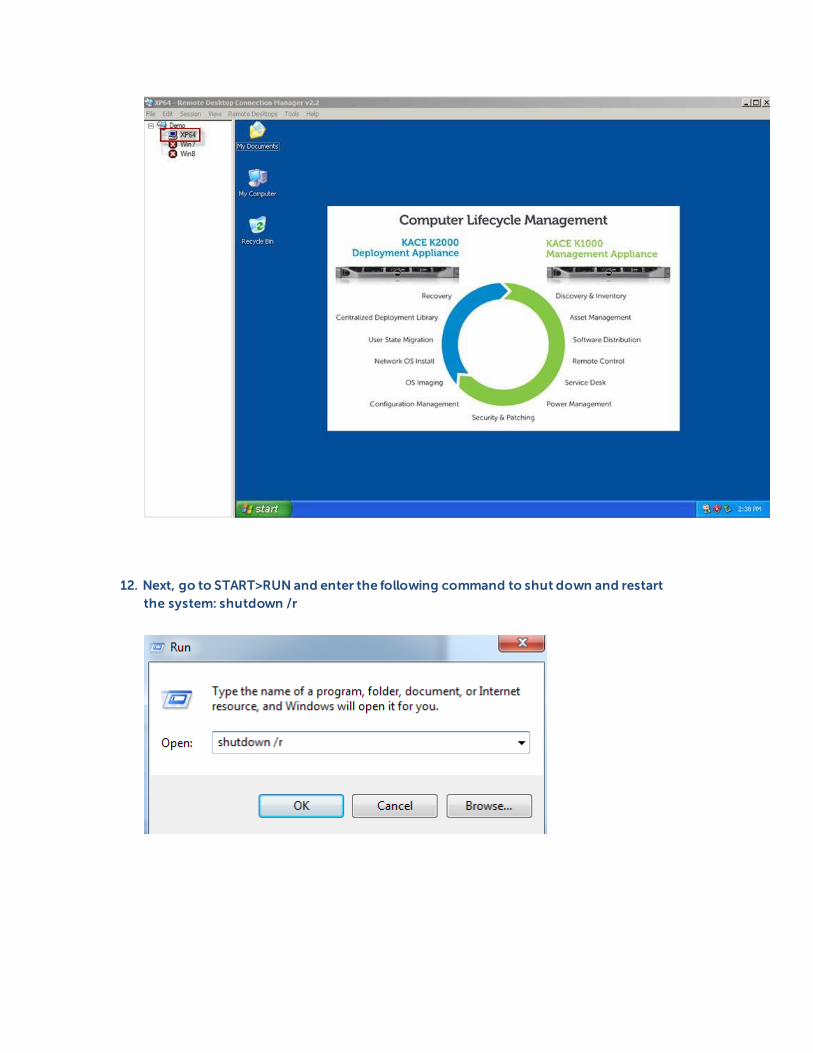
12. Next, go to START>RUN and enter the following command to shut down and restart
the system: shutdown /r

13. You will see the following warning prior to the system re-starting:
14. The system will boot from the network and start the “Windows 7” installation via KBE:
(PLEASE NOTE THE FOLLOWING SCREENS ARE NOT VISIBLE FROM THE WINDOWS RDP
SESSION. THE SESSION WINDOW WILL SHOW A “SYSTEM DISCONNECTED” MESSAGE)
TO TAKE A LOOK AT THE PXE BOOTING PROCESS GO TO SYSTEMS>SYSTEM INVENTORY
CLICK ON THE ICON TO THE LEFT OF THE IP ADDRESS OF THE SYSTEM TO START A VNC
SESSION (NOTE: IT TAKES 2-3 MIN. FOR THE BOOT ENVIRONMENT TO LOAD. IF YOU ARE
NOT ABLE TO
CONNECT RIGHT AWAY. ATTEMPT THE CONNECTION AGAIN AFTER A COUPLE OF
MINUTES!) ENTER “admin” IN THE PWD BOX:
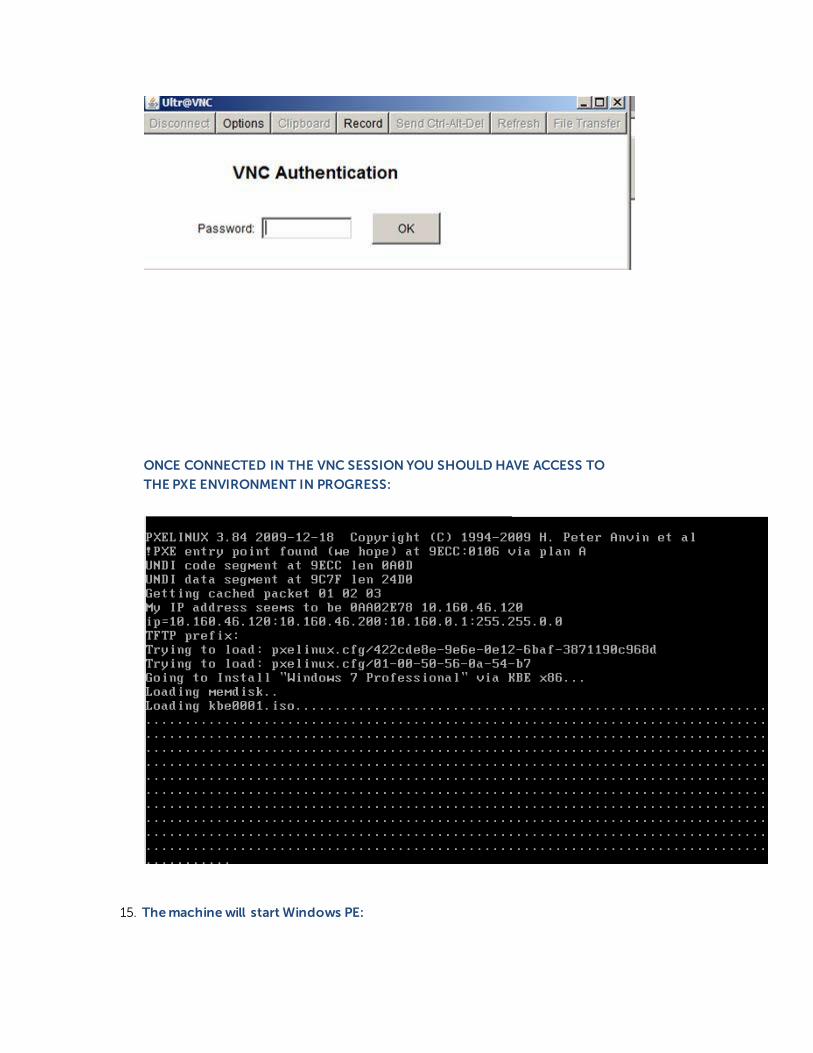
ONCE CONNECTED IN THE VNC SESSION YOU SHOULD HAVE ACCESS TO
THE PXE ENVIRONMENT IN PROGRESS:
15. The machine will start Windows PE:
16. Next, the K2000 Deployment Client will start and configure the rest of the installation:
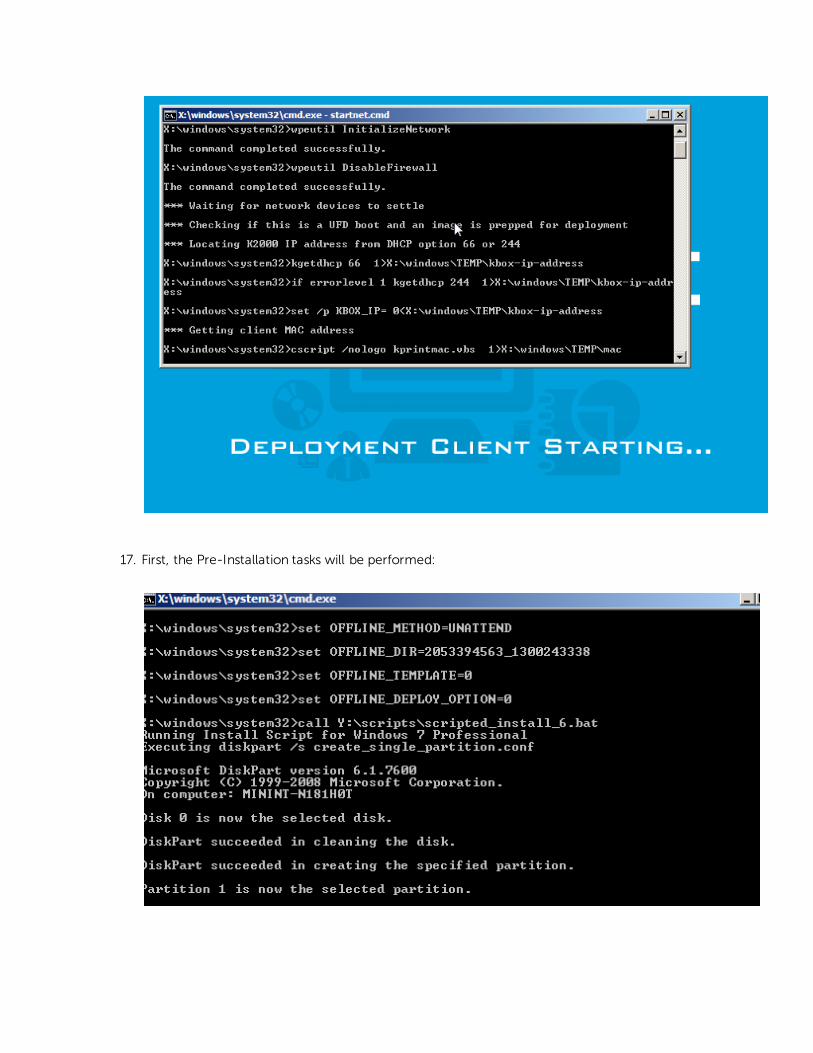
17. First, the Pre-Installation tasks will be performed:

18. Then the “Install Windows” screen will show the Windows installation tasks as well as the
percentage completed:
19. Several minutes later the installation will complete:
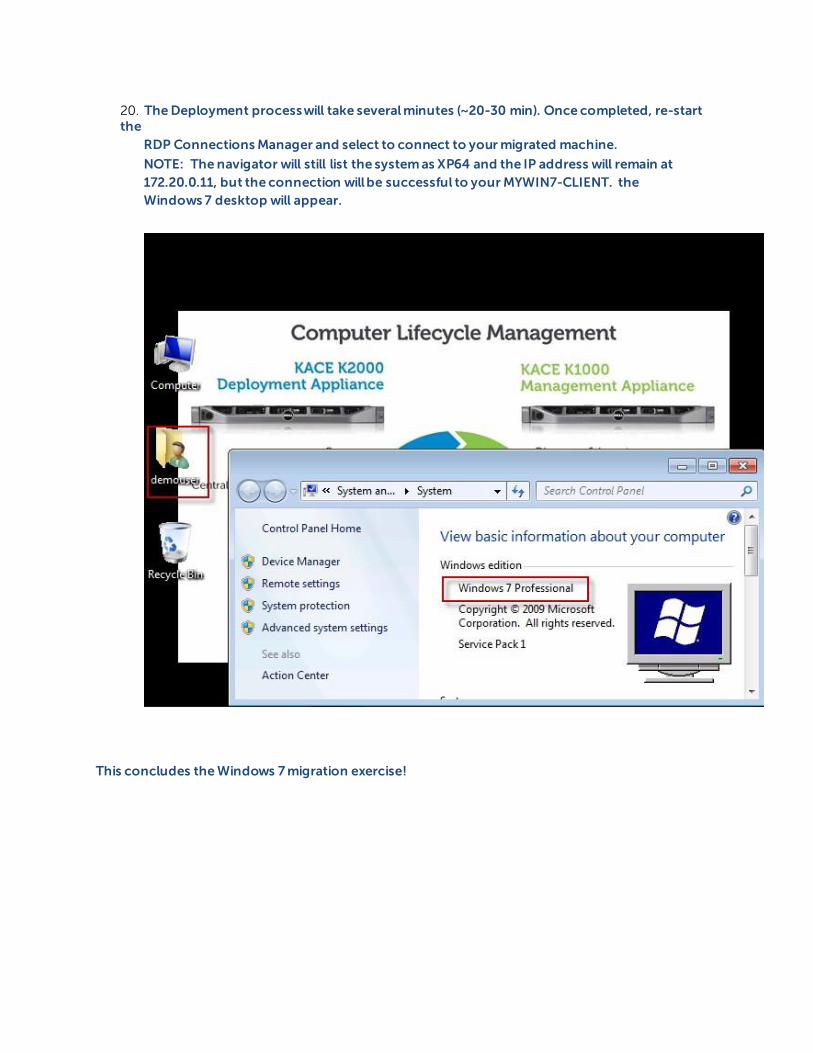
20. The Deployment process will take several minutes (~20-30 min). Once completed, re-start the
RDP Connections Manager and select to connect to your migrated machine.
NOTE: The navigator will still list the system as XP64 and the IP address will remain at
172.20.0.11, but the connection will be successful to your MYWIN7-CLIENT. the
Windows 7 desktop will appear.
This concludes the Windows 7 migration exercise!
5 Imaging Exercise System Imaging allows for the fast and complete deployment of operating systems to large numbers of computers in a short amount of time. Compared to Scripted Installation, System Imaging has added benefit of allowing applications and other settings to be embedded in the image in addition to allowing the flexibility of post-installation tasks.
For this exercise, you will restart your Windows 7 machine to capture an image of the system.
Follow the steps below to complete an image capture of your Win7:
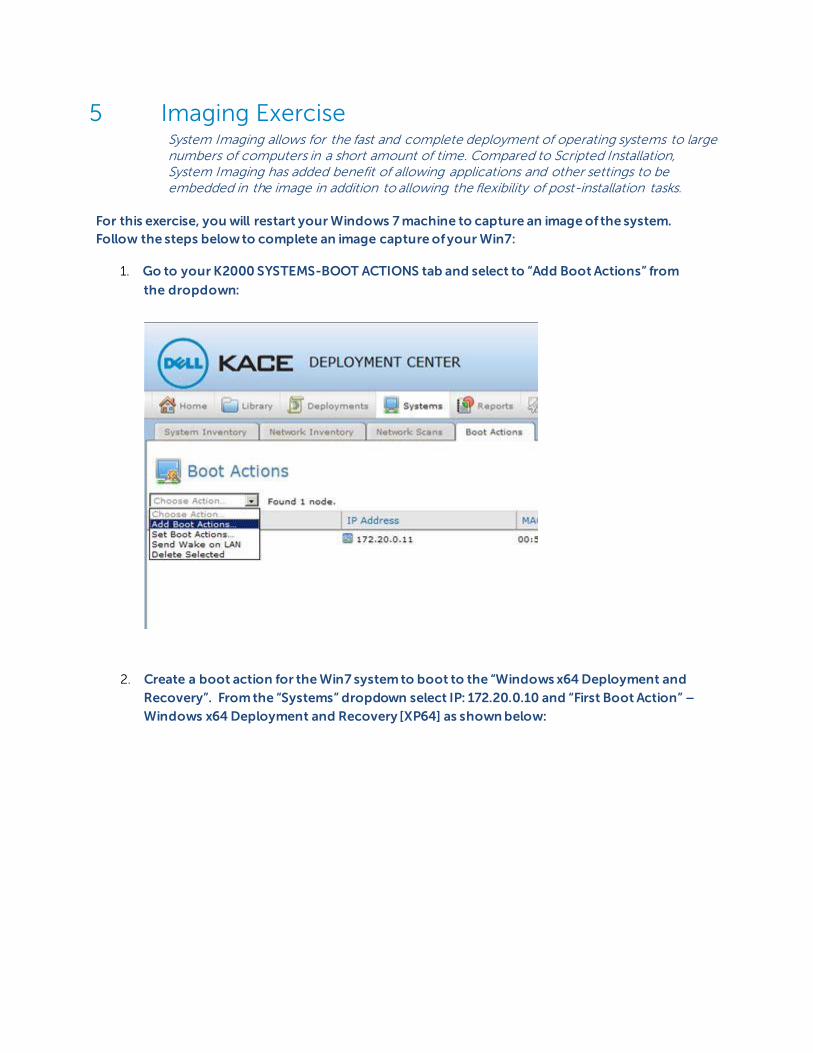
1. Go to your K2000 SYSTEMS-BOOT ACTIONS tab and select to “Add Boot Actions” from
the dropdown:
2. Create a boot action for the Win7 system to boot to the “Windows x64 Deployment and
Recovery”. From the “Systems” dropdown select IP: 172.20.0.10 and “First Boot Action” –
Windows x64 Deployment and Recovery [XP64] as shown below:
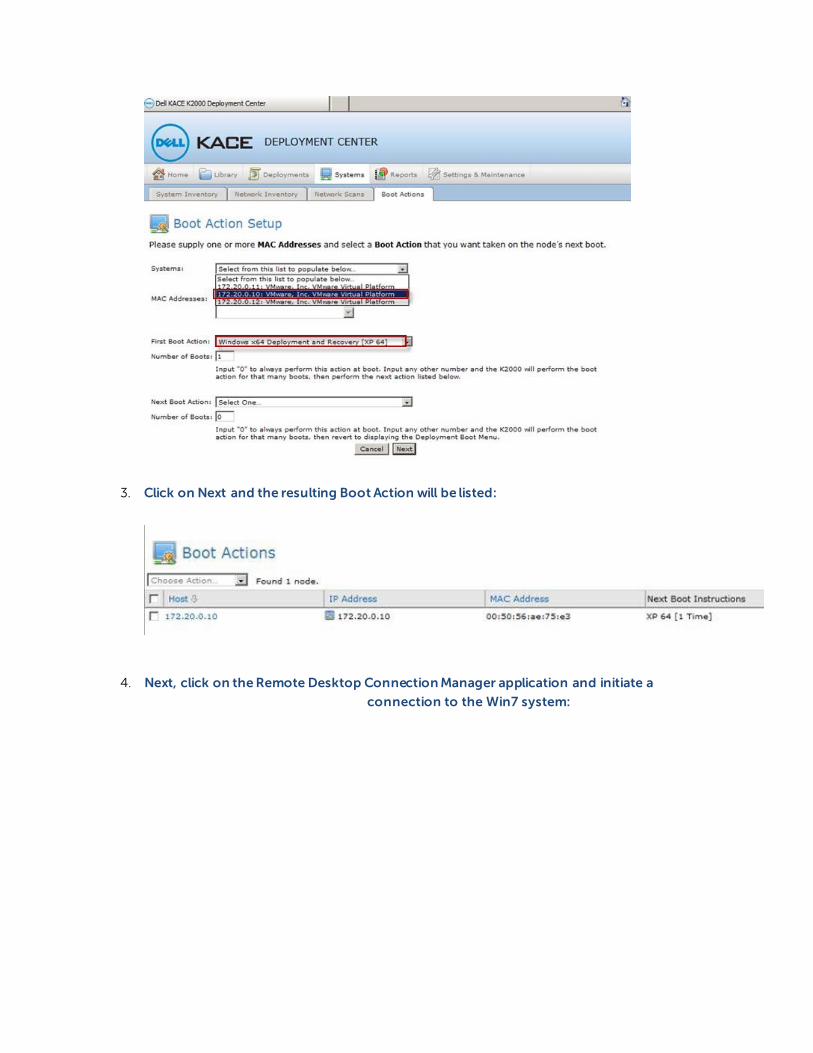
3. Click on Next and the resulting Boot Action will be listed:
4. Next, click on the Remote Desktop Connection Manager application and initiate a
connection to the Win7 system:
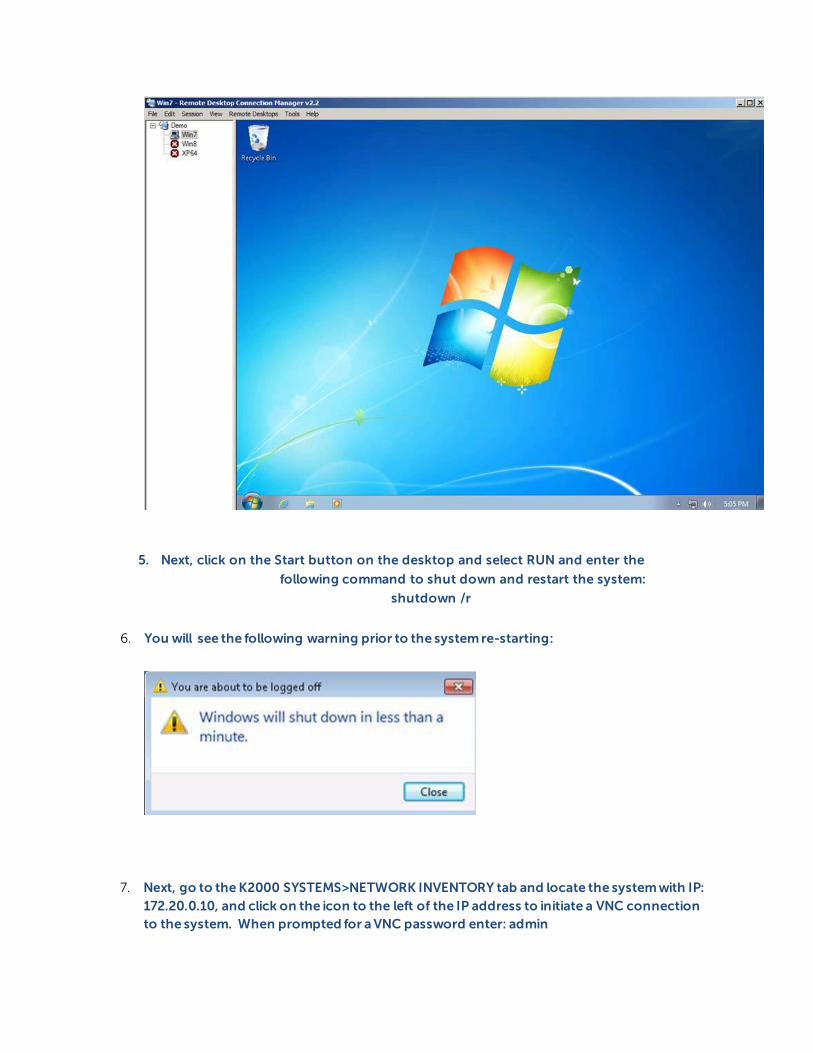
5. Next, click on the Start button on the desktop and select RUN and enter the
following command to shut down and restart the system:
shutdown /r
6. You will see the following warning prior to the system re-starting:
7. Next, go to the K2000 SYSTEMS>NETWORK INVENTORY tab and locate the system with IP:
172.20.0.10, and click on the icon to the left of the IP address to initiate a VNC connection
to the system. When prompted for a VNC password enter: admin
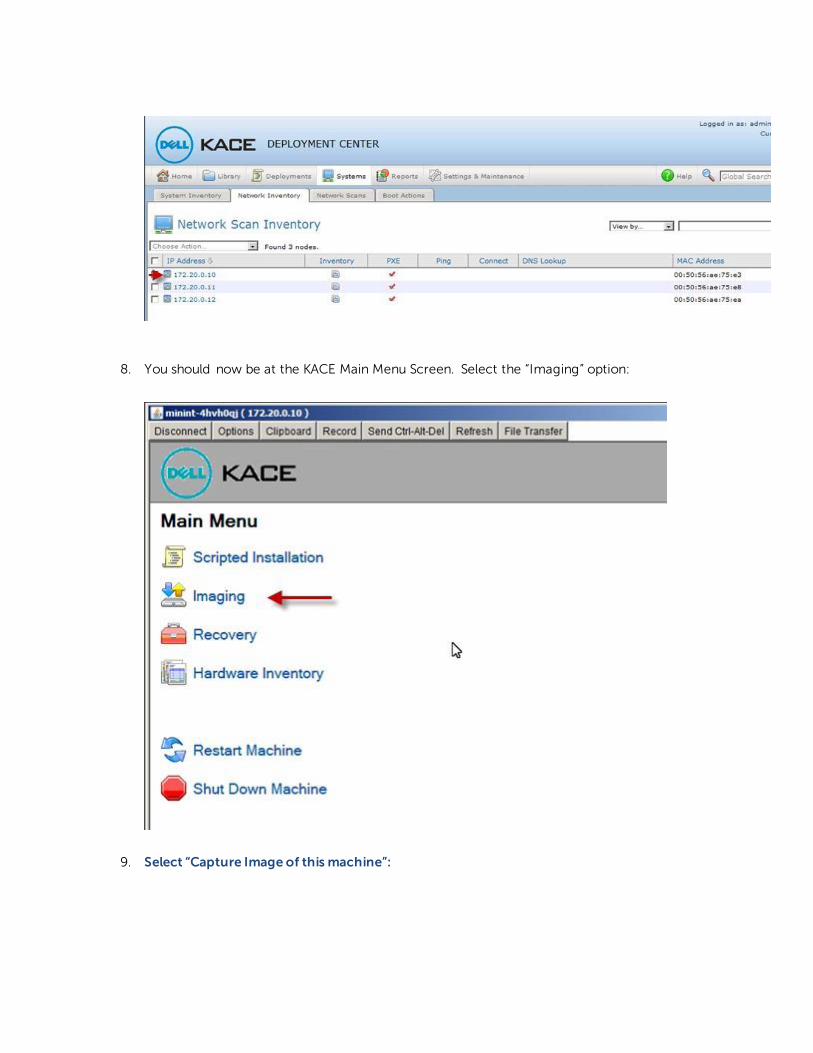
8. You should now be at the KACE Main Menu Screen. Select the “Imaging” option:
9. Select “Capture Image of this machine”:
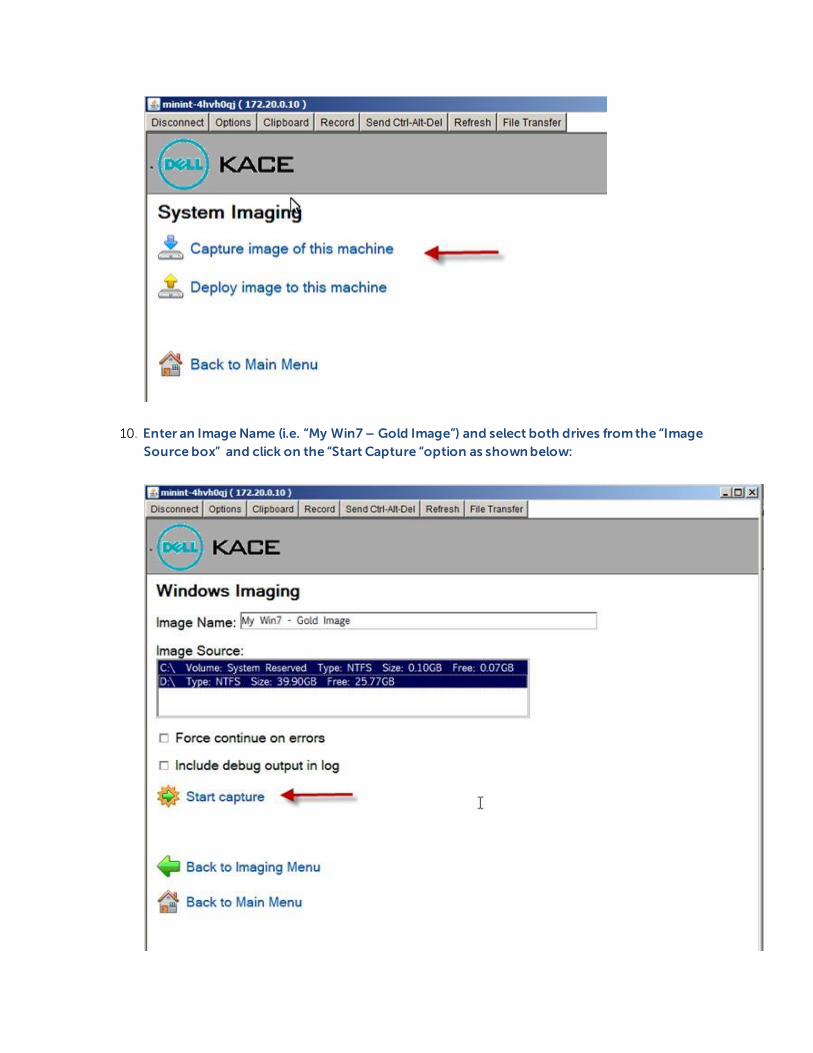
10. Enter an Image Name (i.e. “My Win7 – Gold Image”) and select both drives from the “Image
Source box” and click on the “Start Capture “option as shown below:
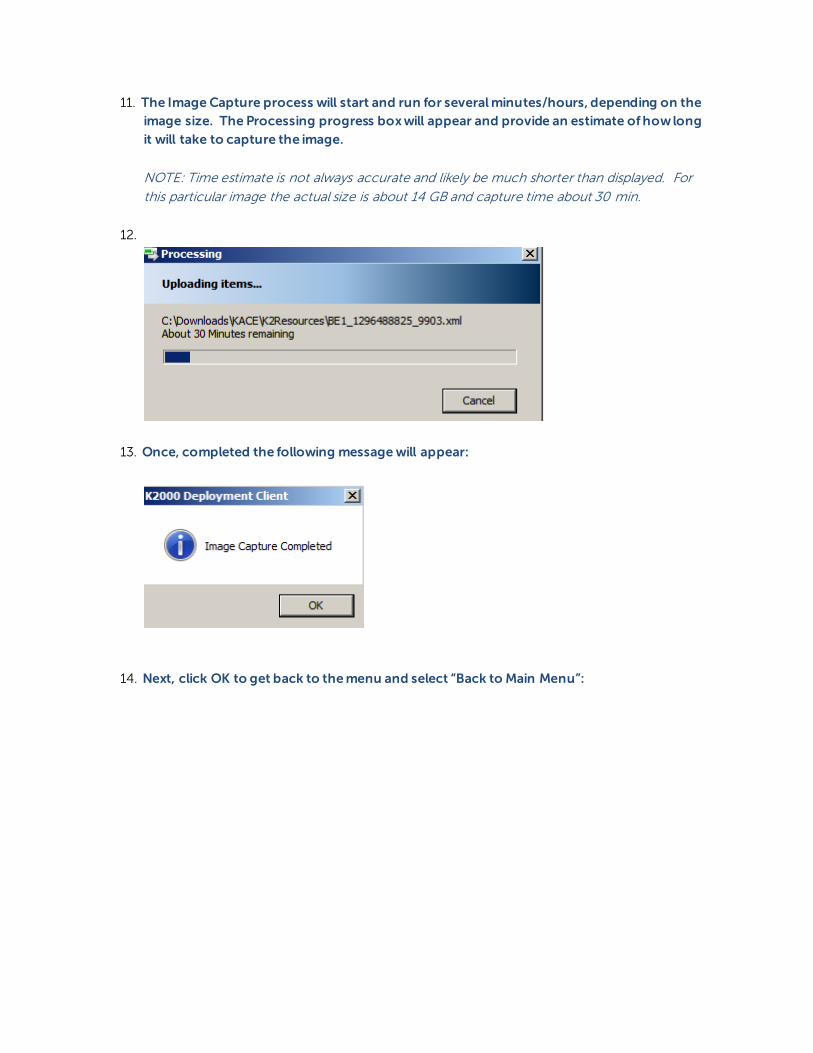
11. The Image Capture process will start and run for several minutes/hours, depending on the
image size. The Processing progress box will appear and provide an estimate of how long
it will take to capture the image.
NOTE: Time estimate is not always accurate and likely be much shorter than displayed. For
this particular image the actual size is about 14 GB and capture time about 30 min.
12.
13. Once, completed the following message will appear:
14. Next, click OK to get back to the menu and select “Back to Main Menu”:
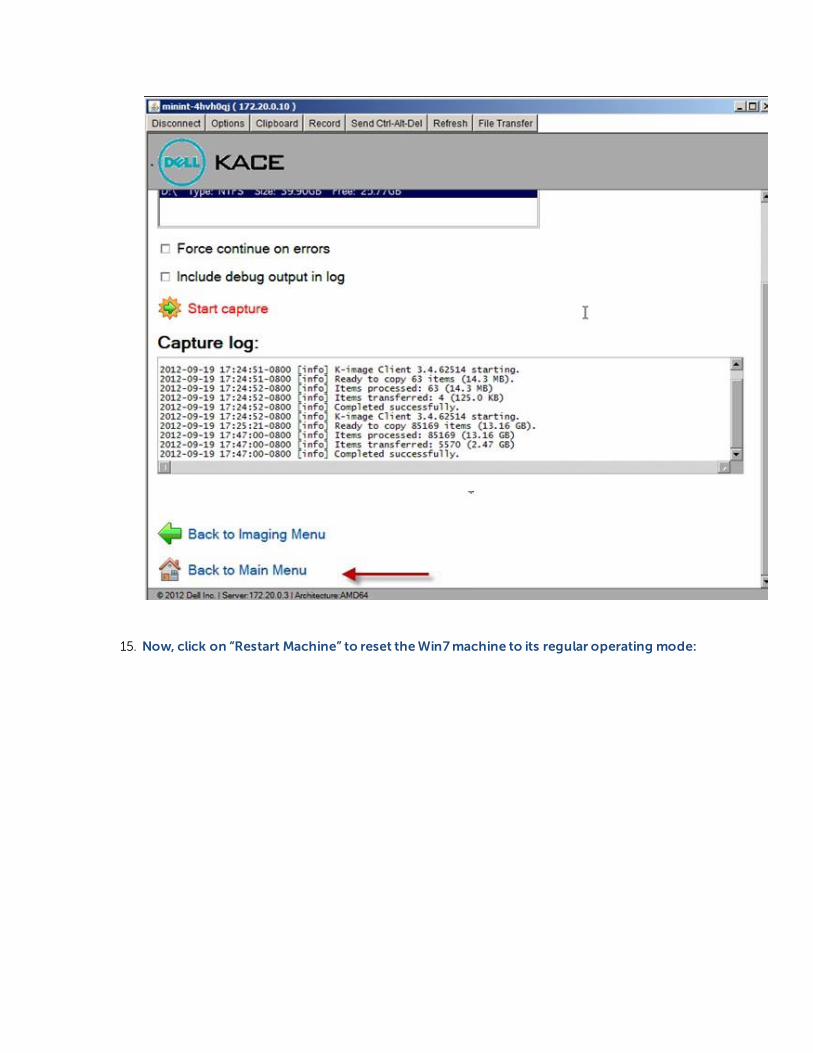
15. Now, click on “Restart Machine” to reset the Win7 machine to its regular operating mode:
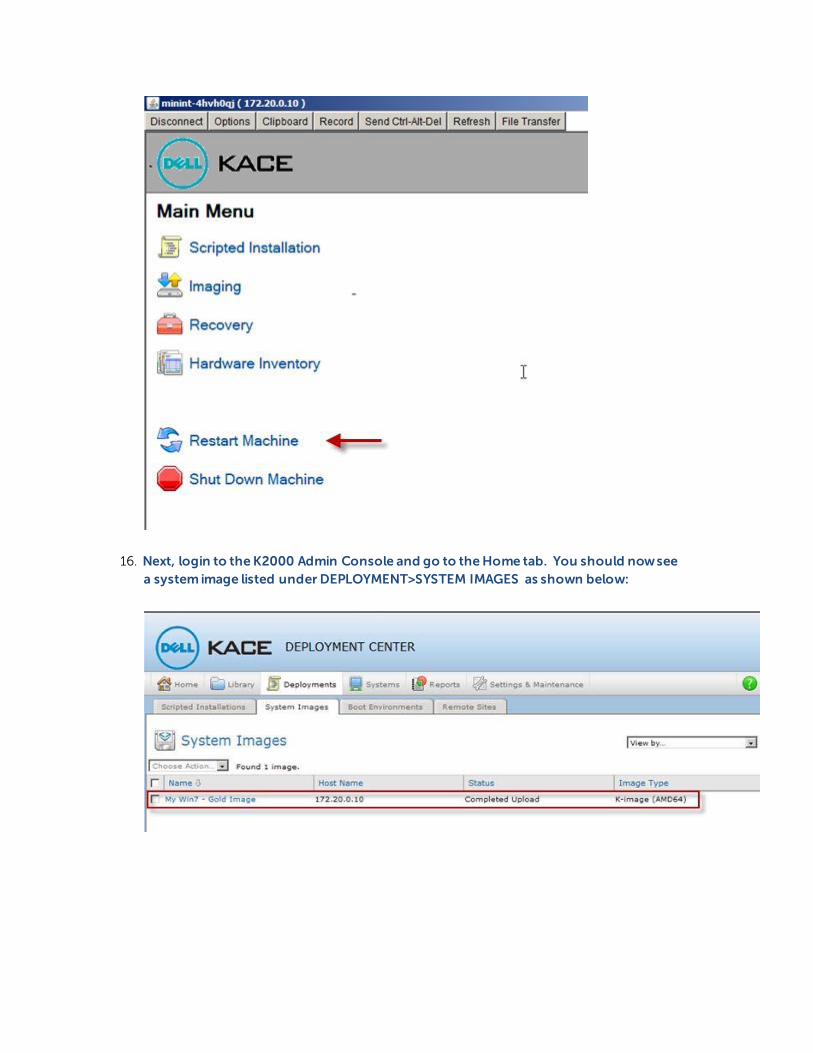
16. Next, login to the K2000 Admin Console and go to the Home tab. You should now see
a system image listed under DEPLOYMENT>SYSTEM IMAGES as shown below:
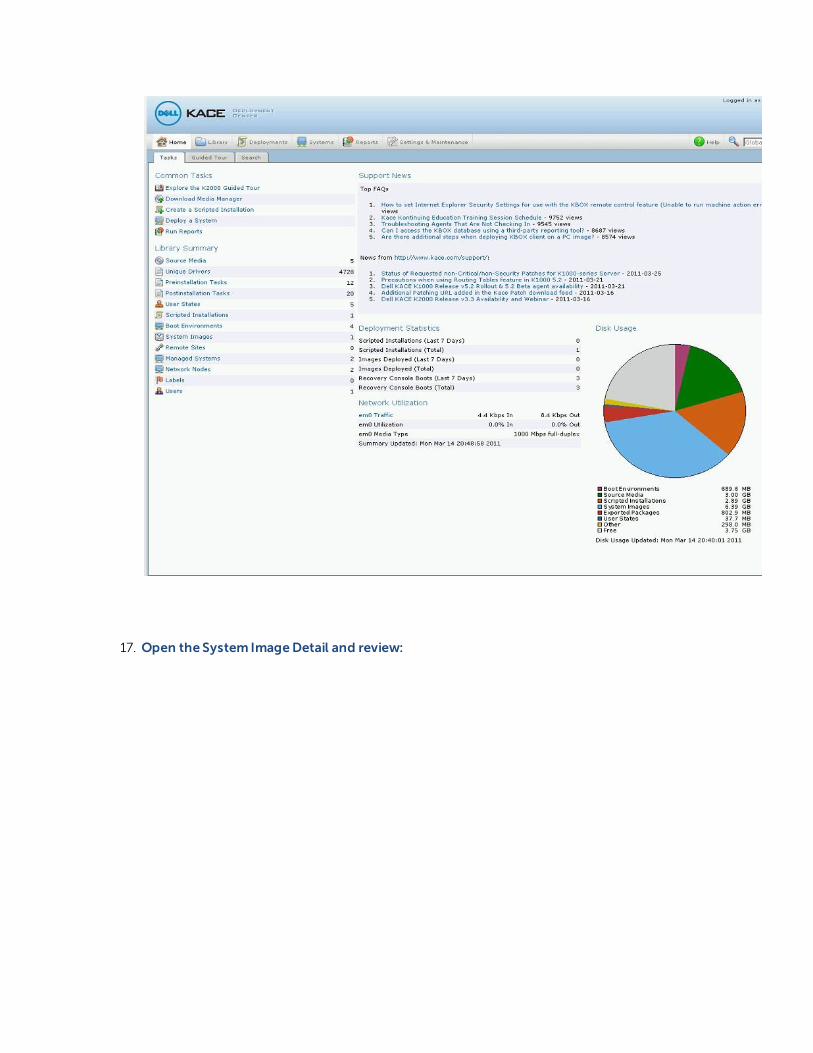
17. Open the System Image Detail and review:
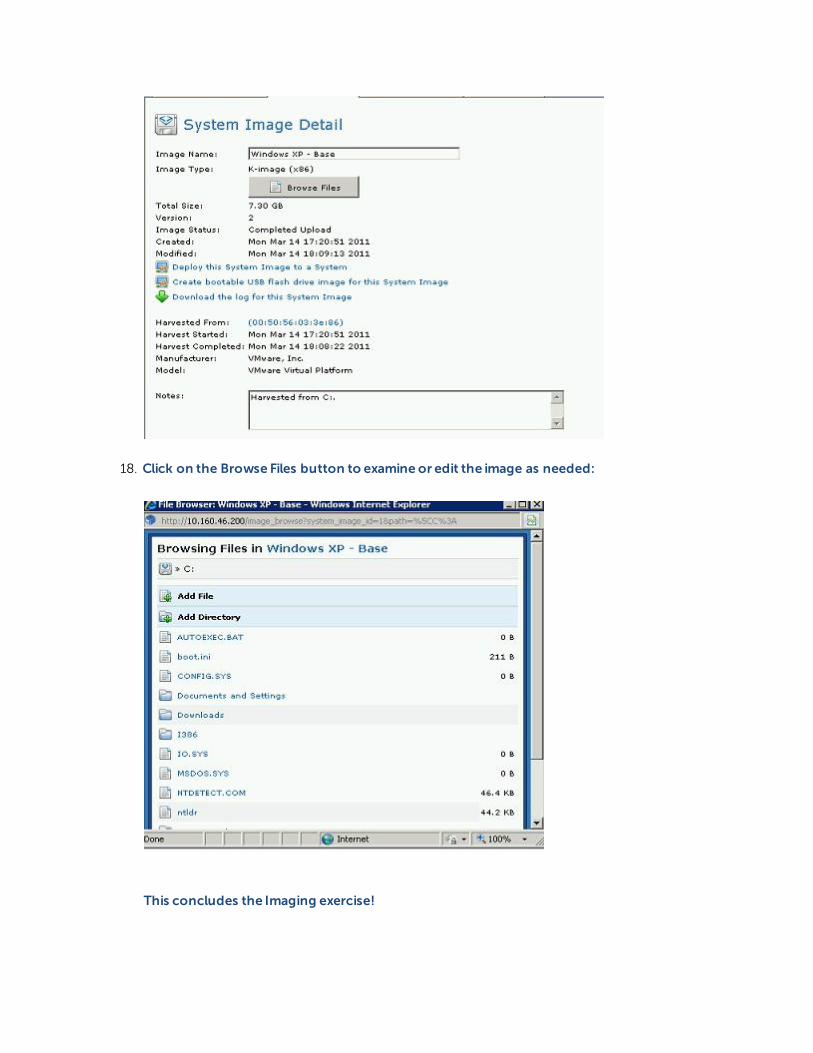
18. Click on the Browse Files button to examine or edit the image as needed:
This concludes the Imaging exercise!
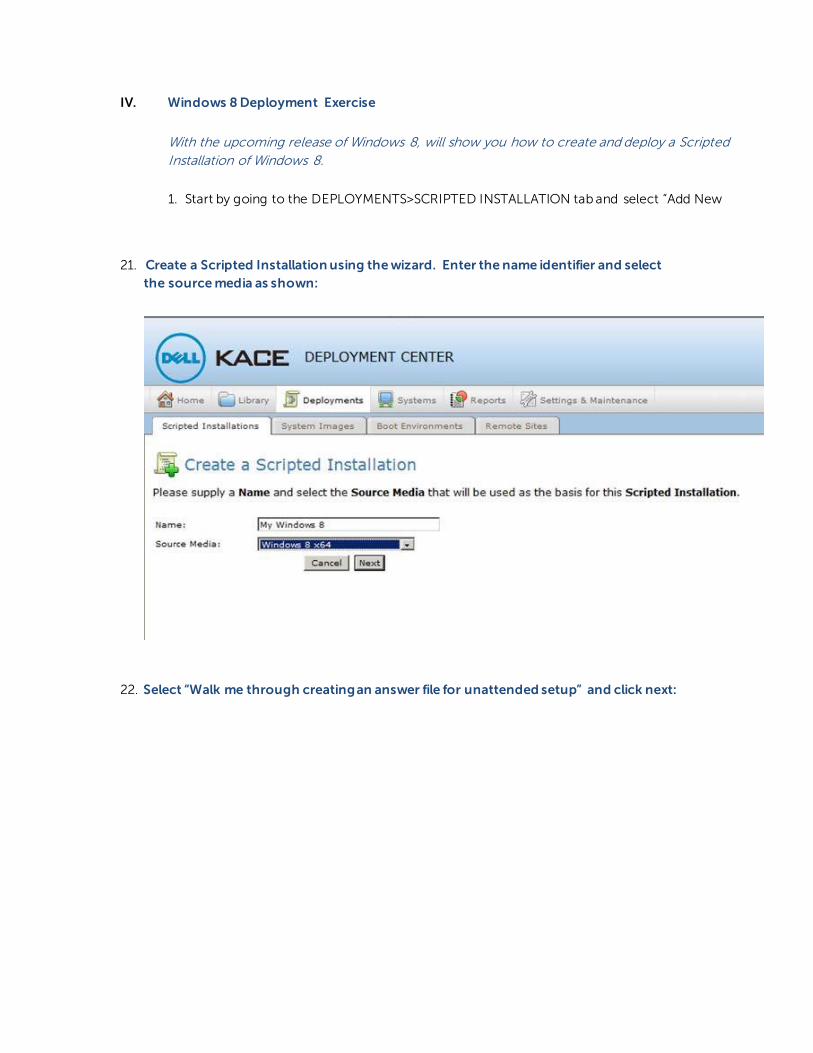
IV. Windows 8 Deployment Exercise
With the upcoming release of Windows 8, will show you how to create and deploy a Scripted
Installation of Windows 8.
1. Start by going to the DEPLOYMENTS>SCRIPTED INSTALLATION tab and select “Add New
21. Create a Scripted Installation using the wizard. Enter the name identifier and select
the source media as shown:
22. Select “Walk me through creating an answer file for unattended setup” and click next:
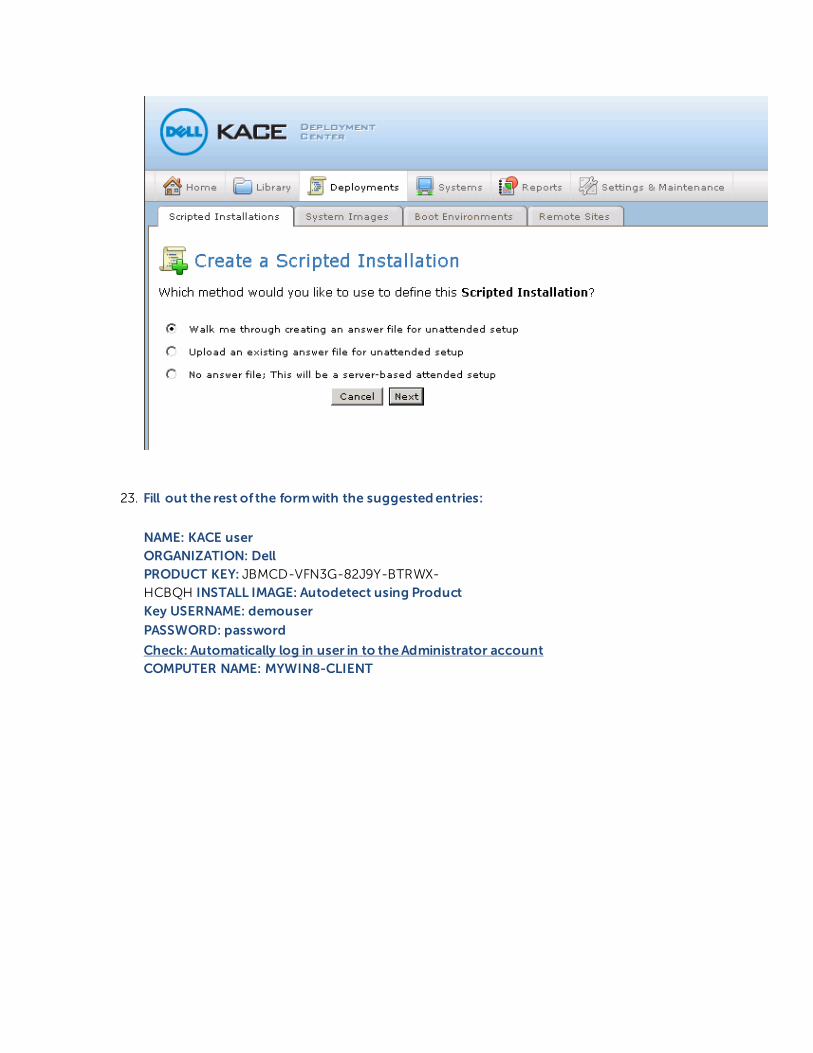
23. Fill out the rest of the form with the suggested entries:
NAME: KACE user
ORGANIZATION: Dell
PRODUCT KEY: JBMCD-VFN3G-82J9Y-BTRWX-
HCBQH INSTALL IMAGE: Autodetect using Product
Key USERNAME: demouser
PASSWORD: password
Check: Automatically log in user in to the Administrator account
COMPUTER NAME: MYWIN8-CLIENT
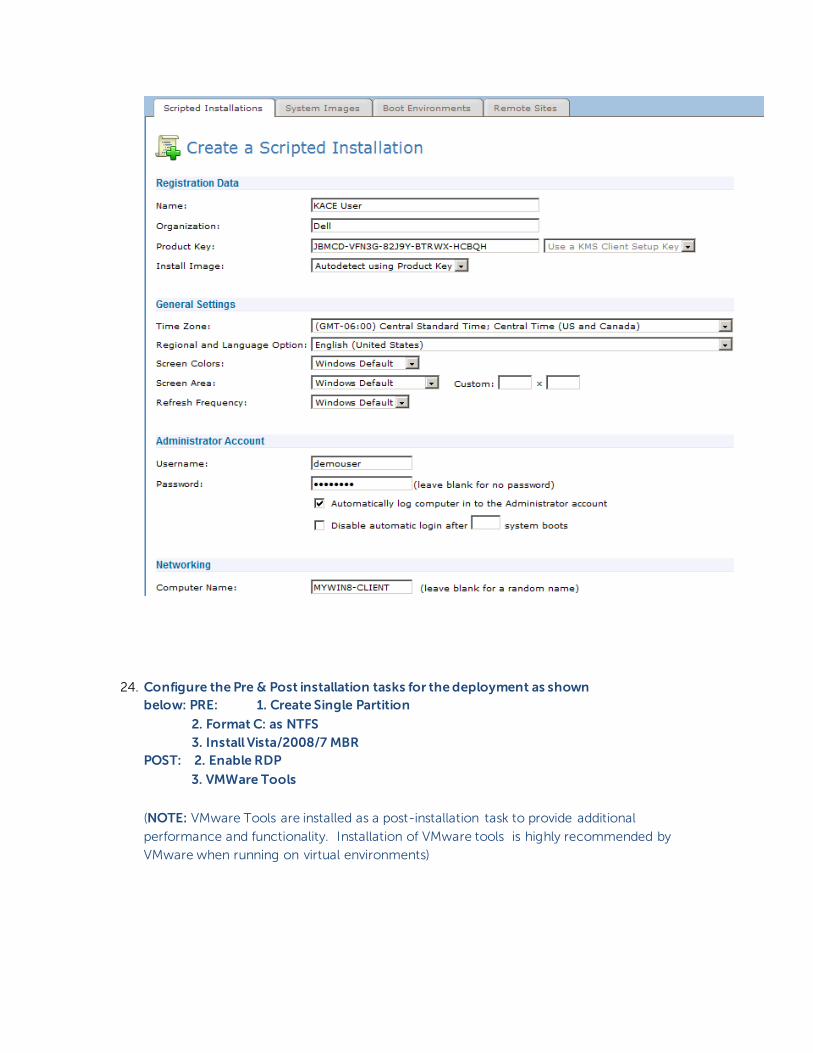
24. Configure the Pre & Post installation tasks for the deployment as shown
below: PRE: 1. Create Single Partition
2. Format C: as NTFS
3. Install Vista/2008/7 MBR
POST: 2. Enable RDP
3. VMWare Tools
(NOTE: VMware Tools are installed as a post-installation task to provide additional
performance and functionality. Installation of VMware tools is highly recommended by
VMware when running on virtual environments)
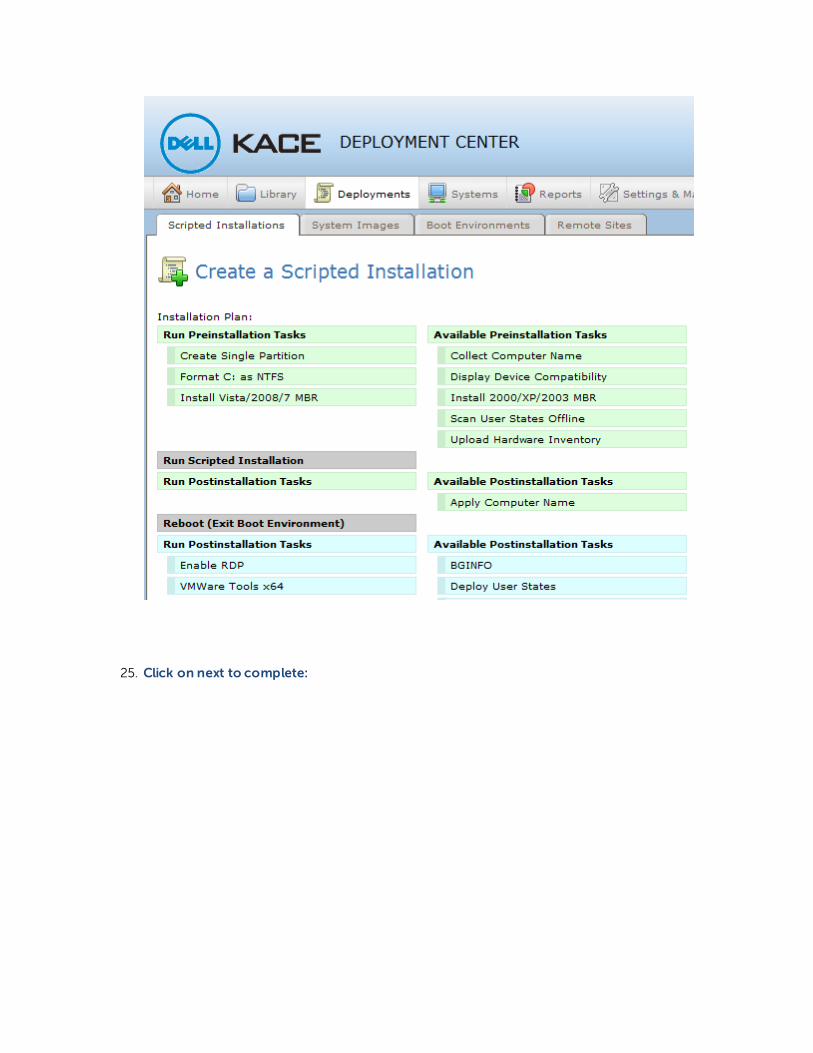
25. Click on next to complete:

26. Next, select to Deploy this Scripted Installation to a System:
27. In the Boot Action Setup select the first system listed under “Systems” (172.20.0.12 VMWare
Virtual Platform):
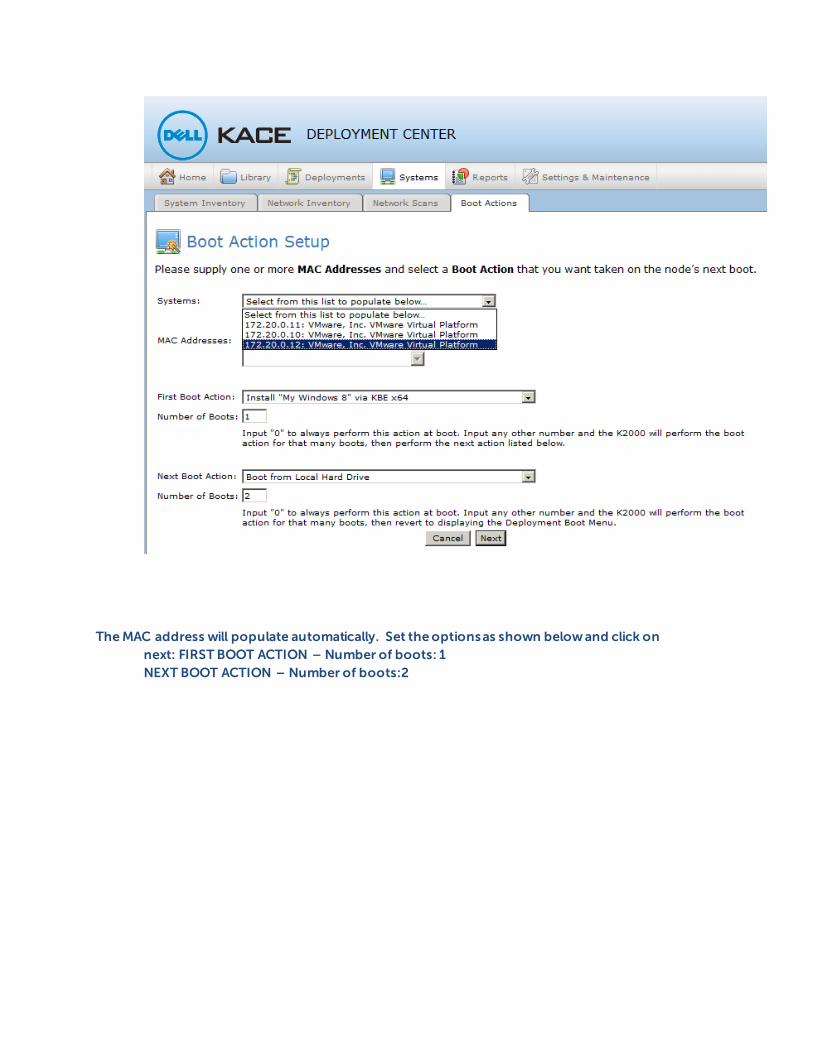
The MAC address will populate automatically. Set the options as shown below and click on
next: FIRST BOOT ACTION – Number of boots: 1
NEXT BOOT ACTION – Number of boots:2
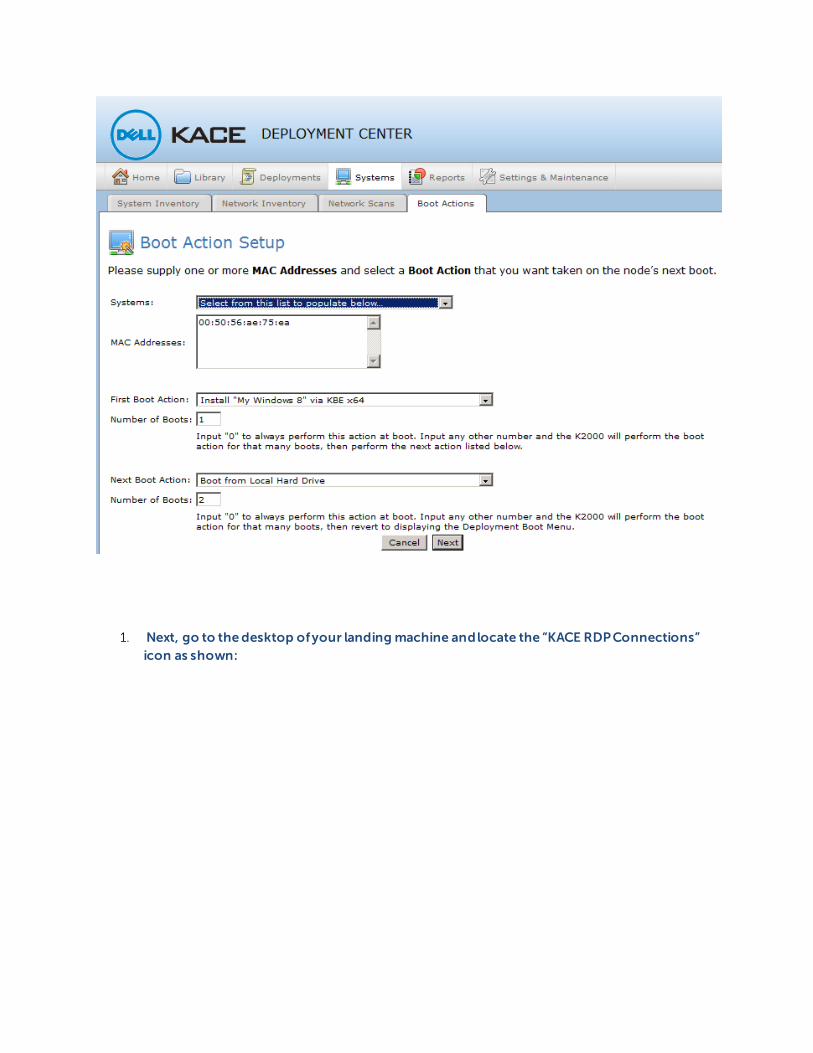
1. Next, go to the desktop of your landing machine and locate the “KACE RDP Connections”
icon as shown:

From the left navigator, double-click on the WIN8 machine to initiate a remote
desktop session to this system:
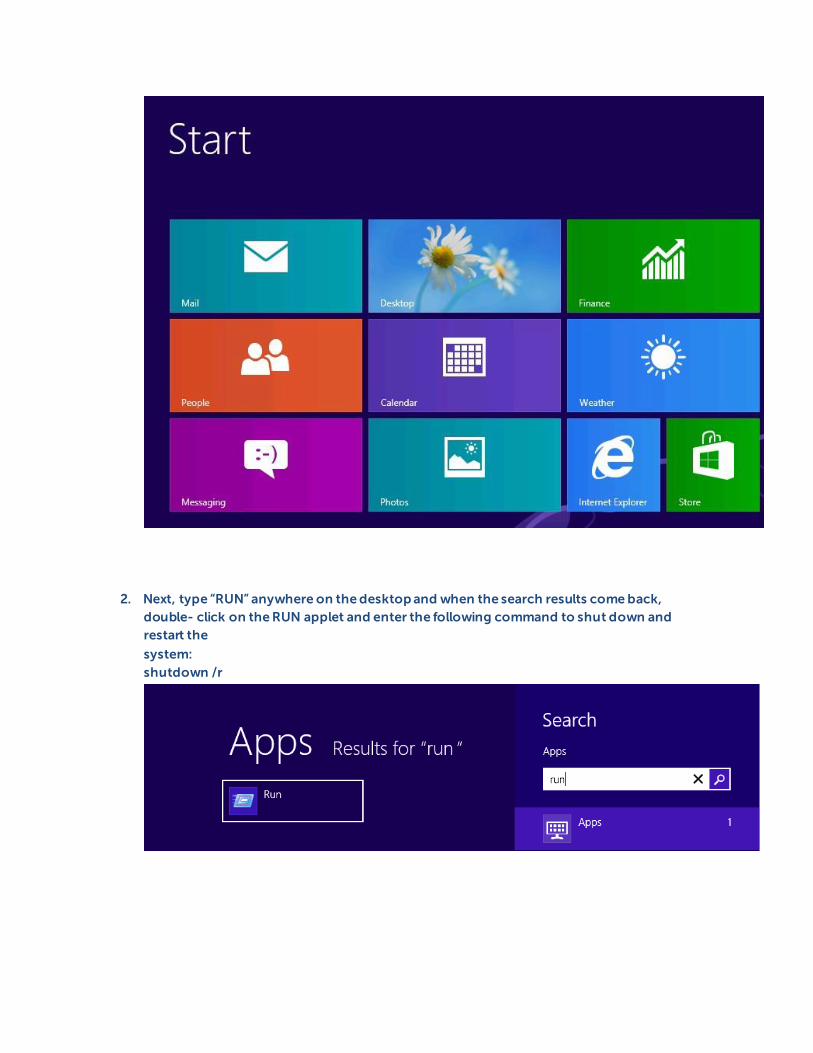
2. Next, type “RUN” anywhere on the desktop and when the search results come back,
double- click on the RUN applet and enter the following command to shut down and
restart the
system:
shutdown /r
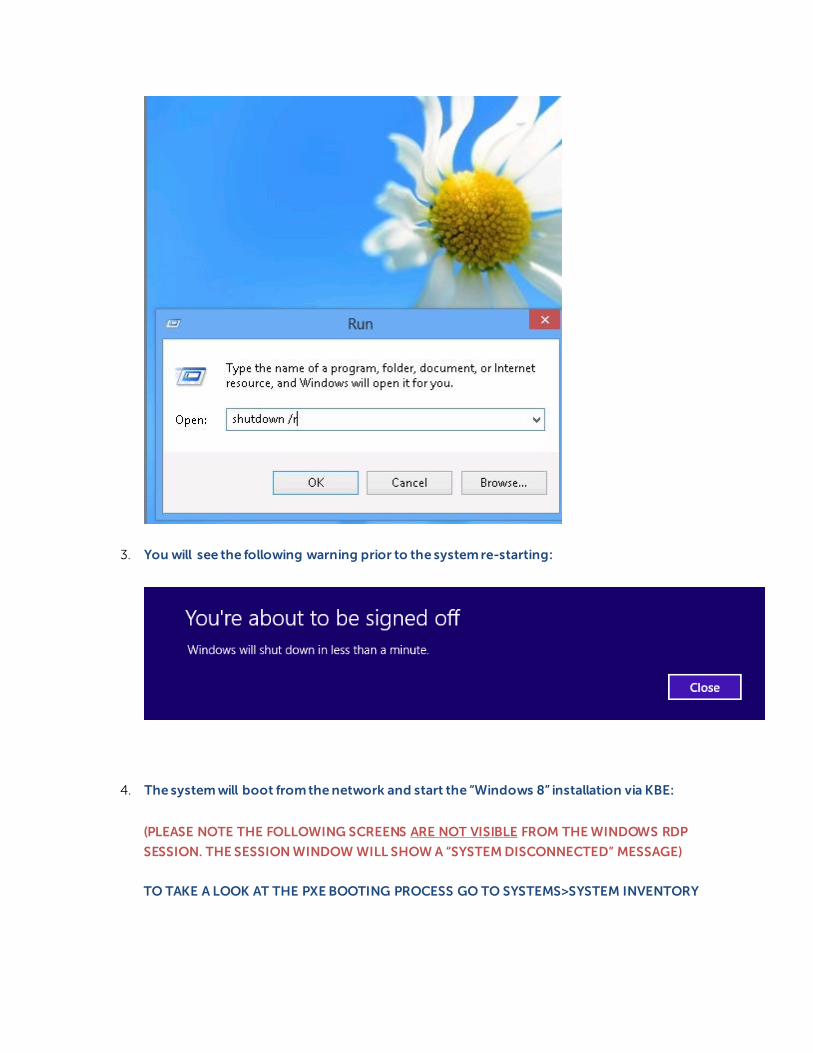
3. You will see the following warning prior to the system re-starting:
4. The system will boot from the network and start the “Windows 8” installation via KBE:
(PLEASE NOTE THE FOLLOWING SCREENS ARE NOT VISIBLE FROM THE WINDOWS RDP
SESSION. THE SESSION WINDOW WILL SHOW A “SYSTEM DISCONNECTED” MESSAGE)
TO TAKE A LOOK AT THE PXE BOOTING PROCESS GO TO SYSTEMS>SYSTEM INVENTORY

CLICK ON THE ICON TO THE LEFT OF THE IP ADDRESS OF THE SYSTEM TO START A VNC SESSION
(NOTE: IT TAKES 2-3 MIN. FOR THE BOOT ENVIRONMENT TO LOAD. IF YOU ARE NOT ABLE
TO CONNECT RIGHT AWAY. ATTEMPT THE CONNECTION AGAIN AFTER A COUPLE OF
MINUTES!)
ENTER “admin” IN THE PWD BOX:
ONCE CONNECTED IN THE VNC SESSION YOU SHOULD HAVE ACCESS TO
THE PXE ENVIRONMENT IN PROGRESS:

5. The machine will start Windows PE:

6. Next, the K2000 Deployment Client will start and configure the rest of the installation:

7. First, the Pre-Installation tasks will be performed:
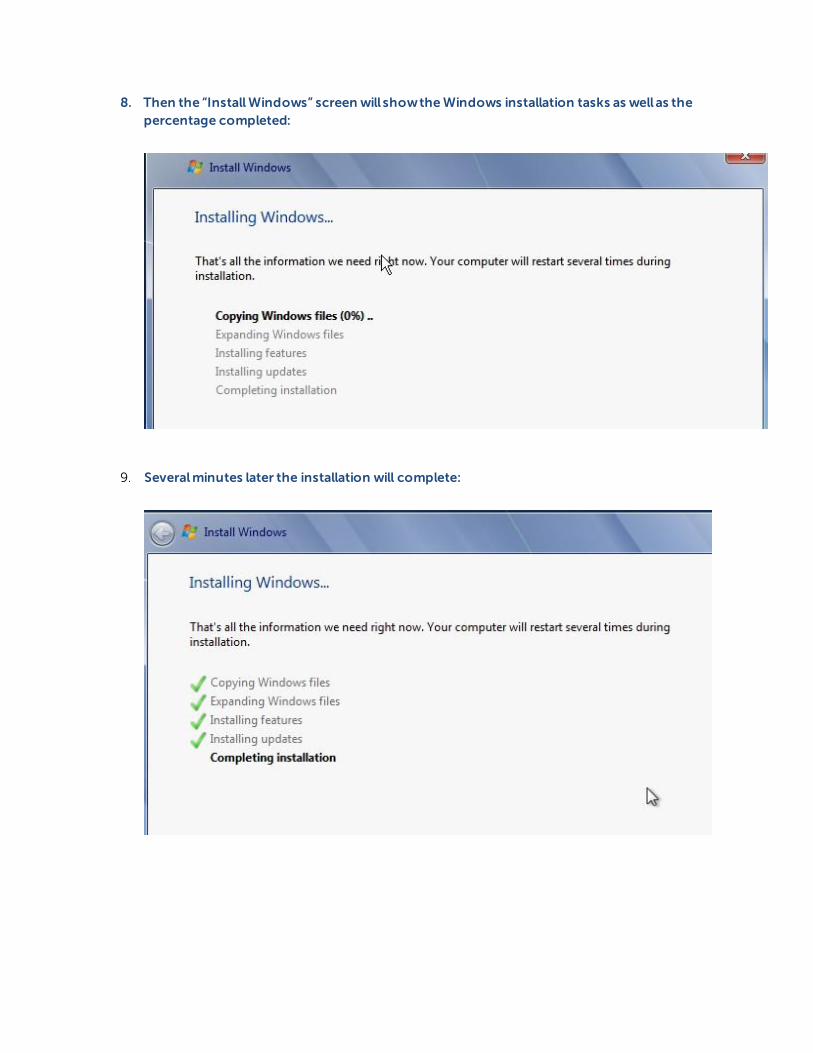
8. Then the “Install Windows” screen will show the Windows installation tasks as well as the
percentage completed:
9. Several minutes later the installation will complete:

53 Dell Demo Center – https://demos.dell.com | Dell Inc., 2016
10. The Deployment process will take several minutes (~20-30 min). Once completed, re-start the
RDP Connections Manager and select to connect to your migrated machine.
NOTE: The navigator will still list the system as WIN8 and the IP address will remain at
172.20.0.12, but the connection will be successful to your MYWIN8-CLIENT.
the Windows 8 desktop will appear.
This concludes the Scripted Installation/Win 8 exercise!
Related Documents