1(14) Junk Rig for Beginners by Arne Kverneland (ver. 20211114a, based on ver. 20141029) (Note: This write-up has been updated in Nov 2021. Most of the updates sit in the Appendix. Only minor fixes have been made to the main section...) The following is an explanation of the basics of the junk rig (JR). It is aimed for sailors with some experience with other rigs; Bermudian, Gaff, Sprit or Lug, but who are new to this one. Johanna, 29ft, 48sqm sail Samson, 49ft, 70 + 37 sqm sails Malena, 23ft, 32sqm sail Why junk rig? Before giving details let me explain why I converted my boat, Malena, from Bermudian to JR, back in 1990. I wanted to sail downwind with better speed and less fuss. This was actually the main reason for converting my first boat. The masthead Bermudian (Bm) rig is such a pain to sail downwind, requiring careful helming and lots of deck-work to boom out the genoa or spinnaker which is not fun for a single-hander. The JR did not disappoint me here: With the single big sail squared out, unrestricted by shrouds, the downwind leg suddenly gave really easy sailing, and the speed went up a lot... I wanted a self-tacking rig. I surely got that. The genoa winches were soon removed. I wanted to get rid of all the sail bags taking up space down below. Oh yes, three foresails and a spinnaker... I’d heard about the JR’s fast reefing and furling. That really works too. Now I hardly go on deck after leaving the harbour. The blind zone of the genoa had given me a few real scares. A double Oh Yes! With the JR there is suddenly a free view all around. New literature available. Yes, on a sailing trip to the Shetland Isles in 1989 I was able to buy the new book; Practical Junk Rig by Hasler & McLeod. With that in hand I was able to set to work. Performance in practice If you fit your boat with a well-made junk rig with cambered panel sail(s), you can expect to just about keep pace with a Bermudian-rigged sister boat when close-hauled. As both boats fall off onto a reach, your JR boat will soon take the lead, and on a straight downwind leg, the JR will be in a different league. A spinnaker set on the Bm-rigged boat may change this, but only if the crew is good. On all but on the close-hauled leg the JR boats seem to sail more upright than the Bm-rigged boats. Easing the sheet of the JR gives better airflow than when easing the sheet on a genoa. With a JR boat your sailing style will change. Soon after experiencing the easy reefing, you will hang on to full sail for longer: Reefing will be done to suit actual wind strength and not to

Welcome message from author
This document is posted to help you gain knowledge. Please leave a comment to let me know what you think about it! Share it to your friends and learn new things together.
Transcript
1(14)
Junk Rig for Beginners
by Arne Kverneland
(ver. 20211114a, based on ver. 20141029)
(Note: This write-up has been updated in Nov 2021. Most of the updates sit in the Appendix. Only minor fixes have been made to the main section...)
The following is an explanation of the basics of the junk rig (JR). It is aimed for sailors with some
experience with other rigs; Bermudian, Gaff, Sprit or Lug, but who are new to this one.
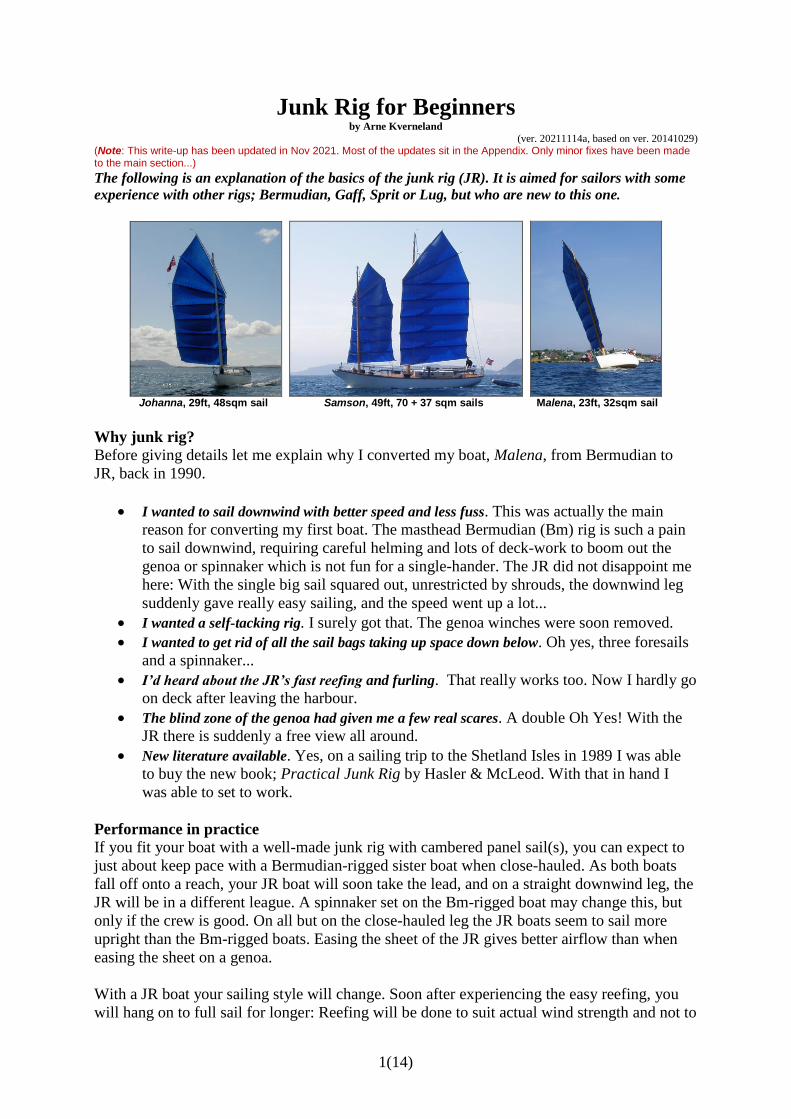
Johanna, 29ft, 48sqm sail Samson, 49ft, 70 + 37 sqm sails Malena, 23ft, 32sqm sail
Why junk rig?
Before giving details let me explain why I converted my boat, Malena, from Bermudian to
JR, back in 1990.
I wanted to sail downwind with better speed and less fuss. This was actually the main
reason for converting my first boat. The masthead Bermudian (Bm) rig is such a pain
to sail downwind, requiring careful helming and lots of deck-work to boom out the
genoa or spinnaker which is not fun for a single-hander. The JR did not disappoint me
here: With the single big sail squared out, unrestricted by shrouds, the downwind leg
suddenly gave really easy sailing, and the speed went up a lot...
I wanted a self-tacking rig. I surely got that. The genoa winches were soon removed.
I wanted to get rid of all the sail bags taking up space down below. Oh yes, three foresails
and a spinnaker...
I’d heard about the JR’s fast reefing and furling. That really works too. Now I hardly go
on deck after leaving the harbour.
The blind zone of the genoa had given me a few real scares. A double Oh Yes! With the
JR there is suddenly a free view all around.
New literature available. Yes, on a sailing trip to the Shetland Isles in 1989 I was able
to buy the new book; Practical Junk Rig by Hasler & McLeod. With that in hand I
was able to set to work.
Performance in practice
If you fit your boat with a well-made junk rig with cambered panel sail(s), you can expect to
just about keep pace with a Bermudian-rigged sister boat when close-hauled. As both boats
fall off onto a reach, your JR boat will soon take the lead, and on a straight downwind leg, the
JR will be in a different league. A spinnaker set on the Bm-rigged boat may change this, but
only if the crew is good. On all but on the close-hauled leg the JR boats seem to sail more
upright than the Bm-rigged boats. Easing the sheet of the JR gives better airflow than when
easing the sheet on a genoa.
With a JR boat your sailing style will change. Soon after experiencing the easy reefing, you
will hang on to full sail for longer: Reefing will be done to suit actual wind strength and not to
2(14)
the wind strength forecasted on the radio. Narrow sounds with headwinds will no longer be a
start-the-engine situation – you will just tack your way through it. Pinching the boat to round
a point will also be out as an extra tack or two is no problem, so you will just sail the boat for
best progress. When sailing with novice crew on board, they will generally relax quite quickly
as there are no genoa sheets to handle when tacking and as there is no noise from the JR as the
boat comes about.
What is a junk rig, technically speaking?
The JR is basically a fully battened, balanced lug sail, in other words a self-tacking fore and
aft sail. The main difference is in the battens which are not bendy, and therefore are more like
intermediate booms or yards. In addition, the sheet is not only attached to the boom, but also
to most of the battens. This may sound like an insignificant difference, but when it comes to
distribution of stress and to sail handling, the difference is huge. More about that later.
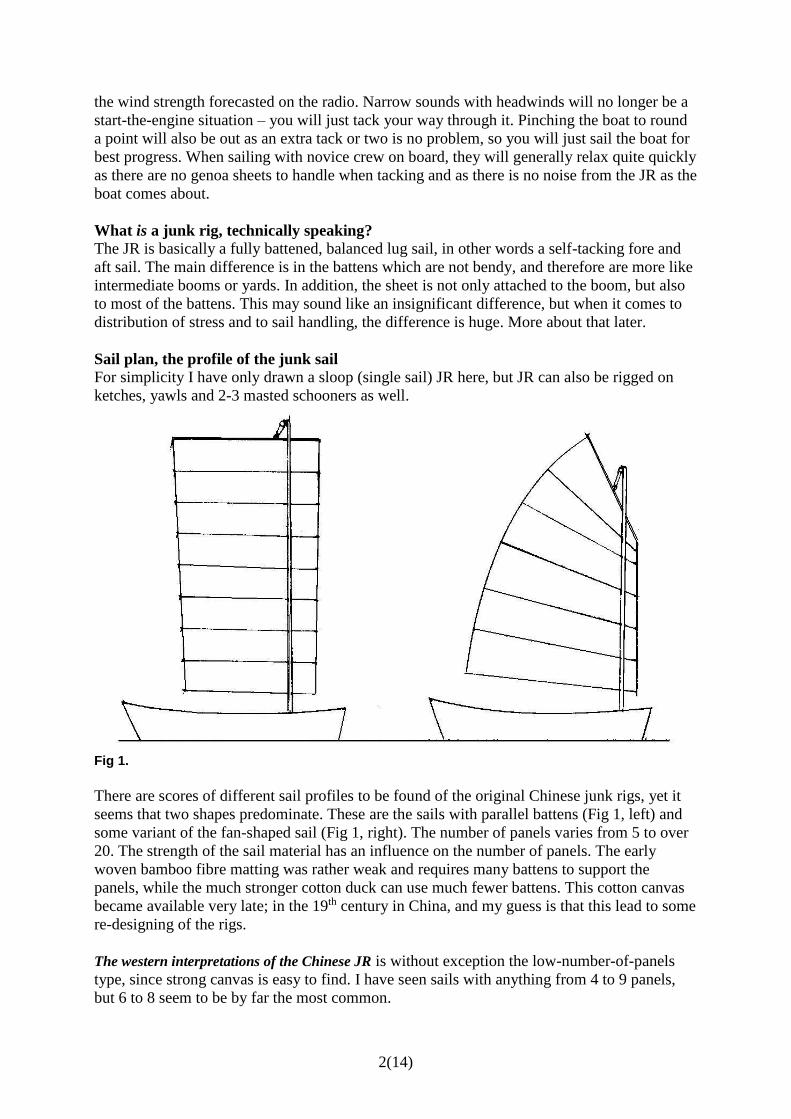
Sail plan, the profile of the junk sail
For simplicity I have only drawn a sloop (single sail) JR here, but JR can also be rigged on
ketches, yawls and 2-3 masted schooners as well.
Fig 1.
There are scores of different sail profiles to be found of the original Chinese junk rigs, yet it
seems that two shapes predominate. These are the sails with parallel battens (Fig 1, left) and
some variant of the fan-shaped sail (Fig 1, right). The number of panels varies from 5 to over
20. The strength of the sail material has an influence on the number of panels. The early
woven bamboo fibre matting was rather weak and requires many battens to support the
panels, while the much stronger cotton duck can use much fewer battens. This cotton canvas
became available very late; in the 19th century in China, and my guess is that this lead to some
re-designing of the rigs.
The western interpretations of the Chinese JR is without exception the low-number-of-panels
type, since strong canvas is easy to find. I have seen sails with anything from 4 to 9 panels,
but 6 to 8 seem to be by far the most common.
3(14)
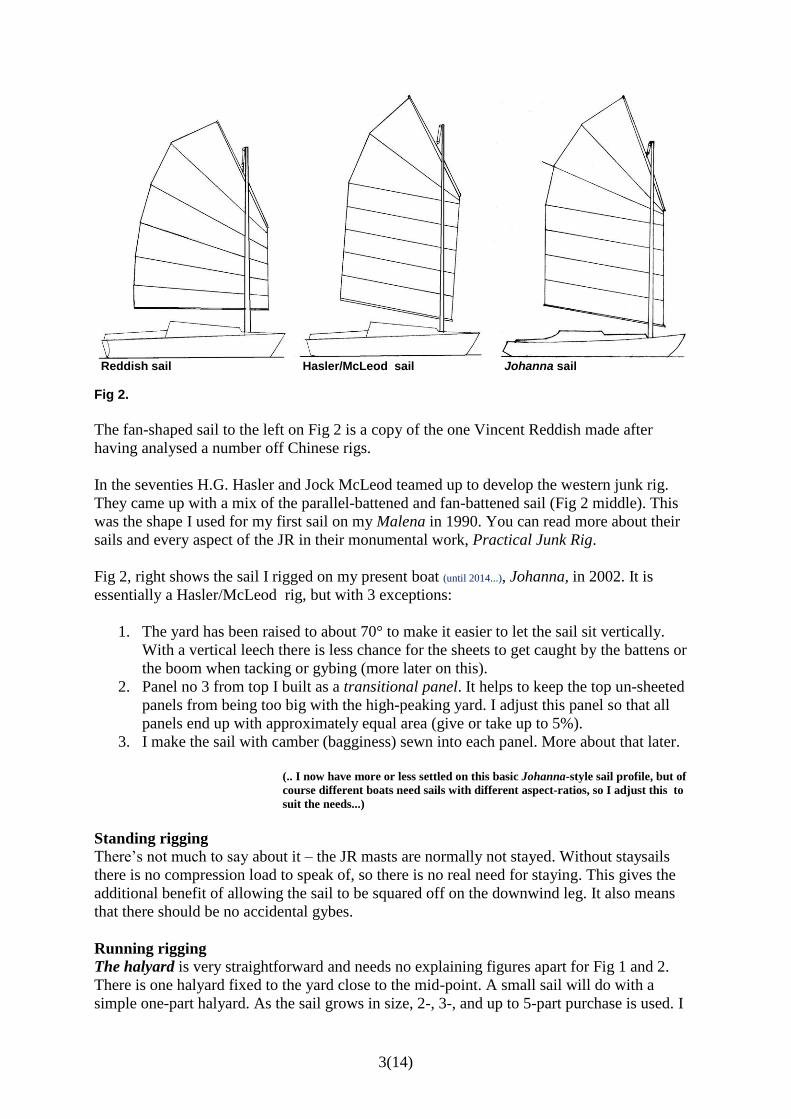
Reddish sail Hasler/McLeod sail Johanna sail
Fig 2.
The fan-shaped sail to the left on Fig 2 is a copy of the one Vincent Reddish made after
having analysed a number off Chinese rigs.
In the seventies H.G. Hasler and Jock McLeod teamed up to develop the western junk rig.
They came up with a mix of the parallel-battened and fan-battened sail (Fig 2 middle). This
was the shape I used for my first sail on my Malena in 1990. You can read more about their
sails and every aspect of the JR in their monumental work, Practical Junk Rig.
Fig 2, right shows the sail I rigged on my present boat (until 2014...), Johanna, in 2002. It is
essentially a Hasler/McLeod rig, but with 3 exceptions:
1. The yard has been raised to about 70° to make it easier to let the sail sit vertically.
With a vertical leech there is less chance for the sheets to get caught by the battens or
the boom when tacking or gybing (more later on this).
2. Panel no 3 from top I built as a transitional panel. It helps to keep the top un-sheeted
panels from being too big with the high-peaking yard. I adjust this panel so that all
panels end up with approximately equal area (give or take up to 5%).
3. I make the sail with camber (bagginess) sewn into each panel. More about that later.
(.. I now have more or less settled on this basic Johanna-style sail profile, but of
course different boats need sails with different aspect-ratios, so I adjust this to
suit the needs...)
Standing rigging
There’s not much to say about it – the JR masts are normally not stayed. Without staysails
there is no compression load to speak of, so there is no real need for staying. This gives the
additional benefit of allowing the sail to be squared off on the downwind leg. It also means
that there should be no accidental gybes.
Running rigging
The halyard is very straightforward and needs no explaining figures apart for Fig 1 and 2.
There is one halyard fixed to the yard close to the mid-point. A small sail will do with a
simple one-part halyard. As the sail grows in size, 2-, 3-, and up to 5-part purchase is used. I
4(14)
recommend using good blocks with ball bearings for the halyards. This makes hoisting easier
and the sail also comes down faster.
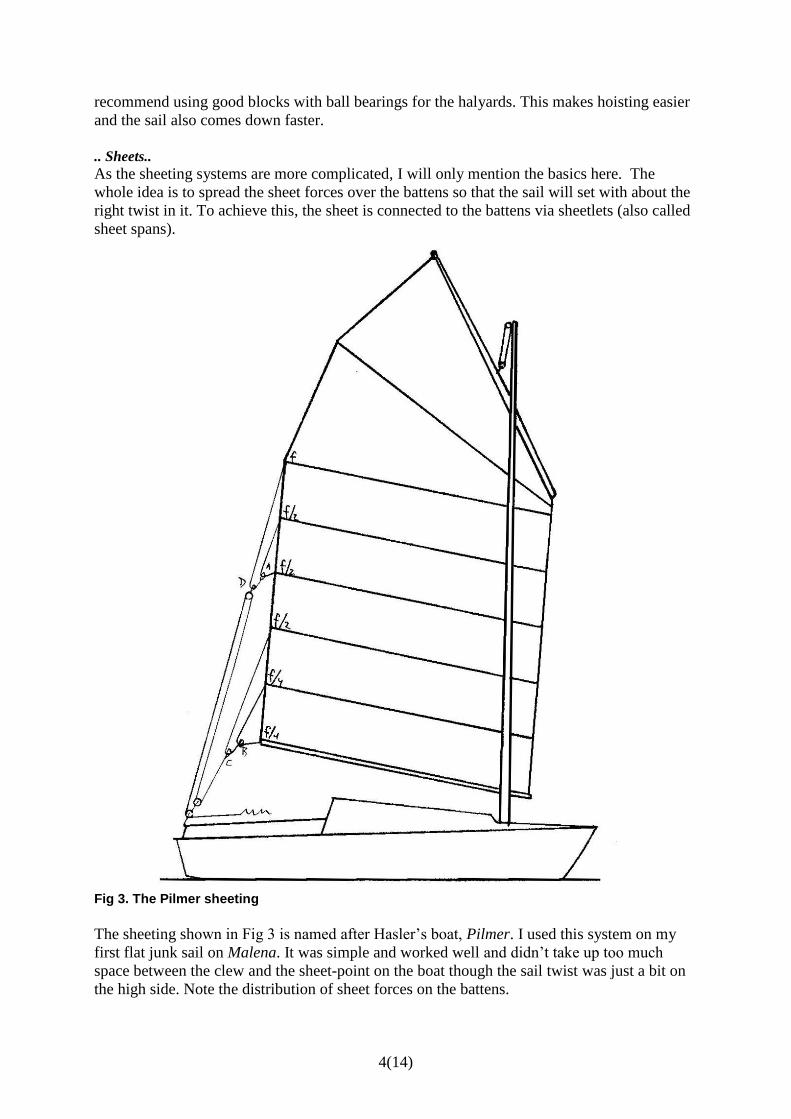
.. Sheets..
As the sheeting systems are more complicated, I will only mention the basics here. The
whole idea is to spread the sheet forces over the battens so that the sail will set with about the
right twist in it. To achieve this, the sheet is connected to the battens via sheetlets (also called
sheet spans).
Fig 3. The Pilmer sheeting
The sheeting shown in Fig 3 is named after Hasler’s boat, Pilmer. I used this system on my
first flat junk sail on Malena. It was simple and worked well and didn’t take up too much
space between the clew and the sheet-point on the boat though the sail twist was just a bit on
the high side. Note the distribution of sheet forces on the battens.
5(14)
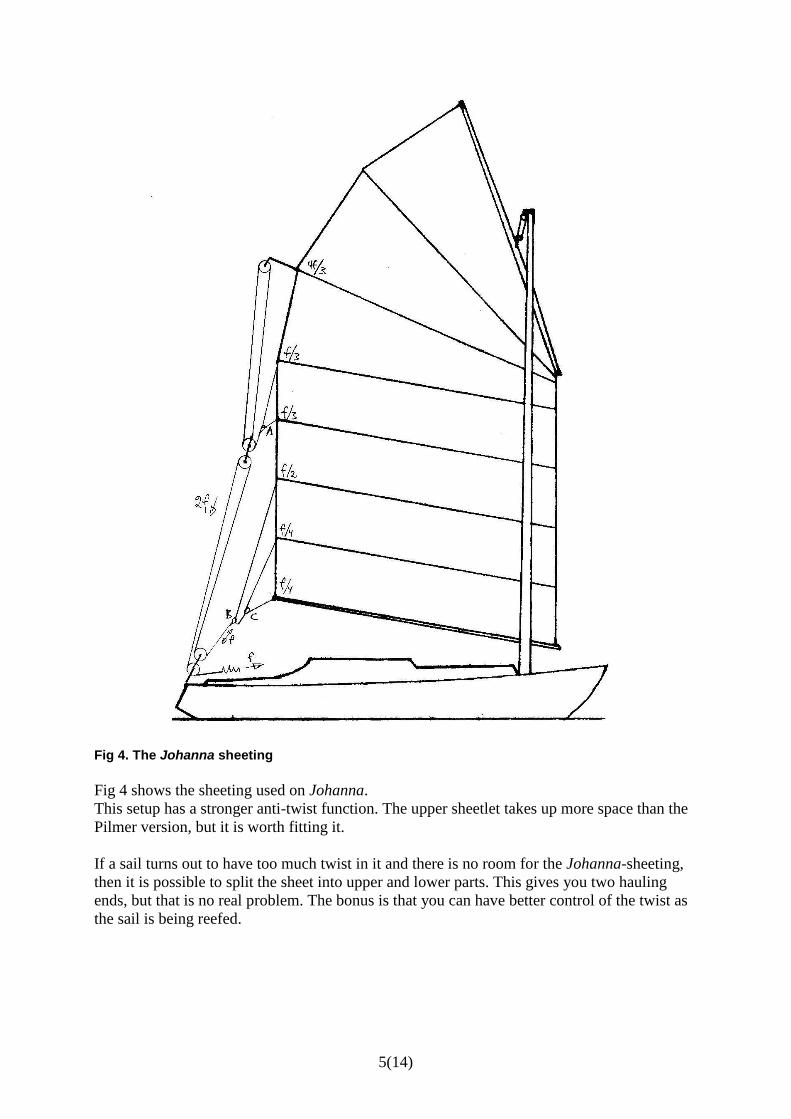
Fig 4. The Johanna sheeting
Fig 4 shows the sheeting used on Johanna.
This setup has a stronger anti-twist function. The upper sheetlet takes up more space than the
Pilmer version, but it is worth fitting it.
If a sail turns out to have too much twist in it and there is no room for the Johanna-sheeting,
then it is possible to split the sheet into upper and lower parts. This gives you two hauling
ends, but that is no real problem. The bonus is that you can have better control of the twist as
the sail is being reefed.
6(14)
..Lazy-Jacks...
Most sailors have seen some sort of lazy-jacks in use on gaffers and Bermudian-rigged boats.
Little do they know that these “modern gadgets” have been in use in China for well over 2000
years. Unlike the western rigs where the lazy-j. are nice to have, on the Chinese JR they are
absolutely essential, as the JR reefs by lowering the sails into the lazy-jacks. This means that
the lazy-jacks must be made from stout chafe-resistant rope and be checked, maintained and
replaced with the same regularity as the halyard.
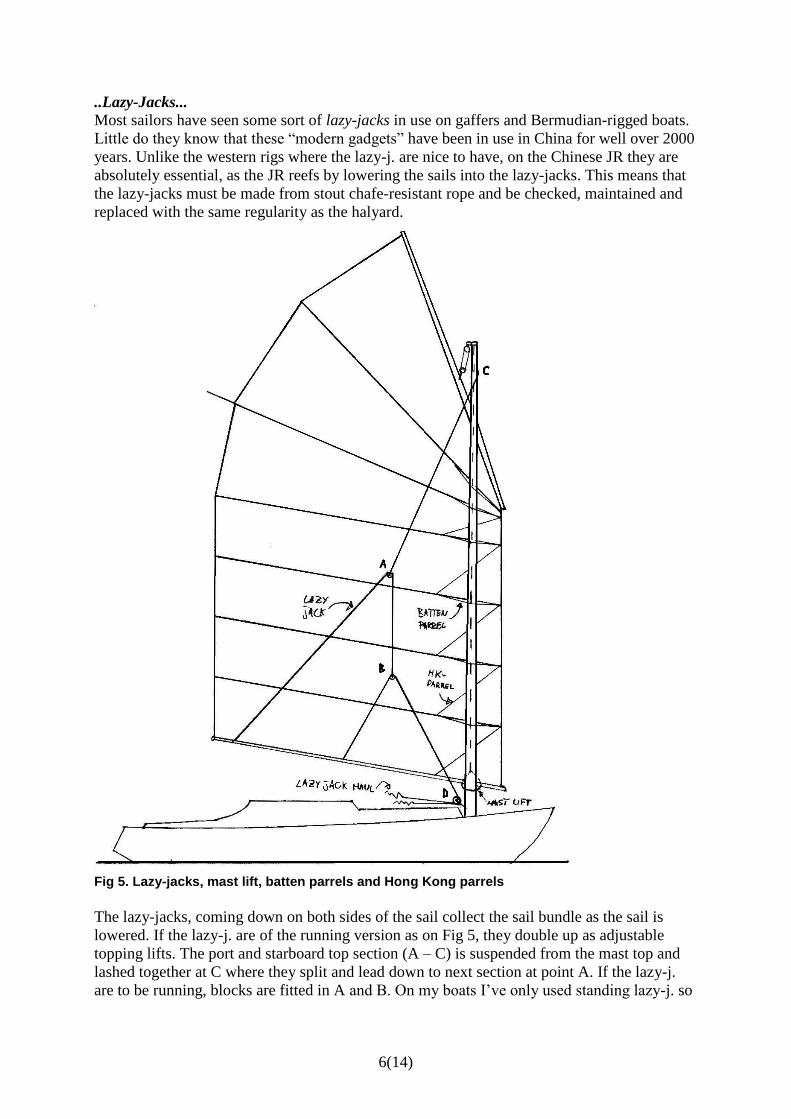
Fig 5. Lazy-jacks, mast lift, batten parrels and Hong Kong parrels
The lazy-jacks, coming down on both sides of the sail collect the sail bundle as the sail is
lowered. If the lazy-j. are of the running version as on Fig 5, they double up as adjustable
topping lifts. The port and starboard top section (A – C) is suspended from the mast top and
lashed together at C where they split and lead down to next section at point A. If the lazy-j.
are to be running, blocks are fitted in A and B. On my boats I’ve only used standing lazy-j. so
7(14)
I only use spliced loops in A and B. I get away with it by using 10mm hard-spun 3-strand
rope. It probably would make sense to splice in plastic thimbles.
..mast lift...
To hold the boom up in the fore end, there is a so-called mast lift, also shown on Fig 5. This
also has a lazy-jack function as the sail is coming down.
..batten parrels...
The batten parrels (Fig 5) hold the battens loosely to the mast. They may be made short to
hold the sail in a fixed fore - aft position, or they may be made long to enable the skipper to
adjust the position of the sail under way. The drawn version is somewhere in between,
..Hong Kong parrels (Fig5)...
The Hong Kong parrels’ job is to support the panels diagonally. Without them some big
diagonal creases tend to show up, particularly on cambered panel sails where there is no
diagonal rigidity in each panel. These parrels were spotted on junks in the Hong Kong area
using fanned batten sails with 6-7 panels. On my cambered panel sails they are essential and
they also make the setting up of the luff hauling parrel and yard hauling parrel much easier.
The HK parrels need no attention after the initial setting up. Note that the HK parrels must
pass on the sail side of the mast to keep equal tension on both tacks.
..controlling the fore-and-aft position of the sail...
See Fig 6, overleaf.
The line which hauls the yard forward is called the yard hauling parrel (YHP). This line has
little use when the sail is fully hoisted. However, when the wind picks up and panels have to
be lowered, the yard hauling parrel, together with the luff hauling parrel, (LHP) (Fig 6) are
needed to fix the sail’s position and stopping the yard from sliding back and forth as the boat
pitches.
From the block on the yard the hauling end of the YHP is passed down inside the lazy jacks
but outside the batten parrels. The luff hauling parrel can take many different arrangements.
Normally it is a running line, but can also be made as a standing version.
On Johanna I have tried a variety of versions of luff hauling parrel, some more complicated
than the others. Finally I understood that its main job was to pull the throat end of the yard
down and aft to counterbalance the sheet forces. I have dropped the block at C (Fig 6) so that
now the hauling line is passed down to the deck block at D directly from the block at B, inside
the batten parrels, but outside the HK parrels. I think the HK-parrels help to keep the luff
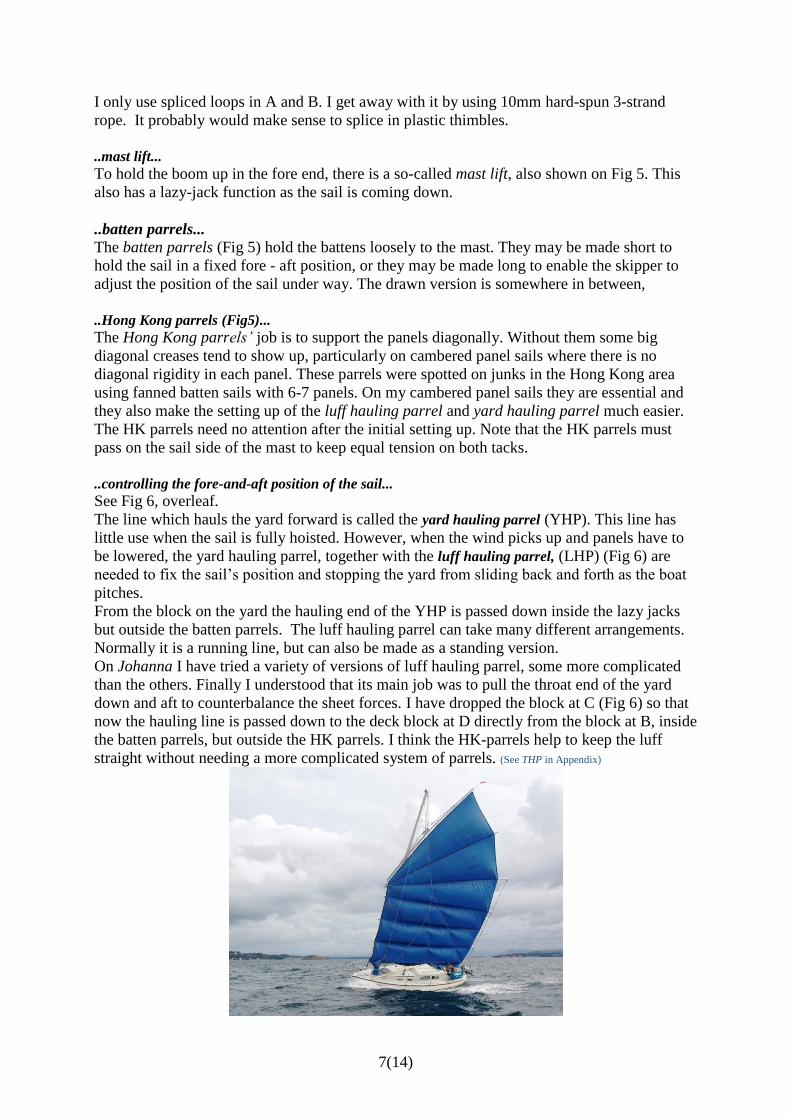
straight without needing a more complicated system of parrels. (See THP in Appendix)
8(14)
On this photo (p.7) Johanna has dropped a panel. With no downhauls and only that simple A-
B luff hauling parrel, the luff still stands quite straight apart from in the lowest panel.
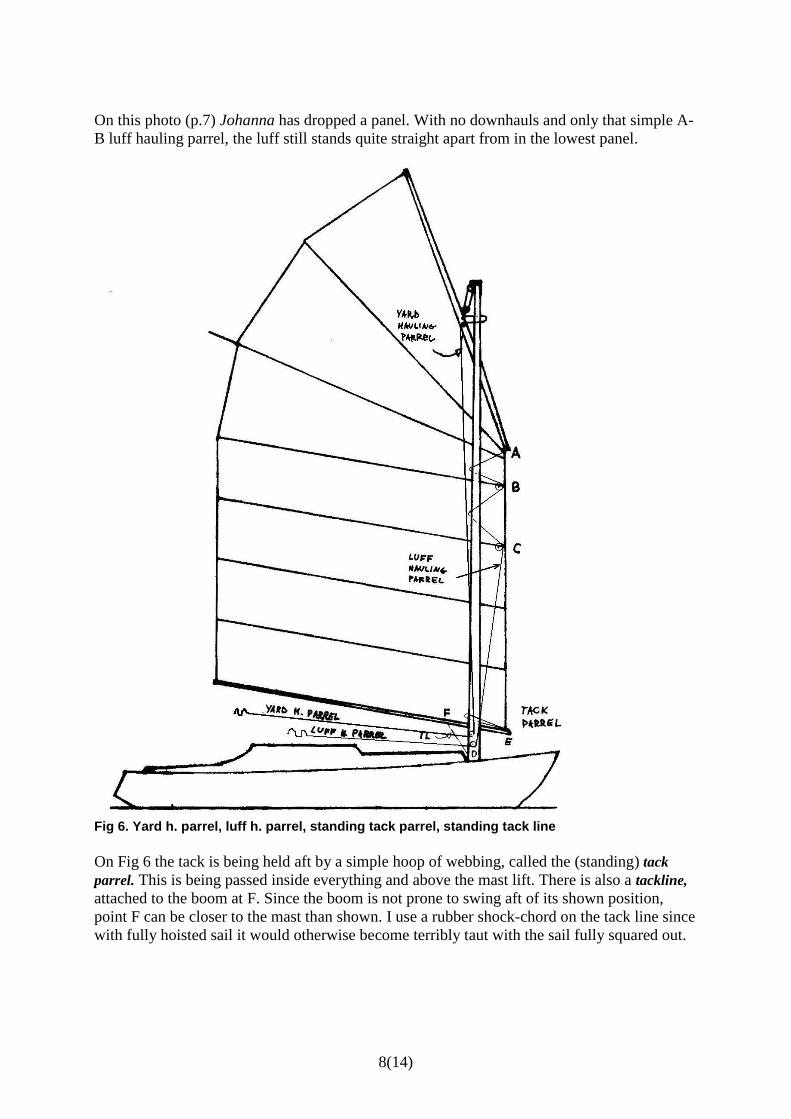
Fig 6. Yard h. parrel, luff h. parrel, standing tack parrel, standing tack line
On Fig 6 the tack is being held aft by a simple hoop of webbing, called the (standing) tack
parrel. This is being passed inside everything and above the mast lift. There is also a tackline,
attached to the boom at F. Since the boom is not prone to swing aft of its shown position,
point F can be closer to the mast than shown. I use a rubber shock-chord on the tack line since
with fully hoisted sail it would otherwise become terribly taut with the sail fully squared out.
9(14)
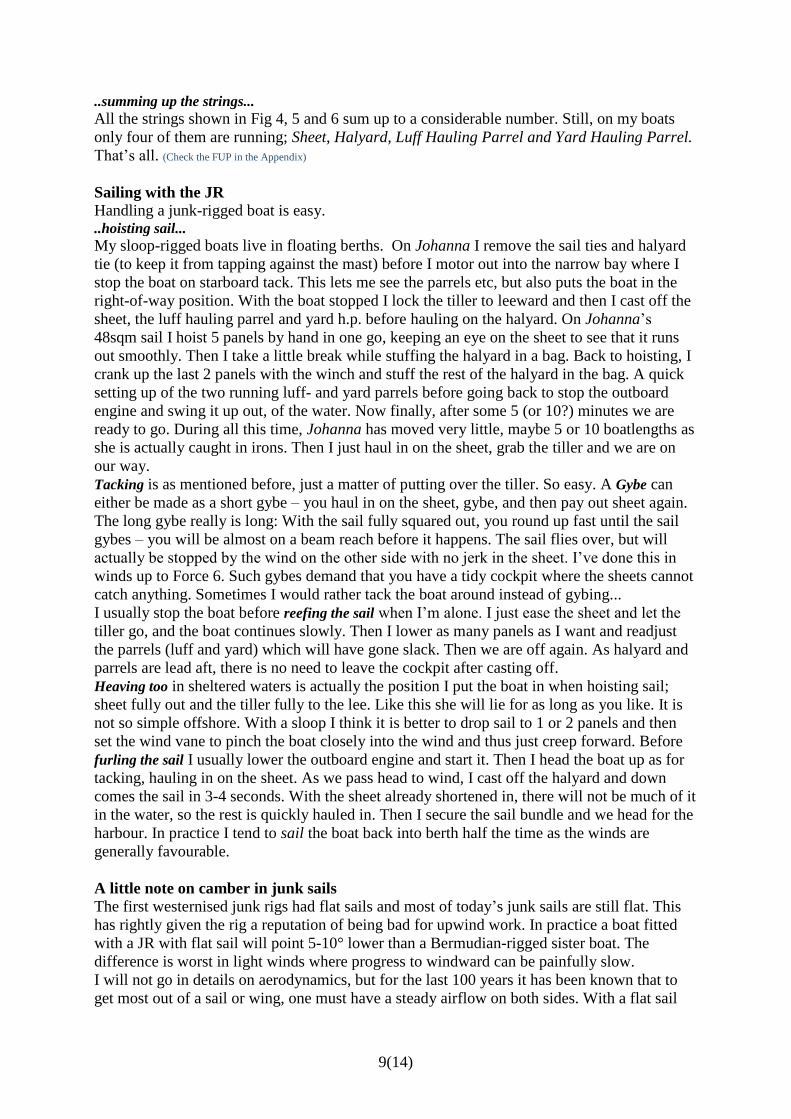
..summing up the strings...
All the strings shown in Fig 4, 5 and 6 sum up to a considerable number. Still, on my boats
only four of them are running; Sheet, Halyard, Luff Hauling Parrel and Yard Hauling Parrel.
That’s all. (Check the FUP in the Appendix)
Sailing with the JR
Handling a junk-rigged boat is easy. ..hoisting sail... My sloop-rigged boats live in floating berths. On Johanna I remove the sail ties and halyard
tie (to keep it from tapping against the mast) before I motor out into the narrow bay where I
stop the boat on starboard tack. This lets me see the parrels etc, but also puts the boat in the
right-of-way position. With the boat stopped I lock the tiller to leeward and then I cast off the
sheet, the luff hauling parrel and yard h.p. before hauling on the halyard. On Johanna’s
48sqm sail I hoist 5 panels by hand in one go, keeping an eye on the sheet to see that it runs
out smoothly. Then I take a little break while stuffing the halyard in a bag. Back to hoisting, I
crank up the last 2 panels with the winch and stuff the rest of the halyard in the bag. A quick
setting up of the two running luff- and yard parrels before going back to stop the outboard
engine and swing it up out, of the water. Now finally, after some 5 (or 10?) minutes we are
ready to go. During all this time, Johanna has moved very little, maybe 5 or 10 boatlengths as
she is actually caught in irons. Then I just haul in on the sheet, grab the tiller and we are on
our way.
Tacking is as mentioned before, just a matter of putting over the tiller. So easy. A Gybe can
either be made as a short gybe – you haul in on the sheet, gybe, and then pay out sheet again.
The long gybe really is long: With the sail fully squared out, you round up fast until the sail
gybes – you will be almost on a beam reach before it happens. The sail flies over, but will
actually be stopped by the wind on the other side with no jerk in the sheet. I’ve done this in
winds up to Force 6. Such gybes demand that you have a tidy cockpit where the sheets cannot
catch anything. Sometimes I would rather tack the boat around instead of gybing...
I usually stop the boat before reefing the sail when I’m alone. I just ease the sheet and let the
tiller go, and the boat continues slowly. Then I lower as many panels as I want and readjust
the parrels (luff and yard) which will have gone slack. Then we are off again. As halyard and
parrels are lead aft, there is no need to leave the cockpit after casting off.
Heaving too in sheltered waters is actually the position I put the boat in when hoisting sail;
sheet fully out and the tiller fully to the lee. Like this she will lie for as long as you like. It is
not so simple offshore. With a sloop I think it is better to drop sail to 1 or 2 panels and then
set the wind vane to pinch the boat closely into the wind and thus just creep forward. Before
furling the sail I usually lower the outboard engine and start it. Then I head the boat up as for
tacking, hauling in on the sheet. As we pass head to wind, I cast off the halyard and down
comes the sail in 3-4 seconds. With the sheet already shortened in, there will not be much of it
in the water, so the rest is quickly hauled in. Then I secure the sail bundle and we head for the
harbour. In practice I tend to sail the boat back into berth half the time as the winds are
generally favourable.
A little note on camber in junk sails
The first westernised junk rigs had flat sails and most of today’s junk sails are still flat. This
has rightly given the rig a reputation of being bad for upwind work. In practice a boat fitted
with a JR with flat sail will point 5-10° lower than a Bermudian-rigged sister boat. The
difference is worst in light winds where progress to windward can be painfully slow.
I will not go in details on aerodynamics, but for the last 100 years it has been known that to
get most out of a sail or wing, one must have a steady airflow on both sides. With a flat sail
10(14)
one can only achieve this flow with the angle of incidence being very low and then the sail or
wing will hardly produce any lift.
Like any other sail a Chinese junk sail needs camber to work well. As I see it, there are 5
ways of achieving camber which either have been used by the Chinese, by the West or by
both.
Bagginess in the panels due do stretchy sail cloth. This can be seen on many Chinese
JRs. When westerners took to JR they skipped this element as it looked so untidy...
Adjustable camber by adjusting the twist in the fanned batten sails. This was also much
used by the Chinese sailors. In Britain Vincent Reddish has described the method and
it works for him though I haven’t tried it myself.
Bendy battens. The Chinese didn’t use the method systematically, but you can’t keep
the battens 100% straight under load, so most battens add 1-3% camber anyway. In the
west it has been tried using GRP tubes which should bend to a desired camber. The
problem is that in light winds, when you need camber, the battens are straight. In
strong winds, when you need a flattish sail, the battens bend too much. Everyone
seems to drop this method after a while.
Hinged battens have been tried with more success. This gives a constant camber,
independent of wind strength. I used it from 1991 to 1994, on and off.
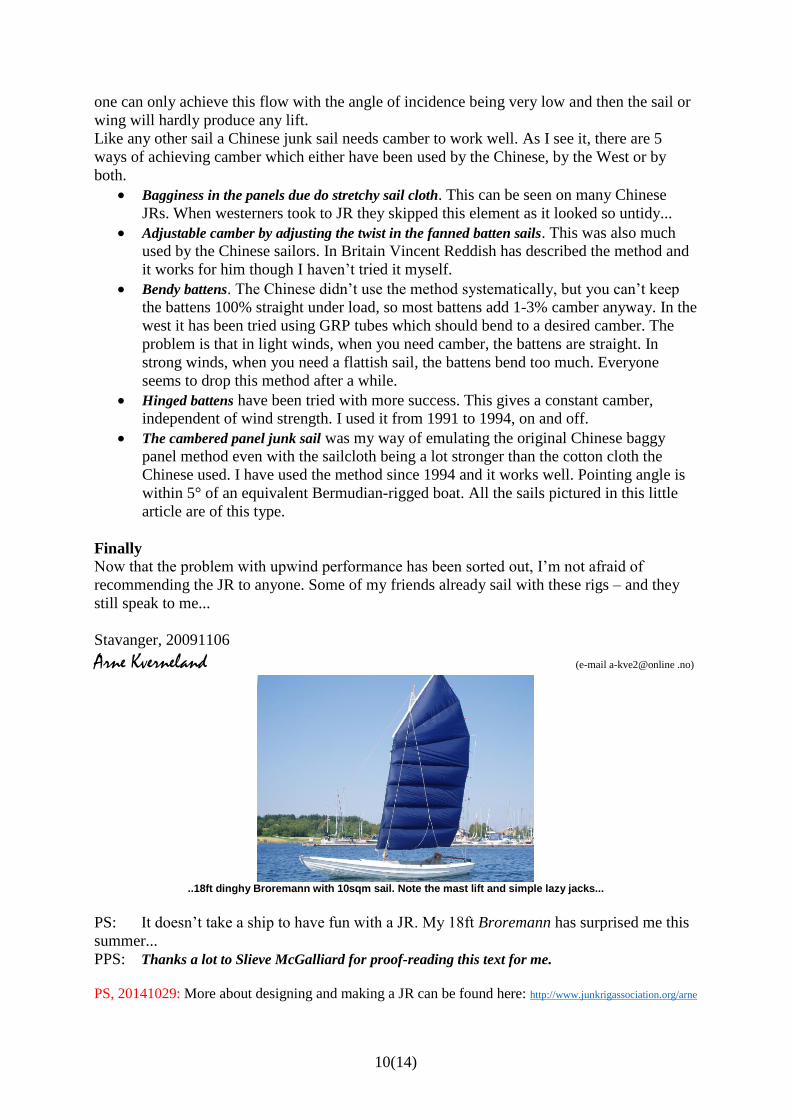
The cambered panel junk sail was my way of emulating the original Chinese baggy
panel method even with the sailcloth being a lot stronger than the cotton cloth the
Chinese used. I have used the method since 1994 and it works well. Pointing angle is
within 5° of an equivalent Bermudian-rigged boat. All the sails pictured in this little
article are of this type.
Finally
Now that the problem with upwind performance has been sorted out, I’m not afraid of
recommending the JR to anyone. Some of my friends already sail with these rigs – and they
still speak to me...
Stavanger, 20091106
Arne Kverneland (e-mail a-kve2@online .no)
..18ft dinghy Broremann with 10sqm sail. Note the mast lift and simple lazy jacks...
PS: It doesn’t take a ship to have fun with a JR. My 18ft Broremann has surprised me this
summer...
PPS: Thanks a lot to Slieve McGalliard for proof-reading this text for me.
PS, 20141029: More about designing and making a JR can be found here: http://www.junkrigassociation.org/arne
11(14)
Appendix, November 2021: updates to Junk Rig for Beginners
Since the original text above was written some twelve years ago, there has been no radical
changes in my view on the rig. I mainly stick with my favourite plain, cambered-panel version
of the Hasler-McLeod style sail, with boom, battens and yard of the same length, and with all
panels of the same area. Still, since I have rigged three more boats and gained experience
from sailing them, I have made some minor changes, which I want to share with you. Some of
them will simply be described in detail here, and some will be made accessible via links to
separate write-ups.
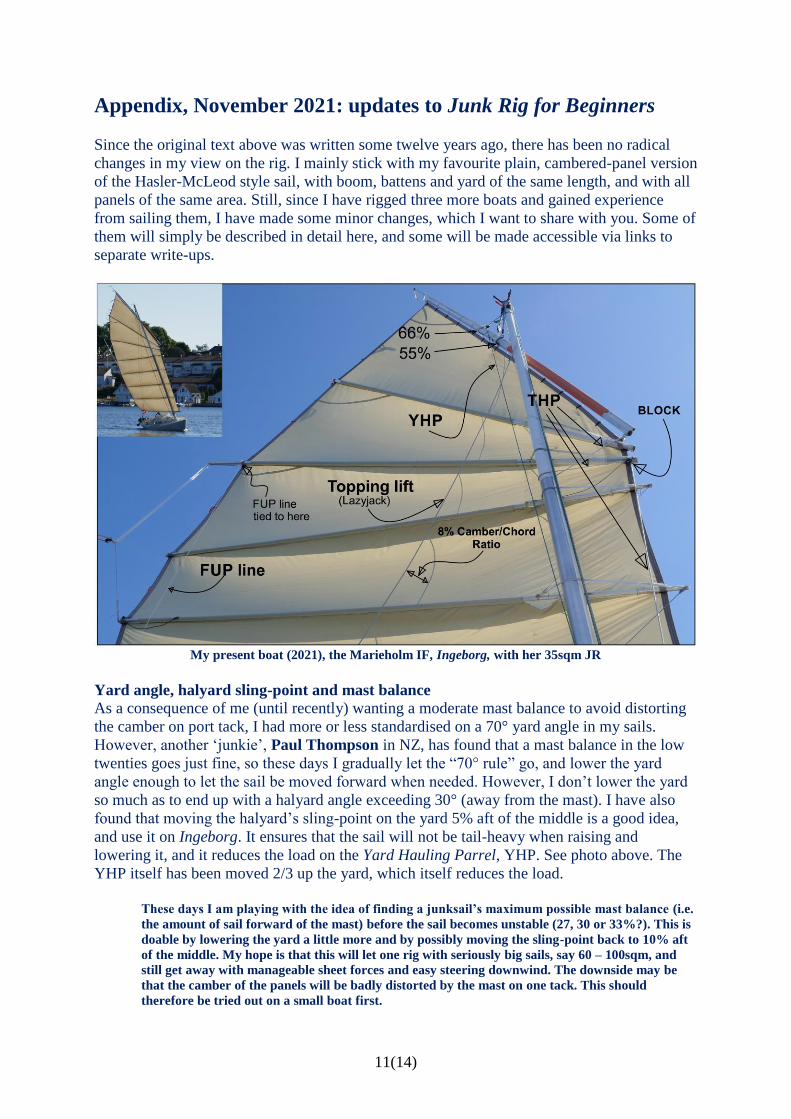
My present boat (2021), the Marieholm IF, Ingeborg, with her 35sqm JR
Yard angle, halyard sling-point and mast balance As a consequence of me (until recently) wanting a moderate mast balance to avoid distorting
the camber on port tack, I had more or less standardised on a 70° yard angle in my sails.
However, another ‘junkie’, Paul Thompson in NZ, has found that a mast balance in the low
twenties goes just fine, so these days I gradually let the “70° rule” go, and lower the yard
angle enough to let the sail be moved forward when needed. However, I don’t lower the yard
so much as to end up with a halyard angle exceeding 30° (away from the mast). I have also
found that moving the halyard’s sling-point on the yard 5% aft of the middle is a good idea,
and use it on Ingeborg. It ensures that the sail will not be tail-heavy when raising and
lowering it, and it reduces the load on the Yard Hauling Parrel, YHP. See photo above. The
YHP itself has been moved 2/3 up the yard, which itself reduces the load.
These days I am playing with the idea of finding a junksail’s maximum possible mast balance (i.e.
the amount of sail forward of the mast) before the sail becomes unstable (27, 30 or 33%?). This is
doable by lowering the yard a little more and by possibly moving the sling-point back to 10% aft
of the middle. My hope is that this will let one rig with seriously big sails, say 60 – 100sqm, and
still get away with manageable sheet forces and easy steering downwind. The downside may be
that the camber of the panels will be badly distorted by the mast on one tack. This should
therefore be tried out on a small boat first.

12(14)
Throat Hauling Parrel, THP
One significant change I have made, is to move the Luff Hauling Parrel, LHP up to the yard
and batten 2, and then rename it Throat Hauling Parrel, THP. It looks like a minor change (it
is mentioned in the main section), but it makes the sail set better with much reduced stress in
the HK parrels and battens. Follow the link to the “Peaking up the JR” write-up: http://goo.gl/r0fwCf
Fan-up preventer, FUP Follow the link to it. I use it on Ingeborg and find it to be a guarantee against getting the peak
of the yard caught forward of the topping lifts - a quite troublesome situation. I now use a
slippery, monofilament 5mm line, which keeps the friction low. https://bit.ly/2F6mzRQ
Sheets
By sticking to generally the same sail planforms in my sails, with equal size panels, I have
also been able to use the same “Johanna-style” sheeting. This has been a bit refined lately,
partly last summer and partly this one. See this write-up: https://bit.ly/2Zc6eCe
Lazy-Jacks
The lazy-jacks have been described in the main section, p.6. In later years, I have made use of
a slightly different version, starting with two straight topping lifts, and then adding sail
catchers according to needs. See this write-up: https://bit.ly/2vz5V5g
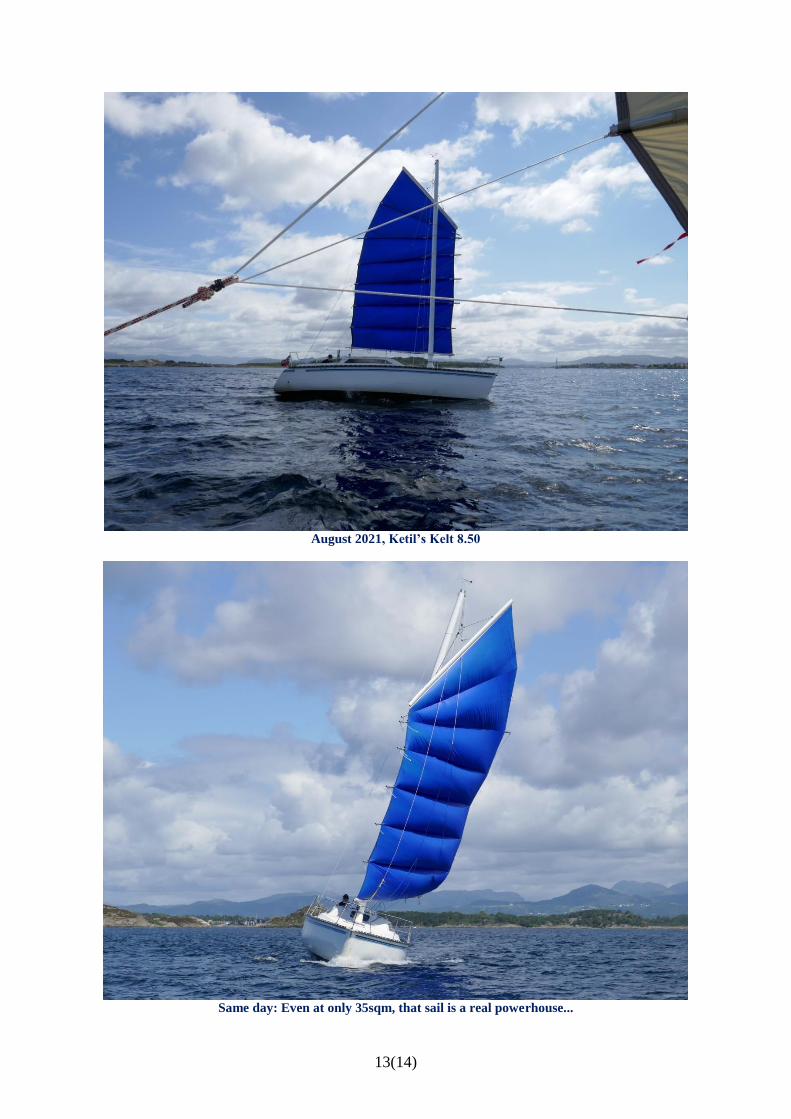
Finally, that Kelt 8.50
Just to show off a little and to show how a sail with 60° yard works very well with about 22%
mast balance, I let you have Ketil Greve’s recently re-rigged Kelt 8.50:
The interior dictated the mast’s position, so a sail with more mast balance was needed. Ketil
lives in Stavanger, and he is familiar with my Ingeborg, so it was easy to discuss his needs
and agree on a suitable sailplan. The four lower panels are in fact copies of Ingeborg’s sail,
while a new top section was designed in to get a 60° yard and still have equal size batten
panels. Just as for Ingeborg’s sail, this one too ended up at 35sqm. After only an hour with
basic sewing machine instructions, Ketil was able to sew up his new sail, un-aided, using his
wife’s sewing machine. He even made a fine job of it. See for yourself, on next page.
13(14)
August 2021, Ketil’s Kelt 8.50
Same day: Even at only 35sqm, that sail is a real powerhouse...
14(14)
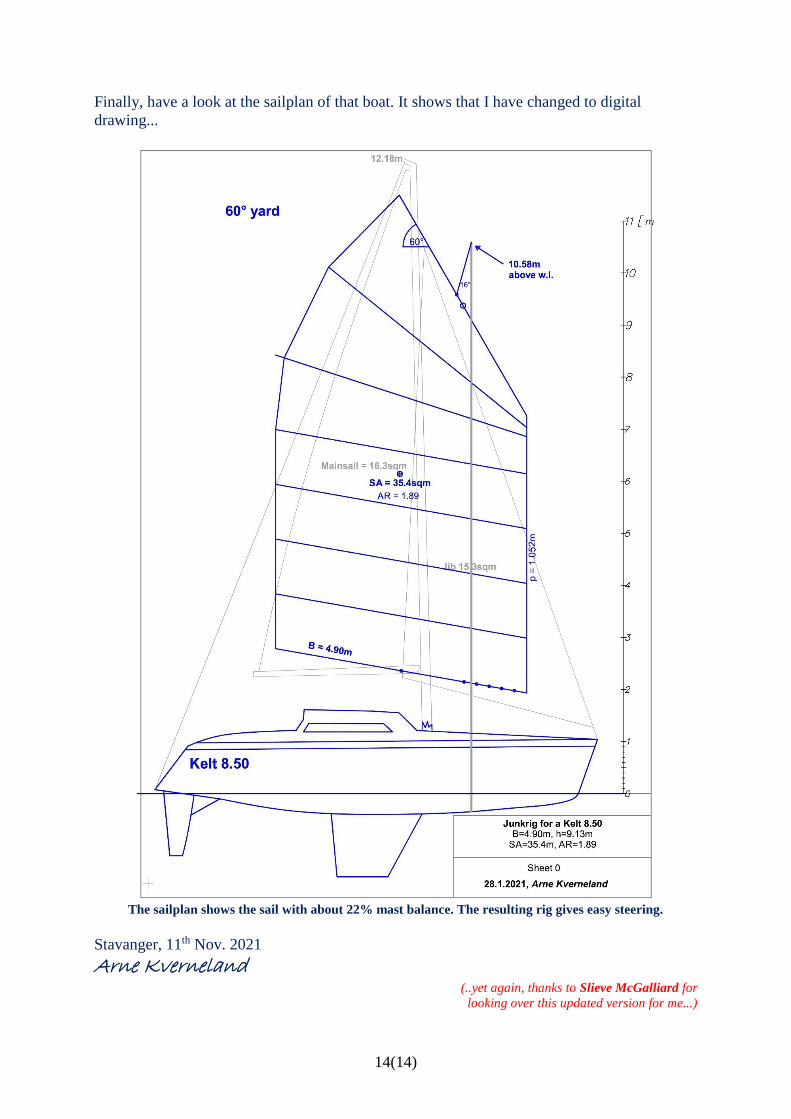
Finally, have a look at the sailplan of that boat. It shows that I have changed to digital
drawing...
The sailplan shows the sail with about 22% mast balance. The resulting rig gives easy steering.
Stavanger, 11th Nov. 2021
Arne Kverneland (..yet again, thanks to Slieve McGalliard for
looking over this updated version for me...)
Related Documents