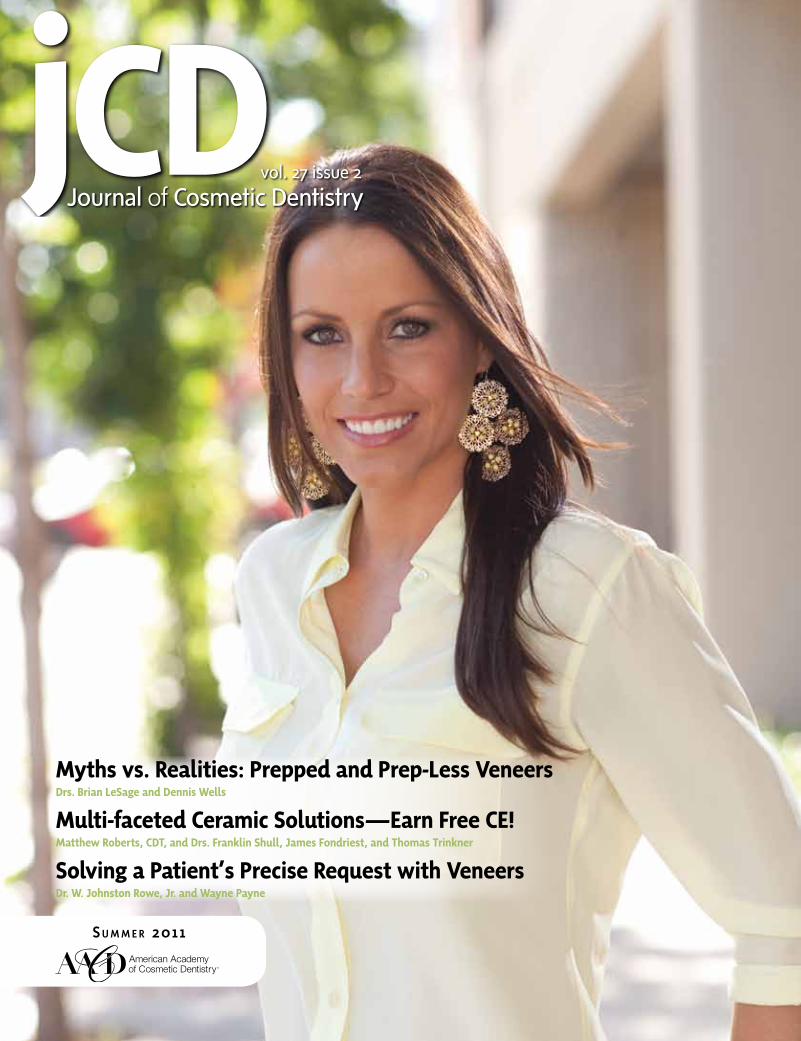
S UMMER 2011 Journal of Cosmetic Dentistry vol. 27 issue 2

Welcome message from author
This document is posted to help you gain knowledge. Please leave a comment to let me know what you think about it! Share it to your friends and learn new things together.
Transcript
S U M M E R 2 0 1 1
Journal of Cosmetic Dentistryvol. 27 issue 2
BEHIND THE SMILE
Now…I never worry when I smile or even laugh. In fact, I get compliments on my smile all the time and I couldn’t be happier!
14 Summer 2011 • Volume 27 • Number 2
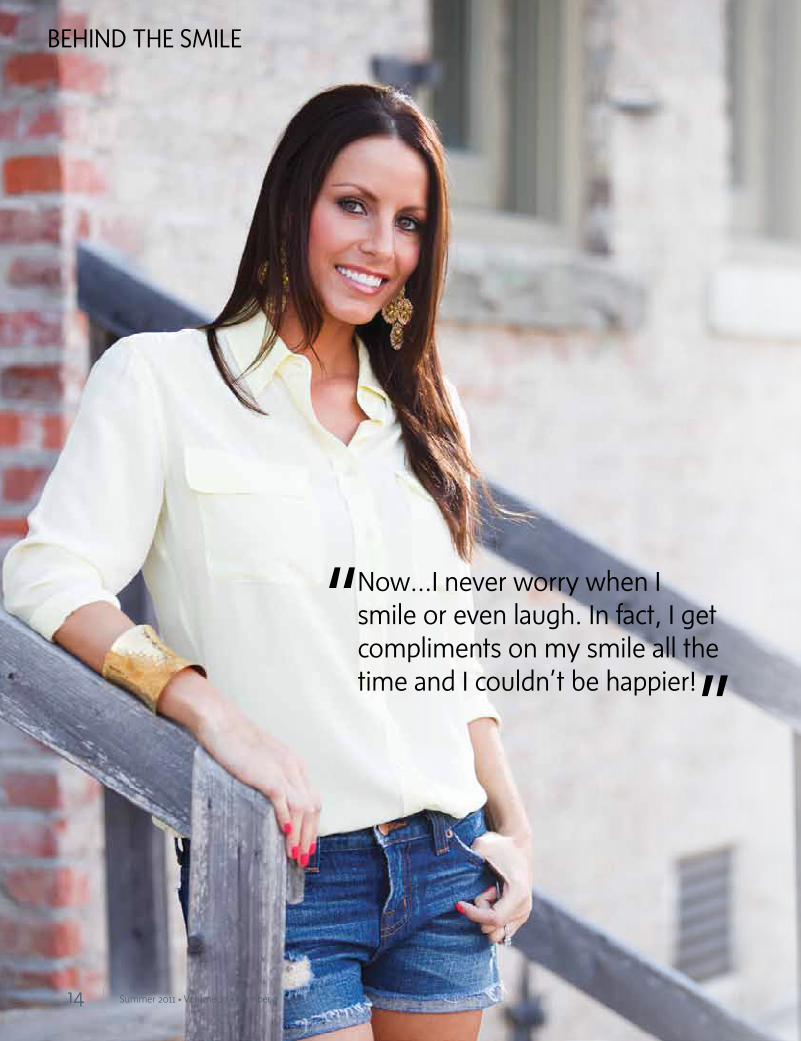
15 Journal of Cosmetic Dentistry
It is not uncommon to have patients present for a cosmetic consultation with some very
precise requests for their envisioned smile makeover. Jessie was one of these patients. She
knew how she wanted her smile to look, and had researched her options extensively. One
of the keys to success was to interpret her requests and incorporate them into a beautiful,
functional smile design.
Although we discussed different treatment options, including orthodontics and cosmetic
bonding, Jessie already knew she wanted porcelain veneers. Her history as an extremely
successful pageant contestant and model had made her conscious of the power of a beautiful
smile. She had always wanted a prettier smile, and I was happy to help her accomplish this
dream. When we first met she was a pharmaceutical sales representative (she now works
in medical sales), was self-conscious about her smile, and felt it was time for a change, as
her success was largely dependent on her confidence. We discussed her desires, looked
at photographs of my completed cases, and talked about her proposed treatment. I then
communicated the details of the case to my master ceramist. The benefits of our collective
planning were realized the day I delivered Jessie’s veneers, and she hasn’t stopped
smiling since!
The AACD provides many educational opportunities focusing on smile design, patient
communication, and collaboration between dentists and laboratory technicians. Taking
advantage of these opportunities provided me with a foundation of learned skills essential for
completing Jessie’s case successfully and, most importantly, to her satisfaction.
For information on the clinical aspects of this case, please turn to page 47.
Restorative dentistry and clinical images by W. Johnston Rowe, Jr., DDS, AAACD (Jonesboro,
AR). Porcelain work by Wayne B. Payne, AAACD (San Clemente, CA). Cover photography by
Michael L. Baxley (Little Rock, AR). Cover photograph shot with a Canon EOS 5D Mark II.
Preoperative Postoperative
A DEFINED SMILE

46 Summer 2011 • Volume 27 • Number 2 46 Summer 2011 • Volume 27 • Number 2
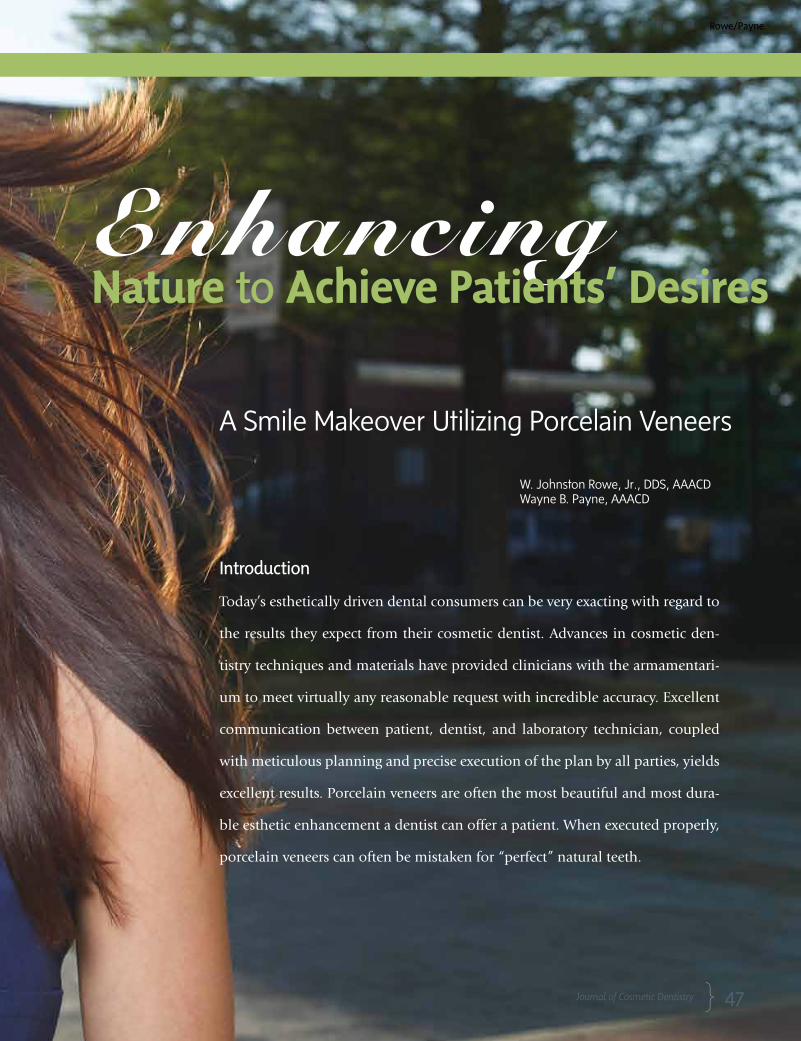
,UOHUJPUN Nature to Achieve Patients’ Desires
A Smile Makeover Utilizing Porcelain Veneers
W. Johnston Rowe, Jr., DDS, AAACD Wayne B. Payne, AAACD
Introduction
Today’s esthetically driven dental consumers can be very exacting with regard to
the results they expect from their cosmetic dentist. Advances in cosmetic den-
tistry techniques and materials have provided clinicians with the armamentari-
um to meet virtually any reasonable request with incredible accuracy. Excellent
communication between patient, dentist, and laboratory technician, coupled
with meticulous planning and precise execution of the plan by all parties, yields
excellent results. Porcelain veneers are often the most beautiful and most dura-
ble esthetic enhancement a dentist can offer a patient. When executed properly,
porcelain veneers can often be mistaken for “perfect” natural teeth.
Rowe/Payne
47 Journal of Cosmetic Dentistry
48 Summer 2011 • Volume 27 • Number 2
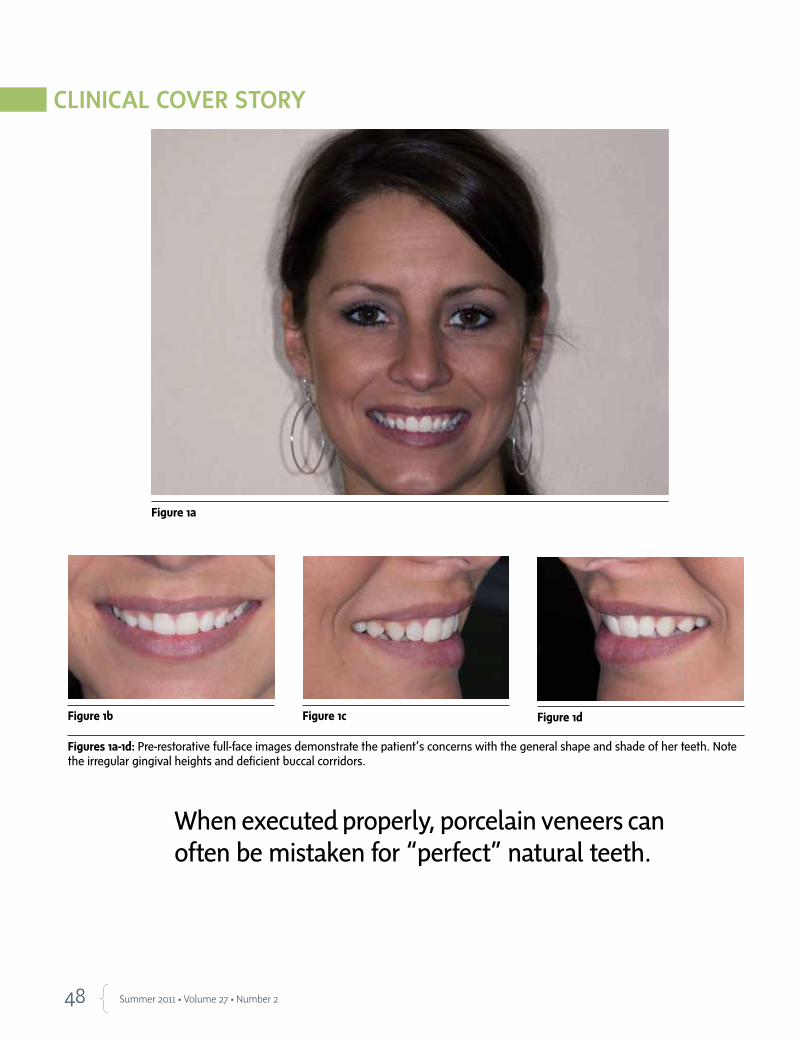
Figure 1a
Figures 1a-1d: Pre-restorative full-face images demonstrate the patient’s concerns with the general shape and shade of her teeth. Note the irregular gingival heights and deficient buccal corridors.
Figure 1dFigure 1b Figure 1c
When executed properly, porcelain veneers can often be mistaken for “perfect” natural teeth.
49 Journal of Cosmetic Dentistry
Case Presentation
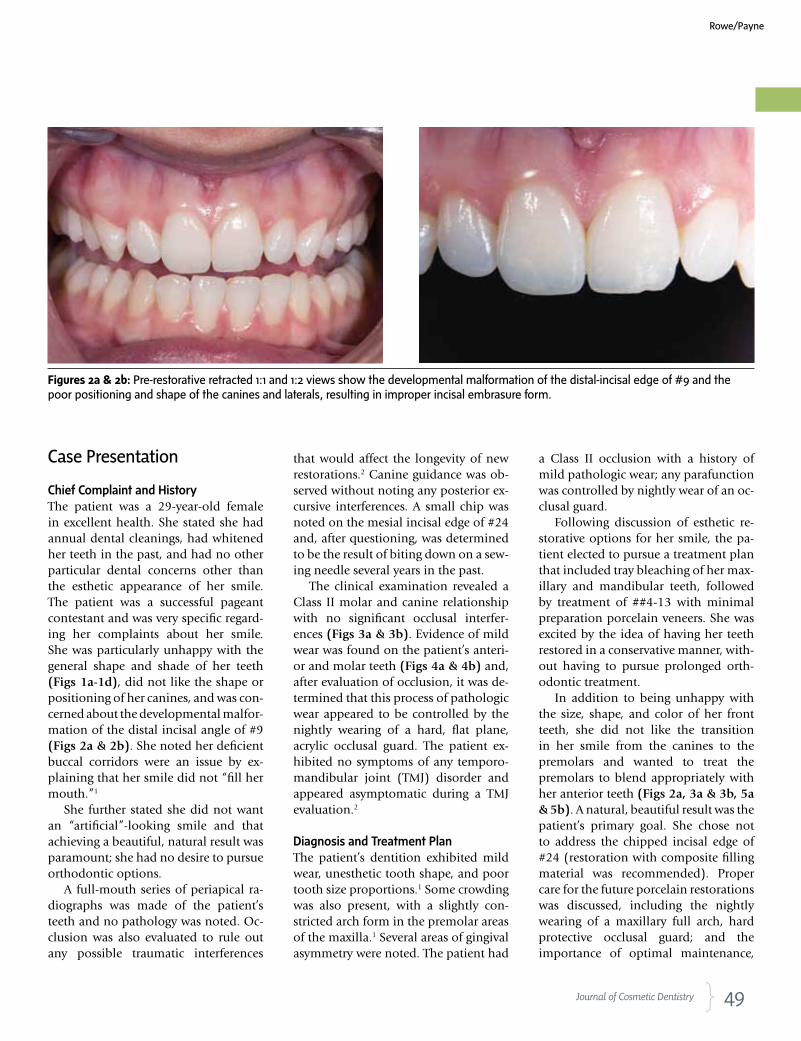
Chief Complaint and HistoryThe patient was a 29-year-old female in excellent health. She stated she had annual dental cleanings, had whitened her teeth in the past, and had no other particular dental concerns other than the esthetic appearance of her smile. The patient was a successful pageant contestant and was very specific regard-ing her complaints about her smile. She was particularly unhappy with the general shape and shade of her teeth (Figs 1a-1d), did not like the shape or positioning of her canines, and was con-cerned about the developmental malfor-mation of the distal incisal angle of #9 (Figs 2a & 2b). She noted her deficient buccal corridors were an issue by ex-plaining that her smile did not “fill her mouth.”1
She further stated she did not want an “artificial”-looking smile and that achieving a beautiful, natural result was paramount; she had no desire to pursue orthodontic options.
A full-mouth series of periapical ra-diographs was made of the patient’s teeth and no pathology was noted. Oc-clusion was also evaluated to rule out any possible traumatic interferences
that would affect the longevity of new restorations.2 Canine guidance was ob-served without noting any posterior ex-cursive interferences. A small chip was noted on the mesial incisal edge of #24 and, after questioning, was determined to be the result of biting down on a sew-ing needle several years in the past.
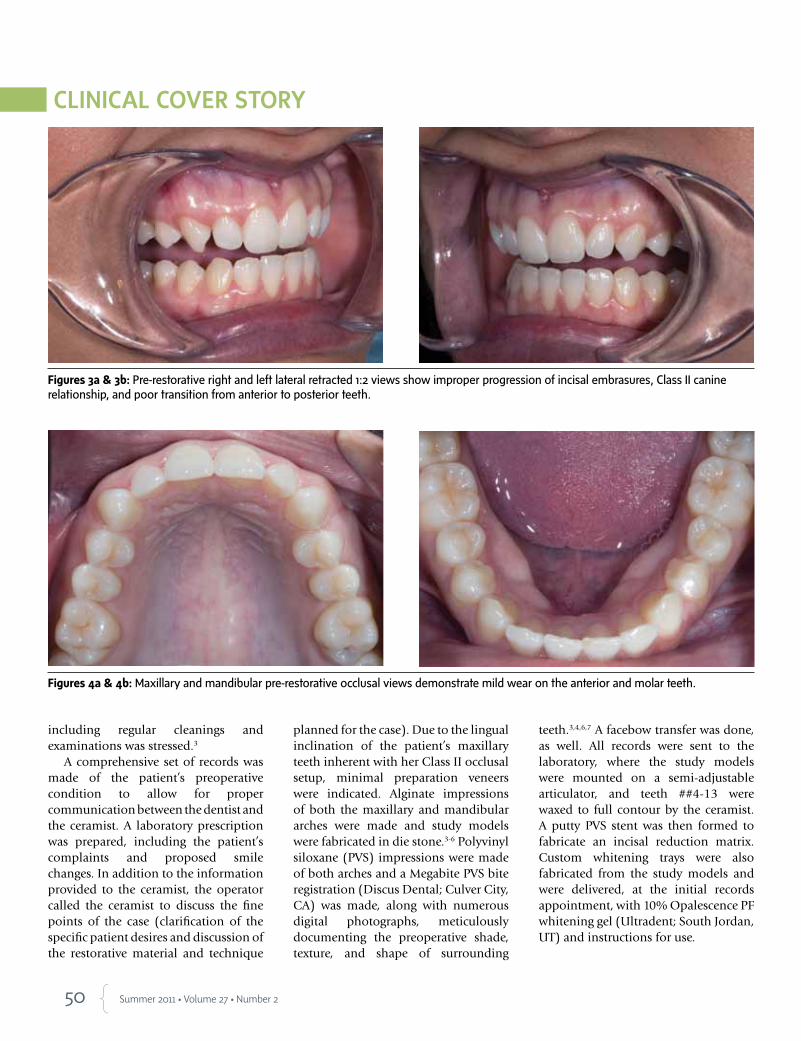
The clinical examination revealed a Class II molar and canine relationship with no significant occlusal interfer-ences (Figs 3a & 3b). Evidence of mild wear was found on the patient’s anteri-or and molar teeth (Figs 4a & 4b) and, after evaluation of occlusion, it was de-termined that this process of pathologic wear appeared to be controlled by the nightly wearing of a hard, flat plane, acrylic occlusal guard. The patient ex-hibited no symptoms of any temporo-mandibular joint (TMJ) disorder and appeared asymptomatic during a TMJ evaluation.2
Diagnosis and Treatment PlanThe patient’s dentition exhibited mild wear, unesthetic tooth shape, and poor tooth size proportions.1 Some crowding was also present, with a slightly con-stricted arch form in the premolar areas of the maxilla.1 Several areas of gingival asymmetry were noted. The patient had
a Class II occlusion with a history of mild pathologic wear; any parafunction was controlled by nightly wear of an oc-clusal guard.
Following discussion of esthetic re-storative options for her smile, the pa-tient elected to pursue a treatment plan that included tray bleaching of her max-illary and mandibular teeth, followed by treatment of ##4-13 with minimal preparation porcelain veneers. She was excited by the idea of having her teeth restored in a conservative manner, with-out having to pursue prolonged orth-odontic treatment.
In addition to being unhappy with the size, shape, and color of her front teeth, she did not like the transition in her smile from the canines to the premolars and wanted to treat the premolars to blend appropriately with her anterior teeth (Figs 2a, 3a & 3b, 5a & 5b). A natural, beautiful result was the patient’s primary goal. She chose not to address the chipped incisal edge of #24 (restoration with composite filling material was recommended). Proper care for the future porcelain restorations was discussed, including the nightly wearing of a maxillary full arch, hard protective occlusal guard; and the importance of optimal maintenance,
Figures 2a & 2b: Pre-restorative retracted 1:1 and 1:2 views show the developmental malformation of the distal-incisal edge of #9 and the poor positioning and shape of the canines and laterals, resulting in improper incisal embrasure form.
Rowe/Payne
50 Summer 2011 • Volume 27 • Number 2
including regular cleanings and examinations was stressed.3
A comprehensive set of records was made of the patient’s preoperative condition to allow for proper communication between the dentist and the ceramist. A laboratory prescription was prepared, including the patient’s complaints and proposed smile changes. In addition to the information provided to the ceramist, the operator called the ceramist to discuss the fine points of the case (clarification of the specific patient desires and discussion of the restorative material and technique
planned for the case). Due to the lingual inclination of the patient’s maxillary teeth inherent with her Class II occlusal setup, minimal preparation veneers were indicated. Alginate impressions of both the maxillary and mandibular arches were made and study models were fabricated in die stone.3-6 Polyvinyl siloxane (PVS) impressions were made of both arches and a Megabite PVS bite registration (Discus Dental; Culver City, CA) was made, along with numerous digital photographs, meticulously documenting the preoperative shade, texture, and shape of surrounding
teeth.3,4,6,7 A facebow transfer was done, as well. All records were sent to the laboratory, where the study models were mounted on a semi-adjustable articulator, and teeth ##4-13 were waxed to full contour by the ceramist. A putty PVS stent was then formed to fabricate an incisal reduction matrix. Custom whitening trays were also fabricated from the study models and were delivered, at the initial records appointment, with 10% Opalescence PF whitening gel (Ultradent; South Jordan, UT) and instructions for use.
Figures 3a & 3b: Pre-restorative right and left lateral retracted 1:2 views show improper progression of incisal embrasures, Class II canine relationship, and poor transition from anterior to posterior teeth.
Figures 4a & 4b: Maxillary and mandibular pre-restorative occlusal views demonstrate mild wear on the anterior and molar teeth.
51 Journal of Cosmetic Dentistry
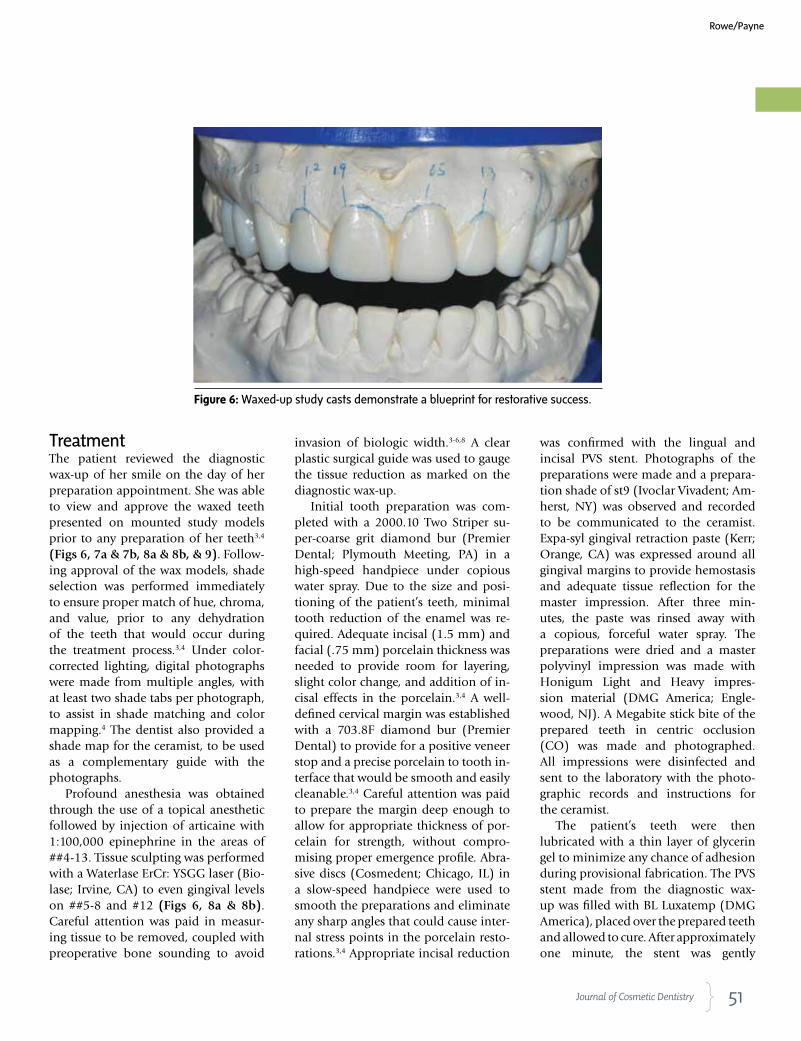
Figure 6: Waxed-up study casts demonstrate a blueprint for restorative success.
TreatmentThe patient reviewed the diagnostic wax-up of her smile on the day of her preparation appointment. She was able to view and approve the waxed teeth presented on mounted study models prior to any preparation of her teeth3,4 (Figs 6, 7a & 7b, 8a & 8b, & 9). Follow-ing approval of the wax models, shade selection was performed immediately to ensure proper match of hue, chroma, and value, prior to any dehydration of the teeth that would occur during the treatment process.3,4 Under color-corrected lighting, digital photographs were made from multiple angles, with at least two shade tabs per photograph, to assist in shade matching and color mapping.4 The dentist also provided a shade map for the ceramist, to be used as a complementary guide with the photographs.
Profound anesthesia was obtained through the use of a topical anesthetic followed by injection of articaine with 1:100,000 epinephrine in the areas of ##4-13. Tissue sculpting was performed with a Waterlase ErCr: YSGG laser (Bio-lase; Irvine, CA) to even gingival levels on ##5-8 and #12 (Figs 6, 8a & 8b). Careful attention was paid in measur-ing tissue to be removed, coupled with preoperative bone sounding to avoid
invasion of biologic width.3-6,8 A clear plastic surgical guide was used to gauge the tissue reduction as marked on the diagnostic wax-up.
Initial tooth preparation was com-pleted with a 2000.10 Two Striper su-per-coarse grit diamond bur (Premier Dental; Plymouth Meeting, PA) in a high-speed handpiece under copious water spray. Due to the size and posi-tioning of the patient’s teeth, minimal tooth reduction of the enamel was re-quired. Adequate incisal (1.5 mm) and facial (.75 mm) porcelain thickness was needed to provide room for layering, slight color change, and addition of in-cisal effects in the porcelain.3,4 A well-defined cervical margin was established with a 703.8F diamond bur (Premier Dental) to provide for a positive veneer stop and a precise porcelain to tooth in-terface that would be smooth and easily cleanable.3,4 Careful attention was paid to prepare the margin deep enough to allow for appropriate thickness of por-celain for strength, without compro-mising proper emergence profile. Abra-sive discs (Cosmedent; Chicago, IL) in a slow-speed handpiece were used to smooth the preparations and eliminate any sharp angles that could cause inter-nal stress points in the porcelain resto-rations.3,4 Appropriate incisal reduction
was confirmed with the lingual and incisal PVS stent. Photographs of the preparations were made and a prepara-tion shade of st9 (Ivoclar Vivadent; Am-herst, NY) was observed and recorded to be communicated to the ceramist. Expa-syl gingival retraction paste (Kerr; Orange, CA) was expressed around all gingival margins to provide hemostasis and adequate tissue reflection for the master impression. After three min-utes, the paste was rinsed away with a copious, forceful water spray. The preparations were dried and a master polyvinyl impression was made with Honigum Light and Heavy impres-sion material (DMG America; Engle-wood, NJ). A Megabite stick bite of the prepared teeth in centric occlusion (CO) was made and photographed. All impressions were disinfected and sent to the laboratory with the photo-graphic records and instructions for the ceramist.
The patient’s teeth were then lubricated with a thin layer of glycerin gel to minimize any chance of adhesion during provisional fabrication. The PVS stent made from the diagnostic wax-up was filled with BL Luxatemp (DMG America), placed over the prepared teeth and allowed to cure. After approximately one minute, the stent was gently
Rowe/Payne

52 Summer 2011 • Volume 27 • Number 2
Figure 9: Occlusal view of maxillary wax-up demonstrates corrected arch form and proper facial embrasures.
Figures 7a & 7b: Measurements for tissue recontouring were marked on the study models and transferred to the mouth for precise tissue sculpting.
Figures 8a & 8b: Right and left lateral views of wax-up demonstrate corrected progression of embrasures and gingival contours.
Figure 10: Temporary model articulated.

54 Summer 2011 • Volume 27 • Number 2
removed, with the veneer provisionals remaining inside. Excess material was scaled away from the teeth and the teeth were cleaned with pumice and Consepsis chlorhexadine (Ultradent). The provisionals were removed from the stent and trimmed. The provisional restorations were then seated with Optibond FL resin (Kerr) and cured for five seconds on each tooth with a Fusion LED curing light (DentLight; Richardson TX). Excess material was removed with a scaler and a #12 scalpel blade, and the provisionals were smoothed and finished with abrasive discs (Cosmedent) and a rubber cup polisher (Cosmedent). Occlusion was verified and checked and the patient was scheduled for a postoperative check 24 hours later.
The 24-hour postoperative check was particularly important because it was the patient’s first opportunity to evaluate the proposed shapes and con-tours of her new teeth without being anesthetized. The check began with an esthetic and phonetic evaluation by the patient and the doctor. The patient re-viewed and approved the shape of her provisional restorations and the shade tabs selected at the prior appointment. Proper occlusion and anterior guidance were confirmed. Photographs were tak-en of the approved provisional restora-tions and shade tabs were made. Other
provisional records were made, includ-ing a stick bite in CO and a polyvinyl impression of the approved provision-als. All records were disinfected and sent to the ceramist, accompanied by a complete laboratory prescription and all photographs taken to that point. The ceramist was instructed to use the im-pression of the approved provisionals as a guide for the final shape, size, and contour of the porcelain restorations.
Laboratory PhaseDuring the three-week provisional phase following the master impres-sion appointment, the patient was able to further reevaluate the provisional restorations. If she had requested any changes, they would have been com-municated to the ceramist during this period. No changes were requested dur-ing this time.
The patient’s approved basic shade choice of BL2 (Ivoclar Vivadent) with a slight fade to BL3 at the gingival (more on #7 and #10 than on the centrals), and a cervical BL4 on the canine teeth was communicated to the ceramist on the laboratory prescription. A moder-ate incisal translucency pattern was re-quested with natural gingival staining and a polished gloss lightly textured finish. Additional information sent to the laboratory included the following:
• shade map (proposed)
• digital photographs: preoperative, prepared, and provisionalized
• digital photographs of teeth with shade guides: preoperative, prepared, and provisionalized
• stick bite registrations with photographs: preoperative, prepared, and provisionalized
• master PVS impression of prepared teeth (two sets)
• opposing PVS impression of mandibular teeth
• PVS impression of maxillary provisional restorations
• specific written details of case goals with special emphasis on shade.
At this time, a prescription for 10 Authentic porcelain veneers (Jensen Industries; North Haven, CT) was writ-ten. On receipt of the case, the records were reviewed by the ceramist and the material choice on the prescription was confirmed during a telephone conversa-tion. Shape, shade, and characterization were discussed again and finalized in the planning stage.
The laboratory received PVS impres-sions of the preparations, opposing arch, and approved provisional resto-rations, as well as a stick bite, bite re-cords, and detailed prescription of the patient’s desired restorative results. The dentist and ceramist discussed and agreed to use a pressed ceramic material (Authentic) for the restorations.
Figure 11: Wax-up articulated. Figure 12: Solid model articulated.
55 Journal of Cosmetic Dentistry
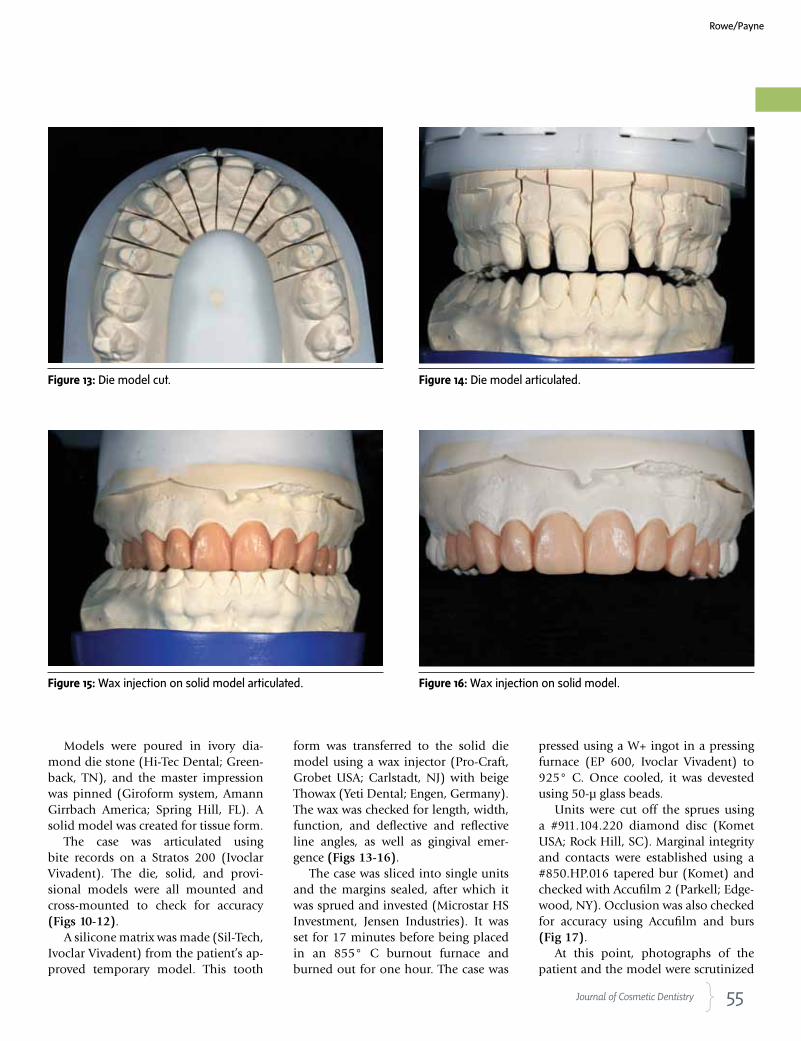
Models were poured in ivory dia-mond die stone (Hi-Tec Dental; Green-back, TN), and the master impression was pinned (Giroform system, Amann Girrbach America; Spring Hill, FL). A solid model was created for tissue form.
The case was articulated using bite records on a Stratos 200 (Ivoclar Vivadent). The die, solid, and provi-sional models were all mounted and cross-mounted to check for accuracy (Figs 10-12).
A silicone matrix was made (Sil-Tech, Ivoclar Vivadent) from the patient’s ap-proved temporary model. This tooth
form was transferred to the solid die model using a wax injector (Pro-Craft, Grobet USA; Carlstadt, NJ) with beige Thowax (Yeti Dental; Engen, Germany). The wax was checked for length, width, function, and deflective and reflective line angles, as well as gingival emer-gence (Figs 13-16).
The case was sliced into single units and the margins sealed, after which it was sprued and invested (Microstar HS Investment, Jensen Industries). It was set for 17 minutes before being placed in an 855° C burnout furnace and burned out for one hour. The case was
pressed using a W+ ingot in a pressing furnace (EP 600, Ivoclar Vivadent) to 925° C. Once cooled, it was devested using 50-µ glass beads.
Units were cut off the sprues using a #911.104.220 diamond disc (Komet USA; Rock Hill, SC). Marginal integrity and contacts were established using a #850.HP.016 tapered bur (Komet) and checked with Accufilm 2 (Parkell; Edge-wood, NY). Occlusion was also checked for accuracy using Accufilm and burs (Fig 17).
At this point, photographs of the patient and the model were scrutinized
Figure 13: Die model cut. Figure 14: Die model articulated.
Figure 16: Wax injection on solid model.Figure 15: Wax injection on solid model articulated.
Rowe/Payne
56 Summer 2011 • Volume 27 • Number 2
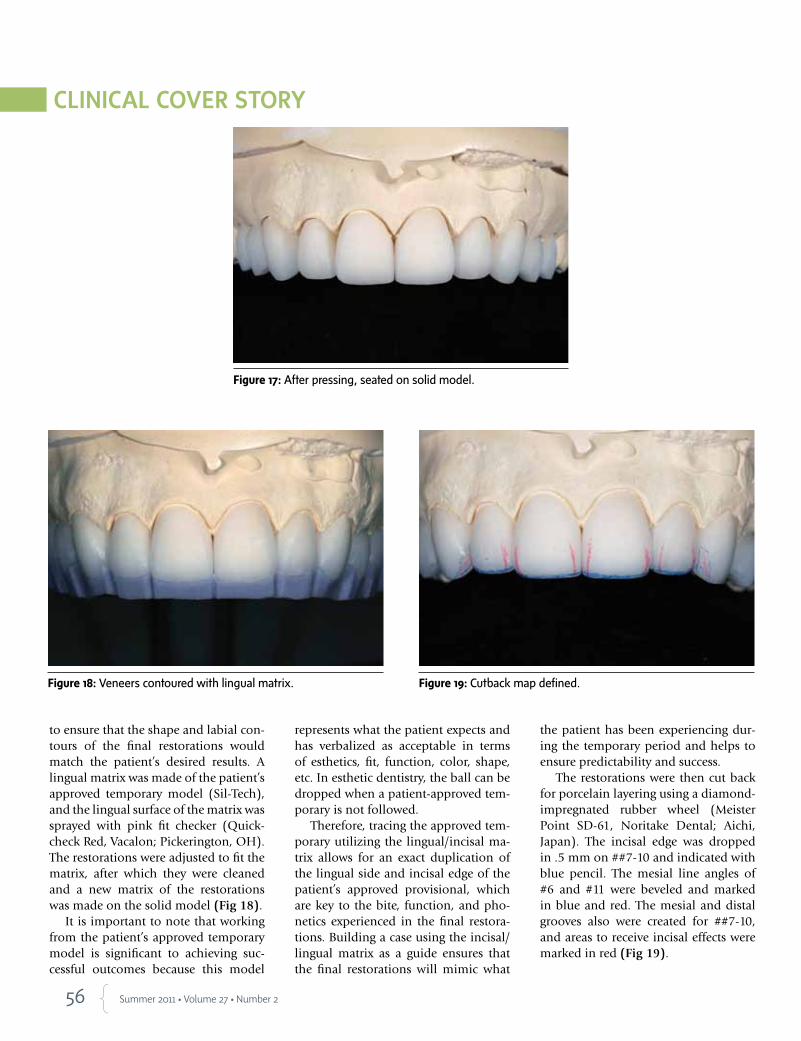
to ensure that the shape and labial con-tours of the final restorations would match the patient’s desired results. A lingual matrix was made of the patient’s approved temporary model (Sil-Tech), and the lingual surface of the matrix was sprayed with pink fit checker (Quick-check Red, Vacalon; Pickerington, OH). The restorations were adjusted to fit the matrix, after which they were cleaned and a new matrix of the restorations was made on the solid model (Fig 18).
It is important to note that working from the patient’s approved temporary model is significant to achieving suc-cessful outcomes because this model
represents what the patient expects and has verbalized as acceptable in terms of esthetics, fit, function, color, shape, etc. In esthetic dentistry, the ball can be dropped when a patient-approved tem-porary is not followed.
Therefore, tracing the approved tem-porary utilizing the lingual/incisal ma-trix allows for an exact duplication of the lingual side and incisal edge of the patient’s approved provisional, which are key to the bite, function, and pho-netics experienced in the final restora-tions. Building a case using the incisal/lingual matrix as a guide ensures that the final restorations will mimic what
the patient has been experiencing dur-ing the temporary period and helps to ensure predictability and success.
The restorations were then cut back for porcelain layering using a diamond-impregnated rubber wheel (Meister Point SD-61, Noritake Dental; Aichi, Japan). The incisal edge was dropped in .5 mm on ##7-10 and indicated with blue pencil. The mesial line angles of #6 and #11 were beveled and marked in blue and red. The mesial and distal grooves also were created for ##7-10, and areas to receive incisal effects were marked in red (Fig 19).
Figure 17: After pressing, seated on solid model.
Figure 18: Veneers contoured with lingual matrix. Figure 19: Cutback map defined.
57 Journal of Cosmetic Dentistry
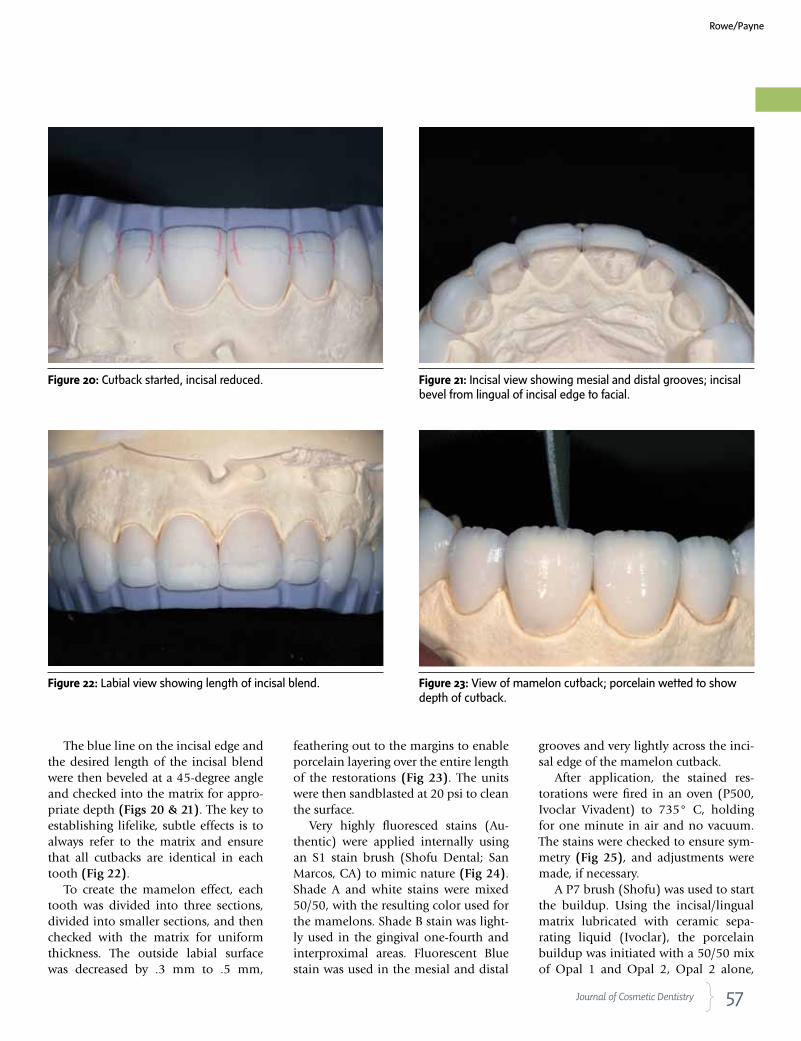
The blue line on the incisal edge and the desired length of the incisal blend were then beveled at a 45-degree angle and checked into the matrix for appro-priate depth (Figs 20 & 21). The key to establishing lifelike, subtle effects is to always refer to the matrix and ensure that all cutbacks are identical in each tooth (Fig 22).
To create the mamelon effect, each tooth was divided into three sections, divided into smaller sections, and then checked with the matrix for uniform thickness. The outside labial surface was decreased by .3 mm to .5 mm,
feathering out to the margins to enable porcelain layering over the entire length of the restorations (Fig 23). The units were then sandblasted at 20 psi to clean the surface.
Very highly fluoresced stains (Au-thentic) were applied internally using an S1 stain brush (Shofu Dental; San Marcos, CA) to mimic nature (Fig 24). Shade A and white stains were mixed 50/50, with the resulting color used for the mamelons. Shade B stain was light-ly used in the gingival one-fourth and interproximal areas. Fluorescent Blue stain was used in the mesial and distal
grooves and very lightly across the inci-sal edge of the mamelon cutback.
After application, the stained res-torations were fired in an oven (P500, Ivoclar Vivadent) to 735° C, holding for one minute in air and no vacuum. The stains were checked to ensure sym-metry (Fig 25), and adjustments were made, if necessary.
A P7 brush (Shofu) was used to start the buildup. Using the incisal/lingual matrix lubricated with ceramic sepa-rating liquid (Ivoclar), the porcelain buildup was initiated with a 50/50 mix of Opal 1 and Opal 2, Opal 2 alone,
Figure 20: Cutback started, incisal reduced. Figure 21: Incisal view showing mesial and distal grooves; incisal bevel from lingual of incisal edge to facial.
Figure 22: Labial view showing length of incisal blend. Figure 23: View of mamelon cutback; porcelain wetted to show depth of cutback.
Rowe/Payne
58 Summer 2011 • Volume 27 • Number 2
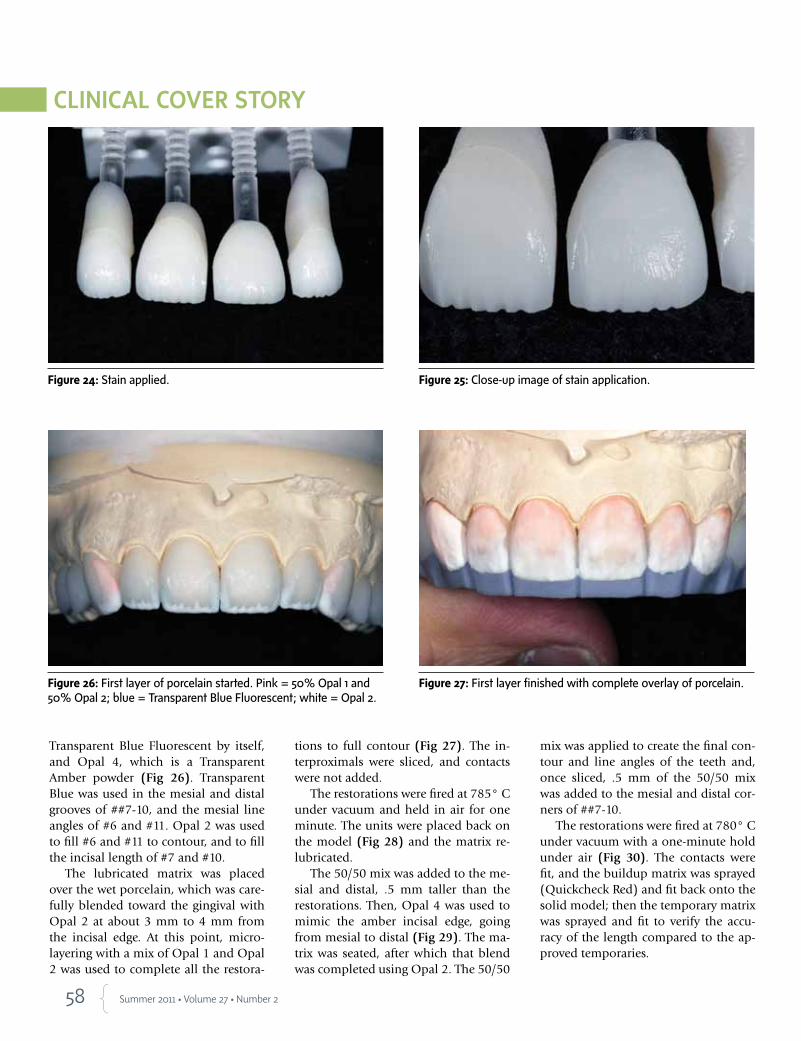
Transparent Blue Fluorescent by itself, and Opal 4, which is a Transparent Amber powder (Fig 26). Transparent Blue was used in the mesial and distal grooves of ##7-10, and the mesial line angles of #6 and #11. Opal 2 was used to fill #6 and #11 to contour, and to fill the incisal length of #7 and #10.
The lubricated matrix was placed over the wet porcelain, which was care-fully blended toward the gingival with Opal 2 at about 3 mm to 4 mm from the incisal edge. At this point, micro-layering with a mix of Opal 1 and Opal 2 was used to complete all the restora-
tions to full contour (Fig 27). The in-terproximals were sliced, and contacts were not added.
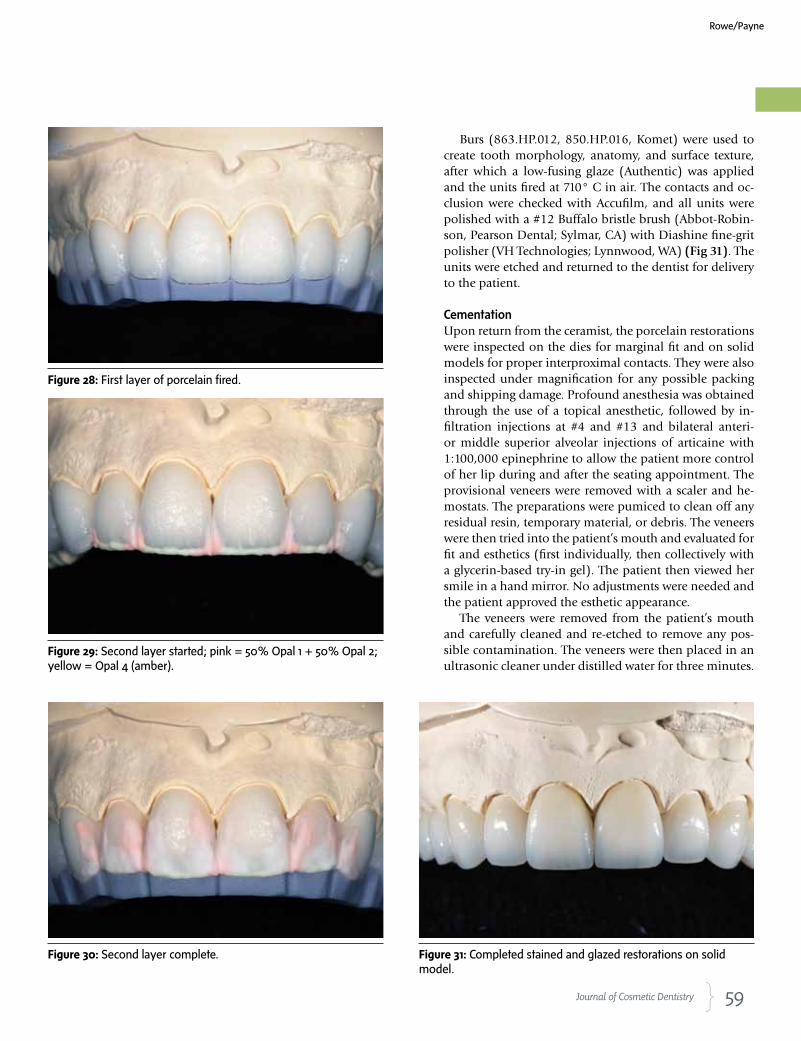
The restorations were fired at 785° C under vacuum and held in air for one minute. The units were placed back on the model (Fig 28) and the matrix re-lubricated.
The 50/50 mix was added to the me-sial and distal, .5 mm taller than the restorations. Then, Opal 4 was used to mimic the amber incisal edge, going from mesial to distal (Fig 29). The ma-trix was seated, after which that blend was completed using Opal 2. The 50/50
mix was applied to create the final con-tour and line angles of the teeth and, once sliced, .5 mm of the 50/50 mix was added to the mesial and distal cor-ners of ##7-10.
The restorations were fired at 780° C under vacuum with a one-minute hold under air (Fig 30). The contacts were fit, and the buildup matrix was sprayed (Quickcheck Red) and fit back onto the solid model; then the temporary matrix was sprayed and fit to verify the accu-racy of the length compared to the ap-proved temporaries.
Figure 24: Stain applied. Figure 25: Close-up image of stain application.
Figure 26: First layer of porcelain started. Pink = 50% Opal 1 and 50% Opal 2; blue = Transparent Blue Fluorescent; white = Opal 2.
Figure 27: First layer finished with complete overlay of porcelain.
59 Journal of Cosmetic Dentistry
Burs (863.HP.012, 850.HP.016, Komet) were used to create tooth morphology, anatomy, and surface texture, after which a low-fusing glaze (Authentic) was applied and the units fired at 710° C in air. The contacts and oc-clusion were checked with Accufilm, and all units were polished with a #12 Buffalo bristle brush (Abbot-Robin-son, Pearson Dental; Sylmar, CA) with Diashine fine-grit polisher (VH Technologies; Lynnwood, WA) (Fig 31). The units were etched and returned to the dentist for delivery to the patient.
CementationUpon return from the ceramist, the porcelain restorations were inspected on the dies for marginal fit and on solid models for proper interproximal contacts. They were also inspected under magnification for any possible packing and shipping damage. Profound anesthesia was obtained through the use of a topical anesthetic, followed by in-filtration injections at #4 and #13 and bilateral anteri-or middle superior alveolar injections of articaine with 1:100,000 epinephrine to allow the patient more control of her lip during and after the seating appointment. The provisional veneers were removed with a scaler and he-mostats. The preparations were pumiced to clean off any residual resin, temporary material, or debris. The veneers were then tried into the patient’s mouth and evaluated for fit and esthetics (first individually, then collectively with a glycerin-based try-in gel). The patient then viewed her smile in a hand mirror. No adjustments were needed and the patient approved the esthetic appearance.
The veneers were removed from the patient’s mouth and carefully cleaned and re-etched to remove any pos-sible contamination. The veneers were then placed in an ultrasonic cleaner under distilled water for three minutes.
Figure 28: First layer of porcelain fired.
Figure 29: Second layer started; pink = 50% Opal 1 + 50% Opal 2; yellow = Opal 4 (amber).
Figure 30: Second layer complete. Figure 31: Completed stained and glazed restorations on solid model.
Rowe/Payne
60 Summer 2011 • Volume 27 • Number 2
Upon removal from the water, they were dried with oil-free compressed air, and silane coupling agent (Ultra-dent) was applied to the intaglio of the veneers.9 After one minute they were dried again and a thin coating of ExciTE bonding agent (Ivoclar Vivadent) was applied to the inside of the veneers and air-thinned. RelyX Translu-cent Veneer Cement (3M ESPE; St Paul, MN) was applied to the veneers and they were immediately placed into a ResinKeeper light-safe box (Cosmedent) to prevent po-lymerization of the resin.3,4
A split rubber dam was applied to isolate the prepared teeth from the oral environment. The preparations were then acid-etched for 15 seconds and the 35% Ultra-Etch phosphoric acid gel etchant (Ultradent) was removed with a copious air and water spray.3,4 All preparations were lightly dried, but not dessicated, with oil-free com-pressed air.3,4 The preparations were left moist and bond-ing agent was applied to each preparation and agitated for 20 seconds prior to air-thinning to evaporate solvents. The bonding agent was then cured for 20 seconds with a Fusion LED curing light. The veneers were removed from the light-safe box and seated on their respective prepara-tions. Excess cement was removed with a Regular Micro-brush (Grafton, WI) and they were tacked into place for five seconds each with the LED curing light.10 Additional excess was gently removed with a scaler, floss was passed through the contacts in the apical direction only, and the veneers were cured fully for an additional 30 seconds each.10 The margins were inspected and any excess cured cement was removed with a #12 scalpel blade.10 Inter-proximal areas were cleaned with Epitex finishing strips (GC America; Alsip, IL). DeOx oxygen-inhibiting gel (Ultradent) was placed around all margins and the res-torations were cured an additional 10 seconds to finalize polymerization.3,4,9 Rubber dam isolation was removed and occlusal marking paper was used to evaluate the oc-clusion in CO and in excursive movements. The lingual aspect was then polished with diamond paste and Flexi-Buff polishers (Cosmedent) in a slow-speed handpiece.
The patient’s teeth were inspected again for any excess restorative material. The occlusion was checked again and smooth, proper contacts were verified with unwaxed floss.
The patient returned the following day and her func-tional occlusion was evaluated and her teeth were in-spected for any residual cement. Also at this 24-hour postoperative check appointment, maxillary and man-dibular alginate impressions were made along with a PVS bite registration to be used for fabrication of a maxillary full-arch bite guard for nighttime wear.3
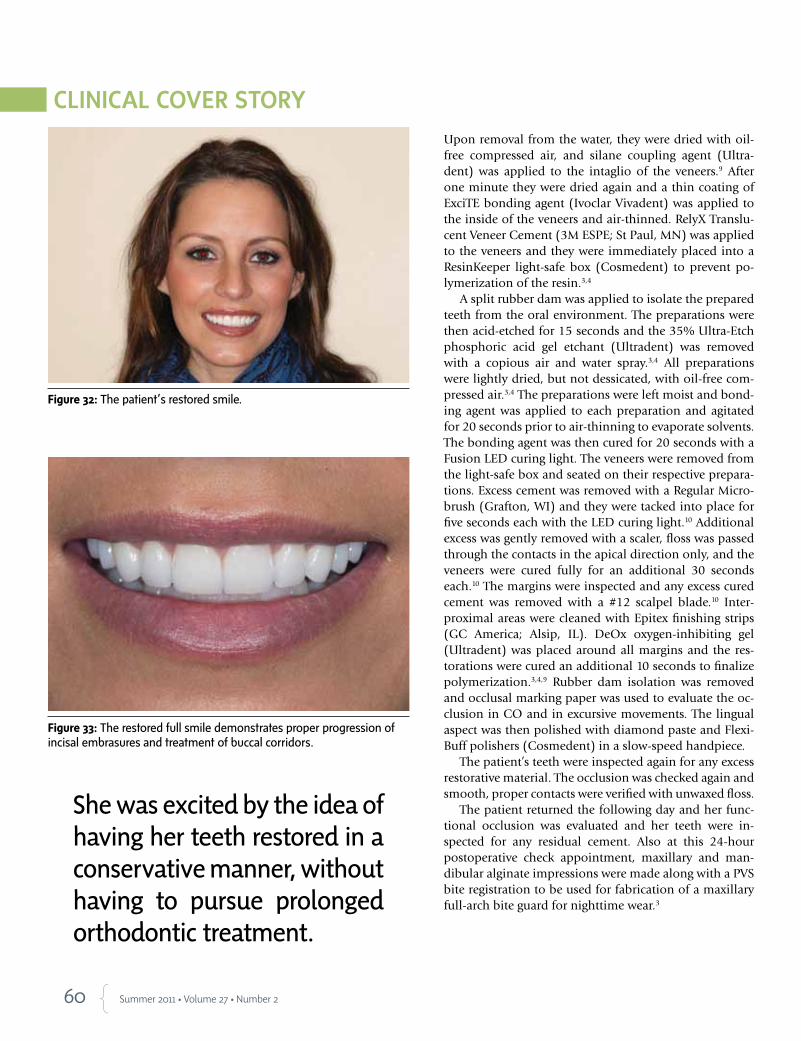
Figure 32: The patient’s restored smile.
Figure 33: The restored full smile demonstrates proper progression of incisal embrasures and treatment of buccal corridors.
She was excited by the idea of having her teeth restored in a conservative manner, without having to pursue prolonged orthodontic treatment.
62 Summer 2011 • Volume 27 • Number 2
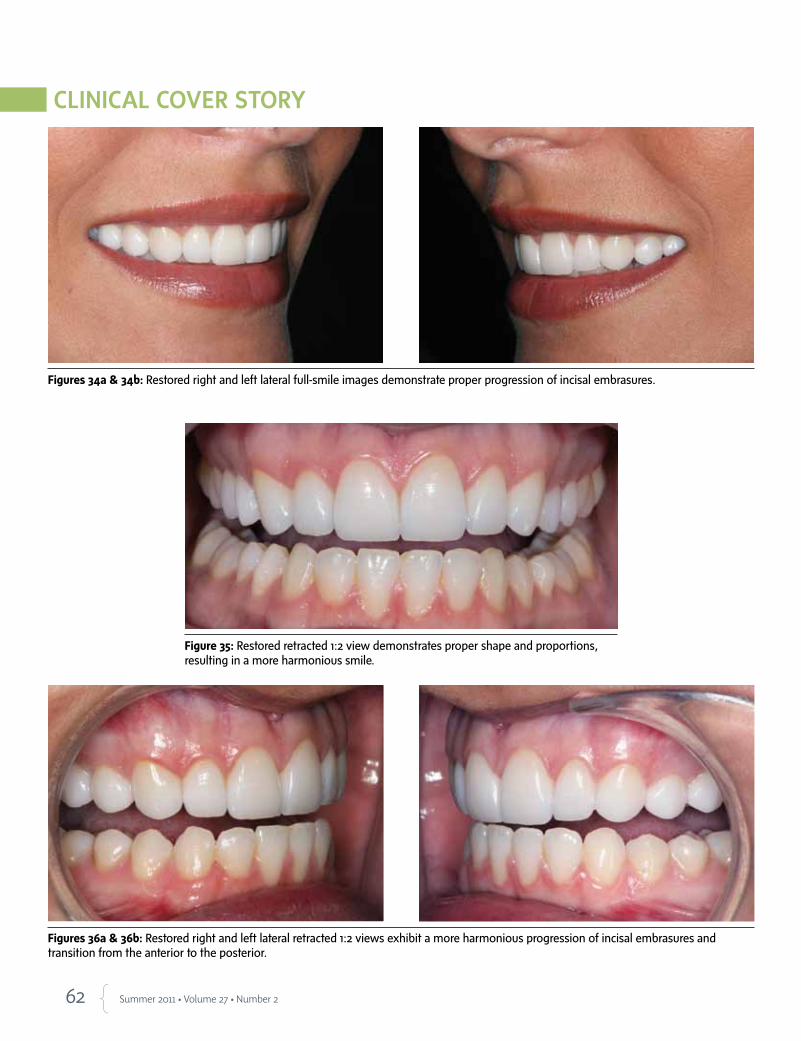
Figures 34a & 34b: Restored right and left lateral full-smile images demonstrate proper progression of incisal embrasures.
Figure 35: Restored retracted 1:2 view demonstrates proper shape and proportions, resulting in a more harmonious smile.
Figures 36a & 36b: Restored right and left lateral retracted 1:2 views exhibit a more harmonious progression of incisal embrasures and transition from the anterior to the posterior.
63 Journal of Cosmetic Dentistry
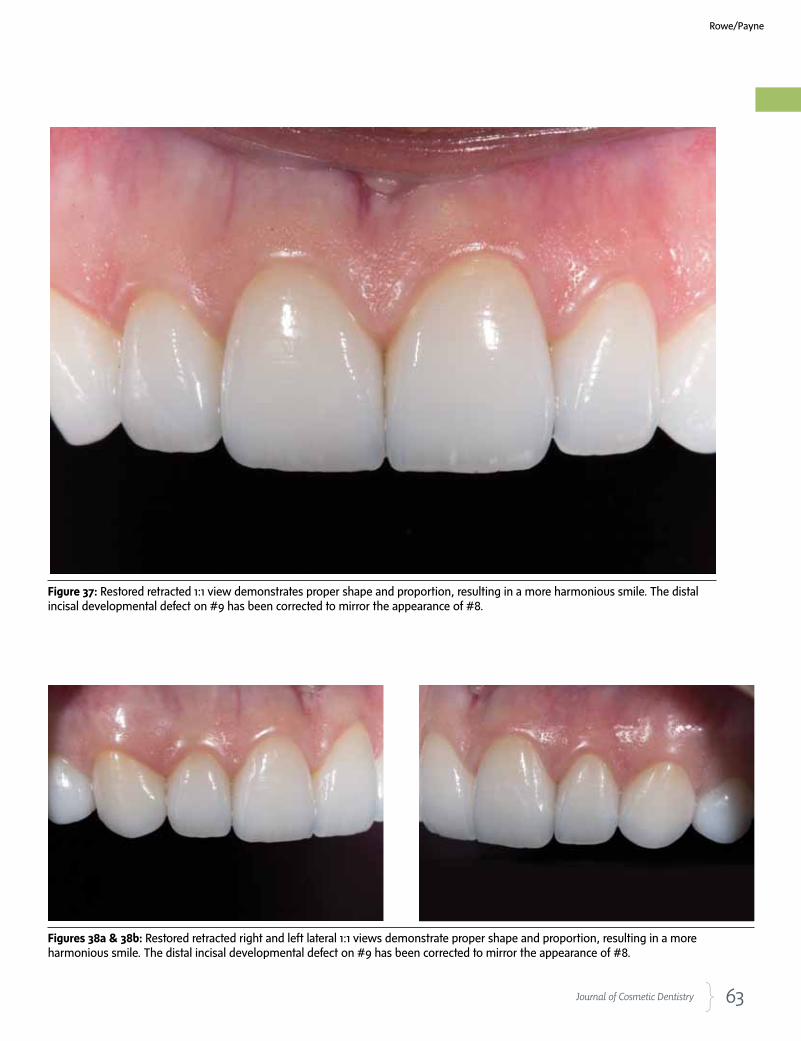
Figure 37: Restored retracted 1:1 view demonstrates proper shape and proportion, resulting in a more harmonious smile. The distal incisal developmental defect on #9 has been corrected to mirror the appearance of #8.
Figures 38a & 38b: Restored retracted right and left lateral 1:1 views demonstrate proper shape and proportion, resulting in a more harmonious smile. The distal incisal developmental defect on #9 has been corrected to mirror the appearance of #8.
Rowe/Payne
64 Summer 2011 • Volume 27 • Number 2
Postoperative home care instructions were given and the patient was scheduled for a follow-up appoint-ment for radiographic and photographic documenta-tion, a final check for function and esthetic evaluation, and delivery of the maxillary protective bite guard3 (Figs 32-40).
ConclusionPorcelain veneers can be employed to provide beauti-ful, natural, long-lasting functional cosmetic results. This patient presented with some very precise re-quests. Careful planning, great communication, and meticulous use of contemporary dental materials yielded an excellent result that surpassed the patient’s expectations.
References
1. American Academy of Cosmetic Dentistry. Diagnosis and treat-
ment evaluation in cosmetic dentistry: a guide to Accreditation
criteria. Madison (WI): The Academy; 2001.
2. Dawson PE. Evaluation, diagnosis, and treatment of occlusal
problems. St. Louis (MO): Mosby; 1989.
3. Magne P, Belser U. Bonded porcelain restorations in the anterior
dentition: a biomimetic approach. Hanover Park (IL): Quintes-
sence Pub.; 2002.
4. Gurel G. The science and art of porcelain laminate veneers. Ha-
nover Park (IL): Quintessence Pub.; 2003.
5. Rufenacht CR. Fundamentals of esthetics. Hanover Park (IL):
Quintessence Pub.; 1992.
6. Fradeani M. Esthetic analysis: a systematic approach to prosthet-
ic treatment. volume 1. Hanover Park (IL): Quintessence Pub.;
2004.
7. Goldstein RE. Esthetics in dentistry. Hamilton (ONT, CA): B.C.
Decker; 1998.
8. Flax H. Smile enhancement with laser technology—predictable
and esthetic: a case report. J Cosmetic Dent. 2007;23(1):92-8.
9. Touati B, Quintas AF. Aesthetic and adhesive cementation for
contemporary porcelain crowns. Pract Proced Aesthet Dent.
2001;13(8):611-20.
10. Miller MB. Reality: the techniques: volume I. Houston (TX): Real-
ity Publishing; 2003. jCD
Dr. Rowe is an AACD Accredited Member, an AACD Accreditation Examiner, and
a member of the American Board of Cosmetic Dentistry. He graduated from the
University of Tennessee College of Dentistry in 2000 and owns a practice with
his wife, Dr. Kristy Rowe, in Jonesboro, Arkansas.
Mr. Payne owns a dental laboratory in San Clemente, California, and is an Ac-
credited Member of the AACD.
Disclosures: Dr. Rowe serves as a clinical evaluator for DMG America. Mr. Payne
did not report any disclosures.
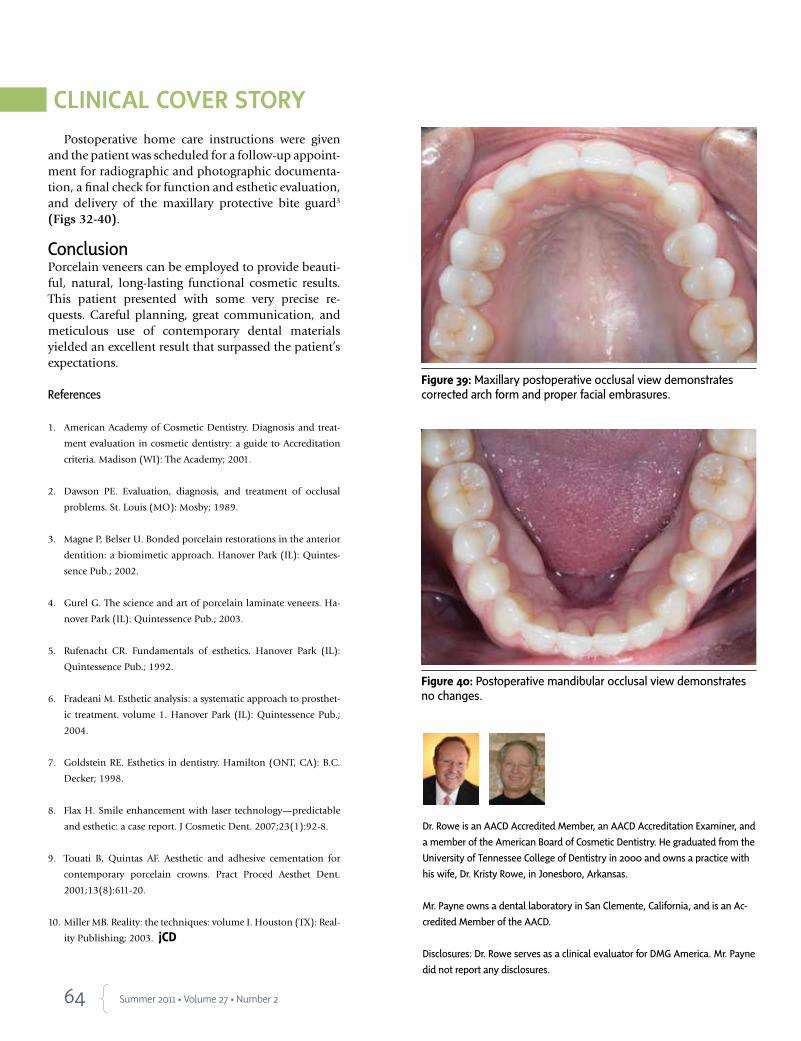
Figure 40: Postoperative mandibular occlusal view demonstrates no changes.
Figure 39: Maxillary postoperative occlusal view demonstrates corrected arch form and proper facial embrasures.
Related Documents