Installing HP-UX 11.0 and Updating HP-UX 10.x to 11.0 HP 9000 Computers Edition 1 B2355-90153 November 1997

Welcome message from author
This document is posted to help you gain knowledge. Please leave a comment to let me know what you think about it! Share it to your friends and learn new things together.
Transcript
Installing HP-UX 11.0 and UpdatingHP-UX 10.x to 11.0
HP 9000 Computers
Edition 1
B2355-90153
November 1997

2
NoticesInformation in this document is subject to change without notice.
Hewlett-Packard makes no warranty of any kind about this manual,including, but not limited to, the implied warranties of merchantabilityand fitness for a particular purpose. Hewlett-Packard shall not be liablefor errors contained herein or direct, indirect, special, incidental orconsequential damages about the furnishing, performance, or use of thismaterial.
Please read the enclosed Hewlett-Packard Software Product LicenseAgreement and Limited Warranty before operating this product. Rightsin the software are offered only on the condition that the customeraccepts all terms and conditions of the License Agreement.
Operating the product indicates your acceptance of these terms andconditions. If you do not agree to the License Agreement, you may returnthe unused product for a full refund.
A copy of the specific warranty terms applicable to your Hewlett-Packardproduct and replacement parts can be obtained from your local Sales andService Office.
© Copyright 1997 Hewlett-Packard Company; Copyright © 1986, 1987,1988 Sun Microsystems, Inc.; Copyright © 1980, 1984, 1986 UNIXSystem Laboratories, Inc.; Copyright © 1985-1986, 1988 MassachusettsInstitute of Technology; Copyright © 1986 Digital Equipment Corp.;Copyright © The Regents of the University of California 1979, 1980,1983, 1985. This document contains information which has beenprotected by copyright. All rights are reserved. Reproduction,adaptation, or translation without prior written permission is prohibited,except as allowed under the copyright laws. This software anddocumentation is based in part on the Fourth Berkeley SoftwareDistribution under license from the Regents of the University ofCalifornia. Restricted Rights Legend: Use, duplication or disclosure bythe United States Government is subject to restrictions as set forth insubparagraph (c) (1) (ii) of the Rights in Technical Data and ComputerSoftware clause at FARs 52.227.7013. Direct comments regarding thesoftware to: OSSD Learning Products, Hewlett-Packard, 3404 EastHarmony Road, Fort Collins, Colorado 80525
3
Printing HistoryThe Version date and printing date show the current edition of thismanual. Minor updates may be made between major releases. Thecurrent Version is indicated by the date on the title page.
November 1997, Edition 1.

4

Contents
5
1. Updating and Installing: Task Information
Chapter Contents. . . . . . . . . . . . . . . . . . . . . . . . . . . . . . . . . . . . . . . . . . . .12
Updating and Installing: Why Do It? . . . . . . . . . . . . . . . . . . . . . . . . . . . .13
Task-Information Roadmap. . . . . . . . . . . . . . . . . . . . . . . . . . . . . . . . . . . .15
2. Updating an Existing Operating System and Software
Chapter Contents. . . . . . . . . . . . . . . . . . . . . . . . . . . . . . . . . . . . . . . . . . . .18
Updating a System . . . . . . . . . . . . . . . . . . . . . . . . . . . . . . . . . . . . . . . . . .19Overview.. . . . . . . . . . . . . . . . . . . . . . . . . . . . . . . . . . . . . . . . . . . . . . . . .20
HP-UX Update Requirements. . . . . . . . . . . . . . . . . . . . . . . . . . . . . . . . . .21Source Media . . . . . . . . . . . . . . . . . . . . . . . . . . . . . . . . . . . . . . . . . . . . .24
Updating SD-UX Before Installing/Updating Software . . . . . . . . . . . . .26SW-DIST Installation. . . . . . . . . . . . . . . . . . . . . . . . . . . . . . . . . . . . . . .27
Updating HP-UX Software . . . . . . . . . . . . . . . . . . . . . . . . . . . . . . . . . . . .30Updating HP-UX on a Stand-Alone System . . . . . . . . . . . . . . . . . . . . .30Updating to HP-UX 11.0 . . . . . . . . . . . . . . . . . . . . . . . . . . . . . . . . . . . .31Updating Interactively from the GUI . . . . . . . . . . . . . . . . . . . . . . . . . .43Updating Non-Interactively from Media or Network. . . . . . . . . . . . . .49
Using HP-UX Extension Software . . . . . . . . . . . . . . . . . . . . . . . . . . . . . .51
Installing Applications Software . . . . . . . . . . . . . . . . . . . . . . . . . . . . . . .52Adding Additional Functionality . . . . . . . . . . . . . . . . . . . . . . . . . . . . . .52Installing Patches. . . . . . . . . . . . . . . . . . . . . . . . . . . . . . . . . . . . . . . . . .52Networking Products on Additional Media. . . . . . . . . . . . . . . . . . . . . .52Installing the Optional OnlineJFS Product . . . . . . . . . . . . . . . . . . . . .53
3. Installing From Media
Chapter Contents. . . . . . . . . . . . . . . . . . . . . . . . . . . . . . . . . . . . . . . . . . . .56
6
Contents
Installing from a Media Source . . . . . . . . . . . . . . . . . . . . . . . . . . . . . . . . 57Preparing for a Media Install . . . . . . . . . . . . . . . . . . . . . . . . . . . . . . . . 57
Booting the Target System . . . . . . . . . . . . . . . . . . . . . . . . . . . . . . . . . . . 59Booting HP 9000 Workstations . . . . . . . . . . . . . . . . . . . . . . . . . . . . . . 59Booting HP 9000 Servers . . . . . . . . . . . . . . . . . . . . . . . . . . . . . . . . . . . 62Booting the V-Class. . . . . . . . . . . . . . . . . . . . . . . . . . . . . . . . . . . . . . . . 65
Using the Ignite-UX Interface . . . . . . . . . . . . . . . . . . . . . . . . . . . . . . . . . 70Choosing a Language for Interaction. . . . . . . . . . . . . . . . . . . . . . . . . . 70Welcome Screen. . . . . . . . . . . . . . . . . . . . . . . . . . . . . . . . . . . . . . . . . . . 71Guided Installation . . . . . . . . . . . . . . . . . . . . . . . . . . . . . . . . . . . . . . . . 74Advanced Media Installation (TUI) . . . . . . . . . . . . . . . . . . . . . . . . . . . 79
4. Configuring an Ignite-UX Server
Chapter Contents . . . . . . . . . . . . . . . . . . . . . . . . . . . . . . . . . . . . . . . . . . . 82
Installing Server Software. . . . . . . . . . . . . . . . . . . . . . . . . . . . . . . . . . . . 83Overview: the Ignite-UX Server. . . . . . . . . . . . . . . . . . . . . . . . . . . . . . 83Ignite-UX Distribution . . . . . . . . . . . . . . . . . . . . . . . . . . . . . . . . . . . . . 84
Setting Up an Ignite-UX Server . . . . . . . . . . . . . . . . . . . . . . . . . . . . . . . 88Starting the Ignite-UX Server . . . . . . . . . . . . . . . . . . . . . . . . . . . . . . . 92Configuring Server Options . . . . . . . . . . . . . . . . . . . . . . . . . . . . . . . . . 92
5. Installing from the Ignite-UX Server
Chapter Contents . . . . . . . . . . . . . . . . . . . . . . . . . . . . . . . . . . . . . . . . . . 100
Network Source Installation . . . . . . . . . . . . . . . . . . . . . . . . . . . . . . . . . 101Booting Client Systems from the Network . . . . . . . . . . . . . . . . . . . . 101Older Series 700 . . . . . . . . . . . . . . . . . . . . . . . . . . . . . . . . . . . . . . . . . 103HP 9000 Workstations and Servers (K/D Class) . . . . . . . . . . . . . . . . 104
Installing from the Server . . . . . . . . . . . . . . . . . . . . . . . . . . . . . . . . . . . 107Displaying the Client Systems . . . . . . . . . . . . . . . . . . . . . . . . . . . . . . 108
Contents
7
Configuring the Installation . . . . . . . . . . . . . . . . . . . . . . . . . . . . . . . . . .111Using the Ignite-UX Interface. . . . . . . . . . . . . . . . . . . . . . . . . . . . . . .112The Basic Tab . . . . . . . . . . . . . . . . . . . . . . . . . . . . . . . . . . . . . . . . . . . .112Configurations . . . . . . . . . . . . . . . . . . . . . . . . . . . . . . . . . . . . . . . . . . .113OS Environment. . . . . . . . . . . . . . . . . . . . . . . . . . . . . . . . . . . . . . . . . .113File System . . . . . . . . . . . . . . . . . . . . . . . . . . . . . . . . . . . . . . . . . . . . . .113Languages. . . . . . . . . . . . . . . . . . . . . . . . . . . . . . . . . . . . . . . . . . . . . . .114Functions Available on all Tabs. . . . . . . . . . . . . . . . . . . . . . . . . . . . . .116The Software Tab . . . . . . . . . . . . . . . . . . . . . . . . . . . . . . . . . . . . . . . . .117The System Tab . . . . . . . . . . . . . . . . . . . . . . . . . . . . . . . . . . . . . . . . . .118Network Services . . . . . . . . . . . . . . . . . . . . . . . . . . . . . . . . . . . . . . . . .122File System Tab . . . . . . . . . . . . . . . . . . . . . . . . . . . . . . . . . . . . . . . . . .128Additional Tasks. . . . . . . . . . . . . . . . . . . . . . . . . . . . . . . . . . . . . . . . . .132Advanced Tab . . . . . . . . . . . . . . . . . . . . . . . . . . . . . . . . . . . . . . . . . . . .137
Executing the Installation: Go!. . . . . . . . . . . . . . . . . . . . . . . . . . . . . . . .139Viewing and Printing a Manifest . . . . . . . . . . . . . . . . . . . . . . . . . . . .139Non-Interactive Installation Using bootsys . . . . . . . . . . . . . . . . . . . .141
6. HP-UX System Recovery
Chapter Contents. . . . . . . . . . . . . . . . . . . . . . . . . . . . . . . . . . . . . . . . . . .144
Overview . . . . . . . . . . . . . . . . . . . . . . . . . . . . . . . . . . . . . . . . . . . . . . . . .145“Expert” Recovery. . . . . . . . . . . . . . . . . . . . . . . . . . . . . . . . . . . . . . . . .145System Recovery. . . . . . . . . . . . . . . . . . . . . . . . . . . . . . . . . . . . . . . . . .145
System Recovery: Creating a Bootable Recovery Tape . . . . . . . . . . . . .147Creating a Bootable Install Tape. . . . . . . . . . . . . . . . . . . . . . . . . . . . .149
“Expert” Recovery Using the Core Media. . . . . . . . . . . . . . . . . . . . . . . .151Automated Recovery Procedures . . . . . . . . . . . . . . . . . . . . . . . . . . . . .152Rebuilding the bootlif and Installing Critical Files . . . . . . . . . . . .152Installing Critical Root Files Only . . . . . . . . . . . . . . . . . . . . . . . . . . .166Rebuilding the ''bootlif'' Only . . . . . . . . . . . . . . . . . . . . . . . . . . . . . . . .174
8
Contents
Replacing the Kernel Only . . . . . . . . . . . . . . . . . . . . . . . . . . . . . . . . . 179
7. Troubleshooting
Chapter Contents . . . . . . . . . . . . . . . . . . . . . . . . . . . . . . . . . . . . . . . . . . 186
Likely Problem Areas. . . . . . . . . . . . . . . . . . . . . . . . . . . . . . . . . . . . . . . 187
Using Config Tools . . . . . . . . . . . . . . . . . . . . . . . . . . . . . . . . . . . . . . . . . 188
During Installation and Configuration of Ignite-UX Tools and Data . 191
Adjusting File System Size . . . . . . . . . . . . . . . . . . . . . . . . . . . . . . . . . . 199
Large Systems . . . . . . . . . . . . . . . . . . . . . . . . . . . . . . . . . . . . . . . . . . . . 201
A. Configuring for a DHCP Server
Appendix Contents . . . . . . . . . . . . . . . . . . . . . . . . . . . . . . . . . . . . . . . . . 204
Introduction . . . . . . . . . . . . . . . . . . . . . . . . . . . . . . . . . . . . . . . . . . . . . . 205
Using DHCP Services: Overview. . . . . . . . . . . . . . . . . . . . . . . . . . . . . . 206
Setting Up a DHCP Server . . . . . . . . . . . . . . . . . . . . . . . . . . . . . . . . . . 208Examples of DHCP Usage . . . . . . . . . . . . . . . . . . . . . . . . . . . . . . . . . 214Using bootptab as an Alternative to DHCP . . . . . . . . . . . . . . . . . . 215
B. Using Configuration Files
Appendix Contents . . . . . . . . . . . . . . . . . . . . . . . . . . . . . . . . . . . . . . . . . 220
Introduction . . . . . . . . . . . . . . . . . . . . . . . . . . . . . . . . . . . . . . . . . . . . . . 221
Types of Config Files . . . . . . . . . . . . . . . . . . . . . . . . . . . . . . . . . . . . . . . 222Other Customized Building Blocks . . . . . . . . . . . . . . . . . . . . . . . . . . 223
Combining Config Files Via INDEX Entries . . . . . . . . . . . . . . . . . . . . 224Examples of Config files . . . . . . . . . . . . . . . . . . . . . . . . . . . . . . . . . . . 225
C. Ignite-UX System Administration
Contents
9
Appendix Contents . . . . . . . . . . . . . . . . . . . . . . . . . . . . . . . . . . . . . . . . .230
Section 1: Installation of Ignite-UX Server Software . . . . . . . . . . . . . .231Ignite-UX Server System Requirements: . . . . . . . . . . . . . . . . . . . . . .231 Load the Ignite-UX software. . . . . . . . . . . . . . . . . . . . . . . . . . . . . . . .232Edit Default Search Path . . . . . . . . . . . . . . . . . . . . . . . . . . . . . . . . . . .232Initial Ignite-UX Server Configuration. . . . . . . . . . . . . . . . . . . . . . . .232
Section 2: The Install Archive. . . . . . . . . . . . . . . . . . . . . . . . . . . . . . . . .236Step 1: Creating an OS Archive. . . . . . . . . . . . . . . . . . . . . . . . . . . . . .236Step 2: Configuring Ignite-UX Server to Recognize the OS Archive .238Step 3: Reboot and Gain Control of Target System . . . . . . . . . . . . . .241Step 4: Install the OS Archive on the Target . . . . . . . . . . . . . . . . . . .242Step 5. Finished . . . . . . . . . . . . . . . . . . . . . . . . . . . . . . . . . . . . . . . . . .244
Section 3: Automatic Installation . . . . . . . . . . . . . . . . . . . . . . . . . . . . . .245Starting an Automatic Installation . . . . . . . . . . . . . . . . . . . . . . . . . . .245Using a “Saved” configuration: . . . . . . . . . . . . . . . . . . . . . . . . . . . . . .246Specifying defaults in the config.local file: . . . . . . . . . . . . . . . . . . . . .246
Section 4: Customization. . . . . . . . . . . . . . . . . . . . . . . . . . . . . . . . . . . . .251Adding an SD Bundle to the Archive Environment . . . . . . . . . . . . . .251Modifying Kernel Parameters with IUX . . . . . . . . . . . . . . . . . . . . . . .252Kernel Parameters Tied to Client Hardware . . . . . . . . . . . . . . . . . . .254Additional Install Parameters . . . . . . . . . . . . . . . . . . . . . . . . . . . . . . .255
Section 5: Post Install Scripts . . . . . . . . . . . . . . . . . . . . . . . . . . . . . . . . .2561. Procedure for adding a post-installation script . . . . . . . . . . . . . . .2562. Managing Network Printers . . . . . . . . . . . . . . . . . . . . . . . . . . . . . .257
Section 6: Using Ignite-UX Across Gateways . . . . . . . . . . . . . . . . . . . .258How to Set Up a 10.x System as a Boot Helper . . . . . . . . . . . . . . . . .258How to Set Up a 9.0x System as a Boot Helper . . . . . . . . . . . . . . . . .259To Perform the Install on the Target: . . . . . . . . . . . . . . . . . . . . . . . . .261
Section 7: Steps to Create a “Golden System” . . . . . . . . . . . . . . . . . . . .262

10
Contents
Step 1: IUX setup of HP-UX OS from media . . . . . . . . . . . . . . . . . . . 262Step 2: Loading critical patches onto the OS. . . . . . . . . . . . . . . . . . . 263Step 3: Load Optional Software . . . . . . . . . . . . . . . . . . . . . . . . . . . . . 264Step 4: Customize the system. . . . . . . . . . . . . . . . . . . . . . . . . . . . . . . 264Step 5: The Golden System is Done . . . . . . . . . . . . . . . . . . . . . . . . . . 264
Section 8: Loading HP-UX Patches Using Ignite-UX. . . . . . . . . . . . . . 265Steps for loading the patches: . . . . . . . . . . . . . . . . . . . . . . . . . . . . . . 265
Section 9: Setting Install Parameters Dynamically . . . . . . . . . . . . . . . 270
Section 10: Installing NetScape as a Post-Configuration Step . . . . . 273
Chapter 1 11
Updating and Installing: Task Information
1 Updating and Installing: TaskInformation
12 Chapter 1
Updating and Installing: Task InformationChapter Contents
Chapter Contents• Updating and Installing: Why Do It?
• Task-Information Roadmap.
Chapter 1 13
Updating and Installing: Task InformationUpdating and Installing: Why Do It?
Updating and Installing: Why Do It?One of the first questions needing to be answered when system hardwarehas to be changed is: should the system undergo an update of just thesoftware concerned, or is it more effective and less error-prone to justre-install the entire disk. Where the change involves a new file systemlayout, as in the transition between HP-UX 9.x and 10.x, there is also thequestion of whether to upgrade or re-install.
Background Ignite-UX is the new installation tool from HP which has replaced theold "cold install" toolset for installations, both for single systems and forlarge replicated sites consisting of many networked systems.
A number of installations tasks are possible, using Ignite-UX:
• Install from media.
• “Pull” or “push” install from Ignite-UX server via network.
• “Push” re-install to many replicated systems from server.
• Re-install/Recovery of a damaged system.
• Recovery of a corrupt root disk.
Ignite-UX provides several advantages over the previous Cold Installproduct:
• At large sites, where speed of installation is crucial, Ignite-UX caninstall one system whose configuration can then act as a model for alllater installations.
• The user interface employs tabbed dialogs to allow moreconfiguration capabilities. In addition, a wizard mode is available foradditional guidance.
• Loads can occur from multiple software sources in a single installsession. For example, you can install a base operating system fromone SD depot, a set of patches from another depot, and applicationsfrom a third depot, all in one session.
Ignite-UX can be set up so that new systems, when cold- booted from theIgnite-UX server, can install a predefined default configuration (“goldendisk”) without further user intervention.
14 Chapter 1
Updating and Installing: Task InformationUpdating and Installing: Why Do It?
Moreover, for a system being re-installed with Ignite-UX, the installprocess can be initiated from the server with no local intervention at theclient system.
The System Administrator can also set up configuration files ahead oftime for existing systems. Ignite-UX will use these during install insteadof the default configuration. This can ensure that specific existingsystems get unique configurations.
Install Scenarios This manual presents a number of scenarios which will help you to followthe following procedures:
• Updating your current OS and applications. This involves using theSD-UX tools to install SD-packaged products and bundles onto yourexisting system. It can serve to either update the OS or othersoftware, while leaving data files untouched. If you need to upgradefrom 9.0x, please see the manual Upgrading from HP-UX 9.x to 10.01.
• Installing a system from media. This is usually done with single orfew standalone systems, using a CD-ROM source.
• Installing a system from a network ("pull" from a client). This is donewith a small networked site (fewer than 50 clients and few servers),and may or may not use a standard system image.
• Installing a number of systems from a network ("push" from aserver). This is done where there are many client systems and theyall generally require a similar installation. This may use a standardsystem image, or "golden disk".
• Re-installing a number of systems from a network server. This is donewhere the client systems are to be "updated" and their data is kept onseparate servers, so that only the OS and minimal systeminformation need to be re-installed. This may also use a standardsystem image, or "golden disk".
• Building a recovery system for the target. This can be done while youare in an install session.
Other "mixed scenarios" are also possible. For information on upgradinga system from HP-UX 9.x, see the manual Upgrading from HP-UX 9.x to10.x (HP Part No. B3782-90073).
The following Task-Information Roadmap will help you find informationon the main installation tasks you are likely to encounter.
Chapter 1 15
Updating and Installing: Task InformationTask-Information Roadmap.
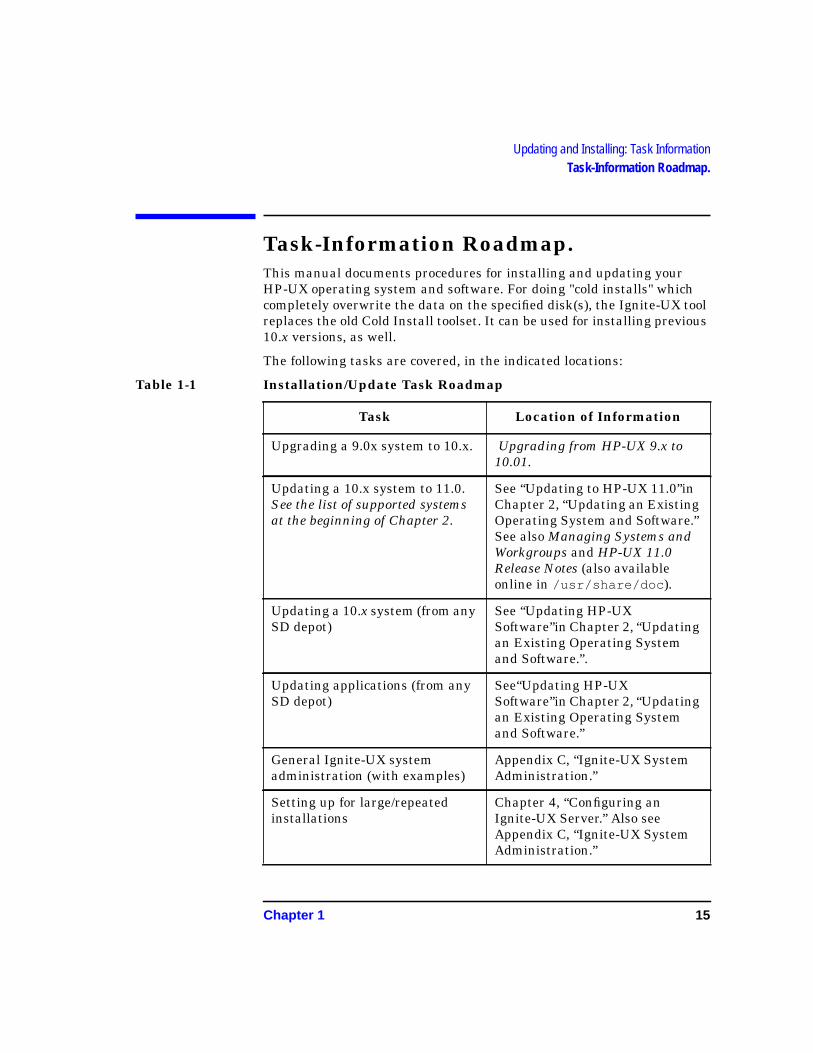
Task-Information Roadmap.This manual documents procedures for installing and updating yourHP-UX operating system and software. For doing "cold installs" whichcompletely overwrite the data on the specified disk(s), the Ignite-UX toolreplaces the old Cold Install toolset. It can be used for installing previous10.x versions, as well.
The following tasks are covered, in the indicated locations:
Table 1-1 Installation/Update Task Roadmap
Task Location of Information
Upgrading a 9.0x system to 10.x. Upgrading from HP-UX 9.x to10.01.
Updating a 10.x system to 11.0.See the list of supported systemsat the beginning of Chapter 2.
See “Updating to HP-UX 11.0”inChapter 2, “Updating an ExistingOperating System and Software.”See also Managing Systems andWorkgroups and HP-UX 11.0Release Notes (also availableonline in /usr/share/doc ).
Updating a 10.x system (from anySD depot)
See “Updating HP-UXSoftware”in Chapter 2, “Updatingan Existing Operating Systemand Software.”.
Updating applications (from anySD depot)
See“Updating HP-UXSoftware”in Chapter 2, “Updatingan Existing Operating Systemand Software.”
General Ignite-UX systemadministration (with examples)
Appendix C, “Ignite-UX SystemAdministration.”
Setting up for large/repeatedinstallations
Chapter 4, “Configuring anIgnite-UX Server.” Also seeAppendix C, “Ignite-UX SystemAdministration.”
16 Chapter 1
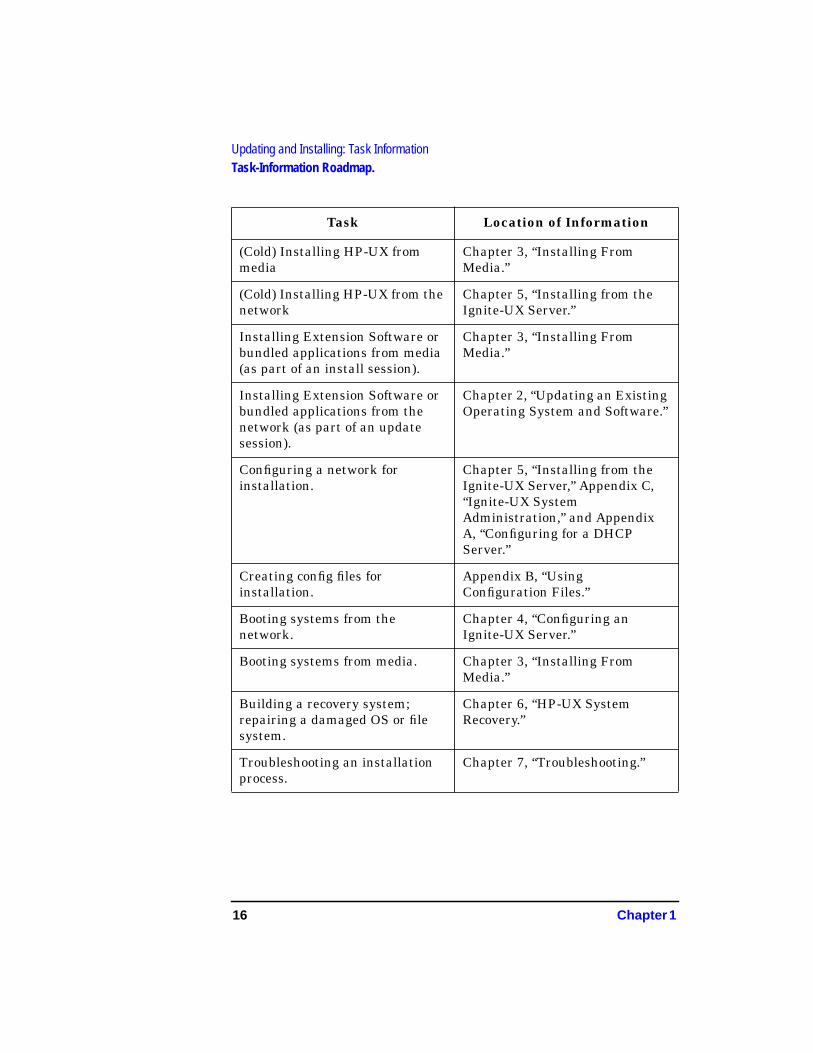
Updating and Installing: Task InformationTask-Information Roadmap.
(Cold) Installing HP-UX frommedia
Chapter 3, “Installing FromMedia.”
(Cold) Installing HP-UX from thenetwork
Chapter 5, “Installing from theIgnite-UX Server.”
Installing Extension Software orbundled applications from media(as part of an install session).
Chapter 3, “Installing FromMedia.”
Installing Extension Software orbundled applications from thenetwork (as part of an updatesession).
Chapter 2, “Updating an ExistingOperating System and Software.”
Configuring a network forinstallation.
Chapter 5, “Installing from theIgnite-UX Server,” Appendix C,“Ignite-UX SystemAdministration,” and AppendixA, “Configuring for a DHCPServer.”
Creating config files forinstallation.
Appendix B, “UsingConfiguration Files.”
Booting systems from thenetwork.
Chapter 4, “Configuring anIgnite-UX Server.”
Booting systems from media. Chapter 3, “Installing FromMedia.”
Building a recovery system;repairing a damaged OS or filesystem.
Chapter 6, “HP-UX SystemRecovery.”
Troubleshooting an installationprocess.
Chapter 7, “Troubleshooting.”
Task Location of Information
Chapter 2 17
Updating an Existing Operating System and Software
2 Updating an ExistingOperating System and Software
18 Chapter 2
Updating an Existing Operating System and SoftwareChapter Contents
Chapter Contents• Overview.
• HP-UX System Requirements.
• Updating SD-UX Before Installing/Updating Software.
• Updating HP-UX Software.
• Updating to HP-UX 11.0.
• Using HP-UX Extension Software.
• Adding Additional Functionality.
Chapter 2 19
Updating an Existing Operating System and SoftwareUpdating a System
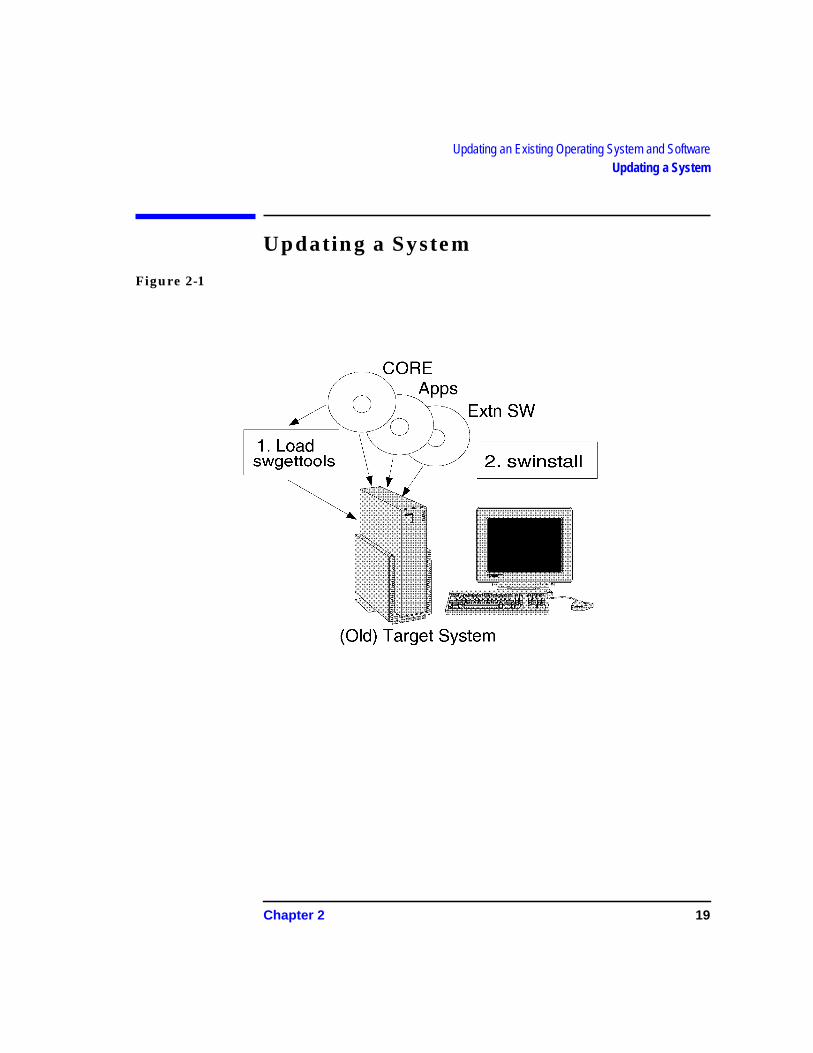
Updating a System
Figure 2-1
20 Chapter 2
Updating an Existing Operating System and SoftwareUpdating a System
Overview.
NOTE As of the HP-UX 11.0 release, Multi-Stream support has been addedwhich enables SD-UX to store products and filesets of more than onebit-type in a single SD-UX depot, manage these software collections, andinstall them to systems.
For information on special procedures for 32-bit and 64-bit updates andsupported hardware, see “Updating to HP-UX 11.0” in this chapter.
Updating your system from the existing HP-UX 10.x, to another versionof HP-UX involves using swinstall and other SD-UX tools with astandard source, such as a network server, tape, or CD-ROM, to installthe appropriate bundles, products, or filesets.
Upgrading means using a suite of tools (version 9.U3 of the Upgradetools) to update your system from HP-UX 9.0x to 10.0. It may alsoinvolve determining hardware compatibility (see “Updating to HP-UX11.0”). For upgrading your 9.0x system, refer to the manual Upgradingfrom HP-UX 9.x to 10.x.
• If you plan to update from HP-UX 10.0 to 10.20 or later, you will haveto update your system first to HP-UX 10.01 or 10.10.
CAUTION Executing swinstall to update from 10.01 or later will not succeedunless you first obtain and execute the swgettools command found onthe new media. This will update the SD-UX commands. Failure toupdate SD-UX from the old version will result in error messages andfailure of the update process.
The instructions for using swgettools are in “Updating SD-UX BeforeInstalling/Updating Software”, in this chapter.
• It is highly recommended that you do a system backup before startingto do an update.
• If you already have the new HP-UX on your root disk, via InstantIgnition or an installation, and you want to update applications, go to“Updating HP-UX Software”, in this chapter.
Chapter 2 21
Updating an Existing Operating System and SoftwareHP-UX Update Requirements
HP-UX Update Requirements
Update and UpgradePaths
You can use the SD-UX tools to update your OS to a later version ofHP-UX, from 10.01, 10.10, 10.20, or 10.30. For upgrades to 10.x from9.0x, see the manual Upgrading from HP-UX 9.x to 10.01. You can alsouse SD-UX to install or update applications.
Required Kernels • The 32-bit kernel can execute on any Server or Workstationsupported on 11.0, except the V2200 Server.
• The 64-bit kernel executes only on certain Servers. The V2200requires the use of the 64-bit kernel.
• Not all PA8x00 CPU-equipped systems are supported for 64-bitoperation, even though all PA8x00 CPUs are 64-bit capable.
SupportedWorkstations:
At release 11.0, the following 32-bit systems are supported (for 64-bitserver information, see “Updating to HP-UX 11.0”, in this chapter):
Series 700: 712, 715/64, 715/80, 715/100, 715/100XC, 743, 744, 725/100
B-Class: B132L, B160L
C-Class: C100, C110, C160, C160L, C180
J-Class: All J-Class systems
UnsupportedWorkstations
Workstations not supported are the following:
705, 710, 715/33, 715/50, 715/75, 720, 725/50, 725/75, 730,
735, 755
Workstations not supported due to required 100BaseT driver are thefollowing:
B132L+, B180L C200, C240
Supported Servers The following summarizes the HP 9000 Server implementations:
• 32-Bit Only: D, E, G, H, and I-class, K-class (PA7x00), T500, andT520.
• 32/64-Bit: K-class (PA8x00), and T600,
• 64-Bit Only:V2200
22 Chapter 2
Updating an Existing Operating System and SoftwareHP-UX Update Requirements
NFS Diskless Updating a cluster server to HP-UX 10.30 or later is not supported. NFSDiskless functionality is not supported in HP-UX 10.30 or later. Do notupdate your server to HP-UX 11.0 if you intend for that server to operateas an NFS Diskless server.
For the latest information on system support, consult your HP salesengineer.
Fiber Link and HPIB HP-UX 11.0 does not support HPIB, or Fiber Link disks or controllercards. If you are using this hardware, you should first copy the data fromthe device(s), and then disconnect it from your system before updating to11.0. Failure to do this will not cause a data loss, panic, or othercatastrophic problem, but will result in not being able to access the dataon those devices. Updating before copying the data will render the datainaccessible, except by reinstalling the earlier release.
Memory and DiskSpace Requirements
• RAM: HP-UX 10.x, including NFS, LAN/9000, and CDE, requires 32MB of RAM. For HP-UX 11.0, a minimum of 32 MB of RAM isrequired, and 64 MB is recommended.
• Before you begin the update, you should be sure your target disk hasthe space needed to accommodate the new OS as well as your datafiles and all needed backups on disk. You should plan on a minimumdisk size of one GB for a general workstation. Disk usage numberswill vary by a factor of 20%, depending on the installation.
• File System Increments: Compared to HP-UX 10.20, updatingHP-UX to 11.0 (including NFS, LAN/9000, CDE, and the XWindow System), requires the following additional file system sizefor a 32-bit update:
• /usr : 120 MB additional.
• /var : 5 MB additional.
• /opt : 55 MB additional.
Since some of these increases may cause the default file systemsize and freespace to be exceeded, see“Adjusting File System Size”,in Chapter 7, “Troubleshooting,” for the procedure for makingadjustments.
Chapter 2 23
Updating an Existing Operating System and SoftwareHP-UX Update Requirements
NOTE In general, the Disk Space Analysis phase of swinstall will warn you ifdisk space is insufficient. However, Disk Space Analysis does notcurrently check /var/adm/sw , where the database is kept, fortemporary space usage.
If you are running your system as LVM and /var comprises a singlevolume, be sure you have configured adequate space in the /var volumeto accommodate the update files. An update requires a minimum amountof free disk space of at least 20 MB to allow for the generation of theinstalled software database, among other things. The disk space analysiswill help you determine the needed volume sizes.
Preparing the Disks 1. Determine your free disk space in /var by running bdf /var andbdf /var/tmp . The default temporary directory is /var/tmp .
2. Delete any files in this volume that you don't need.
3. If necessary, set the environment variable TMPDIR to point to adirectory that has sufficient space. For example (for a directory dir):
export TMPDIR=/ dir
After setting and exporting this variable, kill and restart theswagentd process.
/usr/sbin/swagentd -r
4. Ensure that your system has at least 30 MB of swap enabled beforestarting the update process. You can use swapinfo -mt and checkthe total free MB of swap space. Or you can use SAM to see how muchswap you currently have. If you do not have enough swap, you canenable file system swap for the duration of the update (until systemreboot) by using the following command:
/usr/sbin/swapon /var/tmp
The directory /var/tmp can be used if there is sufficient free space. If/var/tmp is full, then specify a different volume that has enough freespace to satisfy the swap space requirement.
Alternatively, you can shut down unneeded programs to make morememory and swap space available. This also improves performance.
5. Before updating, you may wish to use /usr/sbin/swremove toremove unneeded filesets from your system.
24 Chapter 2
Updating an Existing Operating System and SoftwareHP-UX Update Requirements
For More Informationon SpaceRequirements
Refer to the current System Administration Tasks manual and theRelease Notes for HP-UX 10.x for additional information on peripheralsand disk space.
Source MediaThe general names applied to the HP-UX source media are as follows:
CD-ROMs Used • CORE
• Applications .
• Support .
• HP-UX Extension Software (Includes essential patches).
NOTE If you are updating any networking products, such as FDDI orToken-Ring, which are not on the HP-UX Runtime CORE CD, please see“Networking Products on Additional Media”, in this chapter.
Mounting the SourceMedia
1. Note that your multi-user license is typically supplied on separatemedia.
2. Ensure that you have made a backup tape of your present system.
3. Ensure that your system is booted and running HP-UX 10.x. Youshould have a term window opened.
4. Turn on the CD-ROM drive, if it is external to your HP-UX 10.xsystem.
5. Insert the CD-ROM into its drive.
6. Wait for the busy lights to stop blinking.
7. If necessary, identify the drive device, using the following command:
/etc/ioscan -fn
8. If you are using a single local CD-ROM, note that swinstall willautomatically mount the disk in the drive. Otherwise, you may haveto first mount the disc, using SAM or the mount(1M) command. If youdo not use SAM, you can do the following to mount the disc:
a. Put the CD into the CD-ROM drive. CD-ROM "busy light" shouldblink.
b. Open a term window and, at the shell prompt, type the following:
Chapter 2 25
Updating an Existing Operating System and SoftwareHP-UX Update Requirements
mkdir /SD_CDROM Enter
mount /dev/dsk/ c1t2d0 /SD_CDROMEnter
The device name "c1t2d0" should be replaced with whateverdevice name you found using ioscan in item 7 above.
26 Chapter 2
Updating an Existing Operating System and SoftwareUpdating SD-UX Before Installing/Updating Software
Updating SD-UX BeforeInstalling/Updating Software
CAUTION Before you can update to, for example, 11.0, you must extract the newversion of SD-UX from the 11.0 CD or software depot from which youplan to update your system.
Do not attempt to use your present version of swinstall to update thesystem to a newer version. The update will fail. Updating SD-UX is alsonecessary when transitioning between word-width versions within aparticular release.
Optional Preparation Some system configurations may hang when swgettools is run whilethe old SW-DIST.RUPDATE fileset remains on the system. The followingstep will prevent this possibility. Run the following before invokingswgettools for an update to HP-UX 11.0:
/usr/sbin/swremove SW-DIST.RUPDATE
Procedure To update SD-UX, you must first load the swgettools utility onto yoursystem, and then use swgettools to get the new version of SD-UX.
The swgettools command needs a temporary directory with at least 2MB of free space. By default, swgettools will use the /var/tmpdirectory. If there is not enough space in the temporary directoryswgettools will fail.
You can tell swgettools to use a different temporary directory bymeans of the -t dir_path command-line option. You must do this if youdo not have 2 MB free in /var/tmp . Use bdf /var/tmp to determinethis.
Preparation: Loadingswgettools
The swgettools utility is shipped in thecatalog/SW-GETTOOLS/pfiles directory. Depending on whether thenew software is on CD or a remote system in a software depot, use cp orrcp , respectively, to load swgettools onto your system. Skip to thesection below for more examples and other options.
For example, to load swgettools from a local CD-ROM mounted at/SD_CDROM into /var/tmp , enter the following:
cp /SD_CDROM/catalog/SW-GETTOOLS/pfiles/swgettools /var/tmp
Chapter 2 27
Updating an Existing Operating System and SoftwareUpdating SD-UX Before Installing/Updating Software
For additional examples and discussion regarding loading swgettoolsrefer to “SW-DIST Installation”, in this chapter.
Action: Getting theNew SD-UX Tools
Now, use swgettools to update SD-UX. For example:
/var/tmp/swgettools -s /SD_CDROM
If you get a message indicating that the software is not compatible, youmay disregard this message. This is because the tool is, in effect,“updating itself”.
The expression -s /SD_CDROM indicates a CD-ROM drive mounted at/SD_CDROM. If you get warning messages regarding tool compatibility atthis point, this is a normal part of the loading of the new tool set. See theswgettools(1M) man page for more information on options.
Next Action Further examples are in the next section. After you have updatedSD-UX, you can use swinstall to update your system to the newversion of HP-UX, using the procedure described in “Updating HP-UXSoftware”.
SW-DIST Installation
From CD-ROM To install the new SW-DIST product from the CD-ROM at /SD_CDROM,enter the following:
cp /SD_CDROM/catalog/SW-GETTOOLS/pfiles/swgettools /var/tmp
/var/tmp/swgettools -s /SD_CDROM
From Remote Depot For example, to install the new SW-DIST from a remote depot on systemswperf at /depot_path, enter the following:
rcp swperf: /depot_path/catalog/SW-GETTOOLS/pfiles/swgettools \
/var/tmp
/var/tmp/swgettools -s swperf:/var/spool/sw
Updating SD-UX Without Root Access to the RemoteDepot
Option 1: If you are a system administrator, you can instruct your users to use thisprocedure or Option 2 (below) for more restricted access, if you do notwant to grant the users rcp (.rhosts ) access as root to the server.

28 Chapter 2
Updating an Existing Operating System and SoftwareUpdating SD-UX Before Installing/Updating Software
1. Copy the swgettools script file and the swagent.Z file (both in thecatalog/SW-GETTOOLS/pfiles directory) from the CD to a locationthat your users have FTP access to.
2. Tell the user to do the following:
a. FTP the two files into the /var/tmp directory on the system to beupdated.
b. Use chmod +x to make the /var/tmp/swgettools scriptexecutable.
c. In case swgettools is interrupted, enter the following:
cp swagent.Z swagent.Z.backup
d. Run swgettools and specify the remote depot location with the-s option (and, if necessary, -t to specify a temporary directoryother than /var/tmp ).
Option 2: This option assumes your users will be running swgettools specifyinga source depot on a remote server, and you do not want to grant themrcp (.rhosts ) access as root to the server.
Users can use the SD-UX swcopy command to copy the SW-GETTOOLSproduct from a registered remote source depot to a local depot prior toextracting the files. The remote source depot can be either a CD-ROM ora disk depot.
To copy the SW-GETTOOLS product from the remote CD-ROM depotlocated at swperf :/var/spool/sw to a local depot in /tmp/depot :
swcopy -s swperf:/SD_CDROM SW-GETTOOLS @ /tmp/depot
Then copy the swgettools script and the swagent.Z file to the/var/tmp directory:
cp /tmp/depot/catalog/SW-GETTOOLS/pfiles/sw* /var/tmp
As in the backup step above, first make a backup copy of swagent.Z .Then execute the swgettools script specifying the remote depot toupdate the SW-GETTOOLS product from the following:
/var/tmp/swgettools -s swperf:/SD_CDROM
NOTE If you will be using a temporary directory other then /var/tmp (such as/usr/tmp ), then cp the swgettools script and the swagent.Z file tothe temporary directory you will be using, and specify its location on theswgettools command line using the -t option.
Chapter 2 29
Updating an Existing Operating System and SoftwareUpdating SD-UX Before Installing/Updating Software
Example: cp /tmp/depot/catalog/SW-GETTOOLS/pfiles/sw* /usr/tmp
/usr/tmp/swgettools -s swperf:/SD_CDROM -t /usr/tmp
For More Information Consult the swgettools(1M) and, swinstall(1M) man pages, on the newsystem, the readme document:
/usr/sbin/swlist -a readme -l product SW-DIST
Or see the manual Managing HP-UX Software with SD-UX forassistance with the following:
• If you encounter an error during the execution of the swgettoolsscript.
OR ...
• If you want to see examples of using swgettools with other types ofmedia.
30 Chapter 2
Updating an Existing Operating System and SoftwareUpdating HP-UX Software
Updating HP-UX Software See the section, “Updating to HP-UX 11.0” in this chapter, for specificinformation about transitioning to HP-UX 11.0.
You should have installed the new SW-DIST product first, as given in theprevious sections in this chapter.
On HP 9000 Workstations, you will see a Graphical User Interface (GUI),by default, for interactive invocation of swinstall . On HP 9000Servers, you will see a character display Terminal User Interface (TUI)on a console. You will have a GUI if you are working from an Xterminal.
Updating HP-UX on a Stand-Alone SystemTo invoke swinstall , do one of the following:
CAUTION Updating an HP 9000 Server to HP-UX 11.0 will stop the Server frominteracting with clients and may jeopardize data. Before attempting suchan update you should uncluster (backup and unmount) clients.
Options for 11.0Transition
Use a command-line invocation, if you are transitioning to HP-UX 11.0.You must use -x options specifying the target system word-width and OSversion, for either an interactive or non-interactive SD-UX session.
To specify an OS for the update, the following options are used:
-x os_name= <OS>:<width>
-x os_release= <release>
using the following syntax:
swinstall -x os_name= <OS>: <width> -x os_release= <release>
The value <OS> specifies the name of the OS, such as HP-UX. The value<width> specifies the word-width in bits for the OS to be installed, suchas 32 or 64 . The <OS> and <width>values must be separated by a colon(:).

Chapter 2 31
Updating an Existing Operating System and SoftwareUpdating HP-UX Software
The value <release> can include the following:
B.11.00
In addition to the size/version options, updating between 11.0word-widths requires the following options to swinstall :
-x reinstall=true
-x reinstall_files=true
InteractiveCommand-LineExample
For example, for an interactive update from 10.x to B.11.00 (32-bit), youwould enter the following:
swinstall -x os_name=HP-UX:32 -x os_release=B.11.00
Non-interactiveCommand Line(match_target)
Non-interactive updates to 11.0 require additional options, includingspecification of match_target and autoreboot . (For cold-installingnon-interactively, see the instructions for using the Go! action in“Executing the Installation: Go!”, in Chapter 5, “Installing from theIgnite-UX Server.”) The details are given in “Updating Non-Interactivelyfrom Media or Network”.
Updating to HP-UX 11.0
Before Updating or Installing to HP-UX 11.0 64-bitVersionIf you are planning to update a system to HP-UX 11.0 64-bit, you need todetermine if your system can support the 64-bit version of the operatingsystem. To do this you need determine the following:
• Does your system hardware support 64-bit operation?
• Is the firmware installed in your system recent enough for 64-bit11.0?
Firmware RevisionsNeeded for HP-UX11.0 64-bit Operation
Before installing or updating your HP 9000 Server to HP-UX 11.0 64-bit,you must determine that your system’s Processor Dependent Code(PDC or firmware) version supports 64-bit operation.
This section describes how to determine the version of firmwareoperating on your server, and the minimum version of firmware required.
32 Chapter 2
Updating an Existing Operating System and SoftwareUpdating HP-UX Software
Note the followingprecautions
If you are patching a 10.x system having previous patches, in order toremove all prior patch information from the IPD prior to updating toHP-UX 11.0, see the procedure toward the end of this manual: “Section 8:Loading HP-UX Patches Using Ignite-UX”, in Appendix C, “Ignite-UXSystem Administration.”
CAUTION If you try to update a system lacking the correct level of firmware, yourisk putting the system into an unusable state.
If your HP 9000 Server does not have installed the necessary revision offirmware, you must contact your HP Support Representative to get yourfirmware updated before attempting to install or update to HP-UX 11.064-bit version.
Due to library dependencies, you will also have to follow theswgettools procedure described in “Updating SD-UX BeforeInstalling/Updating Software”.
Note that you are not required to update firmware on any HP 9000Server on which you will only install or update to HP-UX 11.0 32-bitversion. However, it is always advisable to have the most currentfirmware revisions installed. The revisions of firmware that support64-bit operation will also support 32-bit operation. You may wish toconfirm with your HP Support Representative that you have currentfirmware revisions installed.
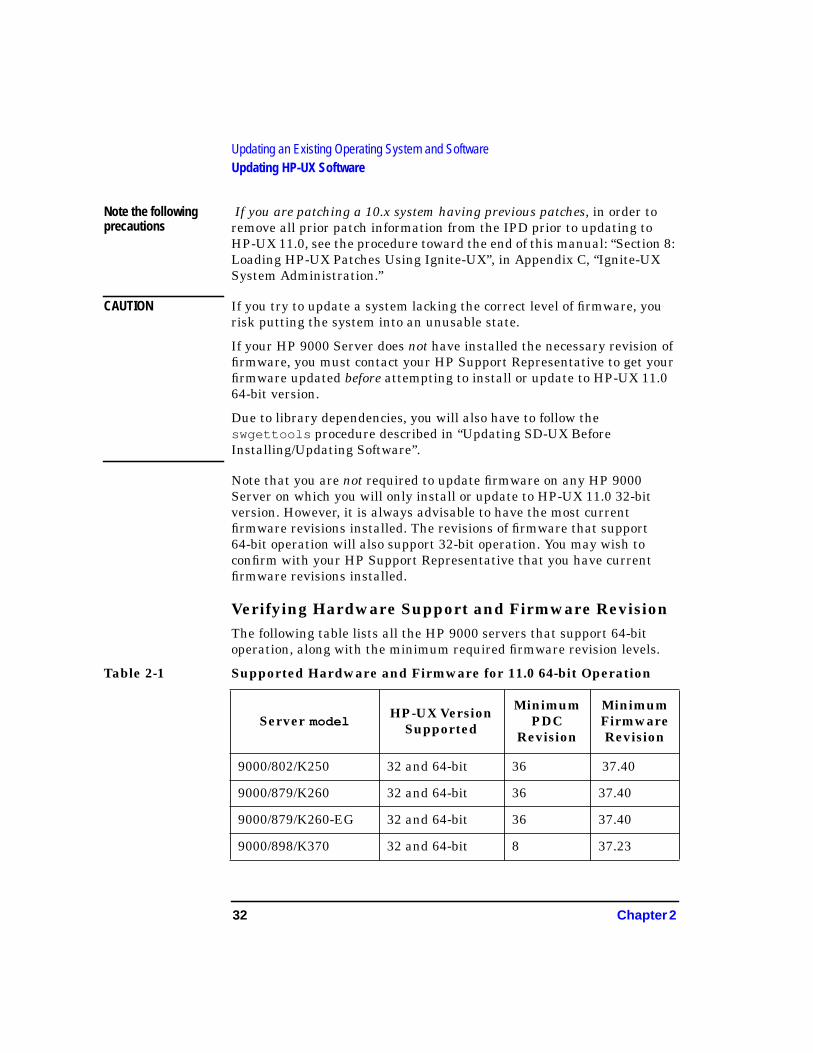
Verifying Hardware Support and Firmware RevisionThe following table lists all the HP 9000 servers that support 64-bitoperation, along with the minimum required firmware revision levels.
Table 2-1 Supported Hardware and Firmware for 11.0 64-bit Operation
Server modelHP-UX Version
Supported
MinimumPDC
Revision
MinimumFirmwareRevision
9000/802/K250 32 and 64-bit 36 37.40
9000/879/K260 32 and 64-bit 36 37.40
9000/879/K260-EG 32 and 64-bit 36 37.40
9000/898/K370 32 and 64-bit 8 37.23
Chapter 2 33
Updating an Existing Operating System and SoftwareUpdating HP-UX Software
NOTE Only HP 9000 servers listed in this table are supported for 64-bitoperation.
All systems not listed in the preceding table are supported only for 32-bitoperation.
There are different methods of determining your system’s firmwarerevision, depending upon its system class. Using the command getconfHW_CPU_SUPP_BITS will indicate your system’s bit compatibility. Thesections that follow detail the procedures for K-class, T-class, and V-classservers.
Determining the Firmware Revision ofK-Class ServersTo determine the firmware revision on HP 9000 K-class servers, performthe following steps.
Step 1. Determine which model of K-class you have by entering:
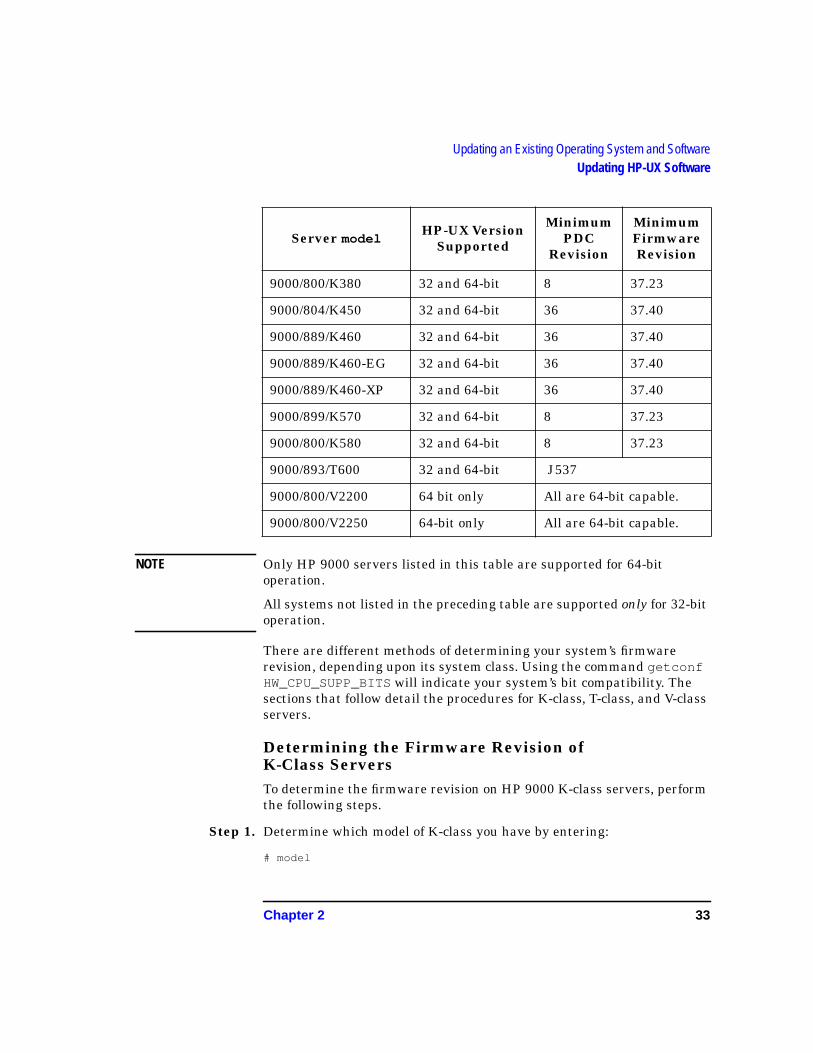
# model
9000/800/K380 32 and 64-bit 8 37.23
9000/804/K450 32 and 64-bit 36 37.40
9000/889/K460 32 and 64-bit 36 37.40
9000/889/K460-EG 32 and 64-bit 36 37.40
9000/889/K460-XP 32 and 64-bit 36 37.40
9000/899/K570 32 and 64-bit 8 37.23
9000/800/K580 32 and 64-bit 8 37.23
9000/893/T600 32 and 64-bit J537
9000/800/V2200 64 bit only All are 64-bit capable.
9000/800/V2250 64-bit only All are 64-bit capable.
Server modelHP-UX Version
Supported
MinimumPDC
Revision
MinimumFirmwareRevision

34 Chapter 2
Updating an Existing Operating System and SoftwareUpdating HP-UX Software
You will see a string similar to the following:
9000/804/K450
Compare the model string to the listing in the table of supported 64-bitsystems.
CAUTION If the model number does not appear in the table of supported 64-bitsystems, do not attempt to install or update to HP-UX 11.0 64-bit,because you risk rendering your system unusable. Instead, install orupdate to HP-UX 11.0 32-bit operation.
If the model number does appear in the table of supported 64-bitsystems, go to the next step to determine if your system’s firmwarerevision supports 64-bit operation.
There are two methods for determining your system firmware revisionlevel on K-class servers. These are described in Step 2 and Step 3.
Step 2. The easiest way to determine the system’s firmware (PDC) revision levelis to run the Support Tools Manager (STM). STM is provided on theHP-UX Support Disc, which is packaged with HP-UX. Support ToolsManager can be run as a character-based (cstm ), menu-driven (mstm), orX-Windows (xstm ) application.
If you do not have Support Tools Manager loaded on your system,
1. Insert the Support Disc in the CD-ROM and mount the CD-ROMread-only. For example,
mount -r /dev/dsk/c0t2d0 /SD_CDROM
If you do not know the device special file name of the CD-ROM, youcan find out by using ioscan (with options -kfnC disk ) or SAM(Peripheral Devices -> Device List ; select the device, thenuse the Actions pulldown and choose Show Device Files ).
2. List the contents of the DIAGNOSTICS directory on the Support Disc,using swlist . For example,
swlist -d -l bundle @ /SD_CDROM/DIAGNOSTICS
Find the OnlineDiag bundle appropriate to your system.
3. Use swinstall to load the OnlineDiag bundle.
Chapter 2 35
Updating an Existing Operating System and SoftwareUpdating HP-UX Software
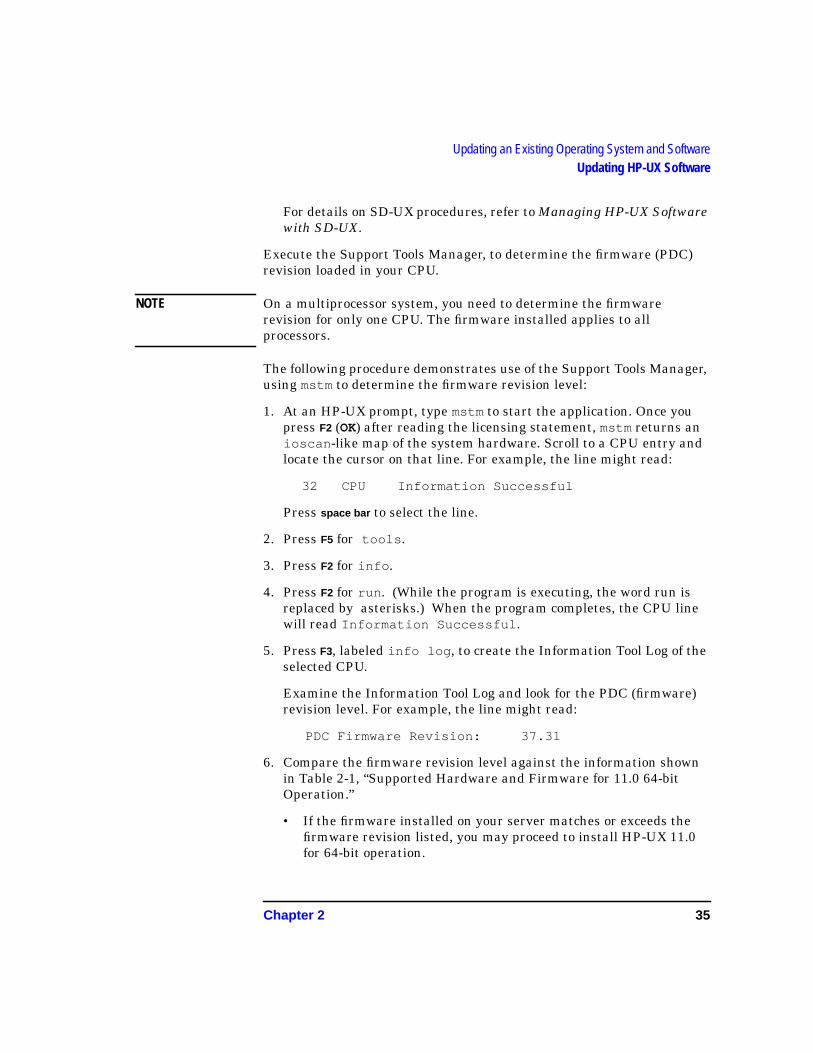
For details on SD-UX procedures, refer to Managing HP-UX Softwarewith SD-UX.
Execute the Support Tools Manager, to determine the firmware (PDC)revision loaded in your CPU.
NOTE On a multiprocessor system, you need to determine the firmwarerevision for only one CPU. The firmware installed applies to allprocessors.
The following procedure demonstrates use of the Support Tools Manager,using mstm to determine the firmware revision level:
1. At an HP-UX prompt, type mstm to start the application. Once youpress F2 (OK) after reading the licensing statement, mstm returns anioscan -like map of the system hardware. Scroll to a CPU entry andlocate the cursor on that line. For example, the line might read:
32 CPU Information Successful
Press space bar to select the line.
2. Press F5 for tools .
3. Press F2 for info .
4. Press F2 for run . (While the program is executing, the word run isreplaced by asterisks.) When the program completes, the CPU linewill read Information Successful .
5. Press F3, labeled info log , to create the Information Tool Log of theselected CPU.
Examine the Information Tool Log and look for the PDC (firmware)revision level. For example, the line might read:
PDC Firmware Revision: 37.31
6. Compare the firmware revision level against the information shownin Table 2-1, “Supported Hardware and Firmware for 11.0 64-bitOperation.”
• If the firmware installed on your server matches or exceeds thefirmware revision listed, you may proceed to install HP-UX 11.0for 64-bit operation.

36 Chapter 2
Updating an Existing Operating System and SoftwareUpdating HP-UX Software
• If your HP 9000 Server does not have installed the necessaryrevision of firmware, you must contact your HP SupportRepresentative to get your firmware updated before attempting toinstall or update to HP-UX 11.0 64-bit version.
CAUTION If you try to update a system lacking the correct level of firmware, yourisk putting the system into an unusable state.
Step 3. If you have not installed the Support Tools Manager (STM) on yoursystem, then you will need to shutdown and reboot your system to checkthe PDC subsystem and determine the firmware revision. (If you havecompleted Step 2, you do not need to perform this step). Read throughthe following procedure before starting.
1. Execute the shutdown command to shutdown and reboot the system.
# /sbin/shutdown -r 0
2. Processing messages will be displayed, ending with a message likethe following:
FINAL System shutdown message from root@gsysem14
System going down IMMEDIATELY
System shutdown time has arrived
sync’ing disks (37 buffers to flush): 37 10
0 buffers not flushed
0 buffers still dirty
Closing open logical volumes...
Done
Watch the console. You will see either a boot prompt or a messageindicating that the system will autoboot in 10 seconds unless youpress a key. If you see the 10 second message, press a key to get theboot prompt.
(If you do not press a key in time, do not worry. Just wait until thesystem finishes booting and then repeat the shutdown/rebootprocedure.)
3. Next you will see the Main menu. At the Enter Command or Menuprompt, enter:
Main menu: Enter command or menu > in fv
Chapter 2 37
Updating an Existing Operating System and SoftwareUpdating HP-UX Software
You will see a message similar to the following:
FIRMWARE INFORMATION
Firmware Version: 37.31
4. To display the chip revision, enter:
Main menu: Enter command or menu > in cr
You will see a message listing modules and revisions for the system.Look for the module named PDC. For example,
PDC 34
IMPORTANT Check the firmware and PDC revision numbers against Table 2-1,“Supported Hardware and Firmware for 11.0 64-bit Operation.” If theyare not the minimum required, call your HP Representative and arrangefor a firmware update before installing or updating to HP-UX 11.0 64-bit.
If you try to update a system lacking the correct level of firmware, yourisk putting the system into an unusable state.
Determining the Firmware Revision onT-Class ServersTo determine the firmware revision on HP 9000 T-class servers, performthe following steps.
1. At the system console, type CONTROL-B to engage the PDC consoleinterface.
NOTE If the console does not respond to the CONTROL-B, make sure the systemconsole interface is enabled by checking the setting of the consolekey on the main system front panel. It must be set to the unlockedposition (padlock with open bar) to access the PDC interface.
2. To connect to the Service Processor, enter:
CM > sp
You see a message similar to the following:
Connecting to Service Processor. (APMSG 10)
3. To display the firmware revision at the SP> prompt, enter
SP> fv
38 Chapter 2
Updating an Existing Operating System and SoftwareUpdating HP-UX Software
You’ll see a display showing that the T-class has two PDC banks. Forexample,
Active Firmware Versions:
SP Bank 0: SP 2.02, PSCM 1.60, Compiled 06/24/97 19:08 UT
PDC Bank 1: J537
PSCM Boot ROM: 2.2
Alternate Firmware Versions:
SP Bank 1: SP 2.00, PSCM 1.60, Compiled 03/21/97 21:45 UT
PDC Bank 0: J533
The critical piece of information is the PDC Bank of the activeFirmware Version. (In this example, the information is J537 .)
IMPORTANT Check the information shown as PDC version number against Table 2-1,“Supported Hardware and Firmware for 11.0 64-bit Operation.” If thePDC Bank number is not the minimum required, call your HP salesengineer and arrange for a firmware update before installing or updatingto HP-UX 11.0 64-bit.
If you try to update a system lacking the correct level of firmware, yourisk putting the system into an unusable state.
Determining the Firmware Revision onV-Class Servers
IMPORTANT All V-class servers are certified solely for 64-bit operation. Do notattempt to install or upgrade V-class servers with the 32-bit version ofHP-UX 11.0.
For More InformationFor detailed information on what firmware or hardware is needed toupdate your system to HP-UX 11.0 64-bit version, see the documentReadme Before Installing or Updating to HP-UX 11.0, the Release Notesfor HP-UX 11.0 , or check with your HP field engineer.
Chapter 2 39
Updating an Existing Operating System and SoftwareUpdating HP-UX Software
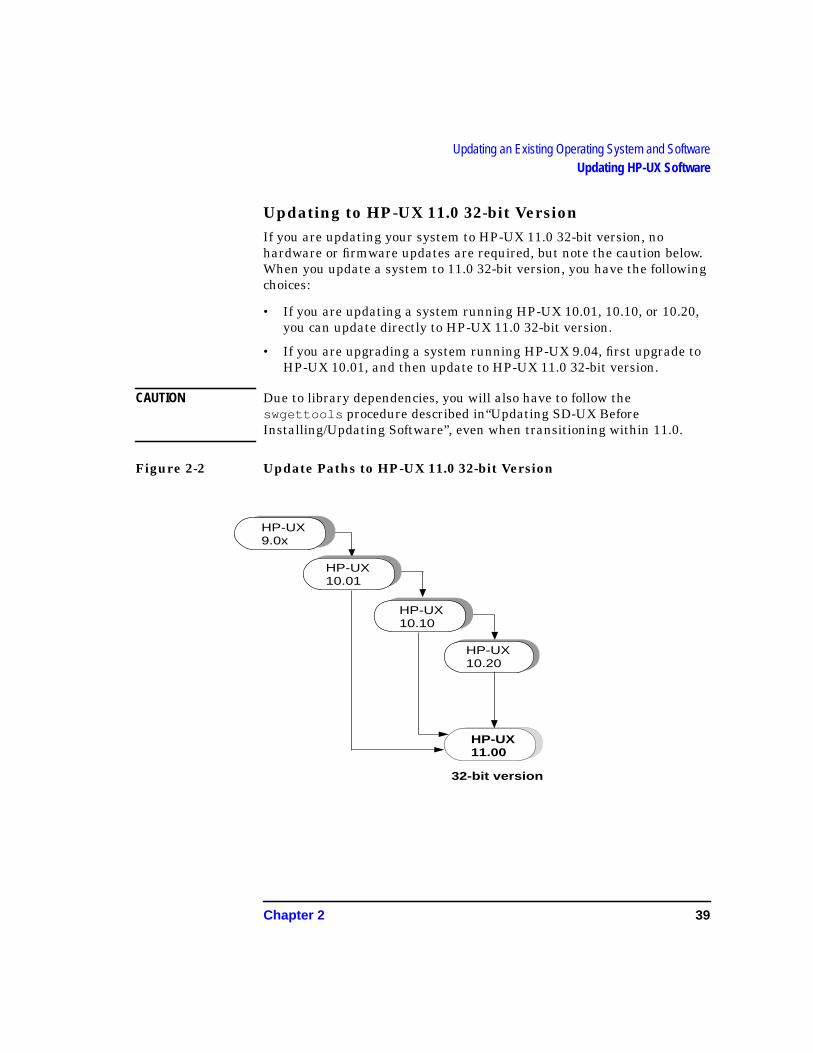
Updating to HP-UX 11.0 32-bit VersionIf you are updating your system to HP-UX 11.0 32-bit version, nohardware or firmware updates are required, but note the caution below.When you update a system to 11.0 32-bit version, you have the followingchoices:
• If you are updating a system running HP-UX 10.01, 10.10, or 10.20,you can update directly to HP-UX 11.0 32-bit version.
• If you are upgrading a system running HP-UX 9.04, first upgrade toHP-UX 10.01, and then update to HP-UX 11.0 32-bit version.
CAUTION Due to library dependencies, you will also have to follow theswgettools procedure described in“Updating SD-UX BeforeInstalling/Updating Software”, even when transitioning within 11.0.
Figure 2-2 Update Paths to HP-UX 11.0 32-bit Version
HP-UX9.0x
HP-UX10.20
HP-UX10.01
HP-UX10.10
HP-UX11.00
32-bit version
40 Chapter 2
Updating an Existing Operating System and SoftwareUpdating HP-UX Software
Updating to HP-UX 11.0 64-bit VersionWhen you update a system to 11.0 64-bit version, you have the followingchoices:
• If you are updating a system running HP-UX 10.20, and it is 64-bitcapable (PA8000 and 64-bit compatible firmware), you can updatedirectly to the HP-UX 11.0 64-bit version.
• If you are updating a system running HP-UX 10.01 or 10.10, youmust first update to HP-UX 10.20, make the appropriate hardwareand firmware upgrades, and then update to the HP-UX 11.0 64-bitversion.
• If you are upgrading a system running HP-UX 9.04, first upgrade toHP-UX 10.01, then update to 10.20, make the appropriate hardwareand firmware upgrades, and then update to the HP-UX 11.0 64-bitversion.
Chapter 2 41
Updating an Existing Operating System and SoftwareUpdating HP-UX Software
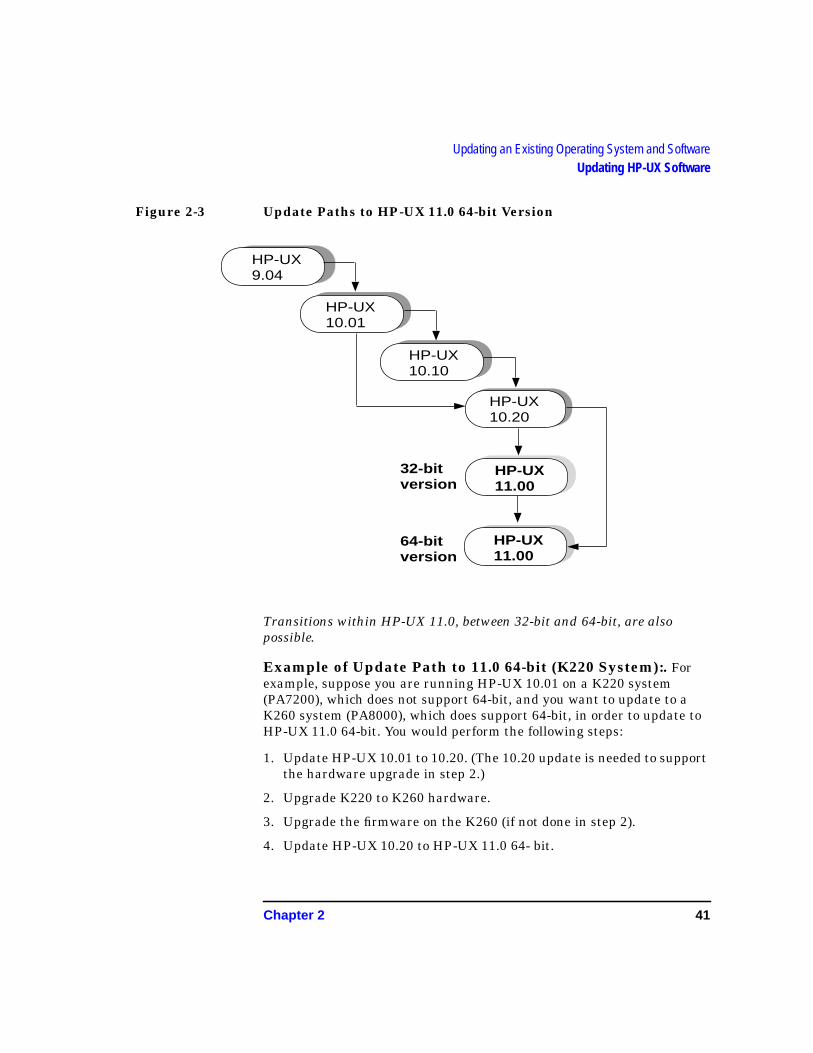
Figure 2-3 Update Paths to HP-UX 11.0 64-bit Version
Transitions within HP-UX 11.0, between 32-bit and 64-bit, are alsopossible.
Example of Update Path to 11.0 64-bit (K220 System):. Forexample, suppose you are running HP-UX 10.01 on a K220 system(PA7200), which does not support 64-bit, and you want to update to aK260 system (PA8000), which does support 64-bit, in order to update toHP-UX 11.0 64-bit. You would perform the following steps:
1. Update HP-UX 10.01 to 10.20. (The 10.20 update is needed to supportthe hardware upgrade in step 2.)
2. Upgrade K220 to K260 hardware.
3. Upgrade the firmware on the K260 (if not done in step 2).
4. Update HP-UX 10.20 to HP-UX 11.0 64- bit.
HP-UX9.04
HP-UX10.20
HP-UX10.01
HP-UX10.10
HP-UX11.00
64-bitversion
HP-UX11.00
32-bit version
42 Chapter 2
Updating an Existing Operating System and SoftwareUpdating HP-UX Software
Example of Update Path 11.0 64-bit (K460 System). Forexample, suppose you are running HP-UX 10.20 on a K460 system(PA8000, which does support 64-bits), and you want to update to HP-UX11.0 64-bit. You would perform the following steps:
1. Upgrade firmware on K460 (if not already compatible).
2. Update HP-UX 10.20 directly to HP-UX 11.0 64-bit version.
Transitioning Between VersionsOnce HP-UX 11.0 is running on your system, you can transition betweenthe 32-bit and 64-bit versions of the operating system. If you areupdating from HP-UX 11.0 32-bit to HP-UX 11.0 64-bit, the transitionshould be straightforward. However, before switching from HP-UX 11.064-bit to HP-UX 11.0 32-bit, you will need to ensure that all applicationscan accommodate the change. If any 64-bit applications have writtenbinary data files (for example, 64-bit ELF executables), there maycompatibility issues when you switch back to the 32-bit version of theoperating system.
NOTE If you transition between 32-->64 bits or 64-->32 bits, you will need to dothe swgettools process. See “Updating SD-UX BeforeInstalling/Updating Software”in this chapter.
See the HP-UX 11.0 Release Notes and the Application InteroperabilityWhite Paper for more information.
Chapter 2 43
Updating an Existing Operating System and SoftwareUpdating HP-UX Software
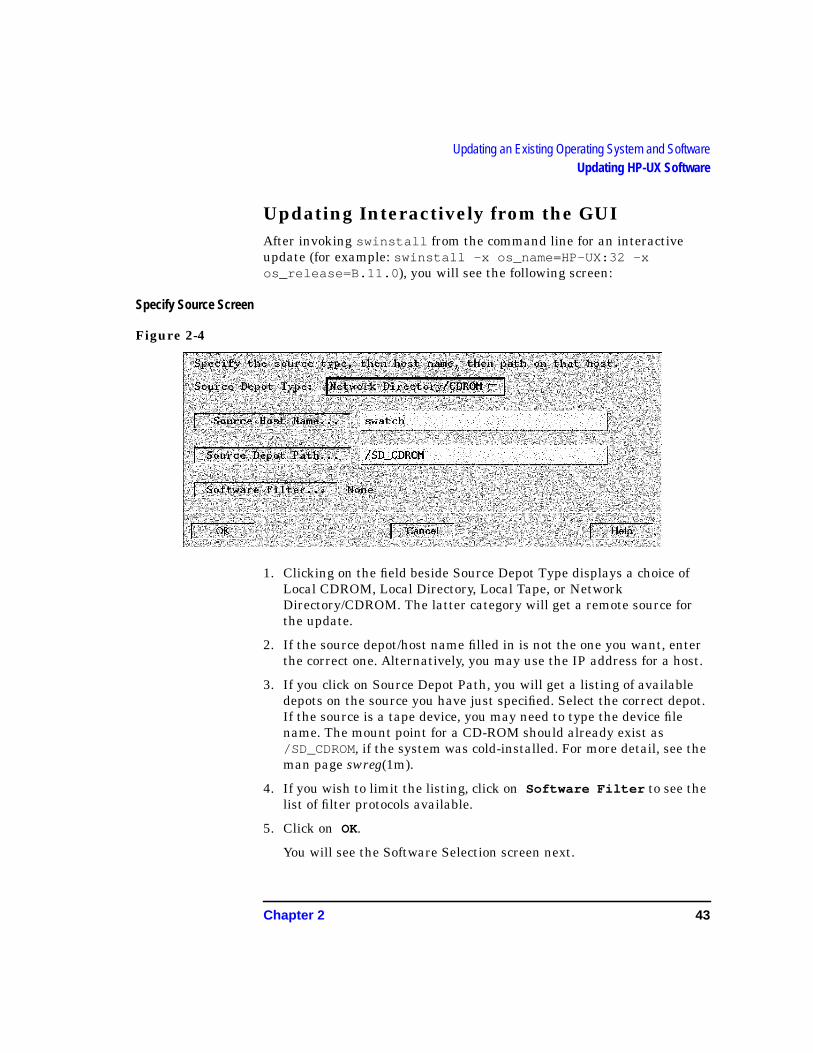
Updating Interactively from the GUIAfter invoking swinstall from the command line for an interactiveupdate (for example: swinstall -x os_name=HP-UX:32 -xos_release=B.11.0 ), you will see the following screen:
Specify Source Screen
Figure 2-4
1. Clicking on the field beside Source Depot Type displays a choice ofLocal CDROM, Local Directory, Local Tape, or NetworkDirectory/CDROM. The latter category will get a remote source forthe update.
2. If the source depot/host name filled in is not the one you want, enterthe correct one. Alternatively, you may use the IP address for a host.
3. If you click on Source Depot Path, you will get a listing of availabledepots on the source you have just specified. Select the correct depot.If the source is a tape device, you may need to type the device filename. The mount point for a CD-ROM should already exist as/SD_CDROM, if the system was cold-installed. For more detail, see theman page swreg(1m).
4. If you wish to limit the listing, click on Software Filter to see thelist of filter protocols available.
5. Click on OK.
You will see the Software Selection screen next.
44 Chapter 2
Updating an Existing Operating System and SoftwareUpdating HP-UX Software
For More Information For information on the options for swinstall , and to change the degreeof detail for its logging functions, see the manual Managing HP-UXSoftware with SD-UX and the man page for swinstall(1M).
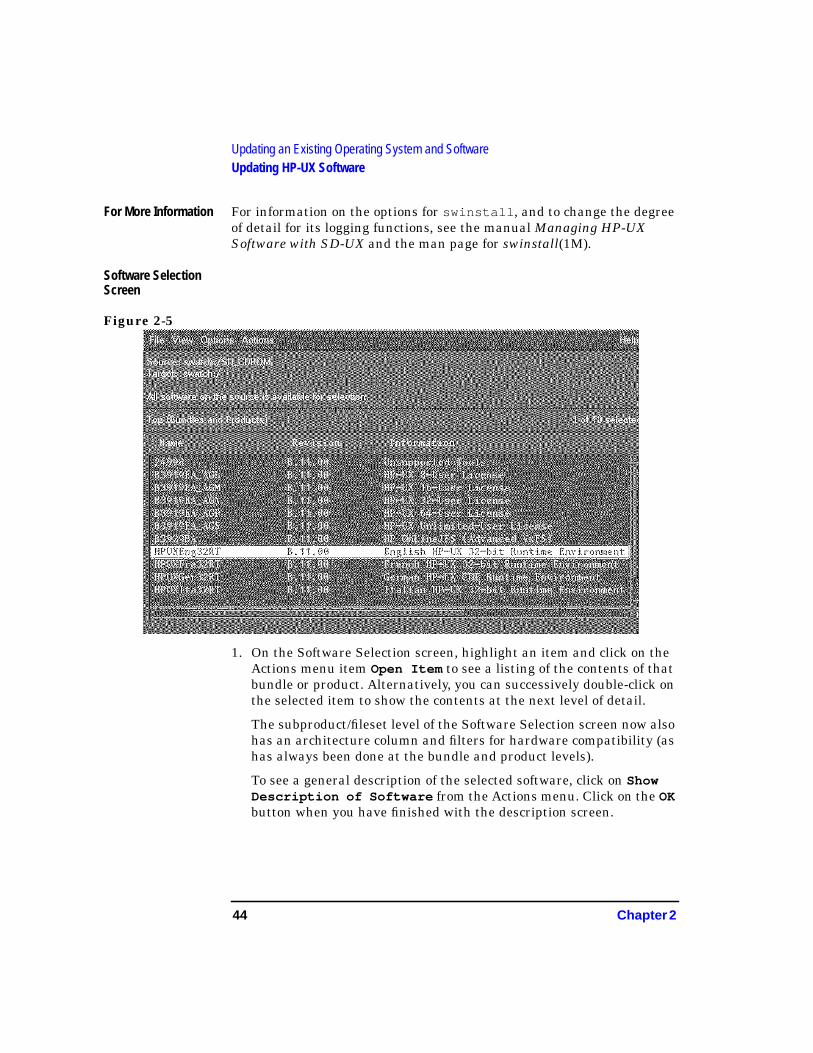
Software SelectionScreen
Figure 2-5
1. On the Software Selection screen, highlight an item and click on theActions menu item Open Item to see a listing of the contents of thatbundle or product. Alternatively, you can successively double-click onthe selected item to show the contents at the next level of detail.
The subproduct/fileset level of the Software Selection screen now alsohas an architecture column and filters for hardware compatibility (ashas always been done at the bundle and product levels).
To see a general description of the selected software, click on ShowDescription of Software from the Actions menu. Click on the OKbutton when you have finished with the description screen.
Chapter 2 45
Updating an Existing Operating System and SoftwareUpdating HP-UX Software
If you want to match the general filesets and functionality youalready have on your old system, choose Match What TargetHas... from the action menu. A log file is available from the Analysisscreen.
AND/OR
2. To choose specific bundles/products to add to the Match WhatTarget Has... selection, highlight the additional item, and thenchoose Mark for Install from the Actions menu. (You can also usethe right mouse button to mark for install).
NOTE In doing system updates, the HP-UX 11.0 release has been enhanced topermit the target system to identify itself temporarily as having thearchitecture/revision of the desired OS. This permits the use of themerged depots without risking ambiguous selections.
For example, if a system has been installed as 11.0 /32- bit and the userwishes to update to the 64- bit version of HP-UX, the system “poses” as a64- bit system for the purpose of compatibility- checking against themerged depot. This is controlled by the -x os_name and -xos_release options on the swinstall command line. These must bespecified for OS updates to 11.0 and later.
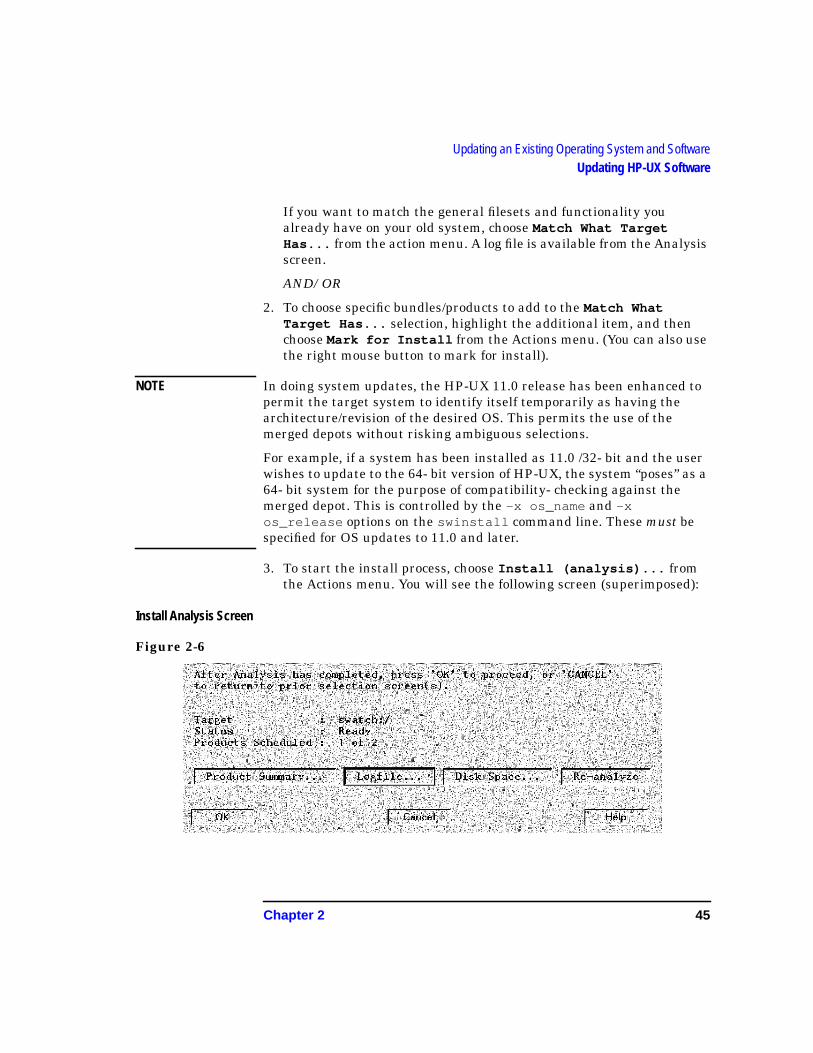
3. To start the install process, choose Install (analysis)... fromthe Actions menu. You will see the following screen (superimposed):
Install Analysis Screen
Figure 2-6
46 Chapter 2
Updating an Existing Operating System and SoftwareUpdating HP-UX Software
• By clicking on the Logfile button, you can open the logfile to monitorthe progress of the analysis. You will also see a listing of files alreadyon the target system which will be reinstalled in new versions. TheDisk space... button will become accessible after the analysisprocess is complete and you can view the results.
• Click on OK to proceed.
Time Note The analysis phase requires 5 to 10 minutes.
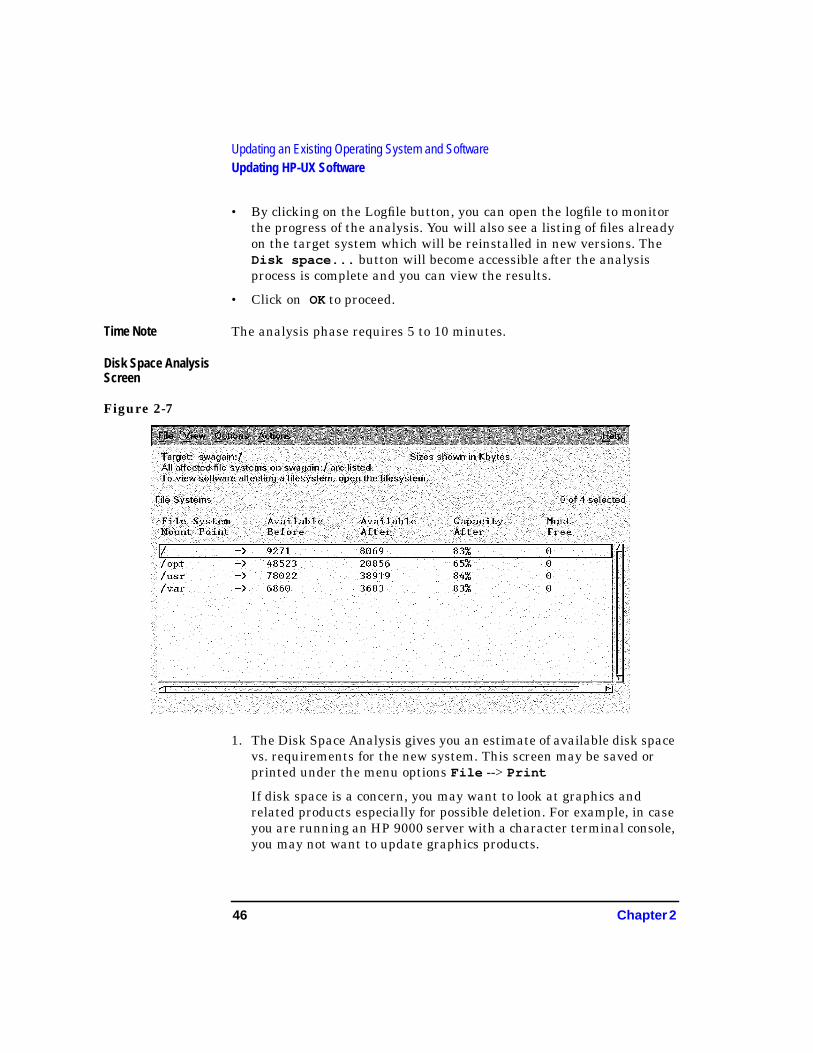
Disk Space AnalysisScreen
Figure 2-7
1. The Disk Space Analysis gives you an estimate of available disk spacevs. requirements for the new system. This screen may be saved orprinted under the menu options File --> Print
If disk space is a concern, you may want to look at graphics andrelated products especially for possible deletion. For example, in caseyou are running an HP 9000 server with a character terminal console,you may not want to update graphics products.
Chapter 2 47
Updating an Existing Operating System and SoftwareUpdating HP-UX Software
NOTE If you are updating from an HP-VUE bundle to a CDE bundle, the /usrfile system will undergo significant expansion. This expansion mayexceed the default file system size set by Cold Install for /usr . SeeChapter 7, “Troubleshooting,” for information on resetting file systemsize.
2. Ensure that the /var "Available After" space is at least 20 MB. (Thescreen shown indicates only about 3.7 MB “Available After”, which isinsufficient and would require deletion of old log and tmp files in/var/adm and /var/tmp .)
3. Close the Disk Space confirmation window to see the analysiswindow.
4. When the disk analysis is satisfactory, choose OK on the InstallAnalysis screen to proceed with the update.
5. A confirmation screen will appear, to which you can respond Yes orNo as to whether you want to continue with the installation.
NOTE Up to this time, you can "back out" of any action by clicking on Cancel inorder to return to previous screens, for example, in order to adjust theselection of filesets being updated.
6. You will see a second confirmation screen warning you that a newkernel will be loaded (in case you are updating HP-UX or akernel-related patch bundle), and this will necessitate a reboot.Respond Yes, if you wish to go ahead.
7. You will see an install status screen which monitors the currentprogress of the installation, including the time remaining.
8. If you want to keep track of the progress of messages and scriptsbeing run during the load, you can keep a logfile window open duringthe process. Do this by clicking on the Logfile button, on the statusscreen.
Time Note • A typical HP-UX update, if done from a network server, will requireone to two hours.
• At the end of an HP-UX update, press Done and you will see aconfirmation message and reboot warning (with about 30 secondsdelay until shut down).
48 Chapter 2
Updating an Existing Operating System and SoftwareUpdating HP-UX Software
• As the system reboots for the first time, the new filesets are beingconfigured. You can, therefore, expect a first boot time of severalminutes. Subsequent reboot processes will not take as long.
After Logging In 1. The login screen appears after the system has rebooted. Log in at thistime.
2. Check the following log files for any messages, including warnings,relating to the update:
/var/adm/sw/swinstall.log
/var/adm/sw/swagent.log
NOTE For an OS update, you will also need to install with the appropriatebundle on the HP-UX Extension Software which came with your HP-UXmedia. This provides CORE-related patches for the current version ofHP-UX. (See “Using HP-UX Extension Software”, in this chapter, andthe patch descriptions on the disc). The system will automatically rebootafter updating with this bundle.
Migrating to CDE: The first time you log in after completing an update from an HP VUEenvironment to a CDE environment, a VUEtoCDE migration dialog willpop up. You may want to migrate VUE customizations to CDE using thisutility.
NOTE If you choose to migrate customizations, complete the VUEtoCDEmigration before uninstalling VUE. In any case, you will need to run theUninstall HP VUE action from the System_Admin folder in theapplication manager. Failure to run Uninstall HP VUE could result inswverify warnings for VUE, CDE, ImagingSubsystem, ScreenCapture,AudioSubsystem, SharedPrint, and DigitalVideo products.
If you are updating from HP-UX 10.20, there will be swverifywarnings regarding the group and ownership of /etc/dt ,/etc/dt/config , and /etc/dt/config/Xsession.d . You candisregard these warning messages.
Chapter 2 49
Updating an Existing Operating System and SoftwareUpdating HP-UX Software
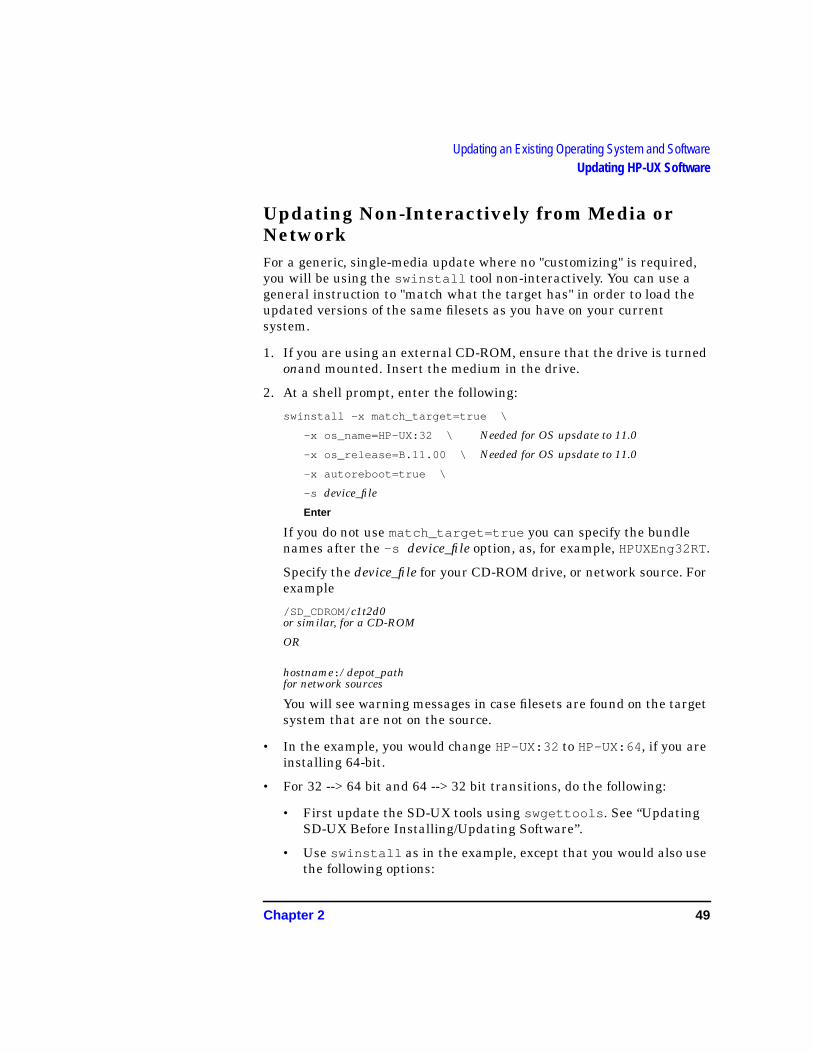
Updating Non-Interactively from Media orNetworkFor a generic, single-media update where no "customizing" is required,you will be using the swinstall tool non-interactively. You can use ageneral instruction to "match what the target has" in order to load theupdated versions of the same filesets as you have on your currentsystem.
1. If you are using an external CD-ROM, ensure that the drive is turnedonand mounted. Insert the medium in the drive.
2. At a shell prompt, enter the following:
swinstall -x match_target=true \
-x os_name=HP-UX:32 \ Needed for OS upsdate to 11.0
-x os_release=B.11.00 \ Needed for OS upsdate to 11.0
-x autoreboot=true \
-s device_file
Enter
If you do not use match_target=true you can specify the bundlenames after the -s device_file option, as, for example, HPUXEng32RT.
Specify the device_file for your CD-ROM drive, or network source. Forexample
/SD_CDROM/c1t2d0or similar, for a CD-ROM
OR
hostname: /depot_pathfor network sources
You will see warning messages in case filesets are found on the targetsystem that are not on the source.
• In the example, you would change HP-UX:32 to HP-UX:64 , if you areinstalling 64-bit.
• For 32 --> 64 bit and 64 --> 32 bit transitions, do the following:
• First update the SD-UX tools using swgettools . See “UpdatingSD-UX Before Installing/Updating Software”.
• Use swinstall as in the example, except that you would also usethe following options:
50 Chapter 2
Updating an Existing Operating System and SoftwareUpdating HP-UX Software
-x reinstall=true \
-x reinstall_files=true
NOTE You will also need to repeat the above steps with the appropriate bundleon the HP-UX Extension Software. (See “Using HP-UX ExtensionSoftware” and the patch descriptions on the disc). The system willautomatically reboot after updating with this bundle.
For the details of swinstall options, see Managing HP-UX Softwarewith SD-UX.
Chapter 2 51
Updating an Existing Operating System and SoftwareUsing HP-UX Extension Software
Using HP-UX Extension SoftwareIn addition to the tapes or CDs holding the operating system, the 11.0release includes a CD labelled "HP-UX Extension Software". This CD isincluded as a means of delivering fixes for any problems that may bediscovered after the release has been packaged for shipment.
Procedure After you have installed or updated your system, read the ExtensionSoftware Information Sheet. Alternatively, read the README FIRST onthe CD-ROM
Ensure that the drive is mounted:
/usr/sbin/mount
If there is no entry for the CD-ROM drive, mount it. For example:
/usr/sbin/mount /dev/dsk/c0t2d0 / your_cdrom_directory
Then print the README FIRST or use the "more" command to read it.
52 Chapter 2
Updating an Existing Operating System and SoftwareInstalling Applications Software
Installing Applications SoftwareIf your applications software is already in a depot (SD packaged), it canbe loaded with the Ignite-UX installation. If it is in a non-SD format, youcan create a bundle by using the Ignite-UX tool make_bundle andinstall or update it on the target system. See Appendix C, “Ignite-UXSystem Administration,”for specific examples for doing this.
Applications software in SD format can also be loaded later usingSD-UX. For the SD procedures for installing additional software fromtape, CD-ROM or network depots, see “Updating HP-UX Software” or themanual Managing HP-UX Software with SD-UX.
Adding Additional FunctionalityIn case you need to add more bundles for the functionality of your newHP-UX, such as JFS or NFSD filesets, use the "Match What Target Has"option described in this chapter, and then select additional bundleswhich you have purchased.
If you need further details, see the manual Managing HP-UX Softwarewith SD-UX.
Installing PatchesSee “Section 8: Loading HP-UX Patches Using Ignite-UX” in Appendix C,“Ignite-UX System Administration,” for detailed information oninstalling patches.
Networking Products on Additional MediaIf you are using certain networking products or other IndependentSoftware Units (ISUs) which are not present on the CORE HP-UX CD ortape, then you may need to follow modified update procedures. Some ofthe networking products affected include FDDI, Token-Ring and 100VGAnyLan, which are provided on the HP Applications CD-ROM or tape.
Chapter 2 53
Updating an Existing Operating System and SoftwareInstalling Applications Software
Since optional networking products are shipped on separate media fromthe CORE HP-UX, their drivers are removed from the kernel during theupdate process. This means that if you update using the CORE medium ora depot made from it, the optional networking will not be available afterreboot.
If the networking which was removed provides access to the remote SDdepot or CD-ROM drive, then, after reboot, any swinstall of applications,including networking will need to be performed from a local CD-ROMdrive or tape drive or a local disk depot.
An alternative is to use swcopy to create a combined CORE andApplications depot and use that depot as your swinstall source.Since a combined depot or tape contains the new revisions of thenetworking products, their drivers will be reinstalled before reboot andso the networking they provide will be available after reboot.
If you have a custom update tape provided as part of you HP softwaresupport contract, then it is normally already combined and you do notneed to create a combined depot, as long as the update tape, or any depotmade from it, contains the HP-UX CORE software and the optionalnetworking software which you need.
Installing the Optional OnlineJFS ProductHP OnlineJFS is the advanced optional bundle for the VxFS File System.You can use the capabilities of OnlineJFS to perform certain keyadministrative tasks on mounted VxFS file systems. Because you canperform these tasks on mounted file systems, users on the system cancontinue to perform their work uninterrupted.
These tasks include:
• Defragmenting a file system to regain performance.
• Resizing a file system.
• Creating a snapshot file system for backup purposes.
You can install it with swinstall in the following order:
1. Install the JournalFS product, if it is not already installed.
2. Install two HP OnlineJFS bundle filesets.(AdvJournalFS.VXFS-ADV-KRN andAdvJournalFS.VXFS-ADV-RUN ).
54 Chapter 2
Updating an Existing Operating System and SoftwareInstalling Applications Software
During the install, swinstall will edit the /stand/system file, rebuildthe kernel, and reboot the system to bring the new kernel libraries intomemory.
For more information about installing and using VxFS and HPOnlineJFS, see the manual HP-UX System Administration Tasks,Chapter 4.
Chapter 3 55
Installing From Media
3 Installing From Media
56 Chapter 3
Installing From MediaChapter Contents
Chapter Contents• Installing from a Media Source.
• Booting the Target System.
• Guided Installation: Using the Task Wizard.
• Advanced Installation: Using Ignite-UX (TUI).
Chapter 3 57
Installing From MediaInstalling from a Media Source
Installing from a Media Source
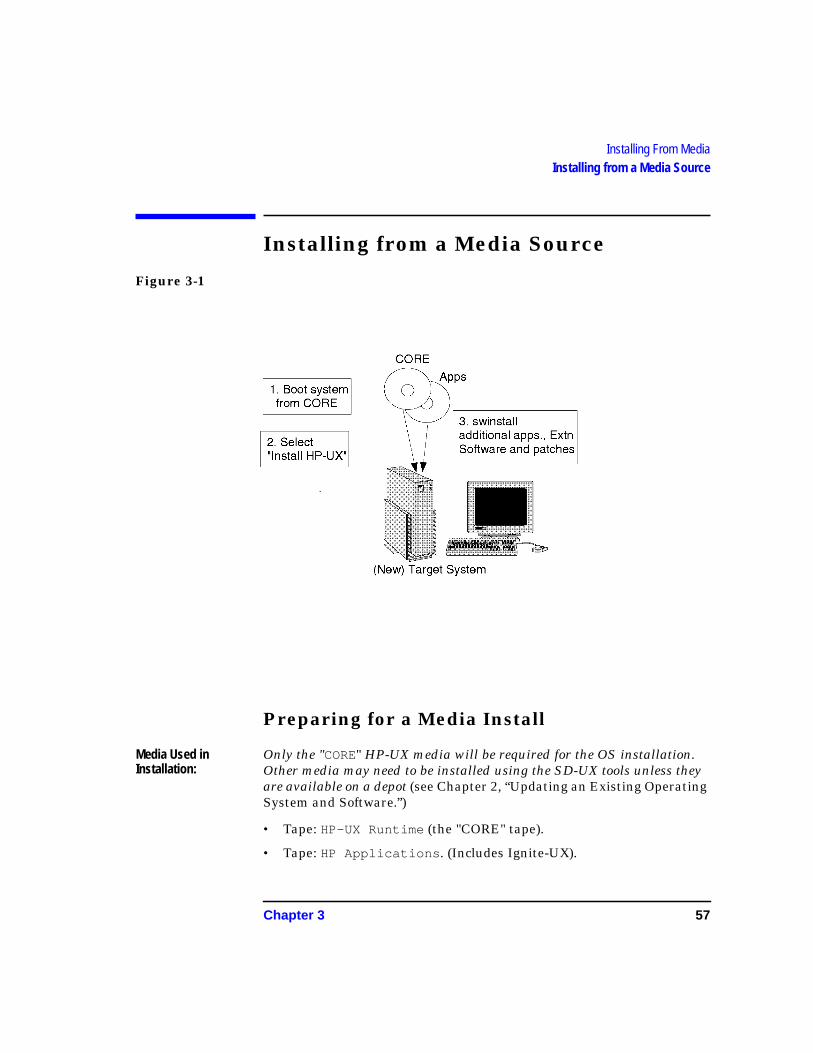
Figure 3-1
Preparing for a Media Install
Media Used inInstallation:
Only the "CORE" HP-UX media will be required for the OS installation.Other media may need to be installed using the SD-UX tools unless theyare available on a depot (see Chapter 2, “Updating an Existing OperatingSystem and Software.”)
• Tape: HP-UX Runtime (the "CORE" tape).
• Tape: HP Applications . (Includes Ignite-UX).
58 Chapter 3
Installing From MediaInstalling from a Media Source
• Tape: HP-UX Support (Includes diagnostics).
• Tape: HP-UX Extension Software . (Includes essential patches).OR
• CD-ROM: HP-UX 10. x CORE
• CD-ROM: Applications . (Includes Ignite-UX).
• CD-ROM: Support . (Includes diagnostics).
• CD-ROM: HP-UX Extension Software (Includes essentialpatches).
Note: Only CD-ROM media will be used after HP-UX 10.20. "Original"customers receive only CD-ROM media; "Update" customers may receiveCD-ROM or DDS-format tape.
Supported and Unsupported SystemsSee “HP-UX Update Requirements” for a listing of currently supportedworkstations.
Chapter 3 59
Installing From MediaBooting the Target System
Booting the Target SystemThe details in the following section are provided for guidance in case youhave a variety of HP systems with different boot-console interfacing.
1. Make sure any external devices connected to the target system areturned on.
2. Turn on the target computer or cycle power.
3. Insert the CORE media into the appropriate drive.
• Workstations: At the message that says how to stop autoboot,press and hold ESC. OR
• Servers: At the message that says how to stop autoboot, press andhold any key.
You will see the boot console menu. As boot procedures varysomewhat, depending on your hardware, the following pages give youdetailed guidance on various types of systems.
There is an on-line help facility to guide you, in case you need to interactwith the process. If you need help, type help boot. The followingsections provide details on differing boot protocols.
Booting HP 9000 WorkstationsAfter turning the system on, if you stop the boot process, the system willdisplay a menu of boot commands. For workstations, you will see a helpdisplay similar to the following:
60 Chapter 3
Installing From MediaBooting the Target System
Newer WorkstationBoot Help Menu:
Command Description
Auto [boot|search] [on|off] Display or set auto flag Boot [pri|alt|scsi.addr] [isl] Boot from primary, alternate or SCSI Boot lan[.lan_addr] [install] [isl] Boot from LAN Chassis [on|off] Enable chassis codes Diagnostic [on|off] Enable/disable diagnostic boot mode Fastboot [on|off] Display or set fast boot flag Help Display the command menu Information Display system information LanAddress Display LAN station addresses Monitor [type] Select monitor type Path [pri|alt] [lan.id|SCSI.addr] Change boot path Pim [hpmc|toc|lpmc] Display PIM info Search [ipl] [scsi|lan [install]] Display potential boot devices Secure [on|off] Display or set security mode
When you see this screen, do the following:
1. Type search Enter .
2. If the device (tape or CD-ROM) is identified in the list shown by thesearch command, proceed with the following steps. Otherwise, checkthe device and cable connections and repeat the search.
3. Type the following:
boot scsi. x
Use the SCSI address of the boot device for x.
4. If you see the following prompt, respond with "n".
Interact with IPL (y or n)?
(The bottom selections may not appear unless you hold down ESC).
Older WorkstationBoot Menu:
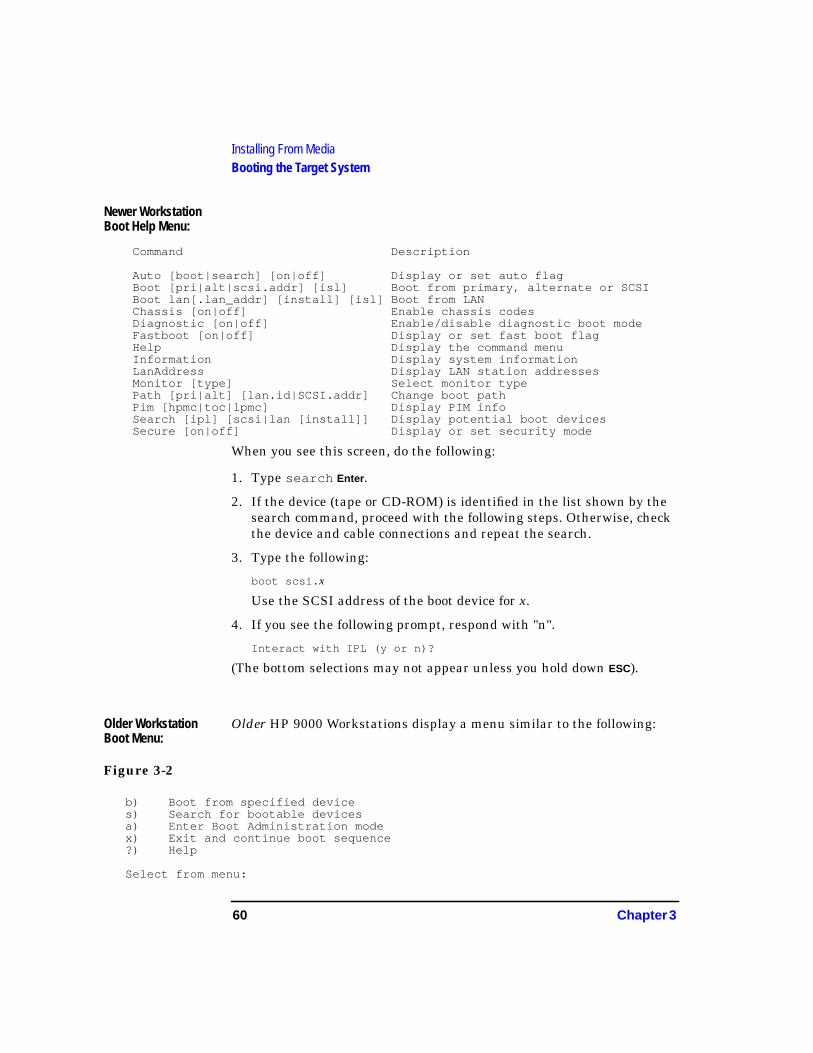
Older HP 9000 Workstations display a menu similar to the following:
Figure 3-2
b) Boot from specified devices) Search for bootable devicesa) Enter Boot Administration modex) Exit and continue boot sequence?) Help
Select from menu:
Chapter 3 61
Installing From MediaBooting the Target System
When the actions menu shown above appears, do the following:
• Press s Enter , to start a search for bootable devices.
Older WorkstationSearch Results
=========================================================================Searching for Devices with Bootable Media.To terminate search, press and hold the ESCAPE key.
Device Selection Device Path Device Type and Utilities
P0 scsi.6.0 HP 2213A IPLP1 scsi.3.0 HP HP35480A IPLP2 scsi.0.0 TOSHIBA CD-ROM XM-3301TA IPLEnter boot selection, (h)elp, or e(x)it:
===============================================================================
You will see a list of "Pn" selections, as above.
If your boot device does not appear in the search list, do the following:
1. Check the hardware.
2. Press x Enter .
3. Type s Enter to initiate another search.
4. At the prompt "Enter boot selection ", enter the "Pn" deviceselection for the device containing your install media.
If you know the SCSI address of the device beforehand, you can skip thesearch and simply type the following at the "Select from menu "prompt:
b scsi. x
Time Note (Bootingfrom Media)
Loading the Ignite-UX install utility from media on a workstation shouldtake 3 to 5 minutes. After this you will be ready to go to “After SelectingBoot Paths (Workstation and Server)”for the procedure to interact withthe rest of the utility to load the remainder of your system.
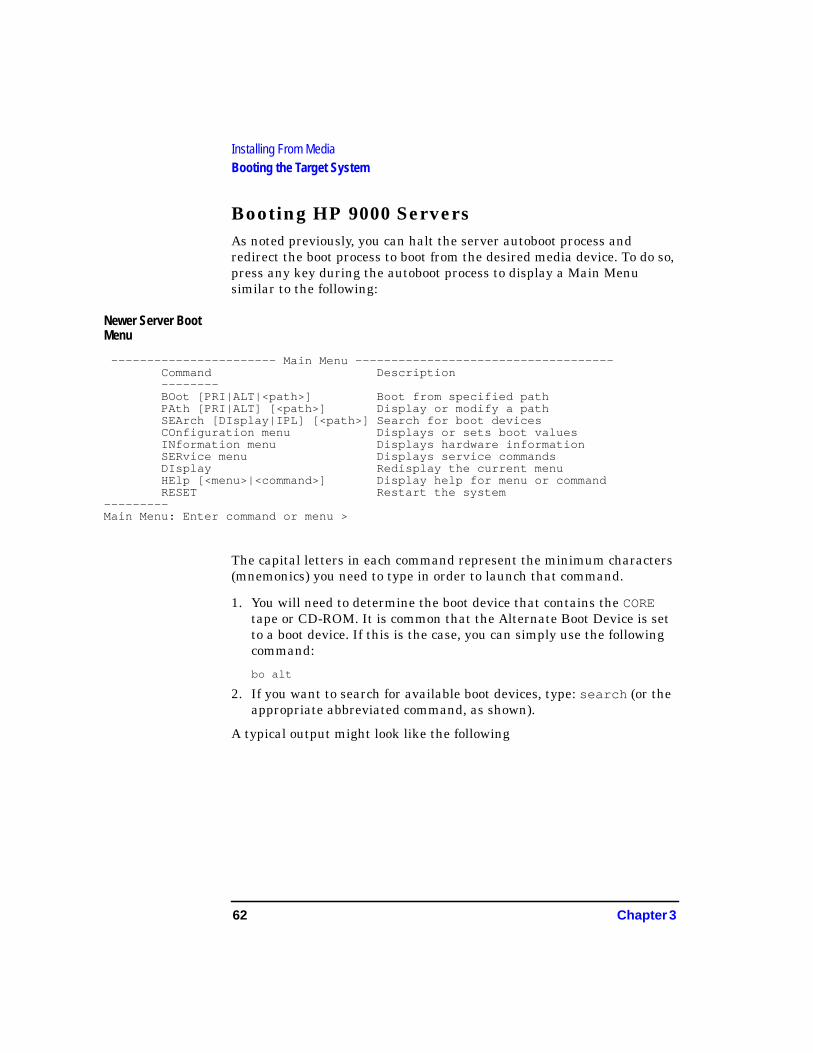
62 Chapter 3
Installing From MediaBooting the Target System
Booting HP 9000 ServersAs noted previously, you can halt the server autoboot process andredirect the boot process to boot from the desired media device. To do so,press any key during the autoboot process to display a Main Menusimilar to the following:
Newer Server BootMenu
----------------------- Main Menu ------------------------------------ Command Description -------- BOot [PRI|ALT|<path>] Boot from specified path PAth [PRI|ALT] [<path>] Display or modify a path SEArch [DIsplay|IPL] [<path>] Search for boot devices COnfiguration menu Displays or sets boot values INformation menu Displays hardware information SERvice menu Displays service commands DIsplay Redisplay the current menu HElp [<menu>|<command>] Display help for menu or command RESET Restart the system---------Main Menu: Enter command or menu >
The capital letters in each command represent the minimum characters(mnemonics) you need to type in order to launch that command.
1. You will need to determine the boot device that contains the COREtape or CD-ROM. It is common that the Alternate Boot Device is setto a boot device. If this is the case, you can simply use the followingcommand:
bo alt
2. If you want to search for available boot devices, type: search (or theappropriate abbreviated command, as shown).
A typical output might look like the following
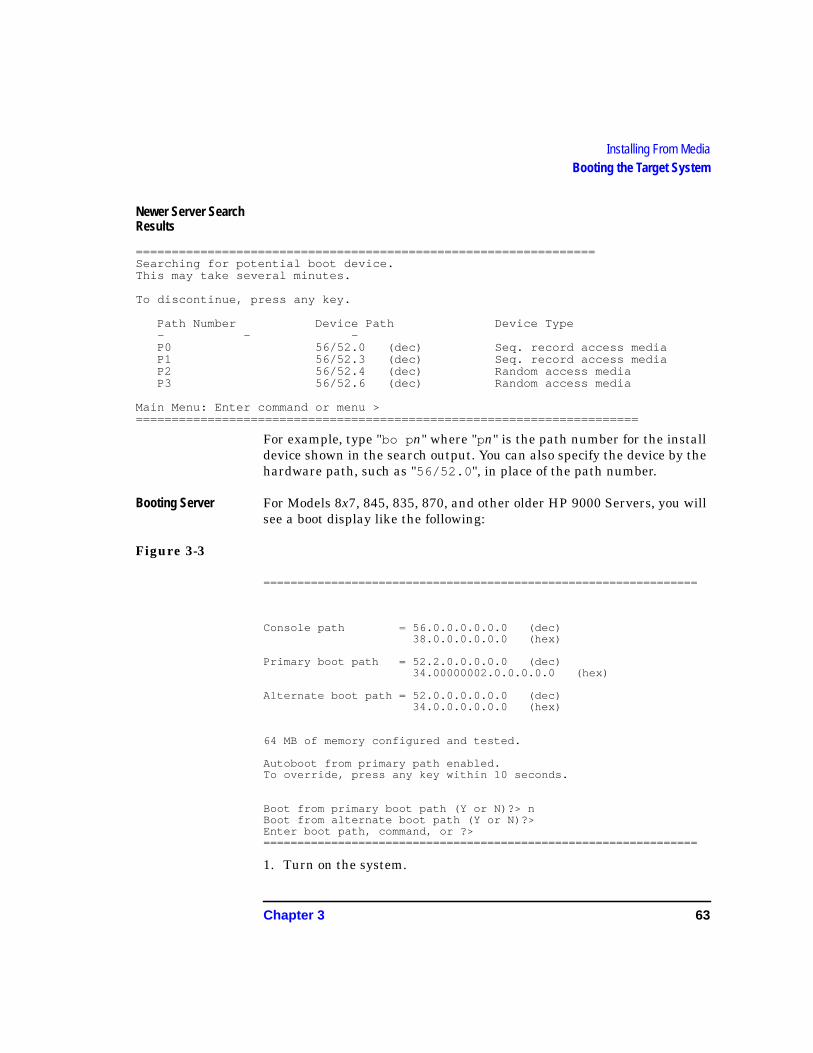
Chapter 3 63
Installing From MediaBooting the Target System
Newer Server SearchResults
================================================================Searching for potential boot device.This may take several minutes.
To discontinue, press any key.
Path Number Device Path Device Type - - - P0 56/52.0 (dec) Seq. record access media P1 56/52.3 (dec) Seq. record access media P2 56/52.4 (dec) Random access media P3 56/52.6 (dec) Random access media
Main Menu: Enter command or menu >======================================================================
For example, type "bo p n" where "pn" is the path number for the installdevice shown in the search output. You can also specify the device by thehardware path, such as "56/52.0 ", in place of the path number.
Booting Server For Models 8x7, 845, 835, 870, and other older HP 9000 Servers, you willsee a boot display like the following:
Figure 3-3
================================================================
Console path = 56.0.0.0.0.0.0 (dec) 38.0.0.0.0.0.0 (hex)
Primary boot path = 52.2.0.0.0.0.0 (dec) 34.00000002.0.0.0.0.0 (hex)
Alternate boot path = 52.0.0.0.0.0.0 (dec) 34.0.0.0.0.0.0 (hex)
64 MB of memory configured and tested.
Autoboot from primary path enabled.To override, press any key within 10 seconds.
Boot from primary boot path (Y or N)?> nBoot from alternate boot path (Y or N)?>Enter boot path, command, or ?>================================================================
1. Turn on the system.

64 Chapter 3
Installing From MediaBooting the Target System
2. Press any key to stop the autoboot process, at the message to do so.
3. Insert the install media (tape or CD-ROM).
4. Determine the hardware path of the install device from your systemadministrator. (There is no search capability to determine thisinformation on older HP 9000 Server models).
• If the primary path shown on your screen is not the same as thatfor the install device, respond with "n" to the prompt "Boot fromprimary boot path". In this case, you will then be asked if youwant to boot from the alternate path, which is typically set to thetape or CD-ROM device.
• If the primary path shown on your screen matches that for theinstall device, respond with "y".
• If neither the primary or alternate device paths correspond to thatfor the tape or CD-ROM device, then respond with "n" to bothprompts. In this case, enter the hardware path of the device (forexample, 52.3.0 ) at the prompt "Enter boot path, command,or ?> ".
5. To the question "Interact with IPL (y or n)? ", respond with"n".
After Selecting Boot Paths (Workstation and Server)
• If you see the following question on your screen, type n:
Interact with IPL (Y or N)?> n
• You can abort the installation at this point, if you wish, by turningthe system off and starting over.
• When you have chosen the boot path and loaded the Ignite-UX utility,the system will display the Ignite-UX keyboard languages screen, ifyour target system has a PC-style keyboard. From this point on, youcan respond to the requests for information on this and the followingscreens.
Time Note: Loading the Install Kernel should take 3 to 5 minutes.
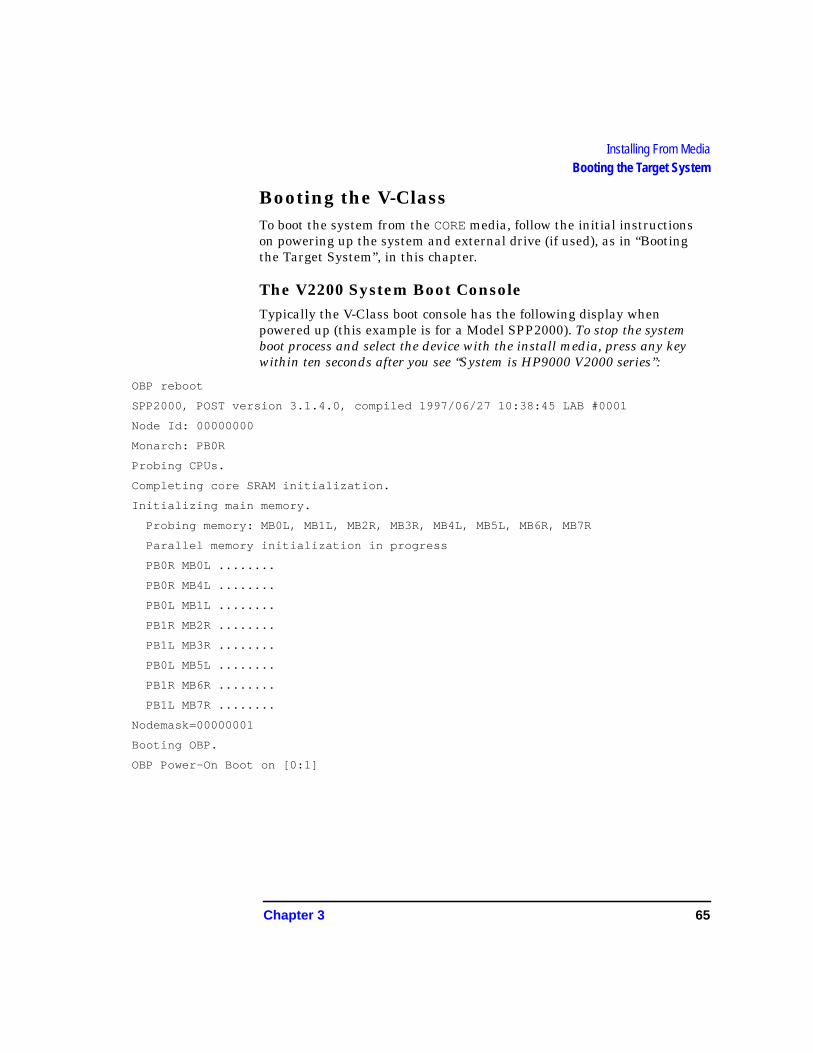
Chapter 3 65
Installing From MediaBooting the Target System
Booting the V-ClassTo boot the system from the CORE media, follow the initial instructionson powering up the system and external drive (if used), as in “Bootingthe Target System”, in this chapter.
The V2200 System Boot ConsoleTypically the V-Class boot console has the following display whenpowered up (this example is for a Model SPP2000). To stop the systemboot process and select the device with the install media, press any keywithin ten seconds after you see “System is HP9000 V2000 series”:
OBP reboot
SPP2000, POST version 3.1.4.0, compiled 1997/06/27 10:38:45 LAB #0001
Node Id: 00000000
Monarch: PB0R
Probing CPUs.
Completing core SRAM initialization.
Initializing main memory.
Probing memory: MB0L, MB1L, MB2R, MB3R, MB4L, MB5L, MB6R, MB7R
Parallel memory initialization in progress
PB0R MB0L ........
PB0R MB4L ........
PB0L MB1L ........
PB1R MB2R ........
PB1L MB3R ........
PB0L MB5L ........
PB1R MB6R ........
PB1L MB7R ........
Nodemask=00000001
Booting OBP.
OBP Power-On Boot on [0:1]
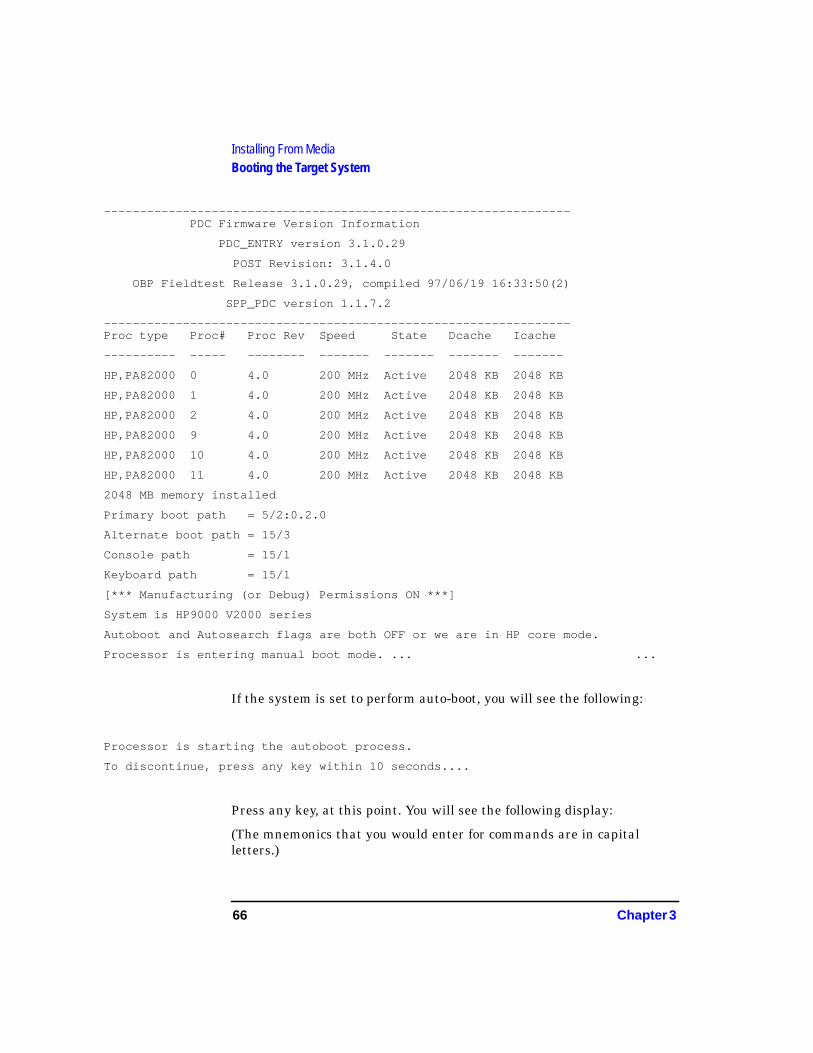
66 Chapter 3
Installing From MediaBooting the Target System
-----------------------------------------------------------------PDC Firmware Version Information
PDC_ENTRY version 3.1.0.29
POST Revision: 3.1.4.0
OBP Fieldtest Release 3.1.0.29, compiled 97/06/19 16:33:50(2)
SPP_PDC version 1.1.7.2
-----------------------------------------------------------------Proc type Proc# Proc Rev Speed State Dcache Icache
---------- ----- -------- ------- ------- ------- -------
HP,PA82000 0 4.0 200 MHz Active 2048 KB 2048 KB
HP,PA82000 1 4.0 200 MHz Active 2048 KB 2048 KB
HP,PA82000 2 4.0 200 MHz Active 2048 KB 2048 KB
HP,PA82000 9 4.0 200 MHz Active 2048 KB 2048 KB
HP,PA82000 10 4.0 200 MHz Active 2048 KB 2048 KB
HP,PA82000 11 4.0 200 MHz Active 2048 KB 2048 KB
2048 MB memory installed
Primary boot path = 5/2:0.2.0
Alternate boot path = 15/3
Console path = 15/1
Keyboard path = 15/1
[*** Manufacturing (or Debug) Permissions ON ***]
System is HP9000 V2000 series
Autoboot and Autosearch flags are both OFF or we are in HP core mode.
Processor is entering manual boot mode. ... ...
If the system is set to perform auto-boot, you will see the following:
Processor is starting the autoboot process.
To discontinue, press any key within 10 seconds....
Press any key, at this point. You will see the following display:
(The mnemonics that you would enter for commands are in capitalletters.)
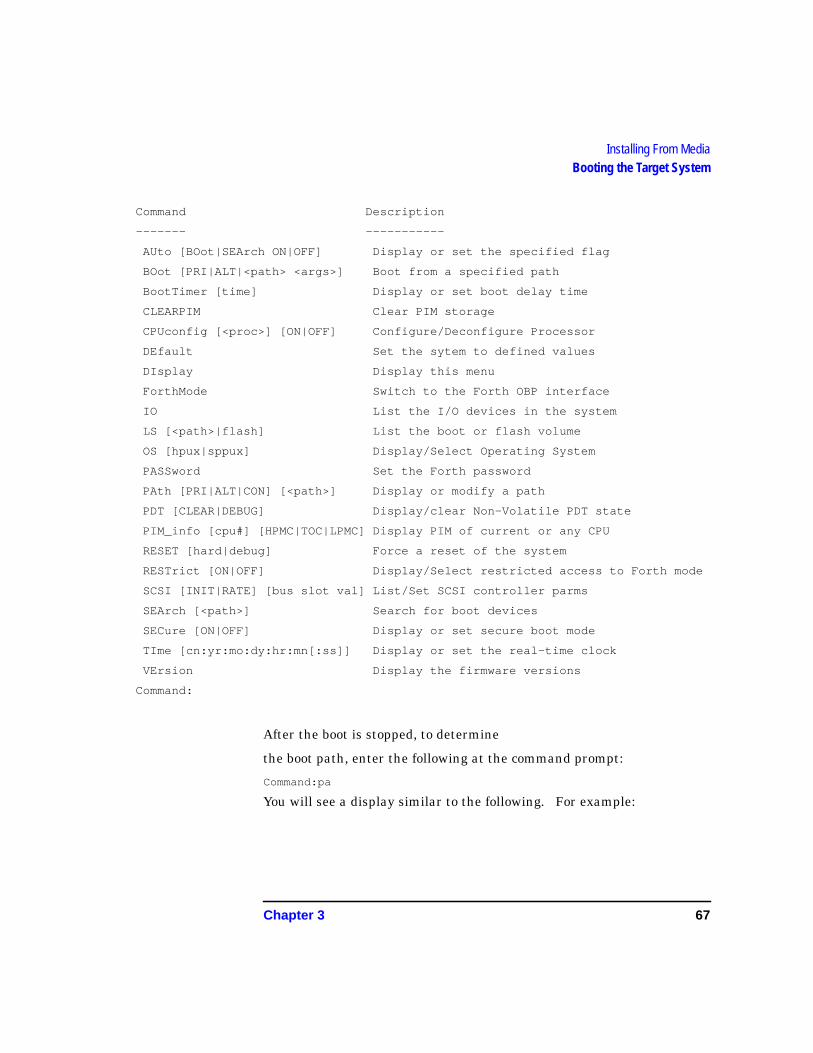
Chapter 3 67
Installing From MediaBooting the Target System
Command Description
------- -----------
AUto [BOot|SEArch ON|OFF] Display or set the specified flag
BOot [PRI|ALT|<path> <args>] Boot from a specified path
BootTimer [time] Display or set boot delay time
CLEARPIM Clear PIM storage
CPUconfig [<proc>] [ON|OFF] Configure/Deconfigure Processor
DEfault Set the sytem to defined values
DIsplay Display this menu
ForthMode Switch to the Forth OBP interface
IO List the I/O devices in the system
LS [<path>|flash] List the boot or flash volume
OS [hpux|sppux] Display/Select Operating System
PASSword Set the Forth password
PAth [PRI|ALT|CON] [<path>] Display or modify a path
PDT [CLEAR|DEBUG] Display/clear Non-Volatile PDT state
PIM_info [cpu#] [HPMC|TOC|LPMC] Display PIM of current or any CPU
RESET [hard|debug] Force a reset of the system
RESTrict [ON|OFF] Display/Select restricted access to Forth mode
SCSI [INIT|RATE] [bus slot val] List/Set SCSI controller parms
SEArch [<path>] Search for boot devices
SECure [ON|OFF] Display or set secure boot mode
TIme [cn:yr:mo:dy:hr:mn[:ss]] Display or set the real-time clock
VErsion Display the firmware versions
Command:
After the boot is stopped, to determine
the boot path, enter the following at the command prompt:
Command:pa
You will see a display similar to the following. For example:
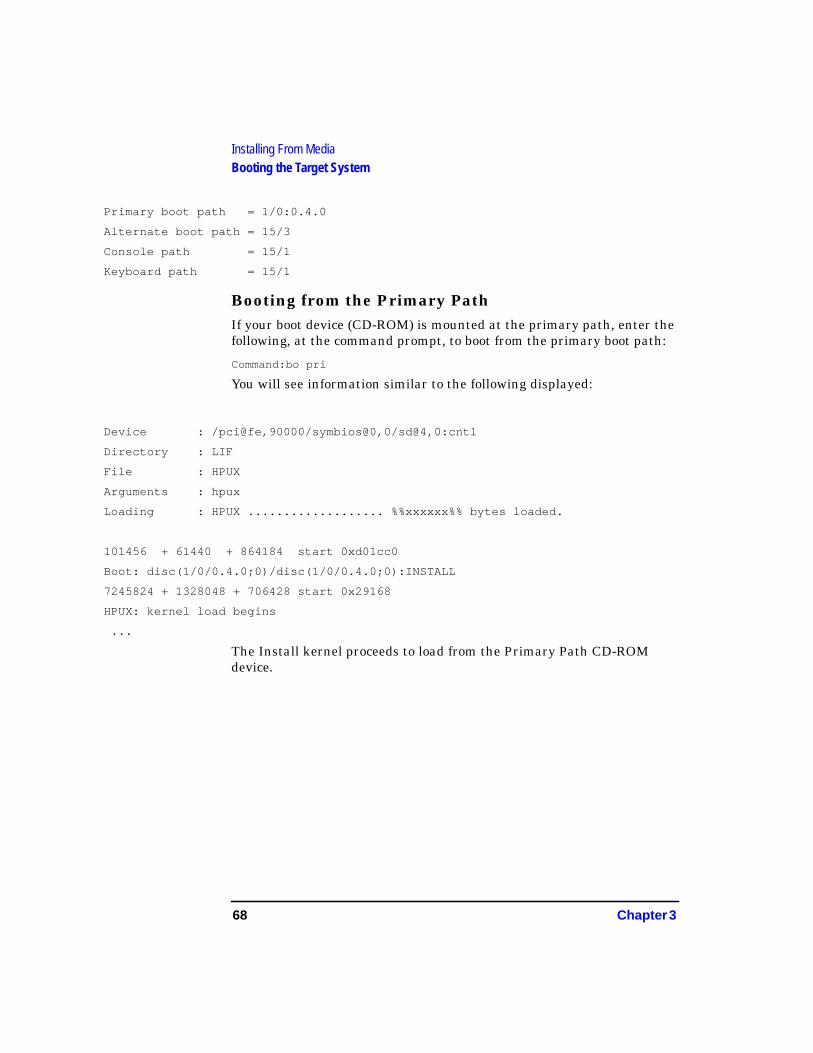
68 Chapter 3
Installing From MediaBooting the Target System
Primary boot path = 1/0:0.4.0
Alternate boot path = 15/3
Console path = 15/1
Keyboard path = 15/1
Booting from the Primary PathIf your boot device (CD-ROM) is mounted at the primary path, enter thefollowing, at the command prompt, to boot from the primary boot path:
Command:bo pri
You will see information similar to the following displayed:
Device : /pci@fe,90000/symbios@0,0/sd@4,0:cntl
Directory : LIF
File : HPUX
Arguments : hpux
Loading : HPUX ................... %%xxxxxx%% bytes loaded.
101456 + 61440 + 864184 start 0xd01cc0
Boot: disc(1/0/0.4.0;0)/disc(1/0/0.4.0;0):INSTALL
7245824 + 1328048 + 706428 start 0x29168
HPUX: kernel load begins
...
The Install kernel proceeds to load from the Primary Path CD-ROMdevice.
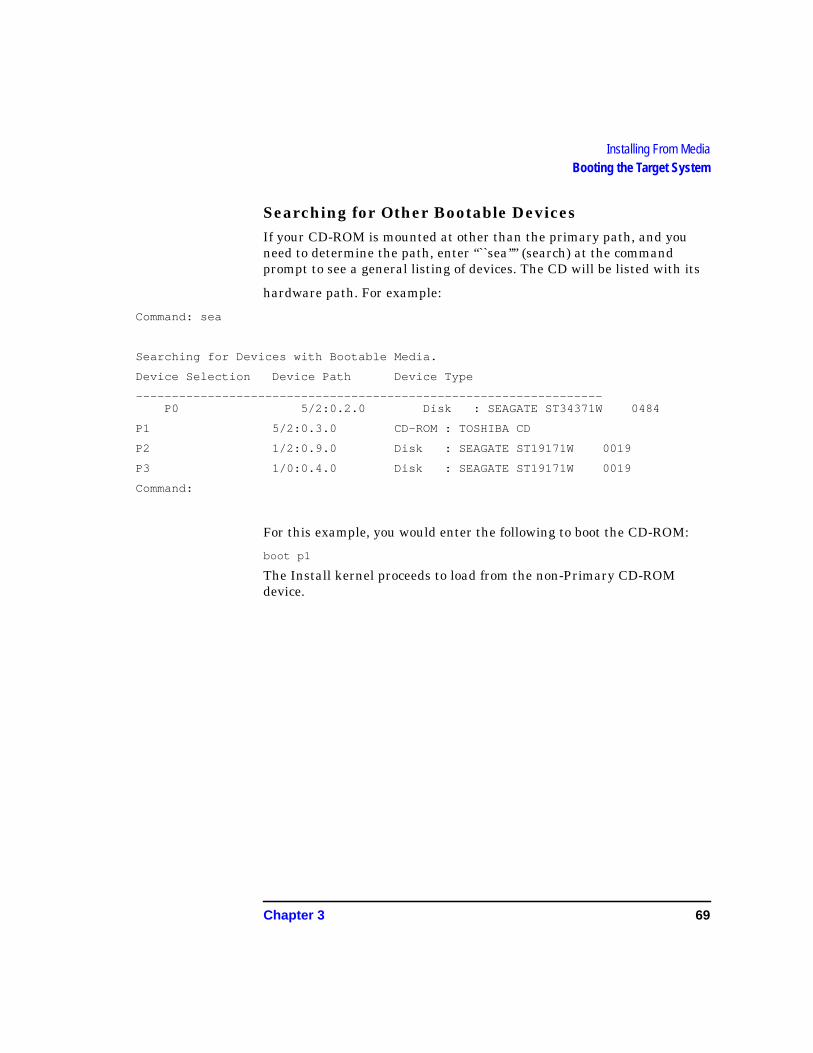
Chapter 3 69
Installing From MediaBooting the Target System
Searching for Other Bootable DevicesIf your CD-ROM is mounted at other than the primary path, and youneed to determine the path, enter “``sea’’” (search) at the commandprompt to see a general listing of devices. The CD will be listed with its
hardware path. For example:
Command: sea
Searching for Devices with Bootable Media.
Device Selection Device Path Device Type
-----------------------------------------------------------------P0 5/2:0.2.0 Disk : SEAGATE ST34371W 0484
P1 5/2:0.3.0 CD-ROM : TOSHIBA CD
P2 1/2:0.9.0 Disk : SEAGATE ST19171W 0019
P3 1/0:0.4.0 Disk : SEAGATE ST19171W 0019
Command:
For this example, you would enter the following to boot the CD-ROM:
boot p1
The Install kernel proceeds to load from the non-Primary CD-ROMdevice.
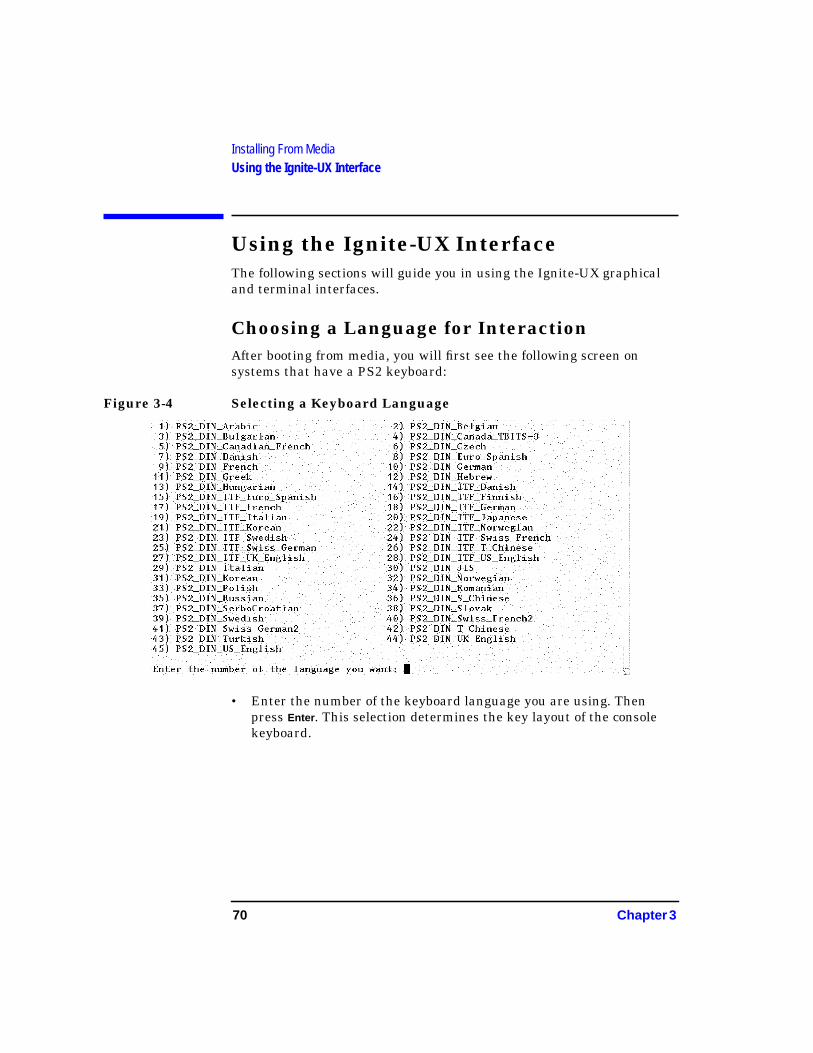
70 Chapter 3
Installing From MediaUsing the Ignite-UX Interface
Using the Ignite-UX InterfaceThe following sections will guide you in using the Ignite-UX graphicaland terminal interfaces.
Choosing a Language for InteractionAfter booting from media, you will first see the following screen onsystems that have a PS2 keyboard:
Figure 3-4 Selecting a Keyboard Language
• Enter the number of the keyboard language you are using. Thenpress Enter . This selection determines the key layout of the consolekeyboard.
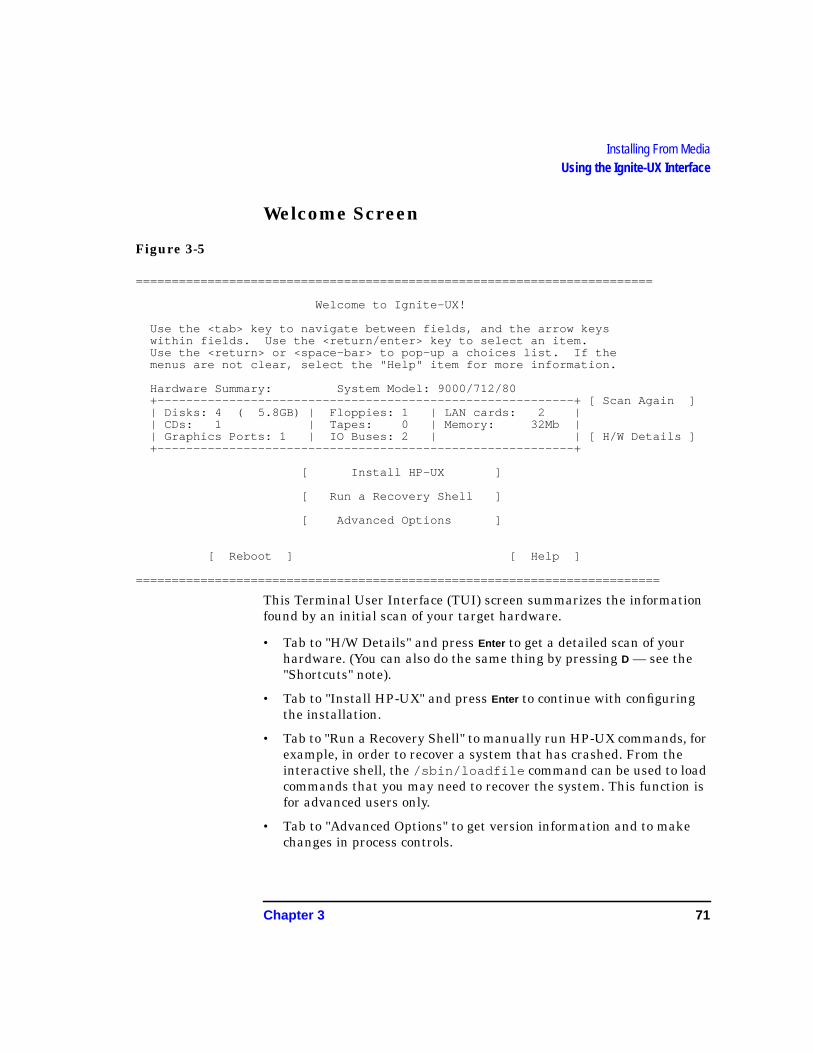
Chapter 3 71
Installing From MediaUsing the Ignite-UX Interface
Welcome Screen
Figure 3-5
========================================================================
Welcome to Ignite-UX!
Use the <tab> key to navigate between fields, and the arrow keys within fields. Use the <return/enter> key to select an item. Use the <return> or <space-bar> to pop-up a choices list. If the menus are not clear, select the "Help" item for more information.
Hardware Summary: System Model: 9000/712/80 +----------------------------------------------------------+ [ Scan Again ] | Disks: 4 ( 5.8GB) | Floppies: 1 | LAN cards: 2 | | CDs: 1 | Tapes: 0 | Memory: 32Mb | | Graphics Ports: 1 | IO Buses: 2 | | [ H/W Details ] +----------------------------------------------------------+
[ Install HP-UX ]
[ Run a Recovery Shell ]
[ Advanced Options ]
[ Reboot ] [ Help ]
=========================================================================
This Terminal User Interface (TUI) screen summarizes the informationfound by an initial scan of your target hardware.
• Tab to "H/W Details" and press Enter to get a detailed scan of yourhardware. (You can also do the same thing by pressing D — see the"Shortcuts" note).
• Tab to "Install HP-UX" and press Enter to continue with configuringthe installation.
• Tab to "Run a Recovery Shell" to manually run HP-UX commands, forexample, in order to recover a system that has crashed. From theinteractive shell, the /sbin/loadfile command can be used to loadcommands that you may need to recover the system. This function isfor advanced users only.
• Tab to "Advanced Options" to get version information and to makechanges in process controls.
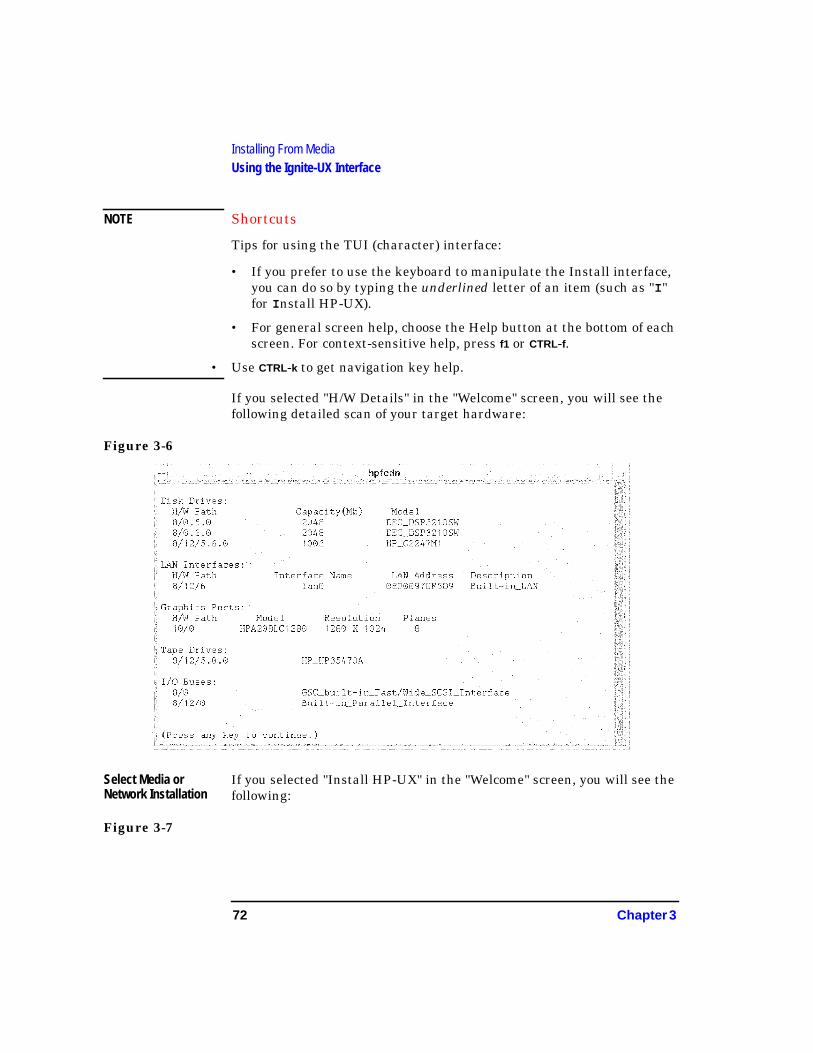
72 Chapter 3
Installing From MediaUsing the Ignite-UX Interface
NOTE Shortcuts
Tips for using the TUI (character) interface:
• If you prefer to use the keyboard to manipulate the Install interface,you can do so by typing the underlined letter of an item (such as "I "for I nstall HP-UX).
• For general screen help, choose the Help button at the bottom of eachscreen. For context-sensitive help, press f1 or CTRL-f.
• Use CTRL-k to get navigation key help.
If you selected "H/W Details" in the "Welcome" screen, you will see thefollowing detailed scan of your target hardware:
Figure 3-6
Select Media orNetwork Installation
If you selected "Install HP-UX" in the "Welcome" screen, you will see thefollowing:
Figure 3-7
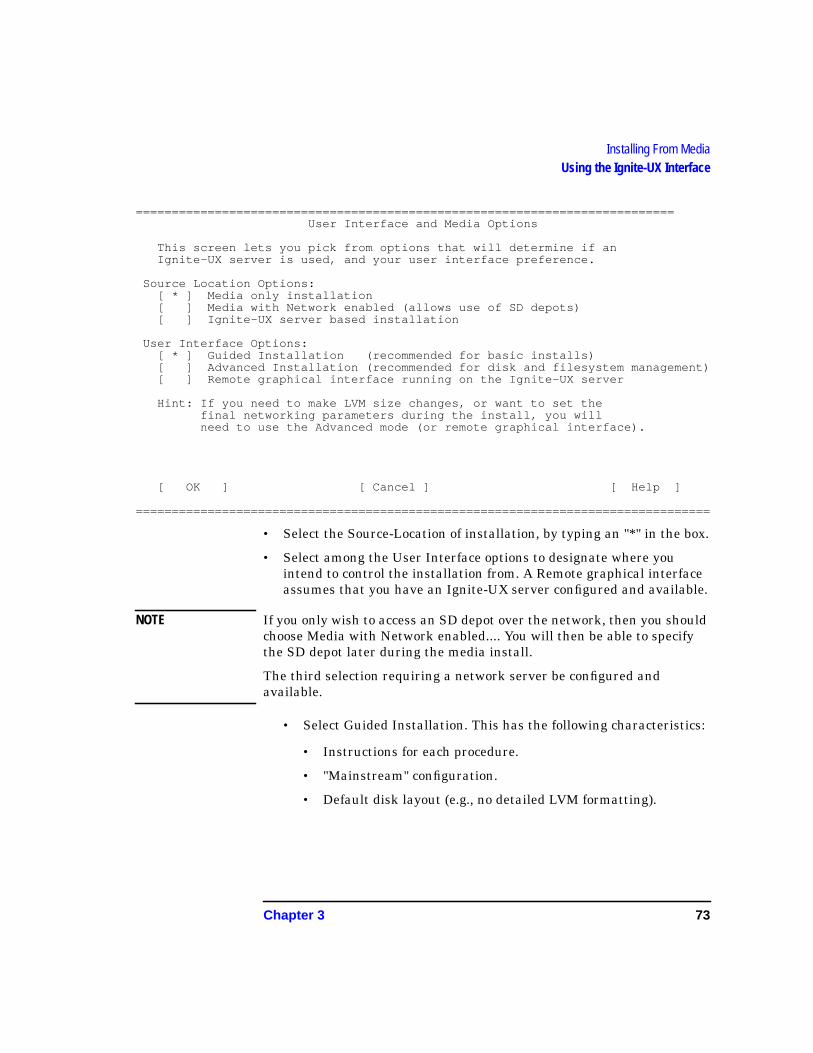
Chapter 3 73
Installing From MediaUsing the Ignite-UX Interface
=========================================================================== User Interface and Media Options
This screen lets you pick from options that will determine if an Ignite-UX server is used, and your user interface preference.
Source Location Options: [ * ] Media only installation [ ] Media with Network enabled (allows use of SD depots) [ ] Ignite-UX server based installation
User Interface Options: [ * ] Guided Installation (recommended for basic installs) [ ] Advanced Installation (recommended for disk and filesystem management) [ ] Remote graphical interface running on the Ignite-UX server
Hint: If you need to make LVM size changes, or want to set the final networking parameters during the install, you will need to use the Advanced mode (or remote graphical interface).
[ OK ] [ Cancel ] [ Help ]
================================================================================
• Select the Source-Location of installation, by typing an "*" in the box.
• Select among the User Interface options to designate where youintend to control the installation from. A Remote graphical interfaceassumes that you have an Ignite-UX server configured and available.
NOTE If you only wish to access an SD depot over the network, then you shouldchoose Media with Network enabled.... You will then be able to specifythe SD depot later during the media install.
The third selection requiring a network server be configured andavailable.
• Select Guided Installation. This has the following characteristics:
• Instructions for each procedure.
• "Mainstream" configuration.
• Default disk layout (e.g., no detailed LVM formatting).

74 Chapter 3
Installing From MediaUsing the Ignite-UX Interface
• For a full Ignite-UX interface install (TUI mode), select AdvancedInstallation. You will see the interface shown in Figure 3-12, withthe same functionality as is described in “Using the Ignite-UXInterface.”, but with TUI navigation. If you need to makeadjustments to LVM parameters, select the Advanced Installation.
Network Information (You will not see this screen if you are doing a media-only installation).
Figure 3-8 netmedia
You can enter networking information on this screen. When you haveentered the needed information, tab to OK and press Enter .
Guided InstallationIf you selected the Guided Installation from the User Interface Optionsmenu, you will be using the Task Wizard illustrated here. The TaskWizard is intended to provide help for a first-time user of Ignite-UX byproviding on-screen explanation and a limited number of steps toaccomplish a basic installation.
Note that the Task Wizard is available only on a client-managed(standalone) installation, and is presented in character-mode (TUI).
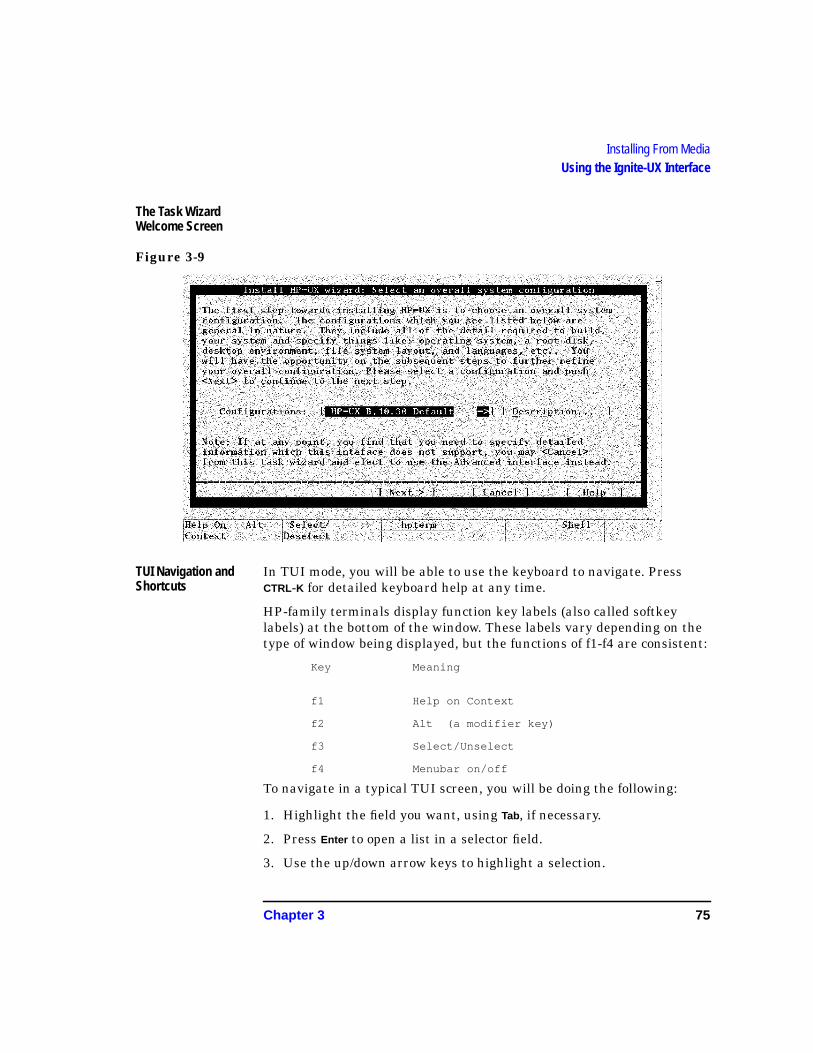
Chapter 3 75
Installing From MediaUsing the Ignite-UX Interface
The Task WizardWelcome Screen
Figure 3-9
TUI Navigation andShortcuts
In TUI mode, you will be able to use the keyboard to navigate. PressCTRL-K for detailed keyboard help at any time.
HP-family terminals display function key labels (also called softkeylabels) at the bottom of the window. These labels vary depending on thetype of window being displayed, but the functions of f1-f4 are consistent:
Key Meaning
f1 Help on Context
f2 Alt (a modifier key)
f3 Select/Unselect
f4 Menubar on/off
To navigate in a typical TUI screen, you will be doing the following:
1. Highlight the field you want, using Tab, if necessary.
2. Press Enter to open a list in a selector field.
3. Use the up/down arrow keys to highlight a selection.

76 Chapter 3
Installing From MediaUsing the Ignite-UX Interface
4. Press Enter again to select the item.
5. Tab to the next field.
• You may also have to take some action, such as select OK or Modify
in order to activate your selection. You can use the local help forthe screen (f1 or Help) to get specific information.
• As a shortcut to specifying an action, you can type the underlinedletter of an item (such as "C" for Cancel) to activate the itemwithout highlighting it.
The Task Wizard:Selecting a SystemConfiguration
Figure 3-10
Task Wizard Topics This screen enables you to select a system environment, such as CDE("Common Desktop Environment") to interact with on the target system.Select Next to continue to a following screen. Select Back to return to aprevious screen. On the last screen, you will select Finish to execute theinstallation.
If you want to cancel out of the process at any time, select Cancel. Youwill see the choices in Figure 3-11.
Chapter 3 77
Installing From MediaUsing the Ignite-UX Interface
The rest of the wizard screens let you do the following tasks:
• Select a root disk.
• Specify the amount of root swap space.
• Select a file system type.
• Specify root volume group disks.
• Select a language(s).
• Select a user license.
• Select Additional Software.
• Pre-install disk information. (To allow you to exclude disks from theinstall.)
• Pre-install check information. (To allow you to review errors orwarnings.)
• System Summary. (To allow you to see a summary of the installconfiguration prior to executing it.)
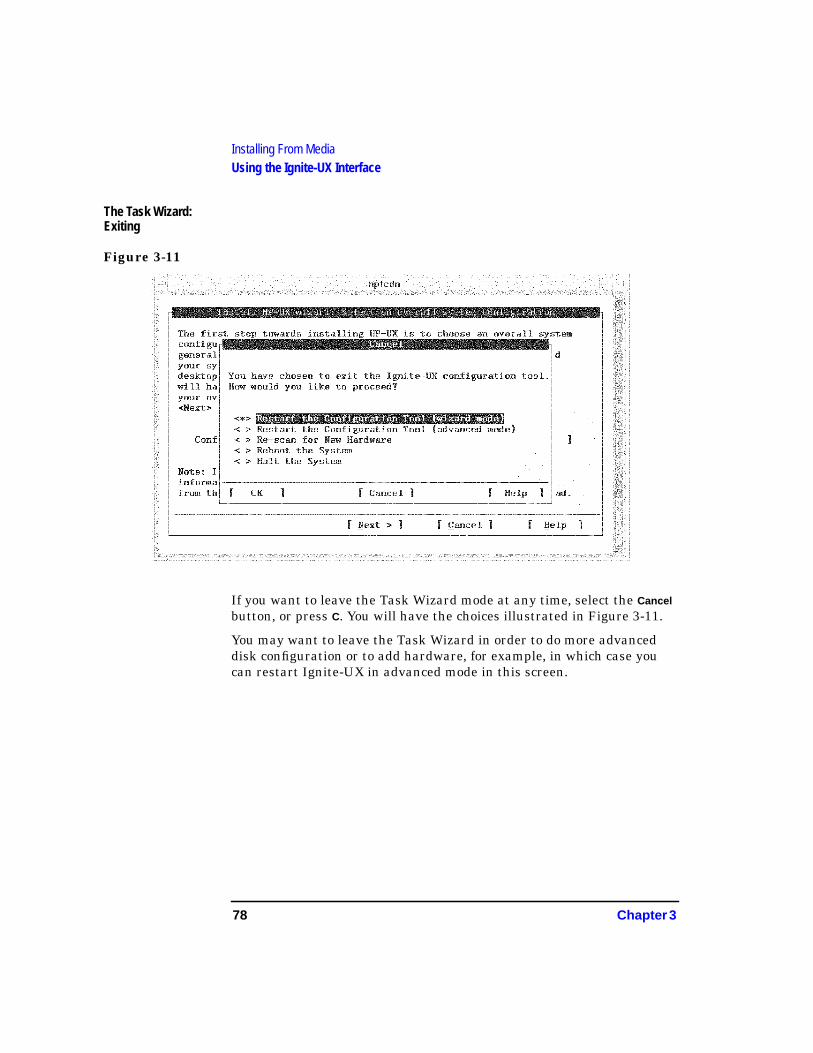
78 Chapter 3
Installing From MediaUsing the Ignite-UX Interface
The Task Wizard:Exiting
Figure 3-11
If you want to leave the Task Wizard mode at any time, select the Cancel
button, or press C. You will have the choices illustrated in Figure 3-11.
You may want to leave the Task Wizard in order to do more advanceddisk configuration or to add hardware, for example, in which case youcan restart Ignite-UX in advanced mode in this screen.
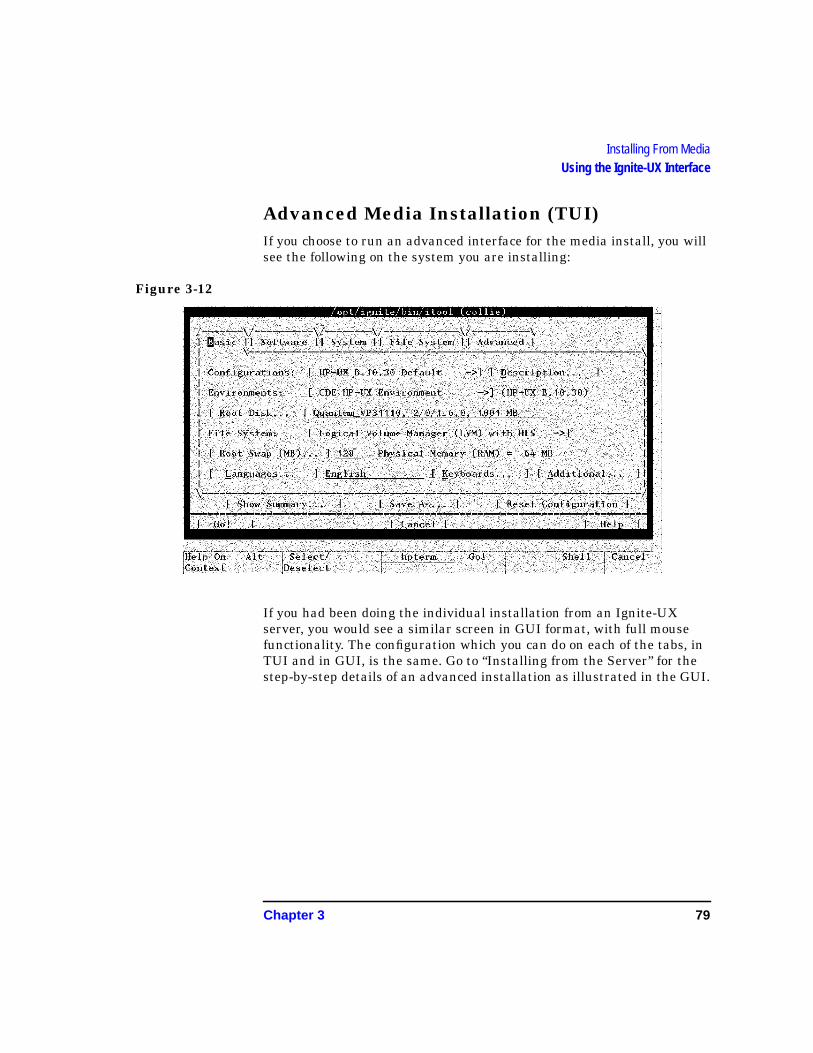
Chapter 3 79
Installing From MediaUsing the Ignite-UX Interface
Advanced Media Installation (TUI)If you choose to run an advanced interface for the media install, you willsee the following on the system you are installing:
Figure 3-12
If you had been doing the individual installation from an Ignite-UXserver, you would see a similar screen in GUI format, with full mousefunctionality. The configuration which you can do on each of the tabs, inTUI and in GUI, is the same. Go to “Installing from the Server” for thestep-by-step details of an advanced installation as illustrated in the GUI.

80 Chapter 3
Installing From MediaUsing the Ignite-UX Interface
Chapter 4 81
Configuring an Ignite-UX Server
4 Configuring an Ignite-UX Server
82 Chapter 4
Configuring an Ignite-UX ServerChapter Contents
Chapter Contents• Overview: the Ignite-UX Server.
• Ignite-UX Distribution Media.
• Hardware Requirements for the Ignite-UX Server.
• Network Requirements.
• Setting Up an Ignite-UX Server.
• Using Configuration Files.
NOTE For online information about the Ignite-UX server, please see the/opt/ignite/share/doc/ directory on your system, and the manpageignite(5).

Chapter 4 83
Configuring an Ignite-UX ServerInstalling Server Software
Installing Server Software
Figure 4-1
Overview: the Ignite-UX ServerFor multiple installations, you will generally be executing theinstallation from the server, although you can also choose to install froma client-target system, in TUI mode.

84 Chapter 4
Configuring an Ignite-UX ServerInstalling Server Software
The requirements for a server are outlined in “Hardware Requirementsfor the Ignite-UX Server and Clients”.
The steps for installing the server are outlined in “Setting Up anIgnite-UX Server”,
Installation of Ignite-UX will take care of most of the serverconfiguration tasks. These include setting up IP addresses andhostnames, interface location, and client response behavior. These canalso be done outside Ignite-UX by the setup_server tool (seesetup_server(1M)) as a simple interface, or by using the Ignite-UX GUI.
The overall server setup tasks include the following:
1. Install HP-UX 10.x (if you have not already done so).
2. Install Ignite-UX tools and data.
3. Set up core software.
4. Add additional applications (optional).
5. Run ignite to complete the configuration (using the Server interfacescreen) and to start the install process.
Ignite-UX Distribution
Hardware Requirements for the Ignite-UX Server andClientsNote that HP-UX 10.30 is not supported on Class B, C, J, or Series 7xxsystems. NFS Diskless functionality is not supported in HP-UX Release10.30. Do not update your server to HP-UX Release 10.30 if you intend forthat server to operate as a NFS Diskless server. You may find referenceswithin this documentation to NFS Diskless functionality. These referencesonly apply to systems running HP-UX Release 10.20 or earlier.
To install HP-UX 10.x you will need the following:
Computer An HP 9000 Series computer with PA 1.1 or laterprocessor.
To check whether your system belongs to the old Series800 designation, use the uname -a command on arunning system.
Chapter 4 85
Configuring an Ignite-UX ServerInstalling Server Software
Memory For any system installed using Ignite-UX, the requiredminimum is 32 MB. (Some older Series 800 models(PA1.0 processor), such as 8x5 are not supported.) YourHP sales engineer can assist in determining the properamount of RAM.
Information on RAM requirements is also available onthe following web site:http://www.hp.com:80/computing/mvp/memory.html .
Source Device Make sure that your system has an appropriate source(CD-ROM, DDS drive, or LAN card). Ensure that tapedrive heads are clean.
Disk Drive A target system needs at least one hard-disk drive withat least the following capacities: (The Ignite-UXprogram performs an analysis of disk space neededprior to loading the software.)
• 2 GB or more for a generally usable system.
• Swap space allotment depends on the softwareloaded and can be adjusted in the Ignite-UXinterface.
• File system minimums depend on software loaded.Ignite-UX computes standard file system sizes andautomatically sets a minimum size for /var .
Other Devices Your system can also have any HP-supported device. Ifyou have an unsupported device connected to yoursystem, HP assumes no responsibility in making thatdevice function properly.
For an Ignite-UXServer:
In addition, an Ignite-UX server requires the following:
• A Series 700/800 system running HP-UX 10.01 or later.
• An X11 display server (workstation, X-terminal, PC running an Xserver, etc). This can be the same system as above.
• A separate graphics display may be required, if a Series 800Ignite-UX server is being used. OR
• The display can be redirected to another X-windows system bysetting the DISPLAY environment variable.
86 Chapter 4
Configuring an Ignite-UX ServerInstalling Server Software
For example, in the Korn Shell or Posix Shell, you would type thefollowing, using your system_name:
export DISPLAY= system_name:0.0
• Product media to load onto the server your Ignite-UX and anysoftware depots you plan to distribute to target systems.
• Network access to the clients to be installed. Client and Server mustbe on the same subnet if you plan to do the initial boot of the clientover the network. A "helper" system can be used to get betweensubnets. The bootsys command also works between subnets.
Supported PeripheralsWith the disk space provision above, all disk drives that are supported onHP 9000 platforms are supported for installation.
Disk arrays can be installed with HP-UX, but the installation tasks donot support configuring an array. See your array documentation forconfiguration information.
The HP-UX client-side installation tools support VT100 and Wyse 60terminals, compatible emulations, and all HP terminals.
Supported File System Types and LayoutsThe HP-UX 10.x file system layout is quite different from HP-UX 9.0xreleases. The 10.x file system is modeled after the UNIX™ SVR4 andOSF/1 systems. This layout provides such benefits as the separation ofOS software from application software, and it also resembles the UNIXstandard layout used by many other computer companies.
File System Types HP-UX 10.x supports the following file system types:
• UFS/HFS or VxFS (Journaled File System) on local disk volumes.
• NFS.
Disk Layouts The file system installed by Ignite-UX will be supported on the followingdisk layouts:
• "Whole disk" (single file system, single swap partition disk layouts).
• The Logical Volume Manager (LVM).
Chapter 4 87
Configuring an Ignite-UX ServerInstalling Server Software
The Logical Volume Manager is offered on all HP 9000 platforms.Because it helps to organize file space across multiple physical disks, youare encouraged to adopt this method of disk management, if you areusing multiple disks. See the manual System Administration Tasks, orthe lvm(7) man page for details.
Series 700 Software Disk Striping is replaced by LVM disk striping forall HP-UX 10.x systems. LVM disk striping is supported by Ignite-UX.
SDS can be converted to LVM via the utility sdstolvm . If you upgrade toHP-UX 10.x from 9.x, as opposed to installing it, this conversion will bedone for you automatically during the upgrade.
LVM disk striping can be set up on some volumes during the installation.However, striped volumes cannot be mirrored later on. Note that not alltypes of volumes may striped. This is due to an unbalanced amount ofdisk space assigned to the root/boot/swap volumes on the root disk thatmust not be striped.
Network Requirements.If you are loading your server depots or client software from a remotesystem, your target system also will need the following:
• A network card. If the target system has multiple LAN cards, selectthe card that is configured onto the correct network using Ignite-UX→ System Tab → Additional Interfaces.
Only one LAN card is used during the installation, configured on theclient console or handled automatically by the bootsys utility.
Your server system will need to be configured. In addition you will needthe following:
• The server system must be on the same network subnet as the target(client) system that will be installed. Or you will need a "helper"system on each subnet from which to boot clients.
• A functional network connection. If you have more than one LANconnection, be prepared to select the correct one with which toconnect to the install server system.
Note: You can only boot over the network from an Ethernet interface.FDDI is also supported, but for non-booting only.
88 Chapter 4
Configuring an Ignite-UX ServerSetting Up an Ignite-UX Server
Setting Up an Ignite-UX ServerIgnite-UX functions through a client-server system. Much of the serversetup process will be performed for you in the Ignite-UX installationprocess, but there are also some separate steps you must take afterinstallation. Tools are supplied to help you complete the server setup.The following steps outline setting up or updating the server:
1. Obtain access to a suitable system running HP-UX 10.x. Forinformation on upgrading from a 9.x system to 10.x, please see themanual Upgrading from HP-UX 9.x to 10.x.
2. If required, update with Extension Media from CD-ROM (see Chapter2, “Updating an Existing Operating System and Software.”)
3. Install the Ignite-UX tools and data from the HP-UX Applicationstape or CD-ROM, using the swinstall utility.
If you are updating a 10.x system, this may require runningswgettools first to update swinstall . (See Chapter 2, “Updatingan Existing Operating System and Software.”)
The 11.0 bundle name is:
• B5725AA
Versions that are on the DART Applications media will be labeledB5724AA_APZ (Series 700) or B5725AA_APZ (Series 800).
4. The release-specific bundles within these each contain the filesetsneeded for installing a particular release to your clients.It isrecommended that you load one or more of these release-specificbundles. They are designated as follows:
Ignite-UX-10-01Ignite-UX-10-10Ignite-UX-10-20. . .
You may load one or more of the Ignite-UX-10- XX bundles onto yourserver depending on which releases of HP-UX you plan on installing ontoclients. That is, you can choose to load a release-specific bundle, such asIgnite-UX-10-20 , or an entire bundle, such as B5724AA_APZ.
Chapter 4 89
Configuring an Ignite-UX ServerSetting Up an Ignite-UX Server
Installing Ignite-UXSoftware
Each software bundle contains the Ignite-UX tools plus the data filesrequired for support of the particular HP-UX release indicated by thebundle name.
The Ignite-UX product replaces the capability previously supplied by theNetInstall bundle that came with HP-UX releases 10.01, 10.10 and10.20. (A system cannot be configured as a server for both NetInstall andIgnite-UX.) Loading any of the Ignite-UX software bundles will give anerror until you remove the NetInstall bundle or touch the file/tmp/okay_to_remove_net_install .
Once the application CD-ROM containing Ignite-UX has been mounted,you may use the swinstall command to load the desired Ignite-UXbundles. For example, the command below would load the supportneeded for installing HP-UX 10.20 onto clients:
# swinstall -s /cdrom Ignite-UX-10-20
• After the Ignite-UX bundle(s) has been loaded, unmount and removethe media, and mount the media/drive, if necessary, to load the COREsoftware.
Set Up or UpdateCORE Software.
Ignite-UX allows many options for installing software on the targetsystem. The most basic option is to install all software from SD depotslocated on the server. Following is the procedure for setting up the COREsoftware on the server.
Setting up the software for the OS installation can be done with the helpof the add_release tool. This tool can also be used interactively to addnew releases to the server and to remove old ones.
If you plan to use both SD sources and non-SD sources (tar ,cpio , orpax ), it will be necessary to consider each individually.
1. For SD OS software:
Run the add_release tool to load the software release(s) you wish toinstall on the target systems. The add_release tool will add a newsoftware release to an Ignite-UX server by creating SD depots for thatsoftware. See the add_release(1M) man page for more details.
To run add_release to test what it would do, without actuallymodifying anything, you can specify the -p option (preview mode), asfollows. For example:
# /opt/ignite/bin/add_release -s /dev/dsk/c0t2d0 -p

90 Chapter 4
Configuring an Ignite-UX ServerSetting Up an Ignite-UX Server
To use a depot other than /dev/dsk/c0t2d0 to read the software,you can specify the depot with the -s option.
For example, the following would apply if you already have an OSdepot, or you have made modifications to it. Then you can use themake_config and manage_index commands to generate aconfiguration file. For example:
# make_config -s server:/depot_700 \-c /var/opt/ignite/data/Rel_B.10.20/core_700
# manage_index -a -f /var/opt/ignite/data/Rel_B.10.20/core_700
See the ignite(5) man page for further examples.
2. For non-SD OS software:
If the source is not an SD depot (i.e., it is an archive image), then theadd_release command is not applicable.
You will need to create a unique config file that represents the non-SDoperating system software. A sample of a config file that does a corearchive can be found at the following location:
/opt/ignite/data/examples/core.cfg
After copying this file and making edits to it as instructed in thecomments contained in the file, you can use the manage_index toolto insert a reference to this configuration in the following location:
/var/opt/ignite/INDEX
Add additionalapplications (optional)
If you have other software that you would like to pull during your installand want to have the software made available for selection in theIgnite-UX UI, run the make_config and manage_index tools on thosedepots. If the contents are not 700/800 specific, then the -a[78]00option should not be used.
NOTE Do not attempt to use non-core-OS archives (i.e. layered applications)that contain files that get loaded in/var/adm/sw/* . Shipping files inthis directory in this method may corrupt the software distributordatabase.
For SD applicationsoftware
1. Run the following commands for each depot you plan to load SDsoftware from during the installation. The make_config tool onlyhandles SD software which is packaged in bundle form. (All
Chapter 4 91
Configuring an Ignite-UX ServerSetting Up an Ignite-UX Server
HP-supplied software is packaged in this form. See themake_bundles(1M) manpage for information on making SD bundlesin an SD depot.)
For example, to make compiler depot bundles available type thefollowing:
/opt/ignite/bin/make_config -s hpfcxxx.hp.com:/depots/compiler -c \/var/opt/ignite/data/Rel_B.10.20/compilers_cfg
/opt/ignite/bin/manage_index -a -f /var/opt/ignite/data/Rel_B.10.20/compilers_cfg
2. The depot server name (in this example hpfcxxx.hp.com) should bereplaced with the server you have the SD software on. Note that thedepot server can be a different system from the Ignite-UX server.
NOTE The make_config command will need to be re-run each time newsoftware is added or modified in the depots.
The make_config tool constructs Ignite-UX config files whichcorrespond to SD depots. When an SD depot is used as part of theIgnite-UX process, it must have a config file which describes thecontents of the depot to Ignite-UX. This command can automaticallyconstruct such a config file, when it is given the name of an SD depotto operate on. This command should be run when adding or changinga depot which will be used by Ignite-UX.
The manage_index tool is used to manipulate the/var/opt/ignite/INDEX file. This utility is primarily called byother Ignite-UX tools but can also be called directly.
For non-SD applicationsoftware:
If the source is not an SD depot, the make_config command is notapplicable. You will need to create a unique config file that references thenon-SD software. A sample of a config file that does a non-core archivecan be found at the following location:
/opt/ignite/data/examples/noncore.cfg
1. Copy this file first to /var/opt/ignite/data/ Release/ configx.Then make the changes to the copy in that directory.
2. After copying and editing this file, you can use manage_index toinsert a reference the copy of the configuration in the followinglocation:
/var/opt/ignite/INDEX
92 Chapter 4
Configuring an Ignite-UX ServerSetting Up an Ignite-UX Server
Starting the Ignite-UX Server• Run ignite to complete the configuration and to start the server
process. Type the following:
/opt/ignite/bin/ignite
This will start the Ignite-UX server.
Complete theConfiguration:
After you have Ignite-UX up and running, you will see the Welcomescreen and then the Ignite-UX Server GUI. When you have booted theclients you will see client icons on the Server GUI. These can bemanipulated as follows:
• Click once on a client icon to select it for further actions.
• Click twice on the client to get a Client Status screen.
• Click the right mouse button (Mouse Button Three) on the selectedclient icon to get an Actions screen similar to the pulldown Actionsmenu.
• Server Configuration: Server Options.
This allows the OS product configuration to be selected, along withthe default printer configuration, client timeout allowance, and wherethe client interface will be booted from and displayed.
• Server Configuration: Session Options.
This configures general interaction behavior for the client sessions.
Details for these screens are on the following pages.
Configuring Server OptionsThe fields in these tabs ("Server Options" and "Session Options") serve toidentify and set up your installation server, and to configure the IPsource address range to be used for initially booting the install clients(target systems) and the DHCP address range to be used for directingthe client installation process. You will see the following screen afterselecting: Options --> Server Configuration.
Chapter 4 93
Configuring an Ignite-UX ServerSetting Up an Ignite-UX Server
Figure 4-2
The Server OptionsTab
• Select on Default Configurations, highlight the one you want to usefrom the list. When doing a client installation, this configuration willbe installed on targets if no other is specified. (The default setting canbe overridden on a per-client basis by Ignite-UX).
• Click on the selection list to display the available (configured)printers. Select the one you want to use.
If necessary, use the SAM → Printers and Plotters area to configure anew printer onto the system.
This will be the printer for printing the manifest or installationhistory. The printer address will be checked by Ignite-UX before a jobis sent.
• Select the appropriate Client Timeout time, or "Off", to set the timelimit for the client to be connected without responding. (This will set alimit on the time since the client install log has been written in.Fifteen to thirty minutes may be required at some points in theinstallation.) A warning note will be displayed if this time isexceeded.
Setting Client Timeout to "off" disables this notification.

94 Chapter 4
Configuring an Ignite-UX ServerSetting Up an Ignite-UX Server
• Use the Interface selection list to designate where you want to see theclient UI for this installation. If you have a server configured, you canhave the choice of running the client installation interface from eitherthe target (as a Terminal User Interface) or the Ignite-UX server (as aGraphical User Interface). If the client installation is to benon-interactive (no interface), select "None".
NOTE The default location for the interface display is the Ignite-UX server, ifthe server is running.
• To use Add Booting IP Addresses..., see the following section.
Adding Booting IPAddresses…
If you clicked on Add Booting IP Addresses..., in Figure 4-2, you wouldget the following screen.
Figure 4-3
Booting Clients This screen allows you to enter appropriate values to use for IPaddresses for the initial boot of the target systems. The number of suchaddresses determines the number of simultaneous installations you cando.
First, ensure that these IP addresses are not assigned elsewhere. TheseIP addresses are used to initially boot the target systems. They are useduntil the system is assigned one of the DHCP-assigned boot addresses.One address is required for each simultaneous boot. Typically one tothree are needed, depending on your usage.
Chapter 4 95
Configuring an Ignite-UX ServerSetting Up an Ignite-UX Server
This data can also be configured from a command line by using the toolsetup_server(1M) for this procedure. Or you can directly edit theinstl_boottab file; this is necessary in order to modify the listing ofexisting IP addresses.
See the instl_bootd(1M) man page for further details.
DHCP Address Range First ensure that these IP addresses are not assigned elsewhere. TheseIP addresses are used during the OS download and application loading.The addresses are in use for most of the Ignite-UX download to a targetmachine. One address is required for each simultaneous download. Youshould set more, if the addresses are assigned permanently.
You would click the “Temporary” box in case you would like to manage asmall group of temporary IP addresses, just for use in doinginstallations, and then reassign the clients new addresses when they aredeployed.
The provision of DHCP capability is for the purpose of installation onlyand you may want to limit configurations so that they do not interferewith prior DHCP server functions.
Also see Appendix A, “Configuring for a DHCP Server,” for examples ofusage. See the setup_server(1M) and instl_adm(4) man pages for moreinformation on setting up DHCP functions, addresses and class IDs.
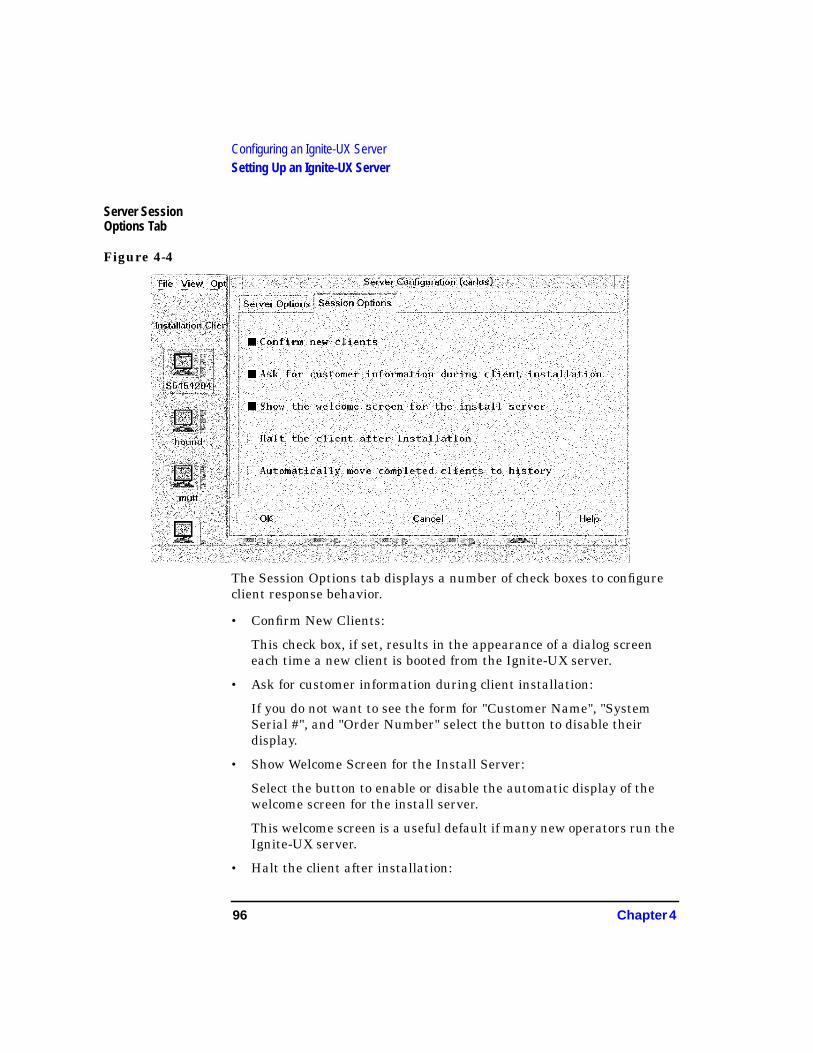
96 Chapter 4
Configuring an Ignite-UX ServerSetting Up an Ignite-UX Server
Server SessionOptions Tab
Figure 4-4
The Session Options tab displays a number of check boxes to configureclient response behavior.
• Confirm New Clients:
This check box, if set, results in the appearance of a dialog screeneach time a new client is booted from the Ignite-UX server.
• Ask for customer information during client installation:
If you do not want to see the form for "Customer Name", "SystemSerial #", and "Order Number" select the button to disable theirdisplay.
• Show Welcome Screen for the Install Server:
Select the button to enable or disable the automatic display of thewelcome screen for the install server.
This welcome screen is a useful default if many new operators run theIgnite-UX server.
• Halt the client after installation:
Chapter 4 97
Configuring an Ignite-UX ServerSetting Up an Ignite-UX Server
Select this button to cause the client system to halt (rather thanreboot) after installation.
• Automatically move completed clients to history:
Select this button to automatically add completed clients to the end ofthe history log,/var/opt/ignite/clients/history/history.log . It will alsomove their config and manifest files to history for future reference.The client icon will be removed from the Server screen. The clientmust be complete (fully installed) for this to take place.
If the client systems are prepared and booted, you can skip to Chapter 5,“Installing from the Ignite-UX Server,” for the procedures for using theserver with the client systems.
Preparing the Clientsfor Installation
1. Boot the Series 700 or Series 800 client system that supports networkboot by entering the appropriate command on the console for thatclient.
Note that, if a client with a known IP address is already runningHP-UX, you can use the bootsys(1m) command from the Ignite-UXserver to install it with specific configuration, without furtherinteraction.
See the exact boot ROM commands for manual booting of your systemin “Booting Client Systems from the Network”.
If the client cannot find the server, check the following items:
• Client is on the same subnet as the server.
• Any instl_bootd errors in /var/adm/syslog/syslog.log .
• Your /var/adm/inetd.sec file to make sure that IP address0.0.0.0 is not being disallowed.
• If /etc/services comes from NIS, make sure that the NIS serverhas instl_boot* entries.
• The daemon rbootd is running.
The icons for all clients booted from the Ignite-UX server should nowappear on the Ignite-UX interface. If the server has not been set upcompletely, or if the client could not obtain enough networkingparameters via DHCP, then the client may require interaction on theclient console.
98 Chapter 4
Configuring an Ignite-UX ServerSetting Up an Ignite-UX Server
You can now proceed with using the Ignite-UX interface (“Installing fromthe Server”).
For More Information See Appendix B, “Using Configuration Files,”for the details of setting upconfiguration files for Ignite-UX.
For more details about server configuration and "golden disks", see the"Ignite-UX Startup Guide for System Administrators" and "Ignite-UXCold Installations", both on your Ignite-UX server system in/opt/ignite/share/docs/ .
Chapter 5 99
Installing from the Ignite-UX Server
5 Installing from the Ignite-UXServer
100 Chapter 5
Installing from the Ignite-UX ServerChapter Contents
Chapter Contents• Booting Client Systems from the Network.
• Installing from the Server.
• Selecting Server or Client Console Interaction.
• Displaying the Client Systems.
• Configuring the Installation
• Basic Tab.
• Software Tab.
• System Tab.
• File System Tab.
• Advanced Tab.
• Doing a Non-Interactive Remote Installation (bootsys).
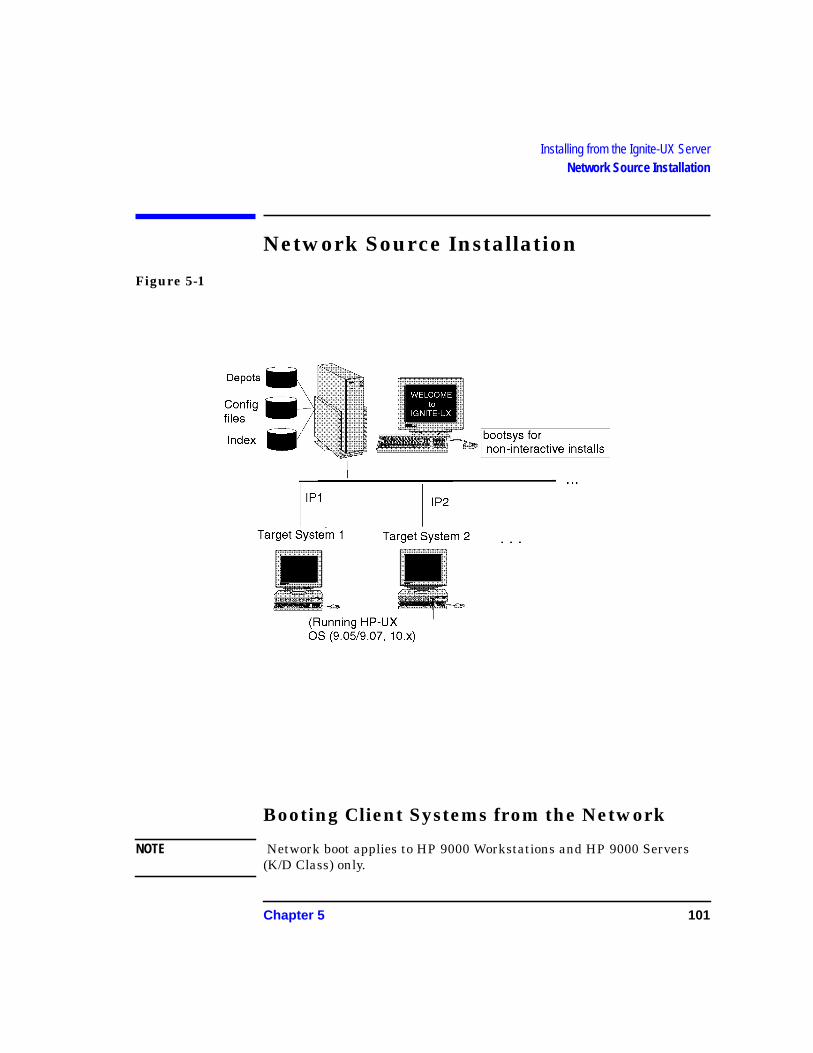
Chapter 5 101
Installing from the Ignite-UX ServerNetwork Source Installation
Network Source Installation
Figure 5-1
Booting Client Systems from the Network
NOTE Network boot applies to HP 9000 Workstations and HP 9000 Servers(K/D Class) only.

102 Chapter 5
Installing from the Ignite-UX ServerNetwork Source Installation
SupportedWorkstations:
At Release 11.0, the following 32-bit HP 9000 Workstations aresupported:
Series 700: 712, 715/64, 715/80, 715/100, 715/100XC, 743, 744, 725/100
B-Class: B132L, B160L C-Class: C100, C110, C160, C160L, C180
J-Class: All J-Class systems
UnsupportedWorkstations
Workstations not supported are the following:
705, 710, 715/33, 715/50, 715/75, 720, 725/50, 725/75, 730,
735, 755
Workstations not supported due to required 100BaseT driver are thefollowing:
B132L+, B180L C200, C240
Supported Servers The 32-bit kernel can execute on any Server and Workstation supportedon 11.0, except the V2200 Server. The 64-bit kernel executes only oncertain servers. The V2200 requires the use of the 64-bit kernel. Not allPA8x00 CPU- equipped systems are supported for 64-bit operation, eventhough all PA8x00 CPUs are 64-bit capable.
At Release 11.0, the following HP 9000 Servers are supported:
• 32-Bit Only: D, E, G, H, and I-class, K-class (PA7x00), T500, andT520.
• 32/64-Bit: K-class (PA8x00), and T600,
• 64-Bit Only: V2200
Updating a cluster server to HP-UX 10.30 or later is not supported. NFSDiskless functionality is not supported in HP-UX Release 10.30 or later.Do not update your server to HP-UX Release 11.0 if you intend for thatserver to operate as an NFS Diskless server.
The details in the following section are provided for guidance in case youhave a variety of HP systems with different boot-console interfacing, andin case the client system is not currently running HP-UX.
There is on-line help in the boot interface to guide you, in case you needto interact with the process. If you need help, type helpboot.
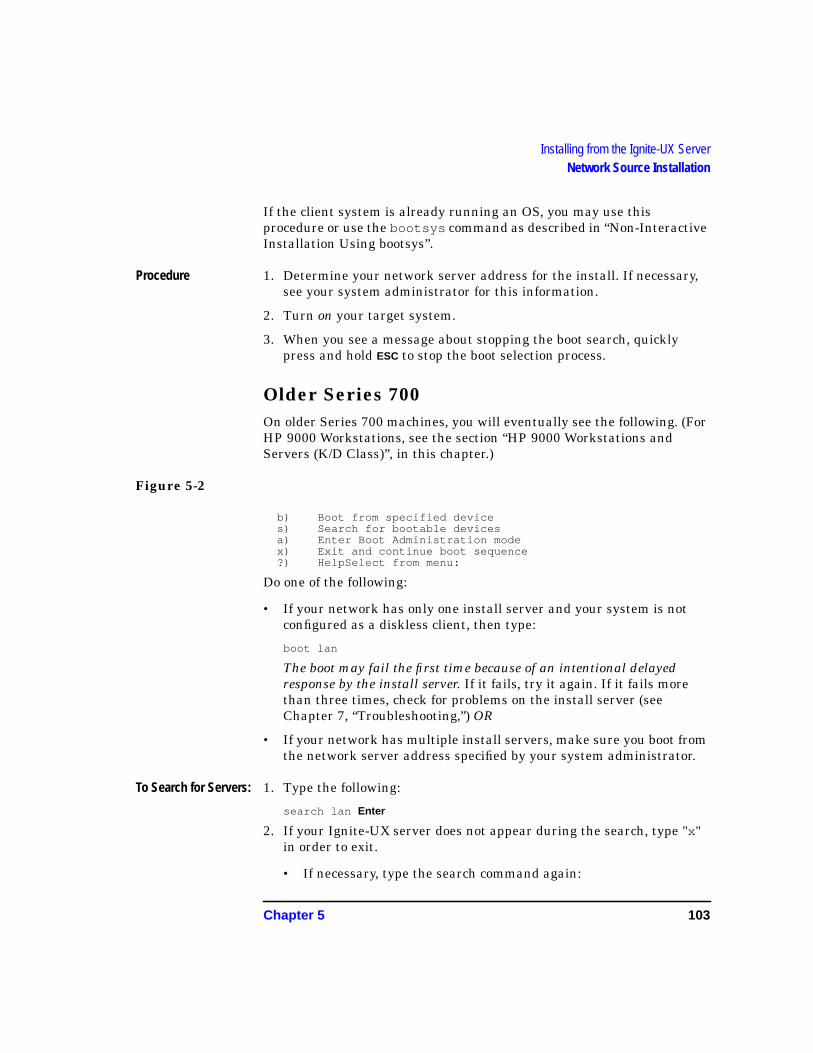
Chapter 5 103
Installing from the Ignite-UX ServerNetwork Source Installation
If the client system is already running an OS, you may use thisprocedure or use the bootsys command as described in “Non-InteractiveInstallation Using bootsys”.
Procedure 1. Determine your network server address for the install. If necessary,see your system administrator for this information.
2. Turn on your target system.
3. When you see a message about stopping the boot search, quicklypress and hold ESC to stop the boot selection process.
Older Series 700On older Series 700 machines, you will eventually see the following. (ForHP 9000 Workstations, see the section “HP 9000 Workstations andServers (K/D Class)”, in this chapter.)
Figure 5-2
b) Boot from specified devices) Search for bootable devicesa) Enter Boot Administration modex) Exit and continue boot sequence?) HelpSelect from menu:
Do one of the following:
• If your network has only one install server and your system is notconfigured as a diskless client, then type:
boot lan
The boot may fail the first time because of an intentional delayedresponse by the install server. If it fails, try it again. If it fails morethan three times, check for problems on the install server (seeChapter 7, “Troubleshooting,”) OR
• If your network has multiple install servers, make sure you boot fromthe network server address specified by your system administrator.
To Search for Servers: 1. Type the following:
search lan Enter
2. If your Ignite-UX server does not appear during the search, type "x"in order to exit.
• If necessary, type the search command again:
104 Chapter 5
Installing from the Ignite-UX ServerNetwork Source Installation
search lan
Note that it will typically take two or three searches before theIgnite-UX server will be found, due to a built-in delayed responsefrom the server system.
• Identify your LAN server from the listing.
• If three attempts result in no response from the desired server, seeChapter 7, “Troubleshooting.”
3. If you know the Ethernet™ address of your server and can specifywhere to boot without going through the search process, type:
boot lan.080009- nnnnnn
where 080009- nnnnnn is the Ethernet address of the install server.(Some newer systems may not use the 080009 prefix.) This numbercan be found by running the lanscan(1M) command on the server.
• If your server is listed during the search, then you can boot thesystem by typing "p" and the index number of the server. Forexample:
p1
This will cause the boot to begin. OR
• Alternatively, you can exit this screen by typing "x Enter ", and typing"boot p1 " at the previous screen.
HP 9000 Workstations and Servers (K/D Class)After the power is turned on, you will see a graphical interface screen(Workstations) that displays instructions to press ESC to stop the bootprocess. (On Servers, the interface will be TUI.)
1. Press ESC, and you should see the following menu:
Figure 5-3
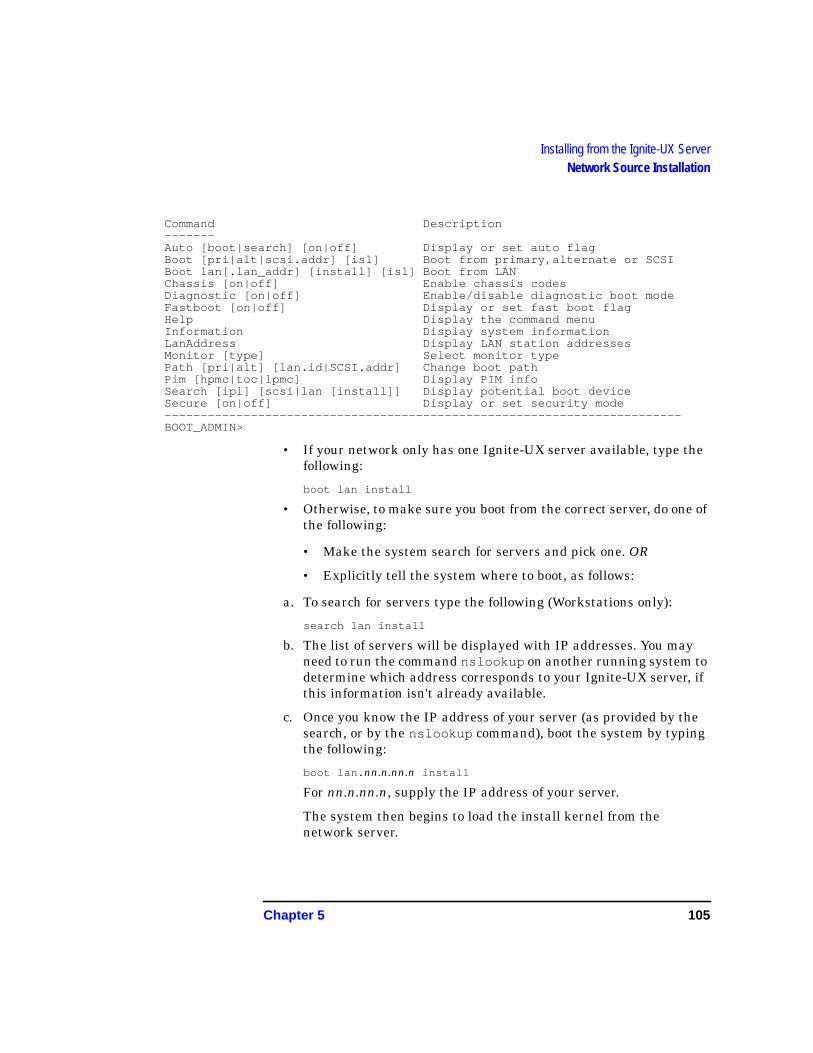
Chapter 5 105
Installing from the Ignite-UX ServerNetwork Source Installation
Command Description ------- Auto [boot|search] [on|off] Display or set auto flag Boot [pri|alt|scsi.addr] [isl] Boot from primary,alternate or SCSI Boot lan[.lan_addr] [install] [isl] Boot from LAN Chassis [on|off] Enable chassis codes Diagnostic [on|off] Enable/disable diagnostic boot mode Fastboot [on|off] Display or set fast boot flag Help Display the command menu Information Display system information LanAddress Display LAN station addresses Monitor [type] Select monitor type Path [pri|alt] [lan.id|SCSI.addr] Change boot path Pim [hpmc|toc|lpmc] Display PIM info Search [ipl] [scsi|lan [install]] Display potential boot device Secure [on|off] Display or set security mode ------------------------------------------------------------------------ BOOT_ADMIN>
• If your network only has one Ignite-UX server available, type thefollowing:
boot lan install
• Otherwise, to make sure you boot from the correct server, do one ofthe following:
• Make the system search for servers and pick one. OR
• Explicitly tell the system where to boot, as follows:
a. To search for servers type the following (Workstations only):
search lan install
b. The list of servers will be displayed with IP addresses. You mayneed to run the command nslookup on another running system todetermine which address corresponds to your Ignite-UX server, ifthis information isn't already available.
c. Once you know the IP address of your server (as provided by thesearch, or by the nslookup command), boot the system by typingthe following:
boot lan. nn.n.nn.n install
For nn.n.nn.n, supply the IP address of your server.
The system then begins to load the install kernel from thenetwork server.
106 Chapter 5
Installing from the Ignite-UX ServerNetwork Source Installation
Time Note (Bootingfrom LAN)
This should take 3 to 5 minutes.
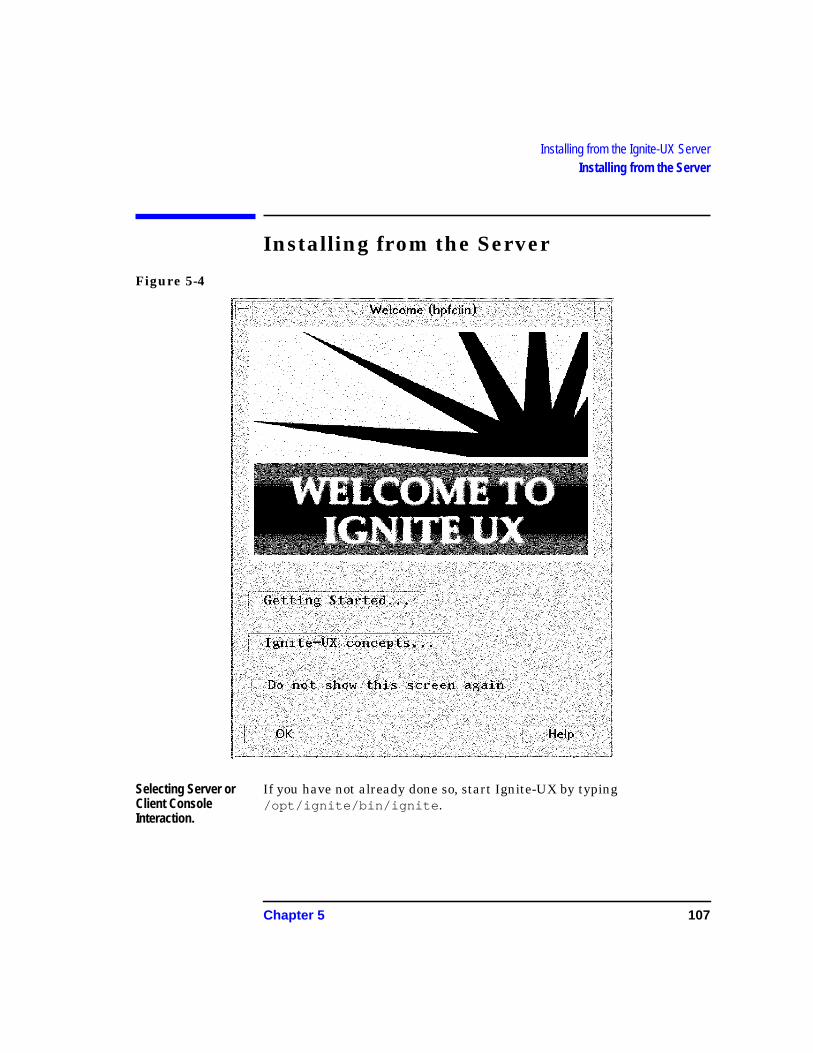
Chapter 5 107
Installing from the Ignite-UX ServerInstalling from the Server
Installing from the Server
Figure 5-4
Selecting Server orClient ConsoleInteraction.
If you have not already done so, start Ignite-UX by typing/opt/ignite/bin/ignite .
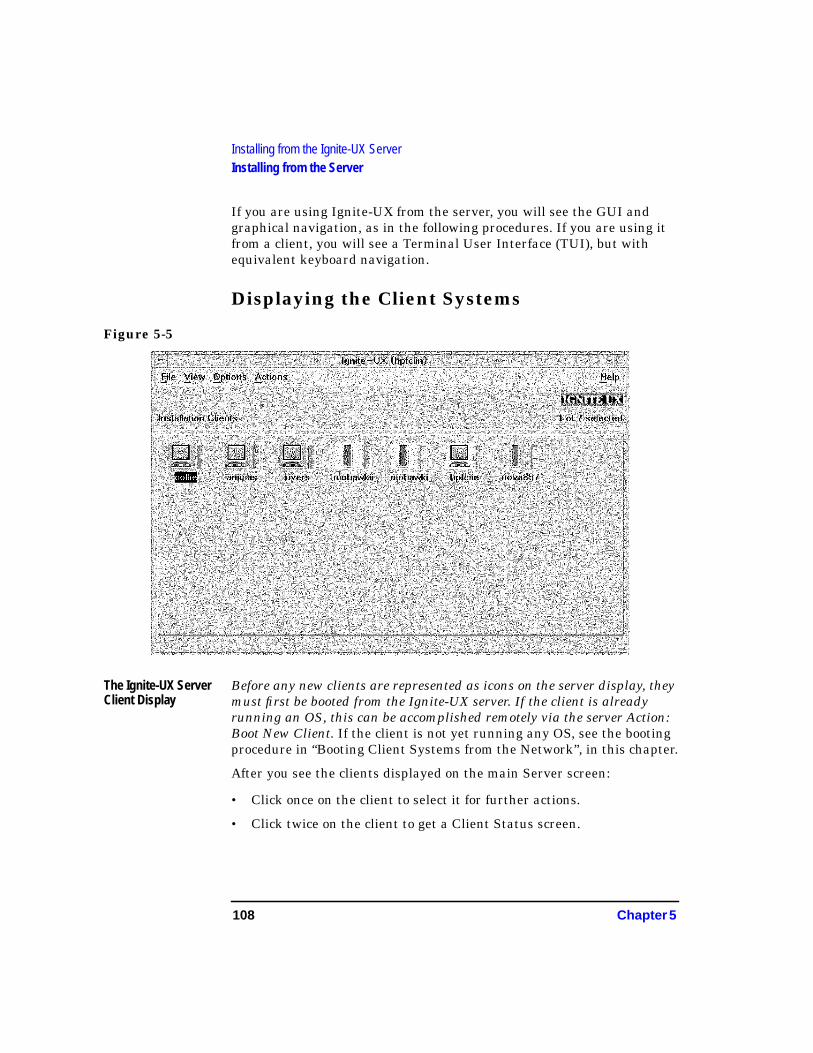
108 Chapter 5
Installing from the Ignite-UX ServerInstalling from the Server
If you are using Ignite-UX from the server, you will see the GUI andgraphical navigation, as in the following procedures. If you are using itfrom a client, you will see a Terminal User Interface (TUI), but withequivalent keyboard navigation.
Displaying the Client Systems
Figure 5-5
The Ignite-UX ServerClient Display
Before any new clients are represented as icons on the server display, theymust first be booted from the Ignite-UX server. If the client is alreadyrunning an OS, this can be accomplished remotely via the server Action:Boot New Client. If the client is not yet running any OS, see the bootingprocedure in “Booting Client Systems from the Network”, in this chapter.
After you see the clients displayed on the main Server screen:
• Click once on the client to select it for further actions.
• Click twice on the client to get a Client Status screen.
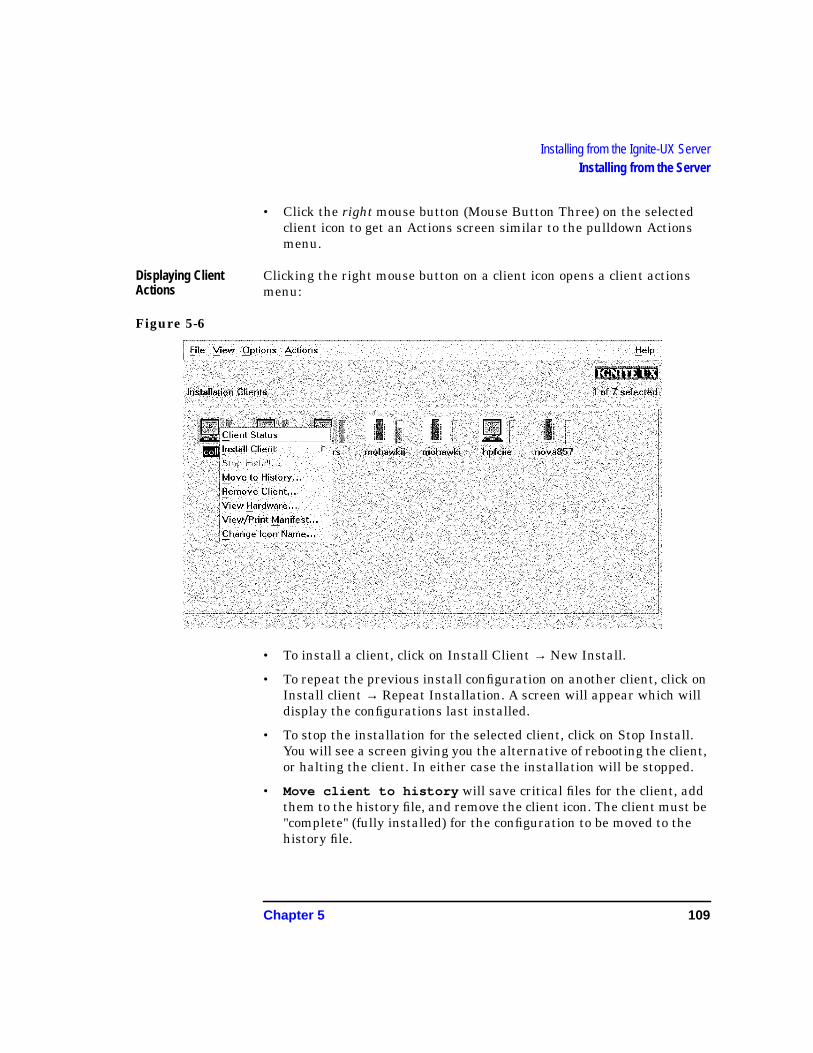
Chapter 5 109
Installing from the Ignite-UX ServerInstalling from the Server
• Click the right mouse button (Mouse Button Three) on the selectedclient icon to get an Actions screen similar to the pulldown Actionsmenu.
Displaying ClientActions
Clicking the right mouse button on a client icon opens a client actionsmenu:
Figure 5-6
• To install a client, click on Install Client → New Install.
• To repeat the previous install configuration on another client, click onInstall client → Repeat Installation. A screen will appear which willdisplay the configurations last installed.
• To stop the installation for the selected client, click on Stop Install.You will see a screen giving you the alternative of rebooting the client,or halting the client. In either case the installation will be stopped.
• Move client to history will save critical files for the client, addthem to the history file, and remove the client icon. The client must be"complete" (fully installed) for the configuration to be moved to thehistory file.
110 Chapter 5
Installing from the Ignite-UX ServerInstalling from the Server
• Remove client will simply delete the icon for the selected client.Data for that client is also removed.
• View Hardware allows you to see a display of the hardwareassociated with the selected client.
• View/Print Manifest allows you to see or print the manifestand/or Software Certificate. The manifest is also available in savedform on the client and server systems after the installation as themanifest files. On the client, the manifest is in/var/opt/ignite/local/manifest . On the server, it is in/var/opt/ignite/clients/Ox LLA/manifest. See Figure 5-24 foran example.
• Change Icon Name brings up a form for renaming the icon for theselected client. This new name will also be reflected on the clientconsole.
Sorting Client Listingby Properties
Clicking on View → By properties will create a listing of clients whichcan be sorted to make it easier to scan. This may make it easier to see"Complete" clients, which have finished installing, for example.
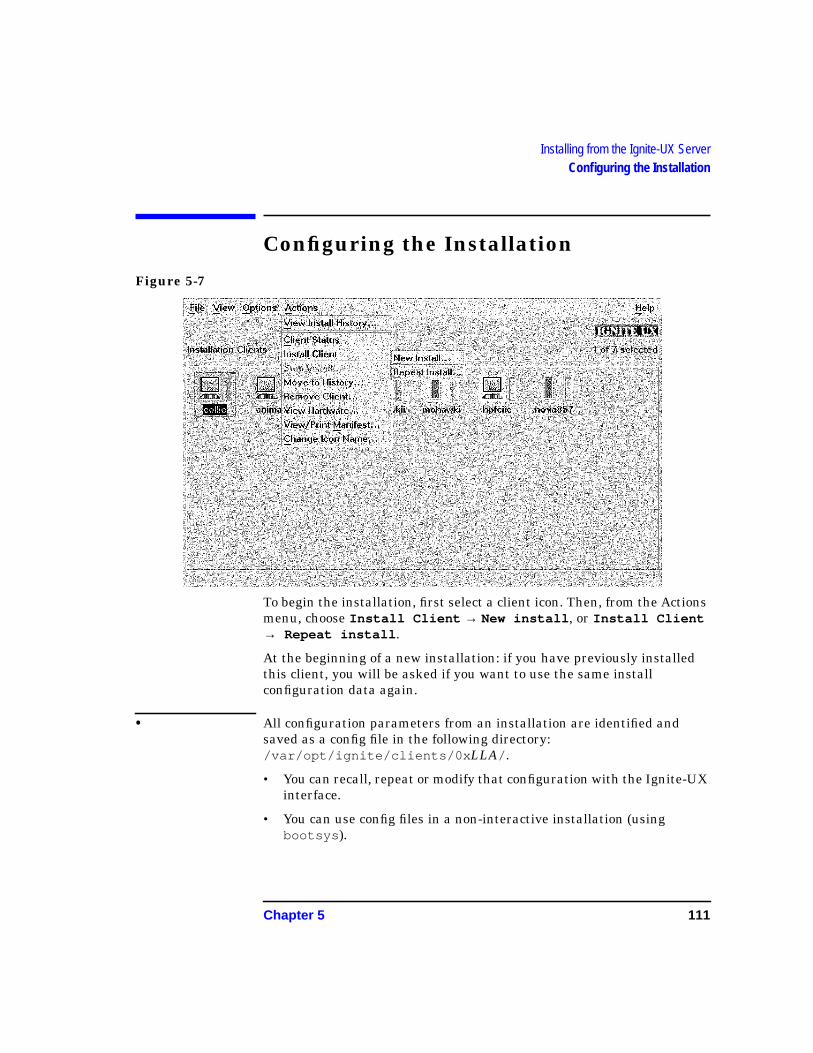
Chapter 5 111
Installing from the Ignite-UX ServerConfiguring the Installation
Configuring the Installation
Figure 5-7
To begin the installation, first select a client icon. Then, from the Actionsmenu, choose Install Client → New install , or Install Client→ Repeat install .
At the beginning of a new installation: if you have previously installedthis client, you will be asked if you want to use the same installconfiguration data again.
• All configuration parameters from an installation are identified andsaved as a config file in the following directory:/var/opt/ignite/clients/0x LLA/ .
• You can recall, repeat or modify that configuration with the Ignite-UXinterface.
• You can use config files in a non-interactive installation (usingbootsys ).

112 Chapter 5
Installing from the Ignite-UX ServerConfiguring the Installation
• You can choose a pre-set configuration in the "Repeat Install" selectionlist to repeat a previously installed configuration and execute it withinIgnite-UX, without further intervention.
Using the Ignite-UX Interface.After you choose to install a system, you will see the following screen.
The Basic Tab
Figure 5-8
NOTE If you see the following message:
Settings from a previous installation session were found atstartup. Do you wish to retain these settings for thecurrent session?
Chapter 5 113
Installing from the Ignite-UX ServerConfiguring the Installation
Respond Yes if you wish to re-use some or all of the configuration thatyou used in the previous session.
Respond No if you want to use an entirely new configuration.
This screen shows all the basic information for setting up the file systemand for loading the Operating System (OS) environment. It also allowsyou to configure languages, locale, and keyboard requirements. A SaveAs... button also appears, for saving configurations for later use.
ConfigurationsClick on this selector to display a list of available OS configurations.Then select the one you want to use for this installation. TheDescription... button will display more information about eachconfiguration.
Your configuration files are stored in a server location referenced by the/var/opt/ignite/INDEX file, usually/var/opt/ignite/data/ release_name/config.local . If a client hasbeen previously installed, Install-UX will tell you this and enable you touse the previous configuration (stored in the directory/var/opt/ignite/clients/history/ LLA).
OS EnvironmentSelect the operating system environment from the choices available inthe list. For HP-UX 11.0, this may include 64-bit or 32-bit byte format.The choices and defaults depend on the releases available on the server,and may include, for example, Common Desktop Environment (CDE) asthe default.
File SystemSelect one of the following:
• "Whole Disk (not LVM) " This may be the appropriate choice forsingle-disk systems.
• "Logical Volume Manager (LVM) with HFS (High-PerformanceFile System)" This selection will format multi-disk systems tocombine the disk space into a single, large disk pool, and then allocatevolumes as needed. The root volume in this case and the swap mustbe on the same physical volume, and will be so configured by
114 Chapter 5
Installing from the Ignite-UX ServerConfiguring the Installation
Ignite-UX. "HFS" is the standard file system format. The File Systemtab will give you additional opportunities to configure the LVMvolumes. In the File System tab, you can edit the sizes of LVMpartitions, or use the values that Ignite-UX computes for you.
• "Logical Volume Manager (LVM) with VxFS " (Journaled FileSystem) This will format multi-disk systems to combine the diskspace into a single, large disk pool, and then allocate volumes asneeded. "VxFS" is the same as the Journaled File System (JFS), andallows file system size to be changed after installation. With theoptional HP OnlineJFS you can resize, defragment, or make a"snapshot" of a mounted file system.
See the “File System Tab” section for detailed information on File Systemconfiguration.
Root Disk To change root disks, select this button, select another disk from the listof available disks, and select OK in that screen.
For example, a root disk is usually located at SCSI bus location 6.
Root Swap The amount of root swap space depends on the applications being loaded.You can choose to use the default which Ignite-UX computes, based onavailable memory on the target system. Or you can select "Root Swap"and select from the choices that appear in the list. You can also edit thefield directly and type in the amount of swap space you wish. The swapwill be rounded to a multiple of 4 MB.
See the manual System Administrator Tasks for how to compute swapspace.
LanguagesThe languages available in your HP-UX system will be shown when youselect this field. Select the item(s) you want, if it is other than thedefault. The dialogue screen allows you to select more than onelanguage. Highlight the additional items by double-clicking on each. Youcan also drag the pointer down the screen to highlight a range of items;then press the mark/unmark button.
You can make any of the selections the system default language. Thiswill become the system default language after it is installed.
Locale Each language will have a corresponding locale (language variant).
Chapter 5 115
Installing from the Ignite-UX ServerConfiguring the Installation
A locale describes the system management of a language for doing thefollowing:
• Messaging
• Representing numbers
• Displaying monetary values
• Telling time
• Generating characters
• Sorting text
HP-UX can have more than one installed language. The "defaultlanguage" is the language environment represented on the target systemat boot, unless you select another installed language using the HP-VUEor CDE login screen, reset the LANG environment variable, or usegeocustoms (HP-UX 10.30 and after) to change it.
Default LanguageChoices
By clicking on Default Language... you have displayed the DefaultLanguage Choices. They are listed in two columns: Language and Locale.Each language may have more than one way of representing itself on thesystem. If this is the case, there will be multiple locale entries for thesame language.
Languages may be activated is several ways:
• ASK_AT_FIRST_BOOT allows you to leave the language setting open(unset) until the client system is first booted. At that time, thelanguage setting will be performed as part of the initial systemconfiguration. (This applies only to HP-UX 10.30 and later).
• SET_NULL_LOCALE creates a NULL language environment, with thelocale variables set to NULL by default. A null locale allows programsto execute without using localized message catalogs. This canincrease system performance. All HP-UX messages appear in Englishif the locale is set to NULL.
Keyboards… Select the type of keyboard to be used, from the adjacent field.Otherwise, you can use the default selection.
Additional… This button brings up a screen allowing you to select among certainpre-configured use-models and variables from your current configurationfiles. The buttons which are available will be determined from the
116 Chapter 5
Installing from the Ignite-UX ServerConfiguring the Installation
variables in your config file. When using LVM, you will see selections foreasily setting up multiple disks, striping, and file system creation. Fordetails on setting this up, see the instl_adm(4) man page.
Functions Available on all Tabs
Save As… In server mode, when you have finished your configuration for all tabs,you can save the configuration as a specific file. The saved configurationswill then appear under the Configurations menu for use in futureinstallations. This function is not available if you are running theIgnite-UX interface on the install client.
Show Summary… Select this button to display the current HP-UX, the basic disk layout,hardware inventory, and other software that will be installed.
Reset Configuration Select this button to change the configuration settings for thecurrently-selected configuration back to the default settings. You can dothis from any tab.
Go! Clicking on Go! initiates an installation. Since the Go! button is alwaysavailable, it may be selected from any of the tabs. If you don't need to doany customization, select Go! now to begin the installation. Then see“Executing the Installation: Go!”, in this chapter.
After clicking on Go! , you will still have the opportunity to cancel out ofthe install sequence.
Cancel Select this button to exit Ignite-UX. You will see a screen which will askwhether you want to exit the Ignite-UX application.
Help Help information is available on all screens, and you can getcontext-sensitive help for specific areas by pressing the f1 function key.
When you have finished with a tab-screen you can go forward orbackward by selecting another tab. Or you can select Go! to start theinstallation at any time.
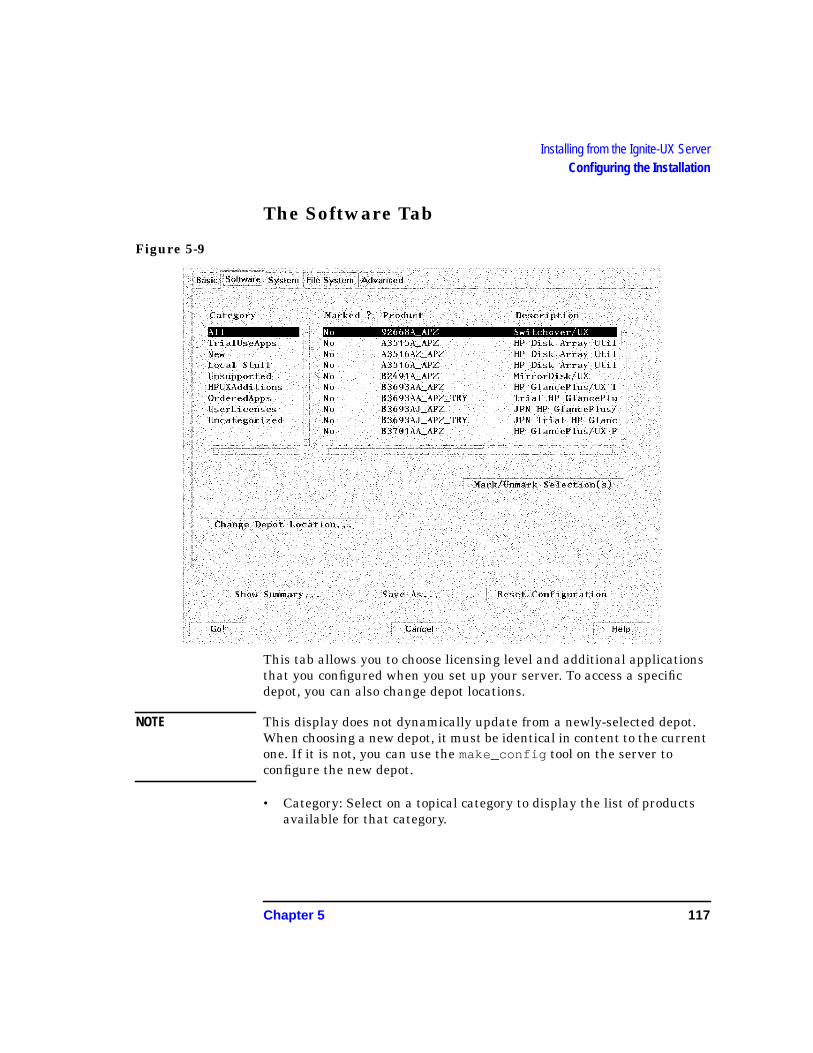
Chapter 5 117
Installing from the Ignite-UX ServerConfiguring the Installation
The Software Tab
Figure 5-9
This tab allows you to choose licensing level and additional applicationsthat you configured when you set up your server. To access a specificdepot, you can also change depot locations.
NOTE This display does not dynamically update from a newly-selected depot.When choosing a new depot, it must be identical in content to the currentone. If it is not, you can use the make_config tool on the server toconfigure the new depot.
• Category: Select on a topical category to display the list of productsavailable for that category.
118 Chapter 5
Installing from the Ignite-UX ServerConfiguring the Installation
• Product List: Double-click on a product in the list to select (highlight)it and to toggle its "marked" status ("Yes" or "No"). You can also usethe Mark/Unmark Selection(s) button to toggle the "marked"status for a selected item.
NOTE If patches are kept in a separate depot, by default they will be loadedafter CORE software. The only problem might arise if there was morethan one non-CORE software to be loaded, which might necessitateovertly specifying the load order for the patch(es) in a config file.
The System TabYou can choose not to set any system parameters for the system duringthis installation. During the first boot of the target system, a parametersscreen will collect this information.
You will see a choice selection allowing you to set parameters now, or atfirst boot of the target system. If you choose to set these parameters now,you will see the following:
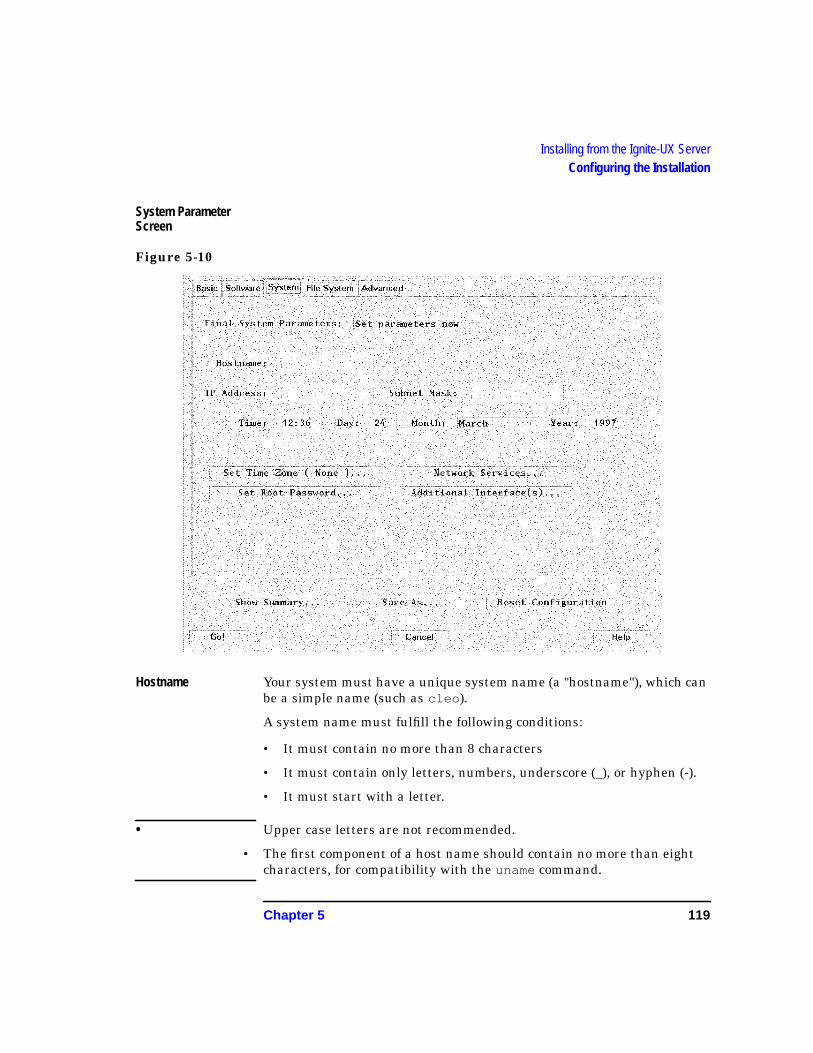
Chapter 5 119
Installing from the Ignite-UX ServerConfiguring the Installation
System ParameterScreen
Figure 5-10
Hostname Your system must have a unique system name (a "hostname"), which canbe a simple name (such as cleo ).
A system name must fulfill the following conditions:
• It must contain no more than 8 characters
• It must contain only letters, numbers, underscore (_), or hyphen (-).
• It must start with a letter.
• Upper case letters are not recommended.
• The first component of a host name should contain no more than eightcharacters, for compatibility with the uname command.
120 Chapter 5
Installing from the Ignite-UX ServerConfiguring the Installation
IP Address This field will be used to enter the IP address.
IP addresses are of the form nn.n.nn.nnn. For example:
15.1.48.140
You can use the tool nslookup hostname to determine an existing IPaddress.
Subnet Mask This field will be used to set the subnet mask.
The subnet mask will typically be provided by your networkadministrator, and is of the form nnn.nnn.nnn.n or a corresponding hexnumber. For example:
255.255.248.0
Time and DateInformation
If necessary, type in the information for the Time , Day, Month , and Yearfields:
• Time (Use the 24-hour format: hh:mm).
Set Time, Date, Month and Year by entering the information in thefields, as needed. You can select the correct month by clicking on thebutton and selecting from the list, as needed.
Select any of the other fields and type in the correct information, asneeded. Edit by using the Backspace and Delete-char keys.
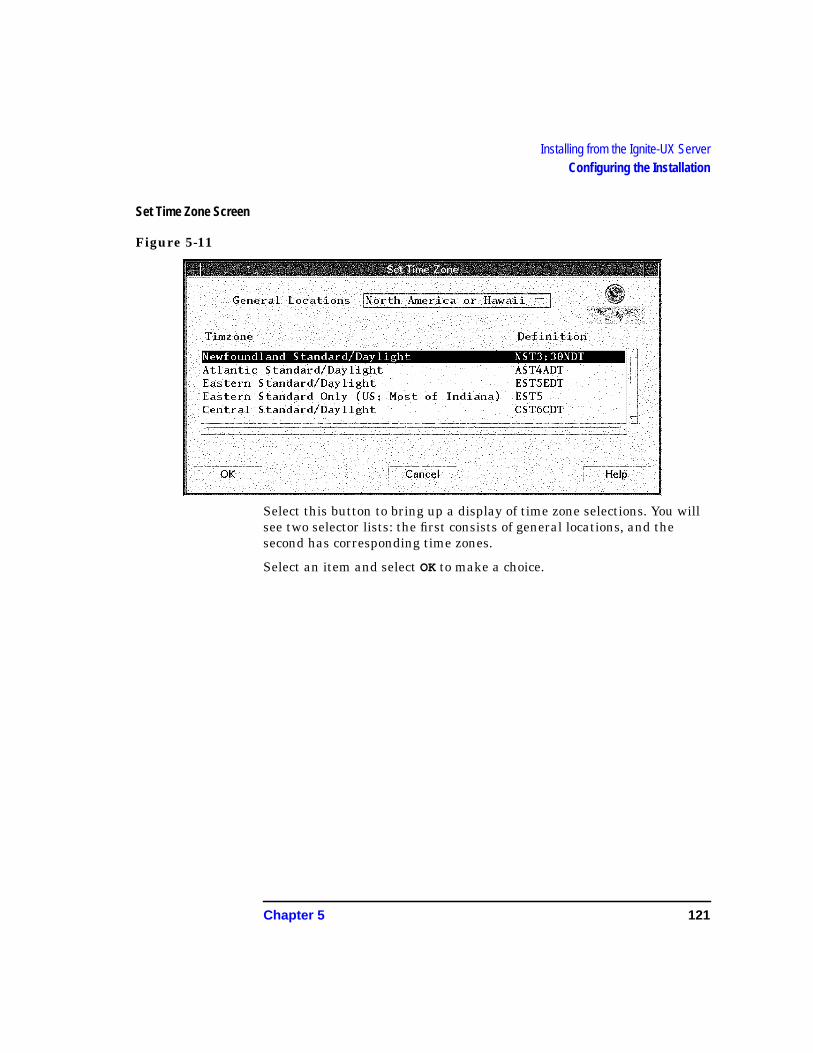
Chapter 5 121
Installing from the Ignite-UX ServerConfiguring the Installation
Set Time Zone Screen
Figure 5-11
Select this button to bring up a display of time zone selections. You willsee two selector lists: the first consists of general locations, and thesecond has corresponding time zones.
Select an item and select OK to make a choice.
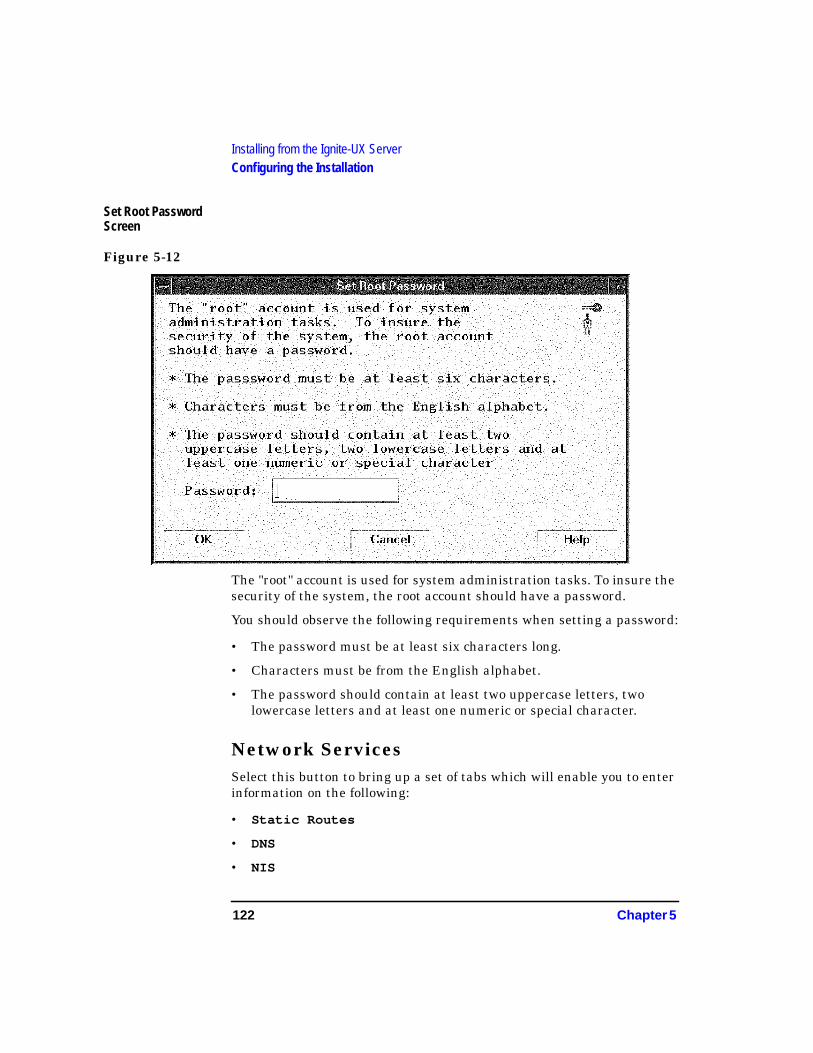
122 Chapter 5
Installing from the Ignite-UX ServerConfiguring the Installation
Set Root PasswordScreen
Figure 5-12
The "root" account is used for system administration tasks. To insure thesecurity of the system, the root account should have a password.
You should observe the following requirements when setting a password:
• The password must be at least six characters long.
• Characters must be from the English alphabet.
• The password should contain at least two uppercase letters, twolowercase letters and at least one numeric or special character.
Network ServicesSelect this button to bring up a set of tabs which will enable you to enterinformation on the following:
• Static Routes
• DNS
• NIS

Chapter 5 123
Installing from the Ignite-UX ServerConfiguring the Installation
• XNTP
Static Routes Screen
Figure 5-13
If your network is divided into subnets, you will probably need to specifya gateway system to reach other subnets:
• Destination: The field has the word "default" or the IP address of thedestination network.
• Gateway: The IP address of the device connecting your network to theremote network, or your own IP, if wildcard routing is used.
• Hop Count If your gateway IP is not your system's own IP, this isusually set to "1". If your gateway IP is the same as your system's,then the Hop Count is "0".
For more information, see the routing(7) man page.
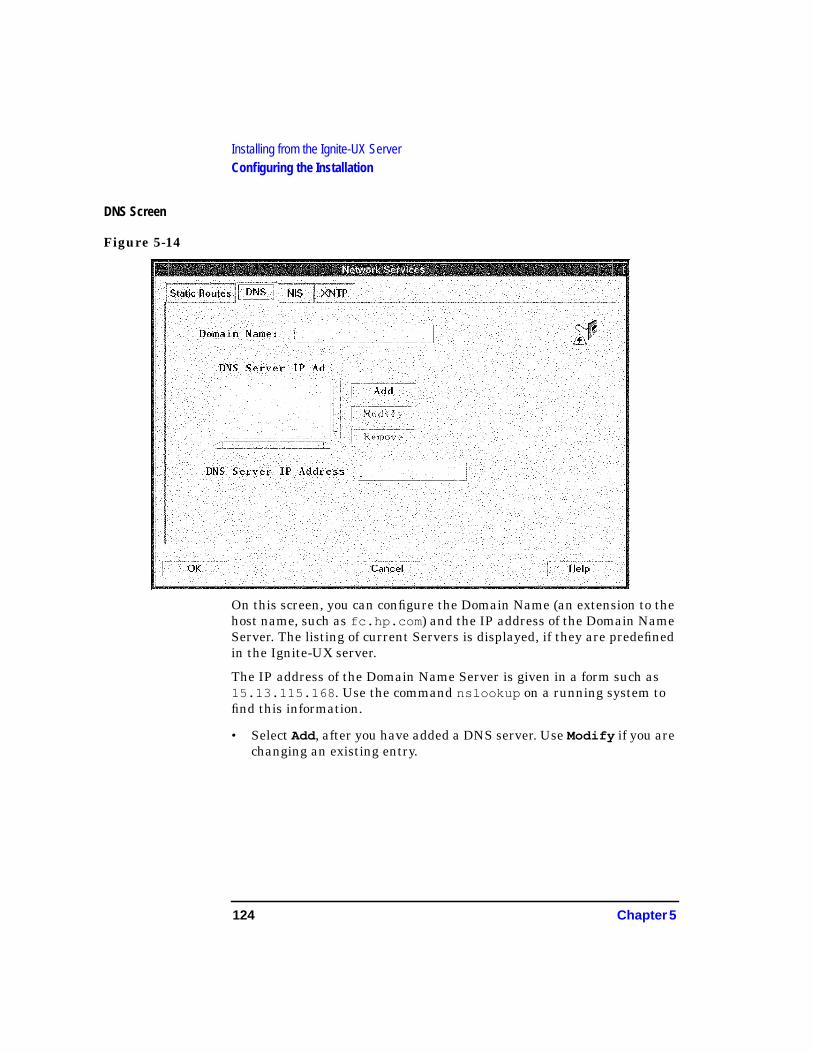
124 Chapter 5
Installing from the Ignite-UX ServerConfiguring the Installation
DNS Screen
Figure 5-14
On this screen, you can configure the Domain Name (an extension to thehost name, such as fc.hp.com ) and the IP address of the Domain NameServer. The listing of current Servers is displayed, if they are predefinedin the Ignite-UX server.
The IP address of the Domain Name Server is given in a form such as15.13.115.168 . Use the command nslookup on a running system tofind this information.
• Select Add, after you have added a DNS server. Use Modify if you arechanging an existing entry.
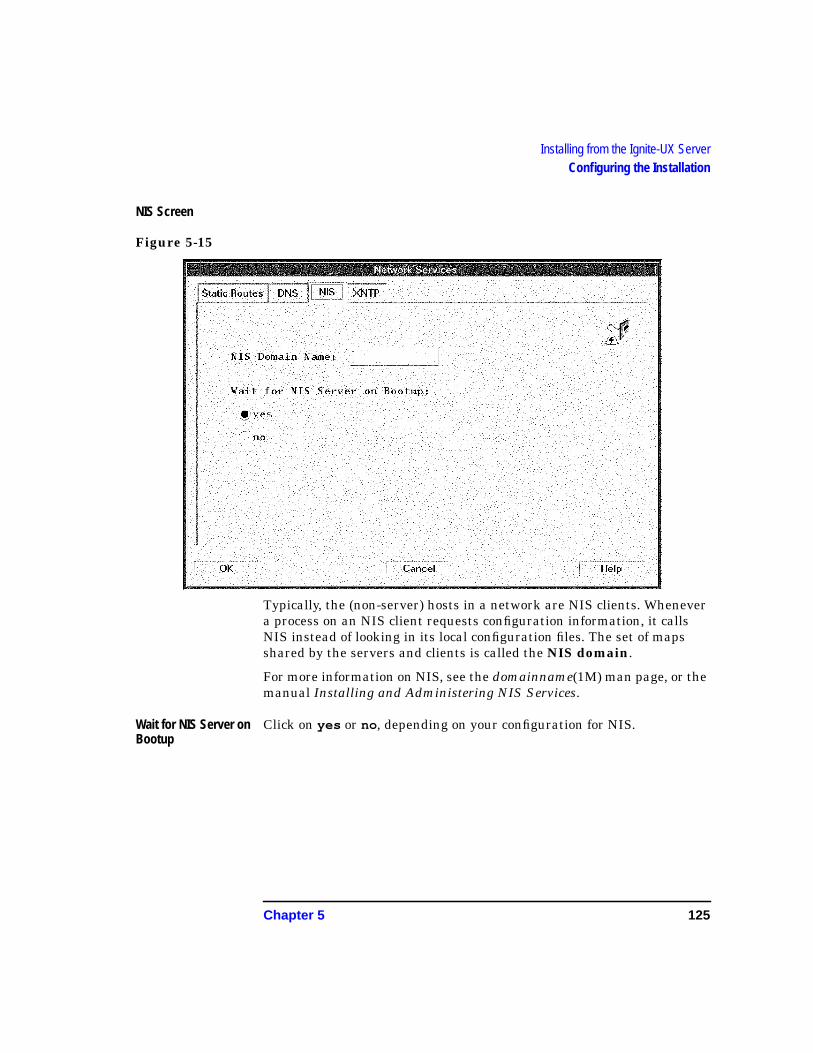
Chapter 5 125
Installing from the Ignite-UX ServerConfiguring the Installation
NIS Screen
Figure 5-15
Typically, the (non-server) hosts in a network are NIS clients. Whenevera process on an NIS client requests configuration information, it callsNIS instead of looking in its local configuration files. The set of mapsshared by the servers and clients is called the NIS domain.
For more information on NIS, see the domainname(1M) man page, or themanual Installing and Administering NIS Services.
Wait for NIS Server onBootup
Click on yes or no , depending on your configuration for NIS.
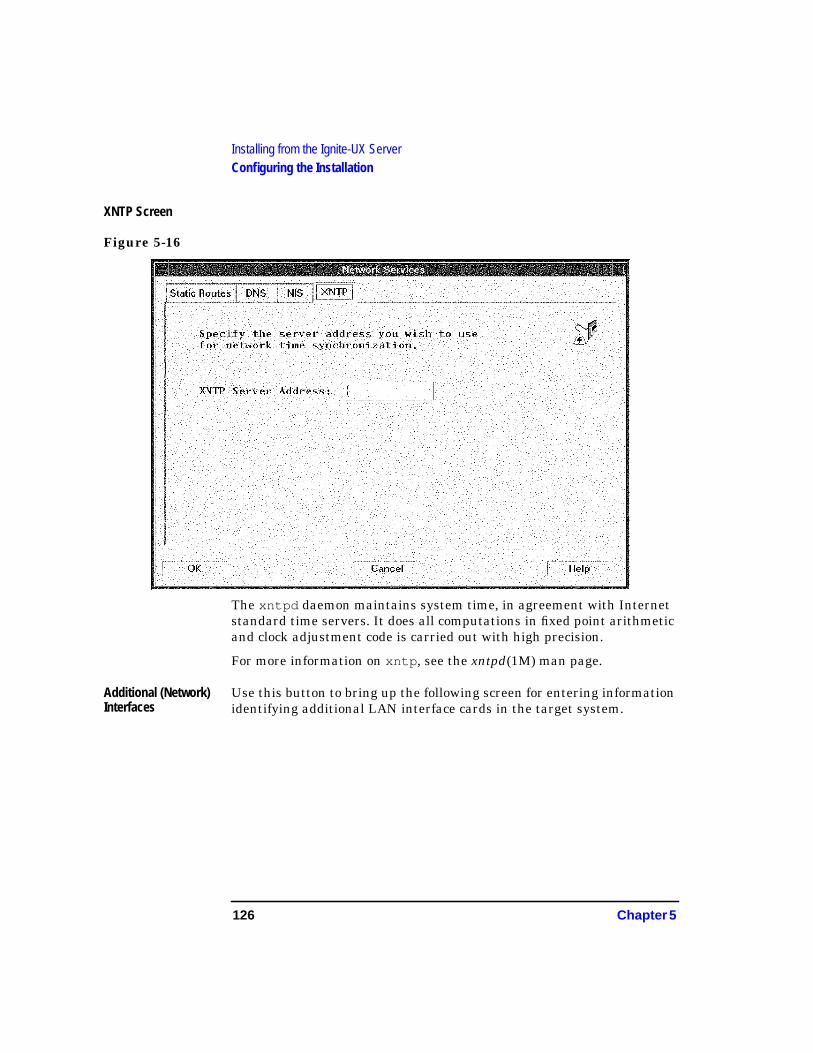
126 Chapter 5
Installing from the Ignite-UX ServerConfiguring the Installation
XNTP Screen
Figure 5-16
The xntpd daemon maintains system time, in agreement with Internetstandard time servers. It does all computations in fixed point arithmeticand clock adjustment code is carried out with high precision.
For more information on xntp , see the xntpd(1M) man page.
Additional (Network)Interfaces
Use this button to bring up the following screen for entering informationidentifying additional LAN interface cards in the target system.
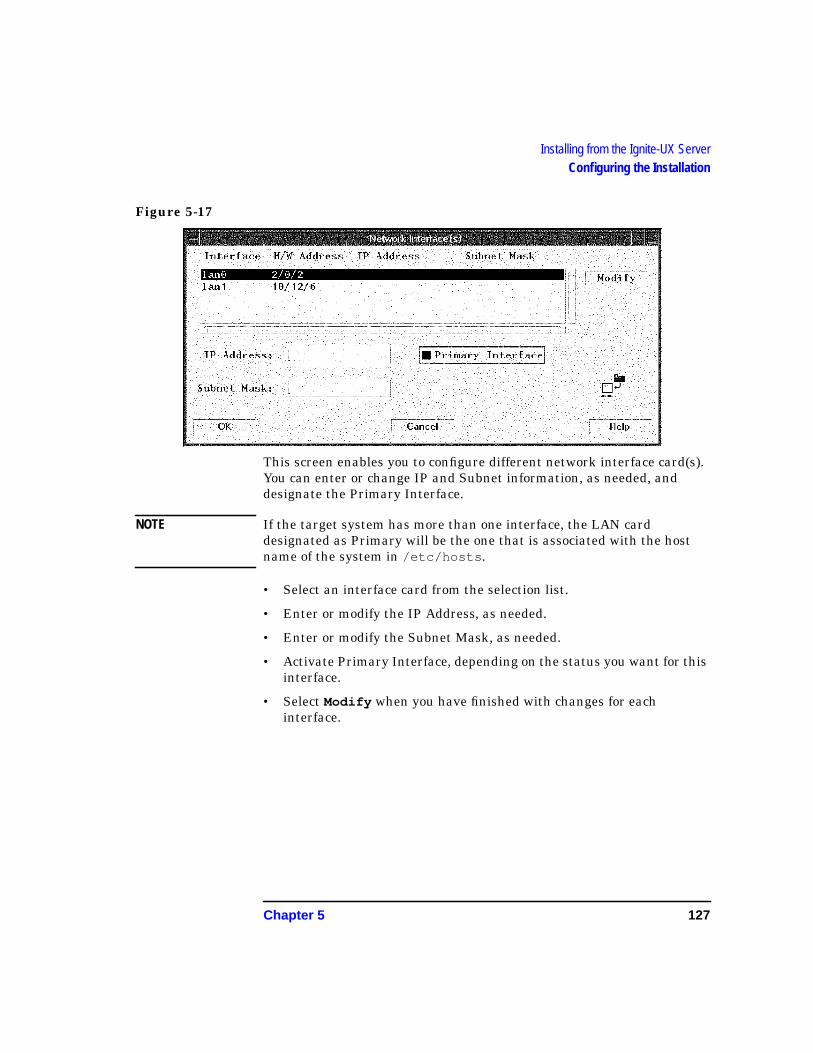
Chapter 5 127
Installing from the Ignite-UX ServerConfiguring the Installation
Figure 5-17
This screen enables you to configure different network interface card(s).You can enter or change IP and Subnet information, as needed, anddesignate the Primary Interface.
NOTE If the target system has more than one interface, the LAN carddesignated as Primary will be the one that is associated with the hostname of the system in /etc/hosts .
• Select an interface card from the selection list.
• Enter or modify the IP Address, as needed.
• Enter or modify the Subnet Mask, as needed.
• Activate Primary Interface, depending on the status you want for thisinterface.
• Select Modify when you have finished with changes for eachinterface.
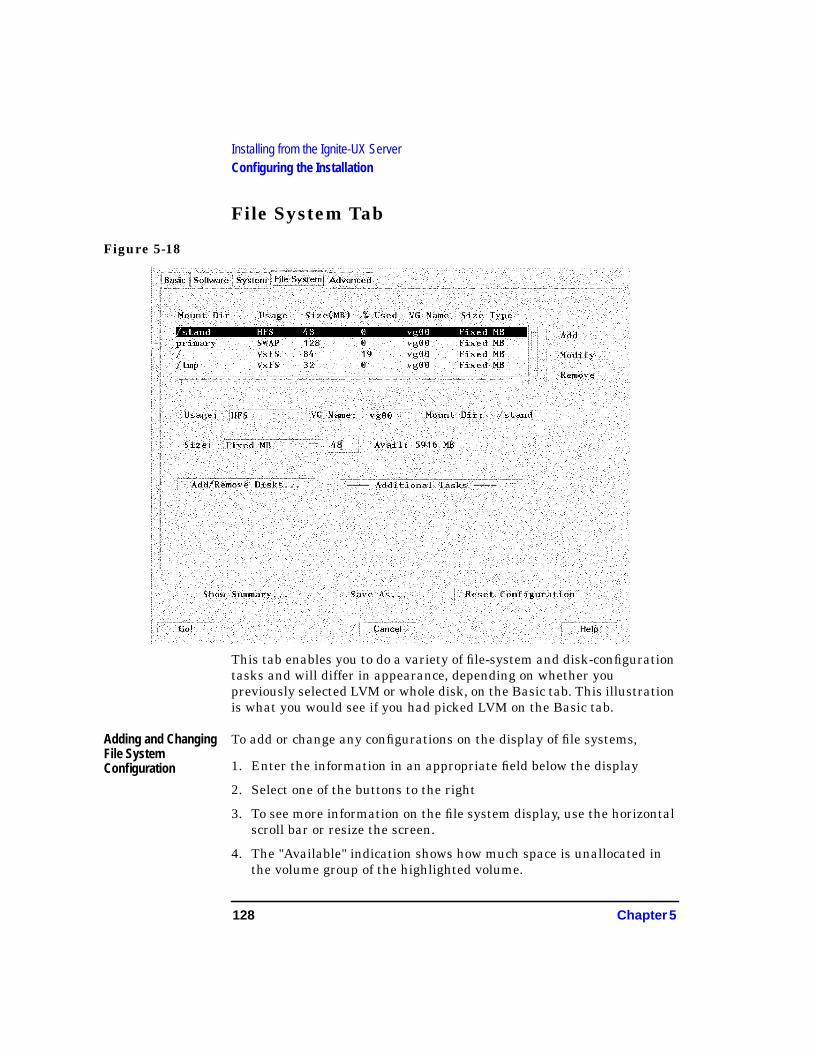
128 Chapter 5
Installing from the Ignite-UX ServerConfiguring the Installation
File System Tab
Figure 5-18
This tab enables you to do a variety of file-system and disk-configurationtasks and will differ in appearance, depending on whether youpreviously selected LVM or whole disk, on the Basic tab. This illustrationis what you would see if you had picked LVM on the Basic tab.
Adding and ChangingFile SystemConfiguration
To add or change any configurations on the display of file systems,
1. Enter the information in an appropriate field below the display
2. Select one of the buttons to the right
3. To see more information on the file system display, use the horizontalscroll bar or resize the screen.
4. The "Available" indication shows how much space is unallocated inthe volume group of the highlighted volume.
Chapter 5 129
Installing from the Ignite-UX ServerConfiguring the Installation
For LVM:
• One of the logical volumes must be root (/ ).
• A swap volume is required.
• Directory names must have valid HP-UX names (e.g., /usr ,/database , etc.).
The buttons which activate changes are:
• Add
• Modify
• Remove
Generally, changes are not put into effect until you select one of these. Ifyou make a change and then leave the tab without using one of thesebuttons, your changes may not be applied.
Usage Select this field to display a selection list of file system usage types. Ifyou want to change file system type or usage for the selected item, selectan item in this list. The usages are as follows:
• None: If you want to protect the data on a disk or file system and"reserve" it from being overwritten during the installation process,select this list, and select "unused" by clicking on this item. Thenselect the Modify button.
• HFS: Select this item to create a High-Performance File System.
• SWAP: Select this item to create swap.
• SWAP-Dump: Select this item to create an area for both swap andsystem dump.
• VxFS: Select this item to create a Journaled File System. This is anextent-based, journaled file system featuring high-reliability, fastrecovery time and on-line administration.
• Unused : This means the logical volume will be created, but not used.
VG Name (VolumeGroup Name)
Click on the field to open a selection list. You can choose a volume groupname from the list.
130 Chapter 5
Installing from the Ignite-UX ServerConfiguring the Installation
NOTE Renaming or changing the FS structure of a disk causes the old filesystem on that disk to be lost (a warning message will remind you ofthis).
• If you want to add a new/unused disk and give it a different volumegroup name or create a new volume group, select the Add/Removefield and follow the procedure.
• If you want to reconfigure the volume group in general, includingrenaming it, select Additional Tasks → Volume Group Parameters,where you can fill in a custom VG Name, and change other diskparameters.
• Select OK when you are finished with the sub-screens for any of thesetasks. You will be returned to the File System tab.
Mount Dir For the root disk, you should use the standard HP-UX (10.0x) mountdirectory designations ("/", "/usr", "/stand", "/var", "/opt" ,etc.) You can also specify your own mount points such as "/special " or"/apps ".
Size For setting up each selected file system (as shown in the Mount Dirdisplay), the following choices are available:
1. First select an item in the directory display for the file system youwant to change. The current selection will show in the Mount Dirfield.
2. The sizing method (such as "Fixed Size") currently used for thatparticular file system will appear in the Size field. To change theSizing Method:
a. Make sure the file system you want to change is selected in thedirectory display list.
b. Select the sizing method field to open the list of sizing methods.
c. Select one of the items (such as "Size Fixed MB "). It will thenremain displayed in that field.
d. Select the Modify button to execute the change on the selected filesystem.
The types of sizing are as follows:
Chapter 5 131
Installing from the Ignite-UX ServerConfiguring the Installation
Fixed size: The selected (highlighted) file system is set to this size.
All Remaining: The selected file system automatically takes over allremaining file system space on the disk or volumegroup.
Free Size: Use this selection when you know how much free spaceyou wish the volume to have after the system isinstalled. The size of the volume will be the specifiedamount plus the amount the selected softwarerequires.
Free Percent: This category is similar to free size, but expressed inpercent. It is used if you know how full you wish thevolume to be, in percentage of the volume size. If youindicate "20%", then the volume would be 80% full afterthe installation of the selected software.
Size Range: Select this category in the list to set a maximum sizefor the file system (the minimum is determined by thesoftware impact on the volume).
Add/Remove Disks This opens a display which allows you to do the following:
• Add a new disk and configure its file system type and volume groupdesignation, if any.
• Remove a disk from current usage on the target system bydesignating it as "Unused".
• Determine your current disk usage.
To change a disk usage status:
• Select a disk in the display list.
• Select the "Usage" selection list to set a new usage. If you select"LVM", a Vol Grp:... button appears.
• Select the "Vol Grp: " button to see the Volume Group Choices ortype in a new volume group name in the entry field.
• Select the Modify button, to execute any changes.
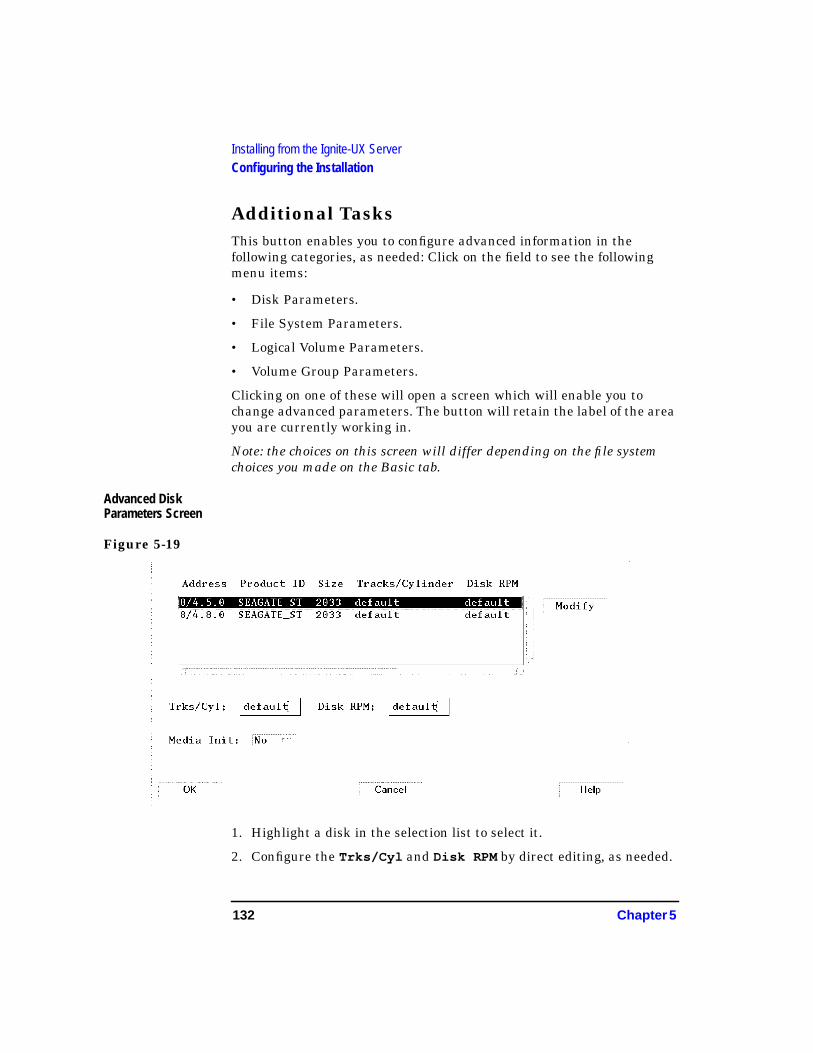
132 Chapter 5
Installing from the Ignite-UX ServerConfiguring the Installation
Additional TasksThis button enables you to configure advanced information in thefollowing categories, as needed: Click on the field to see the followingmenu items:
• Disk Parameters.
• File System Parameters.
• Logical Volume Parameters.
• Volume Group Parameters.
Clicking on one of these will open a screen which will enable you tochange advanced parameters. The button will retain the label of the areayou are currently working in.
Note: the choices on this screen will differ depending on the file systemchoices you made on the Basic tab.
Advanced DiskParameters Screen
Figure 5-19
1. Highlight a disk in the selection list to select it.
2. Configure the Trks/Cyl and Disk RPM by direct editing, as needed.
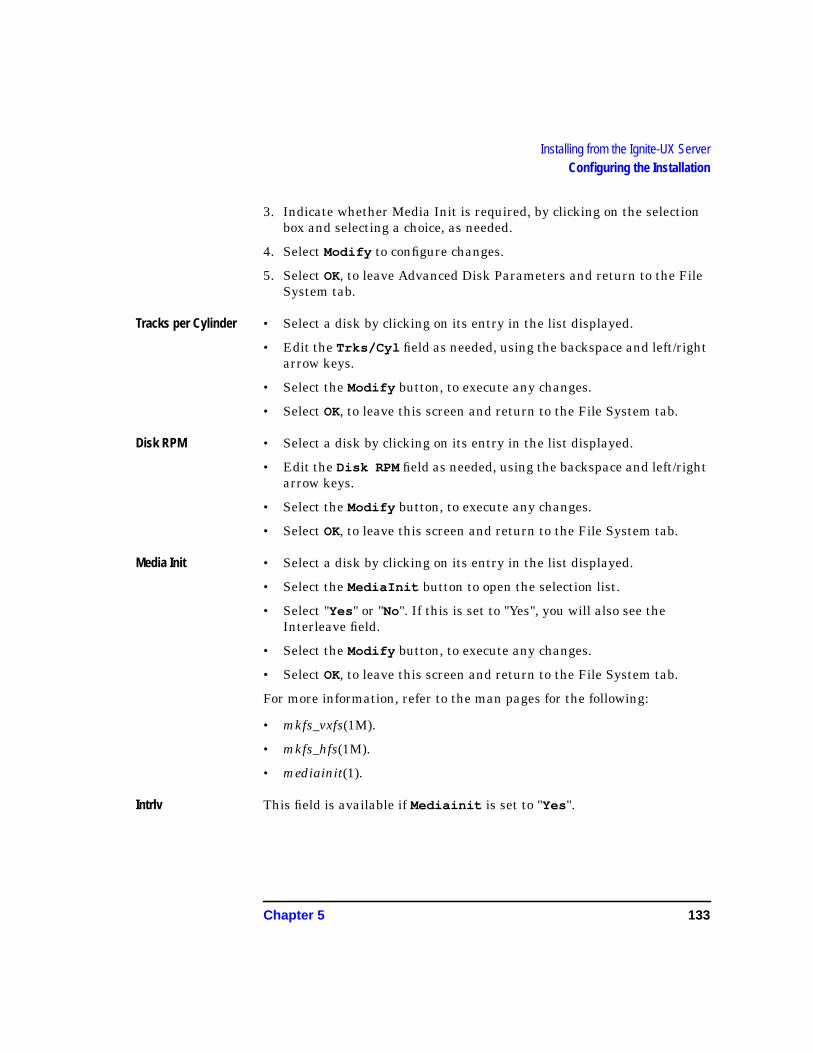
Chapter 5 133
Installing from the Ignite-UX ServerConfiguring the Installation
3. Indicate whether Media Init is required, by clicking on the selectionbox and selecting a choice, as needed.
4. Select Modify to configure changes.
5. Select OK, to leave Advanced Disk Parameters and return to the FileSystem tab.
Tracks per Cylinder • Select a disk by clicking on its entry in the list displayed.
• Edit the Trks/Cyl field as needed, using the backspace and left/rightarrow keys.
• Select the Modify button, to execute any changes.
• Select OK, to leave this screen and return to the File System tab.
Disk RPM • Select a disk by clicking on its entry in the list displayed.
• Edit the Disk RPM field as needed, using the backspace and left/rightarrow keys.
• Select the Modify button, to execute any changes.
• Select OK, to leave this screen and return to the File System tab.
Media Init • Select a disk by clicking on its entry in the list displayed.
• Select the MediaInit button to open the selection list.
• Select "Yes" or "No". If this is set to "Yes", you will also see theInterleave field.
• Select the Modify button, to execute any changes.
• Select OK, to leave this screen and return to the File System tab.
For more information, refer to the man pages for the following:
• mkfs_vxfs(1M).
• mkfs_hfs(1M).
• mediainit(1).
Intrlv This field is available if Mediainit is set to "Yes".
134 Chapter 5
Installing from the Ignite-UX ServerConfiguring the Installation
The interleave factor, “interleave”, refers to the relationship betweensequential logical records and sequential physical records on the disk. Itdefines the number of physical records that lie between the beginningpoints of two consecutively numbered logical records. The choice ofinterleave factor can have a substantial impact on disk performance.
For more information, consult the manual for your disk hardware.
Also see the mediainit(1) man page.
Advanced File SystemParameters Screen
Figure 5-20
These parameters apply only to HFS file systems. You can use thedefault values computed by Ignite-UX, or change them, as needed.
When you have finished with this area, select OK to return to the FileSystem tab.
For More Information To get more details about the following, refer to the mkfs_hfs(1M) andmkfs(1M) man pages.
• Rotational Delay
• Fragment Size
• Block Size
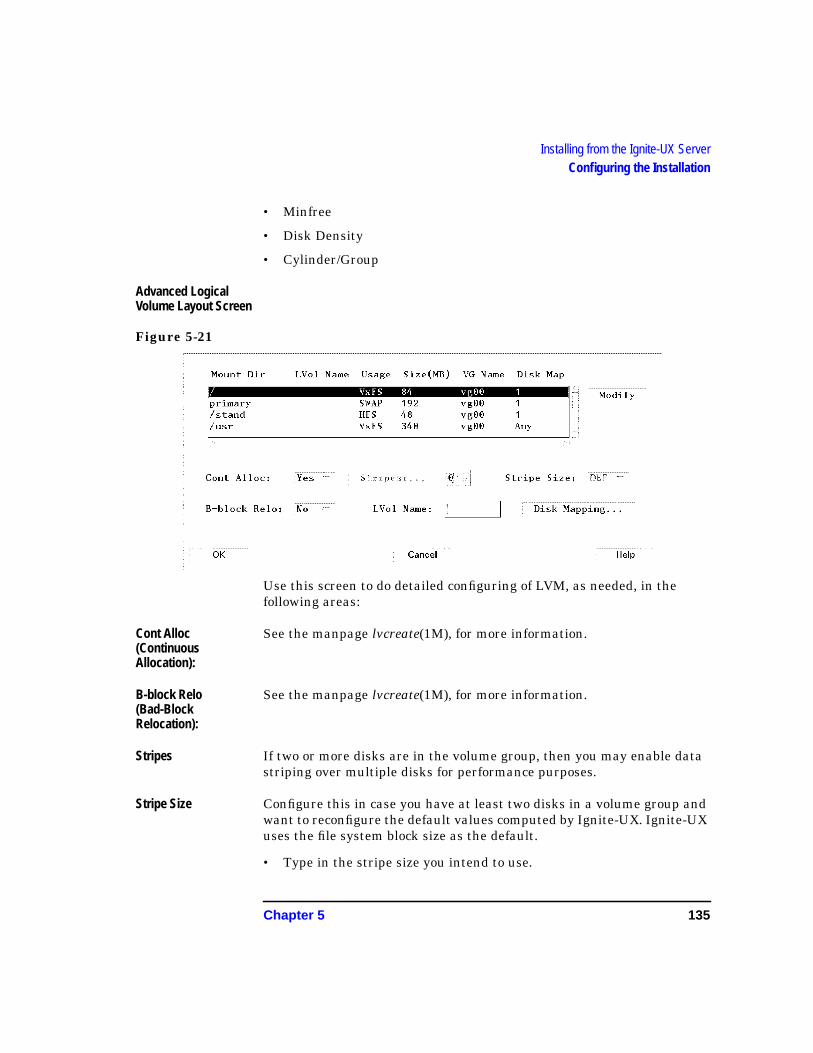
Chapter 5 135
Installing from the Ignite-UX ServerConfiguring the Installation
• Minfree
• Disk Density
• Cylinder/Group
Advanced LogicalVolume Layout Screen
Figure 5-21
Use this screen to do detailed configuring of LVM, as needed, in thefollowing areas:
Cont Alloc(ContinuousAllocation):
See the manpage lvcreate(1M), for more information.
B-block Relo(Bad-BlockRelocation):
See the manpage lvcreate(1M), for more information.
Stripes If two or more disks are in the volume group, then you may enable datastriping over multiple disks for performance purposes.
Stripe Size Configure this in case you have at least two disks in a volume group andwant to reconfigure the default values computed by Ignite-UX. Ignite-UXuses the file system block size as the default.
• Type in the stripe size you intend to use.
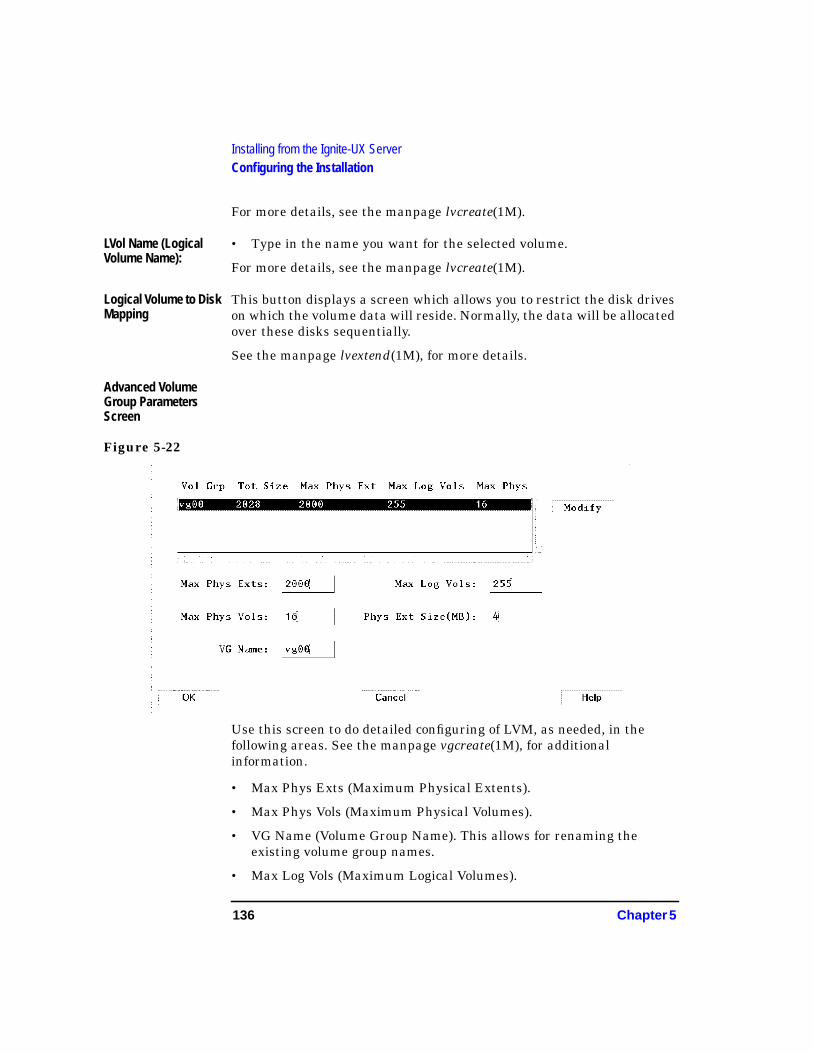
136 Chapter 5
Installing from the Ignite-UX ServerConfiguring the Installation
For more details, see the manpage lvcreate(1M).
LVol Name (LogicalVolume Name):
• Type in the name you want for the selected volume.
For more details, see the manpage lvcreate(1M).
Logical Volume to DiskMapping
This button displays a screen which allows you to restrict the disk driveson which the volume data will reside. Normally, the data will be allocatedover these disks sequentially.
See the manpage lvextend(1M), for more details.
Advanced VolumeGroup ParametersScreen
Figure 5-22
Use this screen to do detailed configuring of LVM, as needed, in thefollowing areas. See the manpage vgcreate(1M), for additionalinformation.
• Max Phys Exts (Maximum Physical Extents).
• Max Phys Vols (Maximum Physical Volumes).
• VG Name (Volume Group Name). This allows for renaming theexisting volume group names.
• Max Log Vols (Maximum Logical Volumes).

Chapter 5 137
Installing from the Ignite-UX ServerConfiguring the Installation
• Physical Ext Size (MB) (Physical Extent Size in Megabytes).
Advanced Tab
Figure 5-23
Transfer Lists In this screen you can activate any HP or custom scripts which youmight want to run as part of your installation. Note that the scriptslisted are those with a "scripts" keyword in the INDEX file.
The file /var/opt/ignite/config.local is a place holder for suchfiles as you may want to generate for post-install, for example.
For more details, see the instl_adm(4) man page.
Adding a Script To add an item to "Scripts to be Executed":
1. Select the item from "Scripts Available" to select it.
2. Select Add to add it to the list "Scripts to be Executed."
138 Chapter 5
Installing from the Ignite-UX ServerConfiguring the Installation
Removing a Script To remove an item from "Scripts to be Executed:"
1. Select the item in "Scripts to be Executed".
2. Select Remove to remove it.
The item will be deactivated, but will continue to be available in the"Scripts Available" list.
Chapter 5 139
Installing from the Ignite-UX ServerExecuting the Installation: Go!
Executing the Installation: Go!Select Go! in any Ignite-UX tab to initiate the installation. You do notneed to examine all tabs, if you simply want to do a generic installation.
1. You will then see a confirmation screen listing the disks that will bewritten on during the process of installation, and a log of anywarnings or errors. This screen will allow you to Cancel before theload begins and return to the current tab you were working in.
• If you do not wish to proceed with the installation at this time, pressCancel .
• The pre-install analysis display screen is scrollable. Be sure to inspectthis information and check to see that the disk(s) described in thedisplay list is the one you intend to install on.
• Any errors which are listed must be corrected before you proceed.
As the installation proceeds, you will see a log including the warningsand errors which may need to be addressed before proceeding.
When the installation is complete, you can print a manifest, and eithersave the client data in a history directory or remove the client and itsdata from the server.
Viewing and Printing a ManifestThe following screen can be accessed from the Ignite-UX server screen,by selecting on a client icon, and then clicking on Actions → ViewManifest , or via the client actions menu (right-click on client icon).
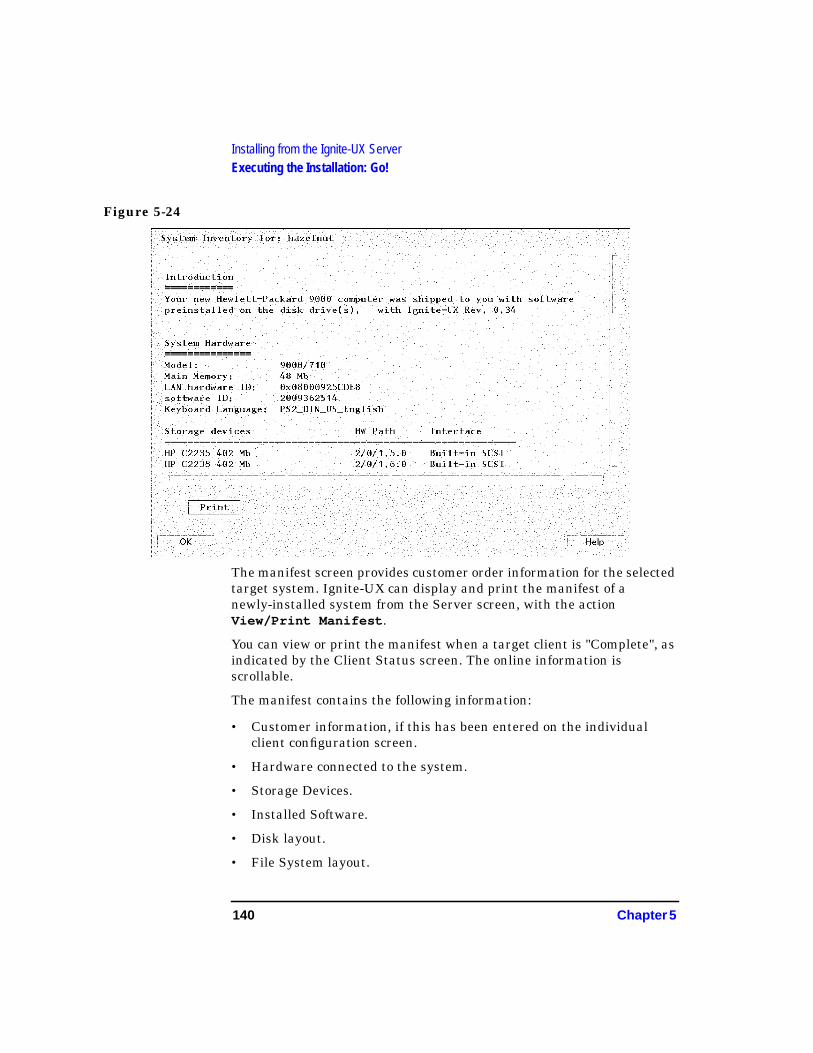
140 Chapter 5
Installing from the Ignite-UX ServerExecuting the Installation: Go!
Figure 5-24
The manifest screen provides customer order information for the selectedtarget system. Ignite-UX can display and print the manifest of anewly-installed system from the Server screen, with the actionView/Print Manifest .
You can view or print the manifest when a target client is "Complete", asindicated by the Client Status screen. The online information isscrollable.
The manifest contains the following information:
• Customer information, if this has been entered on the individualclient configuration screen.
• Hardware connected to the system.
• Storage Devices.
• Installed Software.
• Disk layout.
• File System layout.
Chapter 5 141
Installing from the Ignite-UX ServerExecuting the Installation: Go!
• Swap Configuration
• Kernel Configuration.
• System Information.
The manifest file is saved on the server as/var/opt/ignite/clients/ LLA/manifest/ manifest. It is on thetarget client system as /var/opt/ignite/local/manifest/ manifest.
Using the Ignite-UX interface or the command line, the/opt/ignite/bin/print_manifest utility prints these files in ASCIIto stdout, using the format instructions from the manifest template file
If the client data is moved to history, that data includes both the client'smanifest and config file. Both these files can be recalled at a later time.
Non-Interactive Installation Using bootsysThe bootsys command can be used to start a system installation on oneor more clients without the need to interact on the console of the clientsystem. It can be invoked either from a command shell, or from theIgnite-UX GUI server screen action: Boot New Client . The onlyrequirements are that each client must be currently booted underHP-UX version 9.0 or later, and each client must be accessible on thenetwork. Each will also need to have enough disk space in the /standdirectory to hold the two files: /opt/ignite/boot/INSTALL and/opt/ignite/boot/INSTALLFS .
bootsys copies the Ignite-UX kernel and RAM file system to each clientand then sets the system AUTO file in the LIF area of the root disk toautomatically boot from this kernel at the next system reboot.
Examples: The following sample command line will boot the client system from theserver and wait for install instructions from the Ignite-UX GUI:
bootsys -w system_name
Note that, if you have already run an install session from the server,issuing bootsys will result in an automatic installation without furtherintervention.
To automatically install system1 using a different IP address than whatis currently assigned and without waiting for server interaction, youwould type a line similar to the following:
bootsys -a system1:1.2.3.45
142 Chapter 5
Installing from the Ignite-UX ServerExecuting the Installation: Go!
See Appendix C, “Ignite-UX System Administration,”and the manpageentry for the bootsys(1m) command for more examples and information.
Chapter 6 143
HP-UX System Recovery
6 HP-UX System Recovery
144 Chapter 6
HP-UX System RecoveryChapter Contents
Chapter Contents• Overview.
• System Recovery: Creating a Bootable Recovery Tape: make_recovery.
• Creating a Bootable Install Tape: make_medialif.
• "Expert" Recovery Using Core Media Tools.
Chapter 6 145
HP-UX System RecoveryOverview
Overview HP-UX provides two recovery methods as part of the standard product.Which method you use will depend on the situation.
“Expert” RecoveryThe first method, “expert recovery” (formerly called Support MediaRecovery), allows you to recover a slightly damaged root disk or rootvolume group. With this method, you boot a special recovery system fromcore HP media. Once the recovery system has been booted, it allows youto do the following:
• Put a known good kernel in place.
• Fix the LIF volume on the disk.
• Copy some essential files and commands into place.
Note that expert recovery does not require that you do any preparationbefore you use it. The media used is supplied by HP; it is not customizedto your site. Of course, this also means that any customizations you haveare not reflected in the files you recover via expert recovery. Expertrecovery is meant to give you enough capabilities to get your system backup again. At that point, you need to use your normal restore tool torecover your system to the state it was in before the problem occurred.
System RecoveryThe second method, “system recovery”, allows you to quickly recoverfrom a failed disk (root disk or disk in the root volume group). The failurecan be either a hardware failure or a catastrophic software failure.
System recovery does require some work on your part before the problemoccurs. On a regular basis, you need to run the make_recovery tool oneach of your systems. This tool creates a bootable recovery (install) tapewhich is customized for your machine. The tape contains your system’sconfiguration information (disk layout, etc) as well as an archive of thefiles on your root disk or root volume group. (You can exert some controlover which files are saved as part of the archive.)
When you have a failure, follow these steps:
146 Chapter 6
HP-UX System RecoveryOverview
1. Replace the failed disk (if necessary) - boot from your customizedrecovery tape.
2. Wait for the recovery to complete.
3. Once the system comes back up, you may need to recover the latestcopies of files from the last system backup
Chapter 6 147
HP-UX System RecoverySystem Recovery: Creating a Bootable Recovery Tape
System Recovery: Creating a BootableRecovery Tape
NOTE The copyutil tool is only supported as a diagnostic tool for HP-UX 10.xor later, and should not be used for recovery. Instead, you should use oneof the tools described in this chapter.
Note also that make_recovery (and booting from tape) is not yetsupported on current HP V- class systems.
The make_recovery command creates a system recovery tape. Thistape can be used to boot and recover a system which has becomeunbootable due to corruption of the root disk or volume group. As a"customized" installation medium, it makes use of the installationtechnology provided by Ignite-UX.
A system can be booted and installed from the tape without userintervention for configuration, customization, software selection,hostname, or IP address.
The system recovery tape consists of a boot image, followed by an archiveof system files that comprise a minimum core OS. The minimum core OSconsists of /stand , /sbin , /dev , /etc , and subsets of /usr , /opt and/var that are required during the install process. The devices or volumegroups that correspond to the file systems/directories / , /dev , /etc ,/sbin , /stand , and /usr are considered core devices or volume groups.These devices or volume groups are recreated during the recoveryprocess. All non-OS data on them would be removed and restored duringthe recovery process, if they were specifically appended to the recoverytape. If /usr , /opt or /var are mounted elsewhere, they would not bere-installed during the recovery process, and are fully preserved.
The make_recovery command provides a mechanism for you to specifyyour own non-system files in the archive by using the/var/adm/makrec.append file. These specifications are limited to filesor directories that belong to file systems in the core devices or volumegroups.
The make_recovery command also provides a mechanism for you toexclude selected files from the archive via the -p and -r options. Forbacking-up and recovering non-core file systems which are not on thecore device or volume groups, you would use normal backup utilities.

148 Chapter 6
HP-UX System RecoverySystem Recovery: Creating a Bootable Recovery Tape
NOTE The system recovery tape is only as good as the last time it was created.The tape should be re-created if new software, hardware, or patches havebeen added. You can use the check_recovery to determine whether thesystem has changed enough that the tape needs to be re-created.
Logging Progress and errors are logged to the file /var/opt/ignite/logs/mkrec.log*.
Recovery Example forMinimal OS
The following operations are done as root .
To create a minimal operating system recovery tape at /dev/rmt/0mn ,containing only the OS elements required to boot the system, do thefollowing:
1. Load a writeable tape in the default DDS drive for your system.
2. Enter the following:
# make_recovery
A tape will be created without further interaction.
System recovery from this tape would involve booting from the tape torecover the minimum Core OS. Then you would follow up with datarecovery of user files from the usual backup media.
Default Recovery ofEntire Root Disk
To create a System Recovery tape, at the default device /dev/rmt/0m ,and includes the entire root disk in the archive, you would do thefollowing:
1. Load a writeable tape in the default DDS device for your system.
2. Enter the following:
# make_recovery -A
A tape will be created without further interaction.
Duplicating a System To duplicate a system, you can create a system recovery tape by doingthe following:
1. Load a writeable tape in the default DDS device for your system.
2. Enter the following:
# make_recovery
A tape will be created without further interaction.
You can boot this tape on your new system.
Chapter 6 149
HP-UX System RecoverySystem Recovery: Creating a Bootable Recovery Tape
To duplicate the recovered system disk or volume group, do the following:
1. Mount the system recovery tape on the tape drive.
2. Boot the system.
3. Interrupt the boot sequence to redirect it to the tape drive.
4. Cancel the non-interactive installation by hitting any key when giventhe opportunity.
5. Provide necessary configuration information such as disks,
hostname, IP address, timezone, root password, and DNS server.
6. Allow the install process to complete.
For More Examplesand Information
See the man page make_recovery(1M) for details on using the options,and the syntax for doing so.
Creating a Bootable Install TapeThe make_medialif command creates a bootable LIF image which canbe copied to either a DDS tape or a writable CD to create an Ignite-UXinstall medium.
Examples Some typical examples of the use of make_medialif are the following:
• To create a boot LIF image using the config file /home/root/myconfigand then place it in /home/root/uxinstlf, enter the following:
# make_medialif -f /home/root/myconfig -l /home/root/uxinstlf
• To create a bootable DDS medium that will allow the installation of aconfiguration defined on an Ignite-UX server, for example, the"HP-UX B.10.20 Default" configuration, and using the same tapedrive as before, do the following:
# make_medialif -c "HP-UX B.10.20 Default" -l \
/home/root/uxinstlf
# mt -t /dev/rmt/c0t3d0DDS1n rew
# dd if=/home/root/uxinstlf of=/dev/rmt/c0t3d0DDS1n obs=2k
# mt -t /dev/rmt/c0t3d0DDS1n rew
150 Chapter 6
HP-UX System RecoverySystem Recovery: Creating a Bootable Recovery Tape
Note that the install will proceed according to how the variablesrun_ui and control_from_server are set in the INSTALLFS andin the config files.
Creating a fully self-contained tape that does not require the use of anIgnite-UX server involves copying a depot or system archive to the tapeand specifying a config file representing the archive or depot.
Recovery Procedure To recover a failed system disk or volume group, you would do thefollowing:
1. Mount the System Recovery tape on the tape drive
2. Boot the system
3. Interrupt the boot sequence to redirect it to the tape drive
4. Indicate no interaction with ISL.
5. Allow the system to complete the process.
NOTE If the recovery process encounters a configuration change/error, it goesinto the interactive mode, and displays the Ignite-UX welcome screenwith the following options:
[ Install HP-UX ]
[ Run a Recovery Shell ]
[ Advanced Options ]
[Reboot] [Help]
At this point, select the Install HP-UX option. (You are installing fromthe customized media). Select Advanced Installation (recommendedfor disk and filesystem management) Change your configurations andcontinue. Selecting disks should be done with care, as any existing dataon the disks will then be lost.
The system recovery tape can also be used to duplicate software on yoursystem onto another system, with some manual configurations after thesoftware has been installed.
For More Examplesand Information
See the man page make_medialif(1M) for details on using the options,and the syntax for doing so.
Chapter 6 151
HP-UX System Recovery“Expert” Recovery Using the Core Media
“Expert” Recovery Using the CoreMediaIf your system should become so compromised or corrupt that it will notboot at the login prompt, or the system boots, but critical files arecorrupted, adversely affecting overall system performance, it may beuseful to restore system elements with core recovery media.
Before you attempt to recover an HP-UX system, you should have thefollowing information about your system disk available. Note that muchof this information, including file system types, can be obtained byaccessing your online system manifest, either via Ignite-UX, or by readingthe hardcopy that came with your system:
• Revision of the HP-UX system which you are attempting to recover.
CAUTION You should only attempt to recover HP-UX systems that match theversion number of the recovery tools you are using, in the current case,HP-UX 11.0. For example, you can use HP-UX 10.30 CORE media toattempt to recover a 10.20 file system. Data corruption could occur if youattempt to recover a 9.0 file system with the current recovery tools.
• The address of the root filesystem on the disk (i.e., what filesystemyou will be checking/repairing using fsck ).
• The address of the bootlif path of that disk.
• What the autofile in the bootlif should contain.
• Whether you have an LVM or non-LVM system.
The more you know about the system disk and its partitioning scheme,before you encounter major damage or corruption, the easier it will be foryou to recover.
The procedures which follow assume that both fsck and mount can berun successfully on the system disk; otherwise, the following proceduresare not applicable.
152 Chapter 6
HP-UX System Recovery“Expert” Recovery Using the Core Media
Automated Recovery ProceduresThere are four possible expert recovery situations, each of which has itsassociated recovery procedure:
• If, after a system problem, you can't get the system to the ISL>prompt from the system disk, you will want to rebuild the bootlif onthe system disk, and install all critical files required to boot on theroot filesystem.
• If you can get the system to the ISL> prompt, but cannot bootvmunix , the system disk is corrupted; you will want to install only thecritical files required to boot on the root filesystem.
• If you can't get to the ISL> prompt, but you know that the root filesystem is good, you will want to rebuild the bootlif on the system disk.
• If you believe your kernel is corrupted, you will want to replace onlythe kernel on the root filesystem.
The following subsections describe these procedures in detail.
Rebuilding the bootlif and Installing CriticalFilesFollowing is an example of the detailed procedure for rebuilding thebootlif of the system disk, and for installing all the critical files necessaryto boot from the root filesystem:
1. Have the Core CD-ROM for the appropriate HP-UX ready.
2. Reset the System Processor Unit (SPU) using the reset button, orkeyswitch, as appropriate.
The console will display boot path information. If Autoboot is enabled,the system console will eventually display the following or similarmessages:
Autoboot from primary path enabledTo override, press any key within 10 seconds.
3. Press any key before the 10 seconds elapse. The system console willdisplay the following prompt:
Boot from primary boot path (Y or N)?>
4. Enter n at the prompt.
Chapter 6 153
HP-UX System Recovery“Expert” Recovery Using the Core Media
The console will then display the following:
Boot from alternate boot path (Y or N)?>
5. If the alternate boot path specifies the address of the CD device wherethe Core CD is mounted, enter y at the prompt.
If the alternate boot path does not specify the address of the CDdevice where the HP-UX Core media is mounted, enter n at theprompt. If n is entered at the prompt, the following message will bedisplayed on the system console:
Enter boot Path or ?>
6. Enter the address of the CD device where the HP-UX Core media ismounted.
The system console will display the following:
Interact with IPL (Y or N)>
7. Enter n at the prompt.
After several minutes (approximately), and after displaying severalscreens of status information, the following will be displayed:
Welcome to the HP-UX installation/recovery process!
Use the <tab> and/or arrow keys to navigate through thefollowing menus,and use the <return> key to select an item. Ifthe menu items are not clear, select the "Help" item for more information.
[ Install HP-UX ]
[ Run a Recovery Shell ]
[ Cancel and Reboot ]
[ Advanced Options ]
[ Help ]
8. Select Run a Recovery Shell , the screen clears, and the followingmessage will be displayed:
Would you like to start up networking at this time? [n]
9. Unless you need networking to ftp to other systems, enter n and thefollowing will be displayed:
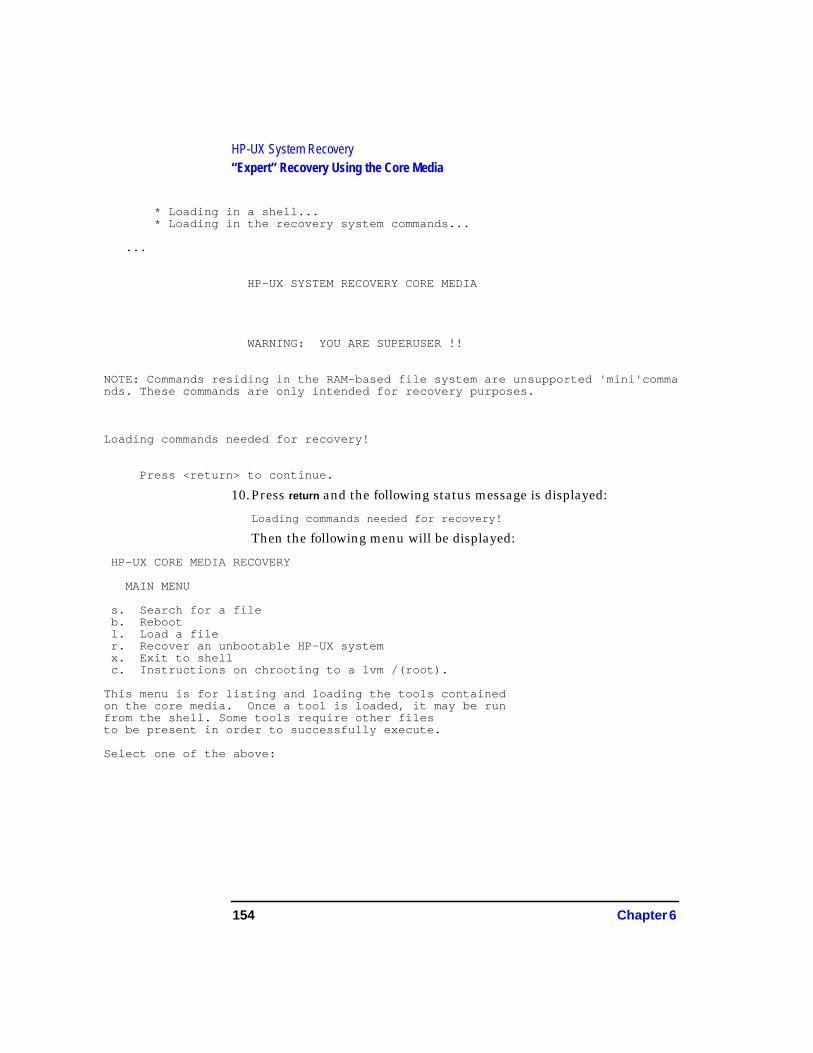
154 Chapter 6
HP-UX System Recovery“Expert” Recovery Using the Core Media
* Loading in a shell...* Loading in the recovery system commands...
...
HP-UX SYSTEM RECOVERY CORE MEDIA
WARNING: YOU ARE SUPERUSER !!
NOTE: Commands residing in the RAM-based file system are unsupported 'mini'commands. These commands are only intended for recovery purposes.
Loading commands needed for recovery!
Press <return> to continue.
10.Press return and the following status message is displayed:
Loading commands needed for recovery!
Then the following menu will be displayed:
HP-UX CORE MEDIA RECOVERY
MAIN MENU
s. Search for a fileb. Rebootl. Load a filer. Recover an unbootable HP-UX systemx. Exit to shellc. Instructions on chrooting to a lvm /(root).
This menu is for listing and loading the tools containedon the core media. Once a tool is loaded, it may be runfrom the shell. Some tools require other filesto be present in order to successfully execute.
Select one of the above:
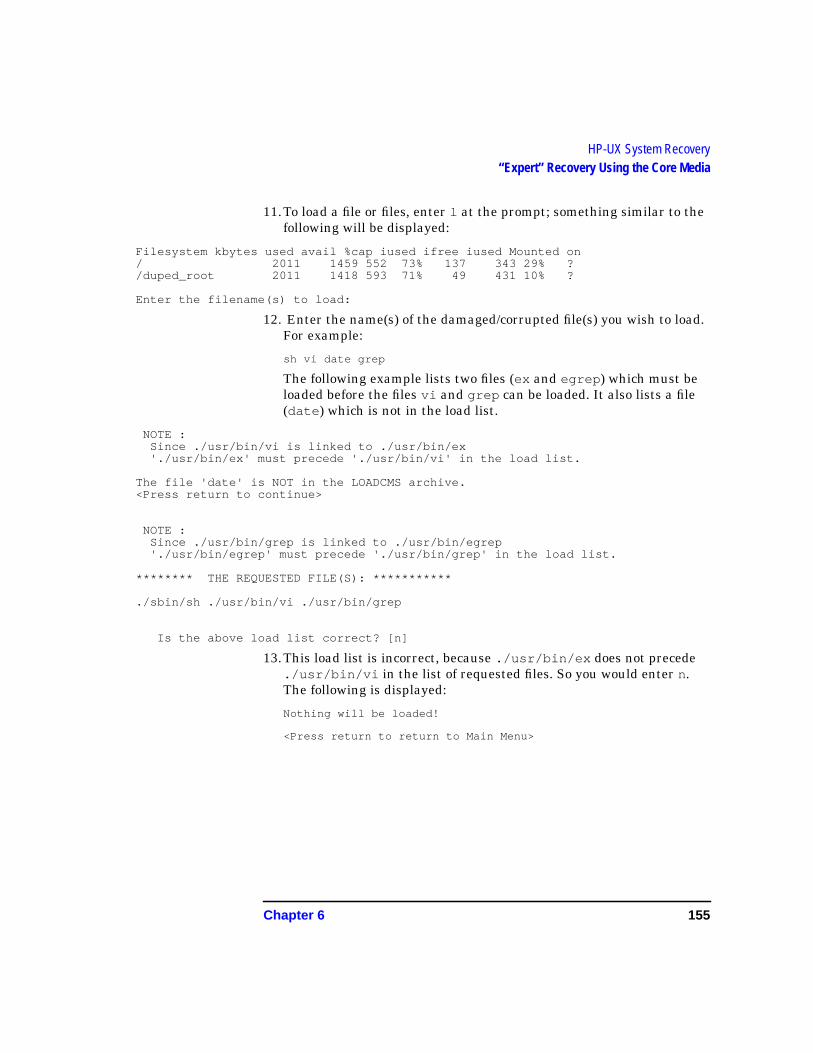
Chapter 6 155
HP-UX System Recovery“Expert” Recovery Using the Core Media
11.To load a file or files, enter l at the prompt; something similar to thefollowing will be displayed:
Filesystem kbytes used avail %cap iused ifree iused Mounted on/ 2011 1459 552 73% 137 343 29% ?/duped_root 2011 1418 593 71% 49 431 10% ?
Enter the filename(s) to load:
12. Enter the name(s) of the damaged/corrupted file(s) you wish to load.For example:
sh vi date grep
The following example lists two files (ex and egrep ) which must beloaded before the files vi and grep can be loaded. It also lists a file(date ) which is not in the load list.
NOTE :Since ./usr/bin/vi is linked to ./usr/bin/ex'./usr/bin/ex' must precede './usr/bin/vi' in the load list.
The file 'date' is NOT in the LOADCMS archive.<Press return to continue>
NOTE :Since ./usr/bin/grep is linked to ./usr/bin/egrep'./usr/bin/egrep' must precede './usr/bin/grep' in the load list.
******** THE REQUESTED FILE(S): ***********
./sbin/sh ./usr/bin/vi ./usr/bin/grep
Is the above load list correct? [n]
13.This load list is incorrect, because ./usr/bin/ex does not precede./usr/bin/vi in the list of requested files. So you would enter n.The following is displayed:
Nothing will be loaded!
<Press return to return to Main Menu>
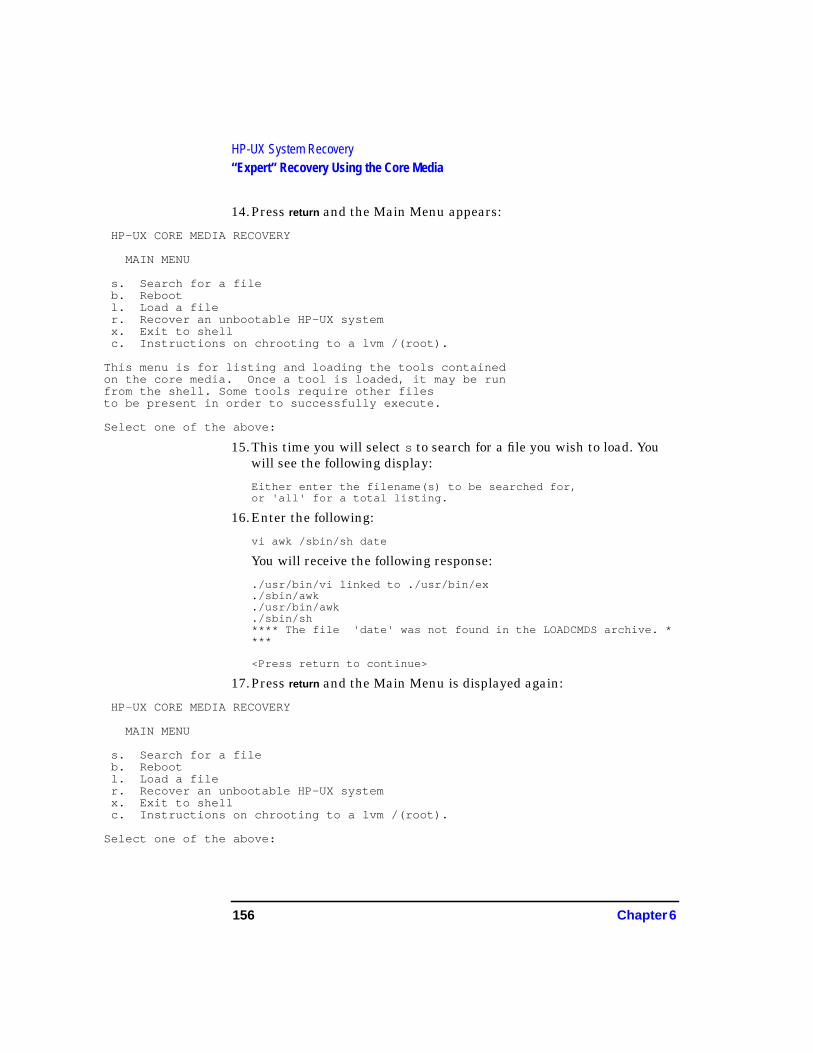
156 Chapter 6
HP-UX System Recovery“Expert” Recovery Using the Core Media
14.Press return and the Main Menu appears:
HP-UX CORE MEDIA RECOVERY
MAIN MENU
s. Search for a fileb. Rebootl. Load a filer. Recover an unbootable HP-UX systemx. Exit to shellc. Instructions on chrooting to a lvm /(root).
This menu is for listing and loading the tools containedon the core media. Once a tool is loaded, it may be runfrom the shell. Some tools require other filesto be present in order to successfully execute.
Select one of the above:
15.This time you will select s to search for a file you wish to load. Youwill see the following display:
Either enter the filename(s) to be searched for,or 'all' for a total listing.
16.Enter the following:
vi awk /sbin/sh date
You will receive the following response:
./usr/bin/vi linked to ./usr/bin/ex
./sbin/awk
./usr/bin/awk
./sbin/sh**** The file 'date' was not found in the LOADCMDS archive. ****
<Press return to continue>
17.Press return and the Main Menu is displayed again:
HP-UX CORE MEDIA RECOVERY
MAIN MENU
s. Search for a fileb. Rebootl. Load a filer. Recover an unbootable HP-UX systemx. Exit to shellc. Instructions on chrooting to a lvm /(root).
Select one of the above:
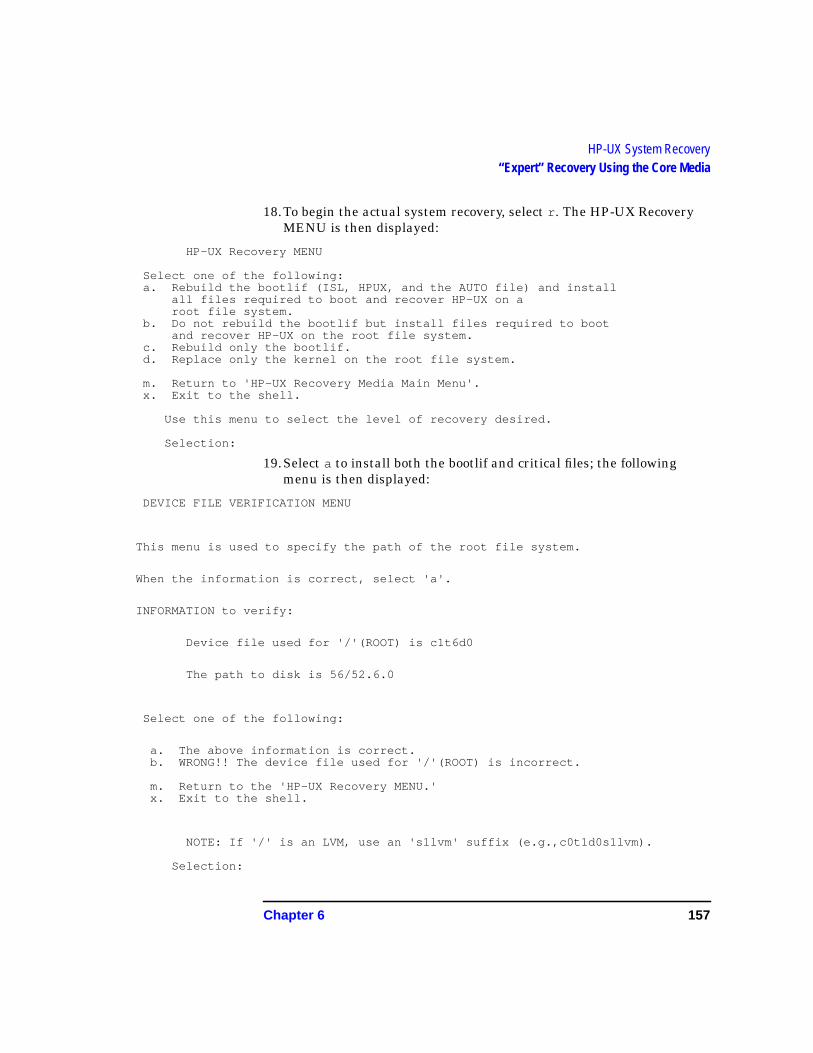
Chapter 6 157
HP-UX System Recovery“Expert” Recovery Using the Core Media
18.To begin the actual system recovery, select r . The HP-UX RecoveryMENU is then displayed:
HP-UX Recovery MENU
Select one of the following:a. Rebuild the bootlif (ISL, HPUX, and the AUTO file) and install
all files required to boot and recover HP-UX on aroot file system.
b. Do not rebuild the bootlif but install files required to bootand recover HP-UX on the root file system.
c. Rebuild only the bootlif.d. Replace only the kernel on the root file system.
m. Return to 'HP-UX Recovery Media Main Menu'.x. Exit to the shell.
Use this menu to select the level of recovery desired.
Selection:
19.Select a to install both the bootlif and critical files; the followingmenu is then displayed:
DEVICE FILE VERIFICATION MENU
This menu is used to specify the path of the root file system.
When the information is correct, select 'a'.
INFORMATION to verify:
Device file used for '/'(ROOT) is c1t6d0
The path to disk is 56/52.6.0
Select one of the following:
a. The above information is correct.b. WRONG!! The device file used for '/'(ROOT) is incorrect.
m. Return to the 'HP-UX Recovery MENU.'x. Exit to the shell.
NOTE: If '/' is an LVM, use an 's1lvm' suffix (e.g.,c0t1d0s1lvm).
Selection:
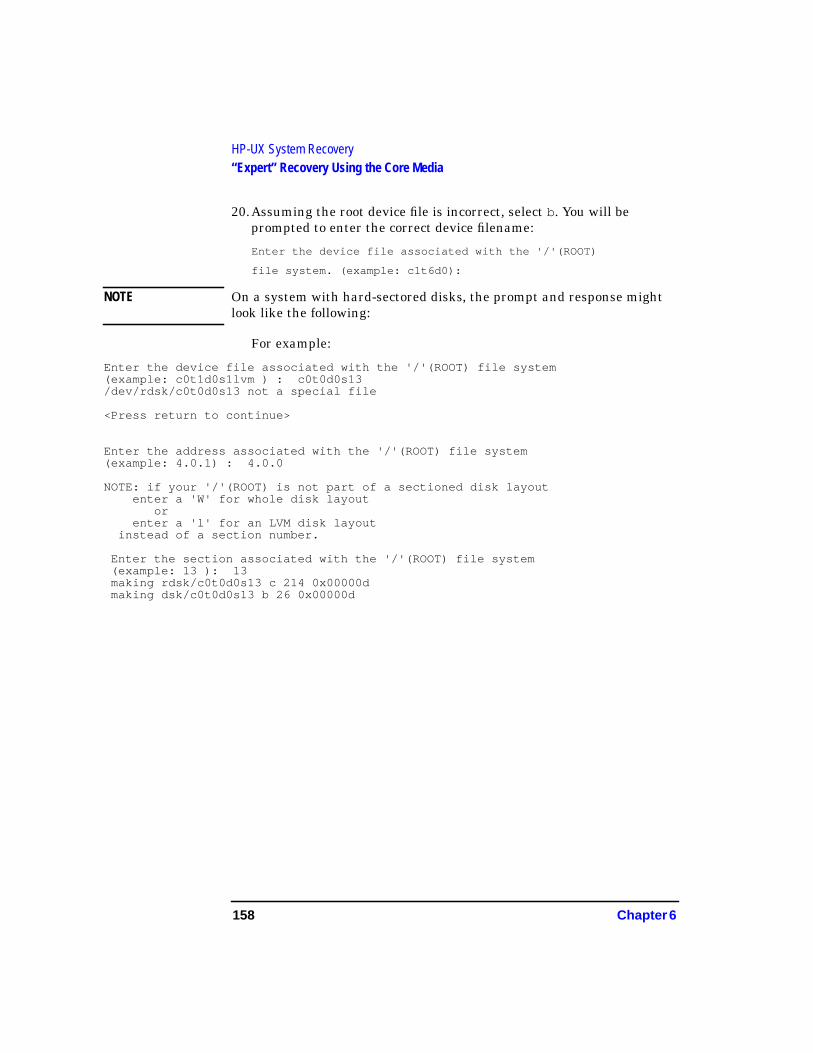
158 Chapter 6
HP-UX System Recovery“Expert” Recovery Using the Core Media
20.Assuming the root device file is incorrect, select b. You will beprompted to enter the correct device filename:
Enter the device file associated with the '/'(ROOT)
file system. (example: c1t6d0):
NOTE On a system with hard-sectored disks, the prompt and response mightlook like the following:
For example:
Enter the device file associated with the '/'(ROOT) file system(example: c0t1d0s1lvm ) : c0t0d0s13/dev/rdsk/c0t0d0s13 not a special file
<Press return to continue>
Enter the address associated with the '/'(ROOT) file system(example: 4.0.1) : 4.0.0
NOTE: if your '/'(ROOT) is not part of a sectioned disk layoutenter a 'W' for whole disk layout
orenter a 'l' for an LVM disk layout
instead of a section number.
Enter the section associated with the '/'(ROOT) file system(example: 13 ): 13making rdsk/c0t0d0s13 c 214 0x00000dmaking dsk/c0t0d0s13 b 26 0x00000d
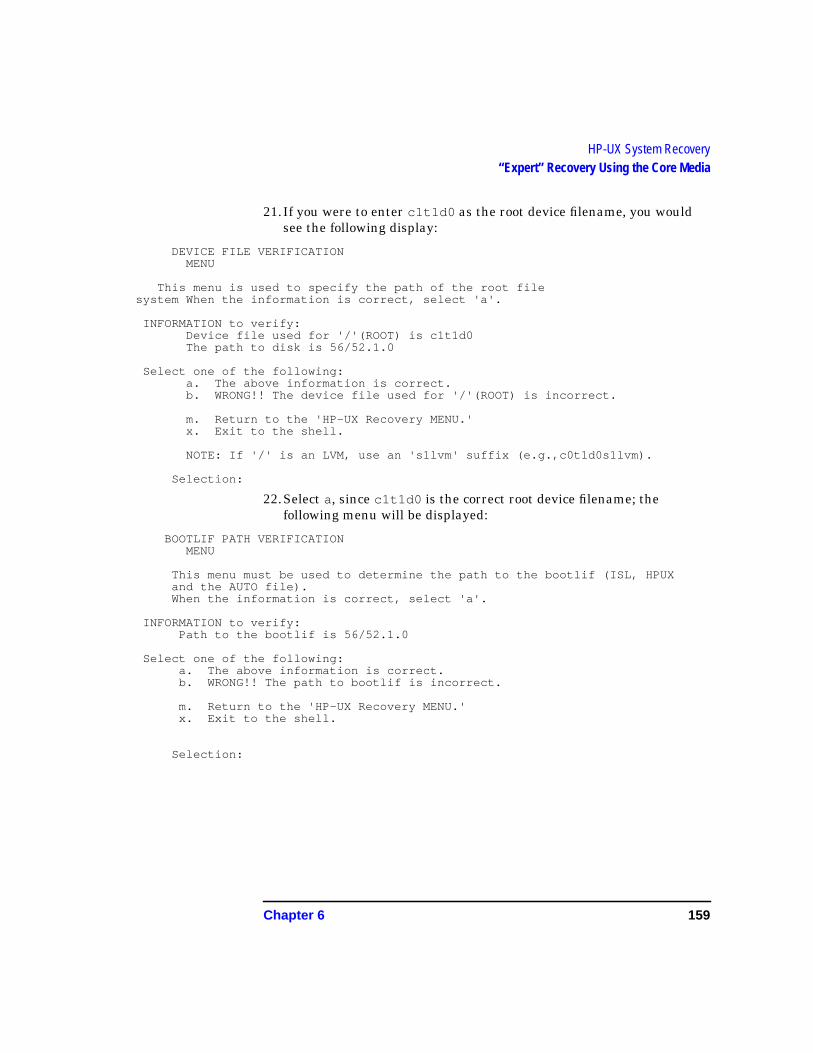
Chapter 6 159
HP-UX System Recovery“Expert” Recovery Using the Core Media
21.If you were to enter c1t1d0 as the root device filename, you wouldsee the following display:
DEVICE FILE VERIFICATIONMENU
This menu is used to specify the path of the root filesystem When the information is correct, select 'a'.
INFORMATION to verify:Device file used for '/'(ROOT) is c1t1d0The path to disk is 56/52.1.0
Select one of the following:a. The above information is correct.b. WRONG!! The device file used for '/'(ROOT) is incorrect.
m. Return to the 'HP-UX Recovery MENU.'x. Exit to the shell.
NOTE: If '/' is an LVM, use an 's1lvm' suffix (e.g.,c0t1d0s1lvm).
Selection:
22.Select a, since c1t1d0 is the correct root device filename; thefollowing menu will be displayed:
BOOTLIF PATH VERIFICATIONMENU
This menu must be used to determine the path to the bootlif (ISL, HPUXand the AUTO file).When the information is correct, select 'a'.
INFORMATION to verify:Path to the bootlif is 56/52.1.0
Select one of the following:a. The above information is correct.b. WRONG!! The path to bootlif is incorrect.
m. Return to the 'HP-UX Recovery MENU.'x. Exit to the shell.
Selection:
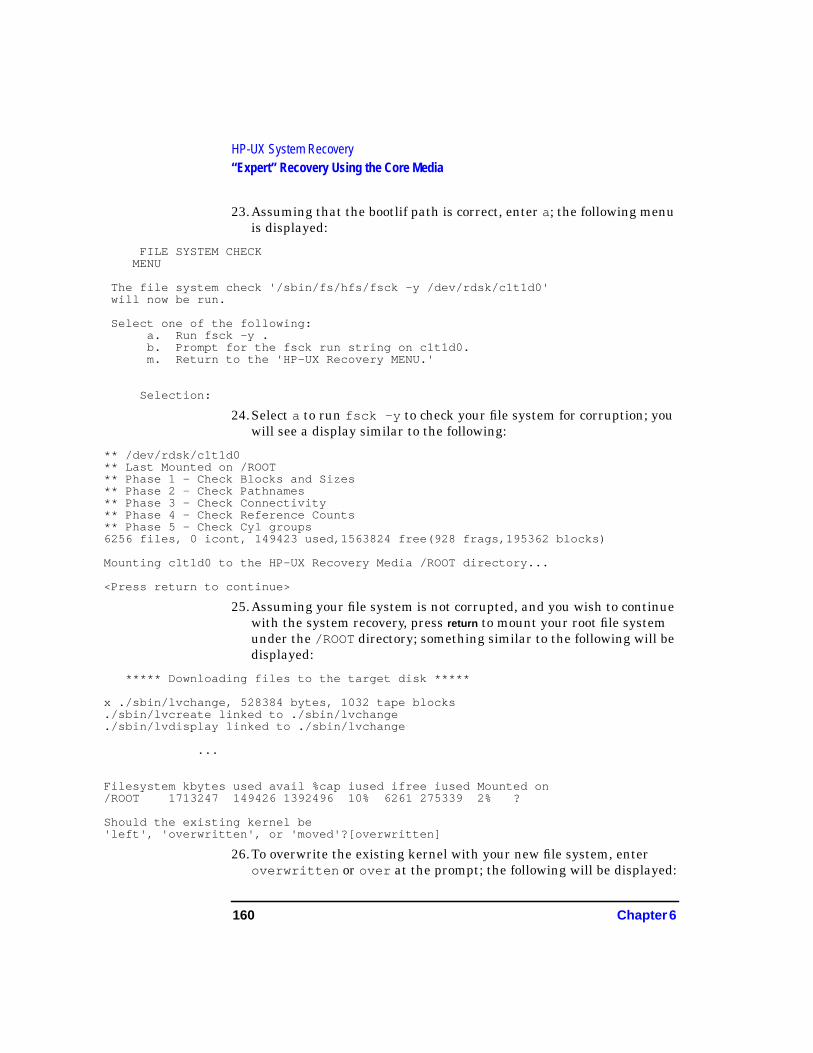
160 Chapter 6
HP-UX System Recovery“Expert” Recovery Using the Core Media
23.Assuming that the bootlif path is correct, enter a; the following menuis displayed:
FILE SYSTEM CHECKMENU
The file system check '/sbin/fs/hfs/fsck -y /dev/rdsk/c1t1d0'will now be run.
Select one of the following:a. Run fsck -y .b. Prompt for the fsck run string on c1t1d0.m. Return to the 'HP-UX Recovery MENU.'
Selection:
24.Select a to run fsck -y to check your file system for corruption; youwill see a display similar to the following:
** /dev/rdsk/c1t1d0** Last Mounted on /ROOT** Phas e 1 - Check Blocks and Sizes** Phas e 2 - Check Pathnames** Phas e 3 - Check Connectivity** Phas e 4 - Check Reference Counts** Phas e 5 - Check Cyl groups6256 files, 0 icont, 149423 used,1563824 free(928 frags,195362 blocks)
Mounting c1t1d0 to the HP-UX Recovery Media /ROOT directory...
<Press return to continue>
25.Assuming your file system is not corrupted, and you wish to continuewith the system recovery, press return to mount your root file systemunder the /ROOT directory; something similar to the following will bedisplayed:
***** Downloading files to the target disk *****
x ./sbin/lvchange, 528384 bytes, 1032 tape blocks./sbin/lvcreate linked to ./sbin/lvchange./sbin/lvdisplay linked to ./sbin/lvchange
...
Filesystem kbytes used avail %cap iused ifree iused Mounted on/ROOT 1713247 149426 1392496 10% 6261 275339 2% ?
Should the existing kernel be'left', 'overwritten', or 'moved'?[overwritten]
26.To overwrite the existing kernel with your new file system, enteroverwritten or over at the prompt; the following will be displayed:
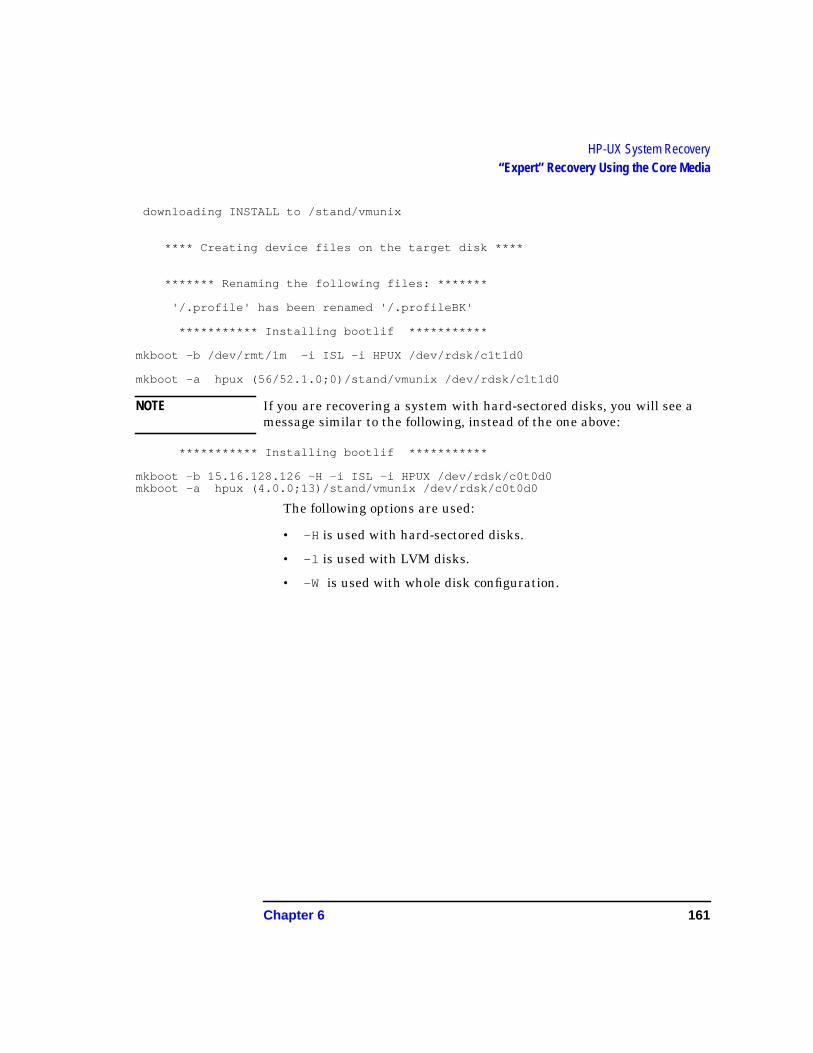
Chapter 6 161
HP-UX System Recovery“Expert” Recovery Using the Core Media
downloading INSTALL to /stand/vmunix
**** Creating device files on the target disk ****
******* Renaming the following files: *******
'/.profile' has been renamed '/.profileBK'
*********** Installing bootlif ***********
mkboot -b /dev/rmt/1m -i ISL -i HPUX /dev/rdsk/c1t1d0
mkboot -a hpux (56/52.1.0;0)/stand/vmunix /dev/rdsk/c1t1d0
NOTE If you are recovering a system with hard-sectored disks, you will see amessage similar to the following, instead of the one above:
*********** Installing bootlif ***********
mkboot -b 15.16.128.126 -H -i ISL -i HPUX /dev/rdsk/c0t0d0mkboot -a hpux (4.0.0;13)/stand/vmunix /dev/rdsk/c0t0d0
The following options are used:
• -H is used with hard-sectored disks.
• -l is used with LVM disks.
• -W is used with whole disk configuration.
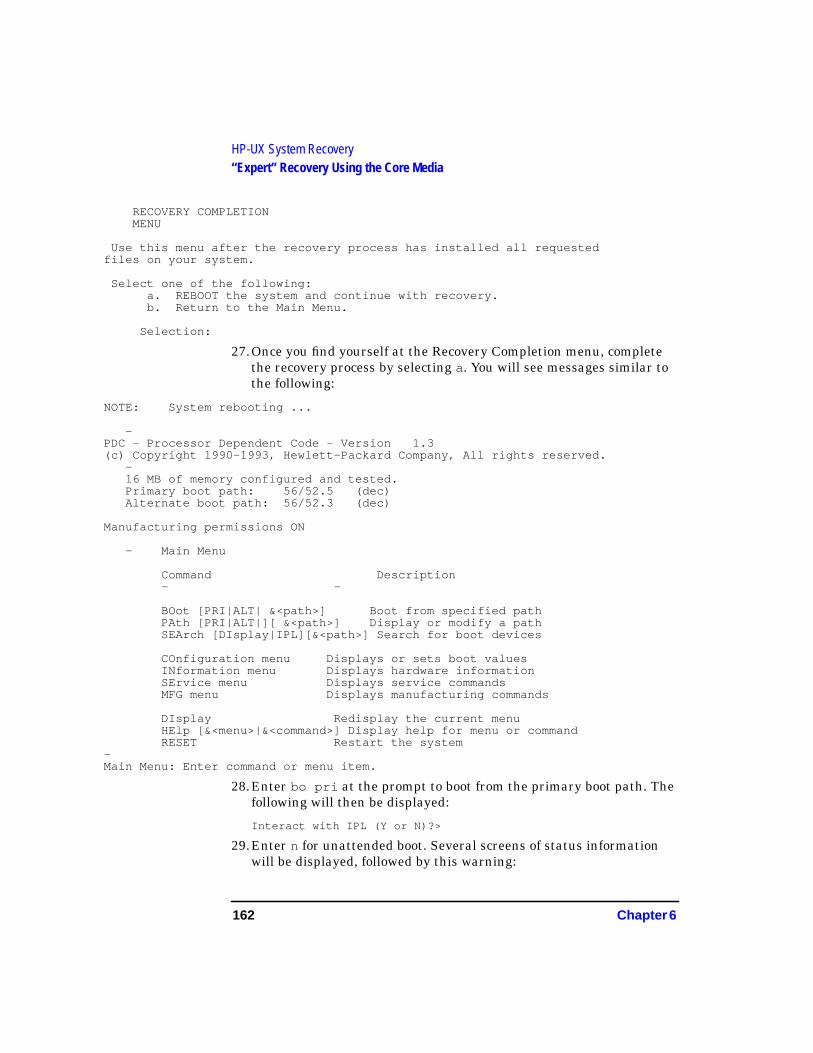
162 Chapter 6
HP-UX System Recovery“Expert” Recovery Using the Core Media
RECOVERY COMPLETIONMENU
Use this menu after the recovery process has installed all requestedfiles on your system.
Select one of the following:a. REBOOT the system and continue with recovery.b. Return to the Main Menu.
Selection:
27.Once you find yourself at the Recovery Completion menu, completethe recovery process by selecting a. You will see messages similar tothe following:
NOTE: System rebooting ...
-PDC - Processor Dependent Code - Version 1.3(c) Copyright 1990-1993, Hewlett-Packard Company, All rights reserved. - 16 MB of memory configured and tested. Primary boot path: 56/52.5 (dec) Alternate boot path: 56/52.3 (dec)
Manufacturing permissions ON
- Main Menu
Command Description - -
BOot [PRI|ALT| &<path>] Boot from specified path PAth [PRI|ALT|][ &<path>] Display or modify a path SEArch [DIsplay|IPL][&<path>] Search for boot devices
COnfiguration menu Displays or sets boot values INformation menu Displays hardware information SErvice menu Displays service commands MFG menu Displays manufacturing commands
DIsplay Redisplay the current menu HElp [&<menu>|&<command>] Display help for menu or command RESET Restart the system-Main Menu: Enter command or menu item.
28.Enter bo pri at the prompt to boot from the primary boot path. Thefollowing will then be displayed:
Interact with IPL (Y or N)?>
29.Enter n for unattended boot. Several screens of status informationwill be displayed, followed by this warning:
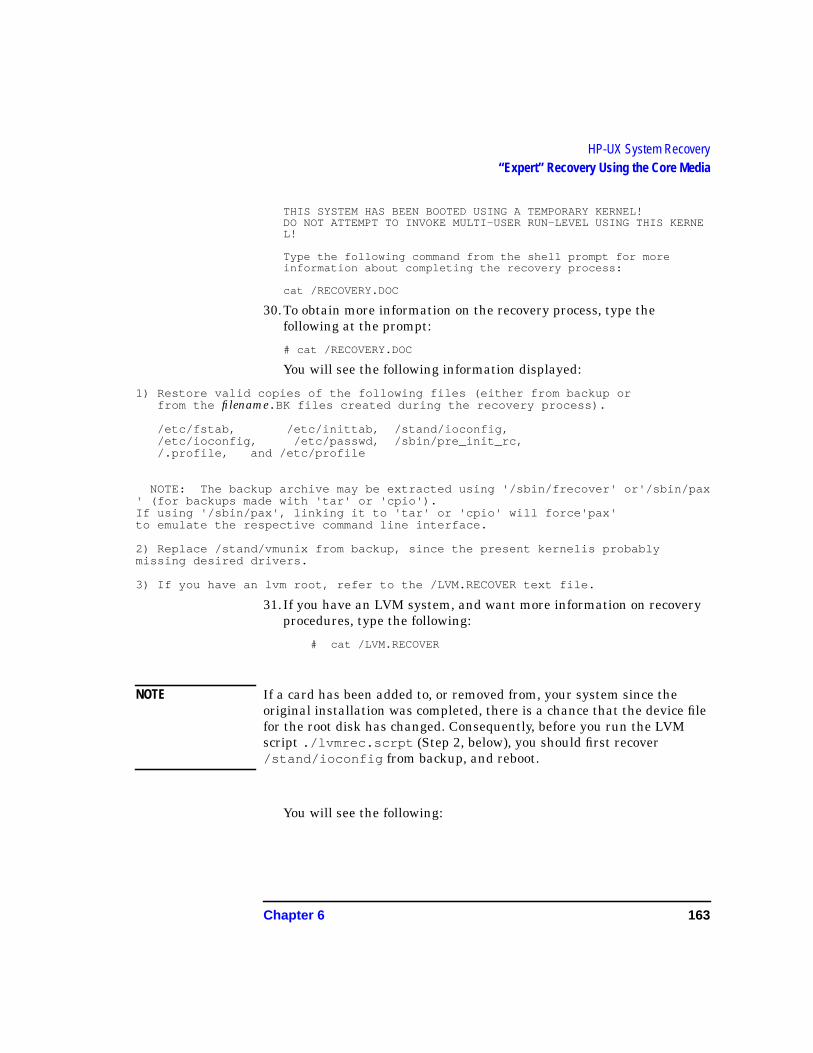
Chapter 6 163
HP-UX System Recovery“Expert” Recovery Using the Core Media
THIS SYSTEM HAS BEEN BOOTED USING A TEMPORARY KERNEL!DO NOT ATTEMPT TO INVOKE MULTI-USER RUN-LEVEL USING THIS KERNEL!
Type the following command from the shell prompt for moreinformation about completing the recovery process:
cat /RECOVERY.DOC
30.To obtain more information on the recovery process, type thefollowing at the prompt:
# cat /RECOVERY.DOC
You will see the following information displayed:
1) Restore valid copies of the following files (either from backup orfrom the filename.BK files created during the recovery process).
/etc/fstab, /etc/inittab, /stand/ioconfig,/etc/ioconfig, /etc/passwd, /sbin/pre_init_rc,/.profile, and /etc/profile
NOTE: The backup archive may be extracted using '/sbin/frecover' or'/sbin/pax' (for backups made with 'tar' or 'cpio').If using '/sbin/pax', linking it to 'tar' or 'cpio' will force'pax'to emulate the respective command line interface.
2) Replace /stand/vmunix from backup, since the present kernelis probablymissing desired drivers.
3) If you have an lvm root, refer to the /LVM.RECOVER text file.
31.If you have an LVM system, and want more information on recoveryprocedures, type the following:
# cat /LVM.RECOVER
NOTE If a card has been added to, or removed from, your system since theoriginal installation was completed, there is a chance that the device filefor the root disk has changed. Consequently, before you run the LVMscript ./lvmrec.scrpt (Step 2, below), you should first recover/stand/ioconfig from backup, and reboot.
You will see the following:
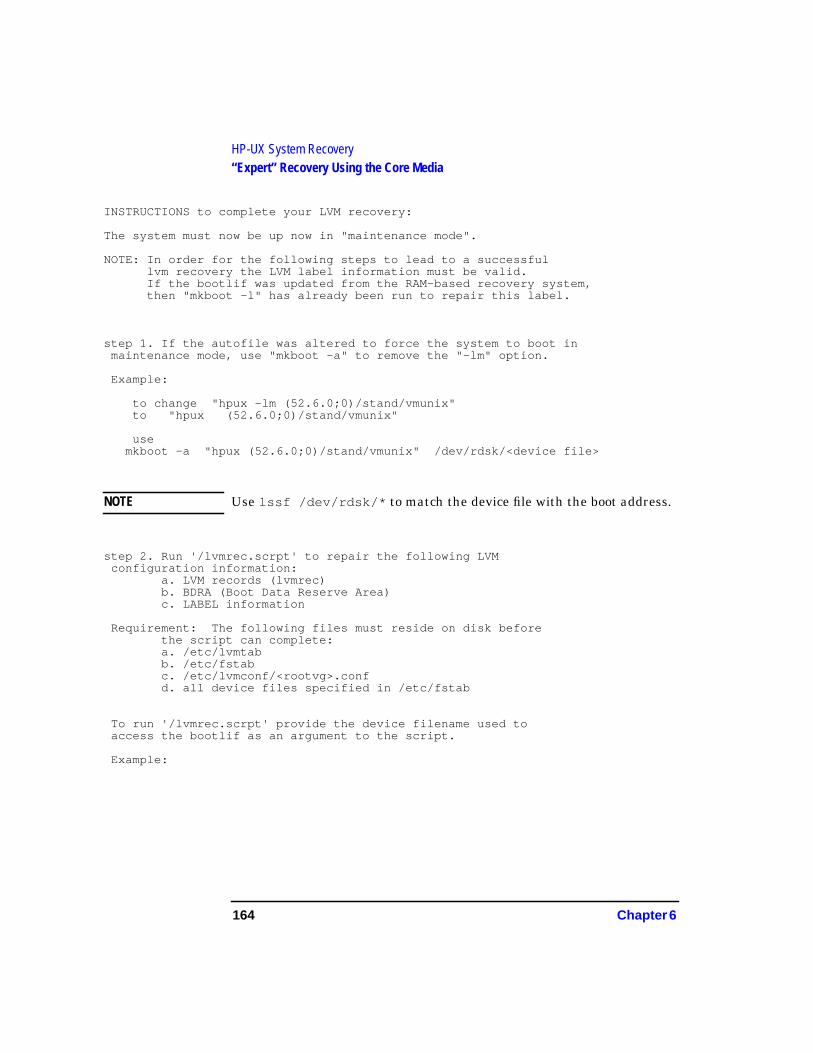
164 Chapter 6
HP-UX System Recovery“Expert” Recovery Using the Core Media
INSTRUCTIONS to complete your LVM recovery:
The system must now be up now in "maintenance mode".
NOTE: In order for the following steps to lead to a successfullvm recovery the LVM label information must be valid.If the bootlif was updated from the RAM-based recovery system,then "mkboot -l" has already been run to repair this label.
step 1. If the autofile was altered to force the system to boot inmaintenance mode, use "mkboot -a" to remove the "-lm" option.
Example:
to change "hpux -lm (52.6.0;0)/stand/vmunix"to "hpux (52.6.0;0)/stand/vmunix"
usemkboot -a "hpux (52.6.0;0)/stand/vmunix" /dev/rdsk/<device file>
NOTE Use lssf /dev/rdsk/* to match the device file with the boot address.
step 2. Run '/lvmrec.scrpt' to repair the following LVMconfiguration information:
a. LVM records (lvmrec)b. BDRA (Boot Data Reserve Area)c. LABEL information
Requirement: The following files must reside on disk beforethe script can complete:a. /etc/lvmtabb. /etc/fstabc. /etc/lvmconf/<rootvg>.confd. all device files specified in /etc/fstab
To run '/lvmrec.scrpt' provide the device filename used toaccess the bootlif as an argument to the script.
Example:
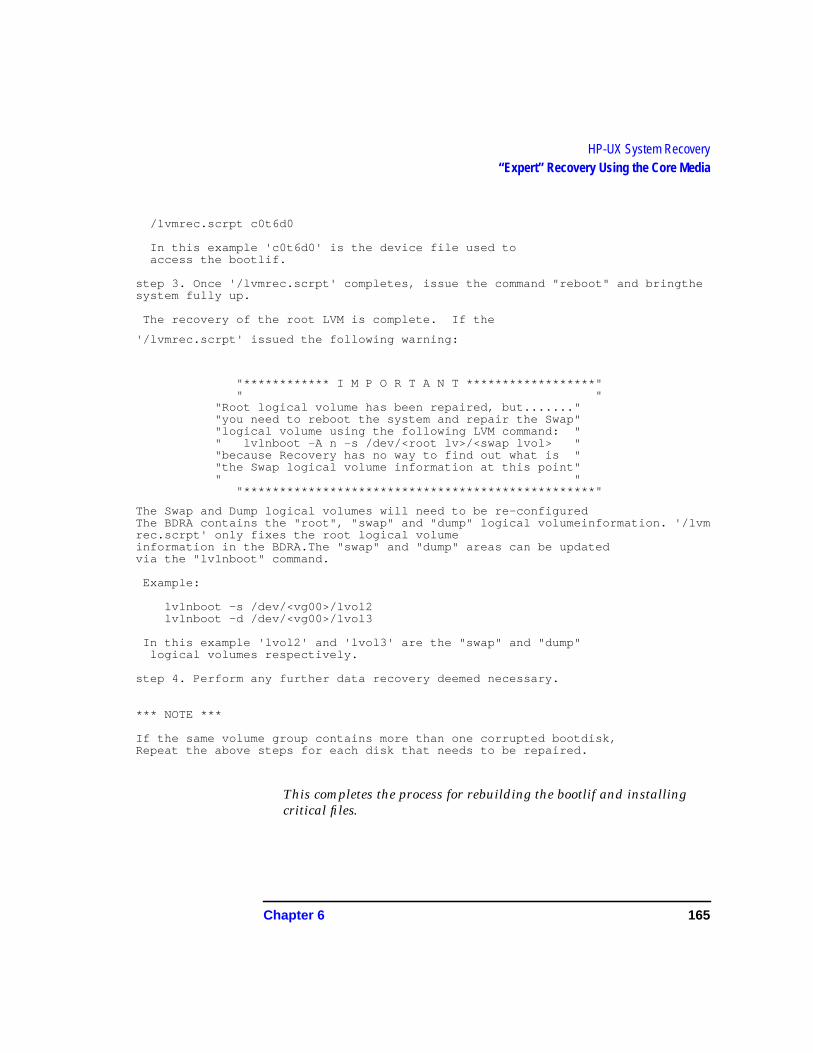
Chapter 6 165
HP-UX System Recovery“Expert” Recovery Using the Core Media
/lvmrec.scrpt c0t6d0
In this example 'c0t6d0' is the device file used toaccess the bootlif.
step 3. Once '/lvmrec.scrpt' completes, issue the command "reboot" and bringthesystem fully up.
The recovery of the root LVM is complete. If the
'/lvmrec.scrpt' issued the following warning:
"*********** * I M P O R T A N T ******************"" "
"Root logical volume has been repaired, but.......""you need to reboot the system and repair the Swap""logical volume using the following LVM command: "" lvlnboot -A n -s /dev/<root lv>/<swap lvol> ""because Recovery has no way to find out what is ""the Swap logical volume information at this point"" "
"*************************************************"
The Swap and Dump logical volumes will need to be re-configuredThe BDRA contains the "root", "swap" and "dump" logical volumeinformation. '/lvmrec.scrpt' only fixes the root logical volumeinformation in the BDRA.The "swap" and "dump" areas can be updatedvia the "lvlnboot" command.
Example:
lvlnboot -s /dev/<vg00>/lvol2lvlnboot -d /dev/<vg00>/lvol3
In this example 'lvol2' and 'lvol3' are the "swap" and "dump"logical volumes respectively.
step 4. Perform any further data recovery deemed necessary.
*** NOTE ***
If the same volume group contains more than one corrupted bootdisk,Repeat the above steps for each disk that needs to be repaired.
This completes the process for rebuilding the bootlif and installingcritical files.
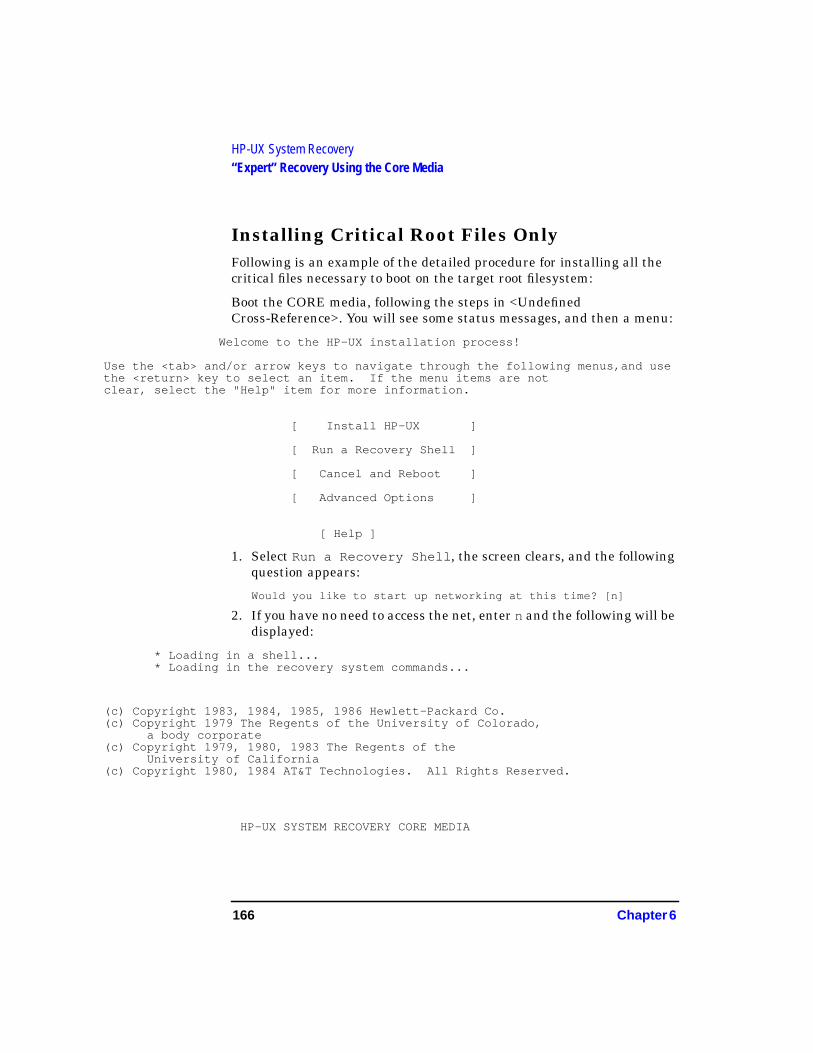
166 Chapter 6
HP-UX System Recovery“Expert” Recovery Using the Core Media
Installing Critical Root Files OnlyFollowing is an example of the detailed procedure for installing all thecritical files necessary to boot on the target root filesystem:
Boot the CORE media, following the steps in <UndefinedCross-Reference>. You will see some status messages, and then a menu:
Welcome to the HP-UX installation process!
Use the <tab> and/or arrow keys to navigate through the following menus,and usethe <return> key to select an item. If the menu items are notclear, select the "Help" item for more information.
[ Install HP-UX ]
[ Run a Recovery Shell ]
[ Cancel and Reboot ]
[ Advanced Options ]
[ Help ]
1. Select Run a Recovery Shell , the screen clears, and the followingquestion appears:
Would you like to start up networking at this time? [n]
2. If you have no need to access the net, enter n and the following will bedisplayed:
* Loading in a shell...* Loading in the recovery system commands...
(c) Copyright 1983, 1984, 1985, 1986 Hewlett-Packard Co.(c) Copyright 1979 The Regents of the University of Colorado,
a body corporate(c) Copyright 1979, 1980, 1983 The Regents of the
University of California(c) Copyright 1980, 1984 AT&T Technologies. All Rights Reserved.
HP-UX SYSTEM RECOVERY CORE MEDIA
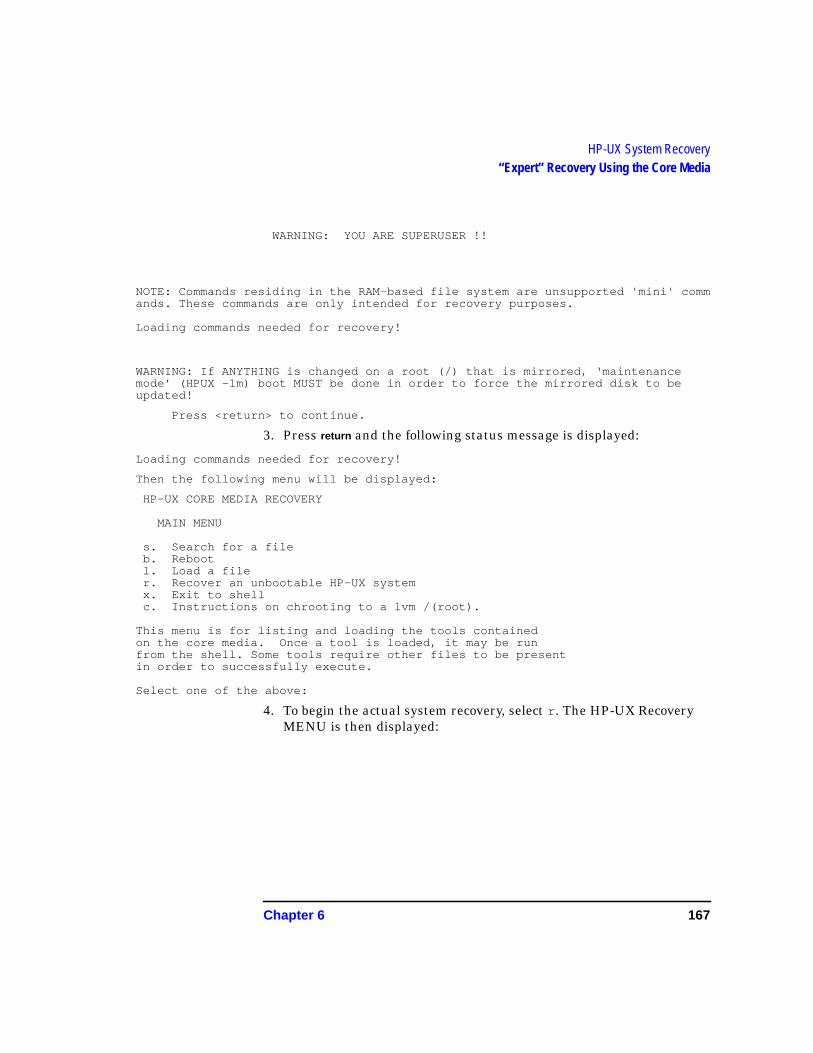
Chapter 6 167
HP-UX System Recovery“Expert” Recovery Using the Core Media
WARNING: YOU ARE SUPERUSER !!
NOTE: Commands residing in the RAM-based file system are unsupported 'mini' commands. These commands are only intended for recovery purposes.
Loading commands needed for recovery!
WARNING: If ANYTHING is changed on a root (/) that is mirrored, ‘maintenancemode’ (HPUX -1m) boot MUST be done in order to force the mirrored disk to beupdated!
Press <return> to continue.
3. Press return and the following status message is displayed:
Loading commands needed for recovery!
Then the following menu will be displayed:
HP-UX CORE MEDIA RECOVERY
MAIN MENU
s. Search for a fileb. Rebootl. Load a filer. Recover an unbootable HP-UX systemx. Exit to shellc. Instructions on chrooting to a lvm /(root).
This menu is for listing and loading the tools containedon the core media. Once a tool is loaded, it may be runfrom the shell. Some tools require other files to be presentin order to successfully execute.
Select one of the above:
4. To begin the actual system recovery, select r . The HP-UX RecoveryMENU is then displayed:
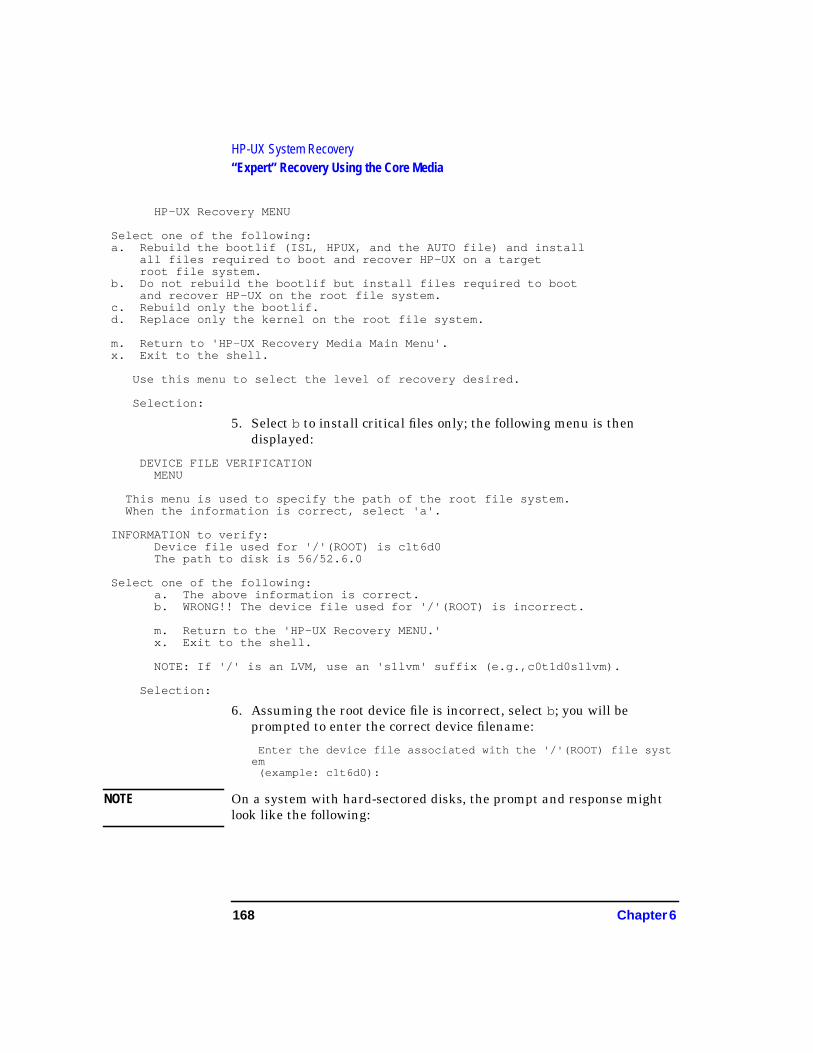
168 Chapter 6
HP-UX System Recovery“Expert” Recovery Using the Core Media
HP-UX Recovery MENU
Select one of the following:a. Rebuild the bootlif (ISL, HPUX, and the AUTO file) and install
all files required to boot and recover HP-UX on a targetroot file system.
b. Do not rebuild the bootlif but install files required to bootand recover HP-UX on the root file system.
c. Rebuild only the bootlif.d. Replace only the kernel on the root file system.
m. Return to 'HP-UX Recovery Media Main Menu'.x. Exit to the shell.
Use this menu to select the level of recovery desired.
Selection:
5. Select b to install critical files only; the following menu is thendisplayed:
DEVICE FILE VERIFICATIONMENU
This menu is used to specify the path of the root file system.When the information is correct, select 'a'.
INFORMATION to verify:Device file used for '/'(ROOT) is c1t6d0The path to disk is 56/52.6.0
Select one of the following:a. The above information is correct.b. WRONG!! The device file used for '/'(ROOT) is incorrect.
m. Return to the 'HP-UX Recovery MENU.'x. Exit to the shell.
NOTE: If '/' is an LVM, use an 's1lvm' suffix (e.g.,c0t1d0s1lvm).
Selection:
6. Assuming the root device file is incorrect, select b; you will beprompted to enter the correct device filename:
Enter the device file associated with the '/'(ROOT) file system
(example: c1t6d0):
NOTE On a system with hard-sectored disks, the prompt and response mightlook like the following:

Chapter 6 169
HP-UX System Recovery“Expert” Recovery Using the Core Media
Enter the device file associated with the '/'(ROOT) file system(example: c0t1d0s1lvm ) : c0t0d0s13/dev/rdsk/c0t0d0s13 not a special file
<Press return to continue>
Enter the address associated with the '/'(ROOT) file system(example: 4.0.1) : 4.0.0
NOTE: if your '/'(ROOT) is not part of a sectioned disk layoutenter a 'W' for whole disk layout
orenter a 'l' for an LVM disk layout
instead of a section number.
Enter the section associated with the '/'(ROOT) file system(example: 13 ): 13making rdsk/c0t0d0s13 c 214 0x00000dmaking dsk/c0t0d0s13 b 26 0x00000d
7. If you were to enter, for example, c1t1d0 as the root device filename,you would see the following display:
DEVICE FILE VERIFICATIONMENU
This menu is used to specify the path of the root file system.When the information is correct, select 'a'.
INFORMATION to verify:Device file used for '/'(ROOT) is c1t1d0The path to disk is 56/52.1.0
Select one of the following:a. The above information is correct.b. WRONG!! The device file used for '/'(ROOT) is incorrect.
m. Return to the 'HP-UX Recovery MENU.'x. Exit to the shell.
NOTE: If '/' is an LVM, use an 's1lvm' suffix (e.g.,c0t1d0s1lvm).
Selection:
8. Select a, since c1t1d0 is the correct root device filename; thefollowing menu will be displayed:
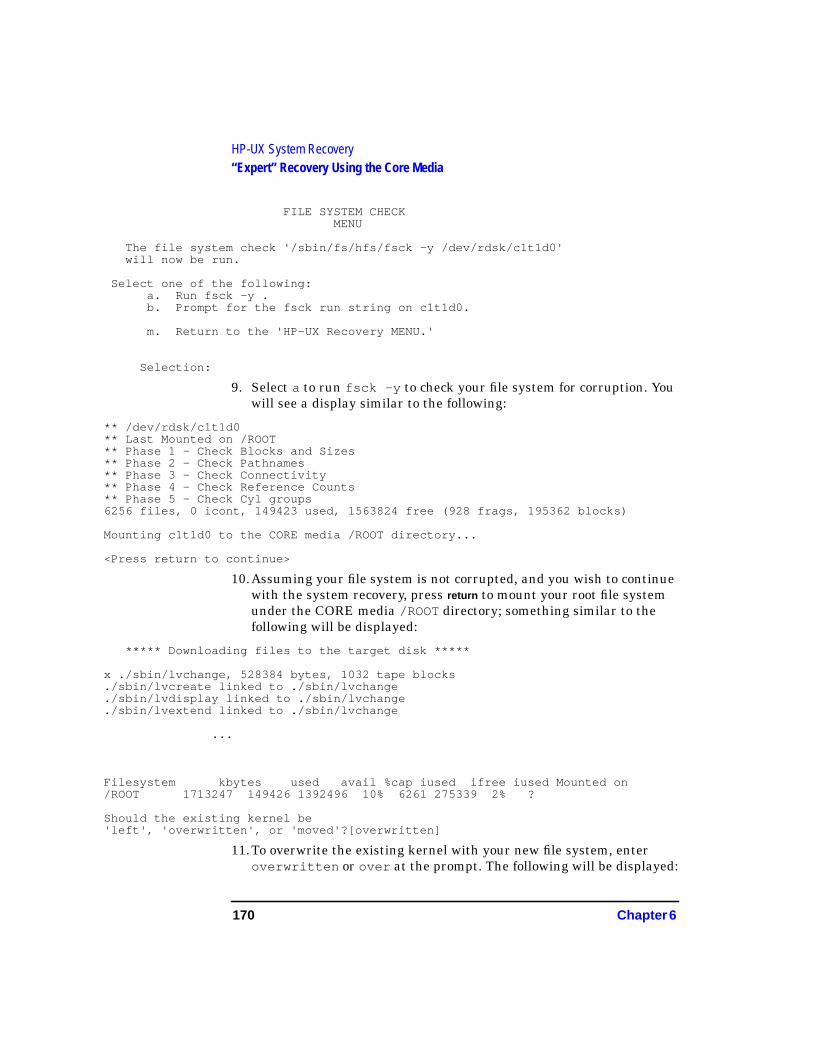
170 Chapter 6
HP-UX System Recovery“Expert” Recovery Using the Core Media
FILE SYSTEM CHECKMENU
The file system check '/sbin/fs/hfs/fsck -y /dev/rdsk/c1t1d0'will now be run.
Select one of the following:a. Run fsck -y .b. Prompt for the fsck run string on c1t1d0.
m. Return to the 'HP-UX Recovery MENU.'
Selection:
9. Select a to run fsck -y to check your file system for corruption. Youwill see a display similar to the following:
** /dev/rdsk/c1t1d0** Last Mounted on /ROOT** Phas e 1 - Check Blocks and Sizes** Phas e 2 - Check Pathnames** Phas e 3 - Check Connectivity** Phas e 4 - Check Reference Counts** Phas e 5 - Check Cyl groups6256 files, 0 icont, 149423 used, 1563824 free (928 frags, 195362 blocks)
Mounting c1t1d0 to the CORE media /ROOT directory...
<Press return to continue>
10.Assuming your file system is not corrupted, and you wish to continuewith the system recovery, press return to mount your root file systemunder the CORE media /ROOT directory; something similar to thefollowing will be displayed:
***** Downloading files to the target disk *****
x ./sbin/lvchange, 528384 bytes, 1032 tape blocks./sbin/lvcreate linked to ./sbin/lvchange./sbin/lvdisplay linked to ./sbin/lvchange./sbin/lvextend linked to ./sbin/lvchange
...
Filesystem kbytes used avail %cap iused ifree iused Mounted on/ROOT 1713247 149426 1392496 10% 6261 275339 2% ?
Should the existing kernel be'left', 'overwritten', or 'moved'?[overwritten]
11.To overwrite the existing kernel with your new file system, enteroverwritten or over at the prompt. The following will be displayed:
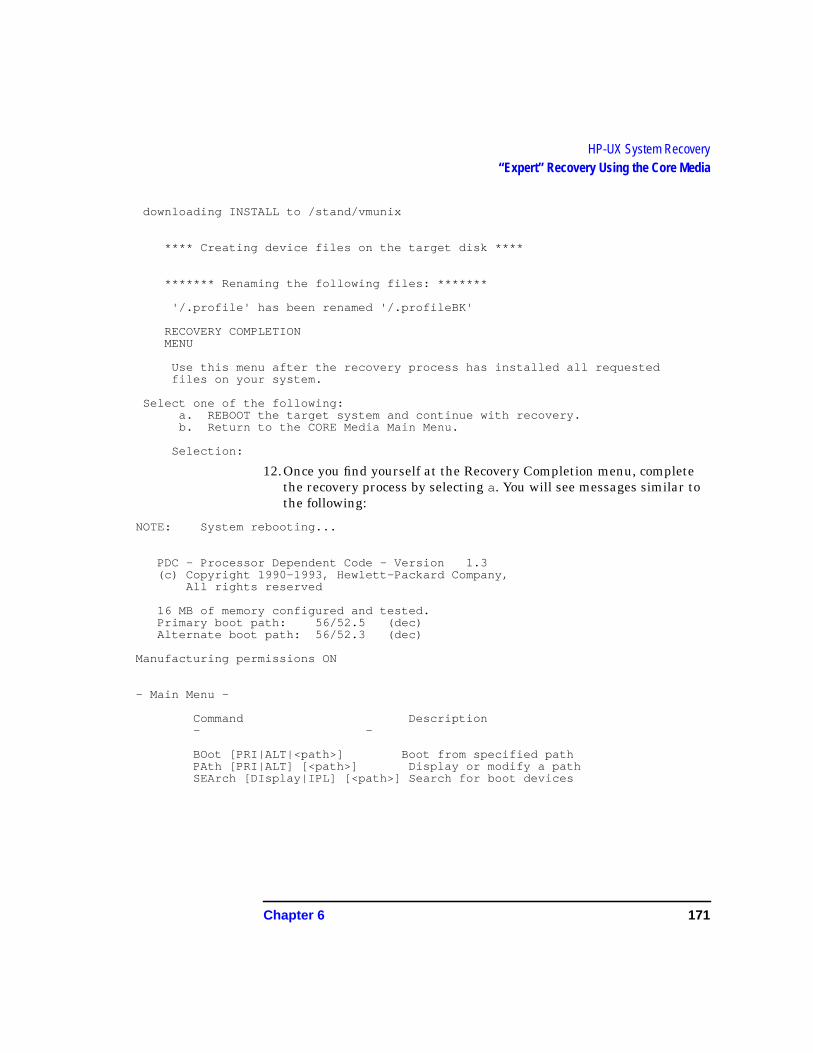
Chapter 6 171
HP-UX System Recovery“Expert” Recovery Using the Core Media
downloading INSTALL to /stand/vmunix
**** Creating device files on the target disk ****
******* Renaming the following files: *******
'/.profile' has been renamed '/.profileBK'
RECOVERY COMPLETIONMENU
Use this menu after the recovery process has installed all requestedfiles on your system.
Select one of the following:a. REBOOT the target system and continue with recovery.b. Return to the CORE Media Main Menu.
Selection:
12.Once you find yourself at the Recovery Completion menu, completethe recovery process by selecting a. You will see messages similar tothe following:
NOTE: System rebooting...
PDC - Processor Dependent Code - Version 1.3(c) Copyright 1990-1993, Hewlett-Packard Company,
All rights reserved
16 MB of memory configured and tested.Primary boot path: 56/52.5 (dec)Alternate boot path: 56/52.3 (dec)
Manufacturing permissions ON
- Main Menu -
Command Description- -
BOot [PRI|ALT|<path>] Boot from specified pathPAth [PRI|ALT] [<path>] Display or modify a pathSEArch [DIsplay|IPL] [<path>] Search for boot devices
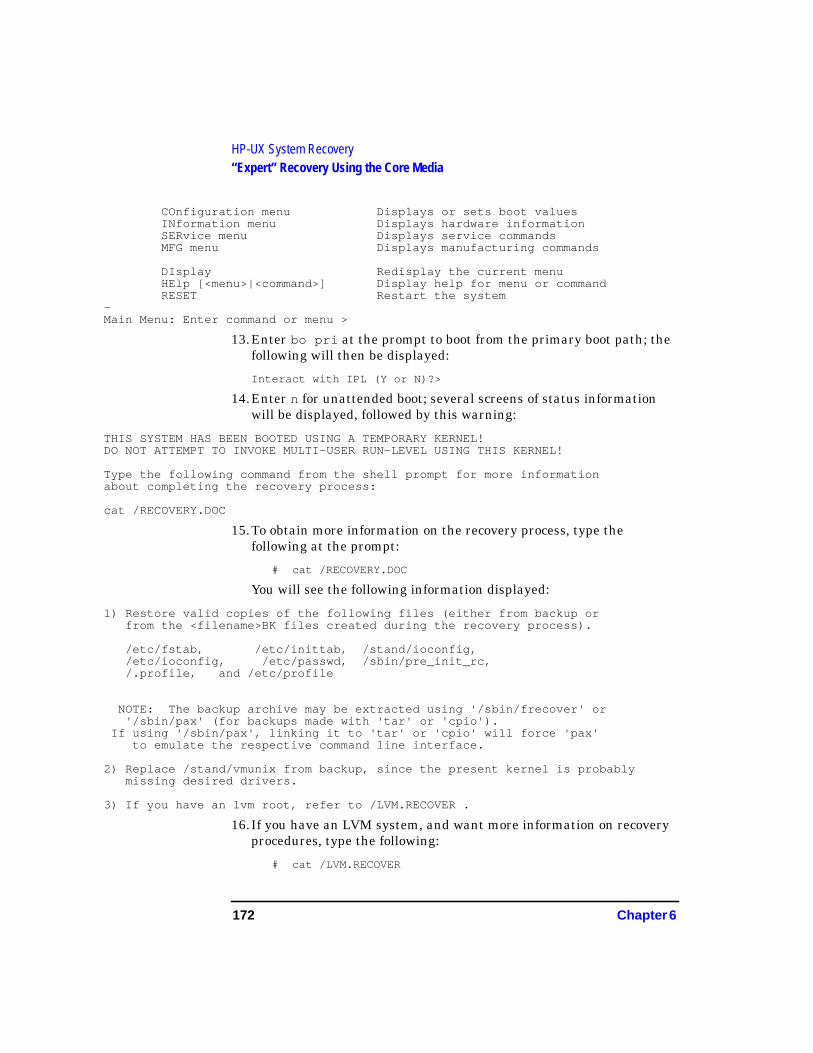
172 Chapter 6
HP-UX System Recovery“Expert” Recovery Using the Core Media
COnfiguration menu Displays or sets boot valuesINformation menu Displays hardware informationSERvice menu Displays service commandsMFG menu Displays manufacturing commands
DIsplay Redisplay the current menuHElp [<menu>|<command>] Display help for menu or commandRESET Restart the system
-Main Menu: Enter command or menu >
13.Enter bo pri at the prompt to boot from the primary boot path; thefollowing will then be displayed:
Interact with IPL (Y or N)?>
14.Enter n for unattended boot; several screens of status informationwill be displayed, followed by this warning:
THIS SYSTEM HAS BEEN BOOTED USING A TEMPORARY KERNEL!DO NOT ATTEMPT TO INVOKE MULTI-USER RUN-LEVEL USING THIS KERNEL!
Type the following command from the shell prompt for more informationabout completing the recovery process:
cat /RECOVERY.DOC
15.To obtain more information on the recovery process, type thefollowing at the prompt:
# cat /RECOVERY.DOC
You will see the following information displayed:
1) Restore valid copies of the following files (either from backup orfrom the <filename>BK files created during the recovery process).
/etc/fstab, /etc/inittab, /stand/ioconfig,/etc/ioconfig, /etc/passwd, /sbin/pre_init_rc,/.profile, and /etc/profile
NOTE: The backup archive may be extracted using '/sbin/frecover' or'/sbin/pax' (for backups made with 'tar' or 'cpio').
If using '/sbin/pax', linking it to 'tar' or 'cpio' will force 'pax'to emulate the respective command line interface.
2) Replace /stand/vmunix from backup, since the present kernel is probablymissing desired drivers.
3) If you have an lvm root, refer to /LVM.RECOVER .
16.If you have an LVM system, and want more information on recoveryprocedures, type the following:
# cat /LVM.RECOVER
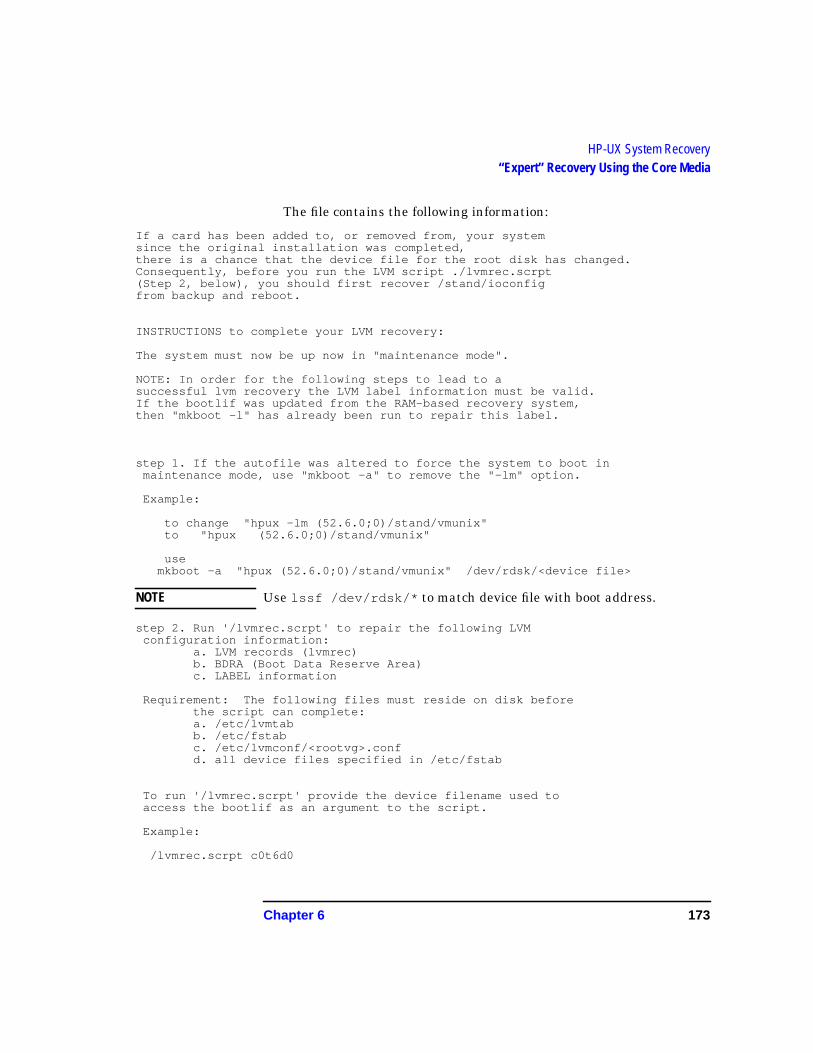
Chapter 6 173
HP-UX System Recovery“Expert” Recovery Using the Core Media
The file contains the following information:
If a card has been added to, or removed from, your systemsince the original installation was completed,there is a chance that the device file for the root disk has changed.Consequently, before you run the LVM script ./lvmrec.scrpt(Step 2, below), you should first recover /stand/ioconfigfrom backup and reboot.
INSTRUCTIONS to complete your LVM recovery:
The system must now be up now in "maintenance mode".
NOTE: In order for the following steps to lead to asuccessful lvm recovery the LVM label information must be valid.If the bootlif was updated from the RAM-based recovery system,then "mkboot -l" has already been run to repair this label.
step 1. If the autofile was altered to force the system to boot inmaintenance mode, use "mkboot -a" to remove the "-lm" option.
Example:
to change "hpux -lm (52.6.0;0)/stand/vmunix"to "hpux (52.6.0;0)/stand/vmunix"
usemkboot -a "hpux (52.6.0;0)/stand/vmunix" /dev/rdsk/<device file>
NOTE Use lssf /dev/rdsk/* to match device file with boot address.
step 2. Run '/lvmrec.scrpt' to repair the following LVMconfiguration information:
a. LVM records (lvmrec)b. BDRA (Boot Data Reserve Area)c. LABEL information
Requirement: The following files must reside on disk beforethe script can complete:a. /etc/lvmtabb. /etc/fstabc. /etc/lvmconf/<rootvg>.confd. all device files specified in /etc/fstab
To run '/lvmrec.scrpt' provide the device filename used toaccess the bootlif as an argument to the script.
Example:
/lvmrec.scrpt c0t6d0
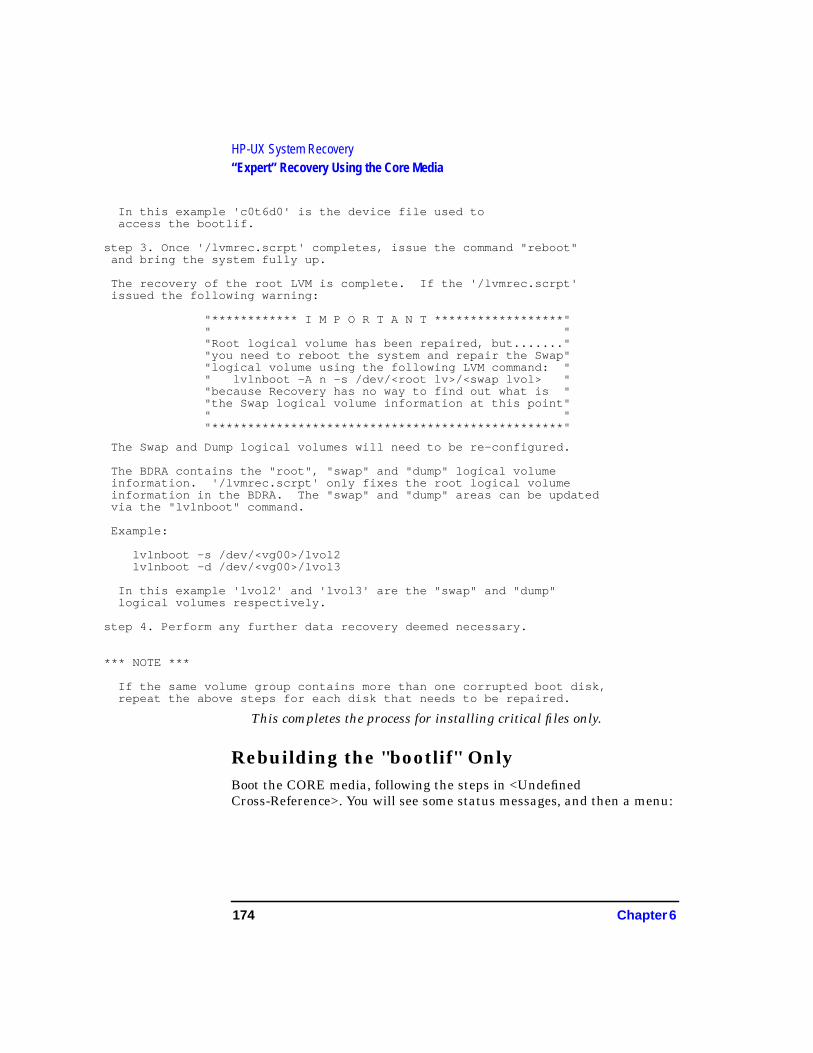
174 Chapter 6
HP-UX System Recovery“Expert” Recovery Using the Core Media
In this example 'c0t6d0' is the device file used toaccess the bootlif.
step 3. Once '/lvmrec.scrpt' completes, issue the command "reboot"and bring the system fully up.
The recovery of the root LVM is complete. If the '/lvmrec.scrpt'issued the following warning:
"*********** * I M P O R T A N T ******************"" ""Root logical volume has been repaired, but.......""you need to reboot the system and repair the Swap""logical volume using the following LVM command: "" lvlnboot -A n -s /dev/<root lv>/<swap lvol> ""because Recovery has no way to find out what is ""the Swap logical volume information at this point"" ""*************************************************"
The Swap and Dump logical volumes will need to be re-configured.
The BDRA contains the "root", "swap" and "dump" logical volumeinformation. '/lvmrec.scrpt' only fixes the root logical volumeinformation in the BDRA. The "swap" and "dump" areas can be updatedvia the "lvlnboot" command.
Example:
lvlnboot -s /dev/<vg00>/lvol2lvlnboot -d /dev/<vg00>/lvol3
In this example 'lvol2' and 'lvol3' are the "swap" and "dump"logical volumes respectively.
step 4. Perform any further data recovery deemed necessary.
*** NOTE ***
If the same volume group contains more than one corrupted boot disk,repeat the above steps for each disk that needs to be repaired.
This completes the process for installing critical files only.
Rebuilding the ''bootlif'' OnlyBoot the CORE media, following the steps in <UndefinedCross-Reference>. You will see some status messages, and then a menu:
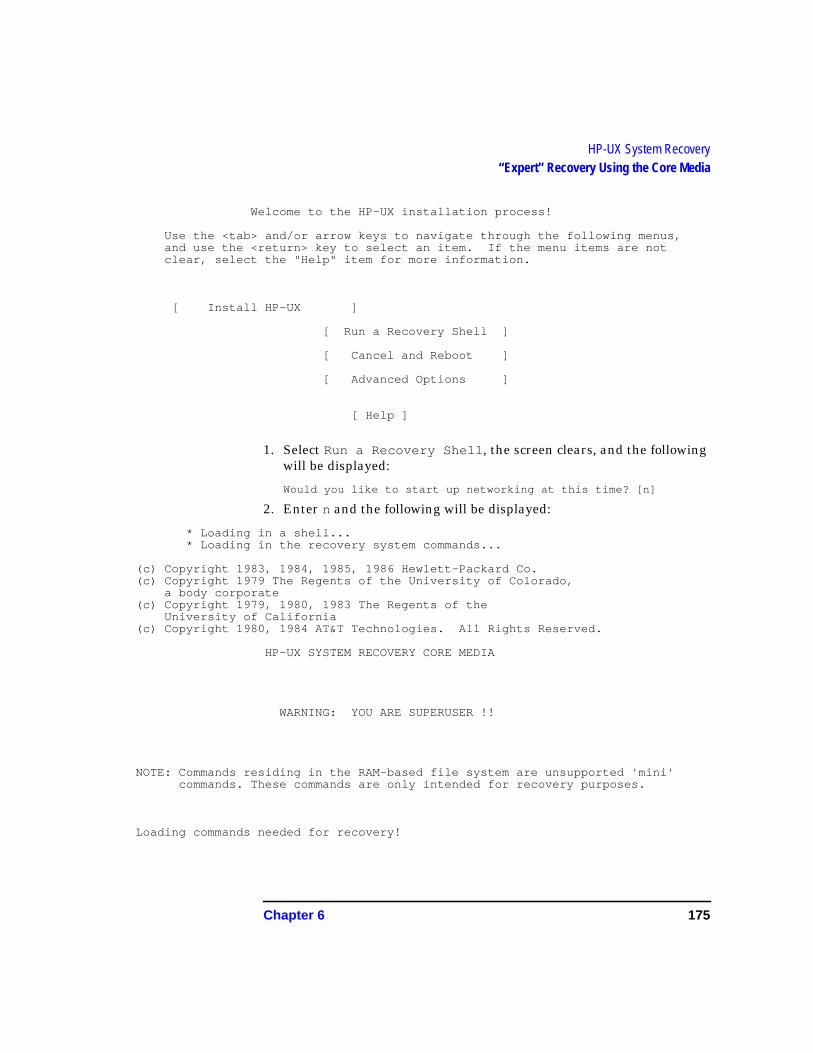
Chapter 6 175
HP-UX System Recovery“Expert” Recovery Using the Core Media
Welcome to the HP-UX installation process!
Use the <tab> and/or arrow keys to navigate through the following menus,and use the <return> key to select an item. If the menu items are notclear, select the "Help" item for more information.
[ Install HP-UX ]
[ Run a Recovery Shell ]
[ Cancel and Reboot ]
[ Advanced Options ]
[ Help ]
1. Select Run a Recovery Shell , the screen clears, and the followingwill be displayed:
Would you like to start up networking at this time? [n]
2. Enter n and the following will be displayed:
* Loading in a shell...* Loading in the recovery system commands...
(c) Copyright 1983, 1984, 1985, 1986 Hewlett-Packard Co.(c) Copyright 1979 The Regents of the University of Colorado,
a body corporate(c) Copyright 1979, 1980, 1983 The Regents of the
University of California(c) Copyright 1980, 1984 AT&T Technologies. All Rights Reserved.
HP-UX SYSTEM RECOVERY CORE MEDIA
WARNING: YOU ARE SUPERUSER !!
NOTE: Commands residing in the RAM-based file system are unsupported 'mini'commands. These commands are only intended for recovery purposes.
Loading commands needed for recovery!
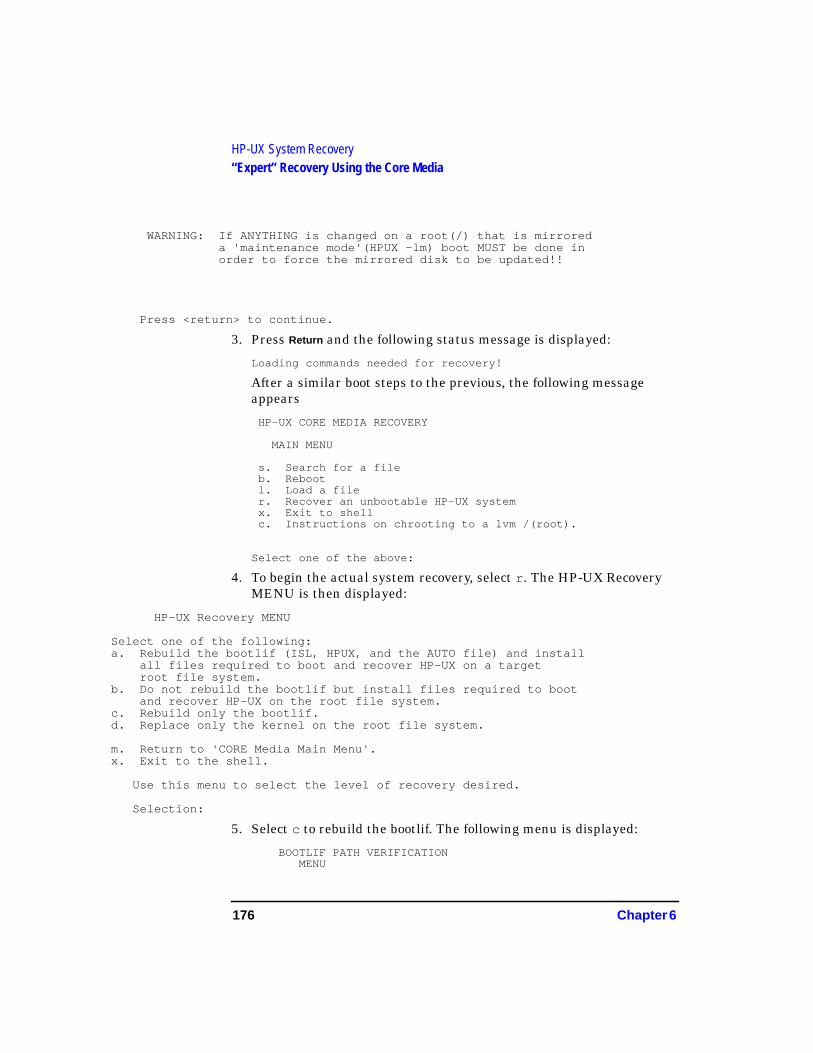
176 Chapter 6
HP-UX System Recovery“Expert” Recovery Using the Core Media
WARNING: If ANYTHING is changed on a root(/) that is mirroreda 'maintenance mode'(HPUX -lm) boot MUST be done inorder to force the mirrored disk to be updated!!
Press <return> to continue.
3. Press Return and the following status message is displayed:
Loading commands needed for recovery!
After a similar boot steps to the previous, the following messageappears
HP-UX CORE MEDIA RECOVERY
MAIN MENU
s. Search for a fileb. Rebootl. Load a filer. Recover an unbootable HP-UX systemx. Exit to shellc. Instructions on chrooting to a lvm /(root).
Select one of the above:
4. To begin the actual system recovery, select r . The HP-UX RecoveryMENU is then displayed:
HP-UX Recovery MENU
Select one of the following:a. Rebuild the bootlif (ISL, HPUX, and the AUTO file) and install
all files required to boot and recover HP-UX on a targetroot file system.
b. Do not rebuild the bootlif but install files required to bootand recover HP-UX on the root file system.
c. Rebuild only the bootlif.d. Replace only the kernel on the root file system.
m. Return to 'CORE Media Main Menu'.x. Exit to the shell.
Use this menu to select the level of recovery desired.
Selection:
5. Select c to rebuild the bootlif. The following menu is displayed:
BOOTLIF PATH VERIFICATIONMENU

Chapter 6 177
HP-UX System Recovery“Expert” Recovery Using the Core Media
This menu must be used to determine the path to the bootlif (ISL, HPUX
and the AUTO file).When the information is correct, select 'a'.
INFORMATION to verify:Path to the bootlif is 56/52.1.0
Select one of the following:a. The above information is correct.b. WRONG!! The path to bootlif is incorrect.
m. Return to the 'HP-UX Recovery MENU.'x. Exit to the shell.
Selection:
6. Assuming that the bootlif path is correct, enter a; the following menuis displayed:
BOOT STRING VERIFICATIONMENU
This menu must be used to verify the system's boot string.When the information is correct, select 'a'.
INFORMATION to verify:The system's boot string should be:
'hpux -lm (56/52.5.0)/stand/vmunix'
Select one of the following:a. The above information is correct.b. WRONG!! Prompt the user for the system's boot string.
m. Return to the 'HP-UX Recovery MENU.'x. Exit to the shell.
NOTE: For an LVM '/'(ROOT) the '-lm' option MUST be specified(example: 'hpux -lm (2.3.4)/stand/vmunix' )
Selection:
7. Assuming the boot string is incorrect, enter b at the prompt. You willsee a message similar to the following:
AUTO FILE should be (replacing 'hpux (56/52.5.0)/stand/vmunix'):
8. Enter the correct information (for example, hpux ); you will then seethe BOOT STRING VERIFICATION MENU displayed again:
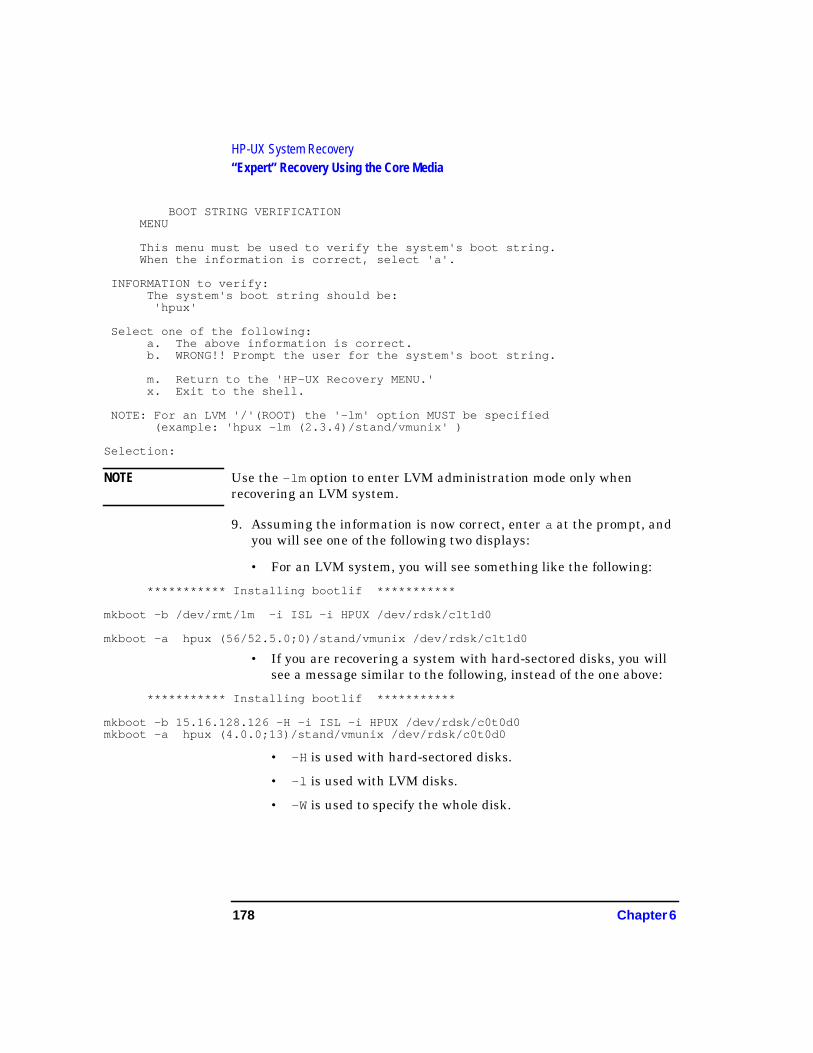
178 Chapter 6
HP-UX System Recovery“Expert” Recovery Using the Core Media
BOOT STRING VERIFICATIONMENU
This menu must be used to verify the system's boot string.When the information is correct, select 'a'.
INFORMATION to verify:The system's boot string should be:
'hpux'
Select one of the following:a. The above information is correct.b. WRONG!! Prompt the user for the system's boot string.
m. Return to the 'HP-UX Recovery MENU.'x. Exit to the shell.
NOTE: For an LVM '/'(ROOT) the '-lm' option MUST be specified(example: 'hpux -lm (2.3.4)/stand/vmunix' )
Selection:
NOTE Use the -lm option to enter LVM administration mode only whenrecovering an LVM system.
9. Assuming the information is now correct, enter a at the prompt, andyou will see one of the following two displays:
• For an LVM system, you will see something like the following:
*********** Installing bootlif ***********
mkboot -b /dev/rmt/1m -i ISL -i HPUX /dev/rdsk/c1t1d0
mkboot -a hpux (56/52.5.0;0)/stand/vmunix /dev/rdsk/c1t1d0
• If you are recovering a system with hard-sectored disks, you willsee a message similar to the following, instead of the one above:
*********** Installing bootlif ***********
mkboot -b 15.16.128.126 -H -i ISL -i HPUX /dev/rdsk/c0t0d0mkboot -a hpux (4.0.0;13)/stand/vmunix /dev/rdsk/c0t0d0
• -H is used with hard-sectored disks.
• -l is used with LVM disks.
• -W is used to specify the whole disk.
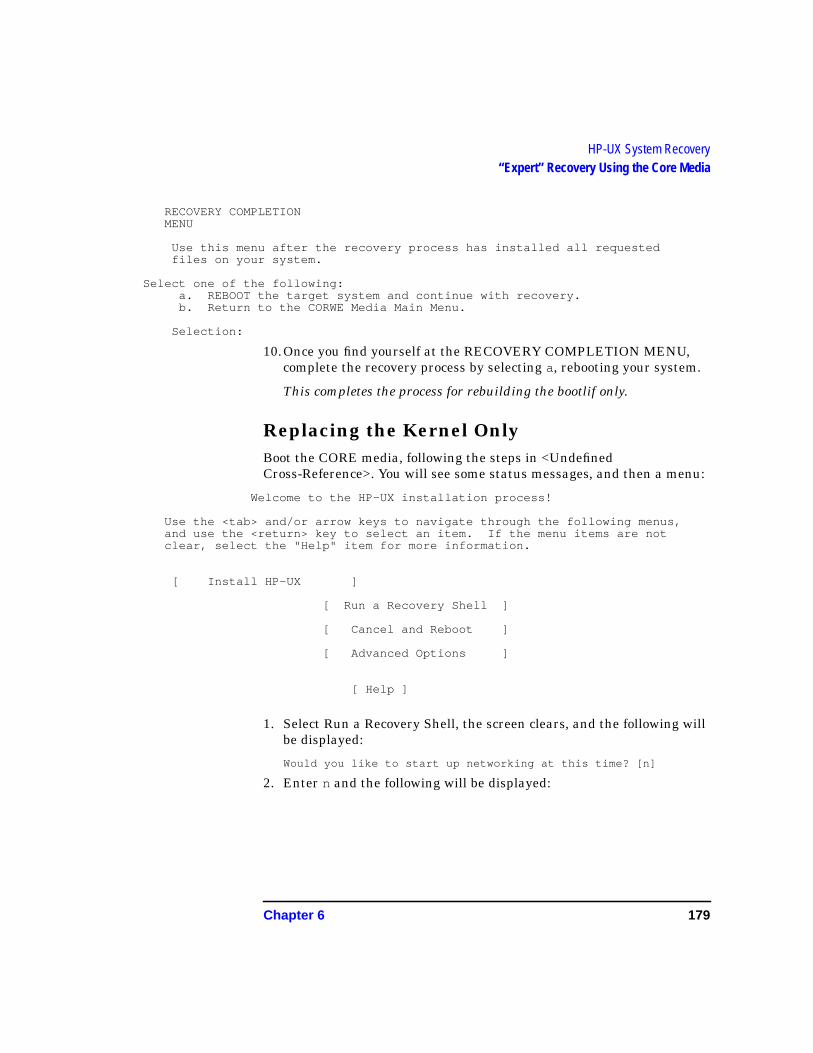
Chapter 6 179
HP-UX System Recovery“Expert” Recovery Using the Core Media
RECOVERY COMPLETIONMENU
Use this menu after the recovery process has installed all requestedfiles on your system.
Select one of the following:a. REBOOT the target system and continue with recovery.b. Return to the CORWE Media Main Menu.
Selection:
10.Once you find yourself at the RECOVERY COMPLETION MENU,complete the recovery process by selecting a, rebooting your system.
This completes the process for rebuilding the bootlif only.
Replacing the Kernel OnlyBoot the CORE media, following the steps in <UndefinedCross-Reference>. You will see some status messages, and then a menu:
Welcome to the HP-UX installation process!
Use the <tab> and/or arrow keys to navigate through the following menus,and use the <return> key to select an item. If the menu items are notclear, select the "Help" item for more information.
[ Install HP-UX ]
[ Run a Recovery Shell ]
[ Cancel and Reboot ]
[ Advanced Options ]
[ Help ]
1. Select Run a Recovery Shell, the screen clears, and the following willbe displayed:
Would you like to start up networking at this time? [n]
2. Enter n and the following will be displayed:
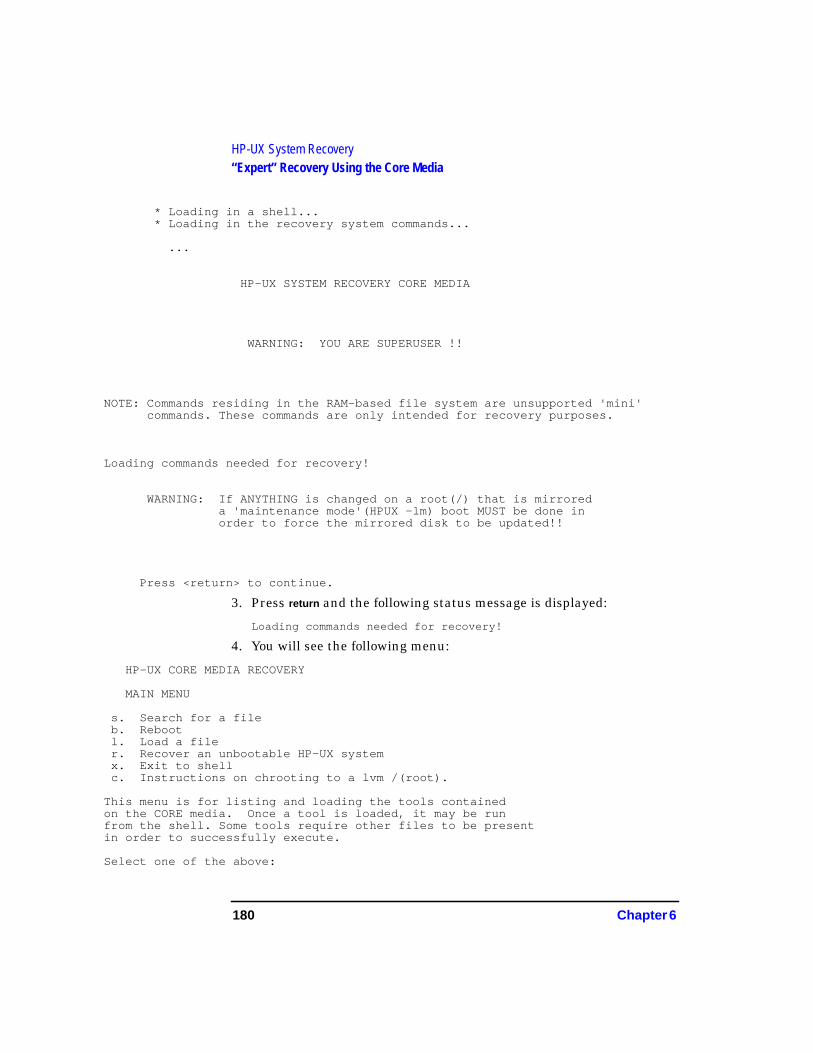
180 Chapter 6
HP-UX System Recovery“Expert” Recovery Using the Core Media
* Loading in a shell...* Loading in the recovery system commands...
...
HP-UX SYSTEM RECOVERY CORE MEDIA
WARNING: YOU ARE SUPERUSER !!
NOTE: Commands residing in the RAM-based file system are unsupported 'mini'commands. These commands are only intended for recovery purposes.
Loading commands needed for recovery!
WARNING: If ANYTHING is changed on a root(/) that is mirroreda 'maintenance mode'(HPUX -lm) boot MUST be done inorder to force the mirrored disk to be updated!!
Press <return> to continue.
3. Press return and the following status message is displayed:
Loading commands needed for recovery!
4. You will see the following menu:
HP-UX CORE MEDIA RECOVERY
MAIN MENU
s. Search for a fileb. Rebootl. Load a filer. Recover an unbootable HP-UX systemx. Exit to shellc. Instructions on chrooting to a lvm /(root).
This menu is for listing and loading the tools containedon the CORE media. Once a tool is loaded, it may be runfrom the shell. Some tools require other files to be presentin order to successfully execute.
Select one of the above:
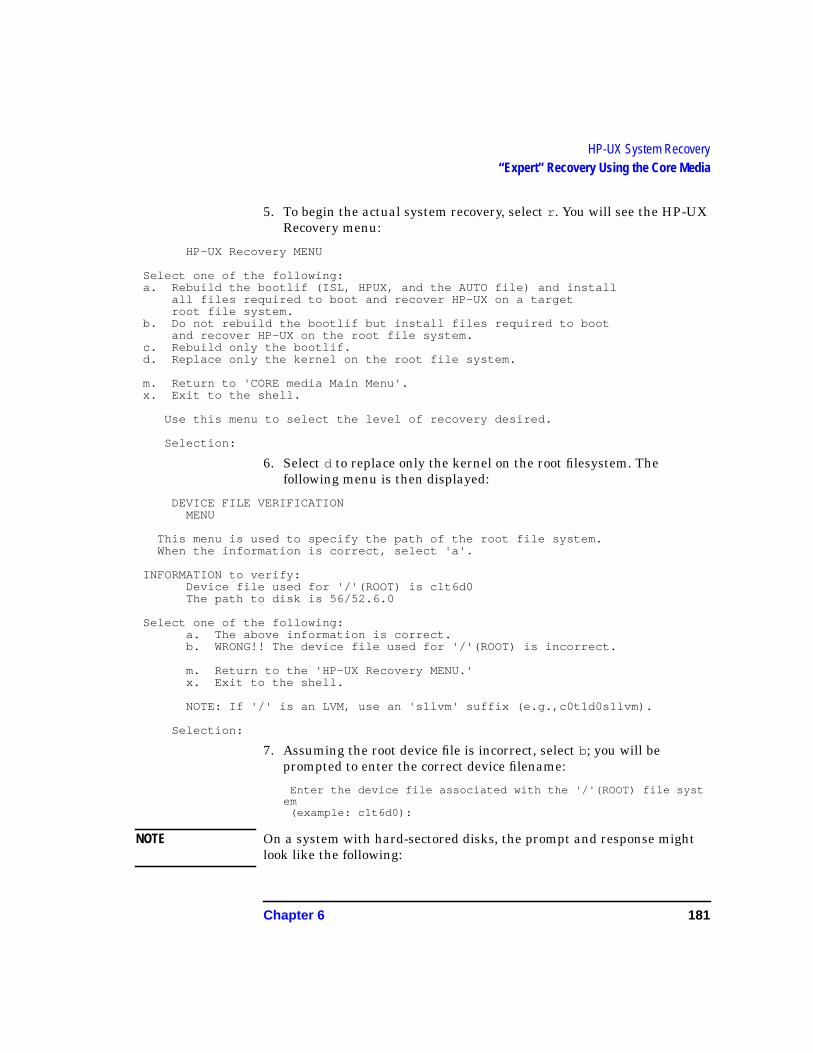
Chapter 6 181
HP-UX System Recovery“Expert” Recovery Using the Core Media
5. To begin the actual system recovery, select r . You will see the HP-UXRecovery menu:
HP-UX Recovery MENU
Select one of the following:a. Rebuild the bootlif (ISL, HPUX, and the AUTO file) and install
all files required to boot and recover HP-UX on a targetroot file system.
b. Do not rebuild the bootlif but install files required to bootand recover HP-UX on the root file system.
c. Rebuild only the bootlif.d. Replace only the kernel on the root file system.
m. Return to 'CORE media Main Menu'.x. Exit to the shell.
Use this menu to select the level of recovery desired.
Selection:
6. Select d to replace only the kernel on the root filesystem. Thefollowing menu is then displayed:
DEVICE FILE VERIFICATIONMENU
This menu is used to specify the path of the root file system.When the information is correct, select 'a'.
INFORMATION to verify:Device file used for '/'(ROOT) is c1t6d0The path to disk is 56/52.6.0
Select one of the following:a. The above information is correct.b. WRONG!! The device file used for '/'(ROOT) is incorrect.
m. Return to the 'HP-UX Recovery MENU.'x. Exit to the shell.
NOTE: If '/' is an LVM, use an 's1lvm' suffix (e.g.,c0t1d0s1lvm).
Selection:
7. Assuming the root device file is incorrect, select b; you will beprompted to enter the correct device filename:
Enter the device file associated with the '/'(ROOT) file system
(example: c1t6d0):
NOTE On a system with hard-sectored disks, the prompt and response mightlook like the following:
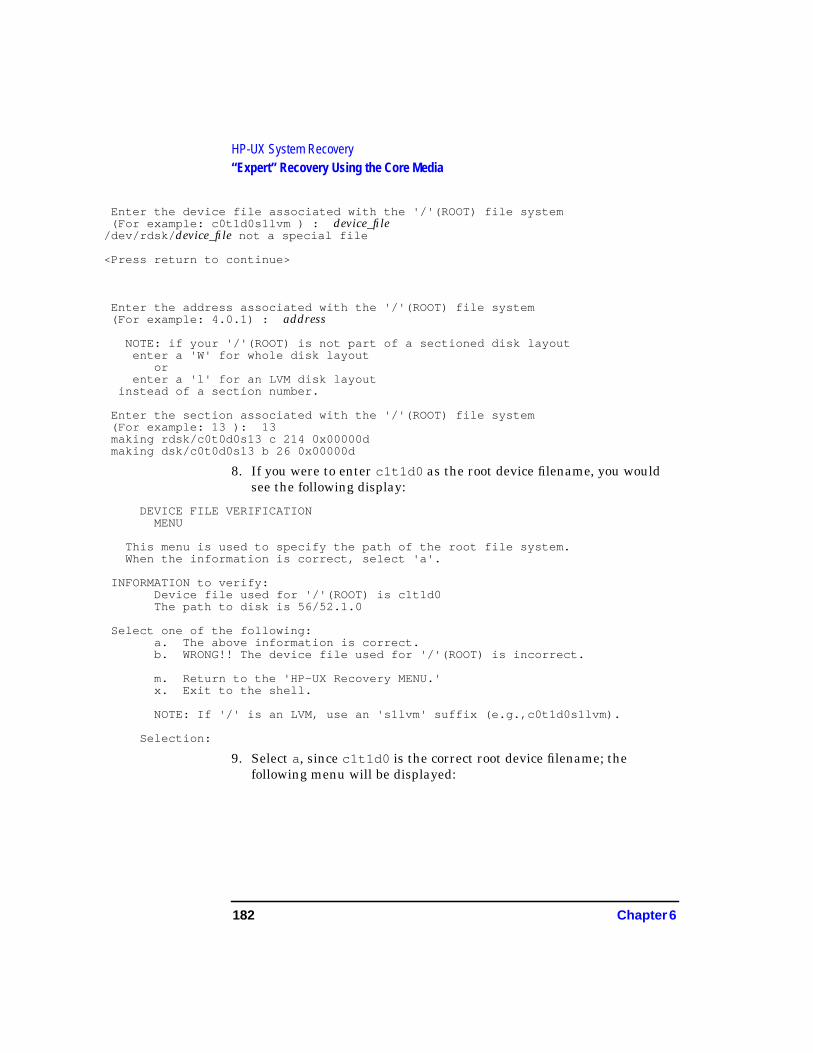
182 Chapter 6
HP-UX System Recovery“Expert” Recovery Using the Core Media
Enter the device file associated with the '/'(ROOT) file system(For example: c0t1d0s1lvm ) : device_file
/dev/rdsk/ device_file not a special file
<Press return to continue>
Enter the address associated with the '/'(ROOT) file system(For example: 4.0.1) : address
NOTE: if your '/'(ROOT) is not part of a sectioned disk layoutenter a 'W' for whole disk layout
orenter a 'l' for an LVM disk layout
instead of a section number.
Enter the section associated with the '/'(ROOT) file system(For example: 13 ): 13making rdsk/c0t0d0s13 c 214 0x00000dmaking dsk/c0t0d0s13 b 26 0x00000d
8. If you were to enter c1t1d0 as the root device filename, you wouldsee the following display:
DEVICE FILE VERIFICATIONMENU
This menu is used to specify the path of the root file system.When the information is correct, select 'a'.
INFORMATION to verify:Device file used for '/'(ROOT) is c1t1d0The path to disk is 56/52.1.0
Select one of the following:a. The above information is correct.b. WRONG!! The device file used for '/'(ROOT) is incorrect.
m. Return to the 'HP-UX Recovery MENU.'x. Exit to the shell.
NOTE: If '/' is an LVM, use an 's1lvm' suffix (e.g.,c0t1d0s1lvm).
Selection:
9. Select a, since c1t1d0 is the correct root device filename; thefollowing menu will be displayed:
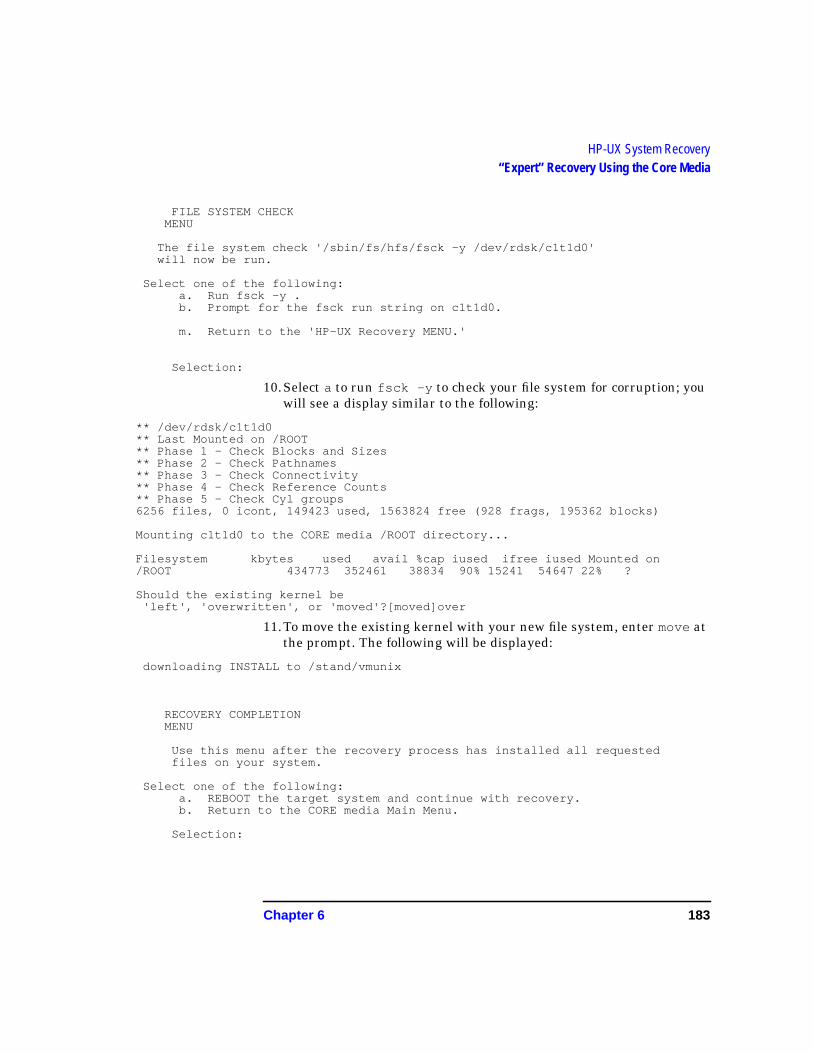
Chapter 6 183
HP-UX System Recovery“Expert” Recovery Using the Core Media
FILE SYSTEM CHECKMENU
The file system check '/sbin/fs/hfs/fsck -y /dev/rdsk/c1t1d0'will now be run.
Select one of the following:a. Run fsck -y .b. Prompt for the fsck run string on c1t1d0.
m. Return to the 'HP-UX Recovery MENU.'
Selection:
10.Select a to run fsck -y to check your file system for corruption; youwill see a display similar to the following:
** /dev/rdsk/c1t1d0** Last Mounted on /ROOT** Phas e 1 - Check Blocks and Sizes** Phas e 2 - Check Pathnames** Phas e 3 - Check Connectivity** Phas e 4 - Check Reference Counts** Phas e 5 - Check Cyl groups6256 files, 0 icont, 149423 used, 1563824 free (928 frags, 195362 blocks)
Mounting c1t1d0 to the CORE media /ROOT directory...
Filesystem kbytes used avail %cap iused ifree iused Mounted on/ROOT 434773 352461 38834 90% 15241 54647 22% ?
Should the existing kernel be'left', 'overwritten', or 'moved'?[moved]over
11.To move the existing kernel with your new file system, enter move atthe prompt. The following will be displayed:
downloading INSTALL to /stand/vmunix
RECOVERY COMPLETIONMENU
Use this menu after the recovery process has installed all requestedfiles on your system.
Select one of the following:a. REBOOT the target system and continue with recovery.b. Return to the CORE media Main Menu.
Selection:

184 Chapter 6
HP-UX System Recovery“Expert” Recovery Using the Core Media
12.Once you find yourself at the RECOVERY COMPLETION MENU,complete the recovery process by selecting a, REBOOT the targetsystem....
This completes the process for replacing the kernel only.
Chapter 7 185
Troubleshooting
7 Troubleshooting
186 Chapter 7
TroubleshootingChapter Contents
Chapter Contents• Likely Problem Areas
• Running add_release
• Running swinstall
• Booting a Client
• Setting Up the Ignite-UX Cluster
• Running the make_depots command
• Adjusting File System Size
• Large Systems
Chapter 7 187
TroubleshootingLikely Problem Areas
Likely Problem AreasAs an install progresses, you will see messages relating to the progressbeing entered into the log file. Usually these messages are related tonormal behavior. ERROR and WARNING messages have the followingsignificance:
ERROR This indicates a serious problem, usually requiringaction from the user in order to proceed with aninstallation.
WARNING This indicates something out of the ordinary, but notfatal. The warning may require action.
In case you see a message, or experience unusual behavior, you can usethe following tables as prioritized lists of likely problems and theirsolutions. They are grouped by the following topics, with the problemsyou are most likely to encounter near the beginning of each section.
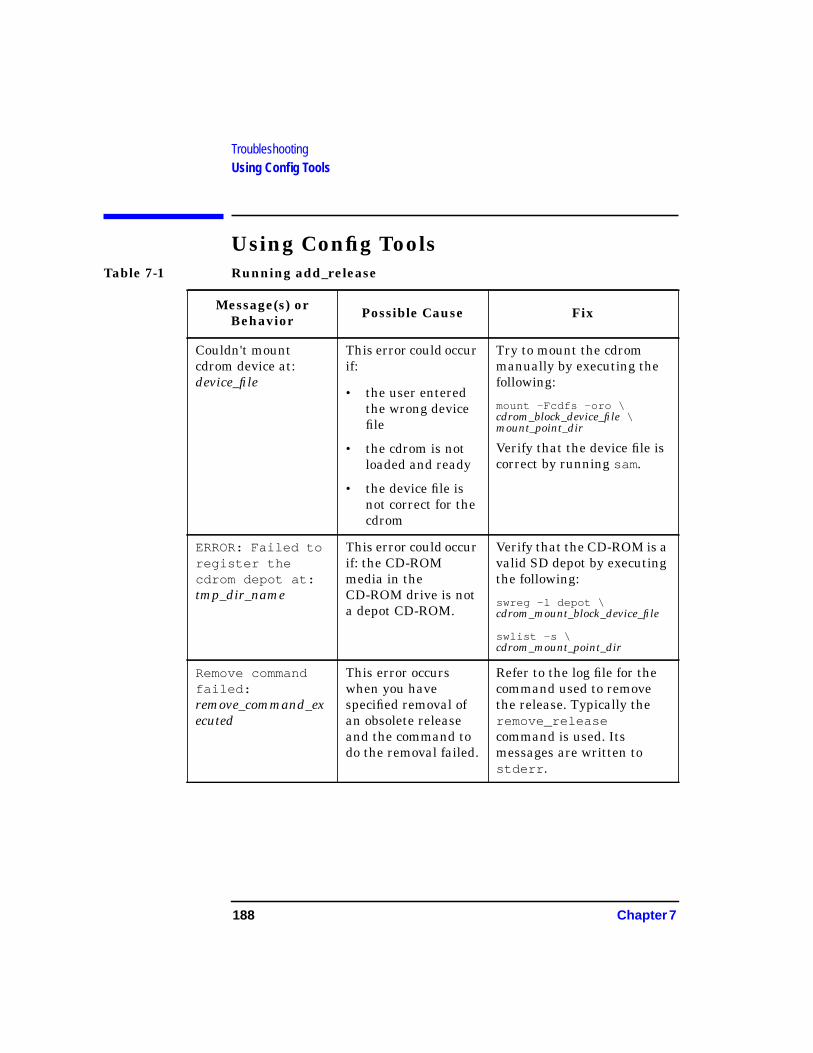
188 Chapter 7
TroubleshootingUsing Config Tools
Using Config ToolsTable 7-1 Running add_release
Message(s) orBehavior Possible Cause Fix
Couldn't mountcdrom device at:device_file
This error could occurif:
• the user enteredthe wrong devicefile
• the cdrom is notloaded and ready
• the device file isnot correct for thecdrom
Try to mount the cdrommanually by executing thefollowing:
mount -Fcdfs -oro \cdrom_block_device_file \mount_point_dir
Verify that the device file iscorrect by running sam.
ERROR: Failed toregister thecdrom depot at:tmp_dir_name
This error could occurif: the CD-ROMmedia in theCD-ROM drive is nota depot CD-ROM.
Verify that the CD-ROM is avalid SD depot by executingthe following:
swreg -l depot \cdrom_mount_block_device_file
swlist -s \cdrom_mount_point_dir
Remove commandfailed:remove_command_executed
This error occurswhen you havespecified removal ofan obsolete releaseand the command todo the removal failed.
Refer to the log file for thecommand used to removethe release. Typically theremove_releasecommand is used. Itsmessages are written tostderr .
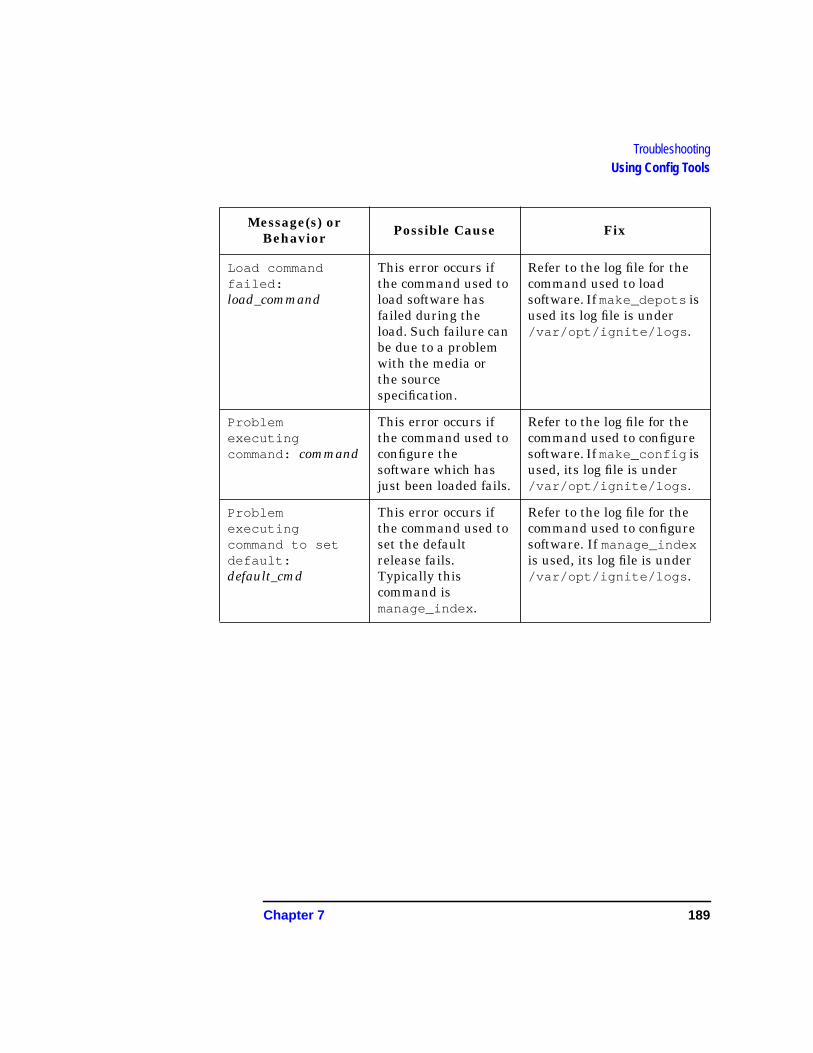
Chapter 7 189
TroubleshootingUsing Config Tools
Load commandfailed:load_command
This error occurs ifthe command used toload software hasfailed during theload. Such failure canbe due to a problemwith the media orthe sourcespecification.
Refer to the log file for thecommand used to loadsoftware. If make_depots isused its log file is under/var/opt/ignite/logs .
Problemexecutingcommand: command
This error occurs ifthe command used toconfigure thesoftware which hasjust been loaded fails.
Refer to the log file for thecommand used to configuresoftware. If make_config isused, its log file is under/var/opt/ignite/logs .
Problemexecutingcommand to setdefault:default_cmd
This error occurs ifthe command used toset the defaultrelease fails.Typically thiscommand ismanage_index .
Refer to the log file for thecommand used to configuresoftware. If manage_indexis used, its log file is under/var/opt/ignite/logs .
Message(s) orBehavior Possible Cause Fix
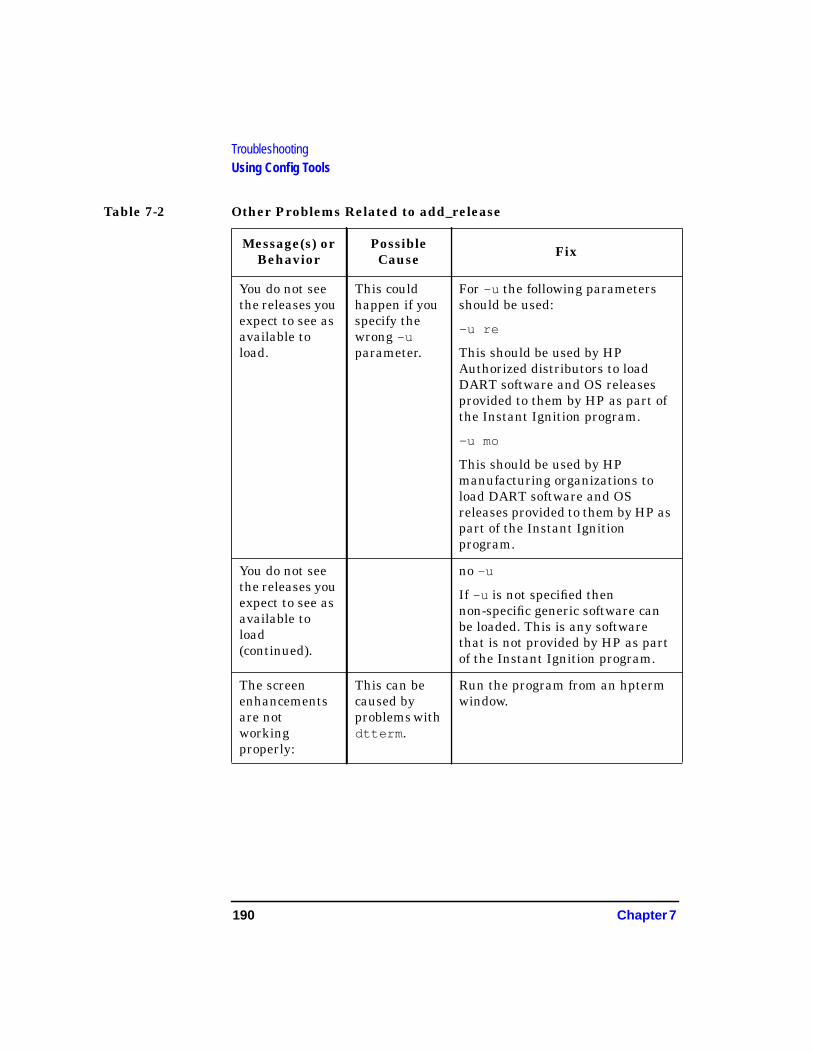
190 Chapter 7
TroubleshootingUsing Config Tools
Table 7-2 Other Problems Related to add_release
Message(s) orBehavior
PossibleCause Fix
You do not seethe releases youexpect to see asavailable toload.
This couldhappen if youspecify thewrong -uparameter.
For -u the following parametersshould be used:
-u re
This should be used by HPAuthorized distributors to loadDART software and OS releasesprovided to them by HP as part ofthe Instant Ignition program.
-u mo
This should be used by HPmanufacturing organizations toload DART software and OSreleases provided to them by HP aspart of the Instant Ignitionprogram.
You do not seethe releases youexpect to see asavailable toload(continued).
no -u
If -u is not specified thennon-specific generic software canbe loaded. This is any softwarethat is not provided by HP as partof the Instant Ignition program.
The screenenhancementsare notworkingproperly:
This can becaused byproblems withdtterm .
Run the program from an hptermwindow.
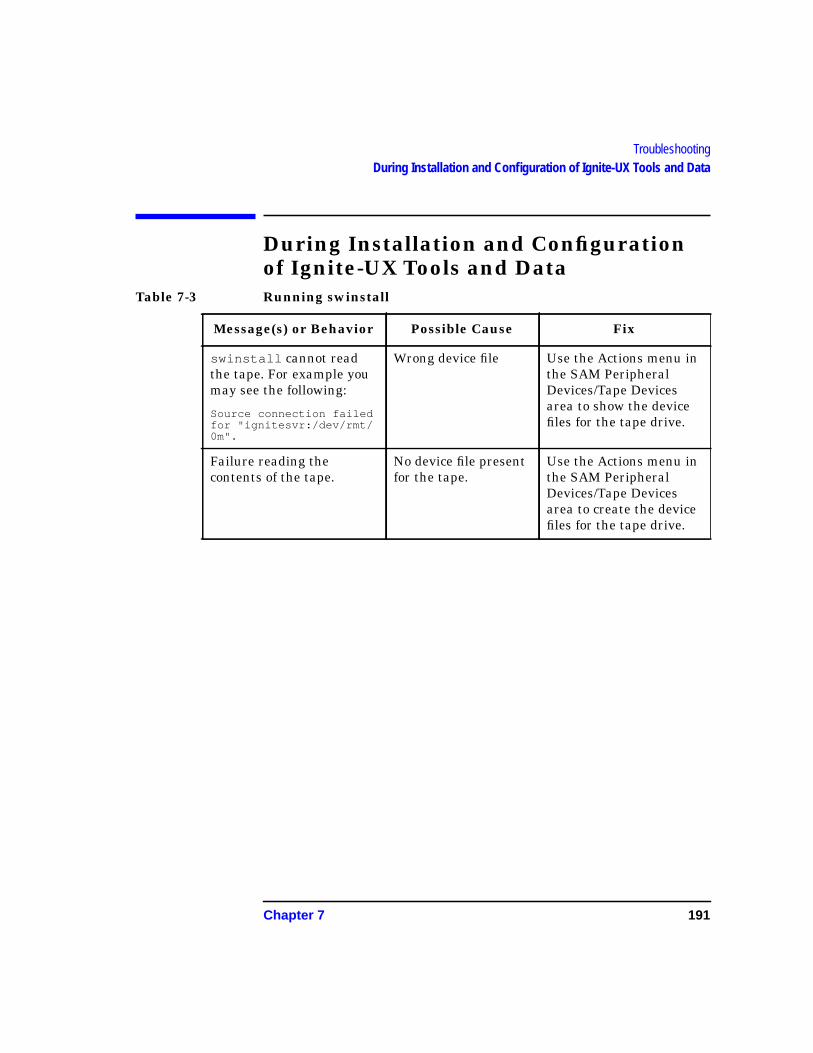
Chapter 7 191
TroubleshootingDuring Installation and Configuration of Ignite-UX Tools and Data
During Installation and Configurationof Ignite-UX Tools and Data
Table 7-3 Running swinstall
Message(s) or Behavior Possible Cause Fix
swinstall cannot readthe tape. For example youmay see the following:
Source connection failedfor "ignitesvr:/dev/rmt/0m".
Wrong device file Use the Actions menu inthe SAM PeripheralDevices/Tape Devicesarea to show the devicefiles for the tape drive.
Failure reading thecontents of the tape.
No device file presentfor the tape.
Use the Actions menu inthe SAM PeripheralDevices/Tape Devicesarea to create the devicefiles for the tape drive.
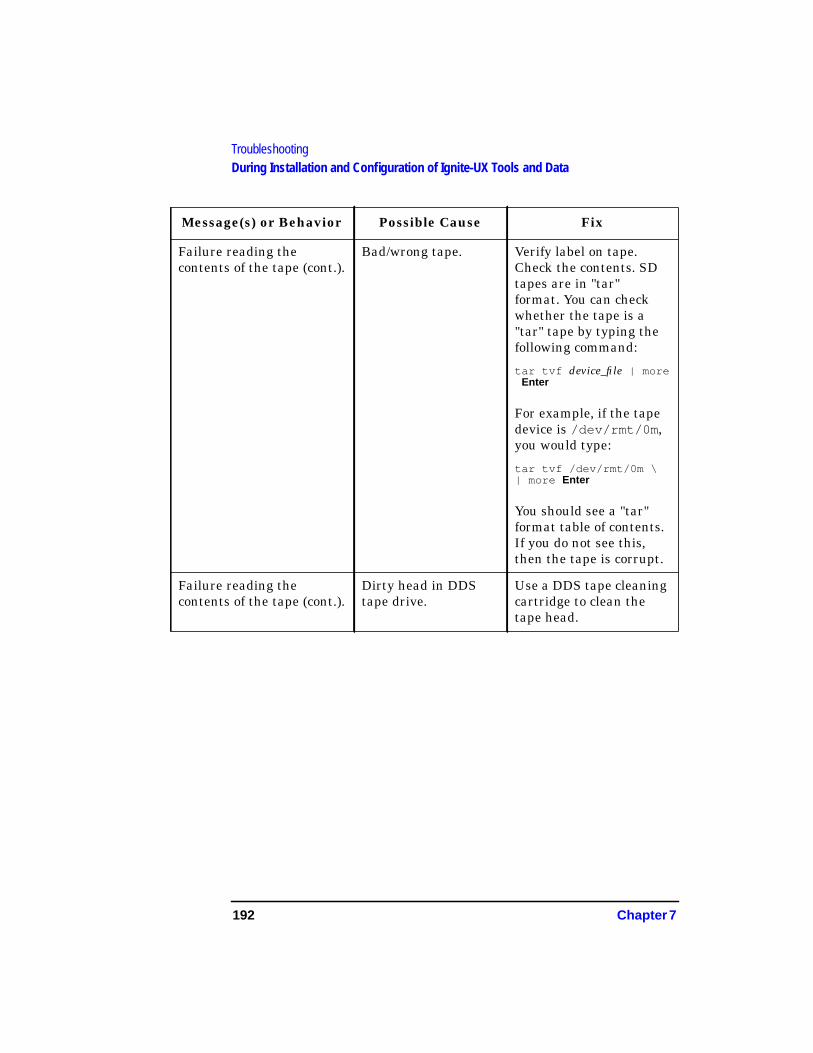
192 Chapter 7
TroubleshootingDuring Installation and Configuration of Ignite-UX Tools and Data
Failure reading thecontents of the tape (cont.).
Bad/wrong tape. Verify label on tape.Check the contents. SDtapes are in "tar"format. You can checkwhether the tape is a"tar" tape by typing thefollowing command:
tar tvf device_file | moreEnter
For example, if the tapedevice is /dev/rmt/0m ,you would type:
tar tvf /dev/rmt/0m \| more Enter
You should see a "tar"format table of contents.If you do not see this,then the tape is corrupt.
Failure reading thecontents of the tape (cont.).
Dirty head in DDStape drive.
Use a DDS tape cleaningcartridge to clean thetape head.
Message(s) or Behavior Possible Cause Fix
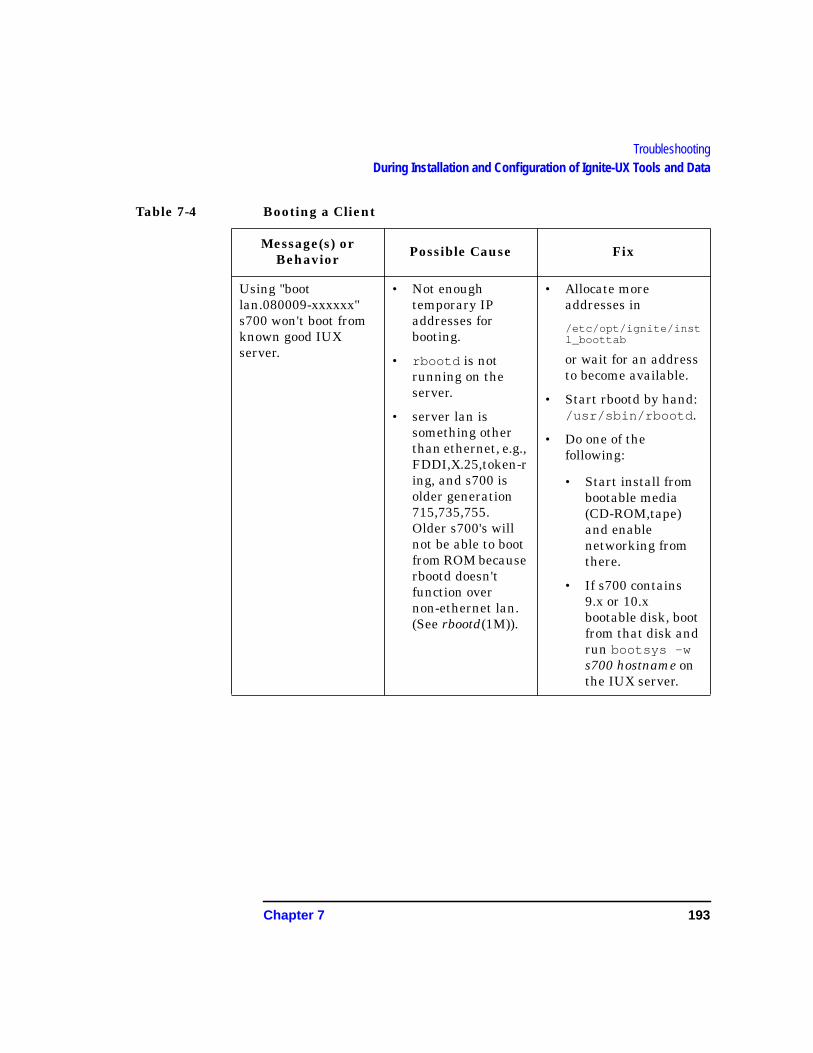
Chapter 7 193
TroubleshootingDuring Installation and Configuration of Ignite-UX Tools and Data
Table 7-4 Booting a Client
Message(s) orBehavior Possible Cause Fix
Using "bootlan.080009-xxxxxx"s700 won't boot fromknown good IUXserver.
• Not enoughtemporary IPaddresses forbooting.
• rbootd is notrunning on theserver.
• server lan issomething otherthan ethernet, e.g.,FDDI,X.25,token-ring, and s700 isolder generation715,735,755.Older s700's willnot be able to bootfrom ROM becauserbootd doesn'tfunction overnon-ethernet lan.(See rbootd(1M)).
• Allocate moreaddresses in
/etc/opt/ignite/instl_boottab
or wait for an addressto become available.
• Start rbootd by hand:/usr/sbin/rbootd .
• Do one of thefollowing:
• Start install frombootable media(CD-ROM,tape)and enablenetworking fromthere.
• If s700 contains9.x or 10.xbootable disk, bootfrom that disk andrun bootsys -ws700 hostname onthe IUX server.
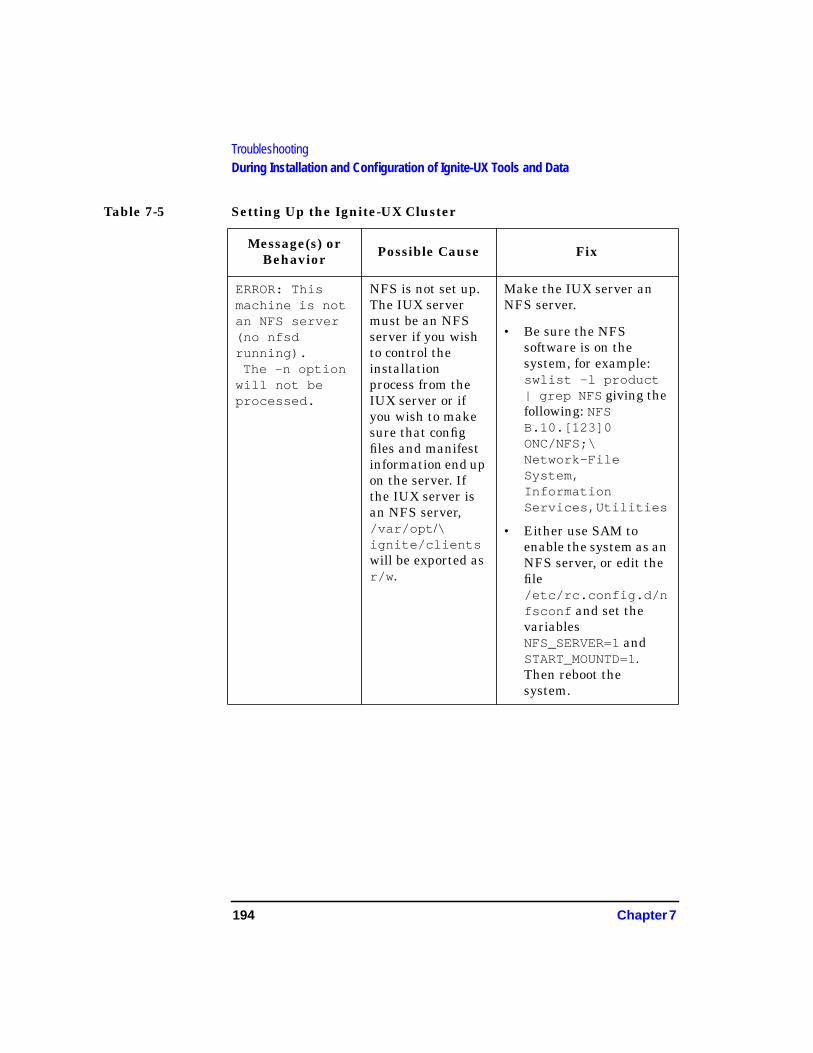
194 Chapter 7
TroubleshootingDuring Installation and Configuration of Ignite-UX Tools and Data
Table 7-5 Setting Up the Ignite-UX Cluster
Message(s) orBehavior Possible Cause Fix
ERROR: Thismachine is notan NFS server(no nfsdrunning). The -n optionwill not beprocessed.
NFS is not set up.The IUX servermust be an NFSserver if you wishto control theinstallationprocess from theIUX server or ifyou wish to makesure that configfiles and manifestinformation end upon the server. Ifthe IUX server isan NFS server,/var/opt /\ignite/clientswill be exported asr/w .
Make the IUX server anNFS server.
• Be sure the NFSsoftware is on thesystem, for example:swlist -l product| grep NFS giving thefollowing: NFSB.10.[123]0ONC/NFS;\Network-FileSystem,InformationServices,Utilities
• Either use SAM toenable the system as anNFS server, or edit thefile/etc/rc.config.d/nfsconf and set thevariablesNFS_SERVER=1 andSTART_MOUNTD=1.Then reboot thesystem.
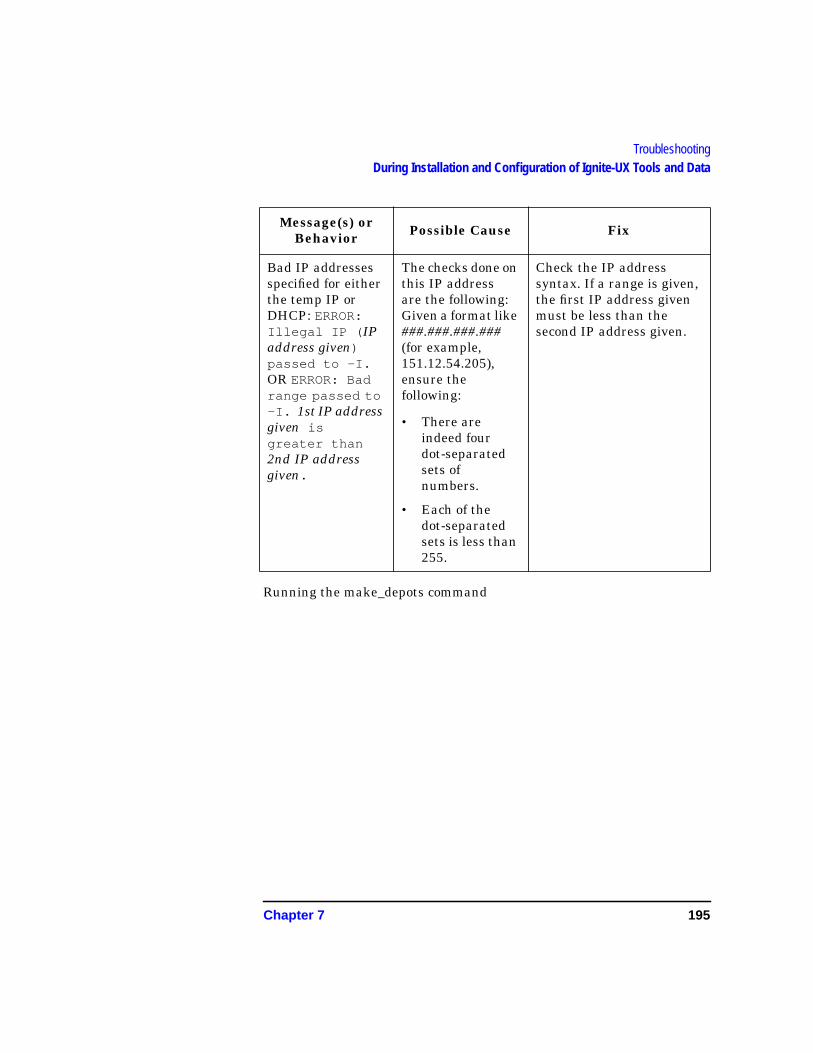
Chapter 7 195
TroubleshootingDuring Installation and Configuration of Ignite-UX Tools and Data
Running the make_depots command
Bad IP addressesspecified for eitherthe temp IP orDHCP: ERROR:Illegal IP ( IPaddress given)passed to -I.OR ERROR: Badrange passed to-I. 1st IP addressgiven isgreater than2nd IP addressgiven.
The checks done onthis IP addressare the following:Given a format like###.###.###.###(for example,151.12.54.205),ensure thefollowing:
• There areindeed fourdot-separatedsets ofnumbers.
• Each of thedot-separatedsets is less than255.
Check the IP addresssyntax. If a range is given,the first IP address givenmust be less than thesecond IP address given.
Message(s) orBehavior Possible Cause Fix
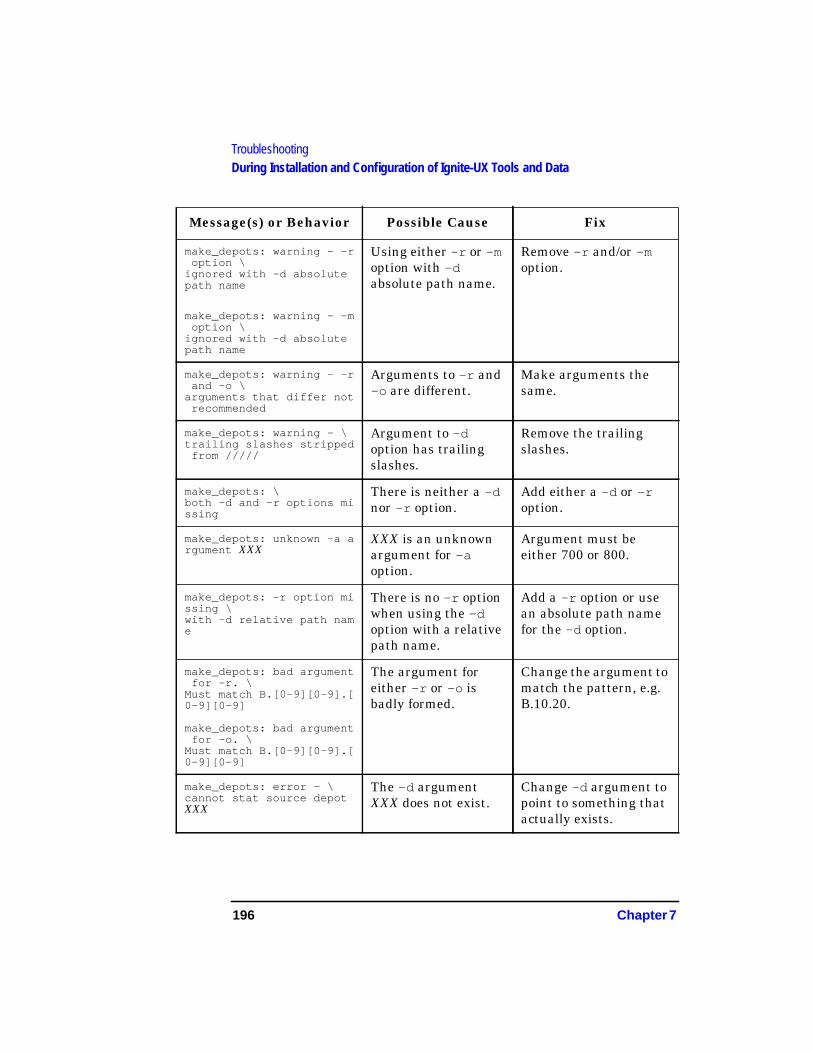
196 Chapter 7
TroubleshootingDuring Installation and Configuration of Ignite-UX Tools and Data
Message(s) or Behavior Possible Cause Fix
make_depots: warning - -roption \
ignored with -d absolutepath name
make_depots: warning - -moption \
ignored with -d absolutepath name
Using either -r or -moption with -dabsolute path name.
Remove -r and/or -moption.
make_depots: warning - -rand -o \
arguments that differ notrecommended
Arguments to -r and-o are different.
Make arguments thesame.
make_depots: warning - \trailing slashes stripped
from /////
Argument to -doption has trailingslashes.
Remove the trailingslashes.
make_depots: \both -d and -r options missing
There is neither a -dnor -r option.
Add either a -d or -roption.
make_depots: unknown -a argument XXX
XXX is an unknownargument for -aoption.
Argument must beeither 700 or 800.
make_depots: -r option missing \with -d relative path name
There is no -r optionwhen using the -doption with a relativepath name.
Add a -r option or usean absolute path namefor the -d option.
make_depots: bad argumentfor -r. \
Must match B.[0-9][0-9].[0-9][0-9]
make_depots: bad argumentfor -o. \
Must match B.[0-9][0-9].[0-9][0-9]
The argument foreither -r or -o isbadly formed.
Change the argument tomatch the pattern, e.g.B.10.20.
make_depots: error - \cannot stat source depotXXX
The -d argumentXXX does not exist.
Change -d argument topoint to something thatactually exists.
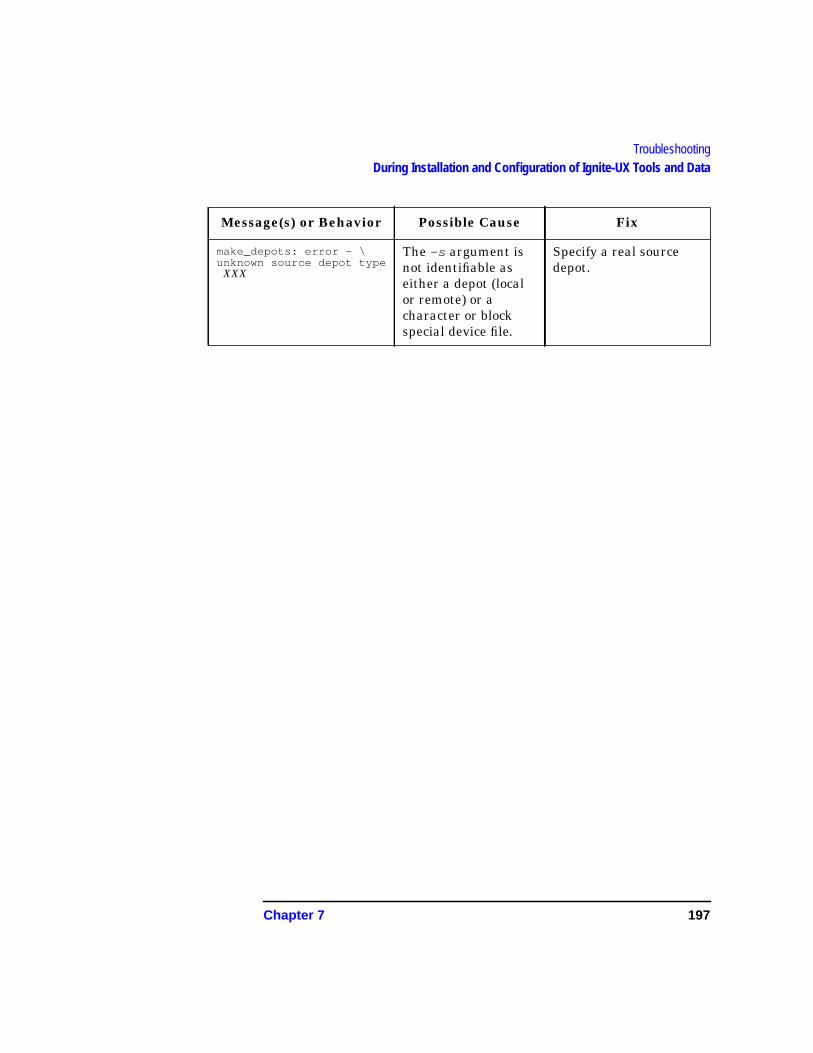
Chapter 7 197
TroubleshootingDuring Installation and Configuration of Ignite-UX Tools and Data
make_depots: error - \unknown source depot type
XXX
The -s argument isnot identifiable aseither a depot (localor remote) or acharacter or blockspecial device file.
Specify a real sourcedepot.
Message(s) or Behavior Possible Cause Fix
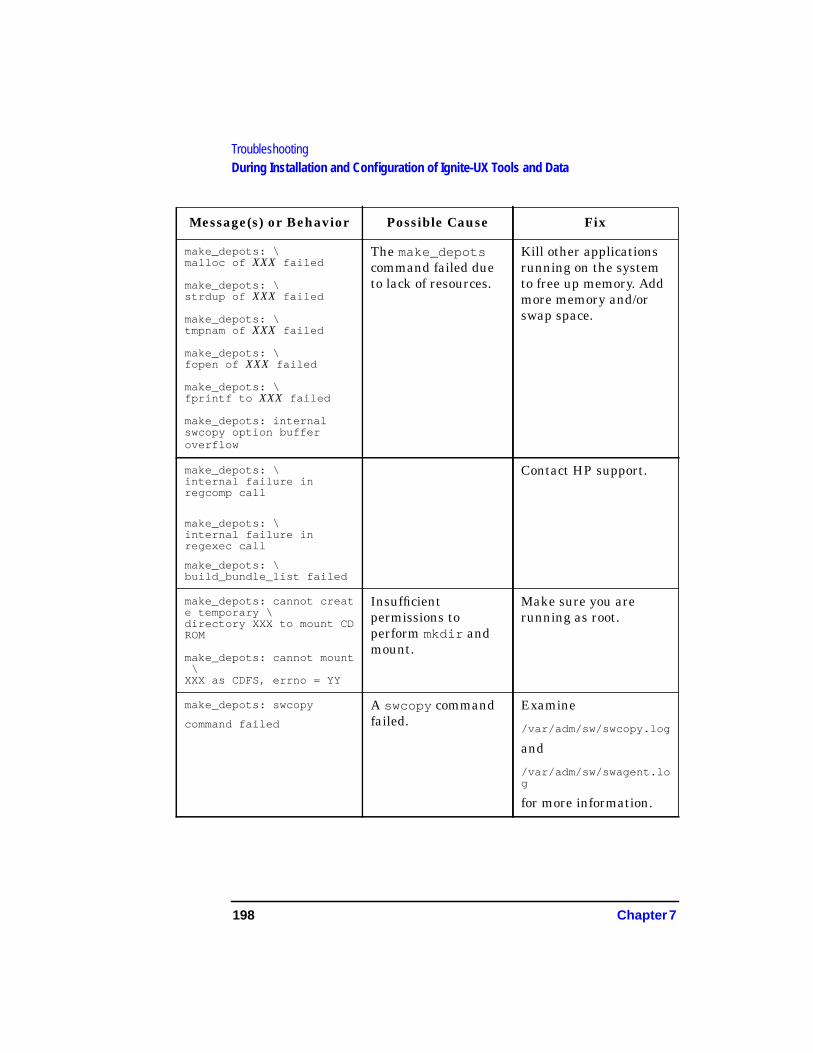
198 Chapter 7
TroubleshootingDuring Installation and Configuration of Ignite-UX Tools and Data
make_depots: \malloc of XXX failed
make_depots: \strdup of XXX failed
make_depots: \tmpnam of XXX failed
make_depots: \fopen of XXX failed
make_depots: \fprintf to XXX failed
make_depots: internalswcopy option bufferoverflow
The make_depotscommand failed dueto lack of resources.
Kill other applicationsrunning on the systemto free up memory. Addmore memory and/orswap space.
make_depots: \internal failure inregcomp call
make_depots: \internal failure inregexec call
make_depots: \build_bundle_list failed
Contact HP support.
make_depots: cannot create temporary \directory XXX to mount CDROM
make_depots: cannot mount\
XXX as CDFS, errno = YY
Insufficientpermissions toperform mkdir andmount.
Make sure you arerunning as root.
make_depots: swcopy
command failed
A swcopy commandfailed.
Examine
/var/adm/sw/swcopy.log
and
/var/adm/sw/swagent.log
for more information.
Message(s) or Behavior Possible Cause Fix
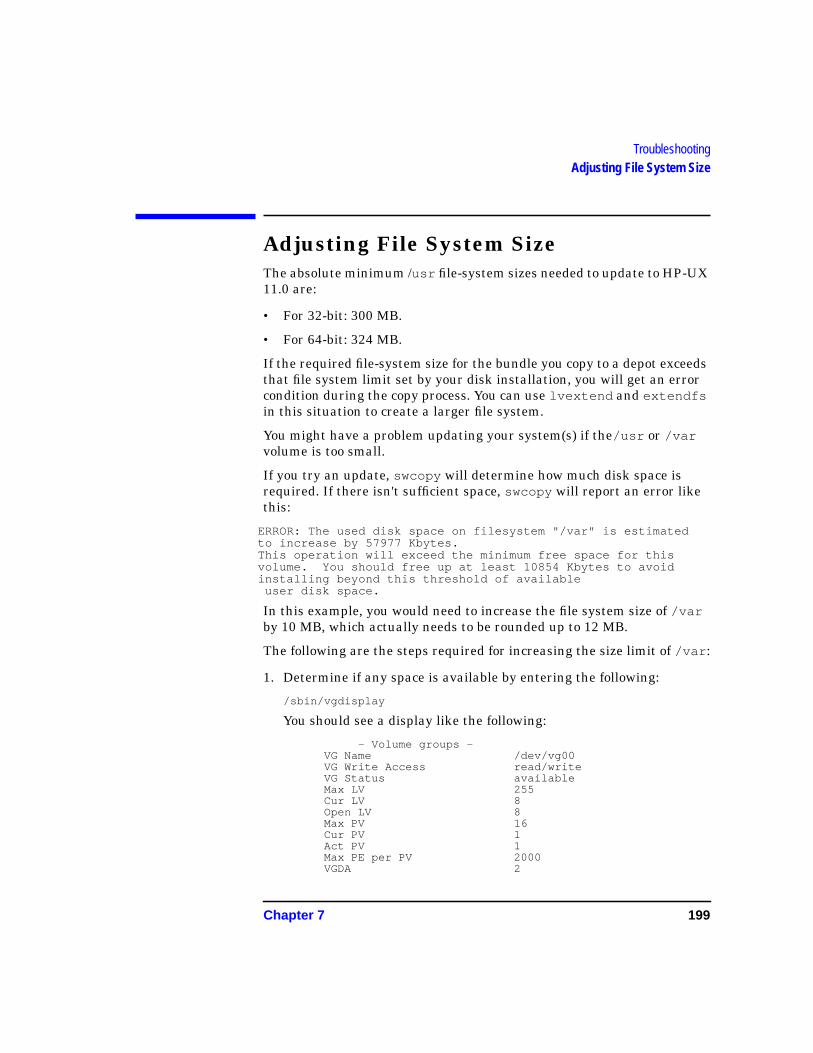
Chapter 7 199
TroubleshootingAdjusting File System Size
Adjusting File System SizeThe absolute minimum /usr file-system sizes needed to update to HP-UX11.0 are:
• For 32-bit: 300 MB.
• For 64-bit: 324 MB.
If the required file-system size for the bundle you copy to a depot exceedsthat file system limit set by your disk installation, you will get an errorcondition during the copy process. You can use lvextend and extendfsin this situation to create a larger file system.
You might have a problem updating your system(s) if the/usr or /varvolume is too small.
If you try an update, swcopy will determine how much disk space isrequired. If there isn't sufficient space, swcopy will report an error likethis:
ERROR: The used disk space on filesystem "/var" is estimatedto increase by 57977 Kbytes.This operation will exceed the minimum free space for thisvolume. You should free up at least 10854 Kbytes to avoidinstalling beyond this threshold of available
user disk space.
In this example, you would need to increase the file system size of /varby 10 MB, which actually needs to be rounded up to 12 MB.
The following are the steps required for increasing the size limit of /var :
1. Determine if any space is available by entering the following:
/sbin/vgdisplay
You should see a display like the following:
- Volume groups -VG Name /dev/vg00VG Write Access read/writeVG Status availableMax LV 255Cur LV 8Open LV 8Max PV 16Cur PV 1Act PV 1Max PE per PV 2000VGDA 2
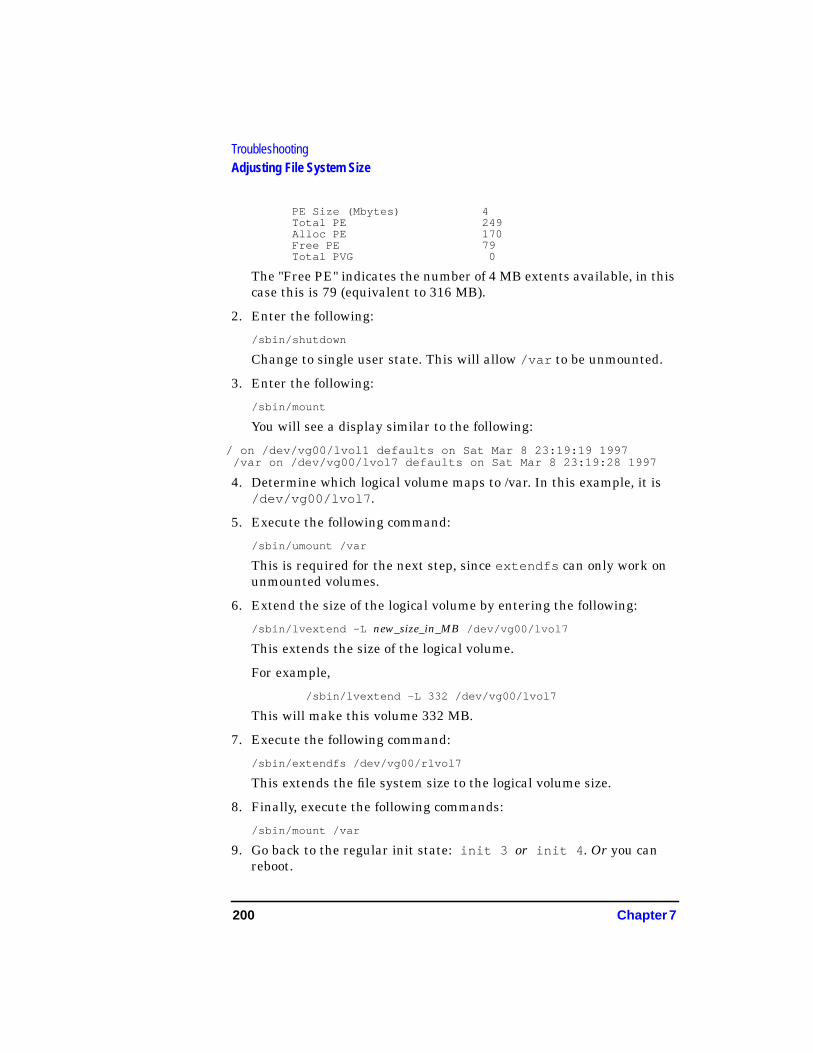
200 Chapter 7
TroubleshootingAdjusting File System Size
PE Size (Mbytes) 4Total PE 249Alloc PE 170Free PE 79Total PVG 0
The "Free PE" indicates the number of 4 MB extents available, in thiscase this is 79 (equivalent to 316 MB).
2. Enter the following:
/sbin/shutdown
Change to single user state. This will allow /var to be unmounted.
3. Enter the following:
/sbin/mount
You will see a display similar to the following:
/ on /dev/vg00/lvol1 defaults on Sat Mar 8 23:19:19 1997/var on /dev/vg00/lvol7 defaults on Sat Mar 8 23:19:28 1997
4. Determine which logical volume maps to /var. In this example, it is/dev/vg00/lvol7 .
5. Execute the following command:
/sbin/umount /var
This is required for the next step, since extendfs can only work onunmounted volumes.
6. Extend the size of the logical volume by entering the following:
/sbin/lvextend -L new_size_in_MB /dev/vg00/lvol7
This extends the size of the logical volume.
For example,
/sbin/lvextend -L 332 /dev/vg00/lvol7
This will make this volume 332 MB.
7. Execute the following command:
/sbin/extendfs /dev/vg00/rlvol7
This extends the file system size to the logical volume size.
8. Finally, execute the following commands:
/sbin/mount /var
9. Go back to the regular init state: init 3 or init 4 . Or you canreboot.
Chapter 7 201
TroubleshootingLarge Systems
Large SystemsIf you are running a system with a large number of file systems, note thefollowing possible problem areas:
1. On a large system such as a T500 with a very large number of diskdrives (such as 50 or more), you may see messages such as thefollowing, during the system analysis phase of cold install.
Out of inode- can't link or find diskorWrite failed, file system is full.orFile system full.
2. To reduce the likelihood of this problem occurring, before you do theinstallation you should turn off any disks you don't plan to use for theinstallation process and start over.
3. After the system is cold-installed, you may wish to add back all thefile systems that existed under the previous installation, eithermanually or using SAM. However, for a large number of file systems(for example, over a hundred), some tables in the kernel may be toosmall to allow correct booting. This is because the newly-installedkernel contains default values for kernel tables sizes, and does notallow for special configurations made to the kernel installedpreviously.
For example, the first boot after adding the file systems may result inerror messages displayed to the console, such as the following:
inode: table is fullproc: table is fullfile: table is full
Additionally, the boot may fail in various ways. For example, you maybe have to do file system repair manually.
• If this is not possible, the kernel may need to be re-configuredbefore booting. The following settings should allow the kernel to bebooted, but may not be optimal for the system:
- ninode = 2048 (default is 476)- nproc = 1024 (default is 276)- nfile = 2048 (default is 790)
• Alternatively, you may wish to re-configure the kernel in one of thefollowing ways:

202 Chapter 7
TroubleshootingLarge Systems
• By raising maxusers to a large value, such as 200 .
• By selecting an appropriate bundle of SAM-tuned parametersfrom the SAM Kernel Configuration Actions menu.
You should determine the correct configuration for your system.
Note that this problem does not appear to affect the Upgrade process(updating from HP-UX 9.0x), since during Upgrade, the new kernelparameters are derived from the previous kernel.
Appendix A 203
Configuring for a DHCP Server
A Configuring for a DHCP Server
204 Appendix A
Configuring for a DHCP ServerAppendix Contents
Appendix Contents• Using DHCP Services: Overview.
• Setting Up a DHCP Server.
• Details on the DHCP Services.
• Enabling DHCP on a System Not Initially Configured with DHCP.
• Examples of DHCP Usage.
• Using bootptab as an Alternative to DHCP.
• Background Information on DHCP Design.
Appendix A 205
Configuring for a DHCP ServerIntroduction
IntroductionThe HP-UX 10.20 version of HPUX and Ignite-UX supports retrievingnetwork information via the Dynamic Host Configuration Protocol(DHCP). This appendix gives the details of setting up DHCP.
The Ignite-UX GUI allows for setting up DHCP for use during systeminstallation. This Appendix is for the user who wishes to use DHCP forongoing IP address management, as well as for system installation.
206 Appendix A
Configuring for a DHCP ServerUsing DHCP Services: Overview
Using DHCP Services: OverviewDHCP provides the following features:
• Allows for dynamically allocating IP addresses and hostnames.
• Automatically supplies most of the networking defaults that arerequested during a system installation or first time boot.
• Provides for on-going IP address maintenance via a concept of an "IPaddress lease". Having a lease on an IP address means that if thesystem "goes away" for a specified period of time without renewingthe lease, then that IP address can be given to a different system thatrequest a new IP address lease.
• Assists in reestablishing valid network parameters when a systemhas been moved from one DHCP-managed network to another.
The environment where DHCP works best is where the followingconditions and restrictions exist:
• When a range of currently unused IP addresses can be allocated foruse during new system bring-up.
• When the IP address-to-hostname mapping can be made ahead oftime (before the system to use it is installed). And this mapping canbe configured in the name services database before installing asystem.
• When the IP address and hostname that get assigned to a system arenot important. A system will keep the same IP address and hostnamefor as long as it renews the lease. However the original assignment isarbitrary.
• When the person installing the systems does not desire to choose ahostname for the system, but rather accepts the one alreadyregistered for the IP address supplied by DHCP. This will ensure thatthe system will be recognized immediately by its hostname.
• When existing systems that did not use DHCP before will continuenot to use it. Or, if they did, they would be willing to accept anarbitrary hostname and IP address. This is the same as with a newsystem. There currently is no tool available for pre-loading the DHCPdatabase with existing IP addresses and identifying the systems theybelong to. A tool to do this may be available in a future release.
Appendix A 207
Configuring for a DHCP ServerUsing DHCP Services: Overview
An alternative to using DHCP is to create /etc/bootptab entries foreach specific client on the network. This allows for specific IP addressmappings and greater control. For more detail, please see the section inthis Appendix , “Using bootptab as an Alternative to DHCP,” at the endof this chapter.
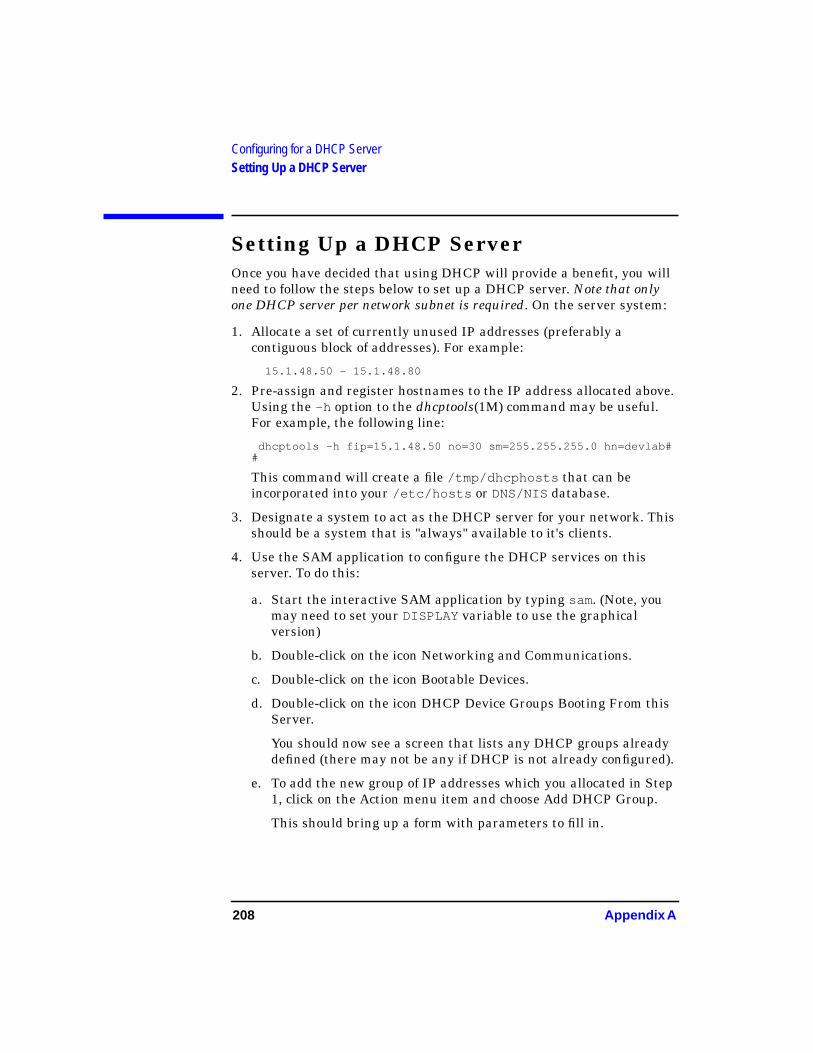
208 Appendix A
Configuring for a DHCP ServerSetting Up a DHCP Server
Setting Up a DHCP ServerOnce you have decided that using DHCP will provide a benefit, you willneed to follow the steps below to set up a DHCP server. Note that onlyone DHCP server per network subnet is required. On the server system:
1. Allocate a set of currently unused IP addresses (preferably acontiguous block of addresses). For example:
15.1.48.50 - 15.1.48.80
2. Pre-assign and register hostnames to the IP address allocated above.Using the -h option to the dhcptools(1M) command may be useful.For example, the following line:
dhcptools -h fip=15.1.48.50 no=30 sm=255.255.255.0 hn=devlab##
This command will create a file /tmp/dhcphosts that can beincorporated into your /etc/hosts or DNS/NIS database.
3. Designate a system to act as the DHCP server for your network. Thisshould be a system that is "always" available to it's clients.
4. Use the SAM application to configure the DHCP services on thisserver. To do this:
a. Start the interactive SAM application by typing sam. (Note, youmay need to set your DISPLAY variable to use the graphicalversion)
b. Double-click on the icon Networking and Communications.
c. Double-click on the icon Bootable Devices.
d. Double-click on the icon DHCP Device Groups Booting From thisServer.
You should now see a screen that lists any DHCP groups alreadydefined (there may not be any if DHCP is not already configured).
e. To add the new group of IP addresses which you allocated in Step1, click on the Action menu item and choose Add DHCP Group.
This should bring up a form with parameters to fill in.
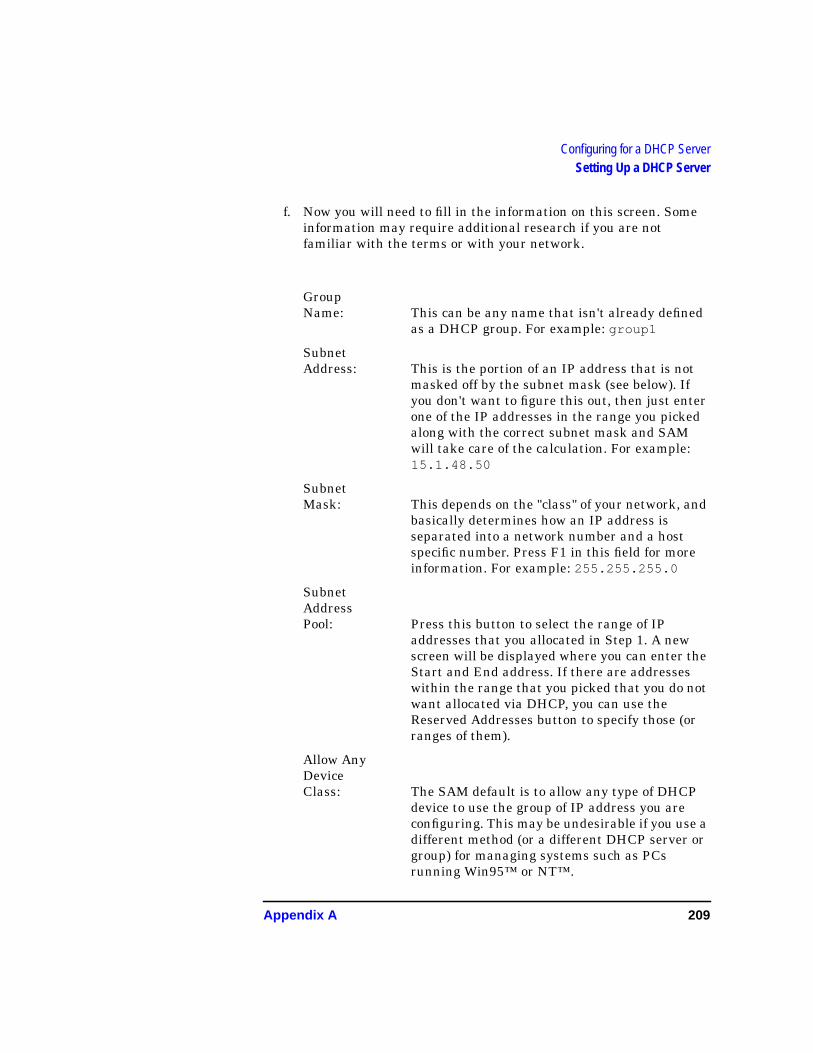
Appendix A 209
Configuring for a DHCP ServerSetting Up a DHCP Server
f. Now you will need to fill in the information on this screen. Someinformation may require additional research if you are notfamiliar with the terms or with your network.
GroupName: This can be any name that isn't already defined
as a DHCP group. For example: group1
SubnetAddress: This is the portion of an IP address that is not
masked off by the subnet mask (see below). Ifyou don't want to figure this out, then just enterone of the IP addresses in the range you pickedalong with the correct subnet mask and SAMwill take care of the calculation. For example:15.1.48.50
SubnetMask: This depends on the "class" of your network, and
basically determines how an IP address isseparated into a network number and a hostspecific number. Press F1 in this field for moreinformation. For example: 255.255.255.0
SubnetAddressPool: Press this button to select the range of IP
addresses that you allocated in Step 1. A newscreen will be displayed where you can enter theStart and End address. If there are addresseswithin the range that you picked that you do notwant allocated via DHCP, you can use theReserved Addresses button to specify those (orranges of them).
Allow AnyDeviceClass: The SAM default is to allow any type of DHCP
device to use the group of IP address you areconfiguring. This may be undesirable if you use adifferent method (or a different DHCP server orgroup) for managing systems such as PCsrunning Win95™ or NT™.
210 Appendix A
Configuring for a DHCP ServerSetting Up a DHCP Server
If you want this range of addresses to be usedonly by HP-UX systems, then unselect thisbutton, and enter the text:"HewlettPackard.HP-UX " in the text fieldprovided.
When using Ignite-UX to set up DHCP, it will seta class specific to the server, and will set thedhcp_class_id string to match. For moredetail, see the instl_adm(4) man page.
AutomaticAllocationto BootpClients: Leave this option disabled. Enabling it will
cause problems for bootp devices such asprinters and terminals which rely only on theirpreconfigured server to respond to their bootrequest.
AcceptNewClients: Leave this option enabled.
AddressLeaseTime: The lease time should be set sufficiently long so
that if a client system is temporarily out ofservice (off) for a time, its lease will not expiretoo soon.
Infinite leases will never expire and disable theIP-address reclamation features of DHCP. Forexample: 2 weeks.
Boot filename: You can leave this field blank.
Additional Params. There are many parameters that can be specified
in this screen for such things as the defaultrouters, time server, DNS server, and NISdomain. You can specify as much or as little asyou like in this area.
Appendix A 211
Configuring for a DHCP ServerSetting Up a DHCP Server
CallbackRoutines: None is necessary.
g. Once the parameters are all filled in, then press OK on the AddDHCP Group screen. SAM will then make the modifications to the/etc/dhcptab file .
h. You will now want to use the Action menu to Enable boot Server (ifit is not already enabled).
5. Now, new systems that are installed with HP-UX 10.20 (or newer) orbooted with a pre-installed 10.20 (or newer) version of HP-UX shouldcontact this server to get an IP address lease and other networkinformation provided by the server.
Details of the DHCPServices
• When doing a cold install of the HP-UX Operating system (version10.20 or newer):
The installation tools will broadcast out on the network for anyavailable DHCP servers. The first server to respond will be chosen toprovide the default network information that the user is presentedwith.
In the network parameters screen during a Cold Install, you see thequestion: "Is this networking information only temporary?". The"yes " or "no" answer to this implies the following:
• "no": Answering "no" (the default) means that if the IP addressand hostname were leased from an DHCP server, then that leasewill be retained after the install is done, so that the first boot ofthe system will attempt to renew the same lease.
• "yes ": Answering "yes " implies that the IP address and hostnamelease should be returned to the server after the installation iscomplete. In this case, the first system boot will try to get a newlease. This is most useful when the system is being installed on anetwork that is different from its final destination.
(This answer to the question can also be set in the configurationfile with instl_adm(1M) using the keywordis_netwk_info_temporary ).
When automating system installations, the DHCP services allowssystems to get networking information without the need to make amapping in the Ignite-UX configuration files. (See instl_adm(1m) andinstl_adm(4)).
212 Appendix A
Configuring for a DHCP ServerSetting Up a DHCP Server
• When a system boots for the first time (either after a Cold Install, orthe first boot of a pre-loaded (Instant Ignition) system):
The auto_parms tool, that lets you configure the system identity andbasic configuration parameters, will invoke the dhcpclient , whichwill broadcast out to find a DHCP server. The server, in turn, providesa default set of networking parameters.
In both cold install and a first boot of a pre-loaded system, if the userchooses not to use the IP address given by the DHCP server, the toolwill inform the DHCP server that it can release the lease on it andgive it to someone else.
• At each system boot:
If a client system was initially set up using an IP address that wasleased by a DHCP server, that client will check to ensure that thelease is still valid at each boot. In addition, the system will start adaemon process (dhcpclient -m ) that will maintain and renew thatlease while the system is running.
If a system cannot contact the DHCP server from which it originallygot the IP address lease, it will try to contact other DHCP servers inorder to determine if it has been moved to a different network. If thisis the case, the system will write a message to the auto_parms logfile (/etc/auto_parms.log ) indicating that it has detected a moveto a new subnet and that it is attempting to request a new lease. Ifthe new lease request is successful, new networking configurationvalues supplied by the DHCP server will automatically be applied.
Enabling DHCP on aSystem Not InitiallyConfigured with DHCP
If a system has been set up without using DHCP, but you would like tostart using it, the following steps may be taken.
NOTE The system's hostname and IP address may change based on what theDHCP server assigns to it the first time it boots.
There are two methods for enabling DHCP on a system that is notcurrently using it:
1. The first method is to use SAM.
a. As root , run sam.
b. Double-click Networking and Communications.
c. Double-click Network Interface Cards.
Appendix A 213
Configuring for a DHCP ServerSetting Up a DHCP Server
d. Highlight the card you wish to enable DHCP on, go to the Actionspull-down menu and select Configure.
e. Single click the Enable DHCP button.
NOTE If Enable DHCP appears grayed-out, you will need to use the alternatemethod for enabling DHCP described below.
f. Single click OK and exit SAM.
Your system will now begin using DHCP after the next reboot. Pleasenote that all of the current networking parameters will be overriddenwith new values supplied by the DHCP server. If for some reason thesystem cannot contact a DHCP server during the next reboot, it willcontinue to use its current networking parameters.
If you suspect that your system had problem contacting the DHCPserver, you can examine the auto_parms log file(/etc/auto_parms.log ) to determine if the lease request wassuccessful.
2. The second method for enabling DHCP over a particular networkinterface is use a text editor (such as vi or emacs) to edit the/etc/rc.config.d/netconf file. In the header of this file, you willfind some brief instructions regarding a variable namedDHCP_ENABLE. This variable is tied by an index number to anindividual network interface. For example, in the following block:
INTERFACE_NAME[0]=lan0IP_ADDRESS[0]=15.1.50.76SUBNET_MASK[0]=255.255.248.0BROADCAST_ADDRESS[0]=""DHCP_ENABLE[0]=1
Here, the variables are instructing the system to use the lan0interface when attempting to contact a DHCP server. Similarly, if thelease request is successful, the above IP_ADDRESS variable would beupdated to reflect the new value supplied by the DHCP server.
If the DHCP_ENABLE variable was set to 0 or if the variable did notexist, no DHCP operations would be attempted over thecorresponding network interface.
As noted in the first method of enabling DHCP, if the variableDHCP_ENABLE does not exist for a particular interface, the SAM toolwill display a grayed out DHCP enable button.

214 Appendix A
Configuring for a DHCP ServerSetting Up a DHCP Server
In this case, you will need to add the variable definition to a specificinterface variable block. As an example, you would need to addDHCP_ENABLE[2]=1 to the following interface variable block in orderto enable DHCP on the lan1 interface:
INTERFACE_NAME[2]=lan1IP_ADDRESS[2]=15.1.50.89SUBNET_MASK[2]=255.255.248.0BROADCAST_ADDRESS[2]=""
The contents of /etc/rc.config.d/netconf for this definitionblock should now look like the following:
INTERFACE_NAME[2]=lan1IP_ADDRESS[2]=15.1.50.89SUBNET_MASK[2]=255.255.248.0BROADCAST_ADDRESS[2]=""DHCP_ENABLE[2]=1
Correspondingly, you could disable DHCP over a particular interfaceby setting the variable to "0".
Again, as in the first method, the system will only begin using DHCPafter the next reboot.
Examples of DHCP UsageTo enable a DHCP server to respond only to specific clients, use theinstl_adm(1M) tool to configure specific dhcp_class_id's.
DHCP Examples For example, your situation might fall into one of the following fourcategories:
1. The network has a DHCP server that manages the whole network,and the clients doing installations will be using the addresses fromthis server permanently. Then the Ignite-UX server setup should be:
• Don't set up DHCP on Ignite-UX server In this case, enter thefollowing in INSTALLFS, (using instl_adm ).:
is_network_info_temporary=false
2. The network has a DHCP server, but the user would like to manage asmall group of temporary IP addresses, just for use in doinginstallations, and the clients will get reassigned new addresses whendeployed.
a. Set up DHCP on Ignite-UX server
Appendix A 215
Configuring for a DHCP ServerSetting Up a DHCP Server
b. Use a unique dhcp_class_id in both the dhcptab and the 8K configfile. This dhpc_class_id could have the server's hostname init. Inthis case, enter the following in INSTALLFS:
is_network_info_temporary=true
c. And enter your class i.d. as the following in the dhcptab andINSTALLFS:
dhcp_class_id
3. The user would like to setup the Ignite-UX server as a"departmental" DHCP server, in which case the IP address leases arepermanent, but they will be isolated to the department's DHCPserver.
a. Set up DHCP on the Ignite-UX server.
b. Enter the following:
Is_network_info_temporary=false
c. And enter your class i.d. as the following in the dhcptab andINSTALLFS:
dhcp_class_id
Use a unique dhcp_class_id in both the dhcptab and the INSTALLFSfile. This dhcp_class_id could have the server's hostname in it.
4. You want to start using DHCP with this server managing the wholenetwork.
• Refer to the preceding sections and /usr/sbin/sam , and itsmanpage (sam(1M)) for this procedure.
If you want to set up the Ignite-UX system to be a DHCP server, thedefault setting will give you Item 2. Otherwise, you can toggle theis_network_info_temporary keyword to select Item 3.
For more information, see the setup_server(1M) and bootpd(1M) manpages.
Using bootptab as an Alternative to DHCPIf you want to have more control over the allocation of IP addresses andtheir mappings to your clients, you can configure entries in/etc/bootptab for each client. Because BOOTP is a subset of DHCP,the client's request for a DHCP server will be satisfied with the BOOTPresponse.
216 Appendix A
Configuring for a DHCP ServerSetting Up a DHCP Server
If you also specify a boot-file (bf) of /opt/ignite/boot/boot_lif inthe bootptab entries, then you do not need any additional entries in/etc/opt/ignite/inst_boottab . In this case, you would then bootthe clients using boot lan instead of boot lan install . Only clientsknown in /etc/bootptab would be able to boot if you do not useinstl_boottab .
A minimal example /etc/bootptab entry would be like the entry below(with your own hostname, IP address, hardware address, and subnetmask). Other networking information may also be specified here, or canbe specified via instl_adm . The IP address of the IUX server must bespecified with the instl_adm -t option.
sysname:\hn:\vm=rfc1048:\ht=ether:\ha=080009352575:\ip=15.1.51.82:\sm=255.255.248.0:\bf=/opt/ignite/boot/boot_lif
BackgroundInformation on DHCPDesign
The DHCP protocol is implemented as extensions to the BOOTPprotocol, and in fact the HP-UX DHCP server daemon and the BOOTPdaemon are the same (bootpd(1M)). This daemon reads two configurationfiles: /etc/bootptab and /etc/dhcptab .
The mapping of systems to IP addresses and lease time information iskept in the DHCP database file /etc/dhcpdb . Some amount ofmanagement of this database is provided by the dhcptools(1M)command.
On the client side, a command called /usr/lbin/dhcpclient is usedto contact the server to get an IP address lease. This command has theability to broadcast out onto the network prior to the network interfacebeing enabled.
The dhcpclient also serves as a daemon process that sleeps until thetime that it needs to renew the IP address lease, at which time it willre-contact the server where it got the original lease in order to extend it.
The dhcpclient command is not intended to be run by users directly,and is called by other tools during system bootup and installation.
For More Information Refer to the auto_parms(1M) man page and the dhcpdb2conf(1M) manpage for more information regarding the networking parameters whichDHCP can supply.
Appendix A 217
Configuring for a DHCP ServerSetting Up a DHCP Server
More information on DHCP in general can be found in the followinglocations:
• Man pages:
bootpd(1m)dhcptools(1M)auto_parms(1M)dhcpdb2conf(1M)
• Worldwide Web information site:
http://web.syr.edu/~jmwobus/comfaqs/dhcp.faq.html

218 Appendix A
Configuring for a DHCP ServerSetting Up a DHCP Server
Appendix B 219
Using Configuration Files
B Using Configuration Files
220 Appendix B
Using Configuration FilesAppendix Contents
Appendix Contents• Types of Config Files.
• Combining Config Files via INDEX Entries.
Appendix B 221
Using Configuration FilesIntroduction
IntroductionThe Ignite-UX central data store is called a config file. A config file can bethought of as a recipe for how to construct a target system. The config fileis expressed in a language designed for this purpose. The language isfully defined in the instl_adm(4) manual page. The syntax ishuman-readable; config files may be created directly by a user or via theIgnite-UX graphical user interface. The config file language is much likemany programming languages in that it supports the use of variablesand conditional expressions.
Most of the important elements which make up an installed system canbe described in the config file, as follows:
• Disk and file system layout.
• Software to be installed.
• The target system hardware identity and network configuration.
• Kernel modifications (additional drivers or tunable parametersettings).
• User-defined scripts which will run at various points in theinstallation process to further customize the target machine.

222 Appendix B
Using Configuration FilesTypes of Config Files
Types of Config FilesFor maintenance convenience, the configuration information is split intoseveral different config files. These config files fall into the followingbasic classes:
• Default disk and file system layout.
Because the capabilities of each operating system release differsomewhat, HP supplies a different set of defaults for each release.These are located in /opt/ignite/data/ Rel_ release/config ,where release is the result of the uname -r command. For example,/opt/ignite/data/Rel_B.10.20/config contains the defaultdisk layouts for the HP-UX 10.20 release.
• Software description of a single SD depot.
Config files which describe software available from SD depots can beautomatically generated via an Ignite-UX tool calledmake_config(1m). This tool produces one config file per SD depot.Software description config files are located in/var/opt/ignite/data/Rel_ release/* .
• Software description of an archive.
Config files can be hand built to allow access to non-SD archives(templates are provided with the Ignite-UX product in/opt/ignite/data/examples/ to give you a good starting point).Archives may be in either tar or cpio format. Archive softwaredescription config files are also located in/var/opt/ignite/data/Rel_ release/* .
• Local configuration overrides that apply globally.
It is often convenient to specify defaults which will be applied to everymachine in- stalled from a particular server. For example, you mightwant to specify the same NIS domain for all machines. Such overridesshould be placed in the /var/opt/ignite/config.local file.
• Boot control parameters and networking information
Appendix B 223
Using Configuration FilesTypes of Config Files
It is possible to specify defaults for attributes like the IP address ofthe Ignite-UX server and whether to run a UI to install a new target.These can be specified in the first 8 KB of the install file system(/opt/ignite/boot/INSTALLFS ). This information is added ordeleted with the instl_adm(1m) command.
• Client-specific configuration files.
Each client which is to be installed has a configuration file which ispeculiar to it located at/var/opt/ignite/clients/0x LLA/config , where LLA is thelink-level address of the client. This file is typically created as a resultof running the user interface to specify the target machineconfiguration.
This file usually refers to other config files mentioned above. It alsocontains specific directives to override what may have been defined inthe other files. For example, you may wish to customize the disklayout beyond what the defaults in/opt/ignite/data/Rel_ release/config allow. The customizationsend up in /var/opt/ignite/clients/0x LLA/config .
• Named configurations created by saving a configuration via the UI
You can create your own default configurations via the UI and savethem for future use. For example, you might have a large number ofusers with similar machines who all run CAD tools. You could build aconfiguration which matches what they need and save it in aconfiguration called "CAD System". When you need to install a newsystem of this type, you can select "CAD System" from the UI andyou're done (or you could customize it further using "CAD System" asa starting point). Saved configurations are located in/var/opt/ignite/saved_cfgs/* .
Other Customized Building BlocksYou can also build your own config files to specify a particular buildingblock you are interested in, and then combine them in arbitrary ways.These building block config files should be located in/var/opt/ignite/data/Rel_{release}/* .
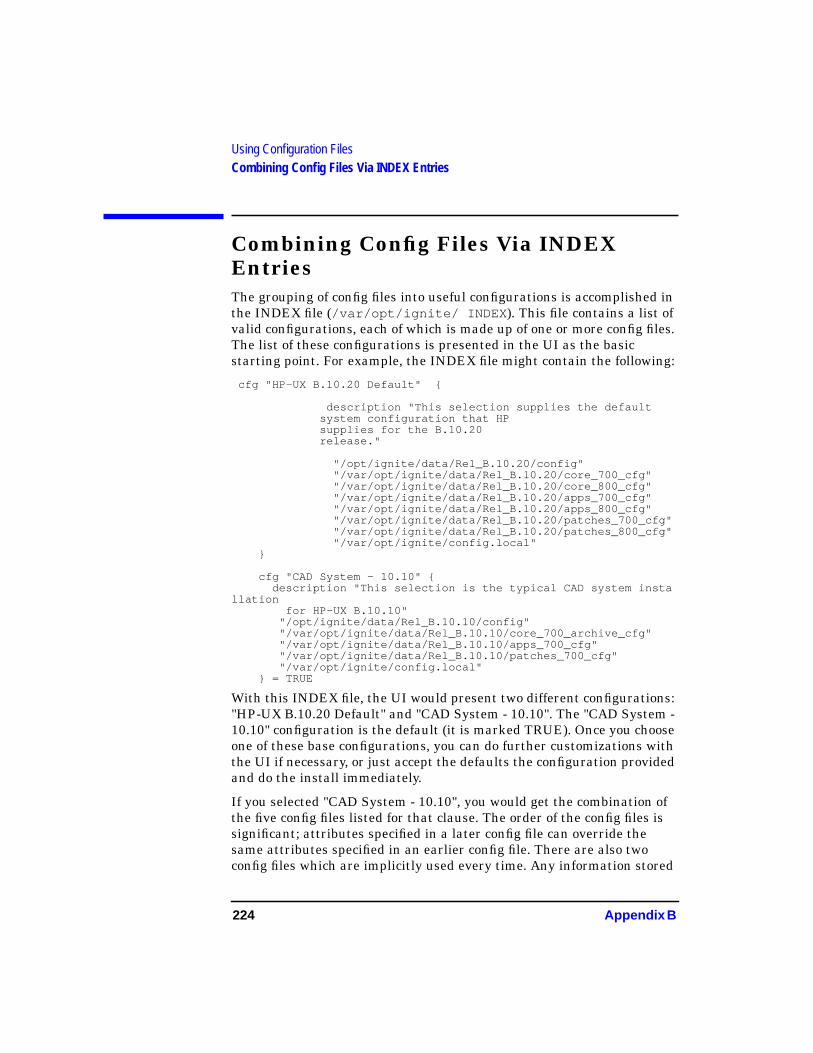
224 Appendix B
Using Configuration FilesCombining Config Files Via INDEX Entries
Combining Config Files Via INDEXEntriesThe grouping of config files into useful configurations is accomplished inthe INDEX file (/var/opt/ignite/ INDEX ). This file contains a list ofvalid configurations, each of which is made up of one or more config files.The list of these configurations is presented in the UI as the basicstarting point. For example, the INDEX file might contain the following:
cfg "HP-UX B.10.20 Default" {
description "This selection supplies the defaultsystem configuration that HPsupplies for the B.10.20release."
"/opt/ignite/data/Rel_B.10.20/config""/var/opt/ignite/data/Rel_B.10.20/core_700_cfg""/var/opt/ignite/data/Rel_B.10.20/core_800_cfg""/var/opt/ignite/data/Rel_B.10.20/apps_700_cfg""/var/opt/ignite/data/Rel_B.10.20/apps_800_cfg""/var/opt/ignite/data/Rel_B.10.20/patches_700_cfg""/var/opt/ignite/data/Rel_B.10.20/patches_800_cfg""/var/opt/ignite/config.local"
}
cfg "CAD System - 10.10" {description "This selection is the typical CAD system insta
llationfor HP-UX B.10.10"
"/opt/ignite/data/Rel_B.10.10/config""/var/opt/ignite/data/Rel_B.10.10/core_700_archive_cfg""/var/opt/ignite/data/Rel_B.10.10/apps_700_cfg""/var/opt/ignite/data/Rel_B.10.10/patches_700_cfg""/var/opt/ignite/config.local"
} = TRUE
With this INDEX file, the UI would present two different configurations:"HP-UX B.10.20 Default" and "CAD System - 10.10". The "CAD System -10.10" configuration is the default (it is marked TRUE). Once you chooseone of these base configurations, you can do further customizations withthe UI if necessary, or just accept the defaults the configuration providedand do the install immediately.
If you selected "CAD System - 10.10", you would get the combination ofthe five config files listed for that clause. The order of the config files issignificant; attributes specified in a later config file can override thesame attributes specified in an earlier config file. There are also twoconfig files which are implicitly used every time. Any information stored
Appendix B 225
Using Configuration FilesCombining Config Files Via INDEX Entries
in the first 8 KB of /opt/ignite/boot/INSTALLFS is implicitly appended toeach configuration. The client-specific configuration file(/var/opt/ignite/clients/0x{LLA}/config ) is implicitly added asthe last config file for each configuration.
A default cfg clause for each release is shipped as part of the Ignite-UXproduct. Additional cfg clauses are added when the following apply:
• You save a named configuration from the graphical user interface viathe Save As button.
• You wish to create a configuration by modifying the INDEX filedirectly
Examples of Config filesThis section shows a few sample config files to give you an idea of theirlook and capabilities. It does not pretend to fully cover the subject. Seethe instl_adm(4) manual page for a complete description.
The following example shows how a disk might be defined. Here, the diskis located at hardware address 2/0/1.6.0 and does not use LVM. The diskcontains the "/ " file system and a swap area. The swap area takes up 64MB, and the file system takes up whatever space is left over:
partitioned_disk {physical_volume disk[2/0/1.6.0] {}fs_partition {
mount_point ="/"usage=HFSsize=remainingfile_length=long
}swap_partition {
usage=SWAPsize=64Mb
}}
In this example, two disks are put together to form a single LVM volumegroup. Two file systems are defined; both are striped across both disks.The first file system ("/apps1 ") is sized by calculating the amount ofspace required by the software which is to be loaded, and then adding a30% free space cushion. The second file system ("/apps2 ") gets all of theremaining space on the disks.
volume_group "appsvol" {physical_volume disk[2/0/1.5.0] {}
226 Appendix B
Using Configuration FilesCombining Config Files Via INDEX Entries
physical_volume disk[2/0/1.4.0] {}logical_volume "apps1" {
mount_point= "/apps1"usage=VxFSsize=30%freeminfree=5stripes=2
}logical_volume "apps2" {
mount_point= "/apps2"usage=VxFSsize=remainingminfree=5stripes=2
}}
This example defines a few of the network parameters which will beassigned to the machine after it has been installed:
final system_name = "acorn1"final ip_addr["lan0"] = "15.99.45.123"final netmask["lan0"] = "255.255.248.0"final nis_domain = "nis1"final route_gateway[0] = "15.99.45.1"
This example defines a single SD depot from which software can beinstalled. Two different pieces of software are defined for the SD depot.Each can be selected independently for installation. The impacts linestell Ignite-UX how much space this software requires in a givendirectory. This information is used to size the file systems correctly.Another interesting construct is sw_category. This allows you to groupthe software so that the user interface can present it in chunks whichmake sense to you. Since this example references an SD depot, it wouldhave been created by the make_config command:
sw_source "ee_apps_depot" {description = "Electrical Engineering Application"source_format = SDsource_type = "NET"sd_server = "15.23.45.6"sd_depot_dir = "/var/opt/ignite/depots/Rel_B.10.20/ee_apps"
}sw_category "Applications" {
description = "User Applications"}sw_sel "EE CAD Package" {
sw_source = "ee_apps_depot"sw_category = "Applications"sd_software_list = "EECad,r=1.2,a=HP-UX_B.10.20_700"impacts = "/var" 90524Kbimpacts = "/sbin" 1248Kb
}sw_sel "EE Routing Package" {
sw_source = "ee_apps_depot"
Appendix B 227
Using Configuration FilesCombining Config Files Via INDEX Entries
sw_category = "Applications"sd_software_list = "EERoute,r=2.4,a=HP-UX_B.10.20_700"impacts = "/usr" 12568Kbimpacts = "/var" 26788Kb
}

228 Appendix B
Using Configuration FilesCombining Config Files Via INDEX Entries

Appendix C 229
Ignite-UX System Administration
C Ignite-UX SystemAdministration
230 Appendix C
Ignite-UX System AdministrationAppendix Contents
Appendix Contents• Section 1: Installation of Ignite-UX Server Software.
• Section 2: The Install Archive.
• Section 3: Automatic Installation.
• Section 4: Customization.
• Section 5: Post-Install Scripts.
• Section 6: Using Ignite-UX Across Gateways.
• Section 7: Steps to Create A “Golden System”.
• Section 8: Loading HP-UX Patches Using Ignite-UX.
• Section 9: Setting Install Parameters Dynamically.
• Section 10: Installing NetScape as a Post-Configuration Step.
This Appendix outlines the general System Administration procedures forIgnite-UX which you will be using for many types of installations. It alsogives details and examples of practical applications.
Appendix C 231
Ignite-UX System AdministrationSection 1: Installation of Ignite-UX Server Software
Section 1: Installation of Ignite-UXServer Software
NOTE Ignite-UX is a replacement for the Net-Install product. If your servercontains the Net-Install bundle (HPUX-Install product), Ignite-UX willrequire that the NetInstall bundle be removed (using swremove ), or thatyou touch the file /tmp/okay_to_remove_net_install before loadingIgnite-UX, in which case loading Ignite-UX will automatically removethe NetInstall software.
Ignite-UX Server System Requirements:
HP-UX Version:It is recommended that the Ignite-UX server be running at least HP-UX10.20. It is supported on any HP-UX 10.x version of the operatingsystem. Only 10.10 and later versions of HP-UX are supported as aDHCP server which Ignite-UX takes advantage of.
Disk Space:Ignite-UX will be loaded under the directory /opt/ignite. The data filesIgnite-UX creates will be placed under /var/opt/ignite. Ignite-UXinstallation will require ~75 MB of disk space. You will probably needadditional space available under /var/opt/ignite for archive and softwaredepot storage.
NFS Server:The Ignite-UX server requires NFS to be configured and working. TheIgnite-UX installation will add lines to the /etc/exports file, and runexportfs .
tftp:Ignite-UX will transfer some of its files using tftp. The minimumdirectories needed by tftp are set up in the /etc/inetd.conf file.Others may need to be added if you place configuration scripts innon-standard locations.

232 Appendix C
Ignite-UX System AdministrationSection 1: Installation of Ignite-UX Server Software
Load the Ignite-UX softwareYou should load one or more Ignite-UX release versions. They areorganized as bundles corresponding to the release that you
wish to load on your target systems. For example, if you
wish to load HP-UX 10.20 onto systems you should load the
Ignite-UX-10-20 bundle. You can multiple releases if desired
To load this software use the swinstall command.
For example to load Ignite-UX to load HP-UX 10.20 execute the
following command:
swinstall -s /dev/rmt/0m Ignite-UX-10-20
This assumes you are load Ignite-UX from a tape drive that is
referenced by the device file at /dev/rmt/0m.
Edit Default Search PathIn your login scripts, add /opt/ignite/bin to your default searchpath:
# export PATH=${PATH}:/opt/ignite/bin
Initial Ignite-UX Server ConfigurationThe majority of the Ignite-UX server configuration is performed by theproduct installation post-process procedures, but there are a fewsite-specific configuration steps you will need to perform. These arecentered around the specification of available IP addresses andhostnames.
You can note that the Ignite-UX installation has added 2 services to your/etc/inetd.conf file; tftp , and instl_boots .
Step 1) Run the Ignite-UX user interfaceEnter the following:
# /opt/ignite/bin/ignite
NOTE You will get a warning screen stating no clients exists. In this situation,this is normal since you really do not have any clients waiting.
Appendix C 233
Ignite-UX System AdministrationSection 1: Installation of Ignite-UX Server Software
If you get the following error message:
ERROR: This machine is not an NFS server (no nfsd running). The -noption will not be processed.
you did not follow the installation instructions properly. The Ignite-UXserver must be an NFS server. Exit Ignite-UX, and make the Ignite-UXserver an NFS server before continuing. You can do this by using “sam”,or by editing /etc/rc.config.d/nfsconf and setting NFS_SERVER=1 andrebooting. If you do not get the above error, you can note that Ignite-UXhas modified your /etc/exports file to include the/var/opt/ignite/clients directory.
This directory is exported to allow remote “root” users to write to theclient’s directory. This is required for proper Ignite-UX operations. Youmay need to export additional directories; for example, if you use NFS totransfer an archive, it must be NFS accessible.
Step 2) Perform Ignite-UX Server Configuration
Step 2.1) Select “Options->Server Configuration”. This willshow the Server Configuration Menu with two tabs: “Server Options”and “Session Options”. Under the “Server Options” tab, do the following:
Modify (if needed) the Server Options to match the following:
Default Configuration: Set to the OS revision you wish to be the default.
Default Printer: <select a default printer to be used by IUX>
Client Timeout: 40 [this is the number of minutes delay due to network, or clientfailures before the IUX server will inform the administrator of a problem]
Run client installation UI on: server “Server= run the GUI for allinstallations on the server” or “ target = run the TUI on the target system” or none+don’t run a UI”..
Step 2.2) Select “Add booting IP Address”. During the installprocess, the clients need to do a network boot from the Ignite-UX server.In order to do this, the clients need to be given a temporary IP address.
Under “Booting Clients”, provide an initial range of available IPaddresses. The following example will allow Ignite-UX to perform 20simultaneous installations. This IP address is only used when bootingover the network during the initial transfer of the kernel to the client.You may only need 1 or 2 addresses depending on how many systems donetwork boots at the same time. (See instl_bootd(1M)). If you need tochanges these addresses later, you will need to edit the/etc/opt/ignite/instl_boottab file directly.
234 Appendix C
Ignite-UX System AdministrationSection 1: Installation of Ignite-UX Server Software
15.2.73.1 15.2.73.20
Step 2.2.2) Permanent IP addresses are distributed via DHCP Services.
DHCP Address ranges to use for remainder of installation.
Unless you are familiar with DHCP services, for this exercise, do notmodify the DHCP Class ID, or the DHCP Addresses are temporary field.
Provide a range of available “permanent” IP address. These can only besupplied once here in Ignite-UX. After the initial definition, furthermodification will need to be performed using SAM “Networking andCommunications->Bootable Devices” area.
Step 2.3) Configure Ignite-UX Session Options. Under“Options->Server Configurations->Sessions Options” you can see variousoptions for your server.
• Confirm new clients
If this is selected, the option will put a dialog popup window on yourserver whenever a new client is requesting to be installed by yourserver.
• Ask for customer information during clientinstallation
If selected this will allow you to enter the customer name, serialnumber, and order number for each client. This information willappear on the system manifest report.
• Show the welcome screen for the install server
. If selected, a welcome screen with information on getting startedand Ignite-UX concepts will appear every time the ignite program isstarted.
• Halt the client after installation
If selected this will cause the client to halt after the installationcompletes.
• Automatically move completed clients to history
If selected, the server will move information related to the install ofeach client to the history area. Any further information about theclient would need to be obtained from the install history.
Appendix C 235
Ignite-UX System AdministrationSection 1: Installation of Ignite-UX Server Software
You may wish to de-select the “Ask for customer information ”checkbox, as this installation information is more geared to HP and HPdistributor-partner manufacturing.
Step 3) Starting the Installation ProcessThere is nothing that needs to be done to the target system to allow it touse Ignite-UX.
If the target system is currently running any version of HP-UX 9.x, 10.x,or later, the target system can be remotely controlled by the Ignite-UXserver. The Ignite-UX bootsys command can be used to perform atarget system shutdown, and re-set the target networking parametersafter the OS installation.
If the target system is not currently running HP-UX, then a manualnetwork boot will need to be performed on the target. Reboot the target,press ESC to interrupt the boot process, and then perform the networkboot from the Ignite-UX server:
> boot lan.15.2.72.150 install
where the above IP address is the IP address of the Ignite-UX server.
Note that this process and command may be slightly different on yourtarget system, depending on the age of your hardware. You’ll need to befamiliar with your system boot commands.
236 Appendix C
Ignite-UX System AdministrationSection 2: The Install Archive
Section 2: The Install ArchiveThis section will cover the following topics:
• Creating an OS Archive (golden image).
• Configuring Ignite-UX to recognize the OS archive.
• Using Ignite-UX “ignite” tools to install to a target.
In this test scenario, we will create a “golden image”, or OS archive,which is a snapshot of a known good installation which we want to copyto other systems. The system we will copy is referred to as the “goldensystem”. The OS archive is a tar or cpio archive which will be distributedto other client machines.
We will explain how an OS archive is created, and placed underIgnite-UX control. We will then add applications and patch bundlesspecific to that OS archive. Note that Ignite-UX does not require us tocreate an OS archive to install a new client OS; we have chosen thismechanism because it’s quicker to install an image than to go throughthe swinstall process. The OS archive method can decrease new OSinstallations to under 30 minutes.
The configuration file structure used by Ignite-UX is well documented inthe instl_adm(4) man page. In the next pages we’ll be modifying anumber of config files, but the key one, which is read first to determinewhat software is available, is the /var/opt/ignite/INDEX file. This file willpoint to additional files which will further specify options andconfigurations.
Step 1: Creating an OS ArchiveOnce you have a golden system with the base OS, Ignite-UX has a facilityto create an OS archive. Note, it is up to the administrator to defineexactly what constitutes a golden system. Some administrators willchoose to place patches, applications, kernel configurations, etc. on thegolden system, others will only place the core OS. In our example, weonly place the core OS. In general, for speed, you will want to place all ofyour common applications, patches and tools onto the golden system.
Appendix C 237
Ignite-UX System AdministrationSection 2: The Install Archive
Ignite-UX is capable of installing systems from SD depots as well asarchives. You may want to use this capability when setting up your“golden system” since you will need to have a system installed somehowbefore you can get an image. See a later section for details.
The make_sys_image command is provided to assist in creating the OSarchive. Refer to the make_sys_image(1m) man page for details. Thecommand is located under /opt/ignite/data/scripts.
NOTE /var/tmp is the default location where make_sys_image stores thearchive image. You can also have it save the image to a remote serverthat allows remote access from this client. Which ever method youchoose, you will need to have sufficient disk space to hold the image. Theamount of disk space will be approximately 1/2 the amount of datacontained on your golden system (assuming about 50% compression ratioprovided by gzip ).
Step 1.1
Copy /opt/ignite/data/scripts/make_sys_image to /tmp on thegolden system, and make sure it is executable.
NOTE While make_sys_image is running, the system should not be in use.Device files are removed, and the host and/or networking information onthe system are reset. After the command is complete these files are putback with the exception of most log files.
Step 1.2
On the golden system run /tmp/make_sys_image [options].
By default, this will create a gzip -formatted archive in /var/tmp withthe name “hostname.gz” default, and all specific host information, devicefiles, log files, and network information will be removed.
Optionally, if you do not have enough disk space, or you would like for thearchive to be created on a remote server, you may use the followingoptions:
# /tmp/make_sys_image -d <directory_to_place_archive> \ -s<ip_address_of_system_to_place_archive>
For example,
# /tmp/make_sys_image -d /var/opt/ignite/archives/Rel_B.11.00 \-s 15.2.72.150
Step 1.3:
238 Appendix C
Ignite-UX System AdministrationSection 2: The Install Archive
On the Ignite-UX server, create an archives directory to store the goldenimage. It is best to keep the naming conventions Rel_B.11.00 (orwhatever your release is). This directory will need to be NFS exported ifyou’ll be using NFS to transfer the archive to the target.
# mkdir /var/opt/ignite/archives
# mkdir /var/opt/ignite/archives/Rel_B.11.00
Step 1.4:
Move the OS archive to/var/opt/ignite/archives/Rel_B.11.00/hpfcnjm2.gz (ifhpfcnjm2 was the hostname).
Step 2: Configuring Ignite-UX Server toRecognize the OS ArchiveIn Ignite-UX, there are no tools to assist in the creation of configurationfiles for an OS archive. An example configuration file is supplied withIgnite-UX, and its modification is fairly straightforward.
Step 2.1:
Use /opt/ignite/data/examples/core.cfg to create the OS archiveconfiguration file.
Step 2.1.1:
Use the example config file to create a new one for the OS archive
# cp /opt/ignite/data/examples/core.cfg \/var/opt/ignite/data/Rel_B.11.00/core_700_archive_cfg
The /var/opt/ignite/data/Rel_B.11.00/core_700_archive_cfg filename isarbitrary. You can store configuration files anywhere on the system youchose. Ignite-UX manages the names and locations via the INDEX filediscussed in Step 2.2. The only restriction on the location of config filesand scripts is that they be accessible via tftp.
Step 2.1.2:
Modify the core_700_archive_cfg to set up the OS Archive for NFStransfer
Key Changes are as follows:
• In the “sw_source” clause, change the following:
nfs_source =“15.2.72.150:/var/opt/ignite/archives/Rel_B.11.00”
Appendix C 239
Ignite-UX System AdministrationSection 2: The Install Archive
(This points to directory where the archive lives, must be NFSexported)
• In the “init sw_sel” clause, change the following:
description = “Archive HP-UX 11.00 CDE”
(This will now appear in the Environments section of the Ignite-UXuser-interface as a menu choice).
• archive_path = “hpfcnjm2.gz”
(This points to the actual file in combination with the nfs_sourceline).
• Also in the “init sw_sel” clause, add the “impacts” lines by executingthe archive_impacts command and include the results in the file,replacing the example impacts lines. By default, this assumes wecreated a tar archive that was gzip’d.
# /opt/ignite/lbin/archive_impact -t -g <archive_file>
Below is the complete “sw_sel” clause. We deleted some of the extraclauses in the example for simplicity.
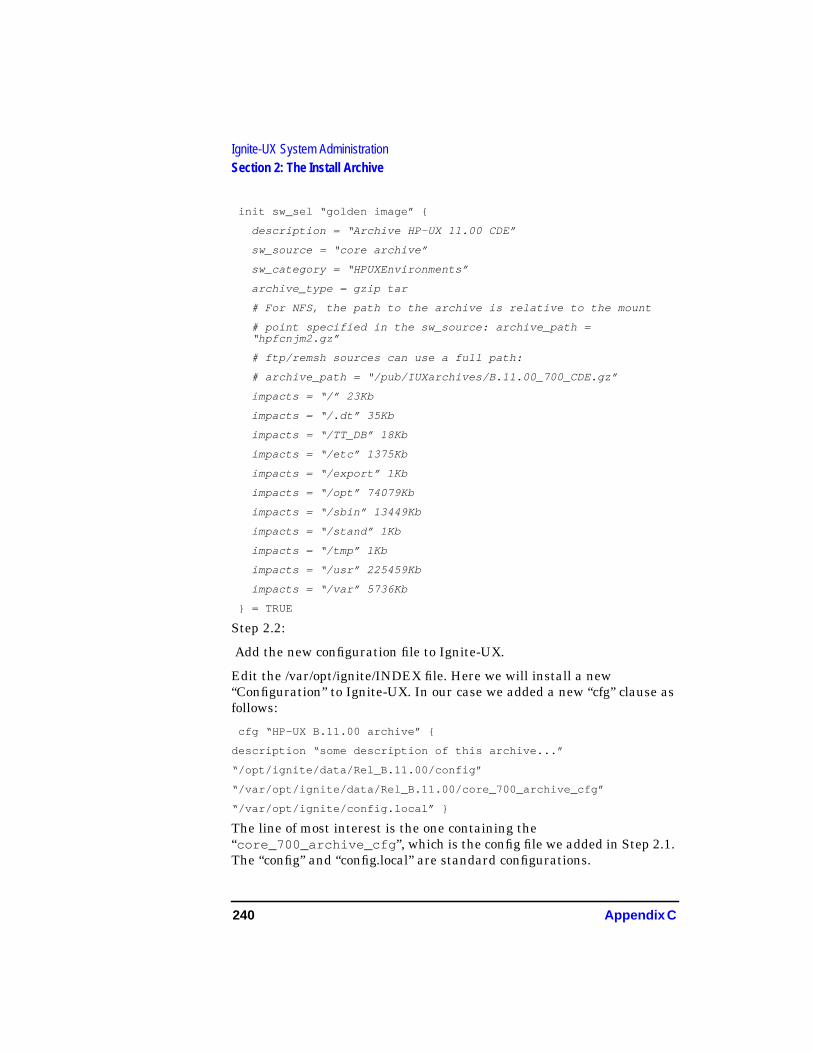
240 Appendix C
Ignite-UX System AdministrationSection 2: The Install Archive
init sw_sel “golden image” {
description = “Archive HP-UX 11.00 CDE”
sw_source = “core archive”
sw_category = “HPUXEnvironments”
archive_type = gzip tar
# For NFS, the path to the archive is relative to the mount
# point specified in the sw_source: archive_path =“hpfcnjm2.gz”
# ftp/remsh sources can use a full path:
# archive_path = “/pub/IUXarchives/B.11.00_700_CDE.gz”
impacts = “/” 23Kb
impacts = “/.dt” 35Kb
impacts = “/TT_DB” 18Kb
impacts = “/etc” 1375Kb
impacts = “/export” 1Kb
impacts = “/opt” 74079Kb
impacts = “/sbin” 13449Kb
impacts = “/stand” 1Kb
impacts = “/tmp” 1Kb
impacts = “/usr” 225459Kb
impacts = “/var” 5736Kb
} = TRUE
Step 2.2:
Add the new configuration file to Ignite-UX.
Edit the /var/opt/ignite/INDEX file. Here we will install a new“Configuration” to Ignite-UX. In our case we added a new “cfg” clause asfollows:
cfg “HP-UX B.11.00 archive” {
description “some description of this archive...”
“/opt/ignite/data/Rel_B.11.00/config”
“/var/opt/ignite/data/Rel_B.11.00/core_700_archive_cfg”
“/var/opt/ignite/config.local” }
The line of most interest is the one containing the“core_700_archive_cfg ”, which is the config file we added in Step 2.1.The “config” and “config.local” are standard configurations.
Appendix C 241
Ignite-UX System AdministrationSection 2: The Install Archive
Note that “/var/opt/ignite/config.local ” should be last. The lastconfig file has the highest priority to override values in prior config files.
The file “/opt/ignite/data/Rel_B.11.00/config ” supplies the diskand file-system layout defaults, plus other control information requiredby Ignite-UX. It must be first in every cfg clause.
Each “cfg” clause appears as an available configuration to Ignite-UX.Therefore, the string “HP-UX B.11.00 archive” will now appear as a validconfiguration.
Step 2.3
Ensure NFS file system is exported correctly.
In the above “sw_source” clause, we specified the location of the OSarchive to be a file on an NFS server. You need to ensure target systemshave access to this directory.
Make sure the NFS configuration is correct. Use the “exportfs -v ”command to view the current status and ensure the directory containingthe archive is correctly exported. Ignite-UX will automatically try toexport /var/opt/ignite/clients for its use. In our example/var/opt/ignite/archives/Rel_B.11.00 must also be exportedbecause that is where we placed the OS archive.
Here’s our /etc/exports file:
/var/opt/ignite/clients -anon=2/var/opt/ignite/archives/Rel_B.11.00 -ro
If these are not correct, use SAM to set them up correctly.
Step 3: Reboot and Gain Control of TargetSystemSince the Ignite-UX server knows about your new OS archive, you cannow use Ignite-UX to load the OS archive onto a target system. To dothis, you need to get the target system to inform Ignite-UX that it isready to install a new OS. There are two methods for doing this.
Method 1): If the system is currently running HP-UX 9.X or HP-UX 10.X:From the Ignite-UX server, use the bootsys command to reboot the targetfor which you wish to install the new OS. The target system can bebooted in a mode in which it can be controlled by the Ignite-UX userinterface.
# /opt/ignite/bin/bootsys -w -v <system_name>
242 Appendix C
Ignite-UX System AdministrationSection 2: The Install Archive
This will cause the target system to boot a copy of the Ignite-UX kerneland file system that bootsys copies to the target. An icon representingthe system will appear in the Ignite-UX user interface on the serverwhen the system has completed boot. (This may take several minutes.)Only booted clients will appear as icons.
If the server cannot resolve the system name, you can specify to bootsysthe system_name and ip-address using following syntax:
# /opt/ignite/bin/bootsys -w -v <system_name:ip-address>
Method 2):
If this is a new system (or running pre-9.X HP-UX): Manually reboot thesystem. Interrupt the boot process and select the Ignite-UX server as thelan boot source. This command will be slightly different depending on theH/W you are installing on. As an example, to install to a 712, type thefollowing after you are in the boot admin mode:
> boot lan.15.2.72.150 install
Older S700’s that use the RMP (rbootd) protocol instead of BOOTPrequire that you use the Ethernet address of the server, and not specifythe “install” keyword:
> boot lan.080009-123456
(Replace the above IP/Ethernet addresses with the correct value for yourIgnite-UX server).
Step 4: Install the OS Archive on the TargetIn this section, we will use the Ignite-UX user interface to customize anOS install. In Section 3, we will discuss how this can be done with nouser/administrator interaction.
Run the Ignite-UX user interface by executing the following as root:
# /opt/ignite/bin/ignite
When the target has rebooted (using the bootsys command or manualreboot), and is ready for installation, it will appear as an icon, labeledeither as its original hostname (if rebooted using bootsys), or by thehostname supplied by DHCP, or at the console.
Step 4.1:
Highlight the icon of the system you wish to install.
Step 4.2:
Appendix C 243
Ignite-UX System AdministrationSection 2: The Install Archive
Select “Actions->Install Client->New Install”
You should now see the Ignite-UX screen with five tabs across the top. (Ifyou see the “System Hardware Inventory” screen simply select OK tobypass this screen).
Step 4.3:
In the Basic tab (default):
Under “Configurations:” select “HP-UX B.11.00 archive”.
Ensure the Root Disk, Root Swap and other fields are correct for yourinstallation. Note that any disks you select here will be formatted! If youhave a disk with existing user information you don’t want to modify, addit manually after Ignite-UX has installed the OS.
Step 4.4:
In the Software tab:
Because there is only an archive at this point, the screen is blank. We’lladd a patch and application depot later.
Step 4.5:
In the System tab:
In “Final System Parameters:” select “Set Parameters Now”. Fill in theblanks with the correct data.
Also Select the “Set Time Zone”, “Network Services” and optionally the“Set Root Password” and fill these in as well.
Step 4.6:
In the File System tab:
Verify the correct disk usage. You can also add disks at this point ormodify the disk and file system parameters.
WARNING A newfs will be performed on all selected disks!
Step 4.7:
In the Advanced tab:
Nothing will be specified here at this time. Later we’ll add post-processscripts to execute.
Step 4.8:
244 Appendix C
Ignite-UX System AdministrationSection 2: The Install Archive
When finished entering data, select “Go!”
A configuration dialog will appear. Make sure the data is correct, andselect “Go!” again.
Step 4.9:
Displaying target installation status
If you double-click on the icon of the target system in the Ignite-UXserver GUI during execution, a status screen will be displayed showingthe install progress.
NOTE A Note on the GUI:
Ignite-UX determines the state of a target by reading the files in the/var/opt/ignite/clients/ <LLA> directory. Seeing an icon in theGUI does not mean that the target actually exists -- only that its configand control files exist in the Ignite-UX directories. We can use thisbehavior to our advantage to reinstall systems. This means that if you’rereinstalling a system that Ignite-UX has already installed, you may needto re-execute the bootsys command (or boot the client from the Ignite-UXserver).
Step 5. FinishedIn less than 30 minutes, the target system should have the new OSinstalled, a new kernel built, the system rebooted and ready for use.Status of the target system will be shown on its icon, and in the(double-click) status screen.
Appendix C 245
Ignite-UX System AdministrationSection 3: Automatic Installation
Section 3: Automatic InstallationSetting up your Ignite-UX server so that the default configuration iscorrect for any given system will save you time and allow you to easilyautomate installations. This section discusses setting up the defaults theway you like them, as well as setting up a configuration for a specifictarget system.
Ignite-UX can install HP-UX on a target system with no additionalconfiguration information (the default configuration as specified in the/var/opt/ignite/INDEX file will be used). You can, however, select fromother configurations listed in the INDEX file on the bootsys commandline.
Starting an Automatic InstallationExecute the following command:
# bootsys -a -v [-i configuration] [-f] <target_hostname>
The -a option specifies an automatic install. The -f option forcesIgnite-UX to disregard prior configuration info. The -i option can besupplied to select an alternate configuration. If not set, the default isused. See bootsys(1M) for details on how to select a configuration and toforce its use. The default is set in the “server options” menu in the UI, orcan be set manually with the “= TRUE” statement after a “cfg” clause inthe /var/opt/ignite/INDEX file.
Ignite-UX will contact the target system and extract its hostname, IPaddress and default gateway. The default configuration is installed. Postinstall, Ignite-UX will reset the hostname, IP address and gateway totheir original values. (Note: remsh access to the target is required. If notavailable, bootsys will prompt the user for the root password on thetarget.)
This is the quickest way to install a system. The drawback is that youwill receive the default config, which may have incomplete networkinginformation unless you are using a previously “saved” configuration, oryou specify the defaults in the /var/opt/ignite/config.local file as shownlater.
246 Appendix C
Ignite-UX System AdministrationSection 3: Automatic Installation
Using a “Saved” configuration:When using the ignite GUI on the server, during an install session whenyou are finished with specifying the configuration for particular target,you may choose to save the result as a named configuration. This willsave any changes that you made during the session. You can then eitherspecify the configuration as the default, and/or just use the name yougive it to the bootsys command using the -i option.
Specifying defaults in the config.local file:The /var/opt/ignite/config.local file is normally included in every cfgclause in the INDEX file. This provides a convenient location to storedefault parameters that are the same for all configurations. Typicallythis will be networking, default software selections, kernel modifications.
It may be easiest to cut and paste information written to the files/var/opt/ignite/clients/*/config by the user interface. However there ismuch more that can be done here that the GUI does not provide accessto. The instl_adm(4) man page gives all the details. Below is an exampleof what a config.local file could look like. The sw_sel’s will depend onwhat you have defined in config files on the server.
dns_domain=”fc.hp.com”
dns_nameserver[0] = “15.2.72.2”
nis_domain=”udl”
wait_for_nis_server=FALSE
root_password=”rlW2xSrugUvi2”
timezone=”MST7MDT”
ntpdate_server=”15.1.48.11”
init sw_sel “Misc_Patches”=TRUE
init sw_sel “B3919DA_AGP”=TRUE
mod_kernel += “maxuprc 100”
mod_kernel += “dbc_max_pct 80”
Always run instl_adm -T after making manual edits to verify that thesyntax is correct.
“Setting Install Parameters Dynamically “shows how defaultinformation may be specified dynamically depending on the targetsystem’s configuration.
Appendix C 247
Ignite-UX System AdministrationSection 3: Automatic Installation
Defaults that must be specified with instl_adm(1M):There are some network parameters that need to be known by the targetclients when they first boot. The command bootsys (or DHCP/BOOTP)can supply the hostname and IP address; however, the netmask andgateway need to be supplied in the ram-filesystem (INSTALLFS). Thiscan done by using the instl_adm(1m) command. The instl_adm commandhas options to set netmask, gateway, IUX/tftp server, etc. Or you candump the current settings to a file and edit it, then load the settingsback. Just loading Ignite-UX sets some of the parameters.
For example, you may want to set the keyboard language so that it neverprompts you for it when booting from the console. The file you store usinginstl_adm -f may look something like the following:
# instl_adm defaults: server=”15.2.72.150”
route_gateway[0]=”15.2.70.1”
route_destination[0]=”default”
netmask[]=”255.255.248.0”
# end instl_adm defaults.
kbdlang=”PS2_DIN_US_English”
Using the per-target client config file:Until now, we have discussed specifying default parameters that alltarget systems may use. If you would like to specify a specificconfiguration for an individual target system, you may use the followingprocedure.
When Ignite-UX begins an install session, it scans the directory/var/opt/ignite/clients for a directory matching the LLA of the targetsystem. As an example, if the LLA of the target is 0x08000992E346 ,Ignite-UX looks in /var/opt/ignite/clients/0x08000992E346 fora file named “config”. Ignite-UX keeps the last configuration installed tothe respective system in this file so it can perform a repeat install.
If found, the configuration data in this file is used to overwrite thedefault values. This file has the highest precedence over all other configfiles listed in the INDEX file
WARNING Ignite-UX will write over this file at the end of the install, sokeep an original copy elsewhere.
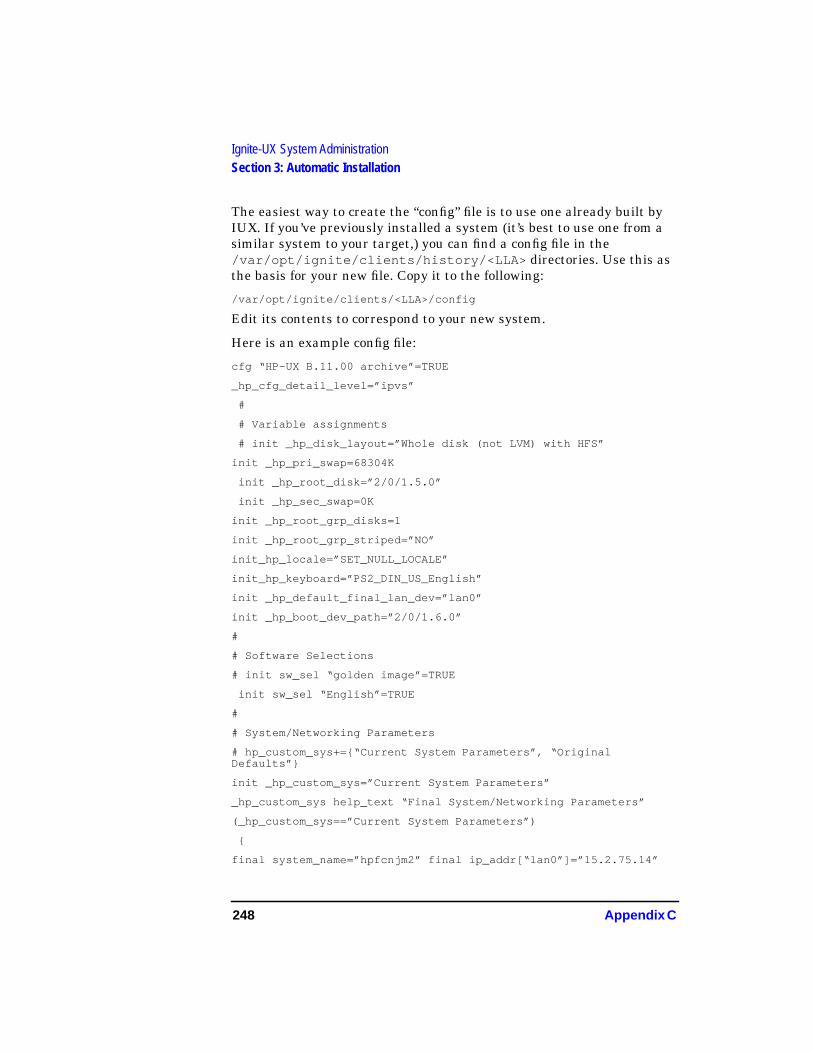
248 Appendix C
Ignite-UX System AdministrationSection 3: Automatic Installation
The easiest way to create the “config” file is to use one already built byIUX. If you’ve previously installed a system (it’s best to use one from asimilar system to your target,) you can find a config file in the/var/opt/ignite/clients/history/<LLA> directories. Use this asthe basis for your new file. Copy it to the following:
/var/opt/ignite/clients/<LLA>/config
Edit its contents to correspond to your new system.
Here is an example config file:
cfg “HP-UX B.11.00 archive”=TRUE
_hp_cfg_detail_level=”ipvs”
#
# Variable assignments
# init _hp_disk_layout=”Whole disk (not LVM) with HFS”
init _hp_pri_swap=68304K
init _hp_root_disk=”2/0/1.5.0”
init _hp_sec_swap=0K
init _hp_root_grp_disks=1
init _hp_root_grp_striped=”NO”
init_hp_locale=”SET_NULL_LOCALE”
init_hp_keyboard=”PS2_DIN_US_English”
init _hp_default_final_lan_dev=”lan0”
init _hp_boot_dev_path=”2/0/1.6.0”
#
# Software Selections
# init sw_sel “golden image”=TRUE
init sw_sel “English”=TRUE
#
# System/Networking Parameters
# hp_custom_sys+={“Current System Parameters”, “OriginalDefaults”}
init _hp_custom_sys=”Current System Parameters”
_hp_custom_sys help_text “Final System/Networking Parameters”
(_hp_custom_sys==”Current System Parameters”)
{
final system_name=”hpfcnjm2” final ip_addr[“lan0”]=”15.2.75.14”
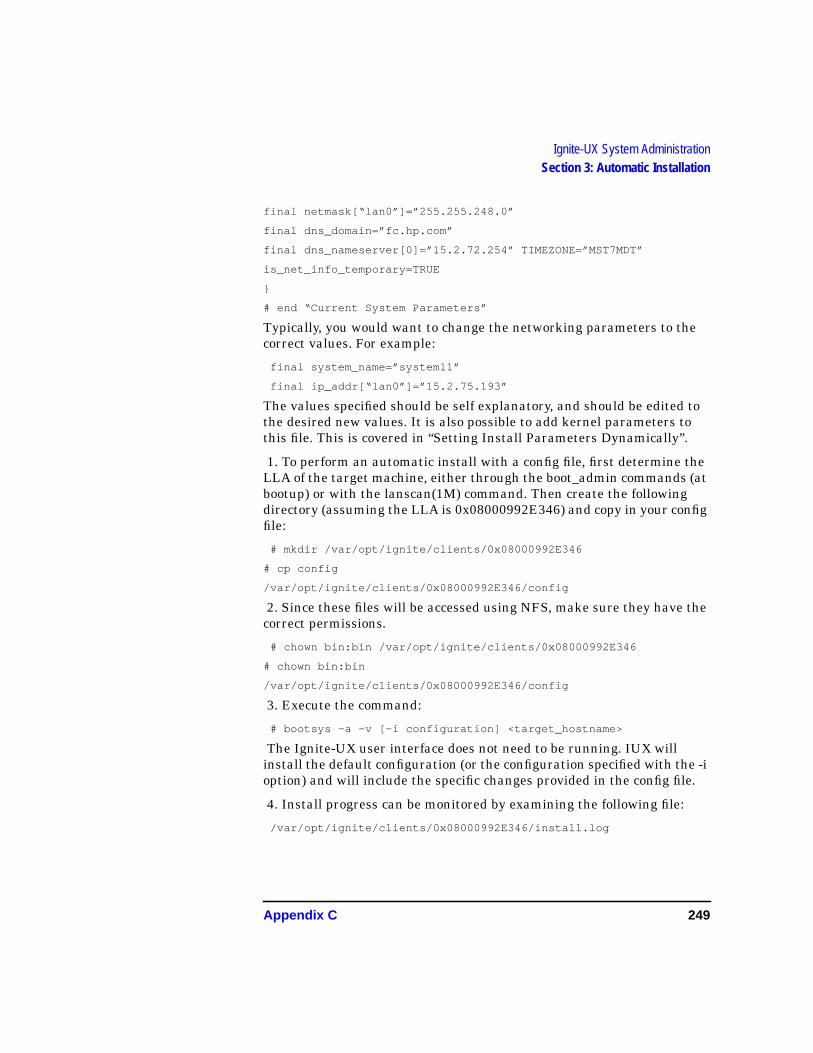
Appendix C 249
Ignite-UX System AdministrationSection 3: Automatic Installation
final netmask[“lan0”]=”255.255.248.0”
final dns_domain=”fc.hp.com”
final dns_nameserver[0]=”15.2.72.254” TIMEZONE=”MST7MDT”
is_net_info_temporary=TRUE
}
# end “Current System Parameters”
Typically, you would want to change the networking parameters to thecorrect values. For example:
final system_name=”system11”
final ip_addr[“lan0”]=”15.2.75.193”
The values specified should be self explanatory, and should be edited tothe desired new values. It is also possible to add kernel parameters tothis file. This is covered in “Setting Install Parameters Dynamically”.
1. To perform an automatic install with a config file, first determine theLLA of the target machine, either through the boot_admin commands (atbootup) or with the lanscan(1M) command. Then create the followingdirectory (assuming the LLA is 0x08000992E346) and copy in your configfile:
# mkdir /var/opt/ignite/clients/0x08000992E346
# cp config
/var/opt/ignite/clients/0x08000992E346/config
2. Since these files will be accessed using NFS, make sure they have thecorrect permissions.
# chown bin:bin /var/opt/ignite/clients/0x08000992E346
# chown bin:bin
/var/opt/ignite/clients/0x08000992E346/config
3. Execute the command:
# bootsys -a -v [-i configuration] <target_hostname>
The Ignite-UX user interface does not need to be running. IUX willinstall the default configuration (or the configuration specified with the -ioption) and will include the specific changes provided in the config file.
4. Install progress can be monitored by examining the following file:
/var/opt/ignite/clients/0x08000992E346/install.log
250 Appendix C
Ignite-UX System AdministrationSection 3: Automatic Installation
The target system should boot into the IUX install process and completethe install automatically. Errors will be reported on the client screen andin the install.log file.
NOTESIf you are attempting to install 10.x onto a system running an HP-UX9.0x version, you may run into the following problem:
bootsys works by copying the Ignite-UX kernel (INSTALL) and RAMfile system (INSTALLFS) to each client and then setting the system’sAUTO file in the LIF area of the root disk to automatically boot from thiskernel at the next system reboot.
For 9.X clients, bootsys requires that the primary boot path be set to thedisk that the system is currently booted from and that the auto-boot flagbe turned on. For 10.X clients, bootsys will set the primary boot path andauto-boot flag (using the setboot command) to the disk it is currentlybooted from.
To set the “pri path” on 9.X systems (if needed), do the following:
Perform an attended boot (hit when instructed at bootup) and executethe following (assuming you want the pri path set to the SCSI disk ataddress 3.0):
boot_admin> path pri scsi.3.0
boot_admin> auto boot on
This may vary slightly depending on the vintage of the system. The helpsystem of the boot-ROM interface should explain the syntax to use.
Appendix C 251
Ignite-UX System AdministrationSection 4: Customization
Section 4: CustomizationThis section will focus on ways to customize the default configuration,either by adding additional info to the default config (dynamicparameters) or by adding additional software selections to be loadedafter the archive.
We’ll be adding the following:
• SD Bundles
• Kernel parameters
• Additional install parameters, e.g. swap and networking info
Adding an SD Bundle to the ArchiveEnvironmentIgnite-UX allows you to add patch bundles to your configuration. Thesebundles can be forced to load at install time, or can be selectable by theuser. This allows the system admin to install the base Operating Systemvery quickly with an Ignite-UX archive, and still have the flexibility toinstall additional software components selectively, based on machinetype or use (for example: server vs client).
In the following example we’ll explore adding a bundle which consists ofpatches, which would be a typical application. You must begin with apatch bundle, not just a patch depot. You can verify the existence ofbundles with the following command:
# swlist -l bundle -d @ /yourdepot
“Setting Install Parameters Dynamically” lists the procedure used tocreate a patch bundle from an existing depot of individual patches.
(You might need to call swreg -l depot /yourdepot to register this depot,depending on how it originated.)
1. Assuming a S700 patch bundle in the /var/opt/ignite/PB depot, runthe following Ignite-UX command to create a config file that Ignite-UXcan use:
# make_config -s /var/opt/ignite/PB -a 700 -c \
/var/opt/ignite/data/Rel_B.11.00/patch_bundle_cfg
252 Appendix C
Ignite-UX System AdministrationSection 4: Customization
This creates the patch_bundle_cfg file which IUX needs to manage theinstall from the depot.
2. Add the new config file name (the argument to -c above) to the/var/opt/ignite/INDEX file so that it appears in our “HP-UX B.11.00archive” configuration. We created this configuration in Section 2.
cfg “HP-UX B.11.00 archive” {
description “The ARCHIVE B.11.00 release with patches.”
“/opt/ignite/data/Rel_B.11.00/config”
“/var/opt/ignite/data/Rel_B.11.00/core_700_archive_cfg”
“/var/opt/ignite/data/Rel_B.11.00/patch_bundle_cfg”
“/var/opt/ignite/config.local” }
The patch bundle will now show up in the software tab of the UI installscreen, but will not be marked for install (It will be optional).
3. To force install of the patch bundle:
In the sw_sel clause for the patch bundle in the file
/var/opt/ignite/data/Rel_B.11.00/patch_bundle_cfg
(you created this file with the make_config command), add the followingline:
load_with_any = “golden image”
“golden image” is the name used in the sw_sel clause in the file/var/opt/ignite/data/Rel_B.11.00/core_700_archive_cfg forour archive 11.00 UX system. The load_with_any line will cause thissoftware selection to always be loaded with the “golden image” archive.
4. Check the syntax of your edits by using the command:
# instl_adm -T
Modifying Kernel Parameters with IUXIgnite-UX uses the same mechanism for kernel parameters as it does forselectable software: create a config file which describes the changes; thenmake that file visible to Ignite-UX by adding it to a existing “cfg” clausein the INDEX file.
The following example will create a software selection called“My_Kernel_Mods”. It will set the following two kernel parameters:nproc and maxuprc, and these will be force loaded whenever the “goldenimage” archive is installed.
Appendix C 253
Ignite-UX System AdministrationSection 4: Customization
1. In the new file /var/opt/ignite/data/Rel_B.11.00/kernel_cfg add thefollowing: (Note that, in lieu of “HPUXAdditions”, you could designateyour own category).
HARDWARE_MODEL ~ “9000/7.*”
{
sw_sel “My_Kernel_Mods”
{
description = “Kernel parameters only”
sw_source = “cmds”
sw_category = “HPUXAdditions”
mod_kernel += “nproc 2000”
mod_kernel += “maxuprc 127”
load_with_any = “golden image”
}
}
2. Add the name of this file into a “cfg” in the INDEX file (in thisexample the “HP-UX B.11.00 archive”):
cfg “HP-UX B.11.00 archive” {
description “The ARCHIVE B.11.00 release with patches.”
“/opt/ignite/data/Rel_B.11.00/config”“/var/opt/ignite/data/Rel_B.11.00/core_700_archive_cfg”“/var/opt/ignite/data/Rel_B.11.00/patch_bundle_cfg”“/var/opt/ignite/data/Rel_B.11.00/kernel_cfg”“/var/opt/ignite/config.local”
}
These changes will result in “My_Kernel_Mods” being loaded wheneverthe “HP-UX B.11.00 archive” is installed. Note that we’ve added the line:
load_with_any = “golden image”
An additional example, using multiple, selectablekernel configsYou can have multiple, pre-defined kernel configs available at installtime. This allows clients to be installed with optional parameters ifnecessary.
254 Appendix C
Ignite-UX System AdministrationSection 4: Customization
In this example, there is a set of parameters we want all systems to have,“Basic_Kernel_Mods”. These are force loaded. There is also an optionalset, “Advanced_Kernel_Mods”, which can be selected in the UI or in aconfig file at install time.
The contents of the /var/opt/ignite/data/Rel_B.11.00/kernel_cfg file isnow:
HARDWARE_MODEL ~ “9000/7.*” {
# basic required kernel parameters
sw_sel “Basic_Kernel_Mods” {
description = “Basic Kernel parameters only”
sw_source = “cmds”
sw_category = “HPUXAdditions”
mod_kernel += “nproc (20+12*MAXUSERS)”
mod_kernel += “maxuprc 127”
load_with_any = “golden image”
}
#optional kernel parameters
sw_sel “Advanced_Kernel_Mods”
{ description = “Advanced Kernel parameters”
sw_source = “cmds”
sw_category = “HPUXAdditions”
mod_kernel += “maxdsiz 0x0A000000”
mod_kernel += “maxtsiz 0x06000000”
}
} # end of hardware-specific section
Kernel Parameters Tied to Client HardwareBecause we’ve specified our kernel mods within a HARDWARE_MODELclause, it’s possible to set kernel parameters based on the H/Wconfiguration of the client. As an example, suppose the first line of thekernel_cfg file is changed to the following:
HARDWARE_MODEL = “9000/715”
Then the values in this clause will only be used if the machine is a Model715. This allows the system administrator to tailor the kernels of serversdifferently from clients, for example.
Appendix C 255
Ignite-UX System AdministrationSection 4: Customization
Additional Install ParametersThere are a large number of additional parameters which can be setwhen we install a system. These are listed in the instl_adm(4) man page.
As a simple example, we may want to set the swap space of all machineswe install using the “golden image” archive to 100 MB. The “goldenimage” is defined in the following file
/var/opt/ignite/data/Rel_B.11.00/core_700_archive_cfg.
1. Add the following to the end of the core_700_archive_cfg file:
init _hp_pri_swap=100MB
If the primary swap size is not further specified in a config file, newsystems will be installed with a default value of 100MB of swap space. Ifthere is a swap value set in the “config” file in the/var/opt/ignite/clients/<LLA> directory, it will take precedence.
As a further example, we’ll set the final DNS domain name and IPaddress of the DNS nameserver of systems installed using the “goldenimage”.
2. Add the following line to the end of the core_700_archive_cfg file:
final dns_domain = “mydomain.mycompany.com” final
dns_nameserver[0]=”1.2.3.4”
256 Appendix C
Ignite-UX System AdministrationSection 5: Post Install Scripts
Section 5: Post Install ScriptsAny number of tasks may be performed on the target system after theOS is installed by providing a script to be run on the target system. Thissection touches on some common examples, but scripts can easily bewritten to mount additional disk drives, add additional software, modifyconfigurations based on system use, etc.
There are a number of points in the install process in which you can forcescripts or commands to be run. Check the instl_adm(4) man page underthe “Command and Script Execution Hooks” section for specifics. Onepoint to note is that the post_config_script will run after all software hasbeen loaded and the system has been booted with its final kernel, butBEFORE any of the normal /etc/rc startup scripts have been run. Basicnetworking is enabled in this environment.
1. Procedure for adding a post-installationscriptStep 1: Create a script.
Create a script to perform the desired task. When Ignite-UX runs thisscript as a post-configuration, it will be run on the target system.
Step 2: Add the script to your configuration file.
Ignite-UX post-configuration scripts are defined using the“post_config_script” variable. For example, you can place the followingline into your core_700_archive_cfg config file:
post_config_script += \“/var/opt/ignite/scripts/install_default_printer”
The above will define the “install_default_printer” script to be run as apost installation process on the target system. Note, the line shouldstand alone, placed OUTSIDE of any clause (i.e. a sw_sel clause). Bydefault, the script will always be run on the targets. You can change thebehavior using the ignite user-interface in the “advanced” tab.
If you want to make a script available under all configurations, you canadd it to the /var/opt/ignite/INDEX file. Add the following to the end ofthis file:
scripts { “/var/opt/ignite/scripts/install_default_printer” }
Appendix C 257
Ignite-UX System AdministrationSection 5: Post Install Scripts
It will then show up in the Advanced tab for all configurations.
NOTE Scripts are accessed by Ignite-UX via tftp. Make sure the directory thescript resides in is available to tftp by examining and/or changing the/etc/inetd.conf file.
2. Managing Network PrintersOne task an administrator generally needs to perform after a new OSinstallation is setting up printers. Here is one method you can use toautomate this process.
Write a script which performs the HP-UX commands for adding aprinter. Attached below is a script for adding a remote printer named“printbob”, and turning on the lp scheduler. We found that the easiestmethod for creating the sequence of commands for the script was to useSAM. We turned on SAM logging for “commands-only”, performed thetasks desired, and then extracted those commands from the SAM log file.
Here is our script for adding “printbob” to all systems:
#!/sbin/sh
# Post process IUX script to add a local default printer
# Performing task “Add Remote Printer”: Adding “printbob”
#
/usr/sbin/lpadmin -pprintbob -ormhpfcmgw.fc.hp.com -orptsslj-mrmodel \ -v/dev/null -orc -ocmrcmodel -osmrsmodel
/usr/sbin/lpadmin -dprintbob
/usr/sbin/accept printbob
/usr/bin/enable printbob
# Turn on lp scheduler
#
lpsched -v
258 Appendix C
Ignite-UX System AdministrationSection 6: Using Ignite-UX Across Gateways
Section 6: Using Ignite-UX AcrossGatewaysA system that is running 9.x or 10.x can use the Ignite-UX server acrossa gateway if the target system is booted via the bootsys command. If thesystem is booted manually, it will need a helper system to help it bootacross a gateway, and enabling the target system to perform a “bootlan.<ip_address> install” to the local boot helper system. This sectiondescribes how to configure the boot helper system.
To boot HP-UX across a gateway, you need a system on the local subnetto provide the target with a minimum core kernel. The helper system canrun either HP-UX 9.x or 10.x. The setup is much simpler if the helpersystem is running 10.x.
How to Set Up a 10.x System as a Boot HelperStep 1: Install the Ignite-UX minimum core functionality onto the helpersystem:
# swinstall -s /dev/rmt/0m Ignite-UX.BOOT-KERNEL
Step 2: On the helper, run the following command to point theINSTALLFS at the correct Ignite-UX server:
# /opt/ignite/bin/instl_adm -t <IUX_server_IP>
Verify that INSTALLFS is referencing the correct Ignite-UX server, andgateway for your subnet:
# /opt/ignite/bin/instl_adm -d
Step 3: Specify temporary IP address for the helper
On the helper, in the /etc/opt/ignite/instl_boottab file, add the IPaddresses that clients can use to boot. The remote subnet needs to havetemporary IP addresses to use during an initial bootup. These arelocated in the /etc/opt/ignite/instl_boottab file, and were provided duringour initial IUX server installation. But, the remote gateway systemscannot use these, so the boot helper system must supply its own.Therefore create an /etc/opt/ignite/instl_boottab file on the boot helpersystem containing lines of the following format. (See/etc/opt/ignite/instl_boottab on the IUX server for more details): Forexample:
Appendix C 259
Ignite-UX System AdministrationSection 6: Using Ignite-UX Across Gateways
15.1.53.180
15.1.53.181
15.1.53.182
Step 4: Reboot the target system, interrupt the boot sequence by pressing<esc>, and type the following:
> boot lan.<helper_IP_address> install
How to Set Up a 9.0x System as a Boot HelperEssentially, the 9.05 helper machine, on the same subnet as the installtarget machine(s), hosts the files necessary for network boot of thetarget. Once the target has booted, it can run the remainder of theinstallation across a gateway. The boot files, in addition to providing theinstallation kernel and program, also direct the target to the properserver machine on the other side of the gateway.
There are two major steps that need to be done: the 9.0X helper machinehas to be modified somewhat to host the 10.X install files, and the bootfiles have to be modified on the 10.X install server and copied over to the9.0X helper. It is not possible to copy the boot files to the helper first andmodify them under 9.0X.
On the (9.0X) helper, do the following:
1. mkdir -p /opt/ignite/boot
2. Edit /etc/inetd.conf: 1. Add the following line
/opt/ignite
to the tftp spec. Don’t forget to add \ to the line before it forcontinuation.
2. Modify the instl_boots spec to be the following (add the -boption):
instl_boots dgram udp wait root /etc/instl_bootd instl_bootd -b\/opt/ignite/boot/boot_lif
3. Run /etc/inetd -c to reread the config.
4. Make sure /usr/adm/instl_boottab on the helper has some booting IPaddresses available/specified.
5. After the install server steps below are finished, you will copy over theinstall boot-up files from the server to /opt/ignite/boot . These fileswill direct the target machine to the install server (across the gateway)for the remainder of the install.
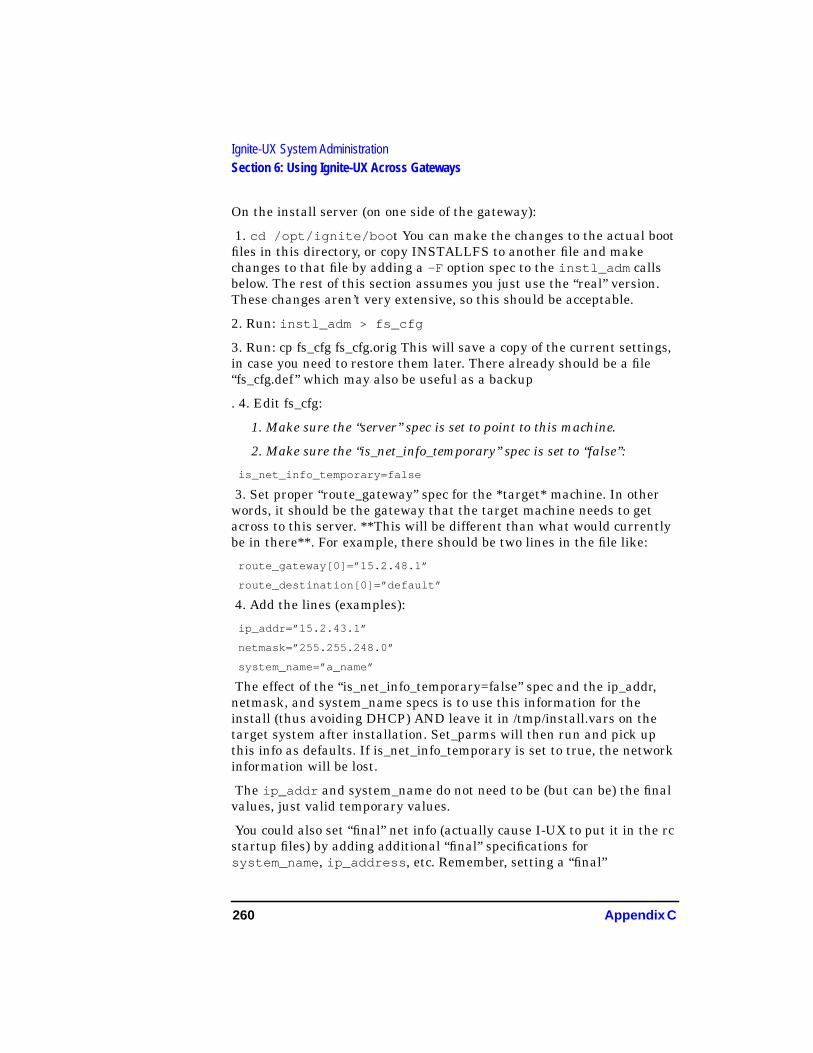
260 Appendix C
Ignite-UX System AdministrationSection 6: Using Ignite-UX Across Gateways
On the install server (on one side of the gateway):
1. cd /opt/ignite/boo t You can make the changes to the actual bootfiles in this directory, or copy INSTALLFS to another file and makechanges to that file by adding a -F option spec to the instl_adm callsbelow. The rest of this section assumes you just use the “real” version.These changes aren’t very extensive, so this should be acceptable.
2. Run: instl_adm > fs_cfg
3. Run: cp fs_cfg fs_cfg.orig This will save a copy of the current settings,in case you need to restore them later. There already should be a file“fs_cfg.def” which may also be useful as a backup
. 4. Edit fs_cfg:
1. Make sure the “server” spec is set to point to this machine.
2. Make sure the “is_net_info_temporary” spec is set to “false”:
is_net_info_temporary=false
3. Set proper “route_gateway” spec for the *target* machine. In otherwords, it should be the gateway that the target machine needs to getacross to this server. **This will be different than what would currentlybe in there**. For example, there should be two lines in the file like:
route_gateway[0]=”15.2.48.1”
route_destination[0]=”default”
4. Add the lines (examples):
ip_addr=”15.2.43.1”
netmask=”255.255.248.0”
system_name=”a_name”
The effect of the “is_net_info_temporary=false” spec and the ip_addr,netmask, and system_name specs is to use this information for theinstall (thus avoiding DHCP) AND leave it in /tmp/install.vars on thetarget system after installation. Set_parms will then run and pick upthis info as defaults. If is_net_info_temporary is set to true, the networkinformation will be lost.
The ip_addr and system_name do not need to be (but can be) the finalvalues, just valid temporary values.
You could also set “final” net info (actually cause I-UX to put it in the rcstartup files) by adding additional “final” specifications forsystem_name , ip_address , etc. Remember, setting a “final”
Appendix C 261
Ignite-UX System AdministrationSection 6: Using Ignite-UX Across Gateways
system_name will cause set_parms not to run, so all other needed systeminfo (timezone, routes, etc.) should probably be set along withsystem_name.
5. Run: instl_adm -f fs_cfg
This applies the changes to the INSTALLFS file.
6. Copy /opt/ignite/boot/* files to the 9.05 boot helper’s /opt/ignite/bootdirectory.
NOTE Any further changes MUST be done on the server system and copied overto the helper system. The 9.0X instl_adm command does have the 10.Xfunctionality.
To perform an installation to a different machine, repeat steps 4, 5, and6. For a subsequent runs, only the file “INSTALLFS” needs to be copiedover to the boot helper machine in step 6.
To Perform the Install on the Target:Boot up the target machine to the boot admin menu, and type a linesimilar to the following (for example):
boot lan.15.1.50.57 install
where “15.1.50.57” is replaced by the IP address of the HELPERmachine. If there’s only 1 install server available on the subnet, then justtyping “boot lan install” should work. The exact string to type issomewhat machine dependent.
At that point, the install should proceed, controlled from the server bydefault.
262 Appendix C
Ignite-UX System AdministrationSection 7: Steps to Create a “Golden System”
Section 7: Steps to Create a “GoldenSystem”Section 2 discusses creating an archive-image of your golden system.We’ll cover the steps for creating the golden system itself here. Ingeneral, the golden system is simply a system which has been configuredwith all the software and customizations which will need to bedistributed to a group of target systems.
Most large HP-UX sites already have the equivalent of a golden system,which is maintained by the IS certification or QA department. Thissystem is configured with customer modifications on top of a base HP-UXsystem. Critical patches which all users need are installed onto the OS.Local, common software that all users use are also layered on the OS,and the resulting system is tested to ensure proper operation in thecustomer’s environment.
These systems represent a prototype or starting point for all users. Thesteps needed for install customizations are normally captured and arewell known. They make good candidates for a golden image archive usingthe steps outlined in Section 2. If a golden system already exists, theremainder of this section can be ignored.
Creating a golden system from scratch normally involves the followingsteps:
1. Installing the HP-UX OS from media.
2. Installing critical patches onto the OS.
3. Loading optional HP software.
4. Loading optional third-party software.
5. Customizing the system.
Step 1: IUX setup of HP-UX OS from mediaThis can be performed without Ignite-UX by using the normal installfrom media steps. Alternately, Ignite-UX can install the OS for you. Inthis example, we’ll use Ignite-UX and a network depot as the source ofour software. We’ll first copy an SD depot of 11.00 onto the Ignite-UXserver.
Appendix C 263
Ignite-UX System AdministrationSection 7: Steps to Create a “Golden System”
On the IUX server, set up the core software to be distributed:
# make_depots -r B.11.00 -a 700 -s \hpfclc:/release/S700_11.00/B3782EA
# /opt/ignite/bin/make_config -r B.11.00
The make_depots command will copy the release B.11.00 software atthe SD depot pointed to by the “-s” option (this pathname will depend onthe setup of the SD depot you are accessing) onto the local Ignite-UXserver. (You can also run make_config and point it to the remote depotdirectly.)
The make_config command will then add this software as a configurationavailable for Ignite-UX installations.
Step 1.1: Installing HP-UX onto the target “golden system”.
First, boot the target from the Ignite-UX server. If the target is currentlyrunning HP-UX, use the following:
# bootsys -v -w -f -i “HP-UX B.11.00 Default” <target_hostname>
If the target is not currently running HP-UX, use the following:
boot lan install
Use the normal Ignite-UX target install steps as laid out in Section 2.
Step 4. Select the configuration you’ve just set up, “HP-UX B.11.00Default”.
Step 2: Loading critical patches onto the OSAt this point you should have a target system with the basic 11.00release. If you have patches which you wish to distribute to all users,install them now. This is normally done using the standard SD tools.
Step 2.1: As an example, install patch PHSS_8375. If you’ve downloadedand unshar’d a patch, you will have a depot file. For example, afterdownloading PHSS_8375 and unsharing it, you would be left with files“PHSS_8375.depot” and “PHSS_8375.text”. To install the patchnon-interactively, run the following:
# swinstall -x autoreboot=true -x match_target=true -s \
./PHSS_8375.depot
These instructions can also be found in the file
“PHSS_8375.text”.
264 Appendix C
Ignite-UX System AdministrationSection 7: Steps to Create a “Golden System”
Step 3: Load Optional SoftwareLoad any optional HP and third-party software you want to makeavailable to ALL users. Keep in mind that we are creating a goldensystem, and anything put on this will be distributed to all systemsinstalled using the golden image. You’ll need to keep in mind licensingrestrictions, as well.
HP software (such as compilers) are normally loaded using SD frommedia or a network SD depot. Third-party software installation variesdepending on the vendor.
Step 4: Customize the systemPerform any customizations that you want to distribute to all users.These might include things like customized CDE login screens, base/etc/passwd files, additional phone tools and man pages, or corporatewide default DNS and NIS setup. It would not include machine, workgroup or site specific changes, such as gateways, user accounts, ormachine-specific networking. These will be taken care of by Ignite-UXlater.
Step 5: The Golden System is Done Use the steps outlined in Section 2 to create the OS Install Archive(“golden image”) from this system, and configure Ignite-UX to use it.
Appendix C 265
Ignite-UX System AdministrationSection 8: Loading HP-UX Patches Using Ignite-UX
Section 8: Loading HP-UX Patches UsingIgnite-UXIgnite-UX can use an existing Software Distributor (SD) depot todistribute additional software. This depot can be managed separatelyfrom Ignite-UX. In this example we’ll create a patch depot containingHP-UX Patches, create a single patch bundle of the contents of the depot,and then add this bundle to an existing Ignite-UX configuration. Notethat Ignite-UX currently will only work with SD software configured inbundles.
Steps for loading the patches:
NOTE Removing Prior Patch Information
If a 10.x system you intend to update is already patched, do the following:
In order to remove all prior patch information from the IPD on 10.xsystems prior to updating to HP-UX 11.0, do the following:
1. Make a backup copy of the IPD (in /var/adm/sw/products ) byentering the following:
find /var/adm/sw/products | cpio -pdumv /tmp
2. Enter the swmodify command
swmodify -u PH[CKNS][OLES]_\*.\* PH[CKNS][OLES]_\*
3. Remove the patch directory by entering the following:
rm -rf /var/adm/sw/patch
The first selection in item 2, “PH[CKNS][OLES]_\*.\* ” tells swmodifyto remove all fileset information for the patch products.
The second selection in item 2, “PH[CKNS][OLES]_\* ” removes theproduct information, once the fileset information is gone.
The swmodify command will not allow you to remove a product from theIPD if any filesets exist in the IPD. The backslashes are necessary toinhibit the shell from expanding the wildcard characters. This allowsswmodify to match all the software selections for patches. You shouldnot have any real products or filesets on your system that match thisregular expression.
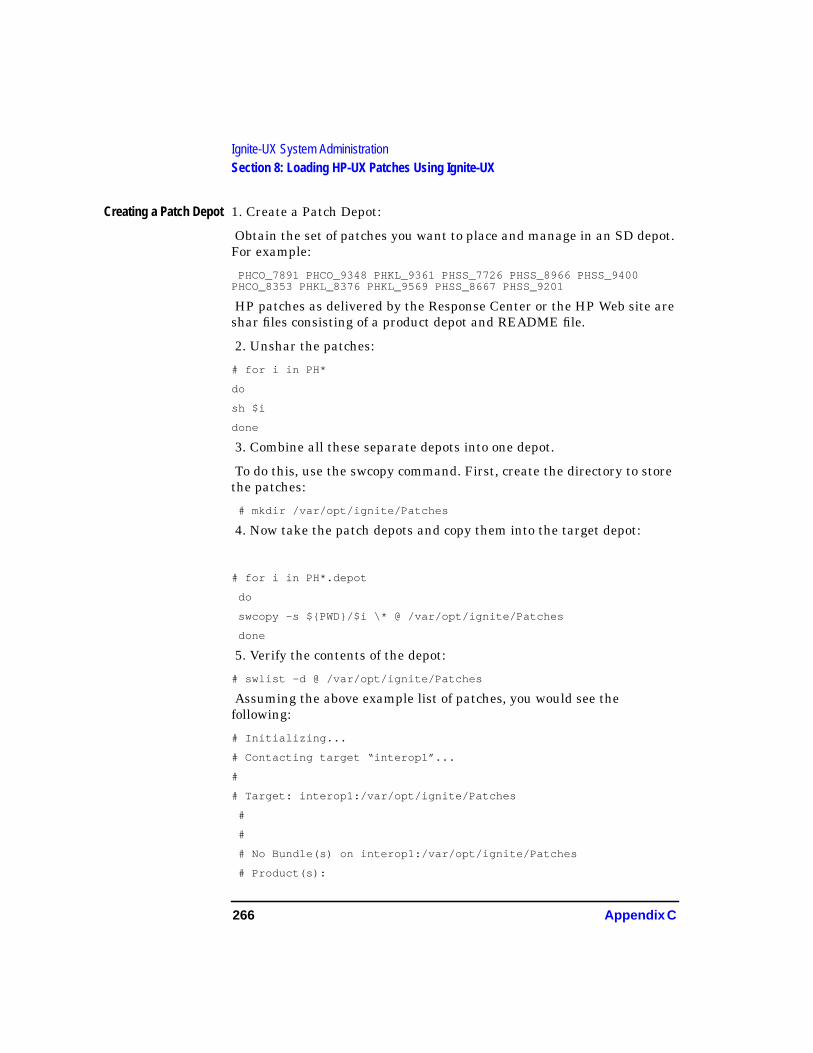
266 Appendix C
Ignite-UX System AdministrationSection 8: Loading HP-UX Patches Using Ignite-UX
Creating a Patch Depot 1. Create a Patch Depot:
Obtain the set of patches you want to place and manage in an SD depot.For example:
PHCO_7891 PHCO_9348 PHKL_9361 PHSS_7726 PHSS_8966 PHSS_9400PHCO_8353 PHKL_8376 PHKL_9569 PHSS_8667 PHSS_9201
HP patches as delivered by the Response Center or the HP Web site areshar files consisting of a product depot and README file.
2. Unshar the patches:
# for i in PH*
do
sh $i
done
3. Combine all these separate depots into one depot.
To do this, use the swcopy command. First, create the directory to storethe patches:
# mkdir /var/opt/ignite/Patches
4. Now take the patch depots and copy them into the target depot:
# for i in PH*.depot
do
swcopy -s ${PWD}/$i \* @ /var/opt/ignite/Patches
done
5. Verify the contents of the depot:
# swlist -d @ /var/opt/ignite/Patches
Assuming the above example list of patches, you would see thefollowing:
# Initializing...
# Contacting target “interop1”...
#
# Target: interop1:/var/opt/ignite/Patches
#
#
# No Bundle(s) on interop1:/var/opt/ignite/Patches
# Product(s):
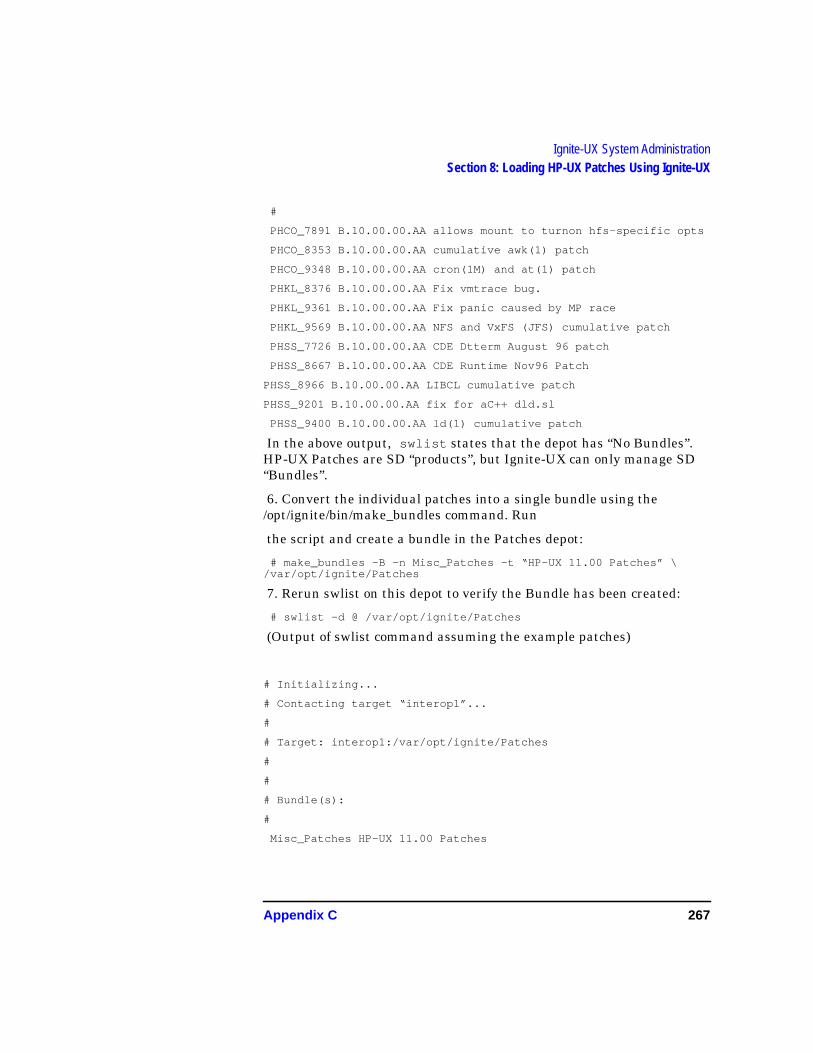
Appendix C 267
Ignite-UX System AdministrationSection 8: Loading HP-UX Patches Using Ignite-UX
#
PHCO_7891 B.10.00.00.AA allows mount to turnon hfs-specific opts
PHCO_8353 B.10.00.00.AA cumulative awk(1) patch
PHCO_9348 B.10.00.00.AA cron(1M) and at(1) patch
PHKL_8376 B.10.00.00.AA Fix vmtrace bug.
PHKL_9361 B.10.00.00.AA Fix panic caused by MP race
PHKL_9569 B.10.00.00.AA NFS and VxFS (JFS) cumulative patch
PHSS_7726 B.10.00.00.AA CDE Dtterm August 96 patch
PHSS_8667 B.10.00.00.AA CDE Runtime Nov96 Patch
PHSS_8966 B.10.00.00.AA LIBCL cumulative patch
PHSS_9201 B.10.00.00.AA fix for aC++ dld.sl
PHSS_9400 B.10.00.00.AA ld(1) cumulative patch
In the above output, swlist states that the depot has “No Bundles”.HP-UX Patches are SD “products”, but Ignite-UX can only manage SD“Bundles”.
6. Convert the individual patches into a single bundle using the/opt/ignite/bin/make_bundles command. Run
the script and create a bundle in the Patches depot:
# make_bundles -B -n Misc_Patches -t “HP-UX 11.00 Patches” \/var/opt/ignite/Patches
7. Rerun swlist on this depot to verify the Bundle has been created:
# swlist -d @ /var/opt/ignite/Patches
(Output of swlist command assuming the example patches)
# Initializing...
# Contacting target “interop1”...
#
# Target: interop1:/var/opt/ignite/Patches
#
#
# Bundle(s):
#
Misc_Patches HP-UX 11.00 Patches
268 Appendix C
Ignite-UX System AdministrationSection 8: Loading HP-UX Patches Using Ignite-UX
The default behavior of swlist is to now show only the higher levelsoftware bundles. Individual patches in the bundle can still be viewed byusing swlist options. The following will show the patch “products”contained in the bundle:
# swlist -l product -d @ /var/opt/ignite/Patches
NOTE If you need to add additional patches to the depot in the future, simplyunshar the patches as described above, swcopy them into the Patchesdepot, and rerun the “make_bundles” command. This will repackage thedepot.
If you would like to remove a Patch from the depot, simply use theswremove command. You can either run swremove and use its friendlieruser-interface, or run swremove in command line mode. The followingwill remove the PHKL_8376 patch from the bundle:
# swremove -d Misc_Patches.PHKL_8376 @ /var/opt/ignite/Patches
8. If you inadvertently create a Bundle of a Bundle (for example, if youadd an HP product you want distributed with the patch depot) useswremove interactively to examine and delete the extra bundle.
9. Create a config file for the newly-created “Misc_Patches” bundle.Follow the steps outlined in the “Adding a SD Bundle to the Archiveenvironment” part of Section 4. Use “/var/opt/ignite/Patches” for yoursource depot and specify a new configuration file:
# make_config -s /var/opt/ignite/Patches -a 700 \
-c /var/opt/ignite/data/Rel_B.11.00/misc_patch_bundle_cfg
10. Modify the /var/opt/ignite/INDEX file to include the new bundle inour “HP-UX B.11.00 archive” configuration:
cfg “HP-UX B.11.00 archive” {
description “The ARCHIVE B.11.00 release with patches.”
“/opt/ignite/data/Rel_B.11.00/config”“/var/opt/ignite/data/Rel_B.11.00/core_700_archive_cfg”“/var/opt/ignite/data/Rel_B.11.00/patch_bundle_cfg”“/var/opt/ignite/data/Rel_B.11.00/misc_patch_bundle_cfg”“/var/opt/ignite/config.local” }
11. To force the installation of the new “Misc_Patches” Bundle with the“golden image” archive, add the following line to the sw_sel clause for thepatch bundle in the file
“/var/opt/ignite/data/Rel_B.11.00/misc_patch_bundle_cfg ”:
load_with_any = “golden image”
Appendix C 269
Ignite-UX System AdministrationSection 8: Loading HP-UX Patches Using Ignite-UX
We created this file with the make_config command file previously.
NOTE Most software distributed by HP, for example applications on DARTCD-ROMs, are already bundles and will not need (and should not be)bundled again!
270 Appendix C
Ignite-UX System AdministrationSection 9: Setting Install Parameters Dynamically
Section 9: Setting Install ParametersDynamicallyIgnite-UX can make intelligent decisions about install parameters whenit runs, based on information it reads from the target system. Instead offorcing static values for, say, swap size or kernel parameters, the bestvalues for these can be determined based on the characteristics of thetarget machine.
This can make configurations set up by the System Administrator moregeneral purpose and limit the need for multiple, slightly differingconfigurations to handle minor system differences.
These decisions are specified in a C-like language and grammar uniqueto Ignite-UX. The variables and syntax are documented in theinstl_adm(4) man page.
1. As an example, we’ll set the primary swap size of the target systemroot disk dynamically at install time based on the size of the disk, and onthe size of the target system RAM. The algorithm will set swap to 125MB if the disk is large (> 500 MB) and if the amount of system RAM isgreater than 64 MB. If we have a small disk we’ll make the swap verysmall to maximize the amount of space available for HP-UX.
You could add the following lines to the end of the file/var/opt/ignite/data/Rel_B.11.00/core_700_archive_cfg orto /var/opt/ignite/config.local if you would like this to be thedefault for all configurations.
# default to very minimal swap of 25MB
# unless the disk is larger than 500 MB
# and we have more than 64MB ram
(disk[_hp_root_disk].size > 500MB & memory > 64MB)
{
init _hp_pri_swap=125MB
}
else
{
init _hp_pri_swap=25MB
}
Appendix C 271
Ignite-UX System AdministrationSection 9: Setting Install Parameters Dynamically
This could also be added to the “config” file created for automatic installs(see Section 4). Note that if the “_hp_pri_swap ” parameter is set laterin the order of files searched in the “cfg” definition, this setting will beoverwritten. The order the files are evaluated is documented in theinstl_adm(4) man page. Also be aware that the config file used forautomatic installs is overwritten as part of the install process. Again, seeSection 4 for details.
2. In this example, we’ll force the load of a patch bundle if we determinethe target machine matches the regular expression “71*”, such as a 710or 712.
Add the following lines to the end of the file:
/var/opt/ignite/data/Rel_B.11.00/core_700_archive_cfg
# check for H/W model 71x
# and add the Misc_Patches bundle if true
(hardware_model ~ “9000/71*”) {
init “Misc_Patches” = true
}
3. This example will run a previously created post install script andincrease a tunable kernel parameter if we determine our target machineis a Model 755. If not, it sets a default value for the kernel parameter:
post_config_script += “/var/opt/ignite/scripts/755special”
HARDWARE_MODEL == “9000/755” {
post_config_script += “/var/opt/ignite/scripts/755special”
mod_kernel += “maxuprc 300”
}
else
{
mod_kernel += “maxuprc 100”
}
4. In this example we’ll load an entirely different configuration based onthe size of the system RAM and disk. For this to have effect, it must gointo the INSTALLFS file by using the instl_adm command as describedin Section 3
# For a system with only one disk and small memory, select
# the “small system configuration”
(num_disks == 1 & memory < 64MB )
272 Appendix C
Ignite-UX System AdministrationSection 9: Setting Install Parameters Dynamically
{ cfg “small system configuration” = true
}
To check the syntax of all configuration files that are listed in the/var/opt/ignite/INDEX file you can use the command:
# instl_adm -T
If you want to check the syntax of a file that is not yet in the INDEX file,you can use the command:
# instl_adm -T -f <file>

Appendix C 273
Ignite-UX System AdministrationSection 10: Installing NetScape as a Post-Configuration Step
Section 10: Installing NetScape as aPost-Configuration StepHere is a little more complicated example of using Ignite-UX postinstallation scripts to load software on new installs. Netscape is one ofthose tools which seems to have a new navigator every six months. Dueto the frequency of the changes, this tool may not make sense to includeon the “golden system”. Here is an example of adding NetscapeNavigator tool.
This example shows one way of accomplishing the task using apost_config_script . Another way would be to create a softwareselection (sw_sel ) that would reference the tar archive, and then apost_config_script (or post_config_cmd ) associated with thesw_sel that would be run only if the selection was picked for loading.Using a sw_sel would have the advantage of making it appear in the UIas just another software selection, and would have the sw_impactstatements to ensure sufficient file system space. For more examples, seethe files in /opt/ignite/data/examples .
WARNING It is up to the individual administrators to ensure the NetscapeNavigator product is appropriately licensed prior to itsinstallation.
Step 1) Get Netscape Navigator
Netscape Navigator is typically pulled from one of the Netscape ftpserver sites. The pulled files are gzip compressed tar images with anencoded name similar to:
netscape-v30-export.hppa1.1-hp-hpux.tar.gz
Step 2) Special Considerations for Netscape
In order to run Navigator, each user needs the correct networkpreferences. Unfortunately, these preferences cannot be defaulted, andmust exist in every users $HOME/.netscape directory. To get around thislimitation, we have supplied a “run-netscape” script. Instead of running“netscape”, the user can run a link to “run-netscape” which will installthe default preferences at first invocation.
274 Appendix C
Ignite-UX System AdministrationSection 10: Installing NetScape as a Post-Configuration Step
* Attached below we have supplied a sample “run-netscape”. * You willalso need to create a default configuration file. Merely take an existingone and remove all user and host specific information.
Step 2) Write an install and customization script
Attached below is a script we used for installing Netscape in ourenvironment. You will note that the script does the following:
• Remote copies from a server to the local target netscape, adefault-preferences file, and the special run-netscape script.
• Unpacks netscape.
• Makes /usr/local/bin/netscape a link to “run-netscape” toensure user defaults will be installed.
• Performs the special netscape customization.
• Cleans up.
We named and placed our script under the following:
/var/opt/ignite/scripts/install_netscape
Step 3) Add the install script to Ignite-UX customization
Add a line similar to the following to one of your config files (not in aclause):
post_config_script += “/var/opt/ignite/scripts/install_netscape”
For details of adding a post configuration script, see Section 5 in thisappendix. This script will need to be accessible using tftp.
Example post install script for Netscape
# !/usr/bin/ksh
#
# Post Ignite-UX installation script used to install Netscapeversion 3.0.
# This installation assumes HP-UX 11.00 because it depends on gzip
# already loaded on the system.
#
PATH=${PATH}:/usr/sbin:/sbin:/usr/contrib/bin
IUX_SERVER=interop1.fc.hp.com
IUX_ARCHIVE_DIR=/var/opt/ignite/archives/Netscape
NETSCAPE_GZIP=netscape-v30-export.hppa1.1-hp-hpux.tar.gzNETSCAPE_INSTALL_DIR=/opt/Netscape NETSCAPE_RUN_DIR=/usr/local
Appendix C 275
Ignite-UX System AdministrationSection 10: Installing NetScape as a Post-Configuration Step
echo “* Loading Netscape”
mkdir ${NETSCAPE_INSTALL_DIR} cd ${NETSCAPE_INSTALL_DIR}
rcp ${IUX_SERVER}:${IUX_ARCHIVE_DIR}/${NETSCAPE_GZIP}${NETSCAPE_GZIP} rcp ${IUX_SERVER}:${IUX_ARCHIVE_DIR}/run-netscape. rcp ${IUX_SERVER}:${IUX_ARCHIVE_DIR}/default-preferences .
gzip -dc ${NETSCAPE_GZIP} | tar -xvf -
echo “* Finished loading Netscape”
# # Configure netscape runtime # echo “* Configuring Netscape”
chmod 755 ${NETSCAPE_INSTALL_DIR}/run-netscape ln -s${NETSCAPE_INSTALL_DIR}/run-netscape${NETSCAPE_RUN_DIR}/bin/netscape
# # Install java_30 # mkdir ${NETSCAPE_RUN_DIR}/lib/netscape ln -s${NETSCAPE_INSTALL_DIR}/java_30${NETSCAPE_RUN_DIR}/lib/netscape/java_30
# # Install plugins library # mkdir${NETSCAPE_RUN_DIR}/lib/netscape/plugins ln -s${NETSCAPE_INSTALL_DIR}/libnullplugin.so${NETSCAPE_RUN_DIR}/lib/netscape/plugins/libnullplugin.so
mkdir ${NETSCAPE_RUN_DIR}/lib/netscape/mime.types mkdir${NETSCAPE_RUN_DIR}/lib/netscape/mailcap
rm -f ${NETSCAPE_GZIP}
echo “* Finished configuring Netscape”
Example run time script for Netscape
#!/bin/sh
# # Put this script in /usr/local/bin/netscape
set -e
# Set this to the location of the real Netscape executable #REAL_NETSCAPE=/opt/Netscape/netscape
# Set this to the location of the default preferences file. #DEF_PREFS=/opt/Netscape/default-preferences
if [ ! -e $HOME/.netscape/preferences ]; then echo ‘(installingdefault Netscape preferences...)’ mkdir $HOME/.netscape
cp -p $DEF_PREFS $HOME/.netscape/preferences echo ‘(done)’ fi
# The “-name” option is to avoid confusing the users’ X resources.# exec $REAL_NETSCAPE -name netscape $*

276 Appendix C
Ignite-UX System AdministrationSection 10: Installing NetScape as a Post-Configuration Step
Index
Index 277
Numerics11.0, updating to, 5064-bit
hardware support table, 32updating to, 31
Aadd_release, 89adding server software
add_release, 89additional network interfaces,
126AdvJournalFS.VXFS-ADV-
KRN, 53AdvJournalFS.VXFS-ADV-
RUN, 53applications
installing, 30, 48optional networking, 52second medium, 52updating, 30, 54
auto_parms, 212
Bboot information
newer Series 700, 60newer Series 800, 62, 63older Series 700, 60, 61older Series 800, 63V-class, 65
booting install kernelpaths, 64paths,network, 103, 106
CCDE, migrating to, 48CD-ROM
Ignite-UX, 84mounting, 24
changing file system size, 199client install, 74
config file examples, 219–227configuration for install
advanced, 137basic, 112file system, 128software, 117system, 118
core media recovery, 151procedures, 152
Ddate
setting, 118day
setting, 118DHCP
design information, 216document information, 216enabling,using SAM, 212enabling,using text editor, 213networking,parameters, 211server,configuring, 205, 217server,finding, 212server,setup procedure, 208,
211variables, 213
dhcpclient, 212diagnosing errors, 186, 202disk parameters
setting, 128disk space
update requirement, 22, 24disks
fiber link (not supported on11.0), 22
distribution media, 84DNS
configuring, 124
Eerror messages, 187, 195Ethernet address, finding, 104
executing install, 139exit, 139expert recovery, 145
procedures, 152Extension Software, 51
Ffiber link disks
not supported on 11.0, 22file system layouts, 86file system parameters
setting, 128file system size, adjusting, 199file systems
UFS/HFS, 86file systems supported
HFS, 86JFS, 86LVM, 86NFS, 86VxFS, 86
firmware revisionV-class, 38
GGUI
starting, 232guided install, 75
Hhardware requirements for
Ignite-UX, 84, 86hardware support
64-bit, 32help
advanced, 75guided install, 75
help system, 75HFS
file systems, 86hop count
configuring, 123
278 Index
Index
HP OnlineJFSfeatures, 53installing, 53
HP-UXselecting OS environment, 112
HP-UX Extension Software, 51
IIgnite-UX
errors, 186, 202hardware requirements, 84, 85interface, 101, 141products and filesets, 84RAM requirement, 84, 85
install(pre-configured) Go!, 116, 139CD names, 57client, 74default values, 75Extension Software, 51media list, 57server,searching for, 103single system, 74stand-alone, 74tape names, 57time,install kernel load, 61time,kernel load, 64, 106using defaults, 116
install kernelautobooting (S800), 62boot paths, 64, 70boot paths,network, 103, 106booting (s700), 59media booting, 57stopping autoboot (S800), 62
install mediaIgnite-UX, 84
installing applicationsinformation, 52
instl_adm, 211IP address
booting, adding, 233
finding, 105setting with DHCP, 211, 216
IUXuser interface, starting, 232
IUX archivesetting up, 236–244
IUX bundleidentifying, 231, 232
IUX server configuration, 233IUX system admin. examples,
230–275IUX system requirements, 231
JJFS
adding functionality, 53file systems, 86, 113OnlineJFS, 53
Llayered applications
loaded in /var/adm/sw/*, 90license
HP-UX,selecting, 112loading applications
information, 52LVM
file systems, 86, 113
Mmake_recovery, 147
duplicating a system, 148manifest, 139manual roadmap, 15media
for updating, 24Ignite-UX, 84
media install, 57messages
errors, 186, 195mount
with update CD, 24
Nnetwork address
finding, 105setting with DHCP, 211
network destination IPconfiguring, 123
network gatewayconfiguring, 123
network interfacesconfiguring, 126
network parameterstemporary, 211
network servicesconfiguring, 122
networking products,optionalsecond medium, 52
networking requirements, 87NFS
file systems, 86NFS Diskless
not supported., 22, 102NIS
configuring, 125nslookup, 124
OOnlineJFS
features, 53installing, 53
order of loading patches, 118OS archives
non-core, possible corruption,90
Pparameters
advanced, 128disk, 128file system, 128system, 118
patchesExtension Software, 51
Index
Index 279
order of loading, 118patches, loading, 265patches, removing prior patch
inlo., 265patching
precautions, 32peripherals
install requirements, 84, 86products and filesets
HP-UX media, 24Ignite-UX, 84
pull install, 74
RRAM space
install requirements, 84, 85update requirement, 22, 24
record keeping,manifest, 139recovery
"expert", 151"expert" recovery, 145bootable install tape, creating,
149bootable recovery tape, 147core media, 145, 151procedures (core media), 152system, 145
removing filesets, 22removing server software
add_release, 89requirements
networking, 87
SS700 systems, Ethernet address,
104S700 systems,IP address, 105searching for install server, 103searching for net address, 105server
configuration for IUX, 232setting up, 88, 98
tools for setup, 88updating, 98
server,installsearching for, 103
session optionsconfiguraing, examples, 234
set_parms, 118single install, 74size, file system
adjusting, 199size,disk
Ignite-UX requirement, 85update requirements, 22, 24
softwareHP-UX,selecting, 112
source media,booting from, 24stand-alone install, 74static routes
configuring, 123support media recovery, 145supported systems
11.0, 21, 102swgettools
updating SD-UX with, 26, 29swinstall
Extension Software, 51patches, 51
SwitchOver, removal, 20system recovery, 145system requirements for
updating, 21
Ttab
advanced, 137basic, 112file system, 128software, 117system, 118
task information, 15task wizard, 75
temporary network parameters,211
termsupdating vs. upgrading, 20
time zonesetting, 118
toolssetting up server, 88
troubleshootinglarge systems, 201
troubleshooting Ignite-UX, 186,202
UUFS
file systems, 86update paths, 21updating
adding bundles, 52, 54applications, 30, 54CD-ROM names, 24disk requirement, 22, 24disk space analysis, 46Extension Software, 51fileset size, 22, 24general time required, 47media, 24memory requirement, 22, 24non-cluster, 30non-interactive, 49RAM requirement, 22, 24requirement for 10.0, 20SD-UX, 26, 29Series 800, 30server,add_release, 89swgettools requirement, 20system requirements for, 21tape names, 24
updating to 11.0, 31–42, 50upgrading
version requirements, 20
280 Index
Index
VV-class
booting, 65firmware revision, 38
versions for updates, 21volume group name
changing, 136VUE-to-CDE migration, 48VxFS
adding functionality, 53file systems, 86, 113OnlineJFS, 53
XXNTP
configuring, 126
Related Documents