Installing and Upgrading vRealize Automation vRealize Automation 7.3

Welcome message from author
This document is posted to help you gain knowledge. Please leave a comment to let me know what you think about it! Share it to your friends and learn new things together.
Transcript
Installing and UpgradingvRealize AutomationvRealize Automation 7.3

Installing and Upgrading vRealize Automation
VMware, Inc. 2
You can find the most up-to-date technical documentation on the VMware website at:
https://docs.vmware.com/
If you have comments about this documentation, submit your feedback to
Copyright © 2017–2018 VMware, Inc. All rights reserved. Copyright and trademark information.
VMware, Inc.3401 Hillview Ave.Palo Alto, CA 94304www.vmware.com

Contents
1 Installing or Upgrading vRealize Automation 4
vRealize Automation Reference Architecture 4
Initial Deployment and Configuration Recommendations 4
vRealize Automation Deployment 5
vRealize Business for Cloud Deployment Considerations 7
vRealize Automation Scalability 7
vRealize Business for Cloud Scalability 10
vRealize Automation High Availability Configuration Considerations 10
vRealize Business for Cloud High Availability Considerations 12
vRealize Automation Hardware Specifications and Capacity Maximums 13
vRealize Automation Small Deployment Requirements 15
vRealize Automation Medium Deployment Requirements 20
vRealize Automation Large Deployment Requirements 25
vRealize Automation Multi-Data Center Data Deployments 31
vRealize Automation Secure Configuration 32
Updated Information 32
vRealize Automation Secure Baseline Overview 33
Verifying the Integrity of Installation Media 33
Hardening VMware System Software Infrastructure 34
Reviewing Installed Software 35
VMware Security Advisories and Patches 36
Secure Configuration 36
Configuring Host Network Security 71
Auditing and Logging 86
Installing vRealize Automation 86
vRealize Automation Installation Overview 86
Preparing for vRealize Automation Installation 94
Deploying the vRealize Automation Appliance 109
Installing vRealize Automation with the Installation Wizard 115
The Standard vRealize Automation Installation Interfaces 139
Silent vRealize Automation Installation 214
vRealize Automation Post-Installation Tasks 220
Troubleshooting a vRealize Automation Installation 237
Upgrading vRealize Automation 264
Upgrading vRealize Automation 7.1 or 7.2 to 7.3 266
Upgrading vRealize Automation 6.2.5 to 7.3 321
Migrating vRealize Automation to 7.3 395
VMware, Inc. 3
Installing or UpgradingvRealize Automation 1You can install vRealize Automation for the first time, or you can upgrade your current environment to thelatest version.
This chapter includes the following topics:
n vRealize Automation Reference Architecture
n vRealize Automation Secure Configuration
n Installing vRealize Automation
n Upgrading vRealize Automation
vRealize Automation Reference ArchitectureReference architecture describes the structure and configuration of typical vRealize Automationdeployments. In addition, it provides information about high availability, scalability and deploymentprofiles.
Reference architecture includes information about the following components:
n VMware vRealize Automation
n VMware vRealize Business for Cloud
For software requirements, installations, and supported platforms, see the documentation for eachproduct.
Initial Deployment and Configuration RecommendationsDeploy and configure all VMware vRealize Automation components in accordance with VMwarerecommendations.
Keep your vRealize Automation, vRealize Business for Cloud, and vRealize Orchestrator in the sametime zone with their clocks synchronized.
Install vRealize Automation, vRealize Business for Cloud, and vRealize Orchestrator on the samemanagement cluster. Provision machines to a cluster that is separate from the management cluster sothat user workload and server workload can be isolated.
VMware, Inc. 4
Deploy Proxy Agents in the same data center as the Endpoint with which they communicate. VMwaredoes not recommended placing DEM Workers in Remote Data Centers unless there is an expressworkflow skill based use case that requires it. All components except the Proxy Agents and DEM Workersmust be deployed in the same Data Center or Data Centers within a Metro Area Network. Latency mustbe less than 5 milliseconds, and bandwidth must not be less than 1 GB/s between the Data Centers in theMetro Area Network.
For more information including a support statement, see the VMware Knowledge Base article Installingthe VMware vRealize Automation on a distributed multi-site instance available at http://kb.vmware.com/selfservice/microsites/search.do?language=en_US&cmd=displayKC&externalId=213484.2.
vRealize Automation DeploymentUse the VMware resource recommendations as a starting point for vRealize Automation deploymentplanning.
After initial testing and deployment to production, continue to monitor performance and allocate additionalresources if necessary, as described in vRealize Automation Scalability.
AuthenticationWhen configuring vRealize Automation, you can use the default Directories Management connector foruser authentication, or you can specify a pre-existing SAML based identity provider to support a single-sign on experience.
If two-factor authentication is required vRealize Automation supports integration with RSASecurID. Whenthis integration point is configured, users are prompted for their user ID and passcode.
Load Balancer ConsiderationsUse the Least Response Time or round-robin method to balance traffic to the vRealize Automationappliances and infrastructure Web servers. Enable session affinity or the sticky session feature to directsubsequent requests from each unique session to the same Web server in the load balancer pool.
You can use a load balancer to manage failover for the Manager Service, but do not use a load-balancingalgorithm, because only one Manager Service is active at a time. Also, do not use session affinity whenmanaging failover with a load balancer.
Use ports 443 and 8444 when load balancing the vRealize Automation Appliance. For the InfrastructureWebsite and Infrastructure Manager Service, only port 443 should be load balanced.
Although you can use other load balancers, NSX, F5 BIG-IP hardware, and F5 BIG-IP Virtual Edition aretested and are recommended for use.
See the vRealize Automation documentation for detailed information on configuring load balancers.
Installing and Upgrading vRealize Automation
VMware, Inc. 5
Database DeploymentvRealize Automation automatically clusters the appliance database in 7.0 and later releases. All new 7.0and later deployments must use the internal appliance database. vRealize Automation instances whichare upgrading to 7.1 or later must merge their external databases into the appliance database. See thevRealize Automation 7.2 product documentation for more information on the upgrade process.
For production deployments of the Infrastructure components, use a dedicated database server to hostthe Microsoft SQL Server (MSSQL) databases. vRealize Automation requires machines thatcommunicate with the database server to be configured to use Microsoft Distributed TransactionCoordinator (MSDTC). By default, MSDTC requires port 135 and ports 1024 through 65535.
For more information about changing the default MSDTC ports, see the Microsoft Knowledge Base articleConfiguring Microsoft Distributed Transaction Coordinator (DTC) to work through a firewall available at https://support.microsoft.com/en-us/kb/250367.
The IaaS Manager Service host must be able to resolve the NETBIOS name of the IaaS SQL Serverdatabase host. If it cannot resolve the NETBIOS name, add the SQL Server NETBIOS name to theManager Service machine /etc/hosts file and restart the Manager Service.
vRealize Automation supports SQL AlwaysON groups only with Microsoft SQL Server 2016. Wheninstalling SQL Server 2016, the database must be created in 100 mode. If you use an older version ofMicrosoft SQL Server, use a Failover Cluster instance with shared disks. For more information onconfiguring SQL AlwaysOn groups with MSDTC, see https://msdn.microsoft.com/en-us/library/ms366279.aspx.
Data Collection ConfigurationThe default data collection settings provide a good starting point for most implementations. Afterdeploying to production, continue to monitor the performance of data collection to determine whether youmust make any adjustments.
Proxy AgentsFor maximum performance, deploy agents in the same data center as the endpoint to which they areassociated. You can install additional agents to increase system throughput and concurrency. Distributeddeployments can have multiple agent servers that are distributed around the globe.
When agents are installed in the same data center as their associated endpoint, you can see an increasein data collection performance of 200 percent, on average. The collection time measured includes onlythe time spent transferring data between the proxy agent and the manager service. It does not include thetime it takes for the manager service to process the data.
For example, you currently deploy the product to a data center in Palo Alto and you have vSphereendpoints in Palo Alto, Boston, and London. In this configuration, the vSphere proxy agents are deployedin Palo Alto, Boston, and London for their respective endpoints. If instead, agents are deployed only inPalo Alto, you might see a 200 percent increase in data collection time for Boston and London.
Installing and Upgrading vRealize Automation
VMware, Inc. 6
Distributed Execution Manager ConfigurationIn general, locate distributed execution managers (DEMs) as close as possible to the model managerhost. The DEM Orchestrator must have strong network connectivity to the model manager at all times. Bydefault, the installer places DEM Orchestrators alongside the Manager Service. Create two DEMOrchestrator instances, one for failover, and two DEM Worker instances in your primary data center.
If a DEM Worker instance must run a location-specific workflow, install the instance in that location.
Assign skills to the relevant workflows and DEMs so that those workflows are always run by DEMs in thecorrect location. For information about assigning skills to workflows and DEMs by using thevRealize Automation designer console, see the vRealize Automation Extensibility documentation.
For the best performance, install DEMs and agents on separate machines. For additional informationabout installing vRealize Automation agents, see Installing Agents.
vRealize OrchestratorUse the internal vRealize Orchestrator instance for all new deployments. If necessary, legacydeployments can continue to use an external vRealize Orchestrator. See https://kb.vmware.com/selfservice/microsites/search.do?language=en_US&cmd=displayKC&externalId=2147109 for the procedure to increase the memoryallocated to the internal vRealize Orchestrator instance.
For best product performance, review and implement configuration guidelines described in the vRealizeAutomation Coding Design Guide prior to importing vRealize Orchestrator content into productiondeployments.
vRealize Business for Cloud Deployment ConsiderationsDeploy vRealize Business for Cloud, formerly known as vRealize Business Standard Edition, inaccordance with VMware guidelines.
Load Balancer ConsiderationsLoad balancing is not supported for data collection connections. For more information, see vRealizeAutomation Scalability. In the vRealize Business for Cloud appliance for user interface and API clientconnections, you can use the vRealize Automation load balancer.
vRealize Automation ScalabilityConsider all applicable scalability factors when configuring your vRealize Automation system.
UsersThe vRealize Automation appliance is configured for syncing less than 100,000 users. If your systemcontains more users, you may need to add memory to vRealize Automation Directories Management. Fordetailed information on adding memory to Directories Management, see Add Memory to DirectoriesManagement.
Installing and Upgrading vRealize Automation
VMware, Inc. 7
Concurrent Provisions ScalabilityBy default, vRealize Automation processes only eight concurrent provisions per endpoint. For informationabout increasing this limit, see Configuring Concurrent Machine Provisioning.
VMware recommends that all deployments start with at least two DEM-Workers. In 6.x each DEM-Workercould process 15 workflows concurrently. This was increased to 30 for vRealize Automation 7.0 and later.
If machines are being customized through Workflow Stubs, you should have 1 DEM-Worker per 20Machines that will be provisioned concurrently. For example, a system supporting 100 concurrentprovisions should have a minimum of 5 DEM-Workers.
For more information on DEM-Workers and scalability see Distributed Execution Manager PerformanceAnalysis and Tuning
Data Collection ScalabilityData collection completion time depends on the compute resource capacity, the number of machines onthe compute resource or endpoint, the current system, and network load, among other variables. Theperformance scales at a different rate for different types of data collection.
Each type of data collection has a default interval that you can override or modify. Infrastructureadministrators can manually initiate data collection for infrastructure source endpoints. Fabricadministrators can manually initiate data collection for compute resources. The following values are thedefault intervals for data collection.
Table 1‑1. Data Collection Default Intervals
Data Collection Type Default Interval
Inventory Every 24 hours (daily)
State Every 15 minutes
Performance Every 24 hours (daily)
Performance Analysis and TuningAs the number of resources collecting data increases, data collection completion times might becomelonger than the interval between data collection intervals, particularly for state data collection. Todetermine whether data collection for a compute resource or endpoint is completing in time or is beingqueued, see the Data Collection page. The Last Completed field value might show In queue or Inprogress instead of a timestamp when data collection last finished. If this problem occurs, you canincrease the interval between data collections to decrease the data collection frequency.
Alternatively, you can increase the concurrent data collection limit per agent. By default,vRealize Automation limits concurrent data collection activities to two per agent and queues requests thatexceed this limit. This limitation allows data collection activities to finish quickly without affecting overallperformance. You can raise the limit to take advantage of concurrent data collection, but you must weighthis option against overall performance degradation.
Installing and Upgrading vRealize Automation
VMware, Inc. 8
If you increase the configured vRealize Automation per-agent limit, you might want to increase one ormore of these execution timeout intervals. For more information about how to configure data collectionconcurrency and timeout intervals, see the vRealize Automation System Administration documentation.Manager Service data collection is CPU-intensive. Increasing the processing power of the ManagerService host can decrease the time required for overall data collection.
Data collection for Amazon Elastic Compute Cloud (Amazon AWS), in particular, can be CPU intensive,especially if your system collects data on multiple regions concurrently and if data was not previouslycollected on those regions. This type of data collection can cause an overall degradation in Web siteperformance. Decrease the frequency of Amazon AWS inventory data collection if it is having anoticeable effect on performance.
Workflow Processing ScalabilityThe average workflow processing time, from when the DEM Orchestrator starts preprocessing theworkflow to when the workflow finishes executing, increases with the number of concurrent workflows.Workflow volume is a function of the amount of vRealize Automation activity, including machine requestsand some data collection activities.
Configure Manager Service for High Data VolumeIf you expect to use a VMware vSphere cluster that contains a large number of objects, for example, 3000or more virtual machines, modify the manager service config file with larger values. If you do not modifythis setting, large inventory data collections might fail.
Modify the default value of the ProxyAgentServiceBinding and maxStringContentLength settings inthe ManagerService.exe.config file.
Procedure
1 Open the ManagerService.exe.config file in a text editor.
Typically, this file resides at C:\Program Files (x86)\VMware\vCAC\Server.
2 Locate the binding name and readerQuotas lines in the file.
<binding name=”ProxyAgentServiceBinding” maxReceivedMessageSize=”13107200”>
<readerQuotas maxStringContentLength=”13107200” />
Note Do not confuse these two lines with the similar lines that contain the following string: bindingname = "ProvisionServiceBinding".
3 Replace the number values assigned to the maxReceivedMessageSize andmaxStringContentLength attributes with a larger value.
The optimal size depends on how many more objects you expect your VMware vSphere cluster tocontain in the future. For example, you can increase these numbers by a factor of 10 for testing.
4 Save your changes and close the file.
5 Restart the vRealize Automation manager service.
Installing and Upgrading vRealize Automation
VMware, Inc. 9
Distributed Execution Manager Performance Analysis and TuningYou can view the total number of in progress or pending workflows at any time on the DistributedExecution Status page, and you can use the Workflow History page to determine how long it takes to runa given workflow.
If you have a large number of pending workflows, or if workflows are taking longer than expected to finish,add more Distributed Execution Manager (DEM) Worker instances to pick up the workflows. Each DEMWorker instance can process 30 concurrent workflows. Excess workflows are queued for execution.
You can adjust workflow schedules to minimize the number of workflows that start simultaneously. Forexample, rather than scheduling all hourly workflows to run at the beginning of the hour, you can staggertheir run times so that they do not compete for DEM resources. For more information about workflows,see the vRealize Automation Extensibility documentation.
Some workflows, particularly certain custom workflows, can be CPU intensive. If the CPU load on theDEM Worker machines is high, consider increasing the processing power of the DEM machine or addingmore DEM machines to your environment.
vRealize Business for Cloud ScalabilityConfigure your vRealize Business for Cloud installation for scalability in accordance with VMwareguidelines.
vRealize Business for Cloud can scale up to 20,000 virtual machines across ten VMware vCenter Serverinstances. The first synchronization of the inventory data collection takes approximately three hours tosynchronize 20,000 virtual machines across three VMwarevCenter Server instances. Synchronization ofstatistics from VMware vCenter Server takes approximately one hour for 20,000 virtual machines. Bydefault, the cost calculation job runs every day and takes approximately two hours for each run for 20,000virtual machines.
Note In vRealize Business for Cloud 1.0, the default virtual appliance configuration can support up to20,000 virtual machines. Increasing the limits of the virtual appliance beyond its default configurationdoes not increase the number of virtual machines that it can support.
vRealize Automation High Availability ConfigurationConsiderationsIf you require maximum system robustness, configure your vRealize Automation system for highavailability in accordance with VMware guidelines.
Installing and Upgrading vRealize Automation
VMware, Inc. 10
vRealize Automation ApplianceThe vRealize Automation appliance supports active-active high availability for all components except theappliance database. Starting with the 7.3 release, database failover is automatic if three nodes aredeployed and synchronous replication is configured between two nodes. When vRealize Automationappliance detects database failure, it promotes a suitable database server to be the master. You canmonitor and manage the appliance database on the Virtual Appliance Management Console vRASettings > Database tab.
To enable high availability for these appliances, place them under a load balancer. For more information,see Configuring Your Load Balancer. Beginning with the 7.0 release, the appliance database, andvRealize Orchestrator are automatically clustered and available for use.
vRealize Automation Directories ManagementEach vRealize Automation appliance includes a connector that supports user authentication, althoughonly one connector is typically configured to perform directory synchronization. It does not matter whichconnector you choose to serve as the sync connector. To support Directories Management highavailability, you must configure a second connector that corresponds to your second vRealize Automationappliance, which connects to your Identity Provider and points to the same Active Directory. With thisconfiguration, if one appliance fails, the other takes over management of user authentication.
In a high availability environment, all nodes must serve the same set of Active Directories, users,authentication methods, etc. The most direct method to accomplish this is to promote the Identity Providerto the cluster by setting the load balancer host as the Identity Provider host. With this configuration, allauthentication requests are directed to the load balancer, which forwards the request to either connectoras appropriate.
For more information about configuring Directories Management for high availability, see ConfigureDirectories Management for High Availability.
Infrastructure Web ServerThe Infrastructure Web server components all support active-active high availability. To enable highavailability for these components, place them under a load balancer.
Infrastructure Manager ServiceThe manager service component supports active-passive high availability. To enable high availability forthis component, place two manager services under a load balancer. In vRealize Automation 7.3 andnewer, failover is automatic.
If the active manager service fails, stop the Windows service, if it is not already stopped under the loadbalancer. Enable the passive manager service and restart the Windows service under the load balancer.See Install the Active Manager Service.
Installing and Upgrading vRealize Automation
VMware, Inc. 11
AgentsAgents support active-active high availability. For information about configuring agents for high availability,see the vRealize Automation configuration documentation. Check the target service for high availability.
Distributed Execution Manager WorkerA Distributed Execution Manager (DEM) running under the Worker role supports active-active highavailability. If a DEM Worker instance fails, the DEM Orchestrator detects the failure and cancelsworkflows that the DEM Worker instance is running. When the DEM Worker instance comes back online,it detects that the DEM Orchestrator has canceled the workflows of the instance and stops running them.To prevent workflows from being canceled prematurely, leave a DEM Worker instance offline for severalminutes before you cancel its workflows.
Distributed Execution Manager OrchestratorDEMs running under the Orchestrator role support active-active high availability. When a DEMOrchestrator starts, it searches for another running DEM Orchestrator.
n If it finds no DEM Orchestrator instances running, it starts running as the primary DEM Orchestrator.
n If it does find another running DEM Orchestrator, it monitors the other primary DEM Orchestrator todetect an outage.
n If it detects an outage, it takes over as the primary instance.
When the previous primary instance comes online again, it detects that another DEM Orchestrator hastaken over its role as primary and monitors for failure of the primary Orchestrator instance.
MSSQL Database Server for Infrastructure ComponentsvRealize Automation supports SQL AlwaysON groups only with Microsoft SQL Server 2016. Wheninstalling SQL Server 2016, the database must be created in 100 mode. If you use an older version ofMicrosoft SQL Server, use a Failover Cluster instance with shared disks. For more information onconfiguring SQL AlwaysOn groups with MSDTC, see https://msdn.microsoft.com/en-us/library/ms366279.aspx.
vRealize OrchestratorAn internal highly-available instance of vRealize Orchestrator is supplied as part of thevRealize Automation appliance.
vRealize Business for Cloud High Availability ConsiderationsUse the VMware vSphere HA feature for the vRealize Business for Cloud Edition appliance.
To configure the VMware vSphere HA feature on the VMware ESXi host, see the vCenter Server andHost Management documentation.
Installing and Upgrading vRealize Automation
VMware, Inc. 12

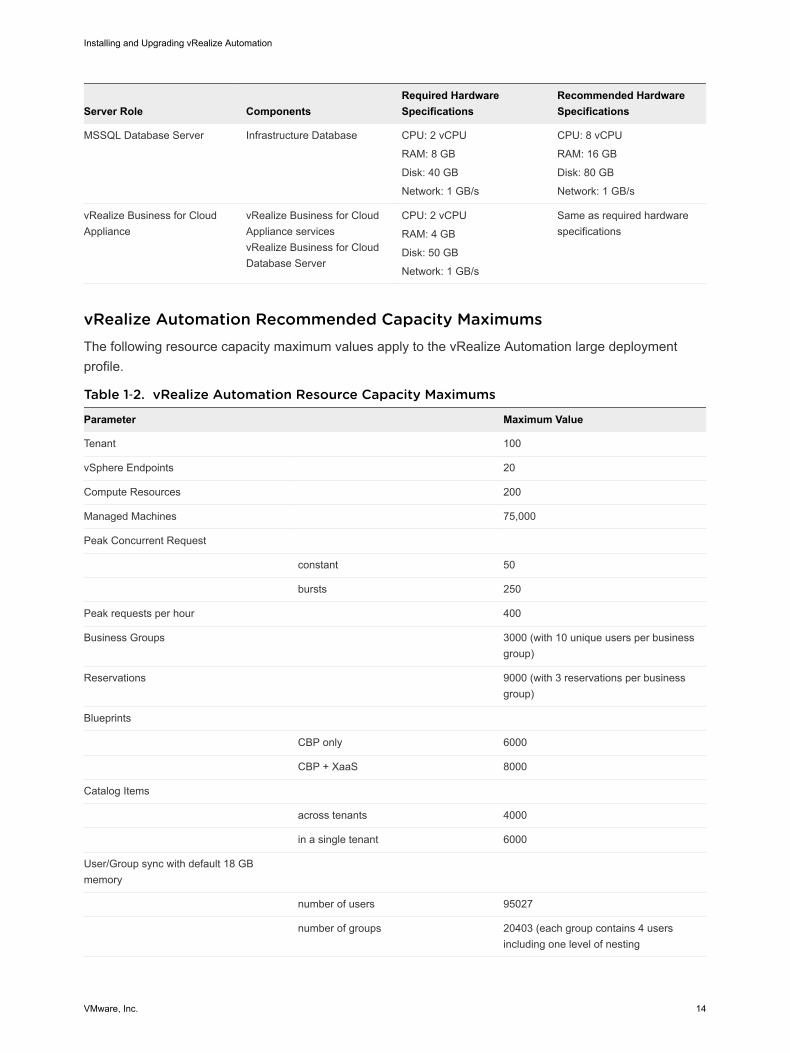
vRealize Automation Hardware Specifications and CapacityMaximumsInstall appropriate components for your configuration and capacity needs on each vRealize Automationserver profile in your environment.
Server Role ComponentsRequired HardwareSpecifications
Recommended HardwareSpecifications
vRealize Automation Appliance vRealize AutomationServices,vRealize Orchestrator,vRealize AutomationAppliance Database
CPU: 4 vCPU
RAM: 18 GB (See vRealizeAutomation Scalability formore information.)
Disk: 140 GB
Network: 1 GB/s
Same as required hardwarespecifications.
Infrastructure Core Server Web site, Manager Service,DEM Orchestrator, DEMWorker, Proxy Agent
CPU: 4 vCPU
RAM: 8 GB
Disk: 40 GB
Network: 1 GB/s
Same as required hardwarespecifications.
Infrastructure Web Server Web site CPU: 2 vCPU
RAM: 2 GB
Disk: 40 GB
Network: 1 GB/s
CPU: 2 vCPU
RAM: 4 GB
Disk: 40 GB
Network: 1 GB/s
Infrastructure Manager Server Manager Service, DEMOrchestrator
CPU: 2 vCPU
RAM: 2 GB
Disk: 40 GB
Network: 1 GB/s
CPU: 2 vCPU
RAM: 4 GB
Disk: 40 GB
Network: 1 GB/s
Infrastructure Web/ManagerServer
Infrastructure Web/ManagerServer
CPU: 2 vCPU
RAM: 4 GB
Disk: 40 GB
Network: 1 GB/s
CPU: 2 vCPU
RAM: 8 GB
Disk: 40 GB
Network: 1 GB/s
Infrastructure DEM Server (One or more) DEM Workers CPU: 2 vCPU
RAM: 2 GB
Disk: 40 GB
Network: 1 GB/s Per DEMWorker
CPU: 2 vCPU
RAM: 6 GB
Disk: 40 GB
Network: 1 GB/s Per DEMWorker
Infrastructure Agent Server (One or more) Proxy Agent CPU: 2 vCPU
RAM: 4 GB
Disk: 40 GB
Network: 1 GB/s
Same as required hardwarespecifications
Installing and Upgrading vRealize Automation
VMware, Inc. 13
Server Role ComponentsRequired HardwareSpecifications
Recommended HardwareSpecifications
MSSQL Database Server Infrastructure Database CPU: 2 vCPU
RAM: 8 GB
Disk: 40 GB
Network: 1 GB/s
CPU: 8 vCPU
RAM: 16 GB
Disk: 80 GB
Network: 1 GB/s
vRealize Business for CloudAppliance
vRealize Business for CloudAppliance servicesvRealize Business for CloudDatabase Server
CPU: 2 vCPU
RAM: 4 GB
Disk: 50 GB
Network: 1 GB/s
Same as required hardwarespecifications
vRealize Automation Recommended Capacity MaximumsThe following resource capacity maximum values apply to the vRealize Automation large deploymentprofile.
Table 1‑2. vRealize Automation Resource Capacity Maximums
Parameter Maximum Value
Tenant 100
vSphere Endpoints 20
Compute Resources 200
Managed Machines 75,000
Peak Concurrent Request
constant 50
bursts 250
Peak requests per hour 400
Business Groups 3000 (with 10 unique users per businessgroup)
Reservations 9000 (with 3 reservations per businessgroup)
Blueprints
CBP only 6000
CBP + XaaS 8000
Catalog Items
across tenants 4000
in a single tenant 6000
User/Group sync with default 18 GBmemory
number of users 95027
number of groups 20403 (each group contains 4 usersincluding one level of nesting
Installing and Upgrading vRealize Automation
VMware, Inc. 14
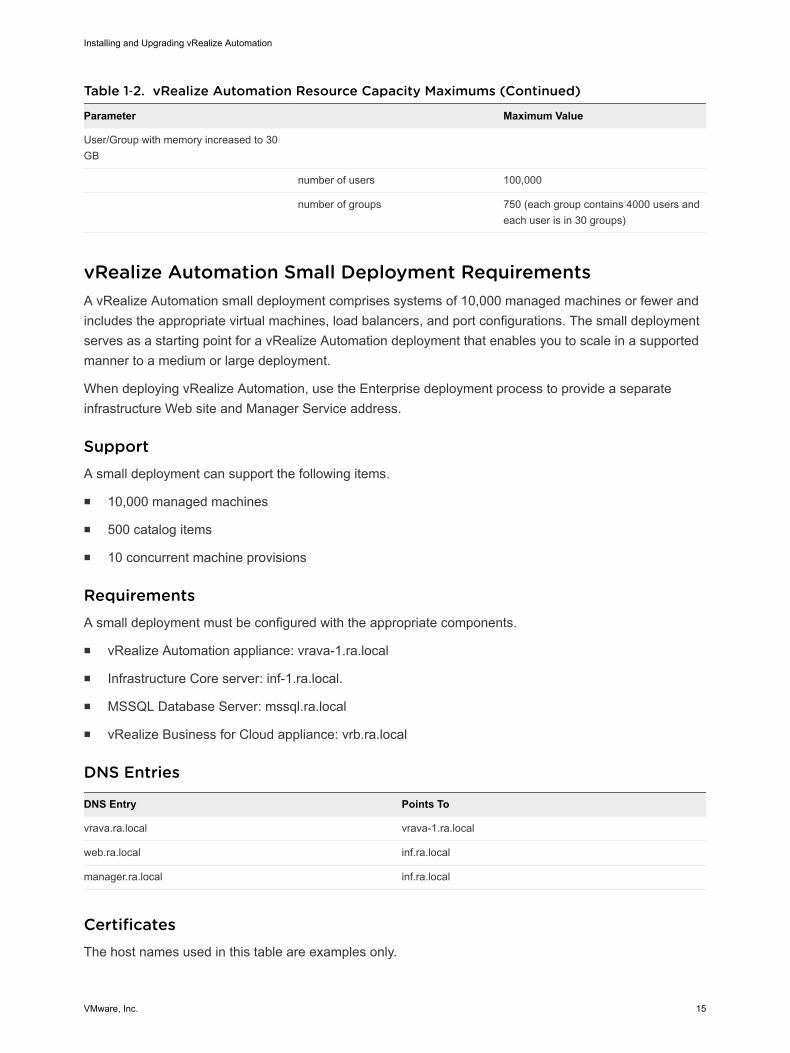
Table 1‑2. vRealize Automation Resource Capacity Maximums (Continued)
Parameter Maximum Value
User/Group with memory increased to 30GB
number of users 100,000
number of groups 750 (each group contains 4000 users andeach user is in 30 groups)
vRealize Automation Small Deployment RequirementsA vRealize Automation small deployment comprises systems of 10,000 managed machines or fewer andincludes the appropriate virtual machines, load balancers, and port configurations. The small deploymentserves as a starting point for a vRealize Automation deployment that enables you to scale in a supportedmanner to a medium or large deployment.
When deploying vRealize Automation, use the Enterprise deployment process to provide a separateinfrastructure Web site and Manager Service address.
SupportA small deployment can support the following items.
n 10,000 managed machines
n 500 catalog items
n 10 concurrent machine provisions
RequirementsA small deployment must be configured with the appropriate components.
n vRealize Automation appliance: vrava-1.ra.local
n Infrastructure Core server: inf-1.ra.local.
n MSSQL Database Server: mssql.ra.local
n vRealize Business for Cloud appliance: vrb.ra.local
DNS Entries
DNS Entry Points To
vrava.ra.local vrava-1.ra.local
web.ra.local inf.ra.local
manager.ra.local inf.ra.local
CertificatesThe host names used in this table are examples only.
Installing and Upgrading vRealize Automation
VMware, Inc. 15

Server Role CN or SAN
vRealize Automation appliance SAN contains vra.va.sqa.local and vra.va-1.sqa.local
Infrastructure Core Server SAN contains web.ra.local, managers.ra.local and inf-1.ra.local
vRealize Business for Cloud Server CN = vrb.ra.local
PortsUsers require access to certain ports. All ports listed are default ports.
Server Role Port
vRealize Automation appliance 443, 8444. Port 8444 is required for the Virtual Machine RemoteConsole. Port 8283 is required for access to thevRealize Orchestrator Control Center.
Administrators require access to certain ports, in addition to the ports that users require.
Server Role Port
vRealize Automation appliance 5480, 8443. Port 8443 is used for advanced identitymanagement configuration.
VMware Identity Manager to Active Directory: 389, 636, 3268,3269
VMware Identity Manager to Domain Controller: 88, 464, 135
vRealize Business for Cloud 5480
Installing and Upgrading vRealize Automation
VMware, Inc. 16
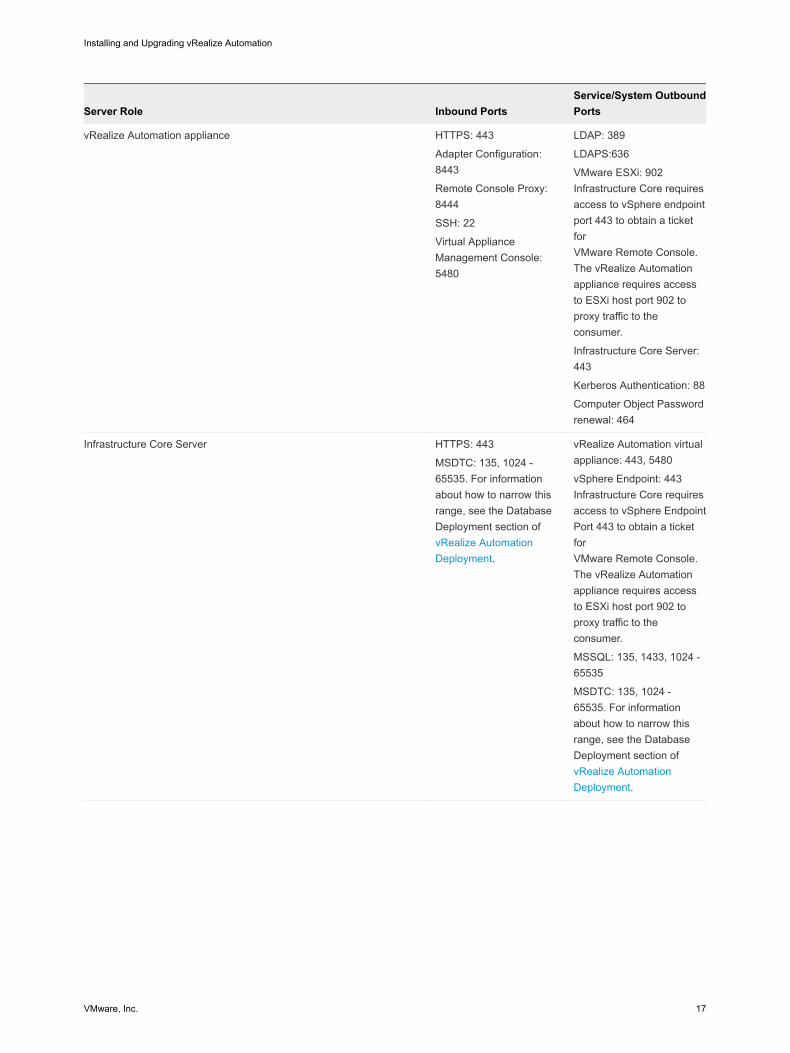
Server Role Inbound PortsService/System OutboundPorts
vRealize Automation appliance HTTPS: 443
Adapter Configuration:8443
Remote Console Proxy:8444
SSH: 22
Virtual ApplianceManagement Console:5480
LDAP: 389
LDAPS:636
VMware ESXi: 902Infrastructure Core requiresaccess to vSphere endpointport 443 to obtain a ticketforVMware Remote Console.The vRealize Automationappliance requires accessto ESXi host port 902 toproxy traffic to theconsumer.
Infrastructure Core Server:443
Kerberos Authentication: 88
Computer Object Passwordrenewal: 464
Infrastructure Core Server HTTPS: 443
MSDTC: 135, 1024 -65535. For informationabout how to narrow thisrange, see the DatabaseDeployment section of vRealize AutomationDeployment.
vRealize Automation virtualappliance: 443, 5480
vSphere Endpoint: 443Infrastructure Core requiresaccess to vSphere EndpointPort 443 to obtain a ticketforVMware Remote Console.The vRealize Automationappliance requires accessto ESXi host port 902 toproxy traffic to theconsumer.
MSSQL: 135, 1433, 1024 -65535
MSDTC: 135, 1024 -65535. For informationabout how to narrow thisrange, see the DatabaseDeployment section of vRealize AutomationDeployment.
Installing and Upgrading vRealize Automation
VMware, Inc. 17
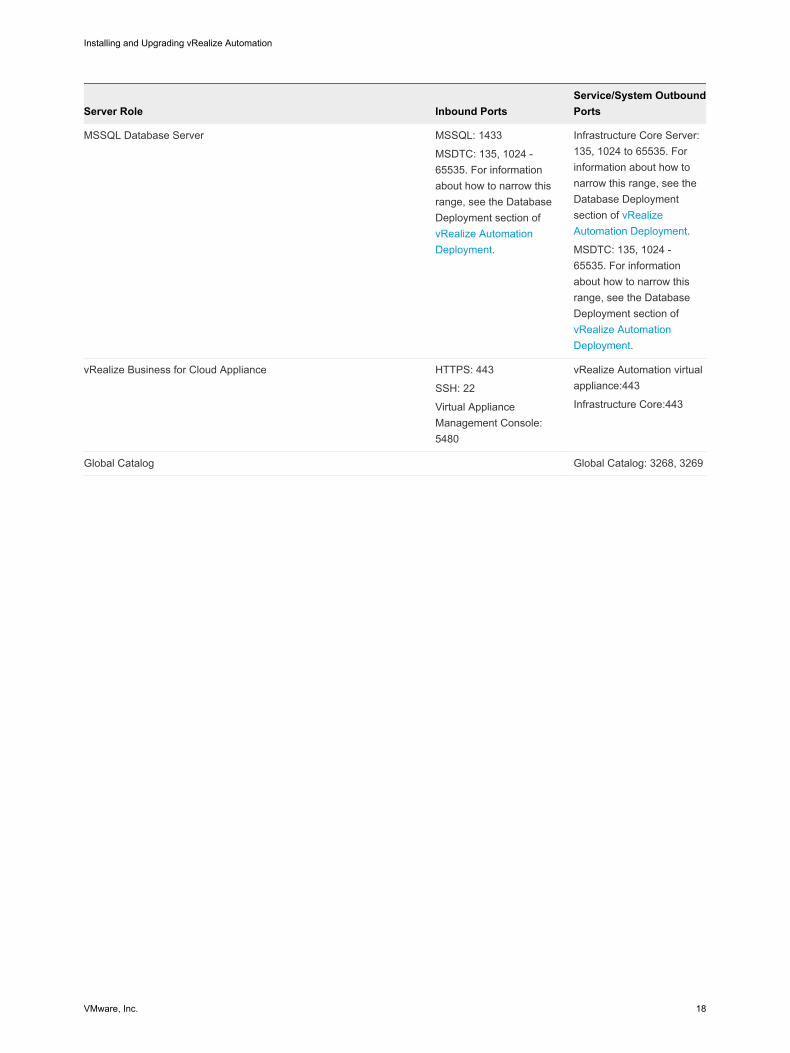
Server Role Inbound PortsService/System OutboundPorts
MSSQL Database Server MSSQL: 1433
MSDTC: 135, 1024 -65535. For informationabout how to narrow thisrange, see the DatabaseDeployment section of vRealize AutomationDeployment.
Infrastructure Core Server:135, 1024 to 65535. Forinformation about how tonarrow this range, see theDatabase Deploymentsection of vRealizeAutomation Deployment.
MSDTC: 135, 1024 -65535. For informationabout how to narrow thisrange, see the DatabaseDeployment section of vRealize AutomationDeployment.
vRealize Business for Cloud Appliance HTTPS: 443
SSH: 22
Virtual ApplianceManagement Console:5480
vRealize Automation virtualappliance:443
Infrastructure Core:443
Global Catalog Global Catalog: 3268, 3269
Installing and Upgrading vRealize Automation
VMware, Inc. 18
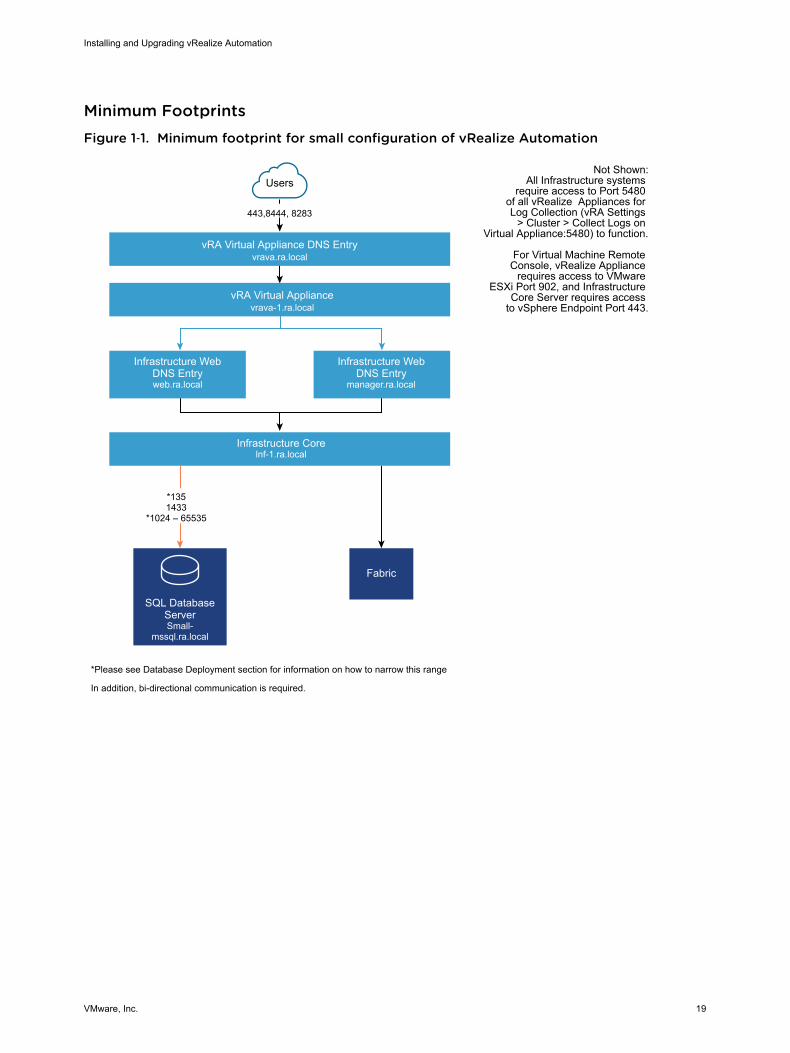
Minimum FootprintsFigure 1‑1. Minimum footprint for small configuration of vRealize Automation
443,8444, 8283
SQL DatabaseServerSmall-
mssql.ra.local
UsersNot Shown:
All Infrastructure systems require access to Port 5480
of all vRealize Appliances for Log Collection (vRA Settings
> Cluster > Collect Logs on Virtual Appliance:5480) to function.
For Virtual Machine Remote Console, vRealize Appliance
requires access to VMware ESXi Port 902, and Infrastructure
Core Server requires access to vSphere Endpoint Port 443.
vRA Virtual Appliancevrava-1.ra.local
vRA Virtual Appliance DNS Entryvrava.ra.local
Infrastructure Web DNS Entryweb.ra.local
Infrastructure Web DNS Entry
manager.ra.local
Infrastructure Corelnf-1.ra.local
*1351433
*1024 – 65535
*Please see Database Deployment section for information on how to narrow this range
In addition, bi-directional communication is required.
Fabric
Installing and Upgrading vRealize Automation
VMware, Inc. 19
Figure 1‑2. Minimum footprint for small configuration of vRealize Business for Cloud
Infrastructure Web DNS Entryweb.ra.local
vRa Virtual Appliance DNS Entry
vrava.ra.local
vRealize Business Standard Virtual Appliance vrb.ra.local
443
443 443 443
443
vCenterAmazon
WebServices
vCloudDirector
vCenter Operations Manager
vRealize Automation Medium Deployment RequirementsA vRealize Automation medium deployment comprises systems of 30,000 managed machines or fewerand includes the appropriate virtual machines, load balancers, and port configurations.
SupportA medium deployment can support the following items.
n 30,000 managed machines
n 1000 catalog items
n 50 machine provisions
RequirementsA medium deployment most meet the appropriate system configuration requirements.
Virtual Appliances
n vRealize Automation appliance 1: vrava-1.ra.local
n vRealize Automation appliance 2: vrava-2.ra.local
n vRealize Business for Cloud Appliance: vrb.ra.local
Windows Server Virtual Machines
n Infrastructure Web/Manager Server 1 (Active Web or DEM-O, Active Manager): inf-1.ra.local
n Infrastructure Web/Manager Server 2 (Active Web or DEM-O, Passive Manager): inf-2.ra.local
n Infrastructure DEM Server 1: dem-1.ra.local
n Infrastructure DEM Server 2: dem-2.ra.local
Installing and Upgrading vRealize Automation
VMware, Inc. 20

n Infrastructure Agent Server 1: agent-1.ra.local
n Infrastructure Agent Server 2: agent-2.ra.local
Database Servers
n MSSQL Failover Cluster Instance: mssql.ra.local
Load Balancers
n vRealize Automation appliance Load Balancer: med-vrava.ra.local
n Infrastructure Web Load Balancer: med-web.ra.local
n Infrastructure Manager Service Load Balancer: med-manager.ra.local
CertificatesThe host names that are used in this table are examples only.
Server Role CN or SAN
vRealize Automation appliance SAN contains the following host names:n vrava.ra.localn vrava-1.ra.localn vrava-2.ra.local
Infrastructure Web or Manager Server SAN contains the following host names:n web.ra.localn manager.ra.localn inf-1.ra.localn inf-2.ra.local
vRealize Business for Cloud Appliance CN = vrb.ra.local
PortsUsers require access to certain ports. All ports listed are default ports.
Server Role Port
vRealize Automation appliance Load Balancer 443, 8444. Port 8444 is required for the Virtual Machine RemoteConsole.
Administrators require access to certain ports, in addition to the ports that users require.
Server Role Port
vRealize Automation appliance fVAMI 5480, 8443. Port 8443 is for advanced identity managementconfiguration.
VMware Identity Manager to Active Directory: 389, 636, 3268,3269
VMware Identity Manager to Domain Controller: 88, 464, 135
vRealize Appliance Orchestrator Control Center 8283
vRealize Business for Cloud Server 5480
Installing and Upgrading vRealize Automation
VMware, Inc. 21
The following table shows inter-application communications.
Server Role Inbound Ports Outbound Ports for Service or System
vRealize Automation appliance HTTPS:
Adapter Configuration:8443
Remote ConsoleProxy: 8444
Postgres: 5432
RabbitMQ: 4369,25672, 5671, 5672
ElasticSearch: 9300,40002, 40003
Stomp: 61613
SSH: 22
LDAP:389
LDAPS: 636
vRealize AutomationAppliance (All other):5432, 4369, 25672, 5671, 5672, 9300,40002, 40003
vRealize Automation Infrastructure WebLoad Balancer: 443
VMware ESXi: 902. Infrastructure Web orManager requires access to vSphereEndpoint port 443 to obtain a ticket forVirtual Machine Remote Console. ThevRealize Automation appliance requiresaccess to ESXi host port 902 to proxyconsole data to the user.
Kerberos Authentication: 88
Computer Object Password renewal: 464
Infrastructure Web/Manager Server HTTPS: 443
MSDTC: 135,1024-65535. Forinformation about howto narrow this range,see the DatabaseDeployment section of vRealize AutomationDeployment.
vRealize Automation appliance LoadBalancer: 443
vRealize Automation Infrastructure WebLoad Balancer: 443
vRealize Automation Appliance (VA):5480.
vSphere Endpoint: 443. InfrastructureWeb or Manager requires access tovSphere Endpoint port 443 to obtain aticket for Virtual Machine RemoteConsole. The vRealize Automationappliance requires access to ESXi hostport 902 to proxy console data to theuser.
MSSQL: 135, 1433, 1024 to 65535. Forinformation about how to narrow thisrange, see the Database Deploymentsection of vRealize AutomationDeployment.
Infrastructure DEM Server NA vRealize Automation Appliance LoadBalancer: 443
vRealize Automation Infrastructure WebLoad Balancer: 443
vRealize Automation InfrastructureManager Load Balancer: 443
vRealize Automation Appliance (VA):5480.
Installing and Upgrading vRealize Automation
VMware, Inc. 22

Server Role Inbound Ports Outbound Ports for Service or System
Infrastructure Agent Server NA vRealize Automation Infrastructure WebLoad Balancer: 443
vRealize Automation InfrastructureManager Load Balancer: 443
vRealize Automation Appliance (VA):5480.
MSSQL Database Server MSSQL: 1433
MSDTC: 135, 1024 -65535. For informationabout how to narrowthis range, see theDatabase Deploymentsection of vRealizeAutomationDeployment.
Infrastructure Web/Manager Server: 135,1024 - 65535. For information about howto narrow this range, see the DatabaseDeployment section of vRealizeAutomation Deployment.
vRealize Business for Cloud Server HTTPS: 443
SSH: 22
Virtual ApplianceManagement Console:5480
vRealize Automation Appliance LoadBalancer: 443
vRealize Automation Infrastructure WebLoad Balancer: 443
Global Catalog Global Catalog: 3268, 3269
Load balancers require access through the following ports.
Load Balancer Ports Balanced
vRealize Automation appliance Load Balancer 443, 8444
vRealize Automation Infrastructure Web Load Balancer 443
vRealize Automation Infrastructure Manager Service LoadBalancer
443
Installing and Upgrading vRealize Automation
VMware, Inc. 23

GraphicsFigure 1‑3. Minimum footprint for vRealize Automation medium configuration
443,8444, 8283
ClusteredMSSQL
Databasemssql.ra.local
UsersNot Shown:
All Infrastructure systems require access to Port 5480
of all vRealize Appliances for Log Collection (vRA Settings
> Cluster > Collect Logs on Virtual Appliance:5480) to function.
For Virtual Machine Remote Console, vRealize Appliance
requires access to VMware ESXi Port 902, and Infrastructure
Core Server requires access to vSphere Endpoint Port 443.
vRA Virtual Appliance Load Balancer (Port 443, 8444, 8283) vrava.ra.local
443, 8283, 8444
vRA Virtual Appliance 1vrava-1.ra.local
(Optional) vRA Virtual Appliance 3vrava-3.ra.local
vRA Virtual Appliance 2vrava-2.ra.local
Ports Required forAppliances to
Replicate/Communicate4369, 5432, 5671, 5672,9300, 25672,4002, 40003
443 443 443
Infrastructure Agent Server 1agent-1.ra.local
Infrastructure Agent Server 2agent-2.ra.local
*1351433
*1024 – 65535
vRA Infrastructure Web Server 1
web.ra.local
Infrastructure ManagerLoad Balancer (Port 443)
manager.ra.local
Infrastructure Web / Manager Server
inf-1.ra.local
Infrastructure Web / Manager Server
inf-2.ra.local
443
*Please see Database Deployment section for information on how to narrow this range
In addition, bi-directional communication is required.
**Endpoint communication ports vary by endpoint design and configuration
**Varies
443
Infrastructure DEM Server 1dem-1.ra.local
InfrastructureDEM Server 2
dem-2.ra.local
Fabric
vCenterEndpoint
443
443
443 443443
443
Installing and Upgrading vRealize Automation
VMware, Inc. 24
Figure 1‑4. Minimum footprint for vRealize Business for Cloud medium deployment
vRA IaaS WebLoad Balancer
web.ra.local
vRA Virtual ApplianceLoad Balancer
vrava.ra.local
vRealize Business Standard Virtual Appliance vrb.ra.local
443
443 443 443
443
vCenterAmazon
WebServices
vCloudDirector
vCenter Operations Manager
vRealize Automation Large Deployment RequirementsA vRealize Automation large deployment comprises systems of 50,000 managed machines or fewer andincludes the appropriate virtual machines, load balancers, and port configurations.
SupportA large deployment can support the following items.
n 50,000 managed machines
n 2500 catalog items
n 100 concurrent machine provisions
RequirementsA large deployment must meet the appropriate system configuration requirements.
Virtual Appliances
n vRealize Automation appliance 1: vrava-1.ra.local
n vRealize Automation appliance 2: vrava-2.ra.local
n vRealize Automation appliance Appliance: vrb.ra.local
Windows Server Virtual Machines
n Infrastructure Web Server 1: web-1.ra.local
n Infrastructure Web Server 2: web-2.ra.local
n Infrastructure Manager Server 1: manager-1.ra.local
n Infrastructure Manager Server 2: manager-2.ra.local
Installing and Upgrading vRealize Automation
VMware, Inc. 25
n Infrastructure DEM Server 1: dem-1.ra.local
n Infrastructure DEM Server 2: dem-2.ra.local
n Infrastructure Agent Server 1: agent-1.ra.local
n Infrastructure Agent Server 2: agent-2.ra.local
n Clustered MSSQL Database: mssql.ra.local
Load Balancers
n vRealize Automation appliance load balancer: vrava.ra.local
n Infrastructure Web load balancer: web.ra.local
n Infrastructure manager service load balancer: manager.ra.local
CertificatesThe host names used in this table are examples only.
Server Role CN or SAN
vRealize Automation appliance SAN contains the following host names:n vrava.ra.localn vrava-1.ra.localn vrava-2.ra.local
Infrastructure Web server SAN contains the following host names:n web.ra.localn web-1.ra.localn web-2.ra.local
Infrastructure manager server SAN contains the following host names:n manager.ra.localn manager-1.ra.localn manager-2.ra.local
vRealize Business for Cloud appliance CN = vrb.ra.local
PortsUsers require access to certain ports. All ports listed are default ports.
Server Role Port
vRealize Automation appliance load balancer 443, 8444 Port 88444 is required for theVMware Remote Console.
Administrators require access to certain ports, in addition to the ports that users require.
Installing and Upgrading vRealize Automation
VMware, Inc. 26
Server Role Port
vRealize Automation appliance 5480, 8443. Port 8443 is used for advanced identitymanagement configuration.
VMware Identity Manager to Active Directory: 389, 636, 3268,3269
VMware Identity Manager to Domain Controller: 88, 464, 135
vRealize Business for Cloud server 5480
The system must support the appropriate inter-application communications.
Server Role Inbound PortsOutbound Ports for Service orSystem
vRealize Automation
vRealize Automation appliance HTTPS: 443
Adapter configuration: 8443
Remote console proxy: 8444
Postgres: 5432
Rabbit MQ: 4369, 25672, 5671,5672
ElasticSearch: 9300, 40002,40003
Stomp: 61613
SSH: 22
Control-Center: 8283
LDAP: 389
LDAPS: 636
vRealize Automation appliance: 5432,4369, 25672, 5671,5672, 9300, 40002,40003.
vRealize Automation infrastructureWeb load balancer: 443
VMware ESXi: 902. Infrastructure Webrequires access to vSphere endpointport 443 to obtain a ticket forVMware Remote Console. ThevRealize Automation appliancerequires access to ESXi host Port 902to proxy console data to the user.
Kerberos Authentication: 88
Computer Object Password renewal:464
Infrastructure Web server HTTPS: 443
MSDTC: 443, 1024-65535. Forinformation about how tonarrow this range, see thedatabase deployment sectionof vRealize AutomationDeployment.
vRealize Automation appliance loadbalancer: 443
vRealize Automation appliance virtualappliance: 5480.
vSphere endpoint: 443. InfrastructureWeb requires access to vSphereendpoint port 443 to obtain a ticket forVMware Remote Console. ThevRealize Automation appliancerequires access to ESXi host port 902to proxy console data to the user.
MSSQL: 135, 1433, 1024 to 65535.For information about how to narrowthis range, see the databasedeployment section of vRealizeAutomation Deployment.
Installing and Upgrading vRealize Automation
VMware, Inc. 27
Server Role Inbound PortsOutbound Ports for Service orSystem
Infrastructure manager server HTTPS: 443
MSDTC: 135,1024-65535. Forinformation about how tonarrow this range, see thedatabase deployment sectionof vRealize AutomationDeployment.
vRealize Automation appliance loadbalancer: 443
vRealize Automation InfrastructureWeb Load Balancer: 443
vRealize Automation appliance: 443,5480
MSSQL: 135, 1433, 1024 to 65535.For information about how to narrowthis range, see the databasedeployment section of vRealizeAutomation Deployment.
Infrastructure DEM server NA vRealize Automation appliance loadbalancer: 443
vRealize Automation infrastructureWeb load Balancer: 443
vRealize Automation infrastructuremanager load balancer: 443
vRealize Orchestrator load balancer:8281
vRealize Automation appliance: 5480.
Infrastructure agent server NA vRealize Automation infrastructureWeb load balancer: 443
vRealize Automation infrastructuremanager load balancer: 443
vRealize Automation appliance: 5480.
MSSQL database server MSSQL: 1433
MSDTC: 135, 1024-65535. Forinformation about how tonarrow this range, see thedatabase deployment sectionof vRealize AutomationDeployment.
Infrastructure Web server: 135,1024-65535. For information abouthow to narrow this range, see thedatabase deployment section of vRealize Automation Deployment.
Infrastructure manager server: 135,1024-65535. For information abouthow to narrow this range, see thedatabase deployment section of vRealize Automation Deployment.
vRealize Business for Cloud server HTTPS: 443
SSH: 22
Virtual Appliance ManagementConsole: 5480
vRealize Automation appliance loadbalancer: 443
vRealize Automation infrastructureWeb load balancer: 443
Global Catalog Global Catalog: 3268, 3269
Load balancers require access through the following ports.
Installing and Upgrading vRealize Automation
VMware, Inc. 28
Load Balancer Ports Balanced
vRealize Automation appliance load balancer 443, 8444
vRealize Automation infrastructure Web load balancer 443
vRealize Automation manager server load balancer 443
Installing and Upgrading vRealize Automation
VMware, Inc. 29
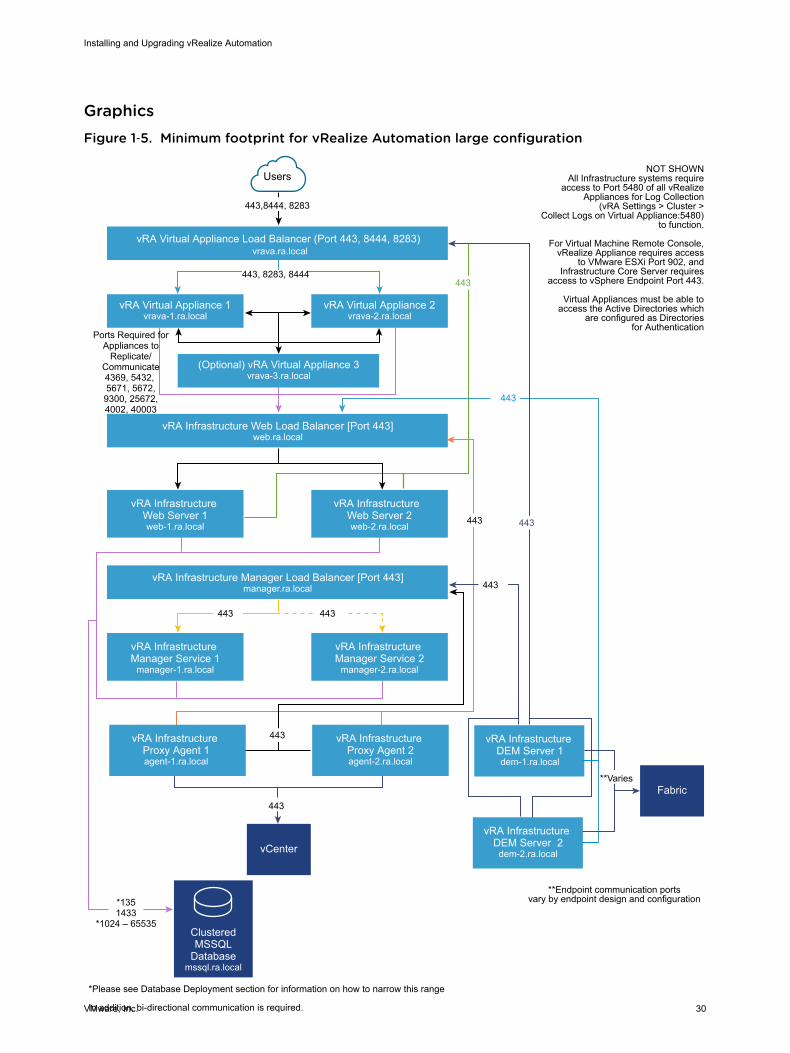
GraphicsFigure 1‑5. Minimum footprint for vRealize Automation large configuration
443,8444, 8283
ClusteredMSSQL
Databasemssql.ra.local
UsersNOT SHOWN
All Infrastructure systems requireaccess to Port 5480 of all vRealize
Appliances for Log Collection(vRA Settings > Cluster >
Collect Logs on Virtual Appliance:5480)to function.
For Virtual Machine Remote Console,vRealize Appliance requires access
to VMware ESXi Port 902, andInfrastructure Core Server requires
access to vSphere Endpoint Port 443.
Virtual Appliances must be able toaccess the Active Directories which
are configured as Directoriesfor Authentication
vRA Virtual Appliance Load Balancer (Port 443, 8444, 8283) vrava.ra.local
443, 8283, 8444
vRA Virtual Appliance 1vrava-1.ra.local
(Optional) vRA Virtual Appliance 3vrava-3.ra.local
vRA Virtual Appliance 2vrava-2.ra.local
Ports Required forAppliances to
Replicate/Communicate4369, 5432, 5671, 5672,9300, 25672,4002, 40003
443
443
vRA Infrastructure Proxy Agent 1agent-1.ra.local
vRA Infrastructure Proxy Agent 2agent-2.ra.local
*1351433
*1024 – 65535
vRA Infrastructure Web Load Balancer [Port 443]web.ra.local
vRA Infrastructure Web Server 1web-1.ra.local
vRA Infrastructure Web Server 2web-2.ra.local
vRA Infrastructure Manager Load Balancer [Port 443]manager.ra.local
vRA Infrastructure Manager Service 1
manager-1.ra.local
vRA Infrastructure Manager Service 2
manager-2.ra.local
443 443
443
443
*Please see Database Deployment section for information on how to narrow this range
In addition, bi-directional communication is required.
**Endpoint communication portsvary by endpoint design and configuration
**Varies
443
vRA Infrastructure DEM Server 1dem-1.ra.local
vRA Infrastructure DEM Server 2
dem-2.ra.local
Fabric
vCenter
443
443
Installing and Upgrading vRealize Automation
VMware, Inc. 30
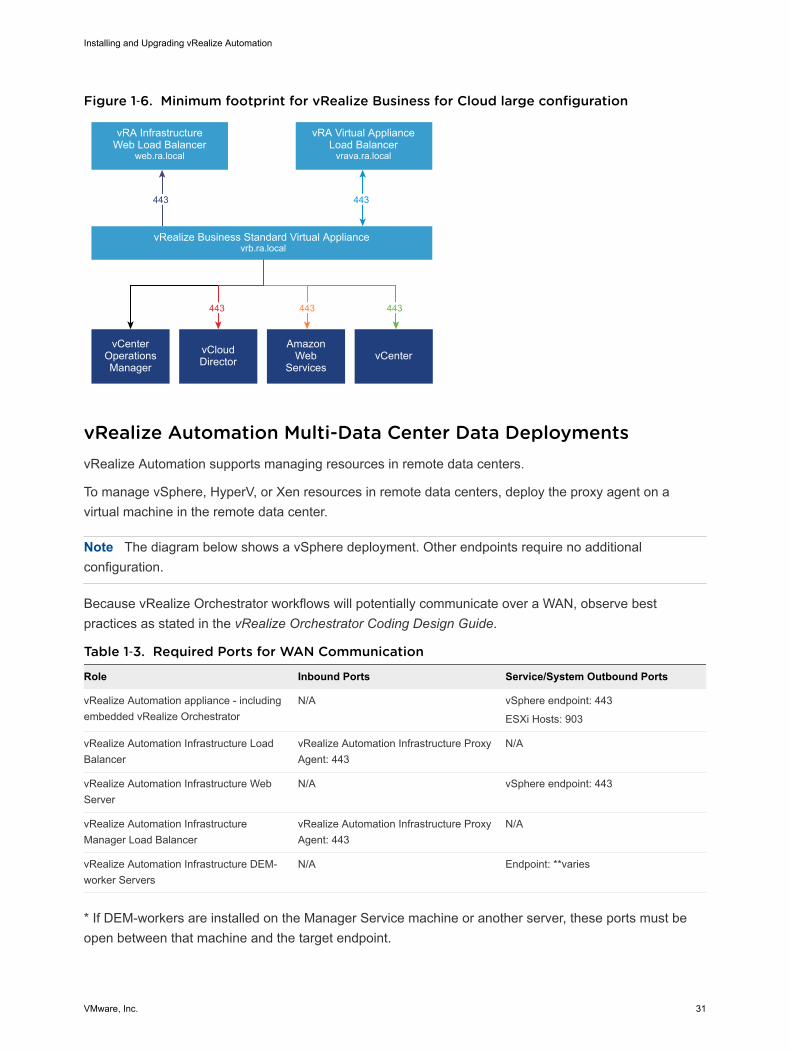
Figure 1‑6. Minimum footprint for vRealize Business for Cloud large configuration
vRA InfrastructureWeb Load Balancer
web.ra.local
vRA Virtual ApplianceLoad Balancer
vrava.ra.local
vRealize Business Standard Virtual Appliance vrb.ra.local
443
443 443 443
443
vCenterAmazon
WebServices
vCloudDirector
vCenter Operations Manager
vRealize Automation Multi-Data Center Data DeploymentsvRealize Automation supports managing resources in remote data centers.
To manage vSphere, HyperV, or Xen resources in remote data centers, deploy the proxy agent on avirtual machine in the remote data center.
Note The diagram below shows a vSphere deployment. Other endpoints require no additionalconfiguration.
Because vRealize Orchestrator workflows will potentially communicate over a WAN, observe bestpractices as stated in the vRealize Orchestrator Coding Design Guide.
Table 1‑3. Required Ports for WAN Communication
Role Inbound Ports Service/System Outbound Ports
vRealize Automation appliance - includingembedded vRealize Orchestrator
N/A vSphere endpoint: 443
ESXi Hosts: 903
vRealize Automation Infrastructure LoadBalancer
vRealize Automation Infrastructure ProxyAgent: 443
N/A
vRealize Automation Infrastructure WebServer
N/A vSphere endpoint: 443
vRealize Automation InfrastructureManager Load Balancer
vRealize Automation Infrastructure ProxyAgent: 443
N/A
vRealize Automation Infrastructure DEM-worker Servers
N/A Endpoint: **varies
* If DEM-workers are installed on the Manager Service machine or another server, these ports must beopen between that machine and the target endpoint.
Installing and Upgrading vRealize Automation
VMware, Inc. 31
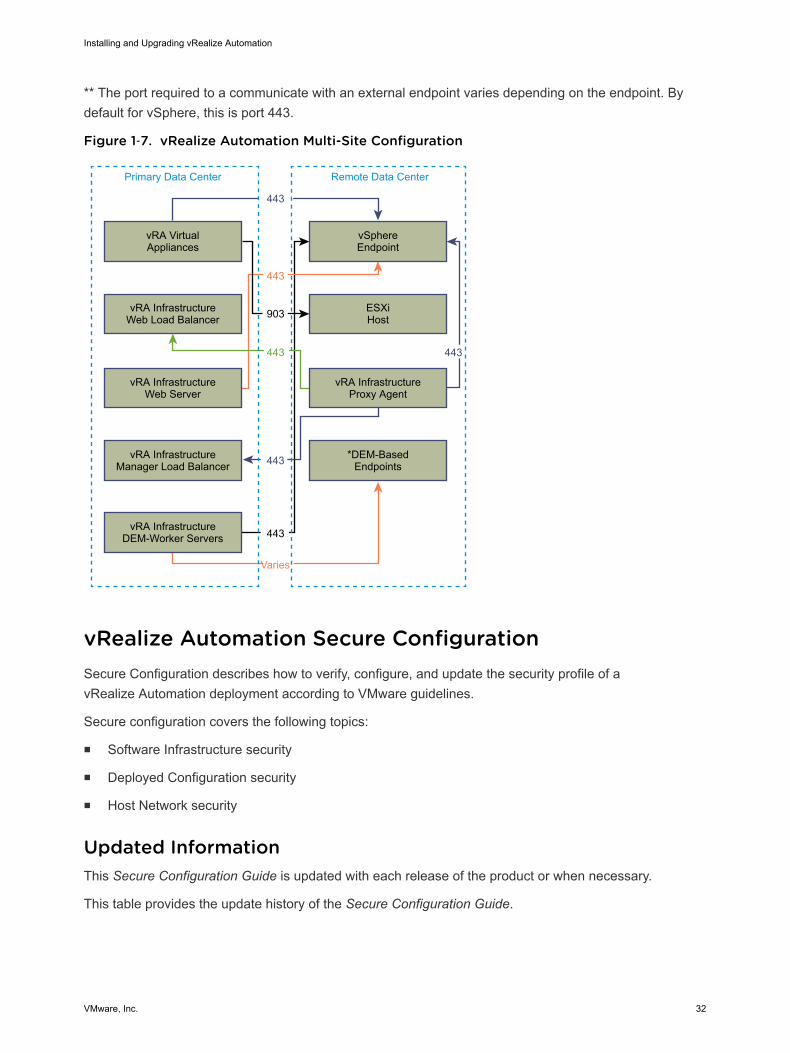
** The port required to a communicate with an external endpoint varies depending on the endpoint. Bydefault for vSphere, this is port 443.
Figure 1‑7. vRealize Automation Multi-Site Configuration
443
443
443
443
Varies
903
vRA VirtualAppliances
Primary Data Center Remote Data Center
vSphere Endpoint
vRA InfrastructureWeb Load Balancer
ESXiHost
vRA InfrastructureWeb Server
vRA Infrastructure Proxy Agent
vRA InfrastructureManager Load Balancer
vRA InfrastructureDEM-Worker Servers
*DEM-Based Endpoints
443
443
vRealize Automation Secure ConfigurationSecure Configuration describes how to verify, configure, and update the security profile of avRealize Automation deployment according to VMware guidelines.
Secure configuration covers the following topics:
n Software Infrastructure security
n Deployed Configuration security
n Host Network security
Updated InformationThis Secure Configuration Guide is updated with each release of the product or when necessary.
This table provides the update history of the Secure Configuration Guide.
Installing and Upgrading vRealize Automation
VMware, Inc. 32
Revision Description
December 5, 2017 Updated Enable TLS on Localhost Configuration
002535-01 Updated Set vRealize Automation appliance Session Timeout.
002535-00 Initial release.
vRealize Automation Secure Baseline OverviewVMware provides comprehensive recommendations to help you verify and configure a secure baseline foryour vRealize Automation system.
Use the appropriate tools and procedures as specified by VMware to verify and maintain a secure,hardened baseline configuration for your vRealize Automation system. Some vRealize Automationcomponents are installed in a hardened or partially-hardened state, but you should review and verifyconfiguration of each component in light of VMware security recommendations, company securitypolicies, and known threats.
vRealize Automation Security PostureThe security posture of vRealize Automation assumes a holistically secure environment based on systemand network configuration, organizational security policies, and security best practices.
When verifying and configuring hardening of a vRealize Automation system, consider each of thefollowing areas as addressed by VMware hardening recommendations.
n Secure Deployment
n Secure Configuration
n Network Security
To ensure that your system is securely hardened, consider VMware recommendations and your localsecurity policies as they relate to each of these conceptual areas.
System ComponentsWhen considering hardening and the secure configuration of your vRealize Automation system, ensurethat you understand all components and how they work together to support system functionality.
Consider the following components when planning and implementing a secure system.
n vRealize Automation appliance
n IaaS Component
To familiarize yourself with vRealize Automation and how the components operate together, see Foundations and Concepts in the VMware vRealize Automation documentation center. For informationabout typical vRealize Automation deployments and architecture, see vRealize Automation ReferenceArchitecture.
Verifying the Integrity of Installation MediaUsers should always verify the integrity of the installation media before installing a VMware product.
Installing and Upgrading vRealize Automation
VMware, Inc. 33
Always verify the SHA1 hash after you download an ISO, offline bundle, or patch to ensure integrity andauthenticity of the downloaded files. If you obtain physical media from VMware and the security seal isbroken, return the software to VMware for a replacement.
After you download the media, use the MD5/SHA1 sum value to verify the integrity of the download.Compare the MD5/SHA1 hash output with the value posted on the VMware Web site. SHA1 or MD5 hashshould match.
For more information about verifying the integrity of the installation media, see http://kb.vmware.com/kb/1537.
Hardening VMware System Software InfrastructureAs part of your hardening process, assess the deployed software infrastructure that supports yourVMware system and verify that it meets VMware hardening guidelines.
Before hardening your VMware system, review and address security deficiencies in your supportingsoftware infrastructure to create a completely hardened and secure environment. Software infrastructureelements to consider include operating system components, supporting software, and database software.Address security concerns in these and other components according to the manufacturer'srecommendations and other relevant security protocols.
Hardening the VMware vSphere ® EnvironmentAssess the VMware vSphere ® environment and verify that the appropriate level of vSphere hardeningguidance is enforced and maintained.
For more guidance about hardening, see http://www.vmware.com/security/hardening-guides.html .
As part of a comprehensively hardened environment, VMware vSphere ® infrastructure must meetsecurity guidelines as defined by VMware.
Hardening the Infrastructure as a Service HostVerify that your Infrastructure as a Service Microsoft Windows host machine is hardened according toVMware guidelines.
Review the recommendations in the appropriate Microsoft Windows hardening and secure best practiceguidelines, and ensure that your Windows Server host is appropriately hardened. Not following thehardening recommendations might result in exposure to known security vulnerabilities from insecurecomponents on Windows releases.
To verify that your version is supported, see the vRealize Automation Support Matrix.
Contact your Microsoft vendor about the correct guidance for hardening practices of Microsoft products.
Hardening Microsoft SQL ServerVerify that the Microsoft SQL Server database meets security guidelines as established by Microsoft andVMware.
Installing and Upgrading vRealize Automation
VMware, Inc. 34
Review the recommendations in the appropriate Microsoft SQL Server hardening and secure bestpractice guidelines. Review all Microsoft security bulletins regarding the installed version of Microsoft SQLServer. Not following the hardening recommendations might result in exposure to known securityvulnerabilities from insecure components on Microsoft SQL Server versions.
To verify that your version Microsoft SQL Server is supported, see the vRealize Automation SupportMatrix.
Contact your Microsoft vendor for guidance about hardening practices for Microsoft products.
Hardening Microsoft .NETAs part of a comprehensively hardened environment, Microsoft .NET must meet security guidelines aslaid out by Microsoft and VMware.
Review the recommendations set out in the appropriate .NET hardening and secure best practiceguidelines. Also, review all Microsoft security bulletins regarding the version of Microsoft SQL Server youare using. Failure to follow the hardening recommendations might result in exposure to known securityvulnerabilities from insecure Microsoft.NET components.
To verify that your version of Microsoft.NET is supported, see the vRealize Automation Support Matrix.
Contact your Microsoft vendor for guidance on hardening practices for Microsoft products.
Hardening Microsoft Internet Information Services (IIS)Verify that your Microsoft Internet Information Services (IIS) meet all Microsoft and VMware securityguidelines.
Review the recommendations set out in the appropriate Microsoft IIS hardening and secure best practiceguidelines. Also, review all Microsoft security bulletins regarding the version of IIS you are using. Notfollowing the hardening recommendations might result in exposure to known security vulnerabilities.
To verify that your version is supported, see the vRealize Automation Support Matrix.
Contact your Microsoft vendor for guidance on hardening practices for Microsoft products.
Reviewing Installed SoftwareBecause vulnerabilities in third party and unused software increase the risk of unauthorized systemaccess and disruption of availability, it is important to review all software installed on VMware hostmachines and evaluate its use.
Do not install software that is not required for the secure operation of the system on the VMware hostmachines. Uninstall unused or extraneous software.
Inventory Installed Unsupported SoftwareAssess your VMware deployment and inventory of installed products to verify that no extraneousunsupported software is installed.
For more information about the support policies for third-party products, see the VMware support article at https://www.vmware.com/support/policies/thirdparty.html.
Installing and Upgrading vRealize Automation
VMware, Inc. 35
Verify Third-Party SoftwareVMware does not support or recommend installation of third party software that has not been tested andverified. Insecure, unpatched, or unauthenticated third-party software installed on VMware host machinesmight put the system at risk of unauthorized access and disruption of availability. If you must useunsupported third-party software, consult the third-party vendor for secure configuration and patchingrequirements.
VMware Security Advisories and PatchesTo maintain maximum security for your system, follow VMware security advisories and apply all relevantpatches.
VMware releases security advisories for products. Monitor these advisories to ensure that your product isprotected against known threats.
Assess the vRealize Automation installation, patching, and upgrade history and verify that the releasedVMware Security Advisories are followed and enforced.
For more information about the current VMware security advisories, seehttp://www.vmware.com/security/advisories/.
Secure ConfigurationVerify and update security settings for vRealize Automation virtual appliances and the Infrastructure as aService component as appropriate for your system configuration. In addition, verify and updateconfiguration of other components and applications.
Securely configuring a vRealize Automation installation involves addressing the configuration of eachcomponent individually and as they work together. Consider the configuration of all systems componentsin concert to achieve a reasonably secure baseline.
Securing the vRealize Automation ApplianceVerify and update security settings for the vRealize Automation appliance as necessary for your systemconfiguration.
Configure security settings for your virtual appliances and their host operating systems. In addition, set orverify configuration of other related components and applications. In some cases, you need to verifyexisting settings, while in others you must change or add settings to achieve an appropriate configuration.
Change the Root Password
You can change the root password for the vRealize Automation appliance to meet applicable securityrequirements.
Change the root password on the vRealize Automation appliance using the Virtual ApplianceManagement Interface. Verify that the root password meets your organization’s corporate passwordcomplexity requirements.
Installing and Upgrading vRealize Automation
VMware, Inc. 36
Procedure
1 Open the Virtual Appliance Management Interface for your vRealize Automation appliance.
https://vRealizeAppliance-url:5480
2 Select the Admin tab on the Virtual Appliance Management Interface.
3 Select the Admin submenu.
4 Enter the existing password in the Current administrator password text box.
5 Enter the new password in the New administrator password text box.
6 Enter the new password in the Retype new administrator password text box.
7 Click Save Settings to save your changes.
Verify Root Password Hash and Complexity
Verify that the root password meets your organization’s corporate password complexity requirements.
Validating the root password complexity is required as the root user bypasses the pam_cracklib modulepassword complexity check that is applied to user accounts.
The account password must start with $6$, which indicates a sha512 hash. This is the standard hash forall hardened appliances.
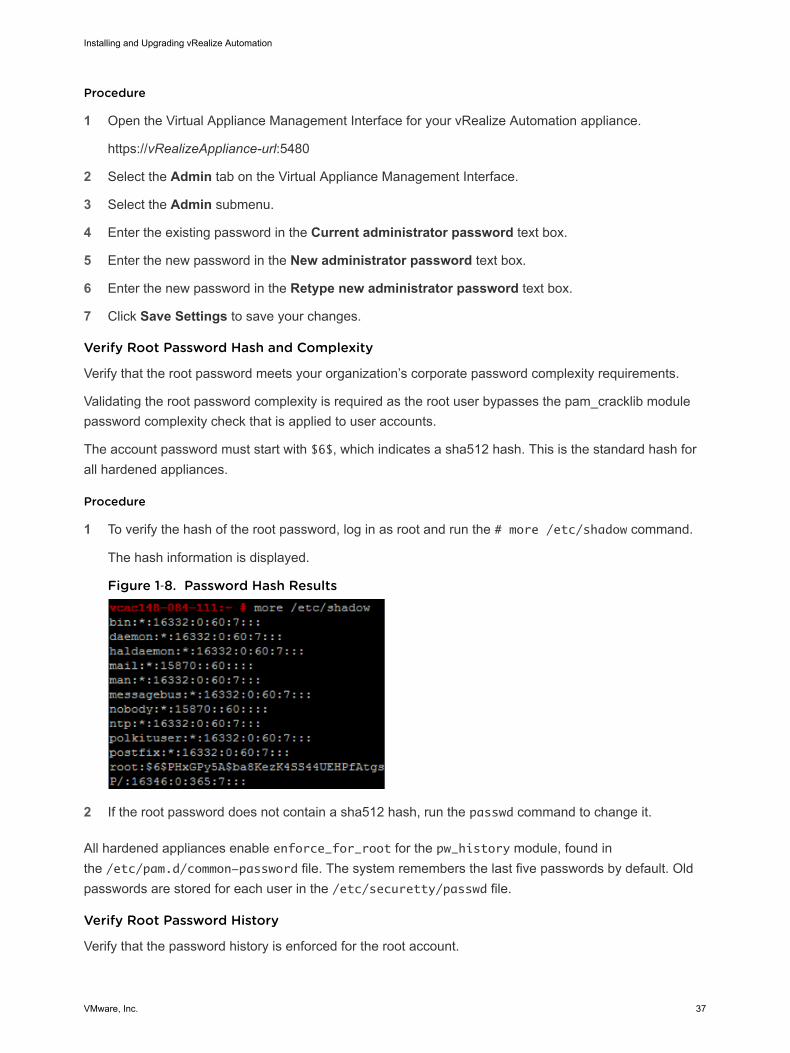
Procedure
1 To verify the hash of the root password, log in as root and run the # more /etc/shadow command.
The hash information is displayed.
Figure 1‑8. Password Hash Results
2 If the root password does not contain a sha512 hash, run the passwd command to change it.
All hardened appliances enable enforce_for_root for the pw_history module, found inthe /etc/pam.d/common-password file. The system remembers the last five passwords by default. Oldpasswords are stored for each user in the /etc/securetty/passwd file.
Verify Root Password History
Verify that the password history is enforced for the root account.
Installing and Upgrading vRealize Automation
VMware, Inc. 37

All hardened appliances enable enforce_for_root for the pw_history module, found inthe /etc/pam.d/common-password file. The system remembers the last five passwords by default. Oldpasswords are stored for each user in the /etc/securetty/passwd file.
Procedure
1 Run the following command:
cat /etc/pam.d/common-password-vmware.local | grep pam_pwhistory.so
2 Ensure that enforce_for_root appears in the returned results.
password required pam_pwhistory.so enforce_for_root remember=5 retry=3
Manage Password Expiry
Configure all account password expirations in accordance with your organization's security policies.
By default, all hardened VMware virtual appliance accounts use a 60-day password expiration. On mosthardened appliances, the root account is set to a 365-day password expiration. As a best practice, verifythat the expiration on all accounts meets both security and operation requirements standards.
If the root password expires, you cannot reinstate it. You must implement site-specific policies to preventadministrative and root passwords from expiring.
Procedure
1 Log in to your virtual appliance machines as root and run the following command to verify thepassword expiration on all accounts.
# cat /etc/shadow
The password expiration is the fifth field (fields are separated by colons) of the shadow file. The rootexpiration is set in days.
Figure 1‑9. Password Expiry Field
2 To modify the expiry of the root account, run a command of the following form.
# passwd -x 365 root
In this command, 365 specifies the number of days until password expiry. Use the same command tomodify any user, substituting the specific account for 'root', and replacing the number of days to meetthe expiry standards of the organization.
Installing and Upgrading vRealize Automation
VMware, Inc. 38
Managing Secure Shell and Administrative Accounts
For remote connections, all hardened appliances include the Secure Shell (SSH) protocol. Use SSH onlywhen necessary and manage it appropriately to preserve system security.
SSH is an interactive command-line environment that supports remote connections to VMware virtualappliances. By default, SSH access requires high-privileged user account credentials. Root user SSHactivities generally bypass the role-based access control (RBAC) and audit controls of the virtualappliances.
As a best practice, disable SSH in a production environment, and activate it only to troubleshoot problemsthat you cannot resolve by other means. Leave it enabled only while needed for a specific purpose and inaccordance with your organization's security policies. SSH is disabled by default on thevRealize Automation appliance. Depending on your vSphere configuration, you might enable or disableSSH when you deploy your Open Virtualization Format (OVF) template.
As a simple test to determine whether SSH is enabled on a machine, try opening a connection by usingSSH. If the connection opens and requests credentials, then SSH is enabled and available forconnections.
Secure Shell root User Account
Because VMware appliances do not include pre-configured user accounts, the root account can use SSHto directly log in by default. Disable SSH as root as soon as possible.
To meet the compliance standards for non repudiation, the SSH server on all hardened appliances is pre-configured with the AllowGroups wheel entry to restrict SSH access to the secondary group wheel. Forseparation of duties, you can modify the AllowGroups wheel entry in the /etc/ssh/sshd_config file touse another group such as sshd.
The wheel group is enabled with the pam_wheel module for superuser access, so members of the wheelgroup can su-root, where the root password is required. Group separation enables users to SSH to theappliance, but not to su to root. Do not remove or modify other entries in the AllowGroups field, whichensures proper appliance functionality. After making a change, you must restart the SSH daemon byrunning the command: # service sshd restart.
Enable or Disable Secure Shell on the vRealize Automation Appliances
Enable Secure Shell (SSH) on the vRealize Automation appliance only for troubleshooting. Disable SSHon these components during normal production operation.
You can enable or disable SSH on the vRealize Automation appliance using the Virtual ApplianceManagement console.
Procedure
1 Navigate to the Virtual Appliance Management Console (VAMI) for your vRealize Automationappliance.
: https://vRealizeAppliance url:5480
2 Click the Admin tab.
Installing and Upgrading vRealize Automation
VMware, Inc. 39
3 Click the Admin sub-menu.
4 Select the SSH service enable check box to enable SSH or deselect it to disable SSH.
5 Click Save Settings to save your changes.
Create Local Administrator Account for Secure Shell
As a security best practice, create and configure local administrative accounts for Secure Shell (SSH) onyour virtual appliance host machines. Also, remove root SSH access after you create the appropriateaccounts.
Create local administrative accounts for SSH, or members of the secondary wheel group, or both. Beforeyou disable direct root access, test that authorized administrators can access SSH by using AllowGroups,and that they can su to root using the wheel group.
Procedure
1 Log in to the virtual appliance as root and run the following commands with the appropriateusername.
# useradd -g users <username> -G wheel -m -d /home/username
# passwd username
Wheel is the group specified in AllowGroups for ssh access. To add multiple secondary groups, use-G wheel,sshd.
2 Switch to the user and provide a new password to enforce password complexity checking.
# su –username
# username@hostname:~>passwd
If the password complexity is met, the password updates. If the password complexity is not met, thepassword reverts to the original password, and you must rerun the password command.
3 To remove direct login to SSH, modify the/etc/ssh/sshd_config file by replacing(#)PermitRootLogin yes with PermitRootLogin no.
Alternatively, you can enable/disable SSH in the Virtual Appliance Management Interface (VAMI) byselecting or deselecting the Administrator SSH login enabled check box on the Admin tab.
What to do next
Disable direct logins as root. By default, the hardened appliances allow direct login to root through theconsole. After you create administrative accounts for non-repudiation and test them for su-root wheelaccess, disable direct root logins by editing the /etc/security file as root and replacing the tty1 entrywith console.
1 Open the /etc/securetty file in a text editor.
2 Locate tty1 and replace it with console.
Installing and Upgrading vRealize Automation
VMware, Inc. 40
3 Save the file and close it.
Restrict Secure Shell Access
As part of your system hardening process, restrict Secure Shell (SSH) access by configuring thetcp_wrappers package appropriately on all VMware virtual appliance host machines. Also maintainrequired SSH key file permissions on these appliances.
All VMware virtual appliances include the tcp_wrappers package to allow tcp-supported daemons tocontrol the network subnets that can access the libwrapped daemons. By default, the /etc/hosts.allowfile contains a generic entry, Sshd: ALL : ALLOW, that allows all access to the secure shell. Restrict thisaccess as appropriate for your organization.
Procedure
1 Open the /etc/hosts.allow file on your virtual appliance host machine in a text editor.
2 Change the generic entry in your production environment to include only the local host entries and themanagement network subnet for secure operations.
sshd:127.0.0.1 : ALLOW
sshd: [::1] : ALLOW
sshd: 10.0.0.0 :ALLOW
In this example, all local host connections and connections that the clients make on the 10.0.0.0subnet are allowed.
3 Add all appropriate machine identification, for example, host name, IP address, fully qualified domainname (FQDN), and loopback.
4 Save the file and close it.
Harden the Secure Shell Server Configuration
Where possible, all VMware appliances have a default hardened configuration. Users can verify that theirconfiguration is appropriately hardened by examining the server and client service settings in the globaloptions section of the configuration file.
If possible, restrict use of the SSH server to a management subnet in the /etc/hosts.allow file.
Procedure
1 Open the /etc/ssh/sshd_config server configuration file on the VMware appliance, and verify thatthe settings are correct.
Setting Status
Server Daemon Protocol Protocol 2
CBC Ciphers aes256-ctr and aes128-ctr
TCP Forwarding AllowTCPForwarding no
Server Gateway Ports Gateway Ports no
X11 Forwarding X11Forwarding no
Installing and Upgrading vRealize Automation
VMware, Inc. 41
Setting Status
SSH Service Use the AllowGroups field and specify a group permitted access. Addappropriate members to this group.
GSSAPI Authentication GSSAPIAuthentication no, if unused
Keberos Authentication KeberosAuthentication no, if unused
Local Variables (AcceptEnv global option) Set to disabled by commenting out or enabled for LC_* or LANGvariables
Tunnel Configuration PermitTunnel no
Network Sessions MaxSessions 1
User Concurrent Connections Set to 1 for root and any other user. The /etc/security/limits.conffile also needs to be configured with the same setting.
Strict Mode Checking Strict Modes yes
Privilege Separation UsePrivilegeSeparation yes
rhosts RSA Authentication RhostsESAAuthentication no
Compression Compression delayed or Compression no
Message Authentication code MACs hmac-sha1
User Access Restriction PermitUserEnvironment no
2 Save your changes and close the file.
Harden the Secure Shell Client Configuration
As part of your system hardening process, verify hardening of the SSH client by examining the SSH clientconfiguration file on virtual appliance host machines to ensure that it is configured according toVMwareguidelines.
Procedure
1 Open the SSH client configuration file, /etc/ssh/ssh_config, and verify that settings in the globaloptions section are correct.
Setting Status
Client Protocol Protocol 2
Client Gateway Ports Gateway Ports no
GSSAPI Authentication GSSAPIAuthentication no
Local Variables (SendEnv globaloption)
Provide only LC_* or LANG variables
CBC Ciphers aes256-ctr and aes128-ctr only
Message Authentication Codes Used in the MACs hmac-sha1 entry only
2 Save your changes and close the file.
Installing and Upgrading vRealize Automation
VMware, Inc. 42
Verifying Secure Shell Key File Permissions
To minimize the possibility of malicious attacks, maintain critical SSH key file permissions on your virtualappliance host machines.
After configuring or updating your SSH configuration, always verify that the following SSH key filepermissions do not change.
n The public host key files located in /etc/ssh/*key.pub are owned by the root user and havepermissions set to 0644 (-rw-r--r--).
n The private host key files located in /etc/ssh/*key are owned by the root user and havepermissions set to 0600 (-rw------).
Verify SSH Key File Permissions
Verify that SSH permissions are applied to both public and private key files.
Procedure
1 Check the SSH public key files by running the following command: ls -l /etc/ssh/*key.pub
2 Verify that the owner is root, that the group owner is root, and that the files have permissions set to0644 (-rw-r--r--).
3 Fix any problems by running the following commands.
chown root /etc/ssh/*key.pub
chgrp root /etc/ssh/*key.pub
chmod 644 /etc/ssh/*key.pub
4 Check the SSH private key files by running the following command: ls -l /etc/ssh/*key
5 Fix any problems by running the following commands.
chown root /etc/ssh/*key
chgrp root /etc/ssh/*key
chmod 644 /etc/ssh/*key
Change the Virtual Appliance Management Interface User
You can add and delete users on the Virtual Appliance Management Interface to create the appropriatelevel of security.
The root user account for the Virtual Appliance Management Interface uses PAM for authentication, sothe clipping levels set by PAM also apply. If you have not appropriately isolated the Virtual ApplianceManagement Interface, a lock out of the system root account could occur if an attacker attempts to bruteforce the login. In addition, where the root account is considered insufficient to provide non-repudiation bymore than one person in your organization, then you might elect to change the admin user for themanagement interface.
Prerequisites
Installing and Upgrading vRealize Automation
VMware, Inc. 43
Procedure
1 Run the following command to create a new user and add it to the Virtual Appliance ManagementInterface group.
useradd -G vami,root user
2 Create a password for the user.
passwd user
3 (Optional) Run the following command to disable root access on the Virtual Appliance ManagementInterface.
usermod -R vami root
Note Disabling root access to the Virtual Appliance Management Interface also disables the abilityto update the Administrator, or root, password from the Admin tab.
Set Boot Loader Authentication
To provide an appropriate level of security, configure boot loader authentication on your VMware virtualappliances.
If the system's boot loader requires no authentication, users with system console access can alter thesystem boot configuration or boot the system into single user or maintenance mode, which can result indenial of service or unauthorized system access. Because boot loader authentication is not set by defaulton the VMware virtual appliances, you must create a GRUB password to configure it.
Procedure
1 Verify whether a boot password exists by locating the password --md5 <password-hash> line inthe /boot/grub/menu.lst file on your virtual appliances.
2 If no password exists, run the # /usr/sbin/grub-md5-crypt command on your virtual appliance.
An MD5 password is generated, and the command supplies the md5 hash output.
3 Append the password to the menu.lst file by running the # password --md5 <hash from grub-md5-crypt> command.
Configure NTP
For critical time sourcing, disable host time synchronization and use the Network Time Protocol (NTP) onthe vRealize Automation appliance.
The NTP daemon on vRealize Automation appliance provides synchronized time services. NTP isdisabled by default, so you need to configure it manually. If possible, use NTP in production environmentsto track user actions and to detect potential malicious attacks and intrusions through accurate audit andlog keeping. For information about NTP security notices, see the NTP Web site.
The NTP configuration file is located in the /etc/ folder on each appliance. You can enable the NTPservice for the vRealize Automation appliance and add time servers on the Admin tab of the VirtualAppliance Management Interface.
Installing and Upgrading vRealize Automation
VMware, Inc. 44
Procedure
1 Open the /etc/ntp.conf configuration file on your virtual appliance host machine using a text editor.
2 Set the file ownership to root:root.
3 Set the permissions to 0640.
4 To mitigate the risk of a denial-of-service amplification attack on the NTP service, openthe /etc/ntp.conf file and ensure that the restrict lines appear in the file.
restrict default kod nomodify notrap nopeer noquery
restrict -6 default kod nomodify notrap nopeer noquery
restrict 127.0.0.1
restrict -6 ::1
5 Save any changes and close the files.
Configuring TLS for vRealize Automation Appliance Data In-transit
Ensure that your vRealize Automation deployment uses strong TLS protocols to secure transmissionchannels for vRealize Automation appliance components.
For performance considerations, TLS is not enabled for localhost connections between some applicationservices. Where defence in depth is of concern, enable TLS on all localhost communications.
Important If you are terminating TLS on the load balancer, disable insecure protocols such as SSLv2,SSLv3, and TLS 1.0 on all load balancers.
Enable TLS on Localhost Configuration
By default some localhost communication does not use TLS. You can enable TLS across all localhostconnections to provide enhanced security.
Procedure
1 Connect to the vRealize Automation appliance using SSH.
2 Set permissions for the vcac keystore by running the following commands.
usermod -A vco,coredump,pivotal vco
chown vcac.pivotal /etc/vcac/vcac.keystore
chmod 640 /etc/vcac/vcac.keystore
Installing and Upgrading vRealize Automation
VMware, Inc. 45
3 Update the HAProxy configuration.
a Open the HAProxy configuration file located at /etc/haproxy/conf.d and choose the 20-vcac.cfg service.
b Locate the lines containing the following string:
server local 127.0.0.1… and add the following to the end of such lines: ssl verify none
This section contains other lines like the following: backend-horizon backend-vro
backend-vra backend-artifactory
backend-vra-health
c Change the port for backend-horizon from 8080 to 8443.
4 Get the password of keystorePass.
a Locate the property certificate.store.password in the /etc/vcac/security.propertiesfile.
For example, certificate.store.password=s2enc~iom0GXATG+RB8ff7Wdm4Bg==
b Decrypt the value using the following command:
vcac-config prop-util -d --p VALUE
For example, vcac-config prop-util -d --p s2enc~iom0GXATG+RB8ff7Wdm4Bg==
5 Configure the vRealize Automation service
a Open the /etc/vcac/server.xml file.
b Add the following attribute to the Connector tag, replacing certificate.store.password with thecertificate store password value found in etc/vcac/security.properties.
scheme=”https” secure=”true” SSLEnabled=”true” sslProtocol=”TLS”
keystoreFile=”/etc/vcac/vcac.keystore” keyAlias=”apache”
keystorePass=”certificate.store.password”
6 Configure the vRealize Orchestrator service.
a Open the /etc/vco/app-server.xml file
b Add the following attribute to the Connector tag, replacing certificate.store.password with thecertificate store password value found in etc/vcac/security.properties.
scheme=”https” secure=”true” SSLEnabled=”true” sslProtocol=”TLS”
keystoreFile=”/etc/vcac/vcac.keystore” keyAlias=”apache”
keystorePass=”certificate.store.password”
Installing and Upgrading vRealize Automation
VMware, Inc. 46

7 Restart the vRealize Orchestrator, vRealize Automation, and haproxy services.
service vcac-server restart
service vco-server restart
service haproxy restart
Note If the vco-server does not restart, reboot the host computer.
8 Configure the Virtual Appliance Management Interface.
a Open the /opt/vmware/share/htdocs/service/café-services/services.py file.
b Change the conn = httplib.HTTP() line to conn = httplib.HTTPS() to enhance security.
Enable Federal Information Processing Standard (FIPS) 140-2 Compliance
The vRealize Automation appliance now uses the Federal Information Processing Standard (FIPS) 140-2certified version of OpenSSL for data-in-transit over TLS on all inbound and outbound network traffic.
You can enable or disable FIPS mode in the vRealize Automation appliance management interface. Youcan also configure FIPS from the command line while logged in as root, using the following commands:
vcac-vami fips enable
vcac-vami fips disable
vcac-vami fips status
When FIPS is enabled, inbound and outbound vRealize Automation appliance network traffic on port 443uses FIPS 140–2 compliant encryption. Regardless of the FIPS setting, vRealize Automation uses AES–256 to protect secured data stored on the vRealize Automation appliance.
Note Currently vRealize Automation only partially enables FIPS compliance, because some internalcomponents do not yet use certified cryptographic modules. In cases where certified modules have notyet been implemented, the AES–256 based encryption is used in all cryptographic algorithms.
Note The following procedure will reboot the physical machine when you alter the configuration.
Procedure
1 Log in as root to the vRealize Automation appliance management interface.
https:// vrealize-automation-appliance-FQDN:5480
2 Select vRA Settings > Host Settings.
3 Click the button under the Actions heading on the upper right to enable or disable FIPS.
4 Click Yes to restart the vRealize Automation appliance
Verify that SSLv3, TLS 1.0, and TLS 1.1 are Disabled
As part of your hardening process, ensure that the deployed vRealize Automation appliance uses securetransmission channels.
Installing and Upgrading vRealize Automation
VMware, Inc. 47
Prerequisites
Complete Enable TLS on Localhost Configuration.
Procedure
1 Verify that SSLv3, TLS 1.0, and TLS 1.1 are disabled in the HAProxy https handlers on the vRealizeAutomation appliance.
Review this fileEnsure the followingis present In the appropriate line as shown
/etc/haproxy/conf.d/20-vcac.cfg no-sslv3 no-tlsv10 no-tls11 force-tls12
bind 0.0.0.0:443 ssl
crt /etc/apache2/server.pem ciphers !aNULL:!
eNULL:kECDH+AESGCM:ECDH+AESGCM:RSA
+AESGCM:kECDH+AES:ECDH+AES:RSA+AES:@STRENGTH
no-sslv3 no-tlsv10 no-tlsv11
/etc/haproxy/conf.d/30-vro-
config.cfg
no-sslv3 no-tlsv10 no-tls11 force-tls12
bind :::8283 v4v6 ssl
crt /opt/vmware/etc/lighttpd/server.pem
ciphers !aNULL:!eNULL:kECDH+AESGCM:ECDH
+AESGCM:RSA+AESGCM:kECDH+AES:ECDH+AES:RSA
+AES:@STRENGTH no-sslv3 no-tlsv10 no-tlsv11
2 Restart the service.
service haproxy restart
3 Open the /opt/vmware/etc/lighttpd/lighttpd.conf file, and verify that the correct disableentries appear.
Note There is no directive to disable TLS 1.0 or TLS 1.1 in Lighttpd. The restriction on TLS 1.0 andTLS 1.1 use can be partially mitigated by enforcing OpenSSL to not use cipher suites of TLS 1.0 andTLS 1.1.
ssl.use-sslv2 = "disable"
ssl.use-sslv3 = "disable"
4 Verify that SSLv3, TLS 1.0, and TLS 1.1 are disabled for the Console Proxy on the vRealizeAutomation appliance.
a Edit the /etc/vcac/security.properties file by adding or modifying the following line:
consoleproxy.ssl.server.protocols = TLSv1.2
b Restart the server by running the following command:
service vcac-server restart
Installing and Upgrading vRealize Automation
VMware, Inc. 48
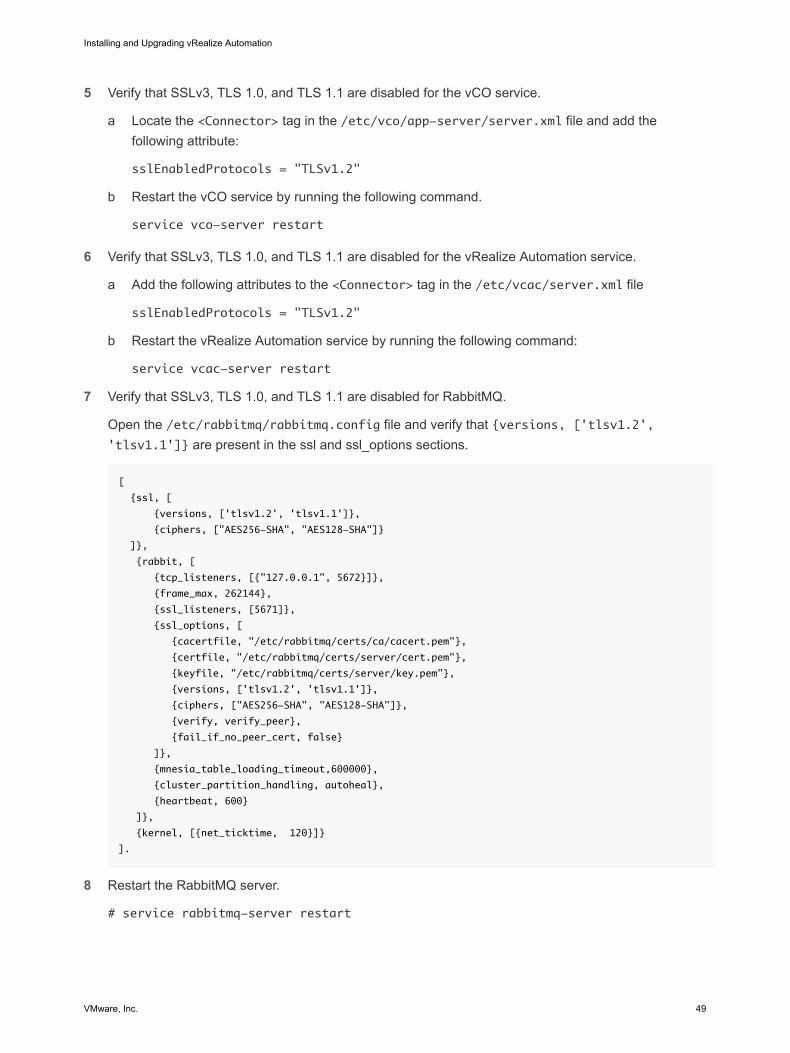
5 Verify that SSLv3, TLS 1.0, and TLS 1.1 are disabled for the vCO service.
a Locate the <Connector> tag in the /etc/vco/app-server/server.xml file and add thefollowing attribute:
sslEnabledProtocols = "TLSv1.2"
b Restart the vCO service by running the following command.
service vco-server restart
6 Verify that SSLv3, TLS 1.0, and TLS 1.1 are disabled for the vRealize Automation service.
a Add the following attributes to the <Connector> tag in the /etc/vcac/server.xml file
sslEnabledProtocols = "TLSv1.2"
b Restart the vRealize Automation service by running the following command:
service vcac-server restart
7 Verify that SSLv3, TLS 1.0, and TLS 1.1 are disabled for RabbitMQ.
Open the /etc/rabbitmq/rabbitmq.config file and verify that {versions, ['tlsv1.2','tlsv1.1']} are present in the ssl and ssl_options sections.
[
{ssl, [
{versions, ['tlsv1.2', 'tlsv1.1']},
{ciphers, ["AES256-SHA", "AES128-SHA"]}
]},
{rabbit, [
{tcp_listeners, [{"127.0.0.1", 5672}]},
{frame_max, 262144},
{ssl_listeners, [5671]},
{ssl_options, [
{cacertfile, "/etc/rabbitmq/certs/ca/cacert.pem"},
{certfile, "/etc/rabbitmq/certs/server/cert.pem"},
{keyfile, "/etc/rabbitmq/certs/server/key.pem"},
{versions, ['tlsv1.2', 'tlsv1.1']},
{ciphers, ["AES256-SHA", "AES128-SHA"]},
{verify, verify_peer},
{fail_if_no_peer_cert, false}
]},
{mnesia_table_loading_timeout,600000},
{cluster_partition_handling, autoheal},
{heartbeat, 600}
]},
{kernel, [{net_ticktime, 120}]}
].
8 Restart the RabbitMQ server.
# service rabbitmq-server restart
Installing and Upgrading vRealize Automation
VMware, Inc. 49
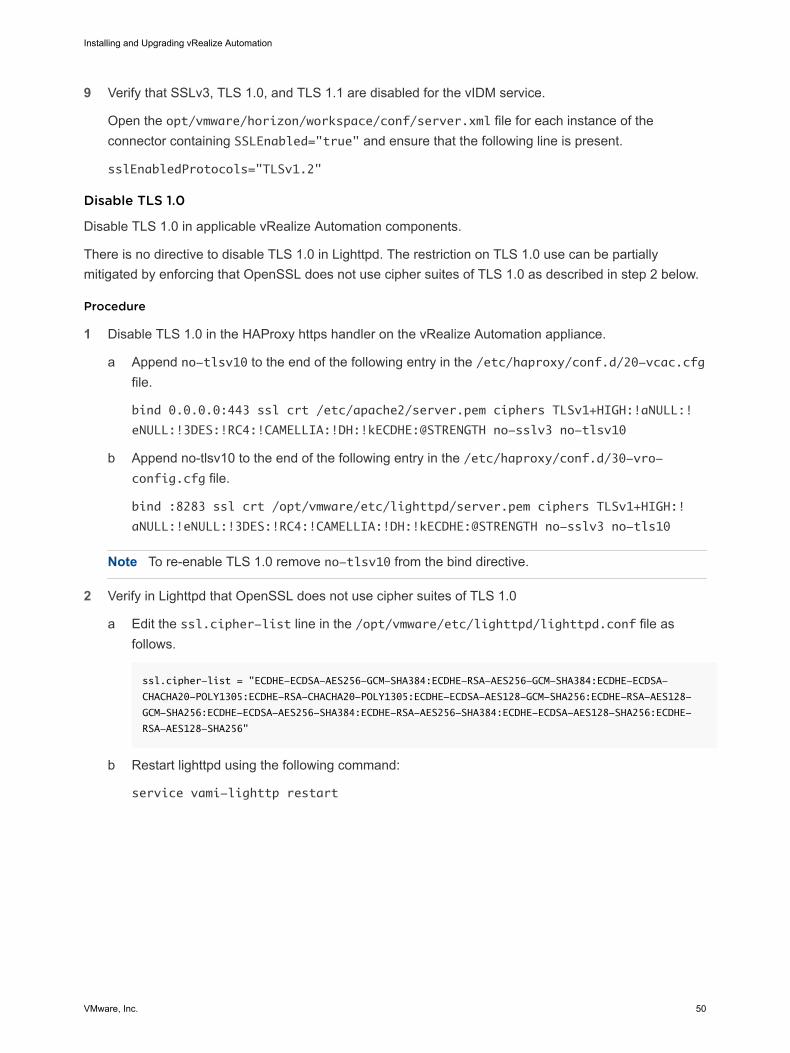
9 Verify that SSLv3, TLS 1.0, and TLS 1.1 are disabled for the vIDM service.
Open the opt/vmware/horizon/workspace/conf/server.xml file for each instance of theconnector containing SSLEnabled="true" and ensure that the following line is present.
sslEnabledProtocols="TLSv1.2"
Disable TLS 1.0
Disable TLS 1.0 in applicable vRealize Automation components.
There is no directive to disable TLS 1.0 in Lighttpd. The restriction on TLS 1.0 use can be partiallymitigated by enforcing that OpenSSL does not use cipher suites of TLS 1.0 as described in step 2 below.
Procedure
1 Disable TLS 1.0 in the HAProxy https handler on the vRealize Automation appliance.
a Append no-tlsv10 to the end of the following entry in the /etc/haproxy/conf.d/20-vcac.cfgfile.
bind 0.0.0.0:443 ssl crt /etc/apache2/server.pem ciphers TLSv1+HIGH:!aNULL:!
eNULL:!3DES:!RC4:!CAMELLIA:!DH:!kECDHE:@STRENGTH no-sslv3 no-tlsv10
b Append no-tlsv10 to the end of the following entry in the /etc/haproxy/conf.d/30-vro-config.cfg file.
bind :8283 ssl crt /opt/vmware/etc/lighttpd/server.pem ciphers TLSv1+HIGH:!
aNULL:!eNULL:!3DES:!RC4:!CAMELLIA:!DH:!kECDHE:@STRENGTH no-sslv3 no-tls10
Note To re-enable TLS 1.0 remove no-tlsv10 from the bind directive.
2 Verify in Lighttpd that OpenSSL does not use cipher suites of TLS 1.0
a Edit the ssl.cipher-list line in the /opt/vmware/etc/lighttpd/lighttpd.conf file asfollows.
ssl.cipher-list = "ECDHE-ECDSA-AES256-GCM-SHA384:ECDHE-RSA-AES256-GCM-SHA384:ECDHE-ECDSA-
CHACHA20-POLY1305:ECDHE-RSA-CHACHA20-POLY1305:ECDHE-ECDSA-AES128-GCM-SHA256:ECDHE-RSA-AES128-
GCM-SHA256:ECDHE-ECDSA-AES256-SHA384:ECDHE-RSA-AES256-SHA384:ECDHE-ECDSA-AES128-SHA256:ECDHE-
RSA-AES128-SHA256"
b Restart lighttpd using the following command:
service vami-lighttp restart
Installing and Upgrading vRealize Automation
VMware, Inc. 50
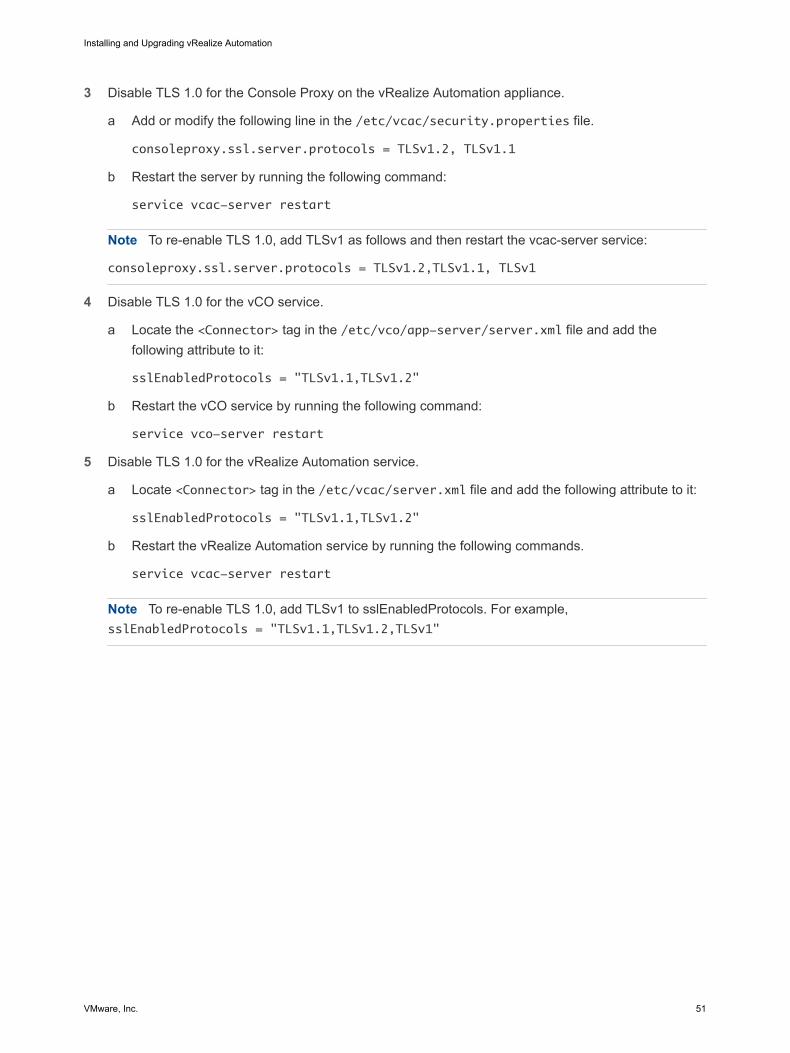
3 Disable TLS 1.0 for the Console Proxy on the vRealize Automation appliance.
a Add or modify the following line in the /etc/vcac/security.properties file.
consoleproxy.ssl.server.protocols = TLSv1.2, TLSv1.1
b Restart the server by running the following command:
service vcac-server restart
Note To re-enable TLS 1.0, add TLSv1 as follows and then restart the vcac-server service:
consoleproxy.ssl.server.protocols = TLSv1.2,TLSv1.1, TLSv1
4 Disable TLS 1.0 for the vCO service.
a Locate the <Connector> tag in the /etc/vco/app-server/server.xml file and add thefollowing attribute to it:
sslEnabledProtocols = "TLSv1.1,TLSv1.2"
b Restart the vCO service by running the following command:
service vco-server restart
5 Disable TLS 1.0 for the vRealize Automation service.
a Locate <Connector> tag in the /etc/vcac/server.xml file and add the following attribute to it:
sslEnabledProtocols = "TLSv1.1,TLSv1.2"
b Restart the vRealize Automation service by running the following commands.
service vcac-server restart
Note To re-enable TLS 1.0, add TLSv1 to sslEnabledProtocols. For example,sslEnabledProtocols = "TLSv1.1,TLSv1.2,TLSv1"
Installing and Upgrading vRealize Automation
VMware, Inc. 51

6 Disable TLS 1.0 for RabbitMQ.
a Open the /etc/rabbitmq/rabbitmq.config file and verify that tlsv1.2 and tlsv1.1 are added tothe ssl and ssl_options sections as shown in the following example.
[
{ssl, [
{versions, ['tlsv1.2', 'tlsv1.1']},
{ciphers, ["AES256-SHA", "AES128-SHA"]}
]},
{rabbit, [
{tcp_listeners, [{"127.0.0.1", 5672}]},
{frame_max, 262144},
{ssl_listeners, [5671]},
{ssl_options, [
{cacertfile, "/etc/rabbitmq/certs/ca/cacert.pem"},
{certfile, "/etc/rabbitmq/certs/server/cert.pem"},
{keyfile, "/etc/rabbitmq/certs/server/key.pem"},
{versions, ['tlsv1.2', 'tlsv1.1']},
{ciphers, ["AES256-SHA", "AES128-SHA"]},
{verify, verify_peer},
{fail_if_no_peer_cert, false}
]},
{mnesia_table_loading_timeout,600000},
{cluster_partition_handling, autoheal},
{heartbeat, 600}
]},
{kernel, [{net_ticktime, 120}]}
].
b Restart the RabbitMQ server by running the following command:
# service rabbitmq-server restart
Configuring TLS Cipher Suites for vRealize Automation Components
For maximum security, you must configure vRealize Automation components to use strong ciphers.
The encryption cipher negotiated between the server and the browser determines the encryption strengththat is used in a TLS session.
To ensure that only strong ciphers are selected, disable weak ciphers in vRealize Automationcomponents. Configure the server to support only strong ciphers and to use sufficiently large key sizes.Also, configure all ciphers in a suitable order.
Disable cipher suites that do not offer authentication such as NULL cipher suites, aNULL, or eNULL. Alsodisable anonymous Diffie-Hellman key exchange (ADH), export level ciphers (EXP, ciphers containingDES), key sizes smaller than 128 bits for encrypting payload traffic, the use of MD5 as a hashingmechanism for payload traffic, IDEA Cipher Suites, and RC4 cipher suites. Also ensure that cipher suitesusing Diffie-Hellman (DHE) key exchange are disabled
Installing and Upgrading vRealize Automation
VMware, Inc. 52
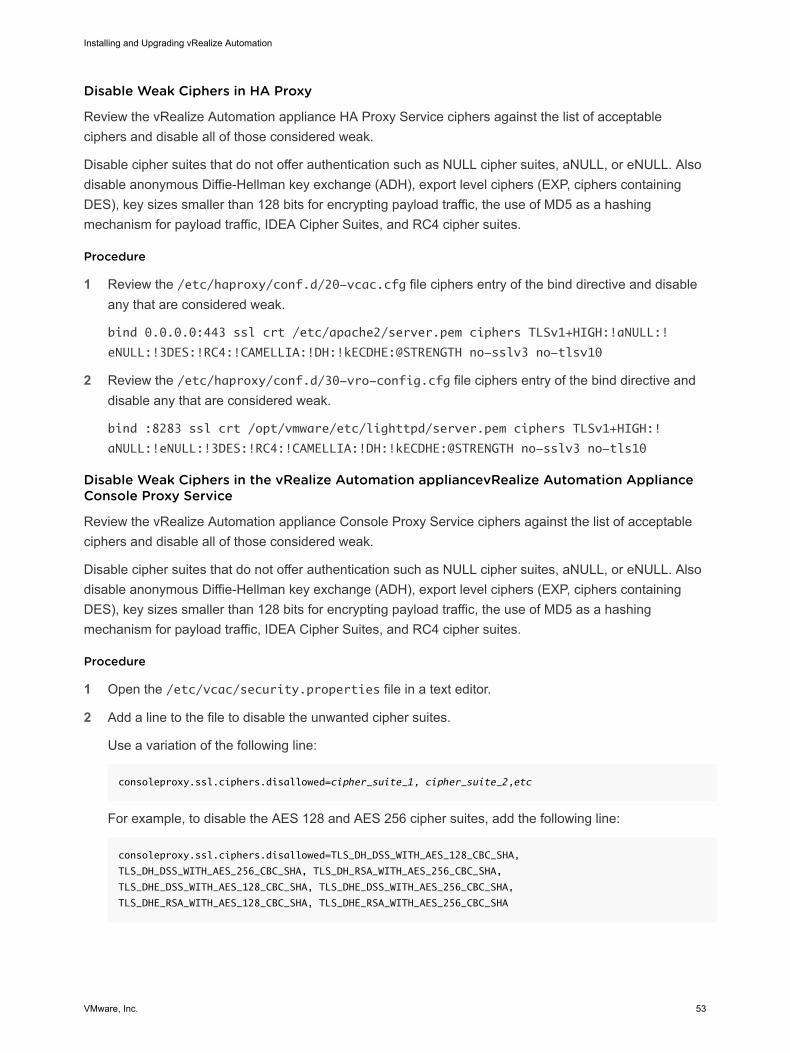
Disable Weak Ciphers in HA Proxy
Review the vRealize Automation appliance HA Proxy Service ciphers against the list of acceptableciphers and disable all of those considered weak.
Disable cipher suites that do not offer authentication such as NULL cipher suites, aNULL, or eNULL. Alsodisable anonymous Diffie-Hellman key exchange (ADH), export level ciphers (EXP, ciphers containingDES), key sizes smaller than 128 bits for encrypting payload traffic, the use of MD5 as a hashingmechanism for payload traffic, IDEA Cipher Suites, and RC4 cipher suites.
Procedure
1 Review the /etc/haproxy/conf.d/20-vcac.cfg file ciphers entry of the bind directive and disableany that are considered weak.
bind 0.0.0.0:443 ssl crt /etc/apache2/server.pem ciphers TLSv1+HIGH:!aNULL:!
eNULL:!3DES:!RC4:!CAMELLIA:!DH:!kECDHE:@STRENGTH no-sslv3 no-tlsv10
2 Review the /etc/haproxy/conf.d/30-vro-config.cfg file ciphers entry of the bind directive anddisable any that are considered weak.
bind :8283 ssl crt /opt/vmware/etc/lighttpd/server.pem ciphers TLSv1+HIGH:!
aNULL:!eNULL:!3DES:!RC4:!CAMELLIA:!DH:!kECDHE:@STRENGTH no-sslv3 no-tls10
Disable Weak Ciphers in the vRealize Automation appliancevRealize Automation ApplianceConsole Proxy Service
Review the vRealize Automation appliance Console Proxy Service ciphers against the list of acceptableciphers and disable all of those considered weak.
Disable cipher suites that do not offer authentication such as NULL cipher suites, aNULL, or eNULL. Alsodisable anonymous Diffie-Hellman key exchange (ADH), export level ciphers (EXP, ciphers containingDES), key sizes smaller than 128 bits for encrypting payload traffic, the use of MD5 as a hashingmechanism for payload traffic, IDEA Cipher Suites, and RC4 cipher suites.
Procedure
1 Open the /etc/vcac/security.properties file in a text editor.
2 Add a line to the file to disable the unwanted cipher suites.
Use a variation of the following line:
consoleproxy.ssl.ciphers.disallowed=cipher_suite_1, cipher_suite_2,etc
For example, to disable the AES 128 and AES 256 cipher suites, add the following line:
consoleproxy.ssl.ciphers.disallowed=TLS_DH_DSS_WITH_AES_128_CBC_SHA,
TLS_DH_DSS_WITH_AES_256_CBC_SHA, TLS_DH_RSA_WITH_AES_256_CBC_SHA,
TLS_DHE_DSS_WITH_AES_128_CBC_SHA, TLS_DHE_DSS_WITH_AES_256_CBC_SHA,
TLS_DHE_RSA_WITH_AES_128_CBC_SHA, TLS_DHE_RSA_WITH_AES_256_CBC_SHA
Installing and Upgrading vRealize Automation
VMware, Inc. 53
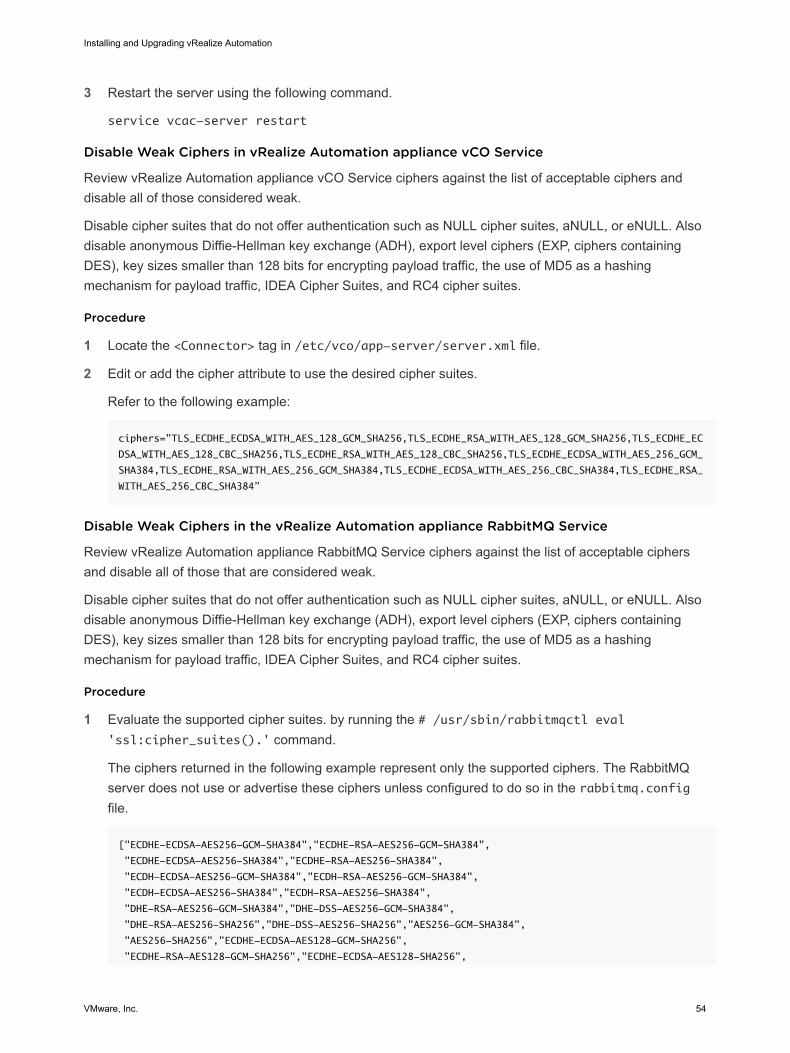
3 Restart the server using the following command.
service vcac-server restart
Disable Weak Ciphers in vRealize Automation appliance vCO Service
Review vRealize Automation appliance vCO Service ciphers against the list of acceptable ciphers anddisable all of those considered weak.
Disable cipher suites that do not offer authentication such as NULL cipher suites, aNULL, or eNULL. Alsodisable anonymous Diffie-Hellman key exchange (ADH), export level ciphers (EXP, ciphers containingDES), key sizes smaller than 128 bits for encrypting payload traffic, the use of MD5 as a hashingmechanism for payload traffic, IDEA Cipher Suites, and RC4 cipher suites.
Procedure
1 Locate the <Connector> tag in /etc/vco/app-server/server.xml file.
2 Edit or add the cipher attribute to use the desired cipher suites.
Refer to the following example:
ciphers="TLS_ECDHE_ECDSA_WITH_AES_128_GCM_SHA256,TLS_ECDHE_RSA_WITH_AES_128_GCM_SHA256,TLS_ECDHE_EC
DSA_WITH_AES_128_CBC_SHA256,TLS_ECDHE_RSA_WITH_AES_128_CBC_SHA256,TLS_ECDHE_ECDSA_WITH_AES_256_GCM_
SHA384,TLS_ECDHE_RSA_WITH_AES_256_GCM_SHA384,TLS_ECDHE_ECDSA_WITH_AES_256_CBC_SHA384,TLS_ECDHE_RSA_
WITH_AES_256_CBC_SHA384”
Disable Weak Ciphers in the vRealize Automation appliance RabbitMQ Service
Review vRealize Automation appliance RabbitMQ Service ciphers against the list of acceptable ciphersand disable all of those that are considered weak.
Disable cipher suites that do not offer authentication such as NULL cipher suites, aNULL, or eNULL. Alsodisable anonymous Diffie-Hellman key exchange (ADH), export level ciphers (EXP, ciphers containingDES), key sizes smaller than 128 bits for encrypting payload traffic, the use of MD5 as a hashingmechanism for payload traffic, IDEA Cipher Suites, and RC4 cipher suites.
Procedure
1 Evaluate the supported cipher suites. by running the # /usr/sbin/rabbitmqctl eval'ssl:cipher_suites().' command.
The ciphers returned in the following example represent only the supported ciphers. The RabbitMQserver does not use or advertise these ciphers unless configured to do so in the rabbitmq.configfile.
["ECDHE-ECDSA-AES256-GCM-SHA384","ECDHE-RSA-AES256-GCM-SHA384",
"ECDHE-ECDSA-AES256-SHA384","ECDHE-RSA-AES256-SHA384",
"ECDH-ECDSA-AES256-GCM-SHA384","ECDH-RSA-AES256-GCM-SHA384",
"ECDH-ECDSA-AES256-SHA384","ECDH-RSA-AES256-SHA384",
"DHE-RSA-AES256-GCM-SHA384","DHE-DSS-AES256-GCM-SHA384",
"DHE-RSA-AES256-SHA256","DHE-DSS-AES256-SHA256","AES256-GCM-SHA384",
"AES256-SHA256","ECDHE-ECDSA-AES128-GCM-SHA256",
"ECDHE-RSA-AES128-GCM-SHA256","ECDHE-ECDSA-AES128-SHA256",
Installing and Upgrading vRealize Automation
VMware, Inc. 54
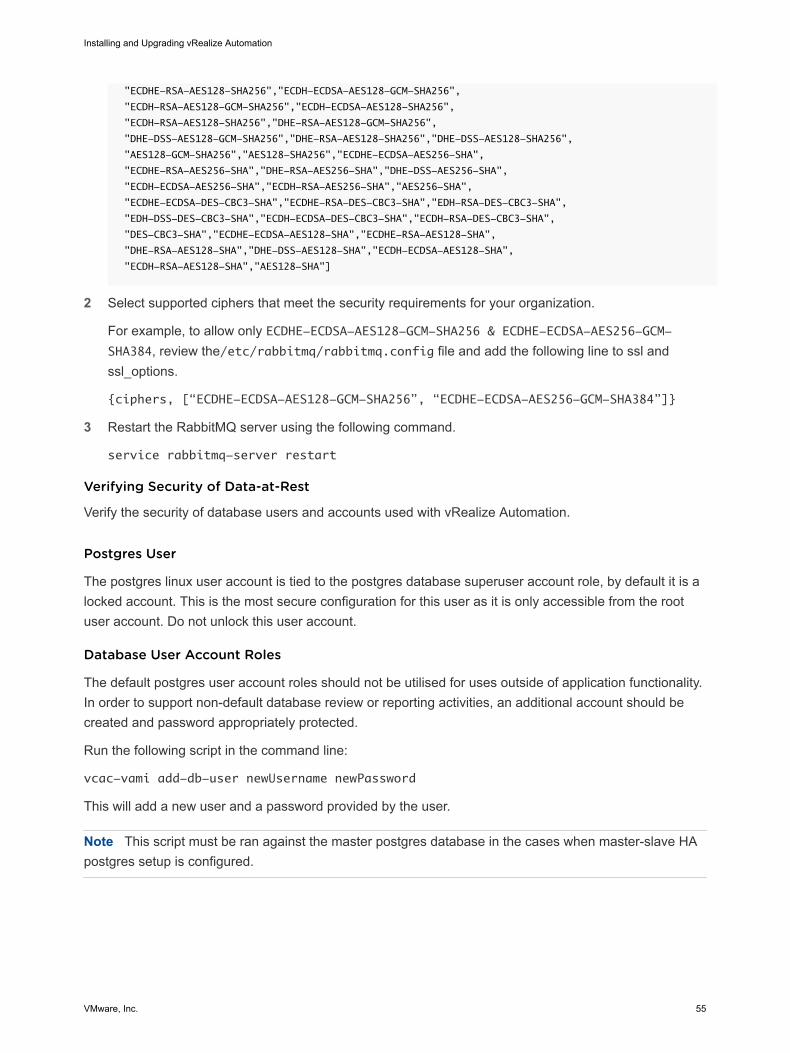
"ECDHE-RSA-AES128-SHA256","ECDH-ECDSA-AES128-GCM-SHA256",
"ECDH-RSA-AES128-GCM-SHA256","ECDH-ECDSA-AES128-SHA256",
"ECDH-RSA-AES128-SHA256","DHE-RSA-AES128-GCM-SHA256",
"DHE-DSS-AES128-GCM-SHA256","DHE-RSA-AES128-SHA256","DHE-DSS-AES128-SHA256",
"AES128-GCM-SHA256","AES128-SHA256","ECDHE-ECDSA-AES256-SHA",
"ECDHE-RSA-AES256-SHA","DHE-RSA-AES256-SHA","DHE-DSS-AES256-SHA",
"ECDH-ECDSA-AES256-SHA","ECDH-RSA-AES256-SHA","AES256-SHA",
"ECDHE-ECDSA-DES-CBC3-SHA","ECDHE-RSA-DES-CBC3-SHA","EDH-RSA-DES-CBC3-SHA",
"EDH-DSS-DES-CBC3-SHA","ECDH-ECDSA-DES-CBC3-SHA","ECDH-RSA-DES-CBC3-SHA",
"DES-CBC3-SHA","ECDHE-ECDSA-AES128-SHA","ECDHE-RSA-AES128-SHA",
"DHE-RSA-AES128-SHA","DHE-DSS-AES128-SHA","ECDH-ECDSA-AES128-SHA",
"ECDH-RSA-AES128-SHA","AES128-SHA"]
2 Select supported ciphers that meet the security requirements for your organization.
For example, to allow only ECDHE-ECDSA-AES128-GCM-SHA256 & ECDHE-ECDSA-AES256-GCM-SHA384, review the/etc/rabbitmq/rabbitmq.config file and add the following line to ssl andssl_options.
{ciphers, [“ECDHE-ECDSA-AES128-GCM-SHA256”, “ECDHE-ECDSA-AES256-GCM-SHA384”]}
3 Restart the RabbitMQ server using the following command.
service rabbitmq-server restart
Verifying Security of Data-at-Rest
Verify the security of database users and accounts used with vRealize Automation.
Postgres User
The postgres linux user account is tied to the postgres database superuser account role, by default it is alocked account. This is the most secure configuration for this user as it is only accessible from the rootuser account. Do not unlock this user account.
Database User Account Roles
The default postgres user account roles should not be utilised for uses outside of application functionality.In order to support non-default database review or reporting activities, an additional account should becreated and password appropriately protected.
Run the following script in the command line:
vcac-vami add-db-user newUsername newPassword
This will add a new user and a password provided by the user.
Note This script must be ran against the master postgres database in the cases when master-slave HApostgres setup is configured.
Installing and Upgrading vRealize Automation
VMware, Inc. 55
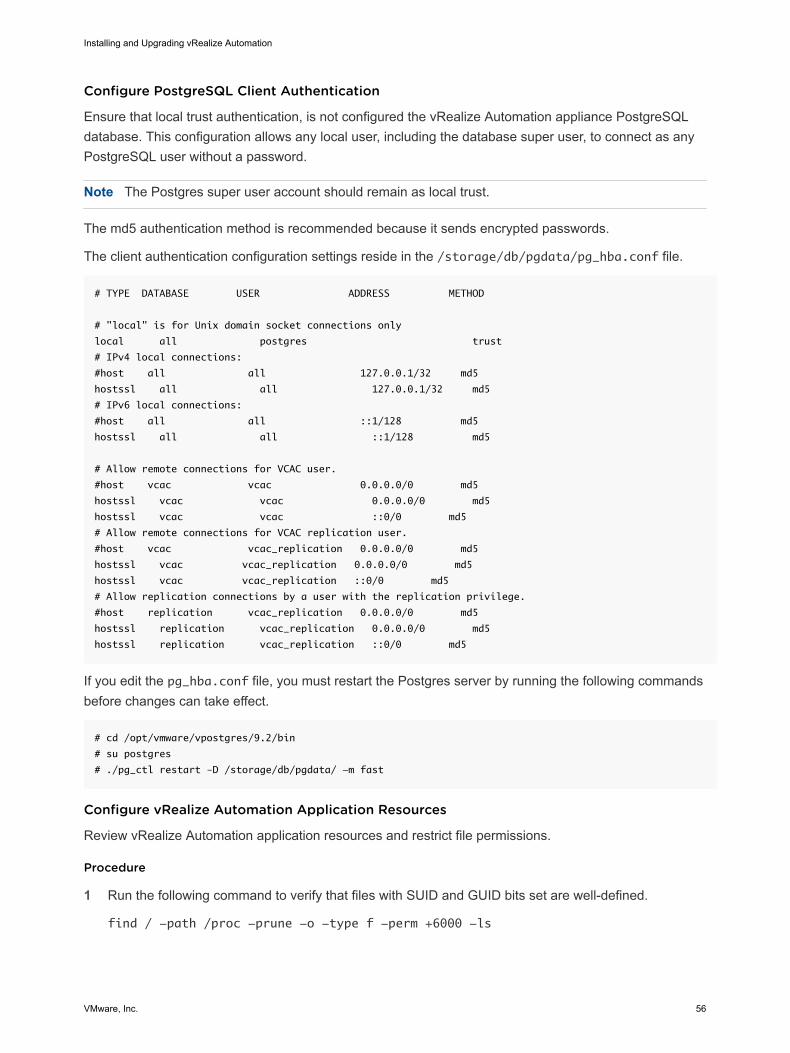
Configure PostgreSQL Client Authentication
Ensure that local trust authentication, is not configured the vRealize Automation appliance PostgreSQLdatabase. This configuration allows any local user, including the database super user, to connect as anyPostgreSQL user without a password.
Note The Postgres super user account should remain as local trust.
The md5 authentication method is recommended because it sends encrypted passwords.
The client authentication configuration settings reside in the /storage/db/pgdata/pg_hba.conf file.
# TYPE DATABASE USER ADDRESS METHOD
# "local" is for Unix domain socket connections only
local all postgres trust
# IPv4 local connections:
#host all all 127.0.0.1/32 md5
hostssl all all 127.0.0.1/32 md5
# IPv6 local connections:
#host all all ::1/128 md5
hostssl all all ::1/128 md5
# Allow remote connections for VCAC user.
#host vcac vcac 0.0.0.0/0 md5
hostssl vcac vcac 0.0.0.0/0 md5
hostssl vcac vcac ::0/0 md5
# Allow remote connections for VCAC replication user.
#host vcac vcac_replication 0.0.0.0/0 md5
hostssl vcac vcac_replication 0.0.0.0/0 md5
hostssl vcac vcac_replication ::0/0 md5
# Allow replication connections by a user with the replication privilege.
#host replication vcac_replication 0.0.0.0/0 md5
hostssl replication vcac_replication 0.0.0.0/0 md5
hostssl replication vcac_replication ::0/0 md5
If you edit the pg_hba.conf file, you must restart the Postgres server by running the following commandsbefore changes can take effect.
# cd /opt/vmware/vpostgres/9.2/bin
# su postgres
# ./pg_ctl restart –D /storage/db/pgdata/ -m fast
Configure vRealize Automation Application Resources
Review vRealize Automation application resources and restrict file permissions.
Procedure
1 Run the following command to verify that files with SUID and GUID bits set are well-defined.
find / -path /proc -prune -o -type f -perm +6000 -ls
Installing and Upgrading vRealize Automation
VMware, Inc. 56
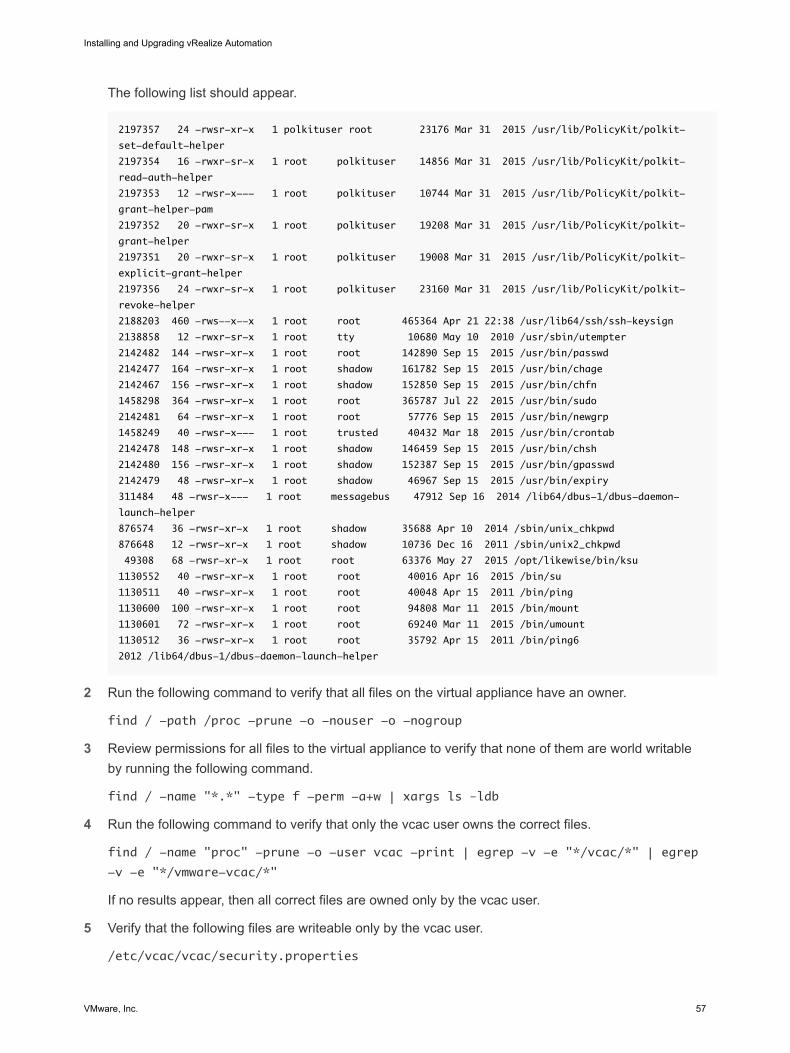
The following list should appear.
2197357 24 -rwsr-xr-x 1 polkituser root 23176 Mar 31 2015 /usr/lib/PolicyKit/polkit-
set-default-helper
2197354 16 -rwxr-sr-x 1 root polkituser 14856 Mar 31 2015 /usr/lib/PolicyKit/polkit-
read-auth-helper
2197353 12 -rwsr-x--- 1 root polkituser 10744 Mar 31 2015 /usr/lib/PolicyKit/polkit-
grant-helper-pam
2197352 20 -rwxr-sr-x 1 root polkituser 19208 Mar 31 2015 /usr/lib/PolicyKit/polkit-
grant-helper
2197351 20 -rwxr-sr-x 1 root polkituser 19008 Mar 31 2015 /usr/lib/PolicyKit/polkit-
explicit-grant-helper
2197356 24 -rwxr-sr-x 1 root polkituser 23160 Mar 31 2015 /usr/lib/PolicyKit/polkit-
revoke-helper
2188203 460 -rws--x--x 1 root root 465364 Apr 21 22:38 /usr/lib64/ssh/ssh-keysign
2138858 12 -rwxr-sr-x 1 root tty 10680 May 10 2010 /usr/sbin/utempter
2142482 144 -rwsr-xr-x 1 root root 142890 Sep 15 2015 /usr/bin/passwd
2142477 164 -rwsr-xr-x 1 root shadow 161782 Sep 15 2015 /usr/bin/chage
2142467 156 -rwsr-xr-x 1 root shadow 152850 Sep 15 2015 /usr/bin/chfn
1458298 364 -rwsr-xr-x 1 root root 365787 Jul 22 2015 /usr/bin/sudo
2142481 64 -rwsr-xr-x 1 root root 57776 Sep 15 2015 /usr/bin/newgrp
1458249 40 -rwsr-x--- 1 root trusted 40432 Mar 18 2015 /usr/bin/crontab
2142478 148 -rwsr-xr-x 1 root shadow 146459 Sep 15 2015 /usr/bin/chsh
2142480 156 -rwsr-xr-x 1 root shadow 152387 Sep 15 2015 /usr/bin/gpasswd
2142479 48 -rwsr-xr-x 1 root shadow 46967 Sep 15 2015 /usr/bin/expiry
311484 48 -rwsr-x--- 1 root messagebus 47912 Sep 16 2014 /lib64/dbus-1/dbus-daemon-
launch-helper
876574 36 -rwsr-xr-x 1 root shadow 35688 Apr 10 2014 /sbin/unix_chkpwd
876648 12 -rwsr-xr-x 1 root shadow 10736 Dec 16 2011 /sbin/unix2_chkpwd
49308 68 -rwsr-xr-x 1 root root 63376 May 27 2015 /opt/likewise/bin/ksu
1130552 40 -rwsr-xr-x 1 root root 40016 Apr 16 2015 /bin/su
1130511 40 -rwsr-xr-x 1 root root 40048 Apr 15 2011 /bin/ping
1130600 100 -rwsr-xr-x 1 root root 94808 Mar 11 2015 /bin/mount
1130601 72 -rwsr-xr-x 1 root root 69240 Mar 11 2015 /bin/umount
1130512 36 -rwsr-xr-x 1 root root 35792 Apr 15 2011 /bin/ping6
2012 /lib64/dbus-1/dbus-daemon-launch-helper
2 Run the following command to verify that all files on the virtual appliance have an owner.
find / -path /proc -prune -o -nouser -o -nogroup
3 Review permissions for all files to the virtual appliance to verify that none of them are world writableby running the following command.
find / -name "*.*" -type f -perm -a+w | xargs ls –ldb
4 Run the following command to verify that only the vcac user owns the correct files.
find / -name "proc" -prune -o -user vcac -print | egrep -v -e "*/vcac/*" | egrep
-v -e "*/vmware-vcac/*"
If no results appear, then all correct files are owned only by the vcac user.
5 Verify that the following files are writeable only by the vcac user.
/etc/vcac/vcac/security.properties
Installing and Upgrading vRealize Automation
VMware, Inc. 57

/etc/vcac/vcac/solution-users.properties
/etc/vcac/vcac/sso-admin.properties
/etc/vcac/vcac/vcac.keystore
/etc/vcac/vcac/vcac.properties
Also verify the following files and their sub-directories
/var/log/vcac/*
/var/lib/vcac/*
/var/cache/vcac/*
6 Verify that only the vcac or root user can read the correct files in the following directories and theirsub-directories.
/etc/vcac/*
/var/log/vcac/*
/var/lib/vcac/*
/var/cache/vcac/*
7 Verify that the correct files are owned only by the vco or root user, as shown in in the followingdirectories and their sub-directories.
/etc/vco/*
/var/log/vco/*
/var/lib/vco/*
/var/cache/vco/*
8 Verify that the correct files are writeable only by the vco or root user, as shown in in the followingdirectories and their sub-directories.
/etc/vco/*
/var/log/vco/*
/var/lib/vco/*
/var/cache/vco/*
9 Verify that the correct files are readable only by the vco or root user, as shown in in the followingdirectories and their sub-directories.
/etc/vco/*
/var/log/vco/*
/var/lib/vco/*
/var/cache/vco/*
Installing and Upgrading vRealize Automation
VMware, Inc. 58

Customizing Console Proxy Configuration
You can customize the remote console configuration for vRealize Automation to facilitate troubleshootingand organizational practices.
When you install, configure, or maintain vRealize Automation, you can change some settings to enabletroubleshooting and debugging of your installation. Catalog and audit each of the changes you make toensure that applicable components are properly secured according to their required use. Do not proceedto production if you are not sure that your configuration changes are correctly secured.
Customize VMware Remote Console Ticket Expiry
You can customize the validity period for remote console tickets used in establishingVMware Remote Console connections.
When a user makes VMware Remote Console connections, the system creates and returns a one-timecredential that establishes a specific connection to a virtual machine. You can set the ticket expiry for aspecified time frame in minutes.
Procedure
1 Open the /etc/vcac/security.properties file in a text editor.
2 Add a line to the file of the form consoleproxy.ticket.validitySec=30.
In this line the numerical value specifies the number of minutes before the ticket expires.
3 Save the file and close it.
4 Restart the vcac-server using the command /etc/init.d/vcac-server restart.
The ticket expiry value is reset to the specified time frame in minutes.
Customize Console Proxy Server Port
You can customize the port on which the VMware Remote Console console proxy listens for messages.
Procedure
1 Open the /etc/vcac/security.properties file in a text editor.
2 Add a line to the file of the form consoleproxy.service.port=8445.
The numerical value specifies the console proxy service port number, in this case 8445.
3 Save the file and close it.
4 Restart the vcac-server using the command /etc/init.d/vcac-server restart.
The proxy service port changes to the specified port number.
Configure X-XSS-Protection Response Header
Add the X-XSS-Protection response header to the haproxy configuration file.
Installing and Upgrading vRealize Automation
VMware, Inc. 59
Procedure
1 Open /etc/haproxy/conf.d/20-vcac.cfg for editing.
2 Add the following lines in a front end section:
rspdel X-XSS-Protection:\ 1;\ mode=block
rspadd X-XSS-Protection:\ 1;\ mode=block
3 Reload the HAProxy configuration using the following command.
/etc/init.d/haproxy reload
Configure HTTP Strict Transport Security Response Header
Add the HTTP Strict Transport (HSTS) response header to the HAProxy configuration.
Procedure
1 Open /etc/haproxy/conf.d/20-vcac.cfg for editing.
2 Add the following lines in a front end section:
rspdel Strict-Transport-Security:\ max-age=31536000
rspadd Strict-Transport-Security:\ max-age=31536000
3 Reload the HAProxy configuration using the following command.
/etc/init.d/haproxy reload
Configure X-Frame-Options Response Header
The X-Frame-Options response header may appear twice in some cases.
The X-Frame-Options response header may appear twice because the vIDM service adds this header tothe back end as well as to HAProxy. You can prevent it appearing twice with an appropriate configuration.
Procedure
1 Open /etc/haproxy/conf.d/20-vcac.cfg for editing.
2 Locate the following line in the front end section:
rspadd X-Frame-Options:\ SAMEORIGIN
3 Add the following lines before the line you located in the preceding step:
rspdel X-Frame-Options:\ SAMEORIGIN
4 Reload the HAProxy configuration using the following command.
/etc/init.d/haproxy reload
Configuring Server Response Headers
As a security best practice, configure your vRealize Automation system to limit information available topotential attackers.
Installing and Upgrading vRealize Automation
VMware, Inc. 60
To the extent possible, minimize the amount of information that your system shares about its identity andversion. Hackers and malicious actors can use this information to craft targeted attacks against your Webserver or version.
Configure the Lighttpd Server Response Header
As a best practice, create a blank server header for the vRealize Automation appliance lighttpd server.
Procedure
1 Open the /opt/vmware/etc/lighttpd/lighttpd.conf file in a text editor.
2 Add the server.tag = " " to the file.
3 Save your changes and close the file.
4 Restart the lighttpd server by running the # /opt/vmware/etc/init.d/vami-lighttp restartcommand.
Configure the TCServer Response Header for the vRealize Automation Appliance
As a best practice, create a custom blank server header for the TCServer response header used with thevRealize Automation appliance to limit the possibility of a malicious attacker obtaining valuableinformation.
Procedure
1 Open the /etc/vco/app-server/server.xml file in a text editor.
2 In each <Connector> element add server=" ".
For example: <Connector protocol="HTTP/1.1" server="" ........ />
3 Save your changes and close the file.
4 Restart the server using the following command.
service vco-server restart
Configure the Internet Information Services Server Response Header
As a best practice, create a custom blank server header for the Internet Information Services (IIS) serverused with the Identity Appliance to limit the possibility of malicious attackers obtaining valuableinformation.
Procedure
1 Open the C:\Windows\System32\inetsrv\urlscan\UrlScan.ini file in a text editor.
2 Search for RemoveServerHeader=0 and change it to RemoveServerHeader=1.
3 Save your changes and close the file.
4 Restart the server by running the iisreset command.
Installing and Upgrading vRealize Automation
VMware, Inc. 61

What to do next
Disable the IIS X-Powered By header by removing HTTP Response headers from the list in the IISManager Console.
1 Open the IIS Manager console.
2 Open the HTTP Response Header and remove it from the list.
3 Restart the server by running the iisreset command.
Set vRealize Automation appliance Session Timeout
Configure the session timeout setting on the vRealize Automation appliance in accordance with yourcompany security policy.
The vRealize Automation appliance default session timeout on user inactivity is 30 minutes. To adjust thistime out value to conform to your organization's security policy, edit the web.xml file on your vRealizeAutomation appliance host machine.
Procedure
1 Open the/usr/lib/vcac/server/webapps/vcac/WEB-INF/web.xml file in a text editor.
2 Find session-config and set the session-timeout value. See the following code sample.
<!-- 30 minutes session expiration time -->
<session-config>
<session-timeout>30</session-timeout>
<tracking-mode>COOKIE</tracking-mode>
<cookie-config>
<path>/</path>
</cookie-config>
</session-config>
3 Restart the server by running the following command.
service vcac-server restart
Managing Nonessential Software
To minimize security risks, remove or configure nonessential software from your vRealize Automationhost machines.
Configure all software that you do not remove in accordance with manufacturer recommendations andsecurity best practices to minimize its potential to create security breaches.
Secure the USB Mass Storage Handler
Secure the USB mass storage handler to prevent its use as the USB device handler with the VMwarevirtual appliance host machines. Potential attackers can exploit this handler to compromise your system.
Procedure
1 Open the/etc/modprobe.conf.local file in a text editor.
Installing and Upgrading vRealize Automation
VMware, Inc. 62
2 Ensure that the install usb-storage /bin/true line appears in the file.
3 Save the file and close it.
Secure the Bluetooth Protocol Handler
Secure the Bluetooth Protocol Handler on your virtual appliance host machines to prevent potentialattackers from exploiting it.
Binding the Bluetooth protocol to the network stack is unnecessary and can increase the attack surface ofthe host.
Procedure
1 Open the /etc/modprobe.conf.local file in a text editor.
2 Ensure that the following line appears in this file.
install bluetooth /bin/true
3 Save the file and close it.
Secure the Stream Control Transmission Protocol
Prevent the Stream Control Transmission Protocol (SCTP) from loading on your system by default.Potential attackers could exploit this protocol to compromise your system.
Configure your system to prevent the Stream Control Transmission Protocol (SCTP) module from loadingunless it is absolutely necessary. SCTP is an unused IETF-standardized transport layer protocol. Bindingthis protocol to the network stack increases the attack surface of the host. Unprivileged local processescould cause the kernel to dynamically load a protocol handler by opening a socket using the protocol.
Procedure
1 Open the /etc/modprobe.conf.local file in a text editor.
2 Ensure that the following line appears in this file.
install sctp /bin/true
3 Save the file and close it.
Secure the Datagram Congestion Protocol
As part of your system hardening activities, prevent the Datagram Congestion Protocol (DCCP) fromloading on your virtual appliance host machines by default. Potential attackers can exploit this protocol tocompromise your system.
Avoid loading the Datagram Congestion Control Protocol (DCCP) module, unless it is absolutelynecessary. DCCP is a proposed transport layer protocol, which is not used. Binding this protocol to thenetwork stack increases the attack surface of the host. Unprivileged local processes can cause the kernelto dynamically load a protocol handler by using the protocol to open a socket.
Procedure
1 Open the /etc/modprobe.conf.local file in a text editor.
Installing and Upgrading vRealize Automation
VMware, Inc. 63
2 Ensure that the DCCP lines appear in the file.
install dccp/bin/true
install dccp_ipv4/bin/true
install dccp_ipv6/bin/true
3 Save the file and close it.
Secure Network Bridging
Prevent the network bridging module from loading on your system by default. Potential attackers couldexploit it to compromise your system.
Configure your system to prevent the network from loading, unless it is absolutely necessary. Potentialattackers could exploit it to bypass network partitioning and security.
Procedure
1 Run the following command on all VMware virtual appliance host machines.
# rmmod bridge
2 Open the /etc/modprobe.conf.local file in a text editor.
3 Ensure that the following line appears in this file.
install bridge /bin/false
4 Save the file and close it.
Secure Reliable Datagram Sockets Protocol
As part of your system hardening activities, prevent the Reliable Datagram Sockets Protocol (RDS) fromloading on your virtual appliance host machines by default. Potential attackers can exploit this protocol tocompromise your system.
Binding the Reliable Datagram Sockets (RDS) Protocol to the network stack increases the attack surfaceof the host. Unprivileged local processes can cause the system to dynamically load a protocol handler byusing the protocol to open a socket.
Procedure
1 Open the /etc/modprobe.conf.local file in a text editor.
2 Ensure that the install rds /bin/true line appears in this file.
3 Save the file and close it.
Secure Transparent Inter-Process Communication Protocol
As part of your system hardening activities, prevent the Transparent Inter-Process CommunicationProtocol (TIPC) from loading on your virtual appliance host machines by default. Potential attackers canexploit this protocol to compromise your system.
Installing and Upgrading vRealize Automation
VMware, Inc. 64
Binding the Transparent Inter-Process Communications (TIPC) Protocol to the network stack increasesthe attack surface of the host. Unprivileged local processes can cause the kernel to dynamically load aprotocol handler by using the protocol to open a socket.
Procedure
1 Open the /etc/modprobe.conf.local file in a text editor.
2 Ensure that the install tipc /bin/true line appears in this file.
3 Save the file and close it.
Secure Internetwork Packet Exchange Protocol
Prevent the Internetwork Packet Exchange Protocol (IPX) from loading on your system by default.Potential attackers could exploit this protocol to compromise your system.
Avoid loading the Internetwork Packet Exchange (IPX) Protocol module unless it is absolutely necessary.IPX protocol is an obsolete network-layer protocol. Binding this protocol to the network stack increasesthe attack surface of the host. Unprivileged local processes could cause the system to dynamically load aprotocol handler by using the protocol to open a socket.
Procedure
1 Open the /etc/modprobe.conf.local file in a text editor.
2 Ensure that the following line appears in this file.
install ipx /bin/true
3 Save the file and close it.
Secure Appletalk Protocol
Prevent the Appletalk Protocol from loading on your system by default. Potential attackers could exploitthis protocol to compromise your system.
Avoid loading the Appletalk Protocol module unless it is absolutely necessary. Binding this protocol to thenetwork stack increases the attack surface of the host. Unprivileged local processes could cause thesystem to dynamically load a protocol handler by using the protocol to open a socket.
Procedure
1 Open the /etc/modprobe.conf.local file in a text editor.
2 Ensure that the following line appears in this file.
install appletalk /bin/true
3 Save the file and close it.
Secure DECnet Protocol
Prevent the DECnet Protocol from loading on your system by default. Potential attackers could exploit thisprotocol to compromise your system.
Installing and Upgrading vRealize Automation
VMware, Inc. 65
Avoid loading the DECnet Protocol module unless it is absolutely necessary. Binding this protocol to thenetwork stack increases the attack surface of the host. Unprivileged local processes could cause thesystem to dynamically load a protocol handler by using the protocol to open a socket.
Procedure
1 Open the DECnet Protocol /etc/modprobe.conf.local file in a text editor.
2 Ensure that the following line appears in this file.
install decnet /bin/true
3 Save the file and close it.
Secure Firewire Module
Prevent the Firewire module from loading on your system by default. Potential attackers could exploit thisprotocol to compromise your system.
Avoid loading the Firewire module unless it is absolutely necessary.
Procedure
1 Open the /etc/modprobe.conf.local file in a text editor.
2 Ensure that the following line appears in this file.
install ieee1394 /bin/true
3 Save the file and close it.
Securing the Infrastructure as a Service ComponentWhen you harden your system, secure the vRealize Automation Infrastructure as a Service (IaaS)component and its host machine to prevent potential attackers from exploiting it.
You must configure security setting for the vRealize Automation Infrastructure as a Service (IaaS)component and the host on which it resides. You must set or verify the configuration of other relatedcomponents and applications. In some cases, you can verify existing settings, in others you must changeor add settings for an appropriate configuration.
Disabling Windows Time Service
As a security best practice, use authorized time servers rather than host time synchronization in avRealize Automation production environment.
In a production environment, disable host time synchronization and use authorized time servers tosupport accurate tracking of user actions, and identification of potential malicious attacks and intrusionthrough auditing and logging.
Configuring TLS for Infrastructure as a Service Data-in-Transit
Ensure that your vRealize Automation deployment uses strong TLS protocols to secure transmissionchannels for Infrastructure as a Service components.
Installing and Upgrading vRealize Automation
VMware, Inc. 66
Secure Sockets Layer (SSL) and the more recently developed Transport Layer Security (TLS) arecryptographic protocols that help ensure system security during network communications betweendifferent system components. As SSL is an older standard, many of its implements no longer provideadequate security against potential attacks. Serious weaknesses have been identified with earlier SSLprotocols, including SSLv2 and SSLv3. These protocols are no longer considered secure.
Depending on your organization’s security policies you may wish to also disable TLS 1.0.
Note When terminating TLS at the load balancer, also disable weak protocols such as SSLv2, SSLv3,as well as TLS 1.0 if required.
Disable SSLv3 in Internet Information Services
As a security best practice, disable SSLv3 in Internet Information Services (IIS) on the Infrastructure as aService (IaaS) host server machine.
Procedure
1 Run the Windows registry editor as an administrator.
2 Navigate toHKEY_LOCAL_MACHINE\SYSTEM\CurrentControlSet\Control\SecurityProviders\Schannel\Pr
otocols\ in the registry window.
3 Right-click on Protocols, and select New > Key.
4 Enter SSL 3.0.
5 In the navigation tree, right-click the newly created SSL 3.0 key, and in the pop-up menu select New> Key and enter Client.
6 In the navigation tree, right-click on the newly created SSL 3.0 key, and in the pop-up menu selectNew > Key and enter Server.
7 In the navigation tree, under SSL 3.0, right-click Client, and select New > DWORD (32-bit) Valueand enter DisabledByDefault.
8 In the navigation tree, under SSL 3.0, select Client, and in the right pane, double-clickDisabledByDefault and enter 1.
9 In the navigation tree, under SSL 3.0, right-click Server, and select New > DWORD (32-bit) Valueand enter Enabled.
10 In the navigation tree, under SSL 3.0, select Server, and in the right pane, double-click the enabledDWORD and enter 0.
11 Restart the Windows Server.
Disable TLS 1.0 for IaaS
To provide maximum security, configure IaaS to use pooling and disable TLS 1.0.
For more information, see the Microsoft knowledge base article https://support.microsoft.com/en-us/kb/245030.
Installing and Upgrading vRealize Automation
VMware, Inc. 67
Procedure
1 Configure IaaS to use pooling instead of web sockets.
a Update the Manager Services configuration file C:\Program Files(x86)\VMware\vCAC\Server\ManagerService.exe.config by adding the following values inthe <appSettings> section
<add key="Extensibility.Client.RetrievalMethod" value="Polling"/>
<add key="Extensibility.Client.PollingInterval" value="2000"/>
<add key="Extensibility.Client.PollingMaxEvents" value="128"/>
b Restart the Manager Service (VMware vCloud Automation Center Service).
2 Verify that TLS 1.0 is disabled on the IaaS server.
a Run the registry editor as an administrator.
b In the registry window, navigate toHKEY_LOCAL_MACHINE\SYSTEM\CurrentControlSet\Control\SecurityProviders\Schanne
l\Protocols\
c Right-click on Protocols and select New > Key and then enter TLS 1.0.
d In the navigation tree, right-click on the TLS 1.0 key that you just created, and in the pop-up menuselect New > Key and enter Client.
e In the navigation tree, right-click on the TLS 1.0 key that you just created and in the pop up menuselect New > Key and enter Server.
f In the navigation tree, under TLS 1.0, right-click on Client, and then click New > DWORD (32-bit)Valueand enter DisabledByDefault.
g In the navigation tree, under TLS 1.0, select Client, and in the right pane, double-clickDisabledByDefault DWORD and enter 1.
h In the navigation tree, under TLS 1.0, right-click Server, and select New > DWORD (32-bit)Value and enter Enabled.
i In the navigation tree, under TLS 1.0, select Server, and in the right pane, double-click EnabledDWORD and enter 0.
j Restart the Windows Server.
Configuring TLS Cipher Suites
For maximum security, you must configure vRealize Automation components to use strong ciphers. Theencryption cipher negotiated between the server and the browser determines the encryption strength thatis used in a TLS session. To ensure that only strong ciphers are selected, disable weak ciphers invRealize Automation components. Configure the server to support only strong ciphers and to usesufficiently large key sizes. Also, configure all ciphers in a suitable order.
Installing and Upgrading vRealize Automation
VMware, Inc. 68

Cipher Suites that are not Acceptable
Disable cipher suites that do not offer authentication such as NULL cipher suites, aNULL, or eNULL. Alsodisable anonymous Diffie-Hellman key exchange (ADH), export level ciphers (EXP, ciphers containingDES), key sizes smaller than 128 bits for encrypting payload traffic, the use of MD5 as a hashingmechanism for payload traffic, IDEA Cipher Suites, and RC4 cipher suites. Also ensure that cipher suitesusing Diffie-Hellman (DHE) key exchange are disabled.
Verifying Host Server Security
As a security best practice, verify the security configuration of your Infrastructure as a Service (IaaS) hostserver machines.
Microsoft supplies several tools to help you verify security on host server machines. Contact yourMicrosoft vendor for guidance on the most appropriate use of these tools.
Verify Host Server Secure Baseline
Run the Microsoft Baseline Security Analyzer (MBSA) to quickly confirm that your server has the latestupdates or hot fixes. You can use the MBSA to install missing security patches from Microsoft to keepyour server up-to-date with Microsoft security recommendations.
Download the latest version of the MBSA tool from the Microsoft website.
Verify Host Server Security Configuration
Use the Windows Security Configuration Wizard (SCW) and the Microsoft Security Compliance Manager(SCM) toolkit to verify that the host server is securely configured.
Run the SCW from the administrative tools from your Windows server. This tool can identify the roles ofyour server and the installed features including networking, Windows firewalls, and registry settings.Compare the report with the latest hardening guidance from the relevant SCM for your Windows server.Based on the results, you can fine tune security settings for each feature such as network services,account settings, and Windows firewalls, and apply the settings to your server.
You can find more information about the SCW tool on the Microsoft Technet Web site.
Protecting Application Resources
As a security best practice, ensure that all relevant Infrastructure as a Service files have the appropriatepermissions.
Review Infrastructure as a Service files against your Infrastructure as a Service installation. In mostcases, subfolders and files for every folder should have the same settings as the folder.
Directory or File Group or UsersFullControl Modify
Read &Execute Read Write
VMware\vCAC\Agents \<agent_name> \logs
SYSTEM X X X X X
Administrator X X X X X
Administrators X X X X X
Installing and Upgrading vRealize Automation
VMware, Inc. 69

Directory or File Group or UsersFullControl Modify
Read &Execute Read Write
VMware\vCAC\Agents\<agent_name> \temp
SYSTEM X X X X X
Administrator X X X X X
Administrators X X X X X
VMware\vCAC\Agents\ SYSTEM X X X X X
Administrators X X X X X
Users X X
VMware\vCAC\Distributed ExecutionManager\
SYSTEM X X X X X
Administrators X X X X X
Users X X
VMware\vCAC\Distributed ExecutionManager\DEM\Logs
SYSTEM X X X X X
Administrator X X X X X
Administrators X X X X X
VMware\vCAC\Distributed ExecutionManager\DEO\Logs
SYSTEM X X X X X
Administrator X X X X X
Administrators X X X X X
VMware\vCAC\Management Agent\ SYSTEM X X X X X
Administrators X X X X X
Users X X
VMware\vCAC\Server\ SYSTEM X X X X X
Administrators X X X X X
Users X X
VMware\vCAC\Web API SYSTEM X X X X X
Administrators X X X X X
Users X X
Secure the Infrastructure as a Service Host Machine
As a security best practice, review basic settings on your Infrastructure as a Service (IaaS) host machineto ensure that it conforms to security guidelines.
Secure miscellaneous accounts, applications, ports, and services on the Infrastructure as a Service(IaaS) host machine.
Verify Server User Account Settings
Verify that no unnecessary local and domain user accounts and settings exist. Restrict any user accountthat is not related to the application functions to those required for administration, maintenance, andtroubleshooting. Restrict remote access from domain user accounts to the minimum required to maintainthe server. Strictly control and audit these accounts.
Installing and Upgrading vRealize Automation
VMware, Inc. 70
Delete Unnecessary Applications
Delete all unnecessary applications from the host servers. Unnecessary applications increase the risk ofexposure because of their unknown or unpatched vulnerabilities.
Disable Unnecessary Ports and Services
Review the host server's firewall for the list of open ports. Block all ports that are not required for the IaaScomponent or critical system operation. See Configuring Ports and Protocols. Audit the services runningagainst your host server, and disable those that are not required.
Configuring Host Network SecurityTo provide maximum protection against known security threats, configure network interface andcommunication settings on all VMware host machines.
As part of a comprehensive security plan, configure network interface security settings for the VMwarevirtual appliances and the Infrastructure as a Service components in accordance with established securityguidelines.
Configuring Network Settings for VMware AppliancesTo ensure that your VMware virtual appliance host machines support only safe and essentialcommunications, review and edit their network communication settings.
Examine the network IP protocol configuration of your VMware host machines, and configure networksettings in accordance with security guidelines. Disable all nonessential communication protocols.
Prevent User Control of Network Interfaces
As a security best practice, allow users only the system privileges that they need to do their jobs onVMware appliance host machines.
Permitting user accounts with privileges to manipulate network interfaces can result in bypassing networksecurity mechanisms or denial of service. Restrict the ability to change network interface settings toprivileged users.
Procedure
1 Run the following command on each VMware appliance host machine.
# grep -i '^USERCONTROL=' /etc/sysconfig/network/ifcfg*
2 Make sure that each interface is set to NO.
Set TCP Backlog Queue Size
To provide some level of defense against malicious attacks, configure a default TCP backlog queue sizeon VMware appliance host machines.
Set the TCP backlog queue sizes to an appropriate default size to provide mitigation for TCP denial orservice attacks. The recommended default setting is 1280.
Installing and Upgrading vRealize Automation
VMware, Inc. 71
Procedure
1 Run the following command on each VMware appliance host machine.
# cat /proc/sys/net/ipv4/tcp_max_syn_backlog
2 Open the /etc/sysctl.conf file in a text editor.
3 Set the default TCP backlog queue size by adding the following entry to the file.
net.ipv4.tcp_max_syn_backlog=1280
4 Save your changes and close the file.
Deny ICMPv4 Echoes to Broadcast Address
As a security best practice, verify that your VMware appliance host machines ignore ICMP broadcastaddress echo requests.
Responses to broadcast Internet Control Message Protocol (ICMP ) echoes provide an attack vector foramplification attacks and can facilitate network mapping by malicious agents. Configuring your appliancehost machines to ignore ICMPv4 echoes provides protection against such attacks.
Procedure
1 Run the # cat /proc/sys/net/ipv4/icmp_echo_ignore_broadcasts command on the VMwarevirtual appliance host machines to confirm that they deny IPv4 broadcast address echo requests.
If the host machines are configured to deny IPv4 redirects, this command will return a value of 0for /proc/sys/net/ipv4/icmp_echo_ignore_broadcasts.
2 To configure a virtual appliance host machine to deny ICMPv4 broadcast address echo requests,open the /etc/sysctl.conf file on Windows host machines in a text editor.
3 Locate the entry that reads net.ipv4.icmp_echo_ignore_broadcasts=0 . If the value for thisentry is not set to zero or if the entry does not exist, add it or update the existing entry accordingly.
4 Save the changes and close the file.
Disable IPv4 Proxy ARP
Verify that IPv4 Proxy ARP is disabled if not otherwise required on your VMware appliance host machinesto prevent unauthorized information sharing.
IPv4 Proxy ARP allows a system to send responses to ARP requests on one interface on behalf of hostsconnected to another interface. Disable it if not needed to prevent leakage of addressing informationbetween the attached network segments.
Installing and Upgrading vRealize Automation
VMware, Inc. 72
Procedure
1 Run the # grep [01] /proc/sys/net/ipv4/conf/*/proxy_arp|egrep "default|all"command on the VMware virtual appliance host machines to verify that IPv4 Proxy ARP is disabled.
If IPv6 Proxy ARP is disabled on the host machines, this command will return values of 0.
/proc/sys/net/ipv4/conf/all/proxy_arp:0
/proc/sys/net/ipv4/conf/default/proxy_arp:0
If the host machines are configured correctly, no further action is necessary.
2 If you need to configure IPv6 Proxy ARP on host machines, open the /etc/sysctl.conf file in a texteditor.
3 Check for the following entries.
net.ipv4.conf.default.proxy_arp=0
net.ipv4.conf.all.proxy_arp=0
If the entries do not exist or if their values are not set to zero, add the entries or update the existingentries accordingly.
4 Save any changes you made and close the file.
Deny IPv4 ICMP Redirect Messages
As a security best practice, verify that your VMware virtual appliance host machines deny IPv4 ICMPredirect messages.
Routers use ICMP redirect messages to tell hosts that a more direct route exists for a destination. Amalicious ICMP redirect message can facilitate a man-in-the-middle attack. These messages modify thehost's route table and are unauthenticated. Ensure that your system is configured to ignore them if theyare not otherwise needed.
Procedure
1 Run the # grep [01] /proc/sys/net/ipv4/conf/*/accept_redirects|egrep "default|all"command on the VMware appliance host machines to confirm that they deny IPv4 redirect messages.
If the host machines are configured to deny IPv4 redirects, this command returns the following:
/proc/sys/net/ipv4/conf/all/accept_reidrects:0
/proc/sys/net/ipv4/conf/default/accept_redirects:0
2 If you need to configure a virtual appliance host machine to deny IPv4 redirect messages, openthe /etc/sysctl.conf file in a text editor.
Installing and Upgrading vRealize Automation
VMware, Inc. 73
3 Check the values of the lines that begin with net.ipv4.conf.
If the values for the following entries are not set to zero or if the entries do not exist, add them to thefile or update the existing entries accordingly.
net.ipv4.conf.all.accept_redirects=0
net.ipv4.conf.default.accept_redirects=0
4 Save the changes you made and close the file.
Deny IPv6 ICMP Redirect Messages
As a security best practice, verify that your VMware virtual appliance host machines deny IPv6 ICMPredirect messages.
Routers use ICMP redirect messages to tell hosts that a more direct route exists for a destination. Amalicious ICMP redirect message can facilitate a man-in-the-middle attack. These messages modify thehost's route table and are unauthenticated. Ensure your system is configured to ignore them if they nototherwise needed.
Procedure
1 Run the # grep [01] /proc/sys/net/ipv6/conf/*/accept_redirects|egrep "default|all"command on the VMwarevirtual appliance host machines to confirm that they deny IPv6 redirectmessages.
If the host machines are configured to deny IPv6 redirects, this command returns the following:
/proc/sys/net/ipv6/conf/all/accept_redirects:0
/proc/sys/net/ipv6/conf/default/accept_redirects:0
2 To configure a virtual appliance host machine to deny IPv4 redirect messages, openthe /etc/sysctl.conf file in a text editor.
3 Check the values of the lines that begin with net.ipv6.conf.
If the values for the following entries in the are not set to zero or if the entries do not exist, add themto the file or update the existing entries accordingly.
net.ipv6.conf.all.accept_redirects=0
net.ipv6.conf.default.accept_redirects=0
4 Save the changes and close the file.
Log IPv4 Martian Packets
As a security best practice, verify that your VMware virtual appliance host machines log IPv4 Martianpackets.
Martian packets contain addresses that the system knows to be invalid. Configure your host machines tolog these messages so that you can identify misconfigurations or attacks in progress.
Installing and Upgrading vRealize Automation
VMware, Inc. 74
Procedure
1 Run the # grep [01] /proc/sys/net/ipv4/conf/*/log_martians|egrep "default|all"command on the VMware appliance host machines to verify that they log IPv4 Martian packets.
If the virtual machines are configured to log Martian packers, they return the following:
/proc/sys/net/ipv4/conf/all/log_martians:1
/proc/sys/net/ipv4/default/log_martians:1
If the host machines are configured correctly, no further action is necessary.
2 If you need to configure virtual machines to log IPv4 martian packets, open the /etc/sysctl.conffile in a text editor.
3 Check the values of the lines that start with net.ipv4.conf.
If the value for the following entries are not set to 1or if they do not exist, add them to the file orupdate the existing entries accordingly.
net.ipv4.conf.all.log_martians=1
net.ipv4.conf.default.log_martians=1
4 Save your changes and close the file.
Use IPv4 Reverse Path Filtering
As a security best practice, verify that your VMware virtual appliance host machines use IPv4 reversepath filtering.
Reverse-path filtering protects against spoofed source addresses by causing the system to discardpackets with source addresses that have no route or a route that does not point towards the originatinginterface. Configure your host machines to use reverse-path filtering whenever possible. In some cases,depending on the system role, reverse-path filtering can cause the system to discard legitimate traffic. Ifyou encounter such problems, you might need to use a more permissive mode or disable reverse-pathfiltering altogether.
Procedure
1 Run the # grep [01] /proc/sys/net/ipv4/conf/*/rp_filter|egrep "default|all"command on the VMware virtual appliance host machines to verify that they use IPv4 reverse pathfiltering.
If the virtual machines use IPv4 reverse path filtering, this command returns the following:
/proc/sys/net/ipv4/conf/all/rp_filter:1
/proc/sys/net/ipv4/conf/default/re_filter:1
If your virtual machines are configured correctly, no further action is required.
2 If you need to configure IPv4 reverse path filtering on host machines, open the /etc/sysctl.conffile in a text editor.
Installing and Upgrading vRealize Automation
VMware, Inc. 75
3 Check the values of the lines that begin with net.ipv4.conf.
If the values for the following entries are not set to 1 or if they do not exist, add them to the file orupdate the existing entries accordingly.
net.ipv4.conf.all.rp_filter=1
net.ipv4.conf.default.rp_filter=1
4 Save the changes and close the file.
Deny IPv4 Forwarding
Verify that your VMware appliance host machines deny IPv4 forwarding.
If the system is configured for IP forwarding and is not a designated router, attackers could use it tobypass network security by providing a path for communication not filtered by network devices. Configureyour virtual appliance host machines to deny IPv4 forwarding to avoid this risk.
Procedure
1 Run the # cat /proc/sys/net/ipv4/ip_forward command on the VMware appliance hostmachines to confirm that they deny IPv4 forwarding.
If the host machines are configured to deny IPv4 forwarding, this command will return a value of 0for /proc/sys/net/ipv4/ip_forward. If the virtual machines are configured correctly, no furtheraction is necessary.
2 To configure a virtual appliance host machine to deny IPv4 forwarding, open the /etc/sysctl.conffile in a text editor.
3 Locate the entry that reads net.ipv4.ip_forward=0. If the value for this entry is not currently set tozero or if the entry does not exist, add it or update the existing entry accordingly.
4 Save any changes and close the file.
Deny IPv6 Forwarding
As a security best practice, verify that your VMware appliance host systems deny IPv6 forwarding.
If the system is configured for IP forwarding and is not a designated router, attackers could use it tobypass network security by providing a path for communication not filtered by network devices. Configureyour virtual appliance host machines to deny IPv6 forwarding to avoid this risk.
Procedure
1 Run the # grep [01] /proc/sys/net/ipv6/conf/*/forwarding|egrep "default|all"command on the VMware appliance host machines to verify that they deny IPv6 forwarding.
If the host machines are configured to deny IPv6 forwarding, this command will return the following:
/proc/sys/net/ipv6/conf/all/forwarding:0
/proc/sys/net/ipv6/conf/default/forwarding:0
If the host machines are configured correctly, no further action is necessary.
Installing and Upgrading vRealize Automation
VMware, Inc. 76
2 If you need to configure a host machine to deny IPv6 forwarding, open the /etc/sysctl.conf file ina text editor.
3 Check the values of the lines that begin with net.ipv6.conf.
If the values for the following entries are not set to zero or if the entries do not exist, add the entries orupdate the existing entries accordingly.
net.ipv6.conf.all.accept_redirects=0
net.ipv6.conf.default.accept_redirects=0
4 Save any changes you made and close the file.
Use IPv4 TCP Syncookies
Verify that your VMware appliance host machines use IPv4 TCP Syncookies.
A TCP SYN flood attack might cause a denial of service by filling a system's TCP connection table withconnections in the SYN_RCVD state. Syncookies prevent tracking a connection until receipt of asubsequent ACK, verifying that the initiator is attempting a valid connection and is not a flood source. Thistechnique does not operate in a fully standards-compliant manner, but is only activated during a floodcondition, and allows defence of the system while continuing to service valid requests.
Procedure
1 Run the # cat /proc/sys/net/ipv4/tcp_syncookies command on the VMware appliance hostmachines to verify that they use IPv4 TCP Syncookies.
If the host machines are configured to deny IPv4 forwarding, this command will return a value of 1for /proc/sys/net/ipv4/tcp_syncookies. If the virtual machines are configured correctly, nofurther action is necessary.
2 If you need to configure a virtual appliance to use IPv4 TCP Syncookies, openthe /etc/sysctl.conf in a text editor.
3 Locate the entry that reads net.ipv4.tcp_syncookies=1.
If the value for this entry is not currently set to one or if it does not exist, add the entry or update theexisting entry accordingly.
4 Save any changes you made and close the file.
Deny IPv6 Router Advertisements
Verify that VMware host machines deny the acceptance of router advertisements and ICMP redirectsunless otherwise required for system operation.
IPv6 enables systems to configure their networking devices by automatically using information from thenetwork. From a security perspective, manually configuring important configuration information ispreferable to accepting it from the network in an unauthenticated way.
Installing and Upgrading vRealize Automation
VMware, Inc. 77
Procedure
1 Run the # grep [01] /proc/sys/net/ipv6/conf/*/accept_ra|egrep "default|all"command on the VMware appliance host machines to verify that they deny router advertisements.
If the host machines are configured to deny IPv6 router advertisements, this command will returnvalues of 0:
/proc/sys/net/ipv6/conf/all/accept_ra:0
/proc/sys/net/ipv6/conf/default/accept_ra:0
If the host machines are configured correctly, no further action is necessary.
2 If you need to configure a host machine to deny IPv6 router advertisements, openthe /etc/sysctl.conf file in a text editor.
3 Check for the following entries.
net.ipv6.conf.all.accept_ra=0
net.ipv6.conf.default.accept_ra=0
If these entries do not exist, or if their values are not set to zero, add the entries or update the existingentries accordingly.
4 Save any changes you made and close the file.
Deny IPv6 Router Solicitations
As a security best practice, verify that your VMware appliance host machines deny IPv6 routersolicitations unless otherwise required for system operation.
The router solicitations setting determines how many router solicitations are sent when bringing up theinterface. If addresses are statically assigned, there is no need to send any solicitations.
Procedure
1 Run the # grep [01] /proc/sys/net/ipv6/conf/*/router_solicitations|egrep "default|all" command on the VMware appliance host machines to verify that they deny IPv6 routersolicitations.
If the host machines are configured to deny IPv6 router advertisements, this command will return thefollowing:
/proc/sys/net/ipv6/conf/all/router_solicitations:0
/proc/sys/net/ipv6/conf/default/router_solicitations:0
If the host machines are configured correctly, no further action is necessary.
2 If you need to configure host machines to deny IPv6 router solicitations, open the /etc/sysctl.conffile in a text editor.
Installing and Upgrading vRealize Automation
VMware, Inc. 78
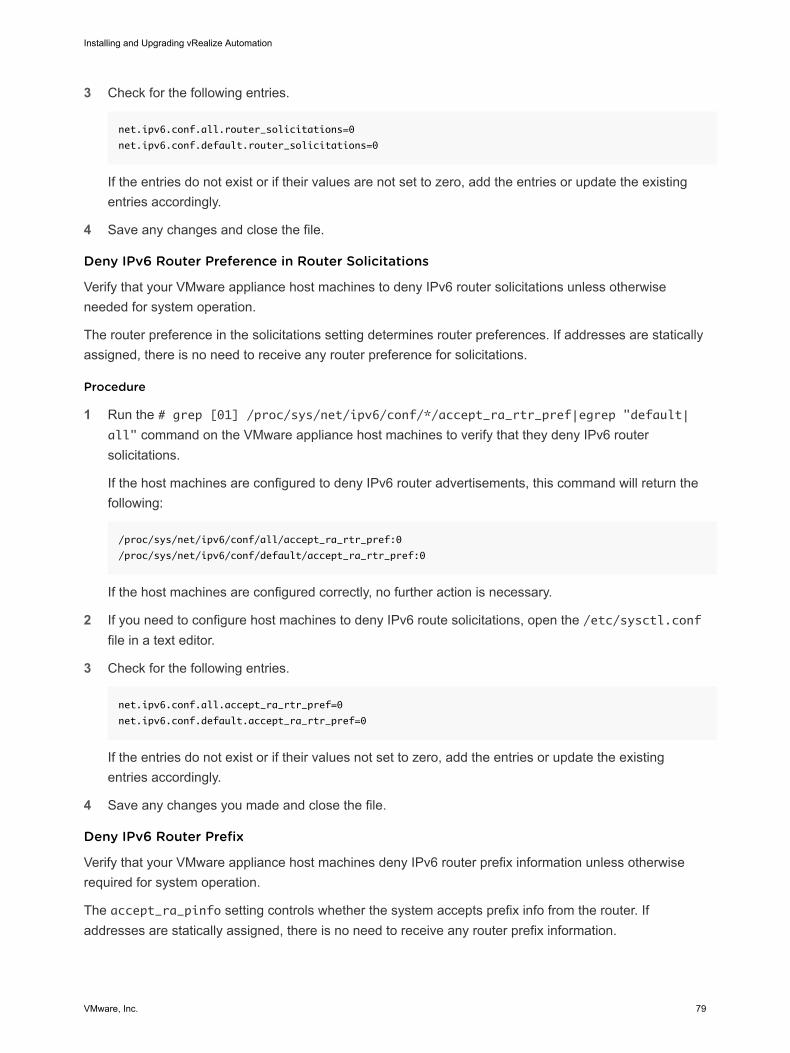
3 Check for the following entries.
net.ipv6.conf.all.router_solicitations=0
net.ipv6.conf.default.router_solicitations=0
If the entries do not exist or if their values are not set to zero, add the entries or update the existingentries accordingly.
4 Save any changes and close the file.
Deny IPv6 Router Preference in Router Solicitations
Verify that your VMware appliance host machines to deny IPv6 router solicitations unless otherwiseneeded for system operation.
The router preference in the solicitations setting determines router preferences. If addresses are staticallyassigned, there is no need to receive any router preference for solicitations.
Procedure
1 Run the # grep [01] /proc/sys/net/ipv6/conf/*/accept_ra_rtr_pref|egrep "default|all" command on the VMware appliance host machines to verify that they deny IPv6 routersolicitations.
If the host machines are configured to deny IPv6 router advertisements, this command will return thefollowing:
/proc/sys/net/ipv6/conf/all/accept_ra_rtr_pref:0
/proc/sys/net/ipv6/conf/default/accept_ra_rtr_pref:0
If the host machines are configured correctly, no further action is necessary.
2 If you need to configure host machines to deny IPv6 route solicitations, open the /etc/sysctl.conffile in a text editor.
3 Check for the following entries.
net.ipv6.conf.all.accept_ra_rtr_pref=0
net.ipv6.conf.default.accept_ra_rtr_pref=0
If the entries do not exist or if their values not set to zero, add the entries or update the existingentries accordingly.
4 Save any changes you made and close the file.
Deny IPv6 Router Prefix
Verify that your VMware appliance host machines deny IPv6 router prefix information unless otherwiserequired for system operation.
The accept_ra_pinfo setting controls whether the system accepts prefix info from the router. Ifaddresses are statically assigned, there is no need to receive any router prefix information.
Installing and Upgrading vRealize Automation
VMware, Inc. 79
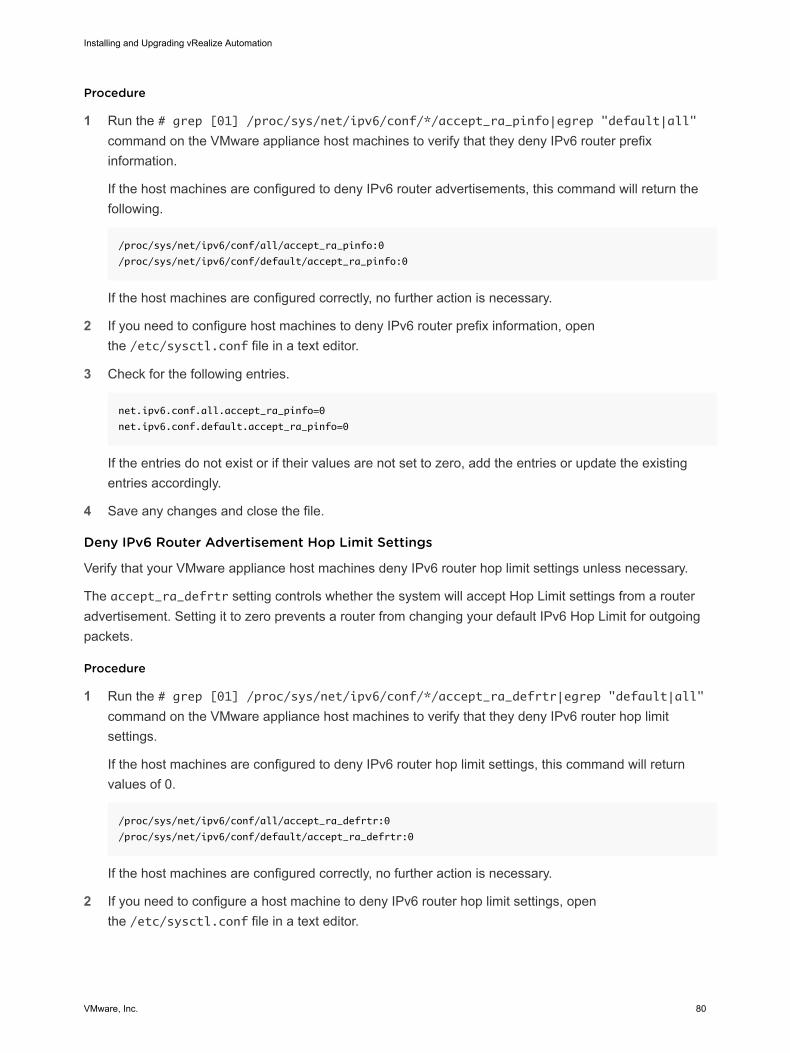
Procedure
1 Run the # grep [01] /proc/sys/net/ipv6/conf/*/accept_ra_pinfo|egrep "default|all"command on the VMware appliance host machines to verify that they deny IPv6 router prefixinformation.
If the host machines are configured to deny IPv6 router advertisements, this command will return thefollowing.
/proc/sys/net/ipv6/conf/all/accept_ra_pinfo:0
/proc/sys/net/ipv6/conf/default/accept_ra_pinfo:0
If the host machines are configured correctly, no further action is necessary.
2 If you need to configure host machines to deny IPv6 router prefix information, openthe /etc/sysctl.conf file in a text editor.
3 Check for the following entries.
net.ipv6.conf.all.accept_ra_pinfo=0
net.ipv6.conf.default.accept_ra_pinfo=0
If the entries do not exist or if their values are not set to zero, add the entries or update the existingentries accordingly.
4 Save any changes and close the file.
Deny IPv6 Router Advertisement Hop Limit Settings
Verify that your VMware appliance host machines deny IPv6 router hop limit settings unless necessary.
The accept_ra_defrtr setting controls whether the system will accept Hop Limit settings from a routeradvertisement. Setting it to zero prevents a router from changing your default IPv6 Hop Limit for outgoingpackets.
Procedure
1 Run the # grep [01] /proc/sys/net/ipv6/conf/*/accept_ra_defrtr|egrep "default|all"command on the VMware appliance host machines to verify that they deny IPv6 router hop limitsettings.
If the host machines are configured to deny IPv6 router hop limit settings, this command will returnvalues of 0.
/proc/sys/net/ipv6/conf/all/accept_ra_defrtr:0
/proc/sys/net/ipv6/conf/default/accept_ra_defrtr:0
If the host machines are configured correctly, no further action is necessary.
2 If you need to configure a host machine to deny IPv6 router hop limit settings, openthe /etc/sysctl.conf file in a text editor.
Installing and Upgrading vRealize Automation
VMware, Inc. 80
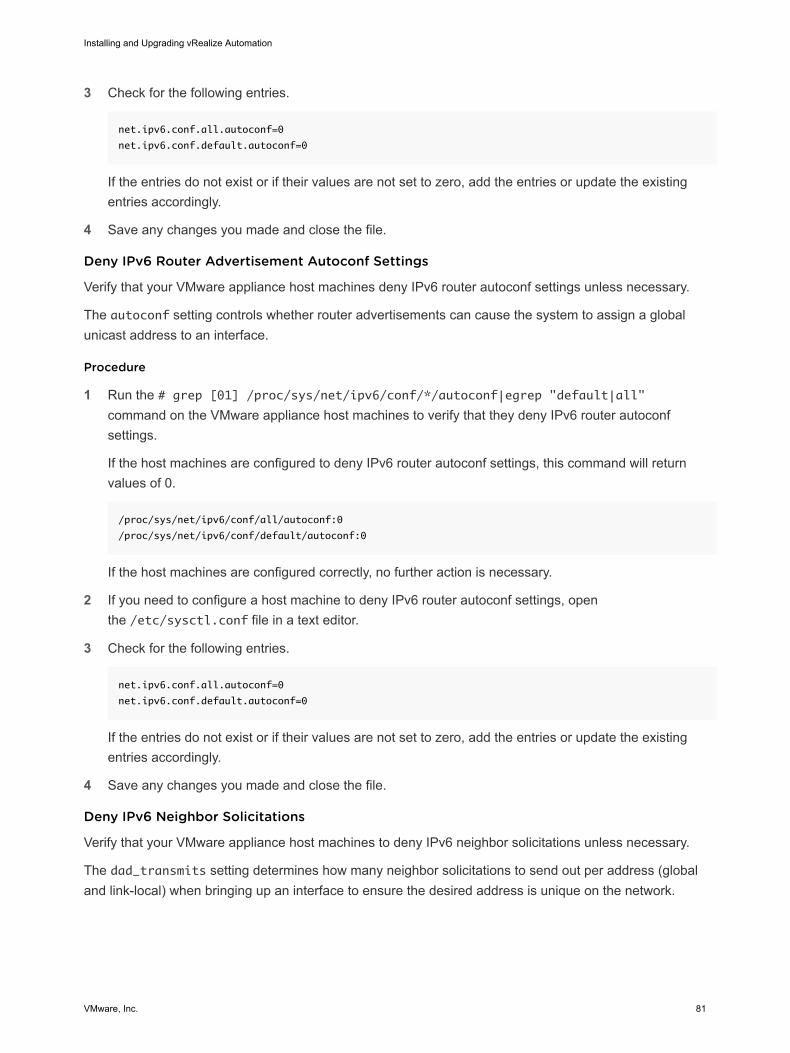
3 Check for the following entries.
net.ipv6.conf.all.autoconf=0
net.ipv6.conf.default.autoconf=0
If the entries do not exist or if their values are not set to zero, add the entries or update the existingentries accordingly.
4 Save any changes you made and close the file.
Deny IPv6 Router Advertisement Autoconf Settings
Verify that your VMware appliance host machines deny IPv6 router autoconf settings unless necessary.
The autoconf setting controls whether router advertisements can cause the system to assign a globalunicast address to an interface.
Procedure
1 Run the # grep [01] /proc/sys/net/ipv6/conf/*/autoconf|egrep "default|all"command on the VMware appliance host machines to verify that they deny IPv6 router autoconfsettings.
If the host machines are configured to deny IPv6 router autoconf settings, this command will returnvalues of 0.
/proc/sys/net/ipv6/conf/all/autoconf:0
/proc/sys/net/ipv6/conf/default/autoconf:0
If the host machines are configured correctly, no further action is necessary.
2 If you need to configure a host machine to deny IPv6 router autoconf settings, openthe /etc/sysctl.conf file in a text editor.
3 Check for the following entries.
net.ipv6.conf.all.autoconf=0
net.ipv6.conf.default.autoconf=0
If the entries do not exist or if their values are not set to zero, add the entries or update the existingentries accordingly.
4 Save any changes you made and close the file.
Deny IPv6 Neighbor Solicitations
Verify that your VMware appliance host machines to deny IPv6 neighbor solicitations unless necessary.
The dad_transmits setting determines how many neighbor solicitations to send out per address (globaland link-local) when bringing up an interface to ensure the desired address is unique on the network.
Installing and Upgrading vRealize Automation
VMware, Inc. 81
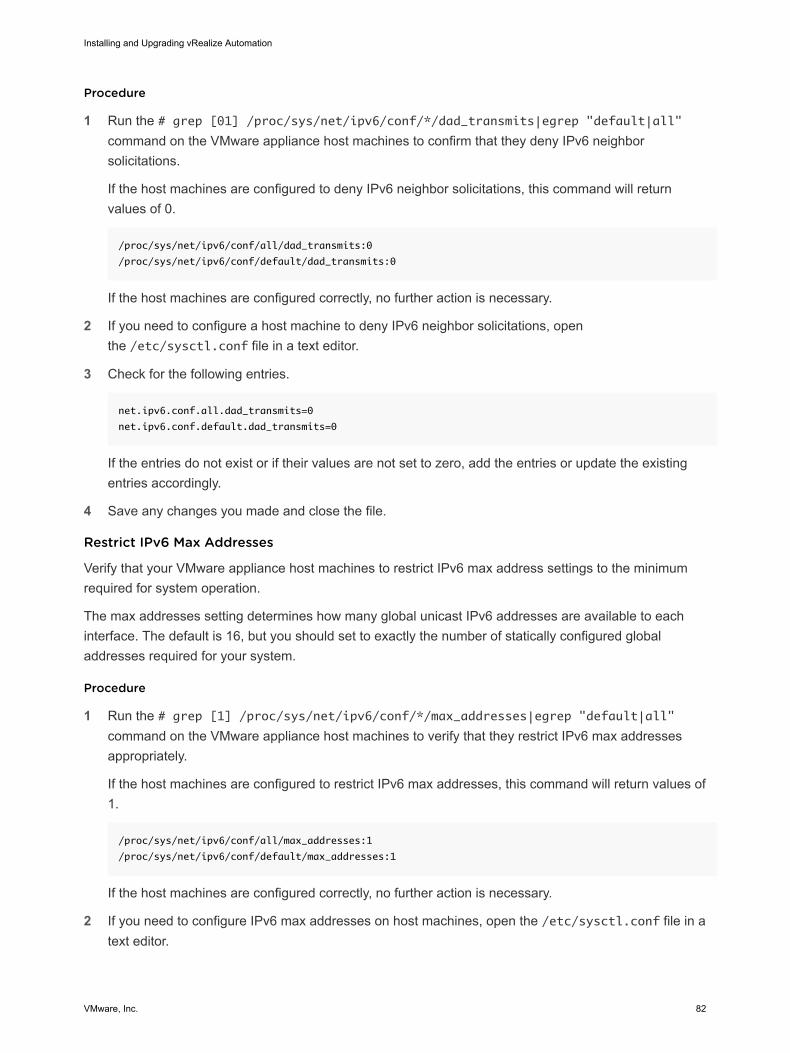
Procedure
1 Run the # grep [01] /proc/sys/net/ipv6/conf/*/dad_transmits|egrep "default|all"command on the VMware appliance host machines to confirm that they deny IPv6 neighborsolicitations.
If the host machines are configured to deny IPv6 neighbor solicitations, this command will returnvalues of 0.
/proc/sys/net/ipv6/conf/all/dad_transmits:0
/proc/sys/net/ipv6/conf/default/dad_transmits:0
If the host machines are configured correctly, no further action is necessary.
2 If you need to configure a host machine to deny IPv6 neighbor solicitations, openthe /etc/sysctl.conf file in a text editor.
3 Check for the following entries.
net.ipv6.conf.all.dad_transmits=0
net.ipv6.conf.default.dad_transmits=0
If the entries do not exist or if their values are not set to zero, add the entries or update the existingentries accordingly.
4 Save any changes you made and close the file.
Restrict IPv6 Max Addresses
Verify that your VMware appliance host machines to restrict IPv6 max address settings to the minimumrequired for system operation.
The max addresses setting determines how many global unicast IPv6 addresses are available to eachinterface. The default is 16, but you should set to exactly the number of statically configured globaladdresses required for your system.
Procedure
1 Run the # grep [1] /proc/sys/net/ipv6/conf/*/max_addresses|egrep "default|all"command on the VMware appliance host machines to verify that they restrict IPv6 max addressesappropriately.
If the host machines are configured to restrict IPv6 max addresses, this command will return values of1.
/proc/sys/net/ipv6/conf/all/max_addresses:1
/proc/sys/net/ipv6/conf/default/max_addresses:1
If the host machines are configured correctly, no further action is necessary.
2 If you need to configure IPv6 max addresses on host machines, open the /etc/sysctl.conf file in atext editor.
Installing and Upgrading vRealize Automation
VMware, Inc. 82
3 Check for the following entries.
net.ipv6.conf.all.max_addresses=1
net.ipv6.conf.default.max_addresses=1
If the entries do not exist or if their values are not set to 1, add the entries or update the existingentries accordingly.
4 Save any changes you made and close the file.
Configuring Network Settings for the Infrastructure as a Service HostAs a security best practice, configure network communication settings on your VMware Infrastructure as aService (IaaS) component host machine according to VMware requirements and guidelines.
Configure the Infrastructure as a Service (IaaS) host machine's network configuration to support fullvRealize Automation functions with appropriate security.
See Securing the Infrastructure as a Service Component.
Configuring Ports and ProtocolsAs a security best practice, configure ports and protocols for all vRealize Automation appliances andcomponents in accordance with VMware guidelines.
Configure incoming and outgoing ports for vRealize Automation components as required for criticalsystem components to operate in production. Disable all unneeded ports and protocols. See vRealizeAutomation Reference Architecture.
User Required Ports
As a security best practice, configure vRealize Automation user ports according to VMware guidelines.
Expose required ports only over a secure network.
SERVER PORTS
vRealize Automation Appliance 443, 8443
Administrator Required Ports
As a security best practice, configure vRealize Automation administrator ports according to VMwareguidelines.
Expose required ports only over a secure network.
SERVER PORTS
vRealize Application Services Server 5480
vRealize Automation Appliance Ports
As a security best practice, configure incoming and outgoing ports for the vRealize Automation applianceaccording to VMware recommendations.
Installing and Upgrading vRealize Automation
VMware, Inc. 83
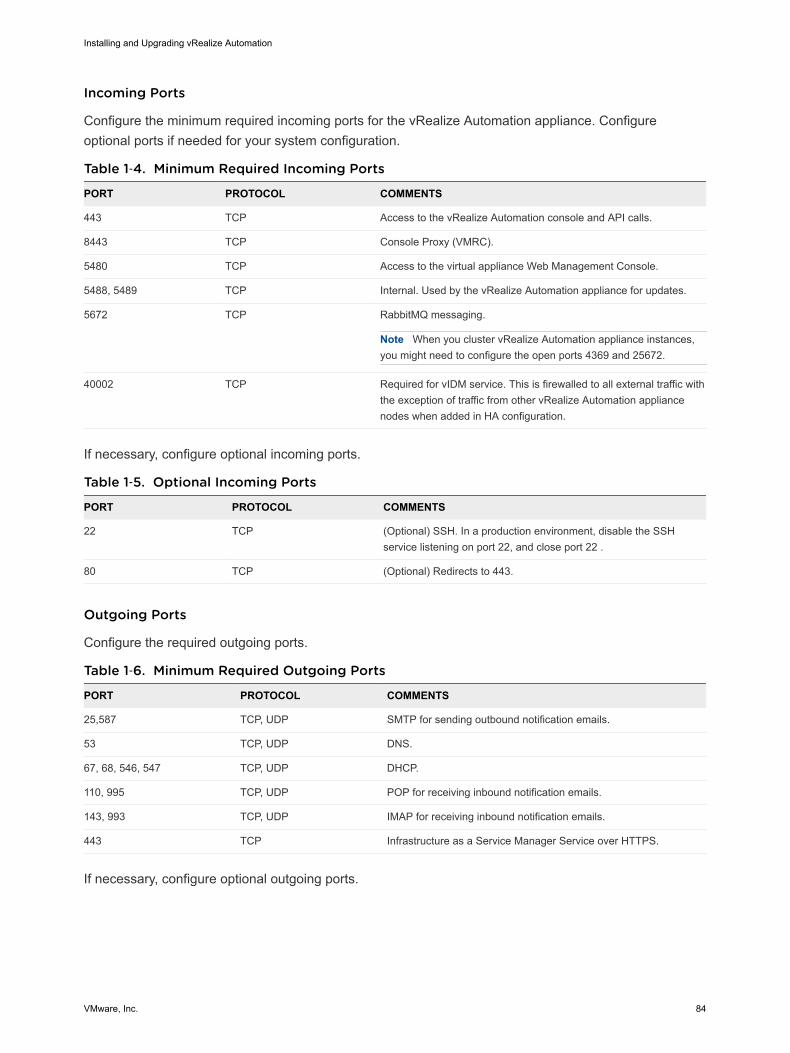
Incoming Ports
Configure the minimum required incoming ports for the vRealize Automation appliance. Configureoptional ports if needed for your system configuration.
Table 1‑4. Minimum Required Incoming Ports
PORT PROTOCOL COMMENTS
443 TCP Access to the vRealize Automation console and API calls.
8443 TCP Console Proxy (VMRC).
5480 TCP Access to the virtual appliance Web Management Console.
5488, 5489 TCP Internal. Used by the vRealize Automation appliance for updates.
5672 TCP RabbitMQ messaging.
Note When you cluster vRealize Automation appliance instances,you might need to configure the open ports 4369 and 25672.
40002 TCP Required for vIDM service. This is firewalled to all external traffic withthe exception of traffic from other vRealize Automation appliancenodes when added in HA configuration.
If necessary, configure optional incoming ports.
Table 1‑5. Optional Incoming Ports
PORT PROTOCOL COMMENTS
22 TCP (Optional) SSH. In a production environment, disable the SSHservice listening on port 22, and close port 22 .
80 TCP (Optional) Redirects to 443.
Outgoing Ports
Configure the required outgoing ports.
Table 1‑6. Minimum Required Outgoing Ports
PORT PROTOCOL COMMENTS
25,587 TCP, UDP SMTP for sending outbound notification emails.
53 TCP, UDP DNS.
67, 68, 546, 547 TCP, UDP DHCP.
110, 995 TCP, UDP POP for receiving inbound notification emails.
143, 993 TCP, UDP IMAP for receiving inbound notification emails.
443 TCP Infrastructure as a Service Manager Service over HTTPS.
If necessary, configure optional outgoing ports.
Installing and Upgrading vRealize Automation
VMware, Inc. 84
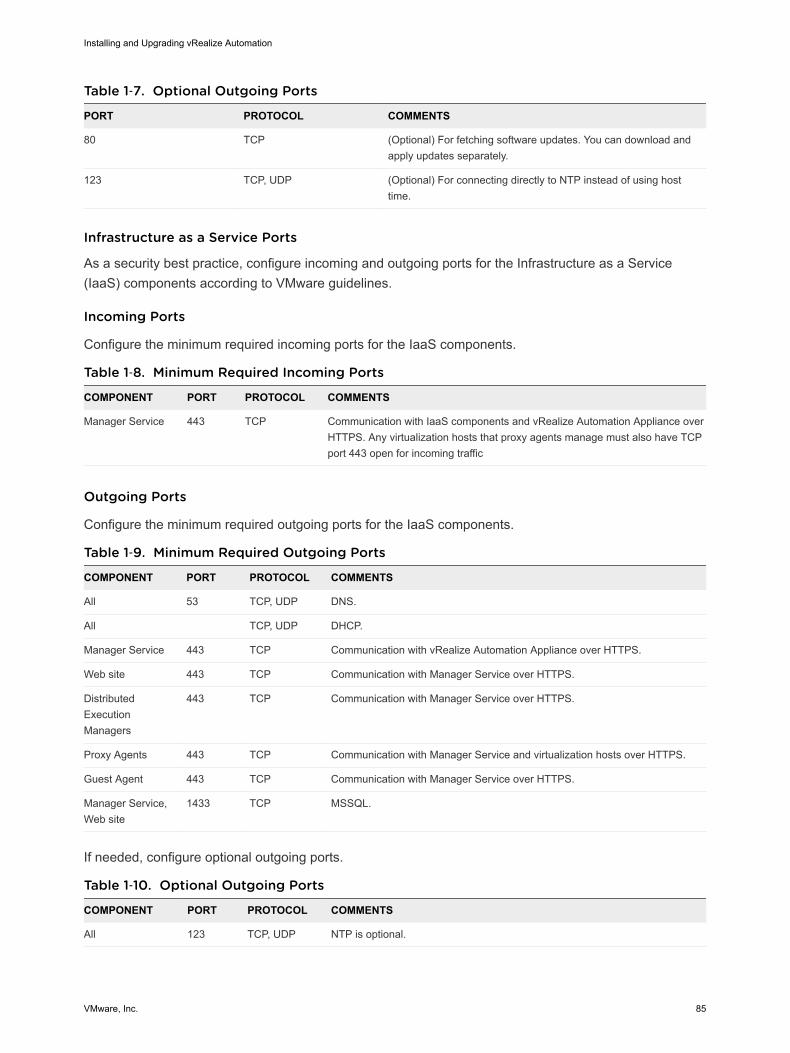
Table 1‑7. Optional Outgoing Ports
PORT PROTOCOL COMMENTS
80 TCP (Optional) For fetching software updates. You can download andapply updates separately.
123 TCP, UDP (Optional) For connecting directly to NTP instead of using hosttime.
Infrastructure as a Service Ports
As a security best practice, configure incoming and outgoing ports for the Infrastructure as a Service(IaaS) components according to VMware guidelines.
Incoming Ports
Configure the minimum required incoming ports for the IaaS components.
Table 1‑8. Minimum Required Incoming Ports
COMPONENT PORT PROTOCOL COMMENTS
Manager Service 443 TCP Communication with IaaS components and vRealize Automation Appliance overHTTPS. Any virtualization hosts that proxy agents manage must also have TCPport 443 open for incoming traffic
Outgoing Ports
Configure the minimum required outgoing ports for the IaaS components.
Table 1‑9. Minimum Required Outgoing Ports
COMPONENT PORT PROTOCOL COMMENTS
All 53 TCP, UDP DNS.
All TCP, UDP DHCP.
Manager Service 443 TCP Communication with vRealize Automation Appliance over HTTPS.
Web site 443 TCP Communication with Manager Service over HTTPS.
DistributedExecutionManagers
443 TCP Communication with Manager Service over HTTPS.
Proxy Agents 443 TCP Communication with Manager Service and virtualization hosts over HTTPS.
Guest Agent 443 TCP Communication with Manager Service over HTTPS.
Manager Service,Web site
1433 TCP MSSQL.
If needed, configure optional outgoing ports.
Table 1‑10. Optional Outgoing Ports
COMPONENT PORT PROTOCOL COMMENTS
All 123 TCP, UDP NTP is optional.
Installing and Upgrading vRealize Automation
VMware, Inc. 85
Auditing and LoggingAs a security best practice, set up auditing and logging on your vRealize Automation system inaccordance with VMware recommendations.
Remote logging to a central log host provides a secure store for log files. By gathering log files to acentral host, you can monitor the environment with a single tool. Also, you can perform aggregateanalysis and search for evidence of threats such as coordinated attacks on multiple entities within theinfrastructure. Logging to a secure, centralized log server can help prevent log tampering, and alsoprovides a long-term audit record.
Ensure That the Remote Logging Server Is SecureOften, after attackers breach the security of your host machine, they attempt to search for and tamperwith log files to cover their tracks and maintain control without being discovered. Securing the remotelogging server appropriately helps to discourage log tampering.
Use an Authorized NTP ServerEnsure that all host machines use the same relative time source, including the relevant localization offset,and that you can correlate the relative time source to an agreed-upon time standard such as CoordinatedUniversal Time (UTC). A disciplined approach to time sources enables you to quickly track and correlatean intruder's actions when you review the relevant log files. Incorrect time settings can make it difficult toinspect and correlate log files to detect attacks and can make auditing inaccurate.
Use at least three NTP servers from outside time sources or configure a few local NTP servers on atrusted network that in turn obtain their time from at least three outside time sources.
Installing vRealize AutomationFollow the instructions provided to install a new instance of vRealize Automation.
vRealize Automation Installation OverviewYou can install vRealize Automation to support minimal, proof of concept environments, or in differentsizes of distributed, enterprise configurations that are capable of handling production workloads.Installation can be interactive or silent.
After installation, you start using vRealize Automation by customizing your setup and configuring tenants,which provides users with access to self-service provisioning and life-cycle management of cloudservices.
About vRealize Automation InstallationYou can install vRealize Automation through different means, each with varying levels of interactivity.
Installing and Upgrading vRealize Automation
VMware, Inc. 86
To install, you deploy a vRealize Automation appliance and then complete the actual installation usingone of the following options:
n A consolidated, browser-based Installation Wizard
n Separate browser-based appliance configuration, and separate Windows installations for IaaS servercomponents
n A command line based, silent installer that accepts input from an answer properties file
n An installation REST API that accepts JSON formatted input
New in this vRealize Automation InstallationIf you installed earlier versions of vRealize Automation, be aware of changes in the installation for thisrelease before you begin.
n In this release, when a problem occurs with the Manager Service, the service can transparently failover to a backup Manager Service host if one is available. You no longer need to log in to the backuphost and start the service.
See About Automatic Manager Service Failover.
n This release allows for automatic failover of the embedded PostgreSQL database in certainconfigurations. See Automatic vRealize Automation PostgreSQL Database Failover.
n This release of vRealize Automation includes Installation Wizard certificate page options to generatecertificate signing request (CSR) files.
If you expect to import your own certificates, your certificate authority (CA) can use the CSR to moreeasily create your SSL certificate.
vRealize Automation Installation ComponentsA typical vRealize Automation installation consists of a vRealize Automation appliance and one or moreWindows servers that, taken together, provide vRealize Automation Infrastructure as a Service (IaaS).
The vRealize Automation Appliance
The vRealize Automation appliance is a preconfigured Linux virtual appliance. The vRealize Automationappliance is delivered as an open virtualization file that you deploy on existing virtualized infrastructuresuch as vSphere.
The vRealize Automation appliance performs several functions central to vRealize Automation.
n The appliance contains the server that hosts the vRealize Automation product portal, where users login to access self-service provisioning and management of cloud services.
n The appliance manages single sign-on (SSO) for user authorization and authentication.
n The appliance server hosts a management interface for vRealize Automation appliance settings.
Installing and Upgrading vRealize Automation
VMware, Inc. 87
n The appliance includes a preconfigured PostgreSQL database used for internal vRealize Automationappliance operations.
In large deployments with redundant appliances, the secondary appliance databases serve asreplicas to provide high availability.
n The appliance includes a preconfigured instance of vRealize Orchestrator. vRealize Automation usesvRealize Orchestrator workflows and actions to extend its capabilities.
The embedded instance of vRealize Orchestrator is now recommended. In older deployments orspecial cases, however, users might connect vRealize Automation to an externalvRealize Orchestrator instead.
n The appliance contains the downloadable Management Agent installer. All Windows servers thatmake up your vRealize Automation IaaS must install the Management Agent.
The Management Agent registers IaaS Windows servers with the vRealize Automation appliance,automates the installation and management of IaaS components, and collects support and telemetryinformation.
Infrastructure as a Service
vRealize Automation IaaS consists of one or more Windows servers that work together to model andprovision systems in private, public, or hybrid cloud infrastructures.
You install vRealize Automation IaaS components on one or more virtual or physical Windows servers.After installation, IaaS operations appear under the Infrastructure tab in the product interface.
IaaS consists of the following components, which can be installed together or separately, depending ondeployment size.
Web Server
The IaaS Web server provides infrastructure administration and service authoring to thevRealize Automation product interface. The Web server component communicates with the ManagerService, which provides updates from the Distributed Execution Manager (DEM), SQL Server database,and agents.
Model Manager
vRealize Automation uses models to facilitate integration with external systems and databases. Themodels implement business logic used by the DEM.
The Model Manager provides services and utilities for persisting, versioning, securing, and distributingmodel elements. Model Manager is hosted on one of the IaaS Web servers and communicates withDEMs, the SQL Server database, and the product interface Web site.
Manager Service
The Manager Service is a Windows service that coordinates communication between IaaS DEMs, theSQL Server database, agents, and SMTP. In addition, the Manager Service communicates with the Webserver through the Model Manager and must be run under a domain account with local administratorprivileges on all IaaS Windows servers.
Installing and Upgrading vRealize Automation
VMware, Inc. 88
Unless you enable automatic Manager Service failover, IaaS requires that only one Windows machineactively run the Manager Service at a time. For backup or high availability, you may deploy additionalManager Service machines, but the manual failover approach requires that backup machines have theservice stopped and configured to start manually.
For more information, see About Automatic Manager Service Failover.
SQL Server Database
IaaS uses a Microsoft SQL Server database to maintain information about the machines it manages, plusits own elements and policies. Most users allow vRealize Automation to create the database duringinstallation. Alternatively, you may create the database separately if site policies require it.
Distributed Execution Manager
The IaaS DEM component runs the business logic of custom models, interacting with the IaaS SQLServer database, and with external databases and systems. A common approach is to install DEMs onthe IaaS Windows server that hosts the active Manager Service, but it is not required.
Each DEM instance acts as a worker or orchestrator. The roles can be installed on the same or separateservers.
DEM Worker—A DEM worker has one function, to run workflows. Multiple DEM workers increasecapacity and can be installed on the same or separate servers.
DEM Orchestrator—A DEM orchestrator performs the following oversight functions.
n Monitors DEM workers. If a worker stops or loses its connection to Model Manager, the DEMorchestrator moves the workflows to another DEM worker.
n Schedules workflows by creating new workflow instances at the scheduled time.
n Ensures that only one instance of a scheduled workflow is running at a given time.
n Preprocesses workflows before they run. Preprocessing includes checking preconditions forworkflows and creating the workflow execution history.
The active DEM orchestrator needs a strong network connection to the Model Manager host. In largedeployments with multiple DEM orchestrators on separate servers, the secondary orchestrators serve asbackups by monitoring the active DEM orchestrator, and provide redundancy and failover if a problemoccurs with the active DEM orchestrator. For this kind of failover configuration, you might considerinstalling the active DEM orchestrator with the active Manager Service host, and secondary DEMorchestrators with the standby Manager Service hosts.
Agents
vRealize Automation IaaS uses agents to integrate with external systems and to manage informationamong vRealize Automation components.
A common approach is to install vRealize Automation agents on the IaaS Windows server that hosts theactive Manager Service, but it is not required. Multiple agents increase capacity and can be installed onthe same or separate servers.
Installing and Upgrading vRealize Automation
VMware, Inc. 89
Virtualization Proxy Agents
vRealize Automation creates and manages virtual machines on virtualization hosts. Virtualization proxyagents send commands to, and collect data from, vSphere ESX Server, XenServer, and Hyper-V hosts,and the virtual machines provisioned on them.
A virtualization proxy agent has the following characteristics.
n Typically requires administrator privileges on the virtualization platform that it manages.
n Communicates with the IaaS Manager Service.
n Is installed separately and has its own configuration file.
Most vRealize Automation deployments install the vSphere proxy agent. You might install other proxyagents depending on the virtualization resources in use at your site.
Virtual Desktop Integration Agents
Virtual desktop integration (VDI) PowerShell agents allow vRealize Automation to integrate with externalvirtual desktop systems. VDI agents require administrator privileges on the external systems.
You can register virtual machines provisioned by vRealize Automation with XenDesktop on a CitrixDesktop Delivery Controller (DDC), which allows the user to access the XenDesktop Web interface fromvRealize Automation.
External Provisioning Integration Agents
External provisioning integration (EPI) PowerShell agents allow vRealize Automation to integrate externalsystems into the machine provisioning process.
For example, integration with Citrix Provisioning Server enables provisioning of machines by on-demanddisk streaming, and an EPI agent allows you to run Visual Basic scripts as extra steps during theprovisioning process.
EPI agents require administrator privileges on the external systems with which they interact.
Windows Management Instrumentation Agent
The vRealize Automation Windows Management Instrumentation (WMI) agent enhances your ability tomonitor and control Windows system information, and allows you to manage remote Windows serversfrom a central location. The WMI agent also enables collection of data from Windows servers thatvRealize Automation manages.
Deployment TypeYou can install vRealize Automation as a minimal deployment for proof of concept or development work,or in a distributed configuration suitable for medium to large production workloads.
Minimal vRealize Automation Deployments
Minimal deployments include one vRealize Automation appliance and one Windows server that hosts theIaaS components. In a minimal deployment, the vRealize Automation SQL Server database can be onthe same IaaS Windows server with the IaaS components, or on a separate Windows server.
Installing and Upgrading vRealize Automation
VMware, Inc. 90
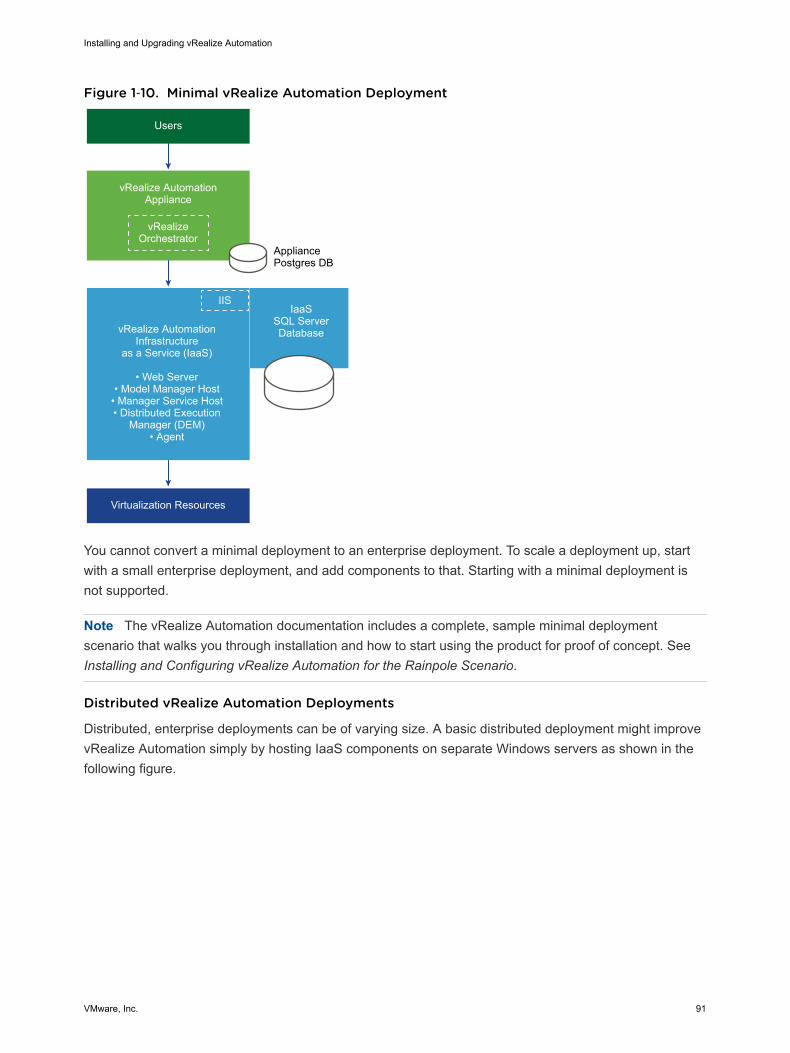
Figure 1‑10. Minimal vRealize Automation Deployment
AppliancePostgres DB
vRealize Orchestrator
IIS
vRealize AutomationAppliance
vRealize AutomationInfrastructure
as a Service (IaaS)
IaaSSQL ServerDatabase
• Web Server• Model Manager Host
• Manager Service Host• Distributed Execution
Manager (DEM)• Agent
Virtualization Resources
Users
You cannot convert a minimal deployment to an enterprise deployment. To scale a deployment up, startwith a small enterprise deployment, and add components to that. Starting with a minimal deployment isnot supported.
Note The vRealize Automation documentation includes a complete, sample minimal deploymentscenario that walks you through installation and how to start using the product for proof of concept. SeeInstalling and Configuring vRealize Automation for the Rainpole Scenario.
Distributed vRealize Automation Deployments
Distributed, enterprise deployments can be of varying size. A basic distributed deployment might improvevRealize Automation simply by hosting IaaS components on separate Windows servers as shown in thefollowing figure.
Installing and Upgrading vRealize Automation
VMware, Inc. 91
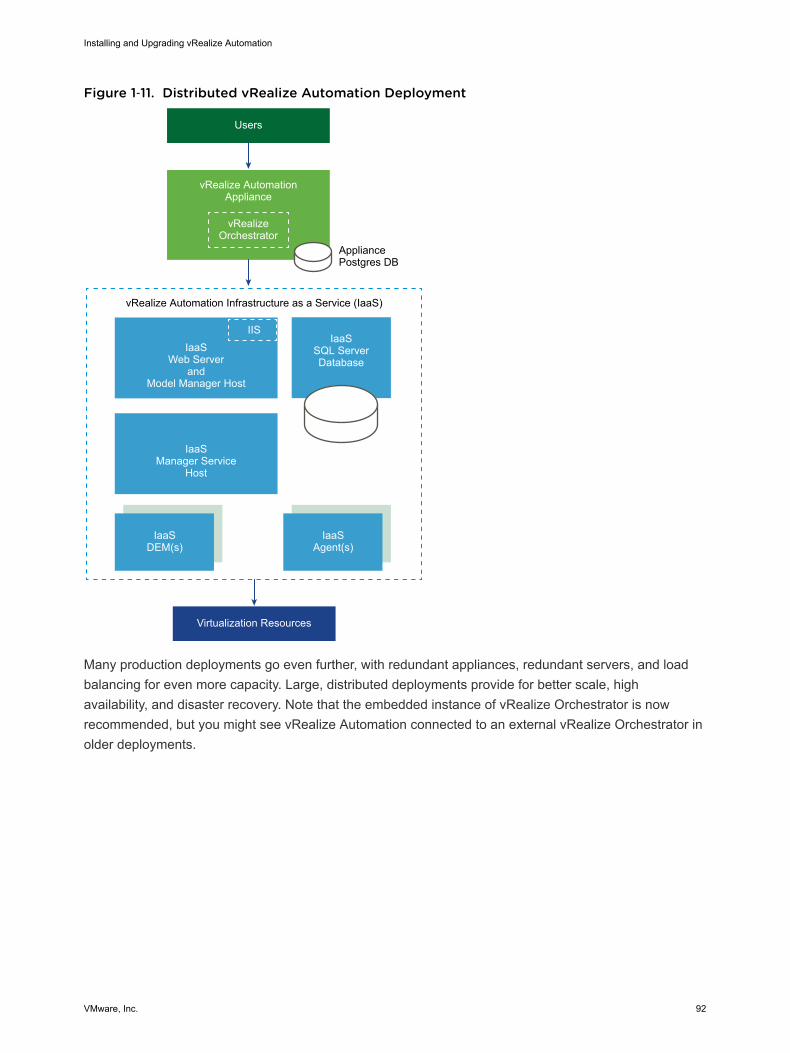
Figure 1‑11. Distributed vRealize Automation Deployment
AppliancePostgres DB
vRealize Automation Infrastructure as a Service (IaaS)
vRealize Orchestrator
vRealize AutomationAppliance
IaaSSQL ServerDatabase
IaaSAgent(s)
IaaSDEM(s)
IaaSWeb Server
andModel Manager Host
Virtualization Resources
Users
IIS
IaaSManager Service
Host
Many production deployments go even further, with redundant appliances, redundant servers, and loadbalancing for even more capacity. Large, distributed deployments provide for better scale, highavailability, and disaster recovery. Note that the embedded instance of vRealize Orchestrator is nowrecommended, but you might see vRealize Automation connected to an external vRealize Orchestrator inolder deployments.
Installing and Upgrading vRealize Automation
VMware, Inc. 92
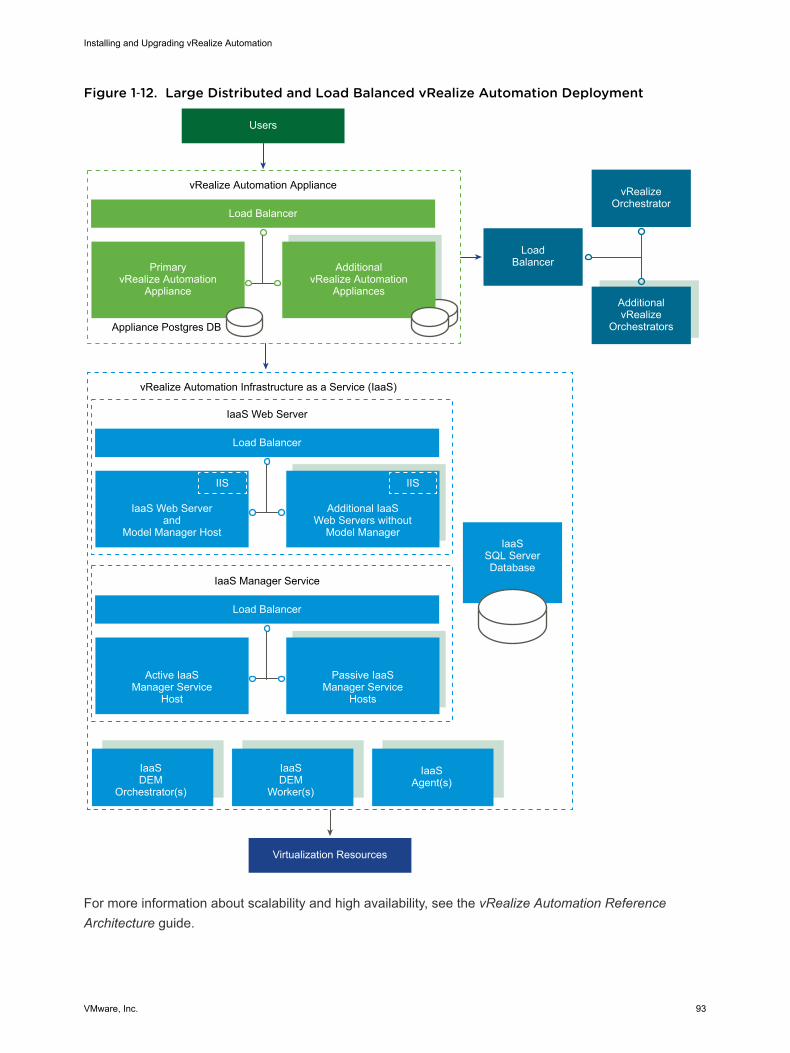
Figure 1‑12. Large Distributed and Load Balanced vRealize Automation Deployment
Appliance Postgres DB
vRealize Automation Infrastructure as a Service (IaaS)
PrimaryvRealize Automation
Appliance
AdditionalvRealize Automation
Appliances
vRealize Orchestrator
LoadBalancer
AdditionalvRealize
Orchestrators
vRealize Automation Appliance
Load Balancer
IaaS Web Serverand
Model Manager Host
Additional IaaSWeb Servers without
Model Manager
IaaS Web Server
Load Balancer
IaaSSQL ServerDatabase
IaaSAgent(s)
IaaSDEM
Orchestrator(s)
IaaSDEM
Worker(s)
Virtualization Resources
Users
IIS IIS
Active IaaSManager Service
Host
Passive IaaSManager Service
Hosts
IaaS Manager Service
Load Balancer
For more information about scalability and high availability, see the vRealize Automation ReferenceArchitecture guide.
Installing and Upgrading vRealize Automation
VMware, Inc. 93
Choosing Your Installation MethodThe consolidated vRealize Automation Installation Wizard is your primary tool for newvRealize Automation installations. Alternatively, you might want to perform the manual, separateinstallation processes or a silent installation.
n The Installation Wizard provides a simple and fast way to install, from minimal deployments todistributed enterprise deployments with or without load balancers. Most users run the InstallationWizard.
n If you want to expand a vRealize Automation deployment or if the Installation Wizard stopped for anyreason, you need the manual installation steps. After you begin a manual installation, you cannot goback and run the Installation Wizard.
n Depending on your site needs, you might also take advantage of silent, command line or API-basedinstallation.
Preparing for vRealize Automation InstallationYou install vRealize Automation into existing virtualization infrastructure. Before you begin an installation,you need to address certain environmental and system requirements.
General PreparationThere are several deployment-wide considerations to be aware of before installing vRealize Automation.
For more about high-level environment requirements, including supported operating system and browserversions, see the vRealize Automation Support Matrix.
User Web Browsers
Multiple browser windows and tabs are not supported. vRealize Automation supports one session peruser.
VMware Remote Consoles provisioned on vSphere support only a subset of vRealize Automationsupported browsers.
Third Party Software
All third-party software should have the latest vendor patches. Third party software includes MicrosoftWindows and SQL Server.
Time Synchronization
All vRealize Automation appliances and IaaS Windows servers must synchronize to the same timesource. You may use only one of the following sources. Do not mix time sources.
n The vRealize Automation appliance host
n One external network time protocol (NTP) server
Installing and Upgrading vRealize Automation
VMware, Inc. 94
To use the vRealize Automation appliance host, you must run NTP on the ESXi host. For more abouttimekeeping, see VMware Knowledge Base article 1318.
You select the time source on the Installation Prerequisites page of the Installation Wizard.
Accounts and PasswordsThere are several user accounts and passwords that you might need to create or plan settings for, beforeinstalling vRealize Automation.
IaaS Service Account
IaaS installs several Windows services that must run under a single user account.
n The account must be a domain user.
n The account does not need to be a domain administrator, but must have local administratorpermission, before installation, on all IaaS Windows servers.
n The account password cannot contain a double quotation mark ( " ) character.
n The Management Agent installer for IaaS Windows servers prompts you for the account credentials.
n The account must have Log on as a service permission, which lets the Manager Service start andgenerate log files.
n The account must have dbo permission on the IaaS database.
If you use the installer to create the database, add the account login to SQL Server beforeinstallation. The installer grants the dbo permission after it creates the database.
n If you use the installer to create the database, in SQL, add the sysadmin role to the account beforeinstallation.
The sysadmin role is not required if you choose to use a pre-existing empty database.
IIS Application Pool Identity
The account you use as the IIS application pool identity for the Model Manager Web service must haveLog on as batch job permission.
IaaS Database Credentials
You can let the vRealize Automation installer create the database, or you can create it separately usingSQL Server. When the vRealize Automation installer creates the database, the following requirementsapply.
n For the vRealize Automation installer, if you select Windows Authentication, the account that runs theManagement Agent on the primary IaaS Web server must have the sysadmin role in SQL to createand alter the size of the database.
n For the vRealize Automation installer, even if you do not select Windows Authentication, the accountthat runs the Management Agent on the primary IaaS Web server must have the sysadmin role inSQL because the credentials are used at runtime.
Installing and Upgrading vRealize Automation
VMware, Inc. 95
n If you separately create the database, the Windows user or SQL user credentials that you provideonly need dbo permission on the database.
IaaS Database Security Passphrase
The database security passphrase generates an encryption key that protects data in the IaaS SQLdatabase. You specify the security passphrase on the IaaS Host page of the Installation Wizard.
n Plan to use the same database security passphrase across the entire installation so that eachcomponent has the same encryption key.
n Record the passphrase, because you need the passphrase to restore the database if there is a failureor to add components after initial installation.
n The database security passphrase cannot contain a double quotation mark ( " ) character. Thepassphrase is accepted when you create it but causes the installation to fail.
vSphere Endpoints
If you plan to provision to a vSphere endpoint, you need a domain or local account with enoughpermission to perform operations on the target. The account also needs the appropriate level ofpermission configured in vRealize Orchestrator.
vRealize Automation Administrator Password
After installation, the vRealize Automation administrator password logs you in to the default tenant. Youspecify the administrator password on the Single Sign-On page of the Installation Wizard.
The vRealize Automation administrator password cannot contain a trailing equals ( = ) character. Thepassword is accepted when you create it but results in errors later, when you perform operations such assaving endpoints.
Host Names and IP AddressesvRealize Automation requires that you name the hosts in your installation according to certainrequirements.
n All vRealize Automation machines in your installation must be able to resolve each other by fullyqualified domain name (FQDN).
While performing the installation, always enter the complete FQDN when identifying or selecting avRealize Automation machine. Do not enter IP addresses or short machine names.
n In addition to the FQDN requirement, Windows machines that host the Model Manager Web service,Manager Service, and Microsoft SQL Server database must be able to resolve each other byWindows Internet Name Service (WINS) name.
Configure your Domain Name System (DNS) to resolve these short WINS host names.
Installing and Upgrading vRealize Automation
VMware, Inc. 96
n Preplan domain and machine naming so that vRealize Automation machine names begin with letters(a–z, A–Z), end with letters or digits (0–9), and have only letters, digits, or hyphens ( - ) in the middle.The underscore character ( _ ) must not appear in the host name or anywhere in the FQDN.
For more information about allowable names, review the host name specifications from the InternetEngineering Task Force. See www.ietf.org.
n In general, you should expect to keep the host names and FQDNs that you planned forvRealize Automation systems. Changing a host name is not always possible. When a change ispossible, it might be a complicated procedure.
n A best practice is to reserve and use static IP addresses for all vRealize Automation appliances andIaaS Windows servers. vRealize Automation supports DHCP, but static IP addresses arerecommended for long-term deployments such as production environments.
n You apply an IP address to the vRealize Automation appliance during OVF or OVA deployment.
n For the IaaS Windows servers, you follow the usual operating system process. Set the IP addressbefore installing vRealize Automation IaaS.
Latency and BandwidthvRealize Automation supports multiple site, distributed installation, but data transmission speed andvolume must meet minimum prerequisites.
vRealize Automation needs an environment of 5 ms or lower network latency, and 1 GB or higherbandwidth, among the following components.
n vRealize Automation appliance
n IaaS Web server
n IaaS Model Manager host
n IaaS Manager Service host
n IaaS SQL Server database
n IaaS DEM Orchestrator
The following component might work at a higher latency site, but the practice is not recommended.
n IaaS DEM Worker
You may install the following component at the site of the endpoint with which it communicates.
n IaaS Proxy Agent
vRealize Automation ApplianceMost vRealize Automation appliance requirements are preconfigured in the OVF or OVA that you deploy.The same requirements apply to standalone, master, or replica vRealize Automation appliances.
The minimum virtual machine hardware on which you can deploy is Version 7, or ESX/ESXi 4.x or later.See VMware Knowledge Base article 2007240. Because of the hardware resource demand, do notdeploy on VMware Workstation.
Installing and Upgrading vRealize Automation
VMware, Inc. 97
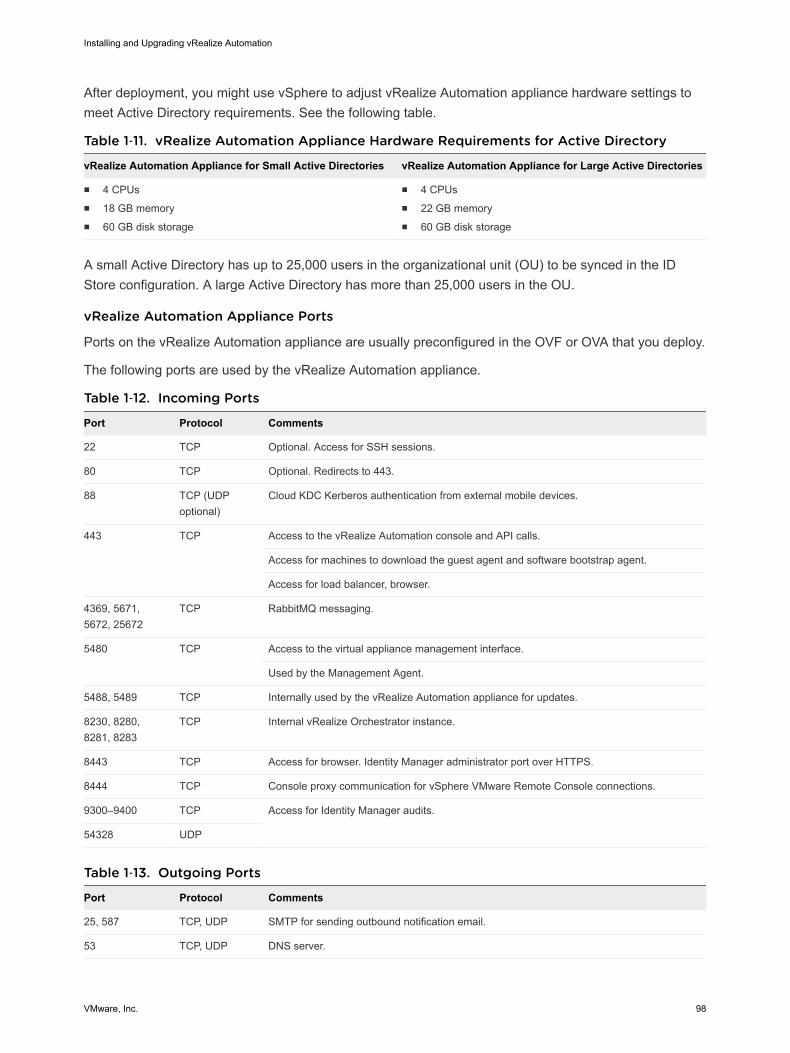
After deployment, you might use vSphere to adjust vRealize Automation appliance hardware settings tomeet Active Directory requirements. See the following table.
Table 1‑11. vRealize Automation Appliance Hardware Requirements for Active Directory
vRealize Automation Appliance for Small Active Directories vRealize Automation Appliance for Large Active Directories
n 4 CPUsn 18 GB memoryn 60 GB disk storage
n 4 CPUsn 22 GB memoryn 60 GB disk storage
A small Active Directory has up to 25,000 users in the organizational unit (OU) to be synced in the IDStore configuration. A large Active Directory has more than 25,000 users in the OU.
vRealize Automation Appliance Ports
Ports on the vRealize Automation appliance are usually preconfigured in the OVF or OVA that you deploy.
The following ports are used by the vRealize Automation appliance.
Table 1‑12. Incoming Ports
Port Protocol Comments
22 TCP Optional. Access for SSH sessions.
80 TCP Optional. Redirects to 443.
88 TCP (UDPoptional)
Cloud KDC Kerberos authentication from external mobile devices.
443 TCP Access to the vRealize Automation console and API calls.
Access for machines to download the guest agent and software bootstrap agent.
Access for load balancer, browser.
4369, 5671,5672, 25672
TCP RabbitMQ messaging.
5480 TCP Access to the virtual appliance management interface.
Used by the Management Agent.
5488, 5489 TCP Internally used by the vRealize Automation appliance for updates.
8230, 8280,8281, 8283
TCP Internal vRealize Orchestrator instance.
8443 TCP Access for browser. Identity Manager administrator port over HTTPS.
8444 TCP Console proxy communication for vSphere VMware Remote Console connections.
9300–9400 TCP Access for Identity Manager audits.
54328 UDP
Table 1‑13. Outgoing Ports
Port Protocol Comments
25, 587 TCP, UDP SMTP for sending outbound notification email.
53 TCP, UDP DNS server.
Installing and Upgrading vRealize Automation
VMware, Inc. 98
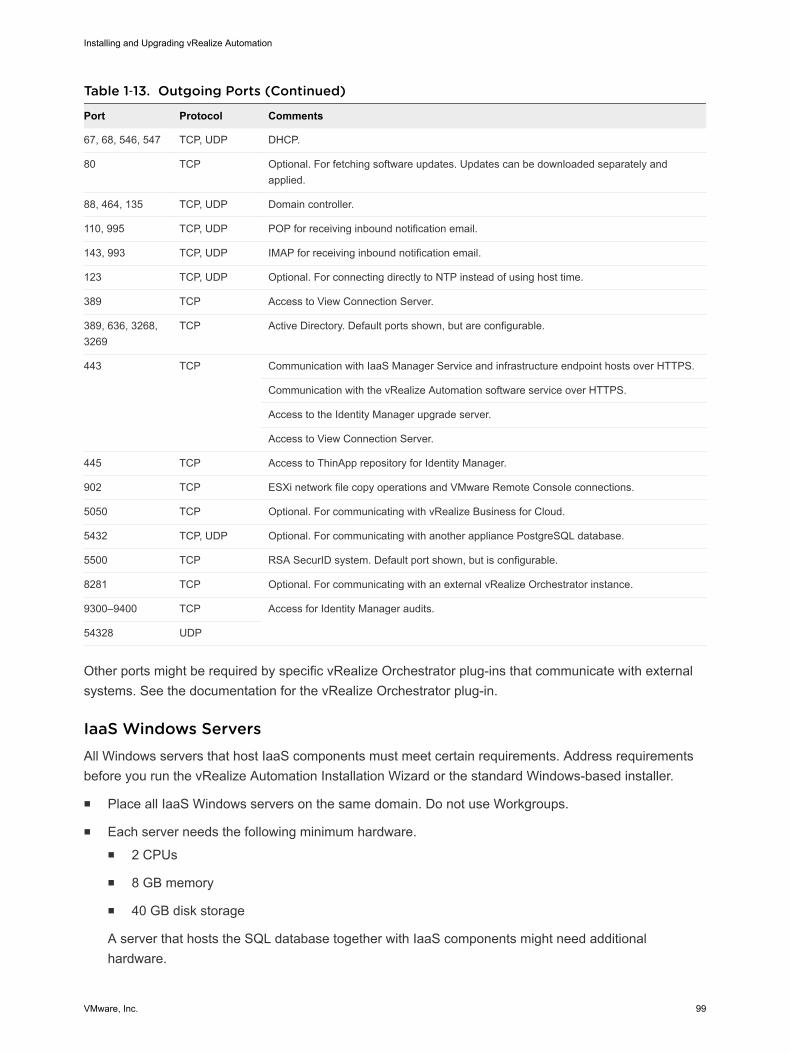
Table 1‑13. Outgoing Ports (Continued)
Port Protocol Comments
67, 68, 546, 547 TCP, UDP DHCP.
80 TCP Optional. For fetching software updates. Updates can be downloaded separately andapplied.
88, 464, 135 TCP, UDP Domain controller.
110, 995 TCP, UDP POP for receiving inbound notification email.
143, 993 TCP, UDP IMAP for receiving inbound notification email.
123 TCP, UDP Optional. For connecting directly to NTP instead of using host time.
389 TCP Access to View Connection Server.
389, 636, 3268,3269
TCP Active Directory. Default ports shown, but are configurable.
443 TCP Communication with IaaS Manager Service and infrastructure endpoint hosts over HTTPS.
Communication with the vRealize Automation software service over HTTPS.
Access to the Identity Manager upgrade server.
Access to View Connection Server.
445 TCP Access to ThinApp repository for Identity Manager.
902 TCP ESXi network file copy operations and VMware Remote Console connections.
5050 TCP Optional. For communicating with vRealize Business for Cloud.
5432 TCP, UDP Optional. For communicating with another appliance PostgreSQL database.
5500 TCP RSA SecurID system. Default port shown, but is configurable.
8281 TCP Optional. For communicating with an external vRealize Orchestrator instance.
9300–9400 TCP Access for Identity Manager audits.
54328 UDP
Other ports might be required by specific vRealize Orchestrator plug-ins that communicate with externalsystems. See the documentation for the vRealize Orchestrator plug-in.
IaaS Windows ServersAll Windows servers that host IaaS components must meet certain requirements. Address requirementsbefore you run the vRealize Automation Installation Wizard or the standard Windows-based installer.
n Place all IaaS Windows servers on the same domain. Do not use Workgroups.
n Each server needs the following minimum hardware.n 2 CPUs
n 8 GB memory
n 40 GB disk storage
A server that hosts the SQL database together with IaaS components might need additionalhardware.
Installing and Upgrading vRealize Automation
VMware, Inc. 99

n Because of the hardware resource demand, do not deploy on VMware Workstation.
n Install Microsoft .NET Framework 4.5.2 or later.
A copy of .NET is available from any vRealize Automation appliance:
https://vrealize-automation-appliance-fqdn:5480/installer/
If you use Internet Explorer for the download, verify that Enhanced Security Configuration is disabled.Navigate to res://iesetup.dll/SoftAdmin.htm on the Windows server.
n Install Microsoft PowerShell 2.0, 3.0, or 4.0, based on your version of Windows.
Note that some vRealize Automation upgrades or migrations might require an older or newerPowerShell version, in addition to the one that you are currently running.
n If you install more than one IaaS component on the same Windows server, plan to install them to thesame installation folder. Do not use different paths.
n IaaS servers use TLS for authentication, which is enabled by default on some Windows servers.
Some sites disable TLS for security reasons, but you must leave at least one TLS protocol enabled.This version of vRealize Automation supports TLS 1.2.
n Enable the Distributed Transaction Coordinator (DTC) service. IaaS uses DTC for databasetransactions and actions such as workflow creation.
Note If you clone a machine to make an IaaS Windows server, install DTC on the clone aftercloning. If you clone a machine that already has DTC, its unique identifier is copied to the clone,which causes communication to fail. See Error in Manager Service Communication.
Also enable DTC on the server that hosts the SQL database, if it is separate from IaaS. For moreabout DTC enablement, see VMware Knowledge Base article 2038943.
n Verify that the Secondary Log On service is running. If desired, you may stop the service afterinstallation is complete.
IaaS Windows Server Ports
Ports on the IaaS Windows servers must be configured before vRealize Automation installation.
Open ports between all IaaS Windows servers according to the following tables. Include the server thathosts the SQL database, if it is separate from IaaS. Alternatively, if site policies allow, you may disablefirewalls between IaaS Windows servers and SQL Server.
Table 1‑14. Incoming Ports
Port Protocol Component Comments
443 TCP Manager Service Communication with IaaS components and vRealize Automationappliance over HTTPS
443 TCP vRealize Automationappliance
Communication with IaaS components and vRealize Automationappliance over HTTPS
Installing and Upgrading vRealize Automation
VMware, Inc. 100
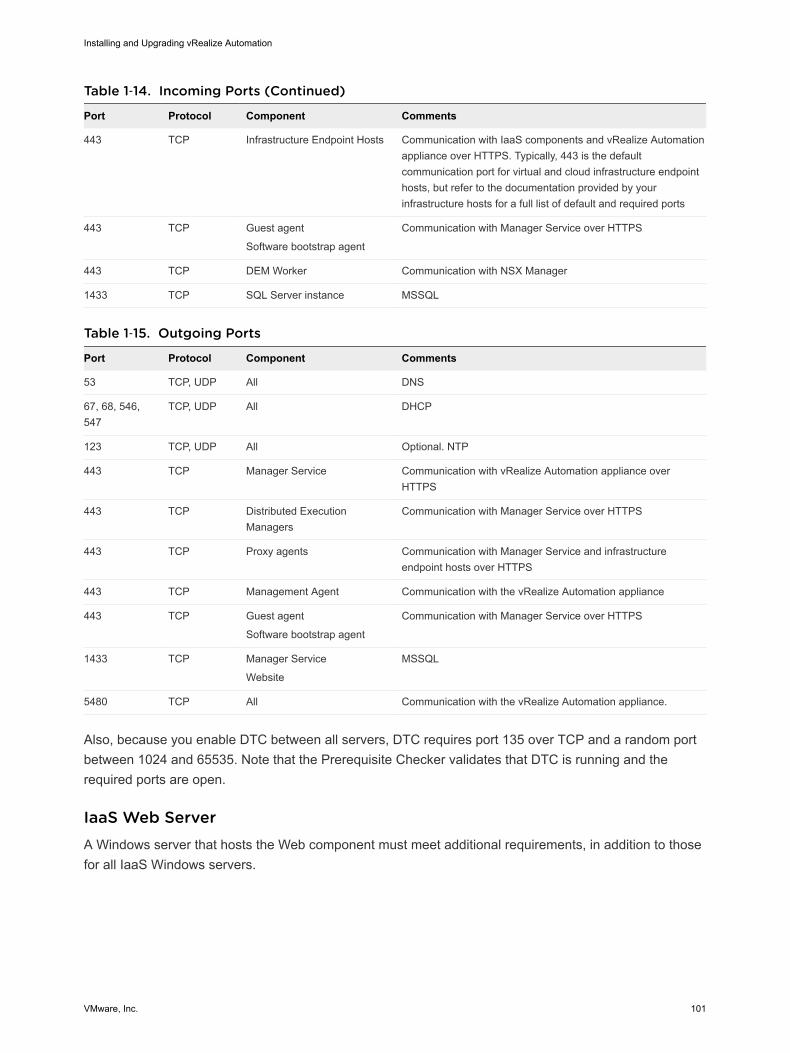
Table 1‑14. Incoming Ports (Continued)
Port Protocol Component Comments
443 TCP Infrastructure Endpoint Hosts Communication with IaaS components and vRealize Automationappliance over HTTPS. Typically, 443 is the defaultcommunication port for virtual and cloud infrastructure endpointhosts, but refer to the documentation provided by yourinfrastructure hosts for a full list of default and required ports
443 TCP Guest agent
Software bootstrap agent
Communication with Manager Service over HTTPS
443 TCP DEM Worker Communication with NSX Manager
1433 TCP SQL Server instance MSSQL
Table 1‑15. Outgoing Ports
Port Protocol Component Comments
53 TCP, UDP All DNS
67, 68, 546,547
TCP, UDP All DHCP
123 TCP, UDP All Optional. NTP
443 TCP Manager Service Communication with vRealize Automation appliance overHTTPS
443 TCP Distributed ExecutionManagers
Communication with Manager Service over HTTPS
443 TCP Proxy agents Communication with Manager Service and infrastructureendpoint hosts over HTTPS
443 TCP Management Agent Communication with the vRealize Automation appliance
443 TCP Guest agent
Software bootstrap agent
Communication with Manager Service over HTTPS
1433 TCP Manager Service
Website
MSSQL
5480 TCP All Communication with the vRealize Automation appliance.
Also, because you enable DTC between all servers, DTC requires port 135 over TCP and a random portbetween 1024 and 65535. Note that the Prerequisite Checker validates that DTC is running and therequired ports are open.
IaaS Web ServerA Windows server that hosts the Web component must meet additional requirements, in addition to thosefor all IaaS Windows servers.
Installing and Upgrading vRealize Automation
VMware, Inc. 101
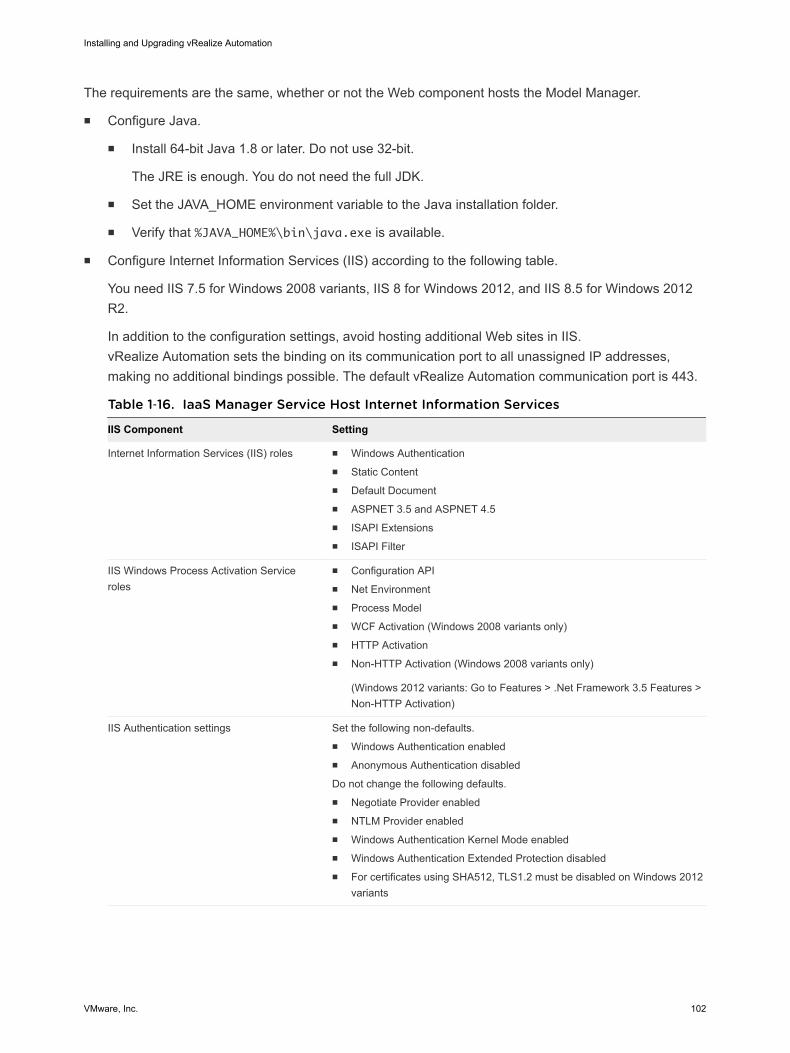
The requirements are the same, whether or not the Web component hosts the Model Manager.
n Configure Java.
n Install 64-bit Java 1.8 or later. Do not use 32-bit.
The JRE is enough. You do not need the full JDK.
n Set the JAVA_HOME environment variable to the Java installation folder.
n Verify that %JAVA_HOME%\bin\java.exe is available.
n Configure Internet Information Services (IIS) according to the following table.
You need IIS 7.5 for Windows 2008 variants, IIS 8 for Windows 2012, and IIS 8.5 for Windows 2012R2.
In addition to the configuration settings, avoid hosting additional Web sites in IIS.vRealize Automation sets the binding on its communication port to all unassigned IP addresses,making no additional bindings possible. The default vRealize Automation communication port is 443.
Table 1‑16. IaaS Manager Service Host Internet Information Services
IIS Component Setting
Internet Information Services (IIS) roles n Windows Authenticationn Static Contentn Default Documentn ASPNET 3.5 and ASPNET 4.5n ISAPI Extensionsn ISAPI Filter
IIS Windows Process Activation Serviceroles
n Configuration APIn Net Environmentn Process Modeln WCF Activation (Windows 2008 variants only)n HTTP Activationn Non-HTTP Activation (Windows 2008 variants only)
(Windows 2012 variants: Go to Features > .Net Framework 3.5 Features >Non-HTTP Activation)
IIS Authentication settings Set the following non-defaults.n Windows Authentication enabledn Anonymous Authentication disabled
Do not change the following defaults.n Negotiate Provider enabledn NTLM Provider enabledn Windows Authentication Kernel Mode enabledn Windows Authentication Extended Protection disabledn For certificates using SHA512, TLS1.2 must be disabled on Windows 2012
variants
Installing and Upgrading vRealize Automation
VMware, Inc. 102
IaaS Manager Service HostA Windows server that hosts the Manager Service component must meet additional requirements, inaddition to those for all IaaS Windows servers.
The requirements are the same, whether the Manager Service host is a primary or backup.
n No firewalls can exist between a Manager Service host and DEM host. For port information, see IaaSWindows Server Ports.
n The Manager Service host must be able to resolve the NETBIOS name of the SQL Server databasehost. If it cannot resolve the NETBIOS name, add the SQL Server NETBIOS name to the ManagerService machine /etc/hosts file.
n Configure Internet Information Services (IIS) according to the following table.
Installing and Upgrading vRealize Automation
VMware, Inc. 103

You need IIS 7.5 for Windows 2008 variants, IIS 8 for Windows 2012, and IIS 8.5 for Windows 2012R2.
In addition to the configuration settings, avoid hosting additional Web sites in IIS.vRealize Automation sets the binding on its communication port to all unassigned IP addresses,making no additional bindings possible. The default vRealize Automation communication port is 443.
Table 1‑17. IaaS Manager Service Host Internet Information Services
IIS Component Setting
Internet Information Services (IIS) roles n Windows Authenticationn Static Contentn Default Documentn ASPNET 3.5 and ASPNET 4.5n ISAPI Extensionsn ISAPI Filter
IIS Windows Process Activation Serviceroles
n Configuration APIn Net Environmentn Process Modeln WCF Activation (Windows 2008 variants only)n HTTP Activationn Non-HTTP Activation (Windows 2008 variants only)
(Windows 2012 variants: Go to Features > .Net Framework 3.5 Features >Non-HTTP Activation)
IIS Authentication settings Set the following non-defaults.n Windows Authentication enabledn Anonymous Authentication disabled
Do not change the following defaults.n Negotiate Provider enabledn NTLM Provider enabledn Windows Authentication Kernel Mode enabledn Windows Authentication Extended Protection disabledn For certificates using SHA512, TLS1.2 must be disabled on Windows 2012
variants
IaaS SQL Server HostA Windows server that hosts the IaaS SQL database must meet certain requirements.
Your SQL Server can reside on one of your IaaS Windows servers, or on a separate host. When hostedtogether with IaaS components, these requirements are in addition to those for all IaaS Windows servers.
n This release of vRealize Automation does not support the default SQL Server 2016 130 compatibilitymode. If you separately create an empty SQL Server 2016 database for use with IaaS, use 100 or120 compatibility mode.
If you create the database through the vRealize Automation installer, compatibility is alreadyconfigured.
Installing and Upgrading vRealize Automation
VMware, Inc. 104
n AlwaysOn Availability Group (AAG) is only supported with SQL Server 2016 Enterprise. When youuse AAG, you specify the AAG listener FQDN as the SQL Server host.
n When hosted together with IaaS components, configure Java.
n Install 64-bit Java 1.8 or later. Do not use 32-bit.
The JRE is enough. You do not need the full JDK.
n Set the JAVA_HOME environment variable to the Java installation folder.
n Verify that %JAVA_HOME%\bin\java.exe is available.
n Use a supported SQL Server version from the vRealize Automation Support Matrix.
n Enable TCP/IP protocol for SQL Server.
n SQL Server includes a model database that is the template for all databases created on the SQLinstance. For IaaS to install correctly, do not change the model database size.
n Usually, the server needs more hardware than the minimums described in IaaS Windows Servers.
n Before running the vRealize Automation installer, you need to identify accounts and add permissionsin SQL. See Accounts and Passwords.
IaaS Distributed Execution Manager HostA Windows server that hosts the Distributed Execution Manager (DEM) Orchestrator or Workercomponent must meet additional requirements, in addition to those for all IaaS Windows servers.
No firewalls can exist between a DEM host and Manager Service host. For port information, see IaaSWindows Server Ports.
DEM Workers might have additional requirements depending on the provisioning resources with whichthey interact.
DEM Workers with Amazon Web Services
A vRealize Automation IaaS DEM Worker that communicates with Amazon Web Services (AWS) mustmeet additional requirements, in addition to those for all IaaS Windows servers and DEMs in general.
A DEM Worker can communicate with AWS for provisioning. The DEM Worker communicates with, andcollects data from, an Amazon EC2 account.
n The DEM Worker must have Internet access.
n If the DEM Worker is behind a firewall, HTTPS traffic must be allowed to and from aws.amazon.comas well as the URLs for EC2 regions that your AWS accounts have access to, such as ec2.us-east-1.amazonaws.com for the US East region.
Each URL resolves to a range of IP addresses, so you might need to use a tool, such as the oneavailable from the Network Solutions Web site, to list and configure these IP addresses.
n If the DEM Worker reaches the Internet through a proxy server, the DEM service must be runningunder credentials that can authenticate to the proxy server.
Installing and Upgrading vRealize Automation
VMware, Inc. 105
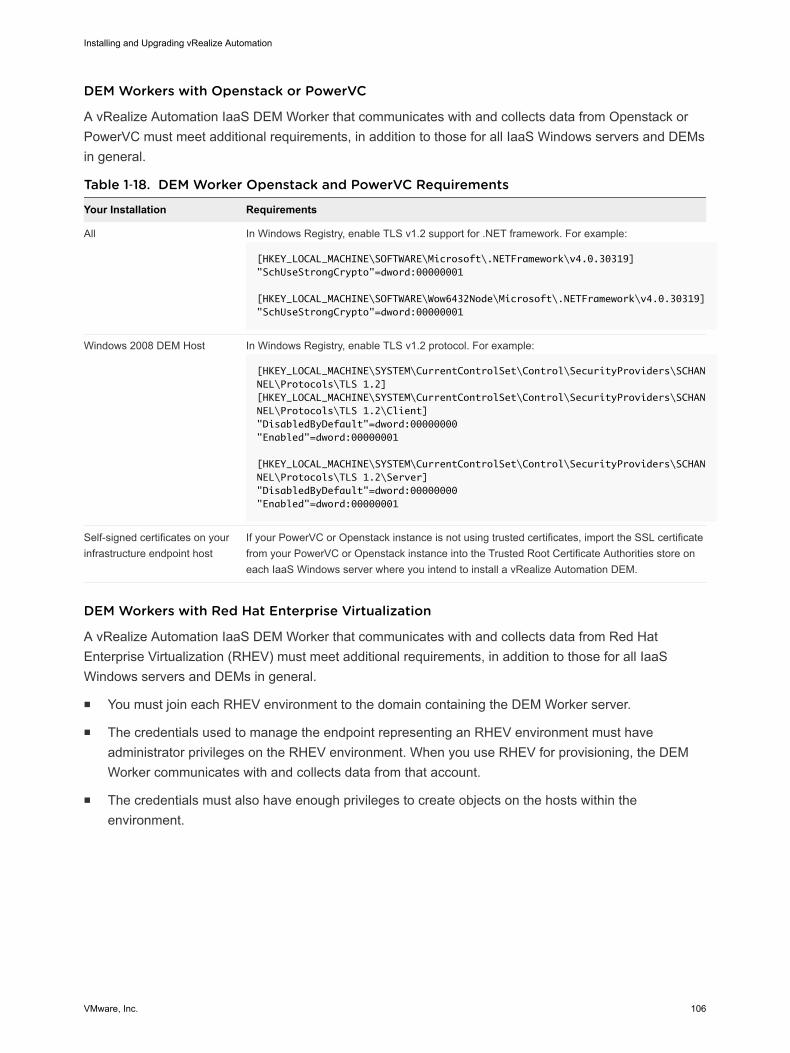
DEM Workers with Openstack or PowerVC
A vRealize Automation IaaS DEM Worker that communicates with and collects data from Openstack orPowerVC must meet additional requirements, in addition to those for all IaaS Windows servers and DEMsin general.
Table 1‑18. DEM Worker Openstack and PowerVC Requirements
Your Installation Requirements
All In Windows Registry, enable TLS v1.2 support for .NET framework. For example:
[HKEY_LOCAL_MACHINE\SOFTWARE\Microsoft\.NETFramework\v4.0.30319]"SchUseStrongCrypto"=dword:00000001
[HKEY_LOCAL_MACHINE\SOFTWARE\Wow6432Node\Microsoft\.NETFramework\v4.0.30319]"SchUseStrongCrypto"=dword:00000001
Windows 2008 DEM Host In Windows Registry, enable TLS v1.2 protocol. For example:
[HKEY_LOCAL_MACHINE\SYSTEM\CurrentControlSet\Control\SecurityProviders\SCHANNEL\Protocols\TLS 1.2][HKEY_LOCAL_MACHINE\SYSTEM\CurrentControlSet\Control\SecurityProviders\SCHANNEL\Protocols\TLS 1.2\Client]"DisabledByDefault"=dword:00000000"Enabled"=dword:00000001
[HKEY_LOCAL_MACHINE\SYSTEM\CurrentControlSet\Control\SecurityProviders\SCHANNEL\Protocols\TLS 1.2\Server]"DisabledByDefault"=dword:00000000"Enabled"=dword:00000001
Self-signed certificates on yourinfrastructure endpoint host
If your PowerVC or Openstack instance is not using trusted certificates, import the SSL certificatefrom your PowerVC or Openstack instance into the Trusted Root Certificate Authorities store oneach IaaS Windows server where you intend to install a vRealize Automation DEM.
DEM Workers with Red Hat Enterprise Virtualization
A vRealize Automation IaaS DEM Worker that communicates with and collects data from Red HatEnterprise Virtualization (RHEV) must meet additional requirements, in addition to those for all IaaSWindows servers and DEMs in general.
n You must join each RHEV environment to the domain containing the DEM Worker server.
n The credentials used to manage the endpoint representing an RHEV environment must haveadministrator privileges on the RHEV environment. When you use RHEV for provisioning, the DEMWorker communicates with and collects data from that account.
n The credentials must also have enough privileges to create objects on the hosts within theenvironment.
Installing and Upgrading vRealize Automation
VMware, Inc. 106
DEM Workers with SCVMM
A vRealize Automation IaaS DEM Worker that manages virtual machines through System Center VirtualMachine Manager (SCVMM) must meet additional requirements, in addition to those for all IaaS Windowsservers and DEMs in general.
n Install the DEM Worker on the same machine with the SCVMM console.
A best practice is to install the SCVMM console on a separate DEM Worker.
n The DEM worker must have access to the SCVMM PowerShell module installed with the console.
n The PowerShell Execution Policy must be set to RemoteSigned or Unrestricted.
To verify the PowerShell Execution Policy, enter one of the following commands at the PowerShellcommand prompt.
help about_signing
help Set-ExecutionPolicy
n If all DEM Workers within the instance are not on machines that meet these requirements, use Skillcommands to direct SCVMM-related workflows to DEM Workers that are.
vRealize Automation does not support a deployment environment that uses an SCVMM private cloudconfiguration. vRealize Automation cannot currently collect from, allocate to, or provision based onSCVMM private clouds.
The following additional requirements apply to SCVMM.
n vRealize Automation supports SCVMM 2012 R2, which requires PowerShell 3 or later.
n Install the SCVMM console before you install vRealize Automation DEM Workers that consumeSCVMM work items.
If you install the DEM Worker before the SCVMM console, you see log errors similar to the followingexample.
Workflow 'ScvmmEndpointDataCollection' failed with the following exception: The
term 'Get-VMMServer' is not recognized as the name of a cmdlet, function, script
file, or operable program. Check the spelling of the name, or if a path was
included, verify that the path is correct and try again.
To correct the problem, verify that the SCVMM console is installed, and restart the DEM Workerservice.
n Each SCVMM instance must be joined to the domain containing the server.
n The credentials used to manage the endpoint representing an SCVMM instance must haveadministrator privileges on the SCVMM server.
The credentials must also have administrator privileges on the Hyper-V servers within the instance.
n To provision machines on an SCVMM resource, the vRealize Automation user who is requesting thecatalog item must have the administrator role within the SCVMM instance.
Installing and Upgrading vRealize Automation
VMware, Inc. 107
n Hyper-V servers within an SCVMM instance to be managed must be Windows 2008 R2 SP1 Serverswith Hyper-V installed. The processor must be equipped with the necessary virtualizationextensions .NET Framework 4.5.2 or later must be installed and Windows ManagementInstrumentation (WMI) must be enabled.
n To provision a Generation-2 machine on an SCVMM 2012 R2 resource, you must add the followingproperties in the blueprint.
Scvmm.Generation2 = true
Hyperv.Network.Type = synthetic
Generation-2 blueprints should have an existing data-collected virtualHardDisk (vHDX) in theblueprint build information page. Having it blank causes Generation-2 provisioning to fail.
For additional information about preparing for machine provisioning, see Preparing Your SCVMMEnvironment.
CertificatesvRealize Automation uses SSL certificates for secure communication among IaaS components andinstances of the vRealize Automation appliance. The appliances and the Windows installation machinesexchange these certificates to establish a trusted connection. You can obtain certificates from an internalor external certificate authority, or generate self-signed certificates during the deployment process foreach component.
For important information about troubleshooting, support, and trust requirements for certificates, see VMware Knowledge Base article 2106583.
Note vRealize Automation supports SHA2 certificates. The self-signed certificates generated by thesystem use SHA-256 With RSA Encryption. You might need to update to SHA2 certificates due tooperating system or browser requirements.
You can update or replace certificates after deployment. For example, a certificate may expire or you maychoose to use self-signed certificates during your initial deployment, but then obtain certificates from atrusted authority before going live with your vRealize Automation implementation.
Table 1‑19. Certificate Implementations
ComponentMinimal Deployment (non-production) Distributed Deployment (production-ready)
vRealizeAutomationAppliance
Generate a self-signed certificateduring appliance configuration.
For each appliance cluster, you can use a certificate from aninternal or external certificate authority. Multi-use and wildcardcertificates are supported.
IaaS Components During installation, accept thegenerated self-signed certificates orselect certificate suppression.
Obtain a multi-use certificate, such as a Subject Alternative Name(SAN) certificate, from an internal or external certificate authoritythat your Web client trusts.
Installing and Upgrading vRealize Automation
VMware, Inc. 108
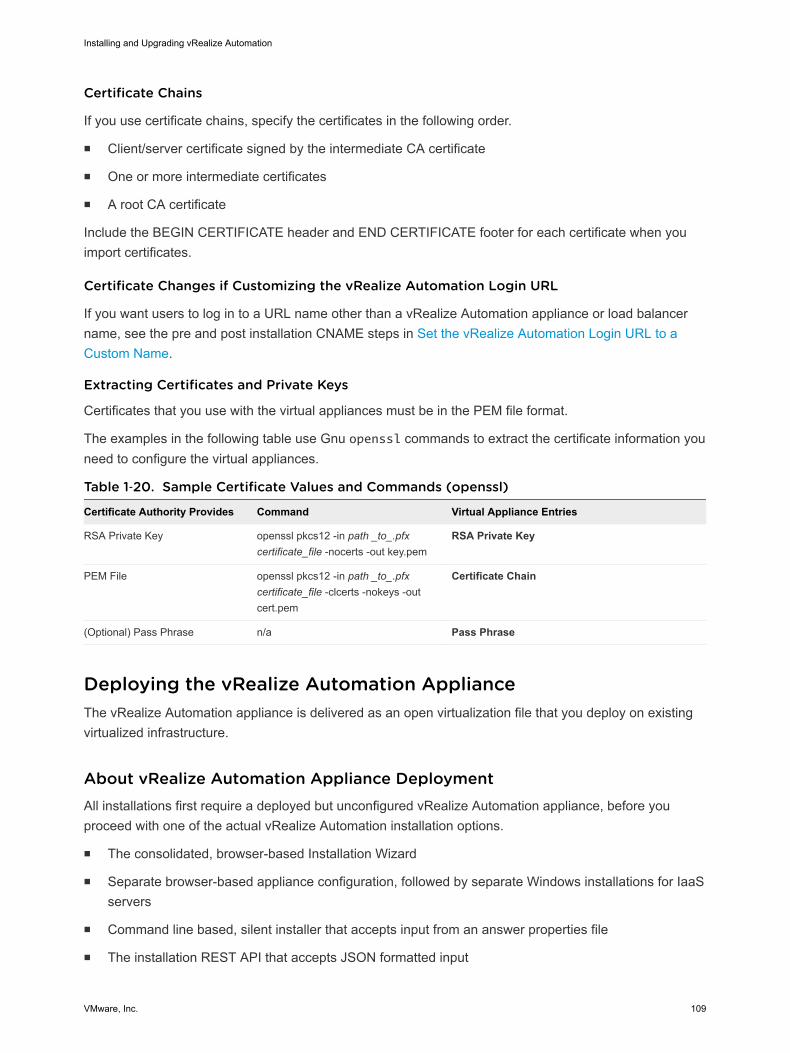
Certificate Chains
If you use certificate chains, specify the certificates in the following order.
n Client/server certificate signed by the intermediate CA certificate
n One or more intermediate certificates
n A root CA certificate
Include the BEGIN CERTIFICATE header and END CERTIFICATE footer for each certificate when youimport certificates.
Certificate Changes if Customizing the vRealize Automation Login URL
If you want users to log in to a URL name other than a vRealize Automation appliance or load balancername, see the pre and post installation CNAME steps in Set the vRealize Automation Login URL to aCustom Name.
Extracting Certificates and Private Keys
Certificates that you use with the virtual appliances must be in the PEM file format.
The examples in the following table use Gnu openssl commands to extract the certificate information youneed to configure the virtual appliances.
Table 1‑20. Sample Certificate Values and Commands (openssl)
Certificate Authority Provides Command Virtual Appliance Entries
RSA Private Key openssl pkcs12 -in path _to_.pfxcertificate_file -nocerts -out key.pem
RSA Private Key
PEM File openssl pkcs12 -in path _to_.pfxcertificate_file -clcerts -nokeys -outcert.pem
Certificate Chain
(Optional) Pass Phrase n/a Pass Phrase
Deploying the vRealize Automation ApplianceThe vRealize Automation appliance is delivered as an open virtualization file that you deploy on existingvirtualized infrastructure.
About vRealize Automation Appliance DeploymentAll installations first require a deployed but unconfigured vRealize Automation appliance, before youproceed with one of the actual vRealize Automation installation options.
n The consolidated, browser-based Installation Wizard
n Separate browser-based appliance configuration, followed by separate Windows installations for IaaSservers
n Command line based, silent installer that accepts input from an answer properties file
n The installation REST API that accepts JSON formatted input
Installing and Upgrading vRealize Automation
VMware, Inc. 109

Deploy the vRealize Automation ApplianceBefore you can take any of the installation paths, vRealize Automation requires that you deploy at leastone vRealize Automation appliance.
To create the appliance, you use the vSphere client to download and deploy a partially configured virtualmachine from a template. You might need to perform the procedure more than once, if you expect tocreate an enterprise deployment for high availability and failover, with multiple vRealize Automationappliances behind a load balancer.
Prerequisites
n Log in to the vSphere client with an account that has permission to deploy OVF templates to theinventory.
n Download the vRealize Automation appliance .ovf or .ova file to a location accessible to thevSphere client.
Procedure
1 Select the vSphere Deploy OVF Template option.
2 Enter the path to the vRealize Automation appliance .ovf or .ova file.
3 Review the template details.
4 Read and accept the end user license agreement.
5 Enter an appliance name and inventory location.
When you deploy appliances, use a different name for each one, and do not include non-alphanumeric characters such as underscores (_) in names.
6 Select the host and cluster in which the appliance will reside.
7 Select the resource pool in which the appliance will reside.
8 Select the storage that will host the appliance.
9 Select a disk format.
Thick formats improve performance, and thin formats save storage space.
Format does not affect appliance disk size. If an appliance needs more space for data, add disk byusing vSphere after deploying.
10 From the drop-down menu, select a Destination Network.
Installing and Upgrading vRealize Automation
VMware, Inc. 110
11 Complete the appliance properties.
a Enter and confirm a root password.
The root account credentials log you in to the browser-based administration interface hosted bythe appliance, or the appliance operating system command line console.
b Select whether or not to allow remote SSH connections to the command line console.
Disabling SSH is more secure but requires that you access the console directly in vSphereinstead of through a separate terminal client.
Installing and Upgrading vRealize Automation
VMware, Inc. 111
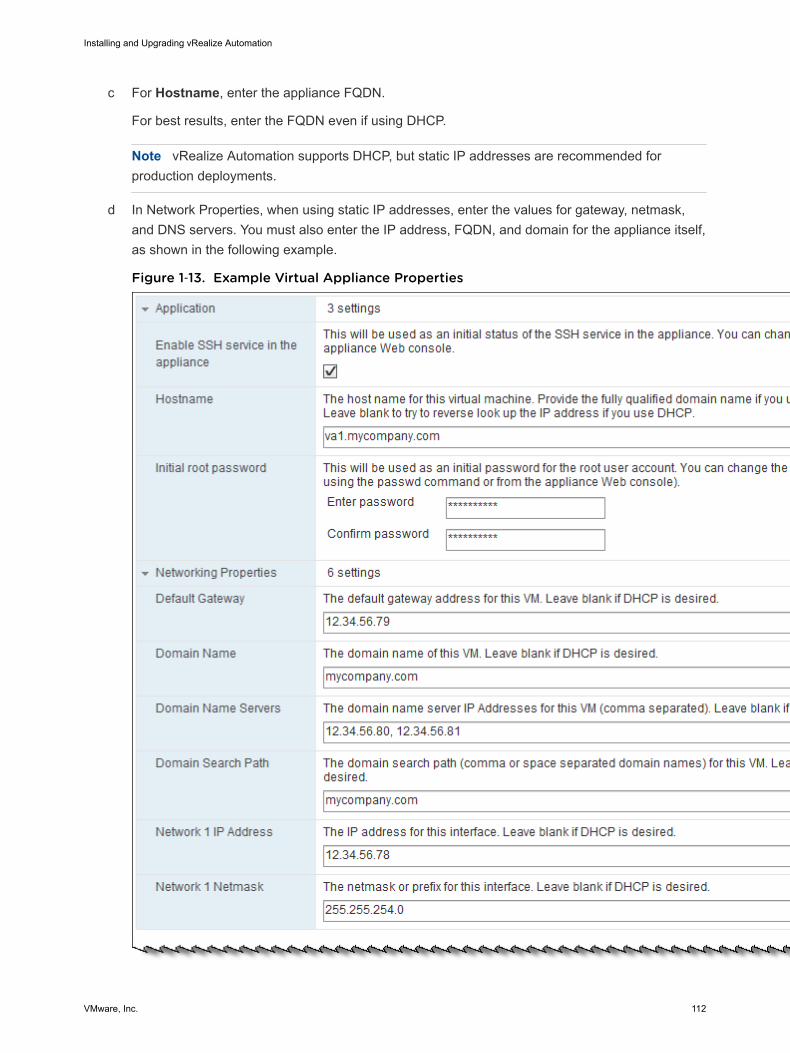
c For Hostname, enter the appliance FQDN.
For best results, enter the FQDN even if using DHCP.
Note vRealize Automation supports DHCP, but static IP addresses are recommended forproduction deployments.
d In Network Properties, when using static IP addresses, enter the values for gateway, netmask,and DNS servers. You must also enter the IP address, FQDN, and domain for the appliance itself,as shown in the following example.
Figure 1‑13. Example Virtual Appliance Properties
Installing and Upgrading vRealize Automation
VMware, Inc. 112
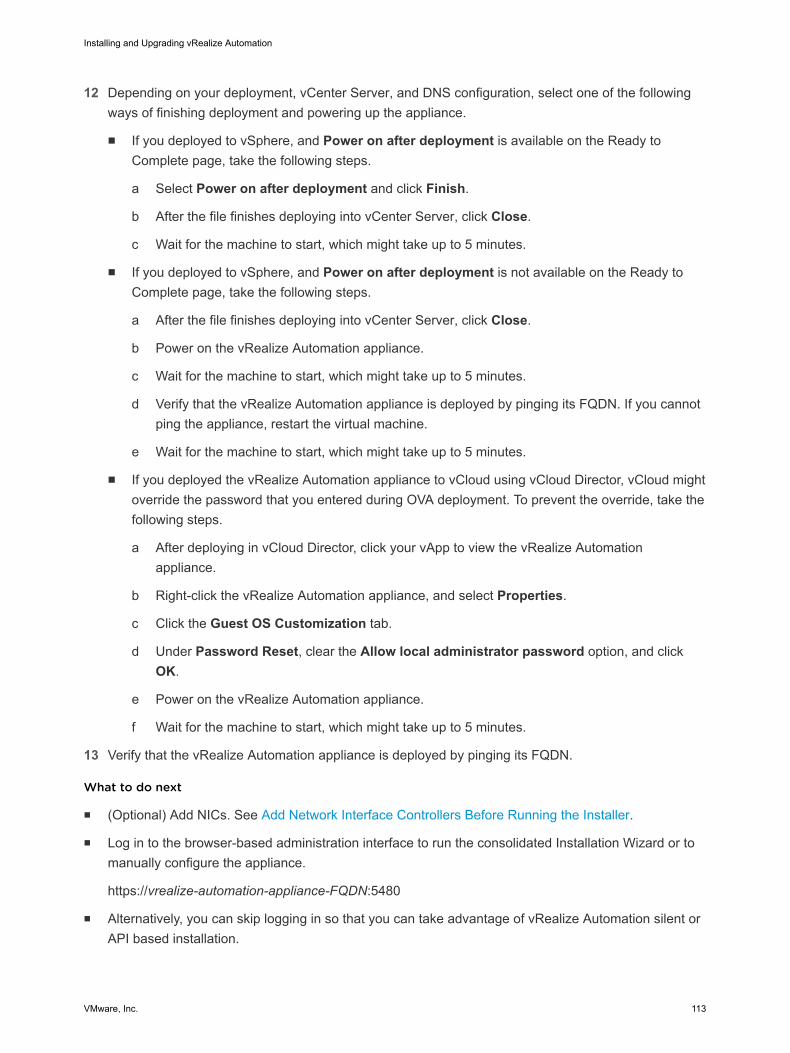
12 Depending on your deployment, vCenter Server, and DNS configuration, select one of the followingways of finishing deployment and powering up the appliance.
n If you deployed to vSphere, and Power on after deployment is available on the Ready toComplete page, take the following steps.
a Select Power on after deployment and click Finish.
b After the file finishes deploying into vCenter Server, click Close.
c Wait for the machine to start, which might take up to 5 minutes.
n If you deployed to vSphere, and Power on after deployment is not available on the Ready toComplete page, take the following steps.
a After the file finishes deploying into vCenter Server, click Close.
b Power on the vRealize Automation appliance.
c Wait for the machine to start, which might take up to 5 minutes.
d Verify that the vRealize Automation appliance is deployed by pinging its FQDN. If you cannotping the appliance, restart the virtual machine.
e Wait for the machine to start, which might take up to 5 minutes.
n If you deployed the vRealize Automation appliance to vCloud using vCloud Director, vCloud mightoverride the password that you entered during OVA deployment. To prevent the override, take thefollowing steps.
a After deploying in vCloud Director, click your vApp to view the vRealize Automationappliance.
b Right-click the vRealize Automation appliance, and select Properties.
c Click the Guest OS Customization tab.
d Under Password Reset, clear the Allow local administrator password option, and clickOK.
e Power on the vRealize Automation appliance.
f Wait for the machine to start, which might take up to 5 minutes.
13 Verify that the vRealize Automation appliance is deployed by pinging its FQDN.
What to do next
n (Optional) Add NICs. See Add Network Interface Controllers Before Running the Installer.
n Log in to the browser-based administration interface to run the consolidated Installation Wizard or tomanually configure the appliance.
https://vrealize-automation-appliance-FQDN:5480
n Alternatively, you can skip logging in so that you can take advantage of vRealize Automation silent orAPI based installation.
Installing and Upgrading vRealize Automation
VMware, Inc. 113
Add Network Interface Controllers Before Running the InstallervRealize Automation supports multiple network interface controllers (NICs). Before running the installer, itis possible to add NICs to the vRealize Automation appliance or IaaS Windows server.
If you need multiple NICs to be in place before running the vRealize Automation installation wizard, addthem after deploying in vCenter but before starting the wizard. Reasons that you might want additionalNICs in place early include the following examples:
n You want separate user and infrastructure networks.
n You need an additional NIC so that IaaS servers can join an Active Directory domain.
For more information about multiple NIC scenarios, see this VMware Cloud Management blog post.
For three or more NICs, be aware of the following limitations.
n VIDM needs access to the Postgres database and Active Directory.
n In an HA cluster, VIDM needs access to the load balancer URL.
n The preceding VIDM connections must come through the first two NICs.
n NICs after the second NIC must not be used or recognized by VIDM.
n NICs after the second NIC must not be used to connect to Active Directory.
Use the first or second NIC when configuring a directory in vRealize Automation.
Prerequisites
Deploy the vRealize Automation appliance OVF and Windows virtual machines, but do not log in or startthe installation wizard.
Procedure
1 In vCenter, add NICs to each vRealize Automation appliance.
a Right click the newly deployed appliance and select Edit Settings.
b Add VMXNETn NICs.
c If it is powered on, restart the appliance.
2 Log in to the vRealize Automation appliance command line as root.
3 Configure the NICs by running the following command for each NIC.
Make sure to include the default gateway address. You can configure static routes after finishing thisprocedure.
/opt/vmware/share/vami/vami_set_network network-interface (STATICV4|
STATICV4+DHCPV6|STATICV4+AUTOV6) IPv4-address netmask gateway-v4-address
For example:
/opt/vmware/share/vami/vami_set_network eth1 STATICV4 192.168.100.20
255.255.255.0 192.168.100.1
Installing and Upgrading vRealize Automation
VMware, Inc. 114

4 Verify that all vRealize Automation nodes can resolve each other by DNS name.
5 Verify that all vRealize Automation nodes can access any load balanced FQDNs forvRealize Automation components.
6 If you are using Split-Brain DNS, verify that all vRealize Automation nodes and VIPs have the sameFQDN in DNS for each node IP and VIP.
7 In vCenter, add NICs to IaaS Windows servers.
a Right click the IaaS server and select Edit Settings.
b Add NICs to the IaaS server virtual machine.
8 In Windows, configure the added IaaS server NICs and their IP addresses. See the Microsoftdocumentation if necessary.
What to do next
n (Optional) If you need static routes, follow the guidelines in Configure Static Routes before continuingwith installation.
n Log in to the browser-based administration interface to run the consolidated Installation Wizard or tomanually configure the appliance.
https://vrealize-automation-appliance-FQDN:5480
n Alternatively, you can skip logging in so that you can take advantage of vRealize Automation silent orAPI based installation.
Installing vRealize Automation with the Installation WizardThe vRealize Automation Installation Wizard provides a simple and fast way to install minimal orenterprise deployments.
Before you launch the wizard, you deploy a vRealize Automation appliance and configure IaaS Windowsservers to meet prerequisites. The Installation Wizard appears the first time you log in to the newlydeployed vRealize Automation appliance.
n To stop the wizard and return later, click Logout.
n To disable the wizard, click Cancel, or log out and begin manual installation through the standardinterfaces.
The wizard is your primary tool for new vRealize Automation installations. If you want to expand anexisting vRealize Automation deployment after running the wizard, see the procedures in The StandardvRealize Automation Installation Interfaces.
Using the Installation Wizard for Minimal DeploymentsMinimal deployments demonstrate how vRealize Automation works but usually do not have enoughcapacity to support enterprise production environments.
Install a minimal deployment for proof-of-concept work or to become familiar with vRealize Automation.
Installing and Upgrading vRealize Automation
VMware, Inc. 115
Start the Installation Wizard for a Minimal Deployment
Minimal deployments typically consist of one vRealize Automation appliance, one IaaS Windows server,and the vSphere agent for endpoints. Minimal installation places all IaaS components on a singleWindows server.
Prerequisites
n Address the prerequisites in Preparing for vRealize Automation Installation.
n Create an unconfigured appliance. See Deploy the vRealize Automation Appliance.
Procedure
1 Log in as root to the vRealize Automation appliance administration interface.
https://vrealize-automation-appliance-FQDN:5480
2 When the Installation Wizard appears, click Next.
3 Accept the license agreement and click Next.
4 On the Deployment Type page, select Minimal deployment and Install Infrastructure as a Service,and click Next.
5 On the Installation Prerequisites page, you pause to log in to your IaaS Windows server and installthe Management Agent. The Management Agent allows the vRealize Automation appliance todiscover and connect to the IaaS server.
What to do next
Install the Management Agent on your IaaS Windows server. See Install the vRealize AutomationManagement Agent.
Install the vRealize Automation Management Agent
All IaaS Windows servers require the Management Agent, which links them to their specificvRealize Automation appliance.
If you host the vRealize Automation SQL Server database on a separate Windows machine that does nothost IaaS components, the SQL Server machine does not need the Management Agent.
The Management Agent registers the IaaS Windows server with the specific vRealize Automationappliance, automates the installation and management of IaaS components, and collects support andtelemetry information. The Management Agent runs as a Windows service under a domain account withadministrator rights on IaaS Windows servers.
Prerequisites
Create a vRealize Automation appliance and begin the Installation Wizard.
See Deploy the vRealize Automation Appliance and Start the Installation Wizard for a MinimalDeployment.
Installing and Upgrading vRealize Automation
VMware, Inc. 116
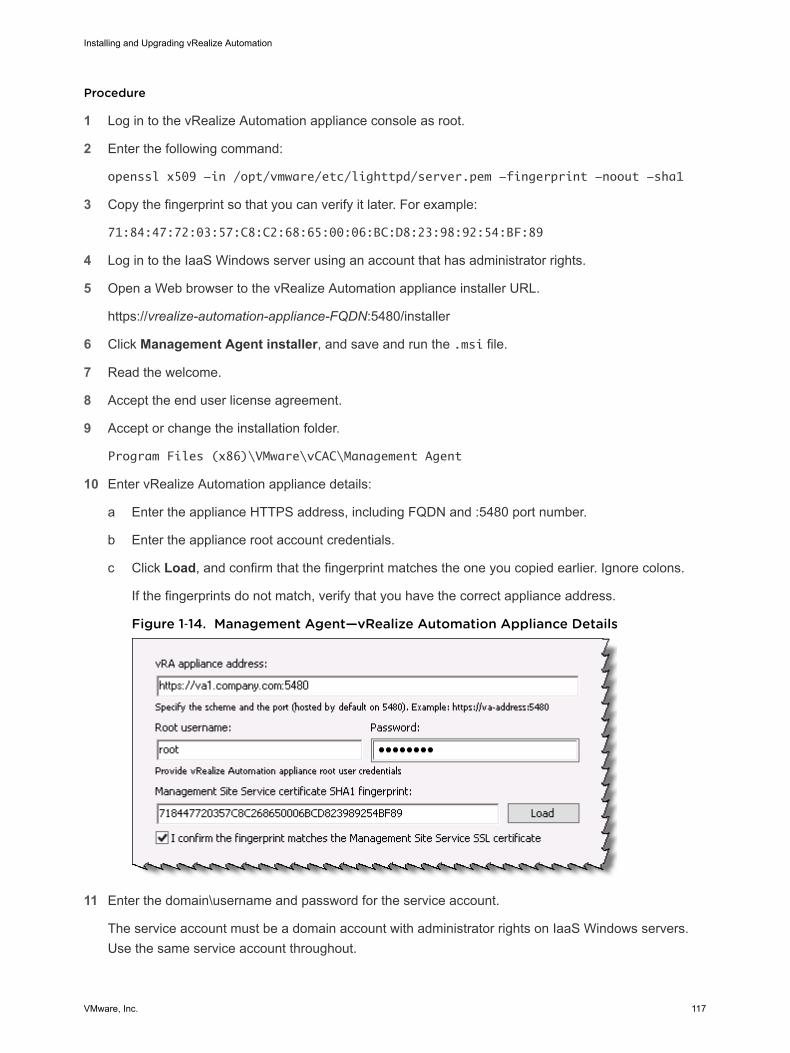
Procedure
1 Log in to the vRealize Automation appliance console as root.
2 Enter the following command:
openssl x509 -in /opt/vmware/etc/lighttpd/server.pem -fingerprint -noout -sha1
3 Copy the fingerprint so that you can verify it later. For example:
71:84:47:72:03:57:C8:C2:68:65:00:06:BC:D8:23:98:92:54:BF:89
4 Log in to the IaaS Windows server using an account that has administrator rights.
5 Open a Web browser to the vRealize Automation appliance installer URL.
https://vrealize-automation-appliance-FQDN:5480/installer
6 Click Management Agent installer, and save and run the .msi file.
7 Read the welcome.
8 Accept the end user license agreement.
9 Accept or change the installation folder.
Program Files (x86)\VMware\vCAC\Management Agent
10 Enter vRealize Automation appliance details:
a Enter the appliance HTTPS address, including FQDN and :5480 port number.
b Enter the appliance root account credentials.
c Click Load, and confirm that the fingerprint matches the one you copied earlier. Ignore colons.
If the fingerprints do not match, verify that you have the correct appliance address.
Figure 1‑14. Management Agent—vRealize Automation Appliance Details
11 Enter the domain\username and password for the service account.
The service account must be a domain account with administrator rights on IaaS Windows servers.Use the same service account throughout.
Installing and Upgrading vRealize Automation
VMware, Inc. 117
12 Follow the prompts to finish installing the Management Agent.
Note Because they are linked, you must reinstall the Management Agent if you replace thevRealize Automation appliance.
Uninstalling IaaS from a Windows server does not remove the Management Agent. To uninstall aManagement Agent, separately use the Add or Remove Programs option in Windows.
What to do next
Return to the browser-based Installation Wizard. IaaS Windows servers with the Management Agentinstalled appear under Discovered Hosts.
Completing the Installation Wizard
After installing the Management Agent, return to the wizard and follow the prompts. If you need additionalinstructions about settings, click the Help link at the upper right of the wizard.
n When you finish the wizard, the last page displays the path and name to a properties file. You can editthe file and use it to perform a silent vRealize Automation installation with the same or similar settingsfrom your wizard session. See Silent vRealize Automation Installation.
n If you created initial content, you can log in to the default tenant as the configurationadmin user andrequest the catalog items. For an example of how to request the item and complete the manual useraction, see Scenario: Request Initial Content for a Rainpole Proof of Concept Deployment.
n To configure access to the default tenant for other users, see Configure Access to the Default Tenant.
Using the Installation Wizard for Enterprise DeploymentsYou can tailor your enterprise deployment to the needs of your organization. An enterprise deploymentcan consist of distributed components or high-availability deployments configured with load balancers.
Enterprise deployments are designed for more complex installation structures with distributed andredundant components and generally include load balancers. Installation of IaaS components is optionalwith either type of deployment.
For load-balanced deployments, multiple active Web server instances and vRealize Automation applianceappliances cause the installation to fail. Only a single Web server instance and a singlevRealize Automation appliance should be active during the installation.
Start the Installation Wizard for an Enterprise Deployment
Enterprise deployments are large enough for production environments. You can use the InstallationWizard to deploy a distributed installation, or a distributed installation with load balancers for highavailability and failover.
If you deploy a distributed installation with load balancers, notify the team responsible for configuring yourvRealize Automation environment. Your tenant administrators must configure Directories Management forhigh availability when they configure the link to Active Directory.
Installing and Upgrading vRealize Automation
VMware, Inc. 118
Prerequisites
n Address the prerequisites in Preparing for vRealize Automation Installation.
n Create an unconfigured appliance. See Deploy the vRealize Automation Appliance.
Procedure
1 Log in as root to the vRealize Automation appliance administration interface.
https://vrealize-automation-appliance-FQDN:5480
2 When the Installation Wizard appears, click Next.
3 Accept the End User License Agreement and click Next.
4 On the Deployment Type page, select Enterprise deployment and Install Infrastructure as aService.
5 On the Installation Prerequisites page, you pause to log in to your IaaS Windows servers and installthe Management Agent. The Management Agent allows the vRealize Automation appliance todiscover and connect to those IaaS servers.
What to do next
Install the Management Agent on your IaaS Windows servers. See Install the vRealize AutomationManagement Agent.
Install the vRealize Automation Management Agent
All IaaS Windows servers require the Management Agent, which links them to their specificvRealize Automation appliance.
If you host the vRealize Automation SQL Server database on a separate Windows machine that does nothost IaaS components, the SQL Server machine does not need the Management Agent.
The Management Agent registers the IaaS Windows server with the specific vRealize Automationappliance, automates the installation and management of IaaS components, and collects support andtelemetry information. The Management Agent runs as a Windows service under a domain account withadministrator rights on IaaS Windows servers.
Prerequisites
Create a vRealize Automation appliance and begin the Installation Wizard.
See Deploy the vRealize Automation Appliance and Start the Installation Wizard for an EnterpriseDeployment.
Procedure
1 Log in to the vRealize Automation appliance console as root.
2 Enter the following command:
openssl x509 -in /opt/vmware/etc/lighttpd/server.pem -fingerprint -noout -sha1
Installing and Upgrading vRealize Automation
VMware, Inc. 119

3 Copy the fingerprint so that you can verify it later. For example:
71:84:47:72:03:57:C8:C2:68:65:00:06:BC:D8:23:98:92:54:BF:89
4 Log in to the IaaS Windows server using an account that has administrator rights.
5 Open a Web browser to the vRealize Automation appliance installer URL.
https://vrealize-automation-appliance-FQDN:5480/installer
6 Click Management Agent installer, and save and run the .msi file.
7 Read the welcome.
8 Accept the end user license agreement.
9 Accept or change the installation folder.
Program Files (x86)\VMware\vCAC\Management Agent
10 Enter vRealize Automation appliance details:
a Enter the appliance HTTPS address, including FQDN and :5480 port number.
b Enter the appliance root account credentials.
c Click Load, and confirm that the fingerprint matches the one you copied earlier. Ignore colons.
If the fingerprints do not match, verify that you have the correct appliance address.
Figure 1‑15. Management Agent—vRealize Automation Appliance Details
11 Enter the domain\username and password for the service account.
The service account must be a domain account with administrator rights on IaaS Windows servers.Use the same service account throughout.
12 Follow the prompts to finish installing the Management Agent.
Installing and Upgrading vRealize Automation
VMware, Inc. 120
Repeat the procedure for all Windows servers that will host IaaS components.
Note Because they are linked, you must reinstall the Management Agent if you replace thevRealize Automation appliance.
Uninstalling IaaS from a Windows server does not remove the Management Agent. To uninstall aManagement Agent, separately use the Add or Remove Programs option in Windows.
What to do next
Return to the browser-based Installation Wizard. IaaS Windows servers with the Management Agentinstalled appear under Discovered Hosts.
Completing the Installation Wizard
After installing the Management Agent, return to the wizard and follow the prompts. If you need additionalinstructions about settings, click the Help link at the upper right of the wizard.
n When you finish the wizard, the last page displays the path and name to a properties file. You can editthe file and use it to perform a silent vRealize Automation installation with the same or similar settingsfrom your wizard session. See Silent vRealize Automation Installation.
n If you created initial content, you can log in to the default tenant as the configurationadmin user andrequest the catalog items. For an example of how to request the item and complete the manual useraction, see Scenario: Request Initial Content for a Rainpole Proof of Concept Deployment.
n To configure access to the default tenant for other users, see Configure Access to the Default Tenant.
Step Through the vRealize Automation Installation WizardThe vRealize Automation Installation Wizard presents you with easy to use pages where you check forprerequisites, enter settings, validate settings, and install vRealize Automation components.
Note The wizard includes steps where you pause to log in to other systems, such as load balancers orIaaS Windows servers.
Prerequisites
n Create one or more unconfigured appliances. See Deploy the vRealize Automation Appliance.
Minimal deployments use one vRealize Automation appliance. Enterprise deployments may havemultiple appliances behind load balancing.
n Have one or more Windows systems available on which to host IaaS components.
n Start the wizard by logging in as root to the vRealize Automation appliance administration interface.
https://vrealize-automation-appliance-FQDN:5480
Installing and Upgrading vRealize Automation
VMware, Inc. 121
Procedure
1 Deployment Type
On the Deployment Type page, you decide which vRealize Automation components, and how manyof each, you want to install.
2 Installation Prerequisites
On the Installation Prerequisites page, you pause to establish a connection to Windows machinesthat will host vRealize Automation IaaS. In addition, you select a time synchronization source.
3 vRealize Appliances
(Enterprise Deployments Only) On the vRealize Appliances page, you have the option to create ahigh-availability deployment with multiple vRealize Automation appliances.
4 Server Roles
(Enterprise Deployments Only) On the Server Roles page, you assign vRealize Automation IaaScomponent roles to the Windows machines where you had installed the Management Agent earlier.
5 Prerequisite Checker
On the Prerequisite Checker page, you check and fix your vRealize Automation Windows servers tosupport IaaS installation.
6 vRealize Automation Host
On the vRealize Automation Host page, you set the base URL address for vRealize Automation. Theaddress is usually the vRealize Automation appliance or, in high availability deployments, a loadbalancer.
7 Single Sign On
On the Single Sign On page, you set the vRealize Automation default tenant system administratorlog in credentials.
8 IaaS Host
On the IaaS Host page, you set the base URL addresses for certain IaaS components. In addition,you create a security passphrase for the vRealize Automation IaaS SQL database.
9 Microsoft SQL Server
On the Microsoft SQL Server page, you configure the vRealize Automation IaaS SQL database. TheIaaS database records provisioned machines, associated elements, and policies.
10 Web Role
(Enterprise Deployments Only) On the Web Role page, you separately configure thevRealize Automation IaaS Web site in IIS.
11 Manager Service Role
(Enterprise Deployments Only) On the Manager Service Role page, you configure the separatevRealize Automation Windows machine that hosts the IaaS Manager Service.
Installing and Upgrading vRealize Automation
VMware, Inc. 122

12 Distributed Execution Managers
On the Distributed Execution Managers page, you configure the vRealize Automation Windowsmachines that host IaaS DEMs. Multiple DEM hosts are supported.
13 Agents
On the Agents page, you create the linkage between vRealize Automation IaaS and thevirtualization resources onto which infrastructure is deployed. You select an agent type, andcomplete the details for the corresponding endpoint.
14 vRealize Appliance Certificate
On the vRealize Appliance Certificate page, you create or select the authentication certificate thatthe vRealize Automation appliance uses. When the certificate is self-signed, end users see andconfirm it when they log in to vRealize Automation in a browser.
15 Web Certificate
On the Web Certificate page, you create or select the authentication certificate that the IaaS Webserver uses. The vRealize Automation appliance connects to the Web server and needs toauthenticate and trust it.
16 Manager Service Certificate
(Enterprise Deployments Only) On the Manager Service Certificate page, you create or select theauthentication certificate that the vRealize Automation IaaS Manager Service host uses. The otherIaaS Windows servers connect to the Manager Service host and need to authenticate and trust it.
17 Load Balancers
(Enterprise Deployments Only) On the Load Balancers page, you pause to configure load balancersfor the correct pool of vRealize Automation member systems.
18 Validation
On the Validation page, you verify that vRealize Automation installation can proceed.
19 Create Snapshots
On the Create Snapshots page, you pause to take virtual machine snapshots of allvRealize Automation components before proceeding with installation.
20 Installation Details
On the Installation Details page, you start the vRealize Automation installation or retry it if problemsoccurred.
21 Licensing
On the Licensing page, you enter a key to activate the installed vRealize Automation product.
22 Telemetry
On the Telemetry page, you decide whether or not vRealize Automation sends usage statistics toVMware as part of the Customer Experience Improvement Program.
Installing and Upgrading vRealize Automation
VMware, Inc. 123
23 Post Installation Options
On the Post Installation Options page, you have options for creating new vRealize Automation dataor migrating older deployment data to your new installation.
24 Initial Content Configuration
On the Initial Content Configuration page, you create a new, local vRealize Automation defaulttenant user who can begin a content workflow for a vSphere endpoint.
25 Migration Configuration
On the Migration Configuration page, you can start the transfer of another, oldervRealize Automation deployment to your newly installed deployment.
Deployment Type
On the Deployment Type page, you decide which vRealize Automation components, and how many ofeach, you want to install.
Minimal
Minimal deployments use just one vRealize Automation appliance and one Windows server that hostsIaaS components. In minimal deployments, you may host the IaaS database on a separate SQL Serversystem, or install SQL on the IaaS Windows server.
You cannot convert a minimal deployment to an enterprise deployment. To scale a deployment up, startwith a small enterprise deployment, and add components to that. Starting with a minimal deployment isnot supported.
Enterprise
Enterprise deployments involve multiple, separate appliances and Windows hosts, typically with loadbalancing. Enterprise deployments also permit you to host the IaaS database on a separate SQL Serversystem or on one of the IaaS Windows servers.
When you select an enterprise deployment, additional Installation Wizard pages appear in the summarylist at the left of the wizard.
Infrastructure as a Service
The Infrastructure as a Service (IaaS) option selects whether or not to configure existing Windowsmachines with vRealize Automation modeling and provisioning capabilities.
When you select IaaS, additional Installation Wizard pages appear in the summary list at the left of thewizard.
Installation Prerequisites
On the Installation Prerequisites page, you pause to establish a connection to Windows machines that willhost vRealize Automation IaaS. In addition, you select a time synchronization source.
Installing and Upgrading vRealize Automation
VMware, Inc. 124
IaaS Windows Servers
For a Windows machine to serve as an IaaS component host, you must download and install vCAC-IaaSManagementAgent-Setup.msi on the Windows machine.
Management Agent installation requires communication with a running vRealize Automation appliance.Each time that you install the Management Agent on Windows, that system becomes uniquely tied to thespecific appliance and deployment.
Potential IaaS Windows servers that have the correct Management Agent installed appear underDiscovered Hosts.
To have the Installation Wizard ignore a discovered host, click Delete. Deleting a Windows host does notremove its Management Agent. To uninstall the agent, use the Add or Remove Programs feature directlyin Windows.
Time Source
You must synchronize every vRealize Automation appliance and IaaS Windows server to the same timesource. The following sources are allowed:
n Use Host Time—Synchronize to the vRealize Automation appliance ESXi host.
n Use Time Server—Synchronize to one external Network Time Protocol (NTP) server. Enter the FQDNor IP address of the NTP server.
Do not mix time sources within a vRealize Automation deployment.
vRealize Appliances
(Enterprise Deployments Only) On the vRealize Appliances page, you have the option to create a high-availability deployment with multiple vRealize Automation appliances.
Multiple appliances are hosted behind a load balancer, which you specify on a later wizard page. Foreach vRealize Automation appliance that you add, enter its FQDN and root credentials.
Server Roles
(Enterprise Deployments Only) On the Server Roles page, you assign vRealize Automation IaaScomponent roles to the Windows machines where you had installed the Management Agent earlier.
IaaS Windows machines may serve as primary and additional Web servers, Manager Service hosts, DEMhosts, and Agent hosts. For more about IaaS component roles, see Infrastructure as a Service.
Separation of IaaS server roles is only possible in enterprise deployments. In minimal deployments, oneWindows machine performs all roles.
Prerequisite Checker
On the Prerequisite Checker page, you check and fix your vRealize Automation Windows servers tosupport IaaS installation.
Installing and Upgrading vRealize Automation
VMware, Inc. 125
The prerequisite checker inspects Windows machines where you installed the Management Agent andwill host IaaS components. Prerequisites include Java, Internet Information Services (IIS) settings, theMicrosoft Distributed Transaction Coordinator (DTC) service, and more. For a detailed list ofprerequisites, click Show Details.
The Installation Wizard allows you to proceed without checking for prerequisites, but be aware thatinstallation might fail.
n To check for prerequisites, click Run.
n If prerequisites are missing, click Show Details to learn more, then click Fix.
The Installation Wizard can fix most software or setting-based prerequisites. After making changes,the Installation Wizard restarts your IaaS hosts.
The wizard cannot fix insufficient memory or CPU. You must correct those issues in vSphere or onyour hardware, if they occur.
vRealize Automation Host
On the vRealize Automation Host page, you set the base URL address for vRealize Automation. Theaddress is usually the vRealize Automation appliance or, in high availability deployments, a load balancer.
n When deploying only one vRealize Automation appliance with no load balancer, enter thevRealize Automation appliance FQDN. You can click to have the Installation Wizard populate theFQDN for you.
n When deploying an enterprise configuration that includes one or more vRealize Automationappliances behind load balancing, enter the load balancer FQDN instead.
A single vRealize Automation appliance can still be deployed behind a load balancer. Taking thatapproach lets you add later appliances more easily, to expand the deployment.
Single Sign On
On the Single Sign On page, you set the vRealize Automation default tenant system administrator log incredentials.
The default tenant system administrator has the most permissions of any user, up to and includingcreating additional tenants. The default tenant system administrator credentials are separate from thevRealize Automation appliance root credentials.
IaaS Host
On the IaaS Host page, you set the base URL addresses for certain IaaS components. In addition, youcreate a security passphrase for the vRealize Automation IaaS SQL database.
Minimal Deployments
Setting Description
IaaS Web Address Enter the IaaS Windows server FQDN.
Install IaaS Components On Select or enter the IaaS Windows server FQDN.
Installing and Upgrading vRealize Automation
VMware, Inc. 126
Setting Description
Username In DOMAIN\username format, enter the service account. The account must be adomain account with local administrator privileges on the IaaS Windows server.
Password Enter the account password.
Security Passphrase Create a passphrase to encrypt data in the IaaS SQL database.n Record the passphrase, because you need it to restore the database if there is a
failure or to add components after initial installation.n The passphrase cannot contain a double quotation mark ( " ) character.
Confirm Passphrase Re-enter the passphrase.
Enterprise Deployments
Setting Description
IaaS Web Address Enter the primary IaaS Web server FQDN. If deploying an enterprise configuration thatincludes load-balanced multiple IaaS Web servers, enter the load balancer FQDNinstead.
Manager Service Address Enter the primary Manager Service host FQDN. If deploying an enterpriseconfiguration that includes load-balanced multiple Manager Service hosts, enter theload balancer FQDN instead.
Security Passphrase Create a passphrase to encrypt data in the IaaS SQL database.n Record the passphrase, because you need it to restore the database if there is a
failure or to add components after initial installation.n The passphrase cannot contain a double quotation mark ( " ) character.
Confirm Passphrase Re-enter the passphrase.
Microsoft SQL Server
On the Microsoft SQL Server page, you configure the vRealize Automation IaaS SQL database. The IaaSdatabase records provisioned machines, associated elements, and policies.
Setting Description
Server Name Enter the FQDN of the SQL Server host, which may be an IaaS Windows server or aseparate server.
If you need to specify a port number or named instance, use FQDN,Port\Instanceformat.
When you use SQL AlwaysOn Availability Group (AAG) you specify the AAG listenerFQDN.
Database Name Accept the default of vra, or enter a different name for the IaaS database.
Create new database Allow the Installation Wizard to create the database.
For this option to work, the account that runs the Management Agent on the primaryIaaS Web server must have the sysadmin role in SQL.
Use existing empty database Do not allow the Installation Wizard to create the database.
When you separately create the database, the Windows user or SQL user credentialsthat you provide need dbo permission on the database.
Installing and Upgrading vRealize Automation
VMware, Inc. 127
Setting Description
Default Settings (New Database Only) Clear this option only if you want to use an alternative storagelocation for IaaS data and log files.
When cleared, enter directories for data (MDF) and logs. Your SQL Server serviceaccount must have write permission to the directories.
Use SSL for database connection Encrypt connections to the database. To use this option, you must separatelyconfigure your SQL Server host for SSL. In addition, the IaaS Web server andManager Service host must trust the SSL certificate from your SQL Server host.
Windows Authentication Clear this option only if you want to use SQL authentication instead of Windows.
When cleared, enter SQL authentication credentials.
Installation Path Leave clear to accept the default of %ProgramFiles(x86)%\VMware, or enter analternative location.n vRealize Automation files are not installed on the SQL Server host. They are
placed on the primary IaaS Web server.n If you install multiple IaaS components on the same Windows machine, install
them all under the same installation path.
Web Role
(Enterprise Deployments Only) On the Web Role page, you separately configure the vRealize AutomationIaaS Web site in IIS.
In an enterprise deployment, you separately specify the IaaS Windows machine that hosts the Webcomponent. For high availability, multiple hosts are supported.
Setting Description
Website Name Customize the name or leave it as the IIS Default Web Site.
Avoid hosting additional Web sites in IIS. vRealize Automationsets the binding on its communication port to all unassigned IPaddresses, making no additional bindings possible.
Port Customize the port or accept the default of 443.
IaaS Web Servers IaaS Host Name Enter the FQDN of each IaaS Windows machine that hosts theIaaS Web component.
Username In DOMAIN\username format, enter the service account. Theaccount must be a domain account with local administratorprivileges on the IaaS Windows server.
Password Enter the account password.
Installation Path Leave clear to accept the default of%ProgramFiles(x86)%\VMware, or enter an alternativelocation.
If you install multiple IaaS components on the same Windowsmachine, install them all under the same installation path.
Manager Service Role
(Enterprise Deployments Only) On the Manager Service Role page, you configure the separatevRealize Automation Windows machine that hosts the IaaS Manager Service.
Installing and Upgrading vRealize Automation
VMware, Inc. 128
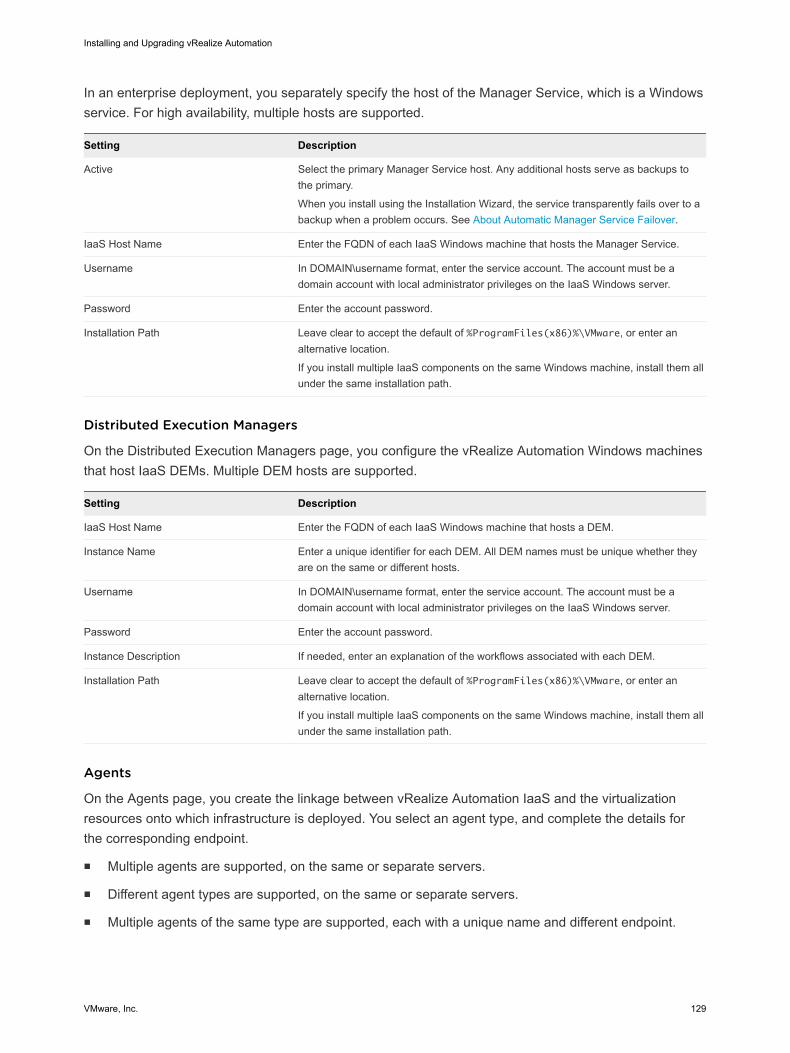
In an enterprise deployment, you separately specify the host of the Manager Service, which is a Windowsservice. For high availability, multiple hosts are supported.
Setting Description
Active Select the primary Manager Service host. Any additional hosts serve as backups tothe primary.
When you install using the Installation Wizard, the service transparently fails over to abackup when a problem occurs. See About Automatic Manager Service Failover.
IaaS Host Name Enter the FQDN of each IaaS Windows machine that hosts the Manager Service.
Username In DOMAIN\username format, enter the service account. The account must be adomain account with local administrator privileges on the IaaS Windows server.
Password Enter the account password.
Installation Path Leave clear to accept the default of %ProgramFiles(x86)%\VMware, or enter analternative location.
If you install multiple IaaS components on the same Windows machine, install them allunder the same installation path.
Distributed Execution Managers
On the Distributed Execution Managers page, you configure the vRealize Automation Windows machinesthat host IaaS DEMs. Multiple DEM hosts are supported.
Setting Description
IaaS Host Name Enter the FQDN of each IaaS Windows machine that hosts a DEM.
Instance Name Enter a unique identifier for each DEM. All DEM names must be unique whether theyare on the same or different hosts.
Username In DOMAIN\username format, enter the service account. The account must be adomain account with local administrator privileges on the IaaS Windows server.
Password Enter the account password.
Instance Description If needed, enter an explanation of the workflows associated with each DEM.
Installation Path Leave clear to accept the default of %ProgramFiles(x86)%\VMware, or enter analternative location.
If you install multiple IaaS components on the same Windows machine, install them allunder the same installation path.
Agents
On the Agents page, you create the linkage between vRealize Automation IaaS and the virtualizationresources onto which infrastructure is deployed. You select an agent type, and complete the details forthe corresponding endpoint.
n Multiple agents are supported, on the same or separate servers.
n Different agent types are supported, on the same or separate servers.
n Multiple agents of the same type are supported, each with a unique name and different endpoint.
Installing and Upgrading vRealize Automation
VMware, Inc. 129
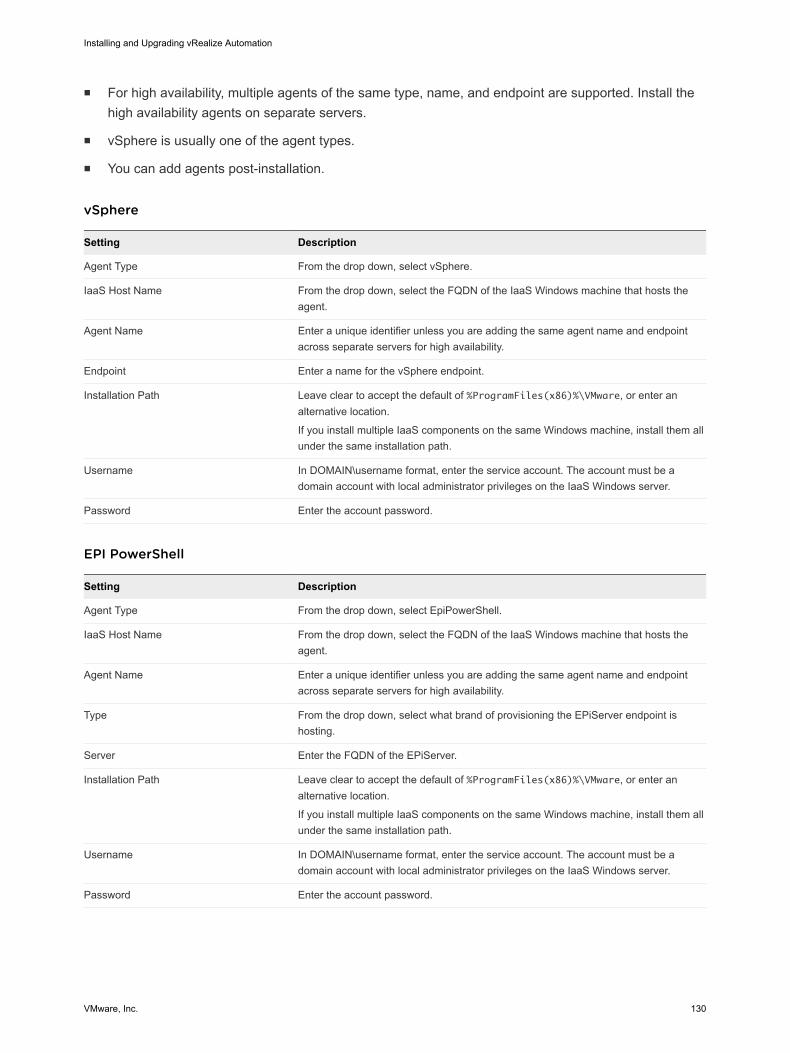
n For high availability, multiple agents of the same type, name, and endpoint are supported. Install thehigh availability agents on separate servers.
n vSphere is usually one of the agent types.
n You can add agents post-installation.
vSphere
Setting Description
Agent Type From the drop down, select vSphere.
IaaS Host Name From the drop down, select the FQDN of the IaaS Windows machine that hosts theagent.
Agent Name Enter a unique identifier unless you are adding the same agent name and endpointacross separate servers for high availability.
Endpoint Enter a name for the vSphere endpoint.
Installation Path Leave clear to accept the default of %ProgramFiles(x86)%\VMware, or enter analternative location.
If you install multiple IaaS components on the same Windows machine, install them allunder the same installation path.
Username In DOMAIN\username format, enter the service account. The account must be adomain account with local administrator privileges on the IaaS Windows server.
Password Enter the account password.
EPI PowerShell
Setting Description
Agent Type From the drop down, select EpiPowerShell.
IaaS Host Name From the drop down, select the FQDN of the IaaS Windows machine that hosts theagent.
Agent Name Enter a unique identifier unless you are adding the same agent name and endpointacross separate servers for high availability.
Type From the drop down, select what brand of provisioning the EPiServer endpoint ishosting.
Server Enter the FQDN of the EPiServer.
Installation Path Leave clear to accept the default of %ProgramFiles(x86)%\VMware, or enter analternative location.
If you install multiple IaaS components on the same Windows machine, install them allunder the same installation path.
Username In DOMAIN\username format, enter the service account. The account must be adomain account with local administrator privileges on the IaaS Windows server.
Password Enter the account password.
Installing and Upgrading vRealize Automation
VMware, Inc. 130

HyperV
Setting Description
Agent Type From the drop down, select HyperV.
IaaS Host Name From the drop down, select the FQDN of the IaaS Windows machine that hosts theagent.
Agent Name Enter a unique identifier unless you are adding the same agent name and endpointacross separate servers for high availability.
Username Enter the login account to the HyperV endpoint instance.
Password Enter the account password.
Installation Path Leave clear to accept the default of %ProgramFiles(x86)%\VMware, or enter analternative location.
If you install multiple IaaS components on the same Windows machine, install them allunder the same installation path.
Username In DOMAIN\username format, enter the service account. The account must be adomain account with local administrator privileges on the IaaS Windows server.
Password Enter the account password.
VDI PowerShell
Setting Description
Agent Type From the drop down, select VdiPowerShell.
IaaS Host Name From the drop down, select the FQDN of the IaaS Windows machine that hosts theagent.
Agent Name Enter a unique identifier unless you are adding the same agent name and endpointacross separate servers for high availability.
Type The endpoint type defaults to XenDesktop and cannot be changed.
Server Enter the FQDN of the XenDesktop endpoint.
XenDesktop Version From the drop down, select the version.
Installation Path Leave clear to accept the default of %ProgramFiles(x86)%\VMware, or enter analternative location.
If you install multiple IaaS components on the same Windows machine, install them allunder the same installation path.
Username In DOMAIN\username format, enter the service account. The account must be adomain account with local administrator privileges on the IaaS Windows server.
Password Enter the account password.
Xen
Setting Description
Agent Type From the drop down, select Xen.
IaaS Host Name From the drop down, select the FQDN of the IaaS Windows machine that hosts theagent.
Installing and Upgrading vRealize Automation
VMware, Inc. 131
Setting Description
Agent Name Enter a unique identifier unless you are adding the same agent name and endpointacross separate servers for high availability.
Username Enter the login account to the Xen endpoint instance.
Password Enter the account password.
Installation Path Leave clear to accept the default of %ProgramFiles(x86)%\VMware, or enter analternative location.
If you install multiple IaaS components on the same Windows machine, install them allunder the same installation path.
Username In DOMAIN\username format, enter the service account. The account must be adomain account with local administrator privileges on the IaaS Windows server.
Password Enter the account password.
WMI
Setting Description
Agent Type From the drop down, select WMI.
IaaS Host Name From the drop down, select the FQDN of the IaaS Windows machine that hosts theagent.
Agent Name Enter a unique identifier unless you are adding the same agent name and endpointacross separate servers for high availability.
Installation Path Leave clear to accept the default of %ProgramFiles(x86)%\VMware, or enter analternative location.
If you install multiple IaaS components on the same Windows machine, install them allunder the same installation path.
Username In DOMAIN\username format, enter the service account. The account must be adomain account with local administrator privileges on the IaaS Windows server.
Password Enter the account password.
Test
Setting Description
Agent Type From the drop down, select Test.
IaaS Host Name From the drop down, select the FQDN of the IaaS Windows machine that hosts theagent.
Agent Name Enter a unique identifier unless you are adding the same agent name and endpointacross separate servers for high availability.
Installation Path Leave clear to accept the default of %ProgramFiles(x86)%\VMware, or enter analternative location.
If you install multiple IaaS components on the same Windows machine, install them allunder the same installation path.
Installing and Upgrading vRealize Automation
VMware, Inc. 132
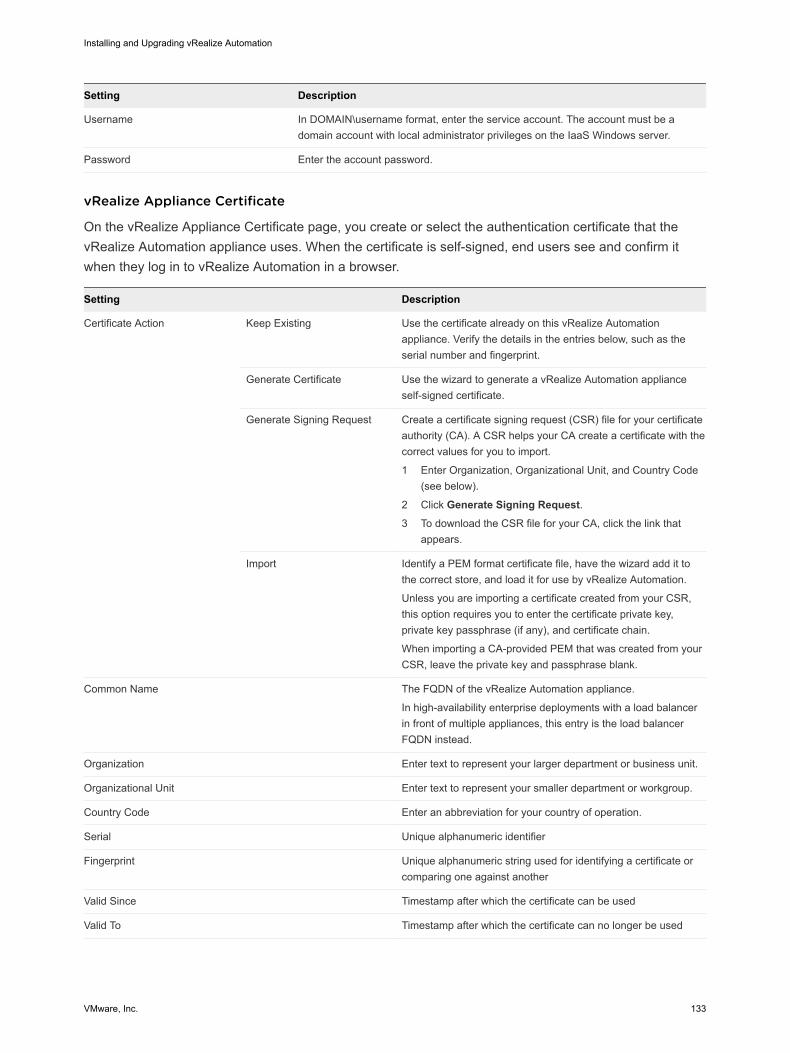
Setting Description
Username In DOMAIN\username format, enter the service account. The account must be adomain account with local administrator privileges on the IaaS Windows server.
Password Enter the account password.
vRealize Appliance Certificate
On the vRealize Appliance Certificate page, you create or select the authentication certificate that thevRealize Automation appliance uses. When the certificate is self-signed, end users see and confirm itwhen they log in to vRealize Automation in a browser.
Setting Description
Certificate Action Keep Existing Use the certificate already on this vRealize Automationappliance. Verify the details in the entries below, such as theserial number and fingerprint.
Generate Certificate Use the wizard to generate a vRealize Automation applianceself-signed certificate.
Generate Signing Request Create a certificate signing request (CSR) file for your certificateauthority (CA). A CSR helps your CA create a certificate with thecorrect values for you to import.
1 Enter Organization, Organizational Unit, and Country Code(see below).
2 Click Generate Signing Request.3 To download the CSR file for your CA, click the link that
appears.
Import Identify a PEM format certificate file, have the wizard add it tothe correct store, and load it for use by vRealize Automation.
Unless you are importing a certificate created from your CSR,this option requires you to enter the certificate private key,private key passphrase (if any), and certificate chain.
When importing a CA-provided PEM that was created from yourCSR, leave the private key and passphrase blank.
Common Name The FQDN of the vRealize Automation appliance.
In high-availability enterprise deployments with a load balancerin front of multiple appliances, this entry is the load balancerFQDN instead.
Organization Enter text to represent your larger department or business unit.
Organizational Unit Enter text to represent your smaller department or workgroup.
Country Code Enter an abbreviation for your country of operation.
Serial Unique alphanumeric identifier
Fingerprint Unique alphanumeric string used for identifying a certificate orcomparing one against another
Valid Since Timestamp after which the certificate can be used
Valid To Timestamp after which the certificate can no longer be used
Installing and Upgrading vRealize Automation
VMware, Inc. 133

Web Certificate
On the Web Certificate page, you create or select the authentication certificate that the IaaS Web serveruses. The vRealize Automation appliance connects to the Web server and needs to authenticate and trustit.
Setting Description
Certificate Action Keep Existing Use the certificate already on this IaaS Web server. Verify thedetails in the entries below, such as the serial number andfingerprint.
Generate Certificate Use the wizard to generate an IaaS Web server self-signedcertificate.
Generate Signing Request Create a certificate signing request (CSR) file for your certificateauthority (CA). A CSR helps your CA create a certificate with thecorrect values for you to import.
1 Enter Organization, Organizational Unit, and Country Code(see below).
2 Click Generate Signing Request.3 To download the CSR file for your CA, click the link that
appears.
Import Identify a PEM format certificate file, have the wizard add it tothe correct store, and load it for use by vRealize Automation.
Unless you are importing a certificate created from your CSR,this option requires you to enter the certificate private key,private key passphrase (if any), and certificate chain.
When importing a CA-provided PEM that was created from yourCSR, leave the private key and passphrase blank.
Provide CertificateThumbprint
Load a certificate that you already added to the correct store.
Common Name The FQDN of the IaaS Web server.
In high-availability enterprise deployments with a load balancerin front of multiple Web servers, this entry is the load balancerFQDN instead.
Organization Enter text to represent your larger department or business unit.
Organizational Unit Enter text to represent your smaller department or workgroup.
Country Code Enter an abbreviation for your country of operation.
Serial Unique alphanumeric identifier
Fingerprint Unique alphanumeric string used for identifying a certificate orcomparing one against another
Valid Since Timestamp after which the certificate can be used
Valid To Timestamp after which the certificate can no longer be used
Installing and Upgrading vRealize Automation
VMware, Inc. 134
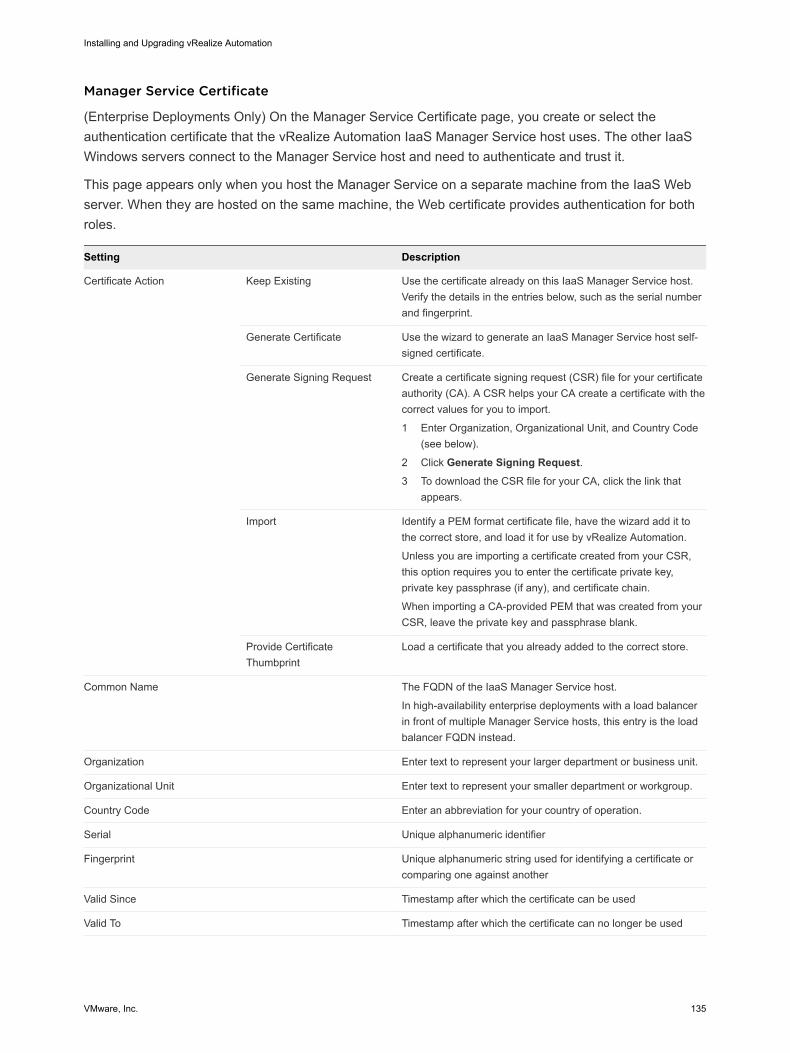
Manager Service Certificate
(Enterprise Deployments Only) On the Manager Service Certificate page, you create or select theauthentication certificate that the vRealize Automation IaaS Manager Service host uses. The other IaaSWindows servers connect to the Manager Service host and need to authenticate and trust it.
This page appears only when you host the Manager Service on a separate machine from the IaaS Webserver. When they are hosted on the same machine, the Web certificate provides authentication for bothroles.
Setting Description
Certificate Action Keep Existing Use the certificate already on this IaaS Manager Service host.Verify the details in the entries below, such as the serial numberand fingerprint.
Generate Certificate Use the wizard to generate an IaaS Manager Service host self-signed certificate.
Generate Signing Request Create a certificate signing request (CSR) file for your certificateauthority (CA). A CSR helps your CA create a certificate with thecorrect values for you to import.
1 Enter Organization, Organizational Unit, and Country Code(see below).
2 Click Generate Signing Request.3 To download the CSR file for your CA, click the link that
appears.
Import Identify a PEM format certificate file, have the wizard add it tothe correct store, and load it for use by vRealize Automation.
Unless you are importing a certificate created from your CSR,this option requires you to enter the certificate private key,private key passphrase (if any), and certificate chain.
When importing a CA-provided PEM that was created from yourCSR, leave the private key and passphrase blank.
Provide CertificateThumbprint
Load a certificate that you already added to the correct store.
Common Name The FQDN of the IaaS Manager Service host.
In high-availability enterprise deployments with a load balancerin front of multiple Manager Service hosts, this entry is the loadbalancer FQDN instead.
Organization Enter text to represent your larger department or business unit.
Organizational Unit Enter text to represent your smaller department or workgroup.
Country Code Enter an abbreviation for your country of operation.
Serial Unique alphanumeric identifier
Fingerprint Unique alphanumeric string used for identifying a certificate orcomparing one against another
Valid Since Timestamp after which the certificate can be used
Valid To Timestamp after which the certificate can no longer be used
Installing and Upgrading vRealize Automation
VMware, Inc. 135
Load Balancers
(Enterprise Deployments Only) On the Load Balancers page, you pause to configure load balancers forthe correct pool of vRealize Automation member systems.
The load balancers list is informational only. Based on your earlier wizard entries, it presents each loadbalancer in your deployment along with members, their component role, FQDN, and port number.
Pause here, and use the list while you log in to your load balancers to add vRealize Automation membersand open ports.
Validation
On the Validation page, you verify that vRealize Automation installation can proceed.
To check that all vRealize Automation components, roles, and accounts are correct and that systems canauthenticate with one another, click Validate. The process can take up to a half hour or more dependingon your environment.
If errors occur, expand the failed line item and make corrections based on the status and messagespresented. You cannot proceed with vRealize Automation installation until validation passes.
Create Snapshots
On the Create Snapshots page, you pause to take virtual machine snapshots of all vRealize Automationcomponents before proceeding with installation.
Even though validation has passed, you are strongly advised to prepare for any unexpected issuesaround installation. Before starting the installation, use your vSphere client to take a snapshot of everyvRealize Automation appliance and IaaS Windows server. Otherwise, you have to re-enter all of thewizard settings to get back to this point.
If you have enough resources, you can take snapshots of virtual machines that are running. A betterpractice is to stop them first.
1 At the upper right of the Installation Wizard, click Logout.
Important If you close the wizard using anything other than Logout, you will not be able to reopenthe wizard.
2 In vSphere, shut down the guest operating system of every vRealize Automation appliance and IaaSWindows server.
3 Right-click the virtual machines, and select Take Snapshot.
4 Name the snapshot.
5 To include machine memory in the snapshot, select Snapshot the virtual machine memory.
6 Click OK.
Wait for the snapshots to be created.
7 Power on the guest operating system of every vRealize Automation appliance and IaaS Windowsserver.
Installing and Upgrading vRealize Automation
VMware, Inc. 136
8 Return to the Installation Wizard snapshot page by logging in again as root.
https://vrealize-automation-appliance-FQDN:5480
Installation Details
On the Installation Details page, you start the vRealize Automation installation or retry it if problemsoccurred.
To start installation, click Install. Depending on your environment, installation can take up to an hour ormore.
During or after installation, you can click the Collect Logs button.
n When you collect logs, a ZIP file download link appears above the status table.
n When you collect logs more than once, each collection overwrites the previous one.
If you want the current logs, download them before clicking Collect Logs again.
If problems occur, the wizard stops the installation and displays messages to help you make corrections.After evaluating the messages and noting the corrections you need, you might or might not need thesnapshots you created.
Do Not Revert to Snapshots
If the wizard enables Retry Failed, you may make corrections and retry the installation without revertingany machines to snapshots.
After making corrections, click Retry Failed.
Revert IaaS Windows Servers to Snapshots
If the wizard enables Retry All IaaS, take the following steps.
1 In vSphere, revert all IaaS Windows machines to the snapshots taken on the previous wizard page.
2 If the snapshots were taken after a shut down, power on guest operating systems.
3 If you used an external SQL Server, delete the vRealize Automation SQL database.
4 Make corrections.
5 Click Retry All IaaS.
Revert Appliances and IaaS Windows Servers to Snapshots
If the wizard displays messages about the vRealize Automation appliance, take the following steps.
1 In vSphere, revert all vRealize Automation appliances and IaaS Windows machines to the snapshotstaken on the previous wizard page.
2 If the snapshots were taken after a shut down, power on guest operating systems.
3 If you used an external SQL Server, delete the vRealize Automation SQL database.
4 Make corrections.
Installing and Upgrading vRealize Automation
VMware, Inc. 137
5 Return to the Installation Wizard by logging in again as root.
https://vrealize-automation-appliance-FQDN:5480
6 Return to the Installation Details page, and click Install.
Licensing
On the Licensing page, you enter a key to activate the installed vRealize Automation product.
In New License Key, enter your key, and click Submit Key. You can separately submit more than onekey, including keys for standalone vRealize Automation, vRealize Suite, vRealize Business for Cloud, andvRealize Code Stream.
On this page you also select whether to enable vRealize Code Stream. vRealize Code Stream is notsupported for high-availability or production vRealize Automation deployments, and requires thevRealize Code Stream Management Pack. For more information, see Licensing vRealize Code Stream.
Telemetry
On the Telemetry page, you decide whether or not vRealize Automation sends usage statistics to VMwareas part of the Customer Experience Improvement Program.
Select or clear the option to join the Customer Experience Improvement Program (CEIP).
For more information, see The Customer Experience Improvement Program.
Post Installation Options
On the Post Installation Options page, you have options for creating new vRealize Automation data ormigrating older deployment data to your new installation.
n Configure Initial Content creates a new, local user of the default tenant. That local user can start theconfiguration process in the default tenant.
For this option, you must have added at least one vSphere endpoint earlier, on the Agents page ofthe Installation Wizard.
n Migrate a Deployment transfers your older vRealize Automation data to this newly installeddeployment. Migration preserves essential elements such as groups, blueprints, and endpoints.
n Continue takes you to the end of the Installation Wizard.
Initial Content Configuration
On the Initial Content Configuration page, you create a new, local vRealize Automation default tenantuser who can begin a content workflow for a vSphere endpoint.
Note This option is only available if you had added at least one vSphere endpoint earlier, on the Agentspage.
The new, local username is configurationadmin. vRealize Automation grants configurationadmin thefollowing privileges.
n Tenant Administrator
Installing and Upgrading vRealize Automation
VMware, Inc. 138
n IaaS Administrator
n Approval Administrator
n Catalog Administrator
n Infrastructure Architect
n XaaS Architect
n vRealize Orchestrator Administrator
Enter and confirm a login password for configurationadmin. To generate a catalog item so thatconfigurationadmin can start the configuration process after logging in to the default tenant, click CreateInitial Content.
Migration Configuration
On the Migration Configuration page, you can start the transfer of another, older vRealize Automationdeployment to your newly installed deployment.
Before migrating an older deployment, address the following guidelines.
n Thoroughly review the vRealize Automation migration guide associated with your older deploymentversion. Prerequisites and other details might vary.
n Migrate the older tenants and identity stores to VMware Identity Manager on the new deployment.
n Clone the older IaaS SQL Server database and restore it to the new deployment IaaS database. Notethe name of the cloned database.
n Obtain and make note of the encryption key for the older IaaS SQL Server database.
n Create and make note of a new passphrase for re-encrypting the migrated data.
n Note the older vRealize Automation appliance or load balancer FQDN and root login credentials.
n Note the new deployment root login credentials.
The Standard vRealize Automation Installation InterfacesAfter running the Installation Wizard, you might need or want to perform certain installation tasksmanually, through the standard interfaces.
The Installation Wizard described in Installing vRealize Automation with the Installation Wizard is yourprimary tool for new vRealize Automation installations. However, after you run the wizard, someoperations still require the older, manual installation process.
You need the manual steps if you want to expand a vRealize Automation deployment or if the wizardstopped for any reason. Situations when you might need to refer to the procedures in this section includethe following examples.
n You chose to cancel the wizard before finishing the installation.
n Installation through the wizard failed.
n You want to add another vRealize Automation appliance for high availability.
Installing and Upgrading vRealize Automation
VMware, Inc. 139
n You want to add another IaaS Web server for high availability.
n You need another proxy agent.
n You need another DEM Worker or Orchestrator.
You might use all or only some of the manual processes. Review the material throughout this section, andfollow the procedures that apply to your situation.
Using the Standard Interfaces for Minimal DeploymentsYou can install a standalone, minimal deployment for use in a development environment or as a proof ofconcept. Minimal deployments are not suitable for a production environment.
Minimal Deployment Checklist
You install vRealize Automation in a minimal configuration for proof of concept or development work.Minimal deployments require fewer steps to install but lack the production capacity of an enterprisedeployment.
Complete the high-level tasks in the following order.
Table 1‑21. Minimal Deployment Checklist
Task Details
Plan the environment and address installation prerequisites. Preparing for vRealize Automation Installation
Create an unconfigured vRealize Automation appliance. Deploy the vRealize Automation Appliance
Manually configure the vRealize Automation appliance. Configure the vRealize Automation Appliance
Install IaaS components on a single Windows server. Installing IaaS Components
Install additional agents, if required. Installing vRealize Automation Agents
Perform post-installation tasks such as configuring thedefault tenant.
Configure Access to the Default Tenant
Configure the vRealize Automation Appliance
The vRealize Automation appliance is a partially configured virtual machine that hosts thevRealize Automation server and user web portal. You download and deploy the appliance openvirtualization format (OVF) template to vCenter Server or ESX/ESXi inventory.
Prerequisites
Create an unconfigured appliance. See Deploy the vRealize Automation Appliance.
Procedure
1 Log in to the unconfigured vRealize Automation appliance management interface as root.
https://vrealize-automation-appliance-FQDN:5480
Continue past any certificate warnings.
Installing and Upgrading vRealize Automation
VMware, Inc. 140
2 If the installation wizard appears, cancel it so that you can go to the management interface instead ofthe wizard.
3 Select Admin > Time Settings, and set the time synchronization source.
Option Description
Host Time Synchronize to the vRealize Automation appliance ESXi host.
Time Server Synchronize to one external Network Time Protocol (NTP) server. Enter theFQDN or IP address of the NTP server.
You must synchronize vRealize Automation appliances and IaaS Windows servers to the same timesource. Do not mix time sources within a vRealize Automation deployment.
4 Select vRA Settings > Host Settings.
Option Action
Resolve Automatically Select Resolve Automatically to specify the name of the current host forthe vRealize Automation appliance.
Update Host For new hosts, select Update Host. Enter the fully qualified domain nameof the vRealize Automation appliance, vra-hostname.domain.name, in theHost Name text box.
For distributed deployments that use load balancers, select Update Host.Enter the fully qualified domain name for the load balancer server, vra-loadbalancername.domain.name, in the Host Name text box.
Note Configure SSO settings as described later in this procedure whenever you use Update Hostto set the host name.
5 Select the certificate type from the Certificate Action menu.
If you are using a PEM-encoded certificate, for example for a distributed environment, select Import.
Certificates that you import must be trusted and must also be applicable to all instances ofvRealize Automation appliance and any load balancer through the use of Subject Alternative Name(SAN) certificates.
Installing and Upgrading vRealize Automation
VMware, Inc. 141
If you want to generate a CSR request for a new certificate that you can submit to a certificateauthority, select Generate Signing Request. A CSR helps your CA create a certificate with thecorrect values for you to import.
Note If you use certificate chains, specify the certificates in the following order:
a Client/server certificate signed by the intermediate CA certificate
b One or more intermediate certificates
c A root CA certificate
Option Action
Keep Existing Leave the current SSL configuration. Select this option to cancel your changes.
Generate Certificate a The value displayed in the Common Name text box is the Host Name as itappears on the upper part of the page. If any additional instances of thevRealize Automation appliance available, their FQDNs are included in theSAN attribute of the certificate.
b Enter your organization name, such as your company name, in theOrganization text box.
c Enter your organizational unit, such as your department name or location, inthe Organizational Unit text box.
d Enter a two-letter ISO 3166 country code, such as US, in the Country textbox.
Generate Signing Request a Select Generate Signing Request.b Review the entries in the Organization, Organization Unit, Country Code,
and Common Name text boxes. These entries are populated from theexisting certificate. You can edit these entries if needed.
c Click Generate CSR to generate a certificate signing request, and then clickthe Download the generated CSR here link to open a dialog that enablesyou to save the CSR to a location where you can send it to a certificateauthority.
d When you receive the prepared certificate, click Import and followinstructions for importing a certificate into vRealize Automation.
Import a Copy the certificate values from BEGIN PRIVATE KEY to END PRIVATE KEY,including the header and footer, and paste them in the RSA Private Key textbox.
b Copy the certificate values from BEGIN CERTIFICATE to ENDCERTIFICATE, including the header and footer, and paste them in theCertificate Chain text box. For multiple certificate values, include a BEGINCERTIFICATE header and END CERTIFICATE footer for each certificate.
Note In the case of chained certificates, additional attributes may beavailable.
c (Optional) If your certificate uses a pass phrase to encrypt the certificate key,copy the pass phrase and paste it in the Passphrase text box.
6 Click Save Settings to save host information and SSL configuration.
7 Configure the SSO settings.
Installing and Upgrading vRealize Automation
VMware, Inc. 142
8 Click Messaging. The configuration settings and status of messaging for your appliance is displayed.Do not change these settings.
9 Click the Telemetry tab to choose whether to join the VMware Customer Experience ImprovementProgram (CEIP).
Details regarding the data collected through CEIP and the purposes for which it is used by VMwareare set forth at the Trust & Assurance Center at http://www.vmware.com/trustvmware/ceip.html.
n Select Join the VMware Customer Experience Improvement Program to participate in theprogram.
n Deselect Join the VMware Customer Experience Improvement Program to not participate inthe program.
10 Click Services and verify that services are registered.
Depending on your site configuration, this can take about 10 minutes.
Note You can log in to the appliance and run tail -f /var/log/vcac/catalina.out to monitorstartup of the services.
11 Enter your license information.
a Click vRA Settings > Licensing.
b Click Licensing.
c Enter a valid vRealize Automation license key that you downloaded when you downloaded theinstallation files, and click Submit Key.
Note If you experience a connection error, you might have a problem with the load balancer. Checknetwork connectivity to the load balancer.
12 Select whether to enable vRealize Code Stream.
vRealize Code Stream is not supported for high-availability or production vRealize Automationdeployments, and requires the vRealize Code Stream Management Pack. See Licensing vRealizeCode Stream.
13 Confirm that you can log in to vRealize Automation.
a Open a Web browser to the vRealize Automation product interface URL.
https://vrealize-automation-appliance-FQDN/vcac
b Accept the vRealize Automation certificate.
c Accept the SSO certificate.
d Log in with [email protected] and the password you specified when you configuredSSO.
The interface opens to the Tenants page on the Administration tab. A single tenant namedvsphere.local appears in the list.
Installing and Upgrading vRealize Automation
VMware, Inc. 143
You have finished the deployment and configuration of your vRealize Automation appliance. If theappliance does not function correctly after configuration, redeploy and reconfigure the appliance. Do notmake changes to the existing appliance.
What to do next
See Install the Infrastructure Components.
Installing IaaS Components
The administrator installs a complete set of infrastructure (IaaS) components on a Windows machine(physical or virtual). Administrator rights are required to perform these tasks.
A minimal installation installs all of the components on the same Windows server, except for the SQLdatabase, which you can install on a separate server.
Enable Time Synchronization on the Windows Server
Clocks on the vRealize Automation server and Windows servers must be synchronized to ensure that theinstallation is successful.
The following steps describe how to enable time synchronization with the ESX/ESXi host by usingVMware Tools. If you are installing the IaaS components on a physical host or do not want to use VMwareTools for time synchronization, ensure that the server time is accurate by using your preferred method.
Procedure
1 Open a command prompt on the Windows installation machine.
2 Type the following command to navigate to the VMware Tools directory.
cd C:\Program Files\VMware\VMware Tools
3 Type the command to display the timesync status.
VMwareToolboxCmd.exe timesync status
4 If timesync is disabled, type the following command to enable it.
VMwareToolboxCmd.exe timesync enable
IaaS Certificates
vRealize Automation IaaS components use certificates and SSL to secure communications betweencomponents. In a minimal installation for proof-of-concept purposes, you can use self-signed certificates.
In a distributed environment, obtain a domain certificate from a trusted certificate authority. Forinformation about installing domain certificates for IaaS components, see Install IaaS Certificates in thedistributed deployment chapter.
Installing and Upgrading vRealize Automation
VMware, Inc. 144

Install the Infrastructure Components
The system administrator logs into the Windows machine and uses the installation wizard to install theIaaS services on the Windows virtual or physical machine.
Prerequisites
n Verify that the server meets the requirements in IaaS Windows Servers.
n Enable Time Synchronization on the Windows Server.
n Verify that you have deployed and fully configured the vRealize Automation appliance, and that thenecessary services are running (plugin-service, catalog-service, iaas-proxy-provider).
Procedure
1 Download the vRealize Automation IaaS Installer
To install IaaS on your minimal virtual or physical Windows server, you download a copy of the IaaSinstaller from the vRealize Automation appliance.
2 Select the Installation Type
The system administrator runs the installer wizard from the Windows 2008 or 2012 installationmachine.
3 Check Prerequisites
The Prerequisite Checker verifies that your machine meets IaaS installation requirements.
4 Specify Server and Account Settings
The vRealize Automation system administrator specifies server and account settings for theWindows installation server and selects a SQL database server instance and authentication method.
5 Specify Managers and Agents
The minimum installation installs the required Distributed Execution Managers and the defaultvSphere proxy agent. The system administrator can install additional proxy agents (XenServer, orHyper-V, for example) after installation using the custom installer.
6 Register the IaaS Components
The system administrator installs the IaaS certificate and registers the IaaS components with theSSO.
7 Finish the Installation
The system administrator finishes the IaaS installation.
Download the vRealize Automation IaaS Installer
To install IaaS on your minimal virtual or physical Windows server, you download a copy of the IaaSinstaller from the vRealize Automation appliance.
If you see certificate warnings during this process, continue past them to finish the installation.
Prerequisites
n Review the IaaS Windows server requirements. See IaaS Windows Servers.
Installing and Upgrading vRealize Automation
VMware, Inc. 145
n If you are using Internet Explorer for the download, verify that Enhanced Security Configuration is notenabled. Navigate to res://iesetup.dll/SoftAdmin.htm on the Windows server.
Procedure
1 Log in to the IaaS Windows server using an account that has administrator rights.
2 Open a Web browser directly to the vRealize Automation appliance installer URL.
https://vrealize-automation-appliance-FQDN:5480/installer
3 Click IaaS Installer.
4 Save setup__vrealize-automation-appliance-FQDN@5480 to the Windows server.
Do not change the installer file name. It is used to connect the installation to the vRealize Automationappliance.
Select the Installation Type
The system administrator runs the installer wizard from the Windows 2008 or 2012 installation machine.
Prerequisites
Download the vRealize Automation IaaS Installer.
Procedure
1 Right-click the [email protected] setup file and selectRun as administrator.
2 Click Next.
3 Accept the license agreement and click Next.
4 On the Log in page, supply administrator credentials for the vRealize Automation appliance and verifythe SSL Certificate.
a Type the user name, which is root, and the password.
The password is the password that you specified when you deployed the vRealize Automationappliance.
b Select Accept Certificate.
c Click View Certificate.
Compare the certificate thumbprint with the thumbprint set for the vRealize Automation appliance.You can view the vRealize Automation appliance certificate in the client browser when themanagement console is accessed on port 5480.
5 Select Accept Certificate.
6 Click Next.
7 Select Complete Install on the Installation Type page if you are creating a minimal deployment andclick Next.
Installing and Upgrading vRealize Automation
VMware, Inc. 146
Check Prerequisites
The Prerequisite Checker verifies that your machine meets IaaS installation requirements.
Prerequisites
Select the Installation Type.
Procedure
1 Complete the Prerequisite Check.
Option Description
No errors Click Next.
Noncritical errors Click Bypass.
Critical errors Bypassing critical errors causes the installation to fail. If warnings appear, selectthe warning in the left pane and follow the instructions on the right. Address allcritical errors and click Check Again to verify.
2 Click Next.
The machine meets installation requirements.
Specify Server and Account Settings
The vRealize Automation system administrator specifies server and account settings for the Windowsinstallation server and selects a SQL database server instance and authentication method.
Prerequisites
Check Prerequisites.
Procedure
1 On the Server and Account Settings page or the Detected Settings page, enter the user name andpassword for the Windows service account. This service account must be a local administratoraccount that also has SQL administrative privileges.
2 Type a phrase in the Passphrase text box.
The passphrase is a series of words that generates the encryption key used to secure database data.
Note Save your passphrase so that it is available for future installations or system recovery.
3 To install the database instance on the same server with the IaaS components, accept the defaultserver in the Server text box in the SQL Server Database Installation Information section.
If the database is on a different machine, enter the server in the following format.
machine-FQDN,port-number\named-database-instance
4 Accept the default in the Database name text box, or enter the appropriate name if applicable.
Installing and Upgrading vRealize Automation
VMware, Inc. 147
5 Select the authentication method.
u Select Use Windows authentication if you want to create the database using the Windowscredentials of the current user. The user must have SQL sys_admin privileges.
u Deselect Use Windows authentication if you want to create the database using SQLauthentication. Type the User name and Password of the SQL Server user with SQL sys_adminprivileges on the SQL server instance.
Windows authentication is recommended. When you choose SQL authentication, the unencrypteddatabase password appears in certain configuration files.
6 (Optional) Select the Use SSL for database connection checkbox.
By default, the checkbox is enabled. SSL provides a more secure connection between the IaaSserver and SQL database. However, you must first configure SSL on the SQL server to support thisoption. For more about configuring SSL on the SQL server, see Microsoft Technet article 189067.
7 Click Next.
Specify Managers and Agents
The minimum installation installs the required Distributed Execution Managers and the default vSphereproxy agent. The system administrator can install additional proxy agents (XenServer, or Hyper-V, forexample) after installation using the custom installer.
Prerequisites
Specify Server and Account Settings.
Procedure
1 On the Distributed Execution Managers And Proxy vSphere Agent page, accept the defaults orchange the names if appropriate.
2 Accept the default to install a vSphere agent to enable provisioning with vSphere or deselect it ifapplicable.
a Select Install and configure vSphere agent.
b Accept the default agent and endpoint, or type a name.
Make a note of the Endpoint name value. You must type this information correctly when youconfigure the vSphere endpoint in the vRealize Automation console or configuration may fail.
3 Click Next.
Register the IaaS Components
The system administrator installs the IaaS certificate and registers the IaaS components with the SSO.
Prerequisites
Download the vRealize Automation IaaS Installer.
Installing and Upgrading vRealize Automation
VMware, Inc. 148
Procedure
1 Accept the default Server value, which is populated with the fully qualified domain name of thevRealize Automation appliance server from which you downloaded the installer. Verify that a fullyqualified domain name is used to identify the server and not an IP address.
If you have multiple virtual appliances and are using a load balancer, enter the load balancer virtualappliance path.
2 Click Load to populate the value of SSO Default Tenant (vsphere.local).
3 Click Download to retrieve the certificate from the vRealize Automation appliance.
You can click View Certificate to view the certificate details.
4 Select Accept Certificate to install the SSO certificate.
5 In the SSO Administrator panel, type administrator in the User name text box and the passwordyou defined for this user when you configured SSO in Password and Confirm password.
6 Click the test link to the right of the User name field to validate the entered password.
7 Accept the default in IaaS Server, which contains the host name of the Windows machine where youare installing.
8 Click the test link to the right of the IaaS Server field to validate connectivity.
9 Click Next.
If any errors appear after you click Next, resolve them before proceeding.
Finish the Installation
The system administrator finishes the IaaS installation.
Prerequisites
n Register the IaaS Components.
n Verify that machine on which you are installing is connected to the network and is able to connect tothe vRealize Automation appliance from which you download the IaaS installer.
Procedure
1 Review the information on the Ready to Install page and click Install.
The installation starts. Depending on your network configuration, installation can take between fiveminutes and one hour.
2 When the success message appears, leave the Guide me through initial configuration check boxselected and click Next, and Finish.
3 Close the Configure the System message box.
The installation is now finished.
Installing and Upgrading vRealize Automation
VMware, Inc. 149

What to do next
Verify IaaS Services.
Using the Standard Interfaces for Distributed DeploymentsEnterprise deployments are designed for greater vRealize Automation capacity in production and requirethat you distribute components across multiple machines. Enterprise deployments also might includeredundant systems behind load balancers.
Distributed Deployment Checklist
A system administrator can deploy vRealize Automation in a distributed configuration, which providesfailover protection and high-availability through redundancy.
The Distributed Deployment Checklist provides a high-level overview of the steps required to perform adistributed installation.
Table 1‑22. Distributed Deployment Checklist
Task Details
Plan and prepare the installation environment andverify that all installation prerequisites are met.
Preparing for vRealize Automation Installation
Plan for and obtain your SSL certificates. Certificate Trust Requirements in a Distributed Deployment
Deploy the lead vRealize Automation applianceserver, and any additional appliances you require forredundancy and high availability.
Deploy the vRealize Automation Appliance
Configure your load balancer to handlevRealize Automation appliance traffic.
Configuring Your Load Balancer
Configure the lead vRealize Automation applianceserver, and any additional appliances you deployedfor redundancy and high availability.
Configuring Appliances for vRealize Automation
Configure your load balancer to handle thevRealize Automation IaaS component traffic andinstall vRealize Automation IaaS components.
Install the IaaS Components in a Distributed Configuration
If required, install agents to integrate with externalsystems.
Installing vRealize Automation Agents
Configure the default tenant and provide the IaaSlicense.
Configure Access to the Default Tenant
vRealize Orchestrator
The vRealize Automation appliance includes an embedded version of vRealize Orchestrator that is nowrecommended for use with new installations. In older deployments or special cases, however, users mightconnect vRealize Automation to a separate, external vRealize Orchestrator. See https://www.vmware.com/products/vrealize-orchestrator.html.
For information about connecting vRealize Automation and vRealize Orchestrator, see VMware vRealizeOrchestrator Plug-In for vRealize Automation.
Installing and Upgrading vRealize Automation
VMware, Inc. 150
Directories Management
If you install a distributed installation with load balancers for high availability and failover, notify the teamresponsible for configuring your vRealize Automation environment. Your tenant administrators mustconfigure Directories Management for high availability when they configure the link to your ActiveDirectory.
Disabling Load Balancer Health Checks
Health checks ensure that a load balancer sends traffic only to nodes that are working. The load balancersends a health check at a specified frequency to every node. Nodes that exceed the failure thresholdbecome ineligible for new traffic.
For workload distribution and failover, you can place multiple vRealize Automation appliances behind aload balancer. In addition, you can place multiple IaaS Web servers and multiple IaaS Manager Serviceservers behind their respective load balancers.
When using load balancers, do not allow the load balancers to send health checks at any time duringinstallation. Health checks might interfere with installation or cause the installation to behaveunpredictably.
n When deploying vRealize Automation appliance or IaaS components behind existing load balancers,disable health checks on all load balancers in the proposed configuration before installing anycomponents.
n After installing and configuring all of vRealize Automation, including all vRealize Automationappliance and IaaS components, you may re-enable health checks.
Certificate Trust Requirements in a Distributed Deployment
vRealize Automation uses certificates to maintain trust relationships and provide secure communicationamong components in distributed deployments.
In a distributed, or clustered, deployment, vRealize Automation certificate organization largely conformsto the three tiered architectural structure of vRealize Automation. The three tiers are vRealize Automationappliance, IaaS Website components, and Manager Service components. In a distributed system, eachhardware machine in a particular tier shares a certificate. That is, each vRealize Automation applianceshares a common certificate, and each Manager Service machine shares the common certificate thatapplies to that layer.
You can use system or user generated self-signed certificates, or CA supplied certificates with distributedvRealize Automation deployments. Starting in vRealize Automation 7.0 and newer, if no certificates aresupplied by the user, the installer automatically generates self-signed certificates for all applicable nodesand places them in the appropriate trust stores.
You can use load balancers with distributed vRealize Automation components to provide high availabilityand failover support. VMware recommends that vRealize Automation deployments use a pass-throughconfiguration for deployments that use load balancers. In a pass-through configuration, load balancerspass requests along to the appropriate components rather than decrypting them. The vRealizeAutomation appliance and IaaS web servers must then perform the necessary decryption.
Installing and Upgrading vRealize Automation
VMware, Inc. 151
For more information about using and configuring load balancers, see vRealize Automation LoadBalancing.
If you supply or generate your own certificates using Openssl or another tool, you can use either wildcardor Subject Alternative Name (SAN) certificates. Note that the IaaS certificates must be multi-usecertificates.
If you are supplying certificates, you must obtain a multiple-use certificate that includes the IaaScomponent in the cluster, and then copy that certificate to the trust store for each component. If you useload balancers, you must include the load balancer FQDN in the trusted address of the cluster multiple-use certificate.
If you are need to update system generated self-signed certificates with user or CA supplied certificates,see Updating vRealize Automation Certificates.
The Certificate Trust Requirements table summarizes the trust registration requirements for variousimported certificates.
Table 1‑23. Certificate Trust Requirements
Import Register
vRealize Automation appliance cluster IaaS Web components cluster
IaaS Web component cluster n vRealize Automation appliance clustern Manager Service components clustern DEM Orchestrators and DEM Worker components
Manager Service component cluster n DEM Orchestrators and DEM Worker componentsn Agents and Proxy Agents
Configure Web Component, Manager Service and DEM Host Certificate Trust
Customers who use a thumb print with pre installed PFX files to support user authentication mustconfigure thumb print trust on the web host, manager service, and DEM Orchestrator and Worker hostmachines.
Customers who import PEM files or use self-signed certificates can ignore this procedure.
Prerequisites
Valid web.pfx and ms.pfx available for thumb print authentication.
Procedure
1 Import the web.pfx and ms.pfx files to the following locations on the web component and managerservice host machines:
n Host Computer/Certificates/Personal certificate store
n Host Computer/Certificates/Trusted People certificate store
Installing and Upgrading vRealize Automation
VMware, Inc. 152
2 Import the web.pfx and ms.pfx files to the following locations on the DEM Orchestrator and Workerhost machines:
Host Computer/Certificates/Trusted People certificate store
3 Open a Microsoft Management Console window on each of the applicable host machines.
Note Actual paths and options in the Management Console may differ somewhat based onWindows versions and system configurations.
a Select Add/Remove Snap-in.
b Select Certificates.
c Select Local Computer.
d Open the certificate files that you imported previously and copy the thumb prints.
What to do next
Insert the thumb print into the vRealize Automation wizard Certificate page for the Manager Service, Webcomponents and DEM components.
Installation Worksheets
Worksheets record important information that you need to reference during installation.
Settings are case sensitive. Note that there are additional spaces for more components, if you areinstalling a distributed deployment. You might not need all the spaces in the worksheets. In addition, amachine might host more than one IaaS component. For example, the primary Web server and DEMOrchestrator might be on the same FQDN.
Table 1‑24. vRealize Automation Appliance
Variable My Value Example
Primary vRealize Automation applianceFQDN
automation.mycompany.com
Primary vRealize Automation appliance IPaddress
For reference only; do not enter IPaddresses
123.234.1.105
Additional vRealize Automation applianceFQDN
automation2.mycompany.com
Additional vRealize Automation applianceIP address
For reference only; do not enter IPaddresses
123.234.1.106
vRealize Automation appliance loadbalancer FQDN
automation-balance.mycompany.com
Installing and Upgrading vRealize Automation
VMware, Inc. 153
Table 1‑24. vRealize Automation Appliance (Continued)
Variable My Value Example
vRealize Automation appliance loadbalancer IP address
For reference only; do not enter IPaddresses
123.234.1.201
Management interface (https://appliance-FQDN:5480) username
root (default) root
Management interface password admin123
Default tenant vsphere.local (default) vsphere.local
Default tenant username [email protected] (default) [email protected]
Default tenant password login123
Table 1‑25. IaaS Windows Servers
Variable My Value Example
Primary IaaS Web Server with ModelManager Data FQDN
web.mycompany.com
Primary IaaS Web Server with ModelManager Data IP address
For reference only; do not enter IPaddresses
123.234.1.107
Additional IaaS Web Server FQDN web2.mycompany.com
Additional IaaS Web Server IP address
For reference only; do not enter IPaddresses
123.234.1.108
IaaS Web Server load balancer FQDN web-balance.mycompany.com
IaaS Web Server load balancer IPaddress
For reference only; do not enter IPaddresses
123.234.1.202
Active IaaS Manager Service host FQDN mgr-svc.mycompany.com
Active IaaS Manager Service host IPaddress
For reference only; do not enter IPaddresses
123.234.1.109
Passive IaaS Manager Service hostFQDN
mgr-svc2.mycompany.com
Passive IaaS Manager Service host IPaddress
For reference only; do not enter IPaddresses
123.234.1.110
IaaS Manager Service host load balancerFQDN
mgr-svc-balance.mycompany.com
Installing and Upgrading vRealize Automation
VMware, Inc. 154
Table 1‑25. IaaS Windows Servers (Continued)
Variable My Value Example
IaaS Manager Service host load balancerIP address
For reference only; do not enter IPaddresses
123.234.203
For IaaS services, domain account withadministrator rights on hosts
SUPPORT\provisioner
Account password login123
Table 1‑26. IaaS SQL Server Database
Variable My Value Example
Database instance IAASSQL
Database name vcac (default) vcac
Passphrase (used at installation, upgrade,and migration)
login123
Table 1‑27. IaaS Distributed Execution Managers
Variable My Value Example
DEM host FQDN dem.mycompany.com
DEM host IP address
For reference only; do not enter IPaddresses
123.234.1.111
DEM host FQDN dem2.mycompany.com
DEM host IP address
For reference only; do not enter IPaddresses
123.234.1.112
Unique DEM Orchestrator name Orchestrator-1
Unique DEM Orchestrator name Orchestrator-2
Unique DEM Worker name Worker-1
Unique DEM Worker name Worker-2
Unique DEM Worker name Worker-3
Unique DEM Worker name Worker-4
Configuring Your Load Balancer
After you deploy the appliances for vRealize Automation, you can set up a load balancer to distributetraffic among multiple instances of the vRealize Automation appliance.
The following list provides an overview of the general steps required to configure a load balancer forvRealize Automation traffic:
1 Install your load balancer.
Installing and Upgrading vRealize Automation
VMware, Inc. 155
2 Enable session affinity, also known as sticky sessions.
3 Ensure that the timeout on the load balancer is at least 100 seconds.
4 If your network or load balancer requires it, import a certificate to your load balancer. For informationabout trust relationships and certificates, see Certificate Trust Requirements in a DistributedDeployment. For information about extracting certificates, see Extracting Certificates and PrivateKeys
5 Configure the load balancer for vRealize Automation appliance traffic.
6 Configure the appliances for vRealize Automation. See Configuring Appliances for vRealizeAutomation.
Note When you set up virtual appliances under the load balancer, do so only for virtual appliances thathave been configured for use with vRealize Automation. If unconfigured appliances are set up, you seefault responses.
For more about load balancers, see vRealize Automation Load Balancing.
For information about scalability and high availability, see the vRealize Automation ReferenceArchitecture guide.
Configuring Appliances for vRealize Automation
After deploying your appliances and configuring load balancing, you configure the appliances forvRealize Automation.
Configure the First vRealize Automation Appliance in a Cluster
The vRealize Automation appliance is a partially configured virtual machine that hosts thevRealize Automation server and user web portal. You download and deploy the appliance openvirtualization format (OVF) template to vCenter Server or ESX/ESXi inventory.
Prerequisites
n Create an unconfigured appliance. See Deploy the vRealize Automation Appliance.
n Obtain an authentication certificate for the vRealize Automation appliance.
If your network or load balancer requires it, later procedures copy the certificate to the load balancerand additional appliances.
Procedure
1 Log in to the unconfigured vRealize Automation appliance management interface as root.
https://vrealize-automation-appliance-FQDN:5480
Continue past any certificate warnings.
2 If the installation wizard appears, cancel it so that you can go to the management interface instead ofthe wizard.
Installing and Upgrading vRealize Automation
VMware, Inc. 156
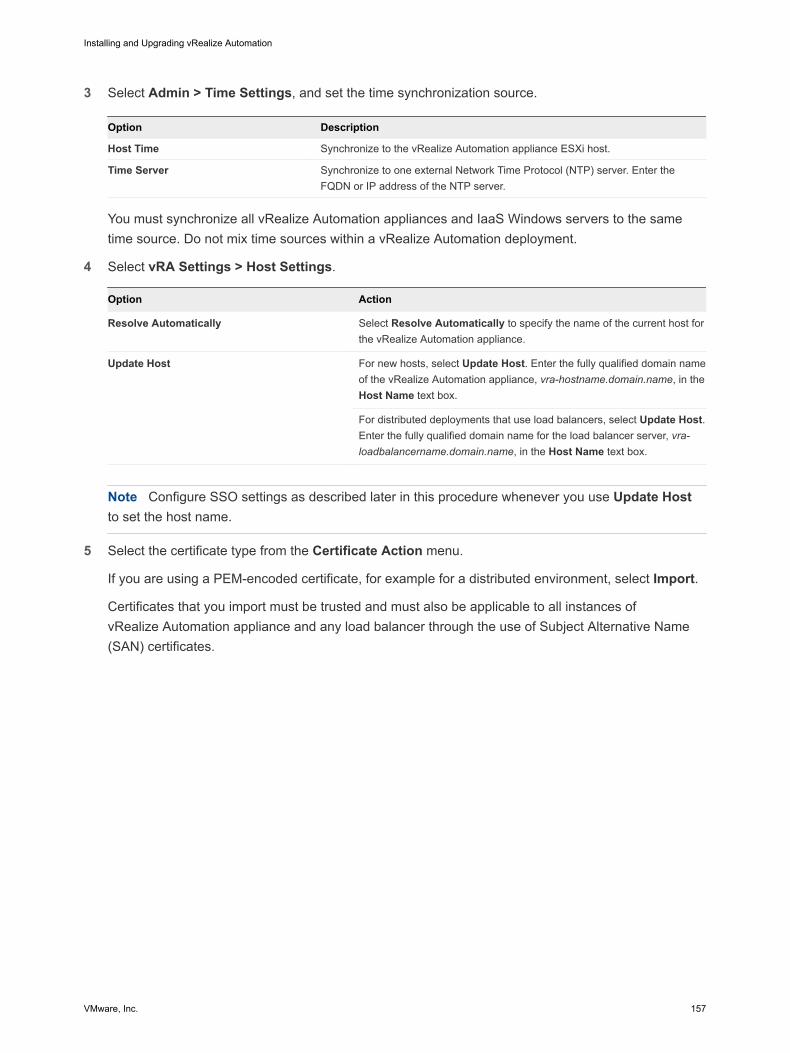
3 Select Admin > Time Settings, and set the time synchronization source.
Option Description
Host Time Synchronize to the vRealize Automation appliance ESXi host.
Time Server Synchronize to one external Network Time Protocol (NTP) server. Enter theFQDN or IP address of the NTP server.
You must synchronize all vRealize Automation appliances and IaaS Windows servers to the sametime source. Do not mix time sources within a vRealize Automation deployment.
4 Select vRA Settings > Host Settings.
Option Action
Resolve Automatically Select Resolve Automatically to specify the name of the current host forthe vRealize Automation appliance.
Update Host For new hosts, select Update Host. Enter the fully qualified domain nameof the vRealize Automation appliance, vra-hostname.domain.name, in theHost Name text box.
For distributed deployments that use load balancers, select Update Host.Enter the fully qualified domain name for the load balancer server, vra-loadbalancername.domain.name, in the Host Name text box.
Note Configure SSO settings as described later in this procedure whenever you use Update Hostto set the host name.
5 Select the certificate type from the Certificate Action menu.
If you are using a PEM-encoded certificate, for example for a distributed environment, select Import.
Certificates that you import must be trusted and must also be applicable to all instances ofvRealize Automation appliance and any load balancer through the use of Subject Alternative Name(SAN) certificates.
Installing and Upgrading vRealize Automation
VMware, Inc. 157
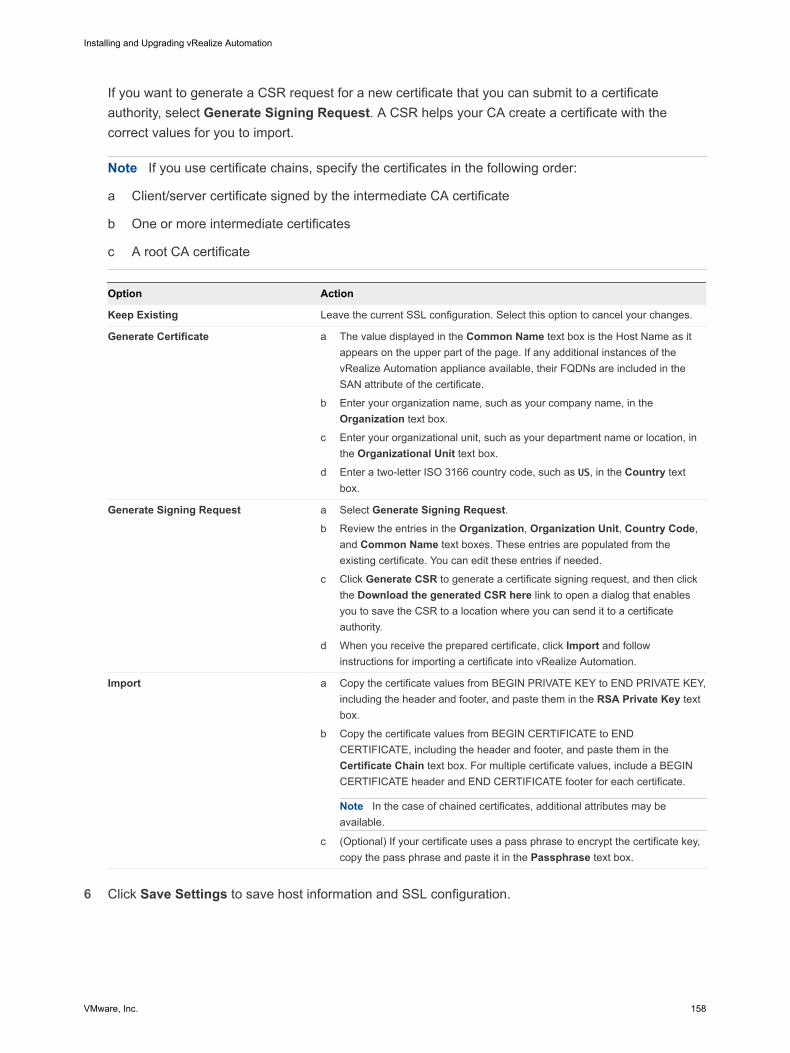
If you want to generate a CSR request for a new certificate that you can submit to a certificateauthority, select Generate Signing Request. A CSR helps your CA create a certificate with thecorrect values for you to import.
Note If you use certificate chains, specify the certificates in the following order:
a Client/server certificate signed by the intermediate CA certificate
b One or more intermediate certificates
c A root CA certificate
Option Action
Keep Existing Leave the current SSL configuration. Select this option to cancel your changes.
Generate Certificate a The value displayed in the Common Name text box is the Host Name as itappears on the upper part of the page. If any additional instances of thevRealize Automation appliance available, their FQDNs are included in theSAN attribute of the certificate.
b Enter your organization name, such as your company name, in theOrganization text box.
c Enter your organizational unit, such as your department name or location, inthe Organizational Unit text box.
d Enter a two-letter ISO 3166 country code, such as US, in the Country textbox.
Generate Signing Request a Select Generate Signing Request.b Review the entries in the Organization, Organization Unit, Country Code,
and Common Name text boxes. These entries are populated from theexisting certificate. You can edit these entries if needed.
c Click Generate CSR to generate a certificate signing request, and then clickthe Download the generated CSR here link to open a dialog that enablesyou to save the CSR to a location where you can send it to a certificateauthority.
d When you receive the prepared certificate, click Import and followinstructions for importing a certificate into vRealize Automation.
Import a Copy the certificate values from BEGIN PRIVATE KEY to END PRIVATE KEY,including the header and footer, and paste them in the RSA Private Key textbox.
b Copy the certificate values from BEGIN CERTIFICATE to ENDCERTIFICATE, including the header and footer, and paste them in theCertificate Chain text box. For multiple certificate values, include a BEGINCERTIFICATE header and END CERTIFICATE footer for each certificate.
Note In the case of chained certificates, additional attributes may beavailable.
c (Optional) If your certificate uses a pass phrase to encrypt the certificate key,copy the pass phrase and paste it in the Passphrase text box.
6 Click Save Settings to save host information and SSL configuration.
Installing and Upgrading vRealize Automation
VMware, Inc. 158
7 If required by your network or load balancer, copy the imported or newly created certificate to thevirtual appliance load balancer.
You might need to enable root SSH access in order to export the certificate.
a If not already logged in, log in to the vRealize Automation appliance Management Console asroot.
b Click the Admin tab.
c Click the Admin sub menu.
d Select the SSH service enabled check box.
Deselect the check box to disable SSH when finished.
e Select the Administrator SSH login check box.
Deselect the check box to disable SSH when finished.
f Click Save Settings.
8 Configure the SSO settings.
9 Click Services.
All services must be running before you can install a license or log in to the console. They usuallystart in about 10 minutes.
Note You can also log in to the appliance and run tail -f /var/log/vcac/catalina.out tomonitor service startup.
10 Enter your license information.
a Click vRA Settings > Licensing.
b Click Licensing.
c Enter a valid vRealize Automation license key that you downloaded when you downloaded theinstallation files, and click Submit Key.
Note If you experience a connection error, you might have a problem with the load balancer. Checknetwork connectivity to the load balancer.
11 Select whether to enable vRealize Code Stream.
vRealize Code Stream is not supported for high-availability or production vRealize Automationdeployments, and requires the vRealize Code Stream Management Pack. See Licensing vRealizeCode Stream.
12 Click Messaging. The configuration settings and status of messaging for your appliance is displayed.Do not change these settings.
Installing and Upgrading vRealize Automation
VMware, Inc. 159
13 Click the Telemetry tab to choose whether to join the VMware Customer Experience ImprovementProgram (CEIP).
Details regarding the data collected through CEIP and the purposes for which it is used by VMwareare set forth at the Trust & Assurance Center at http://www.vmware.com/trustvmware/ceip.html.
n Select Join the VMware Customer Experience Improvement Program to participate in theprogram.
n Deselect Join the VMware Customer Experience Improvement Program to not participate inthe program.
14 Click Save Settings.
15 Confirm that you can log in to vRealize Automation.
a Open a Web browser to the vRealize Automation product interface URL.
https://vrealize-automation-appliance-FQDN/vcac
b If prompted, continue past the certificate warnings.
c Log in with [email protected] and the password you specified when you configuredSSO.
The interface opens to the Tenants page on the Administration tab. A single tenant namedvsphere.local appears in the list.
Configuring Additional Instances of the vRealize Automation Appliance
The system administrator can deploy multiple instances of the vRealize Automation appliance to ensureredundancy in a high-availability environment.
For each vRealize Automation appliance, you must enable time synchronization and add the appliance toa cluster. Configuration information based on settings for the initial (primary) vRealize Automationappliance is added automatically when you add the appliance to the cluster.
If you install a distributed installation with load balancers for high availability and failover, notify the teamresponsible for configuring your vRealize Automation environment. Your tenant administrators mustconfigure Directories Management for high availability when they configure the link to your ActiveDirectory.
Add Another vRealize Automation Appliance to the Cluster
For high availability, distributed installations can use a load balancer in front of a cluster ofvRealize Automation appliance nodes.
You use the management interface on the new vRealize Automation appliance to join it to an existingcluster of one or more appliances. The join operation copies configuration information to the newappliance that you are adding, including certificate, SSO, licensing, database, and messaginginformation.
You must add appliances to a cluster one at a time and not in parallel.
Installing and Upgrading vRealize Automation
VMware, Inc. 160
Prerequisites
n Have one or more vRealize Automation appliances already in the cluster, where one is the primarynode. See Configure the First vRealize Automation Appliance in a Cluster.
You can set a new appliance to be the primary node only after joining it to the cluster.
n Create the new appliance node. See Deploy the vRealize Automation Appliance.
n Verify that the load balancer is configured for use with the new appliance.
n Verify that traffic can pass through the load balancer to reach all current nodes and the new node thatyou are about to add.
n Verify that all vRealize Automation services are started on the current nodes.
Procedure
1 Log in to the new vRealize Automation appliance management interface as root.
https://vrealize-automation-appliance-FQDN:5480
Continue past any certificate warnings.
2 If the installation wizard appears, cancel it so that you can go to the management interface instead ofthe wizard.
3 Select Admin > Time Settings, and set the time source to the same one that the rest of the clusterappliances use.
4 Select vRA Settings > Cluster.
5 Enter the FQDN of a previously configured vRealize Automation appliance in the Leading ClusterNode text box.
You can use the FQDN of the primary vRealize Automation appliance, or any vRealize Automationappliance that is already joined to the cluster.
6 Type the root password in the Password text box.
7 Click Join Cluster.
8 Continue past any certificate warnings.
Services for the cluster are restarted.
9 Verify that services are running.
a Click the Services tab.
b Click the Refresh tab to monitor the progress of service startup.
Disable Unused Services
To conserve internal resources in cases where an external instance of vRealize Orchestrator is used, youmay disable the embedded vRealize Orchestrator service.
Installing and Upgrading vRealize Automation
VMware, Inc. 161
Prerequisites
Add Another vRealize Automation Appliance to the Cluster
Procedure
1 Log in to the vRealize Automation appliance console.
2 Stop the vRealize Orchestrator service.
service vco-server stop
chkconfig vco-server off
Validate the Distributed Deployment
After deploying additional instances of the vRealize Automation appliance, you validate that you canaccess the clustered appliances.
Procedure
1 In the load balancer management interface or configuration file, temporarily disable all nodes exceptthe node that you are testing.
2 Confirm that you can log in to vRealize Automation through the load balancer address:
https://vrealize-automation-appliance-load-balancer-FQDN/vcac
3 After verifying that you can access the new vRealize Automation appliance through the load balancer,re-enable the other nodes.
Install the IaaS Components in a Distributed Configuration
The system administrator installs the IaaS components after the appliances are deployed and fullyconfigured. The IaaS components provide access to vRealize Automation Infrastructure features.
All components must run under the same service account user, which must be a domain account that hasprivileges on each distributed IaaS server. Do not use local system accounts.
Prerequisites
n Configure the First vRealize Automation Appliance in a Cluster.
n If your site includes multiple vRealize Automation appliances, Add Another vRealize AutomationAppliance to the Cluster.
n Verify that the server meets the requirements in IaaS Windows Servers.
n Obtain a certificate from a trusted certificate authority for import to the trusted root certificate store ofthe machines on which you intend to install the Component Website and Model Manager data.
n If you are using load balancers in your environment, verify that they meet the configurationrequirements.
Installing and Upgrading vRealize Automation
VMware, Inc. 162
Procedure
1 Install IaaS Certificates
For production environments, obtain a domain certificate from a trusted certificate authority. Importthe certificate to the trusted root certificate store of all machines on which you intend to install theWebsite Component and Manager Service (the IIS machines) during the IaaS installation.
2 Download the vRealize Automation IaaS Installer
To install IaaS on your distributed virtual or physical Windows servers, you download a copy of theIaaS installer from the vRealize Automation appliance.
3 Choosing an IaaS Database Scenario
vRealize Automation IaaS uses a Microsoft SQL Server database to maintain information about themachines it manages and its own elements and policies.
4 Install an IaaS Website Component and Model Manager Data
The system administrator installs the Website component to provide access to infrastructurecapabilities in the vRealize Automation web console. You can install one or many instances of theWebsite component, but you must configure Model Manager Data on the machine that hosts the firstWebsite component. You install Model Manager Data only once.
5 Install Additional IaaS Web Server Components
The Web server provides access to infrastructure capabilities in vRealize Automation. After the firstWeb server is installed, you might increase performance by installing additional IaaS Web servers.
6 Install the Active Manager Service
The active Manager Service is a Windows service that coordinates communication between IaaSDistributed Execution Managers, the database, agents, proxy agents, and SMTP.
7 Install a Backup Manager Service Component
The backup Manager Service provides redundancy and high availability, and may be startedmanually if the active service stops.
8 Installing Distributed Execution Managers
You install the Distributed Execution Manager as one of two roles: DEM Orchestrator or DEMWorker. You must install at least one DEM instance for each role, and you can install additional DEMinstances to support failover and high-availability.
9 Configuring Windows Service to Access the IaaS Database
A system administrator can change the authentication method used to access the SQL databaseduring run time (after the installation is complete). By default, the Windows identity of the currentlylogged on account is used to connect to the database after it is installed.
10 Verify IaaS Services
After installation, the system administrator verifies that the IaaS services are running. If the servicesare running, the installation is a success.
Installing and Upgrading vRealize Automation
VMware, Inc. 163
What to do next
Install a DEM Orchestrator and at least one DEM Worker instance. See Installing Distributed ExecutionManagers.
Install IaaS Certificates
For production environments, obtain a domain certificate from a trusted certificate authority. Import thecertificate to the trusted root certificate store of all machines on which you intend to install the WebsiteComponent and Manager Service (the IIS machines) during the IaaS installation.
Prerequisites
On Windows 2012 machines, you must disable TLS1.2 for certificates that use SHA512. For moreinformation about disabling TLS1.2, see Microsoft Knowledge Base article 245030.
Procedure
1 Obtain a certificate from a trusted certificate authority.
2 Open the Internet Information Services (IIS) Manager.
3 Double-click Server Certificates from Features View.
4 Click Import in the Actions pane.
a Enter a file name in the Certificate file text box, or click the browse button (…), to navigate to thename of a file where the exported certificate is stored.
b Enter a password in the Password text box if the certificate was exported with a password.
c Select Mark this key as exportable.
5 Click OK.
6 Click on the imported certificate and select View.
7 Verify that the certificate and its chain is trusted.
If the certificate is untrusted, you see the message, This CA root certificate is not trusted.
Note You must resolve the trust issue before proceeding with the installation. If you continue, yourdeployment fails.
8 Restart IIS or open an elevated command prompt window and type iisreset.
What to do next
Download the vRealize Automation IaaS Installer.
Download the vRealize Automation IaaS Installer
To install IaaS on your distributed virtual or physical Windows servers, you download a copy of the IaaSinstaller from the vRealize Automation appliance.
If you see certificate warnings during this process, continue past them to finish the installation.
Installing and Upgrading vRealize Automation
VMware, Inc. 164

Prerequisites
n Configure the First vRealize Automation Appliance in a Cluster and, optionally, Add Another vRealizeAutomation Appliance to the Cluster.
n Verify that the server meets the requirements in IaaS Windows Servers.
n Verify that you imported a certificate to IIS and that the certificate root or the certificate authority is inthe trusted root on the installation machine.
n If you are using load balancers in your environment, verify that they meet the configurationrequirements.
Procedure
1 (Optional) Activate HTTP if you are installing on a Windows 2012 machine.
a Select Features > Add Features from Server Manager.
b Expand WCF Services under .NET Framework Features.
c Select HTTP Activation.
2 Log in to the IaaS Windows server using an account that has administrator rights.
3 Open a Web browser directly to the vRealize Automation appliance installer URL. Do not use a loadbalancer address.
https://vrealize-automation-appliance-FQDN:5480/installer
4 Click IaaS Installer.
5 Save setup__vrealize-automation-appliance-FQDN@5480 to the Windows server.
Do not change the installer file name. It is used to connect the installation to the vRealize Automationappliance.
6 Download the installer file to each IaaS Windows server on which you are installing components.
What to do next
Install an IaaS database, see Choosing an IaaS Database Scenario.
Choosing an IaaS Database Scenario
vRealize Automation IaaS uses a Microsoft SQL Server database to maintain information about themachines it manages and its own elements and policies.
Installing and Upgrading vRealize Automation
VMware, Inc. 165
Depending on your preferences and privileges, there are several procedures to choose from to create theIaaS database.
Note You can enable secure SSL when creating or upgrading the SQL database. For example, whenyou create or upgrade the SQL database, you can use the Secure SSL option to specify that the SSLconfiguration which is already specified in the SQL server be enforced when connecting to the SQLdatabase. SSL provides a more secure connection between the IaaS server and SQL database. Thisoption, which is available in the custom installation wizard, requires that you have already configured SSLon the SQL server. For related information about configuring SSL on the SQL server, see MicrosoftTechnet article 189067.
Table 1‑28. Choosing an IaaS Database Scenario
Scenario Procedure
Create the IaaS database manually using the provided databasescripts. This option enables a database administrator to reviewthe changes carefully before creating the database.
Create the IaaS Database Manually.
Prepare an empty database and use the installer to populate thedatabase schema. This option enables the installer to use adatabase user with dbo privileges to populate the database.
Prepare an Empty Database.
Use the installer to create the database. This is the simplestoption but requires the use of sysadmin privileges in theinstaller.
Create the IaaS Database Using the Installation Wizard.
Create the IaaS Database Manually
The vRealize Automation system administrator can create the database manually using VMware-providedscripts.
Prerequisites
n Install Microsoft .NET Framework 4.5.2 or later on the SQL Server host.
n Use Windows Authentication, rather than SQL Authentication, to connect to the database.
n Verify the database installation prerequisites. See IaaS SQL Server Host.
n Open a Web browser to the vRealize Automation appliance installer URL, and download the IaaSdatabase installation scripts.
https://vrealize-automation-appliance-FQDN:5480/installer
Procedure
1 Navigate to the Database subdirectory in the directory where you extracted the installation ziparchive.
2 Extract the DBInstall.zip archive to a local directory.
3 Log in to the Windows database host with sufficient rights to create and drop databases sysadminprivileges in the SQL Server instance.
Installing and Upgrading vRealize Automation
VMware, Inc. 166
4 Review the database deployment scripts as needed. In particular, review the settings in theDBSettings section of CreateDatabase.sql and edit them if necessary.
The settings in the script are the recommended settings. Only ALLOW_SNAPSHOT_ISOLATION ON andREAD_COMMITTED_SNAPSHOT ON are required.
5 Execute the following command with the arguments described in the table.
BuildDB.bat /p:DBServer=db_server;
DBName=db_name;DBDir=db_dir;
LogDir=[log_dir];ServiceUser=service_user;
ReportLogin=web_user;
VersionString=version_string
Table 1‑29. Database Values
Variable Value
db_server Specifies the SQL Server instance in the formatdbhostname[,port number]\SQL instance. Specify a portnumber only if you are using a non-default port. The Microsoft SQLdefault port number is 1433. The default value for db_server islocalhost.
db_name Name of the database. The default value is vra. Database namesmust consist of no more than 128 ASCII characters.
db_dir Path to the data directory for the database, excluding the finalslash.
log_dir Path to the log directory for the database, excluding the final slash.
service_user User name under which the Manager Service runs.
Web_user User name under which the Web services run.
version_string The vRealize Automation version, found by logging in to thevRealize Automation appliance and clicking the Update tab.
For example, the vRealize Automation 6.1 version string is6.1.0.1200.
The database is created.
What to do next
Install the IaaS Components in a Distributed Configuration.
Prepare an Empty Database
A vRealize Automation system administrator can install the IaaS schema on an empty database. Thisinstallation method provides maximum control over database security.
Prerequisites
n Verify the database installation prerequisites. See IaaS SQL Server Host.
Installing and Upgrading vRealize Automation
VMware, Inc. 167
n Open a Web browser to the vRealize Automation appliance installer URL, and download the IaaSdatabase installation scripts.
https://vrealize-automation-appliance-FQDN:5480/installer
Procedure
1 Navigate to the Database directory within the directory where you extracted the installation ziparchive.
2 Extract the DBInstall.zip archive to a local directory.
3 Log in to the Windows database host with sysadmin privileges within the SQL Server instance.
4 Edit the following files, and replace all instances of the variables in the table with the correct valuesfor your environment.
CreateDatabase.sql
SetDatabaseSettings.sql
Table 1‑30. Database Values
Variable Value
$(DBName) Name of the database, such as vra. Database names must consistof no more than 128 ASCII characters.
$(DBDir) Path to the data directory for the database, excluding the finalslash.
$(LogDir) Path to the log directory for the database, excluding the final slash.
5 Review the settings in the DB Settings section of SetDatabaseSettings.sql and edit them ifneeded.
The settings in the script are the recommended settings for the IaaS database. OnlyALLOW_SNAPSHOT_ISOLATION ON and READ_COMMITTED_SNAPSHOT ON are required.
6 Open SQL Server Management Studio.
7 Click New Query.
An SQL Query window opens.
8 On the Query menu, ensure that SQLCMD Mode is selected.
9 Paste the entire modified contents of CreateDatabase.sql into the query pane.
10 Below the CreateDatabase.sql content, paste the entire modified contents ofSetDatabaseSettings.sql.
11 Click Execute.
The script runs and creates the database.
What to do next
Install the IaaS Components in a Distributed Configuration.
Installing and Upgrading vRealize Automation
VMware, Inc. 168
Create the IaaS Database Using the Installation Wizard
vRealize Automation uses a Microsoft SQL Server database to maintain information about the machinesit manages and its own elements and policies.
The following steps describe how to create the IaaS database using the installer or populate an existingempty database. It is also possible to create the database manually. See Create the IaaS DatabaseManually.
Prerequisites
n If you are creating the database with Windows authentication, instead of SQL authentication, verifythat the user who runs the installer has sysadmin rights on the SQL server.
n Download the vRealize Automation IaaS Installer.
Procedure
1 Right-click the [email protected] setup file and selectRun as administrator.
2 Click Next.
3 Accept the license agreement and click Next.
4 On the Log in page, supply administrator credentials for the vRealize Automation appliance and verifythe SSL Certificate.
a Type the user name, which is root, and the password.
The password is the password that you specified when you deployed the vRealize Automationappliance.
b Select Accept Certificate.
c Click View Certificate.
Compare the certificate thumbprint with the thumbprint set for the vRealize Automation appliance.You can view the vRealize Automation appliance certificate in the client browser when themanagement console is accessed on port 5480.
5 Click Next.
6 Select Custom Install on the Installation Type page.
7 Select IaaS Server under Component Selection on the Installation Type page.
8 Accept the root install location or click Change and select an installation path.
Even in a distributed deployment, you might sometimes install more than one IaaS component on thesame Windows server.
If you install more than one IaaS component, always install them to the same path.
9 Click Next.
10 On the IaaS Server Custom Install page, select Database.
Installing and Upgrading vRealize Automation
VMware, Inc. 169
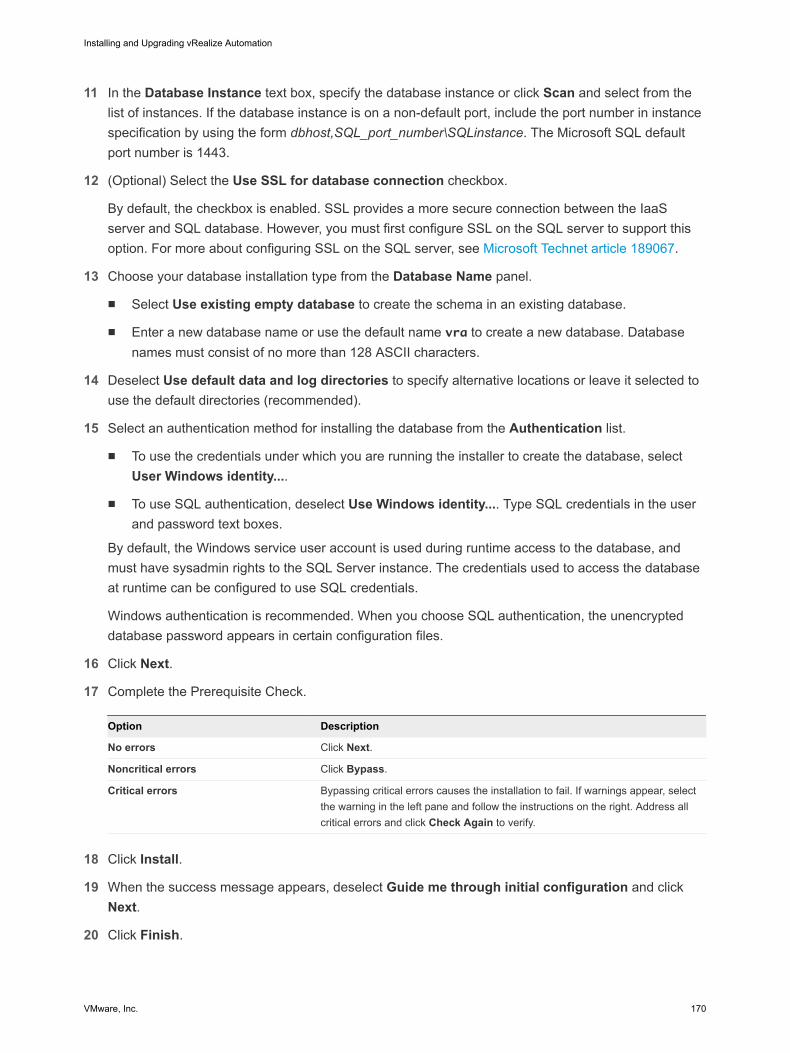
11 In the Database Instance text box, specify the database instance or click Scan and select from thelist of instances. If the database instance is on a non-default port, include the port number in instancespecification by using the form dbhost,SQL_port_number\SQLinstance. The Microsoft SQL defaultport number is 1443.
12 (Optional) Select the Use SSL for database connection checkbox.
By default, the checkbox is enabled. SSL provides a more secure connection between the IaaSserver and SQL database. However, you must first configure SSL on the SQL server to support thisoption. For more about configuring SSL on the SQL server, see Microsoft Technet article 189067.
13 Choose your database installation type from the Database Name panel.
n Select Use existing empty database to create the schema in an existing database.
n Enter a new database name or use the default name vra to create a new database. Databasenames must consist of no more than 128 ASCII characters.
14 Deselect Use default data and log directories to specify alternative locations or leave it selected touse the default directories (recommended).
15 Select an authentication method for installing the database from the Authentication list.
n To use the credentials under which you are running the installer to create the database, selectUser Windows identity....
n To use SQL authentication, deselect Use Windows identity.... Type SQL credentials in the userand password text boxes.
By default, the Windows service user account is used during runtime access to the database, andmust have sysadmin rights to the SQL Server instance. The credentials used to access the databaseat runtime can be configured to use SQL credentials.
Windows authentication is recommended. When you choose SQL authentication, the unencrypteddatabase password appears in certain configuration files.
16 Click Next.
17 Complete the Prerequisite Check.
Option Description
No errors Click Next.
Noncritical errors Click Bypass.
Critical errors Bypassing critical errors causes the installation to fail. If warnings appear, selectthe warning in the left pane and follow the instructions on the right. Address allcritical errors and click Check Again to verify.
18 Click Install.
19 When the success message appears, deselect Guide me through initial configuration and clickNext.
20 Click Finish.
Installing and Upgrading vRealize Automation
VMware, Inc. 170
The database is ready for use.
Install an IaaS Website Component and Model Manager Data
The system administrator installs the Website component to provide access to infrastructure capabilitiesin the vRealize Automation web console. You can install one or many instances of the Websitecomponent, but you must configure Model Manager Data on the machine that hosts the first Websitecomponent. You install Model Manager Data only once.
Prerequisites
n Install the IaaS Database, see Choosing an IaaS Database Scenario.
n If you already installed other IaaS components, know the database passphrase that you created.
n If you are using load balancers in your environment, verify that they meet the configurationrequirements.
Procedure
1 Install the First IaaS Web Server Component
You install the IaaS Web server component to provide access to infrastructure capabilities invRealize Automation.
2 Configure Model Manager Data
You install the Model Manager component on the same machine that hosts the first Web servercomponent. You only install Model Manager Data once.
You can install additional Website components or install the Manager Service. See Install Additional IaaSWeb Server Components or Install the Active Manager Service.
Install the First IaaS Web Server Component
You install the IaaS Web server component to provide access to infrastructure capabilities invRealize Automation.
You can install multiple IaaS Web servers, but only the first one includes Model Manager Data.
Prerequisites
n Create the IaaS Database Using the Installation Wizard.
n Verify that the server meets the requirements in IaaS Windows Servers.
n If you already installed other IaaS components, know the database passphrase that you created.
n If you are using load balancers in your environment, verify that they meet the configurationrequirements.
Installing and Upgrading vRealize Automation
VMware, Inc. 171
Procedure
1 If using a load balancer, disable the other nodes under the load balancer, and verify that traffic isdirected to the node that you want.
In addition, disable load balancer health checks until all vRealize Automation components areinstalled and configured.
2 Right-click the [email protected] setup file and selectRun as administrator.
3 Click Next.
4 Accept the license agreement and click Next.
5 On the Log in page, supply administrator credentials for the vRealize Automation appliance and verifythe SSL Certificate.
a Type the user name, which is root, and the password.
The password is the password that you specified when you deployed the vRealize Automationappliance.
b Select Accept Certificate.
c Click View Certificate.
Compare the certificate thumbprint with the thumbprint set for the vRealize Automation appliance.You can view the vRealize Automation appliance certificate in the client browser when themanagement console is accessed on port 5480.
6 Click Next.
7 Select Custom Install on the Installation Type page.
8 Select IaaS Server under Component Selection on the Installation Type page.
9 Accept the root install location or click Change and select an installation path.
Even in a distributed deployment, you might sometimes install more than one IaaS component on thesame Windows server.
If you install more than one IaaS component, always install them to the same path.
10 Click Next.
11 Select Website and ModelManagerData on the IaaS Server Custom Install page.
12 Select a Web site from available Web sites or accept the default Web site on the Administration &Model Manager Web Site tab.
13 Type an available port number in the Port number text box, or accept the default port 443.
14 Click Test Binding to confirm that the port number is available for use.
Installing and Upgrading vRealize Automation
VMware, Inc. 172

15 Select the certificate for this component.
a If you imported a certificate after you began the installation, click Refresh to update the list.
b Select the certificate to use from Available certificates.
c If you imported a certificate that does not have a friendly name and it does not appear in the list,deselect Display certificates using friendly names and click Refresh.
If you are installing in an environment that does not use load balancers, you can select Generate aSelf-Signed Certificate instead of selecting a certificate. If you are installing additional Web sitecomponents behind a load balancer, do not generate self-signed certificates. Import the certificatefrom the main IaaS Web server to ensure that you use the same certificate on all servers behind theload balancer.
16 (Optional) Click View Certificate, view the certificate, and click OK to close the information window.
17 (Optional) Select Suppress certificate mismatch to suppress certificate errors. The installationignores certificate name mismatch errors as well as any remote certificate-revocation list matcherrors.
This is a less secure option.
Configure Model Manager Data
You install the Model Manager component on the same machine that hosts the first Web servercomponent. You only install Model Manager Data once.
Prerequisites
Install the First IaaS Web Server Component.
Procedure
1 Click the Model Manager Data tab.
2 In the Server text box, enter the vRealize Automation appliance fully qualified domain name.
vrealize-automation-appliance.mycompany.com
Do not enter an IP address.
3 Click Load to display the SSO Default Tenant.
The vsphere.local default tenant is created automatically when you configure single sign-on. Donot modify it.
4 Click Download to import the certificate from the virtual appliance.
It might take several minutes to download the certificate.
5 (Optional) Click View Certificate, view the certificate, and click OK to close the information window.
6 Click Accept Certificate.
7 Enter [email protected] in the User name text box and enter the password youcreated when you configured the SSO in the Password and Confirm text boxes.
Installing and Upgrading vRealize Automation
VMware, Inc. 173

8 (Optional) Click Test to verify the credentials.
9 In the IaaS Server text box, identify the IaaS Web server component.
Option Description
With a load balancer Enter the fully qualified domain name and port number of the load balancer for theIaaS Web server component, web-load-balancer.mycompany.com:443.
Do not enter IP addresses.
Without a load balancer Enter the fully qualified domain name and port number of the machine where youinstalled the IaaS Web server component, web.mycompany.com:443.
Do not enter IP addresses. The default port is 443.
10 Click Test to verify the server connection.
11 Click Next.
12 Complete the Prerequisite Check.
Option Description
No errors Click Next.
Noncritical errors Click Bypass.
Critical errors Bypassing critical errors causes the installation to fail. If warnings appear, selectthe warning in the left pane and follow the instructions on the right. Address allcritical errors and click Check Again to verify.
13 On the Server and Account Settings page, in the Server Installation Information text boxes, enter
the user name and password of the service account user that has administrative privileges on thecurrent installation server.
The service account user must be one domain account that has privileges on each distributed IaaSserver. Do not use local system accounts.
14 Provide the passphrase used to generate the encryption key that protects the database.
Option Description
If you have already installedcomponents in this environment
Type the passphrase you created previously in the Passphrase and Confirm textboxes.
If this is the first installation Type a passphrase in the Passphrase and Confirm text boxes. You must usethis passphrase every time you install a new component.
Keep this passphrase in a secure place for later use.
15 Specify the IaaS database server, database name, and authentication method for the databaseserver in the Microsoft SQL Database Installation Information text box.
This is the IaaS database server, name, and authentication information that you created previously.
16 Click Next.
17 Click Install.
Installing and Upgrading vRealize Automation
VMware, Inc. 174
18 When the installation finishes, deselect Guide me through the initial configuration and click Next.
What to do next
You can install additional Web server components or install the Manager Service. See Install AdditionalIaaS Web Server Components or Install the Active Manager Service.
Install Additional IaaS Web Server Components
The Web server provides access to infrastructure capabilities in vRealize Automation. After the first Webserver is installed, you might increase performance by installing additional IaaS Web servers.
Do not install Model Manager Data with an additional Web server component. Only the first Web servercomponent hosts Model Manager Data.
Prerequisites
n Install an IaaS Website Component and Model Manager Data.
n Verify that the server meets the requirements in IaaS Windows Servers.
n If you already installed other IaaS components, know the database passphrase that you created.
n If you are using load balancers in your environment, verify that they meet the configurationrequirements.
Procedure
1 If using a load balancer, disable the other nodes under the load balancer, and verify that traffic isdirected to the node that you want.
In addition, disable load balancer health checks until all vRealize Automation components areinstalled and configured.
2 Right-click the [email protected] setup file and selectRun as administrator.
3 Click Next.
4 Accept the license agreement and click Next.
5 On the Log in page, supply administrator credentials for the vRealize Automation appliance and verifythe SSL Certificate.
a Type the user name, which is root, and the password.
The password is the password that you specified when you deployed the vRealize Automationappliance.
b Select Accept Certificate.
c Click View Certificate.
Compare the certificate thumbprint with the thumbprint set for the vRealize Automation appliance.You can view the vRealize Automation appliance certificate in the client browser when themanagement console is accessed on port 5480.
Installing and Upgrading vRealize Automation
VMware, Inc. 175
6 Click Next.
7 Select Custom Install on the Installation Type page.
8 Select IaaS Server under Component Selection on the Installation Type page.
9 Accept the root install location or click Change and select an installation path.
Even in a distributed deployment, you might sometimes install more than one IaaS component on thesame Windows server.
If you install more than one IaaS component, always install them to the same path.
10 Click Next.
11 Select Website on the IaaS Server Custom Install page.
12 Select a Web site from available Web sites or accept the default Web site on the Administration &Model Manager Web Site tab.
13 Type an available port number in the Port number text box, or accept the default port 443.
14 Click Test Binding to confirm that the port number is available for use.
15 Select the certificate for this component.
a If you imported a certificate after you began the installation, click Refresh to update the list.
b Select the certificate to use from Available certificates.
c If you imported a certificate that does not have a friendly name and it does not appear in the list,deselect Display certificates using friendly names and click Refresh.
If you are installing in an environment that does not use load balancers, you can select Generate aSelf-Signed Certificate instead of selecting a certificate. If you are installing additional Web sitecomponents behind a load balancer, do not generate self-signed certificates. Import the certificatefrom the main IaaS Web server to ensure that you use the same certificate on all servers behind theload balancer.
16 (Optional) Click View Certificate, view the certificate, and click OK to close the information window.
17 (Optional) Select Suppress certificate mismatch to suppress certificate errors. The installationignores certificate name mismatch errors as well as any remote certificate-revocation list matcherrors.
This is a less secure option.
Installing and Upgrading vRealize Automation
VMware, Inc. 176

18 In the IaaS Server text box, identify the first IaaS Web server component.
Option Description
With a load balancer Enter the fully qualified domain name and port number of the load balancer for theIaaS Web server component, web-load-balancer.mycompany.com:443.
Do not enter IP addresses.
Without a load balancer Enter the fully qualified domain name and port number of the machine where youinstalled the IaaS first Web server component, web.mycompany.com:443.
Do not enter IP addresses. The default port is 443.
19 Click Test to verify the server connection.
20 Click Next.
21 Complete the Prerequisite Check.
Option Description
No errors Click Next.
Noncritical errors Click Bypass.
Critical errors Bypassing critical errors causes the installation to fail. If warnings appear, selectthe warning in the left pane and follow the instructions on the right. Address allcritical errors and click Check Again to verify.
22 On the Server and Account Settings page, in the Server Installation Information text boxes, enter
the user name and password of the service account user that has administrative privileges on thecurrent installation server.
The service account user must be one domain account that has privileges on each distributed IaaSserver. Do not use local system accounts.
23 Provide the passphrase used to generate the encryption key that protects the database.
Option Description
If you have already installedcomponents in this environment
Type the passphrase you created previously in the Passphrase and Confirm textboxes.
If this is the first installation Type a passphrase in the Passphrase and Confirm text boxes. You must usethis passphrase every time you install a new component.
Keep this passphrase in a secure place for later use.
24 Specify the IaaS database server, database name, and authentication method for the databaseserver in the Microsoft SQL Database Installation Information text box.
This is the IaaS database server, name, and authentication information that you created previously.
25 Click Next.
26 Click Install.
27 When the installation finishes, deselect Guide me through the initial configuration and click Next.
Installing and Upgrading vRealize Automation
VMware, Inc. 177
What to do next
Install the Active Manager Service.
Install the Active Manager Service
The active Manager Service is a Windows service that coordinates communication between IaaSDistributed Execution Managers, the database, agents, proxy agents, and SMTP.
Unless you enable automatic Manager Service failover, your IaaS deployment requires that only oneWindows machine actively run the Manager Service at a time. Backup machines must have the servicestopped and configured to start manually.
See About Automatic Manager Service Failover.
Prerequisites
n If you already installed other IaaS components, know the database passphrase that you created.
n (Optional) If you want to install the Manager Service in a Website other than the default Website, firstcreate a Website in Internet Information Services.
n Verify that you have a certificate from a certificate authority imported into IIS and that the rootcertificate or certificate authority is trusted. All components under the load balancer must have thesame certificate.
n Verify that the Website load balancer is configured and that the timeout value for the load balancer isset to a minimum of 180 seconds.
n Install an IaaS Website Component and Model Manager Data.
Procedure
1 If using a load balancer, disable the other nodes under the load balancer, and verify that traffic isdirected to the node that you want.
In addition, disable load balancer health checks until all vRealize Automation components areinstalled and configured.
2 Right-click the [email protected] setup file and selectRun as administrator.
3 Accept the license agreement and click Next.
Installing and Upgrading vRealize Automation
VMware, Inc. 178
4 On the Log in page, supply administrator credentials for the vRealize Automation appliance and verifythe SSL Certificate.
a Type the user name, which is root, and the password.
The password is the password that you specified when you deployed the vRealize Automationappliance.
b Select Accept Certificate.
c Click View Certificate.
Compare the certificate thumbprint with the thumbprint set for the vRealize Automation appliance.You can view the vRealize Automation appliance certificate in the client browser when themanagement console is accessed on port 5480.
5 Click Next.
6 Select Custom Install on the Installation Type page.
7 Select IaaS Server under Component Selection on the Installation Type page.
8 Accept the root install location or click Change and select an installation path.
Even in a distributed deployment, you might sometimes install more than one IaaS component on thesame Windows server.
If you install more than one IaaS component, always install them to the same path.
9 Click Next.
10 Select Manager Service on the IaaS Server Custom Install page.
11 In the IaaS Server text box, identify the IaaS Web server component.
Option Description
With a load balancer Enter the fully qualified domain name and port number of the load balancer for theIaaS Web server component, web-load-balancer.mycompany.com:443.
Do not enter IP addresses.
Without a load balancer Enter the fully qualified domain name and port number of the machine where youinstalled the IaaS Web server component, web.mycompany.com:443.
Do not enter IP addresses. The default port is 443.
12 Select Active node with startup type set to automatic.
13 Select a Web site from available Web sites or accept the default Web site on the Administration &Model Manager Web Site tab.
14 Type an available port number in the Port number text box, or accept the default port 443.
15 Click Test Binding to confirm that the port number is available for use.
Installing and Upgrading vRealize Automation
VMware, Inc. 179
16 Select the certificate for this component.
a If you imported a certificate after you began the installation, click Refresh to update the list.
b Select the certificate to use from Available certificates.
c If you imported a certificate that does not have a friendly name and it does not appear in the list,deselect Display certificates using friendly names and click Refresh.
If you are installing in an environment that does not use load balancers, you can select Generate aSelf-Signed Certificate instead of selecting a certificate. If you are installing additional Web sitecomponents behind a load balancer, do not generate self-signed certificates. Import the certificatefrom the main IaaS Web server to ensure that you use the same certificate on all servers behind theload balancer.
17 (Optional) Click View Certificate, view the certificate, and click OK to close the information window.
18 Click Next.
19 Check the prerequisites and click Next.
20 On the Server and Account Settings page, in the Server Installation Information text boxes, enterthe user name and password of the service account user that has administrative privileges on thecurrent installation server.
The service account user must be one domain account that has privileges on each distributed IaaSserver. Do not use local system accounts.
21 Provide the passphrase used to generate the encryption key that protects the database.
Option Description
If you have already installedcomponents in this environment
Type the passphrase you created previously in the Passphrase and Confirm textboxes.
If this is the first installation Type a passphrase in the Passphrase and Confirm text boxes. You must usethis passphrase every time you install a new component.
Keep this passphrase in a secure place for later use.
22 Specify the IaaS database server, database name, and authentication method for the databaseserver in the Microsoft SQL Database Installation Information text box.
This is the IaaS database server, name, and authentication information that you created previously.
23 Click Next.
24 Click Install.
25 When the installation finishes, deselect Guide me through the initial configuration and click Next.
26 Click Finish.
What to do next
n To ensure that the Manager Service you installed is the active instance, verify that the vCloudAutomation Center Service is running and set it to "Automatic" startup type.
Installing and Upgrading vRealize Automation
VMware, Inc. 180
n You can install another instance of the Manager Service component as a passive backup that you canstart manually if the active instance fails. See Install a Backup Manager Service Component.
n A system administrator can change the authentication method used to access the SQL databaseduring run time (after the installation is complete). See Configuring Windows Service to Access theIaaS Database.
Install a Backup Manager Service Component
The backup Manager Service provides redundancy and high availability, and may be started manually ifthe active service stops.
Unless you enable automatic Manager Service failover, your IaaS deployment requires that only oneWindows machine actively run the Manager Service at a time. Backup machines must have the servicestopped and configured to start manually.
See About Automatic Manager Service Failover.
Prerequisites
n If you already installed other IaaS components, know the database passphrase that you created.
n (Optional) If you want to install the Manager Service in a Web site other than the default Web site,first create a Web site in Internet Information Services.
n Verify that you have a certificate from a certificate authority imported into IIS and that the rootcertificate or certificate authority is trusted. All components under the load balancer must have thesame certificate.
n Verify that the Website load balancer is configured.
n Install an IaaS Website Component and Model Manager Data.
Procedure
1 If using a load balancer, disable the other nodes under the load balancer, and verify that traffic isdirected to the node that you want.
In addition, disable load balancer health checks until all vRealize Automation components areinstalled and configured.
2 Right-click the [email protected] setup file and selectRun as administrator.
3 Click Next.
4 Accept the license agreement and click Next.
Installing and Upgrading vRealize Automation
VMware, Inc. 181
5 On the Log in page, supply administrator credentials for the vRealize Automation appliance and verifythe SSL Certificate.
a Type the user name, which is root, and the password.
The password is the password that you specified when you deployed the vRealize Automationappliance.
b Select Accept Certificate.
c Click View Certificate.
Compare the certificate thumbprint with the thumbprint set for the vRealize Automation appliance.You can view the vRealize Automation appliance certificate in the client browser when themanagement console is accessed on port 5480.
6 Click Next.
7 Select Custom Install on the Installation Type page.
8 Select IaaS Server under Component Selection on the Installation Type page.
9 Accept the root install location or click Change and select an installation path.
Even in a distributed deployment, you might sometimes install more than one IaaS component on thesame Windows server.
If you install more than one IaaS component, always install them to the same path.
10 Click Next.
11 Select Manager Service on the IaaS Server Custom Install page.
12 In the IaaS Server text box, identify the IaaS Web server component.
Option Description
With a load balancer Enter the fully qualified domain name and port number of the load balancer for theIaaS Web server component, web-load-balancer.mycompany.com:443.
Do not enter IP addresses.
Without a load balancer Enter the fully qualified domain name and port number of the machine where youinstalled the IaaS Web server component, web.mycompany.com:443.
Do not enter IP addresses. The default port is 443.
13 Select Disaster recovery cold standby node.
14 Select a Web site from available Web sites or accept the default Web site on the Administration &Model Manager Web Site tab.
15 Type an available port number in the Port number text box, or accept the default port 443.
16 Click Test Binding to confirm that the port number is available for use.
Installing and Upgrading vRealize Automation
VMware, Inc. 182

17 Select the certificate for this component.
a If you imported a certificate after you began the installation, click Refresh to update the list.
b Select the certificate to use from Available certificates.
c If you imported a certificate that does not have a friendly name and it does not appear in the list,deselect Display certificates using friendly names and click Refresh.
If you are installing in an environment that does not use load balancers, you can select Generate aSelf-Signed Certificate instead of selecting a certificate. If you are installing additional Web sitecomponents behind a load balancer, do not generate self-signed certificates. Import the certificatefrom the main IaaS Web server to ensure that you use the same certificate on all servers behind theload balancer.
18 (Optional) Click View Certificate, view the certificate, and click OK to close the information window.
19 Click Next.
20 Check the prerequisites and click Next.
21 On the Server and Account Settings page, in the Server Installation Information text boxes, enterthe user name and password of the service account user that has administrative privileges on thecurrent installation server.
The service account user must be one domain account that has privileges on each distributed IaaSserver. Do not use local system accounts.
22 Provide the passphrase used to generate the encryption key that protects the database.
Option Description
If you have already installedcomponents in this environment
Type the passphrase you created previously in the Passphrase and Confirm textboxes.
If this is the first installation Type a passphrase in the Passphrase and Confirm text boxes. You must usethis passphrase every time you install a new component.
Keep this passphrase in a secure place for later use.
23 Specify the IaaS database server, database name, and authentication method for the databaseserver in the Microsoft SQL Database Installation Information text box.
This is the IaaS database server, name, and authentication information that you created previously.
24 Click Next.
25 Click Install.
26 When the installation finishes, deselect Guide me through the initial configuration and click Next.
27 Click Finish.
What to do next
n To ensure that the Manager Service you installed is a passive backup instance, verify that thevRealize Automation Service is not running and set it to "Manual" startup type.
Installing and Upgrading vRealize Automation
VMware, Inc. 183
n A system administrator can change the authentication method used to access the SQL databaseduring run time (after the installation is complete). See Configuring Windows Service to Access theIaaS Database.
Installing Distributed Execution Managers
You install the Distributed Execution Manager as one of two roles: DEM Orchestrator or DEM Worker. Youmust install at least one DEM instance for each role, and you can install additional DEM instances tosupport failover and high-availability.
The system administrator must choose installation machines that meet predefined system requirements.The DEM Orchestrator and the Worker can reside on the same machine.
As you plan to install Distributed Execution Managers, keep in mind the following considerations:
n DEM Orchestrators support active-active high availability. Typically, you install one DEM Orchestratoron each Manager Service machine.
n Install the Orchestrator on a machine with strong network connectivity to the Model Manager host.
n Install a second DEM Orchestrator on a different machine for failover.
n Typically, you install DEM Workers on the IaaS Manager Service server or on a separate server. Theserver must have network connectivity to the Model Manager host.
n You can install additional DEM instances for redundancy and scalability, including multiple instanceson the same machine.
There are specific requirements for the DEM installation that depend on the endpoints you use. See IaaSDistributed Execution Manager Host.
Install the Distributed Execution Managers
You must install at least one DEM Worker and one DEM Orchestrator. The installation procedure is thesame for both roles.
DEM Orchestrators support active-active high availability. Typically, you install a single DEM Orchestratoron each Manager Service machine. You can install DEM Orchestrators and DEM workers on the samemachine.
Prerequisites
Download the vRealize Automation IaaS Installer.
Procedure
1 Right-click the [email protected] setup file and selectRun as administrator.
2 Click Next.
3 Accept the license agreement and click Next.
Installing and Upgrading vRealize Automation
VMware, Inc. 184

4 On the Log in page, supply administrator credentials for the vRealize Automation appliance and verifythe SSL Certificate.
a Type the user name, which is root, and the password.
The password is the password that you specified when you deployed the vRealize Automationappliance.
b Select Accept Certificate.
c Click View Certificate.
Compare the certificate thumbprint with the thumbprint set for the vRealize Automation appliance.You can view the vRealize Automation appliance certificate in the client browser when themanagement console is accessed on port 5480.
5 Click Next.
6 Select Custom Install on the Installation Type page.
7 Select Distributed Execution Managers under Component Selection on the Installation Type page.
8 Accept the root install location or click Change and select an installation path.
Even in a distributed deployment, you might sometimes install more than one IaaS component on thesame Windows server.
If you install more than one IaaS component, always install them to the same path.
9 Click Next.
10 Check prerequisites and click Next.
11 Enter the log in credentials under which the service will run.
The service account must have local administrator privileges and be the domain account that youhave been using throughout IaaS installation. The service account has privileges on each distributedIaaS server and must not be a local system account.
12 Click Next.
13 Select the installation type from the DEM role drop-down menu.
Option Description
Worker The Worker executes workflows.
Orchestrator The Orchestrator oversees DEM worker activities, including scheduling andpreprocessing workflows, and monitors DEM worker online status.
14 Enter a unique name that identifies this DEM in the DEM name text box.
The name cannot include spaces and cannot exceed 128 characters. If you enter a previously usedname, the following message appears: "DEM name already exists. To enter a different name for thisDEM, click Yes. If you are restoring or reinstalling a DEM with the same name, click No."
15 (Optional) Enter a description of this instance in DEM description.
Installing and Upgrading vRealize Automation
VMware, Inc. 185
16 Enter the host names and ports in the Manager Service Host name and Model Manager WebService Host name text boxes.
Option Description
With a load balancer Enter the fully qualified domain name and port number of the load balancers forthe Manager Service component and the Web server that hosts Model Manager,mgr-svc-load-balancer.mycompany.com:443 and web-load-balancer.mycompany.com:443.
Do not enter IP addresses.
Without a load balancer Enter the fully qualified domain name and port number of the machine where youinstalled the Manager Service component and the Web server that hosts ModelManager, mgr-svc.mycompany.com:443 and web.mycompany.com:443.
Do not enter IP addresses. The default port is 443.
17 (Optional) Click Test to test the connections to the Manager Service and Model Manager WebService.
18 Click Add.
19 Click Next.
20 Click Install.
21 When the installation finishes, deselect Guide me through the initial configuration and click Next.
22 Click Finish.
What to do next
n Verify that the service is running and that the log shows no errors. The service name is VMware DEMRole - Name where role is Orchestrator or Worker. The log location is Install Location\DistributedExecution Manager\Name\Logs.
n Repeat this procedure to install additional DEM instances.
Configure the DEM to Connect to SCVMM at a Different Installation Path
By default, the DEM Worker configuration file uses the default installation path of Microsoft SystemCenter Virtual Machine Manager (SCVMM) console. You must update the file if you install the SCVMMconsole to a non-default location.
You only need this procedure if you have SCVMM endpoints and agents.
Prerequisites
n Know the non-default path where you installed the SCVMM console.
The following is the default path that you must replace in the configuration file.
path="{ProgramFiles}\Microsoft System Center 2012 R2\Virtual Machine Manager\bin"
Installing and Upgrading vRealize Automation
VMware, Inc. 186
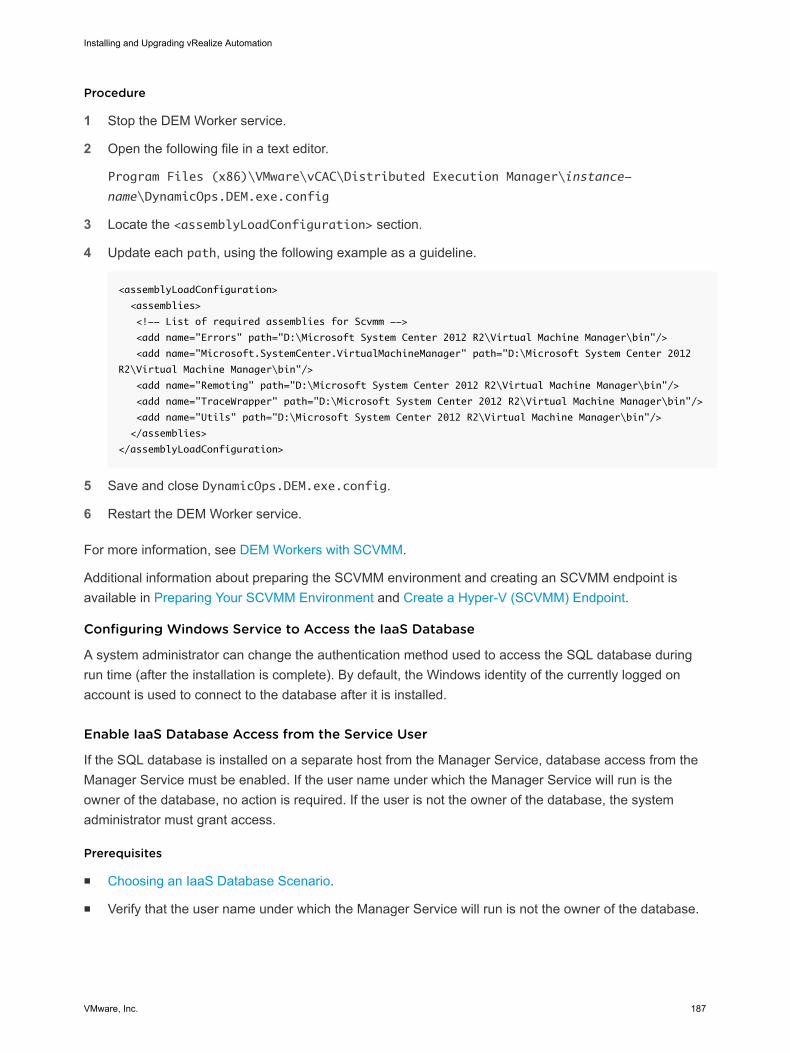
Procedure
1 Stop the DEM Worker service.
2 Open the following file in a text editor.
Program Files (x86)\VMware\vCAC\Distributed Execution Manager\instance-
name\DynamicOps.DEM.exe.config
3 Locate the <assemblyLoadConfiguration> section.
4 Update each path, using the following example as a guideline.
<assemblyLoadConfiguration>
<assemblies>
<!-- List of required assemblies for Scvmm -->
<add name="Errors" path="D:\Microsoft System Center 2012 R2\Virtual Machine Manager\bin"/>
<add name="Microsoft.SystemCenter.VirtualMachineManager" path="D:\Microsoft System Center 2012
R2\Virtual Machine Manager\bin"/>
<add name="Remoting" path="D:\Microsoft System Center 2012 R2\Virtual Machine Manager\bin"/>
<add name="TraceWrapper" path="D:\Microsoft System Center 2012 R2\Virtual Machine Manager\bin"/>
<add name="Utils" path="D:\Microsoft System Center 2012 R2\Virtual Machine Manager\bin"/>
</assemblies>
</assemblyLoadConfiguration>
5 Save and close DynamicOps.DEM.exe.config.
6 Restart the DEM Worker service.
For more information, see DEM Workers with SCVMM.
Additional information about preparing the SCVMM environment and creating an SCVMM endpoint isavailable in Preparing Your SCVMM Environment and Create a Hyper-V (SCVMM) Endpoint.
Configuring Windows Service to Access the IaaS Database
A system administrator can change the authentication method used to access the SQL database duringrun time (after the installation is complete). By default, the Windows identity of the currently logged onaccount is used to connect to the database after it is installed.
Enable IaaS Database Access from the Service User
If the SQL database is installed on a separate host from the Manager Service, database access from theManager Service must be enabled. If the user name under which the Manager Service will run is theowner of the database, no action is required. If the user is not the owner of the database, the systemadministrator must grant access.
Prerequisites
n Choosing an IaaS Database Scenario.
n Verify that the user name under which the Manager Service will run is not the owner of the database.
Installing and Upgrading vRealize Automation
VMware, Inc. 187
Procedure
1 Navigate to the Database subdirectory within the directory where you extracted the installation ziparchive.
2 Extract the DBInstall.zip archive to a local directory.
3 Log in to the database host as a user with the sysadmin role in the SQL Server instance.
4 Edit VMPSOpsUser.sql and replace all instances of $(Service User) with user (from Step 3) underwhich the Manager Service will run.
Do not replace ServiceUser in the line ending with WHERE name = N'ServiceUser').
5 Open SQL Server Management Studio.
6 Select the database (vCAC by default) in Databases in the left-hand pane.
7 Click New Query.
The SQL Query window opens in the right-hand pane.
8 Paste the modified contents of VMPSOpsUser.sql into the query window.
9 Click Execute.
Database access is enabled from the Manager Service.
Configure the Windows Services Account to Use SQL Authentication
By default, the Windows service account accesses the database during run-time, even if you configuredthe database for SQL authentication. You can change run-time authentication from Windows to SQL.
One reason to change run-time authentication might be when, for example, the database is on anuntrusted domain.
Prerequisites
Verify that the vRealize Automation SQL Server database exists. Begin with Choosing an IaaS DatabaseScenario.
Procedure
1 Using an account with administrator privileges, log in to the IaaS Windows server that hosts theManager Service.
2 In Administrative Tools > Services, stop the VMware vCloud Automation Center service.
3 Open the following files in a text editor.
C:\Program Files (x86)\VMware\vCAC\Server\ManagerService.exe.config
C:\Program Files (x86)\VMware\vCAC\Server\Model Manager Web\Web.config
4 In each file, locate the <connectionStrings> section.
Installing and Upgrading vRealize Automation
VMware, Inc. 188
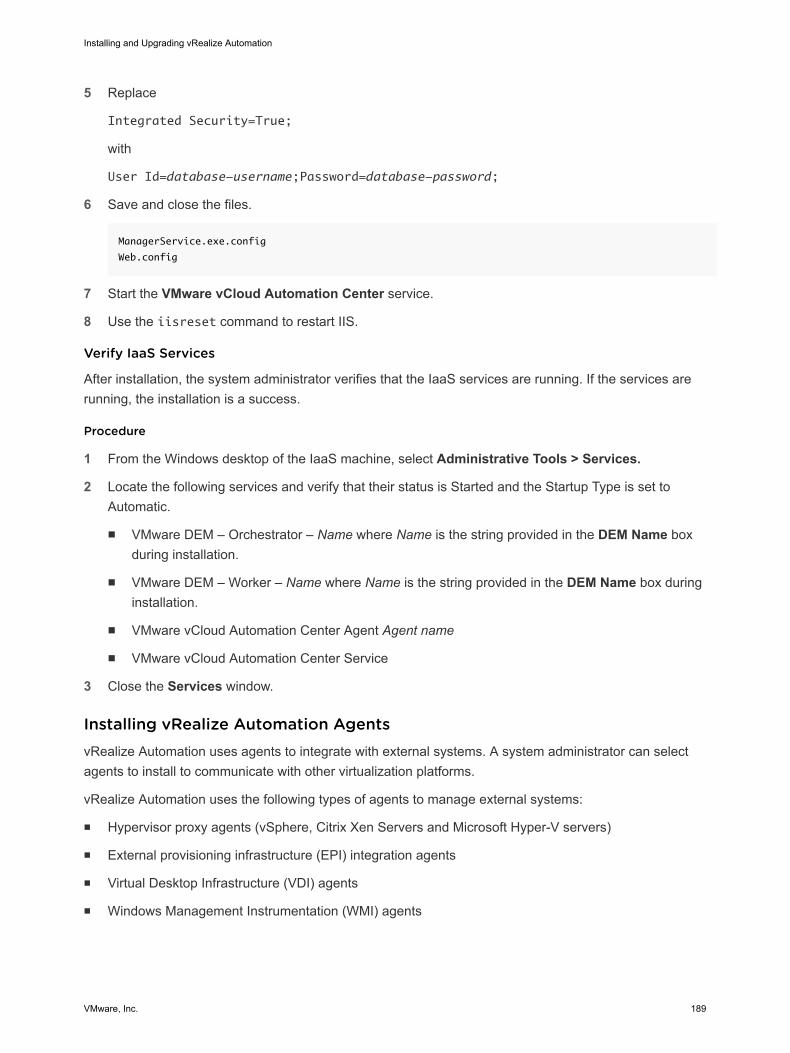
5 Replace
Integrated Security=True;
with
User Id=database-username;Password=database-password;
6 Save and close the files.
ManagerService.exe.config
Web.config
7 Start the VMware vCloud Automation Center service.
8 Use the iisreset command to restart IIS.
Verify IaaS Services
After installation, the system administrator verifies that the IaaS services are running. If the services arerunning, the installation is a success.
Procedure
1 From the Windows desktop of the IaaS machine, select Administrative Tools > Services.
2 Locate the following services and verify that their status is Started and the Startup Type is set toAutomatic.
n VMware DEM – Orchestrator – Name where Name is the string provided in the DEM Name boxduring installation.
n VMware DEM – Worker – Name where Name is the string provided in the DEM Name box duringinstallation.
n VMware vCloud Automation Center Agent Agent name
n VMware vCloud Automation Center Service
3 Close the Services window.
Installing vRealize Automation AgentsvRealize Automation uses agents to integrate with external systems. A system administrator can selectagents to install to communicate with other virtualization platforms.
vRealize Automation uses the following types of agents to manage external systems:
n Hypervisor proxy agents (vSphere, Citrix Xen Servers and Microsoft Hyper-V servers)
n External provisioning infrastructure (EPI) integration agents
n Virtual Desktop Infrastructure (VDI) agents
n Windows Management Instrumentation (WMI) agents
Installing and Upgrading vRealize Automation
VMware, Inc. 189

For high-availability, you can install multiple agents for a single endpoint. Install each redundant agent ona separate server, but name and configure them identically. Redundant agents provide some faulttolerance, but do not provide failover. For example, if you install two vSphere agents, one on server A andone on server B, and server A becomes unavailable, the agent installed on server B continues to processwork items. However, the server B agent cannot finish processing a work item that the server A agent hadalready started.
You have the option to install a vSphere agent as part of your minimal installation, but after the installationyou can also add other agents, including an additional vSphere agent. In a distributed deployment, youinstall all your agents after you complete the base distributed installation. The agents you install dependon the resources in your infrastructure.
For information about using vSphere agents, see vSphere Agent Requirements.
Set the PowerShell Execution Policy to RemoteSigned
You must set the PowerShell Execution Policy from Restricted to RemoteSigned or Unrestricted to allowlocal PowerShell scripts to be run.
For more information about the PowerShell Execution Policy, see the Microsoft PowerShell article aboutExecution Policies. If your PowerShell Execution Policy is managed at the group policy level, contact yourIT support for about their restrictions on policy changes, and see the Microsoft PowerShell article aboutGroup Policy Settings.
Prerequisites
n Verify that Microsoft PowerShell is installed on the installation host before agent installation. Theversion required depends on the operating system of the installation host. See Microsoft Help andSupport.
n For more information about PowerShell Execution Policy, run help about_signing or help Set-ExecutionPolicy at the PowerShell command prompt.
Procedure
1 Using an administrator account, log in to the IaaS host machine where the agent is installed.
2 Select Start > All Programs > Windows PowerShell version > Windows PowerShell.
3 For Remote Signed, run Set-ExecutionPolicy RemoteSigned.
4 For Unrestricted, run Set-ExecutionPolicy Unrestricted.
5 Verify that the command did not produce any errors.
6 Type Exit at the PowerShell command prompt.
Choosing the Agent Installation Scenario
The agents that you need to install depend on the external systems with which you plan to integrate.
Installing and Upgrading vRealize Automation
VMware, Inc. 190

Table 1‑31. Choosing an Agent Scenario
Integration Scenario Agent Requirements and Procedures
Provision cloud machines by integrating with a cloudenvironment such as Amazon Web Services orRed Hat Enterprise Linux OpenStack Platform.
You do not need to install an agent.
Provision virtual machines by integrating with a vSphereenvironment.
Installing and Configuring the Proxy Agent for vSphere
Provision virtual machines by integrating with aMicrosoft Hyper-V Server environment.
Installing the Proxy Agent for Hyper-V or XenServer
Provision virtual machines by integrating with a XenServerenvironment.
n Installing the Proxy Agent for Hyper-V or XenServern Installing the EPI Agent for Citrix
Provision virtual machines by integrating with a XenDesktopenvironment.
n Installing the VDI Agent for XenDesktopn Installing the EPI Agent for Citrix
Run Visual Basic scripts as additional steps in the provisioningprocess before or after provisioning a machine, or whendeprovisioning.
Installing the EPI Agent for Visual Basic Scripting
Collect data from the provisioned Windows machines, forexample the Active Directory status of the owner of a machine.
Installing the WMI Agent for Remote WMI Requests
Provision virtual machines by integrating with any othersupported virtual platform.
You do not need to install an agent.
Agent Installation Location and Requirements
A system administrator typically installs the agents on the vRealize Automation server that hosts theactive Manager Service component.
If an agent is installed on another host, the network configuration must allow communication between theagent and Manager Services installation machine.
Each agent is installed under a unique name in its own directory, Agents\agentname, under thevRealize Automation installation directory (typically Program Files(x86)\VMware\vCAC), with itsconfiguration stored in the file VRMAgent.exe.config in that directory.
Installing and Configuring the Proxy Agent for vSphere
A system administrator installs proxy agents to communicate with vSphere server instances. The agentsdiscover available work, retrieve host information, and report completed work items and other host statuschanges.
vSphere Agent Requirements
vSphere endpoint credentials, or the credentials under which the agent service runs, must haveadministrative access to the installation host. Multiple vSphere agents must meet vRealize Automationconfiguration requirements.
Installing and Upgrading vRealize Automation
VMware, Inc. 191
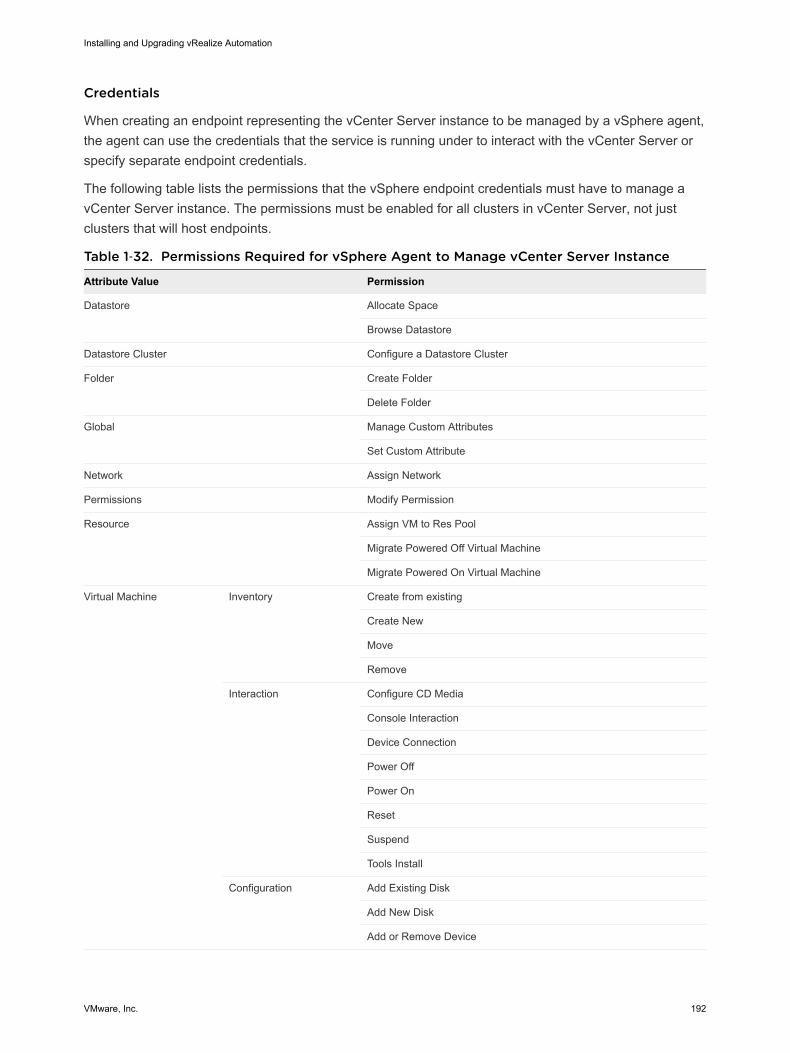
Credentials
When creating an endpoint representing the vCenter Server instance to be managed by a vSphere agent,the agent can use the credentials that the service is running under to interact with the vCenter Server orspecify separate endpoint credentials.
The following table lists the permissions that the vSphere endpoint credentials must have to manage avCenter Server instance. The permissions must be enabled for all clusters in vCenter Server, not justclusters that will host endpoints.
Table 1‑32. Permissions Required for vSphere Agent to Manage vCenter Server Instance
Attribute Value Permission
Datastore Allocate Space
Browse Datastore
Datastore Cluster Configure a Datastore Cluster
Folder Create Folder
Delete Folder
Global Manage Custom Attributes
Set Custom Attribute
Network Assign Network
Permissions Modify Permission
Resource Assign VM to Res Pool
Migrate Powered Off Virtual Machine
Migrate Powered On Virtual Machine
Virtual Machine Inventory Create from existing
Create New
Move
Remove
Interaction Configure CD Media
Console Interaction
Device Connection
Power Off
Power On
Reset
Suspend
Tools Install
Configuration Add Existing Disk
Add New Disk
Add or Remove Device
Installing and Upgrading vRealize Automation
VMware, Inc. 192
Table 1‑32. Permissions Required for vSphere Agent to Manage vCenter Server Instance(Continued)
Attribute Value Permission
Remove Disk
Advanced
Change CPU Count
Change Resource
Extend Virtual Disk
Disk Change Tracking
Memory
Modify Device Settings
Rename
Set Annotation (version 5.0 and later)
Settings
Swapfile Placement
Provisioning Customize
Clone Template
Clone Virtual Machine
Deploy Template
Read Customization Specs
State Create Snapshot
Remove Snapshot
Revert to Snapshot
Disable or reconfigure any third-party software that might change the power state of virtual machinesoutside of vRealize Automation. Such changes can interfere with the management of the machine lifecycle by vRealize Automation.
Install the vSphere Agent
Install a vSphere agent to manage vCenter Server instances. For high availability, you can install asecond, redundant vSphere agent for the same vCenter Server instance. You must name and configureboth vSphere agents identically, and install them on different machines.
Prerequisites
n Install IaaS, including the Web server and Manager Service host.
n Verify that the requirements in vSphere Agent Requirements have been met.
n If you already created a vSphere endpoint for use with this agent, make a note of the endpoint name.
n Download the vRealize Automation IaaS Installer.
Installing and Upgrading vRealize Automation
VMware, Inc. 193
Procedure
1 Right-click the [email protected] setup file and selectRun as administrator.
2 Click Next.
3 Accept the license agreement and click Next.
4 On the Log in page, supply administrator credentials for the vRealize Automation appliance and verifythe SSL Certificate.
a Type the user name, which is root, and the password.
The password is the password that you specified when you deployed the vRealize Automationappliance.
b Select Accept Certificate.
c Click View Certificate.
Compare the certificate thumbprint with the thumbprint set for the vRealize Automation appliance.You can view the vRealize Automation appliance certificate in the client browser when themanagement console is accessed on port 5480.
5 Select Custom Install on the Installation Type page.
6 In the Component Selection area, select Proxy Agents.
7 Accept the root install location or click Change and select an installation path.
Even in a distributed deployment, you might sometimes install more than one IaaS component on thesame Windows server.
If you install more than one IaaS component, always install them to the same path.
8 Click Next.
9 Log in with administrator privileges for the Windows services on the installation machine.
The service must run on the same installation machine.
10 Click Next.
11 Select vSphere from the Agent type list.
Installing and Upgrading vRealize Automation
VMware, Inc. 194
12 Enter an identifier for this agent in the Agent name text box.
Maintain a record of the agent name, credentials, endpoint name, and platform instance for eachagent. You need this information to configure endpoints and to add hosts in the future.
Important For high availability, you may add redundant agents and configure them identically.Otherwise, keep agents unique.
Option Description
Redundant agent Install redundant agents on different servers.
Name and configure redundant agents identically.
Standalone agent Assign a unique name to the agent.
13 Configure a connection to the IaaS Manager Service host.
Option Description
With a load balancer Enter the fully qualified domain name and port number of the load balancer for theManager Service component, mgr-svc-load-balancer.mycompany.com:443.
Do not enter IP addresses.
Without a load balancer Enter the fully qualified domain name and port number of the machine where youinstalled the Manager Service component, mgr-svc.mycompany.com:443.
Do not enter IP addresses. The default port is 443.
14 Configure a connection to the IaaS Web server.
Option Description
With a load balancer Enter the fully qualified domain name and port number of the load balancer for theWeb server component, web-load-balancer.mycompany.com:443.
Do not enter IP addresses.
Without a load balancer Enter the fully qualified domain name and port number of the machine where youinstalled the Web server component, web.mycompany.com:443.
Do not enter IP addresses. The default port is 443.
15 Click Test to verify connectivity to each host.
16 Enter the name of the endpoint.
The endpoint name that you configure in vRealize Automation must match the endpoint nameprovided to the vSphere proxy agent during installation or the endpoint cannot function.
17 Click Add.
18 Click Next.
19 Click Install to begin the installation.
After several minutes a success message appears.
Installing and Upgrading vRealize Automation
VMware, Inc. 195
20 Click Next.
21 Click Finish.
22 Verify that the installation is successful.
23 (Optional) Add multiple agents with different configurations and an endpoint on the same system.
What to do next
Configure the vSphere Agent.
Configure the vSphere Agent
Configure the vSphere agent in preparation for creating and using vSphere endpoints withinvRealize Automation blueprints.
You use the proxy agent utility to modify encrypted portions of the agent configuration file, or to changethe machine deletion policy for virtualization platforms. Only part of the VRMAgent.exe.config agentconfiguration file is encrypted. For example, the serviceConfiguration section is unencrypted.
Prerequisites
Using an account with administrator privileges, log in to the IaaS Windows server where you installed thevSphere agent.
Procedure
1 Open a Windows command prompt as an administrator.
2 Change to the agent installation folder, where agent-name is the folder containing the vSphere agent.
cd %SystemDrive%\Program Files (x86)\VMware\vCAC\Agents\agent-name
3 (Optional) To view the current configuration settings, enter the following command.
DynamicOps.Vrm.VRMencrypt.exe VRMAgent.exe.config get
The following is an example of the command output.
managementEndpointName: VCendpoint
doDeletes: True
4 (Optional) To change the name of the endpoint that you configured at installation, use the followingcommand.
set managementEndpointName
For example: DynamicOps.Vrm.VRMencrypt.exe VRMAgent.exe.config setmanagementEndpointName my-endpoint
You use this process to rename the endpoint within vRealize Automation, instead of changingendpoints.
Installing and Upgrading vRealize Automation
VMware, Inc. 196
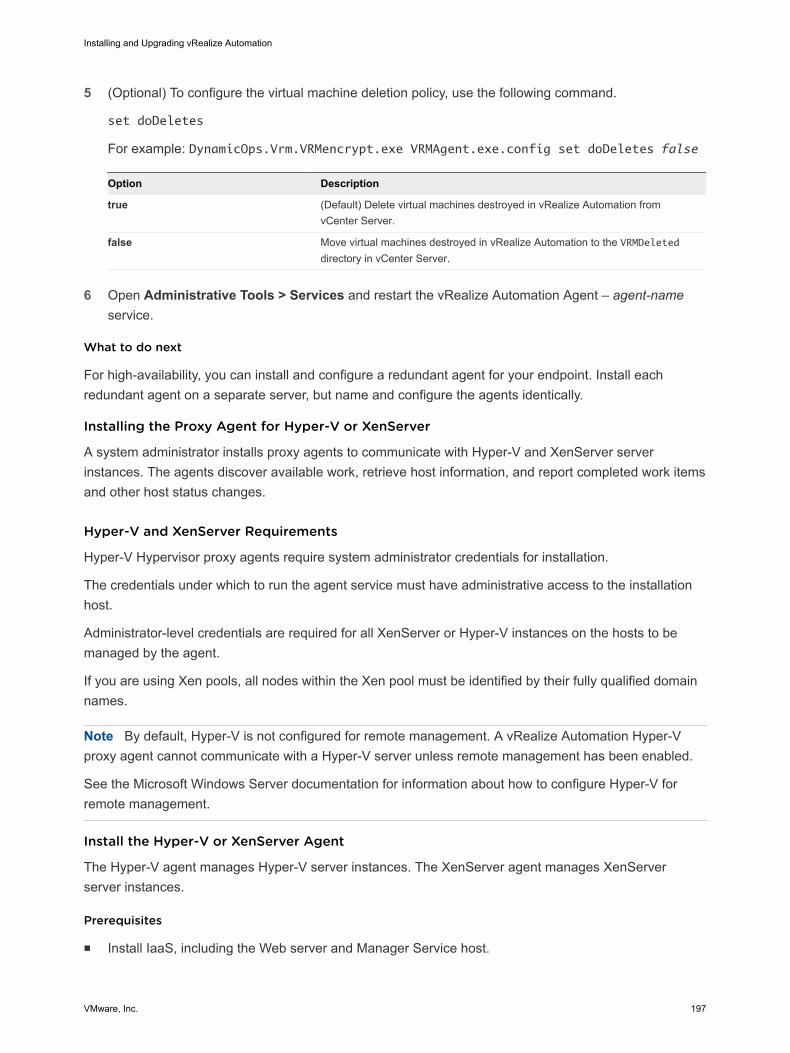
5 (Optional) To configure the virtual machine deletion policy, use the following command.
set doDeletes
For example: DynamicOps.Vrm.VRMencrypt.exe VRMAgent.exe.config set doDeletes false
Option Description
true (Default) Delete virtual machines destroyed in vRealize Automation fromvCenter Server.
false Move virtual machines destroyed in vRealize Automation to the VRMDeleteddirectory in vCenter Server.
6 Open Administrative Tools > Services and restart the vRealize Automation Agent – agent-name
service.
What to do next
For high-availability, you can install and configure a redundant agent for your endpoint. Install eachredundant agent on a separate server, but name and configure the agents identically.
Installing the Proxy Agent for Hyper-V or XenServer
A system administrator installs proxy agents to communicate with Hyper-V and XenServer serverinstances. The agents discover available work, retrieve host information, and report completed work itemsand other host status changes.
Hyper-V and XenServer Requirements
Hyper-V Hypervisor proxy agents require system administrator credentials for installation.
The credentials under which to run the agent service must have administrative access to the installationhost.
Administrator-level credentials are required for all XenServer or Hyper-V instances on the hosts to bemanaged by the agent.
If you are using Xen pools, all nodes within the Xen pool must be identified by their fully qualified domainnames.
Note By default, Hyper-V is not configured for remote management. A vRealize Automation Hyper-Vproxy agent cannot communicate with a Hyper-V server unless remote management has been enabled.
See the Microsoft Windows Server documentation for information about how to configure Hyper-V forremote management.
Install the Hyper-V or XenServer Agent
The Hyper-V agent manages Hyper-V server instances. The XenServer agent manages XenServerserver instances.
Prerequisites
n Install IaaS, including the Web server and Manager Service host.
Installing and Upgrading vRealize Automation
VMware, Inc. 197
n Download the vRealize Automation IaaS Installer.
n Verify that Hyper-V Hypervisor proxy agents have system administrator credentials.
n Verify that the credentials under which to run the agent service have administrative access to theinstallation host.
n Verify that all XenServer or Hyper-V instances on the hosts to be managed by the agent haveadministrator-level credentials.
n If you are using Xen pools, note that all nodes within the Xen pool must be identified by their fullyqualified domain names.
vRealize Automation cannot communicate with or manage any node that is not identified by its fullyqualified domain name within the Xen pool.
n Configure Hyper-V for remote management to enable Hyper-V server communication withvRealize Automation Hyper-V proxy agents.
See the Microsoft Windows Server documentation for information about how to configure Hyper-V forremote management.
Procedure
1 Right-click the [email protected] setup file and selectRun as administrator.
2 Click Next.
3 Accept the license agreement and click Next.
4 On the Log in page, supply administrator credentials for the vRealize Automation appliance and verifythe SSL Certificate.
a Type the user name, which is root, and the password.
The password is the password that you specified when you deployed the vRealize Automationappliance.
b Select Accept Certificate.
c Click View Certificate.
Compare the certificate thumbprint with the thumbprint set for the vRealize Automation appliance.You can view the vRealize Automation appliance certificate in the client browser when themanagement console is accessed on port 5480.
5 Select Custom Install on the Installation Type page.
6 Select Component Selection on the Installation Type page.
7 Accept the root install location or click Change and select an installation path.
Even in a distributed deployment, you might sometimes install more than one IaaS component on thesame Windows server.
If you install more than one IaaS component, always install them to the same path.
Installing and Upgrading vRealize Automation
VMware, Inc. 198

8 Click Next.
9 Log in with administrator privileges for the Windows services on the installation machine.
The service must run on the same installation machine.
10 Click Next.
11 Select the agent from the Agent type list.
n Xen
n Hyper-V
12 Enter an identifier for this agent in the Agent name text box.
Maintain a record of the agent name, credentials, endpoint name, and platform instance for eachagent. You need this information to configure endpoints and to add hosts in the future.
Important For high availability, you may add redundant agents and configure them identically.Otherwise, keep agents unique.
Option Description
Redundant agent Install redundant agents on different servers.
Name and configure redundant agents identically.
Standalone agent Assign a unique name to the agent.
13 Communicate the Agent name to the IaaS administrator who configures endpoints.
To enable access and data collection, the endpoint must be linked to the agent that was configuredfor it.
14 Configure a connection to the IaaS Manager Service host.
Option Description
With a load balancer Enter the fully qualified domain name and port number of the load balancer for theManager Service component, mgr-svc-load-balancer.mycompany.com:443.
Do not enter IP addresses.
Without a load balancer Enter the fully qualified domain name and port number of the machine where youinstalled the Manager Service component, mgr-svc.mycompany.com:443.
Do not enter IP addresses. The default port is 443.
Installing and Upgrading vRealize Automation
VMware, Inc. 199

15 Configure a connection to the IaaS Web server.
Option Description
With a load balancer Enter the fully qualified domain name and port number of the load balancer for theWeb server component, web-load-balancer.mycompany.com:443.
Do not enter IP addresses.
Without a load balancer Enter the fully qualified domain name and port number of the machine where youinstalled the Web server component, web.mycompany.com:443.
Do not enter IP addresses. The default port is 443.
16 Click Test to verify connectivity to each host.
17 Enter the credentials of a user with administrative-level permissions on the managed server instance.
18 Click Add.
19 Click Next.
20 (Optional) Add another agent.
For example, you can add a Xen agent if you previously added the Hyper-V agent.
21 Click Install to begin the installation.
After several minutes a success message appears.
22 Click Next.
23 Click Finish.
24 Verify that the installation is successful.
What to do next
For high-availability, you can install and configure a redundant agent for your endpoint. Install eachredundant agent on a separate server, but name and configure the agents identically.
Configure the Hyper-V or XenServer Agent.
Configure the Hyper-V or XenServer Agent
A system administrator can modify proxy agent configuration settings, such as the deletion policy forvirtualization platforms. You can use the proxy agent utility to modify the initial configurations that areencrypted in the agent configuration file.
Prerequisites
Log in as a system administrator to the machine where you installed the agent.
Procedure
1 Change to the agents installation directory, where agent_name is the directory containing the proxyagent, which is also the name under which the agent is installed.
cd Program Files (x86)\VMware\vCAC Agents\agent_name
Installing and Upgrading vRealize Automation
VMware, Inc. 200
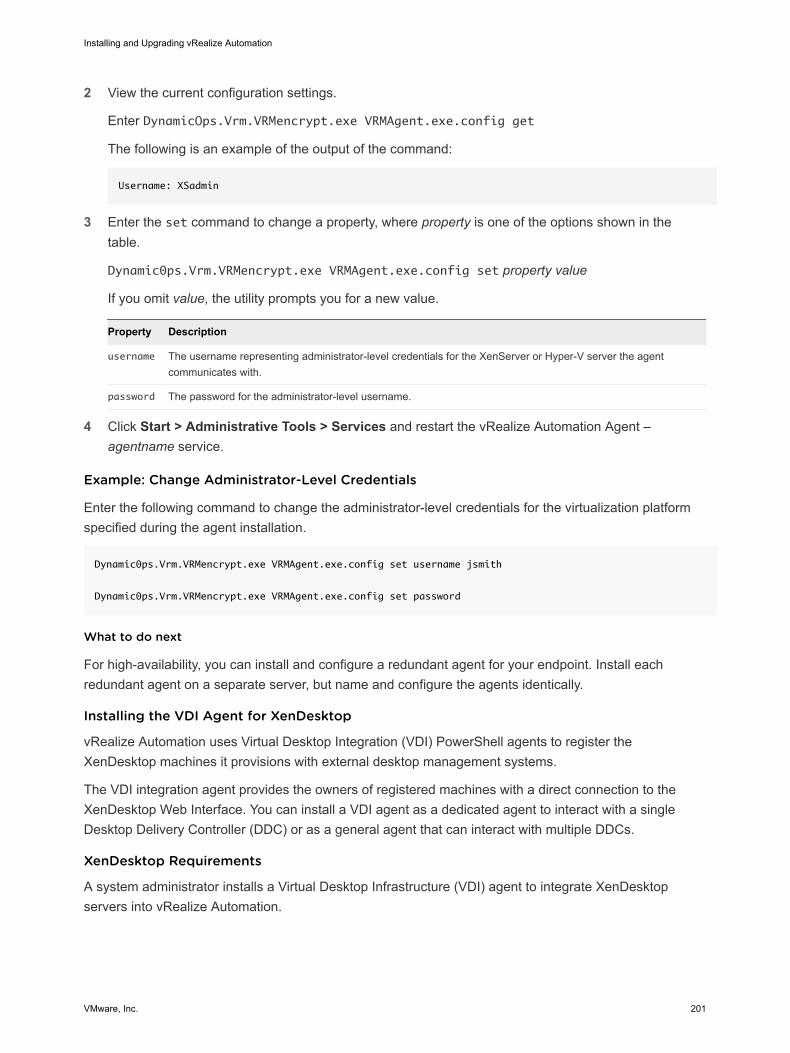
2 View the current configuration settings.
Enter DynamicOps.Vrm.VRMencrypt.exe VRMAgent.exe.config get
The following is an example of the output of the command:
Username: XSadmin
3 Enter the set command to change a property, where property is one of the options shown in thetable.
Dynamic0ps.Vrm.VRMencrypt.exe VRMAgent.exe.config set property value
If you omit value, the utility prompts you for a new value.
Property Description
username The username representing administrator-level credentials for the XenServer or Hyper-V server the agentcommunicates with.
password The password for the administrator-level username.
4 Click Start > Administrative Tools > Services and restart the vRealize Automation Agent –agentname service.
Example: Change Administrator-Level Credentials
Enter the following command to change the administrator-level credentials for the virtualization platformspecified during the agent installation.
Dynamic0ps.Vrm.VRMencrypt.exe VRMAgent.exe.config set username jsmith
Dynamic0ps.Vrm.VRMencrypt.exe VRMAgent.exe.config set password
What to do next
For high-availability, you can install and configure a redundant agent for your endpoint. Install eachredundant agent on a separate server, but name and configure the agents identically.
Installing the VDI Agent for XenDesktop
vRealize Automation uses Virtual Desktop Integration (VDI) PowerShell agents to register theXenDesktop machines it provisions with external desktop management systems.
The VDI integration agent provides the owners of registered machines with a direct connection to theXenDesktop Web Interface. You can install a VDI agent as a dedicated agent to interact with a singleDesktop Delivery Controller (DDC) or as a general agent that can interact with multiple DDCs.
XenDesktop Requirements
A system administrator installs a Virtual Desktop Infrastructure (VDI) agent to integrate XenDesktopservers into vRealize Automation.
Installing and Upgrading vRealize Automation
VMware, Inc. 201
You can install a general VDI agent to interact with multiple servers. If you are installing one dedicatedagent per server for load balancing or authorization reasons, you must provide the name of theXenDesktop DDC server when installing the agent. A dedicated agent can handle only registrationrequests directed to the server specified in its configuration.
Consult the vRealize Automation Support Matrix on the VMware Web site for information about supportedversions of XenDesktop for XenDesktop DDC servers.
Installation Host and Credentials
The credentials under which the agent runs must have administrative access to all XenDesktop DDCservers with which it interacts.
XenDesktop Requirements
The name given to the XenServer Host on your XenDesktop server must match the UUID of the Xen Poolin XenCenter. See Set the XenServer Host Name for more information.
Each XenDesktop DDC server with which you intend to register machines must be configured in thefollowing way:
n The group/catalog type must be set to Existing for use with vRealize Automation.
n The name of a vCenter Server host on a DDC server must match the name of thevCenter Serverinstance as entered in the vRealize Automation vSphere endpoint, without the domain. The endpointmust be configured with a fully qualified domain name (FQDN), and not with an IP address. Forexample, if the address in the endpoint is https://virtual-center27.domain/sdk, the name of the host onthe DDC server must be set to virtual-center27.
If your vRealize Automation vSphere endpoint has been configured with an IP address, you mustchange it to use an FQDN. See IaaS Configuration for more information about setting up endpoints.
XenDesktop Agent Host requirements
Citrix XenDesktop SDK must be installed. The SDK for XenDesktop is included on the XenDesktopinstallation disc.
Verify that Microsoft PowerShell is installed on the installation host before agent installation. The versionrequired depends on the operating system of the installation host. See Microsoft Help and Support.
MS PowerShell Execution Policy is set to RemoteSigned or Unrestricted. See Set the PowerShellExecution Policy to RemoteSigned.
For more information about PowerShell Execution Policy, run help about_signing or help Set-ExecutionPolicy at the PowerShell command prompt.
Set the XenServer Host Name
In XenDesktop, the name given to the XenServer Host on your XenDesktop server must match the UUIDof the Xen Pool in XenCenter. If no XenPool is configured, the name must match the UUID of theXenServer itself.
Installing and Upgrading vRealize Automation
VMware, Inc. 202
Procedure
1 In Citrix XenCenter, select your XenPool or standalone XenServer and click the General tab. Recordthe UUID.
2 When you add your XenServer Pool or standalone host to XenDesktop, type the UUID that wasrecorded in the previous step as the Connection name.
Install the XenDesktop Agent
Virtual desktop integration (VDI) PowerShell agents integrate with external virtual desktop system, suchas XenDesktop and Citrix. Use a VDI PowerShell agent to manage the XenDesktop machine.
Prerequisites
n Install IaaS, including the Web server and Manager Service host.
n Verify that the requirements in XenDesktop Requirements have been met.
n Download the vRealize Automation IaaS Installer.
Procedure
1 Right-click the [email protected] setup file and selectRun as administrator.
2 Click Next.
3 Accept the license agreement and click Next.
4 On the Log in page, supply administrator credentials for the vRealize Automation appliance and verifythe SSL Certificate.
a Type the user name, which is root, and the password.
The password is the password that you specified when you deployed the vRealize Automationappliance.
b Select Accept Certificate.
c Click View Certificate.
Compare the certificate thumbprint with the thumbprint set for the vRealize Automation appliance.You can view the vRealize Automation appliance certificate in the client browser when themanagement console is accessed on port 5480.
5 Click Next.
6 Select Custom Install on the Installation Type page.
7 Select Proxy Agents in the Component Selection pane.
8 Accept the root install location or click Change and select an installation path.
Even in a distributed deployment, you might sometimes install more than one IaaS component on thesame Windows server.
If you install more than one IaaS component, always install them to the same path.
Installing and Upgrading vRealize Automation
VMware, Inc. 203
9 Click Next.
10 Log in with administrator privileges for the Windows services on the installation machine.
The service must run on the same installation machine.
11 Click Next.
12 Select VdiPowerShell from the Agent type list.
13 Enter an identifier for this agent in the Agent name text box.
Maintain a record of the agent name, credentials, endpoint name, and platform instance for eachagent. You need this information to configure endpoints and to add hosts in the future.
Important For high availability, you may add redundant agents and configure them identically.Otherwise, keep agents unique.
Option Description
Redundant agent Install redundant agents on different servers.
Name and configure redundant agents identically.
Standalone agent Assign a unique name to the agent.
14 Configure a connection to the IaaS Manager Service host.
Option Description
With a load balancer Enter the fully qualified domain name and port number of the load balancer for theManager Service component, mgr-svc-load-balancer.mycompany.com:443.
Do not enter IP addresses.
Without a load balancer Enter the fully qualified domain name and port number of the machine where youinstalled the Manager Service component, mgr-svc.mycompany.com:443.
Do not enter IP addresses. The default port is 443.
15 Configure a connection to the IaaS Web server.
Option Description
With a load balancer Enter the fully qualified domain name and port number of the load balancer for theWeb server component, web-load-balancer.mycompany.com:443.
Do not enter IP addresses.
Without a load balancer Enter the fully qualified domain name and port number of the machine where youinstalled the Web server component, web.mycompany.com:443.
Do not enter IP addresses. The default port is 443.
16 Click Test to verify connectivity to each host.
17 Select the VDI version.
18 Enter the fully qualified domain name of the managed server in the VDI Server text box.
Installing and Upgrading vRealize Automation
VMware, Inc. 204
19 Click Add.
20 Click Next.
21 Click Install to begin the installation.
After several minutes a success message appears.
22 Click Next.
23 Click Finish.
24 Verify that the installation is successful.
25 (Optional) Add multiple agents with different configurations and an endpoint on the same system.
What to do next
For high-availability, you can install and configure a redundant agent for your endpoint. Install eachredundant agent on a separate server, but name and configure the agents identically.
Installing the EPI Agent for Citrix
External provisioning Integration (EPI) PowerShell agents integrate Citrix external machines into theprovisioning process. The EPI agent provides on-demand streaming of the Citrix disk images from whichthe machines boot and run.
The dedicated EPI agent interacts with a single external provisioning server. You must install one EPIagent for each Citrix provisioning server instance.
Citrix Provisioning Server Requirements
A system administrator uses External Provisioning Infrastructure (EPI) agents to integrate Citrixprovisioning servers and to enable the use of Visual Basic scripts in the provisioning process.
Installation Location and Credentials
Install the agent on the PVS host for Citrix Provisioning Services instances. Verify that the installation hostmeets Citrix Agent Host Requirements before you install the agent.
Although an EPI agent can generally interact with multiple servers, Citrix Provisioning Server requires adedicated EPI agent. You must install one EPI agent for each Citrix Provisioning Server instance,providing the name of the server hosting it. The credentials under which the agent runs must haveadministrative access to the Citrix Provisioning Server instance.
Consult the vRealize Automation Support Matrix for information about supported versions of Citrix PVS.
Citrix Agent Host Requirements
PowerShell and Citrix Provisioning Services SDK must be installed on the installation host prior to agentinstallation. Consult the vRealize Automation Support Matrix on the VMware Web site for details.
Verify that Microsoft PowerShell is installed on the installation host before agent installation. The versionrequired depends on the operating system of the installation host. See Microsoft Help and Support.
Installing and Upgrading vRealize Automation
VMware, Inc. 205
You must also ensure that the PowerShell Snap-In is installed. For more information, see the CitrixProvisioning Services PowerShell Programmer's Guide on the Citrix Web site.
MS PowerShell Execution Policy is set to RemoteSigned or Unrestricted. See Set the PowerShellExecution Policy to RemoteSigned.
For more information about PowerShell Execution Policy, run help about_signing or help Set-ExecutionPolicy at the PowerShell command prompt.
Install the Citrix Agent
External provisioning integration (EPI) PowerShell agents integrate external systems into the machineprovisioning process. Use the EPI PowerShell agent to integrate with Citrix provisioning server to enableprovisioning of machines by on-demand disk streaming.
Prerequisites
n Install IaaS, including the Web server and Manager Service host.
n Verify that the requirements in Citrix Provisioning Server Requirements have been met.
n Download the vRealize Automation IaaS Installer.
Procedure
1 Right-click the [email protected] setup file and selectRun as administrator.
2 Click Next.
3 Accept the license agreement and click Next.
4 On the Log in page, supply administrator credentials for the vRealize Automation appliance and verifythe SSL Certificate.
a Type the user name, which is root, and the password.
The password is the password that you specified when you deployed the vRealize Automationappliance.
b Select Accept Certificate.
c Click View Certificate.
Compare the certificate thumbprint with the thumbprint set for the vRealize Automation appliance.You can view the vRealize Automation appliance certificate in the client browser when themanagement console is accessed on port 5480.
5 Select Custom Install on the Installation Type page.
6 Select Component Selection on the Installation Type page.
Installing and Upgrading vRealize Automation
VMware, Inc. 206

7 Accept the root install location or click Change and select an installation path.
Even in a distributed deployment, you might sometimes install more than one IaaS component on thesame Windows server.
If you install more than one IaaS component, always install them to the same path.
8 Click Next.
9 Log in with administrator privileges for the Windows services on the installation machine.
The service must run on the same installation machine.
10 Click Next.
11 Select EPIPowerShell from the Agent type list.
12 Enter an identifier for this agent in the Agent name text box.
Maintain a record of the agent name, credentials, endpoint name, and platform instance for eachagent. You need this information to configure endpoints and to add hosts in the future.
Important For high availability, you may add redundant agents and configure them identically.Otherwise, keep agents unique.
Option Description
Redundant agent Install redundant agents on different servers.
Name and configure redundant agents identically.
Standalone agent Assign a unique name to the agent.
13 Configure a connection to the IaaS Manager Service host.
Option Description
With a load balancer Enter the fully qualified domain name and port number of the load balancer for theManager Service component, mgr-svc-load-balancer.mycompany.com:443.
Do not enter IP addresses.
Without a load balancer Enter the fully qualified domain name and port number of the machine where youinstalled the Manager Service component, mgr-svc.mycompany.com:443.
Do not enter IP addresses. The default port is 443.
14 Configure a connection to the IaaS Web server.
Option Description
With a load balancer Enter the fully qualified domain name and port number of the load balancer for theWeb server component, web-load-balancer.mycompany.com:443.
Do not enter IP addresses.
Without a load balancer Enter the fully qualified domain name and port number of the machine where youinstalled the Web server component, web.mycompany.com:443.
Do not enter IP addresses. The default port is 443.
Installing and Upgrading vRealize Automation
VMware, Inc. 207
15 Click Test to verify connectivity to each host.
16 Select the EPI type.
17 Enter the fully qualified domain name of the managed server in the EPI Server text box.
18 Click Add.
19 Click Next.
20 Click Install to begin the installation.
After several minutes a success message appears.
21 Click Next.
22 Click Finish.
23 Verify that the installation is successful.
24 (Optional) Add multiple agents with different configurations and an endpoint on the same system.
What to do next
For high-availability, you can install and configure a redundant agent for your endpoint. Install eachredundant agent on a separate server, but name and configure the agents identically.
Installing the EPI Agent for Visual Basic Scripting
A system administrator can specify Visual Basic scripts as additional steps in the provisioning processbefore or after provisioning a machine, or when deprovisioning a machine. You must install an ExternalProvisioning Integration (EPI) PowerShell before you can run Visual Basic scripts.
Visual Basic scripts are specified in the blueprint from which machines are provisioned. Such scripts haveaccess to all of the custom properties associated with the machine and can update their values. The nextstep in the workflow then has access to these new values.
For example, you could use a script to generate certificates or security tokens before provisioning anduse them in machine provisioning.
To enable scripts in provisioning, you must install a specific type of EPI agent and place the scripts youwant to use on the system on which the agent is installed.
When executing a script, the EPI agent passes all machine custom properties as arguments to the script.To return updated property values, you must place these properties in a dictionary and call avRealize Automation function. A sample script is included in the scripts subdirectory of the EPI agentinstallation directory. This script contains a header to load all arguments into a dictionary, a body in whichyou can include your function(s), and a footer to return updated custom properties values.
Note You can install multiple EPI/VBScripts agents on multiple servers and provision using a specificagent and the Visual Basic scripts on that agent’s host. If you need to do this, contact VMware customersupport.
Installing and Upgrading vRealize Automation
VMware, Inc. 208
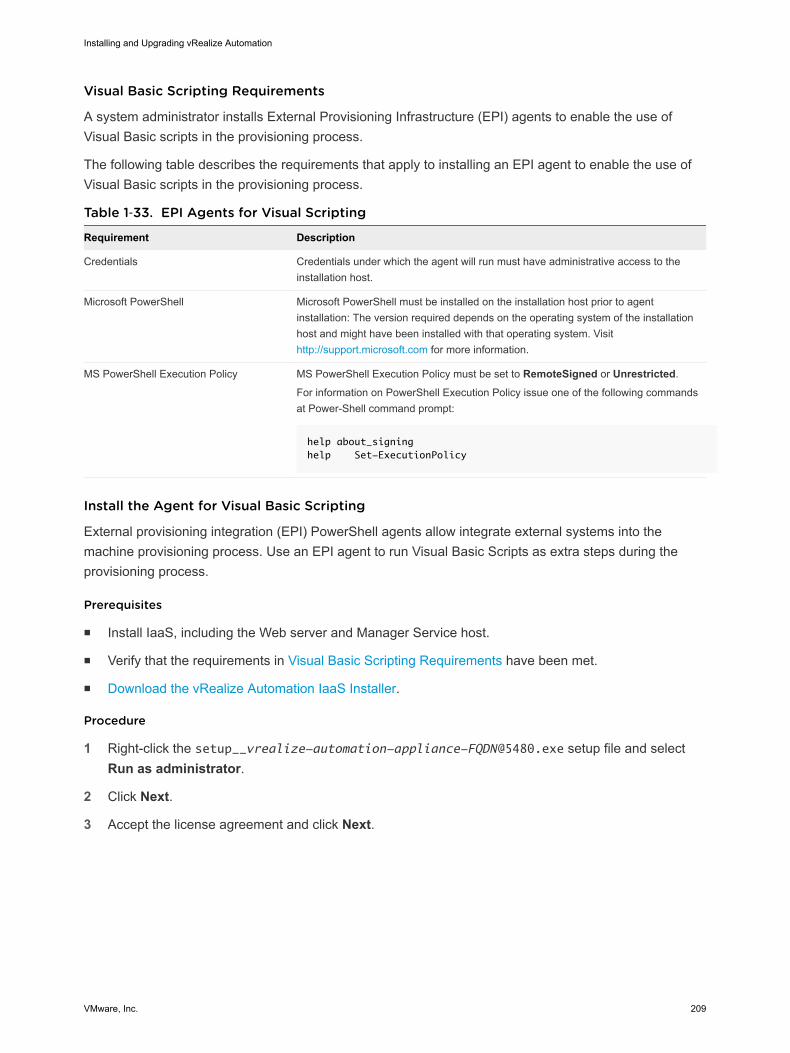
Visual Basic Scripting Requirements
A system administrator installs External Provisioning Infrastructure (EPI) agents to enable the use ofVisual Basic scripts in the provisioning process.
The following table describes the requirements that apply to installing an EPI agent to enable the use ofVisual Basic scripts in the provisioning process.
Table 1‑33. EPI Agents for Visual Scripting
Requirement Description
Credentials Credentials under which the agent will run must have administrative access to theinstallation host.
Microsoft PowerShell Microsoft PowerShell must be installed on the installation host prior to agentinstallation: The version required depends on the operating system of the installationhost and might have been installed with that operating system. Visit http://support.microsoft.com for more information.
MS PowerShell Execution Policy MS PowerShell Execution Policy must be set to RemoteSigned or Unrestricted.
For information on PowerShell Execution Policy issue one of the following commandsat Power-Shell command prompt:
help about_signinghelp Set-ExecutionPolicy
Install the Agent for Visual Basic Scripting
External provisioning integration (EPI) PowerShell agents allow integrate external systems into themachine provisioning process. Use an EPI agent to run Visual Basic Scripts as extra steps during theprovisioning process.
Prerequisites
n Install IaaS, including the Web server and Manager Service host.
n Verify that the requirements in Visual Basic Scripting Requirements have been met.
n Download the vRealize Automation IaaS Installer.
Procedure
1 Right-click the [email protected] setup file and selectRun as administrator.
2 Click Next.
3 Accept the license agreement and click Next.
Installing and Upgrading vRealize Automation
VMware, Inc. 209
4 On the Log in page, supply administrator credentials for the vRealize Automation appliance and verifythe SSL Certificate.
a Type the user name, which is root, and the password.
The password is the password that you specified when you deployed the vRealize Automationappliance.
b Select Accept Certificate.
c Click View Certificate.
Compare the certificate thumbprint with the thumbprint set for the vRealize Automation appliance.You can view the vRealize Automation appliance certificate in the client browser when themanagement console is accessed on port 5480.
5 Select Custom Install on the Installation Type page.
6 Select Component Selection on the Installation Type page.
7 Accept the root install location or click Change and select an installation path.
Even in a distributed deployment, you might sometimes install more than one IaaS component on thesame Windows server.
If you install more than one IaaS component, always install them to the same path.
8 Click Next.
9 Log in with administrator privileges for the Windows services on the installation machine.
The service must run on the same installation machine.
10 Click Next.
11 Select EPIPowerShell from the Agent type list.
12 Enter an identifier for this agent in the Agent name text box.
Maintain a record of the agent name, credentials, endpoint name, and platform instance for eachagent. You need this information to configure endpoints and to add hosts in the future.
Important For high availability, you may add redundant agents and configure them identically.Otherwise, keep agents unique.
Option Description
Redundant agent Install redundant agents on different servers.
Name and configure redundant agents identically.
Standalone agent Assign a unique name to the agent.
Installing and Upgrading vRealize Automation
VMware, Inc. 210
13 Configure a connection to the IaaS Manager Service host.
Option Description
With a load balancer Enter the fully qualified domain name and port number of the load balancer for theManager Service component, mgr-svc-load-balancer.mycompany.com:443.
Do not enter IP addresses.
Without a load balancer Enter the fully qualified domain name and port number of the machine where youinstalled the Manager Service component, mgr-svc.mycompany.com:443.
Do not enter IP addresses. The default port is 443.
14 Configure a connection to the IaaS Web server.
Option Description
With a load balancer Enter the fully qualified domain name and port number of the load balancer for theWeb server component, web-load-balancer.mycompany.com:443.
Do not enter IP addresses.
Without a load balancer Enter the fully qualified domain name and port number of the machine where youinstalled the Web server component, web.mycompany.com:443.
Do not enter IP addresses. The default port is 443.
15 Click Test to verify connectivity to each host.
16 Select the EPI type.
17 Enter the fully qualified domain name of the managed server in the EPI Server text box.
18 Click Add.
19 Click Next.
20 Click Install to begin the installation.
After several minutes a success message appears.
21 Click Next.
22 Click Finish.
23 Verify that the installation is successful.
24 (Optional) Add multiple agents with different configurations and an endpoint on the same system.
Installing the WMI Agent for Remote WMI Requests
A system administrator enables the Windows Management Instrumentation (WMI) protocol and installsthe WMI agent on all managed Windows machines to enable management of data and operations. Theagent is required to collect data from Windows machines, such as the Active Directory status of the ownerof a machine.
Installing and Upgrading vRealize Automation
VMware, Inc. 211
Enable Remote WMI Requests on Windows Machines
To use WMI agents, remote WMI requests must be enabled on the managed Windows servers.
Procedure
1 In each domain that contains provisioned and managed Windows virtual machines, create an ActiveDirectory group and add to it the service credentials of the WMI agents that execute remote WMIrequests on the provisioned machines.
2 Enable remote WMI requests for the Active Directory groups containing the agent credentials on eachWindows machine provisioned.
Install the WMI Agent
The Windows Management Instrumentation (WMI) agent enables data collection from Windows managedmachines.
Prerequisites
n Install IaaS, including the Web server and Manager Service host.
n Verify that the requirements in Enable Remote WMI Requests on Windows Machines have been met.
n Download the vRealize Automation IaaS Installer.
Procedure
1 Right-click the [email protected] setup file and selectRun as administrator.
2 Click Next.
3 Accept the license agreement and click Next.
4 On the Log in page, supply administrator credentials for the vRealize Automation appliance and verifythe SSL Certificate.
a Type the user name, which is root, and the password.
The password is the password that you specified when you deployed the vRealize Automationappliance.
b Select Accept Certificate.
c Click View Certificate.
Compare the certificate thumbprint with the thumbprint set for the vRealize Automation appliance.You can view the vRealize Automation appliance certificate in the client browser when themanagement console is accessed on port 5480.
5 Select Custom Install on the Installation Type page.
6 Select Component Selection on the Installation Type page.
Installing and Upgrading vRealize Automation
VMware, Inc. 212

7 Accept the root install location or click Change and select an installation path.
Even in a distributed deployment, you might sometimes install more than one IaaS component on thesame Windows server.
If you install more than one IaaS component, always install them to the same path.
8 Click Next.
9 Log in with administrator privileges for the Windows services on the installation machine.
The service must run on the same installation machine.
10 Click Next.
11 Select WMI from the Agent type list.
12 Enter an identifier for this agent in the Agent name text box.
Maintain a record of the agent name, credentials, endpoint name, and platform instance for eachagent. You need this information to configure endpoints and to add hosts in the future.
Important For high availability, you may add redundant agents and configure them identically.Otherwise, keep agents unique.
Option Description
Redundant agent Install redundant agents on different servers.
Name and configure redundant agents identically.
Standalone agent Assign a unique name to the agent.
13 Configure a connection to the IaaS Manager Service host.
Option Description
With a load balancer Enter the fully qualified domain name and port number of the load balancer for theManager Service component, mgr-svc-load-balancer.mycompany.com:443.
Do not enter IP addresses.
Without a load balancer Enter the fully qualified domain name and port number of the machine where youinstalled the Manager Service component, mgr-svc.mycompany.com:443.
Do not enter IP addresses. The default port is 443.
14 Configure a connection to the IaaS Web server.
Option Description
With a load balancer Enter the fully qualified domain name and port number of the load balancer for theWeb server component, web-load-balancer.mycompany.com:443.
Do not enter IP addresses.
Without a load balancer Enter the fully qualified domain name and port number of the machine where youinstalled the Web server component, web.mycompany.com:443.
Do not enter IP addresses. The default port is 443.
Installing and Upgrading vRealize Automation
VMware, Inc. 213

15 Click Test to verify connectivity to each host.
16 Click Add.
17 Click Next.
18 Click Install to begin the installation.
After several minutes a success message appears.
19 Click Next.
20 Click Finish.
21 Verify that the installation is successful.
22 (Optional) Add multiple agents with different configurations and an endpoint on the same system.
Silent vRealize Automation InstallationvRealize Automation includes options for scripted, silent installation from the command line, and API-based silent installation. Both approaches require that you prepare, in advance, the values that you wouldnormally enter by hand during a conventional installation.
About Silent vRealize Automation InstallationvRealize Automation silent installation uses an executable that references a text-based answer file.
In the answer file, you preconfigure system FQDNs, account credentials, and other settings that youtypically add throughout a conventional wizard-based or manual installation. Silent installation is useful forthe following kinds of deployments.
n Deploying multiple, nearly identical environments
n Repeatedly redeploying the same environment
n Performing unattended installations
n Performing scripted installations
Perform a Silent vRealize Automation InstallationYou can perform an unattended, silent vRealize Automation installation from the console of a newlydeployed vRealize Automation appliance.
Prerequisites
n Create an unconfigured appliance. See Deploy the vRealize Automation Appliance.
n Create or identify your IaaS Windows servers, and configure their prerequisites.
n Install the Management Agent on your IaaS Windows servers.
You may install the Management Agent using the traditional .msi file download or the silent processdescribed in Perform a Silent vRealize Automation Management Agent Installation.
Installing and Upgrading vRealize Automation
VMware, Inc. 214
Procedure
1 Log in to the vRealize Automation appliance console as root.
2 Navigate to the following directory.
/usr/lib/vcac/tools/install
3 Open the ha.properties answer file in a text editor.
4 Add entries specific to your deployment in ha.properties, and save and close the file.
Alternatively, you can save time by copying and modifying an ha.properties file from anotherdeployment instead of editing the entire default file.
5 From the same directory, start the installation by running the following command.
vra-ha-config.sh
Installation might take up to an hour or more to complete, depending on the environment and size ofthe deployment.
6 (Optional) After installation finishes, review the log file.
/var/log/vcac/vra-ha-config.log
The silent installer does not save proprietary data to the log, such as passwords, licenses, orcertificates.
Perform a Silent vRealize Automation Management Agent InstallationYou can perform a command line based vRealize Automation Management Agent installation on any IaaSWindows server.
Silent Management Agent installation consists of a Windows PowerShell script in which you customize afew settings. After adding your deployment-specific settings, you can silently install the ManagementAgent on all of your IaaS Windows servers by running copies of the same script on each one.
Prerequisites
n Create an unconfigured appliance. See Deploy the vRealize Automation Appliance.
n Create or identify your IaaS Windows servers, and configure their prerequisites.
Procedure
1 Log in to the IaaS Windows server using an account that has administrator rights.
2 Open a Web browser to the vRealize Automation appliance installer URL.
https://vrealize-automation-appliance-FQDN:5480/installer
3 Right-click the link to the InstallManagementAgent.ps1 PowerShell script file, and save it to thedesktop or a folder on the IaaS Windows server.
4 Open InstallManagementAgent.ps1 in a text editor.
Installing and Upgrading vRealize Automation
VMware, Inc. 215

5 Near the top of the script file, add your deployment-specific settings.
n The vRealize Automation appliance URL
https://vrealize-automation-appliance-FQDN:5480
n vRealize Automation appliance root user account credentials
n vRealize Automation service user credentials, a domain account with administrator privileges onthe IaaS Windows servers
n The folder where you want to install the Management Agent, Program Files (x86) by default
n (Optional) The thumbprint of the PEM format certificate that you are using for authentication
6 Save and close InstallManagementAgent.ps1.
7 To silently install the Management Agent, double-click InstallManagementAgent.ps1.
8 (Optional) Verify that installation has finished by locating VMware vCloud Automation CenterManagement Agent in the Windows Control Panel list of Programs and Features, and in the list ofWindows services that are running.
Silent vRealize Automation Installation Answer FileSilent vRealize Automation installations require that you prepare a text-based answer file in advance.
All newly deployed vRealize Automation appliances contain a default answer file.
/usr/lib/vcac/tools/install/ha.properties
To perform a silent installation, you must use a text editor to customize the settings in ha.properties tothe deployment that you want to install. The following examples are a few of the settings and informationthat you must add.
n Your vRealize Automation or suite license key
n vRealize Automation appliance node FQDNs
n vRealize Automation appliance root user account credentials
n IaaS Windows server FQDNs that will act as Web nodes, Manager Service nodes, and so on
n vRealize Automation service user credentials, a domain account with administrator privileges on theIaaS Windows servers
n Load balancer FQDNs
n SQL Server database parameters
n Proxy agent parameters to connect to virtualization resources
n Whether the silent installer should attempt to correct missing IaaS Windows server prerequisites
The silent installer can correct many missing Windows prerequisites. However, some configurationproblems, such as not enough CPU, cannot be changed by the silent installer.
Installing and Upgrading vRealize Automation
VMware, Inc. 216

To save time, you can reuse and modify an ha.properties file that was configured for anotherdeployment, one where the settings were similar. Also, when you install vRealize Automation non-silentlythrough the Installation Wizard, the wizard creates and saves your settings in the ha.properties file.The file might be useful to reuse and modify for silently installing a similar deployment.
The wizard does not save proprietary settings to the ha.properties file, such as passwords, licenses, orcertificates.
The vRealize Automation Installation Command LinevRealize Automation includes a console-based, command line interface for performing installationadjustments that might be required after initial installation.
The command line interface (CLI) can run installation and configuration tasks that are no longer availablethrough the browser-based interface after initial installation. CLI features include rechecking prerequisites,installing IaaS components, installing certificates, or setting the vRealize Automation host name to whichusers point their Web browser.
The CLI is also useful for advanced users who want to script certain operations. Some CLI functions areused by silent installation, so familiarity with both features reinforces your knowledge ofvRealize Automation installation scripting.
vRealize Automation Installation Command Line Basics
The vRealize Automation installation command line interface includes top-level, basic operations.
The basic operations display vRealize Automation node IDs, run commands, report command status, ordisplay the help information. To show these operations and all of their options at the console display, enterthe following command without any options or qualifiers.
vra-command
Display Node IDs
You need to know vRealize Automation node IDs in order to run commands against the correct targetsystems. To display node IDs, enter the following command.
vra-command list-nodes
Make note of node IDs before running commands against specific machines.
Run Commands
Most command line functions involve running a command against a node in the vRealize Automationcluster. To run a command, use the following syntax.
vra-command execute --node node-ID command-name --parameter-name parameter-value
As shown in the preceding syntax, many commands require parameters and parameter values chosen bythe user.
Installing and Upgrading vRealize Automation
VMware, Inc. 217
Display Command Status
Some commands take a few moments or even longer to complete. To check the progress of a commandthat was entered, enter the following command.
vra-command status
The status command is especially valuable for monitoring a silent install, which can take a long time forlarge deployment sizes.
Display Help
To display help information for all available commands, enter the following command.
vra-command help
To display help for a single command, enter the following command.
vra-command help command-name
vRealize Automation Installation Command Names
Commands give you console access to many vRealize Automation installation and configuration tasksthat you might want to perform after initial installation.
Examples of available commands include the following functions.
n Adding another vRealize Automation appliance to an existing installation
n Setting the host name that users point a Web browser to when they access vRealize Automation
n Creating the IaaS SQL Server database
n Running the prerequisite checker against an IaaS Windows server
n Importing certificates
For a complete list of available vRealize Automation commands, log in to the vRealize Automationappliance console, and enter the following command.
vra-command help
The long list of command names and parameters is not reproduced in separate documentation. To usethe list effectively, identify a command of interest, and narrow your focus by entering the followingcommand.
vra-command help command-name
The vRealize Automation Installation APIThe vRealize Automation REST API for installation gives you the ability to create purely software-controlled installations for vRealize Automation.
Installing and Upgrading vRealize Automation
VMware, Inc. 218
The installation API requires a JSON formatted version of the same entries that the CLI based installationobtains from the ha.properties answer file. The following guidelines familiarize you with how the APIworks. From there, you should be able to design programmatic calls to the API to installvRealize Automation.
n To access the API documentation, point a Web browser to the following vRealize Automationappliance page.
https://vrealize-automation-appliance-FQDN:5480/config
You need an unconfigured vRealize Automation appliance. See Deploy the vRealize AutomationAppliance.
n To experiment with the API based installation, locate and expand the following PUT command.
PUT /vra-install
n Copy the unpopulated JSON from the install_json box to a text editor. Fill in the answer values thesame way that you would for ha.properties. When your JSON formatted answers are ready, copythe code back to install_json and overwrite the unpopulated JSON.
Alternatively, you can edit the following template JSON and copy the result to install_json.
/usr/lib/vcac/tools/install/installationProperties.json
You can also convert a completed ha.properties to JSON or vice versa.
n In the action box, select validate and click Try It Out.
The validate action runs the vRealize Automation prerequisite checker and fixer.
n The validate response includes an alphanumeric command ID that you can insert into the followingGET command.
GET /commands/command-id/aggregated-status
The response to the GET includes the progress of the validation operation.
n When validation succeeds, you can run the actual installation by repeating the process. In the actionbox, just select install instead of validate.
Installation can take a long time depending on the deployment size. Again, locate the command ID,and use the aggregated status GET command to obtain installation progress. The GET responsemight resemble the following example.
"progress": "78%", "counts": {"failed": 0, "completed": 14, "total": 18,
"queued": 3, "processing": 1}, "failed-commands": 0
n If something goes wrong with the installation, you can trigger log collection for all nodes using thefollowing command.
PUT /commands/log-bundle
Similar to installation, the returned alphanumeric command ID lets you monitor log collection status.
Installing and Upgrading vRealize Automation
VMware, Inc. 219
Convert Between vRealize Automation Silent Properties and JSONFor silent vRealize Automation CLI or API based installations, you can convert a completed propertiesanswer file to JSON or vice versa. The silent CLI installation requires the properties file, while the APIrequires JSON format.
Prerequisites
A completed properties answer file or completed JSON file
/usr/lib/vcac/tools/install/ha.properties
or
/usr/lib/vcac/tools/install/installationProperties.json
Procedure
1 Log in to a vRealize Automation appliance console session as root.
2 Run the appropriate converter script.
n Convert JSON to Properties
/usr/lib/vcac/tools/install/convert-properties --from-json
installationProperties.json
The script creates a new properties file with the timestamp in the name, for example:
ha.2016-10-17_13.02.15.properties
n Convert Properties to JSON
/usr/lib/vcac/tools/install/convert-properties --to-json ha.properties
The script creates a new installationProperties.json file with the timestamp in the name,for example:
installationProperties.2016-10-17_13.36.13.json
You can also display help for the script.
/usr/lib/vcac/tools/install/convert-properties –-help
vRealize Automation Post-Installation TasksAfter you install vRealize Automation, there are post-installation tasks that might need your attention.
Configure Federal Information Processing Standard Compliant EncryptionYou can enable or disable Federal Information Processing Standard (FIPS) 140–2 compliantcryptography for inbound and outbound vRealize Automation appliance network traffic.
Changing the FIPS setting requires a vRealize Automation restart. FIPS is disabled by default.
Installing and Upgrading vRealize Automation
VMware, Inc. 220
Procedure
1 Log in as root to the vRealize Automation appliance management interface.
https://vrealize-automation-appliance-FQDN:5480
2 Click vRA Settings > Host Settings.
3 Near the upper right, click the button to enable or disable FIPS.
When enabled, inbound and outbound vRealize Automation appliance network traffic on port 443uses FIPS 140–2 compliant encryption. Regardless of the FIPS setting, vRealize Automation usesAES–256 compliant algorithms to protect secured data stored on the vRealize Automation appliance.
Note This vRealize Automation release only partially enables FIPS compliance, because someinternal components do not yet use certified cryptographic modules. In cases where certified moduleshave not yet been implemented, the AES–256 compliant algorithms are used.
4 Click Yes to restart vRealize Automation.
You can also configure FIPS from a vRealize Automation appliance console session as root, using thefollowing commands.
vcac-vami fips enable
vcac-vami fips disable
vcac-vami fips status
Enable Automatic Manager Service FailoverAutomatic Manager Service failover is disabled by default if you install or upgrade the Manager Servicewith the standard vRealize Automation Windows installer.
To enable automatic Manager Service failover after running the standard Windows installer, take thefollowing steps.
Procedure
1 Log in as root to a console session on the vRealize Automation appliance.
2 Navigate to the following directory.
/usr/lib/vcac/tools/vami/commands
3 Enter the following command.
python ./manager-service-automatic-failover ENABLE
If you need to disable automatic failover throughout an IaaS deployment, enter the following commandinstead.
python ./manager-service-automatic-failover DISABLE
Installing and Upgrading vRealize Automation
VMware, Inc. 221

About Automatic Manager Service Failover
You can configure the vRealize Automation IaaS Manager Service to automatically fail over to a backup ifthe primary Manager Service stops.
Starting in vRealize Automation 7.3, you no longer need to manually start or stop the Manager Service oneach Windows server, to control which serves as primary or backup. Automatic Manager Service failoveris enabled by default in the following cases.
n When you install vRealize Automation silently or with the Installation Wizard
n When you upgrade IaaS through the administration interface or with the automatic upgrade script
When automatic failover is enabled, the Manager Service automatically starts on all Manager Servicehosts, including backups. The automatic failover feature allows the hosts to transparently monitor eachother and fail over when necessary, but the Windows service must be running on all hosts.
Note You are not required to use automatic failover. You may disable it and continue to manually startand stop the Windows service to control which host serves as primary or backup. If you take the manualfailover approach, you must only start the service on one host at a time. With automatic failover disabled,simultaneously running the service on multiple IaaS servers makes vRealize Automation unusable.
Do not attempt to selectively enable or disable automatic failover. Automatic failover must always besynchronized as on or off, across every Manager Service host in an IaaS deployment.
If automatic failover does not appear to be working, see Automatic Manager Service Failover Does NotActivate for troubleshooting tips.
Automatic vRealize Automation PostgreSQL Database FailoverIn a high availability vRealize Automation deployment, some configurations allow the embeddedvRealize Automation PostgreSQL database to fail over automatically.
Automatic failover is silently enabled under the following conditions.
n The high availability deployment includes three vRealize Automation appliances.
Automatic failover is not supported with only two appliances.
n Database replication is set to Synchronous Mode in vRA Settings > Database in thevRealize Automation administration interface.
Usually, you should avoid performing a manual failover while automatic failover is enabled. However, forsome node problems, automatic failover might not occur even though it is enabled. When that happens,check to see if you need to perform a manual failover.
1 After the primary PostgreSQL database node fails, wait up to 5 minutes for the rest of the cluster tostabilize.
2 On a surviving vRealize Automation appliance node, open a browser to the following URL.
https://vrealize-automation-appliance-FQDN:5434/api/status
3 Search for manualFailoverNeeded.
Installing and Upgrading vRealize Automation
VMware, Inc. 222
4 If manualFailoverNeeded is true, perform a manual failover.
For more information, see Perform Manual vRealize Automation Appliance Database Failover.
Replacing Self-Signed Certificates with Certificates Provided by an AuthorityIf you installed vRealize Automation with self-signed certificates, you might want to replace them withcertificates provided by a certificate authority before deploying to production.
For more information about updating certificates, see Updating vRealize Automation Certificates.
Changing Host Names and IP AddressesIn general, you should expect to keep the host names, FQDNs, and IP addresses that you planned forvRealize Automation systems. Some post-installation changes are possible but can be complicated.
n If you change the host name of the Windows machine that hosts the IaaS SQL Server database, see Configure the SQL Database for a New Host Name.
n When restoring IaaS components, renaming a host can affect the IaaS Web host, Manager Servicehost, or their respective load balancers. For more information, see Restore the IaaS Website Serviceor Web Load Balancer and Restore the Manager Service or Manager Service Load Balancer.
To change a vRealize Automation appliance host name or IP address, see the following sections.
Change the Master vRealize Automation Appliance Host Name
When maintaining an environment or network, you might need to assign a different host name to anexisting master vRealize Automation appliance.
In a high availability cluster of vRealize Automation appliances, follow these steps to change the hostname of the primary, or master, vRealize Automation appliance node.
Note This procedure also applies to standalone vRealize Automation appliance deployments.
Procedure
1 In DNS, create an additional record with the new master node host name.
Do not remove the existing DNS record with the old host name yet.
2 Wait for DNS replication and zone distribution to occur.
3 Log in as root to the master vRealize Automation appliance management interface.
https://vrealize-automation-appliance-FQDN:5480
4 Click the Network tab.
5 Below the tabs, click Address.
6 In the Hostname text box, enter the new name in FQDN format.
7 At the upper right, click Save Settings.
Installing and Upgrading vRealize Automation
VMware, Inc. 223
8 Log in as root to a console session on the master vRealize Automation appliance, and run thefollowing script.
/usr/lib/vcac/tools/change-hostname/change-hostname.sh old-master-FQDN new-
master-FQDN
9 Log in as root to a console session on all replica vRealize Automation appliances, and run thefollowing command.
sed -i "s/old-master-FQDN/new-master-FQDN/g" "/etc/haproxy/conf.d/10-psql.cfg"
"/etc/haproxy/conf.d/20-vcac.cfg"
10 Log in as root to the master vRealize Automation appliance management interface.
https://vrealize-automation-appliance-FQDN:5480
11 Click the vRA Settings tab.
12 Below the tabs, click Messaging.
13 To reconfigure the messaging services with the new name on all nodes, click Reset RabbitMQCluster.
14 Restart the master vRealize Automation appliance.
15 Restart all replica vRealize Automation appliances, one at a time.
16 If the old master vRealize Automation appliance host name was used in a certificate, update thecertificate with the new name.
For more information, see Updating vRealize Automation Certificates.
17 If the old master vRealize Automation appliance host name was used with a load balancer in an HAenvironment, check and reconfigure the load balancer with the new name.
18 Verify that all authentication connectors are working correctly.
19 In DNS, remove the existing DNS record with the old master host name.
Change a Replica vRealize Automation Appliance Host Name
When maintaining an environment or network, you might need to assign a different host name to anexisting replica vRealize Automation appliance.
In a high availability cluster of vRealize Automation appliances, follow these steps to change the hostname of a replica vRealize Automation appliance node.
Prerequisites
If the master node host name needs to change, complete that entire procedure first. See Change theMaster vRealize Automation Appliance Host Name.
Procedure
1 In DNS, create an additional record with the new replica host name.
Do not remove the existing DNS record with the old host name yet.
Installing and Upgrading vRealize Automation
VMware, Inc. 224
2 Wait for DNS replication and zone distribution to occur.
3 Log in as root to the replica node vRealize Automation appliance management interface.
https://vrealize-automation-appliance-FQDN:5480
4 Click the Network tab.
5 Below the tabs, click Address.
6 In the Hostname text box, enter the new name in FQDN format.
7 At the upper right, click Save Settings.
8 Log in as root to a console session on the replica vRealize Automation appliance, and run thefollowing script.
/usr/lib/vcac/tools/change-hostname/change-hostname.sh old-replica-FQDN new-
replica-FQDN
9 Log in as root to a console session on all other vRealize Automation appliances in the cluster,including the master node and other replicas, and run the following command.
sed -i "s/old-replica-FQDN/new-replica-FQDN/g" "/etc/haproxy/conf.d/10-psql.cfg"
"/etc/haproxy/conf.d/20-vcac.cfg"
10 Log in as root to the master vRealize Automation appliance management interface.
https://vrealize-automation-appliance-FQDN:5480
11 Click the vRA Settings tab.
12 Below the tabs, click Messaging.
13 To reconfigure the messaging services with the new name on all nodes, click Reset RabbitMQCluster.
14 Restart the master vRealize Automation appliance.
15 Restart all replica vRealize Automation appliances, one at a time.
16 If the old replica vRealize Automation appliance host name was used in a certificate, update thecertificate with the new name.
For more information, see Updating vRealize Automation Certificates.
17 If the old replica vRealize Automation appliance host name was used with a load balancer in an HAenvironment, check and reconfigure the load balancer with the new name.
18 Verify that all authentication connectors are working correctly.
19 In DNS, remove the existing DNS record with the old replica host name.
Adjusting the SQL Database for a Changed Host Name
You must revise configuration settings if you move the vRealize Automation IaaS SQL database to adifferent host name.
Installing and Upgrading vRealize Automation
VMware, Inc. 225

On the same host name, you can restore the SQL database from a backup with no further steps required.If you restore to a different host name, you need to edit configuration files to make additional changes.
See VMware Knowledge Base article 2074607 for the changes required when moving the SQL databaseto a different host name.
Change the vRealize Automation Appliance IP Address
When maintaining an environment or network, you might need to assign a different IP address to anexisting vRealize Automation appliance.
Prerequisites
n As a precaution, take snapshots of vRealize Automation appliances and IaaS servers.
n From a console session as root on the vRealize Automation appliances, inspect entries inthe /etc/hosts file.
Look for address assignments that might conflict with the new IP address plan, and make changes asneeded.
On all IaaS servers, repeat the process for the Windows\system32\drivers\etc\hosts file.
n Shut down all vRealize Automation appliances.
n Stop all vRealize Automation services on IaaS servers.
Procedure
1 In vSphere, locate the vRealize Automation appliance that you want to change, and select Actions >Edit Settings.
2 Click vApp Options.
3 Expand IP allocation, and enable the OVF environment option.
Installing and Upgrading vRealize Automation
VMware, Inc. 226
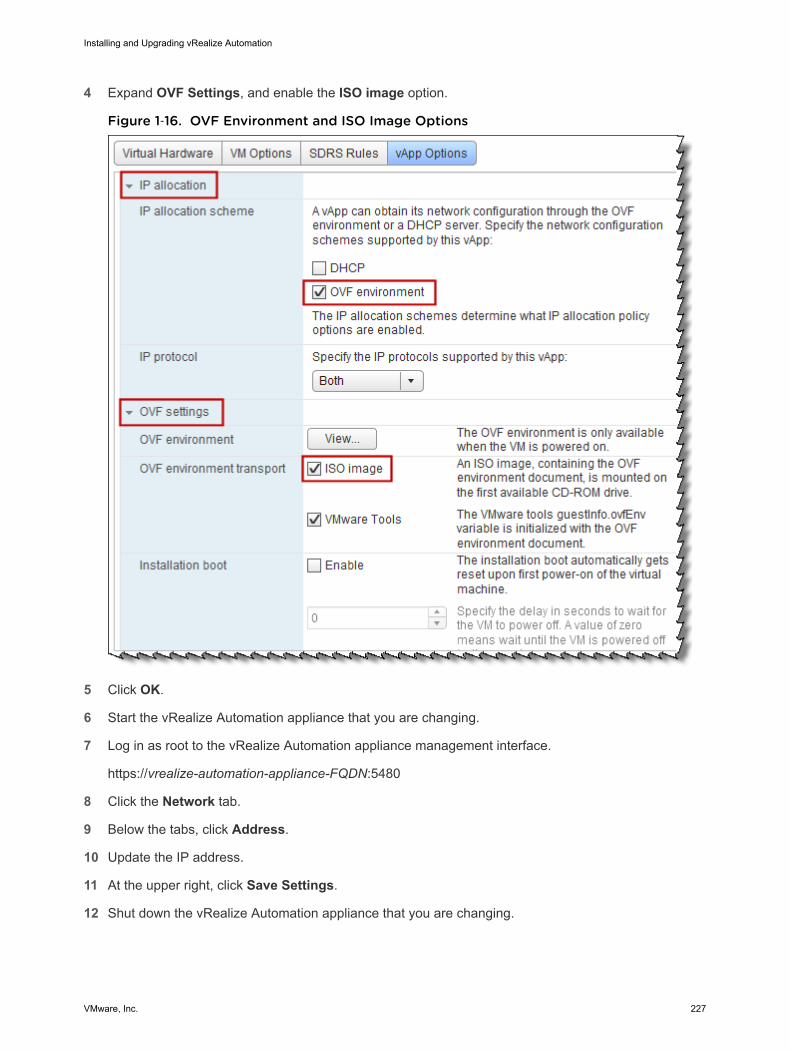
4 Expand OVF Settings, and enable the ISO image option.
Figure 1‑16. OVF Environment and ISO Image Options
5 Click OK.
6 Start the vRealize Automation appliance that you are changing.
7 Log in as root to the vRealize Automation appliance management interface.
https://vrealize-automation-appliance-FQDN:5480
8 Click the Network tab.
9 Below the tabs, click Address.
10 Update the IP address.
11 At the upper right, click Save Settings.
12 Shut down the vRealize Automation appliance that you are changing.
Installing and Upgrading vRealize Automation
VMware, Inc. 227
13 In DNS, update entries for the new IP addresses.
Only update existing A-type records. Do not change FQDNs.
If using a load balancer, also update load balancer IP settings for back-end nodes, service pools, andvirtual servers as needed.
14 Wait for DNS replication and zone distribution to occur.
15 Start all vRealize Automation appliances.
16 Start vRealize Automation services on IaaS servers.
17 Log in as root to the vRealize Automation appliance management interface.
https://vrealize-automation-appliance-FQDN:5480
18 Verify vRealize Automation appliance status in the following areas.
n Database connection status under vRA Settings > Database
n RabbitMQ status under vRA Settings > Messaging
n Xenon status under vRA Settings > Xenon
n All services as REGISTERED under Services
Change an IaaS Server IP Address
When maintaining an environment or network, you might need to assign a different IP address to anexisting vRealize Automation IaaS Windows server.
Prerequisites
n If the vRealize Automation appliance IP address needs to change, do that first. See Change thevRealize Automation Appliance IP Address.
n As a precaution, take snapshots of vRealize Automation appliances and IaaS servers.
n From a console session as root on the vRealize Automation appliance, inspect entries inthe /etc/hosts file.
Look for address assignments that might conflict with the new IP address plan, and make changes asneeded.
On all IaaS servers, repeat the process for the Windows\system32\drivers\etc\hosts file.
n Shut down the vRealize Automation appliance.
n Stop all vRealize Automation services on IaaS servers.
Procedure
1 Log in to the IaaS server with an account that has administrator rights.
2 In Windows, change the IP address.
Look for the IP address in the Windows network adapter settings, under Internet Protocol properties.
Installing and Upgrading vRealize Automation
VMware, Inc. 228
3 Refresh your local DNS with the changes.
Refreshing DNS ensures that the IaaS Windows servers can find each other and that you canreconnect to a Windows server if you are disconnected.
4 On the Manager Service host, inspect the following file in a text editor.
install-folder\vCAC\Server\ManagerService.exe.config
The default install folder is C:\Program Files (x86)\VMware.
Verify IP addresses or FQDNs of vRealize Automation appliances and IaaS Windows servers.
5 On all IaaS Windows servers, inspect the following file in a text editor.
install-folder\vCAC\Management Agent\VMware.IaaS.Management.Agent.exe.Config
Verify the IP address or FQDN of the vRealize Automation appliance.
6 Log in to the SQL Server host.
7 Verify that the repository address is correctly configured to use FQDN in the ConnectionStringcolumn.
For example, open SQL Management Studio and run the following query.
"SELECT Name, ConnectionString FROM [database-name].[DynamicOps.RepositoryModel].
[Models]"
8 Start the vRealize Automation appliance.
9 Start vRealize Automation services on IaaS servers.
10 Inspect log files to verify that Agent, DEM Worker, Manager Service, and Web host services startedsuccessfully.
11 Log in to vRealize Automation as a user with the Infrastructure Administrator role.
12 Navigate to Infrastructure > Monitoring > Distributed Execution Status and verify that all servicesare running.
13 Test for correct operation by checking appliance services, testing provisioning, or using the vRealizeProduction Test tool.
Change an IaaS Server Host Name
When maintaining an environment or network, you might need to assign a different host name to anexisting vRealize Automation IaaS Windows server.
Procedure
1 Take a snapshot of the IaaS server.
2 On the IaaS server, use IIS Manager to stop the vRealize Automation application pools: Repository,VMware vRealize Automation, and Wapi.
3 On the IaaS server, use Administrative Tools > Services to stop all vRealize Automation services,agents, and DEMs.
Installing and Upgrading vRealize Automation
VMware, Inc. 229
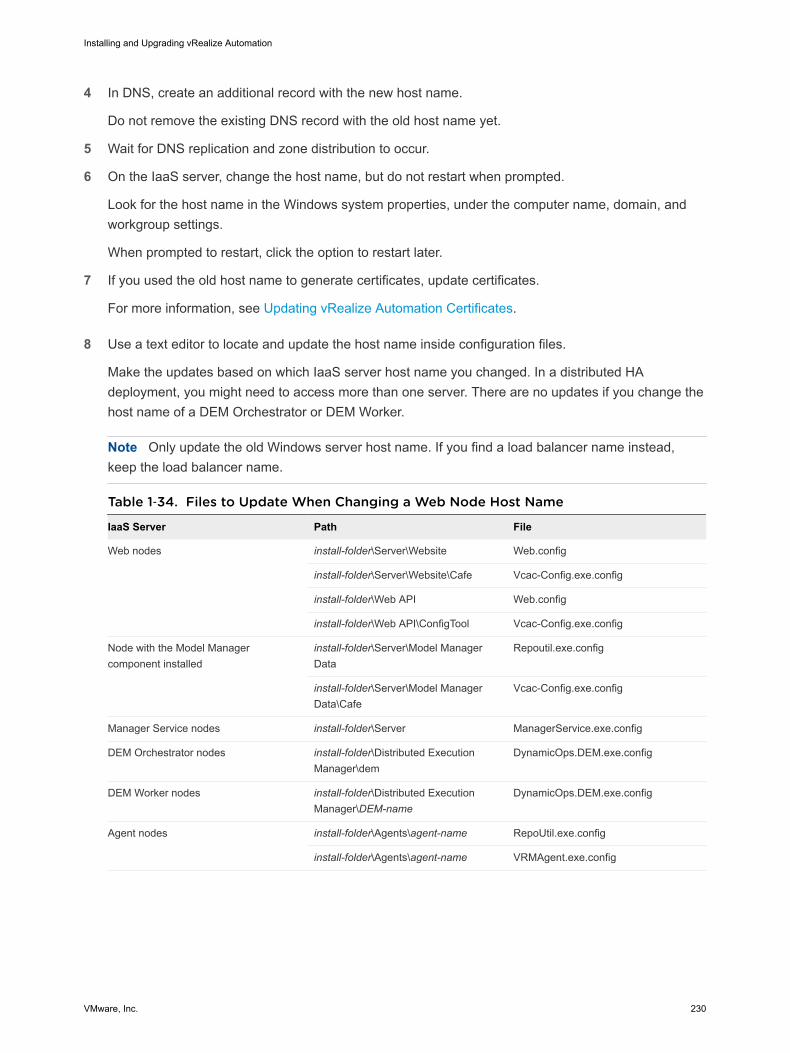
4 In DNS, create an additional record with the new host name.
Do not remove the existing DNS record with the old host name yet.
5 Wait for DNS replication and zone distribution to occur.
6 On the IaaS server, change the host name, but do not restart when prompted.
Look for the host name in the Windows system properties, under the computer name, domain, andworkgroup settings.
When prompted to restart, click the option to restart later.
7 If you used the old host name to generate certificates, update certificates.
For more information, see Updating vRealize Automation Certificates.
8 Use a text editor to locate and update the host name inside configuration files.
Make the updates based on which IaaS server host name you changed. In a distributed HAdeployment, you might need to access more than one server. There are no updates if you change thehost name of a DEM Orchestrator or DEM Worker.
Note Only update the old Windows server host name. If you find a load balancer name instead,keep the load balancer name.
Table 1‑34. Files to Update When Changing a Web Node Host Name
IaaS Server Path File
Web nodes install-folder\Server\Website Web.config
install-folder\Server\Website\Cafe Vcac-Config.exe.config
install-folder\Web API Web.config
install-folder\Web API\ConfigTool Vcac-Config.exe.config
Node with the Model Managercomponent installed
install-folder\Server\Model ManagerData
Repoutil.exe.config
install-folder\Server\Model ManagerData\Cafe
Vcac-Config.exe.config
Manager Service nodes install-folder\Server ManagerService.exe.config
DEM Orchestrator nodes install-folder\Distributed ExecutionManager\dem
DynamicOps.DEM.exe.config
DEM Worker nodes install-folder\Distributed ExecutionManager\DEM-name
DynamicOps.DEM.exe.config
Agent nodes install-folder\Agents\agent-name RepoUtil.exe.config
install-folder\Agents\agent-name VRMAgent.exe.config
Installing and Upgrading vRealize Automation
VMware, Inc. 230
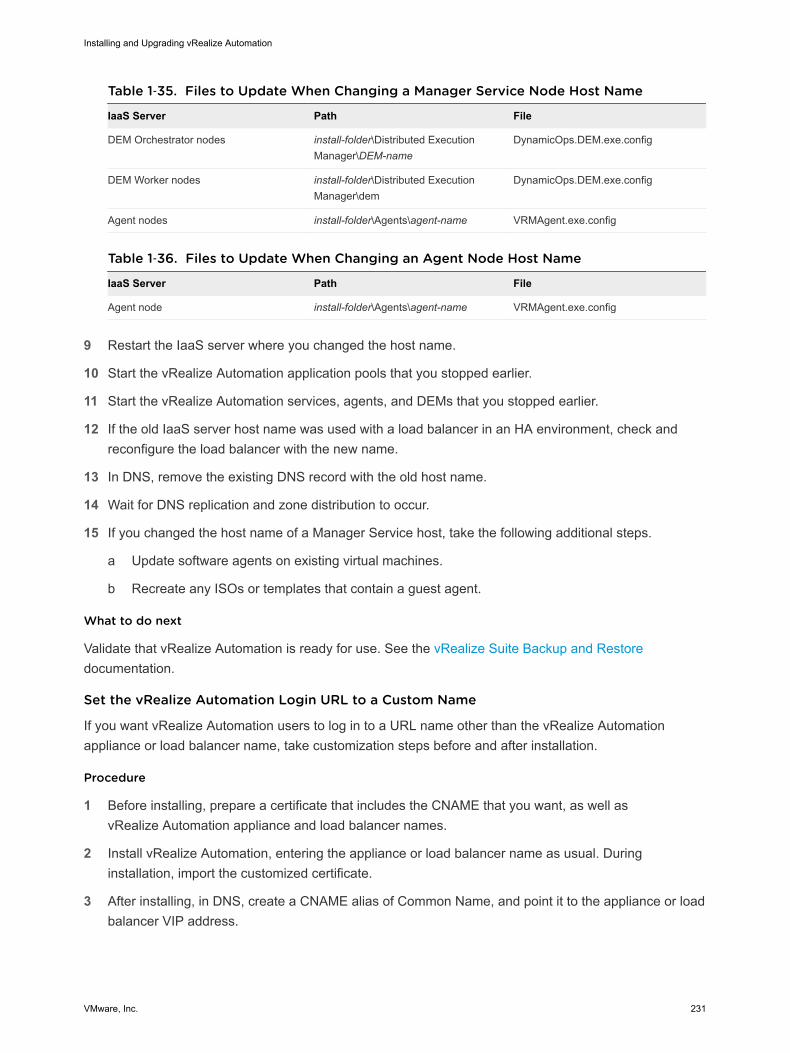
Table 1‑35. Files to Update When Changing a Manager Service Node Host Name
IaaS Server Path File
DEM Orchestrator nodes install-folder\Distributed ExecutionManager\DEM-name
DynamicOps.DEM.exe.config
DEM Worker nodes install-folder\Distributed ExecutionManager\dem
DynamicOps.DEM.exe.config
Agent nodes install-folder\Agents\agent-name VRMAgent.exe.config
Table 1‑36. Files to Update When Changing an Agent Node Host Name
IaaS Server Path File
Agent node install-folder\Agents\agent-name VRMAgent.exe.config
9 Restart the IaaS server where you changed the host name.
10 Start the vRealize Automation application pools that you stopped earlier.
11 Start the vRealize Automation services, agents, and DEMs that you stopped earlier.
12 If the old IaaS server host name was used with a load balancer in an HA environment, check andreconfigure the load balancer with the new name.
13 In DNS, remove the existing DNS record with the old host name.
14 Wait for DNS replication and zone distribution to occur.
15 If you changed the host name of a Manager Service host, take the following additional steps.
a Update software agents on existing virtual machines.
b Recreate any ISOs or templates that contain a guest agent.
What to do next
Validate that vRealize Automation is ready for use. See the vRealize Suite Backup and Restoredocumentation.
Set the vRealize Automation Login URL to a Custom Name
If you want vRealize Automation users to log in to a URL name other than the vRealize Automationappliance or load balancer name, take customization steps before and after installation.
Procedure
1 Before installing, prepare a certificate that includes the CNAME that you want, as well asvRealize Automation appliance and load balancer names.
2 Install vRealize Automation, entering the appliance or load balancer name as usual. Duringinstallation, import the customized certificate.
3 After installing, in DNS, create a CNAME alias of Common Name, and point it to the appliance or loadbalancer VIP address.
Installing and Upgrading vRealize Automation
VMware, Inc. 231

4 Log in to the vRealize Automation appliance administrator interface as root.
https://vrealize-automation-appliance-FQDN:5480
5 Under vRA Settings > Host Settings, change the Host Name to the CNAME that you chose.
Licensing vRealize Code StreamA vRealize Automation license can enable vRealize Code Stream for your vRealize Automationenvironments.
The vRealize Automation license unlocks vRealize Code Stream so that you can use it with thevRealize Code Stream Management Pack for IT DevOps. Enable vRealize Code Stream on the Licensingpage, in either the vRealize Automation management interface or the Installation Wizard.
After enabling the option, you must also install the vRealize Code Stream Management Pack for ITDevOps. You install the management pack on a separate and dedicated appliance that hasvRealize Automation and vRealize Code Stream enabled in non high-availability (HA) mode. Downloadthe management pack and installation documentation from MyVMware.
n Do not enable vRealize Code Stream on production vRealize Automation deployments. Theadditional load can reduce performance.
n Do not enable vRealize Code Stream on high-availability vRealize Automation deployments. vRealizeCode Stream might cause high-availability deployments to behave unpredictably.
For more information, see the vRealize Code Stream Reference Architecture Guide.
Installing the vRealize Log Insight Agent on IaaS ServersThe Windows servers in a vRealize Automation IaaS configuration do not include the vRealize Log Insightagent by default.
vRealize Log Insight provides log aggregation and indexing, and can collect, import, and analyze logs toexpose system problems. If you want to capture and analyze logs from IaaS servers by usingvRealize Log Insight, you must separately install the vRealize Log Insight agent for Windows.
For more information, see the VMware vRealize Log Insight documentation.
vRealize Automation appliances include the vRealize Log Insight agent by default.
Change a vRealize Automation Appliance FQDN Back to the Original FQDNIn some cases, a vRealize Automation appliance FQDN might change when you do not want it to. Forexample, the FQDN changes if you create an Integrated Windows Authentication (IWA) directory for adomain other than the domain that the appliance is on.
If you create an IWA directory for another domain, take the following steps to change the appliance FQDNback to the original FQDN.
Installing and Upgrading vRealize Automation
VMware, Inc. 232
Procedure
1 Log in to vRealize Automation and create the IWA directory as you normally would.
See Configure an Active Directory over LDAP/IWA Link.
2 If this is an HA environment, also follow the steps in Configure Directories Management for HighAvailability.
3 Creating an IWA directory for a domain other than the one that an appliance is on silently changes theappliance FQDN.
For example, va1.domain1.local changes to va1.domain2.local when you create an IWA directory fordomain2.local.
Undo the change by renaming each appliance back to its original FQDN. See the associatedprocedure under Changing Host Names and IP Addresses.
4 After the appliances are completely back online with their original FQDN, log in to each IaaS node,and take the following steps.
a Open the following file in a text editor.
C:\Program Files (x86)\VMware\vCAC\Management
Agent\VMware.IaaS.Management.Agent.exe.Config
b Change each appliance endpoint address= FQDN back to the original FQDN.
For example, from:
<endpoint address="https://va1.domain2.local:5480/"
thumbprint="90C55BAEC53E31609EE1614CE4A8336848A8D4CF" />
<endpoint address="https://va2.domain2.local:5480/"
thumbprint="0468BF6EDBC6F2209BE01D0D7FD1094197E324ED" />
To:
<endpoint address="https://va1.domain1.local:5480/"
thumbprint="90C55BAEC53E31609EE1614CE4A8336848A8D4CF" />
<endpoint address="https://va2.domain1.local:5480/"
thumbprint="0468BF6EDBC6F2209BE01D0D7FD1094197E324ED" />
c Save and close VMware.IaaS.Management.Agent.exe.Config.
5 Log in as root to the vRealize Automation appliance management interface.
https://vrealize-automation-appliance-FQDN:5480
6 Go to vRA settings > Messaging and click Reset RabbitMQ Cluster.
7 After the reset finishes, log in to each appliance management interface.
8 Go to vRA Settings > Cluster, and verify that all nodes are connected to the cluster.
Installing and Upgrading vRealize Automation
VMware, Inc. 233
Configure SQL AlwaysOn Availability GroupYou must make configuration changes if you set up SQL AlwaysOn Availability Group (AAG) afterinstalling vRealize Automation.
When setting up SQL AAG after installation, follow the steps in VMware Knowledge Base article 2074607to configure vRealize Automation with the AAG listener FQDN as the SQL Server host.
Add Network Interface Controllers After Installing vRealize AutomationvRealize Automation supports multiple network interface controllers (NICs). After installation, you can addNICs to the vRealize Automation appliance or IaaS Windows server.
Multiple NICs might be needed for some vRealize Automation deployments, for example:
n You want separate user and infrastructure networks.
n You need an additional NIC so that IaaS servers can join an Active Directory domain.
For more information about multiple NIC scenarios, see this VMware Cloud Management blog post.
For three or more NICs, be aware of the following limitations.
n VIDM needs access to the Postgres database and Active Directory.
n In an HA cluster, VIDM needs access to the load balancer URL.
n The preceding VIDM connections must come through the first two NICs.
n NICs after the second NIC must not be used or recognized by VIDM.
n NICs after the second NIC must not be used to connect to Active Directory.
Use the first or second NIC when configuring a directory in vRealize Automation.
Prerequisites
Completely install vRealize Automation to your vCenter environment.
Procedure
1 In vCenter, add NICs to each vRealize Automation appliance.
a Right click the appliance and select Edit Settings.
b Add VMXNETn NICs.
c If it is powered on, restart the appliance.
2 Log in to the vRealize Automation appliance management interface as root.
https://vrealize-automation-appliance-FQDN:5480
3 Select Network, and verify that multiple NICs are available.
Installing and Upgrading vRealize Automation
VMware, Inc. 234

4 Select Address, and configure the IP address for the NICs.
Table 1‑37. Example NIC Configuration
Setting Value
IPv4 Address Type Static
IPv4 Address 172.22.0.2
Netmask 255.255.255.0
5 Verify that all vRealize Automation nodes can resolve each other by DNS name.
6 Verify that all vRealize Automation nodes can access any load balanced FQDNs forvRealize Automation components.
7 If you are using Split-Brain DNS, verify that all vRealize Automation nodes and VIPs have the sameFQDN in DNS for each node IP and VIP.
8 In vCenter, add NICs to IaaS Windows servers.
a Right click the IaaS server and select Edit Settings.
b Add NICs to the IaaS server virtual machine.
9 In Windows, configure the added IaaS server NICs and their IP addresses. See the Microsoftdocumentation if necessary.
What to do next
(Optional) If you need static routes, see Configure Static Routes.
Configure Static Routes
When adding NICs to a vRealize Automation installation, if you need static routes, you open a commandprompt session to configure them.
Prerequisites
Add multiple NICs to vRealize Automation appliances or IaaS Windows servers.
Procedure
1 Log in to the vRealize Automation appliance command line as root.
2 Open the routes file in a text editor.
/etc/sysconfig/network/routes
3 Locate the default line for the default gateway, but do not modify it.
Note In cases where the default gateway needs to change, use the vRealize Automationmanagement interface instead.
Installing and Upgrading vRealize Automation
VMware, Inc. 235
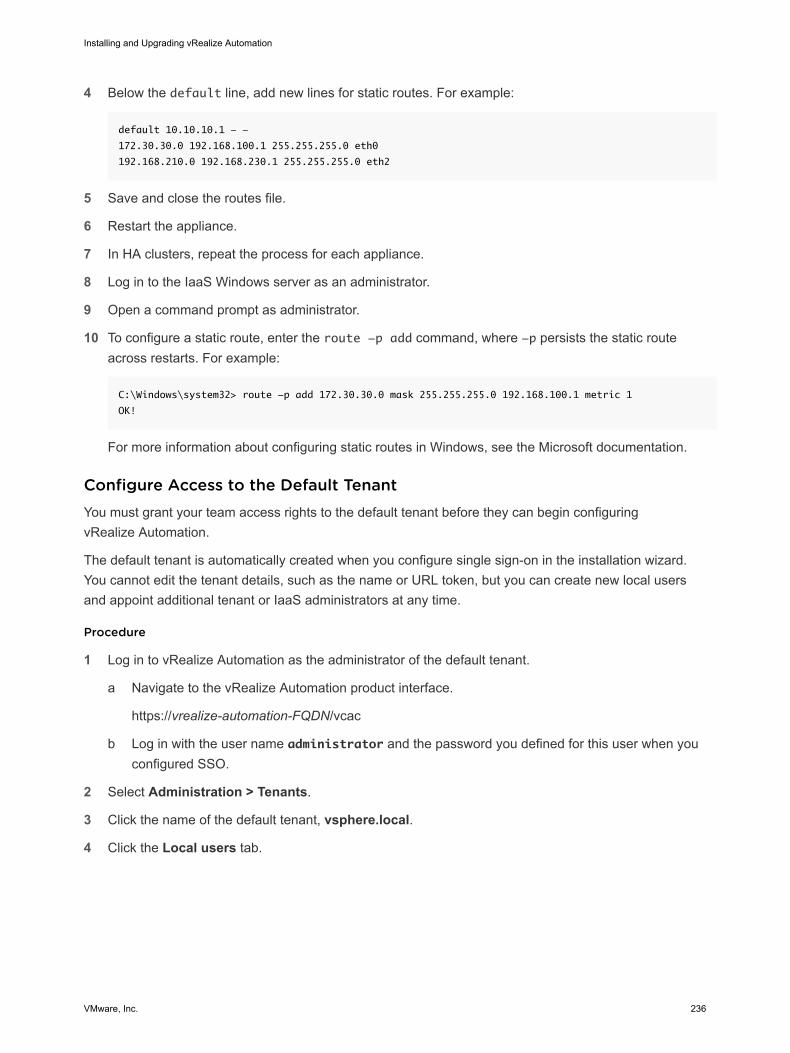
4 Below the default line, add new lines for static routes. For example:
default 10.10.10.1 - -
172.30.30.0 192.168.100.1 255.255.255.0 eth0
192.168.210.0 192.168.230.1 255.255.255.0 eth2
5 Save and close the routes file.
6 Restart the appliance.
7 In HA clusters, repeat the process for each appliance.
8 Log in to the IaaS Windows server as an administrator.
9 Open a command prompt as administrator.
10 To configure a static route, enter the route -p add command, where -p persists the static routeacross restarts. For example:
C:\Windows\system32> route -p add 172.30.30.0 mask 255.255.255.0 192.168.100.1 metric 1
OK!
For more information about configuring static routes in Windows, see the Microsoft documentation.
Configure Access to the Default TenantYou must grant your team access rights to the default tenant before they can begin configuringvRealize Automation.
The default tenant is automatically created when you configure single sign-on in the installation wizard.You cannot edit the tenant details, such as the name or URL token, but you can create new local usersand appoint additional tenant or IaaS administrators at any time.
Procedure
1 Log in to vRealize Automation as the administrator of the default tenant.
a Navigate to the vRealize Automation product interface.
https://vrealize-automation-FQDN/vcac
b Log in with the user name administrator and the password you defined for this user when youconfigured SSO.
2 Select Administration > Tenants.
3 Click the name of the default tenant, vsphere.local.
4 Click the Local users tab.
Installing and Upgrading vRealize Automation
VMware, Inc. 236
5 Create local user accounts for the vRealize Automation default tenant.
Local users are tenant-specific and can only access the tenant in which you created them.
a Click the Add (+) icon.
b Enter details for the user responsible for administering your infrastructure.
c Click Add.
d Repeat this step to add one or more additional users who are responsible for configuring thedefault tenant.
6 Click the Administrators tab.
7 Assign your local users to the tenant administrator and IaaS administrator roles.
a Enter a username in the Tenant administrators search box and press Enter.
b Enter a username in the IaaS administrators search box and press Enter.
The IaaS administrator is responsible for creating and managing your infrastructure endpoints invRealize Automation. Only the system administrator can grant this role.
8 Click Update.
What to do next
Provide your team with the access URL and log in information for the user accounts you created so theycan begin configuring vRealize Automation.
n Your tenant administrators configure settings such as user authentication, including configuringDirectories Management for high availability. See Configuring Tenant Settings.
n Your IaaS administrators prepare external resources for provisioning. See External Preparations forProvisioning.
n If you configured Initial Content Creation during the installation, your configuration administrator canrequest the Initial Content catalog item to quickly populate a proof of concept. For an example of howto request the item and complete the manual user action, see Scenario: Request Initial Content for aRainpole Proof of Concept Deployment.
Troubleshooting a vRealize Automation InstallationvRealize Automation troubleshooting provides procedures for resolving issues you might encounter wheninstalling or configuring vRealize Automation.
Installing and Upgrading vRealize Automation
VMware, Inc. 237
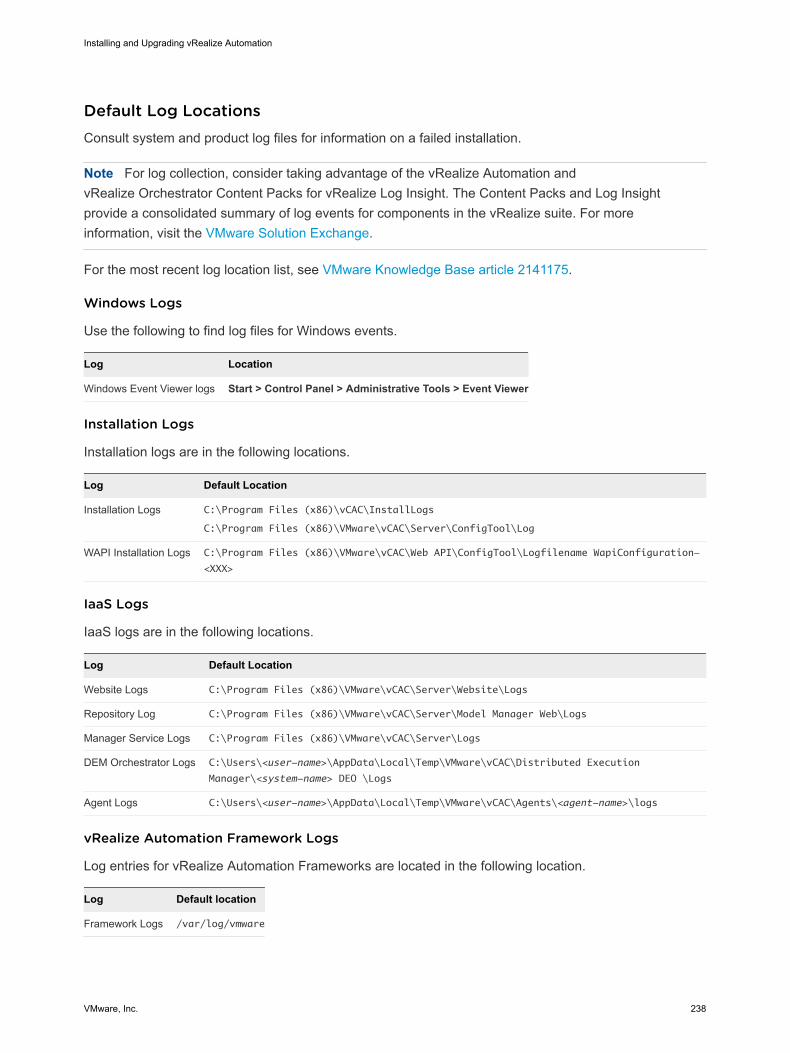
Default Log LocationsConsult system and product log files for information on a failed installation.
Note For log collection, consider taking advantage of the vRealize Automation andvRealize Orchestrator Content Packs for vRealize Log Insight. The Content Packs and Log Insightprovide a consolidated summary of log events for components in the vRealize suite. For moreinformation, visit the VMware Solution Exchange.
For the most recent log location list, see VMware Knowledge Base article 2141175.
Windows Logs
Use the following to find log files for Windows events.
Log Location
Windows Event Viewer logs Start > Control Panel > Administrative Tools > Event Viewer
Installation Logs
Installation logs are in the following locations.
Log Default Location
Installation Logs C:\Program Files (x86)\vCAC\InstallLogs
C:\Program Files (x86)\VMware\vCAC\Server\ConfigTool\Log
WAPI Installation Logs C:\Program Files (x86)\VMware\vCAC\Web API\ConfigTool\Logfilename WapiConfiguration-
<XXX>
IaaS Logs
IaaS logs are in the following locations.
Log Default Location
Website Logs C:\Program Files (x86)\VMware\vCAC\Server\Website\Logs
Repository Log C:\Program Files (x86)\VMware\vCAC\Server\Model Manager Web\Logs
Manager Service Logs C:\Program Files (x86)\VMware\vCAC\Server\Logs
DEM Orchestrator Logs C:\Users\<user-name>\AppData\Local\Temp\VMware\vCAC\Distributed Execution
Manager\<system-name> DEO \Logs
Agent Logs C:\Users\<user-name>\AppData\Local\Temp\VMware\vCAC\Agents\<agent-name>\logs
vRealize Automation Framework Logs
Log entries for vRealize Automation Frameworks are located in the following location.
Log Default location
Framework Logs /var/log/vmware
Installing and Upgrading vRealize Automation
VMware, Inc. 238
Software Component Provisioning Logs
Software component provisioning logs are located in the following location.
Log Default Location
Software Agent Bootstrap Log /opt/vmware-appdirector (for Linux) or \opt\vmware-appdirector (for Windows)
Software Lifecycle Script Logs /tmp/taskId (for Linux)
\Users\darwin\AppData\Local\Temp\taskId (for Windows)
Collection of Logs for Distributed Deployments
You can create a zip file that bundles all logs for components of a distributed deployment. .
Rolling Back a Failed InstallationWhen an installation fails and rolls back, the system administrator must verify that all required files havebeen uninstalled before starting another installation. Some files must be uninstalled manually.
Roll Back a Minimal Installation
A system administrator must manually remove some files and revert the database to completely uninstalla failed vRealize Automation IaaS installation.
Procedure
1 If the following components are present, uninstall them with the Windows uninstaller.
n vRealize Automation Agents
n vRealize Automation DEM-Worker
n vRealize Automation DEM-Orchestrator
n vRealize Automation Server
n vRealize Automation WAPI
Note If you see the following message, restart the machine and then follow the steps in thisprocedure: Error opening installation log file. Verify that the specified log filelocation exists and it is writable
Note If the Windows system has been reverted or you have uninstalled IaaS, you must run theiisreset command before you reinstall vRealize Automation IaaS.
2 Revert your database to the state it was in before the installation was started. The method you usedepends on the original database installation mode.
3 In IIS (Internet Information Services Manager) select Default Web Site (or your custom site) and clickBindings. Remove the https binding (defaults to 443).
Installing and Upgrading vRealize Automation
VMware, Inc. 239
4 Check that the Applications Repository, vRealize Automation and WAPI have been deleted and thatthe application pools RepositoryAppPool, vCACAppPool, WapiAppPool have also been deleted.
The installation is completely removed.
Roll Back a Distributed Installation
A system administrator must manually remove some files and revert the database to completely uninstalla failed IaaS installation.
Procedure
1 If the following components are present, uninstall them with the Windows uninstaller.
n vRealize Automation Server
n vRealize Automation WAPI
Note If you see the following message, restart the machine and then follow this procedure: Erroropening installation log file. Verify that the specified log file location exists
and it is writable.
Note If the Windows system has been reverted or you have uninstalled IaaS, you must run theiisreset command before you reinstall vRealize Automation IaaS.
2 Revert your database to the state it was in before the installation was started. The method you usedepends on the original database installation mode.
3 In IIS (Internet Information Services Manager) select the Default Web Site (or your custom site) andclick Bindings. Remove the https binding (defaults to 443).
4 Check that the Applications Repository, vCAC and WAPI have been deleted and that the applicationpools RepositoryAppPool, vCACAppPool, WapiAppPool have also been deleted.
Table 1‑38. Roll Back Failure Points
Failure Point Action
Installing Manager Service If present, uninstall vCloud Automation Center Server.
Installing DEM-Orchestrator If present, uninstall the DEM Orchestrator.
Installing DEM-Worker If present, uninstall all DEM Workers.
Installing an Agent If present, uninstall all vRealize Automation agents.
Create a vRealize Automation Support BundleYou can create a vRealize Automation support bundle using the vRealize Automation appliancemanagement interface. Support bundles gather logs, and help you or VMware technical support totroubleshoot vRealize Automation problems.
Installing and Upgrading vRealize Automation
VMware, Inc. 240
Procedure
1 Open a Web browser to the vRealize Automation appliance management interface URL.
https://vrealize-automation-appliance-FQDN:5480
2 Log in as root, and click vRA Settings > Cluster.
3 Click Create Support Bundle.
4 Click Download and save the support bundle file on your system.
Support bundles include information from the vRealize Automation appliance and IaaS Windows servers.If you lose connectivity between the vRealize Automation appliance and IaaS components, the supportbundle might be missing the IaaS component logs.
To see which log files were collected, unzip the support bundle and open the Environment.html file in aWeb browser. Without connectivity, IaaS components might appear in red in the Nodes table. Anotherreason that the IaaS logs are missing might be that the vRealize Automation management agent servicehas stopped on IaaS Windows servers that appear in red.
General Installation TroubleshootingThe troubleshooting topics for vRealize Automation appliances provide solutions to potential installation-related problems that you might encounter when using vRealize Automation.
Installation or Upgrade Fails with a Load Balancer Timeout Error
A vRealize Automation installation or upgrade for a distributed deployment with a load balancer fails witha 503 service unavailable error.
Problem
The installation or upgrade fails because the load balancer timeout setting does not allow enough time forthe task to complete.
Cause
An insufficient load balancer timeout setting might cause failure. You can correct the problem byincreasing the load balancer timeout setting to 100 seconds or greater and rerunning the task.
Solution
1 Increase your load balancer timeout value to at least 100 seconds.
2 Rerun the installation or upgrade.
Server Times Are Not Synchronized
An installation might not succeed when IaaS time servers are not synchronized with thevRealize Automation appliance.
Problem
You cannot log in after installation, or the installation fails while it is completing.
Installing and Upgrading vRealize Automation
VMware, Inc. 241
Cause
Time servers on all servers might not be synchronized.
Solution
Synchronize all vRealize Automation appliances and IaaS Windows servers to the same time source. Donot mix time sources within a vRealize Automation deployment.
n Set a vRealize Automation appliance time source:
a Log in to the vRealize Automation appliance management interface as root.
https://vrealize-automation-appliance-FQDN:5480
b Select Admin > Time Settings, and set the time synchronization source.
Option Description
Host Time Synchronize to the vRealize Automation appliance ESXi host.
Time Server Synchronize to one external Network Time Protocol (NTP) server. Enter the FQDN or IP address of theNTP server.
n For IaaS Windows servers, see Enable Time Synchronization on the Windows Server.
Blank Pages May Appear When Using Internet Explorer 9 or 10 on Windows 7
When you use Internet Explorer 9 or 10 on Windows 7 and compatibility mode is enabled, some pagesappear to have no content.
Problem
When using Internet Explorer 9 or 10 on Windows 7, the following pages have no content:
n Infrastructure
n Default Tenant Folder on the Orchestrator page
n Server Configuration on the Orchestrator page
Cause
The problem could be related to compatibility mode being enabled. You can disable compatibility modefor Internet Explorer with the following steps.
Solution
Prerequisites
Ensure that the menu bar is displayed. If you are using Internet Explorer 9 or 10, press Alt to displaythe Menu bar (or right-click the Address bar and then select Menu bar).
Procedure
1 Select Tools > Compatibility View settings.
2 Deselect Display intranet sites in Compatibility View.
Installing and Upgrading vRealize Automation
VMware, Inc. 242
3 Click Close.
Cannot Establish Trust Relationship for the SSL/TLS Secure Channel
You might receive the message "Cannot establish trust relationship for the SSL/TLS secure channel whenupgrading security certificates for vCloud Automation Center."
Problem
If a certificate issue occurs with vcac-config.exe when upgrading a security certificate, you might see thefollowing message:
The underlying connection was closed: Could not establish trust relationship
for the SSL/TLS secure channel
You can find more information about the cause of the issue by using the following procedure.
Solution
1 Open vcac-config.exe.config in a text editor, and locate the repository address:
<add key="repositoryAddress" value="https://IaaS-address:443/repository/" />
2 Open Internet Explorer to the address.
3 Continue through any error messages about certificate trust issues.
4 Obtain a security report from Internet Explorer, and use it to troubleshoot why the certificate is nottrusted.
If problems persist, repeat the procedure by browsing with the address that needs to be registered, theEndpoint address that you used to register with vcac-config.exe.
Connect to the Network Through a Proxy Server
Some sites might connect to the Internet through a proxy server.
Problem
Your deployment cannot connect to the open Internet. For example, you cannot access Web sites, publicclouds that you manage, or vendor addresses from which you download software or updates.
Cause
Your site connects to the Internet through a proxy server.
Solution
Prerequisites
Obtain proxy server names, port numbers, and credentials from the administrator for your site.
Procedure
1 Open a Web browser to the vRealize Automation appliance management interface URL.
https://vrealize-automation-appliance-FQDN:5480
Installing and Upgrading vRealize Automation
VMware, Inc. 243
2 Log in as root, and click Network.
3 Enter your site proxy server FQDN or IP address, and port number.
4 If your proxy server requires credentials, enter the user name and password.
5 Click Save Settings.
What to do next
Configuring to use a proxy might affect VMware Identity Manager user access. To correct the issue, see Proxy Prevents VMware Identity Manager User Log In.
Console Steps for Initial Content Configuration
There is an alternative to using the vRealize Automation installation interface to create the configurationadministrator account and initial content.
Problem
As the last part of installing vRealize Automation, you follow the process to enter a new password, createthe configurationadmin local user account, and create initial content. An error occurs, and the interfaceenters an unrecoverable state.
Solution
Instead of using the interface, enter console commands to create the configurationadmin user and initialcontent. Note that the interface might fail after successfully completing part of the process, so you mightonly need some of the commands.
For example, you might inspect logs and vRealize Orchestrator workflow execution, and determine thatthe interface-based setup created the configurationadmin user but not the initial content. In that case, youcan enter just the last two console commands to complete the process.
Procedure
1 Log in to the vRealize Automation appliance console as root.
2 Import the vRealize Orchestrator workflow by entering the following command:
/usr/sbin/vcac-config -e content-import --
workflow /usr/lib/vcac/tools/initial-config/vra-initial-config-bundle-
workflow.package --user $SSO_ADMIN_USERNAME --password $SSO_ADMIN_PASSWORD --
tenant $TENANT
3 Execute the workflow to create the configurationadmin user:
/usr/bin/python /opt/vmware/share/htdocs/service/wizard/initialcontent/workfl
owexecutor.py --host $CURRENT_VA_HOSTNAME --username $SSO_ADMIN_USERNAME --
password $SSO_ADMIN_PASSWORD --workflowid f2b3064a-75ca-4199-
a824-1958d9c1efed --configurationAdminPassword $CONFIGURATIONADMIN_PASSWORD
--tenant $TENANT
Installing and Upgrading vRealize Automation
VMware, Inc. 244
4 Import the ASD blueprint by entering the following command:
/usr/sbin/vcac-config -e content-import --
blueprint /usr/lib/vcac/tools/initial-config/vra-initial-config-bundle-
asd.zip --user $CONFIGURATIONADMIN_USERNAME --password
$CONFIGURATIONADMIN_PASSWORD --tenant $TENANT
5 Execute the workflow to configure initial content:
/usr/bin/python /opt/vmware/share/htdocs/service/wizard/initialcontent/workfl
owexecutor.py --host $CURRENT_VA_HOSTNAME --username $SSO_ADMIN_USERNAME --
password $SSO_ADMIN_PASSWORD --workflowid ef00fce2-80ef-4b48-96b5-
fdee36981770 --configurationAdminPassword $CONFIGURATIONADMIN_PASSWORD
Cannot Downgrade vRealize Automation Licenses
An error occurs when you submit the license key of a lower product edition.
Problem
You see the following message when using the vRealize Automation administration interface Licensingpage to submit the key to a product edition that is lower than the current one. For example, you start withan enterprise license and try to enter an advanced license.
Unable to downgrade existing license edition
Cause
This vRealize Automation release does not support the downgrading of licenses. You can only addlicenses of an equal or higher edition.
Solution
To change to a lower edition, reinstall vRealize Automation.
Troubleshooting the vRealize Automation ApplianceThe troubleshooting topics for vRealize Automation appliances provide solutions to potential installation-related problems that you might encounter when using your vRealize Automation appliances.
Installers Fail to Download
Installers fail to download from the vRealize Automation appliance.
Problem
Installers do not download when running [email protected].
Cause
n Network connectivity issues when connecting to the vRealize Automation appliance machine.
n Not able to connect to the vRealize Automation appliance machine because the machine cannot bereached or it cannot respond before the connection times out.
Installing and Upgrading vRealize Automation
VMware, Inc. 245
Solution
1 Verify that you can connect to the vRealize Automation URL in a Web browser.
https://vrealize-automation-appliance-FQDN
2 Check the other vRealize Automation appliance troubleshooting topics.
3 Download the setup file and reconnect to the vRealize Automation appliance.
Encryption.key File has Incorrect Permissions
A system error can result when incorrect permissions are assigned to the Encryption.key file for a virtualappliance.
Problem
You log in to vRealize Automation appliance and the Tenants page is displayed. After the page has begunloading, you see the message System Error.
Cause
The Encryption.key file has incorrect permissions or the group or owner user level is incorrectly assigned.
Solution
Prerequisites
Log in to the virtual appliance that displays the error.
Note If your virtual appliances are running under a load balancer, you must check each virtualappliance.
Procedure
1 View the log file /var/log/vcac/catalina.out and search for the message Cannot writeto /etc/vcac/Encryption.key.
2 Go to the /etc/vcac/ directory and check the permissions and ownership for the Encryption.keyfile. You should see a line similar to the following one:
-rw------- 1 vcac vcac 48 Dec 4 06:48 encryption.key
Read and write permission is required and the owner and group for the file must be vcac.
3 If the output you see is different, change the permissions or ownership of the file as needed.
What to do next
Log in to the Tenant page to verify that you can log in without error.
Directories Management Identity Manager Fails to Start After Horizon-Workspace Restart
In a vRealize Automation high availability environment, the Directories Management Identity Manager canfail to start after the horizon-workspace service is restarted.
Installing and Upgrading vRealize Automation
VMware, Inc. 246

Problem
The horizon-workspace service cannot start due an error similar to the following:
Error creating bean with name
'liquibase' defined in class path resource [spring/datastore-wireup.xml]:
Invocation of init method failed; nested exception is
liquibase.exception.LockException: Could not acquire change log lock. Currently
locked by fe80:0:0:0:250:56ff:fea8:7d0c%eth0
(fe80:0:0:0:250:56ff:fea8:7d0c%eth0) since 10/29/15
Cause
The Identity Manager might fail to start in a high availability environment because of issues with theliquibase data management utility used by vRealize Automation.
Solution
1 Log in as root to a console session on the vRealize Automation appliance.
2 Stop the horizon-workspace service by entering the following command.
#service horizon-workspace stop
3 Open the Postgres shell as super user.
su postgres
4 Navigate to the correct bin directory.
cd /opt/vmware/vpostgres/current/bin
5 Connect to the database.
psql vcac
6 From saas.databasechangeloglock, run the following SQL query.
select * from databasechangeloglock;
If the output shows a value of "t" for true, the lock must be released manually.
7 If you need to manually release the lock, run the following SQL query.
update saas.databasechangeloglock set locked=FALSE, lockgranted=NULL,
lockedby=NULL where id=1;
8 From saas.databasechangeloglock, run the following SQL query.
select * from databasechangeloglock;
The output should show a value of "f" for false, meaning it is unlocked.
9 Exit the Postgres vcac database.
vcac=# \q
Installing and Upgrading vRealize Automation
VMware, Inc. 247
10 Close the Postgres shell.
exit
11 Start the horizon-workspace service.
#service horizon-workspace start
Incorrect Appliance Role Assignments After Failover
After a failover occurs, master and replica vRealize Automation appliance nodes might not have thecorrect role assignment, which affects all services that require database write access.
Problem
In a high availability cluster of vRealize Automation appliances, you shut down or make the masterdatabase node inaccessible. You use the management console on another node to promote that node asthe new master, which restores vRealize Automation database write access.
Later, you bring the old master node back online, but the Database tab in its management console stilllists the node as the master node even though it is not. Attempts to use any node management consoleto clear the problem by officially promoting the old node back to master fail.
Solution
When failover occurs, follow these guidelines when configuring old versus new master nodes.
n Before promoting another node to master, remove the previous master node from the load balancerpool of vRealize Automation appliance nodes.
n To have vRealize Automation bring an old master node back to the cluster, let the old machine comeonline. Then, open the new master management console. Look for the old node listed as invalidunder the Database tab, and click its Reset button.
After a successful reset, you may restore the old node to the load balancer pool ofvRealize Automation appliance nodes.
n To manually bring an old master node back to the cluster, bring the machine online, and join it to thecluster as if it were a new node. While joining, specify the newly promoted node as the primary node.
After successfully joining, you may restore the old node to the load balancer pool ofvRealize Automation appliance nodes.
n Until you correctly reset or rejoin an old master node to the cluster, do not use its managementconsole for cluster management operations, even if the node came back online.
n After you correctly reset or rejoin, you may promote an old node back to master.
Failures After Promotion of Replica and Master Nodes
A disk space issue, along with the promotion of replica and master vRealize Automation appliancedatabase nodes, might cause provisioning problems.
Installing and Upgrading vRealize Automation
VMware, Inc. 248
Problem
The master node runs out of disk space. You log in to its management interface Database page, andpromote a replica node with enough space to become the new master. Promotion appears to succeedwhen you refresh the management interface page, even though an error message occurred.
Later, on the node that was the old master, you free up the disk space. After you promote the node backto master, however, provisioning operations fail by being stuck IN_PROGRESS.
Cause
vRealize Automation cannot properly update the old master node configuration when the problem is notenough space.
Solution
If the management interface displays errors during promotion, temporarily exclude the node from the loadbalancer. Correct the node problem, for example by adding disk, before re-including it on the loadbalancer. Then, refresh the management interface Database page and verify that the right nodes aremaster and replica.
Incorrect vRealize Automation Component Service Registrations
The vRealize Automation appliance management interface can help you resolve registration problemswith vRealize Automation component services.
Problem
Under normal operation, all vRealize Automation component services must be unique and in aREGISTERED state. Any other set of conditions might cause vRealize Automation to behaveunpredictably.
Cause
The following are examples of problems that might occur with vRealize Automation component services.
n A service has become inactive.
n Server settings caused a service to be in a state other than REGISTERED.
n A dependency on another service caused a service to be in a state other than REGISTERED.
Solution
Re-register component services that appear to have problems.
1 Take a snapshot of the vRealize Automation appliance.
You might need to revert to the snapshot if you try different service changes, and the appliance endsup in an unpredictable state.
2 Log in to the vRealize Automation appliance management interface as root.
https://vrealize-automation-appliance-FQDN:5480
3 Click Services.
Installing and Upgrading vRealize Automation
VMware, Inc. 249
4 In the list of services, look for a service that is not in the correct state or has other problems.
5 If a faulty service is the iaas-service, go to the next step.
Otherwise, to have vRealize Automation re-register the service, log in to a console session on thevRealize Automation appliance as root, and restart vRealize Automation by entering the followingcommand.
service vcac-server restart
If there are services associated with the embedded vRealize Orchestrator instance, enter thefollowing additional command.
service vco-restart restart
6 If a faulty service is the iaas-service, take the following steps to re-register it.
a Do not unregister the service.
b On the primary IaaS Web Server, log in with an account that has Administrator rights.
c Open a command prompt as Administrator.
d Run the following command.
"C:\Program Files (x86)\VMware\vCAC\Server\Model Manager Data\Cafe\Vcac-
Config.exe" RegisterSolutionUser -url https://appliance-or-load-balancer-IP-
or-FQDN/ -t vsphere.local -cu administrator -cp password -f "C:\Program Files
(x86)\VMware\vCAC\Server\Model Manager Data\Cafe\Vcac-Config.data" -v
The password is the [email protected] password.
e Run a command to update the registration information in the IaaS database.
SQL Server with Windows Authentication:
"C:\Program Files (x86)\VMware\vCAC\Server\Model Manager Data\Cafe\Vcac-
Config.exe" MoveRegistrationDataToDb -s IaaS-SQL-server-IP-or-FQDN -d SQL-
database-name -f "C:\Program Files (x86)\VMware\vCAC\Server\Model Manager
Data\Cafe\Vcac-Config.data" -v
SQL Server with Native SQL Authentication:
"C:\Program Files (x86)\VMware\vCAC\Server\Model Manager Data\Cafe\Vcac-
Config.exe" MoveRegistrationDataToDb -s SQL-server-IP-or-FQDN -d SQL-
database-name -su SQL-user -sp SQL-user-password -f "C:\Program Files
(x86)\VMware\vCAC\Server\Model Manager Data\Cafe\Vcac-Config.data" -v
To find the server or database name, inspect the following file in a text editor, and search forrepository. Data Source and Initial Catalog values reveal the server address and databasename, respectively.
C:\Program Files (x86)\VMware\vCAC\Server\Model Manager Web\Web.config
The SQL user must have DBO privileges on the database.
Installing and Upgrading vRealize Automation
VMware, Inc. 250
f Register the endpoints by running the following commands:
"C:\Program Files (x86)\VMware\vCAC\Server\Model Manager Data\Cafe\Vcac-Config.exe"
RegisterEndpoint --EndpointAddress https://IaaS-Web-server-or-load-balancer-IP-or-FQDN /vcac --
Endpoint ui -v
"C:\Program Files (x86)\VMware\vCAC\Server\Model Manager Data\Cafe\Vcac-Config.exe"
RegisterEndpoint --EndpointAddress https://IaaS-Web-server-or-load-balancer-IP-or-FQDN /WAPI --
Endpoint wapi -v
"C:\Program Files (x86)\VMware\vCAC\Server\Model Manager Data\Cafe\Vcac-Config.exe"
RegisterEndpoint --EndpointAddress https://IaaS-Web-server-or-load-balancer-IP-or-
FQDN /repository --Endpoint repo -v
"C:\Program Files (x86)\VMware\vCAC\Server\Model Manager Data\Cafe\Vcac-Config.exe"
RegisterEndpoint --EndpointAddress https://IaaS-Web-server-or-load-balancer-IP-or-
FQDN /WAPI/api/status --Endpoint status -v
g Register catalog items by running the following command:
"C:\Program Files (x86)\VMware\vCAC\Server\Model Manager Data\Cafe\Vcac-
Config.exe" RegisterCatalogTypesAsync -v
h Resart IIS.
iisreset
i Log in to the primary IaaS Manager Service host.
j Restart the vRealize Automation Windows service.
VMware vCloud Automation Center Service
7 To re-register any services associated with an external system, such as an externalvRealize Orchestrator instance, log in to the external system and restart the services there.
Additional NIC Causes Management Interface Errors
After you add a second network interface card (NIC) to a vRealize Automation appliance, somevRealize Automation management interface pages fail to load properly.
Problem
You successfully add a second NIC using vCenter, and the following vRealize Automation managementinterface pages display errors instead of loading.
n The Network > Status page displays an error about an unresponsive script.
n The Network > Address page displays an error about failing to read network interface information.
Cause
Starting in version 7.3, the vRealize Automation appliance can support dual NICs. However, theengineering template on which the appliance is based prevents the management interface from workingproperly until you apply the solution.
Solution
After adding an additional NIC, restart the vRealize Automation appliance.
Installing and Upgrading vRealize Automation
VMware, Inc. 251
Cannot Promote a Secondary Virtual Appliance to Master
In vRealize Automation, low virtual appliance memory might prevent virtual appliance promotions in thecluster.
Problem
The master node runs low on memory. You log in to its management interface Database page, and try topromote a secondary node to become the new master. The following error occurs.
Fail to execute on Node node-name, host is master-FQDN
because of: Could not read remote lock command result for node: node-name
on address: master-FQDN, reason is: 500 Internal Server Error
Cause
Promotion only succeeds when all nodes can confirm reconfiguration to a newly promoted master. Thelow memory prevents the old master from confirming, even though all nodes are reachable.
Solution
Power off the master node that has low memory. Log in to the secondary node management interfaceDatabase page, and promote the secondary node.
Active Directory Sync Log Retention Time Is Too Short
In vRealize Automation, the Active Directory Sync logs go back only a couple days.
Problem
After two days, Active Directory Sync logs disappear from the management interface. Folders for the logsalso disappear from the following vRealize Automation appliance directory.
/db/elasticsearch/horizon/nodes/0/indices
Cause
To conserve space, vRealize Automation sets the maximum retention time for Active Directory Sync logsto three days.
Solution
1 Log in to a console session on the vRealize Automation appliance as root.
2 Open the following file in a text editor.
/usr/local/horizon/conf/runtime-config.properties
3 Increase the analytics.maxQueryDays property.
4 Save and close runtime-config.properties.
Installing and Upgrading vRealize Automation
VMware, Inc. 252
5 Restart the identity manager and elastic search services.
service horizon-workspace restart
service elasticsearch restart
RabbitMQ Cannot Resolve Host Names
RabbitMQ uses short host names for vRealize Automation appliances by default, which might preventnodes from resolving one another.
Problem
You try to join another vRealize Automation appliance to the cluster, and an error similar to the followingoccurs.
Clustering node 'rabbit@sc2-rdops-vm01-dhcp-62-2' with rabbit@company ...
Error: unable to connect to nodes [rabbit@company]: nodedown
DIAGNOSTICS
===========
attempted to contact: [rabbit@company]
rabbit@company:
* unable to connect to epmd (port 4369) on company: nxdomain (non-existing domain)
current node details:
- node name: 'rabbitmq-cli-11@sc2-rdops-vm01-dhcp-62-2'
- home dir: /var/lib/rabbitmq
- cookie hash: 4+kP1tKnxGYaGjrPL2C8bQ==
[2017-09-01 14:58:04] [root] [INFO] RabbitMQ join failed with exit code: 69, see RabbitMQ logs for
details.
Cause
Your network configuration does not allow vRealize Automation appliances to resolve each other by shorthost name.
Solution
1 For all vRealize Automation appliances in the deployment, log in as root to a console session.
2 Stop the RabbitMQ service.
service rabbitmq-server stop
3 Open the following file in a text editor.
/etc/rabbitmq/rabbitmq-env.conf
4 Set the following property to true.
USE_LONGNAME=true
Installing and Upgrading vRealize Automation
VMware, Inc. 253
5 Save and close rabbitmq-env.conf.
6 Reset RabbitMQ.
vcac-vami rabbitmq-cluster-config reset-rabbitmq-node
7 On just one vRealize Automation appliance node, run the following script.
vcac-config cluster-config-ping-nodes --services rabbitmq-server
8 On all nodes, verify that the RabbitMQ service is started.
vcac-vami rabbitmq-cluster-config get-rabbitmq-status
Troubleshooting IaaS ComponentsThe troubleshooting topics for vRealize Automation IaaS components provide solutions to potentialinstallation-related problems that you might encounter when using vRealize Automation.
Prerequisite Fixer Cannot Install .NET Features
The vRealize Automation Prerequisite Checker Fix option fails and displays messages about not findingthe installation source for .NET 3.5.1.
Problem
The Prerequisite Checker needs to verify that .NET 3.5.1 is installed in order to satisfy requirements forWindows Server 2008 R2 systems with IIS 7.5, and Windows Server 2012 R2 systems with IIS 8.
Cause
For Windows Server 2012 R2, inability to connect to the Internet can prevent .NET automatic installation.Certain Windows 2012 R2 updates can also prevent installation. The problem occurs because theWindows version lacks a local copy of the .NET Framework 3.5 installation source.
Solution
Manually provide a .NET Framework 3.5 installation source.
1 On the Windows host, mount an ISO of the Windows Server 2012 R2 installation media.
2 In Server Manager, enable .NET Framework 3.5 by using the Add Roles and Features Wizard.
3 During the wizard, navigate to the .NET Framework 3.5 installation path on the ISO media.
4 After adding .NET Framework 3.5, rerun the vRealize Automation Prerequisite Checker.
Validating Server Certificates for IaaS
You can use the vcac-Config.exe command to verify that an IaaS server accepts vRealize Automationappliance and SSO appliance certificates.
Problem
You see authorization errors when using IaaS features.
Installing and Upgrading vRealize Automation
VMware, Inc. 254
Cause
Authorization errors can occur when IaaS does not recognize security certificates from other components.
Solution
1 Open a command prompt as an administrator and navigate to the Cafe directory at vra-installation-dir\Server\Model Manager Data\Cafe, typically C:\Program Files(x86)\VMware\vCAC\Server\Model Manager Data\Cafe.
2 Type a command of the formVcac-Config.exe CheckServerCertificates -d [vra-database] -s [vRA SQL server] -v.Optional parameters are -su [SQL user name] and -sp [password].
If the command succeeds you see the following message:
Certificates validated successfully.
Command succeeded.
If the command fails, you see a detailed error message.
Note This command is available only on the node for the Model Manager Data component.
Credentials Error When Running the IaaS Installer
When you install IaaS components, you get an error when entering your virtual appliance credentials.
Problem
After providing credentials in the IaaS installer, an org.xml.sax.SAXParseException error appears.
Cause
You used incorrect credentials or an incorrect credential format.
Solution
u Ensure that you use the correct tenant and user name values.
For example, the SSO default tenant uses domain name such as vsphere.local, [email protected].
Save Settings Warning Appears During IaaS Installation
Message appears during IaaS Installation. Warning: Could not save settings to the virtualappliance during IaaS installation.
Problem
An inaccurate error message indicating that user settings have not been saved appears during IaaSinstallation.
Cause
Communication or network problems can cause this message to appear erroneously.
Installing and Upgrading vRealize Automation
VMware, Inc. 255
Solution
Ignore the error message and proceed with the installation. This message should not cause the setup tofail.
Website Server and Distributed Execution Managers Fail to Install
Your installation of the vRealize Automation appliance infrastructure Web site server and distributedexecution managers cannot proceed when the password for your IaaS service account contains doublequotation marks.
Problem
You see a message telling you that installation of the vRealize Automation appliance distributed executionmanagers (DEMs) and Web site server has failed because of invalid msiexec parameters.
Cause
The IaaS service account password uses a double quotation mark character.
Solution
1 Verify that your IaaS service account password does not include double quotation marks as part ofthe password.
2 If your password contains double quotation marks, create a new password.
3 Restart the installation.
IaaS Authentication Fails During IaaS Web and Model Management Installation
When running the Prerequisite Checker, you see a message that the IIS authentication check has failed.
Problem
The message tells you that authentication is not enabled, but the IIS authentication check box is selected.
Solution
1 Clear the Windows authentication check box.
2 Click Save.
3 Select the Windows authentication check box.
4 Click Save.
5 Rerun the Prerequisite Checker.
Failed to Install Model Manager Data and Web Components
Your vRealize Automation installation can fail if the IaaS installer is unable to save the Model ManagerData component and Web component.
Installing and Upgrading vRealize Automation
VMware, Inc. 256
Problem
Your installation fails with the following message:
The IaaS installer failed to save the Model Manager Data and
Web components.
Cause
The failure has several potential causes.
n Connectivity issues to the vRealize Automation appliance or connectivity issues between theappliances. A connection attempt fails because there was no response or the connection could not bemade.
n Trusted certificate issues in IaaS when using a distributed configuration.
n A certificate name mismatch in a distributed configuration.
n The certificate may be invalid or an error on the certificate chain might exist.
n The Repository Service fails to start.
n Incorrect configuration of the load balancer in a distributed environment.
Solution
n Connectivity
Verify that you can connect to the vRealize Automation URL in a Web browser.
https://vrealize-automation-appliance-FQDN
n Trusted Certificate Issues
n In IaaS, open Microsoft Management Console with the command mmc.exe and check that thecertificate used in the installation has been added to the Trusted Root Certificate Store in themachine.
n From a Web browser, check the status of the MetaModel service and verify that no certificateerrors appear:
https://FQDN-or-IP/repository/data/MetaModel.svc
n Certificate Name Mismatch
This error can occur when the certificate is issued to a particular name and a different name or IPaddress is used. You can suppress the certificate name mismatch error during installation byselecting Suppress certificate mismatch.
You can also use the Suppress certificate mismatch option to ignore remote certificate revocation listmatch errors.
Installing and Upgrading vRealize Automation
VMware, Inc. 257
n Invalid Certificate
Open Microsoft Management Console with the command mmc.exe. Check that the certificate is notexpired and that the status is correct. Do this for all certificates in the certificate chain. You might haveto import other certificates in the chain into the Trusted Root Certificate Store when using a Certificatehierarchy.
n Repository Service
Use the following actions to check the status of the repository service.
n From a Web browser, check the status of the MetaModel service:
https://FQDN-or-IP/repository/data/MetaModel.svc
n Check the Repository.log for errors.
n Reset IIS (iisreset) if you have problems with the applications hosted on the Web site(Repository, vRealize Automation, or WAPI).
n Check the Web site logs in %SystemDrive%\inetpub\logs\LogFiles for additional logginginformation.
n Verify that Prerequisite Checker passed when checking the requirements.
n On Windows 2012, check that WCF Services under .NET Framework is installed and that HTTPactivation is installed.
IaaS Windows Servers Do Not Support FIPS
An installation cannot succeed when Federal Information Processing Standard (FIPS) is enabled.
Problem
Installation fails with the following error while installing the IaaS Web component.
This implementation is not part of the Windows Platform FIPS validated cryptographic
algorithms.
Cause
vRealize Automation IaaS is built on Microsoft Windows Communication Foundation (WCF), which doesnot support FIPS.
Solution
On the IaaS Windows server, disable the FIPS policy.
1 Go to Start > Control Panel > Administrative tools > Local Security Policy.
2 In the Group Policy dialog, under Local Policies, select Security Options.
3 Find and disable the following entry.
System cryptography: Use FIPS compliant algorithms for encryption, hashing, and
signing.
Installing and Upgrading vRealize Automation
VMware, Inc. 258

Adding an XaaS Endpoint Causes an Internal Error
When you attempt to create an XaaS endpoint, an internal error message appears.
Problem
Creation of an endpoint fails with the following internal error message, An internal error hasoccurred. If the problem persists, please contact your system administrator. When
contacting your system administrator, use this reference: c0DD0C01. Reference codes arerandomly generated and not linked to a particular error message.
Solution
1 Open the vRealize Automation appliance log file.
/var/log/vcac/catalina.out
2 Locate the reference code in the error message.
For example, c0DD0C01.
3 Search for the reference code in the log file to locate the associated entry.
4 Review the entries that appear above and below the associated entry to troubleshoot the problem.
The associated log entry does not specifically call out the source of the problem.
Uninstalling a Proxy Agent Fails
Removing a proxy agent can fail if Windows Installer Logging is enabled.
Problem
When you try to uninstall a proxy agent from the Windows Control Panel, the uninstall fails and you seethe following error:
Error opening installation log file. Verify that the
specified log file location exists and is writable
Cause
This can occur if Windows Installer Logging is enabled, but the Windows Installer engine cannot properlywrite the uninstallation log file. For more information, see Microsoft Knowledge Base article 2564571.
Solution
1 Restart your machine or restart explorer.exe from the Task Manager.
2 Uninstall the agent.
Machine Requests Fail When Remote Transactions Are Disabled
Machine requests fail when Microsoft Distributed Transaction Coordinator (DTC) remote transactions aredisabled on Windows server machines.
Installing and Upgrading vRealize Automation
VMware, Inc. 259
Problem
If you provision a machine when remote transactions are disabled on the Model Manager portal or theSQL Server, the request will not complete. Data collection fails and the machine request remains in astate of CloneWorkflow.
Cause
DTC Remote Transactions are disabled in the IaaS SQL Instance used by the vRealize Automationsystem.
Solution
1 Launch Windows Server Manager to enable DTC on all vRealize servers and associated SQLservers.
In Windows 7, navigate Start > Administrative Tools > Component Services.
Note Ensure that all Windows servers have unique SIDs for MSDTC configuration.
In addition, the IaaS Manager Service host must be able to resolve the NETBIOS name of the IaaSSQL Server database host. If it cannot resolve the NETBIOS name, add the SQL Server NETBIOSname to the Manager Service machine /etc/hosts file and restart the Manager Service.
2 Open all nodes to locate the local DTC, or the clustered DTC if using a clustered system.
Navigate Component Services > Computers > My Computer > Distributed TransactionCoordinator.
3 Right click on the local or clustered DTC and select Properties.
4 Click the Security tab.
5 Select the Network DTC Access option.
6 Select the Allow Remote Client and Allow Remote Administration options.
7 Select the Allow Inbound and Allow Outbound options.
8 Enter or select NT AUTHORITY\Network Service in the Account field for the DTC Logon Account.
9 Click OK.
10 Remove machines that are stuck in the Clone Workflow state.
a Log in to the vRealize Automation product interface.
https://vrealize-automation-appliance-FQDN/vcac/tenant-name
b Navigate to Infrastructure > Managed Machines.
c Right click the target machine.
d Select Delete to remove the machine.
Installing and Upgrading vRealize Automation
VMware, Inc. 260
Error in Manager Service Communication
IaaS servers cloned from a template where DTC was already installed contain duplicate identifiers forDTC, which prevents communication among the nodes.
Problem
The IaaS Manager Service fails and posts the following error to the manager service log.
Communication with the underlying transaction manager has failed. --->
System.Runtime.InteropServices.COMException: The MSDTC transaction manager was
unable to pull the transaction from the source transaction manager due to
communication problems. Possible causes are: a firewall is present and it
doesn't have an exception for the MSDTC process, the two machines cannot
find each other by their NetBIOS names, or the support for network transactions
is not enabled for one of the two transaction managers.
Cause
When you clone an IaaS server that already has DTC installed, the clone contains the same uniqueidentifier for DTC as the parent. Communication between the two machines fails.
Solution
1 On the clone, open a command prompt as Administrator.
2 Run the following command.
msdtc -uninstall
3 Restart the clone.
4 Open another command prompt, and run the following command.
msdtc -install manager-service-host-FQDN
Email Customization Behavior Has Changed
In vRealize Automation 6.0 or later, only notifications generated by the IaaS component can becustomized by using the email template functionality from earlier versions.
Solution
You can use the following XSLT templates:
n ArchivePeriodExpired
n EpiRegister
n EpiUnregister
n LeaseAboutToExpire
n LeaseExpired
n LeaseExpiredPowerOff
n ManagerLeaseAboutToExpire
Installing and Upgrading vRealize Automation
VMware, Inc. 261
n ManagerLeaseExpired
n ManagerReclamationExpiredLeaseModified
n ManagerReclamationForcedLeaseModified
n ReclamationExpiredLeaseModified
n ReclamationForcedLeaseModified
n VdiRegister
n VdiUnregister
Email templates are located in the \Templates directory under the server installation directory, typically%SystemDrive%\Program Files x86\VMware\vCAC\Server. The \Templates directory also includesXSLT templates that are no longer supported and cannot be modified.
Troubleshooting Log-In ErrorsThe troubleshooting topics for log-in errors for vRealize Automation provide solutions to potentialinstallation-related problems that you might encounter when using vRealize Automation.
Attempts to Log In as the IaaS Administrator with Incorrect UPN Format Credentials Failswith No Explanation
You attempt to log in to vRealize Automation as an IaaS administrator and are redirected to the loginpage with no explanation.
Problem
If you attempt to log in to vRealize Automation as an IaaS administrator with UPN credentials that do notinclude the @yourdomain portion of the user name, you are logged out of SSO immediately andredirected to the login page with no explanation.
Cause
The UPN entered must adhere to a yourname.admin@yourdomain format, for example if you log in [email protected] as the user name but the UPN in the Active Directory is only set as jsmith.admin,the login fails.
Solution
To correct the problem change the userPrincipalName value to include the needed @yourdomaincontent and retry login. In this example the UPN name should be [email protected]. Thisinformation is provided in the log file in the log/vcac folder.
Log In Fails with High Availability
When you have more than one vRealize Automation appliance, the appliances must be able to identifyeach other by short hostname. Otherwise, you cannot log in.
Installing and Upgrading vRealize Automation
VMware, Inc. 262
Problem
You configure vRealize Automation for high availability by installing an additional vRealize Automationappliance. When you try to log in to vRealize Automation, a message about an invalid license appears.The message is incorrect though, because you determined that your license is valid.
Cause
The vRealize Automation appliance nodes do not correctly form a high availability cluster until they canresolve the short host names of the nodes in the cluster.
Solution
To allow a cluster of high availability vRealize Automation appliances to resolve short host names, takeany of the following approaches. You must modify all appliances in the cluster.
Procedure
n Edit or create a search line in /etc/resolv.conf. The line should contain domains that holdvRealize Automation appliances. Separate multiple domains with spaces. For example:
search sales.mycompany.com support.mycompany.com
n Edit or create domain lines in /etc/resolv.conf. Each line should contain a domain that holdsvRealize Automation appliances. For example:
domain support.mycompany.com
n Add lines to the /etc/hosts file so that each vRealize Automation appliance short name ismapped to its fully qualified domain name. For example:
node1 node1.support.mycompany.com
node2 node2.support.mycompany.com
Proxy Prevents VMware Identity Manager User Log In
Configuring to use a proxy might prevent VMware Identity Manager users from logging in.
Problem
You configure vRealize Automation to access the network through a proxy server, andVMware Identity Manager users see the following error when they attempt to log in.
Error Unable to get metadata
Solution
Prerequisites
Configure vRealize Automation to access the network through a proxy server. See Connect to theNetwork Through a Proxy Server.
Procedure
1 Log in to the console of the vRealize Automation appliance as root.
Installing and Upgrading vRealize Automation
VMware, Inc. 263
2 Open the following file in a text editor.
/etc/sysconfig/proxy
3 Update the NO_PROXY line to ignore the proxy server for VMware Identity Manager logins.
NO_PROXY=vrealize-automation-hostname
For example: NO_PROXY="localhost, 127.0.0.1, automation.mycompany.com"
4 Save and close proxy.
5 Restart the Horizon workspace service by entering the following command.
service horizon-workspace restart
Upgrading vRealize AutomationYou can upgrade your current vRealize Automation environment to the latest version.
Depending on your current vRealize Automation environment, you can upgrade to the latest version byperforming an in-place upgrade or a side-by-side upgrade. Review the information on this page todetermine the best upgrade method for your environment.
An in-place upgrade is a multi-step process. You perform procedures in a particular order to update thevarious components in your current environment. You must upgrade all product components to the sameversion. You can only perform an in-place upgrade for these paths.
n vRealize Automation 6.2.5 to 7.3
n vRealize Automation 7.1 to 7.3
n vRealize Automation 7.2 to 7.3
n vRealize Automation 6.2.5 to 7.3.1
n vRealize Automation 7.1 to 7.3.1
n vRealize Automation 7.2 to 7.3.1
n vRealize Automation 7.3 to 7.3.1
A side-by-side upgrade migrates the data in your current vRealize Automation environment to a targetenvironment deployed with the latest version of vRealize Automation. You can perform a side-by-sideupgrade for these paths.
n vRealize Automation 6.2.0 through 6.2.5 to 7.3 or 7.3.1
n vRealize Automation 7.0 and 7.0.1 to 7.3 or 7.3.1
n vRealize Automation 7.1 and 7.2 to 7.3 or 7.3.1
n vRealize Automation 7.3 to 7.3.1
Locate your current vRealize Automation version in this table. Use the documents on the right to performan upgrade of your vRealize Automation environment to the latest version.
Installing and Upgrading vRealize Automation
VMware, Inc. 264
Table 1‑39. Supported Upgrade Paths to vRealize Automation 7.3 or 7.3.1
Your Currently Installed Version Documentation for Incremental Upgrades
vRealize Automation 7.1, 7.2, or 7.3 See one of these topics.n Upgrading vRealize Automation 7.1 or 7.2 to 7.3n Migrating vRealize Automation to 7.3
vRealize Automation 7.0 or 7.0.1 See Migrating vRealize Automation to 7.3 .
vRealize Automation 6.2.5 See one of these topics.n Upgrading vRealize Automation 6.2.5 to 7.3n Migrating vRealize Automation to 7.3
vRealize Automation 6.2.0, 6.2.1, 6.2.2, 6.2.3, 6.2.4 See Migrating vRealize Automation to 7.3
This table provides information about upgrading from an earlier vCloud Automation Center release. Youmust upgrade to vRealize Automation 6.2.5 before you upgrade to the latest version ofvRealize Automation. You can find links to the documentation for 5.x and 6.x versions ofvCloud Automation Center and vRealize Automation at https://www.vmware.com/support/pubs/vcac-pubs.html.
Table 1‑40. Supported Upgrade Paths to vRealize Automation 6.2.5
Your Currently Installed Version Documentation for Incremental Upgrades
vCloud Automation Center 6.0 Perform upgrades in the following order:
1 Upgrading vCloud Automation Center 6.0 to 6.0.1
2 Upgrading to vCloud Automation Center 6.1
3 Upgrading to vRealize Automation 6.2.x
vCloud Automation Center 6.0.1 Perform upgrades in the following order:
1 Upgrading to vCloud Automation Center 6.1
2 Upgrading to vRealize Automation 6.2.x
vCloud Automation Center 6.1.x Upgrading to vRealize Automation 6.2.x
vRealize Automation 6.2.x Upgrade directly to the 6.2.5 release as described inUpgrading to vRealize Automation 6.2.x
Note vCloud Automation Center rebranded to vRealize Automation in 6.2.0, . Only the user interfaceand service names are changed. Directory names and program names that contain vcac are not affected.
If you are upgrading from a 6.2.x environment, review these items.
n The VMware vRealize Production Test Upgrade Assessment Tool analyzes your vRealize Automation6.2.x environment for any feature configuration that can cause upgrade issues and checks that yourenvironment is ready for upgrade. To download this tool and related documentation, go to the VMware vRealize Production Test Tool download product page.
n Upgrading from a 6.2.x environment to the latest version of vRealize Automation introduces manyfunctional changes. For more information, see Considerations About Upgrading to This vRealizeAutomation Version.
Installing and Upgrading vRealize Automation
VMware, Inc. 265

n If you have customized your vRealize Automation 6.2.x deployment, contact your CCE support stafffor additional information about upgrade considerations.
n Property dictionary controls that are not supported after upgrade can be restored usingvRealize Orchestrator and property dictionary relationships.
n If you have workflows in your source environment that contain deprecated code, see the vRealizeAutomation Extensibility Migration Guide for information about the code changes required forconversion to event broker subscriptions.
To avoid a known problem when upgrading from vRealize Automation 6.2.0, perform the following stepson each IaaS Website node before you upgrade. This problem affects 6.2.0 only. Other 6.2.x versions arenot affected.
1 Open Notepad with Administrative rights. In Start, right-click the Notepad icon and select Run asadministrator.
2 Open the following file:
C:\Program Files (x86)\VMware\vCAC\Server\Model Manager Web\web.config
3 Locate the following statement in the file:
<!-- add key="DisableMessageSignatureCheck" value="false"-->
4 Uncomment the statement and change the value from false to true.
<add key="DisableMessageSignatureCheck" value="true" />
5 Save the file.
If Notepad prompts you to Save As, you did not open Notepad as Administrator and must go back tostep 1.
6 Open a Command Prompt with Administrative rights. In Start, right-click the Command Prompt iconand select Run as administrator.
7 Run reset.
8 Repeat steps 1–7 for all website nodes.
Upgrading vRealize Automation 7.1 or 7.2 to 7.3When you upgrade your vRealize Automation 7.1 or 7.2 environment to the latest version, you useupgrade procedures specific to this environment.
This information is specific to upgrading vRealize Automation 7.1 or 7.2 to 7.3 . For information aboutother supported upgrade paths, see Upgrading vRealize Automation.
Upgrading vRealize Automation 7.1, 7.2 to 7.3 or 7.1, 7.2 ,7.3 to 7.3.1You can upgrade of your current vRealize Automation 7.1 or 7.2 environment to 7.3. You can alsoupgrade your current vRealize Automation 7.1, 7.2, 7.3 environment to 7.3.1. You use upgradeprocedures specific to this version to upgrade your environment.
Installing and Upgrading vRealize Automation
VMware, Inc. 266
An in-place upgrade is a three-stage process. You upgrade the components in your current environmentin this order.
1 vRealize Automation appliance
2 IaaS web server
3 vRealize Orchestrator
You must upgrade all product components to the same version.
Beginning with vRealize Automation 7.2, JFrog Artifactory Pro is no longer bundled with thevRealize Automation appliance. If you upgrade from an earlier version of vRealize Automation, theupgrade process removes JFrog Artifactory Pro. For more information, see Knowledge Base 2147237.
Prerequisites for Upgrading vRealize Automation
Before you upgrade vRealize Automation 7.1, 7.2 to 7.3 or 7.1, 7.2, 7.3 to 7.3.1, review the followingprerequisites.
System Configuration Requirements
Verify that the following prerequisites are finished before you begin an upgrade.
n Verify that all appliances and servers that are part of your deployment meet the system requirementsfor the latest version. See the vRealize Automation Support Matrix at VMware vRealize AutomationDocumentation.
n Consult the VMware Product Interoperability Matrix on the VMware website for information aboutcompatibility with other VMware products.
n Verify that the vRealize Automation you are upgrading from is in stable working condition. Correct anyproblems before upgrading.
Hardware Configuration Requirements
Verify that the hardware in your environment is adequate for vRealize Automation 7.3.
See vRealize Automation Hardware Specifications and Capacity Maximums
Verify that the following prerequisites are finished before you begin an upgrade.
n You must have at least 18-GB RAM, 4 CPUs, Disk1 = 50 GB, Disk3=25 GB, and Disk4=50 GB beforeyou run the upgrade.
If the virtual machine is on vCloud Networking and Security, you might need to allocate more RAMspace.
Although general support for vCloud Networking and Security 5.5.x (vCNS) ended in September2016, the VCNS custom properties continue to be valid for NSX purposes. See the VMwareKnowledge Base article End of Availability and End of General Support for VMware vCloudNetworking and Security 5.5.x (2144733) at http://kb.vmware.com/kb/2144733 for more information.
n These nodes must have at least 5 GB of free disk space:
n Primary IaaS Website
Installing and Upgrading vRealize Automation
VMware, Inc. 267
n Microsoft SQL database
n Model Manager
n The primary IaaS Website node where the Model Manager data is installed must have JAVA SERuntime Environment 8, 64 bits, update 111 or later installed. After you install Java, you must set theJAVA_HOME environment variable to the new version.
n To download and run the upgrade, you must have the following resources:
n At least 4.5 GB on the root partition
n 4.5 GB on the /storage/db partition for the master vRealize Automation appliance
n 4.5 GB on the root partition for each replica virtual appliance
n Check the /storage/log subfolder and remove any older archived ZIP files to clean up space.
General Prerequisites
Verify that the following prerequisites are finished before you begin an upgrade.
n You have access to all databases and all load balancers impacted by or participating in thevRealize Automation upgrade.
n You make the system unavailable to users while you perform the upgrade.
n You disable any applications that query vRealize Automation.
n Verify that Microsoft Distributed Transaction Coordinator (MSDTC) is enabled on allvRealize Automation and associated SQL servers. For instructions, see the VMware Knowledge Basearticle Various tasks fail after upgrading or migrating to VMware vCloud Automation Center (vCAC)6.1.x (2089503) at http://kb.vmware.com/kb/2089503.
n Complete these steps if you are upgrading a distributed environment configured with an embeddedPostgreSQL database.
a Examine the files in the pgdata directory on the master host before you upgrade the replicahosts.
b Navigate to the PostgreSQL data folder on the master hostat /var/vmware/vpostgres/current/pgdata/.
c Close any opened files in the pgdata directory and remove any files with a .swp suffix.
d Verify that all files in this directory have correct ownership: postgres:users.
In addition, verify that custom properties do not have spaces in their names. Before upgrading to thisrelease of vRealize Automation, remove any space characters from your custom property names, forexample replace the space with an underscore character, to allow the custom property to be recognizedin the upgraded vRealize Automation installation. vRealize Automation custom property names cannotcontain spaces. This issue can impact use of an upgraded vRealize Orchestrator installation that usescustom properties that contained spaces in earlier releases of either vRealize Automation or vRealizeOrchestrator or both.
Installing and Upgrading vRealize Automation
VMware, Inc. 268
Checklist for Upgrading vRealize Automation
When you upgrade your vRealize Automation 7.1, 7.2 environment to 7.3 or your 7.1, 7.2, 7.3environment to 7.3.1, you update all components in a specific order.
The order of upgrade varies depending on whether you are upgrading a minimal environment or adistributed environment with multiple vRealize Automation appliances.
Use the checklists to track your work as you complete the upgrade. Finish the tasks in the order they aregiven.
Table 1‑41. Checklist for Upgrading a vRealize Automation Minimal Environment
Task Instructions
Run NSX Network and Security Inventory Data CollectionBefore You Upgrade from vRealize Automation 7.1 or 7.2 to7.3.x. This is only required when vRealize Automation isintegrated with NSX.
See Run NSX Network and Security Inventory Data CollectionBefore You Upgrade vRealize Automation.
Backup your current installation. This is a critical step.For more information on how to back up and restore yoursystem, see Back Up Your Existing vRealize AutomationEnvironment.
For general information, see Configuring Backup and Restore byUsing Symantec Netbackup at http://www.vmware.com/pdf/vrealize-backup-and-restore-netbackup.pdf.
Download update to the vRealize Automation appliance.See Downloading vRealize Automation Appliance Updates.
Install the update on the vRealize Automation applianceand IaaS components.
See Install the Update on the vRealize Automation Applianceand IaaS Components
Table 1‑42. Checklist for Upgrading a vRealize Automation Distributed Environment
Task Instructions
Run NSX Network and Security Inventory Data CollectionBefore You Upgrade from vRealize Automation 7.1 or 7.2 to7.3.x. This is only required when vRealize Automation isintegrated with NSX.
See Run NSX Network and Security Inventory Data CollectionBefore You Upgrade vRealize Automation.
Back up your current installation. This is a critical step.For more information on how to back up and restore yoursystem, see Back Up Your Existing vRealize AutomationEnvironment.
For detailed information, see Configuring Backup and Restore byUsing Symantec Netbackup at http://www.vmware.com/pdf/vrealize-backup-and-restore-netbackup.pdf
Download updates to the vRealize Automation appliance.See Downloading vRealize Automation Appliance Updates.
Set the vRealize Automation PostgreSQL replication modeto asynchronous.
See Set the vRealize Automation PostgreSQL Replication Modeto Asynchronous.
Installing and Upgrading vRealize Automation
VMware, Inc. 269
Table 1‑42. Checklist for Upgrading a vRealize Automation Distributed Environment(Continued)
Task Instructions
Disable your load balancer.See your load balancer documentation.
Install the update on the master vRealize Automationappliance and IaaS components.
Note You must install the update on the master appliance in adistributed environment..
See Install the Update on the vRealize Automation Applianceand IaaS Components.
Enable your load balancer.Enable Your Load Balancers
Upgrading VMware Products Integrated with vRealize AutomationYou must manage any VMware products integrated with your vRealize Automation environment when youupgrade vRealize Automation.
If your vRealize Automation environment is integrated with one or more additional products, you shouldupgrade vRealize Automation before you update the additional products. If vRealize Business for Cloud isintegrated with vRealize Automation, you must unregister vRealize Business for Cloud before youupgrade vRealize Automation.
Follow the suggested workflow for managing integrated products when you upgradevRealize Automation.
1 Upgrade vRealize Automation.
2 Upgrade VMware vRealize Operations Manager and apply the latest management pack.
3 Upgrade VMware vRealize Log Insight.
4 Upgrade VMware vRealize Business for Cloud.
This section provides additional guidance for managing vRealize Business for Cloud when it is integratedwith your vRealize Automation environment.
Upgrading vRealize Operations Manager Integrated with vRealize Automation
Upgrade vRealize Operations Manager after you upgrade vRealize Automation.
Procedure
1 Upgrade vRealize Automation.
2 Upgrade vRealize Operations Manager. For information, see Updating Your Software in the VMwarevRealize Operations Manager Documentation.
Upgrading vRealize Log Insight Integrated with vRealize Automation
Upgrade vRealize Log Insight after you upgrade vRealize Automation.
Installing and Upgrading vRealize Automation
VMware, Inc. 270
Procedure
1 Upgrade vRealize Automation.
2 Upgrade vRealize Log Insight. For information, see Upgrading vRealize Log Insight in the VMwarevRealize Log Insight Documentation.
Upgrading vRealize Business for Cloud Integrated with vRealize Automation
When you upgrade your vRealize Automation environment, you must unregister and register yourconnection to vRealize Business for Cloud.
Perform this procedure to ensure continuity of service with vRealize Business for Cloud when youupgrade your vRealize Automation environment.
Procedure
1 Unregister vRealize Business for Cloud from vRealize Automation. See UnregistervRealize Business for Cloud from vRealize Automation in the VMware vRealize Business for CloudDocumentation.
2 Upgrade vRealize Automation.
3 If necessary, upgrade vRealize Business for Cloud. See Upgrading vRealize Business for Cloud inthe VMware vRealize Business for Cloud Documentation.
4 Register vRealize Business for Cloud with vRealize Automation. See RegistervRealize Business for Cloud with vRealize Automation in the VMware vRealize Business for CloudDocumentation.
Preparing to Upgrade vRealize AutomationComplete the preparatory tasks before you upgrade vRealize Automation 7.1, 7.2 to 7.3 or 7.1, 7.2, 7.3 to7.3.1.
Complete the preparation tasks in the order they appear in the checklist. See Checklist for UpgradingvRealize Automation.
Run NSX Network and Security Inventory Data Collection Before You UpgradevRealize Automation
Before you upgrade vRealize Automation 7.1, 7.2 to 7.3.x, you must run NSX Network and SecurityInventory data collection in your vRealize Automation 7.1, 7.2 or 7.3 environment.
This data collection is necessary for the load balancer reconfigure action to work in vRealize Automation7.3 or 7.3.1 for 7.1 and 7.2 deployments.
Procedure
u Run NSX Network and Security Inventory data collection on vRealize Automation 7.1 or 7.2 beforeyou upgrade. See Start Endpoint Data Collection Manually.
What to do next
Backup Prerequisites for Upgrading vRealize Automation.
Installing and Upgrading vRealize Automation
VMware, Inc. 271
Backup Prerequisites for Upgrading vRealize Automation
Complete the backup prerequisites before you begin your upgrade vRealize Automation 7.1, 7.2 to 7.3 or7.1, 7.2, 7.3 to 7.3.1.
Prerequisites
n Verify that your source environment is fully installed and configured.
n For each appliance in the source environment, back up all the vRealize Automation applianceconfiguration files in the following directories.
n /etc/vcac/
n /etc/vco/
n /etc/apache2/
n /etc/rabbitmq/
n Back up the IaaS Microsoft SQL Server database. For information, find articles on the MicrosoftDeveloper Network about creating a full SQL Server database backup.
n Back up any files you have customized, such as DataCenterLocations.xml.
n Create a snapshot of each virtual appliance and IaaS server. Adhere to regular guidelines for backingup the entire system in case vRealize Automation upgrade is unsuccessful. See Backup andRecovery for vRealize Automation Installations.
What to do next
Back Up Your Existing vRealize Automation Environment.
Back Up Your Existing vRealize Automation Environment
Before you upgrade from vRealize Automation 7.1, 7.2, to 7.3 or 7.1, 7.2, 7.3 to 7.3.1, shut down and takea snapshot of each vRealize Automation IaaS server on each Windows node and eachvRealize Automation appliance on each Linux node. If the upgrade is unsuccessful, use the snapshot toreturn to the last known good configuration and attempt another upgrade.
For information about starting vRealize Automation, see Start Up vRealize Automation.
Prerequisites
n Backup Prerequisites for Upgrading vRealize Automation.
n Beginning with vRealize Automation 7.0, the PostgreSQL database is always configured in high-availability mode. Log in to vRealize Automation Appliance Management and click vRA settings >Database to locate the current Master node. If the database configuration is listed as an externaldatabase, create a manual backup of this external database.
n If the vRealize Automation Microsoft SQL database is not hosted on the IaaS server, create adatabase backup file.
n Verify that you have completed the backup prerequisites for upgrading.
Installing and Upgrading vRealize Automation
VMware, Inc. 272
n Verify that you have taken a snapshot of your system while it is shut down. This is the preferredmethod of taking a snapshot. See your vSphere 6.0 Documentation.
If you cannot shut down your system, take an in-memory snapshot of all the nodes. This is the non-preferred method and should only be used if you cannot take a snapshot while the system is shutdown.
n If you modified the app.config file, make a backup of that file. See Restore Changes to Logging inthe app.config File.
n Make a backup of the external workflow configuration (xmldb) files. See Restore External WorkflowTimeout Files.
n Verify that you have a location outside your current folder where you can store your backup file. See Backup Copies of .xml Files Cause the System to Time Out.
Procedure
1 Log in to your vSphere client.
2 Locate each vRealize Automation IaaS Windows machine, and each vRealize Automation appliancenode.
3 On each machine, click Shutdown guest in this order.
a IaaS Windows Server machines
b vRealize Automation appliance.
4 Take a snapshot of each vRealize Automation machine.
5 Use your preferred backup method to create a full backup of each appliance node.
6 Power on the system. See Start Up vRealize Automation in Managing vRealize Automation.
If you have a high availability environment, complete these steps to power on your virtual appliances.
a Start the master vRealize Automation appliance.
b Log in to vRealize Automation Appliance Management, click Services, and wait until thelicensing-service status is REGISTERED.
c Start the remaining vRealize Automation appliances at the same time.
d Start the primary Web node and wait for the startup to finish.
e Start the primary Manager Service machine and wait for 2 to 5 minutes.
The actual time depends on your site configuration.
Note On secondary machines, do not start or run the Windows service unless you areconfigured for automatic Manager Service failover.
Installing and Upgrading vRealize Automation
VMware, Inc. 273
f Start the Distributed Execution Manager Orchestrator and Workers and all vRealize Automationproxy agents.
Note You can start these components in any order. You do not need to wait for a component tofinish before you start another.
7 Log in to each vRealize Automation appliance management console and verify that the system is fullyfunctional.
a Click Services.
b Verify that each service is REGISTERED.
What to do next
Set the vRealize Automation PostgreSQL Replication Mode to Asynchronous.
Set the vRealize Automation PostgreSQL Replication Mode to Asynchronous
If you upgrade from a distributed vRealize Automation environment that operates in PostgreSQLsynchronous replication mode, you must change it to asynchronous before you upgrade.
Prerequisites
n You have a distributed vRealize Automation environment that you want to upgrade.
n You are logged in as root to vRealize Automation Appliance Management at https://vra-va-hostname.domain.name:5480.
Procedure
1 Click vRA Settings > Database.
2 Click Async Mode and wait until the action completes.
3 Verify that all nodes in the Sync State column display Async status.
What to do next
Downloading vRealize Automation Appliance Updates
Downloading vRealize Automation Appliance Updates
You can check for updates on your appliance management console, and download the updates using oneof the following methods.
For best upgrade performance, use the ISO file method.
Download Virtual Appliance Updates for Use with a CD-ROM Drive
You can update your virtual appliance from an ISO file that the appliance reads from the virtual CD-ROMdrive. This is the preferred method.
You download the ISO file and set up the primary appliance to use this file to upgrade your appliance.
Installing and Upgrading vRealize Automation
VMware, Inc. 274
Prerequisites
n Back up your existing vRealize Automation environment.
n Verify that all CD-ROM drives you use in your upgrade are enabled before you update avRealize Automation appliance. See the vSphere documentation for information about adding a CD-ROM drive to a virtual machine in the vSphere client.
Procedure
1 To download the update repository ISO file, go to the vRealize Automation product page atwww.vmware.com. Click vRealize Automation Download Resources to go to the VMwaredownload page.
2 Locate the downloaded file on your system to verify that the file size is the same as the file on theVMware download page. Use the checksums provided on the download page to validate the integrityof your downloaded file. For more information, see the links at the bottom of the VMware downloadpage.
3 Verify that your primary virtual appliance is powered on.
4 Connect the CD-ROM drive for the primary virtual appliance to the ISO file you downloaded.
5 Go to the management console for your virtual appliance by using its fully qualified domain name,https://va-hostname.domain.name:5480.
6 Log in with the user name root and the password you entered when you deployed the appliance.
7 Click the Update tab.
8 Click Settings.
9 Under Update Repository, select Use CDROM Updates.
10 Click Save Settings.
Download vRealize Automation Appliance Updates from a VMware Repository
You can download the update for your vRealize Automation appliance from a public repository on thevmware.com website.
Prerequisites
n Back up your existing vRealize Automation environment.
n Verify that your vRealize Automation appliance is powered on.
Procedure
1 Go to the management console for your virtual appliance by using its fully qualified domain name,https://va-hostname.domain.name:5480.
2 Log in with the user name root and the password you entered when you deployed the appliance.
3 Click the Update tab.
4 Click Settings.
Installing and Upgrading vRealize Automation
VMware, Inc. 275
5 (Optional) Set how often to check for updates in the Automatic Updates panel.
6 Select Use Default Repository in the Update Repository panel.
The default repository is set to the correct VMware.com URL.
7 Click Save Settings.
Updating the vRealize Automation Appliance and IaaS ComponentsAfter you finish the upgrade prerequisites and download the virtual appliance update, you install theupdate on the vRealize Automation 7.1, 7.2 appliance to upgrade to 7.3 or on the 7.1, 7.2, 7.3 applianceto upgrade to 7.3.1.
You install the update on the vRealize Automation appliance. For a distributed environment, you installthe update on the master appliance node. The time required for the update to finish varies according toyour environment and network. When the update finishes, the system displays the changes made on theUpdate Status page of vRealize Automation Appliance Management. When the appliance updatefinishes, you must reboot the appliance. When you reboot the master appliance in a distributedenvironment, the system reboots each replica node.
After you reboot, Waiting for VA services to start appears on the Update Status page. The IaaSupdate starts when the system is fully initialized and all services are running. You can observe the IaaSupgrade progress on the Update Status page. The first IaaS server component can take about 30minutes to finish. During the upgrade, you see a message similar to Upgrading server componentsfor node web1-vra.mycompany.com.
At the end of the upgrade process for each Manager Service node, you see a message similar toEnabling ManagerService automatic failover mode for node mgr-vra.mycompany.com. InvRealize Automation 7.3, the active Manager Service node changes from a manual election to a systemdecision about which node becomes the failover server. The system enables this feature during upgrade.If you have problems with this feature, see Update Fails to Upgrade the Management Agent.
Install the Update on the vRealize Automation Appliance and IaaS Components
You can install the update on the vRealize Automation 7.1 or 7.2 virtual appliance to upgradevRealize Automation and the IaaS components to 7.3. You can install the update on thevRealize Automation 7.1, 7.2, 7.3 virtual appliance to upgrade vRealize Automation and the IaaScomponents to 7.3.1.
Do not close the management console while you install the update.
If you encounter any problems during the upgrade process, see Troubleshooting the vRealize AutomationUpgrade.
Note While upgrading the Management Agent on the IaaS virtual machines, a VMware public certificateis temporarily installed in your Trusted Publishers certificate store. The Management Agent upgradeprocess uses a PowerShell script that is signed with this certificate. When the upgrade is finished, thiscertificate is removed from your certificate store.
Installing and Upgrading vRealize Automation
VMware, Inc. 276
Prerequisites
n Verify that you selected a download method and downloaded the update. See Downloading vRealizeAutomation Appliance Updates.
n For all high-availability environments, see Back Up Your Existing vRealize Automation Environment.
n For environments with load balancers, verify that you disabled all the redundant nodes and removedthe health monitors. For information, see your load balancer documentation.
n vRealize Automation appliance
n IaaS Website
n IaaS Manager Service
n For environments with load balancers, verify that the traffic is directed only to the primary node.
n Verify that the IaaS service hosted in Microsoft Internet Information Services (IIS) is running byperforming the following steps:
a Enter the URL https://webhostname/Repository/Data/MetaModel.svc to verify that theWeb Repository is running. If successful, no errors are returned and you see a list of models inXML format.
b Log in to the IaaS Website and check that the status recorded in the Repository.log file reportsOK. The file is located in the VCAC home folder at /Server/Model ManagerWeb/Logs/Repository.log.
Note For a distributed IaaS Website, log in to the secondary website, without MMD, and stopMicrosoft IIS temporarily. To ensure that the load balancer traffic is only going through the primaryWeb node, check the MetaModel.svc connectivity, and restart the Microsoft IIS.
n Verify that all IaaS nodes are in a healthy state by performing the following steps:
a Go to the management console for your primary virtual appliance by using its fully qualifieddomain name, https://va-hostname.domain.name:5480.
b Log in with the user name root and the password you entered when the appliance wasdeployed.
c Select vRA settings > Cluster.
d Under Last Connected, verify the following.
n The IaaS nodes in the table have a last connected time of less than 30 seconds.
n The virtual appliance nodes have a last connected time of less than 10 minutes.
If the IaaS nodes are not in communication with the vRealize Automation appliance, the upgradefails.
To diagnose connectivity problems between the Management Agent and virtual appliance,perform these steps.
1 Log in to each IaaS node that is not listed or has a Last Connected time greater than 30seconds.
Installing and Upgrading vRealize Automation
VMware, Inc. 277
2 Check the Management Agent logs to see if any errors are recorded.
3 If the Management Agent is not running, restart the agent in the Services console.
e Note any orphaned nodes listed in the table. An orphaned node is a duplicate node that isreported on the host but does not exist on the host. You must delete all orphaned nodes. Formore information, see Delete Orphaned Nodes on vRealize Automation .
n If you have a replica virtual appliance that is no longer part of the cluster, you must delete it from thecluster table. If you do not delete this appliance, the upgrade process displays a warning messagethat the replica update is unsuccessful.
n Verify that all saved and in-progress requests have finished successfully before you upgrade.
n If you upgrade the IaaS components manually after you update the vRealize Automation 7.1 or 7.2appliance, see Exclude IaaS Upgrade. If you plan to upgrade IaaS manually, you must also stop allIaaS services, except Management Agent, on each IaaS node.
Procedure
1 Open the vRealize Automation appliance management console.
For a distributed environment, open the management console on the master appliance.
a Go to the management console for your virtual appliance by using its fully qualified domain name,https://va-hostname.domain.name:5480.
b Log in with the user name root and the password you entered when you deployed the appliance.
2 Click Services and verify that all services are registered.
3 Select vRA Settings > Database and verify that this appliance is the master vRealize Automationappliance.
You install the update only on the master vRealize Automation appliance. Each replicavRealize Automation appliance is updated with the master appliance.
4 Select Update > Status.
5 Click Check Updates to verify that an update is accessible.
6 (Optional) For instances of vRealize Automation appliance, click Details in the Appliance Versionarea to see information about the location of release notes.
7 Click Install Updates.
8 Click OK.
A message stating that the update is in progress appears. The system shows changes made duringan upgrade on the Update Summary page. The time required for the update to finish varies accordingto your environment and network.
Installing and Upgrading vRealize Automation
VMware, Inc. 278
9 (Optional) To monitor the update in greater detail, use a terminal emulator to log in to the primaryappliance. View the updatecli.log file at /opt/vmware/var/log/vami/updatecli.log.
Additional upgrade progress information can also be seen in these files.
n /opt/vmware/var/log/vami/vami.log
n /var/log/vmware/horizon/horizon.log
n /var/log/bootstrap/*.log
If you log out during the upgrade process, you can continue to follow the update progress in the logfile. The updatecli.log file might display information about the version of vRealize Automation thatyou are upgrading from. This displayed version changes to the proper version later in the upgradeprocess.
10 When the vRealize Automation appliance update finishes, click System > Reboot in themanagement console.
In a distributed environment, all successfully upgraded replica appliance nodes reboot when youreboot the master appliance.
The IaaS update starts when the system is initialized and all services are up and running. ClickUpdate > Status to observe the IaaS upgrade progress.
11 When the IaaS update finishes, click Cluster in the appliance management console and verify thatthe version number is the current version for all IaaS nodes and components.
12 Click the Telemetry in the appliance management console. Read the note about participation in theCustomer Experience Improvement Program (CEIP) and select to join or not join the program.
Details regarding the data collected through CEIP and the purposes for which it is used by VMwareare set forth at the Trust & Assurance Center at http://www.vmware.com/trustvmware/ceip.html.
For more information about the Customer Experience Improvement Program, see Join or Leave theCustomer Experience Improvement Program for vRealize Automation.
What to do next
If your deployment uses a load balancer, perform these steps.
1 Enable the load balancer vRealize Automation health checks.
2 Re-enable load balancer traffic for all vRealize Automation nodes.
If the IaaS components fail to upgrade, see Upgrading the IaaS Server Components Separately If theUpdate Process Fails.
Upgrading the IaaS Server Components Separately If the Update ProcessFailsIf the automatic update process fails, you can upgrade the IaaS components separately.
Installing and Upgrading vRealize Automation
VMware, Inc. 279
If the vRealize Automation IaaS Web site and Manager Service successfully upgraded, you can run theIaaS upgrade shell script again without reverting to the snapshots you took before the upgrade.Sometimes a pending reboot event generated while upgrading multiple IaaS components installed on thesame virtual machine can fail the upgrade. In this case, try manually rebooting the IaaS node andrerunning the upgrade to fix the problem. If the upgrade fails consistently, contact VMware support orattempt a manual upgrade by following these steps.1 Revert your vRealize Automation appliance to its pre-update state.
2 Run a command to exclude the IaaS components from the update process. See Exclude IaaSUpgrade.
3 Run the update process on the vRealize Automation appliance.
4 Update the IaaS components separately using the Upgrade Shell Script or the vRealize Automation7.3 IaaS installer msi package.
Upgrade IaaS Components Using the Upgrade Shell Script After Upgrading thevRealize Automation Appliance
Use the upgrade shell script to upgrade the IaaS Components after you update eachvRealize Automation 7.1, 7.2 appliance to 7.3 or after you update each vRealize Automation 7.1, 7.2, 7.3appliance to 7.3.1.
The updated vRealize Automation appliance contains a shell script that you use to upgrade each IaaSnode and component.
You can run the upgrade script by using the vSphere console for the virtual machine or by using an SSHconsole session. If you use the vSphere console, you avoid intermittent network connectivity problemsthat can break the execution of the script.
If you stop the script while it is upgrading a component, the script stops when it finishes upgrading thecomponent. If other components on the node still must be upgraded, you can run the script again.
When the upgrade finishes, you can review the upgrade result by opening the upgrade log fileat /opt/vmware/var/log/vami/upgrade-iaas.log.
Prerequisites
n Review Troubleshooting the vRealize Automation Upgrade.
n Verify the successful update of all vRealize Automation appliances.
n If you reboot an IaaS server after you update all the vRealize Automation appliances but before youupgrade the IaaS components, stop all the IaaS services on Windows, except for the ManagementAgent service.
n Before you run the upgrade shell script on the master vRealize Automation appliance node, click theServices on the appliance management console. Verify that each service, except for iaas-service, isREGISTERED.
n To install the IaaS Management Agent manually on each IaaS node, finish these steps.a On the Open a browser and navigate to the VMware vRealize Automation IaaS Installation page
on the appliance at https://virtual_appliance_host_FQDN:5480/installer.
Installing and Upgrading vRealize Automation
VMware, Inc. 280
b Download the Management Agent installer, vCAC-IaaSManagementAgent-Setup.msi.
c Log in to each vRealize Automation IaaS machine and upgrade the Management Agent with theManagement Agent installer. Restart the Windows Management Agent service.
n Verify that your primary IaaS Website and Model Manager node has JAVA SE Runtime Environment8, 64 bits, update 161 or later installed. After you install Java, you must set the environment variable,JAVA_HOME, to the new version on each server node.
n Log in to each IaaS Website node and verify that the creation date is earlier than the modified date inthe web.config file. If the creation date for the web.config file is the same as or later than themodified date, perform the procedure in Upgrade Fails for IaaS Website Component.
n To verify that each IaaS node has an upgraded IaaS Management Agent, perform these steps oneach IaaS node:
a Log in to the vRealize Automation appliance management console.
b Select vRA Settings > Cluster.
c Expand the list of all installed components on each IaaS node, and locate the IaaS ManagementAgent.
d Verify that the Management Agent version is current.
n Exclude IaaS Upgrade.
n Verify that the IaaS Microsoft SQL Server database backup is accessible in case you must roll back.
n Verify that snapshots of the IaaS servers in your deployment are available.
If the upgrade is unsuccessful, return to the snapshot and database backup and attempt anotherupgrade.
Procedure
1 Open a new console session on the vRealize Automation appliance host. Log in with the rootaccount.
2 Change directories to /usr/lib/vcac/tools/upgrade/.
It is important that all IaaS Management Agents are upgraded and healthy before runningthe ./upgrade shell script. If any IaaS Management Agent has a problem when you run the upgradeshell script, see Update Fails to Upgrade the Management Agent.
3 Run the upgrade script.
a At the command prompt, enter ./upgrade.
b Press Enter.
For a description of the IaaS upgrade process, see Updating the vRealize Automation Appliance andIaaS Components.
If the Upgrade Shell Script is unsuccessful, review the upgrade-iaas.log file.
You can run the upgrade script again after you fix a problem.
Installing and Upgrading vRealize Automation
VMware, Inc. 281
What to do next
1 Restore Access to the Built-In vRealize Orchestrator Control Center.
2 If your deployment uses a load balancer, re-enable the vRealize Automation health monitors and thetraffic to all nodes.
For more information, see vRealize Automation Load Balancing.
Upgrading IaaS Components Using the IaaS Installer Executable File After Upgrading thevRealize Automation Appliance
You can use this alternative method to upgrade IaaS components after you upgrade thevRealize Automation 7.1, 7.2 appliance to 7.3 or the 7.1, 7.2, 7.3 appliance to 7.3.1.
Download the IaaS Installer to Upgrade IaaS Components After Upgrading thevRealize Automation Appliance
After you upgrade the vRealize Automation appliance to 7.3 or 7.3.1, download the IaaS installer to themachine where the IaaS components to be upgraded are installed.
If you see certificate warnings during this procedure, you can ignore them.
Note Except for a passive backup instance of the Manager Service, the startup type for all services mustbe set to Automatic during the upgrade process. The upgrade process fails if you set services to Manual.
Prerequisites
n Verify that Microsoft .NET Framework 4.5.2 or later is installed on the IaaS installation machine. Youcan download the .NET installer from the vRealize Automation installer Web page. If you update .NETto 4.5.2 after you shut down the services and the machine restarted as part of the installation, youmust manually stop all IaaS services except the Management agent.
n If you are using Internet Explorer for the download, verify that Enhanced Security Configuration is notenabled. Enter res://iesetup.dll/SoftAdmin.htm in the search bar and press Enter.
n Log in as a local administrator to the Windows server where one or more of the IaaS components youwant to upgrade are installed.
Procedure
1 Open a Web browser.
2 Enter the URL for the Windows installer download page.
For example, https://vcac-va-hostname.domain.name:5480/installer, where vcac-va-hostname.domain.name is the name of the primary (master) vRealize Automation appliance node.
3 Click the IaaS installer link.
4 When prompted, save the installer file, [email protected], to thedesktop.
Do not change the file name. It is used to connect the installation to the vRealize Automationappliance.
Installing and Upgrading vRealize Automation
VMware, Inc. 282
What to do next
Upgrade the IaaS Components After Upgrading vRealize Automation 7.1 or 7.2 to 7.3.
Upgrade the IaaS Components After Upgrading vRealize Automation 7.1 or 7.2 to 7.3
You must upgrade the SQL database and configure all systems that have IaaS components installed. Youcan use these steps for minimal and distributed installations.
Note The IaaS installer must be on the machine that contains the IaaS components you want toupgrade. You cannot run the installer from an external location, except for the Microsoft SQL databasewhich also can be upgraded remotely from the Web node.
Verify that snapshots of the IaaS servers in your deployment are available. If the upgrade fails, you canreturn to the snapshot and attempt another upgrade.
Perform the upgrade so that services are upgraded in the following order:
1 IaaS Web sites
If you are using a load balancer, disable traffic to all non-primary nodes.
Finish the upgrade on one server before upgrading the next server that is running a Website service.Start with the one that has the Model Manager Data component installed.
If you are performing a manual external Microsoft SQL database upgrade, you must upgrade theexternal SQL before you upgrade the Web node. You can upgrade the external SQL remotely fromthe Web node.
2 Manager Services
Upgrade the active Manager Service before you upgrade the passive Manager Service.
If you do not have SSL encryption enabled in your SQL instance, uncheck the SSL encryptioncheckbox in the Iaas Upgrade configuration dialog box next to the SQL definition.
3 DEM orchestrator and workers
Upgrade all DEM orchestrators and workers. Finish the upgrade on one server before you upgradethe next server.
4 Agents
Finish the upgrade on one server before you upgrade the next server that is running an agent.
5 Management Agent
Is updated automatically as part of the upgrade process.
Installing and Upgrading vRealize Automation
VMware, Inc. 283
If you are using different services on one server, the upgrade updates the services in the proper order.For example, if your site has Web site and manager services on the same server, select both for update.The upgrade installer applies the updates in the proper order. You must complete the upgrade on oneserver before you begin an upgrade on another.
Note If your deployment uses a load balancer, the primary appliance must be connected to the loadbalancer. All other instances of vRealize Automation appliance appliances must be disabled for loadbalancer traffic before you apply the upgrade to avoid caching errors.
Prerequisites
n Back up your existing vRealize Automation environment.
n If you reboot an IaaS server after you update all the vRealize Automation appliances but before youupgrade the IaaS components , stop all of the IaaS windows services, except for the ManagementAgent service, on the server.
n Download the IaaS Installer to Upgrade IaaS Components After Upgrading the vRealize AutomationAppliance.
n Verify that your primary IaaS Website, Microsoft SQL database, and Model Manager node has JAVASE Runtime Environment 8, 64bits, update 111 or later installed. After you install Java, you must setthe environment variable, JAVA_HOME , to the new version on each server node.
n Verify that the creation date is earlier than the modified date in the web.config file. If the creationdate for the web.config file is the same as or later than the modified date, perform the procedure in Upgrade Fails for IaaS Website Component.
n Complete these steps to reconfigure the Microsoft Distributed Transaction Coordinator (DTC).
Note Even with Distributed Transaction Coordinator enabled, the distributed transaction might fail ifthe firewall is turned on.
a On the vRealize Automation appliance, select Start > Administrative Tools > ComponentServices.
b Expand Component Services > Computers > My Computer > Distributed TransactionCoordinator.
c Choose the appropriate task.
n For a local standalone DTC, right-click Local DTC and select Properties
n For a clustered DTC expand Clustered DTCs and right-click the named clustered DTC andselect Properties.
d Click Security.
e Select all of the following.
n Network DTC Access
n Allow Remote Clients
Installing and Upgrading vRealize Automation
VMware, Inc. 284
n Allow Inbound
n Allow Outbound
n Mutual Authentication Required
f Click OK.
Procedure
1 If you are using a load balancer, prepare your environment.
a Verify the IaaS Website node that contains the Model Manager data is enabled for load balancertraffic.
You can identify this node by the presence of the vCAC Folder\Server\ConfigTool folder.
b Disable all other IaaS Websites and non-primary Manager Services for load balancer traffic.
2 Right-click the [email protected] setup file and selectRun as administrator.
3 Click Next.
4 Accept the license agreement and click Next.
5 Type the administrator credentials for your current deployment on the Log In page.
The user name is root and the password is the password that you specified when you deployed theappliance.
6 Select Accept Certificate.
7 On the Installation Type page, verify that Upgrade is selected.
If Upgrade is not selected, the components on this system are already upgraded to this version.
8 Click Next.
9 Configure the upgrade settings.
Option Action
If you are upgrading the ModelManager Data
Select the Model Manager Data check box in the vCAC Server section.
The check box is selected by default. Upgrade the Model Manager data onlyonce. If you are running the setup file on multiple machines to upgrade adistributed installation, the Web servers stop functioning while there is a versionmismatch between the Web servers and the Model Manager data. When youhave upgraded the Model Manager data and all of the Web servers, all of theWeb servers should function.
If you are not upgrading the ModelManager Data
Unselect the Model Manager Data check box in the vCAC Server section.
Installing and Upgrading vRealize Automation
VMware, Inc. 285
Option Action
To preserve customized workflows asthe latest version in your ModelManager Data
If you are upgrading the Model Manager Data, select the Preserve my latestworkflow versions check box in the Extensibility Workflows section.
The check box is selected by default. Customized workflows are alwayspreserved. The checkbox determines version order only. If you used vRealizeAutomation Designer to customize workflows in the Model Manager, select thisoption to maintain the most recent version of each customized workflow beforeupgrade as the most recent version after upgrade.
If you do not select this option, the version of each workflow provided withvRealize Automation Designer becomes the most recent after upgrade, and themost recent version before upgrade becomes the second most recent.
For information about vRealize Automation Designer, see Extending Machine LifeCycles By Using vRealize Automation Designer.
If you are upgrading a DistributedExecution Manager or a proxy agent
Enter the credentials for the administrator account in the Service Account section.
All of the services that you upgrade run under this account.
To specify your Microsoft SQL Serverdatabase
If you are upgrading the Model Manager Data, enter the names of the databaseserver and database instance in the Server text box in the Microsoft SQL ServerDatabase Installation Information section. Enter a fully qualified domain name(FQDN) for the database server name in the Database name text box.
If the database instance is on a non-default SQL port, include the port number inthe server instance specification. The Microsoft SQL default port number is 1433.
When upgrading the manager nodes, the MSSQL SSL option is selected bydefault. If your database does not use SSL, uncheck Use SSL for databaseconnection.
10 Click Next.
11 Confirm that all services to upgrade appear on the Ready to Upgrade page, and click Upgrade.
The Upgrading page and a progress indicator appear. When the upgrade process finishes, the Nextbutton is enabled.
12 Click Next.
13 Click Finish.
14 Verify that all services restarted.
15 Repeat these steps for each IaaS server in your deployment in the recommended order.
16 After all components are upgraded, log in to the management console for the appliance and verifythat all services, including IaaS, are now registered.
17 (Optional) Enable Automatic Manager Service Failover. See Enable Automatic Manager ServiceFailover After Upgrade.
All of the selected components are upgraded to the new release.
What to do next
1 Restore Access to the Built-In vRealize Orchestrator Control Center.
Installing and Upgrading vRealize Automation
VMware, Inc. 286
2 If your deployment uses a load balancer, upgrade each load balancer node to usevRealize Automation health checks, and re-enable load balancer traffic for any unconnected nodes.
For more information, see vRealize Automation Load Balancing.
Restore Access to the Built-In vRealize Orchestrator Control Center
After you upgrade the IaaS server components, you must restore access to the vRealize Orchestrator.
When you upgrade to vRealize Automation 7.3, you need to perform this procedure to accommodate thenew Role-Based Access Control feature. This procedure is written for a high-availability environment.
Prerequisites
Make a snapshot of your vRealize Automation environment.
Procedure
1 Log in to the vRealize Automation appliance management console as root by using the appliancehost fully qualified domain name, https://va-hostname.domain.name:5480.
2 Select vRA Settings > Database.
3 Identify the master and replica nodes.
4 On each replica node, open an SSH session, log in as administrator, and run this command:
service vco-server stop && service vco-configurator stop
5 On the master node, open an SSH session, log in as administrator, and run this command:
rm /etc/vco/app-server/vco-registration-id
6 On the master node, change directories to /etc/vco/app-server/.
7 Open the sso.properties file.
8 If the property name com.vmware.o11n.sso.admin.group.name contains spaces or any otherBash-related characters that can be accepted as a special character in a Bash command such as ahyphen (') or a dollar sign ($), complete these steps.
a Copy the line with the com.vmware.o11n.sso.admin.group.name property and enterAdminGroup for the value.
b Add # to the beginning of the original line with the com.vmware.o11n.sso.admin.group.nameproperty to comment the line.
c Save and close the sso.properties file.
9 Run this command:
vcac-vami vco-service-reconfigure
Installing and Upgrading vRealize Automation
VMware, Inc. 287
10 Open the sso.properties file. If the file has changed, complete these steps.
a Remove the # from the beginning of the original line with thecom.vmware.o11n.sso.admin.group.name property to uncomment the line.
b Remove the copy of the line with the com.vmware.o11n.sso.admin.group.name property.
c Save and close the sso.properties file.
11 Run this command to restart the vco-server service:
service vco-server restart
12 Run this command to restart the vco-configurator service:
service vco-configurator restart
13 In the vRealize Automation appliance management console, click Services and wait until all theservices in the master node are REGISTERED.
14 When all the services are registered, join the vRealize Automation replica nodes to thevRealize Automation cluster to synchronize the vRealize Orchestrator configuration. For information,see Reconfigure the Built-In vRealize Orchestrator to Support High Availability.
What to do next
Upgrading vRealize Orchestrator After Upgrading vRealize Automation.
Upgrading vRealize Orchestrator After Upgrading vRealize AutomationYou must upgrade your vRealize Orchestrator instance when you upgrade from vRealize Automation 7.1,7.2 to 7.3 or 7.1, 7.2, 7.3 to 7.3.1.
With the release of vRealize Orchestrator 7.3, you have two options for upgrading vRealize Orchestratorwhen you upgrade to vRealize Automation 7.3 or 7.3.1.
n You can migrate your existing external vRealize Orchestrator server to the embeddedvRealize Orchestrator included in vRealize Automation 7.3 or 7.3.1.
n You can upgrade your existing standalone or clustered vRealize Orchestrator server to work withvRealize Automation 7.3 or 7.3.1.
Migrating an External vRealize Orchestrator Server to vRealize Automation
You can migrate your existing external vRealize Orchestrator server to a vRealize Orchestrator instanceembedded in vRealize Automation 7.3 or 7.3.1.
You can deploy vRealize Orchestrator as an external server instance and configure vRealize Automationto work with that external instance, or you can configure and use the vRealize Orchestrator server that isincluded in the vRealize Automation appliance.
VMware recommends that you migrate your external vRealize Orchestrator to the Orchestrator server thatis built into vRealize Automation. The migration from an external to embedded Orchestrator provides thefollowing benefits:
n Reduces the total cost of ownership.
Installing and Upgrading vRealize Automation
VMware, Inc. 288

n Simplifies the deployment model.
n Improves the operational efficiency.
Note Consider using the external vRealize Orchestrator in the following cases:
n Multiple tenants in the vRealize Automation environment
n Geographically dispersed environment
n Workload handling
n Use of specific plug-ins, such as older versions of the Site Recovery Manager plug-in
Control Center Differences Between External and Embedded Orchestrator
Some of the menu items that are available in Control Center of an external vRealize Orchestrator are notincluded in the default Control Center view of an embedded Orchestrator instance.
In Control Center of the embedded Orchestrator server, a few options are hidden by default.
Menu Item Details
Licensing The embedded Orchestrator is preconfigured to use vRealize Automation as a license provider.
Export/Import Configuration The embedded Orchestrator configuration is included in the exported vRealize Automationcomponents.
Configure Database The embedded Orchestrator uses the database that is used by vRealize Automation.
Customer ExperienceImprovement Program
You can join the Customer Experience Improvement Program (CEIP) from thevRealize Automation appliance management interface.
See The Customer Experience Improvement Program in Managing vRealize Automation.
Another options that are hidden from the default Control Center view are the Host address text box andthe UNREGISTER button on the Configure Authentication Provider page.
Note To see the full set of Control Center options in vRealize Orchestrator that is built intovRealize Automation, you must access the advanced Orchestrator Management page at https://vra-va-hostname.domain.name_or_load_balancer_address:8283/vco-controlcenter/#/?advanced and click theF5 button on the keyboard to refresh the page.
Migrate an External vRealize Orchestrator to vRealize Automation
You can export the configuration from your existing external Orchestrator instance and import it to theOrchestrator server that is built into vRealize Automation.
Note If you have multiple vRealize Automation appliance nodes, perform the migration procedure onlyon the primary vRealize Automation node.
Prerequisites
n Successful migration to vRealize Automation 7.3 or 7.3.1.
n Stop the Orchestrator server service on the external Orchestrator.
Installing and Upgrading vRealize Automation
VMware, Inc. 289
n Back up the database, including the database schema, of the external Orchestrator server.
Procedure
1 Export the configuration from the external Orchestrator server.
a Log in to Control Center of the external Orchestrator server as root or as an administrator,depending on the source version.
b Stop the Orchestrator server service from the Startup Options page to prevent unwantedchanges to the database.
c Go to the Export/Import Configuration page.
d On the Export Configuration page, select Export server configuration, Bundle plug-ins andExport plug-in configurations.
2 Migrate the exported configuration into the embedded Orchestrator instance.
a Upload the exported Orchestrator configuration file tothe /usr/lib/vco/tools/configuration-cli/bin directory of the vRealize Automationappliance.
b Log in to the vRealize Automation appliance over SSH as root.
c Stop the Orchestrator server service and the Control Center service of the built-invRealize Orchestrator server.
service vco-server stop && service vco-configurator stop
d Navigate to the /usr/lib/vco/tools/configuration-cli/bin directory.
e Change the ownership of the exported Orchestrator configuration file.
chown vco:vco orchestrator-config-export-orchestrator_appliance_ip-date_hour.zip
f Import the Orchestrator configuration file to the built-in vRealize Orchestrator server, by runningthe vro-configure script with the import command.
./vro-configure.sh import --skipDatabaseSettings --skipLicense --skipSettings --
skipSslCertificate --notForceImportPlugins --notRemoveMissingPlugins --skipTrustStore --path
orchestrator-config-export-orchestrator_appliance_ip-date_hour.zip
3 If the external Orchestrator server from which you want to migrate uses the built-in PostgreSQLdatabase, edit its database configuration files.
a In the /var/vmware/vpostgres/current/pgdata/postgresql.conf file, uncomment thelisten_addresses line.
b Set the values of listen_addresses to a wildcard (*).
listen_addresses ='*'
Installing and Upgrading vRealize Automation
VMware, Inc. 290
c Append a line to the /var/vmware/vpostgres/current/pgdata/pg_hba.conf file.
host all all vra-va-ip-address/32 md5
Note The pg_hba.conf file requires using a CIDR prefix format instead on an IP address and asubnet mask.
d Restart the PostgreSQL server service.
service vpostgres restart
4 Migrate the database to the internal PostgreSQL database, by running the vro-configure script withthe db-migrate command.
./vro-configure.sh db-migrate --sourceJdbcUrl JDBC_connection_URL --sourceDbUsername database_user
--sourceDbPassword database_user_password
Note Enclose passwords that contain special characters in single quotation marks.
The JDBC_connection_URL depends on the type of database that you use.
PostgreSQL: jdbc:postgresql://host:port/database_name
MSSQL: jdbc:jtds:sqlserver://host:port/database_name\; if using SQL authentication and MSSQL:
jdbc:jtds:sqlserver://host:port/database_name\;domain=domain\;useNTLMv2=TRUE if using Windows
authentication.
Oracle: jdbc:oracle:thin:@host:port:database_name
The default database login information is:
database_name vmware
database_user vmware
database_user_password vmware
5 If you migrated vRealize Automation instead of upgrading it, delete the trusted Single Sign-Oncertificates from the database of the embedded Orchestrator instance.
sudo -u postgres -i -- /opt/vmware/vpostgres/current/bin/psql vcac -c "DELETE FROM vmo_keystore
WHERE id='cakeystore-id';"
6 Revert to the default configuration of the postgresql.conf and the pg_hba.conf file.
a Restart the PostgreSQL server service.
Installing and Upgrading vRealize Automation
VMware, Inc. 291

You successfully migrated an external Orchestrator server instance to a vRealize Orchestrator instanceembedded in vRealize Automation.
What to do next
Set up the built-in vRealize Orchestrator server. See Configure the Built-In vRealize Orchestrator Server.
Configure the Built-In vRealize Orchestrator Server
After you export the configuration of an external Orchestrator server and import it to vRealize Automation7.3, you must configure the Orchestrator server that is built into vRealize Automation.
Prerequisites
Migrate the configuration from the external to the internal vRealize Orchestrator.
Procedure
1 Log in to the vRealize Automation appliance over SSH as root.
2 Start the Control Center service and the Orchestrator server service of the built-invRealize Orchestrator server.
service vco-configurator start && service vco-server start
3 Log in to Control Center of the built-in Orchestrator server as an administrator.
Note If you migrate from an external vRealize Orchestrator 7.3 instance, skip to step 5.
4 Verify that Orchestrator is configured properly at the Validate Configuration page in Control Center.
5 If the external Orchestrator was configured to work in cluster mode, reconfigure the Orchestratorcluster in vRealize Automation.
a Go to the advanced Orchestrator Cluster Management page, at https://vra-va-hostname.domain.name_or_load_balancer_address:8283/vco-controlcenter/#/control-app/ha?remove-nodes.
Note If the Remove check boxes next the existing nodes in the cluster do not appear, you mustrefresh the browser page by clicking the F5 button on the keyboard.
b Select the check boxes next to the external Orchestrator nodes and click Remove to removethem from the cluster.
c To exit the advanced cluster management page, delete the &remove-nodes string from the URLand refresh the browser page by clicking the F5 button on the keyboard.
d At the Validate Configuration page in Control Center, verify that Orchestrator is configuredproperly.
6 (Optional) Under the Package Signing Certificate tab on the Certificates page, generate a newpackage signing certificate.
Installing and Upgrading vRealize Automation
VMware, Inc. 292
7 (Optional) Change the values for Default tenant and Admin group on the ConfigureAuthentication Provider page.
8 Verify that the vco-server service appears as REGISTERED under the Services tab in the vRealizeAutomation appliance management console.
9 Select the vco services of the external Orchestrator server and click Unregister.
What to do next
n Import any certificates that were trusted in the external Orchestrator server to the trust store of thebuilt-in Orchestrator.
n Join the vRealize Automation replica nodes to the vRealize Automation cluster to synchronize theOrchestrator configuration.
For more information, see Reconfigure the Target Embedded vRealize Orchestrator to Support HighAvailability in Installing or Upgrading vRealize Automation.
Note The vRealize Orchestrator instances are automatically clustered and available for use.
n Restart the vco-configurator service on all nodes in the cluster.
n Update the vRealize Orchestrator endpoint to point to the migrated built-in Orchestrator server.
n Add the vRealize Automation host and the IaaS host to the inventory of the vRealize Automationplug-in, by running the Add a vRA host and Add the IaaS host of a vRA host workflows.
Upgrading a Stand-Alone vRealize Orchestrator Appliance for vRealize Automation
If you maintain a stand-alone, external instance of vRealize Orchestrator for vRealize Automation, youmust upgrade vRealize Orchestrator when you upgrade vRealize Automation from 7.1, 7.2 to 7.3 or 7.1,7.2, 7.3 to 7.3.1.
Embedded instances of vRealize Orchestrator are upgraded as part of the vRealize Automation applianceupgrade. No additional action is required for an embedded instance.
If you are upgrading a vRealize Orchestrator appliance cluster, see Upgrade a vRealize OrchestratorAppliance Cluster for Use with vRealize Automation 7.3.
Prerequisites
n Install the Update on the vRealize Automation Appliance and IaaS Components.
n Unmount all network file systems. See vSphere Virtual Machine Administration in the vSpheredocumentation.
n Increase the memory of the vSphere Orchestrator appliance to at least 6 GB. See vSphere VirtualMachine Administration in the vSphere documentation.
n Take a snapshot of the vSphere Orchestrator virtual machine. See vSphere Virtual MachineAdministration in the vSphere documentation.
n If you use an external database, back up the database.
Installing and Upgrading vRealize Automation
VMware, Inc. 293

n If you use the preconfigured PostgreSQL database in vSphere Orchestrator, back up the database byusing the Export Database menu in the vSphere Control Center.
Procedure
u Use one of the documented methods to upgrade your stand-alone vRealize Orchestrator.
Upgrade Orchestrator Appliance by Using the Default VMware Repository
You can configure Orchestrator to download the upgrade package from the default VMware repository.
Prerequisites
n Unmount all network file systems. For more information, see the vSphere Virtual MachineAdministration documentation.
n Increase the memory of the Orchestrator Appliance to at least 6 GB. For more information, see thevSphere Virtual Machine Administration documentation.
n Make sure that the root partition of the Orchestrator Appliance has at least 3 GB of available freespace. For more information on increasing the size of a disk partition, see KB 1004071: http://kb.vmware.com/kb/1004071.
n Take a snapshot of the Orchestrator virtual machine. For more information, see the vSphere VirtualMachine Administration documentation.
n If you use an external database, back up the database.
n If you use the preconfigured in Orchestrator PostgreSQL database, back up the database by usingthe Export Database menu in Control Center.
n If you use vSphere as an authentication provider an the Platform Services Controller is external to thevCenter Server, you must configure Orchestrator to connect to the fully qualified domain name or IPaddress of the Platform Services Controller instance that contains the vCenter Single Sign-On.
n Import to Orchestrator manually the certificates of all Platform Services Controllers that share thesame vCenter Single Sign-On domain. For more information, see Import a Trusted CertificateThrough Control Center.
Procedure
1 Go to the Virtual Appliance Management Interface (VAMI) at https://orchestrator_server:5480 and login as root.
2 On the Update tab, click Settings.
The radio button next to the Use Default Repository option is selected.
3 On the Status page, click Check Updates.
4 If any updates are available, click Install Updates.
5 Accept the VMware End-User License Agreement and confirm that you want to install the update.
Installing and Upgrading vRealize Automation
VMware, Inc. 294

6 To complete the update, restart the Orchestrator Appliance.
a Log in again to the to the Virtual Appliance Management Interface (VAMI) as root.
7 (Optional) On the Update tab, verify that the latest version of the Orchestrator Appliance issuccessfully installed.
8 Log in to Control Center as root.
9 If you plan to create a cluster of Orchestrator instances, reconfigure the hosts settings.
a On the Host Settings page in Control Center, click CHANGE.
b Enter the host name of the load balancer server instead of the vRealize Orchestrator appliancename.
10 Reconfigure the authentication.
a If before the upgrade, the Orchestrator server was configured to use LDAP or SSO (legacy) asan authentication method, configure vSphere or vRealize Automation as an authenticationprovider.
b If the authentication is already set to vSphere or vRealize Automation, unregister the settingsand register them again.
You successfully upgraded the Orchestrator Appliance.
What to do next
Verify that Orchestrator is configured properly at the Validate Configuration page in Control Center.
Upgrade Orchestrator Appliance by Using an ISO Image
You can configure Orchestrator to download the upgrade package from an ISO image file mounted to theCD-ROM drive of the appliance.
Prerequisites
n Unmount all network file systems. For more information, see the vSphere Virtual MachineAdministration documentation.
n Increase the memory of the Orchestrator Appliance to at least 6 GB. For more information, see thevSphere Virtual Machine Administration documentation.
n Make sure that the root partition of the Orchestrator Appliance has at least 3 GB of available freespace. For more information on increasing the size of a disk partition, see KB 1004071: http://kb.vmware.com/kb/1004071.
n Take a snapshot of the Orchestrator virtual machine. For more information, see the vSphere VirtualMachine Administration documentation.
n If you use an external database, back up the database.
n If you use the preconfigured in Orchestrator PostgreSQL database, back up the database by usingthe Export Database menu in Control Center.
Installing and Upgrading vRealize Automation
VMware, Inc. 295
n If you use vSphere as an authentication provider an the Platform Services Controller is external to thevCenter Server, you must configure Orchestrator to connect to the fully qualified domain name or IPaddress of the Platform Services Controller instance that contains the vCenter Single Sign-On.
n Import to Orchestrator manually the certificates of all Platform Services Controllers that share thesame vCenter Single Sign-On domain. For more information, see Import a Trusted CertificateThrough Control Center.
Procedure
1 Download the VMware-vRO-Appliance-version-build_number-updaterepo.iso archive from theofficial VMware download site.
2 Connect the CD-ROM drive of the Orchestrator Appliance virtual machine. For more information, seethe vSphere Virtual Machine Administration documentation.
3 Mount the ISO image file to the CD-ROM drive of the appliance. For more information, see thevSphere Virtual Machine Administration documentation.
4 Go to the Virtual Appliance Management Interface (VAMI) at https://orchestrator_server:5480 and login as root.
5 On the Update tab, click Settings.
6 Select the radio button next to the Use CD-ROM updates option.
7 Return to the Status page.
The version of the available upgrade is displayed.
8 Click Install Updates.
9 Accept the VMware End-User License Agreement and confirm that you want to install the update.
10 To complete the update, restart the Orchestrator Appliance.
a Log in again to the to the Virtual Appliance Management Interface (VAMI) as root.
11 (Optional) On the Update tab, verify that the latest version of the Orchestrator Appliance issuccessfully installed.
12 Log in to Control Center as root.
13 If you plan to create a cluster of Orchestrator instances, reconfigure the hosts settings.
a On the Host Settings page in Control Center, click CHANGE.
b Enter the host name of the load balancer server instead of the vRealize Orchestrator appliancename.
Installing and Upgrading vRealize Automation
VMware, Inc. 296
14 Reconfigure the authentication.
a If before the upgrade, the Orchestrator server was configured to use LDAP or SSO (legacy) asan authentication method, configure vSphere or vRealize Automation as an authenticationprovider.
b If the authentication is already set to vSphere or vRealize Automation, unregister the settingsand register them again.
You successfully upgraded the Orchestrator Appliance.
What to do next
Verify that Orchestrator is configured properly at the Validate Configuration page in Control Center.
Upgrade Orchestrator Appliance by Using a Specified Repository
You can configure Orchestrator to use a local repository, on which you uploaded the upgrade archive.
Prerequisites
n Unmount all network file systems. For more information, see the vSphere Virtual MachineAdministration documentation.
n Increase the memory of the Orchestrator Appliance to at least 6 GB. For more information, see thevSphere Virtual Machine Administration documentation.
n Make sure that the root partition of the Orchestrator Appliance has at least 3 GB of available freespace. For more information on increasing the size of a disk partition, see KB 1004071: http://kb.vmware.com/kb/1004071.
n Take a snapshot of the Orchestrator virtual machine. For more information, see the vSphere VirtualMachine Administration documentation.
n If you use an external database, back up the database.
n If you use the preconfigured in Orchestrator PostgreSQL database, back up the database by usingthe Export Database menu in Control Center.
n If you use vSphere as an authentication provider an the Platform Services Controller is external to thevCenter Server, you must configure Orchestrator to connect to the fully qualified domain name or IPaddress of the Platform Services Controller instance that contains the vCenter Single Sign-On.
n Import to Orchestrator manually the certificates of all Platform Services Controllers that share thesame vCenter Single Sign-On domain. For more information, see Import a Trusted CertificateThrough Control Center.
Installing and Upgrading vRealize Automation
VMware, Inc. 297

Procedure
1 Prepare the local repository for upgrades.
a Install and configure a local Web server.
b Download the VMware-vRO-Appliance-version-build_number-updaterepo.zip archivefrom the official VMware download site.
c Extract the .ZIP archive to the local repository.
2 Go to the Virtual Appliance Management Interface (VAMI) at https://orchestrator_server:5480 and login as root.
3 On the Update tab, click Settings.
4 Select the radio button next to the Use Specified Repository option.
5 Enter the URL address of the local repository by pointing to the Update_Repo directory.
http://local_web_server:port/build/mts/release/bora-
build_number/publish/exports/Update_Repo
6 If the local repository requires authentication, enter user name and password.
7 Click Save Settings.
8 On the Status page, click Check Updates.
9 If any updates are available, click Install Updates.
10 Accept the VMware End-User License Agreement and confirm that you want to install the update.
11 To complete the update, restart the Orchestrator Appliance.
a Log in again to the to the Virtual Appliance Management Interface (VAMI) as root.
12 (Optional) On the Update tab, verify that the latest version of the Orchestrator Appliance issuccessfully installed.
13 Log in to Control Center as root.
14 If you plan to create a cluster of Orchestrator instances, reconfigure the hosts settings.
a On the Host Settings page in Control Center, click CHANGE.
b Enter the host name of the load balancer server instead of the vRealize Orchestrator appliancename.
15 Reconfigure the authentication.
a If before the upgrade, the Orchestrator server was configured to use LDAP or SSO (legacy) asan authentication method, configure vSphere or vRealize Automation as an authenticationprovider.
b If the authentication is already set to vSphere or vRealize Automation, unregister the settingsand register them again.
Installing and Upgrading vRealize Automation
VMware, Inc. 298
You successfully upgraded the Orchestrator Appliance.
What to do next
Verify that Orchestrator is configured properly at the Validate Configuration page in Control Center.
Upgrade a vRealize Orchestrator Appliance Cluster for Use with vRealize Automation 7.3
If you use a vRealize Orchestrator appliance cluster with vRealize Automation, you must upgrade theOrchestrator appliance cluster to version 7.3 by upgrading a single instance and joining newly installed7.3 nodes to the upgraded instance.
To upgrade a single instance of vRealize Orchestrator, see Upgrading a Stand-Alone vRealizeOrchestrator Appliance for vRealize Automation.
Prerequisites
n Install the Update on the vRealize Automation Appliance and IaaS Components.
n Set up a load balancer to distribute traffic among multiple instances of vRealize Orchestrator. See the vRealize Orchestrator Load Balancing Configuration Guide.
n Take a snapshot of all vRealize Orchestrator server nodes.
n Back up the vRealize Orchestrator shared database.
Procedure
1 Stop the vco-server and vco-configurator Orchestrator services on all cluster nodes.
2 Upgrade only one of the Orchestrator server instances in your cluster using one of the documentedprocedures.
3 Deploy a new Orchestrator appliance on version 7.3.
a Configure the new node with the network settings of an existing not upgraded instance that is partof the cluster.
4 Access Control Center of the second node to start the configuration wizard.
a Navigate to https://your_orchestrator_server_IP_or_DNS_name:8283/vco-controlcenter.
b Log in as root with the password you entered during OVA deployment.
5 Select the Clustered Orchestrator deployment type.
By choosing this type, you select to join the node to an existing Orchestrator cluster.
6 In the Hostname text box, enter the host name or IP address of the first Orchestrator server instance.
Note This must be the local IP or host name of the Orchestrator instance, to which you are joiningthe second node. You must not use the load balancer address.
7 In the User name and Password text boxes, enter the root credentials of the first Orchestrator serverinstance.
Installing and Upgrading vRealize Automation
VMware, Inc. 299
8 Click Join. The Orchestrator instance clones the configuration of the node, to which it joins.
The Orchestrator server service of both nodes restart automatically.
9 Access Control Center of the upgraded Orchestrator cluster through the load balancer address andlog in as an administrator.
10 On the Orchestrator Cluster Management page, make sure that the Active ConfigurationFingerprint and the Pending Configuration Fingerprint strings on all nodes in the cluster match.
Note You might need to refresh the page several times until the two strings match.
11 Verify that the vRealize Orchestrator cluster is configured properly by opening the ValidateConfiguration page in Control Center.
12 (Optional) Repeat steps 3 through 8 for each additional node in the cluster.
You have successfully upgraded the Orchestrator cluster.
What to do next
Enable Your Load Balancers.
Enable Your Load BalancersIf your deployment uses load balancers, re-enable secondary nodes and health checks.
The health checks for vRealize Automation vary according to version. For information, see thevRealize Automation Load Balancing Configuration Guide in the VMware vRealize AutomationDocumentation.
Post-Upgrade TasksAfter you upgrade vRealize Automation 7.1, 7.2 to 7.3 or 7.1, 7.2. 7.3 to 7.3.1, perform any required post-upgrade tasks.
Set the vRealize Automation PostgreSQL Replication Mode to Synchronous
If you set the PostgreSQL replication mode to asynchronous before upgrade, you can set thePostgreSQL replication mode to synchronous after you upgrade a distributed vRealize Automationenvironment.
Prerequisites
n You have upgraded a distributed vRealize Automation environment.
n You are logged in as root to the appropriate vRealize Automation Appliance Management athttps://vra-va-hostname.domain.name:5480.
Procedure
1 Click vRA Settings > Database.
2 Click Sync Mode and wait until the action completes.
Installing and Upgrading vRealize Automation
VMware, Inc. 300
3 Verify that all nodes in the Sync State column display Sync status.
What to do next
Run Test Connection and Verify Upgraded Endpoints.
Run Test Connection and Verify Upgraded Endpoints
Upgrading to vRealize Automation 7.3 makes changes to endpoints in the target environment.
After you upgrade to vRealize Automation 7.3, you must use the Test Connection action for allapplicable endpoints. You might also need to make adjustments to some upgraded endpoints. For moreinformation, see Considerations When Working With Upgraded or Migrated Endpoints.
The default security setting for upgraded or migrated endpoints is to not accept untrusted certificates.
After upgrading or migrating from pre-vRealize Automation 7.3, if you were using untrusted certificatesyou must perform the following steps for all vSphere and NSX endpoints to enable certificate validation.Otherwise, the endpoint operations fail with certificate errors. For more information see VMwareKnowledge Base articles Endpoint communication is broken after upgrade to vRA 7.3 (2150230) at http://kb.vmware.com/kb/2150230 and How to download and install vCenter Server root certificates toavoid Web Browser certificate warnings (2108294) at http://kb.vmware.com/kb/2108294.
1 After upgrade or migration, log in to the vRealize Automation vSphere agent machine and restart yourvSphere agents by using the Services tab.
Migration might not restart all agents, so manually restart them if needed.
2 Wait for at least one ping report to finish. It takes a minute or two for a ping report to finish.
3 When the vSphere agents have started data collection, log in to vRealize Automation as an IaaSadministrator.
4 Click Infrastructure > Endpoints > Endpoints.
5 Edit a vSphere endpoint and click Test Connection.
6 If a certificate prompt appears, click OK to accept the certificate.
If a certificate prompt does not appear, the certificate might currently be correctly stored in a trustedroot authority of the Windows machine hosting service for the endpoint, for example as a proxy agentmachine or DEM machine.
7 Click OK to apply the certificate acceptance and save the endpoint.
8 Repeat this procedure for each vSphere endpoint.
9 Repeat this procedure for each NSX endpoint.
If the Test Connection action is successful but some data collection or provisioning operations fail, youcan install the same certificate on all the agent machines that serve the endpoint and on all DEMmachines. Alternatively, you can uninstall the certificate from existing machines and repeat the aboveprocedure for the failing endpoint.
Installing and Upgrading vRealize Automation
VMware, Inc. 301
Run NSX Network and Security Inventory Data Collection After You Upgrade fromvRealize Automation 7.1 or 7.2 to 7.3
After you upgrade from vRealize Automation 7.1 or 7.2 to 7.3, you must run NSX Network and SecurityInventory data collection in the vRealize Automation 7.3 environment.
This data collection is necessary for the load balancer reconfigure action to work in vRealize Automation7.3 for 7.1 and 7.2 deployments.
Prerequisites
n Run NSX Network and Security Inventory Data Collection Before You Upgrade vRealize Automation.
n Successful upgrade to vRealize Automation 7.3.
Procedure
u Run NSX Network and Security Inventory data collection in vRealize Automation 7.3 after youupgrade. See Start Endpoint Data Collection Manually .
Join Replica Appliance to Cluster
After you complete the master vRealize Automation appliance update, each updated replica node isautomatically joined to the master node. In case a replica node has to be separately updated, use thesesteps to manually join the replica node to the cluster.
Access the appliance management console of the replica node that is not joined to the cluster andperform the following steps.
Procedure
1 Select vRA Settings > Cluster.
2 Click Join Cluster.
Port Configuration for High-Availability Deployments
After finishing an upgrade in a high-availability deployment, you must configure the load balancer to passtraffic on port 8444 to the vRealize Automation appliance to support remote console features.
For more information, see the vRealize Automation Load Balancing Configuration Guide in the vRealizeAutomation Documentation.
Reconfigure the Built-In vRealize Orchestrator to Support High Availability
For a high-availability deployment, you must manually rejoin each target replica vRealize Automationappliance to the cluster to enable high-availability support for the embedded vRealize Orchestrator.
Prerequisites
Log in to the target replica vRealize Automation appliance management console.
1 Start a browser and open the target replica vRealize Automation management console using the fullyqualified domain name (FQDN) of the target replica virtual appliance: https://vra-va-hostname.domain.name:5480.
Installing and Upgrading vRealize Automation
VMware, Inc. 302
2 Log in with the user name root and the password that you entered when you deployed the targetreplica vRealize Automation appliance.
Procedure
1 Select vRA Settings > Cluster.
2 In the Leading Cluster Node text box, enter the FQDN of the target master vRealize Automationappliance.
3 Enter the root password in the Password text box.
4 Click Join Cluster.
Continue past any certificate warnings. The system restarts services for the cluster.
5 Verify that the services are running.
a On the top tab bar, click Services.
b Click Refresh to monitor the progress of services startup.
Restore External Workflow Timeout Files
You must reconfigure the vRealize Automation external workflow timeout files because the upgradeprocess overwrites xmldb files.
Procedure
1 Open the external workflow configuration (xmldb) files on your system from the following directory.
\VMware\vCAC\Server\ExternalWorkflows\xmldb\.
2 Replace the xmldb files with the files that you backed up before migration. If you do not have backupfiles, reconfigure the external workflow timeout settings.
3 Save your settings.
Enabling the Connect to Remote Console Action for Consumers
The remote console action for consumers is supported for appliances provisioned by vSphere invRealize Automation.
Edit the blueprint after you have upgraded the release and select the Connect to Remote Consoleaction on the Action tab.
For more information, see Knowledge Base article 2109706.
Restore Changes to Logging in the app.config File
The upgrade process overwrites changes you make to logging in the configuration files. After you finishan upgrade, you must restore any changes you made before the upgrade to the app.config file .
Enable Automatic Manager Service Failover After Upgrade
Automatic Manager Service failover is disabled by default when you upgrade vRealize Automation.
Complete these steps to enable automatic Manager Service after upgrade.
Installing and Upgrading vRealize Automation
VMware, Inc. 303
Procedure
1 Open a command prompt as root on the vRealize Automation appliance.
2 Change directories to /usr/lib/vcac/tools/vami/commands.
3 To enable automatic Manager Service failover, run the following command.
python ./manager-service-automatic-failover ENABLE
To disable automatic failover throughout an IaaS deployment, run the following command.
python ./manager-service-automatic-failover DISABLE
About Automatic Manager Service Failover
You can configure the vRealize Automation IaaS Manager Service to automatically fail over to a backup ifthe primary Manager Service stops.
Starting in vRealize Automation 7.3, you no longer need to manually start or stop the Manager Service oneach Windows server, to control which serves as primary or backup. Automatic Manager Service failoveris disabled by default when you upgrade IaaS with the Upgrade Shell Script or using the IaaS Installerexecutable file.
When automatic failover is enabled, the Manager Service automatically starts on all Manager Servicehosts, including backups. The automatic failover feature allows the hosts to transparently monitor eachother and fail over when necessary, but the Windows service must be running on all hosts.
Note You are not required to use automatic failover. You may disable it and continue to manually startand stop the Windows service to control which host serves as primary or backup. If you take the manualfailover approach, you must only start the service on one host at a time. With automatic failover disabled,simultaneously running the service on multiple IaaS servers makes vRealize Automation unusable.
Do not attempt to selectively enable or disable automatic failover. Automatic failover must always besynchronized as on or off, across every Manager Service host in an IaaS deployment.
Troubleshooting the vRealize Automation UpgradeThe upgrade troubleshooting topics provide solutions to problems that you might encounter upgradingvRealize Automation 7.1, 7.2 to 7.3 or 7.1, 7.2, 7.3 to 7.3.1.
Automatic Manager Service Failover Does Not Activate
Suggestions for troubleshooting manager-service-automatic-failover command.
Solution
n The manager-service-automatic-failover command fails or displays this message for more than twominutes: Enabling Manager Service automatic failover mode on node:IAAS_MANAGER_SERVICE_NODEID.
a Log in to vRealize Automation appliance management at https://va-hostname.domain.name:5480with the user name host and the password you entered when you deployed the appliance.
Installing and Upgrading vRealize Automation
VMware, Inc. 304
b Select vRA Settings > Cluster.
c Verify that the Management Agent service is running on all Manager Service hosts.
d Verify that the last connected time for all IaaS Manager Service nodes is less than 30 seconds.
If you find any Management Agent connectivity issues, resolve them manually and retry the commandto enable the Manager Service automatic failover.
n The manager-service-automatic-failover command fails to enable failover on a Manager Servicenode. It is safe to rerun the command to fix this.
n Some Manager Service hosts in the IaaS deployment have failover enabled while other hosts do not.All Manager Service hosts in the IaaS deployment must have the feature enabled or it does not work.To correct this issue, do one of the following:
n Disable failover on all Manager Service nodes and use the manual failover approach instead.Only run failover on one host at a time.
n If multiple attempts fail to enable the feature on a Manager Service node, stop the WindowsVMware vCloud Automation Center Service on this node and set the node startup type to Manualuntil you resolve the issue.
n Use Python to validate that failover is enabled on each Manager Service node.
a Log in to the master vRealize Automation appliance node as root using SSH.
b Run python /usr/lib/vcac/tools/vami/commands/manager-service-automatic-failover ENABLE.
c Verify that the system returns this message: Enabling Manager Service automaticfailover mode on node: IAAS_MANAGER_SERVICE_NODEID done.
n Validate that failover is enabled on each Manager Service node by inspecting the Manager Serviceconfiguration file.
a Open a command prompt on a Manager Service node.
b Navigate to the vRealize Automation installation folder and open the Manager Serviceconfiguration file at VMware\vCAC\Server\ManagerService.exe.config.
c Verify that the following elements are present in the <appSettings> section.
n <add key="FailoverModeEnabled" value="True" />
n <add key="FailoverPingIntervalMilliseconds" value="30000" />
n <add key="FailoverNodeState" value="active" />
n <add key="FailoverMaxFailedDatabasePingAttepts" value="5" />
n <add key="FailoverMaxFailedRepositoryPingAttepts" value="5" />
n Verify that Windows VMware vCloud Automation Center Service status is started and startup type isautomatic.
Installing and Upgrading vRealize Automation
VMware, Inc. 305
n Use Python to validate that failover is disabled on each Manager Service node.
a Log in to the master vRealize Automation appliance node as root using SSH.
b Run python /usr/lib/vcac/tools/vami/commands/manager-service-automatic-failover DISABLE.
c Verify that the system returns this message: Disabling Manager Service automaticfailover mode on node: IAAS_MANAGER_SERVICE_NODEID done.
n Validate that failover is disabled on each Manager Service node by inspecting the Manager Serviceconfiguration file.
a Open a command prompt on a Manager Service node.
b Navigate to the vRealize Automation installation folder and open the Manager Serviceconfiguration file at VMware\vCAC\Server\ManagerService.exe.config.
c Verify that the following element is present in the <appSettings> section.
n <add key="FailoverModeEnabled" value="False" />
n To create a cold standby Manager Service node, set the node Windows VMware vCloud AutomationCenter Service status to stopped and startup type to manual.
n For an active Manager Service node, the node Windows VMware vCloud Automation Center Servicestatus must be started and startup type must be automatic.
n The manager-service-automatic-failover command uses the Manager Service node internal id -IAAS_MANAGER_SERVICE_NODEID. To find the hostname corresponding to this internal id, run thecommand vra-command list-nodes and look for the Manager Service host with NodeId:IAAS_MANAGER_SERVICE_NODEID.
n To locate the Manager Service that the system has automatically elected to be currently active,perform these steps.
a Log in to the master vRealize Automation appliance node as root using SSH.
b Run vra-command list-nodes --components.
n If failover is enabled, find the Manager Service node with State: Active.
n If failover is disabled, find the Manager Service node with State: Started.
Installation or Upgrade Fails with a Load Balancer Timeout Error
A vRealize Automation installation or upgrade for a distributed deployment with a load balancer fails witha 503 service unavailable error.
Problem
The installation or upgrade fails because the load balancer timeout setting does not allow enough time forthe task to complete.
Installing and Upgrading vRealize Automation
VMware, Inc. 306
Cause
An insufficient load balancer timeout setting might cause failure. You can correct the problem byincreasing the load balancer timeout setting to 100 seconds or greater and rerunning the task.
Solution
1 Increase your load balancer timeout value to at least 100 seconds.
2 Rerun the installation or upgrade.
Upgrade Fails for IaaS Website Component
The IaaS upgrade fails and you cannot continue the upgrade.
Problem
The Iaas upgrade fails for the website component. The following error messages appear in the installerlog file.
n System.Data.Services.Client.DataServiceQueryException:
An error occurred while processing this request. --->
System.Data.Services.Client.DataServiceClientException: <!DOCTYPE html>
n <b> Description: </b>An application error
occurred on the server. The current custom error settings for this application
prevent the details of the application error from being viewed remotely (for
security reasons). It could, however, be viewed by browsers running on the
local server machine.
n Warning: Non-zero return code. Command failed.
n Done Building Project "C:\Program Files
(x86)\VMware\vCAC\Server\Model Manager Data\DeployRepository.xml"
(InstallRepoModel target(s)) -- FAILED.
The following error messages appear in the repository log file.
n [Error]: [sub-thread-Id="20"
context="" token=""] Failed to start repository service. Reason:
System.InvalidOperationException: Configuration section encryptionKey is not
protected
at
DynamicOps.Common.Utils.EncryptionHelpers.ReadKeyFromConfiguration(Configuration
config)
at DynamicOps.Common.Utils.EncryptionHelpers.Decrypt(String value)
Installing and Upgrading vRealize Automation
VMware, Inc. 307
at DynamicOps.Repository.Runtime.CoreModel.GlobalPropertyItem.Decrypt(Func`2
decryptFunc)
at
DynamicOps.Common.Entity.ContextHelpers.OnObjectMaterializedCallbackEncryptable(Object
sender, ObjectMaterializedEventArgs e)
at
System.Data.Common.Internal.Materialization.Shaper.RaiseMaterializedEvents()
at
System.Data.Common.Internal.Materialization.Shaper`1.SimpleEnumerator.MoveNext()
at System.Linq.Enumerable.FirstOrDefault[TSource](IEnumerable`1 source)
at System.Linq.Queryable.FirstOrDefault[TSource](IQueryable`1 source)
at
DynamicOps.Repository.Runtime.Common.GlobalPropertyHelper.GetGlobalPropertyItemValue(CoreModelEntities
coreModelContext, String propertyName, Boolean throwIfPropertyNotFound)
at
DynamicOps.Repository.Runtime.CafeClientAbstractFactory.LoadSolutionUserCertificate()
at
DynamicOps.Repository.Runtime.CafeClientAbstractFactory.InitializeFromDb(String
coreModelConnectionString)
at DynamicOps.Repository.Runtime.Common.RepositoryRuntime.Initialize().
Cause
Iaas upgrade fails when the creation date for the web.config file is the same as or later than themodified date.
Solution
1 Log in to the IaaS website component server as administrator.
2 Change directories to the vRealize Automation installation folder.
3 Start your preferred text editor with the Run as Administrator option.
4 Locate and select the web.config file and save the file to change its file modification date.
5 Examine the web.config file properties to confirm that the file modification date is later than thecreation date.
6 Upgrade IaaS.
Installing and Upgrading vRealize Automation
VMware, Inc. 308
Manager Service Fails to Run Due to SSL Validation Errors During Runtime
The manager service fails to run due to SSL validation errors.
Problem
The manager service fails with the following error message in the log:
[Info]: Thread-Id="6" - context="" token="" Failed to connect to the core database,
will retry in 00:00:05, error details: A connection was successfully established
with the server, but then an error occurred during the login process. (provider: SSL
Provider, error: 0 - The certificate chain was issued by an authority that is not
trusted.)
Cause
During runtime, the manager service fails to run due to SSL validation errors.
Solution
1 Open the ManagerService.config configuration file.
2 Update Encrypt=False on the following line:
<add name="vcac-repository" providerName="System.Data.SqlClient"
connectionString="Data Source=iaas-db.sqa.local;Initial Catalog=vcac;Integrated
Security=True;Pooling=True;Max Pool
Size=200;MultipleActiveResultSets=True;Connect Timeout=200, Encrypt=True" />
Log In Fails After Upgrade
You must exit the browser and log in again after an upgrade for sessions that use unsynchronized useraccounts.
Problem
After you upgrade vRealize Automation, the system denies access to unsynchronized user accounts atlogin.
Solution
Exit the browser and relaunch vRealize Automation.
Delete Orphaned Nodes on vRealize Automation
An orphaned node is a duplicate node that is reported on the host but does not exist on the host.
Problem
When you verify that each IaaS and virtual appliance node is in a healthy state, you might discover that ahost has one or more orphaned nodes. You must delete all orphaned nodes.
Solution
1 Go to the management console for your virtual appliance by using its fully qualified domain name,https://va-hostname.domain.name:5480.
Installing and Upgrading vRealize Automation
VMware, Inc. 309
2 Log in with the user name root and the password you entered when the appliance was deployed.
3 Select vRA settings > Cluster.
4 For each orphaned node in the table, click Delete.
Join Cluster Command Appears to Fail After Upgrading a High-Availability Environment
After you click Join Cluster in the management console on a secondary cluster node, the progressindicator disappears.
Problem
When you use the vRealize Automation appliance management console after upgrade to join asecondary cluster node to the primary node, the progress indicator disappears and no error or successmessage appears. This behavior is an intermittent problem.
Cause
The progress indicator disappears because some browsers stop waiting for a response from the server.This behavior does not stop the join cluster process. You can confirm that the join cluster process issuccessful by viewing the log file at /var/log/vmware/vcac/vcac-config.log.
PostgreSQL Database Upgrade Merge Does Not Succeed
The external PostgreSQL database merge with the embedded PostgreSQL database does not succeed.
Problem
If the PostgreSQL database upgrade merge does not succeed, you can perform a manual merge.
Solution
1 Revert the vRealize Automation virtual appliance to the snapshot you made before upgrade.
2 Log in to the vRealize Automation virtual appliance and run this command to allow upgrade tocomplete if the database merge does not succeed.
touch /tmp/allow-external-db
The command does not disable auto merge.
3 On the remote PostgreSQL database host, connect to the PostgreSQL database using the psql tooland run these commands.
CREATE EXTENSION IF NOT EXISTS "hstore";
CREATE EXTENSION IF NOT EXISTS "uuid-ossp";
CREATE SCHEMA saas AUTHORIZATION vcac;
Installing and Upgrading vRealize Automation
VMware, Inc. 310
The user in this command is vcac. If vRealize Automation connects to the external database with adifferent user, replace vcac in this command with the name of that user.
CREATE EXTENSION IF NOT EXISTS "citext" SCHEMA saas;
4 Run upgrade.
If upgrade is successful, the system works as expected with the external PostgreSQL database.Ensure that the external PostgreSQL database is running properly.
5 Log in to the vRealize Automation virtual appliance and run these commands
/etc/bootstrap/postupdate.d/00-20-db-merge-external
/etc/bootstrap/postupdate.d/11-db-merge-external
Replica vRealize Automation Appliance Fails to Update
Replica vRealize Automation appliance fails to update during master appliance update.
Cause
A replica appliance can fail to update due to connectivity issues or other failures. When this happens, yousee a warning message on the master vRealize Automation appliance Update tab, highlighting thereplica that failed to update.
Solution
1 Revert the replica virtual appliance snapshot or backup to the pre-update state and power it on.
2 Open the vRealize Automation appliance management console on the replica appliance.
a Go to the management console for your virtual appliance by using its fully qualified domain name,https://va-hostname.domain.name:5480.
b Log in with the user name root and the password you entered when you deployed the appliance.
3 Click Update > Settings.
4 Select to download the updates from a VMware repository or CDROM in the Update Repositorysection.
5 Click Status.
6 Click Check Updates to verify that an update is accessible.
7 Click Install Updates.
8 Click OK.
A message stating that the update is in progress appears.
9 Open the log files to verify that upgrade is progressing successfully.
n /opt/vmware/var/log/vami/vami.log
Installing and Upgrading vRealize Automation
VMware, Inc. 311

n /var/log/vmware/horizon/horizon.log
If you log out during the upgrade process and log in again before the upgrade is finished, you cancontinue to follow the progress of the update in the log file. The updatecli.log file might displayinformation about the version of vRealize Automation that you are upgrading from. This displayedversion changes to the proper version later in the upgrade process.
The time required for the update to finish varies according to your environment.
10 When the update is finished reboot the virtual appliance.
a Click System.
b Click Reboot and confirm your selection.
11 Select vRA Settings > Cluster.
12 Enter the master vRealize Automation appliance FQDN and click Join Cluster.
Backup Copies of .xml Files Cause the System to Time Out
vRealize Automation registers any file with an .xml extension inthe \VMware\vCAC\Server\ExternalWorkflows\xmldb\ directory. If this directory contains backup files withan .xml extension, the system runs duplicate workflows that cause the system to time out.
Solution
Workaround: When you back up files in this directory, move the backups to another directory, or changethe extension of the backup file name to something other than .xml.
Exclude IaaS Upgrade
You can update the vRealize Automation appliance without upgrading the IaaS components.
Use this procedure when you want to update the vRealize Automation appliance without upgrading theIaaS components. This procedure
n Does not stop IaaS services.
n Skips updating the Management Agents.
n Prevents the automatic update of IaaS components after the vRealize Automation appliance updates.
Procedure
1 Open a secure shell connection to the primary vRealize Automation appliance node.
2 At the command prompt, run this command to create the toggle file:
touch /tmp/disable-iaas-upgrade
Installing and Upgrading vRealize Automation
VMware, Inc. 312
3 Manually stop the IaaS services.
a Log in to your IaaS Windows server.
b Select Start > Administrative Tools > Services.
c Stop these services in the following order.
Note Do not shut down the IaaS Windows server.
1 Each VMware vRealize Automation Proxy Agent.
2 Each VMware DEM worker.
3 The VMware DEM orchestrator.
4 The VMware vCloud Automation Center service.
4 Access the primary vRealize Automation appliance management console and update the primaryvRealize Automation appliance.
Unable to Create New Directory in vRealize Automation
Trying to add new directory with the first sync connector fails.
Problem
This issue occurs due to a bad config-state.json file located inusr/local/horizon/conf/states/VSPHERE.LOCAL/3001/.
For information about fixing this issue, see Knowledge Base Article 2145438.
vRealize Automation Replica Virtual Appliance Update Times Out
vRealize Automation replica virtual appliance update times out when you update the master virtualappliance.
Problem
When you update the master virtual appliance, the master vRealize Automation management consoleupdate tab shows a highlighted replica virtual appliance that has reached the update timeout limit.
Cause
The update times out because of a performance or infrastructure issue.
Installing and Upgrading vRealize Automation
VMware, Inc. 313
Solution
1 Check the replica virtual appliance update progress.
a Go to the management console for your replica virtual appliance by using its fully qualifieddomain name (FQDN), https://va-hostname.domain.name:5480.
b Log in with the user name root and the password you entered when the appliance wasdeployed.
c SelectUpdate > Status and check the update progress.
Do one of the following.
n If the update fails, follow the steps in the troubleshooting topic Replica vRealize AutomationAppliance Fails to Update.
n If the replica virtual appliance upgrade is in progress, wait until the upgrade finishes and go tostep 2.
2 Reboot the virtual appliance.
a Click System.
b Click Reboot and confirm your selection.
3 Select vRA Settings > Cluster.
4 Enter the master vRealize Automation virtual appliance FQDN, and click Join Cluster.
Some Virtual Machines Do Not Have a Deployment Created During Upgrade
Virtual machines in the missing state at the time of upgrade do not have a corresponding deploymentcreated in the target environment.
Problem
If a virtual machine is in the missing state in the source environment during upgrade, a correspondingdeployment is not created in the target environment. If a virtual machine goes out of the missing stateafter upgrade, you can import the machine to the target deployment using bulk import.
Certificate Not Trusted Error
When you view the infrastructure Log Viewer page in the vRealize Automation appliance console, youmight see an endpoint connection failure report with these words, Certificate is not trusted.
Problem
On the vRealize Automation appliance console, select Infrastructure > Monitoring > Log. On the LogViewer page, you might see a report similar to this:
Failed to connect to the endpoint. To validate that a secure connection can be established to thisendpoint, go to the vSphere endpoint on the Endpoints page and click the Test Connection button.
Inner Exception: Certificate is not trusted (RemoteCertificateChainErrors). Subject: C=US,CN=vc6.mycompany.com Thumbprint: DC5A8816231698F4C9013C42692B0AF93D7E35F1
Installing and Upgrading vRealize Automation
VMware, Inc. 314
Cause
Upgrading to vRealize Automation 7.3 makes changes to the endpoints from your original environment.For environments recently upgraded to vRealize Automation 7.3, the IaaS administrator must review eachexisting endpoint that uses a secure, https, connection. If an endpoint has a Certificate is nottrusted error, the endpoint does not work properly.
Solution
1 Log in to the vRealize Automation console as an infrastructure administrator.
2 Select Infrastructure > Endpoints > Endpoints.
3 Complete these steps for each endpoint with a secure connection.
a Click Edit.
b Click Test Connection.
c Review the certificate details and click OK if you trust this certificate.
d Restart the Windows services for all IaaS Proxy Agents used by this endpoint.
4 Verify that Certificate is not trusted errors no longer appear on the infrastructure Log Viewerpage.
Installing or Upgrading vRealize Automation Fails
Installing or upgrading vRealize Automation fails and an error message appears in the log file.
Problem
When you install or upgrade vRealize Automation, the procedure fails. This usually happens when a fixapplied during install or upgrade is not successful. An error message appears in the log file similar to thefollowing: Security error. Applying automatic fix for FIREWALL prerequisite failed. RPMStatus 1: Pre install script failed, package test and installation skipped.
Cause
The Windows environment has a group policy for PowerShell script execution set to Enabled.
Solution
1 On the Windows host machine, run gpedit.msc to open the Local Group Policy Editor.
2 In the left pane under Computer Configuration, click the expand button to open AdministrativeTemplates > Windows Components > Windows PowerShell.
3 For Turn on Script Execution, change the state from Enabled to Not Configured.
Unable to Update DEM and DEO Components
Unable to update DEM and DEO components while upgrading from vRealize Automation 7.2 to 7.3.x
Installing and Upgrading vRealize Automation
VMware, Inc. 315
Problem
After upgrading from vRealize Automation 7.2 to 7.3.x, DEM and DEO components installed on custompath, such as D: drive, are not updated.
See Knowledge Base article 2150517.
Update Fails to Upgrade the Management Agent
An error message about the Management Agent appears when you click Install Updates on the vRealizeAutomation appliance management console Update Status page.
Problem
Upgrade process is unsuccessful. Message appears: Unable to upgrade management agent onnode x. Sometimes the message lists more than one node.
Cause
Many conditions can cause this problem. The error message identifies only the node ID of the affectedmachine. More information is found in the All.log file for the Management Agent on the machine wherethe command fails.
Perform these tasks on the affected nodes according to your situation:
Solution
n If the Management Agent service is not running, start the service and restart upgrade on the virtualappliance.
n If the Management Agent service is running and the Management Agent is upgraded, restart upgradeon the virtual appliance.
n If the Management Agent service is running, but the Management Agent is not upgraded, perform amanual upgrade.
a Open a browser and navigate to the vRealize Automation IaaS installation page onthevRealize Automation appliance at https:// va-hostname.domain.name:5480/install.
b Download and run the Management Agent Installer.
c Reboot the Management Agent machine.
d Restart upgrade on the virtual appliance.
Management Agent Upgrade is Unsuccessful
The Management Agent upgrade is unsuccessful while upgrading from vRealize Automation to the latestversion.
Problem
If a failover incident has switched the primary and secondary Management Agent host, the upgrade isunsuccessful because the automated upgrade process cannot find the expected host. Perform thisprocedure on each IaaS node where the Management Agent is not upgraded.
Installing and Upgrading vRealize Automation
VMware, Inc. 316
Solution
1 Open the All.log in the Management Agent logs folder, which is located at C:\Program Files(x86)\VMware\vCAC\Management Agent\Logs\.
The location of the installation folder might be different from the default location.
2 Search the log file for a message about an outdated or powered off virtual appliance.
For example, INNER EXCEPTION: System.Net.WebException: Unable to connect to theremote server ---> System.Net.Sockets.SocketException: A connection attempt
failed because the connected party did not properly respond after a period of
time, or established connection failed because connected host has failed to
respond IP_Address:5480
3 Edit the Management Agent configuration file at C:\Program Files(x86)\VMware\vCAC\Management Agent\VMware.IaaS.Management.Agent.exe.config toreplace the existing alternativeEndpointaddress value with the URL of the primary virtual applianceendpoint.
The location of the installation folder might be different from the default location.
Example of alternativeEndpointaddress in VMware.IaaS.Management.Agent.exe.config.
<alternativeEndpoint address="https://FQDN:5480/" thumbprint="thumbprint
number" />
4 Restart the Management Agent Windows service and check the All.log file to verify that is working.
5 Run the upgrade procedure on the primary vRealize Automation appliance.
Empty Deployments Are Seen in vRealize Automation After Upgrade
Post provisioning actions appear to complete successfully but no change actually takes place.
Problem
Upgrade process causes some virtual machines to become assigned to the wrong deployment. Forinformation, see Knowledge Base article 2151400.
After Rebooting the Virtual Appliance, Automatic IaaS Upgrade Fails and Displays PendingReboot Error
After you reboot the virtual appliance, the automatic IaaS upgrade command upgrade-server fails and aPending reboot error appears.
Problem
An anti-virus program running on the virtual appliance causes this problem. For information, see Knowledge Base article 52211.
IaaS Repository Application Fails
The presence of Microsoft Monitoring Agent service can cause the IaaS repository application to fail.
Installing and Upgrading vRealize Automation
VMware, Inc. 317
Problem
IaaS repository fails and a "System.Web.Http.dll" version 4.0.0.0 error appears in the Repository.log. Forinformation, see Knowledge Base article 52444.
Upgrading IaaS in a High Availability Environment Fails
Running the IaaS upgrade process on the primary web server node with load balancing enabled fails. Youmight see these error messages: "System.Net.WebException: The operation has timed out" or "401 -Unauthorized: Access is denied due to invalid credentials."
Problem
Upgrading IaaS with load balancing enabled can cause an intermittent failure. When this happens, youmust run the vRealize Automation upgrade again with load balancing disabled.
Solution
1 Revert your environment to the pre-update snapshots.
2 Open a remote desktop connection to the primary IaaS web server node.
3 Navigate to the Windows hosts file at c:\windows\system32\drivers\etc.
4 Open the hosts file and add this line to bypass the web server load balancer.
IP_address_of_primary_iaas_website_node vrealizeautomation_iaas_website_lb_fqdn
Example:
10.10.10.5 vra-iaas-web-lb.domain.com
5 Save the hosts file and retry the vRealize Automation update.
6 When the vRealize Automation update competes, open the hosts file and remove the line you addedin step 4.
Work Around Upgrade Problems
You can modify the upgrade process to work around upgrade problems.
Solution
When you experience problems upgrading your vRealize Automation environment, use this procedure tomodify the upgrade process by selecting one of the available flags.
Procedure
1 Open a secure shell connection to the primary vRealize Automation appliance node.
Installing and Upgrading vRealize Automation
VMware, Inc. 318
2 At the command prompt, run this command to create the toggle file:
touch available_flag
For example: touch /tmp/disable-iaas-upgrade
Table 1‑43. Available Flags
Flag Description
/tmp/disable-iaas-upgrade n Prevents IaaS upgrade process after the virtualappliance restarts.
n Prevents the Management Agent upgrade.n Prevents the automatic prerequisite checks and fixes.n Prevents stopping IaaS services.
/tmp/do-not-upgrade-ma Prevents the Management Agent upgrade. This flag issuitable when the Management Agent is upgradedmanually.
/tmp/skip-prereq-checks Prevents the automatic prerequisite checks and fixes. Thisflag is suitable when there is a problem with the automaticprerequisite fixes and the fixes have been applied manuallyinstead.
/tmp/do-not-stop-services Prevents stopping IaaS services. The upgrade does notstop the IaaS Windows services, such as the ManagerService, DEMs, and agents.
/tmp/do-not-upgrade-servers Prevents the automatic upgrade of all server IaaScomponents, such as the database, web site, WAPI,repository, Model Mfrontanager data, and ManagerService.
Note This flag also prevents enabling the ManagerService automatic failover mode.
/tmp/do-not-upgrade-dems Prevents DEM upgrade.
/tmp/do-not-upgrade-agents Prevents IaaS proxy agent upgrade.
Installing and Upgrading vRealize Automation
VMware, Inc. 319

3 Complete the tasks for your chosen flag.
Table 1‑44. Additional Tasks
Flag Tasks
/tmp/disable-iaas-upgrade n Upgrade the Management Agent manually.n Apply any required IaaS prerequisites manually.n Manually stop the IaaS services.
a Log in to your IaaS Windows server.
b Select Start > Administrative Tools > Services.
c Stop these services in the following order.
Note Do not shut down the IaaS Windows server.
a Each VMware vRealize Automation ProxyAgent.
b Each VMware DEM worker.
c The VMware DEM orchestrator.
d The VMware vCloud Automation Centerservice.
n Start the IaaS upgrade manually after the virtualappliance upgrade is complete.
/tmp/do-not-upgrade-ma Upgrade the Management Agent manually.
/tmp/skip-prereq-checks Apply any required IaaS prerequisites manually.
/tmp/do-not-stop-services Manually stop the IaaS services.
1 Log in to your IaaS Windows server.
2 Select Start > Administrative Tools > Services.
3 Stop these services in the following order.
Note Do not shut down the IaaS Windows server.
a Each VMware vRealize Automation Proxy Agent.
b Each VMware DEM worker.
c The VMware DEM orchestrator.
d The VMware vCloud Automation Center service.
/tmp/do-not-upgrade-servers
/tmp/do-not-upgrade-dems
/tmp/do-not-upgrade-agents
4 Access the primary vRealize Automation appliance management console and update the primaryvRealize Automation appliance.
Note Because each flag remains active until it is removed, run this command to remove yourchosen flag after upgrade: rm /flag_path/flag_name. For example,rm /tmp/disable-iaas-upgrade.
Installing and Upgrading vRealize Automation
VMware, Inc. 320
Upgrading vRealize Automation 6.2.5 to 7.3When you upgrade your vRealize Automation 6.2.5 environment to the latest version, you use upgradeprocedures specific to this environment.
This information is specific to upgrading vRealize Automation 6.2.5 to 7.3 . For information about othersupported upgrade paths, see Upgrading vRealize Automation.
Upgrading vRealize Automation 6.2.5 to 7.3 or 7.3.1You can perform an in-place upgrade of your current vRealize Automation 6.2.5 environment to 7.3 or7.3.1. You use upgrade procedures specific to this version to upgrade your environment.
An in-place upgrade is a three-stage process. You update the components in your current environment inthis order.
1 vRealize Automation appliance
2 IaaS web server
3 vRealize Orchestrator
You must upgrade all product components to the same version.
Beginning with vRealize Automation 7.2, JFrog Artifactory Pro is no longer bundled with the vRealizeAutomation appliance. If you upgrade from an earlier version of vRealize Automation, the upgradeprocess removes JFrog Artifactory Pro. For more information, see Knowledge Base article 2147237.
Note If you have customized your current vRealize Automation 6.2.5 environment, contact your CCEsupport staff for additional upgrade information.
Prerequisites for Upgrading vRealize Automation
Before you upgrade, vRealize Automation 6.2.5 to 7.3 or 7.3.1, review the following prerequisites.
System Configuration Requirements
Verify that the following system requirements are met before you begin an upgrade.
n Verify that all appliances and servers that are part of your deployment meet the system requirementsfor the latest version. See the vRealize Automation Support Matrix at VMware vRealize AutomationDocumentation.
n Consult the VMware Product Interoperability Matrix on the VMware website for information aboutcompatibility with other VMware products.
n Verify that the vRealize Automation you are upgrading from is in stable working condition. Correct anyproblems before upgrading.
n If you are upgrading from vRealize Automation 6.2.5, record the vCloud Suite license key you use foryour current vRealize Automation environment. Upon upgrade, existing license keys are removedfrom the database. If you are upgrading from vRealize Automation 7.x, you do not need to record thelicense
Installing and Upgrading vRealize Automation
VMware, Inc. 321
Hardware Configuration Requirements
Verify that the hardware in your environment is adequate for vRealize Automation 7.3 or 7.3.1.
See vRealize Automation Hardware Specifications and Capacity Maximums
Verify that the following system requirements are met before you begin an upgrade.
n You must configure your current hardware before you download the upgrade. See Increase vCenterServer Hardware Resources for vRealize Automation 6.2.5.
n You must have at least 18-GB RAM, 4 CPUs, Disk1 = 50 GB, Disk3=25 GB, and Disk4=50 GB beforeyou run the upgrade.
If the virtual machine is on vCloud Networking and Security, you might need to allocate more RAMspace.
Although general support for vCloud Networking and Security 5.5.x (vCNS) ended in September2016, the VCNS custom properties continue to be valid for NSX purposes. See the VMwareKnowledge Base article End of Availability and End of General Support for VMware vCloudNetworking and Security 5.5.x (2144733) at http://kb.vmware.com/kb/2144733 for more information.
n These nodes must have at least 5 GB of free disk space:
n Primary IaaS Website
n Microsoft SQL database
n Model Manager
n The primary IaaS Website node where the Model Manager data is installed must have JAVA SERuntime Environment 8, 64 bits, update 111 or later installed. After you install Java, you must set theJAVA_HOME environment variable to the new version.
n To download and run the upgrade, you must have the following resources:
n At least 4.5 GB on the root partition
n 4.5 GB on the /storage/db partition for the master vRealize Automation appliance
n 4.5 GB on the root partition for each replica virtual appliance
n Check the /storage/log subfolder and remove any older archived ZIP files to clean up space.
General Prerequisites
Verify that the following system requirements are met before you begin an upgrade.
n You have access to an Active Directory account with a username@domain format and permissions tobind to the directory.
n You meet these conditions:
n You have access to an account with a SAMaccountName format.
n You have sufficient privileges to join the system to the domain by creating a computer objectdynamically or to merge into a pre-created object.
Installing and Upgrading vRealize Automation
VMware, Inc. 322
n You have access to all databases and all load balancers impacted by or participating in thevRealize Automation upgrade.
n You make the system unavailable to users while you perform the upgrade.
n You disable any applications that query vRealize Automation.
n Verify that Microsoft Distributed Transaction Coordinator (MSDTC) is enabled on allvRealize Automation and associated SQL servers. For instructions, see the VMware Knowledge Basearticle Various tasks fail after upgrading or migrating to VMware vCloud Automation Center (vCAC)6.1.x (2089503) at http://kb.vmware.com/kb/2089503.
n If your environment has an external vRealize Orchestrator appliance, and an externalvRealize Orchestrator appliance connected to the Identity Appliance, upgrade vRealize Orchestratorbefore you upgrade vRealize Automation.
n Complete these steps if you are upgrading a distributed environment configured with an embeddedPostgreSQL database.
a Examine the files in the pgdata directory on the master host before you upgrade the replicahosts.
b Navigate to the PostgreSQL data folder on the master hostat /var/vmware/vpostgres/current/pgdata/.
c Close any opened files in the pgdata directory and remove any files with a .swp suffix.
d Verify that all files in this directory have correct ownership: postgres:users.
n You must review Knowledge Base article 000051531 and perform any relevant fixes to yourenvironments prior to upgrade.
Considerations About Upgrading to This vRealize Automation Version
vRealize Automation 7 and later introduces various functional changes during and after the upgradeprocess. You should review these changes before you upgrade your vRealize Automation 6.2.xdeployment to the new version.
Review the following considerations before you upgrade.
Upgrade and Identity Appliance Specifications
During the vRealize Automation upgrade process, you answer prompts to upgrade the identity appliance.
The target deployment uses the VMware Identity Manager.
Upgrade and Licensing
During the upgrade, your existing vRealize Automation 6.2.5 licenses, and any vCloud Suite 6.x licensesthat you have, are removed. You must reenter your licenses in the vRealize Automation 7.3 or 7.3.1vRealize Automation appliance management console.
Installing and Upgrading vRealize Automation
VMware, Inc. 323
You now use vRealize Automation licensing for virtual appliances and IaaS by entering license keyinformation in the vRealize Automation appliance. Licensing information is no longer available in the IaaSuser interface and IaaS no longer performs licensing checks. Endpoints and quotas are enforced throughthe end-user license agreements (EULAs).
Note Write down your vCloud Suite 6.x license key if you used it for vRealize Automation 6.2.5 beforethe upgrade. Upon upgrade, existing license keys are removed from the database.
For more information about reentering your license information during or after upgrade, see Update theLicense Key.
Understanding How Roles Are Upgraded
When you upgrade vRealize Automation, your organization's existing role assignments are maintained.The upgrade also creates some role assignments to support additional blueprint architect roles.
The following architect roles are used to support the blueprint definition in the design canvas:
n Application architect. Assembles existing components and blueprints to create composite blueprints.
n Infrastructure architect. Creates and manages virtual machine blueprints.
n XaaS architect. Creates and manages XaaS blueprints.
n Software architect. Creates and manages Software components.
In vRealize Automation 7, tenant administrators and business group managers cannot design blueprintsby default. Upgraded tenant administrators and business group managers are given the infrastructurearchitect role.
Users who can reconfigure a virtual machine in the vRealize Automation 6.2.x source version can changevirtual machine ownership after you upgrade to the new version.
The following role assignments are made during the upgrade. Roles that are not listed in the table areupgraded to the same role name in the target deployment.
Table 1‑45. Roles Assigned during Upgrade
Role in Source Deployment Role in Target Deployment
Tenant administrator Tenant administrator and Infrastructure architect
Business group manager Business group manager and Infrastructure architect
Service architect XaaS architect
Application architect Software architect
For more information about roles, see Tenant Roles and Responsibilities in vRealize Automation.
Understanding How Blueprints Are Upgraded
As a rule, published blueprints are upgraded as published blueprints.
Installing and Upgrading vRealize Automation
VMware, Inc. 324
However, there are exceptions to that rule. Multi-machine blueprints are upgraded as compositeblueprints that contain blueprint components. Multi-machine blueprints that contain unsupported settingsare upgraded as unpublished.
Note vRealize Automation 7.x takes a blueprint snapshot at deployment. If you encounter reconfigureproblems when updating machine properties such as CPU and RAM in a deployment, see KnowledgeBase article 2150829 vRA 7.x Blueprint Snapshotting.
For more information about upgrading blueprints, see Upgrade and vApp Blueprints, vCloud Endpoints,and vCloud Reservations and Understanding How Multi-Machine Blueprints Are Upgraded.
Upgrade and vApp Blueprints, vCloud Endpoints, and vCloud Reservations
You cannot upgrade a deployment that contains vApp (vCloud) endpoints. The presence of vApp (vCloud)endpoints prevents upgrade to this vRealize Automation version.
Upgrade fails on the master virtual appliance if there is a vApp (vCloud) endpoint in the sourcedeployment. A message appears in the user interface and log. To determine if your source deploymentcontains a vApp (vCloud) endpoint, log in to the vRealize Automation console as IaaS administrator user.Select Infrastructure > Endponts. If the endpoints list contains vApp (vCloud) endpoints, you cannotupgrade to this vRealize Automation version.
Managed vApps for vCloud Air or vCloud Director resources are not supported in the targetvRealize Automation environment.
Note The following approval policy types are deprecated. If they appear in the list of available approvalpolicy types after upgrade is finished, they are unusable.
n Service Catalog - Catalog Item Request - vApp
n Service Catalog - Catalog Item Request - vApp Component
You can create vCloud Air and vCloud Director endpoints and reservations in the target deployment. Youcan also create blueprints with vCloud Air or vCloud Director virtual machine components.
Understanding How Multi-Machine Blueprints Are Upgraded
You can upgrade managed service, multi-machine blueprints from a supported vRealize Automation 6.2.xversion deployment.
When you upgrade a multi-machine blueprint, component blueprints are upgraded as separate single-machine blueprints. The multi-machine blueprint is upgraded as a composite blueprint in which itsprevious children blueprints are nested as separate blueprint components.
Installing and Upgrading vRealize Automation
VMware, Inc. 325
The upgrade creates a single composite blueprint in the target deployment that contains one virtualmachine component for each component blueprint in the source multi-machine blueprint. If a blueprinthas a setting that is not supported in the new version, the blueprint is upgraded and set to draft status.For example, if the multi-machine blueprint contains a private network profile, upgrade ignores the profilesetting, and the blueprint is upgraded in a draft state. You can edit the draft blueprint to enter supportednetwork profile information and publish it.
Note If a published blueprint in the source deployment is upgraded to a draft status blueprint, theblueprint is no longer part of a service or entitlement. After you update and publish the blueprint in theupgraded vRealize Automation version, you must recreate its needed approval policies and entitlements.
Some multi-machine blueprint settings are not supported in the target vRealize Automation deployment,including private network profiles and routed network profiles with associated PLR edge settings. If youhave used a custom property to specify PLR edge settings (VCNS.LoadBalancerEdgePool.Names), thecustom property is upgraded.
You can upgrade a multi-machine blueprint with vSphere endpoints and NSX network and securitysettings. The upgraded blueprint contains NSX network and security components in the design canvas.
Note Routed gateway specifications for multi-machine blueprints, as defined in reservations, areupgraded. However, the target vRealize Automation deployment does not support reservations for routedprofiles that contain associated PLR edge settings. If the source reservation contains a routed gatewayvalue for a PLR edge, the reservation is upgraded but the routed gateway setting is ignored. As a result,the upgrade generates an error message in the log file and the reservation is disabled.
During upgrade, spaces and special characters are removed from referenced network and securitycomponent names.
Note vRealize Automation 7.x takes a blueprint snapshot at deployment. If you encounter reconfigureproblems when updating machine properties such as CPU and RAM in a deployment, see KnowledgeBase article 2150829 vRA 7.x Blueprint Snapshotting.
Depending on the setting type, the network and security information is captured as several differentsettings in the new blueprint.
n Settings for the overall blueprint on its properties page. This information includes app isolation,transport zone, and routed gateway or NSX edge reservation policy information.
n Available settings for vSphere virtual machine components in NSX network and security componentsin the design canvas.
n Settings in the network and security tabs of individual vSphere virtual machine components in thedesign canvas.
Upgrade and Physical Endpoints, Reservations, and Blueprints
You cannot upgrade a deployment that contains physical endpoints. If physical endpoints are present, thevRealize Automation upgrade process fails.
Installing and Upgrading vRealize Automation
VMware, Inc. 326
Upgrade fails on the master virtual appliance when the vRealize Automation 6.2.x deployment has aphysical endpoint. A failure message appears in the migration interface and log. To determine if yourvRealize Automation 6.2.x deployment has a physical endpoint, log in to vRealize Automation as an IaaSadministrator user. Select Infrastructure > Endponts and review the endpoints list. If the list has aPlatform Type Physical endpoint, you cannot upgrade to vRealize Automation 7.0 and later.
Physical endpoints, reservations, and virtual machine components in blueprints are not supported invRealize Automation 7.0 and later.
Upgrade and Network Profile Settings
Private network profiles are not supported in vRealize Automation 7 and later. These profiles are ignoredduring the upgrade. Routed network profiles with associated PLR edge settings are also not supported invRealize Automation 7 and later. These profiles are also ignored during the upgrade.
The private network profile type is not supported in vRealize Automation 7 and later. When thevRealize Automation upgrade process finds a private network profile in the source deployment, it ignoresthe network profile. Load balancers that reference those private networks are also ignored duringupgrade. The same upgrade conditions are true for a routed network profile with associated PLR edgesettings. Neither network profile configuration is upgraded.
If a reservation contains a private network profile, the private network profile setting is ignored duringupgrade. The reservation is upgraded as disabled in the target deployment.
If a reservation contains a routed network profile with associated PLR edge settings, the routed networkprofile specification is ignored during upgrade. The reservation is upgraded as disabled in the targetdeployment.
For information about upgrading a multi-machine blueprint that contains network settings, see Understanding How Multi-Machine Blueprints Are Upgraded.
Upgrade and Entitled Actions
You cannot upgrade virtual machine actions.
The actions that you can perform on provisioned virtual machines, based on blueprint specifications, arenot upgraded. To recreate the actions you can perform on a virtual machine, customize the entitlementsfor blueprints to enable only certain actions.
For related information, see Actions in Entitlements.
Upgrade and Custom Properties
All the custom properties that vRealize Automation supplies are available in the upgraded deployment.Custom properties and property groups are upgraded.
Terminology and Related Changes
All the build profiles that you created in the source deployment are upgraded as property groups. Theterm build profile has been retired.
The term property set has been retired and CSV property set files are no longer available.
Installing and Upgrading vRealize Automation
VMware, Inc. 327
Case-sensitivity in Custom Property Names
Before vRealize Automation 7.0, custom property names were case-insensitive. In vRealize Automation7.0 and later, custom property names are case-sensitive. During upgrade, custom property names mustbe an exact match. This ensures that property values do not override one another and that they matchproperty dictionary definitions. For example, a custom property hostname and another custom propertyHOSTNAME are considered different custom properties by vRealize Automation 7.0 and later. The customproperty hostname and the custom property HOSTNAME do not override one another during upgrade.
Spaces in Custom Property Names
Before upgrading to this release of vRealize Automation, remove any space characters from your customproperty names, for example replace the space with an underscore character, to allow the customproperty to be recognized in the upgraded vRealize Automation installation. vRealize Automation customproperty names cannot contain spaces. This issue can also impact use of an upgraded vRealizeOrchestrator installation that uses custom properties that contained spaces in earlier releases of eithervRealize Automation or vRealize Orchestrator or both.
Reserved Property Names
Because several keywords are now reserved, some upgraded properties might be affected. Somekeywords that are used by the blueprint code can be imported, for example, by usingvRealize CloudClient blueprint import functions. These keywords are considered reserved and are notavailable for properties that are being upgraded. The keywords include but are not limited to cpu,storage, and memory.
Upgrade and Application Services
Application Services upgrade is supported in vRealize Automation 7 and later.
After successful migration to vRealize Automation 7.3, you can use the vRealize Automation ApplicationServices Migration Tool to upgrade your application services. Complete these steps to download the tool.
1 Click Download VMware vRealize Automation.
2 Select Drivers & Tools > VMware vRealize Application Services Migration Tool.
Upgrade and Advanced Service Design
When you upgrade to vRealize Automation 7 and later, your Advanced Service Design items areupgraded to XaaS elements.
XaaS components are available for use in the design canvas.
Upgrade and Blueprint Price Information
As of 7.0, vRealize Automation price profiles are no longer supported and are not migrated into the targetdeployment during upgrade. However, you can use the enhanced integration withvRealize Business for Cloud to manage your vRealize Automation resource expenses.
Installing and Upgrading vRealize Automation
VMware, Inc. 328
vRealize Business for Cloud is now tightly integrated with vRealize Automation and supports the followingenhanced pricing features.
n Unified location in vRealize Business for Cloud to define flexible pricing policies for:
n Infrastructure resource, machine, and application blueprints
n Provisioned virtual machines in vRealize Automation for supported endpoints such asvCenter Server, vCloud Director, Amazon Web Services, Azure, and OpenStack.
n Any operational price, one time price, and price on custom properties of provisioned virtualmachines
n Deployments, which include the price of virtual machines within the deployments
n Role-based showback reports in vRealize Business for Cloud
n Fully leverage new features in vRealize Business for Cloud
Before you upgrade, you can export your existing expense reports from your source vRealize Automationinstance for reference. After you finish your upgrade, you can install and configurevRealize Business for Cloud to handle pricing.
Note vRealize Automation 7.3.x is compatible only with vRealize Business for Cloud 7.3 and later.
Upgrade and Catalog Items
After you upgrade from vRealize Automation 6.2.x to the latest version, some catalog items appear in theservice catalog but are not available to request.
After you migrate to the latest version of vRealize Automation, catalog items that use these propertydefinitions appear in the service catalog but are not available to request.
n Control types: Check box or link.
n Attributes: Relationship, regular expressions, or property layouts.
In vRealize Automation 7.x, the property definitions no longer use these elements. You must recreate theproperty definition or configure the property definition to use a vRealize Orchestrator script action ratherthan the embedded control types or attributes. For more information, see Catalog Items Appear in theService Catalog After Upgrade But Are Not Available to Request.
Checklist for Upgrading vRealize Automation
When you upgrade vRealize Automation from 6.2.5 to 7.3 or 7.3.1, you update all vRealize Automationcomponents in a specific order.
Use the checklists to track your work as you complete the upgrade. Finish the tasks in the order they aregiven.
Note You must upgrade components in the prescribed order and upgrade all components. Using adifferent order can result in an unexpected behavior after the upgrade or failure of the upgrade tocomplete.
Installing and Upgrading vRealize Automation
VMware, Inc. 329
The order of upgrade varies depending on whether you are upgrading a minimal environment or adistributed environment with multiple vRealize Automation appliances.
Table 1‑46. Checklist to Upgrade a Minimal vRealize Automation Environment
Task Instructions
Back up your current installation. Making this backup is acritical task.
For more information on how to back up and restore yoursystem, see Back Up Your Existing vRealize Automation 6.2.5Environment.
For general information, see Configuring Backup and Restore byUsing Symantec Netbackup at http://www.vmware.com/pdf/vrealize-backup-and-restore-netbackup.pdf
Prepare vRealize Automation 6.2.x virtual machines forupgrade.
You must review Knowledge Base article 000051531 andperform any relevant fixes to your environments prior toupgrade.
Shut down vRealize Automation Windows services on yourIaaS server.
See Stop vRealize Automation Services on the IaaS WindowsServer.
If the Common Components Catalog is installed, you mustuninstall it before you upgrade.
For information about how to uninstall Common ComponentsCatalog components, see the Common Components CatalogInstallation Guide.
If this guide is unavailable, do these steps on each IaaS node.
1 Log in to the IaaS node.
2 Click Start.3 Enter services in the Search programs and files text box.
4 Click Services.
5 In the right pane of the Services window, right-click eachIaaS service and select Stop to stop each service.
6 Click Start > Control Panel > Programs and Features.
7 Right-click each installed Common Components Catalogcomponent, and select Uninstall.
8 Click Start > Command Prompt.9 At the command prompt, run iisreset.
Review Considerations for Upgrading to thisvRealize Automation Version to know what can be upgraded,what cannot be upgraded, and how upgraded items mightbehave differently.
Not all items, including blueprints, reservations, and endpointscan be upgraded. The presence of some unsupportedconfigurations blocks upgrade.
See Considerations About Upgrading to This vRealizeAutomation Version.
Configure your hardware resources.See Increase vCenter Server Hardware Resources for vRealizeAutomation 6.2.5.
Download updates to the vRealize Automation appliance.See Downloading vRealize Automation Appliance Updates.
Install the update on the vRealize Automation appliance.See Install the Update on the vRealize Automation 6.2.5Appliance.
Installing and Upgrading vRealize Automation
VMware, Inc. 330
Table 1‑46. Checklist to Upgrade a Minimal vRealize Automation Environment (Continued)
Task Instructions
Update the Single-Sign On utility to theVMware Identity Manager utility.
See Update Your Single Sign-On Password for VMware IdentityManager.
Update the license key.See Update the License Key.
Migrate the Identity Store to the VMware Identity Manager.Migrate Identity Stores to VMware Identity Manager
Upgrade IaaS components.See Upgrading the IaaS Server Components After UpgradingvRealize Automation.
Upgrade the external vRealize Orchestrator.See Upgrading Stand-Alone vRealize Orchestrator Appliance forUse with vRealize Automation.
See Upgrading External vRealize Orchestrator ApplianceCluster for Use with vRealize Automation
Add users or groups to an Active Directory connection.See Add Users or Groups to an Active Directory Connection.
Table 1‑47. Checklist to Upgrade a vRealize Automation Distributed Environment
Task Instructions
Back up your current installation. Making this backup is acritical task.
For more information on how to back up and restore yoursystem, see Back Up Your Existing vRealize Automation 6.2.5Environment.
For detailed information, see Configuring Backup and Restore byUsing Symantec Netbackup at http://www.vmware.com/pdf/vrealize-backup-and-restore-netbackup.pdf
Shut down vRealize Automation services on your IaaSWindows servers.
See Stop vRealize Automation Services on the IaaS WindowsServer.
If the Common Components Catalog is installed, you mustuninstall it before you upgrade.
For information about how to uninstall Common ComponentsCatalog components, see the Common Components CatalogInstallation Guide.
If this guide is unavailable, do these steps on each IaaS node.
1 Log in to the IaaS node.
2 Click Start.3 Enter services in the Search programs and files text box.
4 Click Services.
5 In the right pane of the Services window, right-click eachIaaS service and select Stop to stop each service.
6 Click Start > Control Panel > Programs and Features.
7 Right-click each installed Common Components Catalogcomponent, and select Uninstall.
8 Click Start > Command Prompt.9 At the command prompt, run iisreset.
Configure your hardware resources for the upgrade.See Increase vCenter Server Hardware Resources for vRealizeAutomation 6.2.5.
Installing and Upgrading vRealize Automation
VMware, Inc. 331
Table 1‑47. Checklist to Upgrade a vRealize Automation Distributed Environment(Continued)
Task Instructions
Disable your load balancers.Disable each secondary node and remove thevRealize Automation health monitors for the following items.n vRealize Automation appliancen IaaS websiten IaaS Manager Service
For a successful upgrade, verify the following:n Load balancer traffic is directed only to the primary node.n vRealize Automation health monitors are removed for the
appliance, website, and Manager Service.
Download updates to the vRealize Automation appliance.See Downloading vRealize Automation Appliance Updates.
Install the update on the first vRealize Automationappliance in your installation. If you have designated anappliance as a master, upgrade this appliance first.
See Install the Update on the vRealize Automation 6.2.5Appliance.
Update the Single-Sign On utility to theVMware Identity Manager utility.
See Update Your Single Sign-On Password for VMware IdentityManager.
Update the license key.See Update the License Key.
Migrate the Identity Store to the VMware Identity Managerutility.
Migrate Identity Stores to VMware Identity Manager
Install the update on the rest of your vRealize Automationappliances.
Install the Update on Additional vRealize Automation Appliances
Upgrade IaaS components.See Upgrading the IaaS Server Components After UpgradingvRealize Automation.
Upgrade the external vRealize Orchestrator.See Upgrading Stand-Alone vRealize Orchestrator Appliance forUse with vRealize Automation.
See Upgrading External vRealize Orchestrator Appliance Clusterfor Use with vRealize Automation
Enable your load balancers.Enable Your Load Balancers
Updated InformationThis Upgrading from vRealize Automation 6.2.5 to 7.3 is updated with each release of the product orwhen necessary.
This table provides the update history of Upgrading from vRealize Automation 6.2.5 to 7.3.
Installing and Upgrading vRealize Automation
VMware, Inc. 332
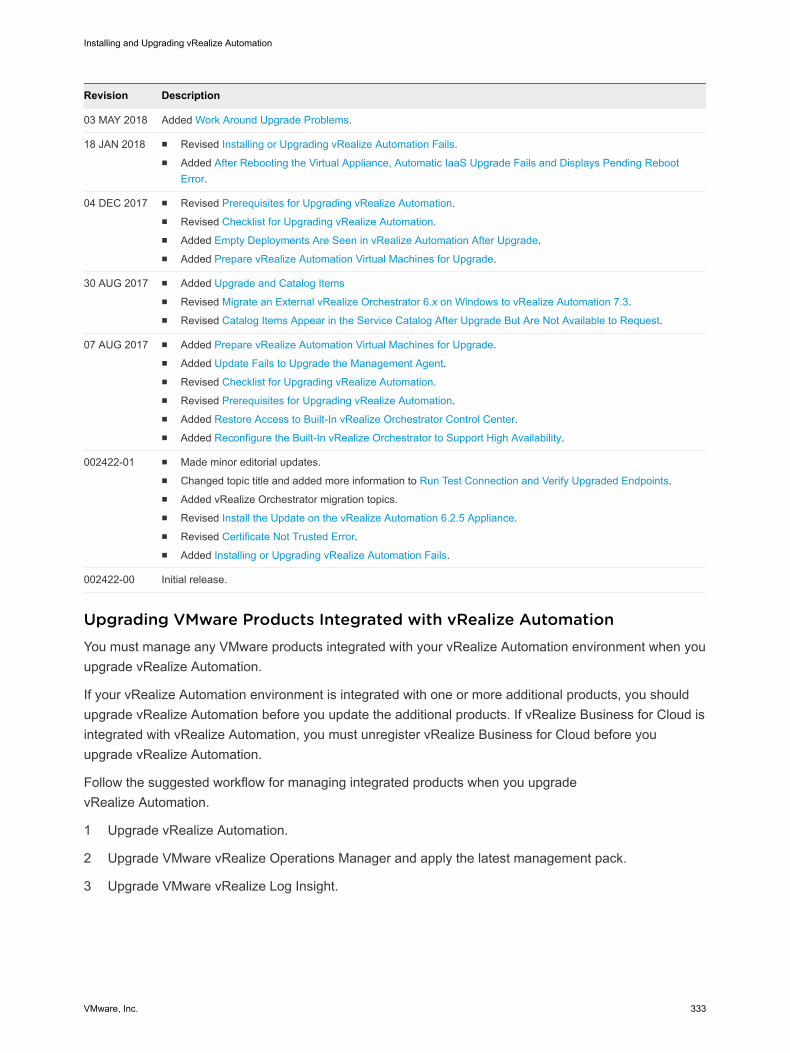
Revision Description
03 MAY 2018 Added Work Around Upgrade Problems.
18 JAN 2018 n Revised Installing or Upgrading vRealize Automation Fails.n Added After Rebooting the Virtual Appliance, Automatic IaaS Upgrade Fails and Displays Pending Reboot
Error.
04 DEC 2017 n Revised Prerequisites for Upgrading vRealize Automation.n Revised Checklist for Upgrading vRealize Automation.n Added Empty Deployments Are Seen in vRealize Automation After Upgrade.n Added Prepare vRealize Automation Virtual Machines for Upgrade.
30 AUG 2017 n Added Upgrade and Catalog Itemsn Revised Migrate an External vRealize Orchestrator 6.x on Windows to vRealize Automation 7.3.n Revised Catalog Items Appear in the Service Catalog After Upgrade But Are Not Available to Request.
07 AUG 2017 n Added Prepare vRealize Automation Virtual Machines for Upgrade.n Added Update Fails to Upgrade the Management Agent.n Revised Checklist for Upgrading vRealize Automation.n Revised Prerequisites for Upgrading vRealize Automation.n Added Restore Access to Built-In vRealize Orchestrator Control Center.n Added Reconfigure the Built-In vRealize Orchestrator to Support High Availability.
002422-01 n Made minor editorial updates.n Changed topic title and added more information to Run Test Connection and Verify Upgraded Endpoints.n Added vRealize Orchestrator migration topics.n Revised Install the Update on the vRealize Automation 6.2.5 Appliance.n Revised Certificate Not Trusted Error.n Added Installing or Upgrading vRealize Automation Fails.
002422-00 Initial release.
Upgrading VMware Products Integrated with vRealize AutomationYou must manage any VMware products integrated with your vRealize Automation environment when youupgrade vRealize Automation.
If your vRealize Automation environment is integrated with one or more additional products, you shouldupgrade vRealize Automation before you update the additional products. If vRealize Business for Cloud isintegrated with vRealize Automation, you must unregister vRealize Business for Cloud before youupgrade vRealize Automation.
Follow the suggested workflow for managing integrated products when you upgradevRealize Automation.
1 Upgrade vRealize Automation.
2 Upgrade VMware vRealize Operations Manager and apply the latest management pack.
3 Upgrade VMware vRealize Log Insight.
Installing and Upgrading vRealize Automation
VMware, Inc. 333
4 Upgrade VMware vRealize Business for Cloud.
This section provides additional guidance for managing vRealize Business for Cloud when it is integratedwith your vRealize Automation environment.
Upgrading vRealize Operations Manager Integrated with vRealize Automation
Upgrade vRealize Operations Manager after you upgrade vRealize Automation.
Procedure
1 Upgrade vRealize Automation.
2 Upgrade vRealize Operations Manager. For information, see Updating Your Software in the VMwarevRealize Operations Manager Documentation.
Upgrading vRealize Log Insight Integrated with vRealize Automation
Upgrade vRealize Log Insight after you upgrade vRealize Automation.
Procedure
1 Upgrade vRealize Automation.
2 Upgrade vRealize Log Insight. For information, see Upgrading vRealize Log Insight in the VMwarevRealize Log Insight Documentation.
Upgrading vRealize Business for Cloud Integrated with vRealize Automation
When you upgrade your vRealize Automation environment, you must unregister and register yourconnection to vRealize Business for Cloud.
Perform this procedure to ensure continuity of service with vRealize Business for Cloud when youupgrade your vRealize Automation environment.
Procedure
1 Unregister vRealize Business for Cloud from vRealize Automation. See UnregistervRealize Business for Cloud from vRealize Automation in the VMware vRealize Business for CloudDocumentation.
2 Upgrade vRealize Automation.
3 If necessary, upgrade vRealize Business for Cloud. See Upgrading vRealize Business for Cloud inthe VMware vRealize Business for Cloud Documentation.
4 Register vRealize Business for Cloud with vRealize Automation. See RegistervRealize Business for Cloud with vRealize Automation in the VMware vRealize Business for CloudDocumentation.
Preparing to Upgrade vRealize AutomationYou must perform various tasks and procedures before you upgrade vRealize Automation from 6.2.5 to7.3 or 7.3.1.
Installing and Upgrading vRealize Automation
VMware, Inc. 334
Perform the tasks in the order they appear in the upgrade checklist. See Checklist for Upgrading vRealizeAutomation.
Prepare vRealize Automation Virtual Machines for Upgrade
Known issues with upgrading vRealize Automation virtual machines can cause problems after upgrade.
You must review Knowledge Base article 000051531 and perform any relevant fixes to your environmentsprior to upgrade.
What to do next
Backup Prerequisites for Upgrading vRealize Automation.
Backup Prerequisites for Upgrading vRealize Automation
Finish the backup prerequisites before you upgrade vRealize Automation 6.2.5 to 7.3 or 7.3.1
Prerequisites
n Verify that your source environment is fully installed and configured.
n For each appliance in the source environment, back up all the vRealize Automation applianceconfiguration files in the following directories.
n /etc/vcac/
n /etc/vco/
n /etc/apache2/
n /etc/rabbitmq/
n Back up the vRealize Automation external workflow configuration (xmldb) files on your system. Storethe backup files in a temporary directory. These files areat \VMware\vCA\Server\ExternalWorkflows\xmldb\. You restore the xmldb files on your newsystem after migration. See Restore External Workflow Timeout Files.
For a related problem, see Backup Copies of .xml Files Cause the System to Time Out.
n Back up the external vRealize Automation PostgreSQL database. To see if your PostgreSQLdatabase is external, complete these steps.
a Log in to the vRealize Automation appliance management console by using its fully qualifieddomain name, https://va-hostname.domain.name:5480.
For a distributed environment, log in to the primary vRealize Automation appliance managementconsole.
b Select vRA Settings > Database.
c If the vRealize Automation PostgreSQL database node host is different from thevRealize Automation appliance host, back up the database. If the database node host is thesame as the appliance host, you do not need to back up the database.
For information about the PostgreSQL database backup, see https://www.postgresql.org/.
Installing and Upgrading vRealize Automation
VMware, Inc. 335

n Create a snapshot of your tenant configuration and the users assigned.
n Back up any files you have customized, such as DataCenterLocations.xml.
n Create a snapshot of each virtual appliance and IaaS server. Adhere to regular guidelines for backingup the entire system in case the vRealize Automation upgrade is unsuccessful. See Backup andRecovery for vRealize Automation Installations.
Back Up Your Existing vRealize Automation 6.2.5 Environment
Before you upgrade, shut down and take a snapshot of your vRealize Automation 6.2.5 environmentcomponents.
Before you upgrade, take a snapshot of these components while your system is shut down.
n vRealize Automation IaaS servers (Windows nodes)
n vRealize Automation appliances (Linux nodes)
n vRealize Automation (SSO) Identity node
If the upgrade fails, use the snapshot to return to the last known good configuration and attempt anotherupgrade.
Prerequisites
n Verify that the embedded PostgreSQL database is in high-availability mode. If it is, locate the currentMaster node. See the knowledge base article http://kb.vmware.com/kb/2105809.
n If your environment has an external PostgreSQL database, create a database backup file.
n If the vRealize Automation Microsoft SQL database is not hosted on the IaaS server, create adatabase backup file. For information, find article on the Microsoft Developer Network about creatinga full SQL Server database backup.
n Verify that you have completed the backup prerequisites for upgrading.
n Verify that you have taken a snapshot of your system while it is shut down. This is the preferredmethod of taking a snapshot. See your vSphere 6.0 Documentation.
If you cannot shut down your system, take an in-memory snapshot of all the nodes. This is the non-preferred method and should only be used if you cannot take a snapshot while the system is shutdown.
n If you modified the app.config file, make a backup of that file. See Restore Changes to Logging inthe app.config File.
n Make a backup of the external workflow configuration (xmldb) files. See Restore External WorkflowTimeout Files.
n Verify that you have a location outside your current folder where you can store your backup file. See Backup Copies of .xml Files Cause the System to Time Out.
Procedure
1 Log in to your vCenter Server.
Installing and Upgrading vRealize Automation
VMware, Inc. 336
2 Locate these vRealize Automation 6.2.5 components.
n vRealize Automation IaaS servers (Windows nodes)
n vRealize Automation appliances (Linux nodes)
n vRealize Automation (SSO) Identity node
3 For each of the following virtual machines, select the virtual machine, click Shutdown guest, andwait for the virtual machine to stop. Shut down these virtual machines in the following order.
a IaaS proxy agent virtual machines
b DEM Worker virtual machines
c DEM Orchestrator virtual machine
d Manager Service virtual machine
e Web Service virtual machines
f Secondary vRealize Automation virtual appliances
g Primary vRealize Automation virtual appliance
h Manager virtual machines (if any)
i Identity Appliance
4 Take a snapshot of each vRealize Automation 6.2.5 virtual machine.
5 Clone each vRealize Automation appliance node.
You perform the upgrade on the cloned virtual machines.
6 Power off each original vRealize Automation appliance virtual machine before you upgrade thecloned virtual machines.
Keep the original virtual machines powered off and use them only if you must restore the system.
What to do next
Increase vCenter Server Hardware Resources for vRealize Automation 6.2.5.
Increase vCenter Server Hardware Resources for vRealize Automation 6.2.5
Before you upgrade from vRealize Automation 6.2.5, you must increase hardware resources for eachvRealize Automation appliance.
This procedure assumes that you use the Windows vCenter Server client.
Prerequisites
n Verify that you have a clone of each vRealize Automation appliance.
n Verify that you have at least 140 GB of free space in your vCenter Server for each appliance clone.
n Verify that the original appliances are powered off.
Installing and Upgrading vRealize Automation
VMware, Inc. 337

Procedure
1 Log in to vCenter Server.
2 Right-click a cloned vRealize Automation appliance icon and select Edit Settings.
3 Select Memory and set the value to 18 GB.
4 Select CPU and set the Number of virtual sockets value to 4.
5 Extend the size of virtual Disk 1 to 50 GB.
a Select Disk 1.
b Change the size to 50 GB.
c Click OK.
6 If you do not have Disk 3, complete these steps to add a Disk 3 with a disk size of 25 GB.
a Click Add above the Resources table to add a virtual disk.
b Select Hard Disk for the Device Type, and click Next.
c Select Create a new virtual disk, and click Next.
d Set disk size value to 25 GB.
e Select Store with the virtual machine and click Next.
f Verify that the Independent option is deselected for Mode and SCSI (0:2) is selected for VirtualDevice Mode, and click Next.
If prompted to accept recommended settings, accept the recommended settings.
g Click Finish.
h Click OK.
7 If there is an existing virtual Disk 4 from a previous vRealize Automation release, complete thesesteps.
a Power on the primary virtual appliance clone and wait 1 minute.
b Power on the secondary virtual appliance clone.
c On the primary virtual appliance clone, open a new command prompt and navigateto /etc/fstab.
d On the primary virtual appliance clone, open the fstab file, and remove lines startingwith /dev/sdd that contain the Wal_Archive write ahead logs.
e On the primary virtual appliance clone, save the file.
f On the secondary virtual appliance clone, open a new command prompt and navigateto /etc/fstab.
g On the secondary virtual appliance clone, open the fstab file, and remove lines startingwith /dev/sdd that contain the Wal_Archive write ahead logs.
Installing and Upgrading vRealize Automation
VMware, Inc. 338

h On the secondary virtual appliance clone, save the file.
i Power off the secondary virtual appliance clone and wait 1 minute.
j Power off the primary virtual appliance clone.
k Right-click the cloned vRealize Automation primary appliance icon and select Edit Settings.
l Delete Disk 4 on the cloned primary virtual appliance machine.
m Right-click the cloned vRealize Automation secondary appliance icon and select Edit Settings.
n Delete Disk 4 on the cloned secondary virtual appliance machine.
8 Complete these steps to add a Disk 4 with a disk size of 50 GB to the cloned primary and secondaryvirtual appliance machines.
a Click Add above the Resources table to add a virtual disk.
b Select Hard Disk for the Device Type, and click Next.
c Select Create a new virtual disk, and click Next.
d Set disk size value to 50 GB.
e Select Store with the virtual machine and click Next.
f Verify that the Independent option is deselected for Mode and SCSI (0:3) is selected for VirtualDevice Mode, and click Next.
If prompted to accept recommended settings, accept the recommended settings.
g Click Finish.
h Click OK.
9 Create a snapshot of the cloned primary virtual appliance machine and the cloned secondary virtualappliance machine.
What to do next
Power On the Entire System.
Power On the Entire System
After you increase the vCenter hardware resources for upgrade, you power on the system before youperform the upgrade.
Prerequisites
n Back Up Your Existing vRealize Automation 6.2.5 Environment.
n Increase vCenter Server Hardware Resources for vRealize Automation 6.2.5.
Installing and Upgrading vRealize Automation
VMware, Inc. 339
Procedure
1 Power on the entire system.
For instructions, see the vRealize Automation 6.2 version of the Restart vRealize Automation topic.
Note If you have a high-availability environment, use this procedure to power on your virtualappliances.
a Power on the virtual appliance that you powered off last.
b Wait one minute.
c Power on the remaining virtual appliances.
2 Verify that the system is fully functional.
What to do next
Stop vRealize Automation Services on the IaaS Windows Server.
Stop vRealize Automation Services on the IaaS Windows Server
When necessary, you can use the following procedure to stop vRealize Automation services on eachserver that is running IaaS services.
Before you begin the upgrade, stop vRealize Automation services on each IaaS Windows server.
Note Except for a passive backup instance of the Manager Service, the startup type for all services mustbe set to Automatic during the upgrade process. If you set services to Manual, the upgrade process fails.
Procedure
1 Log in to your IaaS Windows server.
2 Select Start > Administrative Tools > Services.
3 Stop services in the following order. Be careful not to shut down the virtual machine.
Each virtual machine has a Management agent, which must be stopped with each set of services.
a Each VMware vCloud Automation Center Agent
b Each VMware DEM-Worker
c The VMware DEM-Orchestrator
d The VMware vCloud Automation Center Service
Installing and Upgrading vRealize Automation
VMware, Inc. 340
4 For distributed deployments with load balancers, disable each secondary node and remove thevRealize Automation health monitors for the following items.
a vRealize Automation appliance
b IaaS Website
c IaaS Manager Service
Verify that load balancer traffic is directed only to the primary nodes and that the vRealize Automationhealth monitors are removed for the appliance, Website, and Manager Service, otherwise theupgrade fails.
5 Verify that the IaaS service hosted in Microsoft Internet Information Services (IIS) is running byperforming the following steps.
a In your browser, go to the URL https://webhostname/Repository/Data/MetaModel.svc toverify that the Web Repository is running. If successful, no errors are returned and you see a listof models in XML format.
b Check the status recorded in the Repository.log file on the Web node of the IaaS virtualmachine to see that status reports OK. The file is located in the VCAC home folderat /Server/Model Manager Web/Logs/Repository.log.
For a distributed IaaS Website, log in to the secondary Website, without MMD, and stop theMicrosoft IIS server temporarily. Check the MetaModel.svc connectivity. To verify that the loadbalancer traffic is going through only the primary Web node, start the Microsoft IIS server.
What to do next
Downloading vRealize Automation Appliance Updates.
Downloading vRealize Automation Appliance Updates
You can check for updates on your appliance management console, and download the updates using oneof the following methods.
For best upgrade performance, use the ISO file method.
n Download vRealize Automation Appliance Updates from a VMware Repository
You can download the update for your vRealize Automation appliance from a public repository onthe vmware.com website.
n Download Virtual Appliance Updates for Use with a CD-ROM Drive
You can update your virtual appliance from an ISO file that the appliance reads from the virtual CD-ROM drive. This is the preferred method.
Download vRealize Automation Appliance Updates from a VMware Repository
You can download the update for your vRealize Automation appliance from a public repository on thevmware.com website.
Installing and Upgrading vRealize Automation
VMware, Inc. 341
Prerequisites
n Back up your existing vRealize Automation environment.
n Verify that your vRealize Automation appliance is powered on.
Procedure
1 Go to the management console for your virtual appliance by using its fully qualified domain name,https://va-hostname.domain.name:5480.
2 Log in with the user name root and the password you entered when you deployed the appliance.
3 Click the Update tab.
4 Click Settings.
5 (Optional) Set how often to check for updates in the Automatic Updates panel.
6 Select Use Default Repository in the Update Repository panel.
The default repository is set to the correct VMware.com URL.
7 Click Save Settings.
Download Virtual Appliance Updates for Use with a CD-ROM Drive
You can update your virtual appliance from an ISO file that the appliance reads from the virtual CD-ROMdrive. This is the preferred method.
You download the ISO file and set up the primary appliance to use this file to upgrade your appliance.
Prerequisites
n Back up your existing vRealize Automation environment.
n Verify that all CD-ROM drives you use in your upgrade are enabled before you update avRealize Automation appliance. See the vSphere documentation for information about adding a CD-ROM drive to a virtual machine in the vSphere client.
Procedure
1 To download the update repository ISO file, go to the vRealize Automation product page atwww.vmware.com. Click vRealize Automation Download Resources to go to the VMwaredownload page.
2 Locate the downloaded file on your system to verify that the file size is the same as the file on theVMware download page. Use the checksums provided on the download page to validate the integrityof your downloaded file. For more information, see the links at the bottom of the VMware downloadpage.
3 Verify that your primary virtual appliance is powered on.
4 Connect the CD-ROM drive for the primary virtual appliance to the ISO file you downloaded.
5 Go to the management console for your virtual appliance by using its fully qualified domain name,https://va-hostname.domain.name:5480.
Installing and Upgrading vRealize Automation
VMware, Inc. 342
6 Log in with the user name root and the password you entered when you deployed the appliance.
7 Click the Update tab.
8 Click Settings.
9 Under Update Repository, select Use CDROM Updates.
10 Click Save Settings.
Updating the vRealize Automation ApplianceAfter you complete the upgrade prerequisites and download the virtual appliance update, you update thevRealize Automation 6.2.5 Appliance to 7.3 or 7.3.1. You also reconfigure some settings for the primaryvRealize Automation appliance.
After you upgrade the primary vRealize Automation appliance node, you upgrade the other nodes in yourenvironment in the following order:
1 Each secondary vRealize Automation appliance
2 IaaS Web site
3 IaaS Manager Service
4 IaaS DEM
5 IaaS Agent
6 Upgrade or migrate each external vRealize Orchestrator instance
Install the Update on the vRealize Automation 6.2.5 Appliance
You install the vRealize Automation update on the vRealize Automation 6.2.5 appliance and configure theappliance settings.
Support for an external PostgreSQL database is discontinued beginning with vRealize Automation 7.1.The upgrade process merges the data from an existing PostgreSQL external database with thePostgreSQL internal database that is part of the vRealize Automation appliance.
Details regarding the data collected through CEIP and the purposes for which it is used by VMware areset forth at the Trust & Assurance Center at http://www.vmware.com/trustvmware/ceip.html.
Do not close the management console while you install the update.
If you encounter any problems during the upgrade process, see Troubleshooting the vRealize AutomationUpgrade.
Prerequisites
n Verify that you selected a download method and downloaded the update. See Downloading vRealizeAutomation Appliance Updates.
n For high-availability distributed deployments, see Back Up Your Existing vRealize Automation 6.2.5Environment.
Installing and Upgrading vRealize Automation
VMware, Inc. 343
n For deployments with load balancers, verify that the traffic is directed only to the primary node andthat the health monitors are disabled.
n If you have a Common Components Catalog component installed in your environment, uninstall thecomponent before you upgrade. For information, see the Common Components Catalog InstallationGuide. If this guide is unavailable, use the alternative procedure in the Checklist for UpgradingvRealize Automation.
n Verify that the jdbc:postgresql database connection points to the external IP address of the masterPostgreSQL node.
a On each vRealize Automation appliance, open a new command prompt.
b Navigate to /etc/vcac/server.xml, and back up server.xml.
c Open server.xml.
d If necessary, edit the server.xml file entry jdbc:posgresql that points to the Postgres databaseand point it to the external IP address of the master PostgreSQL node for external PostgreSQL orprimary virtual appliance for embedded PostgreSQL.
For example, jdbc:postgresql://198.15.100.60:5432/vcac
n Verify that all saved and in-progress requests have finished successfully before you upgrade.
Procedure
1 Open the vRealize Automation appliance management console.
a Go to the management console for your virtual appliance by using its fully qualified domain name,https://va-hostname.domain.name:5480.
b Log in with the user name root and the password you entered when you deployed the appliance.
2 Click Services and verify that each service, except iaas-service, is listed as REGISTERED.
3 Select Update > Settings.
4 Select one of the following:
n Use Default Repository.
n Use CDROM Updates.
5 Click Save Settings.
6 Select Status.
7 Click Check Updates to verify that an update is accessible.
8 (Optional) For instances of vRealize Automation appliance, click Details in the Appliance Versionarea to see information about the location of release notes.
9 Click Install Updates.
10 Click OK.
A message stating that the update is in progress appears.
Installing and Upgrading vRealize Automation
VMware, Inc. 344
11 (Optional) If you have not resized Disk 1 to 50 GB manually, perform the following steps.
a When the system prompts you to reboot the virtual appliance, click System and click Reboot.
During the reboot, the system adjusts the space required for the update.
b After the system reboots, log in again to the vRealize Automation appliance managementconsole, verify that each service, except iaas-service, is listed as REGISTERED, and selectUpdate > Status.
c Click Check Updates and Install Updates.
12 To view the upgrade progress, open the following log files.
n /opt/vmware/var/log/vami/updatecli.log
n /opt/vmware/var/log/vami/vami.log
n /var/log/vmware/horizon/horizon.log
n /var/log/bootstrap/*.log
If you log out during the upgrade process and log in again before the upgrade is finished, you cancontinue to follow the progress of the update in the log file. The updatecli.log file might displayinformation about the version of vRealize Automation that you are upgrading from. This displayedversion changes to the proper version later in the upgrade process.
The time required for the update to finish varies according to your environment.
13 Click Telemetry in the appliance management console. Read the note about participation in theCustomer Experience Improvement Program (CEIP) and select to join or not join the program.
Details regarding the data collected through CEIP and the purposes for which it is used by VMwareare set forth at the Trust & Assurance Center at http://www.vmware.com/trustvmware/ceip.html.
For more information about the Customer Experience Improvement Program, see Join or Leave theCustomer Experience Improvement Program for vRealize Automation.
What to do next
Update Your Single Sign-On Password for VMware Identity Manager.
Update Your Single Sign-On Password for VMware Identity Manager
After you install the updates, you must update the Single Sign-On password forVMware Identity Manager.
VMware Identity Manager replaces the Identity Appliance and vSphere SSO components.
Procedure
1 Log out of the vRealize Automation appliance management console, close the browser, open thebrowser again, and log back in.
2 Select vRA Settings > SSO.
Installing and Upgrading vRealize Automation
VMware, Inc. 345
3 Enter a new VMware Identity Manager password and click Save Settings.
Do not use simple passwords. You can safely ignore the error message SSO server is notconnected. It can require several minutes to restart the services.
The password is accepted.
For a high-availability deployment, the password is applied to the first vRealize Automation appliancenode and propagated to all secondary vRealize Automation appliance nodes.
4 Reboot the virtual appliance.
a Click the System tab.
b Click Reboot and confirm your selection.
5 Verify that all services are running.
a Log in to the vRealize Automation appliance management console.
b Click the Services tab on the console.
c Click the Refresh tab to monitor the progress of service startup.
You should see a minimum of 35 services.
6 Verify that all services are registered except iaas-service.
The release-management service does not start without a vRealize Code Stream license key.
What to do next
Update the License Key.
Update the License Key
You must upgrade your license key to use the latest version of the vRealize Automation appliance.
Procedure
1 Go to the management console for your virtual appliance by using its fully qualified domain name,https://va-hostname.domain.name:5480.
2 Log in with the user name root and the password you entered when the appliance was deployed.
3 Select vRA Settings > Licensing.
If the Licensing tab is not available, perform the following steps and repeat the procedure.
a Log out of the management console.
b Clear your browser cache.
4 Enter your new license key in the New License Key text box.
Endpoints and quotas are flagged according to your end-user license agreement (EULA).
5 Click Submit Key.
Installing and Upgrading vRealize Automation
VMware, Inc. 346
What to do next
Migrate Identity Stores to VMware Identity Manager.
Migrate Identity Stores to VMware Identity Manager
When you upgrade from vRealize Automation 6.2.5 to the current version, you must migrate the identitystores.
As required in the following procedures, refer to the snapshot of your 6.2.5 tenant configurationinformation.
Note After you migrate the identity stores, users of vRealize Code Stream must manually reassignvRealize Code Stream roles.
Procedure
1 Create a Local User Account for Your Tenants
You must set up a tenant with a local user account and assign tenant administrator privileges to thelocal user account.
2 Synchronize Users and Groups for an Active Directory Link
To import your users and groups into vRealize Automation using the Directories Managementcapability, you must connect to your Active Directory link.
3 Migrate Multiple Tenant and IaaS Administrators
For each vRealize Automation tenant with Tenant or IaaS administrators, you must delete andrestore each administrator manually.
Create a Local User Account for Your Tenants
You must set up a tenant with a local user account and assign tenant administrator privileges to the localuser account.
Repeat this procedure for each of your tenants.
Prerequisites
Verify that you have set a new VMware Identity Manager password. See Update Your Single Sign-OnPassword for VMware Identity Manager.
Procedure
1 Log in to the vRealize Automation console with the default system administrator user nameadministrator and password.
The console location is https://vra-appliance/vcac/.
2 Click Administration > Tenants.
Click a tenant name, for example, for the default tenant, click vsphere.local.
3 Select the Local Users tab.
Installing and Upgrading vRealize Automation
VMware, Inc. 347
4 Click New.
5 Create a local user account.
You assign the tenant administrator role to this user. Verify that the local user name is a unique userfor your tenant and will not conflict with your Active Directory users.
6 Click OK.
7 Click Administrators.
8 Enter the local user name in the Tenant administrators search box and press Enter.
9 Click Finish.
10 Log out of the console.
What to do next
Synchronize Users and Groups for an Active Directory Link.
Synchronize Users and Groups for an Active Directory Link
To import your users and groups into vRealize Automation using the Directories Management capability,you must connect to your Active Directory link.
Perform this procedure for each of your tenants.
Prerequisites
Verify that you have access privileges to the Active Directory.
Procedure
1 Log in to the vRealize Automation console at: https://vra-appliance/vcac/org/tenant_name.
2 Select Administration > Directories Management > Directories.
3 Click Add Directory and select Add Active Directory over LDAP/IWA.
4 Enter your Active Directory account settings.
u Non-Native Active Directories
Option Sample Input
Directory Name Enter a unique directory name.
Select Active Directory over LDAP when using non-Native Active Directory.
This Directory Supports DNS Services Deselect this option.
Base DN Enter the Distinguished Name (DN) of the starting point for directory serversearches.
For example, cn=users,dc=rainpole,dc=local.
Installing and Upgrading vRealize Automation
VMware, Inc. 348

Option Sample Input
Bind DN Enter the full distinguished name (DN), including common name (CN), of anActive Directory user account that has privileges to search for users.
For example, cn=config_admin infra,cn=users,dc=rainpole,dc=local.
Bind DN Password Enter the Active Directory password for the account that can search for users. u Native Active Directories
Option Sample Input
Directory Name Enter a unique directory name.
Select Active Directory (Integrated Windows Authentication) when using NativeActive Directory.
Domain Name Enter the name of the domain to join.
Domain Admin Username Enter the user name for the domain admin.
Domain Admin Password Enter the password for the domain admin account.
Bind User UPN Use the email address format to enter the name of the user who can authenticatethe domain.
Bind DN Password Enter the Active Directory bind account password for the account that can searchfor users.
5 Click Test Connection to test the connection to the configured directory.
6 Click Save & Next.
The Select the Domains page appears, and displays the list of domains.
7 Accept the default domain setting and click Next.
8 Verify that the attribute names are mapped to the correct Active Directory attributes, and click Next.
9 Select the groups and users to synchronize.
a Click the New icon.
b Enter the user domain and click Find Groups.
For example, enter dc=vcac,dc=local.
c To select the groups to synchronize, click Select and click Next.
d On the Select Users page, select the users to synchronize and click Next.
10 Review the users and groups are syncing to the directory, and click Sync Directory.
The directory synchronization takes some time and runs in the background.
11 Select Administration > Directories Management > Identity Providers, and click your new identityprovider.
For example, WorkspaceIDP__1.
12 Scroll to the bottom of the page, and update the value for the IdP Hostname property to point to theFQDN for the vRealize Automation load balancer.
Installing and Upgrading vRealize Automation
VMware, Inc. 349

13 Click Save.
14 Repeat steps 11–13 for each tenant and identity provider.
15 After you upgrade all vRealize Automation nodes, log in to each tenant and select Administration >Directories Management > Identity Providers.
Each identity provider has all vRealize Automation connectors added to it.
For example, if your deployment has two vRealize Automation appliances, the identity provider hastwo associated connectors.
Migrate Multiple Tenant and IaaS Administrators
For each vRealize Automation tenant with Tenant or IaaS administrators, you must delete and restoreeach administrator manually.
Perform the following procedure for each tenant in the vRealize Automation console.
Prerequisites
Log in to the vRealize Automation console on the upgraded virtual appliance.
1 Open the vRealize Automation console on the upgraded virtual appliance using its fully qualifieddomain name, https://va-hostname.domain_name/vcac.
For a distributed environment, open the console on the master virtual appliance.
2 Select the vsphere.local domain.
3 Log in with the user name administrator and the password that you entered when you deployedthe virtual appliance.
Procedure
1 Select Administration > Tenants.
2 Click a tenant name.
3 Click Administrators.
4 Make a list of each tenant and IaaS administrator name and user name.
5 Point to each administrator and click the delete icon ( ) until you delete all administrators.
6 Click Finish.
7 On the Tenants page, click the tenant name again.
8 Click Administrators.
9 Enter the name of each user that you deleted in the appropriate search box and press Enter.
10 Click the name of the appropriate user from the search returns to add the user back as anadministrator.
When you finish, the list of tenant administrators and IaaS administrators looks the same as the list ofadministrators you deleted.
Installing and Upgrading vRealize Automation
VMware, Inc. 350
11 Click Finish.
What to do next
Upgrade the secondary appliances. See Install the Update on Additional vRealize AutomationAppliances.
Install the Update on Additional vRealize Automation Appliances
In a high-availability environment, the master virtual appliance is the node that runs the embeddedPostgreSQL database in the Master mode. The other nodes in the environment run the embeddedPostgreSQL database in Replica mode. During upgrade, the replica virtual appliance does not requiredatabase changes.
Do not close the management console while you install the update.
Prerequisites
n Verify that you have downloaded the virtual appliance updates. See Downloading vRealizeAutomation Appliance Updates.
n Verify that the jdbc:postgresql database connection points to the external IP address of the masterPostgreSQL node.
a On the vRealize Automation appliance, open a new command prompt.
b Navigate to /etc/vcac/server.xml, and back up the server.xml file.
c Open the server.xml file.
d If necessary, edit the server.xml file entry jdbc:postgresql to indicate the PostgreSQL databasethat you want to use.
n For an external PostgreSQL database, enter the external IP address of the masterPostgreSQL node.
n For the embedded PostgreSQL database, enter the IP address of the master virtualappliance.
For example, jdbc:postgresql://198.15.100.60:5432/vcac
Procedure
1 Open the vRealize Automation appliance management console for the upgrade.
a On each secondary vRealize Automation appliance, log in to vRealize Automation ApplianceManagement as root using the password you entered when you deployed thevRealize Automation appliance.
b Log in with the user name root and the password you entered when you deployed the appliance.
c Click Update.
2 Click Settings.
3 Select to download the updates from a VMware repository or CDROM in the Update Repositorysection.
Installing and Upgrading vRealize Automation
VMware, Inc. 351
4 Click Status.
5 Click Check Updates to verify that an update is accessible.
6 Click Install Updates.
7 Click OK.
A message stating that the update is in progress appears.
8 (Optional) If you have not manually resized Disk 1 GB to 50 GB, perform the following steps.
a When the system prompts you to reboot the virtual appliance, click System and click Reboot.
During the reboot, the system adjusts the space on Disk 1 required for the update.
b After the system reboots, log out and log in again to the vRealize Automation appliancemanagement console and select Update > Status.
c Click Check Updates and Install Updates.
9 To verify that upgrade is progressing successfully, open the log files.
n /opt/vmware/var/log/vami/vami.log
n /opt/vmware/var/log/vami/updatecli.log
n /var/log/vmware/horizon/horizon.log
n /var/log/bootstrap/*.log
If you log out during the upgrade process and log in, you can continue to follow the progress of theupdate in the log file /opt/vmware/var/log/vami/updatecli.log.
The time it takes for the update to finish depends on your environment.
10 When the update is finished, log out the vRealize Automation appliance management console, clearyour Web browser cache, and log in to the vRealize Automation appliance management console.
11 Reboot the virtual appliance.
a Click System.
b Click Reboot and confirm your selection.
12 After the virtual appliance has rebooted, log in to the replica vRealize Automation appliancemanagement console.
13 Select vRA Settings > Cluster.
14 Enter the master vRealize Automation appliance user name and password.
15 Click Join Cluster.
16 Click Services and verify that each service, except iaas-service, is listed as REGISTERED.
What to do next
Upgrading the IaaS Server Components After Upgrading vRealize Automation.
Installing and Upgrading vRealize Automation
VMware, Inc. 352
Upgrading the IaaS Server Components After UpgradingvRealize AutomationAfter you upgrade vRealize Automation 6.2.5 to 7.3 or 7.3.1, a system administrator upgrades the IaaSserver components, including the Microsoft SQL Server database.
You have two options for upgrading the IaaS server components.
n Use the automated IaaS upgrade shell script.
n Use the vRealize Automation 7.3 IaaS installer executable file.
If you have a Common Components Catalog component installed, you must uninstall the componentbefore you upgrade. After you finish the upgrade, you can reinstall the component with the appropriateversion. For more information, see the Common Components Catalog Installation Guide. If this guide isunavailable, use the alternative procedure in Checklist for Upgrading vRealize Automation.
Upgrade IaaS Components Using the Upgrade Shell Script After UpgradingvRealize Automation
Use the upgrade shell script to upgrade the IaaS Components after you update eachvRealize Automation 6.2.5 appliance to 7.3 or 7.3.1.
The updated primary or master vvRealize Automation appliance contains a shell script that you use toupgrade each IaaS node and component.
You can run the upgrade script by using the vSphere console for the virtual machine or by using an SSHconsole session. If you use the vSphere console, you avoid intermittent network connectivity problemsthat can break the execution of the script.
If you stop the script while the script is upgrading a component, the script runs until the upgrade isfinished on the component. If any components on the node are not upgraded, you must run the scriptagain.
When the upgrade finishes, you can review the upgrade result by opening the upgrade log fileat /usr/lib/vcac/tools/upgrade/upgrade.log.
Prerequisites
n Verify the successful update of all vRealize Automation appliances.
n If you reboot an IaaS server after you update all the vRealize Automation appliances, you must stopthe IaaS Windows services. Before you upgrade the IaaS components, stop all the IaaS Windowsservices, except for the Management Agent service, on the server.
n Before you run the upgrade shell script on the master or primary vRealize Automation appliancenode, verify that each service is REGISTERED.
a Go to the appliance management console for your virtual appliance by using its fully qualifieddomain name: https://va-hostname.domain.name:5480.
b Log in with the user name root and the password you entered when the appliance wasdeployed.
Installing and Upgrading vRealize Automation
VMware, Inc. 353

c Click Services.
d Verify that each service, except the iaas-service, is REGISTERED.
n Upgrade the Management Agent on each vRealize Automation IaaS virtual machine.
a Open a browser and navigate to the VMware vRealize Automation IaaS Installation page on thevRealize Automation appliance using the fully qualified domain name:https://virtual_appliance_host:5480/installer.
b Click Management Agent Installer.
By default, the installer is downloaded to the Downloads folder.
c Log in to each vRealize Automation IaaS virtual machine, upgrade the Management Agent withthe Management Agent Installer file.
n Verify that your primary IaaS Website node where the Model Manager data is installed has JAVA SERuntime Environment 8, 64 bits, update 161 or later installed. After you install Java, you must set theenvironment variable, JAVA_HOME, to the new version.
n Log in to each IaaS Website node and verify that the creation date is earlier than the modified date inthe web.config file. If the creation date for the web.config file is the same as or later than themodified date, perform the procedure in Upgrade Fails for IaaS Website Component.
n To verify that each IaaS node has an upgraded IaaS Management Agent, perform these steps oneach IaaS node.
a Log in to the vRealize Automation appliance management console.
b Select vRA Settings > Cluster.
c Expand the list of all installed components on each IaaS node, and locate the IaaS ManagementAgent.
d Verify that the Management Agent version is current.
n Verify that the IaaS Microsoft SQL Server database backup is accessible in case you must roll back.
n Delete all orphaned IaaS nodes. See Delete Orphaned Nodes on vRealize Automation.
n Verify that snapshots of the IaaS servers in your deployment are available.
If the upgrade is unsuccessful, return to the snapshot and database backup and attempt anotherupgrade.
Procedure
1 Open a new console session on the primary or master vRealize Automation appliance node and login with the root account.
If you plan to run the upgrade script with SSH, open an SSH console session.
2 Change directories to /usr/lib/vcac/tools/upgrade/.
3 At the prompt, run this command to create the upgrade.properties file.
./generate_properties
Installing and Upgrading vRealize Automation
VMware, Inc. 354
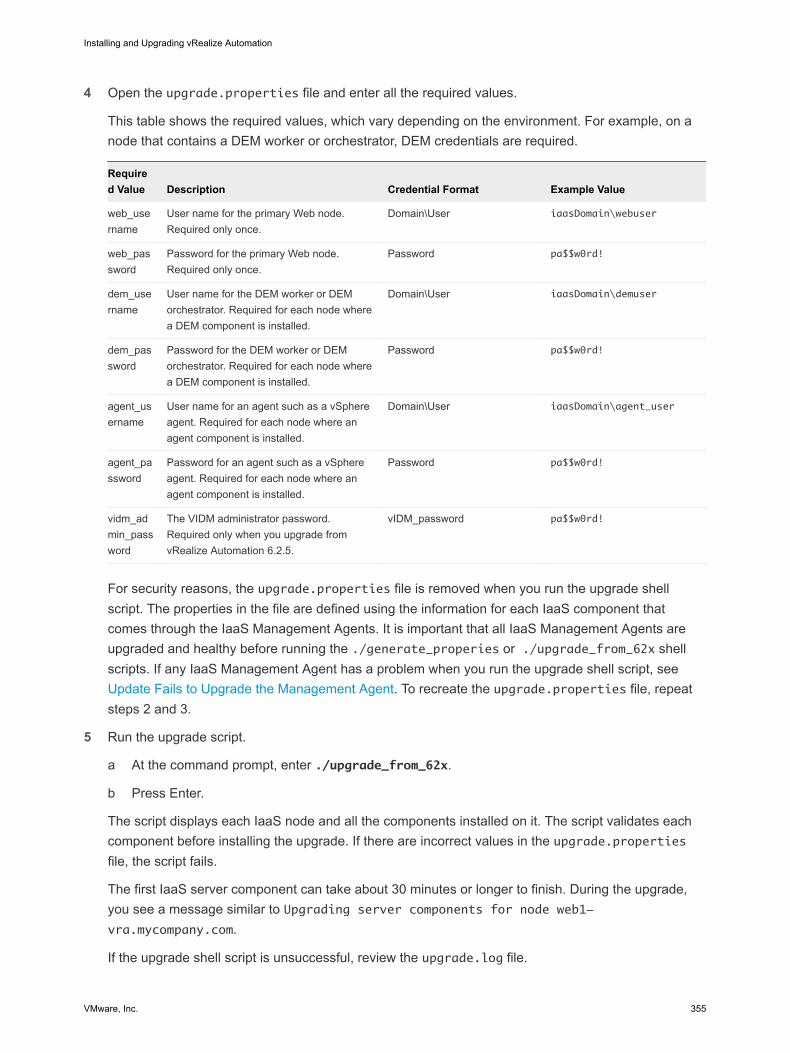
4 Open the upgrade.properties file and enter all the required values.
This table shows the required values, which vary depending on the environment. For example, on anode that contains a DEM worker or orchestrator, DEM credentials are required.
Required Value Description Credential Format Example Value
web_username
User name for the primary Web node.Required only once.
Domain\User iaasDomain\webuser
web_password
Password for the primary Web node.Required only once.
Password pa$$w0rd!
dem_username
User name for the DEM worker or DEMorchestrator. Required for each node wherea DEM component is installed.
Domain\User iaasDomain\demuser
dem_password
Password for the DEM worker or DEMorchestrator. Required for each node wherea DEM component is installed.
Password pa$$w0rd!
agent_username
User name for an agent such as a vSphereagent. Required for each node where anagent component is installed.
Domain\User iaasDomain\agent_user
agent_password
Password for an agent such as a vSphereagent. Required for each node where anagent component is installed.
Password pa$$w0rd!
vidm_admin_password
The VIDM administrator password.Required only when you upgrade fromvRealize Automation 6.2.5.
vIDM_password pa$$w0rd!
For security reasons, the upgrade.properties file is removed when you run the upgrade shellscript. The properties in the file are defined using the information for each IaaS component thatcomes through the IaaS Management Agents. It is important that all IaaS Management Agents areupgraded and healthy before running the ./generate_properies or ./upgrade_from_62x shellscripts. If any IaaS Management Agent has a problem when you run the upgrade shell script, see Update Fails to Upgrade the Management Agent. To recreate the upgrade.properties file, repeatsteps 2 and 3.
5 Run the upgrade script.
a At the command prompt, enter ./upgrade_from_62x.
b Press Enter.
The script displays each IaaS node and all the components installed on it. The script validates eachcomponent before installing the upgrade. If there are incorrect values in the upgrade.propertiesfile, the script fails.
The first IaaS server component can take about 30 minutes or longer to finish. During the upgrade,you see a message similar to Upgrading server components for node web1-vra.mycompany.com.
If the upgrade shell script is unsuccessful, review the upgrade.log file.
Installing and Upgrading vRealize Automation
VMware, Inc. 355
You can run the upgrade script again after you fix a problem. Before you run the upgrade script again,recreate the upgrade.properties file, open it, and enter all the required values.
6 (Optional) Enable automatic Manager Service failover. See Enable Automatic Manager ServiceFailover After Upgrade.
What to do next
Restore Access to Built-In vRealize Orchestrator Control Center.
Upgrading IaaS Components Using the IaaS Installer Executable File After UpgradingvRealize Automation
You can use this alternative method to upgrade IaaS components after upgrading vRealize Automation6.2.5 to 7.3 or 7.3.1.
Download the IaaS Installer to Upgrade IaaS Components After UpgradingvRealize Automation
After upgrading from vRealize Automation 6.2.5 to 7.3 or 7.3.1, download the IaaS installer to the virtualmachine where the IaaS components to be upgraded are installed.
If you see certificate warnings during this procedure, you can ignore them.
Note Except for a passive backup instance of the Manager Service, the startup type for all services mustbe set to Automatic during the upgrade process. If you set services to Manual, the upgrade process fails.
Prerequisites
n Verify that Microsoft .NET Framework 4.5.2 or later is installed on the IaaS installation virtualmachine. You can download the .NET installer from the VMware vRealize Automation IaaSInstallation page. If you update .NET to 4.5.2 after you shut down the services, the virtual machinemight restart as part of the installation. When this happens, you must manually stop all IaaS serviceson the virtual machine except for the Management Agent.
n If you are using Internet Explorer for the download, verify that Enhanced Security Configuration is notenabled. Enter res://iesetup.dll/SoftAdmin.htm in the search bar and press Enter.
n Log in as a local administrator to the Windows server where one or more of the IaaS components youwant to upgrade are installed.
Procedure
1 Open a Web browser.
2 Enter the URL for the VMware vRealize Automation IaaS Installation page.
For example, https://vcac-va-hostname.domain.name:5480/installer, where vcac-va-hostname.domain.name is the name of the primary or master vRealize Automation appliance node.
3 Click IaaS installer.
Installing and Upgrading vRealize Automation
VMware, Inc. 356
4 The installer file, [email protected], is sent to the Downloads folderby default.
Do not change the filename. It is used to connect the installation to the vRealize Automationappliance.
What to do next
n If you have a standalone vRealize Orchestrator, see Upgrading Stand-Alone vRealize OrchestratorAppliance for Use with vRealize Automation.
n If you have an external vRealize Orchestrator appliance cluster, see Upgrading External vRealizeOrchestrator Appliance Cluster for Use with vRealize Automation.
n See Upgrade the IaaS Components After Upgrading vRealize Automation.
Upgrade the IaaS Components After Upgrading vRealize Automation
After upgrading vRealize Automation 6.2.5 to 7.3 or 7.3.1, you must upgrade the SQL database andconfigure all systems that have IaaS components installed. You can use these steps for minimal anddistributed installations.
Note The IaaS installer must be on the virtual machine that contains the IaaS components you want toupgrade. You cannot run the installer from an external location, except for the Microsoft SQL database,which also can be upgraded remotely from the Web node.
Verify that snapshots of the IaaS servers in your deployment are available. If the upgrade fails, you canreturn to the snapshot and attempt another upgrade.
Perform the upgrade so that services are upgraded in the following order:
1 IaaS Websites
If you are using a load balancer, disable traffic to all non-primary nodes.
Finish the upgrade on one server before upgrading the next server that is running a Website service.Begin with the one that has the Model Manager Data component installed.
If you are performing a manual external Microsoft SQL database upgrade, you must upgrade theexternal SQL before you upgrade the Web node. You can upgrade the external SQL remotely fromthe Web node.
2 Manager Services
Upgrade the active Manager Service before you upgrade the passive Manager Service.
If you do not have SSL encryption enabled in your SQL instance, deselect SSL encryption in theIaaS Upgrade configuration dialog box.
3 DEM orchestrator and workers
Upgrade all DEM orchestrators and workers. Finish the upgrade on one server before you upgradethe next server.
Installing and Upgrading vRealize Automation
VMware, Inc. 357
4 Agents
Finish the upgrade on one server before you upgrade the next server that is running an agent.
5 Management Agent
Is updated as part of the upgrade process.
If you are using different services on one server, the upgrade updates the services in the proper order.For example, if your site has website and manager services on the same server, select both for update.The upgrade installer applies the updates in the proper order. You must complete the upgrade on oneserver before you begin an upgrade on another.
Note If your deployment uses a load balancer, the first appliance you plan to upgrade must beconnected to the load balancer. All other instances of vRealize Automation appliance must be disabled forload balancer traffic before you apply the upgrade to avoid caching errors.
Prerequisites
n Back up your existing vRealize Automation 6.2.5 environment.
n If you reboot an IaaS server after you update all the vRealize Automation appliances, you must stopthe IaaS Windows services. Before you upgrade the IaaS components, stop all the IaaS Windowsservices, except for the Management Agent service, on the server.
n Download the IaaS Installer to Upgrade IaaS Components After Upgrading vRealize Automation.
n Verify that your primary IaaS Website node where the Model Manager data is installed has the properJava version. You must have JAVA SE Runtime Environment 8, 64 bits, update 161 or later installed.After you install Java, set the environment variable, JAVA_HOME, to the new version.
n Verify that the creation date is earlier than the modified date in the web.config file. If the creationdate for the web.config file is the same as or later than the modified date, perform the procedure in Upgrade Fails for IaaS Website Component.
n If you are upgrading from vRealize Automation 6.2.5 and have an external Microsoft SQL database,you must have the proper Management Agent version. The Management Agent on the externaldatabase must be version 7.0 or later before you run the IaaS Website upgrade. You can check theManagement Agent version in the Control Panel of your external SQL virtual machine. If theManagement Agent is not version 7.0 or later, complete these steps to upgrade the ManagementAgent.
a Open a browser and navigate to the VMware vRealize Automation IaaS Installation page onthevRealize Automation appliance using the fully qualified domain name:https://virtual_appliance_host:5480/installer.
b Click Management Agent Installer.
By default, the installer is downloaded to the Downloads folder.
c Log in to the external database, upgrade the Management Agent with the Management AgentInstaller file.
Installing and Upgrading vRealize Automation
VMware, Inc. 358
n If you have a Common Components Catalog component installed, you must uninstall the componentbefore you upgrade. For more information, see the Common Components Catalog Installation Guideor follow the steps provided in Checklist for Upgrading vRealize Automation.
Procedure
1 If you are using a load balancer, prepare your environment.
a Verify the IaaS Website node that contains the Model Manager data is enabled for load balancertraffic.
You can identify this node by the presence of the vCAC Folder\Server\ConfigTool folder.
b Disable all other IaaS Websites and non-primary Manager Services for load balancer traffic.
2 Right-click the [email protected] setup file and selectRun as administrator.
3 Click Next.
4 Accept the license agreement and click Next.
5 Enter the administrator credentials for your current deployment on the Log In page.
The user name is root and the password is the password that you entered when you deployed theappliance.
6 Select Accept Certificate.
7 On the Installation Type page, verify that Upgrade is selected.
If Upgrade is not selected, the components on this system are already upgraded to this version.
8 Click Next.
9 Configure the upgrade settings.
Option Action
If you are upgrading the ModelManager Data
Select the Model Manager Data check box in the vCAC Server section.
The check box is selected by default. Upgrade the Model Manager data onlyonce. When you upgrade a distributed installation, the Web servers stopfunctioning while there is a version mismatch between the Web servers and theModel Manager data. When the Model Manager data upgrade finishes, the Webservers function as usual.
If you are not upgrading the ModelManager Data
Unselect the Model Manager Data check box in the vCAC Server section.
Installing and Upgrading vRealize Automation
VMware, Inc. 359
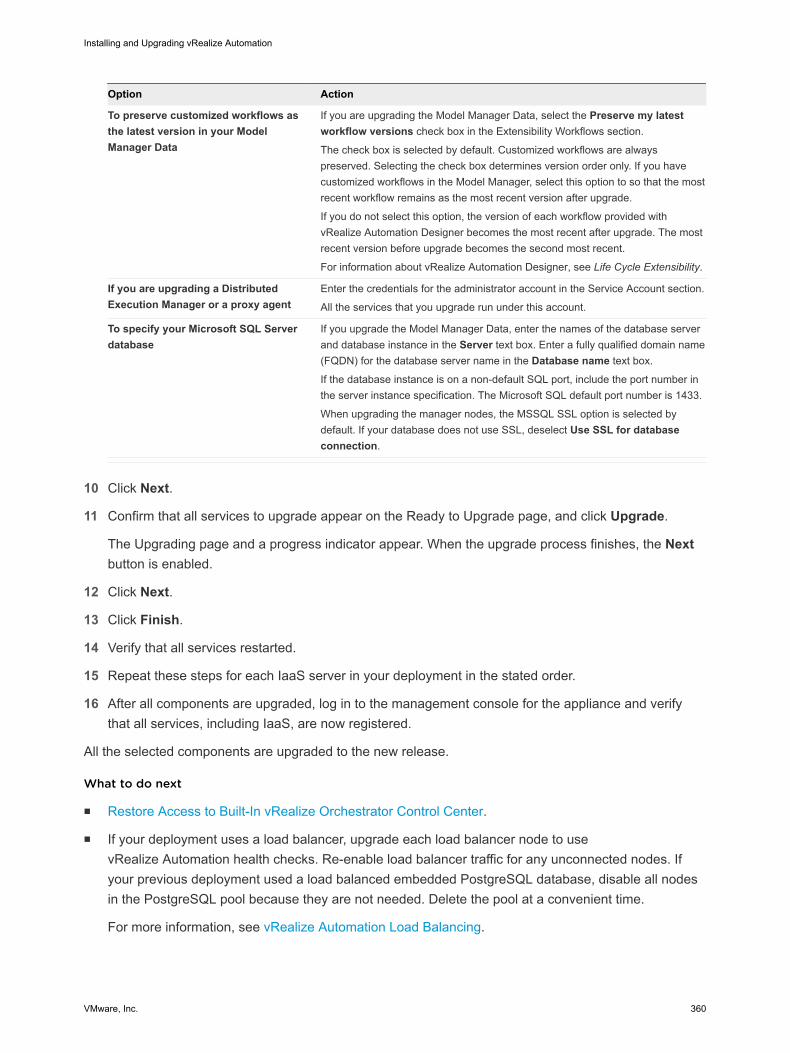
Option Action
To preserve customized workflows asthe latest version in your ModelManager Data
If you are upgrading the Model Manager Data, select the Preserve my latestworkflow versions check box in the Extensibility Workflows section.
The check box is selected by default. Customized workflows are alwayspreserved. Selecting the check box determines version order only. If you havecustomized workflows in the Model Manager, select this option to so that the mostrecent workflow remains as the most recent version after upgrade.
If you do not select this option, the version of each workflow provided withvRealize Automation Designer becomes the most recent after upgrade. The mostrecent version before upgrade becomes the second most recent.
For information about vRealize Automation Designer, see Life Cycle Extensibility.
If you are upgrading a DistributedExecution Manager or a proxy agent
Enter the credentials for the administrator account in the Service Account section.
All the services that you upgrade run under this account.
To specify your Microsoft SQL Serverdatabase
If you upgrade the Model Manager Data, enter the names of the database serverand database instance in the Server text box. Enter a fully qualified domain name(FQDN) for the database server name in the Database name text box.
If the database instance is on a non-default SQL port, include the port number inthe server instance specification. The Microsoft SQL default port number is 1433.
When upgrading the manager nodes, the MSSQL SSL option is selected bydefault. If your database does not use SSL, deselect Use SSL for databaseconnection.
10 Click Next.
11 Confirm that all services to upgrade appear on the Ready to Upgrade page, and click Upgrade.
The Upgrading page and a progress indicator appear. When the upgrade process finishes, the Nextbutton is enabled.
12 Click Next.
13 Click Finish.
14 Verify that all services restarted.
15 Repeat these steps for each IaaS server in your deployment in the stated order.
16 After all components are upgraded, log in to the management console for the appliance and verifythat all services, including IaaS, are now registered.
All the selected components are upgraded to the new release.
What to do next
n Restore Access to Built-In vRealize Orchestrator Control Center.
n If your deployment uses a load balancer, upgrade each load balancer node to usevRealize Automation health checks. Re-enable load balancer traffic for any unconnected nodes. Ifyour previous deployment used a load balanced embedded PostgreSQL database, disable all nodesin the PostgreSQL pool because they are not needed. Delete the pool at a convenient time.
For more information, see vRealize Automation Load Balancing.
Installing and Upgrading vRealize Automation
VMware, Inc. 360
n (Optional) Enable automatic Manager Service failover. See Enable Automatic Manager ServiceFailover After Upgrade.
Restore Access to Built-In vRealize Orchestrator Control Center
After you upgrade the IaaS server components, you must restore access to the vRealize Orchestrator.
When you upgrade to vRealize Automation 7.3, you need to perform this procedure to accommodate thenew Role-Based Access Control feature. This procedure is written for a high-availability environment.
Prerequisites
Make a snapshot of your vRealize Automation environment.
Procedure
1 Log in to the vRealize Automation appliance management console as root by using the appliancehost fully qualified domain name, https://va-hostname.domain.name:5480.
2 Select vRA Settings > Database.
3 Identify the master and replica nodes.
4 On each replica node, open an SSH session, log in as administrator, and run this command:
service vco-server stop && service vco-configurator stop
5 On the master node, open an SSH session, log in as administrator, and run this command:
rm /etc/vco/app-server/vco-registration-id
6 On the master node, change directories to /etc/vco/app-server/.
7 Open the sso.properties file.
8 If the property name com.vmware.o11n.sso.admin.group.name contains spaces or any otherBash-related characters that can be accepted as a special character in a Bash command such as ahyphen (') or a dollar sign ($), complete these steps.
a Copy the line with the com.vmware.o11n.sso.admin.group.name property and enterAdminGroup for the value.
b Add # to the beginning of the original line with the com.vmware.o11n.sso.admin.group.nameproperty to comment the line.
c Save and close the sso.properties file.
9 Run this command:
vcac-vami vco-service-reconfigure
Installing and Upgrading vRealize Automation
VMware, Inc. 361
10 If you completed step 8, open the sso.properties file and complete these steps.
a Remove the # from the beginning of the original line with thecom.vmware.o11n.sso.admin.group.name property to uncomment the line.
b Remove the copy of the line with the com.vmware.o11n.sso.admin.group.name property.
c Save and close the sso.properties file.
11 Run this command to restart the vco-server service:
service vco-server restart
12 Run this command to restart the vco-configurator service:
service vco-configurator restart
13 In the vRealize Automation appliance management console, click Services and wait until all theservices in the master node are REGISTERED.
14 When all the services are registered, join the vRealize Automation replica nodes to thevRealize Automation cluster to synchronize the vRealize Orchestrator configuration. For information,see Reconfigure the Built-In vRealize Orchestrator to Support High Availability.
What to do next
Upgrading vRealize Orchestrator After Upgrading from vRealize Automation.
Upgrading vRealize Orchestrator After Upgrading from vRealize AutomationYou must upgrade your vRealize Orchestrator instance when you upgrade from vRealize Automation6.2.5 to 7.3 or 7.3.1.
With the release of vRealize Orchestrator 7.3, you have two options for upgrading vRealize Orchestratorafter a successful upgrade to vRealize Automation 7.3.
n You can migrate your existing external vRealize Orchestrator server to the embeddedvRealize Orchestrator included in vRealize Automation 7.3 or 7.3.1.
n You can upgrade your existing standalone or clustered vRealize Orchestrator server to work withvRealize Automation 7.3 or 7.3.1.
Note It is important to keep vRealize Automation and vRealize Orchestrator on the same version: 7.3.0with 7.3.0 or 7.3.1 with 7.3.1.
Migrating an External Orchestrator Server to vRealize Automation 7.3
You can migrate your existing external Orchestrator server to a vRealize Orchestrator instance embeddedin vRealize Automation.
You can deploy vRealize Orchestrator as an external server instance and configure vRealize Automationto work with that external instance, or you can configure and use the vRealize Orchestrator server that isincluded in the vRealize Automation appliance.
Installing and Upgrading vRealize Automation
VMware, Inc. 362
VMware recommends that you migrate your external vRealize Orchestrator to the Orchestrator server thatis built into vRealize Automation. The migration from an external to embedded Orchestrator provides thefollowing benefits:
n Reduces the total cost of ownership.
n Simplifies the deployment model.
n Improves the operational efficiency.
Note Consider using the external vRealize Orchestrator in the following cases:n Multiple tenants in the vRealize Automation environment.
n Geographically dispersed environment.
n Workload handling.
n Use of specific plug-ins, such as the Site Recovery Manager plug-in.
Control Center Differences Between External and Embedded Orchestrator
Some of the menu items that are available in Control Center of an external vRealize Orchestrator are notincluded in the default Control Center view of an embedded Orchestrator instance.
In Control Center of the embedded Orchestrator server, a few options are hidden by default.
Menu Item Details
Licensing The embedded Orchestrator is preconfigured to use vRealize Automation as a license provider.
Export/Import Configuration The embedded Orchestrator configuration is included in the exported vRealize Automationcomponents.
Configure Database The embedded Orchestrator uses the database that is used by vRealize Automation.
Customer ExperienceImprovement Program
You can join the Customer Experience Improvement Program (CEIP) from thevRealize Automation appliance management interface.
See The Customer Experience Improvement Program in Managing vRealize Automation.
Another options that are hidden from the default Control Center view are the Host address text box andthe UNREGISTER button on the Configure Authentication Provider page.
Note To see the full set of Control Center options in vRealize Orchestrator that is built intovRealize Automation, you must access the advanced Orchestrator Management page at https://vra-va-hostname.domain.name_or_load_balancer_address:8283/vco-controlcenter/#/?advanced and click theF5 button on the keyboard to refresh the page.
Migrate an External vRealize Orchestrator 6.x on Windows to vRealize Automation 7.3
After you upgrade your vRealize Automation from version 6.x to version 7.3, you can migrate yourexisting external Orchestrator 6.x installed on Windows to the Orchestrator server that is built intovRealize Automation 7.3.
Note If you have a distributed vRealize Automation environment with multiple vRealize Automationappliance nodes, perform the migration procedure only on the primary vRealize Automation node.
Installing and Upgrading vRealize Automation
VMware, Inc. 363
Prerequisites
n Upgrade or migrate your vRealize Automation to version 7.3. For more information, see UpgradingvRealize Automation in Installing or Upgrading vRealize Automation.
n If the source Orchestrator uses a SHA1 package-signing certificate, make sure to regenerate thecertificate using a stronger signing algorithm.
n Stop the Orchestrator server service of the external Orchestrator.
n Back up the database, including the database schema, of the external Orchestrator server.
Procedure
1 Download the migration tool from the target Orchestrator server.
a Log in to the vRealize Automation appliance over SSH as root.
b Download the migration-tool.zip archive that is located in the /var/lib/vco/downloadsdirectory.
2 Export the Orchestrator configuration from the source Orchestrator server.
a Set the PATH environment variable by pointing it to the bin folder of the Java JRE installed withOrchestrator.
b Upload the migration tool to the Windows server, on which the external Orchestrator is installed.
c Extract the downloaded archive in the Orchestrator install folder.
The default path to the Orchestrator install folder in a Windows-based installation is C:\ProgramFiles\VMware\Orchestrator.
d Run the Windows command prompt as administrator and navigate to the bin folder in theOrchestrator install folder.
By default, the path to the bin folder is C:\ProgramFiles\VMware\Orchestrator\migration-cli\bin.
e Run the export command from the command line.
C:\Program Files\VMware\Orchestrator\migration-cli\bin\vro-migrate.bat export
This command combines the VMware vRealize Orchestrator configuration files and plug-ins intoan export archive.
The archive is created in the same folder as the migration-cli folder.
Installing and Upgrading vRealize Automation
VMware, Inc. 364

3 Migrate the exported configuration to the Orchestrator server that is built into vRealize Automation7.3.
a On the vRealize Automation appliance, stop the Orchestrator server service and the ControlCenter service of the built-in vRealize Orchestrator server.
service vco-server stop && service vco-configurator stop
b Back up the catalina.properties, server.xml, and web.xml files in the /etc/vco/app-server and /etc/vco/configuration directories.
For example:
cp catalina.properties catalina.properties-$(date +%Y-%m-%d_%H-%M-%S)
c Back up the setenv.sh file in the /usr/lib/vco/app-server/binand /usr/lib/vco/configuration/bin directories.
cp setenv.sh setenv.sh-$(date +%Y-%m-%d_%H-%M-%S)
d Upload the exported configuration file to the /usr/lib/vco/tools/configuration-cli/bindirectory on the vRealize Automation appliance.
e Change the ownership of the exported Orchestrator configuration file.
chown vco:vco orchestrator-config-export-orchestrator_ip_address-date_hour.zip
f Import the Orchestrator configuration file to the built-in vRealize Orchestrator server, by runningthe vro-configure script with the import command.
./vro-configure.sh import --skipDatabaseSettings --skipLicense --skipSettings --
skipSslCertificate --notForceImportPlugins --notRemoveMissingPlugins --skipTrustStore --path
orchestrator-config-export-orchestrator_appliance_ip-date_hour.zip
Installing and Upgrading vRealize Automation
VMware, Inc. 365
4 Migrate the database to the internal PostgreSQL database, by running the vro-configure script withthe db-migrate command.
./vro-configure.sh db-migrate --sourceJdbcUrl JDBC_connection_URL --sourceDbUsername database_user
--sourceDbPassword database_user_password
Note Enclose passwords that contain special characters in single quotation marks.
The JDBC_connection_URL depends on the type of database that you use.
PostgreSQL: jdbc:postgresql://host:port/database_name
MSSQL: jdbc:jtds:sqlserver://host:port/database_name\; if using SQL authentication and MSSQL:
jdbc:jtds:sqlserver://host:port/database_name\;domain=domain\;useNTLMv2=TRUE if using Windows
authentication.
Oracle: jdbc:oracle:thin:@host:port:database_name
The default database login information is:
database_name vmware
database_user vmware
database_user_password vmware
5 If you migrated vRealize Automation instead of upgrading it, delete the trusted Single Sign-Oncertificates from the database of the embedded Orchestrator instance.
sudo -u postgres -i -- /opt/vmware/vpostgres/current/bin/psql vcac -c "DELETE FROM vmo_keystore
WHERE id='cakeystore-id';"
6 If the external Orchestrator was configured to work in cluster mode, delete the existing cluster nodesfrom the imported Orchestrator database.
sudo -u postgres -i -- /opt/vmware/vpostgres/current/bin/psql vcac -c "DELETE FROM
vmo_clustermember;"
Installing and Upgrading vRealize Automation
VMware, Inc. 366
7 Replace the catalina.properties, server.xml, and web.xml files from the imported configurationwith the backup copy you created in Step 3b.
For example:
mv catalina.properties-date_hour catalina.properties
a Change the ownership of the files to the vco user.
For example:
chown vco:vco catalina.properties
8 Replace the setenv.sh file from the imported configuration with the backup copy you created in Step 3c.
For example:
mv setenv.sh-date_hour setenv.sh
a Change the ownership of the files to the vco user.
For example:
chown vco:vco setenv.sh
You successfully migrated an external vRealize Orchestrator 6.x installed on Windows to avRealize Orchestrator instance embedded in vRealize Automation 7.3.
What to do next
Set up the built-in vRealize Orchestrator server. See Configure the Built-In vRealize Orchestrator Server.
Configure the Built-In vRealize Orchestrator Server
After you export the configuration of an external Orchestrator server and import it to vRealize Automation7.3, you must configure the Orchestrator server that is built into vRealize Automation.
Prerequisites
Migrate the configuration from the external to the internal vRealize Orchestrator.
Procedure
1 Log in to the vRealize Automation appliance over SSH as root.
2 Start the Control Center service and the Orchestrator server service of the built-invRealize Orchestrator server.
service vco-configurator start && service vco-server start
3 Log in to Control Center of the built-in Orchestrator server as an administrator.
Installing and Upgrading vRealize Automation
VMware, Inc. 367
4 Verify that Orchestrator is configured properly at the Validate Configuration page in Control Center.
5 Under the Package Signing Certificate tab on the Certificates page, generate a new packagesigning certificate.
6 Change the values for Default tenant and Admin group on the Configure Authentication Providerpage.
7 Verify that the vco-server service appears as REGISTERED under the Services tab in the vRealizeAutomation appliance management console.
8 Select the vco services of the external Orchestrator server and click Unregister.
What to do next
n Import any certificates that were trusted in the external Orchestrator server to the trust store of thebuilt-in Orchestrator. For more information, see Manage Orchestrator Certificates.
n Join the vRealize Automation replica nodes to the vRealize Automation cluster to synchronize theOrchestrator configuration.
For more information, see Reconfigure the Target Embedded vRealize Orchestrator to Support HighAvailability in Installing or Upgrading vRealize Automation.
Note The vRealize Orchestrator instances are automatically clustered and available for use.
n Restart the vco-configurator service on all nodes in the cluster.
n Update the vRealize Orchestrator endpoint to point to the migrated built-in Orchestrator server.
n Add the vRealize Automation host and the IaaS host to the inventory of the vRealize Automationplug-in, by running the Add a vRA host and Add the IaaS host of a vRA host workflows.
Upgrading Stand-Alone vRealize Orchestrator Appliance for Use with vRealize Automation
If you maintain a stand-alone vRealize Orchestrator appliance for use with vRealize Automation, youmust upgrade the stand-alone appliance when you upgrade vRealize Automation from 6.2.5 to 7.3 or7.3.1.
Embedded instances of vRealize Orchestrator are upgraded as part of the vRealize Automation applianceupgrade. No additional action is required for an embedded instance.
If you are upgrading a vRealize Orchestrator appliance cluster, see Upgrading External vRealizeOrchestrator Appliance Cluster for Use with vRealize Automation.
Prerequisites
n Install the Update on the vRealize Automation 6.2.5 Appliance.
n Upgrade IaaS components as described in Upgrading the IaaS Server Components After UpgradingvRealize Automation.
n Unmount all network file systems. See vSphere Virtual Machine Administration in the vSpheredocumentation.
Installing and Upgrading vRealize Automation
VMware, Inc. 368

n Increase the memory of the vSphere Orchestrator appliance to at least 6 GB. See vSphere VirtualMachine Administration in the vSphere documentation.
n Take a snapshot of the vSphere Orchestrator virtual machine. See vSphere Virtual MachineAdministration in the vSphere documentation.
n If you use an external database, back up the database.
n If you use the preconfigured PostgreSQL database in vSphere Orchestrator, back up the database byusing the Export Database menu in the vSphere Control Center.
Procedure
1 Use one of the documented methods to upgrade your stand-alone vRealize Orchestrator.
2 From the Control Center, upgrade the vRealize Automation NSX plugin.
Upgrade Orchestrator Appliance by Using the Default VMware Repository
You can configure Orchestrator to download the upgrade package from the default VMware repository.
Prerequisites
n Unmount all network file systems. For more information, see the vSphere Virtual MachineAdministration documentation.
n Increase the memory of the Orchestrator Appliance to at least 6 GB. For more information, see thevSphere Virtual Machine Administration documentation.
n Make sure that the root partition of the Orchestrator Appliance has at least 3 GB of available freespace. For more information on increasing the size of a disk partition, see KB 1004071: http://kb.vmware.com/kb/1004071.
n Take a snapshot of the Orchestrator virtual machine. For more information, see the vSphere VirtualMachine Administration documentation.
n If you use an external database, back up the database.
n If you use the preconfigured in Orchestrator PostgreSQL database, back up the database by usingthe Export Database menu in Control Center.
n If you use vSphere as an authentication provider an the Platform Services Controller is external to thevCenter Server, you must configure Orchestrator to connect to the fully qualified domain name or IPaddress of the Platform Services Controller instance that contains the vCenter Single Sign-On.
n Import to Orchestrator manually the certificates of all Platform Services Controllers that share thesame vCenter Single Sign-On domain. For more information, see Import a Trusted CertificateThrough Control Center.
Procedure
1 Go to the Virtual Appliance Management Interface (VAMI) at https://orchestrator_server:5480 and login as root.
Installing and Upgrading vRealize Automation
VMware, Inc. 369
2 On the Update tab, click Settings.
The radio button next to the Use Default Repository option is selected.
3 On the Status page, click Check Updates.
4 If any updates are available, click Install Updates.
5 Accept the VMware End-User License Agreement and confirm that you want to install the update.
6 To complete the update, restart the Orchestrator Appliance.
a Log in again to the to the Virtual Appliance Management Interface (VAMI) as root.
7 (Optional) On the Update tab, verify that the latest version of the Orchestrator Appliance issuccessfully installed.
8 Log in to Control Center as root.
9 If you plan to create a cluster of Orchestrator instances, reconfigure the hosts settings.
a On the Host Settings page in Control Center, click CHANGE.
b Enter the host name of the load balancer server instead of the vRealize Orchestrator appliancename.
10 Reconfigure the authentication.
a If before the upgrade, the Orchestrator server was configured to use LDAP or SSO (legacy) asan authentication method, configure vSphere or vRealize Automation as an authenticationprovider.
b If the authentication is already set to vSphere or vRealize Automation, unregister the settingsand register them again.
You successfully upgraded the Orchestrator Appliance.
What to do next
Verify that Orchestrator is configured properly at the Validate Configuration page in Control Center.
Upgrade Orchestrator Appliance by Using an ISO Image
You can configure Orchestrator to download the upgrade package from an ISO image file mounted to theCD-ROM drive of the appliance.
Prerequisites
n Unmount all network file systems. For more information, see the vSphere Virtual MachineAdministration documentation.
n Increase the memory of the Orchestrator Appliance to at least 6 GB. For more information, see thevSphere Virtual Machine Administration documentation.
n Make sure that the root partition of the Orchestrator Appliance has at least 3 GB of available freespace. For more information on increasing the size of a disk partition, see KB 1004071: http://kb.vmware.com/kb/1004071.
Installing and Upgrading vRealize Automation
VMware, Inc. 370
n Take a snapshot of the Orchestrator virtual machine. For more information, see the vSphere VirtualMachine Administration documentation.
n If you use an external database, back up the database.
n If you use the preconfigured in Orchestrator PostgreSQL database, back up the database by usingthe Export Database menu in Control Center.
n If you use vSphere as an authentication provider an the Platform Services Controller is external to thevCenter Server, you must configure Orchestrator to connect to the fully qualified domain name or IPaddress of the Platform Services Controller instance that contains the vCenter Single Sign-On.
n Import to Orchestrator manually the certificates of all Platform Services Controllers that share thesame vCenter Single Sign-On domain. For more information, see Import a Trusted CertificateThrough Control Center.
Procedure
1 Download the VMware-vRO-Appliance-version-build_number-updaterepo.iso archive from theofficial VMware download site.
2 Connect the CD-ROM drive of the Orchestrator Appliance virtual machine. For more information, seethe vSphere Virtual Machine Administration documentation.
3 Mount the ISO image file to the CD-ROM drive of the appliance. For more information, see thevSphere Virtual Machine Administration documentation.
4 Go to the Virtual Appliance Management Interface (VAMI) at https://orchestrator_server:5480 and login as root.
5 On the Update tab, click Settings.
6 Select the radio button next to the Use CD-ROM updates option.
7 Return to the Status page.
The version of the available upgrade is displayed.
8 Click Install Updates.
9 Accept the VMware End-User License Agreement and confirm that you want to install the update.
10 To complete the update, restart the Orchestrator Appliance.
a Log in again to the to the Virtual Appliance Management Interface (VAMI) as root.
11 (Optional) On the Update tab, verify that the latest version of the Orchestrator Appliance issuccessfully installed.
12 Log in to Control Center as root.
13 If you plan to create a cluster of Orchestrator instances, reconfigure the hosts settings.
a On the Host Settings page in Control Center, click CHANGE.
b Enter the host name of the load balancer server instead of the vRealize Orchestrator appliancename.
Installing and Upgrading vRealize Automation
VMware, Inc. 371

14 Reconfigure the authentication.
a If before the upgrade, the Orchestrator server was configured to use LDAP or SSO (legacy) asan authentication method, configure vSphere or vRealize Automation as an authenticationprovider.
b If the authentication is already set to vSphere or vRealize Automation, unregister the settingsand register them again.
You successfully upgraded the Orchestrator Appliance.
What to do next
Verify that Orchestrator is configured properly at the Validate Configuration page in Control Center.
Upgrade Orchestrator Appliance by Using a Specified Repository
You can configure Orchestrator to use a local repository, on which you uploaded the upgrade archive.
Prerequisites
n Unmount all network file systems. For more information, see the vSphere Virtual MachineAdministration documentation.
n Increase the memory of the Orchestrator Appliance to at least 6 GB. For more information, see thevSphere Virtual Machine Administration documentation.
n Make sure that the root partition of the Orchestrator Appliance has at least 3 GB of available freespace. For more information on increasing the size of a disk partition, see KB 1004071: http://kb.vmware.com/kb/1004071.
n Take a snapshot of the Orchestrator virtual machine. For more information, see the vSphere VirtualMachine Administration documentation.
n If you use an external database, back up the database.
n If you use the preconfigured in Orchestrator PostgreSQL database, back up the database by usingthe Export Database menu in Control Center.
n If you use vSphere as an authentication provider an the Platform Services Controller is external to thevCenter Server, you must configure Orchestrator to connect to the fully qualified domain name or IPaddress of the Platform Services Controller instance that contains the vCenter Single Sign-On.
n Import to Orchestrator manually the certificates of all Platform Services Controllers that share thesame vCenter Single Sign-On domain. For more information, see Import a Trusted CertificateThrough Control Center.
Installing and Upgrading vRealize Automation
VMware, Inc. 372

Procedure
1 Prepare the local repository for upgrades.
a Install and configure a local Web server.
b Download the VMware-vRO-Appliance-version-build_number-updaterepo.zip archivefrom the official VMware download site.
c Extract the .ZIP archive to the local repository.
2 Go to the Virtual Appliance Management Interface (VAMI) at https://orchestrator_server:5480 and login as root.
3 On the Update tab, click Settings.
4 Select the radio button next to the Use Specified Repository option.
5 Enter the URL address of the local repository by pointing to the Update_Repo directory.
http://local_web_server:port/build/mts/release/bora-
build_number/publish/exports/Update_Repo
6 If the local repository requires authentication, enter user name and password.
7 Click Save Settings.
8 On the Status page, click Check Updates.
9 If any updates are available, click Install Updates.
10 Accept the VMware End-User License Agreement and confirm that you want to install the update.
11 To complete the update, restart the Orchestrator Appliance.
a Log in again to the to the Virtual Appliance Management Interface (VAMI) as root.
12 (Optional) On the Update tab, verify that the latest version of the Orchestrator Appliance issuccessfully installed.
13 Log in to Control Center as root.
14 If you plan to create a cluster of Orchestrator instances, reconfigure the hosts settings.
a On the Host Settings page in Control Center, click CHANGE.
b Enter the host name of the load balancer server instead of the vRealize Orchestrator appliancename.
15 Reconfigure the authentication.
a If before the upgrade, the Orchestrator server was configured to use LDAP or SSO (legacy) asan authentication method, configure vSphere or vRealize Automation as an authenticationprovider.
b If the authentication is already set to vSphere or vRealize Automation, unregister the settingsand register them again.
Installing and Upgrading vRealize Automation
VMware, Inc. 373
You successfully upgraded the Orchestrator Appliance.
What to do next
Verify that Orchestrator is configured properly at the Validate Configuration page in Control Center.
Upgrading External vRealize Orchestrator Appliance Cluster for Use withvRealize Automation
If you use an vRealize Orchestrator appliance cluster with vRealize Automation, you must upgrade theOrchestrator appliance cluster to version 7.3 or 7.3.1 by upgrading a single instance and joining newlyinstalled 7.3 or 7.3.1 nodes to the upgraded instance.
Prerequisites
n Install the Update on the vRealize Automation 6.2.5 Appliance.
n Upgrade IaaS components. See Upgrading the IaaS Server Components After Upgrading vRealizeAutomation.
n Set up a load balancer to distribute traffic among multiple instances of vRealize Orchestrator. See the vRealize Orchestrator Load Balancing Configuration Guide.
n Take a snapshot of all vRealize Orchestrator server nodes.
n Back up the vRealize Orchestrator shared database.
Procedure
1 From the Control Center, upgrade the vRealize Automation NSX plugin.
2 Stop the vco-server and vco-configurator Orchestrator services on all cluster nodes.
3 Upgrade only one of the Orchestrator server instances in your cluster using one of the documentedprocedures.
4 Deploy a new Orchestrator appliance on version 7.3.
a Configure the new node with the network settings of an existing not upgraded instance that is partof the cluster.
5 Access Control Center of the second node to start the configuration wizard.
a Navigate to https://your_orchestrator_server_IP_or_DNS_name:8283/vco-controlcenter.
b Log in as root with the password you entered during OVA deployment.
6 Select the Clustered Orchestrator deployment type.
By choosing this type, you select to join the node to an existing Orchestrator cluster.
7 In the Hostname text box, enter the host name or IP address of the first Orchestrator server instance.
Note This must be the local IP or host name of the Orchestrator instance, to which you are joiningthe second node. You must not use the load balancer address.
Installing and Upgrading vRealize Automation
VMware, Inc. 374
8 In the User name and Password text boxes, enter the root credentials of the first Orchestrator serverinstance.
9 Click Join. The Orchestrator instance clones the configuration of the node, to which it joins.
The Orchestrator server service of both nodes restart automatically.
10 Access Control Center of the upgraded Orchestrator cluster through the load balancer address andlog in as an administrator.
11 On the Orchestrator Cluster Management page, make sure that the Active ConfigurationFingerprint and the Pending Configuration Fingerprint strings on all nodes in the cluster match.
Note You might need to refresh the page several times until the two strings match.
12 Verify that the vRealize Orchestrator cluster is configured properly by opening the ValidateConfiguration page in Control Center.
13 (Optional) Repeat steps 3 through 8 for each additional node in the cluster.
14 From the Control Center, upgrade the vRealize Automation NSX plugin.
You have successfully upgraded the Orchestrator cluster.
What to do next
Enable Your Load Balancers.
Add Users or Groups to an Active Directory ConnectionYou can add users or groups to an existing Active Directory connection.
The Directories Management user authentication system imports data from Active Directory when addinggroups and users. The speed of the data transport is limited by Active Directory capabilities. As a result,actions can take a long time depending on the number of groups and users that are added. To minimizeproblems, limit the groups and users to only the groups and users required for a vRealize Automationaction. If problems occur, close unneeded applications and verify that your deployment has appropriatememory allocated to Active Directory. If problems continue, increase the Active Directory memoryallocation. For deployments with large numbers of users and groups, you might need to increase theActive Directory memory allocation to as much as 24 GB.
When you sync a vRealize Automation deployment with a many users and groups, there might be a delaybefore the Log details are available. The time stamp on the log file can differ from the completed timedisplayed on the console.
If members of a group are not in the Users list, when you add the group from Active Directory, themembers are added to the list. When you sync a group, any users that do not have Domain Users astheir primary group in Active Directory are not synced.
Note You cannot cancel a synchronize action after you start the action.
Installing and Upgrading vRealize Automation
VMware, Inc. 375
Prerequisites
n Connector installed and the activation code activated. Select the required default attributes and addadditional attributes on the User Attributes page.
See PLUGINS_ROOT/com.vmware.vra.prepare.use.doc/GUID-9B25F502-EC8C-40CF-8ACF-4731B5A6903A.html.
n List of the Active Directory groups and users to sync from Active Directory.
n For Active Directory over LDAP, information required includes the Base DN, Bind DN, and Bind DNpassword.
n For Active Directory Integrated Windows Authentication, the information required includes thedomain's Bind user UPN address and password.
n If Active Directory is accessed over SSL, a copy of the SSL certificate is required.
n If you have a multi-forest Active Directory integrated with Windows Authentication and the DomainLocal group contains members from different forests, do the following. Add the Bind user to theAdministrators group of the Domain Local group. If the Bind user is not added, these members aremissing from the Domain Local group.
n Log in to the vRealize Automation console as a tenant administrator.
Procedure
1 Select Administration > Directories Management > Directories.
2 Click the desired directory name.
3 Click Sync Settings to open a dialog box with synchronization options.
4 Click the appropriate icon depending on whether you want to change the user or group configuration.
To edit the group configuration:
n To add groups, click the + icon to add a line for group DN definitions and enter the appropriategroup DN.
n If you want to delete a group DN definition, click the x icon for the desired group DN.
To edit the user configuration:
u To add users, click the + icon to add a line for a user DN definition and enter the appropriate userDN.
If you want to delete a user DN definition, click the x icon for the desired user DN.
5 Click Save to save your changes without synchronizing your updates immediately. Click Save &Sync to save your changes and synchronize your updates immediately.
Enable Your Load BalancersIf your deployment uses load balancers, re-enable secondary nodes and health checks.
Installing and Upgrading vRealize Automation
VMware, Inc. 376
The health checks for vRealize Automation vary according to version. For information, see thevRealize Automation Load Balancing Configuration Guide in the VMware vRealize AutomationDocumentation.
Post-Upgrade Tasks for Upgrading vRealize AutomationAfter you upgrade vRealize Automation 6.2.5 to 7.3 or 7.3.1, perform any required post-upgrade tasks.
Port Configuration for High-Availability Deployments
After finishing an upgrade in a high-availability deployment, you must configure the load balancer to passtraffic on port 8444 to the vRealize Automation appliance to support remote console features.
For more information, see the vRealize Automation Load Balancing Configuration Guide in the vRealizeAutomation Documentation.
Reconfigure the Built-In vRealize Orchestrator to Support High Availability
For a high-availability deployment, you must manually rejoin each target replica vRealize Automationappliance to the cluster to enable high-availability support for the embedded vRealize Orchestrator.
Prerequisites
Log in to the target replica vRealize Automation appliance management console.
1 Start a browser and open the target replica vRealize Automation management console using the fullyqualified domain name (FQDN) of the target replica virtual appliance: https://vra-va-hostname.domain.name:5480.
2 Log in with the user name root and the password that you entered when you deployed the targetreplica vRealize Automation appliance.
Procedure
1 Select vRA Settings > Cluster.
2 In the Leading Cluster Node text box, enter the FQDN of the target master vRealize Automationappliance.
3 Enter the root password in the Password text box.
4 Click Join Cluster.
Continue past any certificate warnings. The system restarts services for the cluster.
5 Verify that the services are running.
a On the top tab bar, click Services.
b Click Refresh to monitor the progress of services startup.
Enabling the Connect to Remote Console Action for Consumers
The remote console action for consumers is supported for appliances provisioned by vSphere invRealize Automation.
Installing and Upgrading vRealize Automation
VMware, Inc. 377
Edit the blueprint after you have upgraded the release and select the Connect to Remote Consoleaction on the Action tab.
For more information, see Knowledge Base article 2109706.
Restore External Workflow Timeout Files
You must reconfigure the vRealize Automation external workflow timeout files because the upgradeprocess overwrites xmldb files.
Procedure
1 Open the external workflow configuration (xmldb) files on your system from the following directory.
\VMware\vCAC\Server\ExternalWorkflows\xmldb\.
2 Replace the xmldb files with the files that you backed up before migration. If you do not have backupfiles, reconfigure the external workflow timeout settings.
3 Save your settings.
Verify That vRealize Orchestrator Service Is Available
After you upgrade to the latest version of vRealize Automation, you must verify the connection betweenvRealize Automation and vRealize Orchestrator. Sometimes after upgrade you must restore theconnection.
Prerequisites
Log in to the vRealize Orchestrator configuration interface.
Procedure
1 Click Validate Configuration.
2 If the Authentication section has a green check, go to step 5.
3 If the Authentication section does not have a green check, perform the following steps to restore theconnection to vRealize Orchestrator .
a Click Home.
b Click Configure Authentication Provider.
c In the Admin group text box, select Change, and choose a new Admin group that can beproperly resolved.
The vcoadmins group is available only at the default vsphere.local tenant. If you are usinganother tenant for the vRealize Orchestrator, then you must select another group.
d Click Save Changes, and if prompted, restart the vRealize Orchestrator server.
e Click Home.
4 Repeat step 1 to confirm that the Authentication section still has a green check.
5 Click Home, and close the vRealize Orchestrator Control Center.
Installing and Upgrading vRealize Automation
VMware, Inc. 378
Reconfigure Embedded vRealize Orchestrator Infrastructure Endpoint in the TargetvRealize Automation
When you migrate from a vRealize Automation 6.2.x environment, you must update the URL of theinfrastructure endpoint that points to the target embedded vRealize Orchestrator server.
Prerequisites
n Successfully migrate to vRealize Automation 7.3.
n Log in to the target vRealize Automation console.
a Open the vRealize Automation console using the fully qualified domain name of the target virtualappliance: https://vra-va-hostname.domain.name/vcac.
For a high-availability environment, open the console using the fully qualified domain name of thetarget virtual appliance load balancer: https://vra-va-lb-hostname.domain.name/vcac.
b Log in as a IaaS administrator user.
Procedure
1 Select Infrastructure > Endpoints > Endpoints.
2 On the Endpoints page, select the vRealize Orchestrator endpoint, and click Edit.
3 In the Address text box, edit the vRealize Orchestrator endpoint URL.
n If you migrated to a minimal environment, replace the vRealize Orchestrator endpoint URL withhttps://vra-va-hostname.domain.name:443/vco.
n If you migrated to a high-availability environment, replace the vRealize Orchestrator endpointURL with https://vra-va-lb-hostname.domain.name:443/vco.
4 Click OK.
5 Manually run a data collection on the vRealize Orchestrator endpoint.
a On the Endpoints page, select the vRealize Orchestrator endpoint.
b SelectActions > Data Collection.
Verify that the data collection is successful.
Restore Changes to Logging in the app.config File
The upgrade process overwrites changes you make to logging in the configuration files. After you finishan upgrade, you must restore any changes you made before the upgrade to the app.config file .
Enable Automatic Manager Service Failover After Upgrade
Automatic Manager Service failover is disabled by default when you upgrade vRealize Automation.
Complete these steps to enable automatic Manager Service after upgrade.
Procedure
1 Open a command prompt as root on the vRealize Automation appliance.
Installing and Upgrading vRealize Automation
VMware, Inc. 379
2 Change directories to /usr/lib/vcac/tools/vami/commands.
3 To enable automatic Manager Service failover, run the following command.
python ./manager-service-automatic-failover ENABLE
To disable automatic failover throughout an IaaS deployment, run the following command.
python ./manager-service-automatic-failover DISABLE
About Automatic Manager Service Failover
You can configure the vRealize Automation IaaS Manager Service to automatically fail over to a backup ifthe primary Manager Service stops.
Starting in vRealize Automation 7.3, you no longer need to manually start or stop the Manager Service oneach Windows server, to control which serves as primary or backup. Automatic Manager Service failoveris disabled by default when you upgrade IaaS with the Upgrade Shell Script or using the IaaS Installerexecutable file.
When automatic failover is enabled, the Manager Service automatically starts on all Manager Servicehosts, including backups. The automatic failover feature allows the hosts to transparently monitor eachother and fail over when necessary, but the Windows service must be running on all hosts.
Note You are not required to use automatic failover. You may disable it and continue to manually startand stop the Windows service to control which host serves as primary or backup. If you take the manualfailover approach, you must only start the service on one host at a time. With automatic failover disabled,simultaneously running the service on multiple IaaS servers makes vRealize Automation unusable.
Do not attempt to selectively enable or disable automatic failover. Automatic failover must always besynchronized as on or off, across every Manager Service host in an IaaS deployment.
Run Test Connection and Verify Upgraded Endpoints
Upgrading to vRealize Automation 7.3 makes changes to endpoints in the target environment.
After you upgrade to vRealize Automation 7.3, you must use the Test Connection action for allapplicable endpoints. You might also need to make adjustments to some upgraded endpoints. For moreinformation, see Considerations When Working With Upgraded or Migrated Endpoints.
The default security setting for upgraded or migrated endpoints is to not accept untrusted certificates.
After upgrading or migrating from pre-vRealize Automation 7.3, if you were using untrusted certificatesyou must perform the following steps for all vSphere and NSX endpoints to enable certificate validation.Otherwise, the endpoint operations fail with certificate errors. For more information see VMwareKnowledge Base articles Endpoint communication is broken after upgrade to vRA 7.3 (2150230) at http://kb.vmware.com/kb/2150230 and How to download and install vCenter Server root certificates toavoid Web Browser certificate warnings (2108294) at http://kb.vmware.com/kb/2108294.
1 After upgrade or migration, log in to the vRealize Automation vSphere agent machine and restart yourvSphere agents by using the Services tab.
Migration might not restart all agents, so manually restart them if needed.
Installing and Upgrading vRealize Automation
VMware, Inc. 380
2 Wait for at least one ping report to finish. It takes a minute or two for a ping report to finish.
3 When the vSphere agents have started data collection, log in to vRealize Automation as an IaaSadministrator.
4 Click Infrastructure > Endpoints > Endpoints.
5 Edit a vSphere endpoint and click Test Connection.
6 If a certificate prompt appears, click OK to accept the certificate.
If a certificate prompt does not appear, the certificate might currently be correctly stored in a trustedroot authority of the Windows machine hosting service for the endpoint, for example as a proxy agentmachine or DEM machine.
7 Click OK to apply the certificate acceptance and save the endpoint.
8 Repeat this procedure for each vSphere endpoint.
9 Repeat this procedure for each NSX endpoint.
If the Test Connection action is successful but some data collection or provisioning operations fail, youcan install the same certificate on all the agent machines that serve the endpoint and on all DEMmachines. Alternatively, you can uninstall the certificate from existing machines and repeat the aboveprocedure for the failing endpoint.
Troubleshooting the vRealize Automation UpgradeThe upgrade troubleshooting topics provide solutions to problems that you might encounter whenupgrading vRealize Automation 6.2.5 to 7.3 or 7.3.1.
Installation or Upgrade Fails with a Load Balancer Timeout Error
A vRealize Automation installation or upgrade for a distributed deployment with a load balancer fails witha 503 service unavailable error.
Problem
The installation or upgrade fails because the load balancer timeout setting does not allow enough time forthe task to complete.
Cause
An insufficient load balancer timeout setting might cause failure. You can correct the problem byincreasing the load balancer timeout setting to 100 seconds or greater and rerunning the task.
Solution
1 Increase your load balancer timeout value to at least 100 seconds.
2 Rerun the installation or upgrade.
Upgrade Fails for IaaS Website Component
The IaaS upgrade fails and you cannot continue the upgrade.
Installing and Upgrading vRealize Automation
VMware, Inc. 381
Problem
The Iaas upgrade fails for the website component. The following error messages appear in the installerlog file.
n System.Data.Services.Client.DataServiceQueryException:
An error occurred while processing this request. --->
System.Data.Services.Client.DataServiceClientException: <!DOCTYPE html>
n <b> Description: </b>An application error
occurred on the server. The current custom error settings for this application
prevent the details of the application error from being viewed remotely (for
security reasons). It could, however, be viewed by browsers running on the
local server machine.
n Warning: Non-zero return code. Command failed.
n Done Building Project "C:\Program Files
(x86)\VMware\vCAC\Server\Model Manager Data\DeployRepository.xml"
(InstallRepoModel target(s)) -- FAILED.
The following error messages appear in the repository log file.
n [Error]: [sub-thread-Id="20"
context="" token=""] Failed to start repository service. Reason:
System.InvalidOperationException: Configuration section encryptionKey is not
protected
at
DynamicOps.Common.Utils.EncryptionHelpers.ReadKeyFromConfiguration(Configuration
config)
at DynamicOps.Common.Utils.EncryptionHelpers.Decrypt(String value)
at DynamicOps.Repository.Runtime.CoreModel.GlobalPropertyItem.Decrypt(Func`2
decryptFunc)
at
DynamicOps.Common.Entity.ContextHelpers.OnObjectMaterializedCallbackEncryptable(Object
sender, ObjectMaterializedEventArgs e)
at
System.Data.Common.Internal.Materialization.Shaper.RaiseMaterializedEvents()
at
Installing and Upgrading vRealize Automation
VMware, Inc. 382

System.Data.Common.Internal.Materialization.Shaper`1.SimpleEnumerator.MoveNext()
at System.Linq.Enumerable.FirstOrDefault[TSource](IEnumerable`1 source)
at System.Linq.Queryable.FirstOrDefault[TSource](IQueryable`1 source)
at
DynamicOps.Repository.Runtime.Common.GlobalPropertyHelper.GetGlobalPropertyItemValue(CoreModelEntities
coreModelContext, String propertyName, Boolean throwIfPropertyNotFound)
at
DynamicOps.Repository.Runtime.CafeClientAbstractFactory.LoadSolutionUserCertificate()
at
DynamicOps.Repository.Runtime.CafeClientAbstractFactory.InitializeFromDb(String
coreModelConnectionString)
at DynamicOps.Repository.Runtime.Common.RepositoryRuntime.Initialize().
Cause
Iaas upgrade fails when the creation date for the web.config file is the same as or later than themodified date.
Solution
1 Log in to the IaaS website component server as administrator.
2 Change directories to the vRealize Automation installation folder.
3 Start your preferred text editor with the Run as Administrator option.
4 Locate and select the web.config file and save the file to change its file modification date.
5 Examine the web.config file properties to confirm that the file modification date is later than thecreation date.
6 Upgrade IaaS.
Manager Service Fails to Run Due to SSL Validation Errors During Runtime
The manager service fails to run due to SSL validation errors.
Problem
The manager service fails with the following error message in the log:
[Info]: Thread-Id="6" - context="" token="" Failed to connect to the core database,
will retry in 00:00:05, error details: A connection was successfully established
with the server, but then an error occurred during the login process. (provider: SSL
Provider, error: 0 - The certificate chain was issued by an authority that is not
trusted.)
Installing and Upgrading vRealize Automation
VMware, Inc. 383
Cause
During runtime, the manager service fails to run due to SSL validation errors.
Solution
1 Open the ManagerService.config configuration file.
2 Update Encrypt=False on the following line:
<add name="vcac-repository" providerName="System.Data.SqlClient"
connectionString="Data Source=iaas-db.sqa.local;Initial Catalog=vcac;Integrated
Security=True;Pooling=True;Max Pool
Size=200;MultipleActiveResultSets=True;Connect Timeout=200, Encrypt=True" />
Log In Fails After Upgrade
You must exit the browser and log in again after an upgrade for sessions that use unsynchronized useraccounts.
Problem
After you upgrade vRealize Automation, the system denies access to unsynchronized user accounts atlogin.
Solution
Exit the browser and relaunch vRealize Automation.
Catalog Items Appear in the Service Catalog After Upgrade But Are Not Available toRequest
Catalog items that use certain property definitions from prior versions appear in the service catalog butare not available to request after upgrading to the latest version of vRealize Automation.
Problem
If you upgraded from a 6.2.x or earlier version and you had property definitions with the following controltypes or attributes, the attributes are missing from the property definitions and any catalog items that usethe definitions do not function the way that they did before you performed the upgrade.
n Control types. Check box or link.
n Attributes. Relationship, regular expressions, or property layouts.
Cause
In vRealize Automation 7.0 and later, the property definitions no longer use the attributes. You mustrecreate the property definition or configure the property definition to use a vRealize Orchestrator scriptaction rather than the embedded control types or attributes.
Migrate the control type or attributes to vRealize Automation 7.x using a script action.
Installing and Upgrading vRealize Automation
VMware, Inc. 384
Solution
1 In vRealize Orchestrator, create a script action that returns the property values. The action mustreturn a simple type. For example, return strings, integers, or other supported types. The action cantake the other properties on which it depends as an input parameter.
2 In vRealize Automation console, configure the product definition.
a Select Administration > Property Dictionary > Property Definitions.
b Select the property definition and click Edit.
c From the Display advice drop-down menu, select Dropdown.
d From the Values drop-down menu, select External Values.
e Select the script action.
f Click OK.
g Configure the Input Parameters that are included in the script action. To preserve the existingrelationship, bind the parameter to the other property.
h Click OK.
PostgreSQL External Database Merge Is Unsuccessful
The external PostgreSQL database merge with the embedded PostgreSQL database does not succeed.
Problem
If the external PostgreSQL database version is newer than the embedded PostgreSQL database version,the merge does not succeed.
Solution
1 Log in to the host for the PostgreSQL external database.
2 Run the psql --version command.
Note the PostgreSQL version for the external database.
3 Log in to the host for the PostgreSQL embedded database.
4 Run the psql --version command.
Note the PostgreSQL version for the embedded database.
If the external PostgreSQL version is newer than the embedded PostgreSQL version, contact support forassistance to merge your external PostgreSQL database.
Join Cluster Command Appears to Fail After Upgrading a High-Availability Environment
After you click Join Cluster in the management console on a secondary cluster node, the progressindicator disappears.
Installing and Upgrading vRealize Automation
VMware, Inc. 385
Problem
When you use the vRealize Automation appliance management console after upgrade to join asecondary cluster node to the primary node, the progress indicator disappears and no error or successmessage appears. This behavior is an intermittent problem.
Cause
The progress indicator disappears because some browsers stop waiting for a response from the server.This behavior does not stop the join cluster process. You can confirm that the join cluster process issuccessful by viewing the log file at /var/log/vmware/vcac/vcac-config.log.
Upgrade Is Unsuccessful if Root Partition Does Not Provide Sufficient Free Space
If sufficient free space is unavailable on the root partition of the vRealize Automation appliance host,upgrade cannot proceed.
Solution
This procedure increases the free space on the Disk 1 root partition of the vRealize Automation appliancehost. In a distributed deployment, perform this procedure to increase the free space on each replica nodesequentially, and then increase the free space on the master node.
Note When you perform this procedure, you might see the following warning messages:
nWARNING: Re-reading the partition table failed with error 16:
Device or resource busy. The kernel still uses the old table. The
new table will be used at the next reboot or after you run
partprobe(8) or kpartx(8) Syncing disks.
nError: Partition(s) 1 on /dev/sda have been written, but we have been unable to inform the kernel
of the change, probably because it/they are in use. As a result, the old partition(s) will remain
in use. You should reboot now before making further changes.
Ignore the message You should reboot now before making further changes. If you reboot yoursystem before step 10, you corrupt the upgrade process.
Procedure
1 Power on the vRealize Automation appliance host virtual machine and log in as with a secureshell connection as the root user.
2 Run the following commands to stop services.
a service vcac-server stop
b service vco-server stop
c service vpostgres stop
3 Run the following command to unmount the swap partition.
swapoff -a
Installing and Upgrading vRealize Automation
VMware, Inc. 386
4 Run the following command to delete the existing Disk 1 partitions and create a 44-GB rootpartition and a 6-GB swap partition.
(echo d; echo 2; echo d; echo 1; echo n; echo p; echo ; echo ; echo '+44G';
echo n; echo p; echo ; echo ; echo ; echo w; echo p; echo q) | fdisk /dev/sda
5 Run the following command to change the swap partition type.
(echo t; echo 2; echo 82; echo w; echo p; echo q) | fdisk /dev/sda
6 Run the following command to set the Disk 1 bootable flag.
(echo a; echo 1; echo w; echo p; echo q) | fdisk /dev/sda
7 Run the following command to register the partition changes with the Linux kernel.
partprobe
If you see a message prompting you to reboot before you make further changes, ignore themessage. Rebooting the system before step 10 corrupts the upgrade process.
8 Run the following command to format the new swap partition.
mkswap /dev/sda2
9 Run the following command to mount the swap partition.
swapon -a
10 Reboot the vRealize Automation appliance.
11 After the appliance reboots, run the following command to resize the Disk 1 partition table.
resize2fs /dev/sda1
12 To verify that the disk expansion is successful, run df -h and check that the available disk spaceon /dev/sda1 is greater than 30 GB.
Backup Copies of .xml Files Cause the System to Time Out
vRealize Automation registers any file with an .xml extension inthe \VMware\vCAC\Server\ExternalWorkflows\xmldb\ directory. If this directory contains backup files withan .xml extension, the system runs duplicate workflows that cause the system to time out.
Solution
Workaround: When you back up files in this directory, move the backups to another directory, or changethe extension of the backup file name to something other than .xml.
Delete Orphaned Nodes on vRealize Automation
An orphaned node is a duplicate node that is reported on the host but does not exist on the host.
Problem
When you verify that each IaaS and virtual appliance node is in a healthy state, you might discover that ahost has one or more orphaned nodes. You must delete all orphaned nodes.
Installing and Upgrading vRealize Automation
VMware, Inc. 387
Solution
1 Go to the management console for your virtual appliance by using its fully qualified domain name,https://va-hostname.domain.name:5480.
2 Log in with the user name root and the password you entered when the appliance was deployed.
3 Select vRA settings > Cluster.
4 For each orphaned node in the table, click Delete.
Unable to Create New Directory in vRealize Automation
Trying to add new directory with the first sync connector fails.
Problem
This issue occurs due to a bad config-state.json file located inusr/local/horizon/conf/states/VSPHERE.LOCAL/3001/.
For information about fixing this issue, see Knowledge Base Article 2145438.
Some Virtual Machines Do Not Have a Deployment Created During Upgrade
Virtual machines in the missing state at the time of upgrade do not have a corresponding deploymentcreated in the target environment.
Problem
If a virtual machine is in the missing state in the source environment during upgrade, a correspondingdeployment is not created in the target environment. If a virtual machine goes out of the missing stateafter upgrade, you can import the machine to the target deployment using bulk import.
Certificate Not Trusted Error
When you view the infrastructure Log Viewer page in the vRealize Automation appliance console, youmight see an endpoint connection failure report with these words, Certificate is not trusted.
Problem
On the vRealize Automation appliance console, select Infrastructure > Monitoring > Log. On the LogViewer page, you might see a report similar to this:
Failed to connect to the endpoint. To validate that a secure connection can be established to thisendpoint, go to the vSphere endpoint on the Endpoints page and click the Test Connection button.
Inner Exception: Certificate is not trusted (RemoteCertificateChainErrors). Subject: C=US,CN=vc6.mycompany.com Thumbprint: DC5A8816231698F4C9013C42692B0AF93D7E35F1
Installing and Upgrading vRealize Automation
VMware, Inc. 388

Cause
Upgrading to vRealize Automation 7.3 makes changes to the endpoints from your original environment.For environments recently upgraded to vRealize Automation 7.3, the IaaS administrator must review eachexisting endpoint that uses a secure, https, connection. If an endpoint has a Certificate is nottrusted error, the endpoint does not work properly.
Solution
1 Log in to the vRealize Automation console as an infrastructure administrator.
2 Select Infrastructure > Endpoints > Endpoints.
3 Complete these steps for each endpoint with a secure connection.
a Click Edit.
b Click Test Connection.
c Review the certificate details and click OK if you trust this certificate.
d Restart the Windows services for all IaaS Proxy Agents used by this endpoint.
4 Verify that Certificate is not trusted errors no longer appear on the infrastructure Log Viewerpage.
Installing or Upgrading vRealize Automation Fails
Installing or upgrading vRealize Automation fails and an error message appears in the log file.
Problem
When you install or upgrade vRealize Automation, the procedure fails. This usually happens when a fixapplied during install or upgrade is not successful. An error message appears in the log file similar to thefollowing: Security error. Applying automatic fix for FIREWALL prerequisite failed. RPMStatus 1: Pre install script failed, package test and installation skipped.
Cause
The Windows environment has a group policy for PowerShell script execution set to Enabled.
Solution
1 On the Windows host machine, run gpedit.msc to open the Local Group Policy Editor.
2 In the left pane under Computer Configuration, click the expand button to open AdministrativeTemplates > Windows Components > Windows PowerShell.
3 For Turn on Script Execution, change the state from Enabled to Not Configured.
Update Fails to Upgrade the Management Agent
An error message about the Management Agent appears when you click Install Updates on the vRealizeAutomation appliance management console Update Status page.
Installing and Upgrading vRealize Automation
VMware, Inc. 389
Problem
Upgrade process is unsuccessful. Message appears: Unable to upgrade management agent onnode x. Sometimes the message lists more than one node.
Cause
Many conditions can cause this problem. The error message identifies only the node ID of the affectedmachine. More information is found in the All.log file for the Management Agent on the machine wherethe command fails.
Perform these tasks on the affected nodes according to your situation:
Solution
n If the Management Agent service is not running, start the service and restart upgrade on the virtualappliance.
n If the Management Agent service is running and the Management Agent is upgraded, restart upgradeon the virtual appliance.
n If the Management Agent service is running, but the Management Agent is not upgraded, perform amanual upgrade.
a Open a browser and navigate to the vRealize Automation IaaS installation page onthevRealize Automation appliance at https:// va-hostname.domain.name:5480/install.
b Download and run the Management Agent Installer.
c Reboot the Management Agent machine.
d Restart upgrade on the virtual appliance.
Management Agent Upgrade is Unsuccessful
The Management Agent upgrade is unsuccessful while upgrading from vRealize Automation to the latestversion.
Problem
If a failover incident has switched the primary and secondary Management Agent host, the upgrade isunsuccessful because the automated upgrade process cannot find the expected host. Perform thisprocedure on each IaaS node where the Management Agent is not upgraded.
Solution
1 Open the All.log in the Management Agent logs folder, which is located at C:\Program Files(x86)\VMware\vCAC\Management Agent\Logs\.
The location of the installation folder might be different from the default location.
Installing and Upgrading vRealize Automation
VMware, Inc. 390
2 Search the log file for a message about an outdated or powered off virtual appliance.
For example, INNER EXCEPTION: System.Net.WebException: Unable to connect to theremote server ---> System.Net.Sockets.SocketException: A connection attempt
failed because the connected party did not properly respond after a period of
time, or established connection failed because connected host has failed to
respond IP_Address:5480
3 Edit the Management Agent configuration file at C:\Program Files(x86)\VMware\vCAC\Management Agent\VMware.IaaS.Management.Agent.exe.config toreplace the existing alternativeEndpointaddress value with the URL of the primary virtual applianceendpoint.
The location of the installation folder might be different from the default location.
Example of alternativeEndpointaddress in VMware.IaaS.Management.Agent.exe.config.
<alternativeEndpoint address="https://FQDN:5480/" thumbprint="thumbprint
number" />
4 Restart the Management Agent Windows service and check the All.log file to verify that is working.
5 Run the upgrade procedure on the primary vRealize Automation appliance.
Empty Deployments Are Seen in vRealize Automation After Upgrade
Post provisioning actions appear to complete successfully but no change actually takes place.
Problem
Upgrade process causes some virtual machines to become assigned to the wrong deployment. Forinformation, see Knowledge Base article 2151400.
IaaS Repository Application Fails
The presence of Microsoft Monitoring Agent service can cause the IaaS repository application to fail.
Problem
IaaS repository fails and a "System.Web.Http.dll" version 4.0.0.0 error appears in the Repository.log. Forinformation, see Knowledge Base article 52444.
After Rebooting the Virtual Appliance, Automatic IaaS Upgrade Fails and Displays PendingReboot Error
After you reboot the virtual appliance, the automatic IaaS upgrade command upgrade-server fails and aPending reboot error appears.
Problem
An anti-virus program running on the virtual appliance causes this problem. For information, see Knowledge Base article 52211.
Installing and Upgrading vRealize Automation
VMware, Inc. 391
XaaS Requests Fail After Upgrading vRealize Automation
If your environment is configured for high availability and you upgrade from vRealize Automation from6.2.5 to 7.3, XaaS requested blueprints can fail with a system exception error.
Problem
Configuration differences in the embedded vRealize Orchestrator between vRealize Automation 6.x and7.x cause this problem. For information, see Knowledge Base article 2150604.
Upgrading IaaS in a High Availability Environment Fails
Running the IaaS upgrade process on the primary web server node with load balancing enabled fails. Youmight see these error messages: "System.Net.WebException: The operation has timed out" or "401 -Unauthorized: Access is denied due to invalid credentials."
Problem
Upgrading IaaS with load balancing enabled can cause an intermittent failure. When this happens, youmust run the vRealize Automation upgrade again with load balancing disabled.
Solution
1 Revert your environment to the pre-update snapshots.
2 Open a remote desktop connection to the primary IaaS web server node.
3 Navigate to the Windows hosts file at c:\windows\system32\drivers\etc.
4 Open the hosts file and add this line to bypass the web server load balancer.
IP_address_of_primary_iaas_website_node vrealizeautomation_iaas_website_lb_fqdn
Example:
10.10.10.5 vra-iaas-web-lb.domain.com
5 Save the hosts file and retry the vRealize Automation update.
6 When the vRealize Automation update competes, open the hosts file and remove the line you addedin step 4.
Work Around Upgrade Problems
You can modify the upgrade process to work around upgrade problems.
Solution
When you experience problems upgrading your vRealize Automation environment, use this procedure tomodify the upgrade process by selecting one of the available flags.
Procedure
1 Open a secure shell connection to the primary vRealize Automation appliance node.
Installing and Upgrading vRealize Automation
VMware, Inc. 392

2 At the command prompt, run this command to create the toggle file:
touch available_flag
For example: touch /tmp/disable-iaas-upgrade
Table 1‑48. Available Flags
Flag Description
/tmp/disable-iaas-upgrade n Prevents IaaS upgrade process after the virtualappliance restarts.
n Prevents the Management Agent upgrade.n Prevents the automatic prerequisite checks and fixes.n Prevents stopping IaaS services.
/tmp/do-not-upgrade-ma Prevents the Management Agent upgrade. This flag issuitable when the Management Agent is upgradedmanually.
/tmp/skip-prereq-checks Prevents the automatic prerequisite checks and fixes. Thisflag is suitable when there is a problem with the automaticprerequisite fixes and the fixes have been applied manuallyinstead.
/tmp/do-not-stop-services Prevents stopping IaaS services. The upgrade does notstop the IaaS Windows services, such as the ManagerService, DEMs, and agents.
/tmp/do-not-upgrade-servers Prevents the automatic upgrade of all server IaaScomponents, such as the database, web site, WAPI,repository, Model Mfrontanager data, and ManagerService.
Note This flag also prevents enabling the ManagerService automatic failover mode.
/tmp/do-not-upgrade-dems Prevents DEM upgrade.
/tmp/do-not-upgrade-agents Prevents IaaS proxy agent upgrade.
Installing and Upgrading vRealize Automation
VMware, Inc. 393
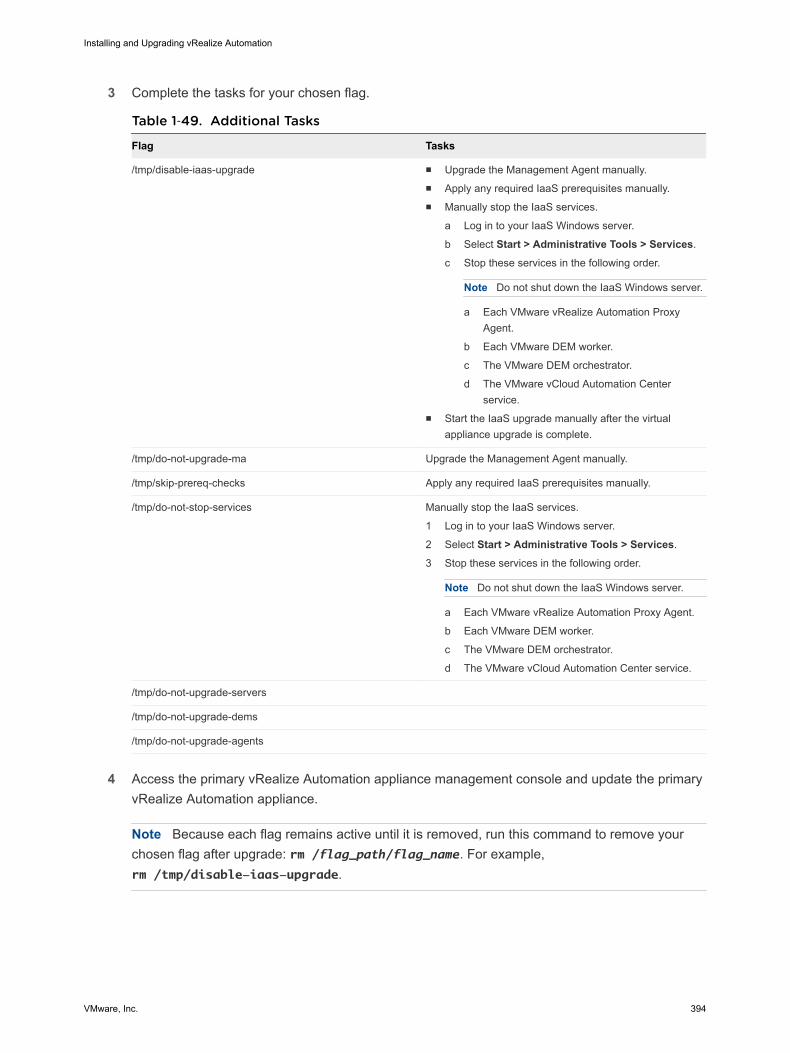
3 Complete the tasks for your chosen flag.
Table 1‑49. Additional Tasks
Flag Tasks
/tmp/disable-iaas-upgrade n Upgrade the Management Agent manually.n Apply any required IaaS prerequisites manually.n Manually stop the IaaS services.
a Log in to your IaaS Windows server.
b Select Start > Administrative Tools > Services.
c Stop these services in the following order.
Note Do not shut down the IaaS Windows server.
a Each VMware vRealize Automation ProxyAgent.
b Each VMware DEM worker.
c The VMware DEM orchestrator.
d The VMware vCloud Automation Centerservice.
n Start the IaaS upgrade manually after the virtualappliance upgrade is complete.
/tmp/do-not-upgrade-ma Upgrade the Management Agent manually.
/tmp/skip-prereq-checks Apply any required IaaS prerequisites manually.
/tmp/do-not-stop-services Manually stop the IaaS services.
1 Log in to your IaaS Windows server.
2 Select Start > Administrative Tools > Services.
3 Stop these services in the following order.
Note Do not shut down the IaaS Windows server.
a Each VMware vRealize Automation Proxy Agent.
b Each VMware DEM worker.
c The VMware DEM orchestrator.
d The VMware vCloud Automation Center service.
/tmp/do-not-upgrade-servers
/tmp/do-not-upgrade-dems
/tmp/do-not-upgrade-agents
4 Access the primary vRealize Automation appliance management console and update the primaryvRealize Automation appliance.
Note Because each flag remains active until it is removed, run this command to remove yourchosen flag after upgrade: rm /flag_path/flag_name. For example,rm /tmp/disable-iaas-upgrade.
Installing and Upgrading vRealize Automation
VMware, Inc. 394

Migrating vRealize Automation to 7.3You can perform a side-by-side upgrade of your current vRealize Automation environment to the latestversion using migration.
This information is specific to upgrading vRealize Automation to 7.3 using migration. For informationabout other supported upgrade paths, see Upgrading vRealize Automation.
Migrating vRealize AutomationYou can perform a side-by-side upgrade of your current vRealize Automation environment usingmigration.
Migration moves all data, except for tenants and identity stores, from your current vRealize Automationsource environment to a target deployment of the latest version of vRealize Automation.
Migration does not change your source environment except to stop vRealize Automation services for thetime required to collect and copy the data safely to your target environment. Depending on the size of thesource vRealize Automation database, migration can take from a few minutes to hours.
You can migrate your source environment to a minimal deployment or a high-availability deployment.
If you plan to put your target environment into production after migration, do not put your sourceenvironment back into service. Changes to your source environment after migration are not synchronizedwith your target environment.
If your source environment is integrated with vCloud Air or vCloud Director or has physical endpoints, youmust use migration to perform an upgrade. Migration removes these endpoints and everything associatedwith them from the target environment. Migration also removes a 6.xVMware vRealize Application Services integration from the target environment.
Note You must complete additional tasks to prepare your vRealize Automation virtual machines beforeyou migrate. Before you migrate, review Knowledge Base article 51531.
If you migrate from vRealize Automation 6.2.x to the latest version, you might experience these issues.
Installing and Upgrading vRealize Automation
VMware, Inc. 395
Issue Resolution
After you migrate from vRealize Automation 6.2.x to the latestversion, catalog items that use these property definitions appearin the service catalog but are not available to request.n Control types: Check box or link.n Attributes: Relationship, regular expressions, or property
layouts.
In vRealize Automation 7.x, the property definitions no longeruse these elements.
You must recreate the property definition or configure theproperty definition to use a vRealize Orchestrator script actionrather than the embedded control types or attributes. For moreinformation, see Catalog Items Appear in the Service CatalogAfter Migration But Are Not Available to Request.
Regular expressions used to define parent child relationships ina drop-down list in vRealize Automation 6.2.x no longer functionafter migration. For example, if you define one or moreresources that are available only in a certain context, theresources do not appear as menu items after migration.
You must recreate the property definition to restore the drop-down menu items after migration.
Migration PrerequisitesThe migration prerequisites differ depending on your target environment.
You can migrate to a minimal environment or to a high-availability environment.
Prerequisites for Migration to a Minimal Environment
Ensure a successful migration to a minimal environment by reviewing these prerequisites.
Prerequisites
n Verify that you have a new target environment of vRealize Automation.
n Install relevant proxy agents on the target environment according to these requirements.
n Target proxy agent name must match the source proxy agent name for vSphere, Hyper-V, CitrixXenServer, and Test proxy agents.
Note Finish these steps to obtain an agent name.
1 Go to the agent installation directory on the IaaS node.
2 Open the VRMAgent.exe.config file.
3 Under the serviceConfiguration tag, look for the value of the agentName attribute.
n Target proxy agent endpoint name must match the source proxy agent endpoint name forvSphere, Hyper-V, Citrix XenServer, and Test proxy agents.
n Do not create an endpoint for vSphere, Hyper-V, Citrix XenServer, or Test proxy agents on thetarget environment.
n Review the version numbers of vRealize Automation components.
a In your target vRealize Automation 7.3 environment, start a browser. Go to the vRealizeAutomation appliance management console at https://vra-va-hostname.domain.name:5480.
b Log in with the user name root and the password you entered when you deployed the appliance.
Installing and Upgrading vRealize Automation
VMware, Inc. 396
c Select vRA Settings > Cluster.
d Expand the Host / Node Name records by clicking the triangle.
Verify that the version numbers of the vRealize Automation IaaS components match.
n You must review Knowledge Base article 000051531 and perform any relevant fixes to yourenvironments prior to migration.
n Verify that the target Microsoft SQL Server version for the vRealize Automation target IaaS databaseis 2012, 2014, or 2016.
n Verify that port 22 is open between the source and target vRealize Automation environments. Port 22is required to establish Secure Shell (SSH) connections between source and target virtual appliances.
n Verify that the IaaS server node in the target environment has at least Java SE Runtime Environment(JRE) 8, update 111 (64 bit) installed. After you install the JRE, make sure the JAVA_HOME systemvariable points to the Java version you installed on each IaaS node. Revise the path if necessary.
n Verify that each IaaS node has PowerShell 3.0 or later installed.
n Verify that the source and target vRealize Automation environments are running.
n Verify that no user and provisioning activities are happening on the source vRealize Automationenvironment.
n Security software must not interact with the operating system and its components running on IaaSnodes in the target vRealize Automation environment during migration. If you have any antivirus orsecurity software installed, verify that the software is correctly configured or disabled for migration.
What to do next
Pre-Migration Tasks.
Prerequisites for Migration to a High-Availability Environment
Ensure a successful migration to a high-availability environment by reviewing these prerequisites.
Prerequisites
n Verify that you have a new target installation of vRealize Automation with a master and replica virtualappliance configured for high availability. See vRealize Automation High Availability ConfigurationConsiderations.
n Verify that all vRealize Automation virtual appliances use the same password for root user.
Installing and Upgrading vRealize Automation
VMware, Inc. 397
n Install relevant proxy agents on the target environment according to these requirements.
n Target proxy agent name must match the source proxy agent name for vSphere, Hyper-V, CitrixXenServer, and Test proxy agents.
Note Finish these steps to obtain an agent name.
1 Go to the agent installation directory on the IaaS node.
2 Open the VRMAgent.exe.config file.
3 Under the serviceConfiguration tag, look for the value of the agentName attribute.
n Target proxy agent endpoint name must match the source proxy agent endpoint name forvSphere, Hyper-V, Citrix XenServer, and Test proxy agents.
n Do not create an endpoint for vSphere, Hyper-V, Citrix XenServer, or Test proxy agents on thetarget environment.
n Check the version numbers of vRealize Automation components.
a In your target vRealize Automation 7.3 environment, start a browser and go to the vRealizeAutomation appliance management console at https://vra-va-hostname.domain.name:5480.
b Log in with the user name root and the password you entered when you deployed the appliance.
c Select vRA Settings > Cluster.
d To expand the Host / Node Name records so you can see the components, click the expandbutton.
Verify that the version numbers of vRealize Automation components match across all virtualappliance nodes.
Verify that the version numbers of vRealize Automation IaaS components match across all IaaSnodes.
e You must review Knowledge Base article 000051531 and perform any relevant fixes to yourenvironments prior to migration.
n Perform these steps to direct traffic to only the master node.
a Disable all the redundant nodes.
b Remove the health monitors for these items according to your load balancer documentation:
n vRealize Automation virtual appliance
n IaaS Website
n IaaS Manager Service
n Verify that the vRealize Automation appliance master node connects to the PostgreSQL database inMASTER mode.
a In your target vRealize Automation 7.3 environment, start a browser and go to the mastervRealize Automation appliance management console at https://vra-va-hostname.domain.name:5480.
Installing and Upgrading vRealize Automation
VMware, Inc. 398
b Log in with the user name root and the password you entered when you deployed the appliance.
c Select vRA Settings > Database.
d Verify that the database node host mode is MASTER.
n Verify that the target Microsoft SQL Server version for the vRealize Automation target IaaS databaseis 2012, 2014, or 2016.
n Verify that port 22 is open between the source and target vRealize Automation environments. Port 22is required to establish Secure Shell (SSH) connections between source and target virtual appliances.
n Verify that the IaaS Web Service and Model Manager Server nodes in the target environment havethe right Java Runtime Environment. You must have Java SE Runtime Environment (JRE) 8, update111 (64 bit) or later installed. Make sure the JAVA_HOME system variable points to the Java versionyou installed on each IaaS node. Revise the path if necessary.
n Verify that each IaaS node has at least PowerShell 3.0 or later installed.
n Verify that the source and target vRealize Automation environments are running.
n Verify that no user and provisioning activities are happening on the source vRealize Automationenvironment.
n Verify that any antivirus or security software that might interact with the operating system and itscomponents running on IaaS nodes in the target vRealize Automation environment is correctlyconfigured or disabled.
n Security software must not interact with the operating system and its components running on IaaSnodes in the target vRealize Automation environment during migration. If you have any antivirus orsecurity software installed, verify that it is correctly configured or disabled for migration.
What to do next
Pre-Migration Tasks.
Pre-Migration TasksBefore you migrate, you must perform several pre-migration tasks.
The pre-migration tasks you perform before you migrate your source vRealize Automation environment tothe target vRealize Automation 7.3 environment vary depending on your source environment.
Review Changes Introduced by Migration from vRealize Automation 6.2.x to 7.x
vRealize Automation 7 and later introduces various functional changes during and after the upgradeprocess. Review these changes before you upgrade your vRealize Automation 6.2.x deployment to thelatest version.
Installing and Upgrading vRealize Automation
VMware, Inc. 399
For information about the differences between vRealize Automation 6.2.x and 7.x, see ConsiderationsAbout Upgrading to This vRealize Automation Version in Upgrading vRealize Automation 6.2.5 to 7.4.
Note The vRealize Production Test Upgrade Assist Tool analyzes your vRealize Automation 6.2.xenvironment for any feature configuration that can cause upgrade issues and checks that yourenvironment is ready for upgrade. To download this tool and related documentation, go to the VMwarevRealize Production Test Tool download product page.
After you migrate from vRealize Automation 6.2.x to the latest version, catalog items that use theseproperty definitions appear in the service catalog but are not available to request.
n Control types: Check box or link.
n Attributes: Relationship, regular expressions, or property layouts.
In vRealize Automation 7.x, the property definitions no longer use these elements. You must recreate theproperty definition or configure the property definition to use a vRealize Orchestrator script action ratherthan the embedded control types or attributes. For more information, see Catalog Items Appear in theService Catalog After Migration But Are Not Available to Request.
Set the vRealize Automation PostgreSQL Replication Mode to Asynchronous
If you migrate from a distributed vRealize Automation 7.3 environment that operates in PostgreSQLsynchronous replication mode, you must change replication mode to asynchronous on both the sourceand target environments before you migrate. If you migrate from a distributed vRealize Automationenvironment earlier than 7.3, you must change PostgreSQL replication mode to asynchronous on thetarget environment before you migrate.
Prerequisites
n You have a distributed vRealize Automation 7.3 environment that you want to migrate or you have adistributed vRealize Automation environment earlier than 7.3 that you want to migrate.
n You are logged in as root on the appropriate vRealize Automation Appliance Management athttps://vra-va-hostname.domain.name:5480.
Procedure
1 Click vRA Settings > Database.
2 Click Async Mode and wait until the action completes.
3 Verify that all nodes in the Sync State column display Async status.
What to do next
Change DoDeletes Setting on the vSphere Agent to False
Change DoDeletes Setting on the vSphere Agent to False
If you migrate from a vRealize Automation 6.2.4 environment, you must change the DoDeletes setting onyour target vSphere agent before migration. This prevents virtual machines from your source environmentbeing deleted after migration.
Installing and Upgrading vRealize Automation
VMware, Inc. 400
Follow the steps in the Configure the vSphere Agent procedure to set DoDeletes to false.
Prerequisites
You have completed the prerequisites for migration.
What to do next
Prepare vRealize Automation Virtual Machines for Migration.
Prepare vRealize Automation Virtual Machines for Migration
Known issues with migrating vRealize Automation 6.2.x virtual machines can cause problems aftermigration.
You must review Knowledge Base article 000051531 and perform any relevant fixes to your environmentsprior to migration.
What to do next
Gather Information Required for Migration.
Gather Information Required for Migration
Use these tables to record the information that you need for migration from your source and targetenvironments.
Prerequisites
Finish verifying the prerequisites for your situation.
n Prerequisites for Migration to a Minimal Environment.
n Prerequisites for Migration to a High-Availability Environment.
Note You must review Knowledge Base article 000051531 and perform any relevant fixes to yourenvironments prior to migration.
Table 1‑50. Source vRealize Automation Appliance
Option Description Value
Host name Log in to your source vRealize Automation appliancemanagement console. Find the host name on theSystem tab. The host name must be a fully qualifieddomain name (FQDN).
Root username root
Root password The root password that you entered when youdeployed your source vRealize Automation appliance.
Installing and Upgrading vRealize Automation
VMware, Inc. 401
Table 1‑51. Target vRealize Automation Appliance
Option Description Value
Root username root
Root password The root password that you entered when youdeployed your target vRealize Automation appliance.
Default tenant The default tenant you created when you configuredsingle sign-on in the vRealize Automation Installationwizard, usually vsphere.local.
Administrator username Default tenant administrator user name that youentered when you deployed the targetvRealize Automation environment, usuallyadministrator.
Administrator password Password for the default tenant administrator user thatyou entered when you deployed the targetvRealize Automation environment.
Table 1‑52. Target IaaS Database
Option Description Value
Database server The location of the Microsoft SQL Server where therestored vRealize Automation IaaS Microsoft SQLdatabase resides. If a named instance and non-defaultport is used, enter in SERVER,PORT\INSTANCE-NAME format.
Cloned database name Name of the source vRealize Automation 6.2.x or 7.xIaaS Microsoft SQL database that you backed up onthe source and restored on the target environment.
Login name Login name of a user with db_owner role for thecloned IaaS Microsoft SQL database in the targetenvironment.
For Windows Authentication, the Windows account forthe vCloud Automation Center Management Agentservice must be db_owner for the cloned IaaS SQLdatabase.
Password Password for the SQL Server user who has thedb_owner role for the cloned IaaS Microsoft SQLdatabase.
Original encryption key Original encryption key that you retrieve from thesource environment. See Obtain the Encryption Keyfrom the Source vRealize Automation Environment.
New passphrase A series of words used to generate a new encryptionkey. You use this passphrase each time you install anew IaaS component in the targetvRealize Automation environment.
What to do next
Obtain the Encryption Key from the Source vRealize Automation Environment.
Installing and Upgrading vRealize Automation
VMware, Inc. 402
Obtain the Encryption Key from the Source vRealize Automation Environment
You must enter the encryption key from the source vRealize Automation environment as part of themigration procedure.
Prerequisites
Verify that you have administrator privileges on the active Manager Service host virtual machine in yoursource environment.
Procedure
1 Open a command prompt as an administrator on the virtual machine that hosts the active ManagerService in your source environment and run this command.
"C:\Program Files
(x86)\VMware\vCAC\Server\ConfigTool\EncryptionKeyTool\DynamicOps.Tools.Encryption
KeyTool.exe" key-read -c "C:\Program Files
(x86)\VMware\vCAC\Server\ManagerService.exe.config" -v
If your installation directory is not in the default location, C:\Program Files (x86)\VMware\vCAC,edit the path to show your actual installation directory.
2 Save the key that appears after you run the command.
The key is a long string of characters that looks similar to this example:
NRH+f/BlnCB6yvasLS3sxespgdkcFWAEuyV0g4lfryg=.
What to do next
n If you are migrating from a vRealize Automation 6.2.x environment: Add Each Tenant from the SourcevRealize Automation Environment to the Target Environment.
n If you are migrating from a vRealize Automation 7.x environment: List Tenant and IaaS Administratorsfrom the Source vRealize Automation 6.2.x Environment.
List Tenant and IaaS Administrators from the Source vRealize Automation 6.2.x Environment
Before you migrate a vRealize Automation 6.2.x environment, you must make a list of the tenant and IaaSadministrators for each tenant.
Perform the following procedure for each tenant in the source vRealize Automation console.
Note If you migrate from a vRealize Automation 7.x environment, you do not need to perform thisprocedure.
Prerequisites
Log in to the source vRealize Automation console.
1 Open the vRealize Automation console using the fully qualified domain name of the source virtualappliance: https://vra-va-hostname.domain.name/vcac.
Installing and Upgrading vRealize Automation
VMware, Inc. 403
For a high-availability environment, open the console using the fully qualified domain name of thesource virtual appliance load balancer: https://vra-va-lb-hostname.domain.name/vcac.
2 Log in with the user name [email protected] and the password that you enteredwhen you deployed the source vRealize Automation.
Procedure
1 Select Administration > Tenants.
2 Click a tenant name.
3 Click Administrators.
4 Make a list of each tenant and IaaS administrator user name.
5 Click Cancel.
What to do next
Add Each Tenant from the Source vRealize Automation Environment to the Target Environment.
Add Each Tenant from the Source vRealize Automation Environment to the TargetEnvironment
You must add tenants in the target environment using the name of each tenant in the source environment.
For successful migration, it is mandatory that each tenant in the source environment is created in thetarget environment. You must also use a tenant-specific access URL for each tenant that you add usingthe tenant URL name from the source environment. If there are unused tenants in the sourceenvironment that you do not want to migrate, delete them from the source environment before migration.
Perform this procedure for each tenant in your source environment.
n When you migrate from a vRealize Automation 6.2.x environment, you migrate your existing SSO2tenants and identity stores on the source environment to the VMware Identity Manager on the targetenvironment.
n When you migrate from a vRealize Automation 7.x environment, you migrate your existingVMware Identity Manager tenants and identity stores on the source environment to theVMware Identity Manager on the target environment.
Prerequisites
n Gather Information Required for Migration.
n Log in to the target vRealize Automation console.
a Open the vRealize Automation console using the fully qualified domain name of the target virtualappliance: https://vra-va-hostname.domain.name/vcac.
For a high-availability environment, open the console using the fully qualified domain name of thetarget virtual appliance load balancer: https://vra-va-lb-hostname.domain.name/vcac.
b Log in with the user name [email protected] and the password that you enteredwhen you deployed the target vRealize Automation.
Installing and Upgrading vRealize Automation
VMware, Inc. 404

Procedure
1 Select Administration > Tenants.
2 Click the New icon ( ).
3 In the Name text box, enter a tenant name that matches a tenant name in the source environment.
For example, if the tenant name in the source environment is DEVTenant, enter DEVTenant.
4 (Optional) Enter a description in the Description text box.
5 In the URL Name text box, enter a tenant URL name that matches the tenant URL name in thesource environment.
The URL name is used to append a tenant-specific identifier to the vRealize Automation consoleURL.
For example, if the URL name for DEVTenant in the source environment is dev, enter dev to createthe URL https://vra-va-hostname.domain.name/vcac/org/dev.
6 (Optional) Enter an email address in the Contact Email text box.
7 Click Submit and Next.
What to do next
Create an Administrator for Each Added Tenant.
Create an Administrator for Each Added Tenant
You must create an administrator for each tenant that you added to the target environment. You create anadministrator by creating a local user account and assigning tenant administrator privileges to the localuser account.
Perform this procedure for each tenant in your target environment.
Prerequisites
n Add Each Tenant from the Source vRealize Automation Environment to the Target Environment.
n Log in to the target vRealize Automation console.
a Open the vRealize Automation console using the fully qualified domain name of the target virtualappliance: https://vra-va-hostname.domain.name/vcac.
For a high-availability environment, open the console using the fully qualified domain name of thetarget virtual appliance load balancer: https://vra-va-lb-hostname.domain.name/vcac.
b Log in with the user name [email protected] and the password that you enteredwhen you deployed the target vRealize Automation.
Procedure
1 Select Administration > Tenants.
Installing and Upgrading vRealize Automation
VMware, Inc. 405
2 Click a tenant that you added.
For example, for DEVTenant, click DEVTenant.
3 Click Local users.
4 Click the New icon ( ).
5 In User Details, enter the requested information to create a local user account to assign the tenantadministrator role.
The local user name must be unique to the default local directory, vsphere.local.
6 Click OK.
7 Click Administrators.
8 Enter the local user name in the Tenant administrators search box and press Enter.
9 Click the appropriate name in the search returns to add the user to the list of tenant administrators.
10 Click Finish.
11 Log out of the console.
What to do next
n For a minimal deployment: Synchronize Users and Groups for an Active Directory Link BeforeMigration to a Minimal Environment.
n For a high-availability deployment: Synchronize Users and Groups for an Active Directory Link BeforeMigration to a High-Availability Environment.
Synchronize Users and Groups for an Active Directory Link Before Migration to a MinimalEnvironment
Before you import your users and groups to a minimal deployment of vRealize Automation, you mustconnect to your Active Directory link.
Perform this procedure for each tenant. If a tenant has more than one Active Directory, perform thisprocedure for each Active Directory that the tenant uses.
Prerequisites
n Create an Administrator for Each Added Tenant.
n Verify that you have access privileges to the Active Directory.
n Log in to the tenanted target vRealize Automation console at https://vra-va-hostname.domain.name/vcac/org/tenant-URL-name with the tenant administrator user name andpassword.
Procedure
1 Select Administration > Directories Management > Directories.
2 Click Add Directory icon ( ) and select Add Active Directory over LDAP/IWA.
Installing and Upgrading vRealize Automation
VMware, Inc. 406
3 Enter your Active Directory account settings.
u For Non-Native Active Directories
Option Sample Input
Directory Name Enter a unique directory name.
Select Active Directory over LDAP when using Non-Native Active Directory.
This Directory Supports DNS ServiceLocation
Deselect this option.
Base DN Enter the distinguished name (DN) of the starting point for directory serversearches.
For example, cn=users,dc=rainpole,dc=local.
Bind DN Enter the full distinguished name (DN), including common name (CN), of anActive Directory user account that has privileges to search for users.
For example, cn=config_admin infra,cn=users,dc=rainpole,dc=local.
Bind DN Password Enter the Active Directory password for the account that can search for users andclick Test Connection to test the connection to the configured directory.
u For Native Active Directories
Option Sample Input
Directory Name Enter a unique directory name.
Select Active Directory (Integrated Windows Authentication) when usingNative Active Directory.
Domain Name Enter the name of the domain to join.
Domain Admin Username Enter the user name for the domain admin.
Domain Admin Password Enter the password for the domain admin.
Bind User UPN Use the email address format to enter the name of the user who can authenticatewith the domain.
Bind DN Password Enter the Active Directory bind account password for the account that can searchfor users.
4 Click Save & Next.
Select the Domains displays a list of domains.
5 Accept the default domain setting and click Next.
6 Verify that the attribute names are mapped to the correct Active Directory attributes, and click Next.
7 Select the groups and users to synchronize.
a Click the New icon ( ).
b Enter the user domain and click Find Groups.
For example, enter dc=vcac,dc=local.
Installing and Upgrading vRealize Automation
VMware, Inc. 407
c To select the groups to synchronize, click Select and click Next.
d On Select Users, select the users to synchronize and click Next.
Only add users and groups that are required to use vRealize Automation. Do not select Syncnested groups unless all of the groups in the nest are required to use vRealize Automation.
8 Review the users and groups you are syncing to the directory, and click Sync Directory.
The directory synchronization takes some time and runs in the background.
What to do next
Run NSX Network and Security Inventory Data Collection in the Source vRealize AutomationEnvironment
Synchronize Users and Groups for an Active Directory Link Before Migration to a High-Availability Environment
Before you import your users and groups to a high-availability vRealize Automation environment, youmust connect to your Active Directory link.
n Perform steps 1- 8 for each tenant. If a tenant has more than one Active Directory, perform thisprocedure for each Active Directory that the tenant uses.
n Repeat steps 9–10 for each identity provider associated with a tenant.
Prerequisites
n Create an Administrator for Each Added Tenant.
n Verify that you have access privileges to the Active Directory.
n Log in to the tenanted target vRealize Automation console at https://vra-va-lb-hostname.domain.name/vcac/org/tenant-URL-name with the tenant administrator user name andpassword.
Procedure
1 Select Administration > Directories Management > Directories.
2 Click Add Directory icon ( ) and select Add Active Directory over LDAP/IWA.
3 Enter your Active Directory account settings.
u For Non-Native Active Directories
Option Sample Input
Directory Name Enter a unique directory name.
Select Active Directory over LDAP when using Non-Native Active Directory.
This Directory Supports DNS ServiceLocation
Deselect this option.
Base DN Enter the distinguished name (DN) of the starting point for directory serversearches.
For example, cn=users,dc=rainpole,dc=local.
Installing and Upgrading vRealize Automation
VMware, Inc. 408
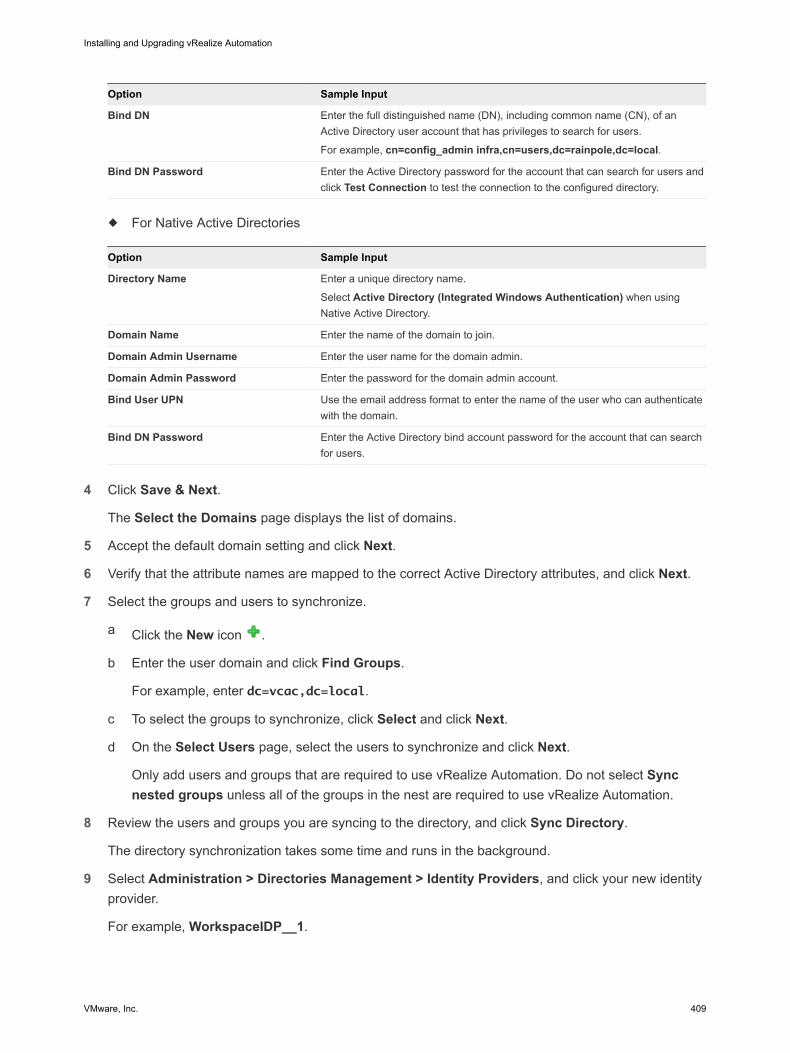
Option Sample Input
Bind DN Enter the full distinguished name (DN), including common name (CN), of anActive Directory user account that has privileges to search for users.
For example, cn=config_admin infra,cn=users,dc=rainpole,dc=local.
Bind DN Password Enter the Active Directory password for the account that can search for users andclick Test Connection to test the connection to the configured directory.
u For Native Active Directories
Option Sample Input
Directory Name Enter a unique directory name.
Select Active Directory (Integrated Windows Authentication) when usingNative Active Directory.
Domain Name Enter the name of the domain to join.
Domain Admin Username Enter the user name for the domain admin.
Domain Admin Password Enter the password for the domain admin account.
Bind User UPN Use the email address format to enter the name of the user who can authenticatewith the domain.
Bind DN Password Enter the Active Directory bind account password for the account that can searchfor users.
4 Click Save & Next.
The Select the Domains page displays the list of domains.
5 Accept the default domain setting and click Next.
6 Verify that the attribute names are mapped to the correct Active Directory attributes, and click Next.
7 Select the groups and users to synchronize.
a Click the New icon .
b Enter the user domain and click Find Groups.
For example, enter dc=vcac,dc=local.
c To select the groups to synchronize, click Select and click Next.
d On the Select Users page, select the users to synchronize and click Next.
Only add users and groups that are required to use vRealize Automation. Do not select Syncnested groups unless all of the groups in the nest are required to use vRealize Automation.
8 Review the users and groups you are syncing to the directory, and click Sync Directory.
The directory synchronization takes some time and runs in the background.
9 Select Administration > Directories Management > Identity Providers, and click your new identityprovider.
For example, WorkspaceIDP__1.
Installing and Upgrading vRealize Automation
VMware, Inc. 409
10 On the page for the identity provider that you selected, add a connector for each node.
a Follow the instructions for Add a Connector.
b Update the value for the IdP Hostname property to point to the fully qualified domain name(FQDN) for the vRealize Automation load balancer.
c Click Save.
What to do next
Run NSX Network and Security Inventory Data Collection in the Source vRealize AutomationEnvironment.
Run NSX Network and Security Inventory Data Collection in the Source vRealize AutomationEnvironment
Before you migrate, you must run NSX Network and Security Inventory data collection in the sourcevRealize Automation environment.
This data collection is necessary for the Load Balancer Reconfigure action to work invRealize Automation 7.3 for 7.1 and 7.2 deployments.
Note You do not need to run this data collection in your source environment when you migrate fromvRealize Automation 6.2.x. vRealize Automation 6.2.x does not support the Load Balancer Reconfigureaction.
Procedure
u Run NSX Network and Security Inventory data collection in your source vRealize Automationenvironment before you migrate to vRealize Automation 7.3. See Start Endpoint Data CollectionManually in Managing vRealize Automation.
What to do next
Manually Clone the Source vRealize Automation IaaS Microsoft SQL Database.
Manually Clone the Source vRealize Automation IaaS Microsoft SQL Database
Before migration, you must back up your IaaS Microsoft SQL database in the vRealize Automation sourceenvironment and restore it to a new blank database created in the vRealize Automation targetenvironment.
Prerequisites
n Run NSX Network and Security Inventory Data Collection in the Source vRealize AutomationEnvironment.
n Obtain information about backing up and restoring an SQL Server database. Find articles on the Microsoft Developer Network about creating a full SQL Server database backup and restoring anSQL Server database to a new location.
Installing and Upgrading vRealize Automation
VMware, Inc. 410
Procedure
u Create a full backup of your source vRealize Automation 6.2.x or 7.x IaaS Microsoft SQL database.You use the backup to restore the SQL database to a new blank database created in the targetenvironment.
What to do next
Snapshot the Target vRealize Automation Environment.
Snapshot the Target vRealize Automation Environment
Take a snapshot of each target vRealize Automation virtual machine. If migration is unsuccessful, you cantry again using the virtual machine snapshots.
For information, see your vSphere documentation.
Prerequisites
Manually Clone the Source vRealize Automation IaaS Microsoft SQL Database.
What to do next
Perform one of the following procedures:
n Migrate vRealize Automation Source Data to a vRealize Automation 7.3 Minimal Environment.
n Migrate vRealize Automation Source Data to a vRealize Automation 7.3 High-AvailabilityEnvironment.
Migration ProceduresThe procedure you perform to migrate your source vRealize Automation environment data dependswhether you migrate to a minimal environment or to a high-availability environment.
Migrate vRealize Automation Source Data to a vRealize Automation 7.3 Minimal Environment
You can migrate your current vRealize Automation environment to a new installation ofvRealize Automation 7.3.
Prerequisites
n Gather Information Required for Migration.
n Obtain the Encryption Key from the Source vRealize Automation Environment.
n Add Each Tenant from the Source vRealize Automation Environment to the Target Environment.
n Create an Administrator for Each Added Tenant.
n Synchronize Users and Groups for an Active Directory Link Before Migration to a MinimalEnvironment.
n Manually Clone the Source vRealize Automation IaaS Microsoft SQL Database.
n Snapshot the Target vRealize Automation Environment.
Installing and Upgrading vRealize Automation
VMware, Inc. 411
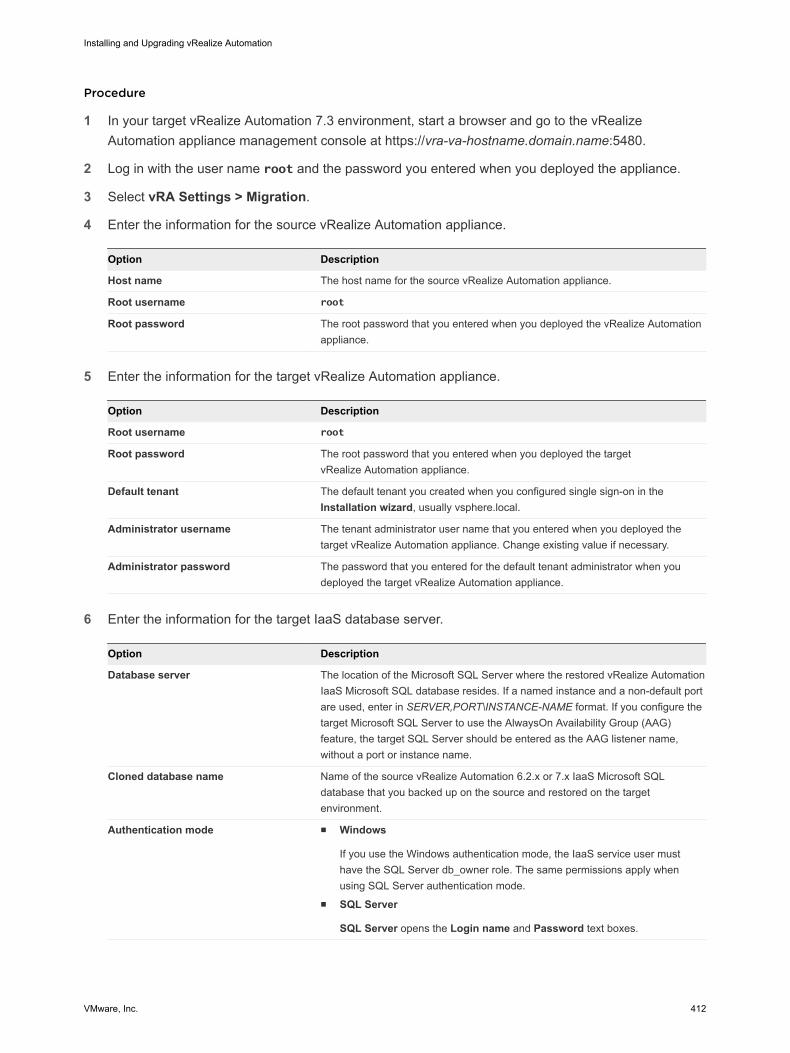
Procedure
1 In your target vRealize Automation 7.3 environment, start a browser and go to the vRealizeAutomation appliance management console at https://vra-va-hostname.domain.name:5480.
2 Log in with the user name root and the password you entered when you deployed the appliance.
3 Select vRA Settings > Migration.
4 Enter the information for the source vRealize Automation appliance.
Option Description
Host name The host name for the source vRealize Automation appliance.
Root username root
Root password The root password that you entered when you deployed the vRealize Automationappliance.
5 Enter the information for the target vRealize Automation appliance.
Option Description
Root username root
Root password The root password that you entered when you deployed the targetvRealize Automation appliance.
Default tenant The default tenant you created when you configured single sign-on in theInstallation wizard, usually vsphere.local.
Administrator username The tenant administrator user name that you entered when you deployed thetarget vRealize Automation appliance. Change existing value if necessary.
Administrator password The password that you entered for the default tenant administrator when youdeployed the target vRealize Automation appliance.
6 Enter the information for the target IaaS database server.
Option Description
Database server The location of the Microsoft SQL Server where the restored vRealize AutomationIaaS Microsoft SQL database resides. If a named instance and a non-default portare used, enter in SERVER,PORT\INSTANCE-NAME format. If you configure thetarget Microsoft SQL Server to use the AlwaysOn Availability Group (AAG)feature, the target SQL Server should be entered as the AAG listener name,without a port or instance name.
Cloned database name Name of the source vRealize Automation 6.2.x or 7.x IaaS Microsoft SQLdatabase that you backed up on the source and restored on the targetenvironment.
Authentication mode n Windows
If you use the Windows authentication mode, the IaaS service user musthave the SQL Server db_owner role. The same permissions apply whenusing SQL Server authentication mode.
n SQL Server
SQL Server opens the Login name and Password text boxes.
Installing and Upgrading vRealize Automation
VMware, Inc. 412
Option Description
Login name Login name of the SQL Server user with the db_owner role for the cloned IaaSMicrosoft SQL database.
Password Password for the SQL Server user with the db_owner role for the cloned IaaSMicrosoft SQL database.
Original encryption key Original encryption key that you retrieve from the source environment. See Obtainthe Encryption Key from the Source vRealize Automation Environment.
New passphrase A series of words used to generate a new encryption key. You use thispassphrase each time you install a new IaaS component in the targetvRealize Automation environment.
7 Click Validate.
The page displays the validation progress.
n If all the items validate successfully, go to step 8.
n If an item fails to validate, inspect the error message and the validation log file on the IaaS nodes.For log file locations, see Migration Log Locations. Click Edit Settings and edit the problem item.Go to step 7.
8 Click Migrate.
The page displays the migration progress.
n If migration is successful, the page displays information about the Software Agent post-migrationupdate.
n If migration is unsuccessful, inspect the migration log files on the virtual appliance and the IaaSnodes. For log file locations, see Migration Log Locations.
Finish these steps before you restart migration.
a Revert your target vRealize Automation environment to the state you captured when you took asnapshot before migration.
b Restore your target IaaS Microsoft SQL database using the backup of the source IaaS database.
What to do next
Post-Migration Tasks.
Migrate vRealize Automation Source Data to a vRealize Automation 7.3 High-AvailabilityEnvironment
You can migrate your current vRealize Automation environment to a new installation ofvRealize Automation 7.3 configured as a high-availability environment.
Prerequisites
n Gather Information Required for Migration.
n Obtain the Encryption Key from the Source vRealize Automation Environment.
n Add Each Tenant from the Source vRealize Automation Environment to the Target Environment.
Installing and Upgrading vRealize Automation
VMware, Inc. 413
n Create an Administrator for Each Added Tenant.
n Synchronize Users and Groups for an Active Directory Link Before Migration to a High-AvailabilityEnvironment.
n Manually Clone the Source vRealize Automation IaaS Microsoft SQL Database.
n Snapshot the Target vRealize Automation Environment.
Procedure
1 In your target vRealize Automation 7.3 environment, open a browser and go to the master vRealizeAutomation appliance management console at https://vra-va-hostname.domain.name:5480.
2 Log in with the user name root and the password you entered when you deployed the appliance.
3 Select vRA Settings > Migration.
4 Enter the information for the source vRealize Automation appliance.
Option Description
Host name The host name for the source vRealize Automation appliance.
Root username root
Root password The root password that you entered when you deployed the sourcevRealize Automation appliance.
5 Enter the information for the target vRealize Automation appliance.
Option Description
Root username root
Root password The root password that you entered when you deployed the targetvRealize Automation appliance.
Default tenant The default tenant you created when you configured single sign-on in theInstallation wizard, usually vsphere.local.
Administrator username The tenant administrator user name that you entered when you deployed thetarget vRealize Automation appliance. Change existing value if necessary.
Administrator password The password that you entered for the default tenant administrator when youdeployed the target vRealize Automation appliance.
6 Enter the information for the target IaaS database server.
Option Description
Database server The location of the Microsoft SQL Server instance where the restored vRealizeAutomation IaaS Microsoft SQL database resides. If a named instance and a non-default port are used, enter in SERVER,PORT\INSTANCE-NAME format. If youconfigure the target Microsoft SQL Server to use the AlwaysOn Availability Group(AAG) feature, the target SQL Server should be entered as the AAG listenername, without a port or instance name.
Cloned database name Name of the source vRealize Automation 6.2.x or 7.x IaaS Microsoft SQLdatabase that you backed up on the source and restored on the targetenvironment.
Installing and Upgrading vRealize Automation
VMware, Inc. 414
Option Description
Authentication mode n Windows
If you use the Windows authentication mode, the IaaS service user musthave the SQL Server db_owner role. The same permissions apply whenusing SQL Server authentication mode.
n SQL Server
SQL Server opens the Login name and Password text boxes.
Login name Login name of the SQL Server user with the db_owner role for the cloned IaaSMicrosoft SQL database.
Password Password for the SQL Server user with the db_owner role for the cloned IaaSMicrosoft SQL database.
Original encryption key Original encryption key that you retrieve from the source environment. See Obtainthe Encryption Key from the Source vRealize Automation Environment.
New passphrase A series of words used to generate a new encryption key. You use thispassphrase each time you install a new IaaS component in the targetvRealize Automation environment.
7 Click Validate.
The page displays the validation progress.n If all the items validate successfully, go to step 8.
n If an item fails to validate, inspect the error message and the validation log file on the IaaS nodes.For log file locations, see Migration Log Locations. Click Edit Settings and edit the problem item.Go to step 7.
8 Click Migrate.
The page displays the migration progress.n If migration is successful, the page displays information about the Software Agent post-migration
update.
n If migration is unsuccessful, inspect the migration log files on the virtual appliance and the IaaSnodes. For log file locations, see Migration Log Locations.
Finish these steps before you restart migration.a Revert your target vRealize Automation environment to the state you captured when you took a
snapshot before migration.
b Restore your target IaaS Microsoft SQL database using the backup of the source IaaS database.
What to do next
Post-Migration Tasks.
Post-Migration TasksAfter you migrate vRealize Automation, perform the post-migration tasks that pertain to your situation.
Note After you migrate the identity stores, users of vRealize Code Stream must manually reassignvRealize Code Stream roles.
Installing and Upgrading vRealize Automation
VMware, Inc. 415
Add Tenant and IaaS Administrators from the Source vRealize Automation 6.2.x Environment
You must delete and restore the vRealize Automation 6.2.x tenant administrators in each tenant aftermigration.
Perform the following procedure for each tenant in the target vRealize Automation console.
Note If you migrate from a vRealize Automation 7.x environment, you do not need to perform thisprocedure.
Prerequisites
n Successful migration to vRealize Automation 7.3.
n Log in to the target vRealize Automation console.
Procedure
1 Select Administration > Tenants.
2 Click a tenant name.
3 Click Administrators.
4 Make a list of each tenant administrator name and user name.
5 Point to each administrator and click the delete icon (Delete) until you delete all administrators.
6 Click Finish.
7 On the Tenants page, click the tenant name again.
8 Click Administrators.
9 Enter the name of each user that you deleted in the appropriate search box and press Enter.
10 Click the name of the appropriate user from the search returns to add the user back as anadministrator.
When you finish, the list of tenant administrators administrators looks the same as the list ofadministrators you deleted.
11 Click Finish.
Set the vRealize Automation PostgreSQL Replication Mode to Synchronous
After you migrate from a distributed vRealize Automation 7.3 environment, you can change PostgreSQLreplication mode to synchronous on both the source and target environments. After you upgrade from adistributed vRealize Automation environment earlier than 7.3, you can change PostgreSQL replicationmode to synchronous on the target environment.
Prerequisites
n You have a distributed vRealize Automation environment that you migrated from 7.3 or you have adistributed vRealize Automation environment that you upgraded from a version earlier than 7.3.
Installing and Upgrading vRealize Automation
VMware, Inc. 416

n You are logged in as root to the appropriate vRealize Automation Appliance Management athttps://vra-va-hostname.domain.name:5480.
Procedure
1 Click vRA Settings > Database.
2 Click Sync Mode and wait until the action completes.
3 Verify that all nodes in the Sync State column display Sync status.
What to do next
Run Test Connection and Verify Migrated Endpoints.
Run Test Connection and Verify Migrated Endpoints
Migrating to vRealize Automation 7.3 makes changes to endpoints in the target environment.
After you migrate to vRealize Automation 7.3, you must use the Test Connection action for all applicableendpoints. You might also need to make adjustments to some migrated endpoints. For more information,see Considerations When Working With Upgraded or Migrated Endpoints.
The default security setting for upgraded or migrated endpoints is to not accept untrusted certificates.
After upgrading or migrating from pre-vRealize Automation 7.3, if you were using untrusted certificatesyou must perform the following steps for all vSphere and NSX endpoints to enable certificate validation.Otherwise, the endpoint operations fail with certificate errors. For more information see VMwareKnowledge Base articles Endpoint communication is broken after upgrade to vRA 7.3 (2150230) at http://kb.vmware.com/kb/2150230 and How to download and install vCenter Server root certificates toavoid Web Browser certificate warnings (2108294) at http://kb.vmware.com/kb/2108294.
1 After upgrade or migration, log in to the vRealize Automation vSphere agent machine and restart yourvSphere agents by using the Services tab.
Migration might not restart all agents, so manually restart them if needed.
2 Wait for at least one ping report to finish. It takes a minute or two for a ping report to finish.
3 When the vSphere agents have started data collection, log in to vRealize Automation as an IaaSadministrator.
4 Click Infrastructure > Endpoints > Endpoints.
5 Edit a vSphere endpoint and click Test Connection.
6 If a certificate prompt appears, click OK to accept the certificate.
If a certificate prompt does not appear, the certificate might currently be correctly stored in a trustedroot authority of the Windows machine hosting service for the endpoint, for example as a proxy agentmachine or DEM machine.
7 Click OK to apply the certificate acceptance and save the endpoint.
8 Repeat this procedure for each vSphere endpoint.
9 Repeat this procedure for each NSX endpoint.
Installing and Upgrading vRealize Automation
VMware, Inc. 417
If the Test Connection action is successful but some data collection or provisioning operations fail, youcan install the same certificate on all the agent machines that serve the endpoint and on all DEMmachines. Alternatively, you can uninstall the certificate from existing machines and repeat the aboveprocedure for the failing endpoint.
Run NSX Network and Security Inventory Data Collection in Your TargetvRealize Automation 7.3 Environment
After you migrate, you must run NSX Network and Security Inventory data collection in the targetVMware vRealize ™ Automation 7.3 environment.
This data collection is necessary for the Load Balancer Reconfigure action to work invRealize Automation 7.3 for 7.1 and 7.2 deployments.
Note You do not need to perform this data collection if you migrated from vRealize Automation 6.2.x to7.3.
Prerequisites
n Run NSX Network and Security Inventory Data Collection in the Source vRealize AutomationEnvironment .
n Successfully migrate to vRealize Automation 7.3.
Procedure
u Run NSX Network and Security Inventory data collection in your target vRealize Automationenvironment before you migrate to vRealize Automation 7.3. See Start Endpoint Data CollectionManually in Managing vRealize Automation.
Reconfigure Load Balancers After Migration to a High-Availability Environment
When you migrate to a high-availability environment, you must reconfigure each load balancer after youfinish migration.
Prerequisites
Migrate vRealize Automation Source Data to a vRealize Automation 7.3 High-Availability Environment.
Procedure
u To restore the original health check settings so replica nodes can accept incoming traffic, configurethe load balancers for these items.
n vRealize Automation appliance.
n IaaS Web Server that hosts the Model Manager.
n Manager Service.
Migrating an External vRealize Orchestrator Server to vRealize Automation 7.3
You can migrate your existing external vRealize Orchestrator server to an instance ofvRealize Orchestrator embedded in vRealize Automation.
Installing and Upgrading vRealize Automation
VMware, Inc. 418

Prerequisites
Successful migration to vRealize Automation 7.3.
For information, see Migrating an External Orchestrator Server to vRealize Automation 7.3 in thevRealize Orchestrator documentation.
Migrate the Embedded vRealize Orchestrator Server from vRealize Automation 7.x to 7.3
You can migrate the vRealize Orchestrator server from your vRealize Automation 7.x source environmentto vRealize Automation 7.3 by performing these procedures.
Prerequisites
Successful migration to vRealize Automation 7.3.
Procedure1 Temporarily Change the Configuration of the Source vRealize Automation Appliance
Before you migrate the vRealize Orchestrator server from your vRealize Automation 7.x sourceenvironment to vRealize Automation 7.3, you must run the commands in this procedure totemporarily change the configuration of the source vRealize Automation appliance.
2 Export the Configuration from the Embedded vRealize Orchestrator on the Source vRealizeAutomation Appliance
Before you migrate the vRealize Orchestrator server from your vRealize Automation 7.x sourceenvironment to vRealize Automation 7.3, you must run the commands in this procedure to export theconfiguration of the embedded source vRealize Orchestrator.
3 Import the Configuration and Database of the Embedded Source vRealize Orchestrator to theEmbedded Target vRealize Orchestrator
Run the commands in this procedure to migrate the vRealize Orchestrator server from yourvRealize Automation 7.x source environment to vRealize Automation 7.3.
4 Reconfigure the Target Embedded vRealize Orchestrator to Support High Availability
For a high-availability deployment, you must manually rejoin each target replica vRealize Automationappliance to the cluster to enable high-availability support for the embedded vRealize Orchestrator.
5 Restore the Configuration of the Source vRealize Automation Appliance
Use this procedure to restore the configuration of the source vRealize Automation appliance.
Temporarily Change the Configuration of the Source vRealize Automation Appliance
Before you migrate the vRealize Orchestrator server from your vRealize Automation 7.x sourceenvironment to vRealize Automation 7.3, you must run the commands in this procedure to temporarilychange the configuration of the source vRealize Automation appliance.
Prerequisites
n For a minimal deployment, log in using SSH to the source vRealize Automation appliance as root.
n For a high-availability deployment, log in using SSH to the master source vRealize Automationappliance as root.
Installing and Upgrading vRealize Automation
VMware, Inc. 419
Procedure
1 Create a vro_migration user in the source PostgreSQL server.
a Before you run the command, replace VRO-MIGRATION-USER-PASSWORD with a password forthe vro_migration user .
sudo -u postgres -i -- /opt/vmware/vpostgres/current/bin/psql vcac
-c "CREATE USER vro_migration WITH PASSWORD
'VRO-MIGRATION-USER-PASSWORD';"
b Grant the vro_migration user access to the tables in the vcac database.
sudo -u postgres -i -- /opt/vmware/vpostgres/current/bin/psql vcac
-c "GRANT SELECT ON ALL TABLES IN SCHEMA public TO vro_migration;"
2 Create a backup of the source PostgreSQL client authentication configuration fileat /storage/db/pgdata/pg_hba.conf.
cp /storage/db/pgdata/pg_hba.conf /storage/db/pgdata/pg_hba.conf.bak
3 Modify the source PostgreSQL client authentication configuration file to grant vro_migration userremote access to vcac database from the target vRealize Automation appliance. Before you run thecommand, replace TARGET-VRA-APPLIANCE-IPV4-ADDRESS with the IP v4 address of the targetvRealize Automation appliance.
echo "host vcac vro_migration TARGET-VRA-APPLIANCE-IPV4-ADDRESS/32 md5"
>> /storage/db/pgdata/pg_hba.conf
4 Restart the source PostgreSQL server.
service vpostgres restart
What to do next
Export the Configuration from the Embedded vRealize Orchestrator on the Source vRealize AutomationAppliance
Export the Configuration from the Embedded vRealize Orchestrator on the SourcevRealize Automation Appliance
Before you migrate the vRealize Orchestrator server from your vRealize Automation 7.x sourceenvironment to vRealize Automation 7.3, you must run the commands in this procedure to export theconfiguration of the embedded source vRealize Orchestrator.
Prerequisites
n For a minimal deployment, log in using SSH to the source vRealize Automation appliance as root.
n For a high-availability deployment, log in using SSH to the master source vRealize Automationappliance as root.
Installing and Upgrading vRealize Automation
VMware, Inc. 420

Procedure
1 Copy the vRealize Orchestrator migration tool from the target vRealize Automation 7.3 environmentto the source vRealize Automation 7.x appliance. Before you run the command, replace TARGET-VRA-APPLIANCE-HOST-NAME with the fully qualified domain name of the targetvRealize Automation appliance host.
scp root@TARGET-VRA-APPLIANCE-HOST-NAME:/var/lib/vco/downloads/migration-tool.zip /storage
2 Extract the migration tool on vRealize Automation source appliance
unzip /storage/migration-tool.zip -d /var/lib/vco
3 Run the migration tool.
/var/lib/vco/migration-cli/bin/vro-migrate.sh export
The migration tool creates a file: /var/lib/vco/orchestrator-config-export-localhost-DATE-AND-TIMESTAMP.zip
Note You can safely ignore a SLF4J error message when you run this command.
4 Copy the generated export zip file to /tmp/vro-config.zip for later use.
mv /var/lib/vco/orchestrator-config-export-localhost-DATE-AND-TIMESTAMP.zip /tmp/vro-config.zip
What to do next
Import the Configuration and Database of the Embedded Source vRealize Orchestrator to the EmbeddedTarget vRealize Orchestrator
Import the Configuration and Database of the Embedded Source vRealize Orchestrator tothe Embedded Target vRealize Orchestrator
Run the commands in this procedure to migrate the vRealize Orchestrator server from yourvRealize Automation 7.x source environment to vRealize Automation 7.3.
Prerequisites
n For a minimal deployment, log in using SSH to the source vRealize Automation appliance as root.
n For a high-availability deployment, log in using SSH to the master source vRealize Automationappliance as root.
Procedure
1 Stop the vRealize Orchestrator server service.
service vco-server stop
Installing and Upgrading vRealize Automation
VMware, Inc. 421
2 Stop the vRealize Orchestrator Control Center service.
service vco-configurator stop
For a high-availability deployment, stop the vRealize Orchestrator server service andvRealize Orchestrator Control Center service on the master vRealize Automation appliance and oneach replica appliance.
3 Copy vro-config.zip from the source vRealize Automation appliance to the /tmp directory on thetarget vRealize Automation appliance. Before you run the command, replace SOURCE-VRA-APPLIANCE-HOST-NAME with the fully qualified domain name of the source vRealize Automationappliance. When prompted, enter the password for the source vRealize Automation appliance rootuser.
scp root@SOURCE-VRA-APPLIANCE-HOST-NAME:/tmp/vro-config.zip /tmp/vro-config.zip
4 Change the ownership of /tmp/vro-config.zip.
chown vco:vco /tmp/vro-config.zip
5 Import the configuration file to the embedded target vRealize Orchestrator server.
/usr/lib/vco/tools/configuration-cli/bin/vro-configure.sh import --skipDatabaseSettings --
skipLicense --skipSettings --skipSslCertificate --skipTrustStore --notForceImportPlugins --
notRemoveMissingPlugins --path /tmp/vro-config.zip
Import of Orchestrator Configuration finished successfully appears when theconfiguration file import succeeds.
Note If the import is successful, you can safely ignore any messages marked [ERROR] or [WARN]when you run this command.
6 Migrate the source vRealize Orchestrator database to the PostgreSQL server running on the targetvRealize Automation appliance. Before you run the command, replace SOURCE-VRA-APPLIANCE-HOST-NAME with the fully qualified domain name of the source vRealize Automation appliance andVRO-MIGRATION-USER-PASSWORD with the vro_migration user password that you created in theTemporarily Change the Configuration of the Source vRealize Automation Appliance procedure.
/usr/lib/vco/tools/configuration-cli/bin/vro-configure.sh db-migrate --sourceJdbcUrl
jdbc:postgresql://SOURCE-VRA-APPLIANCE-HOST-NAME:5432/vcac --sourceDbUsername vro_migration --
sourceDbPassword VRO-MIGRATION-USER-PASSWORD
7 Delete the old trusted certificates from the migrated database.
sudo -u postgres -i -- /opt/vmware/vpostgres/current/bin/psql vcac -c "DELETE FROM vmo_keystore
WHERE id='cakeystore-id';"
Installing and Upgrading vRealize Automation
VMware, Inc. 422
8 Delete old vRealize Orchestrator nodes from the migrated database.
sudo -u postgres -i -- /opt/vmware/vpostgres/current/bin/psql vcac -c "DELETE FROM
vmo_clustermember;"
9 Delete vro-config.zip from the /tmp directory.
rm -rf /tmp/vro-config.zip
10 Start the vRealize Orchestrator server service.
service vco-server start
For a high-availability deployment, start the vRealize Orchestrator server service only on the mastervRealize Automation appliance.
What to do next
Reconfigure the Target Embedded vRealize Orchestrator to Support High Availability
Reconfigure the Target Embedded vRealize Orchestrator to Support High Availability
For a high-availability deployment, you must manually rejoin each target replica vRealize Automationappliance to the cluster to enable high-availability support for the embedded vRealize Orchestrator.
Prerequisites
Log in to the target replica vRealize Automation appliance management.
1 Start a browser and open the target replica vRealize Automation appliance management using thefully qualified domain name (FQDN) of the target replica virtual appliance: https://vra-va-hostname.domain.name:5480.
2 Log in with the user name root and the password that you entered when you deployed the targetreplica vRealize Automation appliance.
Procedure
1 Select vRA Settings > Cluster.
2 In the Leading Cluster Node text box, enter the fully qualified domain name (FQDN) of the targetmaster vRealize Automation appliance.
3 Enter the root user password in the Password text box.
4 Click Join Cluster.
Continue past any certificate warnings. The system restarts services for the cluster.
5 Verify that the services are running.
a On the top tab bar, click Services.
b Click Refresh to monitor the progress of services startup.
Installing and Upgrading vRealize Automation
VMware, Inc. 423
What to do next
Restore the Configuration of the Source vRealize Automation Appliance
Restore the Configuration of the Source vRealize Automation Appliance
Use this procedure to restore the configuration of the source vRealize Automation appliance.
Prerequisites
n For a minimal deployment, log in using SSH to the source vRealize Automation appliance as root.
n For a high-availability deployment, log in using SSH to the master source vRealize Automationappliance as root.
Procedure
1 Delete vro-config.zip from the /tmp directory.
rm -rf /tmp/vro-config.zip
2 Revoke vco_migration user remote access to the vcac database by removing the previously addedline from the source PostgreSQL client authentication configuration file.
sed -i '/vro_migration/d' /storage/db/pgdata/pg_hba.conf
3 Restart the PostgreSQL server.
service vpostgres restart
4 Delete vro_migration user from the source PostgreSQL database.
a Revoke vro_migration user access to the tables in the vcac database.
sudo -u postgres -i -- /opt/vmware/vpostgres/current/bin/psql vcac -c "REVOKE ALL PRIVILEGES
ON ALL TABLES IN SCHEMA public FROM vro_migration;"
b Remove vro_migration user from the source PostgreSQL server.
sudo -u postgres -i -- /opt/vmware/vpostgres/current/bin/psql vcac -c "DROP USER
vro_migration;"
Reconfigure the vRealize Automation Endpoint in the Target vRealize Orchestrator
Use the following procedure to reconfigure the vRealize Automation endpoint in the embedded targetvRealize Orchestrator.
Prerequisites
n Successful migration to vRealize Automation 7.3.
n Connect to the target vRealize Orchestrator using the vRealize Orchestrator client. For information,see Using the VMware vRealize Orchestrator Client in the vRealize Orchestrator documentation.
Installing and Upgrading vRealize Automation
VMware, Inc. 424
Procedure
1 Select Design from the top drop-down menu.
2 Click Inventory.
3 Expand vRealize Automation.
4 Identify endpoints containing the fully qualified domain name (FQDN) of the sourcevRealize Automation appliance host or if you migrated from a high-availability deployment, the load-balanced host.
If you find endpoints containing the FQDN of the sourcevRealize Automation appliance host or if you migratedfrom a high-availability deployment, the load-balancedhost
If you do not find endpoints containing the FQDN of thesource vRealize Automation appliance host or if youmigrated from a high-availability deployment, the load-balanced host
1 Click Workflows.
2 Click the expand button to select Library > vRealizeAutomation > Configuration.
3 Run the Remove a vRA host workflow for every endpointcontaining the FQDN of the source vRealize Automationappliance host .
1 Click Resources.
2 Click the update icon on the top toolbar.
3 Click the expand button to select Library > vCACCAFE >Configuration.
4 Delete each resource that has a URL property containingthe FQDN of the source vRealize Automation appliancehost or if you migrated from a high-availabilitydeployment., the load-balanced host.
5 Click Workflows.
6 Click the expand button to select Library > vRealize Automation > Configuration.
7 To add the target vRealize Automation appliance host or if you migrated to a high-availabilitydeployment, the load-balanced host, run the Add a vRA host using component registry workflow.
Reconfigure the vRealize Automation Infrastructure Endpoint in the TargetvRealize Orchestrator
Use the following procedure to reconfigure the vRealize Automation infrastructure endpoint in theembedded target vRealize Orchestrator.
Prerequisites
n Successful migration to vRealize Automation 7.3.
n Connect to the target vRealize Orchestrator using the vRealize Orchestrator client. For information,see Using the VMware vRealize Orchestrator Client in the vRealize Orchestrator documentation.
Procedure
1 Select Design from the top drop-down menu.
2 Click Inventory.
3 Expand vRealize Automation Infrastructure.
Installing and Upgrading vRealize Automation
VMware, Inc. 425
4 Identify endpoints containing the fully qualified domain name (FQDN) of the sourcevRealize Automation infrastructure host or if you migrated from a high-availability deployment, theload-balanced host.
If you find endpoints containing the FQDN of the sourcevRealize Automation infrastructure host or if youmigrated from a high-availability deployment, the load-balanced host
If you do not find endpoints containing the FQDN of thesource vRealize Automation infrastructure host or if youmigrated from a high-availability deployment, the load-balanced host
1 Click Workflows.
2 Click the expand button to select Library > vRealizeAutomation > Infrastructure Administration >Configuration.
3 Run the Remove an IaaS host workflow for everyendpoint containing the FQDN of the sourcevRealize Automation infrastructure host .
1 Click Resources.
2 Click the update icon on the top toolbar.
3 Click the expand button to select Library > vCAC >Configuration.
4 Delete each resource that has a host property containingthe FQDN of the source vRealize Automationinfrastructure host or if you migrated from a high-availability deployment., the load-balanced host.
5 Click Workflows.
6 Click the expand button to select Library > vRealize Automation > Configuration.
7 To add the target vRealize Automation infrastructure host, or if you migrated to a high-availabilitydeployment load-balanced host, run the Add the IaaS host of a vRA host workflow.
Install vRealize Orchestrator Customization
You can run a workflow to install the customized state change workflow stubs and vRealize Orchestratormenu operation workflows.
For information, see Install vRealize Orchestrator Customization.
Prerequisites
Successful migration to vRealize Automation 7.3.
Reconfigure Embedded vRealize Orchestrator Infrastructure Endpoint in the TargetvRealize Automation
When you migrate from a vRealize Automation 6.2.x environment, you must update the URL of theinfrastructure endpoint that points to the target embedded vRealize Orchestrator server.
Prerequisites
n Successfully migrate to vRealize Automation 7.3.
n Log in to the target vRealize Automation console.
a Open the vRealize Automation console using the fully qualified domain name of the target virtualappliance: https://vra-va-hostname.domain.name/vcac.
For a high-availability environment, open the console using the fully qualified domain name of thetarget virtual appliance load balancer: https://vra-va-lb-hostname.domain.name/vcac.
b Log in as a IaaS administrator user.
Installing and Upgrading vRealize Automation
VMware, Inc. 426
Procedure
1 Select Infrastructure > Endpoints > Endpoints.
2 On the Endpoints page, select the vRealize Orchestrator endpoint, and click Edit.
3 In the Address text box, edit the vRealize Orchestrator endpoint URL.
n If you migrated to a minimal environment, replace the vRealize Orchestrator endpoint URL withhttps://vra-va-hostname.domain.name:443/vco.
n If you migrated to a high-availability environment, replace the vRealize Orchestrator endpointURL with https://vra-va-lb-hostname.domain.name:443/vco.
4 Click OK.
5 Manually run a data collection on the vRealize Orchestrator endpoint.
a On the Endpoints page, select the vRealize Orchestrator endpoint.
b SelectActions > Data Collection.
Verify that the data collection is successful.
Reconfigure the Azure Endpoint in the Target vRealize Automation Environment
After migration, you must reconfigure your Microsoft Azure endpoint.
Perform this procedure for each Azure endpoint.
Prerequisites
n Successfully migrate to vRealize Automation 7.3.
n Log in to the target vRealize Automation console.
a Open the vRealize Automation console using the fully qualified domain name of the target virtualappliance: https://vra-va-hostname.domain.name/vcac.
For a high-availability environment, open the console using the fully qualified domain name of thetarget virtual appliance load balancer: https://vra-va-lb-hostname.domain.name/vcac.
b Log in as a IaaS administrator user.
Procedure
1 Select Administration > vRO Configuration > Endpoints.
2 Select an Azure endpoint.
3 Click Edit.
4 Click Details.
5 In the Client secret text box, enter the original client secret.
6 Click Finish.
7 Repeat for each Azure endpoint.
Installing and Upgrading vRealize Automation
VMware, Inc. 427
Migrate vRealize Automation 6.2.x Automation Application Services to 7.3
You can use the VMware vRealize Application Services Migration Tool to migrate your existing applicationservices blueprints and deployment profiles from VMware vRealize Application Services 6.2.x tovRealize Automation 7.3.
Prerequisites
Successful migration to vRealize Automation 7.3.
Procedure
u To download the VMware vRealize Application Services Migration Tool, complete these steps.
a Click Download VMware vRealize Automation.
b Select Drivers & Tools > VMware vRealize Application Services Migration Tool.
Update Software Agent on Existing Virtual Machines
After migration from vRealize Automation 7.2 to 7.3, the target vRealize Automation console cannotmanage software components on existing virtual machines. Before the target console can managesoftware components on existing virtual machines, you must update the software agent on each virtualmachine.
You use the vRealize Orchestrator client to perform these tasks:
n Import the downloaded Software Agent Post-Migration Update package to the sourcevRealize Orchestrator.
n Update the software agent on an existing virtual machine.
n Re-establish communication with the target vRealize Automation appliance
Note Updating software agents is an irreversible operation. After you do this update, you can no longermanage software components on existing virtual machines with the source vRealize Automation console.
Prerequisites
n Successful migration from source vRealize Automation 7.2 environment to targetvRealize Automation 7.3 environment.
n Download the Software Agent Post-Migration Update package.
a Open the target vRealize Automation appliance Guest and Software Agent Installers page usingthe target appliance fully qualified domain name: https://vra-va-hostname.domain.name/software/index.html.
b Click Software Agent Update workflow.
n Connect to the target vRealize Orchestrator using the vRealize Orchestrator client. For information,see Using the VMware vRealize Orchestrator Client in the vRealize Orchestrator documentation.
Procedure
1 On the vRealize Orchestrator client, select Run from the top drop-down menu.
Installing and Upgrading vRealize Automation
VMware, Inc. 428

2 On the My Orchestrator page, click Import package.
3 Navigate to the directory where you downloaded the Software Agent Post-Migration Update package,com.vmware.vra.sct.update.package.
4 Select the package name and click Open.
5 Click Import and trust provider.
6 Click Import selected elements.
The Packages tab opens showing the imported package.
7 Click the Workflows tab.
8 Click the expand button to select Library > vRealize Automation > Migration > Software Agents.
9 Double-click Re-Parent Software Agents with Target vRealize Automation.
Run this workflow for each tenant in the source vRealize Automation environment.
10 To run the wizard, click the green Start workflow button at the top of the right pane.
11 Provide the requested information for the source vRealize Automation environment.
12 Provide the requested information for the target vRealize Automation environment.
This target environment information is provided on the target vRealize Automation managementconsole Migration Status page.n Virtual appliance IP address.
n Virtual appliance certificate.
n Software agent JAR SHA256 checksum.
13 Click Submit.
The workflow performs these tasks on the source vRealize Automation environment.n Authenticates the user on the tenant to get an API token.
n Installs the software agent update scripts as new software components in the sourcevRealize Automation environment. System installs one software component for each supportedoperating system, Windows or Linux respectively.
n Obtains a list of running virtual machines with software agent installed.
n Updates the software agent by running the appropriate software agent update script on eachvirtual machine in the list.
n Uninstalls previously added software components from the source vRealize Automationenvironment.
Delete Original Target vRealize Automation IaaS Microsoft SQL Database
You can delete the original IaaS database after migration is complete.
Prerequisites
Successful migration to vRealize Automation 7.3.
Installing and Upgrading vRealize Automation
VMware, Inc. 429
Your migrated environment does not use the original vRealize Automation IaaS Microsoft SQL databasethat you created when you installed the target vRealize Automation 7.3 environment. You can safelydelete this original IaaS database from the Microsoft SQL Server after you complete migration.
Update Data Center Location Menu Contents After Migration
After migration, you must add any missing custom data center locations to the Location drop-downmenu.
After migration to vRealize Automation 7.3, the data center locations in the Location drop-down menu onthe Compute Resources page revert to the default list. Although custom data center locations aremissing, all compute resource configurations migrate successfully and the Vrm.DataCenter.Locationproperty is not affected. You can still add custom data center locations to the Location menu.
Prerequisites
Migrate to vRealize Automation 7.3.
Procedure
u Add missing data center locations to the Location drop-down menu. See Scenario: Add DatacenterLocations for Cross Region Deployments.
Validate the Target vRealize Automation 7.3 Environment
You can verify that all data is migrated successfully to the target vRealize Automation 7.3 environment.
Prerequisites
n Migrate to vRealize Automation 7.3.
n Log in to the target vRealize Automation console.
a Open the vRealize Automation console using the fully qualified domain name of the target virtualappliance: https://vra-va-hostname.domain.name/vcac.
For a high-availability environment, open the console using the fully qualified domain name of thetarget virtual appliance load balancer: https://vra-va-lb-hostname.domain.name/vcac.
b Log in with the tenant administrator user name and password.
Procedure
1 Select Infrastructure > Managed Machines and verify that all the managed virtual machines arepresent.
2 Click Compute Resources, select each endpoint, and click Data Collection, Request now, andRefresh to verify that the endpoints are working.
3 Click Design, and on the Blueprints page, verify the elements of each blueprint.
4 Click XaaS and verify the contents of Custom Resources, Resource Mappings, XaaS Blueprints,and Resource Actions.
5 Select Administration > Catalog Management and verify the contents of Services, Catalog Items,Actions, and Entitlements.
Installing and Upgrading vRealize Automation
VMware, Inc. 430
6 Select Items > Deployments and verify the details for the provisioned virtual machines.
7 On the Deployments page, select a provisioned, powered off, virtual machine and select Actions >Power On, click Submit, and click OK. Verify that the virtual machine powers on correctly.
8 Click Catalog and request a new catalog item.
9 On the General tab, enter the request information.
10 Click the Machine icon, accept all the default settings, click Submit, and click OK.
11 Verify that the request finishes successfully.
Troubleshooting MigrationMigration troubleshooting topics provide solutions to problems you might experience when you migratevRealize Automation.
PostgreSQL Version Causes Error
A source vRealize Automation 6.2.x environment containing an updated PostgreSQL database blocksadministrator access.
Problem
If an upgraded PostgreSQL database is used by vRealize Automation 6.2.x, an administrator must add anentry to the pg_hba.conf file that provides access to this database from vRealize Automation.
Solution
1 Open the pg_hba.conf file.
2 To grant access to this database, add the following entry.
host all vcac-database-user vra-va-ip trust-method
Some Virtual Machines Do Not Have a Deployment Created during Migration
Virtual machines in the missing state at the time of migration do not have a corresponding deploymentcreated in the target environment.
Problem
If a virtual machine is in the missing state in the source environment during migration, a correspondingdeployment is not created in the target environment.
Solution
u If a virtual machine goes out of the missing state after migration, you can import the virtual machine tothe target deployment using bulk import.
Load Balancer Configuration Causes Timeout for Long-Running Operations
A load balancer can cause an unexpected connection termination.
Installing and Upgrading vRealize Automation
VMware, Inc. 431
Problem
Some load balancers have very short timeouts for keeping a connection alive during execution of anHTTP/HTTPS request. This short timeout can result in unexpected connection termination when migrationperforms long-running operations.
Solution
u Increase the timeout on the load balancer or update the load balancer DNS record to point to theappropriate active node for the duration of the migration. Once migration is complete, revert the loadbalancer DNS record.
Migration Log Locations
You can troubleshoot validation or migration problems by viewing the logs that record the migrationprocess.
Table 1‑53. Source vRealize Automation Appliance
Log Location
Package creation log /var/log/vmware/vcac/migration-package.log
Table 1‑54. Target vRealize Automation Appliance
Log Location
Migration log /var/log/vmware/vcac/migrate.log
Migration execution log /var/log/vmware/vcac/mseq.migration.log
Migration execution output log /var/log/vmware/vcac/mseq.migration.out.log
Validation execution log /var/log/vmware/vcac/mseq.validation.log
Validation execution output log /var/log/vmware/vcac/mseq.validation.out.log
Table 1‑55. Target vRealize Automation Infrastructure Nodes
Log Location
Migration log C:\Program Files (x86)\VMware\vCAC\InstallLogs-
YYYYMMDDHHMMXX\Migrate.log
Validation log C:\Program Files (x86)\VMware\vCAC\InstallLogs-
YYYYMMDDHHMMXX\Validate.log
Catalog Items Appear in the Service Catalog After Migration But Are Not Available toRequest
Catalog items that use certain property definitions from prior versions appear in the service catalog butare not available to request after migrating to the latest version of vRealize Automation.
Installing and Upgrading vRealize Automation
VMware, Inc. 432
Problem
If you migrated from a 6.2.x or earlier version and you had property definitions with these control types orattributes, these elements are missing from the property definitions and any catalog items that use thedefinitions do not function as they did before you performed the migration.
n Control types. Check box or link.
n Attributes. Relationship, regular expressions, or property layouts.
Cause
In vRealize Automation 7.0 and later, the property definitions no longer use these elements. You mustrecreate the property definition or configure the property definition to use a vRealize Orchestrator scriptaction rather than the embedded control types or attributes.
Migrate the control type or attributes to vRealize Automation 7.x using a script action.
Solution
1 In vRealize Orchestrator, create a script action that returns the property values. The action mustreturn a simple type. For example, return strings, integers, or other supported types. The action cantake the other properties on which it depends as an input parameter.
2 In vRealize Automation console, configure the product definition.
a Select Administration > Property Dictionary > Property Definitions.
b Select the property definition and click Edit.
c From the Display advice drop-down menu, select Dropdown.
d From the Values drop-down menu, select External Values.
e Select the script action.
f Click OK.
g Configure the Input Parameters that are included in the script action. To preserve the existingrelationship, bind the parameter to the other property.
h Click OK.
Empty Deployments Are Seen in vRealize Automation After Migration
Post provisioning actions appear to complete successfully but no change actually takes place.
Problem
Migration process causes some virtual machines to become assigned to the wrong deployment. Forinformation, see Knowledge Base article 2151400.
XaaS Resource Mapping Named Deployment Is Missing After Migration
Deployment XaaS resource named Deployment is missing after migration from vRealize Automation 6.2.xto 7.3.
Installing and Upgrading vRealize Automation
VMware, Inc. 433

Problem
After migration from vRealize Automation 6.2.x to 7.3, the XaaS resource named Deployment is missing.For information, see Knowledge Base article 1153.
Installing and Upgrading vRealize Automation
VMware, Inc. 434
Related Documents