Printed in Korea www.lg.com INSTALLATION MANUAL LED LCD TV Please read this manual carefully before operating your set and retain it for future reference. LP860* P/NO: MFL67738206 (1306-REV00)

Welcome message from author
This document is posted to help you gain knowledge. Please leave a comment to let me know what you think about it! Share it to your friends and learn new things together.
Transcript
Printed in Korea www.lg.com
INSTALLATION MANUAL
LED LCD TV Please read this manual carefully before operatingyour set and retain it for future reference.
LP860*
P/NO: MFL67738206 (1306-REV00)


1
CONTENTS
INSTALLATION MENUIntroduction . . . . . . . . . . . . . . . . . . . . . . . . . . . . . . . . . . . . . . . . . . . . . . . . . . . . . . . . . . . . 12
LGHotelModeSetup . . . . . . . . . . . . . . . . . . . . . . . . . . . . . . . . . . . . . . . . . . . . . . . . . 13~17
USBCloning . . . . . . . . . . . . . . . . . . . . . . . . . . . . . . . . . . . . . . . . . . . . . . . . . . . . . . . . . . . 18
SendToUSB . . . . . . . . . . . . . . . . . . . . . . . . . . . . . . . . . . . . . . . . . . . . . . . . . . . . . . . . 19
ReceiveFromUSB . . . . . . . . . . . . . . . . . . . . . . . . . . . . . . . . . . . . . . . . . . . . . . . . . . . . 19
LogeImageDownload . . . . . . . . . . . . . . . . . . . . . . . . . . . . . . . . . . . . . . . . . . . . . . . . . 20
PasswordChange . . . . . . . . . . . . . . . . . . . . . . . . . . . . . . . . . . . . . . . . . . . . . . . . . . . . . . . 21
SetIDSetup . . . . . . . . . . . . . . . . . . . . . . . . . . . . . . . . . . . . . . . . . . . . . . . . . . . . . . . . . . . 22
ConfigurationSetup . . . . . . . . . . . . . . . . . . . . . . . . . . . . . . . . . . . . . . . . . . . . . . . . . . 23~25
ExternalSpeaker . . . . . . . . . . . . . . . . . . . . . . . . . . . . . . . . . . . . . . . . . . . . . . . . . . . . . . . . 26
SpeakerOutputSetup . . . . . . . . . . . . . . . . . . . . . . . . . . . . . . . . . . . . . . . . . . . . . . . . . 27
IRSetup . . . . . . . . . . . . . . . . . . . . . . . . . . . . . . . . . . . . . . . . . . . . . . . . . . . . . . . . . . . . . . . 28
NetworkSetup . . . . . . . . . . . . . . . . . . . . . . . . . . . . . . . . . . . . . . . . . . . . . . . . . . . . . . 29~30
Pro:Centric . . . . . . . . . . . . . . . . . . . . . . . . . . . . . . . . . . . . . . . . . . . . . . . . . . . . . . . . . . 31~32
PowerSaving . . . . . . . . . . . . . . . . . . . . . . . . . . . . . . . . . . . . . . . . . . . . . . . . . . . . . . . . . . 33
CECSetup . . . . . . . . . . . . . . . . . . . . . . . . . . . . . . . . . . . . . . . . . . . . . . . . . . . . . . . . . . . . 34
ClockSetup . . . . . . . . . . . . . . . . . . . . . . . . . . . . . . . . . . . . . . . . . . . . . . . . . . . . . . . . . . . 35
PreLoadedAppSetup . . . . . . . . . . . . . . . . . . . . . . . . . . . . . . . . . . . . . . . . . . . . . . . . . . . . 36
MediaShare . . . . . . . . . . . . . . . . . . . . . . . . . . . . . . . . . . . . . . . . . . . . . . . . . . . . . . . . . . . 37
DOWNLOAD EXTRA CONTENTS . . . . . . . . . . . . . . . . . . . . . . . . . . . . . 38~39
DOWNLOAD A SPLASH IMAGE . . . . . . . . . . . . . . . . . . . . . . . . . . . . . . . 40~41
LOCATION AND FUNCTION OF CONTROLS . . . . . . . . . . . . . . . . . . . . 2
EZMANAGER
EZ-Manager2 .1-Introduction . . . . . . . . . . . . . . . . . . . . . . . . . . . . . . . . . . . . . . . . . . . . . . 3
EZ-ManagerWizard . . . . . . . . . . . . . . . . . . . . . . . . . . . . . . . . . . . . . . . . . . . . . . . . . . . . . . 3
AutomaticallyforSetup . . . . . . . . . . . . . . . . . . . . . . . . . . . . . . . . . . . . . . . . . . . 4~6
ManuallyforSetup . . . . . . . . . . . . . . . . . . . . . . . . . . . . . . . . . . . . . . . . . . . . . . . 7~9
USBLGSmartInstallUtility . . . . . . . . . . . . . . . . . . . . . . . . . . . . . . . . . . . . . 10~11
Partsandbuttons . . . . . . . . . . . . . . . . . . . . . . . . . . . . . . . . . . . . . . . . . . . . . . . . . . . . . . . . 2
LEDClockconnection . . . . . . . . . . . . . . . . . . . . . . . . . . . . . . . . . . . . . . . . . . . . . . . . . . . . 2

2
LOCATION AND FUNCTION OF CONTROLS
*ImageshownmaydifferfromyourTV .
Button DescriptionHScrollsthroughthesavedprogrammes .
HAdjuststhevolumelevel .OKꔉ Selectsthehighlightedmenuoptionorconfirmsaninput .
SETTINGS Accessesthemainmenu,orsavesyourinputandexitsthemenus .INPUT Changestheinputsource .
/I Turnsthepoweronoroff .
SETTINGS
INPUT
OK
Speakers
Buttons
Screen
LGLogoLightandRemotecontrolsensor
ThisTVcanbeconnectedtoaLEDClockviatheCLOCKport . AV
(RGB)
/DVI IN1 2
COMPONENTIN
LAN ANTENNA/CABLE IN
OPTICALAUDIO OUT
AUDIO IN(COMPONENT/RGB/DVI)
(CONTROL & SERVICE)
RS-232C IN LNB INSatellite
H/P O
UT IN
3US
B IN
PCM
CIA
CARD
SLO
T
SPEAKER OUT
VOLUME CONTROL
STEREO (8 Ω)
CLOCK
LED Clock(*NotProvided)
LEDClockconnection
Partsandbuttons
3
EZMANAGER
EZ-ManagerWizardyy ImageshownmaydifferfromyourTV .
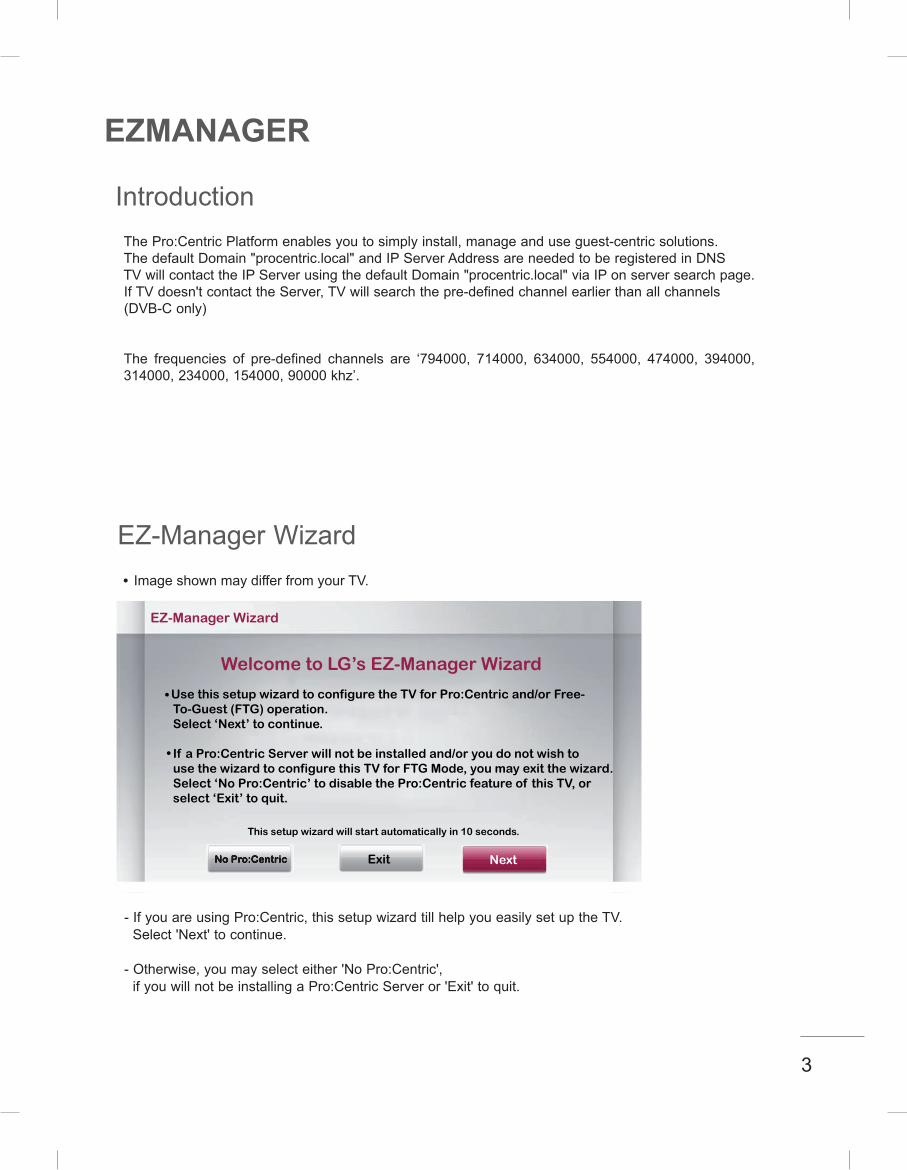
IntroductionThePro:CentricPlatformenablesyoutosimplyinstall,manageanduseguest-centricsolutions .ThedefaultDomain"procentric .local"andIPServerAddressareneededtoberegisteredinDNSTVwillcontacttheIPServerusingthedefaultDomain"procentric .local"viaIPonserversearchpage .IfTVdoesn'tcontacttheServer,TVwillsearchthepre-definedchannelearlierthanallchannels(DVB-Conly)
The frequencies of pre-defined channels are ‘794000, 714000, 634000, 554000, 474000, 394000,314000,234000,154000,90000khz’ .
EZ-Manager Wizard
Exit NextNo Pro:Centric
Welcome to LG’s EZ-Manager Wizard
Use this setup wizard to configure the TV for Pro:Centric and/or Free- To-Guest (FTG) operation. Select ‘Next’ to continue.
If a Pro:Centric Server will not be installed and/or you do not wish to use the wizard to configure this TV for FTG Mode, you may exit the wizard. Select ‘No Pro:Centric’ to disable the Pro:Centric feature of this TV, or select ‘Exit’ to quit.
This setup wizard will start automatically in 10 seconds.
-IfyouareusingPro:Centric,thissetupwizardtillhelpyoueasilysetuptheTV .Select'Next'tocontinue .
-Otherwise,youmayselecteither'NoPro:Centric',ifyouwillnotbeinstallingaPro:CentricServeror'Exit'toquit .
4
EZ-ManagerWizard-AutomaticallyforSetup
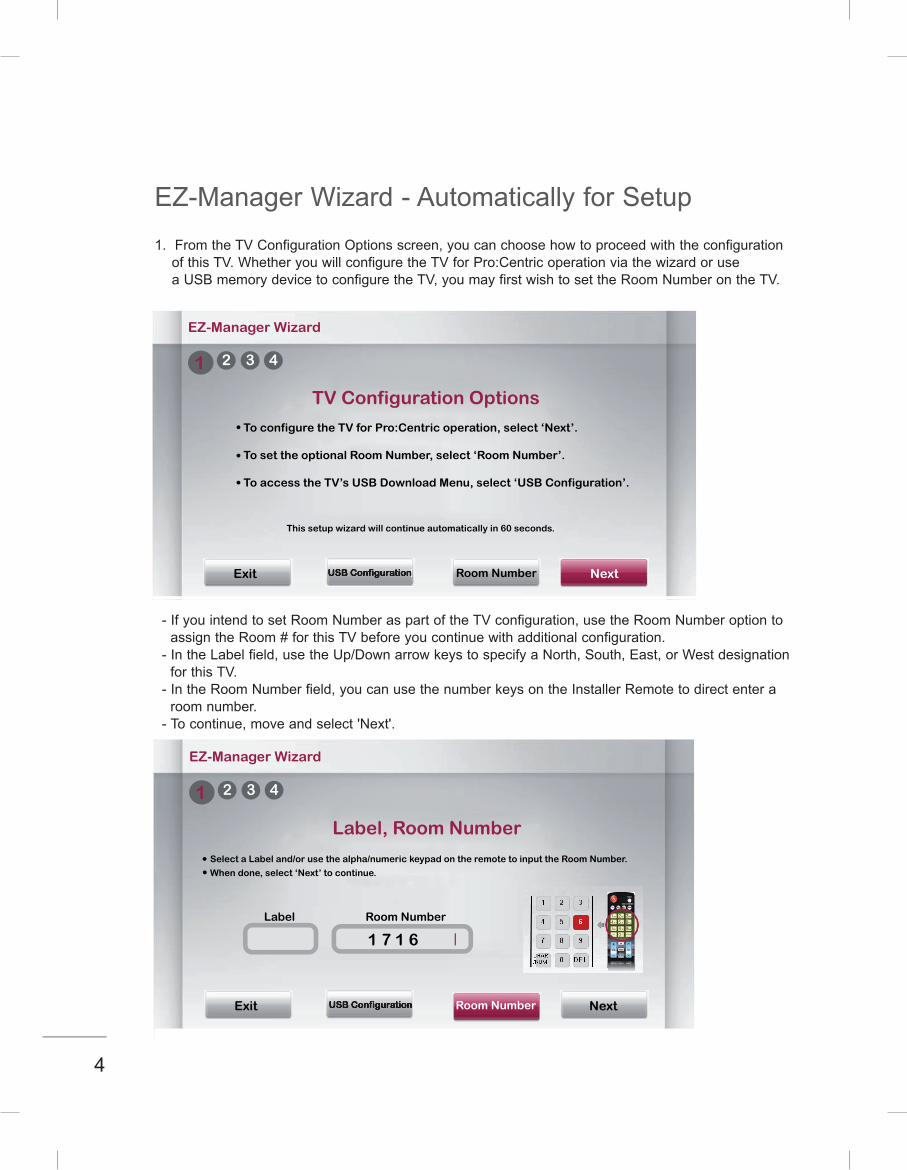
-IfyouintendtosetRoomNumberaspartoftheTVconfiguration,usetheRoomNumberoptiontoassigntheRoom#forthisTVbeforeyoucontinuewithadditionalconfiguration .-IntheLabelfield,usetheUp/DownarrowkeystospecifyaNorth,South,East,orWestdesignationforthisTV .-IntheRoomNumberfield,youcanusethenumberkeysontheInstallerRemotetodirectenteraroomnumber .-Tocontinue,moveandselect'Next' .
1 .FromtheTVConfigurationOptionsscreen,youcanchoosehowtoproceedwiththeconfigurationofthisTV .WhetheryouwillconfiguretheTVforPro:CentricoperationviathewizardoruseaUSBmemorydevicetoconfiguretheTV,youmayfirstwishtosettheRoomNumberontheTV .
EZ-Manager Wizard
1 2 3 4
Exit NextRoom NumberUSB Configuration
TV Configuration Options
To configure the TV for Pro:Centric operation, select ‘Next’.
To set the optional Room Number, select ‘Room Number’.
To access the TV’s USB Download Menu, select ‘USB Configuration’.
This setup wizard will continue automatically in 60 seconds.
EZ-Manager Wizard
1 2 3 4
Exit NextRoom NumberUSB Configuration
Label, Room Number
Select a Label and/or use the alpha/numeric keypad on the remote to input the Room Number.
When done, select ‘Next’ to continue.
Label Room Number
1 7 1 6
5
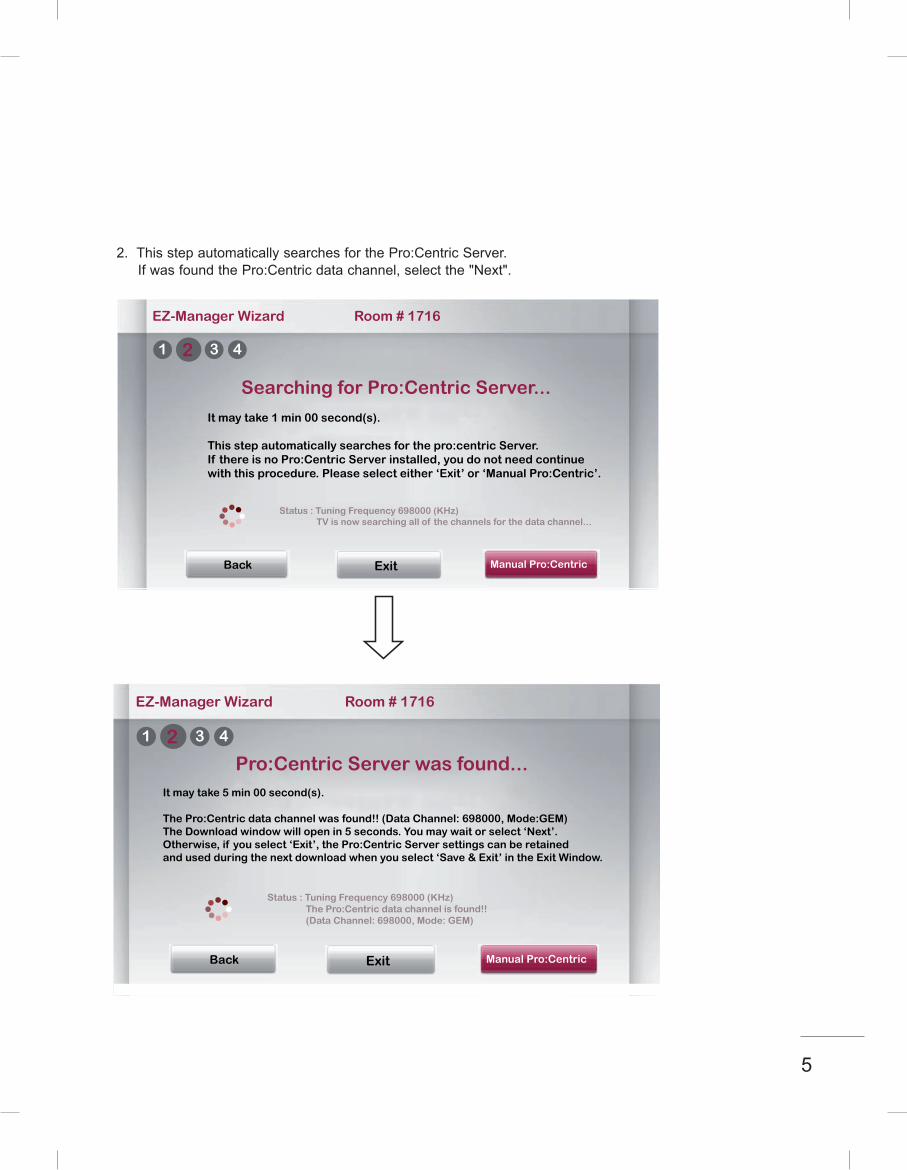
2 .ThisstepautomaticallysearchesforthePro:CentricServer .IfwasfoundthePro:Centricdatachannel,selectthe"Next" .
EZ-Manager Wizard Room # 1716
21 3 4
Exit Manual Pro:CentricBack
Pro:Centric Server was found... It may take 5 min 00 second(s).
The Pro:Centric data channel was found!! (Data Channel: 698000, Mode:GEM) The Download window will open in 5 seconds. You may wait or select ‘Next’. Otherwise, if you select ‘Exit’, the Pro:Centric Server settings can be retained and used during the next download when you select ‘Save & Exit’ in the Exit Window.
Status : Tuning Frequency 698000 (KHz) The Pro:Centric data channel is found!! (Data Channel: 698000, Mode: GEM)
EZ-Manager Wizard Room # 1716
21 3 4
Exit Manual Pro:CentricBack
Searching for Pro:Centric Server...
It may take 1 min 00 second(s).
This step automatically searches for the pro:centric Server. If there is no Pro:Centric Server installed, you do not need continue with this procedure. Please select either ‘Exit’ or ‘Manual Pro:Centric’.
Status : Tuning Frequency 698000 (KHz) TV is now searching all of the channels for the data channel...
6
EZ-Manager Wizard Room # 1716
31 2 4
Processing the Pro:Centric Configuration...
Downloading the Pro:Centric application files takes a few minutes.Please wait...
Application filesMaintenance files - Updating Configuration File - Updating Splash Logo Image
In progress...Pending...
10%
Retrieving files from data Freuquency 698000
Warning - Do not remove AC power or the signal cables during these steps.
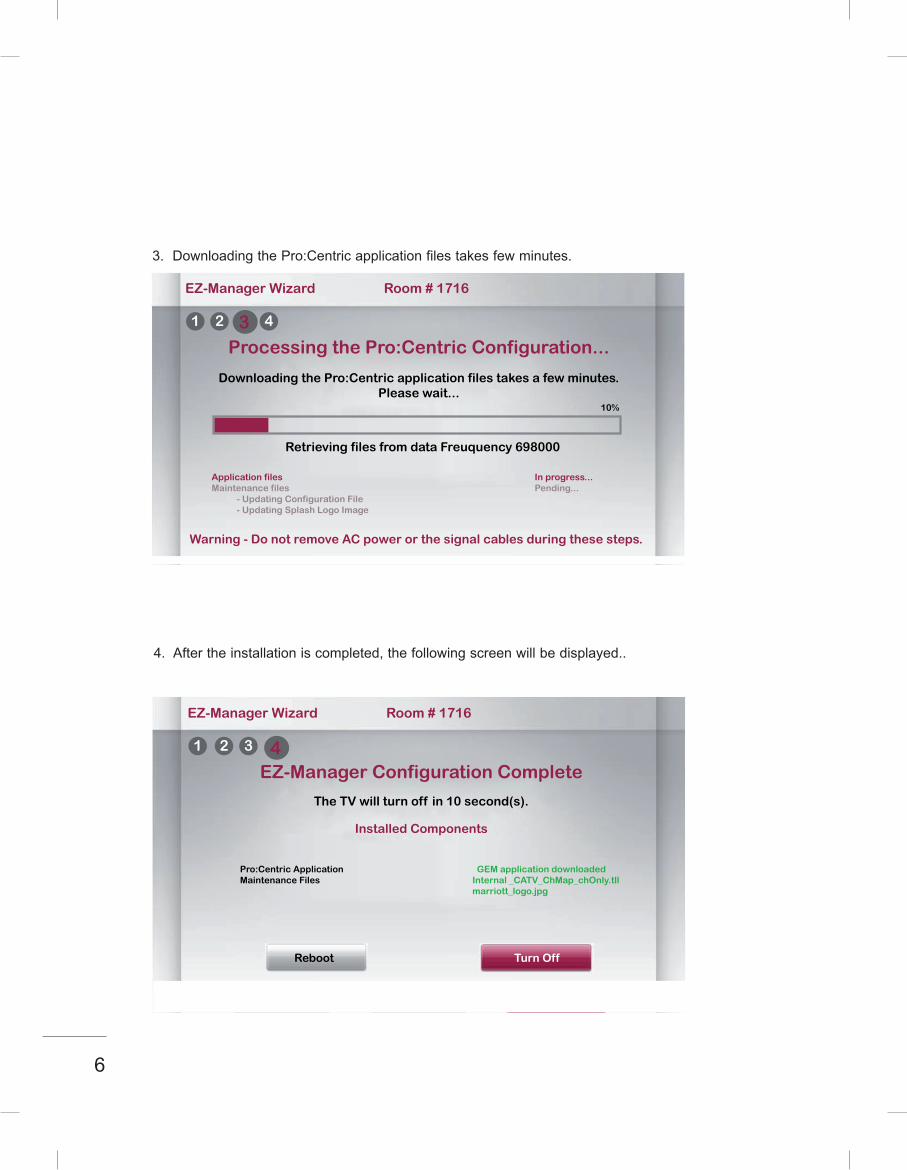
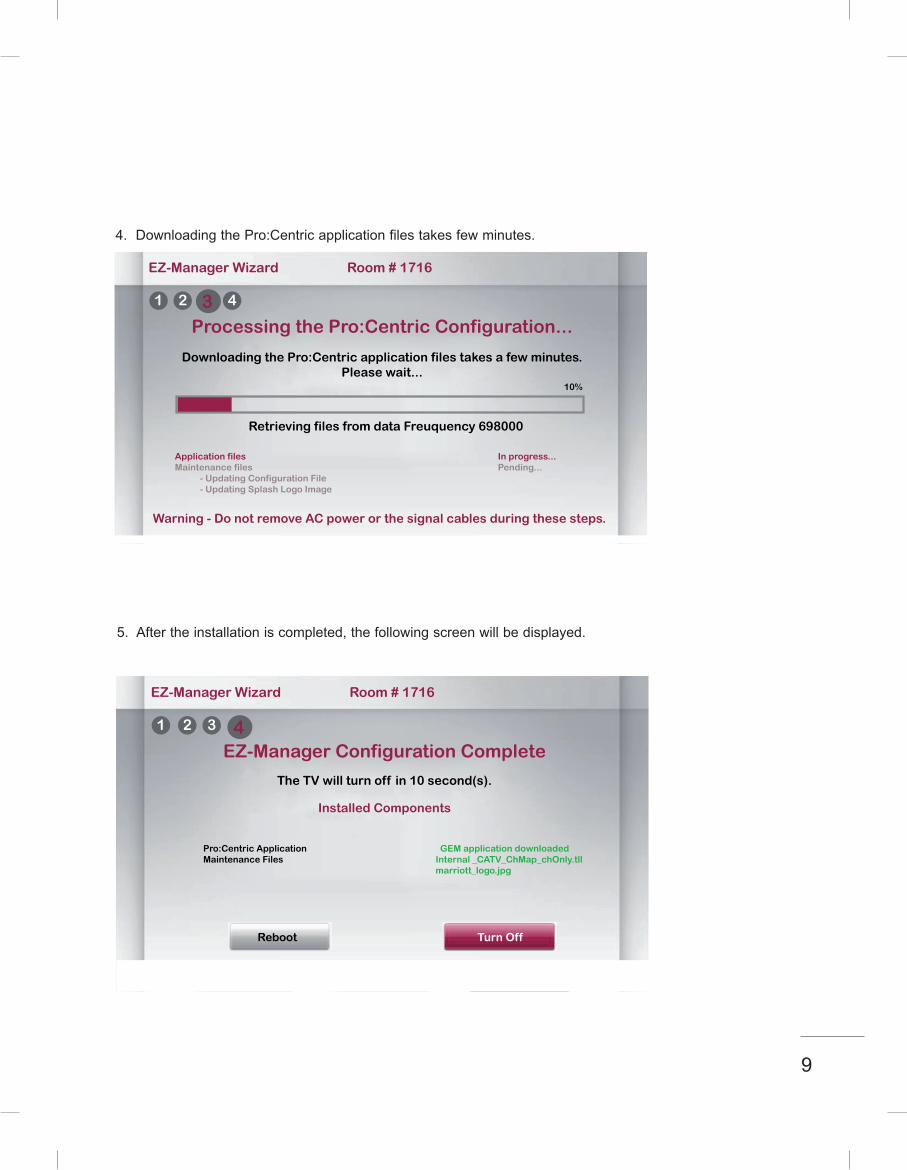
3 .DownloadingthePro:Centricapplicationfilestakesfewminutes .
4 .Aftertheinstallationiscompleted,thefollowingscreenwillbedisplayed . .
EZ-Manager Wizard Room # 1716
41 32
Turn OffReboot
EZ-Manager Configuration Complete
The TV will turn off in 10 second(s).
Installed Components
Pro:Centric ApplicationMaintenance Files
GEM application downloaded Internal _CATV_ChMap_chOnly.tllmarriott_logo.jpg
7
EZMANAGER
EZ-ManagerWizard-ManuallyforSetup
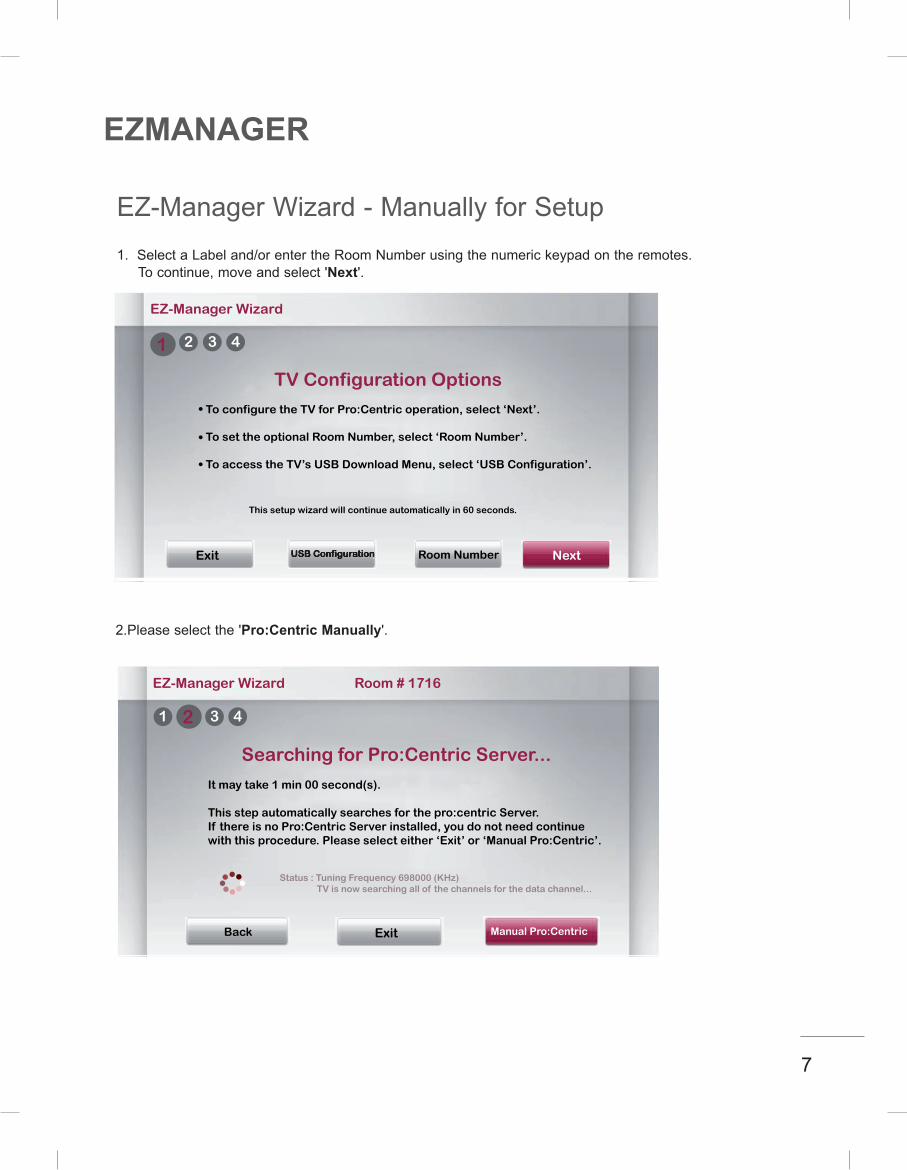
2 .Pleaseselectthe'Pro:Centric Manually' .
1 .SelectaLabeland/orentertheRoomNumberusingthenumerickeypadontheremotes .Tocontinue,moveandselect'Next' .
EZ-Manager Wizard
1 2 3 4
Exit NextRoom NumberUSB Configuration
TV Configuration Options
To configure the TV for Pro:Centric operation, select ‘Next’.
To set the optional Room Number, select ‘Room Number’.
To access the TV’s USB Download Menu, select ‘USB Configuration’.
This setup wizard will continue automatically in 60 seconds.
EZ-Manager Wizard Room # 1716
21 3 4
Exit Manual Pro:CentricBack
Searching for Pro:Centric Server...
It may take 1 min 00 second(s).
This step automatically searches for the pro:centric Server. If there is no Pro:Centric Server installed, you do not need continue with this procedure. Please select either ‘Exit’ or ‘Manual Pro:Centric’.
Status : Tuning Frequency 698000 (KHz) TV is now searching all of the channels for the data channel...
8
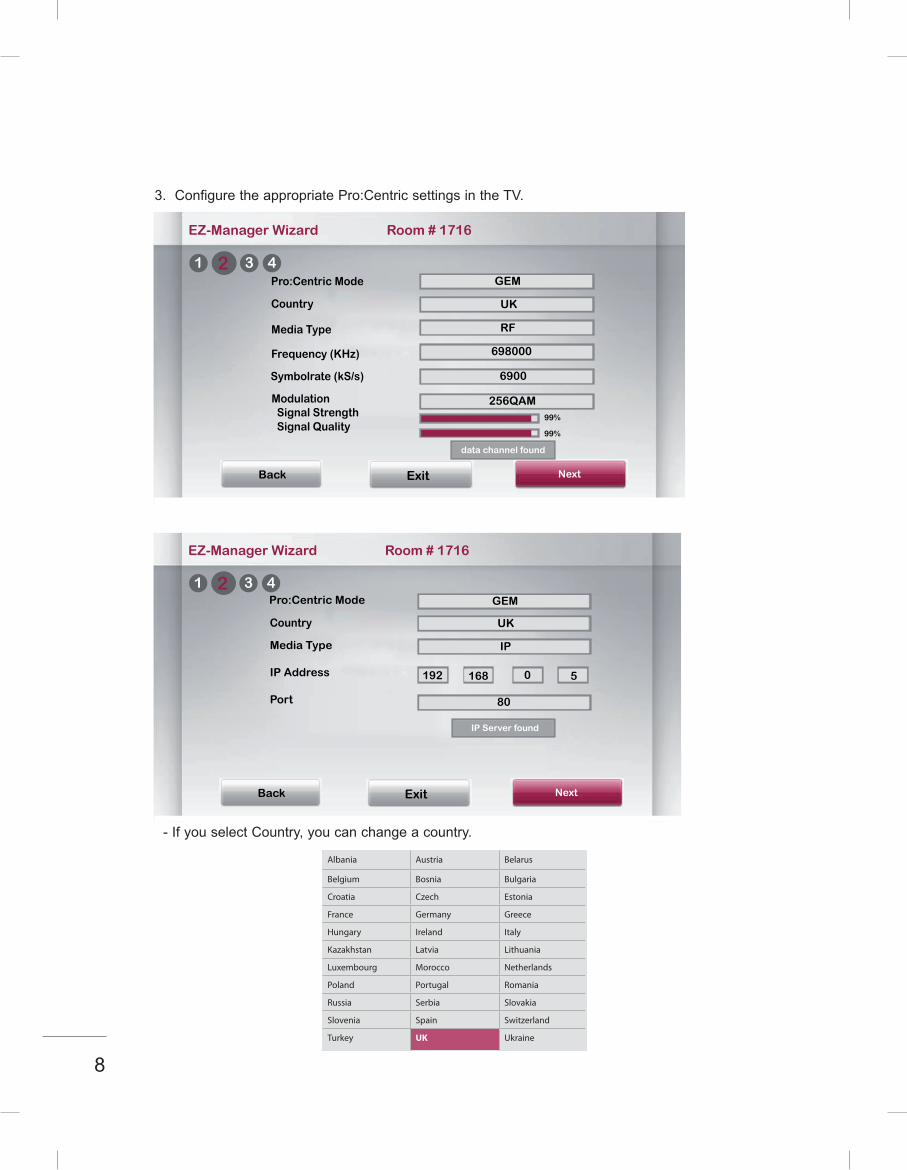
EZ-Manager Wizard Room # 1716
21 3 4
Exit NextBack
Pro:Centric Mode GEM
UK
RF
698000
6900
data channel found
256QAM99%
99%
Country
Media Type
Frequency (KHz)
Symbolrate (kS/s)
Modulation Signal Strength Signal Quality
3. Configure the appropriate Pro:Centric settings in the TV.
EZ-Manager Wizard Room # 1716
21 3 4
Exit NextBack
Pro:Centric Mode GEM
IP
192 168 0 5
80
IP Server found
UKCountry
Media Type
IP Address
Port
- If you select Country, you can change a country.
Albania Austria Belarus
Belgium Bosnia Bulgaria
Croatia Czech Estonia
France Germany Greece
Hungary Ireland Italy
Kazakhstan Latvia Lithuania
Luxembourg Morocco Netherlands
Poland Portugal Romania
Russia Serbia Slovakia
Slovenia Spain Switzerland
Turkey UK Ukraine
9
EZ-Manager Wizard Room # 1716
31 2 4
Processing the Pro:Centric Configuration...
Downloading the Pro:Centric application files takes a few minutes.Please wait...
Application filesMaintenance files - Updating Configuration File - Updating Splash Logo Image
In progress...Pending...
10%
Retrieving files from data Freuquency 698000
Warning - Do not remove AC power or the signal cables during these steps.
4 .DownloadingthePro:Centricapplicationfilestakesfewminutes .
5 .Aftertheinstallationiscompleted,thefollowingscreenwillbedisplayed .
EZ-Manager Wizard Room # 1716
41 32
Turn OffReboot
EZ-Manager Configuration Complete
The TV will turn off in 10 second(s).
Installed Components
Pro:Centric ApplicationMaintenance Files
GEM application downloaded Internal _CATV_ChMap_chOnly.tllmarriott_logo.jpg
10
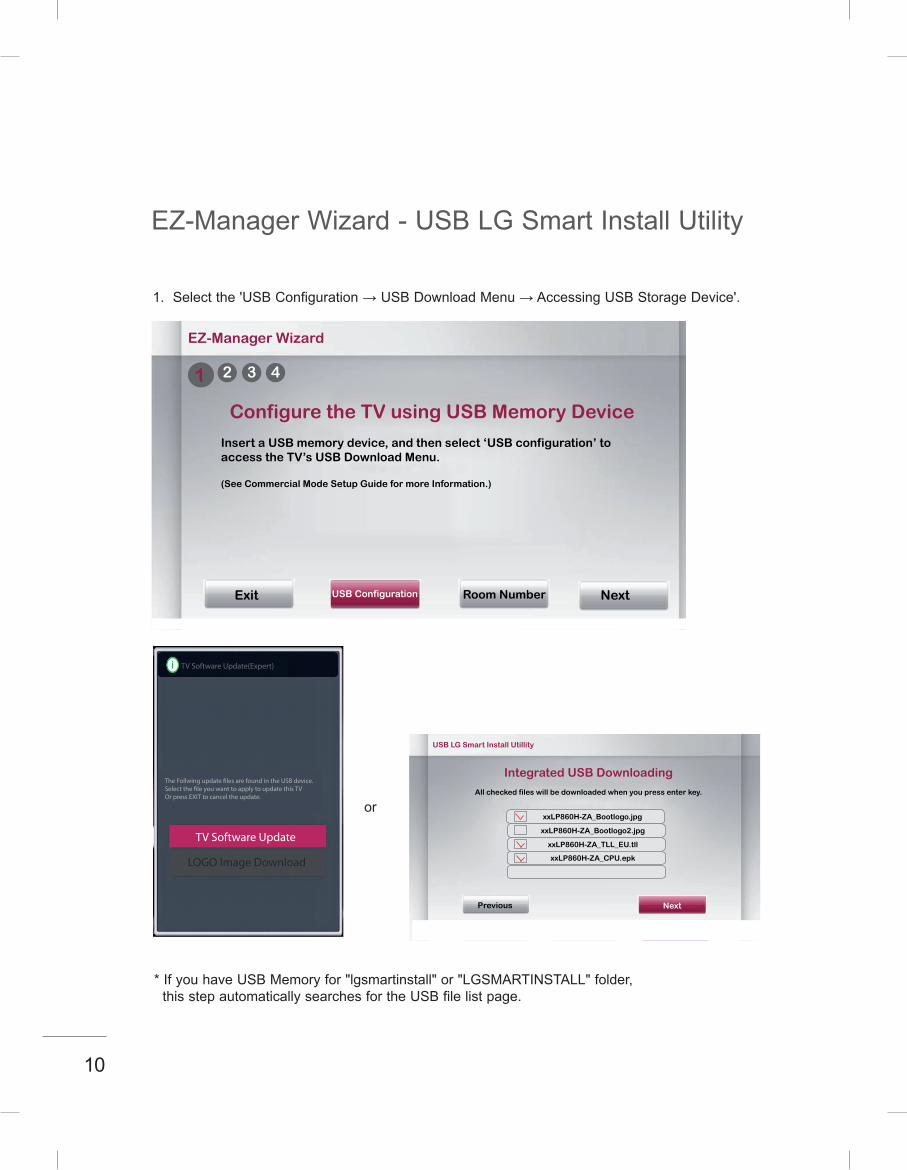
EZ-ManagerWizard-USBLGSmartInstallUtility
1 .Selectthe'USBConfiguration→USBDownloadMenu→AccessingUSBStorageDevice' .
*IfyouhaveUSBMemoryfor"lgsmartinstall"or"LGSMARTINSTALL"folder,thisstepautomaticallysearchesfortheUSBfilelistpage .
TV Software Update(Expert)
The Follwing update �les are found in the USB device.Select the �le you want to apply to update this TVOr press EXIT to cancel the update.
TV Software Update
LOGO Image Download
or
EZ-Manager Wizard
1 2 3 4
Exit Room NumberUSB Configuration
Configure the TV using USB Memory Device
Insert a USB memory device, and then select ‘USB configuration’ to access the TV’s USB Download Menu.
(See Commercial Mode Setup Guide for more Information.)
Next
Previous Next
Integrated USB Downloading
All checked files will be downloaded when you press enter key.
USB LG Smart Install Utillity
xxLP860H-ZA_Bootlogo.jpg
xxLP860H-ZA_Bootlogo2.jpg
xxLP860H-ZA_TLL_EU.tll
xxLP860H-ZA_CPU.epk
11
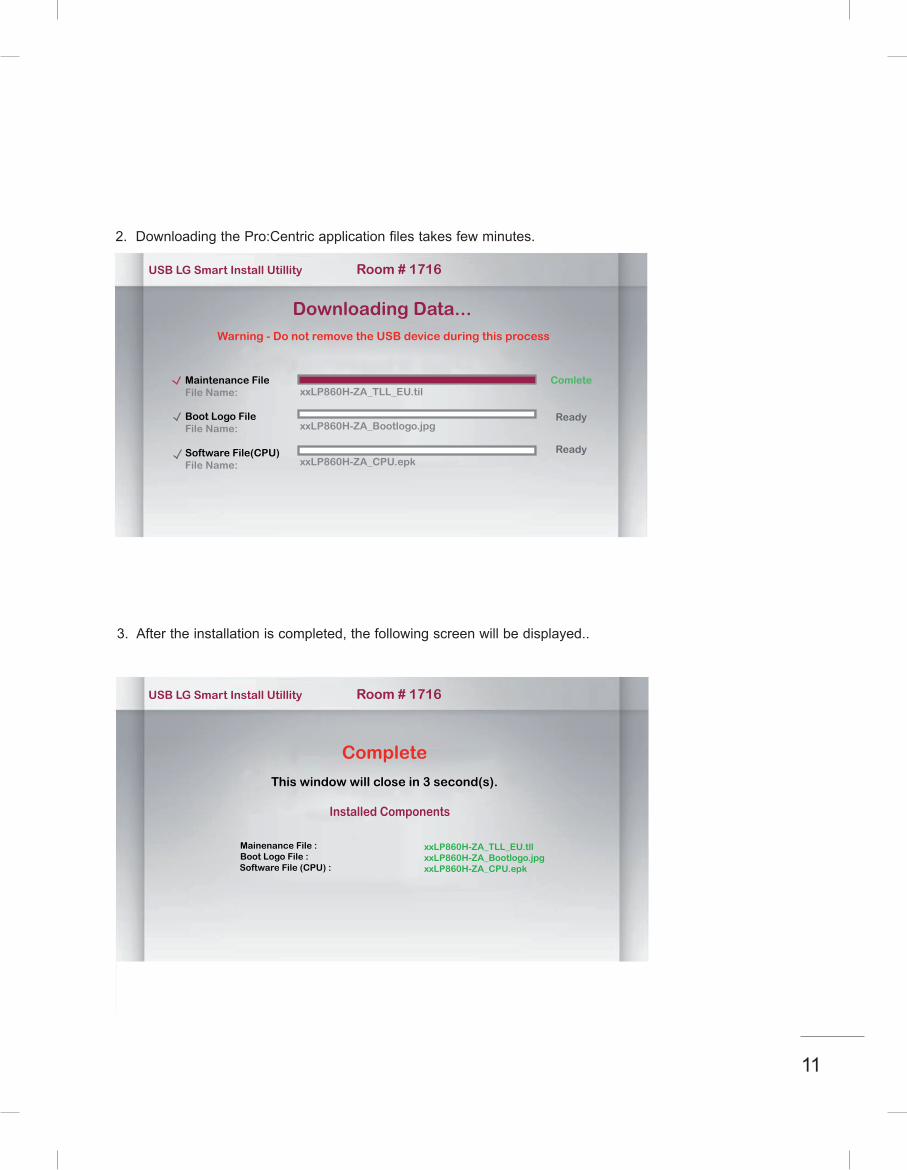
USB LG Smart Install Utillity Room # 1716
Warning - Do not remove the USB device during this process
Downloading Data...
ComleteMaintenance FileFile Name:
Boot Logo FileFile Name:
Software File(CPU)File Name:
Ready
Ready
xxLP860H-ZA_TLL_EU.til
xxLP860H-ZA_Bootlogo.jpg
xxLP860H-ZA_CPU.epk
2 .DownloadingthePro:Centricapplicationfilestakesfewminutes .
3 .Aftertheinstallationiscompleted,thefollowingscreenwillbedisplayed . .
Complete
This window will close in 3 second(s).
Mainenance File :Boot Logo File :Software File (CPU) :
xxLP860H-ZA_TLL_EU.tllxxLP860H-ZA_Bootlogo.jpgxxLP860H-ZA_CPU.epk
Installed Components
USB LG Smart Install Utillity Room # 1716
12
INSTALLATION MENU
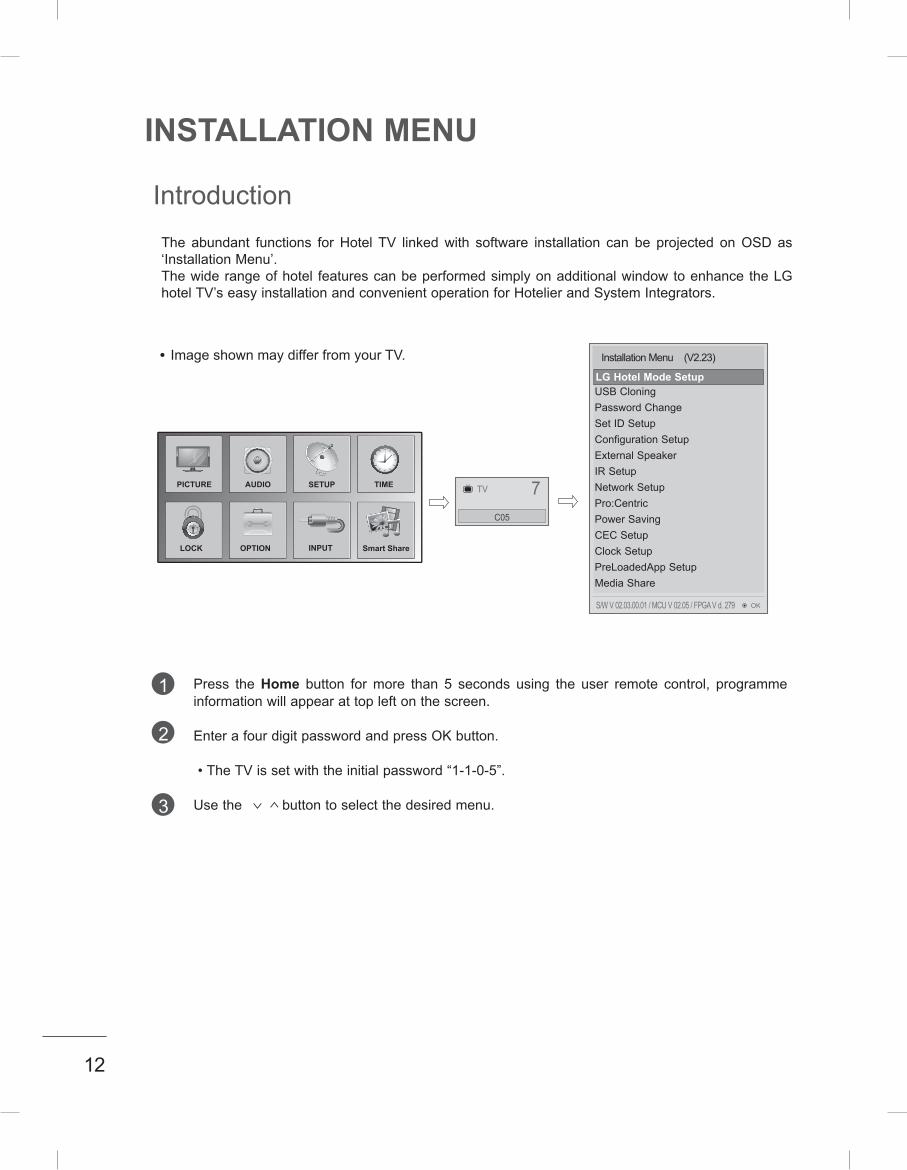
IntroductionThe abundant functions forHotelTV linkedwith software installation can be projected onOSDas‘InstallationMenu’ .
Thewiderangeofhotel featurescanbeperformedsimplyonadditionalwindowtoenhancetheLGhotelTV’seasyinstallationandconvenientoperationforHotelierandSystemIntegrators .
Press theHome button formore than 5 seconds using the user remote control, programmeinformationwillappearattopleftonthescreen .
EnterafourdigitpasswordandpressOKbutton .•TheTVissetwiththeinitialpassword“1-1-0-5” .
Usethe buttontoselectthedesiredmenu .
1
2
3
TV 7C05
yy ImageshownmaydifferfromyourTV . InstallationMenu(V2 .23)
LGHotelModeSetupUSBCloningPasswordChangeSetIDSetupConfigurationSetupExternalSpeakerIRSetupNetworkSetupPro:CentricPowerSavingCECSetupClockSetupPreLoadedAppSetupMediaShare
LG Hotel Mode Setup
OKS/WV02 .03 .00 .01/MCUV02 .05/FPGAVd .279
PICTURE SETUP TIMEAUDIO
OPTIONLOCK Smart ShareINPUT
13
INSTALLATION MENU
InstallationMenu(V2.23)
LGHotelModeSetupUSBCloningPasswordChangeSetIDSetupConfigurationSetupExternalSpeakerIRSetupNetworkSetupPro:CentricPowerSavingCECSetupClockSetupPreLoadedAppSetupMediaShare
LG Hotel Mode Setup
OKS/WV02.03.00.01/MCUV02.05/FPGAVd.279
LGHotelModeSetup
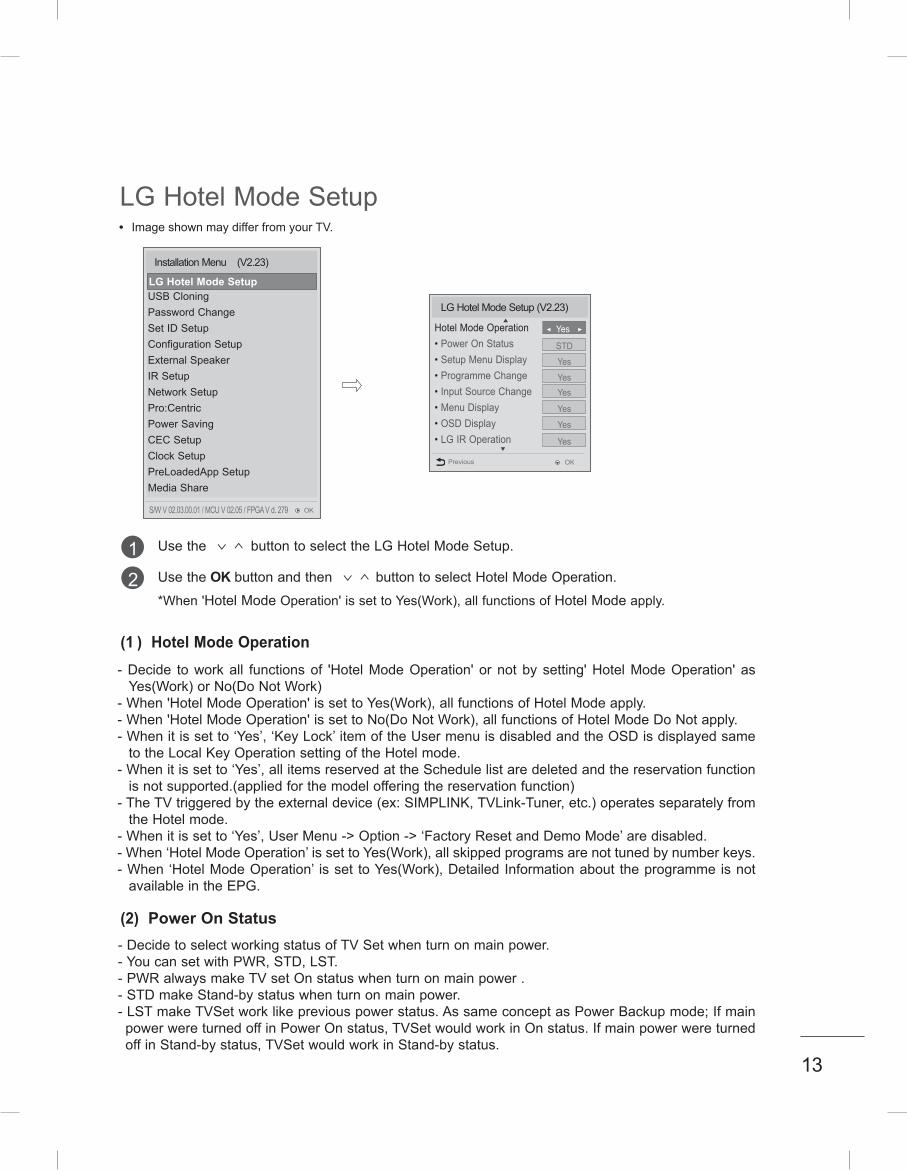
-DecidetoselectworkingstatusofTVSetwhenturnonmainpower.-YoucansetwithPWR,STD,LST.-PWRalwaysmakeTVsetOnstatuswhenturnonmainpower.-STDmakeStand-bystatuswhenturnonmainpower.-LSTmakeTVSetworklikepreviouspowerstatus.AssameconceptasPowerBackupmode;IfmainpowerwereturnedoffinPowerOnstatus,TVSetwouldworkinOnstatus.IfmainpowerwereturnedoffinStand-bystatus,TVSetwouldworkinStand-bystatus.
(2) Power On Status
-Decide toworkall functionsof 'HotelModeOperation'ornotbysetting'HotelModeOperation'asYes(Work)orNo(DoNotWork)
-When'HotelModeOperation'issettoYes(Work),allfunctionsofHotelModeapply.-When'HotelModeOperation'issettoNo(DoNotWork),allfunctionsofHotelModeDoNotapply.-Whenitissetto‘Yes’,‘KeyLock’itemoftheUsermenuisdisabledandtheOSDisdisplayedsametotheLocalKeyOperationsettingoftheHotelmode.
-Whenitissetto‘Yes’,allitemsreservedattheSchedulelistaredeletedandthereservationfunctionisnotsupported.(appliedforthemodelofferingthereservationfunction)
-TheTVtriggeredbytheexternaldevice(ex:SIMPLINK,TVLink-Tuner,etc.)operatesseparatelyfromtheHotelmode.
-Whenitissetto‘Yes’,UserMenu->Option->‘FactoryResetandDemoMode’aredisabled.-When‘HotelModeOperation’issettoYes(Work),allskippedprogramsarenottunedbynumberkeys.-When‘HotelModeOperation’ isset toYes(Work),DetailedInformationabouttheprogrammeisnotavailableintheEPG.
(1 ) Hotel Mode Operation
Usethe buttontoselecttheLGHotelModeSetup.
Usethe OK buttonandthen buttontoselectHotelModeOperation.
*When'HotelModeOperation'issettoYes(Work),allfunctionsofHotelModeapply.
12
yy ImageshownmaydifferfromyourTV.
LGHotelModeSetup(V2.23)
HotelModeOperation•PowerOnStatus•SetupMenuDisplay•ProgrammeChange•InputSourceChange•MenuDisplay•OSDDisplay•LGIROperation
OK
Yes
Yes
Yes
YesYes
Yes
◄Yes►
▼
▲
Previous
STD
14
-Decide toenter 'SetupMenuDisplay'ornot in the 'MainMenu'bysetting 'SetupMenuDisplay'asYes(EnterPossible)orNo(EnterImpossible)onthe"LGHotelModeSetup"OSD .
(3) Setup Menu Display
- Decide to change channel or not by setting 'Programme Change' as Yes(Change Possible) orNo(ChangeImpossible)whenpresentsourceisTV .
-When'ProgrammeChange'issettoNo(ChangeImpossible),ProgrammeKey,NumeralKey,ListKey,TV/RADKey,Q .ViewKeydoesn'tworkandentering'ChannelMenu'intheMainMenuOSDisimpos-sible .
-When'ProgrammeChange’issettoYes(ChangePossible),ProgrammeKey,NumeralKey,ListKey,TV/RADKey,Q .ViewKeydoesworkandentering'ChannelMenu'intheMainMenuOSDispossible .
-When'ProgrammeChange'issettoNo(ChangeImpossible),'Programme'itemin'OnTime'menuwillbefixed .
-When'ProgrammeChange'issettoNo(ChangeImpossible),entering'SetupMenu'inthe'MainMenu'OSDisimpossibleregardlessof'SetupMenuDisplay'item .
(4) Programme Change
-Decidetochangeinputsourceornotbysetting'InputSourceChange'asYes(Changepossible)orNo(Changeimpossible) .
-When'InputSourceChange'issettoNo(Changeimpossible),TV/RADIOkeyandINPUTkeydoesn'twork .
-When'InputSourceChange'issettoNo(Changeimpossible),user'sinput(pressingProgrammekey,numeralkey,Listkey,Q .ViewkeyinallInputsourceexceptTVsource)doesn'tworkandwhenenter-ing'SetupMenu'iteminthe'MainMenuOSD'exceptTVmodedoesn'taccepted .
Becauseentering'SetupMenu'itemmakespresentmodeasTVmodeeventhoughpresentmodeisnotTVmode .
ForthefunctionthatturnstoTVmodedoesn'twork .-When'InputSourceChange'issettoYes(Changepossible),thenchanginginputsourceisavailable .-When 'InputSourceChange' is set toNo(Change Impossible),TVset always turnson fixed inputsourceandvolumeinformationregardlessofalreadysetProgrammeinformation .
-When'InputSourceChange'issettoNo(ChangeImpossible),entering'SetupMenu'exceptTVmodedoesn'tpossibleregardlessof'ProgrammeChange'or'SetupMenuDisplay'item .
-WhenthisissettoNo,itwillonlybeturnedonwiththevolumeinformationintheinputsourceirrelevantfromthePRandinformationsetinOnTime .
(5) Input Source Change
-Functiontodecidewhetherworkwithmenuoflocalkeyornot .-SetYES(Work)orNO(DoNotWork) .- Although select NO(Do Not Work), the action that press a Home button for 5 seconds to enterInstallationMenuisavailable .
-WhenselectYes(Work),Menuworks .
(6) Menu Display

15
-DecidetodisplayOSDornotbysetting'OSDDisplay'asYes(Mark)orNo(NoMark) .-When'OSDDisplay'issettoNo(NoMark),allOSDisnotdisplayedexceptinstallaionmenu .
(7) OSD Display
-Decide'MaxVolume'betweenchangingrange0~100 .-When'MaxVolume'isset,usercanchangeuptosetvolumevalue .-When'MaxVolume'isset,volumejustgoesuptothe'MaxVolume’valuein'OnTimeMenu’ .
(10) Max Volume
-DecidewhetherworktheLGremotecontrolornot .-SettoYes(Work)orNo(DoNotWork) .-When‘LGIROperation’issettoNO(NotWork),allkeysdon’twork .-AlthoughsettoNo,itcanworkinServicemode .-AlthoughsettoNo,Homekeyactiontoenterthe‘InstallationMenu’andkeyactiontoenterPasswordareavailable .
-When‘LGIROperation’issettoYes(Work),allkeysareavailable .
(8) LG IR Operation
(9) Local Key Operation-Decide tooperate 'LocalKey' or not by setting “LocalKeyOperation" asYes(Work) orNo(DoNotWork) .
-When'LocalKeyOperation'issettoNo(DoNotWork),allLocalKeydoesn'tworkexceptvolumeup/downkeyandpowerkey .
-When'LocalKeyOperation'issettoNo(DoNotWork),LocalKeyworkinginservicemodeisstillavail-able .
-When'LocalKeyOperation'issettoYes(Work),allLocalKeyworkingisavailable .-Whensetboth'LocalKey'and'RemoconOperation’asNo(DoNotWork),PowerkeyofRemoconworkasexceptionalcase .
-EvenwhenthelocalkeyoperationissettoNo,whenyoupressthelocalkeyfor5seconds,theHomekeywilloperatetoaccesstheInstallationMenu .
-Exception:Incaseofthecommercialmodel,althoughbothIRandLocalkeyoperationaresetto'No' (nooperation),youcanoperatethevolume+/-keyandthepowerkey .
Itisamodetosetwhethertoupdatedtvchannelautomaticallyornot .WhenDTVChannelUpdateissetto’Auto’,thefunctiontoupdateTV’sprogrammemapaccordingtodtvprogramme’sstreaminformation .DTVChannelUpdateissetto‘Manual’,thefunctiontokeepTV’sprogrammemapeventhoughdtvprogramme’sinformationischanged .
(11) DTV Channel Update (Thisfeatureisnotavailableforallmodels .)
-SetthechanneltodisplayandVolumeLevel,etc .whenturnonpowerinACPowerOnorStand-bystatus .
-SettoYes(Work)orNo(DoNotWork) .-When‘PowerOnDefault’ issettoNo,it isnotappliedtothesubordinateProgramme,Volume,A/VSettingmenu .
-WhenPowerOnDefaultissettoYes,itcansetbyenteringthesubordinatemenu .
(12) Power On Default
16
- Set to Yes(Work) or No(Do Not Work).- Programme that is set to ‘Radio Programme’ and only has Sound should decide whether to set
‘Video Blank’ or not.- When ‘Radio Video Blank’ is set to Yes(Work), ‘Video Blank’ works only in case of Radio Programme.- Although set to Yes(Work), if there are Video signal, ‘Video Blank’ wouldn’t work. In consideration
of case that display background screen and broadcast only with Radio, ‘Video Blank ’works only when there is no Video signal.
- When set to No(Do Not Work), ‘Video Blank’ do not work although it is the Radio Programme.- This operates only in the Analog TV Mode.
- If both 'Volume' data and 'On Time' is set, but just the value is different, then 'Volume' has priority.-This sets whether to apply the Volume Level or not when the power is turned on. When both the Volume and ON TIME Volume are set and have different values, the Volume Level
value is set as the ON TIME Volume value, and cannot move to the ON TIME Volume item.- The next value for the max volume is OFF. And next it will be changed to 0.
(12-3) Volume
- Set to Yes(Work) or No(Do Not Work).- If ‘A/V Setting’ is changed from No to Yes, parameters that are set before entering Installation Menu
are applied whenever turn on power.- Following Parameters are applied to basic. Picture section - PSM mode, Picture Data (Contrast, Brightness, Colour, Sharpness, Tint) Sound section - SSM mode, Sound Data (Balance, Equalizer Data) and AVL and Language, Teletext
language, ARC Data. Except these, other Parameters are applied differently according to the TVSet.
(12-4) A/V Setting
(13) Radio Video Blank
- If the Input source is DTV or ATV, or Radio the set programme is played when the power is turned on.- Only when the Input source is DTV or ATV, it can be entered into the Programme item.- When the Input source is turned off, the Last input at the time of the power-off is turned on, and when
the Last input is the RF, the Last programme is played.- If the Input source is the DTV, ATV, RADIO, the programme number existing at the programme table
can be selected.- The programme should be rotated.- If both the programme and the ON TIME are set, the programme takes the priority.
(12-2) Programme
- Set whether it is turned on by the set input source or by the last stored input source.- It is turned on by the Last Memory Input if the Input source is turned off.- It is turned on by the Last Pr. If the Input source is turned off and the Last Memory Input is the RF.- All sources supported by the said model can be set as Input source. (The Input source value should
be rotated.)- If both the Input source and the ON TIME are set, the Input source takes the priority.- If the DTV/Radio Channel does not exist at the map, the DTV/Radio is skipped while navigating.- When the Input source is changed to the DTV/Radio, the Programme No. is set to the first programme
of the Channel map of the DTV/Radio.- When the Input source is changed to the ATV, the Programme No. is set to 0. (If the channel map
structure does not support this, it follows the structure of the said model.)
(12-1) Input Source
17
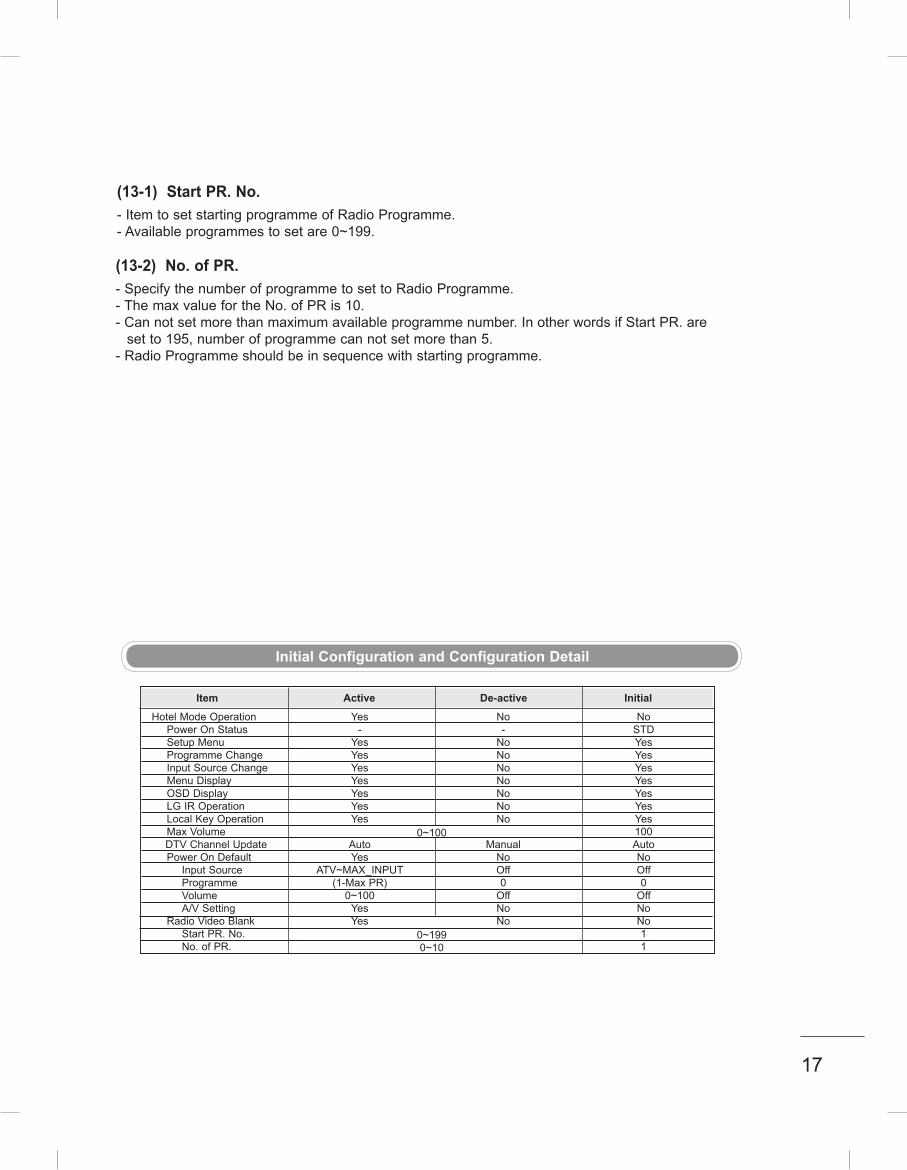
-ItemtosetstartingprogrammeofRadioProgramme .-Availableprogrammestosetare0~199 .
(13-1) Start PR. No.
-SpecifythenumberofprogrammetosettoRadioProgramme .-ThemaxvaluefortheNo .ofPRis10 .-Cannotsetmorethanmaximumavailableprogrammenumber .InotherwordsifStartPR .aresetto195,numberofprogrammecannotsetmorethan5 .
-RadioProgrammeshouldbeinsequencewithstartingprogramme .
(13-2) No. of PR.
Initial Configuration and Configuration Detail
Item Active De-active Initial
Yes-
YesYesYesYesYesYesYes
AutoYes
ATV~MAX_INPUT(1-MaxPR)0~100YesYes
0~100
0~1990~10
No-NoNoNoNoNoNoNo
ManualNoOff0OffNoNo
NoSTDYesYesYesYesYesYesYes100AutoNoOff0OffNoNo11
HotelModeOperation PowerOnStatus SetupMenu ProgrammeChange InputSourceChange MenuDisplay OSDDisplay LGIROperation LocalKeyOperation MaxVolume
DTVChannelUpdate PowerOnDefault InputSource Programme Volume A/VSetting RadioVideoBlank StartPR .No . No .ofPR .

18
CommercialTVshave thecapability tosupportcloning internalTVdataandprogramme informationwithanexternalclonedevicecalled“TVLink-Loader”,inordertocopyTVdataaccuratelyandquickly.Theclone internal functionsuseslightlydifferent internalprocesses for the two typesofcommercialTVs.However,theUIofcloningfeatureremainsthesameinboth.Regardingthedemandsoverthecurrentcloningfeatureforquickercloning,betterportabilityandetc,wewouldliketoannouncethecloningprocessviaUSBport,namedasUSBCloning.USBcloningprocessisdividedinto2mainprocesses.OneiswritingthepreviouslysavedTVdataintotheTV,andoneanotherisreadingofcurrentTVdataintoUSBmemorycard.Toavoidanyconfusionduetothewords,itisclearlyspecifiedas“ReceivefromUSB”and“SendtoUSB”inthewholeprocess.
ThedataclonedarethesamedataclonedbypreviousTVLink-Loader.Detailsareexplainedinthefol-lowing:
1.TVdataincludes:A.InstallerMenusettingsB.Mainmenusettings(Audio,Pictureetc)
2.Analog/DigitalChannelinformationincludes:A.ChannelnumbersB.ChannellabelC.Channelattributesincludingchanneltype,skippingstatusandetc.
TheuserneedsaUSBmemorycardwithFATformattedtomakesuccessivecloningviaUSBport.AUSBmemorycardsizemorethan128MegaBytesandlessthan4GigaBytesisrecommended.
USBCloningProcedure
(1) Overview USB Cloning Procedure
(2) Data To Be Cloned
(3) Requirements for USB
NOTECurrently,supporttheprecedingUSBfilesystemforFATfileformatonly.OtherfileformatsincludingNTFS isnotcurrentlysupported.MicrosoftWindowsofficiallysupportsFATfor theUSBmemorycard.
19
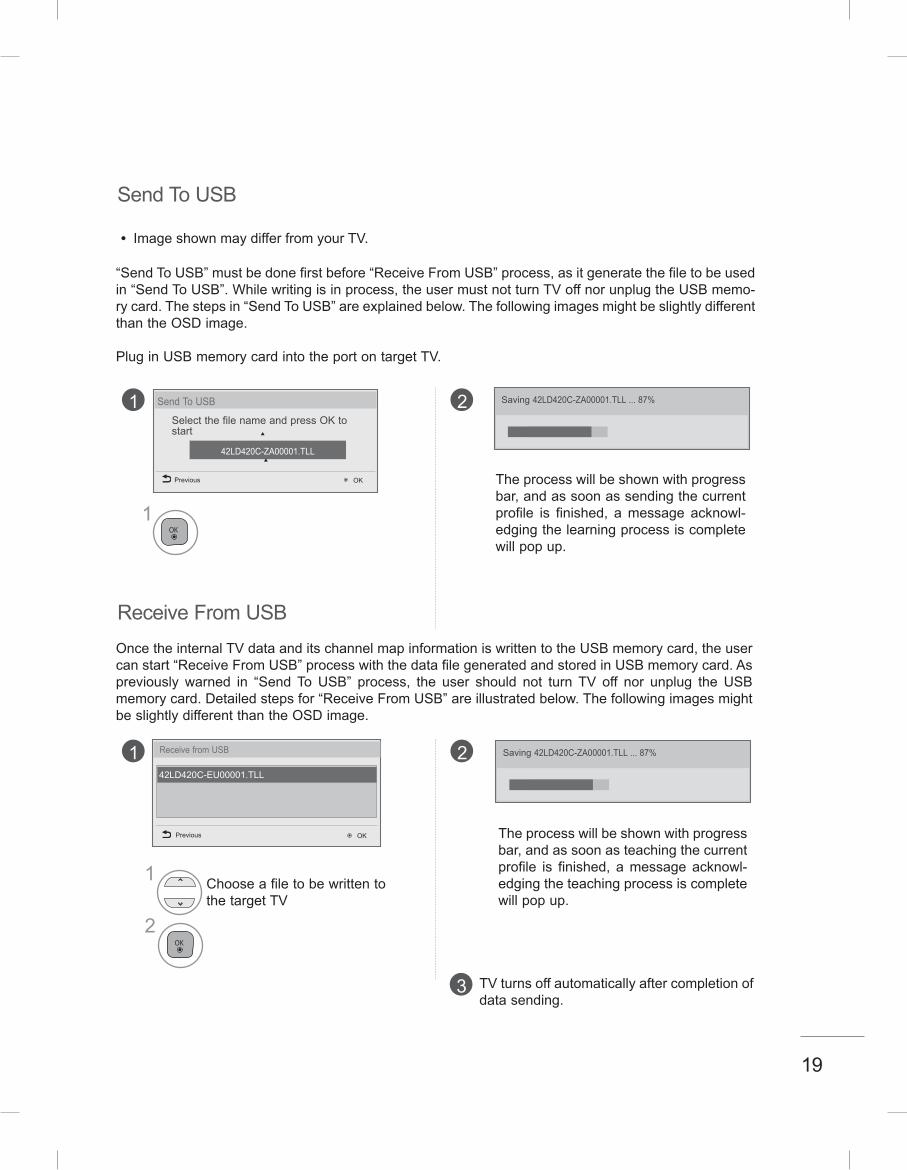
SendToUSB
“SendToUSB”mustbedonefirstbefore“ReceiveFromUSB”process,asitgeneratethefiletobeusedin“SendToUSB”.Whilewritingisinprocess,theusermustnotturnTVoffnorunplugtheUSBmemo-rycard.Thestepsin“SendToUSB”areexplainedbelow.ThefollowingimagesmightbeslightlydifferentthantheOSDimage.
PluginUSBmemorycardintotheportontargetTV.
1 2SelectthefilenameandpressOKtostart
SendToUSB Saving42LD420C-ZA00001.TLL...87%
ReceiveFromUSBOncetheinternalTVdataanditschannelmapinformationiswrittentotheUSBmemorycard,theusercanstart“ReceiveFromUSB”processwiththedatafilegeneratedandstoredinUSBmemorycard.Aspreviously warned in “SendToUSB” process, the user should not turnTV off nor unplug theUSBmemorycard.Detailedstepsfor“ReceiveFromUSB”areillustratedbelow.ThefollowingimagesmightbeslightlydifferentthantheOSDimage.
Theprocesswillbeshownwithprogressbar,andassoonassendingthecurrentprofile is finished, amessage acknowl-edgingthelearningprocessiscompletewillpopup.
2
1
ReceivefromUSB
1 ChooseafiletobewrittentothetargetTV
Theprocesswillbeshownwithprogressbar,andassoonasteachingthecurrentprofile is finished, amessageacknowl-edgingtheteachingprocessiscompletewillpopup.
1 2
42LD420C-ZA00001.TLL
▶
OKPrevious
42LD420C-EU00001.TLL
Previous OK
Saving42LD420C-ZA00001.TLL...87%
TVturnsoffautomaticallyaftercompletionofdatasending.
3
yy ImageshownmaydifferfromyourTV.
▶
20
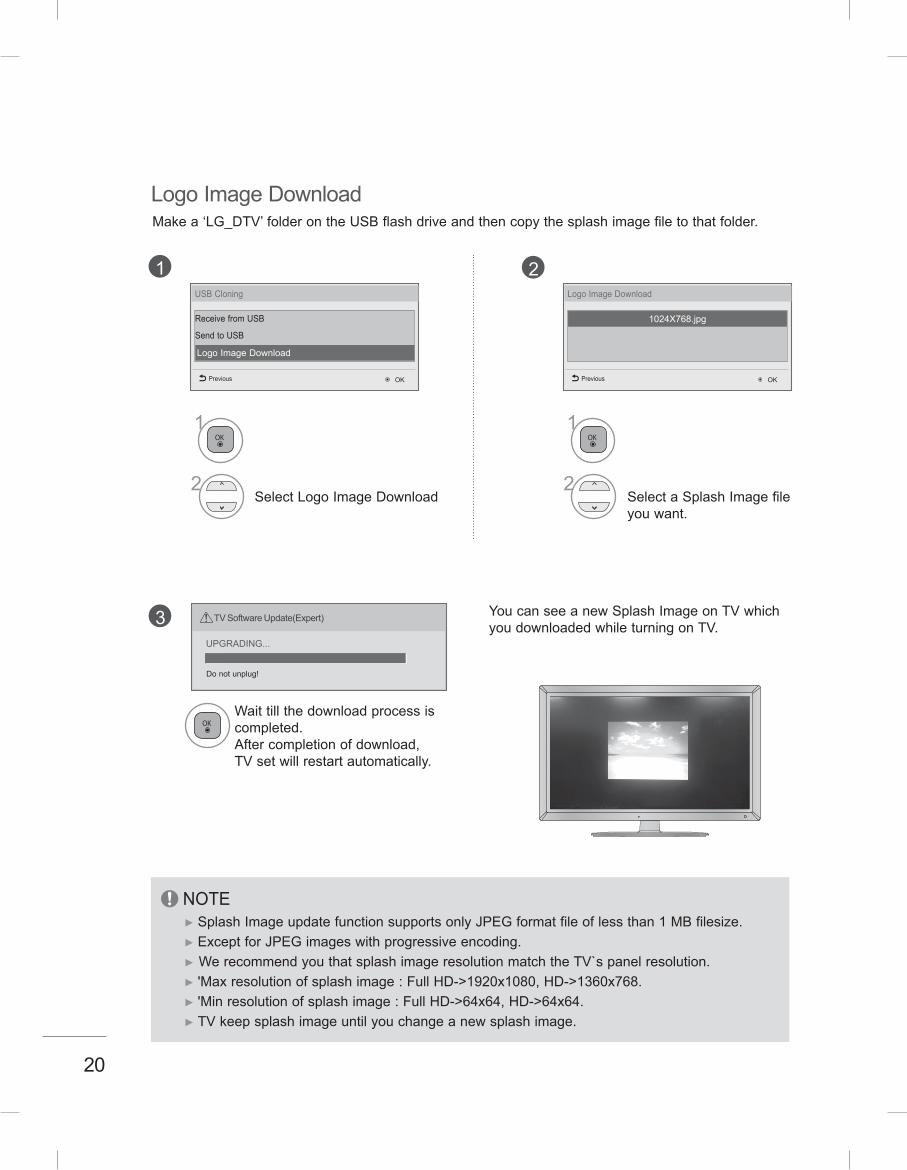
Makea‘LG_DTV’folderontheUSBflashdriveandthencopythesplashimagefiletothatfolder .
LogoImageDownload
1 2
1
USBCloning
LogoImageDownload
OKPrevious
ReceivefromUSB
SendtoUSB
2SelectLogoImageDownload
1
LogoImageDownload
1024X768 .jpg
OKPrevious
2SelectaSplashImagefileyouwant .
TVSoftwareUpdate(Expert)
UPGRADING . . .
Donotunplug!
3
Waittillthedownloadprocessiscompleted .Aftercompletionofdownload,TVsetwillrestartautomatically .
YoucanseeanewSplashImageonTVwhichyoudownloadedwhileturningonTV .
INPUT
MENU
OK
P
NOTE►SplashImageupdatefunctionsupportsonlyJPEGformatfileoflessthan1MBfilesize .►ExceptforJPEGimageswithprogressiveencoding .►WerecommendyouthatsplashimageresolutionmatchtheTV`spanelresolution .►'Maxresolutionofsplashimage:FullHD->1920x1080,HD->1360x768 .►'Minresolutionofsplashimage:FullHD->64x64,HD->64x64 .►TVkeepsplashimageuntilyouchangeanewsplashimage .
21
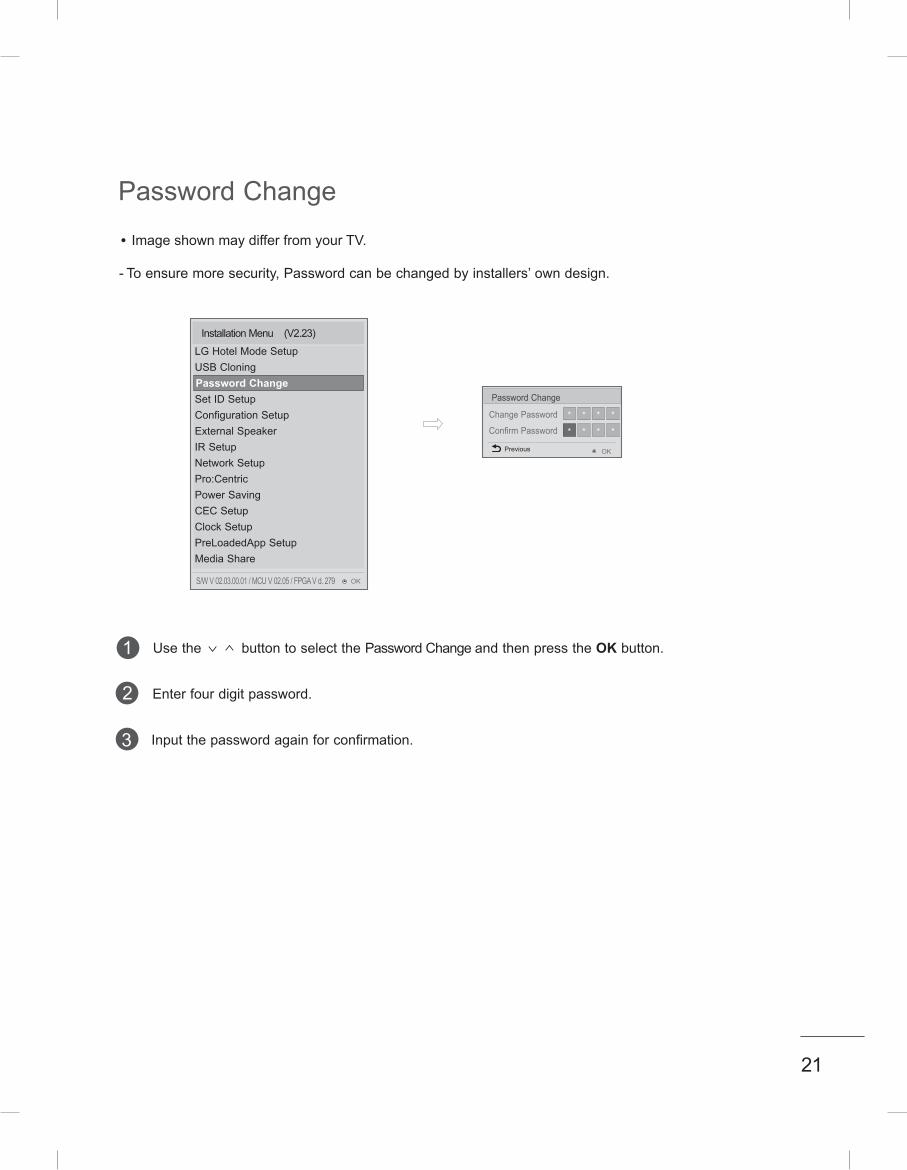
PasswordChange
-Toensuremoresecurity,Passwordcanbechangedbyinstallers’owndesign .
yy ImageshownmaydifferfromyourTV .
InstallationMenu(V2 .23)
LGHotelModeSetupUSBCloningPasswordChangeSetIDSetupConfigurationSetupExternalSpeakerIRSetupNetworkSetupPro:CentricPowerSavingCECSetupClockSetupPreLoadedAppSetupMediaShare
OKS/WV02 .03 .00 .01/MCUV02 .05/FPGAVd .279
Password Change
Inputthepasswordagainforconfirmation .
1
2
3
Usethe buttontoselectthePasswordChangeandthenpresstheOKbutton .
Enterfourdigitpassword .
ChangePassword
ConfirmPassword
PasswordChange
* * * *
* * * *
OKPrevious
22
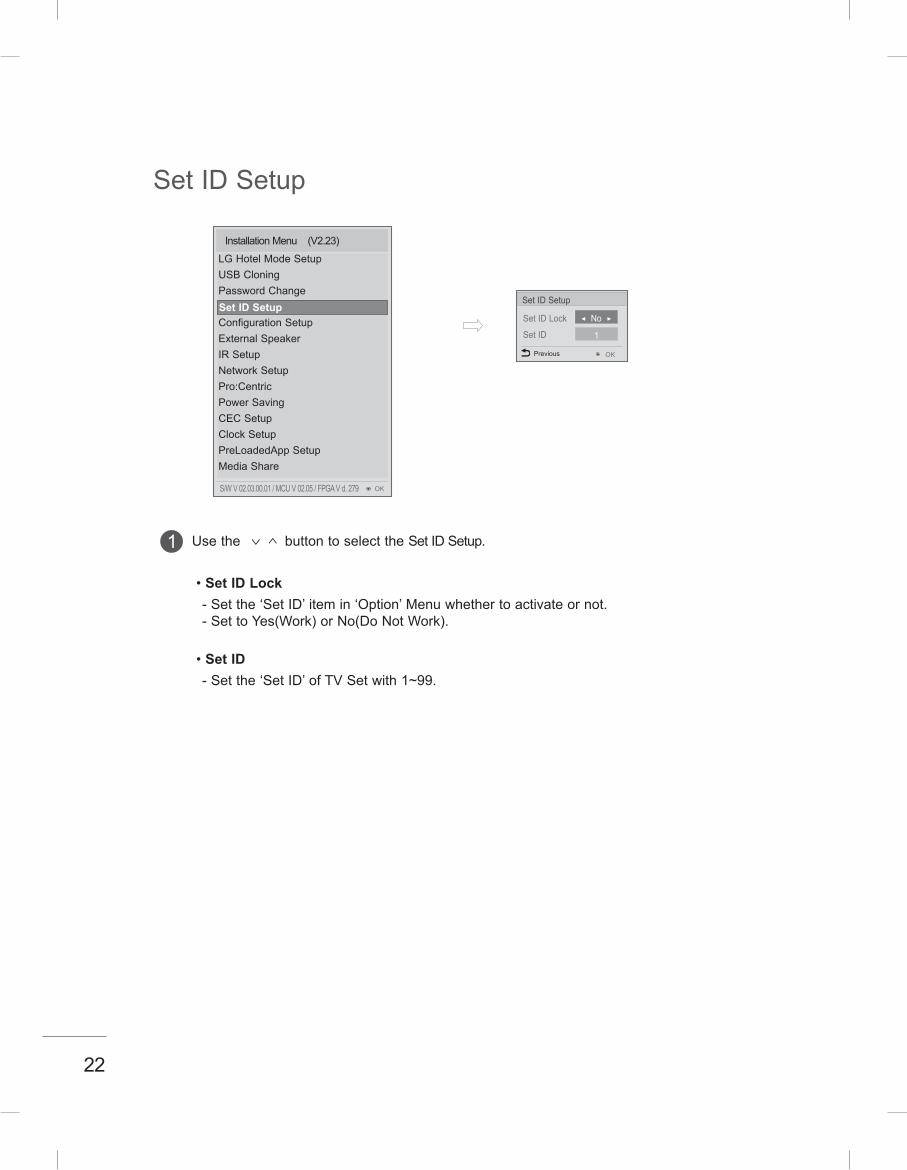
Use the button to select the Set ID Setup.
• Set ID Lock - Set the ‘Set ID’ item in ‘Option’ Menu whether to activate or not. - Set to Yes(Work) or No(Do Not Work).
• Set ID - Set the ‘Set ID’ of TV Set with 1~99.
1
Set ID Setup
Installation Menu (V2.23)
LG Hotel Mode SetupUSB CloningPassword ChangeSet ID SetupConfiguration SetupExternal SpeakerIR SetupNetwork SetupPro:CentricPower SavingCEC SetupClock SetupPreLoadedApp SetupMedia Share
OKS/W V 02.03.00.01 / MCU V 02.05 / FPGA V d. 279
Set ID SetupSet ID Lock
Set ID
◄ No ►
1
OKPrevious
Set ID Setup
23
Configurationsetup
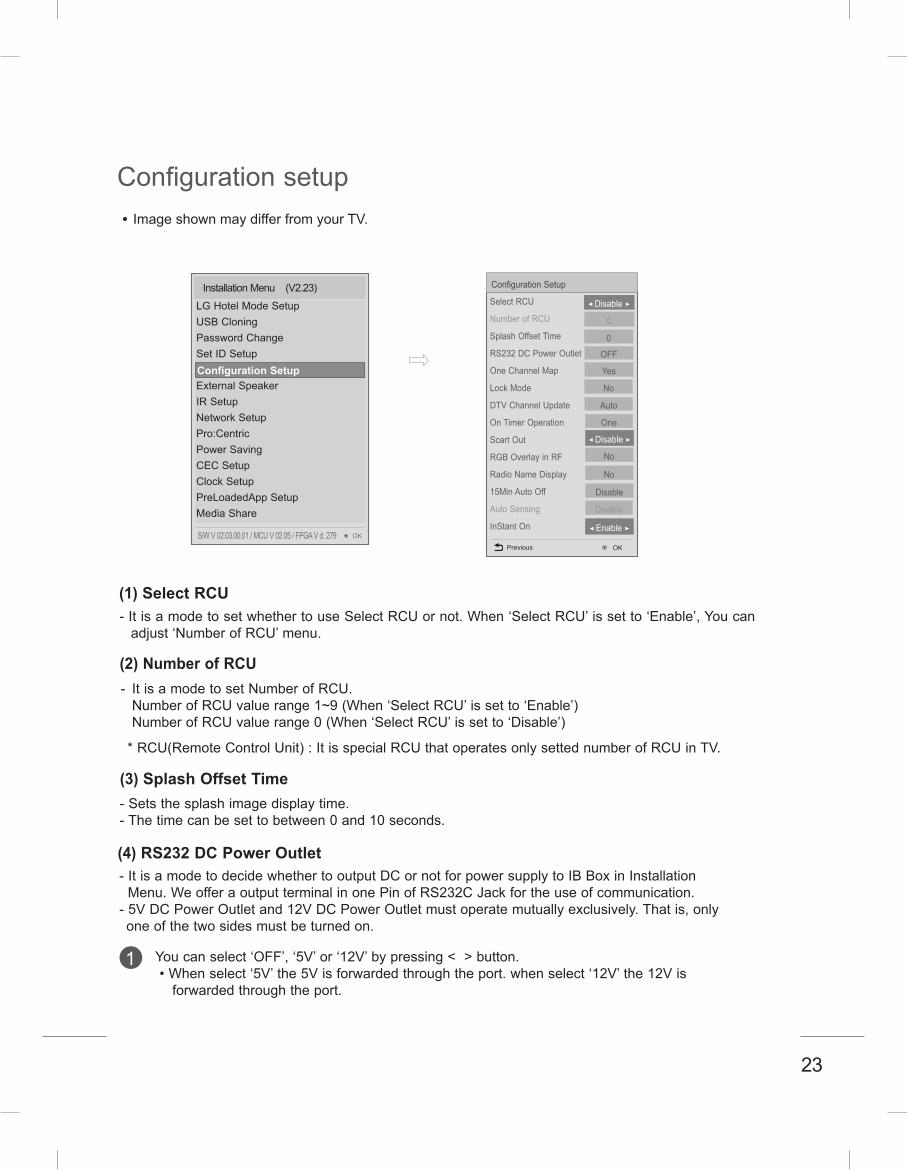
-ItisamodetosetwhethertouseSelectRCUornot .When‘SelectRCU’issetto‘Enable’,Youcanadjust‘NumberofRCU’menu .
(1) Select RCU
- ItisamodetosetNumberofRCU . NumberofRCUvaluerange1~9(When‘SelectRCU’issetto‘Enable’) NumberofRCUvaluerange0(When‘SelectRCU’issetto‘Disable’)
(2) Number of RCU
*RCU(RemoteControlUnit):ItisspecialRCUthatoperatesonlysettednumberofRCUinTV .
-Setsthesplashimagedisplaytime .-Thetimecanbesettobetween0and10seconds .
(3) Splash Offset Time
yy ImageshownmaydifferfromyourTV .
-ItisamodetodecidewhethertooutputDCornotforpowersupplytoIBBoxinInstallationMenu .WeofferaoutputterminalinonePinofRS232CJackfortheuseofcommunication .-5VDCPowerOutletand12VDCPowerOutletmustoperatemutuallyexclusively .Thatis,onlyoneofthetwosidesmustbeturnedon .
(4) RS232 DC Power Outlet
Youcanselect‘OFF’,‘5V’or‘12V’bypressing<>button .•Whenselect‘5V’the5Visforwardedthroughtheport .whenselect‘12V’the12Visforwardedthroughtheport .
1
SelectRCU
NumberofRCU
SplashOffsetTime
RS232DCPowerOutlet
OneChannelMap
LockMode
DTVChannelUpdate
OnTimerOperation
ScartOut
RGBOverlayinRF
RadioNameDisplay
15MinAutoOff
AutoSensing
InStantOn
ConfigurationSetup
0
0
Previous OK
OFF
Yes
No
Auto
One
◄Disable►
No
No
◄Disable►
◄Enable►
InstallationMenu(V2 .23)
LGHotelModeSetupUSBCloningPasswordChangeSetIDSetupConfigurationSetupExternalSpeakerIRSetupNetworkSetupPro:CentricPowerSavingCECSetupClockSetupPreLoadedAppSetupMediaShare
OKS/WV02 .03 .00 .01/MCUV02 .05/FPGAVd .279
Configuration Setup
Disable
Disable
24
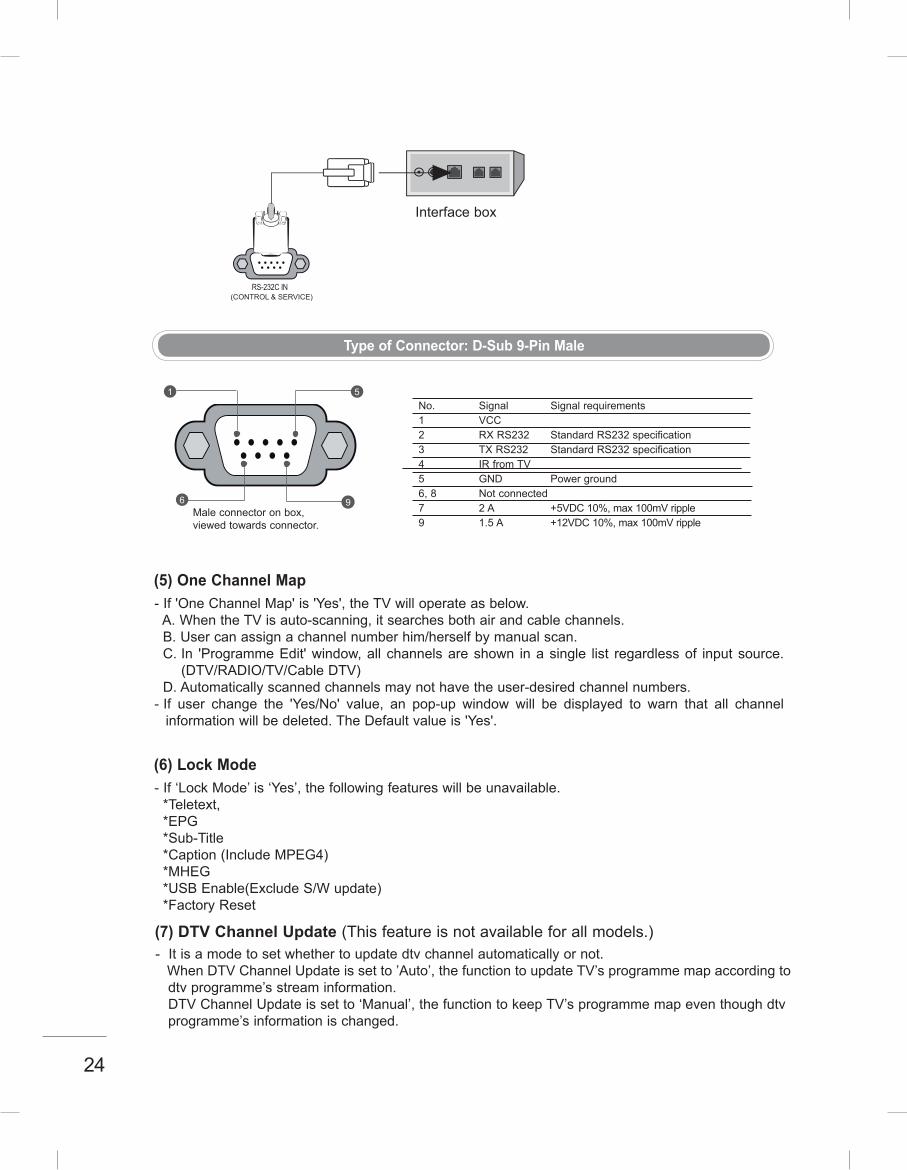
RS-232C IN(CONTROL & SERVICE)
Interface box
Type of Connector: D-Sub 9-Pin Male
No. Signal Signal requirements 1 VCC2 RX RS232 Standard RS232 specification3 TX RS232 Standard RS232 specification4 IR from TV5 GND Power ground6, 8 Not connected7 2 A +5VDC 10%, max 100mV ripple9 1.5 A +12VDC 10%, max 100mV ripple
Male connector on box, viewed towards connector.
9
1 5
6
- If ‘Lock Mode’ is ‘Yes’, the following features will be unavailable. *Teletext, *EPG *Sub-Title *Caption (Include MPEG4) *MHEG *USB Enable(Exclude S/W update) *Factory Reset
(6) Lock Mode
- It is a mode to set whether to update dtv channel automatically or not. When DTV Channel Update is set to ’Auto’, the function to update TV’s programme map according to dtv programme’s stream information. DTV Channel Update is set to ‘Manual’, the function to keep TV’s programme map even though dtv programme’s information is changed.
(7) DTV Channel Update (This feature is not available for all models.)
- If 'One Channel Map' is 'Yes', the TV will operate as below. A. When the TV is auto-scanning, it searches both air and cable channels. B. User can assign a channel number him/herself by manual scan. C. In 'Programme Edit' window, all channels are shown in a single list regardless of input source.
(DTV/RADIO/TV/Cable DTV) D. Automatically scanned channels may not have the user-desired channel numbers.- If user change the 'Yes/No' value, an pop-up window will be displayed to warn that all channel
information will be deleted. The Default value is 'Yes'.
(5) One Channel Map
25
-ItisamodetoselectwhethertodisplayRGBDatatogetheronRFimageornot .When‘RGBOverlayInRF’issetto‘Yes’,OverlayModegetto‘Enable’andyoucanseeRGBDatasignalaswellasgeneralRFImage .-Thisismainlyusedtoprovideinformationtothehotelguest .
(10) RGB Overlay in RF
-Insteadof"AudioOnly",thenameofaradiochannelisdisplayedonthescreenwhenaradiobroadcastisplaying .-SettoYes(Work)orNo(DoNotWork) .-Ifthesettingis"Yes",thenameofaradiochannelisdisplayedfortheradiochannel .-Ifthesettingis"No",thetext"AudioOnly"isdisplayedfortheradiochannel .
(11) Radio Name Display
-If'AutoSensing'issetto'ToSet⊙',theinputisautomaticallyswitchedwhentheinputsignalthatyousetto"ON'isreceived .
-If'AutoSensing'issetto'Disable',theinputisnotswitchedwhentheinputsignalisreceived .*SIMPLINKandAutoSensingcannotworksimultaneously .IfSIMPLINKissettoOn,AutoSensingisautomaticallysettoDisable .*IfthesignalisremovedwhileAutoSensing(automaticinputswitch)isenabled,theinputreturnstotheprevioussetting .IftheseveralinputareconnectedbyenablingAutoSensingandtheautomaticinputreturnstotheprevioussetting .IftheseveralinputsareconnectedbyenablingAutoSensingandtheautomaticinputswitchisperformedseveraltimes,theinputreturnstotheprevioussettingonlyforthelastinputanddoesnotrepeattheoperationfortherest .*FortheAVinputconnectedusingtheeuroscartcable,AutoSensingdoesnotwordfortheTVinputbecausetheAutoAVfunctionisenabled .(Forotherinputs,AutoSensingworksnormally .)
-DeterminewhethertoenableInstantOnornot .WhenInstantOnisenabled,TVwillmoveonWARMmodeautomaticallywhneverTVispoweredoff .Thereforuserwillfeelnobootingtime .Butitcausesmorepowerconsumptioninpoweroff .
(13) Auto Sensing
(14) InStant On
-Itisamodetoselect'OnTimerOperation'workingonetimeorrepeatedly .'ONE':'OnTime'intheusermenuoperatesonlyonetimewhenthe'OnTime'menuissetto'ON' .'Repeat':'OnTime'operatesrepeatedlywhenthe'OnTime'menuissetto'ON' .
(8) On Timer Operation
-ThemonitoroutsignalscanorcannotbeoutputthroughtheSCARTcable,dependingonthesettingvalueofscartout .YoucansettoEnableorDisableusingthe<>button .ThedefaultvalueisEnable .
(9) Scart Out
-When'15MinAutoOff'issetto'Enable',TVwillturnoffifthereisnosignalin15Min .(12) 15Min Auto Off
26
External Speaker
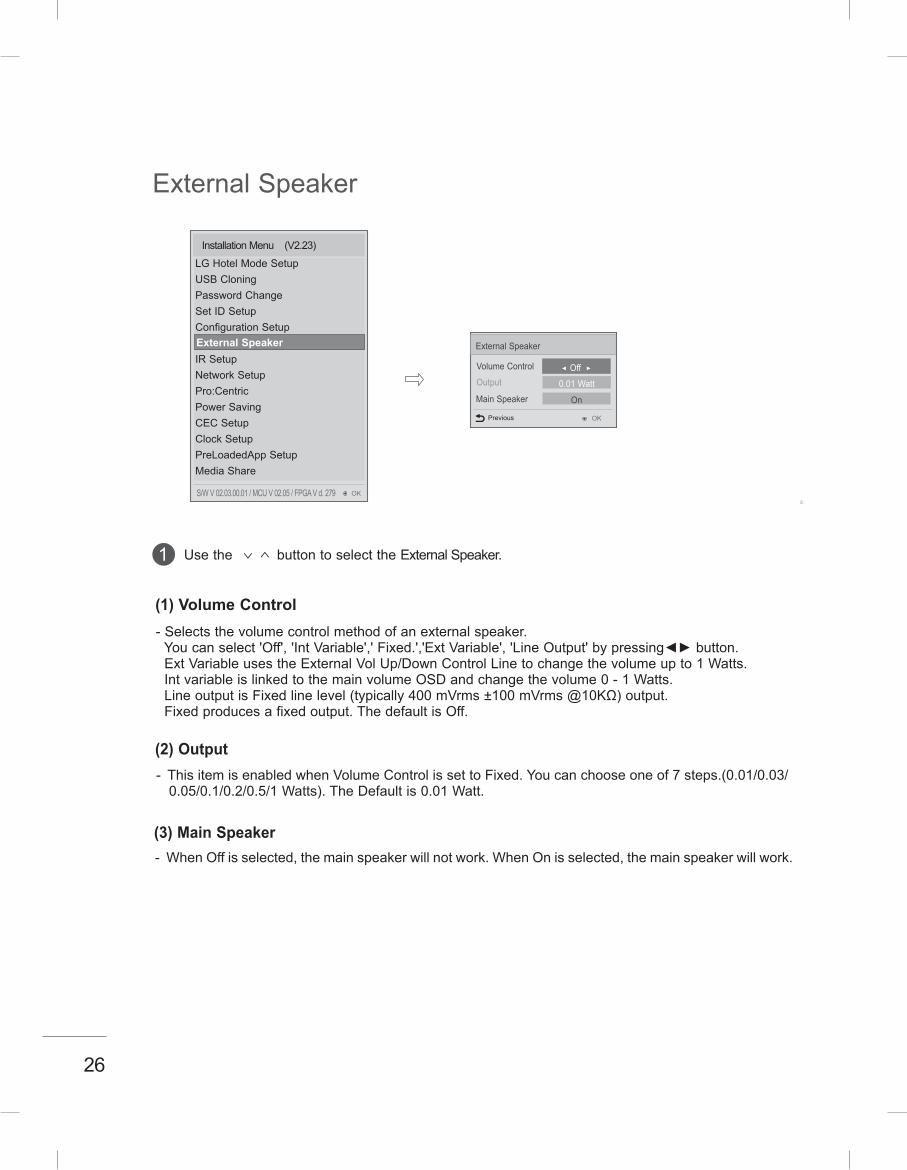
Use the button to select the External Speaker.1
- Selects the volume control method of an external speaker. You can select 'Off', 'Int Variable',' Fixed.','Ext Variable', 'Line Output' by pressing◄► button. Ext Variable uses the External Vol Up/Down Control Line to change the volume up to 1 Watts. Int variable is linked to the main volume OSD and change the volume 0 - 1 Watts. Line output is Fixed line level (typically 400 mVrms ±100 mVrms @10KΩ) output. Fixed produces a fixed output. The default is Off.
(1) Volume Control
- This item is enabled when Volume Control is set to Fixed. You can choose one of 7 steps.(0.01/0.03/ 0.05/0.1/0.2/0.5/1 Watts). The Default is 0.01 Watt.
(2) Output
- When Off is selected, the main speaker will not work. When On is selected, the main speaker will work.
(3) Main Speaker
Volume Control
Output◄ Off ►
0.01 Watt
External Speaker
OK
Main Speaker On
Installation Menu (V2.23)
LG Hotel Mode SetupUSB CloningPassword ChangeSet ID SetupConfiguration SetupExternal SpeakerIR SetupNetwork SetupPro:CentricPower SavingCEC SetupClock SetupPreLoadedApp SetupMedia Share
OKS/W V 02.03.00.01 / MCU V 02.05 / FPGA V d. 279
External Speaker
SPEAKEROUTAAAK
VOLUMECONTROL
STEREO(8 )
SPEAKER OUT
R -R+
L -L+
Previous
27
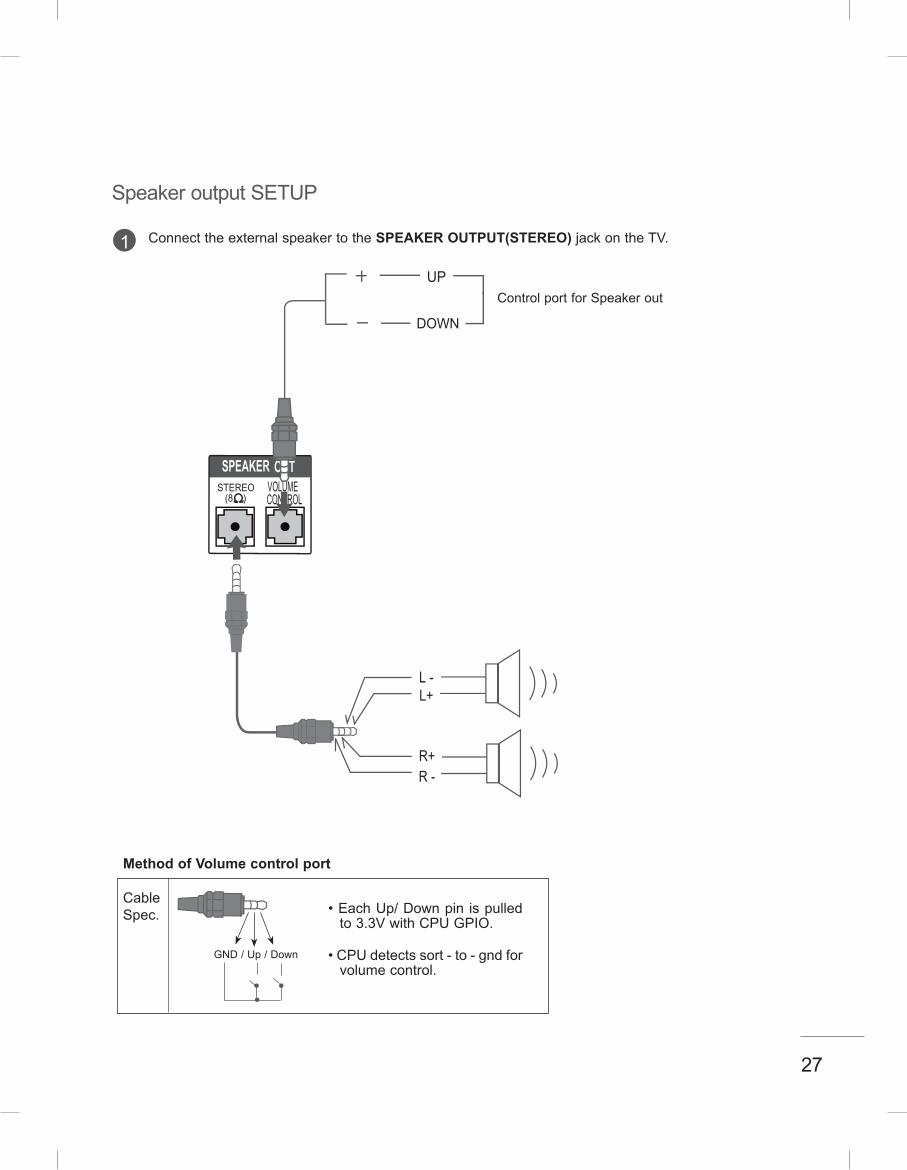
SpeakeroutputSETUP
ConnecttheexternalspeakertotheSPEAKER OUTPUT(STEREO)jackontheTV .1
SPEAKEROUTAAAK
VOLUMECONTROL
STEREO(8 )
SPEAKER OUT
R -R+
L -L+
ControlportforSpeakerout
•EachUp/Downpinispulledto3 .3VwithCPUGPIO .
•CPUdetectssort-to-gndforvolumecontrol .
Method of Volume control port
CableSpec .
VOLUMECONTROL
STEREO
SPEAKEROUT
(8 )
GND/Up/Down
28
IRSetup
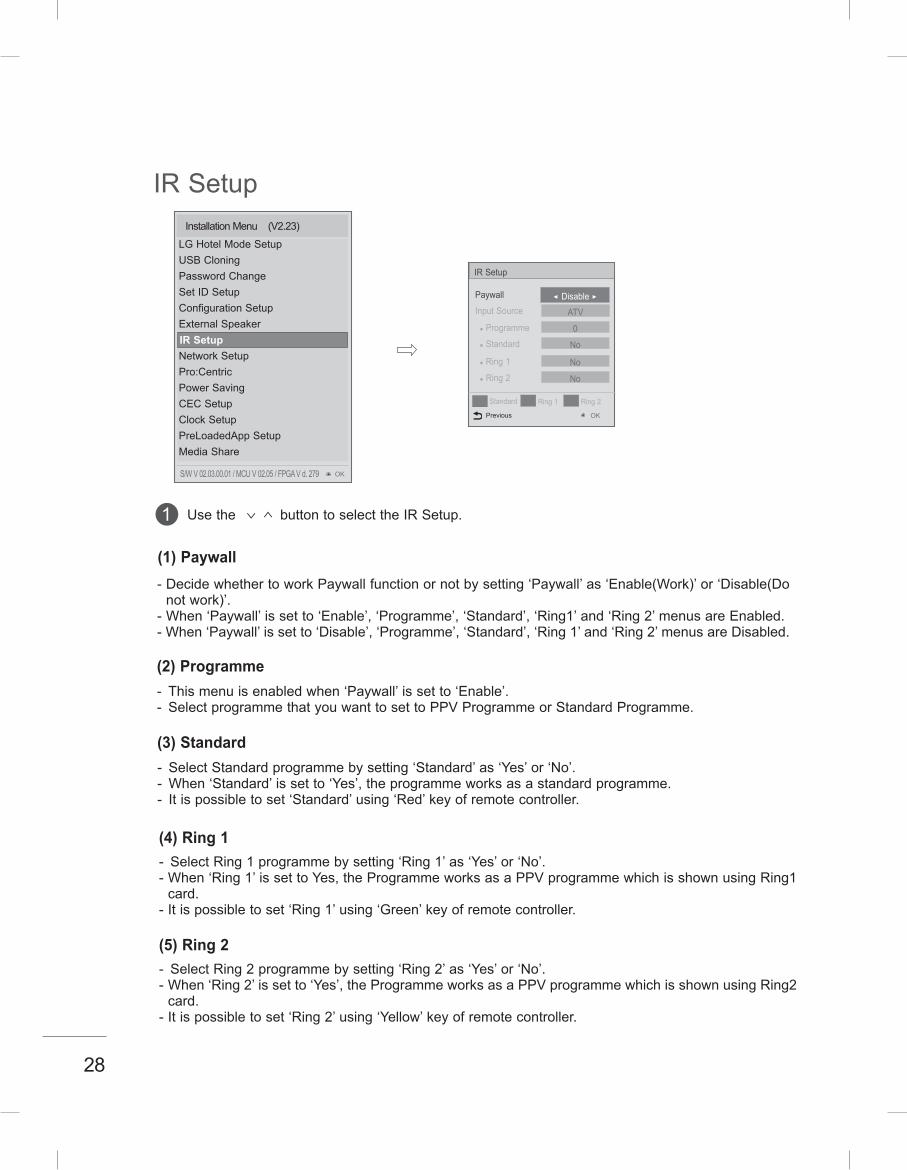
Usethe buttontoselecttheIRSetup .1
-DecidewhethertoworkPaywallfunctionornotbysetting‘Paywall’as‘Enable(Work)’or‘Disable(Donotwork)’ .
-When‘Paywall’issetto‘Enable’,‘Programme’,‘Standard’,‘Ring1’and‘Ring2’menusareEnabled .-When‘Paywall’issetto‘Disable’,‘Programme’,‘Standard’,‘Ring1’and‘Ring2’menusareDisabled .
(1) Paywall
- Thismenuisenabledwhen‘Paywall’issetto‘Enable’ .- SelectprogrammethatyouwanttosettoPPVProgrammeorStandardProgramme .
(2) Programme
- SelectStandardprogrammebysetting‘Standard’as‘Yes’or‘No’ .- When‘Standard’issetto‘Yes’,theprogrammeworksasastandardprogramme .- Itispossibletoset‘Standard’using‘Red’keyofremotecontroller .
(3) Standard
Paywall
InputSource◄Disable►
ATV
IRSetup
OK
ylProgramme
ylStandard
ylRing1
ylRing2
0
No
No
No
Previous
Standard Ring1 Ring2
- SelectRing1programmebysetting‘Ring1’as‘Yes’or‘No’ .-When‘Ring1’issettoYes,theProgrammeworksasaPPVprogrammewhichisshownusingRing1card .
-Itispossibletoset‘Ring1’using‘Green’keyofremotecontroller .
- SelectRing2programmebysetting‘Ring2’as‘Yes’or‘No’ .-When‘Ring2’issetto‘Yes’,theProgrammeworksasaPPVprogrammewhichisshownusingRing2card .
-Itispossibletoset‘Ring2’using‘Yellow’keyofremotecontroller .
(4) Ring 1
(5) Ring 2
InstallationMenu(V2 .23)
LGHotelModeSetupUSBCloningPasswordChangeSetIDSetupConfigurationSetupExternalSpeakerIRSetupNetworkSetupPro:CentricPowerSavingCECSetupClockSetupPreLoadedAppSetupMediaShare
OKS/WV02 .03 .00 .01/MCUV02 .05/FPGAVd .279
IR Setup

29
NetworkSetup
InstallationMenu(V2.23)
LGHotelModeSetupUSBCloningPasswordChangeSetIDSetupConfigurationSetupExternalSpeakerIRSetupNetworkSetupPro:CentricPowerSavingCECSetupClockSetupPreLoadedAppSetupMediaShare
OKS/WV02.03.00.01/MCUV02.05/FPGAVd.279
Network Setup
NetworkSetting
NetworkStatus
WOL(WakeUpFrame)
WOL(MagicPacket)
WakeOnWirelessLAN
PCROffset
AudiaPTSOffset
VideoPTSOffest
IGMPVersion
MACAddress
NetworkSetup
PressOK
Previous OK
◄PressOK►
Disabled
Disabled
0
0
0
3
AA:BB:CC:DD;EE:39
•One-click network connection-Connectseasilytoawired/wirelessnetwork.-NetworkConnectiontoconnecttoanavailablenetworkautomatically.FollowthepromptsontheTV.
(1) Network setting
•To connect to a network through Set Expert-Foruseinspecialcircumstancessuchasinoffices(incaseswhereastaticIPisused).
Selectanetworkconnection,eitherWiredorWireless.
WhenconnectingviaWired,ConfigurestheIPsettingsoftheTVset.YoucansettheIPaddress,subnetmask,gatewayandDNSserver.
WhenconnectingviaWi-Fi,usetheoneofthefollowingnetworkconnectionmethods.
1
2
3
APList ConnectstothenetworkselectedfromtheAPList.
EntertheSSID ConnectstothewirelessAPtypedin.
WPS-PBC ConnectseasilywhenthebuttonofawirelessAPsupportingPBCispressed.
WPS-PIN ConnectseasilywhenthePINofthewirelessAPthatyouwishtoconnecttoisenteredintotheAPwebsite.
Ad-hoc Connectstoanetworkviaawireless-enabledPCormobilephone.
Disabled
30
- YoucanalsocheckwhethertheIPsettingsareconfiguredproperlyusingtheEnterbutton.
(2) Network Status
(4) WOL(Magic Packet)
-Controllingstandardclockofinputstreamdependsonnetworkcondition.
-SetstheWakeOnWirelessLANfunctiontoEnableofDisable.Use“WakeUpFrameandMagicPacket”.
(6) PCR Offset
(5) Wake On Wireless LAN
(3) WOL(Wake Up Frame)- SetstheWakeOnLANfunctiontoEnableorDisable.Use"WakeUpFrame".
- SetstheWakeOnLANfunctiontoEnableorDisable.Use"MagicPacket".
-Controllingoutputstreamtimingofaudio.
(7) Audio PTS Offset
-Controllingoutputstreamtimingofvideo.
(8) Video PTS Offset
-YoucanselectIGMPVersionofmulticastpacket.
(9) IGMP Version
-DisplaystheMACaddress(notcustomizable).
(10) MAC Address
31
Pro:Centric
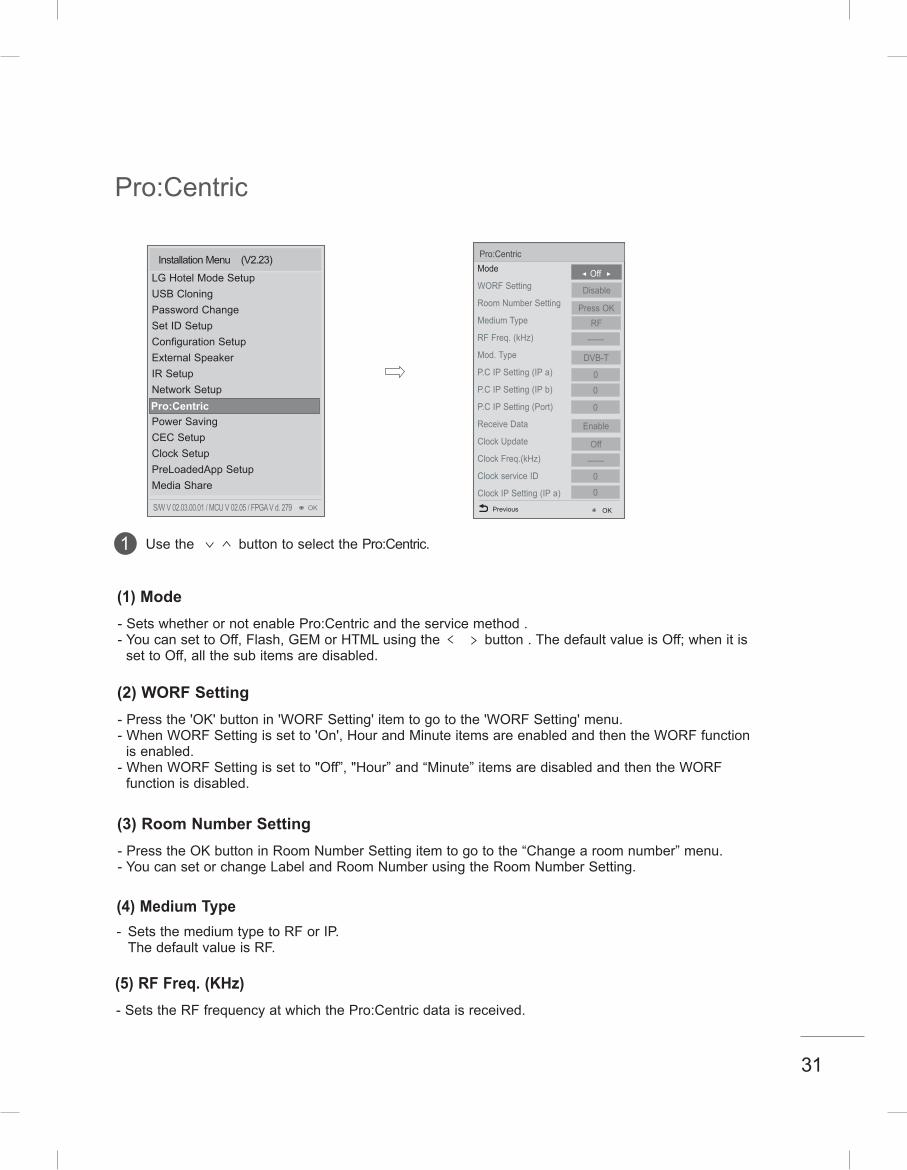
Usethe buttontoselectthePro:Centric.1
-SetswhetherornotenablePro:Centricandtheservicemethod.-YoucansettoOff,Flash,GEMorHTMLusingthe button.ThedefaultvalueisOff;whenitissettoOff,allthesubitemsaredisabled.
-Pressthe'OK'buttonin'WORFSetting'itemtogotothe'WORFSetting'menu.-WhenWORFSettingissetto'On',HourandMinuteitemsareenabledandthentheWORFfunctionisenabled.-WhenWORFSettingissetto"Off”,"Hour”and“Minute”itemsaredisabledandthentheWORFfunctionisdisabled.
-PresstheOKbuttoninRoomNumberSettingitemtogotothe“Changearoomnumber”menu.-YoucansetorchangeLabelandRoomNumberusingtheRoomNumberSetting.
(1) Mode
(2) WORF Setting
(3) Room Number Setting
-SetstheRFfrequencyatwhichthePro:Centricdataisreceived.
(5) RF Freq. (KHz)
(4) Medium Type- SetsthemediumtypetoRForIP. ThedefaultvalueisRF.
InstallationMenu(V2.23)
LGHotelModeSetupUSBCloningPasswordChangeSetIDSetupConfigurationSetupExternalSpeakerIRSetupNetworkSetupPro:CentricPowerSavingCECSetupClockSetupPreLoadedAppSetupMediaShare
OKS/WV02.03.00.01/MCUV02.05/FPGAVd.279
Pro:Centric
Mode
WORFSetting
RoomNumberSetting
MediumType
RFFreq.(kHz)
Mod.Type
P.CIPSetting(IPa)
P.CIPSetting(IPb)
P.CIPSetting(Port)
ReceiveData
ClockUpdate
ClockFreq.(kHz)
ClockserviceID
ClockIPSetting(IPa)
Pro:Centric
Disable
DVB-T
Previous OK
◄Off►
Off
0
PressOK
0
0
0
------
Enable
0
------
RF
32
-SetstheRFmodulationtypetoDVB-TorDVB-C.ThedefaultvalueisDVB-T.
(6) Mod. Type
-Thedefaultvalueis'------'.-SettheRFfrequencyofthechannelfromwhichtoupdatethetime.
-Thedefaultvalueis0.-SettheserviceIDofthechannelfromwhichtoupdatethetime.
-Itcanbesetto"Off"or"ClockFreq".Thedefaultvalueis'Off'.-Ifitissetto"Off",thetimesetfromthemainmenuwillbeused.Ifitissetto"ClockFreq",thetimewillbeupdatedfromaspecificfrequency
(10) Clock Freq.(KHz)
(11) Clock service ID
(9) Clock Update
-Itcanbesetusingtheornumberbuttons.•(IPa):SetsthefirstnumberintheIPv4address.•(IPb):SetsthesecondnumberintheIPv4address.•(IPc):SetsthethirdnumberintheIPv4address.•(IPd):SetsthefourthnumberintheIPv4address.•(Port):SetstheactualportnumberwherethePro:Centricserverisrunning.Itcanbesetusingtheornumberbuttons.-ThedefaultvalueofIPa/b/c/dis0andtherangeisbetween0and255.ThedefaultvalueofPortis80andtherangeisbetween0and65535..
-Itcanbesetusingtheornumberbuttons.•(IPa):SetsthefirstnumberintheIPv4address.•(IPb):SetsthesecondnumberintheIPv4address.•(IPc):SetsthethirdnumberintheIPv4address.•(IPd):SetsthefourthnumberintheIPv4address.•(Port):SetstheactualportnumberwherethePro:Centricserverisrunning.Itcanbesetusingtheornumberbuttons.
-ThedefaultvalueofIPa/b/c/dis0andtherangeisbetween0and255.ThedefaultvalueofPortis80andtherangeisbetween0and65535..
(7) P:C IP Setting
(12) Clock IP Setting
- SetstheRFmodulationtypetoDVB-TorDVB-C. ThedefaultvalueisDVB-T.
- SetsEnableorDisable.WhenitissettoDisable,allthesubitemsaredisable.
(8) Receive Data
33
PowerSaving
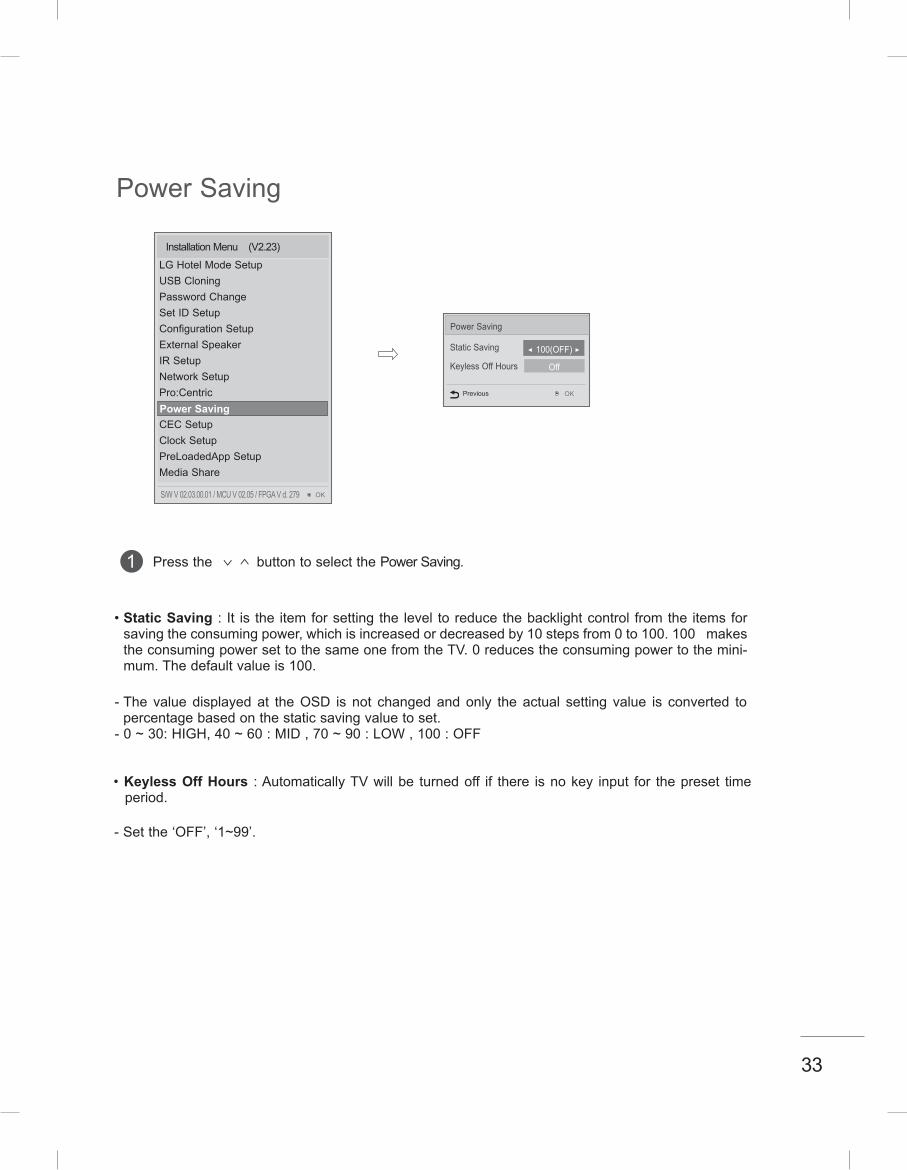
Pressthe buttontoselectthePowerSaving .1
•Static Saving : It is the itemforsettingthe level toreducethebacklightcontrol fromthe itemsforsavingtheconsumingpower,whichisincreasedordecreasedby10stepsfrom0to100 .100makestheconsumingpowersettothesameonefromtheTV .0reducestheconsumingpowertothemini-mum .Thedefaultvalueis100 .
-The valuedisplayedat theOSD is not changedandonly theactual setting value is converted topercentagebasedonthestaticsavingvaluetoset .
-0~30:HIGH,40~60:MID,70~90:LOW,100:OFF
•Keyless Off Hours :AutomaticallyTVwillbe turnedoff if there isnokey input for thepreset time period .
-Setthe‘OFF’,‘1~99’ .
StaticSaving
KeylessOffHours
◄100(OFF)►
Off
PowerSaving
OKPrevious
InstallationMenu(V2 .23)
LGHotelModeSetupUSBCloningPasswordChangeSetIDSetupConfigurationSetupExternalSpeakerIRSetupNetworkSetupPro:CentricPowerSavingCECSetupClockSetupPreLoadedAppSetupMediaShare
OKS/WV02 .03 .00 .01/MCUV02 .05/FPGAVd .279
Power Saving
34
CECSetup
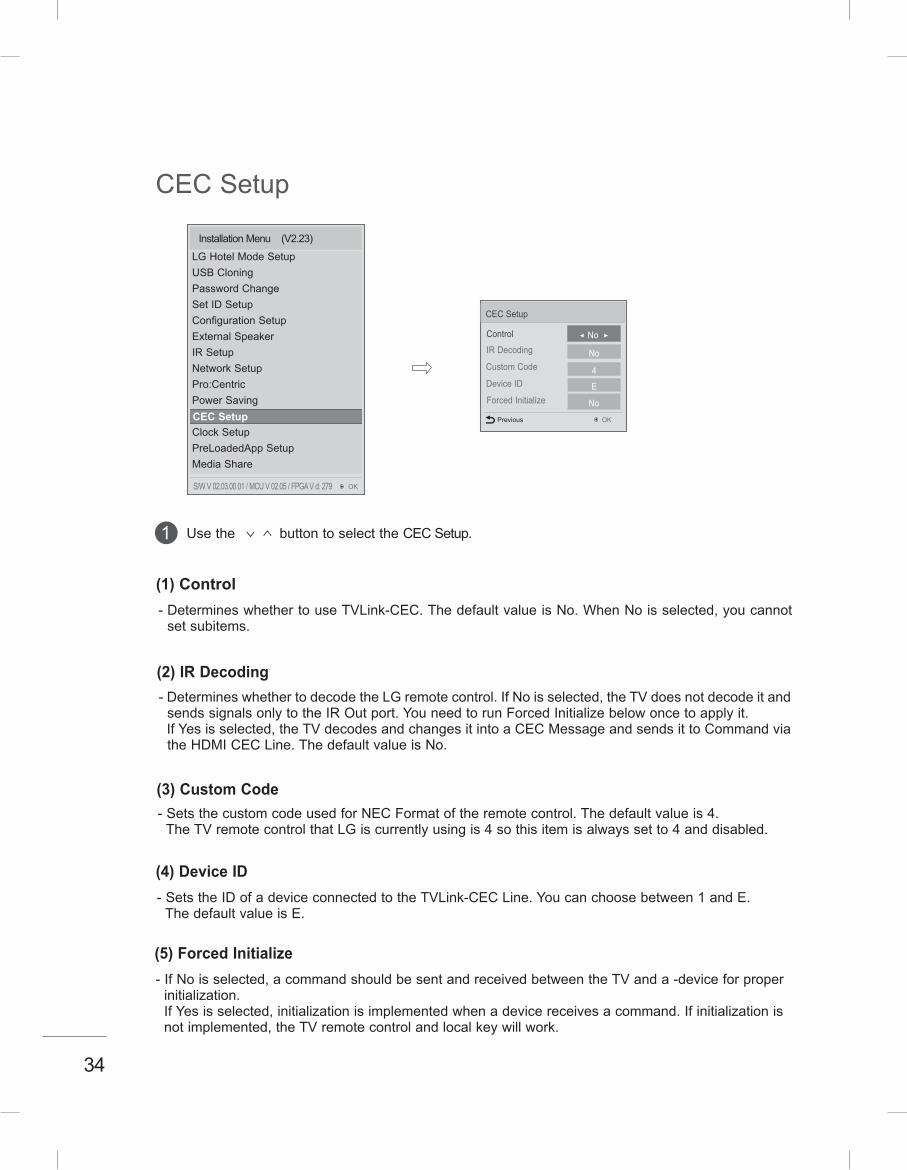
Usethe buttontoselecttheCECSetup .1
-DetermineswhethertouseTVLink-CEC .ThedefaultvalueisNo .WhenNoisselected,youcannotsetsubitems .
(1) Control
-DetermineswhethertodecodetheLGremotecontrol .IfNoisselected,theTVdoesnotdecodeitandsendssignalsonlytotheIROutport .YouneedtorunForcedInitializebelowoncetoapplyit .IfYesisselected,theTVdecodesandchangesitintoaCECMessageandsendsittoCommandviatheHDMICECLine .ThedefaultvalueisNo .
(2) IR Decoding
-SetsthecustomcodeusedforNECFormatoftheremotecontrol .Thedefaultvalueis4 .TheTVremotecontrolthatLGiscurrentlyusingis4sothisitemisalwayssetto4anddisabled .
(3) Custom Code
-SetstheIDofadeviceconnectedtotheTVLink-CECLine .Youcanchoosebetween1andE .ThedefaultvalueisE .
(4) Device ID
-IfNoisselected,acommandshouldbesentandreceivedbetweentheTVanda-deviceforproperinitialization .IfYesisselected,initializationisimplementedwhenadevicereceivesacommand .Ifinitializationisnotimplemented,theTVremotecontrolandlocalkeywillwork .
(5) Forced Initialize
Control
IRDecoding
◄No►
No
CECSetup
OK
CustomCode 4DeviceID EForcedInitialize No
Previous
InstallationMenu(V2 .23)
LGHotelModeSetupUSBCloningPasswordChangeSetIDSetupConfigurationSetupExternalSpeakerIRSetupNetworkSetupPro:CentricPowerSavingCECSetupClockSetupPreLoadedAppSetupMediaShare
OKS/WV02 .03 .00 .01/MCUV02 .05/FPGAVd .279
CEC Setup
35
ClockSetup
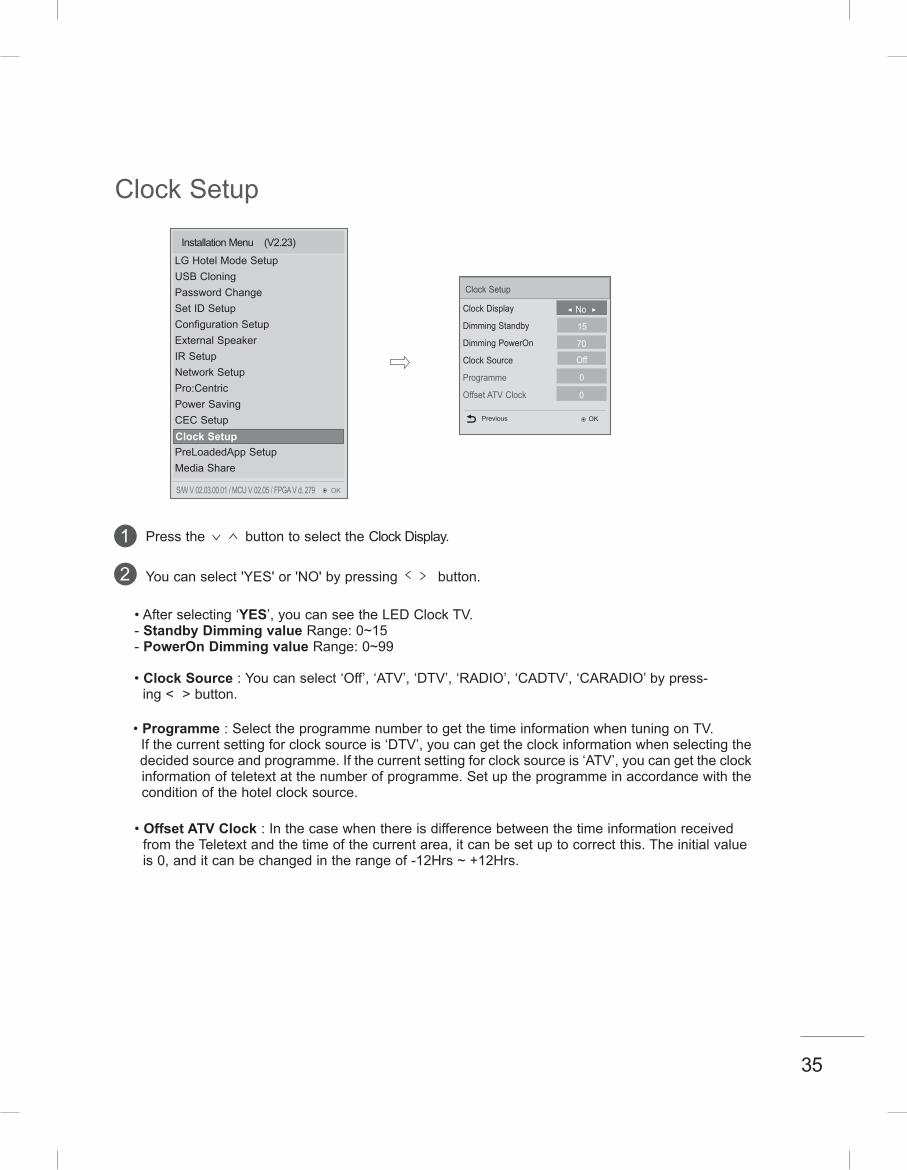
Pressthe buttontoselecttheClockDisplay .1
•Afterselecting‘YES’,youcanseetheLEDClockTV .-Standby Dimming valueRange:0~15-PowerOn Dimming valueRange:0~99
•Clock Source:Youcanselect‘Off’,‘ATV’,‘DTV’,‘RADIO’,‘CADTV’,‘CARADIO’bypress-ing<>button .
•Programme:SelecttheprogrammenumbertogetthetimeinformationwhentuningonTV .Ifthecurrentsettingforclocksourceis‘DTV’,youcangettheclockinformationwhenselectingthedecidedsourceandprogramme .Ifthecurrentsettingforclocksourceis‘ATV’,youcangettheclockinformationofteletextatthenumberofprogramme .Setuptheprogrammeinaccordancewiththeconditionofthehotelclocksource .
•Offset ATV Clock:InthecasewhenthereisdifferencebetweenthetimeinformationreceivedfromtheTeletextandthetimeofthecurrentarea,itcanbesetuptocorrectthis .Theinitialvalueis0,anditcanbechangedintherangeof-12Hrs~+12Hrs .
Youcanselect'YES'or'NO'bypressing button .2
ClockDisplay
DimmingStandby
DimmingPowerOn
ClockSource
Programme
OffsetATVClock
ClockSetup
15
70
Previous OK
Off
◄No►
0
0
InstallationMenu(V2 .23)
LGHotelModeSetupUSBCloningPasswordChangeSetIDSetupConfigurationSetupExternalSpeakerIRSetupNetworkSetupPro:CentricPowerSavingCECSetupClockSetupPreLoadedAppSetupMediaShare
OKS/WV02 .03 .00 .01/MCUV02 .05/FPGAVd .279
Clock Setup
36
PreLoadedAppSetup
InstallationMenu(V2 .23)
LGHotelModeSetupUSBCloningPasswordChangeSetIDSetupConfigurationSetupExternalSpeakerIRSetupNetworkSetupPro:CentricPowerSavingCECSetupClockSetupPreLoadedAppSetupMediaShare
OKS/WV02 .03 .00 .01/MCUV02 .05/FPGAVd .279
PreLoadedApp Setup
1
2
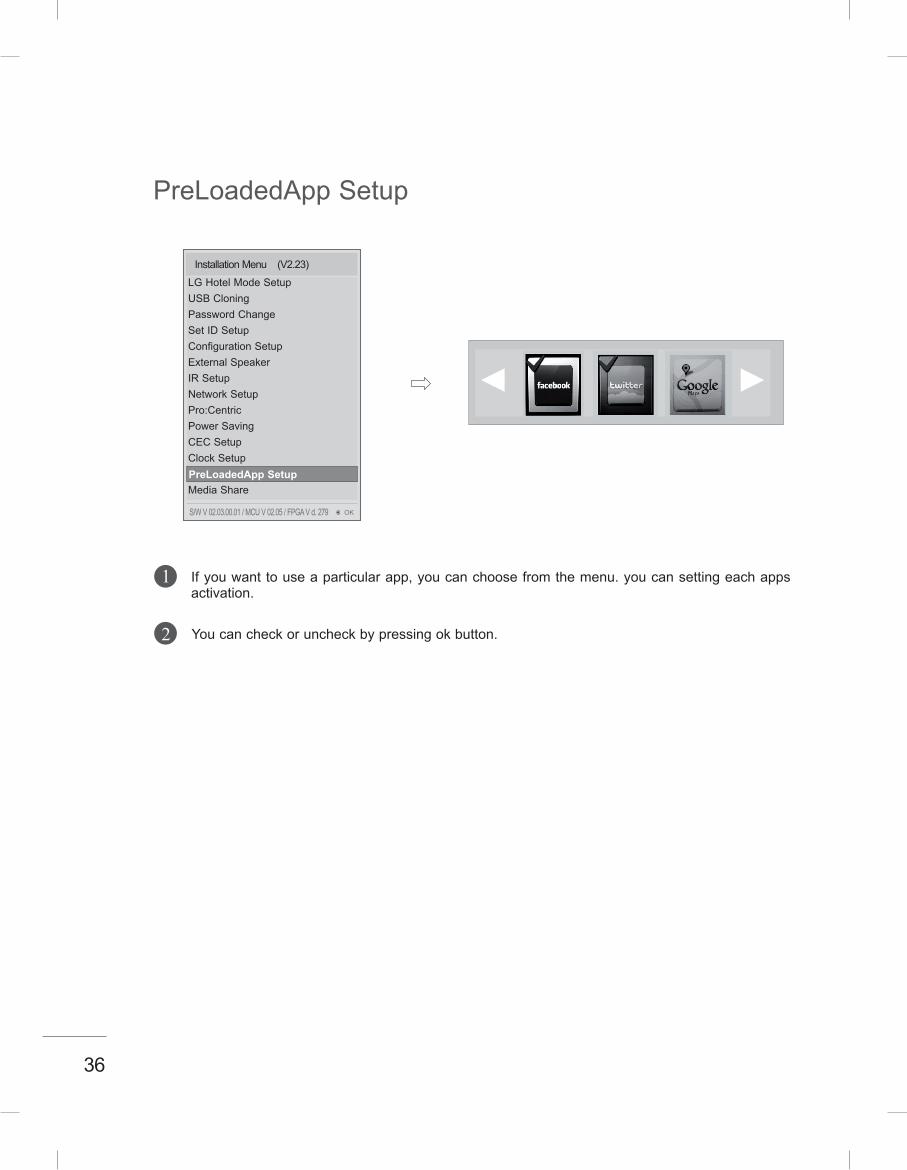
Ifyouwanttouseaparticularapp,youcanchoosefromthemenu .youcansettingeachappsactivation .
Youcancheckoruncheckbypressingokbutton .
◄►
37
MediaShare
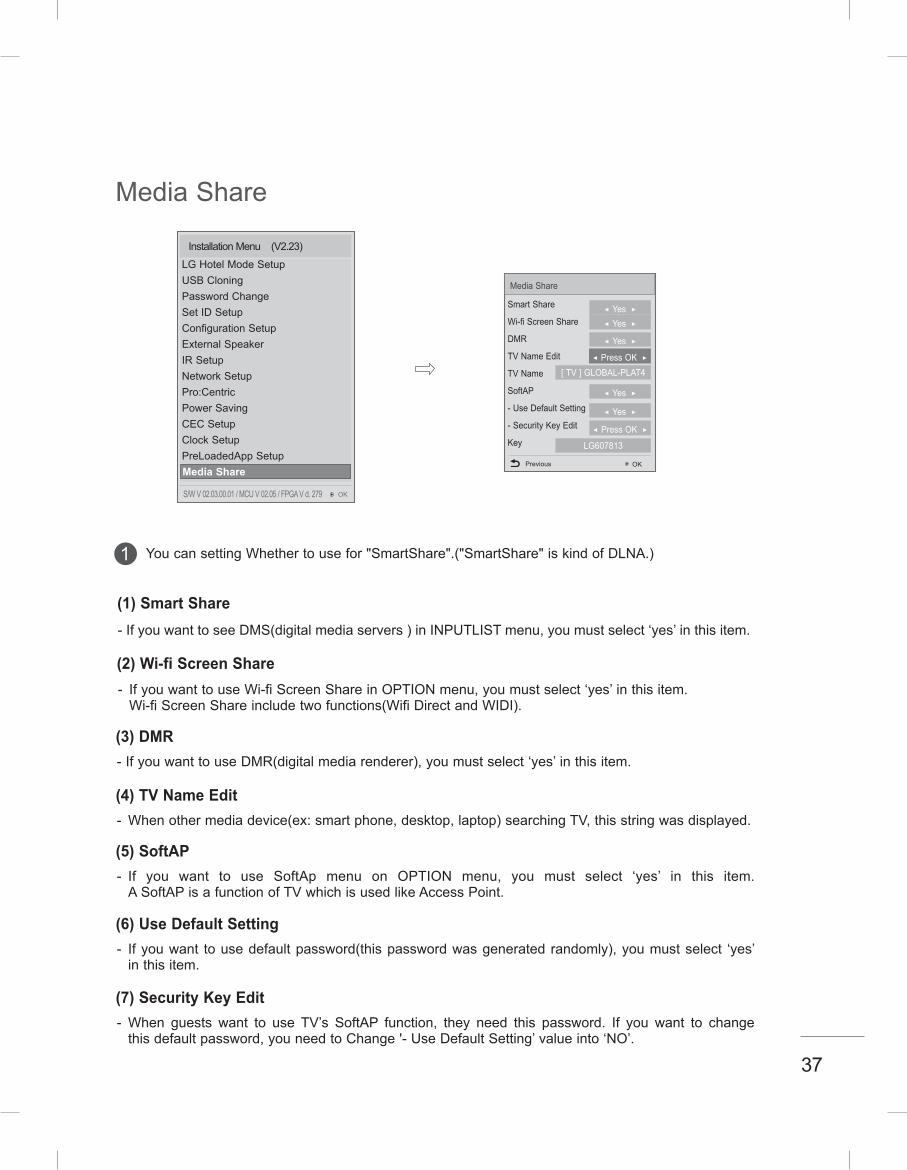
YoucansettingWhethertousefor"SmartShare".("SmartShare"iskindofDLNA.)1
-IfyouwanttoseeDMS(digitalmediaservers)inINPUTLISTmenu,youmustselect‘yes’inthisitem.
(1) Smart Share
- IfyouwanttouseWi-fiScreenShareinOPTIONmenu,youmustselect‘yes’inthisitem. Wi-fiScreenShareincludetwofunctions(WifiDirectandWIDI).
(2) Wi-fi Screen Share
-IfyouwanttouseDMR(digitalmediarenderer),youmustselect‘yes’inthisitem.
- Whenothermediadevice(ex:smartphone,desktop,laptop)searchingTV,thisstringwasdisplayed.
- If you want to use SoftAp menu on OPTION menu, you must select ‘yes’ in this item. ASoftAPisafunctionofTVwhichisusedlikeAccessPoint.
- Ifyouwant tousedefaultpassword(thispasswordwasgeneratedrandomly),youmustselect ‘yes’ inthisitem.
- When guests want to use TV’s SoftAP function, they need this password. If you want to change thisdefaultpassword,youneedtoChange'-UseDefaultSetting’valueinto‘NO’.
(3) DMR
(4) TV Name Edit
(5) SoftAP
(6) Use Default Setting
(7) Security Key Edit
InstallationMenu(V2.23)
LGHotelModeSetupUSBCloningPasswordChangeSetIDSetupConfigurationSetupExternalSpeakerIRSetupNetworkSetupPro:CentricPowerSavingCECSetupClockSetupPreLoadedAppSetupMediaShare
OKS/WV02.03.00.01/MCUV02.05/FPGAVd.279
Media Share
SmartShare
Wi-fiScreenShare
DMR
TVNameEdit
TVName
SoftAP
-UseDefaultSetting
-SecurityKeyEdit
Key
MediaShare
Previous OK
[TV]GLOBAL-PLAT4
◄PressOK►
◄Yes►
◄Yes►◄Yes►
◄Yes►
◄Yes►
◄PressOK►
LG607813
38
DOWNLOAD EXTRA CONTENTS
1
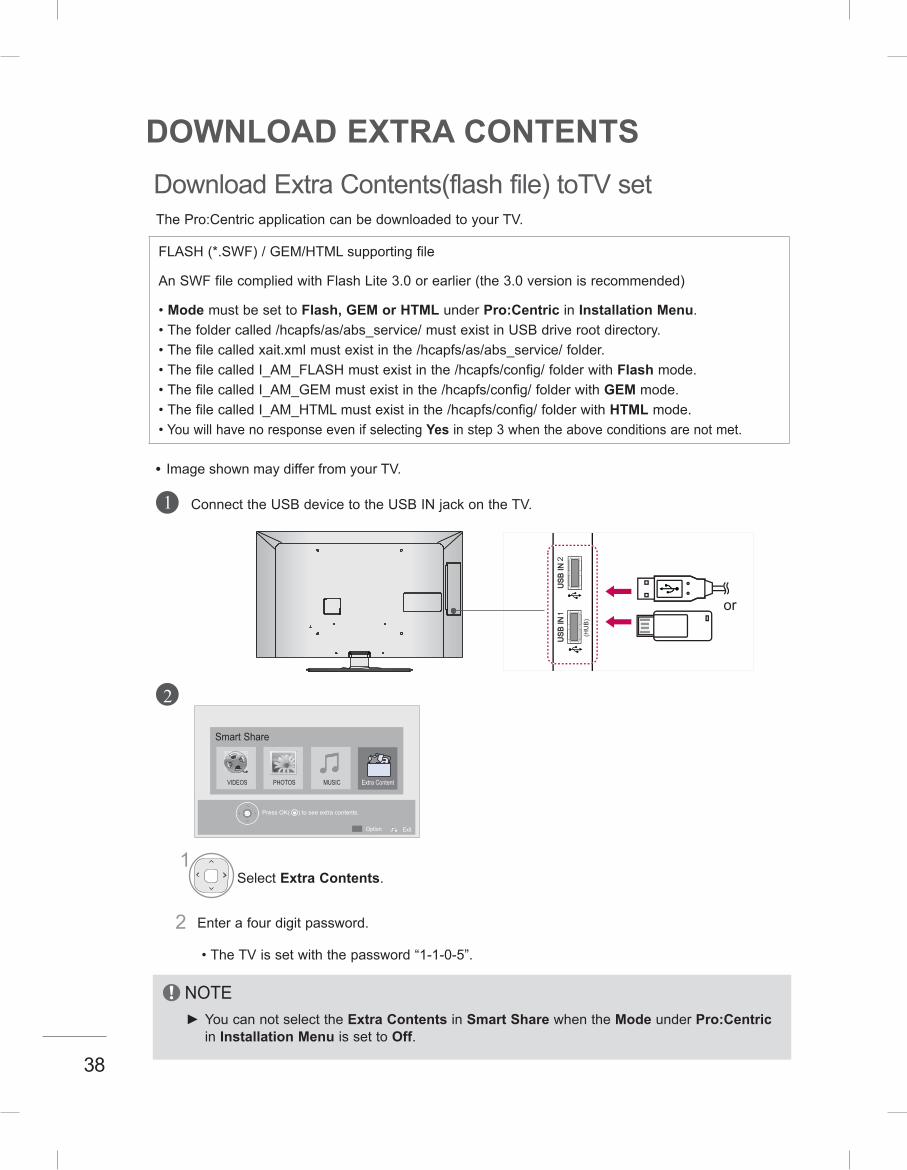
ThePro:CentricapplicationcanbedownloadedtoyourTV .
1
2
HDMI/DVI IN (RGB)LAN
AUX LAN
US
B IN
H
/P
SPEAKEROUT
VOLUME CONTROL
STEREO (8 )
ANTENNAIN
ConnecttheUSBdevicetotheUSBINjackontheTV .
2
1
2
SelectExtra Contents .
Enterafourdigitpassword .•TheTVissetwiththepassword“1-1-0-5” .
FLASH(* .SWF)/GEM/HTMLsupportingfile
AnSWFfilecompliedwithFlashLite3 .0orearlier(the3 .0versionisrecommended)
•ModemustbesettoFlash, GEM or HTMLunderPro:CentricinInstallation Menu .•Thefoldercalled/hcapfs/as/abs_service/mustexistinUSBdriverootdirectory .•Thefilecalledxait .xmlmustexistinthe/hcapfs/as/abs_service/folder .•ThefilecalledI_AM_FLASHmustexistinthe/hcapfs/config/folderwithFlashmode .•ThefilecalledI_AM_GEMmustexistinthe/hcapfs/config/folderwithGEMmode .•ThefilecalledI_AM_HTMLmustexistinthe/hcapfs/config/folderwithHTMLmode .•YouwillhavenoresponseevenifselectingYesinstep3whentheaboveconditionsarenotmet .
NOTE►YoucannotselecttheExtra ContentsinSmart SharewhentheModeunderPro:CentricinInstallation MenuissettoOff .
SmartShare
PressOK()toseeextracontents .
ExitOption
MUSICPHOTOSVIDEOS ExtraContent
DownloadExtraContents(flashfile)toTVset
yy ImageshownmaydifferfromyourTV .
US
B IN
IN 3
US
B IN
US
B IN
or
39
DOWNLOAD EXTRA CONTENTS
INPUT
MENU
OK
P
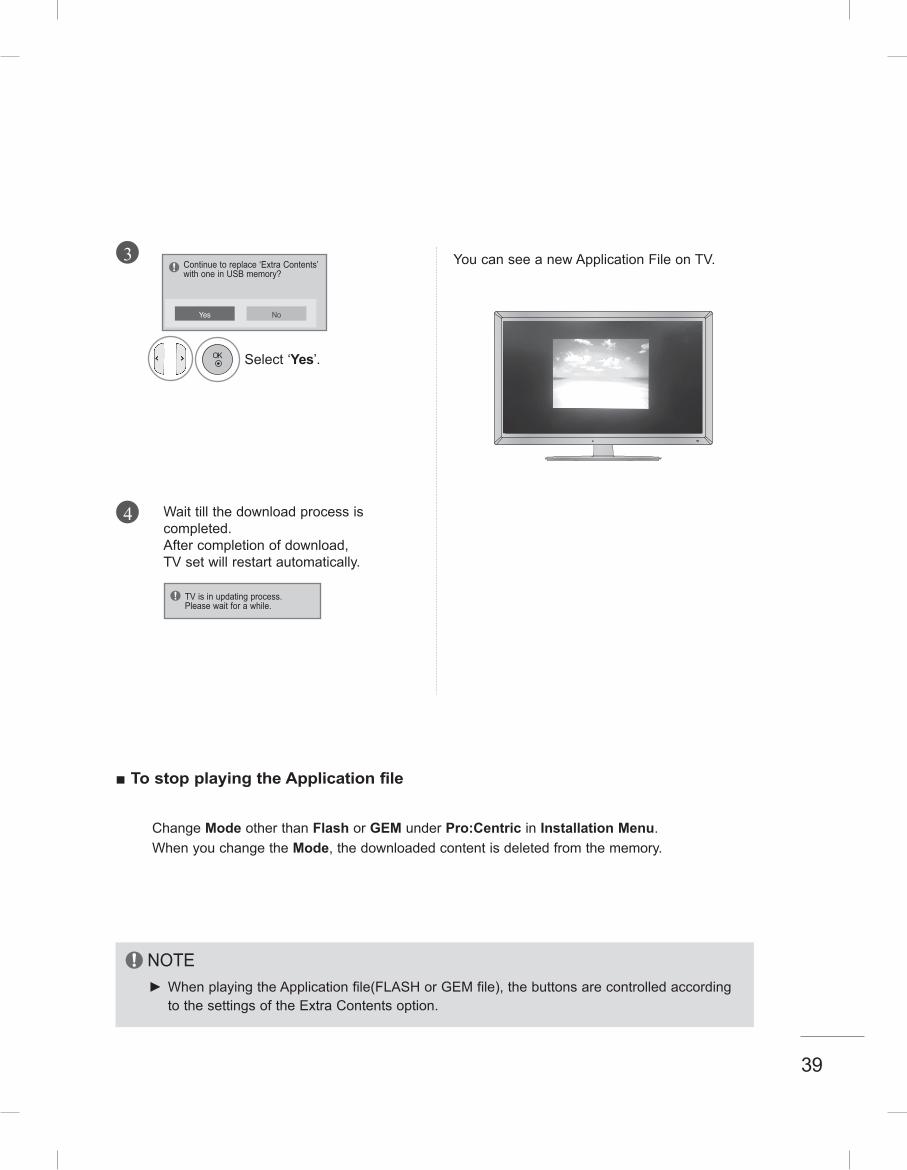
Select‘Yes’ .
YoucanseeanewApplicationFileonTV .
Waittillthedownloadprocessiscompleted .Aftercompletionofdownload,TVsetwillrestartautomatically .
NOTE►WhenplayingtheApplicationfile(FLASHorGEMfile),thebuttonsarecontrolledaccordingtothesettingsoftheExtraContentsoption .
3
4
Yes No
Continuetoreplace‘ExtraContents’withoneinUSBmemory?
ChangeModeotherthanFlashorGEMunderPro:CentricinInstallation Menu .WhenyouchangetheMode,thedownloadedcontentisdeletedfromthememory .
■ To stop playing the Application file
TVisinupdatingprocess .Pleasewaitforawhile .
40
2
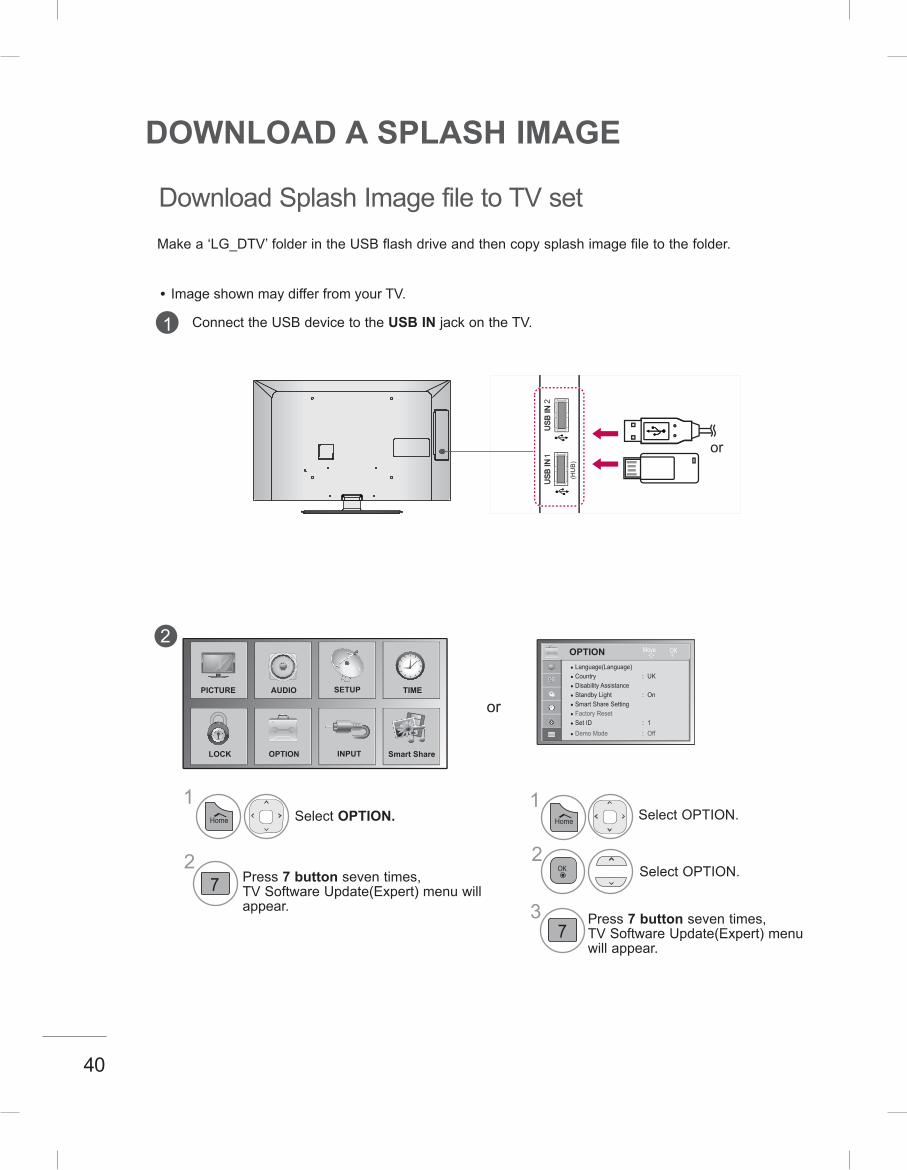
DOWNLOAD A SPLASH IMAGE
DownloadSplashImagefiletoTVsetMakea‘LG_DTV’folderintheUSBflashdriveandthencopysplashimagefiletothefolder .
ConnecttheUSBdevicetotheUSB IN jackontheTV .1
SelectOPTION.1
2
Press7 buttonseventimes,TVSoftwareUpdate(Expert)menuwillappear .
or
SelectOPTION .1
2SelectOPTION .
3 Press7 buttonseventimes,TVSoftwareUpdate(Expert)menuwillappear .
7
7
yy ImageshownmaydifferfromyourTV .
Home Home
OPTION OKMove
●Language(Language)●Country :UK●DisabilityAssistance●StandbyLight :On●SmartShareSetting●FactoryReset●SetID :1●DemoMode :Off
1
2
HDMI/DVI IN (RGB)LAN
AUX LAN
US
B IN
H
/P
SPEAKEROUT
VOLUME CONTROL
STEREO (8 )
ANTENNAIN
US
B IN
IN 3
US
B IN
US
B IN
or
PICTURE SETUP TIMEAUDIO
OPTIONLOCK Smart Share INPUT
41
DOWNLOAD A SPLASH IMAGE
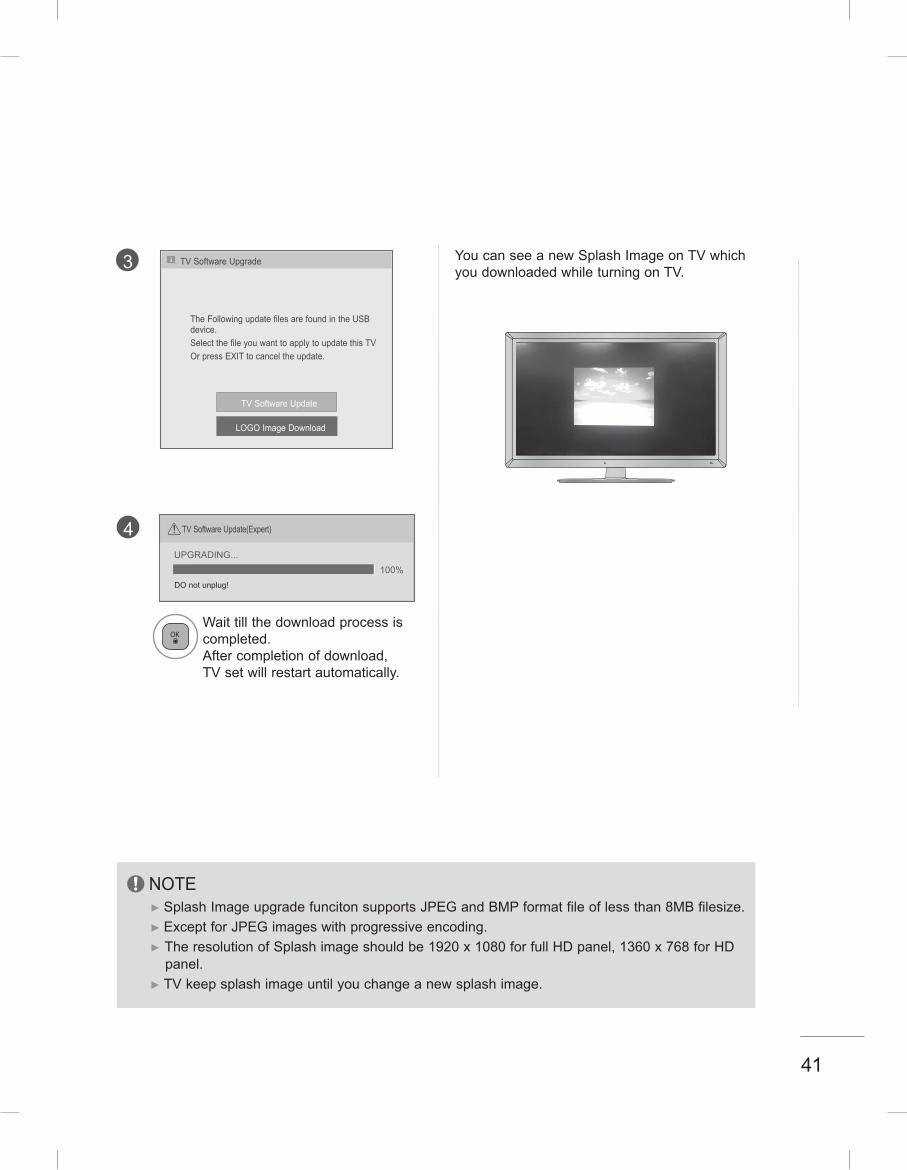
TVSoftwareUpdate(Expert)
UPGRADING . . .
DOnotunplug!
100%
4
YoucanseeanewSplashImageonTVwhichyoudownloadedwhileturningonTV .
Waittillthedownloadprocessiscompleted .Aftercompletionofdownload,TVsetwillrestartautomatically .
NOTE►SplashImageupgradefuncitonsupportsJPEGandBMPformatfileoflessthan8MBfilesize .►ExceptforJPEGimageswithprogressiveencoding .►TheresolutionofSplashimageshouldbe1920x1080forfullHDpanel,1360x768forHDpanel .
►TVkeepsplashimageuntilyouchangeanewsplashimage .
TVSoftwareUpgradei
LOGOImageDownload
3
TheFollowingupdatefilesarefoundintheUSBdevice .SelectthefileyouwanttoapplytoupdatethisTVOrpressEXITtocanceltheupdate .
TVSoftwareUpdate
INPUT
MENU
OK
P

43
Related Documents