Implementing Linux Software RAID1 on HPE ProLiant Servers Abstract This document describes how to use HPE value-added software, using in-distro open-source tools, to configure and build a two-disk RAID1 redundant boot volume in UEFI mode for major operating systems including: Red Hat Enterprise Linux 7.2, SuSE Linux Enterprise Server 12.1, and Ubuntu Server 14.04.4/16.04. Part Number: 872217-001 October 2016 Edition: 1

Welcome message from author
This document is posted to help you gain knowledge. Please leave a comment to let me know what you think about it! Share it to your friends and learn new things together.
Transcript
Implementing Linux Software RAID1 on
HPE ProLiant Servers
Abstract
This document describes how to use HPE value-added software, using in-distro open-source tools, to configure and
build a two-disk RAID1 redundant boot volume in UEFI mode for major operating systems including: Red Hat
Enterprise Linux 7.2, SuSE Linux Enterprise Server 12.1, and Ubuntu Server 14.04.4/16.04.
Part Number: 872217-001
October 2016
Edition: 1
Page 2
© Copyright 2016 Hewlett Packard Enterprise Development LP
The information contained herein is subject to change without notice. The only warranties for Hewlett Packard Enterprise products
and services are set forth in the express warranty statements accompanying such products and services. Nothing herein should be
construed as constituting an additional warranty. Hewlett Packard Enterprise shall not be liable for technical or editorial errors or
omissions contained herein.
Microsoft®, Windows®, and Windows Server® are either registered trademarks or trademarks of Microsoft Corporation in the United
States and/or other countries.
Linux® is the registered trademark of Linus Torvalds in the U.S. and other countries.
Red Hat® is a registered trademark of Red Hat, Inc. in the United States and other countries.
SUSE is a registered trademark or a trademark of SUSE LLC in the United States and other countries.
Ubuntu and Canonical are registered trademarks of Canonical Ltd.
Page 3
Table of Contents
Introduction ................................................................................................................................. 7
Prerequisites ........................................................................................................................... 7
About this task ....................................................................................................................... 7
PXE server information ......................................................................................................... 7
TFTP server information ....................................................................................................... 8
DHCP server information ...................................................................................................... 8
Minnow Software ........................................................................................................................ 9
OS specific installation scripts .............................................................................................. 9
HPE Scripting Toolkit ............................................................................................................. 9
Minnow Value Added software ............................................................................................ 10
OS Deployment ......................................................................................................................... 11
Single machine deployment................................................................................................. 11
RHEL 7.2 ............................................................................................................................. 12
SLES 12.1 ........................................................................................................................... 12
Ubuntu 14.04.4 .................................................................................................................... 13
Ubuntu 16.04 ....................................................................................................................... 13
Multiple machine OS deployment with the HPE Scripting Toolkit (STK) ......................... 14
RHEL 7.2 ............................................................................................................................. 15
SLES 12.1 ........................................................................................................................... 16
Ubuntu 14.04.4 .................................................................................................................... 16
Ubuntu 16.04 ....................................................................................................................... 17
Checking system status ........................................................................................................... 19
Minnow Service Status ......................................................................................................... 19
Checking system status ...................................................................................................... 19
Minnow service start, stop, and restart commands ............................................................. 20
Hard drive thermal information ............................................................................................ 20
Checking RAID status........................................................................................................... 20
Faulty disk replacement ....................................................................................................... 22
Replacing a faulty disk using the hot-swap method ............................................................ 22
Page 4
Replacing a faulty disk using the cold-swap method .......................................................... 23
Verification ............................................................................................................................ 23
Known Issues and Limitations ............................................................................................ 24
The LED on the hard drive tray doesn’t work ...................................................................... 24
Only RAID1 with two hard drives in the AHCI controller is supported, other AHCI/SATA
ports cannot be used ........................................................................................................... 25
The replacement hard drive should not contain any MD metadata or partition information 25
Minnow service should not be stopped or restarted before RAID is fully recovered and
status is clean ..................................................................................................................... 25
In Ubuntu 14.04.4, user should not manually start the minnow service .............................. 25
For the RAID auto-recovery, the space of replacement disk should be the same as the
faulty one; replacement disks with larger space are not supported .................................... 25
If the /boot/efi is empty after auto-recovery, user should reboot the system before making
any changes to the ESP (such as upgrading kernel, modify grub settings, etc) ................. 25
Appendix A: Creating redundant boot strategy for software RAID1 in Linux ..................... 26
Basic configuration............................................................................................................... 26
Setting AHCI mode ............................................................................................................. 26
UEFI partitioning scheme .................................................................................................... 27
Red Hat Enterprise Linux (RHEL) 7.2 .................................................................................. 28
Manually Partitioning through Rescue mode ...................................................................... 28
Normal Installation Process ................................................................................................ 29
Specifying the ESP ............................................................................................................. 30
Specifying the swap directory ............................................................................................. 31
Creating root disk as RAID1 ................................................................................................ 32
Create a RAID1 root partition .............................................................................................. 33
Creating the Redundant ESP .............................................................................................. 34
Creating a New Entry in UEFI Boot Manager ..................................................................... 34
Recovering a failed disk and repairing Software RAID ....................................................... 36
Recover the RAID system ................................................................................................... 37
Complete the recovery process .......................................................................................... 37
SuSE Linux Enterprise Server (SLES) 12 SP1 .................................................................... 39
Page 5
Installation process ............................................................................................................. 39
Partitioning drives for SLES ................................................................................................ 39
Creating the Redundant ESP .............................................................................................. 43
Creating a New Entry in the UEFI Boot Manager ............................................................... 43
Recovering a failed disk and repairing Software RAID ....................................................... 46
Examine the RAID status .................................................................................................... 46
Add two additional kernel parameters to allow booting from the second disk ..................... 47
Recovering the failed partition ............................................................................................. 48
Complete the recovery process .......................................................................................... 49
Ubuntu Server 14.04.4 .......................................................................................................... 50
Installation Process ............................................................................................................. 50
Partitioning drives for Ubuntu .............................................................................................. 50
Creating the Redundant ESP .............................................................................................. 54
Creating a New Entry in UEFI Boot Manager ..................................................................... 54
Recovering a failed disk and repairing Software RAID ....................................................... 56
Completing the recovery process ........................................................................................ 58
Ubuntu Server 16.04 ............................................................................................................. 59
Installation Process ............................................................................................................. 59
Partitioning drives for Ubuntu .............................................................................................. 59
Creating the Redundant ESP .............................................................................................. 63
Creating a New Entry in UEFI Boot Manager ..................................................................... 63
Recovering a failed disk and repairing Software RAID ....................................................... 66
Completing the recovery process ........................................................................................ 68
Appendix B: Example server configurations ......................................................................... 70
PXE server configuration ..................................................................................................... 70
TFTP server configuration ................................................................................................... 72
DHCP server configuration .................................................................................................. 72
Appendix C: Example OS-specific installation scripts ......................................................... 74
KickStart Script ..................................................................................................................... 74
Modifying the KickStart script for RHEL 7.2 ........................................................................ 74
Page 6
AutoYast Script ..................................................................................................................... 75
Modifying the AutoYast script for SLES 12.1 ...................................................................... 76
Preseed Script ....................................................................................................................... 80
Preseed Script for Ubuntu 14.04.4 ...................................................................................... 80
Modifying the Preseed script for Ubuntu 14.04.4 ................................................................ 80
Preseed Script for Ubuntu 16.04 ......................................................................................... 82
Modifying the Preseed script for Ubuntu 16.04 ................................................................... 82
Page 7
Introduction
Minnow (Redundant Boot Strategy for Software RAID1 in Linux) is a solution that uses in-distro
open-source software to build and create a two-disk RAID1 redundant boot volume in UEFI
mode.
This document describes how to create, manage, and recover the RAID system using the
Minnow value-added software provided by Hewlett Packard Enterprise.
Appendix A shows the manual steps to create a redundant boot system without our value-added
software.
Minnow provides:
Installation Scripts: For deployment on a single or multiple servers including basic
RAID1 configurations and system setup.
Boot Auto-Failover: If the first drive fails, the system can boot to the second drive
automatically
RAID Auto-Recovery: When a faulty driver is replaced by the new one, the system will
rebuild the RAID automatically.
Advanced Hard Drive Thermal information: The system reports the thermal
information of the hard drive on the RAID system.
Prerequisites
About this task
These tasks must be performed before moving to the OS installation procedures. In the included
example, the services are installed on a CentOS 7.2 machine.
1. Prepare a PXE server.
2. Prepare a TFTP server.
3. Prepare a DHCP server.
PXE server information
The PXE server in this example is xinetd v2.3.15. You can use a different version or different
software, but you must note the differences accordingly.
For instructions on how to install PXE/TFTP server on the server, see
https://wiki.centos.org/HowTos/PXE/PXE_Setup.
For an example PXE server configuration, see “PXE server configuration.”
Page 8
TFTP server information
In this example, TFTP v5.2 is installed on the CentOS 7.2 system. You can use a different
version of or different software, but you must note the differences accordingly.
Reference to https://wiki.centos.org/HowTos/PXE/PXE_Setup
For instructions on how to install PXE/TFTP server on the server, see
https://wiki.centos.org/HowTos/PXE/PXE_Setup.
For example configuration, see “TFTP server configuration.”
DHCP server information
The DHCP server in this example uses DHCPv v4.2.5. You can use a different version of or
different software, but you must note the differences accordingly.
For an example DHCP server configuration, see “DHCP server configuration.”
Page 9
Minnow Software
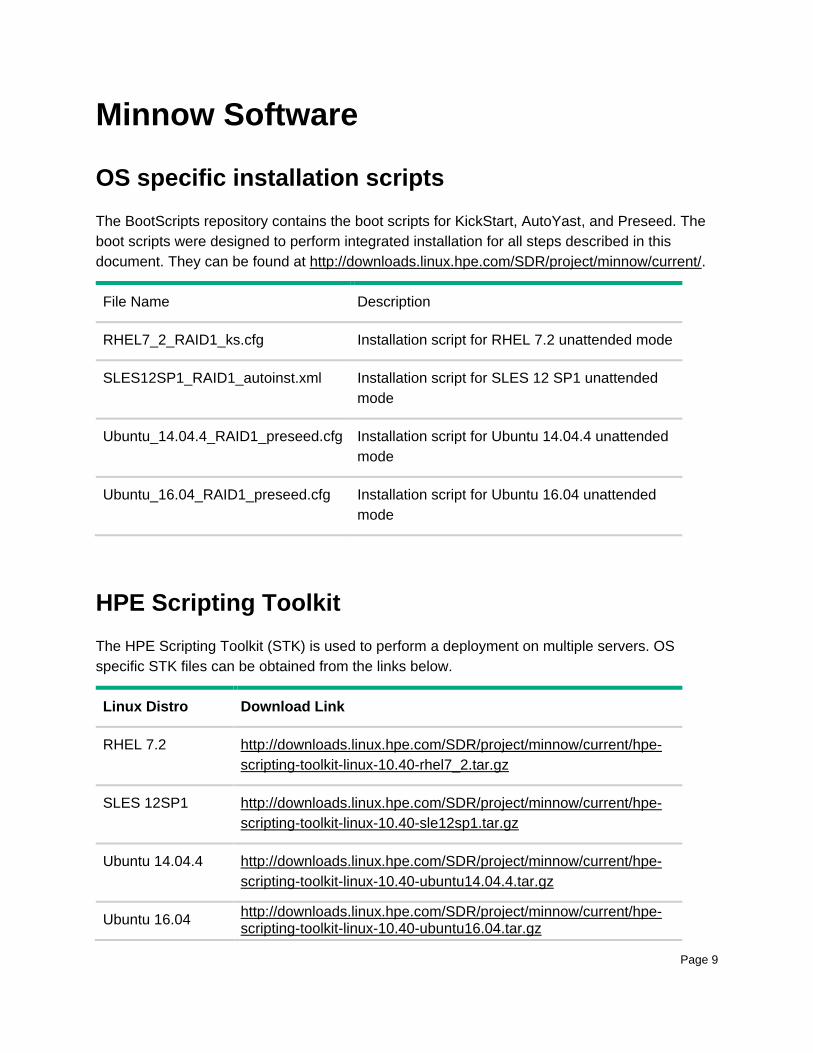
OS specific installation scripts
The BootScripts repository contains the boot scripts for KickStart, AutoYast, and Preseed. The
boot scripts were designed to perform integrated installation for all steps described in this
document. They can be found at http://downloads.linux.hpe.com/SDR/project/minnow/current/.
File Name Description
RHEL7_2_RAID1_ks.cfg Installation script for RHEL 7.2 unattended mode
SLES12SP1_RAID1_autoinst.xml Installation script for SLES 12 SP1 unattended
mode
Ubuntu_14.04.4_RAID1_preseed.cfg Installation script for Ubuntu 14.04.4 unattended
mode
Ubuntu_16.04_RAID1_preseed.cfg Installation script for Ubuntu 16.04 unattended
mode
HPE Scripting Toolkit
The HPE Scripting Toolkit (STK) is used to perform a deployment on multiple servers. OS
specific STK files can be obtained from the links below.
Linux Distro Download Link
RHEL 7.2 http://downloads.linux.hpe.com/SDR/project/minnow/current/hpe-
scripting-toolkit-linux-10.40-rhel7_2.tar.gz
SLES 12SP1 http://downloads.linux.hpe.com/SDR/project/minnow/current/hpe-
scripting-toolkit-linux-10.40-sle12sp1.tar.gz
Ubuntu 14.04.4 http://downloads.linux.hpe.com/SDR/project/minnow/current/hpe-
scripting-toolkit-linux-10.40-ubuntu14.04.4.tar.gz
Ubuntu 16.04 http://downloads.linux.hpe.com/SDR/project/minnow/current/hpe-scripting-toolkit-linux-10.40-ubuntu16.04.tar.gz
Page 10
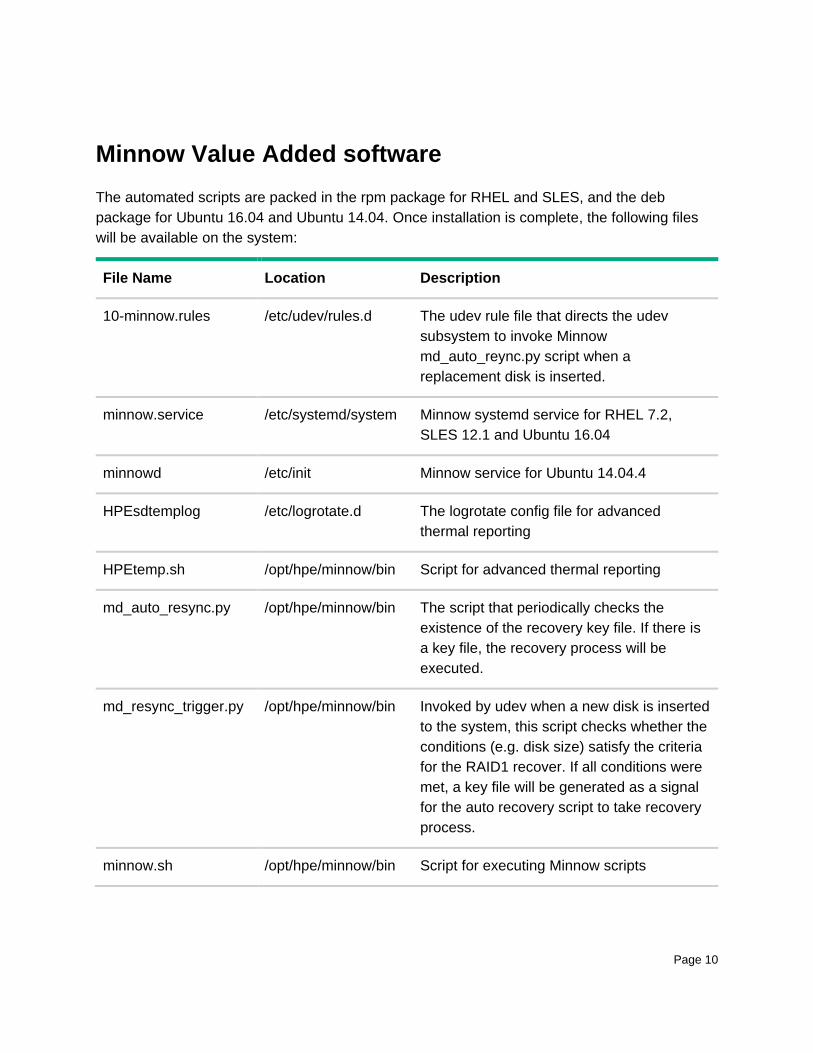
Minnow Value Added software
The automated scripts are packed in the rpm package for RHEL and SLES, and the deb
package for Ubuntu 16.04 and Ubuntu 14.04. Once installation is complete, the following files
will be available on the system:
File Name Location Description
10-minnow.rules /etc/udev/rules.d The udev rule file that directs the udev
subsystem to invoke Minnow
md_auto_reync.py script when a
replacement disk is inserted.
minnow.service /etc/systemd/system Minnow systemd service for RHEL 7.2,
SLES 12.1 and Ubuntu 16.04
minnowd /etc/init Minnow service for Ubuntu 14.04.4
HPEsdtemplog /etc/logrotate.d The logrotate config file for advanced
thermal reporting
HPEtemp.sh /opt/hpe/minnow/bin Script for advanced thermal reporting
md_auto_resync.py /opt/hpe/minnow/bin The script that periodically checks the
existence of the recovery key file. If there is
a key file, the recovery process will be
executed.
md_resync_trigger.py /opt/hpe/minnow/bin Invoked by udev when a new disk is inserted
to the system, this script checks whether the
conditions (e.g. disk size) satisfy the criteria
for the RAID1 recover. If all conditions were
met, a key file will be generated as a signal
for the auto recovery script to take recovery
process.
minnow.sh /opt/hpe/minnow/bin Script for executing Minnow scripts
Page 11
OS Deployment
Single machine deployment
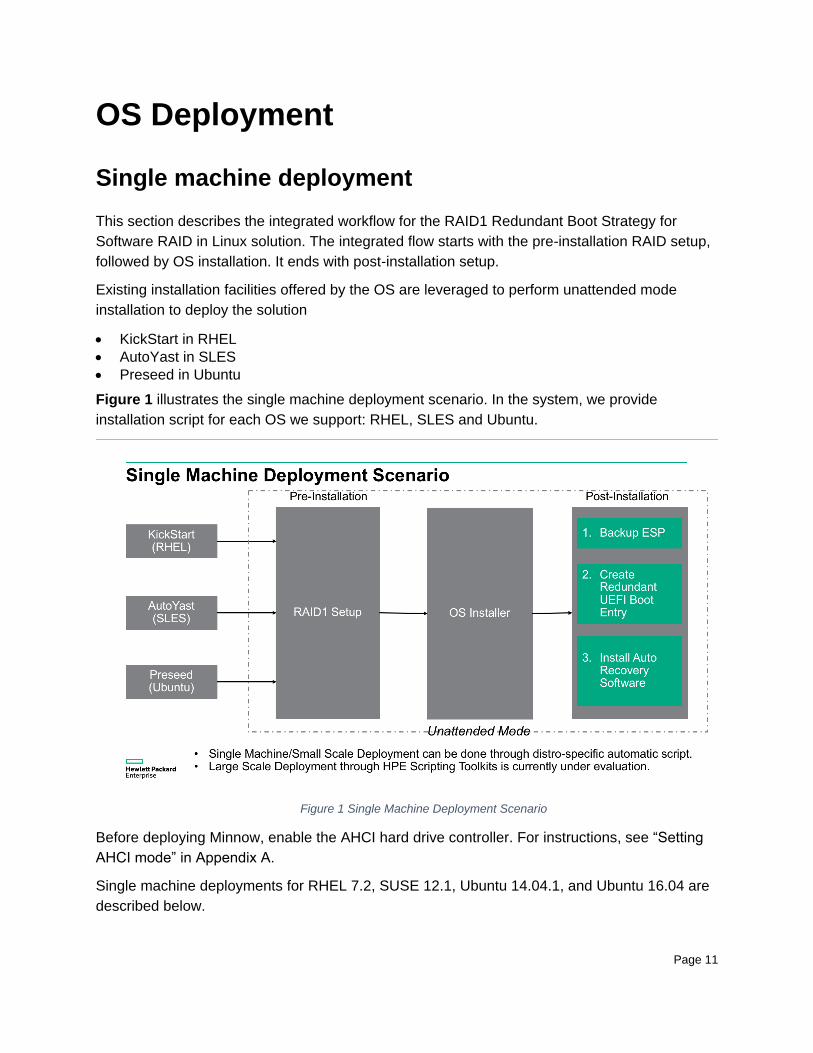
This section describes the integrated workflow for the RAID1 Redundant Boot Strategy for
Software RAID in Linux solution. The integrated flow starts with the pre-installation RAID setup,
followed by OS installation. It ends with post-installation setup.
Existing installation facilities offered by the OS are leveraged to perform unattended mode
installation to deploy the solution
KickStart in RHEL
AutoYast in SLES
Preseed in Ubuntu
Figure 1 illustrates the single machine deployment scenario. In the system, we provide
installation script for each OS we support: RHEL, SLES and Ubuntu.
Figure 1 Single Machine Deployment Scenario
Before deploying Minnow, enable the AHCI hard drive controller. For instructions, see “Setting
AHCI mode” in Appendix A.
Single machine deployments for RHEL 7.2, SUSE 12.1, Ubuntu 14.04.1, and Ubuntu 16.04 are
described below.
Page 12
RHEL 7.2
To begin with the install, upload the KickStart file to the TFTP server and add an entry to the
PXE server:
Example PXE entry:
# For RHEL7.2 single machine deploy
image=/RHEL/RHEL-7.2Server-x86_64/vmlinuz
label=RHEL-7.2Server-x86_64_ks
description = "RHEL 7.2 Server RAID1 kickstart"
initrd=/RHEL/RHEL-7.2Server-x86_64/initrd.img
append="ipv6.disable=1
inst.ks=http://172.1.1.100/answers/RHEL7_2_RAID1_ks.cfg" #The
place to change file path.
In the above example, the RHEL7_2_RAID1_ks.cfg file is placed on the TFTP server
(172.1.1.100), in the folder ‘answer’.
The RHEL7.2 installation files are in the mrepo/RHEL-7.2Server-x86_64 folder on the
same server.
The installation begins when boot from the PXE entry. The detail of the KickStart script can be
found in Appendix C-1.
SLES 12.1
To begin with the install, upload the AutoYast file to the TFTP server and add an entry to the
PXE server.
Example PXE entry:
# For SLES 12 SP1 single machine deploy
image=/SLE/SLE-12-SP1-Server-x86_64/linux
label=SLE-12-SP1-Server-x86_64_ks
description = "SLES 12 SP1 RAID1 ks"
initrd=/SLE/SLE-12-SP1-Server-x86_64/initrd
append="vga=normal netdev=eth1
autoyast=http://172.1.1.100/answers/SLES12SP1_RAID1_autoinst.xml
install=http://172.1.1.100/mrepo/SLE-12-SP1-Server-
x86_64/disc1" #The place to change file path.
In the above example, the SLES12SP1_RAID1_autoinst.xml file is placed on the TFTP server
(172.1.1.100), in the folder ‘answer’. The SLES12SP1 installation files are in the mrepo/SLE-12-
SP1-Server_x86/disc1 folder on the same server.
Page 13
The installation begins when boot from the PXE entry. The detail of the AutoYast script can be
found in Appendix C-2.
Ubuntu 14.04.4
To begin with the install, upload the Preseed file to the TFTP server and add an entry to the
PXE server.
Example PXE entry:
# For Ubuntu 14.04.4 single machine deploy
image=/ubuntu/trusty-ubuntu-installer/amd64/14.04.4/linux
label=Ubuntu-trusty-14.04.4-amd64_ks
description = "Ubuntu Trusty 14.04.4 RAID1 auto-install"
initrd=/ubuntu/trusty-ubuntu-installer/amd64/14.04.4/initrd.gz
append="vga=normal ipv6.disable=1 ramdisk_size=1083840
root=/dev/ram rw
preseed/url=http://172.1.1.100/answers/Ubuntu_14.04.4_RAID1_pres
eed.cfg debian-installer/locale=en_US keyboard-
configuration/layoutcode=us localechooser/translation/warn-
light=true localechooser/translation/warn-severe=true
netcfg/choose_interface=auto netcfg/get_hostname=ubuntu live-
installer/net-image=http://172.1.1.100/mrepo/UBUNTU-14.04.4-
Server-x86_64/install/filesystem.squashfs" #The place to change
file path.
In the above example, the Ubuntu_14.04.4_RAID1_preseed.cfg file is placed on the TFTP
server (172.1.1.100), in the folder ‘answer’. The Ubuntu 14.04.4 installation files are in the
mrepo/UBUNTU-14.04.4-Server-X86_64 folder on the same server.
The installation begins when boot from the PXE entry. The detail of the Preseed script can be
found in Appendix C-3.
Ubuntu 16.04
To begin with the install, upload the Preseed file to the TFTP server and add an entry to the
PXE server.
Example PXE entry:
# For Ubuntu 16.04 single machine deploy
image=/ubuntu/xenial-debian-installer/amd64/16.04/linux
label=Ubuntu-xenial-16.04-amd64_ks
description = "Ubuntu Xenial 16.04 RAID1 auto-install"
initrd=/ubuntu/xenial-debian-installer/amd64/16.04/initrd.gz
Page 14
append="vga=normal ipv6.disable=1 ramdisk_size=1083840
root=/dev/ram rw
preseed/url=http://172.1.1.100/answers/Ubuntu_16.04_RAID1_presee
d.cfg debian-installer/locale=en_US keyboard-
configuration/layoutcode=us localechooser/translation/warn-
light=true localechooser/translation/warn-severe=true
netcfg/choose_interface=auto netcfg/get_hostname=ubuntu live-
installer/net-image=http://172.1.1.100/mrepo/UBUNTU-16.04-
Server-x86_64/install/filesystem.squashfs" #The place to change
file path.
In the above example, the Ubuntu_16.04_RAID1_preseed.cfg file is placed on the TFTP server
(172.1.1.100), in the folder ‘answer’. The Ubuntu 16.04 installation files are in the
mrepo/UBUNTU-16.04-Server-X86_64 folder on the same server.
The installation begins when boot from the PXE entry. The detail of the Preseed script can be
found in Appendix C-3.
Multiple machine OS deployment with the HPE
Scripting Toolkit (STK)
The multiple machine OS deployment method may fit certain environments where there are
hundreds or even thousands of machines that require deployment.
In this scenario, the hard disk controller settings in RBSU are changed from the default (B140i in
Gen9 or B150i for Gen10) to AHCI for all machines under deployment. This should be done
before proceeding to the network deployments described in “Single machine deployment.” To
do this, use the HPE Scripting ToolKit (STK). STK supports the ‘conrep’ command that can
modify the RBSU settings programmatically.
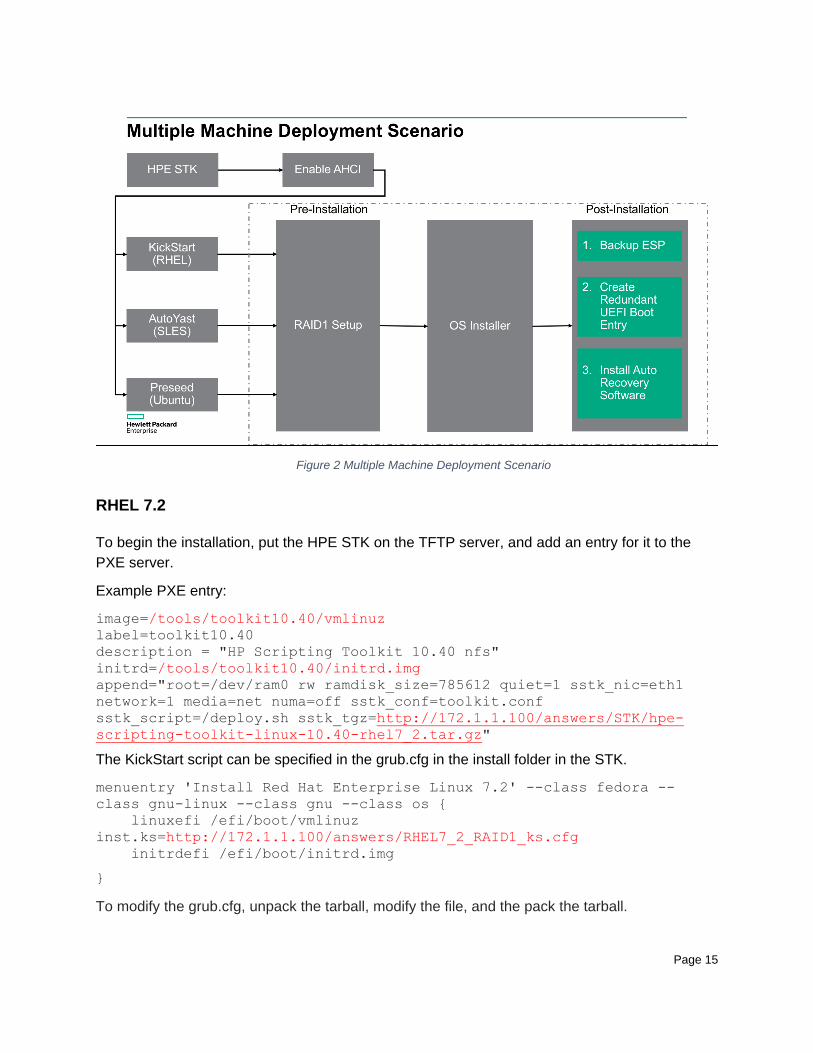
Figure 2 Illustrates the scenario for Multiple Machine Deployment. The HPE Scripting Toolkit
(HPE STK) is use for enabling ACHI mode programmatically. After enabled AHCI mode, the
installation proceeds with the same method as in the single machine deployment.
Page 15
Figure 2 Multiple Machine Deployment Scenario
RHEL 7.2
To begin the installation, put the HPE STK on the TFTP server, and add an entry for it to the
PXE server.
Example PXE entry:
image=/tools/toolkit10.40/vmlinuz
label=toolkit10.40
description = "HP Scripting Toolkit 10.40 nfs"
initrd=/tools/toolkit10.40/initrd.img
append="root=/dev/ram0 rw ramdisk_size=785612 quiet=1 sstk_nic=eth1
network=1 media=net numa=off sstk_conf=toolkit.conf
sstk_script=/deploy.sh sstk_tgz=http://172.1.1.100/answers/STK/hpe-
scripting-toolkit-linux-10.40-rhel7_2.tar.gz"
The KickStart script can be specified in the grub.cfg in the install folder in the STK.
menuentry 'Install Red Hat Enterprise Linux 7.2' --class fedora --
class gnu-linux --class gnu --class os {
linuxefi /efi/boot/vmlinuz
inst.ks=http://172.1.1.100/answers/RHEL7_2_RAID1_ks.cfg
initrdefi /efi/boot/initrd.img
}
To modify the grub.cfg, unpack the tarball, modify the file, and the pack the tarball.

Page 16
SLES 12.1
To begin with the installation, put the HPE STK on the TFTP server and add an entry for it to the
PXE server.
Example PXE entry:
image=/tools/toolkit10.40/vmlinuz
label=toolkit10.40
description = "HP Scripting Toolkit 10.40 nfs"
initrd=/tools/toolkit10.40/initrd.img
append="root=/dev/ram0 rw ramdisk_size=785612 quiet=1 sstk_nic=eth1
network=1 media=net numa=off sstk_conf=toolkit.conf
sstk_script=/deploy.sh sstk_tgz=http://172.1.1.100/answers/STK/hpe-
scripting-toolkit-linux-10.40-sle12sp1.tar.gz"
The AutoYast script can be specified in the grub.cfg in the install folder in the STK.
menuentry 'Install SUSE 12SP1' {
linuxefi /efi/boot/linux vga=normal netdev=eth1
autoyast=http://172.1.1.100/answers/SLES12SP1_RAID1_autoinst.xml
install=http://172.1.1.100/mrepo/SLE-12-SP1-Server-x86_64/disc1
initrdefi /efi/boot/initrd
}
To modify the grub.cfg, unpack the tarball, modify the file, and the pack the tarball.
Ubuntu 14.04.4
To begin the installation, put the HPE STK on the TFTP server and add an entry for it to the
PXE server.
Example PXE entry:
image=/tools/toolkit10.40/vmlinuz
label=toolkit10.40
description = "HP Scripting Toolkit 10.40 nfs"
initrd=/tools/toolkit10.40/initrd.img
append="root=/dev/ram0 rw ramdisk_size=785612 quiet=1
sstk_nic=eth1 network=1 media=net numa=off sstk_conf=toolkit.conf
sstk_script=/deploy.sh
sstk_tgz=http://172.1.1.100/answers/STK/hpe-scripting-toolkit-
linux-10.40-ubuntu14.04.4.tar.gz"
The Preseed script can be specified in the grub.cfg in the install folder in the STK.
menuentry 'Install Ubuntu 14.04.4' {
Page 17
linuxefi /efi/boot/linux vga=normal ipv6.disable=1
ramdisk_size=1083840 root=/dev/ram rw
preseed/url=http://172.1.1.100/answers/Ubuntu_14.04.4_RAID1_prese
ed.cfg debian-installer/locale=en_US keyboard-
configuration/layoutcode=us localechooser/translation/warn-
light=true localechooser/translation/warn-severe=true
netcfg/choose_interface=auto netcfg/get_hostname=ubuntu live-
installer/net-image=http://172.1.1.100/mrepo/UBUNTU-14.04.4-
Server-x86_64/install/filesystem.squashfs
initrdefi /efi/boot/initrd.gz
}
To modify the grub.cfg, unpack the tarball, modify the file, and the pack the tarball.
Ubuntu 16.04
To begin the installation, put the HPE STK on the TFTP server and add an entry for it to the
PXE server.
Example PXE entry:
image=/tools/toolkit10.40/vmlinuz
label=toolkit10.40
description = "HP Scripting Toolkit 10.40 nfs"
initrd=/tools/toolkit10.40/initrd.img
append="root=/dev/ram0 rw ramdisk_size=785612 quiet=1
sstk_nic=eth1 network=1 media=net numa=off sstk_conf=toolkit.conf
sstk_script=/deploy.sh
sstk_tgz=http://172.1.1.100/answers/STK/hpe-scripting-toolkit-
linux-10.40-ubuntu16.04.tar.gz"
The Preseed script can be specified in the grub.cfg in the install folder in the STK.
menuentry 'Install Ubuntu 16.04' {
linuxefi /efi/boot/linux vga=normal ipv6.disable=1
ramdisk_size=1083840 root=/dev/ram rw
preseed/url=http://172.1.1.100/answers/Ubuntu_16.04_RAID1_Preseed
.cfg debian-installer/locale=en_US keyboard-
configuration/layoutcode=us localechooser/translation/warn-
light=true localechooser/translation/warn-severe=true
netcfg/choose_interface=auto netcfg/get_hostname=ubuntu live-

Page 18
installer/net-image=http://172.1.1.100/mrepo/UBUNTU-16.04-Server-
x86_64/install/filesystem.squashfs
initrdefi /efi/boot/initrd.gz
}
To modify the grub.cfg, unpack the tarball, modify the file, and the pack the tarball.
Page 19
Checking system status
Minnow Service Status
Minnow is a systemd service on RHEL7.2, SLES 12.1 and Ubuntu 16.04. Therefore, it can be
used to check, start, stop, and restart the service. Any operations (except status) of the minnow
service can only be done when the RAID status is clean. For more information, see “Known
Issues and Limitations.”
On Ubuntu 14.04.4, it is an UpStart service that will be started when system start.
Checking system status
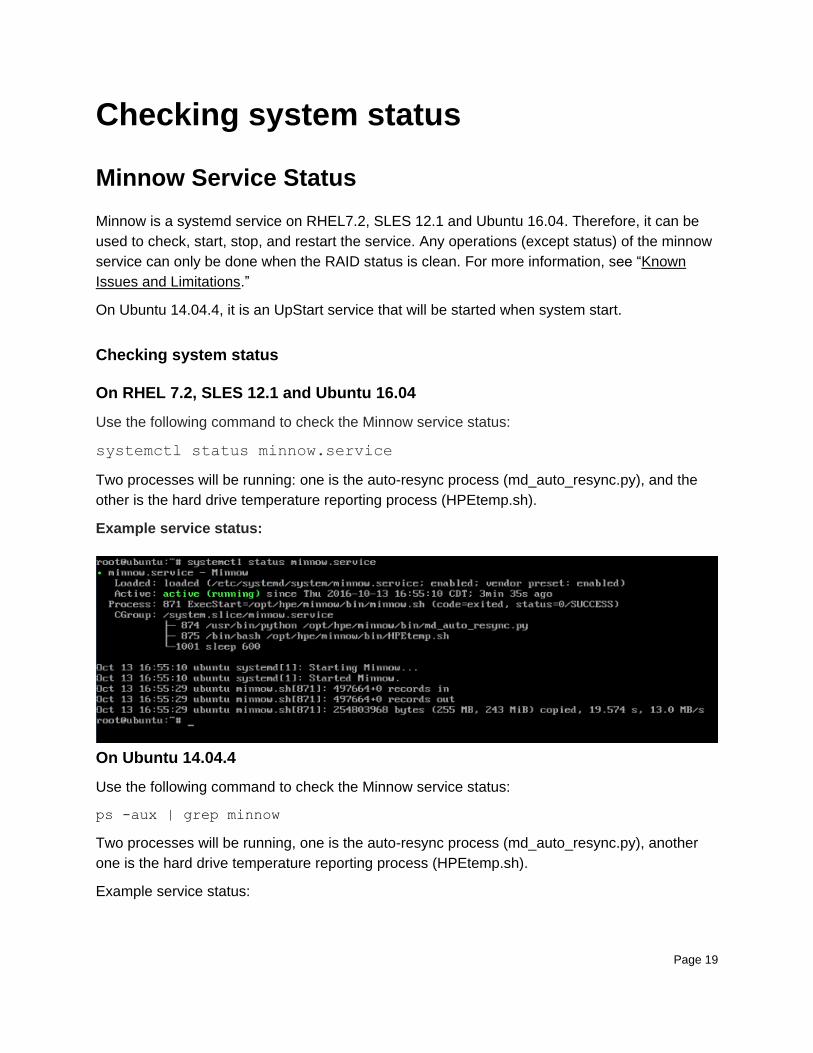
On RHEL 7.2, SLES 12.1 and Ubuntu 16.04
Use the following command to check the Minnow service status:
systemctl status minnow.service
Two processes will be running: one is the auto-resync process (md_auto_resync.py), and the
other is the hard drive temperature reporting process (HPEtemp.sh).
Example service status:
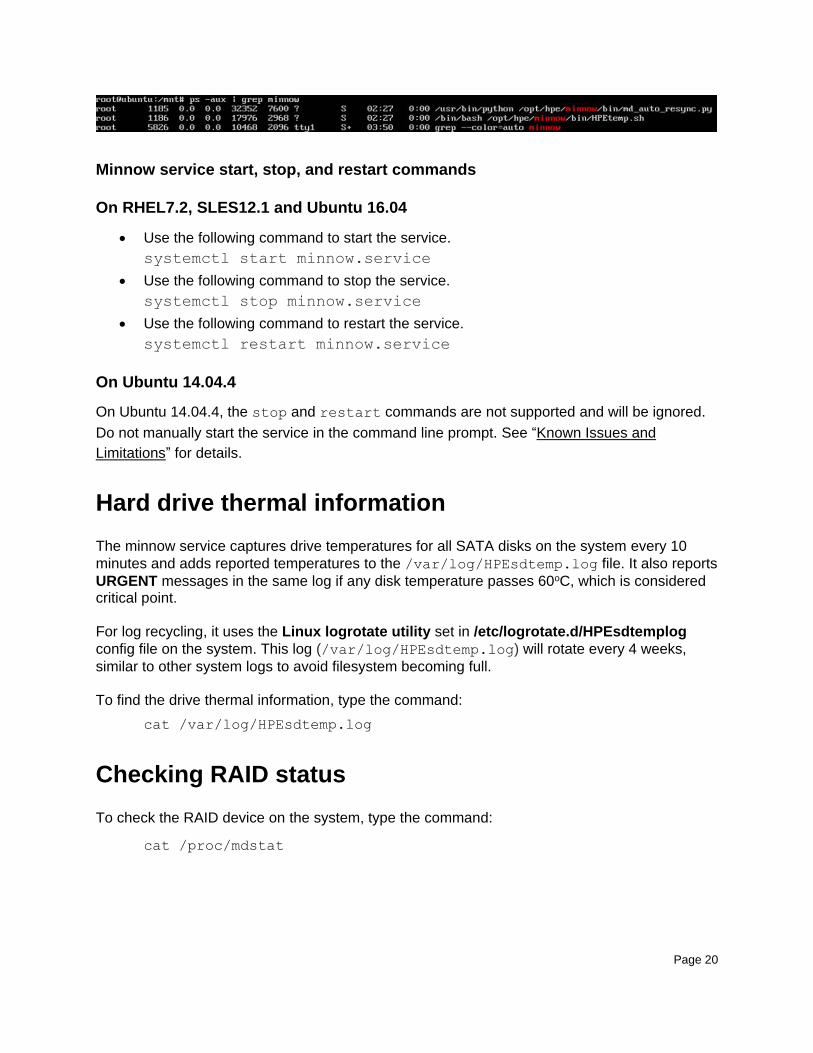
On Ubuntu 14.04.4
Use the following command to check the Minnow service status:
ps -aux | grep minnow
Two processes will be running, one is the auto-resync process (md_auto_resync.py), another
one is the hard drive temperature reporting process (HPEtemp.sh).
Example service status:
Page 20
Minnow service start, stop, and restart commands
On RHEL7.2, SLES12.1 and Ubuntu 16.04
Use the following command to start the service.
systemctl start minnow.service
Use the following command to stop the service.
systemctl stop minnow.service
Use the following command to restart the service.
systemctl restart minnow.service
On Ubuntu 14.04.4
On Ubuntu 14.04.4, the stop and restart commands are not supported and will be ignored.
Do not manually start the service in the command line prompt. See “Known Issues and
Limitations” for details.
Hard drive thermal information
The minnow service captures drive temperatures for all SATA disks on the system every 10
minutes and adds reported temperatures to the /var/log/HPEsdtemp.log file. It also reports
URGENT messages in the same log if any disk temperature passes 60oC, which is considered critical point. For log recycling, it uses the Linux logrotate utility set in /etc/logrotate.d/HPEsdtemplog
config file on the system. This log (/var/log/HPEsdtemp.log) will rotate every 4 weeks,
similar to other system logs to avoid filesystem becoming full. To find the drive thermal information, type the command:
cat /var/log/HPEsdtemp.log
Checking RAID status
To check the RAID device on the system, type the command:
cat /proc/mdstat
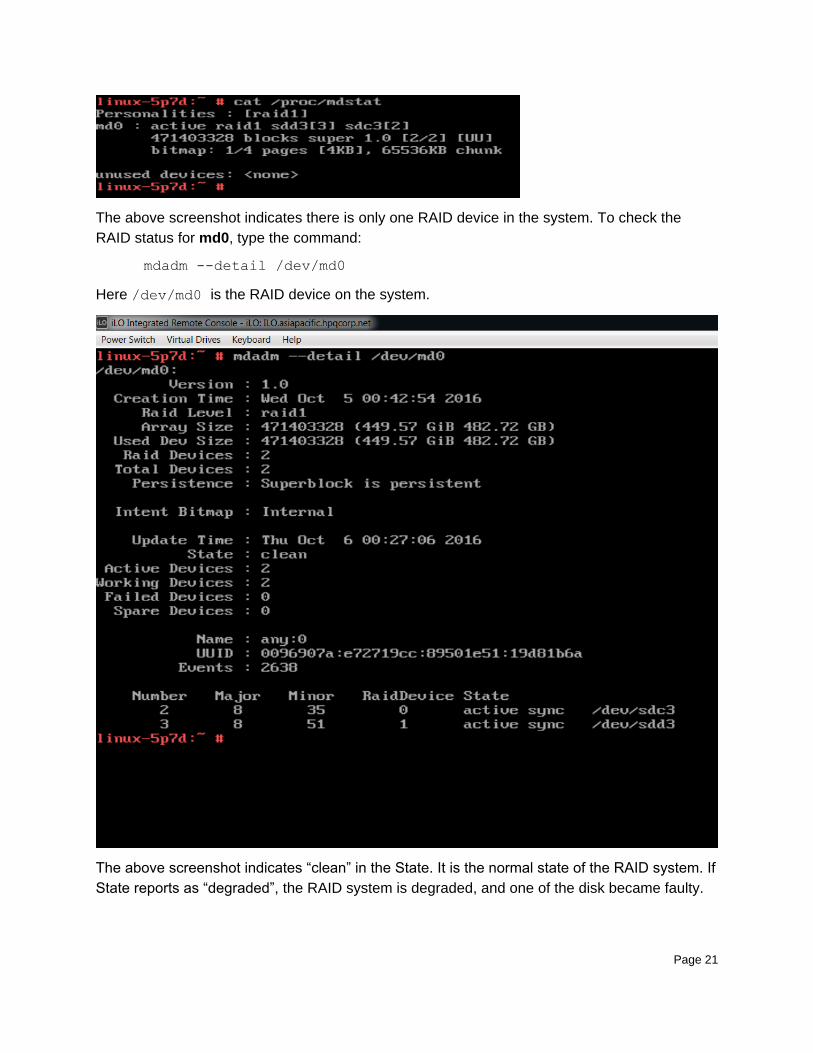
Page 21
The above screenshot indicates there is only one RAID device in the system. To check the
RAID status for md0, type the command:
mdadm --detail /dev/md0
Here /dev/md0 is the RAID device on the system.
The above screenshot indicates “clean” in the State. It is the normal state of the RAID system. If
State reports as “degraded”, the RAID system is degraded, and one of the disk became faulty.
Page 22
Faulty disk replacement
To replace a faulty drive, use either the hot-swap method or the cold-swap method.
Replacing a faulty disk using the hot-swap method
In the hot-swap method, the system doesn’t need to shut down. Simply unplug the faulty drive
and replace it with a new one. The system will automatically rebuild the RAID system with the
new hard drive.
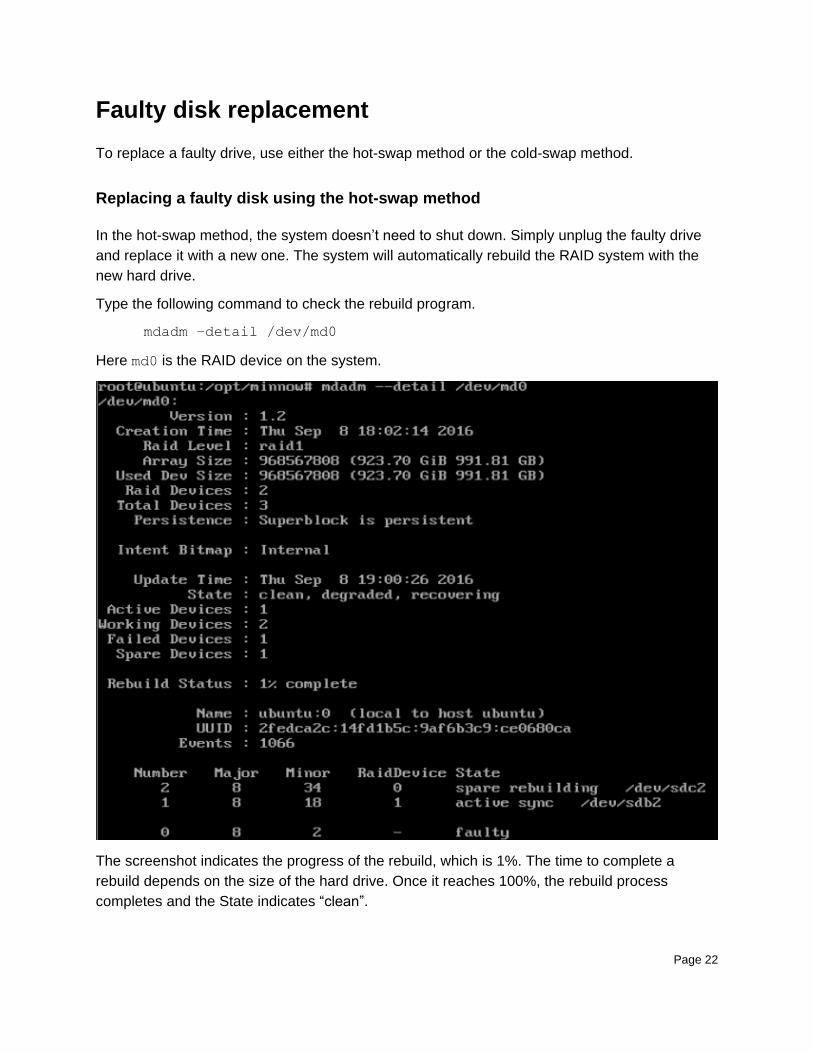
Type the following command to check the rebuild program.
mdadm –detail /dev/md0
Here md0 is the RAID device on the system.
The screenshot indicates the progress of the rebuild, which is 1%. The time to complete a
rebuild depends on the size of the hard drive. Once it reaches 100%, the rebuild process
completes and the State indicates “clean”.
Page 23
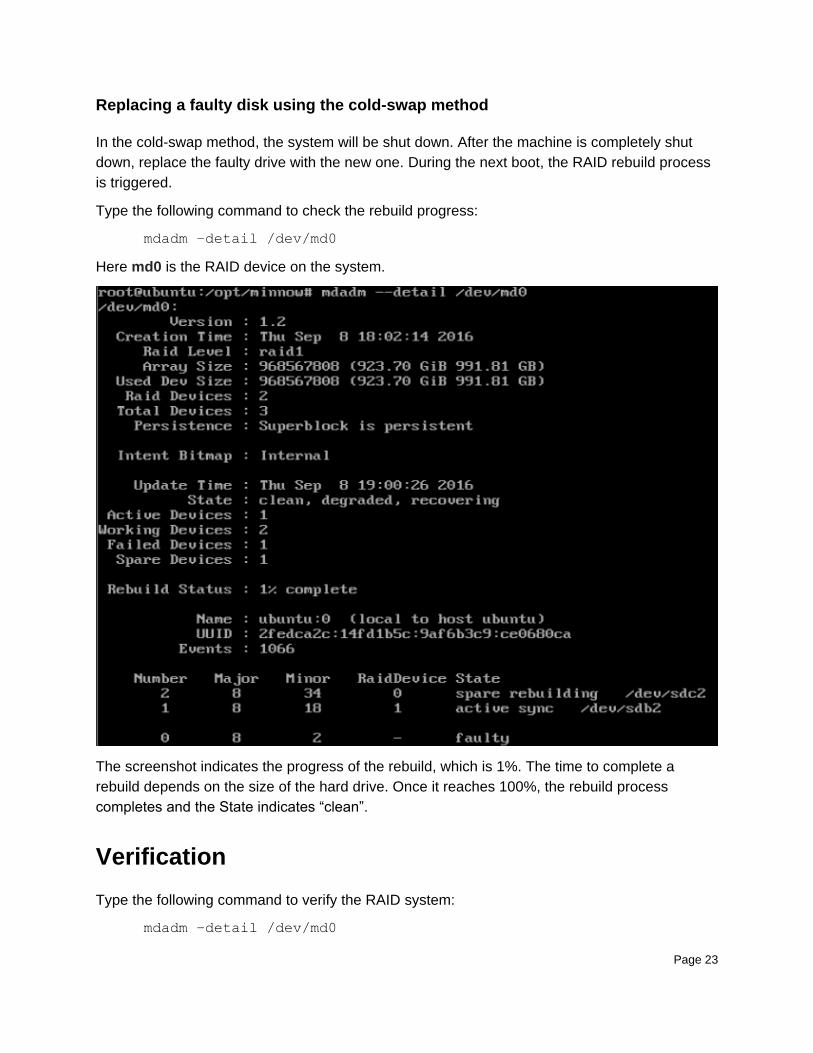
Replacing a faulty disk using the cold-swap method
In the cold-swap method, the system will be shut down. After the machine is completely shut
down, replace the faulty drive with the new one. During the next boot, the RAID rebuild process
is triggered.
Type the following command to check the rebuild progress:
mdadm –detail /dev/md0
Here md0 is the RAID device on the system.
The screenshot indicates the progress of the rebuild, which is 1%. The time to complete a
rebuild depends on the size of the hard drive. Once it reaches 100%, the rebuild process
completes and the State indicates “clean”.
Verification
Type the following command to verify the RAID system:
mdadm –detail /dev/md0
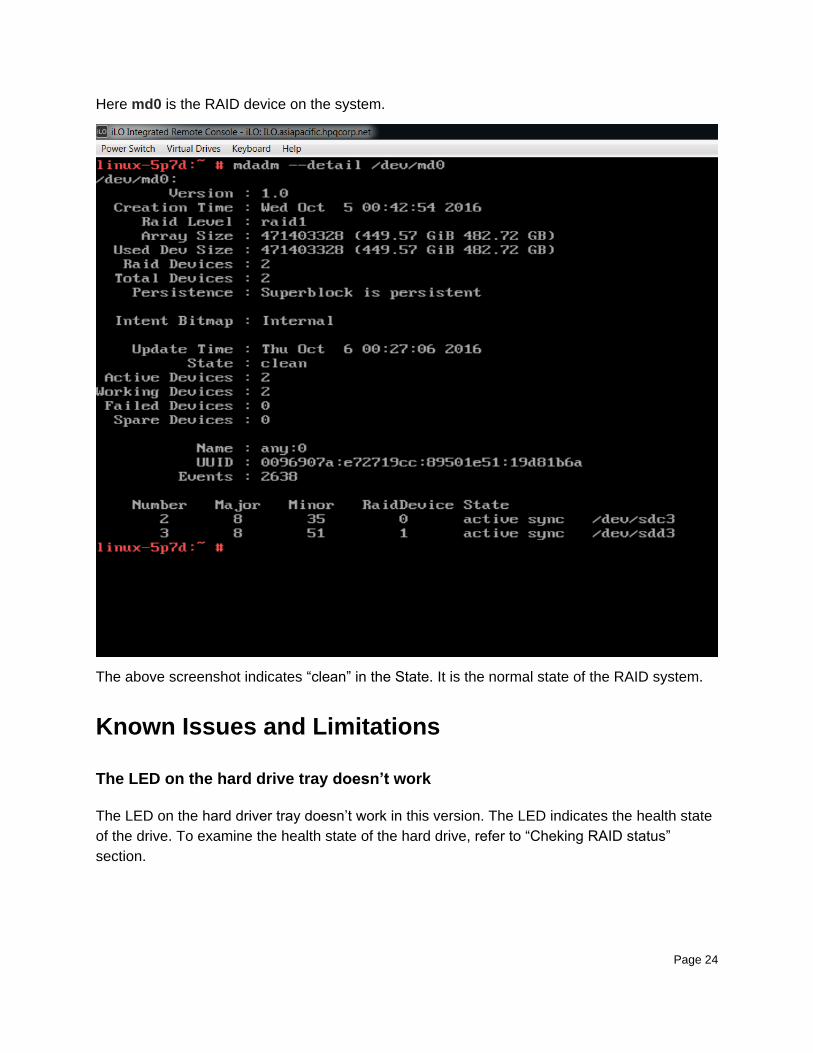
Page 24
Here md0 is the RAID device on the system.
The above screenshot indicates “clean” in the State. It is the normal state of the RAID system.
Known Issues and Limitations
The LED on the hard drive tray doesn’t work
The LED on the hard driver tray doesn’t work in this version. The LED indicates the health state
of the drive. To examine the health state of the hard drive, refer to “Cheking RAID status”
section.
Page 25
Only RAID1 with two hard drives in the AHCI controller is supported, other
AHCI/SATA ports cannot be used
Only two hard drive boot volumes are supported at this moment. Other AHCI/SATA ports cannot
be used.
The replacement hard drive should not contain any MD metadata or partition
information
The RAID metadata or partition information on the replacement hard drive should be wiped
before inserting to the system.
Minnow service should not be stopped or restarted before RAID is fully recovered
and status is clean
When the RAID is degraded and the recovery is in progress, the Minnow service should not be
stopped or restarted.
In Ubuntu 14.04.4, user should not manually start the minnow service
The Minnow service will start automatically at boot time. Do not manually start it in the
command line.
For the RAID auto-recovery, the space of replacement disk should be the same as
the faulty one; replacement disks with larger space are not supported
Only auto-recovery with same size hard drive replacement is supported for RAID recovery.
If the /boot/efi is empty after auto-recovery, user should reboot the system before
making any changes to the ESP (such as upgrading kernel, modify grub settings,
etc)
To check if the /boot/efi folder is empty, type the following command:
ls -la /boot/efi
Page 26
Appendix A: Creating redundant boot
strategy for software RAID1 in Linux
Introduction
The Redundant Boot Strategy for Software RAID1 in Linux operates with the UEFI mode only.
This document describes the process to configure Software RAID in major Linux operating
systems including:
Red Hat Enterprise Linux,
SuSE Linux Enterprise Server and
Ubuntu Server
It covers the following topics:
Installation
Configuration
Recovery steps when a disk fails
Basic configuration
This procedure will be completed using HPE iLO. For more information, see the HPE iLO 4 User
Guide in the Hewlett Packard Enterprise Information Library (www.hpe.com/info/docs),
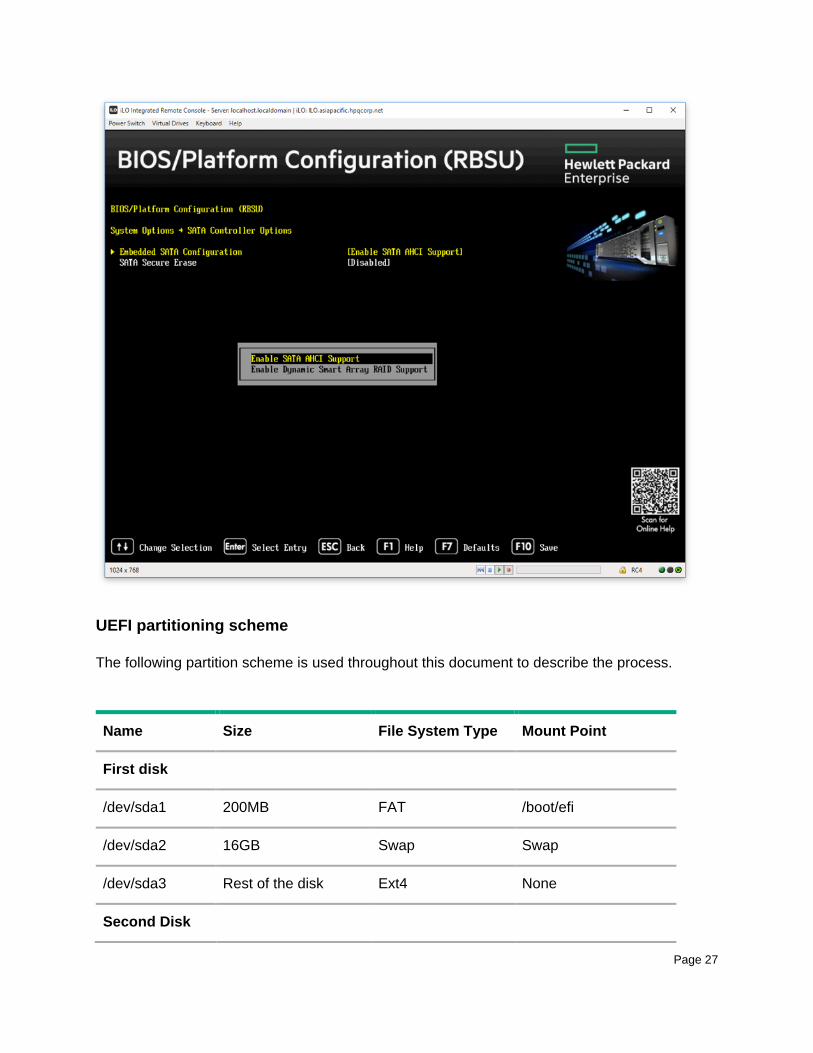
Setting AHCI mode
1. In RBSU > System Options > SATA Controller Options > Embedded SATA
Configuration.
2. Make sure that “Enable SATA AHCI Support” is enabled.
Page 27
UEFI partitioning scheme
The following partition scheme is used throughout this document to describe the process.
Name Size File System Type Mount Point
First disk
/dev/sda1 200MB FAT /boot/efi
/dev/sda2 16GB Swap Swap
/dev/sda3 Rest of the disk Ext4 None
Second Disk
Page 28
Name Size File System Type Mount Point
/dev/sdb1 200MB FAT None
/dev/sdb2 16GB Swap None
/dev/sdb3 Rest of the disk Ext4 None
* In the outlined configuration, the disk size is 500GB. The partition size for sda3 and sdb3 is
roughly 460GB.
Red Hat Enterprise Linux (RHEL) 7.2
Manually Partitioning through Rescue mode
Partition the disk manually in Rescue mode before proceeding to the normal installation
process. Do not use the RHEL GUI installer.
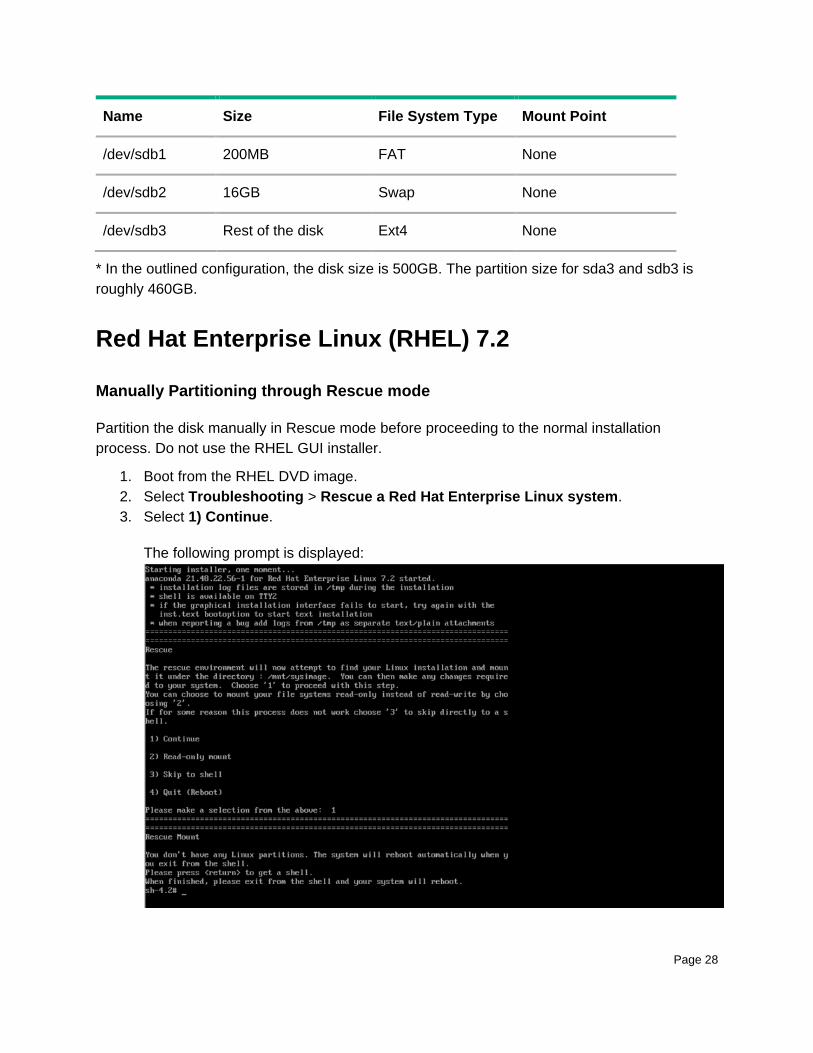
1. Boot from the RHEL DVD image.
2. Select Troubleshooting > Rescue a Red Hat Enterprise Linux system.
3. Select 1) Continue.
The following prompt is displayed:
Page 29
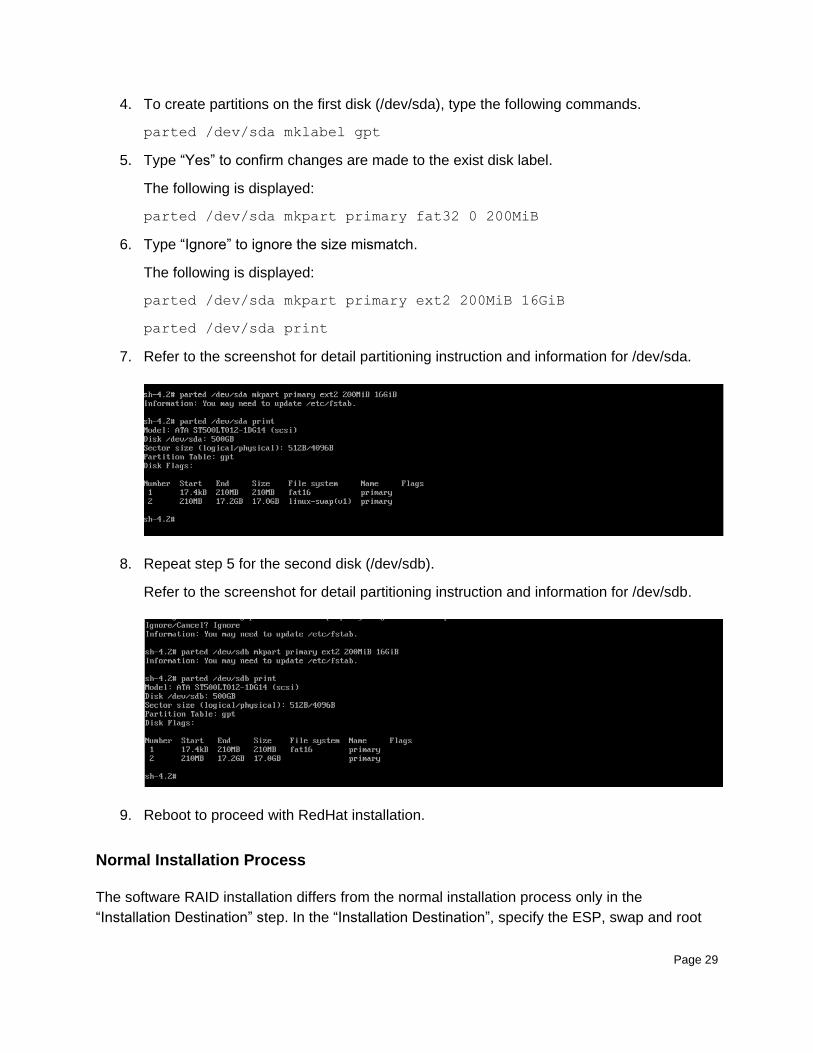
4. To create partitions on the first disk (/dev/sda), type the following commands.
parted /dev/sda mklabel gpt
5. Type “Yes” to confirm changes are made to the exist disk label.
The following is displayed:
parted /dev/sda mkpart primary fat32 0 200MiB
6. Type “Ignore” to ignore the size mismatch.
The following is displayed:
parted /dev/sda mkpart primary ext2 200MiB 16GiB
parted /dev/sda print
7. Refer to the screenshot for detail partitioning instruction and information for /dev/sda.
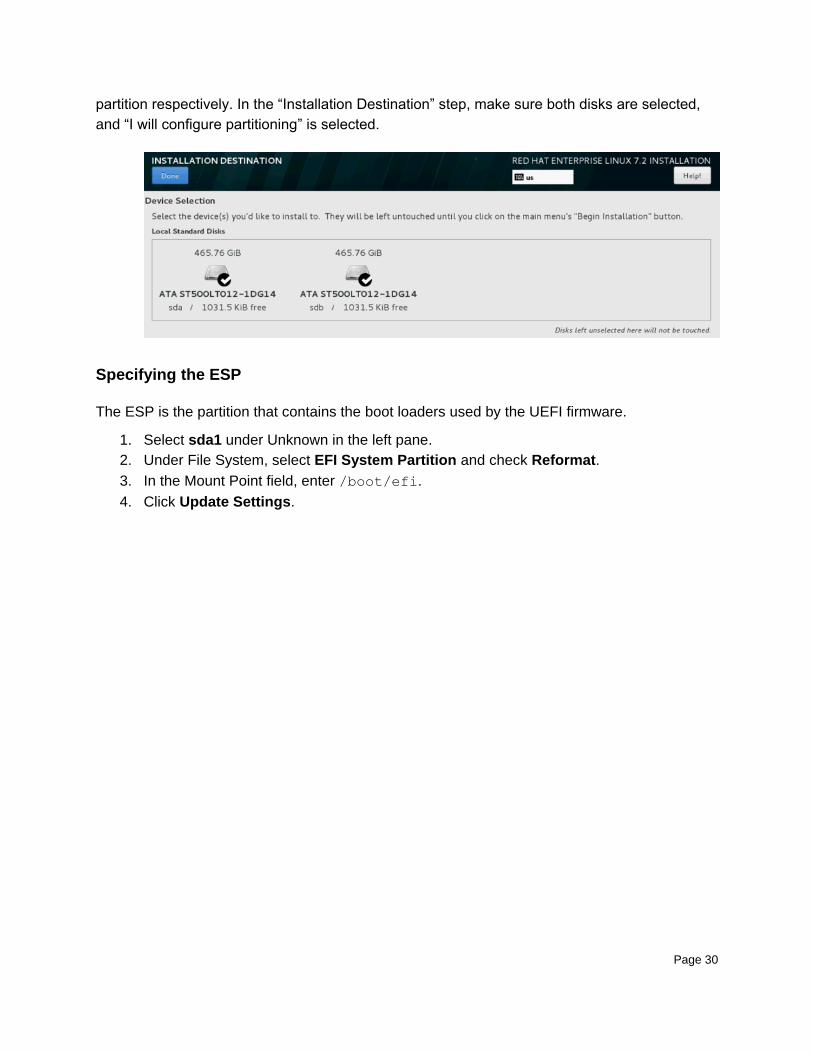
8. Repeat step 5 for the second disk (/dev/sdb).
Refer to the screenshot for detail partitioning instruction and information for /dev/sdb.
9. Reboot to proceed with RedHat installation.
Normal Installation Process
The software RAID installation differs from the normal installation process only in the
“Installation Destination” step. In the “Installation Destination”, specify the ESP, swap and root
Page 30
partition respectively. In the “Installation Destination” step, make sure both disks are selected,
and “I will configure partitioning” is selected.
Specifying the ESP
The ESP is the partition that contains the boot loaders used by the UEFI firmware.
1. Select sda1 under Unknown in the left pane.
2. Under File System, select EFI System Partition and check Reformat.
3. In the Mount Point field, enter /boot/efi.
4. Click Update Settings.
Page 31
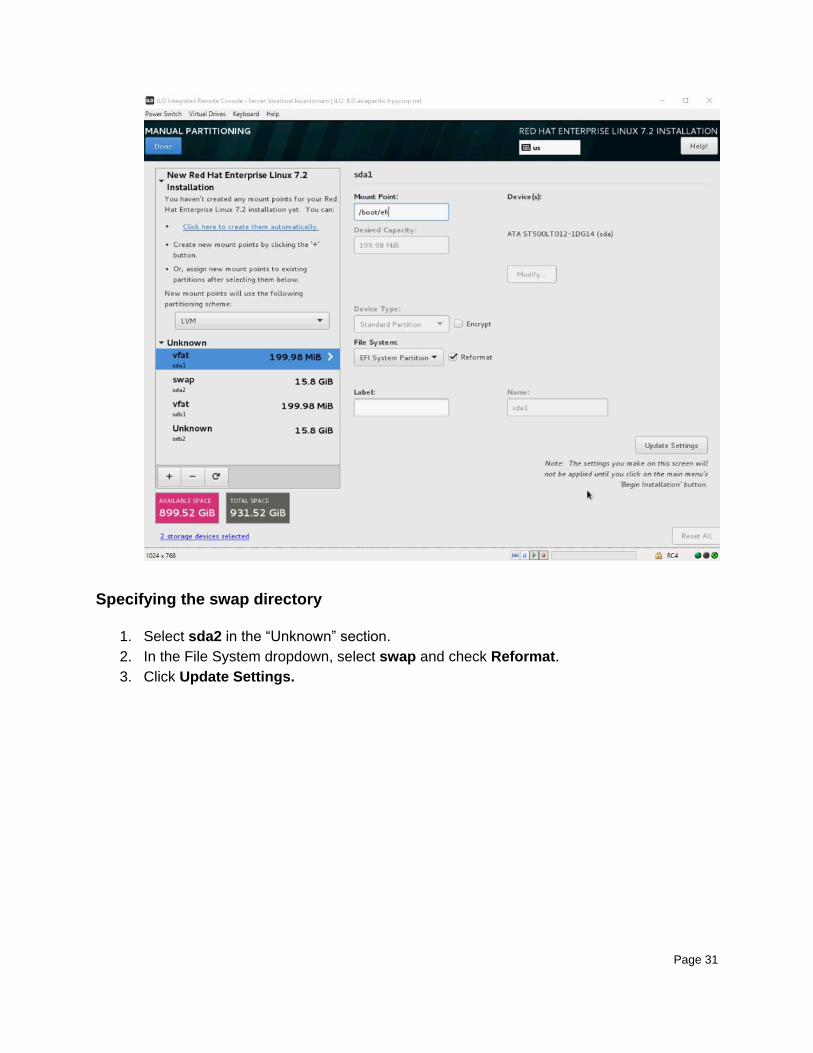
Specifying the swap directory
1. Select sda2 in the “Unknown” section.
2. In the File System dropdown, select swap and check Reformat.
3. Click Update Settings.

Page 32
Creating root disk as RAID1
1. Click “+”.
2. To choose the root directory, enter “/” as mount point.
3. Enter “1000GB” in Desired Capacity.
The system will calculate the correct size.
4. Click Add mount point.
Page 33
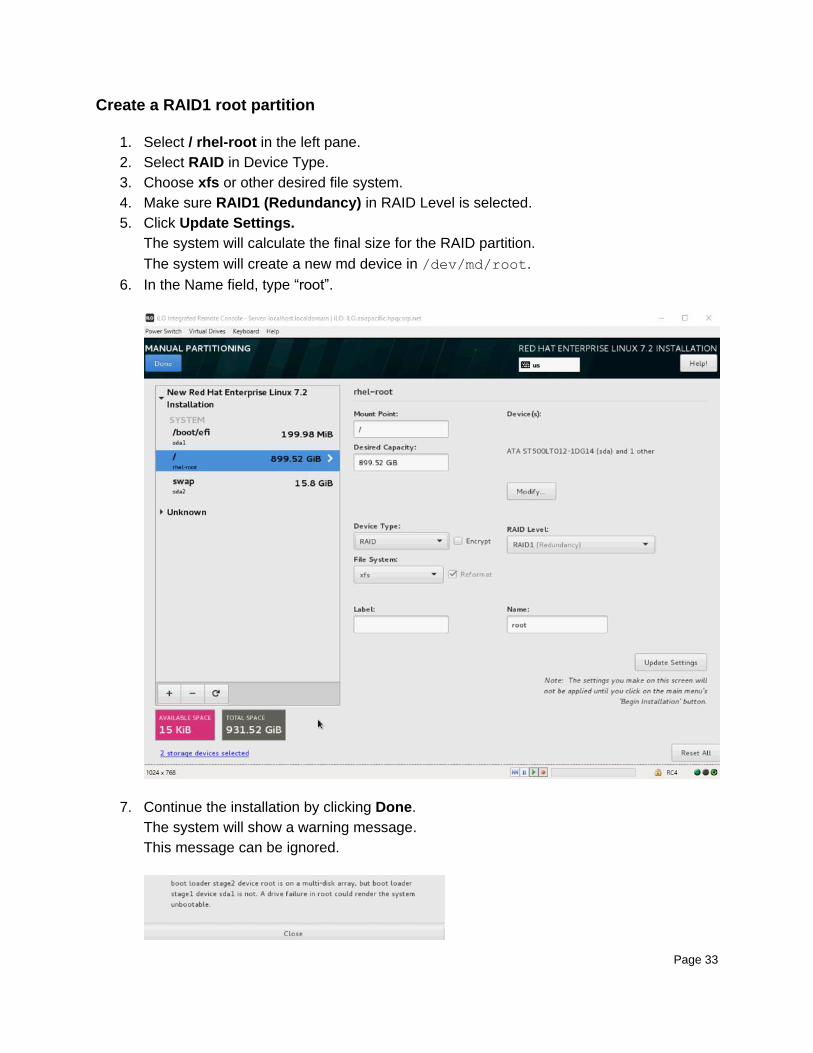
Create a RAID1 root partition
1. Select / rhel-root in the left pane.
2. Select RAID in Device Type.
3. Choose xfs or other desired file system.
4. Make sure RAID1 (Redundancy) in RAID Level is selected.
5. Click Update Settings.
The system will calculate the final size for the RAID partition.
The system will create a new md device in /dev/md/root.
6. In the Name field, type “root”.
7. Continue the installation by clicking Done.
The system will show a warning message.
This message can be ignored.
Page 34
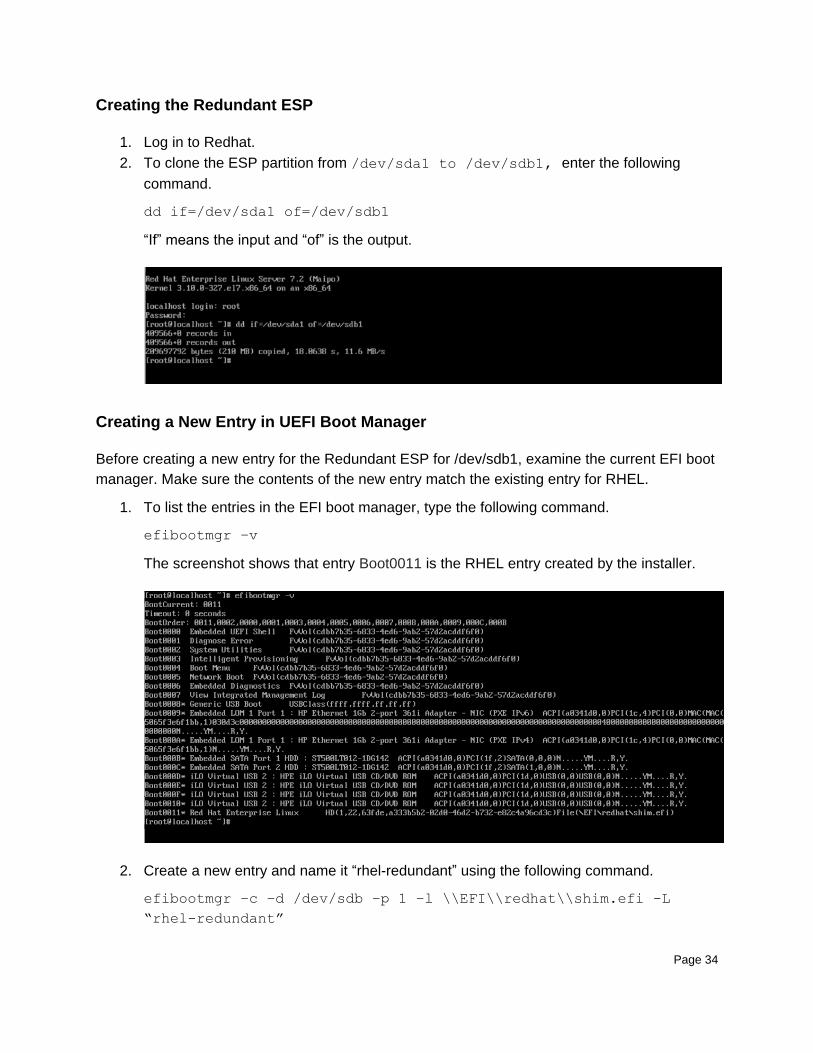
Creating the Redundant ESP
1. Log in to Redhat.
2. To clone the ESP partition from /dev/sda1 to /dev/sdb1, enter the following
command.
dd if=/dev/sda1 of=/dev/sdb1
“If” means the input and “of” is the output.
Creating a New Entry in UEFI Boot Manager
Before creating a new entry for the Redundant ESP for /dev/sdb1, examine the current EFI boot
manager. Make sure the contents of the new entry match the existing entry for RHEL.
1. To list the entries in the EFI boot manager, type the following command.
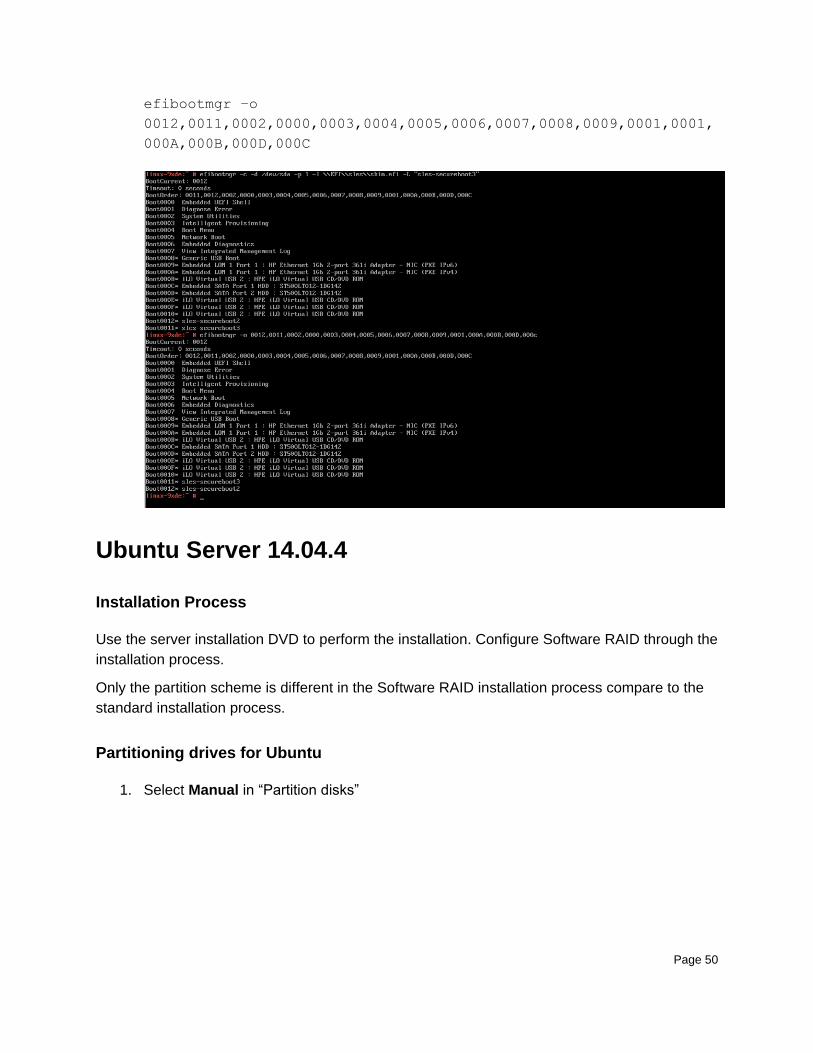
efibootmgr –v
The screenshot shows that entry Boot0011 is the RHEL entry created by the installer.
2. Create a new entry and name it “rhel-redundant” using the following command.
efibootmgr –c –d /dev/sdb –p 1 –l \\EFI\\redhat\\shim.efi -L
“rhel-redundant”
Page 35
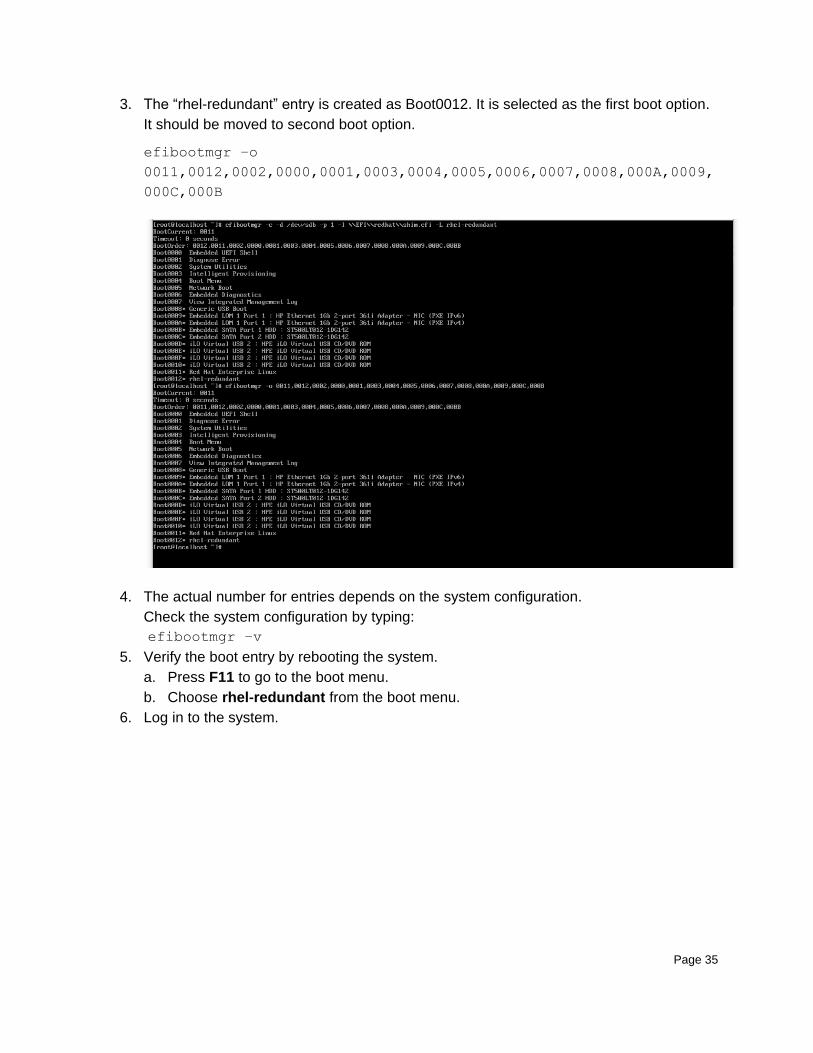
3. The “rhel-redundant” entry is created as Boot0012. It is selected as the first boot option.
It should be moved to second boot option.
efibootmgr –o
0011,0012,0002,0000,0001,0003,0004,0005,0006,0007,0008,000A,0009,
000C,000B
4. The actual number for entries depends on the system configuration.
Check the system configuration by typing:
efibootmgr –v
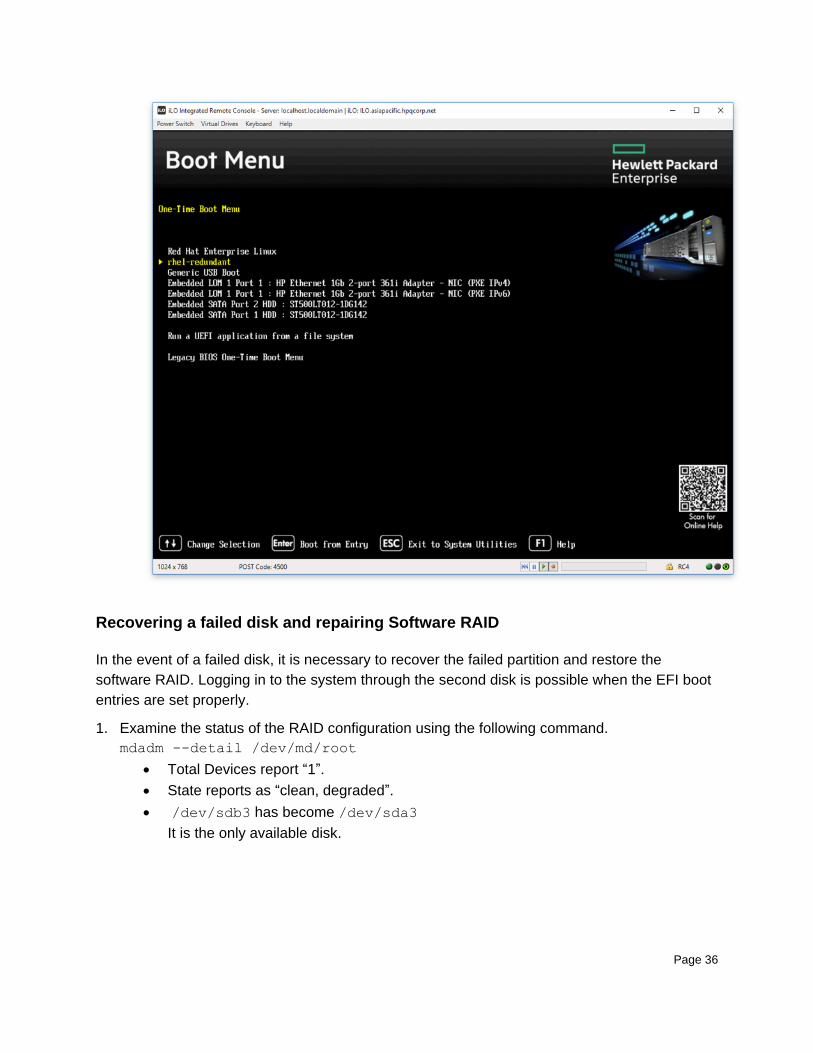
5. Verify the boot entry by rebooting the system.
a. Press F11 to go to the boot menu.
b. Choose rhel-redundant from the boot menu.
6. Log in to the system.
Page 36
Recovering a failed disk and repairing Software RAID
In the event of a failed disk, it is necessary to recover the failed partition and restore the
software RAID. Logging in to the system through the second disk is possible when the EFI boot
entries are set properly.
1. Examine the status of the RAID configuration using the following command.
mdadm --detail /dev/md/root
Total Devices report “1”.
State reports as “clean, degraded”.
/dev/sdb3 has become /dev/sda3
It is the only available disk.
Page 37
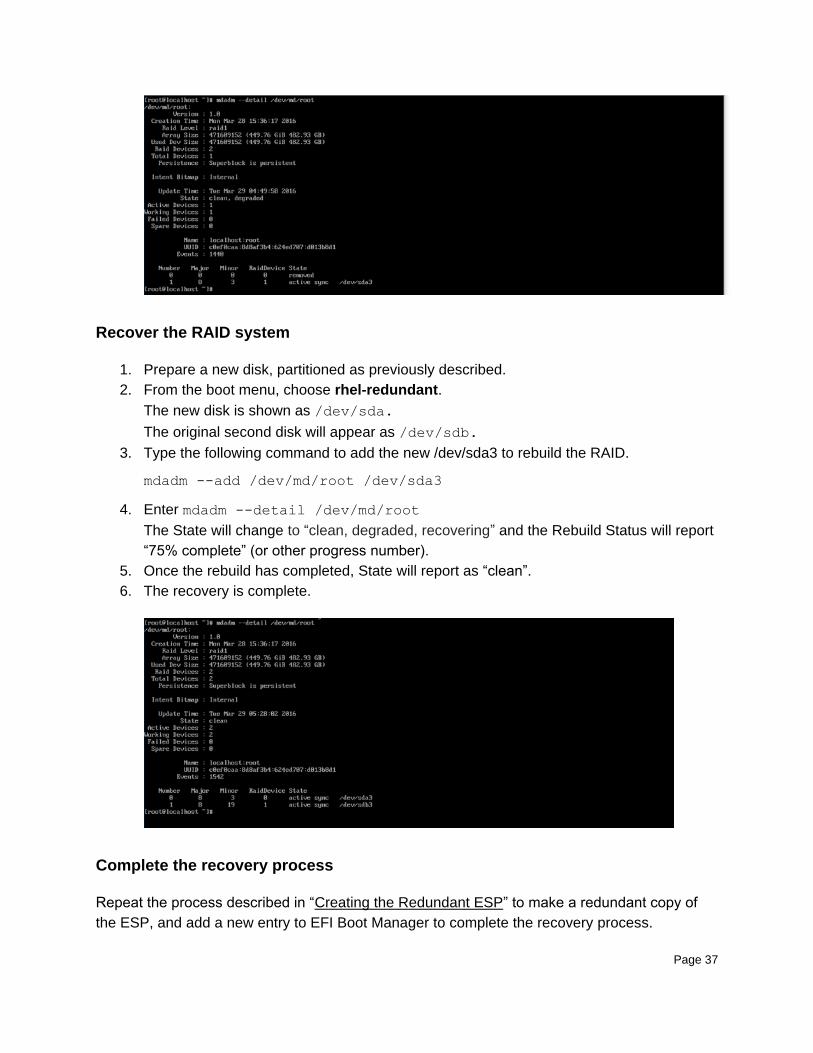
Recover the RAID system
1. Prepare a new disk, partitioned as previously described.
2. From the boot menu, choose rhel-redundant.
The new disk is shown as /dev/sda.
The original second disk will appear as /dev/sdb.
3. Type the following command to add the new /dev/sda3 to rebuild the RAID.
mdadm --add /dev/md/root /dev/sda3
4. Enter mdadm --detail /dev/md/root
The State will change to “clean, degraded, recovering” and the Rebuild Status will report
“75% complete” (or other progress number).
5. Once the rebuild has completed, State will report as “clean”.
6. The recovery is complete.
Complete the recovery process
Repeat the process described in “Creating the Redundant ESP” to make a redundant copy of
the ESP, and add a new entry to EFI Boot Manager to complete the recovery process.
Page 38
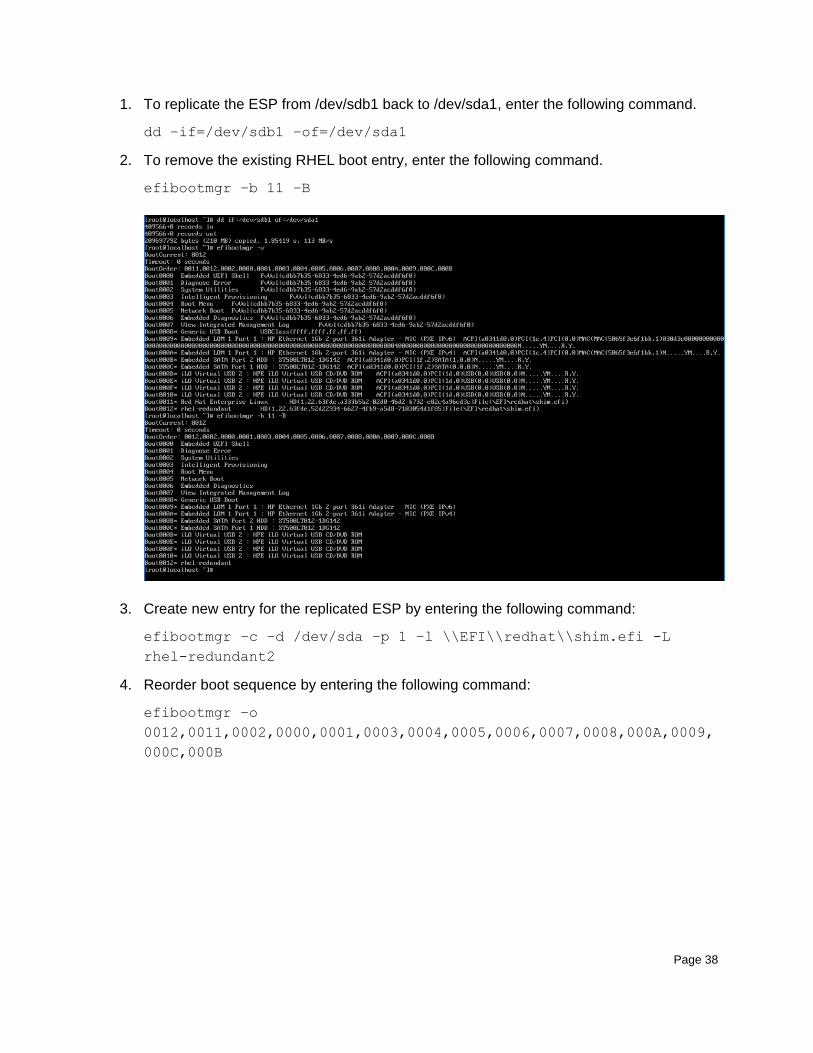
1. To replicate the ESP from /dev/sdb1 back to /dev/sda1, enter the following command.
dd –if=/dev/sdb1 –of=/dev/sda1
2. To remove the existing RHEL boot entry, enter the following command.
efibootmgr –b 11 –B
3. Create new entry for the replicated ESP by entering the following command:
efibootmgr –c –d /dev/sda –p 1 –l \\EFI\\redhat\\shim.efi -L
rhel-redundant2
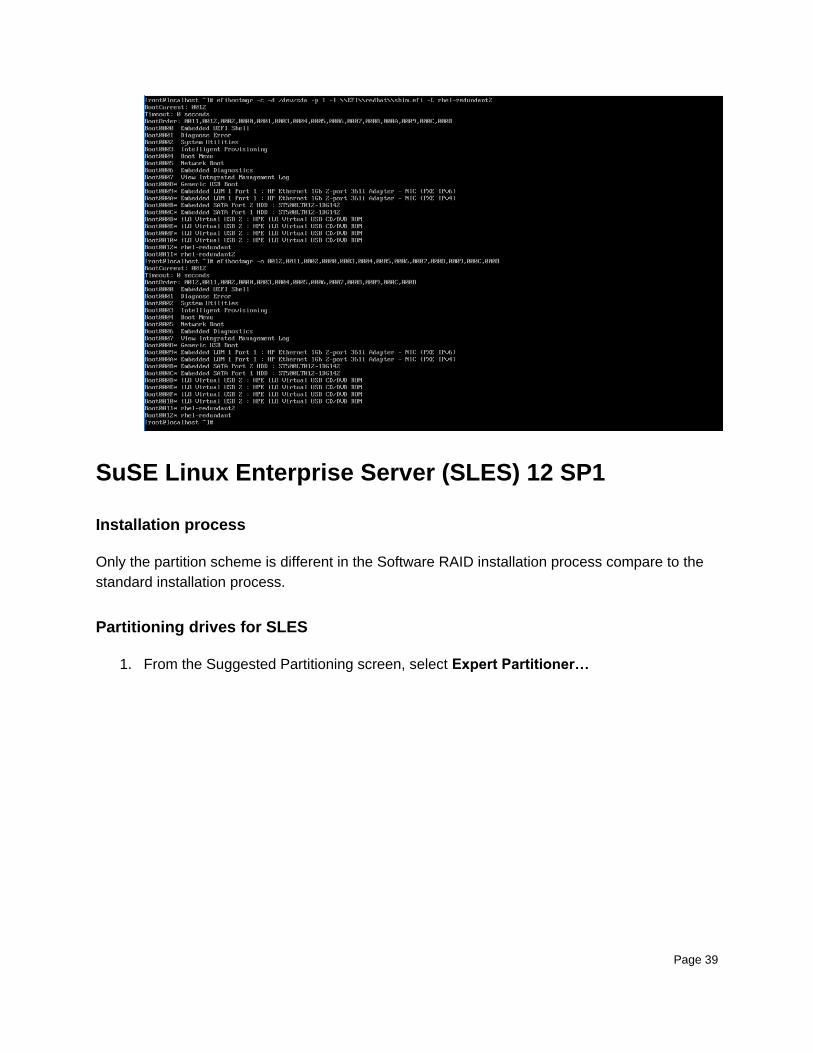
4. Reorder boot sequence by entering the following command:
efibootmgr –o
0012,0011,0002,0000,0001,0003,0004,0005,0006,0007,0008,000A,0009,
000C,000B
Page 39
SuSE Linux Enterprise Server (SLES) 12 SP1
Installation process
Only the partition scheme is different in the Software RAID installation process compare to the
standard installation process.
Partitioning drives for SLES
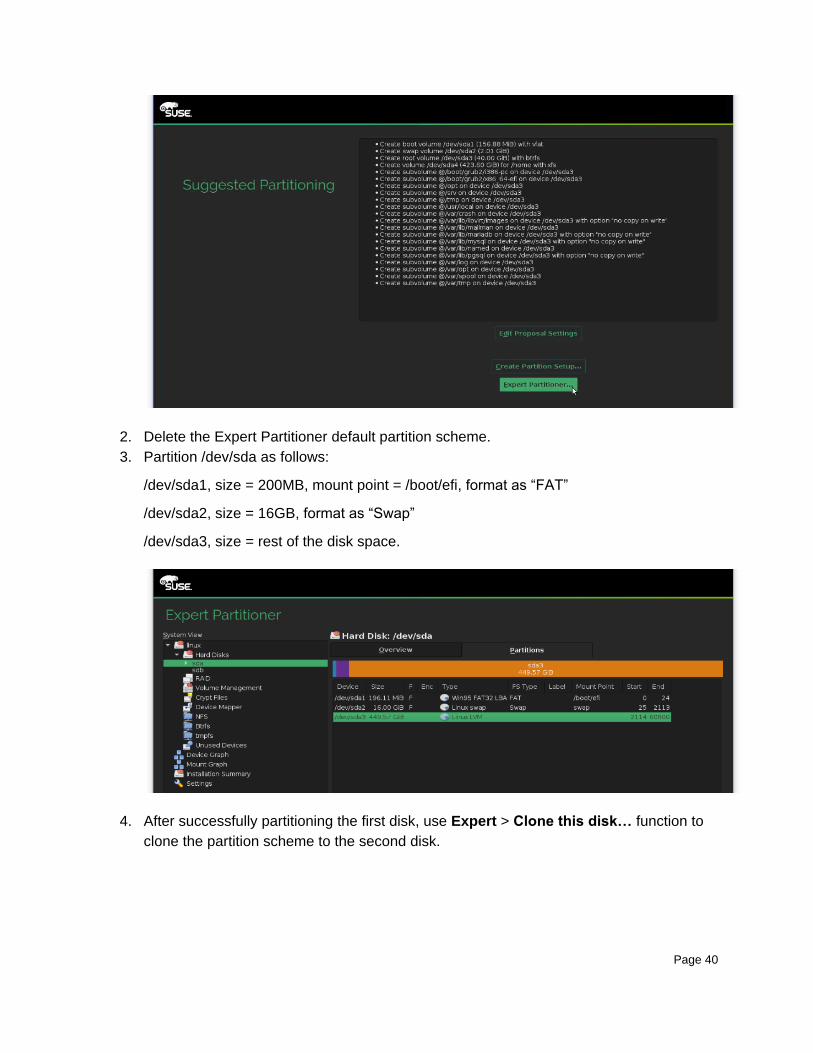
1. From the Suggested Partitioning screen, select Expert Partitioner…
Page 40
2. Delete the Expert Partitioner default partition scheme.
3. Partition /dev/sda as follows:
/dev/sda1, size = 200MB, mount point = /boot/efi, format as “FAT”
/dev/sda2, size = 16GB, format as “Swap”
/dev/sda3, size = rest of the disk space.
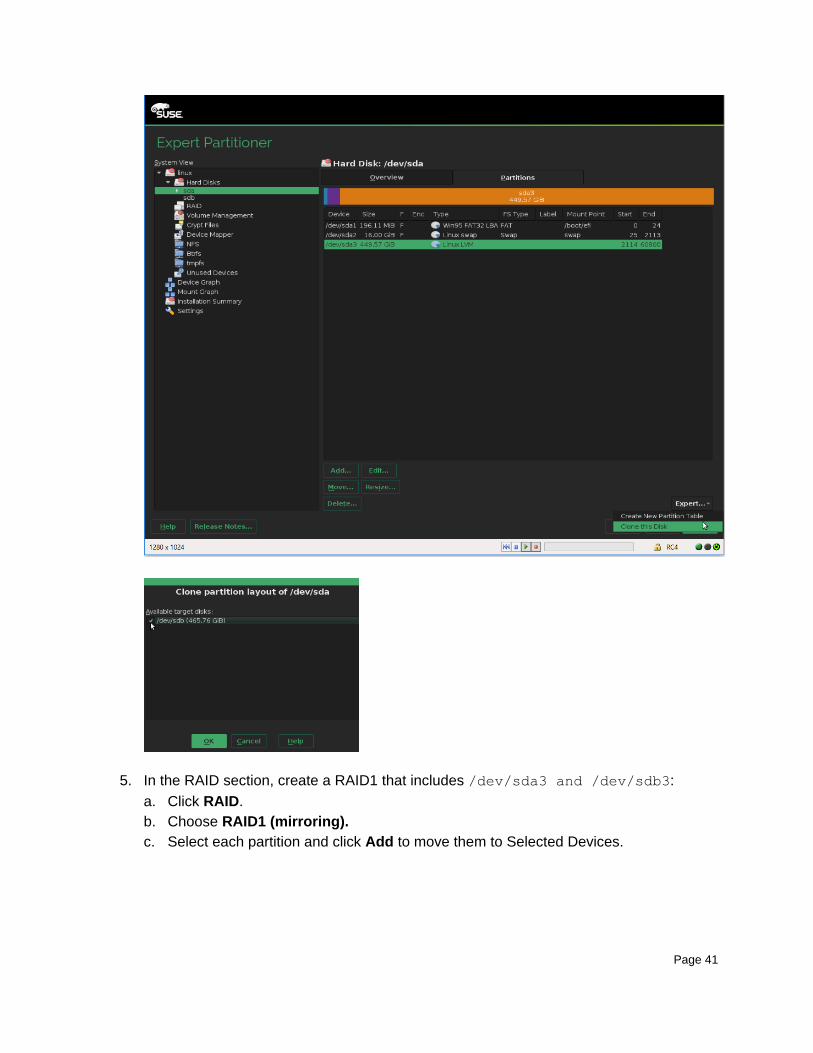
4. After successfully partitioning the first disk, use Expert > Clone this disk… function to
clone the partition scheme to the second disk.
Page 41
5. In the RAID section, create a RAID1 that includes /dev/sda3 and /dev/sdb3:
a. Click RAID.
b. Choose RAID1 (mirroring).
c. Select each partition and click Add to move them to Selected Devices.
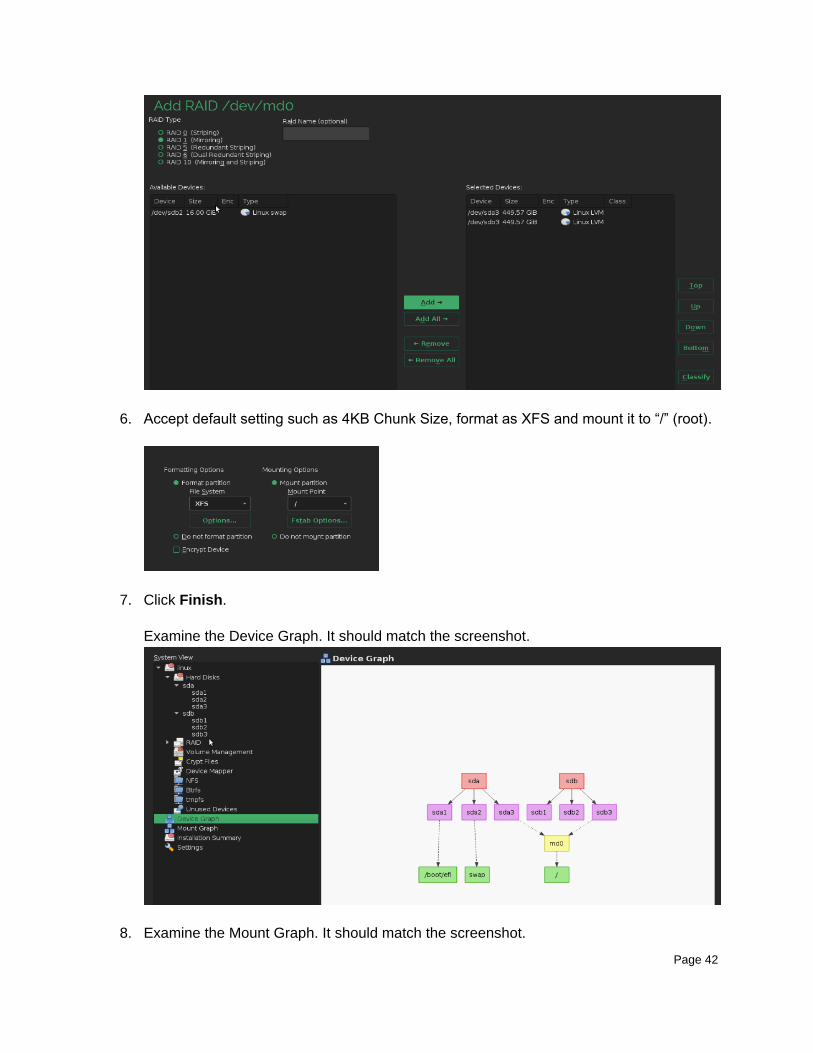
Page 42
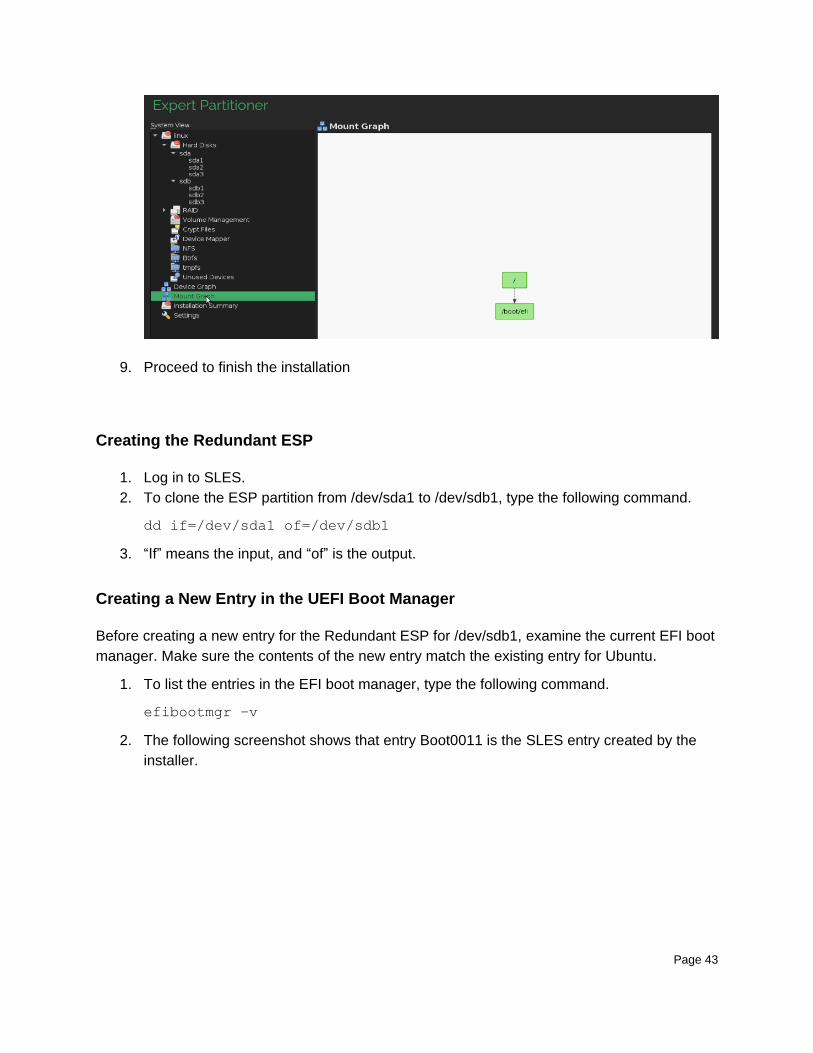
6. Accept default setting such as 4KB Chunk Size, format as XFS and mount it to “/” (root).
7. Click Finish.
Examine the Device Graph. It should match the screenshot.
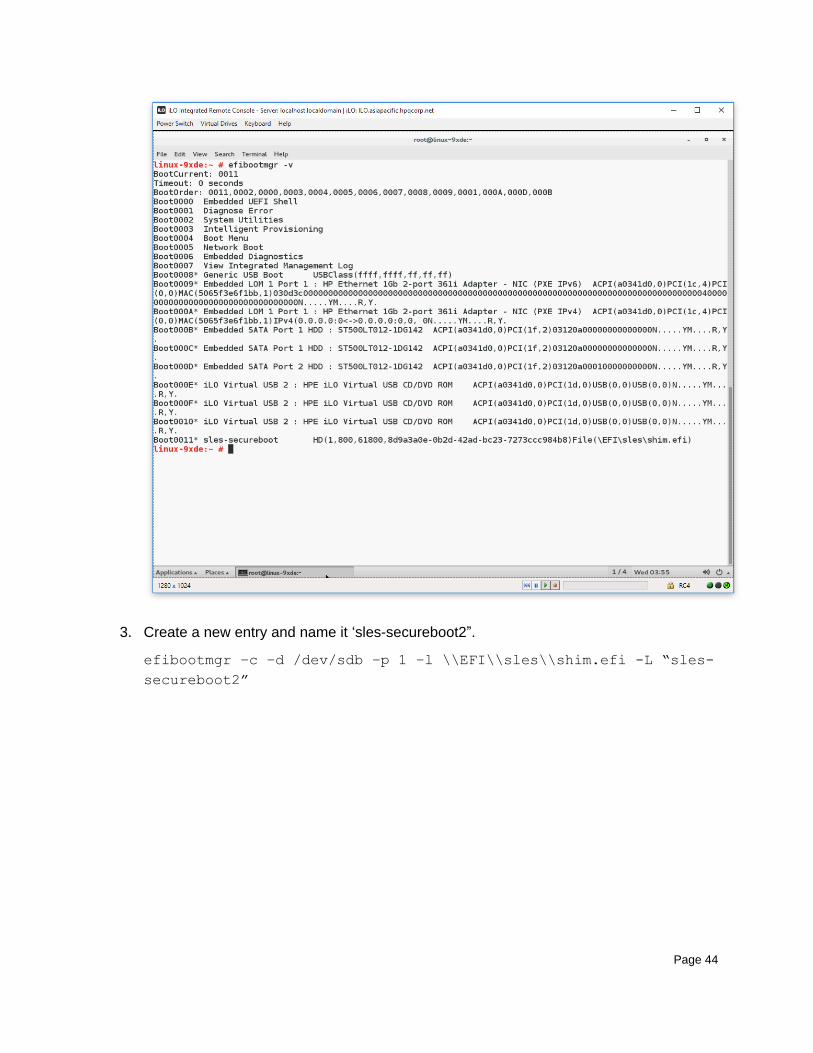
8. Examine the Mount Graph. It should match the screenshot.
Page 43
9. Proceed to finish the installation
Creating the Redundant ESP
1. Log in to SLES.
2. To clone the ESP partition from /dev/sda1 to /dev/sdb1, type the following command.
dd if=/dev/sda1 of=/dev/sdb1
3. “If” means the input, and “of” is the output.
Creating a New Entry in the UEFI Boot Manager
Before creating a new entry for the Redundant ESP for /dev/sdb1, examine the current EFI boot
manager. Make sure the contents of the new entry match the existing entry for Ubuntu.
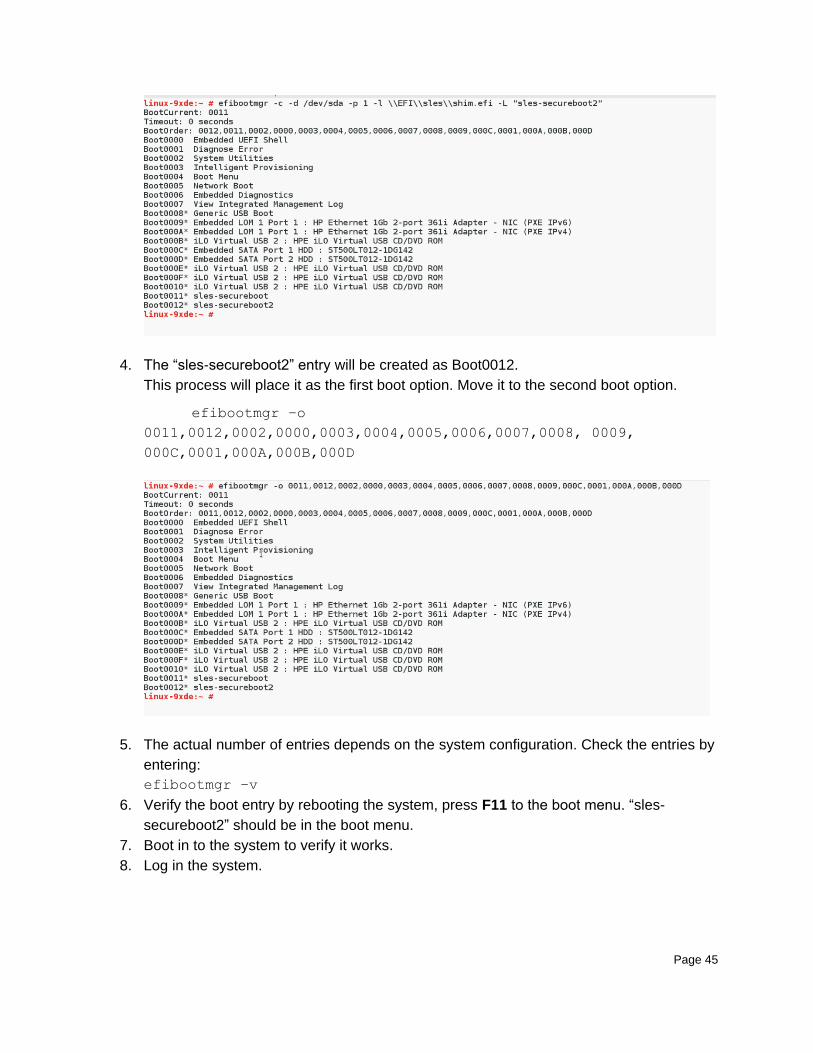
1. To list the entries in the EFI boot manager, type the following command.
efibootmgr –v
2. The following screenshot shows that entry Boot0011 is the SLES entry created by the
installer.
Page 44
3. Create a new entry and name it ‘sles-secureboot2”.
efibootmgr –c –d /dev/sdb –p 1 –l \\EFI\\sles\\shim.efi -L “sles-
secureboot2”
Page 45
4. The “sles-secureboot2” entry will be created as Boot0012.
This process will place it as the first boot option. Move it to the second boot option.
efibootmgr –o
0011,0012,0002,0000,0003,0004,0005,0006,0007,0008, 0009,
000C,0001,000A,000B,000D
5. The actual number of entries depends on the system configuration. Check the entries by
entering:
efibootmgr –v
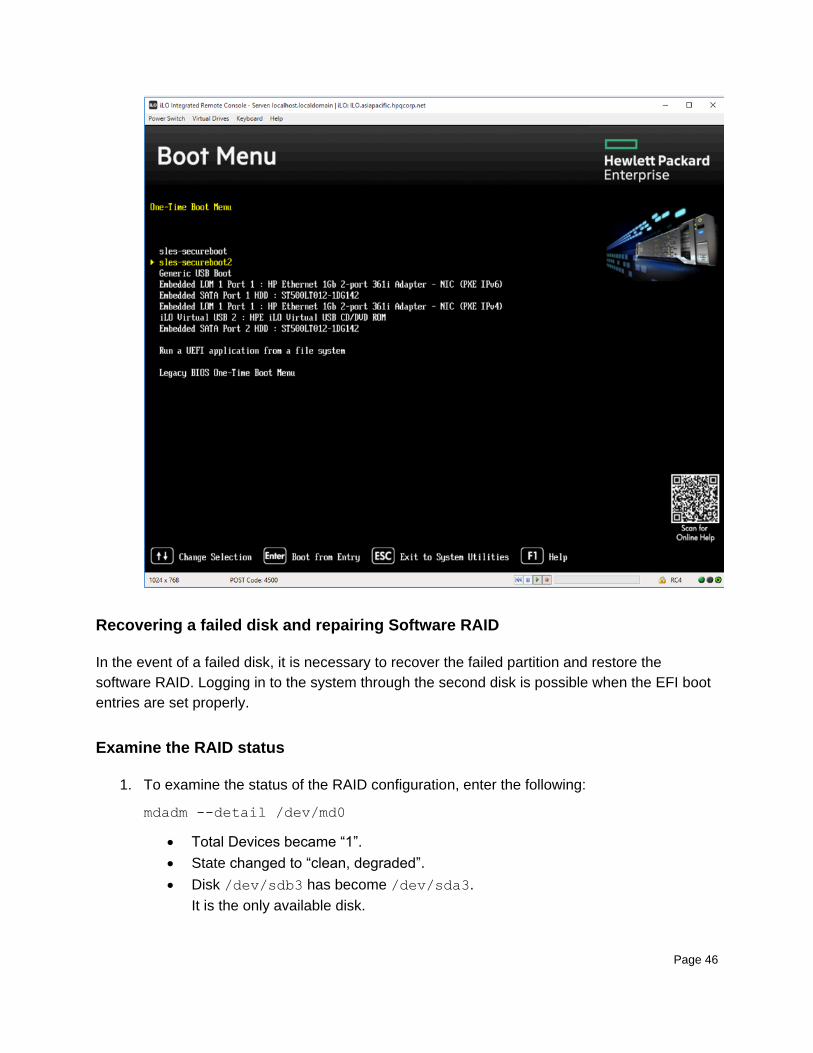
6. Verify the boot entry by rebooting the system, press F11 to the boot menu. “sles-
secureboot2” should be in the boot menu.
7. Boot in to the system to verify it works.
8. Log in the system.
Page 46
Recovering a failed disk and repairing Software RAID
In the event of a failed disk, it is necessary to recover the failed partition and restore the
software RAID. Logging in to the system through the second disk is possible when the EFI boot
entries are set properly.
Examine the RAID status
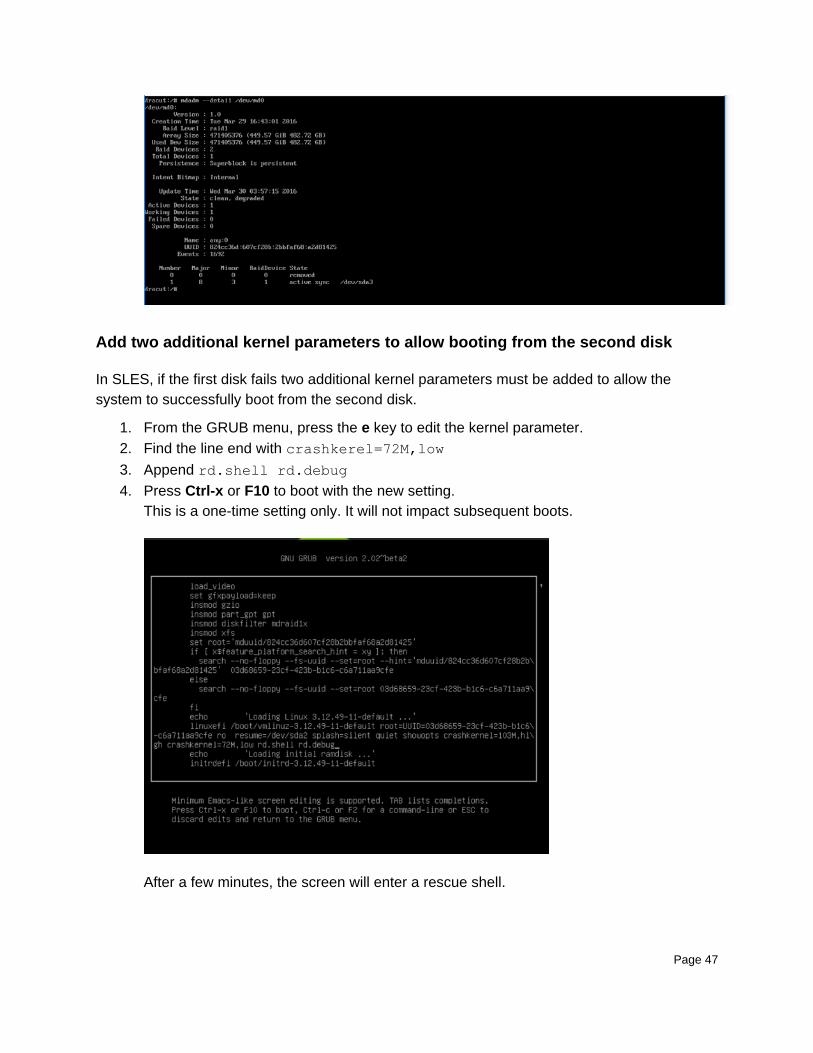
1. To examine the status of the RAID configuration, enter the following:
mdadm --detail /dev/md0
Total Devices became “1”.
State changed to “clean, degraded”.
Disk /dev/sdb3 has become /dev/sda3.
It is the only available disk.
Page 47
Add two additional kernel parameters to allow booting from the second disk
In SLES, if the first disk fails two additional kernel parameters must be added to allow the
system to successfully boot from the second disk.
1. From the GRUB menu, press the e key to edit the kernel parameter.
2. Find the line end with crashkerel=72M,low
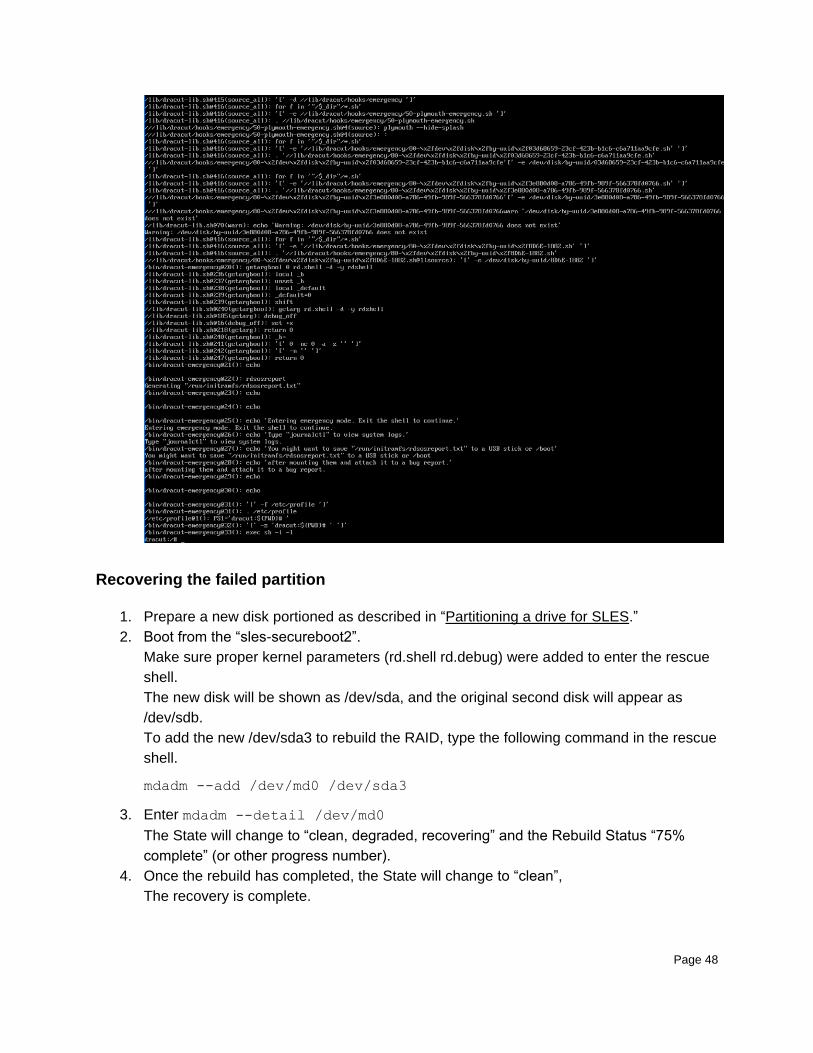
3. Append rd.shell rd.debug
4. Press Ctrl-x or F10 to boot with the new setting.
This is a one-time setting only. It will not impact subsequent boots.
After a few minutes, the screen will enter a rescue shell.
Page 48
Recovering the failed partition
1. Prepare a new disk portioned as described in “Partitioning a drive for SLES.”
2. Boot from the “sles-secureboot2”.
Make sure proper kernel parameters (rd.shell rd.debug) were added to enter the rescue
shell.
The new disk will be shown as /dev/sda, and the original second disk will appear as
/dev/sdb.
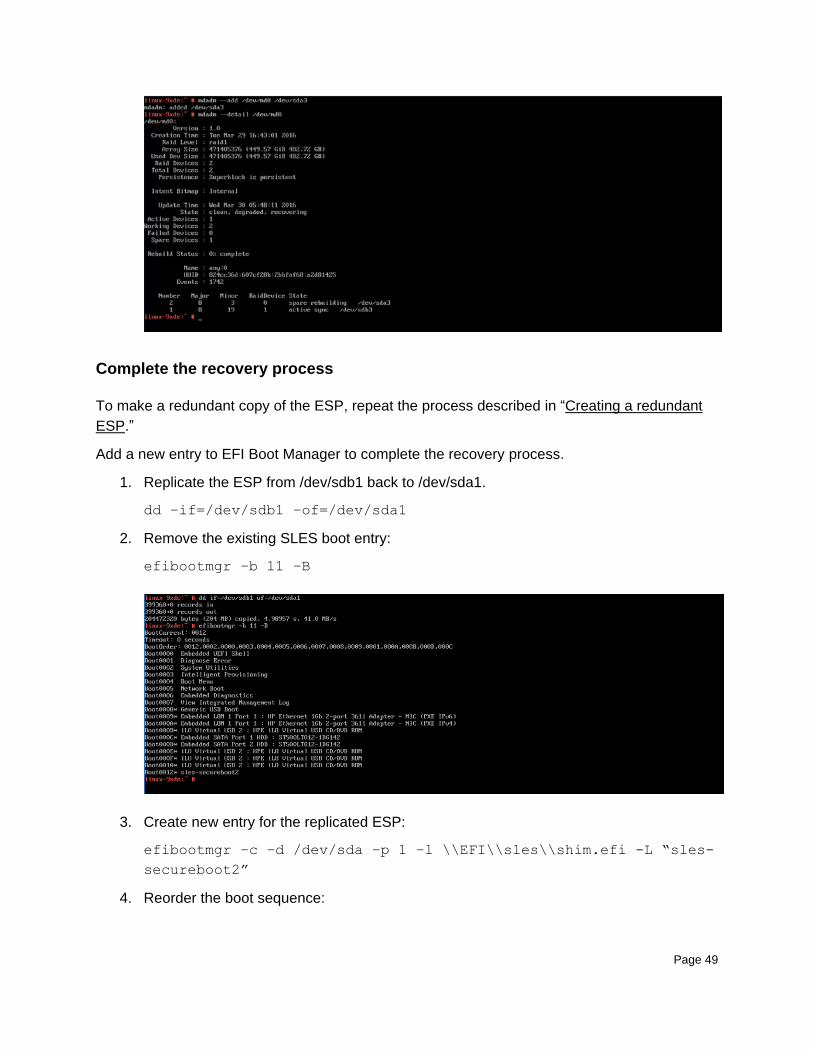
To add the new /dev/sda3 to rebuild the RAID, type the following command in the rescue
shell.
mdadm --add /dev/md0 /dev/sda3
3. Enter mdadm --detail /dev/md0
The State will change to “clean, degraded, recovering” and the Rebuild Status “75%
complete” (or other progress number).
4. Once the rebuild has completed, the State will change to “clean”,
The recovery is complete.
Page 49
Complete the recovery process
To make a redundant copy of the ESP, repeat the process described in “Creating a redundant
ESP.”
Add a new entry to EFI Boot Manager to complete the recovery process.
1. Replicate the ESP from /dev/sdb1 back to /dev/sda1.
dd –if=/dev/sdb1 –of=/dev/sda1
2. Remove the existing SLES boot entry:
efibootmgr –b 11 –B
3. Create new entry for the replicated ESP:
efibootmgr –c –d /dev/sda –p 1 –l \\EFI\\sles\\shim.efi -L “sles-
secureboot2”
4. Reorder the boot sequence:
Page 50
efibootmgr –o
0012,0011,0002,0000,0003,0004,0005,0006,0007,0008,0009,0001,0001,
000A,000B,000D,000C
Ubuntu Server 14.04.4
Installation Process
Use the server installation DVD to perform the installation. Configure Software RAID through the
installation process.
Only the partition scheme is different in the Software RAID installation process compare to the
standard installation process.
Partitioning drives for Ubuntu
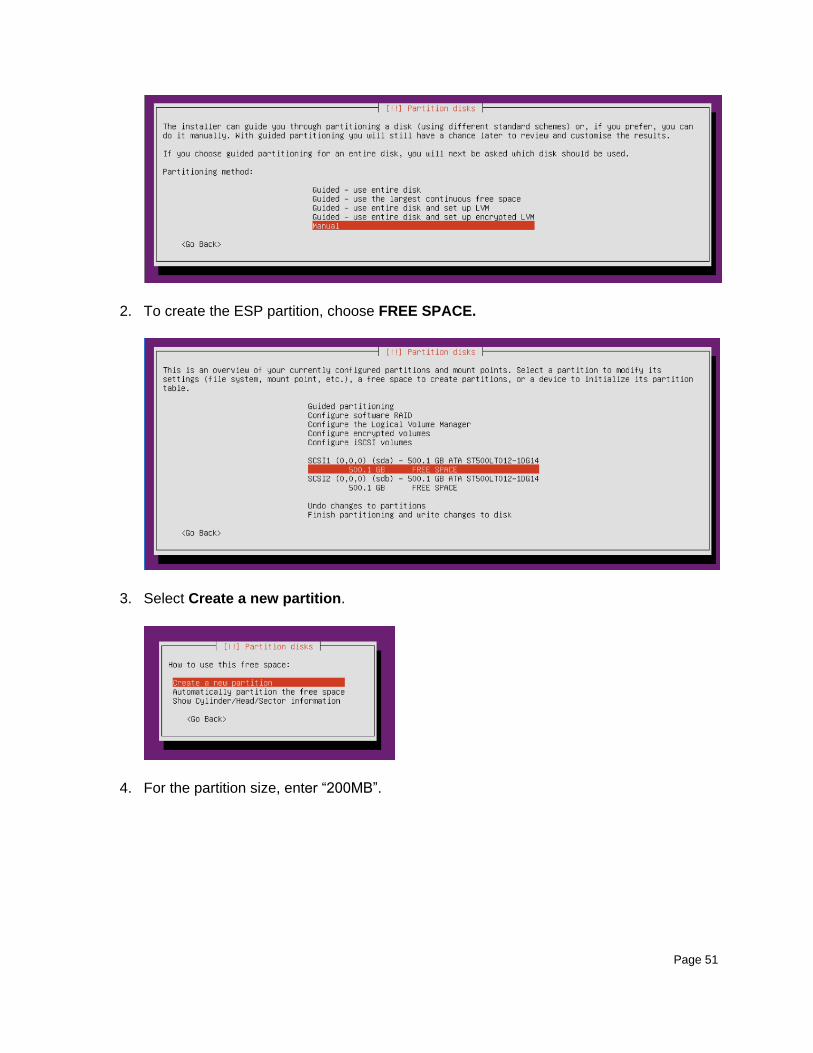
1. Select Manual in “Partition disks”
Page 51
2. To create the ESP partition, choose FREE SPACE.
3. Select Create a new partition.
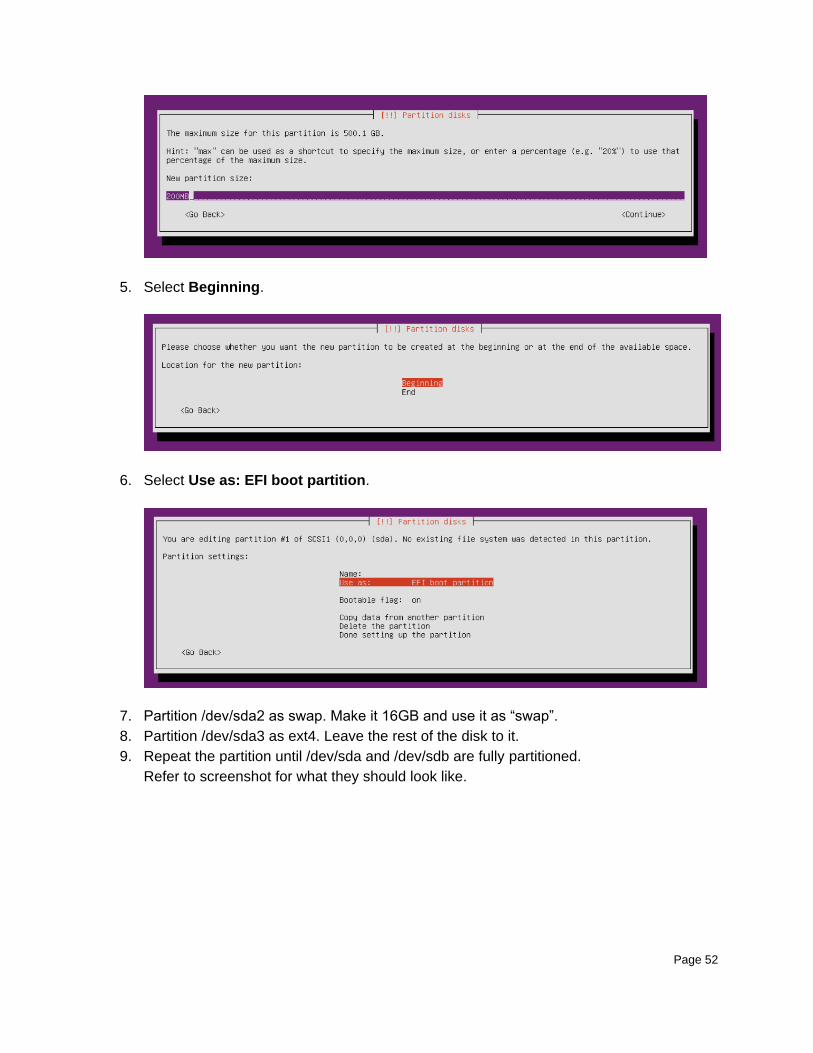
4. For the partition size, enter “200MB”.
Page 52
5. Select Beginning.
6. Select Use as: EFI boot partition.
7. Partition /dev/sda2 as swap. Make it 16GB and use it as “swap”.
8. Partition /dev/sda3 as ext4. Leave the rest of the disk to it.
9. Repeat the partition until /dev/sda and /dev/sdb are fully partitioned.
Refer to screenshot for what they should look like.
Page 53
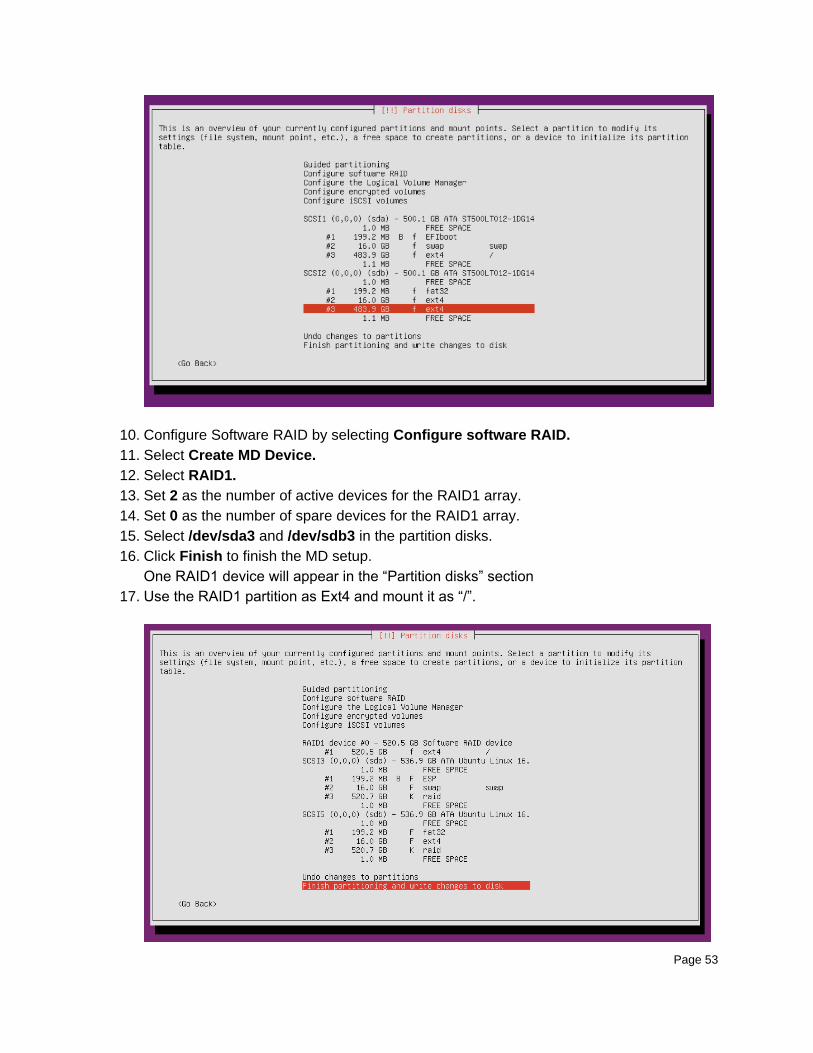
10. Configure Software RAID by selecting Configure software RAID.
11. Select Create MD Device.
12. Select RAID1.
13. Set 2 as the number of active devices for the RAID1 array.
14. Set 0 as the number of spare devices for the RAID1 array.
15. Select /dev/sda3 and /dev/sdb3 in the partition disks.
16. Click Finish to finish the MD setup.
One RAID1 device will appear in the “Partition disks” section
17. Use the RAID1 partition as Ext4 and mount it as “/”.
Page 54
18. Finish partitioning and continue the installation.
Creating the Redundant ESP
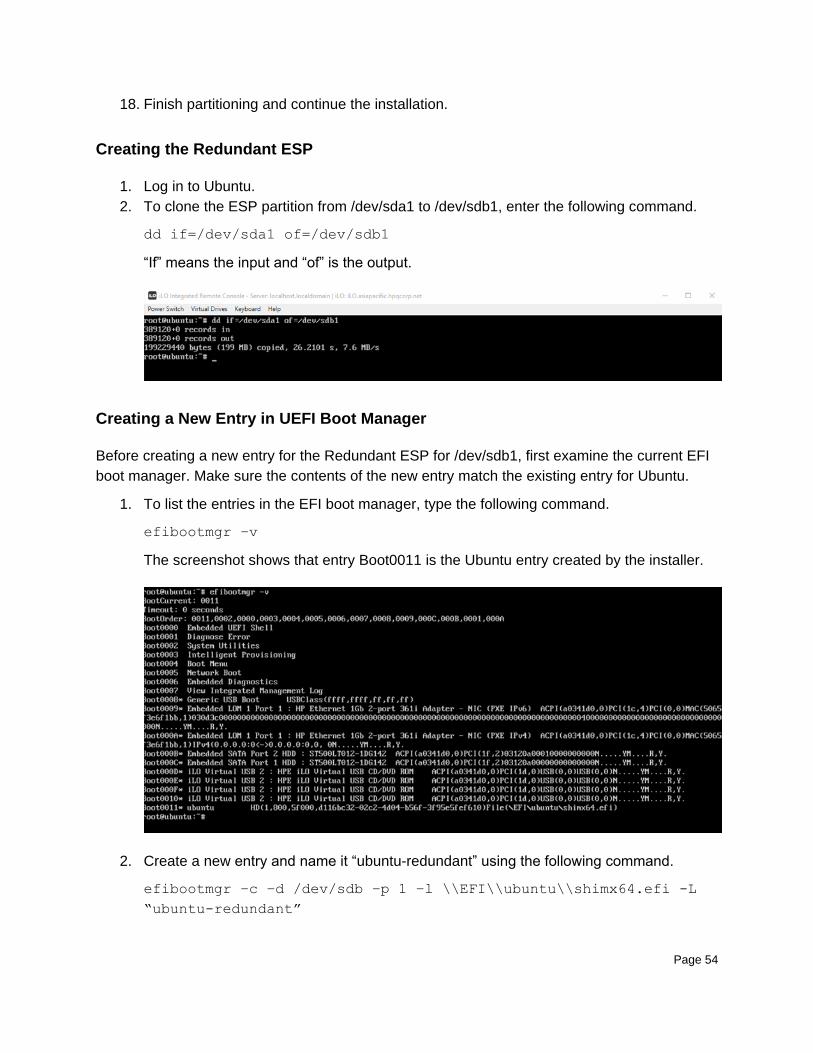
1. Log in to Ubuntu.
2. To clone the ESP partition from /dev/sda1 to /dev/sdb1, enter the following command.
dd if=/dev/sda1 of=/dev/sdb1
“If” means the input and “of” is the output.
Creating a New Entry in UEFI Boot Manager
Before creating a new entry for the Redundant ESP for /dev/sdb1, first examine the current EFI
boot manager. Make sure the contents of the new entry match the existing entry for Ubuntu.
1. To list the entries in the EFI boot manager, type the following command.
efibootmgr –v
The screenshot shows that entry Boot0011 is the Ubuntu entry created by the installer.
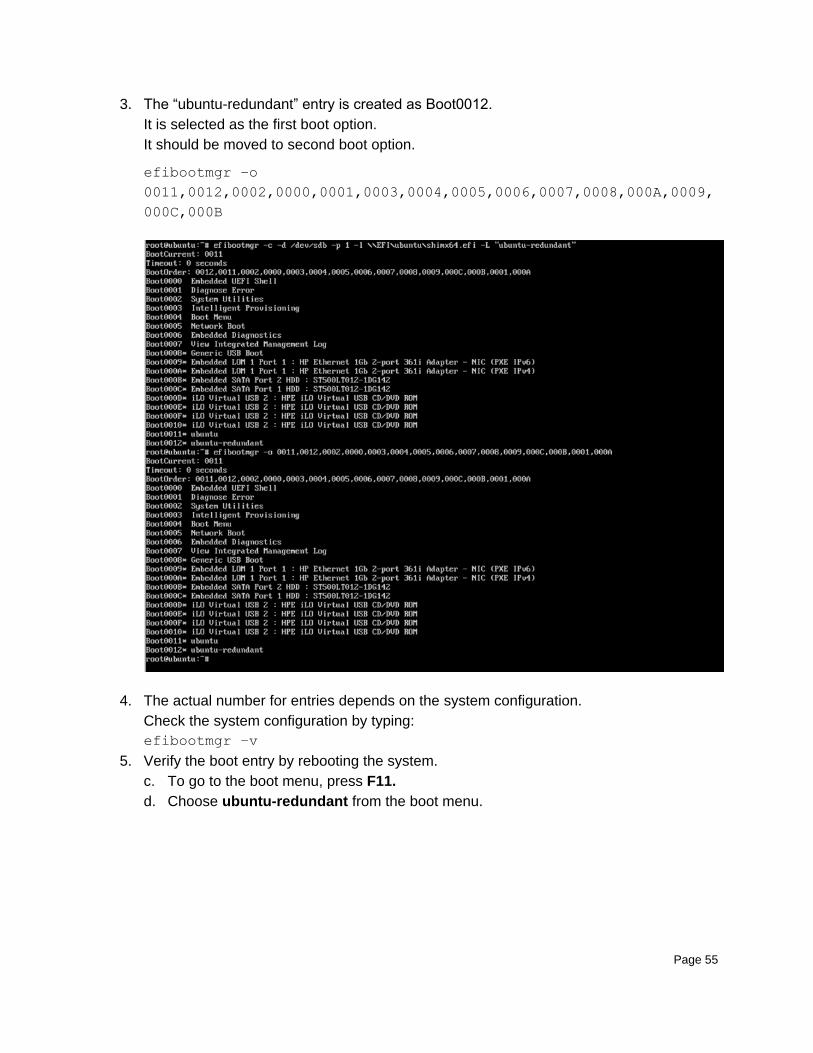
2. Create a new entry and name it “ubuntu-redundant” using the following command.
efibootmgr –c –d /dev/sdb –p 1 –l \\EFI\\ubuntu\\shimx64.efi -L
“ubuntu-redundant”
Page 55
3. The “ubuntu-redundant” entry is created as Boot0012.
It is selected as the first boot option.
It should be moved to second boot option.
efibootmgr –o
0011,0012,0002,0000,0001,0003,0004,0005,0006,0007,0008,000A,0009,
000C,000B
4. The actual number for entries depends on the system configuration.
Check the system configuration by typing:
efibootmgr –v
5. Verify the boot entry by rebooting the system.
c. To go to the boot menu, press F11.
d. Choose ubuntu-redundant from the boot menu.

Page 56
Recovering a failed disk and repairing Software RAID
In the event of a failed disk, it is necessary to recover the failed partition and restore the
software RAID. Logging in to the system through the second disk is possible when the EFI boot
entries are set properly.
With EFI boot entries set properly, you can log in the system through the second disk.
1. To examine the status of the RAID configuration enter:
mdadm --detail /dev/md0
“Total Devices” reports “1”
“State” reports as “clean, degraded”
Disk /dev/sdb3 changes to /dev/sda3 since
It is the only available disk.

Page 57
To recover the RAID system, first prepare a new disk partitioned as previously described in
“Partitioning drives for Ubuntu.”
1. Boot from the “ubuntu-redundant”.
The new disk be reported as /dev/sda, and the original second disk will appear as
/dev/sdb.
2. Type the following command to add the new /dev/sda3 to rebuild the RAID.
mdadm --add /dev/md0 /dev/sda3
3. Type “mdadm --detail /dev/md0”. The State should report as “clean, degraded,
recovering” and the Rebuild Status “75% complete” (or other progress number).
4. Once the rebuild has completed, the State should report as “clean”, the recovery is
complete.
Page 58
Completing the recovery process
Repeat the process described in “Creating the Redundant ESP” to make a redundant copy of
the ESP, and add a new entry to EFI Boot Manager to complete the recovery process.
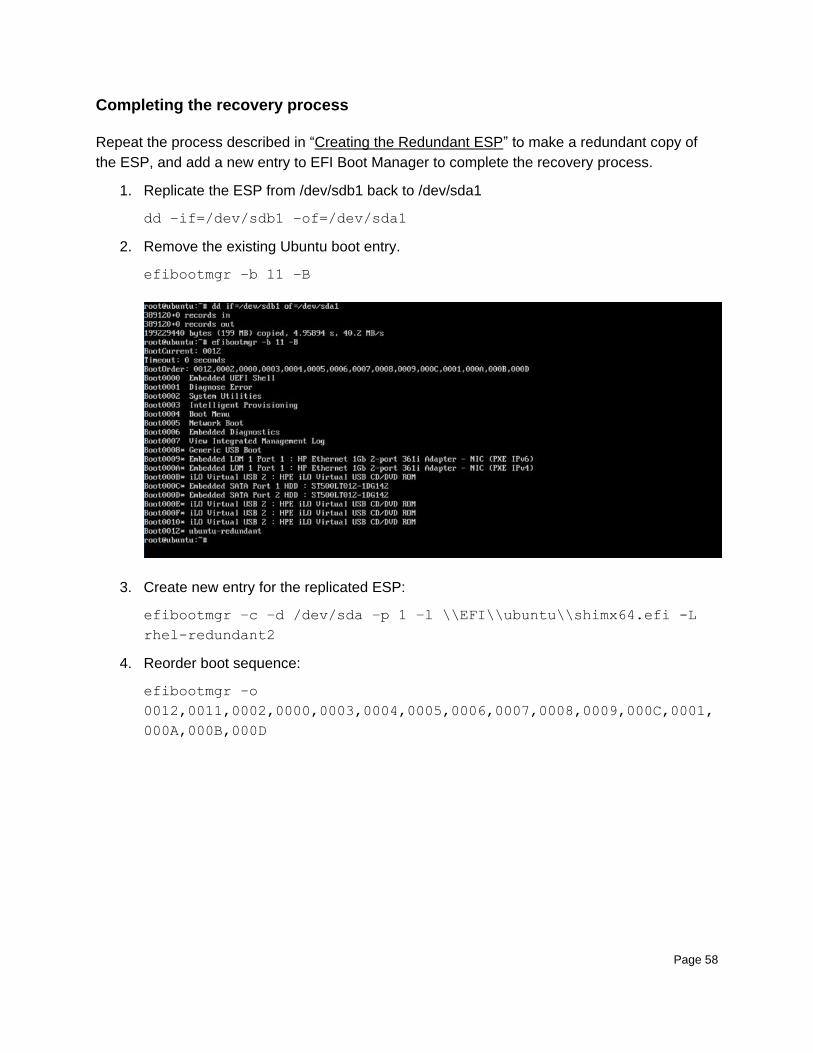
1. Replicate the ESP from /dev/sdb1 back to /dev/sda1
dd –if=/dev/sdb1 –of=/dev/sda1
2. Remove the existing Ubuntu boot entry.
efibootmgr –b 11 –B
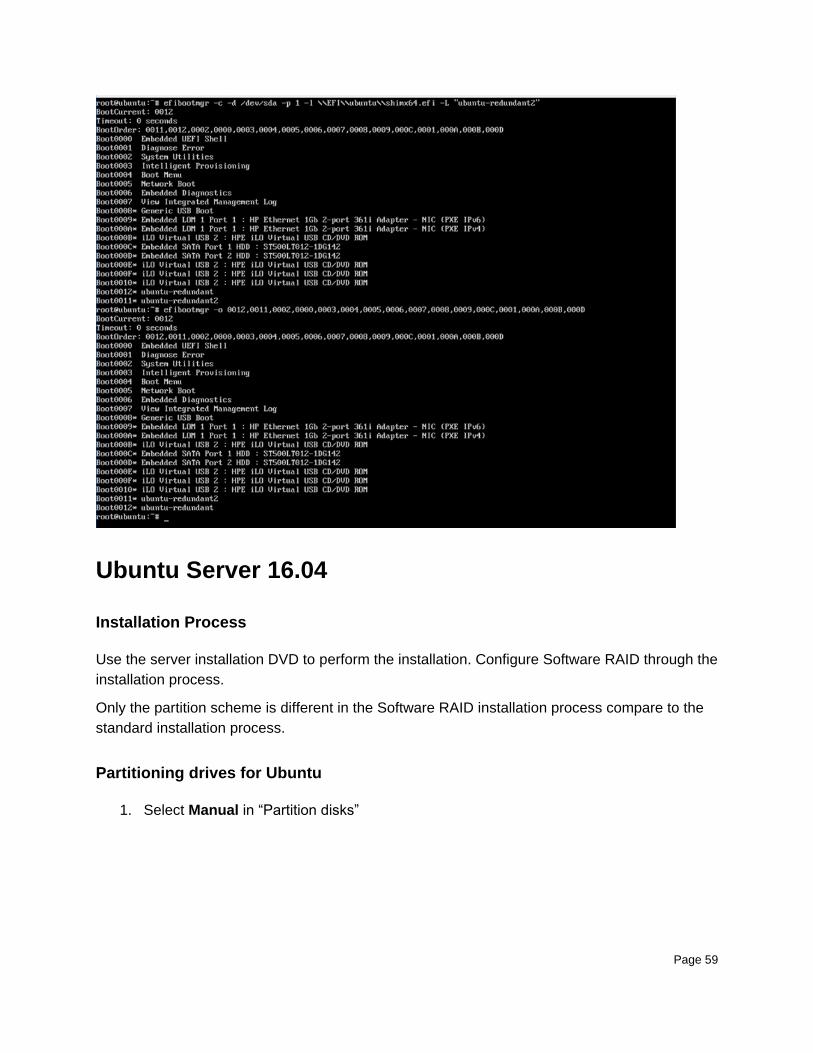
3. Create new entry for the replicated ESP:
efibootmgr –c –d /dev/sda –p 1 –l \\EFI\\ubuntu\\shimx64.efi -L
rhel-redundant2
4. Reorder boot sequence:
efibootmgr –o
0012,0011,0002,0000,0003,0004,0005,0006,0007,0008,0009,000C,0001,
000A,000B,000D
Page 59
Ubuntu Server 16.04
Installation Process
Use the server installation DVD to perform the installation. Configure Software RAID through the
installation process.
Only the partition scheme is different in the Software RAID installation process compare to the
standard installation process.
Partitioning drives for Ubuntu
1. Select Manual in “Partition disks”
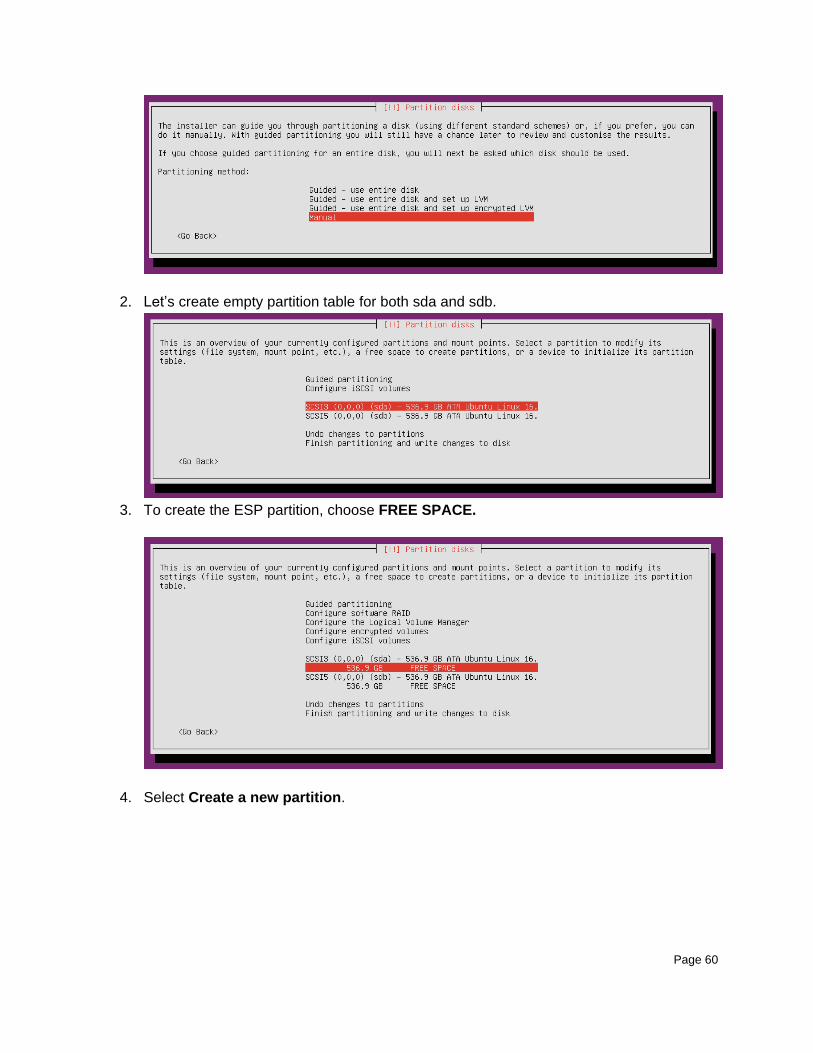
Page 60
2. Let’s create empty partition table for both sda and sdb.
3. To create the ESP partition, choose FREE SPACE.
4. Select Create a new partition.
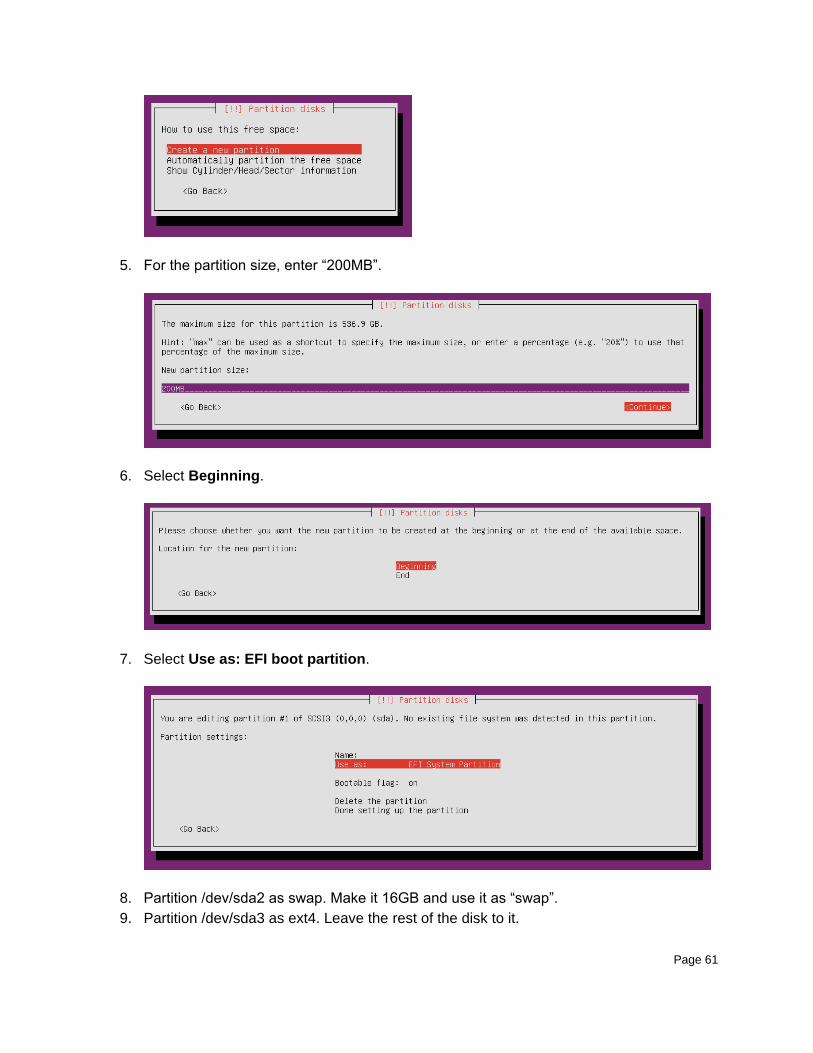
Page 61
5. For the partition size, enter “200MB”.
6. Select Beginning.
7. Select Use as: EFI boot partition.
8. Partition /dev/sda2 as swap. Make it 16GB and use it as “swap”.
9. Partition /dev/sda3 as ext4. Leave the rest of the disk to it.
Page 62
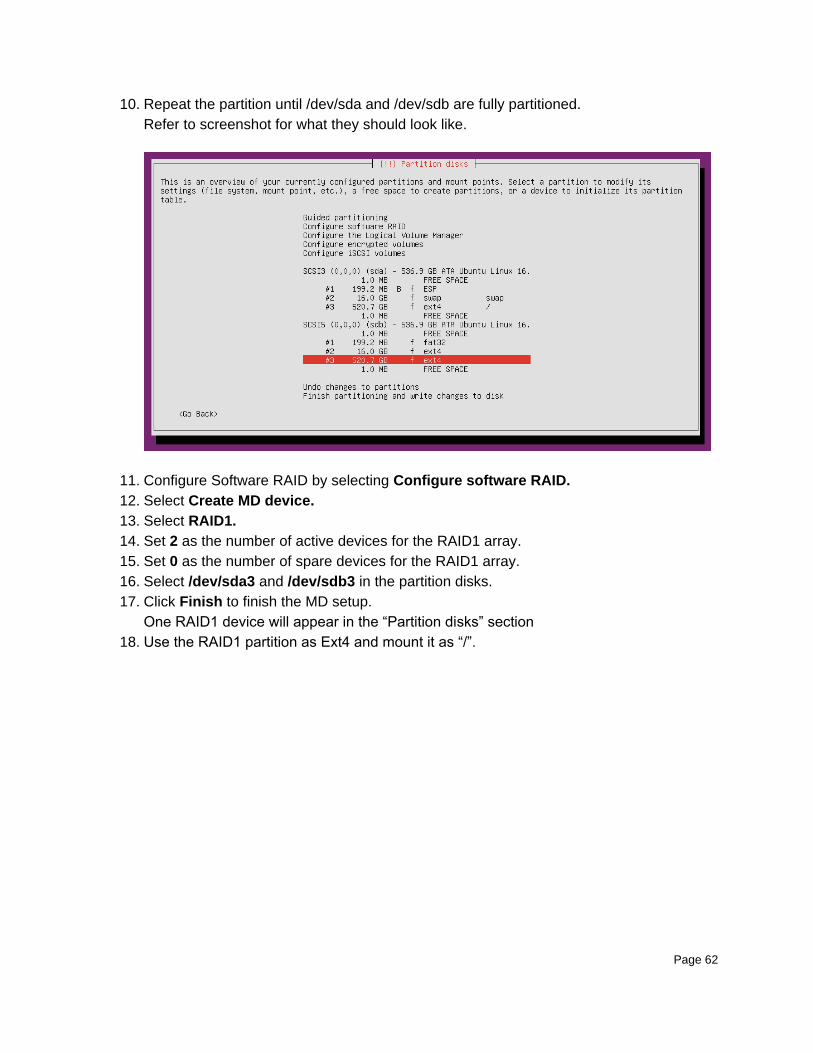
10. Repeat the partition until /dev/sda and /dev/sdb are fully partitioned.
Refer to screenshot for what they should look like.
11. Configure Software RAID by selecting Configure software RAID.
12. Select Create MD device.
13. Select RAID1.
14. Set 2 as the number of active devices for the RAID1 array.
15. Set 0 as the number of spare devices for the RAID1 array.
16. Select /dev/sda3 and /dev/sdb3 in the partition disks.
17. Click Finish to finish the MD setup.
One RAID1 device will appear in the “Partition disks” section
18. Use the RAID1 partition as Ext4 and mount it as “/”.
Page 63
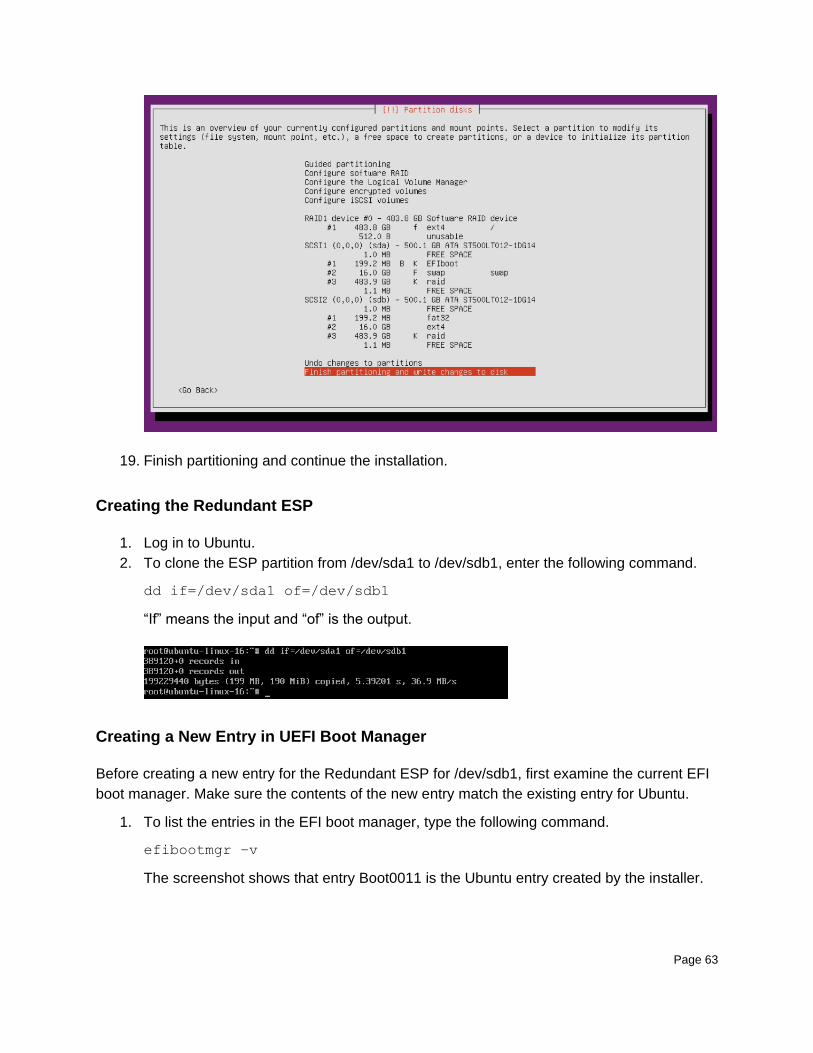
19. Finish partitioning and continue the installation.
Creating the Redundant ESP
1. Log in to Ubuntu.
2. To clone the ESP partition from /dev/sda1 to /dev/sdb1, enter the following command.
dd if=/dev/sda1 of=/dev/sdb1
“If” means the input and “of” is the output.
Creating a New Entry in UEFI Boot Manager
Before creating a new entry for the Redundant ESP for /dev/sdb1, first examine the current EFI
boot manager. Make sure the contents of the new entry match the existing entry for Ubuntu.
1. To list the entries in the EFI boot manager, type the following command.
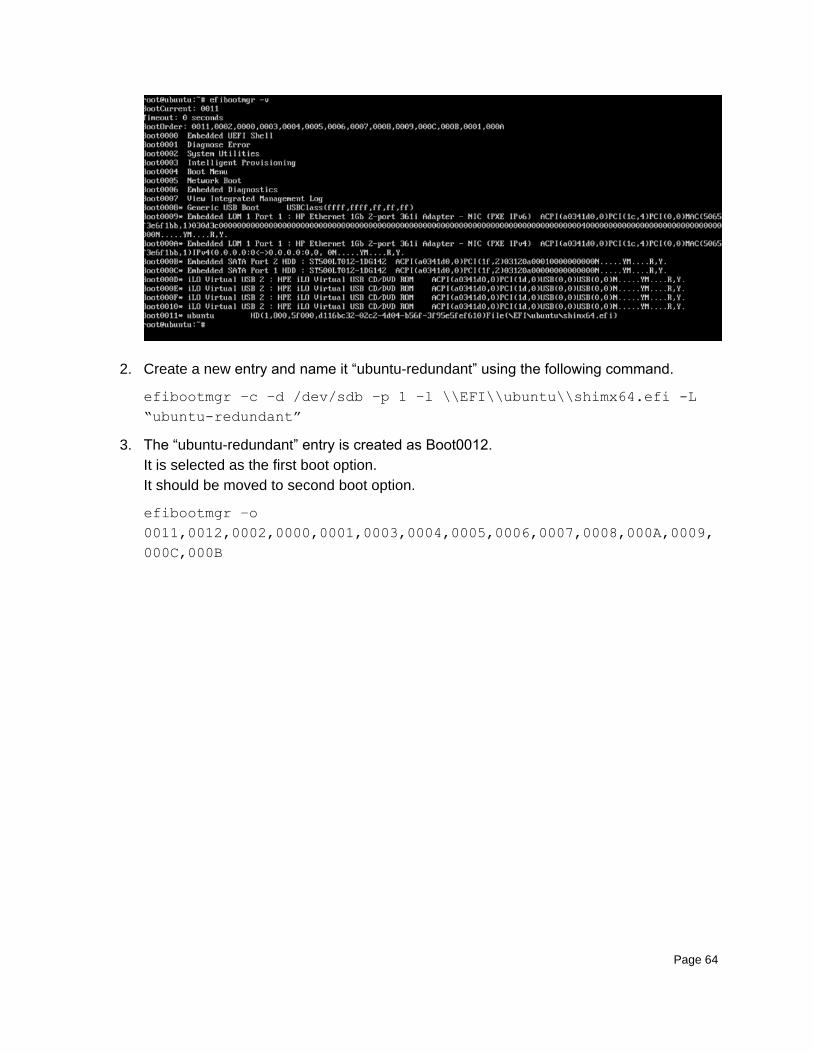
efibootmgr –v
The screenshot shows that entry Boot0011 is the Ubuntu entry created by the installer.
Page 64
2. Create a new entry and name it “ubuntu-redundant” using the following command.
efibootmgr –c –d /dev/sdb –p 1 –l \\EFI\\ubuntu\\shimx64.efi -L
“ubuntu-redundant”
3. The “ubuntu-redundant” entry is created as Boot0012.
It is selected as the first boot option.
It should be moved to second boot option.
efibootmgr –o
0011,0012,0002,0000,0001,0003,0004,0005,0006,0007,0008,000A,0009,
000C,000B
Page 65
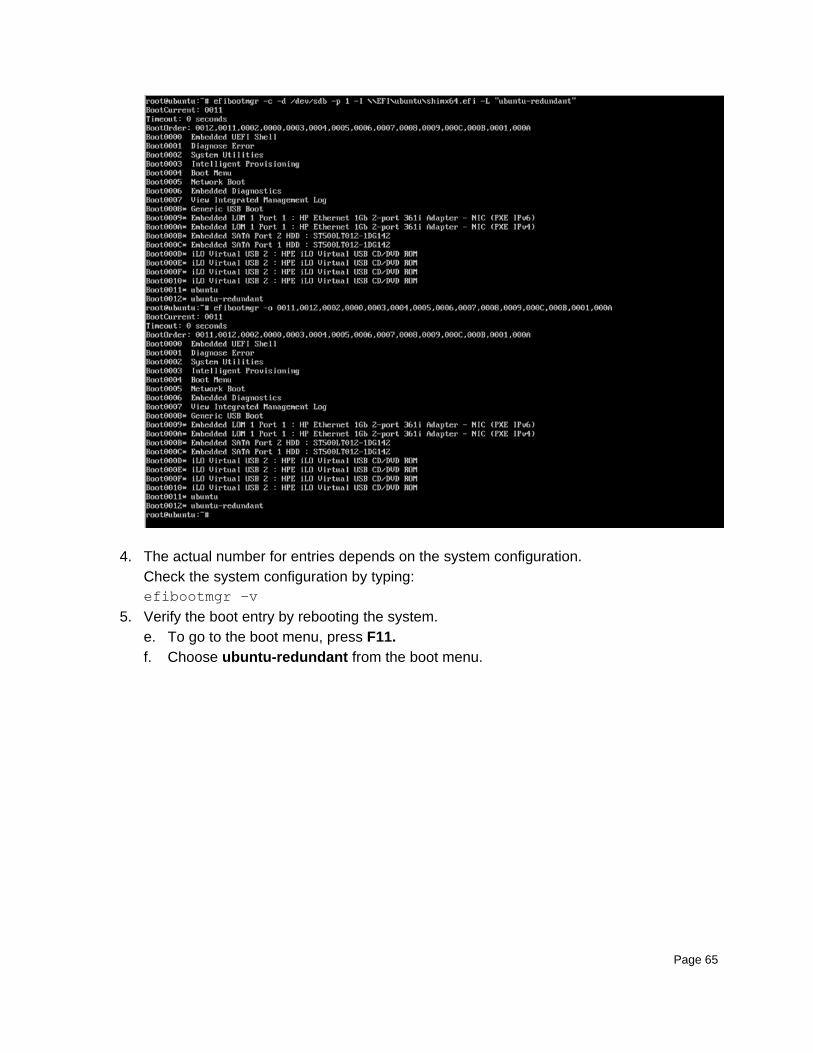
4. The actual number for entries depends on the system configuration.
Check the system configuration by typing:
efibootmgr –v
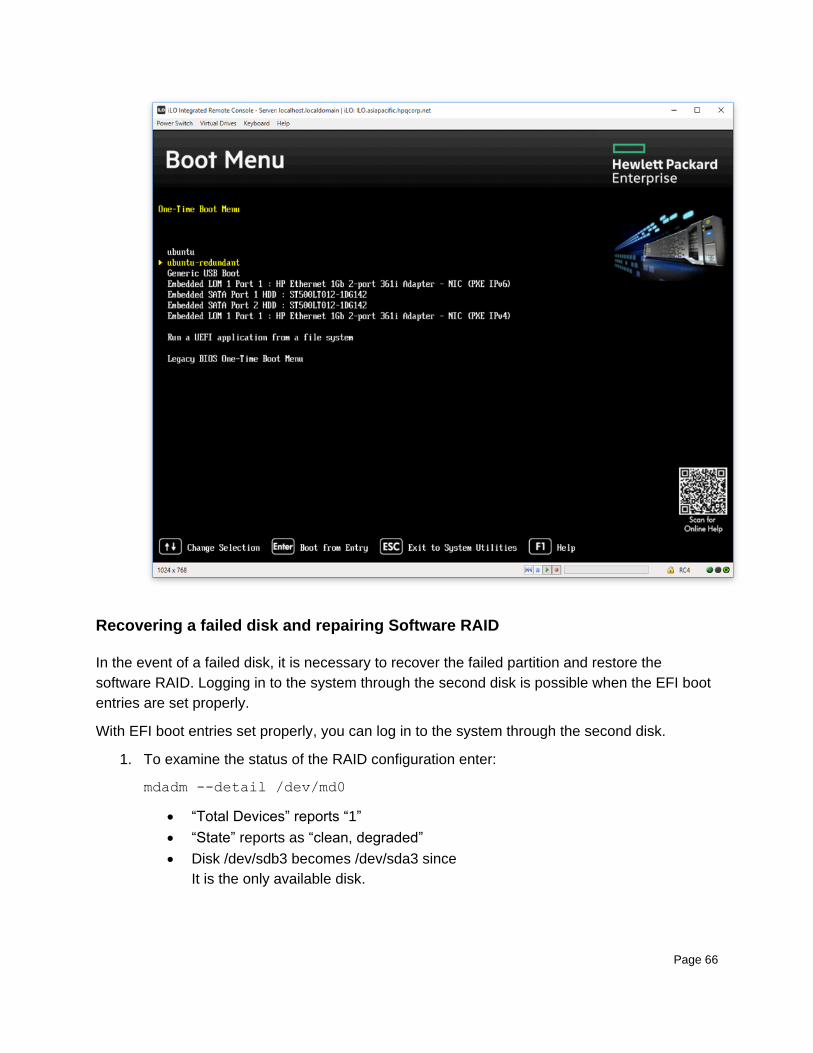
5. Verify the boot entry by rebooting the system.
e. To go to the boot menu, press F11.
f. Choose ubuntu-redundant from the boot menu.
Page 66
Recovering a failed disk and repairing Software RAID
In the event of a failed disk, it is necessary to recover the failed partition and restore the
software RAID. Logging in to the system through the second disk is possible when the EFI boot
entries are set properly.
With EFI boot entries set properly, you can log in to the system through the second disk.
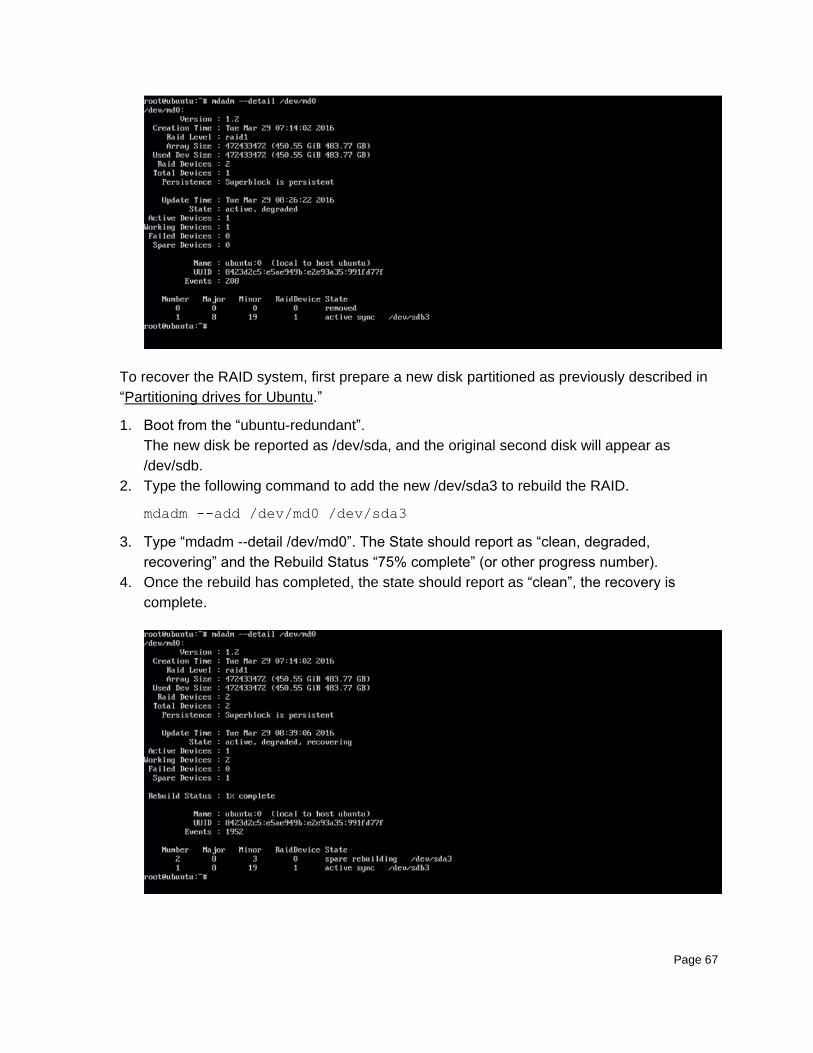
1. To examine the status of the RAID configuration enter:
mdadm --detail /dev/md0
“Total Devices” reports “1”
“State” reports as “clean, degraded”
Disk /dev/sdb3 becomes /dev/sda3 since
It is the only available disk.
Page 67
To recover the RAID system, first prepare a new disk partitioned as previously described in
“Partitioning drives for Ubuntu.”
1. Boot from the “ubuntu-redundant”.
The new disk be reported as /dev/sda, and the original second disk will appear as
/dev/sdb.
2. Type the following command to add the new /dev/sda3 to rebuild the RAID.
mdadm --add /dev/md0 /dev/sda3
3. Type “mdadm --detail /dev/md0”. The State should report as “clean, degraded,
recovering” and the Rebuild Status “75% complete” (or other progress number).
4. Once the rebuild has completed, the state should report as “clean”, the recovery is
complete.
Page 68
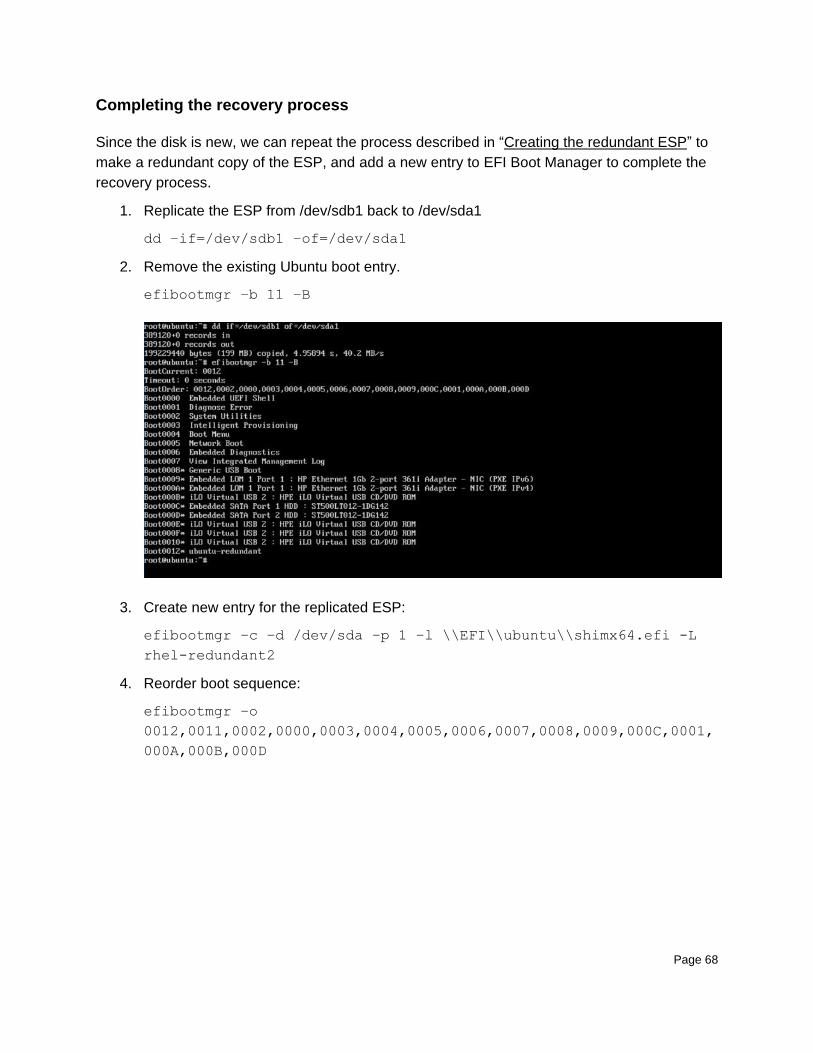
Completing the recovery process
Since the disk is new, we can repeat the process described in “Creating the redundant ESP” to
make a redundant copy of the ESP, and add a new entry to EFI Boot Manager to complete the
recovery process.
1. Replicate the ESP from /dev/sdb1 back to /dev/sda1
dd –if=/dev/sdb1 –of=/dev/sda1
2. Remove the existing Ubuntu boot entry.
efibootmgr –b 11 –B
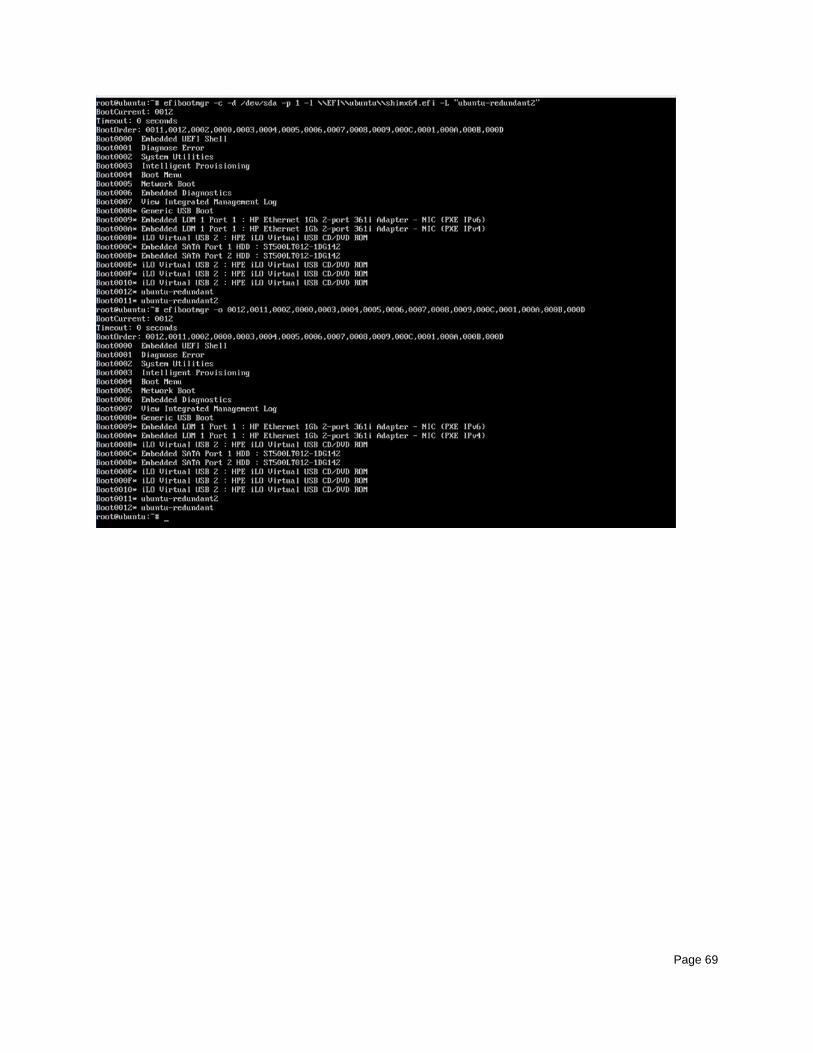
3. Create new entry for the replicated ESP:
efibootmgr –c –d /dev/sda –p 1 –l \\EFI\\ubuntu\\shimx64.efi -L
rhel-redundant2
4. Reorder boot sequence:
efibootmgr –o
0012,0011,0002,0000,0003,0004,0005,0006,0007,0008,0009,000C,0001,
000A,000B,000D
Page 69

Page 70
Appendix B: Example server configurations
PXE server configuration
The PXE configuration file is located in /data/tftpboot/EFI/eilo.cfg. It may be in a different
location in your environment.
The following sample configuration shows how to specify the default entry, timeout, etc. As you
proceed, you will create additional PXE entries in this file.
chooser=simple #This setting will directly boot into default entry for
mass deployment use. If you want to manually select, you can
modify to textmenu.
#message=textmenu-message.msg
prompt
delay=0
timeout=10 #Time out (second)
default=toolkit10.40.RHEL7.2 #The default boot entry.
# For RHEL7.2 Multiple Servers Deployment
image=/tools/toolkit10.40/vmlinuz
label=toolkit10.40.RHEL7.2
description = "HPE Scripting Toolkit 10.40 RHEL7.2"
initrd=/tools/toolkit10.40/initrd.img
append="root=/dev/ram0 rw ramdisk_size=785612 quiet=1 sstk_nic=eth0
network=1 media=net numa=off sstk_conf=toolkit.conf
sstk_script=/deploy.sh sstk_tgz=http://172.1.1.100/answers/STK/hpe-
scripting-toolkit-linux-10.40-rhel7_2.tar.gz" #The place to change
file path.
# For Ubuntu 14.04.4 Multiple Server Deployment
image=/tools/toolkit10.40/vmlinuz
label=toolkit10.40.Ubuntu.14.04.4
description = "HP Scripting Toolkit 10.40 Ubuntu 14.04.4"
initrd=/tools/toolkit10.40/initrd.img
append="root=/dev/ram0 rw ramdisk_size=785612 quiet=1 sstk_nic=eth0
network=1 media=net numa=off sstk_conf=toolkit.conf
sstk_script=/deploy.sh sstk_tgz=http://172.1.1.100/answers/STK/hpe-
scripting-toolkit-linux-10.40-ubuntu14.04.4.tar.gz" #The place to
change file path.
# For Ubuntu 16.04 Multiple Server Deployment
image=/tools/toolkit10.40/vmlinuz
label=toolkit10.40.Ubuntu.16.04
description = "HP Scripting Toolkit 10.40 Ubuntu 16.04"
initrd=/tools/toolkit10.40/initrd.img
append="root=/dev/ram0 rw ramdisk_size=785612 quiet=1 sstk_nic=eth0
network=1 media=net numa=off sstk_conf=toolkit.conf
Page 71
sstk_script=/deploy.sh sstk_tgz=http://172.1.1.100/answers/STK/hpe-
scripting-toolkit-linux-10.40-ubuntu16.04.tar.gz" #The place to change
file path.
# For SLES 12 SP1 Multiple Server Deployment
image=/tools/toolkit10.40/vmlinuz
label=toolkit10.40.SLE12SP1
description = "HP Scripting Toolkit 10.40 SUSE 12 SP1"
initrd=/tools/toolkit10.40/initrd.img
append="root=/dev/ram0 rw ramdisk_size=785612 quiet=1 sstk_nic=eth0
network=1 media=net numa=off sstk_conf=toolkit.conf
sstk_script=/deploy.sh sstk_tgz=http://172.1.1.100/answers/STK/hpe-
scripting-toolkit-linux-10.40-sle12sp1.tar.gz" #The place to change
file path.
# For RHEL7.2 Single Machine Deployment
image=/RHEL/RHEL-7.2Server-x86_64/vmlinuz
label=RHEL-7.2Server-x86_64_ks
description = "RHEL 7.2 Server RAID1 kickstart"
initrd=/RHEL/RHEL-7.2Server-x86_64/initrd.img
append="ipv6.disable=1
inst.ks=http://172.1.1.100/answers/RHEL7_2_RAID1_ks.cfg" #The place to
change file path.
# For SLES 12 SP1 Single Machine Deployment
image=/SLE/SLE-12-SP1-Server-x86_64/linux
label=SLE-12-SP1-Server-x86_64_ks
description = "SLES 12 SP1 RAID1 ks"
initrd=/SLE/SLE-12-SP1-Server-x86_64/initrd
append="vga=normal netdev=eth1
autoyast=http://172.1.1.100/answers/SLES12SP1_RAID1_autoinst.xml insta
ll=http://172.1.1.100/mrepo/SLE-12-SP1-Server-x86_64/disc1" #The place
to change file path.
# For Ubuntu 14.04.4 Single Machine Deployment
image=/ubuntu/trusty-ubuntu-installer/amd64/14.04.4/linux
label=Ubuntu-trusty-14.04.4-amd64_ks
description = "Ubuntu Trusty 14.04.4 RAID1 auto-install"
initrd=/ubuntu/trusty-ubuntu-installer/amd64/14.04.4/initrd.gz
append="vga=normal ipv6.disable=1 ramdisk_size=1083840 root=/dev/ram
rw
preseed/url=http://172.1.1.100/answers/Ubuntu_14.04.4_RAID1_preseed.cf
g debian-installer/locale=en_US keyboard-configuration/layoutcode=us
localechooser/translation/warn-light=true
localechooser/translation/warn-severe=true
netcfg/choose_interface=auto netcfg/get_hostname=ubuntu live-
installer/net-image=http://172.1.1.100/mrepo/UBUNTU-14.04.4-Server-
x86_64/install/filesystem.squashfs" #The place to change file path.
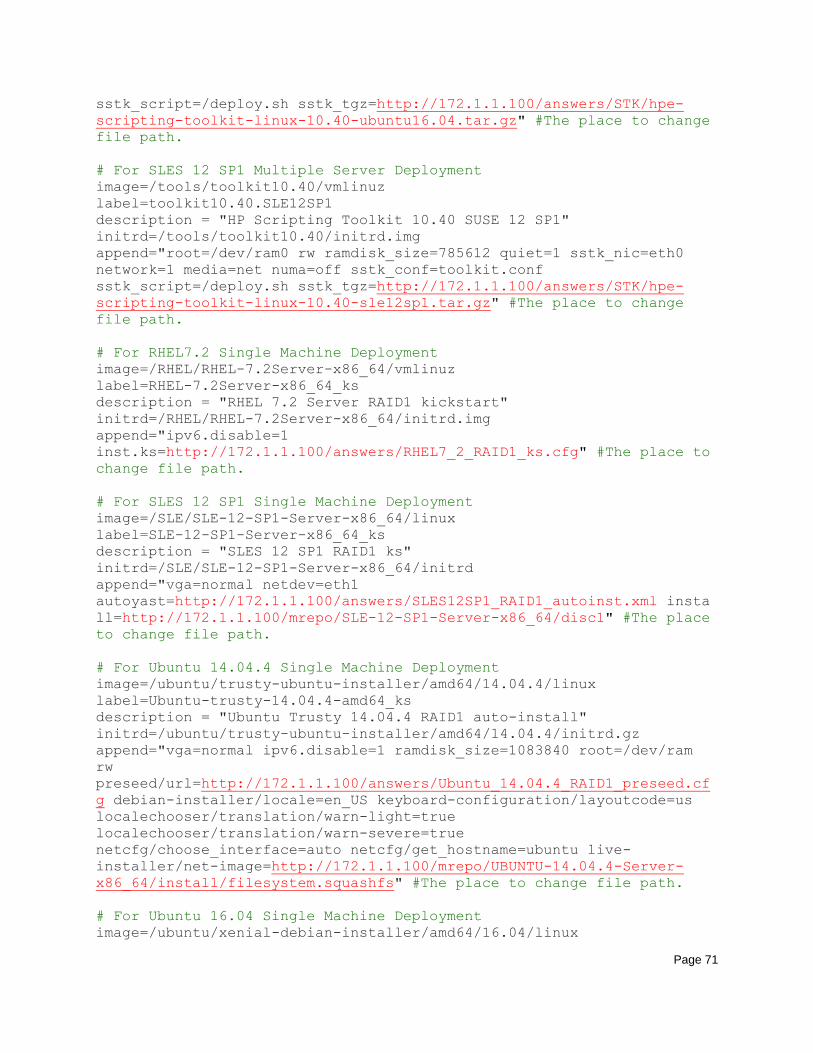
# For Ubuntu 16.04 Single Machine Deployment
image=/ubuntu/xenial-debian-installer/amd64/16.04/linux
Page 72
label=Ubuntu-xenial-16.04-amd64_ks
description = "Ubuntu Xenial 16.04 RAID1 auto-install"
initrd=/ubuntu/xenial-debian-installer/amd64/16.04/initrd.gz
append="vga=normal ipv6.disable=1 ramdisk_size=1083840 root=/dev/ram
rw
preseed/url=http://172.1.1.100/answers/Ubuntu_16.04_RAID1_preseed.cfg
debian-installer/locale=en_US keyboard-configuration/layoutcode=us
localechooser/translation/warn-light=true
localechooser/translation/warn-severe=true
netcfg/choose_interface=auto netcfg/get_hostname=ubuntu live-
installer/net-image=http://172.1.1.100/mrepo/UBUNTU-16.04-Server-
x86_64/install/filesystem.squashfs" #The place to change file path.
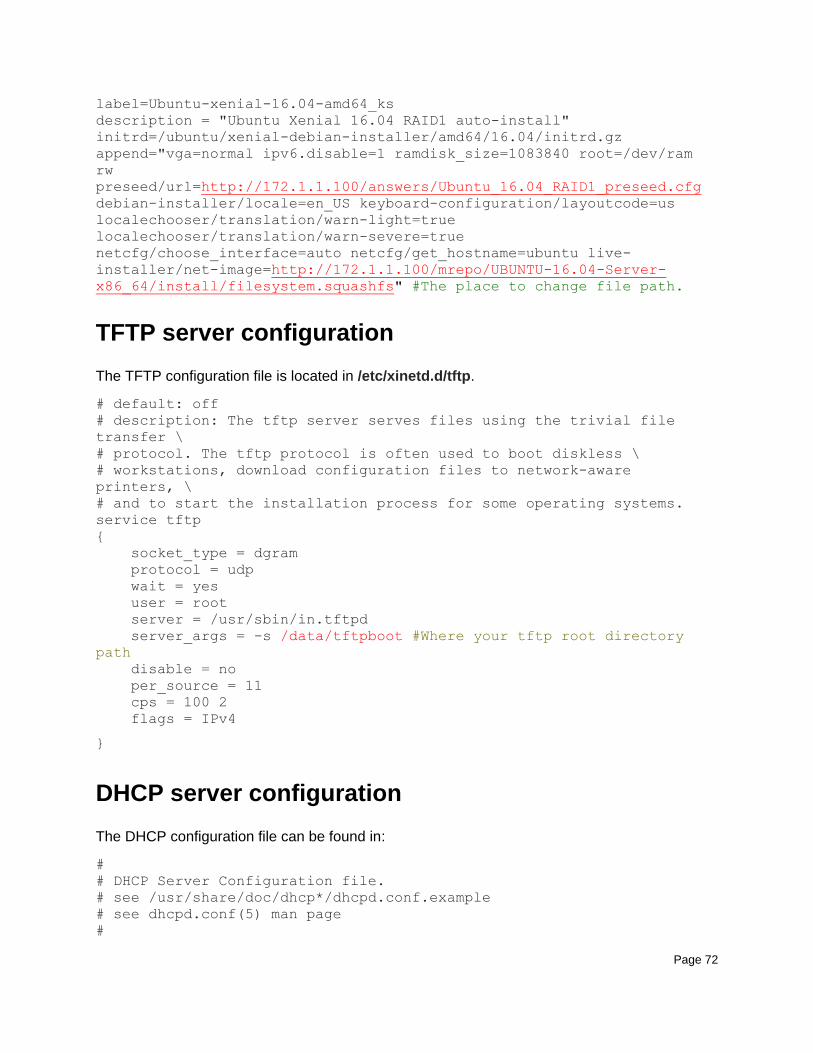
TFTP server configuration
The TFTP configuration file is located in /etc/xinetd.d/tftp.
# default: off
# description: The tftp server serves files using the trivial file
transfer \
# protocol. The tftp protocol is often used to boot diskless \
# workstations, download configuration files to network-aware
printers, \
# and to start the installation process for some operating systems.
service tftp
{
socket_type = dgram
protocol = udp
wait = yes
user = root
server = /usr/sbin/in.tftpd
server_args = -s /data/tftpboot #Where your tftp root directory
path
disable = no
per_source = 11
cps = 100 2
flags = IPv4
}
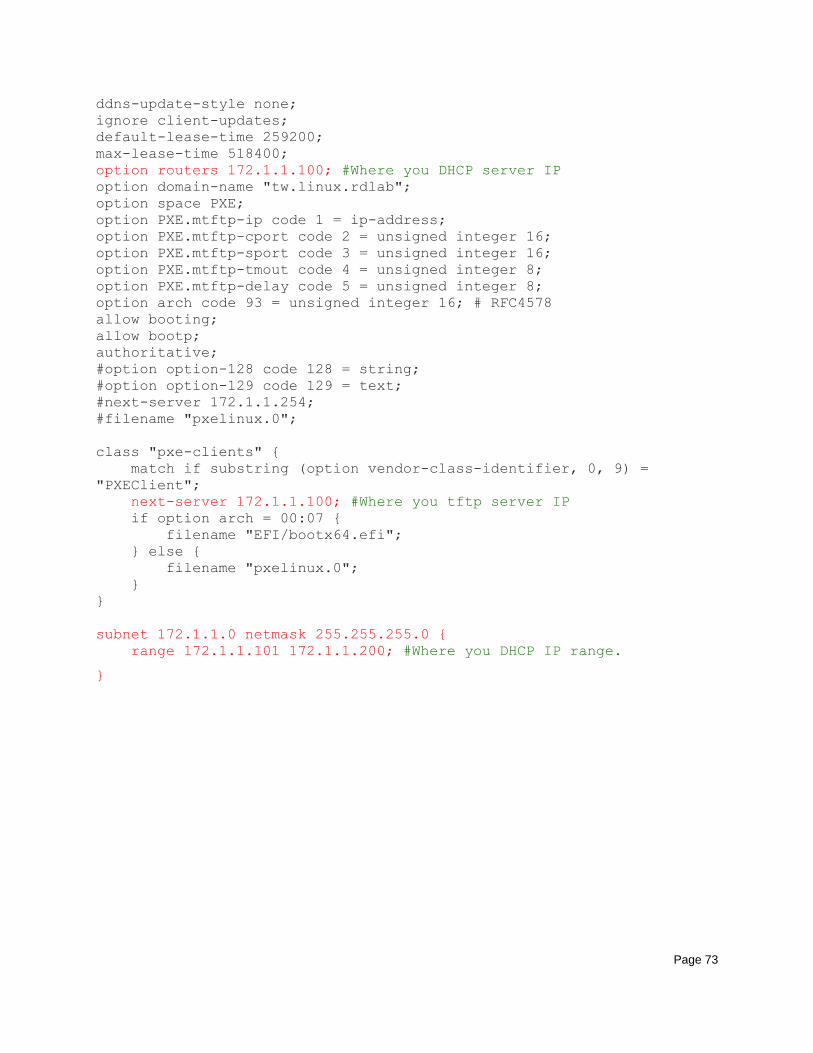
DHCP server configuration
The DHCP configuration file can be found in:
#
# DHCP Server Configuration file.
# see /usr/share/doc/dhcp*/dhcpd.conf.example
# see dhcpd.conf(5) man page
#
Page 73
ddns-update-style none;
ignore client-updates;
default-lease-time 259200;
max-lease-time 518400;
option routers 172.1.1.100; #Where you DHCP server IP
option domain-name "tw.linux.rdlab";
option space PXE;
option PXE.mtftp-ip code 1 = ip-address;
option PXE.mtftp-cport code 2 = unsigned integer 16;
option PXE.mtftp-sport code 3 = unsigned integer 16;
option PXE.mtftp-tmout code 4 = unsigned integer 8;
option PXE.mtftp-delay code 5 = unsigned integer 8;
option arch code 93 = unsigned integer 16; # RFC4578
allow booting;
allow bootp;
authoritative;
#option option-128 code 128 = string;
#option option-129 code 129 = text;
#next-server 172.1.1.254;
#filename "pxelinux.0";
class "pxe-clients" {
match if substring (option vendor-class-identifier, 0, 9) =
"PXEClient";
next-server 172.1.1.100; #Where you tftp server IP
if option arch = 00:07 {
filename "EFI/bootx64.efi";
} else {
filename "pxelinux.0";
}
}
subnet 172.1.1.0 netmask 255.255.255.0 {
range 172.1.1.101 172.1.1.200; #Where you DHCP IP range.
}
Page 74
Appendix C: Example OS-specific
installation scripts
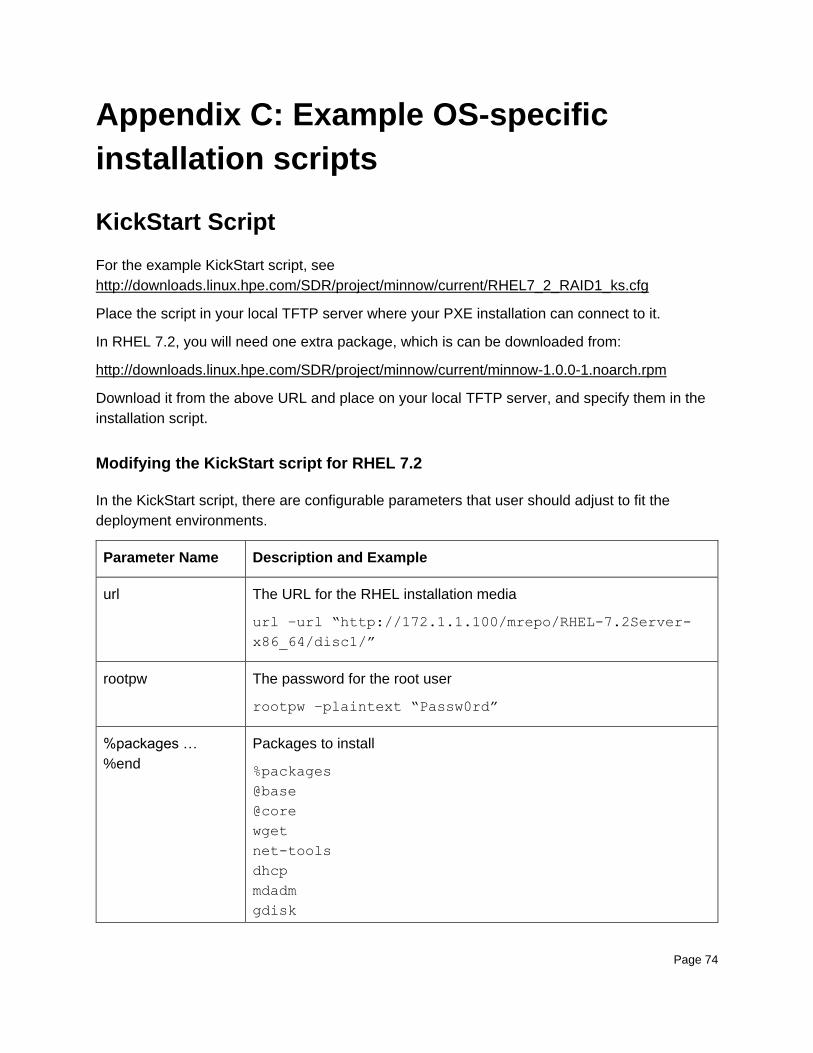
KickStart Script
For the example KickStart script, see
http://downloads.linux.hpe.com/SDR/project/minnow/current/RHEL7_2_RAID1_ks.cfg
Place the script in your local TFTP server where your PXE installation can connect to it.
In RHEL 7.2, you will need one extra package, which is can be downloaded from:
http://downloads.linux.hpe.com/SDR/project/minnow/current/minnow-1.0.0-1.noarch.rpm
Download it from the above URL and place on your local TFTP server, and specify them in the
installation script.
Modifying the KickStart script for RHEL 7.2
In the KickStart script, there are configurable parameters that user should adjust to fit the
deployment environments.
Parameter Name Description and Example
url The URL for the RHEL installation media
url –url “http://172.1.1.100/mrepo/RHEL-7.2Server-
x86_64/disc1/”
rootpw The password for the root user
rootpw –plaintext “Passw0rd”
%packages …
%end
Packages to install
%packages
@base
@core
wget
net-tools
dhcp
mdadm
gdisk
Page 75
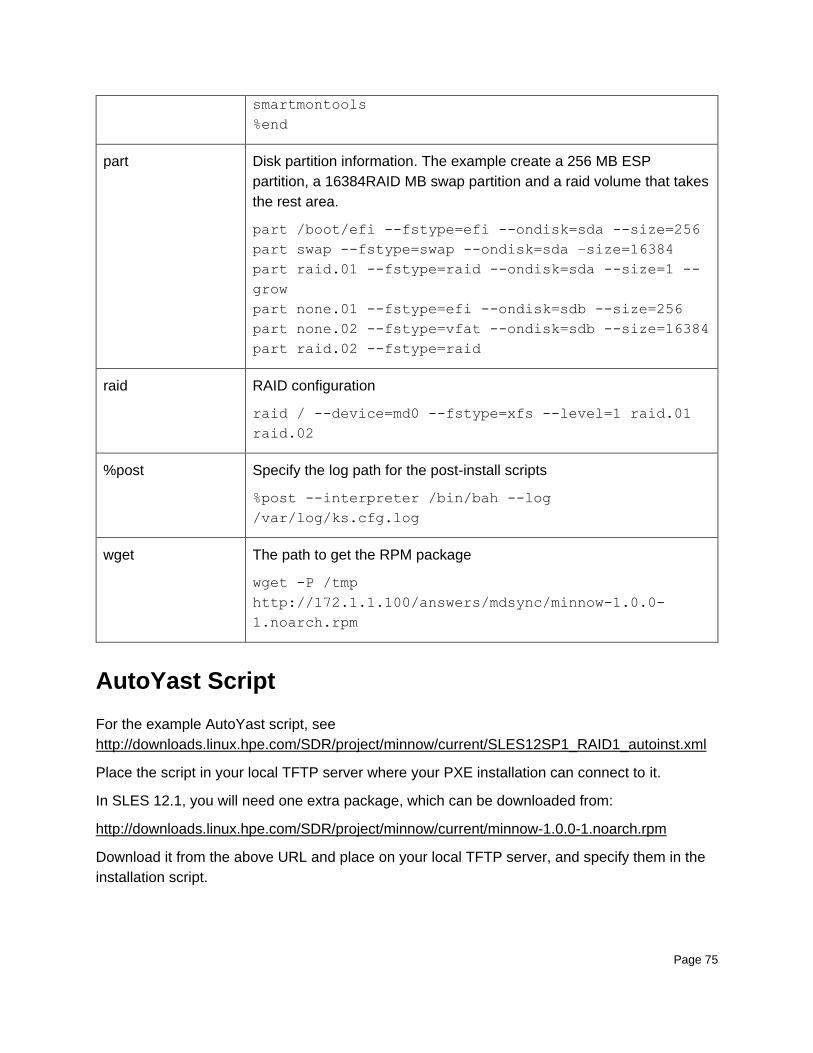
smartmontools
%end
part Disk partition information. The example create a 256 MB ESP
partition, a 16384RAID MB swap partition and a raid volume that takes
the rest area.
part /boot/efi --fstype=efi --ondisk=sda --size=256
part swap --fstype=swap --ondisk=sda –size=16384
part raid.01 --fstype=raid --ondisk=sda --size=1 --
grow
part none.01 --fstype=efi --ondisk=sdb --size=256
part none.02 --fstype=vfat --ondisk=sdb --size=16384
part raid.02 --fstype=raid
raid RAID configuration
raid / --device=md0 --fstype=xfs --level=1 raid.01
raid.02
%post Specify the log path for the post-install scripts
%post --interpreter /bin/bah --log
/var/log/ks.cfg.log
wget The path to get the RPM package
wget -P /tmp
http://172.1.1.100/answers/mdsync/minnow-1.0.0-
1.noarch.rpm
AutoYast Script
For the example AutoYast script, see
http://downloads.linux.hpe.com/SDR/project/minnow/current/SLES12SP1_RAID1_autoinst.xml
Place the script in your local TFTP server where your PXE installation can connect to it.
In SLES 12.1, you will need one extra package, which can be downloaded from:
http://downloads.linux.hpe.com/SDR/project/minnow/current/minnow-1.0.0-1.noarch.rpm
Download it from the above URL and place on your local TFTP server, and specify them in the
installation script.
Page 76
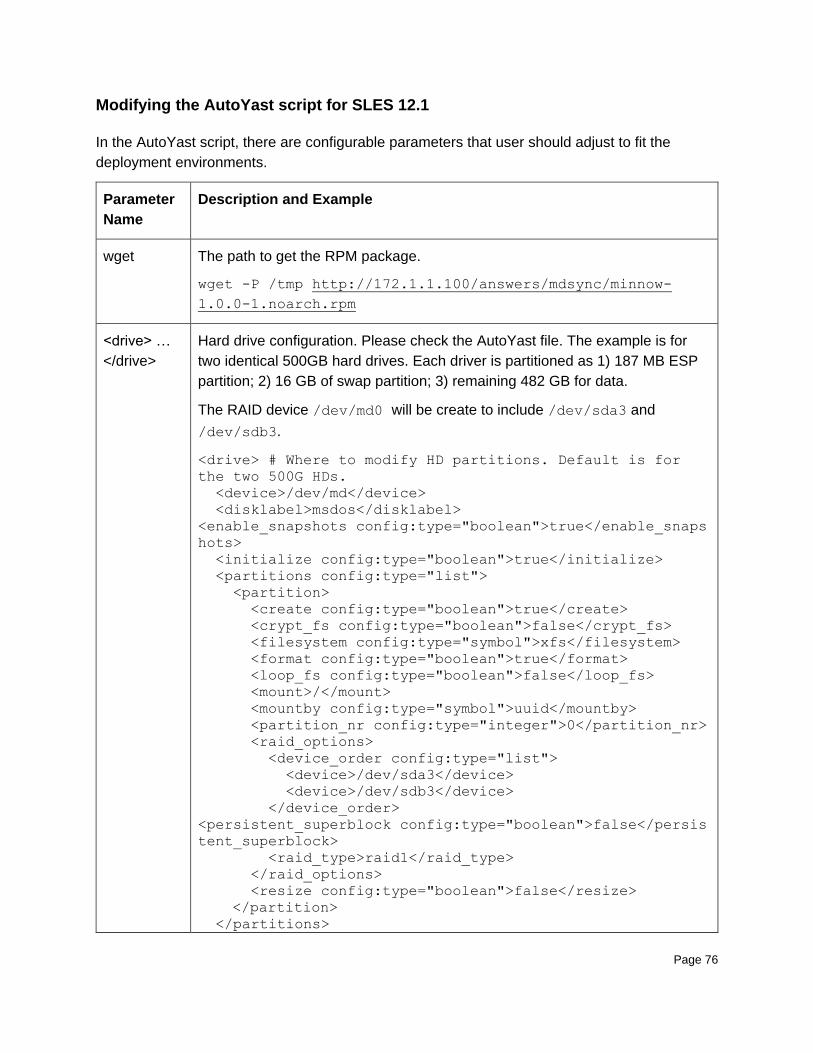
Modifying the AutoYast script for SLES 12.1
In the AutoYast script, there are configurable parameters that user should adjust to fit the
deployment environments.
Parameter
Name
Description and Example
wget The path to get the RPM package.
wget -P /tmp http://172.1.1.100/answers/mdsync/minnow-
1.0.0-1.noarch.rpm
<drive> …
</drive>
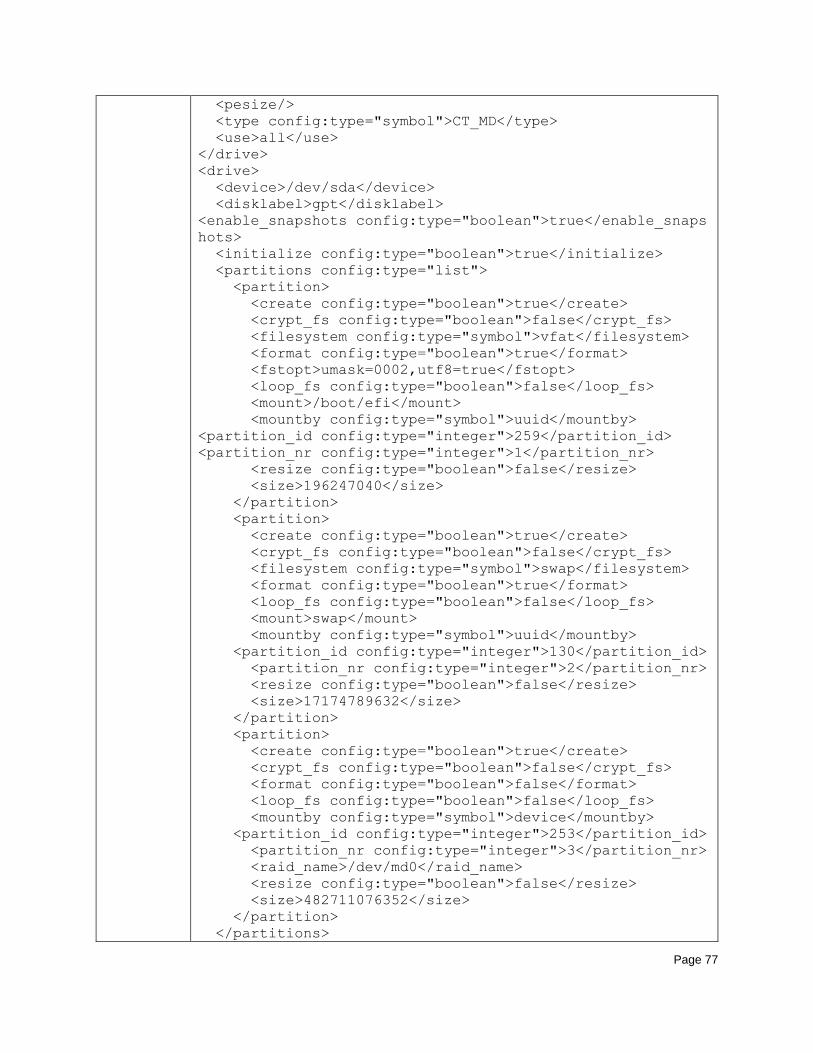
Hard drive configuration. Please check the AutoYast file. The example is for
two identical 500GB hard drives. Each driver is partitioned as 1) 187 MB ESP
partition; 2) 16 GB of swap partition; 3) remaining 482 GB for data.
The RAID device /dev/md0 will be create to include /dev/sda3 and
/dev/sdb3.
<drive> # Where to modify HD partitions. Default is for
the two 500G HDs.
<device>/dev/md</device>
<disklabel>msdos</disklabel>
<enable_snapshots config:type="boolean">true</enable_snaps
hots>
<initialize config:type="boolean">true</initialize>
<partitions config:type="list">
<partition>
<create config:type="boolean">true</create>
<crypt_fs config:type="boolean">false</crypt_fs>
<filesystem config:type="symbol">xfs</filesystem>
<format config:type="boolean">true</format>
<loop_fs config:type="boolean">false</loop_fs>
<mount>/</mount>
<mountby config:type="symbol">uuid</mountby>
<partition_nr config:type="integer">0</partition_nr>
<raid_options>
<device_order config:type="list">
<device>/dev/sda3</device>
<device>/dev/sdb3</device>
</device_order>
<persistent_superblock config:type="boolean">false</persis
tent_superblock>
<raid_type>raid1</raid_type>
</raid_options>
<resize config:type="boolean">false</resize>
</partition>
</partitions>
Page 77
<pesize/>
<type config:type="symbol">CT_MD</type>
<use>all</use>
</drive>
<drive>
<device>/dev/sda</device>
<disklabel>gpt</disklabel>
<enable_snapshots config:type="boolean">true</enable_snaps
hots>
<initialize config:type="boolean">true</initialize>
<partitions config:type="list">
<partition>
<create config:type="boolean">true</create>
<crypt_fs config:type="boolean">false</crypt_fs>
<filesystem config:type="symbol">vfat</filesystem>
<format config:type="boolean">true</format>
<fstopt>umask=0002,utf8=true</fstopt>
<loop_fs config:type="boolean">false</loop_fs>
<mount>/boot/efi</mount>
<mountby config:type="symbol">uuid</mountby>
<partition_id config:type="integer">259</partition_id>
<partition_nr config:type="integer">1</partition_nr>
<resize config:type="boolean">false</resize>
<size>196247040</size>
</partition>
<partition>
<create config:type="boolean">true</create>
<crypt_fs config:type="boolean">false</crypt_fs>
<filesystem config:type="symbol">swap</filesystem>
<format config:type="boolean">true</format>
<loop_fs config:type="boolean">false</loop_fs>
<mount>swap</mount>
<mountby config:type="symbol">uuid</mountby>
<partition_id config:type="integer">130</partition_id>
<partition_nr config:type="integer">2</partition_nr>
<resize config:type="boolean">false</resize>
<size>17174789632</size>
</partition>
<partition>
<create config:type="boolean">true</create>
<crypt_fs config:type="boolean">false</crypt_fs>
<format config:type="boolean">false</format>
<loop_fs config:type="boolean">false</loop_fs>
<mountby config:type="symbol">device</mountby>
<partition_id config:type="integer">253</partition_id>
<partition_nr config:type="integer">3</partition_nr>
<raid_name>/dev/md0</raid_name>
<resize config:type="boolean">false</resize>
<size>482711076352</size>
</partition>
</partitions>
Page 78
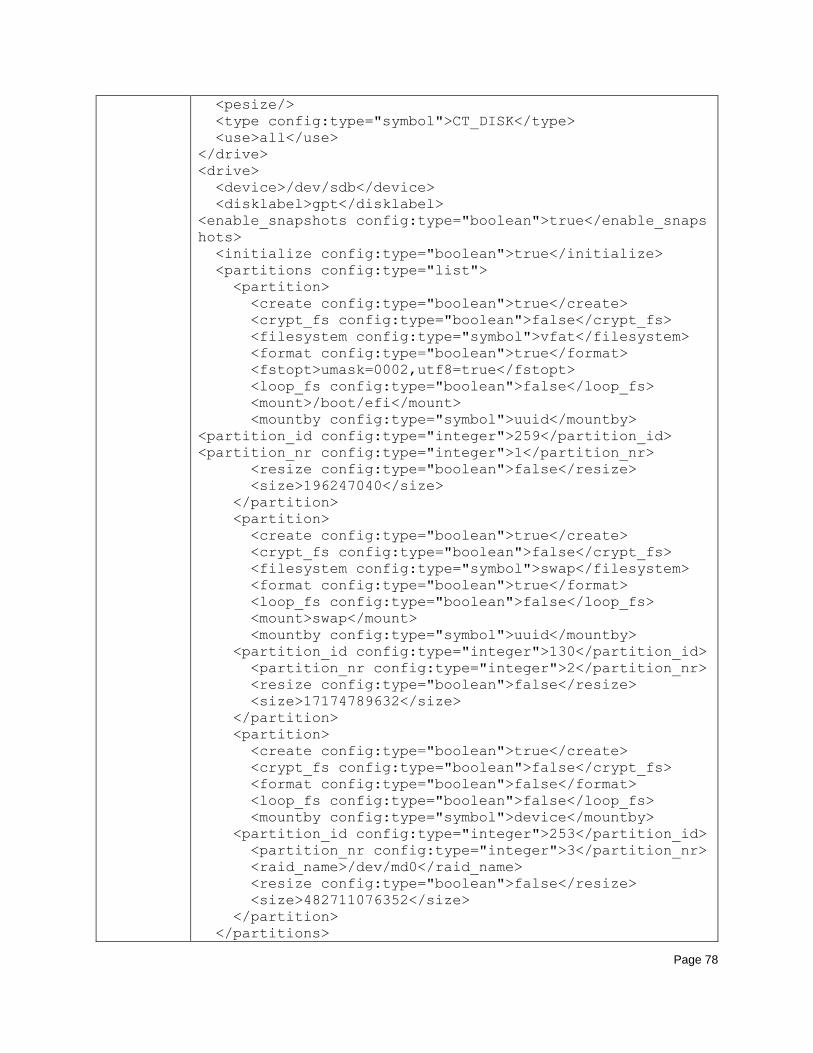
<pesize/>
<type config:type="symbol">CT_DISK</type>
<use>all</use>
</drive>
<drive>
<device>/dev/sdb</device>
<disklabel>gpt</disklabel>
<enable_snapshots config:type="boolean">true</enable_snaps
hots>
<initialize config:type="boolean">true</initialize>
<partitions config:type="list">
<partition>
<create config:type="boolean">true</create>
<crypt_fs config:type="boolean">false</crypt_fs>
<filesystem config:type="symbol">vfat</filesystem>
<format config:type="boolean">true</format>
<fstopt>umask=0002,utf8=true</fstopt>
<loop_fs config:type="boolean">false</loop_fs>
<mount>/boot/efi</mount>
<mountby config:type="symbol">uuid</mountby>
<partition_id config:type="integer">259</partition_id>
<partition_nr config:type="integer">1</partition_nr>
<resize config:type="boolean">false</resize>
<size>196247040</size>
</partition>
<partition>
<create config:type="boolean">true</create>
<crypt_fs config:type="boolean">false</crypt_fs>
<filesystem config:type="symbol">swap</filesystem>
<format config:type="boolean">true</format>
<loop_fs config:type="boolean">false</loop_fs>
<mount>swap</mount>
<mountby config:type="symbol">uuid</mountby>
<partition_id config:type="integer">130</partition_id>
<partition_nr config:type="integer">2</partition_nr>
<resize config:type="boolean">false</resize>
<size>17174789632</size>
</partition>
<partition>
<create config:type="boolean">true</create>
<crypt_fs config:type="boolean">false</crypt_fs>
<format config:type="boolean">false</format>
<loop_fs config:type="boolean">false</loop_fs>
<mountby config:type="symbol">device</mountby>
<partition_id config:type="integer">253</partition_id>
<partition_nr config:type="integer">3</partition_nr>
<raid_name>/dev/md0</raid_name>
<resize config:type="boolean">false</resize>
<size>482711076352</size>
</partition>
</partitions>
Page 79
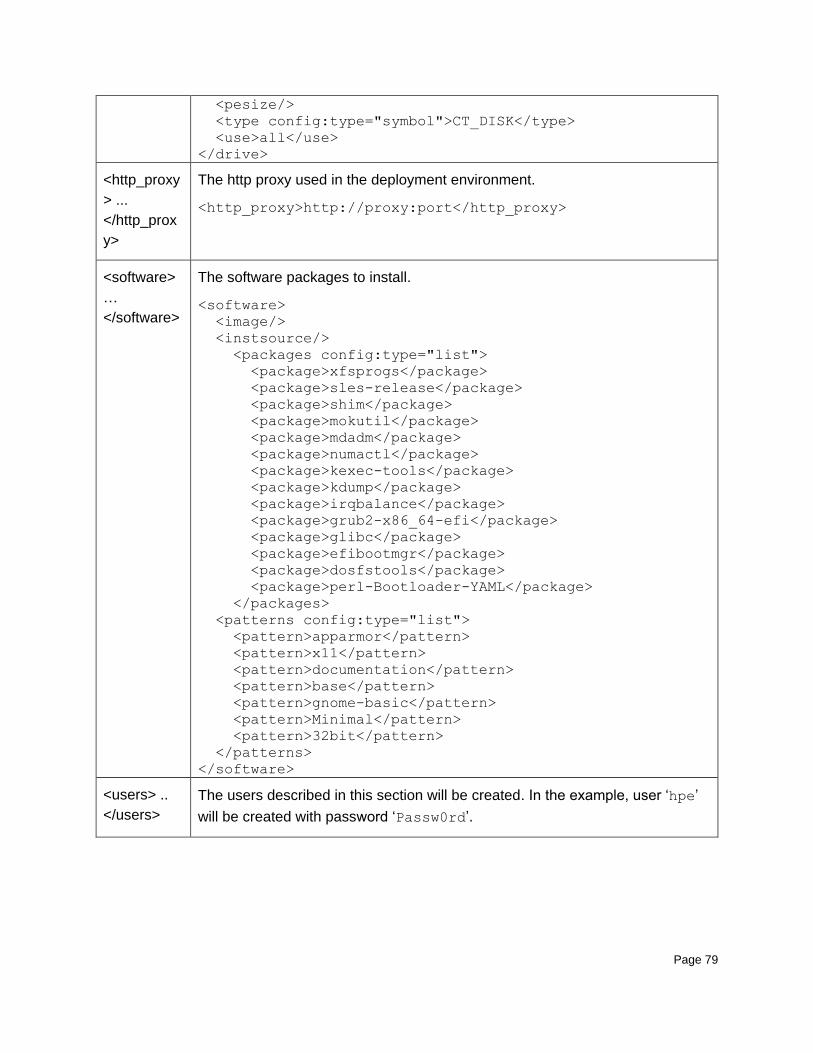
<pesize/>
<type config:type="symbol">CT_DISK</type>
<use>all</use>
</drive>
<http_proxy
> ...
</http_prox
y>
The http proxy used in the deployment environment.
<http_proxy>http://proxy:port</http_proxy>
<software>
…
</software>
The software packages to install.
<software>
<image/>
<instsource/>
<packages config:type="list">
<package>xfsprogs</package>
<package>sles-release</package>
<package>shim</package>
<package>mokutil</package>
<package>mdadm</package>
<package>numactl</package>
<package>kexec-tools</package>
<package>kdump</package>
<package>irqbalance</package>
<package>grub2-x86_64-efi</package>
<package>glibc</package>
<package>efibootmgr</package>
<package>dosfstools</package>
<package>perl-Bootloader-YAML</package>
</packages>
<patterns config:type="list">
<pattern>apparmor</pattern>
<pattern>x11</pattern>
<pattern>documentation</pattern>
<pattern>base</pattern>
<pattern>gnome-basic</pattern>
<pattern>Minimal</pattern>
<pattern>32bit</pattern>
</patterns>
</software>
<users> ..
</users>
The users described in this section will be created. In the example, user ‘hpe’
will be created with password ‘Passw0rd’.
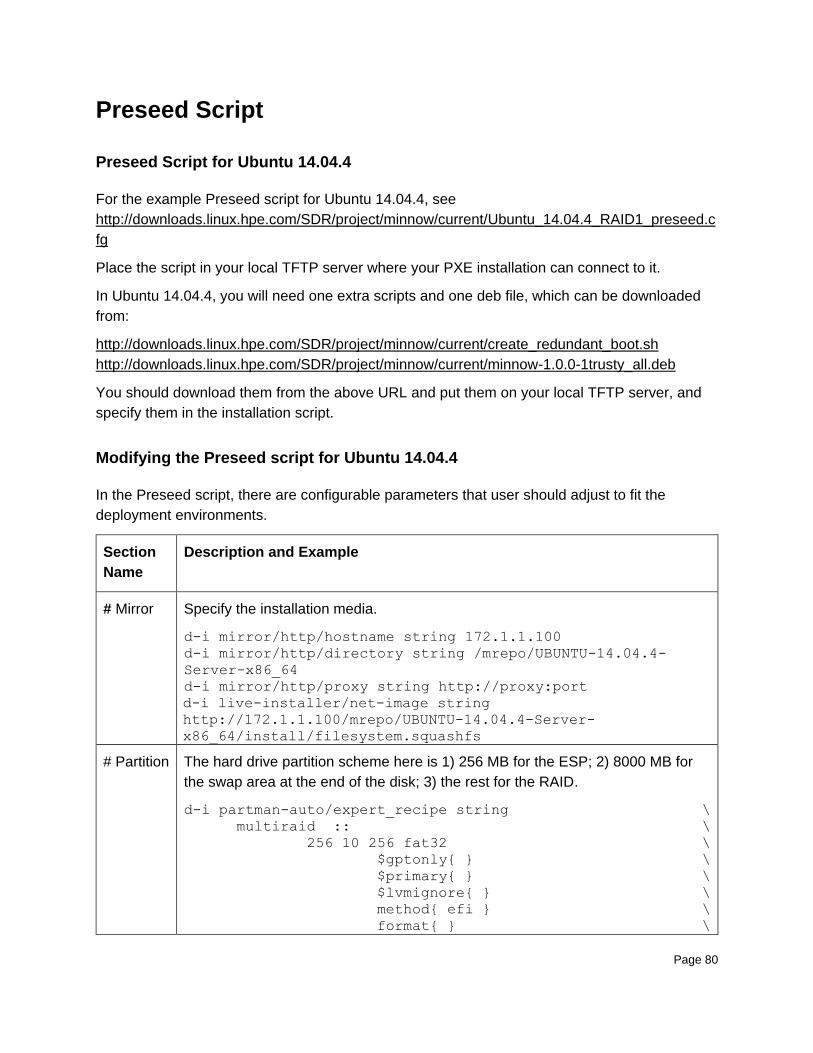
Page 80
Preseed Script
Preseed Script for Ubuntu 14.04.4
For the example Preseed script for Ubuntu 14.04.4, see
http://downloads.linux.hpe.com/SDR/project/minnow/current/Ubuntu_14.04.4_RAID1_preseed.c
fg
Place the script in your local TFTP server where your PXE installation can connect to it.
In Ubuntu 14.04.4, you will need one extra scripts and one deb file, which can be downloaded
from:
http://downloads.linux.hpe.com/SDR/project/minnow/current/create_redundant_boot.sh
http://downloads.linux.hpe.com/SDR/project/minnow/current/minnow-1.0.0-1trusty_all.deb
You should download them from the above URL and put them on your local TFTP server, and
specify them in the installation script.
Modifying the Preseed script for Ubuntu 14.04.4
In the Preseed script, there are configurable parameters that user should adjust to fit the
deployment environments.
Section
Name
Description and Example
# Mirror Specify the installation media.
d-i mirror/http/hostname string 172.1.1.100
d-i mirror/http/directory string /mrepo/UBUNTU-14.04.4-
Server-x86_64
d-i mirror/http/proxy string http://proxy:port
d-i live-installer/net-image string
http://172.1.1.100/mrepo/UBUNTU-14.04.4-Server-
x86_64/install/filesystem.squashfs
# Partition The hard drive partition scheme here is 1) 256 MB for the ESP; 2) 8000 MB for
the swap area at the end of the disk; 3) the rest for the RAID.
d-i partman-auto/expert_recipe string \
multiraid :: \
256 10 256 fat32 \
$gptonly{ } \
$primary{ } \
$lvmignore{ } \
method{ efi } \
format{ } \
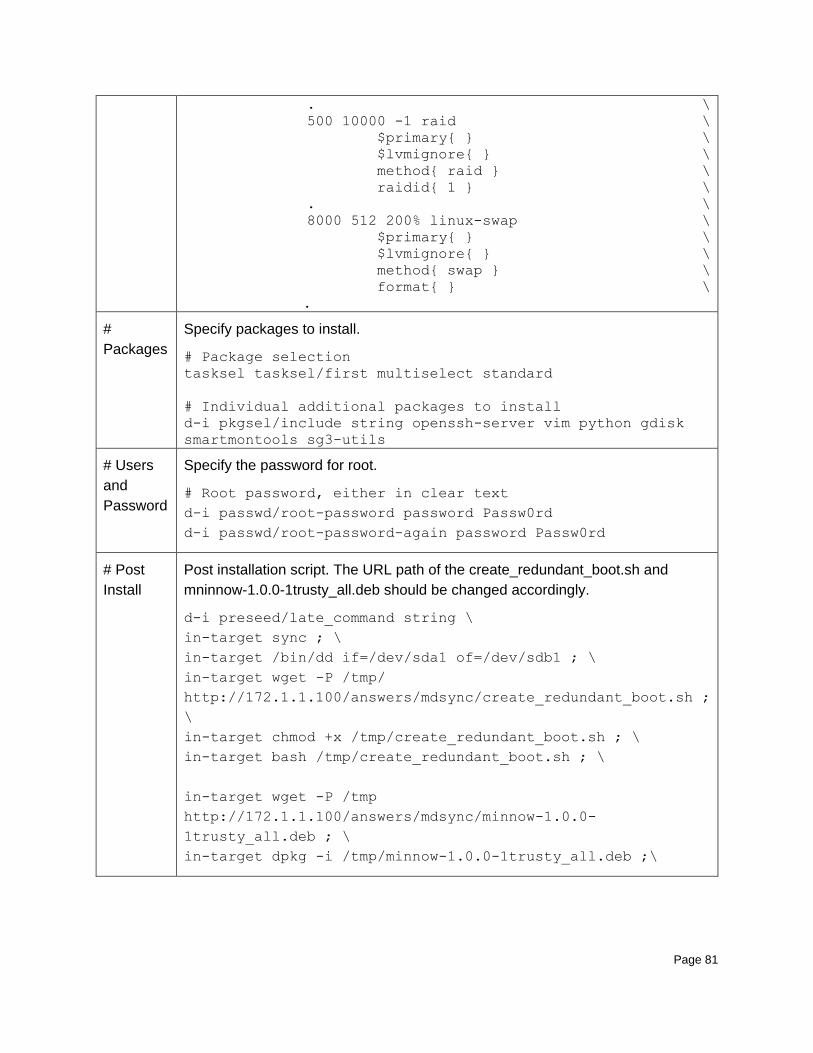
Page 81
. \
500 10000 -1 raid \
$primary{ } \
$lvmignore{ } \
method{ raid } \
raidid{ 1 } \
. \
8000 512 200% linux-swap \
$primary{ } \
$lvmignore{ } \
method{ swap } \
format{ } \
.
#
Packages
Specify packages to install.
# Package selection
tasksel tasksel/first multiselect standard
# Individual additional packages to install
d-i pkgsel/include string openssh-server vim python gdisk
smartmontools sg3-utils
# Users
and
Password
Specify the password for root.
# Root password, either in clear text
d-i passwd/root-password password Passw0rd
d-i passwd/root-password-again password Passw0rd
# Post
Install
Post installation script. The URL path of the create_redundant_boot.sh and
mninnow-1.0.0-1trusty_all.deb should be changed accordingly.
d-i preseed/late_command string \
in-target sync ; \
in-target /bin/dd if=/dev/sda1 of=/dev/sdb1 ; \
in-target wget -P /tmp/
http://172.1.1.100/answers/mdsync/create_redundant_boot.sh ;
\
in-target chmod +x /tmp/create_redundant_boot.sh ; \
in-target bash /tmp/create_redundant_boot.sh ; \
in-target wget -P /tmp
http://172.1.1.100/answers/mdsync/minnow-1.0.0-
1trusty_all.deb ; \
in-target dpkg -i /tmp/minnow-1.0.0-1trusty_all.deb ;\
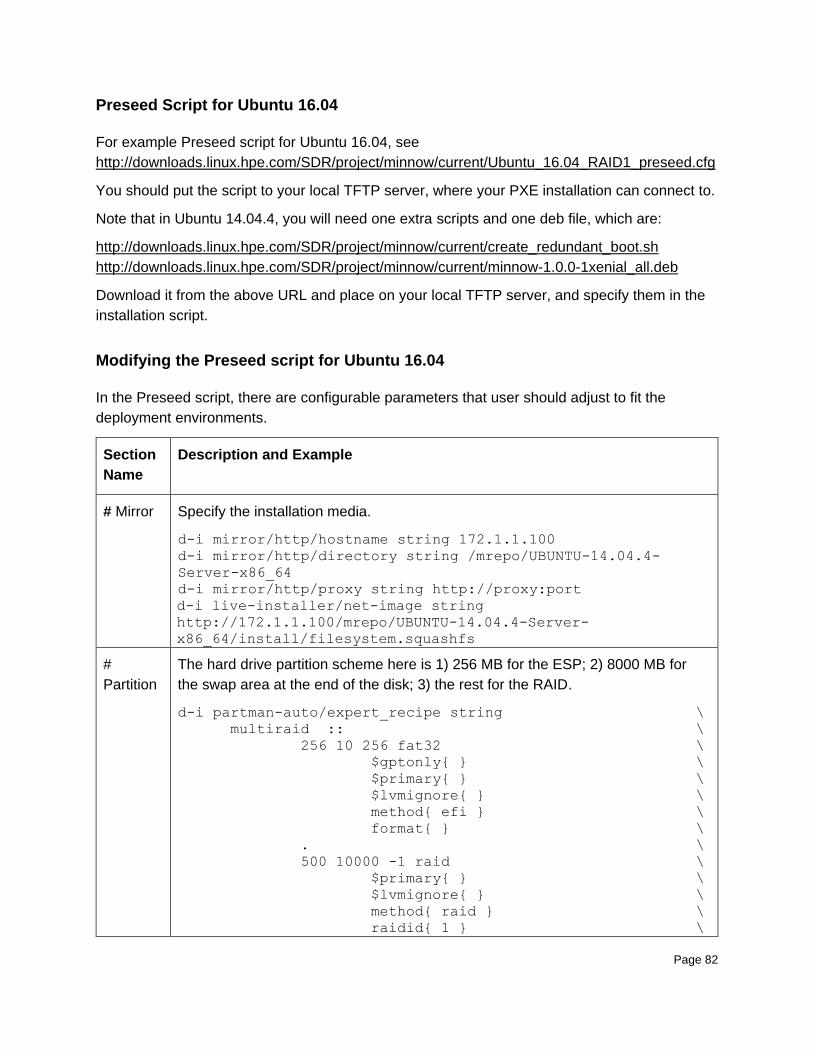
Page 82
Preseed Script for Ubuntu 16.04
For example Preseed script for Ubuntu 16.04, see
http://downloads.linux.hpe.com/SDR/project/minnow/current/Ubuntu_16.04_RAID1_preseed.cfg
You should put the script to your local TFTP server, where your PXE installation can connect to.
Note that in Ubuntu 14.04.4, you will need one extra scripts and one deb file, which are:
http://downloads.linux.hpe.com/SDR/project/minnow/current/create_redundant_boot.sh
http://downloads.linux.hpe.com/SDR/project/minnow/current/minnow-1.0.0-1xenial_all.deb
Download it from the above URL and place on your local TFTP server, and specify them in the
installation script.
Modifying the Preseed script for Ubuntu 16.04
In the Preseed script, there are configurable parameters that user should adjust to fit the
deployment environments.
Section
Name
Description and Example
# Mirror Specify the installation media.
d-i mirror/http/hostname string 172.1.1.100
d-i mirror/http/directory string /mrepo/UBUNTU-14.04.4-
Server-x86_64
d-i mirror/http/proxy string http://proxy:port
d-i live-installer/net-image string
http://172.1.1.100/mrepo/UBUNTU-14.04.4-Server-
x86_64/install/filesystem.squashfs
#
Partition
The hard drive partition scheme here is 1) 256 MB for the ESP; 2) 8000 MB for
the swap area at the end of the disk; 3) the rest for the RAID.
d-i partman-auto/expert_recipe string \
multiraid :: \
256 10 256 fat32 \
$gptonly{ } \
$primary{ } \
$lvmignore{ } \
method{ efi } \
format{ } \
. \
500 10000 -1 raid \
$primary{ } \
$lvmignore{ } \
method{ raid } \
raidid{ 1 } \
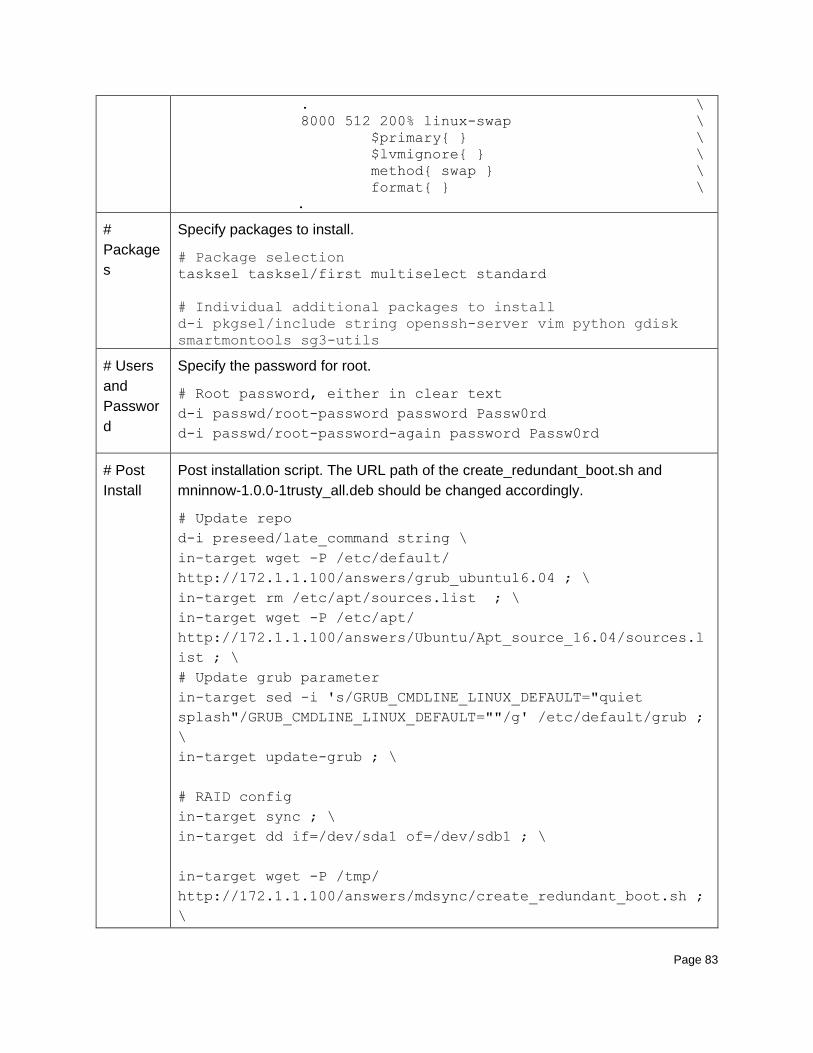
Page 83
. \
8000 512 200% linux-swap \
$primary{ } \
$lvmignore{ } \
method{ swap } \
format{ } \
.
#
Package
s
Specify packages to install.
# Package selection
tasksel tasksel/first multiselect standard
# Individual additional packages to install
d-i pkgsel/include string openssh-server vim python gdisk
smartmontools sg3-utils
# Users
and
Passwor
d
Specify the password for root.
# Root password, either in clear text
d-i passwd/root-password password Passw0rd
d-i passwd/root-password-again password Passw0rd
# Post
Install
Post installation script. The URL path of the create_redundant_boot.sh and
mninnow-1.0.0-1trusty_all.deb should be changed accordingly.
# Update repo
d-i preseed/late_command string \
in-target wget -P /etc/default/
http://172.1.1.100/answers/grub_ubuntu16.04 ; \
in-target rm /etc/apt/sources.list ; \
in-target wget -P /etc/apt/
http://172.1.1.100/answers/Ubuntu/Apt_source_16.04/sources.l
ist ; \
# Update grub parameter
in-target sed -i 's/GRUB_CMDLINE_LINUX_DEFAULT="quiet
splash"/GRUB_CMDLINE_LINUX_DEFAULT=""/g' /etc/default/grub ;
\
in-target update-grub ; \
# RAID config
in-target sync ; \
in-target dd if=/dev/sda1 of=/dev/sdb1 ; \
in-target wget -P /tmp/
http://172.1.1.100/answers/mdsync/create_redundant_boot.sh ;
\

Page 84
in-target chmod +x /tmp/create_redundant_boot.sh ; \
in-target bash /tmp/create_redundant_boot.sh ; \
in-target wget -P /tmp
http://172.1.1.100/answers/mdsync/minnow-1.0.0-
1xenial_all.deb ; \
in-target dpkg -i /tmp/minnow-1.0.0-1xenial_all.deb ; \
Related Documents


![cdn. · 13 14 15 HARDWARE Proliant DL360 Gen9 Proliant DL360e ... Linux Centos Linux Ubuntu Mac OS Leopard Windows 7 Professional Windows Server 2003 R2 PERú PRIMER9] Av. La Molina](https://static.cupdf.com/doc/110x72/5ffee4d66139055830136556/cdn-13-14-15-hardware-proliant-dl360-gen9-proliant-dl360e-linux-centos-linux.jpg)