05.1 Image Classification Supervised ERDAS Imagine 2016 Description: This lab describes how to generate supervised classifications of multispectral image using ERDAS Imagine.

Welcome message from author
This document is posted to help you gain knowledge. Please leave a comment to let me know what you think about it! Share it to your friends and learn new things together.
Transcript

05.1
Image Classification Supervised
ERDAS Imagine 2016
Description: This lab describes how to generate supervised classifications of multispectral image using ERDAS Imagine.

05.2
Supervised Classification
Supervised classification in ERDAS Imagine works in a similar way to unsupervised classification. However, signature files consisting of means and covariance matrices for each class are created first, before running the classification result. These signatures are used with a classifier (usually maximum likelihood) to assign each pixel within the image to a discrete class. The primary difference between the unsupervised and supervised methods is in the creation of the signature files. In a supervised classification, the analyst selects and digitizes polygons (training areas) and places these polygons in an AOI (Area of Interest) layer from which to create the signature files, rather than using an automated routine to define the most separable classes. This method is a bit more time consuming than unsupervised classification, but the benefits include higher confidence of signature files from reference data. Here are the basic steps for supervised classification using ERDAS Imagine to explore this technique:
Delineating Training Sites and Generating Signatures
In Imagine, an individual training site is delineated as an "area of interest" and given a class name. The pixels within the training site are used to generate a "signature." This process is repeated to gather several training sites for each class.
To show all of the menus properly, ERDAS Imagine needs to be at full screen. If it is not some of the menu choices may be shortened or eliminated. Navigate to the folder for Supervised Classification and open hg1_2345.img in a 2D View with (3,2,1) and right click in the frame and select Fit to Frame. Then click on Raster > Supervised (in the classification group) > Signature Editor. This will open the "Signature Editor" window (it's a good idea to expand the window to the right so you can see all of the columns):
We will use the signature editor to capture information about the training polygons we draw in later steps.

05.3
From the File Menu click New > 2D View > AOI Layer. This is the layer where we will draw our polygons to use as training data. Your screen should look like this:
Be sure you are selected on the AOI layer.
Now, open the AOI drawing menu by selecting, AOI Drawing. The screen should look like:
The circled area in the figure above shows the area of the drawing menu bar in which we will be primarily working.
The AOI tools let you interactively select, by using the cursor, a specific area from the image. The pixel values of all image bands within an AOI are used to generate a signature. A signature includes the mean and variance of the digital numbers in each band, as well as the covariance between bands, for all pixels within a training area (in other words, it does

05.4
not matter how your image is being displayed, the statistics are coming from the entire image and all of its layers). Other statistics (min, max, mode, etc.) may also be generated.
Let’s create some signatures. Zoom in on an area of the image and select the polygon tool from the AOI tools . Then, in the viewer pick a known field to be an "area of interest". Click to mark each node of the polygon and double-click to close the polygon.
Additional "tools" for delineating training sites other than polygons are also available. For example, a linear feature, such as a road (often only one pixel wide and difficult to draw within a polygon) can be delineated as a training area. Try to delineate a polygon that represents a homogeneous group of pixels representing a particular class and avoid getting to close to the edges of the fields.
For the purposes of this classification, we will use the reference map provided in Image Enhancement and Indices Lab as ‘ground reference’ data (note, the phrase ‘ground truth’ implies too much that we know the information is true, when in actuality we did not collect the data ourselves, the information could have been out-of-date or otherwise contain errors in identification from the original source).
Make sure you have “activated” the AOI by left-clicking on it—it should look something like this when activated:
Now add that area as a training area by selecting Edit > Add from the Signature Editor menu as shown below:
Alternately you can click on the add button . A signature will be generated based on the pixel values within the polygon you just created. (In ERDAS 2016, there is no relationship between the color of the training sample and the color of the signature row.) This signature will appear automatically in the Signature Editor Cell Array. Remember that Imagine defaults to generating signatures based on all of the data layers (bands) in the *.img file and not just those bands displayed in the Viewer.
05.5
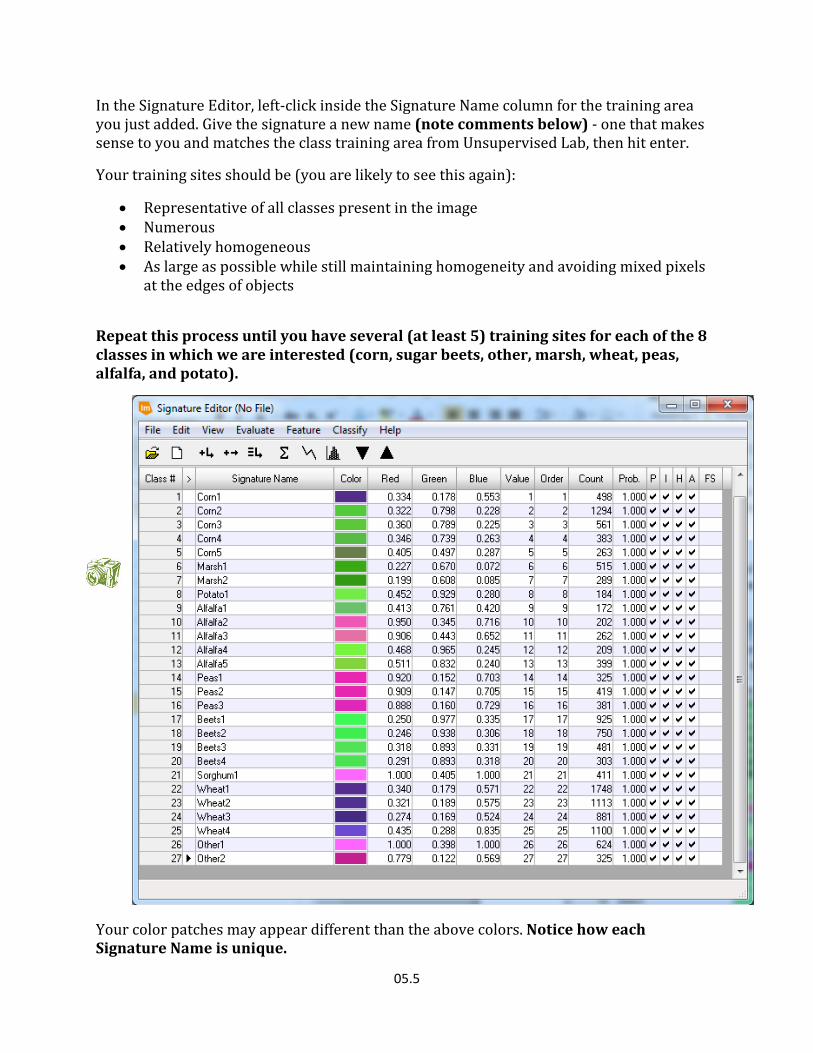
In the Signature Editor, left-click inside the Signature Name column for the training area you just added. Give the signature a new name (note comments below) - one that makes sense to you and matches the class training area from Unsupervised Lab, then hit enter.
Your training sites should be (you are likely to see this again):
• Representative of all classes present in the image • Numerous • Relatively homogeneous • As large as possible while still maintaining homogeneity and avoiding mixed pixels
at the edges of objects
Repeat this process until you have several (at least 5) training sites for each of the 8 classes in which we are interested (corn, sugar beets, other, marsh, wheat, peas, alfalfa, and potato).
Your color patches may appear different than the above colors. Notice how each Signature Name is unique.

05.6
In creating signatures you are "telling" the computer how a particular class "looks". The algorithm used for the supervised classification will use the summary statistics from the signature areas and match every pixel in the image to one (and only one) of the signatures. One pixel at a time, the computer will find which signature is most similar to each pixel and assign the pixel to that signature's class. So, you want your signatures to be specific enough that each class is as clearly defined as possible. Also, you want the range of classes to be wide enough so that it is reasonable for all of the pixels to fit into at least one class.
BEFORE CLOSING THE VIEWER, we need to save two files….
While the polygons are still displayed, right click on the AOI layer in the Table of Contents and select Save Layer as... from the menu bar. This dialog allows you to save the AOIs in a file (in your own directory). The *.aoi extension should be automatically displayed. Click OK to save the AOIs. This file can now be used in any function which applies to AOIs. You can also use Application Menu > Open > AOI Layer to display the AOIs at any time for adding or deleting areas. Note that once edited the AOI file must be saved again. If you save it to the same name as the original AOI file, Imagine will first ask if you want to write over the existing file.
Also, you should save your training data by saving a *.sig file by selecting File > Save as... from the Signature Editor menu (The ".sig" extension should be automatically added). The signature file that you create is associated with the image you are using to draw the areas of interest on. If in the future if you are unable to open the signature file properly, try making sure the image association is set properly and try again (Edit > Image Association). Saving often is always a good idea!!
Merging the Signatures
We can now merge the signatures where we know they represent the same class. Be sure to save your signature file as above before doing this step so you can always go back to the original if need be. To Merge signatures, select the rows that represent a single class by clicking in the Class # column of the first row to merge and then Shift-Clicking on the subsequent rows. Your screen will look something like this:
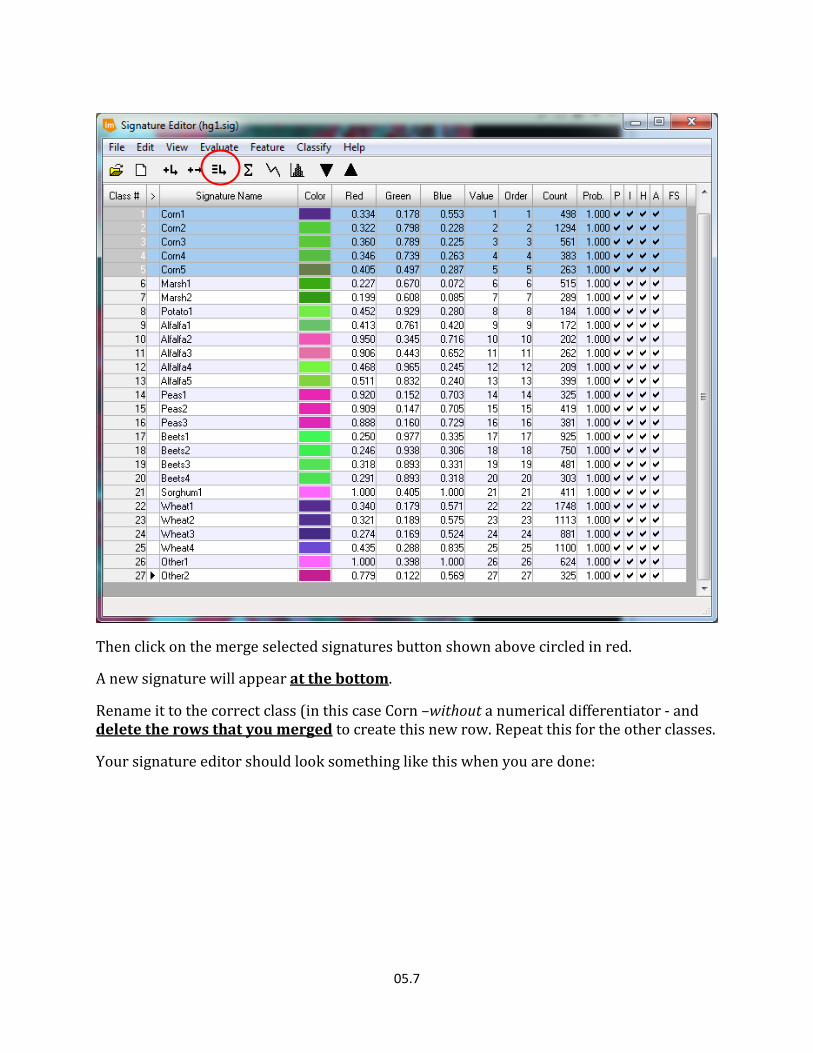
05.7
Then click on the merge selected signatures button shown above circled in red.
A new signature will appear at the bottom.
Rename it to the correct class (in this case Corn –without a numerical differentiator - and delete the rows that you merged to create this new row. Repeat this for the other classes.
Your signature editor should look something like this when you are done:

05.8
The Value column dictates the class number in the result. You can change this if you desire to be contiguous values. Save the signature editor with a new name that indicates you merged the classes using File > Save As in the Signature editor window.
Before running the supervised classification using the merged signature file just created, it is important that we evaluate the statistics, mean plots, and general separability of the signature classes. Use your experience with evaluating histograms from previous labs to evaluate how much one class might overlap with another by looking at the means and variances, the histograms, and explore the separability statistics. Also, use some time to read up on separability in the ERDAS Field Guide. If you find that you do not have proper separability and/or the class statistics between particular classes are too similar, you may want to step back a step and re-evaluate your areas of interest and/or the merged signatures you chose. The creation of signature files is more often than not an iterative process and is rarely a straight-forward one-step process.
Performing the Classification
If it is not still open, re-open the Signature Editor with your merged signature. In the Signature Editor window, select all of the signatures so that they will all be used in the classification process (If none of the signatures are selected, then they are all used by default). From the Signature Editor menu bar, left-hold Classify > Supervised to proceed with the classification.
You can also enter the Supervised classification routine from
Raster > Supervised > Supervised Classification
The resulting dialog box will ask you for the Signature file that you have saved, rather than assuming it is the file open in the Signature editor
05.9
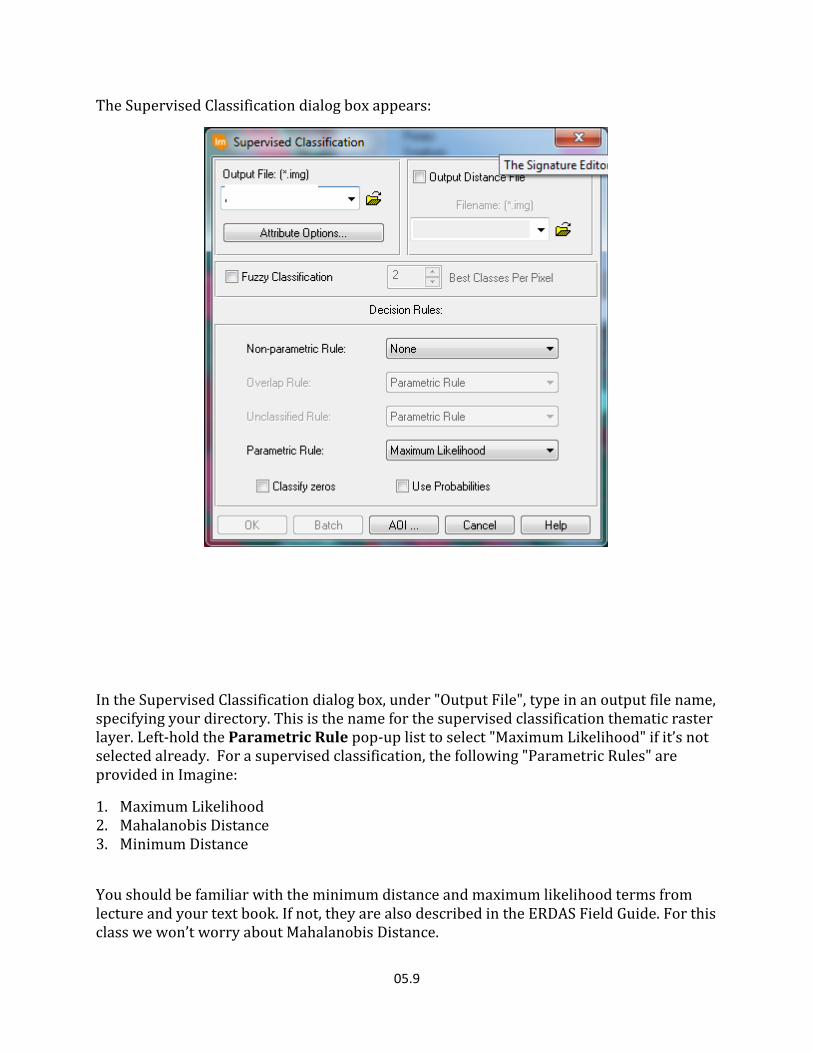
The Supervised Classification dialog box appears:
In the Supervised Classification dialog box, under "Output File", type in an output file name, specifying your directory. This is the name for the supervised classification thematic raster layer. Left-hold the Parametric Rule pop-up list to select "Maximum Likelihood" if it’s not selected already. For a supervised classification, the following "Parametric Rules" are provided in Imagine:
1. Maximum Likelihood 2. Mahalanobis Distance 3. Minimum Distance
You should be familiar with the minimum distance and maximum likelihood terms from lecture and your text book. If not, they are also described in the ERDAS Field Guide. For this class we won’t worry about Mahalanobis Distance.
05.10
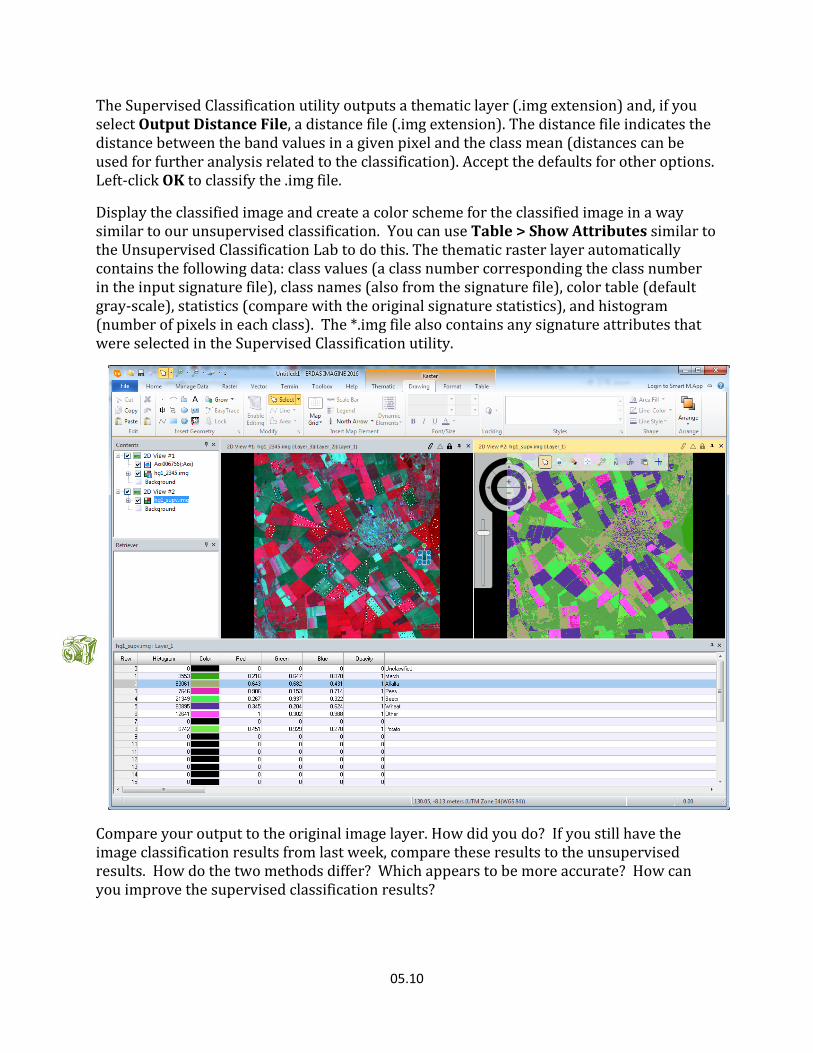
The Supervised Classification utility outputs a thematic layer (.img extension) and, if you select Output Distance File, a distance file (.img extension). The distance file indicates the distance between the band values in a given pixel and the class mean (distances can be used for further analysis related to the classification). Accept the defaults for other options. Left-click OK to classify the .img file.
Display the classified image and create a color scheme for the classified image in a way similar to our unsupervised classification. You can use Table > Show Attributes similar to the Unsupervised Classification Lab to do this. The thematic raster layer automatically contains the following data: class values (a class number corresponding the class number in the input signature file), class names (also from the signature file), color table (default gray-scale), statistics (compare with the original signature statistics), and histogram (number of pixels in each class). The *.img file also contains any signature attributes that were selected in the Supervised Classification utility.
Compare your output to the original image layer. How did you do? If you still have the image classification results from last week, compare these results to the unsupervised results. How do the two methods differ? Which appears to be more accurate? How can you improve the supervised classification results?
05.11
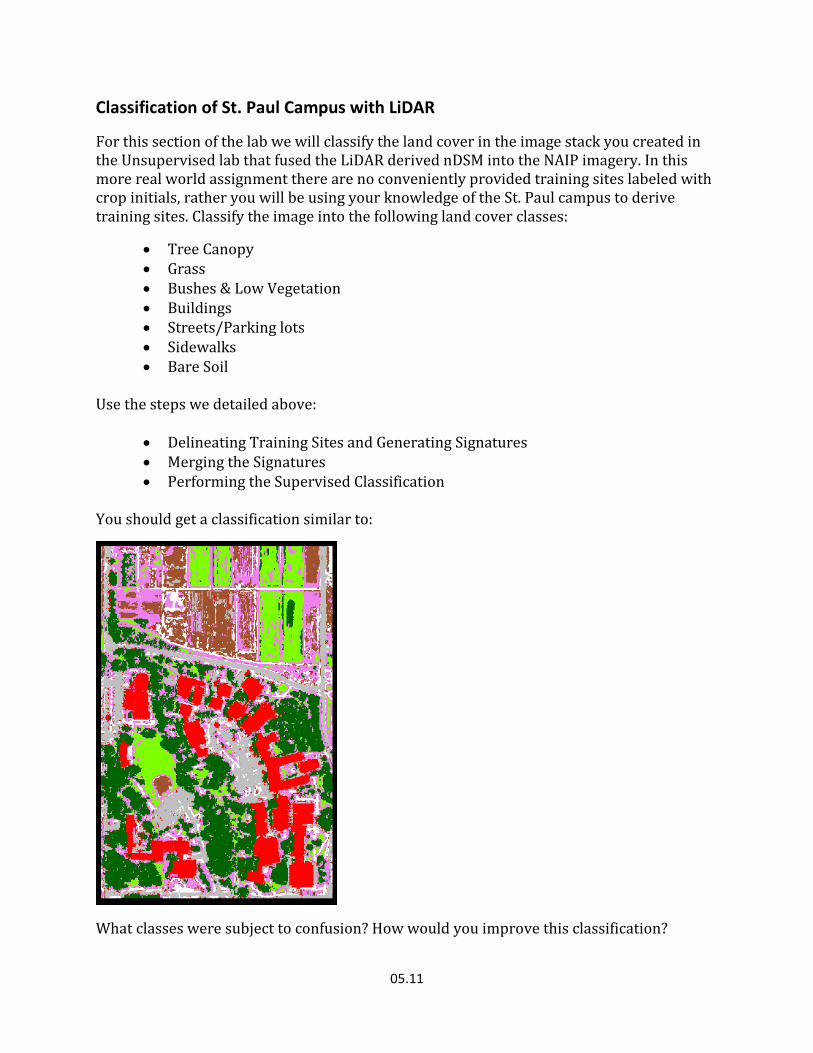
Classification of St. Paul Campus with LiDAR
For this section of the lab we will classify the land cover in the image stack you created in the Unsupervised lab that fused the LiDAR derived nDSM into the NAIP imagery. In this more real world assignment there are no conveniently provided training sites labeled with crop initials, rather you will be using your knowledge of the St. Paul campus to derive training sites. Classify the image into the following land cover classes:
• Tree Canopy • Grass • Bushes & Low Vegetation • Buildings • Streets/Parking lots • Sidewalks • Bare Soil
Use the steps we detailed above:
• Delineating Training Sites and Generating Signatures • Merging the Signatures • Performing the Supervised Classification
You should get a classification similar to:
What classes were subject to confusion? How would you improve this classification?

05.12
Lesson Outcomes
By completing this lesson you should be able to:
1. Create an AOI layer that contains polygons drawn around groupings of pixels in a single class.
2. Capture signatures in the signature editor from your training pixels 3. Run a supervised classification from these signatures.
Related Documents