CM6030 MFP CM6040 MFP CM6030f MFP CM6040f MFP HP Color LaserJet CM6030/CM6040 MFP Series Software Technical Reference

Welcome message from author
This document is posted to help you gain knowledge. Please leave a comment to let me know what you think about it! Share it to your friends and learn new things together.
Transcript

CM6030 MFPCM6040 MFP
CM6030f MFPCM6040f MFP
HP Color LaserJet CM6030/CM6040 MFP Series
Software Technical Reference

HP Color LaserJet CM6030 and CM6040 MFPSeries MFP SeriesSoftware Technical Reference

Copyright and license
©2008 Copyright Hewlett-PackardDevelopment Company, L.P.
Reproduction, adaptation or translationwithout prior written permission is prohibited,except as allowed under the copyright laws.
The information contained herein is subjectto change without notice.
The only warranties for HP products andservices are set forth in the express warrantystatements accompanying such productsand services. Nothing herein should beconstrued as constituting an additionalwarranty. HP shall not be liable for technicalor editorial errors or omissions containedherein.
Edition 1, 4/2008
Trademark Credits
Adobe®, Acrobat® and PostScript® aretrademarks of Adobe Systems Incorporated.
Corel® is a trademark or registeredtrademark of Corel Corporation or CorelCorporation Limited.
Microsoft®, Windows® and Windows NT®are U.S. registered trademarks of MicrosoftCorporation.
Windows Vista™ is either a registeredtrademark or trademark of MicrosoftCorporation in the United States and/or othercountries.
PANTONE® is Pantone, Inc's check-standard trademark for color.
UNIX® is a registered of The Open Group.
ENERGY STAR® and the ENERGY STARlogo® are U.S. registered marks of theUnited States Enviromental ProtectionAgency.
Table of contents
1 Purpose and scopeIntroduction ........................................................................................................................................... 2Product comparison ............................................................................................................................. 3Product features ................................................................................................................................... 5Quick Reference Job Aids .................................................................................................................... 8Product walkaround .............................................................................................................................. 9
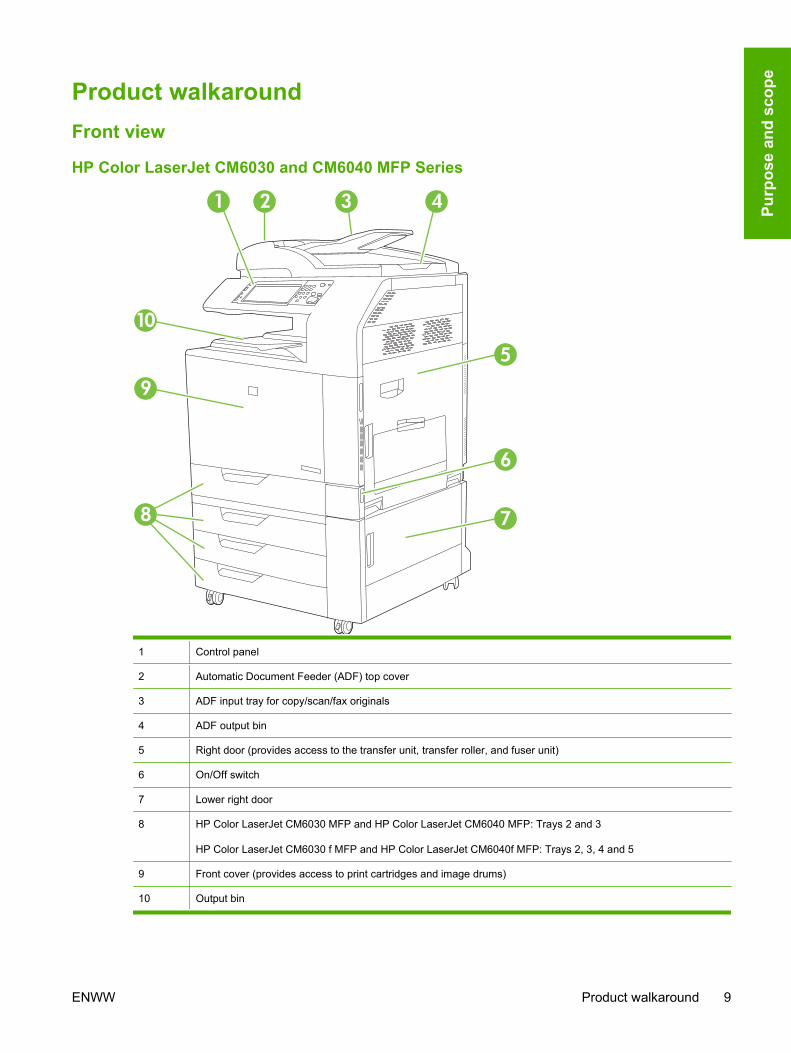
Front view ............................................................................................................................ 9HP Color LaserJet CM6030 and CM6040 MFP Series ....................................... 9
Back view ........................................................................................................................... 10Interface ports .................................................................................................................... 11Serial number and model number location ........................................................................ 11
Printing-system software .................................................................................................................... 13Operating-system support ................................................................................................ 13
Supported operating systems for Windows ....................................................... 14Supported printer drivers for Windows .............................................................. 14HP Universal Print Driver (UPD) ....................................................................... 14
UPD installation modes .................................................................... 15Supported utilities for Windows ......................................................................... 15
Supported utilities for Windows ........................................................ 15Embedded Web server ..................................................................... 15HP Easy Printer Care ....................................................................... 15
Supported operating systems for Macintosh ..................................................... 16Supported printer drivers for Macintosh ............................................................ 16Software for Macintosh computers .................................................................... 16
HP Printer Utility ............................................................................... 16Open the HP Printer Utility ................................................................................ 17HP Printer Utility features .................................................................................. 17Supported utilities for Macintosh ....................................................................... 18
Embedded Web server ..................................................................... 18Software for other operating systems ............................................................... 18Printer driver support in other operating systems ............................................. 18
Availability ......................................................................................................................... 19Printing-system software on the Web ............................................................... 20In-box printing-system software CDs ................................................................ 20
ENWW iii
Admin CD ......................................................................................... 20User CD ............................................................................................ 211 Worldwide Version ......................................................................... 21
Documentation availability and localization ........................................................................................ 27Admin CD .......................................................................................................................... 27
Main browser screen ......................................................................................... 28HP Color LaserJet CM6030 and CM6040 MFP Series Printing-system Install Notes ......................................................................... 28
Administrator Documentation screen ................................................................ 29HP Embedded Web Server User Guide ........................................... 30HP Jetdirect Print Servers Administrator's Guide ............................. 30HP Driver Preconfiguration Support Guide ....................................... 31
User CD ............................................................................................................................. 31Main browser screen ......................................................................................... 32
Control Panel Wall Poster (.PDF Poster) ......................................... 32User Guides ...................................................................................................... 33
User Guide ....................................................................................... 33Fax Guides ........................................................................................................ 35
HP Color LaserJet CM6040 MFP Series Fax Guide ........................ 35HP Color LaserJet CM6040 MFP Series Analog Fax Accessory300 Send Fax Driver Guide .............................................................. 36
2 Software descriptionWindows printing-system software ..................................................................................................... 38
Supported operating systems for Windows ....................................................................... 38Windows system requirements .......................................................................................... 38Macintosh system requirements ........................................................................................ 39Printer driver ...................................................................................................................... 39Select the correct printer driver for Windows ..................................................................... 39Priority for print settings ..................................................................................................... 40Change printer-driver settings for Windows ....................................................................... 41Printing system and installer .............................................................................................. 41
Printing-system software CD for Windows systems .......................................... 41Installer features ................................................................................................ 45
Driver version numbers for Windows operating systems ................................................... 46Windows printer-driver configuration .................................................................................................. 48
Printer-driver autoconfiguration ......................................................................................... 48Bidirectional communication .............................................................................................. 48Enterprise AutoConfiguration ............................................................................................. 49Update Now ....................................................................................................................... 49HP Web Jetadmin .............................................................................................................. 50
Configurable settings ....................................................................................... 51Continuous export ............................................................................................ 53
HP Driver Diagnostic Printer Check Tool ........................................................................................... 54
iv ENWW
Advanced color use ............................................................................................................................ 55Restrict color use ............................................................................................................... 55
Restrict color printing and copying from the control panel ................................ 55International Color Consortium (ICC) profiles .................................................................... 55PANTONE color profiles [INTERNAL] ............................................................................... 55
Embedded Web server ....................................................................................................................... 57HP Web Jetadmin .............................................................................................................................. 58Scan Setup Wizard ............................................................................................................................. 59MFP Send Fax Driver ......................................................................................................................... 60Font support ....................................................................................................................................... 61
Basic Windows fonts ......................................................................................................... 61Default printing-system fonts ............................................................................................. 61
3 Install Windows printing-system componentsSupported operating systems for Windows ........................................................................................ 68Windows operating system requirements .......................................................................................... 68Install overview ................................................................................................................................... 68Software installation types for Windows ............................................................................................. 68Installation options .............................................................................................................................. 69Microsoft Windows general installation overview ............................................................................... 70
HP Color LaserJet CM6030 and CM6040 MFP Series printing-system software CD forWindows systems .............................................................................................................. 70
Install ................................................................................................................. 71Install Notes ...................................................................................................... 72Support .............................................................................................................. 72Administrator Software ...................................................................................... 73Administrator Documentation ............................................................................ 74Scan Setup Wizard ........................................................................................... 75Next Steps ......................................................................................................... 76
Install Windows software for direct connections ................................................................ 78Install Windows software for networks ............................................................................... 79
Detailed Microsoft Windows installation instructions .......................................................................... 80Install the printer driver using the HP Driver Installation Utility (HPDIU) ........................... 80Install the printer driver using the Microsoft Add Printer Wizard ........................................ 89
Use an existing port for a direct connection ...................................................... 89Create a new TCP/IP port for a direct connection ............................................. 96Print sever connection ....................................................................................... 99
Microsoft Windows Sharing (peer-to-peer networking) .................................................... 103Setting up the host computer running Windows 2000 ..................................... 104Setting up the host computer running Windows XP ........................................ 104Setting up client computers running Windows 2000 ....................................... 104Setting up client computers running Windows XP .......................................... 105
Microsoft Point and Print .................................................................................................. 105Use the MFP Send Fax Driver ......................................................................................................... 106
ENWW v
Download the HP Send Fax ............................................................................................ 106Install the HP Send Fax Driver ........................................................................................ 107
HP Driver Installation Utility (HPDIU) .............................................................. 107Add Printer Wizard .......................................................................................... 111
Send a fax using the HP Send Fax Driver ....................................................................... 117Create a network folder using the Scan Setup Wizard ..................................................................... 118Install documentation and optional software .................................................................................... 128Uninstall software ............................................................................................................................. 130
Uninstall component list ................................................................................................... 130Uninstall the printer driver or the HP Send Fax Driver by using Windows Add or RemovePrograms feature ............................................................................................................. 131Uninstall the printer driver or the HP Send Fax Driver by using the Server Propertiesfeature .............................................................................................................................. 135Uninstall documentation and optional software ............................................................... 136
4 HP PCL 6 Print Driver for WindowsIntroduction ....................................................................................................................................... 137Access print drivers .......................................................................................................................... 139
Printing Preferences driver tabs ...................................................................................... 139Properties driver tabs ....................................................................................................... 140
Help system ...................................................................................................................................... 141“What's this?” Help ........................................................................................................... 141Incompatible Print Settings messages ............................................................................. 141
Advanced tab features ..................................................................................................................... 143Paper/Output ................................................................................................................... 143
Copy Count ..................................................................................................... 144Graphic ............................................................................................................................ 144
Image Color Management ............................................................................... 144TrueType Font ................................................................................................. 145
Document Options ........................................................................................................... 145Advanced Printing Features ............................................................................ 145Print Optimizations ......................................................................................... 145Printer Features .............................................................................................. 146Layout Options ................................................................................................ 146
Printing Shortcuts tab features ......................................................................................................... 147Use defined printing shortcuts ......................................................................................... 148
General Everyday Printing .............................................................................. 148Paper source .................................................................................. 148Paper sizes ..................................................................................... 149Paper type ...................................................................................... 149Orientation ...................................................................................... 150Print on both sides .......................................................................... 150Pages per sheet ............................................................................. 150Staple ............................................................................................. 151
vi ENWW
Two-sided (Duplex) Printing ............................................................................ 151Booklet Printing ............................................................................................... 151Envelopes ....................................................................................................... 152Factory Defaults .............................................................................................. 152
Create a custom printing shortcut .................................................................................... 152Paper/Quality tab features ................................................................................................................ 154
Paper Options .................................................................................................................. 155Paper sizes ..................................................................................................... 155Custom Paper Size ......................................................................................... 156
Name .............................................................................................. 156Paper size ....................................................................................... 157Units ............................................................................................... 157Custom width and height control limits ........................................... 157
Paper source ................................................................................................... 158Paper type ....................................................................................................... 158Special pages .................................................................................................. 159
Covers ............................................................................................ 160Print pages on different paper ........................................................ 160
Document preview image ................................................................................................ 161Print Quality ..................................................................................................................... 162
Print Quality drop-down menu ......................................................................... 162Effects tab features .......................................................................................................................... 163
Resizing Options .............................................................................................................. 163Actual Size ...................................................................................................... 164Print Document On ......................................................................................... 164Scale to Fit ...................................................................................................... 164% of Actual Size .............................................................................................. 164
Document preview image ................................................................................................ 165Watermarks ..................................................................................................................... 165
Current watermarks ......................................................................................... 166Watermark Message ....................................................................................... 167Message Angle ............................................................................................... 167Font Attributes ................................................................................................. 167Default watermark settings .............................................................................. 169
Finishing tab features ....................................................................................................................... 170Document Options ........................................................................................................... 170
Print on both sides .......................................................................................... 171Print on both sides (automatically) ................................................. 171Print on both sides (manually) ........................................................ 172
Flip pages up ................................................................................................... 173Booklet layout .................................................................................................. 173
Book and Booklet Printing .............................................................. 174Pages per sheet .............................................................................................. 174Print page borders ........................................................................................... 175
ENWW vii
Page order ...................................................................................................... 175Job Separator .................................................................................................................. 176Document preview image ................................................................................................ 176Orientation ....................................................................................................................... 176
Output tab features ........................................................................................................................... 177Output Options ................................................................................................................. 177Document preview image ................................................................................................ 178Output Bin options ........................................................................................................... 178
Job Storage tab features .................................................................................................................. 179Status group box .............................................................................................................. 180Job Storage Mode ........................................................................................................... 181
Off ................................................................................................................... 181Proof and Hold ............................................................................................... 181Personal Job ................................................................................................... 181Quick Copy ...................................................................................................... 182Stored Job ....................................................................................................... 182
PIN to print ....................................................................................................................... 183Job Notification Options ................................................................................................... 183User Name ....................................................................................................................... 183Job Name ........................................................................................................................ 184Use job-storage features when printing ........................................................................... 184
Release a job-storage print job ....................................................................... 185Delete a job-storage print job .......................................................................... 185
Color tab features ............................................................................................................................. 186Color Options ................................................................................................................... 187
Automatic ........................................................................................................ 187Manual ............................................................................................................ 187General ........................................................................................................... 189Neutral Grays .................................................................................................. 189Halftone ........................................................................................................... 189
Color Themes .................................................................................................................. 190Default (sRGB) ................................................................................................ 190Photo (sRGB) .................................................................................................. 190Photo (Adobe RGB 1998) ............................................................................... 190None ................................................................................................................ 190Custom Profile ................................................................................................. 190
Document preview image ................................................................................................ 191Services tab features ........................................................................................................................ 191
Internet Services .............................................................................................................. 192Device services ................................................................................................................ 193
Device Settings tab features ............................................................................................................ 194Form to Tray Assignment ................................................................................................ 194Font Substitution Table .................................................................................................... 195
External Fonts ................................................................................................. 196
viii ENWW
Installing external fonts ................................................................... 197Removing external fonts ................................................................. 198
Installable Options ........................................................................................................... 198Automatic Configuration .................................................................................. 199Tray 3 .............................................................................................................. 199Tray 4 .............................................................................................................. 199Tray 5 .............................................................................................................. 199Duplex Unit (for 2-Sided Printing) .................................................................. 199Allow Manual Duplexing .................................................................................. 199Accessory Output Bin ...................................................................................... 200Printer Memory ................................................................................................ 200Printer Hard Disk ............................................................................................. 200Job Storage ..................................................................................................... 200Job Separator .................................................................................................. 200Mopier Mode ................................................................................................... 200
Mopier mode and collation ............................................................. 201About tab features ............................................................................................................................ 201
5 Macintosh software and utilitiesSupported operating systems for Macintosh .................................................................................... 204Macintosh system requirements ....................................................................................................... 205Macintosh printing-system software ................................................................................................. 206
Supported printer drivers for Macintosh ........................................................................... 206Priority for print settings for Macintosh ............................................................................ 206Change printer-driver settings for Macintosh ................................................................... 207Software for Macintosh computers .................................................................................. 208
HP Printer Utility .............................................................................................. 208Open the HP Printer Utility ............................................................. 208
HP Printer Utility features ................................................................................ 208Embedded Web server ................................................................................... 209
Availability ........................................................................................................................ 209Printing-system software on the Web ............................................................. 209In-box printing-system software CDs .............................................................. 210
Macintosh partition ......................................................................... 210CD versions .................................................................................... 210
Macintosh install and uninstall instructions ...................................................................................... 212Install the Macintosh printing-system software ................................................................ 212
General installation for Macintosh operating systems ..................................... 212Detailed Mac OS X installation ........................................................................ 213Product setup .................................................................................................. 220
Setup a product on Mac OS X V10.4 ............................................. 220Setup a product on Mac OS X V10.3 ............................................. 225Setup a product on Mac OS X V10.2.8 .......................................... 229
ENWW ix
Troubleshooting the product setup ................................................. 231Remove software from Macintosh operating systems ..................................................... 232
Macintosh HP Printer Utility .............................................................................................................. 233Access to the HP Printer Utility ........................................................................................ 233Supplies Status ................................................................................................................ 237Device Information ........................................................................................................... 240HP Support ...................................................................................................................... 241File Upload ....................................................................................................................... 243Update Firmware ............................................................................................................. 245Remote firmware update by using the HP Printer Utility .................................................. 245Duplex mode .................................................................................................................... 246Trays Configuration ......................................................................................................... 247Lock Resources ............................................................................................................... 248Stored Jobs ...................................................................................................................... 249
Releasing a job-storage print job .................................................................... 249Deleting a job-storage print job ....................................................................... 250
E-mail Alerts .................................................................................................................... 250Network Settings .............................................................................................................. 251Bonjour Settings .............................................................................................................. 252Additional Network Settings ............................................................................................. 254
Use features in the Macintosh printer driver ..................................................................................... 254Create and use printing presets in Macintosh ................................................................. 254Resize documents or print on a custom paper size ......................................................... 255Print a cover page ............................................................................................................ 255Use watermarks ............................................................................................................... 255Print multiple pages on one sheet of paper in Macintosh ................................................ 255Print on both sides of the page (duplex printing) ............................................................. 256Set the stapling options ................................................................................................... 257Store jobs ......................................................................................................................... 257Set the color options ........................................................................................................ 257Use the Services menu .................................................................................................... 258
6 Engineering detailsRemote firmware updates ............................................................................................................... 260
Print the configuration page ............................................................................................ 261Print the menu map ......................................................................................... 262
HP Easy Firmware Upgrade utility ................................................................................... 262Other remote firmware update methods .......................................................................... 264
Remote firmware update by using FTP through a browser ............................. 265Remote firmware update by using FTP on a network connection ................... 265Remote firmware update through a Windows network .................................. 267Remote firmware update for UNIX systems ................................................... 267Remote firmware update by using the LPR command ................................... 268
x ENWW
Remote firmware update by using HP Web Jetadmin .................................... 268Remote firmware update by using the HP Embedded Web Server ................ 269Messages during the firmware update ............................................................ 269
Print print-ready documents ............................................................................................................. 272Print a print-ready file by using FTP through a browser .................................................. 272Print a print-ready file by using FTP on a network connection ........................................ 273Print-ready file printing in a Windows network ................................................................. 274Print a print-ready file in UNIX systems ........................................................................... 274Print a print-ready file by using the LPR command ........................................................ 274Print a print-ready file through the HP Embedded Web Server ....................................... 275
Media attributes ................................................................................................................................ 276Media sources and destinations ...................................................................................... 276Media-source commands ................................................................................................ 276Printer driver supported media sizes ............................................................................... 277Printer driver supported media types ............................................................................... 279Custom paper sizes ......................................................................................................... 280Media-type commands .................................................................................................... 281Paper and print media ..................................................................................................... 282
Understand paper and print media use ........................................................... 282Supported paper and print media sizes .......................................................... 282Supported paper and print media types .......................................................... 287Special paper or print media guidelines .......................................................... 288
HP Device Manager for Linux .......................................................................................................... 290
Glossary ........................................................................................................................................................... 293
Index ................................................................................................................................................................. 297
ENWW xi

xii ENWW
List of tables
Table 1-1 Product models .................................................................................................................................. 3Table 1-2 Features ............................................................................................................................................. 5Table 1-3 Software component availability ...................................................................................................... 19Table 1-4 Supported printing-system components (AR – FR) ......................................................................... 22Table 1-5 Supported printing-system components (HE – NO) ......................................................................... 23Table 1-6 Supported printing-system components (PL – ZHTW) .................................................................... 25Table 2-1 Availability of automatic discovery and printer- driver configuration through bidirectionalcommunication in Windows ................................................................................................................................ 48Table 2-2 Default fonts ..................................................................................................................................... 61Table 2-3 Additional PS emulation fonts .......................................................................................................... 63Table 4-1 PCL 6 custom paper sizes ............................................................................................................. 157Table 4-2 Font Attribute settings for new and preset watermarks .................................................................. 169Table 4-3 Page orientation ............................................................................................................................. 173Table 4-4 Driver mopier mode and collation settings ..................................................................................... 201Table 5-1 Titles ............................................................................................................................................... 208Table 5-2 Adding a product in Macintosh operating systems ........................................................................ 212Table 6-1 Version Checking [INTERNAL] ...................................................................................................... 260Table 6-2 Troubleshooting a firmware update ............................................................................................... 270Table 6-3 Update messages .......................................................................................................................... 270Table 6-4 Troubleshooting a firmware update failure ..................................................................................... 271Table 6-5 Media sources and destinations ................................................................................................... 276Table 6-6 Media-source commands .............................................................................................................. 277Table 6-7 Supported media sizes and attributes ............................................................................................ 277Table 6-8 Supported input media types ........................................................................................................ 279Table 6-9 PCL 6 custom media sizes ............................................................................................................. 280Table 6-10 Media-type commands ................................................................................................................. 281Table 6-11 Supported paper and print media sizes ....................................................................................... 282Table 6-12 Supported envelopes and postcards ........................................................................................... 284Table 6-13 Supported paper and print media sizes for the optional HP 3-bin Stapler/Stacker and HP BookletMaker/Finisher accessories .............................................................................................................................. 285Table 6-14 Tray 1 paper information .............................................................................................................. 287Table 6-15 Trays 2, 3, 4, and 5 paper information ......................................................................................... 287
ENWW xiii

xiv ENWW

List of figures
Figure 1-1 Admin CD — main browser screen ................................................................................................. 28Figure 1-2 Administrator Documentation screen .............................................................................................. 29Figure 1-3 User CD – main browser screen ..................................................................................................... 32Figure 1-4 User Guides screen ........................................................................................................................ 33Figure 1-5 Fax Guides screen .......................................................................................................................... 35Figure 2-1 Installation software CD Browser (Admin CD) ................................................................................ 42Figure 2-2 Online Support screen .................................................................................................................... 43Figure 2-3 Optional Software screen ................................................................................................................ 44Figure 2-4 Administrator Documentation screen .............................................................................................. 45Figure 2-5 Scan Setup Wizard — Complete screen ........................................................................................ 59Figure 3-1 CD Browser – Main screen ............................................................................................................. 70Figure 3-2 CD Browser — Install screen .......................................................................................................... 72Figure 3-3 CD Browser — Support screen ....................................................................................................... 73Figure 3-4 CD Browser — Administrator Software screen ............................................................................... 74Figure 3-5 CD Browser — Administrator Documentation screen ..................................................................... 75Figure 3-6 CD Browser — Scan Setup Wizard screen .................................................................................... 76Figure 3-7 CD Browser — Next Steps screen .................................................................................................. 77Figure 3-8 Software Installation — Initial screen .............................................................................................. 81Figure 3-9 Software Installation — Please choose a driver to install screen ................................................... 82Figure 3-10 Software Installation — License Agreement screen ..................................................................... 83Figure 3-11 Software Installation — Device Connection screen ...................................................................... 84Figure 3-12 Software Installation — Devices Found screen ............................................................................ 85Figure 3-13 Software Installation — Device Connection screen 2 ................................................................... 86Figure 3-14 Software Installation — Driver Installation Complete screen 1 ..................................................... 87Figure 3-15 Software Installation — Driver Installation Complete screen 2 ..................................................... 88Figure 3-16 Add Printer Wizard — Local or Network Printer screen ................................................................ 90Figure 3-17 Add Printer Wizard — Select a Printer Port screen ...................................................................... 91Figure 3-18 Add Printer Wizard — Install Printer Software screen .................................................................. 92Figure 3-19 Add Printer Wizard — Install from Disk screen ............................................................................. 92Figure 3-20 Add Printer Wizard — Install Printer Software, screen 2 .............................................................. 93Figure 3-21 Add Printer Wizard — Name Your Printer screen ......................................................................... 94Figure 3-22 Add Printer Wizard — Printer Sharing screen .............................................................................. 95Figure 3-23 Add Printer Wizard — Print Test Page screen .............................................................................. 96Figure 3-24 Local or Network Printer screen .................................................................................................... 97
ENWW xv
Figure 3-25 Select a Printer Port screen .......................................................................................................... 98Figure 3-26 Add Standard TCP/IP Printer Port screen .................................................................................... 98Figure 3-27 Add Port screen ............................................................................................................................ 99Figure 3-28 Add Printer Wizard — Local or Network Printer screen .............................................................. 100Figure 3-29 Add Printer Wizard — Specify A Printer screen .......................................................................... 101Figure 3-30 Add Printer Wizard — Find Printers screen ................................................................................ 102Figure 3-31 Add Printer Wizard — Default Printer screen ............................................................................. 102Figure 3-32 Add Printer Wizard — Browse for Printer screen ........................................................................ 103Figure 3-33 Send Fax Driver Installation — License Agreement screen ....................................................... 107Figure 3-34 Send Fax Driver Installation — Device Connection screen ........................................................ 108Figure 3-35 Send Fax Driver Installation — Devices Found screen .............................................................. 109Figure 3-36 Send Fax Driver Installation — Device Connection screen 2 ..................................................... 110Figure 3-37 Send Fax Driver Installation — Driver Installation Complete screen .......................................... 111Figure 3-38 Send Fax Driver Installation — Local or Network Printer screen ................................................ 112Figure 3-39 Send Fax Driver Installation — Use the following port screen .................................................... 113Figure 3-40 Send Fax Driver Installation — Install Printer Software screen .................................................. 114Figure 3-41 Send Fax Driver Installation — Install From Disk screen ............................................................ 114Figure 3-42 Send Fax Driver Installation — Name Your Printer screen ........................................................ 115Figure 3-43 Send Fax Driver Installation — Printer Sharing screen .............................................................. 116Figure 3-44 Send Fax Driver Installation — Print Test Page screen ............................................................. 117Figure 3-45 Scan Setup Wizard — Welcome screen ..................................................................................... 119Figure 3-46 Scan Setup Wizard — Devices Found screen ............................................................................ 120Figure 3-47 Scan Setup Wizard — Network Settings screen ........................................................................ 121Figure 3-48 Scan Setup Wizard — Contacting Device screen ...................................................................... 122Figure 3-49 Scan Setup Wizard — Add or Remove Folders screen .............................................................. 123Figure 3-50 Scan Setup Wizard — Authentication screen ............................................................................. 124Figure 3-51 Scan Setup Wizard — Folder Settings screen ........................................................................... 125Figure 3-52 Scan Setup Wizard — Folder Name screen ............................................................................... 126Figure 3-53 Scan Setup Wizard — Complete screen .................................................................................... 127Figure 3-54 Install or Uninstall Software ........................................................................................................ 129Figure 3-55 Windows Control Panel screen ................................................................................................... 131Figure 3-56 Windows Change or Remove Programs screen ......................................................................... 132Figure 3-57 HP Driver Uninstall Utility screen ................................................................................................ 133Figure 3-58 Uninstall selected device screen ................................................................................................ 134Figure 3-59 Uninstall all devices screen ......................................................................................................... 134Figure 3-60 Uninstall progress window .......................................................................................................... 134Figure 3-61 Uninstall optional software screen .............................................................................................. 134Figure 4-1 An Incompatible Print Settings message ...................................................................................... 141Figure 4-2 The default appearance of the Advanced tab .............................................................................. 143Figure 4-3 Printing Shortcuts tab .................................................................................................................... 147Figure 4-4 Printing Shortcuts dialog box ........................................................................................................ 153Figure 4-5 Printing Shortcuts tab – custom shortcut ...................................................................................... 153Figure 4-6 Paper/Quality tab ......................................................................................................................... 154Figure 4-7 Paper Options group box ............................................................................................................. 155
xvi ENWW

Figure 4-8 Custom Paper Size dialog box .................................................................................................... 156Figure 4-9 Print pages on different paper - First or Last ................................................................................ 161Figure 4-10 Effects tab .................................................................................................................................. 163Figure 4-11 Preview images – Legal on Letter; Scale to Fit off (left) and on (right) ...................................... 164Figure 4-12 Watermark Details dialog box .................................................................................................... 166Figure 4-13 Finishing tab ............................................................................................................................... 170Figure 4-14 Page-order preview images ...................................................................................................... 175Figure 4-15 Output tab ................................................................................................................................. 177Figure 4-16 Job Storage tab .......................................................................................................................... 180Figure 4-17 Job Storage Identification dialog box .......................................................................................... 183Figure 4-18 Color tab ..................................................................................................................................... 186Figure 4-19 Color Settings dialog box ............................................................................................................ 188Figure 4-20 Services tab ................................................................................................................................ 192Figure 4-21 Device Settings tab ..................................................................................................................... 194Figure 4-22 Font Substitution Table .............................................................................................................. 196Figure 4-23 HP Font Installer dialog box ...................................................................................................... 197Figure 4-24 About tab ..................................................................................................................................... 202Figure 5-1 Product CD image ......................................................................................................................... 213Figure 5-2 HP LaserJet installer browser screen ........................................................................................... 214Figure 5-3 Introduction dialog box ................................................................................................................. 215Figure 5-4 Read Me dialog box ...................................................................................................................... 215Figure 5-5 License dialog box ........................................................................................................................ 216Figure 5-6 Agree/Disagree dialog box ........................................................................................................... 216Figure 5-7 Select Destination dialog box ....................................................................................................... 217Figure 5-8 Installation Type dialog box .......................................................................................................... 217Figure 5-9 Custom Install dialog box .............................................................................................................. 218Figure 5-10 Authenticate dialog box .............................................................................................................. 218Figure 5-11 Installing dialog box .................................................................................................................... 219Figure 5-12 Finish Up dialog box ................................................................................................................... 219Figure 5-13 Printer list screen ........................................................................................................................ 221Figure 5-14 Print & Fax dialog ........................................................................................................................ 221Figure 5-15 Default Browser tab .................................................................................................................... 222Figure 5-16 Printer Browser – IP Printer tab .................................................................................................. 223Figure 5-17 Installable Options screen .......................................................................................................... 224Figure 5-18 Printer List screen ....................................................................................................................... 225Figure 5-19 Print & Fax screen ...................................................................................................................... 226Figure 5-20 Add printer screen ....................................................................................................................... 227Figure 5-21 Add printer screen ....................................................................................................................... 229Figure 5-22 Printer Selector screen ............................................................................................................... 234Figure 5-23 Connection Type screen ............................................................................................................. 235Figure 5-24 Select Printer screen – printer selected ...................................................................................... 235Figure 5-25 Printer Utility screen .................................................................................................................... 236Figure 5-26 Printer Status screen .................................................................................................................. 236Figure 5-27 Current Supplies Levels screen .................................................................................................. 237
ENWW xvii
Figure 5-28 Supplies Status screen ............................................................................................................... 237Figure 5-29 Transfer printer information to HP SureSupply? screen ............................................................. 238Figure 5-30 Welcome to HP SureSupply screen ............................................................................................ 239Figure 5-31 Paper Status screen ................................................................................................................... 239Figure 5-32 Device Information screen .......................................................................................................... 240Figure 5-33 HP Online Support screen .......................................................................................................... 241Figure 5-34 HP Instant Support link ............................................................................................................... 242Figure 5-35 HP Registration Web page ......................................................................................................... 243Figure 5-36 File Upload screen ...................................................................................................................... 244Figure 5-37 Update Firmware screen ............................................................................................................. 245Figure 5-38 Duplex Mode screen ................................................................................................................... 246Figure 5-39 Trays Configuration screen ......................................................................................................... 247Figure 5-40 Lock Resources screen .............................................................................................................. 248Figure 5-41 Enable Job Storing screen .......................................................................................................... 249Figure 5-42 E-mail Alerts screen .................................................................................................................... 251Figure 5-43 Network Settings screen ............................................................................................................. 251Figure 5-44 Bonjour Settings screen .............................................................................................................. 253Figure 5-45 Additional Network Settings screen ............................................................................................ 254Figure 6-1 HP Easy Firmware Upgrade utility screen 1 ................................................................................. 263Figure 6-2 HP Easy Firmware Upgrade utility screen 2 ................................................................................. 263Figure 6-3 HP Easy Firmware Upgrade utility complete screen ..................................................................... 264Figure 6-4 HP Device Manager – Functions tab ............................................................................................ 290Figure 6-5 HP Device Manager – Status tab ................................................................................................. 291Figure 6-6 HP Device Manager – Supplies tab .............................................................................................. 291Figure 6-7 HP Device Manager – Panel tab .................................................................................................. 292
xviii ENWW

1 Purpose and scope
ENWW 1
Purp
ose
and
scop
e
IntroductionThis software technical reference (STR) provides information about and troubleshooting tips for theprinting-system software for the product.
This STR is prepared in an electronic format to serve as a quick-reference tool for Customer Care Center(CCC) agents, support engineers, system administrators, management information systems (MIS)personnel, and end users, as appropriate.
NOTE: This STR describes drivers that are shipped on the printing-system software CD that comeswith the product. This STR does not describe drivers that will become available on the Web.
The following information is included in this STR:
● Descriptions of drivers, operating systems, and system environments
● Procedures for installing and uninstalling the printing-system software components
For information about the location of information within chapters, see the table of contents. An index isalso provided in this STR.
Additional detailed information about the printing-system software is published in an addendum to thisSTR. The following information is available in the addendum:
● Lists of installed files
● System-modification information, such as files added or modified
2 Chapter 1 Purpose and scope ENWW
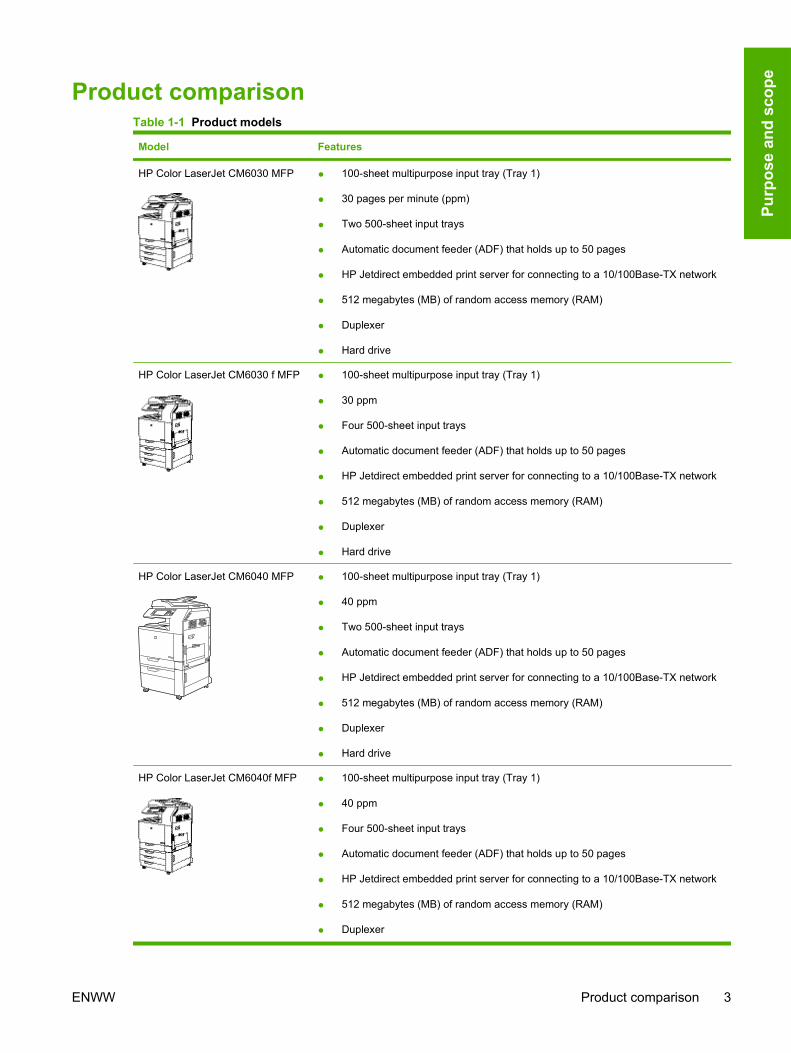
Product comparisonTable 1-1 Product models
Model Features
HP Color LaserJet CM6030 MFP ● 100-sheet multipurpose input tray (Tray 1)
● 30 pages per minute (ppm)
● Two 500-sheet input trays
● Automatic document feeder (ADF) that holds up to 50 pages
● HP Jetdirect embedded print server for connecting to a 10/100Base-TX network
● 512 megabytes (MB) of random access memory (RAM)
● Duplexer
● Hard drive
HP Color LaserJet CM6030 f MFP ● 100-sheet multipurpose input tray (Tray 1)
● 30 ppm
● Four 500-sheet input trays
● Automatic document feeder (ADF) that holds up to 50 pages
● HP Jetdirect embedded print server for connecting to a 10/100Base-TX network
● 512 megabytes (MB) of random access memory (RAM)
● Duplexer
● Hard drive
HP Color LaserJet CM6040 MFP ● 100-sheet multipurpose input tray (Tray 1)
● 40 ppm
● Two 500-sheet input trays
● Automatic document feeder (ADF) that holds up to 50 pages
● HP Jetdirect embedded print server for connecting to a 10/100Base-TX network
● 512 megabytes (MB) of random access memory (RAM)
● Duplexer
● Hard drive
HP Color LaserJet CM6040f MFP ● 100-sheet multipurpose input tray (Tray 1)
● 40 ppm
● Four 500-sheet input trays
● Automatic document feeder (ADF) that holds up to 50 pages
● HP Jetdirect embedded print server for connecting to a 10/100Base-TX network
● 512 megabytes (MB) of random access memory (RAM)
● Duplexer
ENWW Product comparison 3
Purp
ose
and
scop
e

Model Features
● Hard drive
● Analog fax
Table 1-1 Product models (continued)
4 Chapter 1 Purpose and scope ENWW
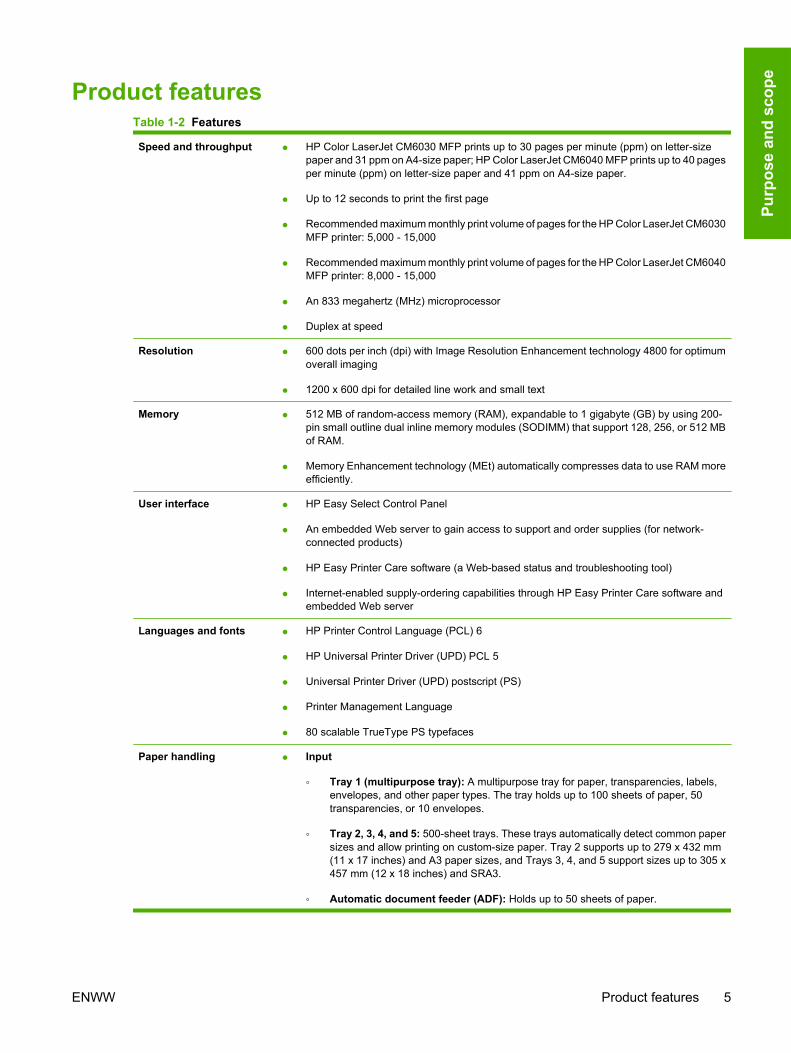
Product featuresTable 1-2 Features
Speed and throughput ● HP Color LaserJet CM6030 MFP prints up to 30 pages per minute (ppm) on letter-sizepaper and 31 ppm on A4-size paper; HP Color LaserJet CM6040 MFP prints up to 40 pagesper minute (ppm) on letter-size paper and 41 ppm on A4-size paper.
● Up to 12 seconds to print the first page
● Recommended maximum monthly print volume of pages for the HP Color LaserJet CM6030MFP printer: 5,000 - 15,000
● Recommended maximum monthly print volume of pages for the HP Color LaserJet CM6040MFP printer: 8,000 - 15,000
● An 833 megahertz (MHz) microprocessor
● Duplex at speed
Resolution ● 600 dots per inch (dpi) with Image Resolution Enhancement technology 4800 for optimumoverall imaging
● 1200 x 600 dpi for detailed line work and small text
Memory ● 512 MB of random-access memory (RAM), expandable to 1 gigabyte (GB) by using 200-pin small outline dual inline memory modules (SODIMM) that support 128, 256, or 512 MBof RAM.
● Memory Enhancement technology (MEt) automatically compresses data to use RAM moreefficiently.
User interface ● HP Easy Select Control Panel
● An embedded Web server to gain access to support and order supplies (for network-connected products)
● HP Easy Printer Care software (a Web-based status and troubleshooting tool)
● Internet-enabled supply-ordering capabilities through HP Easy Printer Care software andembedded Web server
Languages and fonts ● HP Printer Control Language (PCL) 6
● HP Universal Printer Driver (UPD) PCL 5
● Universal Printer Driver (UPD) postscript (PS)
● Printer Management Language
● 80 scalable TrueType PS typefaces
Paper handling ● Input
◦ Tray 1 (multipurpose tray): A multipurpose tray for paper, transparencies, labels,envelopes, and other paper types. The tray holds up to 100 sheets of paper, 50transparencies, or 10 envelopes.
◦ Tray 2, 3, 4, and 5: 500-sheet trays. These trays automatically detect common papersizes and allow printing on custom-size paper. Tray 2 supports up to 279 x 432 mm(11 x 17 inches) and A3 paper sizes, and Trays 3, 4, and 5 support sizes up to 305 x457 mm (12 x 18 inches) and SRA3.
◦ Automatic document feeder (ADF): Holds up to 50 sheets of paper.
ENWW Product features 5
Purp
ose
and
scop
e
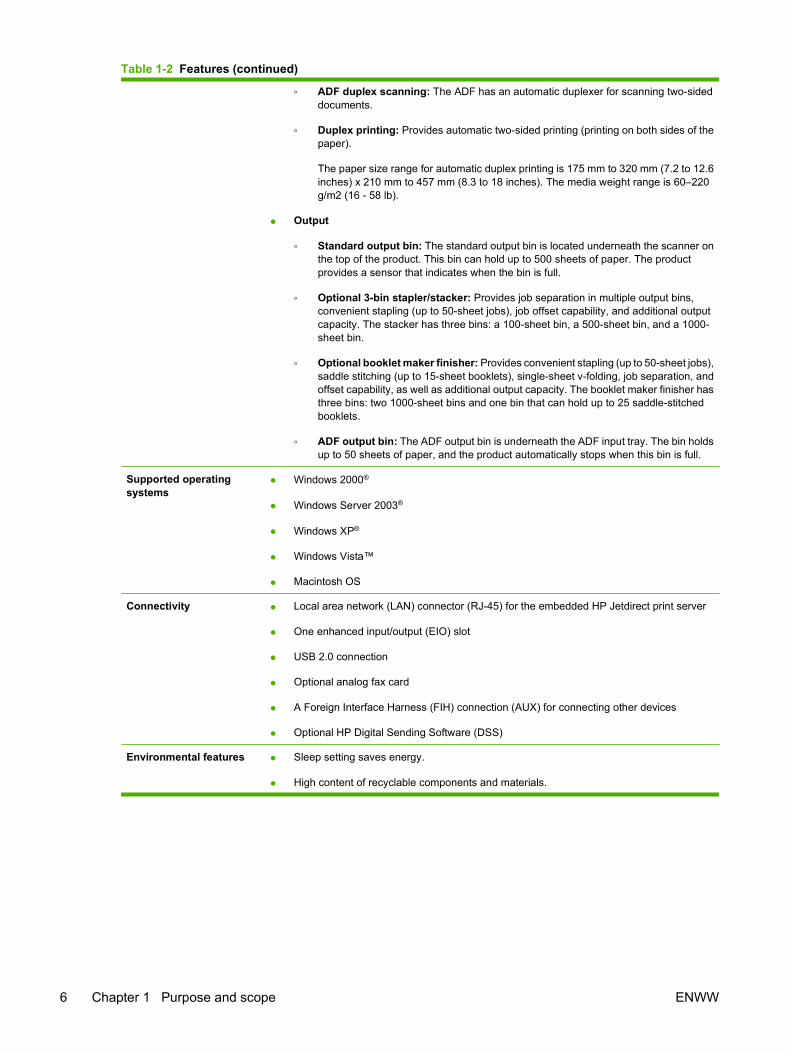
◦ ADF duplex scanning: The ADF has an automatic duplexer for scanning two-sideddocuments.
◦ Duplex printing: Provides automatic two-sided printing (printing on both sides of thepaper).
The paper size range for automatic duplex printing is 175 mm to 320 mm (7.2 to 12.6inches) x 210 mm to 457 mm (8.3 to 18 inches). The media weight range is 60–220g/m2 (16 - 58 lb).
● Output
◦ Standard output bin: The standard output bin is located underneath the scanner onthe top of the product. This bin can hold up to 500 sheets of paper. The productprovides a sensor that indicates when the bin is full.
◦ Optional 3-bin stapler/stacker: Provides job separation in multiple output bins,convenient stapling (up to 50-sheet jobs), job offset capability, and additional outputcapacity. The stacker has three bins: a 100-sheet bin, a 500-sheet bin, and a 1000-sheet bin.
◦ Optional booklet maker finisher: Provides convenient stapling (up to 50-sheet jobs),saddle stitching (up to 15-sheet booklets), single-sheet v-folding, job separation, andoffset capability, as well as additional output capacity. The booklet maker finisher hasthree bins: two 1000-sheet bins and one bin that can hold up to 25 saddle-stitchedbooklets.
◦ ADF output bin: The ADF output bin is underneath the ADF input tray. The bin holdsup to 50 sheets of paper, and the product automatically stops when this bin is full.
Supported operatingsystems
● Windows 2000®
● Windows Server 2003®
● Windows XP®
● Windows Vista™
● Macintosh OS
Connectivity ● Local area network (LAN) connector (RJ-45) for the embedded HP Jetdirect print server
● One enhanced input/output (EIO) slot
● USB 2.0 connection
● Optional analog fax card
● A Foreign Interface Harness (FIH) connection (AUX) for connecting other devices
● Optional HP Digital Sending Software (DSS)
Environmental features ● Sleep setting saves energy.
● High content of recyclable components and materials.
Table 1-2 Features (continued)
6 Chapter 1 Purpose and scope ENWW
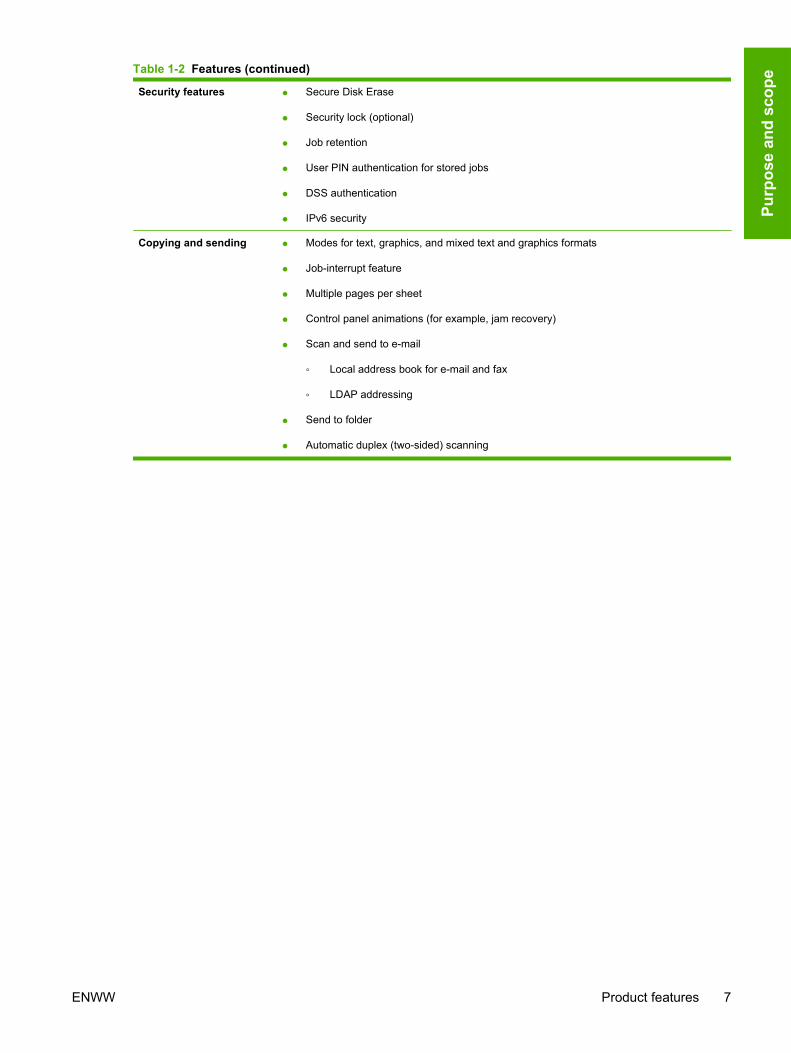
Security features ● Secure Disk Erase
● Security lock (optional)
● Job retention
● User PIN authentication for stored jobs
● DSS authentication
● IPv6 security
Copying and sending ● Modes for text, graphics, and mixed text and graphics formats
● Job-interrupt feature
● Multiple pages per sheet
● Control panel animations (for example, jam recovery)
● Scan and send to e-mail
◦ Local address book for e-mail and fax
◦ LDAP addressing
● Send to folder
● Automatic duplex (two-sided) scanning
Table 1-2 Features (continued)
ENWW Product features 7
Purp
ose
and
scop
e
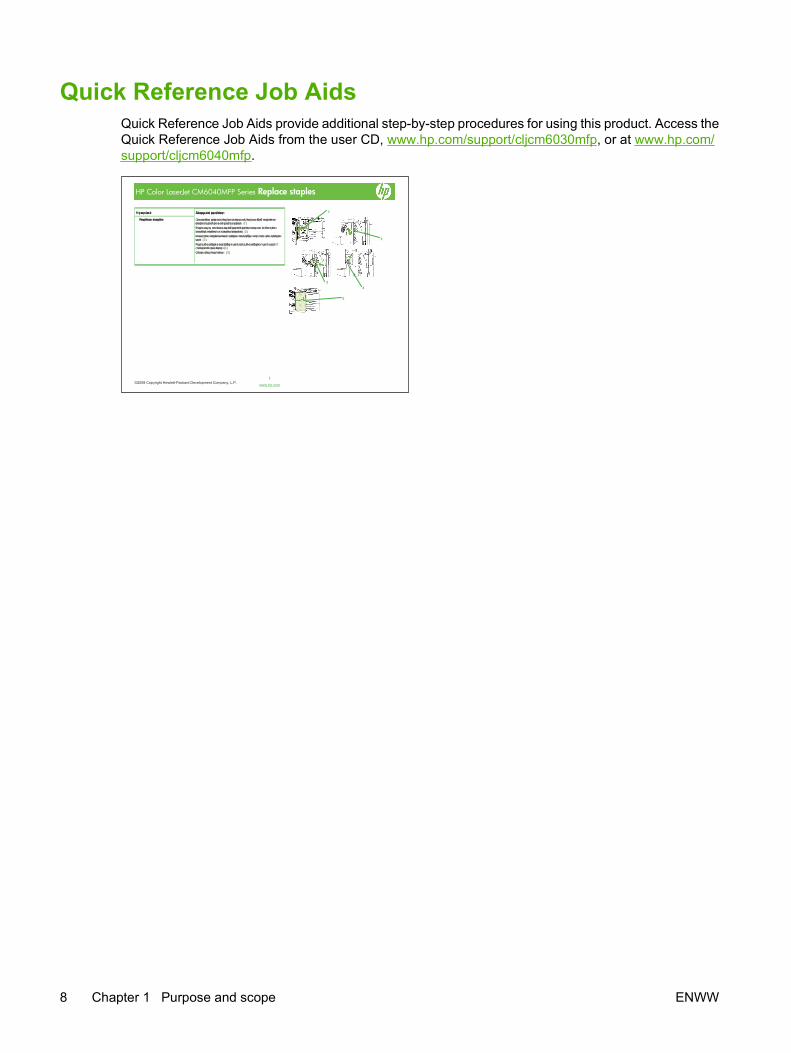
Quick Reference Job AidsQuick Reference Job Aids provide additional step-by-step procedures for using this product. Access theQuick Reference Job Aids from the user CD, www.hp.com/support/cljcm6030mfp, or at www.hp.com/support/cljcm6040mfp.
HP Color LaserJet CM6040MFP Series Replace staples
©2008 Copyright Hewlett-Packard Development Company, L.P. 1
www.hp.com
How do I ow do I mrofrepotspetS
Replace stapleseplace staples Grasp the grip on the front door of the booklet maker or stapler/stacker and pull to open. (1)Push up to on the staple cartridge to remove it from the booklet maker or stapler/stacker. (2)Insert the replacement staple cartridge unit into the stapler unit. (3)Push the staple cartridge unit into the stapler unit until it ush the staple cartridge unit into the stapler unit until iclicks into position. (4)Close the front door. (
mr ofr ep ot spet
rasp the grip on the front door of the booklet maker or stapler/stacker and pull to open
ush up to on the staple cartridge to remove it from the booklet maker or stapler/stacker
nsert the replacement staple cartridge unit into the stapler
unit.
clicks into position.lose the front door. 5)
2
3
1
4
5
8 Chapter 1 Purpose and scope ENWW
Product walkaroundFront view
HP Color LaserJet CM6030 and CM6040 MFP Series
9
5
6
7
1 2 4
8
3
10
1 Control panel
2 Automatic Document Feeder (ADF) top cover
3 ADF input tray for copy/scan/fax originals
4 ADF output bin
5 Right door (provides access to the transfer unit, transfer roller, and fuser unit)
6 On/Off switch
7 Lower right door
8 HP Color LaserJet CM6030 MFP and HP Color LaserJet CM6040 MFP: Trays 2 and 3
HP Color LaserJet CM6030 f MFP and HP Color LaserJet CM6040f MFP: Trays 2, 3, 4 and 5
9 Front cover (provides access to print cartridges and image drums)
10 Output bin
ENWW Product walkaround 9
Purp
ose
and
scop
e
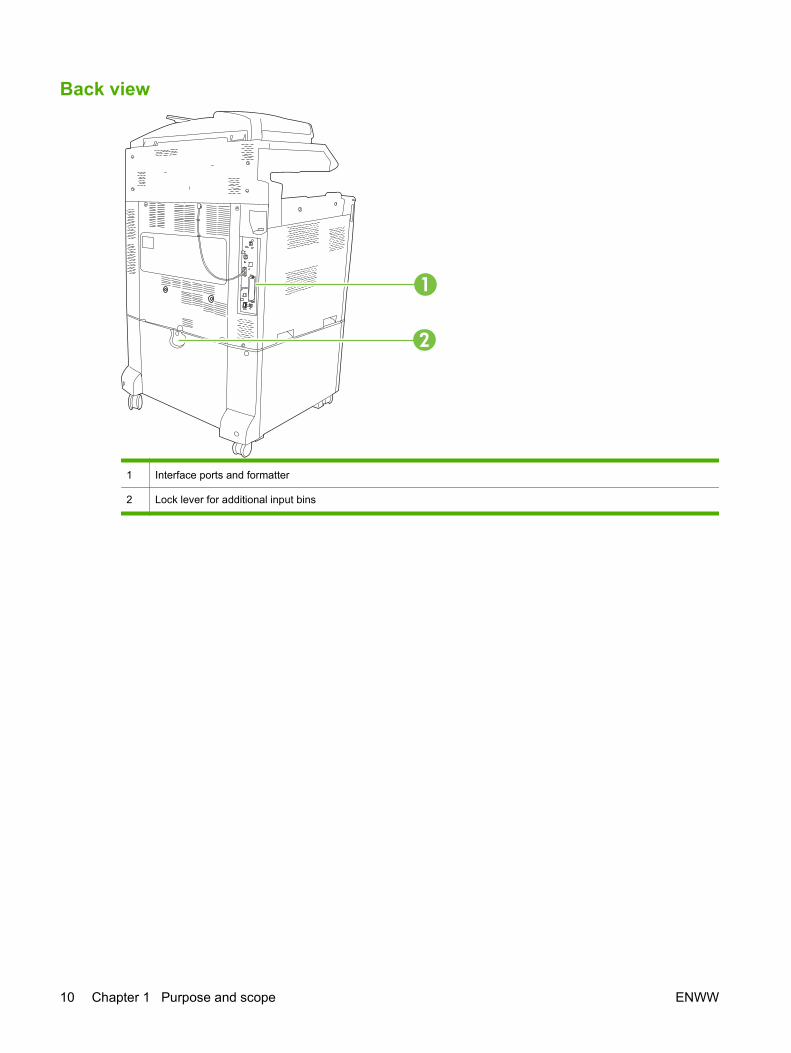
Back view
1 Interface ports and formatter
2 Lock lever for additional input bins
10 Chapter 1 Purpose and scope ENWW
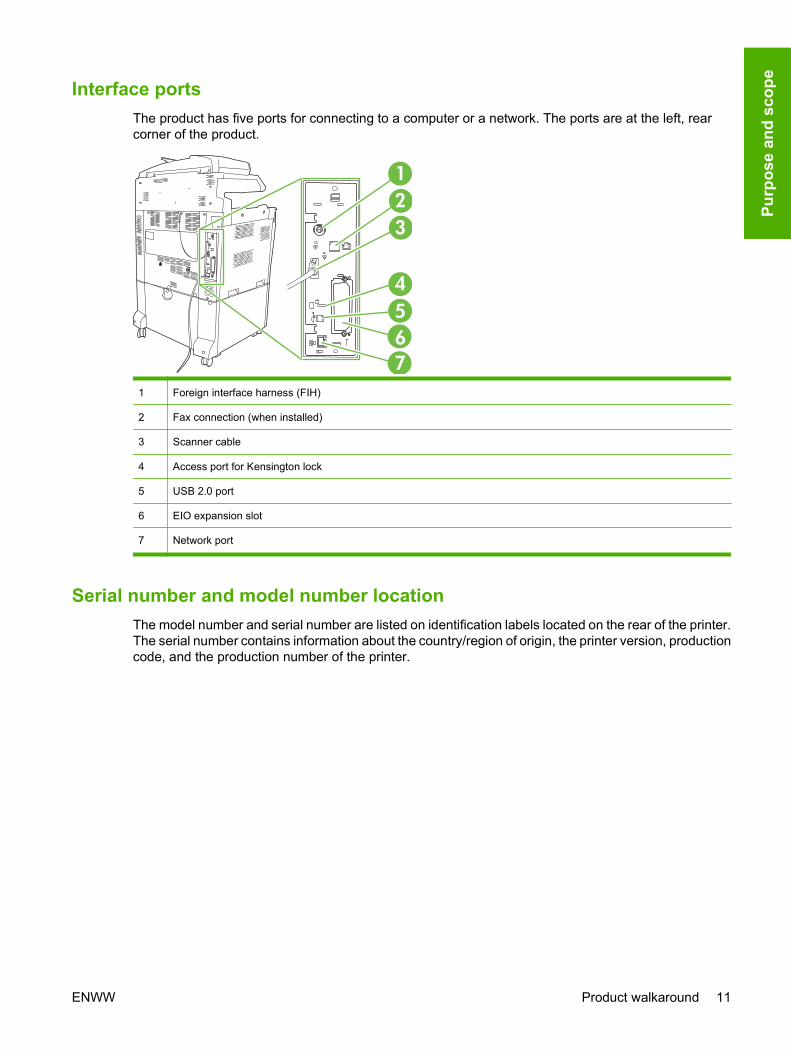
Interface portsThe product has five ports for connecting to a computer or a network. The ports are at the left, rearcorner of the product.
1
2
3
4
5
6
7
1 Foreign interface harness (FIH)
2 Fax connection (when installed)
3 Scanner cable
4 Access port for Kensington lock
5 USB 2.0 port
6 EIO expansion slot
7 Network port
Serial number and model number locationThe model number and serial number are listed on identification labels located on the rear of the printer.The serial number contains information about the country/region of origin, the printer version, productioncode, and the production number of the printer.
ENWW Product walkaround 11
Purp
ose
and
scop
e
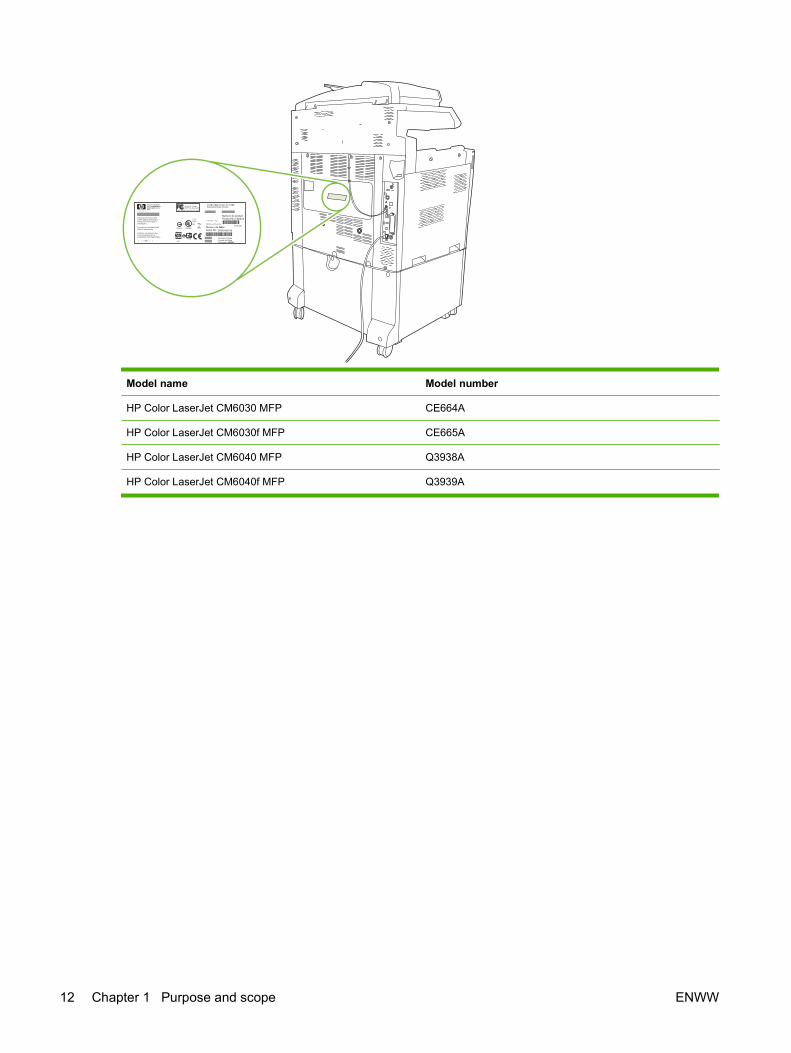
Model name Model number
HP Color LaserJet CM6030 MFP CE664A
HP Color LaserJet CM6030f MFP CE665A
HP Color LaserJet CM6040 MFP Q3938A
HP Color LaserJet CM6040f MFP Q3939A
12 Chapter 1 Purpose and scope ENWW
Printing-system software● Operating-system support
● Availability
Operating-system support Windows operating systems provide full-featured support for the product. Operating systems that arenot described in this STR provide varying levels of functionality.
Throughout this document, Windows XP is used to denote Windows XP Home Edition and WindowsXP Professional, unless noted otherwise.
Information relating to networking functions is specific to products that have network capabilities.
Information relating to faxing functions is specific to products that have fax capabilities.
The printing-system software has not been tested with and is not supported in the following operatingsystems:
● Windows 3.1x
● Windows 95
● Windows 98
● Windows Millennium Edition (Me)
● Windows NT® 4.0
● IA-64-bit operating systems
Printer drivers for these operating systems are not included on the printing-system software CD and arenot available on the Web. Other printer drivers might work with the product, but some print-driver featuresand functions might not be available.
For more information about the product, go to the following Web sites:
www.hp.com/support/cljcm6030mfp or www.hp.com/support/cljcm6040mfp
● Supported operating systems for Windows
● Supported printer drivers for Windows
● HP Universal Print Driver (UPD)
● Supported utilities for Windows
● Supported operating systems for Macintosh
● Supported printer drivers for Macintosh
● Software for Macintosh computers
● Open the HP Printer Utility
● HP Printer Utility features
● Supported utilities for Macintosh
ENWW Printing-system software 13
Purp
ose
and
scop
e
● Software for other operating systems
● Printer driver support in other operating systems
Supported operating systems for WindowsThe product supports the following Windows operating systems:
● Windows 2000
● Windows Server 2003 (32-bit and 64-bit)
● Windows XP (32-bit and 64-bit)
● Windows Vista (32-bit and 64-bit)
Supported printer drivers for Windows
● HP PCL 6
● HP postscript emulation Universal Print Driver (HP UPD PS)
● HP PCL 5 UPD Universal Print Driver (HP UPD PCL 5)
The printer drivers include online Help that has instructions for common printing tasks and also describesthe buttons, checkboxes, and drop-down lists that are in the printer driver.
NOTE: The HP PCL 6 is the only printer-driver that is included with this product; it is included in thebox on the Admin CD.
NOTE: For more information about the UPD, see www.hp.com/go/upd.
HP Universal Print Driver (UPD)The HP Universal Print Driver (UPD) for Windows is a single driver that gives you instant access tovirtually any HP LaserJet product, from any location, without downloading separate drivers. It is built onproven HP print driver technology and has been tested thoroughly and used with many softwareprograms. It is a powerful solution that performs consistently over time.
The HP UPD communicates directly with each HP product, gathers configuration information, and thencustomizes the user interface to show the product’s unique, available features. It automatically enablesfeatures that are available for the product, such as two-sided printing and stapling, so you do not needto enable them manually.
For more information, go to www.hp.com/go/upd.
14 Chapter 1 Purpose and scope ENWW
UPD installation modes
Traditional mode ● Use this mode if you are installing the driver from a CD for a single computer.
● When installed with this mode, UPD operates like traditional printer drivers.
● If you use this mode, you must install UPD separately for each printer.
Dynamic mode ● Use this mode if you are installing the driver for a mobile computer, so you candiscover and print to HP products in any location.
● Use this mode if you are installing UPD for a workgroup.
● To use this mode, download UPD from the Internet. See www.hp.com/go/upd.
Supported utilities for Windows
Supported utilities for Windows
HP Web Jetadmin
HP Web Jetadmin is a browser-based management tool for HP Jetdirect-connected printers within yourintranet, and it should be installed only on the network administrator’s computer.
To download a current version of HP Web Jetadmin and for the latest list of supported host systems,visit www.hp.com/go/webjetadmin.
When installed on a host server, a Windows client can gain access to HP Web Jetadmin by using asupported Web browser (such as Microsoft® Internet Explorer 4.x or Netscape Navigator 4.x or later)by navigating to the HP Web Jetadmin host.
Embedded Web server
The product is equipped with an embedded Web server, which provides access to information aboutproduct and network activities. This information appears in a Web browser, such as Microsoft InternetExplorer, Netscape Navigator, Apple Safari, or Firefox.
The embedded Web server resides on the product. It is not loaded on a network server.
The embedded Web server provides an interface to the product that anyone who has a network-connected computer and a standard Web browser can use. No special software is installed orconfigured, but you must have a supported Web browser on the computer. To gain access to theembedded Web server, type the IP address for the product in the address line of the browser.
For a complete explanation of the features and functionality of the embedded Web server, see the HPColor LaserJet CM6030 and HP Color LaserJet CM6040 MFP Embedded Web Server User Guides,which are available on the Admin CD.
HP Easy Printer Care
HP Easy Printer Care software is a program that you can use for the following tasks:
● Check the product status
● Check the supplies status and use HP SureSupply to shop online for supplies
● Set up alerts
ENWW Printing-system software 15
Purp
ose
and
scop
e
● View product usage reports
● View product documentation
● Gain access to troubleshooting and maintenance tools
● Use HP Proactive Support to routinely scan your printing system and to prevent potential problems.HP Proactive Support can update software, firmware, and HP printer drivers.
You can view HP Easy Printer Care software when the product is directly connected to your computeror when it is connected to a network.
Supported operating systems ● Microsoft® Windows 2000
● Microsoft Windows Server 2003
● Microsoft Windows XP, Service Pack 2
● Microsoft Windows Vista™
Supported browsers ● Microsoft Internet Explorer 6.0 or 7.0
To download HP Easy Printer Care software, go to www.hp.com/go/easyprintercare. This Web site alsoprovides updated information about supported browsers and a list of HP products that support HP EasyPrinter Care software.
For more information about using HP Easy Printer Care software, see the HP Color LaserJet CM6030and CM6040 MFP Series User Guides, which are available on the User CD.
Supported operating systems for MacintoshThe product supports the following Macintosh operating systems:
● Mac OS X V10.2.8, V10.3, V10.4, V10.5, and later
NOTE: For Mac OS X V10.4 and later, PPC and Intel Core Processor Macs are supported.
Supported printer drivers for MacintoshThe HP installer provides PostScript® Printer Description (PPD) files, Printer Dialog Extensions (PDEs),and the HP Printer Utility for use with Macintosh computers.
The PPDs, in combination with the Apple PostScript printer drivers, provide access to device features.Use the Apple PostScript printer driver that comes with the computer
Software for Macintosh computers
HP Printer Utility
Use the HP Printer Utility to set up product features that are not available in the printer driver.
You can use the HP Printer Utility when the product uses a universal serial bus (USB) cable or isconnected to a TCP/IP-based network.
16 Chapter 1 Purpose and scope ENWW
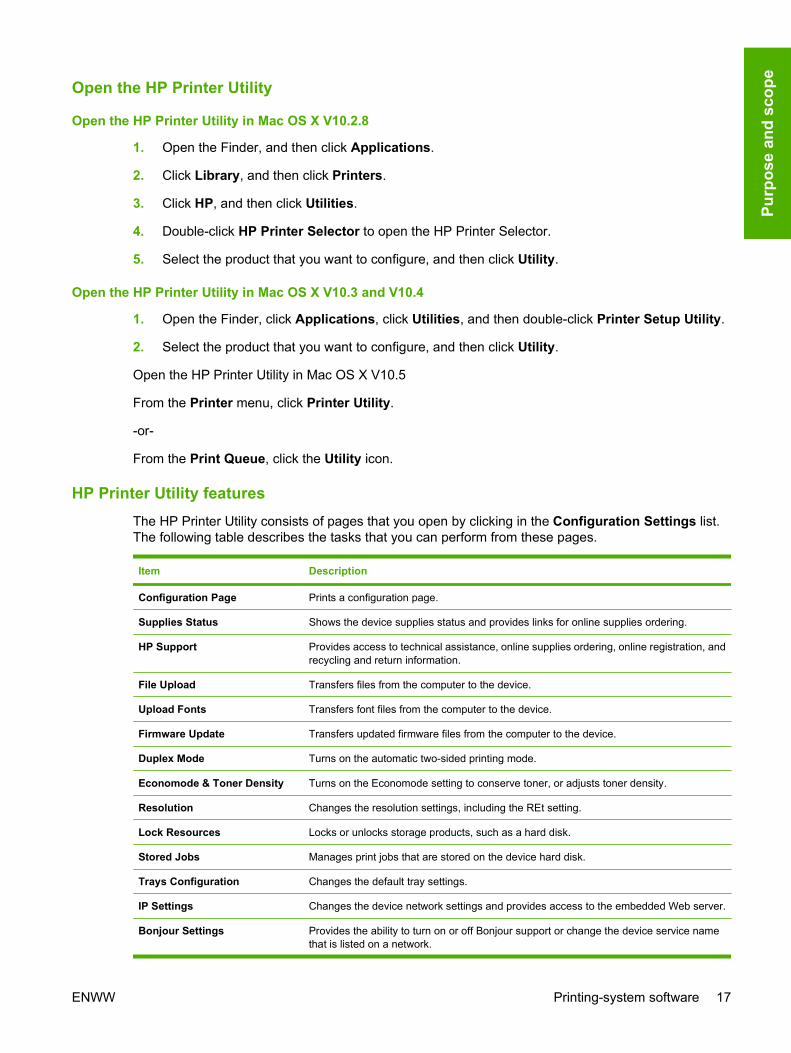
Open the HP Printer Utility
Open the HP Printer Utility in Mac OS X V10.2.8
1. Open the Finder, and then click Applications.
2. Click Library, and then click Printers.
3. Click HP, and then click Utilities.
4. Double-click HP Printer Selector to open the HP Printer Selector.
5. Select the product that you want to configure, and then click Utility.
Open the HP Printer Utility in Mac OS X V10.3 and V10.4
1. Open the Finder, click Applications, click Utilities, and then double-click Printer Setup Utility.
2. Select the product that you want to configure, and then click Utility.
Open the HP Printer Utility in Mac OS X V10.5
From the Printer menu, click Printer Utility.
-or-
From the Print Queue, click the Utility icon.
HP Printer Utility featuresThe HP Printer Utility consists of pages that you open by clicking in the Configuration Settings list.The following table describes the tasks that you can perform from these pages.
Item Description
Configuration Page Prints a configuration page.
Supplies Status Shows the device supplies status and provides links for online supplies ordering.
HP Support Provides access to technical assistance, online supplies ordering, online registration, andrecycling and return information.
File Upload Transfers files from the computer to the device.
Upload Fonts Transfers font files from the computer to the device.
Firmware Update Transfers updated firmware files from the computer to the device.
Duplex Mode Turns on the automatic two-sided printing mode.
Economode & Toner Density Turns on the Economode setting to conserve toner, or adjusts toner density.
Resolution Changes the resolution settings, including the REt setting.
Lock Resources Locks or unlocks storage products, such as a hard disk.
Stored Jobs Manages print jobs that are stored on the device hard disk.
Trays Configuration Changes the default tray settings.
IP Settings Changes the device network settings and provides access to the embedded Web server.
Bonjour Settings Provides the ability to turn on or off Bonjour support or change the device service namethat is listed on a network.
ENWW Printing-system software 17
Purp
ose
and
scop
e
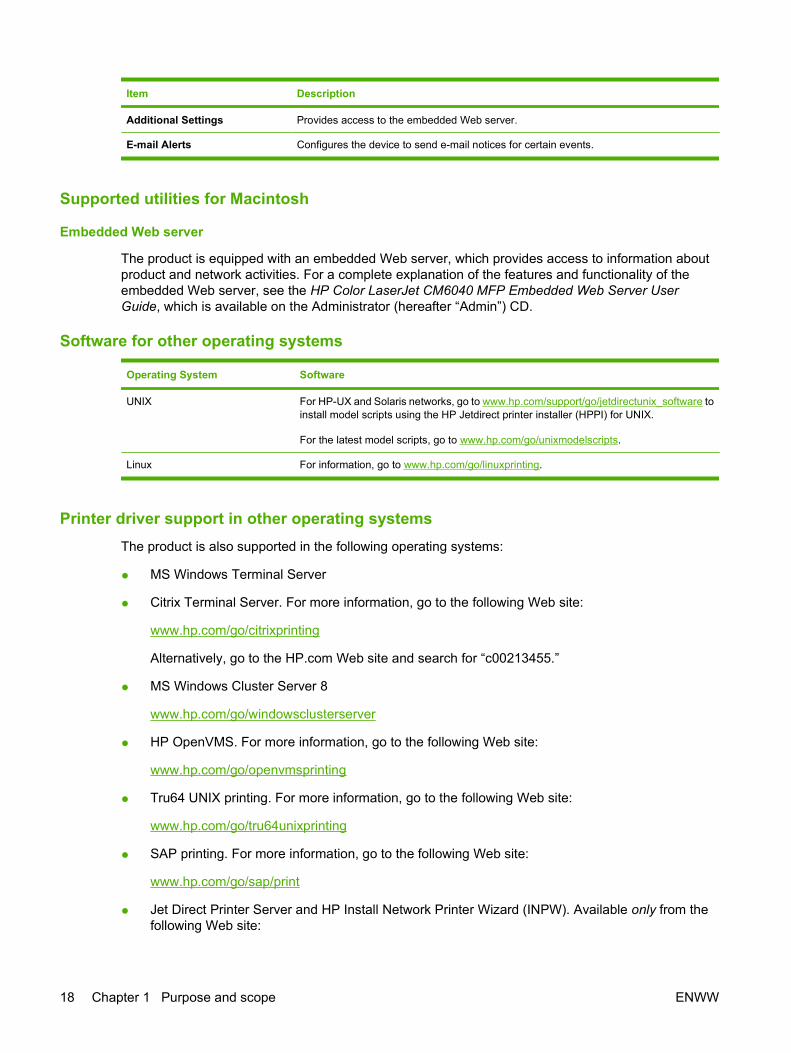
Item Description
Additional Settings Provides access to the embedded Web server.
E-mail Alerts Configures the device to send e-mail notices for certain events.
Supported utilities for Macintosh
Embedded Web server
The product is equipped with an embedded Web server, which provides access to information aboutproduct and network activities. For a complete explanation of the features and functionality of theembedded Web server, see the HP Color LaserJet CM6040 MFP Embedded Web Server UserGuide, which is available on the Administrator (hereafter “Admin”) CD.
Software for other operating systems
Operating System Software
UNIX For HP-UX and Solaris networks, go to www.hp.com/support/go/jetdirectunix_software toinstall model scripts using the HP Jetdirect printer installer (HPPI) for UNIX.
For the latest model scripts, go to www.hp.com/go/unixmodelscripts.
Linux For information, go to www.hp.com/go/linuxprinting.
Printer driver support in other operating systemsThe product is also supported in the following operating systems:
● MS Windows Terminal Server
● Citrix Terminal Server. For more information, go to the following Web site:
www.hp.com/go/citrixprinting
Alternatively, go to the HP.com Web site and search for “c00213455.”
● MS Windows Cluster Server 8
www.hp.com/go/windowsclusterserver
● HP OpenVMS. For more information, go to the following Web site:
www.hp.com/go/openvmsprinting
● Tru64 UNIX printing. For more information, go to the following Web site:
www.hp.com/go/tru64unixprinting
● SAP printing. For more information, go to the following Web site:
www.hp.com/go/sap/print
● Jet Direct Printer Server and HP Install Network Printer Wizard (INPW). Available only from thefollowing Web site:
18 Chapter 1 Purpose and scope ENWW
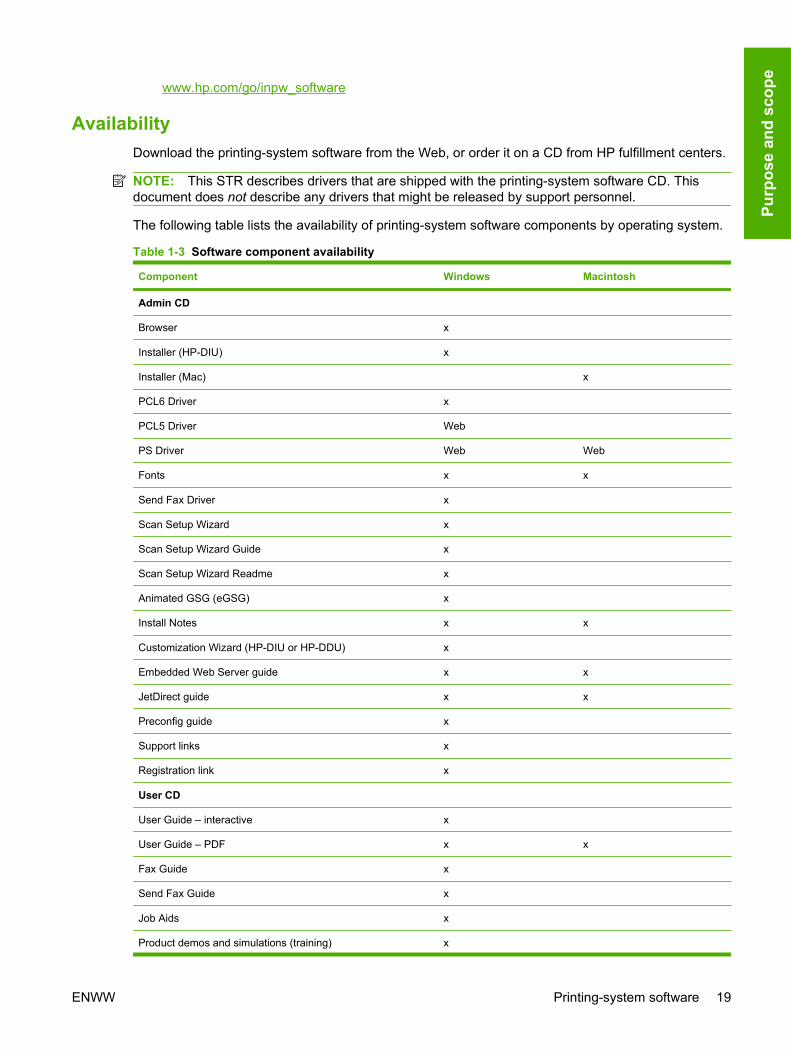
www.hp.com/go/inpw_software
Availability Download the printing-system software from the Web, or order it on a CD from HP fulfillment centers.
NOTE: This STR describes drivers that are shipped with the printing-system software CD. Thisdocument does not describe any drivers that might be released by support personnel.
The following table lists the availability of printing-system software components by operating system.
Table 1-3 Software component availability
Component Windows Macintosh
Admin CD
Browser x
Installer (HP-DIU) x
Installer (Mac) x
PCL6 Driver x
PCL5 Driver Web
PS Driver Web Web
Fonts x x
Send Fax Driver x
Scan Setup Wizard x
Scan Setup Wizard Guide x
Scan Setup Wizard Readme x
Animated GSG (eGSG) x
Install Notes x x
Customization Wizard (HP-DIU or HP-DDU) x
Embedded Web Server guide x x
JetDirect guide x x
Preconfig guide x
Support links x
Registration link x
User CD
User Guide – interactive x
User Guide – PDF x x
Fax Guide x
Send Fax Guide x
Job Aids x
Product demos and simulations (training) x
ENWW Printing-system software 19
Purp
ose
and
scop
e
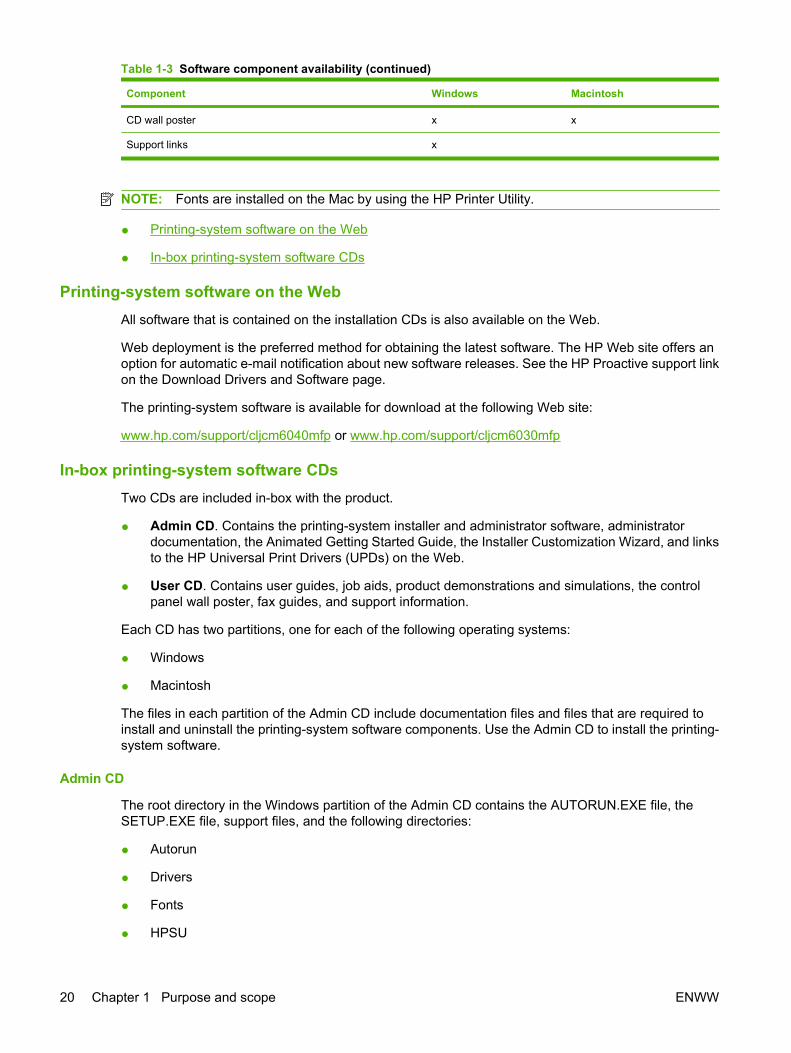
Component Windows Macintosh
CD wall poster x x
Support links x
NOTE: Fonts are installed on the Mac by using the HP Printer Utility.
● Printing-system software on the Web
● In-box printing-system software CDs
Printing-system software on the WebAll software that is contained on the installation CDs is also available on the Web.
Web deployment is the preferred method for obtaining the latest software. The HP Web site offers anoption for automatic e-mail notification about new software releases. See the HP Proactive support linkon the Download Drivers and Software page.
The printing-system software is available for download at the following Web site:
www.hp.com/support/cljcm6040mfp or www.hp.com/support/cljcm6030mfp
In-box printing-system software CDsTwo CDs are included in-box with the product.
● Admin CD. Contains the printing-system installer and administrator software, administratordocumentation, the Animated Getting Started Guide, the Installer Customization Wizard, and linksto the HP Universal Print Drivers (UPDs) on the Web.
● User CD. Contains user guides, job aids, product demonstrations and simulations, the controlpanel wall poster, fax guides, and support information.
Each CD has two partitions, one for each of the following operating systems:
● Windows
● Macintosh
The files in each partition of the Admin CD include documentation files and files that are required toinstall and uninstall the printing-system software components. Use the Admin CD to install the printing-system software.
Admin CD
The root directory in the Windows partition of the Admin CD contains the AUTORUN.EXE file, theSETUP.EXE file, support files, and the following directories:
● Autorun
● Drivers
● Fonts
● HPSU
Table 1-3 Software component availability (continued)
20 Chapter 1 Purpose and scope ENWW
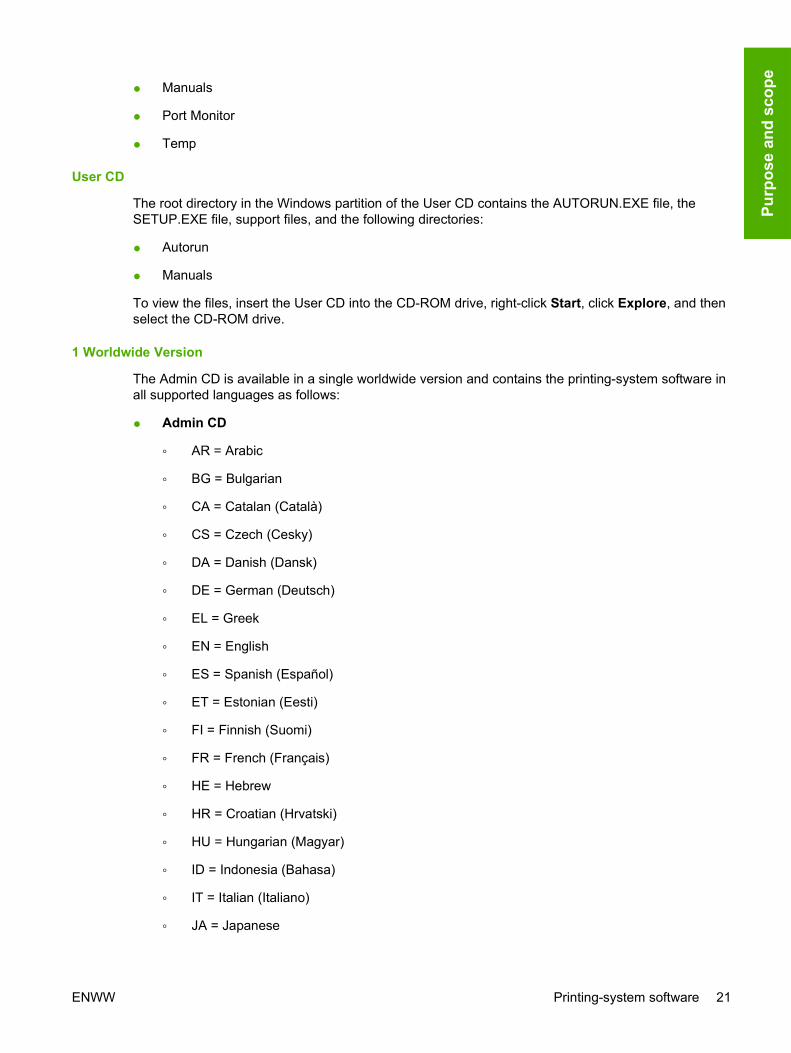
● Manuals
● Port Monitor
● Temp
User CD
The root directory in the Windows partition of the User CD contains the AUTORUN.EXE file, theSETUP.EXE file, support files, and the following directories:
● Autorun
● Manuals
To view the files, insert the User CD into the CD-ROM drive, right-click Start, click Explore, and thenselect the CD-ROM drive.
1 Worldwide Version
The Admin CD is available in a single worldwide version and contains the printing-system software inall supported languages as follows:
● Admin CD
◦ AR = Arabic
◦ BG = Bulgarian
◦ CA = Catalan (Català)
◦ CS = Czech (Cesky)
◦ DA = Danish (Dansk)
◦ DE = German (Deutsch)
◦ EL = Greek
◦ EN = English
◦ ES = Spanish (Español)
◦ ET = Estonian (Eesti)
◦ FI = Finnish (Suomi)
◦ FR = French (Français)
◦ HE = Hebrew
◦ HR = Croatian (Hrvatski)
◦ HU = Hungarian (Magyar)
◦ ID = Indonesia (Bahasa)
◦ IT = Italian (Italiano)
◦ JA = Japanese
ENWW Printing-system software 21
Purp
ose
and
scop
e
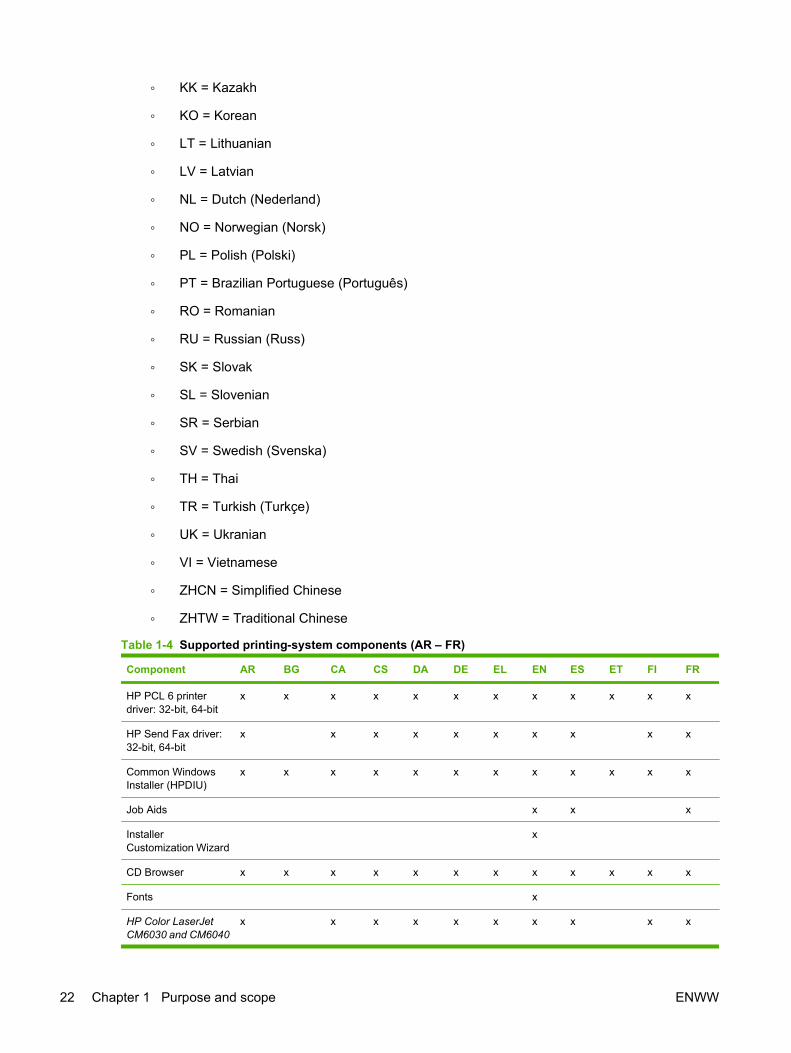
◦ KK = Kazakh
◦ KO = Korean
◦ LT = Lithuanian
◦ LV = Latvian
◦ NL = Dutch (Nederland)
◦ NO = Norwegian (Norsk)
◦ PL = Polish (Polski)
◦ PT = Brazilian Portuguese (Português)
◦ RO = Romanian
◦ RU = Russian (Russ)
◦ SK = Slovak
◦ SL = Slovenian
◦ SR = Serbian
◦ SV = Swedish (Svenska)
◦ TH = Thai
◦ TR = Turkish (Turkçe)
◦ UK = Ukranian
◦ VI = Vietnamese
◦ ZHCN = Simplified Chinese
◦ ZHTW = Traditional Chinese
Table 1-4 Supported printing-system components (AR – FR)
Component AR BG CA CS DA DE EL EN ES ET FI FR
HP PCL 6 printerdriver: 32-bit, 64-bit
x x x x x x x x x x x x
HP Send Fax driver:32-bit, 64-bit
x x x x x x x x x x
Common WindowsInstaller (HPDIU)
x x x x x x x x x x x x
Job Aids x x x
InstallerCustomization Wizard
x
CD Browser x x x x x x x x x x x x
Fonts x
HP Color LaserJetCM6030 and CM6040
x x x x x x x x x x
22 Chapter 1 Purpose and scope ENWW
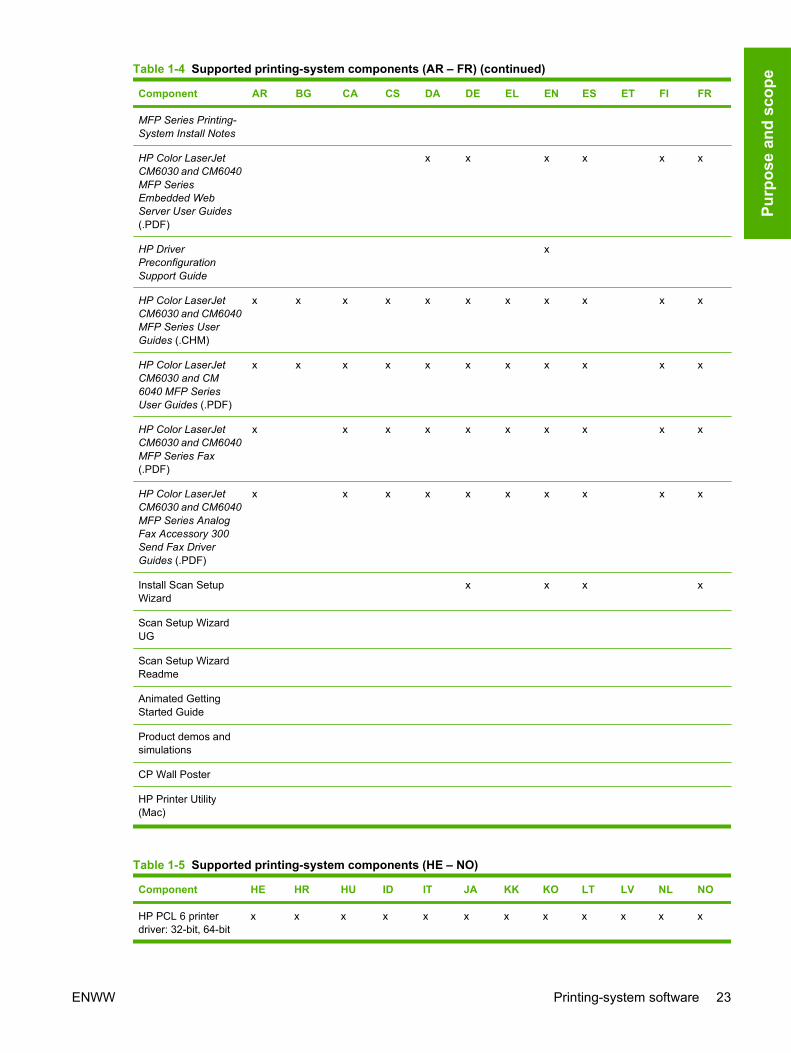
Component AR BG CA CS DA DE EL EN ES ET FI FR
MFP Series Printing-System Install Notes
HP Color LaserJetCM6030 and CM6040MFP SeriesEmbedded WebServer User Guides(.PDF)
x x x x x x
HP DriverPreconfigurationSupport Guide
x
HP Color LaserJetCM6030 and CM6040MFP Series UserGuides (.CHM)
x x x x x x x x x x x
HP Color LaserJetCM6030 and CM6040 MFP SeriesUser Guides (.PDF)
x x x x x x x x x x x
HP Color LaserJetCM6030 and CM6040MFP Series Fax(.PDF)
x x x x x x x x x x
HP Color LaserJetCM6030 and CM6040MFP Series AnalogFax Accessory 300Send Fax DriverGuides (.PDF)
x x x x x x x x x x
Install Scan SetupWizard
x x x x
Scan Setup WizardUG
Scan Setup WizardReadme
Animated GettingStarted Guide
Product demos andsimulations
CP Wall Poster
HP Printer Utility(Mac)
Table 1-5 Supported printing-system components (HE – NO)
Component HE HR HU ID IT JA KK KO LT LV NL NO
HP PCL 6 printerdriver: 32-bit, 64-bit
x x x x x x x x x x x x
Table 1-4 Supported printing-system components (AR – FR) (continued)
ENWW Printing-system software 23
Purp
ose
and
scop
e
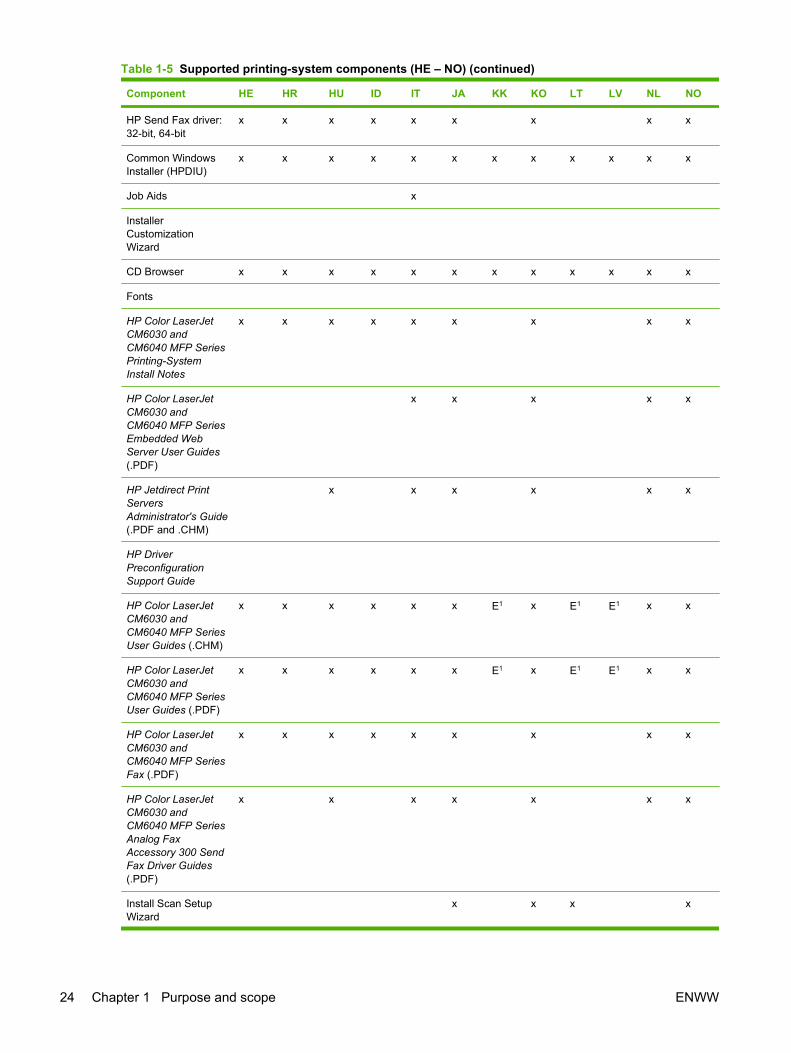
Component HE HR HU ID IT JA KK KO LT LV NL NO
HP Send Fax driver:32-bit, 64-bit
x x x x x x x x x
Common WindowsInstaller (HPDIU)
x x x x x x x x x x x x
Job Aids x
InstallerCustomizationWizard
CD Browser x x x x x x x x x x x x
Fonts
HP Color LaserJetCM6030 andCM6040 MFP SeriesPrinting-SystemInstall Notes
x x x x x x x x x
HP Color LaserJetCM6030 andCM6040 MFP SeriesEmbedded WebServer User Guides(.PDF)
x x x x x
HP Jetdirect PrintServersAdministrator's Guide(.PDF and .CHM)
x x x x x x
HP DriverPreconfigurationSupport Guide
HP Color LaserJetCM6030 andCM6040 MFP SeriesUser Guides (.CHM)
x x x x x x E1 x E1 E1 x x
HP Color LaserJetCM6030 andCM6040 MFP SeriesUser Guides (.PDF)
x x x x x x E1 x E1 E1 x x
HP Color LaserJetCM6030 andCM6040 MFP SeriesFax (.PDF)
x x x x x x x x x
HP Color LaserJetCM6030 andCM6040 MFP SeriesAnalog FaxAccessory 300 SendFax Driver Guides(.PDF)
x x x x x x x
Install Scan SetupWizard
x x x x
Table 1-5 Supported printing-system components (HE – NO) (continued)
24 Chapter 1 Purpose and scope ENWW
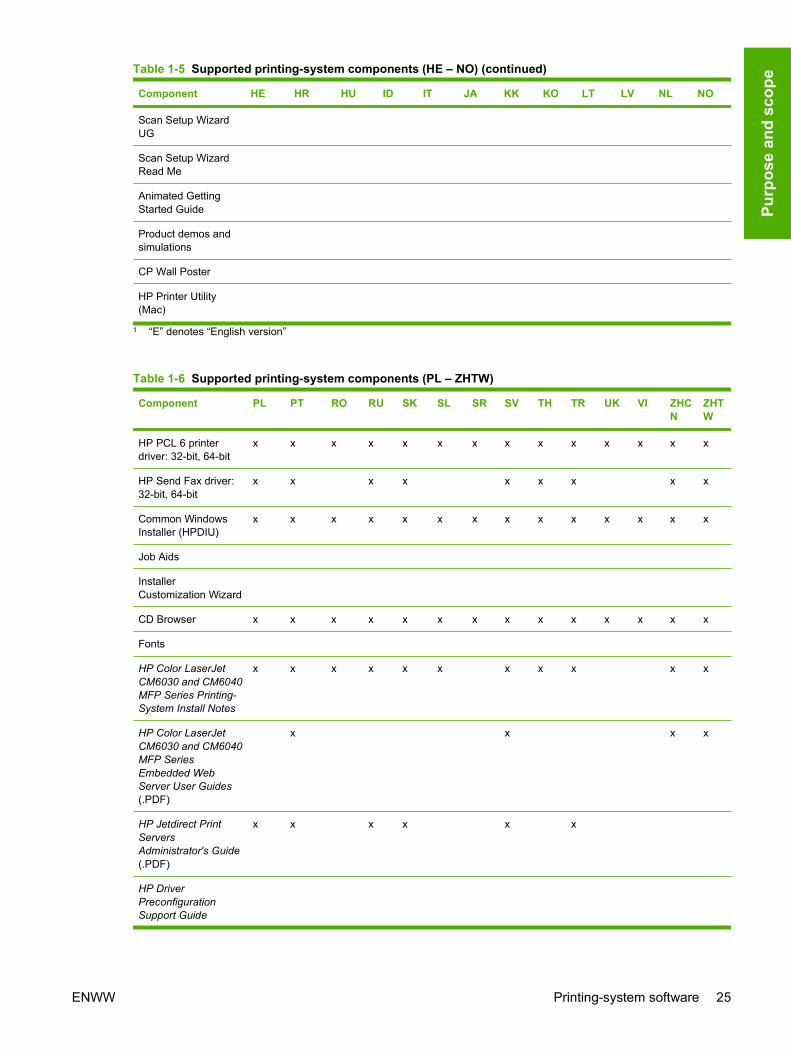
Component HE HR HU ID IT JA KK KO LT LV NL NO
Scan Setup WizardUG
Scan Setup WizardRead Me
Animated GettingStarted Guide
Product demos andsimulations
CP Wall Poster
HP Printer Utility(Mac)
1 “E” denotes “English version”
Table 1-6 Supported printing-system components (PL – ZHTW)
Component PL PT RO RU SK SL SR SV TH TR UK VI ZHCN
ZHTW
HP PCL 6 printerdriver: 32-bit, 64-bit
x x x x x x x x x x x x x x
HP Send Fax driver:32-bit, 64-bit
x x x x x x x x x
Common WindowsInstaller (HPDIU)
x x x x x x x x x x x x x x
Job Aids
InstallerCustomization Wizard
CD Browser x x x x x x x x x x x x x x
Fonts
HP Color LaserJetCM6030 and CM6040MFP Series Printing-System Install Notes
x x x x x x x x x x x
HP Color LaserJetCM6030 and CM6040MFP SeriesEmbedded WebServer User Guides(.PDF)
x x x x
HP Jetdirect PrintServersAdministrator's Guide(.PDF)
x x x x x x
HP DriverPreconfigurationSupport Guide
Table 1-5 Supported printing-system components (HE – NO) (continued)
ENWW Printing-system software 25
Purp
ose
and
scop
e
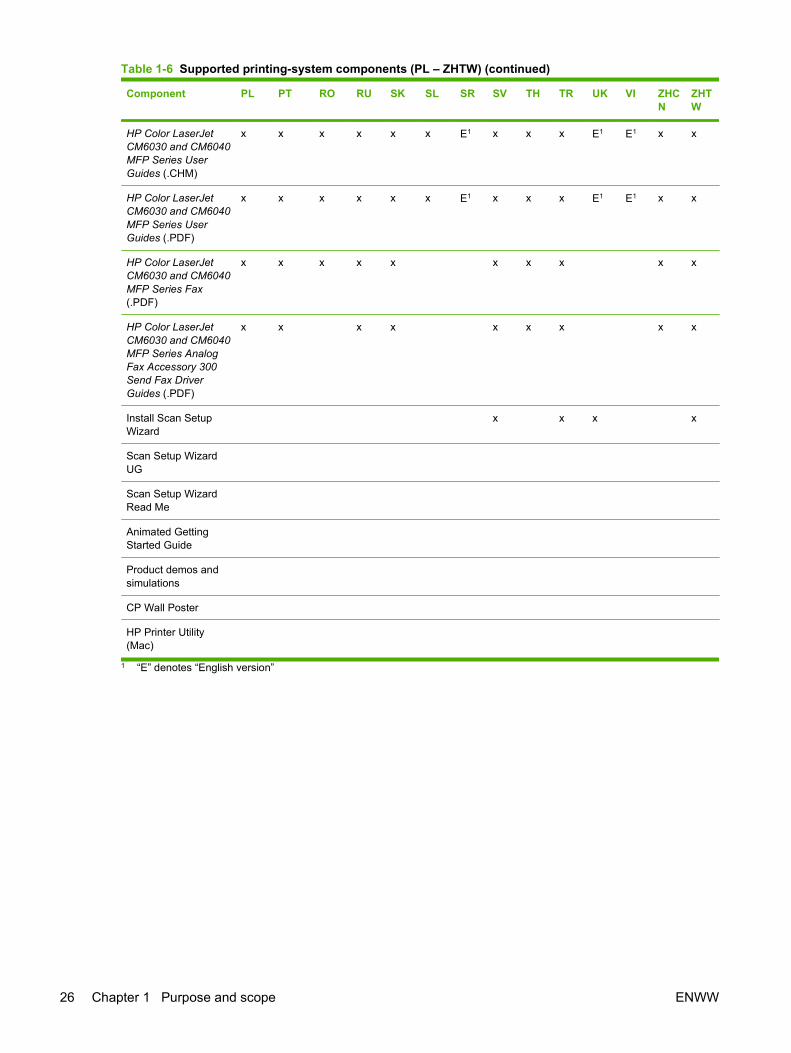
Component PL PT RO RU SK SL SR SV TH TR UK VI ZHCN
ZHTW
HP Color LaserJetCM6030 and CM6040MFP Series UserGuides (.CHM)
x x x x x x E1 x x x E1 E1 x x
HP Color LaserJetCM6030 and CM6040MFP Series UserGuides (.PDF)
x x x x x x E1 x x x E1 E1 x x
HP Color LaserJetCM6030 and CM6040MFP Series Fax(.PDF)
x x x x x x x x x x
HP Color LaserJetCM6030 and CM6040MFP Series AnalogFax Accessory 300Send Fax DriverGuides (.PDF)
x x x x x x x x x
Install Scan SetupWizard
x x x x
Scan Setup WizardUG
Scan Setup WizardRead Me
Animated GettingStarted Guide
Product demos andsimulations
CP Wall Poster
HP Printer Utility(Mac)
1 “E” denotes “English version”
Table 1-6 Supported printing-system components (PL – ZHTW) (continued)
26 Chapter 1 Purpose and scope ENWW
Documentation availability and localizationBoth CDs that are included with the product contain documentation.
Access to the documents depends on the document type and location:
● Some documents can be opened from the CD Browser.
● Some documents appear on the CD and can only be opened by navigating to the folder where theyreside.
● Some documents are available on the Web through links in the CD Browser or CD folders.
Documents are available in the following file formats:
● Portable document Format (.PDF) . To view documentation in .PDF format, Adobe® Acrobat®Reader must be installed on the computer. Adobe Acrobat Reader is available at the following Website:
www.adobe.com
● Compiled HTML (.CHM). When you click a documentation link to a .CHM document, a MicrosoftHTML Viewer opens the file on the computer screen.
● Hypertext markup (.HTM). When you click a documentation link to an .HTM document, a Webbrowser opens the file on the computer screen.
● Admin CD
● User CD
Admin CD● Main browser screen
● Administrator Documentation screen
ENWW Documentation availability and localization 27
Purp
ose
and
scop
e

Main browser screenTo view documentation on the Admin CD, insert the CD into the into the CD-ROM drive. The main screenof the Admin CD Browser opens. Move the cursor over each option to see a description of the option inthe right panel.
Figure 1-1 Admin CD — main browser screen
NOTE: Functionality for the Animated Getting Started Guide button will be added to future versionsof the CD.
HP Color LaserJet CM6030 and CM6040 MFP Series Printing-system Install Notes
The HP Color LaserJet CM6030 and CM6040 MFP Series Printing-System Install Notes (.HTM) containsimportant information about device features, instructions for installing the printing-system software, andtechnical assistance.
To view this guide from the Admin CD, click Install Notes on the main screen of the Admin CD Browser.
To gain access to the .HTM file:
1. Insert the Admin CD into the CD-ROM drive.
2. Navigate to the Manuals\<language> folder.
3. Open the following file:
28 Chapter 1 Purpose and scope ENWW
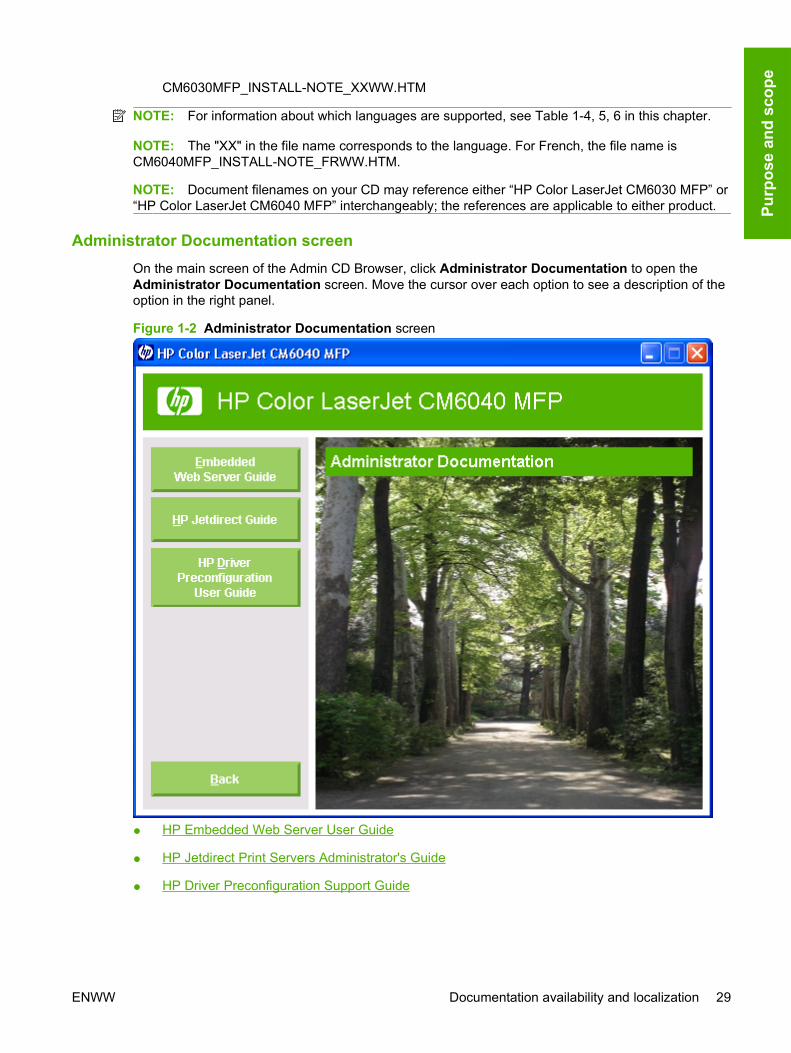
CM6030MFP_INSTALL-NOTE_XXWW.HTM
NOTE: For information about which languages are supported, see Table 1-4, 5, 6 in this chapter.
NOTE: The "XX" in the file name corresponds to the language. For French, the file name isCM6040MFP_INSTALL-NOTE_FRWW.HTM.
NOTE: Document filenames on your CD may reference either “HP Color LaserJet CM6030 MFP” or“HP Color LaserJet CM6040 MFP” interchangeably; the references are applicable to either product.
Administrator Documentation screenOn the main screen of the Admin CD Browser, click Administrator Documentation to open theAdministrator Documentation screen. Move the cursor over each option to see a description of theoption in the right panel.
Figure 1-2 Administrator Documentation screen
● HP Embedded Web Server User Guide
● HP Jetdirect Print Servers Administrator's Guide
● HP Driver Preconfiguration Support Guide
ENWW Documentation availability and localization 29
Purp
ose
and
scop
e
HP Embedded Web Server User Guide
The HP Embedded Web Server User Guide provides information about accessing product status,settings, and networking through the Embedded Web Server.
View this guide from the Admin CD:
1. On the main screen of the CD Browser, click Administrator Documentation.
2. Click Embedded Web Server Guide.
Gain access to the .PDF file:
1. Insert the software CD into the CD-ROM drive.
2. Navigate to the MANUALS\<LANGUAGE> folder.
3. Open the following file:
CM6040MFP_EWS_XXWW.PDF
NOTE: For information about which languages are supported, see Table 1-4, 5, 6 in this chapter.
NOTE: The "XX" in the file name corresponds to the language. For French, the file name isCM6040MFP_EWS_FRWW.PDF.
NOTE: Document filenames on your CD may reference either “HP Color LaserJet CM6030 MFP”or “HP Color LaserJet CM6040 MFP” interchangeably; the references are applicable to eitherproduct.
4. When the file is open, click File, and then click Save As to save a copy of the file to another location.
HP Jetdirect Print Servers Administrator's Guide
The HP Jetdirect Print Servers Administrator's Guide is a network administrator guide that containsinformation about connecting the product directly to a network.
View this guide from the Admin CD:
1. On the main screen of the Admin CD Browser, click Administrator Documentation.
2. Click HP Jetdirect Guide.
Gain access to the .PDF file:
1. Insert the Admin CD into the CD-ROM drive.
2. Navigate to the Manuals\<language> folder.
3. Open the following file:
HPJDAG_XXWW.PDF
NOTE: For information about which languages are supported, see Table 1-4, 5, 6 in this chapter.
NOTE: The "XX" in the file name corresponds to the language. For French, the file name isHPJDAG_FRWW.PDF.
When the file is open, click File and then click Save As to save a copy of the file to another location.
30 Chapter 1 Purpose and scope ENWW
The guide can also be accessed as an MS Windows Help file (.CHM file). This readable, onscreenversion of the guide is provided in accordance with the Americans with Disabilities Act (ADA).
Gain access to the .CHM file:
1. Insert the Admin CD into the CD-ROM drive.
2. Navigate to the Manuals\<language> folder.
3. Open the following file:
HPJDAG_XXWW.CHM
NOTE: For information about which languages are supported, see Table 1-4, 5, 6 in this chapter.
NOTE: The "XX" in the file name corresponds to the language. For French, the file name isHPJDAG__FRWW.CHM.
HP Driver Preconfiguration Support Guide
The HP Driver Preconfiguration Support Guide (.PDF) contains important information aboutpreconfiguring printer drivers before installation in network environments.
View this guide from the Admin CD:
1. On the main screen of the Admin CD Browser, click Administrator Documentation.
2. Click HP Preconfiguration User Guide.
Gain access to the .PDF file:
1. Insert the Admin CD into the CD-ROM drive.
2. Navigate to the MANUALS\<LANGUAGE> folder.
3. Open the following file: PRECONFIG_SUPPORT_XXWW.PDF
NOTE: For information about which languages are supported, see Table 1-4, 5, 6 in this chapter.
NOTE: The "XX" in the file name corresponds to the language. For French, the file name isPRECONFIG_SUPPORT_FRWW.PDF.
4. When the file is open, click File, and then click Save As to save a copy of the file to another location.
User CD● Main browser screen
● User Guides
● Fax Guides
ENWW Documentation availability and localization 31
Purp
ose
and
scop
e
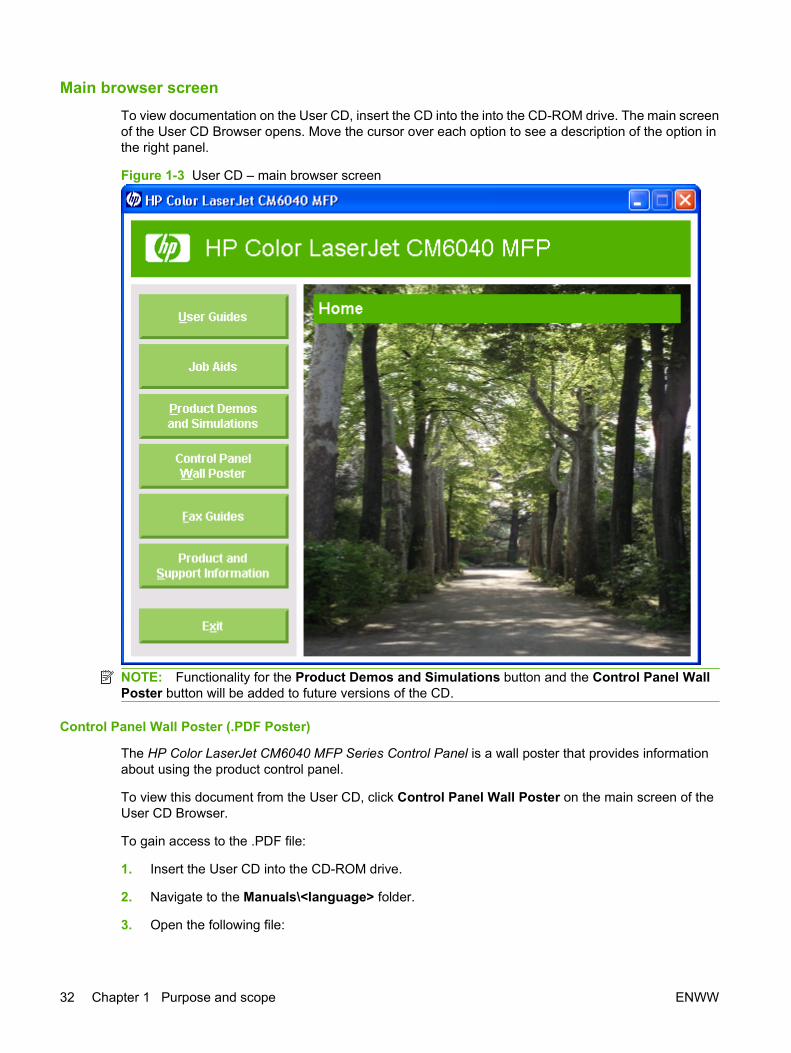
Main browser screenTo view documentation on the User CD, insert the CD into the into the CD-ROM drive. The main screenof the User CD Browser opens. Move the cursor over each option to see a description of the option inthe right panel.
Figure 1-3 User CD – main browser screen
NOTE: Functionality for the Product Demos and Simulations button and the Control Panel WallPoster button will be added to future versions of the CD.
Control Panel Wall Poster (.PDF Poster)
The HP Color LaserJet CM6040 MFP Series Control Panel is a wall poster that provides informationabout using the product control panel.
To view this document from the User CD, click Control Panel Wall Poster on the main screen of theUser CD Browser.
To gain access to the .PDF file:
1. Insert the User CD into the CD-ROM drive.
2. Navigate to the Manuals\<language> folder.
3. Open the following file:
32 Chapter 1 Purpose and scope ENWW
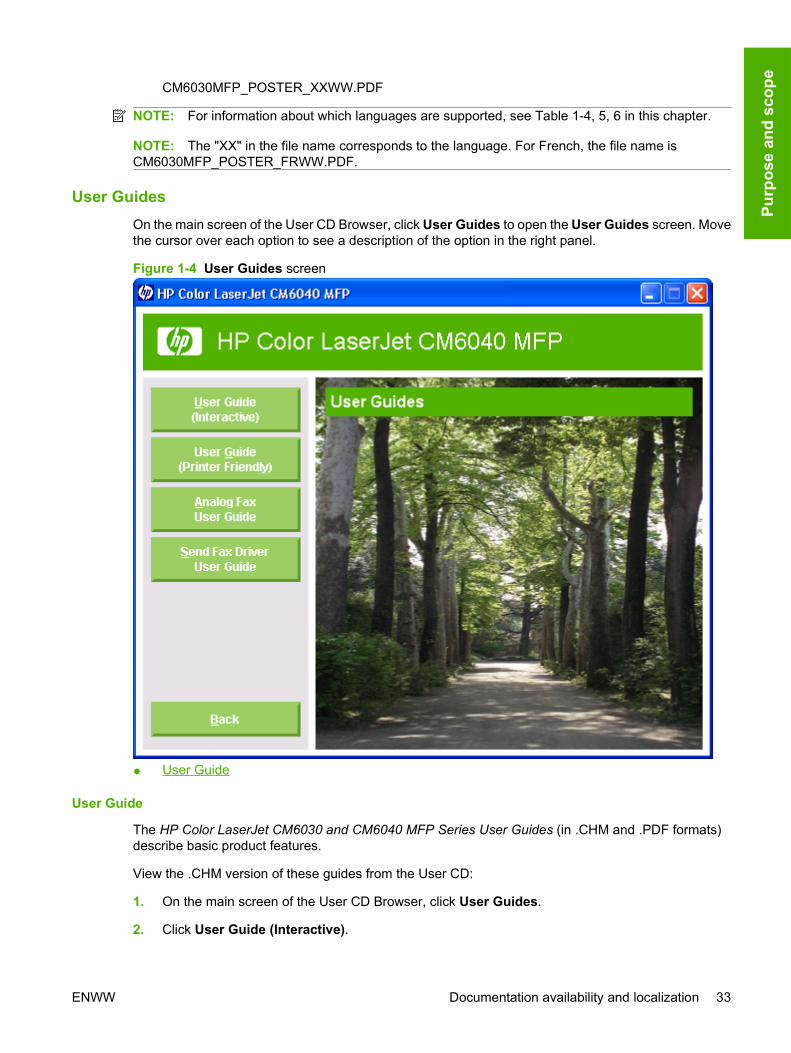
CM6030MFP_POSTER_XXWW.PDF
NOTE: For information about which languages are supported, see Table 1-4, 5, 6 in this chapter.
NOTE: The "XX" in the file name corresponds to the language. For French, the file name isCM6030MFP_POSTER_FRWW.PDF.
User GuidesOn the main screen of the User CD Browser, click User Guides to open the User Guides screen. Movethe cursor over each option to see a description of the option in the right panel.
Figure 1-4 User Guides screen
● User Guide
User Guide
The HP Color LaserJet CM6030 and CM6040 MFP Series User Guides (in .CHM and .PDF formats)describe basic product features.
View the .CHM version of these guides from the User CD:
1. On the main screen of the User CD Browser, click User Guides.
2. Click User Guide (Interactive).
ENWW Documentation availability and localization 33
Purp
ose
and
scop
e
The guide opens as a Windows Help file (.CHM file). This readable, onscreen version of the guide isprovided in accordance with the Americans with Disabilities Act (ADA).
Gain access to the .CHM file:
1. Insert the User CD into the CD-ROM drive.
2. Navigate to the MANUALS\<LANGUAGE> folder.
3. Open the following file:
CM6040MFP_USE_XXWW.CHM
NOTE: For information about which languages are supported, see Table 1-4, 5, 6 in this chapter.
NOTE: The "XX" in the file name corresponds to the language. For French, the file name isCM6040MFP_USE_FRWW.CHM.
NOTE: Document filenames on your CD may reference either “HP Color LaserJet CM6030 MFP” or“HP Color LaserJet CM6040 MFP” interchangeably; the references are applicable to either product.
The HP Color LaserJet CM6030 and CM6040 MFP Series User Guides are also provided asprintable .PDF files. To view and print the .PDF versions of the guides:
1. In the User CD Browser, click User Guides.
2. Click User Guide (Printer Friendly). The guide opens.
3. Print the guide.
Gain access to the .PDF file:
1. Insert the User CD into the CD-ROM drive.
2. Navigate to the MANUALS\<LANGUAGE> folder.
3. Open the following file:
CM6040MFP_USE_XXWW.PDF
NOTE: For information about which languages are supported, see Table 1-4, 5, 6 in this chapter.
NOTE: The "XX" in the file name corresponds to the language. For French the file name isCM6040MFP_USE_FRWW.PDF.
4. When the file is open, click File, and then click Save As to save a copy of the file to another location.
34 Chapter 1 Purpose and scope ENWW

Fax GuidesOn the main screen of the User CD Browser, click Fax Guides to open the AdministratorDocumentation screen. Move the cursor over each option to see a description of the option in the rightpanel.
Figure 1-5 Fax Guides screen
● HP Color LaserJet CM6040 MFP Series Fax Guide
● HP Color LaserJet CM6040 MFP Series Analog Fax Accessory 300 Send Fax Driver Guide
NOTE: Document filenames on your CD may reference either “HP Color LaserJet CM6030 MFP” or“HP Color LaserJet CM6040 MFP” interchangeably; the references are applicable to either product.
HP Color LaserJet CM6040 MFP Series Fax Guide
The HP Color LaserJet CM6030 and CM6040 MFP Series Fax Guides describe how to use the productas a standalone analog fax machine and provide information about product specifications and regulatoryrequirements.
View these guides from the User CD:
1. On the main screen of the User CD Browser, click User Guides.
2. Click Analog Fax User Guide.
ENWW Documentation availability and localization 35
Purp
ose
and
scop
e

Gain access to the .PDF file:
1. Insert the User CD into the CD-ROM drive.
2. Navigate to the MANUALS\<LANGUAGE> folder.
3. Open the following file:
CM6040MFP_FAX_XXWW.PDF
NOTE: For information about which languages are supported, see Table 1-4, 5, 6 in this chapter.
NOTE: The “XX” in the file name corresponds to the language. For French the file name isCM6040MFP_FAX_FRWW.PDF.
4. When the file is open, click File, and then click Save As to save a copy of the file to another location.
HP Color LaserJet CM6040 MFP Series Analog Fax Accessory 300 Send Fax Driver Guide
The HP Color LaserJet CM6040 MFP Series Analog Fax Accessory 300 Send Fax Driver Guidedescribes the fax functions that are included with the Send Fax driver and provides instructions for thefollowing tasks:
● Install the Send Fax driver
● Send faxes
● Configure fax settings
● Troubleshoot problems
View this guide from the User CD:
1. On the main screen of the User CD Browser, click User Guides.
2. Click Send Fax Driver User Guide.
Gain access to the .PDF file:
1. Insert the software CD into the CD-ROM drive.
2. Navigate to the MANUALS\<LANGUAGE> folder.
3. Open the following file:
CM6040MFP_FAX-SEND_XXWW.PDF
NOTE: For information about which languages are supported, see Table 1-4, 5, 6 in this chapter.
NOTE: The “XX” in the file name corresponds to the language. For French the file name isCM6040MFP_FAX-SEND_FRWW.PDF.
4. When the file is open, click File, and then click Save As to save a copy of the file to another location.
36 Chapter 1 Purpose and scope ENWW
2 Software description
● Windows printing-system software
● Windows printer-driver configuration
● HP Driver Diagnostic Printer Check Tool
● Advanced color use
● Embedded Web server
● HP Web Jetadmin
● Scan Setup Wizard
● MFP Send Fax Driver
● Font support
ENWW 37
Softw
are
desc
riptio
n
Windows printing-system software● Supported operating systems for Windows
● Windows system requirements
● Macintosh system requirements
● Printer driver
● Select the correct printer driver for Windows
● Priority for print settings
● Change printer-driver settings for Windows
● Printing system and installer
● Driver version numbers for Windows operating systems
Supported operating systems for WindowsThe product supports the following Windows operating systems:
● Windows XP (32-bit and 64-bit)
● Windows Server 2003 (32-bit and 64-bit)
● Windows 2000
● Windows Vista (32-bit and 64-bit)
NOTE: Document filenames on your CD may reference either “HP Color LaserJet CM6030 MFP” or“HP Color LaserJet CM6040 MFP” interchangeably; the references are applicable to either product.
Windows system requirementsThe HP printing-system software has the following minimum system requirements for the followingWindows operating systems.
● Windows 2000: 333-MHz processor with 64 MB RAM
● Windows XP: 333-MHz processor with 128 MB RAM
● Windows Server 2003: 550-MHz processor with 128 MB RAM
● Windows Vista: 800-MHz processor with 512 MB RAM
All Windows operating systems also have the following requirements:
● A CD-ROM, DVD drive, or Internet connection with which to install the printing-system software
● A dedicated USB 1.1 or USB 2.0 connectivity port, or network connection, to communicate withthe product.
38 Chapter 2 Software description ENWW
Macintosh system requirementsThe HP printing-system software has the following minimum system requirements for the Macintosh OSX V10.2.8, V10.3, V10.4, and later operating systems:
● CD-ROM
● 128 MB RAM
● 160 MB of free hard disk space
NOTE: For Mac OS V10.4 and later, PPC and Intel Core Processor Macs are supported.
Printer driverPrinter drivers provide access to product features, such as printing on custom-sized paper, resizingdocuments, and inserting watermarks.
NOTE: The most recent drivers are available at www.hp.com/support/cljcm6030mfp or atwww.hp.com/support/cljcm6040mfp.
Select the correct printer driver for WindowsPrinter drivers provide access to the product features and allow the computer to communicate with theproduct (using a printer language). Check the installation notes and readme files on the product CD foradditional software and languages.
HP PCL 6 driver description
● Recommended for printing in all Windows environments
● Provides the overall best speed, print quality, and product-feature support for most users
● Developed to align with the Windows Graphic Device Interface (GDI) for the best speed in Windowsenvironments
● Might not be fully compatible with third-party and custom software programs that are based onPCL 5
HP postscript level 3 emulation universal printer driver description
● Recommended for printing with Adobe® software programs or with other highly graphics-intensivesoftware programs
● Provides support for printing from postscript level 3 emulation needs or for postscript flash fontsupport
● Performs slightly faster than the PCL 6 driver when using Adobe software programs
HP PCL 5 Universal Print Driver description
● Recommended for general office printing in Windows environments
● Compatible with previous PCL versions and older HP LaserJet products
● The best choice for printing from third-party or custom software programs
ENWW Windows printing-system software 39
Softw
are
desc
riptio
n
● The best choice when operating with mixed environments, which require the product to be set toPCL 5 (UNIX, Linux, mainframe)
● Designed for use in corporate Windows environments to provide a single driver for use with multipleprinter models
● Preferred when printing to multiple printer models from a mobile Windows computer
Priority for print settingsChanges to print settings are prioritized depending on where the changes are made:
NOTE: The names of commands and dialog boxes might vary depending on your software program.
● Page Setup dialog box: Click Page Setup or a similar command on the File menu of the programyou are working in to open this dialog box. Settings changed here override settings changedanywhere else.
● Print dialog box: Click Print, Print Setup, or a similar command on the File menu of the programyou are working in to open this dialog box. Settings changed in the Print dialog box have a lowerpriority and do not override changes made in the Page Setup dialog box.
● Printer Properties dialog box (printer driver): Click Properties in the Print dialog box to openthe printer driver. Settings changed in the Printer Properties dialog box do not override settingsanywhere else in the printing software.
● Default printer driver settings: The default printer driver settings determine the settings used inall print jobs, unless settings are changed in the Page Setup, Print, or Printer Properties dialogboxes.
● Printer control panel settings: Settings changed at the printer control panel have a lower prioritythan changes made anywhere else.
40 Chapter 2 Software description ENWW
Change printer-driver settings for Windows
Change the settings for all print jobsuntil the software program is closed
Change the default settings for allprint jobs
Change the product configurationsettings
1. On the File menu in the softwareprogram, click Print.
2. Select the driver, and then clickProperties or Preferences.
The steps can vary; this procedure ismost common.
1. Windows XP and WindowsServer 2003 (using the defaultStart menu view): Click Start, andthen click Printers and Faxes.
-or-
Windows 2000, Windows XP, andWindows Server 2003 (using theClassic Start menu view): ClickStart, click Settings, and then clickPrinters.
-or-
Windows Vista: Click Start, clickControl Panel, and then in thecategory for Hardware andSound click Printer.
2. Right-click the driver icon, and thenselect Printing Preferences.
1. Windows XP and WindowsServer 2003 (using the defaultStart menu view): Click Start, andthen click Printers and Faxes.
-or-
Windows 2000, Windows XP, andWindows Server 2003 (using theClassic Start menu view): ClickStart, click Settings, and then clickPrinters.
-or-
Windows Vista: Click Start, clickControl Panel, and then in thecategory for Hardware andSound click Printer.
2. Right-click the driver icon, and thenselect Properties.
3. Click the Device Settings tab.
Printing system and installer● Printing-system software CD for Windows systems
● Installer features
Printing-system software CD for Windows systemsIn supported Windows operating systems, insert the Administrator (hereafter “Admin”) CD in the CD-ROM drive to open an interactive CD Browser. Use the CD Browser to install the drivers and related
ENWW Windows printing-system software 41
Softw
are
desc
riptio
n
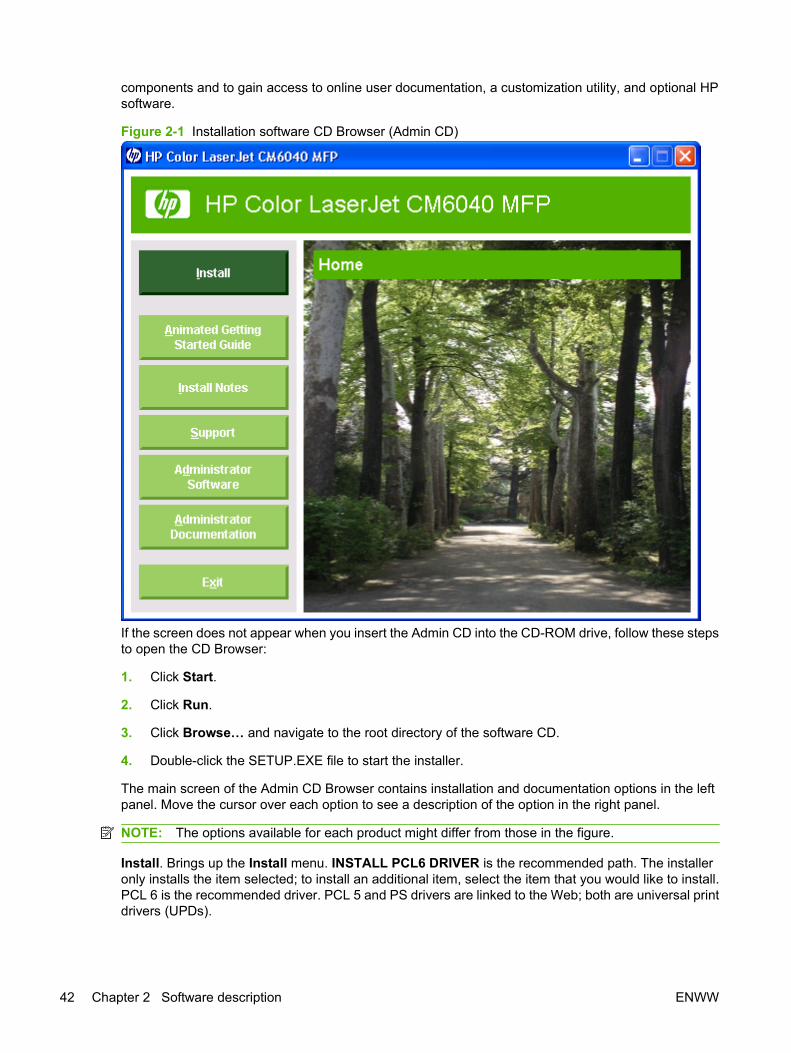
components and to gain access to online user documentation, a customization utility, and optional HPsoftware.
Figure 2-1 Installation software CD Browser (Admin CD)
If the screen does not appear when you insert the Admin CD into the CD-ROM drive, follow these stepsto open the CD Browser:
1. Click Start.
2. Click Run.
3. Click Browse… and navigate to the root directory of the software CD.
4. Double-click the SETUP.EXE file to start the installer.
The main screen of the Admin CD Browser contains installation and documentation options in the leftpanel. Move the cursor over each option to see a description of the option in the right panel.
NOTE: The options available for each product might differ from those in the figure.
Install. Brings up the Install menu. INSTALL PCL6 DRIVER is the recommended path. The installeronly installs the item selected; to install an additional item, select the item that you would like to install.PCL 6 is the recommended driver. PCL 5 and PS drivers are linked to the Web; both are universal printdrivers (UPDs).
42 Chapter 2 Software description ENWW
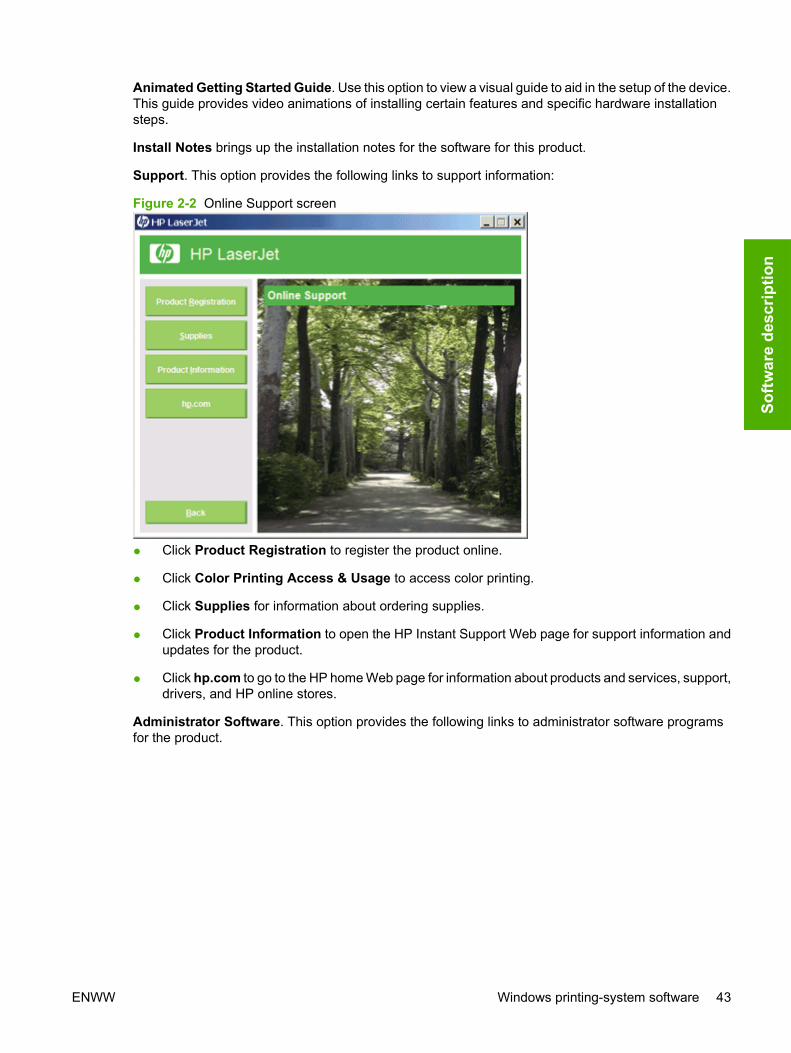
Animated Getting Started Guide. Use this option to view a visual guide to aid in the setup of the device.This guide provides video animations of installing certain features and specific hardware installationsteps.
Install Notes brings up the installation notes for the software for this product.
Support. This option provides the following links to support information:
Figure 2-2 Online Support screen
● Click Product Registration to register the product online.
● Click Color Printing Access & Usage to access color printing.
● Click Supplies for information about ordering supplies.
● Click Product Information to open the HP Instant Support Web page for support information andupdates for the product.
● Click hp.com to go to the HP home Web page for information about products and services, support,drivers, and HP online stores.
Administrator Software. This option provides the following links to administrator software programsfor the product.
ENWW Windows printing-system software 43
Softw
are
desc
riptio
n

Figure 2-3 Optional Software screen
● HP Universal Print Driver Portal. Use this option to download the HP Universal Printer Driver(HP UPD) from the HP Web site. Use this printer driver to ensure a standard interface to find andprint to an HP product.
● Installer Customization Wizard. Use this wizard to customize the printing-system installer toinstall silently for unattended installations.
● HP Web Jetadmin. Use this option to download HP Web Jetadmin software from the HP Web site.
● HP Easy Printer Care Software. Use this option to download and install HP Easy Care. Thismaintenance tool helps track and maintain multiple products by providing information about status,alert notifications, usage, and supplies.
Administrator Documentation. Use this option to view the administrator documentation. The followingdocument options are available:
44 Chapter 2 Software description ENWW
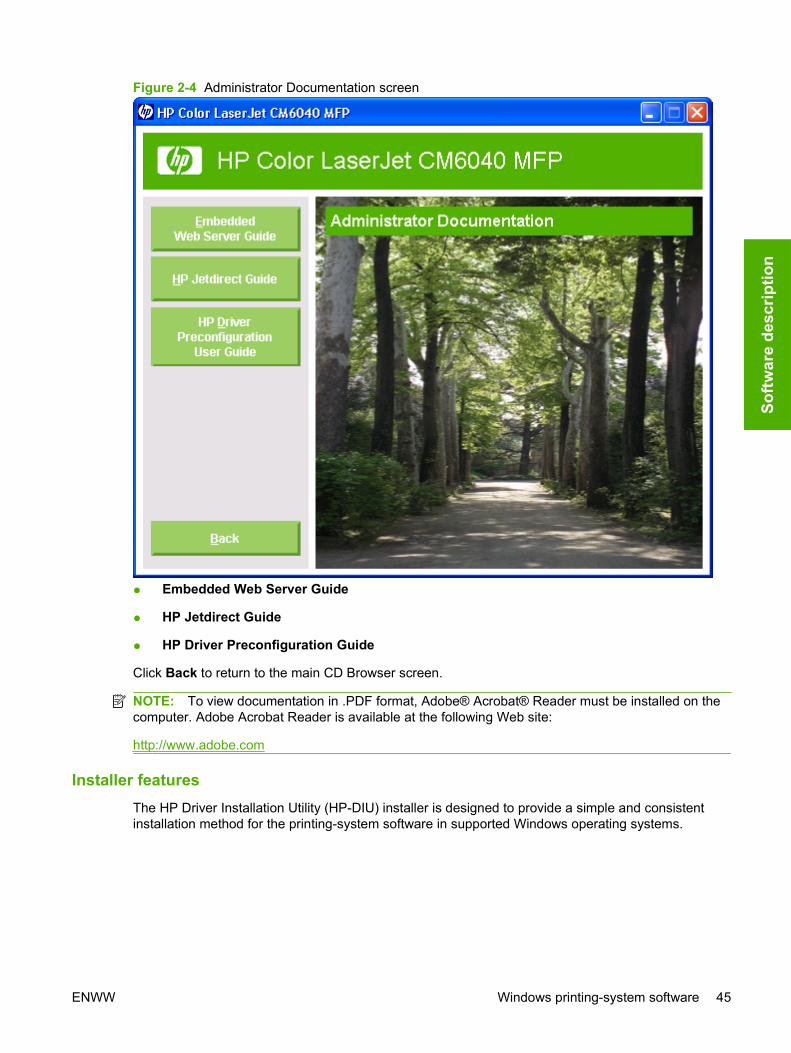
Figure 2-4 Administrator Documentation screen
● Embedded Web Server Guide
● HP Jetdirect Guide
● HP Driver Preconfiguration Guide
Click Back to return to the main CD Browser screen.
NOTE: To view documentation in .PDF format, Adobe® Acrobat® Reader must be installed on thecomputer. Adobe Acrobat Reader is available at the following Web site:
http://www.adobe.com
Installer featuresThe HP Driver Installation Utility (HP-DIU) installer is designed to provide a simple and consistentinstallation method for the printing-system software in supported Windows operating systems.
ENWW Windows printing-system software 45
Softw
are
desc
riptio
n
The HP-DIU installer offers the following features:
● The Administrator software CD features an interactive software interface.
● Network connection is integrated so that you can install drivers and connect to a networked productin a single process.
● The selection dialog box sets the operating-system language as the default language. You can usethe installer to select any of the languages on the Admin CD.
For custom installations, the Admin CD also includes the Installer Customization Wizard.
● The HP Customization Utility for custom installations
All of the printing-system components are installed by using the HP-DIU installer. The installerautomatically detects the language of choice and the operating system.
Driver version numbers for Windows operating systemsAccess to driver version numbers varies, depending on the operating system in which the printing systemis installed.
NOTE: For a list of product drivers, updated HP printing-system software, and product-supportinformation, go to:
www.hp.com/support/cljcm6030mfp
- or -
www.hp.com/support/cljcm6040mfp
In supported Windows operating systems, follow these steps to find driver-version information:
1. Click Start, and then do one of the following:
For Windows 2000: Select Settings, and then click Printers.
-or-
For Windows Server 2003 and Windows XP Professional: Select Settings, and then selectPrinters and Faxes.
-or-
For Windows XP Home: Click Control Panel, and then double-click the Printers and OtherHardware icon.
-or-
For Windows Vista: Click Control Panel, click Hardware and Sound, and then click Printers.
2. Right-click the product driver icon.
3. Click Properties.
4. Click the About tab.
To determine the latest version, compare the overall build number (in parenthesis after the model name)and the GPD version number (in the Driver Files: field). If the overall build number has increased, thisis the latest version of the driver.
46 Chapter 2 Software description ENWW

If the overall build number is the same, check the version number of the GPD file. The driver that hasthe highest GPD version number is the latest driver.
ENWW Windows printing-system software 47
Softw
are
desc
riptio
n

Windows printer-driver configurationThe HP PCL 6 printer driver features bidirectional communication technology which, in environmentsthat support the printer driver, provides automatic discovery and printer-driver configuration for productaccessories at the time of installation.
Some accessories that are automatically discovered and configured include the duplexing unit, optionalpaper trays, and dual inline memory modules (DIMMs).
● Printer-driver autoconfiguration
● Bidirectional communication
● Enterprise AutoConfiguration
● Update Now
● HP Web Jetadmin
Printer-driver autoconfigurationNOTE: The 64-bit operating systems do not support printer-driver autoconfiguration.
Automatic discovery and printer-driver configuration through bidirectional communication occurs in thefollowing circumstances:
● When a printer driver is installed by using Enterprise AutoConfiguration (EAC)
● When using the Update Now feature for a printer driver that is already installed
However, as shown in the following table, printer-driver auto configuration and EAC are not available in32-bit Windows operating systems over a direct connection when the printing-system software isinstalled by using the Add Printer Wizard. Direct connection is a parallel or USB port connection.
Table 2-1 Availability of automatic discovery and printer- driver configuration through bidirectionalcommunication in Windows
Connection type Add Printer Wizard install HPDIU
Network Yes Yes
Direct connection No Yes
Bidirectional communicationIn environments that support bidirectional communication, the computer communicates with the productduring installation, determines the physical configuration, and then configures the printer driveraccordingly.
Bidirectional communication is the capability of the product to respond to data inquiries from thecomputer, such as what type of print media is available and what accessories are connected to theproduct. Bidirectional communication depends on the network operating system and on the type ofconnection that exists between the computer and the product. If the connection does not have thiscapability, the product can only accept commands from the host and cannot respond to data inquiriesfrom the host computer.
48 Chapter 2 Software description ENWW
Enterprise AutoConfigurationEnterprise AutoConfiguration (EAC) uses bidirectional communication to provide autoconfigurationfunctionality for installation of the printer driver over a network, whether you use the installer on theAdmin CD or the Add Printer Wizard to install the printer driver. Printer-driver installation that includesEAC is configured with the same settings as the physical configuration of the product. Configurationoccurs without user interaction.
If bidirectional-communication software has been installed previously, EAC is not activated, and the pre-existing bidirectional-communication software is used to configure the printer driver.
If bidirectional communication software has not been installed, EAC installs bidirectional-communicationsoftware that allows it to communicate with the product and automatically match the printer driver withthe product configuration. EAC is activated during installation of the printer driver or whenever theUpdate Now feature is used.
If the product configuration changes after installation, the printer driver can be automatically updated byusing the Update Now feature in environments that support bidirectional communication.
Update NowIf the product configuration changes after installation, the printer driver can be automatically updated byusing the Update Now feature in environments that support bidirectional communication. For example,if the product is installed and an optional paper-handling accessory is added later, use Update Now toquery the product and update the printer-driver settings to match the new product configuration.
The Update Now feature automatically updates the registry and changes the configuration informationthat appears on the Device Settings tab of the HP PCL 6 printer driver.
To activate Update Now, follow these steps:
1. Click Start, and then do one of the following:
For Windows 2000: Select Settings, and then click Printers.
-or-
For Windows Server 2003 and Windows XP Professional: Select Settings, and then selectPrinters and Faxes.
-or-
For Windows XP Home: Click Control Panel, and then double-click the Printers and OtherHardware icon.
-or-
For Windows Vista: Click Control Panel, click Hardware and Sound, and then click Printers.
2. Right-click the product name.
3. Click Printing Preferences.
4. Click Device Settings.
5. If necessary, click Installable Options to expand it and show the options.
ENWW Windows printer-driver configuration 49
Softw
are
desc
riptio
n
6. In the Automatic Configuration drop-down menu, select Update Now.
7. Click OK to save the setting.
HP Web JetadminHP Web Jetadmin is a software architecture and set of tools for customizing and distributing HP printing-system software in managed corporate printing environments. Using HP Web Jetadmin, informationtechnology (IT) administrators in corporate and enterprise environments can preconfigure the printingand product defaults for HP printer drivers before installing the printer drivers in the network environment.
HP Web Jetadmin is most beneficial when configuring printer drivers for multiple workstations or printservers for print queues that share the same configuration. Two types of features can be configured:
● Product settings
● Printing-preferences settings
HP Web Jetadmin configures the printer driver to match the accessories that are installed on the product,or to match the settings that IT administrators make in the configuration .CFG file (for example, optionaltrays, total amount of memory, or job-storage settings).
The preconfiguration process consists of three steps:
● Printer-driver acquisition
● Printer-driver preconfiguration
● Printer-driver installation and deployment
These steps can be accomplished in different ways, depending on the tool that is being used to definethe configuration.
Printer-driver preconfiguration is supported through three tools. All three are designed with the samebasic user-interface (UI) controls for interacting with the .CFG file, but are packaged differently, either
50 Chapter 2 Software description ENWW
to support established product installation workflows or to allow the user to deploy and install the printerdriver. The following tools support printer-driver preconfiguration:
● HP Driver Configuration Editor. The HP Driver Configuration Editor is a small standaloneWindows-based software program that administrators can use to open the .CFG file that isassociated with a particular printer driver and make modifications that are applied when that printerdriver is installed on the host computer. Use it in environments that have an established processfor deploying printer drivers. It is used in the same way as any ordinary Windows-based softwareprogram.
The HP Driver Configuration Editor is available at the following Web site:
www.hp.com/support/hpdpc
● The HP Web Jetadmin Driver Configuration Plugin. HP Web Jetadmin provides a program tocreate printer queues in supported Windows operating systems. The HP Web Jetadmin DriverConfiguration Plugin adds screens for customizing the printer drivers that are being installed forthe queues. The plug-in is limited to Internet Explorer browsers. Netscape Navigator is notsupported.
The HP Web Jetadmin Driver Configuration Plugin is available at the following Web site:
www.hp.com/bizsupport/wja/live/manual/8.0/html/wjacomp_winnt.html
● Customization Utility. The Customization Utility enables an IT administrator to preconfigure theprinter drivers when customizing the installation for a silent install.
For detailed information about customizing printer drivers with the Customization Utility, see theHP Driver Preconfiguration Support Guide, which is available on the Admin CD.
● Configurable settings
● Continuous export
Configurable settings The following PCL 6 printer-driver features can be preconfigured. Lockable features, which can belocked to prevent end users from changing the setting, have the word <Lock> at the end of theirrespective descriptions.
NOTE: Some selections and options, such as the Finishing Accessory option, may depend on whichdevice setting has been selected.
Printing Preferences tab
● Print on Both Sides (duplex): The options are True or False. <Lock>
● Orientation: The options are either Portrait , Landscape, Rotated Portrait, or RotatedLandscape .
● Print in Grayscale: The options are Disabled or Enabled. <Lock>
● Color Options: The options are either Automatic or Manual.
● Paper Size: See the drop-down list associated with this feature .
● Media Type: The options include all of the media types that the product supports. <Lock>
● Services: The options are either Disabled or Enabled:.
ENWW Windows printer-driver configuration 51
Softw
are
desc
riptio
n
● Paper Source: The options are Printer Auto Select, Manual Feed (Tray 1), Tray 1, Tray 2, orTray 3. <Lock>
● Stapling/Folding: The options are either None, One Staple Left, One Staple Right, Two StaplesLeft, Two Staples Right, and Two Staples Top.
● Output Bin: The option is Auto Select. <Lock>
● Job Retention Mode: The options are Off:, Proof & Hold, Private Job, Quick Copy, or StoredJob. <Lock>
Advanced Features The following advanced features are also available:
● Pages per Sheet: The options are 1, 2, 4, 6, 9, or 16 .
● Booklet Printing: The options are Off, Left Edge Binding, or Right Edge Binding.
● Booklet Target Size: The option is None.
● Send True Type As Bitmap: The options are True or False.
● Print all Text as Black: The options are True or False.
● Print Document On: The options are True or False.
● Rotate by 180 degrees: The options are Enable or Disable.
● Scale to Fit:. The options are True or False.
● Percent of Normal Size: The options are Enter % or 25-400.
● Watermarks: The options are None, Confidential, Draft, or Sample.
● Copies: The options are 1 or (Enter Number).
● PostScript Language Level: The options are 1, 2 or 3.
● Mirror Output:. The options are True or False.
Device Settings tab
● Tray 3: The options are Installed or Not Installed .
● Tray 4: The options are Installed or Not Installed .
● Tray 5: The options are Installed or Not Installed .
● Printer Alert Notification Settings: The options are Show for Every Print Job, Show for DeviceErrors and Warnings, Show for Device Errors, or Disabled.
This advanced feature also contains the following sub-features:
◦ Device Query Interval: The options are Normal or Minimize Network Traffic.
◦ Access HP Online Product Support: The options, available through drop-down menu, areEnabled or Disabled.
◦ Shop for Supplies: The options are Enabled or Disabled.
● Allow Manual Duplexing: The options are Enabled or Disabled.
52 Chapter 2 Software description ENWW
● Duplex Unit: The options are Installed or Not Installed.
● Mopier Enabled: The options are Enabled or Disabled.
● Printer Hard-Disk: The options are Installed or Not Installed.
● Job Storage: The options are Enabled or Disabled.
● Accessory Output Bin: The options are Not Installed, HP 3-Bin Stapler/Stacker - MailboxMode, HP 3-Bin Function Stapler/Stacker - Function Separator, HP 3-Bin Stapler/Stacker -Stacker Mode, HP Booklet Maker - Mailbox Mode, and HP Booklet Maker - Stacker Mode.
● Memory: The options are 768, 896, or 1024.
When a feature is locked, the selected default option is the only option that is available to users.Generally, the feature is unavailable in the printer-driver UI after it has been locked.
Continuous export The term continuous export refers to the ability of the printer driver to copy the latest printer-driversettings to the working copy of the preconfiguration file. Using this feature, the exported values can betransferred when a compatible version of the printer driver is used to upgrade the printer driver. Forinstance, if the orientation is set to Landscape in a printer driver that was originally installed in Windows2000, then the orientation setting automatically remains Landscape when the operating system isupgraded to Windows XP or Windows Vista. The continuous export feature functions transparently fromthe user's perspective and works only between printer drivers of identical models.
NOTE: Not all of the printer-driver components can be exported; however, the exportable componentsare always the same as the components that can be preconfigured.
ENWW Windows printer-driver configuration 53
Softw
are
desc
riptio
n
HP Driver Diagnostic Printer Check ToolUse the HP Driver Diagnostic Printer Check Tool, a Web-based diagnostic software program, todetermine whether the correct and most current printer driver for the product is in use. Use the followingsteps to gain access to the HP Driver Diagnostic Printer Check Tool:
1. Open a Web browser.
2. Go to the following Web site:
www.hp.com/go/drivercheck
When the HP Driver Diagnostic Printer Check Tool runs, the products that are currently installed on thecomputer appear in a list. The tool gathers information about the products, drivers, and system setupin order to diagnose the software driver configuration and check the printer driver.
When the HP Driver Diagnostic Printer Check Tool is open, select the HP product that you want to check.The tool verifies whether the latest printer driver is being used, provides feedback if an incorrect printerdriver is being used, and indicates whether an updated printer-driver version is available. Click the latestprinter-driver version to download and install it.
The data that the HP Driver Diagnostic Printer Check Tool gathers is stored anonymously so that HP cananalyze and continuously improve its diagnostic tools. No private data is gathered from the computer.
54 Chapter 2 Software description ENWW

Advanced color use● Restrict color use
● International Color Consortium (ICC) profiles
● PANTONE color profiles [INTERNAL]
Restrict color useThis product includes a Restrict Color setting. A network administrator can use the setting to restrictuser access to the color printing in order to conserve color toner. If you are unable to print in color, seeyour network administrator.
Restrict color printing and copying from the control panelFor information about how to restrict color printing and how to copy from the control panel, see the HPColor LaserJet CM6030 and CM6040 MFP Series User Guide; or, go to www.hp.com/go/coloraccess.
International Color Consortium (ICC) profilesHP provides cyan-magenta-yellow-black (CMYK) and standard red-green-blue (sRGB) InternationalColor Consortium (ICC) profiles with the product. The CMYK profile can only be used with a postscriptprinter driver; the sRGB profile can be used with any of the product printer drivers. The profiles areavailable at the following HP Web site:
www.hp.com/support/cljcm6040mfp
The ICC profiles describe the way that color will be interpreted in the default CMYK and RGB modes.These profiles can be used for color conversions in a color-managed workflow. The sRGB profilematches the default RGB mode (sRGB), which is enabled with the Default (sRGB) or Color setting ineither a PCL or postscript printer driver. The product interprets CMYK data according to theSpecifications for Web Offset Publications (SWOP) simulation when Default CMYK+ is the selectedCMYK Color setting in the postscript printer driver, and a more accurate SWOP rendering can beproduced by selecting the SWOP setting. This standard defines how a particular set of CMYK ink colorsshould behave. Emulation for Dainippon Press (DIC) and Euro-standard CMYK inks used in Asia andEurope are also available and can be selected from the printer driver.
PANTONE color profiles [INTERNAL]Most software programs that support the use of PANTONE colors for graphic objects will include thePANTONE® name in the postscript output along with the color values that are assigned to the object.For best results, select an application that uses PANTONE palette in a CMYK workspace and print withthe Postscript printer driver with the SWOP inkset emulation selected.
When SWOP is selected as the CMYK Color setting, these CMYK values provide a good reproductionof the PANTONE 4C spot-color simulations.
PANTONE provides product- and software-specific palettes for some HP Color LaserJet products. Usingthe custom colors in these palettes can provide an alternative match to the 4C spot-color simulation.However, files that use these palettes are not portable to other products.
Vector graphics, such as company logos that are created in PANTONE Application Palettes, can beimported into Microsoft Word, PowerPoint, or other Microsoft Office software programs. To import, thecolor program must create an encapsulated postscript (.EPS) file of the image. By using the Insertfile function, you can then import the file into the Office document.
ENWW Advanced color use 55
Softw
are
desc
riptio
n

NOTE: Cutting and pasting from the clipboard does not work. These steps do not preserve thePANTONE name or the CMYK palette value.
56 Chapter 2 Software description ENWW
Embedded Web serverThe product is equipped with an embedded Web server, which provides access to information aboutproduct and network activities. This information appears in a Web browser, such as Microsoft InternetExplorer, Netscape Navigator, Apple Safari, or Firefox.
The embedded Web server resides on the product. It is not loaded on a network server.
The embedded Web server provides an interface to the product that anyone who has a network-connected computer and a standard Web browser can use. No special software is installed orconfigured, but you must have a supported Web browser on the computer. To gain access to theembedded Web server, type the IP address for the product in the address line of the browser.
For a complete explanation of the features and functionality of the embedded Web server, see the HPColor LaserJet CM6040 MFP Embedded Web Server User Guide, which is available on the Admin CD.
NOTE: Document filenames on your CD may reference either “HP Color LaserJet CM6030 MFP” or“HP Color LaserJet CM6040 MFP” interchangeably; the references are applicable to either product.
ENWW Embedded Web server 57
Softw
are
desc
riptio
n
HP Web JetadminHP Web Jetadmin is a browser-based management tool for HP Jetdirect-connected printers within yourintranet, and it should be installed only on the network administrator’s computer.
To download a current version of HP Web Jetadmin and for the latest list of supported host systems,visit www.hp.com/go/webjetadmin.
When installed on a host server, a Windows client can gain access to HP Web Jetadmin by using asupported Web browser (such as Microsoft® Internet Explorer 4.x or Netscape Navigator 4.x or later)by navigating to the HP Web Jetadmin host.
58 Chapter 2 Software description ENWW
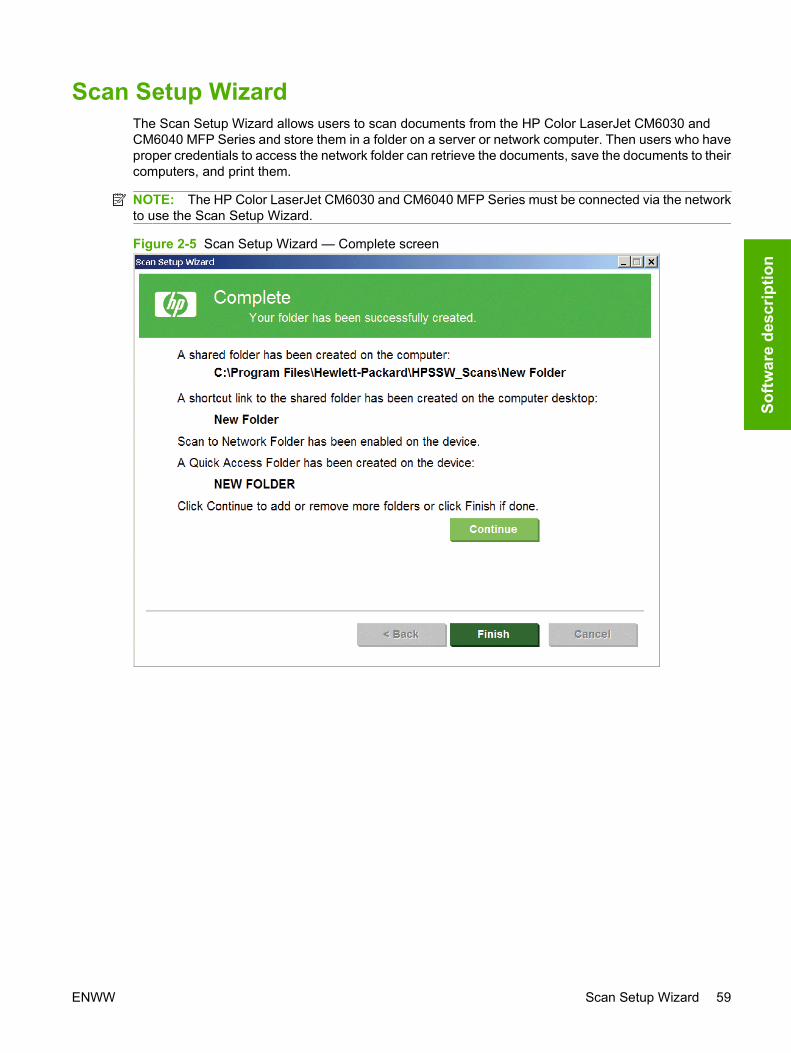
Scan Setup WizardThe Scan Setup Wizard allows users to scan documents from the HP Color LaserJet CM6030 andCM6040 MFP Series and store them in a folder on a server or network computer. Then users who haveproper credentials to access the network folder can retrieve the documents, save the documents to theircomputers, and print them.
NOTE: The HP Color LaserJet CM6030 and CM6040 MFP Series must be connected via the networkto use the Scan Setup Wizard.
Figure 2-5 Scan Setup Wizard — Complete screen
ENWW Scan Setup Wizard 59
Softw
are
desc
riptio
n
MFP Send Fax DriverYou can use the HP Send Fax Driver to send faxes from your computer through the HP Color LaserJetCM6030 and CM6040 MFP Series if the optional Analog Fax Accessory 300 is installed. After the HPSend Fax Driver is installed, it can be accessed and used in the same manner as a printer driver.
NOTE: For complete information about using the HP Send Fax Driver, see the HP LaserJet MFPAnalog Fax Accessory 300 Send Fax Driver Guide, which can be downloaded by going to www.hp.com/go/cljcm6030mfp_software or www.hp.com/go/cljcm6040mfp_software, and then clicking theManuals option from the left navigation bar.
The following operating systems support the HP Easy Printer Care:
● Windows 2000
● Windows XP (32-bit and 64-bit)
● Windows Server 2003 (32-bit and 64-bit)
● Windows Vista (32-bit and 64-bit)
60 Chapter 2 Software description ENWW
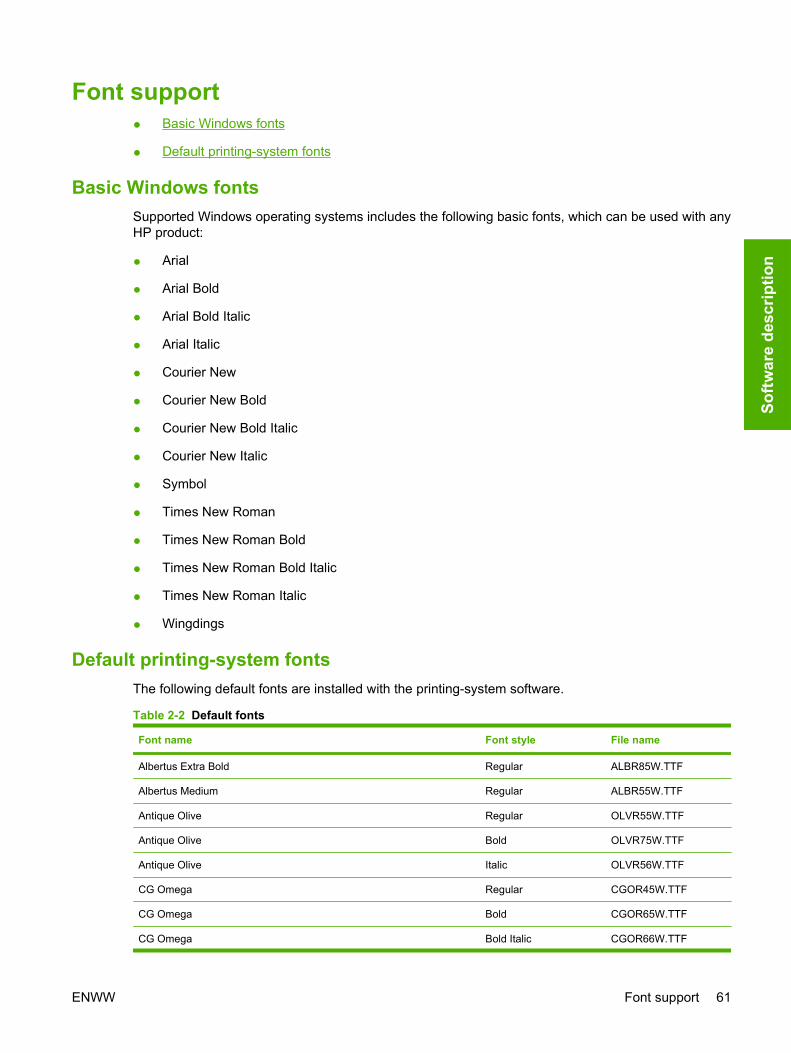
Font support● Basic Windows fonts
● Default printing-system fonts
Basic Windows fonts Supported Windows operating systems includes the following basic fonts, which can be used with anyHP product:
● Arial
● Arial Bold
● Arial Bold Italic
● Arial Italic
● Courier New
● Courier New Bold
● Courier New Bold Italic
● Courier New Italic
● Symbol
● Times New Roman
● Times New Roman Bold
● Times New Roman Bold Italic
● Times New Roman Italic
● Wingdings
Default printing-system fontsThe following default fonts are installed with the printing-system software.
Table 2-2 Default fonts
Font name Font style File name
Albertus Extra Bold Regular ALBR85W.TTF
Albertus Medium Regular ALBR55W.TTF
Antique Olive Regular OLVR55W.TTF
Antique Olive Bold OLVR75W.TTF
Antique Olive Italic OLVR56W.TTF
CG Omega Regular CGOR45W.TTF
CG Omega Bold CGOR65W.TTF
CG Omega Bold Italic CGOR66W.TTF
ENWW Font support 61
Softw
are
desc
riptio
n
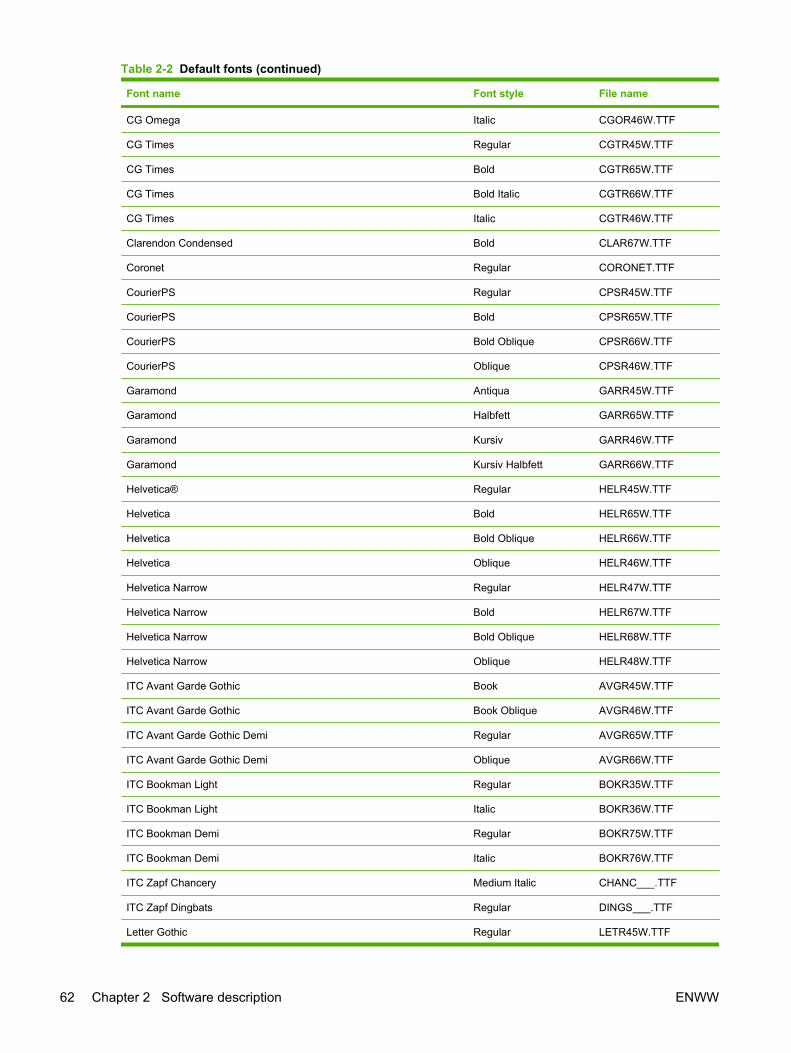
Font name Font style File name
CG Omega Italic CGOR46W.TTF
CG Times Regular CGTR45W.TTF
CG Times Bold CGTR65W.TTF
CG Times Bold Italic CGTR66W.TTF
CG Times Italic CGTR46W.TTF
Clarendon Condensed Bold CLAR67W.TTF
Coronet Regular CORONET.TTF
CourierPS Regular CPSR45W.TTF
CourierPS Bold CPSR65W.TTF
CourierPS Bold Oblique CPSR66W.TTF
CourierPS Oblique CPSR46W.TTF
Garamond Antiqua GARR45W.TTF
Garamond Halbfett GARR65W.TTF
Garamond Kursiv GARR46W.TTF
Garamond Kursiv Halbfett GARR66W.TTF
Helvetica® Regular HELR45W.TTF
Helvetica Bold HELR65W.TTF
Helvetica Bold Oblique HELR66W.TTF
Helvetica Oblique HELR46W.TTF
Helvetica Narrow Regular HELR47W.TTF
Helvetica Narrow Bold HELR67W.TTF
Helvetica Narrow Bold Oblique HELR68W.TTF
Helvetica Narrow Oblique HELR48W.TTF
ITC Avant Garde Gothic Book AVGR45W.TTF
ITC Avant Garde Gothic Book Oblique AVGR46W.TTF
ITC Avant Garde Gothic Demi Regular AVGR65W.TTF
ITC Avant Garde Gothic Demi Oblique AVGR66W.TTF
ITC Bookman Light Regular BOKR35W.TTF
ITC Bookman Light Italic BOKR36W.TTF
ITC Bookman Demi Regular BOKR75W.TTF
ITC Bookman Demi Italic BOKR76W.TTF
ITC Zapf Chancery Medium Italic CHANC___.TTF
ITC Zapf Dingbats Regular DINGS___.TTF
Letter Gothic Regular LETR45W.TTF
Table 2-2 Default fonts (continued)
62 Chapter 2 Software description ENWW
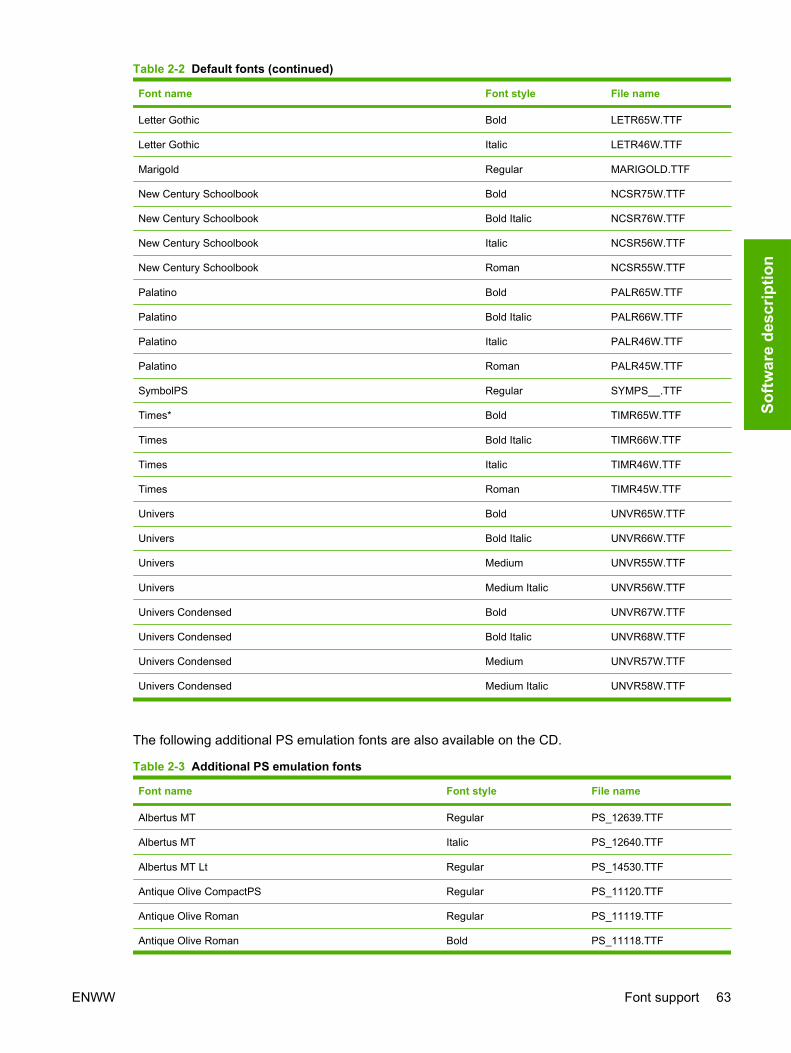
Font name Font style File name
Letter Gothic Bold LETR65W.TTF
Letter Gothic Italic LETR46W.TTF
Marigold Regular MARIGOLD.TTF
New Century Schoolbook Bold NCSR75W.TTF
New Century Schoolbook Bold Italic NCSR76W.TTF
New Century Schoolbook Italic NCSR56W.TTF
New Century Schoolbook Roman NCSR55W.TTF
Palatino Bold PALR65W.TTF
Palatino Bold Italic PALR66W.TTF
Palatino Italic PALR46W.TTF
Palatino Roman PALR45W.TTF
SymbolPS Regular SYMPS__.TTF
Times* Bold TIMR65W.TTF
Times Bold Italic TIMR66W.TTF
Times Italic TIMR46W.TTF
Times Roman TIMR45W.TTF
Univers Bold UNVR65W.TTF
Univers Bold Italic UNVR66W.TTF
Univers Medium UNVR55W.TTF
Univers Medium Italic UNVR56W.TTF
Univers Condensed Bold UNVR67W.TTF
Univers Condensed Bold Italic UNVR68W.TTF
Univers Condensed Medium UNVR57W.TTF
Univers Condensed Medium Italic UNVR58W.TTF
The following additional PS emulation fonts are also available on the CD.
Table 2-3 Additional PS emulation fonts
Font name Font style File name
Albertus MT Regular PS_12639.TTF
Albertus MT Italic PS_12640.TTF
Albertus MT Lt Regular PS_14530.TTF
Antique Olive CompactPS Regular PS_11120.TTF
Antique Olive Roman Regular PS_11119.TTF
Antique Olive Roman Bold PS_11118.TTF
Table 2-2 Default fonts (continued)
ENWW Font support 63
Softw
are
desc
riptio
n
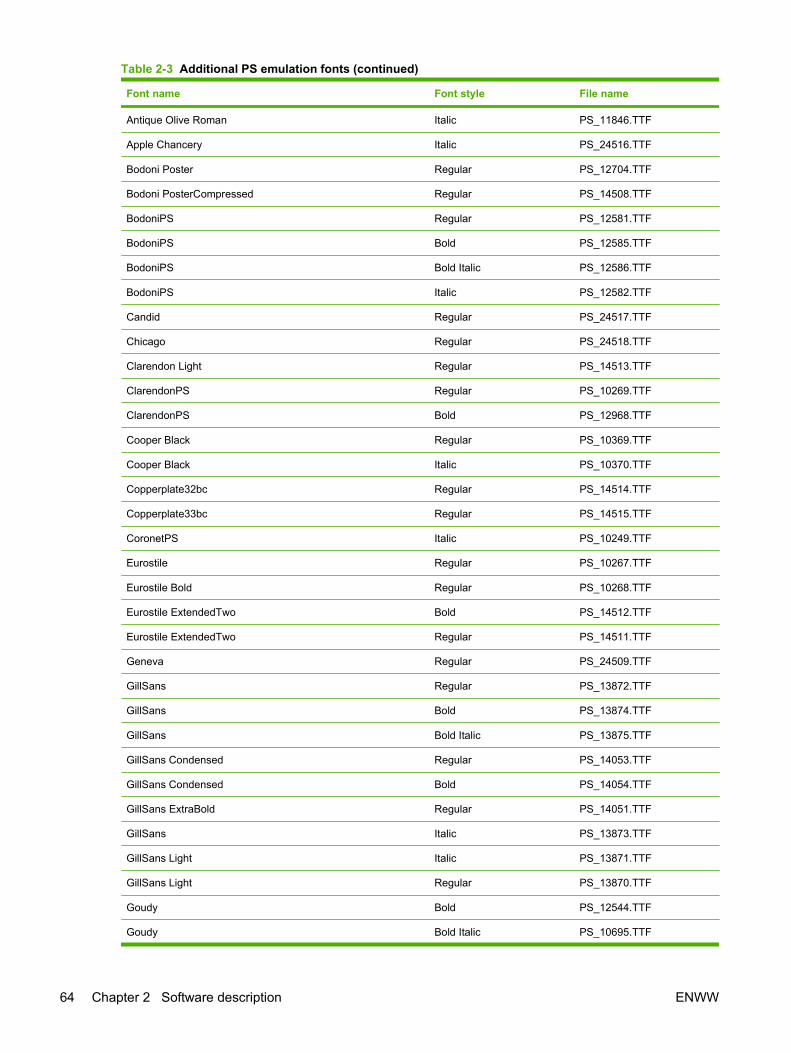
Font name Font style File name
Antique Olive Roman Italic PS_11846.TTF
Apple Chancery Italic PS_24516.TTF
Bodoni Poster Regular PS_12704.TTF
Bodoni PosterCompressed Regular PS_14508.TTF
BodoniPS Regular PS_12581.TTF
BodoniPS Bold PS_12585.TTF
BodoniPS Bold Italic PS_12586.TTF
BodoniPS Italic PS_12582.TTF
Candid Regular PS_24517.TTF
Chicago Regular PS_24518.TTF
Clarendon Light Regular PS_14513.TTF
ClarendonPS Regular PS_10269.TTF
ClarendonPS Bold PS_12968.TTF
Cooper Black Regular PS_10369.TTF
Cooper Black Italic PS_10370.TTF
Copperplate32bc Regular PS_14514.TTF
Copperplate33bc Regular PS_14515.TTF
CoronetPS Italic PS_10249.TTF
Eurostile Regular PS_10267.TTF
Eurostile Bold Regular PS_10268.TTF
Eurostile ExtendedTwo Bold PS_14512.TTF
Eurostile ExtendedTwo Regular PS_14511.TTF
Geneva Regular PS_24509.TTF
GillSans Regular PS_13872.TTF
GillSans Bold PS_13874.TTF
GillSans Bold Italic PS_13875.TTF
GillSans Condensed Regular PS_14053.TTF
GillSans Condensed Bold PS_14054.TTF
GillSans ExtraBold Regular PS_14051.TTF
GillSans Italic PS_13873.TTF
GillSans Light Italic PS_13871.TTF
GillSans Light Regular PS_13870.TTF
Goudy Bold PS_12544.TTF
Goudy Bold Italic PS_10695.TTF
Table 2-3 Additional PS emulation fonts (continued)
64 Chapter 2 Software description ENWW
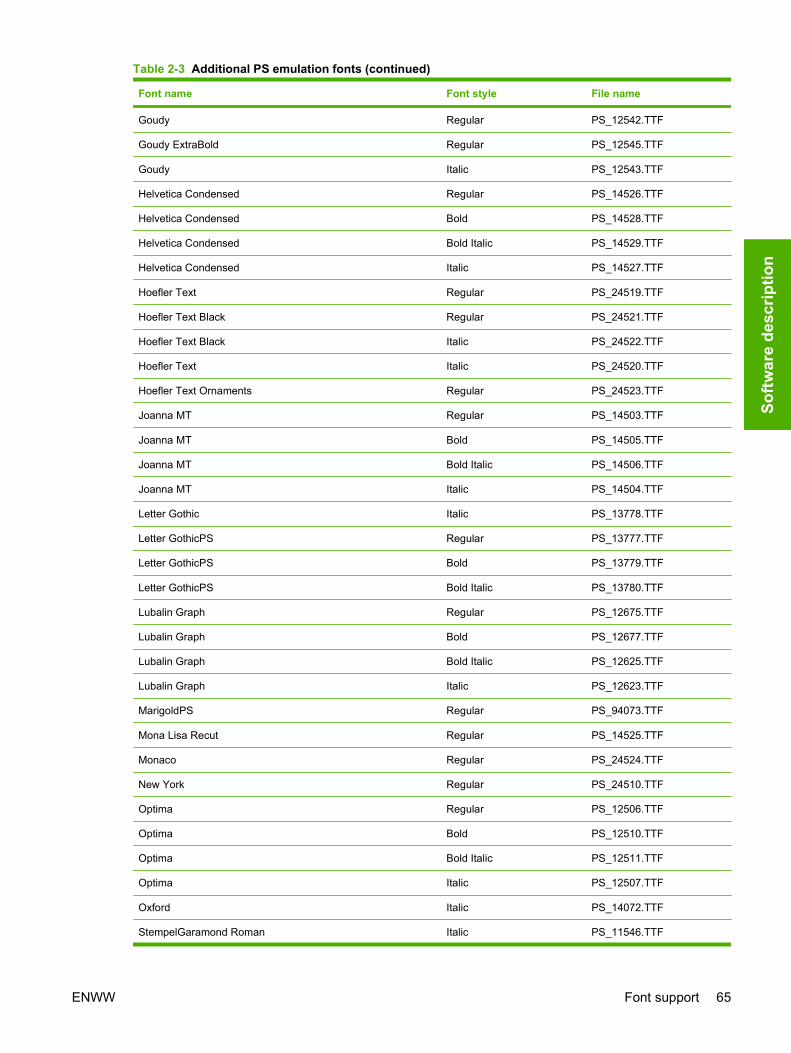
Font name Font style File name
Goudy Regular PS_12542.TTF
Goudy ExtraBold Regular PS_12545.TTF
Goudy Italic PS_12543.TTF
Helvetica Condensed Regular PS_14526.TTF
Helvetica Condensed Bold PS_14528.TTF
Helvetica Condensed Bold Italic PS_14529.TTF
Helvetica Condensed Italic PS_14527.TTF
Hoefler Text Regular PS_24519.TTF
Hoefler Text Black Regular PS_24521.TTF
Hoefler Text Black Italic PS_24522.TTF
Hoefler Text Italic PS_24520.TTF
Hoefler Text Ornaments Regular PS_24523.TTF
Joanna MT Regular PS_14503.TTF
Joanna MT Bold PS_14505.TTF
Joanna MT Bold Italic PS_14506.TTF
Joanna MT Italic PS_14504.TTF
Letter Gothic Italic PS_13778.TTF
Letter GothicPS Regular PS_13777.TTF
Letter GothicPS Bold PS_13779.TTF
Letter GothicPS Bold Italic PS_13780.TTF
Lubalin Graph Regular PS_12675.TTF
Lubalin Graph Bold PS_12677.TTF
Lubalin Graph Bold Italic PS_12625.TTF
Lubalin Graph Italic PS_12623.TTF
MarigoldPS Regular PS_94073.TTF
Mona Lisa Recut Regular PS_14525.TTF
Monaco Regular PS_24524.TTF
New York Regular PS_24510.TTF
Optima Regular PS_12506.TTF
Optima Bold PS_12510.TTF
Optima Bold Italic PS_12511.TTF
Optima Italic PS_12507.TTF
Oxford Italic PS_14072.TTF
StempelGaramond Roman Italic PS_11546.TTF
Table 2-3 Additional PS emulation fonts (continued)
ENWW Font support 65
Softw
are
desc
riptio
n
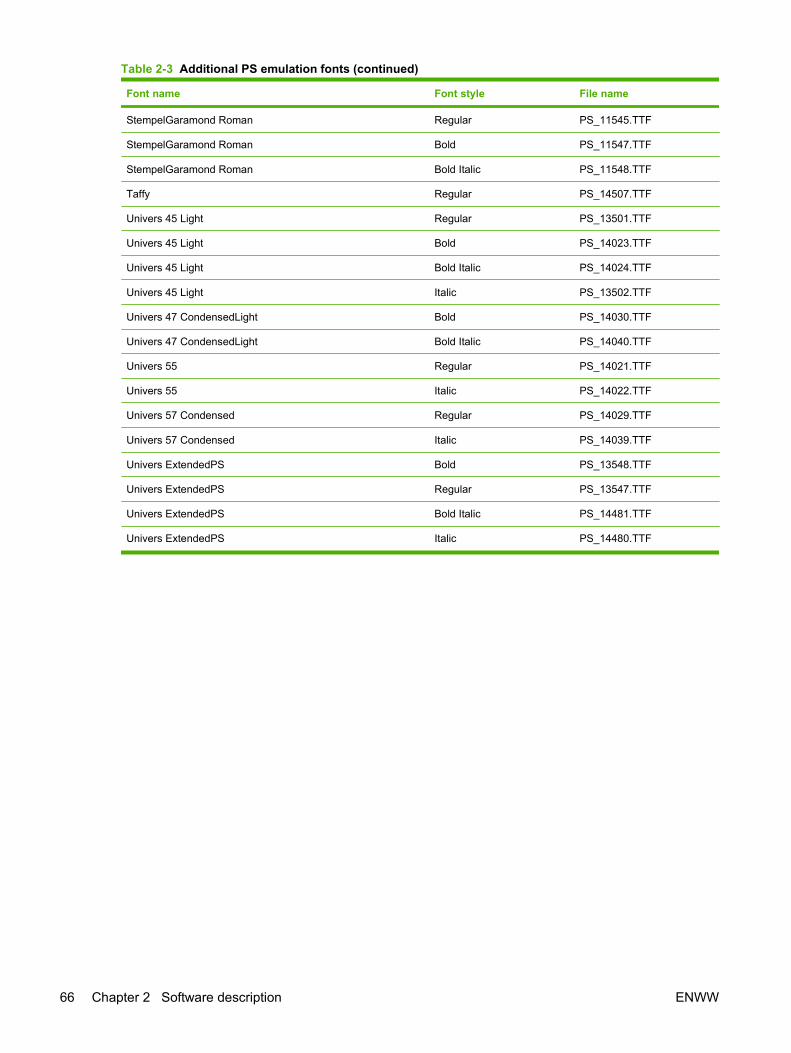
Font name Font style File name
StempelGaramond Roman Regular PS_11545.TTF
StempelGaramond Roman Bold PS_11547.TTF
StempelGaramond Roman Bold Italic PS_11548.TTF
Taffy Regular PS_14507.TTF
Univers 45 Light Regular PS_13501.TTF
Univers 45 Light Bold PS_14023.TTF
Univers 45 Light Bold Italic PS_14024.TTF
Univers 45 Light Italic PS_13502.TTF
Univers 47 CondensedLight Bold PS_14030.TTF
Univers 47 CondensedLight Bold Italic PS_14040.TTF
Univers 55 Regular PS_14021.TTF
Univers 55 Italic PS_14022.TTF
Univers 57 Condensed Regular PS_14029.TTF
Univers 57 Condensed Italic PS_14039.TTF
Univers ExtendedPS Bold PS_13548.TTF
Univers ExtendedPS Regular PS_13547.TTF
Univers ExtendedPS Bold Italic PS_14481.TTF
Univers ExtendedPS Italic PS_14480.TTF
Table 2-3 Additional PS emulation fonts (continued)
66 Chapter 2 Software description ENWW
3 Install Windows printing-systemcomponents
The HP Color LaserJet CM6030 and CM6040 MFP Series comes with software and installers forMicrosoft Windows and Apple Macintosh systems. For information about Macintosh software, seeChapter 5 of this document. Linux and UNIX systems support the HP Color LaserJet CM6030 andCM6040 MFP Series, and software is available on the Web. This chapter provides procedures forinstalling and uninstalling the HP Color LaserJet CM6030 and CM6040 MFP Series printing-systemsoftware for Windows operating systems.
● Supported operating systems for Windows
● Windows operating system requirements
● Install overview
● Software installation types for Windows
● Installation options
● Microsoft Windows general installation overview
● Detailed Microsoft Windows installation instructions
● Use the MFP Send Fax Driver
● Create a network folder using the Scan Setup Wizard
● Install documentation and optional software
● Uninstall software
ENWW 67
Inst
allin
g W
indo
ws
prin
ting-
syst
emco
mpo
nent
s

Supported operating systems for WindowsThe HP Color LaserJet CM6030 and CM6040 MFP Series supports the following Windows operatingsystems:
● Windows 2000
● Windows Server 2003 (32-bit and 64-bit)
● Windows XP (32-bit and 64-bit)
● Windows Vista (32-bit and 64-bit)
Windows operating system requirements● Windows 2000: 333 MHz processor with 64 MB RAM
● Windows Server 2003: 550 MHz processor with 128 MB RAM
● Windows XP: 333 MHz processor with 128 MB RAM
● Windows Vista: 800 MHz processor with 512 MB RAM
NOTE: All Windows operating systems also require a CD-ROM, DVD drive, or Internet connection toinstall the HP Color LaserJet CM6030 and CM6040 MFP Series printing-system software, as well aseither a dedicated universal serial bus (USB 1.1 or 2.0) connectivity port or network connection tocommunicate with the MFP.
NOTE: Windows 95, Windows 98, Windows Me, and Windows NT are not supported.
Install overviewThe software for the HP Color LaserJet CM6030 and CM6040 MFP Series comes on a single CD. TheSetup program installs the HP Color LaserJet CM6030 and CM6040 MFP Series printing-systemsoftware from the CD onto the hard disk and updates Windows files.
For all supported operating systems, each install option presents a series of query dialog boxes thatguide you through the installation process.
Software installation types for WindowsThe HP Color LaserJet CM6030 and CM6040 MFP Series printing-system software can be installed inthe following ways:
● HP Driver Installation Utility (HPDIU) — Recommended, included on the Admin CD and fromdownloaded drivers available at www.hp.com.
● Microsoft Add Printer Wizard
68 Chapter 3 Install Windows printing-system components ENWW
Installation optionsThe HP Color LaserJet CM6030 and CM6040 MFP Series printing-system software can be installedwhen the product is connected to the computer in the following configurations:
● Directly connected via a USB port.
● Connected via the network.
ENWW Installation options 69
Inst
allin
g W
indo
ws
prin
ting-
syst
emco
mpo
nent
s
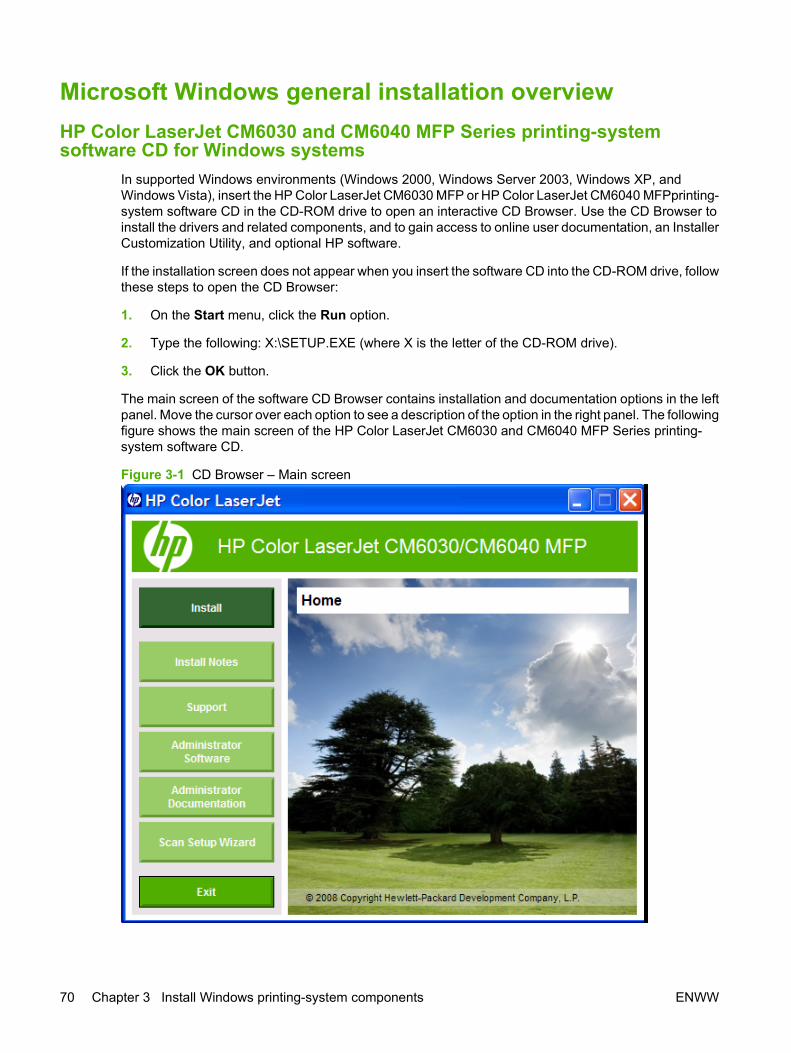
Microsoft Windows general installation overviewHP Color LaserJet CM6030 and CM6040 MFP Series printing-systemsoftware CD for Windows systems
In supported Windows environments (Windows 2000, Windows Server 2003, Windows XP, andWindows Vista), insert the HP Color LaserJet CM6030 MFP or HP Color LaserJet CM6040 MFPprinting-system software CD in the CD-ROM drive to open an interactive CD Browser. Use the CD Browser toinstall the drivers and related components, and to gain access to online user documentation, an InstallerCustomization Utility, and optional HP software.
If the installation screen does not appear when you insert the software CD into the CD-ROM drive, followthese steps to open the CD Browser:
1. On the Start menu, click the Run option.
2. Type the following: X:\SETUP.EXE (where X is the letter of the CD-ROM drive).
3. Click the OK button.
The main screen of the software CD Browser contains installation and documentation options in the leftpanel. Move the cursor over each option to see a description of the option in the right panel. The followingfigure shows the main screen of the HP Color LaserJet CM6030 and CM6040 MFP Series printing-system software CD.
Figure 3-1 CD Browser – Main screen
70 Chapter 3 Install Windows printing-system components ENWW
NOTE: Document filenames on your CD may reference either “HP Color LaserJet CM6030 MFP” or“HP Color LaserJet CM6040 MFP” interchangeably; the references are applicable to either product.
InstallNOTE: For detailed installation instructions, see Detailed Microsoft Windows installation instructionson page 80. For a general overview of the installation process, see either Install Windows softwarefor direct connections on page 78 or Install Windows software for networks on page 79.
Click the Install button and select the driver you want to install to launch the HP Color LaserJet CM6030and CM6040 MFP Series printing-system software installation.
● Click the Install PCL 6 Driver button to install the PCL 6 driver.
● Click the Install Documentation and Optional Software button to install the HP Color LaserJetCM6030 and CM6040 MFP Series MFP User Guides.
● Click the Install PCL 5 Driver button to install the PCL 5 driver, which is a UPD that can youdownload at www.hp.com.
● Click the Install PostScript Driver button to install the PS emulation driver, which is a UPD thatcan you download at www.hp.com.
● Click the Install HP MFP Send Fax Driver button to install the Send Fax Driver.
● Click the Scan Setup Wizard button to install the Scan Setup Wizard.
NOTE: For more information about HP Color LaserJet CM6030 and CM6040 MFP Series printerdrivers, see chapter 4 of this document.
Click the Back button to return to the main CD Browser screen.
ENWW Microsoft Windows general installation overview 71
Inst
allin
g W
indo
ws
prin
ting-
syst
emco
mpo
nent
s
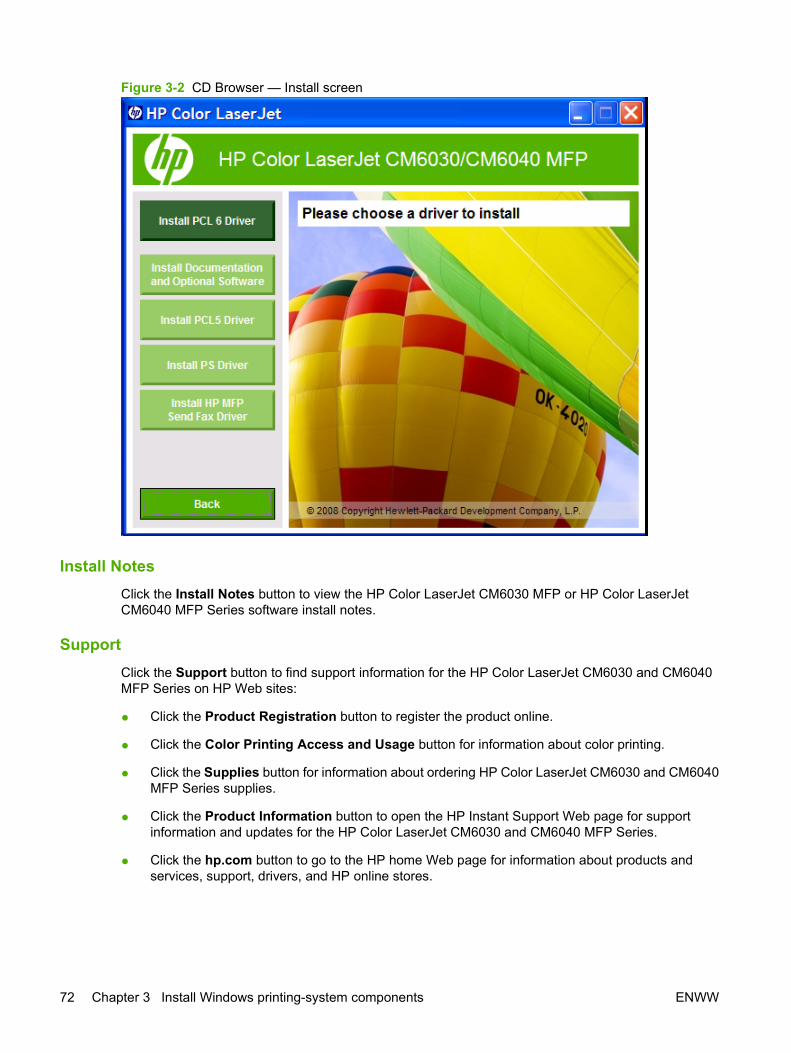
Figure 3-2 CD Browser — Install screen
Install NotesClick the Install Notes button to view the HP Color LaserJet CM6030 MFP or HP Color LaserJetCM6040 MFP Series software install notes.
SupportClick the Support button to find support information for the HP Color LaserJet CM6030 and CM6040MFP Series on HP Web sites:
● Click the Product Registration button to register the product online.
● Click the Color Printing Access and Usage button for information about color printing.
● Click the Supplies button for information about ordering HP Color LaserJet CM6030 and CM6040MFP Series supplies.
● Click the Product Information button to open the HP Instant Support Web page for supportinformation and updates for the HP Color LaserJet CM6030 and CM6040 MFP Series.
● Click the hp.com button to go to the HP home Web page for information about products andservices, support, drivers, and HP online stores.
72 Chapter 3 Install Windows printing-system components ENWW
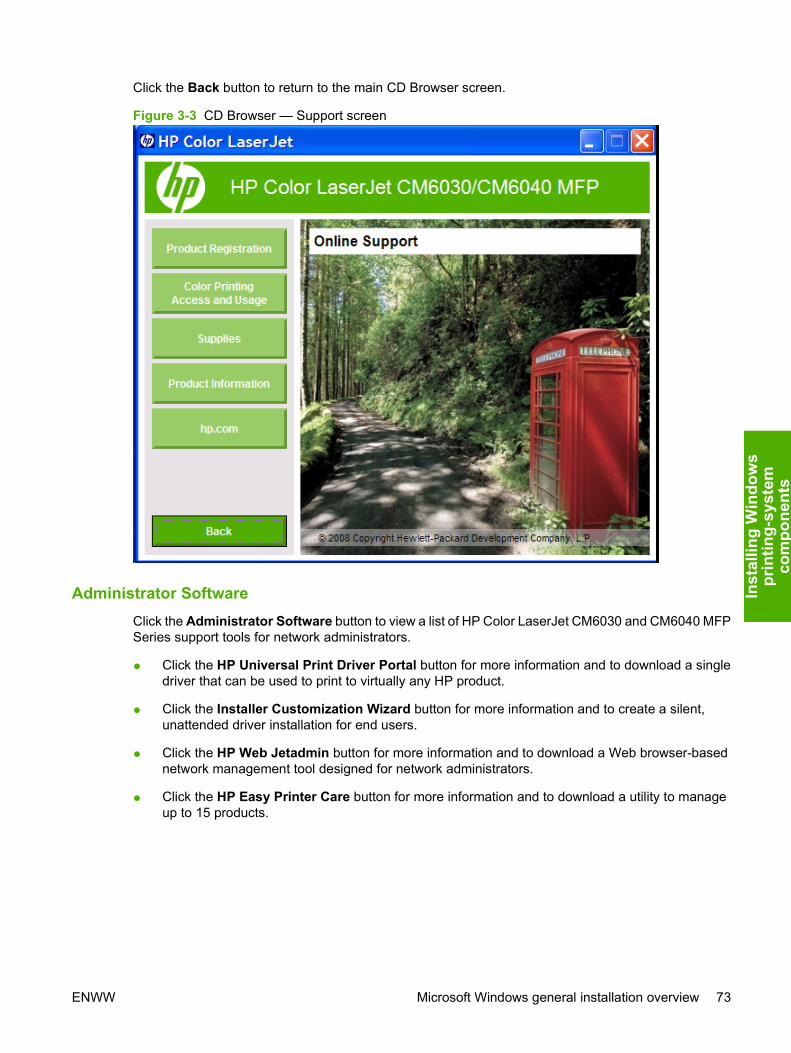
Click the Back button to return to the main CD Browser screen.
Figure 3-3 CD Browser — Support screen
Administrator SoftwareClick the Administrator Software button to view a list of HP Color LaserJet CM6030 and CM6040 MFPSeries support tools for network administrators.
● Click the HP Universal Print Driver Portal button for more information and to download a singledriver that can be used to print to virtually any HP product.
● Click the Installer Customization Wizard button for more information and to create a silent,unattended driver installation for end users.
● Click the HP Web Jetadmin button for more information and to download a Web browser-basednetwork management tool designed for network administrators.
● Click the HP Easy Printer Care button for more information and to download a utility to manageup to 15 products.
ENWW Microsoft Windows general installation overview 73
Inst
allin
g W
indo
ws
prin
ting-
syst
emco
mpo
nent
s
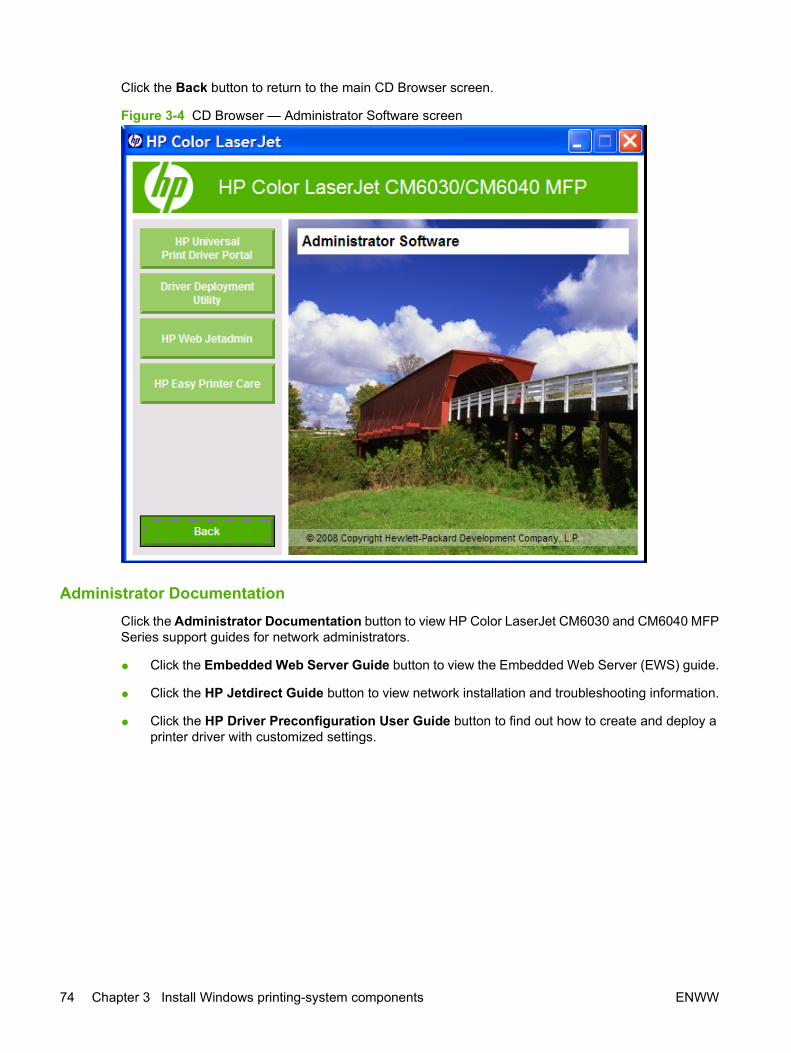
Click the Back button to return to the main CD Browser screen.
Figure 3-4 CD Browser — Administrator Software screen
Administrator DocumentationClick the Administrator Documentation button to view HP Color LaserJet CM6030 and CM6040 MFPSeries support guides for network administrators.
● Click the Embedded Web Server Guide button to view the Embedded Web Server (EWS) guide.
● Click the HP Jetdirect Guide button to view network installation and troubleshooting information.
● Click the HP Driver Preconfiguration User Guide button to find out how to create and deploy aprinter driver with customized settings.
74 Chapter 3 Install Windows printing-system components ENWW
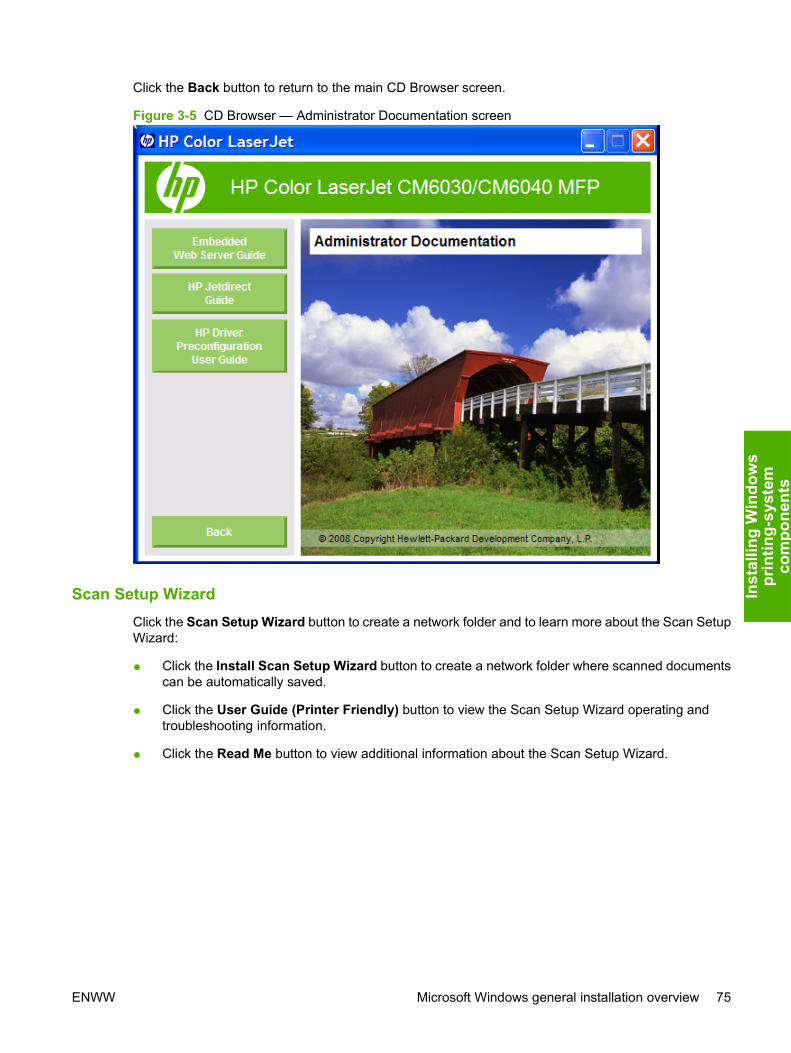
Click the Back button to return to the main CD Browser screen.
Figure 3-5 CD Browser — Administrator Documentation screen
Scan Setup WizardClick the Scan Setup Wizard button to create a network folder and to learn more about the Scan SetupWizard:
● Click the Install Scan Setup Wizard button to create a network folder where scanned documentscan be automatically saved.
● Click the User Guide (Printer Friendly) button to view the Scan Setup Wizard operating andtroubleshooting information.
● Click the Read Me button to view additional information about the Scan Setup Wizard.
ENWW Microsoft Windows general installation overview 75
Inst
allin
g W
indo
ws
prin
ting-
syst
emco
mpo
nent
s
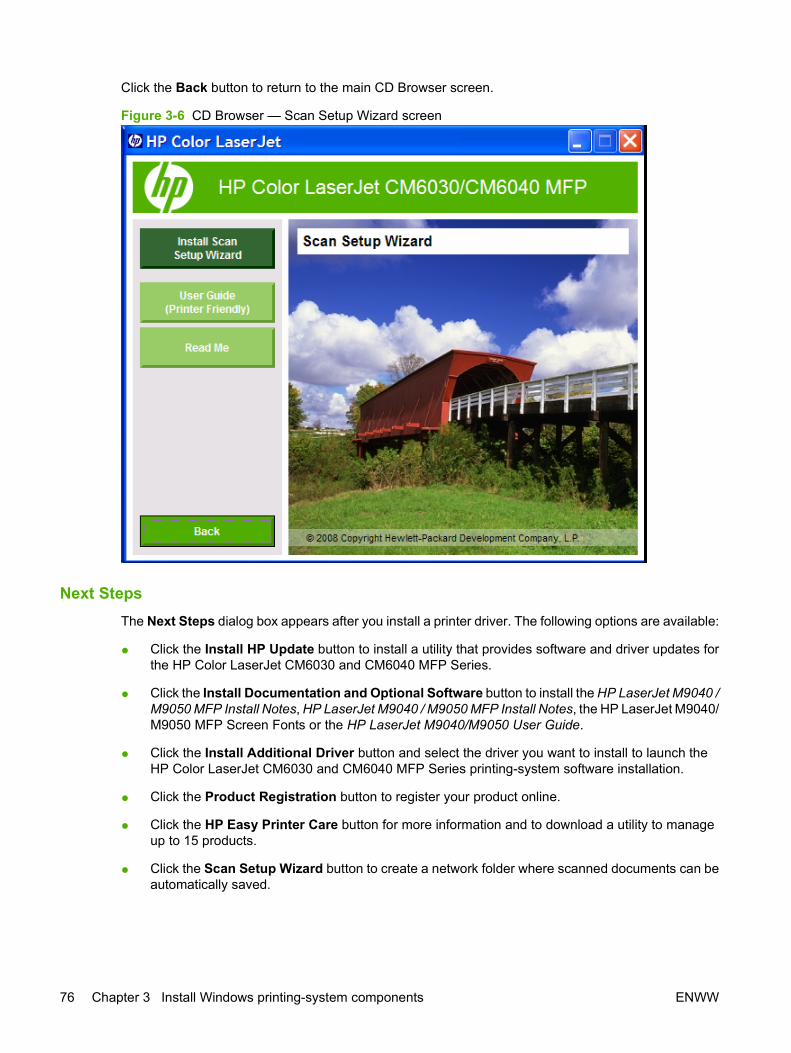
Click the Back button to return to the main CD Browser screen.
Figure 3-6 CD Browser — Scan Setup Wizard screen
Next StepsThe Next Steps dialog box appears after you install a printer driver. The following options are available:
● Click the Install HP Update button to install a utility that provides software and driver updates forthe HP Color LaserJet CM6030 and CM6040 MFP Series.
● Click the Install Documentation and Optional Software button to install the HP LaserJet M9040 /M9050 MFP Install Notes, HP LaserJet M9040 / M9050 MFP Install Notes, the HP LaserJet M9040/M9050 MFP Screen Fonts or the HP LaserJet M9040/M9050 User Guide.
● Click the Install Additional Driver button and select the driver you want to install to launch theHP Color LaserJet CM6030 and CM6040 MFP Series printing-system software installation.
● Click the Product Registration button to register your product online.
● Click the HP Easy Printer Care button for more information and to download a utility to manageup to 15 products.
● Click the Scan Setup Wizard button to create a network folder where scanned documents can beautomatically saved.
76 Chapter 3 Install Windows printing-system components ENWW

Click the Exit button to close the CD Browser screen.
Figure 3-7 CD Browser — Next Steps screen
ENWW Microsoft Windows general installation overview 77
Inst
allin
g W
indo
ws
prin
ting-
syst
emco
mpo
nent
s
Install Windows software for direct connectionsNOTE: For detailed installation instructions, see Detailed Microsoft Windows installation instructionson page 80.
When installing the product software in a direct-connect environment, always install the software beforeconnecting the USB cable (the software installer will prompt you to connect the cable at the appropriatetime). In addition, make sure to use a standard 2-meter USB cable.
1. Close all programs.
2. Insert the HP Color LaserJet CM6030 or HP Color LaserJet CM6040 software CD into the CD-ROM drive. The installer program should open.
If the installer program has not started after 30 seconds, complete these steps:
a. On the Start menu, click the Run option.
b. Type the following: X:\SETUP.EXE (where X is the letter of the CD-ROM drive).
c. Click the OK button.
3. When prompted, click the Install button. The printer driver screen appears.
4. Select the driver that you want to install and follow the instructions on the computer screen.
5. After the installation is complete, you might need to restart the computer.
6. Print a test page from any software program to make sure that the software is correctly installed.
If installation fails, reinstall the software. If this fails, check the installation notes and readme files on theproduct CD-ROM or the flyer that came in the product box, or go to www.hp.com/support/cljcm6030mfp or www.hp.com/support/cljcm6040mfp for help or more information.
78 Chapter 3 Install Windows printing-system components ENWW
Install Windows software for networksNOTE: For detailed installation instructions, see Detailed Microsoft Windows installation instructionson page 80.
The software on the HP Color LaserJet CM6030 and CM6040 MFP Series CD-ROM supports networkinstallation with a Microsoft network. For network installation on other operating systems, go towww.hp.com/support/cljcm6030mfp or www.hp.com/support/cljcm6040mfp.
The installer does not support product installation or object creation on Novell servers. It supports onlydirect-mode network installations between Windows computers and a product. To install the productand create objects on a Novell server, use an HP utility (such as HP Web Jetadmin) or a Novell utility(such as NWAdmin).
1. Make sure that you have administrator privileges.
2. Make sure that the HP Jetdirect print server and product are correctly connected to the network.Print a configuration page, and find the HP Jetdirect page.
To print a configuration page from the product control panel, perform the following:
a. Touch Administration.
b. Touch Information.
c. Touch Configuration/Status Pages.
d. Touch Configuration Page.
e. Touch Print.
On the HPJetdirect page, locate the IP address that is currently configured. You might need thisaddress to initially identify the product on your network and complete the installation.
3. Close all programs.
4. Insert the HP Color LaserJet CM6030 or HP Color LaserJet CM6040 software CD into the CD-ROM drive. The installer program should open.
If the installer program has not started after 30 seconds, complete these steps:
a. On the Start menu, click the Run option.
b. Type the following: X:\SETUP.EXE (where X is the letter of the CD-ROM drive).
c. Click the OK button.
5. When prompted, click the Install button. The printer driver screen appears.
6. Select the driver that you want to install and follow the instructions on the computer screen.
7. After the installation is complete, you might need to restart the computer.
8. Print a test page from any software program to make sure that the software is correctly installed.
ENWW Microsoft Windows general installation overview 79
Inst
allin
g W
indo
ws
prin
ting-
syst
emco
mpo
nent
s
Detailed Microsoft Windows installation instructionsInstall the printer driver using the HP Driver Installation Utility (HPDIU)
A series of dialog boxes appear during installation of the HP Color LaserJet CM6030 and CM6040 MFPSeries printing-system software in Windows environments.
NOTE: You can return to the previous dialog box by clicking the Back button, or exit the HP ColorLaserJet CM6030 and CM6040 MFP Series printing-system software installation by clicking theCancel button.
1. Close all programs.
2. Insert the HP Color LaserJet CM6030 or HP Color LaserJet CM6040 software CD into the CD-ROM drive. The software installer detects the language of the operating system, and then displaythe main menu of the CD Browser program in the same language.
If the installer program has not started after 30 seconds, complete these steps:
a. On the Start menu, click the Run option.
b. Type the following: X:\SETUP.EXE (where X is the letter of the CD-ROM drive).
c. Click the OK button.
80 Chapter 3 Install Windows printing-system components ENWW
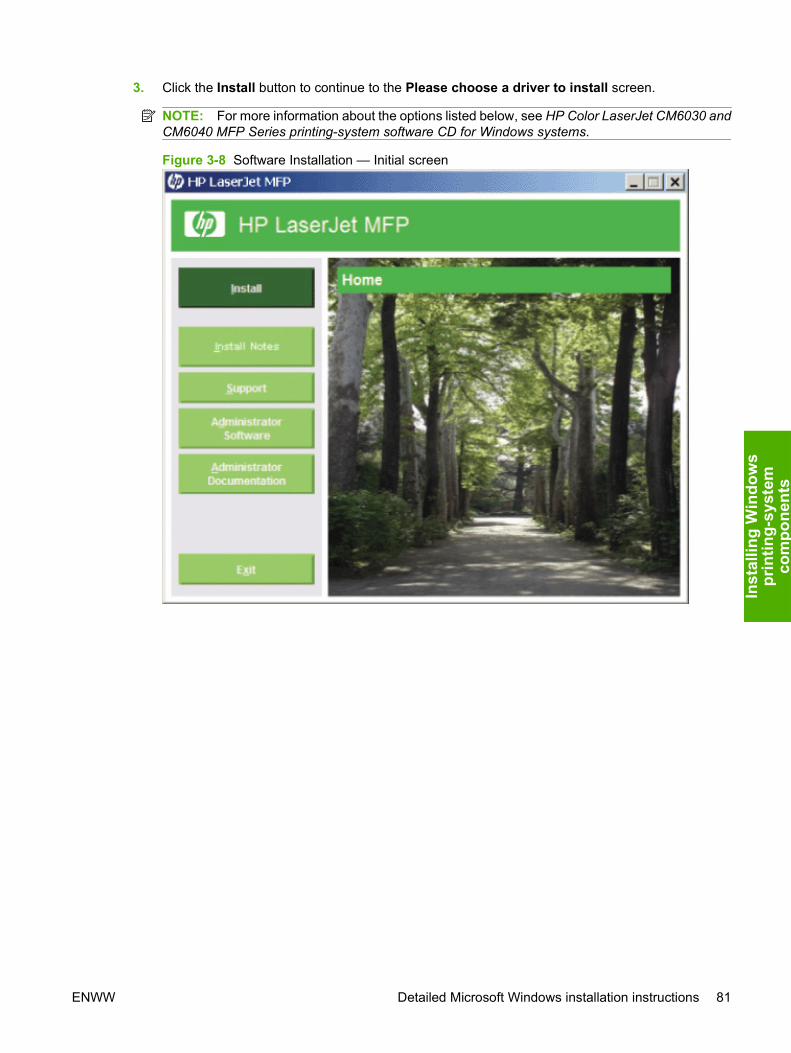
3. Click the Install button to continue to the Please choose a driver to install screen.
NOTE: For more information about the options listed below, see HP Color LaserJet CM6030 andCM6040 MFP Series printing-system software CD for Windows systems.
Figure 3-8 Software Installation — Initial screen
ENWW Detailed Microsoft Windows installation instructions 81
Inst
allin
g W
indo
ws
prin
ting-
syst
emco
mpo
nent
s

4. Select the driver you want to install to continue to the License Agreement screen.
NOTE: Each software component or printer driver is installed individually. Additional softwarecomponents and printer drivers can be installed at the conclusion of the software installation byclicking either the Install Documentation and Optional Software button or the Install AdditionalDriver button from the Next Steps dialog box.
For more information about HP Color LaserJet CM6030 and CM6040 MFP Series printer drivers,see Chapter 4 of this document. For more information documentation and optional software, seechapter 6 of this document..
Figure 3-9 Software Installation — Please choose a driver to install screen
82 Chapter 3 Install Windows printing-system components ENWW
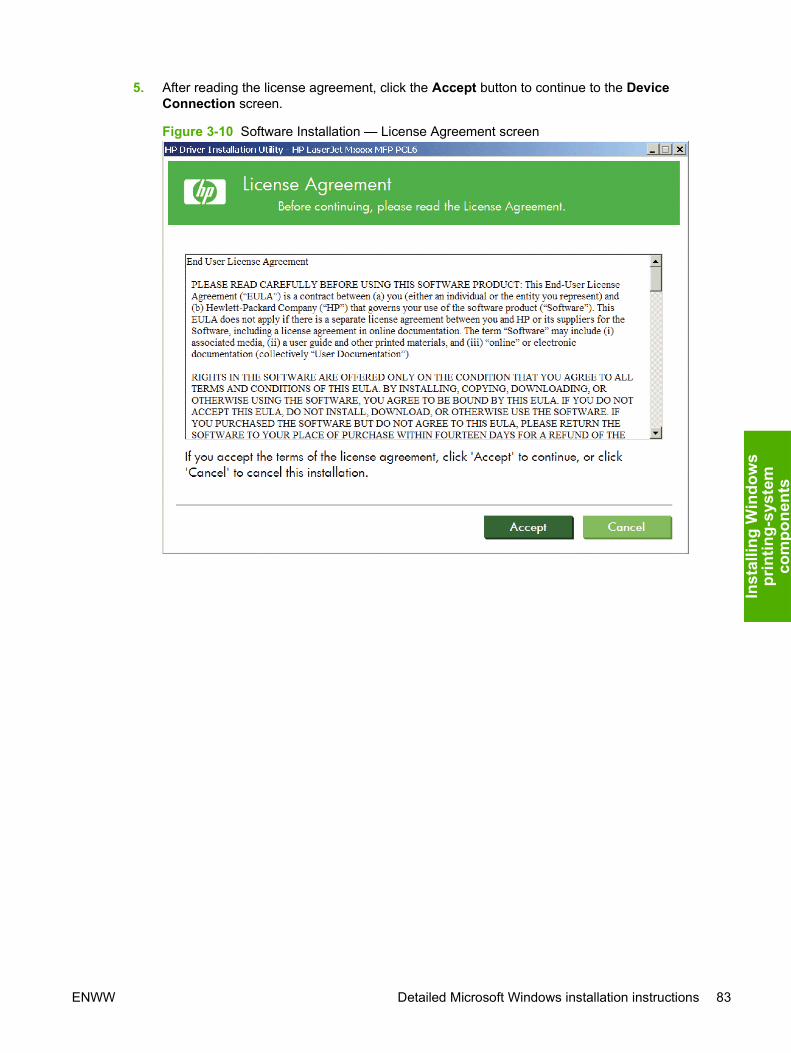
5. After reading the license agreement, click the Accept button to continue to the DeviceConnection screen.
Figure 3-10 Software Installation — License Agreement screen
ENWW Detailed Microsoft Windows installation instructions 83
Inst
allin
g W
indo
ws
prin
ting-
syst
emco
mpo
nent
s
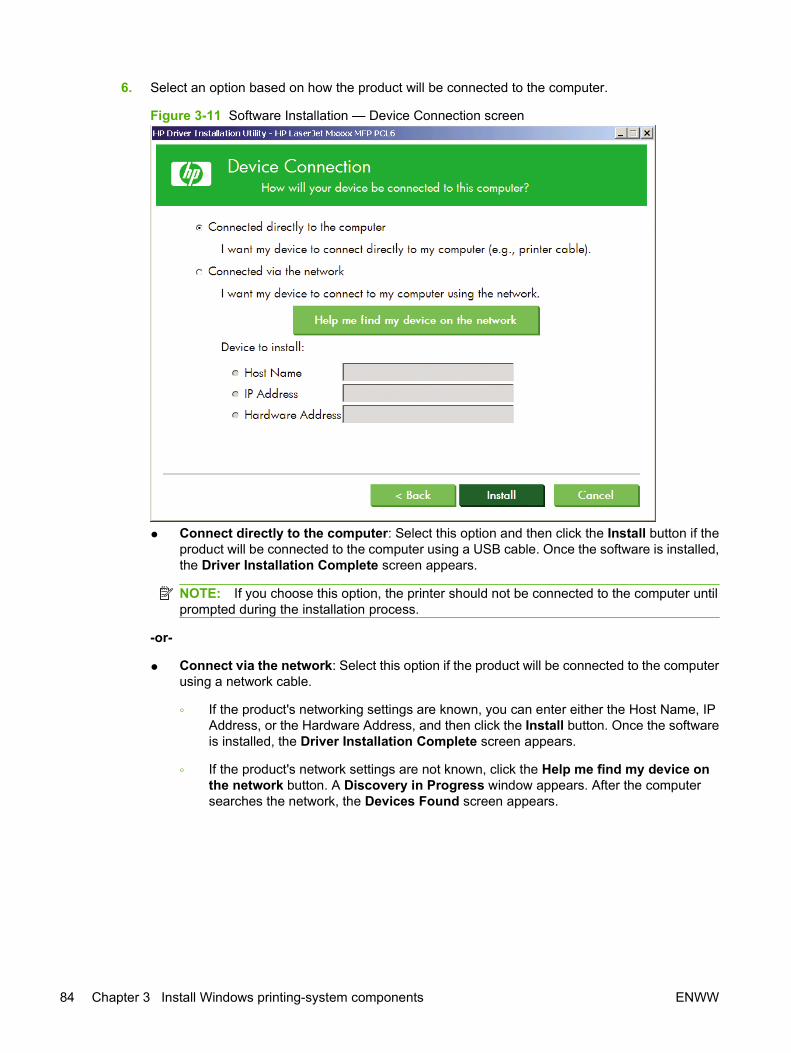
6. Select an option based on how the product will be connected to the computer.
Figure 3-11 Software Installation — Device Connection screen
● Connect directly to the computer: Select this option and then click the Install button if theproduct will be connected to the computer using a USB cable. Once the software is installed,the Driver Installation Complete screen appears.
NOTE: If you choose this option, the printer should not be connected to the computer untilprompted during the installation process.
-or-
● Connect via the network: Select this option if the product will be connected to the computerusing a network cable.
◦ If the product's networking settings are known, you can enter either the Host Name, IPAddress, or the Hardware Address, and then click the Install button. Once the softwareis installed, the Driver Installation Complete screen appears.
◦ If the product's network settings are not known, click the Help me find my device onthe network button. A Discovery in Progress window appears. After the computersearches the network, the Devices Found screen appears.
84 Chapter 3 Install Windows printing-system components ENWW
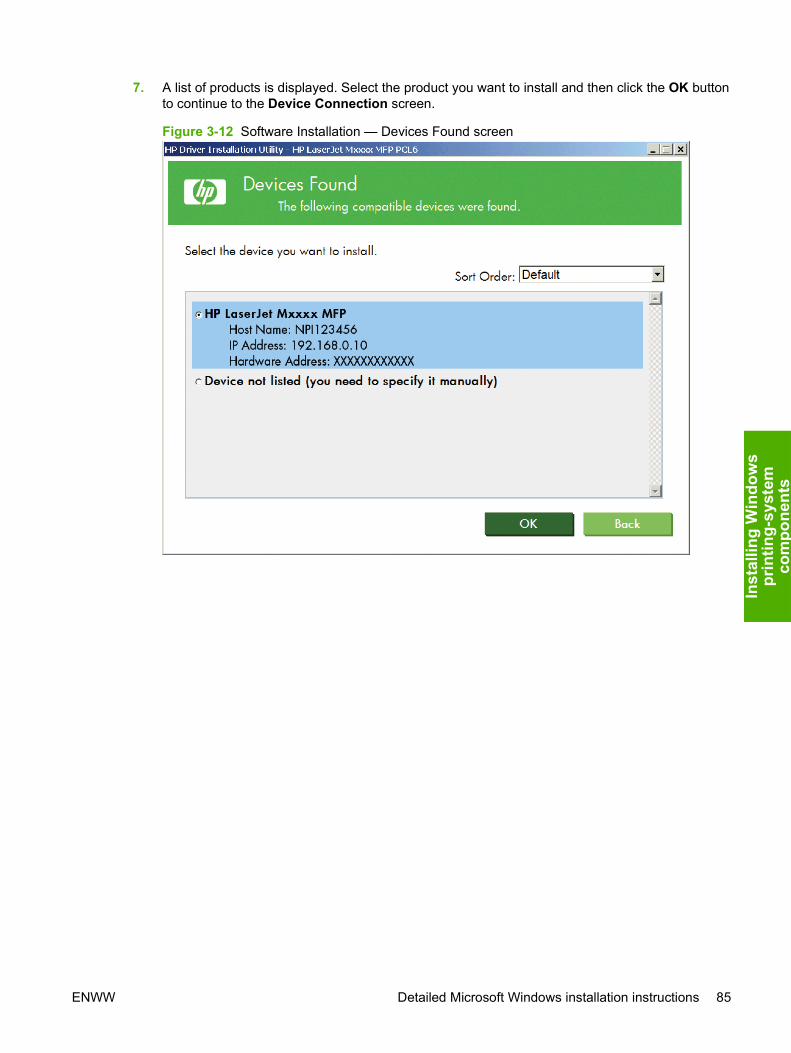
7. A list of products is displayed. Select the product you want to install and then click the OK buttonto continue to the Device Connection screen.
Figure 3-12 Software Installation — Devices Found screen
ENWW Detailed Microsoft Windows installation instructions 85
Inst
allin
g W
indo
ws
prin
ting-
syst
emco
mpo
nent
s
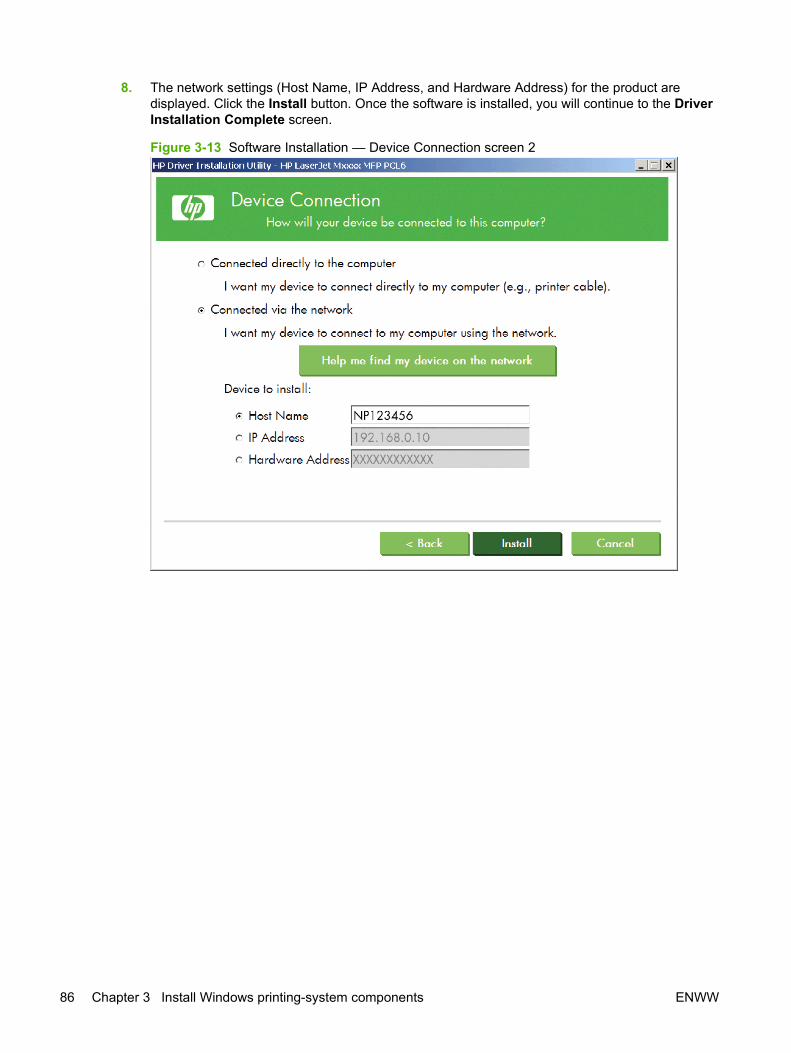
8. The network settings (Host Name, IP Address, and Hardware Address) for the product aredisplayed. Click the Install button. Once the software is installed, you will continue to the DriverInstallation Complete screen.
Figure 3-13 Software Installation — Device Connection screen 2
86 Chapter 3 Install Windows printing-system components ENWW
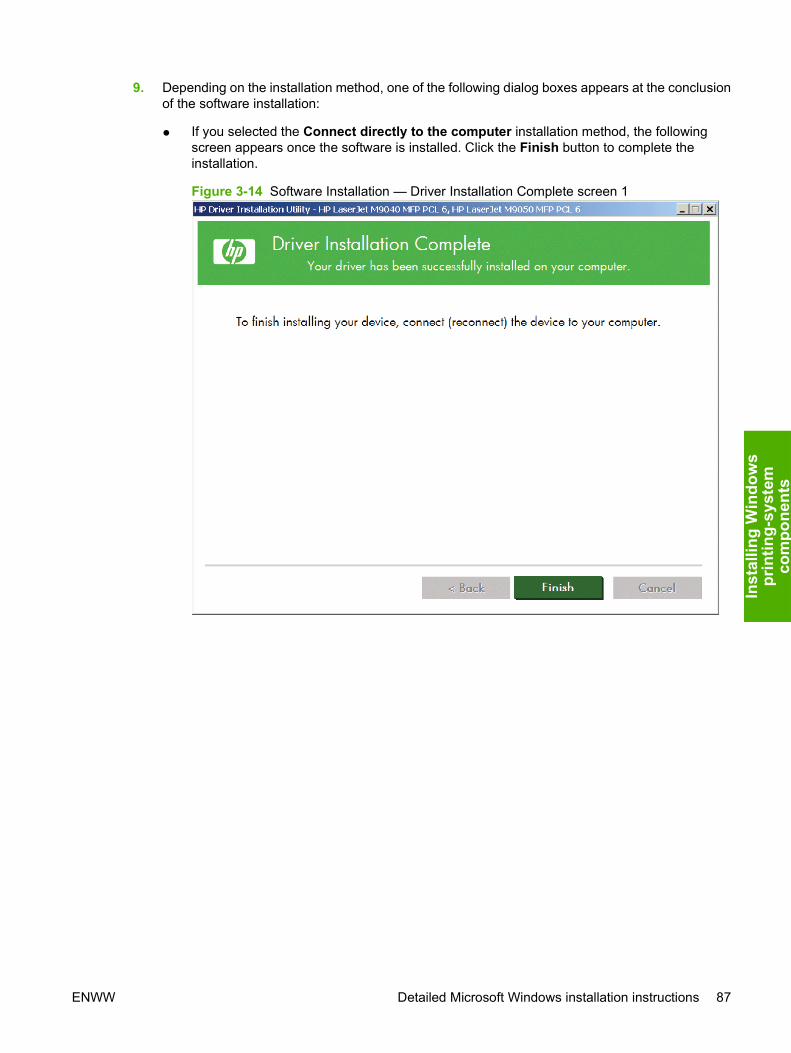
9. Depending on the installation method, one of the following dialog boxes appears at the conclusionof the software installation:
● If you selected the Connect directly to the computer installation method, the followingscreen appears once the software is installed. Click the Finish button to complete theinstallation.
Figure 3-14 Software Installation — Driver Installation Complete screen 1
ENWW Detailed Microsoft Windows installation instructions 87
Inst
allin
g W
indo
ws
prin
ting-
syst
emco
mpo
nent
s
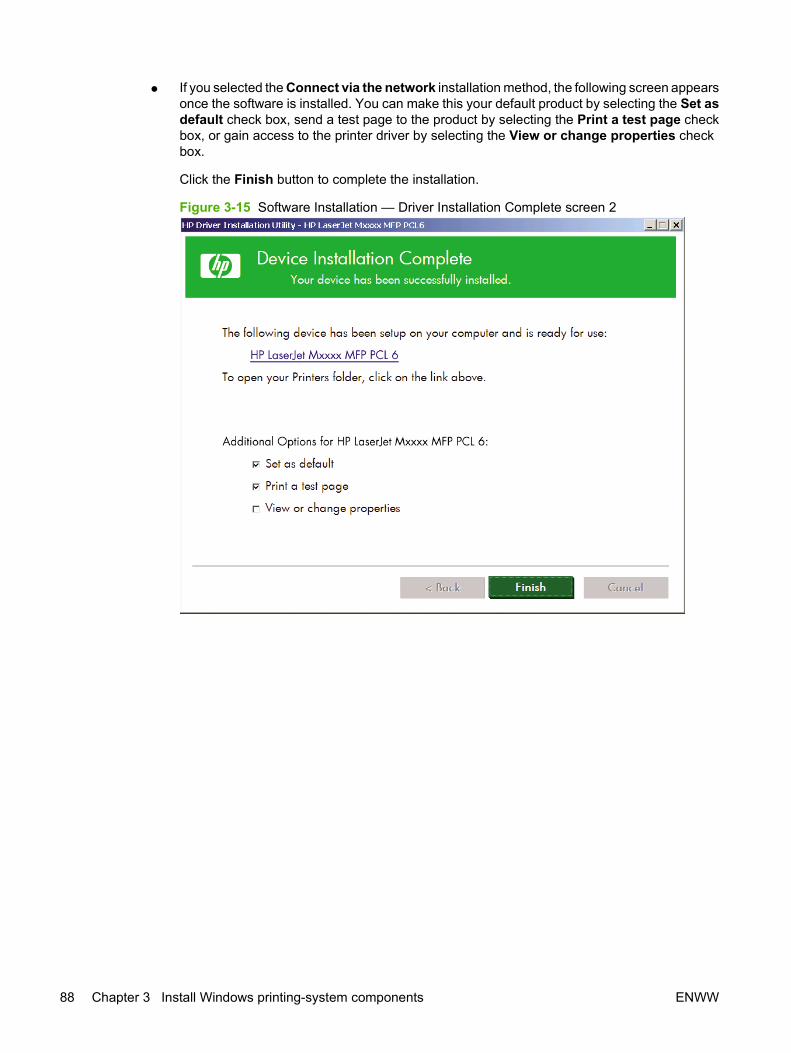
● If you selected the Connect via the network installation method, the following screen appearsonce the software is installed. You can make this your default product by selecting the Set asdefault check box, send a test page to the product by selecting the Print a test page checkbox, or gain access to the printer driver by selecting the View or change properties checkbox.
Click the Finish button to complete the installation.
Figure 3-15 Software Installation — Driver Installation Complete screen 2
88 Chapter 3 Install Windows printing-system components ENWW
Install the printer driver using the Microsoft Add Printer WizardNOTE: You can return to the previous screen by clicking the < Back button, or exit the Add PrinterWizard by clicking the Cancel button.
Select one of the following three options to install The printer driver using the Microsoft Add PrinterWizard:
● Use an existing port for a direct connection: The product is connected to the computer using aUSB cable or is connected via the network without using a print server and the printer port alreadyexists.
● Create a new TCP/IP port for a direct connection: The product is connected via the networkwithout using a print server and the printer port does not exist.
● Print server connection: The product is connected via the network using a print server.
Use an existing port for a direct connectionPerform the following when the product is connected to the computer using a USB cable or when printingvia the network without using a print server:
1. On the Start menu, click the Settings option, and then
Windows 2000: Click the Printers option.
-or-
Windows XP Home: Click the Printers and Other Hardware Devices option.
-or-
Windows XP Professional and Windows Server 2003: Click the Printers and Faxes option.
-or-
Windows Vista: Under the Hardware and Sound category, click the Printer option.
2. Click the Add a printer option. The Add Printer Wizard opens.
3. Click the Next button on the Add Printer Wizard welcome dialog box.
ENWW Detailed Microsoft Windows installation instructions 89
Inst
allin
g W
indo
ws
prin
ting-
syst
emco
mpo
nent
s
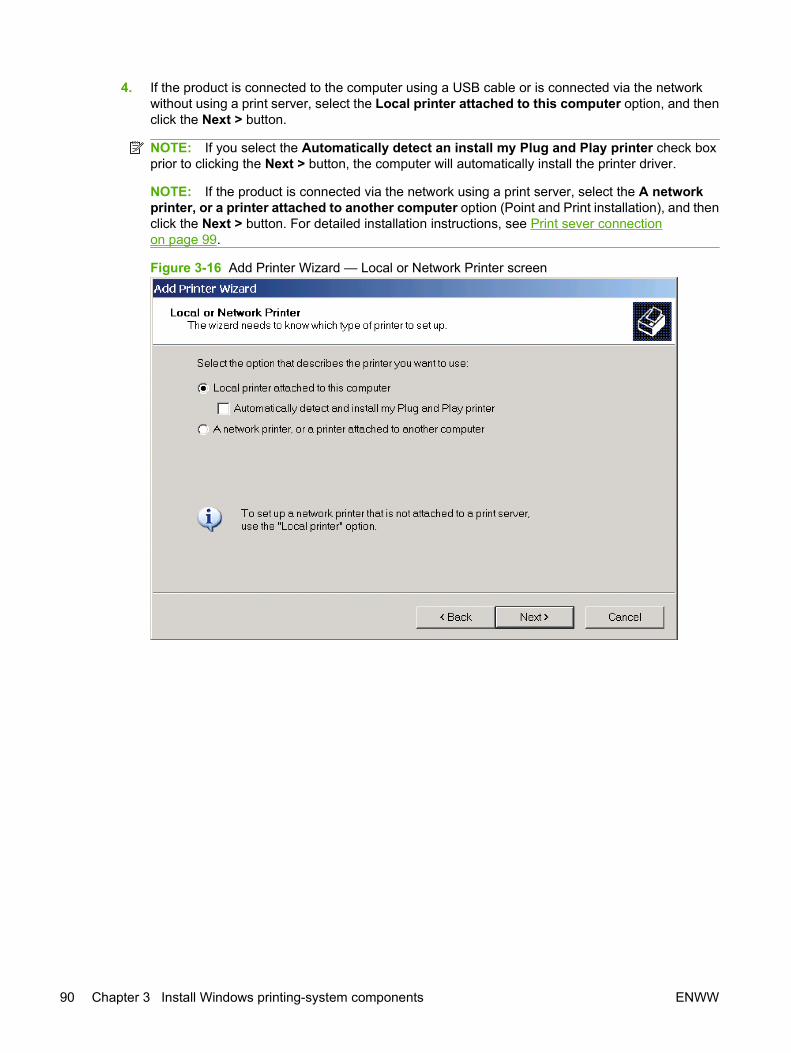
4. If the product is connected to the computer using a USB cable or is connected via the networkwithout using a print server, select the Local printer attached to this computer option, and thenclick the Next > button.
NOTE: If you select the Automatically detect an install my Plug and Play printer check boxprior to clicking the Next > button, the computer will automatically install the printer driver.
NOTE: If the product is connected via the network using a print server, select the A networkprinter, or a printer attached to another computer option (Point and Print installation), and thenclick the Next > button. For detailed installation instructions, see Print sever connectionon page 99.
Figure 3-16 Add Printer Wizard — Local or Network Printer screen
90 Chapter 3 Install Windows printing-system components ENWW
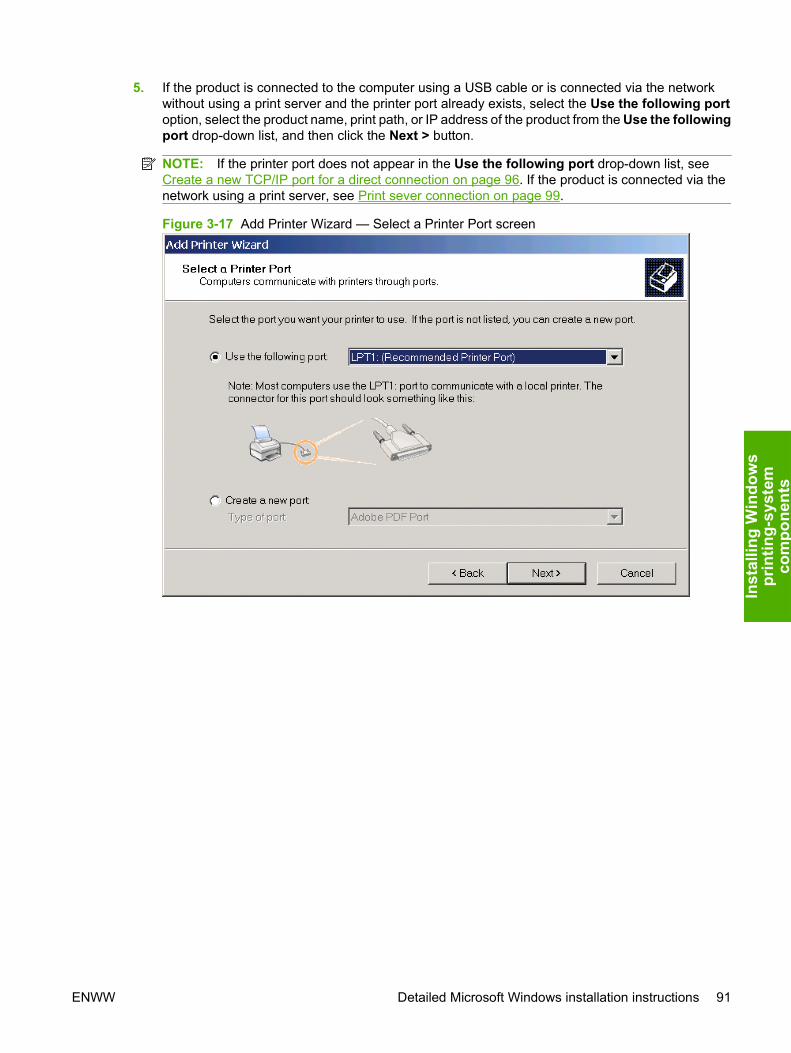
5. If the product is connected to the computer using a USB cable or is connected via the networkwithout using a print server and the printer port already exists, select the Use the following portoption, select the product name, print path, or IP address of the product from the Use the followingport drop-down list, and then click the Next > button.
NOTE: If the printer port does not appear in the Use the following port drop-down list, seeCreate a new TCP/IP port for a direct connection on page 96. If the product is connected via thenetwork using a print server, see Print sever connection on page 99.
Figure 3-17 Add Printer Wizard — Select a Printer Port screen
ENWW Detailed Microsoft Windows installation instructions 91
Inst
allin
g W
indo
ws
prin
ting-
syst
emco
mpo
nent
s
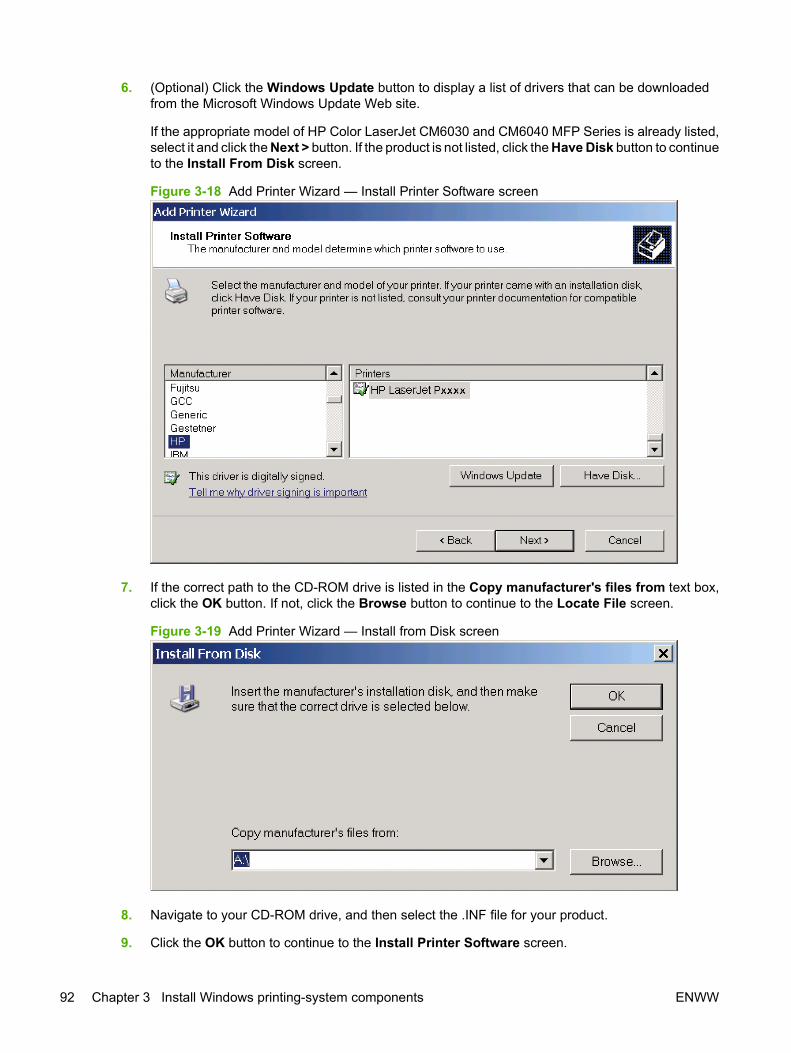
6. (Optional) Click the Windows Update button to display a list of drivers that can be downloadedfrom the Microsoft Windows Update Web site.
If the appropriate model of HP Color LaserJet CM6030 and CM6040 MFP Series is already listed,select it and click the Next > button. If the product is not listed, click the Have Disk button to continueto the Install From Disk screen.
Figure 3-18 Add Printer Wizard — Install Printer Software screen
7. If the correct path to the CD-ROM drive is listed in the Copy manufacturer's files from text box,click the OK button. If not, click the Browse button to continue to the Locate File screen.
Figure 3-19 Add Printer Wizard — Install from Disk screen
8. Navigate to your CD-ROM drive, and then select the .INF file for your product.
9. Click the OK button to continue to the Install Printer Software screen.
92 Chapter 3 Install Windows printing-system components ENWW
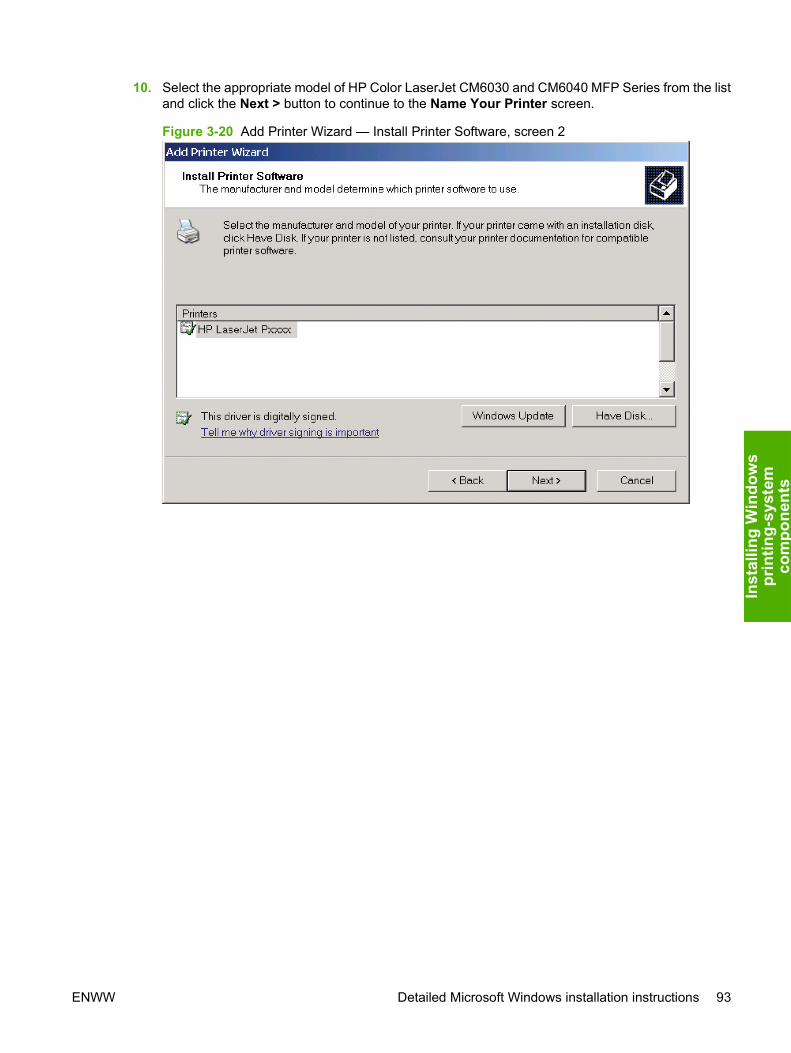
10. Select the appropriate model of HP Color LaserJet CM6030 and CM6040 MFP Series from the listand click the Next > button to continue to the Name Your Printer screen.
Figure 3-20 Add Printer Wizard — Install Printer Software, screen 2
ENWW Detailed Microsoft Windows installation instructions 93
Inst
allin
g W
indo
ws
prin
ting-
syst
emco
mpo
nent
s
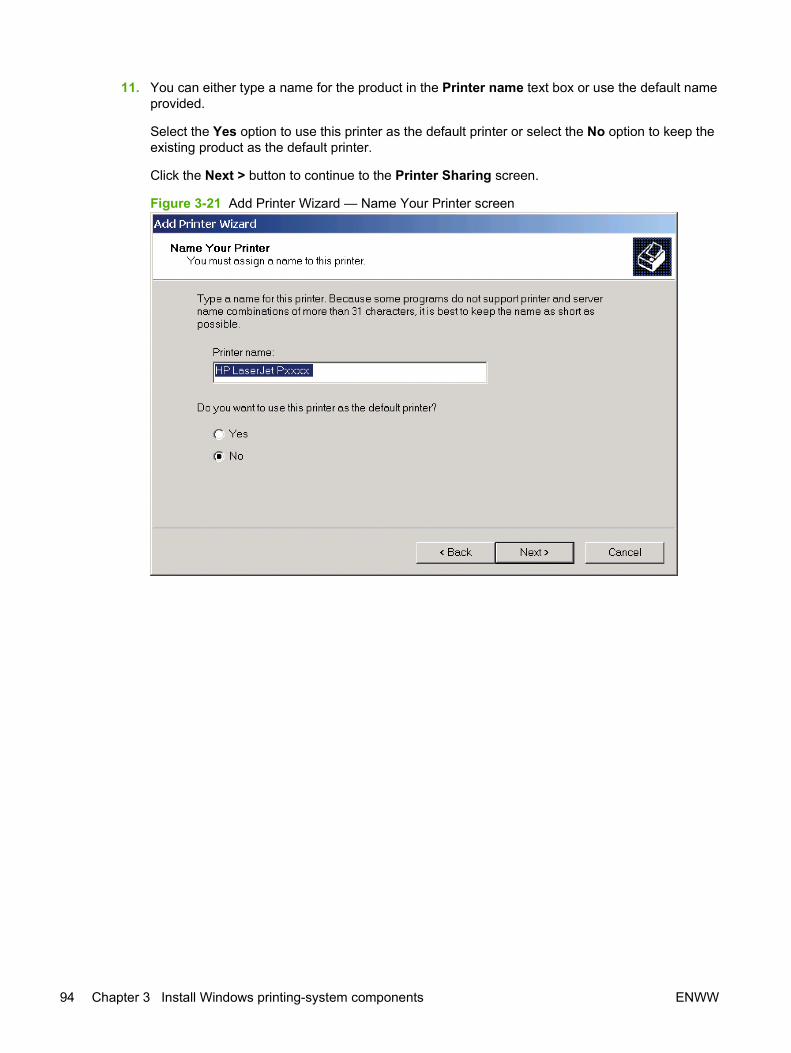
11. You can either type a name for the product in the Printer name text box or use the default nameprovided.
Select the Yes option to use this printer as the default printer or select the No option to keep theexisting product as the default printer.
Click the Next > button to continue to the Printer Sharing screen.
Figure 3-21 Add Printer Wizard — Name Your Printer screen
94 Chapter 3 Install Windows printing-system components ENWW
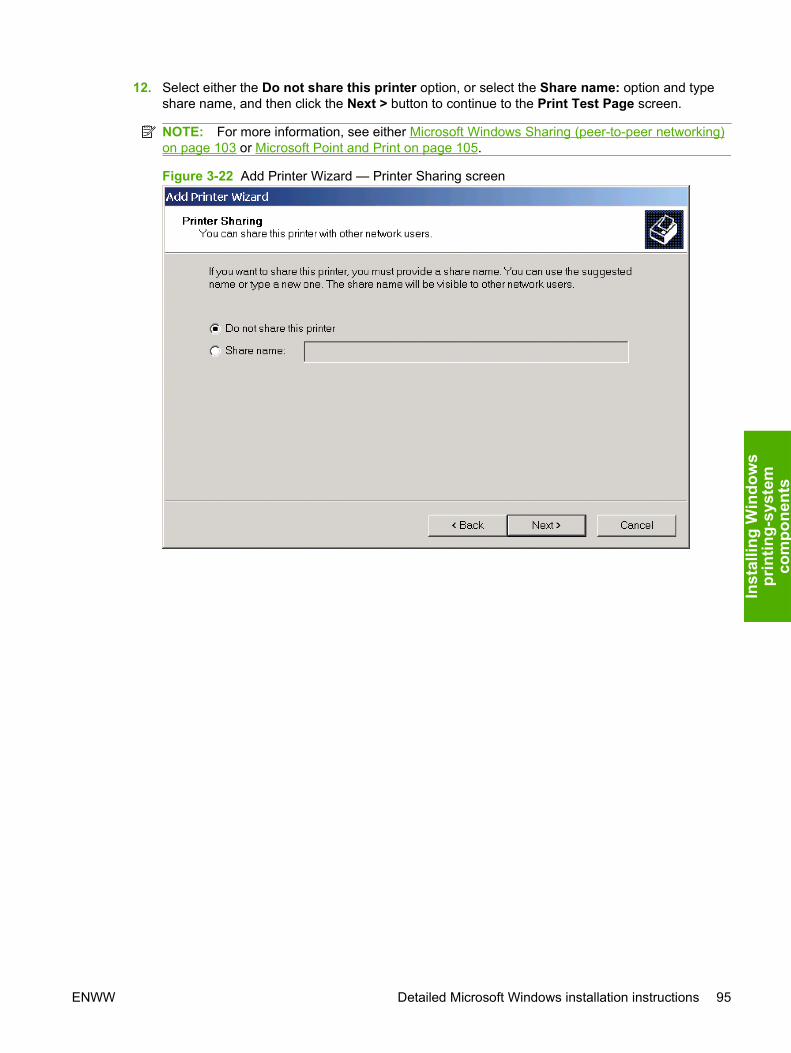
12. Select either the Do not share this printer option, or select the Share name: option and typeshare name, and then click the Next > button to continue to the Print Test Page screen.
NOTE: For more information, see either Microsoft Windows Sharing (peer-to-peer networking)on page 103 or Microsoft Point and Print on page 105.
Figure 3-22 Add Printer Wizard — Printer Sharing screen
ENWW Detailed Microsoft Windows installation instructions 95
Inst
allin
g W
indo
ws
prin
ting-
syst
emco
mpo
nent
s
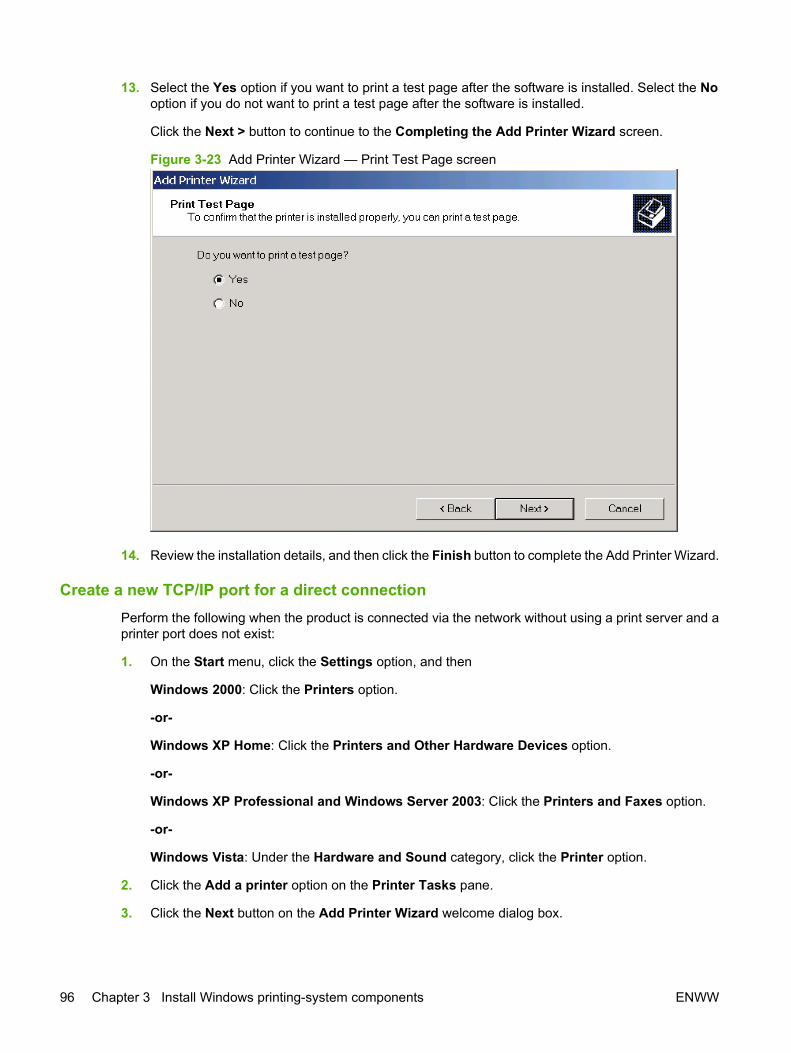
13. Select the Yes option if you want to print a test page after the software is installed. Select the Nooption if you do not want to print a test page after the software is installed.
Click the Next > button to continue to the Completing the Add Printer Wizard screen.
Figure 3-23 Add Printer Wizard — Print Test Page screen
14. Review the installation details, and then click the Finish button to complete the Add Printer Wizard.
Create a new TCP/IP port for a direct connectionPerform the following when the product is connected via the network without using a print server and aprinter port does not exist:
1. On the Start menu, click the Settings option, and then
Windows 2000: Click the Printers option.
-or-
Windows XP Home: Click the Printers and Other Hardware Devices option.
-or-
Windows XP Professional and Windows Server 2003: Click the Printers and Faxes option.
-or-
Windows Vista: Under the Hardware and Sound category, click the Printer option.
2. Click the Add a printer option on the Printer Tasks pane.
3. Click the Next button on the Add Printer Wizard welcome dialog box.
96 Chapter 3 Install Windows printing-system components ENWW
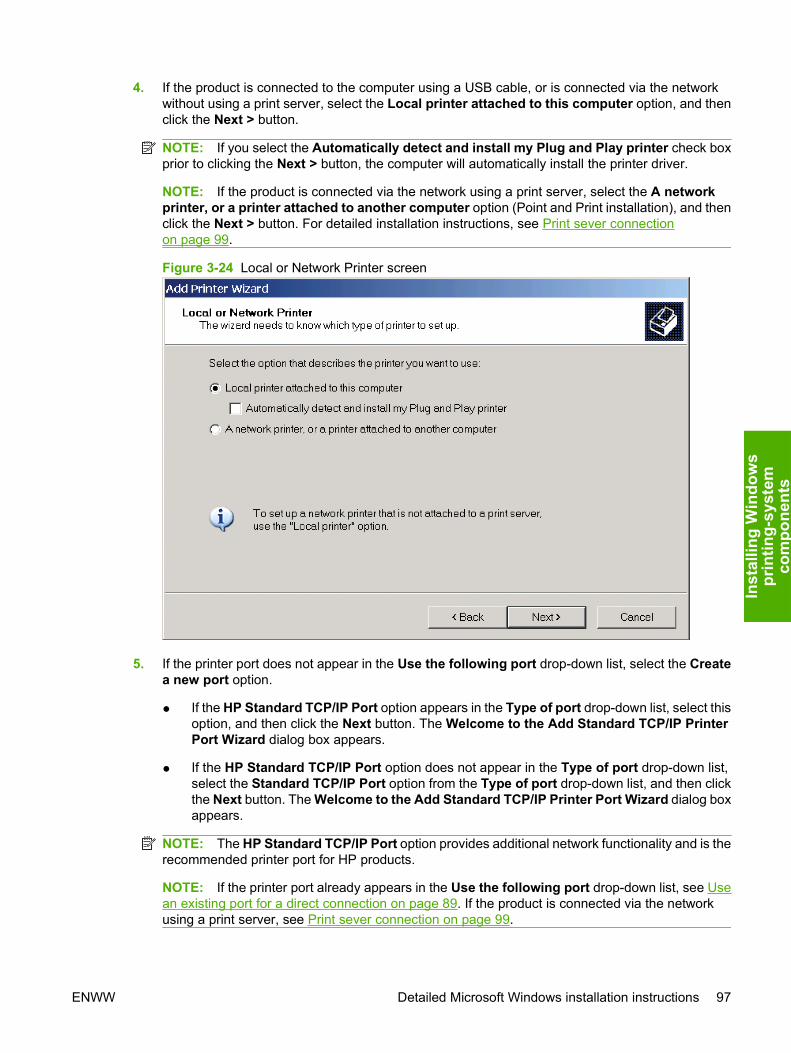
4. If the product is connected to the computer using a USB cable, or is connected via the networkwithout using a print server, select the Local printer attached to this computer option, and thenclick the Next > button.
NOTE: If you select the Automatically detect and install my Plug and Play printer check boxprior to clicking the Next > button, the computer will automatically install the printer driver.
NOTE: If the product is connected via the network using a print server, select the A networkprinter, or a printer attached to another computer option (Point and Print installation), and thenclick the Next > button. For detailed installation instructions, see Print sever connectionon page 99.
Figure 3-24 Local or Network Printer screen
5. If the printer port does not appear in the Use the following port drop-down list, select the Createa new port option.
● If the HP Standard TCP/IP Port option appears in the Type of port drop-down list, select thisoption, and then click the Next button. The Welcome to the Add Standard TCP/IP PrinterPort Wizard dialog box appears.
● If the HP Standard TCP/IP Port option does not appear in the Type of port drop-down list,select the Standard TCP/IP Port option from the Type of port drop-down list, and then clickthe Next button. The Welcome to the Add Standard TCP/IP Printer Port Wizard dialog boxappears.
NOTE: The HP Standard TCP/IP Port option provides additional network functionality and is therecommended printer port for HP products.
NOTE: If the printer port already appears in the Use the following port drop-down list, see Usean existing port for a direct connection on page 89. If the product is connected via the networkusing a print server, see Print sever connection on page 99.
ENWW Detailed Microsoft Windows installation instructions 97
Inst
allin
g W
indo
ws
prin
ting-
syst
emco
mpo
nent
s
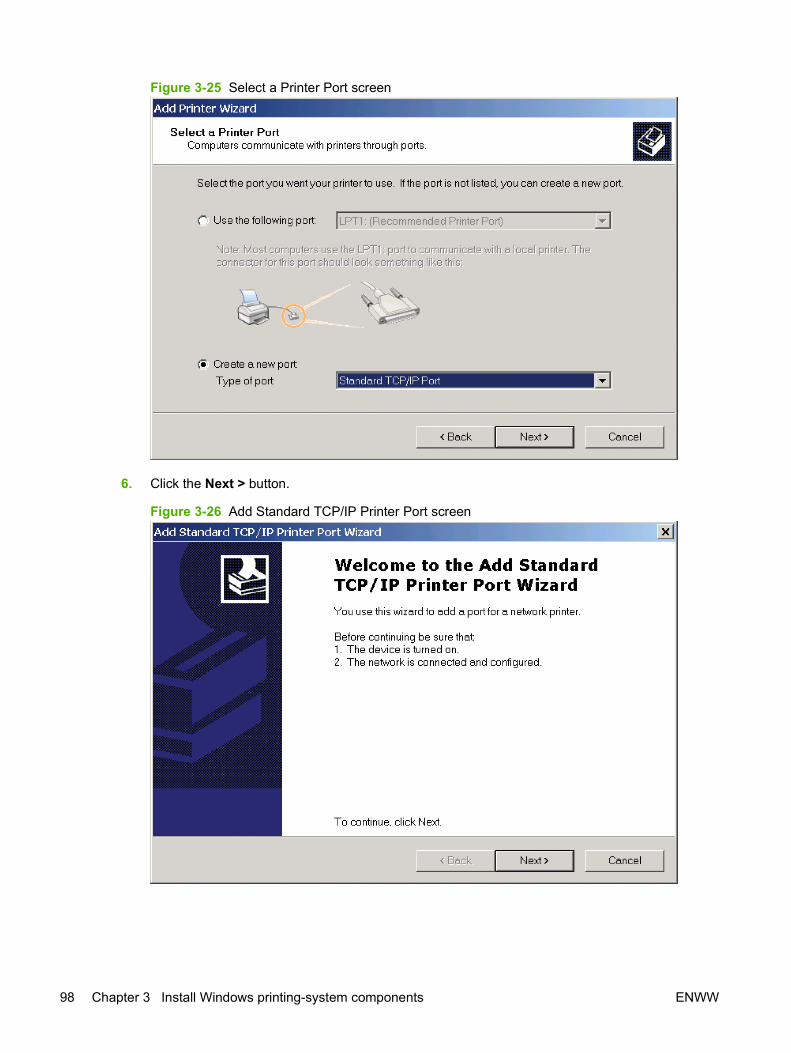
Figure 3-25 Select a Printer Port screen
6. Click the Next > button.
Figure 3-26 Add Standard TCP/IP Printer Port screen
98 Chapter 3 Install Windows printing-system components ENWW
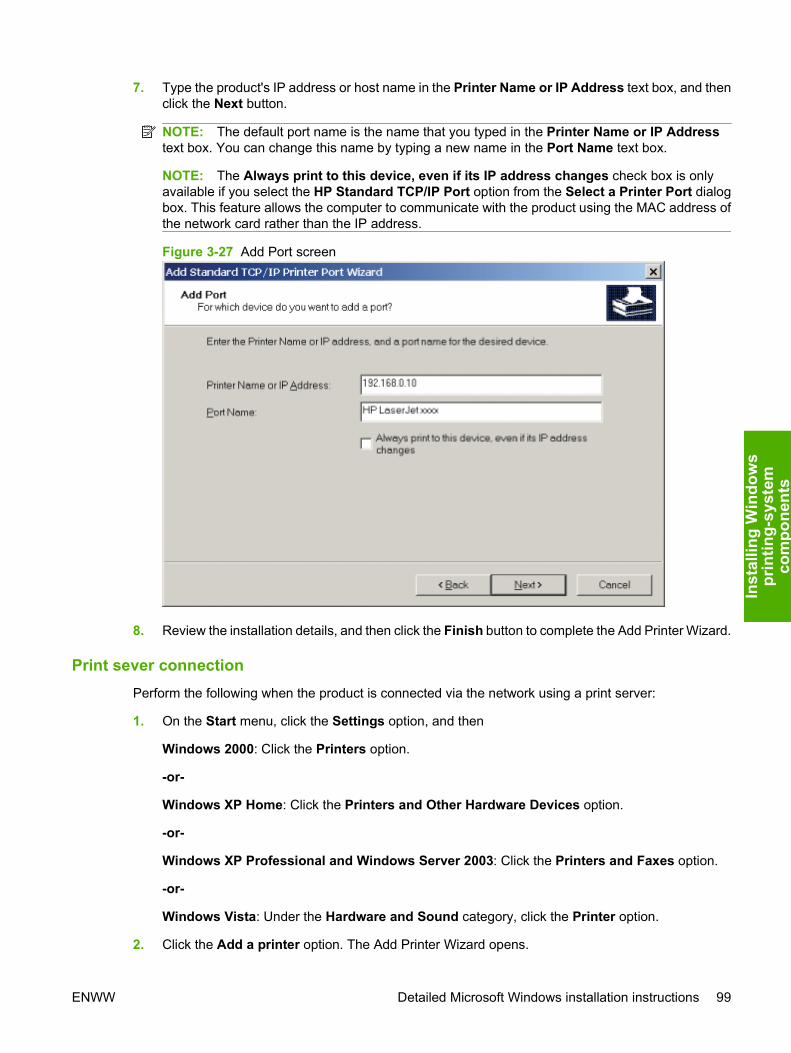
7. Type the product's IP address or host name in the Printer Name or IP Address text box, and thenclick the Next button.
NOTE: The default port name is the name that you typed in the Printer Name or IP Addresstext box. You can change this name by typing a new name in the Port Name text box.
NOTE: The Always print to this device, even if its IP address changes check box is onlyavailable if you select the HP Standard TCP/IP Port option from the Select a Printer Port dialogbox. This feature allows the computer to communicate with the product using the MAC address ofthe network card rather than the IP address.
Figure 3-27 Add Port screen
8. Review the installation details, and then click the Finish button to complete the Add Printer Wizard.
Print sever connectionPerform the following when the product is connected via the network using a print server:
1. On the Start menu, click the Settings option, and then
Windows 2000: Click the Printers option.
-or-
Windows XP Home: Click the Printers and Other Hardware Devices option.
-or-
Windows XP Professional and Windows Server 2003: Click the Printers and Faxes option.
-or-
Windows Vista: Under the Hardware and Sound category, click the Printer option.
2. Click the Add a printer option. The Add Printer Wizard opens.
ENWW Detailed Microsoft Windows installation instructions 99
Inst
allin
g W
indo
ws
prin
ting-
syst
emco
mpo
nent
s
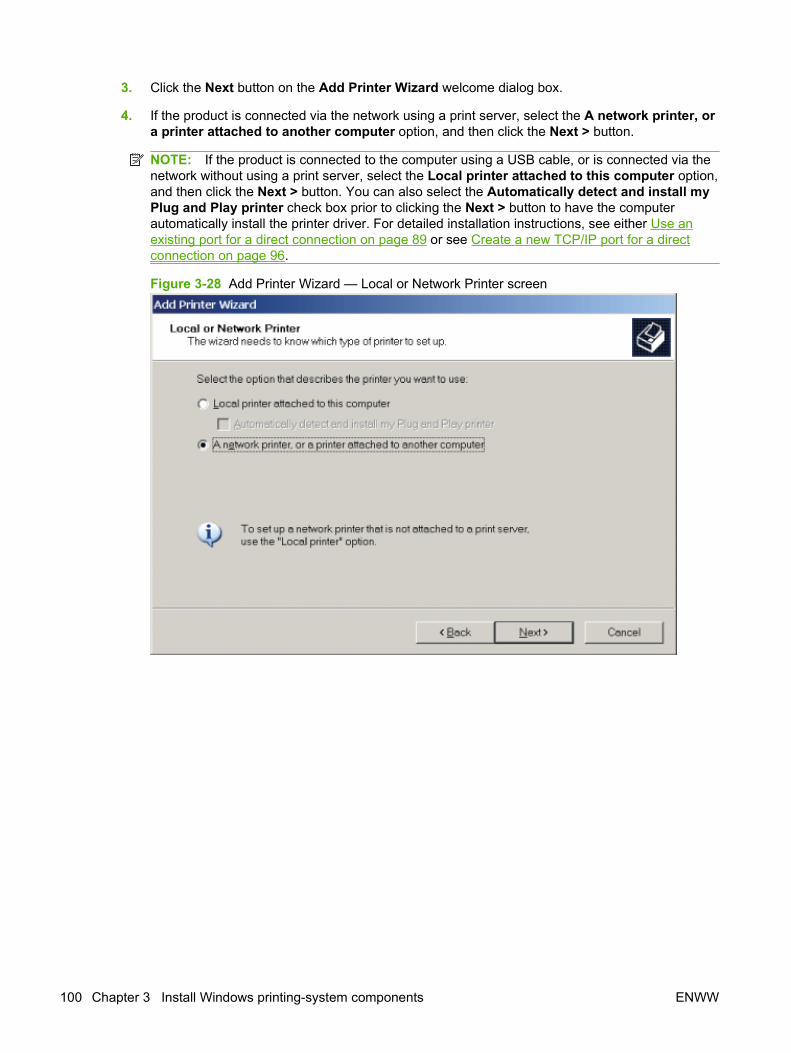
3. Click the Next button on the Add Printer Wizard welcome dialog box.
4. If the product is connected via the network using a print server, select the A network printer, ora printer attached to another computer option, and then click the Next > button.
NOTE: If the product is connected to the computer using a USB cable, or is connected via thenetwork without using a print server, select the Local printer attached to this computer option,and then click the Next > button. You can also select the Automatically detect and install myPlug and Play printer check box prior to clicking the Next > button to have the computerautomatically install the printer driver. For detailed installation instructions, see either Use anexisting port for a direct connection on page 89 or see Create a new TCP/IP port for a directconnection on page 96.
Figure 3-28 Add Printer Wizard — Local or Network Printer screen
100 Chapter 3 Install Windows printing-system components ENWW
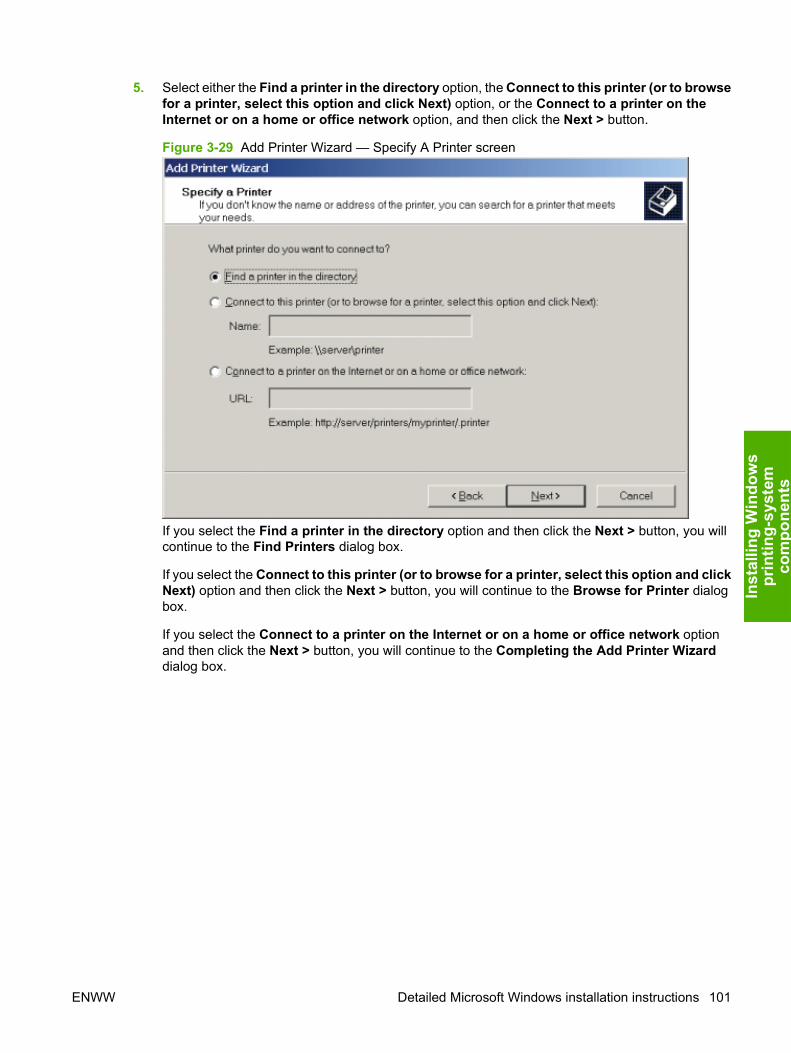
5. Select either the Find a printer in the directory option, the Connect to this printer (or to browsefor a printer, select this option and click Next) option, or the Connect to a printer on theInternet or on a home or office network option, and then click the Next > button.
Figure 3-29 Add Printer Wizard — Specify A Printer screen
If you select the Find a printer in the directory option and then click the Next > button, you willcontinue to the Find Printers dialog box.
If you select the Connect to this printer (or to browse for a printer, select this option and clickNext) option and then click the Next > button, you will continue to the Browse for Printer dialogbox.
If you select the Connect to a printer on the Internet or on a home or office network optionand then click the Next > button, you will continue to the Completing the Add Printer Wizarddialog box.
ENWW Detailed Microsoft Windows installation instructions 101
Inst
allin
g W
indo
ws
prin
ting-
syst
emco
mpo
nent
s
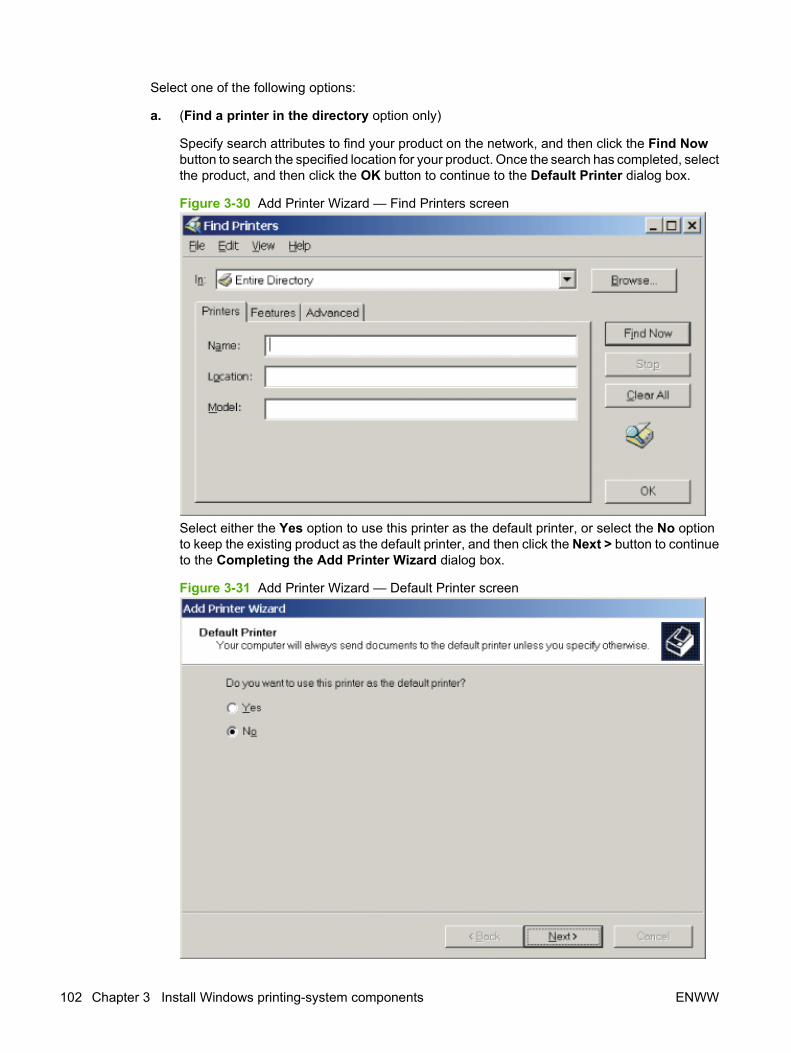
Select one of the following options:
a. (Find a printer in the directory option only)
Specify search attributes to find your product on the network, and then click the Find Nowbutton to search the specified location for your product. Once the search has completed, selectthe product, and then click the OK button to continue to the Default Printer dialog box.
Figure 3-30 Add Printer Wizard — Find Printers screen
Select either the Yes option to use this printer as the default printer, or select the No optionto keep the existing product as the default printer, and then click the Next > button to continueto the Completing the Add Printer Wizard dialog box.
Figure 3-31 Add Printer Wizard — Default Printer screen
102 Chapter 3 Install Windows printing-system components ENWW
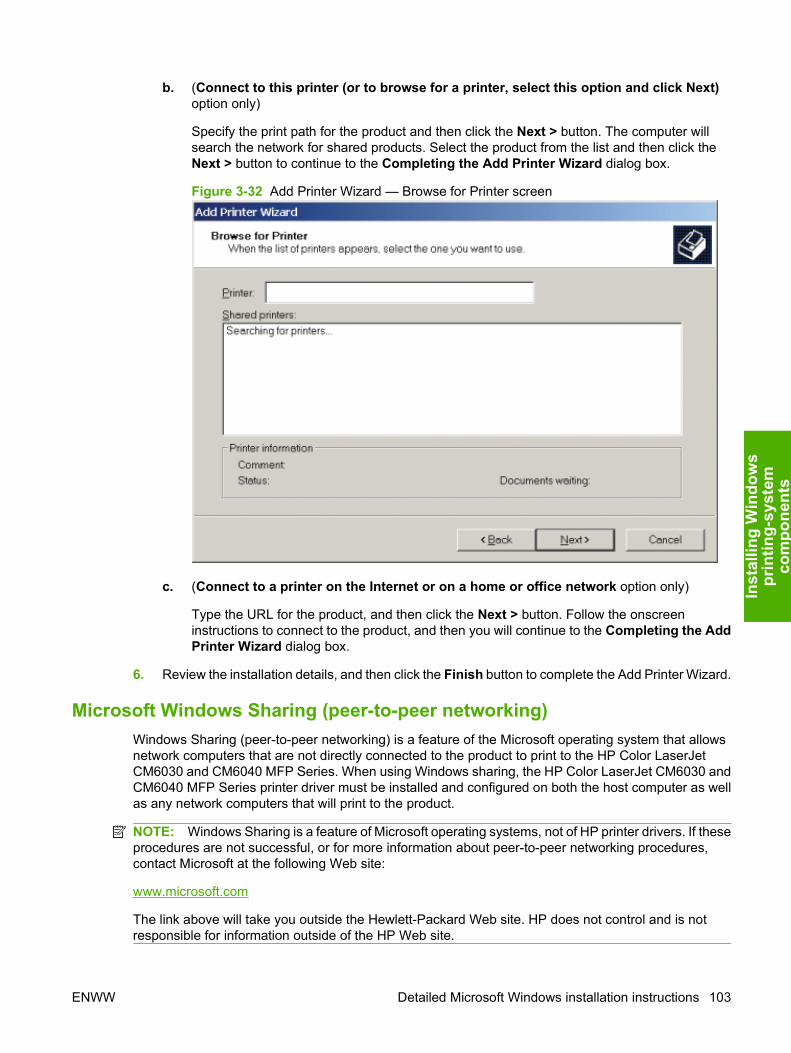
b. (Connect to this printer (or to browse for a printer, select this option and click Next)option only)
Specify the print path for the product and then click the Next > button. The computer willsearch the network for shared products. Select the product from the list and then click theNext > button to continue to the Completing the Add Printer Wizard dialog box.
Figure 3-32 Add Printer Wizard — Browse for Printer screen
c. (Connect to a printer on the Internet or on a home or office network option only)
Type the URL for the product, and then click the Next > button. Follow the onscreeninstructions to connect to the product, and then you will continue to the Completing the AddPrinter Wizard dialog box.
6. Review the installation details, and then click the Finish button to complete the Add Printer Wizard.
Microsoft Windows Sharing (peer-to-peer networking)Windows Sharing (peer-to-peer networking) is a feature of the Microsoft operating system that allowsnetwork computers that are not directly connected to the product to print to the HP Color LaserJetCM6030 and CM6040 MFP Series. When using Windows sharing, the HP Color LaserJet CM6030 andCM6040 MFP Series printer driver must be installed and configured on both the host computer as wellas any network computers that will print to the product.
NOTE: Windows Sharing is a feature of Microsoft operating systems, not of HP printer drivers. If theseprocedures are not successful, or for more information about peer-to-peer networking procedures,contact Microsoft at the following Web site:
www.microsoft.com
The link above will take you outside the Hewlett-Packard Web site. HP does not control and is notresponsible for information outside of the HP Web site.
ENWW Detailed Microsoft Windows installation instructions 103
Inst
allin
g W
indo
ws
prin
ting-
syst
emco
mpo
nent
s

Setting up the host computer running Windows 20001. Click the Start button, click the Settings option, and then click Printers option.
2. In the printer list, right-click the icon for the product you want to share, and then click theSharing option.
3. On the Sharing tab, click the Share As option, and then type a name for the product in the ShareName text box. Click the OK button.
Setting up the host computer running Windows XP1. On the Start menu, click one of the following options:
Printers and Faxes (Windows XP Professional)
-or-
Printers and Other Hardware Devices (Windows XP Home)
2. In the printer list, right-click the icon for the product you want to share, and then click theSharing option.
3. On the Sharing tab, click the Share this printer option, and then type a name for the product inthe Share Name text box. Click the OK button.
4. Click the Ports tab. Clear the Enable bidirectional support check box, and then click the OKbutton.
Setting up client computers running Windows 20001. Click the Start menu, click the Settings option, and then click the Printers option.
2. Double-click the Add Printer icon to open the Add Printer Wizard.
3. Click the Next button to start the wizard.
4. Click the Network Printer option, and then click the Next button.
5. Type in the path and share name of the product to which you want to connect.
-or-
Click the Browse button and navigate to find the product to which you want to connect.
Click the Next button.
6. Select either the Yes or No option when asked if you want to use this product as your default printerfor Windows-based programs, and then click the Next button.
7. Click the Finish button to complete the installation and close the Add Printer Wizard.
NOTE: You might need to use the product software CD to complete the printer driver installations.
104 Chapter 3 Install Windows printing-system components ENWW
Setting up client computers running Windows XP1. On the Start menu, click one of the following options:
Printers and Faxes (Windows XP Professional)
-or-
Printers and Other Hardware Devices (Windows XP Home)
2. On the left-hand column, under Printer Tasks, click the Add a printer option to open the AddPrinter Wizard.
3. Click the Next button to start the wizard.
4. Click the A network printer or a printer attached to another computer option, and then clickthe Next button.
5. Type in the path and share name of the product to which you want to connect.
-or-
Click the Browse button and navigate to find the product to which you want to connect.
Click the Next button.
6. Click either the Yes or No option when asked if you want to use this product as your default printerfor Windows-based programs, and then click the Next button.
7. Click the Finish button to complete the installation and close the Add Printer Wizard.
Microsoft Point and PrintMicrosoft Point and Print is a two-step driver installation process that allows network computers to printvia a print server rather than printing directly to a product. Point and Print is similar to Window Sharingexcept that the printer driver is installed on a network print server rather than a client directly connectedto the product. The first step is to install a shared driver on a network print server. The second step isto "point" to the print server from a network client so that the client can use the printer driver.
NOTE: Point and Print is a feature of Microsoft operating systems, not of HP printer drivers. If theseprocedures are not successful, or for more information about Point and Print networking procedures,contact Microsoft at the following Web site:
www.microsoft.com
The link above will take you outside the Hewlett-Packard Web site. HP does not control and is notresponsible for information outside of the HP Web site.
ENWW Detailed Microsoft Windows installation instructions 105
Inst
allin
g W
indo
ws
prin
ting-
syst
emco
mpo
nent
s
Use the MFP Send Fax DriverYou can use the HP Send Fax Driver to send faxes from your computer via the HP Color LaserJetCM6030 and CM6040 MFP Series if the optional Analog Fax Accessory 300, which is standard on theHP Color LaserJet CM6030 and CM6040 MFP Series printers, is installed. After the HP Send Fax Driveris installed, it can be accessed and used in the same manner as a printer driver.
NOTE: For complete information about using the HP Send Fax Driver, see the HP LaserJet MFPAnalog Fax Accessory 300 Send Fax Driver Guide, which can be downloaded from www.hp.com/go/mfpfaxaccessory300, and then clicking the Manuals option from the left navigation bar. It is alsoavailable on the User CD.
Download the HP Send FaxThe HP Send Fax Driver is on the Admin CD under Install. The Admin CD is the primary install methodfor the HP Send Fax Driver; alternatively, you can also download the HP Send Fax Driver by using thefollowing procedure:
1. Go to www.hp.com/go/mfpfaxaccessory300, and then click the Download drivers and softwareoption from the left navigation bar.
2. In the Select operating system pane, click the appropriate operating system.
3. In the Driver table that appears, click Download >> next to the MFP Send Fax driver.
4. In the File Download dialog box that opens, click the Save button.
5. In the File Name text box on the Save As window that opens, type the location on your computerwhere you want to save the HP Easy Printer Care file.
6. Click the Save button.
7. After the file has been downloaded, close the File Download dialog box if necessary.
106 Chapter 3 Install Windows printing-system components ENWW
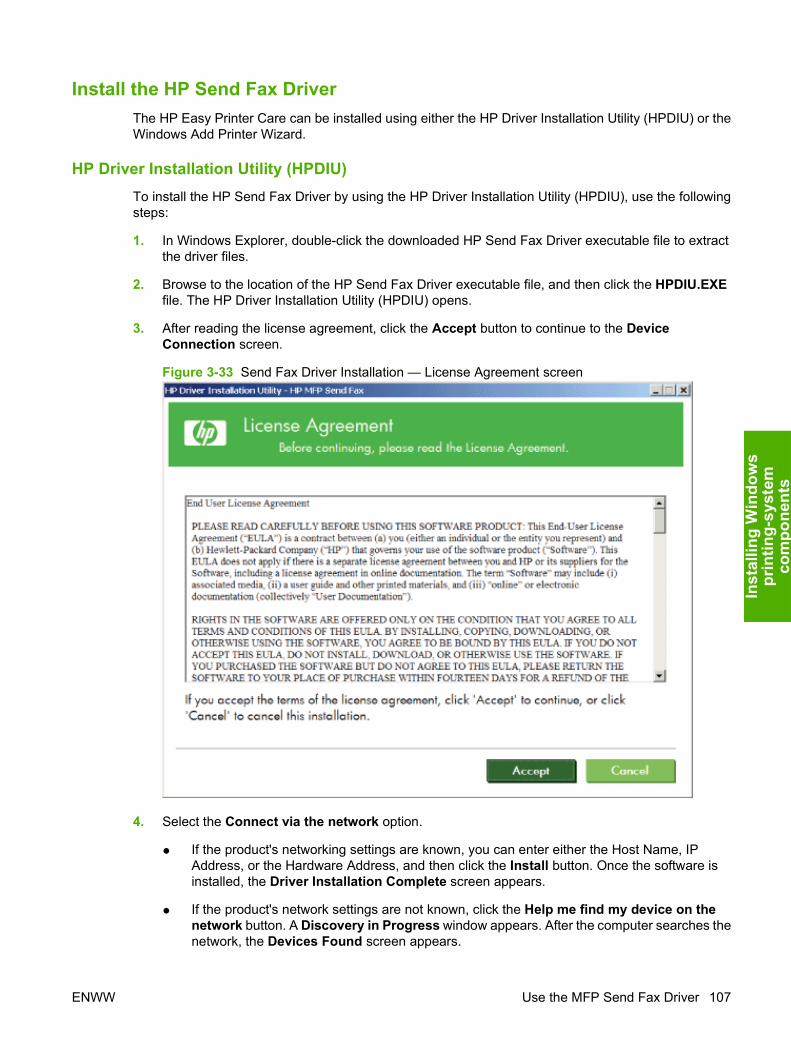
Install the HP Send Fax DriverThe HP Easy Printer Care can be installed using either the HP Driver Installation Utility (HPDIU) or theWindows Add Printer Wizard.
HP Driver Installation Utility (HPDIU)To install the HP Send Fax Driver by using the HP Driver Installation Utility (HPDIU), use the followingsteps:
1. In Windows Explorer, double-click the downloaded HP Send Fax Driver executable file to extractthe driver files.
2. Browse to the location of the HP Send Fax Driver executable file, and then click the HPDIU.EXEfile. The HP Driver Installation Utility (HPDIU) opens.
3. After reading the license agreement, click the Accept button to continue to the DeviceConnection screen.
Figure 3-33 Send Fax Driver Installation — License Agreement screen
4. Select the Connect via the network option.
● If the product's networking settings are known, you can enter either the Host Name, IPAddress, or the Hardware Address, and then click the Install button. Once the software isinstalled, the Driver Installation Complete screen appears.
● If the product's network settings are not known, click the Help me find my device on thenetwork button. A Discovery in Progress window appears. After the computer searches thenetwork, the Devices Found screen appears.
ENWW Use the MFP Send Fax Driver 107
Inst
allin
g W
indo
ws
prin
ting-
syst
emco
mpo
nent
s
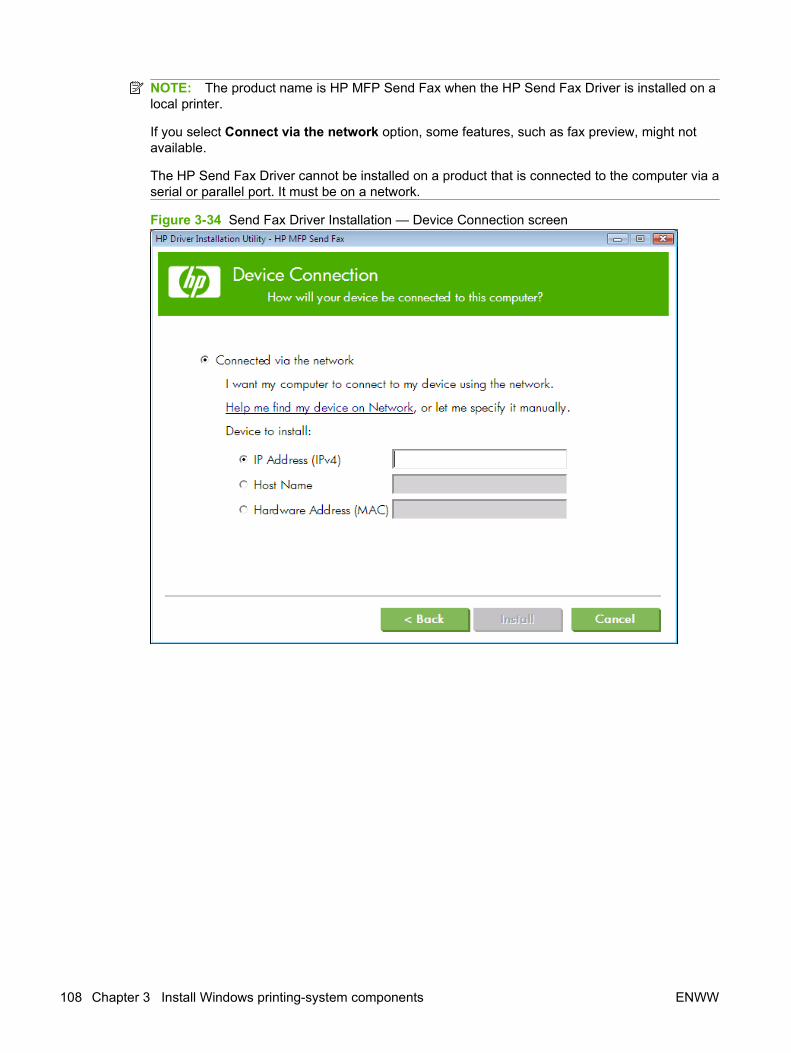
NOTE: The product name is HP MFP Send Fax when the HP Send Fax Driver is installed on alocal printer.
If you select Connect via the network option, some features, such as fax preview, might notavailable.
The HP Send Fax Driver cannot be installed on a product that is connected to the computer via aserial or parallel port. It must be on a network.
Figure 3-34 Send Fax Driver Installation — Device Connection screen
108 Chapter 3 Install Windows printing-system components ENWW
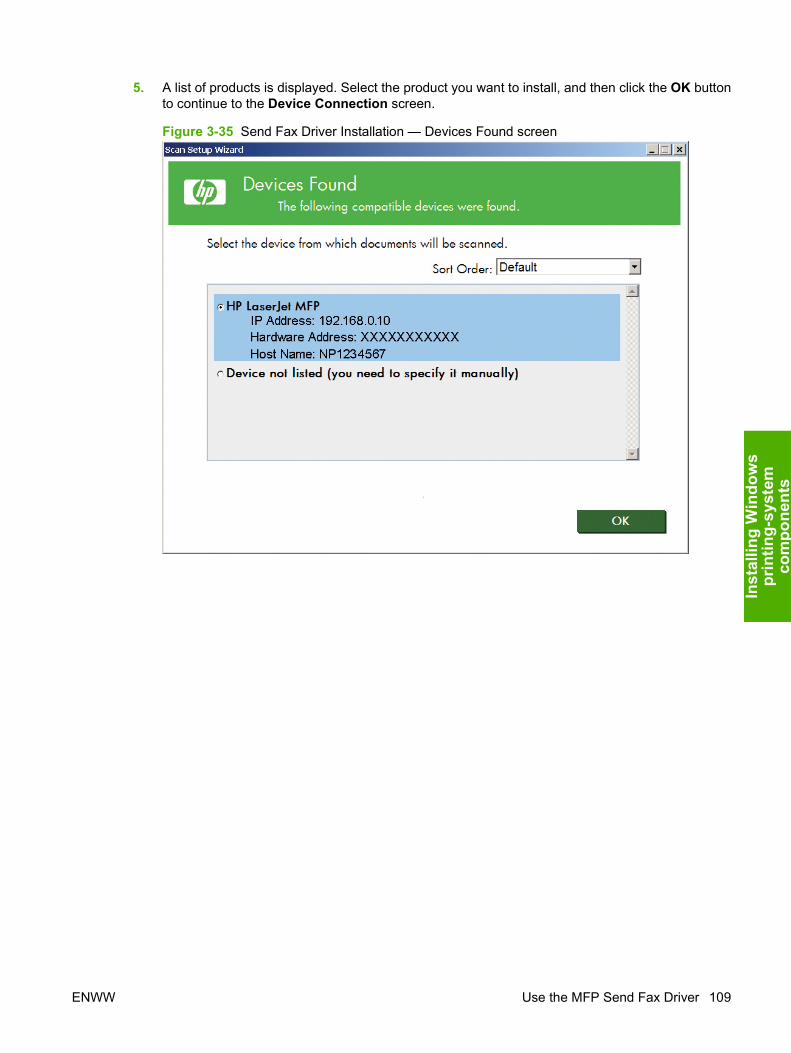
5. A list of products is displayed. Select the product you want to install, and then click the OK buttonto continue to the Device Connection screen.
Figure 3-35 Send Fax Driver Installation — Devices Found screen
ENWW Use the MFP Send Fax Driver 109
Inst
allin
g W
indo
ws
prin
ting-
syst
emco
mpo
nent
s
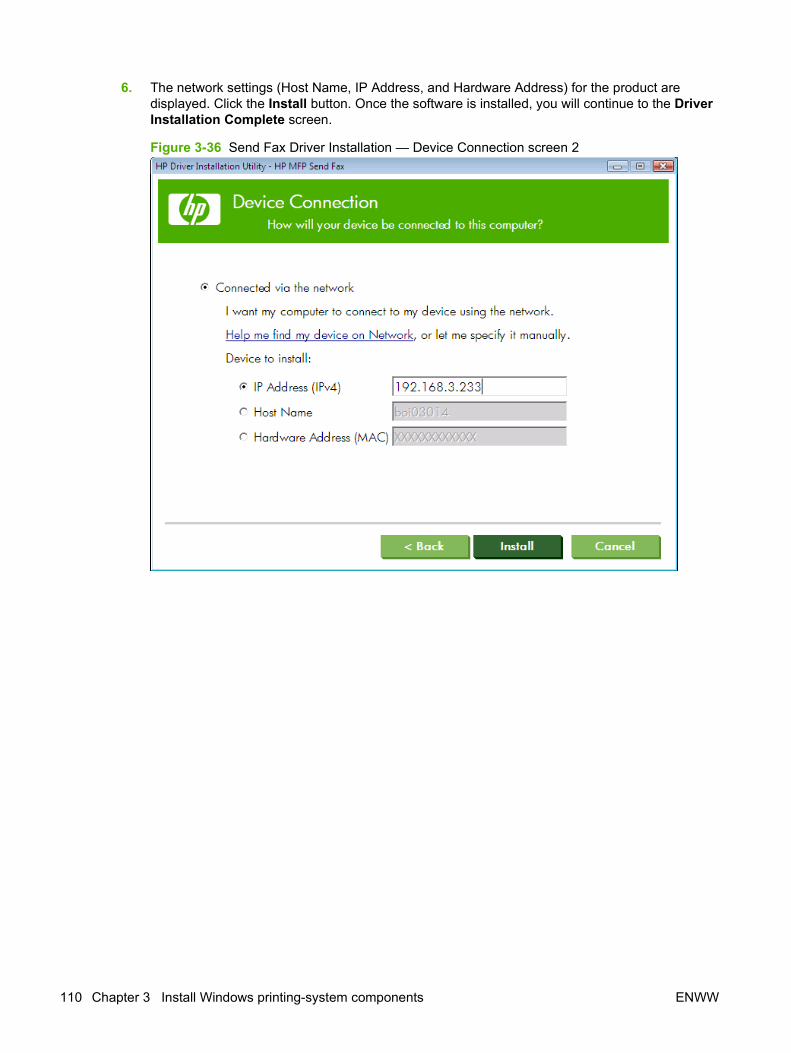
6. The network settings (Host Name, IP Address, and Hardware Address) for the product aredisplayed. Click the Install button. Once the software is installed, you will continue to the DriverInstallation Complete screen.
Figure 3-36 Send Fax Driver Installation — Device Connection screen 2
110 Chapter 3 Install Windows printing-system components ENWW
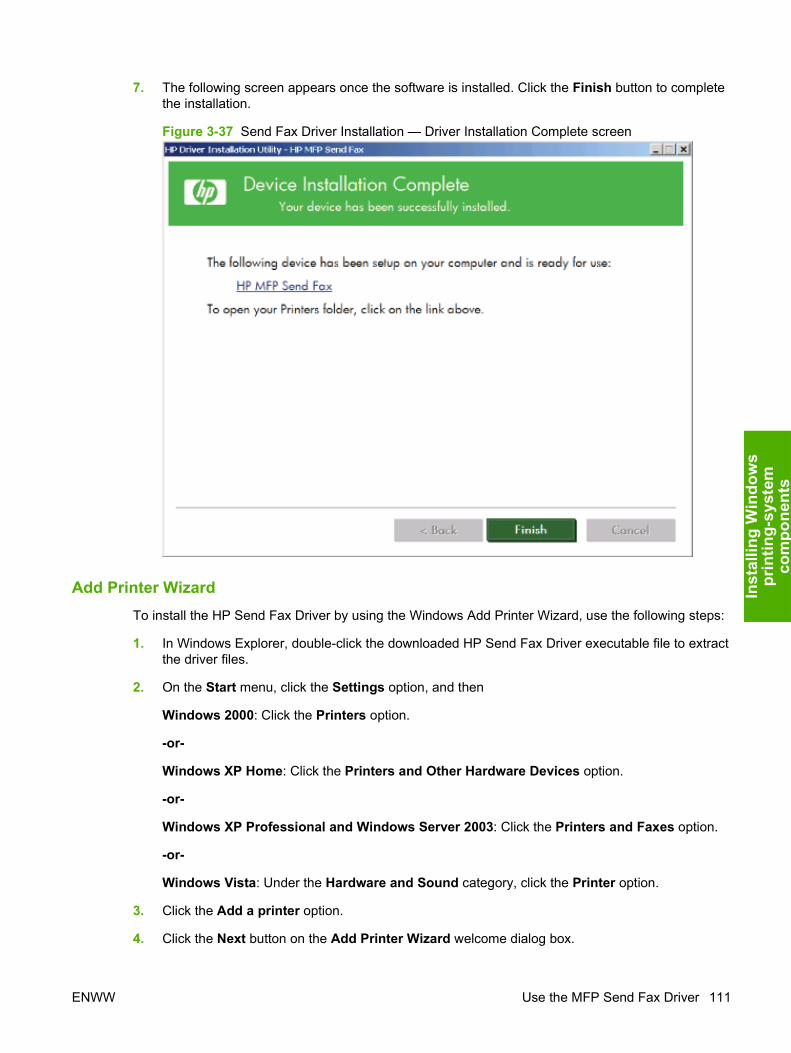
7. The following screen appears once the software is installed. Click the Finish button to completethe installation.
Figure 3-37 Send Fax Driver Installation — Driver Installation Complete screen
Add Printer WizardTo install the HP Send Fax Driver by using the Windows Add Printer Wizard, use the following steps:
1. In Windows Explorer, double-click the downloaded HP Send Fax Driver executable file to extractthe driver files.
2. On the Start menu, click the Settings option, and then
Windows 2000: Click the Printers option.
-or-
Windows XP Home: Click the Printers and Other Hardware Devices option.
-or-
Windows XP Professional and Windows Server 2003: Click the Printers and Faxes option.
-or-
Windows Vista: Under the Hardware and Sound category, click the Printer option.
3. Click the Add a printer option.
4. Click the Next button on the Add Printer Wizard welcome dialog box.
ENWW Use the MFP Send Fax Driver 111
Inst
allin
g W
indo
ws
prin
ting-
syst
emco
mpo
nent
s
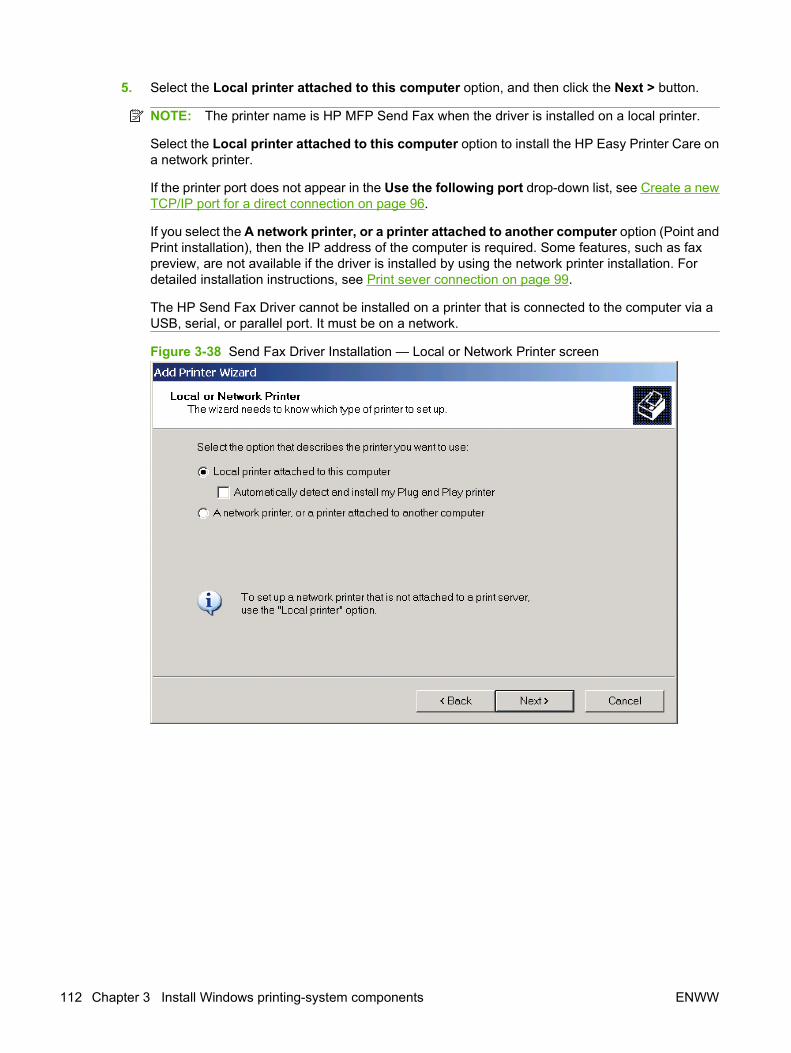
5. Select the Local printer attached to this computer option, and then click the Next > button.
NOTE: The printer name is HP MFP Send Fax when the driver is installed on a local printer.
Select the Local printer attached to this computer option to install the HP Easy Printer Care ona network printer.
If the printer port does not appear in the Use the following port drop-down list, see Create a newTCP/IP port for a direct connection on page 96.
If you select the A network printer, or a printer attached to another computer option (Point andPrint installation), then the IP address of the computer is required. Some features, such as faxpreview, are not available if the driver is installed by using the network printer installation. Fordetailed installation instructions, see Print sever connection on page 99.
The HP Send Fax Driver cannot be installed on a printer that is connected to the computer via aUSB, serial, or parallel port. It must be on a network.
Figure 3-38 Send Fax Driver Installation — Local or Network Printer screen
112 Chapter 3 Install Windows printing-system components ENWW
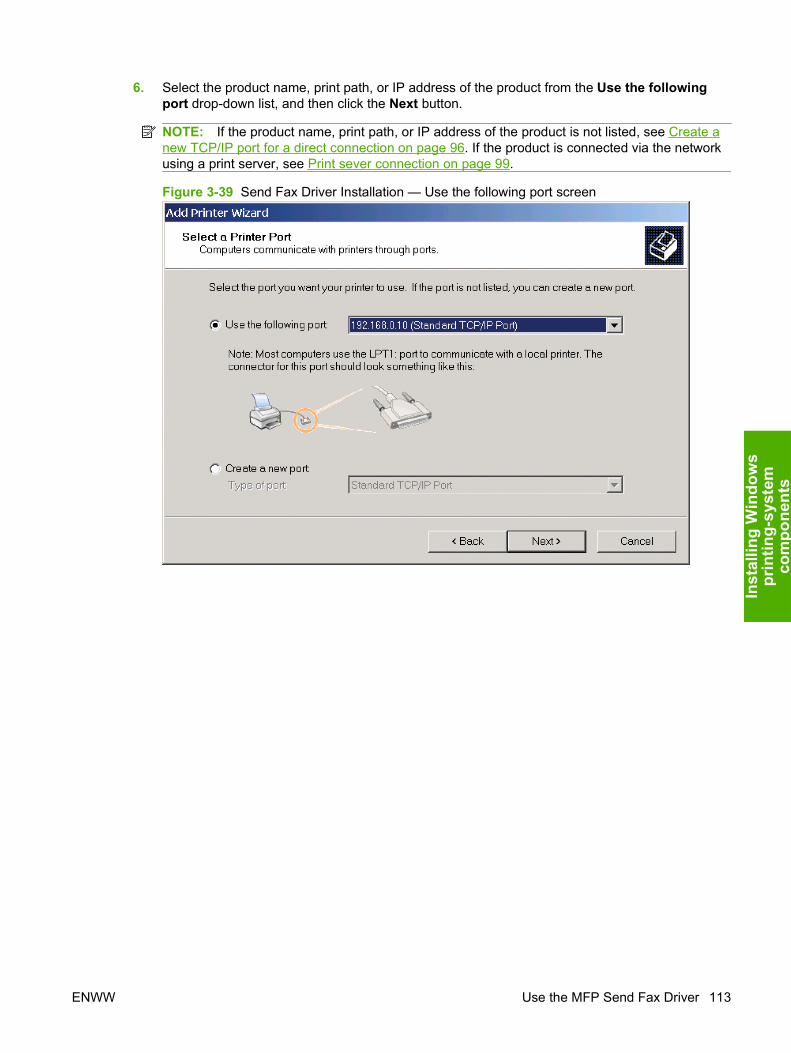
6. Select the product name, print path, or IP address of the product from the Use the followingport drop-down list, and then click the Next button.
NOTE: If the product name, print path, or IP address of the product is not listed, see Create anew TCP/IP port for a direct connection on page 96. If the product is connected via the networkusing a print server, see Print sever connection on page 99.
Figure 3-39 Send Fax Driver Installation — Use the following port screen
ENWW Use the MFP Send Fax Driver 113
Inst
allin
g W
indo
ws
prin
ting-
syst
emco
mpo
nent
s
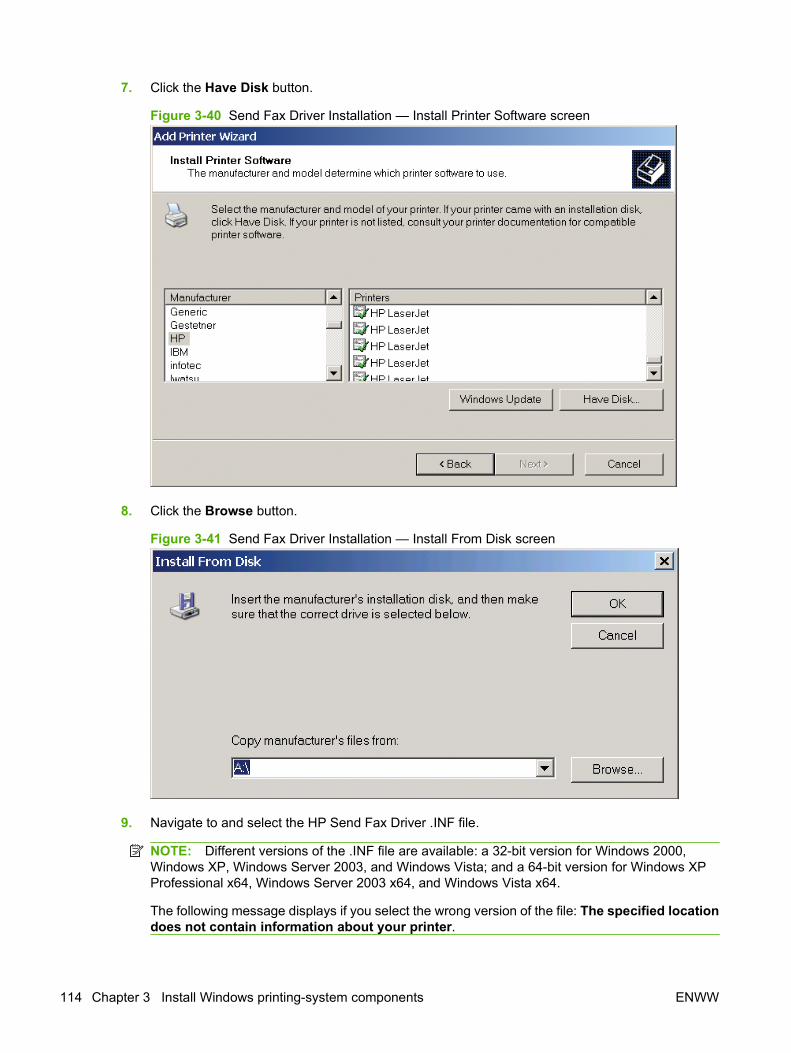
7. Click the Have Disk button.
Figure 3-40 Send Fax Driver Installation — Install Printer Software screen
8. Click the Browse button.
Figure 3-41 Send Fax Driver Installation — Install From Disk screen
9. Navigate to and select the HP Send Fax Driver .INF file.
NOTE: Different versions of the .INF file are available: a 32-bit version for Windows 2000,Windows XP, Windows Server 2003, and Windows Vista; and a 64-bit version for Windows XPProfessional x64, Windows Server 2003 x64, and Windows Vista x64.
The following message displays if you select the wrong version of the file: The specified locationdoes not contain information about your printer.
114 Chapter 3 Install Windows printing-system components ENWW
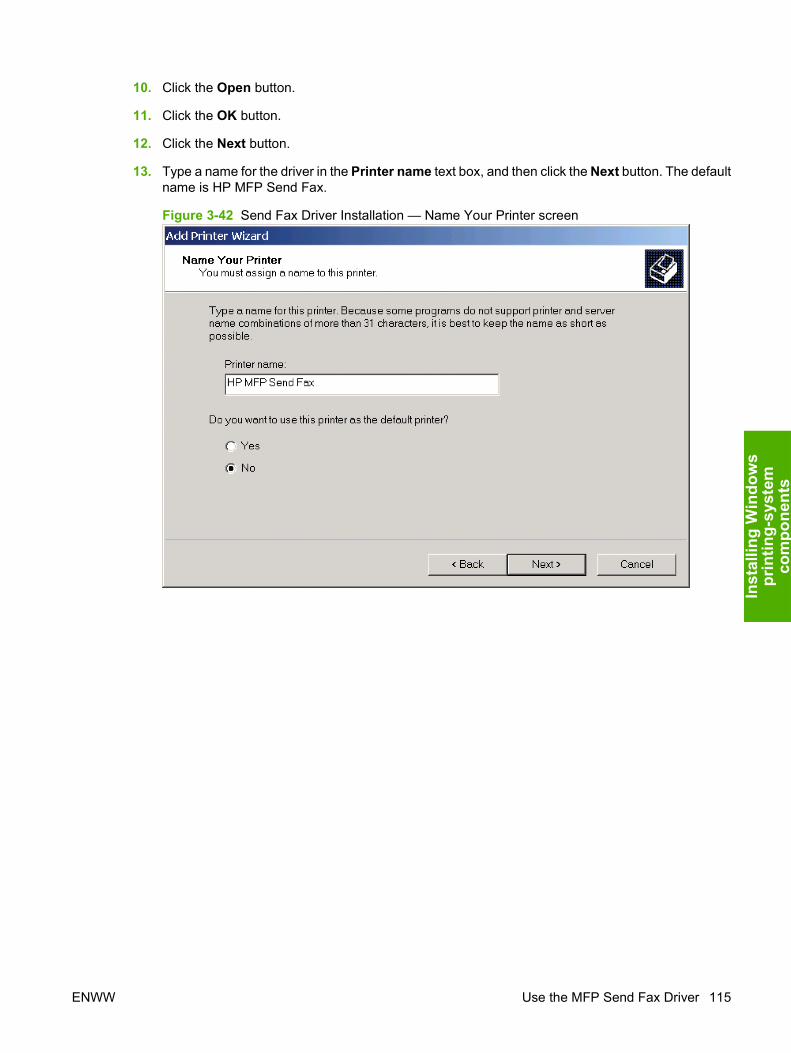
10. Click the Open button.
11. Click the OK button.
12. Click the Next button.
13. Type a name for the driver in the Printer name text box, and then click the Next button. The defaultname is HP MFP Send Fax.
Figure 3-42 Send Fax Driver Installation — Name Your Printer screen
ENWW Use the MFP Send Fax Driver 115
Inst
allin
g W
indo
ws
prin
ting-
syst
emco
mpo
nent
s
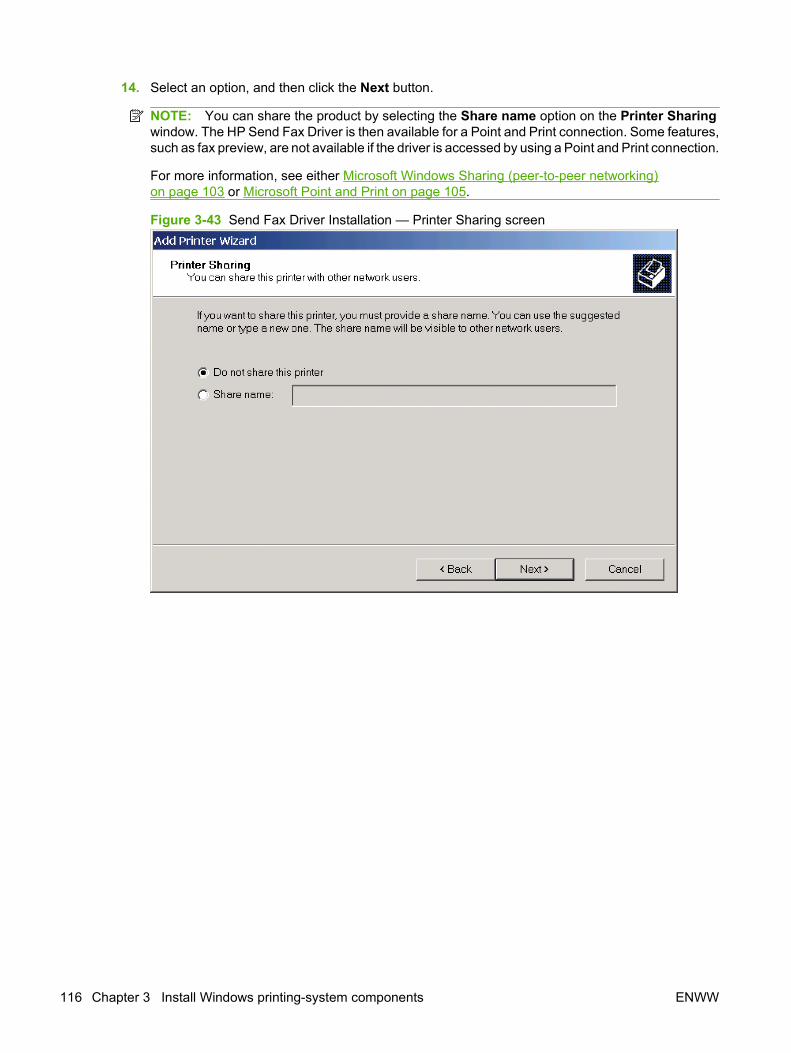
14. Select an option, and then click the Next button.
NOTE: You can share the product by selecting the Share name option on the Printer Sharingwindow. The HP Send Fax Driver is then available for a Point and Print connection. Some features,such as fax preview, are not available if the driver is accessed by using a Point and Print connection.
For more information, see either Microsoft Windows Sharing (peer-to-peer networking)on page 103 or Microsoft Point and Print on page 105.
Figure 3-43 Send Fax Driver Installation — Printer Sharing screen
116 Chapter 3 Install Windows printing-system components ENWW

15. Select either the Yes or No option to send a test fax, and then click the Next button.
NOTE: If you select the Yes option, the HP Send Fax Driver will open once the installation iscomplete. No page is printed from the product; however, a fax will be sent.
Figure 3-44 Send Fax Driver Installation — Print Test Page screen
16. Click the Finish button to complete the wizard.
NOTE: If you selected the Yes option to print a test page in the previous step, the Setup tab ofthe HP Easy Printer Care appears.
Send a fax using the HP Send Fax DriverYou can use the HP Send Fax Driver to send faxes from your computer via the HP Color LaserJetCM6030 and CM6040 MFP Series if the optional Analog Fax Accessory 300 is installed. After the HPSend Fax Driver is installed, it can be accessed and used in the same manner as a printer driver.
NOTE: For complete information about using the HP Send Fax Driver, the HP LaserJet MFP AnalogFax Accessory 300 Send Fax Driver Guide, which can be accessed on your User CD or downloadedfrom www.hp.com/go/mfpfaxaccessory300, and then clicking the Manuals option from the leftnavigation bar.
ENWW Use the MFP Send Fax Driver 117
Inst
allin
g W
indo
ws
prin
ting-
syst
emco
mpo
nent
s
Create a network folder using the Scan Setup WizardTo create a network folder on an computer using the Scan Setup Wizard, follow these steps:
NOTE: You can return to the previous dialog box by clicking the < Back button, or exit the Scan SetupWizard by clicking the Cancel button.
1. Insert the HP Color LaserJet CM6030 or HP Color LaserJet CM6040 printing-system Adminsoftware CD in the CD-ROM drive to open an interactive CD Browser.
If the installation screen does not appear when you insert the Admin software CD into the CD-ROMdrive, follow these steps to open the CD Browser:
a. On the Start menu, click the Run option.
b. Type the following: X:\SETUP.EXE (where X is the letter of the CD-ROM drive).
c. Click the OK button.
2. Click Install, then click the Scan Setup Wizard button from the main screen of the CD Browser.
3. Click the Install Scan Setup Wizard button.
118 Chapter 3 Install Windows printing-system components ENWW
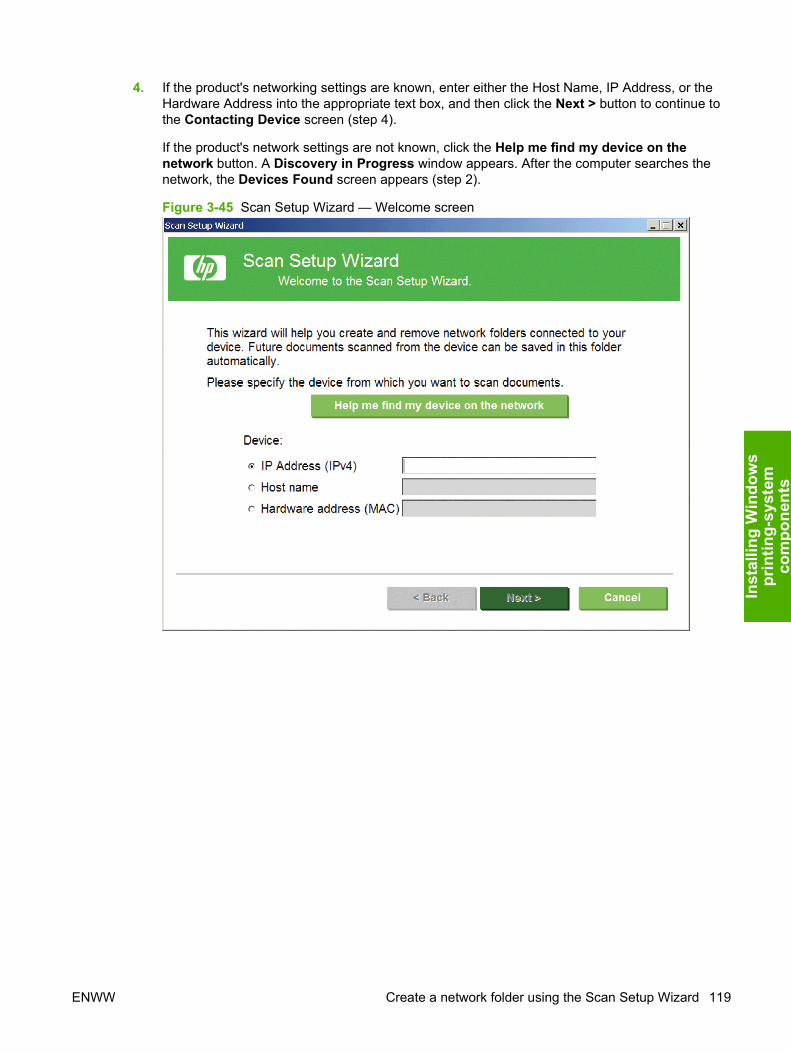
4. If the product's networking settings are known, enter either the Host Name, IP Address, or theHardware Address into the appropriate text box, and then click the Next > button to continue tothe Contacting Device screen (step 4).
If the product's network settings are not known, click the Help me find my device on thenetwork button. A Discovery in Progress window appears. After the computer searches thenetwork, the Devices Found screen appears (step 2).
Figure 3-45 Scan Setup Wizard — Welcome screen
ENWW Create a network folder using the Scan Setup Wizard 119
Inst
allin
g W
indo
ws
prin
ting-
syst
emco
mpo
nent
s
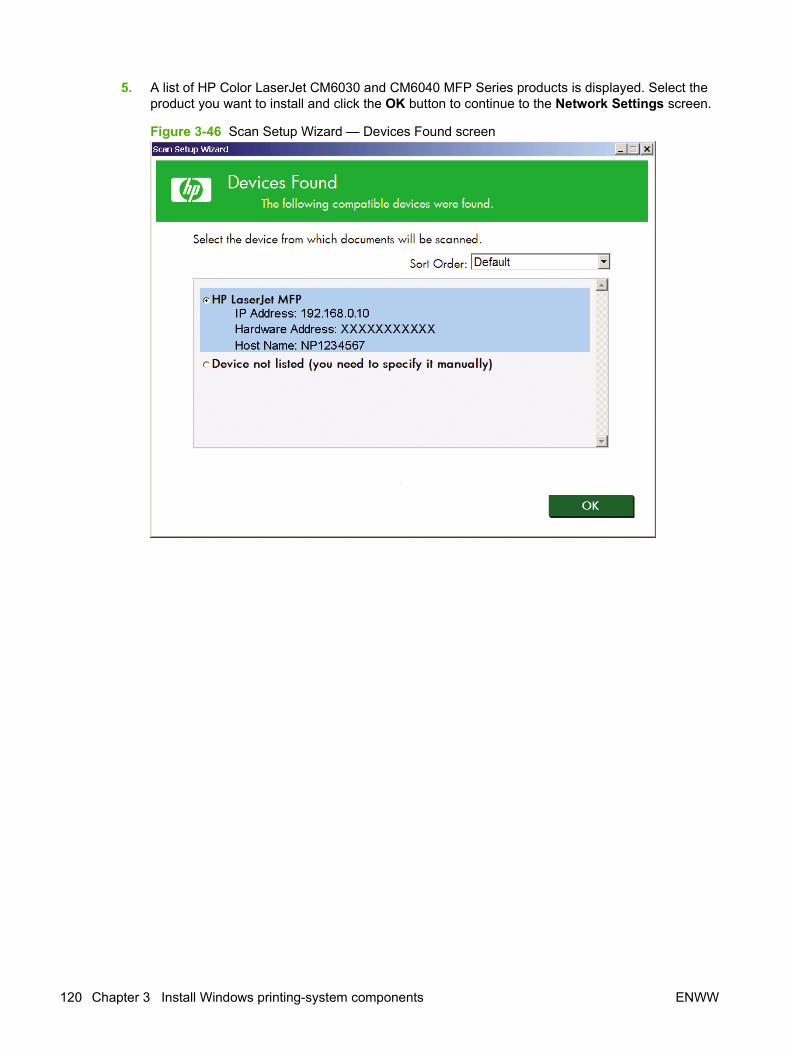
5. A list of HP Color LaserJet CM6030 and CM6040 MFP Series products is displayed. Select theproduct you want to install and click the OK button to continue to the Network Settings screen.
Figure 3-46 Scan Setup Wizard — Devices Found screen
120 Chapter 3 Install Windows printing-system components ENWW
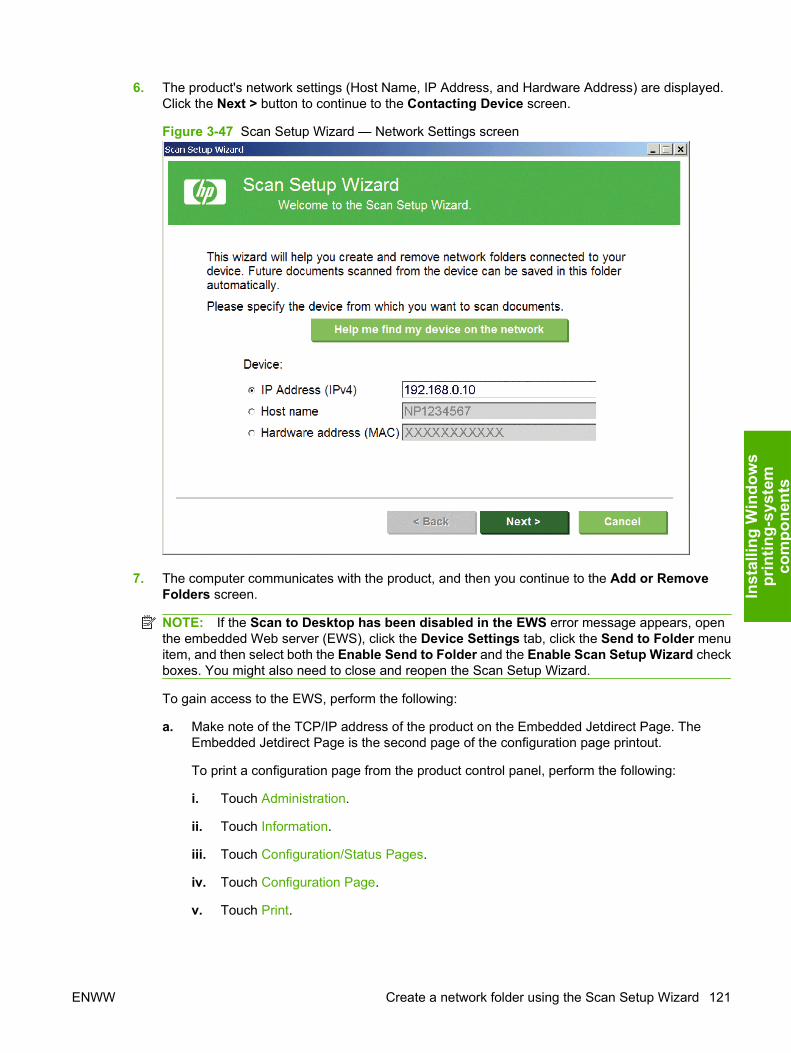
6. The product's network settings (Host Name, IP Address, and Hardware Address) are displayed.Click the Next > button to continue to the Contacting Device screen.
Figure 3-47 Scan Setup Wizard — Network Settings screen
7. The computer communicates with the product, and then you continue to the Add or RemoveFolders screen.
NOTE: If the Scan to Desktop has been disabled in the EWS error message appears, openthe embedded Web server (EWS), click the Device Settings tab, click the Send to Folder menuitem, and then select both the Enable Send to Folder and the Enable Scan Setup Wizard checkboxes. You might also need to close and reopen the Scan Setup Wizard.
To gain access to the EWS, perform the following:
a. Make note of the TCP/IP address of the product on the Embedded Jetdirect Page. TheEmbedded Jetdirect Page is the second page of the configuration page printout.
To print a configuration page from the product control panel, perform the following:
i. Touch Administration.
ii. Touch Information.
iii. Touch Configuration/Status Pages.
iv. Touch Configuration Page.
v. Touch Print.
ENWW Create a network folder using the Scan Setup Wizard 121
Inst
allin
g W
indo
ws
prin
ting-
syst
emco
mpo
nent
s

NOTE: If the product contains an HP Jetdirect EIO print server or an optional hard disk drive,additional configuration pages print that provide information about those options.
b. Open a Web browser window.
c. In the address line of the browser, type ftp://<IPADDRESS>, where <IPADDRESS> is theTCP/IP address of your product. For example, if the TCP/IP address is 192.168.0.10, typeftp://192.168.0.10.
d. Press the Enter button.
Figure 3-48 Scan Setup Wizard — Contacting Device screen
122 Chapter 3 Install Windows printing-system components ENWW
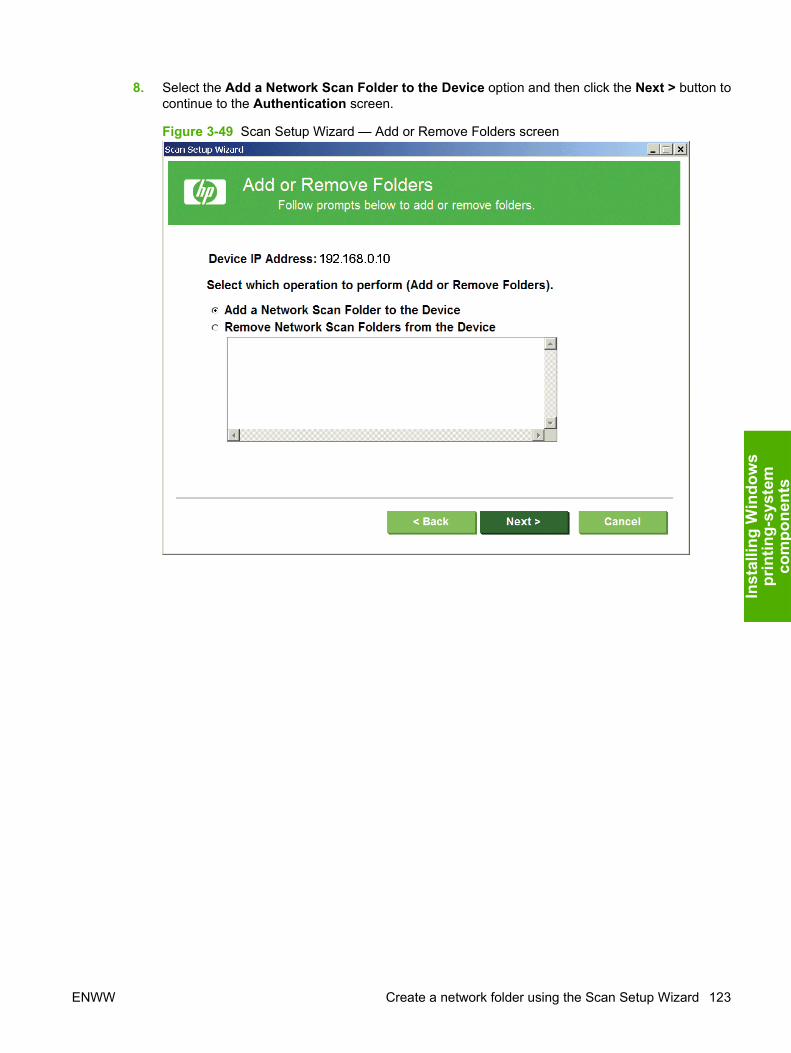
8. Select the Add a Network Scan Folder to the Device option and then click the Next > button tocontinue to the Authentication screen.
Figure 3-49 Scan Setup Wizard — Add or Remove Folders screen
ENWW Create a network folder using the Scan Setup Wizard 123
Inst
allin
g W
indo
ws
prin
ting-
syst
emco
mpo
nent
s
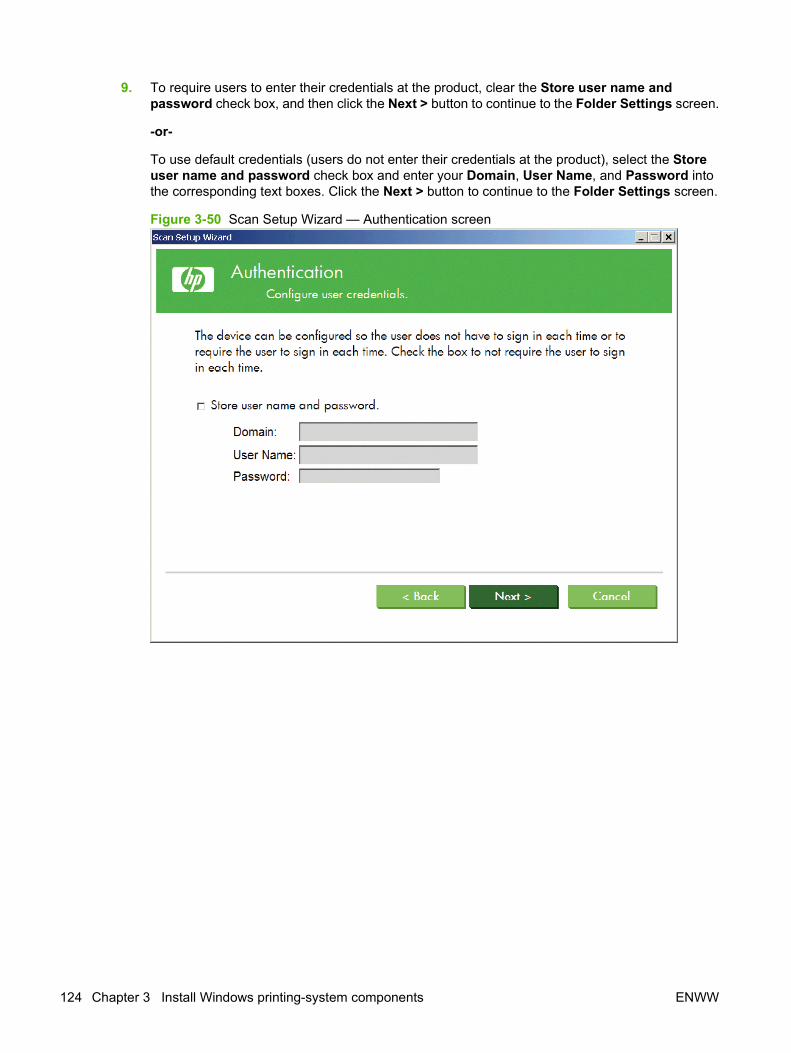
9. To require users to enter their credentials at the product, clear the Store user name andpassword check box, and then click the Next > button to continue to the Folder Settings screen.
-or-
To use default credentials (users do not enter their credentials at the product), select the Storeuser name and password check box and enter your Domain, User Name, and Password intothe corresponding text boxes. Click the Next > button to continue to the Folder Settings screen.
Figure 3-50 Scan Setup Wizard — Authentication screen
124 Chapter 3 Install Windows printing-system components ENWW
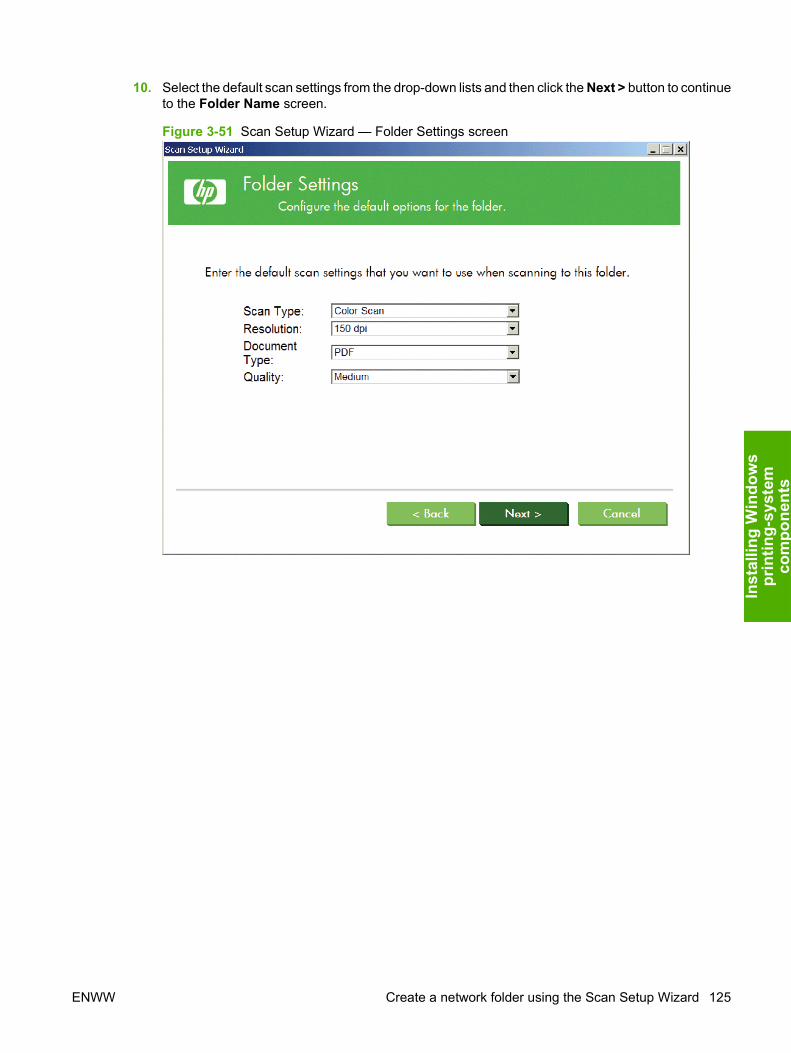
10. Select the default scan settings from the drop-down lists and then click the Next > button to continueto the Folder Name screen.
Figure 3-51 Scan Setup Wizard — Folder Settings screen
ENWW Create a network folder using the Scan Setup Wizard 125
Inst
allin
g W
indo
ws
prin
ting-
syst
emco
mpo
nent
s

11. Specify the folder name and location of the folder, and then click the Create button. A NetworkFolder Creation in Progress window appears. Once the folder has been created, you will continueto the Complete screen.
● You can either type a folder name in the Folder name text box, or use the default folder name.
● You can either click the Browse button and navigate to the path where scanned documentswill be stored, or enter the path in the Location text box.
● If you want a shortcut to the folder placed on your desktop, select the Create a shortcut tothis folder on my desktop check box.
Figure 3-52 Scan Setup Wizard — Folder Name screen
126 Chapter 3 Install Windows printing-system components ENWW
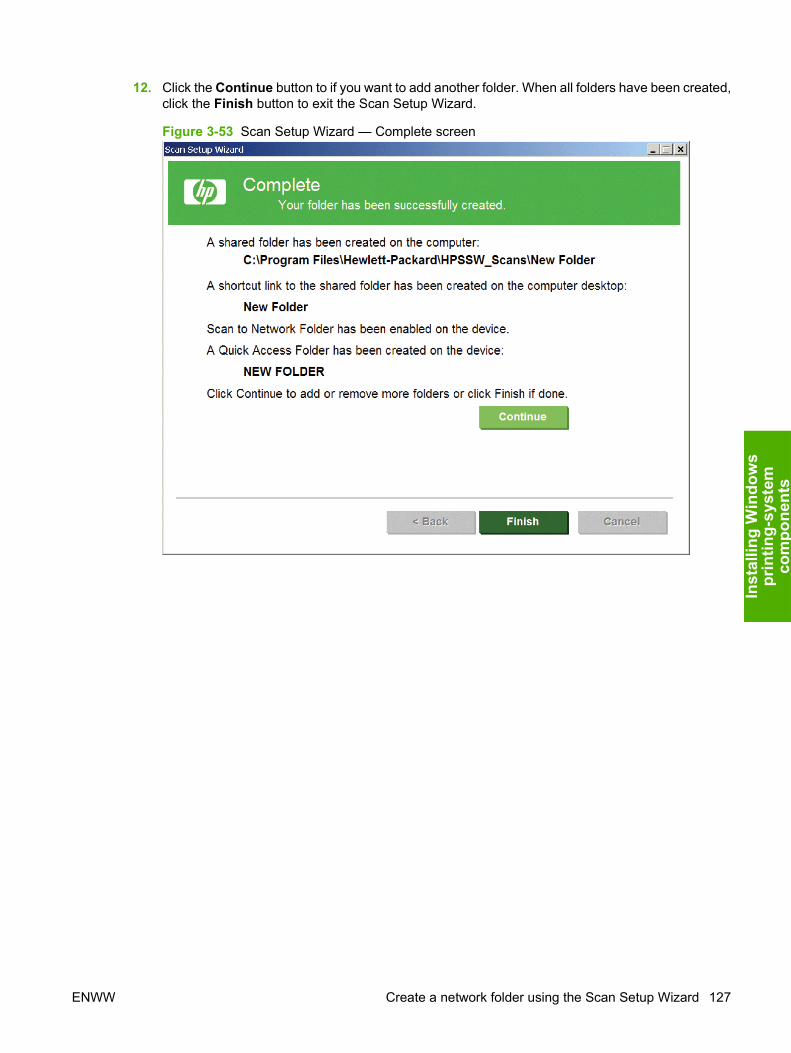
12. Click the Continue button to if you want to add another folder. When all folders have been created,click the Finish button to exit the Scan Setup Wizard.
Figure 3-53 Scan Setup Wizard — Complete screen
ENWW Create a network folder using the Scan Setup Wizard 127
Inst
allin
g W
indo
ws
prin
ting-
syst
emco
mpo
nent
s
Install documentation and optional softwareThe following documentation and optional software programs are available for the HP Color LaserJetCM6030 and CM6040 MFP Series:
● HP LaserJet M9040/M9050 MFP Screen Fonts: Printer-matching TrueType fonts to help ensurescreen match printing.
● HP LaserJet M9040/M9050 MFP User Guide: Includes information about the product operation,troubleshooting, warranty and specifications, supplies and support.
● HP LaserJet M9040 / M9050 MFP Install Notes: Includes information about installing your product'ssoftware
Perform the following to install or uninstall the documentation and optional software programs:
1. Insert the HP Color LaserJet CM6030 or HP Color LaserJet CM6040 Admin software CD into theCD-ROM drive. The installer program should open.
If the installer program has not started after 30 seconds, complete these steps:
a. On the Start menu, click the Run option.
b. Type the following: X:\SETUP.EXE (where X is the letter of the CD-ROM drive).
c. Click the OK button.
2. Click the Install button. The printer driver screen appears.
128 Chapter 3 Install Windows printing-system components ENWW
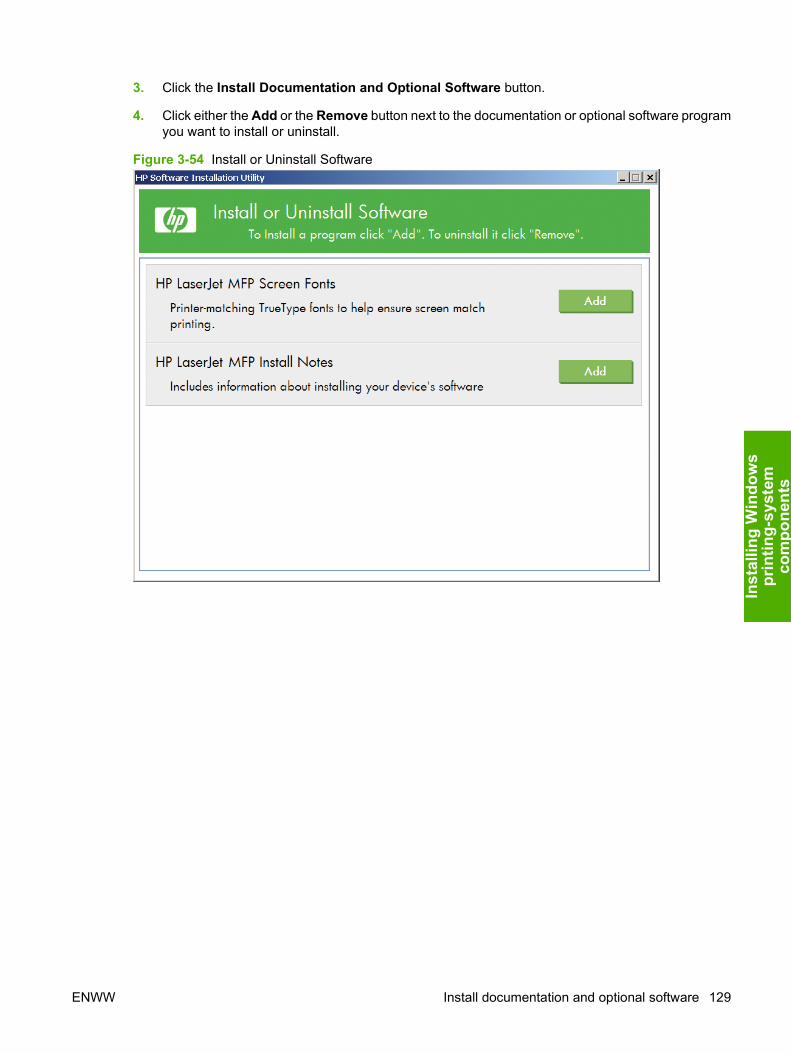
3. Click the Install Documentation and Optional Software button.
4. Click either the Add or the Remove button next to the documentation or optional software programyou want to install or uninstall.
Figure 3-54 Install or Uninstall Software
ENWW Install documentation and optional software 129
Inst
allin
g W
indo
ws
prin
ting-
syst
emco
mpo
nent
s
Uninstall softwareNOTE: If the printer driver or the HP Send Fax Driver was installed using the HP Driver InstallationUtility, follow the instructions in the Uninstall the printer driver or the HP Send Fax Driver by usingWindows Add or Remove Programs feature on page 131 section. If the printer driver or the HP SendFax Driver was installed using the Add Printer Wizard, follow the instructions in the Uninstall the printerdriver or the HP Send Fax Driver by using the Server Properties feature on page 135 section.
Uninstall component listThe following HP Color LaserJet CM6030 and CM6040 MFP Series components, if previously installed,can be removed from your computer using the Windows Add or Remove Programs feature:
● HP Color LaserJet CM6030 and CM6040 MFP Series PCL 5 driver
● HP Color LaserJet CM6030 and CM6040 MFP Series PCL 6 driver
● HP Color LaserJet CM6030 and CM6040 MFP Series PS driver
● HP LaserJet M9040 / M9050 MFP Install Notes
● HP LaserJet M9040/M9050 MFP Screen Fonts
● HP LaserJet M9040/M9050 MFP User Guide
● HP Send Fax Driver
130 Chapter 3 Install Windows printing-system components ENWW
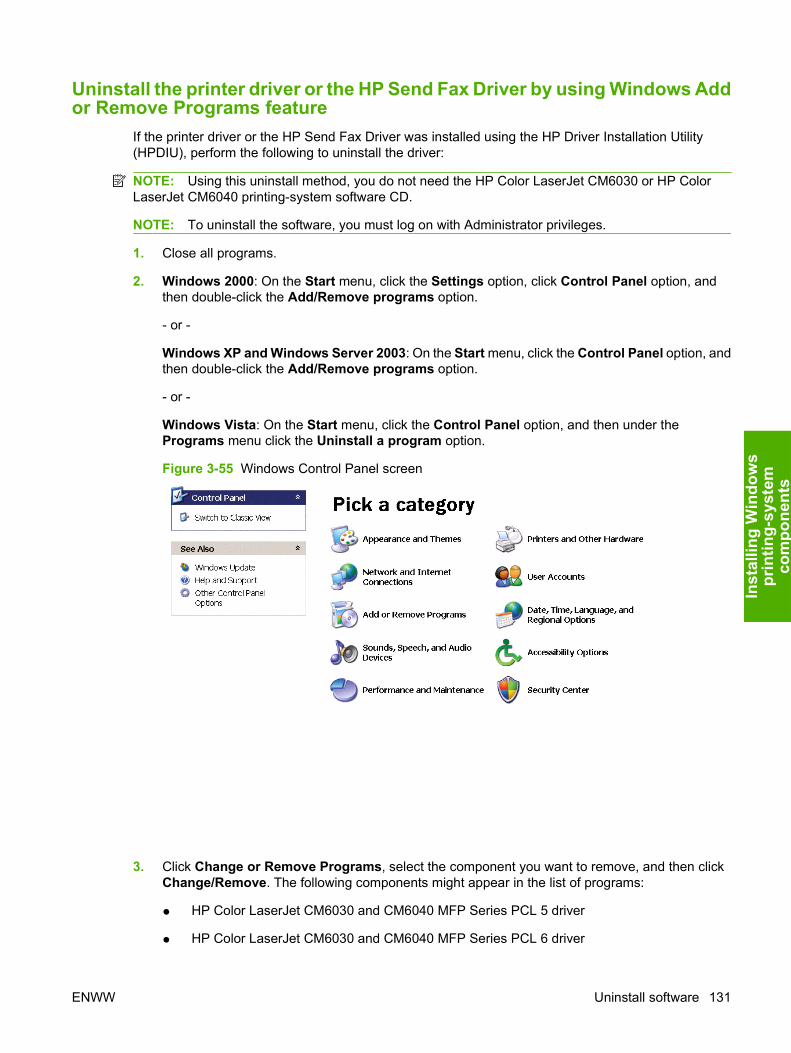
Uninstall the printer driver or the HP Send Fax Driver by using Windows Addor Remove Programs feature
If the printer driver or the HP Send Fax Driver was installed using the HP Driver Installation Utility(HPDIU), perform the following to uninstall the driver:
NOTE: Using this uninstall method, you do not need the HP Color LaserJet CM6030 or HP ColorLaserJet CM6040 printing-system software CD.
NOTE: To uninstall the software, you must log on with Administrator privileges.
1. Close all programs.
2. Windows 2000: On the Start menu, click the Settings option, click Control Panel option, andthen double-click the Add/Remove programs option.
- or -
Windows XP and Windows Server 2003: On the Start menu, click the Control Panel option, andthen double-click the Add/Remove programs option.
- or -
Windows Vista: On the Start menu, click the Control Panel option, and then under thePrograms menu click the Uninstall a program option.
Figure 3-55 Windows Control Panel screen
3. Click Change or Remove Programs, select the component you want to remove, and then clickChange/Remove. The following components might appear in the list of programs:
● HP Color LaserJet CM6030 and CM6040 MFP Series PCL 5 driver
● HP Color LaserJet CM6030 and CM6040 MFP Series PCL 6 driver
ENWW Uninstall software 131
Inst
allin
g W
indo
ws
prin
ting-
syst
emco
mpo
nent
s
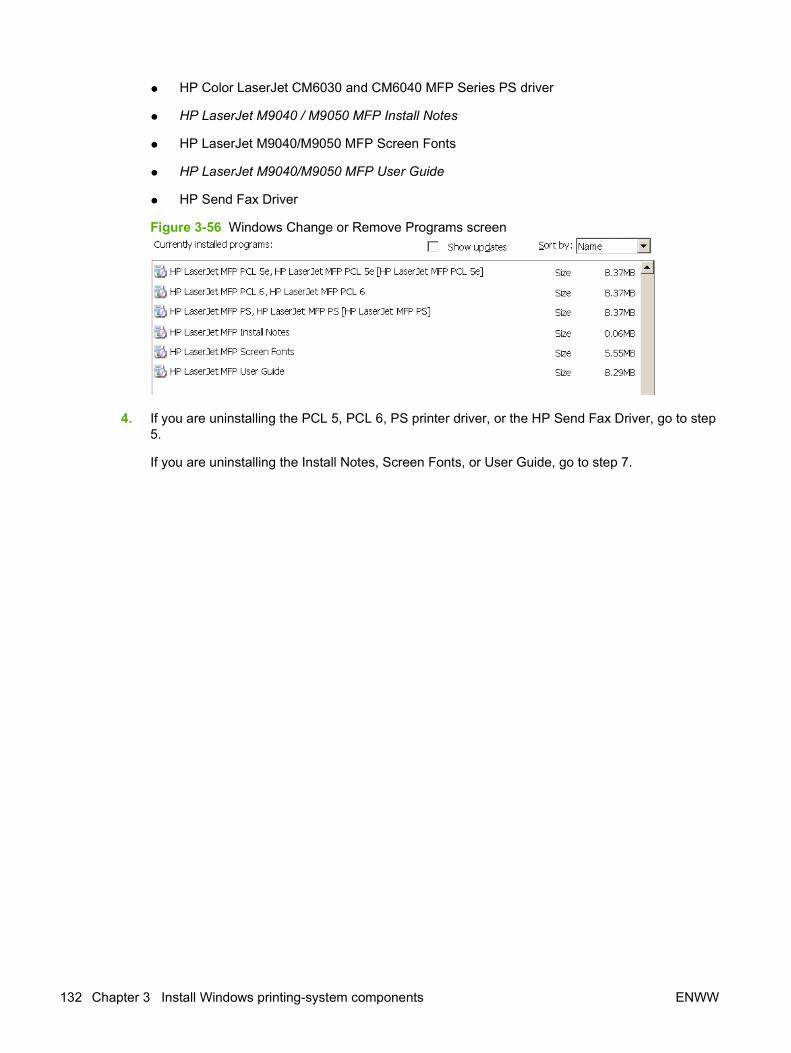
● HP Color LaserJet CM6030 and CM6040 MFP Series PS driver
● HP LaserJet M9040 / M9050 MFP Install Notes
● HP LaserJet M9040/M9050 MFP Screen Fonts
● HP LaserJet M9040/M9050 MFP User Guide
● HP Send Fax Driver
Figure 3-56 Windows Change or Remove Programs screen
4. If you are uninstalling the PCL 5, PCL 6, PS printer driver, or the HP Send Fax Driver, go to step5.
If you are uninstalling the Install Notes, Screen Fonts, or User Guide, go to step 7.
132 Chapter 3 Install Windows printing-system components ENWW
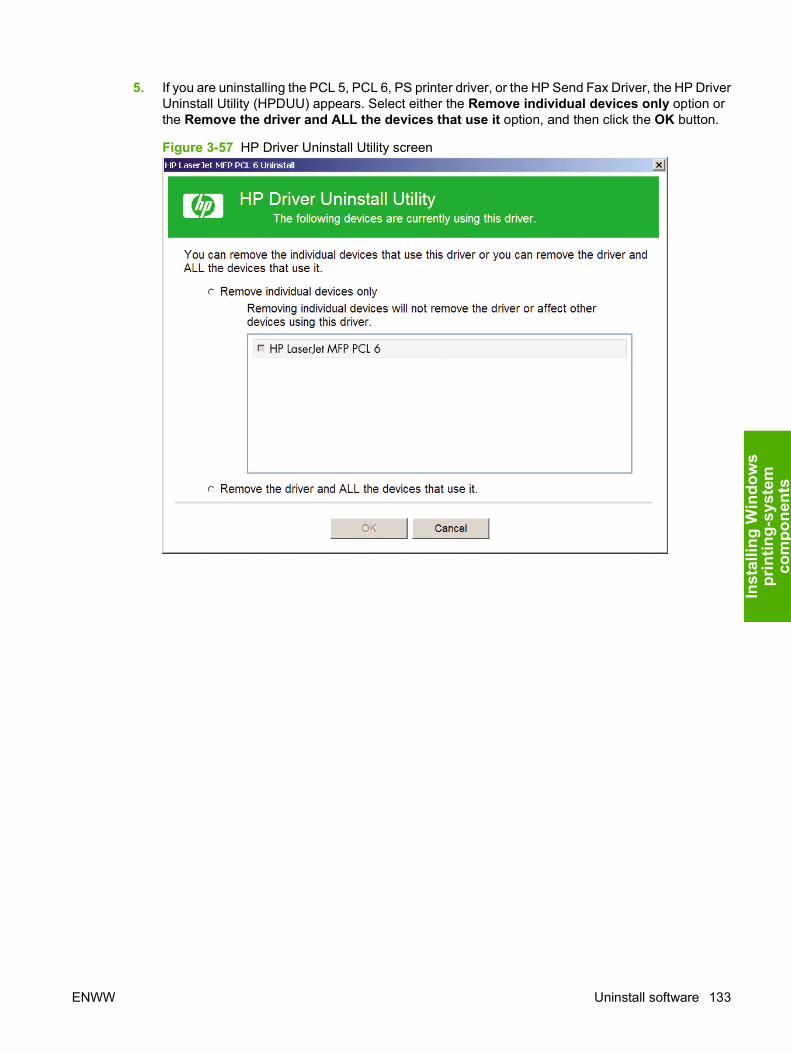
5. If you are uninstalling the PCL 5, PCL 6, PS printer driver, or the HP Send Fax Driver, the HP DriverUninstall Utility (HPDUU) appears. Select either the Remove individual devices only option orthe Remove the driver and ALL the devices that use it option, and then click the OK button.
Figure 3-57 HP Driver Uninstall Utility screen
ENWW Uninstall software 133
Inst
allin
g W
indo
ws
prin
ting-
syst
emco
mpo
nent
s
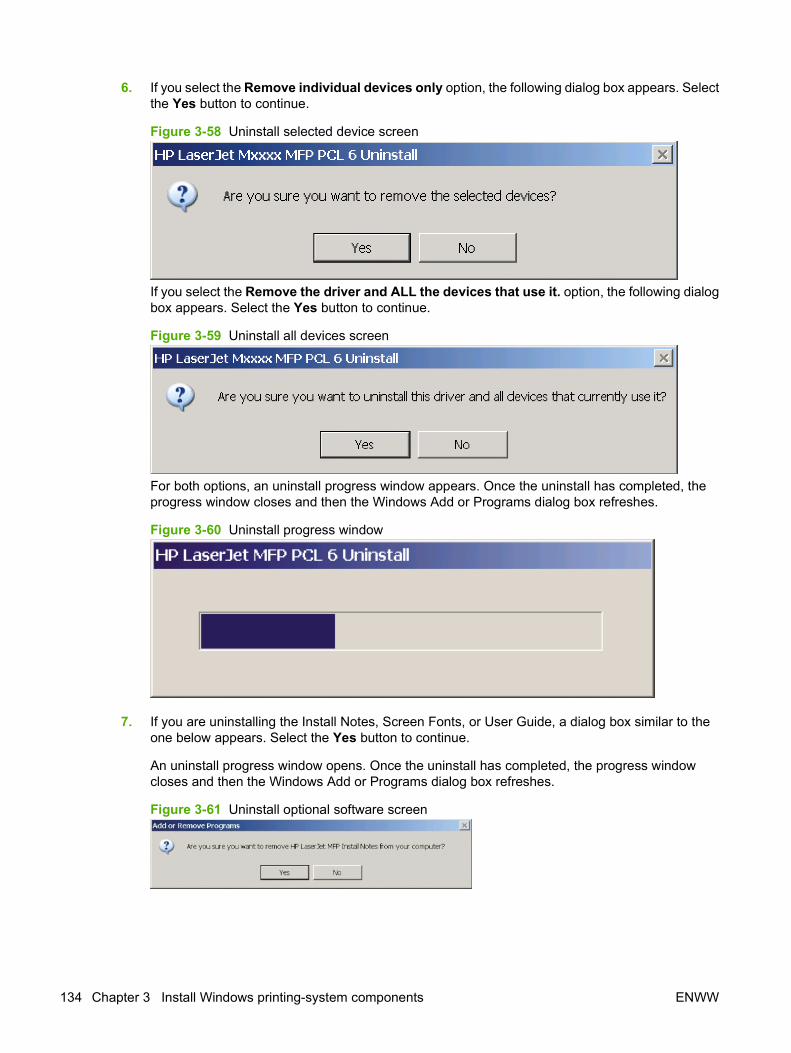
6. If you select the Remove individual devices only option, the following dialog box appears. Selectthe Yes button to continue.
Figure 3-58 Uninstall selected device screen
If you select the Remove the driver and ALL the devices that use it. option, the following dialogbox appears. Select the Yes button to continue.
Figure 3-59 Uninstall all devices screen
For both options, an uninstall progress window appears. Once the uninstall has completed, theprogress window closes and then the Windows Add or Programs dialog box refreshes.
Figure 3-60 Uninstall progress window
7. If you are uninstalling the Install Notes, Screen Fonts, or User Guide, a dialog box similar to theone below appears. Select the Yes button to continue.
An uninstall progress window opens. Once the uninstall has completed, the progress windowcloses and then the Windows Add or Programs dialog box refreshes.
Figure 3-61 Uninstall optional software screen
134 Chapter 3 Install Windows printing-system components ENWW

Uninstall the printer driver or the HP Send Fax Driver by using the ServerProperties feature
If the printer driver or the HP Send Fax Driver was installed by using the Add Printer Wizard, performthe following to uninstall the driver:
NOTE: To uninstall the software, you must log on with Administrator privileges.
1. Close all programs.
2. On the Start menu, click the Settings option, and then
Windows 2000: Click the Printers option.
-or-
Windows XP Home: Click the Printers and Other Hardware Devices option.
-or-
Windows XP Professional and Windows Server 2003: Click the Printers and Faxes option.
-or-
Windows Vista: Under the Hardware and Sound category, click the Printer option.
3. Right-click the icon for your product and then click the Delete button. This removes the icon for theproduct only, but it does not remove the associated files.
4. To remove the associated files, click the File menu from inside the Printers folder, and then clickthe Server Properties option.
5. Click the Driver tab, click the name of your product, and then click the Remove button. When youare prompted to confirm the deletion, click the Yes button.
6. Click the Close button to close the Server Properties dialog box, and then close the Printers folder.
ENWW Uninstall software 135
Inst
allin
g W
indo
ws
prin
ting-
syst
emco
mpo
nent
s
Uninstall documentation and optional softwareNOTE: To uninstall the software, you must log on with Administrator privileges.
NOTE: Printer drivers cannot be uninstalled using this method. Instead, use either the Window Addor Remove Programs feature or the Server Properties feature.
1. Close all programs.
2. Insert the HP Color LaserJet CM6030 or HP Color LaserJet CM6040 software CD into the CD-ROM drive. The installer program should open.
a. On the Start menu, click the Run option.
b. Type the following: X:\SETUP.EXE (where X is the letter of the CD-ROM drive).
c. Click the OK button.
3. Click the Install button.
4. Click the Install Documentation and Optional Software button.
5. Click the Remove button for the feature you want to uninstall.
136 Chapter 3 Install Windows printing-system components ENWW
4 HP PCL 6 Print Driver for Windows
IntroductionThis chapter describes the features of the HP Color LaserJet CM6030 and CM6040 MFP Series PCL6 Print Driver for Windows 2000, Windows XP (32-bit and 64-bit), Windows Server 2003 (32-bit and64-bit), and Windows Vista (32-bit and 64-bit).
You can control print jobs from several places:
● The product control panel
● The software program print dialog box
● The driver user interface
Generally, for features that are duplicated in more than one location (for instance, you can select thepaper input tray from any of them), settings that are established in the software program take precedenceover print-driver settings. Print-driver settings, in turn, override product control-panel settings.
When you install the printing-system software in Microsoft Windows 2000, Microsoft Windows XP,Microsoft Windows Server 2003, and Microsoft Windows Vista, the HP PCL 6 Print Driver is therecommended driver and the first selection in the CD Browser. The HP PS Universal Print Driver andthe HP PCL 5 Universal Print Driver can be installed by download from hp.com (link in browser button).They can also be installed by the installer, which is included with the driver.
Topics:
● Access print drivers
● Help system
● Advanced tab features
● Printing Shortcuts tab features
● Paper/Quality tab features
● Effects tab features
● Finishing tab features
● Output tab features
● Job Storage tab features
● Color tab features
● Services tab features
ENWW Introduction 137
HP
PCL
6 Pr
int D
river
for
Win
dow
s

● Device Settings tab features
● About tab features
138 Chapter 4 HP PCL 6 Print Driver for Windows ENWW
Access print driversDepending on the operating system on which you are installing the print drivers, you can gain accessto the print drivers and different print-driver interfaces in several ways.
To gain access to the print-driver settings from within most software programs, follow these steps:
1. Click File.
2. Click Print.
3. Click Properties.
The appearance and names of the driver tabs can vary, depending on the operating system. Thesedriver settings apply only while that software program is open.
You can control the drivers directly from the Printers folder. Here you have access to two sets of drivertabs: the Printing Preferences tabs and the Properties tabs. The settings that you make on thePrinting Preferences driver tabs control the driver default settings for each user's profile. Installableoptions can be configured in Properties driver tabs.
Printing Preferences driver tabsThe Printing Preferences driver tabs change the default settings that are used across all softwareprograms. To gain access to these tabs, follow these steps:
1. In Windows Vista, click the Start button, click Control Panel, click Hardware and Sound, andthen click Printers.
In Windows XP and Windows Server 2003, click Start, click Settings, and then click Printers andFaxes.
In Windows 2000, click Start, click Settings, and then click Printers.
2. Right-click the product name.
3. Click Printing Preferences.
The following Printing Preferences print-driver tabs are available:
● Advanced
● Printing Shortcuts
● Paper/Quality
● Effects
● Finishing
● Output
● Job Storage
● Color
● Services
ENWW Access print drivers 139
HP
PCL
6 Pr
int D
river
for
Win
dow
s
Properties driver tabsThis set of tabs controls the driver behavior and driver connections. To gain access to the Propertiestabs, follow these steps:
1. In Windows Vista, click the Start button, click Control Panel, click Hardware and Sound, andthen click Printers.
In Windows XP and Windows Server 2003, click Start, click Settings, and then click Printers andFaxes.
In Windows 2000, click Start, click Settings, and then click Printers.
2. Right-click the product name.
3. Click Properties.
The following Properties print-driver tabs are available:
● General
● Sharing
● Ports
● Advanced
● Color Management
● Security
● Device Settings
● About
140 Chapter 4 HP PCL 6 Print Driver for Windows ENWW
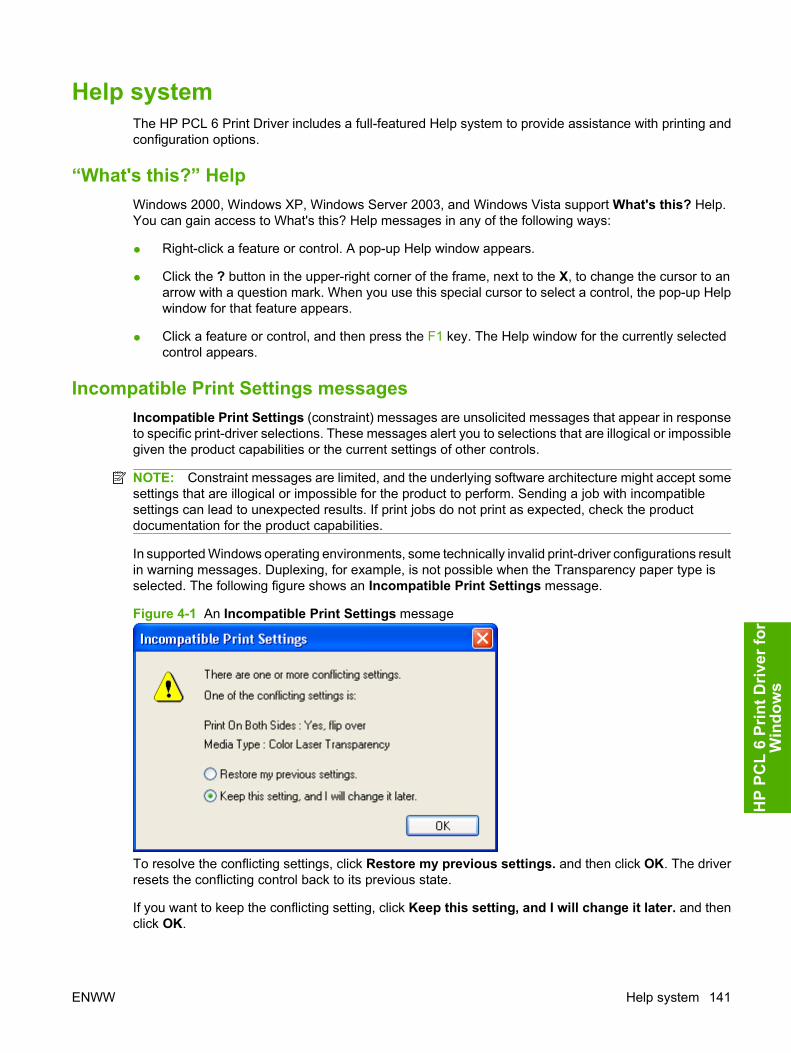
Help systemThe HP PCL 6 Print Driver includes a full-featured Help system to provide assistance with printing andconfiguration options.
“What's this?” HelpWindows 2000, Windows XP, Windows Server 2003, and Windows Vista support What's this? Help.You can gain access to What's this? Help messages in any of the following ways:
● Right-click a feature or control. A pop-up Help window appears.
● Click the ? button in the upper-right corner of the frame, next to the X, to change the cursor to anarrow with a question mark. When you use this special cursor to select a control, the pop-up Helpwindow for that feature appears.
● Click a feature or control, and then press the F1 key. The Help window for the currently selectedcontrol appears.
Incompatible Print Settings messagesIncompatible Print Settings (constraint) messages are unsolicited messages that appear in responseto specific print-driver selections. These messages alert you to selections that are illogical or impossiblegiven the product capabilities or the current settings of other controls.
NOTE: Constraint messages are limited, and the underlying software architecture might accept somesettings that are illogical or impossible for the product to perform. Sending a job with incompatiblesettings can lead to unexpected results. If print jobs do not print as expected, check the productdocumentation for the product capabilities.
In supported Windows operating environments, some technically invalid print-driver configurations resultin warning messages. Duplexing, for example, is not possible when the Transparency paper type isselected. The following figure shows an Incompatible Print Settings message.
Figure 4-1 An Incompatible Print Settings message
To resolve the conflicting settings, click Restore my previous settings. and then click OK. The driverresets the conflicting control back to its previous state.
If you want to keep the conflicting setting, click Keep this setting, and I will change it later. and thenclick OK.
ENWW Help system 141
HP
PCL
6 Pr
int D
river
for
Win
dow
s

NOTE: In this example, the conflict can be resolved manually. If the conflict is not resolved when thedriver is closed, then the same dialog appears again when a print job is sent to the product.
142 Chapter 4 HP PCL 6 Print Driver for Windows ENWW
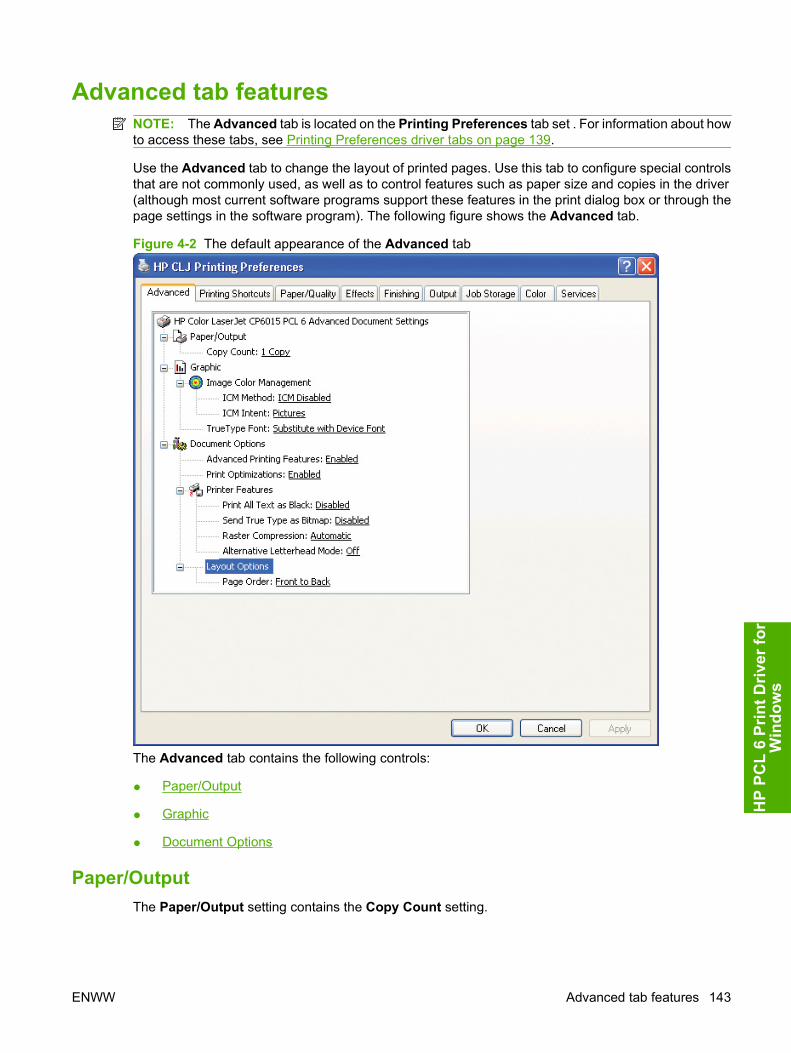
Advanced tab featuresNOTE: The Advanced tab is located on the Printing Preferences tab set . For information about howto access these tabs, see Printing Preferences driver tabs on page 139.
Use the Advanced tab to change the layout of printed pages. Use this tab to configure special controlsthat are not commonly used, as well as to control features such as paper size and copies in the driver(although most current software programs support these features in the print dialog box or through thepage settings in the software program). The following figure shows the Advanced tab.
Figure 4-2 The default appearance of the Advanced tab
The Advanced tab contains the following controls:
● Paper/Output
● Graphic
● Document Options
Paper/OutputThe Paper/Output setting contains the Copy Count setting.
ENWW Advanced tab features 143
HP
PCL
6 Pr
int D
river
for
Win
dow
s
Copy CountCopy Count specifies the number of copies to print. This driver setting is useful for software programsthat do not provide a copy count. If a copy count is available in the software program, set the copy countin the software program.
The number of copies that you request appears in the Copy Count option. You can select the numberby typing in the text box or by using the up and down arrows to the right of the text box. Valid entriesare numbers from 1 to 9999. The copies value will not advance from the maximum number (9999) to 1when the up arrow is used, or change from 1 to the maximum number (9999) when the down arrow isused. When you click another group box or leave the Advanced tab, invalid entries into the text box(such as non-numerical input, numbers less than 1, or numbers greater than the maximum allowed) arechanged to the last valid value that appeared in the text box. The default number of copies is 1.
Because you can set the number of copies that you want from some software programs, conflictsbetween the software program you are using and the driver can arise. In most cases, the softwareprogram and the driver communicate, so that the number of copies set in one location (such as theprogram) will appear in the other (such as the driver). For some programs, this communication does nottake place, and the copies values are treated independently. For these programs, setting 10 copies inthe program and then setting 10 copies in the driver will result in 100 copies (10 x 10) being printed. Itis recommended that you set the number of copies in the program, whenever possible.
GraphicThe Graphic setting contains the following controls:
● Image Color Management settings
● TrueType Font settings
Image Color ManagementThis control lists the available Image Color Management (ICM) options used for printing color graphics.ICM, a set of calculations for color matching, makes it possible for programs to adjust colors beforeprinting so that the color of images on the screen more closely match the color of those images whenthey are printed. The following options are available:
● ICM Method. The ICM Method setting specifies how to print color graphics.
◦ To enable Image Color Management, click the option and then select ICM Enabled.
◦ If you want the host computer to perform calculations for color matching before it sends thedocument to the product, click ICM Handled by Host System.
◦ If you want the HP Color LaserJet CM6030 and CM6040 MFP Series product to performcalculations for color matching, click ICM Handled by Printer. In this case, a set of rules formapping the colors is created and downloaded to the product. The product uses these rulesto adjust colors in the document.
● ICM Intent. The ICM Intent setting specifies how color images are created to produce the imagethat looks best on the printed page.
◦ If you are printing a chart or using fully saturated, bright colors, click Graphics.
◦ For photographs or pictures where the colors blend together, click Pictures to maximize thecontrast.
144 Chapter 4 HP PCL 6 Print Driver for Windows ENWW
◦ If your document uses a color that you need to match exactly, and you are sending thedocument to a product that has that specific color of ink, click Proof.
◦ If you want to preview the color settings from another product, click Match.
TrueType FontUse Substitute with Device Font (the default setting) to print documents that contain TrueType fontsby using equivalent printer fonts. This permits faster printing; however, you might lose special charactersthat the equivalent printer font does not support. Select Download as Softfont to download TrueTypefonts for printing instead of using printer fonts.
Document OptionsThe Document Options setting contains the following controls:
● Advanced Printing Features
● Print Optimizations
● Printer Features
● Layout Options
Advanced Printing FeaturesWhen the Advanced Printing Features setting is Enabled, metafile spooling is turned on andFinishing tab options such as Page Order, Booklet Layout, and Pages per Sheet are available,depending on your product.
Enhanced metafile spooling is used to greatly reduce the amount of time that elapses between a requestto print (initiated by an application) and the return of control to the application by the operating system.
For normal printing, leave the Advanced Printing Features setting at the default (Enabled). Ifcompatibility problems occur, you can disable the feature. However, some advanced printing featuresmight still appear in the print driver, even though they have been disabled. If you select an advancedprinting feature in the print driver that has been disabled on the Advanced tab, the feature isautomatically re-enabled.
Print Optimizations The default setting for Print Optimizations is Enabled. When this feature is enabled and your documentcontains overlapping text and graphics, the text that is placed on top of a graphic might not print correctly.If the printed output is not correct, you can disable this feature. When this feature is disabled, printoptimization features, such as substituting device fonts for TrueType fonts and scanning for horizontaland vertical rules, are turned off.
ENWW Advanced tab features 145
HP
PCL
6 Pr
int D
river
for
Win
dow
s
Printer FeaturesThe Printer Features setting contains the following controls:
● Print All Text as Black
The feature is Disabled by default. When Enabled is selected, the driver prints all text as blackregardless of the original document text color. Color text is printed as black, except for white text,which remains white. (White text is a reliable method of printing reverse typeface against a darkbackground.) This setting does not affect graphic images on the page, nor does it affect any textthat is part of a graphic.
● Send TrueType as Bitmap
Send TrueType as Bitmap provides an alternative for software programs that have trouble usingTrueType fonts for special graphic aspects such as shading, rotation, or slanting. The setting isDisabled (off) by default. The TrueType fonts are converted to bitmap soft fonts beforedownloading. The Enabled setting causes the driver to send TrueType fonts to the product asoutlines, which retains the standard format (outline) of the fonts.
● Raster Compression
Use the Raster Compression feature to select the graphics-compression method:
◦ Automatic. The software determines the best compression method to use.
◦ Best Quality. This option forces the software to use a lossless compression method.(Lossless means that no data is lost during compression.)
◦ Maximum Compression. Where applicable, this option requires the software to always usea lossy compression method (some data is lost).
● Alternative Letterhead Mode
When selected, this option eliminates the need to flip or reload letterhead or preprinted paper in atray, whether you are printing on one or both sides of the sheet. Load the paper as you would forprinting on both sides. If the product tray has an icon that indicates whether to load paper eitherface-up or face-down, load the paper in opposite orientation of that shown.
When this option is selected, you must use one of the following options in the Paper type setting:
◦ Letterhead
◦ Preprinted
Layout OptionsThe Layout Options setting contains the Page Order setting.
Page Order specifies the order in which the pages of your document are printed. Front to Back printsthe document so that page 1 prints first. Back to Front prints the document so that page 1 prints last.
NOTE: The page-ordering operation works on whole sheets of paper rather than on individual logicalpages. Accordingly, if you set Pages per Sheet (on the Finishing tab) to be greater than one, theordering of logical pages on a physical sheet of paper does not change.
146 Chapter 4 HP PCL 6 Print Driver for Windows ENWW
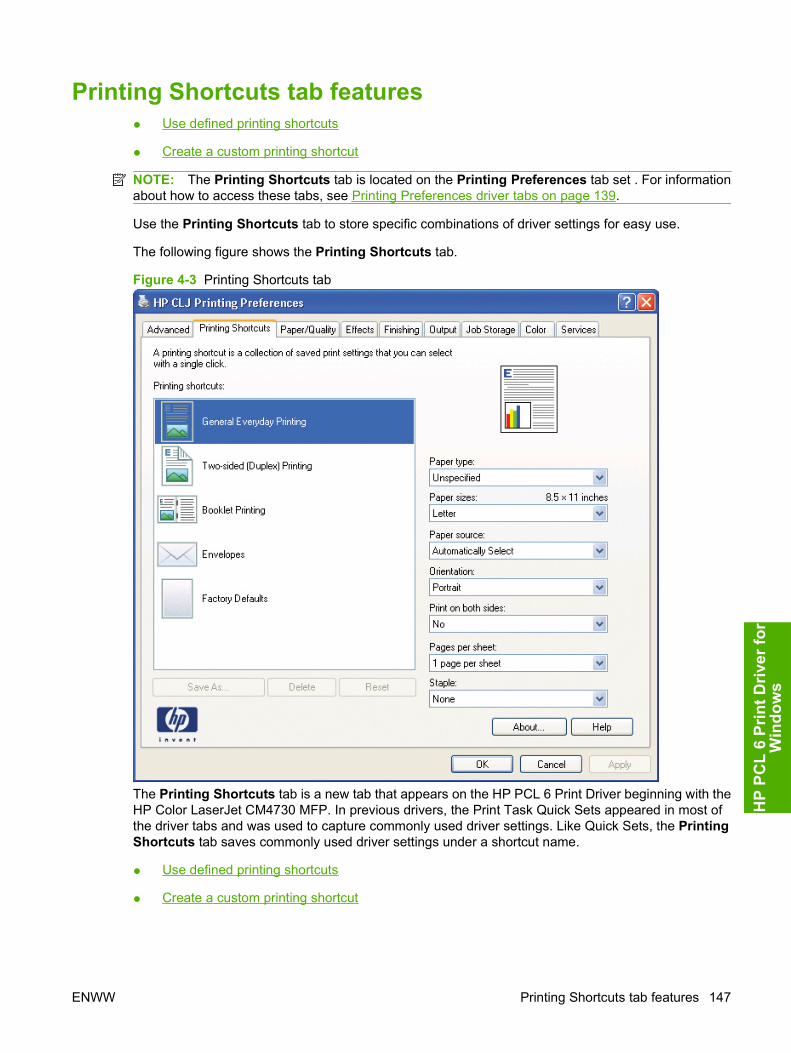
Printing Shortcuts tab features● Use defined printing shortcuts
● Create a custom printing shortcut
NOTE: The Printing Shortcuts tab is located on the Printing Preferences tab set . For informationabout how to access these tabs, see Printing Preferences driver tabs on page 139.
Use the Printing Shortcuts tab to store specific combinations of driver settings for easy use.
The following figure shows the Printing Shortcuts tab.
Figure 4-3 Printing Shortcuts tab
The Printing Shortcuts tab is a new tab that appears on the HP PCL 6 Print Driver beginning with theHP Color LaserJet CM4730 MFP. In previous drivers, the Print Task Quick Sets appeared in most ofthe driver tabs and was used to capture commonly used driver settings. Like Quick Sets, the PrintingShortcuts tab saves commonly used driver settings under a shortcut name.
● Use defined printing shortcuts
● Create a custom printing shortcut
ENWW Printing Shortcuts tab features 147
HP
PCL
6 Pr
int D
river
for
Win
dow
s
Use defined printing shortcutsThe Printing Shortcuts tab contains the following control sets:
● General Everyday Printing
● Two-sided (Duplex) Printing
● Booklet Printing
● Envelopes
● Factory Defaults
NOTE: Selections (for example, paper types) that are found under the Printing Shortcuts tab mayinclude all items found in other driver tabs. The selection list may be shortened under a shortcut forsimplification.
General Everyday PrintingWhen General Everyday Printing is selected, the following controls are available:
● Paper source
● Paper sizes
● Paper type
● Orientation
● Print on both sides
● Pages per sheet
● Staple
NOTE: This option appears only if the optional HP 3-bin Stapler/Stacker Accessory or the HPBooklet Maker/Finisher Accessory are installed on the product.
When options other than the defaults are selected, the Save as... and Reset buttons become active.
Click Save as... to create a custom printing shortcut.
Click Reset to change customized settings back to the default settings.
Paper source
The following options are available:
● Automatically Select (default)
● Printer auto select
● Manual Feed in Tray 1
● Tray 1
● Tray 2
● Tray 3
148 Chapter 4 HP PCL 6 Print Driver for Windows ENWW
● Tray 4
● Tray 5
Paper sizes
The following options are available:
● Letter (default)
● Legal
● Executive
● Statement
● 8.5 x 13
● 11 x 17
● C size sheet
● 12 x 18
● 4 x 6
● 5 x 8
● A3
● A2
● A4
● A5
● A6
● RA3
● SRA3
● B4 (JIS)
● B5 (JIS)
● B6 (JIS)
● 8K 270 x 390mm
● 16K 195 x 270mm
Paper type
The following options are available:
● Unspecified (default)
● Plain
● Intermediate 85 - 95
ENWW Printing Shortcuts tab features 149
HP
PCL
6 Pr
int D
river
for
Win
dow
s
● Bond
● Recycled
● Mid-weight 96 - 110
● Mid-weight Glossy 96 - 110
● Heavy 111 - 130
● Heavy Glossy 111 - 130
● Extra Heavy 131 - 175
● Extra Heavy Glossy 131 - 175
● Cardstock 176 - 220
● Card Glossy 176 - 220
● Letterhead
● Envelope
● Preprinted
● Prepunched
● Colored
● Rough
● HP Tough Paper
Orientation
The following options are available:
● Portrait (default)
● Landscape
Print on both sides
The following options are available:
● No (default)
● Yes, Flip Over
● Yes, Flip Up
Pages per sheet
The following options are available:
● 1 page per sheet (default)
● 2 pages per sheet
● 4 pages per sheet
150 Chapter 4 HP PCL 6 Print Driver for Windows ENWW
● 6 pages per sheet
● 9 pages per sheet
● 16 pages per sheet
Staple
NOTE: The Staple options appear only if the optional HP 3-bin Stapler/Stacker Accessory or the HPBooklet Maker/Finisher Accessory are installed on the product.
The following staple options are available:
● None
● One staple left
● One staple right
● Two staples left
● Two staples right
Two-sided (Duplex) PrintingNOTE: Because this product does not include a duplexing unit, the Two-sided (Duplex) Printingoption is available, but duplexing is a manual process.
When Two-sided (Duplex) Printing is selected, the following options are selected:
● Paper source: Automatically Select
● Paper sizes: Letter
● Paper type: Unspecified
● Orientation: Portrait
● Print on both sides: Yes, flip over
● Pages per sheet: 1 page per sheet
● Staple: none (This option appears only if the optional HP 3-bin Stapler/Stacker Accessory or theHP Booklet Maker/Finisher Accessory are installed on the product.)
Booklet PrintingNOTE: The Booklet Printing option appears only if the optional HP 3-bin Stapler/Stacker Accessoryor the HP Booklet Maker/Finisher Accessory are installed on the product.
When Booklet Printing is selected, the following options are selected:
● Paper source: Automatically Select
● Paper sizes: Letter
● Paper type: Unspecified
● Orientation: Portrait
ENWW Printing Shortcuts tab features 151
HP
PCL
6 Pr
int D
river
for
Win
dow
s
● Booklet Layout: Left binding
● Print document on: Letter
● Staple: Fold and Stitch (Max 15 sheets)
EnvelopesWhen Envelopes is selected, the following options are selected:
● Paper source: Automatically Select
● Paper sizes: Envelope #9
● Paper type: Unspecified
● Orientation: Portrait
Factory DefaultsWhen Factory Defaults is selected, the customizable options are unavailable, locking in those defaultoptions.
The Factory Defaults are as follows:
● Paper source: Automatically select
● Paper sizes: Letter/A4 (This setting changes according to country/region.)
● Paper type: Unspecified
● Orientation: Portrait
● Print on both sides: No
● Staple: None (This option appears only if the optional HP 3-bin Stapler/Stacker Accessory or theHP Booklet Maker/Finisher Accessory are installed on the product.)
Create a custom printing shortcutFollow these instructions to create a custom printing shortcut:
1. Select one of the defined printing shortcuts as a base.
2. Select the appropriate print settings on the Printing Shortcuts tab or by using the settings on anyof the Printing Preferences tabs.
152 Chapter 4 HP PCL 6 Print Driver for Windows ENWW
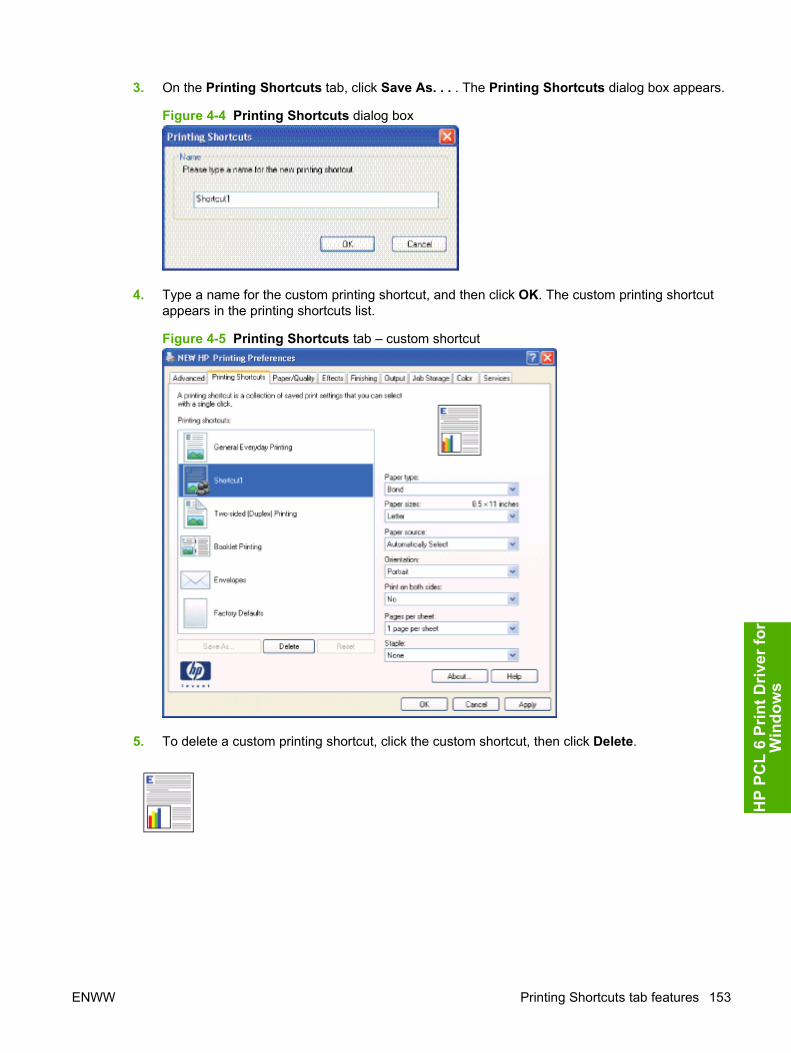
3. On the Printing Shortcuts tab, click Save As. . . . The Printing Shortcuts dialog box appears.
Figure 4-4 Printing Shortcuts dialog box
4. Type a name for the custom printing shortcut, and then click OK. The custom printing shortcutappears in the printing shortcuts list.
Figure 4-5 Printing Shortcuts tab – custom shortcut
5. To delete a custom printing shortcut, click the custom shortcut, then click Delete.
ENWW Printing Shortcuts tab features 153
HP
PCL
6 Pr
int D
river
for
Win
dow
s
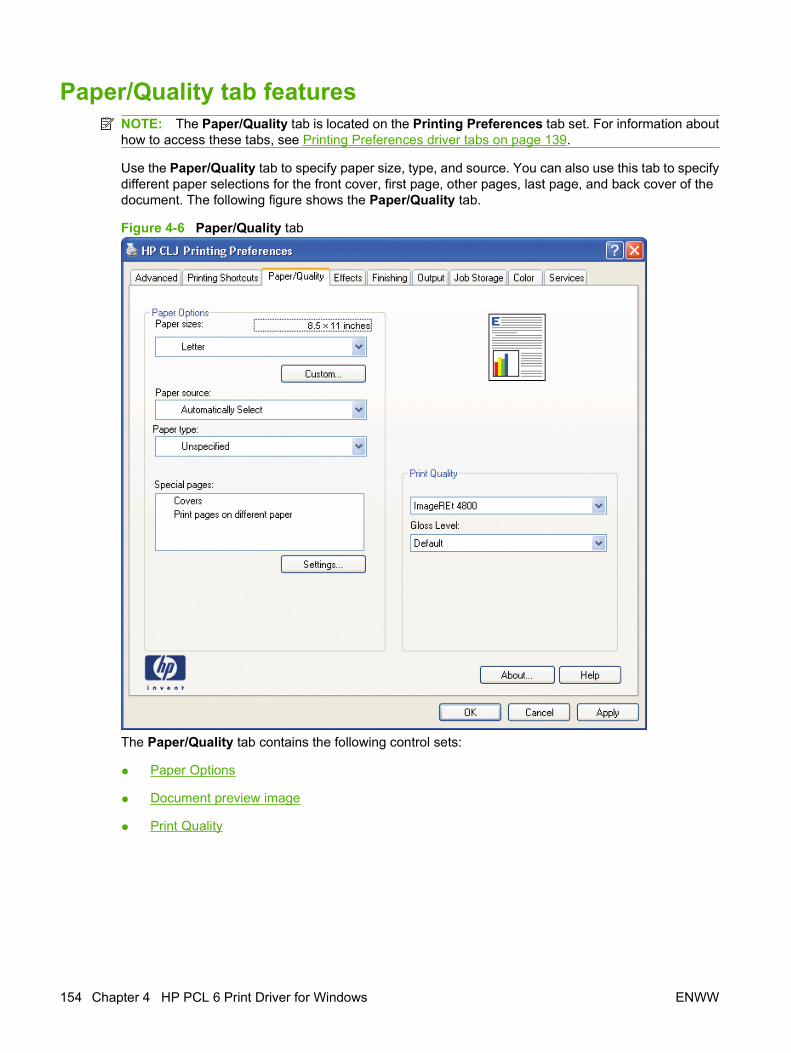
Paper/Quality tab featuresNOTE: The Paper/Quality tab is located on the Printing Preferences tab set. For information abouthow to access these tabs, see Printing Preferences driver tabs on page 139.
Use the Paper/Quality tab to specify paper size, type, and source. You can also use this tab to specifydifferent paper selections for the front cover, first page, other pages, last page, and back cover of thedocument. The following figure shows the Paper/Quality tab.
Figure 4-6 Paper/Quality tab
The Paper/Quality tab contains the following control sets:
● Paper Options
● Document preview image
● Print Quality
154 Chapter 4 HP PCL 6 Print Driver for Windows ENWW
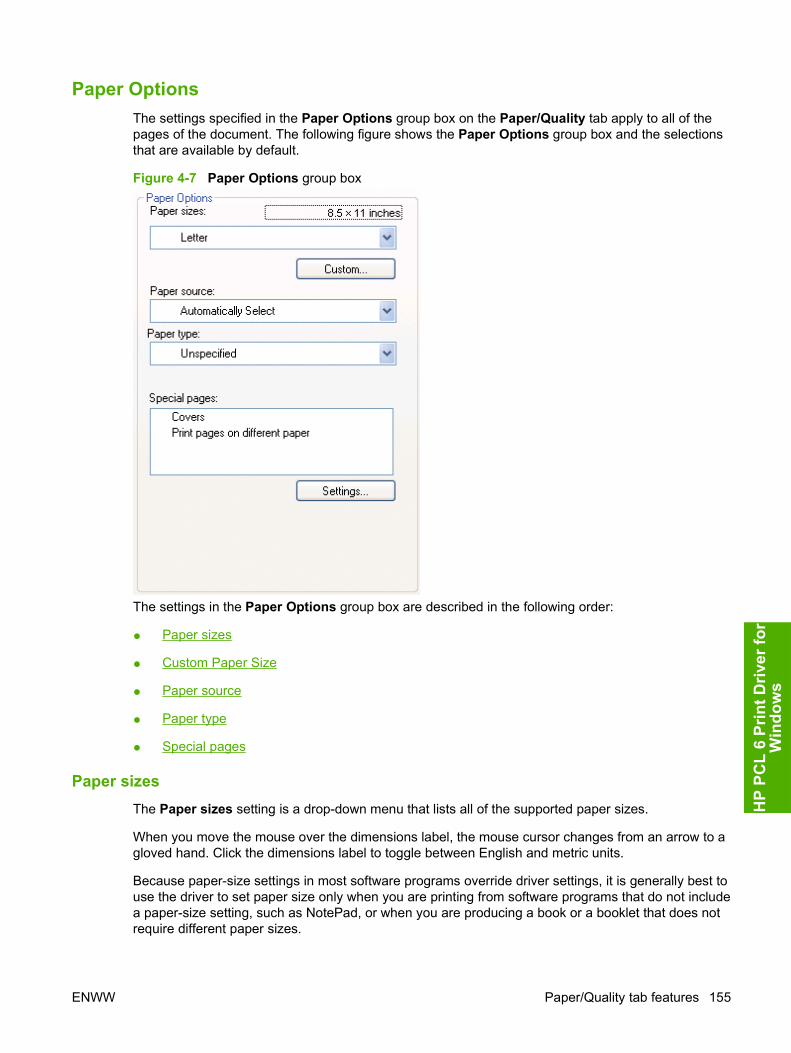
Paper OptionsThe settings specified in the Paper Options group box on the Paper/Quality tab apply to all of thepages of the document. The following figure shows the Paper Options group box and the selectionsthat are available by default.
Figure 4-7 Paper Options group box
The settings in the Paper Options group box are described in the following order:
● Paper sizes
● Custom Paper Size
● Paper source
● Paper type
● Special pages
Paper sizesThe Paper sizes setting is a drop-down menu that lists all of the supported paper sizes.
When you move the mouse over the dimensions label, the mouse cursor changes from an arrow to agloved hand. Click the dimensions label to toggle between English and metric units.
Because paper-size settings in most software programs override driver settings, it is generally best touse the driver to set paper size only when you are printing from software programs that do not includea paper-size setting, such as NotePad, or when you are producing a book or a booklet that does notrequire different paper sizes.
ENWW Paper/Quality tab features 155
HP
PCL
6 Pr
int D
river
for
Win
dow
s
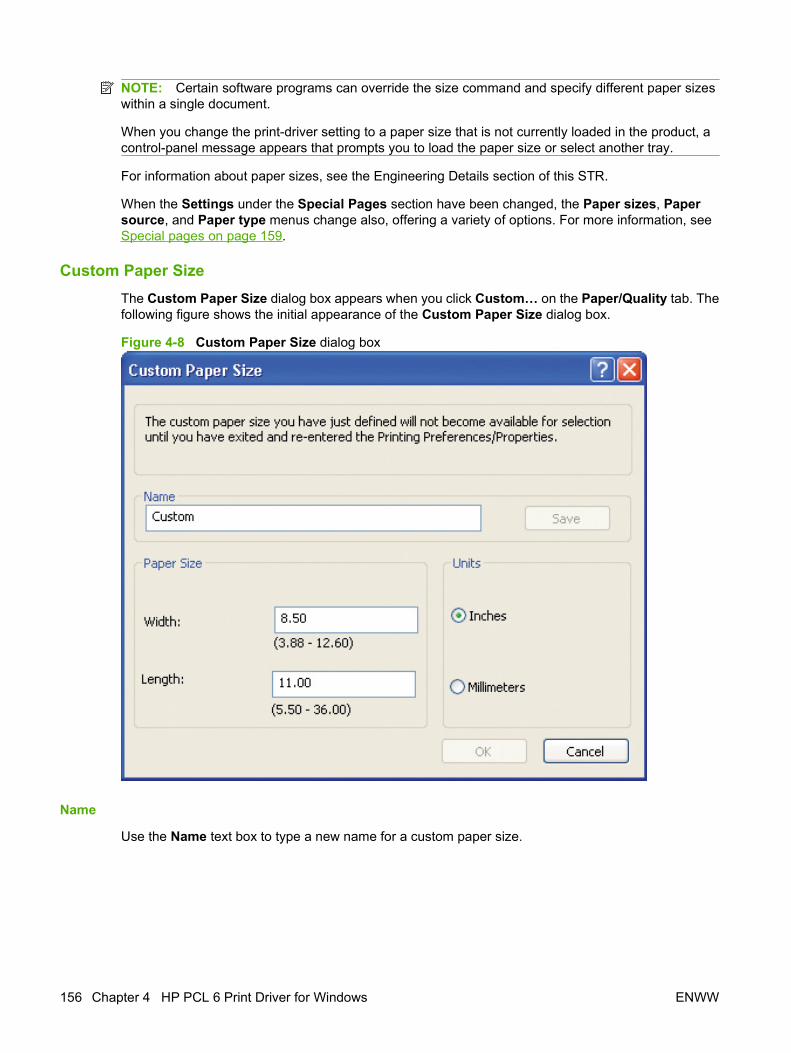
NOTE: Certain software programs can override the size command and specify different paper sizeswithin a single document.
When you change the print-driver setting to a paper size that is not currently loaded in the product, acontrol-panel message appears that prompts you to load the paper size or select another tray.
For information about paper sizes, see the Engineering Details section of this STR.
When the Settings under the Special Pages section have been changed, the Paper sizes, Papersource, and Paper type menus change also, offering a variety of options. For more information, seeSpecial pages on page 159.
Custom Paper SizeThe Custom Paper Size dialog box appears when you click Custom… on the Paper/Quality tab. Thefollowing figure shows the initial appearance of the Custom Paper Size dialog box.
Figure 4-8 Custom Paper Size dialog box
Name
Use the Name text box to type a new name for a custom paper size.
156 Chapter 4 HP PCL 6 Print Driver for Windows ENWW
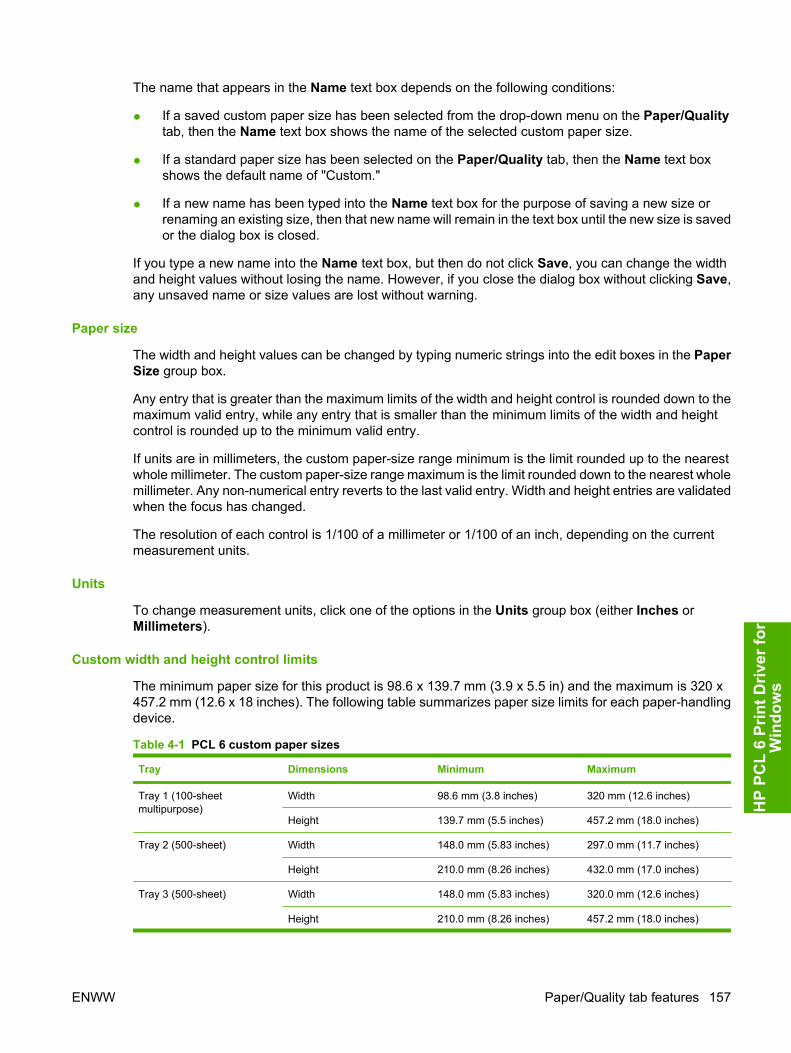
The name that appears in the Name text box depends on the following conditions:
● If a saved custom paper size has been selected from the drop-down menu on the Paper/Qualitytab, then the Name text box shows the name of the selected custom paper size.
● If a standard paper size has been selected on the Paper/Quality tab, then the Name text boxshows the default name of "Custom."
● If a new name has been typed into the Name text box for the purpose of saving a new size orrenaming an existing size, then that new name will remain in the text box until the new size is savedor the dialog box is closed.
If you type a new name into the Name text box, but then do not click Save, you can change the widthand height values without losing the name. However, if you close the dialog box without clicking Save,any unsaved name or size values are lost without warning.
Paper size
The width and height values can be changed by typing numeric strings into the edit boxes in the PaperSize group box.
Any entry that is greater than the maximum limits of the width and height control is rounded down to themaximum valid entry, while any entry that is smaller than the minimum limits of the width and heightcontrol is rounded up to the minimum valid entry.
If units are in millimeters, the custom paper-size range minimum is the limit rounded up to the nearestwhole millimeter. The custom paper-size range maximum is the limit rounded down to the nearest wholemillimeter. Any non-numerical entry reverts to the last valid entry. Width and height entries are validatedwhen the focus has changed.
The resolution of each control is 1/100 of a millimeter or 1/100 of an inch, depending on the currentmeasurement units.
Units
To change measurement units, click one of the options in the Units group box (either Inches orMillimeters).
Custom width and height control limits
The minimum paper size for this product is 98.6 x 139.7 mm (3.9 x 5.5 in) and the maximum is 320 x457.2 mm (12.6 x 18 inches). The following table summarizes paper size limits for each paper-handlingdevice.
Table 4-1 PCL 6 custom paper sizes
Tray Dimensions Minimum Maximum
Tray 1 (100-sheetmultipurpose)
Width 98.6 mm (3.8 inches) 320 mm (12.6 inches)
Height 139.7 mm (5.5 inches) 457.2 mm (18.0 inches)
Tray 2 (500-sheet) Width 148.0 mm (5.83 inches) 297.0 mm (11.7 inches)
Height 210.0 mm (8.26 inches) 432.0 mm (17.0 inches)
Tray 3 (500-sheet) Width 148.0 mm (5.83 inches) 320.0 mm (12.6 inches)
Height 210.0 mm (8.26 inches) 457.2 mm (18.0 inches)
ENWW Paper/Quality tab features 157
HP
PCL
6 Pr
int D
river
for
Win
dow
s
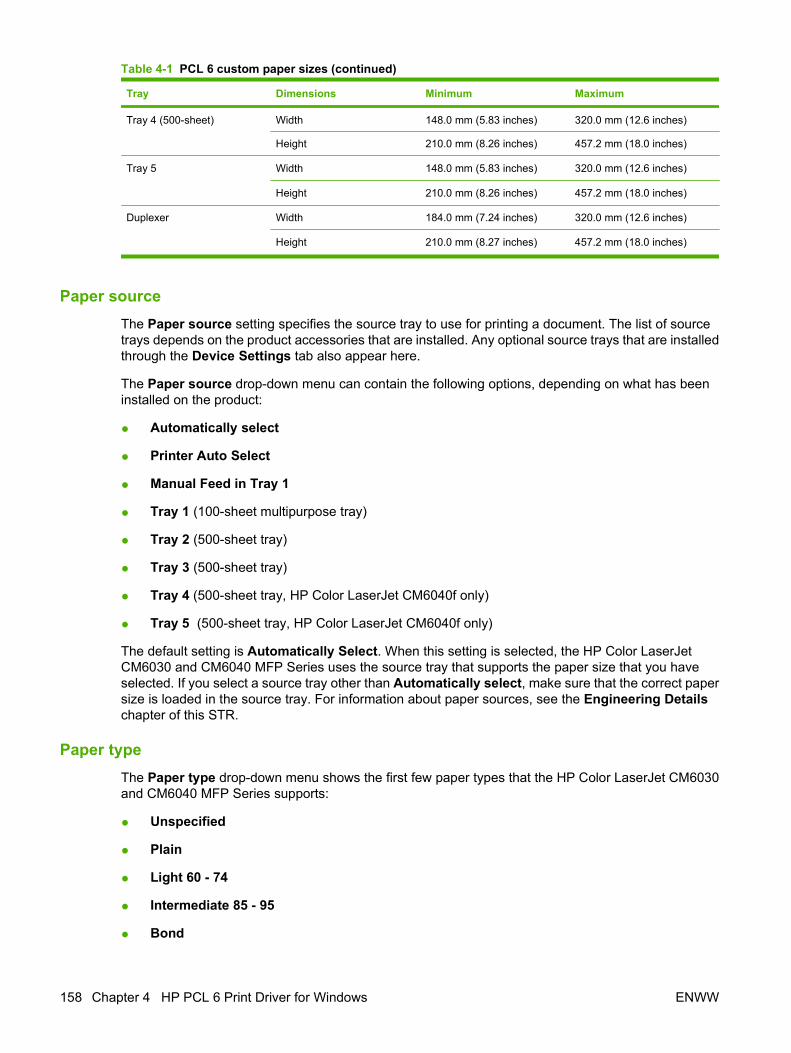
Tray Dimensions Minimum Maximum
Tray 4 (500-sheet) Width 148.0 mm (5.83 inches) 320.0 mm (12.6 inches)
Height 210.0 mm (8.26 inches) 457.2 mm (18.0 inches)
Tray 5 Width 148.0 mm (5.83 inches) 320.0 mm (12.6 inches)
Height 210.0 mm (8.26 inches) 457.2 mm (18.0 inches)
Duplexer Width 184.0 mm (7.24 inches) 320.0 mm (12.6 inches)
Height 210.0 mm (8.27 inches) 457.2 mm (18.0 inches)
Paper sourceThe Paper source setting specifies the source tray to use for printing a document. The list of sourcetrays depends on the product accessories that are installed. Any optional source trays that are installedthrough the Device Settings tab also appear here.
The Paper source drop-down menu can contain the following options, depending on what has beeninstalled on the product:
● Automatically select
● Printer Auto Select
● Manual Feed in Tray 1
● Tray 1 (100-sheet multipurpose tray)
● Tray 2 (500-sheet tray)
● Tray 3 (500-sheet tray)
● Tray 4 (500-sheet tray, HP Color LaserJet CM6040f only)
● Tray 5 (500-sheet tray, HP Color LaserJet CM6040f only)
The default setting is Automatically Select. When this setting is selected, the HP Color LaserJetCM6030 and CM6040 MFP Series uses the source tray that supports the paper size that you haveselected. If you select a source tray other than Automatically select, make sure that the correct papersize is loaded in the source tray. For information about paper sources, see the Engineering Detailschapter of this STR.
Paper typeThe Paper type drop-down menu shows the first few paper types that the HP Color LaserJet CM6030and CM6040 MFP Series supports:
● Unspecified
● Plain
● Light 60 - 74
● Intermediate 85 - 95
● Bond
Table 4-1 PCL 6 custom paper sizes (continued)
158 Chapter 4 HP PCL 6 Print Driver for Windows ENWW
● Recycled
● Mid-weight Glossy 96 - 110
● Mid-weight 96 - 110
● Heavy 111 - 130
● Heavy Glossy 111 - 130
● Extra Heavy 131 - 175
● Extra Heavy Glossy 131 - 175
● Cardstock 176 - 220
● Card Glossy 176 - 220
● Color Laser Transparency
● Labels
● Letterhead
● Envelope
● Preprinted
● Prepunched
● Colored
● Rough
● HP Tough Paper
When you use the default setting, Unspecified, the product uses the default paper type, which is usuallyPlain.
No mechanism exists for manually adding custom paper types through the driver. Custom types can beadded only by using the bidirectional communication mechanism, so they must already exist in theproduct when the bidirectional query occurs. If bidirectional communication is enabled, then theinformation on an updated list of paper types is returned. If bidirectional communication is not enabled,then the driver looks for custom paper types that have been saved from a previous bidirectionalcommunication query, and uses those. Otherwise, no custom paper types are available through thedriver.
The default setting is Unspecified, and the program selects the paper type. If you select a differentsetting, make sure that the correct paper type is loaded in the tray that you selected in the Papersource setting. For more information about paper types, see the Engineering Details chapter of thisSTR.
When you change the print-driver setting to a paper type that is not currently loaded in the product, acontrol-panel message appears that prompts you to load the paper type or select another tray.
Special pagesTo specify special pages to be used, click the Settings button under Special Pages.
ENWW Paper/Quality tab features 159
HP
PCL
6 Pr
int D
river
for
Win
dow
s
Covers
To specify cover settings, click Covers on the Special Pages window, then click Settings.
Use the Covers options to include a blank or preprinted cover on a document or to include a front/backcover from a source tray that is different from the one used for the remainder of the document.
The following are the Covers options:
● Add a blank or preprinted cover: Select which cover is customized: Front, Back, or Both.
● Paper source: The Paper source setting specifies the source tray to use for adding a front and/or back cover to the document. The list of source trays depends on the accessories that areinstalled. Any optional trays that are installed through the Device Settings tab also appear here.
● Paper type: The Paper type setting specifies the paper size to use for front and/or back covers.Changes made to the Paper type setting here override any previous Paper type settings usingthe same paper source.
NOTE: The Back Cover options are not available when the Booklet Printing Layout setting isenabled on the Finishing tab. The back cover setting is unavailable, because this page would be printedin the middle of a booklet.
NOTE: The same size of paper will be used for the entire print job.
When you change the type and source of the paper and covers, the settings remain configured until youclose the software program.
Print pages on different paper
Use the Print pages on different paper options to select an alternative paper type or source for thefirst or last page of a document.
160 Chapter 4 HP PCL 6 Print Driver for Windows ENWW
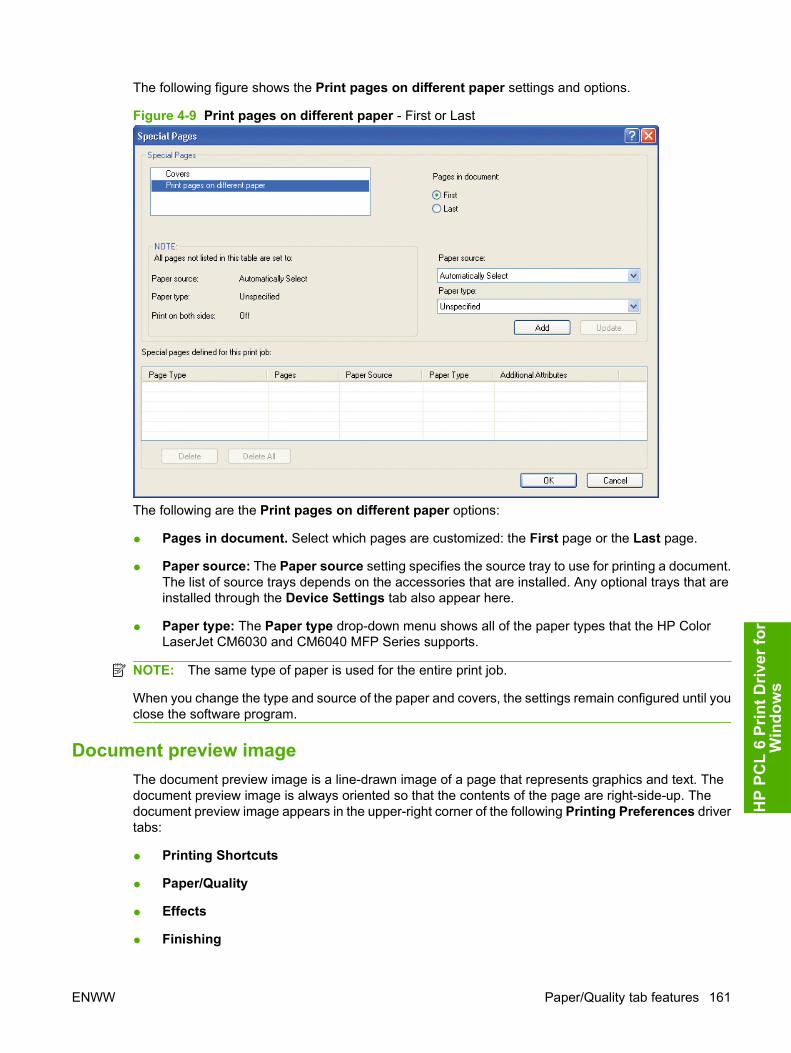
The following figure shows the Print pages on different paper settings and options.
Figure 4-9 Print pages on different paper - First or Last
The following are the Print pages on different paper options:
● Pages in document. Select which pages are customized: the First page or the Last page.
● Paper source: The Paper source setting specifies the source tray to use for printing a document.The list of source trays depends on the accessories that are installed. Any optional trays that areinstalled through the Device Settings tab also appear here.
● Paper type: The Paper type drop-down menu shows all of the paper types that the HP ColorLaserJet CM6030 and CM6040 MFP Series supports.
NOTE: The same type of paper is used for the entire print job.
When you change the type and source of the paper and covers, the settings remain configured until youclose the software program.
Document preview imageThe document preview image is a line-drawn image of a page that represents graphics and text. Thedocument preview image is always oriented so that the contents of the page are right-side-up. Thedocument preview image appears in the upper-right corner of the following Printing Preferences drivertabs:
● Printing Shortcuts
● Paper/Quality
● Effects
● Finishing
ENWW Paper/Quality tab features 161
HP
PCL
6 Pr
int D
river
for
Win
dow
s

● Output
● Color
Switching between tabs does not change the location or appearance of the document preview image.When you move the mouse over the document preview image, the mouse cursor changes from an arrowto a gloved hand. You can toggle between portrait and landscape page orientation by clicking the image.
Print QualityThe Print Quality group box contains the following controls:
● Print Quality drop-down menu
Print Quality drop-down menuUse this control to select a print quality. Numeric values are in dots per inch (dpi). ImageREt settingsprecisely control colors by combining up to 4 colors within a single dot and varying the amount of tonerin a given area to create millions of smooth colors, sharp images, and crisp text.
The Print Quality drop-down menu contains the following resolution options.
● ImageREt 4800. This setting produces 4800 dpi color laser-class print quality. This setting isselected by default.
● 1200 x 600. This setting is the best option for printing line images and fine text. It provides laser-class print quality but is slower than ImageREt 4800.
162 Chapter 4 HP PCL 6 Print Driver for Windows ENWW
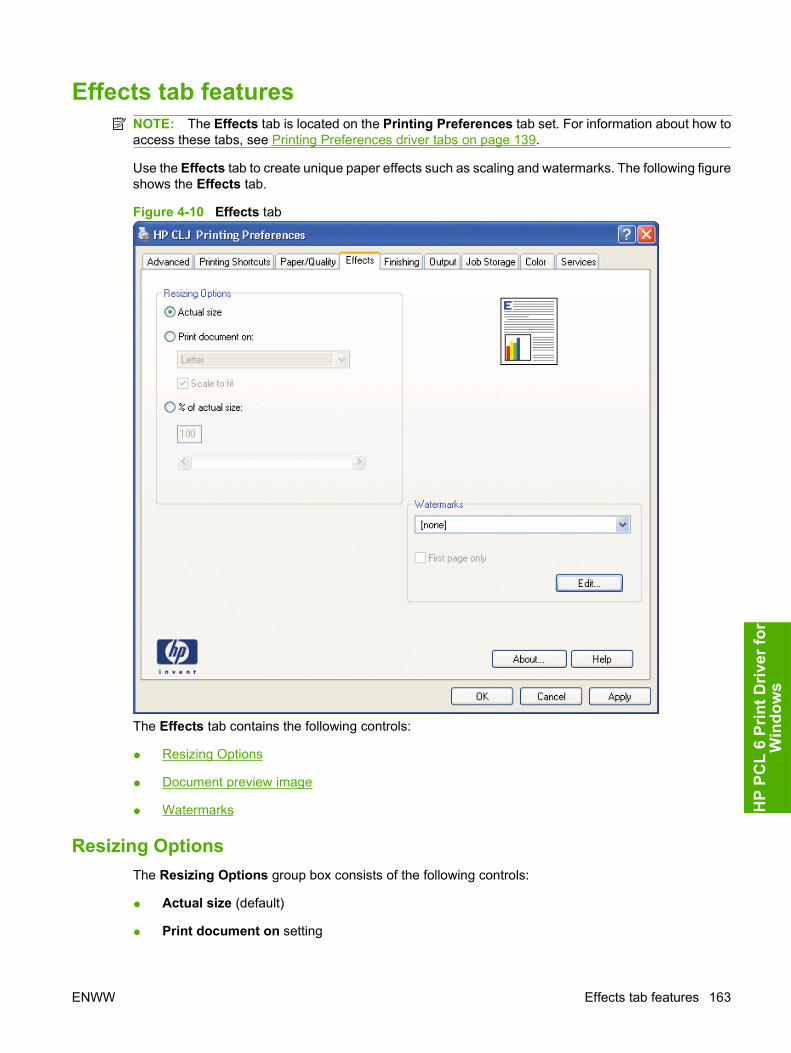
Effects tab featuresNOTE: The Effects tab is located on the Printing Preferences tab set. For information about how toaccess these tabs, see Printing Preferences driver tabs on page 139.
Use the Effects tab to create unique paper effects such as scaling and watermarks. The following figureshows the Effects tab.
Figure 4-10 Effects tab
The Effects tab contains the following controls:
● Resizing Options
● Document preview image
● Watermarks
Resizing OptionsThe Resizing Options group box consists of the following controls:
● Actual size (default)
● Print document on setting
ENWW Effects tab features 163
HP
PCL
6 Pr
int D
river
for
Win
dow
s
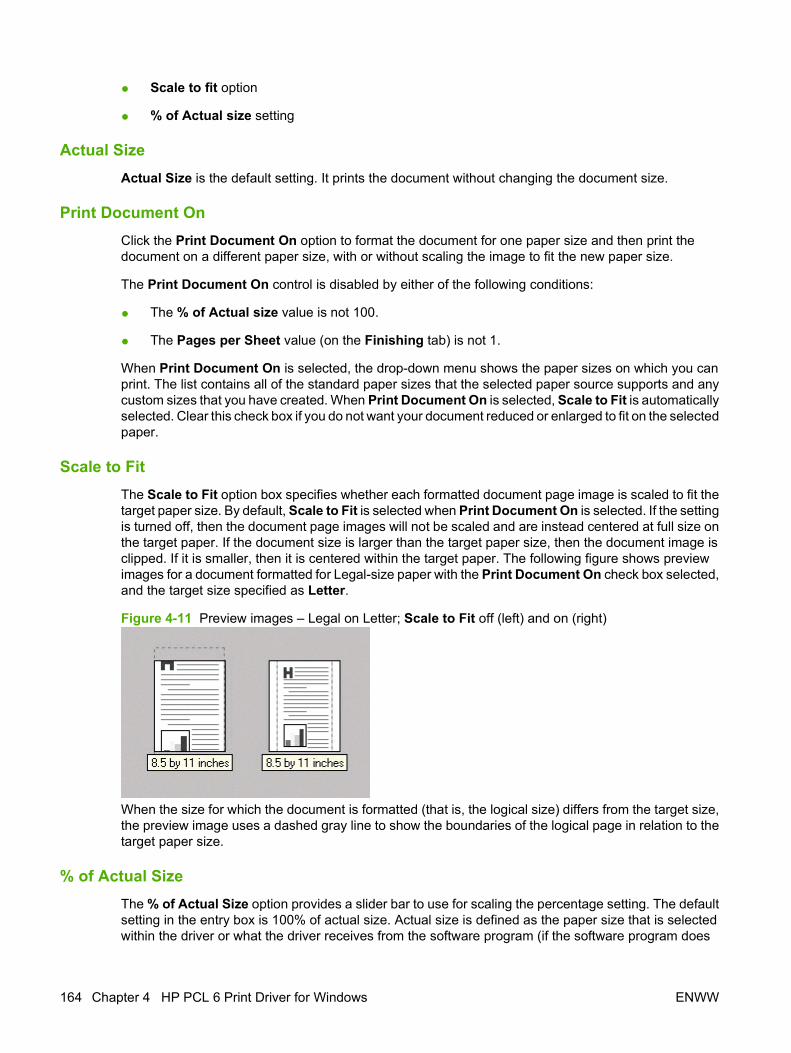
● Scale to fit option
● % of Actual size setting
Actual SizeActual Size is the default setting. It prints the document without changing the document size.
Print Document OnClick the Print Document On option to format the document for one paper size and then print thedocument on a different paper size, with or without scaling the image to fit the new paper size.
The Print Document On control is disabled by either of the following conditions:
● The % of Actual size value is not 100.
● The Pages per Sheet value (on the Finishing tab) is not 1.
When Print Document On is selected, the drop-down menu shows the paper sizes on which you canprint. The list contains all of the standard paper sizes that the selected paper source supports and anycustom sizes that you have created. When Print Document On is selected, Scale to Fit is automaticallyselected. Clear this check box if you do not want your document reduced or enlarged to fit on the selectedpaper.
Scale to FitThe Scale to Fit option box specifies whether each formatted document page image is scaled to fit thetarget paper size. By default, Scale to Fit is selected when Print Document On is selected. If the settingis turned off, then the document page images will not be scaled and are instead centered at full size onthe target paper. If the document size is larger than the target paper size, then the document image isclipped. If it is smaller, then it is centered within the target paper. The following figure shows previewimages for a document formatted for Legal-size paper with the Print Document On check box selected,and the target size specified as Letter.
Figure 4-11 Preview images – Legal on Letter; Scale to Fit off (left) and on (right)
When the size for which the document is formatted (that is, the logical size) differs from the target size,the preview image uses a dashed gray line to show the boundaries of the logical page in relation to thetarget paper size.
% of Actual SizeThe % of Actual Size option provides a slider bar to use for scaling the percentage setting. The defaultsetting in the entry box is 100% of actual size. Actual size is defined as the paper size that is selectedwithin the driver or what the driver receives from the software program (if the software program does
164 Chapter 4 HP PCL 6 Print Driver for Windows ENWW
not negotiate the paper size with the driver). The driver scales the page by the appropriate factor andsends it to the product.
The limits of the range are from 25% to 400%, and any values outside the range are adjusted to thoselimits as soon as the focus is removed from the control (that is, when the Tab key is pressed or anothercontrol is selected).
Any change to the scale also changes the page preview, which increases or decreases from the upper-left corner of the preview.
The slider bar controls the scale directly. The value in the edit box changes as the slider-bar indicatoris dragged, and the document preview image is updated to the new image scale. Each click on thearrows increases or decreases the scale by 1%. Each click on the slider bar affects the scale by 10%.
You cannot achieve an exact value by dragging the slider-bar indicator. Instead, either use the slider-bar indicator to approximate the value that you want and then use the arrows to refine the value, or typethe value into the entry box.
The following settings disable % of Actual Size:
● Print Document On (on the Effects tab) is selected
● Pages per Sheet (on the Finishing tab) is not 1
Document preview imageThe document preview image is a line-drawn image of a page that represents graphics and text. Thedocument preview image is always oriented so that the contents of the page are right-side-up. Thedocument preview image appears in the upper-right corner of the following Printing Preferences drivertabs:
● Printing Shortcuts
● Paper/Quality
● Effects
● Finishing
● Output
● Color
Switching between tabs does not change the location or appearance of the document preview image.When you move the mouse over the document preview image, the mouse cursor changes from an arrowto a gloved hand. You can toggle between portrait and landscape page orientation by clicking the image.
WatermarksUse the Watermarks feature to select a watermark, create a new watermark (text only), or edit anexisting watermark. The following watermarks are preset in the driver:
● (none)
● Confidential
● Draft
● SAMPLE
ENWW Effects tab features 165
HP
PCL
6 Pr
int D
river
for
Win
dow
s
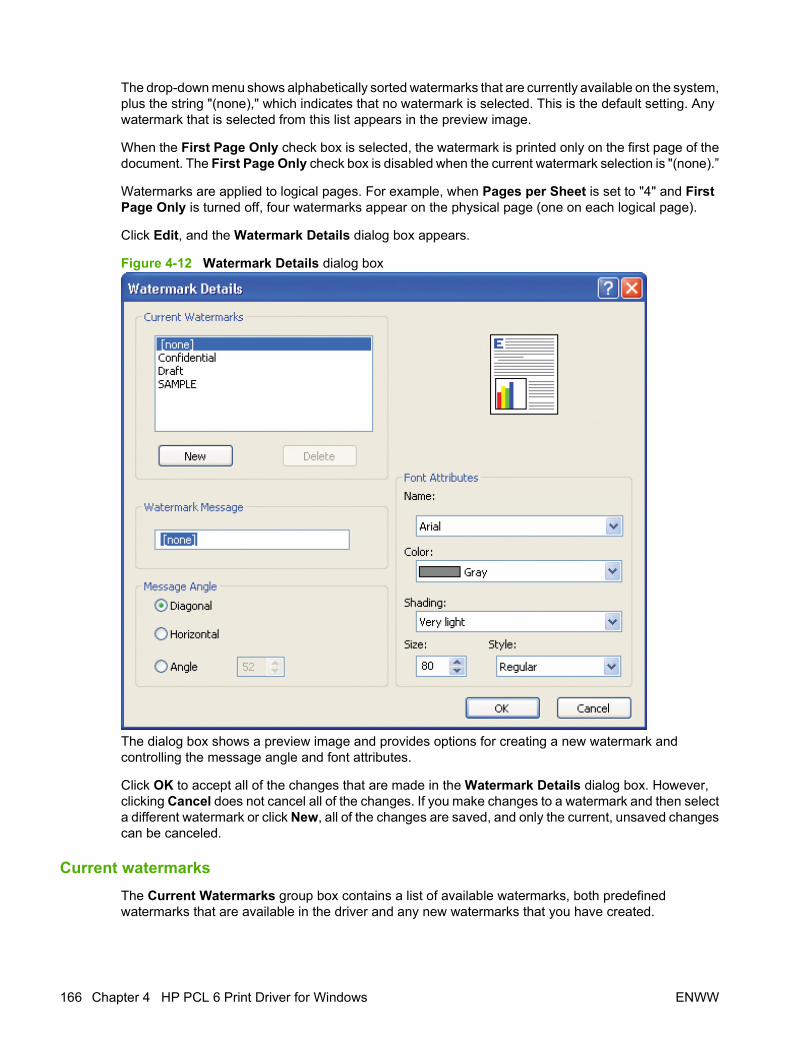
The drop-down menu shows alphabetically sorted watermarks that are currently available on the system,plus the string "(none)," which indicates that no watermark is selected. This is the default setting. Anywatermark that is selected from this list appears in the preview image.
When the First Page Only check box is selected, the watermark is printed only on the first page of thedocument. The First Page Only check box is disabled when the current watermark selection is "(none).”
Watermarks are applied to logical pages. For example, when Pages per Sheet is set to "4" and FirstPage Only is turned off, four watermarks appear on the physical page (one on each logical page).
Click Edit, and the Watermark Details dialog box appears.
Figure 4-12 Watermark Details dialog box
The dialog box shows a preview image and provides options for creating a new watermark andcontrolling the message angle and font attributes.
Click OK to accept all of the changes that are made in the Watermark Details dialog box. However,clicking Cancel does not cancel all of the changes. If you make changes to a watermark and then selecta different watermark or click New, all of the changes are saved, and only the current, unsaved changescan be canceled.
Current watermarksThe Current Watermarks group box contains a list of available watermarks, both predefinedwatermarks that are available in the driver and any new watermarks that you have created.
166 Chapter 4 HP PCL 6 Print Driver for Windows ENWW
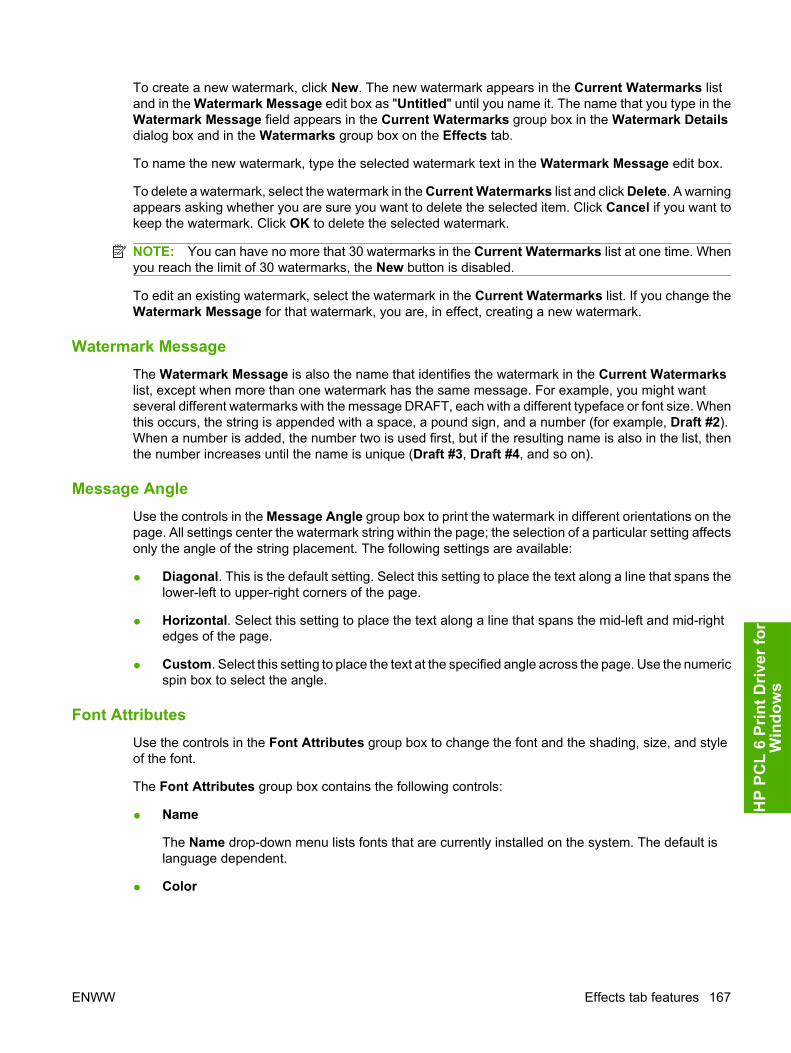
To create a new watermark, click New. The new watermark appears in the Current Watermarks listand in the Watermark Message edit box as "Untitled" until you name it. The name that you type in theWatermark Message field appears in the Current Watermarks group box in the Watermark Detailsdialog box and in the Watermarks group box on the Effects tab.
To name the new watermark, type the selected watermark text in the Watermark Message edit box.
To delete a watermark, select the watermark in the Current Watermarks list and click Delete. A warningappears asking whether you are sure you want to delete the selected item. Click Cancel if you want tokeep the watermark. Click OK to delete the selected watermark.
NOTE: You can have no more that 30 watermarks in the Current Watermarks list at one time. Whenyou reach the limit of 30 watermarks, the New button is disabled.
To edit an existing watermark, select the watermark in the Current Watermarks list. If you change theWatermark Message for that watermark, you are, in effect, creating a new watermark.
Watermark MessageThe Watermark Message is also the name that identifies the watermark in the Current Watermarkslist, except when more than one watermark has the same message. For example, you might wantseveral different watermarks with the message DRAFT, each with a different typeface or font size. Whenthis occurs, the string is appended with a space, a pound sign, and a number (for example, Draft #2).When a number is added, the number two is used first, but if the resulting name is also in the list, thenthe number increases until the name is unique (Draft #3, Draft #4, and so on).
Message AngleUse the controls in the Message Angle group box to print the watermark in different orientations on thepage. All settings center the watermark string within the page; the selection of a particular setting affectsonly the angle of the string placement. The following settings are available:
● Diagonal. This is the default setting. Select this setting to place the text along a line that spans thelower-left to upper-right corners of the page.
● Horizontal. Select this setting to place the text along a line that spans the mid-left and mid-rightedges of the page.
● Custom. Select this setting to place the text at the specified angle across the page. Use the numericspin box to select the angle.
Font AttributesUse the controls in the Font Attributes group box to change the font and the shading, size, and styleof the font.
The Font Attributes group box contains the following controls:
● Name
The Name drop-down menu lists fonts that are currently installed on the system. The default islanguage dependent.
● Color
ENWW Effects tab features 167
HP
PCL
6 Pr
int D
river
for
Win
dow
s
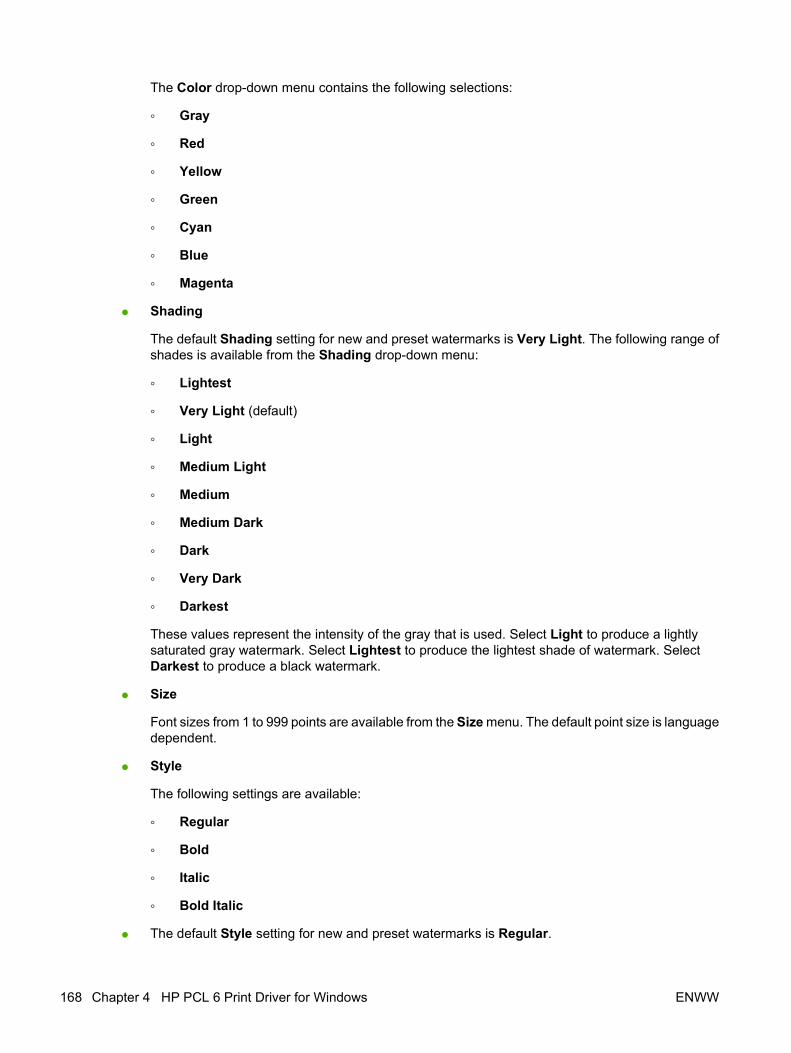
The Color drop-down menu contains the following selections:
◦ Gray
◦ Red
◦ Yellow
◦ Green
◦ Cyan
◦ Blue
◦ Magenta
● Shading
The default Shading setting for new and preset watermarks is Very Light. The following range ofshades is available from the Shading drop-down menu:
◦ Lightest
◦ Very Light (default)
◦ Light
◦ Medium Light
◦ Medium
◦ Medium Dark
◦ Dark
◦ Very Dark
◦ Darkest
These values represent the intensity of the gray that is used. Select Light to produce a lightlysaturated gray watermark. Select Lightest to produce the lightest shade of watermark. SelectDarkest to produce a black watermark.
● Size
Font sizes from 1 to 999 points are available from the Size menu. The default point size is languagedependent.
● Style
The following settings are available:
◦ Regular
◦ Bold
◦ Italic
◦ Bold Italic
● The default Style setting for new and preset watermarks is Regular.
168 Chapter 4 HP PCL 6 Print Driver for Windows ENWW
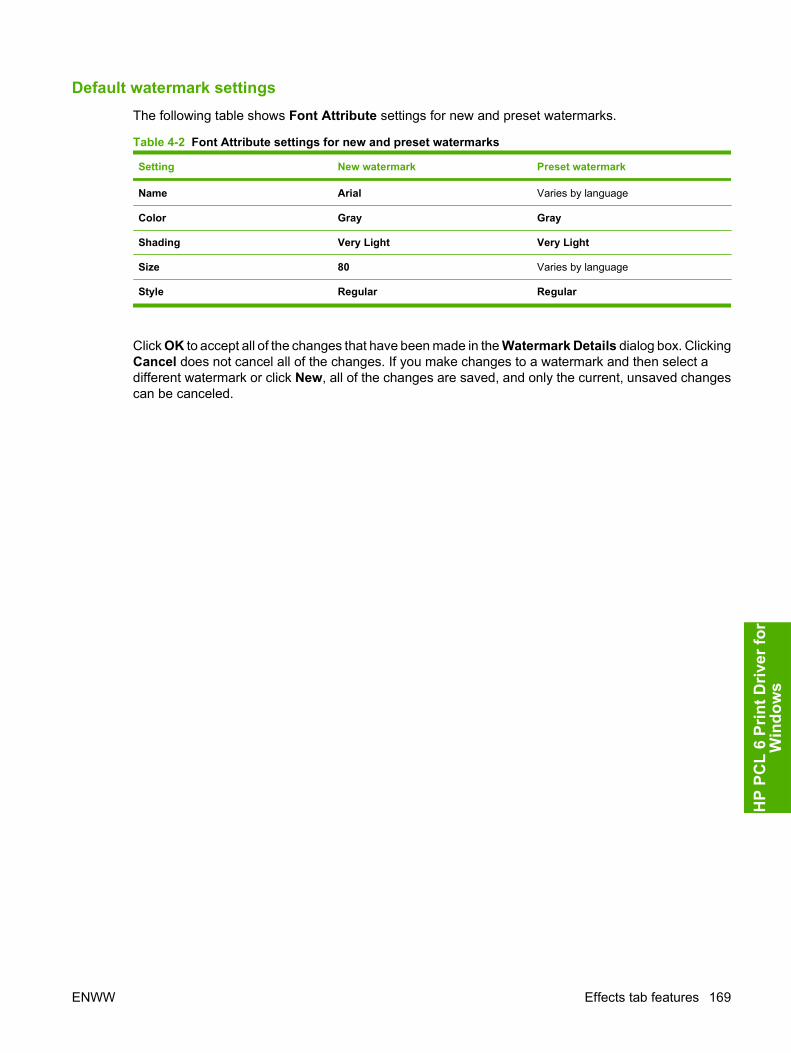
Default watermark settingsThe following table shows Font Attribute settings for new and preset watermarks.
Table 4-2 Font Attribute settings for new and preset watermarks
Setting New watermark Preset watermark
Name Arial Varies by language
Color Gray Gray
Shading Very Light Very Light
Size 80 Varies by language
Style Regular Regular
Click OK to accept all of the changes that have been made in the Watermark Details dialog box. ClickingCancel does not cancel all of the changes. If you make changes to a watermark and then select adifferent watermark or click New, all of the changes are saved, and only the current, unsaved changescan be canceled.
ENWW Effects tab features 169
HP
PCL
6 Pr
int D
river
for
Win
dow
s
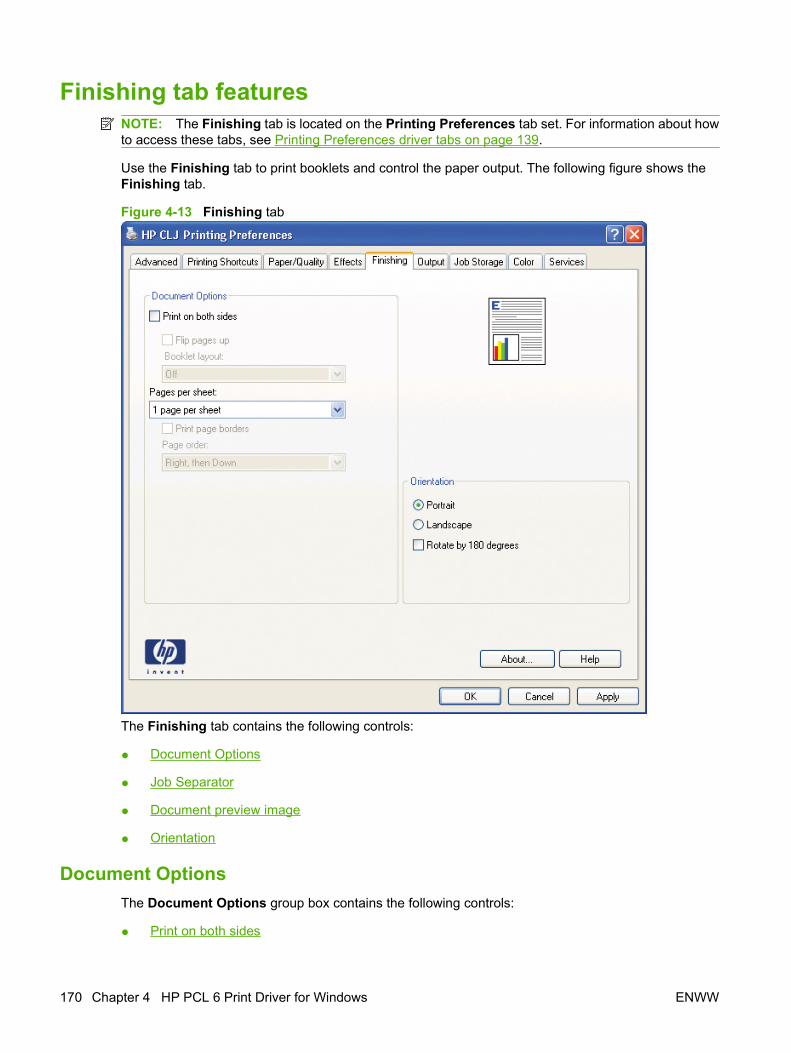
Finishing tab featuresNOTE: The Finishing tab is located on the Printing Preferences tab set. For information about howto access these tabs, see Printing Preferences driver tabs on page 139.
Use the Finishing tab to print booklets and control the paper output. The following figure shows theFinishing tab.
Figure 4-13 Finishing tab
The Finishing tab contains the following controls:
● Document Options
● Job Separator
● Document preview image
● Orientation
Document OptionsThe Document Options group box contains the following controls:
● Print on both sides
170 Chapter 4 HP PCL 6 Print Driver for Windows ENWW
● Flip pages up
● Booklet layout
● Pages per sheet
● Print page borders
● Page order
Print on both sidesThe default setting for the Print on both sides option is off (not selected). Print on both sides isavailable when the following conditions exist:
● Paper type on the Paper/Quality tab is set to any paper type except for the following types:
◦ Labels
◦ Color Laser Transparency
● Paper sizes is set to any paper size except for the following sizes:
◦ Envelope #10
◦ Double Postcard (JIS)
◦ Envelope #9
◦ Envelope Monarch
◦ Envelope B5
◦ Envelope C5
◦ Envelope C6
◦ Envelope DL
Print on both sides (automatically)
The smart duplexing feature increases printing performance by preventing one-page print jobs or single-sided pages of a duplexed print job from going through the duplexing unit even when the duplexingfeature has been selected in the driver.
All paper types support the smart duplexing feature, except for paper types that cannot be printed onboth sides (such as labels, transparencies, and envelopes) and the following paper types:
● Prepunched
● Preprinted
● Letterhead
● Cardstock
When the paper type is set to Unspecified, the smart duplexing feature is disabled.
To achieve the best print quality when printing on the second side of the page, the product needs tomake adjustments to its print modes. When you select a paper type, you are, in effect, instructing theproduct to use a group of settings (such as fuser temperature and print speed) to print the paper with
ENWW Finishing tab features 171
HP
PCL
6 Pr
int D
river
for
Win
dow
s
the best possible quality. This group of settings is known as print mode. A different print mode is usedwith each paper type. Print-mode adjustments for the second side of a duplexed page are automatic.
Print on both sides (manually)
● Manually Print on 2nd Side is not selected by default.
Select the Print on both sides (Manually) check box to print on the second side of the paper forthe HP Color LaserJet CM6030 MFP product model, which does not have a duplexing unit installed.Also select Print on both sides (Manually) on the other HP Color LaserJet CM6030 and CM6040MFP Series product models for paper types that are not available when using the automaticduplexing unit, such as cardstock and thick paper.
Manually printing on the second side of a page is available when you are using the HP PCL 6driver. If a duplexing unit is installed and manual duplexing is enabled in the driver, the productautomatically prints on both sides of paper types that are supported for automatic duplexing (Letter,A4, Legal, and 8.5 x 11 only). For paper types that are not supported for automatic duplexing, ahelp message appears prompting you to configure the driver settings for manual printing on bothsides. Manual printing on both sides does not occur automatically.
Select the paper type that corresponds to the paper that you are using for the print job. The followingpaper types have a different print modes when you manually print on the second side:
◦ Plain
◦ Preprinted
◦ Letterhead
◦ Prepunched
◦ Bond
◦ Recycled
◦ Colored
◦ Rough
NOTE: To make the Print on both sides (Manually) check box available in the document options,select the Allow Manual Duplexing option on the Device Settings tab in the print-driver Propertiestab set. See Installable Options on page 198. Also, under Device Settings, set Duplex Unit to NotInstalled.
If you want to print on both sides manually while using paper that is supported for automatic duplexing,you must select and apply the Not Installed setting on the Allow manual duplexing option on theDevice Settings tab.
Cardstock paper can be manually printed on the second side, but no change occurs to the print mode.Transparencies and labels should never be manually printed on the second side.
To print a multiple-page document, follow these steps:
1. Select the Print on both sides (Manually) check box.
2. Click OK. The even-number pages of the document print.
3. When the control panel shows the MANUALLY FEED message, insert the stack of paper (on whichthe even-number pages have been printed) as indicated in the following figure.
172 Chapter 4 HP PCL 6 Print Driver for Windows ENWW
4. If a finisher is attached, follow these steps:
● The graphic and instructions for manual duplex are correct for use with long-edge feed media.Rotate the stack with the short edge as the axis, and place in the manual-feed tray. Even-numbered pages should be face up, with long-edge feed.
● If short-edge feed media is used (letter-R, for example), flip the media as shown in the graphic(short edge as the axis), and also rotate the stack 90 degrees counterclockwise and thenplace in Tray 1. Even-numbered pages should be face up, with long-edge feed, even thoughthe paper started out as short-edge feed.
5. If a finisher is not attached follow these steps:
● For long-edge feed paper, rotate the stack with the long edge as the axis, and place in themanual-feed tray. Even-numbered pages should be face up, with long-edge feed.
● For short-edge feed paper, flip the media as shown in the graphic, but also rotate the stack90 degrees counterclockwise and then place in Tray 1. Even-numbered pages should be faceup, with long-edge feed, even though the paper started out as short-edge feed.
Flip pages upUse the Flip pages up check box to specify the duplex-binding option. By default, the Flip pages upcheck box is not available. It is available only when Print on both sides is selected. The following tabledemonstrates the results of selecting this check box, depending on the paper orientation selected onthe Finishing tab.
Table 4-3 Page orientation
Orientation (Finishing tab) Flip pages up selected Flip pages up not selected
Portrait Short-edge binding Long-edge binding
Landscape Long-edge binding Short-edge binding
When Print on both sides is selected, the document preview image changes to show a spiral bindingalong either the left edge or the top edge of the page. In addition, a folded-over corner appears in thelower-right portion of the preview image, indicating that printing occurs on the back side. An arrow onthe folded-over corner points in the direction that the pages would be flipped if they were bound together.
Short-side binding is for print jobs with pages that read by flipping over like the pages of a calendar.Long-side binding is for print jobs with pages that read by turning like the pages of a book.
Booklet layoutThe Booklet Layout drop-down menu, visible when Print on Both Sides is selected, offers choicesthat are based on the current paper size. The default setting for the Booklet Printing drop-down menuis Off. The other settings have the following format, where [paper size] depends on the paper size thatis set on the Paper/Quality tab:
● Left Edge Binding
● Right Edge Binding
When you select Left Edge Binding or Right Edge Binding, the document preview image changes toshow the location of the binding. If the Pages per Sheet setting is on the default setting of 1, itautomatically changes to 2 pages per sheet. If you change the Pages per Sheet setting manually to
ENWW Finishing tab features 173
HP
PCL
6 Pr
int D
river
for
Win
dow
s
4, 6, 9, or 16 pages per sheet, the booklet setting is disabled. See Pages per sheet on page 174 formore information.
Book and Booklet Printing
The HP Color LaserJet CM6030 and CM6040 MFP Series supports book and booklet printing.
A book is a print job consisting of at least two pages. It can have a different paper type for the frontcover, first page, other pages, last page, or back cover. Use the Covers and Print pages on differentpaper settings on the Paper/Quality tab to select different paper for the front cover, first page, otherpages, and back cover. For more information, see Paper/Quality tab features on page 154.
A booklet is a print job that places two pages on each side of a sheet that can then be folded into abooklet that is half the size of the paper. Use the Booklet Layout drop-down menu on the Finishingtab to control booklet settings.
Print a booklet
1. Open the driver Printing Preferences tab set and click the Printing Shortcuts tab. For informationabout how to access the Printing Preferences tab set, see Printing Preferences driver tabson page 139.
2. Click to select Booklet Printing.
NOTE: Typically, you select the size of each page of the booklet in your software program byclicking File, clicking Page, and then clicking Setup. For example, if each page of the finished bookis to be Letter-sized in your 2-up booklet, select Letter in your software program, and then select11 x 17 from the Print document on drop-down menu (physical size of the page) on the PrintingShortcuts tab. If your software program does not allow you to set the paper size, use the Papersizes drop-down menu on the Printing Shortcuts tab.
3. Select the appropriate settings from the following drop-down menus on the Printing Shortcutstab.
● Paper source
● Paper size
● Paper type
● Orientation
● Booklet Layout
● Print document on
● Staple
4. Click OK to print.
Pages per sheetUse the Pages per Sheet option to select the number of pages that you want to print on a single sheetof paper. If you choose to print more than one page per sheet, the pages appear smaller and are
174 Chapter 4 HP PCL 6 Print Driver for Windows ENWW
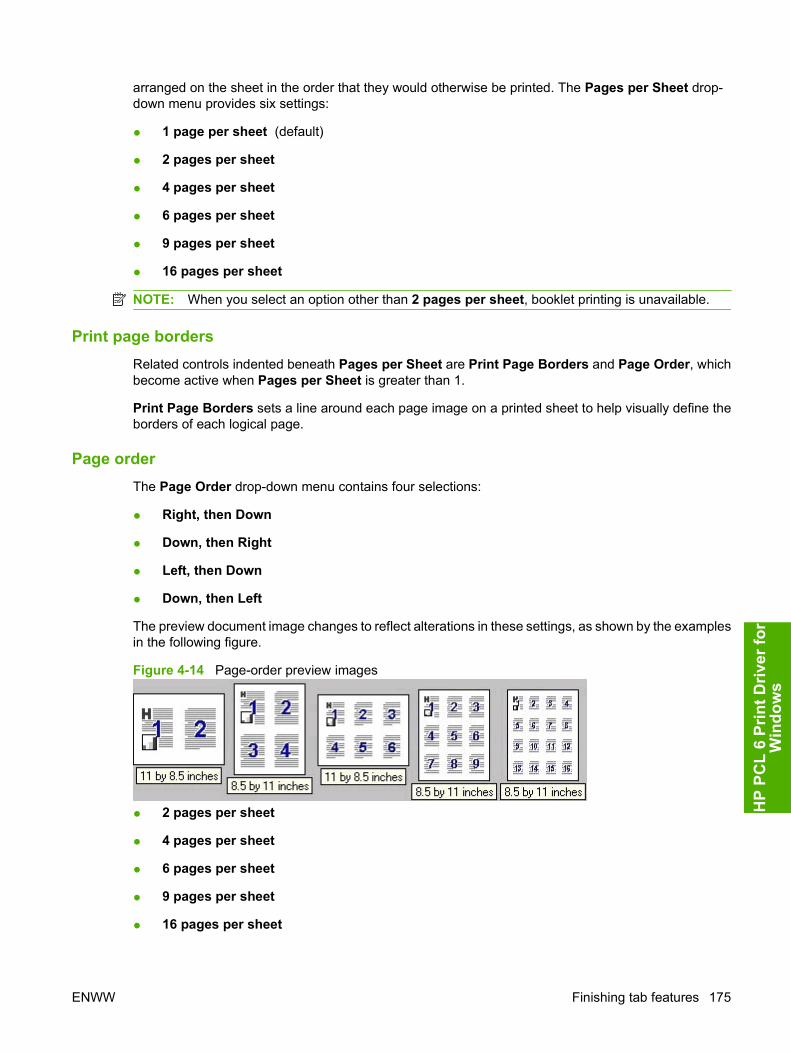
arranged on the sheet in the order that they would otherwise be printed. The Pages per Sheet drop-down menu provides six settings:
● 1 page per sheet (default)
● 2 pages per sheet
● 4 pages per sheet
● 6 pages per sheet
● 9 pages per sheet
● 16 pages per sheet
NOTE: When you select an option other than 2 pages per sheet, booklet printing is unavailable.
Print page bordersRelated controls indented beneath Pages per Sheet are Print Page Borders and Page Order, whichbecome active when Pages per Sheet is greater than 1.
Print Page Borders sets a line around each page image on a printed sheet to help visually define theborders of each logical page.
Page orderThe Page Order drop-down menu contains four selections:
● Right, then Down
● Down, then Right
● Left, then Down
● Down, then Left
The preview document image changes to reflect alterations in these settings, as shown by the examplesin the following figure.
Figure 4-14 Page-order preview images
● 2 pages per sheet
● 4 pages per sheet
● 6 pages per sheet
● 9 pages per sheet
● 16 pages per sheet
ENWW Finishing tab features 175
HP
PCL
6 Pr
int D
river
for
Win
dow
s
Job SeparatorThis button produces the Detail dialog box.
This button only appears when the Job Separator setting is enabled under Device settings.
Document preview imageThe document preview image is a line-drawn image of a page that represents graphics and text. Thedocument preview image is always oriented so that the contents of the page are right side up. Thedocument preview image appears in the upper-right corner of the following Printing Preferences drivertabs:
● Printing Shortcuts
● Paper/Quality
● Effects
● Finishing
● Output
● Color
Switching between tabs does not change the location or appearance of the document preview image.When you move the mouse over the document preview image, the mouse cursor changes from an arrowto a gloved hand. You can toggle between portrait and landscape page orientation by clicking the image.
OrientationOrientation refers to the layout of the image on the page and does not affect the way that paper feedsinto the product. You can specify the orientation of the print job. The three available orientations areportrait, landscape, and rotated. The default orientation is Portrait.
NOTE: Nearly all software programs establish the orientation for the printed page, so the pageorientation in the driver is useful only for the few software programs that do not set an orientation.
The Orientation group box contains the following options:
● Portrait. The top edge of the document is the shorter edge of the paper.
● Landscape. The top edge of the document is the longer edge of the paper.
● Rotate by 180 degrees. This creates a landscape or portrait orientation in which the image isrotated 180°. This setting is useful for printing prepunched paper.
You can toggle orientation between portrait and landscape by clicking the document preview image. Ifyou select the Rotate by 180 degrees check box, no change occurs in the document preview image.
176 Chapter 4 HP PCL 6 Print Driver for Windows ENWW

Output tab featuresNOTE: The Output tab is located on the Printing Preferences tab set . For information about how toaccess these tabs, see Printing Preferences driver tabs on page 139.
Use the Output tab to select finishing and output options for a document. The following figure showsthe Output tab.
Figure 4-15 Output tab
The Output tab contains the following controls:
● Output Options group box
● Document preview image
● Output Bin Options
Output OptionsThe Output tab appears only if the optional HP 3-bin Stapler/Stacker Accessory or the HP BookletMaker/Finisher Accessory are installed on the product.
ENWW Output tab features 177
HP
PCL
6 Pr
int D
river
for
Win
dow
s
The available Output Options that are available depend on which output accessory is installed andconfigured on the product. The options for accessories, which must be configured on the DeviceSettings tab, are:
● None
● One staple left
● One staple right
● Two staples left
● Two staples right
● Fold and Stitch (Max 15 sheets)
Document preview imageThe document preview image is a line-drawn image of a page that represents graphics and text. Thedocument preview image is always oriented so that the contents of the page are right side up. Thedocument preview image appears in the upper-right corner of the following Printing Preferences drivertabs:
● Printing Shortcuts
● Paper/Quality
● Effects
● Finishing
● Output
● Color
Switching between tabs does not change the location or appearance of the document preview image.When you move the mouse over the document preview image, the mouse cursor changes from an arrowto a gloved hand. You can toggle between portrait and landscape page orientation by clicking on theimage.
Output Bin optionsThe available settings depend on which accessory output bin is installed on your product, the HP 3-binStapler/Stacker Accessory or the HP Booklet Maker/Finisher Accessory. The following options areavailable.
● Automatically Select: Sends the pages to the product’s default output bin.
● Upper Left Bin: Pages exit the product face down in the bin. Pages sent to this output bin stackin the order that they are printed (correct-ordered output).
● Middle Left Bin: Pages exit the product face down and in the correct order.
● Lower Left Bin: Pages exit the product face down and in the correct order. For the HP BookletMaker/Finisher Accessory, the Lower Left Bin is used for booklet output only.
178 Chapter 4 HP PCL 6 Print Driver for Windows ENWW
Job Storage tab featuresNOTE: The Job Storage tab is located on the Printing Preferences tab set. For information abouthow to access these tabs, see Printing Preferences driver tabs on page 139.
Use the job-storage feature to store print jobs in the HP Color LaserJet CM6030 and CM6040 MFPSeries product memory or hard disk for printing at a later time.
The Job Storage tab appears among the driver tabs only if the job-storage feature is enabled on theDevice Settings tab. To support job-storage features for complex jobs, or if you often print complexgraphics, print postscript (PS) documents, or use many downloaded fonts, HP recommends that youinstall additional memory, install a hard disk, or both. Added memory also gives you more flexibility insupporting job-storage features. A minimum total memory of 288 MB is required to use the Proof andHold and Personal Job job-storage features. A hard disk is required to use the Quick Copy and StoredJob job-storage features.
NOTE: This product comes with a hard disk installed on all models of the product.
There are four Job Storage Mode settings:
● Proof and Hold
● Personal Job
● Quick Copy
● Stored Job
The following figure shows the Job Storage tab.
ENWW Job Storage tab features 179
HP
PCL
6 Pr
int D
river
for
Win
dow
s
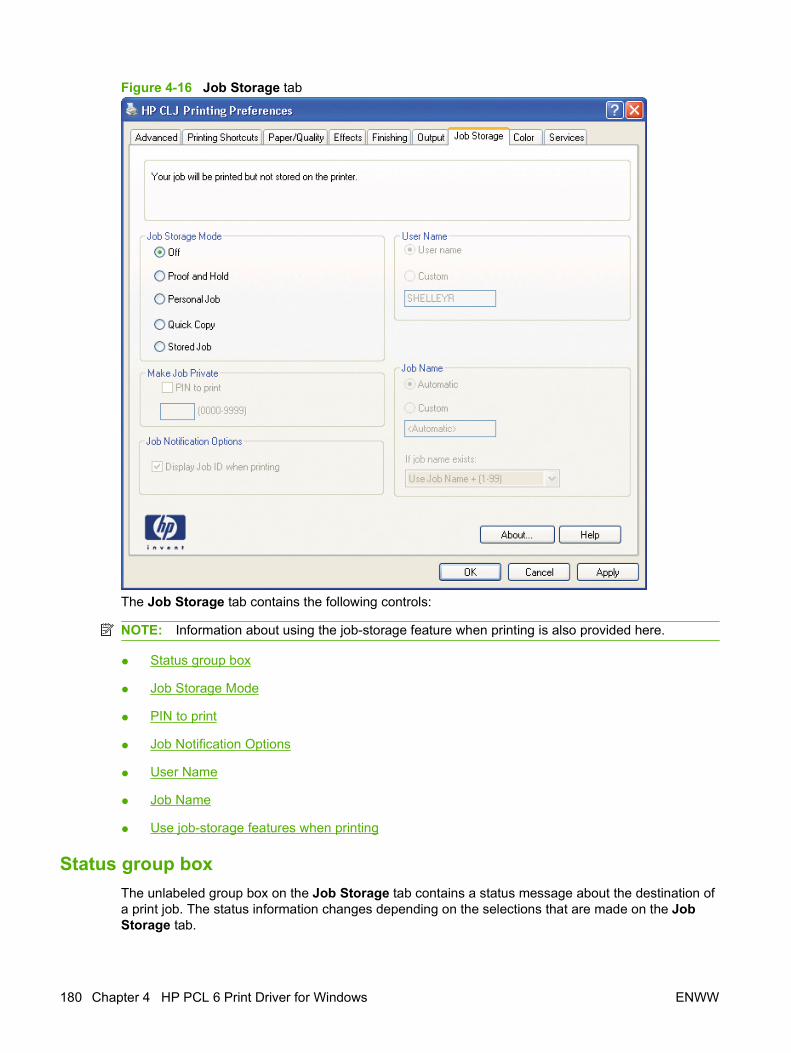
Figure 4-16 Job Storage tab
The Job Storage tab contains the following controls:
NOTE: Information about using the job-storage feature when printing is also provided here.
● Status group box
● Job Storage Mode
● PIN to print
● Job Notification Options
● User Name
● Job Name
● Use job-storage features when printing
Status group boxThe unlabeled group box on the Job Storage tab contains a status message about the destination ofa print job. The status information changes depending on the selections that are made on the JobStorage tab.
180 Chapter 4 HP PCL 6 Print Driver for Windows ENWW
Job Storage ModeUse the Job Storage Mode options on the HP Color LaserJet CM6030 and CM6040 MFP Seriesproduct to store documents at the product and then control their printing at the product control panel.
The HP Color LaserJet CM6030 and CM6040 MFP Series product offers the following Job StorageMode options:
● Off
● Proof and Hold
● Personal Job
● Quick Copy
● Stored Job
These options and the settings that control them are described below.
OffWhen selected, this option turns the job-storage feature off (it is disabled), which means that the printjob will not be stored in the product.
Proof and Hold To use the Proof and Hold option, the job-storage feature must be enabled.
When selected, this option stores the print job in memory and prints only the first copy of the job, allowingyou to check the first copy. If the document prints correctly, you can print the remaining copies of theprint job at the control panel. You can set the number of proof-and-hold print jobs that can be stored inthe product at the control panel.
After it is released for printing, the proof-and-hold job is immediately deleted from the product. If morecopies are needed, you must reprint the job from the software program. If you send a second proof-and-hold job to the product with the same user name and job name as an existing proof-and-hold job (andyou have not released the original job for printing), the job will overwrite the existing job. Proof-and-holdjobs are deleted if you turn off the product.
NOTE: The product configuration can be set to hold a maximum of 50 quick-copy or proof-and-holdjobs. The number is set at the product control panel in the CONFIGURATION menu, and the default is32. When this preset limit is reached, the new document overwrites the oldest held document. Also, adocument that has the same user name and job name as one that is already stored on the printer harddisk will overwrite the existing document.
Personal JobTo use the Personal Job option, the job-storage feature must be enabled.
When you select Personal Job, the print job is sent to the product but is not printed until you requestthe job at the product control panel. Selecting Personal Job activates the PIN group box. If PIN toprint is selected, the print job can be printed only after you type the correct PIN at the control panel.After the job is printed, the job is immediately deleted from the product. This feature is useful when youare printing sensitive or confidential documents that you do not want to leave in an output bin afterprinting.
ENWW Job Storage tab features 181
HP
PCL
6 Pr
int D
river
for
Win
dow
s
The Private Job/PIN coupling has a PIN restriction of four ASCII numeric characters (0 though 9). If youtype non-numeric characters, they are removed immediately. If you type more than four characters, thecharacters past the fourth are truncated. The field temporarily accepts fewer than four digits in the string,but when the edit field loses focus, the zeroes pad the left end until the PIN contains exactly four digits.The default initialized value for the PIN is 0000 for Personal Job.
After it is released for printing, the private job is impapertely deleted from the product. If more copiesare needed, you must reprint the job from the software program. If you send a second private job thathas the same user name and job name as an existing private job (and you have not released the originaljob for printing), the job will overwrite the existing job, regardless of the PIN. Private jobs are deleted ifyou turn off the product.
Quick CopyTo use the Quick Copy option, a printer hard disk must be installed, and the job-storage feature mustbe enabled.
When you select Quick Copy, the entire print job prints and a copy of the print job is stored on theproduct, after which you can print additional copies of the print job at the product control panel. Thenumber of quick-copy print jobs that can be stored in the product is set by using the product controlpanel.
NOTE: The product configuration can be set to hold a maximum of 50 quick-copy or proof-and-holdjobs. The number is set at the product control panel in the CONFIGURATION menu, and the default is32. When this preset limit is reached, the new document overwrites the oldest held document. Also, adocument that has the same user name and job name as one that is already stored on the printer harddisk will overwrite the existing document. Quick Copy jobs are deleted if you turn off the product.
Stored JobTo use the Stored Job option, a hard disk must be installed on the product and the job-storage featuremust be enabled.
Use the Stored Job option to send a print job directly to the printer hard disk without printing it. Theprint job is stored in the product as if it is an electronic file cabinet. After the print job is stored on theprinter hard disk, you can print the job at the product control panel.
The job remains stored in the product until it is deleted or overwritten by a document that has the sameuser name and job name. Stored jobs remain on the printer hard disk when the product is turned off.Use this feature for forms and other common or shared documents.
A stored job can be managed in two ways: as either a private or a public job.
Select the PIN to Print check box to set the private mode. Use a private stored job to send a print jobdirectly to the product, which can then be printed only after you type a PIN up to 4 digits long at theproduct control panel. (You can set the PIN in the PIN group box.)
After the job is printed, the job remains in the product and can be printed again at the product controlpanel.
The box labeled PIN is usually inactive. The PIN to Print option becomes available when you selectStored Job. If you select the PIN to Print box, you must type a PIN to make the stored job private.
NOTE: A private stored job is not the same as a personal job. Personal jobs are deleted from theproduct after they are printed. Private stored jobs are retained in the product after printing but requirethat a PIN be typed each time they are printed. A printer hard disk is required for Private stored jobs.
182 Chapter 4 HP PCL 6 Print Driver for Windows ENWW
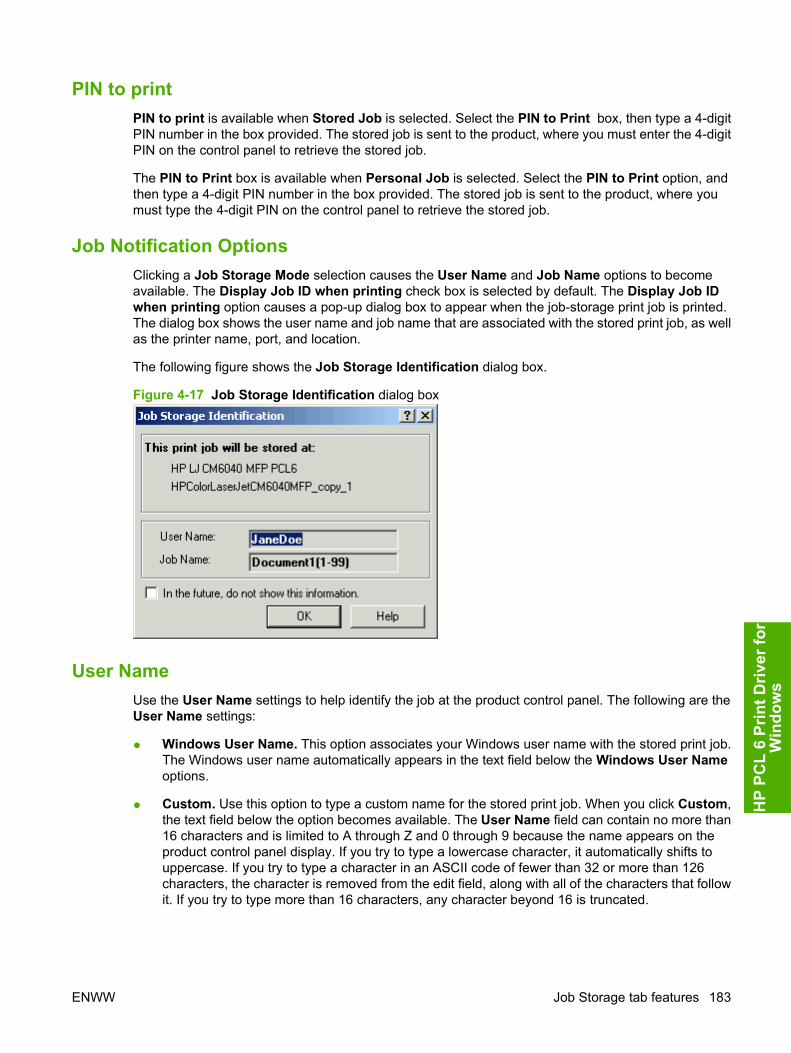
PIN to printPIN to print is available when Stored Job is selected. Select the PIN to Print box, then type a 4-digitPIN number in the box provided. The stored job is sent to the product, where you must enter the 4-digitPIN on the control panel to retrieve the stored job.
The PIN to Print box is available when Personal Job is selected. Select the PIN to Print option, andthen type a 4-digit PIN number in the box provided. The stored job is sent to the product, where youmust type the 4-digit PIN on the control panel to retrieve the stored job.
Job Notification OptionsClicking a Job Storage Mode selection causes the User Name and Job Name options to becomeavailable. The Display Job ID when printing check box is selected by default. The Display Job IDwhen printing option causes a pop-up dialog box to appear when the job-storage print job is printed.The dialog box shows the user name and job name that are associated with the stored print job, as wellas the printer name, port, and location.
The following figure shows the Job Storage Identification dialog box.
Figure 4-17 Job Storage Identification dialog box
User NameUse the User Name settings to help identify the job at the product control panel. The following are theUser Name settings:
● Windows User Name. This option associates your Windows user name with the stored print job.The Windows user name automatically appears in the text field below the Windows User Nameoptions.
● Custom. Use this option to type a custom name for the stored print job. When you click Custom,the text field below the option becomes available. The User Name field can contain no more than16 characters and is limited to A through Z and 0 through 9 because the name appears on theproduct control panel display. If you try to type a lowercase character, it automatically shifts touppercase. If you try to type a character in an ASCII code of fewer than 32 or more than 126characters, the character is removed from the edit field, along with all of the characters that followit. If you try to type more than 16 characters, any character beyond 16 is truncated.
ENWW Job Storage tab features 183
HP
PCL
6 Pr
int D
river
for
Win
dow
s
Job NameUse the Job Name options to specify a name to identify the job at the product control panel. The followingare the Job Name settings:
● <Automatic> This option, which is the default selection, automatically generates the job name thatis associated with the stored print job. The file name of the print job is used if it is available to theprint driver. Otherwise, the software program name or a time stamp is used for the job name.
● Custom. Use this to type a custom job name for the stored print job. When you click Custom, thetext field below the option becomes available. In those languages for which <Automatic> cannotbe translated without the use of invalid characters, the driver uses a string of three dashes. Theacceptable characters for job name and user name vary for each operating system. The string mustbe of a length and type that can appear on the product control-panel display.
The Job Name field can contain no more than 16 characters and is limited to A through Z (uppercaseor lowercase) and 0 through 9 so that the name can appear on the product control panel display. If youtry to type a character in an ASCII code of fewer than 32 or more than 126 characters, the character isremoved from the edit field, along with all of the characters that follow it. If you try to type more than 16characters, any character beyond 16 is truncated.
When the dialog box is closed, or as soon as the focus is removed from the control (that is, when theTab key is pressed or another control is selected), an empty string is replaced with <Automatic>. Theacceptable characters for job name and user name vary for each operating system. The string must beof a length and type that can appear on the product control panel display.
If Job Name Exists. When you store a print job, you can create a print job name or the product softwarecan assign one automatically. If a print job with the same name already exists, the new print job willoverwrite the existing print job. To eliminate the chances of a new print job overwriting an old print jobbecause both have the same name, select Use Job Name + (1-99). After you create the print job name,or when one is created automatically, the product software assigns a number between 1 and 999 to theend of the print job name to make the name unique. Select Replace Existing File if you always wantthe product software to overwrite an existing print job with the same print job name.
Use job-storage features when printingTo use job-storage features when printing, follow these steps:
1. Click File and then click Print from the software program. The Print dialog box appears.
NOTE: Clicking the print icon in the software program toolbar prints the job without using job-storage features.
2. Click Properties. The Properties dialog box appears.
3. Click the Job Storage tab.
4. Select the job-storage options by clicking the appropriate option button, and then complete anyrequired fields.
5. Click OK.
184 Chapter 4 HP PCL 6 Print Driver for Windows ENWW
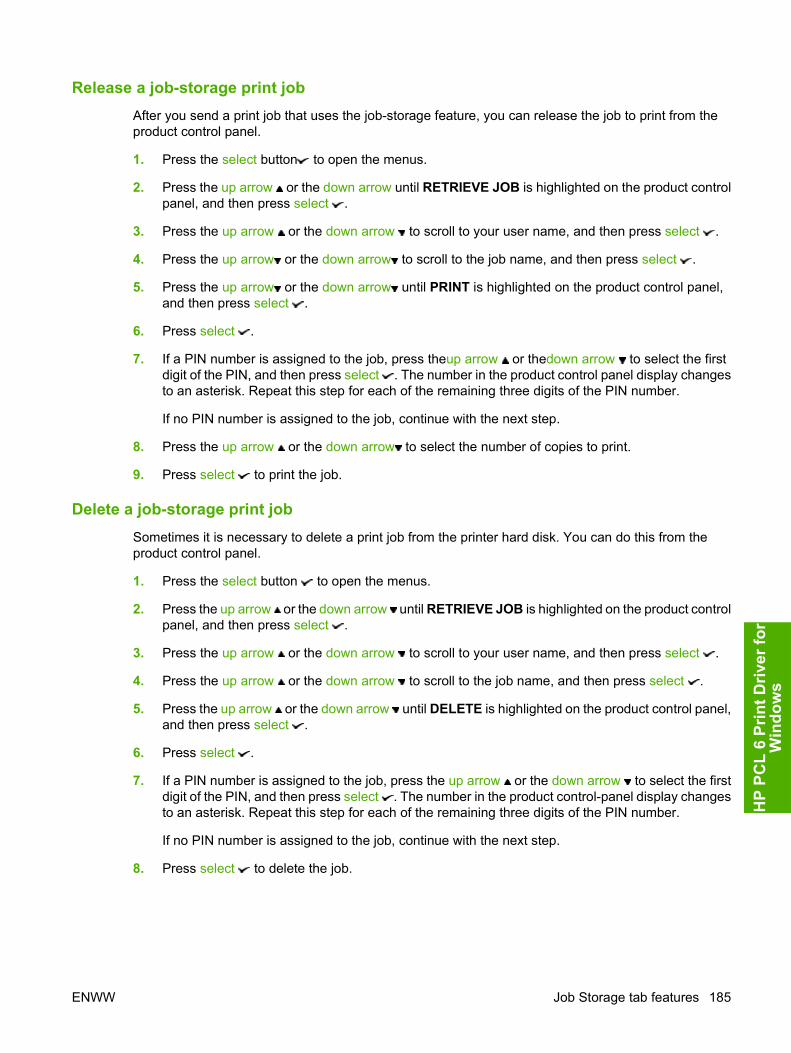
Release a job-storage print jobAfter you send a print job that uses the job-storage feature, you can release the job to print from theproduct control panel.
1. Press the select button to open the menus.
2. Press the up arrow or the down arrow until RETRIEVE JOB is highlighted on the product controlpanel, and then press select .
3. Press the up arrow or the down arrow to scroll to your user name, and then press select .
4. Press the up arrow or the down arrow to scroll to the job name, and then press select .
5. Press the up arrow or the down arrow until PRINT is highlighted on the product control panel,and then press select .
6. Press select .
7. If a PIN number is assigned to the job, press theup arrow or thedown arrow to select the firstdigit of the PIN, and then press select . The number in the product control panel display changesto an asterisk. Repeat this step for each of the remaining three digits of the PIN number.
If no PIN number is assigned to the job, continue with the next step.
8. Press the up arrow or the down arrow to select the number of copies to print.
9. Press select to print the job.
Delete a job-storage print jobSometimes it is necessary to delete a print job from the printer hard disk. You can do this from theproduct control panel.
1. Press the select button to open the menus.
2. Press the up arrow or the down arrow until RETRIEVE JOB is highlighted on the product controlpanel, and then press select .
3. Press the up arrow or the down arrow to scroll to your user name, and then press select .
4. Press the up arrow or the down arrow to scroll to the job name, and then press select .
5. Press the up arrow or the down arrow until DELETE is highlighted on the product control panel,and then press select .
6. Press select .
7. If a PIN number is assigned to the job, press the up arrow or the down arrow to select the firstdigit of the PIN, and then press select . The number in the product control-panel display changesto an asterisk. Repeat this step for each of the remaining three digits of the PIN number.
If no PIN number is assigned to the job, continue with the next step.
8. Press select to delete the job.
ENWW Job Storage tab features 185
HP
PCL
6 Pr
int D
river
for
Win
dow
s

Color tab featuresNOTE: The Color tab is located on the Printing Preferences tab set . For information about how toaccess these tabs, see Printing Preferences driver tabs on page 139,
Use the Color tab to specify predefined color-option settings or to fine tune the color treatments andhalftoning. Color output can also be converted to grayscale. The Color tab is shown in the followingfigure.
Figure 4-18 Color tab
The Color tab contains the following sets of controls:
● Color Options
● Color Themes
● Document preview image
186 Chapter 4 HP PCL 6 Print Driver for Windows ENWW

Color OptionsUse the Color Options group box to adjust the independent color controls. The settings affect the printjob color rendering and print quality. The Color Options group box contains the following controls:
● Automatic option (default)
● Manual option
● Settings button (Click this button to open the Color Settings dialog box.)
● Print in Grayscale check box
AutomaticUse the Automatic option for color settings that automatically fine tune the printed output. TheAutomatic color settings provide high quality output while maintaining product performance for mostcolor printing needs.
ManualTo change the color settings, select the Manual option, and then click Settings. The Color Settingsdialog box appears.
ENWW Color tab features 187
HP
PCL
6 Pr
int D
river
for
Win
dow
s
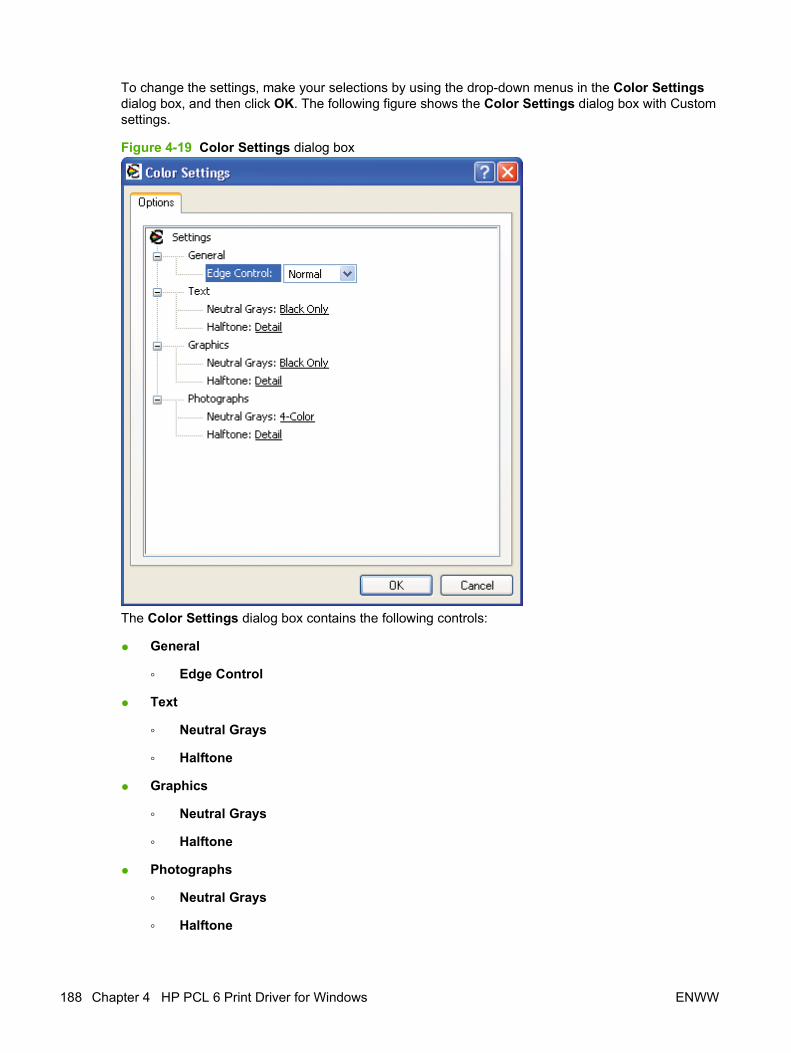
To change the settings, make your selections by using the drop-down menus in the Color Settingsdialog box, and then click OK. The following figure shows the Color Settings dialog box with Customsettings.
Figure 4-19 Color Settings dialog box
The Color Settings dialog box contains the following controls:
● General
◦ Edge Control
● Text
◦ Neutral Grays
◦ Halftone
● Graphics
◦ Neutral Grays
◦ Halftone
● Photographs
◦ Neutral Grays
◦ Halftone
188 Chapter 4 HP PCL 6 Print Driver for Windows ENWW

GeneralUse the General setting group to control Edge Control settings for all color printing.
Edge Control determines how edges are rendered. Edge Control consists of three components:
● Adaptive Halftoning, which increases edge sharpness
● Trapping, which reduces the effect of color plane misregistration by slightly overlapping the edgesof adjacent objects
● Color Resolution Enhancement Technology (C-REt), which increases the apparent resolution byplacing each dot for the smoothest edges
The Edge Control option offers four settings:
● Off. The Off setting turns Trapping, Adaptive Halftoning, and C-REt to Off.
● Light. The Light setting provides minimal trapping. Adaptive Halftoning is set to On and C-REt isset to On.
● Normal. The Normal setting provides the default trapping settings. Adaptive Halftoning is set toOn, and C-REt is set to On.
● Maximum. The Maximum setting provides the most trapping. Adaptive Halftoning is set to On,and C-REt is set to On.
The following settings apply to text, graphics, and photographs for color settings.
Neutral GraysThe Neutral Grays drop-down menu controls the selection of a device-dependent color table that isembedded in the product firmware. You can adjust the Neutral Grays setting independently for text,graphics, or photographs. The following options are available:
● Black Only. This option generates neutral colors (grays and black) by using only black toner. Thisoption guarantees that neutral colors do not have a color cast. Black Only is the default setting forthe Text and Graphics components.
● 4-Color. This option generates neutral colors by combining all four colors of toner, which producessmoother gradients and transitions to non-neutral colors. It also produces the darkest possibleblack. 4-Color is the default setting for Photographs.
HalftoneThe Halftone setting controls the selection of a product-dependent halftone algorithm that is embeddedin the product firmware. Halftoning is a method by which the product mixes the four primary colors (cyan,magenta, yellow, and black) in varying proportions to create millions of colors. The Halftone optionsaffect the resolution and clarity of the color on the printed page. You can select Halftone settings fortext, graphics, and photographs independently.
ENWW Color tab features 189
HP
PCL
6 Pr
int D
river
for
Win
dow
s
The following Halftone options are available:
● Detail. This is the default option; it is useful for text and graphics that require sharp distinctionsamong lines or colors or for images that contain a pattern or a high level of detail. Select this optionfor sharp edges and detail.
● Smooth. This option provides better results for large, solid-filled print areas. It also enhancesphotographs by smoothing out fine color gradations. Select this option for uniform and smooth areafills.
Color ThemesThe Color Themes group box contains the following RGB color options, which determines how colorsare rendered:
● Default (sRGB)
● Photo (sRGB)
● Photo (Adobe RGB 1998)
● None
● Custom Profile
Default (sRGB)Select Default (sRGB) for most printing needs. This setting instructs the product to interpret RGB coloras sRGB, which is the accepted standard of Microsoft and the World Wide Web Consortium (W3C).Colors are matched to optimize the RGB colors on the screen and to provide vivid images and graphics.
Photo (sRGB)Select Photo (sRGB) to enhance documents in which the content is mainly bitmap images, such as .GIFor .EPS files. This setting instructs the product to use the best color matching for rendering sRGB bitmapimages. This setting affects only raster data; it has no effect on text or vector-based graphics. Usingglossy paper in combination with this setting provides the maximum enhancement.
Photo (Adobe RGB 1998)Select Photo (AdobeRGB 1998) for documents that use the AdobeRGB color space rather than sRGB.For example, some digital cameras capture images in Adobe RBG, and documents that are producedwith Adobe PhotoShop use the Adobe RGB color space. When printing from a professional softwareprogram that uses Adobe RGB, turn off the color management in the software program and allow theproduct software to manage the color space.
NoneThis option allows the printer to accept RGB data directly from the application.
Custom ProfileSelect Custom Profile when you want to duplicate the printed output from other products or for usingspecial effects. This setting instructs the product to use a custom profile to emulate color output fromanother product by modifying how color is rendered.
190 Chapter 4 HP PCL 6 Print Driver for Windows ENWW
The default custom profile is an emulation of the color table used on the HP Color LaserJet 9500 product.The product holds only one custom profile at a time, so when you download and install another colortable, it erases the default color table and installs the new one.
You can download custom profiles from the following Web sites:
www.hp.com/go/cljcm6030mfp_firmware or www.hp.com/go/cljcm6040_firmware
Document preview imageThe document preview image is a line-drawn image of a page that represents graphics and text. Thedocument preview image is always oriented so that the contents of the page are right-side-up. Thedocument preview image appears in the upper-right corner of the following Printing Preferences drivertabs:
● Printing Shortcuts
● Paper/Quality
● Effects
● Finishing
● Output
● Color
Switching between tabs does not change the location or appearance of the document preview image.When you move the mouse over the document preview image, the mouse cursor changes from an arrowto a gloved hand. You can toggle between portrait and landscape page orientation by clicking the image.
Services tab featuresNOTE: The Services tab is located on the Printing Preferences tab set. For information about howto access these tabs, see Printing Preferences driver tabs on page 139.
The Services tab is shown in the following figure.
ENWW Services tab features 191
HP
PCL
6 Pr
int D
river
for
Win
dow
s

Figure 4-20 Services tab
The Services tab contains the following group boxes:
● Internet Services
● Device services
Internet ServicesThe Internet Services group box contains the Select a destination drop-down menu with the followingselections:
● Online diagnostic tools. This is the HP Instant Support Web site, where you can find interactivetools and contacts for troubleshooting.
● Support and troubleshooting. This is the main Web site for HP Color LaserJet CM6030 andCM6040 MFP Series product support.
● Product manuals. View or download HP Color LaserJet CM6030 and CM6040 MFP Seriesproduct manuals.
● Check for driver updates. Automatically check your print drivers to see whether the correct andmost up-to-date print drivers are installed.
● Color printing access/usage. Find information about enabling and disabling color printing andtracking color print-job usage.
● Shop for supplies. Shop online for HP Color LaserJet CM6030 and CM6040 MFP Series productsupplies.
If you have Internet access, select any of these items and click Go! to open the corresponding HP Webpage.
192 Chapter 4 HP PCL 6 Print Driver for Windows ENWW

Device servicesClick the Device and Supplies status icon to open the Device Status screen of the HP EWS, whichshows supply levels and control panel status.
Click the Print color usage job log icon to print a page that shows information about users, print jobs,and applications that have printed to the HP Color LaserJet CM6030 and CM6040 MFP Series product.
ENWW Services tab features 193
HP
PCL
6 Pr
int D
river
for
Win
dow
s
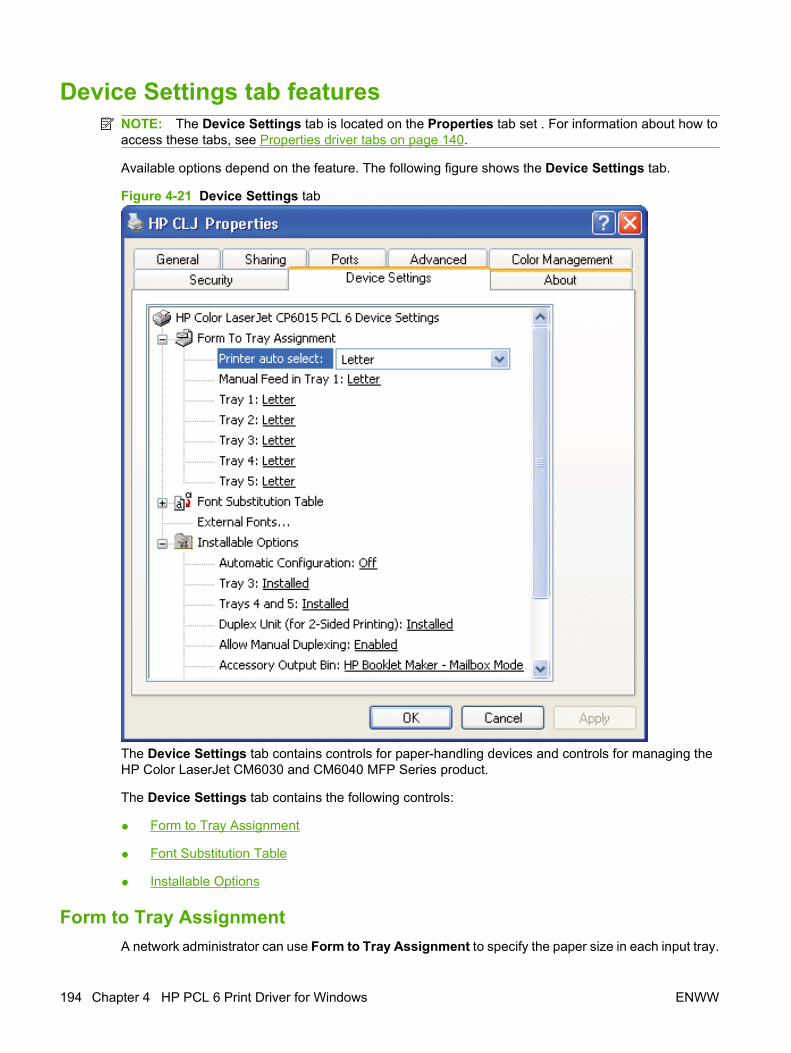
Device Settings tab featuresNOTE: The Device Settings tab is located on the Properties tab set . For information about how toaccess these tabs, see Properties driver tabs on page 140.
Available options depend on the feature. The following figure shows the Device Settings tab.
Figure 4-21 Device Settings tab
The Device Settings tab contains controls for paper-handling devices and controls for managing theHP Color LaserJet CM6030 and CM6040 MFP Series product.
The Device Settings tab contains the following controls:
● Form to Tray Assignment
● Font Substitution Table
● Installable Options
Form to Tray AssignmentA network administrator can use Form to Tray Assignment to specify the paper size in each input tray.
194 Chapter 4 HP PCL 6 Print Driver for Windows ENWW
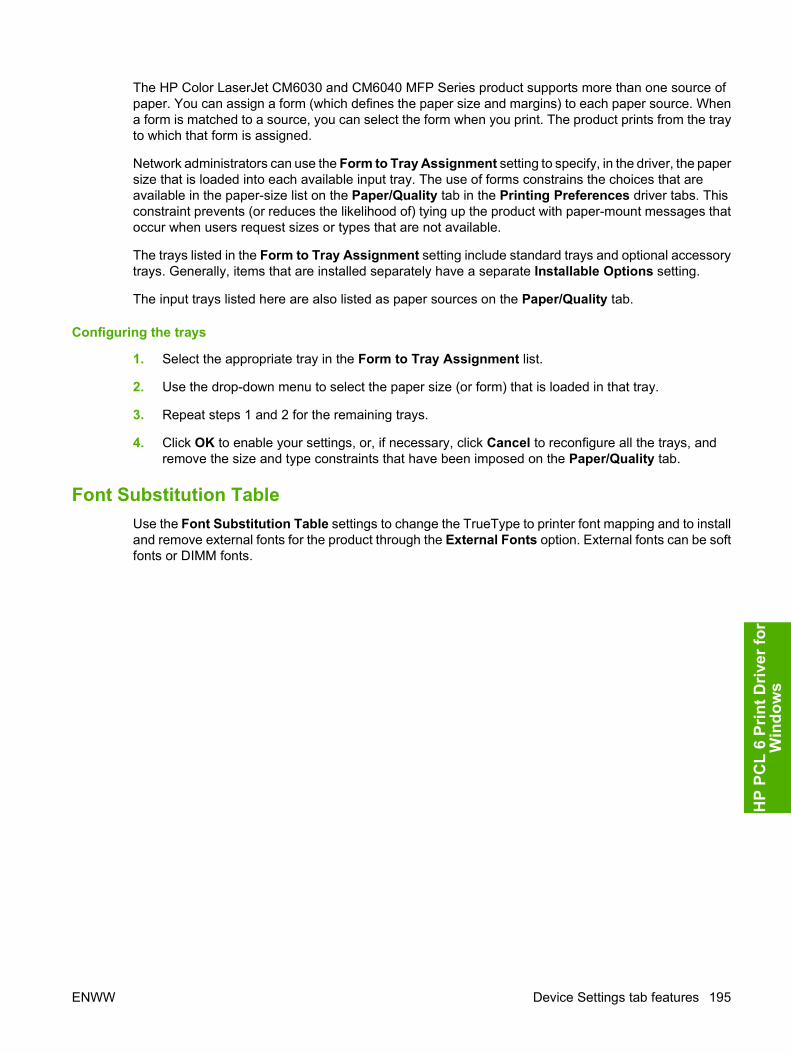
The HP Color LaserJet CM6030 and CM6040 MFP Series product supports more than one source ofpaper. You can assign a form (which defines the paper size and margins) to each paper source. Whena form is matched to a source, you can select the form when you print. The product prints from the trayto which that form is assigned.
Network administrators can use the Form to Tray Assignment setting to specify, in the driver, the papersize that is loaded into each available input tray. The use of forms constrains the choices that areavailable in the paper-size list on the Paper/Quality tab in the Printing Preferences driver tabs. Thisconstraint prevents (or reduces the likelihood of) tying up the product with paper-mount messages thatoccur when users request sizes or types that are not available.
The trays listed in the Form to Tray Assignment setting include standard trays and optional accessorytrays. Generally, items that are installed separately have a separate Installable Options setting.
The input trays listed here are also listed as paper sources on the Paper/Quality tab.
Configuring the trays
1. Select the appropriate tray in the Form to Tray Assignment list.
2. Use the drop-down menu to select the paper size (or form) that is loaded in that tray.
3. Repeat steps 1 and 2 for the remaining trays.
4. Click OK to enable your settings, or, if necessary, click Cancel to reconfigure all the trays, andremove the size and type constraints that have been imposed on the Paper/Quality tab.
Font Substitution TableUse the Font Substitution Table settings to change the TrueType to printer font mapping and to installand remove external fonts for the product through the External Fonts option. External fonts can be softfonts or DIMM fonts.
ENWW Device Settings tab features 195
HP
PCL
6 Pr
int D
river
for
Win
dow
s
Click the Font Substitution Table option to open a list of fonts, as show in the following figure. Use thesettings to change the TrueType-to-product font mappings.
Figure 4-22 Font Substitution Table
External FontsUse the External Fonts option to install and remove external fonts for the product. External fonts canbe soft fonts or DIMM fonts.
196 Chapter 4 HP PCL 6 Print Driver for Windows ENWW
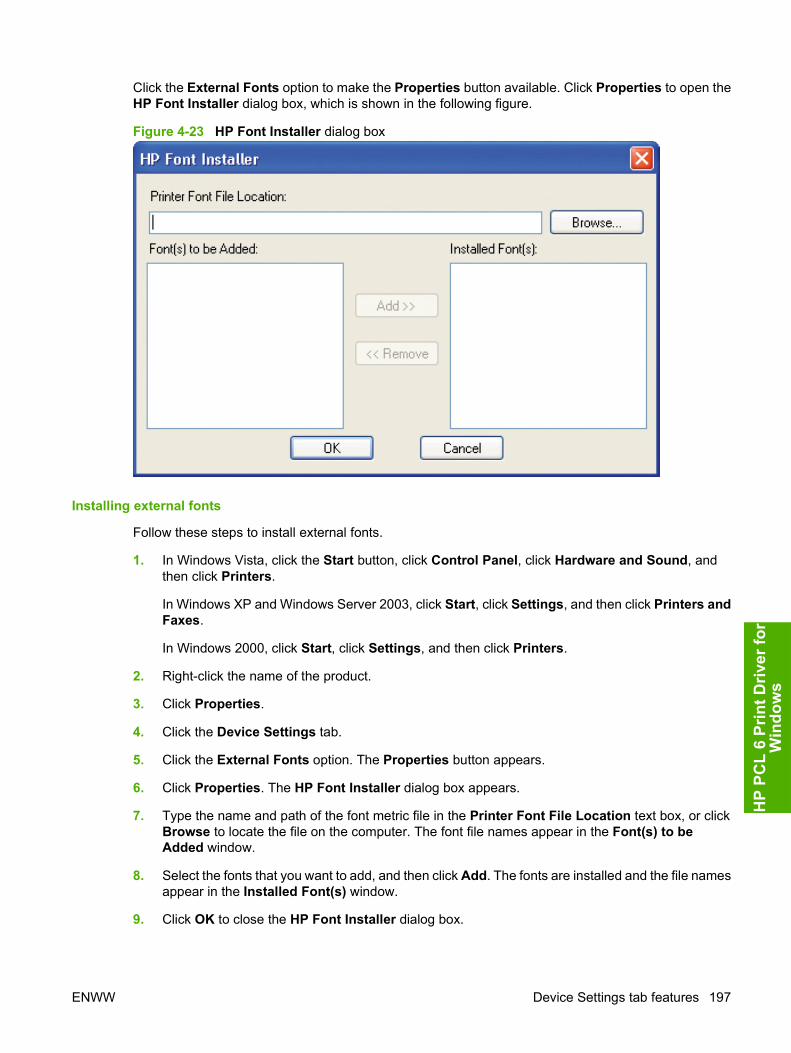
Click the External Fonts option to make the Properties button available. Click Properties to open theHP Font Installer dialog box, which is shown in the following figure.
Figure 4-23 HP Font Installer dialog box
Installing external fonts
Follow these steps to install external fonts.
1. In Windows Vista, click the Start button, click Control Panel, click Hardware and Sound, andthen click Printers.
In Windows XP and Windows Server 2003, click Start, click Settings, and then click Printers andFaxes.
In Windows 2000, click Start, click Settings, and then click Printers.
2. Right-click the name of the product.
3. Click Properties.
4. Click the Device Settings tab.
5. Click the External Fonts option. The Properties button appears.
6. Click Properties. The HP Font Installer dialog box appears.
7. Type the name and path of the font metric file in the Printer Font File Location text box, or clickBrowse to locate the file on the computer. The font file names appear in the Font(s) to beAdded window.
8. Select the fonts that you want to add, and then click Add. The fonts are installed and the file namesappear in the Installed Font(s) window.
9. Click OK to close the HP Font Installer dialog box.
ENWW Device Settings tab features 197
HP
PCL
6 Pr
int D
river
for
Win
dow
s
Removing external fonts
1. In Windows Vista, click the Start button, click Control Panel, click Hardware and Sound, andthen click Printers.
In Windows XP and Windows Server 2003, click Start, click Settings, and then click Printers andFaxes.
In Windows 2000, click Start, click Settings, and then click Printers.
2. Right-click the name of the product.
3. Click Properties.
4. Click the Device Settings tab.
5. Click the External Fonts option. The Properties button appears.
6. Click Properties. The HP Font Installer dialog box appears. The external fonts that are installedappear in the Installed Fonts window.
7. Select the fonts that you want to remove, and then click Remove. The fonts are removed.
8. Click OK to close the HP Font Installer dialog box.
Installable OptionsItems under Installable Options are automatically populated and their defaults set when the driver isinstalled.
The HP Color LaserJet CM6030 and CM6040 MFP Series product has printing options that you caninstall and configure in this section. The following controls are available:
● Automatic Configuration
● Tray 3
● Tray 4
● Tray 5
● Duplex Unit (for 2-Sided Printing)
● Allow Manual Duplexing
● Accessory Output Bin
● Printer Memory
● Printer Hard Disk
● Job Storage
● Job Separator
● Mopier Mode
198 Chapter 4 HP PCL 6 Print Driver for Windows ENWW

Automatic ConfigurationUse the Device Settings tab to tell the driver about the hardware configuration of the product. Ifbidirectional communication is enabled in a supported environment, update this tab by selecting theUpdate Now setting in the Automatic Configuration setting. The default setting is Off. After anautomatic configuration, the setting returns to Off after the changes are made.
If your environment does not support bidirectional communication, the Update Now setting isunavailable, so you must manually configure the options on this tab.
If you have more than one driver installed for the product (for example, the default HP PCL 6 Print Driverand the HP PCL 5 Universal Print Driver), the Update Now feature works automatically only on the driveron which it is activated. The other driver will not be updated and might show the default setting for thespecific product model.
Tray 3This control specifies whether you have tray 3, an additional 500-sheet tray, installed on the product.Tray 3 comes standard on the product.
NOTE: Tray 3 is always installed.
Tray 4This control specifies whether you have tray 4, additional 500-sheet trays, installed on the product. Tray4 comes standard on the HP Color LaserJet CM6040f MFP.
Tray 5This control specifies whether you have tray 5, additional 500-sheet trays, installed on the product. Tray5 comes standard on the HP Color LaserJet CM6040f MFP.
Duplex Unit (for 2-Sided Printing) All of the HP Color LaserJet CM6030 and CM6040 MFP Series product models come with a duplex unitinstalled.
NOTE: The HP Color LaserJet CM6030 and CM6040 MFP Series product supports smart duplexing.The product uses the smart duplexing feature to detect information on both sides of the print job pagesand only runs the pages through the duplexing unit if printable information appears on the second sideof the page.
Allow Manual DuplexingSelect Allow Manual Duplexing to print on both sides of any supported size and most types of paper(except transparencies, envelopes, and labels). To use this feature, you must reinsert the paper stackinto the input tray to print the second side. The product pauses while you make this adjustment.
This setting is enabled by default.
ENWW Device Settings tab features 199
HP
PCL
6 Pr
int D
river
for
Win
dow
s
Accessory Output BinThis control specifies whether you have any accessory output devices installed on your product. Thefollowing are available accessory output devices:
● HP 3-bin Stapler/Stacker – Mailbox Mode
● HP 3-bin Stapler/Stacker – Function Separator Mode
● HP 3-bin Stapler/Stacker – Stacker Mode
● HP Booklet Maker – Mailbox Mode
● HP Booklet Maker – Stacker Mode
Printer MemoryThis control has the following settings:
● 768 MB
● 896 MB
● 1024 MB
Printer Hard DiskWhen this option is enabled, the Job Storage option and the Mopier Mode are enabled in the printdriver. Use the Job Storage option to store print jobs and then print them later from the control panel.The multiple-original print (mopy) function is an HP-designed feature that produces multiple, collatedcopies from a single print job.
NOTE: This option is always installed.
Job StorageWhen Job Storage is enabled, the product can store print jobs so that you can gain access to thoseprint jobs later at the control panel.
Job SeparatorUse this control to specify whether a print job identifier page should be printed between print jobs.
See Preferences, Finishing Tab for more information.
Mopier ModeThe multiple-original print (mopy) function is an HP-designed feature that produces multiple, collatedcopies from a single print job. Multiple-original printing (mopying) increases performance and reducesnetwork traffic by transmitting the job to the product once and then storing it in memory or on the harddisk. The remainder of the copies are printed at the fastest speed. All documents that are printed inmopier mode can be created, controlled, managed, and finished from the computer, which eliminatesthe extra step of using a photocopier.
The HP Color LaserJet CM6030 and CM6040 MFP Series supports the transmit-once mopying featurewhen the Mopier Mode: setting on the Device Settings tab is Enabled.
200 Chapter 4 HP PCL 6 Print Driver for Windows ENWW
When you use the HP PCL 6 Print Driver, mopying is performed in one of two ways: either through thesoftware or through the product hardware. When mopier mode is enabled, mopying takes place throughthe product hardware. One copy of a multiple-page print job is transmitted once through the network tothe product, together with a printer job language (PJL) command directing the product to make thespecified number of copies.
When you disable mopier mode, you are not necessarily disabling multiple collated copies, which thedriver can still perform through the software rather than the product hardware (the mopying path that isdisabled when you change the Mopier Mode setting to Disabled). However, a multiple-copy print jobthat is sent when the mopier is disabled loses the advantage of transmitting the print job once, becausethe job is sent through the network for each collated copy.
Mopier mode and collation
Mopying and collating print jobs are independent but closely related functions. Mopying, the ability tosend original print jobs to the product, is performed by the print driver. Collating can be controlled byeither the print driver or the document software program. The mopying mode is selected by default inthe driver and can be disabled by changing the Mopier Mode setting on the Device Settings tab toDisabled.
Control collation through the print driver by selecting or clearing the Collated check box on theAdvanced tab. Click Copy Count under the Paper Output setting. You can clear the check box, whichis available only when the Copy Count option is set to more than 1 copy, to allow the software programto control collation.
To receive uncollated multiple copies of a print job, you must clear the Collated check box and makesure that the software program collation feature is not selected.
The following table shows the relation between mopier mode settings and collation settings in thesoftware program and the driver. The first three columns show the settings; the last column, Expectedresult, shows how a 3-page print job would appear.
Table 4-4 Driver mopier mode and collation settings
Mopier mode Application collation Driver collation Expected result
Disabled Not selected Not selected 3 copies uncollated
Disabled Not selected Selected 3 copies uncollated
Disabled Selected Not selected 3 copies collated
Disabled Selected Selected 3 copies collated
Enabled Not selected Not selected 3 copies uncollated
Enabled Not selected Selected 3 copies uncollated
Enabled Selected Not selected 3 copies collated
Enabled Selected Selected 3 copies collated
About tab featuresNOTE: The About tab is located on the Properties tab set. For information about how to access thesetabs, see Properties driver tabs on page 140.
The About tab provides detailed information about driver component versions. It contains an overallbuild version number (in parentheses after the model name) together with specific information about
ENWW About tab features 201
HP
PCL
6 Pr
int D
river
for
Win
dow
s
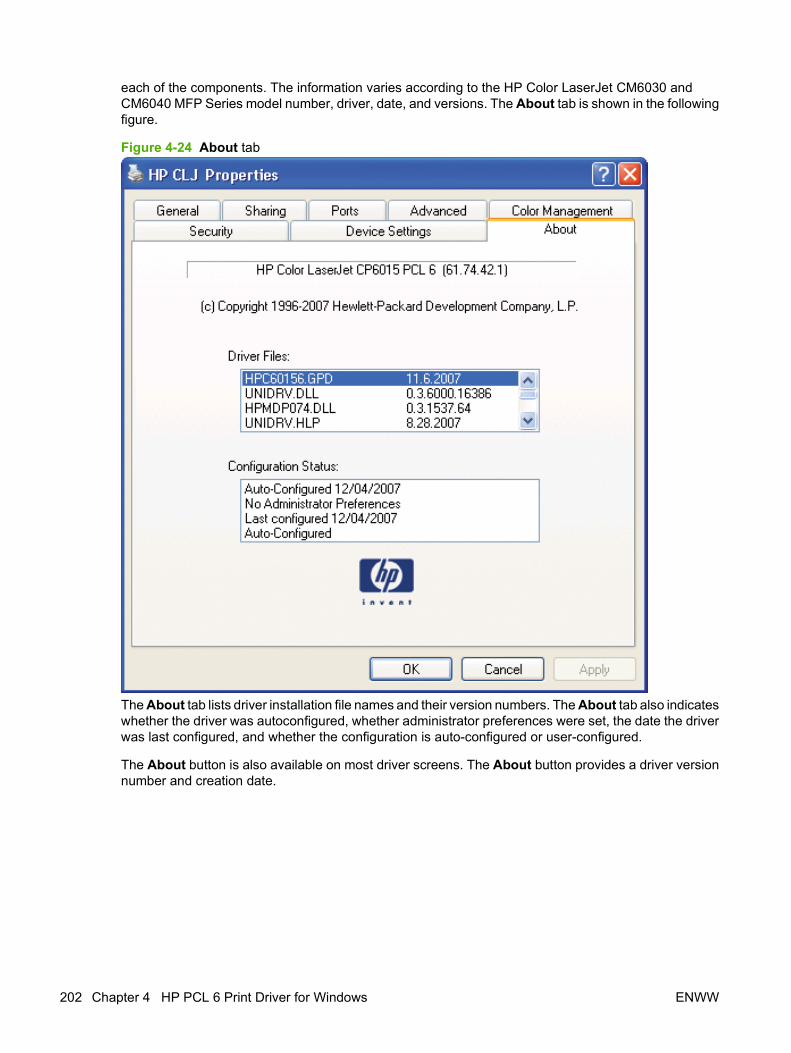
each of the components. The information varies according to the HP Color LaserJet CM6030 andCM6040 MFP Series model number, driver, date, and versions. The About tab is shown in the followingfigure.
Figure 4-24 About tab
The About tab lists driver installation file names and their version numbers. The About tab also indicateswhether the driver was autoconfigured, whether administrator preferences were set, the date the driverwas last configured, and whether the configuration is auto-configured or user-configured.
The About button is also available on most driver screens. The About button provides a driver versionnumber and creation date.
202 Chapter 4 HP PCL 6 Print Driver for Windows ENWW
5 Macintosh software and utilities
● Supported operating systems for Macintosh
● Macintosh system requirements
● Macintosh printing-system software
● Macintosh install and uninstall instructions
● Macintosh HP Printer Utility
● Use features in the Macintosh printer driver
ENWW 203
Mac
into
sh
Supported operating systems for MacintoshThe product supports the following Macintosh operating systems:
● Mac OS X V10.2.8, V10.3, V10.4, V10.5 and later
NOTE: For Mac OS X V10.4 and later, PPC and Intel Core Processor Macs are supported.
204 Chapter 5 Macintosh software and utilities ENWW
Macintosh system requirements● PowerPC G3, G4, G5, or Intel Core processor
● 256 MB RAM
● 32 MB of available hard-disk space
● CD-ROM drive or Internet connection
ENWW Macintosh system requirements 205
Mac
into
sh
Macintosh printing-system softwareThe printing-system software for Macintosh is composed of an HP-created Postscript (PS) printerdefinition file (PPD) and a printer dialog extension (PDE) file that work together with the Macintosh OSprinting system. These files are used by the Macintosh OS printing system to determine default printer-driver settings and to allow the user to select between the various print options and settings. An HP-supplied Macintosh printer configuration utility is provided, which allows the user to access theembedded Web server (EWS) for additional configuration and product status monitoring. The followingare provided on the Admin CD:
● The HP LaserJet Installer for Macintosh
● Install notes (Readme file)
The following components are installed by the HP LaserJet Installer for Macintosh:
● HP Color LaserJet CM6030 and CM6040 MFP Series PPD
● HP Color LaserJet CM6030 and CM6040 MFP Series PDE
● HP USB EWS Gateway
● HP Printer Utility
● HP Uninstaller for the HP Printer Utility and HP USB EWS Gateway
NOTE: Document filenames on your CD may reference either “HP Color LaserJet CM6030 MFP” or“HP Color LaserJet CM6040 MFP” interchangeably; the references are applicable to either product.
● Supported printer drivers for Macintosh
● Priority for print settings for Macintosh
● Change printer-driver settings for Macintosh
● Software for Macintosh computers
● Availability
Supported printer drivers for MacintoshThe HP installer provides postscript Printer Description (PPD) files, Printer Dialog Extensions (PDEs),and the HP Printer Utility for use with Macintosh computers.
The PPDs, in combination with the Apple postscript printer drivers, provide access to device features.Use the Apple postscript printer driver that comes with the computer.
Priority for print settings for MacintoshChanges to print settings are prioritized depending on where the changes are made:
206 Chapter 5 Macintosh software and utilities ENWW
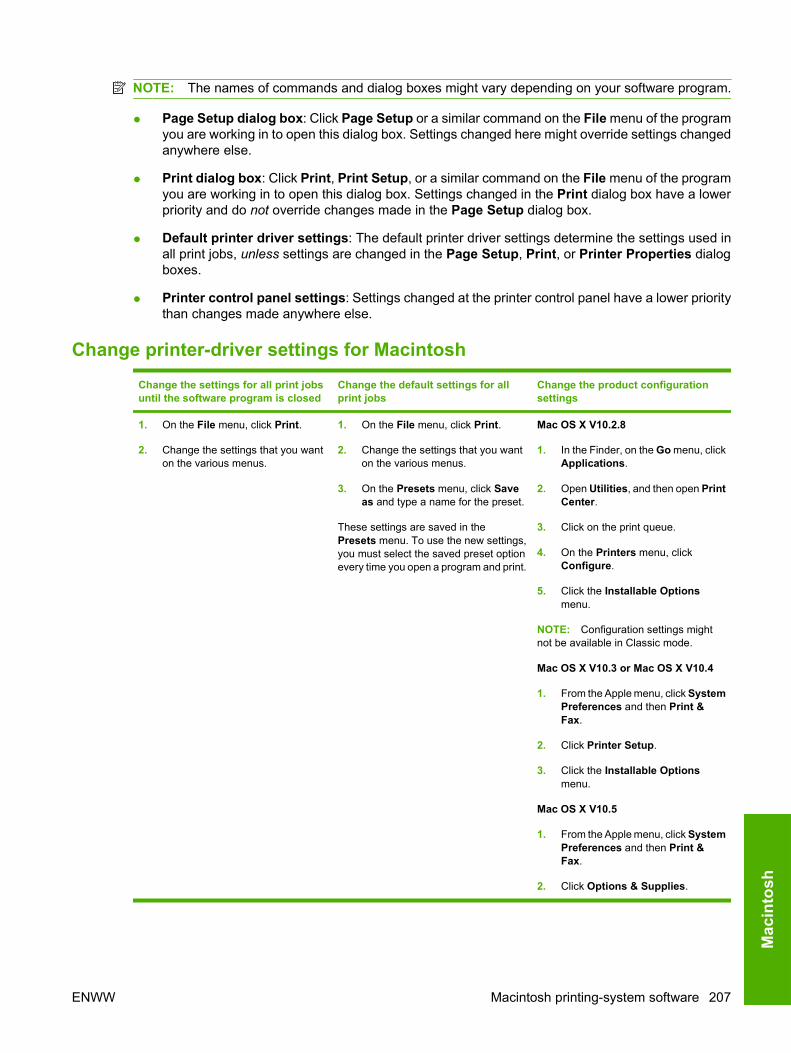
NOTE: The names of commands and dialog boxes might vary depending on your software program.
● Page Setup dialog box: Click Page Setup or a similar command on the File menu of the programyou are working in to open this dialog box. Settings changed here might override settings changedanywhere else.
● Print dialog box: Click Print, Print Setup, or a similar command on the File menu of the programyou are working in to open this dialog box. Settings changed in the Print dialog box have a lowerpriority and do not override changes made in the Page Setup dialog box.
● Default printer driver settings: The default printer driver settings determine the settings used inall print jobs, unless settings are changed in the Page Setup, Print, or Printer Properties dialogboxes.
● Printer control panel settings: Settings changed at the printer control panel have a lower prioritythan changes made anywhere else.
Change printer-driver settings for Macintosh
Change the settings for all print jobsuntil the software program is closed
Change the default settings for allprint jobs
Change the product configurationsettings
1. On the File menu, click Print.
2. Change the settings that you wanton the various menus.
1. On the File menu, click Print.
2. Change the settings that you wanton the various menus.
3. On the Presets menu, click Saveas and type a name for the preset.
These settings are saved in thePresets menu. To use the new settings,you must select the saved preset optionevery time you open a program and print.
Mac OS X V10.2.8
1. In the Finder, on the Go menu, clickApplications.
2. Open Utilities, and then open PrintCenter.
3. Click on the print queue.
4. On the Printers menu, clickConfigure.
5. Click the Installable Optionsmenu.
NOTE: Configuration settings mightnot be available in Classic mode.
Mac OS X V10.3 or Mac OS X V10.4
1. From the Apple menu, click SystemPreferences and then Print &Fax.
2. Click Printer Setup.
3. Click the Installable Optionsmenu.
Mac OS X V10.5
1. From the Apple menu, click SystemPreferences and then Print &Fax.
2. Click Options & Supplies.
ENWW Macintosh printing-system software 207
Mac
into
sh
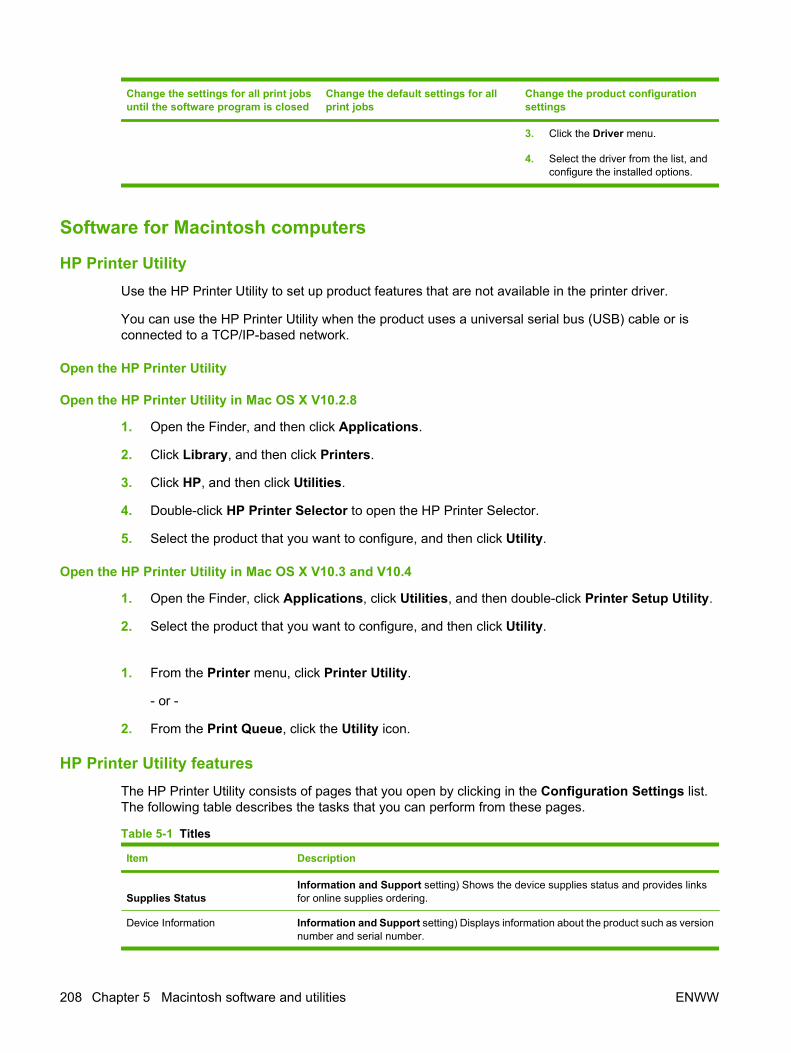
Change the settings for all print jobsuntil the software program is closed
Change the default settings for allprint jobs
Change the product configurationsettings
3. Click the Driver menu.
4. Select the driver from the list, andconfigure the installed options.
Software for Macintosh computers
HP Printer UtilityUse the HP Printer Utility to set up product features that are not available in the printer driver.
You can use the HP Printer Utility when the product uses a universal serial bus (USB) cable or isconnected to a TCP/IP-based network.
Open the HP Printer Utility
Open the HP Printer Utility in Mac OS X V10.2.8
1. Open the Finder, and then click Applications.
2. Click Library, and then click Printers.
3. Click HP, and then click Utilities.
4. Double-click HP Printer Selector to open the HP Printer Selector.
5. Select the product that you want to configure, and then click Utility.
Open the HP Printer Utility in Mac OS X V10.3 and V10.4
1. Open the Finder, click Applications, click Utilities, and then double-click Printer Setup Utility.
2. Select the product that you want to configure, and then click Utility.
1. From the Printer menu, click Printer Utility.
- or -
2. From the Print Queue, click the Utility icon.
HP Printer Utility featuresThe HP Printer Utility consists of pages that you open by clicking in the Configuration Settings list.The following table describes the tasks that you can perform from these pages.
Table 5-1 Titles
Item Description
Supplies StatusInformation and Support setting) Shows the device supplies status and provides linksfor online supplies ordering.
Device Information Information and Support setting) Displays information about the product such as versionnumber and serial number.
208 Chapter 5 Macintosh software and utilities ENWW
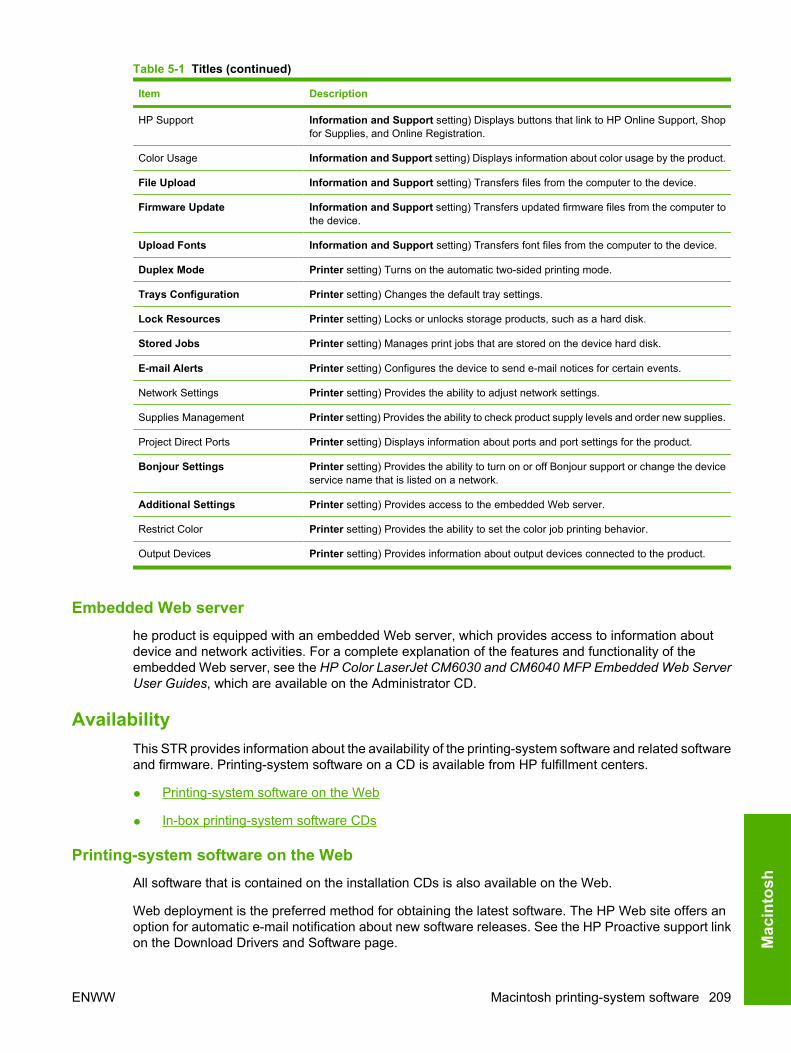
Item Description
HP Support Information and Support setting) Displays buttons that link to HP Online Support, Shopfor Supplies, and Online Registration.
Color Usage Information and Support setting) Displays information about color usage by the product.
File Upload Information and Support setting) Transfers files from the computer to the device.
Firmware Update Information and Support setting) Transfers updated firmware files from the computer tothe device.
Upload Fonts Information and Support setting) Transfers font files from the computer to the device.
Duplex Mode Printer setting) Turns on the automatic two-sided printing mode.
Trays Configuration Printer setting) Changes the default tray settings.
Lock Resources Printer setting) Locks or unlocks storage products, such as a hard disk.
Stored Jobs Printer setting) Manages print jobs that are stored on the device hard disk.
E-mail Alerts Printer setting) Configures the device to send e-mail notices for certain events.
Network Settings Printer setting) Provides the ability to adjust network settings.
Supplies Management Printer setting) Provides the ability to check product supply levels and order new supplies.
Project Direct Ports Printer setting) Displays information about ports and port settings for the product.
Bonjour Settings Printer setting) Provides the ability to turn on or off Bonjour support or change the deviceservice name that is listed on a network.
Additional Settings Printer setting) Provides access to the embedded Web server.
Restrict Color Printer setting) Provides the ability to set the color job printing behavior.
Output Devices Printer setting) Provides information about output devices connected to the product.
Embedded Web serverhe product is equipped with an embedded Web server, which provides access to information aboutdevice and network activities. For a complete explanation of the features and functionality of theembedded Web server, see the HP Color LaserJet CM6030 and CM6040 MFP Embedded Web ServerUser Guides, which are available on the Administrator CD.
AvailabilityThis STR provides information about the availability of the printing-system software and related softwareand firmware. Printing-system software on a CD is available from HP fulfillment centers.
● Printing-system software on the Web
● In-box printing-system software CDs
Printing-system software on the WebAll software that is contained on the installation CDs is also available on the Web.
Web deployment is the preferred method for obtaining the latest software. The HP Web site offers anoption for automatic e-mail notification about new software releases. See the HP Proactive support linkon the Download Drivers and Software page.
Table 5-1 Titles (continued)
ENWW Macintosh printing-system software 209
Mac
into
sh
NOTE: This STR describes drivers that are shipped on the Administrator printing-system software CDthat comes with the product. This STR does not describe drivers that will become available on the Web.
The printing-system software is available for download at the following Web sites:
www.hp.com/go/cljcm6030mfp_software or www.hp.com/go/cljcm6040mfp_software
In-box printing-system software CDsTwo CDs are included in-box with the product.
● Administrator CD. Contains the printing-system installer and administrator software, administratordocumentation, the Animated Getting Started Guide, the Installer Customization Wizard, and linksto the HP Universal Print Drivers (UPDs) on the Web.
● User CD. Contains job aids, product demonstrations and simulations, the control panel wall poster,fax guides, and support information.
The CDs are divided into two partitions, one for each of the following operating systems:
● Windows
● Macintosh
The files in each partition of the Administrator CD include documentation files and files that are requiredto install and uninstall the printing-system software components. Use the Administrator CD to install theprinting-system software.
● Macintosh partition
● CD versions
Macintosh partition
The HP Macintosh printing-system software files reside in the Macintosh partition. The HP LaserJetInstaller for Macintosh is at the root of the Macintosh CD partition. The user manuals (.PDF) are groupedby language and are in the Manuals directory on the Macintosh partition of the software CDs.
CD versions
The Administrator software CD is available in a single version and contains the printing-system softwarein various languages:
● DA = Danish (Dansk)
● DE = German (Deutsch)
● EN = English
● ES = Spanish (Español)
● FI = Finnish (Suomi)
● FR = French (Français)
● IT = Italian (Italiano)
● JA = Japanese
● KO = Korean
210 Chapter 5 Macintosh software and utilities ENWW
● NL = Dutch (Nederland)
● NO = Norwegian (Norsk)
● PT = Brazilian Portuguese (Português)
● RU = Russian (Russ)
● SV = Swedish (Svenska)
● ZHCN = Simplified Chinese
● ZHTW = Traditional Chinese
ENWW Macintosh printing-system software 211
Mac
into
sh

Macintosh install and uninstall instructions● Install the Macintosh printing-system software
● Remove software from Macintosh operating systems
Install the Macintosh printing-system softwareOn a Macintosh computer, the printing-system software installation procedures are the same for anetwork administrator, a network client, or a single user. Install the printing-system software on anycomputer that has access rights to the product. The computer user must also have administrative rightson the computer to install the printing-system software.
● General installation for Macintosh operating systems
● Detailed Mac OS X installation
● Product setup
General installation for Macintosh operating systems1. If you are connecting the product to a network, connect the network cable to the network port. If
you are connecting the product to a computer using the USB cable, install the software beforeconnecting the USB cable.
2. Insert the Administrator software CD into the CD-ROM drive.
NOTE: If the HP LaserJet installer browser screen does not open automatically when the CD isinserted into the CD-ROM drive, double-click the product CD image on the desktop to open theinstaller browser screen.
3. Double-click the product .MKPG icon to start the printing-system software installation.
NOTE: In the HP LaserJet installer browser screen, double-click the Manuals icon to gainaccess to the HP Color LaserJet CM6030 and CM6040 MFP Series User Guide.
4. The Introduction dialog box appears. Click Continue and then follow the onscreen instructionsto complete the printing-system software installation.
NOTE: When the printing-system software is installing, be patient. The installer must perform aninitial search of the computer, which can take up to 1 minute. During this time, the installer mightappear to be stalled.
5. When the printing-system software installation is complete, click Close.
6. Continue with the steps for setting up a product.
The software program that you use to finish setting up the product varies by operating system. Thefollowing table shows the product setup tools that are available.
Table 5-2 Adding a product in Macintosh operating systems
Operating system Print Center Printer Setup Utility Print & Fax
Mac OS X V10.2.8 x
Mac OS X V10.3 x x
212 Chapter 5 Macintosh software and utilities ENWW
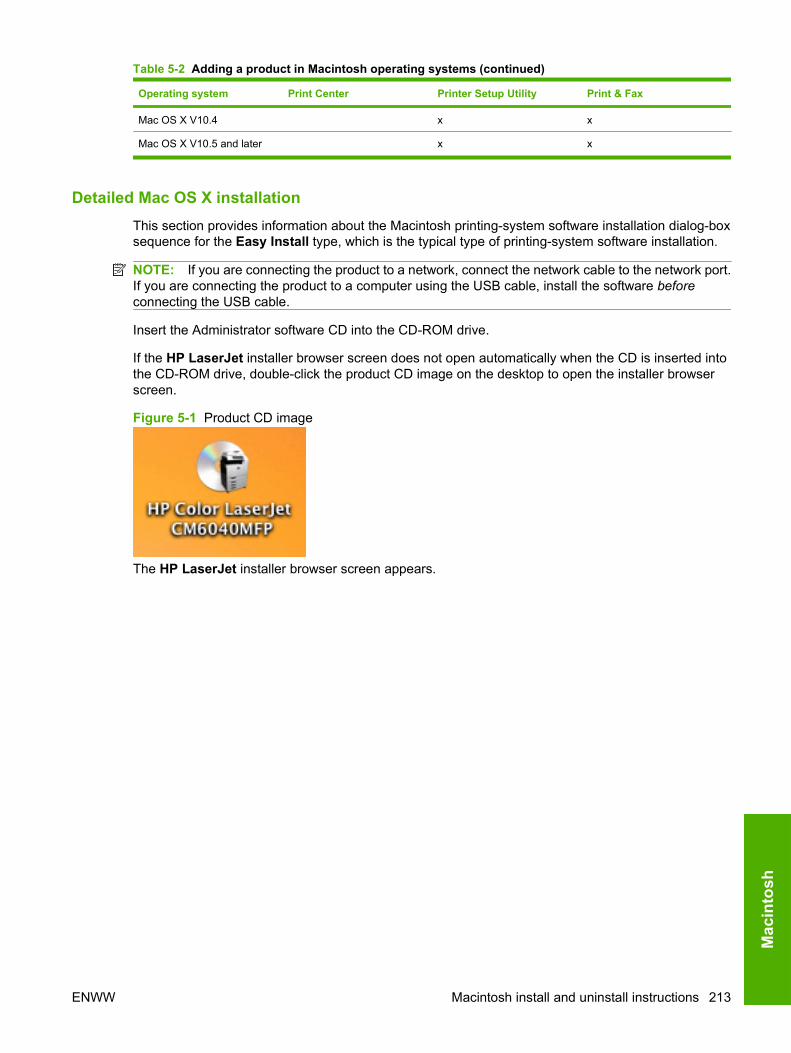
Operating system Print Center Printer Setup Utility Print & Fax
Mac OS X V10.4 x x
Mac OS X V10.5 and later x x
Detailed Mac OS X installationThis section provides information about the Macintosh printing-system software installation dialog-boxsequence for the Easy Install type, which is the typical type of printing-system software installation.
NOTE: If you are connecting the product to a network, connect the network cable to the network port.If you are connecting the product to a computer using the USB cable, install the software beforeconnecting the USB cable.
Insert the Administrator software CD into the CD-ROM drive.
If the HP LaserJet installer browser screen does not open automatically when the CD is inserted intothe CD-ROM drive, double-click the product CD image on the desktop to open the installer browserscreen.
Figure 5-1 Product CD image
The HP LaserJet installer browser screen appears.
Table 5-2 Adding a product in Macintosh operating systems (continued)
ENWW Macintosh install and uninstall instructions 213
Mac
into
sh
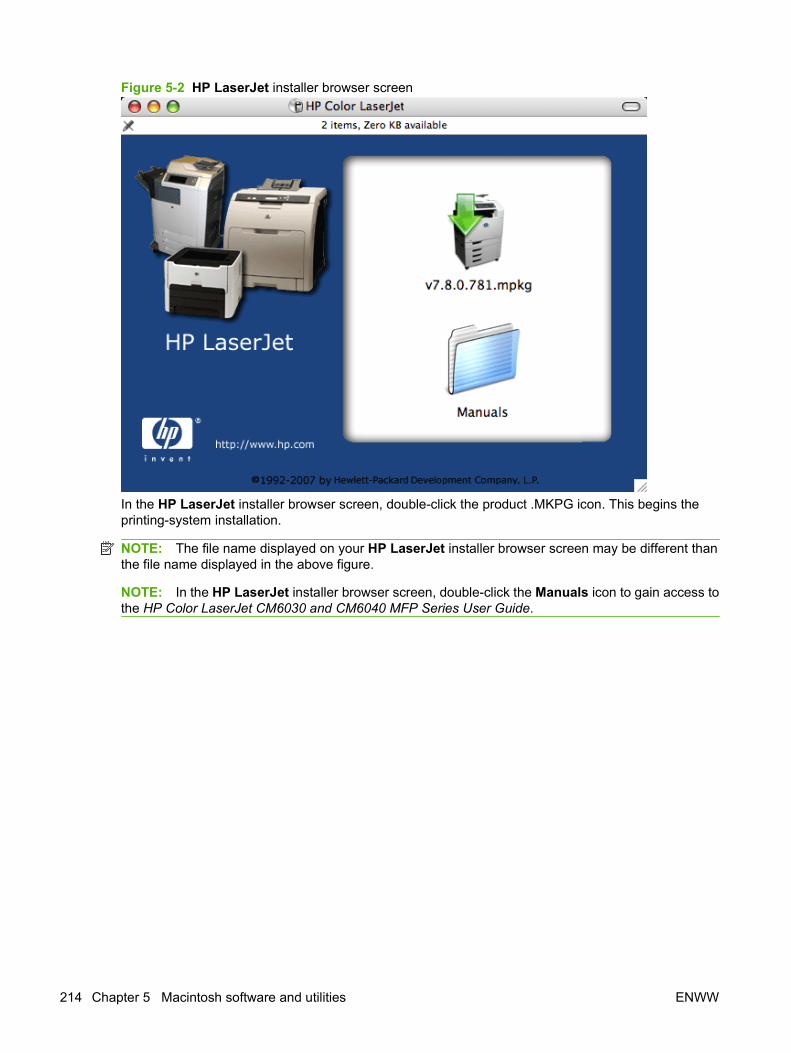
Figure 5-2 HP LaserJet installer browser screen
In the HP LaserJet installer browser screen, double-click the product .MKPG icon. This begins theprinting-system installation.
NOTE: The file name displayed on your HP LaserJet installer browser screen may be different thanthe file name displayed in the above figure.
NOTE: In the HP LaserJet installer browser screen, double-click the Manuals icon to gain access tothe HP Color LaserJet CM6030 and CM6040 MFP Series User Guide.
214 Chapter 5 Macintosh software and utilities ENWW
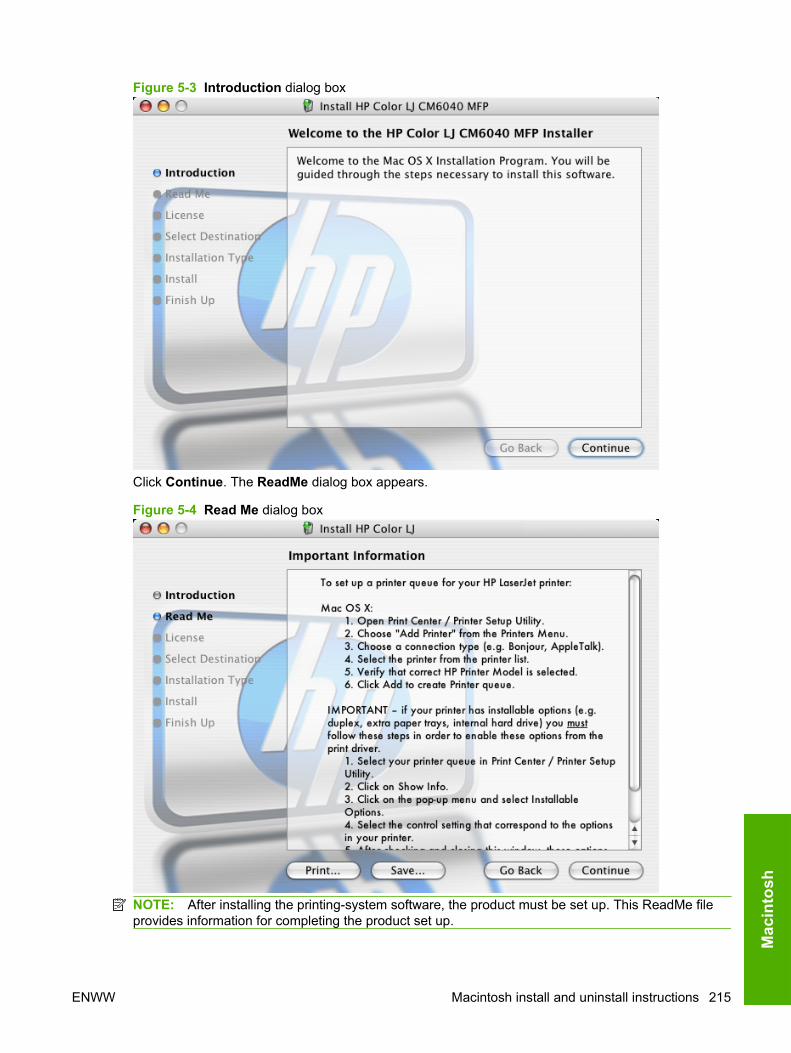
Figure 5-3 Introduction dialog box
Click Continue. The ReadMe dialog box appears.
Figure 5-4 Read Me dialog box
NOTE: After installing the printing-system software, the product must be set up. This ReadMe fileprovides information for completing the product set up.
ENWW Macintosh install and uninstall instructions 215
Mac
into
sh
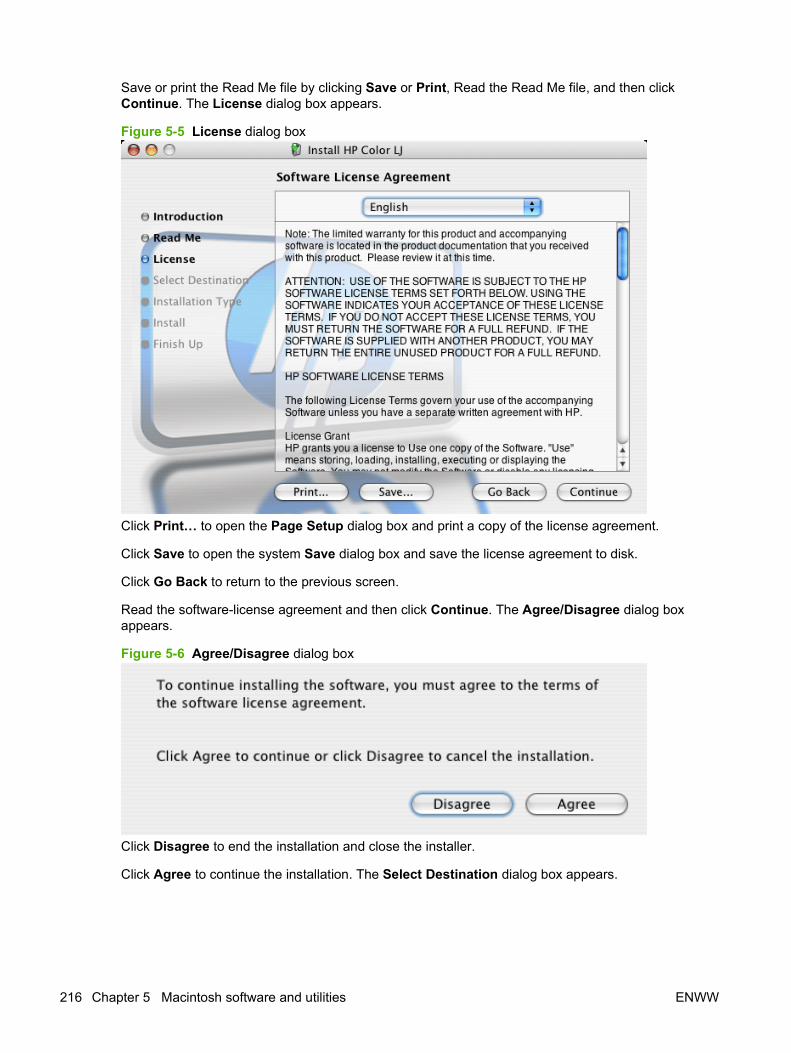
Save or print the Read Me file by clicking Save or Print, Read the Read Me file, and then clickContinue. The License dialog box appears.
Figure 5-5 License dialog box
Click Print… to open the Page Setup dialog box and print a copy of the license agreement.
Click Save to open the system Save dialog box and save the license agreement to disk.
Click Go Back to return to the previous screen.
Read the software-license agreement and then click Continue. The Agree/Disagree dialog boxappears.
Figure 5-6 Agree/Disagree dialog box
Click Disagree to end the installation and close the installer.
Click Agree to continue the installation. The Select Destination dialog box appears.
216 Chapter 5 Macintosh software and utilities ENWW
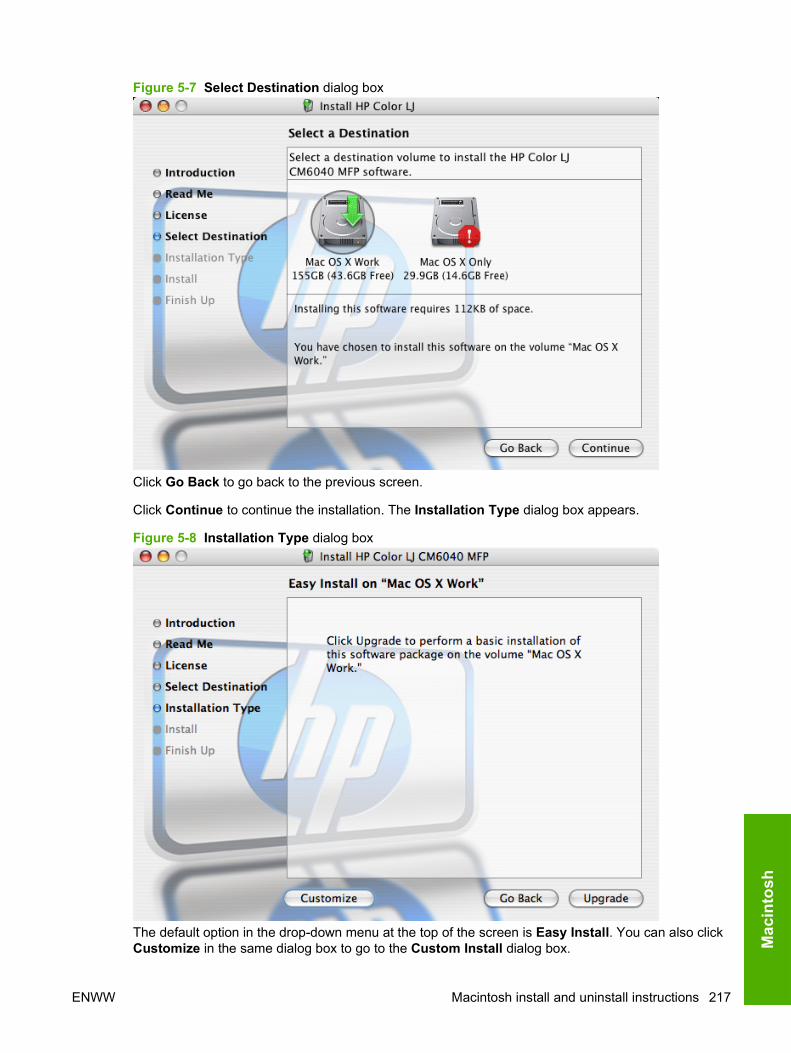
Figure 5-7 Select Destination dialog box
Click Go Back to go back to the previous screen.
Click Continue to continue the installation. The Installation Type dialog box appears.
Figure 5-8 Installation Type dialog box
The default option in the drop-down menu at the top of the screen is Easy Install. You can also clickCustomize in the same dialog box to go to the Custom Install dialog box.
ENWW Macintosh install and uninstall instructions 217
Mac
into
sh
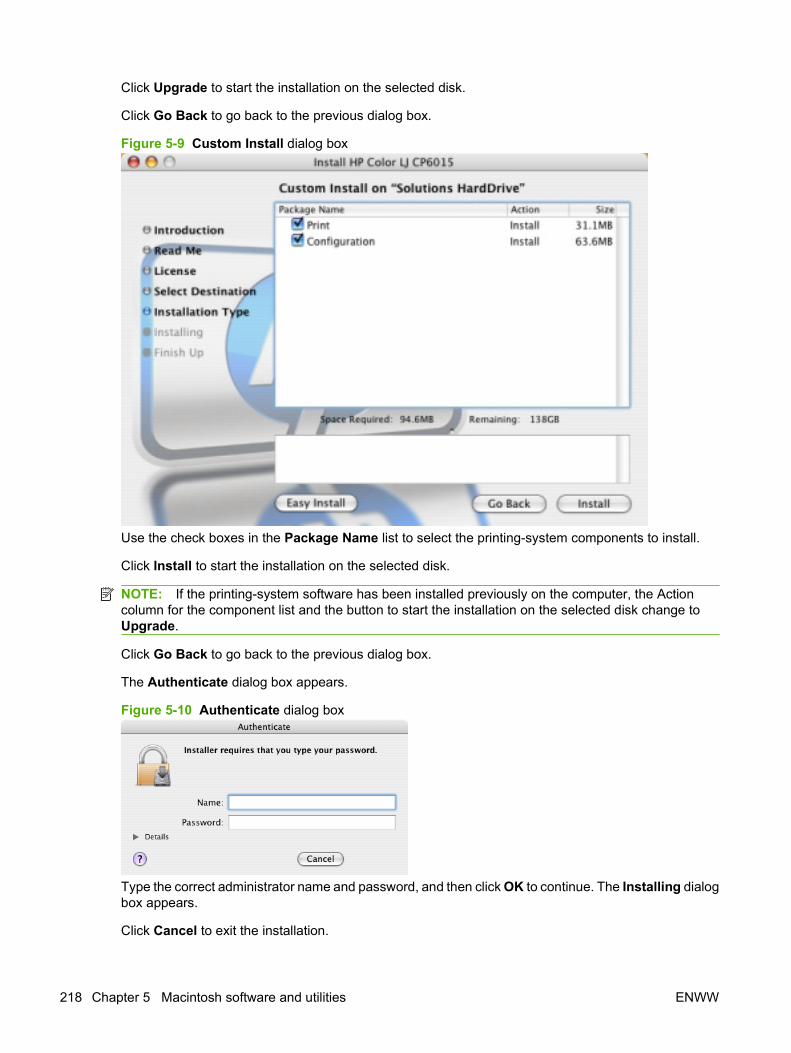
Click Upgrade to start the installation on the selected disk.
Click Go Back to go back to the previous dialog box.
Figure 5-9 Custom Install dialog box
Use the check boxes in the Package Name list to select the printing-system components to install.
Click Install to start the installation on the selected disk.
NOTE: If the printing-system software has been installed previously on the computer, the Actioncolumn for the component list and the button to start the installation on the selected disk change toUpgrade.
Click Go Back to go back to the previous dialog box.
The Authenticate dialog box appears.
Figure 5-10 Authenticate dialog box
Type the correct administrator name and password, and then click OK to continue. The Installing dialogbox appears.
Click Cancel to exit the installation.
218 Chapter 5 Macintosh software and utilities ENWW
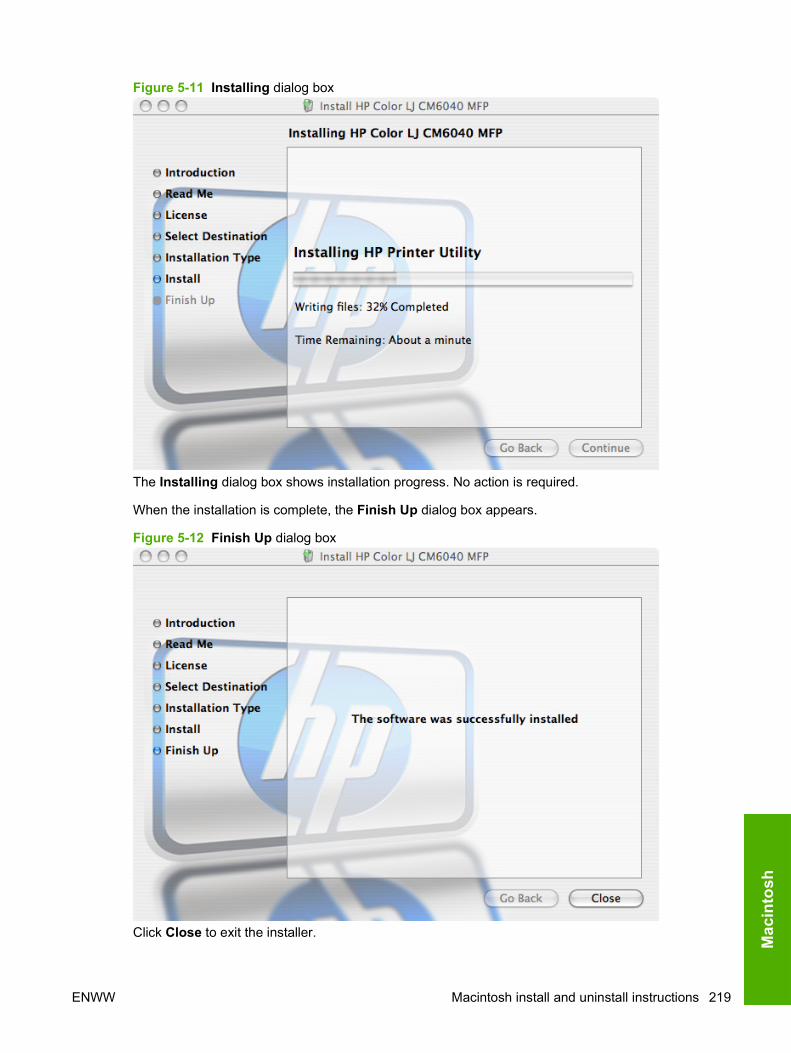
Figure 5-11 Installing dialog box
The Installing dialog box shows installation progress. No action is required.
When the installation is complete, the Finish Up dialog box appears.
Figure 5-12 Finish Up dialog box
Click Close to exit the installer.
ENWW Macintosh install and uninstall instructions 219
Mac
into
sh
NOTE: After installing the printing-system software, the product must be set up.
Product setup
● Setup a product on Mac OS X V10.4
● Setup a product on Mac OS X V10.3
● Setup a product on Mac OS X V10.2.8
● Troubleshooting the product setup
Setup a product on Mac OS X V10.4
Complete these steps after completing the printing-system software installation.
1. If you are installing the product using a USB connection, connect the USB cable between theproduct and the computer. Turn on the product. If you are installing using a network connection,verify that the network cable is connected to the product and that the product is on.
220 Chapter 5 Macintosh software and utilities ENWW

2. In the Applications folder, open the Utilities folder, and then run the Printer Setup Utility. ThePrinter List screen appears. The following figure is an example of a typical Printer List screen ona computer that has multiple products installed.
Figure 5-13 Printer list screen
You can also configure the product using the Print & Fax pane of System Preferences. From theApple menu, choose System Preferences..., then choose Print & Fax.
Figure 5-14 Print & Fax dialog
3. If you are installing the product using a USB connection, verify that the product appears in theprinter list. The Kind column in the printer list, or the Kind field in the Print & Fax screen, shoulddisplay the product name. If this is the case, the setup is complete.
If the product does not appear, or if the correct information does not appear in the Kind field, seeTroubleshooting the product setup on page 231.
If you are installing the product using a network connection, continue with the following steps.
4. Click Add in the Printer List (or the + button in the Print & Fax utility) to open the PrinterBrowser screen.
ENWW Macintosh install and uninstall instructions 221
Mac
into
sh
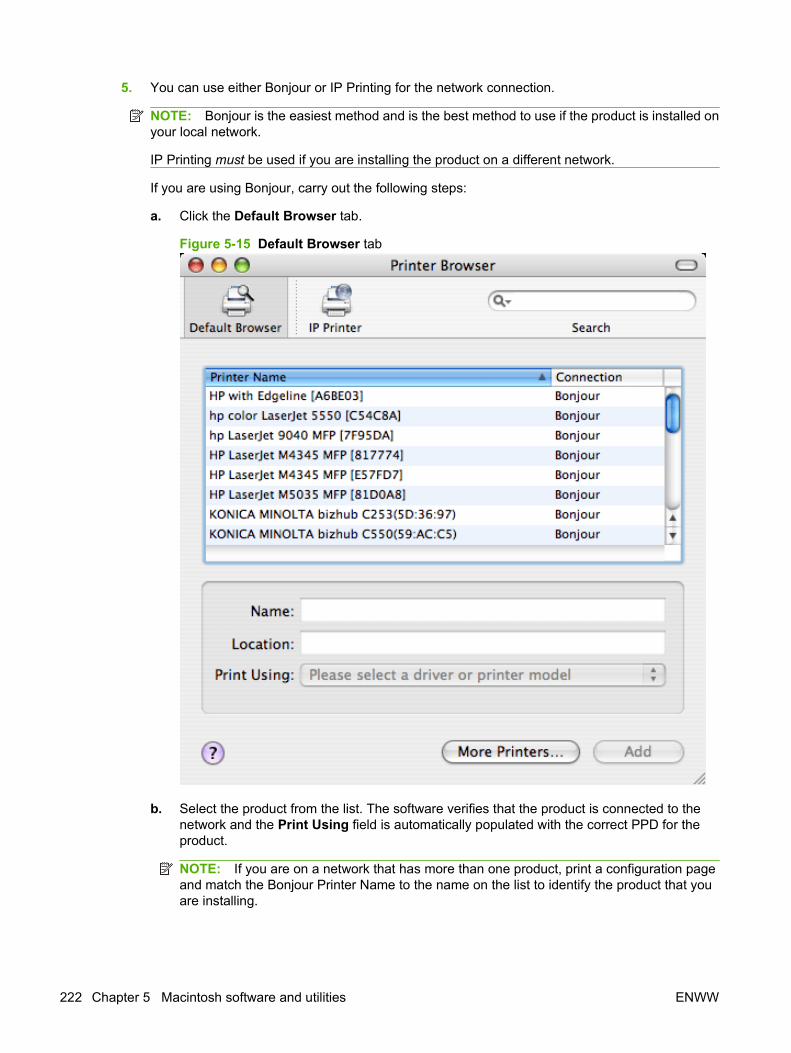
5. You can use either Bonjour or IP Printing for the network connection.
NOTE: Bonjour is the easiest method and is the best method to use if the product is installed onyour local network.
IP Printing must be used if you are installing the product on a different network.
If you are using Bonjour, carry out the following steps:
a. Click the Default Browser tab.
Figure 5-15 Default Browser tab
b. Select the product from the list. The software verifies that the product is connected to thenetwork and the Print Using field is automatically populated with the correct PPD for theproduct.
NOTE: If you are on a network that has more than one product, print a configuration pageand match the Bonjour Printer Name to the name on the list to identify the product that youare installing.
222 Chapter 5 Macintosh software and utilities ENWW
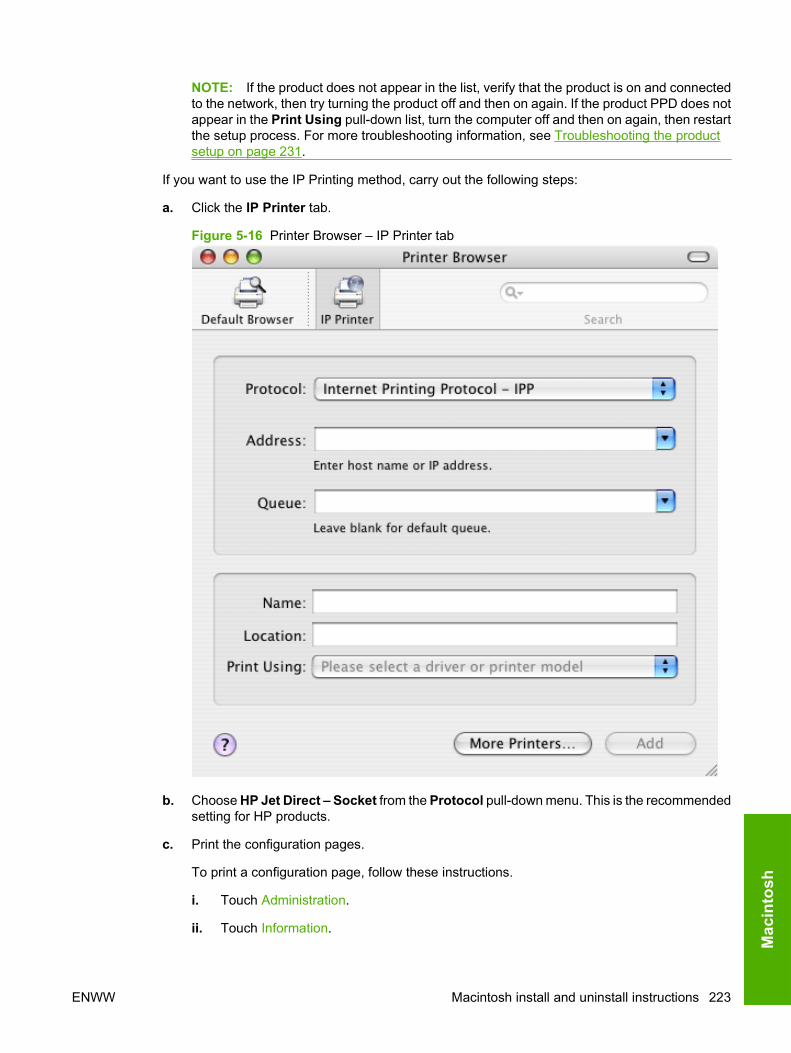
NOTE: If the product does not appear in the list, verify that the product is on and connectedto the network, then try turning the product off and then on again. If the product PPD does notappear in the Print Using pull-down list, turn the computer off and then on again, then restartthe setup process. For more troubleshooting information, see Troubleshooting the productsetup on page 231.
If you want to use the IP Printing method, carry out the following steps:
a. Click the IP Printer tab.
Figure 5-16 Printer Browser – IP Printer tab
b. Choose HP Jet Direct – Socket from the Protocol pull-down menu. This is the recommendedsetting for HP products.
c. Print the configuration pages.
To print a configuration page, follow these instructions.
i. Touch Administration.
ii. Touch Information.
ENWW Macintosh install and uninstall instructions 223
Mac
into
sh
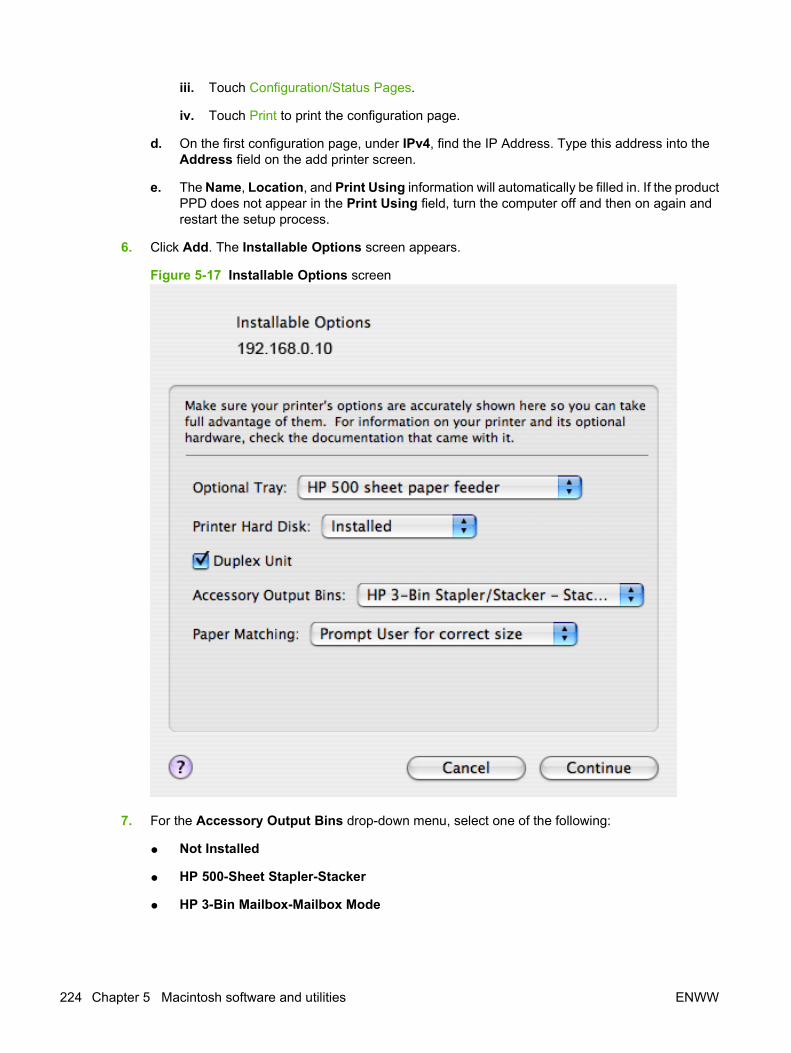
iii. Touch Configuration/Status Pages.
iv. Touch Print to print the configuration page.
d. On the first configuration page, under IPv4, find the IP Address. Type this address into theAddress field on the add printer screen.
e. The Name, Location, and Print Using information will automatically be filled in. If the productPPD does not appear in the Print Using field, turn the computer off and then on again andrestart the setup process.
6. Click Add. The Installable Options screen appears.
Figure 5-17 Installable Options screen
7. For the Accessory Output Bins drop-down menu, select one of the following:
● Not Installed
● HP 500-Sheet Stapler-Stacker
● HP 3-Bin Mailbox-Mailbox Mode
224 Chapter 5 Macintosh software and utilities ENWW
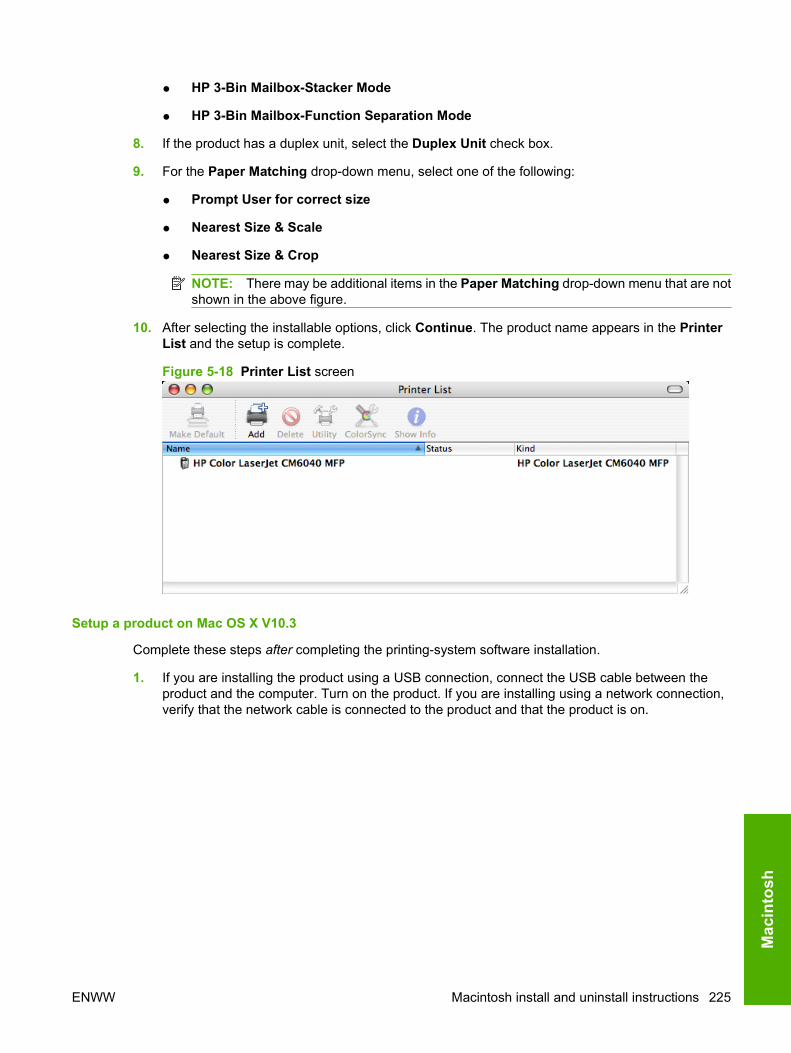
● HP 3-Bin Mailbox-Stacker Mode
● HP 3-Bin Mailbox-Function Separation Mode
8. If the product has a duplex unit, select the Duplex Unit check box.
9. For the Paper Matching drop-down menu, select one of the following:
● Prompt User for correct size
● Nearest Size & Scale
● Nearest Size & Crop
NOTE: There may be additional items in the Paper Matching drop-down menu that are notshown in the above figure.
10. After selecting the installable options, click Continue. The product name appears in the PrinterList and the setup is complete.
Figure 5-18 Printer List screen
Setup a product on Mac OS X V10.3
Complete these steps after completing the printing-system software installation.
1. If you are installing the product using a USB connection, connect the USB cable between theproduct and the computer. Turn on the product. If you are installing using a network connection,verify that the network cable is connected to the product and that the product is on.
ENWW Macintosh install and uninstall instructions 225
Mac
into
sh
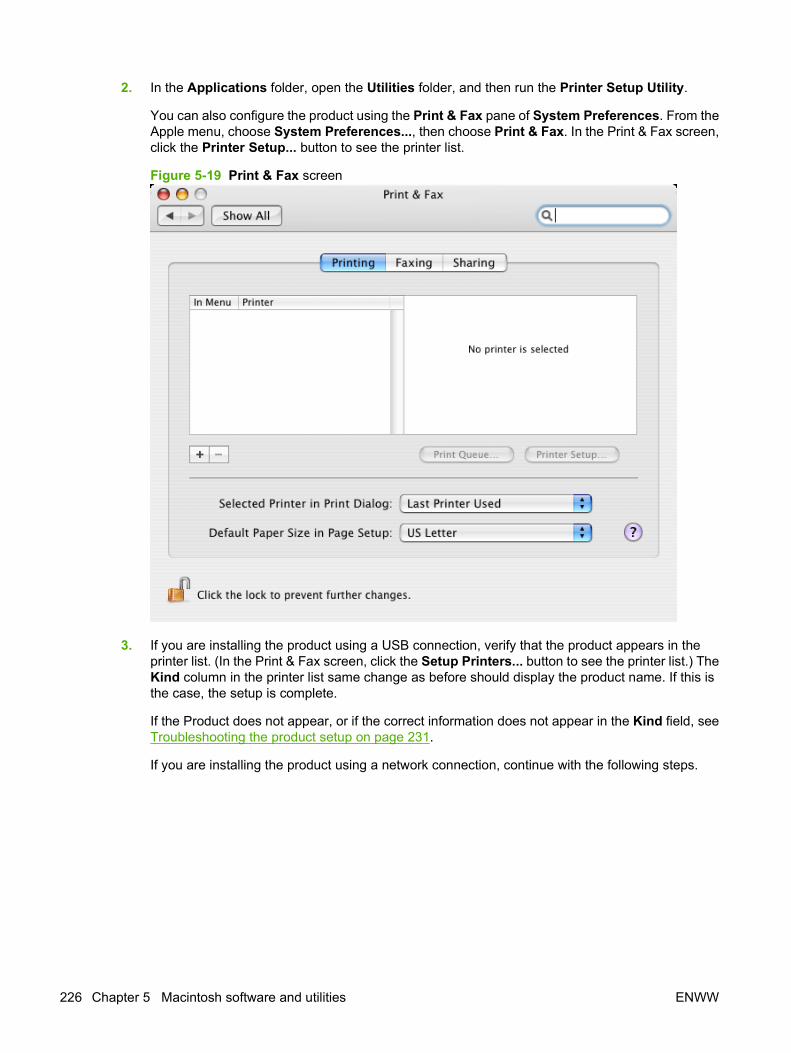
2. In the Applications folder, open the Utilities folder, and then run the Printer Setup Utility.
You can also configure the product using the Print & Fax pane of System Preferences. From theApple menu, choose System Preferences..., then choose Print & Fax. In the Print & Fax screen,click the Printer Setup... button to see the printer list.
Figure 5-19 Print & Fax screen
3. If you are installing the product using a USB connection, verify that the product appears in theprinter list. (In the Print & Fax screen, click the Setup Printers... button to see the printer list.) TheKind column in the printer list same change as before should display the product name. If this isthe case, the setup is complete.
If the Product does not appear, or if the correct information does not appear in the Kind field, seeTroubleshooting the product setup on page 231.
If you are installing the product using a network connection, continue with the following steps.
226 Chapter 5 Macintosh software and utilities ENWW
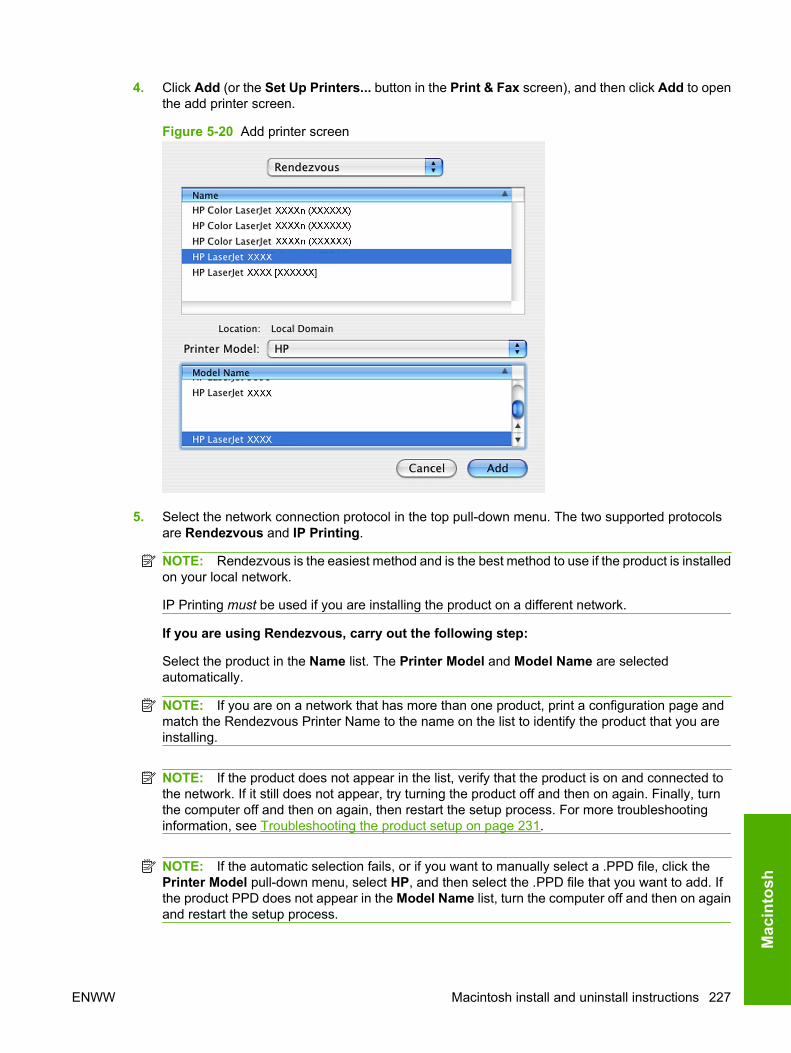
4. Click Add (or the Set Up Printers... button in the Print & Fax screen), and then click Add to openthe add printer screen.
Figure 5-20 Add printer screen
5. Select the network connection protocol in the top pull-down menu. The two supported protocolsare Rendezvous and IP Printing.
NOTE: Rendezvous is the easiest method and is the best method to use if the product is installedon your local network.
IP Printing must be used if you are installing the product on a different network.
If you are using Rendezvous, carry out the following step:
Select the product in the Name list. The Printer Model and Model Name are selectedautomatically.
NOTE: If you are on a network that has more than one product, print a configuration page andmatch the Rendezvous Printer Name to the name on the list to identify the product that you areinstalling.
NOTE: If the product does not appear in the list, verify that the product is on and connected tothe network. If it still does not appear, try turning the product off and then on again. Finally, turnthe computer off and then on again, then restart the setup process. For more troubleshootinginformation, see Troubleshooting the product setup on page 231.
NOTE: If the automatic selection fails, or if you want to manually select a .PPD file, click thePrinter Model pull-down menu, select HP, and then select the .PPD file that you want to add. Ifthe product PPD does not appear in the Model Name list, turn the computer off and then on againand restart the setup process.
ENWW Macintosh install and uninstall instructions 227
Mac
into
sh
If you are using IP Printing, carry out the following steps:
a. Choose Socket/HP Jet Direct from the Printer Type pull-down menu. This is therecommended setting for HP products.
b. Print the product configuration pages.
To print a configuration page, follow these instructions.
i. Touch Administration.
ii. Touch Information.
iii. Touch Configuration/Status Pages.
iv. Touch Configuration Page.
v. Touch Print to print the configuration page.
c. On the first configuration page, under Product Settings, find the IP Address. Type thisaddress into the Printer Address field on the add printer screen.
d. Select the Printer Model and select the product in the Model Name list. If the product PPDdoes not appear in the Model Name list, turn the computer off and then on again and restartthe setup process.
6. Click Add. The product appears in the Printer List.
7. To configure installable options such as a duplexing unit or optional paper tray, click Show Info?on the printer list and choose Installable Options in the pull-down menu.
8. For the Accessory Output Bins drop-down menu, select one of the following:
● Not Installed
● HP 500-Sheet Stapler-Stacker
● HP 3-Bin Mailbox-Mailbox Mode
● HP 3-Bin Mailbox-Stacker Mode
● HP 3-Bin Mailbox-Function Separation Mode
9. If the product has a duplex unit, select the Duplex Unit check box.
10. For the Paper Matching drop-down menu, select one of the following:
● Prompt User for correct size
● Nearest Size & Scale
● Nearest Size & Crop
11. Click Apply Changes, and then close the Printer List dialog.
228 Chapter 5 Macintosh software and utilities ENWW
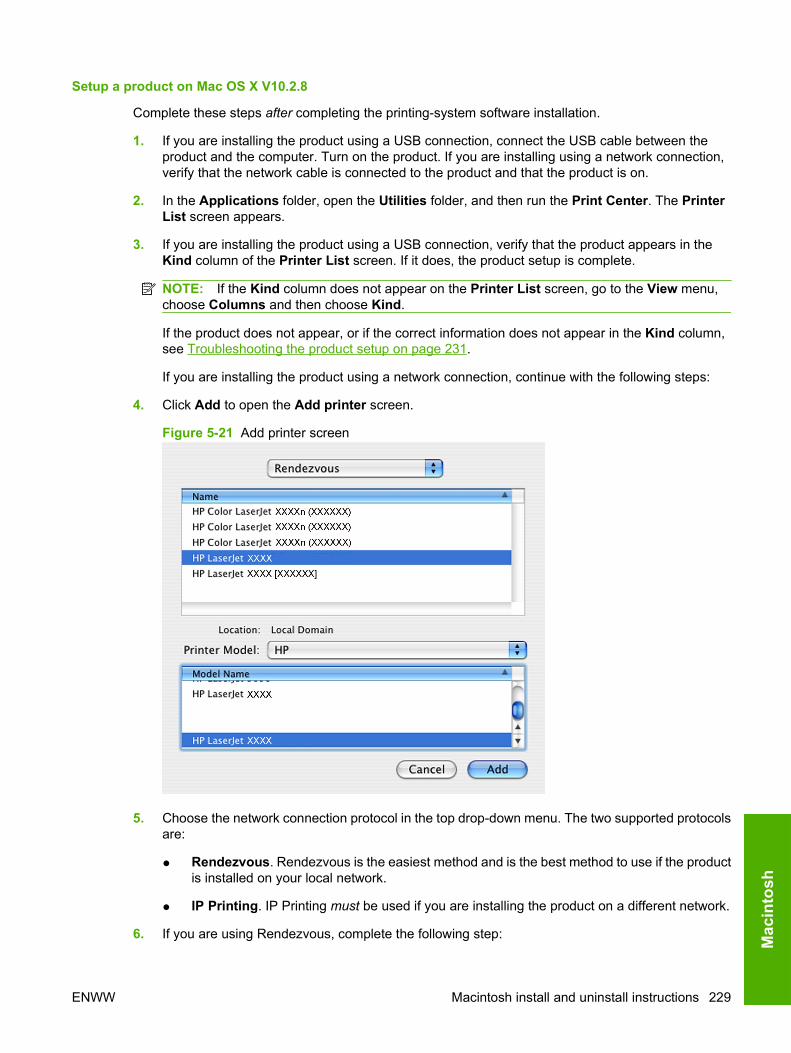
Setup a product on Mac OS X V10.2.8
Complete these steps after completing the printing-system software installation.
1. If you are installing the product using a USB connection, connect the USB cable between theproduct and the computer. Turn on the product. If you are installing using a network connection,verify that the network cable is connected to the product and that the product is on.
2. In the Applications folder, open the Utilities folder, and then run the Print Center. The PrinterList screen appears.
3. If you are installing the product using a USB connection, verify that the product appears in theKind column of the Printer List screen. If it does, the product setup is complete.
NOTE: If the Kind column does not appear on the Printer List screen, go to the View menu,choose Columns and then choose Kind.
If the product does not appear, or if the correct information does not appear in the Kind column,see Troubleshooting the product setup on page 231.
If you are installing the product using a network connection, continue with the following steps:
4. Click Add to open the Add printer screen.
Figure 5-21 Add printer screen
5. Choose the network connection protocol in the top drop-down menu. The two supported protocolsare:
● Rendezvous. Rendezvous is the easiest method and is the best method to use if the productis installed on your local network.
● IP Printing. IP Printing must be used if you are installing the product on a different network.
6. If you are using Rendezvous, complete the following step:
ENWW Macintosh install and uninstall instructions 229
Mac
into
sh
If you are using Rendezvous, carry out the following step:
Select the product in the Name list. The Printer Model and Model Name are selectedautomatically.
NOTE: If you are on a network that has more than one product, print a configuration page andmatch the Rendezvous Printer Name to the name on the list to identify the product that you areinstalling.
NOTE: If the product does not appear in the list, verify that the product is on and connected tothe network. If it still does not appear, try turning the product off and then on again. Finally, turnthe computer off and then on again, then restart the setup process. For more troubleshootinginformation, see Troubleshooting the product setup on page 231.
NOTE: If the automatic selection fails, or if you want to manually select a PPD file, click thePrinter Model drop-down menu, choose HP, and then choose the PPD file that you want to add.If the product PPD does not appear in the Model Name list, turn the computer off and then onagain and restart the setup process.
If you are using IP Printing, carry out the following steps:
Print the product configuration pages.
a. From the Home screen, touch Administration.
b. Touch Information.
c. Touch Configuration/Status Pages.
d. Touch Print.
e. On the second configuration page, under IPv4, find the IP Address. Type this address intothe Printer's Address field.
f. Choose Printer Model and then choose the product in the Model Name list.
7. Click Add. The product appears in the Printer List.
8. Select the product, go to the Printers menu, and choose Show Info.
9. Choose Installable Options from the top drop-down menu.
10. For the Accessory Output Bins drop-down menu, select one of the following:
● Not Installed
● HP 500-Sheet Stapler-Stacker
● HP 3-Bin Mailbox-Mailbox Mode
● HP 3-Bin Mailbox-Stacker Mode
● HP 3-Bin Mailbox-Function Separation Mode
11. If the product has a duplex unit, select the Duplex Unit check box.
230 Chapter 5 Macintosh software and utilities ENWW

12. For the Paper Matching drop-down menu, select one of the following:
● Prompt User for correct size
● Nearest Size & Scale
● Nearest Size & Crop
13. Click Apply Changes, and then close the Printer List dialog.
Troubleshooting the product setup
If the product does not appear in the printer list after an installation:
Complete each one of these solutions in the order given, and restart the setup process after each oneto see if the issue has been resolved.
● Verify that the USB or network cable is connected between the product and the computer and thatthe product is powered on.
● Try disconnecting and reconnecting the cable. If the computer has more than one USB port, try adifferent USB port.
● Turn the product off and then back on.
● Turn the computer off and then back on.
● If you are using a USB hub on the computer, disconnect any other USB devices from the hub.
If the wrong PPD appears in the Kind column in the printer list after installation:
1. Unplug the USB cable.
2. Delete the print queue with the incorrect type (for example, Generic PostScript Printer).
3. Reinstall the printing-system software.
4. Turn the computer off and then on.
5. Reconnect the USB cable from the computer to the product.
If these steps do not resolve the problem, delete the incorrect print queue, click Add, choose the productfrom the list, and then browse manually for the product PPD. If this procedure does not resolve theproblem, try the following procedure:
1. Open the finder.
2. Select Applications.
3. Select Utilities.
4. Open the Printer Setup utility.
5. Select Printer to remove.
6. Select Printer.
NOTE: This process removes the printer object from the printer list but does not remove the filesfrom the system. It is recommended to keep the file in the operating system for later use. if youmust remove the files, see the following section.
ENWW Macintosh install and uninstall instructions 231
Mac
into
sh
Remove software from Macintosh operating systemsFollow these instructions to remove the Macintosh printing-system software:
1. Browse to the folder containing the PPDs. In Mac OS X V10.2.8 or later, the PPDs are installed inLibrary/Printers/PPDs/Contents/Resources:<lang>.lproj, where <lang> is the appropriatelanguage.
2. Choose the product .GZ file and drag it to Trash.
3. Empty the Trash.
232 Chapter 5 Macintosh software and utilities ENWW
Macintosh HP Printer UtilityThe HP Printer Utility is a software program that gives you access to the product in Mac OS X.
The HP Printer Utility is available only in Mac OS X V10.2.8 and later. The HP Printer Utility does notwork when it is installed by using the AppleTalk protocol. Use IP, Bonjour, Rendezvous, or a USBconnection to enable the HP Printer Utility.
● Access to the HP Printer Utility
● Supplies Status
● Device Information
● HP Support
● File Upload
● Update Firmware
● Remote firmware update by using the HP Printer Utility
● Duplex mode
● Trays Configuration
● Lock Resources
● Stored Jobs
● E-mail Alerts
● Network Settings
● Bonjour Settings
● Additional Network Settings
Access to the HP Printer UtilityIn Mac OS X V10.4 and Mac OS X V10.5, follow these steps to gain access to the HP Printer Utility:
1. On the Finder menu, click Go.
2. Click Utilities.
3. Double-click HP Printer Selector. The Select Printer screen appears.
ENWW Macintosh HP Printer Utility 233
Mac
into
sh
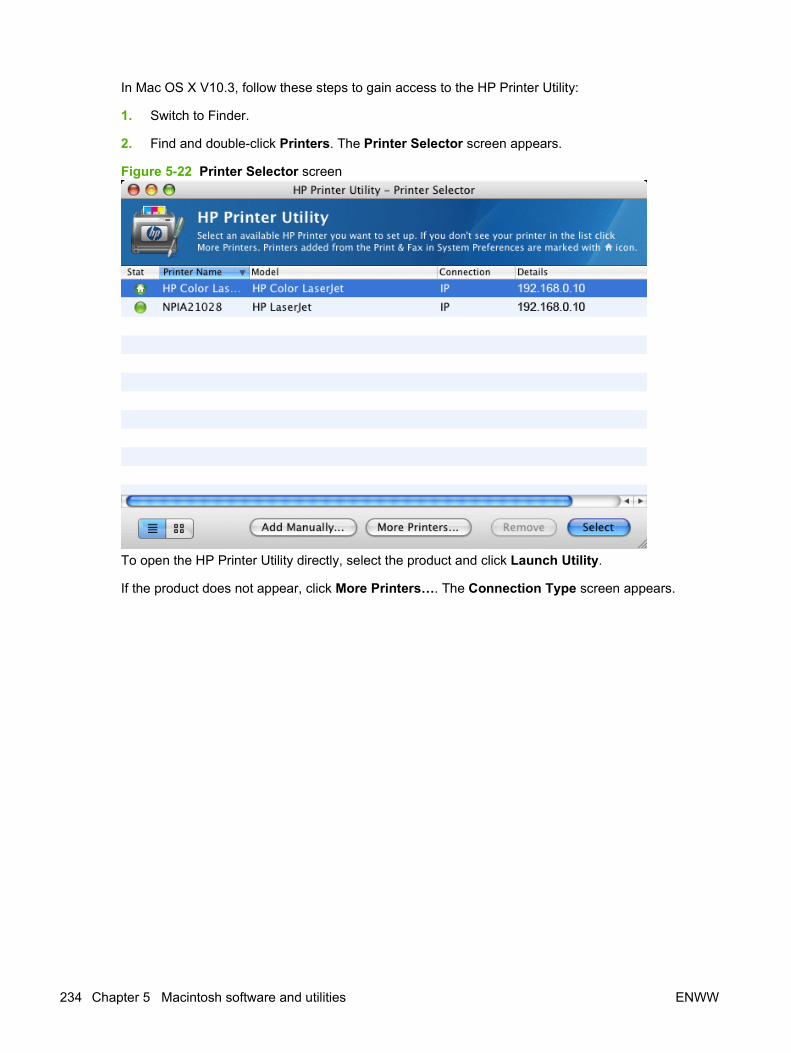
In Mac OS X V10.3, follow these steps to gain access to the HP Printer Utility:
1. Switch to Finder.
2. Find and double-click Printers. The Printer Selector screen appears.
Figure 5-22 Printer Selector screen
To open the HP Printer Utility directly, select the product and click Launch Utility.
If the product does not appear, click More Printers…. The Connection Type screen appears.
234 Chapter 5 Macintosh software and utilities ENWW
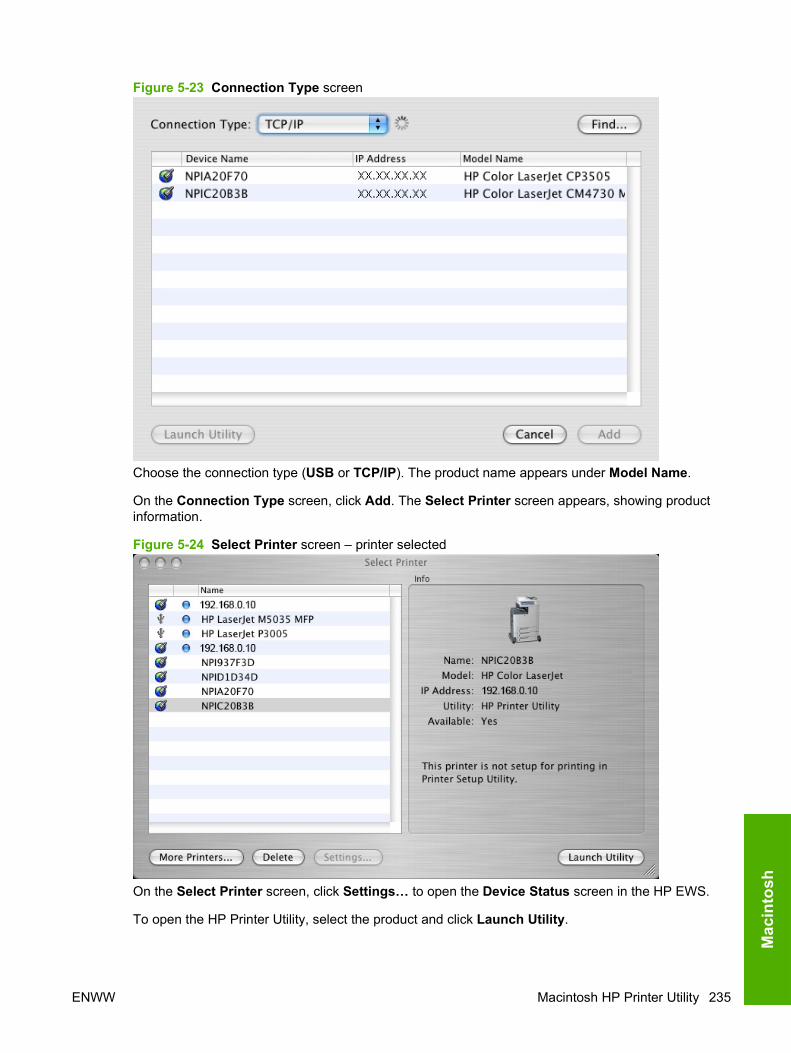
Figure 5-23 Connection Type screen
Choose the connection type (USB or TCP/IP). The product name appears under Model Name.
On the Connection Type screen, click Add. The Select Printer screen appears, showing productinformation.
Figure 5-24 Select Printer screen – printer selected
On the Select Printer screen, click Settings… to open the Device Status screen in the HP EWS.
To open the HP Printer Utility, select the product and click Launch Utility.
ENWW Macintosh HP Printer Utility 235
Mac
into
sh
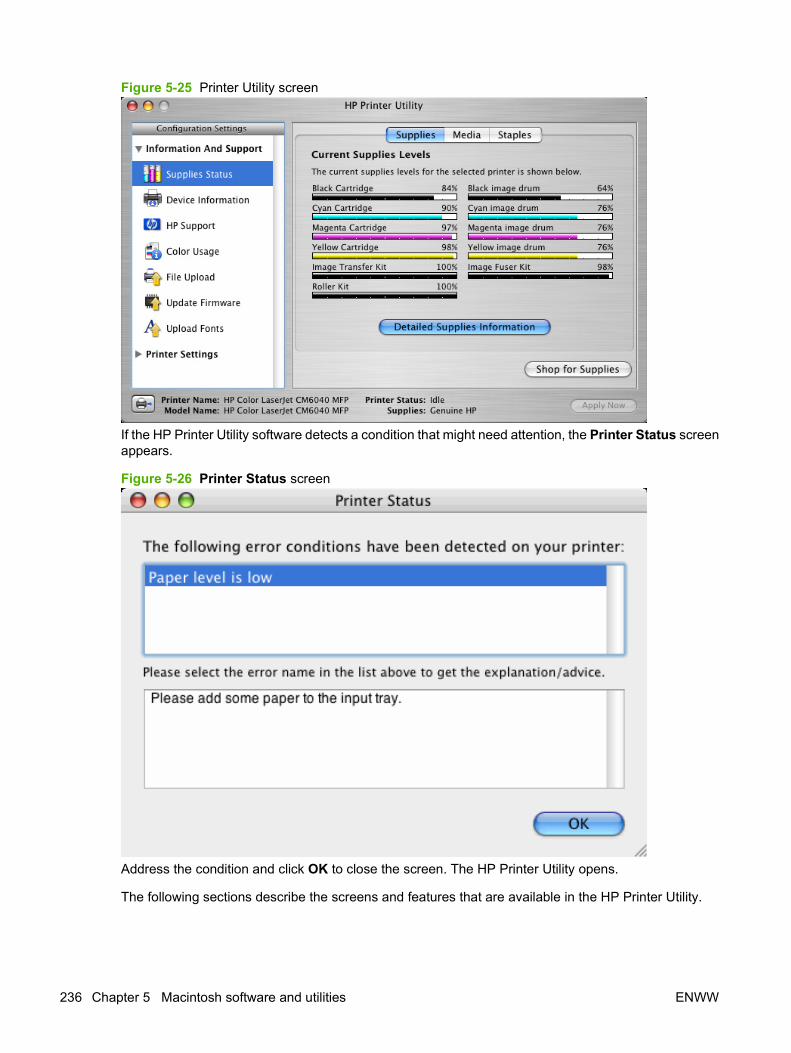
Figure 5-25 Printer Utility screen
If the HP Printer Utility software detects a condition that might need attention, the Printer Status screenappears.
Figure 5-26 Printer Status screen
Address the condition and click OK to close the screen. The HP Printer Utility opens.
The following sections describe the screens and features that are available in the HP Printer Utility.
236 Chapter 5 Macintosh software and utilities ENWW
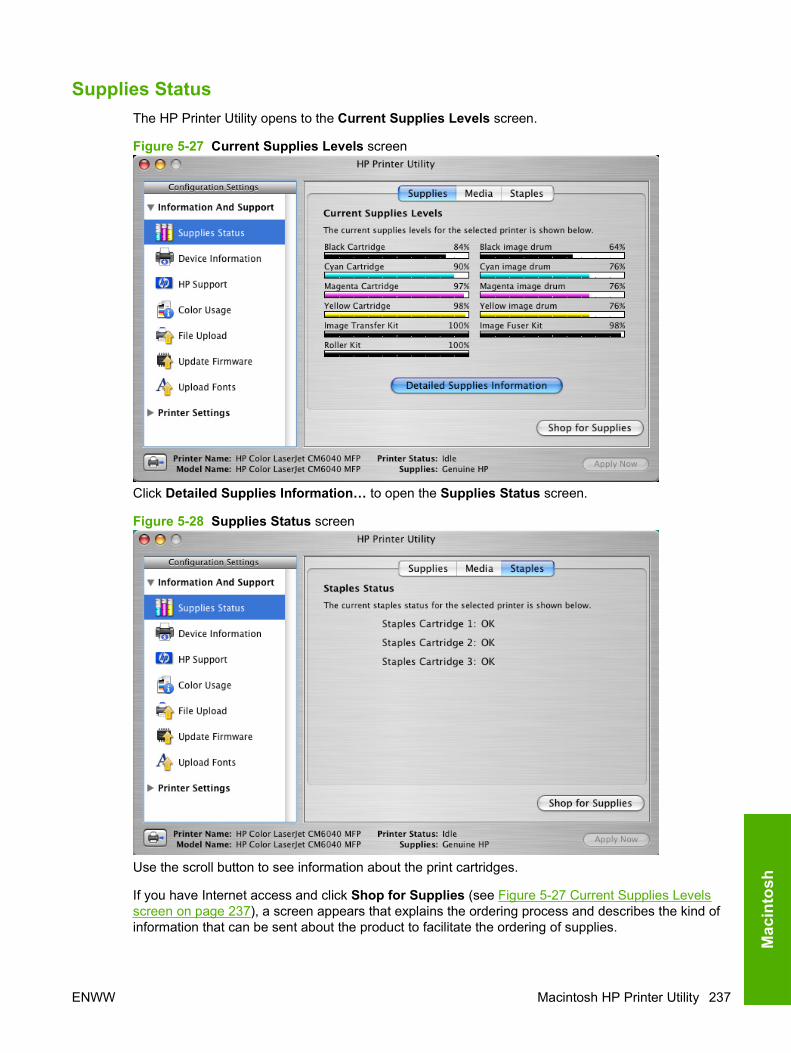
Supplies StatusThe HP Printer Utility opens to the Current Supplies Levels screen.
Figure 5-27 Current Supplies Levels screen
Click Detailed Supplies Information… to open the Supplies Status screen.
Figure 5-28 Supplies Status screen
Use the scroll button to see information about the print cartridges.
If you have Internet access and click Shop for Supplies (see Figure 5-27 Current Supplies Levelsscreen on page 237), a screen appears that explains the ordering process and describes the kind ofinformation that can be sent about the product to facilitate the ordering of supplies.
ENWW Macintosh HP Printer Utility 237
Mac
into
sh

Figure 5-29 Transfer printer information to HP SureSupply? screen
After either option is selected (Send or Don't Send), the Welcome to HP SureSupply Web page opens.
238 Chapter 5 Macintosh software and utilities ENWW
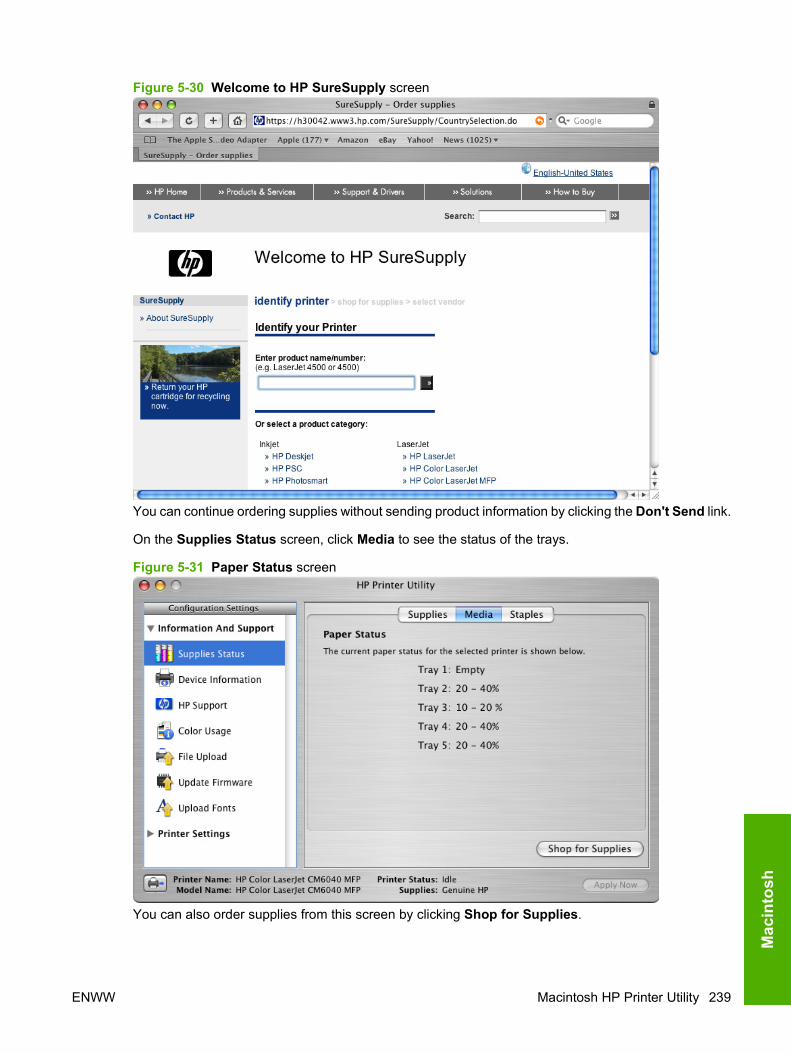
Figure 5-30 Welcome to HP SureSupply screen
You can continue ordering supplies without sending product information by clicking the Don't Send link.
On the Supplies Status screen, click Media to see the status of the trays.
Figure 5-31 Paper Status screen
You can also order supplies from this screen by clicking Shop for Supplies.
ENWW Macintosh HP Printer Utility 239
Mac
into
sh
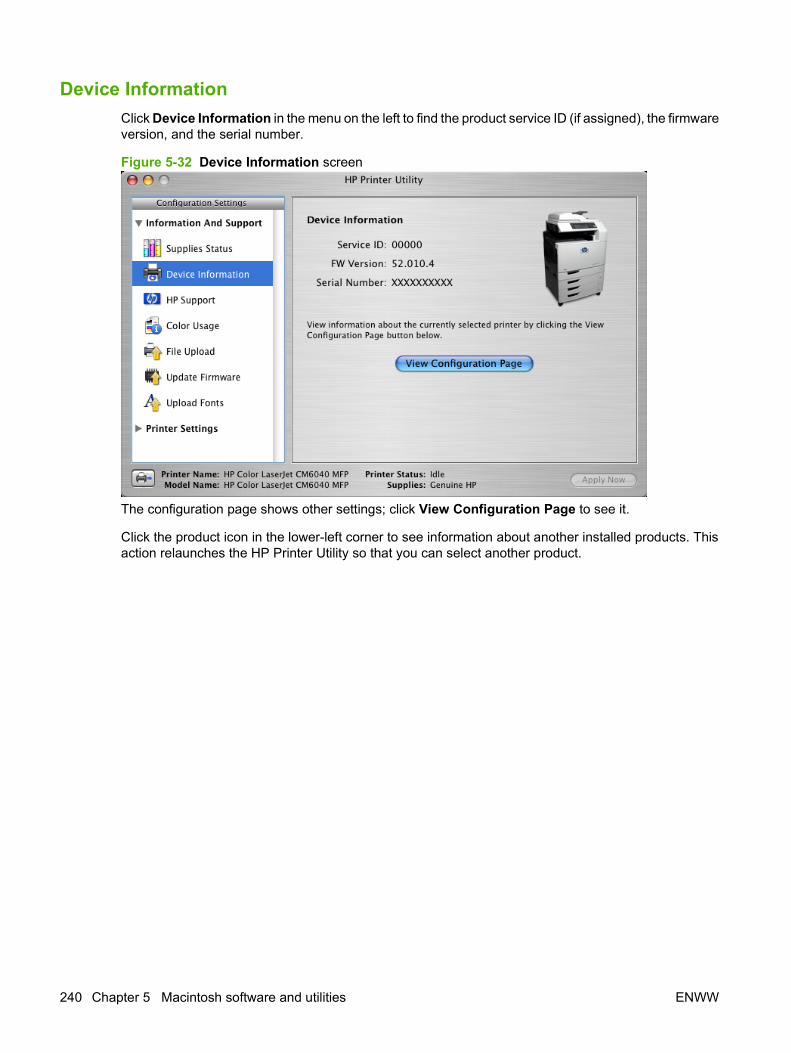
Device InformationClick Device Information in the menu on the left to find the product service ID (if assigned), the firmwareversion, and the serial number.
Figure 5-32 Device Information screen
The configuration page shows other settings; click View Configuration Page to see it.
Click the product icon in the lower-left corner to see information about another installed products. Thisaction relaunches the HP Printer Utility so that you can select another product.
240 Chapter 5 Macintosh software and utilities ENWW
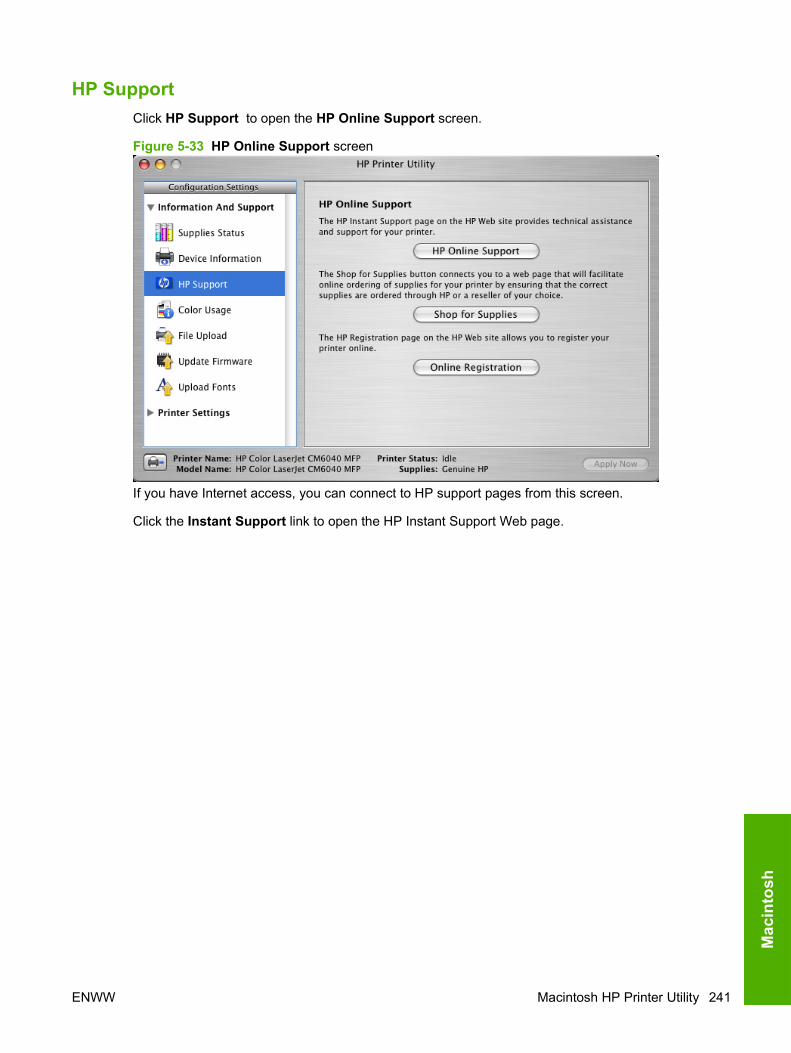
HP SupportClick HP Support to open the HP Online Support screen.
Figure 5-33 HP Online Support screen
If you have Internet access, you can connect to HP support pages from this screen.
Click the Instant Support link to open the HP Instant Support Web page.
ENWW Macintosh HP Printer Utility 241
Mac
into
sh
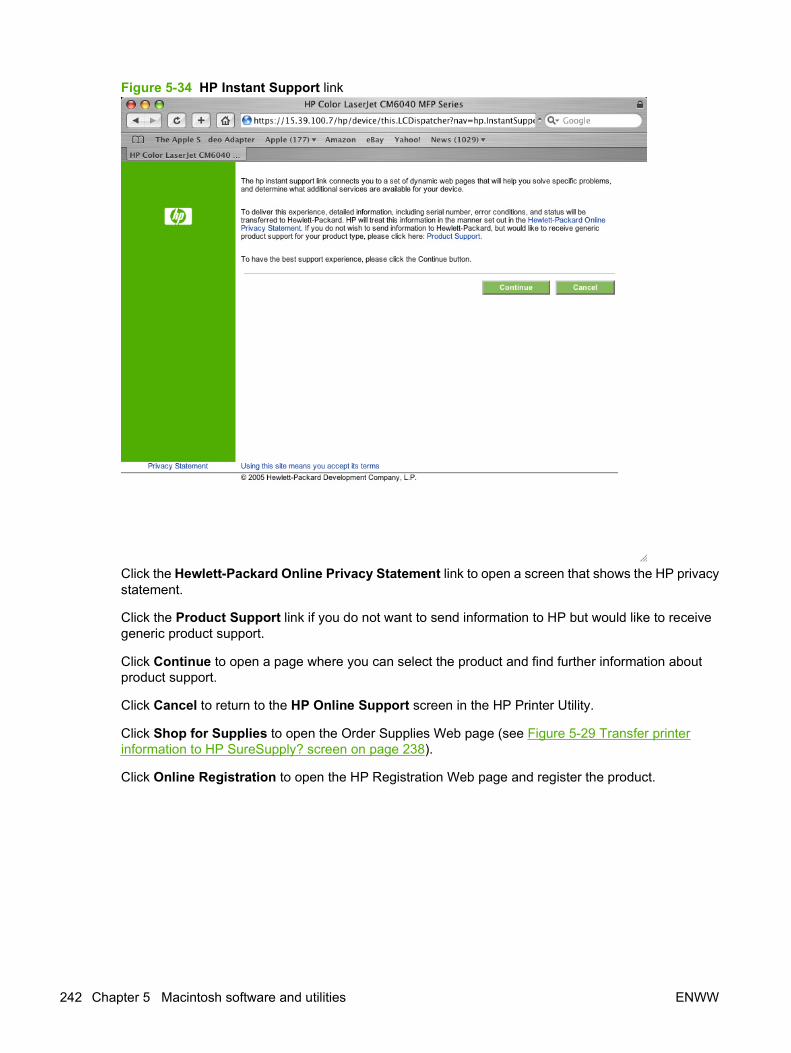
Figure 5-34 HP Instant Support link
Click the Hewlett-Packard Online Privacy Statement link to open a screen that shows the HP privacystatement.
Click the Product Support link if you do not want to send information to HP but would like to receivegeneric product support.
Click Continue to open a page where you can select the product and find further information aboutproduct support.
Click Cancel to return to the HP Online Support screen in the HP Printer Utility.
Click Shop for Supplies to open the Order Supplies Web page (see Figure 5-29 Transfer printerinformation to HP SureSupply? screen on page 238).
Click Online Registration to open the HP Registration Web page and register the product.
242 Chapter 5 Macintosh software and utilities ENWW

Figure 5-35 HP Registration Web page
ENWW Macintosh HP Printer Utility 243
Mac
into
sh
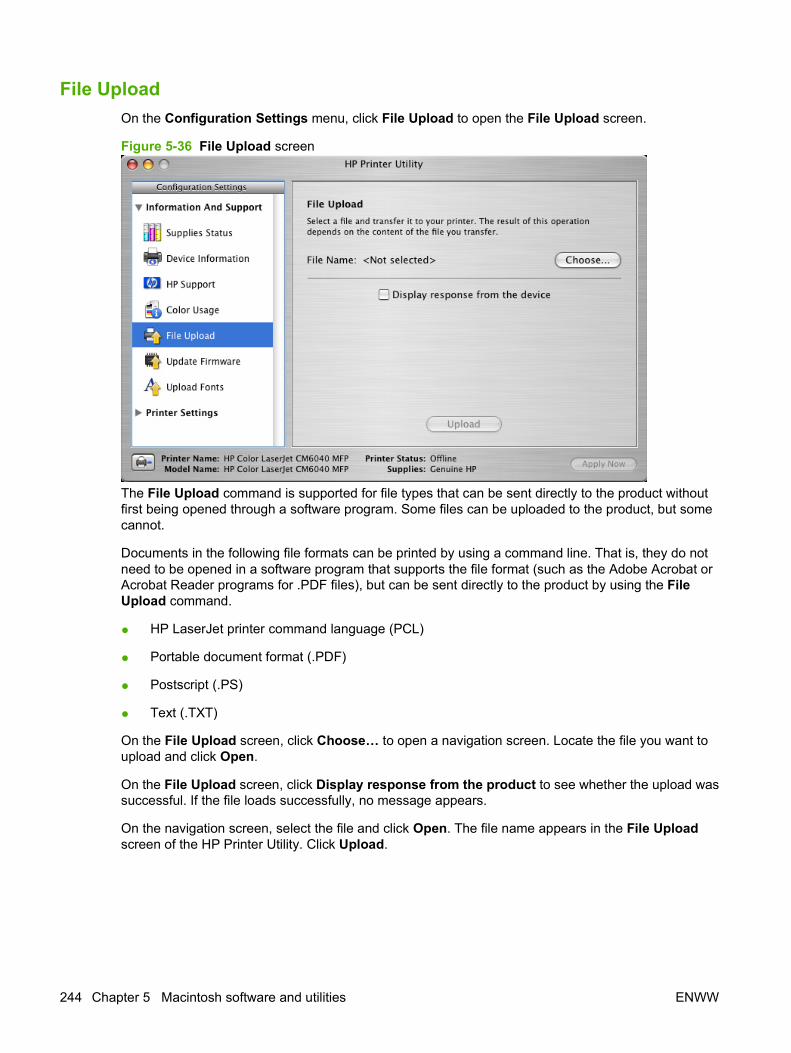
File UploadOn the Configuration Settings menu, click File Upload to open the File Upload screen.
Figure 5-36 File Upload screen
The File Upload command is supported for file types that can be sent directly to the product withoutfirst being opened through a software program. Some files can be uploaded to the product, but somecannot.
Documents in the following file formats can be printed by using a command line. That is, they do notneed to be opened in a software program that supports the file format (such as the Adobe Acrobat orAcrobat Reader programs for .PDF files), but can be sent directly to the product by using the FileUpload command.
● HP LaserJet printer command language (PCL)
● Portable document format (.PDF)
● Postscript (.PS)
● Text (.TXT)
On the File Upload screen, click Choose… to open a navigation screen. Locate the file you want toupload and click Open.
On the File Upload screen, click Display response from the product to see whether the upload wassuccessful. If the file loads successfully, no message appears.
On the navigation screen, select the file and click Open. The file name appears in the File Uploadscreen of the HP Printer Utility. Click Upload.
244 Chapter 5 Macintosh software and utilities ENWW
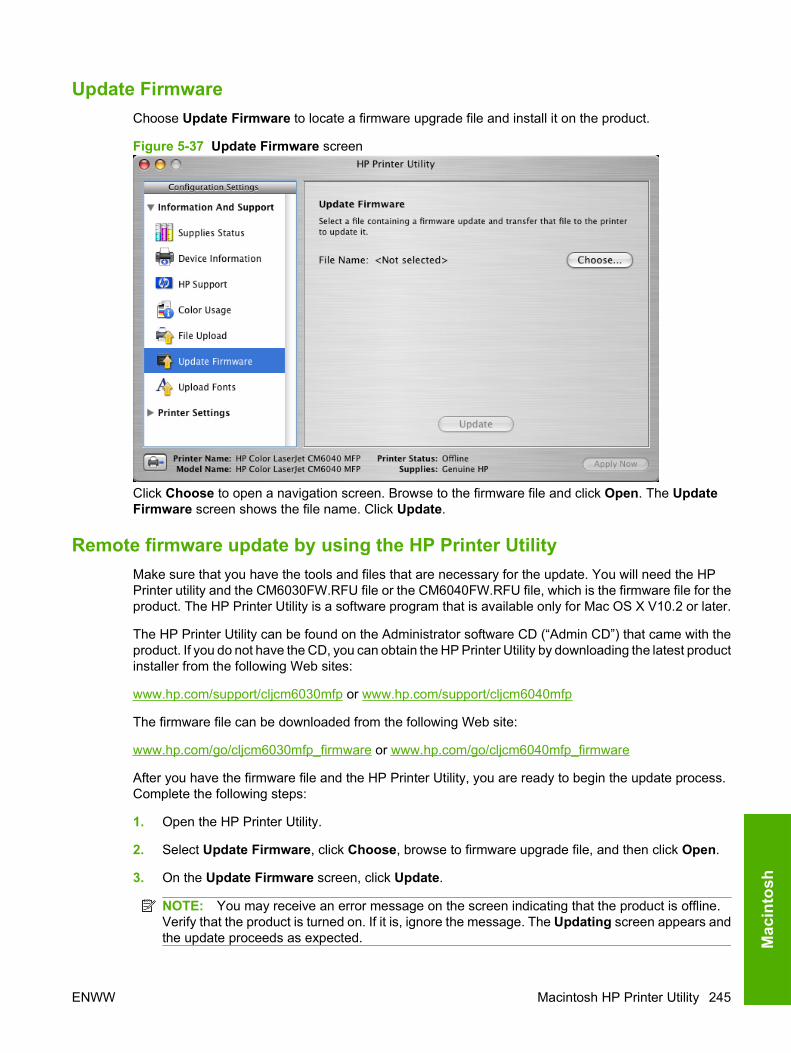
Update FirmwareChoose Update Firmware to locate a firmware upgrade file and install it on the product.
Figure 5-37 Update Firmware screen
Click Choose to open a navigation screen. Browse to the firmware file and click Open. The UpdateFirmware screen shows the file name. Click Update.
Remote firmware update by using the HP Printer UtilityMake sure that you have the tools and files that are necessary for the update. You will need the HPPrinter utility and the CM6030FW.RFU file or the CM6040FW.RFU file, which is the firmware file for theproduct. The HP Printer Utility is a software program that is available only for Mac OS X V10.2 or later.
The HP Printer Utility can be found on the Administrator software CD (“Admin CD”) that came with theproduct. If you do not have the CD, you can obtain the HP Printer Utility by downloading the latest productinstaller from the following Web sites:
www.hp.com/support/cljcm6030mfp or www.hp.com/support/cljcm6040mfp
The firmware file can be downloaded from the following Web site:
www.hp.com/go/cljcm6030mfp_firmware or www.hp.com/go/cljcm6040mfp_firmware
After you have the firmware file and the HP Printer Utility, you are ready to begin the update process.Complete the following steps:
1. Open the HP Printer Utility.
2. Select Update Firmware, click Choose, browse to firmware upgrade file, and then click Open.
3. On the Update Firmware screen, click Update.
NOTE: You may receive an error message on the screen indicating that the product is offline.Verify that the product is turned on. If it is, ignore the message. The Updating screen appears andthe update proceeds as expected.
ENWW Macintosh HP Printer Utility 245
Mac
into
sh
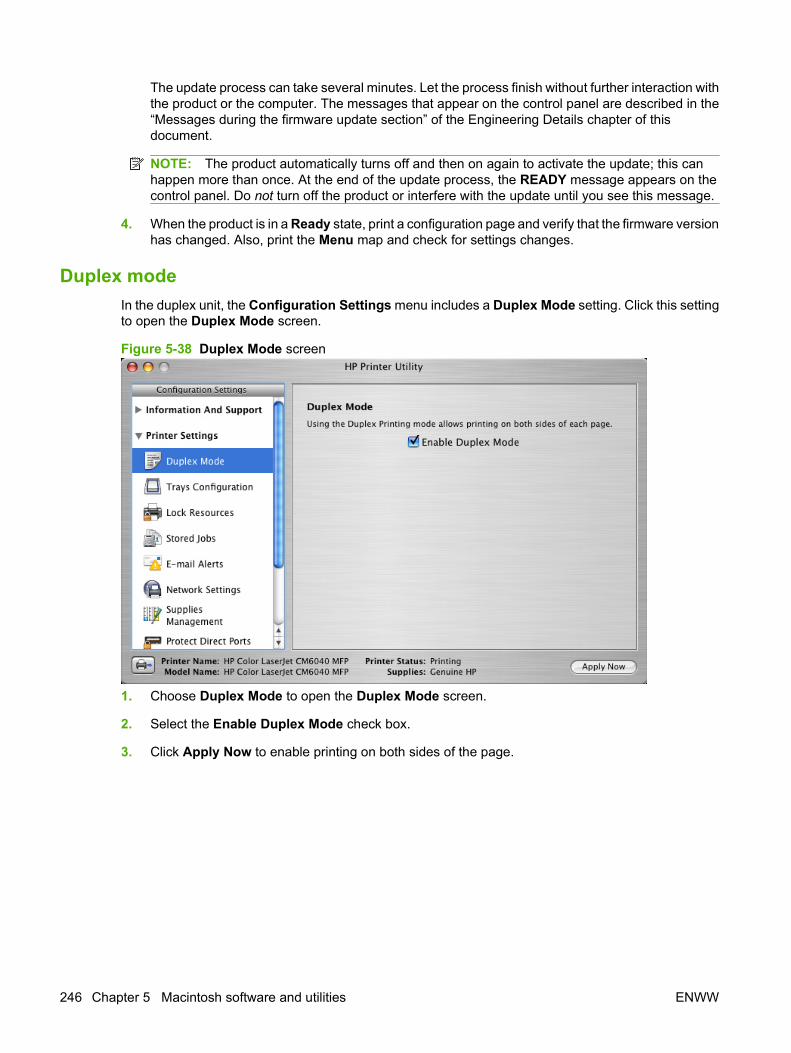
The update process can take several minutes. Let the process finish without further interaction withthe product or the computer. The messages that appear on the control panel are described in the“Messages during the firmware update section” of the Engineering Details chapter of thisdocument.
NOTE: The product automatically turns off and then on again to activate the update; this canhappen more than once. At the end of the update process, the READY message appears on thecontrol panel. Do not turn off the product or interfere with the update until you see this message.
4. When the product is in a Ready state, print a configuration page and verify that the firmware versionhas changed. Also, print the Menu map and check for settings changes.
Duplex modeIn the duplex unit, the Configuration Settings menu includes a Duplex Mode setting. Click this settingto open the Duplex Mode screen.
Figure 5-38 Duplex Mode screen
1. Choose Duplex Mode to open the Duplex Mode screen.
2. Select the Enable Duplex Mode check box.
3. Click Apply Now to enable printing on both sides of the page.
246 Chapter 5 Macintosh software and utilities ENWW
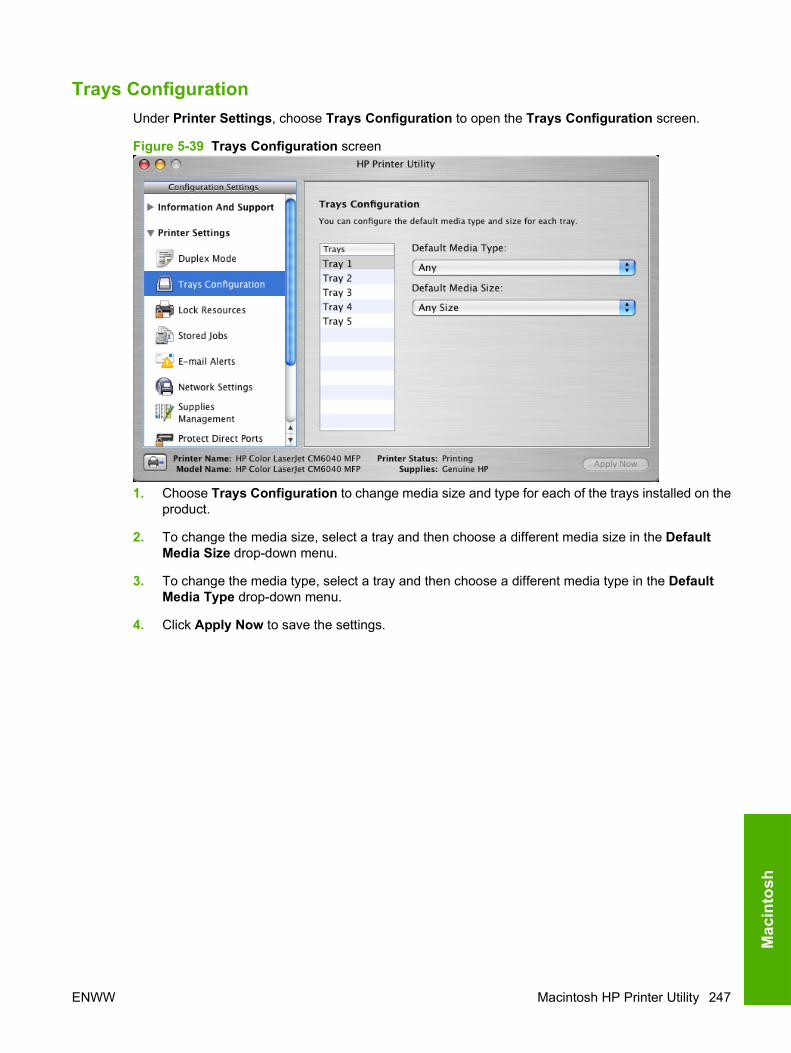
Trays ConfigurationUnder Printer Settings, choose Trays Configuration to open the Trays Configuration screen.
Figure 5-39 Trays Configuration screen
1. Choose Trays Configuration to change media size and type for each of the trays installed on theproduct.
2. To change the media size, select a tray and then choose a different media size in the DefaultMedia Size drop-down menu.
3. To change the media type, select a tray and then choose a different media type in the DefaultMedia Type drop-down menu.
4. Click Apply Now to save the settings.
ENWW Macintosh HP Printer Utility 247
Mac
into
sh
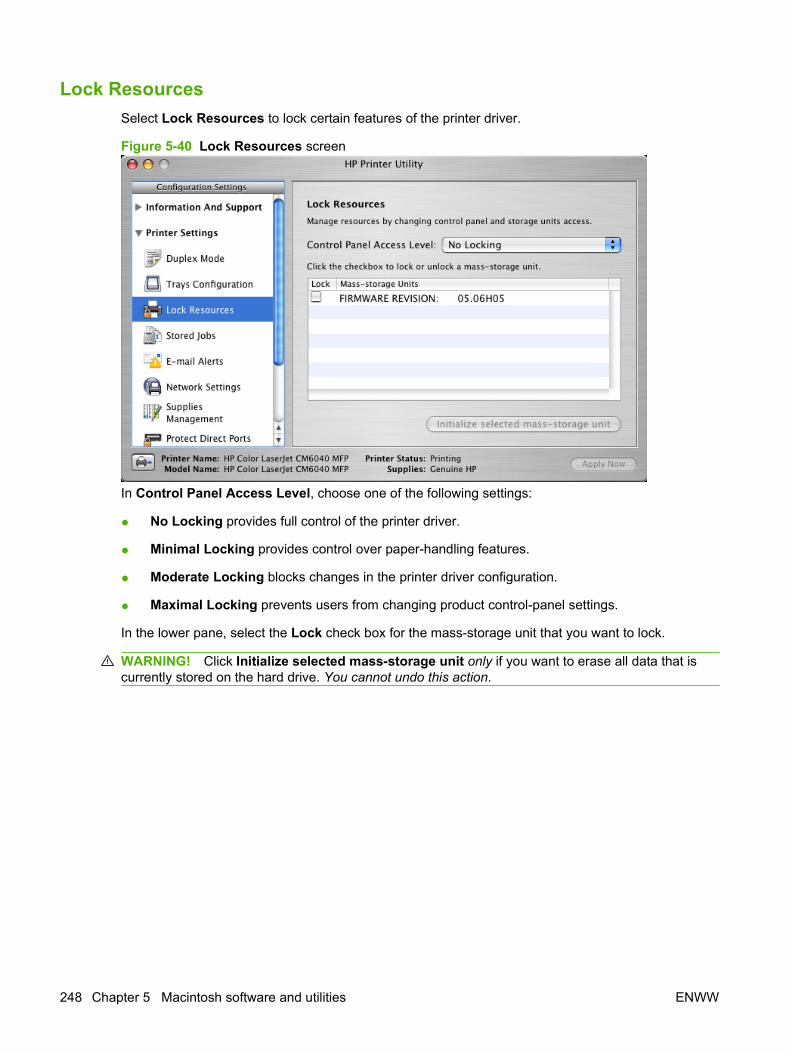
Lock ResourcesSelect Lock Resources to lock certain features of the printer driver.
Figure 5-40 Lock Resources screen
In Control Panel Access Level, choose one of the following settings:
● No Locking provides full control of the printer driver.
● Minimal Locking provides control over paper-handling features.
● Moderate Locking blocks changes in the printer driver configuration.
● Maximal Locking prevents users from changing product control-panel settings.
In the lower pane, select the Lock check box for the mass-storage unit that you want to lock.
WARNING! Click Initialize selected mass-storage unit only if you want to erase all data that iscurrently stored on the hard drive. You cannot undo this action.
248 Chapter 5 Macintosh software and utilities ENWW
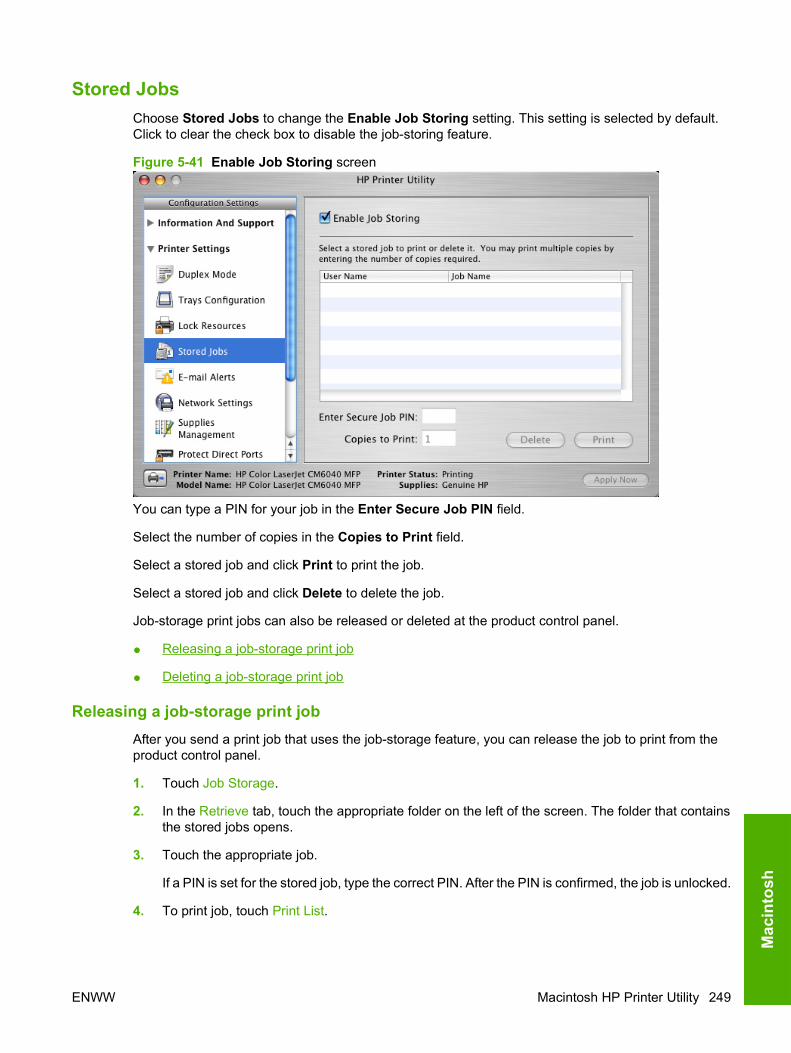
Stored JobsChoose Stored Jobs to change the Enable Job Storing setting. This setting is selected by default.Click to clear the check box to disable the job-storing feature.
Figure 5-41 Enable Job Storing screen
You can type a PIN for your job in the Enter Secure Job PIN field.
Select the number of copies in the Copies to Print field.
Select a stored job and click Print to print the job.
Select a stored job and click Delete to delete the job.
Job-storage print jobs can also be released or deleted at the product control panel.
● Releasing a job-storage print job
● Deleting a job-storage print job
Releasing a job-storage print jobAfter you send a print job that uses the job-storage feature, you can release the job to print from theproduct control panel.
1. Touch Job Storage.
2. In the Retrieve tab, touch the appropriate folder on the left of the screen. The folder that containsthe stored jobs opens.
3. Touch the appropriate job.
If a PIN is set for the stored job, type the correct PIN. After the PIN is confirmed, the job is unlocked.
4. To print job, touch Print List.
ENWW Macintosh HP Printer Utility 249
Mac
into
sh
Deleting a job-storage print jobSometimes it is necessary to delete a print job from the product memory. Do this from the product controlpanel.
1. Touch Job Storage.
2. Touch the appropriate folder on the left of the screen.
3. Touch the appropriate document.
If a PIN is set for the stored job, type the correct PIN. Once the PIN is confirmed, the job is unlocked.
4. Touch Delete.
5. A message appears: Do you want to delete this stored job?
Touch Yes. The document is deleted.
Or, do the following:
1. Touch Job Storage.
2. Touch the appropriate folder on the left of the screen.
3. Touch appropriate document.
4. Touch Delete.
If a PIN is set for the stored job, type the correct PIN. Once the PIN is confirmed, the job is deleted.
E-mail AlertsNOTE: The E-mail Alerts screen is available if the product is installed over a network connection. Itis not available when the product is installed over a USB connection.
Choose E-mail Alerts to configure the product to send e-mail notifications to users.
If a user name and password have been set, you might need to obtain them from the IT administrator.For a complete explanation of the features and functionality of the embedded Web server, see the HPColor LaserJet CM6030 and CM6040 MFP Embedded Web Server User Guides, which are availableon the Admin CD.
250 Chapter 5 Macintosh software and utilities ENWW
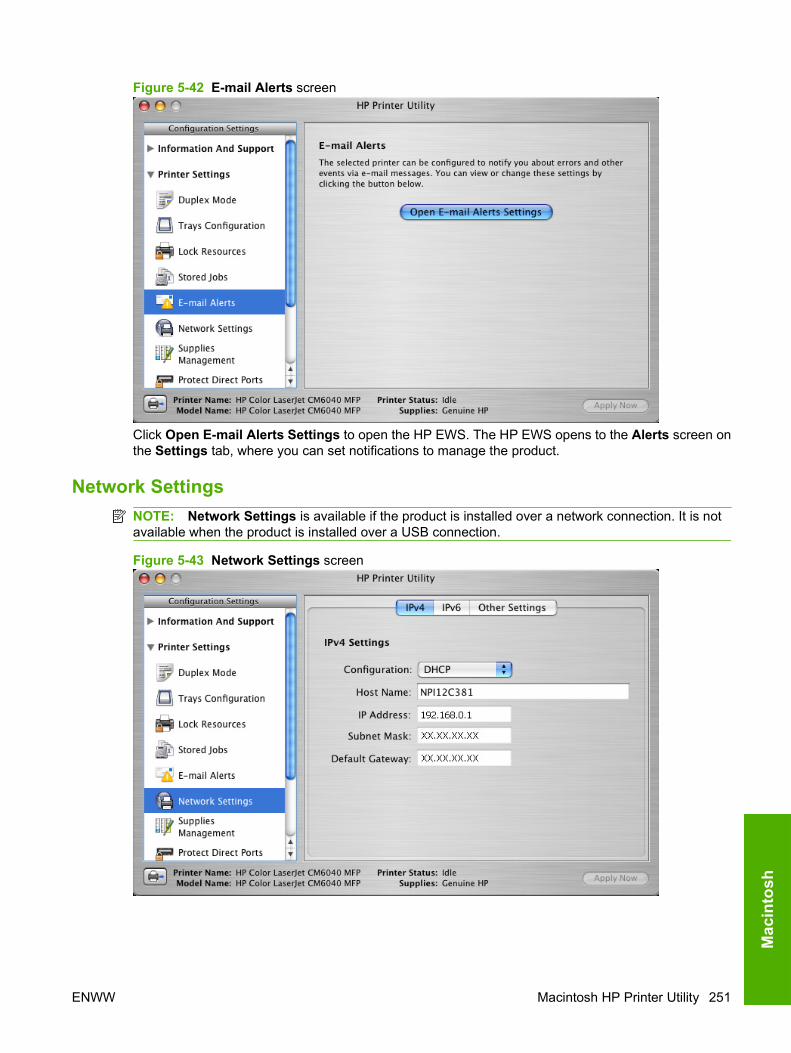
Figure 5-42 E-mail Alerts screen
Click Open E-mail Alerts Settings to open the HP EWS. The HP EWS opens to the Alerts screen onthe Settings tab, where you can set notifications to manage the product.
Network SettingsNOTE: Network Settings is available if the product is installed over a network connection. It is notavailable when the product is installed over a USB connection.
Figure 5-43 Network Settings screen
ENWW Macintosh HP Printer Utility 251
Mac
into
sh
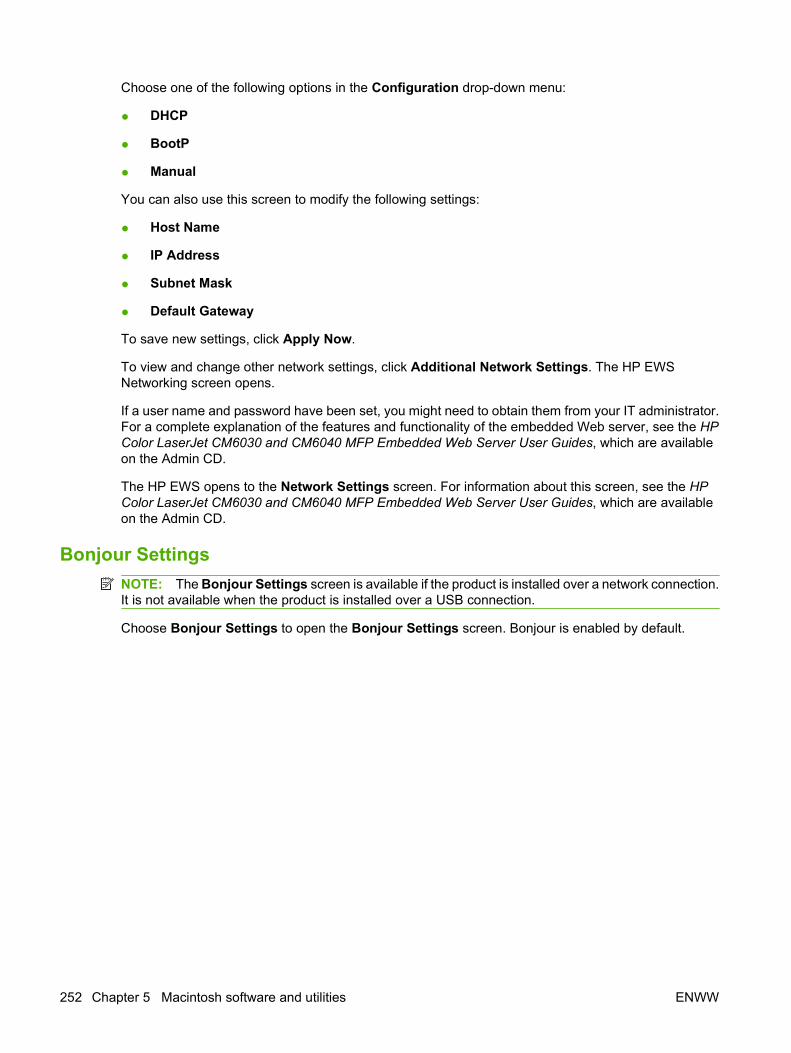
Choose one of the following options in the Configuration drop-down menu:
● DHCP
● BootP
● Manual
You can also use this screen to modify the following settings:
● Host Name
● IP Address
● Subnet Mask
● Default Gateway
To save new settings, click Apply Now.
To view and change other network settings, click Additional Network Settings. The HP EWSNetworking screen opens.
If a user name and password have been set, you might need to obtain them from your IT administrator.For a complete explanation of the features and functionality of the embedded Web server, see the HPColor LaserJet CM6030 and CM6040 MFP Embedded Web Server User Guides, which are availableon the Admin CD.
The HP EWS opens to the Network Settings screen. For information about this screen, see the HPColor LaserJet CM6030 and CM6040 MFP Embedded Web Server User Guides, which are availableon the Admin CD.
Bonjour SettingsNOTE: The Bonjour Settings screen is available if the product is installed over a network connection.It is not available when the product is installed over a USB connection.
Choose Bonjour Settings to open the Bonjour Settings screen. Bonjour is enabled by default.
252 Chapter 5 Macintosh software and utilities ENWW
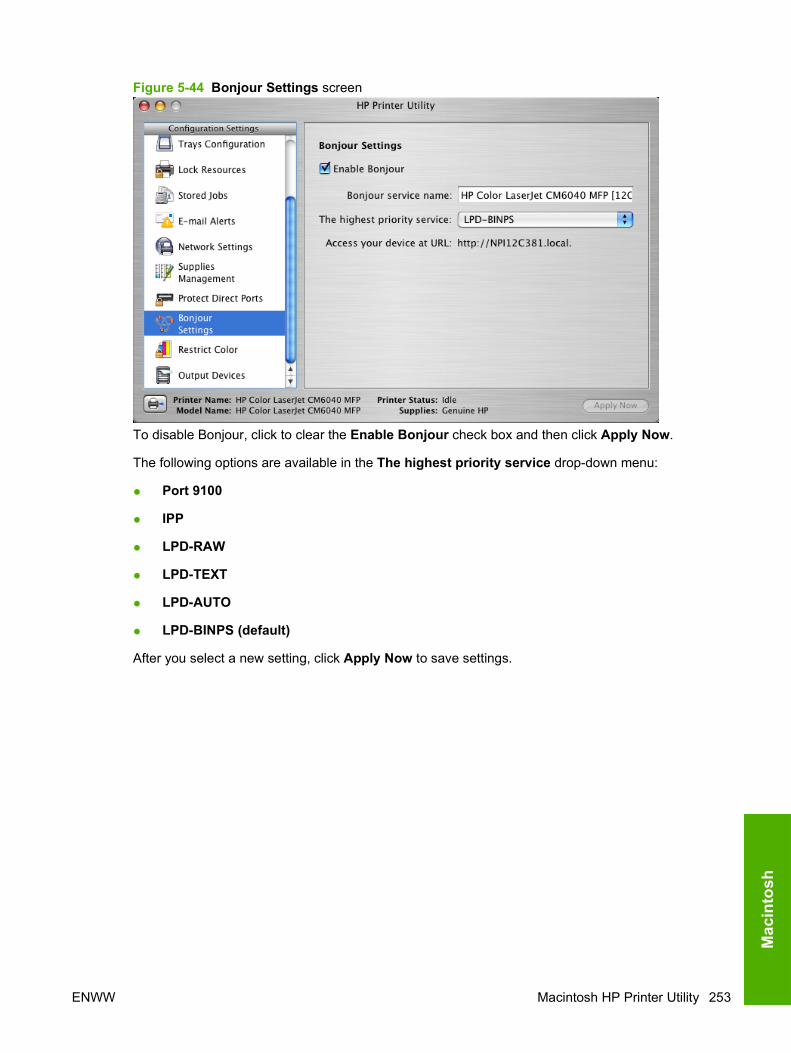
Figure 5-44 Bonjour Settings screen
To disable Bonjour, click to clear the Enable Bonjour check box and then click Apply Now.
The following options are available in the The highest priority service drop-down menu:
● Port 9100
● IPP
● LPD-RAW
● LPD-TEXT
● LPD-AUTO
● LPD-BINPS (default)
After you select a new setting, click Apply Now to save settings.
ENWW Macintosh HP Printer Utility 253
Mac
into
sh

Additional Network SettingsChoose Additional Network Settings to gain access to the HP EWS.
Figure 5-45 Additional Network Settings screen
To open the HP EWS, click Open Embedded Web Server.
For information about HP EWS settings, see the HP Color LaserJet CM6030 and CM6040 MFPEmbedded Web Server User Guides, which are available on the Admin CD.
Use features in the Macintosh printer driverCreate and use printing presets in Macintosh
Use printing presets to save the current printer driver settings for reuse.
Create a printing preset
1. On the File menu, click Print.
2. Select the driver.
3. Select the print settings.
4. In the Presets box, click Save As..., and type a name for the preset.
5. Click OK.
Use printing presets
1. On the File menu, click Print.
2. Select the driver.
3. In the Presets box, select the printing preset that you want to use.
254 Chapter 5 Macintosh software and utilities ENWW
NOTE: To use printer-driver default settings, select Standard.
Resize documents or print on a custom paper sizeYou can scale a document to fit on a different size of paper.
1. On the File menu, click Print.
2. Open the Paper Handling menu.
3. In the area for Destination Paper Size, select Scale to fit paper size, and then select the sizefrom the drop-down list.
4. If you want to use only paper that is smaller than the document, select Scale down only.
Print a cover pageYou can print a separate cover page for your document that includes a message (such as “Confidential”).
1. On the File menu, click Print.
2. Select the driver.
3. Open the Cover Page menu, and then select whether to print the cover page Before Documentor After Document.
4. In the Cover Page Type menu, select the message that you want to print on the cover page.
NOTE: To print a blank cover page, select Standard as the Cover Page Type.
Use watermarksA watermark is a notice, such as “Confidential,” that is printed in the background of each page of adocument.
1. On the File menu, click Print.
2. Open the Watermarks menu.
3. Next to Mode, select the type of watermark to use. Select Watermark to print a semi-transparentmessage. Select Overlay to print a message that is not transparent.
4. Next to Pages, select whether to print the watermark on all pages or on the first page only.
5. Next to Text, select one of the standard messages, or select Custom and type a new message inthe box.
6. Select options for the remaining settings.
Print multiple pages on one sheet of paper in MacintoshYou can print more than one page on a single sheet of paper. This feature provides a cost-effective wayto print draft pages.
ENWW Use features in the Macintosh printer driver 255
Mac
into
sh

1. On the File menu, click Print.
2. Select the driver.
3. Open the Layout menu.
4. Next to Pages per Sheet, select the number of pages that you want to print on each sheet (1, 2,4, 6, 9, or 16).
5. Next to Layout Direction, select the order and placement of the pages on the sheet.
6. Next to Borders, select the type of border to print around each page on the sheet.
Print on both sides of the page (duplex printing)
Use automatic duplex printing
1. Insert enough paper into one of the trays to accommodate the print job. If you are loading specialpaper such as letterhead, load it in one of the following ways:
● For tray 1, load the letterhead paper face-up with the bottom edge feeding into the printer first.
● For all other trays, load the letterhead paper face-down with the top edge at the back of thetray.
2. On the File menu, click Print.
3. Open the Layout menu.
4. Next to Two-Sided, select either Long-Edge Binding or Short-Edge Binding.
5. Click Print.
Print on both sides manually
1. Insert enough paper into one of the trays to accommodate the print job. If you are loading specialpaper such as letterhead, load it in one of the following ways:
● For tray 1, load the letterhead paper face-up with the bottom edge feeding into the printer first.
● For all other trays, load the letterhead paper face-down with the top edge at the back of thetray.
CAUTION: To avoid jams, do not load paper that is heavier than 105 g/m2 (28-lb bond).
2. On the File menu, click Print.
256 Chapter 5 Macintosh software and utilities ENWW
3. On the Finishing menu, select Manually Print on 2nd Side.
4. Click Print. Follow the instructions in the pop-up window that appears on the computer screenbefore replacing the output stack in tray 1 for printing the second half.
5. Go to the printer, and remove any blank paper that is in tray 1.
6. Insert the printed stack face-up with the bottom edge feeding into the printer first in tray 1. Youmust print the second side from tray 1.
7. If prompted, press the appropriate control panel button to continue.
Set the stapling optionsIf a finishing device that has a stapler is installed, you can staple documents.
1. On the File menu, click Print.
2. Open the Finishing menu.
3. In the Stapling Options drop-down list, select the stapling option that you want to use.
Store jobsYou can store jobs on the product so you can print them at any time. You can share stored jobs withother users, or you can make them private.
1. On the File menu, click Print.
2. Open the Job Storage menu.
3. In the Job Storage: drop-down list, select the type of stored job.
4. For the Stored Job, Private Job, and Private Stored Job types of stored jobs, enter a name forthe stored job in the box next to Job Name:.
Select which option to use if another stored job already has that name.
● Use Job Name + (1 - 99) appends a unique number to the end of the job name.
● Replace Existing File overwrites the existing stored job with the new one.
5. If you selected Stored Job or Private Job in step 3, type a 4-digit number in the box next to PINTo Print (0000 - 9999). When other people attempt to print this job, the product prompts them toenter this PIN number.
Set the color optionsUse the Color Options pop-up menu to control how colors are interpreted and printed from softwareprograms.
1. On the File menu in the software program, click Print.
2. Select the driver.
3. Open the Color Options pop-up menu.
ENWW Use features in the Macintosh printer driver 257
Mac
into
sh
4. Click Show Advanced Options.
5. Adjust the individual settings for text, graphics, and photographs.
Use the Services menuIf the product is connected to a network, use the Services menu to obtain product and supply-statusinformation.
1. On the File menu, click Print.
2. Open the Services menu.
3. To open the embedded Web server and perform a maintenance task, do the following:
a. Select Device Maintenance.
b. Select a task from the drop-down list.
c. Click Launch.
4. To go to various support Web sites for this device, do the following:
a. Select Services on the Web.
b. Select Internet Services, and select an option from the drop-down list.
c. Click Go!.
258 Chapter 5 Macintosh software and utilities ENWW
6 Engineering details
● Remote firmware updates
● Print print-ready documents
● Media attributes
● HP Device Manager for Linux
ENWW 259
Engi
neer
ing
deta
ils
Remote firmware updates The configuration page lists the firmware version of the product. On flash-based products, you canupdate the firmware code by downloading the latest flash executable file for the product and runningthe program according to the Readme instructions that come with it. If the firmware should becomecorrupted or fail, usually because of an interruption when attempting to update the firmware, the productmay no longer function. If updated firmware becomes available, you can download the firmware updateflash executable file for the product from one of the following Web sites:
www.hp.com/go/cljcm6030mfp_firmware or www.hp.com/go/cljcm6040mfp_firmware
The product features remote firmware update (.RFU) capability. The method for downloading remotefirmware updates from the Web site is similar to that used to download the latest printing-systemsoftware and printer drivers.
The process for remotely upgrading firmware involves the following steps:
1. Print a configuration page to see what version of firmware is currently installed on the product. Also,print a menu map to see what user settings have been configured.
2. Go to the HP Web site and download the latest firmware to the computer.
To find the most recent firmware upgrade for the product, go to one of the following URLs:
www.hp.com/go/cljcm6030mfp_firmware or www.hp.com/go/cljcm6040mfp_firmware
3. Download the new firmware to the product.
For support information about downloading new firmware from the Web, go to the following URLmentioned in the previous step.
4. Print a new menu map to compare user settings between the previous firmware and the upgradedfirmware.
Table 6-1 Version Checking [INTERNAL]
Primary/Location Version Checking
JetDirect inside (JDI) Does version checking.
Upgrades if the firmware version is newer; this means it will notrewrite or upgrade if the firmware is the same or older.
This becomes an issue if the current firmware is corrupt.Because the firmware version may be the same even thoughit may be corrupt, the firmware will not rewrite because it is thesame version.
To update corrupt firmware with the same .RFU version, usethe nodebug bundle of firmware, then update using the correctfirmware bundle.
Fax Modem Does version checking.
The firmware updates if the .RFU is different from what iscurrently on the component. The firmware can be updated ifthe .RFU is older or newer than the current firmware version.
Will not upgrade if firmware version is the same. The sameversion does not rewrite because of speed.
260 Chapter 6 Engineering details ENWW
This becomes an issue if the current firmware is corrupt.Because the firmware version may be the same even thoughit may be corrupt, the firmware will not rewrite because it is thesame version.
Formatter No version checking.
The formatter firmware updates if there is a formatter bundleon the .RFU and is not dependant on what version of firmwarethe formatter is currently using.
Copy control board (CPB) No version checking.
Scan control board (SCB) Does version checking.
Upgrades if the firmware version is newer; this means it will notrewrite or upgrade if the firmware is the same or older.
This becomes an issue if the current firmware is corrupt.Because the firmware version may be the same even thoughit may be corrupt, the firmware will not rewrite because it is thesame version.
To update corrupt firmware with the same .RFU version, usethe nodebug bundle of firmware, then update using the correctfirmware bundle.
Jetlink protocol
(interface used to hook up output devices; external to product)
No version checking.
DC controller
(internal to product)
● Duplexer
● Input external trays
● Output external bins
Does version checking.
The firmware updates if the .RFU is different from what iscurrently on the component. The firmware can be updated ifthe .RFU is older or newer than the current firmware version.
Will not upgrade if firmware version is the same.
This becomes an issue if the current firmware is corrupt.Because the firmware version may be the same even thoughit may be corrupt, the firmware will not rewrite because it is thesame version.
● Print the configuration page
● HP Easy Firmware Upgrade utility
● Other remote firmware update methods
Print the configuration page To determine the current level of firmware, view the configuration page.
To print the configuration page from the product control panel:
1. From the Home screen, touch Administration.
2. Touch Information.
3. Touch Configuration/Status Pages.
Table 6-1 Version Checking [INTERNAL] (continued)
ENWW Remote firmware updates 261
Engi
neer
ing
deta
ils

4. Touch Configuration Page.
5. Touch Print.
NOTE: If the product contains an HP Jetdirect print server or an optional hard disk drive, additionalconfiguration pages print that provide information about those options.
The firmware datecode is listed on the configuration page in the section titled Device Information. Thefirmware datecode has this format: YYYYMMDD XX.XXX.X. The first string of numbers is the date,where YYYY represents the year, MM represents the month, and DD represents the day. For example,a firmware datecode that begins with 20061125 represents November 25, 2006. The second string ofnumbers represents the firmware version.
Print the menu mapPrint the menu map before updating the firmware to see what user settings have been configured in thecurrent firmware. This menu map can be compared with the menu map printed after the firmware updateto determine what user settings have been added or changed in the new firmware.
To print the menu map from the product control panel:
1. From the Home screen, touch Administration.
2. Touch Information.
3. Touch Configuration/Status Pages.
4. Touch Administration Menu Map.
5. Touch Print.
HP Easy Firmware Upgrade utilityUse the HP Easy Firmware Upgrade utility to download a new firmware file to the product.
When this type of firmware update is downloaded from the HP Web site, the file contains two .EXE files,the HP Easy Firmware Upgrade utility executable (which contains the firmware upgrade integrated intothe utility) and the Readme file that is applicable for the product and firmware revision that you aredownloading.
The HP Easy Firmware Upgrade utility uses the current print queue to communicate with the productand does not require the Windows spooler. This utility is only available for Windows operating systems.
Follow these instructions to complete the firmware update:
NOTE: In some circumstances, the firmware update might require ten minutes or more to complete.Do not power cycle the product or the computer during the update process or the product may becomeunusable.
1. Download the HP Easy Firmware Upgrade utility from the following Web site:
www.hp.com/go/cljcm6030mfp_firmware or www.hp.com/go/cljcm6040mfp_firmware
2. Double-click and extract the downloaded file to the desktop.
3. Print a configuration page from the product control panel (if you have not done so already). Underthe Device Information heading, note the Firmware Datecode. This version should change afteryou have successfully completed the firmware update. To print a configuration page, see Print theconfiguration page on page 261.
262 Chapter 6 Engineering details ENWW

4. Verify that the product is in a Ready state.
5. On the computer, double-click the HP Easy Firmware Upgrade utility executable file.
Figure 6-1 HP Easy Firmware Upgrade utility screen 1
6. Select the product that you want to update from the Select Printer to Update: drop-down list.
NOTE: If the product that you want to upgrade is not in the list, you must install a printer driverfor the product and be able to print to the product before continuing.
Figure 6-2 HP Easy Firmware Upgrade utility screen 2
7. Click Send Firmware to begin the firmware update process.
CAUTION: Interrupting the firmware upgrade process by turning the product off and then turningit on again, or by attempting to send a print job to the product, might cause the product to go intoan unrecoverable state.
NOTE: The progress bar does not necessarily reflect the actual time needed for the firmwareupgrade to complete.
ENWW Remote firmware updates 263
Engi
neer
ing
deta
ils
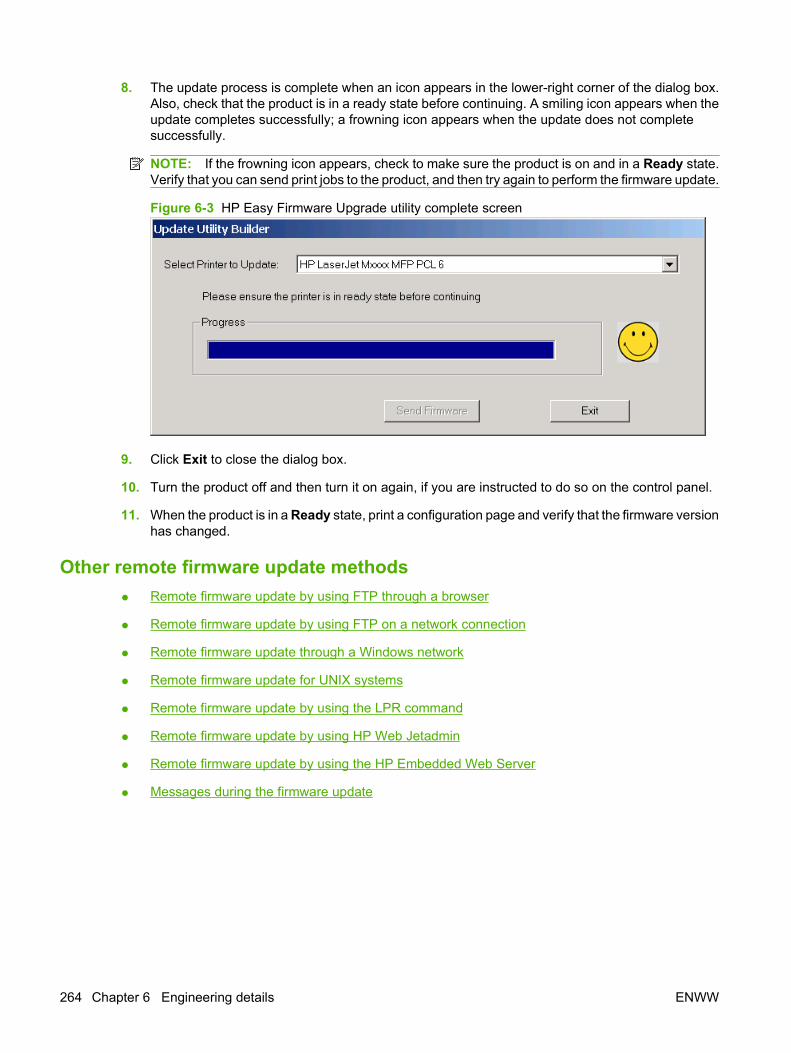
8. The update process is complete when an icon appears in the lower-right corner of the dialog box.Also, check that the product is in a ready state before continuing. A smiling icon appears when theupdate completes successfully; a frowning icon appears when the update does not completesuccessfully.
NOTE: If the frowning icon appears, check to make sure the product is on and in a Ready state.Verify that you can send print jobs to the product, and then try again to perform the firmware update.
Figure 6-3 HP Easy Firmware Upgrade utility complete screen
9. Click Exit to close the dialog box.
10. Turn the product off and then turn it on again, if you are instructed to do so on the control panel.
11. When the product is in a Ready state, print a configuration page and verify that the firmware versionhas changed.
Other remote firmware update methods● Remote firmware update by using FTP through a browser
● Remote firmware update by using FTP on a network connection
● Remote firmware update through a Windows network
● Remote firmware update for UNIX systems
● Remote firmware update by using the LPR command
● Remote firmware update by using HP Web Jetadmin
● Remote firmware update by using the HP Embedded Web Server
● Messages during the firmware update
264 Chapter 6 Engineering details ENWW
Remote firmware update by using FTP through a browserComplete the following steps to update the product firmware by using file transfer protocol (FTP) througha browser on Windows operating systems:
1. Make note of the TCP/IP address on the EIO-Jetdirect page. The EIO-Jetdirect page is the secondpage of the configuration page printout. To print a configuration page, see Print the configurationpage on page 261.
2. Open a browser window.
3. In the address line of the browser, type ftp://<IPADDRESS>, where <IPADDRESS> is the TCP/IP address of the product. For example, if the TCP/IP address is 192.168.0.90, type FTP://192.168.0.90.
4. Press Enter.
5. Locate the downloaded .RFU file for the product.
6. Drag and drop the .RFU file onto the PORT icon or onto any open space in the browser window.
NOTE: If the PORT icon does not appear as a folder name, you might have to enable folderviewing for FTP sites in the Web browser. In Microsoft Internet Explorer, use the followingprocedure to enable the folder view:
a. Select Tools, select Internet Options, and then select the Advanced tab.
b. Select the Enable folder view for FTP sites.
c. Click OK to save the setting.
The download process begins and the firmware is updated on the product. This can take severalminutes. Let the process finish without further interaction with the product or the computer. Themessages described in Messages during the firmware update on page 269 appear on the controlpanel.
NOTE: The product automatically turns off and then on again to activate the update; this canhappen more than once. At the end of the update process, the READY message appears on thecontrol panel. Do not turn off the product or interfere with the update until you see this message.
7. When the product is in a Ready state, print a configuration page and verify that the firmware versionhas changed. Also, print the Menu map and check for settings changes.
Remote firmware update by using FTP on a network connectionComplete the following steps to update the product firmware by using file transfer protocol (FTP) througha network connection on Windows operating systems:
1. Make note of the TCP/IP address on the Embedded Jetdirect page. The HP Embedded Jetdirectpage is the second page of the configuration page printout. To print a configuration page, see Printthe configuration page on page 261.
NOTE: Before connecting to the product, make sure that the product is in a Ready state. Alsomake sure that any error messages are cleared from the control panel display.
2. Open a command prompt or an MS-DOS command prompt on the computer.
3. Type ftp://<IPADDRESS>, where <IPADDRESS> is the TCP/IP address of the product. Forexample, if the TCP/IP address is 192.168.0.90, type ftp 192.168.0.90.
ENWW Remote firmware updates 265
Engi
neer
ing
deta
ils
4. Press Enter.
5. When prompted for the user name, press Enter.
6. When prompted for the password, press Enter.
7. Type bin at the command prompt.
8. Press Enter. The message 200 Type set to I, Using binary mode to transfer files appears in thecommand window.
9. Type put <FILENAME>, where <FILENAME> is the name of the .RFU file that was downloadedfrom the Web, including the path. For example, type put C:\CLJ\xxxxFW.RFU, and then pressEnter.
NOTE: If the file name or path includes a space, you must enclose the file name or path inquotation marks. For example, type put "c:\My Documents\CLJ\xxxxfw.rfu".
The following series of messages appears in the command window:
200 PORT command successful
150 Opening BINARY mode data connection
226 Ready
226 Processing Job
226 Transfer complete
After these messages appear, a message containing transfer-speed information appears.
The download process begins and the firmware is updated on the product. This can take severalminutes. Let the process finish without further interaction with the product or the computer. Themessages described in Messages during the firmware update on page 269 appear on the controlpanel.
NOTE: The product automatically turns off and then on again to activate the update; this canhappen more than once. At the end of the update process, the READY message appears on thecontrol panel. Do not turn off the product or interfere with the update until you see this message.
10. When the product is in a Ready state, print a configuration page and verify that the firmware versionhas changed.
11. At the command prompt, type bye to exit the FTP command.
12. At the command prompt, type exit to return to the Windows interface.
13. When the product is in a Ready state, print a configuration page and verify that the firmware versionhas changed. Also, print the Menu map and check for settings changes.
266 Chapter 6 Engineering details ENWW

Remote firmware update through a Windows network If the product is shared on a Windows network, update the firmware by completing these instructions:
1. Make note of the TCP/IP address on the Embedded Jetdirect page. The HP Embedded Jetdirectpage is the second page of the configuration page printout. To print a configuration page, see Printthe configuration page on page 261.
2. From a command prompt or in an MS-DOS window, type copy /b <FILENAME> \\<COMPUTERNAME>\<SHARENAME>, where <FILENAME> is the name of the .RFU file, includingthe path, <COMPUTERNAME> is the name of the computer from which the product is beingshared, and <SHARENAME> is the product share name. For example, type the following:
C:\>copy /b c:\xxxxfw.rfu \\COMPUTERNAME\SHARENAME
NOTE: If the file name or path includes a space, you must enclose the file name or path inquotation marks. For example, type C:\>copy /b "c:\My Documents\xxxxfw.rfu" \\COMPUTERNAME\SHARENAME
3. Press Enter.
The download process begins and the firmware is updated on the product. This can take severalminutes. Let the process finish without further interaction with the product or the computer. Themessages described in Messages during the firmware update on page 269 appear on the controlpanel. The message 1 file(s) copied appears on the computer screen.
NOTE: The product automatically turns off and then on again to activate the update; this canhappen more than once. At the end of the update process, the READY message appears on thecontrol panel. Do not turn off the product or interfere with the update until you see this message.
4. When the product is in a Ready state, print a configuration page and verify that the firmware versionhas changed. Also, print the Menu map and check for settings changes.
Remote firmware update for UNIX systems For UNIX systems, any command method that downloads the .TAR file to the product is acceptable,including the following:
1. Make note of the TCP/IP address on the Embedded Jetdirect page. The HP Embedded Jetdirectpage is the second page of the configuration page printout. To print a configuration page, see Printthe configuration page on page 261.
2. From a command prompt or in an MS-DOS window, type cp /home/yourmachine/FILENAME /dev/parallel>, where </home/yourmachine/FILENAME> is the location ofthe .TAR file.
The download process begins and the firmware is updated on the product. This can take severalminutes. Let the process finish without further interaction with the product or the computer. Themessages described in Messages during the firmware update on page 269 appear on the controlpanel.
NOTE: The product automatically turns off and then on again to activate the update; this canhappen more than once. At the end of the update process, the READY message appears on thecontrol panel. Do not turn off the product or interfere with the update until you see this message.
3. When the product is in a Ready state, print a configuration page and verify that the firmware versionhas changed. Also, print the Menu map and check for settings changes.
ENWW Remote firmware updates 267
Engi
neer
ing
deta
ils
Remote firmware update by using the LPR command Complete the following steps to update the firmware by using the LPR command:
1. Make note of the TCP/IP address on the Embedded Jetdirect page. The HP Embedded Jetdirectpage is the second page of the configuration page printout. To print a configuration page, see Printthe configuration page on page 261.
2. From a command prompt or in an MS-DOS window, type lpr -P <IPADDRESS> -S<IPADDRESS> -o l <FILENAME> -OR- lpr -S <IPADDRESS> -Pbinps <FILENAME>,where <IPADDRESS> can be either the TCP/IP address or the hostname of the product, and where<FILENAME> is the filename of the .RFU file.
NOTE: The parameter (-o l) consists of a lowercase "O", not a zero, and a lowercase "L", not thenumeral 1. This parameter sets the transport protocol to binary mode.
3. Press Enter.
The download process begins and the firmware is updated on the product. This can take severalminutes. Let the process finish without further interaction with the product or the computer. Themessages described in Messages during the firmware update on page 269 appear on the controlpanel.
NOTE: The product automatically turns off and then on again to activate the update; this canhappen more than once. At the end of the update process, the READY message appears on thecontrol panel. Do not turn off the product or interfere with the update until you see this message.
4. Type exit at the command prompt to close the command window.
5. When the product is in a Ready state, print a configuration page and verify that the firmware versionhas changed. Also, print the Menu map and check for settings changes.
Remote firmware update by using HP Web JetadminThis procedure requires that you install HP Web Jetadmin Version 7.0 or later on the computer.
1. Start HP Web Jetadmin.
2. Open the Device Management folder in the drop-down list in the Navigation panel. Navigate tothe Device Lists folder.
3. Expand the Device Lists folder and select All Devices. Locate the product in the list, and thenclick to select it.
NOTE: If you need to upgrade the firmware for multiple products, select all of them by pressingthe Ctrl key as you click the name of each product.
4. Locate the drop-down box for Device Tools in the upper-right corner of the window. Select UpdatePrinter Firmware from the action list.
5. If the name of the .RFU file is not listed in the All Available Images box, click Browse in theUpload New Firmware Image dialog box and navigate to the .RFU file that you downloaded fromthe Web at the start of this procedure. If the filename is listed, select it.
6. Click Upload to move the .RFU file from the hard drive to the HP Web Jetadmin server. After theupload is complete, the browser window refreshes.
7. Select the .RFU file from the Printer Firmware Update drop-down menu.
268 Chapter 6 Engineering details ENWW
8. Click Update Firmware. HP Web Jetadmin sends the selected .RFU file to the product. The controlpanel shows messages that indicate the progress of the upgrade. At the end of the upgradeprocess, the control panel shows the Ready message.
9. Start HP Web Jetadmin.
10. Create a device group. To accomplish this, follow these steps:
a. Click the Device Management folder, and then click the All Devices option.
b. Shift-click to select devices that are to be included in the group, and then click the OK button.
c. When prompted, type a name for the new device group, and then click the OK button.
11. To modify several products in a group, click the group name, and then click the Open button.
12. The Device Group Tools drop-down menu appears on the right side of the window. Scroll ifnecessary to view it.
13. In the Device Group Tools drop-down box, select an action. Type the appropriate information.Click the Return to Device Group option when finished.
14. When the product is in a Ready state, print a configuration page and verify that the firmware versionhas changed. Also, print the Menu map and check for settings changes.
Remote firmware update by using the HP Embedded Web ServerCAUTION: Use extreme caution when using this method. Only use this method as a last resort.
CAUTION: When trying to install or update firmware, do not use any buttons, browse to another site,close or touch the browser page in any way until the product has reset and displays Ready.
1. Print a menu map from the product control panel. To print a menu map, see Print the configurationpage on page 261.
2. Open the HP Embedded Web Server (HP EWS).
3. In the Information tab, click the Print menu item.
4. Click Browse and navigate to the .RFU file.
5. Click Apply.
6. After the product automatically reboots, you might need to reboot manually. Turn the product off,then on.
7. When the product is in a Ready state, print a configuration page and verify that the firmware versionhas changed. Also, print the Menu map and check for settings changes.
NOTE: Print a menu map to see what user settings are configured in the current firmware. This menumap can be compared with a menu map printed before the firmware update to determine what usersettings have been added or changed in the new firmware. To print a menu map from the product controlpanel, see Print the configuration page on page 261.
Messages during the firmware updateThe following table lists the causes and results of possible interruptions to the firmware update.
ENWW Remote firmware updates 269
Engi
neer
ing
deta
ils

Table 6-2 Troubleshooting a firmware update
Cause Result
The job was cancelled from the control panel. No update has occurred.
A break in the I/O stream occurred during send (for example,the network cable was removed).
No update has occurred.
A power cycle occurred during the RECEIVING UPGRADEprocess.
No update has occurred.
A power cycle occurred during the PERFORMINGUPGRADE process.
No update has occurred. Resend the update through a USBport.
A power cycle occurred during the INITIALIZING process. The update has been completed.
Print jobs that are sent to the product while a firmware update is in process do not interrupt the update.
All HP LaserJet products leave the factory with the most recent firmware version installed. If a remotefirmware update fails for the component, the .RFU file must be resent. The only component exceptionis the formatter. See the following table for information regarding a formatter update error.
NOTE: Because a firmware update cannot be resent over a USB connection for Mac, contact an HPCustomer Care Center if a remote update fails in a Macintosh operating system.
The first three messages in the following table appear during a normal firmware update process; othersappear only if the update process does not succeed.
Table 6-3 Update messages
Product message Explanation
RECEIVING UPGRADE This message appears from the time the product recognizes the beginning ofan .RFU update until the time the product has verified the validity and integrity ofthe .RFU update.
NOTE: If the remote firmware update process is interrupted before the firmwareis downloaded (while RECEIVING UPGRADE appears on the control-paneldisplay), the firmware file must be sent again. No message appears on the productcontrol panel to indicate that the firmware update was interrupted.
PERFORMING UPGRADE This message appears while the product is reprogramming the firmware.
NOTE: If power is lost during the flash DIMM update (while PERFORMINGUPGRADE appears on the control-panel display), the update is interrupted andthe message RESEND UPGRADE appears on the control-panel display.
INITIALIZING This message appears from the time the product has finished reprogramming theflash until the product reinitializes.
RESEND UPGRADE This message appears (in English only) if the firmware update fails becausethe .RFU process is interrupted. It can also occur if firmware for accessories (suchas the duplex unit becomes corrupted). Perform another firmware update by anymeans that is supported by the product, regardless of the connection (network orUSB).
.RFU LOAD ERROR
SEND .RFU UPGRADE
ON USB PORT
This message appears (in English only) if the firmware update of the formatterfails because the print-engine firmware is corrupted.
If this message appears, the update must now be sent by a computer that isattached to the USB port of the product.
270 Chapter 6 Engineering details ENWW
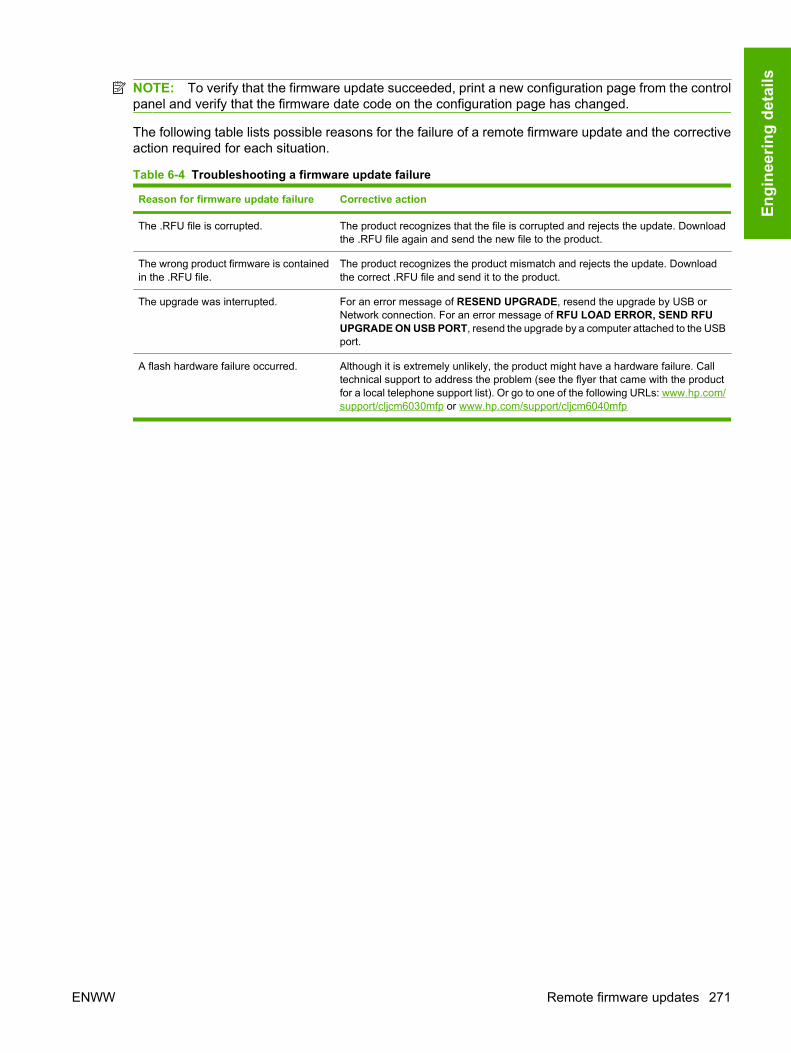
NOTE: To verify that the firmware update succeeded, print a new configuration page from the controlpanel and verify that the firmware date code on the configuration page has changed.
The following table lists possible reasons for the failure of a remote firmware update and the correctiveaction required for each situation.
Table 6-4 Troubleshooting a firmware update failure
Reason for firmware update failure Corrective action
The .RFU file is corrupted. The product recognizes that the file is corrupted and rejects the update. Downloadthe .RFU file again and send the new file to the product.
The wrong product firmware is containedin the .RFU file.
The product recognizes the product mismatch and rejects the update. Downloadthe correct .RFU file and send it to the product.
The upgrade was interrupted. For an error message of RESEND UPGRADE, resend the upgrade by USB orNetwork connection. For an error message of RFU LOAD ERROR, SEND RFUUPGRADE ON USB PORT, resend the upgrade by a computer attached to the USBport.
A flash hardware failure occurred. Although it is extremely unlikely, the product might have a hardware failure. Calltechnical support to address the problem (see the flyer that came with the productfor a local telephone support list). Or go to one of the following URLs: www.hp.com/support/cljcm6030mfp or www.hp.com/support/cljcm6040mfp
ENWW Remote firmware updates 271
Engi
neer
ing
deta
ils
Print print-ready documentsSeveral methods are available for printing documents independently of the original software programthat was used to create the document. Normally, the document is printed by opening the originalapplication and printing it to a file, or by a distribution method such as Internet downloading. The followingprint-ready file formats can be sent directly to the product without first opening the original softwareprogram:
● HP LaserJet Printer Control Language (.PCL)
● Portable Document Format (.PDF)
● Postscript (.PS)
● Text (.TXT)
● Print file (.PRN)
Use one of the following methods to send print-ready files to the product.
NOTE: The examples in this section are for printing .PDF documents. However, any print-ready filetype can be printed.
Print a print-ready file by using FTP through a browserComplete the following steps to print print-ready files directly by using FTP through a browser:
NOTE: The following instructions can be used on Windows or Macintosh operating systems.
1. Open a browser window.
2. In the address line of the browser, type ftp://<IPADDRESS>. For example, if the TCP/IP addressof the product is 192.168.0.90, type the following:
FTP:// 192.168.0.90
NOTE: The above TCP/IP address is the TCP/IP address from the embedded JetDirect page ofthe configuration page report.
3. Locate the print-ready file for the product.
4. Drag and drop the print-ready file onto the PORT icon in the browser window.
NOTE: If the PORT icon does not appear as a folder name, you might have to enable folderviewing for FTP sites in your Web browser. In Microsoft Internet Explorer, use the followingprocedure to enable the folder view.
a. Select Tools, then select Internet Options, and then select the Advanced tab.
b. Select the Enable folder view for FTP sites.
c. Click OK to save the setting.
272 Chapter 6 Engineering details ENWW
Print a print-ready file by using FTP on a network connectionComplete the following steps to print a print-ready document by using file transfer protocol (FTP) througha network connection on Windows operating systems:
1. Open a command prompt or an MS-DOS command prompt on the computer.
2. Type ftp <TCP/IP printer ADDRESS>. For example, if the TCP/IP address is 192.168.0.90,type the following:
ftp 192.168.0.90
NOTE: The above TCP/IP address is the TCP/IP address from the embedded JetDirect page ofthe configuration page report.
3. Press Enter.
4. When prompted for the user name, press Enter.
5. When prompted for the password, press Enter.
6. Type bin at the command prompt.
7. Press Enter. The message 200 Types set to I, Using binary mode to transfer files appears inthe command window.
8. Type put <FILENAME>, where <FILENAME> is the name of the print-ready file to be printed,including the path. For example, type the following:
put C:\LJ\GUIDE.pdf
NOTE: If the file name or path includes a space, you must enclose the file name or path inquotation marks. For example, type put "c:\My Documents\LJ\GUIDE.pdf"
The following series of messages appears in the command window:
200 PORT command successful
150 Opening BINARY mode data connection
226 Ready
226 Processing Job
9. Press Enter.
10. The print-ready file prints.
11. At the command prompt, type bye to exit the FTP command.
12. At the command prompt, type exit to return to the Windows interface.
ENWW Print print-ready documents 273
Engi
neer
ing
deta
ils
Print-ready file printing in a Windows networkIf the product is shared on a Windows network, complete the following steps:
1. From a command prompt or in an MS-DOS window, type copy /b <FILENAME> \\<COMPUTERNAME>\<SHARENAME>, where <FILENAME> is the name of the print-ready file(including the path), <COMPUTERNAME> is the name of the computer from which the product isbeing shared, and <SHARENAME> is the product share name. For example, type the following:
C:\>copy /b c:\GUIDE.pdf \\<COMPUTERNAME>\<SHARENAME>
NOTE: The above TCP/IP address is the TCP/IP address from the embedded JetDirect page ofthe configuration page report.
NOTE: If the file name or path includes a space, you must enclose the file name or path inquotation marks. For example, type C:\>copy /b "c:\My Documents\GUIDE.pdf" \\<COMPUTERNAME>\<SHARENAME>
2. Press Enter. The message PROCESSING JOB appears on the control panel, and the job prints.The message 1 file(s) copied appears on the computer screen.
Print a print-ready file in UNIX systemsFor UNIX systems, any command method that delivers the print-ready file to the product is acceptable,including the following:
At the command prompt, type cp </home/yourmachine/FILENAME/ dev/parallel>, where </home/yourmachine/FILENAME> is the location of the print-ready file.
Print a print-ready file by using the LPR command NOTE: This direct printing method is for use in Windows.
Complete the following steps to print a print-ready file by using the LPR command:
1. From a command prompt or in an MS-DOS window, type the following:
lpr -P IPADDRESS -S IPADDRESS -o l FILENAME lpr -S <IPADDRESS> -Pbinps<FILENAME>
where IPADDRESS can be either the TCP/IP address or the host name of the product, and whereFILENAME is the file name of the print-ready file.
NOTE: The above TCP/IP address is the TCP/IP address from the embedded JetDirect page ofthe configuration page report.
NOTE: The parameter (-o l) consists of a lowercase "O", not a zero, and a lowercase "L", not thenumeral 1. This parameter sets the transport protocol to binary mode.
2. The file prints, but no messages appear in the command prompt window.
3. Type exit at the command prompt to close the command window.
274 Chapter 6 Engineering details ENWW

Print a print-ready file through the HP Embedded Web Server1. Open the HP Embedded Web Server (HP EWS).
2. In the Information tab, click the Print menu item.
3. Click Browse and navigate to the file that you want to print.
4. Click Apply.
ENWW Print print-ready documents 275
Engi
neer
ing
deta
ils
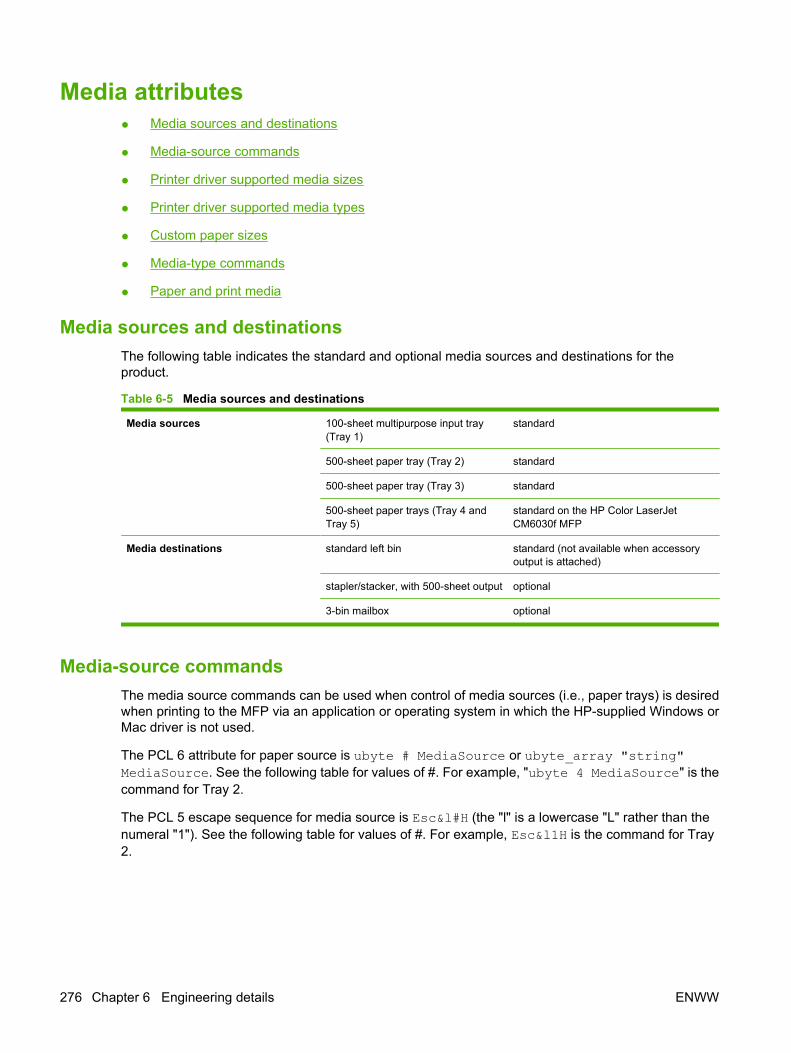
Media attributes● Media sources and destinations
● Media-source commands
● Printer driver supported media sizes
● Printer driver supported media types
● Custom paper sizes
● Media-type commands
● Paper and print media
Media sources and destinationsThe following table indicates the standard and optional media sources and destinations for theproduct.
Table 6-5 Media sources and destinations
Media sources 100-sheet multipurpose input tray(Tray 1)
standard
500-sheet paper tray (Tray 2) standard
500-sheet paper tray (Tray 3) standard
500-sheet paper trays (Tray 4 andTray 5)
standard on the HP Color LaserJetCM6030f MFP
Media destinations standard left bin standard (not available when accessoryoutput is attached)
stapler/stacker, with 500-sheet output optional
3-bin mailbox optional
Media-source commandsThe media source commands can be used when control of media sources (i.e., paper trays) is desiredwhen printing to the MFP via an application or operating system in which the HP-supplied Windows orMac driver is not used.
The PCL 6 attribute for paper source is ubyte # MediaSource or ubyte_array "string"MediaSource. See the following table for values of #. For example, "ubyte 4 MediaSource" is thecommand for Tray 2.
The PCL 5 escape sequence for media source is Esc&l#H (the "l" is a lowercase "L" rather than thenumeral "1"). See the following table for values of #. For example, Esc&l1H is the command for Tray2.
276 Chapter 6 Engineering details ENWW
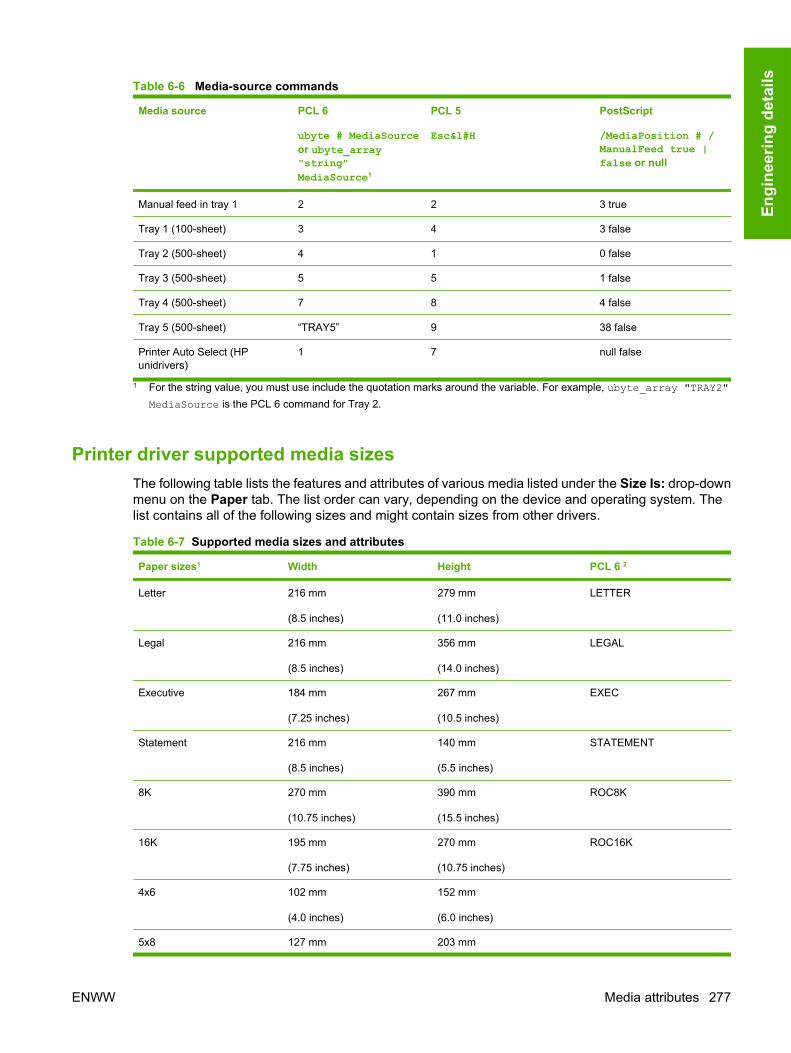
Table 6-6 Media-source commands
Media source PCL 6
ubyte # MediaSourceor ubyte_array"string"MediaSource1
PCL 5
Esc&l#HPostScript
/MediaPosition # /ManualFeed true |false or null
Manual feed in tray 1 2 2 3 true
Tray 1 (100-sheet) 3 4 3 false
Tray 2 (500-sheet) 4 1 0 false
Tray 3 (500-sheet) 5 5 1 false
Tray 4 (500-sheet) 7 8 4 false
Tray 5 (500-sheet) “TRAY5” 9 38 false
Printer Auto Select (HPunidrivers)
1 7 null false
1 For the string value, you must use include the quotation marks around the variable. For example, ubyte_array "TRAY2"MediaSource is the PCL 6 command for Tray 2.
Printer driver supported media sizesThe following table lists the features and attributes of various media listed under the Size Is: drop-downmenu on the Paper tab. The list order can vary, depending on the device and operating system. Thelist contains all of the following sizes and might contain sizes from other drivers.
Table 6-7 Supported media sizes and attributes
Paper sizes1 Width Height PCL 6 2
Letter 216 mm
(8.5 inches)
279 mm
(11.0 inches)
LETTER
Legal 216 mm
(8.5 inches)
356 mm
(14.0 inches)
LEGAL
Executive 184 mm
(7.25 inches)
267 mm
(10.5 inches)
EXEC
Statement 216 mm
(8.5 inches)
140 mm
(5.5 inches)
STATEMENT
8K 270 mm
(10.75 inches)
390 mm
(15.5 inches)
ROC8K
16K 195 mm
(7.75 inches)
270 mm
(10.75 inches)
ROC16K
4x6 102 mm
(4.0 inches)
152 mm
(6.0 inches)
5x8 127 mm 203 mm
ENWW Media attributes 277
Engi
neer
ing
deta
ils
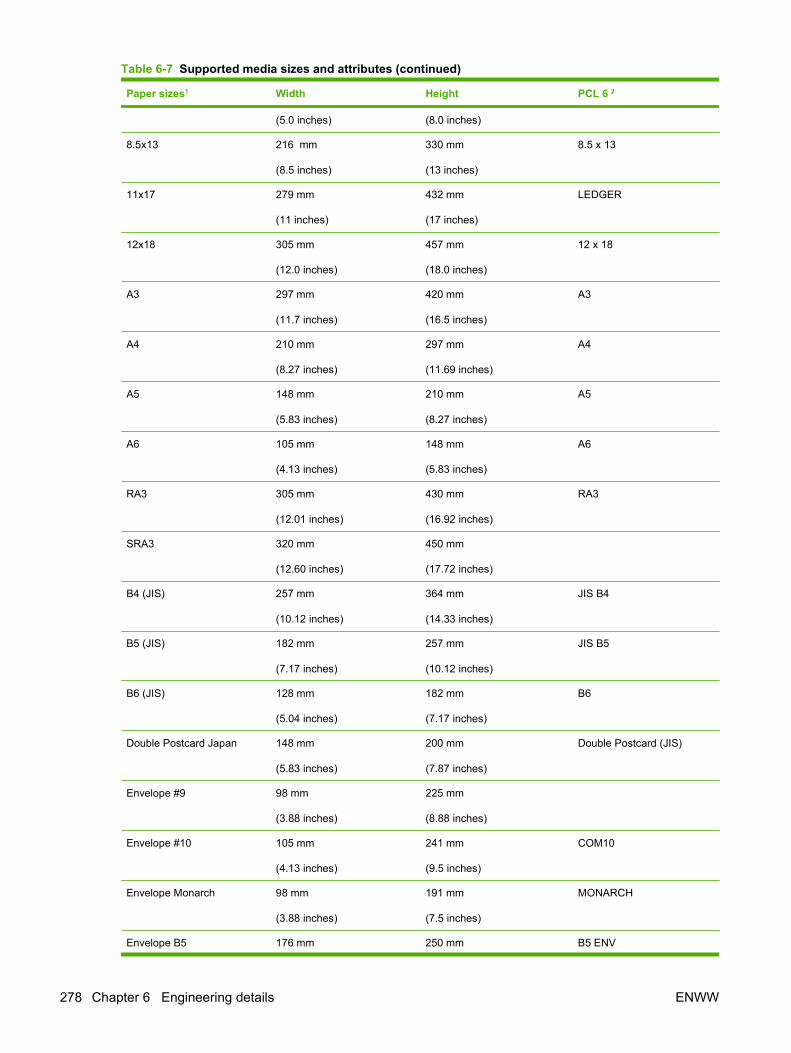
Paper sizes1 Width Height PCL 6 2
(5.0 inches) (8.0 inches)
8.5x13 216 mm
(8.5 inches)
330 mm
(13 inches)
8.5 x 13
11x17 279 mm
(11 inches)
432 mm
(17 inches)
LEDGER
12x18 305 mm
(12.0 inches)
457 mm
(18.0 inches)
12 x 18
A3 297 mm
(11.7 inches)
420 mm
(16.5 inches)
A3
A4 210 mm
(8.27 inches)
297 mm
(11.69 inches)
A4
A5 148 mm
(5.83 inches)
210 mm
(8.27 inches)
A5
A6 105 mm
(4.13 inches)
148 mm
(5.83 inches)
A6
RA3 305 mm
(12.01 inches)
430 mm
(16.92 inches)
RA3
SRA3 320 mm
(12.60 inches)
450 mm
(17.72 inches)
B4 (JIS) 257 mm
(10.12 inches)
364 mm
(14.33 inches)
JIS B4
B5 (JIS) 182 mm
(7.17 inches)
257 mm
(10.12 inches)
JIS B5
B6 (JIS) 128 mm
(5.04 inches)
182 mm
(7.17 inches)
B6
Double Postcard Japan 148 mm
(5.83 inches)
200 mm
(7.87 inches)
Double Postcard (JIS)
Envelope #9 98 mm
(3.88 inches)
225 mm
(8.88 inches)
Envelope #10 105 mm
(4.13 inches)
241 mm
(9.5 inches)
COM10
Envelope Monarch 98 mm
(3.88 inches)
191 mm
(7.5 inches)
MONARCH
Envelope B5 176 mm 250 mm B5 ENV
Table 6-7 Supported media sizes and attributes (continued)
278 Chapter 6 Engineering details ENWW
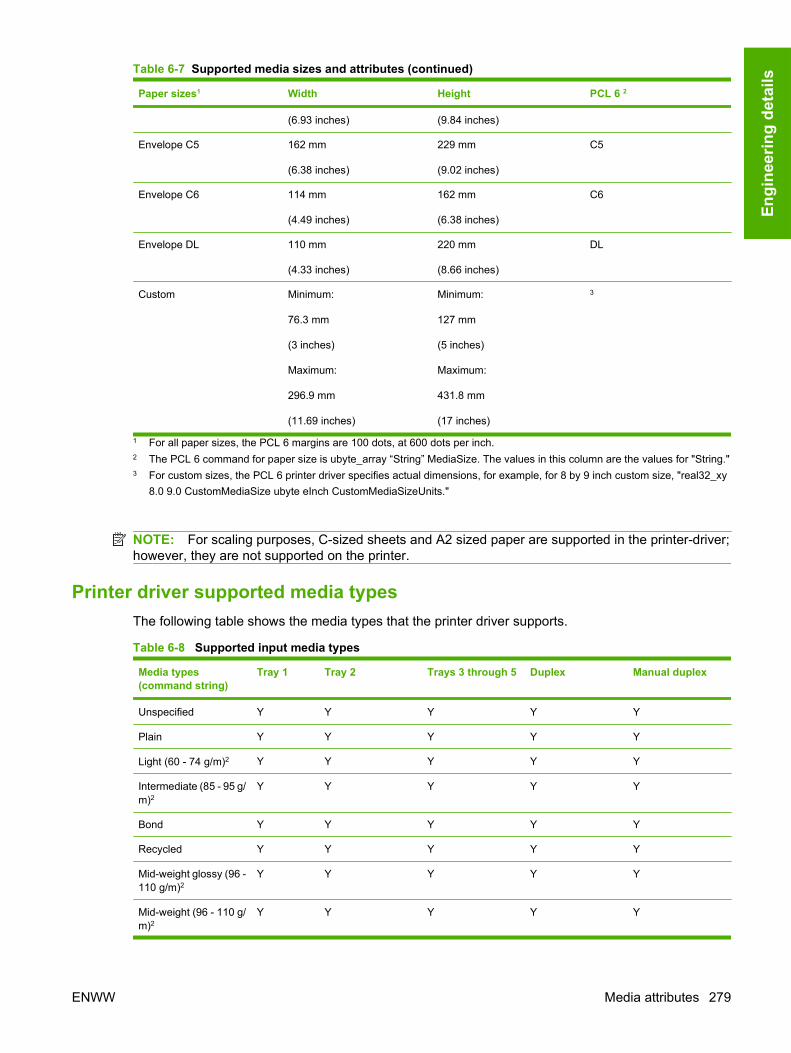
Paper sizes1 Width Height PCL 6 2
(6.93 inches) (9.84 inches)
Envelope C5 162 mm
(6.38 inches)
229 mm
(9.02 inches)
C5
Envelope C6 114 mm
(4.49 inches)
162 mm
(6.38 inches)
C6
Envelope DL 110 mm
(4.33 inches)
220 mm
(8.66 inches)
DL
Custom Minimum:
76.3 mm
(3 inches)
Maximum:
296.9 mm
(11.69 inches)
Minimum:
127 mm
(5 inches)
Maximum:
431.8 mm
(17 inches)
3
1 For all paper sizes, the PCL 6 margins are 100 dots, at 600 dots per inch.2 The PCL 6 command for paper size is ubyte_array “String” MediaSize. The values in this column are the values for "String."3 For custom sizes, the PCL 6 printer driver specifies actual dimensions, for example, for 8 by 9 inch custom size, "real32_xy
8.0 9.0 CustomMediaSize ubyte eInch CustomMediaSizeUnits."
NOTE: For scaling purposes, C-sized sheets and A2 sized paper are supported in the printer-driver;however, they are not supported on the printer.
Printer driver supported media typesThe following table shows the media types that the printer driver supports.
Table 6-8 Supported input media types
Media types(command string)
Tray 1 Tray 2 Trays 3 through 5 Duplex Manual duplex
Unspecified Y Y Y Y Y
Plain Y Y Y Y Y
Light (60 - 74 g/m)2 Y Y Y Y Y
Intermediate (85 - 95 g/m)2
Y Y Y Y Y
Bond Y Y Y Y Y
Recycled Y Y Y Y Y
Mid-weight glossy (96 -110 g/m)2
Y Y Y Y Y
Mid-weight (96 - 110 g/m)2
Y Y Y Y Y
Table 6-7 Supported media sizes and attributes (continued)
ENWW Media attributes 279
Engi
neer
ing
deta
ils
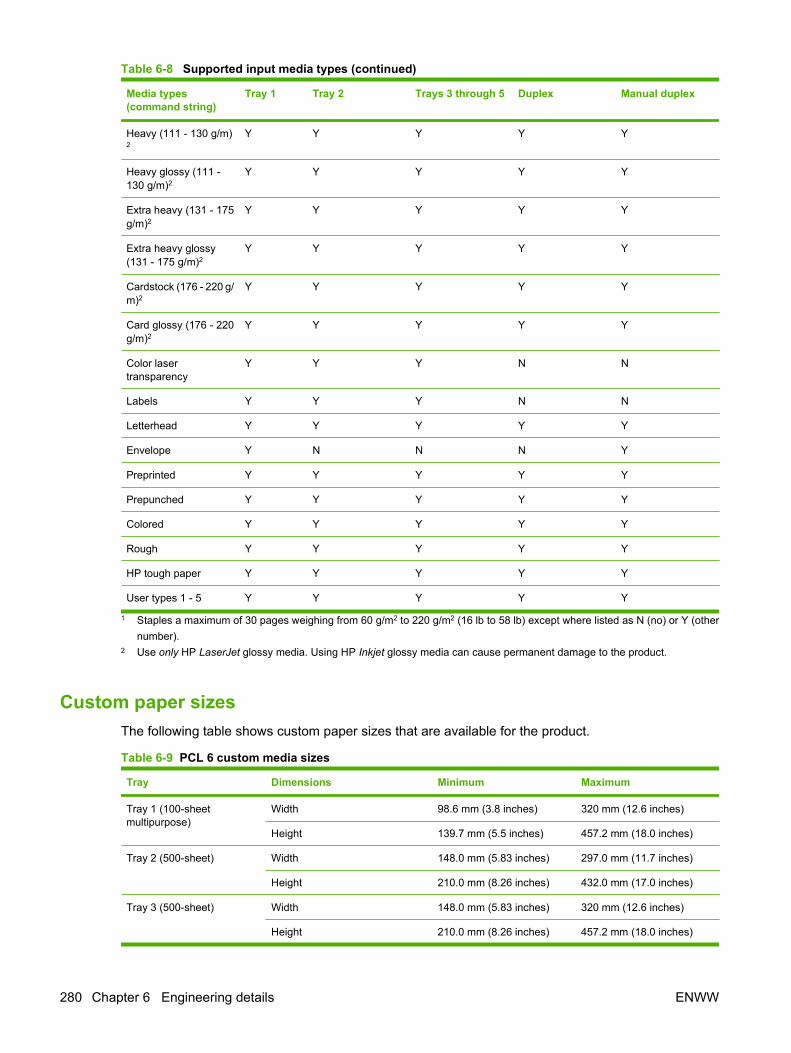
Media types(command string)
Tray 1 Tray 2 Trays 3 through 5 Duplex Manual duplex
Heavy (111 - 130 g/m)2
Y Y Y Y Y
Heavy glossy (111 -130 g/m)2
Y Y Y Y Y
Extra heavy (131 - 175g/m)2
Y Y Y Y Y
Extra heavy glossy(131 - 175 g/m)2
Y Y Y Y Y
Cardstock (176 - 220 g/m)2
Y Y Y Y Y
Card glossy (176 - 220g/m)2
Y Y Y Y Y
Color lasertransparency
Y Y Y N N
Labels Y Y Y N N
Letterhead Y Y Y Y Y
Envelope Y N N N Y
Preprinted Y Y Y Y Y
Prepunched Y Y Y Y Y
Colored Y Y Y Y Y
Rough Y Y Y Y Y
HP tough paper Y Y Y Y Y
User types 1 - 5 Y Y Y Y Y
1 Staples a maximum of 30 pages weighing from 60 g/m2 to 220 g/m2 (16 lb to 58 lb) except where listed as N (no) or Y (othernumber).
2 Use only HP LaserJet glossy media. Using HP Inkjet glossy media can cause permanent damage to the product.
Custom paper sizesThe following table shows custom paper sizes that are available for the product.
Table 6-9 PCL 6 custom media sizes
Tray Dimensions Minimum Maximum
Tray 1 (100-sheetmultipurpose)
Width 98.6 mm (3.8 inches) 320 mm (12.6 inches)
Height 139.7 mm (5.5 inches) 457.2 mm (18.0 inches)
Tray 2 (500-sheet) Width 148.0 mm (5.83 inches) 297.0 mm (11.7 inches)
Height 210.0 mm (8.26 inches) 432.0 mm (17.0 inches)
Tray 3 (500-sheet) Width 148.0 mm (5.83 inches) 320 mm (12.6 inches)
Height 210.0 mm (8.26 inches) 457.2 mm (18.0 inches)
Table 6-8 Supported input media types (continued)
280 Chapter 6 Engineering details ENWW
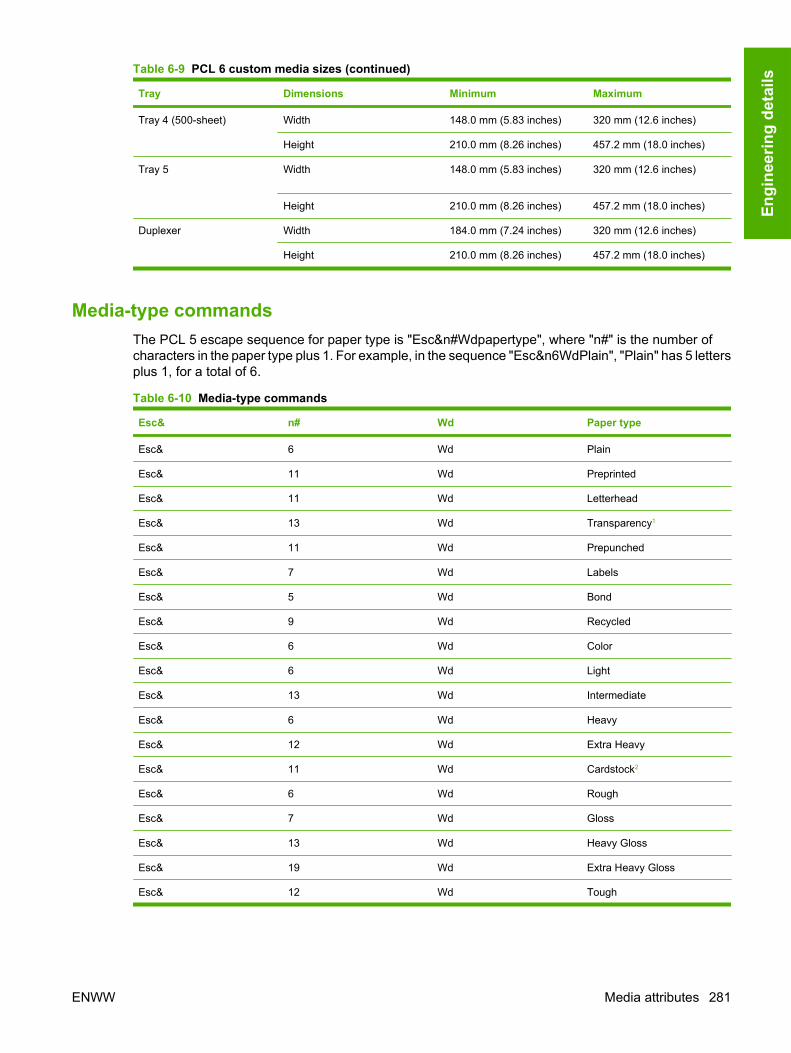
Tray Dimensions Minimum Maximum
Tray 4 (500-sheet) Width 148.0 mm (5.83 inches) 320 mm (12.6 inches)
Height 210.0 mm (8.26 inches) 457.2 mm (18.0 inches)
Tray 5 Width 148.0 mm (5.83 inches) 320 mm (12.6 inches)
Height 210.0 mm (8.26 inches) 457.2 mm (18.0 inches)
Duplexer Width 184.0 mm (7.24 inches) 320 mm (12.6 inches)
Height 210.0 mm (8.26 inches) 457.2 mm (18.0 inches)
Media-type commandsThe PCL 5 escape sequence for paper type is "Esc&n#Wdpapertype", where "n#" is the number ofcharacters in the paper type plus 1. For example, in the sequence "Esc&n6WdPlain", "Plain" has 5 lettersplus 1, for a total of 6.
Table 6-10 Media-type commands
Esc& n# Wd Paper type
Esc& 6 Wd Plain
Esc& 11 Wd Preprinted
Esc& 11 Wd Letterhead
Esc& 13 Wd Transparency1
Esc& 11 Wd Prepunched
Esc& 7 Wd Labels
Esc& 5 Wd Bond
Esc& 9 Wd Recycled
Esc& 6 Wd Color
Esc& 6 Wd Light
Esc& 13 Wd Intermediate
Esc& 6 Wd Heavy
Esc& 12 Wd Extra Heavy
Esc& 11 Wd Cardstock2
Esc& 6 Wd Rough
Esc& 7 Wd Gloss
Esc& 13 Wd Heavy Gloss
Esc& 19 Wd Extra Heavy Gloss
Esc& 12 Wd Tough
Table 6-9 PCL 6 custom media sizes (continued)
ENWW Media attributes 281
Engi
neer
ing
deta
ils
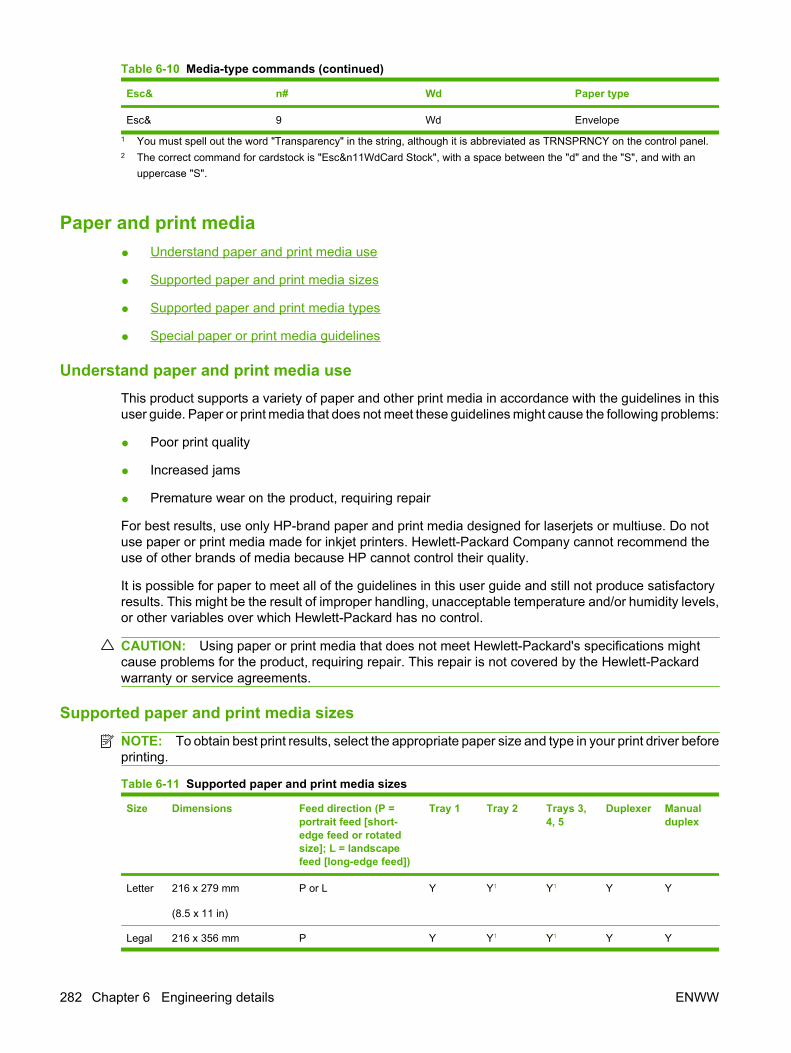
Esc& n# Wd Paper type
Esc& 9 Wd Envelope
1 You must spell out the word "Transparency" in the string, although it is abbreviated as TRNSPRNCY on the control panel.2 The correct command for cardstock is "Esc&n11WdCard Stock", with a space between the "d" and the "S", and with an
uppercase "S".
Paper and print media● Understand paper and print media use
● Supported paper and print media sizes
● Supported paper and print media types
● Special paper or print media guidelines
Understand paper and print media useThis product supports a variety of paper and other print media in accordance with the guidelines in thisuser guide. Paper or print media that does not meet these guidelines might cause the following problems:
● Poor print quality
● Increased jams
● Premature wear on the product, requiring repair
For best results, use only HP-brand paper and print media designed for laserjets or multiuse. Do notuse paper or print media made for inkjet printers. Hewlett-Packard Company cannot recommend theuse of other brands of media because HP cannot control their quality.
It is possible for paper to meet all of the guidelines in this user guide and still not produce satisfactoryresults. This might be the result of improper handling, unacceptable temperature and/or humidity levels,or other variables over which Hewlett-Packard has no control.
CAUTION: Using paper or print media that does not meet Hewlett-Packard's specifications mightcause problems for the product, requiring repair. This repair is not covered by the Hewlett-Packardwarranty or service agreements.
Supported paper and print media sizesNOTE: To obtain best print results, select the appropriate paper size and type in your print driver beforeprinting.
Table 6-11 Supported paper and print media sizes
Size Dimensions Feed direction (P =portrait feed [short-edge feed or rotatedsize]; L = landscapefeed [long-edge feed])
Tray 1 Tray 2 Trays 3,4, 5
Duplexer Manualduplex
Letter 216 x 279 mm
(8.5 x 11 in)
P or L Y Y1 Y1 Y Y
Legal 216 x 356 mm P Y Y1 Y1 Y Y
Table 6-10 Media-type commands (continued)
282 Chapter 6 Engineering details ENWW
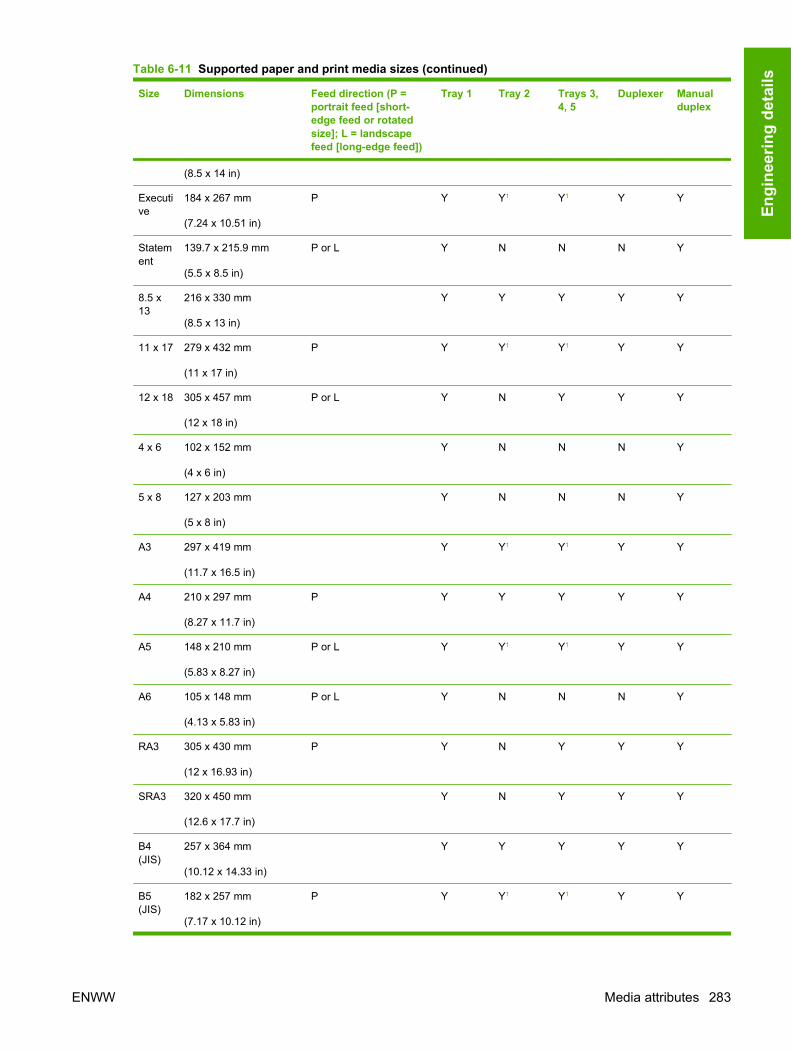
Size Dimensions Feed direction (P =portrait feed [short-edge feed or rotatedsize]; L = landscapefeed [long-edge feed])
Tray 1 Tray 2 Trays 3,4, 5
Duplexer Manualduplex
(8.5 x 14 in)
Executive
184 x 267 mm
(7.24 x 10.51 in)
P Y Y1 Y1 Y Y
Statement
139.7 x 215.9 mm
(5.5 x 8.5 in)
P or L Y N N N Y
8.5 x13
216 x 330 mm
(8.5 x 13 in)
Y Y Y Y Y
11 x 17 279 x 432 mm
(11 x 17 in)
P Y Y1 Y1 Y Y
12 x 18 305 x 457 mm
(12 x 18 in)
P or L Y N Y Y Y
4 x 6 102 x 152 mm
(4 x 6 in)
Y N N N Y
5 x 8 127 x 203 mm
(5 x 8 in)
Y N N N Y
A3 297 x 419 mm
(11.7 x 16.5 in)
Y Y1 Y1 Y Y
A4 210 x 297 mm
(8.27 x 11.7 in)
P Y Y Y Y Y
A5 148 x 210 mm
(5.83 x 8.27 in)
P or L Y Y1 Y1 Y Y
A6 105 x 148 mm
(4.13 x 5.83 in)
P or L Y N N N Y
RA3 305 x 430 mm
(12 x 16.93 in)
P Y N Y Y Y
SRA3 320 x 450 mm
(12.6 x 17.7 in)
Y N Y Y Y
B4(JIS)
257 x 364 mm
(10.12 x 14.33 in)
Y Y Y Y Y
B5(JIS)
182 x 257 mm
(7.17 x 10.12 in)
P Y Y1 Y1 Y Y
Table 6-11 Supported paper and print media sizes (continued)
ENWW Media attributes 283
Engi
neer
ing
deta
ils
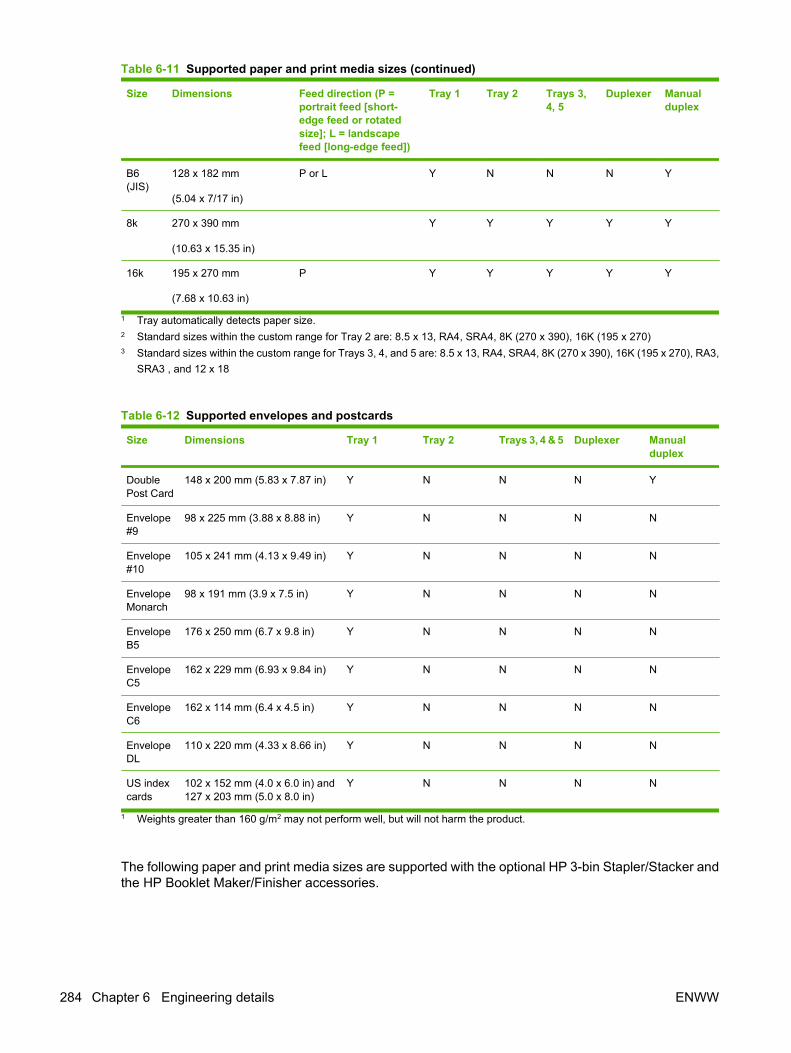
Size Dimensions Feed direction (P =portrait feed [short-edge feed or rotatedsize]; L = landscapefeed [long-edge feed])
Tray 1 Tray 2 Trays 3,4, 5
Duplexer Manualduplex
B6(JIS)
128 x 182 mm
(5.04 x 7/17 in)
P or L Y N N N Y
8k 270 x 390 mm
(10.63 x 15.35 in)
Y Y Y Y Y
16k 195 x 270 mm
(7.68 x 10.63 in)
P Y Y Y Y Y
1 Tray automatically detects paper size.2 Standard sizes within the custom range for Tray 2 are: 8.5 x 13, RA4, SRA4, 8K (270 x 390), 16K (195 x 270)3 Standard sizes within the custom range for Trays 3, 4, and 5 are: 8.5 x 13, RA4, SRA4, 8K (270 x 390), 16K (195 x 270), RA3,
SRA3 , and 12 x 18
Table 6-12 Supported envelopes and postcards
Size Dimensions Tray 1 Tray 2 Trays 3, 4 & 5 Duplexer Manualduplex
DoublePost Card
148 x 200 mm (5.83 x 7.87 in) Y N N N Y
Envelope#9
98 x 225 mm (3.88 x 8.88 in) Y N N N N
Envelope#10
105 x 241 mm (4.13 x 9.49 in) Y N N N N
EnvelopeMonarch
98 x 191 mm (3.9 x 7.5 in) Y N N N N
EnvelopeB5
176 x 250 mm (6.7 x 9.8 in) Y N N N N
EnvelopeC5
162 x 229 mm (6.93 x 9.84 in) Y N N N N
EnvelopeC6
162 x 114 mm (6.4 x 4.5 in) Y N N N N
EnvelopeDL
110 x 220 mm (4.33 x 8.66 in) Y N N N N
US indexcards
102 x 152 mm (4.0 x 6.0 in) and127 x 203 mm (5.0 x 8.0 in)
Y N N N N
1 Weights greater than 160 g/m2 may not perform well, but will not harm the product.
The following paper and print media sizes are supported with the optional HP 3-bin Stapler/Stacker andthe HP Booklet Maker/Finisher accessories.
Table 6-11 Supported paper and print media sizes (continued)
284 Chapter 6 Engineering details ENWW
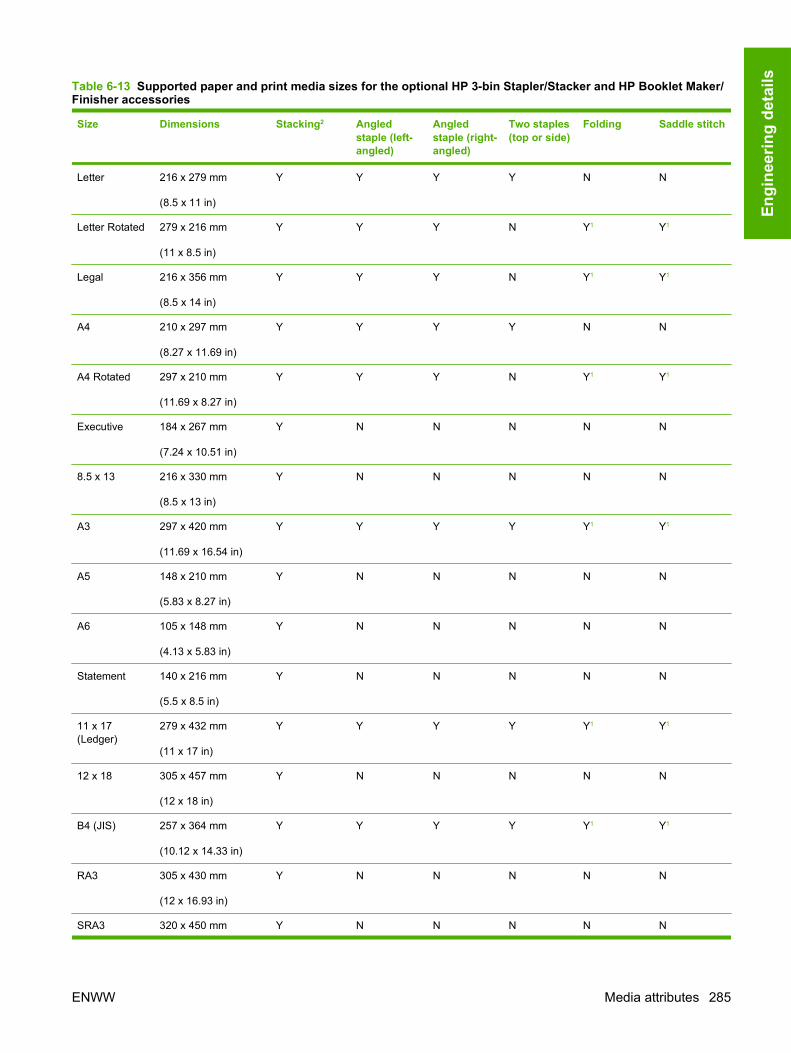
Table 6-13 Supported paper and print media sizes for the optional HP 3-bin Stapler/Stacker and HP Booklet Maker/Finisher accessories
Size Dimensions Stacking2 Angledstaple (left-angled)
Angledstaple (right-angled)
Two staples(top or side)
Folding Saddle stitch
Letter 216 x 279 mm
(8.5 x 11 in)
Y Y Y Y N N
Letter Rotated 279 x 216 mm
(11 x 8.5 in)
Y Y Y N Y1 Y1
Legal 216 x 356 mm
(8.5 x 14 in)
Y Y Y N Y1 Y1
A4 210 x 297 mm
(8.27 x 11.69 in)
Y Y Y Y N N
A4 Rotated 297 x 210 mm
(11.69 x 8.27 in)
Y Y Y N Y1 Y1
Executive 184 x 267 mm
(7.24 x 10.51 in)
Y N N N N N
8.5 x 13 216 x 330 mm
(8.5 x 13 in)
Y N N N N N
A3 297 x 420 mm
(11.69 x 16.54 in)
Y Y Y Y Y1 Y1
A5 148 x 210 mm
(5.83 x 8.27 in)
Y N N N N N
A6 105 x 148 mm
(4.13 x 5.83 in)
Y N N N N N
Statement 140 x 216 mm
(5.5 x 8.5 in)
Y N N N N N
11 x 17(Ledger)
279 x 432 mm
(11 x 17 in)
Y Y Y Y Y1 Y1
12 x 18 305 x 457 mm
(12 x 18 in)
Y N N N N N
B4 (JIS) 257 x 364 mm
(10.12 x 14.33 in)
Y Y Y Y Y1 Y1
RA3 305 x 430 mm
(12 x 16.93 in)
Y N N N N N
SRA3 320 x 450 mm Y N N N N N
ENWW Media attributes 285
Engi
neer
ing
deta
ils
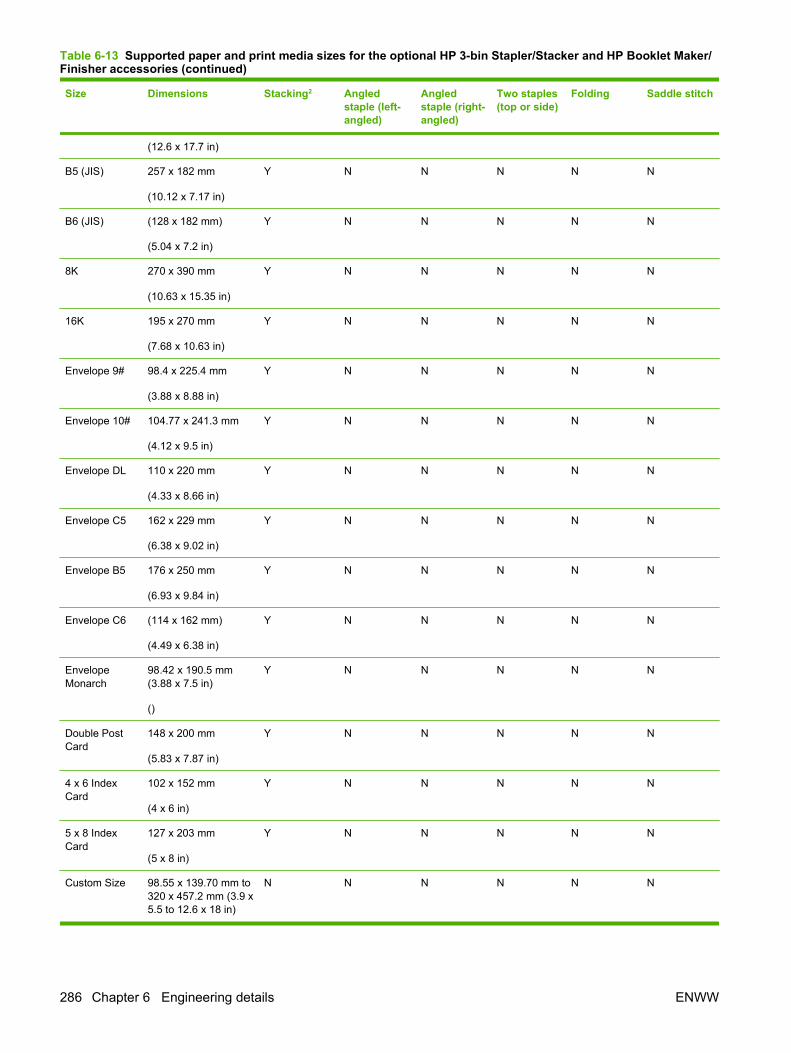
Size Dimensions Stacking2 Angledstaple (left-angled)
Angledstaple (right-angled)
Two staples(top or side)
Folding Saddle stitch
(12.6 x 17.7 in)
B5 (JIS) 257 x 182 mm
(10.12 x 7.17 in)
Y N N N N N
B6 (JIS) (128 x 182 mm)
(5.04 x 7.2 in)
Y N N N N N
8K 270 x 390 mm
(10.63 x 15.35 in)
Y N N N N N
16K 195 x 270 mm
(7.68 x 10.63 in)
Y N N N N N
Envelope 9# 98.4 x 225.4 mm
(3.88 x 8.88 in)
Y N N N N N
Envelope 10# 104.77 x 241.3 mm
(4.12 x 9.5 in)
Y N N N N N
Envelope DL 110 x 220 mm
(4.33 x 8.66 in)
Y N N N N N
Envelope C5 162 x 229 mm
(6.38 x 9.02 in)
Y N N N N N
Envelope B5 176 x 250 mm
(6.93 x 9.84 in)
Y N N N N N
Envelope C6 (114 x 162 mm)
(4.49 x 6.38 in)
Y N N N N N
EnvelopeMonarch
98.42 x 190.5 mm(3.88 x 7.5 in)
()
Y N N N N N
Double PostCard
148 x 200 mm
(5.83 x 7.87 in)
Y N N N N N
4 x 6 IndexCard
102 x 152 mm
(4 x 6 in)
Y N N N N N
5 x 8 IndexCard
127 x 203 mm
(5 x 8 in)
Y N N N N N
Custom Size 98.55 x 139.70 mm to320 x 457.2 mm (3.9 x5.5 to 12.6 x 18 in)
N N N N N N
Table 6-13 Supported paper and print media sizes for the optional HP 3-bin Stapler/Stacker and HP Booklet Maker/Finisher accessories (continued)
286 Chapter 6 Engineering details ENWW

Size Dimensions Stacking2 Angledstaple (left-angled)
Angledstaple (right-angled)
Two staples(top or side)
Folding Saddle stitch
(3.9 x 5.5 in to 12.6 x18 in)
1 Booklet maker only2 Stacking uses bins 1, 2, and 3 in the stapler/stacker, or bins 1 and 2 in the booklet maker.
Supported paper and print media typesTable 6-14 Tray 1 paper information
Type Specifications Quantity Driver settings Paper orientation
Paper and cardstock,standard sizes
Range:
60 g/m2 (16 lb) bond to220 g/m2 (58 lb) bond
Maximum stack height:10 mm (0.6 in)
Equivalent to 100sheets of 75 g/m2 (20lb) bond.
Plain or unspecified Load preprinted orprepunched paperfacing down, with thetop edge leading intothe tray, or toward theback of the product
Envelopes Less than 60 g/m2 (16lb) bond to 90 g/m2 (24lb) bond
Up to 10 envelopes Envelope Short edge leading,flap toward the front ofthe product, facing up
Labels Maximum 0.23 mm(0.009 in) thick
Maximum stack height:10 mm (0.6 in)
Labels Side to be printed onfacing down
Transparencies Minimum 0.13 mm(0.005 in) thick
Maximum stack height:10 mm (0.6 in)
Transparencies Side to be printed onfacing down
Heavy 0.13 mm (0.005 in)thick
Maximum stack height:10 mm (0.6 in)
Light glossy, glossy, orheavy glossy
Side to be printed onfacing down
Glossy Range:
75 g/m2 (20 lb) bond to220 g/m2 (58 lb) bond
Maximum stack height:10 mm (0.6 in)
Light glossy, glossy, orheavy glossy
Side to be printed onfacing down
Photo media 60 g/m2 (16 lb) bond to220 g/m2 (58 lb) bond
Maximum stack height:10 mm (0.6 in)
Side to be printed onfacing down
Cut sheet paper 60 g/m2 (16 lb) bond to220 g/m2 (58 lb) bond
Maximum stack height:10 mm (0.6 in)
Side to be printed onfacing down
Tough paper 60 g/m2 (16 lb) bond to220 g/m2 (58 lb) bond
Maximum stack height:10 mm (0.6 in)
Side to be printed onfacing down
Table 6-15 Trays 2, 3, 4, and 5 paper information
Type Specifications Quantity Settings Paper orientation
Paper and cardstock,standard sizes
Range:
60 g/m2 (16 lb) bond to220 g/m2 (58 lb) bond
500 sheets of 75 g/m2
(20 lb) bond.Plain or unspecified Load preprinted or
prepunched paperfacing up, with the toptoward the back of thetray or toward the right-hand side of the tray.
Labels Maximum 0.13 mm(0.005 in) thick
Maximum stack height:54 mm (2.1 in)
Labels Side to be printed onfacing up
Table 6-13 Supported paper and print media sizes for the optional HP 3-bin Stapler/Stacker and HP Booklet Maker/Finisher accessories (continued)
ENWW Media attributes 287
Engi
neer
ing
deta
ils
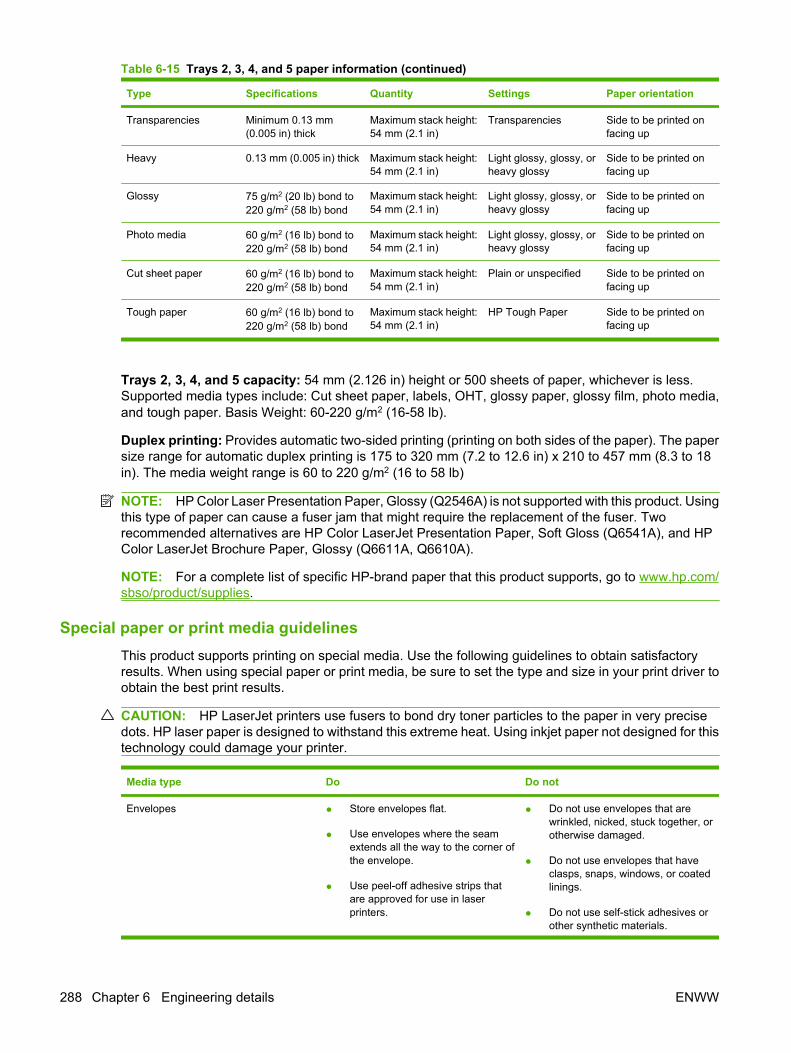
Type Specifications Quantity Settings Paper orientation
Transparencies Minimum 0.13 mm(0.005 in) thick
Maximum stack height:54 mm (2.1 in)
Transparencies Side to be printed onfacing up
Heavy 0.13 mm (0.005 in) thick Maximum stack height:54 mm (2.1 in)
Light glossy, glossy, orheavy glossy
Side to be printed onfacing up
Glossy 75 g/m2 (20 lb) bond to220 g/m2 (58 lb) bond
Maximum stack height:54 mm (2.1 in)
Light glossy, glossy, orheavy glossy
Side to be printed onfacing up
Photo media 60 g/m2 (16 lb) bond to220 g/m2 (58 lb) bond
Maximum stack height:54 mm (2.1 in)
Light glossy, glossy, orheavy glossy
Side to be printed onfacing up
Cut sheet paper 60 g/m2 (16 lb) bond to220 g/m2 (58 lb) bond
Maximum stack height:54 mm (2.1 in)
Plain or unspecified Side to be printed onfacing up
Tough paper 60 g/m2 (16 lb) bond to220 g/m2 (58 lb) bond
Maximum stack height:54 mm (2.1 in)
HP Tough Paper Side to be printed onfacing up
Trays 2, 3, 4, and 5 capacity: 54 mm (2.126 in) height or 500 sheets of paper, whichever is less.Supported media types include: Cut sheet paper, labels, OHT, glossy paper, glossy film, photo media,and tough paper. Basis Weight: 60-220 g/m2 (16-58 lb).
Duplex printing: Provides automatic two-sided printing (printing on both sides of the paper). The papersize range for automatic duplex printing is 175 to 320 mm (7.2 to 12.6 in) x 210 to 457 mm (8.3 to 18in). The media weight range is 60 to 220 g/m2 (16 to 58 lb)
NOTE: HP Color Laser Presentation Paper, Glossy (Q2546A) is not supported with this product. Usingthis type of paper can cause a fuser jam that might require the replacement of the fuser. Tworecommended alternatives are HP Color LaserJet Presentation Paper, Soft Gloss (Q6541A), and HPColor LaserJet Brochure Paper, Glossy (Q6611A, Q6610A).
NOTE: For a complete list of specific HP-brand paper that this product supports, go to www.hp.com/sbso/product/supplies.
Special paper or print media guidelinesThis product supports printing on special media. Use the following guidelines to obtain satisfactoryresults. When using special paper or print media, be sure to set the type and size in your print driver toobtain the best print results.
CAUTION: HP LaserJet printers use fusers to bond dry toner particles to the paper in very precisedots. HP laser paper is designed to withstand this extreme heat. Using inkjet paper not designed for thistechnology could damage your printer.
Media type Do Do not
Envelopes ● Store envelopes flat.
● Use envelopes where the seamextends all the way to the corner ofthe envelope.
● Use peel-off adhesive strips thatare approved for use in laserprinters.
● Do not use envelopes that arewrinkled, nicked, stuck together, orotherwise damaged.
● Do not use envelopes that haveclasps, snaps, windows, or coatedlinings.
● Do not use self-stick adhesives orother synthetic materials.
Table 6-15 Trays 2, 3, 4, and 5 paper information (continued)
288 Chapter 6 Engineering details ENWW
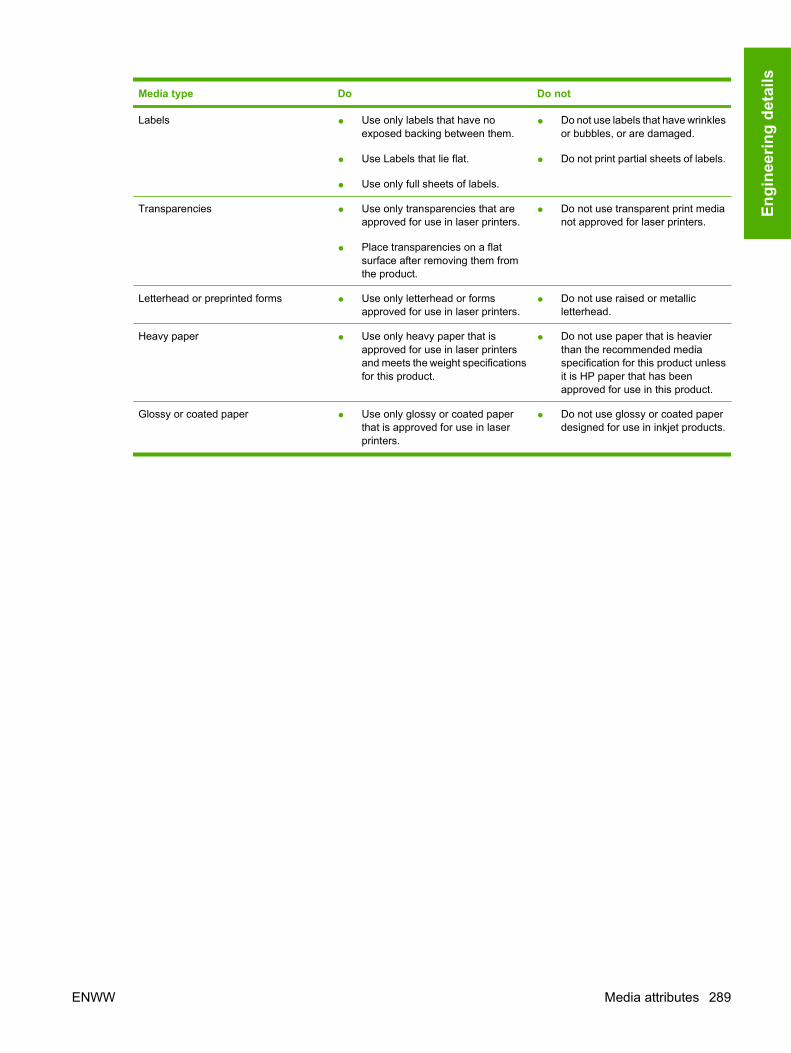
Media type Do Do not
Labels ● Use only labels that have noexposed backing between them.
● Use Labels that lie flat.
● Use only full sheets of labels.
● Do not use labels that have wrinklesor bubbles, or are damaged.
● Do not print partial sheets of labels.
Transparencies ● Use only transparencies that areapproved for use in laser printers.
● Place transparencies on a flatsurface after removing them fromthe product.
● Do not use transparent print medianot approved for laser printers.
Letterhead or preprinted forms ● Use only letterhead or formsapproved for use in laser printers.
● Do not use raised or metallicletterhead.
Heavy paper ● Use only heavy paper that isapproved for use in laser printersand meets the weight specificationsfor this product.
● Do not use paper that is heavierthan the recommended mediaspecification for this product unlessit is HP paper that has beenapproved for use in this product.
Glossy or coated paper ● Use only glossy or coated paperthat is approved for use in laserprinters.
● Do not use glossy or coated paperdesigned for use in inkjet products.
ENWW Media attributes 289
Engi
neer
ing
deta
ils
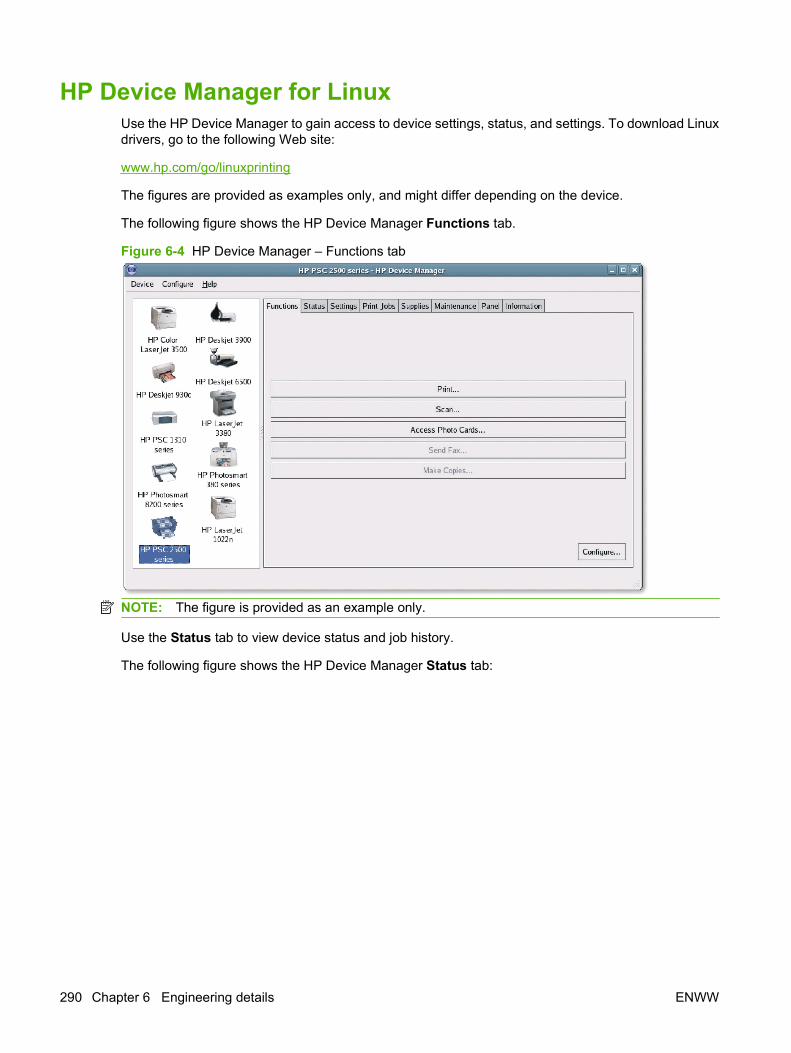
HP Device Manager for LinuxUse the HP Device Manager to gain access to device settings, status, and settings. To download Linuxdrivers, go to the following Web site:
www.hp.com/go/linuxprinting
The figures are provided as examples only, and might differ depending on the device.
The following figure shows the HP Device Manager Functions tab.
Figure 6-4 HP Device Manager – Functions tab
NOTE: The figure is provided as an example only.
Use the Status tab to view device status and job history.
The following figure shows the HP Device Manager Status tab:
290 Chapter 6 Engineering details ENWW
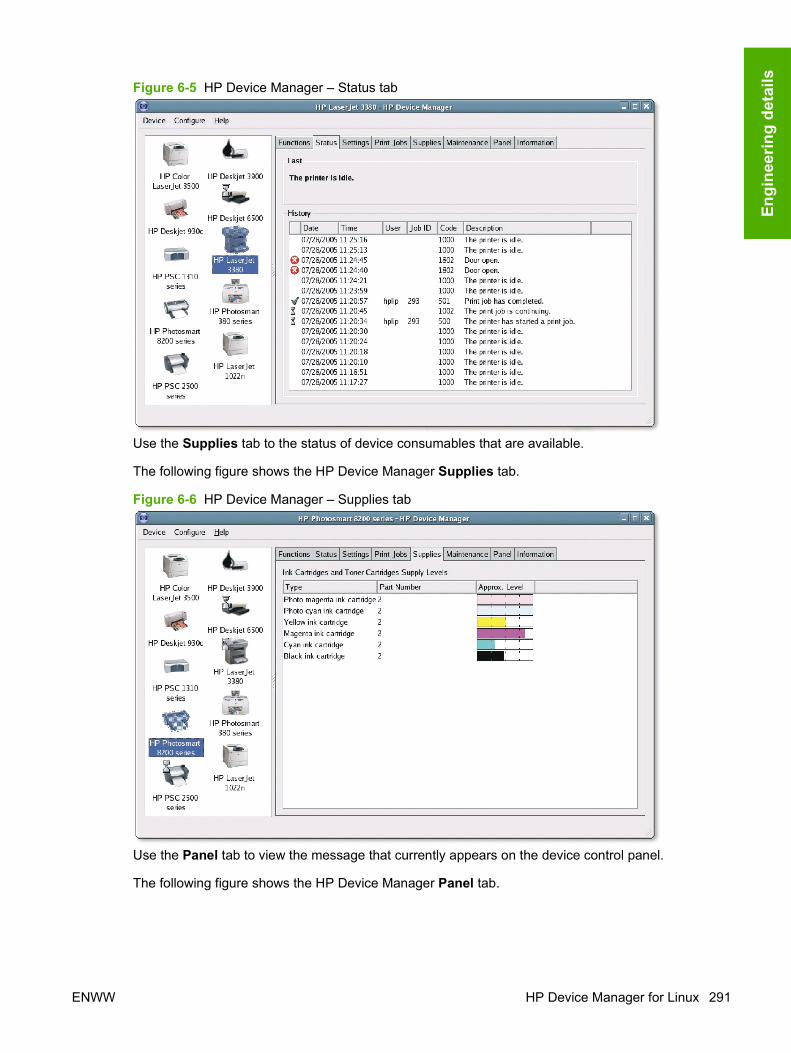
Figure 6-5 HP Device Manager – Status tab
Use the Supplies tab to the status of device consumables that are available.
The following figure shows the HP Device Manager Supplies tab.
Figure 6-6 HP Device Manager – Supplies tab
Use the Panel tab to view the message that currently appears on the device control panel.
The following figure shows the HP Device Manager Panel tab.
ENWW HP Device Manager for Linux 291
Engi
neer
ing
deta
ils
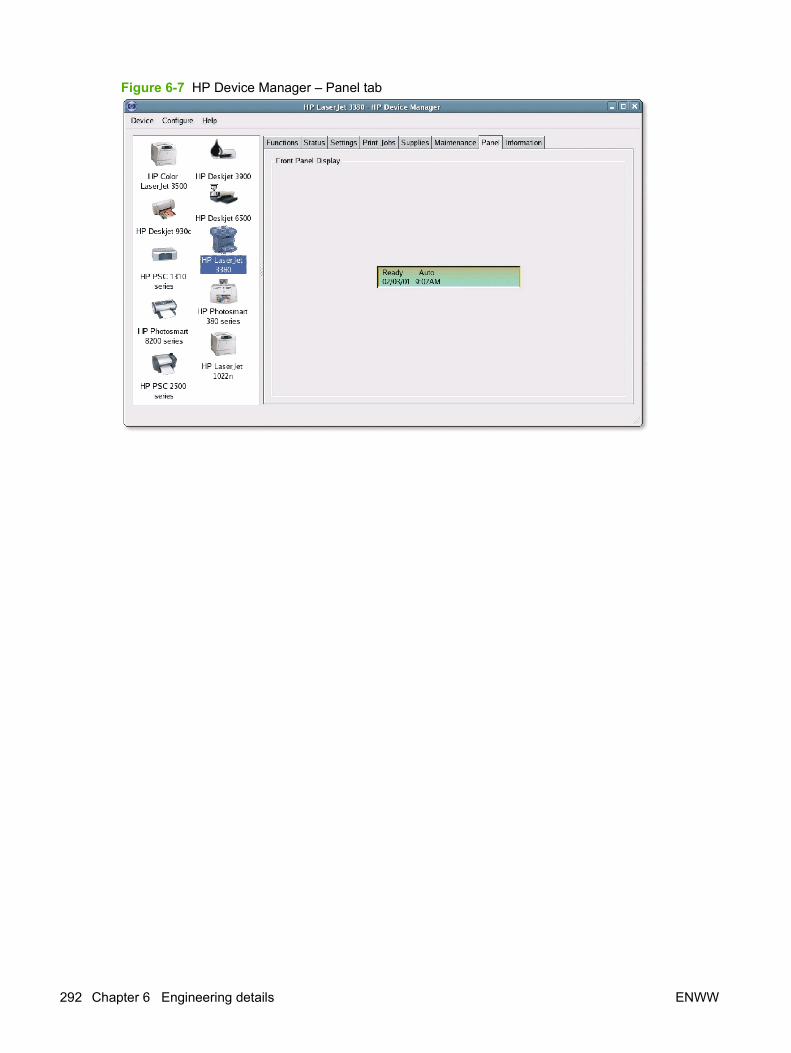
Figure 6-7 HP Device Manager – Panel tab
292 Chapter 6 Engineering details ENWW
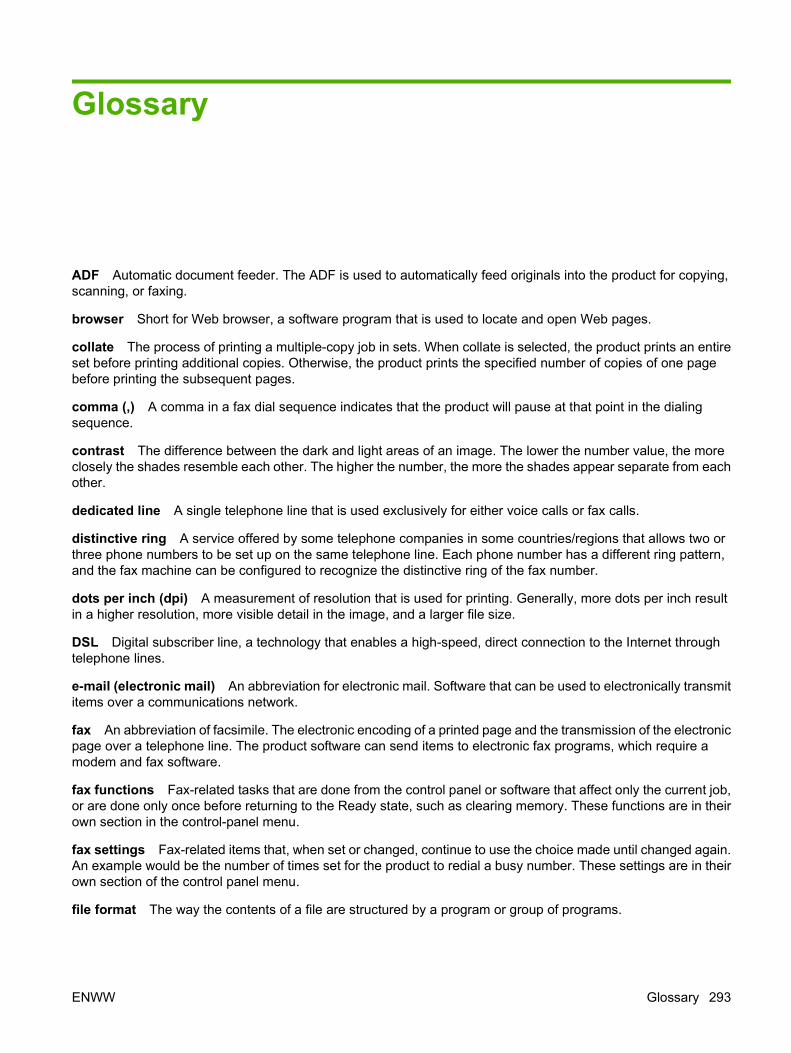
Glossary
ADF Automatic document feeder. The ADF is used to automatically feed originals into the product for copying,scanning, or faxing.
browser Short for Web browser, a software program that is used to locate and open Web pages.
collate The process of printing a multiple-copy job in sets. When collate is selected, the product prints an entireset before printing additional copies. Otherwise, the product prints the specified number of copies of one pagebefore printing the subsequent pages.
comma (,) A comma in a fax dial sequence indicates that the product will pause at that point in the dialingsequence.
contrast The difference between the dark and light areas of an image. The lower the number value, the moreclosely the shades resemble each other. The higher the number, the more the shades appear separate from eachother.
dedicated line A single telephone line that is used exclusively for either voice calls or fax calls.
distinctive ring A service offered by some telephone companies in some countries/regions that allows two orthree phone numbers to be set up on the same telephone line. Each phone number has a different ring pattern,and the fax machine can be configured to recognize the distinctive ring of the fax number.
dots per inch (dpi) A measurement of resolution that is used for printing. Generally, more dots per inch resultin a higher resolution, more visible detail in the image, and a larger file size.
DSL Digital subscriber line, a technology that enables a high-speed, direct connection to the Internet throughtelephone lines.
e-mail (electronic mail) An abbreviation for electronic mail. Software that can be used to electronically transmititems over a communications network.
fax An abbreviation of facsimile. The electronic encoding of a printed page and the transmission of the electronicpage over a telephone line. The product software can send items to electronic fax programs, which require amodem and fax software.
fax functions Fax-related tasks that are done from the control panel or software that affect only the current job,or are done only once before returning to the Ready state, such as clearing memory. These functions are in theirown section in the control-panel menu.
fax settings Fax-related items that, when set or changed, continue to use the choice made until changed again.An example would be the number of times set for the product to redial a busy number. These settings are in theirown section of the control panel menu.
file format The way the contents of a file are structured by a program or group of programs.
ENWW Glossary 293
grayscale Shades of gray that represent light and dark portions of an image when color images are convertedto grayscale; colors are represented by various shades of gray.
halftone An image type that simulates grayscale by varying the number of dots. Highly colored areas consist ofa large number of dots, while lighter areas consist of a smaller number of dots.
HP Easy Printer Care HP Easy Printer Care is a program that provides access to the product management andtroubleshooting tools, embedded Web server, and product documentation. HP Easy Printer Care does not supportMacintosh operating systems.
HP Director A software screen that is used when working with documents. When the document is loaded intothe automatic document feeder (ADF) and the computer is connected directly to the product, the HP Directorappears on the computer screen to initiate faxing, copying, or scanning.
ISDN Integrated Services Digital Network (ISDN) is a suite of internationally adopted standards for end-to-enddigital communication over the public telephone network.
link A connection to a program or device that can be used to send information from the product software to otherprograms, such as e-mail, electronic fax, and OCR links.
optical character recognition (OCR) software OCR software converts an electronic image of text, such as ascanned document, into a form that word processor, spreadsheet, and database programs can use.
pixels per inch (ppi) A measurement of resolution that is used for scanning. Generally, more pixels per inchresult in a higher resolution, more visible detail in the image, and a larger file size.
printer driver A printer driver is a program that software programs use to gain access to a product’s features.A printer driver translates a software program’s formatting commands (such as page breaks and font selection)into a printer language (such as PostScript or PCL), and then sends the print file to the product.
private branch exchange (PBX) A small telephone switching system that typically is used by large businessesor universities to connect all telephone extensions within the organization. A PBX also connects to the publicswitched telephone network (PSTN) and may be either manual or dial, depending on the method used byextensions to place incoming or outgoing calls. Normally, the equipment is owned by the customer rather thanleased from the telephone company.
public switched telephone network (PSTN) The worldwide dial-up telephone network or a portion of thatnetwork. Users are assigned unique phone numbers, which allow them to connect to the PSTN through localtelephone exchange companies. Often, this phrase is used when referring to data or other non-telephone servicescarried over a path initially established using normal telephone signaling and ordinary switched long-distancetelephone circuits.
Readiris An optical character recognition (OCR) program that was developed by I.R.I.S. and that is includedwith the product software.
resolution The sharpness of an image, measured in dots per inch (dpi). The higher the dpi, the greater theresolution.
shared line A single telephone line that is used for both voice and fax calls.
surge protector A device that protects a power supply and communications lines from electrical surges.
TWAIN An industry standard for scanners and software. By using a TWAIN-compliant scanner with a TWAIN-compliant program, a scan can be initiated from within the program.
URL Uniform resource locator, the global address of documents and resources on the Internet. The first part ofthe address indicates what protocol to use, the second part specifies the IP address or the domain name wherethe resource is located.
294 Glossary ENWW

USB Universal serial bus (USB) is a standard that was developed by the USB Implementers Forum, Inc., toconnect computers and peripherals. USB is designed to concurrently connect a single computer USB port tomultiple peripherals.
watermarks A watermark adds background text to a document that is being printed. For example, “Confidential”can be printed in the background text of a document to indicate that the document is confidential. A selection canbe made from a set of predefined watermarks, and the font, size, angle, and style can be changed. The productcan place the watermark on the first page only or all pages.
WIA Windows Imaging Architecture (WIA) is an imaging architecture that is available in Windows Me andWindows XP. A scan can be initiated from within these operating systems by using a WIA-compliant scanner.
ENWW Glossary 295

296 Glossary ENWW
Index
Symbols/Numerics3-bin mailbox
capacity 6500-sheet trays
models including 3
Aaccessibility, documentation 34accessories, automatic
configuration 48Acrobat Reader
viewing documentation 27ADA (Americans with Disabilities
Act) compliance 34Add Printer installation 89Add Printer Wizard, detailed install
existing port for a directconnection, using 89
print server connection 99TCP/IP port for direction
connection, creating 96ADF
capacity 5ADF output bin
capacity 6Adobe Acrobat Reader
viewing documentation 27alerts
Macintosh 250alerts, e-mail 18, 209Americans with Disabilities Act
(ADA) compliance 34autoconfiguration, driver 48autoconfiguration, Enterprise
about 49autorun CD-ROM, Windows 42,
70
BBasic Installation
choosing 42bidirectional communication
about 48Enterprise
Autoconfiguration 49bins
capacities 6included 276locating 9
Bonjour Settings 17, 209Bonjour Settings, Macintosh 252booklet printing
Booklet Layout settings 173both sides, printing on
Macintosh settings 17, 209
Ccapacity
3-bin mailbox 6ADF 5output bins 6stapler/stacker 6
cardstock, paper typecommands 282
cartridges, printMacintosh status 258
CDAdministrator
Documentation 74Administrator Software 73Install 71Next Steps 76Scan Setup Wizard 75Support 72User Documentation 72
CD-ROMdirectory structure,
Macintosh 210
directory structure,Windows 20
documentation 27, 44installer, Windows printing-
system software 41, 70installing Macintosh printing-
system software 212languages, Macintosh 210languages, Windows 21Windows installation 27
CHM files, viewing 27Citrix Terminal Server support 18Color
Color Options settings 187Color Themes settings 190Custom Profile setting 190Default (sRGB) setting 190features, print drivers 186Neutral Gray settings 189Photo (Adobe RGB 1998)
setting 190Photo (sRGB) setting 190
colorchange default settings,
manually 187Edge Control settings 189fine-tune default settings 187Halftone setting 189restrict use 55
Color printingICC profiles 55PANTONE*® Matching System
colors 55Color tab settings 257commands, paper
size 279source 276type 281
common installer, features 45
ENWW Index 297
components, softwareMacintosh 19, 206Windows 19
configuration pageMacintosh 17
configurations, models 3connectivity
bidirectional communicationsupport 48
connectivity features 6constraint messages
print drivers 141continuous export 53control panel
locating 9settings 40, 206
copiesQuick Copy setting 182
copyingfeatures 7speed specifications 5
cover pages 255covers, locating 9Custom Installation
choosing 42custom paper sizes
supported 280custom-size paper settings
Macintosh 255customer support
HP Printer Utility pages 17
Ddeleting job-storage jobs 250density
settings 17device status
Macintosh Services tab 258diagnostics
troubleshoot 191dialog boxes, printing-system
software installationMac OS X 213
direct printingFTP, Windows 273LPR 274networks, Windows 274UNIX 274
directory structure, CD-ROMMacintosh 210Windows 20
disablingdriver features 51
disk space requirementsMacintosh 205Windows 38
documentationHP Driver Preconfiguration
Support Guide 31HP Embedded Web Server User
Guide 30HP Jetdirect Administrator's
Guide 30install notes 28installing (Windows) 128User Guide 33viewing 27, 44
double-sided printingMacintosh settings 17, 209
downloadingprinting-system software 20
dpi, settings 17drivers
accessory configuration 48Add Printer installation 89Automatic Configuration
setting 199continuous export feature 53custom paper sizes 280diagnostics 54Enterprise
Autoconfiguration 49lockable features 51, 248Macintosh 206Macintosh settings 254paper sizes supported 277paper source commands 276paper type commands 281Point and Print
installation 105preconfiguration 50preconfiguration support 31presets (Macintosh) 254settings 40, 41, 206, 207supported 14, 39universal 14Update Now 49
Update Now, bidirectionalcommunication 199
version numbers 46drivers, install
license agreement 83, 107drivers, uninstall
Add/Remove Programs 131Server Properties 135
Duplex mode, HP Printer Utility,Macintosh 246
duplex printing accessorylocating 9
duplexerMacintosh settings 17, 209
duplexing unitmedia supported 279testing Macintosh 246
duty cycle 5
Ee-mail
alerts, Macintosh 250e-mail alerts 18, 209embedded Web server 15, 57Enterprise Autoconfiguration
about 49envelopes, paper type
commands 282error messages
e-mail alerts 18, 209escape sequences
paper source 276paper type 281
Ethernet cards 6EWS (Macintosh)
documentation 30HP Printer Utility, accessing
from 254EWS (Windows)
documentation 30exporting driver parameters 53
Ffax driver
installation 106features 3, 5File Upload, Macintosh 17, 209,
244firmware
about updating remotely 260
298 Index ENWW
determine current level 261FTP updates, Windows 265LPR command updates 268Macintosh updates 245messages during update 269troubleshooting updates 269UNIX updates 267verifying installation 271Windows network
updates 267Firmware Update, Macintosh 17,
209first page
use different paper 255fonts
included 5install/remove external
fonts 195Send True Type as Bitmap, print
drivers 146True Type, print drivers 145Upload Macintosh 17, 209Windows 61, 63
Foreign Interface Harness(FIH) 11
formatter cover, locating 9FTP
direct printing, Windows 273Windows firmware
updates 265Full Installation
choosing 42
Gglossary of terms 293
Hheavy paper, paper type
commands 282help
print drivers 141HP Device Manager for
Linux 290HP Driver Diagnostic Printer Check
Tool 54HP Driver Installation Utility
(HPDIU) 80HP Driver Preconfiguration 50HP Driver Preconfiguration Support
Guide 31
HP Easy Printer Caredescription 15downloading 15sending a fax 117supported browsers 15supported operating
systems 15HP Embedded Web Server
(Macintosh)documentation 30HP Printer Utility, accessing
from 254HP Embedded Web Server
(Windows)documentation 30
HP Jetdirect Administrator'sGuide 30
HP Jetdirect print servermodels including 3
HP OpenVMS 18HP PCL 6 Print Driver
features 137settings 137
HP Printer Utility 17, 208HP Printer Utility, Macintosh
about 233accessing 233Bonjour Settings 252Device Information 240Duplex mode 246E-mail Alerts 250Embedded Web Server
access 254File Upload 244HP Support 241Lock Resources 248Network Settings 251Supplies Status 237Tray Configuration 247Update Firmware 245
HP Universal Print Driver 14HP Web Jetadmin
Driver PreconfigurationPlugin 50, 51
firmware updates 268HP-UX software 18HTML files, viewing 27
IICC color profiles 55
ICM. See Image ColorManagement
Image Color Managementcolor graphics printing 144
Incompatible Print Settingsmessages. See constraintmessages
input trays. See traysInstall Network Printer Wizard
(INPW) 19install notes 28installation
Add Printer 89dialog boxes, Mac OS X 213fax driver 106HP Driver Installation
Utility 80instruction details
(Windows) 80Mac OS X V10.2.8 setup 229Mac OS X V10.3 setup 225Mac OS X V10.4 220Macintosh printing-system
software 212options 69Point and Print 105system requirements 68system requirements for
Macintosh 205system requirements for
Windows 38troubleshooting
Macintosh 231Windows CD-ROM 27Windows for direct
connection 78Windows printing-system
software 68Windows software on
network 79installers
common, features 45Windows 41, 70
Instant Support 241interface ports
included 6locating 11
Jjam-access lever, locating 9
ENWW Index 299
Jetadminfirmware updates 268
Jetadmin, HP Web 15, 58Jetdirect Administrator's
Guide 30Jetdirect print server
models including 3Job Aids 8job storage
deleting jobs 250Macintosh 249Macintosh settings 257releasing jobs 249
jobsMacintosh settings 17, 209
LLAN-connector 6languages
Macintosh CD-ROMs 210languages, printer 5Linux operating systems
HP Device Manager 290Linux software 18localized CD-ROMs
Macintosh 210Lock Resources, Macintosh 17,
209lockable features, drivers 51,
248LPR commands
firmware updates 268printing PDF files 274
MMacintosh
driver settings 207, 254HP Printer Utility 17, 208removing software 232resize documents 255software 16, 208staple options 257supported operating
systems 16, 204Macintosh driver settings
custom-size paper 255Job Storage 257Services tab 258watermarks 255
Macintosh operating systemsBonjour Settings 252Device Information 240dialog boxes, Mac OS X printing-
system softwareinstallation 213
direct printing 272directory structure, CD-
ROM 210e-mail alerts 250File Upload command 244firmware upgrades 245hardware requirements 205HP Printer Utility 233installing printing-system
software 212localized software CDs 210locking driver features 248network settings 251setting up with Mac OS X
V10.2.8 229setting up with Mac OS X
V10.3 225setting up with Mac OS X
V10.4 220software components 206stored jobs 249supplies status 237support 13tray configuration 247troubleshooting setup 231Update Firmware 245
mailbox, 3-bincapacity 6
manuals. See documentationmargins
PCL 6 driver 279media
custom-size, Macintoshsettings 255
first page 255pages per sheet 255supported sizes 282
memoryfeatures 5included 3, 16, 208installation requirements for
Windows operatingsystems 38
Macintosh requirements 205
messagese-mail alerts 18, 209
messages, constraintprint drivers 141
MFP Send Fax driver, installAdd Printer Wizard 111HP Driver Installation
Utility 107Microsoft Windows
installation options 69models 3monthly duty cycle 5mopy 200MS Windows Cluster Server 8
support 18multiple pages per sheet 255multiple-original print. See mopy
Nn-up printing 255networking
peer-to-peer, Windowssharing 103
networksconnectivity features 6direct printing 274firmware updates 267HP Driver Preconfiguration 50HP Driver Preconfiguration
Support Guide 31HP Jetdirect Administrator's
Guide 30Install Network Printer Wizard
(INPW) 19Macintosh settings 17, 209,
251Point and Print
installation 105print servers included 3
Oon/off switch, locating 9operating systems
availability of softwarecomponents 19
supported 13operating systems supported 14,
16, 38, 39, 204ordering supplies 43, 72
300 Index ENWW
output binscapacities 6included 276locating 9
Ppages per minute 5pages per sheet 255paper
Alternative LetterheadMode 146
custom sizes 280custom-size, Macintosh
settings 255duplex binding settings, print
drivers 173first page 255margins 279orientation 176pages per sheet 255settings, print drivers 155size commands 279sizes supported 277source commands 276sources and destinations 276supported sizes 282type 287type commands 281types supported 279
parallel portlocating 11
PCL driverscustom paper sizes 280diagnostics 54paper sizes supported 277paper source commands 276paper type commands 281universal print driver 14Update Now 49version numbers 46
PCL traditional driversmargins 279paper size commands 279
PCL unidriverspaper size commands 279
PDF filesLPR commands, printing 274Macintosh, File Upload
command 244viewing 27
peer-to-peer networkingabout (Windows) 103client with Windows XP 105host with Windows 2000 104host with Windows XP 104
perr-to-peer networkingclient with Windows 2000 104
PINPersonal Job setting 181PIN to print setting 183
Point and Print installation,Windows printing-systemsoftware 105
portsincluded 6locating 11
PostScript Printer Description(PPD) files
included 16, 208power switch, locating 9PPDs
included 16, 208PPDs, Macintosh
troubleshooting 231preconfiguration, driver 31, 50presets (Macintosh) 254print cartridges
Macintosh status 258print drivers
About tab contents 201access 139accessory output bins, Device
Settings tab 200Advanced Printing Features
settings, print drivers 145Advanced tab content 143Allow Manual Duplexing setting,
Device Settings tab 199Alternative Letterhead Mode,
Advanced tab 146Automatic Configuration setting,
Device Settings tab 199Automatic settings, Color
tab 187Booklet Layout settings,
Finishing tab 173collation settings 201Color Options settings, Color
tab 187Color tab contents 186
Color Themes settings, Colortab 190
Copy Count settings, Advancedtab 144
device services, Servicestab 193
Device Settings tabcontent 194
Document Options setting,Advanced tab 145
Document Options settings,Finishing tab 170
document preview image 161,165, 176, 178, 191
duplex unit, Device Settingstab 199
Effects tab content 163Envelopes setting, Printing
Shortcuts tab 152Factory Defaults setting, Printing
Shortcuts tab 152Finishing tab contents 170Flip Pages Up setting, Finishing
tab 173Font Substitution Table settings,
Device Settings tab 195Form to Tray Assignment
setting, Device Settingstab 194
General Everyday Printingsetting, Printing Shortcutstab 148
General settings, Colortab 189
Graphic setting, Advancedtab 144
Halftone setting, Colortab 189
Help system 141ICM options, Advanced
tab 144incompatible print settings
messages 141installable options, Device
Settings tab 198Internet Services options,
Services tab 192Job name settings, Job Storage
tab 184
ENWW Index 301
job notification options, JobStorage tab 183
Job Separator setting, DeviceSettings tab 200
Job separator Settings,Finishing tab 176
Job Storage Mode settings, JobStorage tab 181
job storage settings, JobStorage tab 184
Job Storage tab contents 179Layout Options setting,
Advanced tab 146Manual settings, Color
tab 187mopier mode, Device Settings
tab 200Neutral Graysl settings, Color
tab 189Orientation settings, Finishing
tab 176Output Bin settings, Output
tab 178Output Options settings, Output
tab 177Output tab contents 177Page Order settings, Finishing
tab 175Pages per Sheet setting,
Finishing tab 174, 175Paper Options settings, Paper/
Quality tab 155Paper source setting, Paper/
Quality tab 158Paper type setting, Paper/
Quality tab 158Paper/Output settings,
Advanced tab 143Paper/Quality tab
contents 154Personal Job setting, Job
Storage tab 181PIN to print setting, Job Storage
tab 183Print All Text as Black setting,
Advanced tab 146Print on Both Sides settings,
Finishing tab 171Print Optimizations setting,
Advanced tab 145
Print Quality settings, Paper/Quality tab 162
Printer Features setting,Advanced tab 146
printer hard disk, DeviceSettings tab 200
Printing Preferences tab, driveraccess 139
Printing Shortcuts tabcontents 147
Proof and Hold setting, JobStorage tab 181
Properties tab, driveraccess 140
Quick Copy setting, Job Storagetab 182
Raster Compression feature,Advanced tab 146
Resizing Options settings,Effects tab 163
Send True Type as Bitmapsetting, Advanced tab 146
Services tab content 191status message, Job Storage
tab 180Stored Job setting, Job Storage
tab 182tray 3, Device Settings
tab 199trays 4 and 5, Device Settings
tab 199True Type font settings,
Advanced tab 145Two-sided (Duplex) Printing
setting, Printing Shortcutstab 151
user name settings, Job Storagetab 183
Watermarks settings, Effectstab 165
What's this? Help 141print job
delete stored job 185hard disk, job storage 200Job Name settings 184job separator 200job storage 200Personal Job setting 181Proof and Hold setting 181Quick Copy setting 182
release stored job 185Stored Job setting 182user name 183
print mediasupported sizes 282
print papertypes 287
printer driver. See printer driverSee also fax driver
printer driverssupported 39
printer languages 5printing
speed specifications 5stored jobs 249User Guide 34
printing-system software, installlicense agreement 83, 107
printing-system software, uninstallAdd/Remove Programs 131Server Properties 135
priority, settings 40, 206problem-solving
e-mail alerts 18, 209processor speed 5PS Emulation driver
custom paper sizes 280diagnostics 54paper sizes supported 277paper source commands 276Update Now 49version number 46
PS Emulation drivers 14PS emulation fonts 63
QQuick Reference Job Aids 8
Rregional versions, CD-ROMs
Macintosh 210releasing job-storage jobs 249remote firmware updates
about 260determine current firmware
level 261FTP, Windows 265LPR commands 268Macintosh 245messages 269
302 Index ENWW
troubleshooting 269UNIX 267verifying installation 271Windows network 267
removing Macintoshsoftware 232
resize documentsMacintosh 255
resolutionsettings 17specifications 5
Resolution Enhancementtechnology (REt) 17
REt (Resolution Enhancementtechnology) 17
SSAP printing 18scale documents
Macintosh 255Scan Setup Wizard
create network folder 118scanning
speed specifications 5screen-readable
documentation 34security features 7send fax driver
installation 106serial number
locate 11Services tab
Macintosh 258settings
continuous export 53driver presets
(Macintosh) 254drivers 41, 207locking 51priority 40, 206
sizes, papercommands 279custom 280margins 279supported 277
softwareembedded Web server 15,
57HP Easy Printer Care 15HP Printer Utility 17, 208
HP Web Jetadmin 15, 58Macintosh 16, 208option install (Windows) 128settings 40, 206supported operating
systems 14, 16, 38, 204uninstalling 130uninstalling Macintosh 232Windows 14, 38
software license agreement 83,107
software, uninstallcomponent list 130
Solaris software 18sources, paper. See traysspecial media
guidelines 288special paper
guidelines 288specifications
features 5speed specifications 5standard output bin
capacity 6locating 9
staple optionsMacintosh 257
stapler/stackercapacity 6
statusHP Printer Utility,
Macintosh 17, 208Macintosh services tab 258supplies, Macintosh 237
storage, jobdeleting jobs 250Macintosh 249Macintosh settings 17, 209,
257releasing jobs 249
suppliesMacintosh status 237ordering 43, 72status, viewing with HP Printer
Utility 17, 208supply-status, Services tab
Macintosh 258support
HP Printer Utility pages 17
Support tab, HP PrinterUtility 241
supported media 282Supported operating systems
availability of softwarecomponents 19
supported utilitiesfor Macintosh 18
system requirementsWindows 38
TTCP/IP port creation 96terminology 293toner
density setting 17top cover
locating 9transparencies, paper type
commands 282tray 1
locating 9trays
Alternative LetterheadMode 146
autoconfiguration 48custom paper sizes 280double-sided printing 256duplex unit 199included 3, 276Macintosh configuration 247Macintosh settings 17, 209media supported 279paper source commands 276paper type commands 281specify paper size 194tray 3 199trays 4 and 5 199
troubleshootdiagnostics 191
troubleshootingduplexing unit, Macintosh 246firmware upgrades 269HP driver Diagnostic Printer
Check Tool 54Macintosh setup 231
Tru64 UNIX printing 18TrueType fonts included 5two-sided printing
Macintosh settings 17, 209
ENWW Index 303

typefacesincluded 5
types, papersupported 279
Uunidrivers
paper size commands 279uninstallation
documentation(Windows) 136
optional software(Windows) 136
Windows software 130uninstalling Macintosh
software 232universal print driver 14UNIX operating systems
direct printing 274print-ready printing 274remote firmware update 267
UNIX software 18Update Now feature 49updating firmware remotely. See
remote firmware updatesUser Guide 33
Vversion numbers, drivers 46
Wwatermarks 255Web Jetadmin
firmware updates 268Web sites
Citrix Terminal serversupport 18
downloading software 20HP Driver Diagnostic Printer
Check Tool 54HP OpenVMS 18Internet Services options,
Services tab 192SAP printing 18support links 43, 72Tru64 UNIX printing 18universal print driver 14
Windowsdriver settings 41drivers supported 14installation options 69
supported operatingsystems 14, 38
system requirements 38universal print driver 14
Windows installation CD 27Windows operating systems
Add Printer installation 89CD-ROM, print system 41, 70direct printing 272direct printing, networks 274directory structure, CD-
ROM 20documentation 27driver versions 46fonts supported 61installation details 80installation overview 70installing printing-system 68LPR commands 274Point and Print
installation 105PS emulation fonts
supported 63support 13supported 68system requirements 68
Windows OSHP PCL 6 Print Driver
features 137
304 Index ENWW


© 2008 Hewlett-Packard Development Company, L.P.
www.hp.com
Related Documents