CM6040 MFP CM6040f MFP CM6030 MFP CM6030f MFP HP Color LaserJet CM6030 and CM6040 MFP Series User Guide

Welcome message from author
This document is posted to help you gain knowledge. Please leave a comment to let me know what you think about it! Share it to your friends and learn new things together.
Transcript

CM6040 MFP CM6040f MFP
CM6030 MFP CM6030f MFP
HP Color LaserJet CM6030 and CM6040 MFP Series User Guide


HP Color LaserJet CM6030 and CM6040 MFPSeriesUser Guide

Copyright and License
© 2008 Copyright Hewlett-PackardDevelopment Company, L.P.
Reproduction, adaptation, or translationwithout prior written permission is prohibited,except as allowed under the copyright laws.
The information contained herein is subjectto change without notice.
The only warranties for HP products andservices are set forth in the express warrantystatements accompanying such productsand services. Nothing herein should beconstrued as constituting an additionalwarranty. HP shall not be liable for technicalor editorial errors or omissions containedherein.
Part number: Q3938-90967
Edition 2, 06/2009
Trademark Credits
Adobe®, Acrobat®, and PostScript® aretrademarks of Adobe Systems Incorporated.
Corel® is a trademark or registeredtrademark of Corel Corporation or CorelCorporation Limited.
Microsoft®, Windows®, and Windows NT®
are U.S. registered trademarks of MicrosoftCorporation.
Windows Vista™ is either a registeredtrademark or trademark of MicrosoftCorporation in the United States and/or othercountries.
PANTONE® is Pantone, Inc's check-standard trademark for color.
UNIX® is a registered trademark of The OpenGroup.
ENERGY STAR® and the ENERGY STARlogo® are U.S. registered marks of the UnitedStates Environmental Protection Agency.

Table of contents
1 Product basicsProduct comparison ............................................................................................................................. 2Product features ................................................................................................................................... 4Quick Reference Job Aids .................................................................................................................... 7Product walkaround .............................................................................................................................. 8
Front view ............................................................................................................................ 8HP Color LaserJet CM6030 and CM6040 MFP Series ....................................... 8
Back view ............................................................................................................................. 9Interface ports .................................................................................................................... 10Serial number and model number location ........................................................................ 10
2 Control panelUse the control panel ......................................................................................................................... 14
Control-panel layout ........................................................................................................... 14Home screen ..................................................................................................................... 15Buttons on the touchscreen ............................................................................................... 16Control-panel help system ................................................................................................. 16
Navigate the Administration menu ..................................................................................................... 17Information menu ............................................................................................................................... 18Default Job Options menu .................................................................................................................. 20
Default Options for Originals .............................................................................................. 20Image adjustment .............................................................................................................. 21Default Copy Options ......................................................................................................... 22Default Fax Options ........................................................................................................... 23Default E-mail Options ....................................................................................................... 24Default Send to Folder Options ......................................................................................... 25Default Print Options .......................................................................................................... 26
Time/Scheduling menu ....................................................................................................................... 27Management menu ............................................................................................................................ 29Initial Setup menu ............................................................................................................................... 31
Networking and I/O ............................................................................................................ 31Fax Setup .......................................................................................................................... 38E-mail Setup ...................................................................................................................... 41Send Setup menu .............................................................................................................. 41
ENWW iii

Device Behavior menu ....................................................................................................................... 42Print Quality menu .............................................................................................................................. 49Troubleshooting menu ........................................................................................................................ 53Resets menu ...................................................................................................................................... 59Service menu ..................................................................................................................................... 60
3 Software for WindowsSupported operating systems for Windows ........................................................................................ 62Supported printer drivers for Windows ............................................................................................... 63HP Universal Print Driver (UPD) ........................................................................................................ 64
UPD installation modes ..................................................................................................... 64Select the correct printer driver for Windows ..................................................................................... 65Priority for print settings ...................................................................................................................... 66Change printer-driver settings for Windows ....................................................................................... 67Remove software for Windows ........................................................................................................... 68Supported utilities for Windows .......................................................................................................... 69
HP Web Jetadmin .............................................................................................................. 69Embedded Web server ...................................................................................................... 69HP Easy Printer Care ........................................................................................................ 69
Software for other operating systems ................................................................................................. 71
4 Use the product with MacintoshSoftware for Macintosh ....................................................................................................................... 74
Supported operating systems for Macintosh ..................................................................... 74Supported printer drivers for Macintosh ............................................................................. 74Remove software from Macintosh operating systems ....................................................... 74Priority for print settings for Macintosh .............................................................................. 74Change printer-driver settings for Macintosh ..................................................................... 74Software for Macintosh computers .................................................................................... 75
HP Printer Utility ................................................................................................ 75Open the HP Printer Utility ............................................................... 75HP Printer Utility features ................................................................. 76
Supported utilities for Macintosh ........................................................................................ 76Embedded Web server ..................................................................................... 76
Use features in the Macintosh printer driver ....................................................................................... 77Print ................................................................................................................................... 77
Create and use printing presets in Macintosh ................................................... 77Resize documents or print on a custom paper size .......................................... 77Print a cover page ............................................................................................. 77Use watermarks ................................................................................................ 78Print multiple pages on one sheet of paper in Macintosh ................................. 78Print on both sides of the page (duplex printing) ............................................... 79Set the stapling options ..................................................................................... 79
iv ENWW

Store jobs .......................................................................................................... 80Set the color options ......................................................................................... 80Use the Services menu ..................................................................................... 80
5 Connect the productUSB connection .................................................................................................................................. 84Network connection ............................................................................................................................ 85
6 Network configurationBenefits of a network connection ....................................................................................................... 88Supported network protocols .............................................................................................................. 89Configuring network settings .............................................................................................................. 90
TCP/IP ............................................................................................................................... 90Internet Protocol (IP) ......................................................................................... 90Transmission Control Protocol (TCP) ............................................................... 90IP address ......................................................................................................... 90Configure IP parameters ................................................................................... 90
Dynamic Host Configuration Protocol (DHCP) ................................. 91BOOTP ............................................................................................. 91
Subnets ............................................................................................................. 91Subnet mask ..................................................................................... 91
Gateways .......................................................................................................... 91Default gateway ................................................................................ 91
Configure TCP/IPv4 parameters ........................................................................................ 92Input or change the IP address ......................................................................... 92Set the subnet mask ......................................................................................... 92Set the default gateway ..................................................................................... 93
Configure TCP/IPv6 parameters ........................................................................................ 93Network utilities .................................................................................................................................. 94
Other components and utilities .......................................................................................... 94
7 Paper and print mediaUnderstand paper and print media use .............................................................................................. 96Supported paper and print media sizes .............................................................................................. 97Supported paper types ..................................................................................................................... 100Special paper or print media guidelines ........................................................................................... 102Load paper and print media ............................................................................................................. 103
Load Tray 1 ...................................................................................................................... 103Print envelopes ............................................................................................... 104
Load trays 2, 3, 4, or 5 ..................................................................................................... 104Load standard-sized media into trays 2, 3, 4, or 5 .......................................... 104Load undetectable standard-sized media into Tray 2, 3, 4, and 5 .................. 106Load custom-size media into tray 2, 3, 4, or 5 ................................................ 107
ENWW v
Load large size paper into Tray 3, 4, or 5 ....................................................... 108Load letterhead, pre-printed, or pre-punched paper ........................................................ 108
Change the Image Rotation setting ................................................................. 109Choose the correct orientation for loading letterhead, pre-printed, or pre-punched paper ................................................................................................ 109
Configure trays ................................................................................................................................. 114Configure a tray when loading paper ............................................................................... 114Configure a tray to match print job settings ..................................................................... 114Automatic media type sensing (auto sense mode) .......................................................... 114
Auto sense settings ......................................................................................... 115Select the paper by source, type, or size ......................................................................... 115
Source ............................................................................................................. 115Type and Size ................................................................................................. 116
Choose an output location ................................................................................................................ 117Standard output bins ........................................................................................................ 117Optional output accessories ............................................................................................ 117
3-bin stapler/stacker features .......................................................................... 118Booklet maker finisher features ....................................................................... 118Accessory walkaround .................................................................................... 118
Use the booklet-making feature ....................................................................................... 119Create a booklet from the print driver .............................................................. 120Create a booklet from a copy .......................................................................... 120
Configure the accessory operation mode ........................................................................ 121Select the operating mode at the control panel ............................................... 121Select the operating mode in the printer driver ............................................... 121Select the operating mode in the printer driver (Mac OS X) ........................... 121
8 Use product featuresEconomy settings ............................................................................................................................. 124
Sleep and wake ............................................................................................................... 124Set economy modes from the EWS ................................................................................. 125
Use the stapler ................................................................................................................................. 126Supported paper sizes for stapling .................................................................................. 126Staple print jobs ............................................................................................................... 128
Job storage features for print jobs .................................................................................................... 129Gain access to the job storage features .......................................................................... 129Use the proof and hold feature ........................................................................................ 129
Create a proof and hold job ............................................................................. 129Print the remaining copies of a proof and hold job .......................................... 130Delete a proof and hold job ............................................................................. 130
Use the personal job feature ............................................................................................ 131Print a personal job ......................................................................................... 131Delete a personal job ...................................................................................... 131
Use the QuickCopy feature .............................................................................................. 132
vi ENWW

Create a QuickCopy job .................................................................................. 132Print additional copies of a QuickCopy job ...................................................... 132Delete a QuickCopy job .................................................................................. 132
Use the stored job feature for copy jobs .......................................................................... 133Create a stored copy job ................................................................................. 133Print a stored job ............................................................................................. 133Delete a stored job .......................................................................................... 133
Print photos or marketing material ................................................................................................... 135Supported glossy paper .................................................................................................. 135Configure the paper tray ................................................................................................. 135Configure the driver settings ............................................................................................ 136
Print weatherproof maps and outdoor signs ..................................................................................... 137Supported tough paper .................................................................................................... 137Configure the paper tray .................................................................................................. 137Configure the driver settings ............................................................................................ 137
Set the duplex alignment .................................................................................................................. 138
9 Print tasksCancel a print job ............................................................................................................................. 140
Stop the current print job from the control panel .............................................................. 140Stop the current print job from the software program ...................................................... 140
Use features in the Windows printer driver ...................................................................................... 141Open the printer driver ..................................................................................................... 141Use printing shortcuts ...................................................................................................... 141Set paper and quality options .......................................................................................... 141Set document effects ....................................................................................................... 142Set document finishing options ........................................................................................ 142Set product output options ............................................................................................... 142Set job storage options .................................................................................................... 142Set color options .............................................................................................................. 143Obtain support and product-status information ................................................................ 143Set advanced printing options ......................................................................................... 144
10 Use colorManage color .................................................................................................................................... 146
Automatic or manual color adjustment ............................................................................ 146Manual color options ....................................................................................... 146
Print in grayscale ............................................................................................................. 147Restrict color use ............................................................................................................. 147
Restrict color printing and copying from the control panel .............................. 147RGB Color (Color Themes) ............................................................................................. 147
Match colors ..................................................................................................................................... 149Sample book color matching ........................................................................................... 149
ENWW vii

Printing color samples ..................................................................................................... 149PANTONE® color matching ............................................................................................ 150
Advanced color use .......................................................................................................................... 151HP ImageREt 4800 .......................................................................................................... 151Paper selection ................................................................................................................ 151sRGB ............................................................................................................................... 151Print in four colors — CMYK ............................................................................................ 151
CMYK ink set emulation (HP postscript level 3 emulation) ............................. 151
11 CopyUse the Copy screen ........................................................................................................................ 154Set the default copy options ............................................................................................................. 154Copy from the scanner glass ............................................................................................................ 154Copy from the document feeder ....................................................................................................... 154Adjust the copy settings ................................................................................................................... 155Copy two-sided documents .............................................................................................................. 156
Copying two-sided documents manually ......................................................................... 156Copy two-sided documents automatically ....................................................................... 156
Copy mixed-size originals ................................................................................................................ 158Change the copy-collation setting .................................................................................................... 159Copy photos and books .................................................................................................................... 160Combine copy jobs by using Job Build ............................................................................................. 161Cancel a copy job ............................................................................................................................. 162
12 Scan and send to e-mailConfigure e-mail settings .................................................................................................................. 164
Supported protocols ......................................................................................................... 164Configure e-mail server settings ...................................................................................... 164
Use the Send E-mail screen ............................................................................................................. 166Perform basic e-mail functions ......................................................................................................... 167
Load documents .............................................................................................................. 167Send documents .............................................................................................................. 167
Send a document ............................................................................................ 167Use the auto-complete function ...................................................................... 168
Use the address book ...................................................................................................................... 168Create a recipient list ....................................................................................................... 168Use the local address book ............................................................................................. 169
Add e-mail addresses to the local address book ............................................ 169Delete e-mail addresses from the local address book .................................... 169
Change e-mail settings for the current job ....................................................................................... 170Scan to a folder ................................................................................................................................ 171Scan to a workflow destination ......................................................................................................... 172
viii ENWW

13 FaxAnalog fax ........................................................................................................................................ 174
Connect the fax accessory to a phone line ...................................................................... 174Configure and use the fax features .................................................................................. 174
Digital fax .......................................................................................................................................... 176
14 Manage and maintain the productInformation pages ............................................................................................................................. 178HP Easy Printer Care ....................................................................................................................... 180
Open the HP Easy Printer Care software ........................................................................ 180HP Easy Printer Care software sections .......................................................................... 180
Embedded Web server ..................................................................................................................... 183Open the embedded Web server by using a network connection ................................... 183Embedded Web server sections ...................................................................................... 184
Use HP Web Jetadmin software ...................................................................................................... 187Security features .............................................................................................................................. 188
Secure the embedded Web server .................................................................................. 188Foreign Interface Harness (FIH) ...................................................................................... 188
Requirements .................................................................................................. 188Use the FIH ..................................................................................................... 188
Enable the FIH portal ...................................................................... 188Disable the FIH portal ..................................................................... 189
Secure Disk Erase ........................................................................................................... 189Data affected ................................................................................................... 189Gain access to Secure Disk Erase .................................................................. 190Additional Information ..................................................................................... 190
DSS authentication .......................................................................................................... 190Lock the control-panel menus .......................................................................................... 190
Set the real-time clock ...................................................................................................................... 191Set the date format .......................................................................................................... 191Set the date ..................................................................................................................... 191Set the time format .......................................................................................................... 191Set the time ...................................................................................................................... 191
Manage supplies .............................................................................................................................. 193Print-cartridge storage ..................................................................................................... 193HP policy on non-HP print cartridges ............................................................................... 193HP fraud hotline and Web site ......................................................................................... 193
Replace supplies .............................................................................................................................. 194Locate supplies ................................................................................................................ 194Supply replacement guidelines ........................................................................................ 194Approximate replacement intervals for supplies .............................................................. 195Change print cartridges ................................................................................................... 195Change image drums ...................................................................................................... 198
ENWW ix

Install memory ................................................................................................................. 201Install DDR memory DIMMs ............................................................................ 201Enable memory ............................................................................................... 204
Enable memory for Windows 2000 and XP .................................... 204Install an HP Jetdirect or EIO print server card or EIO hard disk .................... 205
Replace the staple cartridge ............................................................................................ 207Replace saddle stitch staple cartridges in the booklet maker .......................................... 209
Clean the product ............................................................................................................................. 212Clean the outside of the product ...................................................................................... 212Clean the touchscreen ..................................................................................................... 212Clean the scanner glass .................................................................................................. 212Cleaning the ADF delivery system ................................................................................... 212
Clean the ADF delivery system ....................................................................... 213Clean the ADF rollers ...................................................................................... 214
ADF maintenance kit ........................................................................................................................ 216Calibrate the scanner ....................................................................................................................... 217Upgrade the firmware ....................................................................................................................... 218
Determine the current firmware version ........................................................................... 218Download new firmware from the HP Web site ............................................................... 218Transfer the new firmware to the product ........................................................................ 218
Use FTP to upload the firmware through a browser ....................................... 218Use FTP to upgrade the firmware on a network connection ........................... 219Use HP Web Jetadmin to upgrade the firmware ............................................. 220Use MS-DOS commands to upgrade the firmware ......................................... 220
Use the HP Jetdirect firmware ......................................................................................... 221
15 Solve problemsSolving general problems ................................................................................................................. 224
Troubleshooting checklist ................................................................................................ 224Restore factory settings ................................................................................................... 225Factors that affect product performance .......................................................................... 225
Control-panel message types ........................................................................................................... 226Control-panel messages .................................................................................................................. 227Jams ................................................................................................................................................. 228
Common causes of jams ................................................................................................. 228Jam locations ................................................................................................................... 229Clear jams ........................................................................................................................ 229
AREA 1: Clear jams in the output bin .............................................................. 230AREA 2: Clear jams in the fuser ..................................................................... 232Clear jams in the duplex area ......................................................................... 236AREA 5: Clear jams in Tray 2 and the internal paper path ............................. 239AREA 6: Clear jams in Tray 1 ......................................................................... 242AREA 7: Clear jams in optional Trays 3, 4, and 5 ........................................... 245
x ENWW

AREA 8: Clear jams in the optional finishing devices ..................................... 248Clear jams in the output-accessory bridge ..................................... 248Clear jams in the sorter area .......................................................... 249Clear jams in the booklet maker ..................................................... 250
AREA 9: Clear jams in the ADF ...................................................................... 252Clear staple jams ............................................................................................ 253
Clear staple jams in the main stapler ............................................. 253Clear staple jams in the booklet maker .......................................... 254
Jam recovery ................................................................................................................... 257Paper-handling problems ................................................................................................................. 258
Product feeds multiple sheets .......................................................................................... 258Product feeds incorrect page size ................................................................................... 258Product pulls from incorrect tray ...................................................................................... 258Paper does not feed automatically .................................................................................. 259Paper does not feed from Tray 2, 3, 4, or 5 ..................................................................... 259Transparencies or glossy paper will not feed .................................................................. 260Envelopes jam or will not feed in the product .................................................................. 261Output is curled or wrinkled ............................................................................................. 261Product will not duplex or duplexes incorrectly ................................................................ 262
Understand lights on the formatter ................................................................................................... 263HP Jetdirect LEDs ........................................................................................................... 263Heartbeat LED ................................................................................................................. 263
Correct print quality and copy quality problems ............................................................................... 264Example print quality problems ........................................................................................ 264Repetitive defects ruler .................................................................................................... 264Print quality problems associated with the environment .................................................. 266Print quality problems associated with jams .................................................................... 266Optimize and improve image quality ................................................................................ 266
Use supported paper ....................................................................................... 266Calibrate the product ....................................................................................... 266Specify the correct paper type ........................................................................ 267Clean the fuser ................................................................................................ 267Respond to control panel error messages ...................................................... 267
Clean the registration second transfer assembly ........................... 268Use manual print modes ................................................................................. 270Print-quality-troubleshooting pages ................................................................. 271
Performance problems ..................................................................................................................... 272Solve fax problems ........................................................................................................................... 273Solve e-mail problems ...................................................................................................................... 273
Validate the SMTP gateway address ............................................................................... 273Validate the LDAP gateway address ............................................................................... 273
Solve network connectivity problems ............................................................................................... 274Solve network printing problems ...................................................................................... 274Verify communication over the network ........................................................................... 275
ENWW xi

Solve common Macintosh problems ................................................................................................ 276
Appendix A Supplies and accessoriesOrder parts, accessories, and supplies ............................................................................................ 280
Order directly from HP ..................................................................................................... 280Order through service or support providers ..................................................................... 280Order directly through the embedded Web server (for printers that are connected to anetwork) ........................................................................................................................... 280Order directly through the HP Easy Printer Care software .............................................. 280
Part numbers .................................................................................................................................... 281Accessories ..................................................................................................................... 281Print cartridges ................................................................................................................. 281Image drums .................................................................................................................... 281Maintenance kits .............................................................................................................. 281Memory ............................................................................................................................ 282Cables and interfaces ...................................................................................................... 282
Appendix B Service and supportHewlett-Packard limited warranty statement .................................................................................... 284Print cartridge limited warranty statement ........................................................................................ 286Color LaserJet Fuser Kit, Transfer Kit, and Roller Kit Limited Warranty Statement ......................... 287Customer self repair warranty service .............................................................................................. 288Customer support ............................................................................................................................. 289Availability of support and service .................................................................................................... 290HP maintenance agreements ........................................................................................................... 291
On-site service agreements ............................................................................................. 291Priority onsite service ....................................................................................................... 291Next-day onsite service ................................................................................................... 291Weekly (volume) on-site service ...................................................................................... 291
Appendix C Product specificationsPhysical specifications ..................................................................................................................... 294Electrical specifications .................................................................................................................... 295Acoustic specifications ..................................................................................................................... 296Environmental specifications ............................................................................................................ 297
Appendix D Regulatory informationCompliance with FCC regulations .................................................................................................... 300Declaration of Conformity ................................................................................................................. 301Declaration of Conformity ................................................................................................................. 302Environmental product stewardship program ................................................................................... 303
Protecting the environment .............................................................................................. 303Ozone production ............................................................................................................ 303
xii ENWW

Power consumption ......................................................................................................... 303Toner consumption .......................................................................................................... 303Paper use ........................................................................................................................ 303Plastics ............................................................................................................................ 303HP LaserJet print supplies ............................................................................................... 303Return and recycling instructions ..................................................................................... 304
United States and Puerto Rico ........................................................................ 304Multiple returns (more than one cartridge) ..................................... 304Single returns ................................................................................. 304Shipping .......................................................................................... 304
Non-U.S. returns ............................................................................................. 304Paper ............................................................................................................................... 304Material restrictions .......................................................................................................... 304Disposal of waste equipment by users in private households in the EuropeanUnion ............................................................................................................................... 305Material Safety Data Sheet (MSDS) ................................................................................ 305For more information ....................................................................................................... 306
Certificate of volatility ....................................................................................................................... 307Types of memory ............................................................................................................. 307
Volatile memory .............................................................................................. 307Non-volatile memory ....................................................................................... 307Hard-disk-drive memory .................................................................................. 307
Safety statements ............................................................................................................................. 308Laser safety ..................................................................................................................... 308Canadian DOC regulations .............................................................................................. 308VCCI statement (Japan) .................................................................................................. 308Power cord statement (Japan) ......................................................................................... 308EMI statement (Korea) ..................................................................................................... 308EMI statement (Taiwan) ................................................................................................... 309General telecom statement .............................................................................................. 309Laser statement for Finland ............................................................................................. 309Substances Table (China) ............................................................................................... 310
Index ................................................................................................................................................................. 311
ENWW xiii

xiv ENWW

1 Product basics
● Product comparison
● Product features
● Quick Reference Job Aids
● Product walkaround
ENWW 1
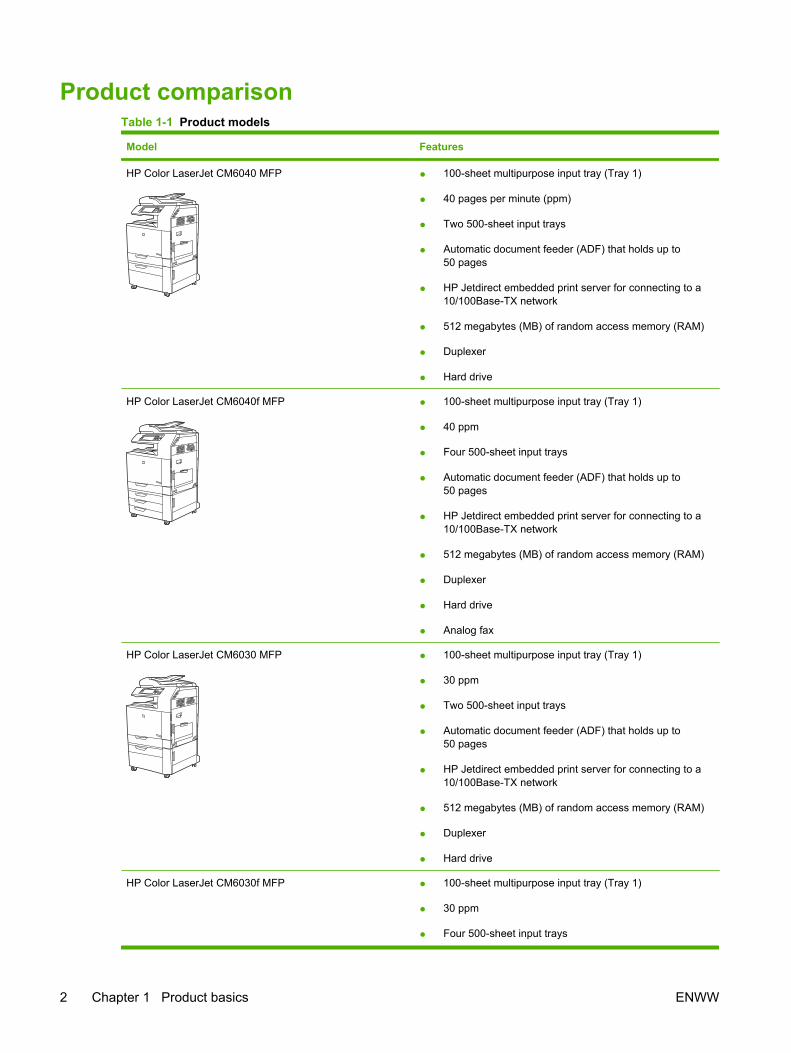
Product comparisonTable 1-1 Product models
Model Features
HP Color LaserJet CM6040 MFP ● 100-sheet multipurpose input tray (Tray 1)
● 40 pages per minute (ppm)
● Two 500-sheet input trays
● Automatic document feeder (ADF) that holds up to50 pages
● HP Jetdirect embedded print server for connecting to a10/100Base-TX network
● 512 megabytes (MB) of random access memory (RAM)
● Duplexer
● Hard drive
HP Color LaserJet CM6040f MFP ● 100-sheet multipurpose input tray (Tray 1)
● 40 ppm
● Four 500-sheet input trays
● Automatic document feeder (ADF) that holds up to50 pages
● HP Jetdirect embedded print server for connecting to a10/100Base-TX network
● 512 megabytes (MB) of random access memory (RAM)
● Duplexer
● Hard drive
● Analog fax
HP Color LaserJet CM6030 MFP ● 100-sheet multipurpose input tray (Tray 1)
● 30 ppm
● Two 500-sheet input trays
● Automatic document feeder (ADF) that holds up to50 pages
● HP Jetdirect embedded print server for connecting to a10/100Base-TX network
● 512 megabytes (MB) of random access memory (RAM)
● Duplexer
● Hard drive
HP Color LaserJet CM6030f MFP ● 100-sheet multipurpose input tray (Tray 1)
● 30 ppm
● Four 500-sheet input trays
2 Chapter 1 Product basics ENWW

Model Features
● Automatic document feeder (ADF) that holds up to50 pages
● HP Jetdirect embedded print server for connecting to a10/100Base-TX network
● 512 megabytes (MB) of random access memory (RAM)
● Duplexer
● Hard drive
● Analog fax
Table 1-1 Product models (continued)
ENWW Product comparison 3

Product featuresTable 1-2 Features
Speed and throughput ● Print up to 40 ppm (HP Color LaserJet CM6040) or 30 ppm (HP Color LaserJet CM6030)on letter-size paper.
● Less than 11 seconds to print the first page
● Recommended maximum monthly print volume of 15,000 pages (HP Color LaserJetCM6040) or 10,000 pages (HP Color LaserJet CM6030)
● An 835 megahertz (MHz) microprocessor
● Duplex at speed
Resolution ● 600 dots per inch (dpi) with Image Resolution Enhancement technology 4800 for optimumoverall imaging
● 1200 x 600 dpi for detailed line work and small text
Memory ● 512 MB of random-access memory (RAM), expandable to 768 MB by using 200-pin small outline dual inline memory modules (SODIMM) that support 128 or 256 MBof RAM.
● Memory Enhancement technology (MEt) automatically compresses data to use RAM moreefficiently.
User interface ● HP Easy Select Control Panel
● An embedded Web server to gain access to support and order supplies (for network-connected products)
● HP Easy Printer Care software (a Web-based status and troubleshooting tool)
● Internet-enabled supply-ordering capabilities through HP Easy Printer Care software andembedded Web server
Languages and fonts ● HP Printer Control Language (PCL) 6
● HP Universal Printer Driver (UPD) PCL 5
● HP UPD postscript (PS)
● Printer Management Language
● 80 scalable TrueType PS typefaces
Print cartridges/imagedrums (4 of each)
● Two-part toner/imaging system
● Black print cartridges print up to 19,500 pages at 5% coverage
● Color print cartridges print up to 21,000 pages at 5% coverage
● Image drums print up to 35,000 pages at 5% coverage
● Authentic HP print cartridge detection
● Automatic toner strip remover
4 Chapter 1 Product basics ENWW
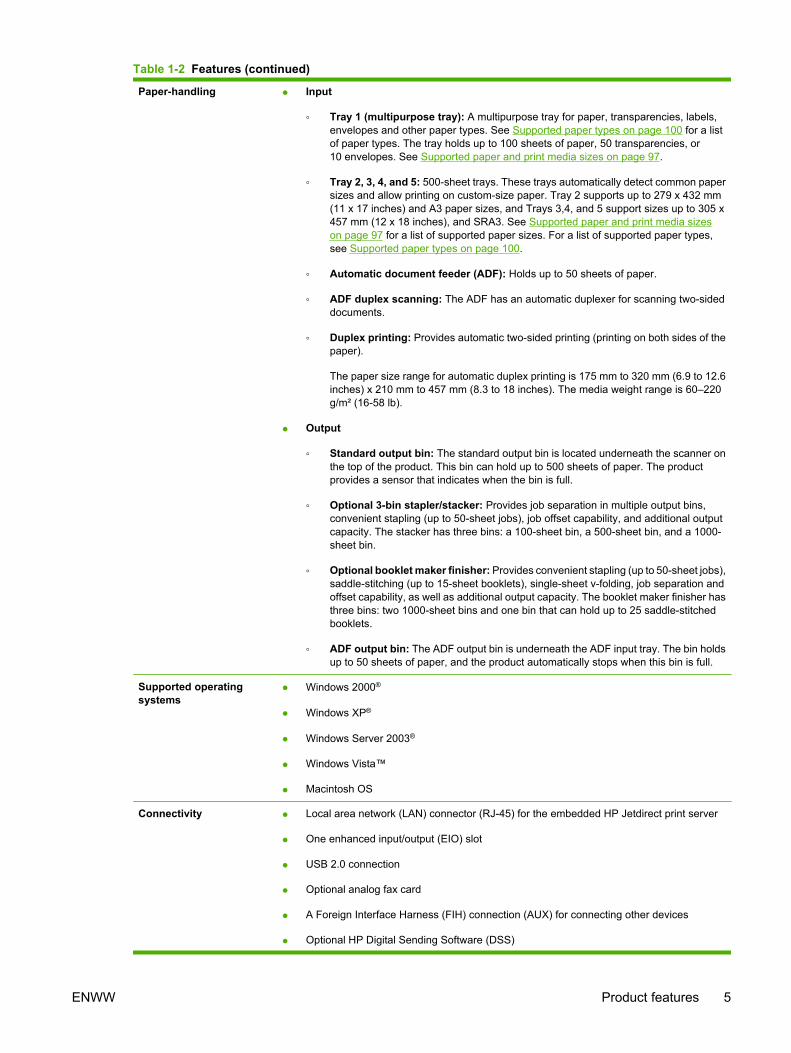
Paper-handling ● Input
◦ Tray 1 (multipurpose tray): A multipurpose tray for paper, transparencies, labels,envelopes and other paper types. See Supported paper types on page 100 for a listof paper types. The tray holds up to 100 sheets of paper, 50 transparencies, or10 envelopes. See Supported paper and print media sizes on page 97.
◦ Tray 2, 3, 4, and 5: 500-sheet trays. These trays automatically detect common papersizes and allow printing on custom-size paper. Tray 2 supports up to 279 x 432 mm(11 x 17 inches) and A3 paper sizes, and Trays 3,4, and 5 support sizes up to 305 x457 mm (12 x 18 inches), and SRA3. See Supported paper and print media sizeson page 97 for a list of supported paper sizes. For a list of supported paper types,see Supported paper types on page 100.
◦ Automatic document feeder (ADF): Holds up to 50 sheets of paper.
◦ ADF duplex scanning: The ADF has an automatic duplexer for scanning two-sideddocuments.
◦ Duplex printing: Provides automatic two-sided printing (printing on both sides of thepaper).
The paper size range for automatic duplex printing is 175 mm to 320 mm (6.9 to 12.6inches) x 210 mm to 457 mm (8.3 to 18 inches). The media weight range is 60–220g/m² (16-58 lb).
● Output
◦ Standard output bin: The standard output bin is located underneath the scanner onthe top of the product. This bin can hold up to 500 sheets of paper. The productprovides a sensor that indicates when the bin is full.
◦ Optional 3-bin stapler/stacker: Provides job separation in multiple output bins,convenient stapling (up to 50-sheet jobs), job offset capability, and additional outputcapacity. The stacker has three bins: a 100-sheet bin, a 500-sheet bin, and a 1000-sheet bin.
◦ Optional booklet maker finisher: Provides convenient stapling (up to 50-sheet jobs),saddle-stitching (up to 15-sheet booklets), single-sheet v-folding, job separation andoffset capability, as well as additional output capacity. The booklet maker finisher hasthree bins: two 1000-sheet bins and one bin that can hold up to 25 saddle-stitchedbooklets.
◦ ADF output bin: The ADF output bin is underneath the ADF input tray. The bin holdsup to 50 sheets of paper, and the product automatically stops when this bin is full.
Supported operatingsystems
● Windows 2000®
● Windows XP®
● Windows Server 2003®
● Windows Vista™
● Macintosh OS
Connectivity ● Local area network (LAN) connector (RJ-45) for the embedded HP Jetdirect print server
● One enhanced input/output (EIO) slot
● USB 2.0 connection
● Optional analog fax card
● A Foreign Interface Harness (FIH) connection (AUX) for connecting other devices
● Optional HP Digital Sending Software (DSS)
Table 1-2 Features (continued)
ENWW Product features 5

Environmental features ● Sleep setting saves energy.
● High content of recyclable components and materials.
Security features ● Secure Disk Erase
● Security lock (optional)
● Job retention
● User PIN authentication for stored jobs
● DSS authentication
● IPv6 security
Copying and sending ● Modes for text, graphics, and mixed text and graphics formats
● Job-interrupt feature
● Multiple pages per sheet
● Control panel animations (for example, jam recovery)
● Scan and send to e-mail
◦ Local address book for e-mail and fax
◦ LDAP addressing
● Send to folder
● Automatic duplex (two-sided) scanning
Table 1-2 Features (continued)
6 Chapter 1 Product basics ENWW

Quick Reference Job AidsQuick Reference Job Aids provide additional step-by-step procedures for using this product. Access theQuick Reference Job Aids from the product CD or at www.hp.com/support/cljcm6030mfp orwww.hp.com/support/cljcm6040mfp.
ENWW Quick Reference Job Aids 7

Product walkaroundFront view
HP Color LaserJet CM6030 and CM6040 MFP Series
9
5
6
7
1 2 4
8
3
10
1 Control panel
2 Automatic Document Feeder (ADF) top cover
3 ADF input tray for copy/scan/fax originals
4 ADF output bin
5 Right-door (provides access to the transfer unit, transfer roller, and fuser unit)
6 On/Off switch
7 Lower right door
8 HP Color LaserJet CM6030 MFP and HP Color LaserJet CM6040 MFP: Trays 2 and 3
HP Color LaserJet CM6030f MFP and HP Color LaserJet CM6040f MFP: Trays 2, 3, 4 and 5
9 Front cover (provides access to print cartridges and image drums)
10 Output bin
8 Chapter 1 Product basics ENWW

Back view
1 Interface ports and formatter
2 Lock lever for additional input bins
ENWW Product walkaround 9

Interface portsThe product has five ports for connecting to a computer or a network. The ports are at the left, rearcorner of the product.
1
2
3
4
5
6
7
1 Foreign interface harness (FIH)
2 Fax connection (when installed)
3 Scanner cable
4 Access port for Kensington lock
5 USB 2.0 port
6 EIO expansion slot
7 Network port
Serial number and model number locationThe model number and serial number are listed on identification labels located on the rear of the printer.The serial number contains information about the country/region of origin, the printer version, productioncode, and the production number of the printer.
10 Chapter 1 Product basics ENWW

Model name Model number
HP Color LaserJet CM6030 MFP CE664A
HP Color LaserJet CM6030f MFP CE665A
HP Color LaserJet CM6040 MFP Q3938A
HP Color LaserJet CM6040f MFP Q3939A
ENWW Product walkaround 11

12 Chapter 1 Product basics ENWW
2 Control panel
● Use the control panel
● Navigate the Administration menu
● Information menu
● Default Job Options menu
● Time/Scheduling menu
● Management menu
● Initial Setup menu
● Device Behavior menu
● Print Quality menu
● Troubleshooting menu
● Resets menu
● Service menu
ENWW 13

Use the control panelThe control panel has a VGA touchscreen that provides access to all device functions. Use the buttonsand numeric keypad to control jobs and the device status. The LEDs indicate overall device status.
Control-panel layoutThe control panel includes a touchscreen graphical display, job-control buttons, a numeric keypad, andthree light-emitting diode (LED) status lights.
1 2 3 4
5
67
8
9
10
1 Touchscreen graphical display Use the touchscreen to open and set up all device functions.
2 Numeric keypad Allows you to type numeric values for number of copies required and othernumeric values.
3 Reset button Resets the job settings to factory or user-defined default values.
4 Sleep button If the device is inactive for a long period of time, it automatically enters asleep mode. To place the device into sleep mode or to reactivate the device,press the Sleep button.
5 Stop button Stops the active job and opens the Job Status screen.
6 Start button Begins a copy job, starts digital sending, or continues a job that has beeninterrupted.
7 Attention light The Attention light indicates that the device has a condition that requiresintervention. Examples include an empty paper tray or an error messageon the touchscreen.
8 Ready light The Ready light indicates that the device is ready to begin processing anyjob.
9 Data light The Data light indicates that the device is receiving data.
10 Contrast-adjustment dial Turn the dial to adjust the contrast of the touchscreen display for yourviewing angle.
14 Chapter 2 Control panel ENWW

Home screenThe home screen provides access to the device features, and it indicates the current status of the device.
NOTE: Depending on how the device has been configured, the features that appear on the homescreen can vary.
1
2 3 4 5
6
789
1 Features Depending on how the system administrator has configured the device, the features that appearin this area can include any of the following items:
● Copy
● Fax
● Secondary E-mail
● Job Status
● Network Folder
● Job Storage
● Workflow
● Supplies Status
● Administration
2 Device status line The status line provides information about the overall device status. Various buttons appear inthis area, depending on the current status. For a description of each button that can appear inthe status line, see Buttons on the touchscreen on page 16.
3 Copy type Shows whether copies are color.
4 Copy count The copy count box indicates the number of copies that the device is set to make.
5 Help button Touch the Help button to open the embedded help system.
6 Scroll bar Touch the up or down arrows on the scroll bar to see the complete list of available features.
7 Sign Out Touch Sign Out to sign out of the device if you have signed in for access to restricted features.After you sign out, the device restores all options to the default settings.
8 Network Address Touch Network Address to find information about the network connection.
9 Date and time The current date and time appear here. The system administrator can select the format thatthe device uses to show the date and time, for example 12-hour format or 24-hour format.
ENWW Use the control panel 15

Buttons on the touchscreenThe status line on the touchscreen provides information about the status of the device. Various buttonscan appear in this area. The following table describes each button.
Home button. Touch the home button to go to the Home screen from any other screen.
Start button. Touch the Start button to begin the action for the feature that you are using.
NOTE: The name of this button changes for each feature. For example, in the Copy feature, the buttonis named Start Copy.
Stop button. If the device is processing a print or fax job, the Stop button appears instead of the Startbutton. Touch the Stop button to halt the current job. The device prompts you to cancel the job or to resumeit.
Error button. The error button appears whenever the device has an error that requires attention beforeit can continue. Touch the error button to see a message that describes the error. The message also hasinstructions for solving the problem.
Warning button. The warning button appears when the device has a problem but can continuefunctioning. Touch the warning button to see a message that describes the problem. The message alsohas instructions for solving the problem.
Help button. Touch the help button to open the built-in online Help system. For more information, seeControl-panel help system on page 16.
Control-panel help systemThe device has a built-in Help system that explains how to use each screen. To open the Help system,touch the Help button in the upper-right corner of the screen.
For some screens, the Help opens to a global menu where you can search for specific topics. You canbrowse through the menu structure by touching the buttons in the menu.
For screens that contain settings for individual jobs, the Help opens to a topic that explains the optionsfor that screen.
If the device alerts you of an error or warning, touch the error or warning button to open a messagethat describes the problem. The message also contains instructions to help solve the problem.
16 Chapter 2 Control panel ENWW

Navigate the Administration menuFrom the Home screen, touch Administration to open the menu structure. You might need to scroll tothe bottom of the Home screen to see this feature.
The Administration menu has several sub-menus, which are listed on the left side of the screen. Touchthe name of a menu to expand the structure. A plus sign (+) next to a menu name means that it containssub-menus. Continue opening the structure until you reach the option that you want to configure. Toreturn to the previous level, touch Back.
To exit the Administration menu, touch the Home button in the upper-left corner of the screen.
The device has built-in Help that explains each of the features that are available through the menus.Help is available for many menus on the right-hand side of the touchscreen. Or, to open the global Helpsystem, touch the Help button in the upper-right corner of the screen.
The tables in the sections that follow indicate the overall structure of each menu under the Administrationmenu.
ENWW Navigate the Administration menu 17

Information menuAdministration > Information
Use this menu to print information pages and reports that are stored internally on the device.
Table 2-1 Information menu
Menu item Sub-menu item Sub-menu item Values Description
Configuration/StatusPages
Administration MenuMap
Print Shows the basic structure of theAdministration menu and currentadministration settings.
Configuration/statusPages
Print A set of configuration pages that show thecurrent device settings.
Supplies StatusPage
Print Shows the status of supplies such ascartridges, maintenance kits, and staples.
Usage Page Print Shows information about the number ofpages that have been printed on each papertype and size.
Color Usage Job Log Print A directory page that contains job-by-jobcolor usage information. Page contentincludes the user name, application name,and number of black-only pages and colorpages.
File Directory Print A directory page that contains information forany mass-storage devices, such as flashdrives, memory cards, or hard disks, that areinstalled in this device.
Fax Reports Fax Activity Log Print Contains a list of the faxes that have beensent from or received by this device.
Fax Call Report Fax Call Report Print A detailed report of the last fax operation,either sent or received.
Thumbnail on Report Yes
No (default)
Choose whether or not to include a thumbnailof the first page of the fax on the call report.
When to Print Report Never auto print
Print after any fax job
Print after fax send jobs
Print after any fax error (default)
Print after send errors only
Print after receive errors only
Billing Codes Report Print A list of billing codes that have been used foroutgoing faxes. This report shows how manysent faxes were billed to each code.
Blocked Fax List Print A list of phone numbers that are blocked fromsending faxes to this device.
Speed Dial List Print Shows the speed dials that have been set upfor this device.
18 Chapter 2 Control panel ENWW

Menu item Sub-menu item Sub-menu item Values Description
Sample Pages/Fonts Demonstration Page Print Printout of a page highlighting the printcapabilities of the product.
RGB Samples Print Printout of color samples for different RGBvalues. The samples act as a guide for colormatching.
CMYK Samples Print Printout of color samples for different CMYKvalues. The samples act as a guide for colormatching.
PCL Font List Print A list of printer control language (PCL) fontsthat are currently available on the device.
PS Font List Print A list of PostScript (PS) fonts that arecurrently available on the device.
Table 2-1 Information menu (continued)
ENWW Information menu 19

Default Job Options menuAdministration > Default Job Options
Use this menu to define the default job options for each function. These are used if the user does notspecify other options when creating the job.
Default Options for OriginalsAdministration > Default Job Options > Default Options For Originals
Table 2-2 Default Options for Originals menu
Menu item Values Description
Paper Size Select a paper size from the list. Select the paper size that is most often used for copy or scanoriginals.
Number of Sides 1 Select whether copy or scan originals are most often single-sided ordouble-sided.
2
Orientation Portrait Select the orientation that is most often used for copy or scanoriginals. Select Portrait if the short edge is at the top or selectLandscape if the long edge is at the top.Landscape
Optimize Text/Picture Manually Adjust Optimize the output for a particular type of original: text, pictures, ora mixture of both.
If you select Manually Adjust, specify the mix of text and pictures thatis used most often.
Text
Printed Picture
Photograph
20 Chapter 2 Control panel ENWW

Image adjustmentAdministration > Default Job Options > Image Adjustment
Table 2-3 Image Adjustment menu
Menu item Values Description
Darkness Select a value. Select the level of density (darkness) for the output.
Background Cleanup Adjust the value within the range. Increase the Background Removal setting to remove faint imagesfrom the background or to remove a light background color.
Sharpness Adjust the value within the range. Adjust the Sharpness setting to clarify or soften the image.
ENWW Default Job Options menu 21

Default Copy OptionsAdministration > Default Job Options > Default Copy Options
Table 2-4 Default Copy Options menu
Menu item Sub-menu item Values Description
Number of Copies Type the number ofcopies. The factorydefault setting is 1.
Set the default number of copies for a copy job.
Number of Sides 1
2
Set the default number of sides for copies.
Color/Black Auto detect
Color
Black (default)
Choose whether the default copy mode is color orblack.
Staple/Collate Staple None (default)
One left angled
Two left
Two top
One right angled
Two right
Set up options for stapling and collating sets of copies.
If Collate is selected, the device prints a complete copybefore starting on the next copy. Otherwise, the deviceprints the first page of all copies before printing thesecond page, and so on.
The staple and collate feature may not be present inyour product. These features depend on the optionaloutput accessory installed.
Collate Off
On (default)
Output Bin <Binname> Select the default output bin for copies.
This option is available only if an optional outputaccessory is installed.
Edge-To-Edge Normal (recommended)(default)
Edge-To-Edge Output
If the original document is printed close to the edges,use the Edge-To-Edge feature to avoid shadows alongthe edges. Combine this feature with the Reduce/Enlarge feature to ensure that the entire page appearson the copies.
Auto Include Margins Off (default)
On
This feature automatically reduces the image sizeduring scanning so the margins are included.
22 Chapter 2 Control panel ENWW

Default Fax OptionsAdministration > Default Job Options > Default Fax Options
Table 2-5 Fax Send menu
Menu item Sub-menu item Values Description
Resolution Standard (100x200dpi)(default)
Fine (200x200dpi)
Superfine (300x300dpi)
Set the resolution for sent documents. Higherresolution images have more dots per inch (dpi), sothey show more detail. Lower resolution images havefewer dots per inch and show less detail, but the filesize is smaller.
Fax Header Prepend (default)
Overlay
Select the position of the fax header on the page.
Select Prepend to print the fax header above the faxcontent and move the fax content down on the page.Select Overlay to print the fax header over the top ofthe fax contents without moving the contents down.Using this option could prevent a single-page fax fromflowing onto another page.
Table 2-6 Fax Receive menu
Menu item Sub-menu item Values Description
Fax Forwarding Fax Forwarding Off (default)
Custom
To forward received faxes to another fax device, selectFax Forwarding and Custom. Then type the number ofthe other fax device into the Fax Forwarding Numberfield. When you select this menu item for the first time,you are prompted to set up a PIN. Type that PIN everytime you use this menu. This is the same PIN that isused to access the Fax Printing menu.
Create PIN
Stamp Received Faxes Enabled
Disabled (default)
Add the date, time, senders phone number, and pagenumber to each page of the faxes that this devicereceives.
Fit to Page Enabled (default)
Disabled
Shrink faxes that are larger than Letter-size or A4-sizeso that they can fit onto a Letter-size or A4-size page.If it this feature set to Disabled, faxes larger than Letteror A4 will flow across multiple pages.
Fax Paper Tray Select from the list of trays.The default setting isAutomatic.
Select the tray that holds the size and type of paperthat you want to use for incoming faxes.
Output Bin <Binname> Select the default output bin, if applicable, to use forfaxes.
ENWW Default Job Options menu 23

Default E-mail OptionsAdministration > Default Job Options > Default E-mail Options
Menu item Values Description
Document File Type PDF (default)
JPEG
TIFF
M-TIFF
Select the file format for the e-mail.
Output Quality High (large file)
Medium (default)
Low (small file)
Selecting higher quality for output increases the size of theoutput file.
Resolution 300 DPI
200 DPI
150 DPI (default)
75 DPI
Select the resolution. Use a lower setting to create smallerfiles.
Color/Black Color scan (default)
Black/white scan
Specify whether the e-mail will be in black or in color.
TIFF Version TIFF 6.0 (default)
TIFF (Post 6.0)
Specify the TIFF version to use when saving scanned files.
24 Chapter 2 Control panel ENWW

Default Send to Folder OptionsAdministration > Default Job Options > Default Send To Folder Options
Menu item Values Description
Color/Black Color scan
Black/white scan (default)
Specify whether the file will be in black or in color.
Document File Type PDF (default)
M-TIFF
TIFF
JPEG
Select the file format for the file.
TIFF version TIFF 6.0 (default)
TIFF (post 6.0)
Specify the TIFF version to use when saving scanned files.
Output Quality High (large file)
Medium (default)
Low (small file)
Selecting higher quality for output increases the size of theoutput file.
Resolution 75 DPI
150 DPI (default)
200 DPI
300 DPI
400 DPI
600 DPI
Select the resolution. Use a lower setting to create smallerfiles.
ENWW Default Job Options menu 25

Default Print OptionsAdministration > Default Job Options > Default Print Options
Table 2-7 Default Print Options menu
Menu item Sub-menu item Values Description
Copies Per Job Type a value. Set the default number of copies for print jobs.
Default Paper Size (List of supported sizes) Select a paper size.
Default Custom PaperSize
Unit of measure Millimeters
Inches
Configure the default paper size that is used when theuser selects Custom as the paper size for a print job.
X Dimension Configure the width measurement for the DefaultCustom Paper Size.
Y Dimension Configure the height measurement for the DefaultCustom Paper Size.
Output Bin <binname> Select the default output bin for print jobs. If optionaltrays are installed, output bin options vary.
Print Sides 1-sided
2-sided
Select whether print jobs are single-sided or double-sided by default.
26 Chapter 2 Control panel ENWW

Time/Scheduling menuAdministration > Time/Scheduling
Use this menu to set options for setting the time and for setting the device to enter and exit sleep mode.
NOTE: Values shown with "(default)" are the factory-default values. Some menu items have no default.
Table 2-8 Time/Scheduling menu
Menu item Sub-menu item Sub-menu item Values Description
Date/Time Date Format YYYY/MMM/DD(default)
MMM/DD/YYYY
DD/MMM/YYYY
Use this feature to set the current date andtime, and to set the date format and timeformat that are used to time-stamp outgoingfaxes.
Date Month
Day
Year
Time Format 12 hour (AM/PM)(default)
24 hour
Time Hour
Minute
AM
PM
Sleep Delay 1 Minute
20 minutes
30 minutes
(default)
45 minutes
1 hour (60 minutes)
90 minutes
2 hours
4 hours
Use this feature to select the time interval thatthe device should remain inactive beforeentering Sleep Mode.
Wake Time Monday
Tuesday
Wednesday
Thursday
Friday
Saturday
Sunday
Off (default)
Custom
Select Custom to set a wake time for eachday of the week. The device exits sleep modeaccording to this schedule. Using a sleepschedule helps conserve energy andprepares the device for use so that users donot have to wait for it to warm up.
ENWW Time/Scheduling menu 27

Menu item Sub-menu item Sub-menu item Values Description
Sleep Time Monday
Tuesday
Wednesday
Thursday
Friday
Saturday
Sunday
Off (default)
Custom
Use this feature to set a sleep time for eachday of the week for periods when the devicewill not likely be in use (for example, at acertain time each evening). Setting a sleeptime makes the device automatically go intoa low-power mode. Select a day and thenselect Custom to set up a custom sleep timeschedule.
FAX Printing Create PIN If you have concerns about the security ofprivate faxes, use this feature to store faxesrather than having them automatically print bycreating a printing schedule. When you selectthis menu item for the first time, you areprompted to set up a PIN. Type that PIN everytime you use this menu.
Table 2-8 Time/Scheduling menu (continued)
28 Chapter 2 Control panel ENWW

Management menuAdministration > Management
Use this menu to set up global device-management options.
NOTE: Values shown with "(default)" are the factory-default values. Some menu items have no default.
Table 2-9 Management menu
Menu item Sub-menu item Values Description
Network Address Button Display
Hide (default)
Use this feature to display the Network Address buttonon the Home screen.
Stored Job Management Quick Copy Job StorageLimit
Select the maximumnumber of jobs to store
Use this menu to view and manage any jobs that arestored on the device.
Quick Copy Job HeldTimeout
Off (default)
1 Hour
4 Hours
1 Day
1 Week
Sleep mode Disable
Use Sleep Delay (default)
Use this feature to customize the sleep mode settingsfor this device.
Select Use Sleep Delay to set the device to enter sleepmode after the delay that is specified in the Time/Scheduling menu.
Manage Supplies Replace Supplies Stop at low
Stop at out (default)
Override at out 1
Override at out 2
This menu sets the product behavior for when a printcartridge, fuser kit, or transfer kit is low. Choose Stopat low to stop printing when a supply reaches a lowcondition. Choose Stop at out to allow the product tocontinue printing until a color print cartridge is empty.
Choose Override at out 1 to allow the product tocontinue printing when the cartridges are empty orwhen the other supplies are worn out. The productstops printing when the toner collection units are full.Using this option could reduce print quality.
Choose Override at out 2 to allow the product to keepprinting when the cartridges are empty; when othersupplies are worn out; and when the waste tonercollection units are full. Using this option can damagethe device.
Supply Low/OrderThreshold
Select a value in therange. The default is 5%.
Use this menu to carry out administrative supplymanagement tasks such as changing the thresholdwhen supplies should be ordered.
Color Supply Out Stop (default)
Auto-continue black
This menu sets the product behavior when a colorsupply is empty. When Auto-continue black is selected,the product will continue printing using black toner only.
ENWW Management menu 29
Menu item Sub-menu item Values Description
Restrict Color Use Color printing access Enable Color (default)
Color If Allowed
Disable Color
This item allows the administrator to disable or restrictcolor printing. To use the Color If Allowed setting, setup user permissions and/or application permissions inthe embedded Web server, HP Easy Printer Caresoftware, or Web Jetadmin.
Color copying access Enable Color (default)
Disable Color
This item allows the administrator to disable or restrictcolor copying.
Color/Black Mix Automatic (default)
Mostly color pages
Mostly black pages
This item controls how the engine switches from colormode to monochrome mode for maximumperformance and print cartridge life.
Choose Automatic to reset the product to the factorydefault setting.
Choose Mostly color pages if nearly all of your printjobs are color with high page coverage.
Choose Mostly black pages if you print mostlymonochrome jobs or a combination of color andmonochrome jobs.
Table 2-9 Management menu (continued)
30 Chapter 2 Control panel ENWW

Initial Setup menuAdministration > Initial Setup
NOTE: Values shown with "(default)" are the factory-default values. Some menu items have no default.
Networking and I/OAdministration > Initial Setup > Networking and I/O
Table 2-10 Networking and I/O
Menu item Sub-menu item Values Description
I/O Timeout Select a value in therange. The factory defaultsetting is 15 seconds.
I/O timeout refers to the elapsed time before a print jobfails. If the stream of data that the device receives fora print job gets interrupted, this setting indicates howlong the device will wait before it reports that the jobhas failed.
Embedded Jetdirect See Table 2-11 Jetdirect menus on page 31 for the list of options.
Table 2-11 Jetdirect menus
Menu item Sub-menu item Sub-menu item Values and Description
TCP/IP Enable Off: Disable the TCP/IP protocol.
On (default): Enable the TCP/IP protocol.
Host Name An alphanumeric string, up to 32 characters, used toidentify the device. This name is listed on theHP Jetdirect configuration page. The default host nameis NPIxxxxxx, where xxxxxx is the last six digits of theLAN hardware (MAC) address.
IPV4 Settings Config Method Specifies the method that TCP/IPv4 parameters will beconfigured on the HP Jetdirect print server.
Bootp: Use BootP (Bootstrap Protocol) for automaticconfiguration from a BootP server.
DHCP: Use DHCP (Dynamic Host ConfigurationProtocol) for automatic configuration from a DHCPv4server. If selected and a DHCP lease exists, DHCPRelease and DHCP Renew menus are available to setDHCP lease options.
Auto IP: Use automatic link-local IPv4 addressing. Anaddress in the form 169.254.x.x is assignedautomatically.
Manual: Use the Manual Settings menu to configureTCP/IPv4 parameters.
Default IP Specify the IP address to default to when the printserver is unable to obtain an IP address from thenetwork during a forced TCP/IP reconfiguration (forexample, when manually configured to use BootP orDHCP).
Auto IP: A link-local IP address 169.254.x.x is set.
ENWW Initial Setup menu 31

Menu item Sub-menu item Sub-menu item Values and Description
Legacy: The address 192.0.0.192 is set, consistentwith older HP Jetdirect devices.
DHCP Release This menu appears if Config Method was set toDHCP and a DHCP lease for the print server exists.
No (default): The current DHCP lease is saved.
Yes: The current DHCP lease and the leased IPaddress are released.
DHCP Renew This menu appears if Config Method was set toDHCP and a DHCP lease for the print server exists.
No (default): The print server does not request to renewthe DHCP lease.
Yes: The print server requests to renew the currentDHCP lease.
Primary DNS Specify the IP address (n.n.n.n) of a Primary DNSServer.
Secondary DNS Specify the IP address (n.n.n.n) of a SecondaryDomain Name System (DNS) Server.
IPV6 Settings Enable Use this item to enable or disable IPv6 operation on theprint server.
Off: IPv6 is disabled.
On (default): IPv6 is enabled.
Address Manual Settings: Use this item to manually set IPv6addresses on the print server.
Enable: Select this item and choose On to enablemanual configuration, or Off to disable manualconfiguration.
Address: Use this item to type a 32 hexadecimal digitIPv6 node address that uses the colon hexadecimalsyntax.
DHCPV6 Policy Router Specified: The stateful auto-configurationmethod to be used by the print server is determined bya router. The router specifies whether the print serverobtains its address, its configuration information, orboth from a DHCPv6 server.
Router Unavailable: If a router is not available, the printserver should attempt to obtain its statefulconfiguration from a DHCPv6 server.
Always: Whether or not a router is available, the printserver always attempts to obtain its statefulconfiguration from a DHCPv6 server.
Primary DNS Use this item to specify an IPv6 address for a primaryDNS server that the print server should use.
Secondary DNS Use this item to specify an IPv6 address for asecondary DNS server that the print server should use.
Table 2-11 Jetdirect menus (continued)
32 Chapter 2 Control panel ENWW

Menu item Sub-menu item Sub-menu item Values and Description
Proxy Server Specifies the proxy server to be used by embeddedapplications in the device. A proxy server is typicallyused by network clients for Internet access. It cachesWeb pages, and provides a degree of Internet security,for those clients.
To specify a proxy server, enter its IPv4 address orfully-qualified domain name. The name can be up to255 octets.
For some networks, you may need to contact yourIndependent Service Provider (ISP) for the proxyserver address.
Proxy Port Type the port number used by the proxy server forclient support. The port number identifies the portreserved for proxy activity on your network, and can bea value from 0 to 65535.
IPX/SPX Enable Off: Disable the IPX/SPX protocol.
On (default): Enable the IPX/SPX protocol.
Frame Type Selects the frame-type setting for your network.
Auto: Automatically sets and limits the frame type tothe first one detected.
EN_8023, EN_II, EN_8022, and EN_SNAP: Frame-type selections for Ethernet networks.
AppleTalk Enable Off: Disable the AppleTalk protocol.
On (default): Enable the AppleTalk protocol.
DLC/LLC Enable Off: Disable the DLC/LLC protocol.
On (default): Enable the DLC/LLC protocol.
Table 2-11 Jetdirect menus (continued)
ENWW Initial Setup menu 33
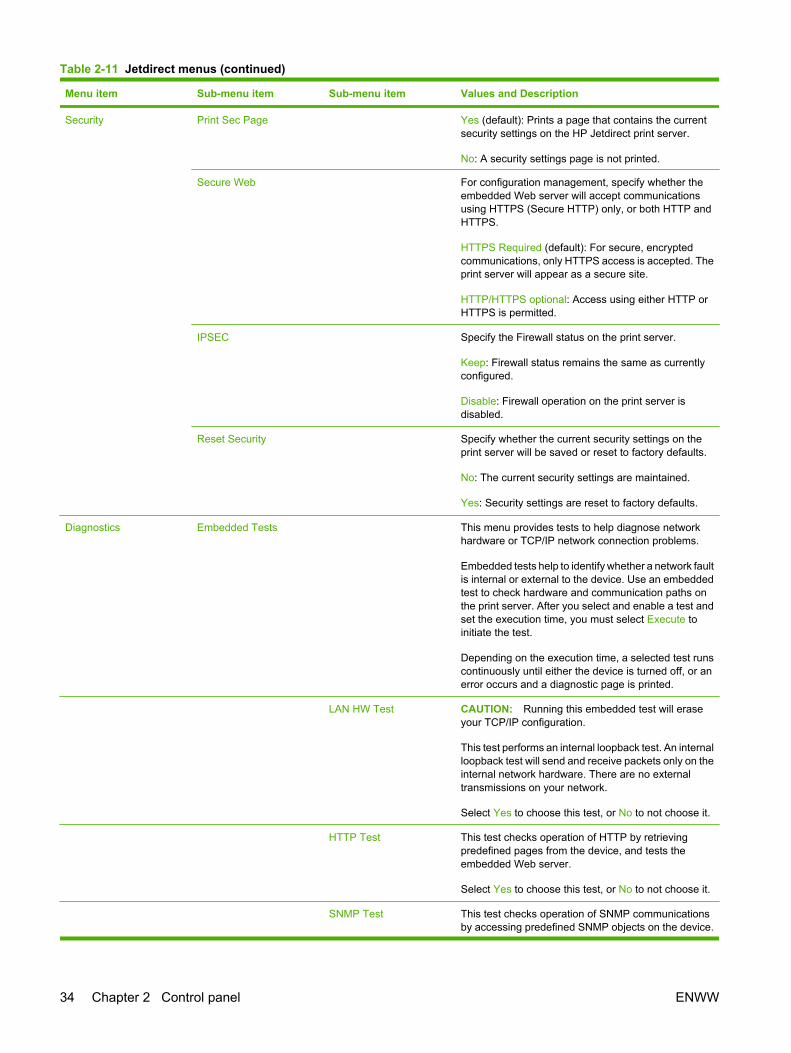
Menu item Sub-menu item Sub-menu item Values and Description
Security Print Sec Page Yes (default): Prints a page that contains the currentsecurity settings on the HP Jetdirect print server.
No: A security settings page is not printed.
Secure Web For configuration management, specify whether theembedded Web server will accept communicationsusing HTTPS (Secure HTTP) only, or both HTTP andHTTPS.
HTTPS Required (default): For secure, encryptedcommunications, only HTTPS access is accepted. Theprint server will appear as a secure site.
HTTP/HTTPS optional: Access using either HTTP orHTTPS is permitted.
IPSEC Specify the Firewall status on the print server.
Keep: Firewall status remains the same as currentlyconfigured.
Disable: Firewall operation on the print server isdisabled.
Reset Security Specify whether the current security settings on theprint server will be saved or reset to factory defaults.
No: The current security settings are maintained.
Yes: Security settings are reset to factory defaults.
Diagnostics Embedded Tests This menu provides tests to help diagnose networkhardware or TCP/IP network connection problems.
Embedded tests help to identify whether a network faultis internal or external to the device. Use an embeddedtest to check hardware and communication paths onthe print server. After you select and enable a test andset the execution time, you must select Execute toinitiate the test.
Depending on the execution time, a selected test runscontinuously until either the device is turned off, or anerror occurs and a diagnostic page is printed.
LAN HW Test CAUTION: Running this embedded test will eraseyour TCP/IP configuration.
This test performs an internal loopback test. An internalloopback test will send and receive packets only on theinternal network hardware. There are no externaltransmissions on your network.
Select Yes to choose this test, or No to not choose it.
HTTP Test This test checks operation of HTTP by retrievingpredefined pages from the device, and tests theembedded Web server.
Select Yes to choose this test, or No to not choose it.
SNMP Test This test checks operation of SNMP communicationsby accessing predefined SNMP objects on the device.
Table 2-11 Jetdirect menus (continued)
34 Chapter 2 Control panel ENWW

Menu item Sub-menu item Sub-menu item Values and Description
Select Yes to choose this test, or No to not choose it.
Data Path Test This test helps to identify data path and corruptionproblems on an HP postscript level 3 emulation device.It sends a predefined PS file to the device, However,the test is paperless; the file will not print.
Select Yes to choose this test, or No to not choose it.
Select All Tests Use this item to select all available embedded tests.
Select Yes to choose all tests. Select No to selectindividual tests.
Execution Time [H] Use this item to specify the length of time (in hours) thatan embedded test will be run. You can select a valuefrom 1 to 60 hours. If you select zero (0), the test runsindefinitely until an error occurs or device is turned off.
Data gathered from the HTTP, SNMP, and Data Pathtests is printed after the tests have completed.
Execute No: Do not initiate the selected tests.
Yes: Initiate the selected tests.
Ping Test This test is used to check network communications.This test sends link-level packets to a remote networkhost, then waits for an appropriate response. To run aping test, set the following items:
Dest Type Specify whether the target device is an IPv4 or IPv6node.
Dest IPv4 Type the IPv4 address.
Dest IPv6 Type the IPv6 address.
Packet Size Specify the size of each packet, in bytes, to be sent tothe remote host. The minimum is 64 (default) and themaximum is 2048.
Timeout Specify the length of time, in seconds, to wait for aresponse from the remote host. The default is 1 andthe maximum is 100.
Count Specify the number of ping test packets to send for thistest. Select a value from 1 to 100. To configure the testto run continuously, select 0.
Print Results If the ping test was not set for continuous operation,you can choose to print the test results. Select Yes toprint results. If you select No (default), results are notprinted.
Execute Specify whether to initiate the ping test. Select Yes toinitiate the test, or No to not run the test.
Table 2-11 Jetdirect menus (continued)
ENWW Initial Setup menu 35
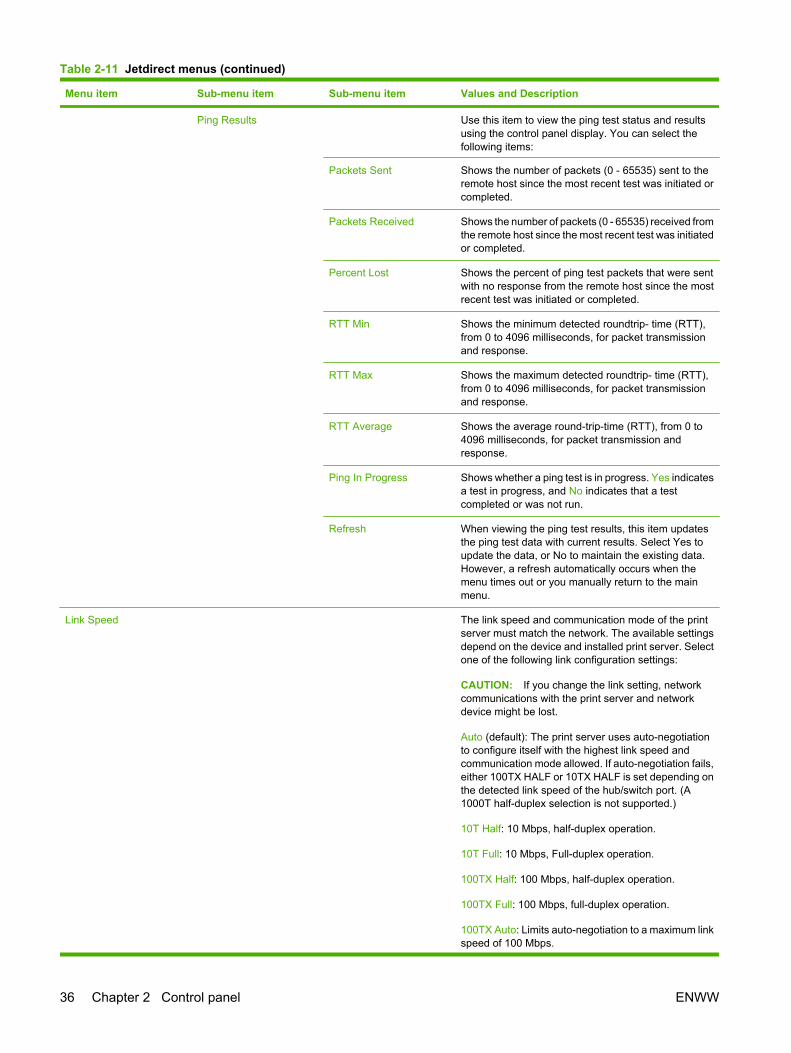
Menu item Sub-menu item Sub-menu item Values and Description
Ping Results Use this item to view the ping test status and resultsusing the control panel display. You can select thefollowing items:
Packets Sent Shows the number of packets (0 - 65535) sent to theremote host since the most recent test was initiated orcompleted.
Packets Received Shows the number of packets (0 - 65535) received fromthe remote host since the most recent test was initiatedor completed.
Percent Lost Shows the percent of ping test packets that were sentwith no response from the remote host since the mostrecent test was initiated or completed.
RTT Min Shows the minimum detected roundtrip- time (RTT),from 0 to 4096 milliseconds, for packet transmissionand response.
RTT Max Shows the maximum detected roundtrip- time (RTT),from 0 to 4096 milliseconds, for packet transmissionand response.
RTT Average Shows the average round-trip-time (RTT), from 0 to4096 milliseconds, for packet transmission andresponse.
Ping In Progress Shows whether a ping test is in progress. Yes indicatesa test in progress, and No indicates that a testcompleted or was not run.
Refresh When viewing the ping test results, this item updatesthe ping test data with current results. Select Yes toupdate the data, or No to maintain the existing data.However, a refresh automatically occurs when themenu times out or you manually return to the mainmenu.
Link Speed The link speed and communication mode of the printserver must match the network. The available settingsdepend on the device and installed print server. Selectone of the following link configuration settings:
CAUTION: If you change the link setting, networkcommunications with the print server and networkdevice might be lost.
Auto (default): The print server uses auto-negotiationto configure itself with the highest link speed andcommunication mode allowed. If auto-negotiation fails,either 100TX HALF or 10TX HALF is set depending onthe detected link speed of the hub/switch port. (A1000T half-duplex selection is not supported.)
10T Half: 10 Mbps, half-duplex operation.
10T Full: 10 Mbps, Full-duplex operation.
100TX Half: 100 Mbps, half-duplex operation.
100TX Full: 100 Mbps, full-duplex operation.
100TX Auto: Limits auto-negotiation to a maximum linkspeed of 100 Mbps.
Table 2-11 Jetdirect menus (continued)
36 Chapter 2 Control panel ENWW

Menu item Sub-menu item Sub-menu item Values and Description
1000TX Full: 1000 Mbps, full-duplex operation.
Print Protocols Use this item to print a page that lists the configurationof the following protocols: IPX/SPX, Novell NetWare,AppleTalk, DLC/LLC.
Table 2-11 Jetdirect menus (continued)
ENWW Initial Setup menu 37
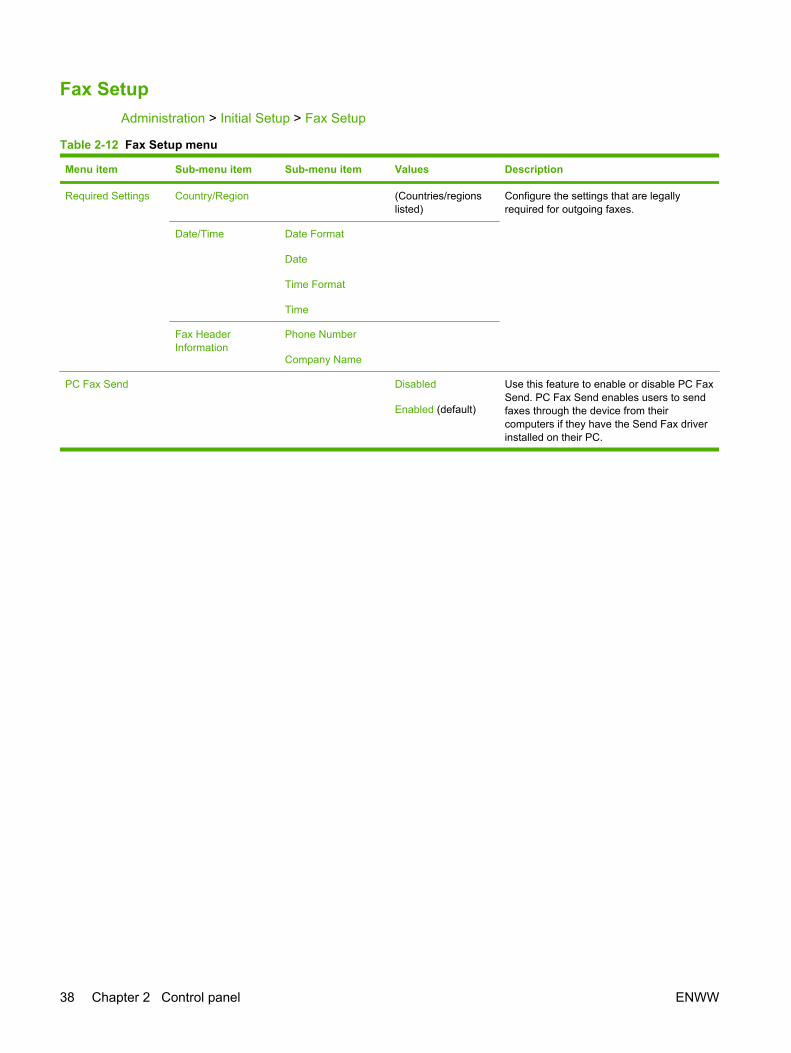
Fax SetupAdministration > Initial Setup > Fax Setup
Table 2-12 Fax Setup menu
Menu item Sub-menu item Sub-menu item Values Description
Required Settings Country/Region (Countries/regionslisted)
Configure the settings that are legallyrequired for outgoing faxes.
Date/Time Date Format
Date
Time Format
Time
Fax HeaderInformation
Phone Number
Company Name
PC Fax Send Disabled
Enabled (default)
Use this feature to enable or disable PC FaxSend. PC Fax Send enables users to sendfaxes through the device from theircomputers if they have the Send Fax driverinstalled on their PC.
38 Chapter 2 Control panel ENWW

Menu item Sub-menu item Sub-menu item Values Description
Fax Send Settings Fax Dial Volume Off
Low (default)
High
Use this feature to set the volume of the tonesthat you hear while the device dials the faxnumber.
Error CorrectionMode
Enabled (default)
Disabled
When Error Correction Mode is enabled andan error occurs during fax transmission, thedevice sends or receives the error portionagain.
JBIG Compression Enabled (default)
Disabled
JBIG compression reduces fax-transmissiontime, which can result in lower phonecharges. However, using JBIG compressionsometimes causes compatibility problemswith older fax machines. If this occurs, turn offJBIG compression.
Maximum Baud Rate Select a value fromthe list. The default is33.6K.
Use this feature to set the maximum baudrate for receiving faxes. This can be used asa diagnostic tool for troubleshooting faxproblems.
TCF T.30 DelayTimer
Default (default)
Custom
This setting should be left at the default valueand only changed when directed by an HPtechnical support agent. Adjustmentprocedures associated with this setting arebeyond the scope of this guide.
TCF Extend Default (default)
Custom
This setting should be left at the default valueand only changed when directed by an HPtechnical support agent. Adjustmentprocedures associated with this setting arebeyond the scope of this guide.
Dialing Mode Tone (default)
Pulse
Select whether the device should use tone orpulse dialing.
Redial On Busy The range is between0 and 9. The factorydefault is 3 times.
Type the number of times the device shouldattempt to redial if the line is busy.
Redial On No Answer Never (default)
Once
Twice
Use this feature to specify the number oftimes the device should attempt to dial if therecipient fax number does not answer.
NOTE: Twice is available in locations otherthan the United States and Canada.
Table 2-12 Fax Setup menu (continued)
ENWW Initial Setup menu 39
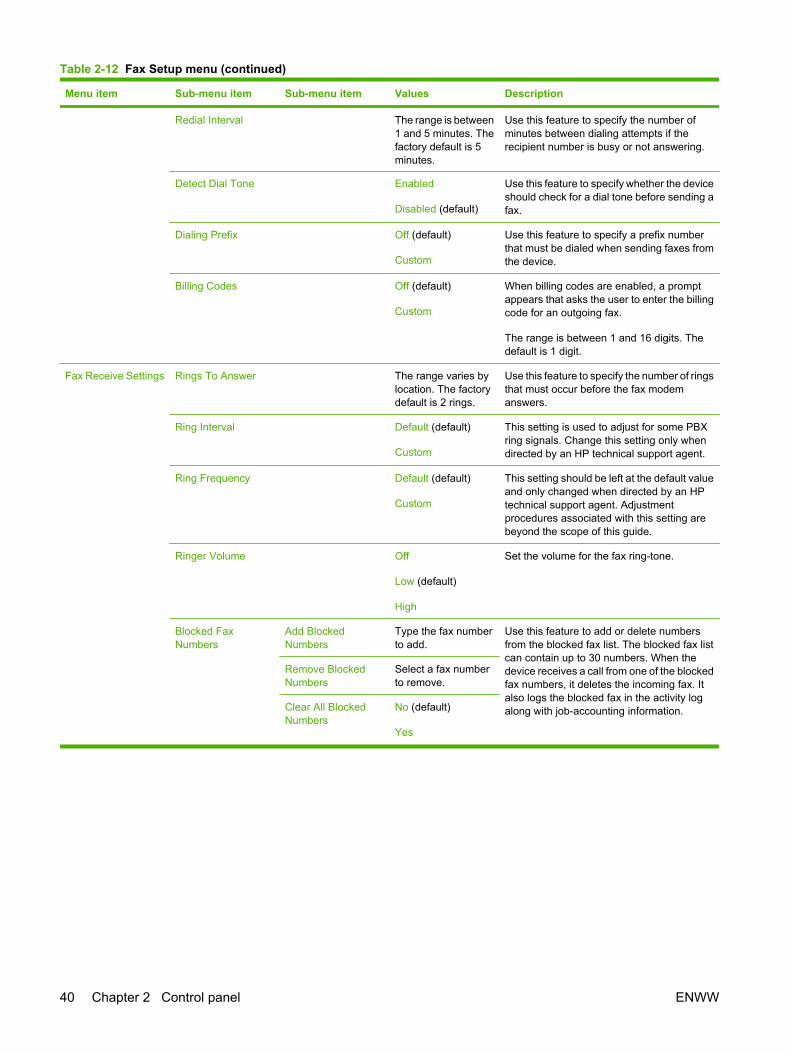
Menu item Sub-menu item Sub-menu item Values Description
Redial Interval The range is between1 and 5 minutes. Thefactory default is 5minutes.
Use this feature to specify the number ofminutes between dialing attempts if therecipient number is busy or not answering.
Detect Dial Tone Enabled
Disabled (default)
Use this feature to specify whether the deviceshould check for a dial tone before sending afax.
Dialing Prefix Off (default)
Custom
Use this feature to specify a prefix numberthat must be dialed when sending faxes fromthe device.
Billing Codes Off (default)
Custom
When billing codes are enabled, a promptappears that asks the user to enter the billingcode for an outgoing fax.
The range is between 1 and 16 digits. Thedefault is 1 digit.
Fax Receive Settings Rings To Answer The range varies bylocation. The factorydefault is 2 rings.
Use this feature to specify the number of ringsthat must occur before the fax modemanswers.
Ring Interval Default (default)
Custom
This setting is used to adjust for some PBXring signals. Change this setting only whendirected by an HP technical support agent.
Ring Frequency Default (default)
Custom
This setting should be left at the default valueand only changed when directed by an HPtechnical support agent. Adjustmentprocedures associated with this setting arebeyond the scope of this guide.
Ringer Volume Off
Low (default)
High
Set the volume for the fax ring-tone.
Blocked FaxNumbers
Add BlockedNumbers
Type the fax numberto add.
Use this feature to add or delete numbersfrom the blocked fax list. The blocked fax listcan contain up to 30 numbers. When thedevice receives a call from one of the blockedfax numbers, it deletes the incoming fax. Italso logs the blocked fax in the activity logalong with job-accounting information.
Remove BlockedNumbers
Select a fax numberto remove.
Clear All BlockedNumbers
No (default)
Yes
Table 2-12 Fax Setup menu (continued)
40 Chapter 2 Control panel ENWW

E-mail SetupAdministration > Initial Setup > E-mail Setup
Use this menu to enable the e-mail feature and to configure basic e-mail settings.
NOTE: To configure advanced e-mail settings, use the embedded Web server. For more information,see Embedded Web server on page 183.
Table 2-13 E-mail Setup menu
Menu item Values Description
Address Validation On (default)
Off
This option enables the device to check e-mail syntax when you typean e-mail address. Valid e-mail addresses require the "@" sign anda ".".
Find Send Gateways Search the network for SMTP gateways that the device can use tosend e-mail.
SMTP Gateway Enter a value. Specify the IP address of the SMTP gateway that is used to send e-mail from the device.
Test Send Gateway Test the configured SMTP gateway to see if it is functional.
Send Setup menuAdministration > Initial Setup > Send Setup
Table 2-14 Send Setup menu
Menu item Values Description
Fax Number Confirmation Disable (default)
Enable
When fax number confirmation is enabled, you are prompted to enterthe fax number twice to verify that it has been typed correctly.
ENWW Initial Setup menu 41
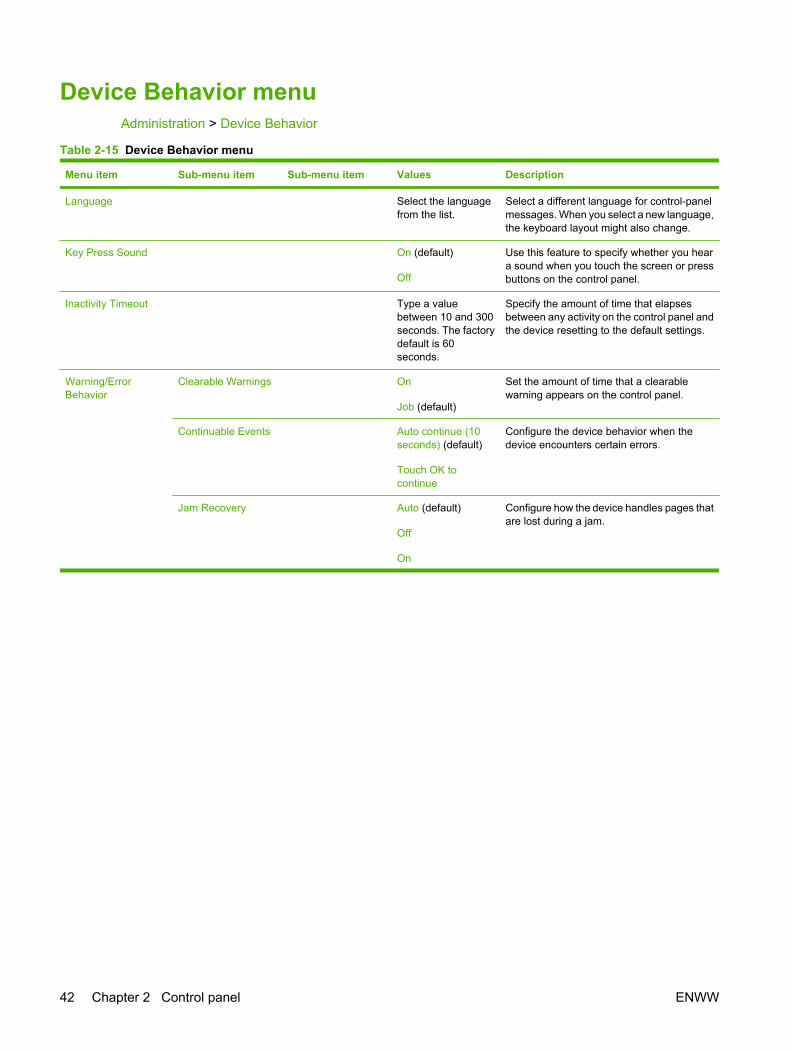
Device Behavior menuAdministration > Device Behavior
Table 2-15 Device Behavior menu
Menu item Sub-menu item Sub-menu item Values Description
Language Select the languagefrom the list.
Select a different language for control-panelmessages. When you select a new language,the keyboard layout might also change.
Key Press Sound On (default)
Off
Use this feature to specify whether you heara sound when you touch the screen or pressbuttons on the control panel.
Inactivity Timeout Type a valuebetween 10 and 300seconds. The factorydefault is 60seconds.
Specify the amount of time that elapsesbetween any activity on the control panel andthe device resetting to the default settings.
Warning/ErrorBehavior
Clearable Warnings On
Job (default)
Set the amount of time that a clearablewarning appears on the control panel.
Continuable Events Auto continue (10seconds) (default)
Touch OK tocontinue
Configure the device behavior when thedevice encounters certain errors.
Jam Recovery Auto (default)
Off
On
Configure how the device handles pages thatare lost during a jam.
42 Chapter 2 Control panel ENWW

Menu item Sub-menu item Sub-menu item Values Description
Tray Behavior Use Requested Tray Exclusively (default)
First
Control how the device handles jobs thathave specified a specific input tray.
Manually FeedPrompt
Always (default)
Unless Loaded
Specify how a prompt should appear whenthe type or size for a job does not match thespecified tray and the device pulls from themultipurpose tray instead.
PS Defer Media Enabled (default)
Disabled
Select either the PostScript (PS) or HPpaper-handling model.
Use Another Tray Enabled (default)
Disabled
Turn on or off the control-panel prompt toselect another tray when the specified tray isempty.
Size/Type Prompt Display (default)
Do not display
Control whether the tray configurationmessage appears whenever a tray is openedor closed.
Duplex Blank Pages Auto (default)
Yes
Control how the device handles two-sidedjobs (duplexing).
Image Rotation Left to Right
Right to Left
Alternate
Image rotation allows users to put paper inthe input tray using the same orientationregardless of whether there is a finisherinstalled.
NOTE: The image rotation set in this menuwill be applied any time a job does notrequest stapling or when the requestedstapling could not be applied because ofunsupported media or when the stapler isunavailable.
Select Left to Right to rotate the image as if itwere going to be bound on the left. Thissetting is appropriate for print jobs wherereading from left to right is the cultural norm.This is the default setting.
Select Right to Left to rotate the image as if itwere going to be bound on the right. Thissetting is usually appropriate for print jobswhere reading from right to left is the culturalnorm.
Select Alternate to use a different loadingorientation that might work better withpreprinted forms that are used on legacyproducts.
Multifunc Finisher
or
MBM-3 Bin Stapler
Operation Mode Mailbox
Stacker
Function Separator
This menu appears when the HP 3-binStapler/Stacker Accessory or the HP BookletMaker/Finisher Accessory is attached.
Allows you to set the default operation mode.Mailbox assigns a user or group of users toeach output bin. Stacker treats all of theoutput bins as a single large bin. When onebin gets full, jobs are automatically routed tothe next bin. Function Separator specifies a
Table 2-15 Device Behavior menu (continued)
ENWW Device Behavior menu 43

Menu item Sub-menu item Sub-menu item Values Description
default bin for specific types of jobs such asfaxes or copies (stapler/stacker only).
Staples None
One Left Angled
One Right Angled
Two Left
Two Right
Two Top
Sets the default staple selection fordocuments sent to the device when no staplevalue is specified.
Staples Out Stop
Continue
Sets the default behavior when a jobspecifies stapling and the stapler is out ofstaples. Stop stops printing if the stapler runsout of staples. Continue allows a job tocontinue printing even when the device is outof staples.
Offset Off
On
Turns the job offset feature on or off. Whenjob offset is on, each copy of a job is shiftedto one side in the output bin in order to keepeach copy separate from the others.
A4/Letter Staple Normal
Alternate 1
Alternate 2
Controls the speed of the print engine toprevent paper jams by using the staplerbuffer.
NOTE: The stapler buffer may or may notbe used depending on the selected mediatype or on the sensed media type, ifAutosense Mode is enabled.
If the Normal setting is enabled, the enginespeed will be normal by using the staplerbuffer whenever possible.
If the Alternate 1 setting is enabled, and theengine is in Autosense Mode, the engineslows down to prevent jams. If the product isNOT in Autosense Mode, the engineperforms at normal speed, using the staplerbuffer whenever possible.
If the Alternate 2 setting is enabled, theengine always slows down to prevent jams,never using the stapler buffer.
Fold LTR-R & A4 - R –4.0 mm
–3.5 mm
–3.0 mm
–2.5 mm
–2.0 mm
–1.5 mm
–1.0 mm
Adjusts the fold line for Letter and A4 sizepaper (booklet maker only).
Table 2-15 Device Behavior menu (continued)
44 Chapter 2 Control panel ENWW

Menu item Sub-menu item Sub-menu item Values Description
–0.5 mm
0.0 mm
0.5 mm
1.0 mm
1.5 mm
2.0 mm
2.5 mm
3.0 mm
3.5 mm
4.0 mm
Fold Legal & JISB4 –4.0 mm
–3.5 mm
–3.0 mm
–2.5 mm
–2.0 mm
–1.5 mm
–1.0 mm
–0.5 mm
0.0 mm
0.5 mm
1.0 mm
1.5 mm
2.0 mm
2.5 mm
3.0 mm
3.5 mm
4.0 mm
Adjusts the fold line for Legal and JIS B4 sizepaper (booklet maker only).
Fold 11X17 & A3 –4.0 mm
–3.5 mm
–3.0 mm
–2.5 mm
–2.0 mm
–1.5 mm
Adjusts the fold line for Legal and 11x17 andA3 size paper (booklet maker only).
Table 2-15 Device Behavior menu (continued)
ENWW Device Behavior menu 45

Menu item Sub-menu item Sub-menu item Values Description
–1.0 mm
–0.5 mm
0.0 mm
0.5 mm
1.0 mm
1.5 mm
2.0 mm
2.5 mm
3.0 mm
3.5 mm
4.0 mm
General CopyBehavior
Scan Ahead Enabled (default)
Disabled
Turn on no-wait scanning. With Scan Aheadenabled, the pages in the original documentare scanned to disk and held until the devicebecomes available.
Auto Print Interrupt Enabled
Disabled (default)
When this feature is enabled, copy jobs caninterrupt print jobs that are set to print multiplecopies.
The copy job is inserted into the print queueat the end of one copy of the print job. Afterthe copy job is complete, the devicecontinues printing the remaining copies of theprint job.
Copy Interrupt Enabled
Disabled (default)
When this feature is enabled, a copy job thatis currently printing can be interrupted whena new copy job is started. You are promptedto confirm that you want to interrupt thecurrent job.
AlternativeLetterhead Mode
Off (default)
On
This option allows loading of letterhead orpreprinted paper the same way for all copyjobs, whether copying to one side of thepaper or to both sides of the paper.
Table 2-15 Device Behavior menu (continued)
46 Chapter 2 Control panel ENWW
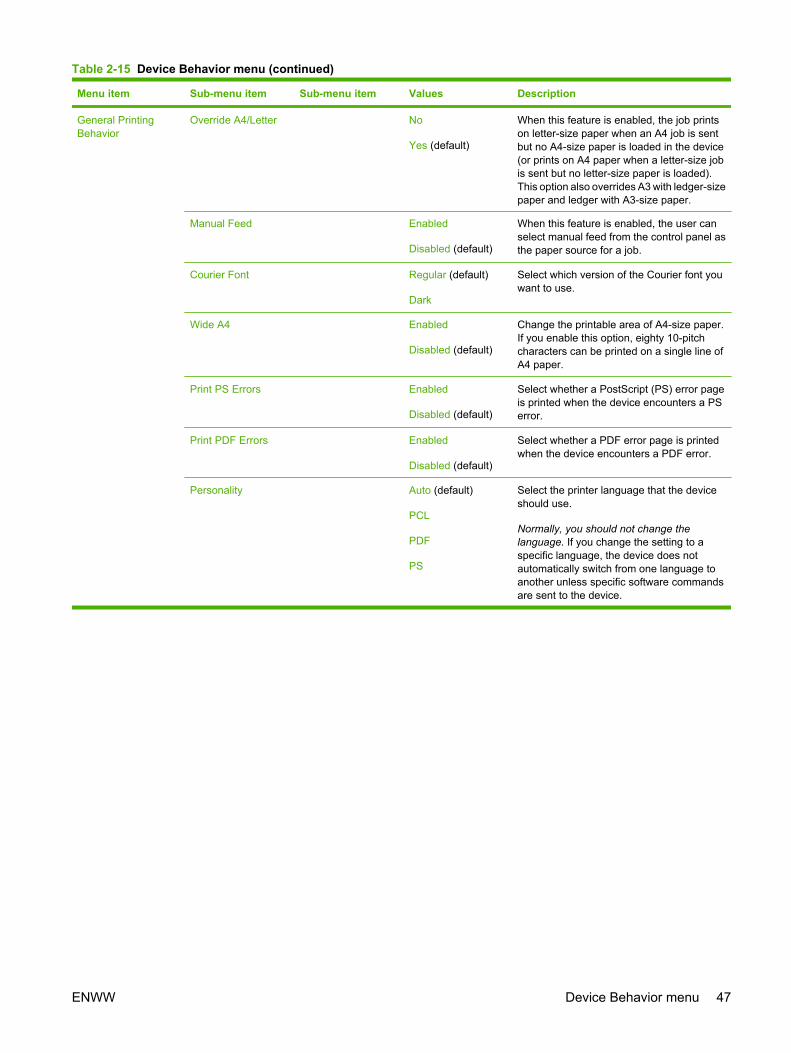
Menu item Sub-menu item Sub-menu item Values Description
General PrintingBehavior
Override A4/Letter No
Yes (default)
When this feature is enabled, the job printson letter-size paper when an A4 job is sentbut no A4-size paper is loaded in the device(or prints on A4 paper when a letter-size jobis sent but no letter-size paper is loaded).This option also overrides A3 with ledger-sizepaper and ledger with A3-size paper.
Manual Feed Enabled
Disabled (default)
When this feature is enabled, the user canselect manual feed from the control panel asthe paper source for a job.
Courier Font Regular (default)
Dark
Select which version of the Courier font youwant to use.
Wide A4 Enabled
Disabled (default)
Change the printable area of A4-size paper.If you enable this option, eighty 10-pitchcharacters can be printed on a single line ofA4 paper.
Print PS Errors Enabled
Disabled (default)
Select whether a PostScript (PS) error pageis printed when the device encounters a PSerror.
Print PDF Errors Enabled
Disabled (default)
Select whether a PDF error page is printedwhen the device encounters a PDF error.
Personality Auto (default)
PCL
PS
Select the printer language that the deviceshould use.
Normally, you should not change thelanguage. If you change the setting to aspecific language, the device does notautomatically switch from one language toanother unless specific software commandsare sent to the device.
Table 2-15 Device Behavior menu (continued)
ENWW Device Behavior menu 47

Menu item Sub-menu item Sub-menu item Values Description
PCL Form Length Type a valuebetween 5 and 128lines. The factorydefault is 60 lines.
PCL is a set of printer commands thatHewlett-Packard developed to provideaccess to printer features.
Orientation Portrait (default)
Landscape
Select the orientation that is most often usedfor print jobs. Select Portrait if the short edgeis at the top or Landscape if the long edge isat the top.
Font Source Select the sourcefrom the list.
Select the font source for the user-soft defaultfont.
Font Number Type the fontnumber. The rangeis between 0 and999. The factorydefault is 0.
Specify the font number for the user softdefault font by using the source that isspecified in the Font Source menu item. Thedevice assigns a number to each font andlists it on the PCL font list (available from theAdministration menu).
Font Pitch Type a valuebetween 0.44 and99.99. The factorydefault is 10.00.
If Font Source and Font Number indicate acontour font, use this feature to select adefault pitch (for a fixed-spaced font).
Symbol Set PC-8 (default)
(50 additionalsymbol sets fromwhich to choose)
Select any one of several available symbolsets from the control panel. A symbol set is aunique grouping of all the characters in a font.
Append CR to LF No (default)
Yes
Configure whether a carriage return (CR) isappended to each line feed (LF) encounteredin backwards-compatible PCL jobs (puretext, no job control).
Suppress BlankPages
No (default)
Yes
This option is for users who are generatingtheir own PCL, which could include extraform feeds that cause blank pages to beprinted. When Yes is selected, form feeds areignored if the page is blank.
Media SourceMapping
Standard (default)
Classic
Select and maintain input trays by numberwhen you are not using the device driver, orwhen the software program has no option fortray selection.
Table 2-15 Device Behavior menu (continued)
48 Chapter 2 Control panel ENWW

Print Quality menuAdministration > Print Quality
Table 2-16 Print Quality menu
Menu item Sub-menu item Values Description
Adjust Color Highlights Cyan Density. MagentaDensity. Yellow Density.Black Density
+5 to –5. Default is 0.
Adjust the darkness or lightness of highlights on aprinted page. Lower values represent lighter highlightson a printed page, and higher values represent darkerhighlights on a printed page.
Midtones Cyan Density. MagentaDensity. Yellow Density.Black Density
+5 to –5. Default is 0.
Adjust the darkness or lightness of midtones on aprinted page. Lower values represent lighter midtoneson a printed page, and higher values represent darkermidtones on a printed page.
Shadows Cyan Density. MagentaDensity. Yellow Density.Black Density
+5 to –5. Default is 0.
Adjust the darkness or lightness of shadows on aprinted page. Lower values represent lighter shadowson a printed page, and higher values represent darkershadows on a printed page.
Restore Color Values Sets all the density values back to the factory defaultsettings.
Set Registration Test Page Print Shift the margin alignment to center the image on thepage from top to bottom and from left to right. You canalso align the image on the front with the image printedon the back.
Print a test page for setting the registration.
Source All trays
Tray <X>: <contents>(choose a tray)
Select the source input tray for printing the SetRegistration page.
Adjust Tray <X> Shift from -20 to 20 alongthe X or Y axes. 0 is thedefault.
X1 Shift
X2 Shift
Y Shift
Perform the alignment procedure for each tray.
When it creates an image, the device scans across thepage from side to side as the sheet feeds from top tobottom into the device.
The scan direction is referred to as X. X1 is the scandirection for the first side of a 2-sided page. X2 is thescan direction for the second side of a 2-sided page.The feed direction is referred to as Y.
Print Modes <Paper Type> Configure which mode is associated with which papertype.
ENWW Print Quality menu 49

Menu item Sub-menu item Values Description
Auto Sense Mode Tray 1 sensing Full Sensing (default forTray 1)
Expanded Sensing(default for Trays 2-5)
Transparency Only
When Full Sensing is selected, the product recognizeslight, plain, heavy, glossy, and tough paper andoverhead transparencies. When Expanded Sensing isselected, the device recognizes normal paper,overhead transparencies, glossy paper, and toughpaper. When Transparency Only is selected, the devicerecognizes only overhead transparency and non-overhead transparency types.
Tray 2-5 Sensing Expanded Sensing
Transparency Only(default)
When Expanded Sensing is selected, the devicerecognizes normal paper, overhead transparencies,glossy paper, and tough paper. When TransparencyOnly is selected, the device recognizes only overheadtransparency and non-overhead transparency types.
Optimize Paper Curl Normal
Reduced
To help reduce paper curl, set this option to Reduced.This decreases full speed to 10 PPM (instead of 40ppm) and 3/4 speed to 7.5 ppm (instead of 30 ppm).
Pre-rotation Off (default)
On
Turn this feature On if horizontal streaks appear onpages. Using this feature increases the warm-up timefor the device.
Fuser Temp Normal (default)
Alternate 1
Alternate 2
Alternate 3
If you are seeing a faint image of the page repeated atthe bottom of the page or on the following page, youshould first make sure the Paper Type and Print Modesettings are correct for the type of paper you are using.If you continue to see ghost images on your print jobs,set the Fuser Temp feature to one of the Alternatesettings . Try the Alternate 1 setting first and see if itsolves the problem. If you continue to see the problem,try Alternate 2 and then Alternate 3. With the Alternate2 and Alternate 3 settings you may see an extra delaybetween jobs.
Tray 1 Normal (default)
Alternate
If you are seeing marks on the back side of the paperwhen printing from Tray 1, set the mode to Alternate.This increases the frequency of the cleaning cycle.
Gloss Mode Normal (default)
High
Chosen when stable high gloss is required. Set thisfeature to High for glossy print jobs, such as photos, ifyou notice the gloss finish decreasing after the firstpage is printed. This setting reduces the performancefor all paper types.
Table 2-16 Print Quality menu (continued)
50 Chapter 2 Control panel ENWW

Menu item Sub-menu item Values Description
Light Media Auto (default)
On
Prevents the fuser from wrapping with light paper. Setthis feature to On if you are frequently seeing FuserDelay Jam or Fuser Wrap Jam messages, especiallywhen printing on lightweight paper or on jobs withheavy toner coverage.
Environment Normal (default)
Low Temp
Optimizes performance in extreme low temperatureenvironments. Set this feature to Low Temp if theproduct is operating in a low-temperature environmentand you are having problems with print quality such asblisters in the printed image.
Line Voltage Normal (default)
100V
Optimizes performance in low-voltage conditions. Setthis feature to 100V if the product is operating in a low-voltage environment and you are having problems withprint quality such as blisters in the printed image.
Cleaning frequency Normal (default)
Alternate
Set this feature to Alternate if you are seeing defects inthe printed output that repeat at 38 mm (1.5 inch)intervals. This feature increases the frequency at whichthe C roller is cleaned. Setting this feature toAlternate might also reduce printing speed andincrease the frequency of consumable replacement.
D-Blade bias Normal (default)
Alternate
Set this feature to Alternate if you are seeing short whitevertical lines in the printed output. The Alternate settingmight also cause dark spots in the printed output, so besure to test this setting on a few print jobs.
Waste Bin Normal (default)
Alternate
Try setting this feature to Alternate if you are seeinglengthwise toner streaks in your printed output,especially in jobs with low toner coverage.
Discharge Brush Off (default)
On
Enable this feature in low temperature and low humidityenvironments if you are seeing specks of tonerscattered on double-sided jobs using light-weight paperand longer than ten pages.
Background Off (default)
On
Turn this feature On if pages are printing with a shadedbackground. Using this feature might reduce glosslevels.
Heavy Mode 30 PPM (default)
24 PPM
The default setting is 30 PPM. Select the 24 PPM optionto reduce the speed and improve fusing on heavypaper.
Tracking Control Off (default)
On
Improves color stability by adjusting the bias voltage.This setting should remain On.
Restore Optimize Select this setting to return all the settings in theOptimize menu to the factory default settings.
Resolution Image REt 4800
1200X600dpi
Select Image REt 4800 to produces fast, high-qualityprinting that is appropriate for most print jobs
Select 1200X600dpi to produce the highest-qualityprinting available, but it may slow print speed. Thissetting may be useful for jobs that contain very thin linesor fine graphics.
Color REt Enabled (default)
Disabled
Enable or disable Resolution Enhancement technology(REt), which produces print output with smooth angles,curves, and edges.
Table 2-16 Print Quality menu (continued)
ENWW Print Quality menu 51

Menu item Sub-menu item Values Description
Calibration/Cleaning
Process Cleaning Page Process Use this feature to create and process a cleaning pagefor cleaning excess toner off the pressure roller in thefuser. The process takes up to 2.5 minutes.
Quick Calibration Calibrate Performs partial product calibrations.
Full Calibration Calibrate Performs all product calibrations.
Delay Calibration AtWake/Power On
No
Yes (default)
This menu controls the timing of the calibration whenthe printer wakes up or is turned on.
● Select No to have the printer calibrate immediatelywhen it wakes up or is turned on. The device willnot print any jobs until it finishes calibrating.
● Select Yes to enable a device that is asleep toaccept print jobs before it calibrates. The deviceonly accepts new jobs for a short time. It may startcalibrating before it has printed all the jobs it hasreceived.
NOTE: For the best results, allow the device tocalibrate before printing. Print jobs performed beforecalibration may not be of the highest quality.
Table 2-16 Print Quality menu (continued)
52 Chapter 2 Control panel ENWW

Troubleshooting menuAdministration > Troubleshooting
NOTE: Many of the menu items under the Troubleshooting menu are for advanced troubleshootingpurposes.
Table 2-17 Troubleshooting menu
Menu item Sub-menu item Sub-menu item Values Description
Event Log Print This shows the event codes and theircorresponding engine cycles on the control-panel display.
Calibrate Scanner Calibrate Use this feature to compensate for offsets inthe scanner imaging system (carriage head)for ADF and flatbed scans.
You might need to calibrate the scanner if itis not capturing the correct sections ofscanned documents.
PQ Troubleshooting Print Print various diagnostic pages that help solveprint-quality problems.
Fax T.30 Trace Print T.30 Report Print or configure the fax T.30 trace report. T.30 is the standard that specifieshandshaking, protocols, and error correctionbetween fax machines.
When to Print Report Never auto print(default)
Print after any fax job
Print after fax sendjobs
Print after any faxerror
Print after senderrors only
Print after receiveerrors only
Fax Transmit SignalLoss
A value between 0and 30. The default is0.
Set loss levels to compensate for phone-linesignal loss. Do not modify this setting unlessrequested to do so by an HP servicerepresentative because it could cause the faxto stop functioning.
Fax V.34 Normal (default)
Off
Disable V.34 mode if several fax failures haveoccurred or if phone line conditions require it.
Fax Speaker Mode Normal (default)
Diagnostic
A technician can use this feature technicianto evaluate and diagnose fax issues bylistening to the sounds of fax modulations.
Diagnostic Page Print Print a diagnostic page that includes colorswatches and the EP parameters table.
Disable CartridgeCheck
Use this item to enter a mode where acartridge (or color pair of cartridge and drum)can be removed to determine which particular
ENWW Troubleshooting menu 53
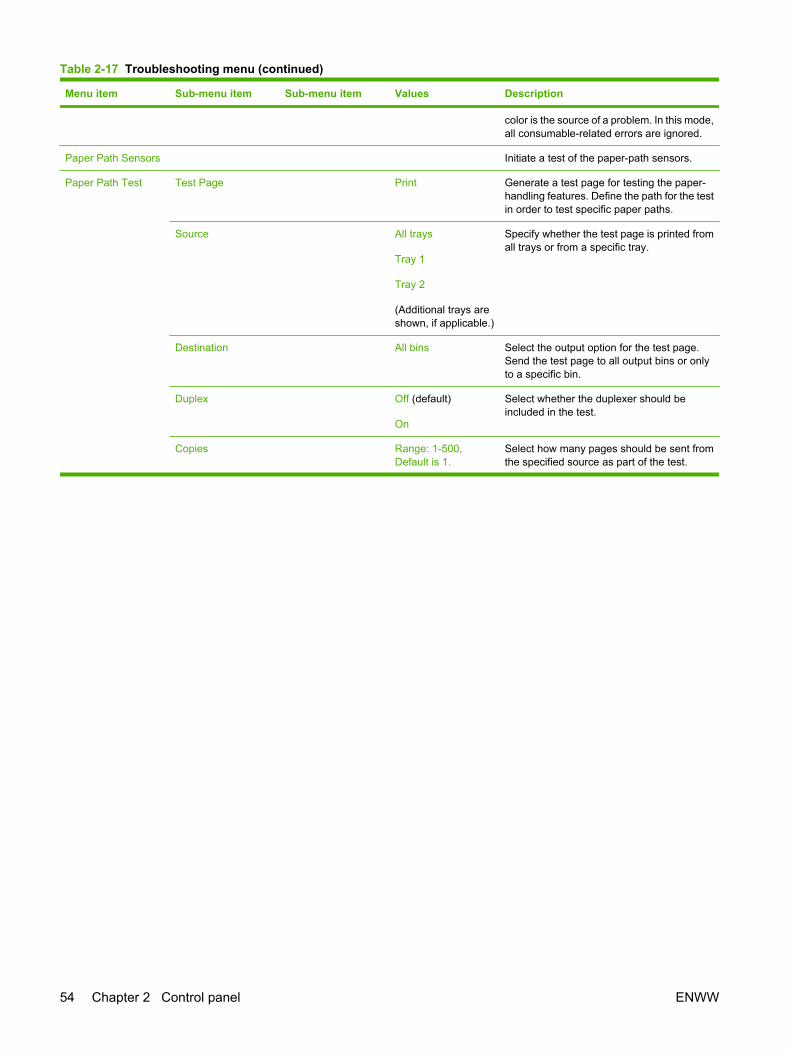
Menu item Sub-menu item Sub-menu item Values Description
color is the source of a problem. In this mode,all consumable-related errors are ignored.
Paper Path Sensors Initiate a test of the paper-path sensors.
Paper Path Test Test Page Print Generate a test page for testing the paper-handling features. Define the path for the testin order to test specific paper paths.
Source All trays
Tray 1
Tray 2
(Additional trays areshown, if applicable.)
Specify whether the test page is printed fromall trays or from a specific tray.
Destination All bins Select the output option for the test page.Send the test page to all output bins or onlyto a specific bin.
Duplex Off (default)
On
Select whether the duplexer should beincluded in the test.
Copies Range: 1-500,Default is 1.
Select how many pages should be sent fromthe specified source as part of the test.
Table 2-17 Troubleshooting menu (continued)
54 Chapter 2 Control panel ENWW

Menu item Sub-menu item Sub-menu item Values Description
Finishing Paper PathTest
Staples Finishing Options Choose from a list ofavailable options.
Test the paper-handling features on thefinisher.
Select the option that you want to test.
Destination Bin
Media Size Letter
A4
Select the paper size for the test.
Media Type Select from a list oftypes.
Select the paper type for the test.
Copies Range: 2-30,Default=2
Select the number of copies to include in thetest.
Duplex Off
On
Select whether to use the duplexer in the test.
Test Page Print Print a test page to use for the test.
Stack Destination Bin Select from a list ofbins.
Select the options that you want to use to testthe stacker.
Media Size Letter
Legal
A4
Executive (JIS)
8.5 x 13
Media Type Select from a list ofbins.
Select the type of media to use for theFinishing Paper Path Test.
Copies 1
10
50
100
500
Select the number of copies to include in theFinishing Paper Path Test.
Duplex Off
On
Select whether to use the duplexer in theFinishing Paper Path Test.
Test Page Print Print a test page to use for the test.
Table 2-17 Troubleshooting menu (continued)
ENWW Troubleshooting menu 55

Menu item Sub-menu item Sub-menu item Values Description
Booklet Maker Media Size Letter
Legal
A4
Executive (JIS)
8.5 x 13
Select the options that you want to use to testthe booklet maker.
Media Type Select from a list ofbins.
Select the type of media to use for theFinishing Paper Path Test.
Copies 1
10
50
100
500
Select the number of copies to include in theFinishing Paper Path Test.
Duplex Off
On
Select whether to use the duplexer in theFinishing Paper Path Test.
Test Page Print Print a test page to use for the test.
Manual Sensor Test This item performs tests to determinewhether the paper-path sensors areoperating correctly.
Component Test Transfer Motors
Belt Only
Image Drum Motors
Black Laser Scanner
Cyan Laser Scanner
Magenta LaserScanner
Yellow LaserScanner
Fuser Motor
Fuser PressureRelease Motor
Black AlienationMotor
Cyan AlienationMotor
Magenta AlienationMotor
Yellow AlienationMotor
Exercise individual parts independently toisolate noise, leaking, or other issues. To startthe test, select one of the components. Thetest runs the number of times specified in theRepeat option. You might be prompted toremove parts from the device during the test.Press the Stop button to abort the test.
Table 2-17 Troubleshooting menu (continued)
56 Chapter 2 Control panel ENWW

Menu item Sub-menu item Sub-menu item Values Description
ITB Contact/Alienation
Tray 2 Pickup Motor
Tray 2 PickupSolenoid
Tray 3 Pickup Motor
Tray 3 PickupSolenoid
Tray 4 Pickup Motor
Tray 4 PickupSolenoid
Tray 5 Pickup Motor
Tray 5 PickupSolenoid
Duplexer ReverseMotor
Duplexer Feed Motor
Duplexer ReFeedMotor
Paper TransportMotor
Repeat Once (Default)
Continuous
Determines the number of times the test runs.
Print/Stop Test Continuous valuefrom 0 to 60,000milliseconds.Default: 0
Isolate faults by stopping the device duringthe print cycle and observing where in theprocess the image degrades. To run the test,specify a stop time. The next job that is sentto the device stops at the specified time in theprocess.
Color Band Test Test Page Print Prints a page that helps identify arcing in thehigh-voltage power supplies.
Copies Continuous valuefrom 1 to 30.
Default: 1
Specify the number of copies to print for theColor Band test
Scanner Tests Lower Lamp
Sensors
ADF Input Motor
ADF Input Reverse
Flatbed Motor
ADF Read Motor
A service technician can use this menu itemto diagnose potential problems with thedevice scanner.
Table 2-17 Troubleshooting menu (continued)
ENWW Troubleshooting menu 57

Menu item Sub-menu item Sub-menu item Values Description
ADF Read MotorReverse
ADF DuplexSolenoid
ADF LED Indicator
Control Panel LEDs Verify that the components of the controlpanel are functioning correctly.
Display
Buttons
Touchscreen
Finisher Tests Manual Sensor Test
Component Test
Table 2-17 Troubleshooting menu (continued)
58 Chapter 2 Control panel ENWW

Resets menuAdministration > Resets
Table 2-18 Resets menu
Menu item Values Description
Clear Local Address Book Clear Use this feature to clear all addresses from the address books thatare stored on the device.
Clear Fax Activity Log Yes
No (default)
Use this feature to clear all events from the Fax Activity Log.
Restore Factory Telecom Setting Restore Use this option to restore the following settings to their factory defaultsettings: Transmit Signal Loss, V34, Maximum Baud Rate, SpeakerMode.
Restore Factory Settings Restore Use this feature to restore all device settings to their factory defaults.
Reset Supplies New Document Feeder Kit (Yes/No)
Notify the device that a new document-feeder kit has beeninstalled.
ENWW Resets menu 59

Service menuAdministration > Service
The Service menu is locked and requires a PIN for access. This menu is intended for use by authorizedservice personnel.
60 Chapter 2 Control panel ENWW

3 Software for Windows
● Supported operating systems for Windows
● Supported printer drivers for Windows
● HP Universal Print Driver (UPD)
● Select the correct printer driver for Windows
● Priority for print settings
● Change printer-driver settings for Windows
● Remove software for Windows
● Supported utilities for Windows
● Software for other operating systems
ENWW 61

Supported operating systems for WindowsThe product supports the following Windows operating systems:
● Windows XP (32-bit and 64-bit)
● Windows Server 2003 (32-bit and 64-bit)
● Windows 2000
● Windows Vista (32-bit and 64-bit)
62 Chapter 3 Software for Windows ENWW
Supported printer drivers for Windows● HP PCL 6
● HP postscript emulation Universal Print Driver (HP UPD PS)
● HP PCL 5 UPD Universal Print Driver (HP UPD PCL 5)
The printer drivers include online Help that has instructions for common printing tasks and also describesthe buttons, checkboxes, and drop-down lists that are in the printer driver.
NOTE: For more information about the UPD, see www.hp.com/go/upd.
ENWW Supported printer drivers for Windows 63

HP Universal Print Driver (UPD)The HP Universal Print Driver (UPD) for Windows is a single driver that gives you instant access tovirtually any HP LaserJet product, from any location, without downloading separate drivers. It is built onproven HP print driver technology and has been tested thoroughly and used with many softwareprograms. It is a powerful solution that performs consistently over time.
The HP UPD communicates directly with each HP product, gathers configuration information, and thencustomizes the user interface to show the product’s unique, available features. It automatically enablesfeatures that are available for the product, such as two-sided printing and stapling, so you do not needto enable them manually.
NOTE: For more information about the UPD, see www.hp.com/go/upd.
UPD installation modes
Traditional mode ● Use this mode if you are installing the driver from a CD for a single computer.
● When installed with this mode, UPD operates like traditional printer drivers.
● If you use this mode, you must install UPD separately for each computer.
Dynamic mode ● Use this mode if you are installing the driver for a mobile computer, so you candiscover and print to HP products in any location.
● Use this mode if you are installing UPD for a workgroup.
● To use this mode, download UPD from the Internet. See www.hp.com/go/upd.
64 Chapter 3 Software for Windows ENWW

Select the correct printer driver for WindowsPrinter drivers provide access to the product features and allow the computer to communicate with theproduct (using a printer language). Check the installation notes and readme files on the device CD foradditional software and languages.
HP PCL 6 driver description
● Recommended for printing in all Windows environments
● Provides the overall best speed, print quality, and product-feature support for most users
● Developed to align with the Windows Graphic Device Interface (GDI) for the best speed in Windowsenvironments
● Might not be fully compatible with third-party and custom software programs that are based onPCL 5
HP postscript level 3 emulation driver description
● Recommended for printing with Adobe® software programs or with other highly graphics-intensivesoftware programs
● Provides support for printing from postscript level 3 emulation needs, or for postscript flash fontsupport
● Performs slightly faster than the PCL 6 driver when using Adobe software programs
HP PCL 5 Universal Print Driver description
● Recommended for general office printing in Windows environments
● Compatible with previous PCL versions and older HP LaserJet products
● The best choice for printing from third-party or custom software programs
● The best choice when operating with mixed environments, which require the product to be set toPCL 5 (UNIX, Linux, mainframe)
● Designed for use in corporate Windows environments to provide a single driver for use with multipleprinter models
● Preferred when printing to multiple printer models from a mobile Windows computer
ENWW Select the correct printer driver for Windows 65

Priority for print settingsChanges to print settings are prioritized depending on where the changes are made:
NOTE: The names of commands and dialog boxes might vary depending on your software program.
● Page Setup dialog box: Click Page Setup or a similar command on the File menu of the programyou are working in to open this dialog box. Settings changed here override settings changedanywhere else.
● Print dialog box: Click Print, Print Setup, or a similar command on the File menu of the programyou are working in to open this dialog box. Settings changed in the Print dialog box have a lowerpriority and do not override changes made in the Page Setup dialog box.
● Printer Properties dialog box (printer driver): Click Properties in the Print dialog box to openthe printer driver. Settings changed in the Printer Properties dialog box do not override settingsanywhere else in the printing software.
● Default printer driver settings: The default printer driver settings determine the settings used inall print jobs, unless settings are changed in the Page Setup, Print, or Printer Properties dialogboxes.
● Printer control panel settings: Settings changed at the printer control panel have a lower prioritythan changes made anywhere else.
66 Chapter 3 Software for Windows ENWW

Change printer-driver settings for WindowsChange the settings for all print jobsuntil the software program is closed
Change the default settings for allprint jobs
Change the product configurationsettings
1. On the File menu in the softwareprogram, click Print.
2. Select the driver, and then clickProperties or Preferences.
The steps can vary; this procedure ismost common.
1. Windows XP and WindowsServer 2003 (using the defaultStart menu view): Click Start, andthen click Printers and Faxes.
-or-
Windows 2000, Windows XP, andWindows Server 2003 (using theClassic Start menu view): ClickStart, click Settings, and then clickPrinters.
-or-
Windows Vista: Click Start, clickControl Panel, and then in thecategory for Hardware andSound click Printer.
2. Right-click the driver icon, and thenselect Printing Preferences.
1. Windows XP and WindowsServer 2003 (using the defaultStart menu view): Click Start, andthen click Printers and Faxes.
-or-
Windows 2000, Windows XP, andWindows Server 2003 (using theClassic Start menu view): ClickStart, click Settings, and then clickPrinters.
-or-
Windows Vista: Click Start, clickControl Panel, and then in thecategory for Hardware andSound click Printer.
2. Right-click the driver icon, and thenselect Properties.
3. Click the Device Settings tab.
ENWW Change printer-driver settings for Windows 67

Remove software for Windows1. Click Start, and then click All Programs.
2. Click HP, and then click HP Color LaserJet CM6030 or HP Color LaserJet CM6040 MFP.
3. Click Uninstall HP Color LaserJet CM6030 or HP Color LaserJet CM6040 MFP, and then followthe onscreen instructions to remove the software.
68 Chapter 3 Software for Windows ENWW

Supported utilities for WindowsHP Web Jetadmin
HP Web Jetadmin is a browser-based management tool for HP Jetdirect-connected printers within yourintranet, and it should be installed only on the network administrator’s computer.
To download a current version of HP Web Jetadmin and for the latest list of supported host systems,visit www.hp.com/go/webjetadmin.
When installed on a host server, a Windows client can gain access to HP Web Jetadmin by using asupported Web browser (such as Microsoft® Internet Explorer 4.x or Netscape Navigator 4.x or later)by navigating to the HP Web Jetadmin host.
Embedded Web serverThe device is equipped with an embedded Web server, which provides access to information aboutdevice and network activities. This information appears in a Web browser, such as Microsoft InternetExplorer, Netscape Navigator, Apple Safari, or Firefox.
The embedded Web server resides on the device. It is not loaded on a network server.
The embedded Web server provides an interface to the device that anyone who has a network-connected computer and a standard Web browser can use. No special software is installed orconfigured, but you must have a supported Web browser on your computer. To gain access to theembedded Web server, type the IP address for the device in the address line of the browser. (To findthe IP address, print a configuration page. For more information about printing a configuration page,see Information pages on page 178.)
For a complete explanation of the features and functionality of the embedded Web server, seeEmbedded Web server on page 183.
HP Easy Printer CareHP Easy Printer Care software is a program that you can use for the following tasks:
● Check the product status
● Check the supplies status and use HP SureSupply to shop online for supplies
● Set up alerts
● View product usage reports
● View product documentation
● Gain access to troubleshooting and maintenance tools
● Use HP Proactive Support to routinely scan your printing system and to prevent potential problems.HP Proactive Support can update software, firmware, and HP printer drivers.
You can view HP Easy Printer Care software when the product is directly connected to your computeror when it is connected to a network.
ENWW Supported utilities for Windows 69

Supported operating systems ● Microsoft® Windows 2000
● Microsoft Windows XP, Service Pack 2 (Home andProfessional editions)
● Microsoft Windows Server 2003
● Microsoft Windows Vista™
Supported browsers ● Microsoft Internet Explorer 6.0 or 7.0
To download HP Easy Printer Care software , go to www.hp.com/go/easyprintercare. This Web site alsoprovides updated information about supported browsers and a list of HP products that support HP EasyPrinter Care software.
For more information about using HP Easy Printer Care software, see HP Easy Printer Careon page 180.
70 Chapter 3 Software for Windows ENWW

Software for other operating systemsOS Software
UNIX For HP-UX and Solaris networks, go to www.hp.com/support/go/jetdirectunix_software toinstall model scripts using the HP Jetdirect printer installer (HPPI) for UNIX.
For the latest model scripts, go to www.hp.com/go/unixmodelscripts.
Linux For information, go to www.hp.com/go/linuxprinting.
ENWW Software for other operating systems 71

72 Chapter 3 Software for Windows ENWW

4 Use the product with Macintosh
● Software for Macintosh
● Use features in the Macintosh printer driver
ENWW 73

Software for MacintoshSupported operating systems for Macintosh
The device supports the following Macintosh operating systems:
● Mac OS X V10.2.8, V10.3, V10.4, V10.5 and later
NOTE: For Mac OS X V10.4 and later, PPC and Intel Core Processor Macs are supported.
Supported printer drivers for MacintoshThe HP installer provides PostScript® Printer Description (PPD) files, Printer Dialog Extensions (PDEs),and the HP Printer Utility for use with Macintosh computers.
The PPDs, in combination with the Apple PostScript printer drivers, provide access to device features.Use the Apple PostScript printer driver that comes with the computer.
Remove software from Macintosh operating systemsTo remove the software from a Macintosh computer, drag the PPD files to the trash can.
Priority for print settings for MacintoshChanges to print settings are prioritized depending on where the changes are made:
NOTE: The names of commands and dialog boxes might vary depending on your software program.
● Page Setup dialog box: Click Page Setup or a similar command on the File menu of the programyou are working in to open this dialog box. Settings changed here might override settings changedanywhere else.
● Print dialog box: Click Print, Print Setup, or a similar command on the File menu of the programyou are working in to open this dialog box. Settings changed in the Print dialog box have a lowerpriority and do not override changes made in the Page Setup dialog box.
● Default printer driver settings: The default printer driver settings determine the settings used inall print jobs, unless settings are changed in the Page Setup, Print, or Printer Properties dialogboxes.
● Printer control panel settings: Settings changed at the printer control panel have a lower prioritythan changes made anywhere else.
Change printer-driver settings for Macintosh
Change the settings for all print jobsuntil the software program is closed
Change the default settings for allprint jobs
Change the product configurationsettings
1. On the File menu, click Print.
2. Change the settings that you wanton the various menus.
1. On the File menu, click Print.
2. Change the settings that you wanton the various menus.
3. On the Presets menu, click Saveas and type a name for the preset.
Mac OS X V10.2.8
1. In the Finder, on the Go menu, clickApplications.
2. Open Utilities, and then open PrintCenter.
3. Click on the print queue.
74 Chapter 4 Use the product with Macintosh ENWW

Change the settings for all print jobsuntil the software program is closed
Change the default settings for allprint jobs
Change the product configurationsettings
These settings are saved in thePresets menu. To use the new settings,you must select the saved preset optionevery time you open a program and print.
4. On the Printers menu, clickConfigure.
5. Click the Installable Optionsmenu.
NOTE: Configuration settings mightnot be available in Classic mode.
Mac OS X V10.3 or Mac OS X V10.4
1. From the Apple menu, click SystemPreferences and then Print &Fax.
2. Click Printer Setup.
3. Click the Installable Optionsmenu.
Mac OS X V10.5
1. From the Apple menu, click SystemPreferences and then Print &Fax.
2. Click Options & Supplies.
3. Click the Driver menu.
4. Select the driver from the list, andconfigure the installed options.
Software for Macintosh computers
HP Printer UtilityUse the HP Printer Utility to set up product features that are not available in the printer driver.
You can use the HP Printer Utility when the product uses a universal serial bus (USB) cable or isconnected to a TCP/IP-based network.
Open the HP Printer Utility
Open the HP Printer Utility in Mac OS X V10.2.8
1. Open the Finder, and then click Applications.
2. Click Library, and then click Printers.
3. Click hp, and then click Utilities.
4. Double-click HP Printer Selector to open the HP Printer Selector.
5. Select the product that you want to configure, and then click Utility.
ENWW Software for Macintosh 75

Open the HP Printer Utility in Mac OS X V10.3 and V10.4
1. Open the Finder, click Applications, click Utilities, and then double-click Printer Setup Utility.
2. Select the product that you want to configure, and then click Utility.
Open the HP Printer Utility in Mac OS X V10.5
▲ From the Printer menu, click Printer Utility.
-or-
From the Print Queue, click the Utility icon.
HP Printer Utility features
The HP Printer Utility consists of pages that you open by clicking in the Configuration Settings list.The following table describes the tasks that you can perform from these pages.
Item Description
Configuration Page Prints a configuration page.
Supplies Status Shows the device supplies status and provides links for online supplies-ordering.
HP Support Provides access to technical assistance, online supplies ordering, online registration, andrecycling and return information.
File Upload Transfers files from the computer to the device.
Upload Fonts Transfers font files from the computer to the device.
Firmware Update Transfers updated firmware files from the computer to the device.
Duplex Mode Turns on the automatic two-sided printing mode.
Economode & Toner Density Turns on the Economode setting to conserve toner, or adjusts toner density.
Resolution Changes the resolution settings, including the REt setting.
Lock Resources Locks or unlocks storage products, such as a hard disk.
Stored Jobs Manages print jobs that are stored on the device hard disk.
Trays Configuration Changes the default tray settings.
IP Settings Changes the device network settings and provides access to the embedded Web server.
Bonjour Settings Provides the ability to turn on or off Bonjour support or change the device service namethat is listed on a network.
Additional Settings Provides access to the embedded Web server.
E-mail Alerts Configures the device to send e-mail notices for certain events.
Supported utilities for Macintosh
Embedded Web serverThe device is equipped with an embedded Web server, which provides access to information aboutdevice and network activities. For more information, see Embedded Web server sectionson page 184.
76 Chapter 4 Use the product with Macintosh ENWW
Use features in the Macintosh printer driverPrint
Create and use printing presets in MacintoshUse printing presets to save the current printer driver settings for reuse.
Create a printing preset
1. On the File menu, click Print.
2. Select the driver.
3. Select the print settings.
4. In the Presets box, click Save As..., and type a name for the preset.
5. Click OK.
Use printing presets
1. On the File menu, click Print.
2. Select the driver.
3. In the Presets box, select the printing preset that you want to use.
NOTE: To use printer-driver default settings, select Standard.
Resize documents or print on a custom paper sizeYou can scale a document to fit on a different size of paper.
1. On the File menu, click Print.
2. Open the Paper Handling menu.
3. In the area for Destination Paper Size, select Scale to fit paper size, and then select the sizefrom the drop-down list.
4. If you want to use only paper that is smaller than the document, select Scale down only.
Print a cover pageYou can print a separate cover page for your document that includes a message (such as “Confidential”).
1. On the File menu, click Print.
2. Select the driver.
3. Open the Cover Page menu, and then select whether to print the cover page Before Documentor After Document.
4. In the Cover Page Type menu, select the message that you want to print on the cover page.
NOTE: To print a blank cover page, select Standard as the Cover Page Type.
ENWW Use features in the Macintosh printer driver 77

Use watermarksA watermark is a notice, such as “Confidential,” that is printed in the background of each page of adocument.
1. On the File menu, click Print.
2. Open the Watermarks menu.
3. Next to Mode, select the type of watermark to use. Select Watermark to print a semi-transparentmessage. Select Overlay to print a message that is not transparent.
4. Next to Pages, select whether to print the watermark on all pages or on the first page only.
5. Next to Text, select one of the standard messages, or select Custom and type a new message inthe box.
6. Select options for the remaining settings.
Print multiple pages on one sheet of paper in MacintoshYou can print more than one page on a single sheet of paper. This feature provides a cost-effective wayto print draft pages.
1. On the File menu, click Print.
2. Select the driver.
3. Open the Layout menu.
4. Next to Pages per Sheet, select the number of pages that you want to print on each sheet (1, 2,4, 6, 9, or 16).
5. Next to Layout Direction, select the order and placement of the pages on the sheet.
6. Next to Borders, select the type of border to print around each page on the sheet.
78 Chapter 4 Use the product with Macintosh ENWW

Print on both sides of the page (duplex printing)
Use automatic duplex printing
1. Insert enough paper into one of the trays to accommodate the print job. If you are loading specialpaper such as letterhead, load it in one of the following ways:
● For tray 1, load the letterhead paper face-up with the bottom edge feeding into the printer first.
● For all other trays, load the letterhead paper face-down with the top edge at the back of thetray.
2. On the File menu, click Print.
3. Open the Layout menu.
4. Next to Two-Sided, select either Long-Edge Binding or Short-Edge Binding.
5. Click Print.
Print on both sides manually
1. Insert enough paper into one of the trays to accommodate the print job. If you are loading specialpaper such as letterhead, load it in one of the following ways:
● For tray 1, load the letterhead paper face-up with the bottom edge feeding into the printer first.
● For all other trays, load the letterhead paper face-down with the top edge at the back of thetray.
CAUTION: To avoid jams, do not load paper that is heavier than 105 g/m2 (28-lb bond).
2. On the File menu, click Print.
3. On the Finishing menu, select Manually Print on 2nd Side.
4. Click Print. Follow the instructions in the pop-up window that appears on the computer screenbefore replacing the output stack in tray 1 for printing the second half.
5. Go to the printer, and remove any blank paper that is in tray 1.
6. Insert the printed stack face-up with the bottom edge feeding into the printer first in tray 1. Youmust print the second side from tray 1.
7. If prompted, press the appropriate control-panel button to continue.
Set the stapling optionsIf a finishing device that has a stapler is installed, you can staple documents.
1. On the File menu, click Print.
2. Open the Finishing menu.
3. In the Stapling Options drop-down list, select the stapling option that you want to use.
ENWW Use features in the Macintosh printer driver 79

Store jobsYou can store jobs on the product so you can print them at any time. You can share stored jobs withother users, or you can make them private.
1. On the File menu, click Print.
2. Open the Job Storage menu.
3. In the Job Storage: drop-down list, select the type of stored job.
4. For the Stored Job, Private Job, and Private Stored Job types of stored jobs, enter a name forthe stored job in the box next to Job Name:.
Select which option to use if another stored job already has that name.
● Use Job Name + (1 - 99) appends a unique number to the end of the job name.
● Replace Existing File overwrites the existing stored job with the new one.
5. If you selected Stored Job or Private Job in step 3, type a 4-digit number in the box next to PINTo Print (0000 - 9999). When other people attempt to print this job, the product prompts them toenter this PIN number.
Set the color optionsUse the Color Options pop-up menu to control how colors are interpreted and printed from softwareprograms.
1. On the File menu in the software program, click Print.
2. Select the driver.
3. Open the Color Options pop-up menu.
4. Click Show Advanced Options.
5. Adjust the individual settings for text, graphics, and photographs.
Use the Services menuIf the product is connected to a network, use the Services menu to obtain product and supply-statusinformation.
1. On the File menu, click Print.
2. Open the Services menu.
80 Chapter 4 Use the product with Macintosh ENWW

3. To open the embedded Web server and perform a maintenance task, do the following:
a. Select Device Maintenance.
b. Select a task from the drop-down list.
c. Click Launch.
4. To go to various support Web sites for this device, do the following:
a. Select Services on the Web.
b. Select Internet Services, and select an option from the drop-down list.
c. Click Go!.
ENWW Use features in the Macintosh printer driver 81

82 Chapter 4 Use the product with Macintosh ENWW

5 Connect the product
● USB connection
● Network connection
ENWW 83
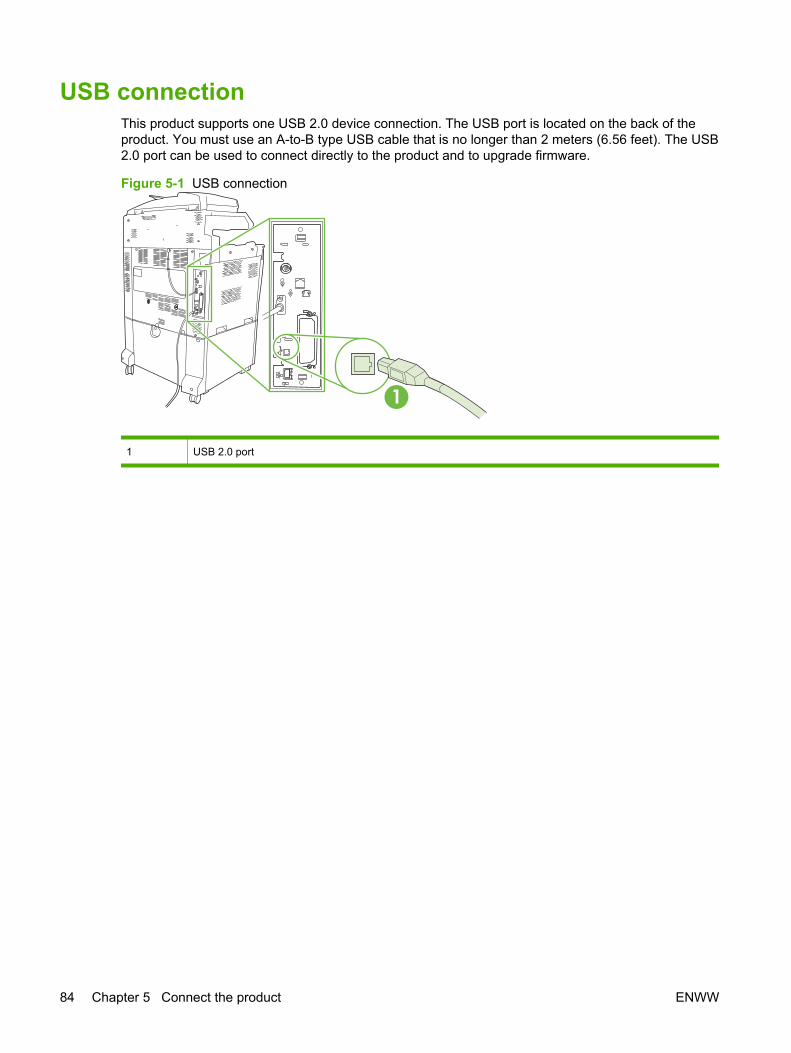
USB connectionThis product supports one USB 2.0 device connection. The USB port is located on the back of theproduct. You must use an A-to-B type USB cable that is no longer than 2 meters (6.56 feet). The USB2.0 port can be used to connect directly to the product and to upgrade firmware.
Figure 5-1 USB connection
1 USB 2.0 port
84 Chapter 5 Connect the product ENWW

Network connectionAll product models include an embedded HP Jetdirect print server, which supports connection to anetwork using the local area network (LAN) connector (RJ-45) on the back of the product. For moreinformation about configuring the product on a network see Network configuration on page 87
Figure 5-2 Network connection
1 Network cable
2 Network port
ENWW Network connection 85

86 Chapter 5 Connect the product ENWW

6 Network configuration
● Benefits of a network connection
● Supported network protocols
● Configuring network settings
● Network utilities
ENWW 87

Benefits of a network connectionConnecting the product to a network provides a number of benefits:
● All network users can share the same product.
● You can manage the product remotely, from any computer on the network, by using the embeddedWeb server (EWS).
● You can use the HP Easy Printer Care software to view supply usage on all HP products connectedto the network. This makes it easy to centrally manage ordering replacement cartridges and othersupplies.
● For large enterprise businesses, you can also manage the product remotely by using HP WebJetadmin.
88 Chapter 6 Network configuration ENWW

Supported network protocolsThe product supports the TCP/IP network protocol, the most widely used and accepted networkingprotocol. Many networking services utilize this protocol. For more information, see TCP/IPon page 90. The following table lists the supported networking services and protocols.
Table 6-1 Printing
Service name Description
port9100 (Direct Mode) Printing service
Line printer daemon (LPD) Printing service
Table 6-2 Network device discovery
Service name Description
SLP (Service Location Protocol) Device-discovery protocol, used to help find and configurenetwork devices. Used primarily by Microsoft-based programs.
Bonjour Device-discovery protocol, used to help find and configurenetwork devices. Used primarily by Apple Macintosh-basedprograms.
Table 6-3 Messaging and management
Service name Description
HTTP (Hyper Text Transfer Protocol) Allows Web browsers to communicate with embedded Webserver.
EWS (embedded Web server) Allows a user to manage the product through a Web browser.
SNMP (Simple Network Management Protocol) Used by network applications for product management. SNMPv1 and standard MIB-II (Management Information Base)objects are supported.
Table 6-4 IP addressing
Service name Description
DHCP (Dynamic Host Configuration Protocol) For automatic IP address assignment. The DHCP serverprovides the product with an IP address. Generally, no userintervention is required for the product to obtain an IP addressfrom a DHCP server.
BOOTP (Bootstrap Protocol) For automatic IP address assignment. The BOOTP serverprovides the product with an IP address. Requires theadministrator to input a product's MAC hardware address onthe BOOTP server for the product to obtain an IP address fromthat server.
Auto IP For automatic IP address assignment. If neither a DHCPserver nor a BOOTP server is present, the product uses thisservice to generate a unique IP address.
ENWW Supported network protocols 89

Configuring network settingsYou might need to configure certain network parameters on the product. You can configure theseparameters from the installation software, the product control panel, the embedded Web server, ormanagement software, such as HP Web Jetadmin.
For more information about supported networks and network configuration tools, see the HP JetdirectPrint Servers Administrator’s Guide. The guide comes with printers in which an HP Jetdirect print serveris installed.
TCP/IPSimilar to a common language that people use to communicate with each other, TCP/IP (TransmissionControl Protocol/Internet Protocol) is a suite of protocols designed to define the way computers andother devices communicate with each other over a network.
Internet Protocol (IP)When information is sent across the network, the data is broken down into small packets. Each packetis sent independently. Each packet is encoded with IP information, such as the IP address of the senderand receiver. IP packets can be routed over routers and gateways: devices that connect a network withother networks.
IP communications require no connection. When IP packets are sent, they might not arrive at theirdestination in the correct sequence. However, higher-level protocols and programs place the packetsin the correct sequence, so IP communications are efficient.
Each node or device that communicates on the network requires an IP address.
Transmission Control Protocol (TCP)TCP breaks the data into packets and recombines them on the receiving end by providing a connection-oriented, reliable, and guaranteed delivery service to another node on the network. When data packetsare received at their destination, TCP calculates a checksum for each packet to verify that the data isnot corrupt. If the data in the packet has been corrupted during transmission, TCP discards the packetand requests that the packet be resent.
IP addressEvery host (workstation or node) on an IP network requires a unique IP address for each networkinterface. This address is used to identify both the network and specific hosts that are located on thatnetwork. It is possible for a host to query a server for a dynamic IP address each time the product bootsup (for example, using DHCP and BOOTP).
An IP address contains four bytes of information, divided into sections that each contain one byte. TheIP address has the following format:
xxx.xxx.xxx.xxx
CAUTION: When assigning IP addresses, always consult the IP address administrator. Setting thewrong address can disable other equipment operating on the network or interfere with communications.
Configure IP parametersTCP/IP configuration parameters can be configured manually, or they can be automatically downloadedby using DHCP or BOOTP each time the product is turned on.
90 Chapter 6 Network configuration ENWW

When turned on, a new product that is unable to retrieve a valid IP address from the networkautomatically assigns itself a default IP address. The IP address for the product is listed on the productConfiguration page and the Network report. See Information pages on page 178.
Dynamic Host Configuration Protocol (DHCP)
DHCP allows a group of devices to use a set of IP addresses that are maintained by a DHCP server.The product sends a request to the server, and if an IP address is available, the server assigns it to thatproduct.
BOOTP
BOOTP is a bootstrap protocol used to download configuration parameters and host information froma network server.
The client broadcasts a boot request packet that contains the product hardware address. The serveranswers with a boot reply packet that contains the information that the product needs for configuration.
SubnetsWhen an IP network address for a particular network class is assigned to an organization, no provisionis made for more than one network being present at that location. Local network administrators usesubnets to partition a network into several different subnetworks. Splitting a network into subnets canresult in better performance and improved use of limited network address space.
Subnet mask
The subnet mask is a mechanism used to divide a single IP network into several different subnetworks.For a given network class, a portion of an IP address that would normally be used to identify a node isused, instead, to identify a subnetwork. A subnet mask is applied to each IP address to specify theportion used for subnetworks, and the portion used to identify the node.
GatewaysGateways (routers) are used to connect networks together. Gateways are devices that act as translatorsbetween systems that do not use the same communication protocols, data formatting, structures,languages, or architectures. Gateways repackage the data packets and change the syntax to matchthat of the destination system. When networks are divided into subnets, gateways are required toconnect one subnet to another.
Default gateway
The default gateway is the IP address of the gateway or router that moves packets between networks.
If multiple gateways or routers exist, then the default gateway is typically the address of the first, ornearest, gateway or router. If no gateways or routers exist, then the default gateway will typically assumethe IP address of the network node (such as the workstation or product).
ENWW Configuring network settings 91
Configure TCP/IPv4 parametersIf your network doesn't provide automatic IP addressing through DHCP, BOOTP, RARP, or anothermethod, you might need to enter the following parameters manually before you can print over thenetwork:
● IP address (4 bytes)
● Subnet mask (4 bytes)
● Default gateway (4 bytes)
Input or change the IP addressYou can view the current IP address of the device from the control-panel Home screen by touchingNetwork Address.
Use the following procedure to change the IP address manually.
1. Scroll to and touch Administration.
2. Scroll to and touch Initial Setup.
3. Touch Networking and I/O.
4. Touch Embedded Jetdirect.
5. Touch TCP/IP.
6. Touch IPV4 Settings.
7. Touch Config Method.
8. Touch Manual.
9. Touch Save.
10. Touch Manual Settings.
11. Touch IP Address.
12. Touch the IP Address text box.
13. Use the touchscreen keypad to type the IP address.
14. Touch OK.
15. Touch Save.
Set the subnet mask1. Scroll to and touch Administration.
2. Scroll to and touch Initial Setup.
3. Touch Networking and I/O.
4. Touch Embedded Jetdirect.
5. Touch TCP/IP.
92 Chapter 6 Network configuration ENWW

6. Touch IPV4 Settings.
7. Touch Config Method.
8. Touch Manual.
9. Touch Save.
10. Touch Manual Settings.
11. Touch Subnet Mask.
12. Touch the Subnet Mask text box.
13. Use the touchscreen keypad to type the subnet mask.
14. Touch OK.
15. Touch Save.
Set the default gateway1. Scroll to and touch Administration.
2. Scroll to and touch Initial Setup.
3. Touch Networking and I/O.
4. Touch Embedded Jetdirect.
5. Touch TCP/IP.
6. Touch IPV4 Settings.
7. Touch Config Method.
8. Touch Manual.
9. Touch Save.
10. Touch Manual Settings.
11. Touch Default Gateway.
12. Touch the Default Gateway text box.
13. Use the touchscreen keyboard to type the default gateway.
14. Touch OK.
15. Touch Save.
Configure TCP/IPv6 parametersFor information about configuring the device for a TCP/IPv6 network, see the HP Jetdirect Print ServersAdministrator's Guide.
ENWW Configuring network settings 93

Network utilitiesThe product can be used with several utilities that make it easy to monitor and manage the product ona network.
● HP Web Jetadmin: See HP Web Jetadmin on page 69.
● Embedded Web server: See Embedded Web server on page 69.
● HP Easy Printer Care software: See HP Easy Printer Care on page 69.
Other components and utilities
Windows Macintosh OS
● Software installer — automates the printing systeminstallation
● Online Web registration
● The HP Printer Utility — change device settings, viewstatus, and set up printer-event notification from a Mac.This utility is supported for Mac OS X V10.2 and later.
94 Chapter 6 Network configuration ENWW
7 Paper and print media
● Understand paper and print media use
● Supported paper and print media sizes
● Supported paper types
● Special paper or print media guidelines
● Load paper and print media
● Configure trays
● Choose an output location
ENWW 95
Understand paper and print media useThis product supports a variety of paper and other print media in accordance with the guidelines in thisuser guide. Paper or print media that does not meet these guidelines might cause the following problems:
● Poor print quality
● Increased jams
● Premature wear on the product, requiring repair
For best results, use only HP-brand paper and print media designed for laserjets or multiuse. Do notuse paper or print media made for inkjet printers. Hewlett-Packard Company cannot recommend theuse of other brands of media because HP cannot control their quality.
It is possible for paper to meet all of the guidelines in this user guide and still not produce satisfactoryresults. This might be the result of improper handling, unacceptable temperature and/or humidity levels,or other variables over which Hewlett-Packard has no control.
CAUTION: Using paper or print media that does not meet Hewlett-Packard's specifications mightcause problems for the product, requiring repair. This repair is not covered by the Hewlett-Packardwarranty or service agreements.
96 Chapter 7 Paper and print media ENWW

Supported paper and print media sizesNOTE: To obtain best print results, select the appropriate paper size and type in your print driver beforeprinting.
Table 7-1 Supported paper and print media sizes
Size Dimensions Tray 1 Tray 2 Trays 3, 4, 5
Letter 216 x 279 mm (8.5 x 11 in) 1 1
Letter Rotated 279 x 216 mm (11 x 8.5 in) 1 1
Legal 216 x 356 mm (8.5 x 14 in) 1 1
A4 210 x 297 mm (8.27 x 11.69 in) 1 1
A4 Rotated 297 x 210 mm (11.69 x 8.27 in) 1 1
Executive 184 x 267 mm (7.24 x 10.51 in) 1 1
Statement 139.7 x 215.9 mm (5.5 x 8.5 in)
8.5 x 13 216 x 330 mm (8.5 x 13 in)
A3 297 x 420 mm (11.69 x 16.54 in) 1 1
A5 148 x 210 mm (5.83 x 8.27 in) 1 1
A6 105 x 148 mm (4.13 x 5.83 in)
11 x 17 279 x 432 mm (11 x 17 in) 1 1
12 x 18 305 x 457 mm (12 x 18 in)
B4 (JIS) 257 x 364 mm (10.12 x 14.33 in) 1 1
RA3 305 x 430 mm (12 x 16.93 in)
SRA3 320 x 450 mm (12.6 x 17.7 in)
B5 (JIS) 182 x 257 mm (7.17 x 10.12 in) 1 1
8k 270 x 390 mm (10.63 x 15.35 in)
16k 195 x 270 mm (7.68 x 10.63 in)
Custom 98.55 x 139.70 mm to 320 x 457.2 mm(3.9 x 5.5 to 12.6 x 18 in)3
Custom 148 x 210 mm to 297 x 432 mm (5.8 x 8.2 to11.7 x 17 in)2
Custom 148 x 210 mm to 320 x 457.2 mm (5.8 x 8.2 to12.6 x 18 in)
1 Tray automatically detects paper size.2 Standard sizes within the custom range for Tray 2 are: 8.5 x 13, RA4, SRA4, 8K (270 x 390), 16K (195 x 270)3 Standard sizes within the custom range for Trays 3, 4, and 5 are: 8.5 x 13, RA4, SRA4, 8K (270 x 390), 16K (195 x 270), RA3,
SRA3 , and 12 x 18
Table 7-2 Supported envelopes and postcards
Size Dimensions Tray 1 Trays 2, 3, 4, 5
Envelope #9 98 x 225 mm (3.88 x 8.88 in)
ENWW Supported paper and print media sizes 97

Size Dimensions Tray 1 Trays 2, 3, 4, 5
Envelope #10 105 x 241 mm (4.13 x 9.49 in)
Envelope DL 110 x 220 mm (4.33 x 8.66 in)
Envelope C5 162 x 229 mm (6.93 x 9.84 in)
Envelope B5 176 x 250 mm (6.7 x 9.8 in)
Envelope C6 162 x 114 mm (6.4 x 4.5 in)
EnvelopeMonarch
98 x 191 mm (3.9 x 7.5 in)
Double Post Card 148 x 200 mm (5.83 x 7.87 in)
US Index Cards 102 x 152 mm (4 x 6 in) and 127 x 203 mm (5 x 8 in)
1 Weights greater than 160 g/m2 may not perform well, but will not harm the product.
The following paper sizes are supported with the optional HP 3-bin Stapler/Stacker and HP BookletMaker/Finisher accessories.
Table 7-3 Supported paper and print media sizes for the optional HP 3-bin Stapler/Stacker and HP Booklet Maker/Finisher accessories
Size Dimensions Stacking2 Angledstaple (left-angled)
Angledstaple (right-angled)
Two staples(top or side)
Folding Saddle stitch
Letter 216 x 279 mm(8.5 x 11 in)
Letter Rotated 279 x 216 mm(11 x 8.5 in)
1 1
Legal 216 x 356 mm(8.5 x 14 in)
1 1
A4 210 x 297 mm(8.27 x 11.69 in)
A4 Rotated 297 x 210 mm(11.69 x 8.27 in)
1 1
Executive 184 x 267 mm(7.24 x 10.51 in)
8.5 x 13 216 x 330 mm(8.5 x 13 in)
A3 297 x 420 mm(11.69 x 16.54 in)
1 1
A5 148 x 210 mm(5.83 x 8.27 in)
A6 105 x 148 mm(4.13 x 5.83 in)
Statement 140 x 216 mm(5.5 x 8.5 in)
11 x 17(Ledger)
279 x 432 mm(11 x 17 in)
1 1
Table 7-2 Supported envelopes and postcards (continued)
98 Chapter 7 Paper and print media ENWW

Size Dimensions Stacking2 Angledstaple (left-angled)
Angledstaple (right-angled)
Two staples(top or side)
Folding Saddle stitch
12 x 18 305 x 457 mm(12 x 18 in)
B4 (JIS) 257 x 364 mm(10.12 x 14.33 in)
1 1
RA3 305 x 430 mm(12 x 16.93 in)
SRA3 320 x 450 mm(12.6 x 17.7 in)
B5 (JIS) 257 x 182 mm(10.12 x 7.17 in)
B6 (JIS) 128 x 182 mm(5.04 x 7.2 in)
8K 270 x 390 mm(10.63 x 15.35 in)
16K 195 x 270 mm(7.68 x 10.63 in)
Envelope 9# 98.4 x 225.4 mm(3.88 x 8.88 in)
Envelope 10# 104.77 x 241.3 mm(4.12 x 9.5 in)
Envelope DL 110 x 220 mm(4.33 x 8.66 in)
Envelope C5 162 x 229 mm(6.38 x 9.02 in)
Envelope B5 176 x 250 mm(6.93 x 9.84 in)
Envelope C6 114 x 162 mm(4.49 x 6.38 in)
EnvelopeMonarch
98.42 x 190.5 mm(3.88 x 7.5 in)
Double PostCard
148 x 200 mm(5.83 x 7.87 in)
4 x 6 IndexCard
102 x 152 mm (4 x 6 in)
5 x 8 IndexCard
127 x 203 mm (5 x 8 in)
Custom Size 98.55 x 139.70 mm to320 x 457.2 mm(3.9 x 5.5 to12.6 x 18 in)
1 Booklet maker only2 Stacking uses bins 1, 2, and 3 in the stapler/stacker, or bins 1 and 2 in the booklet maker.
Table 7-3 Supported paper and print media sizes for the optional HP 3-bin Stapler/Stacker and HP Booklet Maker/Finisher accessories (continued)
ENWW Supported paper and print media sizes 99

Supported paper typesTable 7-4 Tray 1 paper information
Type Specifications Quantity Driver settings Paper orientation
Paper and cardstock,standard sizes
Range:
60 g/m2 (16 lb) bond to220 g/m2 (58 lb) bond
Maximum stack height:10 mm (0.6 in)
Equivalent to 100sheets of 75 g/m2 (20lb) bond.
Plain or unspecified Load preprinted orprepunched paperfacing down, with thetop edge leading intothe tray, or toward theback of the product
Envelopes Less than 60 g/m2 (16lb) bond to 90 g/m2 (24lb) bond
Up to 10 envelopes Envelope Short edge leading,flap toward the front ofthe product, facing up
Labels Maximum 0.23 mm(0.009 in) thick
Maximum stack height:10 mm (0.6 in)
Labels Side to be printed onfacing down
Transparencies Minimum 0.13 mm(0.005 in) thick
Maximum stack height:10 mm (0.6 in)
Transparencies Side to be printed onfacing down
Heavy 0.13 mm (0.005 in)thick
Maximum stack height:10 mm (0.6 in)
Light glossy, glossy, orheavy glossy
Side to be printed onfacing down
Glossy Range:
75 g/m2 (20 lb) bond to220 g/m2 (58 lb) bond
Maximum stack height:10 mm (0.6 in)
Light glossy, glossy, orheavy glossy
Side to be printed onfacing down
Photo media 60 g/m2 (16 lb) bond to220 g/m2 (58 lb) bond
Maximum stack height:10 mm (0.6 in)
Side to be printed onfacing down
Cut sheet paper 60 g/m2 (16 lb) bond to220 g/m2 (58 lb) bond
Maximum stack height:10 mm (0.6 in)
Side to be printed onfacing down
Tough paper 60 g/m2 (16 lb) bond to220 g/m2 (58 lb) bond
Maximum stack height:10 mm (0.6 in)
Side to be printed onfacing down
Table 7-5 Trays 2, 3, 4, and 5 paper information
Type Specifications Quantity Settings Paper orientation
Paper and cardstock,standard sizes
Range:
60 g/m2 (16 lb) bond to220 g/m2 (58 lb) bond
500 sheets of 75 g/m2
(20 lb) bond.Plain or unspecified Load preprinted or
prepunched paperfacing up, with the toptoward the back of thetray or toward the right-hand side of the tray.
Labels Maximum 0.13 mm(0.005 in) thick
Maximum stack height:54 mm (2.1 in)
Labels Side to be printed onfacing up
Transparencies Minimum 0.13 mm(0.005 in) thick
Maximum stack height:54 mm (2.1 in)
Transparencies Side to be printed onfacing up
Heavy 0.13 mm (0.005 in) thick Maximum stack height:54 mm (2.1 in)
Light glossy, glossy, orheavy glossy
Side to be printed onfacing up
Glossy 75 g/m2 (20 lb) bond to220 g/m2 (58 lb) bond
Maximum stack height:54 mm (2.1 in)
Light glossy, glossy, orheavy glossy
Side to be printed onfacing up
100 Chapter 7 Paper and print media ENWW
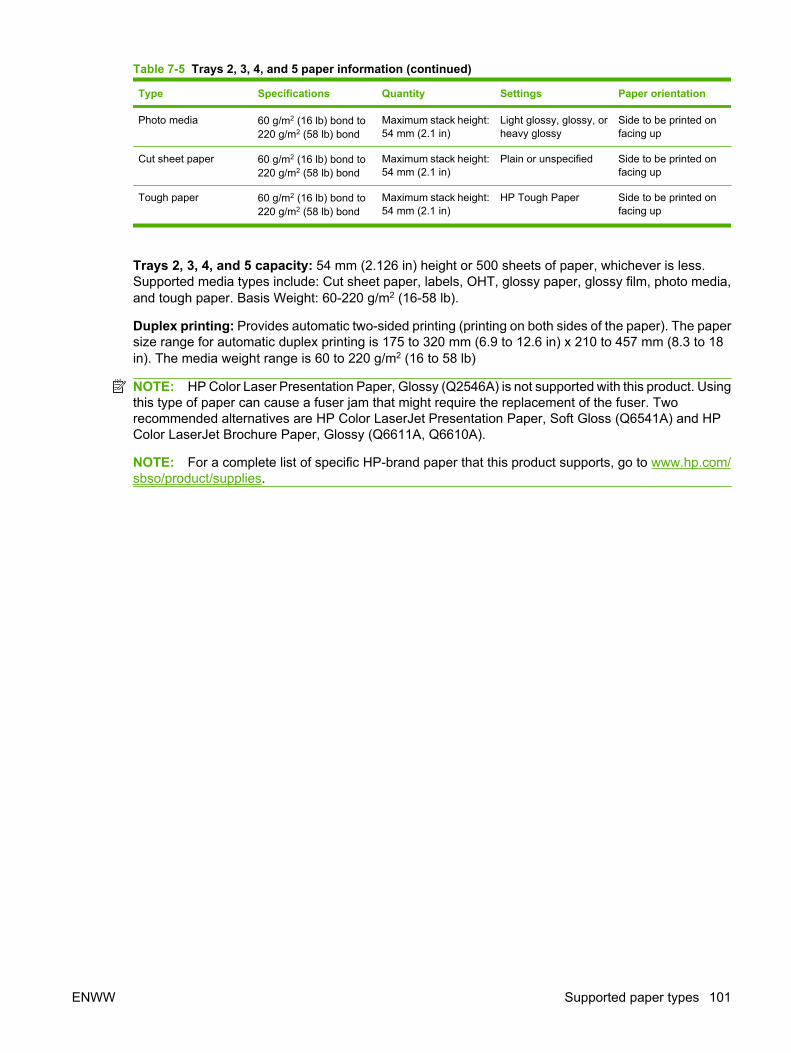
Type Specifications Quantity Settings Paper orientation
Photo media 60 g/m2 (16 lb) bond to220 g/m2 (58 lb) bond
Maximum stack height:54 mm (2.1 in)
Light glossy, glossy, orheavy glossy
Side to be printed onfacing up
Cut sheet paper 60 g/m2 (16 lb) bond to220 g/m2 (58 lb) bond
Maximum stack height:54 mm (2.1 in)
Plain or unspecified Side to be printed onfacing up
Tough paper 60 g/m2 (16 lb) bond to220 g/m2 (58 lb) bond
Maximum stack height:54 mm (2.1 in)
HP Tough Paper Side to be printed onfacing up
Trays 2, 3, 4, and 5 capacity: 54 mm (2.126 in) height or 500 sheets of paper, whichever is less.Supported media types include: Cut sheet paper, labels, OHT, glossy paper, glossy film, photo media,and tough paper. Basis Weight: 60-220 g/m2 (16-58 lb).
Duplex printing: Provides automatic two-sided printing (printing on both sides of the paper). The papersize range for automatic duplex printing is 175 to 320 mm (6.9 to 12.6 in) x 210 to 457 mm (8.3 to 18in). The media weight range is 60 to 220 g/m2 (16 to 58 lb)
NOTE: HP Color Laser Presentation Paper, Glossy (Q2546A) is not supported with this product. Usingthis type of paper can cause a fuser jam that might require the replacement of the fuser. Tworecommended alternatives are HP Color LaserJet Presentation Paper, Soft Gloss (Q6541A) and HPColor LaserJet Brochure Paper, Glossy (Q6611A, Q6610A).
NOTE: For a complete list of specific HP-brand paper that this product supports, go to www.hp.com/sbso/product/supplies.
Table 7-5 Trays 2, 3, 4, and 5 paper information (continued)
ENWW Supported paper types 101
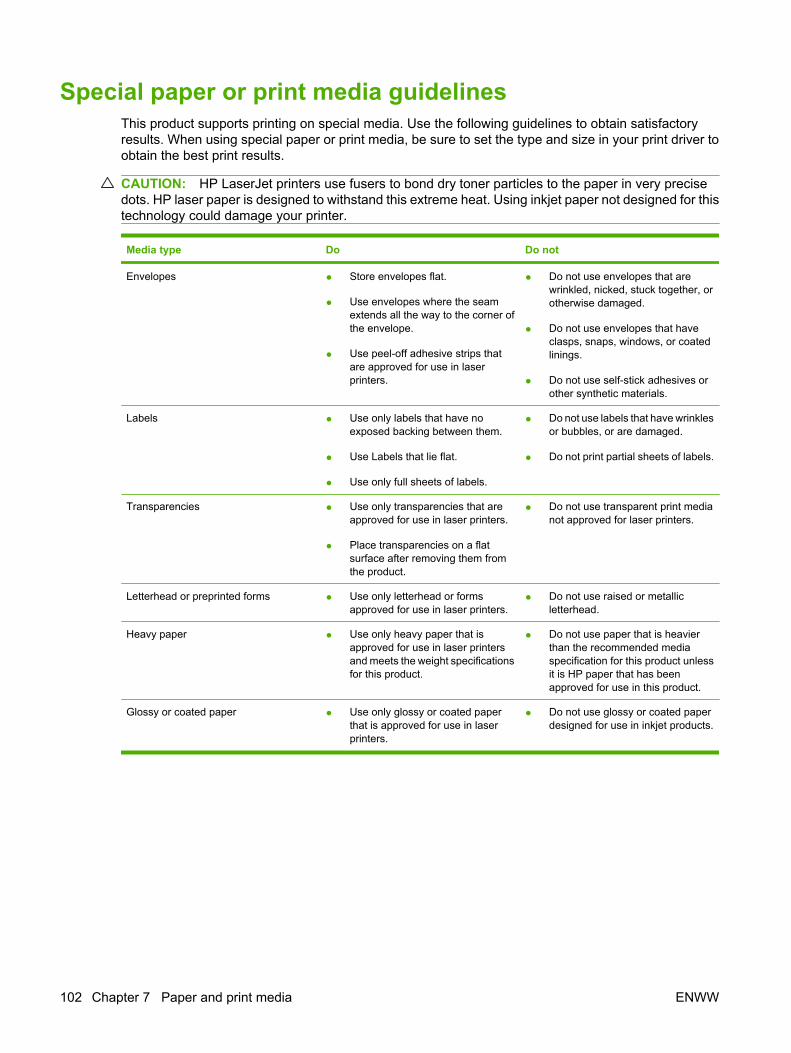
Special paper or print media guidelinesThis product supports printing on special media. Use the following guidelines to obtain satisfactoryresults. When using special paper or print media, be sure to set the type and size in your print driver toobtain the best print results.
CAUTION: HP LaserJet printers use fusers to bond dry toner particles to the paper in very precisedots. HP laser paper is designed to withstand this extreme heat. Using inkjet paper not designed for thistechnology could damage your printer.
Media type Do Do not
Envelopes ● Store envelopes flat.
● Use envelopes where the seamextends all the way to the corner ofthe envelope.
● Use peel-off adhesive strips thatare approved for use in laserprinters.
● Do not use envelopes that arewrinkled, nicked, stuck together, orotherwise damaged.
● Do not use envelopes that haveclasps, snaps, windows, or coatedlinings.
● Do not use self-stick adhesives orother synthetic materials.
Labels ● Use only labels that have noexposed backing between them.
● Use Labels that lie flat.
● Use only full sheets of labels.
● Do not use labels that have wrinklesor bubbles, or are damaged.
● Do not print partial sheets of labels.
Transparencies ● Use only transparencies that areapproved for use in laser printers.
● Place transparencies on a flatsurface after removing them fromthe product.
● Do not use transparent print medianot approved for laser printers.
Letterhead or preprinted forms ● Use only letterhead or formsapproved for use in laser printers.
● Do not use raised or metallicletterhead.
Heavy paper ● Use only heavy paper that isapproved for use in laser printersand meets the weight specificationsfor this product.
● Do not use paper that is heavierthan the recommended mediaspecification for this product unlessit is HP paper that has beenapproved for use in this product.
Glossy or coated paper ● Use only glossy or coated paperthat is approved for use in laserprinters.
● Do not use glossy or coated paperdesigned for use in inkjet products.
102 Chapter 7 Paper and print media ENWW

Load paper and print mediaYou can load different media in the trays and then request media by type or size by using the controlpanel.
Load Tray 1CAUTION: To avoid jams, never add or remove paper from Tray 1 during printing.
1. Open Tray 1.
2. Set the side guides to the correct width, and pull out the tray extensions to support paper.
3. Load paper in the tray with the side to be printed on face down and the top of the paper or non-postage end facing the back of the printer.
NOTE: For Letter Rotated and A4 Rotated sizes, place the side to be printed on face down, withthe bottom of the page facing into the printer.
4. Make sure the stack fits under the tabs on the guides and does not exceed the load-level indicators.
5. Adjust the side guides so that they lightly touch the paper stack but do not bend it.
ENWW Load paper and print media 103

Print envelopesIf your software does not automatically format an envelope, specify Landscape for page orientation inyour software program or printer driver. Use the following guidelines to set margins for return anddestination addresses on Commercial #10 or DL envelopes:
Address type Left margin Top margin
Return 15 mm (0.6 in) 15 mm (0.6 in)
Destination 102 mm (4 in) 51 mm (2 in)
For envelopes of other sizes, adjust the margin settings accordingly.
Load trays 2, 3, 4, or 5Trays 2, 3, 4, and 5 each hold up to 500 sheets of standard paper or a 54 mm (2.13-inch) stack of labelsor other thick paper.
Load standard-sized media into trays 2, 3, 4, or 5The product automatically detects the following standard sizes of media in these 500-sheet trays: Letter,Letter rotated, Legal, Executive, 11x17, A3, A4, A4 rotated, A5, B4 (JIS), and B5 (JIS).
CAUTION: Do not print envelopes or unsupported sizes of paper from the 500-trays. Print on thesetypes of paper only from Tray 1.
1. Slide the tray from the product.
NOTE: Do not open the input tray while it is in use. Doing so can cause jams in the product.
104 Chapter 7 Paper and print media ENWW

2. Adjust the paper width guide by squeezing the adjustment latch and sliding the guide to the sizeof the paper being used.
3. Adjust the paper length guide by squeezing the adjustment latch and sliding the guide to the sizeof the paper being used.
ENWW Load paper and print media 105

4. Load paper into the tray face up. Check the paper to verify the guides lightly touch the stack, butdo not bend it.
NOTE: To prevent jams, do not overfill the input tray. Be sure the top of the stack is below thetray full indicator.
NOTE: For best performance, fill the tray completely without splitting the ream of paper. Splittingthe ream can cause a multifeed problem. The capacity of the paper tray can vary. For example, ifyou are using 75 g/m2 (20 lb) paper, the tray holds a full ream of 500 sheets. If the media is heavier,the tray will not hold a full ream. Do not overfill the tray.
NOTE: If the tray is not adjusted correctly, an error message might appear or the media mightjam.
5. Slide the tray into the product. The control panel shows the tray’s paper type and size. If theconfiguration is not correct, touch Modify on the control panel and select the correct configuration.If the configuration is correct, touch OK.
Load undetectable standard-sized media into Tray 2, 3, 4, and 5The following undetectable standard-sized media is supported in the 500-sheet trays:
● Executive (JIS) (8.5 x 13)
● 12 x 18 (Trays 3, 4, or 5 only)
● B4 (ISO)
● RA3 (Trays 3, 4, or 5 only)
106 Chapter 7 Paper and print media ENWW
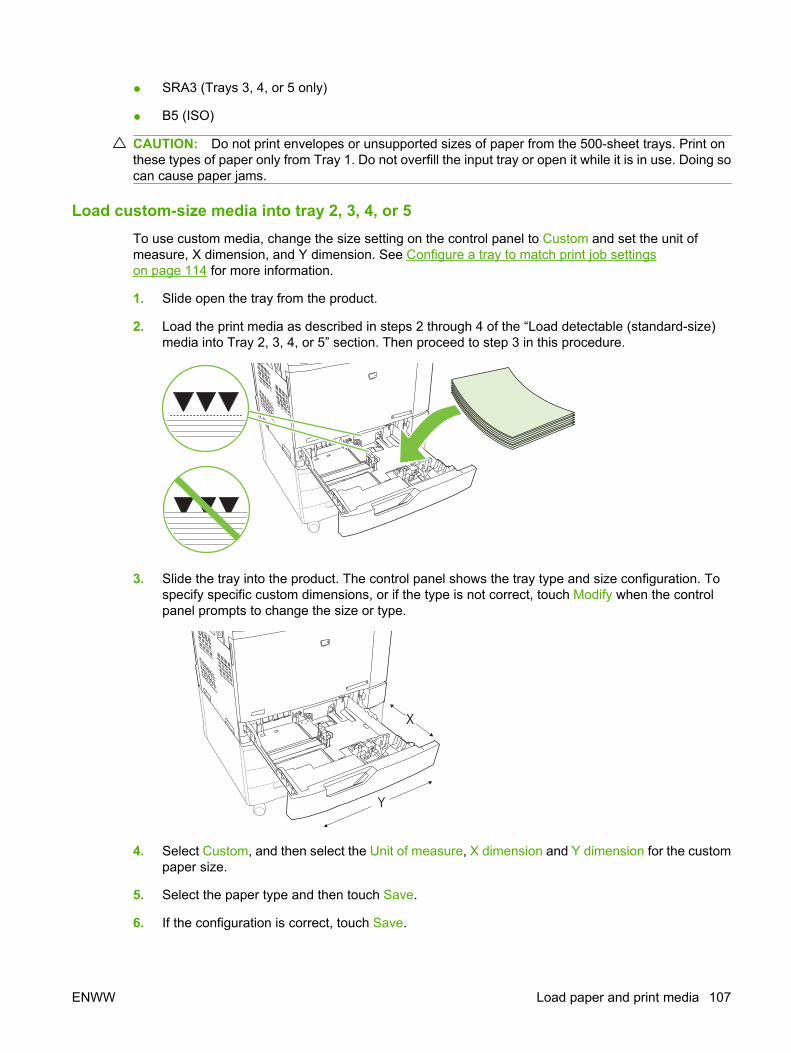
● SRA3 (Trays 3, 4, or 5 only)
● B5 (ISO)
CAUTION: Do not print envelopes or unsupported sizes of paper from the 500-sheet trays. Print onthese types of paper only from Tray 1. Do not overfill the input tray or open it while it is in use. Doing socan cause paper jams.
Load custom-size media into tray 2, 3, 4, or 5To use custom media, change the size setting on the control panel to Custom and set the unit ofmeasure, X dimension, and Y dimension. See Configure a tray to match print job settingson page 114 for more information.
1. Slide open the tray from the product.
2. Load the print media as described in steps 2 through 4 of the “Load detectable (standard-size)media into Tray 2, 3, 4, or 5” section. Then proceed to step 3 in this procedure.
3. Slide the tray into the product. The control panel shows the tray type and size configuration. Tospecify specific custom dimensions, or if the type is not correct, touch Modify when the controlpanel prompts to change the size or type.
Y
X
4. Select Custom, and then select the Unit of measure, X dimension and Y dimension for the custompaper size.
5. Select the paper type and then touch Save.
6. If the configuration is correct, touch Save.
ENWW Load paper and print media 107

Load large size paper into Tray 3, 4, or 5Use the following instructions if you are loading 11x17, RA3, SRA3, or 12 x 18-sized paper into Tray 3,4, or 5.
1. Slide open Tray 3, 4, or 5.
2. Adjust the paper width guide by squeezing the adjustment latch and sliding the guide to the sizeof the paper being used.
3. Load the paper into the tray.
4. Move the paper stop lever to the correct position for the paper being used.
● For SRA3-sized paper, rotate the lever all the way to the left.
● For A3- or 11x17-sized paper, rotate the lever down into the center position.
● For RA3- or 12x18-sized paper, rotate the lever all the way to the right.
5. Slide the tray into the product. The control panel shows the tray’s media type and size. If theconfiguration is not correct, touch Modify and configure the tray to the correct type and size. If theconfiguration is correct, touch OK.
Load letterhead, pre-printed, or pre-punched paperTo correctly print or copy on letterhead, pre-printed, or pre-punched paper, you need to make sure youload the paper correctly into the tray. You might also need to adjust the Image Rotation setting on theproduct control panel. The Image Rotation setting is used to adjust for languages that read from left toright (the default) or from right to left.
108 Chapter 7 Paper and print media ENWW

For more information regarding this subject see the Quick Reference Job Aids on the User CD that camewith the product, or visit www.hp.com/support/cljcm6030mfp/manuals or www.hp.com/support/cljcm6040mfp/manuals
Change the Image Rotation setting1. At the control panel home screen, scroll down and touch Administration.
2. Scroll down and touch Device Behavior.
3. Scroll down and touch Tray Behavior.
4. Scroll down and touch Image Rotation.
5. Touch the correct Image Rotation option. The default setting is Left to right.
6. Touch OK.
Choose the correct orientation for loading letterhead, pre-printed, or pre-punched paperThe tables below should be used as a guide for loading letterhead, pre-printed, or pre-punched paper.The first table shows the tray-loading orientation when Image Rotation is set to Left to right, whichindicates that the language reads left to right. The second table shows the tray-loading orientation whenImage Rotation is set to Right to left, which indicates that the language reads right to left. The tablesalso contain the following information:
● The paper type: letterhead, pre-printed or pre-punched.
● The paper tray: Tray 1 or Trays 2 through 5.
● Image orientation: Portrait (1) or Landscape (2).
1 2
● One-sided or two-sided (duplex) printing.
ENWW Load paper and print media 109
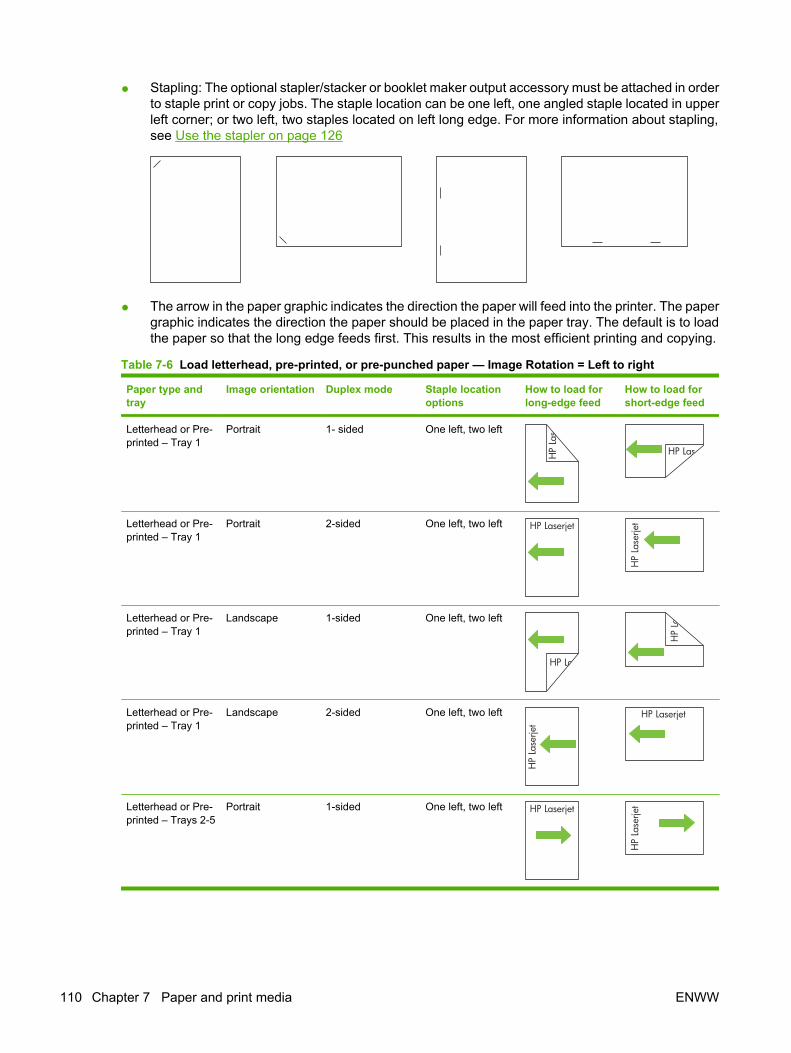
● Stapling: The optional stapler/stacker or booklet maker output accessory must be attached in orderto staple print or copy jobs. The staple location can be one left, one angled staple located in upperleft corner; or two left, two staples located on left long edge. For more information about stapling,see Use the stapler on page 126
● The arrow in the paper graphic indicates the direction the paper will feed into the printer. The papergraphic indicates the direction the paper should be placed in the paper tray. The default is to loadthe paper so that the long edge feeds first. This results in the most efficient printing and copying.
Table 7-6 Load letterhead, pre-printed, or pre-punched paper — Image Rotation = Left to right
Paper type andtray
Image orientation Duplex mode Staple locationoptions
How to load forlong-edge feed
How to load forshort-edge feed
Letterhead or Pre-printed – Tray 1
Portrait 1- sided One left, two left
Letterhead or Pre-printed – Tray 1
Portrait 2-sided One left, two left HP Laserjet
HP
Lase
rjet
Letterhead or Pre-printed – Tray 1
Landscape 1-sided One left, two left
Letterhead or Pre-printed – Tray 1
Landscape 2-sided One left, two left
HP
Lase
rjet
HP Laserjet
Letterhead or Pre-printed – Trays 2-5
Portrait 1-sided One left, two left HP Laserjet
HP
Lase
rjet
110 Chapter 7 Paper and print media ENWW

Paper type andtray
Image orientation Duplex mode Staple locationoptions
How to load forlong-edge feed
How to load forshort-edge feed
Letterhead or Pre-printed – Trays 2-5
Portrait 2-sided One left, two left
Letterhead or Pre-printed – Trays 2-5
Landscape 1-sided One left, two left
HP
Lase
rjet
HP Laserjet
Letterhead or Pre-printed – Trays 2-5
Landscape 2-sided One left, two left
Pre-punched –Tray 1
Portrait 1-sided or 2-sided One left, two left
Pre-punched –Tray 1
Landscape 1-sided or 2-sided One left, two left
Pre-punched –Trays 2-5
Portrait 1-sided or 2-sided One left, two left
Pre-punched –Trays 2-5
Landscape 1-sided or 2-sided One left, two left
Table 7-6 Load letterhead, pre-printed, or pre-punched paper — Image Rotation = Left to right (continued)
ENWW Load paper and print media 111

Table 7-7 Load letterhead, pre-printed, or pre-punched paper — Image Rotation = Right to left
Paper type andtray
Image orientation Duplex mode Staple locationoptions
How to load forlong-edge feed
How to load forshort-edge feed
Letterhead or Pre-printed – Tray 1
Portrait 1-sided One right, two right
Letterhead or Pre-printed – Tray 1
Landscape 2-sided One right, two right
HP
Lase
rjet
HP Laserjet
Letterhead or Pre-printed – Trays 2-5
Portrait 2-sided One right, two right
Letterhead or Pre-printed – Trays 2-5
Landscape 1-sided One right, two right
HP
Lase
rjet
HP Laserjet
Pre-punched –Tray 1
Portrait 1-sided or 2-sided One right, two right
Pre-punched –Tray 1
Landscape 1-sided or 2-sided One right, two right
Pre-punched –Trays 2-5
Portrait 1-sided or 2-sided One right, two right
Pre-punched –Trays 2-5
Landscape 1-sided or 2-sided One right, two right
112 Chapter 7 Paper and print media ENWW

NOTE: For more information regarding this subject see the Job Aids on the User CD that came withthe product, or visit www.hp.com/support/cljcm6030mfp/manuals or www.hp.com/support/cljcm6040mfp/manuals
ENWW Load paper and print media 113

Configure traysThe product automatically prompts you to configure a tray for type and size in the following situations:
● When you load paper into the tray
● When you specify a particular tray or media type for a print job through the printer driver or asoftware program and the tray is not configured to match the print-job’s settings
The following message appears on the control panel:Tray <x> [type] [size] To change size or type,touch “Modify”. To accept, touch “OK”.
NOTE: The prompt does not appear if you are printing from Tray 1 and Tray 1 is configured for AnyCustom and Any Type.
NOTE: If you have used other HP LaserJet product models, you might be accustomed to configuringTray 1 to First mode or Cassette mode. On HP Color LaserJet CM6040 Series, setting Tray 1 size toAny Custom is equivalent to First mode. Setting size for Tray 1 to a setting other than Any Custom isequivalent to Cassette mode.
Configure a tray when loading paper1. Load paper in the tray. Close the tray if you are using Tray 2, 3, 4, or 5.
2. The tray configuration message appears.
3. Touch OK to accept the detected size and type, or touch Modify to choose a different paper sizeor type.
4. Select the correct size and type and then touch OK.
NOTE: The product automatically detects most paper sizes in Trays 2, 3, 4, and 5.
Configure a tray to match print job settings1. In the software program, specify the source tray, the paper size, and the paper type.
2. Send the job to the product.
If the tray needs to be configured, the Load Tray x <Type> <Size> message appears.
3. Load the tray with the specified type and size of paper, and then close the tray.
To specify a custom size, Modify.
4. When the Tray <x> Size=<Size> message appears, touch OK to confirm the size.
5. When the Tray<x> Type=<Type> message appears, touch OK to confirm the type and continuewith the job.
Automatic media type sensing (auto sense mode)The automatic media type sensor functions only when that tray is configured to Any Type or Plain type.Configuring a tray to any other type, such as Bond or Glossy, deactivates the media sensor in that tray.
114 Chapter 7 Paper and print media ENWW

The HP Color LaserJet CM6030 and CM6040 MFP Series can automatically classify many paper typesinto one of the following categories:
● Plain
● Transparency
● Glossy
● Extra-heavy glossy
● Glossy film
● Heavy
For more control, a specific type must be selected in the job or configured in a tray.
Auto sense settings
Full sensing (default for Tray 1)
● The product recognizes light, plain, heavy, glossy, and tough paper and overhead transparencies.
● Each time the product begins a print job, it stops the first page to sense the type.
● This is the slowest mode.
Expanded sensing (default for Trays 2, 3, 4, and 5)
● Each time the product begins a print job, it stops the first page to sense the type.
● The product assumes that the second and all subsequent pages are of the same media type asthe first page.
● This is the second-fastest mode, and is useful for using stacks of the same media type.
Transparency only
● The product does not stop any pages for sensing but distinguishes between transparencies(Transparency mode) and paper (Normal mode).
● This is the fastest mode and is useful for high-volume printing in Normal mode.
For more information about setting these options, see Print Quality menu on page 49
Select the paper by source, type, or sizeIn the Microsoft Windows operating system, three settings affect how the printer driver tries to pull mediawhen you send a print job. Source, Type, and Size settings appear in the Page Setup, Print, or PrintProperties dialog boxes in most software programs. Unless you change these settings, the productautomatically selects a tray using the default settings.
SourceTo print by Source select a specific tray for the product to pull from. If you select a tray that is configuredfor a type or size that does not match your print job, the product prompts you to load the tray with thetype or size of print media for your print job before printing it. When you load the tray, the product beginsprinting.
ENWW Configure trays 115

Type and SizePrinting by Type or Size means that you want the product to pull from the tray that is loaded with thecorrect type and size of media. Selecting media by type rather than source is similar to locking out traysand helps protect special media from accidental use. For example, if a tray is configured for letterheadand you select plain paper, the product will not pull the letterhead from that tray. Instead, it will pull froma tray that has plain paper loaded and is configured for plain paper on the product control panel. Selectingmedia by Type and Size results in significantly better print quality for heavy paper, glossy paper, andtransparencies. Using the wrong setting might result in unsatisfactory print quality. Always print by Typefor special print media, such as labels or transparencies. Print by Size for envelopes, if possible.
● To print by Type or Size, select the Type or Size from the Page Setup dialog box, the Print dialogbox, or the Print Properties dialog box, depending on the software program.
● If you often print on a certain type or size of media, configure a tray for that type or size. Then,when you select that type or size as you print a job, the product automatically pulls media from thetray that is configured for that type or size.
116 Chapter 7 Paper and print media ENWW

Choose an output locationStandard output bins
The product has an ADF output bin and the standard output bin for printed pages.
21
1 Standard output bin
2 ADF output bin (for copy originals)
When you scan or copy documents by using the ADF, the originals are automatically delivered to theADF output bin. Copies made from the scanner glass are delivered to the standard output bin or theoutput bin(s) on the stapler/stacker or the 3-bin mailbox.
When you send print jobs to the product from a computer, the output is to the standard output bin or theoutput bin(s) on the stapler/stacker or the 3-bin mailbox.
Optional output accessoriesAn optional 3 bin stapler/stacker or booklet-maker finisher accessory can be installed with the product.When an accessory is installed, an output accessory bridge is also added on top of the product in orderto route the print jobs to the accessory output bins.
ENWW Choose an output location 117

3-bin stapler/stacker featuresTable 7-8 3-bin stapler/stacker features
Job offset Each copy of a job is shifted to one side in the output bin in order to keep each copy separatefrom the others. (Supported paper sizes: A3, A4, A4 rotated, A5, B4, B5, Ledger, Legal, Letter,Letter rotated, Statement.)
Three operation modes Mailbox Mode assigns each bin to a user or group of users. Stacker Mode uses all three outputbins for all print jobs — when one bin is full, jobs are routed to the next bin. Function SeparatorMode sends copies to bin 1, faxes to bin 2, and print jobs to bin 3.
Stapler Built-in stapler staples jobs up to 50 sheets in size or 30 stapled jobs. Pages can be stapledin one position at the front, in one position at the back, or at two positions at the side or top.
Large-capacity output bins The stacker has three bins: a 100-sheet bin, a 500-sheet bin, and a 1000-sheet bin.
Booklet maker finisher featuresTable 7-9 Booklet-maker finisher features
Booklet-making The booklet-making feature staples and folds print jobs of 2 to 15 pages into a booklet.
Folding Single-sheet print jobs can be automatically folded in the center.
Job offset Each copy of a job is shifted to one side in the output bin in order to keep each copy separatefrom the others. (Supported paper sizes: A3, A4, A4 rotated, A5, B4, B5, Ledger, Legal, Letter,Letter rotated, Statement.)
Two operation modes Mailbox Mode assigns each bin to a user or group of users, and Stacker Mode uses bothoutput bins for all print jobs — when the top bin is full, jobs are routed to the next bin.
Stapler Built-in stapler staples jobs up to 50 sheets in size or 30 stapled jobs. Pages can be stapledin one position at the front, in one position at the back, or at two positions at the side or top.
Large-capacity output bins The stacker has three bins: two 1000-sheet bins and one bin that can hold up to 25 saddle-stitched booklets.
Accessory walkaroundFigure 7-1 3-bin stapler/stacker accessory
1 2 34 5
1 Output bins
118 Chapter 7 Paper and print media ENWW

2 Front door
3 Stapler unit
4 Top cover
5 Connection cable
Figure 7-2 Booklet-maker finisher accessory
6 753
2
1
4
1 Booklet bin guide
2 Booklet output bin
3 Stacking output bins
4 Front door
5 Stapler units
6 Top cover
7 Connection cable
Use the booklet-making featureYou can create booklets from the print driver or by copying an original document.
Before creating a booklet, set the booklet bin guide for the size of paper being used:
● Closed: 11x17, Legal, A3, or B4
● Open: Letter Rotated, A4 Rotated
ENWW Choose an output location 119

Create a booklet from the print driver1. On the File menu of your software program, click Print.
2. Select HP Color LaserJet CM6030 or CM6040 MFP.
3. Click Properties, and then click Booklet Printing.
4. Set the Paper source, Paper sizes, Paper type, Orientation, Booklet Layout, Print documenton, andStaple settings, and then click OK.
5. Click OK to print.
Create a booklet from a copyDocuments can be copied from the automatic document feeder (ADF) or by placing the document onthe scanner glass.
1. From the control panel, touch Copy.
2. Scroll to and touch Booklet Format.
3. Touch Booklet on.
4. For Original Sides touch 1-sided or 2-sided.
5. Touch OK and then touch Start.
120 Chapter 7 Paper and print media ENWW

Configure the accessory operation mode
Select the operating mode at the control panelYou can set the operating mode for the stapler/stacker or the booklet maker at the product control panel.
1. At the control panel, touch Administration, and then touch Device behavior.
2. Touch MBM-3 bin stapler or Multifunction finisher.
3. Touch Operation mode, and then select the operation mode that you want to use.
● When Mailbox Mode is used, each bin is assigned to a user or group of users. Every time auser sends a print job, the job is routed to the assigned bin.
● When Stacker Mode is used and the optional 3-bin stapler/stacker is installed, the three binsact as a single bigger bin. When one bin gets full, jobs are automatically routed to the nextbin. When Stacker Mode is used and the booklet maker finisher is installed, the two upperbins act as a single bin, and the third bin is reserved for booklets.
● When Function Separator (3-bin stapler/stacker only) mode is used, each bin is assigned toa specific kind of job. Usually this designation is bin 1 for copies, bin 2 for fax, and bin 3 forprinting. These values can be modified in the Default Job Options menus for copy, fax, andprint.
NOTE: Use the product embedded Web server to assign output bins to users or groups of users.For more information see Embedded Web server on page 183.
Select the operating mode in the printer driver1. Click the Start button, point to Settings, and then click Printers (for Windows 2000) or Printers
and Faxes (for Windows XP).
From your Vista computer click Start, click Control Panel, and then in the category for Hardwareand Sound click Printer.
2. Right-click the HP product icon, and then click Properties or Printing Preferences.
3. Click the Device Settings tab.
4. Perform one of the following actions:
For automatic configuration: under Installable Options, click Update Now in the AutomaticConfiguration list.
-or-
For manual configuration: under Installable Options, select the appropriate operation mode in theAccessory Output Bin list.
5. Click Apply to save the settings.
Select the operating mode in the printer driver (Mac OS X)1. In the Apple menu, click System Preferences.
2. In the System Preferences box, click Print and Fax.
3. Click Set Up Printers. A Printer List displays.
ENWW Choose an output location 121

4. Select the HP product, and then click Show Info on the Printers menu.
5. Select the Installable Options panel.
6. In the Accessory Output Bins list, select correct accessory.
7. In the Mailbox Mode list, select the appropriate operational mode, and then click ApplyChanges.
122 Chapter 7 Paper and print media ENWW

8 Use product features
● Economy settings
● Use the stapler
● Job storage features for print jobs
● Print photos or marketing material
● Print weatherproof maps and outdoor signs
● Set the duplex alignment
ENWW 123
Economy settingsSleep and wake
Set the sleep delay
Use the sleep-delay feature to select the time interval the product remains inactive before entering sleepmode. The default is one hour.
1. Scroll to and touch Administration.
2. Touch Time/Scheduling.
3. Touch Sleep Delay.
4. Touch the sleep-delay setting that you want and then touch Save.
Set the wake time
Use the wake time feature to wake the product at a set time each day.
1. Scroll to and touch Administration.
2. Touch Time/Scheduling.
3. Touch Wake Time.
4. Touch the day of the week for the wake time.
5. Touch Custom.
6. Touch Save.
7. Touch the appropriate options to set the correct hour, minute, and AM/PM setting.
8. If you want to wake the product at the same time each day, on the Apply to all days screen, touchYes. If you want to set the time for individual days, touch No, and repeat the procedure for eachday.
Set the sleep time
Use the sleep time feature to program the product to enter sleep mode at a set time each day.
1. Scroll to and touch Administration.
2. Touch Time/Scheduling.
3. Touch Sleep Time.
4. Touch the day of the week for the sleep time setting.
5. Touch Custom.
6. Touch Save.
124 Chapter 8 Use product features ENWW

7. Touch the appropriate options to set the correct hour, minute, and AM/PM setting.
8. If you want the product to enter sleep mode at the same time each day, on the Apply to alldays screen, touch Yes. If you want to set the time for individual days, touch No, and repeat theprocedure for each day.
Set economy modes from the EWS1. From a Web browser, open the EWS. See Embedded Web server on page 183.
2. Click Settings and then Wake Time.
3. Set the wake time for each day of the week.
4. Set the sleep delay for the product.
5. Click Apply.
ENWW Economy settings 125

Use the staplerThe automatic stapler is only available with the optional HP 3-bin Stapler/Stacker (CC517A) or HPbooklet Maker/Finisher Accessory (CC516A).
Print jobs can be stapled with a diagonal staple in either top corner, with two horizontal staples at thetop of the page, or with two vertical staples at either side of the page.
● Paper weight can range from 60 to 220 g/m2 (16 to 148 lbs.). Heavier paper might have a staplinglimit of fewer than 50 sheets.
● The optional stapler/stacker can staple jobs of up to 50 sheets of 75 g/m2 (20 lb) paper. It can stackup to 1,000 sheets of paper, or 30 stapled jobs, whichever is less.
● The optional booklet maker can also staple jobs of up to 50 sheets of 75 g/m2 (20 lb) paper. It canstaple and fold up to 15 pages into a booklet. It can stack up to 1,000 sheets of paper, (or 30 stapledjobs) or up to 25 saddle-stitched booklets.
● If the job consists of only one sheet, or if it consists of more than 50 sheets, the product deliversthe job to the bin, but does not staple the job.
● The stapler supports paper only. Do not try to staple other types of print media, such as envelopes,transparencies, or labels.
NOTE: For information on loading letterhead, pre-printed, and pre-punched paper, see Loadletterhead, pre-printed, or pre-punched paper on page 108.
When you want the product to staple or fold a document, select the correct option in the software. Youcan usually select the stapler in your program or printer driver, although some options might be availableonly in the printer driver. Where and how you make selections depends on your program or printer driver.
If you cannot select the stapler or booklet maker finisher in the program or printer driver, select it at theproduct control panel.
The stapler accepts print jobs if it is out of staples, but it does not staple the pages. The product can beconfigured to stop printing if the staple cartridge is empty.
Supported paper sizes for staplingIn order to staple a print job, you must be a supported paper size and orientation.
Corner, angled staples are supported with the following paper sizes: A4, A4 Rotated, Letter, LetterRotated, Legal, A3, 11 x 17, and B4 (JIS).
Two staples at the top or side of the print job are supported with the following paper sizes: A4, Letter,A3, 11 x 17, and B4 (JIS).
Saddle-stitch stapling with the booklet maker can be carried out with these sizes: A4 Rotated, LetterRotated, Legal, A3, 11 x 17, and B4 (JIS).
As shown in the graphic below, the paper must also be loaded into the paper trays with the correctorientation.
126 Chapter 8 Use product features ENWW

A4LTR
A4LTR
A4LTR
A4 R, LTR R
A4 R, LTR R
LGL, B4
LGL, B4
A3, 11x17
A3, 11x17
B4
A3, 11x17
If the correct paper size or orientation is not used, the print job will print, but it will not be stapled.
NOTE: For information about loading and stapling print or copy jobs on letterhead, pre-printed, or pre-punched paper, see 3-bin stapler/stacker features on page 118
ENWW Use the stapler 127

Staple print jobsNOTE: For staple job capacity see 3-bin stapler/stacker features on page 118
Select the stapler at the control panel for printed jobs
1. Touch Administration and then touch Device Behavior.
2. Touch MBM-3 Bin Stapler or Multifunc Finisher.
3. Touch Staples.
4. Touch the option that you want to use: One Left Angled, One Right Angled, Two Left, Two Right,and Two Top.
NOTE: Selecting the stapler at the printer control panel changes the default setting. It is possible thatall print jobs will be stapled. However, settings that are changed in the printer driver override settingsthat are changed at the control panel.
Select the stapler in the printer driver for printed jobs (Windows)
NOTE: The following procedure changes the default setting to staple all print jobs.
1. Open the printer driver. See Change printer-driver settings for Windows on page 67.
2. On the Output tab, click the drop-down list under Staple, and select a staple option.
Select the stapler in the printer driver for printed jobs (Mac)
Select the stapler by creating a new preset in the printer driver.
1. Open the printer driver. See Change printer-driver settings for Macintosh on page 74.
2. Create the new preset.
Configure the device to stop or continue when the staple cartridge is empty
You can specify whether the product stops printing when the staple cartridge is empty or if it continuesprinting but does not staple the jobs.
1. Touch Administration and then touch Device Behavior.
2. Touch MBM-3 Bin Stapler or Multifunc Finisher.
3. Touch Staples Out.
4. Touch the option that you want to use:
● Select Stop to stop all printing until the staple cartridge is replaced.
● Select Continue to continue printing jobs without stapling them.
128 Chapter 8 Use product features ENWW
Job storage features for print jobsYou can save a print job to the product hard disk without printing it. You can then print the job at anytime at the control panel. The following job-storage features are available for print jobs:
● Proof and hold jobs: This feature provides a quick and easy way to print and proof one copy ofa job and then print the additional copies.
● Personal jobs: When you send a private job to the device, the job does not print until you providethe required personal identification number (PIN) at the control panel.
● QuickCopy jobs: You can print the requested number of copies of a job and then store a copy ofthe job on the device hard disk. Storing the job allows you to print additional copies of the job later.
● Stored jobs: You can store a job such as a personnel form, time sheet, or calendar on the deviceand allow other users to print the job at any time. Stored jobs also can be protected by a PIN.
Follow the instructions in this section to gain access to the job storage features at the computer. Seethe specific section for the type of job that you want to create.
CAUTION: If you turn off the device, all QuickCopy, proof and hold, and personal jobs are deleted.
Gain access to the job storage featuresFor Windows
1. On the File menu, click Print.
2. Click Properties, and then click the Job Storage tab.
3. Select the job storage mode that you want.
For Macintosh
In newer drivers: Select Job Storage in the pull-down menu in the Print dialog box. In older drivers,select Printer Specific Options.
Use the proof and hold featureThe proof and hold feature provides a quick and easy way to print and proof one copy of a job and thento print the additional copies.
To permanently store the job and prevent the device from deleting it when space is needed for somethingelse, select the Stored Job option in the driver.
Create a proof and hold jobCAUTION: If the device needs additional space to store newer proof and hold jobs, the device deletesother stored proof and hold jobs, starting with the oldest job. To permanently store a job and preventthe device from deleting it when space is needed, select the Stored Job option in the driver instead ofthe Proof and Hold option.
In the driver, select the Proof and Hold option and type a user name and job name.
The device prints one copy of the job for you to proof.
ENWW Job storage features for print jobs 129

Print the remaining copies of a proof and hold jobAt the device control panel, use the following procedure to print the remaining copies of a job held onthe hard disk.
1. From the Home screen, touch Job Storage.
2. Touch the Retrieve tab.
3. Scroll to and touch the job storage folder that holds the job.
4. Scroll to and touch the job that you want to print.
5. Select the number of copies on the numeric keypad.
6. Touch Retrieve Stored Job to print the document.
Delete a proof and hold jobWhen you send a proof and hold job, the device automatically deletes your previous proof and hold job.
1. From the Home screen, touch Job Storage.
2. Touch the Retrieve tab.
3. Scroll to and touch the job storage folder that holds the job.
4. Scroll to and touch the job that you want to delete.
5. Touch Delete.
6. Touch Yes.
130 Chapter 8 Use product features ENWW

Use the personal job featureUse the personal job feature to specify that a job is not printed until you release it. Your job will be storedon the product and nothing will be printed until you request the job from the product's control panel.Once the job is printed, it will be automatically removed from the product's job storage. Personal jobscan be stored with or without a 4-digit personal identification number (PIN). To make the job private, aPIN must be used.
Print a personal jobYou can print a personal job at the control panel after the job has been sent to the product.
1. From the Home screen, touch Job Storage.
2. Touch the Retrieve tab.
3. Scroll to and touch the job storage folder that holds the personal job.
4. Scroll to and touch the personal job that you want to print.
5. If a PIN is required, touch the PIN field.
6. Use the numeric keypad to type the PIN, and then touch OK.
7. Select the number of copies on the numeric keypad to change the number of copies to print.
8. Touch Retrieve Stored Job to print the document.
Delete a personal jobA personal job is automatically deleted from the device hard disk after you release it for printing. If youwant to delete the job without printing it, use this procedure.
1. From the Home screen, touch Job Storage.
2. Touch the Retrieve tab.
3. Scroll to and touch the job storage folder that holds the personal job.
4. Scroll to and touch the personal job that you want to delete.
NOTE: A personal job will have a lock symbol next to it.
5. Touch the PIN field.
6. Use the numeric keypad to type the PIN, and then touch OK.
7. Touch Delete.
8. Touch Yes.
ENWW Job storage features for print jobs 131

Use the QuickCopy featureThe QuickCopy feature prints the requested number of copies of a job and stores a copy on the devicehard disk. Additional copies of the job can be printed later. This feature can be turned off in the printerdriver.
The default number of different QuickCopy jobs that can be stored on the device is 32. At the controlpanel, you can set a different default number. See Navigate the Administration menu on page 17.
Create a QuickCopy jobCAUTION: If the device needs additional space to store newer QuickCopy jobs, the device deletesother stored QuickCopy jobs, starting with the oldest job. To permanently store a job and prevent thedevice from deleting it when space is needed, select the Job Storage option in the driver instead of theQuickCopy option.
In the driver, select the QuickCopy option, and then type a user name and a job name.
When you send the job to print, the device prints the number of copies that you set in the driver. To printmore quick copies at the device control panel, see Print additional copies of a QuickCopy jobon page 132.
Print additional copies of a QuickCopy jobThis procedure describes how to print additional copies of a job stored on the device hard disk at thecontrol panel.
1. From the Home screen, touch Job Storage.
2. Touch the Retrieve tab.
3. Scroll to and touch the job storage folder that holds the job.
4. Scroll to and touch the job that you want to print.
5. Select the number of copies on the numeric keypad to change the number of copies to print.
6. Touch Retrieve Stored Job to print the document.
Delete a QuickCopy jobDelete a QuickCopy job at the device control panel when you no longer need it. If the device requiresadditional space to store new QuickCopy jobs, the device automatically deletes other stored QuickCopyjobs, starting with the oldest job.
NOTE: Stored QuickCopy jobs can be deleted at the control panel or in HP Web Jetadmin.
1. From the Home screen, touch Job Storage.
2. Touch the Retrieve tab.
3. Scroll to and touch the job storage folder that holds the job.
4. Scroll to and touch the job that you want to delete.
5. Touch Delete.
6. Touch Yes.
132 Chapter 8 Use product features ENWW

Use the stored job feature for copy jobsYou also can create a stored copy job at the control panel that can be printed at a later time.
Create a stored copy job1. Place the original document face-down on the glass or face-up in the ADF.
2. From the Home screen, touch Job Storage.
3. Touch Create.
4. To create a Job Name, touch the New Job button to open the keyboard.
5. Type the name of the folder on the touch screen keyboard.
6. Select Job Name from the drop-down menu.
7. Type the job name on the touch screen keyboard.
8. If it is a private job, select PIN to print. Enter the PIN in the popup box.
9. Touch OK.
10. After all the options are set, touch Start to scan the document and save the file.
For information about printing the job, see Print a stored job on page 133
Print a stored jobAt the control panel, you can print a job that is stored on the device hard disk.
1. From the Home screen, touch Job Storage.
2. Touch the Retrieve tab.
3. Scroll to and touch the job storage folder that holds the stored job.
4. Scroll to and touch the stored job that you want to print.
5. Touch Retrieve Stored Job to print the document.
6. Select the number of copies on the numeric keypad to change the number of copies to print.
7. Touch Retrieve Stored Job to print the document.
If the file has lock symbol next to it, the job is a private job and requires a PIN. See Use the personaljob feature on page 131.
Delete a stored jobJobs stored on the device hard disk can be deleted at the control panel.
1. From the Home screen, touch Job Storage.
2. Touch the Retrieve tab.
3. Scroll to and touch the job storage folder that holds the stored job.
4. Scroll to and touch the stored job that you want to delete.
ENWW Job storage features for print jobs 133

5. Touch Delete.
6. Touch Yes.
If the file has lock symbol next to it, the job requires a PIN to delete it. See Use the personal job featureon page 131.
134 Chapter 8 Use product features ENWW

Print photos or marketing materialYou can use the HP Color LaserJet CM6030 or HP Color LaserJet CM6040 to print high-quality colorphotos, marketing and sales material, or other color documents on glossy paper. To maximize the qualityof this output you must do the following:
● Choose the appropriate paper
● Configure the paper tray correctly
● Choose the correct settings in the print driver
Supported glossy paper
HP glossy paper product Product code Product size Control panel and printdriver settings
HP Color Laser PresentationPaper, Soft Gloss
Q6541A Letter HP soft gloss 120 g
HP Color Laser ProfessionalPaper, Soft Gloss
Q6542A A4 HP soft gloss 120 g
HP Color Laser BrochurePaper, Glossy
Q6611A, Q6610A Letter HP glossy 160 g
HP Color Laser SuperiorPaper, Glossy
Q6616A A4 HP glossy 160 g
HP Color Laser Photo Paper,Glossy
Q6607A, Q6608A Letter HP glossy 220 g
HP Color Laser Photo Paper,Glossy
Q6614A A4 HP glossy 220 g
HP Color Laser Photo Paper,Glossy 4x6
Q8842A 101.6 x 152.4 mm (4 x 6 in) HP glossy 220 g
HP Color Laser Photo Paper,Glossy 10 cm x 15 cm
Q8843A 101.6 x 152.4 mm (4 x 6 in) HP glossy 220 g
CAUTION: HP Color Laser Presentation Paper, Glossy (Q2546A) is not supported with this product.Using this type of paper can cause a fuser jam that might require the replacement of the fuser. Tworecommended alternatives are HP Color LaserJet Presentation Paper, Soft Gloss (Q6541A) andHP Color LaserJet Brochure Paper, Glossy (Q6611A, Q6610A).
Configure the paper trayConfigure the paper tray for the correct paper type.
1. Load the paper into Tray 2, 3, 4, or 5.
2. After you close the tray, the control panel prompts you to configure the paper size and type.
3. If the correct size and type is displayed, touch OK to accept the detected size and type, orModify to choose a different paper size and type.
ENWW Print photos or marketing material 135
4. When the paper size prompt appears, touch the correct size, and then touch Save.
5. When the paper type prompt appears, touch the correct type. See the table above to determinethe correct paper type.
Configure the driver settingsCarry out the following steps to print to glossy paper from your graphics software program.
1. Select Print from the File menu of your software program.
2. Select the HP Color LaserJet CM6030 or HP Color LaserJet CM6040, and then click Propertiesor Printing Preferences.
3. From the Paper type drop-down list, select the same paper type that you configured on the productcontrol panel.
4. Click OK to save the settings and OK to print. The print job will automatically be printed from thetray that has been configured for glossy paper, optimizing print quality for that type.
136 Chapter 8 Use product features ENWW

Print weatherproof maps and outdoor signsYou can use the HP Color LaserJet CM6030 or HP Color LaserJet CM6040 to print durable, waterproofmaps, signs, or menus by using HP Tough Paper. HP Tough Paper is a waterproof, tear-proof, satinfinish paper that retains rich, vibrant print color and clarity even when exposed to heavy usage orweather. This avoids the expensive and time-consuming laminating that is required with plain papers.To maximize the quality of this output you must do the following:
● Choose the appropriate paper
● Configure the paper tray correctly
● Choose the correct settings in the print driver
Supported tough paper
HP paper name Product code Product size Control panel and printdriver settings
HP LaserJet Tough Paper Q1298A Letter HP Tough Paper
HP LaserJet Tough Paper Q1298B A4 HP Tough Paper
Configure the paper trayConfigure the paper tray for the correct paper type.
1. Load the paper into Tray 2, 3, 4, or 5.
2. After you close the tray, the control panel prompts you to configure the paper size and type.
3. If the correct size is displayed, touch OK to accept the detected size, or Modify to choose a differentpaper size and type.
4. When the paper size prompt appears, touch the correct size, and then touch Save. When the papertype prompt appears, touch the correct type. See the table above to determine the correct papertype.
Configure the driver settingsCarry out the following steps to print to tough paper from your graphics software program.
1. Select Print from the File menu of your software program.
2. Select the HP Color LaserJet CM6030 and CM6040 MFP Series, and then click Properties orPrinting Preferences.
3. From the Paper type drop-down list, select the same paper type that you configured on the productcontrol panel.
4. Click OK to save the settings and OK to print. The print job will automatically be printed from thetray that has been configured for tough paper.
ENWW Print weatherproof maps and outdoor signs 137

Set the duplex alignmentFor duplexed documents such as brochures, set the registration for the tray before printing to ensurethe pages align.
1. From the control panel, touch Administration and then touch Print Quality.
2. Touch Set Registration, and then touch the tray you are adjusting.
3. Touch Test Page and then touch Print.
4. Follow the steps on the page that prints.
138 Chapter 8 Use product features ENWW

9 Print tasks
● Cancel a print job
● Use features in the Windows printer driver
ENWW 139

Cancel a print jobYou can stop a print request by using the control panel or by using the software program. For instructionsabout how to stop a print request from a computer on a network, see the online Help for the specificnetwork software.
NOTE: It can take some time for all printing to clear after you have canceled a print job.
Stop the current print job from the control panel▲ Press Stop on the control panel.
Stop the current print job from the software programA dialog box will appear briefly on the screen, giving you the option to cancel the print job.
If several requests have been sent to the device through your software, they might be waiting in a printqueue (for example, in Windows Print Manager). See the software documentation for specificinstructions about canceling a print request from the computer.
If a print job is waiting in a print queue (computer memory) or print spooler (Windows), delete the printjob there.
Click Start, click Settings, and then click Printers or Printers and Faxes . Double-click the deviceicon to open the print spooler. Select the print job that you want to cancel, and then press Delete. If theprint job is not cancelled, you might need to shut down and restart the computer. If the job is not in theprint spooler, use the Job Status menu from control panel to cancel the job.
140 Chapter 9 Print tasks ENWW

Use features in the Windows printer driverOpen the printer driver
How do I Steps to perform
Open the printer driver On the File menu in the software program, click Print. Selectthe printer, and then click Properties or Preferences.
Get help for any printing option Click the ? symbol in the upper-right corner of the printer driver,and then click any item in the printer driver. A pop-up messagedisplays that provides information about the item. Or, clickHelp to open the online Help.
Use printing shortcutsTo perform the following tasks, open the printer driver and click the Printing Shortcuts tab.
NOTE: In previous HP printer drivers, this feature was called Quick Sets.
How do I Steps to perform
Use a printing shortcut Select one of the shortcuts, and then click OK to print the jobwith the predefined settings.
Create a custom printing shortcut a) Select an existing shortcut as a base. b) Select the printoptions for the new shortcut. c) Click Save As, type a name forthe shortcut, and click OK.
Set paper and quality optionsTo perform the following tasks, open the printer driver and click the Paper/Quality tab.
How do I Steps to perform
Select a page size Select a size from the Paper size drop-down list.
Select a custom page size a) Click Custom. The Custom Paper Size dialog box opens.b) Type a name for the custom size, specify the dimensions,and click OK.
Select a paper source Select a tray from the Paper source drop-down list.
Select a paper type Select a type from the Paper type drop-down list.
Print covers on different paper
Print the first or last page on different paper
a) In the Special pages area, click Covers or Print pages ondifferent paper, and then click Settings. b) Select an optionto print a blank or preprinted front cover, back cover, or both.Or, select an option to print the first or last page on differentpaper. c) Select options from the Paper source and Papertype drop-down lists, and then click Add. d) Click OK.
Adjust the resolution of printed images In the Print Quality area, select an option from the first drop-down list. See the printer-driver online Help for informationabout each of the available options.
ENWW Use features in the Windows printer driver 141

Set document effectsTo perform the following tasks, open the printer driver and click the Effects tab.
How do I Steps to perform
Scale a page to fit on a selected paper size Click Print document on, and then select a size from the drop-down list.
Scale a page to be a percent of the actual size Click % of actual size, and then type the percent or adjust theslider bar.
Print a watermark a) Select a watermark from the Watermarks drop-down list.b) To print the watermark on the first page only, click First pageonly. Otherwise, the watermark is printed on each page.
Add or edit watermarks
NOTE: The printer driver must be stored on your computerfor this to work.
a) In the Watermarks area, click Edit. The WatermarkDetails dialog box opens. b) Specify the settings for thewatermark, and then click OK.
Set document finishing optionsTo perform the following tasks, open the printer driver and click the Finishing tab.
How do I Steps to perform
Print on both sides (Duplex) Click Print on both sides. If you will bind the document alongthe top edge, click Flip pages up.
Print a booklet a) Click Print on both sides. b) In the Booklet layout drop-down list, click Left binding or Right binding. The Pages persheet option automatically changes to 2 pages per sheet.
Print multiple pages per sheet a) Select the number of pages per sheet from the Pages persheet drop-down list. b) Select the correct options for Printpage borders, Page order, and Orientation.
Select page orientation a) In the Orientation area, click Portrait or Landscape. b) Toprint the page image upside down, click Rotate by 180degrees.
Set product output optionsTo perform the following tasks, open the printer driver and click the Output tab.
NOTE: The options that are available on this tab depend on the finishing device that you are using.
How do I Steps to perform
Select staple options Select a stapling option from the Staple drop-down list.
Select an output bin Select an output bin from the Bin drop-down list.
Set job storage optionsTo perform the following tasks, open the printer driver and click the Job Storage tab.
142 Chapter 9 Print tasks ENWW
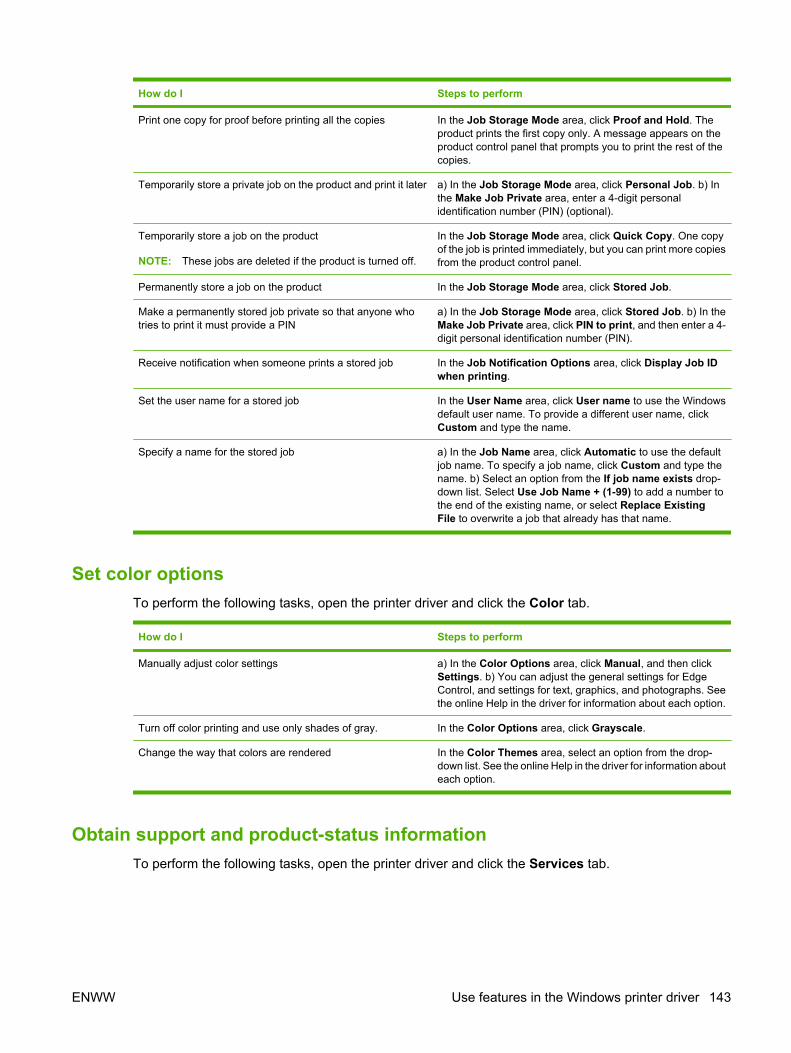
How do I Steps to perform
Print one copy for proof before printing all the copies In the Job Storage Mode area, click Proof and Hold. Theproduct prints the first copy only. A message appears on theproduct control panel that prompts you to print the rest of thecopies.
Temporarily store a private job on the product and print it later a) In the Job Storage Mode area, click Personal Job. b) Inthe Make Job Private area, enter a 4-digit personalidentification number (PIN) (optional).
Temporarily store a job on the product
NOTE: These jobs are deleted if the product is turned off.
In the Job Storage Mode area, click Quick Copy. One copyof the job is printed immediately, but you can print more copiesfrom the product control panel.
Permanently store a job on the product In the Job Storage Mode area, click Stored Job.
Make a permanently stored job private so that anyone whotries to print it must provide a PIN
a) In the Job Storage Mode area, click Stored Job. b) In theMake Job Private area, click PIN to print, and then enter a 4-digit personal identification number (PIN).
Receive notification when someone prints a stored job In the Job Notification Options area, click Display Job IDwhen printing.
Set the user name for a stored job In the User Name area, click User name to use the Windowsdefault user name. To provide a different user name, clickCustom and type the name.
Specify a name for the stored job a) In the Job Name area, click Automatic to use the defaultjob name. To specify a job name, click Custom and type thename. b) Select an option from the If job name exists drop-down list. Select Use Job Name + (1-99) to add a number tothe end of the existing name, or select Replace ExistingFile to overwrite a job that already has that name.
Set color optionsTo perform the following tasks, open the printer driver and click the Color tab.
How do I Steps to perform
Manually adjust color settings a) In the Color Options area, click Manual, and then clickSettings. b) You can adjust the general settings for EdgeControl, and settings for text, graphics, and photographs. Seethe online Help in the driver for information about each option.
Turn off color printing and use only shades of gray. In the Color Options area, click Grayscale.
Change the way that colors are rendered In the Color Themes area, select an option from the drop-down list. See the online Help in the driver for information abouteach option.
Obtain support and product-status informationTo perform the following tasks, open the printer driver and click the Services tab.
ENWW Use features in the Windows printer driver 143
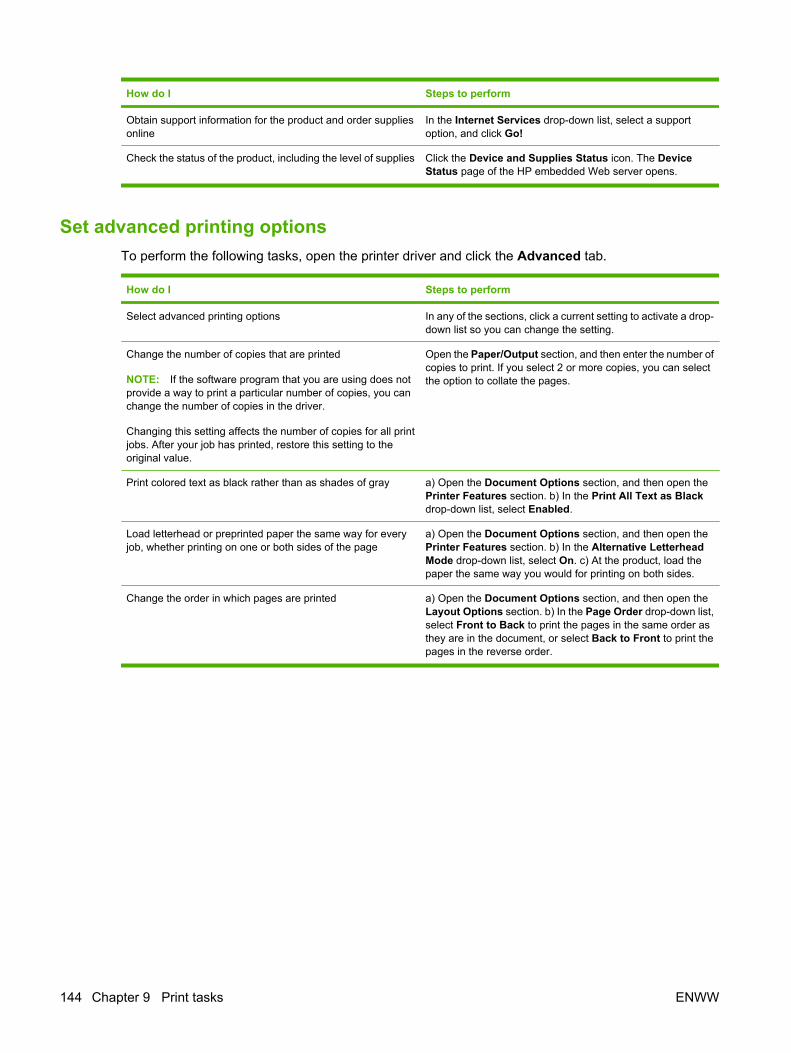
How do I Steps to perform
Obtain support information for the product and order suppliesonline
In the Internet Services drop-down list, select a supportoption, and click Go!
Check the status of the product, including the level of supplies Click the Device and Supplies Status icon. The DeviceStatus page of the HP embedded Web server opens.
Set advanced printing optionsTo perform the following tasks, open the printer driver and click the Advanced tab.
How do I Steps to perform
Select advanced printing options In any of the sections, click a current setting to activate a drop-down list so you can change the setting.
Change the number of copies that are printed
NOTE: If the software program that you are using does notprovide a way to print a particular number of copies, you canchange the number of copies in the driver.
Changing this setting affects the number of copies for all printjobs. After your job has printed, restore this setting to theoriginal value.
Open the Paper/Output section, and then enter the number ofcopies to print. If you select 2 or more copies, you can selectthe option to collate the pages.
Print colored text as black rather than as shades of gray a) Open the Document Options section, and then open thePrinter Features section. b) In the Print All Text as Blackdrop-down list, select Enabled.
Load letterhead or preprinted paper the same way for everyjob, whether printing on one or both sides of the page
a) Open the Document Options section, and then open thePrinter Features section. b) In the Alternative LetterheadMode drop-down list, select On. c) At the product, load thepaper the same way you would for printing on both sides.
Change the order in which pages are printed a) Open the Document Options section, and then open theLayout Options section. b) In the Page Order drop-down list,select Front to Back to print the pages in the same order asthey are in the document, or select Back to Front to print thepages in the reverse order.
144 Chapter 9 Print tasks ENWW

10 Use color
● Manage color
● Match colors
● Advanced color use
ENWW 145

Manage colorSetting color options to Automatic typically produces the best possible print quality for the most commonprinting requirements. However, for some documents, setting the color options manually can enhancethe way the document appears. Examples of these documents include marketing brochures that containmany images or documents that are printed on a paper type that is not listed in the printer driver.
Use the printer driver to adjust color settings. For more information, see Set color optionson page 143 for Windows and Set the color options on page 80 for Macintosh.
Automatic or manual color adjustmentThe Automatic color adjustment option optimizes the neutral gray color treatment, halftones, and edgeenhancements that are used for each element in a document.
NOTE: Automatic is the default setting and is recommended for printing most color documents.
The Manual color adjustment option allows you to adjust the neutral gray color treatment, halftones,and edge enhancements for text, graphics, and photographs.
Manual color optionsYou can manually adjust color options for Edge Control, Halftones, and Neutral Grays.
Edge Control
The Edge Control setting determines how edges are rendered. Edge control has three components:adaptive halftoning, Resolution Enhancement technology (REt), and trapping. Adaptive halftoningincreases the edge sharpness. Trapping reduces the effect of incorrect color alignment by slightlyoverlapping the edges of adjacent objects. The color REt option smoothes the edges.
NOTE: If you notice white gaps between objects, or if you notice areas that have a slight shadow ofcyan, magenta, or yellow at the edge, choose an edge-control setting that increases the trapping level.
Four levels of edge control are available:
● Maximum is the most aggressive trapping setting. Adaptive halftoning and color REt settings areon.
● Normal is the default trapping setting. Trapping is at a medium level. Adaptive halftoning and colorREt settings are on.
● Light sets trapping at a minimal level. Adaptive halftoning and color REt settings are on.
● Off turns off trapping, adaptive halftoning, and color REt.
Halftone options
Halftone options affect the resolution and clarity of your color output. You can select halftone settingsfor text, graphics, and photographs independently. The two halftone options are Smooth and Detail.
● The Smooth option provides better results for large, solid-filled print areas. It also enhancesphotographs by smoothing out fine color gradations. Choose this option when uniform and smootharea fills are top priority.
● The Detail option is useful for text and graphics that require sharp distinctions among lines orcolors, or for images that contain a pattern or a high level of detail. Choose this option when sharpedges and details are top priority.
146 Chapter 10 Use color ENWW

NOTE: Some software programs convert text or graphics to bitmap images. In these cases, settingthe color options for photographs also affects how text and graphics appear.
Neutral Grays
The Neutral Grays setting determines the method used for creating gray colors that are used in text,graphics, and photographs.
Two values are available for the Neutral Grays setting:
● Black Only generates neutral colors (grays and black) using only black toner. This guaranteesneutral colors without a color cast.
● 4-Color generates neutral colors (grays and black) by combining all four toner colors. This methodproduces smoother gradients and transitions to non-neutral colors, and it produces the darkestblack.
Print in grayscaleSelect the Print in Grayscale or Print Color as Gray option from the printer driver to print a documentin black and white.
Restrict color useThis product includes a Restrict Color setting. A network administrator can use the setting to restrictuser access to the color printing in order to conserve color toner. If you are unable to print in color, seeyour network administrator.
Restrict color printing and copying from the control panel1. Scroll to and touch Administration and then touch Management.
2. Touch Restrict Color Use.
3. Touch Color printing access or Color copying access.
4. Select one of the following options:
● Enable Color (default). This setting allows color-printing capabilities for all users.
● Color If Allowed. The setting allows the network administrator to allow color use for selectusers and/or applications. Use the embedded Web server to designate which users and/orapplications can print in color (Color printing access only).
● Disable Color. This setting denies color-printing capabilities to all users.
5. Touch Save.
For more information about restricting and reporting color usage, go to www.hp.com/go/coloraccess.
RGB Color (Color Themes)You can change RGB Color settings from the printer-driver. For more information on accessing theprinter driver, see Set color options on page 143 for Windows and Set the color options on page 80 forMacintosh.
ENWW Manage color 147

Five values are available for the RGB Color setting:
● Select Default (sRGB) for most printing needs. This setting instructs the product to interpret RGBcolor as sRGB, which is the accepted standard of Microsoft and the World Wide Web Consortium(W3C).
● Select Image optimization (sRGB) to enhance documents in which the content is mainly bitmapimages, such as .GIF or .JPEG files. This setting instructs the product to use the best color matchingfor rendering sRGB, bitmap images. This setting has no effect on text or vector-based graphics.Using glossy paper in combination with this setting provides the maximum enhancement.
● Select AdobeRGB for documents that use the AdobeRGB color space rather than sRGB. Forexample, some digital cameras capture images in AdobeRBG, and documents that are producedwith Adobe PhotoShop use the AdobeRGB color space. When printing from a professional softwareprogram that uses AdobeRGB, it is important that you turn off the color management in the softwareprogram and allow the product software to manage the color space.
● Select Custom Profile when you want to increase the color saturation in the midtones. Lesscolorful objects are rendered more colorfully. You can download custom profiles from www.hp.com/go/cljcm6030mfp_software or www.hp.com/go/cljcm6040mfp_software.
148 Chapter 10 Use color ENWW

Match colorsThe process of matching product output color to your computer screen is quite complex because printersand computer monitors use different methods of producing color. Monitors display colors by light pixelsusing an RGB (red, green, blue) color process, but printers print colors using a CMYK (cyan, magenta,yellow, and black) process.
Several factors can influence your ability to match printed colors to those on your monitor. These factorsinclude:
● Paper
● Printer colorants (inks or toners for example)
● Printing process (inkjet, press, or laser technology for example)
● Overhead lighting
● Personal differences in perception of color
● Software programs
● Printer drivers
● Computer operating system
● Monitors and monitor settings
● Video cards and drivers
● Operating environment (humidity for example)
Keep the above factors in mind when colors on your screen do not perfectly match your printed colors.
For most users, the best method for matching colors on your screen to your product is to print sRGBcolors.
Sample book color matchingThe process for matching product output to preprinted sample books and standard color references iscomplex. In general, you can obtain a reasonably good match to a sample book if the inks used to createthe sample book are cyan, magenta, yellow, and black. These are usually referred to as process colorsample books.
Some sample books are created from spot colors. Spot colors are specially created colorants. Many ofthese spot colors are outside of the range of the product. Most spot color sample books have companionprocess sample books that provide CMYK approximations to the spot color.
Most process sample books will state which process standards were used to print the sample book. Inmost cases they will be SWOP, EURO, or DIC. To get optimal color matching to the process samplebook, select the corresponding ink emulation from the product menu. If you cannot identify the processstandard, use SWOP ink emulation.
Printing color samplesTo use the color samples, select the color sample that is the closest match to the desired color. Use thesample’s color value in your software program to describe the object you wish to match. Colors may
ENWW Match colors 149
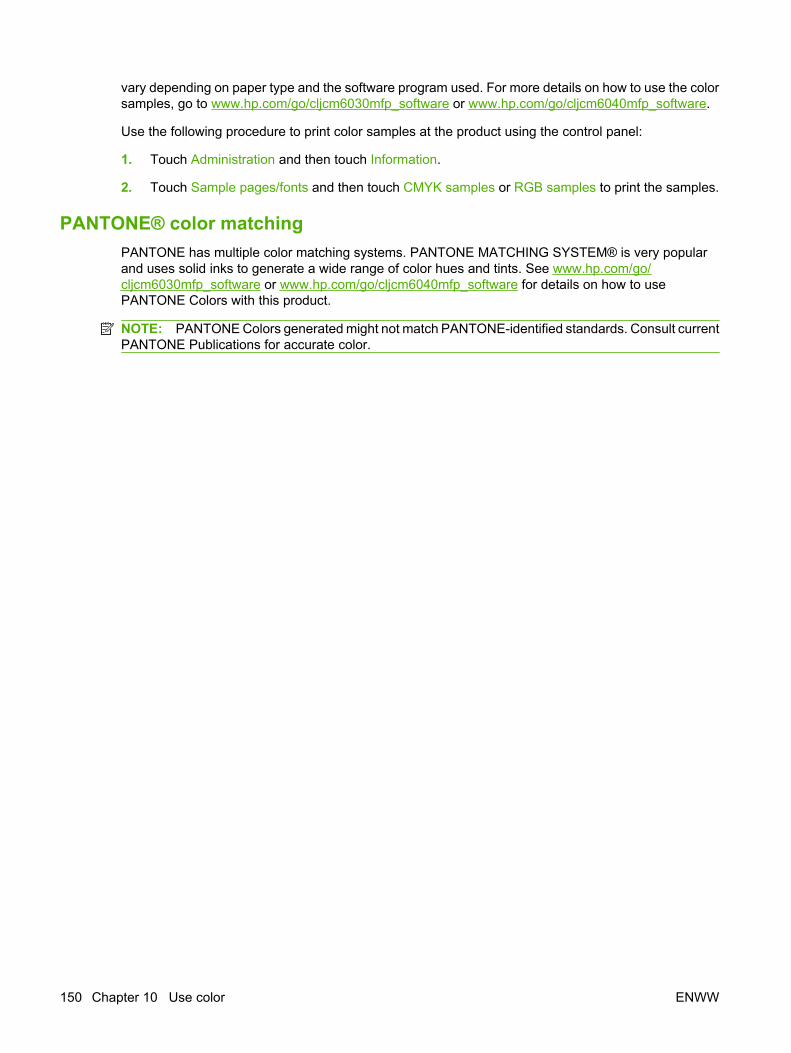
vary depending on paper type and the software program used. For more details on how to use the colorsamples, go to www.hp.com/go/cljcm6030mfp_software or www.hp.com/go/cljcm6040mfp_software.
Use the following procedure to print color samples at the product using the control panel:
1. Touch Administration and then touch Information.
2. Touch Sample pages/fonts and then touch CMYK samples or RGB samples to print the samples.
PANTONE® color matchingPANTONE has multiple color matching systems. PANTONE MATCHING SYSTEM® is very popularand uses solid inks to generate a wide range of color hues and tints. See www.hp.com/go/cljcm6030mfp_software or www.hp.com/go/cljcm6040mfp_software for details on how to usePANTONE Colors with this product.
NOTE: PANTONE Colors generated might not match PANTONE-identified standards. Consult currentPANTONE Publications for accurate color.
150 Chapter 10 Use color ENWW

Advanced color useHP ImageREt 4800
HP ImageREt 4800 print technology is a system of innovative technologies developed exclusively byHP to deliver superior print quality. The HP ImageREt system sets itself apart from the industry byintegrating technology advancements and optimizing each element of the print system. Severalcategories of HP ImageREt have been developed for a variety of user needs.
The system uses key color-laser technologies, including image enhancements, smart supplies, andhigh-resolution imaging, to provide superior images for general office documents and marketingcollateral. Optimized for printing on HP color laser high-gloss papers, HP Image REt 4800 providessuperior results on all supported paper, and under a variety of environmental conditions.
Paper selectionFor the best color and image quality, it is important to select the appropriate paper type from the productmenu or from the front panel.
sRGBStandard red-green-blue (sRGB) is a worldwide color standard originally developed by HP and Microsoftas a common color language for monitors, input devices (scanners, digital cameras), and output devices(products, printers, plotters). It is the default color space used for HP products, Microsoft operatingsystems, the Web, and most office software sold today. sRGB is representative of the typical Windowscomputer monitor today and the convergence standard for high-definition television.
NOTE: Factors such as the type of monitor you use and the room’s lighting can affect the appearanceof colors on your screen.
The latest versions of Adobe PhotoShop, CorelDRAW™, Microsoft Office, and many other softwareprograms use sRGB to communicate color. Most importantly, as the default color space in Microsoftoperating systems, sRGB has gained broad adoption as a means to exchange color information betweensoftware programs and devices using a common definition that assures typical users will experiencegreatly improved color matching. sRGB improves your ability to match colors between the product, thecomputer monitor, and other input devices (scanner, digital camera) automatically, without the need tobecome a color expert.
Print in four colors — CMYKCyan, magenta, yellow, and black (CMYK) are the inks used by a printing press. The process is oftencalled four-color printing. CMYK data files are typically used by and originate from graphic arts (printingand publishing) environments. The product will accept CMYK colors through the PS printer driver. Theproduct color-rendering of CMYK is designed to provide rich, saturated colors for text and graphics.
CMYK ink set emulation (HP postscript level 3 emulation)The product color rendering of CMYK can be made to emulate several standard offset press ink sets.In some situations, the CMYK color values in an image or document might not be suited to the product.For example, a document might be optimized for another product. For best results, the CMYK values
ENWW Advanced color use 151

should be adapted to the HP Color LaserJet CM6030 or HP Color LaserJet CM6040. Select theappropriate color input profile from the printer driver.
● Default CMYK+. HP CMYK+ technology produces optimal printing results for most printing jobs.
● Specification for Web Offset Publications (SWOP). Common ink standard in the United Statesand other countries/regions.
● Euroscale. Common ink standard in Europe and other countries/regions.
● Dainippon Ink and Chemical (DIC). Common ink standard in Japan and other countries/regions.
● Custom profile. Select this option to use a custom input profile to accurately control color output,for example, to emulate another HP color LaserJet product. To download color profiles, go towww.hp.com and search for "CM6030 mfp color profile" or "CM6040 mfp color profile".
152 Chapter 10 Use color ENWW

11 Copy
● Use the Copy screen
● Set the default copy options
● Copy from the scanner glass
● Copy from the document feeder
● Adjust the copy settings
● Copy two-sided documents
● Copy mixed-size originals
● Change the copy-collation setting
● Copy photos and books
● Combine copy jobs by using Job Build
● Cancel a copy job
ENWW 153

Use the Copy screenFrom the Home screen, touch Copy to view the Copy screen. Only the first six copy features areimmediately visible. In order to view additional copy features, touch More Options.
Set the default copy optionsYou can use the administration menu to establish default settings that apply to all copy jobs. If necessary,you can override most settings for an individual job. After that job is complete, the product returns to thedefault settings.
1. From the Home screen, scroll to and touch Administration.
2. Touch Default Job Options, and then touch Default Copy Options.
3. Several options are available. You can configure defaults for all options, or for only some options.
For information about each option, see Adjust the copy settings on page 155. The built-in Helpsystem also provides an explanation of each option. Touch the Help button in the upper-rightcorner of the screen.
4. To exit the administration menu, touch the Home button in the upper-left corner of the screen.
Copy from the scanner glassUse the scanner glass to make as many as 999 copies of small, lightweight media (less than 60 g/m2
or 16 lb) or heavy media (more than 105 g/m2 or 28 lb). This includes media such as receipts, newspaperclippings, photographs, old documents, worn documents, and books.
Place original documents face-down on the glass. Align the corner of the original with the upper-leftcorner of the glass.
To make copies by using the default copy options, use the numeric keypad on the control panel to selectthe number of copies, and press Start. To use customized settings, touch Copy. Specify the settings,and then press Start. For more information about using customized settings, see Adjust the copy settingson page 155.
Copy from the document feederUse the document feeder to make as many as 999 copies of a document that has up to 50 pages(depending on the thickness of the pages). Place the document into the document feeder with the pagesfacing up.
To make copies by using the default copy options, use the numeric keypad on the control panel to selectthe number of copies, and press Start. To use customized settings, touch Copy. Specify the settings,and then press Start. For more information about using customized settings, see Adjust the copy settingson page 155.
Before starting another copy job, retrieve the original document from the document-feeder output binthat is under the document feeder input tray, and retrieve the copies from the appropriate output bin.
154 Chapter 11 Copy ENWW

Adjust the copy settingsThe product offers several features so you can optimize copied output. These features are all availableon the Copy screen.
The Copy screen consists of several pages. From the first page, touch More Options to go to the nextpage. Then touch the up or down arrow buttons to scroll to other pages.
For details about how to use an option, touch the option, and then touch the help button in the upper-right corner of the screen. The following table provides an overview of the copy options.
NOTE: Depending on how the system administrator has configured the product, some of these optionsmight not appear. The options in the table are listed in the order in which they can appear.
Option name Description
Sides Use this feature to indicate whether the original document is printed on one or both sides, andwhether the copies should be printed on one or both sides.
Reduce/Enlarge Use this feature to reduce or enlarge the copied image on the page.
Color/Black Use this feature to choose black printing or color printing.
Staple/Collate or Collate If the optional HP Stapler/Stacker/Separator is attached, the Staple/Collate option is available.Use this feature to set up options for stapling and assembling the pages in sets of copies.
If the optional HP Stapler/Stacker/Separator is not attached, the Collate option is available. Usethis feature to assemble each set of copied pages in the same order as the original document.
Paper Selection Use this feature to select the tray that holds the size and type of paper that you want to use.
Image Adjustment Use this feature to improve the overall quality of the copy. For example, you can adjust thedarkness and sharpness, and you can use the Background Cleanup setting to remove faintimages from the background or to remove a light background color.
Content Orientation Use this feature to specify the way the content of the original page is placed on the page: portraitor landscape.
Output Bin Use this feature to select an output bin for the copies.
Optimize Text/Picture Use this feature to optimize the output for a particular type of content. You can optimize theoutput for text or printed pictures, or you can manually adjust the values.
Pages per Sheet Use this feature to copy multiple pages onto one sheet of paper.
Original Size Use this feature to describe the page size of the original document.
Book Copy Use this feature to scan and print pages from a book.
Booklet Format Use this feature to copy two or more pages onto one sheet of paper so you can fold the sheetsin the center to form a booklet.
Edge-To-Edge Use this feature to avoid shadows that can appear along the edges of copies when the originaldocument is printed close to the edges. Combine this feature with the Reduce/Enlarge featureto ensure that the entire page is printed on the copies.
Job Build Use this feature to combine several sets of original documents into one copy job. Also use thisfeature to copy an original document that has more pages than the document feeder canaccommodate at one time.
ENWW Adjust the copy settings 155

Copy two-sided documentsTwo-sided documents can be copied manually or automatically.
Copying two-sided documents manuallyCopies resulting from this procedure are printed on one side, and need to be hand-collated.
1. Load the documents to be copied into the document feeder input tray with the first page facing up,and with the top of the page leading into the document feeder.
2. Touch Start Copy. The odd-numbered pages are copied and printed.
3. Remove the stack from the document feeder output tray and reload the stack with the last pagefacing up, and with the top of the page leading into the document feeder.
4. Touch Start Copy. The even-numbered pages are copied and printed.
5. Collate the odd- and even-numbered printed copies.
Copy two-sided documents automaticallyThe default copy setting is one-sided to one-sided. Use the following procedures to change the settingso you can copy from or to documents that are two-sided.
Make two-sided copies from one-sided documents
1. Load the documents to be copied into the document feeder with the first page facing up, and withthe top of the page leading.
2. On the control panel, touch Copy.
3. Touch Sides.
4. Touch 1-sided original, 2-sided output.
5. Touch OK.
6. Touch Start Copy.
Make two-sided copies from two-sided documents
1. Load the documents to be copied into the document feeder with the first page facing up, and withthe top of the page leading.
2. On the control panel, touch Copy.
3. Touch Sides.
156 Chapter 11 Copy ENWW

4. Touch 2-sided original, 2-sided output.
5. Touch OK.
6. Touch Start Copy.
Make one-sided copies from two-sided documents
1. Load the documents to be copied into the document feeder with the first page facing up, and withthe top of the page leading.
2. On the control panel, touch Copy.
3. Touch Sides.
4. Touch 2-sided original, 1-sided output.
5. Touch OK.
6. Touch Start Copy.
ENWW Copy two-sided documents 157

Copy mixed-size originalsYou can copy original documents that are printed on different sizes of paper as long as the sheets ofpaper have one common dimension. For example, you could combine letter and legal sizes, or you couldcombine A4 and A5 sizes.
1. Arrange the sheets in the original document so they all have the same width.
2. Place the sheets face-up into the document feeder, and adjust both paper guides against thedocument.
3. From the Home screen, touch Copy.
4. Touch Original Size.
NOTE: If this option is not on the first screen, touch More Options until the option appears.
5. Select Mixed Ltr/Lgl, and then touch OK.
6. Touch Start Copy.
158 Chapter 11 Copy ENWW

Change the copy-collation settingYou can set the device to automatically collate multiple copies into sets. For example, if you are makingtwo copies of three pages and the automatic collation is on, the pages print in this order: 1,2,3,1,2,3. Ifautomatic collation is off, the pages print in this order: 1,1,2,2,3,3.
To use the automatic collation, the original document size must fit into the memory. If it does not, thedevice makes only one copy and a message appears notifying you of the change. If that happens, useone of the following methods to finish the job:
● Split the job into smaller jobs that contain fewer pages.
● Make only one copy of the document at a time.
● Turn off the automatic collation.
The collation setting you select is in effect for all copies until you change the setting. The default settingfor automatic copy collation is On.
1. On the control panel, touch Copy.
2. Touch Staple/Collate or Collate.
3. Touch Off.
4. Touch OK.
ENWW Change the copy-collation setting 159

Copy photos and booksCopy a photo
NOTE: Photos should be copied from the flatbed scanner, not from the document feeder.
1. Lift the lid and place the photo on the flatbed scanner with the picture-side down and the upper-left corner of the photo in the upper-left corner of the glass.
2. Gently close the lid.
3. Touch Copy.
4. Touch Optimize Text/Picture and select Photograph.
5. Touch Start Copy.
Copy a book
1. Place the book face down on the glass with the top edge toward the rear of the glass. Align thebook spine with the book icon along the top edge of the glass.
2. Touch Copy.
3. Scroll to and touch Book Copy .
4. Touch Book Copy On and then touch OK.
5. Select the number of copies to make and adjust other settings as needed.
6. Touch Start Copy, or press the Start button on the control panel.
7. The following 3 options are available when Start Copy is touched:
● Copy both pages copies the images on both the left and right side of the spine
● Skip left page copies the image on the right side of the spine only
● Skip right page copies the image on the left side of the spine only
8. Touch Scan.
9. After the last page is scanned, touch Finish.
160 Chapter 11 Copy ENWW

Combine copy jobs by using Job BuildUse this feature to combine several sets of original documents into one copy job. Also use this featureto copy an original document that has more pages than the document feeder can accommodate at onetime.
1. Touch Copy.
2. Scroll to and touch Job Build.
3. Touch Job Build On.
4. Touch OK.
5. If necessary, select the desired copy options.
6. Touch Start Copy. After each page is scanned, the control panel prompts you for more pages.
7. If the job contains more pages, load the next page, and then touch Scan.
The product temporarily saves all the scanned images. The product will begin printing copies whenit has enough information to begin. Touch Finish to finish printing the copies.
NOTE: In Job Build, if you scan the first page of a document by using the document feeder, then youmust scan all of the pages in that document by using the document feeder. If you scan the first page ofa document by using the scanner glass, then you must scan all of the pages in that document by usingthe scanner glass.
ENWW Combine copy jobs by using Job Build 161

Cancel a copy job1. Touch the Stop button on the control panel and then touch the job from the list.
2. Touch Cancel Job and then touch OK.
NOTE: If you cancel a copy job, clear the document from the flatbed scanner or from the automaticdocument feeder.
162 Chapter 11 Copy ENWW

12 Scan and send to e-mail
● Configure e-mail settings
● Use the Send E-mail screen
● Perform basic e-mail functions
● Use the address book
● Change e-mail settings for the current job
● Scan to a folder
● Scan to a workflow destination
ENWW 163
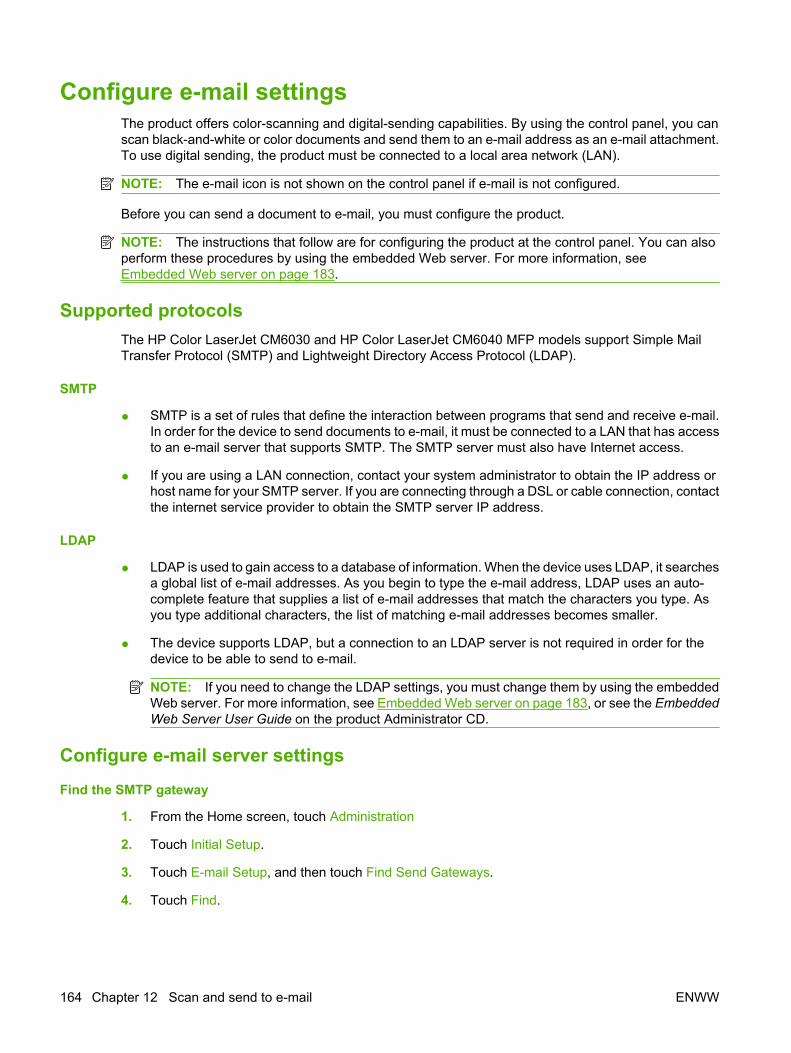
Configure e-mail settingsThe product offers color-scanning and digital-sending capabilities. By using the control panel, you canscan black-and-white or color documents and send them to an e-mail address as an e-mail attachment.To use digital sending, the product must be connected to a local area network (LAN).
NOTE: The e-mail icon is not shown on the control panel if e-mail is not configured.
Before you can send a document to e-mail, you must configure the product.
NOTE: The instructions that follow are for configuring the product at the control panel. You can alsoperform these procedures by using the embedded Web server. For more information, seeEmbedded Web server on page 183.
Supported protocolsThe HP Color LaserJet CM6030 and HP Color LaserJet CM6040 MFP models support Simple MailTransfer Protocol (SMTP) and Lightweight Directory Access Protocol (LDAP).
SMTP
● SMTP is a set of rules that define the interaction between programs that send and receive e-mail.In order for the device to send documents to e-mail, it must be connected to a LAN that has accessto an e-mail server that supports SMTP. The SMTP server must also have Internet access.
● If you are using a LAN connection, contact your system administrator to obtain the IP address orhost name for your SMTP server. If you are connecting through a DSL or cable connection, contactthe internet service provider to obtain the SMTP server IP address.
LDAP
● LDAP is used to gain access to a database of information. When the device uses LDAP, it searchesa global list of e-mail addresses. As you begin to type the e-mail address, LDAP uses an auto-complete feature that supplies a list of e-mail addresses that match the characters you type. Asyou type additional characters, the list of matching e-mail addresses becomes smaller.
● The device supports LDAP, but a connection to an LDAP server is not required in order for thedevice to be able to send to e-mail.
NOTE: If you need to change the LDAP settings, you must change them by using the embeddedWeb server. For more information, see Embedded Web server on page 183, or see the EmbeddedWeb Server User Guide on the product Administrator CD.
Configure e-mail server settings
Find the SMTP gateway
1. From the Home screen, touch Administration
2. Touch Initial Setup.
3. Touch E-mail Setup, and then touch Find Send Gateways.
4. Touch Find.
164 Chapter 12 Scan and send to e-mail ENWW

Configure the SMTP gateway address
1. From the Home screen, touch Administration.
2. Touch Initial Setup.
3. Touch E-mail Setup, and then touch SMTP Gateway.
4. Type the SMTP gateway address, either as an IP address or as a fully qualified domain name. Ifyou do not know the IP address or domain name, contact the network administrator.
5. Touch Save.
Test the SMTP settings
1. From the Home screen, touch Administration.
2. Touch Initial Setup.
3. Touch E-mail Setup, and then touch Test.
If the configuration is correct, Gateways OK appears on the control-panel display.
If the first test was successful, send an e-mail to yourself by using the digital-send feature. If you receivethe e-mail, you have successfully configured the digital-sending feature.
If you do not receive the e-mail, use these actions to resolve issues with the digital-sending software:
● Check the SMTP and address to make sure that you typed them correctly.
● Print a configuration page. Verify that the SMTP gateway address is correct.
● Make sure that the network is operating correctly. Send an e-mail to yourself from a computer. Ifyou receive the e-mail, the network is operating correctly. If you do not receive the e-mail, contactyour network administrator or Internet service provider (ISP).
ENWW Configure e-mail settings 165

Use the Send E-mail screenUse the touchscreen to navigate through the options on the Send E-mail screen.
1 Send E-mail button Touching this button scans the document and sends an e-mail file to the provided e-mailaddresses.
2 Home button Touching this button opens the Home screen.
3 From: field Touch this field to open the keyboard, and then type your e-mail address. If the systemadministrator has configured the device to do so, this field might automatically insert a defaultaddress.
4 To: field Touch this field to open the keyboard, and then type the e-mail addresses of those whom youwant to receive the scanned document.
5 Subject: field Touch this field to open the keyboard, and then type a subject title.
6 More Options button Touch this button to change certain e-mail settings for the current scan job.
7 Scroll bar Use the scroll bar to view and set up the CC:, BCC:, Message, and File Name fields. Touch anyof those fields to open the keyboard and add the necessary information.
8 Address book buttons Touch these buttons to use the address book to populate the To:, CC:, or BCC: fields. For moreinformation, see Use the local address book on page 169.
9 Help button Touch this button for control-panel help. For more information, see Use the control panelon page 14.
10 Error/warning button This button appears only when there is an error or warning in the status line area. Touch it to opena pop-up screen that will help you resolve the error or warning.
166 Chapter 12 Scan and send to e-mail ENWW
Perform basic e-mail functionsThe product e-mail feature offers the following benefits:
● Sends documents to multiple e-mail addresses, saving time and delivery costs.
● Delivers files in black-and-white or in color. Files can be sent in different file formats that therecipient can manipulate.
With e-mail, documents are scanned into the product memory and sent to an e-mail address or multipleaddresses as an e-mail attachment. Digital documents can be sent in several graphics formats, suchas .TFF and .JPG, which allows recipients to manipulate the document file in various programs to meettheir specific needs. Documents arrive in near-original quality, and then can be printed, stored, orforwarded.
In order to use the e-mail feature, the product needs to be connected to a valid SMTP local area networkthat includes Internet access.
Load documentsYou can scan a document by using either the glass or the ADF. The glass and ADF can accommodateLetter-, Executive-, A4-, and A5-size originals. The ADF can also accommodate Legal-size originals.Smaller originals, receipts, irregular and worn documents, stapled documents, previously foldeddocuments, and photographs should be scanned by using the glass. Multiple-page documents can bescanned easily by using the ADF.
Send documentsThe product scans both black-and-white and color originals. You can use default settings or change thescanning preferences and file formats. The following are the default settings:
● Color
● PDF (requires the recipient to have an Adobe Acrobat viewer to view the e-mail attachment)
For information about changing the settings for the current job, see Change e-mail settings for the currentjob on page 170.
Send a document1. Place the document face-down on the scanner glass or face-up in the ADF.
2. From the Home screen, touch E-mail.
3. If prompted, type your user name and password.
4. Complete the From:, To:, and Subject: fields. Scroll down and complete the CC:, and BCC: fieldsif appropriate. Your user name or other default information might appear in the From: field. If so,you might not be able to change it.
5. (Optional) Touch More Options to change the settings for the document that you are sending (forexample, the document’s original size). If you are sending a two-sided document, you should selectSides and an option with a two-sided original.
6. Press Start to begin sending.
7. When you are finished, remove the original document from the scanner glass or ADF.
ENWW Perform basic e-mail functions 167
Use the auto-complete functionWhen you type characters into the To:, CC:, or From: fields on the Send E-mail screen, the auto-complete function is activated. As you type the required address or name by using the keyboard screen,the device automatically searches the address book list and completes the address or name by usingthe first match. You can then select that name by touching Enter, or continue typing the name until auto-complete finds the correct entry. If you type a character that does not match any entry in the list, theauto-complete text is removed from the display to indicate that you are typing an address that is not inthe address book.
Use the address bookYou can send e-mail to a list of recipients by using the address book feature of the product. See yoursystem administrator for information about configuring address lists.
NOTE: You can also use the embedded Web server (EWS) to create and manage the e-mail addressbook. The EWS e-mail address book can be used to add, edit, or delete single e-mail addresses or e-mail distribution lists. For more information, see Embedded Web server on page 183.
Create a recipient list1. From the Home screen, touch E-mail.
2. Complete one of the following steps:
● Touch To: to open the keyboard screen, and then type the recipients' e-mail addresses.Separate multiple e-mail addresses with a semicolon or by touching Enter on the touchscreen.
● Use the address book.
a. On the Send E-mail screen, touch the address book button to open the address book.
b. Navigate the entries in the address book by using the scroll bar. Hold down the arrow toscroll quickly through the list.
c. Highlight the name to select a recipient, and then touch the arrow button .
You can also select a distribution list by touching the drop-down list at the top of thescreen and then touching All, or add a recipient from a local list by touching Local in thedrop-down list. Highlight the appropriate names, and then touch the arrow button toadd the name to your list of recipients.
You can remove a recipient from your list by scrolling to highlight the recipient, and thentouching the remove button in the middle of the screen.
3. The names in the recipient list are placed in the text line of the keyboard screen. If you want, youcan add a recipient that is not found in the address book by typing the e-mail address on thekeyboard. After you are satisfied with your recipient list, touch OK.
4. Touch OK.
5. Finish typing information in the CC: and Subject: fields on the Send E-mail screen, if necessary.You can check the list of recipients by touching the down arrow in the To: text line.
6. Press Start.
168 Chapter 12 Scan and send to e-mail ENWW

Use the local address bookUse the local address book to store frequently-used e-mail addresses. The local address book can beshared between devices that use the same server to gain access to the HP Digital Sending software.
You can use the address book when you type e-mail addresses in the From:, To:, CC:, or BCC: fields.You can also add or delete addresses in the address book.
To open the address book, touch the address book button .
Add e-mail addresses to the local address book1. Touch Local.
2. Touch the add button .
3. (Optional) Touch the Name field, and in the keyboard that appears type a name for the new entry.Touch OK.
The name is the alias for the e-mail address. If you do not type an alias name, the alias will be thee-mail address itself.
4. Touch the Address field, and in the keyboard that appears type the e-mail address for the newentry. Touch OK.
Delete e-mail addresses from the local address bookYou can delete e-mail addresses that you no longer use.
NOTE: To change an e-mail address, you must first delete the address and then add the correctedaddress as a new address in the local address book.
1. Touch Local.
2. Touch the e-mail address that you want to delete.
3. Touch the remove button in the lower right corner.
The following confirmation message appears: Do you want to delete the selected address(es)?
4. Touch Yes to delete the e-mail address(es) or touch No to return to the Address Book screen.
ENWW Use the address book 169

Change e-mail settings for the current jobUse the More Options button to change the following e-mail settings for the current print job:
Button Description
Document File Type Touch this button to change the type of file the device creates after scanning the document.
Output Quality Touch this button to increase or decrease the print quality of the file being scanned. A higher qualitysetting produces a larger file size.
Resolution Touch this button to change the scan resolution. A higher resolution setting produces a larger file size.
Color/Black Touch this button to determine whether you will scan the document in color or in black-and-white.
Original Sides Touch this button to indicate if the original document is one-sided or two-sided.
Content Orientation Touch this button to select either the portrait or landscape orientation for the original.
Original Size Touch this button to select the size of the document: letter, A4, legal, or mixed letter/legal.
Optimize Text/Picture
Touch this button to change the scanning procedure based on the type of document that you arescanning.
Job Build Touch this button to activate or deactivate the Job Build mode, which enables you to scan several smallscan jobs and send them as one file.
Image Adjustment Touch this button to change the darkness and sharpness settings, or to clean up background clutter onthe original.
170 Chapter 12 Scan and send to e-mail ENWW
Scan to a folderIf the system administrator has made the feature available, the device can scan a file and send it to afolder on the network. Supported operating systems for folder destinations include Windows 2000,Windows XP, and Windows Server 2003.
NOTE: You might be required to supply a user name and password in order to use this option, or tosend to certain folders. See your system administrator for more information.
1. Place the document face-down on the scanner glass or face-up in the ADF.
2. From the Home screen, touch Network Folder.
3. In the Quick Access Folders list, select the folder in which you want to save the document.
4. Touch the File Name field to open the keyboard pop-up screen, and then type the file name.
5. Touch Send to Network Folder.
ENWW Scan to a folder 171

Scan to a workflow destinationNOTE: This device feature is provided by the optional Digital Sending Software.
If the system administrator has enabled the workflow functionality, you can scan a document and sendit to a custom workflow destination. A workflow destination gives you the ability to send additionalinformation, along with the scanned document, to a specified network or file transfer protocol (FTP)location. Prompts for specific information appear on the control-panel display. The system administratorcan also designate a printer as a workflow destination, which allows you to scan a document and thensend it directly to a network printer for printing.
1. Place the document face-down on the scanner glass or face-up in the ADF.
2. From the Home screen, touch Workflow.
3. Select the destination to which you want to scan.
4. In the Text Field field, type the data that you want to accompany the file, and then touch SendWorkflow.
172 Chapter 12 Scan and send to e-mail ENWW

13 Fax
● Analog fax
● Digital fax
ENWW 173

Analog faxWhen the analog fax accessory is installed, the product can function as a standalone fax machine.
The HP Color LaserJet CM6030f MFP or HP Color LaserJet CM6040f MFP models come with a faxaccessory already installed. For the HP Color LaserJet CM6030 MFP or HP Color LaserJet CM6040MFP (base models), you can order this accessory as an option. See Part numbers on page 281 forinformation about ordering the analog fax accessory. Specifications for the Analog Fax Accessory areavailable in the HP LaserJet Analog Fax Accessory 300 User Guide. An electronic version of this guideis located on the User CD that comes with the product. The Analog Fax Accessory 300 Fax Guide andthe Analog Fax Accessory 300 Send Fax Driver Guide are also located on the product User CD or atwww.hp.com/go/mfpfaxaccessory300.
Connect the fax accessory to a phone lineWhen connecting the fax accessory to a phone line, ensure that the phone line being used for the faxaccessory is a dedicated line that is not used by any other devices. Also, this line should be an analogline because the fax will not function correctly if it is connected to some digital PBX systems. If you arenot sure whether you have an analog or digital phone line, contact your telecom provider.
NOTE: HP recommends using the phone cord that comes with the fax accessory to ensure that theaccessory functions correctly.
Follow these instructions to connect the fax accessory to a phone jack.
1. Locate the phone cord that is included with the fax accessory kit. Connect one end of the phonecord into the fax accessory phone jack that is on the formatter. Push the connector until it clicks.
CAUTION: Be sure to connect the phone line to the fax accessory port, which is located in thecenter of the formatter. Do not connect the phone line to the HP Jetdirect port, which is nearer thebottom of the formatter.
2. Connect the other end of the phone cord into the phone jack on the wall. Push the connector untilit clicks or until it is securely seated. Because different types of connectors are used in differentcountries/regions, the connector might not make an audible click.
Configure and use the fax featuresBefore you can use the fax features, you must configure them in the control-panel menus. For completeinformation about configuring and using the fax accessory, and for information about troubleshooting
174 Chapter 13 Fax ENWW

problems with the fax accessory, see the HP LaserJet Analog Fax Accessory 300 User Guide. Thisguide is provided with the fax accessory, and it is also available on the product User CD.
Use the Send Fax driver to send a fax from a computer without going to the product control panel. Seethe HP LaserJet MFP Analog Fax Accessory 300 Send Fax Driver Guide for more information.
The HP LaserJet Analog Fax Accessory 300 User Guide and HP LaserJet MFP Analog Fax Accessory300 Send Fax Driver Guide are both available on the product User CD.
ENWW Analog fax 175

Digital faxDigital faxing is available when you install the optional HP Digital Sending Software. For informationabout ordering this software, go to www.hp.com/go/digitalsending
With digital faxing, the product does not need to be connected directly to a phone line. Instead, theproduct can send a fax in one of three ways:
● LAN fax sends faxes through a third-party fax provider.
● Microsoft Windows 2000 fax is a fax modem and Digital Sender Module on a computer that allowsthe computer to operate as a turnkey gateway fax.
● Internet fax uses an Internet fax provider to process faxes, and the fax is delivered on a traditionalfax machine or sent to the user’s e-mail.
For complete information about using digital faxing, see the documentation that is provided with theHP Digital Sending Software.
176 Chapter 13 Fax ENWW
14 Manage and maintain the product
● Information pages
● HP Easy Printer Care
● Embedded Web server
● Use HP Web Jetadmin software
● Security features
● Set the real-time clock
● Manage supplies
● Replace supplies
● Clean the product
● ADF maintenance kit
● Calibrate the scanner
● Upgrade the firmware
ENWW 177
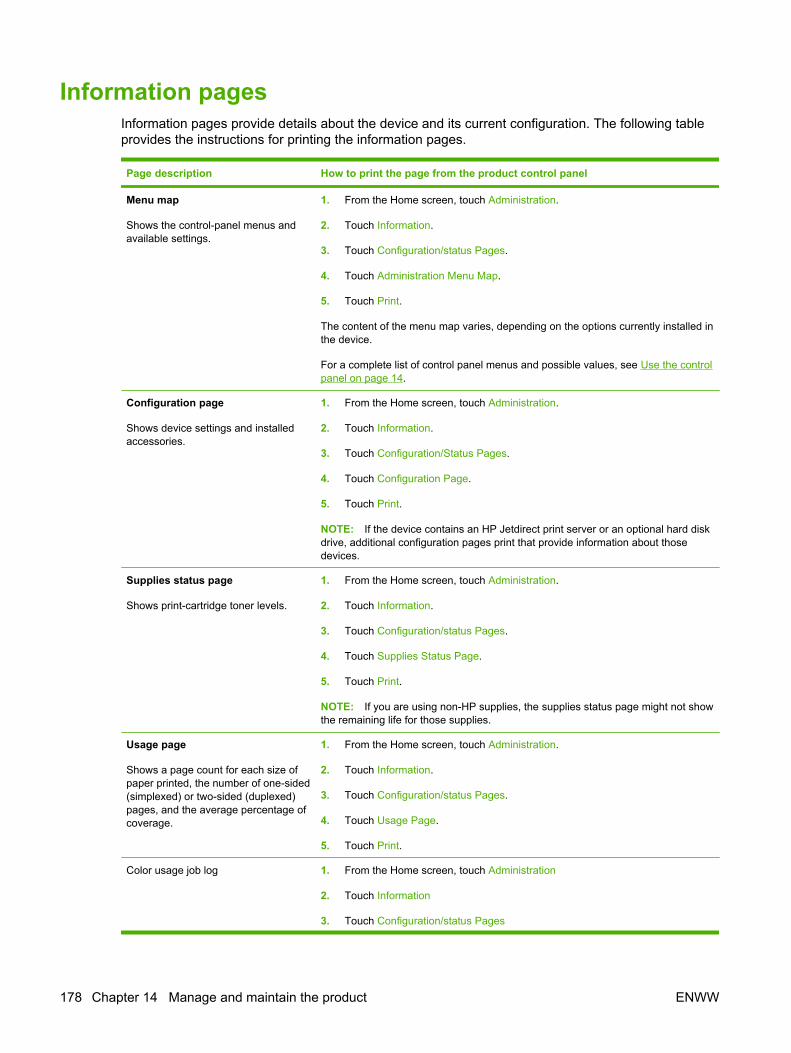
Information pagesInformation pages provide details about the device and its current configuration. The following tableprovides the instructions for printing the information pages.
Page description How to print the page from the product control panel
Menu map
Shows the control-panel menus andavailable settings.
1. From the Home screen, touch Administration.
2. Touch Information.
3. Touch Configuration/status Pages.
4. Touch Administration Menu Map.
5. Touch Print.
The content of the menu map varies, depending on the options currently installed inthe device.
For a complete list of control panel menus and possible values, see Use the controlpanel on page 14.
Configuration page
Shows device settings and installedaccessories.
1. From the Home screen, touch Administration.
2. Touch Information.
3. Touch Configuration/Status Pages.
4. Touch Configuration Page.
5. Touch Print.
NOTE: If the device contains an HP Jetdirect print server or an optional hard diskdrive, additional configuration pages print that provide information about thosedevices.
Supplies status page
Shows print-cartridge toner levels.
1. From the Home screen, touch Administration.
2. Touch Information.
3. Touch Configuration/status Pages.
4. Touch Supplies Status Page.
5. Touch Print.
NOTE: If you are using non-HP supplies, the supplies status page might not showthe remaining life for those supplies.
Usage page
Shows a page count for each size ofpaper printed, the number of one-sided(simplexed) or two-sided (duplexed)pages, and the average percentage ofcoverage.
1. From the Home screen, touch Administration.
2. Touch Information.
3. Touch Configuration/status Pages.
4. Touch Usage Page.
5. Touch Print.
Color usage job log 1. From the Home screen, touch Administration
2. Touch Information
3. Touch Configuration/status Pages
178 Chapter 14 Manage and maintain the product ENWW

Page description How to print the page from the product control panel
4. Touch Color Usage Job Log
5. Touch Print
File directory
Contains information for any massstorage devices, such as flash drives,memory cards, or hard disks, that areinstalled in the device.
1. From the Home screen, touch Administration.
2. Touch Information.
3. Touch Configuration/status Pages.
4. Touch File Directory.
5. Touch Print.
Fax reports
Five reports show fax activity, fax calls,billing codes, blocked fax numbers, andspeed-dial numbers.
NOTE: Fax reports are available onlyon device models that have faxcapabilities.
1. From the Home screen, touch Administration.
2. Touch Information.
3. Touch Fax Reports.
4. Touch one of the following buttons to print the corresponding report:
◦ Fax Activity Log
◦ Fax Call Report
◦ Billing Codes Report
◦ Blocked Fax List
◦ Speed Dial List
5. Touch Print.
For more information, see the fax guide that came with the device.
Font lists
Shows which fonts are currentlyinstalled in the device.
1. From the Home screen, touch Administration.
2. Touch Information.
3. Touch Sample Pages/Fonts.
4. Touch one of the following buttons to print the corresponding report:
◦ Demonstration Page
◦ RGB Samples
◦ CMYK Samples
◦ PCL Font List
◦ PS Font List
5. Touch Print.
NOTE: The font lists also show which fonts reside on a hard disk accessory orDIMM.
ENWW Information pages 179

HP Easy Printer CareOpen the HP Easy Printer Care software
Use one of the following methods to open the HP Easy Printer Care software:
● On the Start menu, select Programs, select Hewlett-Packard, select HP Easy Printer Care, andthen click Start HP Easy Printer Care.
● In the Windows system tray (in the lower-right corner of the desktop), double-click the HP EasyPrinter Care icon.
● Double-click the desktop icon.
HP Easy Printer Care software sectionsHP Easy Printer Care software can provide information about multiple HP products that are on yournetwork as well as any products that are directly connected to your computer. Some of the items thatare in the following table might not be available for every product.
The Help button (?) in the upper-right corner of each page provides more detailed information about theoptions on that page.
Section Options
Device List tab
When you open the software, this is thefirst page that appears.
NOTE: To return to this page from anytab, click My HP Printers in the left sideof the window.
● Devices list: Shows the products that you can select.
NOTE: The product information appears either in list form or as icons,depending on the setting for the View as option.
● The information on this tab includes current alerts for the product.
● If you click a product in the list, the HP Easy Printer Care opens theOverview tab for that product.
Compatible Printers Provides a list of all the HP products that support HP Easy Printer Care software.
Find Other Printers window
Add more products to theMy HP Printers list
Click the Find Other Printers link in the Devices list to open the Find OtherPrinters window. The Find Other Printers window provides a utility that detectsother network printers so that you can add them to the My HP Printers list and thenmonitor those products from your computer.
Overview tab
Contains basic status information for thedevice
● Device Status section: This section shows product-identification informationand the product status. It indicates product-alert conditions, such as an emptyprint cartridge. After you correct a problem with the product, click the refreshbutton in the upper-right corner of the window to update the status.
● Supplies Status section: Shows detailed supplies status, such as thepercentage of toner remaining in the print cartridge and the status of the paperthat is loaded in each tray.
● Supplies Details link: Opens the supplies status page to view more detailedinformation about product supplies, ordering information, and recyclinginformation.
180 Chapter 14 Manage and maintain the product ENWW

Section Options
Support tab
Provides links to support information
● Device Status section: This section shows product-identification informationand the product status. It indicates product-alert conditions, such as an emptyprint cartridge. After you correct a problem with the product, click the refreshbutton in the upper-right corner of the window to update the status.
● Device Management section: Provides links to information about HP EasyPrinter Care, to advanced product settings, and to product usage reports.
● Troubleshooting and Help: Provides links to tools that you can use to resolveproblems, to online product support information, and to online HP experts.
Settings tab
Configure product settings, adjust print-quality settings, and find informationabout specific product features
NOTE: This tab is not available forsome products.
● About: Provides general information about this tab.
● General: Provides information about the product, such as the model number,serial number, and the settings for date and time, if they are available.
● Information Pages: Provides links to print the information pages that areavailable for the product.
● Capabilities: Provides information about product features, such as duplexing,the available memory, and the available printing personalities. Click Changeto adjust the settings.
● Print Quality: Provides information about print-quality settings. ClickChange to adjust the settings.
● Trays / Paper: Provides information about the trays and how they areconfigured. Click Change to adjust the settings.
● Restore Defaults: Provides a way to restore the product settings to the factorydefaults. Click Restore to restore the settings to the defaults.
HP Proactive Support
NOTE: This item is available from theOverview and Support tabs.
When enabled, HP Proactive Support routinely scans your printing system to identifypotential problems. Click the more info link to configure how frequently the scansoccur. This page also provides information about available updates for productsoftware, firmware, and HP printer drivers. You can accept or decline eachrecommended update.
Supplies Ordering button
Click the Supplies Ordering button onany tab to open the Supplies Orderingwindow, which provides access to onlinesupplies ordering.
NOTE: This item is available from theOverview and Support tabs.
● Ordering list: Shows the supplies that you can order for each product. To ordera certain item, click the Order check box for that item in the supplies list. Youcan sort the list by product, or by the supplies that need to be ordered thesoonest. The list contains supplies information for every product that is in theMy HP Printers list.
● Shop Online for Supplies button: Opens the HP SureSupply Web site in anew browser window. If you have checked the Order check box for any items,the information about those items can be transferred to the Web site, whereyou will receive information on options for purchasing your selected supplies.
● Print Shopping List button: Prints the information for the supplies that havethe Order check box selected.
Alert Settings link
NOTE: This item is available from theOverview and Support tabs.
Click Alert Settings to open the Alert Settings window, in which you can configurealerts for each product.
● Alerting is on or off: Activates or deactivates the alerts feature.
● Printer Alerts: Select the option to receive alerts for critical errors only, or forany error.
● Job Alerts: For products that support it, you can receive alerts for specific printjobs.
Color Access Control Use this feature to permit or restrict color printing.
ENWW HP Easy Printer Care 181

Section Options
NOTE: This item is available only forHP color products that support ColorAccess Control.
NOTE: This item is available from theOverview and Support tabs.
182 Chapter 14 Manage and maintain the product ENWW

Embedded Web serverUse the embedded Web server to view product and network status and to manage printing functionsfrom your computer instead of from the product control panel. The following are examples of what youcan do using the embedded Web server:
NOTE: When the printer is directly connected to a computer, use the HP Easy Printer Care to viewthe printer status.
● View product status information.
● Set the type of media that is loaded in each tray.
● Determine the remaining life for all supplies and order new ones.
● View and change tray configurations.
● View and change the product control-panel menu configuration.
● View and print internal pages.
● Receive notification of product and supplies events.
● View and change network configuration.
To use the embedded Web server, you must have Microsoft Internet Explorer 5.01 or later or Netscape6.2 or later for Windows, Mac OS, and Linux (Netscape only). Netscape Navigator 4.7 is required forHP-UX 10 and HP-UX 11. The embedded Web server works when the product is connected to an IP-based network. The embedded Web server does not support IPX-based product connections. You donot have to have Internet access to open and use the embedded Web server.
When the product is connected to the network, the embedded Web server is automatically available.
NOTE: For complete information about using the embedded Web server, see the Embedded WebServer User Guide, which is on the product Administrator CD.
Open the embedded Web server by using a network connection1. In a supported Web browser on your computer, type the device IP address or host name in the
address/URL field. To find the IP address or host name, print a configuration page. See Informationpages on page 178.
NOTE: After you open the URL, you can bookmark it so that you can return to it quickly in thefuture.
2. The embedded Web server has four tabs that contain settings and information about the device:the Information tab, the Settings tab, the Networking tab, and the Digital Sending tab. Click thetab that you want to view.
See Embedded Web server sections on page 184 for more information about each tab.
ENWW Embedded Web server 183

Embedded Web server sections
Tab or section Options
Information tab
Provides device, status, andconfiguration information
● Device Status: Shows the device status and shows the life remaining of HP supplies,with 0% indicating that a supply is empty. The page also shows the type and size ofprint paper set for each tray. To change the default settings, click ChangeSettings.
● Configuration Page: Shows the information found on the configuration page.
● Supplies Status: Shows the life remaining of HP supplies, with 0 percent indicatingthat a supply is empty. This page also provides supplies part numbers. To order newsupplies, click Shop for Supplies in the Other Links area on the left side of thewindow.
● Event log: Shows a list of all device events and errors.
● Usage page: Shows a summary of the number of pages the device has printed,grouped by size and type.
● Device Information: Shows the device network name, address, and modelinformation. To change these entries, click Device Information on the Settings tab.
● Control Panel: Shows messages from the device control panel, such as Ready orSleep mode on.
● Print: Allows you to send print jobs to the device.
Settings tab
Provides the ability to configure thedevice from your computer
● Configure Device: Allows you to configure device settings. This page contains thetraditional menus found on devices using a control-panel display.
● E-mail Server: Network only. Used in conjunction with the Alerts page to set upincoming and outgoing e-mail, as well as to set e-mail alerts.
● Alerts: Network only. Allows you to set up to receive e-mail alerts for various deviceand supplies events.
● AutoSend: Allows you to configure the device to send automated e-mails regardingdevice configuration and supplies to specific e-mail addresses.
● Security: Allows you to set a password that must be entered to gain access to theSettings and Networking tabs. Enable and disable certain features of theembedded Web server.
● Authentication Manager: Allows you to determine which device functions willrequire a user to provide log-in information in order to use those functions.
● LDAP Authentication: Allows you to configure a Lightweight Directory AccessProtocol (LDAP) server to limit device access to certain users. The LDAP server willrequire a user to provide log-in information in order to gain access to the device.
● Edit Other Links: Allows you to add or customize a link to another Web site. Thislink is displayed in the Other Links area on all embedded Web server pages.
● Device Information: Allows you to name the device and assign an asset number toit. Enter the name and e-mail address for the primary contact who will receiveinformation about the device.
● Language: Allows you to determine the language in which to display the embeddedWeb server information.
● Date & Time: Allows time synchronization with a network time server.
● Wake Time: Allows you to set or edit a wake time for the device.
184 Chapter 14 Manage and maintain the product ENWW

Tab or section Options
NOTE: The Settings tab can be password-protected. If this device is on a network,always consult with the system administrator before changing settings on this tab.
Digital Sending tab Use the pages on the Digital Sending tab to configure the digital-sending features.
NOTE: If the product is configured to use the optional HP Digital Sending Software, theoptions on these tabs are not available. Instead, all digital-sending configuration isperformed by using the HP Digital Sending Software.
● General. Set up contact information for the system administrator.
● Send to E-mail. Configure the e-mail settings for digital sending. You can specifythe SMTP server, the default "From" address, and the default subject. You can alsoset the maximum file size that is allowed for attachments.
● E-mail Address Book. The E-mail Address Book page enables you to add e-mailaddresses into the product one at a time, and to edit e-mail addresses that havealready been saved in the product. You can also use the Import/Export tab to load alarge list of frequently-used e-mail addresses on to the product all at once, ratherthan adding them one at a time.
● Import/Export. Use this tab to import or export .CSV files containing e-mailaddresses, fax numbers, or user records, so that they can be accessed on thisproduct. You can also export e-mail, fax, or user records from the device into a fileon your computer. You can then use this file as a data backup, or you can use it toimport the records onto another HP device.
● Log. View the digital-sending activity log for the product. The log contains digital-sending job information, including any errors that occur.
● Preferences. Configure digital-sending defaults such as the default page-size andthe default settings-reset delay. You can also configure these settings by using theproduct control-panel menus.
Fax tab The Fax tab contains options to configure and use the fax capabilities of the product. Foradditional information about fax functions, see the Fax User Guide.
● Use the Fax Settings screen to configure the send-to-fax features for the product.
● The Fax Address Book page enables you to add fax numbers into the product oneat a time, and to edit fax numbers that have already been saved in the product. Youcan also use the Import/Export feature on the Digital Sending tab to load a large listof frequently-used fax numbers on to the device all at once, rather than adding themone at a time.
● Use the Fax Speed Dials screen to add, edit, or delete fax speed dial entries to andfrom the product. You can use fax speed dials to store frequently used fax numbersor lists of up to 100 fax numbers. Up to 100 speed dial entries can be configured.
ENWW Embedded Web server 185

Tab or section Options
Networking tab
Provides the ability to changenetwork settings from yourcomputer
Network administrators can use this tab to control network-related settings for the devicewhen it is connected to an IP-based network. This tab does not appear if the device isdirectly connected to a computer, or if the device is connected to a network using anythingother than an HP Jetdirect print server.
NOTE: The Networking tab can be password-protected.
Other links
Contains links that connect you tothe Internet
● HP Instant Support™: Connects you to the HP Web site to help you find solutions.This service analyzes your device error log and configuration information to providediagnostic and support information specific to your device.
● Shop for Supplies: Connects to the HP SureSupply Web site, where you will receiveinformation on options for purchasing original HP supplies, such as print cartridgesand paper.
● Product Support: Connects to the support site for the device, from which you cansearch for help regarding general topics.
NOTE: You must have Internet access in order to use any of these links. If you use adial-up connection and did not connect when you first opened the embedded Web server,you must connect before you can visit these Web sites. Connecting might require that youclose the embedded Web server and reopen it.
186 Chapter 14 Manage and maintain the product ENWW

Use HP Web Jetadmin softwareHP Web Jetadmin is a Web-based software solution for remotely installing, monitoring, andtroubleshooting network-connected peripherals. The intuitive browser interface simplifies cross-platformmanagement of a wide range of devices, including HP and non-HP devices. Management is proactive,allowing network administrators the ability to resolve issues before users are affected. Download thisfree, enhanced-management software at www.hp.com/go/webjetadmin_software.
To obtain plug-ins to HP Web Jetadmin, click plug-ins, and then click the download link that is next tothe name of the plug-in that you want. The HP Web Jetadmin software can automatically notify youwhen new plug-ins are available. On the Product Update page, follow the directions to automaticallyconnect to the HP Web site.
If installed on a host server, HP Web Jetadmin is available to any client through a supported Webbrowser, such as Microsoft Internet Explorer 6.0 for Windows or Netscape Navigator 7.1 for Linux.Browse to the HP Web Jetadmin host.
NOTE: Browsers must be Java-enabled. Browsing from an Apple PC is not supported.
ENWW Use HP Web Jetadmin software 187

Security featuresSecure the embedded Web server
Assign a password for access to the embedded Web server so that unauthorized users cannot changethe product settings.
1. Open the embedded Web server. See Embedded Web server on page 183.
2. Click the Settings tab.
3. On the left side of the window, click Security.
4. Type the password next to New Password, and type it again next to Verify Password.
5. Click Apply. Make note of the password and store it in a safe place.
Foreign Interface Harness (FIH)The Foreign Interface Harness (FIH) provides a portal on the product. By using the FIH and third-partyequipment, you can track information about copies that are made on the product.
Requirements
● Windows 2000 or Windows XP
● Access to third-party accounting hardware solutions, such as Equitrac or Copitrak devices
Use the FIHTo use the FIH, you must download and install the FIH software. The software is available fromwww.hp.com/go/cljcm6030mfp_software and www.hp.com/go/cljcm6040mfp_software. The software isused to enable or disable the FIH portal. Use the software to set and change the administrator personalidentification number (PIN).
Administrators can use the PIN option to configure the FIH to prevent any unauthorized changes.Changes can be made only with the correct PIN authentication.
NOTE: It is important to remember the PIN that is assigned to the FIH administration software. ThePIN is required to make any changes to the FIH.
Enable the FIH portal
1. Double-click the FIH.EXE file. The Foreign Interface Harness dialog box appears.
2. Click OK.
3. Click Enable.
4. If you have not entered a PIN before, click No. If you have entered a PIN before, click Yes. If youclick No, type and confirm the PIN, and then click OK. If you click Yes, type the PIN and clickOK.
NOTE: The PIN must be numeric.
5. Click the appropriate button for the type of connection: Direct or Network. If Direct is selected,type the product port. If Network is selected, type the IP address and port for the product.
188 Chapter 14 Manage and maintain the product ENWW

NOTE: The IP address for the product can be found on the Configuration page.
If you typed an incorrect IP address, you will receive an error message. Otherwise, the portal is enabled.
Disable the FIH portal
1. Double-click the FIH.EXE file. The Foreign Interface Harness dialog box appears.
2. Click OK.
3. Click Disable.
4. Type the PIN and click OK.
5. Click the appropriate button for the type of connection: Direct or Network. If Direct is selected,type the product port and click OK. If Network is selected, type the IP address and port for theproduct, and then click OK. The portal is disabled.
NOTE: If you lose the PIN number and the portal needs to be disabled, try using the default PIN thatis listed to disable it. For assistance, use the HP Instant Support service, which is available through theembedded Web server or at www.hp.com/go/instantsupport. See Embedded Web serveron page 183.
Secure Disk EraseTo protect deleted data from unauthorized access on the product hard drive, use the Secure Disk Erasefeature. This feature can securely erase print and copy jobs from the hard drive.
Secure Disk Erase offers the following levels of disk security:
● Non-Secure Fast Erase. This is a simple file-table erase function. Access to the file is removed,but actual data is retained on the disk until it is overwritten by subsequent data-storage operations.This is the fastest mode. Non-Secure Fast Erase is the default erase mode.
● Secure Fast Erase. Access to the file is removed, and the data is overwritten with a fixed identicalcharacter pattern. This is slower than Non-Secure Fast Erase, but all data is overwritten. SecureFast Erase meets the U.S. Department of Defense 5220-22.M requirements for the clearing of diskmedia.
● Secure Sanitizing Erase. This level is similar to the Secure Fast Erase mode. In addition, data isrepetitively overwritten by using an algorithm that prevents any residual data persistence. Thismode will impact performance. Secure Sanitizing Erase meets the U.S. Department of Defense5220-22.M requirements for the sanitization of disk media.
Data affectedData affected (covered) by the Secure Disk Erase feature includes temporary files that are createdduring the print and copying process, stored jobs, proof and hold jobs, disk-based fonts, disk-basedmacros (forms), stored fax files, address books, and HP and third-party applications.
NOTE: Stored jobs will be securely overwritten only when they have been deleted through theRetrieve Job menu on the product after the appropriate erase mode has been set.
This feature will not impact data that is stored on flash-based product non-volatile RAM (NVRAM) thatis used to store default settings, page counts, and similar data. This feature does not affect data that isstored on a system RAM disk (if one is used). This feature does not impact data that is stored on theflash-based system boot RAM.
ENWW Security features 189

Changing the Secure Disk Erase mode does not overwrite previous data on the disk, nor does itimmediately perform a full-disk sanitization. Changing the Secure Disk Erase mode changes how theproduct cleans up temporary data for jobs after the erase mode has been changed.
Gain access to Secure Disk EraseUse HP Web Jetadmin to gain access to and set the Secure Disk Erase feature.
Additional InformationFor additional information about the HP Secure Disk Erase feature, see the HP support flyer or go towww.hp.com/go/webjetadmin/.
DSS authenticationOptional Digital Sending Software (DSS) for the product is available for purchase separately. Thesoftware provides an advanced sending program that contains an authentication process. This processrequires users to type a user identification and a password before they can use any of the DSS featuresthat require authentication.
Lock the control-panel menusTo prevent someone from changing the product configuration, you can lock the control-panel menus.This prevents unauthorized users from changing the configuration settings such as the SMTP server.The following procedure describes how to restrict access to the control-panel menus by using theHP Web Jetadmin software. (See Use HP Web Jetadmin software on page 187.)
1. Open the HP Web Jetadmin program.
2. Open the DEVICE MANAGEMENT folder in the drop-down list in the Navigation panel. Navigateto the DEVICE LISTS folder.
3. Select the product.
4. In the Device Tools drop-down list, select Configure.
5. Select Security from the Configuration Categories list.
6. Type a Device Password.
7. In the Control Panel Access section, select Maximum Lock. This prevents unauthorized usersfrom gaining access to configuration settings.
190 Chapter 14 Manage and maintain the product ENWW
Set the real-time clockUse the real-time clock feature to set the date and time settings. The date and time information isattached to stored print, fax, and digital-send jobs, so you can identify the most recent versions of storedprint jobs.
Set the date format1. On the control panel, scroll to and touch Administration.
2. Touch Time/Scheduling.
3. Touch Date/Time.
4. Touch Date Format.
5. Touch the desired format.
6. Touch Save.
Set the date1. On the control panel, scroll to and touch Administration.
2. Touch Time/Scheduling.
3. Touch Date/Time.
4. Touch Date.
5. Touch the appropriate options to set the correct month, date of the month, and the year.
6. Touch Save.
Set the time format1. On the control panel, scroll to and touch Administration.
2. Touch Time/Scheduling.
3. Touch Date/Time.
4. Touch Time Format.
5. Touch the appropriate format.
6. Touch Save.
Set the time1. On the control panel, scroll to and touch Administration.
2. Touch Time/Scheduling.
3. Touch Date/Time.
4. Touch Time.
ENWW Set the real-time clock 191

5. Touch the appropriate options to set the correct hour, minute, and AM/PM setting.
6. Touch Save.
192 Chapter 14 Manage and maintain the product ENWW
Manage suppliesUse genuine HP print cartridges for the best printing results.
Print-cartridge storageDo not remove the print cartridge from its package until you are ready to use it.
CAUTION: To prevent damage to the print cartridge, do not expose it to light for more than a fewminutes.
HP policy on non-HP print cartridgesHewlett-Packard Company cannot recommend the use of non-HP print cartridges, either new orremanufactured.
CAUTION: Any damage caused by a non-HP print cartridge is not covered under the HP warrantyand service agreements.
To install a new HP print cartridge, see Change print cartridges on page 195. To recycle the usedcartridge, follow the instructions included with the new cartridge.
HP fraud hotline and Web siteCall the HP fraud hotline (1-877-219-3183, toll-free in North America) or go to www.hp.com/go/anticounterfeit when you install an HP print cartridge and the control-panel message says the cartridgeis non-HP. HP will help determine if the cartridge is genuine and take steps to resolve the problem.
Your print cartridge might not be a genuine HP print cartridge if you notice the following:
● You are experiencing a high number of problems with the print cartridge.
● The cartridge does not look like it usually does (for example, the orange pull tab is missing, or thepackaging differs from HP packaging).
ENWW Manage supplies 193

Replace suppliesWhen you use genuine HP supplies, the product automatically notifies you when supplies are nearlydepleted. The notification to order supplies allows ample time to order new supplies before they needto be replaced. For more information about ordering supplies, see Supplies and accessorieson page 279
Locate suppliesSupplies are identified by their labeling and their blue plastic handles.
The following figure illustrates the location of each supply item.
Figure 14-1 Supply item locations
1
2
3
4
5
6
1 Image drums
2 Print cartridges
3 Document feeder kit
4 Fuser
5 Transfer unit
6 Transfer roller
Supply replacement guidelinesTo facilitate the replacement of supplies, keep the following guidelines in mind when setting up theproduct.
● Allow sufficient space in the front and on the right side of the product for removing supplies.
● The product should be located on a flat, sturdy surface.
For instructions on installing supplies, see the installation guides provided with each supply item or seemore information at www.hp.com/go/cljcm6030mfp_software or www.hp.com/go/cljcm6040mfp_software. When you connect, select Solve a Problem.
194 Chapter 14 Manage and maintain the product ENWW

CAUTION: Hewlett-Packard recommends the use of genuine HP products in this product. Use of non-HP products may cause problems requiring service that is not covered by the Hewlett-Packard extendedwarranty or service agreements.
Approximate replacement intervals for suppliesThe following table lists the estimated replacement intervals for supplies and the control panel messagesthat prompt when to replace each item. Usage conditions and print patterns may cause results to vary.
Item Printer message Page count Approximate time period
Print cartridges Replace <color> Cartridge 17,000 pages1 for color
20,000 pages for black
4 months for color
5 months for black
Image drums Replace <color> Drum 35,000 pages1
Image transfer kit Replace Transfer Kit 150,000 pages2 37 months
Image fuser kit Replace Fuser Kit 100,000 pages 25 months
Roller kit Replace Roller Kit 100,000 pages 25 months
Stapler cartridge Replace Stapler Cartridge 5000 staples
Booklet maker staplecartridges
Replace Staple Cartridges 2and 3
2,000 booklets
Document feeder kit Replace Document FeederKit
60,000 pages 50 months
1 Approximate average A4-/letter-size page count based on 2-page jobs printed from Tray 2, with 5% coverage of individualcolors.
2 Approximate life is based on 4,000 pages per month.
Change print cartridgesWhen a print cartridge approaches the end of its useful life, the control panel displays a messagerecommending that you order a replacement. The product can continue to print using the current printcartridge until the control panel displays a message instructing you to replace the cartridge.
The product uses four colors and has a different print cartridge for each color: black (K), magenta (M),cyan (C), and yellow (Y).
Replace a print cartridge when the control panel displays a Replace <color> Cartridge message. Thecontrol panel display will also indicate the color that should be replaced (if a genuine HP cartridge iscurrently installed). Replacement instructions are included in the print-cartridge box.
CAUTION: If toner gets on clothing, wipe it off with a dry cloth and wash the clothes in cold water. Hotwater sets toner into fabric.
NOTE: Information about recycling used print cartridges is on the print-cartridge box.
ENWW Replace supplies 195

Replace print cartridges
1. Grasp the grips on the sides of the front door and pull down to open.
2. Grasp the handle of the used print cartridge and pull out to remove.
3. Store the used print cartridge in a protective bag. Information about recycling used print cartridgesis on the print-cartridge box.
4. Remove additional print cartridges in the same manner.
196 Chapter 14 Manage and maintain the product ENWW

5. Remove the new print cartridge from its protective bag.
NOTE: Store the protective bag in a secure place for future use.
6. Hold both sides of the cartridge and shake up and down 5-6 times.
7. Align the print cartridge with its slot and insert the print cartridge until it clicks into place.
8. Insert additional print cartridges in the same manner.
ENWW Replace supplies 197

9. Grasp the grips on the sides of the front door and lift up to close.
To recycle the used print cartridge, follow the instructions included with the new print cartridge.
Change image drumsWhen an image drum approaches the end of its useful life, the control panel displays a messagerecommending that you order a replacement. The product can continue to print using the current imagedrum until the control panel displays a message instructing you to replace the image drum.
The product uses four colors and has a different image drums for each color: black (K), magenta (M),cyan (C), and yellow (Y).
Replace an image drum when the control panel displays Replace <color> Drum message. The control-panel display also indicates the color that should be replaced (if a genuine HP cartridge is currentlyinstalled). Replacement instructions are included in the image drum box.
CAUTION: If toner gets on clothing, wipe it off with a dry cloth and wash the clothes in cold water. Hotwater sets toner into fabric.
NOTE: Information about recycling used image drums is on the image drum box.
198 Chapter 14 Manage and maintain the product ENWW

Replace image drums
1. Grasp the grips on the sides of the front door and pull down to open.
2. With one hand, lift and slowly pull the used image drum out of the product, while supporting theimage drum with your other hand.
CAUTION: If reusing the same image drum, do not touch the green cylinder on the bottom of thedrum because it can damage the drum.
3. Store the used image drum in a protective bag. Information about recycling used image drums ison the image drum box.
4. Remove additional image drums in the same manner.
ENWW Replace supplies 199
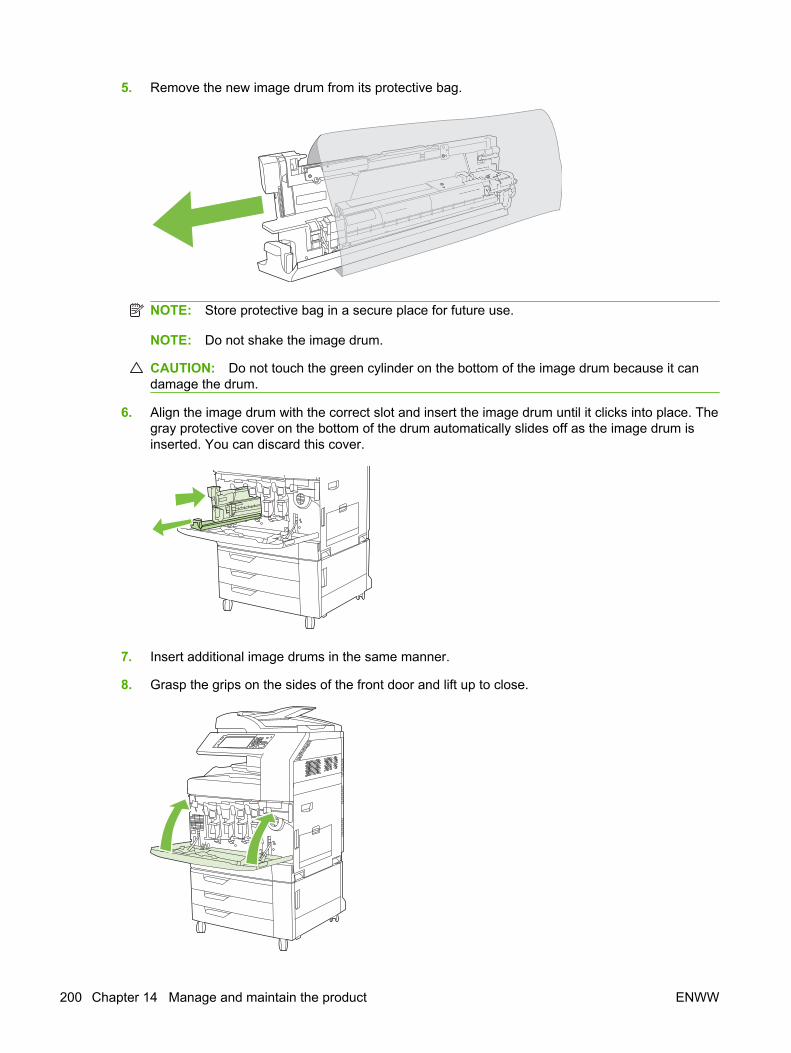
5. Remove the new image drum from its protective bag.
NOTE: Store protective bag in a secure place for future use.
NOTE: Do not shake the image drum.
CAUTION: Do not touch the green cylinder on the bottom of the image drum because it candamage the drum.
6. Align the image drum with the correct slot and insert the image drum until it clicks into place. Thegray protective cover on the bottom of the drum automatically slides off as the image drum isinserted. You can discard this cover.
7. Insert additional image drums in the same manner.
8. Grasp the grips on the sides of the front door and lift up to close.
200 Chapter 14 Manage and maintain the product ENWW

To recycle the used image drum, follow the instructions included with the new image drum.
Install memoryYou can install more memory for the product.
CAUTION: Static electricity can damage DIMMs. When handling DIMMs, either wear an antistaticwrist strap, or frequently touch the surface of the DIMM antistatic package and then touch bare metalon the product.
Install DDR memory DIMMs1. Turn the product off.
2. Disconnect all power and interface cables.
ENWW Replace supplies 201

3. Locate the black formatter pressure release tabs on the formatter board in the rear of the product.
4. Gently press the black tabs toward each other.
5. Gently pull on the black tabs to pull the formatter board from the product. Place the formatter boardon a clean, flat, grounded surface.
202 Chapter 14 Manage and maintain the product ENWW

6. To replace a DIMM that is currently installed, spread the latches apart on each side of the DIMMslot, lift the DIMM up at an angle, and pull it out.
XOXOXO
XOXOXO
XOXOXOXOXOXO
XOXOXOXOXO
XOXOXOXOXO
XOXOXOXOXO
XOXOXOXOXO
XOXOXOXOXOXO
XOXOXOXOXO
XOXOXOXOXOXOXOXOXOXOXOXO
XOXOXO
XOXOXO
XOXOXO
XOXOXOXOXOXO
XOXOXO
XO
XO
XO
XOXOXOXOXOXOXO
XOXOXO
XOXOXO
7. Remove the new DIMM from the antistatic package. Locate the alignment notch on the bottomedge of the DIMM.
8. Holding the DIMM by the edges, align the notch on the DIMM with the bar in the DIMM slot at anangle and firmly press the DIMM into the slot until it is fully seated. When installed correctly, themetal contacts are not visible.
XOXOXO
XOXOXO
XOXOXOXOXOXO
XOXOXOXOXO
XOXOXOXOXO
XOXOXOXOXO
XOXOXOXOXO
XOXOXOXOXOXO
XOXOXOXOXO
XOXOXOXOXOXOXOXOXOXOXOXO
XOXOXO
XOXOXO
XOXOXO
XOXOXOXOXOXO
XOXOXO
XO
XO
XO
XOXOXOXOXOXOXO
XOXOXO
XOXOXO
9. Push down on the DIMM until both latches engage the DIMM.
XOXOXO
XOXOXO
XOXOXOXOXOXO
XOXOXOXOXOXO
XOXOXOXOXO
XOXOXOXOXOXOXOXOXOXOXOXO
XOXOXO
XOXOXO
XOXOXO
XOXOXOXOXOXO
XOXOXO
XO
XO
XO
XOXOXOXOXOXOXO
XOXOXO
XOXOXO
XIOXIOXIXO
OXIXO
XIOXIO
XIOXIOXIXO
OXIXO
XIOXIO
XIOXIOXIXO
OXIXO
XIOXIO
XIOXIOXIXO
OXIXO
XIOXIO
NOTE: If you have difficulty inserting the DIMM, make sure the notch on the bottom of the DIMMis aligned with the bar in the slot. If the DIMM still does not go in, make sure you are using thecorrect type of DIMM.
ENWW Replace supplies 203

10. Align the formatter board in the tracks at the bottom of the slot, and then slide the board back intothe product.
CAUTION: To prevent damage to the formatter board, ensure the formatter board is aligned inthe tracks.
11. Reconnect the power cable and interface cables, and turn the product on.
12. To enable the new memory, go to Enable memory on page 204.
Enable memoryIf you installed a memory DIMM, set the product driver to recognize the newly added memory.
Enable memory for Windows 2000 and XP
1. On the Start menu, point to Settings, and click Printers or Printers and Faxes.
2. Right-click the product and select Properties.
3. On the Device Settings tab, click Printer Memory (in the Installable Options section).
4. Select the total amount of memory that is now installed.
5. Click OK.
204 Chapter 14 Manage and maintain the product ENWW

Install an HP Jetdirect or EIO print server card or EIO hard diskThe HP Color LaserJet CM6030 and CM6040 MFP Series are equipped with an embedded print serverport. If desired, you can install an additional I/O card in the available EIO slot.
1. Turn the product off.
2. Disconnect all power and interface cables.
ENWW Replace supplies 205

3. Locate an open EIO slot. Loosen and remove the two retaining screws holding the cover for theEIO slot, and then remove the cover. You will not need these screws and the cover again. Theycan be discarded.
4. Firmly insert the HP Jetdirect print server card into the EIO slot.
5. Insert and tighten the retaining screws that came with the print server card.
206 Chapter 14 Manage and maintain the product ENWW

6. Reconnect the power cable and remaining interface cables, and turn the product on.
7. Print a configuration page. In addition to a product configuration page and a Supplies Status page,an HP Jetdirect configuration page that contains network configuration and status informationshould also print.
If it does not print, turn the power to the device off and uninstall and reinstall the print server cardto ensure that it is completely seated in the slot.
8. Perform one of these steps:
● Choose the correct port. See the computer or operating system documentation forinstructions.
● Reinstall the software, choosing the network installation this time.
Replace the staple cartridgeIf the optional HP 3-bin Stapler/Stacker Accessory or HP Booklet Maker/Finisher Accessory runs out ofstaples while it is stapling a print job, the product automatically stops, if set to stop when out. If theproduct is set to continue when out, the product will continue to print without stapling.
NOTE: Only replace the staple cartridge unit when the stapler/stacker or booklet maker has run outof staples. Removing the staple cartridge at other times can cause an error to occur.
NOTE: When the stapler/stacker or booklet maker runs out of staples, the stapler unit will return to itsdefault position automatically.
Replace the staple cartridge
1. Open the front door of the booklet maker or stapler/stacker.
ENWW Replace supplies 207

2. Push up to on the staple cartridge to remove it from the booklet maker or stapler/stacker.
3. Insert the replacement staple cartridge unit into the stapler unit.
4. Push the staple cartridge unit into the stapler unit until it clicks into position.
5. Close the front door.
208 Chapter 14 Manage and maintain the product ENWW

Replace saddle stitch staple cartridges in the booklet maker1. Open the front door of the booklet maker.
2. Grasp the blue handle and pull the staple carriage out of the booklet maker.
3. Grasp the small blue handle on the staple cartridge unit and pull it toward you, then swing the staplecartridge unit into an upright position.
2
1
4. Grasp the edges of each staple cartridge and pull up firmly to remove the staple cartridges fromthe staple cartridge unit.
ENWW Replace supplies 209

5. Unpack the new cartridges and remove the plastic packing lock from each one.
6. Hold the new cartridges so that the arrows on the cartridges align with the arrows on the staplecartridge unit and insert them into the unit.
7. Pull the handle of the staple cartridge unit toward you and rotate it downward to its original position.Lock it into position by pushing in the handle.
12
8. Push the staple carriage back into the booklet maker finisher.
210 Chapter 14 Manage and maintain the product ENWW

9. Close the front door of the booklet maker.
ENWW Replace supplies 211
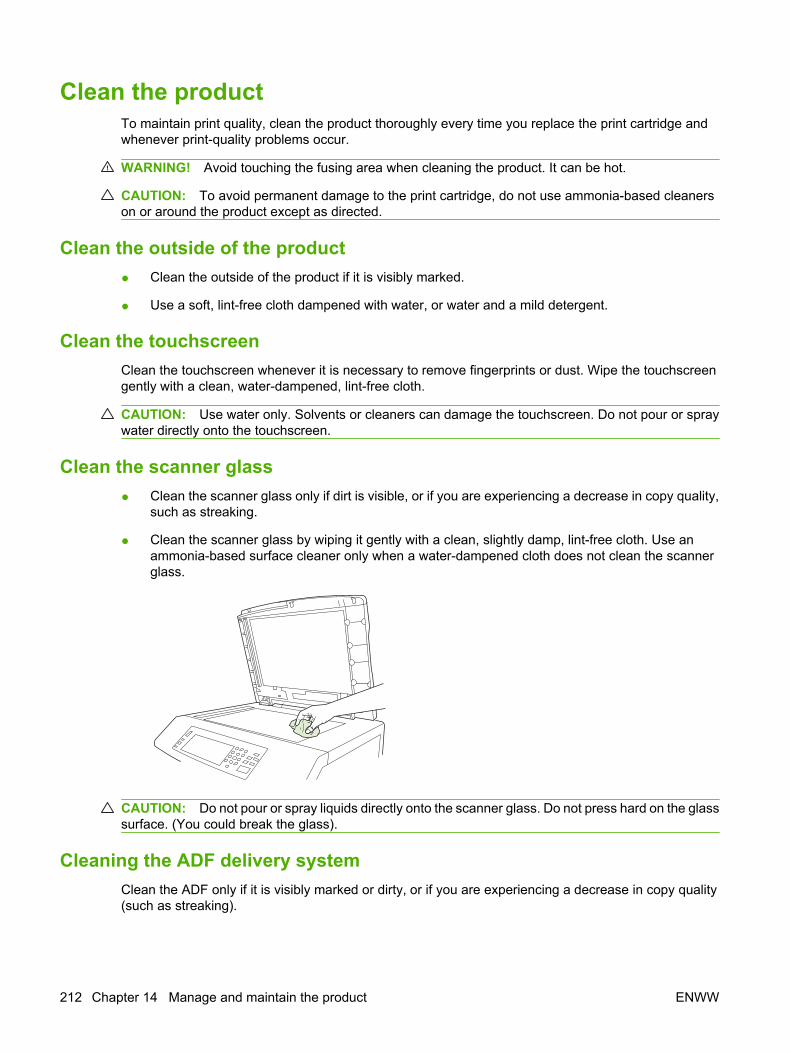
Clean the productTo maintain print quality, clean the product thoroughly every time you replace the print cartridge andwhenever print-quality problems occur.
WARNING! Avoid touching the fusing area when cleaning the product. It can be hot.
CAUTION: To avoid permanent damage to the print cartridge, do not use ammonia-based cleanerson or around the product except as directed.
Clean the outside of the product● Clean the outside of the product if it is visibly marked.
● Use a soft, lint-free cloth dampened with water, or water and a mild detergent.
Clean the touchscreenClean the touchscreen whenever it is necessary to remove fingerprints or dust. Wipe the touchscreengently with a clean, water-dampened, lint-free cloth.
CAUTION: Use water only. Solvents or cleaners can damage the touchscreen. Do not pour or spraywater directly onto the touchscreen.
Clean the scanner glass● Clean the scanner glass only if dirt is visible, or if you are experiencing a decrease in copy quality,
such as streaking.
● Clean the scanner glass by wiping it gently with a clean, slightly damp, lint-free cloth. Use anammonia-based surface cleaner only when a water-dampened cloth does not clean the scannerglass.
CAUTION: Do not pour or spray liquids directly onto the scanner glass. Do not press hard on the glasssurface. (You could break the glass).
Cleaning the ADF delivery systemClean the ADF only if it is visibly marked or dirty, or if you are experiencing a decrease in copy quality(such as streaking).
212 Chapter 14 Manage and maintain the product ENWW
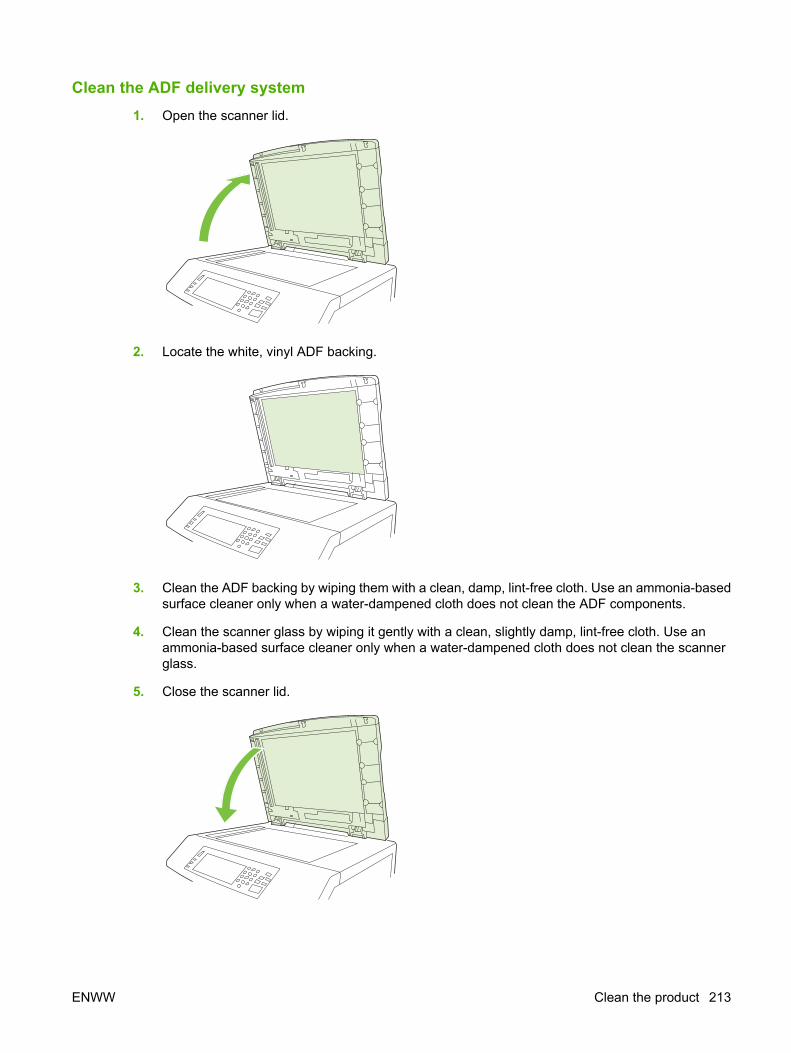
Clean the ADF delivery system1. Open the scanner lid.
2. Locate the white, vinyl ADF backing.
3. Clean the ADF backing by wiping them with a clean, damp, lint-free cloth. Use an ammonia-basedsurface cleaner only when a water-dampened cloth does not clean the ADF components.
4. Clean the scanner glass by wiping it gently with a clean, slightly damp, lint-free cloth. Use anammonia-based surface cleaner only when a water-dampened cloth does not clean the scannerglass.
5. Close the scanner lid.
ENWW Clean the product 213

Clean the ADF rollersYou should clean the rollers in the ADF if you are experiencing misfeeds or if your originals show marksas they exit the ADF.
CAUTION: Clean the rollers only if you experience misfeeds or marks on the originals, and you noticedust on the rollers. Cleaning the rollers frequently could introduce dust into the device.
1. Pull the release lever to open the ADF cover.
2. Locate the rollers.
3. Wipe the rollers with a clean, water-dampened, lint-free cloth.
CAUTION: Do not pour water directly onto the rollers. Doing so might damage the device.
4. Locate the separation pad.
5. Wipe the pad with a clean, water-dampened, lint-free cloth.
214 Chapter 14 Manage and maintain the product ENWW

6. Close the ADF cover.
ENWW Clean the product 215

ADF maintenance kitAfter feeding 60,000 pages through the ADF, a Replace Document Feeder Kit message appears onthe control-panel display. This message appears approximately one month before the kit needs to bereplaced. Order a new kit when this message appears. See Part numbers on page 281 for informationabout ordering a new ADF maintenance kit.
The ADF maintenance kit includes the following items:
● One pick-up roller assembly
● One separation pad
● An instruction sheet
Follow the instructions that come with the kit to install it.
After replacing the kit, reset the ADF maintenance-kit count.
Reset the ADF maintenance-kit count
1. On the control panel, scroll to and touch Administration.
2. Touch Resets.
3. Touch Reset Supplies.
4. Touch ADF Maintenance Kit.
5. Touch Yes.
6. Touch Save.
216 Chapter 14 Manage and maintain the product ENWW

Calibrate the scannerCalibrate the scanner to compensate for offsets in the scanner imaging system (carriage head) for ADFand flatbed scans. Because of mechanical tolerances, the scanner's carriage head might not read theposition of the image accurately. During the calibration procedure, scanner offset values are calculatedand stored. The offset values are then used when producing scans so that the correct portion of thedocument is captured.
Scanner calibration should be carried out only if you notice offset problems with the scanned images.The scanner is calibrated before it leaves the factory. It needs to be calibrated again only rarely.
Before calibrating the scanner, print the calibration target.
1. Place letter- or A4-size paper in tray 1, and adjust the side guides.
2. On the control-panel Home screen, scroll to and touch Administration.
3. Touch Troubleshooting.
4. Touch Calibrate Scanner.
5. Touch Calibrate to print the first pass of the calibration target.
6. Place the first pass of the calibration target face-down in tray 1 so that the arrows are facing intothe product.
7. Touch Start to print the second pass. The final calibration target must look like the following figure.
CAUTION: If the calibration target does not look like the figure shown here, the calibrationprocess will fail and the quality of scans will be degraded. The black areas must extend completelyto the short edges of the page. If they do not, use a black marker to extend the black areas to theedge of the page. Ensure that the paper is loaded properly.
8. Place the calibration target face-up into the ADF, and adjust the side guides.
9. After the calibration target has passed through the ADF once, reposition it face down in the ADFand touch Start.
10. Place the calibration target face-down on the scanner glass, touch Start, and scan the page. Afterthis pass, the calibration is complete.
ENWW Calibrate the scanner 217
Upgrade the firmwareThe product has remote firmware update (RFU) capability. Use the information in this section to upgradethe product firmware.
Determine the current firmware version1. From the control panel Home screen, scroll to and touch Administration.
2. Touch Information.
3. Touch Configuration/status Pages.
4. Touch Configuration Page.
5. Touch Print.
The firmware datecode is listed on the Configuration page in the section called Device Information.The firmware datecode has this format: YYYYMMDD XX.XXX.X. The first string of numbers is the date,where YYYY represents the year, MM represents the month, and DD represents the date. For example,a firmware datecode of that begins with20061125
represents November 25, 2006.
Download new firmware from the HP Web siteTo find the most recent firmware upgrade for the product, go to www.hp.com/go/cljcm6030mfp_firmware or www.hp.com/go/cljcm6040mfp_firmware. This page provides instructionsfor downloading the new firmware version.
Transfer the new firmware to the productNOTE: The product can receive an .RFU file update when it is in a "ready" state.
The elapsed time for an update depends on the I/O transfer time, as well as the time that it takes for theproduct to re-initialize. The I/O transfer time depends on a number of things, including the speed of thehost computer that is sending the update. If the remote firmware update process is interrupted beforethe firmware is downloaded (while Receiving Upgrade appears on the control-panel display), thefirmware file must be sent again. If power is lost during the flash DIMM update (while the PerformingUpgrade message appears on the control-panel display), the update is interrupted and the messageResend Upgrade appears (in English only) on the control-panel display. In this case, you must sendthe upgrade by using the parallel port. Finally, any jobs that are ahead of the RFU job in the queue arecompleted before the update is processed.
Use FTP to upload the firmware through a browserNOTE: The firmware update involves a change in the format of nonvolatile random-access memory(NVRAM). Any menu settings that are changed from the default settings might return to default settingsand must be changed again if you want settings that are different from the defaults.
1. Print a configuration page and note the TCP/IP address shown on the EIO Jetdirect page.
2. Open a browser window.
3. In the address line of the browser, type
218 Chapter 14 Manage and maintain the product ENWW

ftp://<ADDRESS>
, where <ADDRESS> is the address of the product. For example, if the TCP/IP address is192.168.0.90, typeftp://192.168.0.90
.
4. Locate the downloaded .RFU file for the product.
5. Drag and drop the .RFU file onto the PORT1 icon in the browser window.
NOTE: The product turns off and then on automatically to activate the update. When the updateprocess is complete, a Ready message displays on the product control panel.
Use FTP to upgrade the firmware on a network connectionNOTE: The firmware update involves a change in the format of nonvolatile random-access memory(NVRAM). Any menu settings that are changed from the default settings might return to default settingsand must be changed again if you want settings that are different from the defaults.
1. Take note of the IP address on the HP Jetdirect page. The HP Jetdirect page is the second pagethat prints when you print the configuration page.
NOTE: Before upgrading the firmware, make sure that the product is not in Sleep mode. Alsomake sure that any error messages are cleared from the control-panel display.
2. Open an MS-DOS command prompt on your computer.
3. Type: ftp TCP/IP ADDRESS>. For example, if the TCP/IP address is 192.168.0.90, type ftp192.168.0.90.
4. Go to the folder where the firmware file is stored.
5. Press Enter on the keyboard.
6. When prompted for the user name, press Enter.
7. When prompted for the password, press Enter.
8. Type bin at the command prompt.
9. Press Enter. The message 200 Types set to I, Using binary mode to transfer files appears inthe command window.
10. Type put and then the file name (for example, if the file name is CM6040mfp.efn, type putCM6040mfp.efn).
11. The download process begins and the firmware is updated on the product. This can takeapproximately five minutes. Let the process finish without further interaction with the product orcomputer.
NOTE: The product automatically turns off and then on again after processing the upgrade.
12. At the command prompt, type: bye to exit the ftp command.
13. At the command prompt, type: exit to return to the Windows interface.
ENWW Upgrade the firmware 219

Use HP Web Jetadmin to upgrade the firmwareThis procedure requires that you install HP Web Jetadmin Version 7.0 or later on your computer. SeeUse HP Web Jetadmin software on page 187. Complete the following steps to update a single devicethrough HP Web Jetadmin after downloading the .RFU file from the HP Web site.
1. Start HP Web Jetadmin.
2. Open the Device Management folder in the drop-down list in the Navigation panel. Navigate tothe Device Lists folder.
3. Expand the Device Lists folder and select All Devices. Locate the product in the list of devices,and then click to select it.
If you need to upgrade the firmware for multiple HP Color LaserJet CM6030 and CM6040 MFPSeries products, select all of them by pressing the Ctrl key as you click the name of each product.
4. Locate the drop-down box for Device Tools in the upper-right corner of the window. Select UpdatePrinter Firmware from the action list.
5. If the name of the .RFU file is not listed in the All Available Images box, click Browse in theUpload New Firmware Image dialog box and navigate to the location of the .RFU file that youdownloaded from the Web at the start of this procedure. If the filename is listed, select it.
6. Click Upload to move the .RFU file from your hard drive to the HP Web Jetadmin server. After theupload is complete, the browser window refreshes.
7. Select the .RFU file from the Printer Firmware Update drop-down menu.
8. Click Update Firmware. HP Web Jetadmin sends the selected .RFU file to the product. The controlpanel shows messages that indicate the progress of the upgrade. At the end of the upgradeprocess, the control panel shows the Ready message.
Use MS-DOS commands to upgrade the firmwareTo update the firmware by using a network connection, follow these instructions.
1. From a command prompt or in an MS-DOS window, type the following:copy /B FILENAME> \\COMPUTERNAME>\SHARENAME>
, where <FILENAME> is the name of the .RFU file (including the path), <COMPUTERNAME> isthe name of the computer from which the product is being shared, and <SHARENAME> is theproduct share name. For example:C:\>copy /b C:\9200fW.RFU \\YOUR_SERVER\YOUR_COMPUTER
.
NOTE: If the file name or path includes a space, you must enclose the file name or path inquotation marks. For example, type:C:\>copy /b "C:\MY DOCUMENTS\3500FW.RFU" \\YOUR_SERVER\YOUR_COMPUTER
.
2. Press Enter on the keyboard. The control panel shows a message that indicates the progress ofthe firmware upgrade. At the end of the upgrade process, the control panel shows the Readymessage . The message One File Copied appears on the computer screen.
220 Chapter 14 Manage and maintain the product ENWW

Use the HP Jetdirect firmwareThe HP Jetdirect network interface in the product has firmware that can be upgraded separately fromthe product firmware. This procedure requires that you install HP Web Jetadmin Version 7.0 or later onyour computer. See Use HP Web Jetadmin software on page 187. Complete the following steps toupdate the HP Jetdirect firmware by using HP Web Jetadmin.
1. Open the HP Web Jetadmin program.
2. Open the Device Management folder in the drop-down list in the Navigation panel. Navigate tothe Device Lists folder.
3. Select the device that you want to update.
4. In the Device Tools drop-down list, select Jetdirect Firmware Update.
5. Under Jetdirect firmware version the HP Jetdirect model number and current firmware versionare listed. Make a note of these.
6. Go to www.hp.com/go/wja_firmware.
7. Scroll down to the list of HP Jetdirect model numbers and find the model number you wrote down.
8. Look at the current firmware version for the model, and see if it is later than the version you wrotedown. If it is, right-click on the firmware link, and follow the instructions on the Web page todownload the new firmware file. The file must be saved into the <drive>:\PROGRAM FILES\HP WEB JETADMIN\DOC\PLUGINS\HPWJA\FIRMWARE\JETDIRECT folder on the computerthat is running the HP Web Jetadmin software.
9. In HP Web Jetadmin, return to the main device list and select the digital sender again.
10. In the Device Tools drop-down list, select Jetdirect Firmware Update again.
11. On the HP Jetdirect firmware page, the new firmware version is listed under Jetdirect FirmwareAvailable on HP Web Jetadmin. Click the Update Firmware Now button to update the Jetdirectfirmware.
ENWW Upgrade the firmware 221

222 Chapter 14 Manage and maintain the product ENWW

15 Solve problems
● Solving general problems
● Control-panel message types
● Control-panel messages
● Jams
● Paper-handling problems
● Understand lights on the formatter
● Correct print quality and copy quality problems
● Performance problems
● Solve fax problems
● Solve e-mail problems
● Solve network connectivity problems
● Solve common Macintosh problems
ENWW 223
Solving general problemsIf the product is not responding properly, complete the steps in the following checklist, in order. If theproduct does not pass a step, follow the corresponding troubleshooting suggestions. If a step resolvesthe problem, you can stop without performing the other steps on the checklist.
Troubleshooting checklist1. Make sure the product Ready light is on. If no lights are on, complete these steps:
a. Check the power-cable connections.
b. Check that the power switch is on.
c. Make sure that the line voltage is correct for the product power configuration. (See the labelthat is on the back of the product for voltage requirements.) If you are using a power strip andits voltage is not within specifications, plug the product directly into the wall. If it is alreadyplugged into the wall, try a different outlet.
d. Remove any other products plugged into the same circuit.
e. If none of these measures restores power, contact HP Customer Care.
2. Check the cabling.
a. Check the cable connection between the product and the computer or network port. Makesure that the connection is secure.
b. Make sure that the cable itself is not faulty by using a different cable, if possible.
c. Check the network connection. See Solve network printing problems on page 274.
3. If the product is in the READY state, check to see if any message appear on the control-paneldisplay. If any error messages appear, see Control-panel messages on page 227.
4. Ensure that the print paper that you are using meets specifications.
5. Print a configuration page (see Information pages on page 178. An HP Jetdirect page also prints.)
a. If the pages do not print, check that at least one tray contains print paper.
b. If the page jams in the product, see Jams on page 228.
6. If the configuration page prints, check the following items.
a. If the page prints correctly, then the product hardware is working. The problem is with thecomputer you are using, with the printer driver, or with the program.
b. If the page does not print correctly, the problem is with the product hardware. ContactHP Customer Care.
7. Select one of the following options:
Windows: Click Start, click Settings, and then click Printers, or Printers and Faxes. Double clickHP Color LaserJet CM6030 or HP Color LaserJet CM6040.
-or-
224 Chapter 15 Solve problems ENWW

Mac OS X: Open Print Center, (or Printer Setup Utility for Mac OS X v. 10.3), and double-clickthe line for the HP Color LaserJet CM6030 or HP Color LaserJet CM6040.
8. Verify that you have installed the HP Color LaserJet CM6030 or HP Color LaserJet CM6040 seriesprinter driver. Check the program to make sure that you are using an HP Color LaserJetCM6030 or HP Color LaserJet CM6040 series printer driver.
9. Print a short document from a different program that has worked in the past. If this solution works,then the problem is with the program you are using. If this solution does not work (the documentdoes not print) complete these steps:
a. Try printing the job from another computer that has the product software installed.
b. If you connected the product to the network, connect the product directly to a computer witha USB cable. Redirect the product to the correct port, or reinstall the software, selecting thenew connection type that you are using.
Restore factory settingsUse the Resets menu to restore factory settings.
1. Scroll to and touch Administration and then touch Resets.
2. Touch Restore Factory Settings and then touch Restore.
For more information, see Resets menu on page 59.
Factors that affect product performanceSeveral factors affect the time it takes to print a job:
● Maximum printer speed, measured in pages per minute (ppm)
● The use of special paper (such as transparencies, heavy paper, and custom-size paper)
● Printer processing and download time
● The complexity and size of graphics
● The speed of the computer you are using
● The USB connection
● The printer I/O configuration
● The amount of printer memory installed
● The network operating system and configuration (if applicable)
● Printer personality (HP JetReady, PCL, or PS)
NOTE: Although additional printer memory can resolve memory problems, improve how the printerhandles complex graphics, and improve download times, it will not increase maximum printer speed(ppm).
ENWW Solving general problems 225

Control-panel message typesFour types of control-panel messages can indicate the status of or problems with the device.
Message type Description
Status messages Status messages reflect the current state of the device. They inform you of normal device operationand require no interaction to clear them. They change as the state of the device changes. Wheneverthe device is ready, not busy, and has no pending warning messages, the status message Readyappears if the device is online.
Warning messages Warning messages inform you of data and print errors. These messages typically alternate with theReady or status messages and remain until you touch OK. Some warning messages are clearable.If Clearable Warnings is set to Job on the device Device Behavior menu, the next print job clearsthese messages.
Error messages Error messages communicate that some action must be performed, such as adding paper or clearinga jam.
Some error messages are auto-continuable. If Auto-Continue is set on the menus, the device willcontinue normal operation after an auto-continuable error message appears for 10 seconds.
NOTE: Pressing any button during the 10-second auto-continuable error message overrides theauto-continue feature, and the button function takes precedence. For example, pressing the Stopbutton pauses printing and offers the option to cancel the print job.
Critical-error messages Critical error messages inform you of a device failure. Some of these messages can be cleared byturning the device off and then on. These messages are not affected by the Auto-Continue setting.If a critical error persists, service is required.
226 Chapter 15 Solve problems ENWW
Control-panel messagesThe product provides robust control panel messaging. When a message appears on the control panel,follow the on-screen instructions to resolve the issue. If the product displays an “Error” or “Attention”message, and no steps are shown to resolve the issue, turn the product off then on. Contact HP supportif you continue to experience issues with the product.
To get additional information for warnings that appear in the status line, touch the Warning button
.
For additional information on a variety of topics, touch the Help button in the upper-right corner ofthe home screen.
ENWW Control-panel messages 227
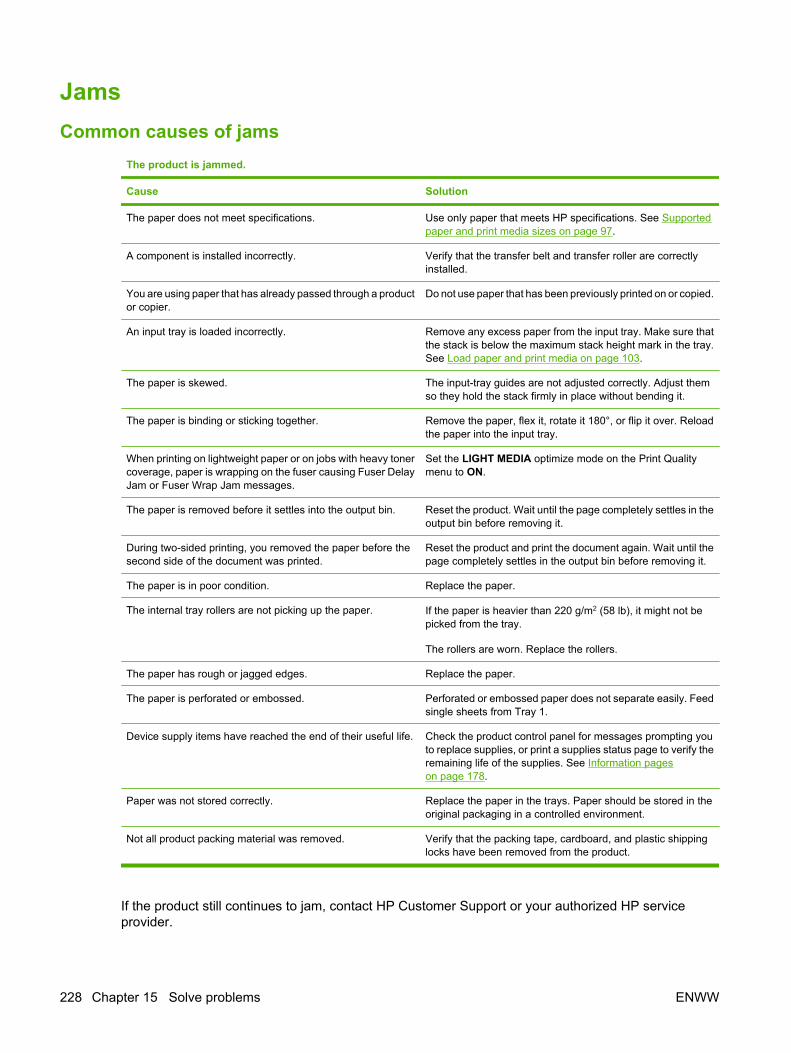
JamsCommon causes of jams
The product is jammed.
Cause Solution
The paper does not meet specifications. Use only paper that meets HP specifications. See Supportedpaper and print media sizes on page 97.
A component is installed incorrectly. Verify that the transfer belt and transfer roller are correctlyinstalled.
You are using paper that has already passed through a productor copier.
Do not use paper that has been previously printed on or copied.
An input tray is loaded incorrectly. Remove any excess paper from the input tray. Make sure thatthe stack is below the maximum stack height mark in the tray.See Load paper and print media on page 103.
The paper is skewed. The input-tray guides are not adjusted correctly. Adjust themso they hold the stack firmly in place without bending it.
The paper is binding or sticking together. Remove the paper, flex it, rotate it 180°, or flip it over. Reloadthe paper into the input tray.
When printing on lightweight paper or on jobs with heavy tonercoverage, paper is wrapping on the fuser causing Fuser DelayJam or Fuser Wrap Jam messages.
Set the LIGHT MEDIA optimize mode on the Print Qualitymenu to ON.
The paper is removed before it settles into the output bin. Reset the product. Wait until the page completely settles in theoutput bin before removing it.
During two-sided printing, you removed the paper before thesecond side of the document was printed.
Reset the product and print the document again. Wait until thepage completely settles in the output bin before removing it.
The paper is in poor condition. Replace the paper.
The internal tray rollers are not picking up the paper. If the paper is heavier than 220 g/m2 (58 lb), it might not bepicked from the tray.
The rollers are worn. Replace the rollers.
The paper has rough or jagged edges. Replace the paper.
The paper is perforated or embossed. Perforated or embossed paper does not separate easily. Feedsingle sheets from Tray 1.
Device supply items have reached the end of their useful life. Check the product control panel for messages prompting youto replace supplies, or print a supplies status page to verify theremaining life of the supplies. See Information pageson page 178.
Paper was not stored correctly. Replace the paper in the trays. Paper should be stored in theoriginal packaging in a controlled environment.
Not all product packing material was removed. Verify that the packing tape, cardboard, and plastic shippinglocks have been removed from the product.
If the product still continues to jam, contact HP Customer Support or your authorized HP serviceprovider.
228 Chapter 15 Solve problems ENWW

Jam locationsUse this illustration to identify locations of jams. In addition, this product provides instructions on thecontrol panel to direct you to the location of jammed paper and how to clear it.
NOTE: All areas of the product that might need to be opened to clear jams are equipped with greenhandles.
Figure 15-1 Jam locations
1 AREA 1: Output bin
2 AREA 2: Fuser area
3 AREA 3: Transfer area
4 AREA 4: Duplexing area
5 AREA 5: Tray 2 pickup area
6 AREA 6: Tray 1 area
7 AREA 7: Optional Trays 3, 4, and 5
8 AREA 8: Optional finishing device
9 AREA 9: ADF area
Clear jamsWhen a jam occurs, a message appears on the control-panel display that describes the location of thejam. The following table lists the messages that can appear and provides links to the procedures forclearing the jam.
ENWW Jams 229

WARNING! To avoid electrical shock, remove any necklaces, bracelets, or other metal items beforereaching into the inside of the product.
Type of jam Procedure
13.JJ.NT Jam below control panel See AREA 1: Clear jams in the output bin on page 230.
13.JJ.NT Fuser Area Jam
13.JJ.NT Fuser Wrap Jam
13.JJ.NT Transfer And Fuser Jam
See AREA 2: Clear jams in the fuser on page 232.
13.JJ.NT Jam Inside Right Door See Clear jams in the duplex area on page 236.
13.JJ.NT Jam In Tray 2
13.JJ.NT Transfer Area Jam
See AREA 5: Clear jams in Tray 2 and the internal paper pathon page 239.
13.JJ.NT Jam In Tray 1 See AREA 6: Clear jams in Tray 1 on page 242.
13.JJ.NT Jam In Tray 3
13.JJ.NT Jam In Tray 4
13.JJ.NT Jam In Tray 5
13.JJ.NT Jam Inside Lower Right Door
13.JJ.NT Jam In Input Accessory
See AREA 7: Clear jams in optional Trays 3, 4, and 5on page 245
13.JJ.NT Jam In Left Accessory See AREA 8: Clear jams in the optional finishing deviceson page 248.
Jam in document feeder See AREA 9: Clear jams in the ADF on page 252.
AREA 1: Clear jams in the output bin1. If jammed paper is visible in the output bin, gently pull the paper to remove it.
230 Chapter 15 Solve problems ENWW

2. Open the right door.
3. If paper has jammed as it enters the output bin, gently pull the paper to remove it.
4. Close the right door.
ENWW Jams 231

AREA 2: Clear jams in the fuserWARNING! The fuser can be hot while the product is in use. Wait for the fuser to cool before handlingit.
1. Open the right door.
2. Lift the green handle on the transfer-access panel and open the panel.
12
3. If paper is visible entering the bottom of the fuser, gently pull downward to remove it.
232 Chapter 15 Solve problems ENWW

4. Close the transfer-access panel.
5. Open the fuser jam access door above the fuser and remove any paper that is visible. Then closethe fuser jam access door.
6. Paper could also be jammed inside the fuser where it would not be visible. Remove the fuser tocheck for jammed paper inside.
WARNING! The fuser can be hot while the product is in use. Wait for the fuser to cool beforehandling it.
a. Pull the two blue fuser handles forward.
ENWW Jams 233

b. Rotate the fuser-release levers down to open them.
c. Grasp the fuser handles and pull straight out to remove the fuser.
CAUTION: The fuser weighs 5 kg (11 lbs). Be careful not to drop it.
d. Open the two fuser jam access doors by pushing and rotating the rear door backward, andpulling and rotating the front door forward. If paper is jammed inside the fuser, gently pull itstraight up to remove it. If the paper tears, remove all paper fragments.
WARNING! Even if the body of the fuser has cooled, the rollers that are inside could still behot. Do not touch the fuser rollers until they have cooled.
2
1
234 Chapter 15 Solve problems ENWW

e. Close both fuser jam-access doors and align the fuser with the arrows on the product. Pushthe fuser completely into the printer.
f. Rotate the fuser-release levers up to lock the fuser into place.
g. Push the fuser handles back to close them.
ENWW Jams 235

7. Close the right door.
Clear jams in the duplex area1. Check for jammed paper inside the product. Open the right door.
236 Chapter 15 Solve problems ENWW

2. If paper is jammed below the duplexing unit, gently pull the paper downward to remove it.
3. If paper is jammed inside the right door, gently pull the paper to remove it.
ENWW Jams 237

4. Lift the paper-feed cover on the inside of the right door. If jammed paper is present, gently pull thepaper straight out to remove it.
1
2
5. Lift the green handle on the transfer-assembly and open the panel.
12
6. Gently pull the paper out of the paper path.
238 Chapter 15 Solve problems ENWW

7. Close the transfer-access panel.
8. Close the right door.
AREA 5: Clear jams in Tray 2 and the internal paper path1. Open the right door.
ENWW Jams 239
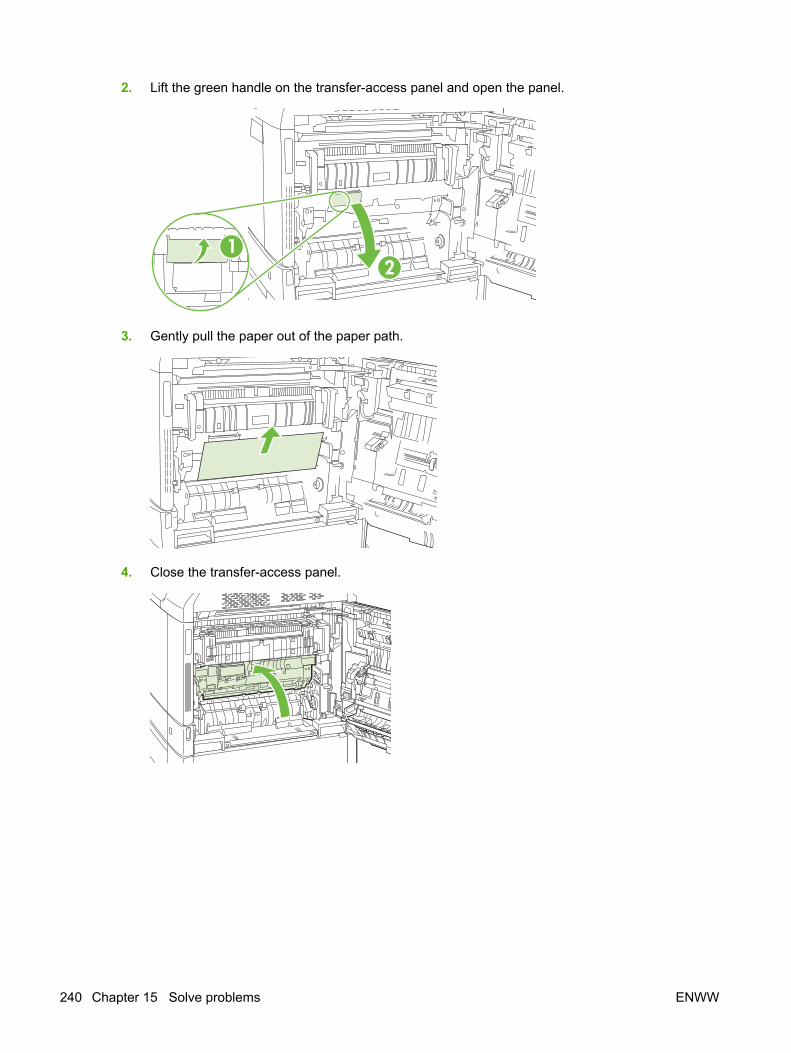
2. Lift the green handle on the transfer-access panel and open the panel.
12
3. Gently pull the paper out of the paper path.
4. Close the transfer-access panel.
240 Chapter 15 Solve problems ENWW

5. Open Tray 2 and make sure that the paper is stacked correctly.
6. Pull the tray completely out of the product by pulling and lifting it up slightly.
7. Remove any paper from the feeder rollers inside the product.
8. Reinsert Tray 2 by aligning the side rollers and pushing it back into the product.
ENWW Jams 241

9. Close the tray.
10. Close the right door.
AREA 6: Clear jams in Tray 1NOTE: Even if jammed paper is visible in Tray 1, clear the jam from the inside of the product by openingthe right door.
242 Chapter 15 Solve problems ENWW

1. Open the right door.
NOTE: When clearing jams of long paper (11 x 17, 12 x 18, and A3), it may be necessary to cutor tear the jammed paper before opening the right door.
2. If paper is visible inside the right door, gently pull the paper downward to remove it.
ENWW Jams 243

3. If paper has entered the internal paper path, lift the green handle on the transfer-access panel andopen the panel.
12
4. Gently pull the paper out of the paper path.
5. Close the transfer-access panel.
244 Chapter 15 Solve problems ENWW

6. Close the right door.
AREA 7: Clear jams in optional Trays 3, 4, and 51. Open the right door.
2. If paper is visible in the paper-input area, gently pull the jammed paper up to remove it.
ENWW Jams 245

3. Close the right door.
4. Open the lower right door.
5. Gently pull the jammed paper to remove it.
246 Chapter 15 Solve problems ENWW

6. Open the tray that is indicated in the control-panel message, and make sure that the paper isstacked correctly.
7. Close the tray.
8. Close the lower right door.
ENWW Jams 247

AREA 8: Clear jams in the optional finishing devices
Clear jams in the output-accessory bridge
1. Lift the latch on the top cover of the output-accessory bridge and open the top cover.
2. Gently pull the jammed paper to remove it.
3. Close the top cover of the output-accessory bridge.
248 Chapter 15 Solve problems ENWW

Clear jams in the sorter area
1. Lift the latch on the top cover of the finishing device, and open the top cover.
NOTE: Opening the top cover releases pressure on the output-bin rollers.
2. Remove jammed paper from the output bin or from the inside of the finishing device.
12
3
ENWW Jams 249

3. Close the top cover of the finishing device.
4. Lift the swing guide panel in the output bin. If you can see any jammed paper, gently pull it out.
Clear jams in the booklet maker
1. If the paper is visible in the booklet output bin, gently pull the paper to remove it.
2. Open the front door of the booklet maker.
250 Chapter 15 Solve problems ENWW

3. Push the upper delivery guide to the right, and remove any jammed paper.
1
2
4. Push the lower delivery guide to the right, and remove any jammed paper.
1
2
5. The positioning knob is the smaller, green dial on the right. Turn the positioning knobcounterclockwise.
6. The jam-release knob is the larger, green dial on the left. Push in the jam-release knob, and thenturn it clockwise to move any jammed paper into the output bin.
ENWW Jams 251

7. Close the front door of the booklet maker.
AREA 9: Clear jams in the ADF1. Open the ADF cover.
2. Remove any jammed media.
3. Close the ADF cover.
252 Chapter 15 Solve problems ENWW

Clear staple jams
Clear staple jams in the main stapler
The HP 3-bin Stapler/Stacker and the HP Booklet maker/Finisher Accessory each have a main stapler,which is located near the top of the finishing device.
1. Open the front door of the finishing device.
2. To remove the staple cartridge, pull up on the green handle and pull out the staple cartridge.
3. Lift up on the small lever at the back of the staple cartridge.
4. Remove the damaged staples that protrude from the staple cartridge. Remove the entire sheet ofstaples that the damaged staples were attached to.
ENWW Jams 253
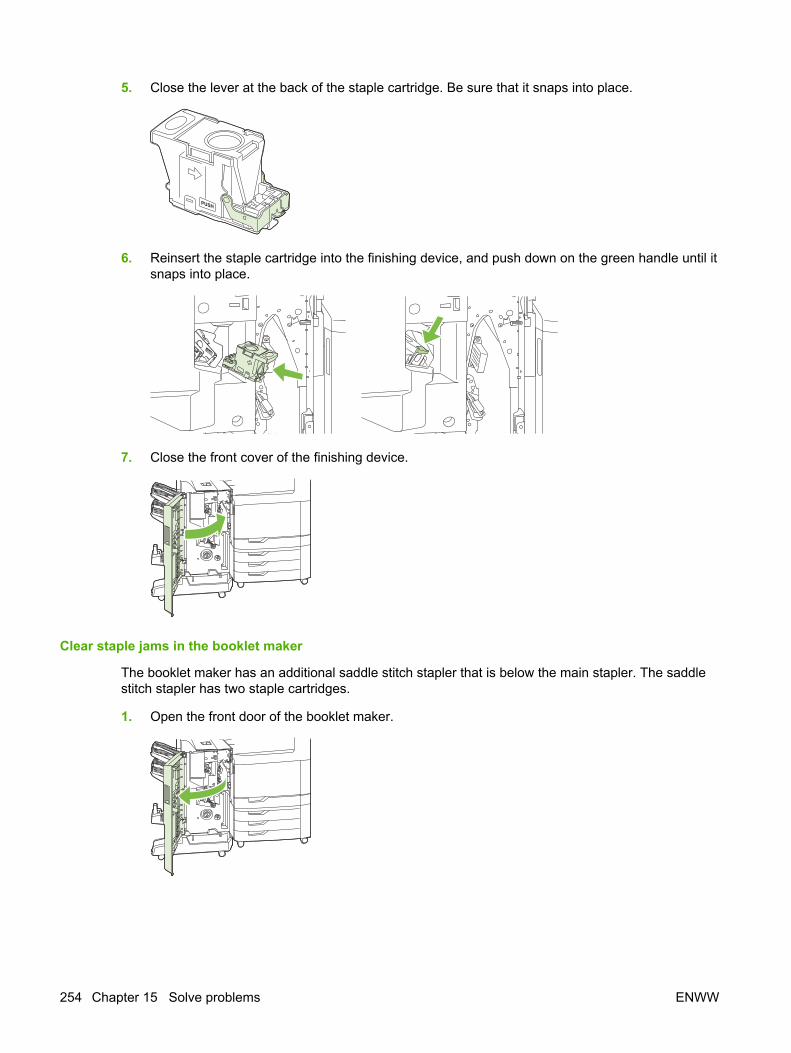
5. Close the lever at the back of the staple cartridge. Be sure that it snaps into place.
6. Reinsert the staple cartridge into the finishing device, and push down on the green handle until itsnaps into place.
7. Close the front cover of the finishing device.
Clear staple jams in the booklet maker
The booklet maker has an additional saddle stitch stapler that is below the main stapler. The saddlestitch stapler has two staple cartridges.
1. Open the front door of the booklet maker.
254 Chapter 15 Solve problems ENWW
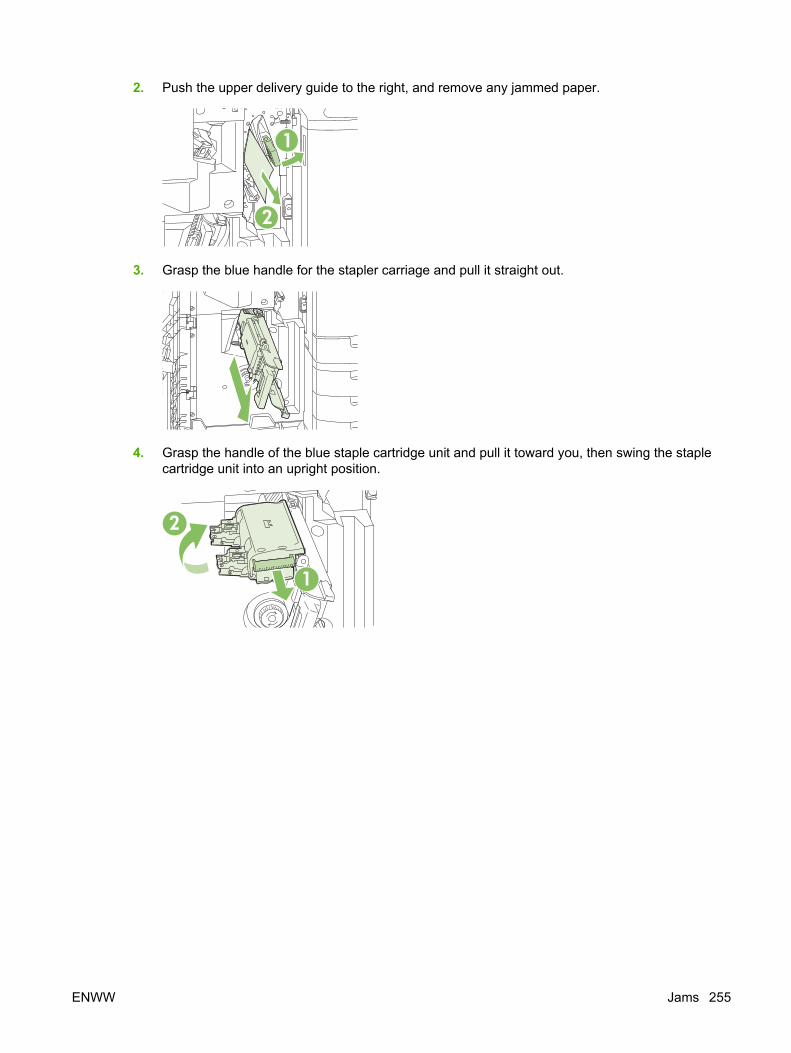
2. Push the upper delivery guide to the right, and remove any jammed paper.
1
2
3. Grasp the blue handle for the stapler carriage and pull it straight out.
4. Grasp the handle of the blue staple cartridge unit and pull it toward you, then swing the staplecartridge unit into an upright position.
2
1
ENWW Jams 255

5. Check each staple cartridge for jammed staples.
a. On each staple cartridge, press down on the green plastic tabs while lifting the jam clearanceplate.
WARNING! Do not place your fingers or hands underneath the staple cartridge during thisprocedure.
3
2
1
b. Remove any jammed staples. Remove any damaged staples and the entire sheet of staplesthat the damaged staples were attached to.
c. Press down on the jam clearance plate to close it.
WARNING! Do not place your fingers or hands underneath the staple cartridge during thisprocedure.
6. Pull the staple cartridge unit forward, and swing it downward to the original position. Push in on thehandle to lock it into position.
12
256 Chapter 15 Solve problems ENWW

7. Push the staple carriage back into the booklet maker.
8. Close the front door of the booklet maker.
Jam recoveryThis product provides jam recovery, a feature that reprints jammed pages. The following options areavailable:
● Auto — The product attempts to reprint jammed pages when sufficient memory is available.
● Off — The product does not attempt to reprint jammed pages. Because no memory is used to storethe most recent pages, performance is optimal.
NOTE: When using this option, if the product runs out of paper and the job is being printed onboth sides, some pages can be lost.
● On — The product always reprints jammed pages. Additional memory is allocated to store the lastfew pages printed. This might cause overall performance to suffer.
Set the jam recovery feature
1. Touch Administration and then touch Device Behavior.
2. Touch Warning/Error Behavior and then touch Jam Recovery.
3. Touch an option and then touch Save.
ENWW Jams 257

Paper-handling problemsUse only paper that meets the specifications outlined in the HP LaserJet Printer Family Print MediaGuide. This guide is available at www.hp.com/support/ljpaperguide.
Product feeds multiple sheetsProduct feeds multiple sheets
Cause Solution
The input tray is overfilled. Open the tray and verify that thepaper stack is below the maximum stack height mark.
Remove excess paper from the input tray.
Print paper is sticking together. Remove paper, flex it, rotate it 180 degrees or flip it over, andthen reload it into the tray.
NOTE: Do not fan paper. Fanning can cause static electricity,which can cause paper to stick together.
Paper does not meet the specifications for this product. Use only paper that meets HP paper specifications for thisproduct.
Trays are not properly adjusted. Make sure that the paper guides match the size of paper beingused.
Product feeds incorrect page sizeProduct feeds incorrect page size
Cause Solution
The correct size paper is not loaded in the input tray. Load the correct size paper in the input tray.
The correct size paper is not selected in the software programor printer driver.
Confirm that the settings in the software program and printerdriver are appropriate, since the software program settingsoverride the printer driver and control panel settings, and theprinter driver settings override the control panel settings. Formore information, see Change printer-driver settings forWindows on page 67 or Change printer-driver settings forMacintosh on page 74.
The correct size paper for the tray is not selected in the productcontrol panel.
From the control panel, select the correct size paper for thetray.
The paper size is not configured correctly for the input tray. Print a configuration page or use the control panel to determinethe paper size for which the tray is configured.
The guides in the tray are not against the paper. Verify that the paper guides are touching the paper.
Product pulls from incorrect trayProduct pulls from incorrect tray
Cause Solution
You are using a driver for a different product. Use a driver for this product.
The specified tray is empty. Load paper in the specified tray.
258 Chapter 15 Solve problems ENWW

Product pulls from incorrect tray
Cause Solution
The paper size is not configured correctly for the input tray. Print a configuration page or use the control panel to determinethe paper size for which the tray is configured.
The guides in the tray are not against the paper. Verify that the guides are touching the paper.
Paper does not feed automaticallyPaper does not feed automatically
Cause Solution
Manual feed is selected in the software program. Load Tray 1 with paper, or, if the paper is loaded, press theStart button.
The correct size paper is not loaded. Load the correct size paper.
The input tray is empty. Load paper into the input tray.
Paper from a previous jam has not been completely removed. Open the product and remove any paper in the paper path.
The paper size is not configured correctly for the input tray. Print a configuration page or use the control panel to determinethe paper size for which the tray is configured.
The guides in the tray are not against the paper. Verify that the rear and width paper guides are touching thepaper.
The manual-feed prompt is set to ALWAYS. The productalways prompts for manual feed, even if the tray is loaded.
Open the tray, reload the media, and then close the tray.
Or, change the manual-feed prompt setting to UNLESSLOADED, so that the product prompts for manual feed onlywhen the tray is empty.
The USE REQUESTED TRAY setting on the product is set toEXCLUSIVELY, and the requested tray is empty. The productwill not use another tray.
Load the requested tray.
Or, change the setting from EXCLUSIVELY to FIRST on theCONFIGURE DEVICE menu. The product can use other traysif no media is loaded in the specified tray.
Paper does not feed from Tray 2, 3, 4, or 5Paper does not feed from Tray 2, 3, 4, or 5
Cause Solution
The correct size paper is not loaded. Load the correct size paper.
The input tray is empty. Load paper in the input tray.
The correct paper type for the input tray is not selected in theproduct control panel.
From the product control panel, select the correct paper typefor the input tray.
Paper from a previous jam has not been completely removed. Open the product and remove any paper in the paper path.Closely inspect the fuser area for jams.
None of the optional trays appear as input tray options. The optional trays only display as available if they are installed.Verify that any optional trays are correctly installed. Verify that
ENWW Paper-handling problems 259

Paper does not feed from Tray 2, 3, 4, or 5
Cause Solution
the printer driver has been configured to recognize the optionaltrays.
An optional tray is incorrectly installed. Print a configuration page to confirm that the optional tray isinstalled. If not, verify that the tray is correctly attached to theproduct.
The paper size is not configured correctly for the input tray. Print a configuration page or use the control panel to determinethe paper size for which the tray is configured.
The guides in the tray are not against the paper. Verify that the guides are touching the paper.
Transparencies or glossy paper will not feedTransparencies or glossy paper will not feed
Cause Solution
The correct paper type is not specified in the software or printerdriver.
Verify that the correct paper type is selected in the software orprinter driver.
The input tray is overfilled. Remove excess paper from the input tray. Do not load morethan 200 sheets of glossy paper or glossy film, or more than100 transparencies in Tray 2, 3, 4, or 5. Do not exceed themaximum stack height marks for Tray 1.
Paper in another input tray is the same size as thetransparencies, and the product is defaulting to the other tray.
Make sure that the input tray containing the transparencies orglossy paper is selected in the software program or printerdriver. Use the product control panel to configure the tray tothe paper type loaded.
The tray containing the transparencies or glossy paper is notconfigured correctly for type.
Make sure that the input tray containing the transparencies orglossy paper is selected in the software program or printerdriver. Use the product control panel to configure the tray tothe paper type loaded.
Transparencies or glossy paper might not meet supportedpaper specifications.
Use only paper that meets the HP paper specifications for thisproduct.
High-humidity environments may cause glossy paper not tofeed, or to feed too many sheets.
Print glossy paper from Tray 2, 3, 4, or 5 for best results.
Avoid printing glossy paper in high humidity conditions. Whenprinting glossy paper, removing the paper from the wrapperand letting it rest for a few hours can improve feeding into theproduct. However, letting paper rest in humid environmentsmay also cause blisters.
CAUTION: HP Color Laser Presentation Paper, Glossy (Q2546A) is not supported with this product.Using this type of paper can cause a fuser jam that might require the replacement of the fuser. Tworecommended alternatives are HP Color LaserJet Presentation Paper, Soft Gloss (Q6541A) andHP Color LaserJet Brochure Paper, Glossy (Q6611A, Q6610A). For a list of supported paper types, seeSupported paper types on page 100.
260 Chapter 15 Solve problems ENWW

Envelopes jam or will not feed in the productEnvelopes jam or will not feed in the product
Cause Solution
Envelopes are loaded in an unsupported tray. Only Tray 1 canfeed envelopes.
Load envelopes into Tray 1.
Envelopes are curled or damaged. Try using different envelopes. Store envelopes in a controlledenvironment.
Envelopes are sealing because the moisture content is toohigh.
Try using different envelopes. Store envelopes in a controlledenvironment.
Envelope orientation is incorrect. Verify that the envelope is loaded correctly.
This product does not support the envelopes being used. Refer to the HP LaserJet Printer Family Print Media Guide.
Tray 1 is configured for a size other than envelopes. Configure Tray 1 size for envelopes.
Output is curled or wrinkledOutput is curled or wrinkled
Cause Solution
Paper does not meet the specifications for this product. Use only paper that meets the HP paper specifications for thisproduct.
Paper is damaged or in poor condition. Remove paper from the input tray and load paper that is ingood condition.
Product speed needs to be reduced. Set the PAPER CURL option in the Print Quality menu toREDUCED to decrease full speed to 10 ppm (instead of 40ppm) and 3/4 speed to 7.5 ppm (instead of 30 ppm).
Product is operating in an excessively humid environment. Verify that the printing environment is within humidityspecifications.
You are printing large, solid-filled areas. Large, solid-filled areas can cause excessive curl. Try using adifferent pattern.
Paper used was not stored correctly and might have absorbedmoisture.
Remove paper and replace it with paper from a fresh,unopened package.
Paper has poorly cut edges. Remove paper, flex it, rotate it 180 degrees or turn it over, andthen reload it into the input tray. Do not fan paper. If the problempersists, replace the paper.
The specific paper type was not configured for the tray orselected in the software.
Configure the software for the paper (see the softwaredocumentation). Configure the tray for the paper, see Loadpaper and print media on page 103.
The paper has previously been used for a print job. Do not re-use paper.
ENWW Paper-handling problems 261

Product will not duplex or duplexes incorrectlyProduct will not duplex (print 2-sided jobs) or duplexes incorrectly
Cause Solution
You are trying to duplex on unsupported paper. Verify that the paper is supported for duplex printing.
The printer driver is not set up for duplex printing. Set up the printer driver to enable duplex printing.
The first page is printing on the back of preprinted forms orletterhead.
Load preprinted forms and letterhead in Tray 1 with theletterhead or printed side down, with the top of the page towardthe back of the product. For Tray 2, 3, 4 and 5, load the paperprinted side up with the top of the page toward the back of theproduct.
The product model does not support automatic 2-sidedprinting.
The HP Color LaserJet CM6040 MFP does not supportautomatic 2-sided printing.
The product configuration is not set for duplexing. In Windows, run the automatic configuration feature:
1. Click the Start button, point to Settings, and then clickPrinters (for Windows 2000) or Printers and Faxes (forWindows XP).
2. Right-click the HP product icon, and then clickProperties or Printing Preferences.
3. Click the Device Settings tab.
4. Under Installable Options, click Update Now in theAutomatic Configuration list.
262 Chapter 15 Solve problems ENWW

Understand lights on the formatterThree LEDs on the formatter indicate that the product is functioning correctly.
1
2
1 Heartbeat LED
2 HP Jetdirect LEDs (This LED exists only if HP Jetdirect is installed.)
HP Jetdirect LEDsThe embedded HP Jetdirect print server has two LEDs. The yellow LED indicates network activity, andthe green LED indicates the link status. A blinking yellow LED indicates network traffic. If the green LEDis off, a link has failed.
For link failures, check all of the network cable connections. In addition, you can try to manually configurethe link settings on the embedded print server by using the product control-panel menus.
1. Scroll to and touch Administration.
2. Touch Initial Setup.
3. Touch Networking and I/O.
4. Touch Embedded Jetdirect or EIO <X> Jetdirect.
5. Touch Link Speed.
6. Select the appropriate link speed.
7. Touch Save.
Heartbeat LEDThe heartbeat LED indicates that the formatter is functioning correctly. While the product is initializingafter you turn it on, the LED blinks rapidly, and then turns off. When the product has finished theinitialization sequence, the heartbeat LED pulses on and off.
If the heartbeat LED is off, the formatter might have a problem. Contact an HP-authorized service orsupport provider. See the HP support flyer, or go to www.hp.com/go/cljcm6030mfp_software orwww.hp.com/go/cljcm6040mfp_software.
ENWW Understand lights on the formatter 263

Correct print quality and copy quality problemsThe following procedures help you define print quality problems and what to do to correct them. Oftenprint quality problems can be handled easily by making sure that the product is properly maintained,using print media that meets HP specifications, or running a cleaning page.
Example print quality problemsSome print quality problems arise from use of inappropriate paper.
● Use paper that meets HP paper specifications.
● The surface of the paper is too rough. Use paper that meets HP paper specifications.
● The printer driver setting or paper tray setting might be incorrect. Be sure that you have configuredthe paper tray at the product control panel and have also selected the correct driver setting for thepaper that you are using.
● The print mode might be set incorrectly, or the paper might not meet recommended specifications.
● The transparencies you are using are not designed for proper toner adhesion. Use onlytransparencies designed for HP Color LaserJet products.
● The moisture content of the paper is uneven, too high, or too low. Use paper from a different sourceor from an unopened ream of paper.
● Some areas of the paper reject toner. Use paper from a different source or from an unopened reamof paper.
● The letterhead you are using is printed on rough paper. Use a smoother, xerographic paper. If thissolves your problem, consult with the printer of your letterhead to verify that the paper used meetsthe specifications for this product.
● Several optimize print modes can be used to address print quality issues. See Print Quality menuon page 49.
Repetitive defects rulerIf defects repeat at regular intervals on the page, use this ruler to identify the cause of the defect. Placethe top of the ruler at the first defect. The marking that is beside the next occurrence of the defectindicates which component needs to be replaced.
264 Chapter 15 Solve problems ENWW

(0)
(40mm)
(36mm)
(50mm)
(71mm)
(94mm)
(144mm)(148mm)
(82mm)
36 mm Developer roller in an image drum.
The print quality defect will be in one of the four image drums (image drum).
40 mm Charge roller in an image drum.
The print quality defect will be spots or dots sometimes caused when feeding labels and will be in one of the fourimage drums (image drum).
50 mm Transfer 1 roller in the transfer unit (transfer kit).
71 mm Transfer 2 roller in the roller kit (transfer kit).
82 mm Tension in the transfer unit (transfer kit).
94 mm Image drum.
The print quality defect will be in one of the four image drums (image drum).
ENWW Correct print quality and copy quality problems 265
144 mm Pressure roller in the fuser (fuser kit).
148 mm Fusing roller in the fuser (fuser kit).
To identify if the image drum is the problem, insert an image drum from another HP Color LaserJetCM6040 series, if one is available, before ordering a new image drum.
If the defect repeats at 94.0 mm (3.75 inch) intervals, try replacing the image drum before replacing thefuser.
Print quality problems associated with the environmentIf the product is operating in excessively humid or dry conditions, verify that the printing environment iswithin specifications. See Environmental specifications on page 297. Several optimization modes canalso help with environmental conditions. See Use manual print modes on page 270.
Print quality problems associated with jams● Make sure that all paper is cleared from the paper path.
● If the product recently jammed, print two to three pages to clean the product.
● The paper does not pass through the fuser, causing image defects to appear on subsequentdocuments. Print two to three pages to clean the product.
Optimize and improve image qualityThe following procedures can be used to solve most image quality problems.
If following the procedures does not improve print quality, go to www.hp.com/go/cljcm6030mfp_software or www.hp.com/go/cljcm6040mfp_software.
Use supported paperUsing unsupported paper or other media in the product can cause a wide variety of image qualityproblems.
Calibrate the productCalibration is a product function that optimizes print quality. If you experience any image-qualityproblems, calibrate the product.
At the control panel;
1. Touch Administration.
2. Scroll and touch Print Quality.
3. Scroll and touch Calibration/Cleaning .
4. Touch Quick Calibration or Full Calibration.
5. Touch Calibrate.
266 Chapter 15 Solve problems ENWW

Specify the correct paper typeWhen you send a print job to the product, specify the type of paper you are using.
1. On the File menu in the software program, click Print.
2. Select the product, and then click Properties or Preferences.
NOTE: The steps can vary; this procedure is most common.
3. Select the Paper/Quality tab.
4. In the Paper Type drop-down box, select More... and then select the paper type that best matchesthe paper that is loaded in the product.
Clean the fuserRun the device cleaning page to keep the fuser free of toner and paper particles that can sometimesaccumulate. Accumulation of toner and particles can cause specks to appear on the front or back sideof your print jobs.
HP recommends that you use the cleaning page when there is a print quality issue.
A Cleaning message appears on the product control panel display while the cleaning is taking place.
In order for the cleaning page to work correctly, print the page on copier-grade paper (not bond, heavy,or rough paper).
Create and use the cleaning page
1. Scroll to and touch Administration.
2. Scroll to and touch Print Quality
3. Touch Calibration/cleaning.
4. Touch Process cleaning page.
Respond to control panel error messagesIf you see a 54.Error <XX> message in the event log, you might need to perform some maintenanceon the product in order to avoid more errors and solve print quality problems.
1. Open and then close the right door of the product to log a 54.Error <XX> as the latest event in theevent log.
2. Scroll to and touch Administration.
3. Scroll to and touch Troubleshooting.
4. Scroll to and touch Event Log.
ENWW Correct print quality and copy quality problems 267

5. Touch Print.
6. Find the most recent event in the log.
● If the event is a 54.OE.01 Media Sensor event, you need to replace the registration secondtransfer assembly. Contact HP Support at www.hp.com/go/cljcm6030mfp_software orwww.hp.com/go/cljcm6040mfp_software and provide them with this error code.
● If the event is a 54.OE.02 Media Sensor event, you need to replace the product transfer kit.Contact HP Support at www.hp.com/support/cljcm6040mfp or www.hp.com/support/cljcm6030mfp and provide them with this error code.
● If the event is a 54.OE.03 Media Sensor event, you need to clean the registration secondtransfer assembly and the media sensor using the following procedure.
Clean the registration second transfer assembly
1. Open the right door.
2. Locate and remove the cleaning brush.
268 Chapter 15 Solve problems ENWW

3. Lift the green handle on the transfer-access panel and open the panel.
12
4. Clean the media sensor with the cleaning brush.
5. Close the transfer access panel, and replace the cleaning brush in its holder.
ENWW Correct print quality and copy quality problems 269

6. Close the right door.
Use manual print modesTry the following manual print modes to see if they solve the image quality problems. These options canbe found in the Optimize sub-menu under the control panel Print Quality menu. See Print Quality menuon page 49.
● Fuser Temp: If you are seeing a faint image of the page repeated at the bottom of the page or onthe following page, you should first make sure the Paper Type and Print Mode settings are correctfor the type of paper you are using. If you continue to see ghost images on your print jobs, set theFuser Temp feature to one of the Alternate settings . Try the Alternate 1 setting first and see if itsolves the problem. If you continue to see the problem, try Alternate 2 and then Alternate 3. Withthe Alternate 2 and Alternate 3 settings you may see an extra delay between jobs.
● Light Media: Set this feature to On if you are frequently seeing Fuser Delay Jam or Fuser WrapJam messages, especially when printing on light-weight paper or on jobs with heavy tonercoverage.
● Media Temp: Set this feature to Reduced if you are having problems with paper sticking togetherin the output bin.
● Environment: Enable this feature if the product is operating in a low temperature environment andyou are having problems with print quality such as blisters in the printed image.
● Line Voltage: Enable this feature if the product is operating in a low voltage environment and youare having problems with print quality such as blisters in the printed image.
● Background: Turn this feature on if pages are printing with a shaded background. Using thisfeature can reduce gloss levels.
● Paper Curl: Set this feature to Reduced if excessive curling of paper in the output bin occurs. Thissetting will reduce printing speed and increase the frequency of consumable replacement.
● Pre-rotation: Turn this feature on if horizontal streaks appear on pages. Using this featureincreases the warm-up time for the device.
● Tray 1: If you are seeing marks on the back side of the paper or extra toner on pages when printingfrom Tray 1, set the mode to Alternate. When the mode is set to Alternate a cleaning cycle will be
270 Chapter 15 Solve problems ENWW

performed after each job that is printed from Tray 1. Using Alternate mode increase wear on all theprint cartridges.
● Tracking Control: This setting should always be set to On.
● Cleaning Frequency = Normal/Alternate: Set this feature to Alternate if you are seeing defectsin the printed output that repeat at 38 mm (1.5 inch) intervals. This feature increases the frequencyat which the C roller is cleaned. Setting this feature to Alternate might also reduce printing speedand increase the frequency of consumable replacement.
● D-Blade Bias = Normal/Alternate: Set this feature to Alternate if you are seeing short, white,vertical lines in the printed output. The Alternate setting might also cause dark spots in the printedoutput, so be sure to test this setting on a few print jobs.
● Waste Bin = Normal/Alternate: Try setting this feature to Alternate if you are seeing lengthwisetoner streaks in your printed output, especially in jobs with low toner coverage.
● Discharge Brush = Off/On: Enable this feature in low temperature and low humidity environmentsif you are seeing specks of toner scattered on double-sided jobs using lightweight paper and longerthan ten pages.
Print-quality-troubleshooting pagesUse the built-in print-quality-troubleshooting pages to help diagnose and solve print-quality problems.
1. Scroll to and touch Administration
2. Scroll to and touch Troubleshooting.
3. Touch PQ Troubleshooting.
4. Touch Print.
The product returns to the Ready state after printing the print-quality-troubleshooting pages. Follow theinstructions on the pages that print out.
ENWW Correct print quality and copy quality problems 271

Performance problemsProblem Cause Solution
Pages print but are totally blank. The sealing tape might still be in the printcartridges.
Verify that the sealing tape has beencompletely removed from the printcartridges.
The document might contain blankpages.
Check the document that you are printingto see if content appears on all of thepages.
The product might be malfunctioning. To check the product, print aConfiguration page.
Pages print very slowly. Heavier media types can slow the printjob.
Print on a different type of media.
Complex pages can print slowly. Proper fusing may require a slower printspeed to ensure the best print quality.
The RLT photo fix options under HPreal life technologies on the Paper/Quality tab of the print driver can causeslow printing.
De-select these options to improve printspeed.
Pages did not print. The product might not be pulling mediacorrectly.
Make sure paper is loaded in the traycorrectly.
If the problem persists, you might needto replace the pickup rollers and theseparation pad. See Customer supporton page 289.
The media is jamming in the device. Clear the jam. See Jams on page 228.
The USB cable might be defective orincorrectly connected.
● Disconnect the USB cable at bothends and reconnect it.
● Try printing a job that has printed inthe past.
● Try using a different USB cable.
Other devices are running on yourcomputer.
The product might not share a USB port.If you have an external hard drive ornetwork switchbox that is connected tothe same port as the product, the otherdevice might be interfering. To connectand use the product, you mustdisconnect the other device or you mustuse two USB ports on the computer.
272 Chapter 15 Solve problems ENWW

Solve fax problemsFor help solving fax problems, go to www.hp.com/go/mfpfaxaccessory300.
You can also refer to the Analog Fax Accessory 300 Fax Guide and the Analog Fax Accessory 300Send Fax Driver Guide, which are included on the product User CD.
Solve e-mail problemsIf you are unable to send e-mails by using the digital-send feature, you might need to reconfigure theSMTP gateway address or the LDAP gateway address. Print a configuration page to find the currentSMTP and LDAP gateway addresses. See Information pages on page 178. Use the followingprocedures to check if the SMTP and LDAP gateway addresses are valid.
Validate the SMTP gateway addressNOTE: This procedure is for Windows operating systems.
1. Open an MS-DOS command prompt: click Start, click Run, and then typecmd
.
2. Typetelnet
followed by the SMTP gateway address and then the number 25, which is the port over which theproduct is communicating. For example, typetelnet 123.123.123.123 25
where "123.123.123.123" represents the SMTP gateway address.
3. Press Enter. If the SMTP gateway address is not valid, the response contains the messageCould not open connection to the host on port 25: Connect Failed.
4. If the SMTP gateway address is not valid, contact the network administrator.
Validate the LDAP gateway addressNOTE: This procedure is for Windows operating systems.
1. Open Windows Explorer. In the address bar, typeLDAP://
immediately followed by the LDAP gateway address. For example, typeLDAP://12.12.12.12
where "12.12.12.12" represents the LDAP gateway address.
2. Press Enter. If the LDAP gateway address is valid, the Find People dialog box opens.
3. If the LDAP gateway address is not valid, contact the network administrator.
ENWW Solve fax problems 273
Solve network connectivity problemsIf the product is having problems communicating with the network, use the information in this section toresolve the problem.
Solve network printing problemsNOTE: HP recommends that you use the product CD to install and set up the product on a network.
● Make sure that the network cable is securely seated into the product's RJ45 connector.
● Make sure that the Link LED on the formatter is lit. See Understand lights on the formatteron page 263.
● Make sure that the I/O card is ready. Print a configuration page (see Information pageson page 178). If an HP Jetdirect print server is installed, printing a configuration page also printsa second page that shows the network settings and status.
NOTE: The HP Jetdirect print server supports various network protocols (TCP/IP, IPX/SPX,Novell NetWare, AppleTalk, and DCL/LLC). Make sure that the correct protocols and networkparameters are set correctly.
On the HP Jetdirect configuration page, verify the following items for your protocol:
◦ Under HP Jetdirect Configuration, the status is "I/O Card Ready."
◦ Protocol status is "Ready."
◦ An IP address is listed.
◦ The configuration method (Config by:) is listed correctly. See the network administrator if youare not sure which method is correct.
● Try printing the job from another computer.
● To verify that a product works with a computer, use a USB cable to connect it directly to a computer.You will have to reinstall the printing software. Print a document from a program that has printedcorrectly in the past. If this works, a problem with the network might exist.
● Contact your network administrator for assistance.
274 Chapter 15 Solve problems ENWW

Verify communication over the networkIf the HP Jetdirect configuration page shows an IP address for the product, use this procedure to verifythat you can communicate with the product over the network.
1. Windows: Click Start, click Run, and then typecmd
. An MS-DOS command prompt opens.
-or-
Mac: Click Applications, click Utilities, and then open the Terminal application. The terminalwindow opens.
2. Typeping
followed by the IP address. For example, typeping XXX.XXX.XXX.XXX
where "XXX.XXX.XXX.XXX" is the IPv4 address that is shown on the HP Jetdirect configurationpage. If the product is communicating over the network, the response is a list of replies from theproduct.
3. Verify that the IP address is not a duplicate address on the network by using the address resolutionprotocol (arp -a) command. At the prompt, typearp -a
. Find the IP address in the list and compare its physical address to the hardware address that islisted on the HP Jetdirect configuration page in the section called HP Jetdirect Configuration. If theaddresses match, all network communications are valid.
4. If you cannot verify that the product is communicating over the network, contact the networkadministrator.
ENWW Solve network connectivity problems 275

Solve common Macintosh problemsThis section lists problems that can occur when using Mac OS X.
Table 15-1 Problems with Mac OS X
The printer driver is not listed in the Print Center or Printer Setup Utility.
Cause Solution
The product software might not have been installed or was installedincorrectly.
Make sure that the product PPD is in the following hard-drive folder:Library/Printers/PPDs/Contents/Resources/<lang>.lproj
, where <lang> is the two-letter language code for the language thatyou are using. If necessary, reinstall the software. See the gettingstarted guide for instructions.
The Postscript Printer Description (PPD) file is corrupt. Delete the PPD file from the following hard-drive folder:Library/Printers/PPDs/Contents/Resources/<lang>.lproj
, where <lang> is the two-letter language code for the language thatyou are using. Reinstall the software. See the getting started guidefor instructions.
The product name, IP address, or Rendezvous/Bonjour host name does not appear in the product list in the Print Center or PrinterSetup Utility.
Cause Solution
The product might not be ready. Make sure that the cables are connected correctly, the product is on,and the ready light is on. If you are connecting through a USB orEthernet hub, try connecting directly to the computer or use a differentport.
The wrong connection type might be selected. Make sure that USB, IP Printing, or Rendezvous/Bonjour is selected,depending on the type of connection that exists between the productand the computer.
The wrong product name, IP address, or Rendezvous/Bonjour hostname is being used.
Print a configuration page in order to check the product name, IPaddress, or Rendezvous host name. Verify that the name, IP address,or Rendezvous host name on the configuration page matches theproduct name, IP address, or Rendezvous host name in the PrintCenter or Printer Setup Utility.
The interface cable might be defective or of poor quality. Replace the interface cable. Make sure to use a high-quality cable.
The printer driver does not automatically set up your selected product in the Print Center or Printer Setup Utility.
Cause Solution
The product might not be ready. Make sure that the cables are connected correctly, the product is on,and the ready light is on. If you are connecting through a USB orEthernet hub, try connecting directly to the computer or use a differentport.
The product software might not have been installed or was installedincorrectly.
Make sure that the product PPD is in the following hard-drive folder:Library/Printers/PPDs/Contents/Resources/<lang>.lproj
276 Chapter 15 Solve problems ENWW

The printer driver does not automatically set up your selected product in the Print Center or Printer Setup Utility.
Cause Solution
, where <lang> is the two-letter language code for the language thatyou are using. If necessary, reinstall the software. See the gettingstarted guide for instructions.
The Postscript Printer Description (PPD) file is corrupt. Delete the PPD file from the following hard-drive folder:Library/Printers/PPDs/Contents/Resources/<lang>.lproj
, where <lang> is the two-letter language code for the language thatyou are using. Reinstall the software. See the getting started guidefor instructions.
The interface cable might be defective or of poor quality. Replace the interface cable. Make sure to use a high-quality cable.
A print job was not sent to the product that you wanted.
Cause Solution
The print queue might be stopped. Restart the print queue. Open print monitor and select Start Jobs.
The wrong product name or IP address is being used. Anotherproduct with the same or similar name, IP address, or Rendezvoushost name might have received your print job.
Print a configuration page in order to check the product name, IPaddress, or Rendezvous host name. Verify that the name, IP address,or Rendezvous host name on the configuration page matches theproduct name, IP address, or Rendezvous host name in the PrintCenter or Printer Setup Utility.
An encapsulated PostScript (EPS) file does not print with the correct fonts.
Cause Solution
This problem occurs with some programs. ● Try downloading the fonts that are contained in the EPS file tothe product before printing.
● Send the file in ASCII format instead of binary encoding.
You are unable to print from a third-party USB card.
Cause Solution
This error occurs when the software for USB products is notinstalled.
When adding a third-party USB card, you might need the Apple USBAdapter Card Support software. The most current version of thissoftware is available from the Apple Web site.
Table 15-1 Problems with Mac OS X (continued)
ENWW Solve common Macintosh problems 277

When connected with a USB cable, the product does not appear in the Print Center or Printer Setup Utility after the driver is selected.
Cause Solution
This problem is caused by either a software or a hardwarecomponent.
Software troubleshooting
● Check that your Macintosh supports USB.
● Verify that your Macintosh operating system is Mac OS X v10.1or later.
● Ensure that your Macintosh has the appropriate USB softwarefrom Apple.
Hardware troubleshooting
● Check that the product is turned on.
● Verify that the USB cable is connected correctly.
● Check that you are using the appropriate high-speed USB cable.
● Ensure that you do not have too many USB devices drawingpower from the chain. Disconnect all of the devices from thechain, and connect the cable directly to the USB port on the hostcomputer.
● Check to see if more than two nonpowered USB hubs areconnected in a row on the chain. Disconnect all of the devicesfrom the chain and connect the cable directly to the USB port onthe host computer.
NOTE: The iMac keyboard is a nonpowered USB hub.
Table 15-1 Problems with Mac OS X (continued)
278 Chapter 15 Solve problems ENWW

A Supplies and accessories
● Order parts, accessories, and supplies
● Part numbers
ENWW 279
Order parts, accessories, and suppliesSeveral methods are available for ordering parts, supplies, and accessories.
● Order directly from HP
● Order through service or support providers
● Order directly through the embedded Web server (for printers that are connected to a network)
● Order directly through the HP Easy Printer Care software
Order directly from HPYou can obtain the following items directly from HP:
● Replacement parts: To order replacement parts in the U.S., go to www.hp.com/go/hpparts/.Outside the United States, order parts by contacting your local authorized HP service center.
● Supplies and accessories: To order supplies in the U.S., go to www.hp.com/go/ljsupplies. Toorder supplies and accessories worldwide, go to www.hp.com/ghp/buyonline.html.
Order through service or support providersTo order a part or accessory, contact an HP-authorized service or support provider.
Order directly through the embedded Web server (for printers that areconnected to a network)
Use the following steps to order printing supplies directly through the embedded Web server.
1. In the Web browser on the computer, type the IP address or host name of the device. The statuswindow opens.
2. In the Other links area, double-click Order Supplies. This provides a URL for a site from whichyou can purchase consumables.
3. Select the part numbers that you want to order, and follow the instructions on the screen.
Order directly through the HP Easy Printer Care softwareHP Easy Printer Care software is a printer management tool designed to make printer configuration,monitoring, supplies ordering, troubleshooting, and updating as simple and efficient as possible. Formore information about HP Easy Printer Care software, go to www.hp.com/easyprintercare.
280 Appendix A Supplies and accessories ENWW

Part numbersOrdering information and availability might change during the life of the product.
Accessories
Item Description Part number
HP 3-bin Stapler/Stacker Accessory 3-bin stapler/stacker with outputaccessory bridge unit
CC517A
HP 3-bin Stapler/Stacker or HP BookletMaker/Finisher staple cartridge (uppercartridge on HP Booklet Maker/Finisher)
5000-staple replacement cartridge C8091A
HP Booklet Maker/Finisher Accessory Booklet maker finisher with outputaccessory bridge unit
CC516A
HP Booklet Maker/Finisher saddle-stitchstaple cartridge (lower cartridge)
2000-staple replacement cartridge(quantity of 2)
CC383A
HP LaserJet analog fax accessory 300 Provides fax capability for the product.This is included with the HP ColorLaserJet CM6040f MFP model.
Q3701A
Print cartridges
Item Description Part number
HP Color LaserJet black print cartridge 19,500-page black cartridge CB390A
HP Color LaserJet cyan print cartridge 21,000-page cyan cartridge CB381A
HP Color LaserJet yellow print cartridge 21,000-page yellow cartridge CB382A
HP Color LaserJet magenta printcartridge
21,000-page magenta cartridge CB383A
Image drums
Item Description Part number
HP Color LaserJet black image drum 35,000-page black image drum CB384A
HP Color LaserJet cyan image drum 35,000-page cyan image drum CB385A
HP Color LaserJet yellow image drum 35,000-page yellow image drum CB386A
HP Color LaserJet magenta image drum 35,000-page magenta image drum CB387A
Maintenance kits
Item Description Part number
Image fuser kit 110 volt CB457A
ENWW Part numbers 281

Item Description Part number
Image fuser kit 220 volt CB458A
Roller kit CB459A
Transfer kit CB463A
ADF roller kit CE487A
Memory
Item Description Part number
200-pin DDR memory DIMM (dual inlinememory module)
Boosts the ability of the product to handlelarge or complex print jobs.
128 MB Q7557A
256 MB Q7558A
Cables and interfaces
Item Description Part number
Enhanced I/O (EIO) card HP Jetdirect 635n IPv6/IPsec PrintServer
J7961G
USB cable 2-meter standard USB-compatibledevice connector
C6518A
282 Appendix A Supplies and accessories ENWW

B Service and support
● Hewlett-Packard limited warranty statement
● Print cartridge limited warranty statement
● Color LaserJet Fuser Kit, Transfer Kit, and Roller Kit Limited Warranty Statement
● Customer self repair warranty service
● Customer support
● Availability of support and service
● HP maintenance agreements
ENWW 283

Hewlett-Packard limited warranty statementHP PRODUCT DURATION OF LIMITED WARRANTY
HP Color LaserJet CM6030 Series MFP One-year limited warranty
HP Color LaserJet CM6040 Series MFP One-year limited warranty
HP warrants to you, the end-user customer, that HP hardware and accessories will be free from defectsin materials and workmanship after the date of purchase, for the period specified above. If HP receivesnotice of such defects during the warranty period, HP will, at its option, either repair or replace productswhich prove to be defective. Replacement products may be either new or equivalent in performance tonew.
HP warrants to you that HP software will not fail to execute its programming instructions after the dateof purchase, for the period specified above, due to defects in material and workmanship when properlyinstalled and used. If HP receives notice of such defects during the warranty period, HP will replacesoftware which does not execute its programming instructions due to such defects.
HP does not warrant that the operation of HP products will be uninterrupted or error free. If HP is unable,within a reasonable time, to repair or replace any product to a condition as warranted, you will be entitledto a refund of the purchase price upon prompt return of the product.
HP products may contain remanufactured parts equivalent to new in performance or may have beensubject to incidental use.
Warranty does not apply to defects resulting from (a) improper or inadequate maintenance or calibration,(b) software, interfacing, parts or supplies not supplied by HP, (c) unauthorized modification or misuse,(d) operation outside of the published environmental specifications for the product, or (e) improper sitepreparation or maintenance.
TO THE EXTENT ALLOWED BY LOCAL LAW, THE ABOVE WARRANTIES ARE EXCLUSIVE ANDNO OTHER WARRANTY OR CONDITION, WHETHER WRITTEN OR ORAL, IS EXPRESSED ORIMPLIED AND HP SPECIFICALLY DISCLAIMS ANY IMPLIED WARRANTIES OR CONDITIONS OFMERCHANTABILITY, SATISFACTORY QUALITY, AND FITNESS FOR A PARTICULAR PURPOSE.Some countries/regions, states or provinces do not allow limitations on the duration of an impliedwarranty, so the above limitation or exclusion might not apply to you. This warranty gives you specificlegal rights and you might also have other rights that vary from country/region to country/region, stateto state, or province to province.
HP's limited warranty is valid in any country/region or locality where HP has a support presence for thisproduct and where HP has marketed this product. The level of warranty service you receive may varyaccording to local standards. HP will not alter form, fit or function of the product to make it operate in acountry/region for which it was never intended to function for legal or regulatory reasons.
TO THE EXTENT ALLOWED BY LOCAL LAW, THE REMEDIES IN THIS WARRANTY STATEMENTARE YOUR SOLE AND EXCLUSIVE REMEDIES. EXCEPT AS INDICATED ABOVE, IN NO EVENTWILL HP OR ITS SUPPLIERS BE LIABLE FOR LOSS OF DATA OR FOR DIRECT, SPECIAL,INCIDENTAL, CONSEQUENTIAL (INCLUDING LOST PROFIT OR DATA), OR OTHER DAMAGE,WHETHER BASED IN CONTRACT, TORT, OR OTHERWISE. Some countries/regions, states orprovinces do not allow the exclusion or limitation of incidental or consequential damages, so the abovelimitation or exclusion may not apply to you.
284 Appendix B Service and support ENWW

THE WARRANTY TERMS CONTAINED IN THIS STATEMENT, EXCEPT TO THE EXTENTLAWFULLY PERMITTED, DO NOT EXCLUDE, RESTRICT OR MODIFY AND ARE IN ADDITION TOTHE MANDATORY STATUTORY RIGHTS APPLICABLE TO THE SALE OF THIS PRODUCT TO YOU.
ENWW Hewlett-Packard limited warranty statement 285

Print cartridge limited warranty statementThis HP product is warranted to be free from defects in materials and workmanship.
This warranty does not apply to products that (a) have been refilled, refurbished, remanufactured ortampered with in any way, (b) experience problems resulting from misuse, improper storage, oroperation outside of the published environmental specifications for the printer product or (c) exhibit wearfrom ordinary use.
To obtain warranty service, please return the product to place of purchase (with a written description ofthe problem and print samples) or contact HP customer support. At HP's option, HP will either replaceproducts that prove to be defective or refund your purchase price.
TO THE EXTENT ALLOWED BY LOCAL LAW, THE ABOVE WARRANTY IS EXCLUSIVE AND NOOTHER WARRANTY OR CONDITION, WHETHER WRITTEN OR ORAL, IS EXPRESSED ORIMPLIED AND HP SPECIFICALLY DISCLAIMS ANY IMPLIED WARRANTIES OR CONDITIONS OFMERCHANTABILITY, SATISFACTORY QUALITY, AND FITNESS FOR A PARTICULAR PURPOSE.
TO THE EXTENT ALLOWED BY LOCAL LAW, IN NO EVENT WILL HP OR ITS SUPPLIERS BELIABLE FOR DIRECT, SPECIAL, INCIDENTAL, CONSEQUENTIAL (INCLUDING LOST PROFIT ORDATA), OR OTHER DAMAGE, WHETHER BASED IN CONTRACT, TORT, OR OTHERWISE.
THE WARRANTY TERMS CONTAINED IN THIS STATEMENT, EXCEPT TO THE EXTENTLAWFULLY PERMITTED, DO NOT EXCLUDE, RESTRICT OR MODIFY AND ARE IN ADDITION TOTHE MANDATORY STATUTORY RIGHTS APPLICABLE TO THE SALE OF THIS PRODUCT TO YOU.
286 Appendix B Service and support ENWW

Color LaserJet Fuser Kit, Transfer Kit, and Roller KitLimited Warranty Statement
This HP product is warranted to be free from defects in materials and workmanship until the printerprovides a low-life indicator on the control panel.
This warranty does not apply to products that (a) have been refurbished, remanufactured or tamperedwith in any way, (b) experience problems resulting from misuse, improper storage, or operation outsideof the published environmental specifications for the printer product or (c) exhibit wear from ordinaryuse.
To obtain warranty service, please return the product to place of purchase (with a written description ofthe problem) or contact HP customer support. At HP’s option, HP will either replace products that proveto be defective or refund your purchase price.
TO THE EXTENT ALLOWED BY LOCAL LAW, THE ABOVE WARRANTY IS EXCLUSIVE AND NOOTHER WARRANTY OR CONDITION, WHETHER WRITTEN OR ORAL, IS EXPRESSED ORIMPLIED AND HP SPECIFICALLY DISCLAIMS ANY IMPLIED WARRANTIES OR CONDITIONS OFMERCHANTABILITY, SATISFACTORY QUALITY, AND FITNESS FOR A PARTICULAR PURPOSE.
TO THE EXTENT ALLOWED BY LOCAL LAW, IN NO EVENT WILL HP OR ITS SUPPLIERS BELIABLE FOR DIRECT, SPECIAL, INCIDENTAL, CONSEQUENTIAL (INCLUDING LOST PROFIT ORDATA), OR OTHER DAMAGE, WHETHER BASED IN CONTRACT, TORT, OR OTHERWISE.
THE WARRANTY TERMS CONTAINED IN THIS STATEMENT, EXCEPT TO THE EXTENTLAWFULLY PERMITTED, DO NOT EXCLUDE, RESTRICT OR MODIFY AND ARE IN ADDITION TOTHE MANDATORY STATUTORY RIGHTS APPLICABLE TO THE SALE OF THIS PRODUCT TO YOU.
ENWW Color LaserJet Fuser Kit, Transfer Kit, and Roller Kit Limited Warranty Statement 287

Customer self repair warranty serviceHP products are designed with many Customer Self Repair (CSR) parts to minimize repair time andallow for greater flexibility in performing defective parts replacement. If during the diagnosis period, HPidentifies that the repair can be accomplished by the use of a CSR part, HP will ship that part directly toyou for replacement. There are two categories of CSR parts: 1) Parts for which customer self repair ismandatory. If you request HP to replace these parts, you will be charged for the travel and labor costsof this service. 2) Parts for which customer self repair is optional. These parts are also designed forCustomer Self Repair. If, however, you require that HP replace them for you, this may be done at noadditional charge under the type of warranty service designated for your product.
Based on availability and where geography permits, CSR parts will be shipped for next business daydelivery. Same-day or four-hour delivery may be offered at an additional charge where geographypermits. If assistance is required, you can call the HP Technical Support Center and a technician willhelp you over the phone. HP specifies in the materials shipped with a replacement CSR part whethera defective part must be returned to HP. In cases where it is required to return the defective part to HP,you must ship the defective part back to HP within a defined period of time, normally five (5) businessdays. The defective part must be returned with the associated documentation in the provided shippingmaterial. Failure to return the defective part may result in HP billing you for the replacement. With acustomer self repair, HP will pay all shipping and part return costs and determine the courier/carrier tobe used.
288 Appendix B Service and support ENWW
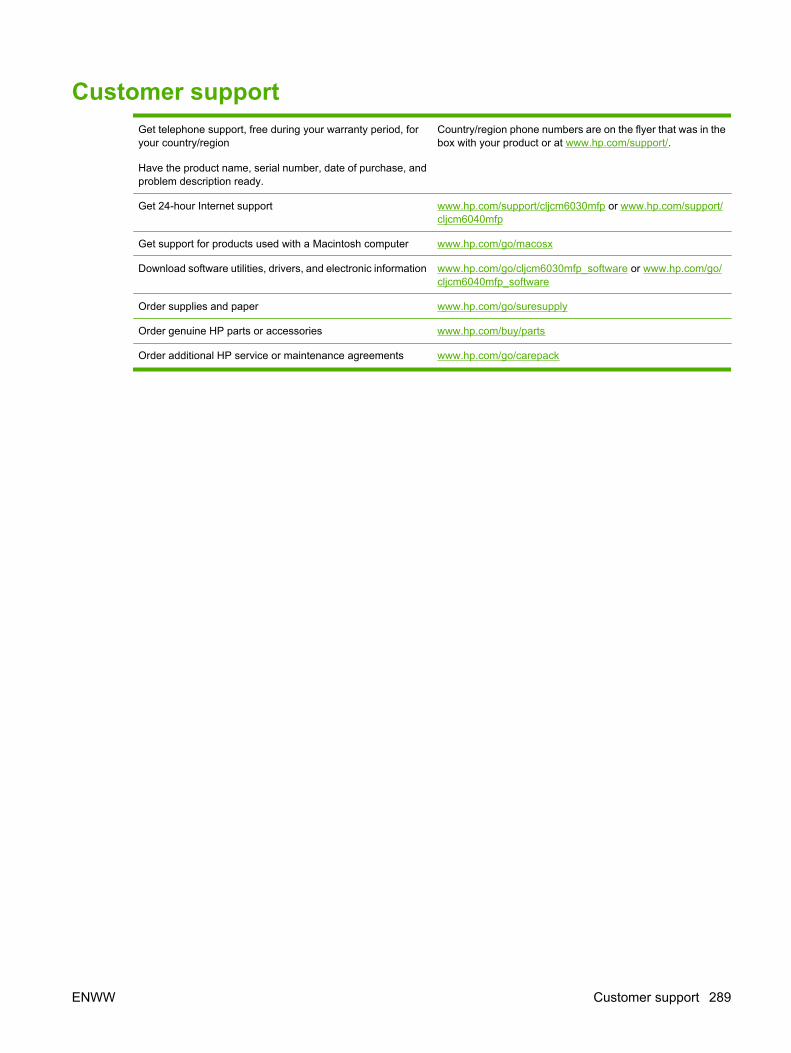
Customer supportGet telephone support, free during your warranty period, foryour country/region
Have the product name, serial number, date of purchase, andproblem description ready.
Country/region phone numbers are on the flyer that was in thebox with your product or at www.hp.com/support/.
Get 24-hour Internet support www.hp.com/support/cljcm6030mfp or www.hp.com/support/cljcm6040mfp
Get support for products used with a Macintosh computer www.hp.com/go/macosx
Download software utilities, drivers, and electronic information www.hp.com/go/cljcm6030mfp_software or www.hp.com/go/cljcm6040mfp_software
Order supplies and paper www.hp.com/go/suresupply
Order genuine HP parts or accessories www.hp.com/buy/parts
Order additional HP service or maintenance agreements www.hp.com/go/carepack
ENWW Customer support 289

Availability of support and serviceAround the world, HP provides a variety of service and support options for purchase. Availability of theseprograms will vary depending upon your location.
290 Appendix B Service and support ENWW

HP maintenance agreementsHP has several types of maintenance agreements that meet a wide range of support needs.Maintenance agreements are not part of the standard warranty. Support services may vary by area.Check with your local HP dealer to determine the services available to you.
On-site service agreementsTo provide you with the level of support best suited to your needs, HP has on-site service agreementswith three response times:
Priority onsite serviceThis agreement provides 4-hour service response to your site for calls made during normal HP businesshours.
Next-day onsite serviceThis agreement provides support by the next working day following a service request. Extendedcoverage hours and extended travel beyond HP’s designated service zones are available on most on-site agreements (for additional charges).
Weekly (volume) on-site serviceThis agreement provides scheduled weekly on-site visits for organizations with many HP products. Thisagreement is designated for sites using 25 or more workstation products, including printers, plotters,computers, and disk drives.
ENWW HP maintenance agreements 291

292 Appendix B Service and support ENWW
C Product specifications
● Physical specifications
● Electrical specifications
● Acoustic specifications
● Environmental specifications
ENWW 293

Physical specificationsTable C-1 Product dimensions
Product Height Depth Width Weight1
HP Color LaserJet CM6030 MFP 1194 mm (47 in) 635 mm (25 in) 704 mm (27.7 in) 140 kg (308 lb)
HP Color LaserJet CM6030f MFP 1194 mm (47 in) 635 mm (25 in) 704 mm (27.7 in) 145 kg (319 lb)
HP Color LaserJet CM6040 MFP 1194 mm (47 in) 635 mm (25 in) 704 mm (27.7 in) 140 kg (308 lb)
HP Color LaserJet CM6040f MFP 1194 mm (47 in) 635 mm (25 in) 704 mm (27.7 in) 145 kg (319 lb)
1 Without print cartridge
Table C-2 Product dimensions, with all doors and trays fully opened
Product Height Depth Width
HP Color LaserJet CM6030 MFP 1524 mm (60 in) 1079.5 mm (42.5 in) 983 mm (38.7 in)
HP Color LaserJet CM6030f MFP 1524 mm (60 in) 1079.5 mm (42.5 in) 983 mm (38.7 in)
HP Color LaserJet CM6040 MFP 1524 mm (60 in) 1079.5 mm (42.5 in) 983 mm (38.7 in)
HP Color LaserJet CM6040f MFP 1524 mm (60 in) 1079.5 mm (42.5 in) 983 mm (38.7 in)
294 Appendix C Product specifications ENWW

Electrical specificationsWARNING! Power requirements are based on the country/region where the product is sold. Do notconvert operating voltages. This can damage the product and void the product warranty.
Table C-3 Power requirements (HP Color LaserJet CM6030 and CM6040 MFP Series)
Specification 110-volt models 220-volt models
Power requirements 100 to 127 volts (± 10%)
50/60 Hz (± 2 Hz)
220 to 240 volts (± 10%)
50/60 Hz (± 2 Hz)
Rated current 10.5 A 5.5 A
Table C-4 Power consumption HP Color LaserJet CM6030 and CM6040 MFP Series (average, in watts)
Product model Printing Ready Sleep Off
HP Color LaserJetCM6030 MFP
1265 W 251.7 W 26.3 W 0.72 W
HP Color LaserJetCM6030f MFP
1265 W 251.7 W 26.5 W 0.72 W
HP Color LaserJetCM6040 MFP
1265 W 251.7 W 26.3 W 0.72 W
HP Color LaserJetCM6040f MFP
1265 W 251.7 W 26.5 W 0.72 W
Values subject to change. See www.hp.com/support/cljcm6030mfp or www.hp.com/support/cljcm6040mfp for current information.
HP Color LaserJet CM6030 and CM6040 MFP Series printing and copying speeds are 40 ppm for Letterand A4 sizes.
Default time from Ready mode to Sleep mode = 60 minutes.
Recovery time from Sleep mode = less than 20 seconds
ENWW Electrical specifications 295

Acoustic specificationsTable C-5 Sound power and pressure level1 (HP Color LaserJet CM6030 and CM6040 MFP Series)
Sound power level Declared per ISO 9296
Printing1 LWAd= 6.9 Bels (A) [69 dB(A)]
Copying2 LWAd= 7.3 Bels (A) [73 dB(A)]
Ready LWAd= 5.8 Bels (A) [58 dB(A)]
Sound pressure level Declared per ISO 9296
Printing1 LpAm=53 dB (A)
Copying2 LpAm=57 dB (A)
Ready LpAm=40 dB (A)
1 Values subject to change. See www.hp.com/support/cljcm6030mfp or www.hp.com/support/cljcm6040mfp for currentinformation.
2 Configuration tested (HP Color LaserJet CM6030 and CM6040 MFP Series) Base model, simplex copying from ADF with A4paper size.)
296 Appendix C Product specifications ENWW

Environmental specificationsEnvironmental condition Recommended Allowed Storage/standby
Temperature (product andprint cartridge)
17° to 25°C (62.6° to 77°F) 10° to 30°C (50° to 86°F) 0° to 35°C (32° to 95°F)
Relative humidity 30% to 70% relative humidity(RH)
10% to 80% RH 5% to 95%
Altitude N/A 0 meters (0 feet) to 2500meters (8000 feet)
N/A
ENWW Environmental specifications 297

298 Appendix C Product specifications ENWW

D Regulatory information
ENWW 299

Compliance with FCC regulationsThis equipment has been tested and found to comply with the limits for a Class A digital device, pursuantto part 15 of the FCC Rules. These limits are designed to provide reasonable protection against harmfulinterference when the equipment is operated in a commercial environment. This equipment generates,uses, and can radiate radio frequency energy and, if not installed and used in accordance with theinstruction manual, may cause harmful interference to radio communications. Operation of thisequipment in a residential area is likely to cause harmful interference in which case the user will berequired to correct the interference at his own expense.
300 Appendix D Regulatory information ENWW

Declaration of ConformityDeclaration of Conformityaccording to ISO/IEC 17050–1 and EN 17050–1Manufacturer's Name: Hewlett-Packard Company
DoC#: BOISB-0601–01–rel.2.0Manufacturer's Address: 11311 Chinden Boulevard,
Boise, Idaho 83714-1021, USAdeclares that the product
Product Name: HP Color LaserJet CM6030, CM6040 MFP seriesAccessories CB473A – 1x500-sheet input tray/stand
CB474A – 3x500-sheet input tray/standCC516A – Booklet MakerCC517A - 3-Bin Stapler/Stacker
Regulatory Model Number:2) BOISB-0601-01Product Options: ALL
Toner Cartridges/Drums: CB390A, CB381A, CB382A, CB383A, CB384A, CB385A, CB386A,CB387A
conforms to the following Product Specifications:
Safety: IEC 60950-1:2001 / EN60950-1: 2001 + A11IEC 60825-1:1993 +A1 +A2 / EN 60825-1:1994 A1 +A2 (Class 1 Laser/LED Product)GB4943-2001
EMC: CISPR 22:2005 / EN 55022:2006 – Class A1)
EN 61000-3-2:2000 +A2EN 61000-3-3:1995 + A1EN 55024:1998+A1 + A2FCC Title 47 CFR, Part 15 Class A / ICES-003, Issue 4GB9254-1998, GB17625.1–2003
Supplementary Information:
The product herewith complies with the requirements of the EMC Directive 2004/108/EC and the Low Voltage Directive 2006/95/EC, andcarries the CE-Marking accordingly.
This device complies with Part 15 of the FCC Rules. Operation is subject to the following two Conditions: (1) this device may not cause harmfulinterference, and (2) this device must accept any interference received, including interference that may cause undesired operation.
1) The product was tested in a typical configuration with Hewlett-Packard Personal Computer Systems.
2) For regulatory purposes, this product is assigned a Regulatory model number. This number should not be confused with the product nameor the product number(s).
Boise, Idaho , USA
February 1, 2008
For regulatory topics only:
European Contact: Your Local Hewlett-Packard Sales and Service Office or Hewlett-Packard GmbH, Department HQ-TRE / StandardsEurope, Herrenberger Straße 140, D-71034 Böblingen, Germany, (FAX: +49-7031-14-3143) www.hp.com/go/certificates
USA Contact: Product Regulations Manager, Hewlett-Packard Company, PO Box 15, Mail Stop 160, Boise, Idaho 83707-0015, USA,(Phone: 208-396-6000)
ENWW Declaration of Conformity 301
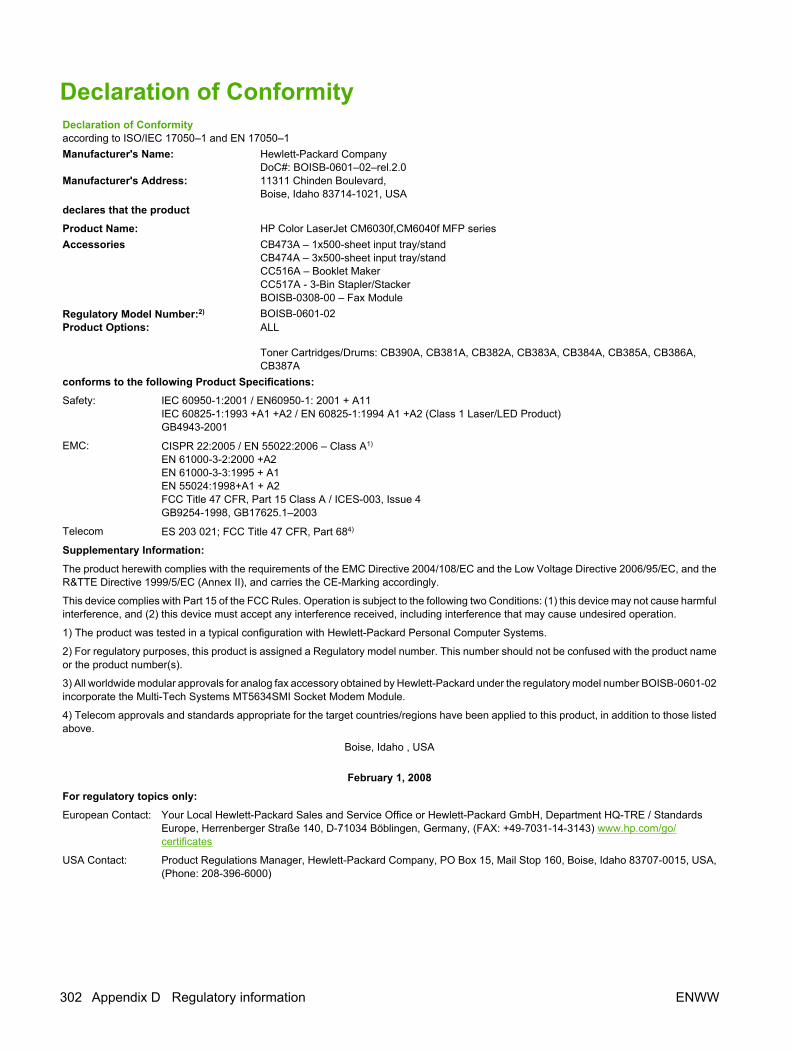
Declaration of ConformityDeclaration of Conformityaccording to ISO/IEC 17050–1 and EN 17050–1Manufacturer's Name: Hewlett-Packard Company
DoC#: BOISB-0601–02–rel.2.0Manufacturer's Address: 11311 Chinden Boulevard,
Boise, Idaho 83714-1021, USAdeclares that the product
Product Name: HP Color LaserJet CM6030f,CM6040f MFP seriesAccessories CB473A – 1x500-sheet input tray/stand
CB474A – 3x500-sheet input tray/standCC516A – Booklet MakerCC517A - 3-Bin Stapler/StackerBOISB-0308-00 – Fax Module
Regulatory Model Number:2) BOISB-0601-02Product Options: ALL
Toner Cartridges/Drums: CB390A, CB381A, CB382A, CB383A, CB384A, CB385A, CB386A,CB387A
conforms to the following Product Specifications:
Safety: IEC 60950-1:2001 / EN60950-1: 2001 + A11IEC 60825-1:1993 +A1 +A2 / EN 60825-1:1994 A1 +A2 (Class 1 Laser/LED Product)GB4943-2001
EMC: CISPR 22:2005 / EN 55022:2006 – Class A1)
EN 61000-3-2:2000 +A2EN 61000-3-3:1995 + A1EN 55024:1998+A1 + A2FCC Title 47 CFR, Part 15 Class A / ICES-003, Issue 4GB9254-1998, GB17625.1–2003
Telecom ES 203 021; FCC Title 47 CFR, Part 684)
Supplementary Information:
The product herewith complies with the requirements of the EMC Directive 2004/108/EC and the Low Voltage Directive 2006/95/EC, and theR&TTE Directive 1999/5/EC (Annex II), and carries the CE-Marking accordingly.
This device complies with Part 15 of the FCC Rules. Operation is subject to the following two Conditions: (1) this device may not cause harmfulinterference, and (2) this device must accept any interference received, including interference that may cause undesired operation.
1) The product was tested in a typical configuration with Hewlett-Packard Personal Computer Systems.
2) For regulatory purposes, this product is assigned a Regulatory model number. This number should not be confused with the product nameor the product number(s).
3) All worldwide modular approvals for analog fax accessory obtained by Hewlett-Packard under the regulatory model number BOISB-0601-02incorporate the Multi-Tech Systems MT5634SMI Socket Modem Module.
4) Telecom approvals and standards appropriate for the target countries/regions have been applied to this product, in addition to those listedabove.
Boise, Idaho , USA
February 1, 2008
For regulatory topics only:
European Contact: Your Local Hewlett-Packard Sales and Service Office or Hewlett-Packard GmbH, Department HQ-TRE / StandardsEurope, Herrenberger Straße 140, D-71034 Böblingen, Germany, (FAX: +49-7031-14-3143) www.hp.com/go/certificates
USA Contact: Product Regulations Manager, Hewlett-Packard Company, PO Box 15, Mail Stop 160, Boise, Idaho 83707-0015, USA,(Phone: 208-396-6000)
302 Appendix D Regulatory information ENWW
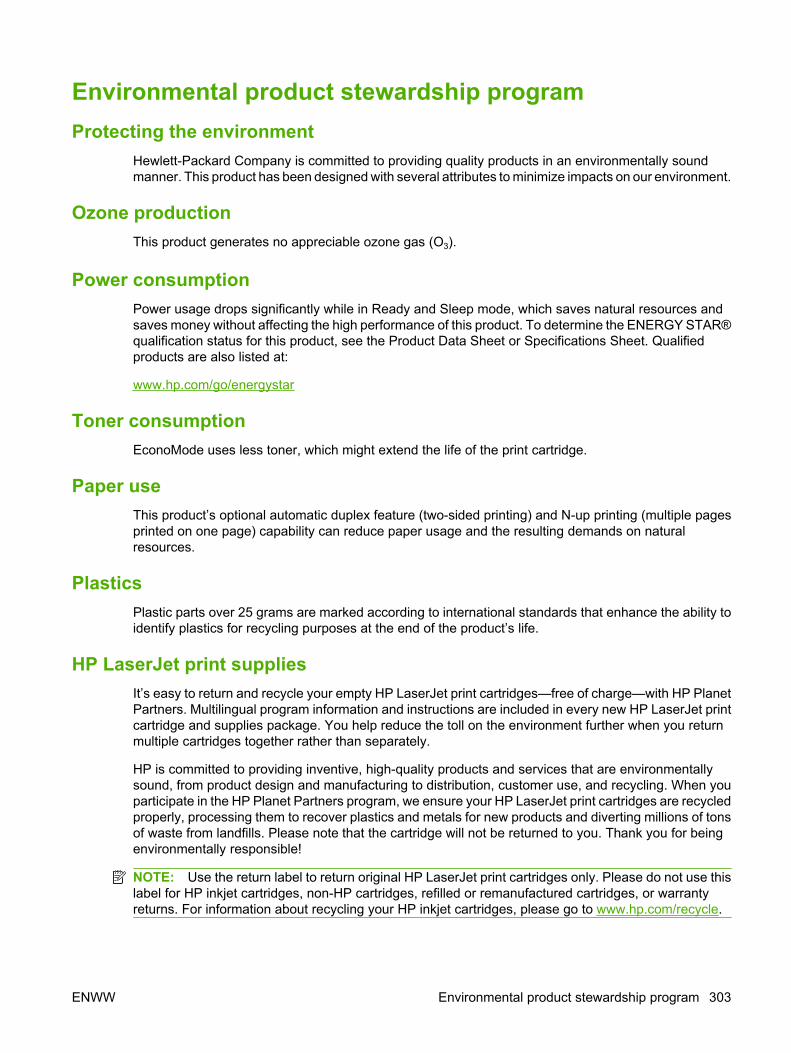
Environmental product stewardship programProtecting the environment
Hewlett-Packard Company is committed to providing quality products in an environmentally soundmanner. This product has been designed with several attributes to minimize impacts on our environment.
Ozone productionThis product generates no appreciable ozone gas (O3).
Power consumptionPower usage drops significantly while in Ready and Sleep mode, which saves natural resources andsaves money without affecting the high performance of this product. To determine the ENERGY STAR®qualification status for this product, see the Product Data Sheet or Specifications Sheet. Qualifiedproducts are also listed at:
www.hp.com/go/energystar
Toner consumptionEconoMode uses less toner, which might extend the life of the print cartridge.
Paper useThis product’s optional automatic duplex feature (two-sided printing) and N-up printing (multiple pagesprinted on one page) capability can reduce paper usage and the resulting demands on naturalresources.
PlasticsPlastic parts over 25 grams are marked according to international standards that enhance the ability toidentify plastics for recycling purposes at the end of the product’s life.
HP LaserJet print suppliesIt’s easy to return and recycle your empty HP LaserJet print cartridges—free of charge—with HP PlanetPartners. Multilingual program information and instructions are included in every new HP LaserJet printcartridge and supplies package. You help reduce the toll on the environment further when you returnmultiple cartridges together rather than separately.
HP is committed to providing inventive, high-quality products and services that are environmentallysound, from product design and manufacturing to distribution, customer use, and recycling. When youparticipate in the HP Planet Partners program, we ensure your HP LaserJet print cartridges are recycledproperly, processing them to recover plastics and metals for new products and diverting millions of tonsof waste from landfills. Please note that the cartridge will not be returned to you. Thank you for beingenvironmentally responsible!
NOTE: Use the return label to return original HP LaserJet print cartridges only. Please do not use thislabel for HP inkjet cartridges, non-HP cartridges, refilled or remanufactured cartridges, or warrantyreturns. For information about recycling your HP inkjet cartridges, please go to www.hp.com/recycle.
ENWW Environmental product stewardship program 303
Return and recycling instructions
United States and Puerto RicoThe enclosed label in the HP LaserJet toner cartridge box is for the return and recycling of one or moreHP LaserJet print cartridges after use. Please follow the applicable instructions below.
Multiple returns (more than one cartridge)
1. Package each HP LaserJet print cartridge in its original box and bag.
2. Tape the boxes together using strapping or packaging tape. The package can weigh up to 31 kg(70 lb).
3. Use a single pre-paid shipping label.
OR
1. Use your own suitable box, or request a free bulk collection box from www.hp.com/recycle or1-800-340-2445 (holds up to 31 kg (70 lb) of HP LaserJet print cartridges).
2. Use a single pre-paid shipping label.
Single returns
1. Package the HP LaserJet print cartridge in its original bag and box.
2. Place the shipping label on the front of the box.
Shipping
For all HP LaserJet print cartridge recycling returns, give the package to UPS during your next deliveryor pickup, or take it to an authorized UPS drop-off center. For the location of your local UPS drop-offcenter, call 1-800-PICKUPS or visit www.ups.com. If you are returning via USPS label, give the packageto a U.S. Postal Service carrier or drop off at a U.S. Postal Service Office. For more information, or toorder additional labels or boxes for bulk returns, visit www.hp.com/recycle or call 1-800-340-2445.Requested UPS pickup will be charged normal pickup rates. Information subject to change withoutnotice.
Non-U.S. returnsTo participate in HP Planet Partners return and recycling program, just follow the simple directions inthe recycling guide (found inside the packaging of your new product supply item) or visit www.hp.com/recycle. Select your country/region for information on how to return your HP LaserJet printing supplies.
PaperThis product is capable of using recycled papers when the paper meets the guidelines outlined in theHP LaserJet Printer Family Print Media Guide. This product is suitable for the use of recycled paperaccording to EN12281:2002.
Material restrictionsThis HP product contains a battery that may require special handling at end-of-life.
The battery contained in this product includes:
304 Appendix D Regulatory information ENWW

Type Carbon monofluoride lithium battery
Weight 0.8 grams
Location Formatter board
User removable No
This product contains mercury in the fluorescent lamp of the control panel liquid crystal display thatmight require special handling at end-of-life.
For recycling information you can visit www.hp.com/go/recycle or contact your local authorities or theElectronics Industry Alliance (www.eiae.org).
Disposal of waste equipment by users in private households in theEuropean Union
This symbol on the product or on its packaging indicates that this product must not be disposed of withyour other household waste. Instead, it is your responsibility to dispose of your waste equipment byhanding it over to a designated collection point for the recycling of waste electrical and electronicequipment. The separate collection and recycling of your waste equipment at the time of disposal willhelp to conserve natural resources and ensure that it is recycled in a manner that protects human healthand the environment. For more information about where you can drop off your waste equipment forrecycling, please contact your local city office, your household waste disposal service or the shop whereyou purchased the product.
Material Safety Data Sheet (MSDS)Material Safety Data Sheets (MSDS) for supplies containing chemical substances (for example, toner)can be obtained by accessing the HP Web site at www.hp.com/go/msds or www.hp.com/hpinfo/community/environment/productinfo/safety.
ENWW Environmental product stewardship program 305

For more informationTo obtain information about these environmental topics:
● Product environmental profile sheet for this and many related HP products
● HP’s commitment to the environment
● HP’s environmental management system
● HP’s end-of-life product return and recycling program
● Material Safety Data Sheets
Visit www.hp.com/go/environment or www.hp.com/hpinfo/globalcitizenship/environment.
306 Appendix D Regulatory information ENWW

Certificate of volatilityThis is a statement regarding the volatility of customer data stored in memory. It also outlines how toerase secure data from the device.
Types of memory
Volatile memoryThe MFP utilizes volatile memory (64MB on the board and 256MB installed, for a total of 320MB) tostore customer data during the printing and copying process. When the MFP is powered off, this volatilememory is erased.
Non-volatile memoryThe MFP utilizes non-volatile memory (EEPROM) to store system control data and user preferencesettings. No customer print or copy data is stored in non-volatile memory. This non-volatile memory canbe cleared and restored to factory defaults by performing a Cold Reset or Restore Factory Defaults fromthe control panel.
Hard-disk-drive memoryThe MFP contains an internal hard disk drive (40GB or larger) that may retain data after the MFP ispowered off. The MFP also may contain additional optional compact flash storage, or an external EIOhard disk. Data stored in these devices may be from incoming/outgoing fax or email files, stored copyor print jobs, fax or email address books, or third-party solutions. Some of this data can be erased fromthe control panel of the MFP, but most must be erased using the Secure Storage Erase featuresavailable within HP Web Jetadmin. Secure Storage Erase features comply with U.S. Department ofDefense (DOD) specification 5220–22.M.
ENWW Certificate of volatility 307

Safety statementsLaser safety
The Center for Devices and Radiological Health (CDRH) of the U.S. Food and Drug Administration hasimplemented regulations for laser products manufactured since August 1, 1976. Compliance ismandatory for products marketed in the United States. The device is certified as a “Class 1” laser productunder the U.S. Department of Health and Human Services (DHHS) Radiation Performance Standardaccording to the Radiation Control for Health and Safety Act of 1968. Since radiation emitted inside thedevice is completely confined within protective housings and external covers, the laser beam cannotescape during any phase of normal user operation.
WARNING! Using controls, making adjustments, or performing procedures other than those specifiedin this user guide may result in exposure to hazardous radiation.
Canadian DOC regulationsComplies with Canadian EMC Class A requirements.
« Conforme à la classe A des normes canadiennes de compatibilité électromagnétiques. « CEM ». »
VCCI statement (Japan)
Power cord statement (Japan)
EMI statement (Korea)
308 Appendix D Regulatory information ENWW

EMI statement (Taiwan)
General telecom statementThe HP Color LaserJet CM6030f MFP and CM6040f MFP models have the HP LaserJet Analog FaxAccessory 300 already installed to provide communication to the public switch telephone network(PSTN) for fax functionality. See the HP LaserJet Analog Fax Accessory 300 User Guide for allregulatory approval information and regulatory notices associated with the fax functionality and thatdevice.
Laser statement for FinlandLuokan 1 laserlaite
Klass 1 Laser Apparat
HP LaserJet CM6030, CM6040, CM6030f, CM6040f, laserkirjoitin on käyttäjän kannalta turvallinenluokan 1 laserlaite. Normaalissa käytössä kirjoittimen suojakotelointi estää lasersäteen pääsyn laitteenulkopuolelle. Laitteen turvallisuusluokka on määritetty standardin EN 60825-1 (1994) mukaisesti.
VAROITUS !
Laitteen käyttäminen muulla kuin käyttöohjeessa mainitulla tavalla saattaa altistaa käyttäjänturvallisuusluokan 1 ylittävälle näkymättömälle lasersäteilylle.
VARNING !
Om apparaten används på annat sätt än i bruksanvisning specificerats, kan användaren utsättas förosynlig laserstrålning, som överskrider gränsen för laserklass 1.
HUOLTO
HP LaserJet CM6030, CM6040, CM6030f, CM6040f - kirjoittimen sisällä ei ole käyttäjän huollettavissaolevia kohteita. Laitteen saa avata ja huoltaa ainoastaan sen huoltamiseen koulutettu henkilö.Tällaiseksi huoltotoimenpiteeksi ei katsota väriainekasetin vaihtamista, paperiradan puhdistusta taimuita käyttäjän käsikirjassa lueteltuja, käyttäjän tehtäväksi tarkoitettuja ylläpitotoimia, jotka voidaansuorittaa ilman erikoistyökaluja.
VARO !
Mikäli kirjoittimen suojakotelo avataan, olet alttiina näkymättömällelasersäteilylle laitteen ollessatoiminnassa. Älä katso säteeseen.
VARNING !
Om laserprinterns skyddshölje öppnas då apparaten är i funktion, utsättas användaren för osynliglaserstrålning. Betrakta ej strålen. Tiedot laitteessa käytettävän laserdiodin säteilyominaisuuksista:Aallonpituus 775-795 nm Teho 5 m W Luokan 3B laser.
ENWW Safety statements 309

Substances Table (China)
310 Appendix D Regulatory information ENWW

Index
Symbols/Numerics3-bin mailbox
capacity 5selecting 117specifications, physical 293
3-bin stapler/stackerfeatures 117
500-sheet traysmodels including 2specifications, physical 293
Aaccessories
3-bin stapler/stacker 117booklet-maker finisher 117optional output 117ordering 280part numbers 281
accounting hardware 188acoustic specifications 296activity log, fax 179address books, e-mail
adding addresses 169auto-complete function 168clearing 59deleting addresses 169importing 185LDAP support 164recipient lists 168recipient lists, creating 168
address, printerMacintosh,
troubleshooting 276ADF
capacity 5clean delivery system 212maintenance kit 216make copies from 154sizes supported 167
ADF output bincapacity 5selecting 117
Administration menu, controlpanel 17
advanced printing optionsWindows 144
agreements, maintenance 291alerts, e-mail 76alternative letterhead mode 144anticounterfeit supplies 193AppleTalk settings 33Attention light
locating 14automatic media sensing 114automatic two-sided printing path
copying documents 156
Bbilling codes report, fax 179bins
capacities 5locating 8selecting 117
blank pages, troubleshooting 272blocked fax list, printing 179Bonjour Settings 76booklet maker
configuring 121features 117use 119walkaround 119
bookscopying 160
BOOTP 91both sides, copying 156both sides, printing on
Macintosh settings 76browser requirements
embedded Web server 183
buttons, control panellocating 14touchscreen 16
Ccabinet/stand
specifications, physical 293cable, USB
part number 282cables
USB, troubleshooting 272calibrate scanner 217calibrating scanner 53call report, fax 179Canadian DOC regulations 308cancel
copy jobs 162print 140
cancel a print request 140capacity
3-bin mailbox 5ADF 5output bins 5stapler/stacker 5
cartridgesmanagement menu 29non-HP 193ordering through embedded
Web server 186recycling 303replace 194storage 193warranty 286
cartridges, printMacintosh status 80part numbers 281
cleanabout 212, 214ADF delivery system 212ADF rollers 214
ENWW Index 311
fuser 267glass 212outside of product 212touchscreen 212
clean page, printing 267clock
set 191collating copies 159color
adjusting 146advanced use 151CMYK ink set emulation 151edge control 146four-color printing 151halftone options 146HP ImageREt 4800 151manage 145match 149neutral grays 147Pantone® matching 150print color samples 149print in grayscale 147printed vs. monitor 149restrict use 147sample book matching 149sRGB 151using 145
color options 143Color tab settings 80colored text
print as black 144configuration page
Information menu 18Macintosh 76printing 178
configurations, models 2configure
trays 114connect product 84connectivity
network utilities 94USB 84
connectivity features 5contracts, maintenance 291control panel
Administration menu 17buttons 14clean touchscreen 212copy-screen 154e-mail screen 166
E-mail Setup menu 41Fax Setup menu 38help 16Home screen 15Information menu 18Initial Setup menu 31layout 14lights 14locating 8locking menus 190Management menu 29messages, types of 226Resets menu 59Send Setup menu 41Service menu 60settings 66, 74Time/Scheduling menu 27touchscreen buttons 16
controlling print jobs 115copies, number of
Windows 144Copitrak devices 188copy
cancel 162control-panel navigation 154copy screen 154from document feeder 154from glass 154Job Mode 161multiple originals 161photos and books 160set options 154settings 155two-sided documents 156
copyingbooks 160collating 159features 6quality, troubleshooting 264speed specifications 4
counterfeit supplies 193cover pages 77, 141covers, locating 8custom-size paper settings
Macintosh 77customer support
embedded Web serverlinks 186
HP Printer Utility pages 76
maintenance agreements 291online 289
DData light
locating 14date, set 191date, setting 27Declaration of Conformity 301,
302default job options menu 20default settings
Resets menu 59defects, repeating 264delay, sleep 124density
settings 76Device Behavior menu 42device discovery 89device status
Macintosh Services tab 80DHCP 91diagnostics
networks 34digital faxing 176digital sending
about 164, 167address books 168, 169configure e-mail 164control-panel settings 166embedded Web server
settings 185folders 171job settings 170LDAP support 164loading documents 167recipient lists 168sending documents 167Setup menu 41SMTP support 164validating gateway
addresses 273workflow 172
Digital Sending tab, embeddedWeb server 185
DIMMs (dual inline memorymodules)
installing 201part numbers 282
Disk Erase feature 189
312 Index ENWW

DLC/LLC settings 33document feeder
copying two-sideddocuments 156
document feeder kit,replacing 216
double-sided copying 156double-sided printing
Macintosh settings 76dpi, settings 76drivers
Macintosh settings 77Macintosh,
troubleshooting 276presets (Macintosh) 77settings 66, 67, 74shortcuts (Windows) 141supported 63universal 64Windows, opening 141
duplexcopying documents 156
duplex printingWindows 142
duplex printing accessorylocating 8specifications, physical 293
duplexerMacintosh settings 76
duty cycle 4
Ee-mail alerts 76Easy Printer Care 180economy settings
sleep and wake 124EIO cards
installing 205part number 282
electrical specifications 295embedded Web server
assigning a password 188Digital Sending tab 185features 183
energy specifications 295Enhanced I/O card
part number 282envelope feeder
specifications, physical 293
envelopesjams 261loading in tray 1 103
environment, specifications 297Environmental Product
Stewardship Program 303EPS files, troubleshooting 277Equitrac devices 188erasing hard disk 189Error button, control panel
touchscreen 16error messages
control panel 227e-mail alerts 76types of 226
Ethernet cards 5European Union, waste
disposal 305EWS
features 183Explorer, versions supported
embedded Web server 183extended warranty 291e-mail
about 164, 167address books 168, 169auto-complete function 168configure 164control-panel settings 166embedded Web server
settings 185job settings 170LDAP support 164loading documents 167problem solving 273recipient lists 168scan 164sending documents 167SMTP support 164validating gateway
addresses 273E-mail Setup menu 41
Ffax accessory
analog fax 174configure features 174connecting phone line 174digital fax 176
printing schedule 28solve problems 273
Fax Activity Logclearing 59
fax reports, printing 18, 179Fax Setup menu 38faxing
analog 174faxing, digital 176features 2, 4file directory, printing 179File Upload, Macintosh 76Finnish laser safety
statement 309Firmware Update, Macintosh 76firmware, upgrading 218first page
use different paper 77folders
sending to 171fonts
EPS files, troubleshooting 277included 4list, printing 19, 179Upload Macintosh 76
Foreign Interface Harness(FIH) 10, 188
formatter cover, locating 8formatter lights 263fraud hotline 193FTP, sending to 172fuser
clean 267
Ggateways
configure 164configuring 165testing 165validating addresses 273
glassclean 212sizes supported 167
graphical display, controlpanel 14
grayscale printing 147
Hhard disk
erasing 189
ENWW Index 313

heartbeat LED 263held jobs 129Help button, control panel
touchscreen 16help, control panel 16Home button, control panel
touchscreen 16Home screen, control panel 15HP Customer Care 289HP Easy Printer Care
description 69downloading 69opening 180options 180supported browsers 69supported operating
systems 69using 180
HP fraud hotline 193HP Jetdirect print server
firmware updates 221installing 205lights 263models including 2settings 31
HP Jetdirect print serversinstalling 205
HP Printer Utility 75, 76HP Printer Utility, Macintosh 75HP Universal Print Driver 64HP Web Jetadmin
firmware updates 220HP-UX software 71humidity requirements 297
II/O configuration
network configuration 90settings 31
image drumspart numbers 281replace 198
image fuser kit, 110 voltpart number 281
image fuser kit, 220 voltpart number 282
Information menu 18information pages 178Information tab, embedded Web
server 184
Initial Setup menu 31installers, Windows 94installing
EIO cards 205interface ports
included 5locating 10
Internet Explorer, versionssupported
embedded Web server 183Internet fax 176Internet protocol (IP) 90IP address
BOOTP 91changing 92input 92Macintosh,
troubleshooting 276overview 90
IP addressing 89IPX/SPX setting 33
Jjam-access lever, locating 8jams
clearing 229common causes of 228envelopes 261recovery 257
Japanese VCCI statement 308Jetadmin
firmware updates 220Jetadmin, HP Web 69, 187Jetdirect print server
firmware updates 221installing 205lights 263models including 2settings 31
Job Aids 7Job Mode, copying 161job storage
accessing 129features 129Macintosh settings 80personal 131proof and hold 129QuickCopy 132settings 29
jobsMacintosh settings 76
Kkeys, control panel
locating 14touchscreen 16
Korean EMI statement 308
LLAN fax 176LAN-connector 5landscape orientation
setting, Windows 142languages, printer 4laser safety statements 308, 309LDAP servers
connect to 164embedded Web server
settings 185validating gateway
addresses 273letterhead
load 108letterhead paper, loading 144lights
control panel 14formatter 263
link speed settings 36Linux software 71load media
configuring 103loading
documents, sizessupported 167
scanner glass 167sizes supported 167tray 1 103trays 2, 3, 4 104
Lock Resources, Macintosh 76locking
control panel menus 190
MMacintosh
AppleTalk settings 33driver settings 74, 77drivers, troubleshooting 276HP Printer Utility 75problems,
troubleshooting 276
314 Index ENWW

removing software 74resize documents 77software 75software components 94staple options 79support 289supported operating
systems 74USB card,
troubleshooting 277Macintosh driver settings
custom-size paper 77Job Storage 80Services tab 80watermarks 78
mailbox, 3-bincapacity 5selecting 117specifications, physical 293
maintenance agreements 291maintenance kit 281manage
EPC 180EWS 183information pages 178supplies 193
Management menu 29Material Safety Data Sheet
(MSDS) 305Media 95media
custom-size, Macintoshsettings 77
first page 77loading tray 2 107loading tray 2, 3, and 4 106loading tray 2, 3, or 4 104pages per sheet 78stapler support 126supported sizes 97
memoryenabling 204features 4included 2, 75part numbers 282
Menu button 14menu map
Information menu 18printing 178
menus, control panelAdministration 17E-mail Setup 41Fax Setup 38Information 18Initial Setup 31locking 190Management 29Resets 59Send Setup 41Service 60Time/Scheduling 27
messagese-mail alerts 76types of 226
models 2monthly duty cycle 4multiple pages per sheet
Windows 142
Nn-up printing
Windows 142Netscape Navigator, versions
supportedembedded Web server 183
networkconnection 85
Network Folder, scan to 171Networking tab, embedded Web
server 186networks
AppleTalk settings 33configuring 90configuring gateway
addresses 165connectivity features 5default gateway 93device discovery 89DHCP 91diagnostics 34DLC/LLC settings 33gateways 91HP Web Jetadmin 187installing EIO cards 205Internet Protocol (IP) 90IP address 89, 90, 92IPX/SPX settings 33link speed settings 36Macintosh settings 76
print servers included 2protocol configuration page,
printing 37protocols supported 89security 34SMTP servers 164subnet mask 92subnets 91TCP/IP 90TCP/IP parameters 92TCP/IP settings 31testing SMTP settings 165Transmission Control Protocol
(TCP) 90troubleshooting printing 274validating gateway
addresses 273noise specifications 296non-HP supplies 193
Oon/off switch, locating 8online help, control panel 16online support 289operating environment
specifications 297operating systems supported 62,
74optional output accessories 117ordering
part numbers for 281supplies and accessories 280supplies through embedded
Web server 186orientation
setting, Windows 142outdoor signs
printing 137output bins
accessories 117capacities 5locating 8selecting 117selecting, Windows 142standard 117
output qualitytroubleshooting 264
Ppage order, changing 144
ENWW Index 315

pagesblank 272not printing 272printing slowly 272
pages per minute 4pages per sheet
Windows 142paper
covers, using differentpaper 141
custom size, selecting 141custom-size, Macintosh
settings 77first and last pages, using
different paper 141first page 77load 103pages per sheet 78selecting 116source 115stapler support 126supported sizes 97type 100, 116type and size 116type, selecting 141
paper jamsADF 252
parallel portlocating 10
part numbersaccessories 281image drums 281memory 282print cartridges 281
partsorder 281
pausing a print request 140PCL drivers
universal 64personal jobs 131phone line, connecting fax
accessory 174photos
copying 160improving print quality 141loading 167printing 135removing red eye 141
physical specifications 293PINs, personal jobs 131
portrait orientationsetting, Windows 142
portsincluded 5locating 10troubleshooting
Macintosh 277PostScript Printer Description
(PPD) filesincluded 75
powerspecifications 295troubleshooting 224
power switch, locating 8PPDs
included 75pre-printed paper
load 108pre-punched paper
load 108presets (Macintosh) 77print cartridge
managing 193print cartridges
Macintosh status 80management menu 29non-HP 193ordering through embedded
Web server 186part numbers 281recycling 303replacing 195storage 193warranty 286
print driversWindows 141
print featurespaper quality options 141
print medialoading in tray 1 103supported sizes 97
print on both sidesWindows 142
print paperfor color printing 151types 100
print qualitymenu 49troubleshooting 264
print server cardinstalling 205
print tasks 139printer languages 4printing
outdoor signs 137output bin, selecting 117speed specifications 4troubleshooting 272weatherproof maps 137
printing from tray 2, 3, or 4 104priority onsite service 291priority, settings 66, 74private jobs
cancel 140Windows 142
problem-solvinge-mail alerts 76Error button, control panel
touchscreen 16e-mail 273jams 228messages, types of 226networks 34paper handling 258
processor speed 4product info 1product status
HP Easy Printer Care 180proof and hold
Windows 142proof and hold jobs 129protocol configuration page,
printing 37protocols, network 89PS Emulation drivers 63
Qquality
troubleshooting 264Quick Reference Job Aids 7Quick Sets 141
RReady light
locating 14real-time clock 191recipient lists 168
316 Index ENWW

recyclingHP printing supplies returns and
environmental program 304red eye, removing 141regulatory statements
Declaration ofConformity 301, 302
environmental productstewardship program 303
remote firmware update(RFU) 218
removing Macintosh software 74repeating defects,
troubleshooting 264replace
image drums 198memory 201supplies 194
reset button 14Resets menu, control panel 59resize documents
Macintosh 77Windows 142
resolutionsettings 76specifications 4troubleshooting quality 264
Resolution Enhancementtechnology (REt) 76
resolution, adjusting 141restore factory settings 225REt (Resolution Enhancement
technology) 76retention, job
accessing 129features 129personal 131proof and hold 129QuickCopy 132
rollersclean ADF 214
ruler, repetitive defect 264
Ssafety statements 308, 309scale documents
Macintosh 77Windows 142
scanner calibration 53, 217
scanner glassclean 212
scanningspeed specifications 4
scanning to e-mailabout 164, 167address books 168, 169configure 164control-panel settings 166embedded Web server
settings 185job settings 170LDAP support 164loading documents 167recipient lists 168sending documents 167settings 164SMTP support 164validating addresses 273
scanning to folder 171scanning to workflow 172Secure Disk Erase 189security
EWS 188Foreign Interface Harness
(FIH) 188locking control panel
menus 190secure disk erase 189settings 34
security features 6Send Setup menu 41Send to Folder 171Send to Workflow 172sending to e-mail
about 164, 167address books 168, 169embedded Web server
settings 185job settings 170LDAP support 164loading documents 167recipient lists 168sending documents 167settings 166SMTP support 164validating gateway
addresses 273separator page
Windows 142
serial numberlocate 10
serviceagreements 291
Service menu, control panel 60Services tab
Macintosh 80settings
driver presets (Macintosh) 77drivers 67, 74priority 66, 74restore factory 225
Settings tab, embedded Webserver 184
shortcuts 141Sleep button 14Sleep mode
settings 27, 29sleep settings
delay 124power specifications 295wake time 124
SMTP serversconfiguring gateway
address 165connect to 164testing 165validating gateway
addresses 273software
embedded Web server 69HP Easy Printer Care 69,
180HP Printer Utility 75HP Web Jetadmin 69Macintosh 75, 94settings 66, 74supported operating
systems 62, 74uninstalling Macintosh 74Windows 62, 94
Solaris software 71space requirements 293special media
guidelines 102special paper
guidelines 102specifications
acoustic 296electrical 295
ENWW Index 317
features 4operating environment 297physical 293
speed dial list, printing 179speed specifications 4standard output bin
capacity 5locating 8selecting 117
staple cartridgesempty, stop or continue
settings 128staple options
Macintosh 79Windows 142
staplerempty, stop or continue
settings 128jams, clearing 253paper sizes supported 126using 128
stapler optionsstapler/stacker 118
stapler/stackercapacity 5configuring 121selecting 117specifications, physical 293
staplesloading 207, 209
stapling jobs 128Start button 14Start button, control panel
touchscreen 16status
embedded Web server 184Home screen, control
panel 15HP Easy Printer Care 180HP Printer Utility,
Macintosh 76Macintosh services tab 80messages, types of 226
Status button 14Stop button 14Stop button, control panel
touchscreen 16stopping a print request 140storage cabinet
specifications, physical 293
storage, jobaccessing 129features 129Macintosh settings 76, 80personal 131proof and hold 129QuickCopy 132settings 29
store jobsWindows 142
storingprint cartridges 193
subnet mask 91, 92subnets 91supplies
counterfeit 193locating 194management menu 29non-HP 193ordering 280ordering through embedded
Web server 186part numbers 281recycling 303replace 194replacement intervals 195replacing 194Resets menu 59status page, printing 178status, viewing with embedded
Web server 184status, viewing with HP Printer
Utility 76supplies 193
supplies, statusHP Easy Printer Care 180
supply-status, Services tabMacintosh 80Windows 143
supportembedded Web server
links 186HP Printer Utility pages 76maintenance agreements 291online 143, 289
supported media 97supported utilities
for Macintosh 76system requirements
embedded Web server 183
TTaiwan EMI statement 309TCP/IP
configuring 90TCP/IP settings 31TCP/IPv4 92TCP/IPv6 93technical support
maintenance agreements 291online 289
temperature requirements 297tests
networks 34time, set 191time, setting 27Time/Scheduling menu, control
panel 27timeout settings 31toner
density setting 76toner cartridges. See print
cartridgestop cover
locating 8touchscreen, clean 212Transmission Control Protocol
(TCP) 90tray 1
locating 8tray 2, 3, 4, 5
load 104trays
automatic media sensing 114configure 114double-sided printing 79included 2load 103Macintosh settings 76select paper 115specifications, physical 293
trays, statusHP Easy Printer Care 180
troubleshootingblank pages 272checklist 224control panel messages 227duplexing 262EPS files 277gateway addresses 273jams 228
318 Index ENWW
Macintosh problems 276menu 53network printing 274pages not printing 272pages printing slowly 272paper handling problems 258quality 264repeating defects 264transparencies 260USB cables 272
TrueType fonts included 4two-sided copying 156two-sided printing
Macintosh settings 76Windows 142
typefacesincluded 4
Uuninstalling Macintosh
software 74universal print driver 64UNIX software 71upgrading firmware 218usage page, printing 178USB configuration 84USB connection 84USB port
troubleshooting 272troubleshooting
Macintosh 277
Vvalidating gateway
addresses 273voltage specifications 295
Wwake time, setting 27, 124Warning button, control panel
touchscreen 16warranty
Customer self repair 288extended 291print cartridges 286product 284
watermarksWindows 142
weatherproof mapsprinting 137
Web browser requirementsembedded Web server 183
Web Jetadminfirmware updates 220
Web sitescustomer support 289fraud reports 193HP Web Jetadmin,
downloading 187Macintosh customer
support 289Material Safety Data Sheet
(MSDS) 305ordering supplies 280universal print driver 64
Windowsdriver settings 67drivers supported 63software components 94supported operating
systems 62universal print driver 64
Windows 2000 fax 176workflow, send to 172
ENWW Index 319

320 Index ENWW


© 2008 Hewlett-Packard Development Company, L.P.
www.hp.com
*Q3938-90967**Q3938-90967*Q3938-90967
Related Documents