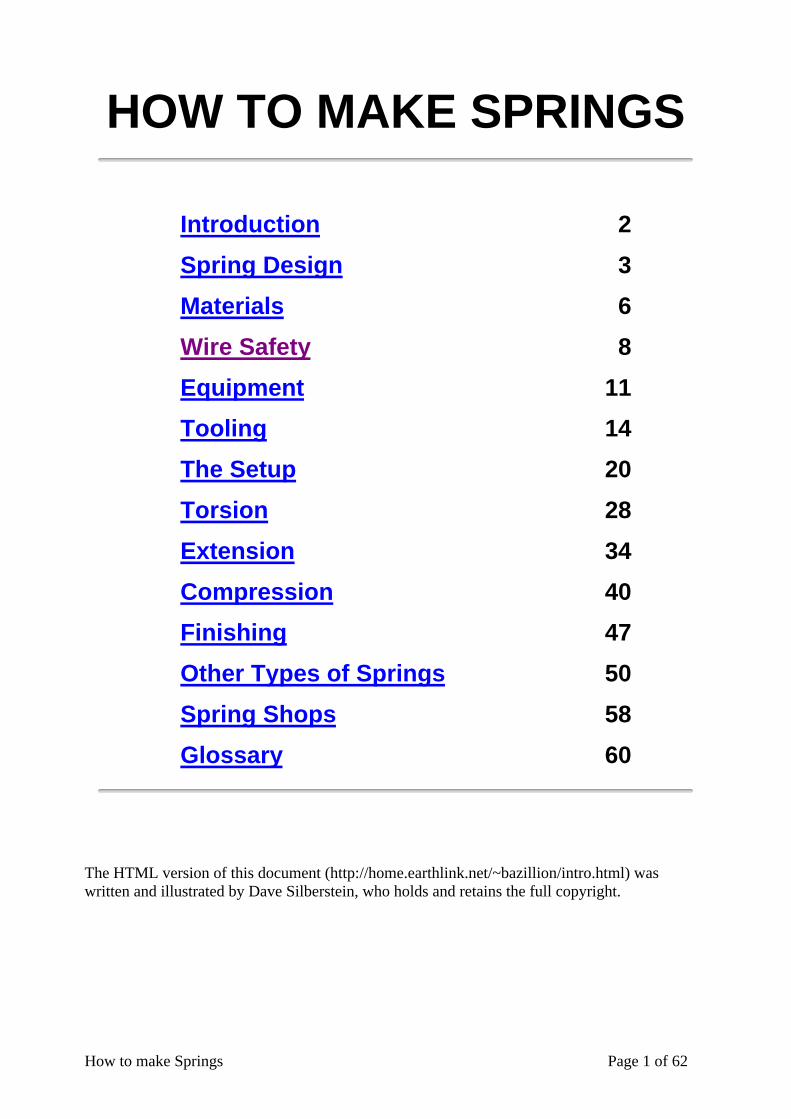
How to make Springs Page 1 of 62 HOW TO MAKE SPRINGS Introduction 2 Spring Design 3 Materials 6 Wire Safety 8 Equipment 11 Tooling 14 The Setup 20 Torsion 28 Extension 34 Compression 40 Finishing 47 Other Types of Springs 50 Spring Shops 58 Glossary 60 The HTML version of this document (http://home.earthlink.net/~bazillion/intro.html) was written and illustrated by Dave Silberstein, who holds and retains the full copyright.

Welcome message from author
This document is posted to help you gain knowledge. Please leave a comment to let me know what you think about it! Share it to your friends and learn new things together.
Transcript
How to make Springs Page 1 of 62
HOW TO MAKE SPRINGS
Introduction 2
Spring Design 3
Materials 6
Wire Safety 8
Equipment 11
Tooling 14
The Setup 20
Torsion 28
Extension 34
Compression 40
Finishing 47
Other Types of Springs 50
Spring Shops 58
Glossary 60
The HTML version of this document (http://home.earthlink.net/~bazillion/intro.html) waswritten and illustrated by Dave Silberstein, who holds and retains the full copyright.
How to make Springs Page 2 of 62
HOW TO MAKE SPRINGSThere are three things you'll need to read before you get started. First, theDISCLAIMER:
This document is designed to provide information in regard to the subject matter beingcovered. Every effort has been made to ensure the accuracy of its contents. However theremay be mistakes, both typographical and in content. Additionally, work in the metal tradesimplies an acceptance of the risk of injury, loss, or damage, the cause of which is clearlybeyond the control of the writer of a work on the subject. Therefore, the author of thisdocument accepts no responsibility or liability whatsoever for any injury, loss or damagesustained by a reader who, having read this material, then seeks to apply what he or she haslearned therein. Please read the Terms of Use at http://home.earthlink.net/~bazillion/spring_terms.html.
Second, before you start to work with spring wire, read the section on safety. When youhave read that section, read it again. No kidding.
And third, about this document: I've tried to write for the benefit of someone who has(or can gain access to) basic hand and power tools. The sections of the document arearranged in logical order presuming a minimal knowledge of the metalworking trades ingeneral or of springmaking in particular, and cross-linked to provide a forward path thatleads from this point through the entire manufacturing process. There's a glossary ofspring terminology, which should help you to define terms and find additional resources.Where possible, I've indicated where to find additional information in the main body ofthe text.
Any comments or suggestions for improvement should be made to [email protected].
INTRODUCTIONThis section will give you some basic information about springs, what they look like,what their parts are, and how they work.
If you already know about springs and want to get right to it, be my guest. There are three basic types of springs:
Compression springs can be found in ballpoint pens, pogo sticks, and the valveassemblies of gasoline engines. When you put a load on the spring, making itshorter, it pushes back against the load and tries to get back to its original length.Extension springs are found in garage door assemblies, vise-grip pliers, andcarburetors. They are attached at both ends, and when the things they are attachedto move apart, the spring tries to bring them together again.Torsion springs can be found on clipboards, underneath swing-down tailgates,and, again, in car engines. The ends of torsion springs are attached to other things,and when those things rotate around the center of the spring, the spring tries topush them back to their original position.
See the Glossary for detailed diagrams of these types of springs.
How to make Springs Page 3 of 62
SPRING DESIGNIf you're trying to make a spring to replace a broken one, you don't need to know awhole lot about design. On the other hand, if you're making a prototype of a machine,for instance, and you don't know exactly what you want, then this book is for you. Hereyou'll learn some basic data about spring design, which is what you'll need to know tomake exactly the spring you want.
General PrinciplesThere are three basic principles in spring design:
• The heavier the wire, the stronger the spring.• The smaller the coil, the stronger the spring.• The more active coils, the less load you will have to apply in order to get it to
move a certain distance.
Based on these general principles, you now know what to do to change the propertiesof a spring you already have. For instance, if you want to make automotive valvesprings a little stronger than stock, you can a) go to a slightly heavier wire and keep thedimensions and coil count the same, b) decrease the diameter of the spring, keepingthe wire size and coil count the same, or c) decrease the number of active coils,keeping the wire size and spring diameter the same. Naturally, you can also go to astronger material to achieve the same result. Now, what if you're making a spring from scratch, with nothing to go on in the way of asample? You can engineer your own design (see the next chapter for the math), coil aspring, and then test it. If it's what you want, fine. If it's, let's say, a skosh too strong,then you can a) go to a lighter wire, b) open up the coil diameter, or c) increase thenumber of active coils to get a slightly weaker spring. Or, if you want to make things really simple, go to
http://home.earthlink.net/~bazillion/resources.html,where you'll find a few websites that offer online design!
How to make Springs Page 4 of 62
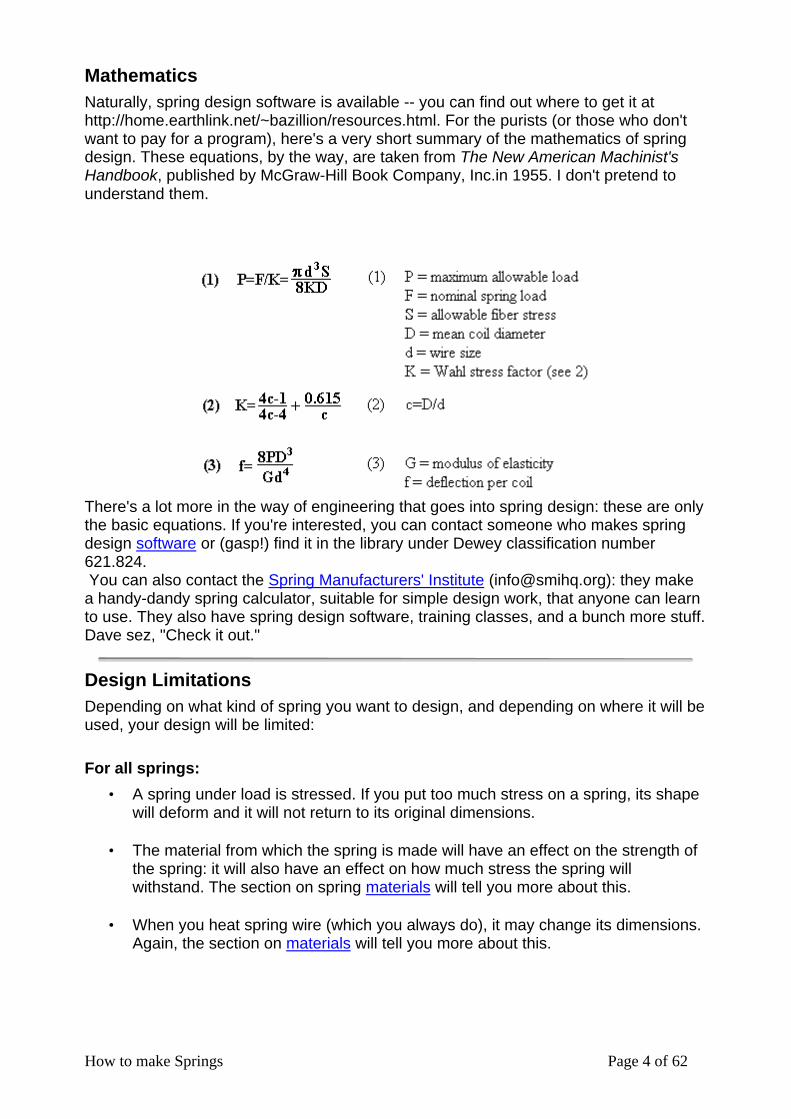
MathematicsNaturally, spring design software is available -- you can find out where to get it athttp://home.earthlink.net/~bazillion/resources.html. For the purists (or those who don'twant to pay for a program), here's a very short summary of the mathematics of springdesign. These equations, by the way, are taken from The New American Machinist'sHandbook, published by McGraw-Hill Book Company, Inc.in 1955. I don't pretend tounderstand them.
There's a lot more in the way of engineering that goes into spring design: these are onlythe basic equations. If you're interested, you can contact someone who makes springdesign software or (gasp!) find it in the library under Dewey classification number621.824. You can also contact the Spring Manufacturers' Institute ([email protected]): they makea handy-dandy spring calculator, suitable for simple design work, that anyone can learnto use. They also have spring design software, training classes, and a bunch more stuff.Dave sez, "Check it out."
Design LimitationsDepending on what kind of spring you want to design, and depending on where it will beused, your design will be limited:
For all springs:
• A spring under load is stressed. If you put too much stress on a spring, its shapewill deform and it will not return to its original dimensions.
• The material from which the spring is made will have an effect on the strength ofthe spring: it will also have an effect on how much stress the spring willwithstand. The section on spring materials will tell you more about this.
• When you heat spring wire (which you always do), it may change its dimensions.Again, the section on materials will tell you more about this.
How to make Springs Page 5 of 62
For compression springs:
• If the spring will set solid (compress all the way, so that all the coils touch eachother) at the limit of its travel, the diameter of the wire times the number of coilscannot be greater than the space allowed, unless you want the spring itself to actas a mechanical stop to the motion.
• Springs that operate in a high-temperature environment (like for instance insidean engine) will need to be made slightly longer to compensate for the fact thatthe heat may have an effect on the length of the spring. The section on finishingwill tell you more about this.
• As a compression spring assumes a load and shortens, the diameter of theactive coils will increase. This is only a problem when the spring has to work in aconfined space.
For extension springs:
• There should be some mechanical limit on how far the spring will extend, or thespring will lose its shape and not return to its initial condition with all coils closed.
• Extension springs operating in a high-temperature environment may have to becoiled extra-tight, as the heat will tend to weaken the spring. The section onextension springs will tell you more about this.
For torsion springs:
• When a torsion springs assumes a load, the diameter of the coil body willdecrease. If the spring has something inside the coil, it will act as a mechanicalstop to the action of the spring.
Buying DesignIf you want to have a mechanical engineer design your spring, your best bet is to call aspring shop. You can find spring shops in the phone book. If your phone book doesn'tlist any, go to the library: they should have phone books for major cities where springfactories are -- try Detroit or Los Angeles if there are none in your area. A spring shop will generally do the design work for you for a small charge. They willalso try to get you to let them make the spring for you, which you may or may not want. The section on spring shops will tell you more about how their business operates.http://home.earthlink.net/~bazillion/resources.html will give you links to spring shops,suppliers, people who make spring design software, and a whole slew of other stuff.
How to make Springs Page 6 of 62
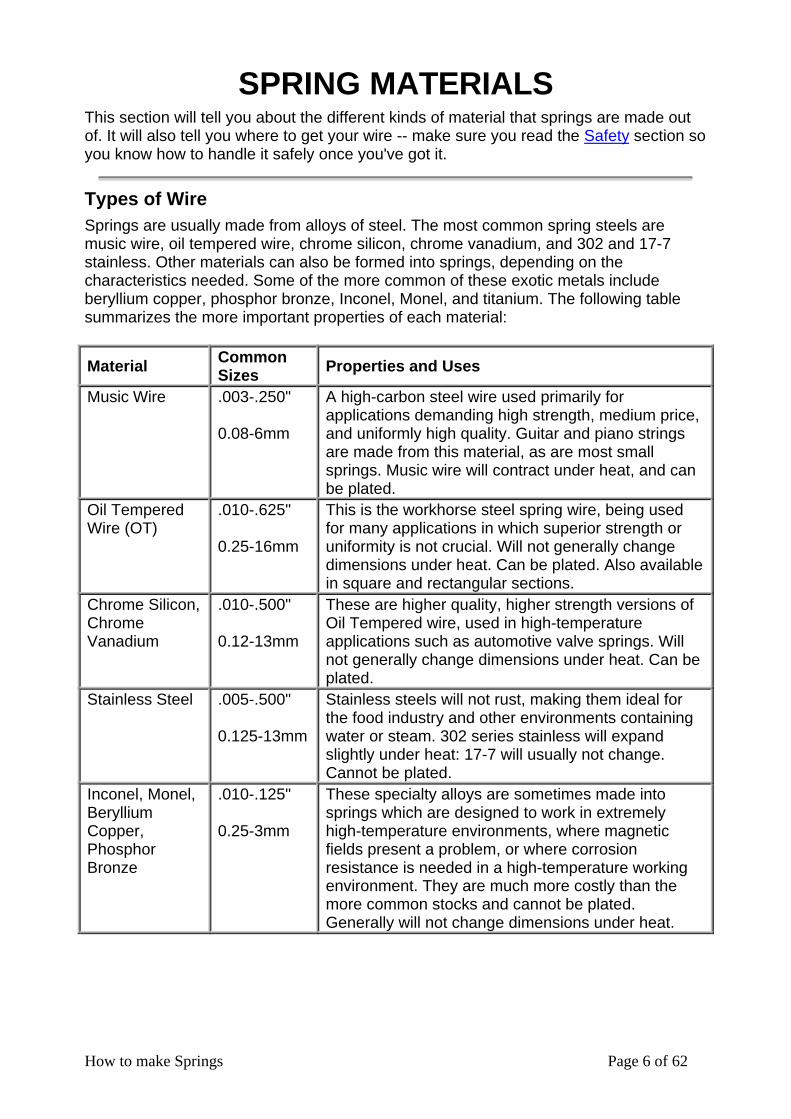
SPRING MATERIALSThis section will tell you about the different kinds of material that springs are made outof. It will also tell you where to get your wire -- make sure you read the Safety section soyou know how to handle it safely once you've got it.
Types of WireSprings are usually made from alloys of steel. The most common spring steels aremusic wire, oil tempered wire, chrome silicon, chrome vanadium, and 302 and 17-7stainless. Other materials can also be formed into springs, depending on thecharacteristics needed. Some of the more common of these exotic metals includeberyllium copper, phosphor bronze, Inconel, Monel, and titanium. The following tablesummarizes the more important properties of each material:
Material CommonSizes Properties and Uses
Music Wire .003-.250"
0.08-6mm
A high-carbon steel wire used primarily forapplications demanding high strength, medium price,and uniformly high quality. Guitar and piano stringsare made from this material, as are most smallsprings. Music wire will contract under heat, and canbe plated.
Oil TemperedWire (OT)
.010-.625"
0.25-16mm
This is the workhorse steel spring wire, being usedfor many applications in which superior strength oruniformity is not crucial. Will not generally changedimensions under heat. Can be plated. Also availablein square and rectangular sections.
Chrome Silicon,ChromeVanadium
.010-.500"
0.12-13mm
These are higher quality, higher strength versions ofOil Tempered wire, used in high-temperatureapplications such as automotive valve springs. Willnot generally change dimensions under heat. Can beplated.
Stainless Steel .005-.500"
0.125-13mm
Stainless steels will not rust, making them ideal forthe food industry and other environments containingwater or steam. 302 series stainless will expandslightly under heat: 17-7 will usually not change.Cannot be plated.
Inconel, Monel,BerylliumCopper,PhosphorBronze
.010-.125"
0.25-3mm
These specialty alloys are sometimes made intosprings which are designed to work in extremelyhigh-temperature environments, where magneticfields present a problem, or where corrosionresistance is needed in a high-temperature workingenvironment. They are much more costly than themore common stocks and cannot be plated.Generally will not change dimensions under heat.
How to make Springs Page 7 of 62
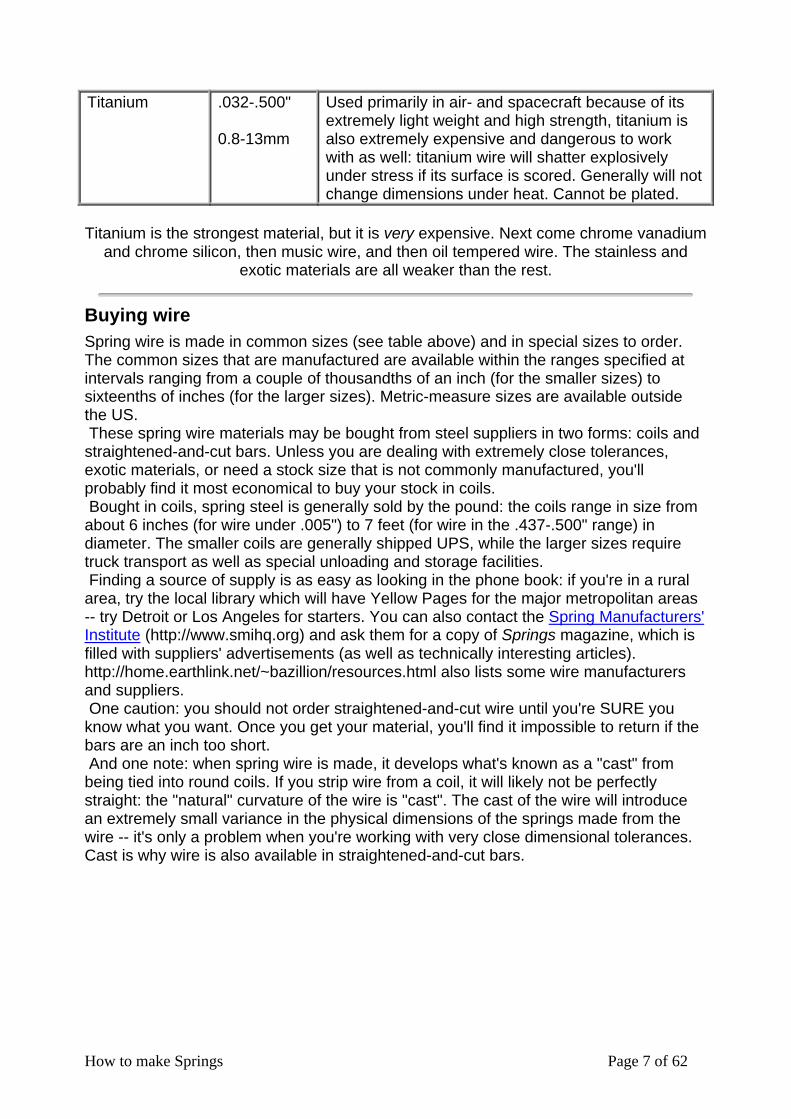
Titanium .032-.500"
0.8-13mm
Used primarily in air- and spacecraft because of itsextremely light weight and high strength, titanium isalso extremely expensive and dangerous to workwith as well: titanium wire will shatter explosivelyunder stress if its surface is scored. Generally will notchange dimensions under heat. Cannot be plated.
Titanium is the strongest material, but it is very expensive. Next come chrome vanadiumand chrome silicon, then music wire, and then oil tempered wire. The stainless and
exotic materials are all weaker than the rest.
Buying wireSpring wire is made in common sizes (see table above) and in special sizes to order.The common sizes that are manufactured are available within the ranges specified atintervals ranging from a couple of thousandths of an inch (for the smaller sizes) tosixteenths of inches (for the larger sizes). Metric-measure sizes are available outsidethe US. These spring wire materials may be bought from steel suppliers in two forms: coils andstraightened-and-cut bars. Unless you are dealing with extremely close tolerances,exotic materials, or need a stock size that is not commonly manufactured, you'llprobably find it most economical to buy your stock in coils. Bought in coils, spring steel is generally sold by the pound: the coils range in size fromabout 6 inches (for wire under .005") to 7 feet (for wire in the .437-.500" range) indiameter. The smaller coils are generally shipped UPS, while the larger sizes requiretruck transport as well as special unloading and storage facilities. Finding a source of supply is as easy as looking in the phone book: if you're in a ruralarea, try the local library which will have Yellow Pages for the major metropolitan areas-- try Detroit or Los Angeles for starters. You can also contact the Spring Manufacturers'Institute (http://www.smihq.org) and ask them for a copy of Springs magazine, which isfilled with suppliers' advertisements (as well as technically interesting articles).http://home.earthlink.net/~bazillion/resources.html also lists some wire manufacturersand suppliers. One caution: you should not order straightened-and-cut wire until you're SURE youknow what you want. Once you get your material, you'll find it impossible to return if thebars are an inch too short. And one note: when spring wire is made, it develops what's known as a "cast" frombeing tied into round coils. If you strip wire from a coil, it will likely not be perfectlystraight: the "natural" curvature of the wire is "cast". The cast of the wire will introducean extremely small variance in the physical dimensions of the springs made from thewire -- it's only a problem when you're working with very close dimensional tolerances.Cast is why wire is also available in straightened-and-cut bars.
How to make Springs Page 8 of 62
WIRE SAFETY
THIS PAGE IS IMPORTANT!Spring wire can be dangerous if not
properly handled. Read this section carefully
before you start working with wire.
General SafetySprings under load want to return to their original shape. The same goes for spring wire.Spring wire will try to straighten itself out if given the chance: don't let your body get inits way.
Small wire
Small wire (diameter less than about .025") will not hurt you if it hits you. On the otherhand, small wire is nothing more than an edge, waiting for something to cut. Don't useyour hand to try to stop wire that's moving, especially if it's moving under power (likebeing pulled by a lathe). Instead, wait till it stops moving. Gloves are an excellent idea,too.
Medium wire
Medium wire (diameter from about .025" - .312") is too wide to act as an edge, andusually not massive enough to break bones, but it can raise quite a knot if you get in itsway. Again, always keep track of where the ends of the wire are, and if they start tomove, get out of the way.
Heavy wire
Heavy wire (diameter greater than about .312") needs respect. If it gets loose, it canEASILY break bones, or worse.
Stainless steel
Stainless steel is a lot softer than other types of wire. When cut, the end of the wire islike a knife edge. Always keep track of where the end of the wire is, and keep yourhands away from it while it's moving.
Handling WireThe two most dangerous times are when you're breaking open a coil of wire and whenyou're actually winding a spring.
Breaking open coils
Once you have your wire, you'll need to take it out of its coil. The coil may be wrappedin paper -- take that off first. Under the paper, the wire will be tied. Light wire will be tied with string. Medium wire will

How to make Springs Page 9 of 62
be tied with tie wire. Large wire will be tied with metal bands. Whatever size wire youhave, remember that the coil should have only two ends. One will be on the inside of thecoil, and the other will be on the outside. You'll normally use wire from the inside, toavoid tangling. Always make a hook on the "inside" end so it's easy to find again:
Handling Small Wire in Coils
To break open a coil of small (up to about .125") wire, cut all the ties except two. Don'tcut the closest tie holding the outside end of the wire, and the tie most directly oppositeto that one. To remove wire from the coil, start with the end on the inside of the coil: this will keepthe coil from tangling. Grab the end of the wire and cut off the hook. Pull it slightly, untilyou can see the gap between it and the rest of the coil. Grab the wire at the gap andpull the end free from the tie holding it. Repeat this process, working around the coil,until you have the length you need. Medium-sized wire
(.125 - .312") can be handled the same way, except that you should keep three tiesinstead of two. When uncoiling wire larger than .250", you should lay the coil flat on theground and always stand in the center of the coil, for safety. Large wire
(.312 - .625") needs special handling. First of all, you'll probably be using a hoist orforklift to move the coil, because of the weight. Lay the coil on top of something (a 2x4or a pipe works great) to keep one end off the ground so that you can pick it up whenyou're done. Stand inside the coil from now on! Then, take a length of tie wire and double it over. Loop it twice around the coil, rightnext to the second tie holding the inside end of the wire. Pull it tight and twist it so thatyou have a "pigtail" and the tie wire is too tight to move by hand. Then, cut the first twooriginal ties. Grab the end of the wire and flip it over the coil, so that it sticks out.
Go to the next tie and repeat this process, working your way around the coil until youhave the length you need. You can use heavy bolt cutters or an acetylene torch to cutthe wire. If heavy wire gets away from you and starts to come undone all by itself, the very bestthing to do is
• Run like hell, and• Pray it doesn't hit you.
How to make Springs Page 10 of 62
CoilingIf you're using a lathe to make your springs, you'll be standing there, letting the lathepull the wire. The lathe will do what you want, but it will not know to stop if things get outof control. So, before you start the lathe, figure out what you're going to do if things gohaywire. Know how to stop the lathe, and know which way you can safely run. Never reach over the wire to get to your lathe controls, especially when working withheavy wire. Reach under it and avoid injury if your wire guide breaks. Keep the lathe speed DEAD SLOW: with heavy wire, 10 rpm is about right. Don't grab onto wire that's being fed into the lathe. Stop the lathe and back it off untilthere's no tension in the wire before you put your hands near.NEVER try to guide wire by hand. Use tooling.
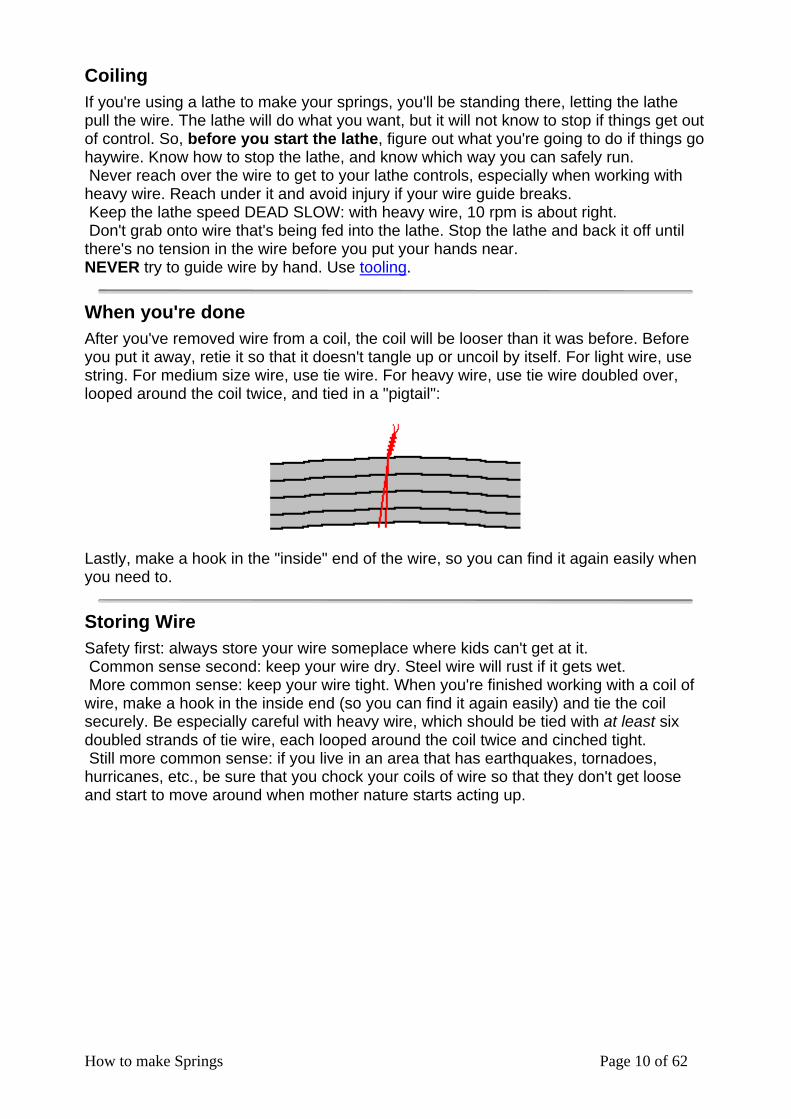
When you're doneAfter you've removed wire from a coil, the coil will be looser than it was before. Beforeyou put it away, retie it so that it doesn't tangle up or uncoil by itself. For light wire, usestring. For medium size wire, use tie wire. For heavy wire, use tie wire doubled over,looped around the coil twice, and tied in a "pigtail":
Lastly, make a hook in the "inside" end of the wire, so you can find it again easily whenyou need to.
Storing WireSafety first: always store your wire someplace where kids can't get at it. Common sense second: keep your wire dry. Steel wire will rust if it gets wet. More common sense: keep your wire tight. When you're finished working with a coil ofwire, make a hook in the inside end (so you can find it again easily) and tie the coilsecurely. Be especially careful with heavy wire, which should be tied with at least sixdoubled strands of tie wire, each looped around the coil twice and cinched tight. Still more common sense: if you live in an area that has earthquakes, tornadoes,hurricanes, etc., be sure that you chock your coils of wire so that they don't get looseand start to move around when mother nature starts acting up.
How to make Springs Page 11 of 62
EQUIPMENTThis section will tell you what equipment you will need to make springs.
Winding MachinesThe basic thing you'll need is a winding machine of some sort. A winding machine issomething that will pull your wire around and make it coil up into a spring shape. Whatkind of winding machine you'll need depends on what size wire you'll be working with,and also, how many springs you want to make. If you want to make more than about 50 springs of one kind, it'll probably be worth yourwhile to have your springs made commercially. You can find out about how springfactories operate: http://home.earthlink.net/~bazillion/resources.html also has a list ofspring shops that have a Web presence. You can also find spring shops in your area byconsulting the phone book.
Light Wire
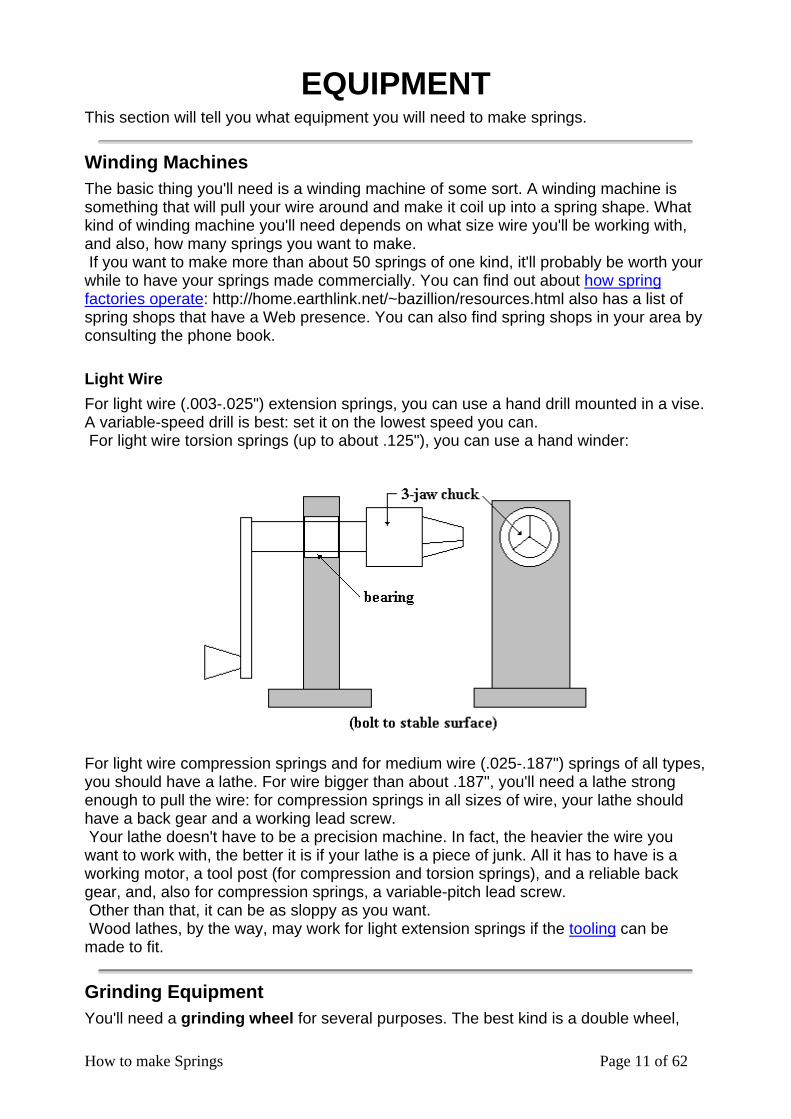
For light wire (.003-.025") extension springs, you can use a hand drill mounted in a vise.A variable-speed drill is best: set it on the lowest speed you can. For light wire torsion springs (up to about .125"), you can use a hand winder:
For light wire compression springs and for medium wire (.025-.187") springs of all types,you should have a lathe. For wire bigger than about .187", you'll need a lathe strongenough to pull the wire: for compression springs in all sizes of wire, your lathe shouldhave a back gear and a working lead screw. Your lathe doesn't have to be a precision machine. In fact, the heavier the wire youwant to work with, the better it is if your lathe is a piece of junk. All it has to have is aworking motor, a tool post (for compression and torsion springs), and a reliable backgear, and, also for compression springs, a variable-pitch lead screw. Other than that, it can be as sloppy as you want. Wood lathes, by the way, may work for light extension springs if the tooling can bemade to fit.
Grinding EquipmentYou'll need a grinding wheel for several purposes. The best kind is a double wheel,
How to make Springs Page 12 of 62
where you can have a grinding wheel in one side and a cutoff wheel on the other. Metaltrades suppliers can sell you the wheels. For all springs, you'll have to be able to cut away the waste wire from the ends of yoursprings. You can do this with wire cutters (for wire up to about .062"), with a cutoffwheel, or with an acetylene torch. (One note: an acetylene torch will not be effective onlarge-diameter stainless steel wire.) For compression springs, you may want to have the ends ground square with respectto the body of the spring. You can do this with an abrasive wheel. For heavycompression springs, you may need a bigger grinder: a small grinder will take forever. Also for compression springs, you may want to deburr the inside and outside of theends after grinding. You can do this with a conical grinding stone mounted in a drill (forthe inside) and a regular abrasive wheel (for the outside). You'll also need a grinding wheel to make some of your tooling: most of the toolingyou'll need can be made rough, and a grinding wheel will work just fine.
Finishing EquipmentAfter you've wound your springs and formed the ends, you'll need to get rid of the stressthat bending the wire has caused. To do this, you need an oven. How hot your ovenneeds to go depends on what material you use for your spring:
Oil tempered wire, music wire, and 302 stainless 500°F 260°C17-7 stainless and chrome silicon 650°F 340°CChrome vanadium 750°F 400°CMost exotic materials 850°F 450°C
It's probably best not to use your kitchen oven for oil tempered wire, chrome silicon, orchrome vanadium. The wire will come coated with oil, which will burn off in the oven. Ifyour oven won't reach the temperature you need, find a potter who has a kiln you can
use.For stainless steel wire, you'll also need a passivating tank to remove the chemicalcoating on the wire. This is a tank made out of stainless steel (an old sink is fine) andfilled with acid.If you want your springs to be plated, send them out to a plating shop. Don't try to doyour own plating unless you're already in the plating business.
How to make Springs Page 13 of 62
Hand ToolsYou'll need some basic hand tools:
• A vise (either floor- or bench-mounted)• Wire cutters (6" diagonal)• Needle-nose pliers• Calipers (if dimensions are critical)• Tape measure (if dimensions are rough)• Crescent wrench• Acetylene torch (if working with wire over about .250")• Bolt cutters (for wire between .080-.250")• Round nose pliers (for forming the ends of torsion springs)• Chalk
Testing EquipmentDepending on what kind of machine your spring is going to work in, probably the bestway to test a spring is to make one and see if it does the job. Other than that, here are afew ways to perform rough testing on springs. To test extension springs, you can always hang the spring from the ceiling and load itup with weights on the other end. For medium-sized compression springs, you can made the spring act as a limited-travelextension spring (see extension springs for how to do this) and test them the same way.This method will not work for light or heavy compression springs -- just medium ones. I don't know of a simple way to make a really accurate testing rig for torsion springs:best bet is to just plug it in and see if it works.
Tooling StockTo make the tooling you need, you should have some pieces of flat stock (mild steel)and some bar stock. You'll get the idea of what kind of stock you'll need for your toolingas you read the section on tooling. You can find this kind of stuff at your local scrapdealer or junkyard: they usually sell it by the pound. You'll also need arbor stock (an arbor is the bar or pipe you use to wrap the wirearound to make the spring). Once you know what size arbor you need, visit your localscrap yard: it doesn't have to be pretty, but remember, it does have to be long enough. If you're working with heavy wire, you may need a welding rig to make your toolingsafe.
How to make Springs Page 14 of 62
TOOLINGThe whole purpose of tooling is to keep the wire under control while you make yoursprings. The important parts of the wire to keep under control are the two ends. Thissection will tell you how to make the tooling you'll need to keep the ends of your wireunder control:
The important parts of the wire that you want to keep under control are the two ends:• The front end -- the part of the wire that you use to begin coiling, and• The back end -- the part of the wire that is last to be coiled, or that most closely
approximates that condition.
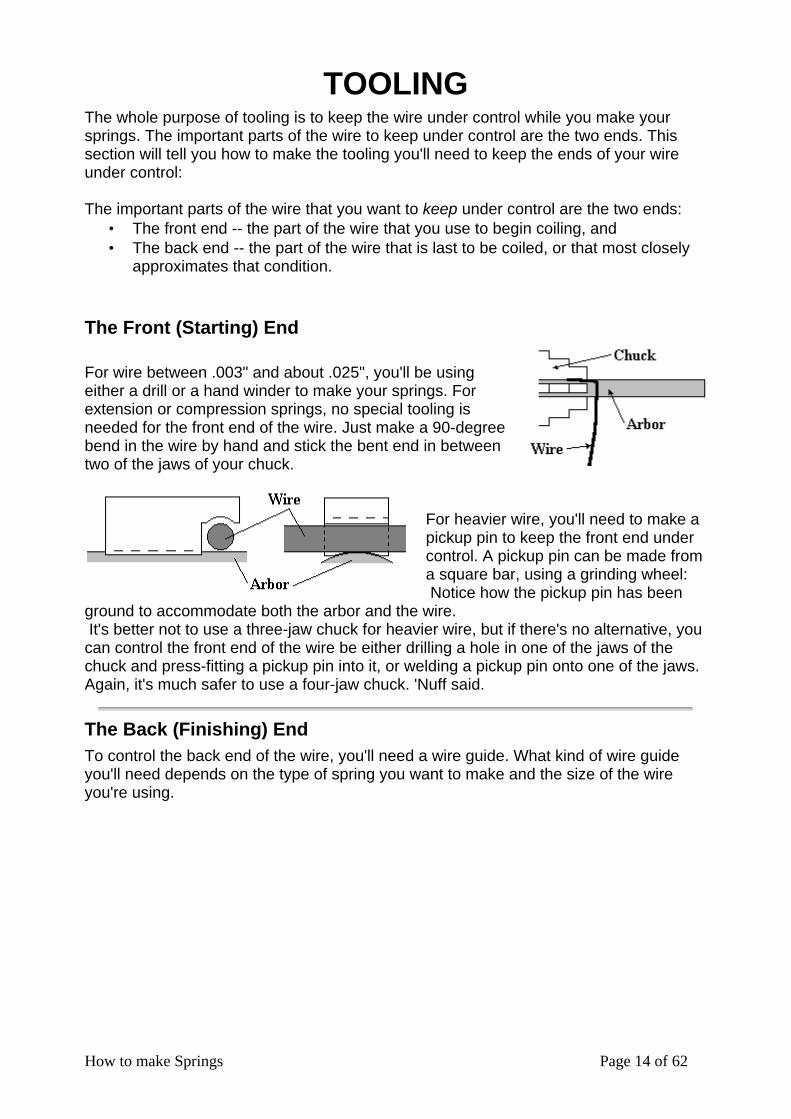
The Front (Starting) End
For wire between .003" and about .025", you'll be usingeither a drill or a hand winder to make your springs. Forextension or compression springs, no special tooling isneeded for the front end of the wire. Just make a 90-degreebend in the wire by hand and stick the bent end in betweentwo of the jaws of your chuck.
For heavier wire, you'll need to make apickup pin to keep the front end undercontrol. A pickup pin can be made froma square bar, using a grinding wheel: Notice how the pickup pin has been
ground to accommodate both the arbor and the wire. It's better not to use a three-jaw chuck for heavier wire, but if there's no alternative, youcan control the front end of the wire be either drilling a hole in one of the jaws of thechuck and press-fitting a pickup pin into it, or welding a pickup pin onto one of the jaws.Again, it's much safer to use a four-jaw chuck. 'Nuff said.
The Back (Finishing) EndTo control the back end of the wire, you'll need a wire guide. What kind of wire guideyou'll need depends on the type of spring you want to make and the size of the wireyou're using.
How to make Springs Page 15 of 62
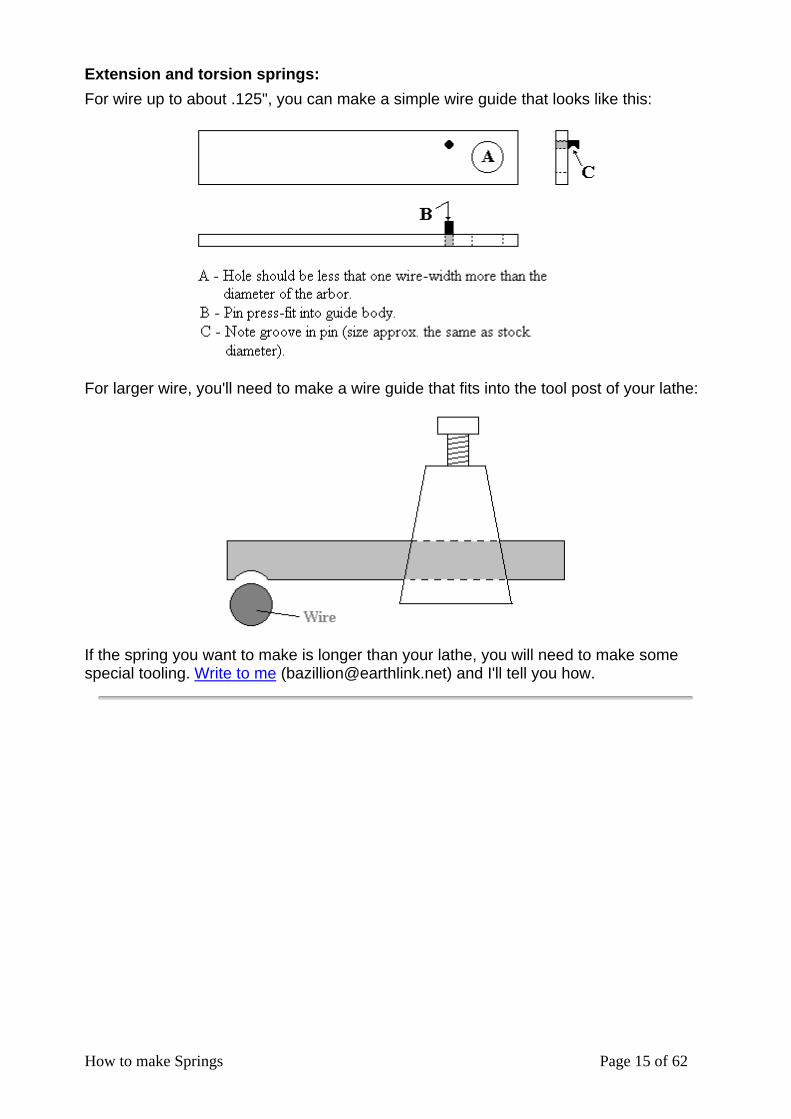
Extension and torsion springs:
For wire up to about .125", you can make a simple wire guide that looks like this:
For larger wire, you'll need to make a wire guide that fits into the tool post of your lathe:
If the spring you want to make is longer than your lathe, you will need to make somespecial tooling. Write to me ([email protected]) and I'll tell you how.
How to make Springs Page 16 of 62
Finishing ToolingYou'll also need to make tools to help you finish the ends of extension and torsionsprings. Again, the tooling you'll need will depend on the size of your wire.
Extension springs:
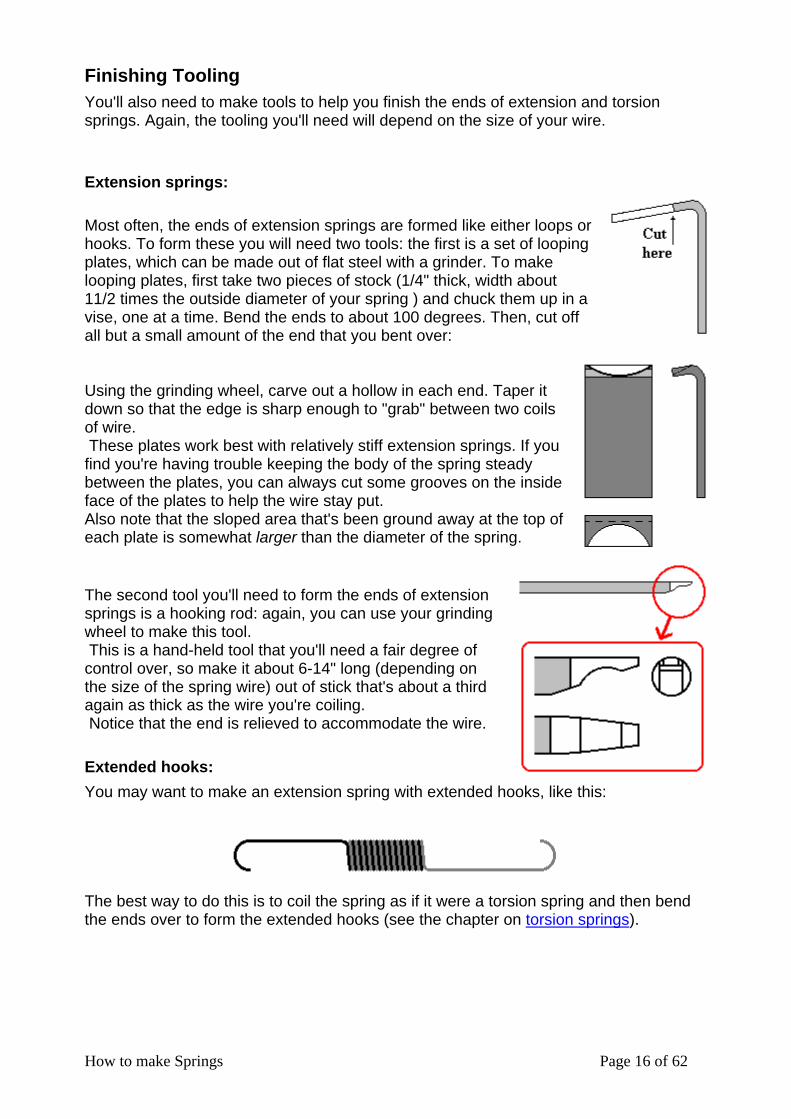
Most often, the ends of extension springs are formed like either loops orhooks. To form these you will need two tools: the first is a set of loopingplates, which can be made out of flat steel with a grinder. To makelooping plates, first take two pieces of stock (1/4" thick, width about11/2 times the outside diameter of your spring ) and chuck them up in avise, one at a time. Bend the ends to about 100 degrees. Then, cut offall but a small amount of the end that you bent over:
Using the grinding wheel, carve out a hollow in each end. Taper itdown so that the edge is sharp enough to "grab" between two coilsof wire. These plates work best with relatively stiff extension springs. If youfind you're having trouble keeping the body of the spring steadybetween the plates, you can always cut some grooves on the insideface of the plates to help the wire stay put.Also note that the sloped area that's been ground away at the top ofeach plate is somewhat larger than the diameter of the spring.
The second tool you'll need to form the ends of extensionsprings is a hooking rod: again, you can use your grindingwheel to make this tool. This is a hand-held tool that you'll need a fair degree ofcontrol over, so make it about 6-14" long (depending onthe size of the spring wire) out of stick that's about a thirdagain as thick as the wire you're coiling. Notice that the end is relieved to accommodate the wire.
Extended hooks:
You may want to make an extension spring with extended hooks, like this:
The best way to do this is to coil the spring as if it were a torsion spring and then bendthe ends over to form the extended hooks (see the chapter on torsion springs).
How to make Springs Page 17 of 62
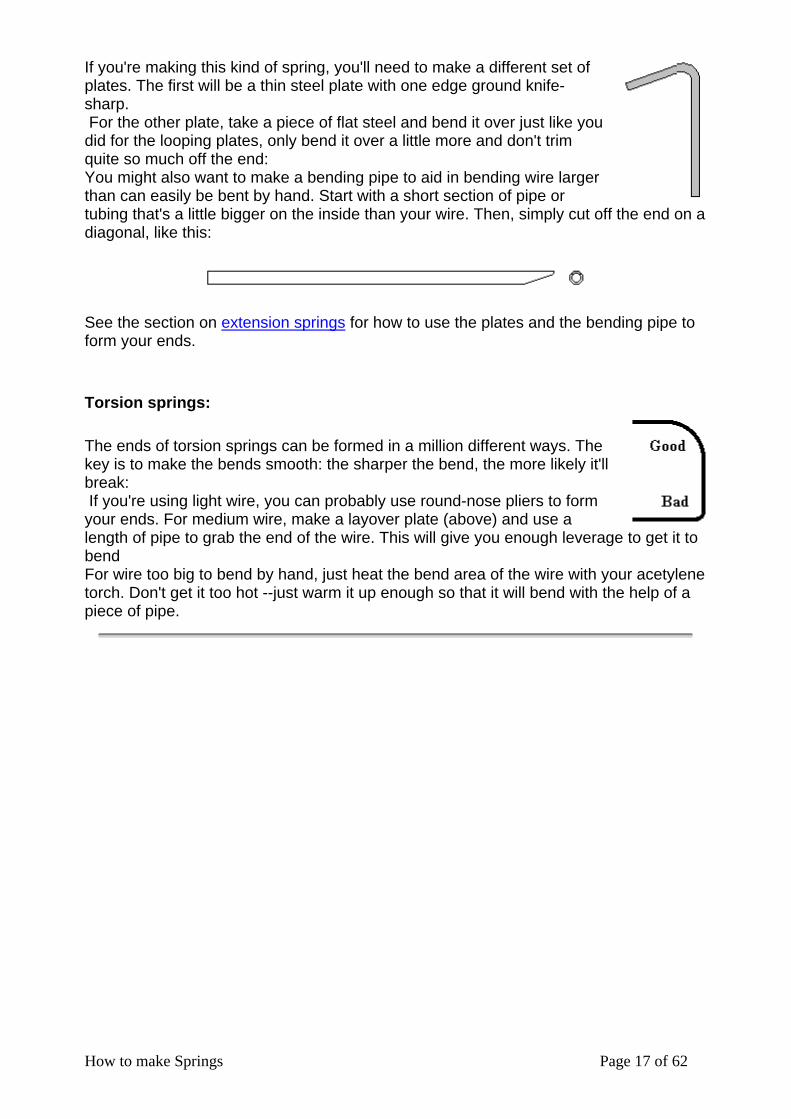
If you're making this kind of spring, you'll need to make a different set ofplates. The first will be a thin steel plate with one edge ground knife-sharp. For the other plate, take a piece of flat steel and bend it over just like youdid for the looping plates, only bend it over a little more and don't trimquite so much off the end:You might also want to make a bending pipe to aid in bending wire largerthan can easily be bent by hand. Start with a short section of pipe ortubing that's a little bigger on the inside than your wire. Then, simply cut off the end on adiagonal, like this:
See the section on extension springs for how to use the plates and the bending pipe toform your ends.
Torsion springs:
The ends of torsion springs can be formed in a million different ways. Thekey is to make the bends smooth: the sharper the bend, the more likely it'llbreak: If you're using light wire, you can probably use round-nose pliers to formyour ends. For medium wire, make a layover plate (above) and use alength of pipe to grab the end of the wire. This will give you enough leverage to get it tobendFor wire too big to bend by hand, just heat the bend area of the wire with your acetylenetorch. Don't get it too hot --just warm it up enough so that it will bend with the help of apiece of pipe.
How to make Springs Page 18 of 62
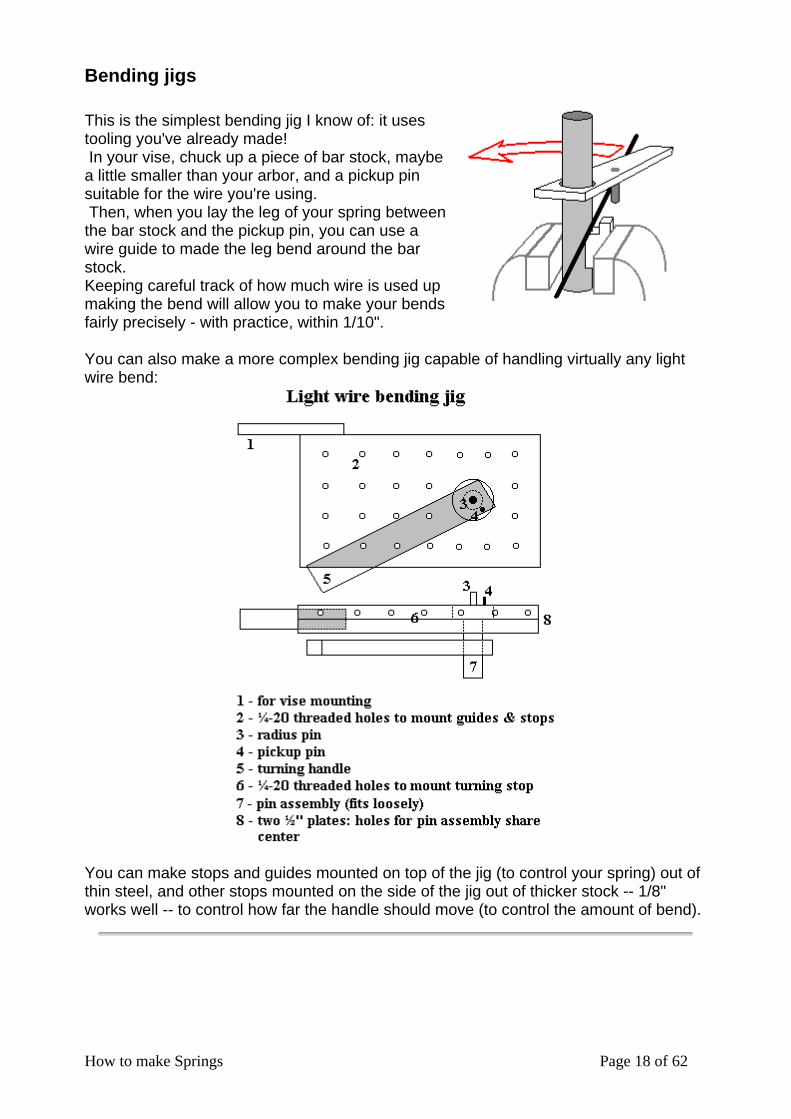
Bending jigs
This is the simplest bending jig I know of: it usestooling you've already made! In your vise, chuck up a piece of bar stock, maybea little smaller than your arbor, and a pickup pinsuitable for the wire you're using. Then, when you lay the leg of your spring betweenthe bar stock and the pickup pin, you can use awire guide to made the leg bend around the barstock.Keeping careful track of how much wire is used upmaking the bend will allow you to make your bendsfairly precisely - with practice, within 1/10". You can also make a more complex bending jig capable of handling virtually any lightwire bend:
You can make stops and guides mounted on top of the jig (to control your spring) out ofthin steel, and other stops mounted on the side of the jig out of thicker stock -- 1/8"works well -- to control how far the handle should move (to control the amount of bend).

How to make Springs Page 19 of 62
Passivating basketIf you're working with stainless steel wire, you'll need a passivating basket. All apassivating basket has to do is hold the springs while they're taking a bath in some niceacid. You can make one very easily using stainless steel mesh. Just bend the edges ofthe mesh up to form a basket shape large enough to hold your springs, "stitch" theedges together with stainless steel wire, and make a handle, also out of stainless steel.Don't use anything but stainless to make your passivating basket -- otherwise, the acidwill eat it alive.
Grinding stageA grinding stage is simply a flat piece of material (either steel or wood will work)attached to your grinder. The purpose of a grinding stage is to provide a flat surface thatyour spring lays on while you're grinding the ends. Make your stage so that it faces the flat side of the grinding wheel, and is at least aswide as the grinding wheel's side surface.
How to make Springs Page 20 of 62
SETTING UP FOR COILINGThis is the first of five chapters that will tell you how to make springs. The informationcovered on this chapter is necessary, no matter what kind of spring you want to make.
The next chapters, covering torsion springs, extension springs, compression springs,and finishing techniques, will round out the subject. To get the most from these pages you should have your wire, your tools, and thedesign in mind for a spring you want to make.
(For info on coiling without a lead screw, see the section on compression springs. NOTE: I'm planning to make an animated gif showing the coiling process, but it'sturning out to be a MAJOR project and I'd rather get this site on the web without it thanwait until it's done. It will be done, though, so keep checking back ;-)
The ArborMaking springs by hand basically consists of bending wire around a rod called an arboror mandrel. The arbor is secured in the chuck of a winding machine (typically either adrill, a hand winder, or a lathe). This section will tell you how to get the right diameterarbor, but it's also important to get the right length. Correct arbor length is importantbecause it's difficult (not impossible, but difficult) to coil a spring on an arbor that's notlong enough. Here's how to figure out how long your arbor has to be.
1. Estimate the amount of arbor you'll need to accommodate the spring itself.
Know that spring wire wound on an arbor will take up more space than the samespring will after it's off the arbor. How much more depends on the number of coilsand the size of the wire. Generally, the more coils in the spring, the more it willcontract after coiling. Also generally, the smaller the wire, the more space it willtake up on the arbor. And lastly, the larger the arbor, the more room you'll needto accommodate your spring while coiling. A couple of examples might help withall this:
• A heavy torsion spring with 5 coils will generally not uncoil more thanabout 1/2 a coil after winding. Giving yourself as much slack as you can,your arbor might be 6-8" longer than the spring, plus whatever length youneed to chuck it up.
• A similar torsion spring made from very light wire (same diameter arbor)will lose more coils, and take up more room on the arbor when coiling.Because it's short to begin with, though, the 6-8" addition to the arborlength should still be okay.
• A long extension spring (like on a screen door) should be wound on anarbor at least a foot longer than the spring itself, again plus whatever youneed for the chuck.
2. Add in the amount of arbor you'll need to secure it safely in the chuck.
3. Add in a fudge factor -- 10% will do -- just for the heck of it.
How to make Springs Page 21 of 62
Remember that your arbor should be at least the length you figure out here: there's noreal maximum length until your winding machine won't support the weight.
The First CoilsOnce you have your arbor, make a few coils to check the diameter. How you do thisdepends on what kind of machine you're using to coil your wire.
If you're using a drill:
1. First, make sure that your drill is mounted solidly. Best bet is to mount it in a vise.DON'T TRY TO HOLD ONTO A DRILL THAT'S BEING USED TO COIL WIRE!Mount your drill so that if you're standing with the drill in front of your leftshoulder, the top of the chuck spins away from you when you turn it on.
2. Next, chuck up your arbor. The diameter of the arbor should be a little less thanthe inside diameter of the spring you want to make.
3. Get a piece of wire maybe a couple of feet long. Cut it off from the coil and makea 90-degree bend in one end, giving you a dogleg end about an inch long.
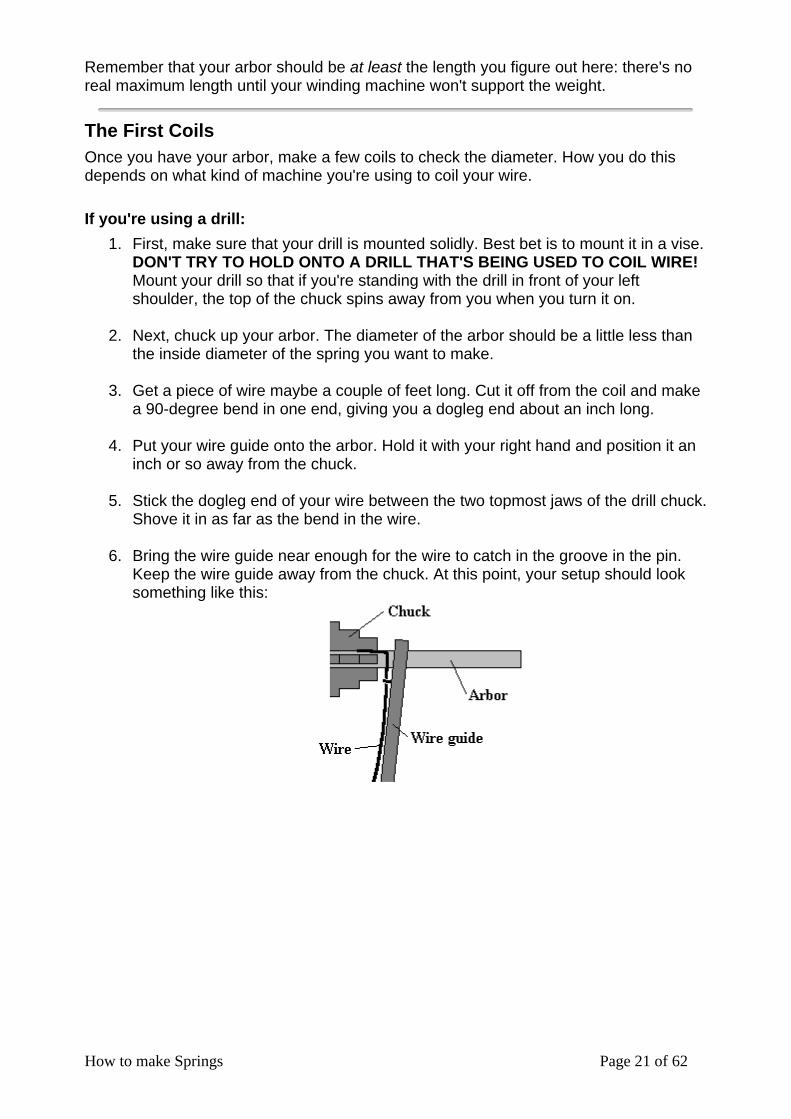
4. Put your wire guide onto the arbor. Hold it with your right hand and position it aninch or so away from the chuck.
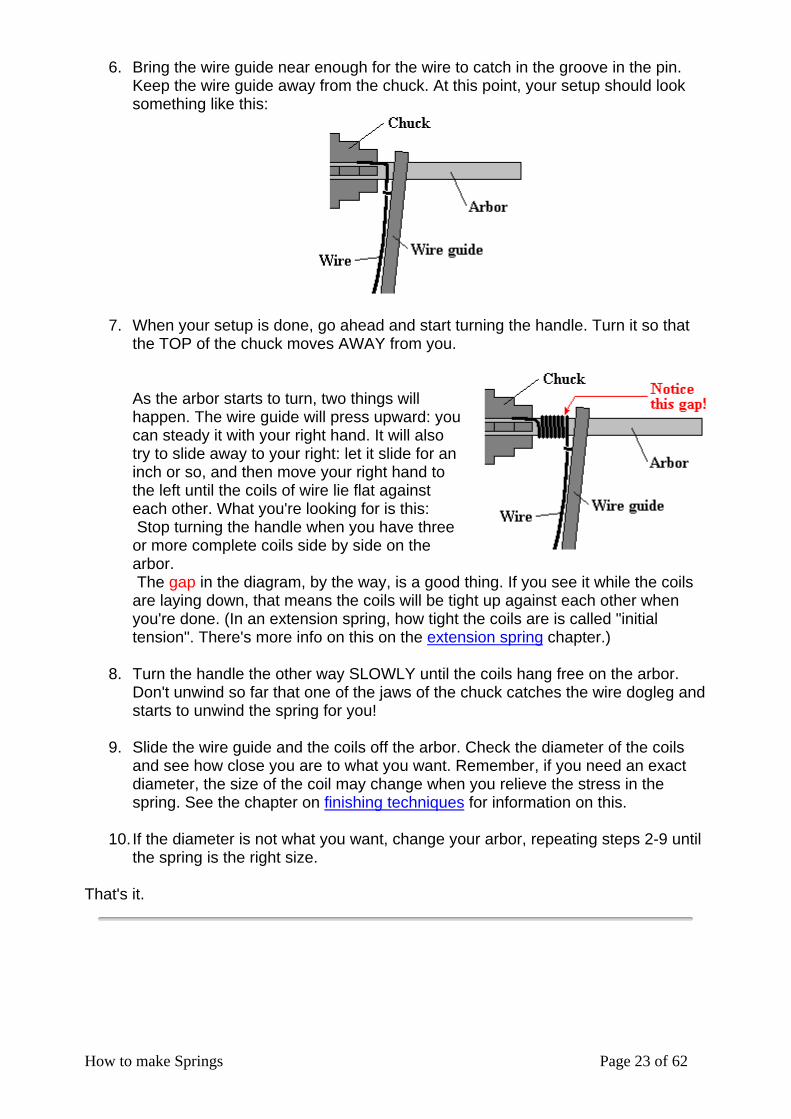
5. Stick the dogleg end of your wire between the two topmost jaws of the drill chuck.Shove it in as far as the bend in the wire.
6. Bring the wire guide near enough for the wire to catch in the groove in the pin.Keep the wire guide away from the chuck. At this point, your setup should looksomething like this:
How to make Springs Page 22 of 62
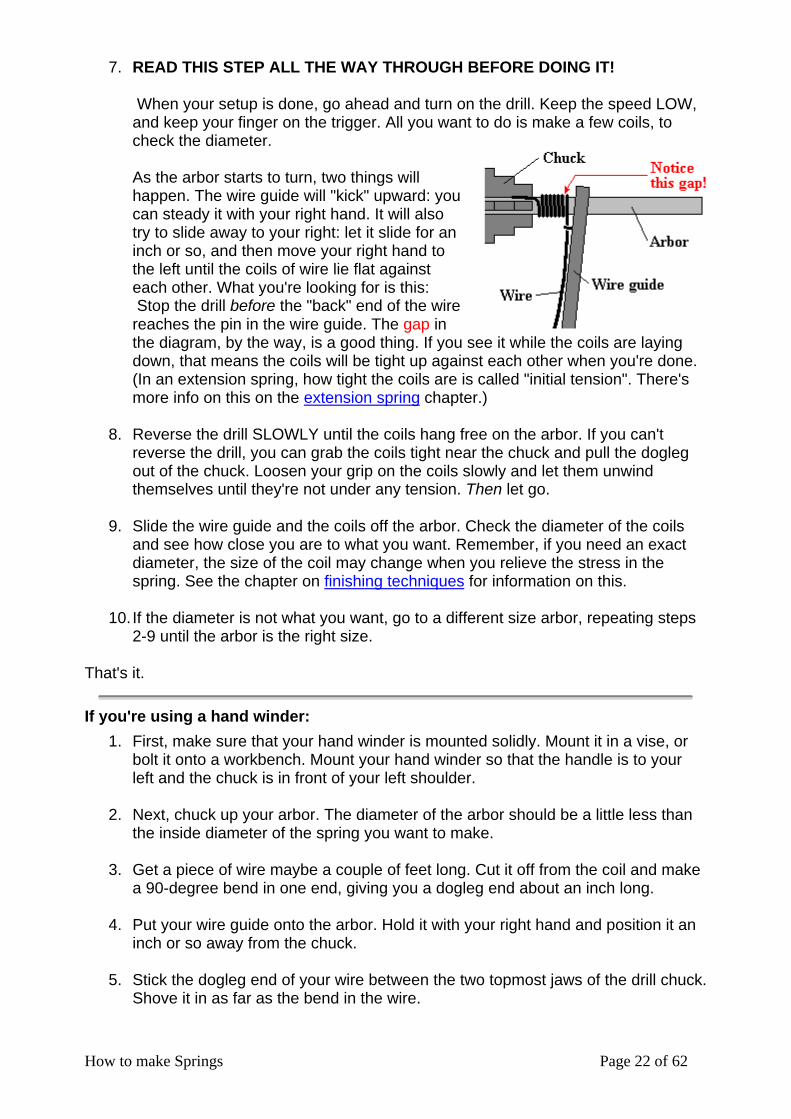
7. READ THIS STEP ALL THE WAY THROUGH BEFORE DOING IT! When your setup is done, go ahead and turn on the drill. Keep the speed LOW,and keep your finger on the trigger. All you want to do is make a few coils, tocheck the diameter.
As the arbor starts to turn, two things willhappen. The wire guide will "kick" upward: youcan steady it with your right hand. It will alsotry to slide away to your right: let it slide for aninch or so, and then move your right hand tothe left until the coils of wire lie flat againsteach other. What you're looking for is this: Stop the drill before the "back" end of the wirereaches the pin in the wire guide. The gap inthe diagram, by the way, is a good thing. If you see it while the coils are layingdown, that means the coils will be tight up against each other when you're done.(In an extension spring, how tight the coils are is called "initial tension". There'smore info on this on the extension spring chapter.)
8. Reverse the drill SLOWLY until the coils hang free on the arbor. If you can'treverse the drill, you can grab the coils tight near the chuck and pull the doglegout of the chuck. Loosen your grip on the coils slowly and let them unwindthemselves until they're not under any tension. Then let go.
9. Slide the wire guide and the coils off the arbor. Check the diameter of the coilsand see how close you are to what you want. Remember, if you need an exactdiameter, the size of the coil may change when you relieve the stress in thespring. See the chapter on finishing techniques for information on this.
10. If the diameter is not what you want, go to a different size arbor, repeating steps2-9 until the arbor is the right size.
That's it.
If you're using a hand winder:
1. First, make sure that your hand winder is mounted solidly. Mount it in a vise, orbolt it onto a workbench. Mount your hand winder so that the handle is to yourleft and the chuck is in front of your left shoulder.
2. Next, chuck up your arbor. The diameter of the arbor should be a little less thanthe inside diameter of the spring you want to make.
3. Get a piece of wire maybe a couple of feet long. Cut it off from the coil and makea 90-degree bend in one end, giving you a dogleg end about an inch long.
4. Put your wire guide onto the arbor. Hold it with your right hand and position it aninch or so away from the chuck.
5. Stick the dogleg end of your wire between the two topmost jaws of the drill chuck.Shove it in as far as the bend in the wire.
How to make Springs Page 23 of 62
6. Bring the wire guide near enough for the wire to catch in the groove in the pin.Keep the wire guide away from the chuck. At this point, your setup should looksomething like this:
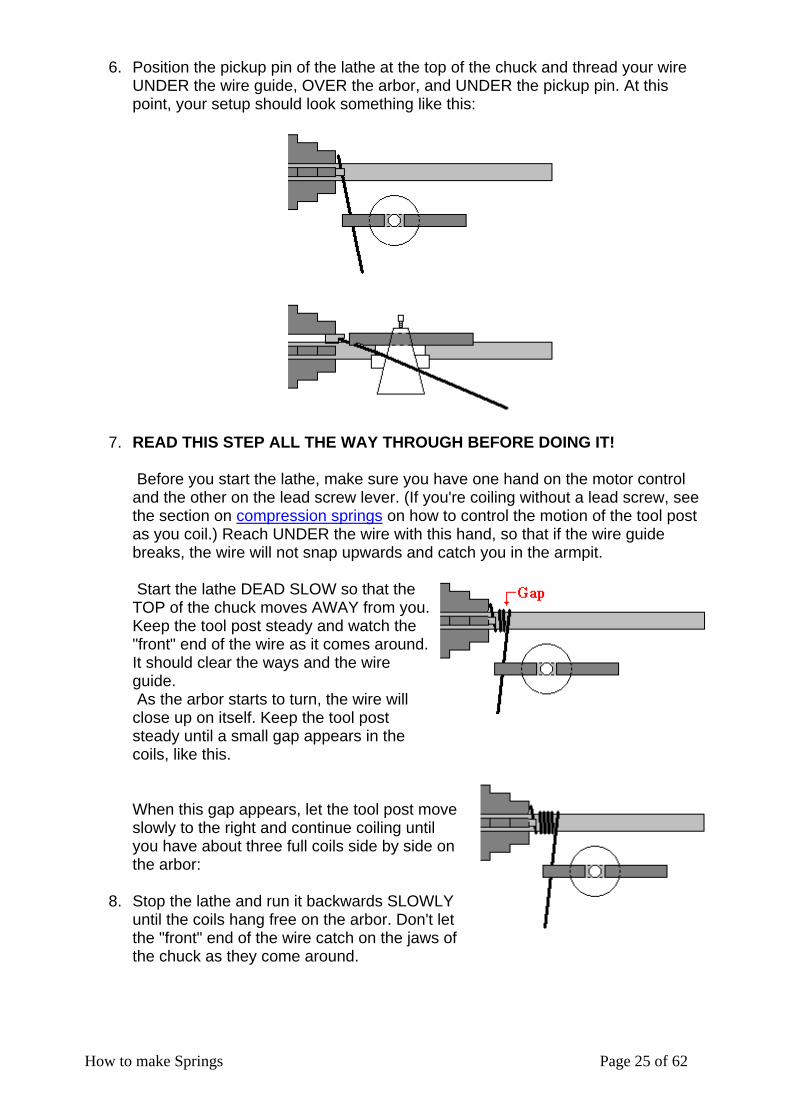
7. When your setup is done, go ahead and start turning the handle. Turn it so thatthe TOP of the chuck moves AWAY from you.
As the arbor starts to turn, two things willhappen. The wire guide will press upward: youcan steady it with your right hand. It will alsotry to slide away to your right: let it slide for aninch or so, and then move your right hand tothe left until the coils of wire lie flat againsteach other. What you're looking for is this: Stop turning the handle when you have threeor more complete coils side by side on thearbor. The gap in the diagram, by the way, is a good thing. If you see it while the coilsare laying down, that means the coils will be tight up against each other whenyou're done. (In an extension spring, how tight the coils are is called "initialtension". There's more info on this on the extension spring chapter.)
8. Turn the handle the other way SLOWLY until the coils hang free on the arbor.Don't unwind so far that one of the jaws of the chuck catches the wire dogleg andstarts to unwind the spring for you!
9. Slide the wire guide and the coils off the arbor. Check the diameter of the coilsand see how close you are to what you want. Remember, if you need an exactdiameter, the size of the coil may change when you relieve the stress in thespring. See the chapter on finishing techniques for information on this.
10. If the diameter is not what you want, change your arbor, repeating steps 2-9 untilthe spring is the right size.
That's it.

How to make Springs Page 24 of 62
If you're using a lathe:
1. If this is the first time you're using the lathe, make sure you're familiar with it.Know how to stop the dang thing before you turn it on! Also, make sure you havea clear space around you (common sense).
2. Next, chuck up your arbor. The diameter of the arbor should be a little less thanthe inside diameter of the spring you want to make.
3. If you're using a four-jaw chuck, you'll have to center your arbor. Do this byturning on the lathe and holding a piece of chalk in your hand, right next to thetool post. Move your hand slowly towards the arbor until the chalk leaves a mark.Then, stop the lathe and adjust the jaws of the chuck so that the arbor movesaway from the mark. Tighten the jaws and do this again, until the arbor is close tobeing centered (it doesn't have to be exact).
Next, back off one of the jaws of the chuck and put your pickup pin between thejaw and the arbor. Let it stick out past the end of the jaw about twice the diameterof the wire you'll be using (see the diagram below).
4. What type of wire guide you use depends on how heavy your wire is. Formedium and light wire, you can use the same type of guide as for a hand winderor drill: for heavy wire (over about ¼"), use a tool post-mounted wire guide.If you're using light wire, you can read the directions for this step as if you wereusing a hand winder (above). Otherwise, complete this step as below.
Put your wire guide into the tool post. It should be positioned just a little underthe top of the arbor. With small wire, the distance between the arbor and the wireguide should be fairly close; for medium wire, 3-6"; for heavy wire, 6-12". Thegroove in your wire guide should also be fairly close to the tool post: the heavierthe wire, the closer it should be. Cinch the wire guide down TIGHT. This is what your setup should look like edge-on from where you're standing:
Note the horizontal clearance between the right end of the pickup pin and the leftend of the wire guide.
5. Get a piece of wire a few feet long (the heavier the wire, the longer the piece:also, the bigger the arbor, the longer the piece). Cut it off from the coil.
How to make Springs Page 25 of 62
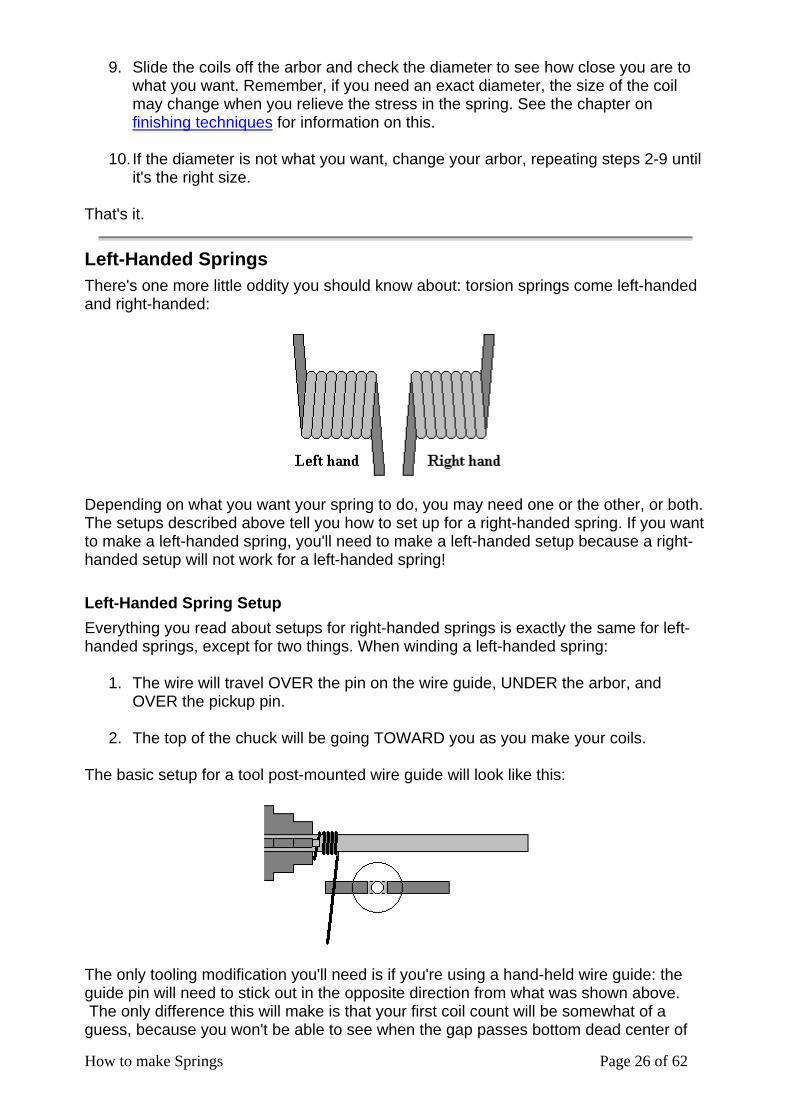
6. Position the pickup pin of the lathe at the top of the chuck and thread your wireUNDER the wire guide, OVER the arbor, and UNDER the pickup pin. At thispoint, your setup should look something like this:
7. READ THIS STEP ALL THE WAY THROUGH BEFORE DOING IT!
Before you start the lathe, make sure you have one hand on the motor controland the other on the lead screw lever. (If you're coiling without a lead screw, seethe section on compression springs on how to control the motion of the tool postas you coil.) Reach UNDER the wire with this hand, so that if the wire guidebreaks, the wire will not snap upwards and catch you in the armpit.
Start the lathe DEAD SLOW so that theTOP of the chuck moves AWAY from you.Keep the tool post steady and watch the"front" end of the wire as it comes around.It should clear the ways and the wireguide. As the arbor starts to turn, the wire willclose up on itself. Keep the tool poststeady until a small gap appears in thecoils, like this.
When this gap appears, let the tool post moveslowly to the right and continue coiling untilyou have about three full coils side by side onthe arbor:
8. Stop the lathe and run it backwards SLOWLYuntil the coils hang free on the arbor. Don't letthe "front" end of the wire catch on the jaws ofthe chuck as they come around.
How to make Springs Page 26 of 62
9. Slide the coils off the arbor and check the diameter to see how close you are towhat you want. Remember, if you need an exact diameter, the size of the coilmay change when you relieve the stress in the spring. See the chapter onfinishing techniques for information on this.
10. If the diameter is not what you want, change your arbor, repeating steps 2-9 untilit's the right size.
That's it.
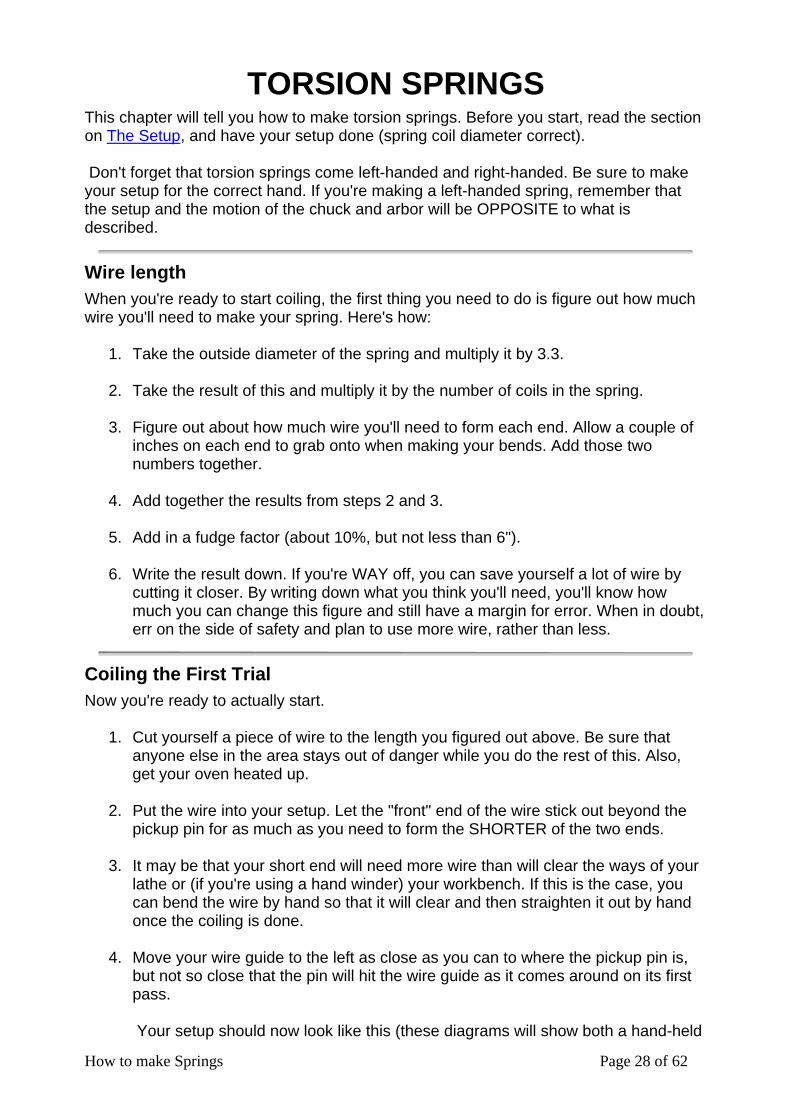
Left-Handed SpringsThere's one more little oddity you should know about: torsion springs come left-handedand right-handed:
Depending on what you want your spring to do, you may need one or the other, or both.The setups described above tell you how to set up for a right-handed spring. If you wantto make a left-handed spring, you'll need to make a left-handed setup because a right-handed setup will not work for a left-handed spring!
Left-Handed Spring Setup
Everything you read about setups for right-handed springs is exactly the same for left-handed springs, except for two things. When winding a left-handed spring:
1. The wire will travel OVER the pin on the wire guide, UNDER the arbor, andOVER the pickup pin.
2. The top of the chuck will be going TOWARD you as you make your coils.
The basic setup for a tool post-mounted wire guide will look like this:
The only tooling modification you'll need is if you're using a hand-held wire guide: theguide pin will need to stick out in the opposite direction from what was shown above. The only difference this will make is that your first coil count will be somewhat of aguess, because you won't be able to see when the gap passes bottom dead center of

How to make Springs Page 27 of 62
the arbor. On your second trial spring, though, you should be able to correct this exactlywith your chalk mark.
How to make Springs Page 28 of 62
TORSION SPRINGSThis chapter will tell you how to make torsion springs. Before you start, read the sectionon The Setup, and have your setup done (spring coil diameter correct).
Don't forget that torsion springs come left-handed and right-handed. Be sure to makeyour setup for the correct hand. If you're making a left-handed spring, remember thatthe setup and the motion of the chuck and arbor will be OPPOSITE to what isdescribed.
Wire lengthWhen you're ready to start coiling, the first thing you need to do is figure out how muchwire you'll need to make your spring. Here's how:
1. Take the outside diameter of the spring and multiply it by 3.3.
2. Take the result of this and multiply it by the number of coils in the spring.
3. Figure out about how much wire you'll need to form each end. Allow a couple ofinches on each end to grab onto when making your bends. Add those twonumbers together.
4. Add together the results from steps 2 and 3.
5. Add in a fudge factor (about 10%, but not less than 6").
6. Write the result down. If you're WAY off, you can save yourself a lot of wire bycutting it closer. By writing down what you think you'll need, you'll know howmuch you can change this figure and still have a margin for error. When in doubt,err on the side of safety and plan to use more wire, rather than less.
Coiling the First TrialNow you're ready to actually start.
1. Cut yourself a piece of wire to the length you figured out above. Be sure thatanyone else in the area stays out of danger while you do the rest of this. Also,get your oven heated up.
2. Put the wire into your setup. Let the "front" end of the wire stick out beyond thepickup pin for as much as you need to form the SHORTER of the two ends.
3. It may be that your short end will need more wire than will clear the ways of yourlathe or (if you're using a hand winder) your workbench. If this is the case, youcan bend the wire by hand so that it will clear and then straighten it out by handonce the coiling is done.
4. Move your wire guide to the left as close as you can to where the pickup pin is,but not so close that the pin will hit the wire guide as it comes around on its firstpass.
Your setup should now look like this (these diagrams will show both a hand-held
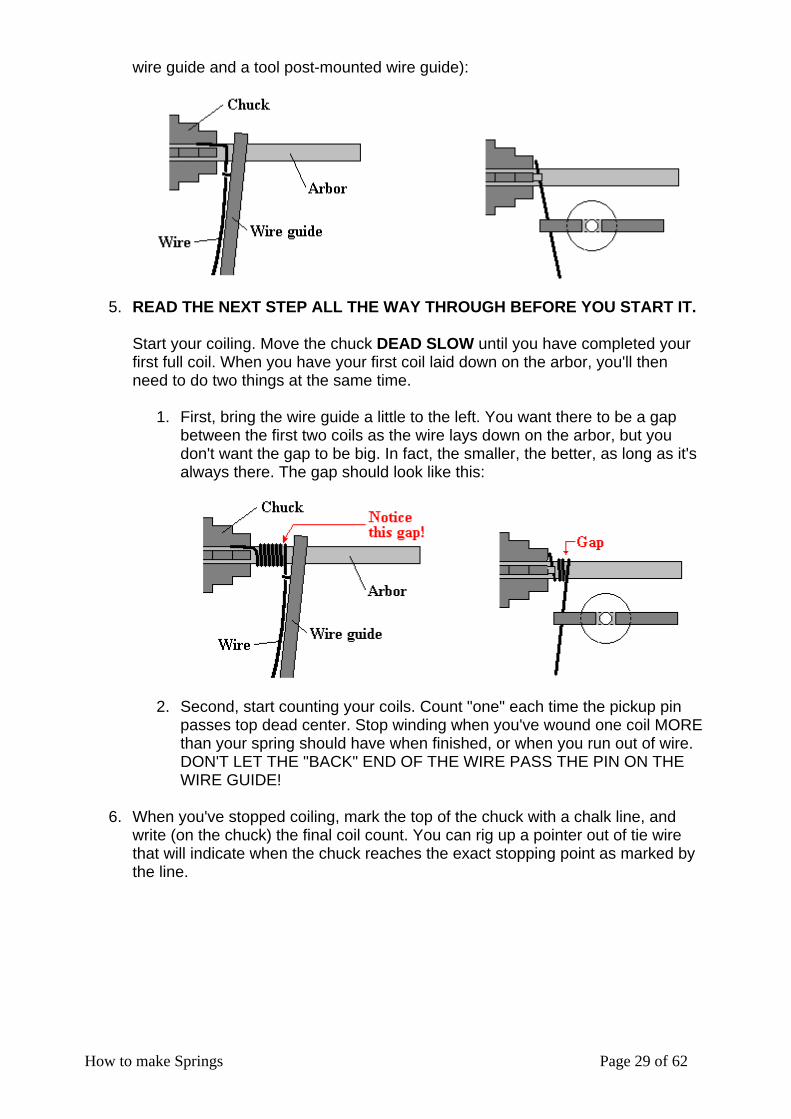
How to make Springs Page 29 of 62
wire guide and a tool post-mounted wire guide):
5. READ THE NEXT STEP ALL THE WAY THROUGH BEFORE YOU START IT.
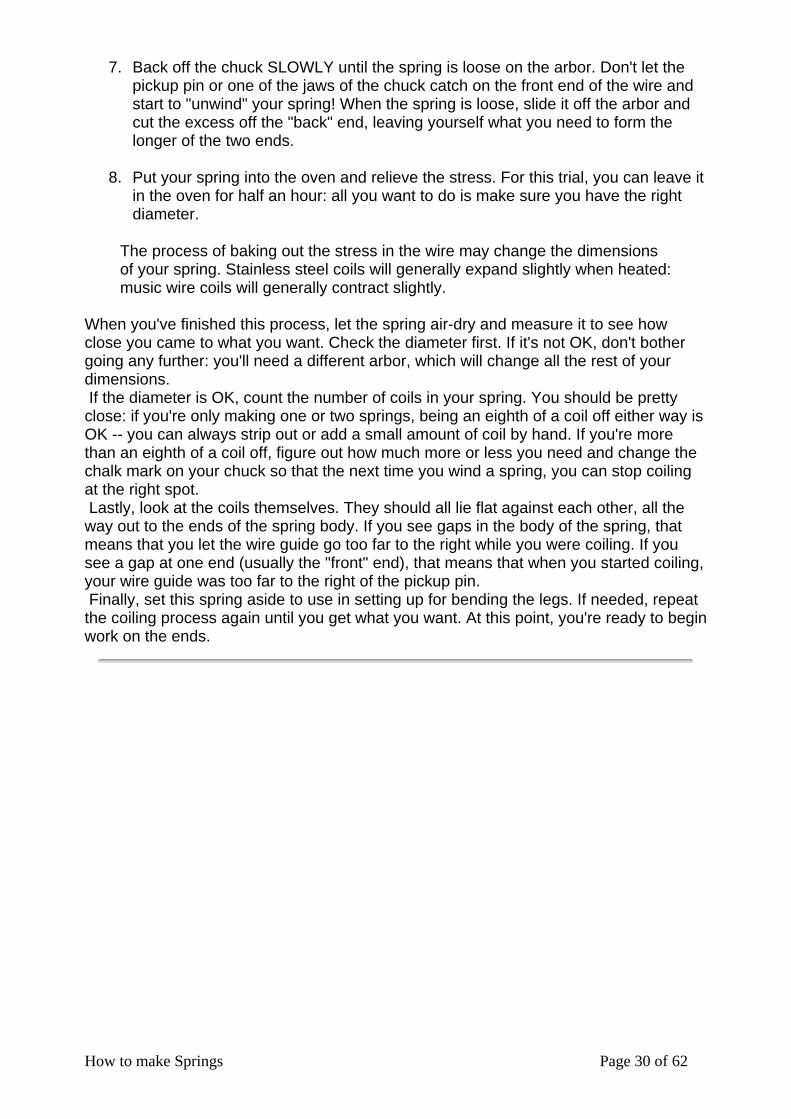
Start your coiling. Move the chuck DEAD SLOW until you have completed yourfirst full coil. When you have your first coil laid down on the arbor, you'll thenneed to do two things at the same time.
1. First, bring the wire guide a little to the left. You want there to be a gapbetween the first two coils as the wire lays down on the arbor, but youdon't want the gap to be big. In fact, the smaller, the better, as long as it'salways there. The gap should look like this:
2. Second, start counting your coils. Count "one" each time the pickup pinpasses top dead center. Stop winding when you've wound one coil MOREthan your spring should have when finished, or when you run out of wire.DON'T LET THE "BACK" END OF THE WIRE PASS THE PIN ON THEWIRE GUIDE!
6. When you've stopped coiling, mark the top of the chuck with a chalk line, andwrite (on the chuck) the final coil count. You can rig up a pointer out of tie wirethat will indicate when the chuck reaches the exact stopping point as marked bythe line.
How to make Springs Page 30 of 62
7. Back off the chuck SLOWLY until the spring is loose on the arbor. Don't let thepickup pin or one of the jaws of the chuck catch on the front end of the wire andstart to "unwind" your spring! When the spring is loose, slide it off the arbor andcut the excess off the "back" end, leaving yourself what you need to form thelonger of the two ends.
8. Put your spring into the oven and relieve the stress. For this trial, you can leave itin the oven for half an hour: all you want to do is make sure you have the rightdiameter.
The process of baking out the stress in the wire may change the dimensionsof your spring. Stainless steel coils will generally expand slightly when heated:music wire coils will generally contract slightly.
When you've finished this process, let the spring air-dry and measure it to see howclose you came to what you want. Check the diameter first. If it's not OK, don't bothergoing any further: you'll need a different arbor, which will change all the rest of yourdimensions. If the diameter is OK, count the number of coils in your spring. You should be prettyclose: if you're only making one or two springs, being an eighth of a coil off either way isOK -- you can always strip out or add a small amount of coil by hand. If you're morethan an eighth of a coil off, figure out how much more or less you need and change thechalk mark on your chuck so that the next time you wind a spring, you can stop coilingat the right spot. Lastly, look at the coils themselves. They should all lie flat against each other, all theway out to the ends of the spring body. If you see gaps in the body of the spring, thatmeans that you let the wire guide go too far to the right while you were coiling. If yousee a gap at one end (usually the "front" end), that means that when you started coiling,your wire guide was too far to the right of the pickup pin. Finally, set this spring aside to use in setting up for bending the legs. If needed, repeatthe coiling process again until you get what you want. At this point, you're ready to beginwork on the ends.
How to make Springs Page 31 of 62
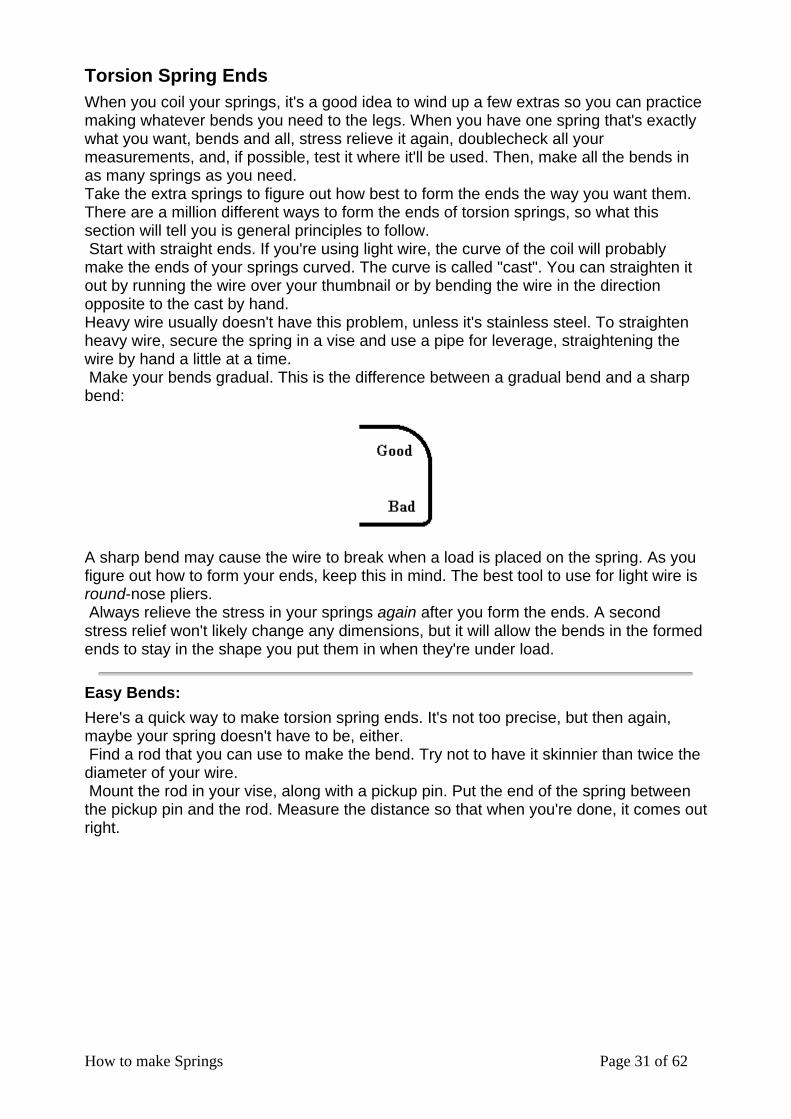
Torsion Spring EndsWhen you coil your springs, it's a good idea to wind up a few extras so you can practicemaking whatever bends you need to the legs. When you have one spring that's exactlywhat you want, bends and all, stress relieve it again, doublecheck all yourmeasurements, and, if possible, test it where it'll be used. Then, make all the bends inas many springs as you need.Take the extra springs to figure out how best to form the ends the way you want them.There are a million different ways to form the ends of torsion springs, so what thissection will tell you is general principles to follow. Start with straight ends. If you're using light wire, the curve of the coil will probablymake the ends of your springs curved. The curve is called "cast". You can straighten itout by running the wire over your thumbnail or by bending the wire in the directionopposite to the cast by hand.Heavy wire usually doesn't have this problem, unless it's stainless steel. To straightenheavy wire, secure the spring in a vise and use a pipe for leverage, straightening thewire by hand a little at a time. Make your bends gradual. This is the difference between a gradual bend and a sharpbend:
A sharp bend may cause the wire to break when a load is placed on the spring. As youfigure out how to form your ends, keep this in mind. The best tool to use for light wire isround-nose pliers. Always relieve the stress in your springs again after you form the ends. A secondstress relief won't likely change any dimensions, but it will allow the bends in the formedends to stay in the shape you put them in when they're under load.
Easy Bends:
Here's a quick way to make torsion spring ends. It's not too precise, but then again,maybe your spring doesn't have to be, either. Find a rod that you can use to make the bend. Try not to have it skinnier than twice thediameter of your wire. Mount the rod in your vise, along with a pickup pin. Put the end of the spring betweenthe pickup pin and the rod. Measure the distance so that when you're done, it comes outright.
How to make Springs Page 32 of 62
Using a wire guide or a bending pipe, bend the end the way you want it. (With very lightwire, you can do this by hand.) If the spring slips as you bend the end around, put somepressure on the coil body so that the pickup pin grabs it solidly.
If you're just making a few springs, you can probably get away with doing each one byhand. If you want to make a lot of the same kind of spring, go ahead and make a moresophisticated bending jig -- see the section on tooling for how to do this.
Extended hooks
If you're making an extension spring with extended hooks, like this:
you'll need to treat the ends as if the spring was a torsion spring. The first step in forming extended hooks is to make sure that the ends of the wire arestraight. Having done that, the next step is to lay the ends over. Here's how you do this:
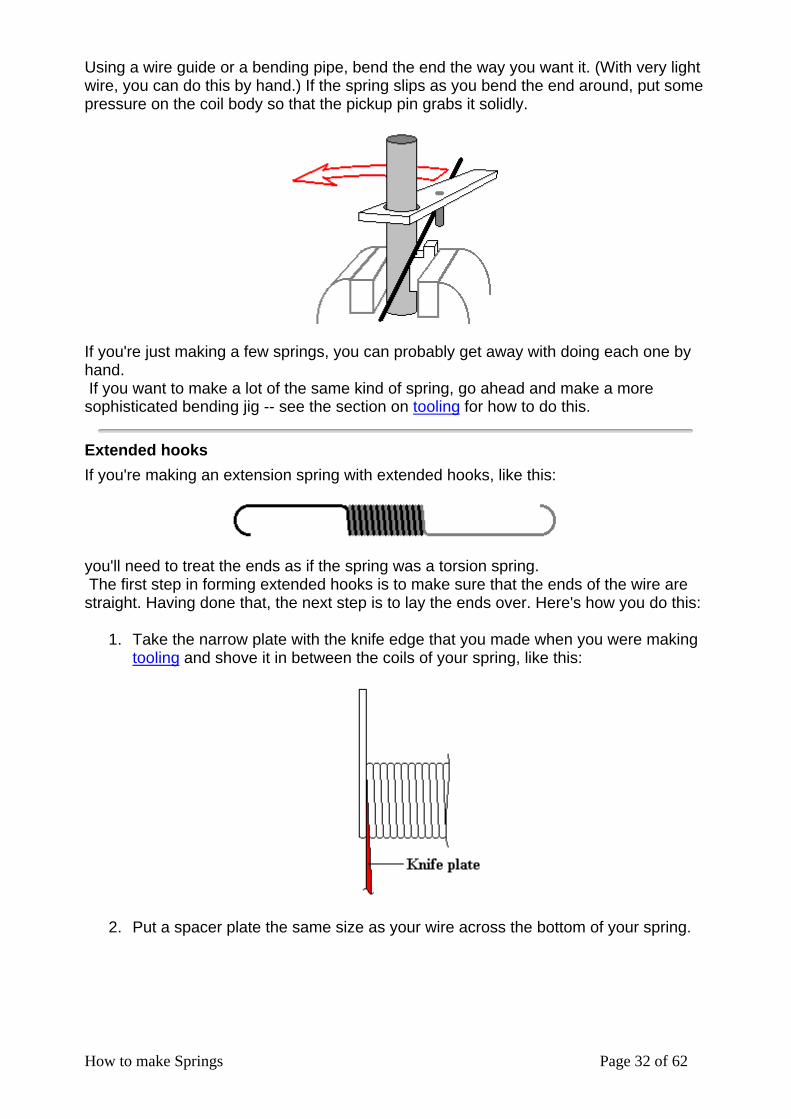
1. Take the narrow plate with the knife edge that you made when you were makingtooling and shove it in between the coils of your spring, like this:
2. Put a spacer plate the same size as your wire across the bottom of your spring.
How to make Springs Page 33 of 62
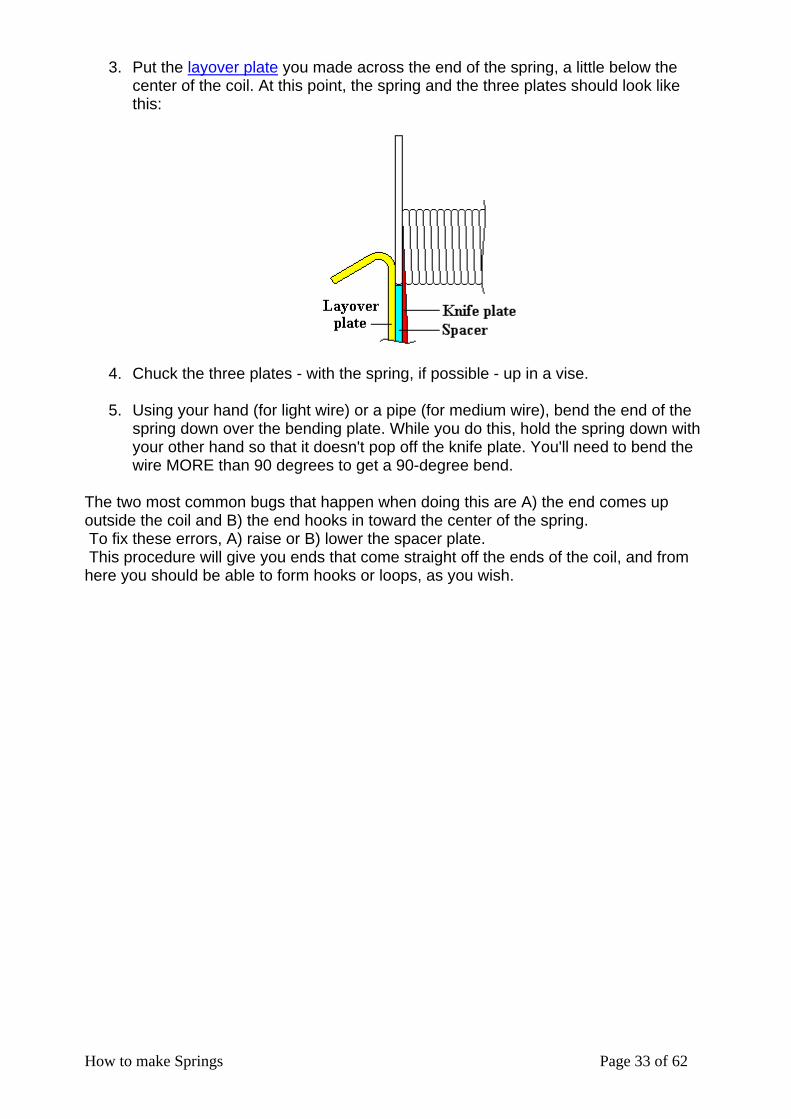
3. Put the layover plate you made across the end of the spring, a little below thecenter of the coil. At this point, the spring and the three plates should look likethis:
4. Chuck the three plates - with the spring, if possible - up in a vise.
5. Using your hand (for light wire) or a pipe (for medium wire), bend the end of thespring down over the bending plate. While you do this, hold the spring down withyour other hand so that it doesn't pop off the knife plate. You'll need to bend thewire MORE than 90 degrees to get a 90-degree bend.
The two most common bugs that happen when doing this are A) the end comes upoutside the coil and B) the end hooks in toward the center of the spring. To fix these errors, A) raise or B) lower the spacer plate. This procedure will give you ends that come straight off the ends of the coil, and fromhere you should be able to form hooks or loops, as you wish.
How to make Springs Page 34 of 62
EXTENSION SPRINGSThis section will tell you how to make extension springs.
(For how to make extended hooks, see the torsion spring chapter.)
Once you have your setup done, the first thing you should do is make sure you haveenough wire.
Wire LengthIf you're using light wire, or if you're making short extension springs with wire up toabout .250", you really don't need to know how much wire you need for each spring --just be sure you have more than enough. You can figure a rough length by taking thelength of the body of the spring, dividing by the wire size (which gives you anapproximate count of the number of coils in the spring) and then multiplying that by 3.3.It'll probably come out too long, but that's okay - you can use your first couple of springsto set up for making your loops. If you want to make long extension springs out of wire over about .250" or if you wantmore than 50 of one design, I recommend that you go to a spring shop and have themmake your springs for you.
Coiling the First TrialNow let's make a spring.
1. Cut yourself a piece of wire that's the right length. If you're using light wire, youcan just undo the wire and let it sit on the floor in front of the lathe or windingmachine. Take the end of the wire on the inside of the coil for your starting end --that way it won't tangle. If you're coiling short springs, cut yourself off a LONGlength of wire, so you can coil several springs at the same time. Be sure thatanyone else in the area stays out of danger while you do the rest of this. Also,get your oven fired up.
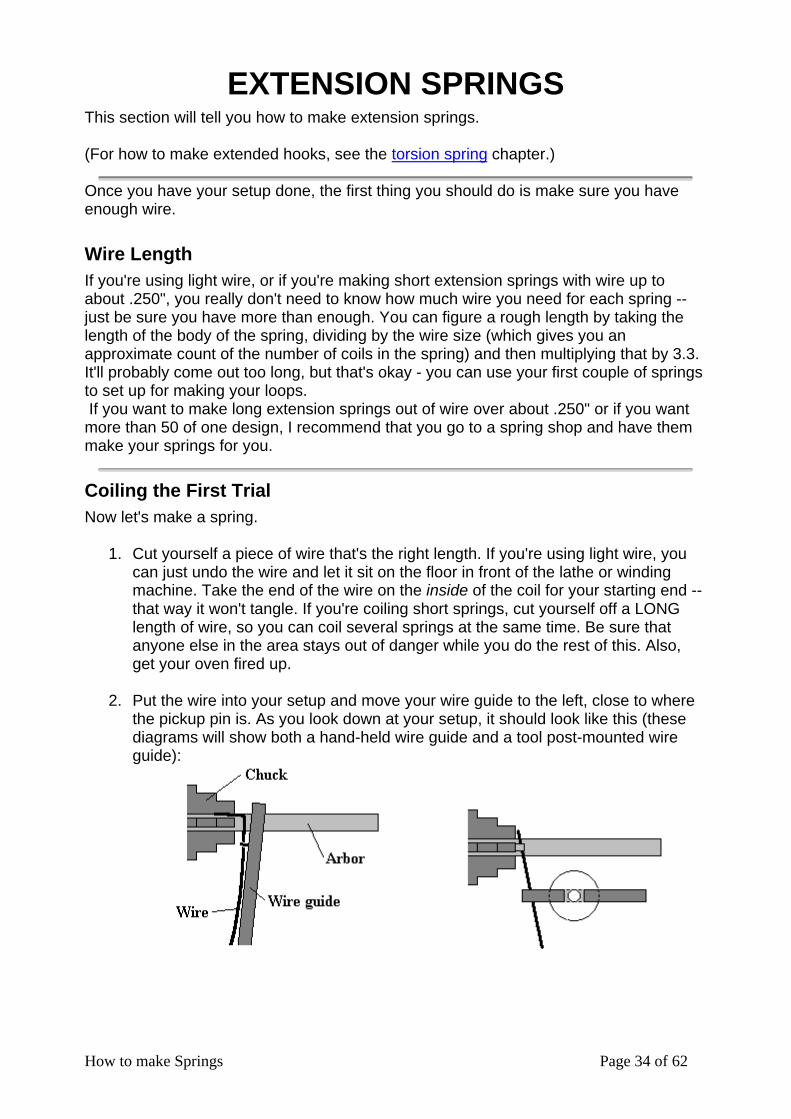
2. Put the wire into your setup and move your wire guide to the left, close to wherethe pickup pin is. As you look down at your setup, it should look like this (thesediagrams will show both a hand-held wire guide and a tool post-mounted wireguide):
How to make Springs Page 35 of 62
3. Start your coiling. Move the chuck DEAD SLOW until you're sure that the wire isseated on the pickup pin and the pin on your wire guide. Let a couple of coils laydown on the arbor.
4. READ THE NEXT STEP ALL THE WAY THROUGH BEFORE YOU START IT.
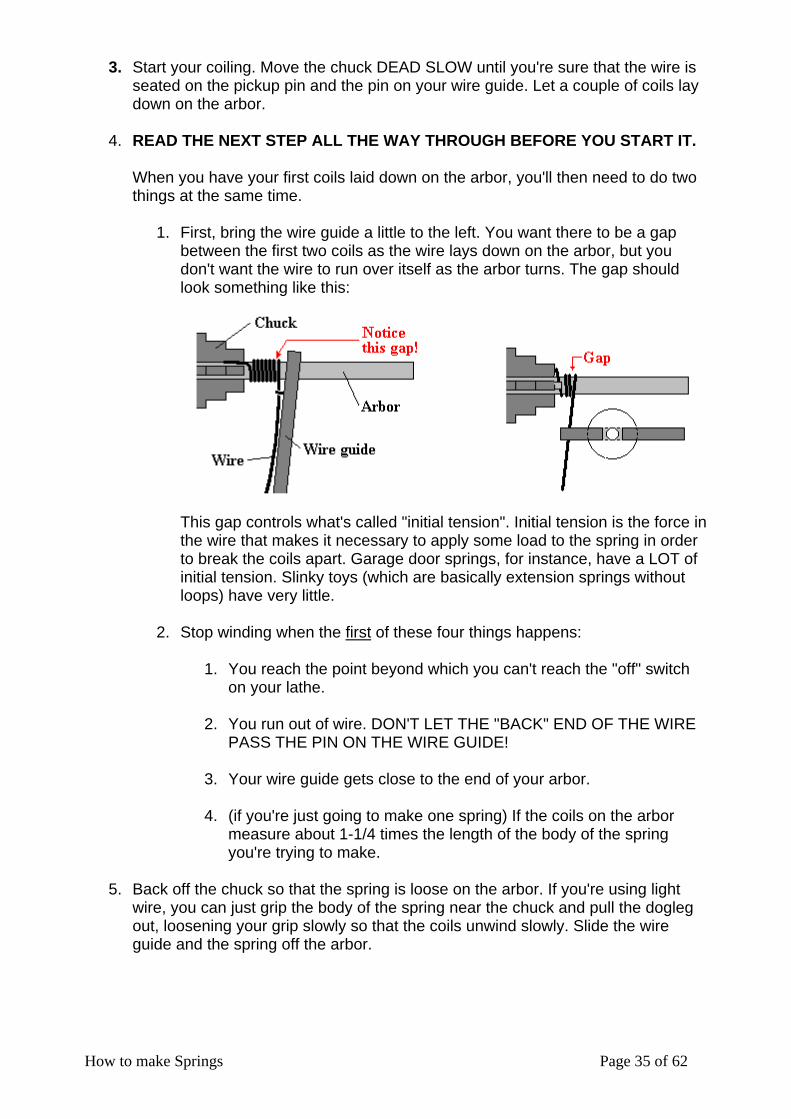
When you have your first coils laid down on the arbor, you'll then need to do twothings at the same time.
1. First, bring the wire guide a little to the left. You want there to be a gapbetween the first two coils as the wire lays down on the arbor, but youdon't want the wire to run over itself as the arbor turns. The gap shouldlook something like this:
This gap controls what's called "initial tension". Initial tension is the force inthe wire that makes it necessary to apply some load to the spring in orderto break the coils apart. Garage door springs, for instance, have a LOT ofinitial tension. Slinky toys (which are basically extension springs withoutloops) have very little.
2. Stop winding when the first of these four things happens:
1. You reach the point beyond which you can't reach the "off" switchon your lathe.
2. You run out of wire. DON'T LET THE "BACK" END OF THE WIREPASS THE PIN ON THE WIRE GUIDE!
3. Your wire guide gets close to the end of your arbor.
4. (if you're just going to make one spring) If the coils on the arbormeasure about 1-1/4 times the length of the body of the springyou're trying to make.
5. Back off the chuck so that the spring is loose on the arbor. If you're using lightwire, you can just grip the body of the spring near the chuck and pull the doglegout, loosening your grip slowly so that the coils unwind slowly. Slide the wireguide and the spring off the arbor.
How to make Springs Page 36 of 62
6. Put your spring into the oven and relieve the stress. Remember, springs made ofstainless steel wire will open up a little in the heat, while springs made of musicwire will contract.
When you've finished this process, let the spring air-cool and check the diameter. If youdid your setup properly, it should be just what you want. Then, look at the coils. Theyshould all lie flat against each other, all the way out to the ends of the spring body. Ifyou see gaps in the body of the spring, that means that you let the wire guide go too farto the right while you were coiling.Now, another word about initial tension. It may or may not be important whether theloops on the ends of your spring line up with each other or cross. If the spring is longenough, you can twist the loops so that they either align or cross, and the initial tensionin the coils will hold them in that position. The information that follows, which will tell you how to make loops, assumes that theposition of the loops IS important: if it's not, then just make the loops and let the spring'sinitial tension take care of how they align.
Making LoopsThis section will tell you how to make one type of loop; a basic, no-frills type of loop thatwill do the trick for most springs. There are other types of loops that are stronger andprettier but to make them, you need tooling that is specially made for making this type ofloop and nothing else. Brillisour & Moline used to make looping pliers designed for lightwire, but I'm afraid they're out of business. If anyone knows of a new source for these,lemme know. NEWS FLASH: "Hook-Kon" brand looping pliers are available from Advance CarMover! These are the same pliers mentioned above - I've got a pair and they work greatfor light wire extension springs!
Simple loops:
1. Cut off the end of your spring, leaving only coils that touch each other all the wayaround.
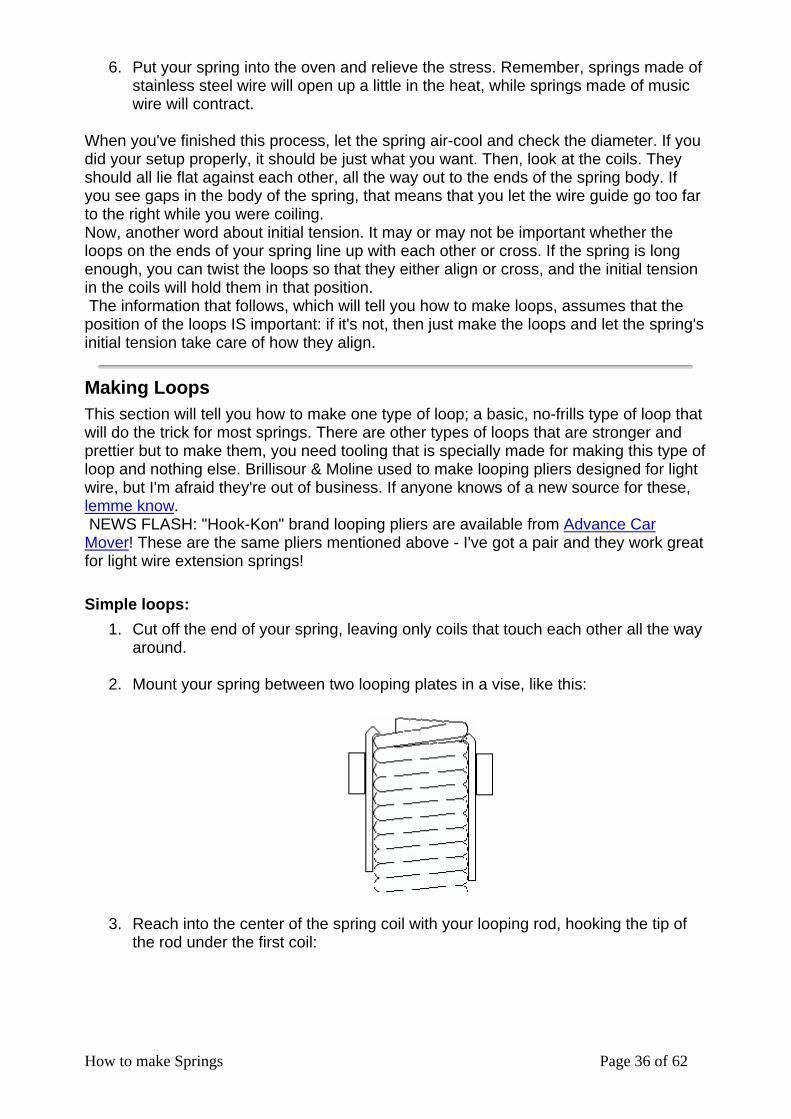
2. Mount your spring between two looping plates in a vise, like this:
3. Reach into the center of the spring coil with your looping rod, hooking the tip ofthe rod under the first coil:
How to make Springs Page 37 of 62
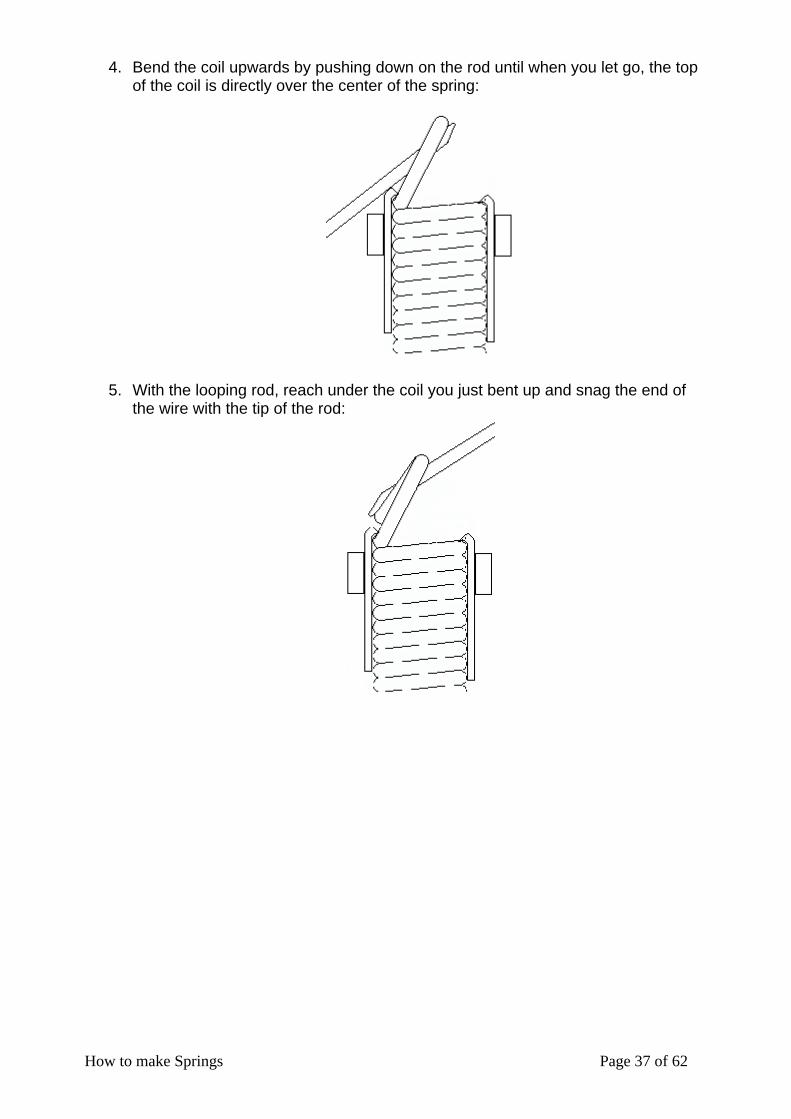
4. Bend the coil upwards by pushing down on the rod until when you let go, the topof the coil is directly over the center of the spring:
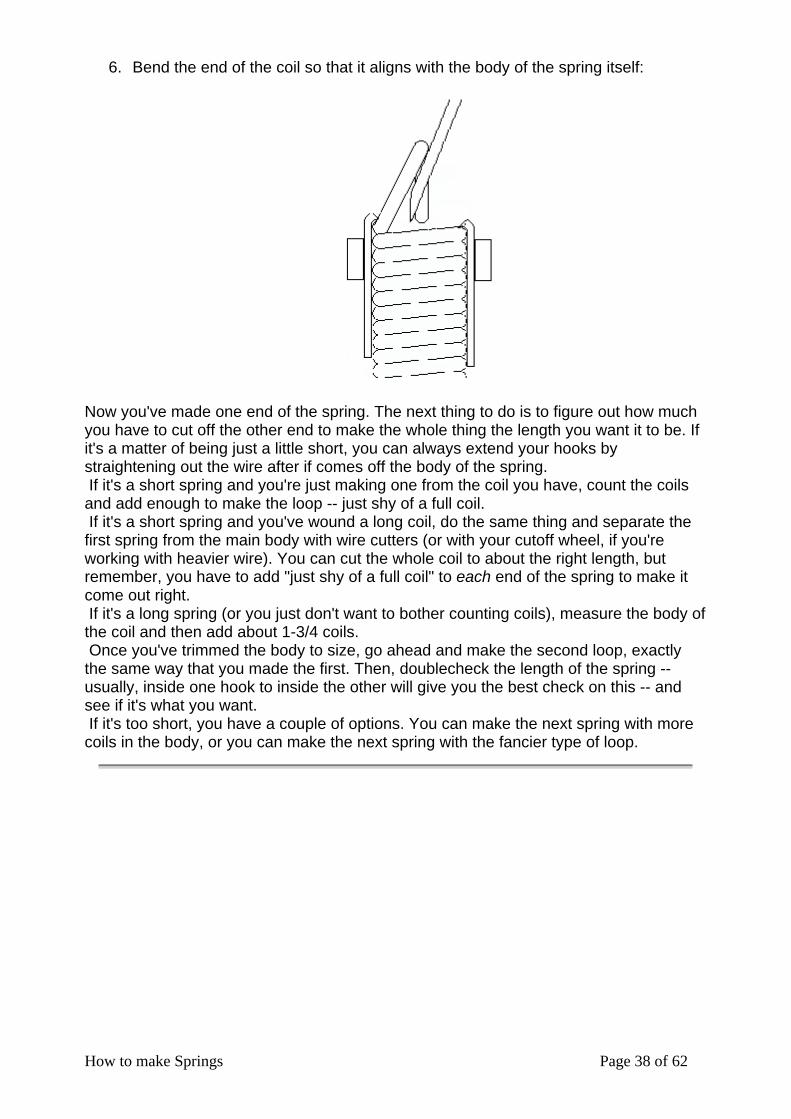
5. With the looping rod, reach under the coil you just bent up and snag the end ofthe wire with the tip of the rod:
How to make Springs Page 38 of 62
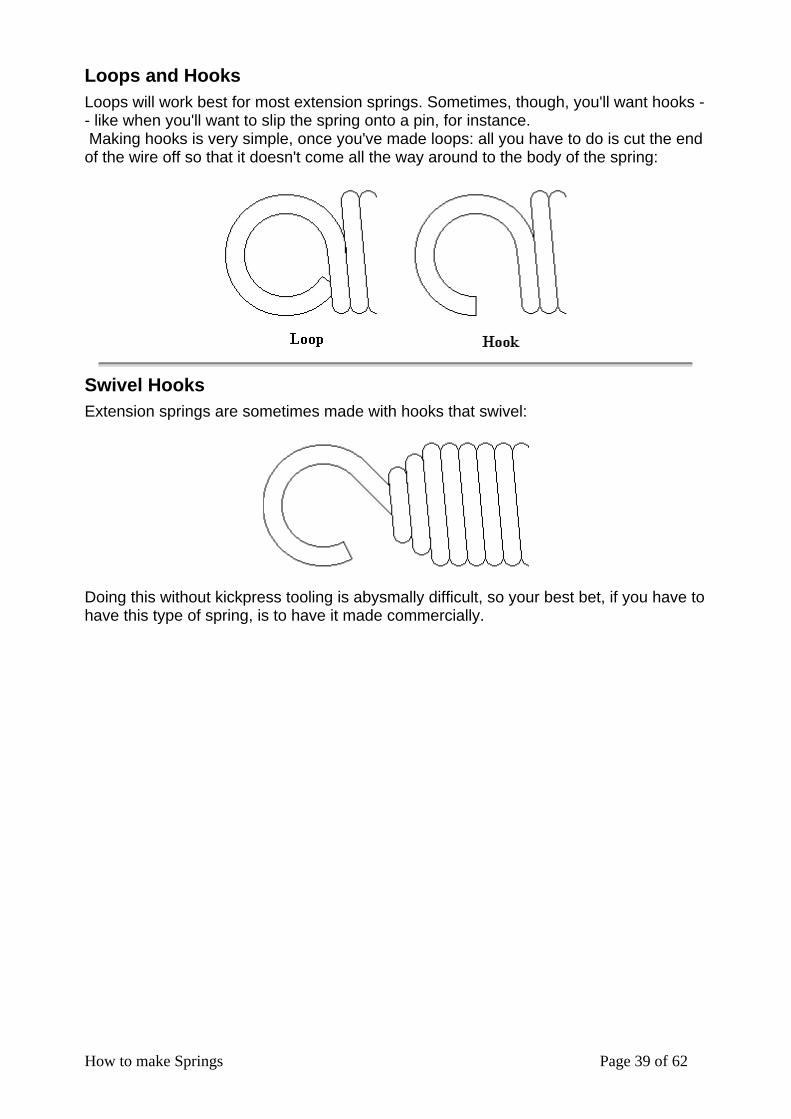
6. Bend the end of the coil so that it aligns with the body of the spring itself:
Now you've made one end of the spring. The next thing to do is to figure out how muchyou have to cut off the other end to make the whole thing the length you want it to be. Ifit's a matter of being just a little short, you can always extend your hooks bystraightening out the wire after if comes off the body of the spring. If it's a short spring and you're just making one from the coil you have, count the coilsand add enough to make the loop -- just shy of a full coil. If it's a short spring and you've wound a long coil, do the same thing and separate thefirst spring from the main body with wire cutters (or with your cutoff wheel, if you'reworking with heavier wire). You can cut the whole coil to about the right length, butremember, you have to add "just shy of a full coil" to each end of the spring to make itcome out right. If it's a long spring (or you just don't want to bother counting coils), measure the body ofthe coil and then add about 1-3/4 coils. Once you've trimmed the body to size, go ahead and make the second loop, exactlythe same way that you made the first. Then, doublecheck the length of the spring --usually, inside one hook to inside the other will give you the best check on this -- andsee if it's what you want. If it's too short, you have a couple of options. You can make the next spring with morecoils in the body, or you can make the next spring with the fancier type of loop.
How to make Springs Page 39 of 62
Loops and HooksLoops will work best for most extension springs. Sometimes, though, you'll want hooks -- like when you'll want to slip the spring onto a pin, for instance. Making hooks is very simple, once you've made loops: all you have to do is cut the endof the wire off so that it doesn't come all the way around to the body of the spring:
Swivel HooksExtension springs are sometimes made with hooks that swivel:
Doing this without kickpress tooling is abysmally difficult, so your best bet, if you have tohave this type of spring, is to have it made commercially.
How to make Springs Page 40 of 62
COMPRESSION SPRINGSThis chapter will tell you how to make compression springs. Making compressionsprings is a lot more fun than making either extension or torsion springs, but it's also alot more complicated.
Before we start, let's have a word about equipment. Compression springs have pitch --that's the distance between the open coils in the spring -- and to make a spring withpitch means that you have to be able to control how fast your wire guide travels from leftto right as the arbor turns around. With a lathe, it's easy. You just engage the lead screw and away you go. But with a drill or a hand winder, it's more difficult. Not impossible, just more difficult. Spring shops get around the difficulty by buying a hand-winding machine designed formaking light compression springs. These are designed so that once you set it up, youcan make any number of springs and they will all be exactly the same. CarlsonCompany, Inc. (http://www.carlsoncoinc.com) is one manufacturer of hand-winders:they can be contacted at 605 Bain St., Springdale AR 72764 or by phone at (501) 756-2169. Using a lathe, especially for light wire, you're likely to get a lot of different springs, eventhough you think you're doing the same thing each time you wind one. That's thedifference between doing the job "by eye" and having professional equipment.
Wire LengthThe first thing to do is figure out how much wire you'll need to make a spring. To do this:
1. Take the outside diameter of the spring and multiply it by 3.3.
2. Take the number of active coils and add 9.
3. Multiply the results of steps 1 and 2 together.
4. Add in a fudge factor. With light wire, make the fudge factor about 6"; withmedium wire, about 3'; with heavy wire, about 6'.
5. Write the result down. If you're WAY off, you can save yourself a lot of wire bycutting it closer. By writing down what you think you'll need, you'll know howmuch you can change this figure and still have a margin for safety.
Coiling the First TrialBEFORE YOU START, set your lead screw to the right setting and make sure yourback gear is engaged. Remember that the heavier the wire you're using, the slower yourlathe speed should be. Here's how to set your lead screw speed:
1. First make sure that the lead screw will go in the right direction -- left to right --when you engage it.
How to make Springs Page 41 of 62
2. The second step is to set the speed of the lead screw so that the coils will beproperly spaced along the arbor. To do this, measure (or figure out by math, orguess) how far apart the coils should be.
The quick way to ballpark the pitch is:
1. Take the free length of the spring and subtract 11/2 times the diameter ofthe wire.
2. Divide the result by the number of active coils.
3. Then turn on your lathe and engage the lead screw. Hold a piece of chalk tightagainst the tool post and move the post toward the arbor until the chalk justtouches it. Let the chalk mark the arbor for a couple of turns, and then stop thelathe.
4. Measure the distance between your chalk marks and compare it to what youwant. Adjust the speed of your lead screw until they're about the same.
Once you've gotten your lead screw setting, you can go ahead and make your first trialspring:
1. Cut a piece of wire to the length you figured out above. Be sure that anyone elsein the area stays out of danger while you do the rest of this. Also, get your ovenheated up.
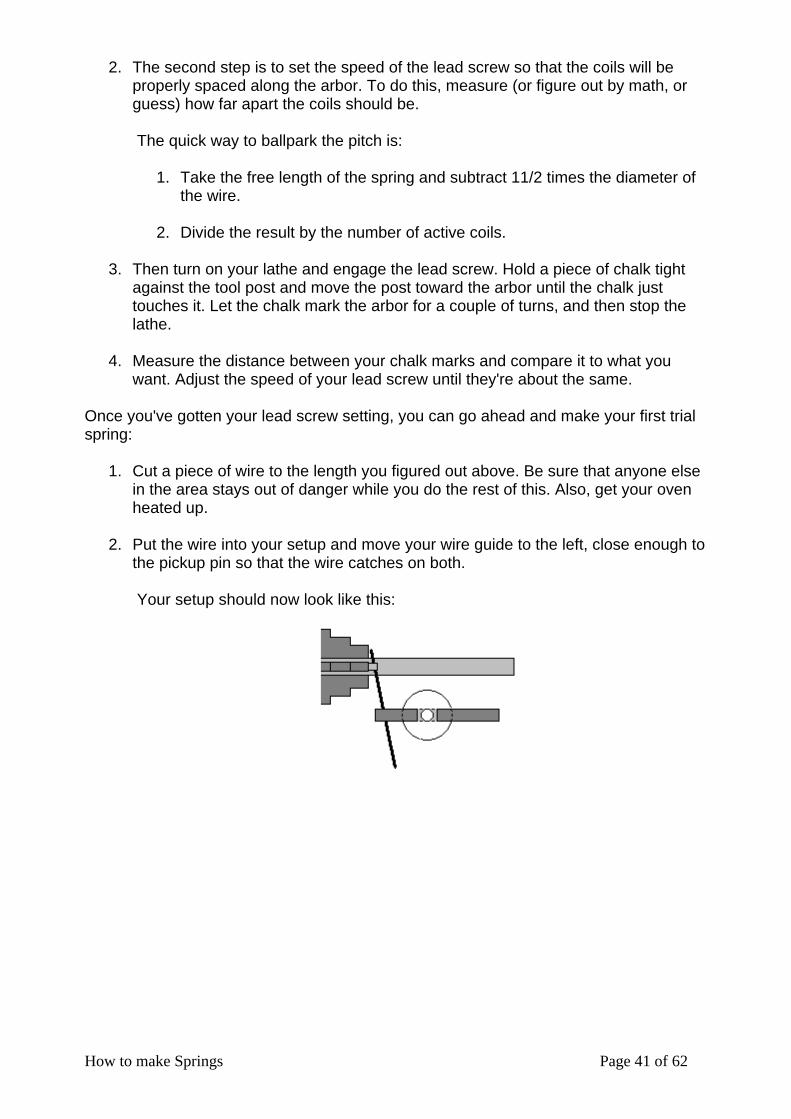
2. Put the wire into your setup and move your wire guide to the left, close enough tothe pickup pin so that the wire catches on both.
Your setup should now look like this:
How to make Springs Page 42 of 62
3. READ THE NEXT STEP ALL THE WAY THROUGH BEFORE YOU START IT.
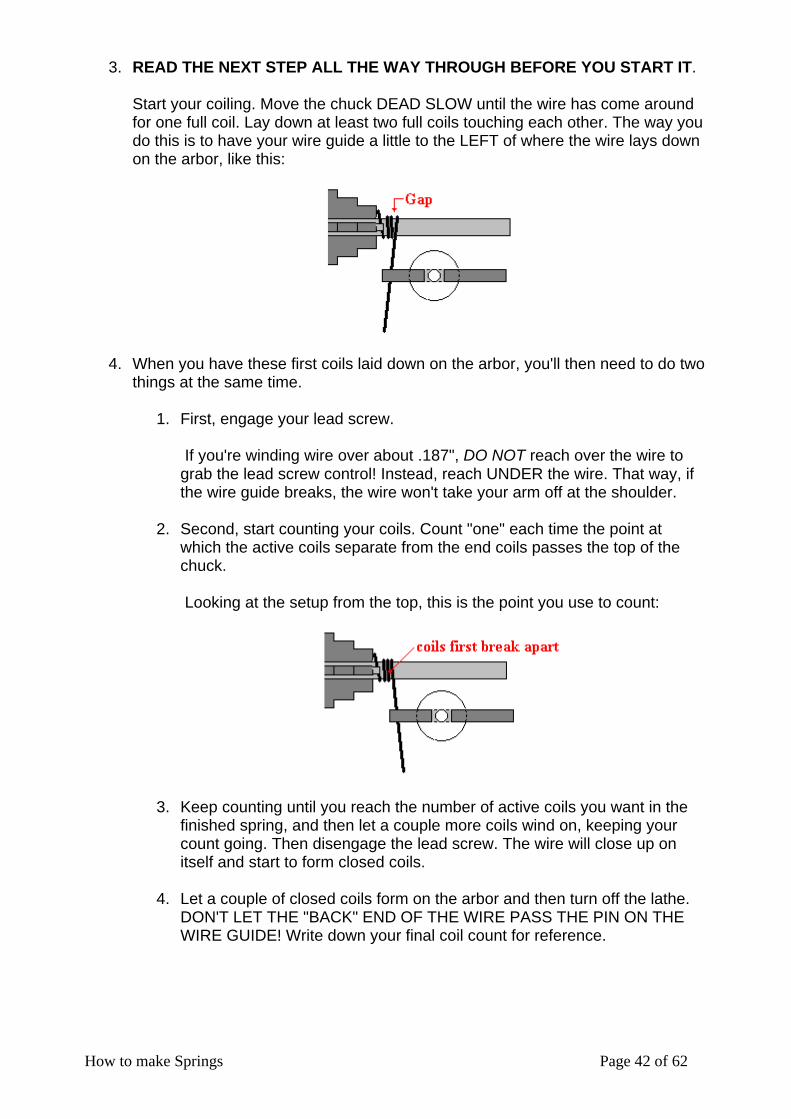
Start your coiling. Move the chuck DEAD SLOW until the wire has come aroundfor one full coil. Lay down at least two full coils touching each other. The way youdo this is to have your wire guide a little to the LEFT of where the wire lays downon the arbor, like this:
4. When you have these first coils laid down on the arbor, you'll then need to do twothings at the same time.
1. First, engage your lead screw.
If you're winding wire over about .187", DO NOT reach over the wire tograb the lead screw control! Instead, reach UNDER the wire. That way, ifthe wire guide breaks, the wire won't take your arm off at the shoulder.
2. Second, start counting your coils. Count "one" each time the point atwhich the active coils separate from the end coils passes the top of thechuck.
Looking at the setup from the top, this is the point you use to count:
3. Keep counting until you reach the number of active coils you want in thefinished spring, and then let a couple more coils wind on, keeping yourcount going. Then disengage the lead screw. The wire will close up onitself and start to form closed coils.
4. Let a couple of closed coils form on the arbor and then turn off the lathe.DON'T LET THE "BACK" END OF THE WIRE PASS THE PIN ON THEWIRE GUIDE! Write down your final coil count for reference.
How to make Springs Page 43 of 62
5. Reverse the chuck slowly so that the spring is loose on the arbor. Don't letthe pickup pin or the jaws of the chuck catch the front end of the wire asthe spring gets loose on the arbor!
If there's a lot of extra wire, cut it off. Then, put your spring into the ovenand relieve the stress. For this trial, you can leave it in the oven for half anhour. Remember that stress relief will cause music wire springs to closeup slightly, while stainless steel will expand.
When you've finished this process, let the spring air-cool and measure it to see howclose you came to what you want. Check the diameter first. If it's not OK, don't bothergoing any further: you'll need a different arbor, which will change all the rest of yourdimensions. If the diameter is OK, count the number of active coils in your spring. You should bepretty close: for a small number of springs, being a quarter coil off either way is OK. Ifyou're more than a quarter coil off, figure out how much more or less you need andchange your coil count for the next trial.
Coiling without a lead screwIt's possible to coil compression springs without a lead screw on your lathe. Thedifficulty you'll run into is making more than one spring alike. Here's how you do it:
1. Calculate the pitch of the spring. Take the free length, subtract 11/2 wirediameters, and divide the result by the number of active coils you want.
2. Hold your chalk up against the tool post and move the tool post toward the arboruntil the chalk leaves a mark an inch or two to the right of the chuck.
3. Turn on the lathe, letting the chalk ride on the arbor, making a complete circlearound the arbor.
4. With the handwheel, move the tool post to the right at a steady pace, keeping thechalk in contact with the arbor. The chalk will mark a path approximating thespring you want to make.
5. Count the number of coils you mark with the chalk and stop the rightward motionof the tool post when you reach your trial coil count.
6. Let the lathe continue to run until the chalk has marked the arbor all the wayaround.
7. Wind a trial spring, making the wire follow your chalk line as closely as possible.
8. If your spring is not right, wash the chalk off the arbor, recalculate the pitch asneeded, and try again.
How to make Springs Page 44 of 62
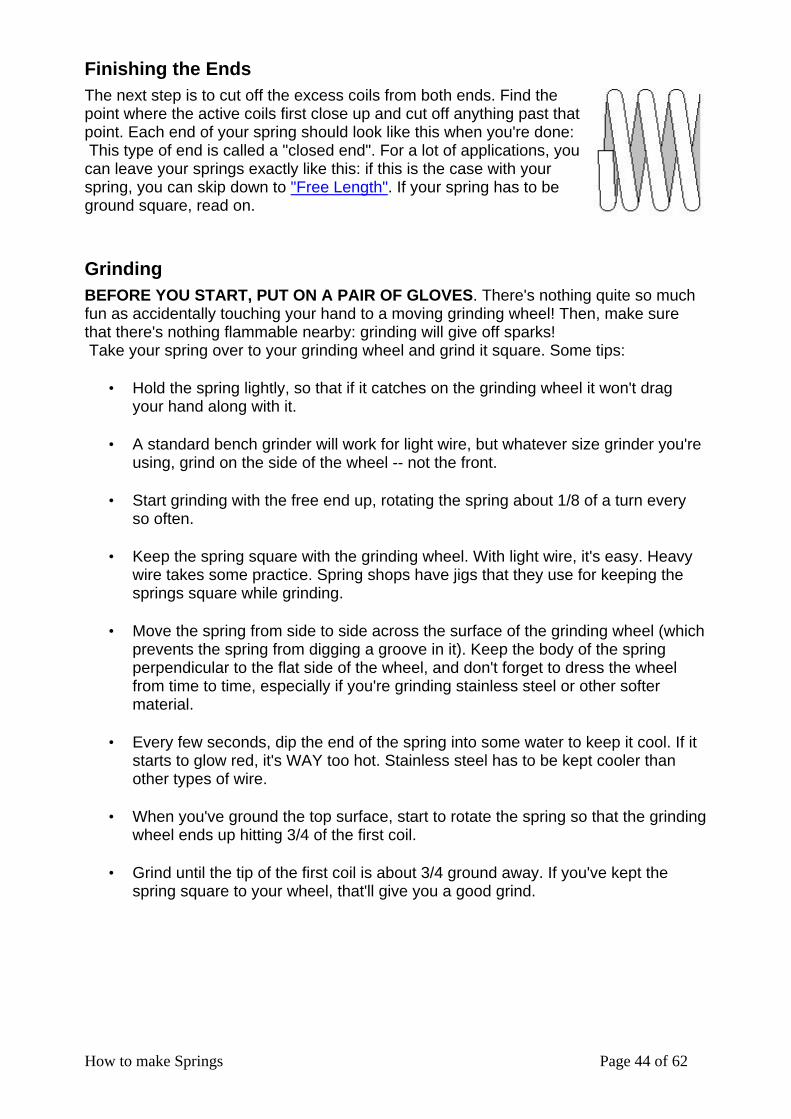
Finishing the EndsThe next step is to cut off the excess coils from both ends. Find thepoint where the active coils first close up and cut off anything past thatpoint. Each end of your spring should look like this when you're done: This type of end is called a "closed end". For a lot of applications, youcan leave your springs exactly like this: if this is the case with yourspring, you can skip down to "Free Length". If your spring has to beground square, read on.
GrindingBEFORE YOU START, PUT ON A PAIR OF GLOVES. There's nothing quite so muchfun as accidentally touching your hand to a moving grinding wheel! Then, make surethat there's nothing flammable nearby: grinding will give off sparks! Take your spring over to your grinding wheel and grind it square. Some tips:
• Hold the spring lightly, so that if it catches on the grinding wheel it won't dragyour hand along with it.
• A standard bench grinder will work for light wire, but whatever size grinder you'reusing, grind on the side of the wheel -- not the front.
• Start grinding with the free end up, rotating the spring about 1/8 of a turn everyso often.
• Keep the spring square with the grinding wheel. With light wire, it's easy. Heavywire takes some practice. Spring shops have jigs that they use for keeping thesprings square while grinding.
• Move the spring from side to side across the surface of the grinding wheel (whichprevents the spring from digging a groove in it). Keep the body of the springperpendicular to the flat side of the wheel, and don't forget to dress the wheelfrom time to time, especially if you're grinding stainless steel or other softermaterial.
• Every few seconds, dip the end of the spring into some water to keep it cool. If itstarts to glow red, it's WAY too hot. Stainless steel has to be kept cooler thanother types of wire.
• When you've ground the top surface, start to rotate the spring so that the grindingwheel ends up hitting 3/4 of the first coil.
• Grind until the tip of the first coil is about 3/4 ground away. If you've kept thespring square to your wheel, that'll give you a good grind.
How to make Springs Page 45 of 62
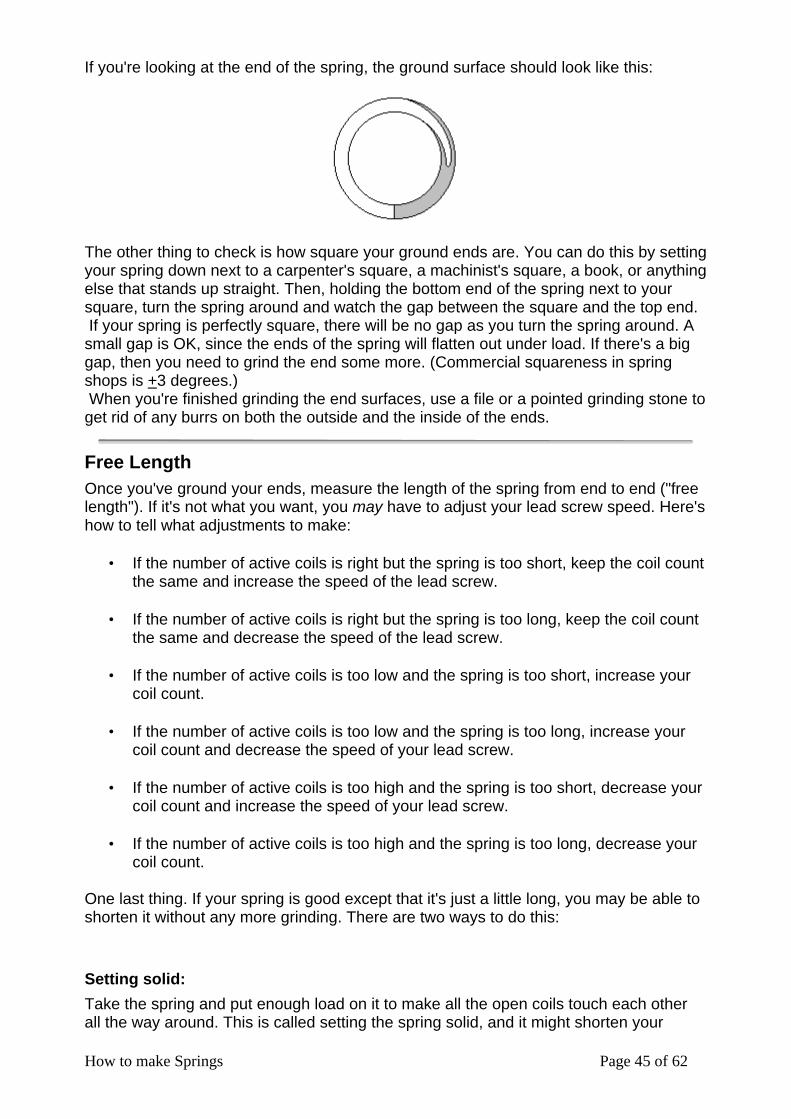
If you're looking at the end of the spring, the ground surface should look like this:
The other thing to check is how square your ground ends are. You can do this by settingyour spring down next to a carpenter's square, a machinist's square, a book, or anythingelse that stands up straight. Then, holding the bottom end of the spring next to yoursquare, turn the spring around and watch the gap between the square and the top end. If your spring is perfectly square, there will be no gap as you turn the spring around. Asmall gap is OK, since the ends of the spring will flatten out under load. If there's a biggap, then you need to grind the end some more. (Commercial squareness in springshops is +3 degrees.) When you're finished grinding the end surfaces, use a file or a pointed grinding stone toget rid of any burrs on both the outside and the inside of the ends.
Free LengthOnce you've ground your ends, measure the length of the spring from end to end ("freelength"). If it's not what you want, you may have to adjust your lead screw speed. Here'show to tell what adjustments to make:
• If the number of active coils is right but the spring is too short, keep the coil countthe same and increase the speed of the lead screw.
• If the number of active coils is right but the spring is too long, keep the coil countthe same and decrease the speed of the lead screw.
• If the number of active coils is too low and the spring is too short, increase yourcoil count.
• If the number of active coils is too low and the spring is too long, increase yourcoil count and decrease the speed of your lead screw.
• If the number of active coils is too high and the spring is too short, decrease yourcoil count and increase the speed of your lead screw.
• If the number of active coils is too high and the spring is too long, decrease yourcoil count.
One last thing. If your spring is good except that it's just a little long, you may be able toshorten it without any more grinding. There are two ways to do this:
Setting solid:
Take the spring and put enough load on it to make all the open coils touch each otherall the way around. This is called setting the spring solid, and it might shorten your
How to make Springs Page 46 of 62
spring up a little bit. Remember that when you put a load on a compression spring, it'll want to spring backto its free length. If you hold it unevenly, it might fly out sideways. Best bet, if you'regoing to set your springs solid, is to mount your arbor in a vise, slip your spring(s) ontothe arbor, and set them solid using a piece of flat steel, drilled to accommodate thearbor. This will prevent your springs from flying away and hurting someone.
Heat setting:
Heat setting your springs will make them shorter than setting them solid will. You MUSTheat set springs that will be used somewhere hot -- like inside an engine, for instance.Here's how to do it:
1. Find a rod that's longer than your spring and just a little bit narrower than theinside diameter of the spring. The arbor you used to coil the spring should worknicely.
2. Grind a flat spot near one end and make two collet clamps. Mount one so thatthe set screw fits into the flat spot on the rod.
3. Slide your spring onto the rod up against the collet clamp and slide the othercollet clamp on after it.
4. Set the spring solid ON THE BAR, using a vise as in "setting solid" above, andtighten the set screw on the second collet clamp so that it holds the spring in thatposition. AFTER THIS POINT, BE VERY CAREFUL NOT TO POINT EITHER END OFTHE ROD AT ANYONE, INCLUDING YOURSELF!
5. Stick the rod, with the spring and collet clamps, into your oven. The longer you letit cook, or the higher the temperature, the shorter the spring will get.
6. Take the rod out of the oven and let it air-cool.
7. MAKING SURE THAT THE ENDS OF THE ROD POINT AWAY FROM YOU,loosen the second collet clamp. If you're working with heavy wire, mount the "tail"end of the rod in a vise, so that when the collet clamp breaks loose, it won't goanywhere.
The spring will bounce back to near its free length, and you can check it against whatyou want.
How to make Springs Page 47 of 62
FINISHINGThis section will tell you about a few of the finishing touches you can put on yoursprings. Some of these are necessary, while others may be called for by the design youhave in mind.
TweakingSad to say, your spring may not be exactly what you want. Sometimes not all is lostthough -- you should know, first, how to correct what's wrong and second, what you cando to "tweak" your springs into shape. First, how to correct what's wrong:
Increasing the Will give you
Number of coils A weaker spring: it will take less force to deflectthe spring a certain amount.
Diameter of the spring A weaker spring: it will take less force to deflectthe spring a certain amount.
Diameter of the wire A stronger spring: it will take more force todeflect the spring a certain amount.
(You'll note that this is the same data you read about in the section on spring design.) Sometimes you'll be able to "tweak" your springs into shape, especially when they'renot too far off, and also especially before you've relieved the stress. Here are sometechniques you can use: You can open up the diameter a notch or two by grabbing the ends of the wire in yourhands and twisting the coil gently in the opposite direction. This works best on shortsprings with few coils. On longer springs with many coils, you can open the diameter upby simply dropping the spring onto a hard surface (like maybe the floor). Compression springs can be shortened by setting them solid or heat setting them (seethe section on compression springs). You can lengthen a compression spring by drivinga wedge in between each pair of coils. Be careful to use the same amount of force eachtime you do this, and also be sure you do it evenly all the way up and down the springbody. Note that when you do this, the diameter of the spring will also open up.

How to make Springs Page 48 of 62
Necessary Steps
Stress relief
Spring wire that gets bent has to have the bending stress relieved. Here are the stressrelief guidelines for all common spring wire materials.
Material Movement Temperature Time (hrs)Aluminum (none) 400°F 200°C 1/2Basic (none) (none) (none)Brass (none) (just warm) --Beryllium copper close slightly 600°F 315°C 1 1/2Bronze (none) 350°F 180°C 1/2Chrome Silicon close 800°F 430°C 1/2Chrome Vanadium close 800°F 430°C 1/2Elgiloy open 900°F 480°C 5Hard drawn (none) 500°F 260°C 1/3Inconel (none) 800°F 430°C 1Inocnel 718 (none) 1375°F 750°C 16
Inconel X #1 temper (none) 1375 °Fthen 700°F
750°Cthen 370°C
161
Inconel X spring temper (none) 1250°F 680°C 4K Monel (none) 1000°F 540°C 4Maraging flat stock (none) 950°F 510°C 4+Maraging wire (none) 850°F 450°C 1/2Monel (none) 600°F 315°C 1Music wire close 500°F 260°C 1Ni-span C (open) 1250°F 680°C 3Oil Tempered close slightly 500°F 260°C 1/2Premier (none) 625°F 330°C 1/2Rene' 41 (none) 1400°F 760°C 16Stainless steel (302) open 600°F 315°C 1Stainless steel(17-4 or 17-7) open 900°F 480°C 1
Titanium open 800°F 430°C 10
How to make Springs Page 49 of 62
Passivating
Working with stainless steel creates "free iron" contamination on the surface that canlater rust and create problems with the part and its working environment. The process ofremoving this free iron is called passivation: here's how you do it. BEFORE YOU START, find a safe spot to do this. You should do it outdoors, and awayfrom anyplace where animals or other people can get into it.
1. Put your springs into a stainless steel basket, which you made on the toolingchapter.
2. Fill your passivating tank with acid. The tank itself can be anything large enoughthat doesn't leak and is made out of stainless steel. An old sink, fitted with astainless steel plug in the drain hole, works great. Muriatic acid -- the same kindthey use for swimming pools -- is a good acid to use. Pour the acid into the tank,being careful not to get ANY on your body or your clothes.
3. Lower the basket with the springs into the tank and let it sit there for an hour.
4. After an hour, lift the basket out of the tank and wash the springs with plainwater. If you want to save the acid for later use, put it back into its originalcontainer and WASH OUT THE TANK so that no animals or people can get intoit accidentally.
Don't passivate anything but stainless, by the way: the acid will eat non-stainless steeland ruin the springs.
Optional StepsDepending on where you want your springs to go, you may want them to look shiny. Ifyou do, you can have them plated after you're finished making them. Plating will notchange their dimensions. You can have springs plated with chrome, silver, gold, or anyother metal. Springs that are used to make electrical connections are usually plated withsilver or gold. If you're not in the plating business yourself, your best bet is to get yoursprings plated commercially, rather than try to do it yourself. Also depending on the use of the springs you make, you may want to have thempainted or dipped in rubber (like if you want to hang something from an extension springand not let the spring scratch whatever it is that's hanging from it). I personally think that small-wire springs can be beautiful, and although I've never doneit myself, there's no reason why someone couldn't make jewelry using them as astarting point. Earrings, for instance. If you want to try this out, go right ahead.
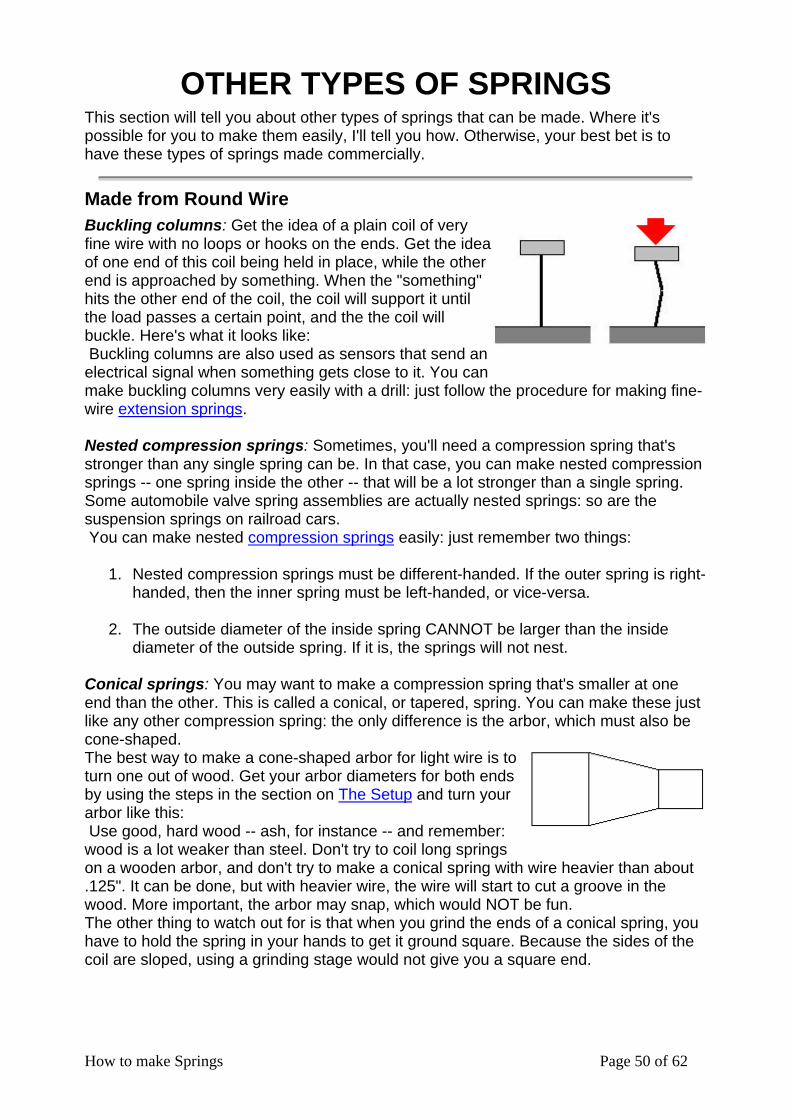
How to make Springs Page 50 of 62
OTHER TYPES OF SPRINGSThis section will tell you about other types of springs that can be made. Where it'spossible for you to make them easily, I'll tell you how. Otherwise, your best bet is tohave these types of springs made commercially.
Made from Round WireBuckling columns: Get the idea of a plain coil of veryfine wire with no loops or hooks on the ends. Get the ideaof one end of this coil being held in place, while the otherend is approached by something. When the "something"hits the other end of the coil, the coil will support it untilthe load passes a certain point, and the the coil willbuckle. Here's what it looks like: Buckling columns are also used as sensors that send anelectrical signal when something gets close to it. You canmake buckling columns very easily with a drill: just follow the procedure for making fine-wire extension springs.
Nested compression springs: Sometimes, you'll need a compression spring that'sstronger than any single spring can be. In that case, you can make nested compressionsprings -- one spring inside the other -- that will be a lot stronger than a single spring.Some automobile valve spring assemblies are actually nested springs: so are thesuspension springs on railroad cars. You can make nested compression springs easily: just remember two things:
1. Nested compression springs must be different-handed. If the outer spring is right-handed, then the inner spring must be left-handed, or vice-versa.
2. The outside diameter of the inside spring CANNOT be larger than the insidediameter of the outside spring. If it is, the springs will not nest.
Conical springs: You may want to make a compression spring that's smaller at oneend than the other. This is called a conical, or tapered, spring. You can make these justlike any other compression spring: the only difference is the arbor, which must also becone-shaped.The best way to make a cone-shaped arbor for light wire is toturn one out of wood. Get your arbor diameters for both endsby using the steps in the section on The Setup and turn yourarbor like this: Use good, hard wood -- ash, for instance -- and remember:wood is a lot weaker than steel. Don't try to coil long springson a wooden arbor, and don't try to make a conical spring with wire heavier than about.125". It can be done, but with heavier wire, the wire will start to cut a groove in thewood. More important, the arbor may snap, which would NOT be fun.The other thing to watch out for is that when you grind the ends of a conical spring, youhave to hold the spring in your hands to get it ground square. Because the sides of thecoil are sloped, using a grinding stage would not give you a square end.
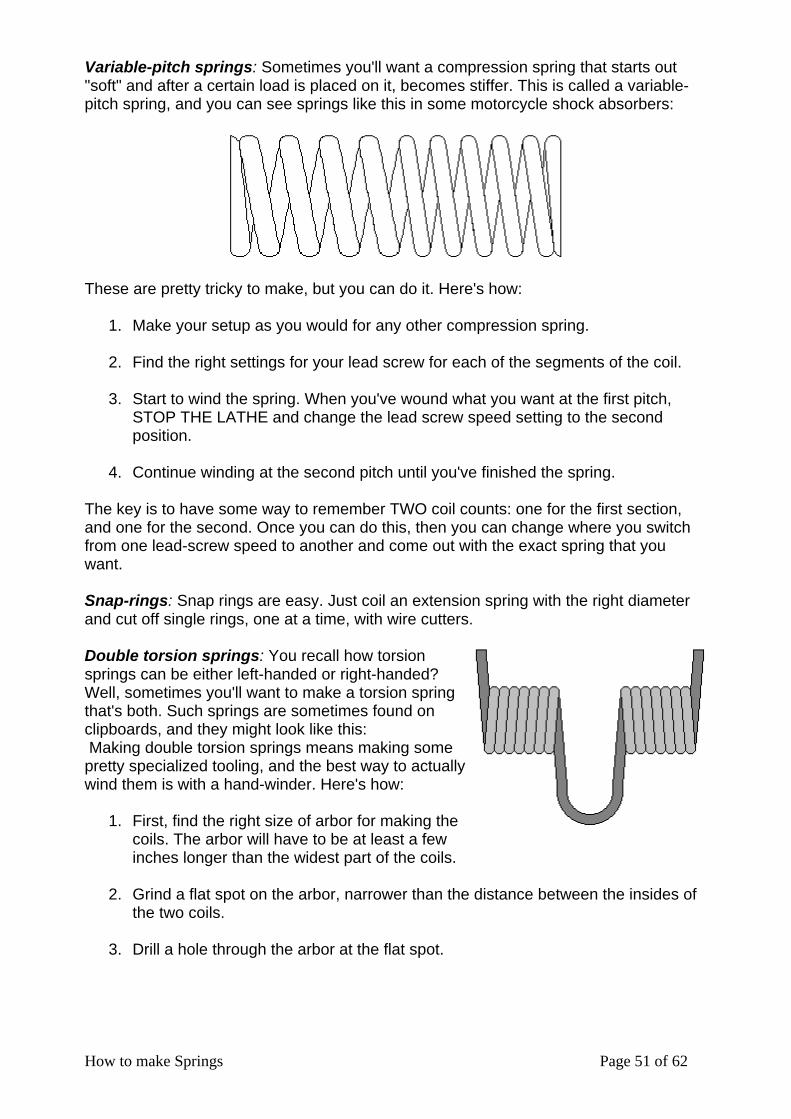
How to make Springs Page 51 of 62
Variable-pitch springs: Sometimes you'll want a compression spring that starts out"soft" and after a certain load is placed on it, becomes stiffer. This is called a variable-pitch spring, and you can see springs like this in some motorcycle shock absorbers:
These are pretty tricky to make, but you can do it. Here's how:
1. Make your setup as you would for any other compression spring.
2. Find the right settings for your lead screw for each of the segments of the coil.
3. Start to wind the spring. When you've wound what you want at the first pitch,STOP THE LATHE and change the lead screw speed setting to the secondposition.
4. Continue winding at the second pitch until you've finished the spring.
The key is to have some way to remember TWO coil counts: one for the first section,and one for the second. Once you can do this, then you can change where you switchfrom one lead-screw speed to another and come out with the exact spring that youwant.
Snap-rings: Snap rings are easy. Just coil an extension spring with the right diameterand cut off single rings, one at a time, with wire cutters.
Double torsion springs: You recall how torsionsprings can be either left-handed or right-handed?Well, sometimes you'll want to make a torsion springthat's both. Such springs are sometimes found onclipboards, and they might look like this: Making double torsion springs means making somepretty specialized tooling, and the best way to actuallywind them is with a hand-winder. Here's how:
1. First, find the right size of arbor for making thecoils. The arbor will have to be at least a fewinches longer than the widest part of the coils.
2. Grind a flat spot on the arbor, narrower than the distance between the insides ofthe two coils.
3. Drill a hole through the arbor at the flat spot.
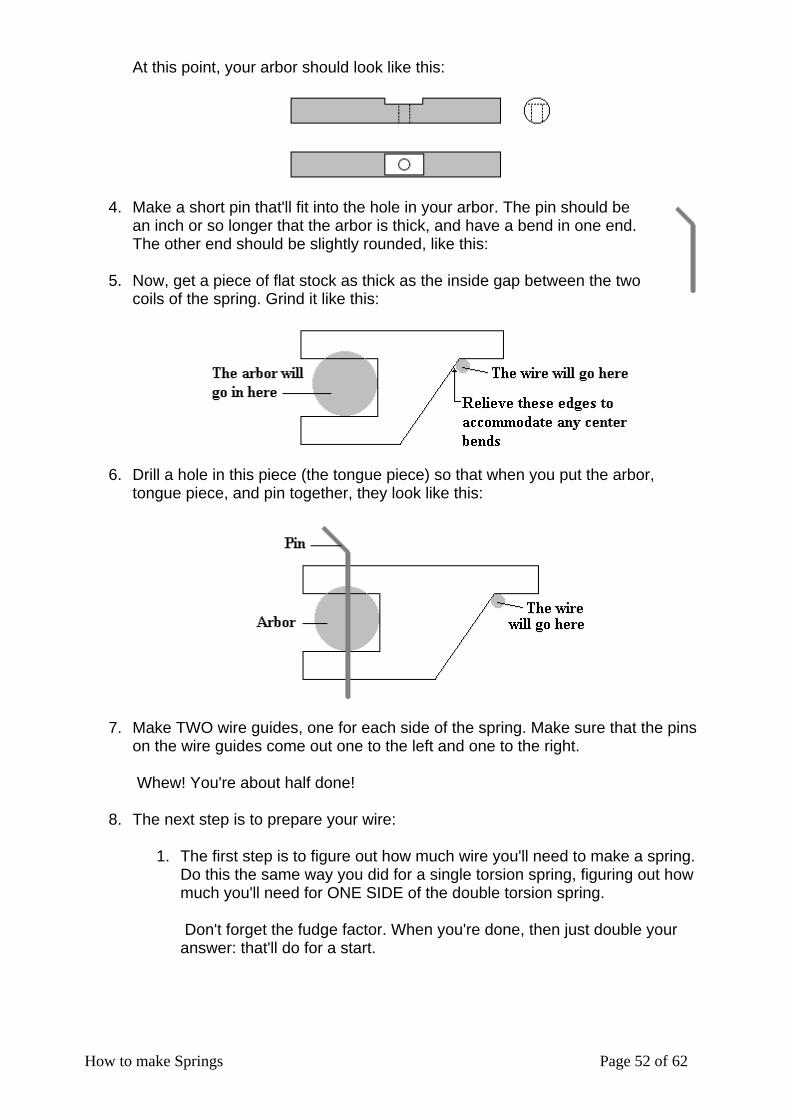
How to make Springs Page 52 of 62
At this point, your arbor should look like this:
4. Make a short pin that'll fit into the hole in your arbor. The pin should bean inch or so longer that the arbor is thick, and have a bend in one end.The other end should be slightly rounded, like this:
5. Now, get a piece of flat stock as thick as the inside gap between the twocoils of the spring. Grind it like this:
6. Drill a hole in this piece (the tongue piece) so that when you put the arbor,tongue piece, and pin together, they look like this:
7. Make TWO wire guides, one for each side of the spring. Make sure that the pinson the wire guides come out one to the left and one to the right.
Whew! You're about half done!
8. The next step is to prepare your wire:
1. The first step is to figure out how much wire you'll need to make a spring.Do this the same way you did for a single torsion spring, figuring out howmuch you'll need for ONE SIDE of the double torsion spring.
Don't forget the fudge factor. When you're done, then just double youranswer: that'll do for a start.
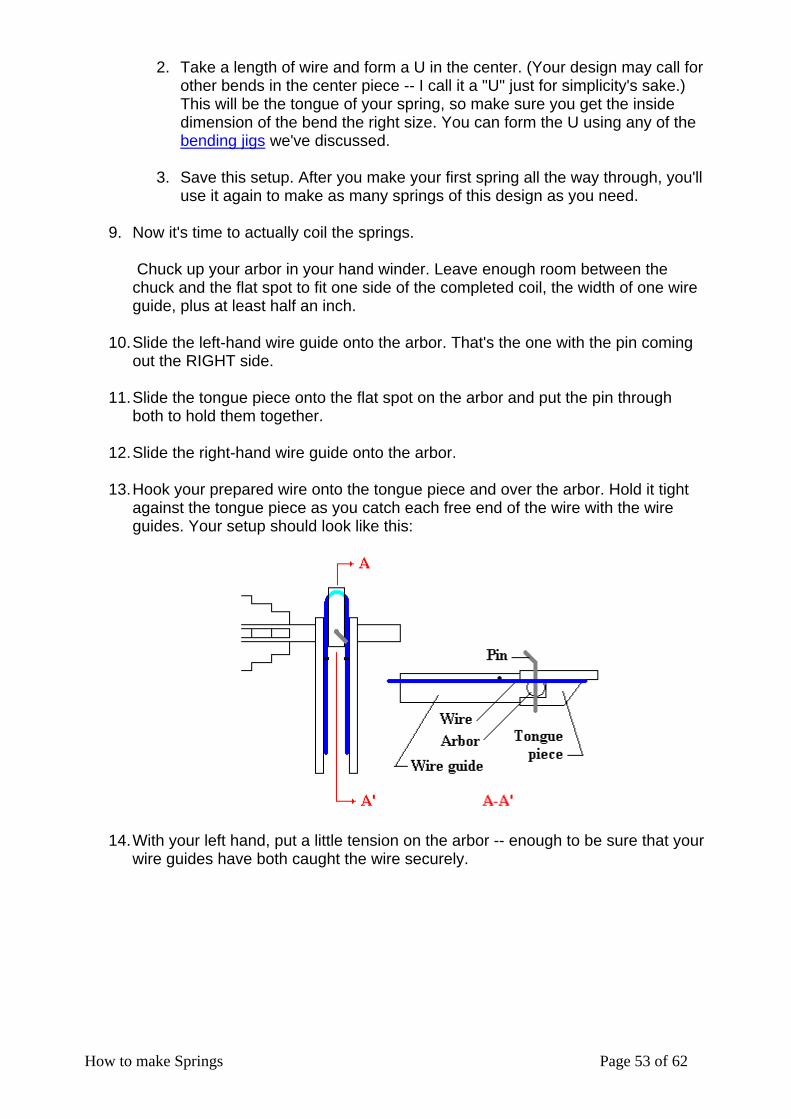
How to make Springs Page 53 of 62
2. Take a length of wire and form a U in the center. (Your design may call forother bends in the center piece -- I call it a "U" just for simplicity's sake.)This will be the tongue of your spring, so make sure you get the insidedimension of the bend the right size. You can form the U using any of thebending jigs we've discussed.
3. Save this setup. After you make your first spring all the way through, you'lluse it again to make as many springs of this design as you need.
9. Now it's time to actually coil the springs.
Chuck up your arbor in your hand winder. Leave enough room between thechuck and the flat spot to fit one side of the completed coil, the width of one wireguide, plus at least half an inch.
10. Slide the left-hand wire guide onto the arbor. That's the one with the pin comingout the RIGHT side.
11. Slide the tongue piece onto the flat spot on the arbor and put the pin throughboth to hold them together.
12. Slide the right-hand wire guide onto the arbor.
13. Hook your prepared wire onto the tongue piece and over the arbor. Hold it tightagainst the tongue piece as you catch each free end of the wire with the wireguides. Your setup should look like this:
14. With your left hand, put a little tension on the arbor -- enough to be sure that yourwire guides have both caught the wire securely.
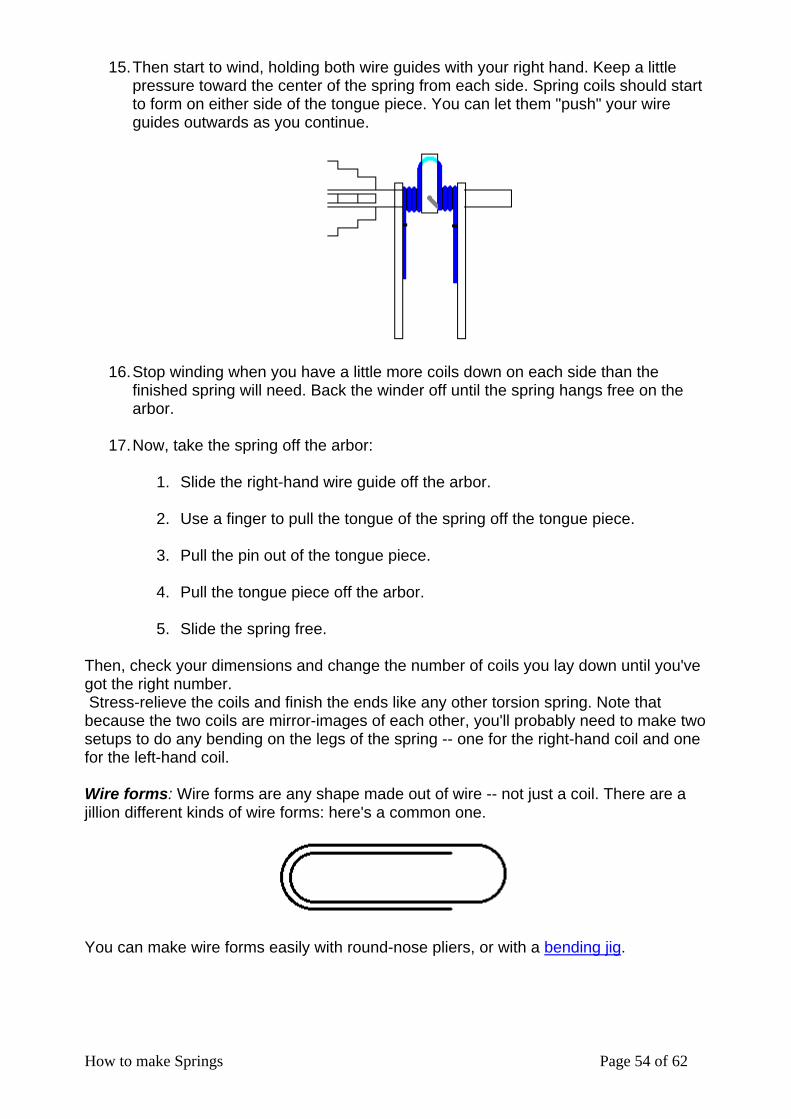
How to make Springs Page 54 of 62
15. Then start to wind, holding both wire guides with your right hand. Keep a littlepressure toward the center of the spring from each side. Spring coils should startto form on either side of the tongue piece. You can let them "push" your wireguides outwards as you continue.
16. Stop winding when you have a little more coils down on each side than thefinished spring will need. Back the winder off until the spring hangs free on thearbor.
17. Now, take the spring off the arbor:
1. Slide the right-hand wire guide off the arbor.
2. Use a finger to pull the tongue of the spring off the tongue piece.
3. Pull the pin out of the tongue piece.
4. Pull the tongue piece off the arbor.
5. Slide the spring free.
Then, check your dimensions and change the number of coils you lay down until you'vegot the right number. Stress-relieve the coils and finish the ends like any other torsion spring. Note thatbecause the two coils are mirror-images of each other, you'll probably need to make twosetups to do any bending on the legs of the spring -- one for the right-hand coil and onefor the left-hand coil.
Wire forms: Wire forms are any shape made out of wire -- not just a coil. There are ajillion different kinds of wire forms: here's a common one.
You can make wire forms easily with round-nose pliers, or with a bending jig.
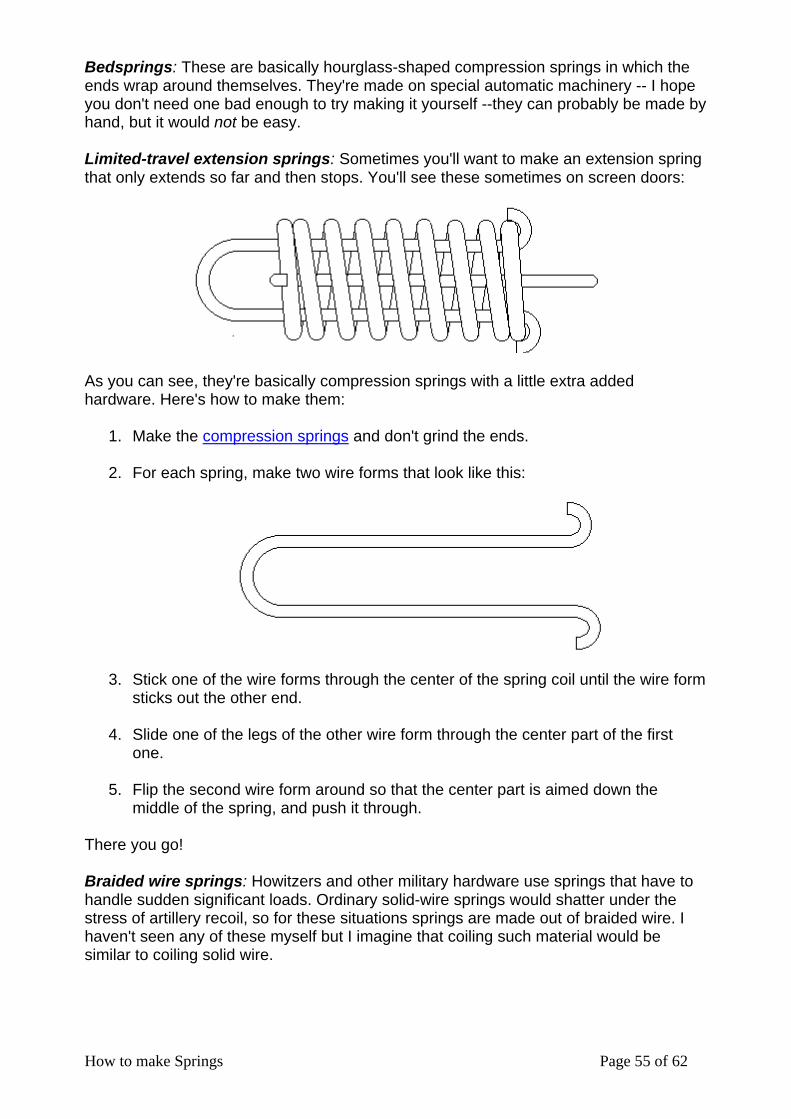
How to make Springs Page 55 of 62
Bedsprings: These are basically hourglass-shaped compression springs in which theends wrap around themselves. They're made on special automatic machinery -- I hopeyou don't need one bad enough to try making it yourself --they can probably be made byhand, but it would not be easy.
Limited-travel extension springs: Sometimes you'll want to make an extension springthat only extends so far and then stops. You'll see these sometimes on screen doors:
As you can see, they're basically compression springs with a little extra addedhardware. Here's how to make them:
1. Make the compression springs and don't grind the ends.
2. For each spring, make two wire forms that look like this:
3. Stick one of the wire forms through the center of the spring coil until the wire formsticks out the other end.
4. Slide one of the legs of the other wire form through the center part of the firstone.
5. Flip the second wire form around so that the center part is aimed down themiddle of the spring, and push it through.
There you go!
Braided wire springs: Howitzers and other military hardware use springs that have tohandle sudden significant loads. Ordinary solid-wire springs would shatter under thestress of artillery recoil, so for these situations springs are made out of braided wire. Ihaven't seen any of these myself but I imagine that coiling such material would besimilar to coiling solid wire.
How to make Springs Page 56 of 62
Very heavy wire: What's the heaviest wire that can be made into a spring? Well, coilingcold, the heaviest is about 5/8". Most spring shops won't coil 5/8" wire cold, though,because it's too dangerous. Springs made from larger material start as straight bars of steel with the ends tapereddown. The bars are heated red-hot and then coiled on special machinery. I've seen 2-1/2" bars made into railroad suspension springs, and I've heard of 6" bars being madeinto compression springs that are used as shock absorbers for underground militarycommand sites. If you need a spring made with wire thicker than .375", I'd recommend going to a springshop and having them make your springs for you. With a big enough lathe and athorough awareness of wire safety, you can coil up to .625", but frankly, mostspringmakers you talk to will think you're crazy.
Very light wire: Common commercial coiling machines typically handle wire as fine as.010", but springs have been made with wire as fine as .002" using custom-made microcoilers. Winding extremely fine wire by hand is difficult because the wire tangles easilyand cuts flesh even easier. Leave these to the pros, OK?
Springs Made from Other MaterialsMany springs are made from material other than round wire. Again, if you can makesome of these with simple setups, this section will tell you how.
Square and flat wire: All types of coil springs can be made from either square or flatwire. Using these materials gives you a stronger spring than if you use round wire forthe same design. You can use these materials to make your springs: the only change to your setup is thewire guide. Besides the wire guide that fits in the tool post of your lathe, hold the wire ina crescent wrench, in front of the tool post. As the wire coils onto the arbor, it'll try to "roll" in a clockwise direction. To prevent this,keep a counterclockwise pressure on the wire with the crescent wrench. Then, the wirewill lay down flat on the arbor.
Tubular stock: You can also coil tubing into spring shapes for cooling coils and soforth. Tubular stock is very soft, though, compared with solid wire, so a couple of extrasteps are needed: • All tooling parts which come in contact with the stock should be "dished" to
accommodate the stock. That means the arbor should be made with a shallowgroove:
• And the wire guide, ideally, should be a roller with a groove in it, gimballed to allow itto swing:
• To prevent the stock from collapsing during bending, fill it with fine sand before youstart. Be sure the sand is packed tight -- the tighter the sand, the less the stock willdeform.
Leaf springs: Leaf springs start out as bars of flat stock, which are then heated red-hotand formed, either by machine or by hand. If you need leaf springs, best bet is to go to aspring shop that specializes in making them.
Belleville washers: These are just like regular washers -- flat metal donuts -- except

How to make Springs Page 57 of 62
that the inside of the washer is higher than the outside. Belleville washers are mountedin a pack and with a bunch of them together, make a very strong spring: Belleville washers are made by a stamping process that's best done in a spring shop.
Clock springs: Some springs are made from wide, flat stock and coiled up like the shellof a snail. These are called clock springs, and the material they're made from is called"blue clock", because the color of the steel is blue. Springs like this are found inside clocks, retractor reels, and other machinery. Takeapart an old thermostat and you'll see that the sensor element is basically a clockspring. You can make them on a lathe, but you'll need special tooling that's not easy tomake. Your best bet, again, is to go to a spring shop and get them made for you.
How to make Springs Page 58 of 62
HOW SPRING SHOPS WORKThis section will tell you about spring shops and how they work, so that if you need tocontact one, you'll know how to talk to the people there intelligently.
Spring ShopsIn almost every major city you will find spring factories. Some specialize in certain kindsof springs, while others can make anything you can dream up. The major springmakingcenters in the United States are the area around Detroit (which serves the automobileindustry) and the area around Los Angeles. Most spring shops are divided into two parts: the office and the shop itself. Inside theshop, there are often four departments: Coiling This is the area where the automatic coiling machinery operates.
Automatic coilers can handle wire from .010" to .500", and once they'reset up, can pretty much run all day long.
Grinding This is the department where the ends of compression springs areground. A lot of the work is done with automatic machines, which passthe springs between two grinding wheels that can be four feet across.
Secondary The secondary department is where wire is bent by hand. This is wherethe ends of torsion springs are formed, where loops are put onto theends of extension springs, and where wire forms are made.
ShortOrder
This is where small quantities of springs are made by hand. If acustomer wants less than 50 of a spring, the job is given to the shortorder department, since they can generally make the springs faster andtheir work doesn't tie up the automatic coilers.
Most of the information on this site would be used in the short order part of the shop. Depending on the size of the shop and what it's equipped to make, there can also bemachinists to make tooling, a shipping and receiving department, a quality controldepartment, and a "hot shop", where larger sizes of wire are made into really bigsprings.
How Spring Shops Make MoneySprings are sold by the piece. When you call a spring shop and ask for a quote, here'show they'll figure out how much to charge you: $ _____ Cost of material, plus $ _____ How long it will take to set the job up, times an hourly rate, plus $ _____ How long it will take to run the job, times an hourly rate, plus $ _____ How long it will take to do any secondary work, times an hourly rate, plus $ _____ How much it will cost to get any outside finishing work (like plating) done, plus $ _____ A margin for profit, plus $ _____ Sales tax $ _____ = TOTAL COST

How to make Springs Page 59 of 62
The hourly rates will vary from shop to shop. Generally, they'll figure an hour to set upan automatic machine, and they'll estimate the time it takes to do the coiling, grinding,looping, etc., based on what they know the machines and people can do. They'll have aminimum charge to cover their expenses, even for small orders. There are also catalog stores, which stock a variety of more-or-less common springdesigns. Some have catalogs, and you can call them and place an order just like youwould with any other retailer.
Careers in SpringmakingSomeone applying for work in a spring shop will generally start out either in grinding(the dirtiest, most boring part of the work) or in secondary. Experienced springmakerswill tend to make a home for themselves either in coiling or in short order. Springmaking is a good field, especially if you're into machinery. But once you'reworking in a spring shop, it's hard to transfer from the shop into the front office. Also, ifyou've spent a few years in springmaking, it's next to impossible to find work in anyother trade. Beats selling pencils on the corner tho ... :-)

How to make Springs Page 60 of 62
GLOSSARYThese are many of the common words that have definitions in the springmaking field.The definitions are my own (caveat) and are admittedly not complete. This is not adictionary -- it's just another tool you can use to do a better job.
Active coil A coil of wire which contributes to the motive force of aspring. In extension and torsion springs, all the coils areactive coils. In compression springs, only the coils whichshow daylight between them are active coils.
Arbor A bar or pipe around which wire is wound to form aspring.
Back gear A mechanism in a lathe that allows the chuck to turn veryslowly.
Beryllium copper (wire) An exotic material that can be made into springs.Bundle A roll or coil of wire as it is shipped from the
manufacturer.Cast The curvature in wire that results from its being bundled
into coils at the factory.Chrome Silicon (wire) An alloy of steel, stronger than Oil Tempered wire.Chrome Vanadium (wire) An alloy of steel, stronger than Oil Tempered wire.Closed and ground end Referring to the end of a compression spring where the
wire forms one dead coil and is ground square.Closed end Referring to the end of a compression spring where the
wire forms one dead coil and is not ground square.Coil 1) (noun) The wire of a spring going completely around
once (see active coil, dead coil).2) (noun) A bundle of wire as it is shipped from thefactory.3) (verb) To form (wire) into a spring.
Compression Making smaller.Compression spring A spring which derives its usefulness because it pushes
against a load which makes it smaller.Dead coil A coil of wire which does not contribute to the motive
force of a spring. In extension and torsion springs, thereare no dead coils. In compression springs, the coils ateach end that lay against each other are dead coils: allthe rest are active coils.
Double torsion A form of torsion spring that has two coils; one left-handed and one right-handed, connected by a centraltongue.
Extension Making longer.Extension spring A spring which derives its usefulness because it pulls
against a load which makes it longer.Free length The length of a spring with no load applied.Grinding stage A flat (usually) steel platform used to ensure that the
ends of compression springs orient correctly to agrinding wheel.
Heat treat(ing) 1) The process of tempering metal.2) (colloquially) The process of stress relief.
Lathe A machine which derives its usefulness by rotating stock
How to make Springs Page 61 of 62
against which tooling may be brought to bear. Springsare often wound on a lathe.
Lead screw A mechanism in a lathe that allows the tool post to movefrom side to side at a precise rate.
Mandrel An arbor.Music wire A high-carbon steel alloy used in making springs.Open end Referring to the end of a compression spring where the
pitch of the spring extends all the way to the end of thewire, and does not form any dead coils.
OT (Oil Tempered wire) A lower-carbon steel alloy used in making springs.Passivate (-ation) The process of removing chemical coatings from
stainless steel by immersion in an acid bath.Phosphor bronze (wire) An exotic alloy sometimes used in making springs.Pigtail A form taken by tie wire when used to secure a bundle of
heavy spring wire.Pitch The distance, center to center, between two active coils
of a compression spring.Spring [dia] A helically formed piece of (usually) wire which derives
its usefulness because it tries to regain its original shapewhen subjected to a load. See Compression Spring,Extension Spring, Torsion Spring.
Stainless Steel (wire) An alloy used in making springs that will not rust. Themost common stainless steels are called 302 and 17-7.
Stress Misalignment of the molecules in wire due to bending.Titanium A strong, lightweight metal sometimes used in making
springs.Tool post The part of a lathe that allows tooling to be mounted and
used on stock.Torsion Twisting.Torsion spring A spring which derives its usefulness by trying to return
to its original shape when subjected to a load travelingaround its axis.
Variable pitch A form of compression spring that has more than onepitch.
Wind To coil (a spring).Wire Metal, usually round and solid in section, used in making
springs.
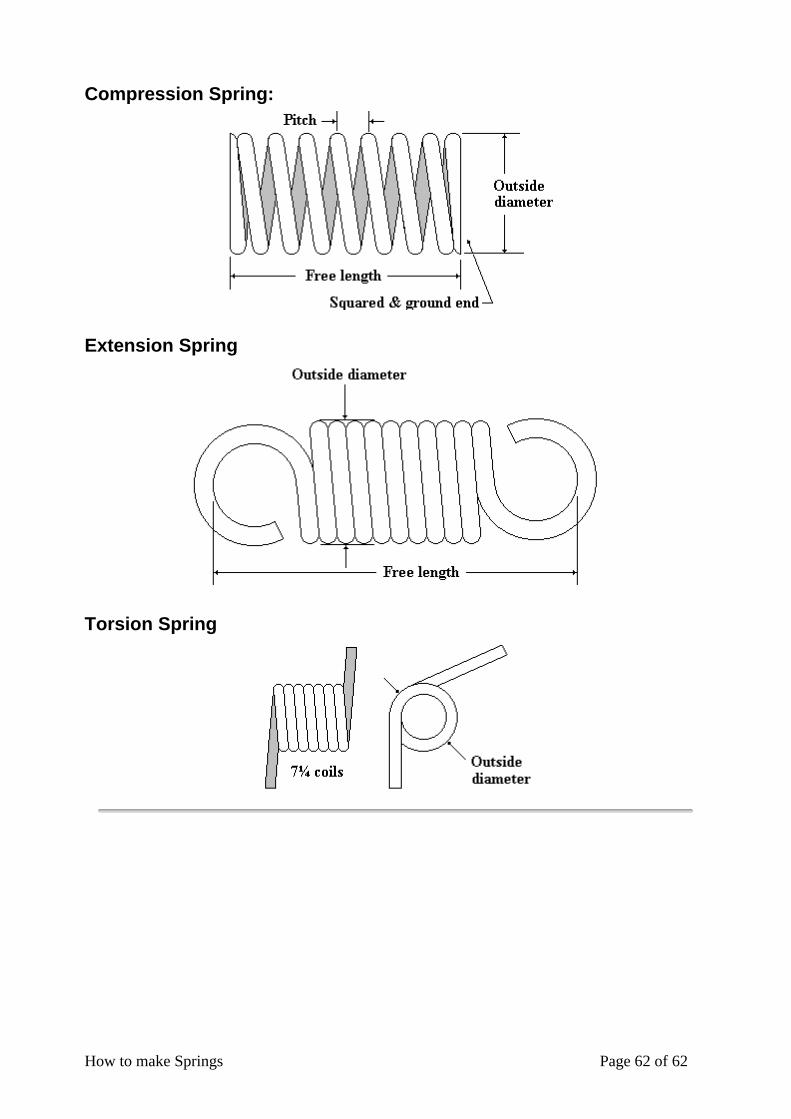
How to make Springs Page 62 of 62
Compression Spring:
Extension Spring
Torsion Spring
Related Documents


![[ 3 ] Power MOSFET in Detail - Educypedia](https://static.cupdf.com/doc/110x72/613d0efc736caf36b758d244/-3-power-mosfet-in-detail-educypedia.jpg)