-1- Home-made Electron Tube Replica by Dr. Rüdiger Walz In June 1983, my meanwhile late friend Franz Pemmerl and I started with our hobby to rebuild old radio electron tubes. A lot of things had to be learned and a lot of failures taught us how to build tubes. For all those who dream of making thermionic tubes as a hobby I like to give an insight into my hobby workshop. Repair or Rebuilt ? A lot of people collecting vintage radios dream of repairing of especially rare tubes. In the 1920ies this has been the service of several small companies. So why do we not repair tubes today? There are several arguments not to do it: 1) All old tubes are today historical artefacts and not items of daily use. A repair procedure would destroy writings and the original shape of the bulb. The function as a historical artifact would be irreversibly destroyed. 2) You would need a lot of different materials, glass types, tungsten wires etc. to repair old tubes. Every repair is a sole action and would need high skills and training in glassblowing. 3) By experience we found out that the glass has become brittle after decades and even a professional glass blower failed to warm up and repair a tubewithout cracking of the glass. The same problem occurs if you try to melt in an old press into a new bulb. 4) It is necessary to remove the base of the tube and the copper wires are corroded within the last decades. So in most cases it breaks just were it comes out of the press. Making a replica is much easier. You start with new raw materials. Depending on your skills the replica looks more or less like the original tube. It was our aim to keep as close as possible to the production process, the used materials and the shape of the original tubes even if in the meantime better materials or constructive solutions would exist. The starting point Starting point of our workshop was a vertical turning lathe of the 1940ies from the company Gladitz which built a lot of glassblowing tools in former times till the 1960ies. You can make the press and melt the system into the bulb using this machine. It is not automatic but makes handling of the glass easier for a non-professional glass blower like me. You will see below pictures of making tubes on this machine.

Welcome message from author
This document is posted to help you gain knowledge. Please leave a comment to let me know what you think about it! Share it to your friends and learn new things together.
Transcript
-1-
Home-made Electron Tube Replica
by Dr. Rüdiger Walz
In June 1983, my meanwhile late friend Franz Pemmerl and I started with our hobby to
rebuild old radio electron tubes.
A lot of things had to be learned and a lot of failures taught us how to build tubes. For all
those who dream of making thermionic tubes as a hobby I like to give an insight into my
hobby workshop.
Repair or Rebuilt ?
A lot of people collecting vintage radios dream of repairing of especially rare tubes. In the
1920ies this has been the service of several small companies. So why do we not repair tubes
today?
There are several arguments not to do it:
1) All old tubes are today historical artefacts and not items of daily use. A repair procedure
would destroy writings and the original shape of the bulb. The function as a historical artifact
would be irreversibly destroyed.
2) You would need a lot of different materials, glass types, tungsten wires etc. to repair old
tubes. Every repair is a sole action and would need high skills and training in glassblowing.
3) By experience we found out that the glass has become brittle after decades and even a
professional glass blower failed to warm up and repair a tubewithout cracking of the glass.
The same problem occurs if you try to melt in an old press into a new bulb.
4) It is necessary to remove the base of the tube and the copper wires are corroded within the
last decades. So in most cases it breaks just were it comes out of the press.
Making a replica is much easier. You start with new raw materials. Depending on your skills
the replica looks more or less like the original tube. It was our aim to keep as close as possible
to the production process, the used materials and the shape of the original tubes even if in the
meantime better materials or constructive solutions would exist.
The starting point
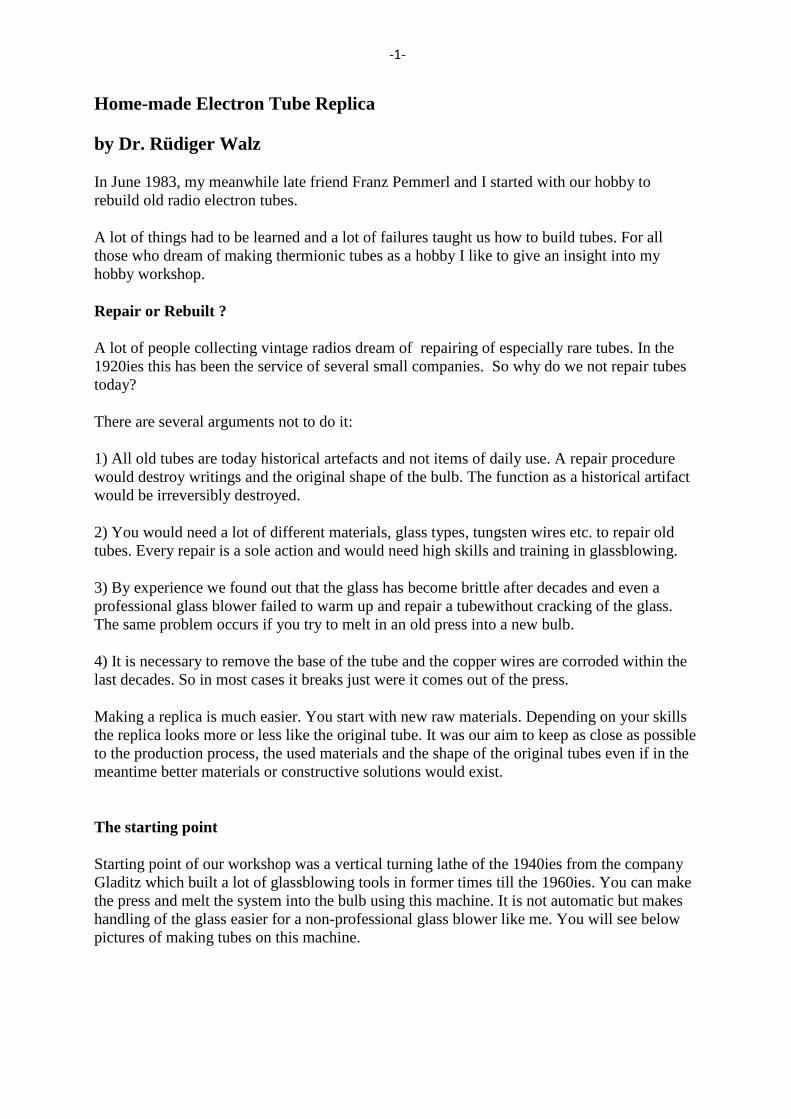
Starting point of our workshop was a vertical turning lathe of the 1940ies from the company
Gladitz which built a lot of glassblowing tools in former times till the 1960ies. You can make
the press and melt the system into the bulb using this machine. It is not automatic but makes
handling of the glass easier for a non-professional glass blower like me. You will see below
pictures of making tubes on this machine.
-2-
Decision for the Type of Replica
For the above reasons we decided
to make tube replicas and not
repairing tubes. The replicas should
be as original as possible.
So what types of tubes can you
make in a hobby workshop? We
decided it should be tubes of the
early 1920ies because end of
1920ies the tube technology has
already been on a high level.
Indirect heated cathodes and oxide
coated cathodes had been
developed. The grid construction
already needs special machines for producing it.
Tubes of the end 1920ies are today still easily
available apart from some special types so there
is no need for replica from the end-1920ies. Early
1920ies tubes can still be made by hand with a
limited need of special machines and tools.
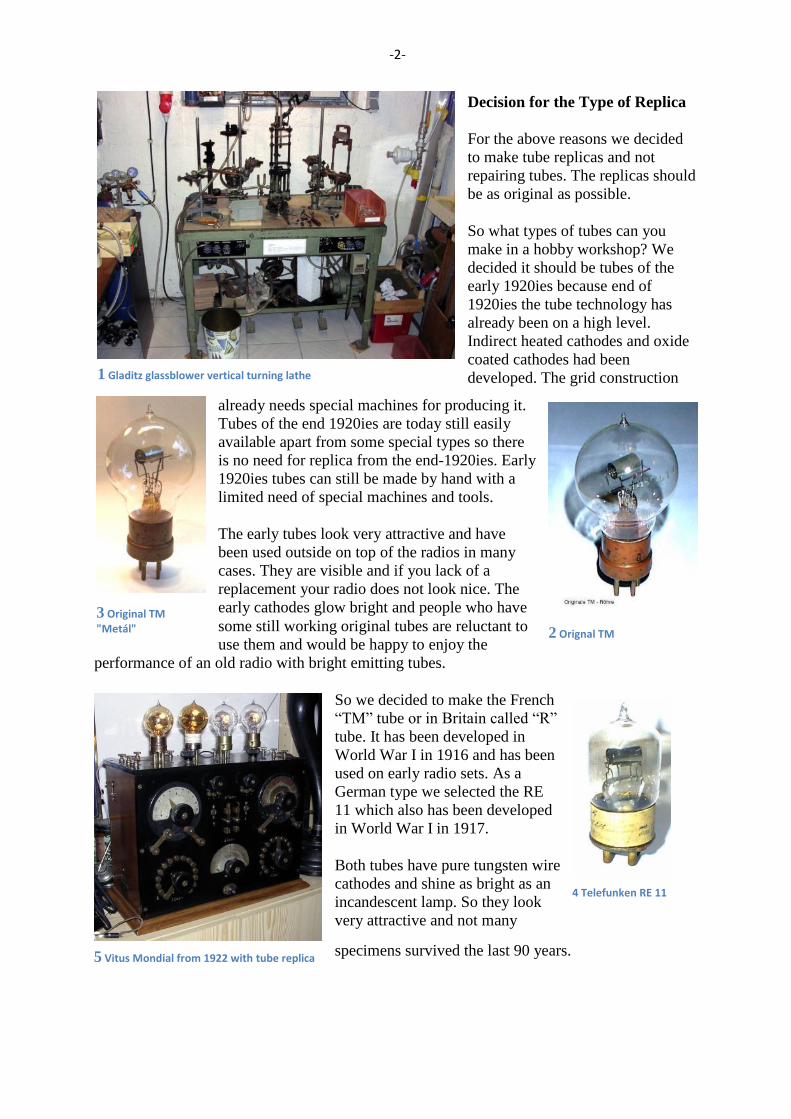
The early tubes look very attractive and have
been used outside on top of the radios in many
cases. They are visible and if you lack of a
replacement your radio does not look nice. The
early cathodes glow bright and people who have
some still working original tubes are reluctant to
use them and would be happy to enjoy the
performance of an old radio with bright emitting tubes.
So we decided to make the French
“TM” tube or in Britain called “R”
tube. It has been developed in
World War I in 1916 and has been
used on early radio sets. As a
German type we selected the RE
11 which also has been developed
in World War I in 1917.
Both tubes have pure tungsten wire
cathodes and shine as bright as an
incandescent lamp. So they look
very attractive and not many
specimens survived the last 90 years.
3 Original TM "Metál"
4 Telefunken RE 11
1 Gladitz glassblower vertical turning lathe
5 Vitus Mondial from 1922 with tube replica
2 Orignal TM
-3-
Supply of special Materials
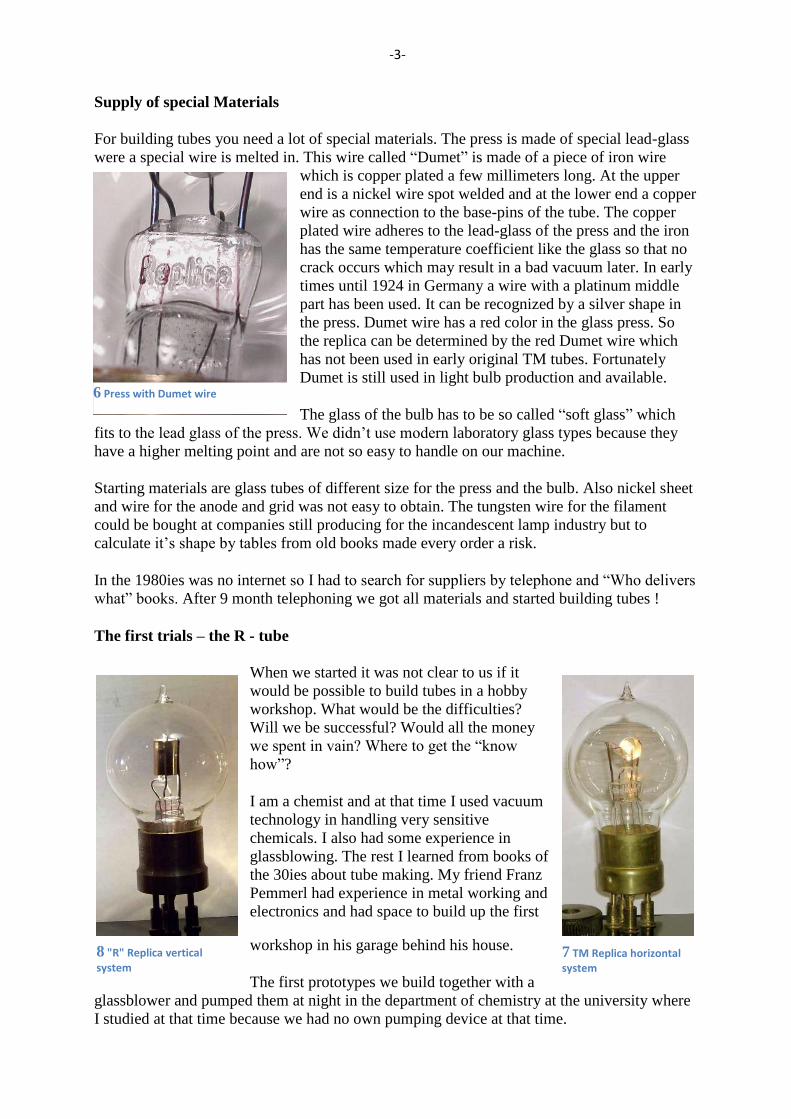
For building tubes you need a lot of special materials. The press is made of special lead-glass
were a special wire is melted in. This wire called “Dumet” is made of a piece of iron wire
which is copper plated a few millimeters long. At the upper
end is a nickel wire spot welded and at the lower end a copper
wire as connection to the base-pins of the tube. The copper
plated wire adheres to the lead-glass of the press and the iron
has the same temperature coefficient like the glass so that no
crack occurs which may result in a bad vacuum later. In early
times until 1924 in Germany a wire with a platinum middle
part has been used. It can be recognized by a silver shape in
the press. Dumet wire has a red color in the glass press. So
the replica can be determined by the red Dumet wire which
has not been used in early original TM tubes. Fortunately
Dumet is still used in light bulb production and available.
The glass of the bulb has to be so called “soft glass” which
fits to the lead glass of the press. We didn’t use modern laboratory glass types because they
have a higher melting point and are not so easy to handle on our machine.
Starting materials are glass tubes of different size for the press and the bulb. Also nickel sheet
and wire for the anode and grid was not easy to obtain. The tungsten wire for the filament
could be bought at companies still producing for the incandescent lamp industry but to
calculate it’s shape by tables from old books made every order a risk.
In the 1980ies was no internet so I had to search for suppliers by telephone and “Who delivers
what” books. After 9 month telephoning we got all materials and started building tubes !
The first trials – the R - tube
When we started it was not clear to us if it
would be possible to build tubes in a hobby
workshop. What would be the difficulties?
Will we be successful? Would all the money
we spent in vain? Where to get the “know
how”?
I am a chemist and at that time I used vacuum
technology in handling very sensitive
chemicals. I also had some experience in
glassblowing. The rest I learned from books of
the 30ies about tube making. My friend Franz
Pemmerl had experience in metal working and
electronics and had space to build up the first
workshop in his garage behind his house.
The first prototypes we build together with a
glassblower and pumped them at night in the department of chemistry at the university where
I studied at that time because we had no own pumping device at that time.
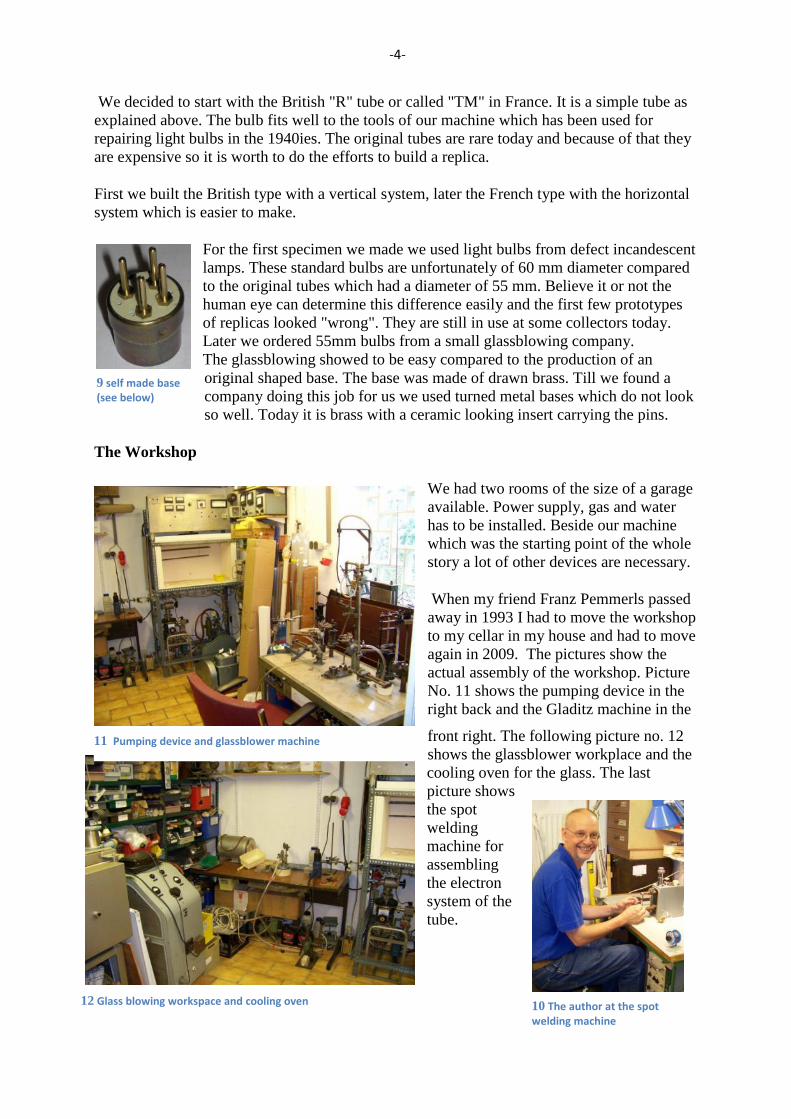
8 "R" Replica vertical
system 7 TM Replica horizontal system
6 Press with Dumet wire
-4-
We decided to start with the British "R" tube or called "TM" in France. It is a simple tube as
explained above. The bulb fits well to the tools of our machine which has been used for
repairing light bulbs in the 1940ies. The original tubes are rare today and because of that they
are expensive so it is worth to do the efforts to build a replica.
First we built the British type with a vertical system, later the French type with the horizontal
system which is easier to make.
For the first specimen we made we used light bulbs from defect incandescent
lamps. These standard bulbs are unfortunately of 60 mm diameter compared
to the original tubes which had a diameter of 55 mm. Believe it or not the
human eye can determine this difference easily and the first few prototypes
of replicas looked "wrong". They are still in use at some collectors today.
Later we ordered 55mm bulbs from a small glassblowing company.
The glassblowing showed to be easy compared to the production of an
original shaped base. The base was made of drawn brass. Till we found a
company doing this job for us we used turned metal bases which do not look
so well. Today it is brass with a ceramic looking insert carrying the pins.
The Workshop
We had two rooms of the size of a garage
available. Power supply, gas and water
has to be installed. Beside our machine
which was the starting point of the whole
story a lot of other devices are necessary.
When my friend Franz Pemmerls passed
away in 1993 I had to move the workshop
to my cellar in my house and had to move
again in 2009. The pictures show the
actual assembly of the workshop. Picture
No. 11 shows the pumping device in the
right back and the Gladitz machine in the
front right. The following picture no. 12
shows the glassblower workplace and the
cooling oven for the glass. The last
picture shows
the spot
welding
machine for
assembling
the electron
system of the
tube.
12 Glass blowing workspace and cooling oven
9 self made base (see below)
10 The author at the spot welding machine
11 Pumping device and glassblower machine
-5-
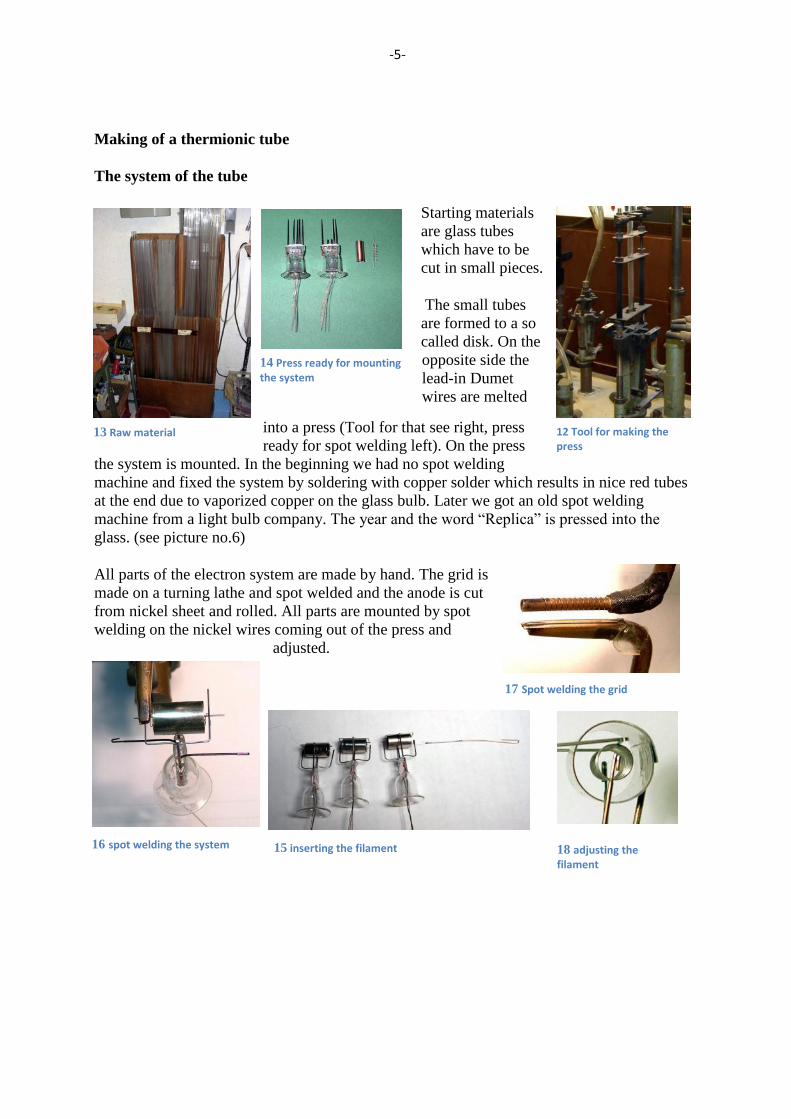
Making of a thermionic tube
The system of the tube
Starting materials
are glass tubes
which have to be
cut in small pieces.
The small tubes
are formed to a so
called disk. On the
opposite side the
lead-in Dumet
wires are melted
into a press (Tool for that see right, press
ready for spot welding left). On the press
the system is mounted. In the beginning we had no spot welding
machine and fixed the system by soldering with copper solder which results in nice red tubes
at the end due to vaporized copper on the glass bulb. Later we got an old spot welding
machine from a light bulb company. The year and the word “Replica” is pressed into the
glass. (see picture no.6)
All parts of the electron system are made by hand. The grid is
made on a turning lathe and spot welded and the anode is cut
from nickel sheet and rolled. All parts are mounted by spot
welding on the nickel wires coming out of the press and
adjusted.
17 Spot welding the grid
14 Press ready for mounting the system
18 adjusting the filament
13 Raw material 12 Tool for making the press
16 spot welding the system 15 inserting the filament
-6-
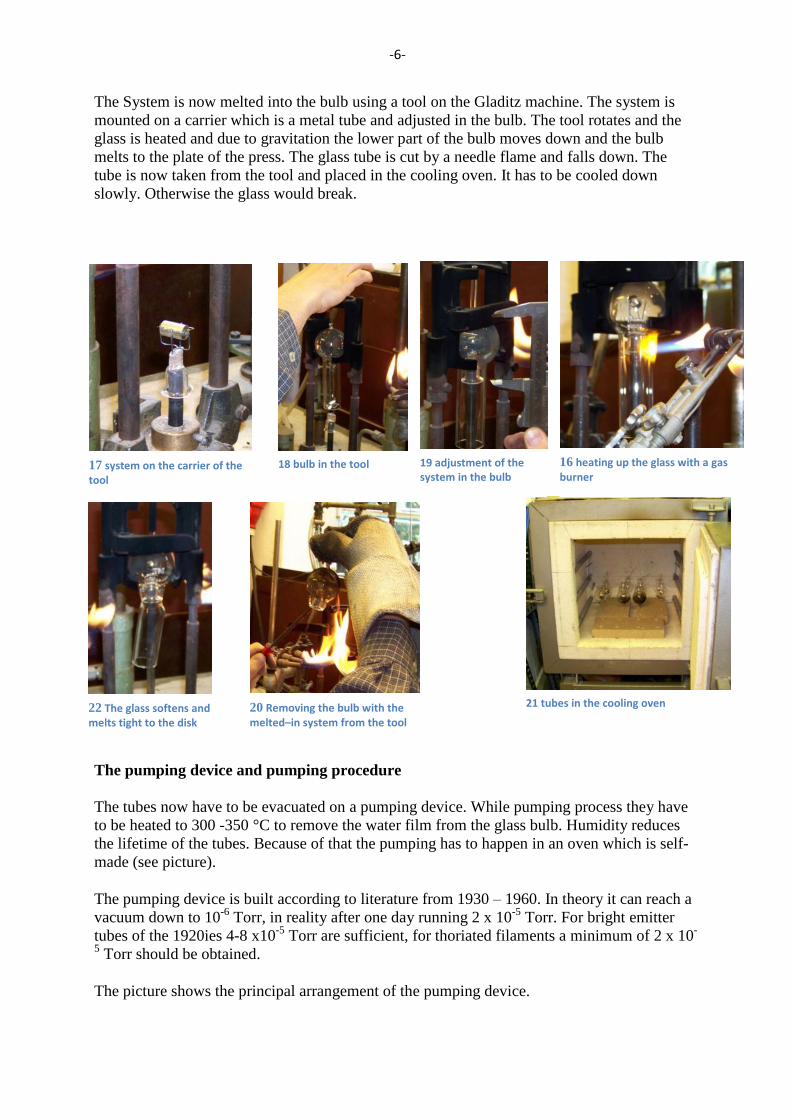
The System is now melted into the bulb using a tool on the Gladitz machine. The system is
mounted on a carrier which is a metal tube and adjusted in the bulb. The tool rotates and the
glass is heated and due to gravitation the lower part of the bulb moves down and the bulb
melts to the plate of the press. The glass tube is cut by a needle flame and falls down. The
tube is now taken from the tool and placed in the cooling oven. It has to be cooled down
slowly. Otherwise the glass would break.
The pumping device and pumping procedure
The tubes now have to be evacuated on a pumping device. While pumping process they have
to be heated to 300 -350 °C to remove the water film from the glass bulb. Humidity reduces
the lifetime of the tubes. Because of that the pumping has to happen in an oven which is self-
made (see picture).
The pumping device is built according to literature from 1930 – 1960. In theory it can reach a
vacuum down to 10-6
Torr, in reality after one day running 2 x 10⁻⁵
Torr. For bright emitter
tubes of the 1920ies 4-8 x10⁻⁵
Torr are sufficient, for thoriated filaments a minimum of 2 x 10-
5 Torr should be obtained.
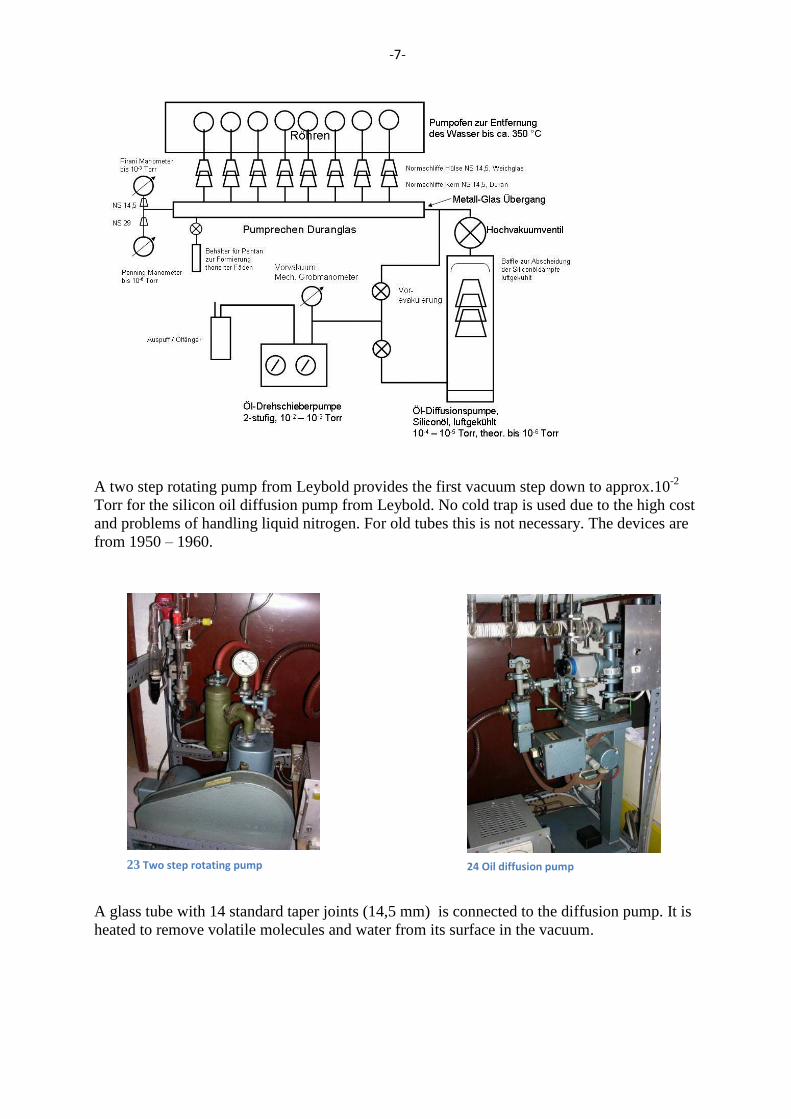
The picture shows the principal arrangement of the pumping device.
17 system on the carrier of the tool
18 bulb in the tool 19 adjustment of the system in the bulb
16 heating up the glass with a gas burner
20 Removing the bulb with the melted–in system from the tool
21 tubes in the cooling oven 22 The glass softens and melts tight to the disk
-7-
A two step rotating pump from Leybold provides the first vacuum step down to approx.10-2
Torr for the silicon oil diffusion pump from Leybold. No cold trap is used due to the high cost
and problems of handling liquid nitrogen. For old tubes this is not necessary. The devices are
from 1950 – 1960.
A glass tube with 14 standard taper joints (14,5 mm) is connected to the diffusion pump. It is
heated to remove volatile molecules and water from its surface in the vacuum.
23 Two step rotating pump 24 Oil diffusion pump
-8-
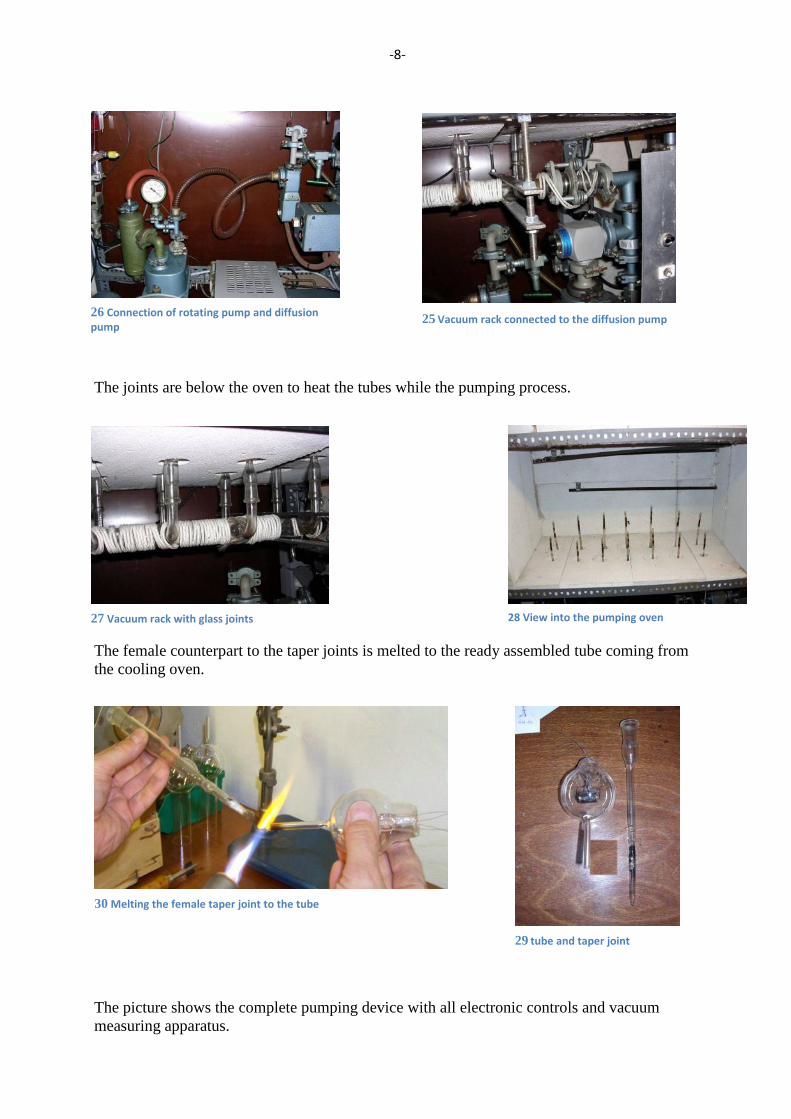
The joints are below the oven to heat the tubes while the pumping process.
The female counterpart to the taper joints is melted to the ready assembled tube coming from
the cooling oven.
The picture shows the complete pumping device with all electronic controls and vacuum
measuring apparatus.
25 Vacuum rack connected to the diffusion pump
27 Vacuum rack with glass joints 28 View into the pumping oven
30 Melting the female taper joint to the tube
29 tube and taper joint
26 Connection of rotating pump and diffusion pump
-9-
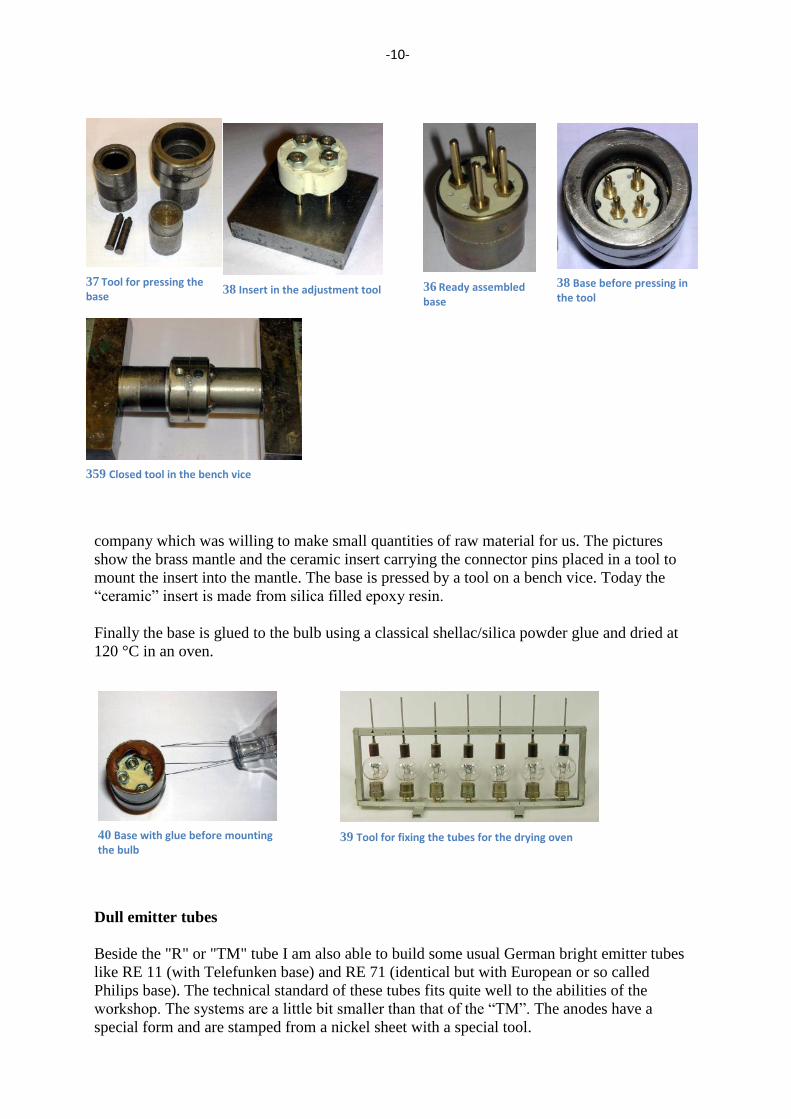
After two hours of pumping a plate and grid
voltage of + 200 V is applied and a plate current
of 80 to 100 mA (later in use 50 V, 1-2 mA !).
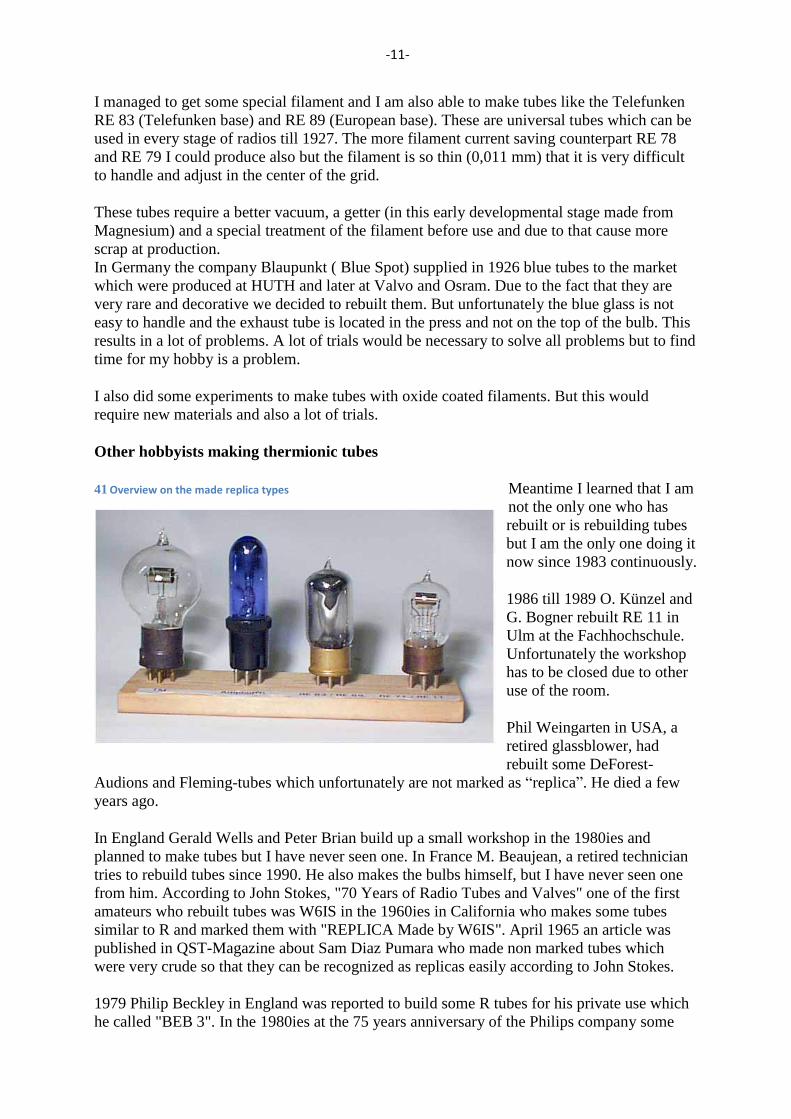
The anode becomes red hot and all occulted
gasses are removed. The tube glows nicely blue
due to ionized
oxygen
molecules in
the bulb. After
that the bulbs
are melted
from their
exhaust tube
and the
characteristic
tip is formed.
The tubes have a writing "TM"
or "Type RE 11" on the bulb and
a number. This is done with a
rubber stamp and a special dye
which is fixed by heating up to
500 C. Inside the word "Replica"
and the year of making is pressed
into the soft hot glass of the press
so that the replica can be
identified as such. Till the dead of
Franz Pemmerl in 1993 the year
was signed as "19PWxx" after
1993 "19Wxx" or now "20Wxx".
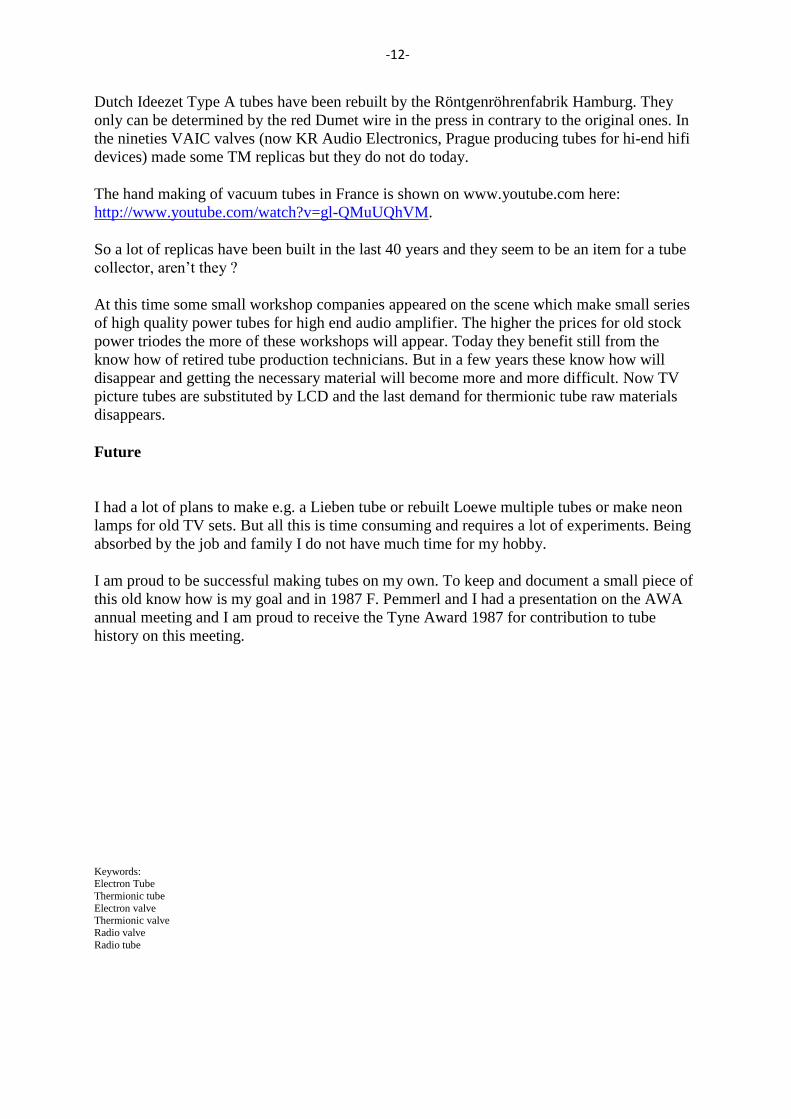
The base
As I explained it was more complicated to make an original looking base than the glass bulbs
of the tubes. The base is made from brass tubes and we needed some time to find a
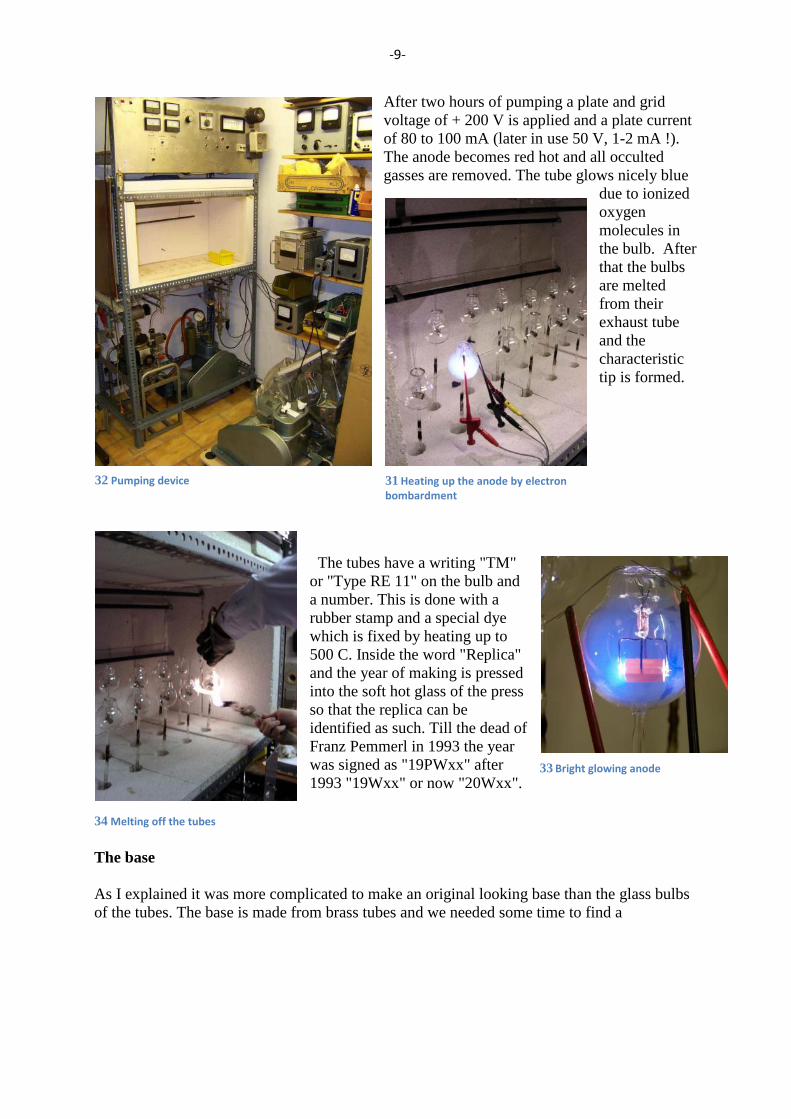
32 Pumping device 31 Heating up the anode by electron bombardment
34 Melting off the tubes
33 Bright glowing anode
-10-
company which was willing to make small quantities of raw material for us. The pictures
show the brass mantle and the ceramic insert carrying the connector pins placed in a tool to
mount the insert into the mantle. The base is pressed by a tool on a bench vice. Today the
“ceramic” insert is made from silica filled epoxy resin.
Finally the base is glued to the bulb using a classical shellac/silica powder glue and dried at
120 °C in an oven.
Dull emitter tubes
Beside the "R" or "TM" tube I am also able to build some usual German bright emitter tubes
like RE 11 (with Telefunken base) and RE 71 (identical but with European or so called
Philips base). The technical standard of these tubes fits quite well to the abilities of the
workshop. The systems are a little bit smaller than that of the “TM”. The anodes have a
special form and are stamped from a nickel sheet with a special tool.
37 Tool for pressing the base 38 Insert in the adjustment tool 36 Ready assembled
base
38 Base before pressing in the tool
40 Base with glue before mounting the bulb
359 Closed tool in the bench vice
39 Tool for fixing the tubes for the drying oven
-11-
I managed to get some special filament and I am also able to make tubes like the Telefunken
RE 83 (Telefunken base) and RE 89 (European base). These are universal tubes which can be
used in every stage of radios till 1927. The more filament current saving counterpart RE 78
and RE 79 I could produce also but the filament is so thin (0,011 mm) that it is very difficult
to handle and adjust in the center of the grid.
These tubes require a better vacuum, a getter (in this early developmental stage made from
Magnesium) and a special treatment of the filament before use and due to that cause more
scrap at production.
In Germany the company Blaupunkt ( Blue Spot) supplied in 1926 blue tubes to the market
which were produced at HUTH and later at Valvo and Osram. Due to the fact that they are
very rare and decorative we decided to rebuilt them. But unfortunately the blue glass is not
easy to handle and the exhaust tube is located in the press and not on the top of the bulb. This
results in a lot of problems. A lot of trials would be necessary to solve all problems but to find
time for my hobby is a problem.
I also did some experiments to make tubes with oxide coated filaments. But this would
require new materials and also a lot of trials.
Other hobbyists making thermionic tubes
Meantime I learned that I am
not the only one who has
rebuilt or is rebuilding tubes
but I am the only one doing it
now since 1983 continuously.
1986 till 1989 O. Künzel and
G. Bogner rebuilt RE 11 in
Ulm at the Fachhochschule.
Unfortunately the workshop
has to be closed due to other
use of the room.
Phil Weingarten in USA, a
retired glassblower, had
rebuilt some DeForest-
Audions and Fleming-tubes which unfortunately are not marked as “replica”. He died a few
years ago.
In England Gerald Wells and Peter Brian build up a small workshop in the 1980ies and
planned to make tubes but I have never seen one. In France M. Beaujean, a retired technician
tries to rebuild tubes since 1990. He also makes the bulbs himself, but I have never seen one
from him. According to John Stokes, "70 Years of Radio Tubes and Valves" one of the first
amateurs who rebuilt tubes was W6IS in the 1960ies in California who makes some tubes
similar to R and marked them with "REPLICA Made by W6IS". April 1965 an article was
published in QST-Magazine about Sam Diaz Pumara who made non marked tubes which
were very crude so that they can be recognized as replicas easily according to John Stokes.
1979 Philip Beckley in England was reported to build some R tubes for his private use which
he called "BEB 3". In the 1980ies at the 75 years anniversary of the Philips company some
41 Overview on the made replica types
-12-
Dutch Ideezet Type A tubes have been rebuilt by the Röntgenröhrenfabrik Hamburg. They
only can be determined by the red Dumet wire in the press in contrary to the original ones. In
the nineties VAIC valves (now KR Audio Electronics, Prague producing tubes for hi-end hifi
devices) made some TM replicas but they do not do today.
The hand making of vacuum tubes in France is shown on www.youtube.com here:
http://www.youtube.com/watch?v=gl-QMuUQhVM.
So a lot of replicas have been built in the last 40 years and they seem to be an item for a tube
collector, aren’t they ?
At this time some small workshop companies appeared on the scene which make small series
of high quality power tubes for high end audio amplifier. The higher the prices for old stock
power triodes the more of these workshops will appear. Today they benefit still from the
know how of retired tube production technicians. But in a few years these know how will
disappear and getting the necessary material will become more and more difficult. Now TV
picture tubes are substituted by LCD and the last demand for thermionic tube raw materials
disappears.
Future
I had a lot of plans to make e.g. a Lieben tube or rebuilt Loewe multiple tubes or make neon
lamps for old TV sets. But all this is time consuming and requires a lot of experiments. Being
absorbed by the job and family I do not have much time for my hobby.
I am proud to be successful making tubes on my own. To keep and document a small piece of
this old know how is my goal and in 1987 F. Pemmerl and I had a presentation on the AWA
annual meeting and I am proud to receive the Tyne Award 1987 for contribution to tube
history on this meeting.
Keywords: Electron Tube
Thermionic tube
Electron valve Thermionic valve
Radio valve
Radio tube
Related Documents