Quintessence Publishing Co, Inc Chicago, Berlin, Tokyo, London, Paris, Milan, Barcelona, Istanbul, Moscow, New Delhi, Prague, São Paulo, and Warsaw Herbert T. Shillingburg, Jr, DDS David Ross Boyd Professor Emeritus Department of Fixed Prosthodontics University of Oklahoma College of Dentistry Oklahoma City, Oklahoma with David A. Sather, DDS Edwin L. Wilson, Jr, DDS, MEd Joseph R. Cain, DDS, MS Donald L. Mitchell, DDS, MS Luis J. Blanco, DMD, MS James C. Kessler, DDS Illustrations by Suzan E. Stone

Welcome message from author
This document is posted to help you gain knowledge. Please leave a comment to let me know what you think about it! Share it to your friends and learn new things together.
Transcript
Quintessence Publishing Co, IncChicago, Berlin, Tokyo, London, Paris, Milan, Barcelona, Istanbul, Moscow, New Delhi, Prague, São Paulo, and Warsaw
Herbert T. Shillingburg, Jr, DDSDavid Ross Boyd Professor Emeritus
Department of Fixed Prosthodontics
University of Oklahoma College of Dentistry
Oklahoma City, Oklahoma
with
David A. Sather, DDS
Edwin L. Wilson, Jr, DDS, MEd
Joseph R. Cain, DDS, MS
Donald L. Mitchell, DDS, MS
Luis J. Blanco, DMD, MS
James C. Kessler, DDS
Illustrations by
Suzan E. Stone

Cover design based on a photograph of Monument Valley on the Navajo Reservation in northern Arizona taken at sunrise by Dr Herbert T. Shillingburg, Jr.

Dedication vii
Authors viii
Preface ix Acknowledgments x
1 An Introduction to Fixed Prosthodontics 1
2 Fundamentals of Occlusion 13
3 Articulators 27
4 Interocclusal Records 35
5 Articulation of Casts 45
6 Treatment Planning for Single-Tooth Restorations 71
7 Treatment Planning for the Replacement of Missing Teeth 81
8 Fixed Partial Denture and Implant Con!gurations 99
9 Principles of Tooth Preparations 131
10 Preparations for Full Coverage Crowns 149
11 Preparations for Partial Coverage Crowns 165
12 Preparations for Intracoronal Restorations 193
13 Preparations for Severely Debilitated Teeth 203
14 Preparations for Periodontally Weakened Teeth 229
15 Provisional Restorations 241
16 Fluid Control and Soft Tissue Management 269
Contents
17 Impressions 291
18 Working Casts and Dies 325
19 Wax Patterns 343
20 Investing and Casting 363
21 Cementation and Bonding 383
22 Esthetic Considerations 413
23 All-Ceramic Restorations 425
24 Metal-Ceramic Restorations 447
25 Pontics and Edentulous Ridges 471
26 Solder Joints and Other Connectors 493
27 Restoration of Osseointegrated Dental Implants 517
28 Single-Tooth Implant Restoration 531
29 Multiple-Tooth Implant Restoration 543
Index 555

vii
This book is dedicated to the loving memory of Constance Murphy Shillingburg. We met at the University of New Mex-ico at the beginning of her freshman year in 1956. We were married 4 years later, 1 week after she graduated. During my !rst 2 years in dental school, I made 13 trips, totaling over 22,000 miles, from Los Angeles to Albuquerque. She shared all of the triumphs and disappointments of my last 2 years in dental school. It was not my career; it was our career. She supported me in all that I did. She didn’t question my leaving practice to start a career in academics or our mov-ing from California to Oklahoma. We had three daughters along the way. Although she had three open-heart surgeries in her teens because of rheumatic fever and then two cancer
surgeries later in life, she was the most optimistic person I ever met.
She accompanied me on 29 trips outside the United States. At !rst she came along because she loved to travel, and I didn’t enjoy the trips nearly as much without her. However, I very quickly learned that my hosts and audiences were en-chanted by her. They enjoyed her as much or more than they did me, and she used what she learned on those trips in her teaching. She died 3 weeks after we celebrated our 48th wedding anniversary. There is a song on the most recent Glen Campbell album, Ghost on the Canvas, that sums it up perfectly: “There’s no me…without you.”
Dedication
In MemoriamConstance Murphy Shillingburg
1938–2008

viii
Authors
Luis J. Blanco, DMD, MS
Professor and ChairDepartment of Fixed ProsthodonticsUniversity of Oklahoma College of DentistryOklahoma City, Oklahoma
Joseph R. Cain, DDS, MS
Professor EmeritusDepartment of Removable ProsthodonticsUniversity of Oklahoma College of DentistryOklahoma City, Oklahoma
James C. Kessler, DDS
Director of EducationL. D. Pankey InstituteKey Biscayne, Florida
Donald L. Mitchell, DDS, MS
Professor EmeritusDepartment of Oral ImplantologyUniversity of Oklahoma College of DentistryOklahoma City, Oklahoma
David A. Sather, DDS
Associate ProfessorDepartment of Fixed ProsthodonticsUniversity of Oklahoma College of DentistryOklahoma City, Oklahoma
Herbert T. Shillingburg, Jr, DDS
David Ross Boyd Professor EmeritusDepartment of Fixed ProsthodonticsUniversity of Oklahoma College of DentistryOklahoma City, Oklahoma
Edwin L. Wilson, Jr, DDS, MEd
Professor EmeritusDepartment of OcclusionUniversity of Oklahoma College of DentistryOklahoma City, Oklahoma

ix
Fixed prosthodontics is the art and science of restoring dam-aged teeth with cast metal, metal-ceramic, or all-ceramic restorations and of replacing missing teeth with !xed pros-theses using metal-ceramic arti!cial teeth (pontics) or metal-ceramic crowns over implants. Successfully treating a patient by means of !xed prosthodontics requires a thoughtful com-bination of many aspects of dental treatment: patient edu-cation and the prevention of further dental disease, sound diagnosis, periodontal therapy, operative skills, occlusal con-sider ations, and, sometimes, placement of removable com-plete or partial prostheses and endodontic treatment.
Restorations in this !eld of dentistry can be the !nest ser-vice rendered for dental patients or the worst disservice per-petrated upon them. The path taken depends upon one’s knowledge of sound biologic and mechanical principles, the growth of manipulative skills to implement the treatment plan, and the development of a critical eye and judgement for assessing detail.
As in all !elds of the healing arts, there has been tremen-dous change in this area of dentistry in recent years. Im-proved materials, instruments, and techniques have made it possible for today’s operator with average skills to provide a service whose quality is on a par with that provided only by the most gifted dentist of years gone by. This is possible, however, only if the dentist has a thorough background in the principles of restorative dentistry and an intimate knowl-edge of the techniques required.
This book was designed to serve as an introduction to the area of restorative dentistry dealing with !xed partial dentures and cast metal, metal-ceramic, and all-ceramic restorations. It should provide the background knowledge needed by the novice as well as serve as a refresher for the practitioner or graduate student.
To provide the needed background for formulating ratio-nal judgments in the clinical environment, there are chapters dealing with the fundamentals of treatment planning, occlu-sion, and tooth preparation. In addition, sections of other chapters are devoted to the fundamentals of the respective subjects. Speci!c techniques and instruments are discussed because dentists and dental technicians must deal with them in their daily work.
Alternative techniques are given when there are multiple techniques widely used in the profession. Frequently, how-ever, only one technique is presented. Cognizance is given to the fact that there is usually more than one acceptable way of accomplishing a particular task. However, in the limited time available in the undergraduate dental curriculum, there is usually time for the mastery of only one basic technique for accomplishing each of the various types of treatment.
An attempt has been made to provide a sound work-ing background in the various facets of !xed prosthodon-tic therapy. Current information has been added to cover the increased use of new cements, new packaging and dis-pensing equipment for the use of impression materials, and changes in the management of soft tissues for impression making. New articulators, facebows, and concepts of occlu-sion needed attention, along with precise ways of making removable dies. The usage of periodontally weakened teeth requires different designs for preparations of teeth with ex-posed root morphology or molars that have lost a root.
Different ways of handling edentulous ridges with defects have given the dentist better control of the functional and cosmetic outcome. No longer are metal or ceramics needed to somehow mask the loss of bone and soft tissue. The big-gest change in the replacement of missing teeth, of course, is the widespread use of endosseous implants, which make it possible to replace teeth without damaging adjacent sound teeth.
The increased emphasis on cosmetic restorations has ne-cessitated expanding the chapters on those types of resto-rations. The design of resin-bonded !xed partial dentures has been moved to the chapters on partial coverage restora-tions. There are some uses for that type of restoration, but the indications are far more limited than they were thought to be a few years ago.
Updated references document the rationale for using ma-terials and techniques and familiarize the reader with the lit-erature in the various aspects of !xed prosthodontics. If more background information on speci!c topics is desired, several books are recommended: For detailed treatment of dental materials, refer to Kenneth J. Anusavice’s Phillip’s Sci-ence of Dental Materials, Eleventh Edition (Saunders, 2003) or William J. O’Brien’s Dental Materials and Their Selection, Fourth Edition (Quintessence, 2008). For an in-depth study of occlusion, see Jeffrey P. Okeson’s Management of Temporo-mandibular Disorders and Occlusion, Sixth Edition (Mosby, 2007). The topic of tooth preparations is discussed in detail in Fundamentals of Tooth Preparations (Quintessence, 1987) by Herbert T. Shillingburg et al. For detailed coverage of oc-clusal morphology used in waxing restorations, consult the Guide to Occlusal Waxing (Quintessence, 1984) by Herbert T. Shillingburg et al. Books of particular interest in the area of ceramics include W. Patrick Naylor’s Introduction to Metal Ceramic Technology (Quintessence, 2009) and Christoph Hämmerle et al’s Dental Ceramics: Essential Aspects for Clinical Practice (Quintessence, 2009).
—Herbert T. Shillingburg, Jr, DDS
Preface

x
Acknowledgments
No book is the work of just its authors. It is dif!cult to say which ideas are our own and which are an amalgam of those with whom we have associated. Two !ne restorative dentists had an important in"uence on this book: Dr Robert Dewhirst and Dr Donald Fisher have been mentors, colleagues, and, most importantly, friends. Their philosophies have been our guide for the last 40 years. Dr Manville G. Duncanson, Jr, Professor Emeritus of Dental Materials, and Dr Dean John-son, Professor Emeritus of Removable Prosthodontics, both of the University of Oklahoma, were forthcoming through the years with their suggestions, criticism, and shared knowl-edge. Thanks are also due to Mr James Robinson of Whip-Mix Corporation for his help with materials and instruments in the chapters that deal with laboratory procedures. Appre-ciation is expressed to Dr Mike Fling for his input regarding tooth preparations for laminate veneers. Thank you to Mr
Lee Holmstead, Brasseler USA, for his assistance with the illustrations of the diamonds and carbide burs.
Illustrations have been done by several people through the years: Mr Robert Shackelford, Ms Laurel Kallenberger, Ms Jane Cripps, and Ms Judy Amico of the Graphics and Media Department of the University of Oklahoma Health Sci-ences Center. Artwork was also contributed by Drs Richard Jacobi and Herbert T. Shillingburg. This book would not have come to fruition without the illustrations provided by Ms Suzan Stone and the computer program, Topaz Simplify, suggested by Mr Alvin Flier, a friend from 40 years ago in Simi, California. A special thank you to the Rev John W. Price of Houston, Texas, for restoring my sense of mission in June 2008.
Thanks to you all.

Treatment Planning for the Replacement of Missing Teeth 7
81
The need to replace missing teeth is obvious to the patient when the edentulous space is in the anterior segment of the mouth, but it is equally important in the posterior region. It is tempting to think of the dental arch as a static entity, but that is certainly not the case. It is in a state of dynamic equilibrium, with the teeth supporting each other (Fig 7-1). When a tooth is lost, the structural integrity of the dental arch is disrupted, and there is a subsequent realignment of teeth as a new state of equilibrium is achieved. Teeth adja-cent to or opposing the edentulous space frequently move into it (Fig 7-2). Adjacent teeth, especially those distal to the space, may drift bodily, although a tilting movement is a far more common occurrence.
If an opposing tooth intrudes severely into the edentu-lous space, it is not enough just to replace the missing tooth (Fig 7-3). To restore the mouth to complete function, free of interferences, it is often necessary to restore the tooth opposing the edentulous space (Fig 7-4). In severe cases, this may necessitate the devitalization of the supererupted opposing tooth to permit enough shortening to correct the plane of occlusion; in extreme cases, extraction of the op-posing tooth may be required.
Selection of the Type of Prosthesis
Missing teeth may be replaced by one of three prosthesis types: a removable partial denture, a tooth-supported !xed partial denture, or an implant-supported !xed partial den-ture (Table 7-1). Several factors must be weighed when choos-ing the type of prosthesis to be used in any given situation. Biomechanical, periodontal, esthetic, and !nancial factors, as well as the patient’s wishes, are some of the more impor-tant ones. It is not uncommon to combine two types in the same arch, such as a removable partial denture and a tooth-supported !xed partial denture. Combining teeth and im-plants in the support of the same !xed partial denture, how-ever, is not recommended.
In treatment planning, there is one principle that should be kept in mind: treatment simpli!cation. There are many times when certain treatments are technically possible but too complex. It is important to narrow the possibilities and present a recommendation that will serve the patient’s needs and still be reasonable to accomplish. At such times, the re-storative dentist, or prosthodontist, is the one who should manage the sequencing and referral to other specialists. He or she will be !nishing the treatment and should act as the quarterback. The restorative dentist must communicate and be open to suggestions but should not allow someone else to dictate the restorative phase of the treatment, which may result in carrying out a treatment plan that seems unfeasible. As the clinician who is providing the restoration, the restor-ative dentist is the one the patient will return to if it fails; therefore, he or she must be comfortable with the planned treatment.
The following are guidelines, not laws, and they are not absolute. However, when a preponderance of these items is used in the consideration of the planning for one arch or one mouth, a compelling reason exists for the selection of the type of prosthesis described.
Removable partial denture
A removable partial denture is generally indicated for eden-tulous spaces greater than two posterior teeth, anterior spaces greater than four incisors, or spaces that include a canine and two other contiguous teeth (ie, central incisor, lateral incisor, and canine; lateral incisor, canine, and !rst premolar; or the canine and both premolars).
An edentulous space with no distal abutment will usually require a removable partial denture. There are exceptions in which a cantilever !xed partial denture can be used, but this solution should be approached cautiously. See the section on cantilevers later in the chapter for a more detailed description of this type of restoration. Multiple edentulous spaces, each of which may be restorable with a !xed partial denture, none-theless may call for the use of a removable partial denture because of the expense and technical complexity. Bilateral

108
Fixed Partial Denture and Implant Con!gurations8
Missing: Maxillary canineImplant: 4.5 × 15 mm Considerations: A dental implant is the restoration of choice.Restoration: MCR over a custom abutment (UCLA, Atlantis, or preparable abutment)
Missing: Mandibular canine Abutments: Central incisor, lateral incisor, and !rst premolarConsiderations: An implant-supported MCR is the restora-tion of choice in the mandible as well. Use group function to restore the occlusion. If there has been extensive bone loss around the lateral incisor, or if it is tilted to produce a line of draw discrepancy, remove the lateral incisor and use both central incisors as abutments if a !xed partial denture is used. Fortunately, the need to replace this tooth is not common.Retainers: MCRsPontic: Ovate MCR Abutment-pontic root ratio: 1.9
Missing: Mandibular canineImplant: 4.5 × 15 mm Considerations: A dental implant is the restoration of choice.Restoration: MCR over a custom abutment (UCLA, Atlantis, or preparable abutment)

109
Simple Fixed Partial Dentures (Two Teeth)
Simple Fixed Partial Dentures (Two Teeth)
Missing: Maxillary central incisor and lateral incisorAbutments: Central incisor and canineConsiderations: If the central incisor and canine are unblem-ished and unusually large, pin-modi!ed partial coverage crowns could be used. Patient acceptance and dentist skill are strong considerations.Retainers: MCRsPontics: Modi!ed ridge lap MCRAbutment-pontic root ratio: 1.2
Missing: Maxillary central incisor and lateral incisorImplants: 4.0 × 12 mm (central incisor), 3.5 × 12 mm (lateral incisor) Considerations: A large nasopalatine foramen (incisive canal) may interfere with implant placement. If loss of the lateral in-cisor has caused loss of the facial plate of bone, the resulting facial concavity will place the implant too far to the lingual. This may necessitate bone grafting to eliminate the facial concavity. Splinting the dental implant restoration will re-duce rotational forces on the abutment screws, lessening the possibility of screw loosening. Splinting the dental implants will increase restoration strength and stress distribution. Restorations: MCRs over custom abutments (UCLA, Atlantis, or preparable abutments)
Missing: Mandibular central incisorsAbutments: Lateral incisorsConsiderations: If there has been any bone loss around the lateral incisors, or if they are malpositioned, remove them. Use MCR retainers on the canines for a tooth-borne !xed partial denture. Retainers: Resin-bonded retainers if the abutments are un-blemishedPontics: Ovate MCRs or one-piece pontics with a modi!ed ridge lap of pink porcelainAbutment-pontic root ratio: 1.1
204
Preparations for Severely Debilitated Teeth13
Principle of Substitution
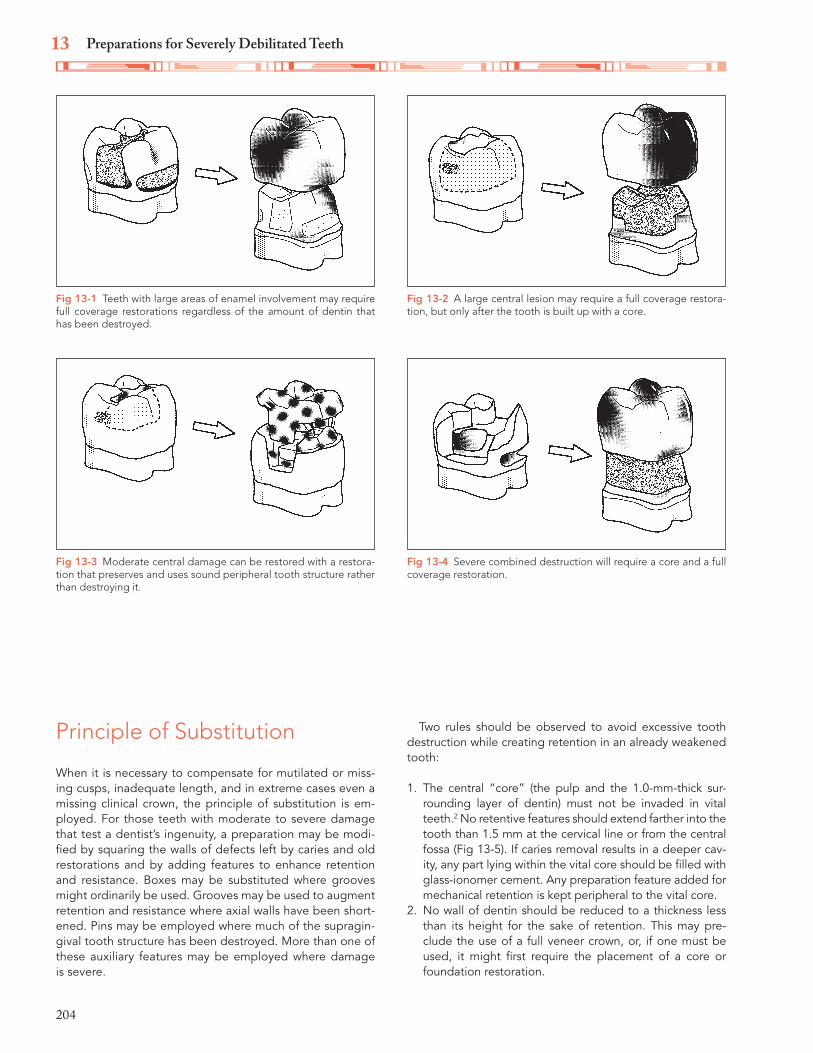
When it is necessary to compensate for mutilated or miss-ing cusps, inadequate length, and in extreme cases even a missing clinical crown, the principle of substitution is em-ployed. For those teeth with moderate to severe damage that test a dentist’s ingenuity, a preparation may be modi-!ed by squaring the walls of defects left by caries and old restorations and by adding features to enhance retention and resistance. Boxes may be substituted where grooves might ordinarily be used. Grooves may be used to augment retention and resistance where axial walls have been short-ened. Pins may be employed where much of the supragin-gival tooth structure has been destroyed. More than one of these auxiliary features may be employed where damage is severe.
Two rules should be observed to avoid excessive tooth destruction while creating retention in an already weakened tooth:
1. The central “core” (the pulp and the 1.0-mm-thick sur-rounding layer of dentin) must not be invaded in vital teeth.2 No retentive features should extend farther into the tooth than 1.5 mm at the cervical line or from the central fossa (Fig 13-5). If caries removal results in a deeper cav-ity, any part lying within the vital core should be !lled with glass-ionomer cement. Any preparation feature added for mechanical retention is kept peripheral to the vital core.
2. No wall of dentin should be reduced to a thickness less than its height for the sake of retention. This may pre-clude the use of a full veneer crown, or, if one must be used, it might !rst require the placement of a core or foundation restoration.
Fig 13-1 Teeth with large areas of enamel involvement may require full coverage restorations regardless of the amount of dentin that has been destroyed.
Fig 13-3 Moderate central damage can be restored with a restora-tion that preserves and uses sound peripheral tooth structure rather than destroying it.
Fig 13-2 A large central lesion may require a full coverage restora-tion, but only after the tooth is built up with a core.
Fig 13-4 Severe combined destruction will require a core and a full coverage restoration.
205
Principle of Substitution
Box forms
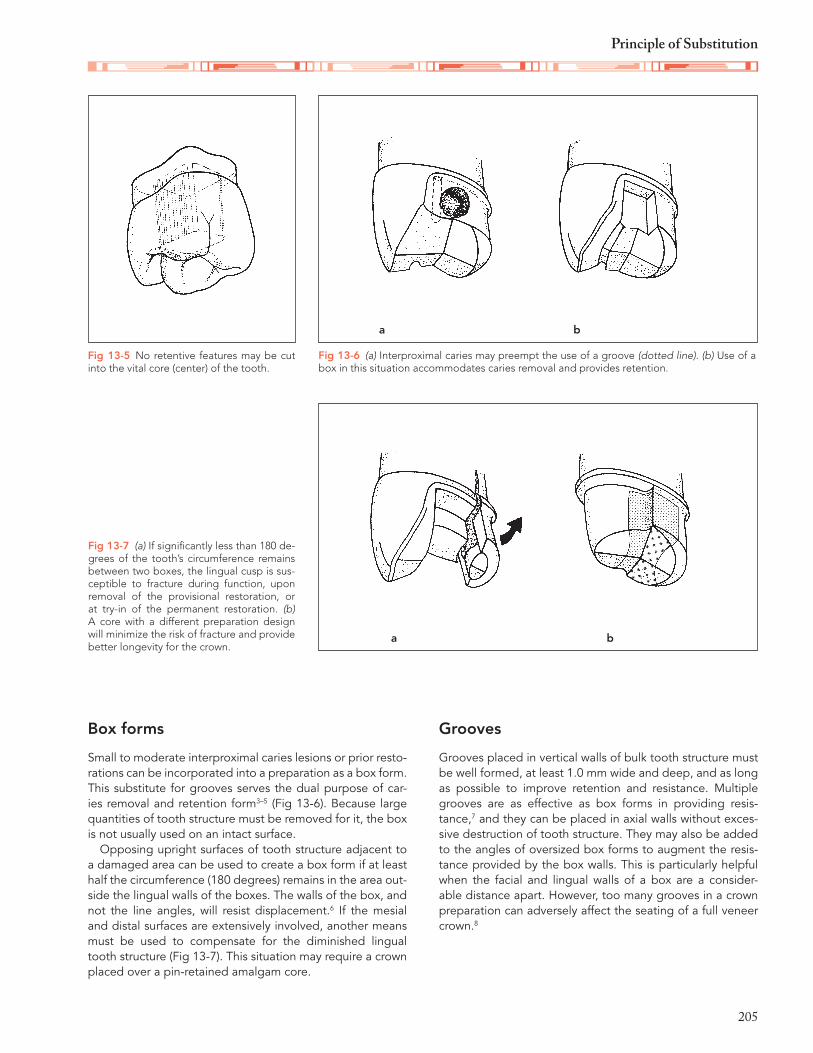
Small to moderate interproximal caries lesions or prior resto-rations can be incorporated into a preparation as a box form. This substitute for grooves serves the dual purpose of car-ies removal and retention form3–5 (Fig 13-6). Because large quantities of tooth structure must be removed for it, the box is not usually used on an intact surface.
Opposing upright surfaces of tooth structure adjacent to a damaged area can be used to create a box form if at least half the circumference (180 degrees) remains in the area out-side the lingual walls of the boxes. The walls of the box, and not the line angles, will resist displacement.6 If the mesial and distal surfaces are extensively involved, another means must be used to compensate for the diminished lingual tooth structure (Fig 13-7). This situation may require a crown placed over a pin-retained amalgam core.
Grooves
Grooves placed in vertical walls of bulk tooth structure must be well formed, at least 1.0 mm wide and deep, and as long as possible to improve retention and resistance. Multiple grooves are as effective as box forms in providing resis-tance,7 and they can be placed in axial walls without exces-sive destruction of tooth structure. They may also be added to the angles of oversized box forms to augment the resis-tance provided by the box walls. This is particularly helpful when the facial and lingual walls of a box are a consider-able distance apart. However, too many grooves in a crown preparation can adversely affect the seating of a full veneer crown.8
Fig 13-6 (a) Interproximal caries may preempt the use of a groove (dotted line). (b) Use of a box in this situation accommodates caries removal and provides retention.
Fig 13-7 (a) If signi!cantly less than 180 de-grees of the tooth’s circumference remains between two boxes, the lingual cusp is sus-ceptible to fracture during function, upon removal of the provisional restoration, or at try-in of the permanent restoration. (b) A core with a different preparation design will minimize the risk of fracture and provide better longevity for the crown.
Fig 13-5 No retentive features may be cut into the vital core (center) of the tooth.
a
a
b
b
248
Provisional Restorations15
not touch any rests or clasps on that tooth. Resin is added to the outside of the crown, and while the resin is still soft, the crown is seated on the tooth. To form the rest seat and guide planes on the crown, the partial denture is lubricated with petrolatum and seated over the provisional crown. The par-tial denture should be pumped up and down several times to ensure that it is not locked into any undercuts. The crown is removed from the tooth, any rough areas are smoothed, and the crown is polished.
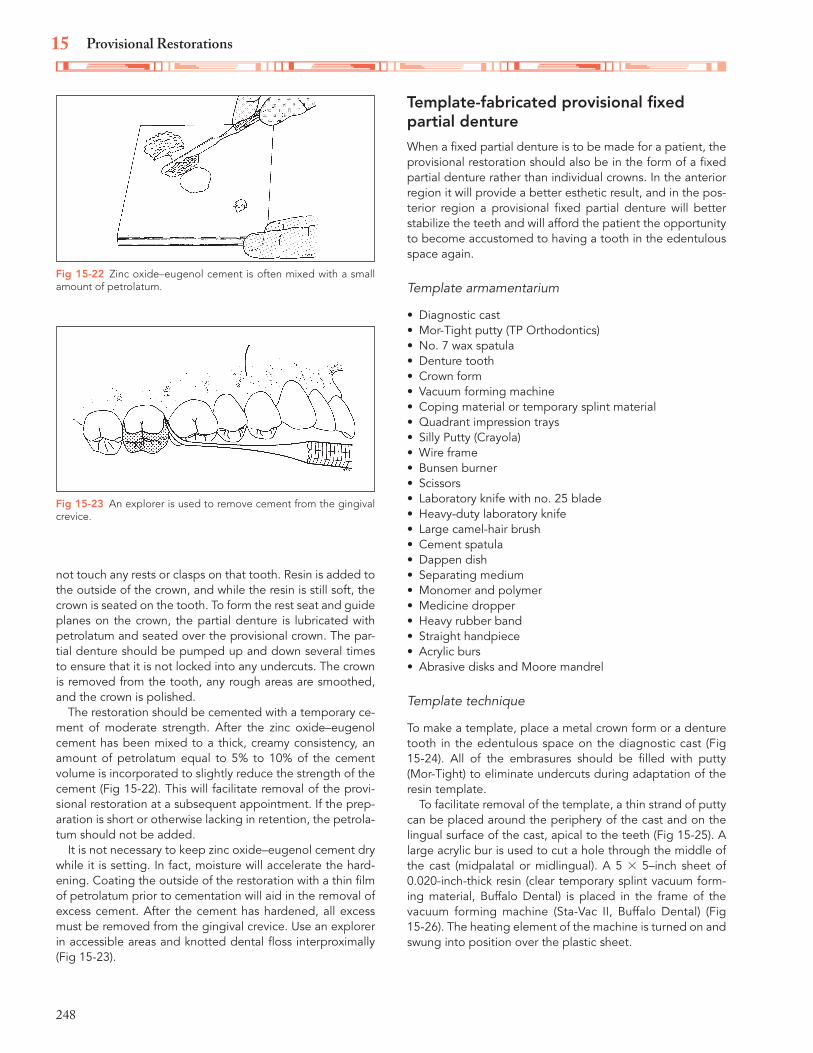
The restoration should be cemented with a temporary ce-ment of moderate strength. After the zinc oxide–eugenol cement has been mixed to a thick, creamy consistency, an amount of petrolatum equal to 5% to 10% of the cement volume is incorporated to slightly reduce the strength of the cement (Fig 15-22). This will facilitate removal of the provi-sional restoration at a subsequent appointment. If the prep-aration is short or otherwise lacking in retention, the petrola-tum should not be added.
It is not necessary to keep zinc oxide–eugenol cement dry while it is setting. In fact, moisture will accelerate the hard-ening. Coating the outside of the restoration with a thin !lm of petrolatum prior to cementation will aid in the removal of excess cement. After the cement has hardened, all excess must be removed from the gingival crevice. Use an explorer in accessible areas and knotted dental "oss interproximally (Fig 15-23).
Template-fabricated provisional !xed partial dentureWhen a !xed partial denture is to be made for a patient, the provisional restoration should also be in the form of a !xed partial denture rather than individual crowns. In the anterior region it will provide a better esthetic result, and in the pos-terior region a provisional !xed partial denture will better stabilize the teeth and will afford the patient the opportunity to become accustomed to having a tooth in the edentulous space again.
Template armamentarium
Diagnostic castMor-Tight putty (TP Orthodontics)No. 7 wax spatulaDenture toothCrown formVacuum forming machineCoping material or temporary splint materialQuadrant impression traysSilly Putty (Crayola)Wire frameBunsen burnerScissorsLaboratory knife with no. 25 bladeHeavy-duty laboratory knifeLarge camel-hair brushCement spatulaDappen dishSeparating mediumMonomer and polymerMedicine dropperHeavy rubber bandStraight handpieceAcrylic bursAbrasive disks and Moore mandrel
Template technique
To make a template, place a metal crown form or a denture tooth in the edentulous space on the diagnostic cast (Fig 15-24). All of the embrasures should be !lled with putty (Mor-Tight) to eliminate undercuts during adaptation of the resin template.
To facilitate removal of the template, a thin strand of putty can be placed around the periphery of the cast and on the lingual surface of the cast, apical to the teeth (Fig 15-25). A large acrylic bur is used to cut a hole through the middle of the cast (midpalatal or midlingual). A 5 × 5–inch sheet of 0.020-inch-thick resin (clear temporary splint vacuum form-ing material, Buffalo Dental) is placed in the frame of the vacuum forming machine (Sta-Vac II, Buffalo Dental) (Fig 15-26). The heating element of the machine is turned on and swung into position over the plastic sheet.
Fig 15-22 Zinc oxide–eugenol cement is often mixed with a small amount of petrolatum.
Fig 15-23 An explorer is used to remove cement from the gingival crevice.

249
Techniques for Custom Provisional Restorations
As the resin sheet is heated to the proper temperature, it will droop or sag about 1.0 inch in the frame. If a coping ma-terial is used, it will lose its cloudy appearance and become completely clear (Fig 15-27). The cast should be in position in the center of the perforated stage of the vacuum forming machine. Then the vacuum is turned on.
The handles on the frame that holds the heated coping material are grasped while the frame is forcefully lowered over the perforated stage (Fig 15-28). The heating element
is turned off and swung to the side. After approximately 30 seconds, the vacuum is turned off, and the resin sheet is released from the holding frame. After the resin sheet is removed from the frame, a laboratory knife with a sharp no. 25 blade is used to cut through the resin over the Mor-Tight strand (Fig 15-29).
If a vacuum forming machine is not available, it is still pos-sible to fabricate a template for a provisional restoration. A quadrant impression tray is !lled with Silly Putty, a soft sili-
Fig 15-24 A crown form or a denture tooth is placed in the edentu-lous space on the diagnostic cast.
Fig 15-26 The plastic sheet is secured in the frame of the vacuum forming machine.
Fig 15-28 The frame is pulled down over the perforated stage of the vacuum forming machine.
Fig 15-25 A rope of Mor-Tight is placed around the periphery of the cast.
Fig 15-27 The plastic sags as it is heated to the proper temperature.
Fig 15-29 The plastic is cut to remove the template from the diag-nostic cast.
534
Single-Tooth Implant Restoration28
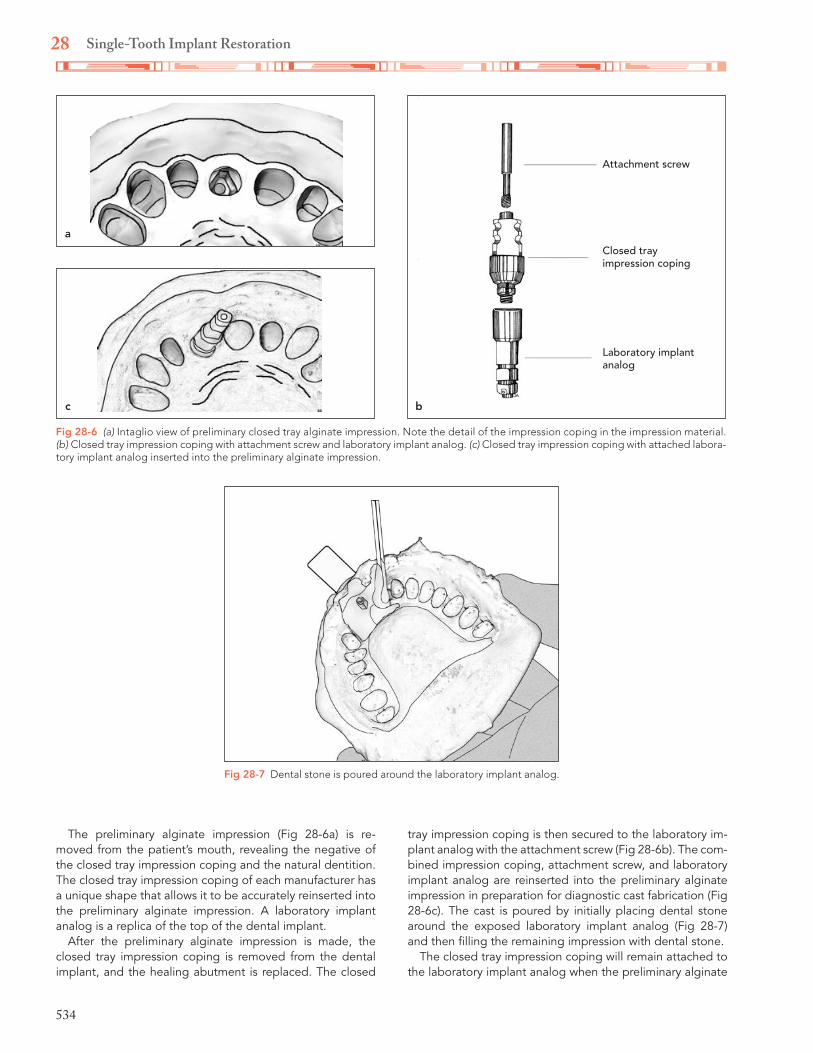
The preliminary alginate impression (Fig 28-6a) is re-moved from the patient’s mouth, revealing the negative of the closed tray impression coping and the natural dentition. The closed tray impression coping of each manufacturer has a unique shape that allows it to be accurately reinserted into the preliminary alginate impression. A laboratory implant analog is a replica of the top of the dental implant.
After the preliminary alginate impression is made, the closed tray impression coping is removed from the dental implant, and the healing abutment is replaced. The closed
tray impression coping is then secured to the laboratory im-plant analog with the attachment screw (Fig 28-6b). The com-bined impression coping, attachment screw, and laboratory implant analog are reinserted into the preliminary alginate impression in preparation for diagnostic cast fabrication (Fig 28-6c). The cast is poured by initially placing dental stone around the exposed laboratory implant analog (Fig 28-7) and then !lling the remaining impression with dental stone.
The closed tray impression coping will remain attached to the laboratory implant analog when the preliminary alginate
Fig 28-6 (a) Intaglio view of preliminary closed tray alginate impression. Note the detail of the impression coping in the impression material. (b) Closed tray impression coping with attachment screw and laboratory implant analog. (c) Closed tray impression coping with attached labora-tory implant analog inserted into the preliminary alginate impression.
a
bc
Attachment screw
Closed tray impression coping
Laboratory implant analog
Fig 28-7 Dental stone is poured around the laboratory implant analog.

535
Impression Taking and Cast Fabrication
impression tray is separated from the cast (Fig 28-8a). The closed tray impression coping is removed from the cast by unscrewing the attachment screw. This will reveal the top of the laboratory implant analog, which is a replica of the pa-tient’s dental implant with the internal hex (Fig 28-8b). The detailed shape of a closed tray impression coping, while well recorded within impression material, can present a challenge when reseating the impression coping in the impression for cast fabrication.
Final impression and master cast fabrication
The open tray impression coping (Fig 28-9a) has an even more detailed shape and a longer attachment screw than
the closed tray impression coping. As stated earlier, an open tray impression technique will produce a more accurate cast than a closed tray impression technique because the impres-sion coping remains within the impression material when the impression tray is removed from the mouth. Therefore, the open tray impression technique is recommended for taking a !nal impression and fabricating a master cast.
The open tray is fabricated on the diagnostic cast with the open tray impression coping attached to the laboratory implant analog with the attachment screw (Figs 28-9b and 28-9c). The diagnostic cast is blocked out around the denti-tion with two sheets of pink baseplate wax (approximately 2 mm thick), leaving the top two-thirds of the attachment screw exposed. Four vertical stops are cut through the oc-clusal surface of the block-out wax. The stops should be well spaced to provide impression tray stability during the
a b
Fig 28-8 (a) Diagnostic cast following impression separation with closed tray impression coping in place. (b) Diagnostic cast with preliminary impression coping removed, showing the top of the implant analog.
Fig 28-9 (a) Open tray impression coping with attachment screw and laboratory implant analog. (b) Facial view of open tray impression coping seated on diagnostic cast with attachment screw. (c) Palatal view.
a
Attachment screw
Open tray impression coping
Laboratory implant analog
b
c

555
IndexPage numbers followed by “f” indicate figures; those followed by “t” indicate tables
AAbrasives
definition of, 384forms of, 384–385Knoop hardness numbers, 384t
Abutmentscontraindications, 85criteria for
crown-root ratio, 85–86overview, 85periodontal ligament area, 86–88, 88froot configuration, 86root surface areas, 86f, 86–88
definition of, 1diagnostic casts of, 9endodontically treated teeth, 217pier, 91f, 91–92secondary, criteria for selecting, 90tilted molar, 94–95tooth-supported fixed partial dentures
conventional, 84resin-bonded, 84
Acid etching, 179, 426Addition silicone. See Polyvinyl siloxane.Adjustments, for gold restorations
contours, 395esthetics, 395margin finishing, 390–392marginal adaptation, 390, 391focclusal
nonworking movement, 394, 394fovercorrection, 392, 393fprotrusive interferences, 394, 394fworking movement, 394, 394f
proximal contacts, 389f, 389–390seating completeness, 390
Agar. See Reversible hydrocolloid.Air brush, 396fAlginate impressions
multiple-tooth implant, 544–546, 545f–546foverimpression-fabricated custom provisional
restorationsarmamentarium, 243cementation process
armamentarium, 247
procedure, 247–248, 247f–248ftechnique, 243–247, 243f–247ftooth preparation, 243–247
single-tooth implant, 533–535, 533f–535fAll-ceramic crowns
attributes, 77tcementation
armamentarium, 408cements
removal of excess, 410selection of, 409shade, 409–410
finishing of rough surfaces, 409, 444proximal contacts, 409, 443stone smoothing, 444technique, 409f, 409–410
contraindications for, 161description of, 76evolution of, 425fabrication of, 429–434, 430f–434ffracture susceptibility of, 161illustration of, 76findications, 149longevity of, 78, 79tocclusal reduction, 138, 138ftooth preparations
armamentarium, 161depth-orientation grooves, 161, 161fincisal reduction, 161, 161flabial reduction, 161–162, 161f–162flingual reduction, 162, 162foverview, 162fradial shoulder, 162, 162f, 429shoulders, 161
All-ceramic restorationsbonded
advantages of, 426feldspathic porcelain restorations, 426highly filled glass-ceramic restorations, 427–428
cementation of, 443–444crowns. See All-ceramic crowns.finishing of, 443–444high-strength core restorations
alumina-reinforced substructures, 428–429zirconia-reinforced substructures, 429
overview of, 425–426Allergies, 3–4
556
Index
All-metal crowncharacteristics of, 77tlongevity of, 79t
All-metal hygienic pontic, fabricationcasting, 486, 486fdie trimming, 482, 482f–483fexcess wax removal, 482, 484finvesting, 486, 486fplaster matrix, 484, 485fwax coping, 482–483
AlloysADA classification, 364base metal. See Base metal alloys.casting of. See Casting.factors that affect choice of, 364–365gold
base metal alloys and, differences, 363investing of, 365types II and III, casting of
armamentarium, 371burnout, 371cleaning the cast, 373–374, 374fcommon defects, 375fpickling, 374, 374fprocedure, 371–373, 372f–373f
gold-palladiumcasting
armamentarium, 379procedure, 379, 379f
for metal-ceramic restorations, 448–449soldering
burnout, 512casting, 512indexing, 509–510investing, 510–511preparatory procedures, 509
noble. See Noble alloys.recommended uses, 364–365
Alumina-reinforced materials, 428–429Alveolar bone loss, 232Amalgam
cores for, 208indications for, 71–72, 193longevity of, 78, 79tplaque control, 71for prefabricated dowels, 217restorations
complexattributes, 77tdescription of, 73, 75illustration of, 74flongevity of, 78, 79t
simpleattributes, 77tdescription of, 72–73illustration of, 74flongevity of, 78, 79t
strength of, 217Angle of convergence, 132Angle of divergence, 132
Anterior guidance, 17fDenar facebow and articulator, 61–62, 62fHanau facebow and articulator
custom settings, 68, 68fmechanical, 69, 69f
Whip Mix facebow and articulator, 55–56, 55f–56fAnterior teeth
dowel cores, for endodontically treated teethillustration of, 215f–216flength determinations, 215frationale for, 214–217retentive properties, 215
guidance of mandible, 55–56, 61–62, 68, 69metal-ceramic crowns. See Metal-ceramic crowns,
anterior teeth.three-quarter crown, tooth preparations for. See Three-
quarter crowns, anterior teeth.vertical overlap of, 23f
Ante’s Law, 87, 526Anticoagulants, 520Anticoagulation, 4Antirotational devices, for die in working casts
Pindex system, 333–340straight dowel pin, 330–333, 331f–333f
Antisialagogues, 271Appearance zone
definition of, 413, 474incisors
incisal lines, 416interproximal contacts, 416
midline, 413pontics, 474smile line, 413
Arcon articulatorsadvantages of, 30–31description of, 30
Articular disc, 13Articulators
arcon, 30–31border movements duplicated by, 27condylar movements, 33f, 33–34definition of, 27Denar, 57fully adjustable, 28–29Hanau, 63–69nonadjustable, 27, 28fnonarcon, 30–31principles of, 27, 28fsemiadjustable, 27tooth–transverse horizontal axis relationship, 31f, 31–32Whip Mix, 45
Aspiration of restorations, 407Autopolymerizing acrylic resin, 300–302, 301f–302fAxial contours
full veneer crown, 347fwax patterns
bulges, 346, 347femergence profile, 346, 347ffaciolingual, 345–346, 345f–346fproximal, 345

557
Index
Axis, hingearbitrary location of, 32articulator hinge axis and, effect of dissimilarities, 27,
28f–29ftrial and error method to determine, 31
BBase, 207–208, 209fBase metal alloys
advantages, 364beryllium content, 364fluoride use, 493gold alloys and, differences, 363melting temperatures, 364for metal-ceramic restorations, 448–449nickel-chromium, 364soldering, 512
Base metal restorationsadjustments, 397finishing, preliminary
armamentarium, 397procedure, 397
polishing, 397try-in, 397
Bennett angle, 16, 16fBeryllium
carcinogenic properties of, 364, 449description of, 364
Bevelscontraindications for, 140–141, 140f–141ffacial, 169ffunctional cusp
description of, 138, 139ffor full veneer crown, 150metal-ceramic crown, 158, 159fthree-quarter partial coverage crowns, 166, 166f
indications for, 140mesio-occlusodistal onlays, 197–200, 198f–200fproximo-occlusal inlays, 195f, 195–196three-quarter crown, 171, 173f
Bilateral balanced occlusion, 20, 361Binangle chisel, 156, 156f–157fBiologic width, 212Bis-acryl composite
characteristics of, 242toverimpression-fabricated crowns
description of, 256procedure for creating, 256–259, 256f–259f
Bisphosphonate-related osteonecrosis of the jaws, 6Bite fork, 46f, 49f, 58Black triangles, 478Blow holes, soldering repair of, 503Bonded ceramic restorations
advantages of, 426feldspathic porcelain restorations, 426highly filled glass-ceramic restorations, 427–428
Bonding, 434Border movements, 27Box form
for damaged teeth, 205, 205fsubstitution of, 136
Bridge. See Fixed partial denture.Brightness. See Value.Bruxism, occlusion and, 19Bur(s), 146t, 174f–175f, 194f. See also specific procedure,
armamentarium.Burnout
definition of, 363gold alloys, types II and III, 371high-temperature, 366low-temperature, 365
CCAD/CAM system, 320, 427, 457Canines
in appearance zone, 415fixed partial dentures for
configurations, one tooth, 107–108description of, 95, 95fresin-bonded, 183f
incisal lines, 416fmandible, 117, 124–125maxillary, 115f, 124root surface area of, 526t
Cantilever fixed partial dentures, 95–96, 96f–97fCaries
resin-bonded fixed partial denture and, 182restoration of, glass ionomer use, 72, 73f
Castingalloys, 363–365definition of, 363dowel-core patterns, 376gold alloys, types II and III
armamentarium, 371burnout, 371procedure, 371–373, 372f–373f
gold-palladium alloysarmamentarium, 379procedure, 379, 379f
inlay patterns, 376investing for, 368–371, 369f–371fvoids, soldering repair of
armamentarium, 503contraindications, 503indications for, 503
Casting rings, for gypsum-bonded investments, 368Casting temperature, 376Casts, working
mounting ofDenar facebow and articulator
mandibular, 59–60maxillary, 59, 59f
Hanau facebow and articulatormandibular, 65–66, 66fmaxillary, 65, 65f
Whip Mix facebow and articulatormandibular, 52–53maxillary, 50–52
with removable dieadvantages over separate die, 330antirotational devices, 330, 330fmethods of orienting die in cast
558
Index
Pindex system, 333–340, 334f–340frequirements, 330straight dowel pin, 330–333, 331f–333f
requirements for, 325with separate die
armamentarium, 325description of, 325die preparation, 327–329, 327f–329fdifficulties associated with, 325finish lines, 327–328, 329fhardening agents, 328impression pouring, 325–326, 326f
Cellulose liners, for casting rings, 368Cement(s)
bonding mechanismsmicromechanical bonding, 398, 399fmolecular adhesion, 398nonadhesive luting, 398, 399f
glass ionomer. See Glass-ionomer cement.polycarboxylate. See Polycarboxylate cement.resin. See Resin cements.selection of, 398–401zinc oxide–eugenol. See Zinc oxide–eugenol cement.zinc phosphate. See Zinc phosphate.
Cement film, 141fCementation
all-ceramic restorationsarmamentarium, 408cements
removal of excess, 410selection of, 409shade, 409–410
finishing of rough surfaces, 409proximal contacts, 409technique, 409f, 409–410
ceramic crowns, 444–445description of, 401dowel cores, 407–408, 408ffixed partial dentures, 410gold inlays, 407metal-ceramic crowns, 410with polycarboxylate cement, 407with resin cements, 402–404, 403fwith resin-modified glass-ionomer cement, 401–402vent holes for cement escape, 402fwith zinc phosphate cement
cement preparation, 404–405, 405fmandibular isolation, 404, 404fpulp protection, 404removal of excess cement, 406restoration seating, 405–406, 406fvital tooth considerations, 404
Cemented restorationsexternal surface
finishing of, 383plaque accumulation on, 383, 383f
indications for, 71–72internal surface, 383plaque control, 71
provisionalarmamentarium, 247procedure, 247–248
Central incisorsfixed partial dentures for
complexmore than two teeth, 117–118two teeth, 113–114
pier abutments, 120–122, 129simple
one tooth, 100–101two teeth, 109–110
root surface area of, 526tCentric occlusal interference, 17, 18fCentric relation, 13Centric relation record
armamentarium, 35description of, 35technique
anterior programming device, 37, 37fbaseplate wax adaptation to maxillary teeth, 37–38bimanual manipulation, 35–36, 36fmanipulation of mandible, 36f, 36–37patient positioning, 36–37registration base use, 37–38, 38f–39f
Ceramic liners, for casting rings, 368Ceramic restorations. See also All-ceramic restorations.
etching of, 426inlays
attributes, 77tdescription of, 75illustration of, 74flongevity of, 78, 79t
veneer crownsall. See All-ceramic crowns.attributes, 77tcementation, 444–445description of, 76illustration of, 76flongevity of, 78, 79t
Chamfers. See also Finish line(s).advantages of, 144tdescription of, 141disadvantages of, 144tfull veneer crown, 150heavy, 141illustration of, 142fresin-bonded fixed partial denture, 182
Chemical bonding, 448Chroma, 419Classic shoulder finish line, 142, 143f, 144tClenching, occlusion and, 19Colloid solutions. See Hydrocolloid.Color, for shade selection of ceramic restorations
characteristics of, 419daily functions’ effect on, 419factors that affect, 418light sources’ effect on
artificial, 418f, 418–419natural, 418, 418f

559
Index
Color blindness, 418Composite resin restorations
attributes, 77tcriteria for, 71–72inlays, 72, 74flongevity of, 78, 79t
Condensation siliconesarmamentarium, 311characteristics of, 292tdisadvantages, 310–311impression making, 311–312, 311f–312fputty/reline, 311reaction of, 310viscosity, 293, 293fwettability, 291
Condylesguidance
on Denar facebow, 60–61, 61feffect on posterior teeth, 21–22, 21f–22fon Hanau facebow, 66–67, 67f–68fon Whip Mix facebow, 50f, 53f–54f, 53–55
inclination of, on arcon and nonarcon articulators, 30, 30fmovements of
articulator reproduction of, 27, 33f, 33–34pantographic recordings, 33f, 33–34
positioning of, 13Cone beam computed tomography, 520–521, 521fConnectors
definition of, 1nonrigid
cross-pin and wing, 515, 515fdovetail, 513–514, 513f–514ffor pier abutments, 91–92, 92f, 513–514split pontic, 514for tilted molar abutments, 94, 94f
rigid, contraindications for, 91–92soldering. See Soldering.
Contacts, proximaladjustments for, 389f, 389–390all-ceramic restorations, 409, 443metal-ceramic restorations, 450–451soldering
armamentarium, 502, 502findications for, 502
Copingfor fabrication of wax patterns, 343–344, 344fmetal-ceramic restorations
alloy used, melting range of, 448description of, 447extent of veneered area, 451–453, 452f–453ffacial margins, 454metal collar, 454occlusal contacts, 450–451, 451foverview, 449porcelain support, 450, 450fporcelain veneer, 449–450proximal contacts, 450–451thickness of metal, 450
Corecomposite resin, 208
pin-retained, 207f, 208Cross-pin and wing, 515, 515fCrown-root ratio, for abutment teeth, 85–86Crowns
all-ceramic. See All-ceramic crowns.cement retention of, 524, 525fdefinition of, 1endodontic access preparation, 215full coverage. See Full coverage crown.lengthening of, for gingival exposure, 287–288longevity of, 78, 79tmetal-ceramic, 75, 151–152, 158–160partial coverage. See Partial coverage crowns.pin placement, 206f, 206–207preformed anatomical metal
armamentarium, 264procedure, 263–267, 264f–267f
provisional, for endodontically treated tooth, 263, 263fremoval force resistance by, 72fretention and resistance, 131, 131ftapering of, 132–133three-quarter, 171–178
Crucible, 371C-terminal cross-linking telopeptide, 520Curve of Spee, 354Curve of Wilson, 355Cusp(s)
mandibular teeth, 349tmaxillary teeth, 349t
Cusp-fossacurve of Spee, 354curve of Wilson, 355cusp placement and occlusal contacts, 354fdefinition of, 354description of, 348tillustration of, 348fwax patterns of, 355–358, 355f–358f
Cusp–marginal ridgecusp placement and occlusal contacts, 350fdescription of, 348–349wax patterns of
mandibular teeth, 352, 353fmaxillary teeth, 350–352, 351f–352f
Custom provisional restorationsoverimpression-fabricated. See Overimpression-
fabricated custom provisional restorations.shell-fabricated
armamentarium, 254description of, 254procedure, 254–255, 255f
template-fabricatedarmamentarium, 248fabrication process, 248–252, 248f–252f
visible light–curedarmamentarium, 252fabrication process, 252–254
Custom resin traysadhesives, 298–299armamentarium, 299autopolymerizing acrylic resin, 300–302, 301f–302f

560
Index
composition of, 299faciolingual section of, 298fpreparation, 299–302stock trays and, comparison, 298uses of, 298for VLC, 299f–300f, 299–300
Cutback areas, 462, 463f–464fCuttle, 384
DDam, rubber, 269, 272Damaged teeth
destruction areas, 203, 204forthodontic adjuncts
extrusion, 212f, 212–214, 214fregaining interproximal space, 210
preparations forbases, 207–208cores, 208
retention and spacemethods to avoid excessive destruction, 203–204substitutive methods for creating
box forms, 205, 205foverview, 204pins, 206–207
vital teeth, modifications for, 208–210, 209fDeep chamfer finish line, 141–142, 143f, 144tDental implants. See Implants.Depth-orientation grooves
all-ceramic crowns, 161, 161ffull veneer crown, 149–150metal-ceramic crowns, 154, 155f
Devitrification, 467Diagnostic casts, 9, 522, 522fDiagnostic work-up
casts, 9elements of, 1–2full-mouth radiographs, 9history taking, 2–6intraoral examination, 8f, 8–9
Die, for working castsremovable
advantages over separate die, 330antirotational devices, 330, 330fmethods of orienting die in cast
Pindex system, 333–340, 334f–340fstraight dowel pin, 330–333, 331f–333f
requirements, 330separate
armamentarium, 325description of, 325die preparation, 327–329, 327f–329fdifficulties associated with, 325finish lines, 327–328, 329fhardening agents, 328impression pouring, 325–326, 326f
Die milling, 428Digital impressions, 320–322, 321fDisinfection, of impressions, 319–320Disocclusion, 21Distofacial root, of maxillary molar, 234, 234f
Double-bite impression, 305Dovetail connector, 513–514, 513f–514fDowel cores
aspiration during try-in, 407–408cemented vs threaded, 218classification of, 218for damaged teeth, 215f–217fdiameter of, 223fendodontically treated teeth
for anterior teethillustration of, 215f–216flength determinations, 215frationale for, 214–217retentive properties, 215
illustration of, 215f–217finsertion procedure, 220, 220f–221flength determinations, 215ffor posterior teeth, 215–216prefabricated, with amalgam or resin core, 217–218rationale for, 214–217retentive properties, 215tooth preparation for
armamentarium, 218custom cast
armamentarium, 222canal preparation, 222–223finishing and cementation, 224–225, 225finstrumentation, 222tresin pattern fabrication, 223–224, 224f
Peeso reamer use, 218–219, 218f–219fpin placement, 220, 220fprefabricated with amalgam or composite resin core
armamentarium, 218diameter recommendations, 219, 219fPeeso reamer use, 218–219, 218f–219fpin placement, 220, 220f
technique, 218–220for pulpless teeth, 215fwax patterns, 376
Dowel inlays, 222Dowel pins
armamentarium, 331location, 330procedure, 331–333
Dry mouth, 5–6Dual-arch impressions
advantages of, 302armamentarium for, 302technique for, 303–306, 303f–306fvariations of, 302
EEdentulous ridge
classification of, 477, 477fdeformities, 477, 477fpontic modification, 478–479, 478f–479fsurgical correction
Class II and III defects, 480, 481fdonor tissue, 480incisions, 479–480, 480f
561
Index
Edentulous spacesfixed partial denture, 84–85, 99–100removable partial denture, 81–82, 84
Electrochemical etching, 179Electrosurgery
armamentarium, 284contraindications, 284crown lengthening, 287–288current types, 282, 282fedentulous cuff removal, 287, 287fgingival sulcus enlargement, 286grounding, 283, 283frecommended uses, 281, 281ftechnique, 284–285, 285f–286ftissue damage from, 281
Emergence profile, 346, 347fEndodontically treated teeth
abutment use, 217anterior teeth, 215dowel cores. See Dowel cores, endodontically treated
teeth.technique, 218–220
Endosseous implants, 517, 518f–519f, 519Epinephrine
cardiovascular disease contraindications, 4in gingival retraction cord, 273, 273t
Esthetic zone, 474Esthetics
absolute, 417appearance zone
definition of, 413incisors
incisal lines, 416interproximal contacts, 416
midline, 413smile line, 413
conversational, 417ideal, 416–417, 417f
Etchingacid, 179, 426electrochemical, 179
Examination, intraoral, 8f, 8–9Expansion methods, for shrinkage during investing
hygroscopic, 365setting, 365thermal, 365–366wax pattern, 365
Extracoronal restorations, 75–76Extrusion, for damaged teeth, 212f, 214f
arch wire, 213, 213fbiologic width, 212determination of amount needed, 213fendodontic treatment, 212–214ferrule effect, 212pin placement, 213, 213fsurgical crown lengthening vs, 212f
FFacebows
articulator use, 31–32caliper-style, 32, 32f
Denaranterior guidance settings, 61–62, 62farmamentarium, 57cast mountings, 59–60components of, 57fcondylar guidance settings, 60–61, 61fdescription of, 57facebow records, 57–58, 60f–61f
description of, 31Hanau
anterior guidancecustom settings, 68, 68fmechanical, 69, 69f
armamentarium, 63cast mountings, 65–66components of, 63fcondylar guidance, 66–67, 67ffacebow record, 63–65, 64f
hinge axis points, arbitrary, 32transverse horizontal axis recordings, 31Whip Mix
anterior guidance, 55–56, 55f–56farmamentarium, 45cast mountings, 50–53components of, 45fcondylar guidance, 50f, 53f–54f, 53–55facebow records, 45–46, 45–48, 46f
Facial bevel, 169fFacial roots, of maxillary molar, 237Faciolingual axial contours, 345–346, 345f–346fFacio-occlusal finish line, 144, 145fFeldspathic porcelain restorations, 426Ferrule effect, 212Fineness, 493Finish line(s)
advantages of, 144tbevels, 141chamfer, 141, 142f, 144tclassic shoulder, 142, 143f, 144tconfigurations for marginal integrity, 141–145deep chamfer, 141–142, 143f, 144tdisadvantages of, 144tfacio-occlusal, 144, 145fknife edge, 144, 144f, 144tplacement of
near alveolar crest, 145subgingival, 145supragingival, 145
radial shoulder, 142–143, 143f, 144tshoulder with a bevel, 143f, 143–144
Finish line exposurechemicomechanical, 273–278criteria for, 273decongestants, 275electrosurgery. See Electrosurgery.lasers for, 288f, 288–289mechanical, 272, 272fretraction cord
armamentarium, 275chemical types, 274tepinephrine, 273

562
Index
placement of, 275–278, 275f–279frotary curettage, 280, 280frubber dam, 272
Finishingbase metal restorations, preliminary, 397gold restorations
postcementation, 396preliminary
armamentarium, 385procedure, 385–387, 386f–387f
margins, for wax patterns, 358–360, 359f–360fFixed partial dentures
abutment teethcrown-root ratio, 85–86ideal types, 84
arch curvature, 90, 90fbiomechanical considerations, 89–90, 89f–90fcanine-replacement, 95, 95fcantilever, 95–96, 96fcasting of, single-piece, 494cementation, 410configurations
complexmore than two teeth, 117–120one tooth, 107–108two teeth, 113–117
simpleone tooth, 100–107two teeth, 109–113
connectors, 91–94, 94, 513–515definition of, 1deflection of, 89f, 89–90faciolingual movement, 91, 91fillustration of, 3fimplant-supported, 84–85metal-ceramic
coping wax pattern, 487–490, 488f–490fincisal configuration, 486metal coping, 486rigidity, 486–487soldering
indications for, 504methods, 504, 504fpostveneer, 509–512, 509f–512fpreveneer, 505–508, 505f–508f
occlusal interferences, 82fpontics, 477for posterior teeth
description of, 99template-fabricated provisional restorations, 248–252,
248f–252fresin-bonded. See Resin-bonded fixed partial dentures.soldering
breaking of joint, 503–504distortions, 496gold alloy
distortions, 496indexing, 494investing, 497–499, 497f–499fprocedure, 500–501, 500f–501fsingle-piece casting, 494
metal-ceramic alloysindications for, 504methods, 504, 504fpostveneer, 509–512, 509f–512fpreveneer, 505–508, 505f–508f
methods of, 504, 504fpreveneer, 504proximal contacts, 502–503repair of casting voids, 503requisites for, 493single-piece casting, 494
tooth-supportedconventional, 84resin-bonded, 84
wax patterns, 378Fluid control methods
antisialagogues, 271high-volume vacuum, 269–270, 270frubber dam, 269saliva ejector, 270Svedopter, 270–271, 270f–271fvacuum attachments, 269f
Freedom of displacement, 133–134, 134fFull coverage crown
axial contours, 347fdefinition of, 1esthetics, 71illustration of, 2findications for, 149partial coverage crown and, comparison, 149, 165prevalence of, 149retention of, 71–72tooth preparation for
armamentarium, 149axial reduction, 150, 150fchamfer, 150depth-orientation grooves, 149–150finishing lines, 150functional cusp bevel, 150occlusal reduction, 149, 150foverview, 149, 151fseating groove, 151
venting of, 401Functional cusp bevel
description of, 138, 139ffor full coverage crown, 150for metal-ceramic crown, 158for MOD onlay, 198for partial coverage crown, 166
Functionally generated path techniqueadvantages, 361definition of, 360functional core, 360
Furcationdefinition of, 230flutes, 230preparation finish lines, 229f, 229–230, 231froot resections affected by, 232
Fusion temperature, 376

563
Index
GGingiva, finish line exposure of. See Finish line exposure.Gingival collar, 230fGingival sulcus, 281, 286Glass-ionomer cement
attributes of, 77tbacteriostatic properties, 400composition of, 400disadvantages, 400–401factors that affect, 401hybrid, 401indications for, 72, 73flongevity of, 78, 79tproperties, 400–401pulp protection for damaged teeth, 207resin-modified, 401–402
Glass-ceramic restorations, highly filled, 427–428Glenoid fossae, 13Glycosylated hemoglobin, 5, 5tGold alloys
casting of, 371–373casting defects, 375fcleaning the castings, 373–374, 374fpickling the castings, 374, 374f
investing of, 365properties of, 363
Gold restorationsadjustments
contours, 395esthetics, 395margin finishing, 390–392marginal adaptation, 390, 391focclusal, 392–394proximal contacts, 389f, 389–390seating completeness, 390
cementation, 401–407finishing
postcementation, 396precementation polishing, 395, 395f–396fpreliminary, 385–387, 386f–387f
try-inanesthesia use, 387armamentarium, 387precautionary procedures, 388, 388fprovisional crown
patient hypersensitivity, 387removal, 388
Golden rectangle, 415, 415fGold-palladium alloys
casting, 379, 379ffor metal-ceramic restorations, 448–449soldering
burnout, 512indexing, 509–510investing, 510–511preparatory procedures, 509
Groovesdepth-orientation
all-ceramic crowns, 161, 161ffull coverage crown, 149–150
metal-ceramic crowns, 154, 155fretentive, 136
Group function, 20
HHemisection, 232, 237–238, 238fHepatitis B, 9–10Highly filled glass-ceramic restorations, 427–428Hinge axis
accuracy of, 32tarbitrary location of, 32and articulator hinge axis, effect of dissimilarities, 27,
28f–29ftrial and error method to determine, 31
History, patient, 3–6Horizontal symmetry, 413Hue, 419Hybrid ionomer cements, 401Hydrocolloids, reversible, 294–298
irreversible hydrocolloids andconcomitant use, 294disadvantages of, 294–295
origins of, 294storage of impressions, 294wettability, 291
Hygienic pontic, all-metalcasting, 486, 486fdie trimming, 482, 482f–483fexcess wax removal, 482, 484finvesting, 486, 486fplaster matrix, 484, 485fwax coping, 482–483
Hygroscopic expansion, 365
IImplants
Brånemark, 519crown retention, 524diameter of, 526–527endosseous, 517, 518f–519f, 519history of, 517–519ideal positioning of, 524, 524finclination of, 525, 525flength of, 526–527number of, 526–527occlusal considerations, 527in partially edentulous patients, 517, 517fplacement of, 525f–526f, 525–527restoration retention over, 524–525single-tooth. See Single-tooth implant.size of, 527tsubperiosteal, 517, 518fsurgical splint for, 526, 526ftreatment planning of
anatomical structures, 523, 523fcone beam computed tomography, 520, 521fdiagnostic casts, 522, 522fhealth history, 520imaging, 520–521oral examination, 520
564
Index
Implant-supported fixed partial denturecharacteristics of, 83tdescription of, 84retainers, 84span length, 83t, 84
Impressionsalginate. See Alginate impressions.condensation silicones. See Condensation silicones.criteria, 291definition of, 291digital, 320–322, 321fdisinfection of, 319–320dual-arch. See Dual-arch impressions.factors in selecting
cost, 293viscosity, 293, 293fwettability, 291
hydrophilic vs hydrophobic, 291pin-retained restorations, 318–319, 319fpolyether. See Polyether.polysulfide. See Polysulfide.polyvinyl siloxane. See Polyvinyl siloxane.shear rate, 293single-tooth implant
alginate, 533–535, 533f–535fclosed tray, 532–533, 533ffinal, 535–539, 535f–539fopen tray, 532–533, 533f
Incisal curve, 413Incisal reduction
all-ceramic crowns, 161, 161flaminate veneer, 436, 436fmetal-ceramic crowns, 154, 155fthree-quarter crown, 171, 172f
Incisive canal, 523Incisors
central, fixed partial dentures forcomplex
more than two teeth, 117–118two teeth, 113–114
pier abutments, 120–122, 129simple
one tooth, 100–101two teeth, 109–110
esthetic length of, 413, 414fincisal edges, 416mandibular, 126maxillary, 115f, 125preparation of, for resin-bonded fixed partial denture,
183froot surface area of, 526t
Index, solderingarmamentarium, 495, 495f–496ffunction of, 494gap width, 496procedure, 495–496
Infectious diseasepatient history taking for, 3protective measures, 9–10, 10f
Inlayscementation, 407ceramic
cementation, 444–445description of, 75
definition of, 1dowel-inlay, 222illustration of, 2findications, 193metal. See Metal inlays.proximo-occlusal
armamentarium, 194bevel, 195f, 195–196flares, 194–195, 195fgingivoaxial groove, 194, 195fmarginal ridge, 194occlusal outline, 194overview, 196fproximal box, 194
wax patterns, 343Interferences, occlusal, 17–18, 18fInterocclusal records, 42f
articulator use of, 30centric relation. See Centric relation record.definition of, 30maximal intercuspation, 40–41
Interproximal spaceloss from tooth migration, 211fmethods to regain, 210
Intracoronal restorationsamalgam, 71–79, 208, 217composite resin
attributes, 77tcriteria for, 71–72inlays, 72, 74f
glass ionomer, 72, 207, 400–401inlays. See Inlays.retention and resistance, 131, 131fstress concentrations, 193
Investingfor casting
base metal alloys, 380crowns, gold alloy, 371–373, 372f–373fdowel-cores, 376expansion methods, 365–366, 376fixed partial denture, gold alloy, 497–499, 497f–499fgeneral procedure, 368–371, 369f–371fgold-palladium alloys, 379, 379finlays, gold, 376
definition of, 363for soldering
metal-ceramic alloys, 506–508, 510–511type III gold, 497–499, 497f–499f
Investments, castinggypsum-bonded, 366–376phosphate-bonded, 377frequirements of, 365
Irreversible hydrocolloid, 291, 294

565
Index
JJoining, 493Joints, solder. See Soldering.
KKeyway, 223, 223f, 513Knife edge finish line, 144, 144f, 144tKnoop hardness numbers, 384t
LLaminate veneer
composite resin, 434definition of, 1porcelain. See Porcelain laminate veneer.working casts, 437–438
Laminating, 435Lasers, for finish line exposure, 288f, 288–289Lateral incisors
fixed partial dentures forcomplex, 113–116pier abutments, 120–123, 126–127, 129simple
one tooth, 101–102two teeth, 109
root surface area of, 526tLateral interocclusal record, 42–43Lateral translation, 24fLeucite-reinforced material, 427Light
artificial, 418f, 418–419natural, 418, 418f
Lingual index, 154fLingual reduction
all-ceramic crowns, 162, 162fmetal-ceramic crowns, 154resin-bonded fixed partial dentures, 185fthree-quarter crown, 171, 172f
Lithium disilicate-reinforced material, 427Lost salt technique, 179
MMandible
movementBennett angle, 16, 16fdeterminants
anterior guidance, 22–24condylar guidance, 21–22, 21f–22fdescription of, 17molar disocclusion, 21posterior. See Temporomandibular joint.
effect of anterior teeth, 17excursion, 15–16, 16fprotrusive, 15, 16ftypes of, 15, 15f
positioning ofdysfunctional, 14fhealthy, 14fmethods to guide, 13
terminal hinge axis theory, 15Mandibular canal, 523, 523f
Mandibular teethcusp placement, 349tcusp–marginal ridge, 352, 353fhemisection, 237–238, 238fincisors
esthetic length of, 413, 414fpreparation for resin-bonded fixed partial denture, 183f
root surface areas, 87fMargins
beveling vs not beveling, 140–141, 140f–141ffinishing
for gold restorations, 390–392for wax patterns, 358–360, 359f–360f
Maryland bridge, 179Master cast
multiple-tooth implant, 552, 552fsingle-tooth implant, 539, 539f–540f
Maxillary sinuses, 523Maxillary teeth
cusp placement, 349tincisors
esthetic length of, 413, 414fincisal edges, 416preparation for resin-bonded fixed partial denture, 183f
root resections ofdistofacial root, 234mesiofacial root, 235, 235f
root surface areas, 87fwax patterns of cusp–marginal ridge, 350–352,
351f–352fMaximal intercuspation record, 40–41, 41fMCR. See Metal-ceramic restorations.Mesiofacial root, of maxillary molar, 235, 235fMesio-occlusodistal onlays
attributes, 77tdescription of, 75illustration of, 74findications for, 197longevity of, 78, 79tmandibular molar preparations for, 200fmaxillary teeth preparations for, 197–200stress concentrations, 197, 197f
Metal inlaysattributes of, 77tClass 1, 196, 196fClass 3, 196, 196fClass 5, 196f, 196–197description of, 75illustration of, 74flongevity of, 79ttooth preparations for, 196–197
Metal-ceramic crownsanterior teeth
armamentarium, 152axial reduction, 154, 155fdepth-orientation grooves, 154, 155ffinish lines, 154, 156incisal reduction, 154, 155flabial reduction, 154, 155flingual reduction, 154

566
Index
occlusal reduction, 152, 152foverview, 157fproximal reduction, 154putty molds, 152, 153fradial shoulder, 154, 156, 156fshoulders, 154, 156technique, 152–157, 153f–157f
attributes, 77tcementation, 410description of, 75, 151–152illustration of, 76findications, 149longevity of, 78, 79tpath of insertion, 137fon periodontally weakened teeth, 229plaque accumulation, 383, 383fposterior teeth
axial reduction, 159f–160fdepth-orientation grooves, 159ffacial reduction, 159ffunctional cusp bevel, 159fgingival bevel, 160indications, 158occlusal reduction, 158, 159fpreparation for
armamentarium, 158axial reduction, 159depth-orientation grooves, 158facial reduction, 158functional cusp bevel, 158gingival bevel, 160focclusal reduction, 138, 138foverview, 160fradial shoulder, 160selective use of, 158
thickness requirements, 152Metal-ceramic restorations
all-ceramic restorations and, comparison, 447alloy types, 448–449, 449tbonding mechanisms, 448CAD/CAM application to, 457cementation, 467–468chairside correction of, 468composition of, 447coping design
extent of veneered area, 451–453, 452f–453ffacial margins, 454metal collar, 454occlusal contacts, 450–451, 451foverview, 449porcelain support, 450, 450fporcelain veneer, 449–450proximal contacts, 450–451thickness of metal, 450
crowns. See Metal-ceramic crowns.finishing, 467–468fixed partial dentures
coping wax pattern, 487–490, 488f–490fincisal configuration, 486metal coping, 486requirements, 486
rigidity, 486–487soldering, 504, 504f
layers of, 447fmaxillary molar, 234fmetal coping, 447pontics, 471, 471f, 476porcelain addition
all-porcelain margin fabrication, 459–462, 459f–462fdentin and enamel porcelain, 462–467, 463f–467fopaque application, 458, 459f
soldering of, 504, 504fsurface treatment, 467wax pattern
alloy surface treatment, 457, 457fall-wax technique, 455–457heat treatment, 458single coping, 454–458, 455f–458f
Metamerism, 419Micromechanical bonding, of cements
description of, 398illustration of, 399f
Missing teeth, treatment options forcase presentation, 85considerations, 81, 85removable partial denture, 81–82, 83t, 85
MOD onlay, 75, 197–200Molars
first, 119fixed partial dentures
cantilever, 96configurations for
one tooth, 105–107pier abutments, 128–129two teeth, 111–113
resin-bonded, preparations for, 184freverse three-quarter crown, 170, 170froot surface area of, 526t
Molecular adhesion, of cements, 398Multiple-tooth implant
healing of, 543impressions
alginate, 544–546, 545f–546fclosed tray, 544final, 546–551, 546f–551fopen tray, 544
master cast articulation, 552, 552fplacement of, 543, 543f, 553, 553fstudy cast for, 544–545, 545f–546fwax-up, 553, 553f
Mutually protected occlusion, 20, 361
NNasal cavity, 523Nickel-chromium alloys, 364Noble alloys
ADA classification system, 363gold content, 363heat treatment, 458melting temperature, 448types of, 363
Nonadhesive luting, 398
567
Index
Nonarcon articulators, 30Nonrigid connectors. See Connectors, nonrigid.Nonworking interference, 18f, 394
OOcclusion
bilateral balanced, 20diagnostic casts, 9disharmony of, 19fevaluation of, 6–8implant considerations, 527interferences, 17–18mandibular movement. See Mandible, movement.mutually protected, 20normal vs pathologic, 19unilateral balanced, 20wax patterns
cusp-fossacusp placement and occlusal contacts, 354fdefinition of, 354description of, 349tillustration of, 348forigins, 355procedure, 355–358, 355f–358f
cusp–marginal ridgecusp placement and occlusal contacts, 350fdescription of, 348–349for mandibular teeth, 352, 353ffor maxillary teeth, 350–352, 351f–352f
Onlaydefinition of, 1illustration of, 3fmesio-occlusodistal. See Mesio-occlusodistal onlays.
Organo-tin silicones, 310–312Osseointegration, 519Osteonecrosis, 6Overimpression-fabricated custom provisional restorations
alginatearmamentarium, 243cementation process
armamentarium, 247procedure, 247–248, 247f–248f
technique, 243–247, 243f–247ftooth preparation, 243–247
bis-acryl composite crown, 256–259, 256f–259fOxidation cycle, 458, 458f
PPalatal root, of maxillary molar, 236–237, 236f–237fPalladium alloys
goldcasting, 379, 379ffor metal-ceramic restorations, 448–449soldering, 509–512, 509f–512f
silver, 363Pantograph
air-activated, 33fcondylar movement recordings, 33f, 33–34description of, 33fully adjustable articulator use with, 34
Partial coverage crownsadvantages of, 165characteristics of, 77tdefinition of, 1full coverage crown and, comparison, 149, 165illustration of, 2findications, 165lingual grooves, 165, 165flongevity of, 79tretention of, 165seven-eighths crown, 170, 170fthree-quarter, tooth preparations for
anterior teethoverview, 173fpath of insertion, 171tooth preparation, 171–173
pin-modified, 174–178posterior teeth, 166–170
Partial denturesfixed. See Fixed partial dentures.removable, 81–82, 84, 247–248
Path of insertion, 136, 137fPeriodontal ligament area, 86–88, 88fPeriodontically weakened teeth
finish line modificationsfurcation flutes, 230, 231flocation, 229f, 229–230
nonresection methods, 239troot resection. See Root resection.
Periodontium, finishing line effects on, 145Phosphate-bonded investments
alloy types, 376armamentarium, 376casting
base metal alloys, 380gold-palladium alloys, 379, 379f
expansion methods, 376indications for, 376investing procedure, 376–379, 378fsprue former, 376–377
Pickling, 374, 374fPier abutments
description of, 91–92fixed partial denture configurations, 120–129illustration of, 91fnonrigid connectors, 91–92, 92f
Pin(s)for damaged teeth, 206–207dowel
armamentarium, 331location, 330procedure, 331–333
in restorations, impressions for, 318–319, 319fretentive, 174fuses of, 206
Pinholedrilling of, 206–207placement areas, 206fsubstitution of, 136
568
Index
Pindex systembase to cast, process for adding, 337–339components, 334fdescription of, 333pinholes, 335–336pouring of impression, 333technique, 334f–340f
Pin-modified three-quarter crownindications for, 174retention, 174tooth preparation for
armamentarium, 176axial reduction, 176, 176fbevel, 178cutting holes, 174–175flares, 177grooves, 176–177, 177foffset, 177, 178foverview, 178f
Pitting, 493Plasma glucose, 5, 5tPolishing materials
abrasives, 384–385description of, 384
Polycarbonate crown, anterior, 260–263Polycarboxylate cements
cementation, 407, 407fcompressive strength, 400indications, 400pulp protection for damaged teeth, 207
Polyetherarmamentarium, 318characteristics of, 292tdescription of, 318effect of disinfectant solutions, 319–320impression making, 318wettability, 291
Polyethyl methacrylate, 242tPolymerization, 242Polymerization shrinkage, 72Polymethyl methacrylate, 241–242, 242tPolysulfide
armamentarium, 307characteristics of, 292tin custom resin trays, 299effect of disinfectant solutions, 319–320hydrophobic nature, 307impression making, 307–310, 308f–310fpackaging of, 307viscosity, 293f
Polyvinyl siloxanearmamentarium, 315bonding strength of, 298–299characteristics of, 292tdescription of, 312–313effect of disinfectant solutions, 319–320formulations, 313–315hydrophobic nature, 313impression making, 315–317, 316f–317foverimpression-fabricated crowns, 256–259, 256f–259f
packaging of, 313technique for, 313f–315fviscosity, 293f
Polyvinylethyl methacrylate, 242tPontic
all-metal hygienicarmamentarium, 482casting, 486, 486fdie trimming, 482, 482f–483fexcess wax removal, 482, 484finvesting, 486, 486fplaster matrix, 484, 485fwax coping, 482–483
in appearance zone, 474cantilever, 96definition of, 1, 471designs
conical, 475, 476fconsiderations for, 471hygienic, 475, 475fovate, 475–476, 476fridge lap, modified, 474saddle, 474
metal-ceramic, 476modifications
for edentulous ridge, 478–479, 478f–479fof surfaces, 471, 472f
postinsertion hygiene, 473–474, 473f–474fprefabricated facings, 476span length, deflection created by, 89, 89fsplit, 514tissue contact with ridge, 472f, 472–473types of, 471, 471fuse of, 9
Porcelainaddition of, to metal-ceramic restorations
all-porcelain margin fabrication, 459–462, 459f–462fdentin and enamel porcelain, 462–467, 463f–467fopaque application, 458, 459f
contouring of, 468glazed, 435
Porcelain jacket crown, 425, 425f. See also All-ceramic crowns.
Porcelain laminate veneerdescription of, 434developmental stages of, 434–435dies
fabrication of, 437–438, 438fgingival retraction, 437illustration of, 3fimpression, 437refractory, 438f–441f, 438–441removable, 437–438
indications, 435porcelain application
color, 441procedure for, 441–443, 442f–443fshade selection, 441
preformed, 434provisional restorations, 445

569
Index
removable, 437–438silane coupling agent, 435tooth preparation
axial outline, 436, 436faxial reduction, 436, 436fdepth-reduction grooves, 436ffacial reduction, 435, 435f–436ffinish line, 435, 437finishing, 437, 437fincisal finish line, 437incisal reduction, 436, 436fproximal refinement, 437tissue management, 437tooth reduction, 435working casts, 437–438
Porcelain release agent, 460Porcelain-fused-to-metal restoration. See Metal-ceramic
crowns.Posterior teeth
contact with mandible, 20fixed partial dentures for, 99metal-ceramic crowns. See Metal-ceramic crowns,
posterior teeth.three-quarter crowns. See Three-quarter crowns,
posterior teeth.Precious metals. See Noble alloys.Prefabricated provisional restorations
anterior polycarbonate crownarmamentarium, 260overview of, 260procedure, 260–263, 260f–263f
preformed anatomical metal crownarmamentarium, 264procedure, 263–267, 264f–267f
Premolarsdowel cores, 222fixed partial dentures
configurations forone tooth, 103–105pier abutments, 122–129two teeth, 110–112
resin-bonded, preparations for, 184fmandibular first, 120maxillary first, 119–120maxillary second, 119root surface area of, 526t
Preparations, tooth. See Tooth preparations.Protrusive incisal path, 22Protrusive incisal path inclination, 22Protrusive occlusal interference
adjustments, for gold restorations, 394, 394fdefinition of, 18illustration of, 18f
Provisional restorationsclassifications
direct vs indirect, 241–242prefabricated vs custom, 241
criteria for, 241custom. See Custom provisional restorations.definition of, 241
endodontically treated teeth, 263, 263fprefabricated, techniques for
anterior polycarbonate crown, 260–263, 260f–263fpreformed anatomical metal crown, 263–267,
264f–267fremoval of, 388resins, 242, 242t. See also specific resin.
Proximal contactsadjustments for, 389f, 389–390all-ceramic restorations, 409metal-ceramic restorations, 450–451soldering, 502–503
Proximo-occlusal inlaysarmamentarium, 194bevel, 195f, 195–196flares, 194–195, 195fgingivoaxial groove, 194, 195fmarginal ridge, 194occlusal outline, 194overview, 196fproximal box, 194
Pulpless tooth. See Endodontically treated teeth.
QQuick Mount facebow, 45–48
RRadial shoulder, 142–143, 143f, 154, 156, 160, 429Radiating symmetry, 415Radiographs, full-mouth, 9Reduction. See specific reduction.Removable die, for working casts
antirotational devices, 330, 330forientation methods for
Pindex system, 333–340, 334f–340fstraight dowel pin, 330–333, 331f–333f
requirements, 330separate die vs, 330
Removable partial denturesabutment teeth requirements, 81–82characteristics of, 83tindications for, 81provisional crown placement under, 247–248
Resin cementsautopolymerizing, 398cementation, 402–404, 403fcomposite
dentinal bonding agent use with, 402–404description of, 398problems associated with, 402restorations
criteria for, 71–72inlays, 72longevity of, 79t
problems associated with, 398–400restorations
inlays, 74flongevity of, 78
Resin-bonded fixed partial denturesadvantages, 180
570
Index
cements, 180contraindications, 182delivery
armamentarium, 186sequence
abutment teeth, 186, 187fair abrading, 186, 187fbonding, 187–188excess removal, 188Oxyguard II, 188, 188fprimer, 187pumice cleaning, 186
disadvantages, 180framework configurations, 184flongevity uncertainties, 180, 181tMaryland bridge, 179Rochette bridge, 179tooth preparation
armamentarium, 184axial reduction, 182, 186fcountersinks, 185fexamples of, 183f–184ffinish lines, 182grooves, 183, 183f–184f, 186flingual reduction, 185focclusal reduction, 182, 185fproximal reduction, 185frests, 184fsequence, 185–186vertical stops, 182
Virginia bridge, 179–180Resin-modified glass-ionomer cement, 401–402Resistance, 131–137Restorations
all-ceramic. See All-ceramic restorations.base metal
adjustments, 397finishing, preliminary, 397polishing, 397try-in, 397
ceramic. See Ceramic restorations.considerations for, 71–72gold
adjustmentscontours, 395esthetics, 395margin finishing, 390–392marginal adaptation, 390, 391focclusal
nonworking movement, 394, 394fovercorrection, 392, 393fprotrusive interferences, 394, 394fworking movement, 394, 394f
proximal contacts, 389f, 389–390seating completeness, 390
finishingpostcementation, 396preliminary, 385–387
precementation polishing, 395, 395f–396ftry-in
anesthesia use, 387
armamentarium, 387precautionary procedures, 388, 388f–389fprovisional crown
patient hypersensitivity, 387removal, 388
marginal integritybeveling vs not beveling, 140f–141f, 140–141finish line configurations, 141–145
metal-ceramic. See Metal-ceramic restorations.provisional. See Provisional restorations.retention and resistance of
extracoronal, 131, 131ffactors that affect
freedom of displacement, 133–134, 134finternal feature substitution, 136, 136focclusogingival length, 135, 135fpath of insertion, 136, 137f
intracoronal, 131, 131foverview, 131small teeth vs large teeth, 133, 133f
shade selection. See Shade selection.structural durability, factors that affect
axial reduction, 138, 139ffunctional cusp bevel, 138, 139focclusal reduction, 138
tooth preparation for. See Tooth preparation.tooth structure preservation, 131
Retainersdefinition of, 1implant-supported fixed partial denture, 84
Retentive pins, 174fRetraction cord
armamentarium, 275chemical types, 274tepinephrine, 273, 275–278placement of, 275–278, 275f–279f
Reverse occlusion, 20Reversible hydrocolloid
agar content, 294armamentarium, 296characteristics of, 292tconditioner for, 294, 295fcooling of, 294impression making, 294, 296f–297f, 296–298irreversible, 294origins of, 294storage of impressions, 294wettability, 291
Ridgescusp–marginal
cusp placement and occlusal contacts, 350fdescription of, 348–349wax patterns of
mandibular teeth, 352, 353fmaxillary teeth, 350–352, 351f–352f
edentulousclassification of, 477, 477fdeformities, 477, 477fpontic modification, 478–479, 478f–479fsurgical correction
Class II and III defects, 480, 481f

571
Index
donor tissue, 480incisions, 479–480, 480f
Rochette bridge, 179Root
configuration of, 86crown-root ratio, 85–86
Root amputation, 232Root canal. See Endodontically treated teeth.Root caries. See Caries.Root resection
capacity of resected roots, 232contraindications, 232description of, 232effect of narrow furcations, 232failure rates, 239indications, 232success rates, 239, 239ttechnique, 232–233, 233ftooth preparation and crown configurations
mandibular hemisection, 237–238, 238fmaxillary distofacial root, 234maxillary facial roots, 237maxillary mesiofacial root, 235, 235fmaxillary palatal root, 236, 236f, 237, 237fskyfurcation, 239, 239f
Rotary curettage, 280, 280fRouge, 384Rubber base. See Polyether; Polysulfide.Rubber dam, 269, 272Rubber points, 385Rubber wheels, 385
SSaliva ejector, 270Separating disks, 384Seven-eighths crown, 170, 170fShade selection
colorcharacteristics of, 419daily functions’ effect on, 419light sources’ effect on
artificial, 418f, 418–419factors that affect, 418natural, 418, 418f
glass-ceramic restorations, 427metal-ceramic restorations, 467sequence for
illustration of, 420f–423fpatient positioning, 421recording of findings, 423removal of distractions, 420shade guide, 420shade tabs, 421–423
translucency, 419Shade tabs, 421–423Shear thinning, 293Shell-fabricated provisional restorations, 254–255, 255fShoulder
all-ceramic crowns, 161–162, 162fmesio-occlusodistal onlays, 198fmetal-ceramic crowns, 154, 156, 156f
Shrinkage, during investingdescription of, 365expansion methods
hygroscopic, 365setting, 365thermal, 365–366wax pattern, 365
Shrink-spot porosity, 367, 375fSilane coupling agent, 435Silicon carbide, 384Silicone
Condensation. See Condensation silicones.polyvinyl siloxane. See Polyvinyl siloxane.
Silicone putty index, 253fSilver-palladium alloys, 363Single-tooth implant
cast fabrication, 532, 535–539description of, 531facial view of, 531fgingival tissue evaluation, 532healing of, 531, 532fimpression techniques
alginate, 533–535, 533f–535fclosed tray, 532–533, 533ffinal, 535–539, 535f–539fopen tray, 532–533, 533f
master cast articulation, 539, 539f–540fplacement of, 531, 542, 542fwax-up for, 540, 541f–542f
Single-tooth restorationsattributes of, 77textracoronal. See Crowns.intracoronal
amalgamcomplex, 73, 75simple, 72–73
composite resin. See Composite resin restorations.glass ionomer, 72, 207, 400–401inlays. See Inlays.mesio-occlusodistal onlays. See Mesio-occlusodistal.
longevity of, 78treatment planning, considerations for, 71–72
Skyfurcation, 239, 239fSmile line
effect of mouth on, 414fillustration of, 413f
Solderbreaking of, 503–504characteristics of, 493gold, 493noble metal content, 493
Solderingdefinition of, 493difficulty associated with, 494fixed partial denture
gold alloydistortions, 496indexing, 494investing, 497–499, 497f–499fsingle-piece casting, 494soldering, 500–501, 500f–501f
572
Index
metal-ceramic alloysindications for, 504methods, 504, 504fpostveneer
burnout, 512casting, 512indexing, 509–510investing, 510–511preparatory procedures, 509
preveneerburnout, 506–508indexing, 506investing, 506–508margin finishing, 508postveneer and, comparison, 505procedure, 505–508, 505f–508f
methods of, 504, 504fpreveneer, 504proximal contacts, 502–503repair of casting voids, 503requisites for, 493
Sprue formerfor all-metal hygienic pontics, 486description of, 366in gypsum-bonded investments, 366–368, 368fillustration of, 367fin phosphate-bonded investments, 376–377
Stones, abrasivegreen, 385pink, 385shapes of, 385fwhite, 385
Stress concentrations, in intracoronal restorations, 197Structural durability, of restorations
axial reduction, 138, 139ffunctional cusp bevel, 138, 139focclusal reduction, 138
Subgingival margins, 145Subperiosteal implants, 517, 518fSupragingival margins, 145Surgical crown lengthening, 212fSvedopter, 270–271, 270f–271fSymmetry, of face, 413
TTaper
definition of, 132optimum degree of, 132, 133tretention and, relationship between, 132f
Teeth. See also Mandibular teeth; Maxillary teeth; specific teeth.
abutment use. See Abutments.alignment of, 82fdamaged. See Damaged teeth.endodontically treated. See Endodontically treated
teeth.mandibular movement affected by, 17missing. See Missing teeth.
Telescope crown, 94, 94f
Templates, for provisional restorationsfixed partial denture, 248–252, 248f–252fvisible light–cured, 252–254
Temporomandibular jointanatomy of, 13, 14fevaluation of, 6–8mandibular movement and, 27
Terminal hinge axis theory, 15Three-quarter crowns
anterior teetharmamentarium, 171axial reduction, 171–172, 172fbevels, 171, 173fflares, 172–173, 173fgrooves, 172f, 172–173incisal reduction, 171, 172flingual reduction, 171, 172foffset, 173, 173foverview, 173fpath of insertion, 171
for mandibular molar, 170, 170fpin-modified
indications for, 174retention, 174tooth preparation for
armamentarium, 176axial reduction, 176, 176fbevel, 178cutting holes, 174–175, 177f–178fflares, 177grooves, 176–177, 177foffset, 177, 178foverview, 178f
posterior teetharmamentarium, 166axial reduction, 166–167, 167ffinishing lines, 167, 167fflares, 168–169, 169ffunctional cusp bevel, 166, 166fgrooves, 167–168, 167f–168focclusal reduction, 166, 166foffsets, 169overview, 169f
reverse, 170, 170fTilted molar
abutmentscorrective methods, 93–94description of, 93–94fixed partial dentures, 93–94split pontics, 514
proximal half crown, 170f, 170–171uprighting of, 93, 93f
Titanium alloy, 364TMJ. See Temporomandibular joint.Tooth conditions, 203tTooth preparations
all-ceramic crowns. See All-ceramic crowns, tooth preparations.
damaged teeth. See Damaged teeth, preparations for.full coverage crown. See Full coverage crown, tooth
preparation for.

573
Index
instrumentation, 145–147, 146tlaminate veneers, porcelain
depth-reduction grooves, 436ffacial reduction, 435, 435f–436ffinish line, 435finishing, 437incisal reduction, 436, 436f
marginal integritybeveling vs not beveling, 140–141, 140f–141ffinish line configurations, 141–145
mesio-occlusodistal onlaysfor mandibular molars, 200ffor maxillary teeth
armamentarium, 197bevel, 198–199, 198f–200ffinish lines, 198, 199fflares, 198, 199fisthmus, 198occlusal reduction, 197–198, 198foverview, 200fproximal box, 198shoulder, 198f
metal-ceramic crowns. See Metal-ceramic crowns.periodontium preservation, 145retention and resistance
extracoronal, 131, 131ffactors that affect
freedom of displacement, 133–134, 134finternal feature substitution, 136, 136focclusogingival length, 135, 135fpath of insertion, 136, 137f
intracoronal, 131, 131foverview, 131taper, 132–133
small teeth vs large teeth, 135fstructural durability, factors that affect
axial reduction, 138, 139ffunctional cusp bevel, 138, 139focclusal reduction, 138
tooth structure preservation, 131, 208–210Tooth structure preservation, 131, 208–210Transformation toughening, 429Transosseous mandibular bone plate, 517, 518fTripoli, 384Try-in
base metal restorations, 397gold alloy restorations
anesthesia use, 387armamentarium, 387precautionary procedures, 388, 388f–389fprovisional crown
patient hypersensitivity, 387removal, 388
UUndercuts
box form to eliminate, 208visual examination for, 136, 137f
Unilateral balanced occlusion, 20, 361
VVac-U-Spat investor, 369–371Value, 419Van der Waals forces, 448Veneer crowns. See Full coverage crown; Partial coverage
crowns.Veneer restorations. See Laminate veneer.Vent holes, 401Virginia bridge, 179–180Visible light–cured provisional restorations, template-
fabricated, 252–254Visible light–cured urethane dimethacrylate, 242tVital teeth
abutment use of, 85damaged, modifications for restorative procedures, 208–
210, 209fVoids, casting
armamentarium, 503contraindications, 503indications for, 503
WWax interocclusal records. See Interocclusal records.Wax patterns
axial contoursbulges, 346, 347femergence profile, 346, 347ffaciolingual, 345–346, 345f–346fproximal, 345
fabricationarmamentarium, 343coping, 343–344, 344fmethods of, 343
margin finishingcommon problems, 358occlusal grooves, 360
occlusal schemeclassification of, 349tcusp-fossa
curve of Spee, 354curve of Wilson, 355cusp placement and occlusal contacts, 354fdefinition of, 354description of, 349tillustration of, 348forigins, 355procedure, 355f–358f, 355–358
cusp–marginal ridgecusp placement and occlusal contacts, 350fdescription of, 348–349for mandibular teeth, 352, 353ffor maxillary teeth, 350–352, 351f–352f
single coping, 454–458, 455f–458fwax types, 343
Wax wafers, 45, 46fWet field technique, 296–297Working casts
mounting ofDenar facebow and articulator, 59–60
574
Index
Hanau facebow and articulator, 65–66Whip Mix facebow and articulator, 50–53
with removable dieadvantages over separate die, 330antirotational devices, 330, 330fmethods of orienting die in cast
Pindex system. See Pindex system.straight dowel pin, 330–333, 331f–333f
requirements, 330requirements for, 325with separate die
armamentarium, 325description of, 325die preparation, 327–329, 327f–329fdifficulties associated with, 325finish lines, 327–328, 329fhardening agents, 328impression pouring, 325–326, 326f
Working occlusal interferenceadjustments, for gold restorations, 394, 394fdescription of, 17, 18f
XXerostomia, 5–6
ZZinc oxide–eugenol cement
indications, 400performance of, 400provisional crowns, 248, 248f
Zinc phosphatecementation
cement preparation, 404–405, 405fmandibular isolation, 404, 404fpulp protection, 404removal of excess cement, 406restoration seating, 405–406, 406fvital tooth considerations, 404
compressive strength, 400indications, 400
Zirconia-reinforced materials, 429
Related Documents