User Guide English ( 3 – 9 ) Guía del usuario Español ( 10 – 16 ) Guide d’utilisation Français ( 17 – 23 ) Guida per l’uso Italiano ( 24 – 30 ) Benutzerhandbuch Deutsch ( 31 – 37 ) Appendix English ( 38 )

Welcome message from author
This document is posted to help you gain knowledge. Please leave a comment to let me know what you think about it! Share it to your friends and learn new things together.
Transcript
User Guide English ( 3 – 9 )
Guía del usuario Español ( 10 – 16 )
Guide d’utilisation Français ( 17 – 23 )
Guida per l’uso Italiano ( 24 – 30 )
Benutzerhandbuch Deutsch ( 31 – 37 )
Appendix English ( 38 )

2
3
User Guide (English) Introduction Box Contents Melody 61
Microphone
Headphones
Keyboard Stand
Bench
Power Adapter
User Guide
Safety & Warranty Manual Support For the latest information about this product (system requirements, compatibility information, etc.) and product registration, visit alesis.com.
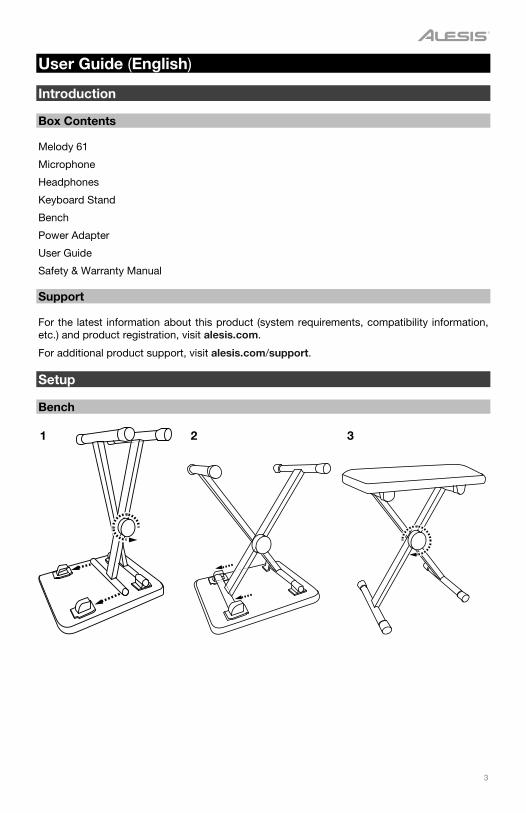
For additional product support, visit alesis.com/support. Setup Bench
1 2 3
4
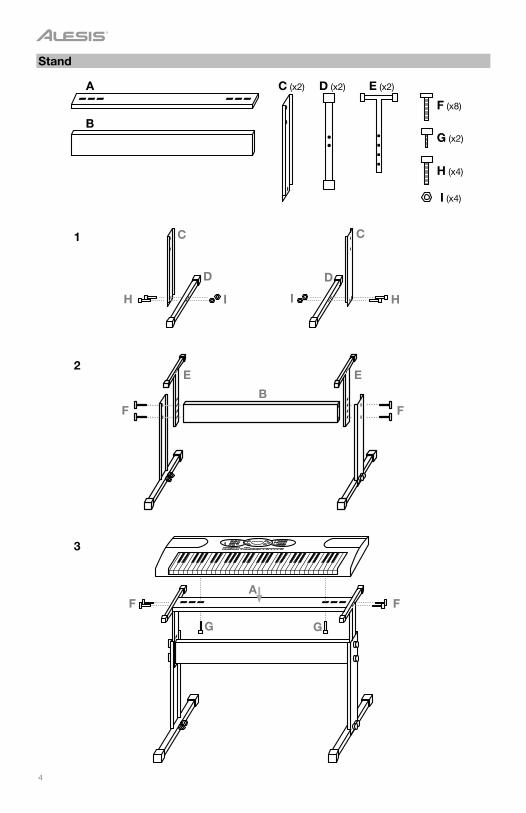
Stand
A
B
C (x2) D (x2) E (x2)
F (x8)
C C
D D
H I I H
F F
E E
B
AF F
G (x2)
H (x4)
I (x4)
G G
1
2
3
5
UDISK AUDIOINPUT
MIC PHONES/OUTPUT 9V
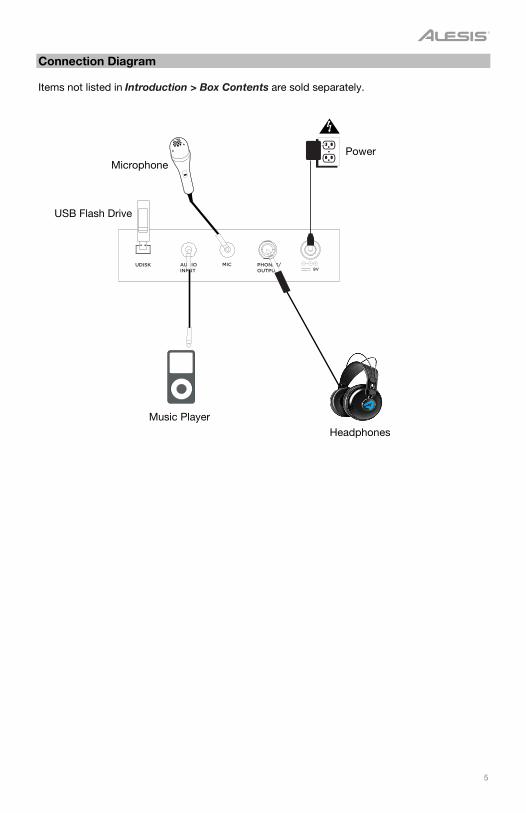
Connection Diagram Items not listed in Introduction > Box Contents are sold separately.
Microphone Power
USB Flash Drive
Headphones
Music Player

6
Features
Top Panel
1. Power On/Off: Press this button to turn the keyboard on or off. 2. Transpose: Press the Transpose + or Transpose – button to increase or decrease the
key by a half-step. Press the Transpose + and Transpose – buttons simultaneously to reset to the default value.
3. Rhythm Volume: Press the Rhythm Vol + or Rhythm Vol – button to increase or decrease the rhythm volume. Press the Rhythm Vol + and Rhythm Vol – simultaneously to reset to the default value.
4. Chord Volume: Press the Chord Vol + or Chord Vol – button to increase or decrease the chord volume. Press the Chord Vol + and Chord Vol – buttons simultaneously to reset to the default value.
5. Master Volume: Press the Master Vol + or Master Vol – button to increase or decrease the overall volume for the sounds and rhythms. Press the Master Vol + and Master Vol –buttons simultaneously to reset to the default value.
6. Tempo: Press the Tempo + or Tempo – button to increase or decrease the rhythm speed. Press the Tempo + and Tempo – buttons simultaneously to reset to the default value.
7. Demo Songs: Press this to hear the 10 demonstration songs. Use the number buttons or + or – buttons during playback to select another demonstration song.
8. One-Key: Press this button to start the Intelligent Teaching Function lesson 1. 9. Follow: Press this button to start the Intelligent Teaching Function lesson 2. 10. Ensemble: Press this button to start the Intelligent Teaching Function lesson 3. 11. LED Display: Shows the various keyboard functions and numerical values. 12. Program: Press this button to program a custom rhythm. 13. Play: Press this button to playback a custom rhythm. 14. Record: Press this button to record a custom rhythm. 15. Tone: Select from the 200 sounds using the number buttons or pressing + or –. 16. Rhythm: Press this button to activate the corresponding accompaniment rhythm. Select
another rhythm using the number buttons or pressing + or –. 17. Numbers: Use these buttons to select an instrument, rhythm, song, or tempo. 18. Sync: Press the Sync button, and then play the keys in the lowest two octaves
(corresponding to the chords/notes). The play-along feature starts immediately when playing a key, instead of having to press the Start/Stop button to start it.
19. Start/Stop: Press to start or stop an accompaniment rhythm. 20. Fill-In: Press this button to have a temporary rhythm play during the accompaniment
rhythm. 21. Single: Press this button after starting a rhythm to use the automatic chord
accompaniment and play a single chord on the keys in the AUTO BASS CHORD area of the keyboard, which is F# and below. You can play any major chord by pressing a key in this area. Press this button again to disable the chord function.
TONE
USB Music Player
000-007 PIANO008-015 MALLET016-023 ORGAN024-031 GUITAR
032-039 BASS040-047 STRINGS048-055 STRING ENSEMBLE056-063 BRASS
064-071 REEDS072-079 FLUTE080-087 LEAD088-095 PADS
096-103 FX104-111 ETHNIC112-119 PERCUSSION120-128 SOUND EFFECTS
129-133 SYNTH PERCUSSION134-143 SYNTH ORGAN144-159 SYNTH GUITAR160-172 SYNTH STRINGS
173-187 SYNTH REEDS188-199 SYNTH BRASS
000-042 8 BEAT/16 BEAT043-046 BALLAD047-062 JAZZ/EUROPEAN063-100 LATIN
101-106 MARCH/POLKA107-113 COUNTRY/WESTERN114-118 ASIAN119-127 WALTZ
25252525
1
2345
6
7 8
91010
1111 1212
13131414
1515 1717
18181919
2020
2121
2222
2323
1616
2424
2525 2626
2727 2828 2929 3030
3131
3232
3333
3434
3535
3636
7
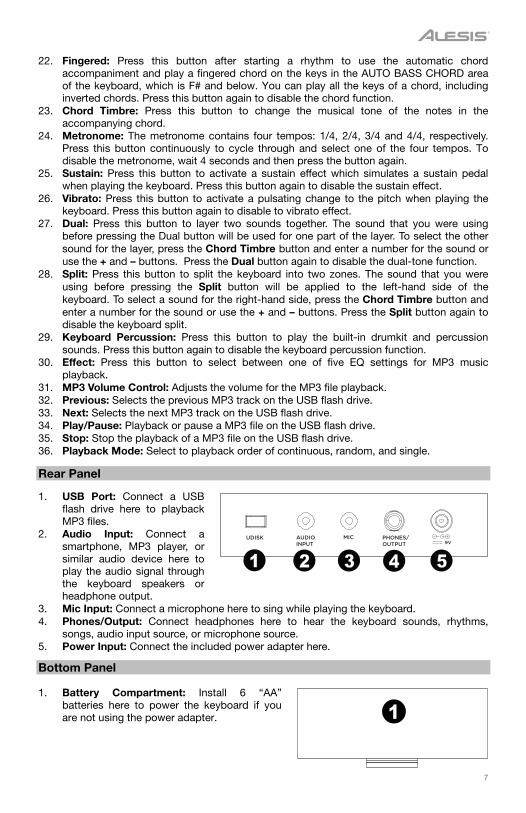
22. Fingered: Press this button after starting a rhythm to use the automatic chord
accompaniment and play a fingered chord on the keys in the AUTO BASS CHORD area of the keyboard, which is F# and below. You can play all the keys of a chord, including inverted chords. Press this button again to disable the chord function.
23. Chord Timbre: Press this button to change the musical tone of the notes in the accompanying chord.
24. Metronome: The metronome contains four tempos: 1/4, 2/4, 3/4 and 4/4, respectively. Press this button continuously to cycle through and select one of the four tempos. To disable the metronome, wait 4 seconds and then press the button again.
25. Sustain: Press this button to activate a sustain effect which simulates a sustain pedal when playing the keyboard. Press this button again to disable the sustain effect.
26. Vibrato: Press this button to activate a pulsating change to the pitch when playing the keyboard. Press this button again to disable to vibrato effect.
27. Dual: Press this button to layer two sounds together. The sound that you were using before pressing the Dual button will be used for one part of the layer. To select the other sound for the layer, press the Chord Timbre button and enter a number for the sound or use the + and – buttons. Press the Dual button again to disable the dual-tone function.
28. Split: Press this button to split the keyboard into two zones. The sound that you were using before pressing the Split button will be applied to the left-hand side of the keyboard. To select a sound for the right-hand side, press the Chord Timbre button and enter a number for the sound or use the + and – buttons. Press the Split button again to disable the keyboard split.
29. Keyboard Percussion: Press this button to play the built-in drumkit and percussion sounds. Press this button again to disable the keyboard percussion function.
30. Effect: Press this button to select between one of five EQ settings for MP3 music playback.
31. MP3 Volume Control: Adjusts the volume for the MP3 file playback. 32. Previous: Selects the previous MP3 track on the USB flash drive. 33. Next: Selects the next MP3 track on the USB flash drive. 34. Play/Pause: Playback or pause a MP3 file on the USB flash drive. 35. Stop: Stop the playback of a MP3 file on the USB flash drive. 36. Playback Mode: Select to playback order of continuous, random, and single.
Rear Panel
1. USB Port: Connect a USB flash drive here to playback MP3 files.
2. Audio Input: Connect a smartphone, MP3 player, or similar audio device here to play the audio signal through the keyboard speakers or headphone output.
3. Mic Input: Connect a microphone here to sing while playing the keyboard. 4. Phones/Output: Connect headphones here to hear the keyboard sounds, rhythms,
songs, audio input source, or microphone source. 5. Power Input: Connect the included power adapter here.
Bottom Panel
1. Battery Compartment: Install 6 “AA” batteries here to power the keyboard if you are not using the power adapter.
1
UDISK AUDIOINPUT
MIC PHONES/OUTPUT 9V
1 2 3 4 5
8
Operation
Rhythm Control
1. Press the Start/Stop button to start the accompaniment rhythm. 2. Play the keys on the keyboard. 3. Press the Fill-in button for a quick intermediate rhythm part to begin playing. 4. Press the Start/Stop button to stop the accompaniment rhythm.
Recording Function
1. Press the Rec button to start recording. When the memory is full, the screen will display “FUL”, and recording will automatically stop.
2. During the recording process, press Play to stop recording. Press Play again to play the recorded notes.
3. Press Play again to stop playback. Note: The recorded notes will be erased when recording is started again or when the keyboard is turned off.
Rhythm Programming
Create custom rhythms by playing the keyboard keys.
1. Press the Prog button and start programming the rhythm by playing each note in the pattern, one at a time.
2. Press Play to stop programming and hear the programmed rhythm. 3. Press the Prog button again to disable the programming function and erase the
programming data. Note: The programmed rhythm will be erased when programming is performed again or if the keyboard is turned off.
9
Intelligent Teaching Function This function is divided into three parts to guide in learning to play the keyboard. Use the exercise One-Key to get familiar with the melody and rhythm of a song, use the Follow exercise for accurate playing of the song notes, and then use the Ensemble exercise to freely play with others.
Teaching 1: One-Key
When the One-Key button is pressed, the One-Key teaching function is enabled, and the screen displays the number of the current demonstration song for teaching. You can select the song to be learned by pressing the number button or pressing + or –. One-Key teaching allows for mistakes when playing the keys, but the keyboard still plays correct notes. The One-Key teaching can be disabled by pressing the One-Key button again.
Teaching 2: Follow
When the Follow button is pressed, the Follow teaching function is enabled, and the screen displays the number of the current demonstration song for teaching. You can select the song to be learned by pressing the number button or pressing + or –. The display will then show the correct note to play and will wait for you to play it before it moves to the next note. This will continue until the song is finished. The Follow teaching function can be disabled by pressing the Follow button again. Teaching 3: Ensemble
When the Ensemble button is pressed, the Ensemble teaching function is enabled, and the screen displays the number of the current demonstration song for teaching. You can select the song to be learned by pressing the number button or pressing + or –. The Ensemble teaching is used when you are able to play the correct song notes. If a note is not played within 3 seconds, the keyboard will automatically play the correct note. The Ensemble teaching function can be disabled by pressing the Ensemble button again. MP3 File Playback Insert a USB flash drive to select MP3 files for playback. • Press to go to the previous track.
• Press to go to the next track.
• Press to play/pause a track.
• Press to stop a playing track.
• Press to cycle through the repeat modes for continuous, random, or single playback.
• Press the buttons to adjust the volume.
• Press the Effect button to cycle through one of five EQ settings until you find one that sounds best for your MP3 music. The five EQ settings are Normal, Pop, Rock, Jazz, and Classical.
Note: Be sure your USB thumb drive is formatted as FAT32. Other formats, such as NTFS, will not work. When adding MP3 files to your USB thumb drive, place them on the root directory of the drive. Do not place them into any folders, or they will not be recognized.
10
Guía del usuario (Español) Introducción Contenido de la caja Melody 61
Micrófono
Auriculares
Soporte para teclado
Banco
Adaptador de corriente
Guía del usuario
Manual sobre la seguridad y garantía Soporte Para obtener la información más reciente acerca de este producto (requisitos de sistema, información de compatibilidad, etc.) y registrarlo, visite alesis.com.
Para obtener soporte adicional del producto, visite alesis.com/support. Instalación Banco
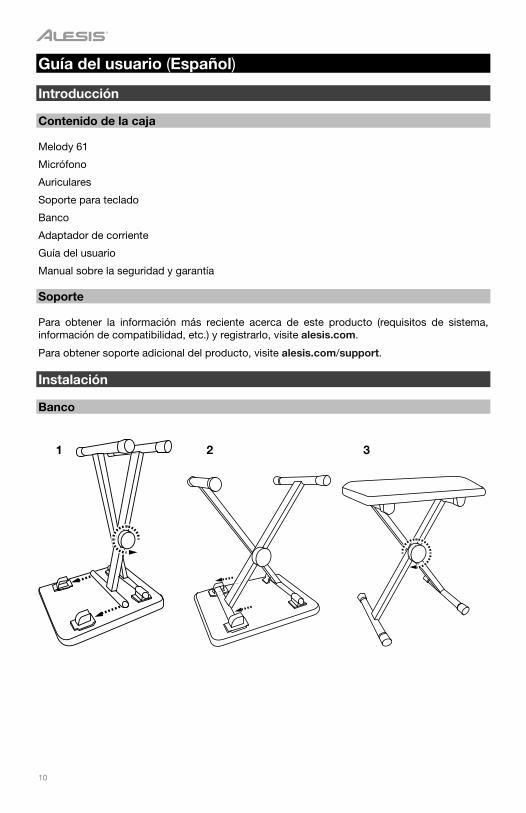
1 2 3

11
Soporte
A
B
C (x2) D (x2) E (x2)
F (x8)
C C
D D
H I I H
F F
E E
B
AF F
G (x2)
H (x4)
I (x4)
G G
1
2
3
12
UDISK AUDIOINPUT
MIC PHONES/OUTPUT 9V
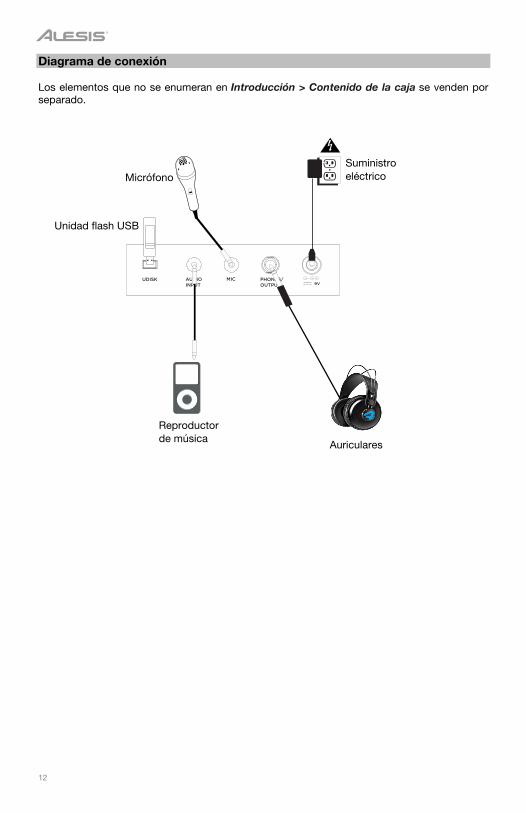
Diagrama de conexión Los elementos que no se enumeran en Introducción > Contenido de la caja se venden por separado.
Micrófono Suministro eléctrico
Unidad flash USB
Auriculares
Reproductor de música
13
Características
Panel superior
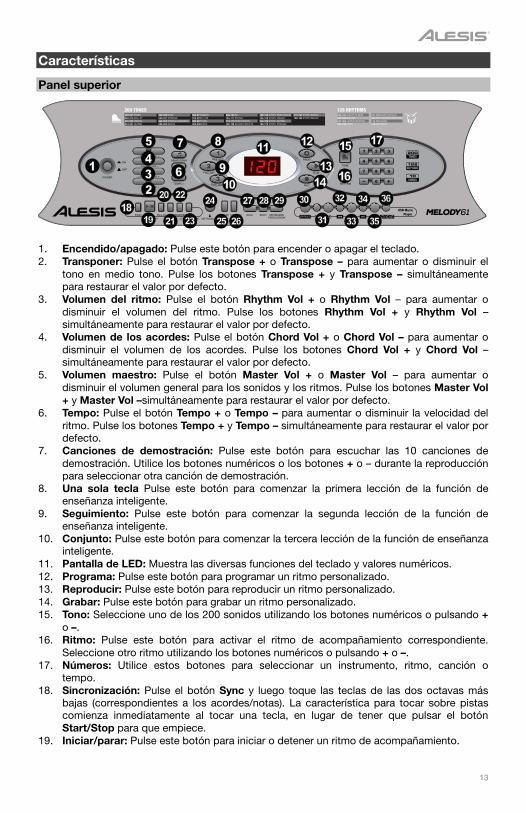
1. Encendido/apagado: Pulse este botón para encender o apagar el teclado. 2. Transponer: Pulse el botón Transpose + o Transpose – para aumentar o disminuir el
tono en medio tono. Pulse los botones Transpose + y Transpose – simultáneamente para restaurar el valor por defecto.
3. Volumen del ritmo: Pulse el botón Rhythm Vol + o Rhythm Vol – para aumentar o disminuir el volumen del ritmo. Pulse los botones Rhythm Vol + y Rhythm Vol – simultáneamente para restaurar el valor por defecto.
4. Volumen de los acordes: Pulse el botón Chord Vol + o Chord Vol – para aumentar o disminuir el volumen de los acordes. Pulse los botones Chord Vol + y Chord Vol – simultáneamente para restaurar el valor por defecto.
5. Volumen maestro: Pulse el botón Master Vol + o Master Vol – para aumentar o disminuir el volumen general para los sonidos y los ritmos. Pulse los botones Master Vol + y Master Vol –simultáneamente para restaurar el valor por defecto.
6. Tempo: Pulse el botón Tempo + o Tempo – para aumentar o disminuir la velocidad del ritmo. Pulse los botones Tempo + y Tempo – simultáneamente para restaurar el valor por defecto.
7. Canciones de demostración: Pulse este botón para escuchar las 10 canciones de demostración. Utilice los botones numéricos o los botones + o – durante la reproducción para seleccionar otra canción de demostración.
8. Una sola tecla Pulse este botón para comenzar la primera lección de la función de enseñanza inteligente.
9. Seguimiento: Pulse este botón para comenzar la segunda lección de la función de enseñanza inteligente.
10. Conjunto: Pulse este botón para comenzar la tercera lección de la función de enseñanza inteligente.
11. Pantalla de LED: Muestra las diversas funciones del teclado y valores numéricos. 12. Programa: Pulse este botón para programar un ritmo personalizado. 13. Reproducir: Pulse este botón para reproducir un ritmo personalizado. 14. Grabar: Pulse este botón para grabar un ritmo personalizado. 15. Tono: Seleccione uno de los 200 sonidos utilizando los botones numéricos o pulsando +
o –. 16. Ritmo: Pulse este botón para activar el ritmo de acompañamiento correspondiente.
Seleccione otro ritmo utilizando los botones numéricos o pulsando + o –. 17. Números: Utilice estos botones para seleccionar un instrumento, ritmo, canción o
tempo. 18. Sincronización: Pulse el botón Sync y luego toque las teclas de las dos octavas más
bajas (correspondientes a los acordes/notas). La característica para tocar sobre pistas comienza inmediatamente al tocar una tecla, en lugar de tener que pulsar el botón Start/Stop para que empiece.
19. Iniciar/parar: Pulse este botón para iniciar o detener un ritmo de acompañamiento.
TONE
USB Music Player
000-007 PIANO008-015 MALLET016-023 ORGAN024-031 GUITAR
032-039 BASS040-047 STRINGS048-055 STRING ENSEMBLE056-063 BRASS
064-071 REEDS072-079 FLUTE080-087 LEAD088-095 PADS
096-103 FX104-111 ETHNIC112-119 PERCUSSION120-128 SOUND EFFECTS
129-133 SYNTH PERCUSSION134-143 SYNTH ORGAN144-159 SYNTH GUITAR160-172 SYNTH STRINGS
173-187 SYNTH REEDS188-199 SYNTH BRASS
000-042 8 BEAT/16 BEAT043-046 BALLAD047-062 JAZZ/EUROPEAN063-100 LATIN
101-106 MARCH/POLKA107-113 COUNTRY/WESTERN114-118 ASIAN119-127 WALTZ
25252525
1
2345
6
7 8
91010
1111 1212
13131414
1515 1717
18181919
2020
2121
2222
2323
1616
2424
2525 2626
2727 2828 2929 3030
3131
3232
3333
3434
3535
3636
14
20. Relleno: Pulse este botón para hacer que se reproduzca un ritmo temporal durante el
ritmo de acompañamiento. 21. Single: Pulse este botón una vez comenzado un ritmo para utilizar el acompañamiento
de acordes automático y toque un acorde único en las teclas en la zona AUTO BASS CHORD del teclado, la cual se extiende desde F# hacia abajo. Puede reproducir cualquier acorde mayor tocando una tecla en esta zona. Pulse este botón nuevamente para desactivar la función de acordes.
22. Digitados: Pulse este botón una vez comenzado un ritmo para utilizar el acompañamiento de acordes automático y toque un acorde único en las teclas en la zona AUTO BASS CHORD del teclado, la cual se extiende desde F# hacia abajo. Puede reproducir todas las teclas de un acorde, incluyendo los acordes invertidos. Pulse este botón nuevamente para desactivar la función de acordes.
23. Timbre del acorde: Pulse este botón para cambiar el tono musical de las notas del acorde de acompañamiento.
24. Metrónomo: El metrónomo contiene cuatro tempos: 1/4, 2/4, 3/4 y 4/4 respectivamente. Pulse este botón continuamente para recorrer los cuatro tempos y seleccionar uno de ellos. Para desactivar el metrónomo, espere 4 segundos y luego pulse el botón nuevamente.
25. Sostenido: Pulse este botón para activar un efecto de sostenido que simula el pedal de sostenido cuando se toca el teclado. Pulse este botón nuevamente para desactivar el efecto de sostenido.
26. Vibrato: Pulse este botón para activar un cambio pulsante al tono al tocar el teclado. Pulse este botón nuevamente para desactivar el efecto de vibrato.
27. Dual: Pulse este botón para disponer dos sonidos en capas. El sonido que estaba utilizando antes de pulsar el botón Dual se utilizará en una parte de la capa. Para seleccionar el otro sonido de la capa, pulse el botón Chord Timbre e introduzca un número para el sonido o utilice los botones + y –. Pulse el botón Dual nuevamente para desactivar la función de tono doble.
28. División: Pulse este botón para dividir el teclado en dos zonas. El sonido que estaba utilizando antes de pulsar el botón Split se aplicará al lado izquierdo del teclado. Para seleccionar el sonido del lado derecho, pulse el botón Chord Timbre e introduzca un número para el sonido o utilice los botones + y –. Pulse el botón Split nuevamente para desactivar la división del teclado.
29. Percusión con teclado: Pulse este botón para reproducir los sonidos de percusión y batería integrados. Pulse este botón nuevamente para desactivar la función de percusión con teclado.
30. Efecto: Pulse este botón para seleccionar uno de los cinco ajustes de ecualización para la reproducción de música en MP3.
31. Control de volumen de MP3: Ajusta el volumen de la reproducción de archivos MP3. 32. Anterior: Selecciona la pista MP3 anterior en la unidad de memoria USB. 33. Siguiente: Selecciona la pista MP3 siguiente en la unidad de memoria USB. 34. Reproducir/Pausa: Reproduce o hace una pausa en el archivo MP3 de la unidad de
memoria USB. 35. Detener: Detiene la reproducción del archivo MP3 de la unidad de memoria USB. 36. Modo de reproducción: Selecciona el orden de reproducción entre continuo, aleatorio e
individual.
15
Panel trasero
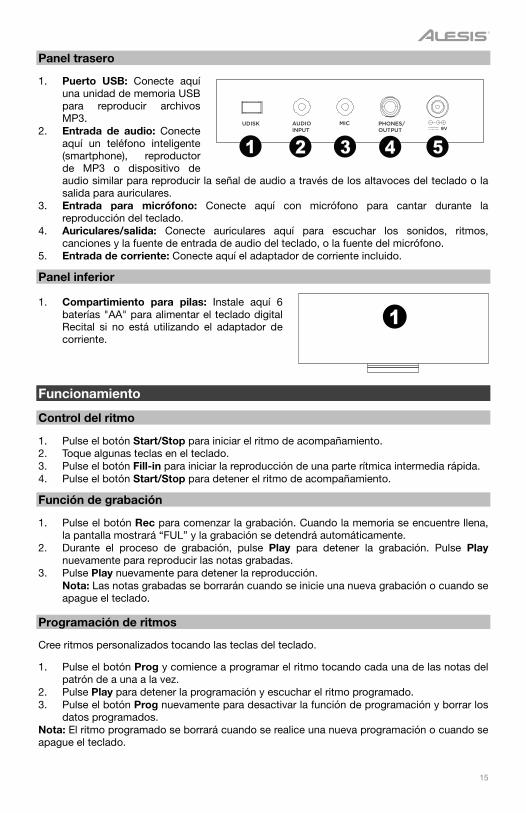
1. Puerto USB: Conecte aquí una unidad de memoria USB para reproducir archivos MP3.
2. Entrada de audio: Conecte aquí un teléfono inteligente (smartphone), reproductor de MP3 o dispositivo de audio similar para reproducir la señal de audio a través de los altavoces del teclado o la salida para auriculares.
3. Entrada para micrófono: Conecte aquí con micrófono para cantar durante la reproducción del teclado.
4. Auriculares/salida: Conecte auriculares aquí para escuchar los sonidos, ritmos, canciones y la fuente de entrada de audio del teclado, o la fuente del micrófono.
5. Entrada de corriente: Conecte aquí el adaptador de corriente incluido.
Panel inferior
1. Compartimiento para pilas: Instale aquí 6 baterías "AA" para alimentar el teclado digital Recital si no está utilizando el adaptador de corriente.
Funcionamiento
Control del ritmo
1. Pulse el botón Start/Stop para iniciar el ritmo de acompañamiento. 2. Toque algunas teclas en el teclado. 3. Pulse el botón Fill-in para iniciar la reproducción de una parte rítmica intermedia rápida. 4. Pulse el botón Start/Stop para detener el ritmo de acompañamiento.
Función de grabación
1. Pulse el botón Rec para comenzar la grabación. Cuando la memoria se encuentre llena, la pantalla mostrará “FUL” y la grabación se detendrá automáticamente.
2. Durante el proceso de grabación, pulse Play para detener la grabación. Pulse Play nuevamente para reproducir las notas grabadas.
3. Pulse Play nuevamente para detener la reproducción. Nota: Las notas grabadas se borrarán cuando se inicie una nueva grabación o cuando se apague el teclado.
Programación de ritmos
Cree ritmos personalizados tocando las teclas del teclado.
1. Pulse el botón Prog y comience a programar el ritmo tocando cada una de las notas del patrón de a una a la vez.
2. Pulse Play para detener la programación y escuchar el ritmo programado. 3. Pulse el botón Prog nuevamente para desactivar la función de programación y borrar los
datos programados. Nota: El ritmo programado se borrará cuando se realice una nueva programación o cuando se apague el teclado.
1
UDISK AUDIOINPUT
MIC PHONES/OUTPUT 9V
1 2 3 4 5
16
Función de enseñanza inteligente Esta función se divide en tres partes para guiar el aprendizaje del estudiante de teclado. Utilice el ejercicio Una sola tecla para familiarizarse con la melodía y ritmo de una canción, el ejercicio Seguimiento para la interpretación precisa de las notas de una canción y finalmente el ejercicio Conjunto para tocar libremente con los demás.
Lección 1: Una sola tecla
Cuando se pulsa el botón One-Key se activa la función de aprendizaje Una sola tecla y la pantalla muestra el número de la canción de demostración actual para el aprendizaje. Puede seleccionar la canción a aprender pulsando el botón numérico o pulsando + o –. La lección Una sola tecla permite errores al tocar las teclas, pero aun así el teclado reproduce las notas correctas. La lección Una sola tecla puede desactivarse presionando el botón One-Key nuevamente.
Lección 2: Seguimiento
Cuando se pulsa el botón Follow se activa la función de aprendizaje Seguimiento y la pantalla muestra el número de la canción de demostración actual para el aprendizaje. Puede seleccionar la canción a aprender pulsando el botón numérico o pulsando + o –. En ese momento la pantalla mostrará la nota correcta a reproducir y esperar a hasta que la toque antes de pasar a la siguiente nota. Esto continuará hasta finalizar la canción. La función de aprendizaje Seguimiento puede desactivarse presionando el botón Follow nuevamente. Lección 3: Conjunto
Cuando se pulsa el botón Ensemble se activa la función de aprendizaje Conjunto y la pantalla muestra el número de la canción de demostración actual para el aprendizaje. Puede seleccionar la canción a aprender pulsando el botón numérico o pulsando + o –. La lección Conjunto se utiliza cuando ya es capaz de tocar las notas correctas de una canción. Si no se toca ninguna nota durante 3 segundos, el teclado reproducirá automáticamente la nota correcta. La función de aprendizaje Conjunto puede desactivarse presionando el botón Ensemble nuevamente. Reproducción de archivos MP3 Inserte una unidad de memoria USB para seleccionar los archivos MP3 a reproducir. • Pulse para regresar a la pista anterior.
• Pulse para pasar a la pista siguiente.
• Pulse para reproducir/pausar una pista.
• Pulse para detener la reproducción de una pista.
• Pulse para recorrer los modos de repetición y elegir entre una reproducción continua, aleatoria o individual.
• Pulse los botones para ajustar el volumen.
• Pulse el botón Effect para recorrer los cinco ajustes de ecualización hasta encontrar el que hace que su música en MP3 suene mejor. Los cinco ajustes de ecualización son normal, pop, rock, jazz y clásica.
Nota: Asegúrese de que su unidad de memoria USB esté formateada en FAT32. Otros formatos, tales como NTFS, no funcionarán. Al añadir archivos MP3 a su unidad de memoria USB, colóquelos en el directorio raíz de la unidad. No los coloque en carpetas ya que no serán reconocidos.
17
Guide d’utilisation (Français) Présentation Contenu de la boîte Melody 61
Microphone
Casque d'écoute
Support pour clavier
Banc
Câble d’alimentation
Guide d'utilisation
Consignes de sécurité et informations concernant la garantie Assistance technique Pour les toutes dernières informations concernant la configuration système requise, la compatibilité, etc., et l’enregistrement du produit, veuillez visiter alesis.com.
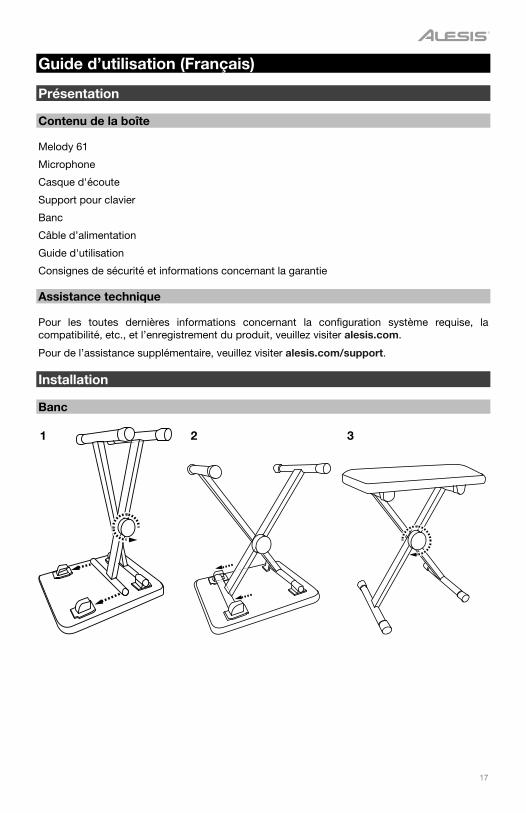
Pour de l’assistance supplémentaire, veuillez visiter alesis.com/support. Installation Banc
1 2 3
18
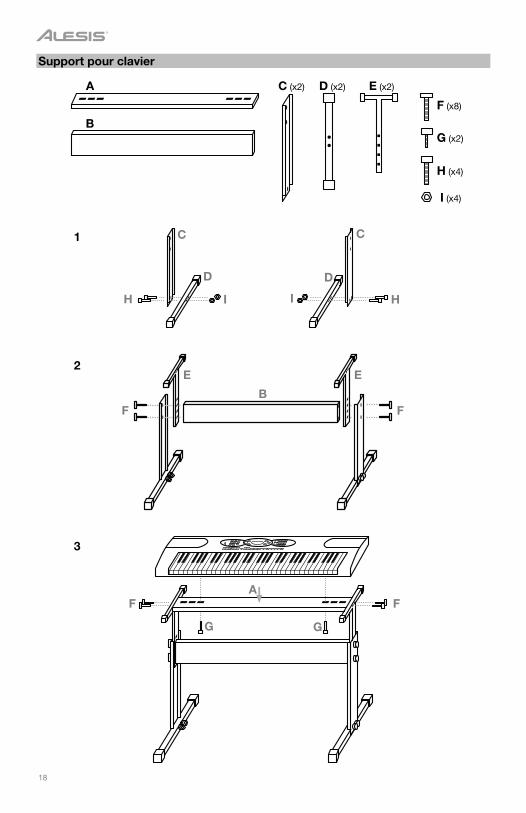
Support pour clavier
A
B
C (x2) D (x2) E (x2)
F (x8)
C C
D D
H I I H
F F
E E
B
AF F
G (x2)
H (x4)
I (x4)
G G
1
2
3
19
UDISK AUDIOINPUT
MIC PHONES/OUTPUT 9V
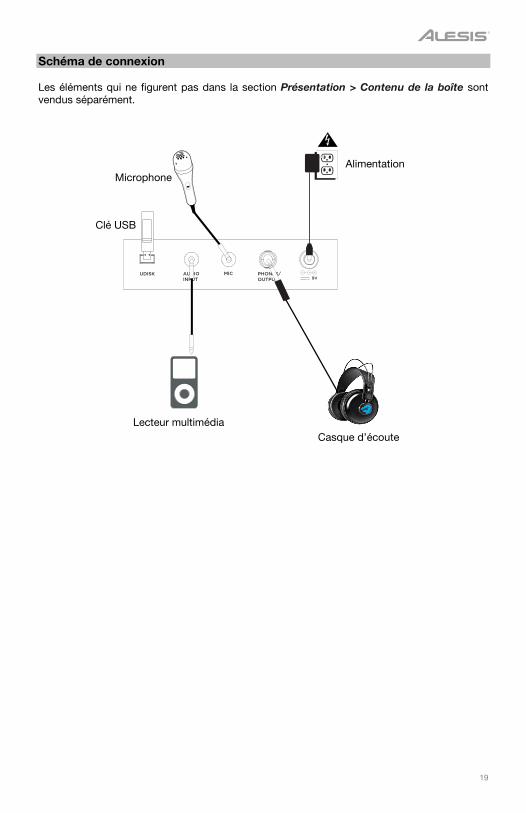
Schéma de connexion Les éléments qui ne figurent pas dans la section Présentation > Contenu de la boîte sont vendus séparément.
Microphone Alimentation
Clé USB
Casque d’écoute Lecteur multimédia
20
Caractéristiques
Panneau supérieur
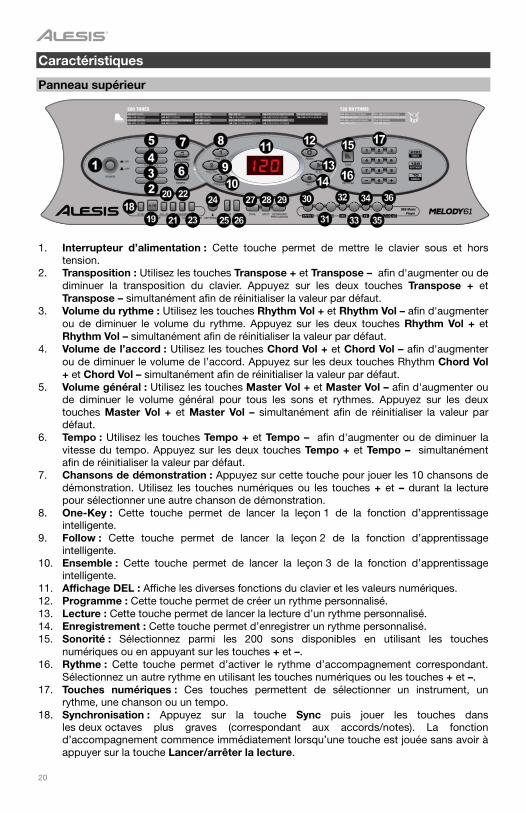
1. Interrupteur d’alimentation : Cette touche permet de mettre le clavier sous et hors tension.
2. Transposition : Utilisez les touches Transpose + et Transpose – afin d'augmenter ou de diminuer la transposition du clavier. Appuyez sur les deux touches Transpose + et Transpose – simultanément afin de réinitialiser la valeur par défaut.
3. Volume du rythme : Utilisez les touches Rhythm Vol + et Rhythm Vol – afin d'augmenter ou de diminuer le volume du rythme. Appuyez sur les deux touches Rhythm Vol + et Rhythm Vol – simultanément afin de réinitialiser la valeur par défaut.
4. Volume de l’accord : Utilisez les touches Chord Vol + et Chord Vol – afin d'augmenter ou de diminuer le volume de l’accord. Appuyez sur les deux touches Rhythm Chord Vol + et Chord Vol – simultanément afin de réinitialiser la valeur par défaut.
5. Volume général : Utilisez les touches Master Vol + et Master Vol – afin d'augmenter ou de diminuer le volume général pour tous les sons et rythmes. Appuyez sur les deux touches Master Vol + et Master Vol – simultanément afin de réinitialiser la valeur par défaut.
6. Tempo : Utilisez les touches Tempo + et Tempo – afin d'augmenter ou de diminuer la vitesse du tempo. Appuyez sur les deux touches Tempo + et Tempo – simultanément afin de réinitialiser la valeur par défaut.
7. Chansons de démonstration : Appuyez sur cette touche pour jouer les 10 chansons de démonstration. Utilisez les touches numériques ou les touches + et – durant la lecture pour sélectionner une autre chanson de démonstration.
8. One-Key : Cette touche permet de lancer la leçon 1 de la fonction d’apprentissage intelligente.
9. Follow : Cette touche permet de lancer la leçon 2 de la fonction d’apprentissage intelligente.
10. Ensemble : Cette touche permet de lancer la leçon 3 de la fonction d’apprentissage intelligente.
11. Affichage DEL : Affiche les diverses fonctions du clavier et les valeurs numériques. 12. Programme : Cette touche permet de créer un rythme personnalisé. 13. Lecture : Cette touche permet de lancer la lecture d’un rythme personnalisé. 14. Enregistrement : Cette touche permet d’enregistrer un rythme personnalisé. 15. Sonorité : Sélectionnez parmi les 200 sons disponibles en utilisant les touches
numériques ou en appuyant sur les touches + et –. 16. Rythme : Cette touche permet d’activer le rythme d’accompagnement correspondant.
Sélectionnez un autre rythme en utilisant les touches numériques ou les touches + et –. 17. Touches numériques : Ces touches permettent de sélectionner un instrument, un
rythme, une chanson ou un tempo. 18. Synchronisation : Appuyez sur la touche Sync puis jouer les touches dans
les deux octaves plus graves (correspondant aux accords/notes). La fonction d’accompagnement commence immédiatement lorsqu’une touche est jouée sans avoir à appuyer sur la touche Lancer/arrêter la lecture.
TONE
USB Music Player
000-007 PIANO008-015 MALLET016-023 ORGAN024-031 GUITAR
032-039 BASS040-047 STRINGS048-055 STRING ENSEMBLE056-063 BRASS
064-071 REEDS072-079 FLUTE080-087 LEAD088-095 PADS
096-103 FX104-111 ETHNIC112-119 PERCUSSION120-128 SOUND EFFECTS
129-133 SYNTH PERCUSSION134-143 SYNTH ORGAN144-159 SYNTH GUITAR160-172 SYNTH STRINGS
173-187 SYNTH REEDS188-199 SYNTH BRASS
000-042 8 BEAT/16 BEAT043-046 BALLAD047-062 JAZZ/EUROPEAN063-100 LATIN
101-106 MARCH/POLKA107-113 COUNTRY/WESTERN114-118 ASIAN119-127 WALTZ
25252525
1
2345
6
7 8
91010
1111 1212
13131414
1515 1717
18181919
2020
2121
2222
2323
1616
2424
2525 2626
2727 2828 2929 3030
3131
3232
3333
3434
3535
3636
21
19. Lancer/arrêter la lecture : Cette touche permet de lancer ou d’arrêter un rythme
d’accompagnement. 20. Rythme temporaire : Cette touche permet d’activer un rythme temporaire durant la
lecture d’un rythme d’accompagnement. 21. Accord à un doigt : Appuyez sur cette touche après avoir lancer un rythme pour utiliser
la fonction d’accord d’accompagnement automatique et jouer un accord à un doigt sur les touches dans la section AUTO BASS CHORD du clavier, fa dièse et les suivantes. Vous pouvez jouer n’importe quel accord majeur en appuyant sur une des touches dans cette section. Appuyez de nouveau sur cette touche pour désactiver la fonction d’accord d’accompagnement automatique.
22. Accord à plusieurs doigts : Appuyez sur cette touche après avoir lancer un rythme pour utiliser la fonction d’accord d’accompagnement automatique et jouer un accord à plusieurs doigts sur les touches dans la section AUTO BASS CHORD du clavier, fa dièse et les suivantes. Vous pouvez jouer toutes les touches d’un accord, y compris les accords inversés. Appuyez de nouveau sur cette touche pour désactiver la fonction d’accord d’accompagnement automatique.
23. Timbre de l’accord : Cette touche permet de changer le timbre des notes de l’accorde d'accompagnement.
24. Métronome : Le métronome dispose de quatre tempos : 1/4, 2/4, 3/4 et 4/4, respectivement. Appuyez sur cette touche à plusieurs reprises pour passer en revue et sélectionner les tempos. Pour désactiver le métronome, attendez 4 secondes, puis appuyez de nouveau sur la touche.
25. Sustain : Appuyez sur cette touche pour activer un effet de sustain qui simule une pédale de sustain. Appuyez de nouveau sur cette touche pour désactiver l’effet de sustain.
26. Vibrato : Appuyez sur cette touche pour activer un changement de la tonalité pulsatoire. Appuyez de nouveau sur cette touche pour désactiver l’effet de vibrato.
27. Superposition : Appuyez sur cette touche pour superposer deux sonorités. La sonorité sélectionnée avant d’appuyer sur la touche Dual sera une des sonorités superposées. Pour sélectionner l’autre sonorité qui sera superposée, appuyez sur la touche Chord Timbre et entrez le numéro de la sonorité désirée ou utilisez les touches + et –. Appuyez de nouveau sur la touche Dual pour désactiver la fonction à deux sonorités.
28. Séparation du clavier : Cette touche permet de séparer le clavier en deux sections. La sonorité sélectionnée avant d’appuyer sur la touche Split sera utilisée pour le côté gauche du clavier. Pour sélectionner une sonorité pour le côté droit du clavier, appuyez sur la touche Chord Timbre et entrez le numéro de la sonorité désirée ou utilisez les touches + et –. Appuyez de nouveau sur la touche Split pour désactiver la séparation du clavier.
29. Percussion : Appuyez sur cette touche pour utiliser les sons de batterie et de percussion intégrés. Appuyez de nouveau sur cette touche pour désactiver la fonction de percussion.
30. Effet : Cette touche permet de choisir entre un de cinq réglages d'égalisation pour la lecture MP3.
31. Volume de la lecture MP3 : Cette touche permet de régler le volume de la lecture MP3. 32. Piste précédente : Cette touche permet de sélectionner la piste précédente sur la clé
USB. 33. Piste suivante : Cette touche permet de sélectionner la piste suivante sur la clé USB. 34. Lancer/interrompre la lecture : Cette touche permet de lancer ou d’interrompre la
lecture de la piste sur la clé USB. 35. Arrêt de lecture : Cette touche permet d’arrêter la lecture de la piste sur la clé USB. 36. Mode de lecture : Cette touche permet de sélection le mode de lecture : continu,
aléatoire et simple.
22
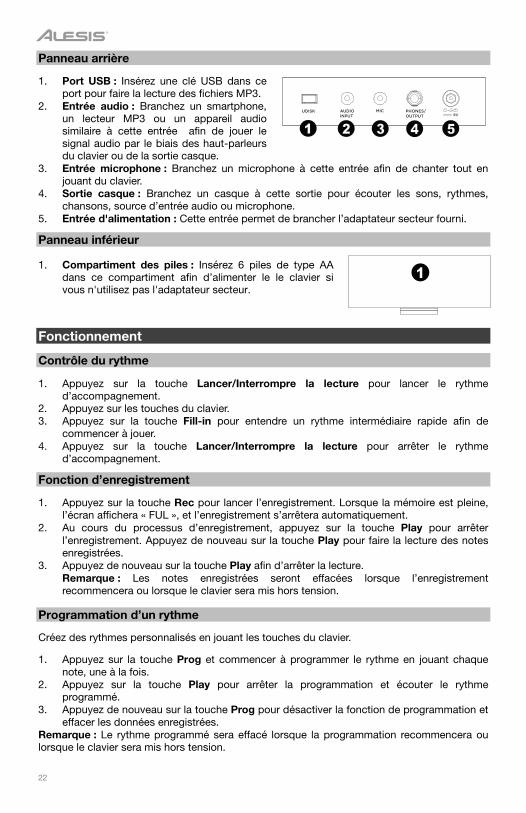
Panneau arrière
1. Port USB : Insérez une clé USB dans ce port pour faire la lecture des fichiers MP3.
2. Entrée audio : Branchez un smartphone, un lecteur MP3 ou un appareil audio similaire à cette entrée afin de jouer le signal audio par le biais des haut-parleurs du clavier ou de la sortie casque.
3. Entrée microphone : Branchez un microphone à cette entrée afin de chanter tout en jouant du clavier.
4. Sortie casque : Branchez un casque à cette sortie pour écouter les sons, rythmes, chansons, source d’entrée audio ou microphone.
5. Entrée d'alimentation : Cette entrée permet de brancher l’adaptateur secteur fourni.
Panneau inférieur
1. Compartiment des piles : Insérez 6 piles de type AA dans ce compartiment afin d’alimenter le le clavier si vous n'utilisez pas l'adaptateur secteur.
Fonctionnement
Contrôle du rythme
1. Appuyez sur la touche Lancer/Interrompre la lecture pour lancer le rythme d’accompagnement.
2. Appuyez sur les touches du clavier. 3. Appuyez sur la touche Fill-in pour entendre un rythme intermédiaire rapide afin de
commencer à jouer. 4. Appuyez sur la touche Lancer/Interrompre la lecture pour arrêter le rythme
d’accompagnement.
Fonction d’enregistrement
1. Appuyez sur la touche Rec pour lancer l’enregistrement. Lorsque la mémoire est pleine, l’écran affichera « FUL », et l’enregistrement s’arrêtera automatiquement.
2. Au cours du processus d’enregistrement, appuyez sur la touche Play pour arrêter l’enregistrement. Appuyez de nouveau sur la touche Play pour faire la lecture des notes enregistrées.
3. Appuyez de nouveau sur la touche Play afin d’arrêter la lecture. Remarque : Les notes enregistrées seront effacées lorsque l’enregistrement recommencera ou lorsque le clavier sera mis hors tension.
Programmation d’un rythme
Créez des rythmes personnalisés en jouant les touches du clavier.
1. Appuyez sur la touche Prog et commencer à programmer le rythme en jouant chaque note, une à la fois.
2. Appuyez sur la touche Play pour arrêter la programmation et écouter le rythme programmé.
3. Appuyez de nouveau sur la touche Prog pour désactiver la fonction de programmation et effacer les données enregistrées.
Remarque : Le rythme programmé sera effacé lorsque la programmation recommencera ou lorsque le clavier sera mis hors tension.
1
UDISK AUDIOINPUT
MIC PHONES/OUTPUT 9V
1 2 3 4 5
23
Fonction d’apprentissage intelligente Cette fonction est divisée en trois parties pour vous aider à apprendre à jouer du clavier. Utilisez l’exercice One-Key afin de vous familiariser avec la mélodie et le rythme d’une chanson, utiliser l’exercice Follow pour jouer les notes de la chanson de manière précise et puis utiliser l’exercice Ensemble pour jouer du clavier avec d’autres.
Leçon 1: One-Key
Lorsque vous appuyez sur la touche One-Key, la fonction d’apprentissage One-Key est activée, et l’écran affiche le numéro de la chanson de démonstration en cours. Vous pouvez sélectionner la chanson à apprendre en appuyant sur les touches numériques ou en appuyant sur + ou –. La leçon One-Key tient compte des erreurs de jeu des touches, mais le clavier joue toujours les bonnes notes. La leçon One-Key peut être désactivée en appuyant de nouveau sur la touche One-Key.
Leçon 2 : Follow
Lorsque vous appuyez sur la touche Follow, la fonction d’apprentissage Follow est activée, et l’écran affiche le numéro de la chanson de démonstration en cours. Vous pouvez sélectionner la chanson à apprendre en appuyant sur les touches numériques ou en appuyant sur + ou –. L’écran affiche alors la bonne note à jouer et attend que vous la jouiez avant de passer à la prochaine note. Cela continue jusqu'à ce que la chanson soit terminée. La leçon Follow peut être désactivée en appuyant de nouveau sur la touche Follow. Leçon 3 : Ensemble
Lorsque vous appuyez sur la touche Ensemble, la fonction d’apprentissage Ensemble est activée, et l’écran affiche le numéro de la chanson de démonstration en cours. Vous pouvez sélectionner la chanson à apprendre en appuyant sur les touches numériques ou en appuyant sur + ou –. La fonction d’apprentissage Ensemble est utilisée lorsque vous êtes en mesure de jouer correctement les notes de la chanson. Si une note n'est pas jouée dans les 3 secondes, le clavier jouera automatiquement la bonne note. La leçon Ensemble peut être désactivée en appuyant de nouveau sur la touche Ensemble. Lecture de fichiers MP3 Insérez une clé USB afin de sélectionner des fichiers MP3. • Cette touche permet de revenir à la piste précédente.
• Cette touche permet d'avancer à la piste suivante.
• Cette touche permet de lancer/d’interrompre la lecture de la piste.
• Cette touche permet d’arrêter la lecture de la piste.
• Cette touche permet de parcourir les différents modes de lecture répétée : continu, aléatoire et simple.
• Ces touches permettent de régler le volume.
• Appuyez sur la touche Effect afin de parcourir les différents réglages d’égalisation jusqu'à ce que vous trouviez celui qui semble le mieux pour votre musique MP3. Les cinq réglages d’égalisation sont Normal, Pop, Rock, Jazz et Classique.
Remarque : Veuillez vous assurer que la clé USB est formatée en FAT32. Autres formats, tel que NTFS ne fonctionneront pas. Lorsque vous ajoutez des fichiers MP3 sur votre clé USB, placez-les dans le répertoire racine du lecteur. Ne les placez pas dans des dossiers, car ils ne seront pas reconnus.
24
Guida per l'uso (Italiano) Introduzione Contenuti della confezione Melody 61
Microfono
Cuffie
Supporto per tastiera
Sedile
Adattatore di alimentazione
Guida per l'uso
Istruzioni di sicurezza e garanzia Assistenza Per le ultime informazioni in merito a questo prodotto (requisiti di sistema, informazioni sulla compatibilità, ecc.) e per la registrazione del prodotto, recarsi alla pagina alesis.com.
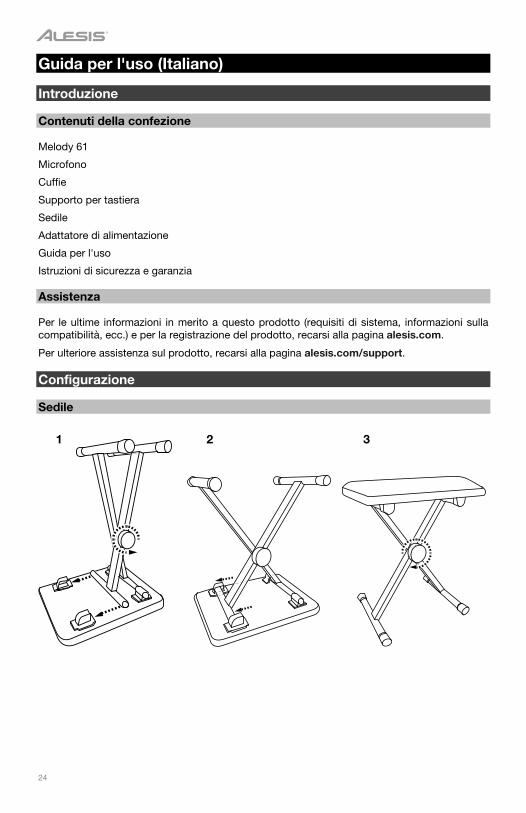
Per ulteriore assistenza sul prodotto, recarsi alla pagina alesis.com/support. Configurazione Sedile
1 2 3
25
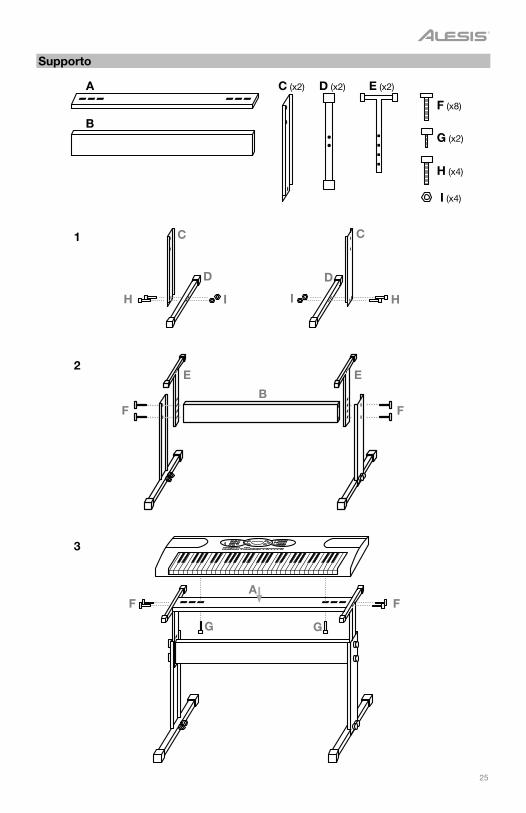
Supporto
A
B
C (x2) D (x2) E (x2)
F (x8)
C C
D D
H I I H
F F
E E
B
AF F
G (x2)
H (x4)
I (x4)
G G
1
2
3
26
UDISK AUDIOINPUT
MIC PHONES/OUTPUT 9V
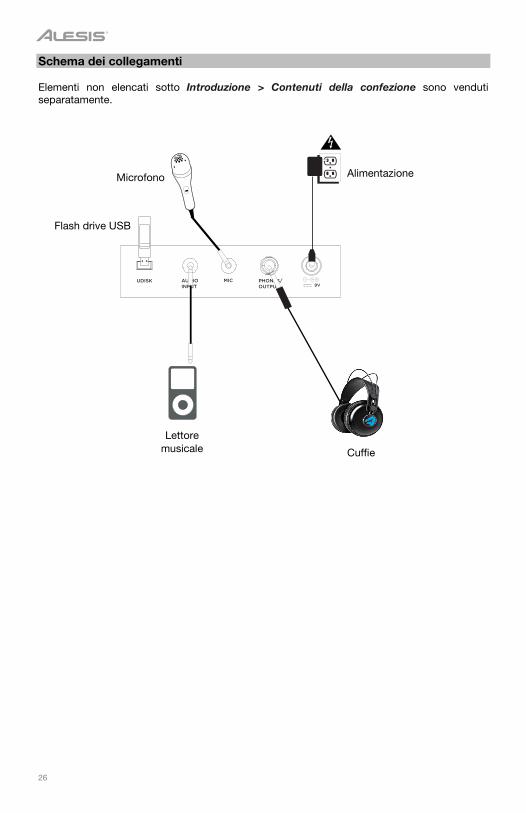
Schema dei collegamenti Elementi non elencati sotto Introduzione > Contenuti della confezione sono venduti separatamente.
Microfono Alimentazione
Flash drive USB
Cuffie
Lettore musicale
27
Caratteristiche
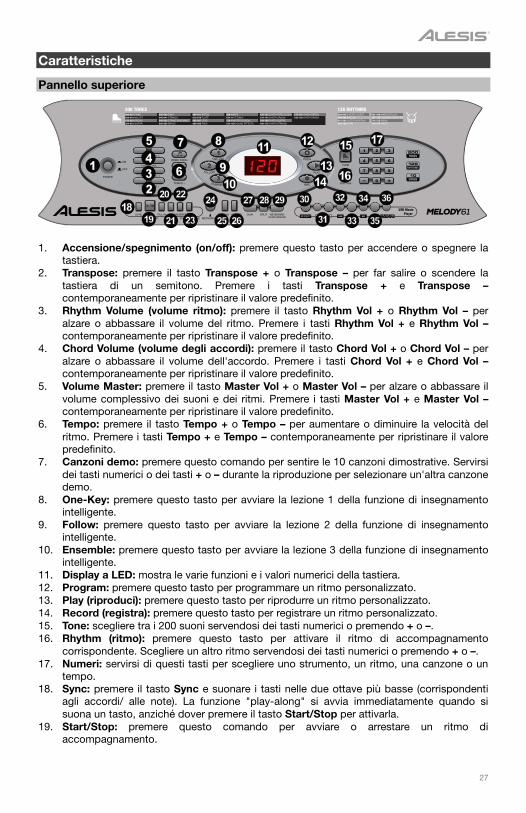
Pannello superiore
1. Accensione/spegnimento (on/off): premere questo tasto per accendere o spegnere la tastiera.
2. Transpose: premere il tasto Transpose + o Transpose – per far salire o scendere la tastiera di un semitono. Premere i tasti Transpose + e Transpose – contemporaneamente per ripristinare il valore predefinito.
3. Rhythm Volume (volume ritmo): premere il tasto Rhythm Vol + o Rhythm Vol – per alzare o abbassare il volume del ritmo. Premere i tasti Rhythm Vol + e Rhythm Vol – contemporaneamente per ripristinare il valore predefinito.
4. Chord Volume (volume degli accordi): premere il tasto Chord Vol + o Chord Vol – per alzare o abbassare il volume dell'accordo. Premere i tasti Chord Vol + e Chord Vol – contemporaneamente per ripristinare il valore predefinito.
5. Volume Master: premere il tasto Master Vol + o Master Vol – per alzare o abbassare il volume complessivo dei suoni e dei ritmi. Premere i tasti Master Vol + e Master Vol – contemporaneamente per ripristinare il valore predefinito.
6. Tempo: premere il tasto Tempo + o Tempo – per aumentare o diminuire la velocità del ritmo. Premere i tasti Tempo + e Tempo – contemporaneamente per ripristinare il valore predefinito.
7. Canzoni demo: premere questo comando per sentire le 10 canzoni dimostrative. Servirsi dei tasti numerici o dei tasti + o – durante la riproduzione per selezionare un'altra canzone demo.
8. One-Key: premere questo tasto per avviare la lezione 1 della funzione di insegnamento intelligente.
9. Follow: premere questo tasto per avviare la lezione 2 della funzione di insegnamento intelligente.
10. Ensemble: premere questo tasto per avviare la lezione 3 della funzione di insegnamento intelligente.
11. Display a LED: mostra le varie funzioni e i valori numerici della tastiera. 12. Program: premere questo tasto per programmare un ritmo personalizzato. 13. Play (riproduci): premere questo tasto per riprodurre un ritmo personalizzato. 14. Record (registra): premere questo tasto per registrare un ritmo personalizzato. 15. Tone: scegliere tra i 200 suoni servendosi dei tasti numerici o premendo + o –. 16. Rhythm (ritmo): premere questo tasto per attivare il ritmo di accompagnamento
corrispondente. Scegliere un altro ritmo servendosi dei tasti numerici o premendo + o –. 17. Numeri: servirsi di questi tasti per scegliere uno strumento, un ritmo, una canzone o un
tempo. 18. Sync: premere il tasto Sync e suonare i tasti nelle due ottave più basse (corrispondenti
agli accordi/ alle note). La funzione "play-along" si avvia immediatamente quando si suona un tasto, anziché dover premere il tasto Start/Stop per attivarla.
19. Start/Stop: premere questo comando per avviare o arrestare un ritmo di accompagnamento.
TONE
USB Music Player
000-007 PIANO008-015 MALLET016-023 ORGAN024-031 GUITAR
032-039 BASS040-047 STRINGS048-055 STRING ENSEMBLE056-063 BRASS
064-071 REEDS072-079 FLUTE080-087 LEAD088-095 PADS
096-103 FX104-111 ETHNIC112-119 PERCUSSION120-128 SOUND EFFECTS
129-133 SYNTH PERCUSSION134-143 SYNTH ORGAN144-159 SYNTH GUITAR160-172 SYNTH STRINGS
173-187 SYNTH REEDS188-199 SYNTH BRASS
000-042 8 BEAT/16 BEAT043-046 BALLAD047-062 JAZZ/EUROPEAN063-100 LATIN
101-106 MARCH/POLKA107-113 COUNTRY/WESTERN114-118 ASIAN119-127 WALTZ
25252525
1
2345
6
7 8
91010
1111 1212
13131414
1515 1717
18181919
2020
2121
2222
2323
1616
2424
2525 2626
2727 2828 2929 3030
3131
3232
3333
3434
3535
3636
28
20. Fill-In: premere questo tasto per far suonare un ritmo temporaneo durante il ritmo di
accompagnamento. 21. Single: premere questo tasto dopo aver avviato un ritmo per utilizzare l'accordo di
accompagnamento automatico e riprodurre un singolo accordo sui tasti nell'area AUTO BASS CHORD della tastiera, che è F# e inferiore. Si possono suonare tutti gli accordi principali premendo un tasto in quest'area. Premere nuovamente questo tasto per disattivare la funzione di accordo.
22. Fingered: premere questo tasto dopo aver avviato un ritmo per utilizzare l'accordo di accompagnamento automatico e riprodurre un accordo di fingering sui tasti nell'area AUTO BASS CHORD della tastiera, che è F# e inferiore. Si possono suonare tutte le note di un accordo, inclusi gli accordi inversi. Premere nuovamente questo tasto per disattivare la funzione di accordo.
23. Chord Timbre (timbro dell'accordo): premere questo tasto per cambiare la tonalità musicale delle note nell'accordo di accompagnamento.
24. Metronomo: il metronomo contiene quattro tempi: 1/4, 2/4, 3/4 e 4/4, rispettivamente. Premere questo tasto in maniera continua per scorrere lungo i quattro tempi e selezionarne uno. Per disattivare il metronomo, attendere 4 secondi e premere nuovamente il tasto.
25. Sustain: premere questo tasto per attivare un effetto di sostegno che simula un pedale sustain quando si suona con la tastiera. Premere nuovamente questo tasto per disattivare l'effetto sustain.
26. Vibrato: premere questo tasto per attivare un cambiamento pulsante del pitch quando si suona con la tastiera. Premere nuovamente questo tasto per disattivare l'effetto vibrato.
27. Dual: premere questo tasto per unire due suoni in un unico strato. Il suono che si stava usando prima della pressione del tasto Dual verrà utilizzato per una parte dello strato. Per selezionare l'altro suono dello strato, premere il tasto Chord Timbre e inserire un numero per il suono, oppure utilizzare i tasti + e –. Premere nuovamente il tasto Dual per disattivare la funzione di doppio tono.
28. Split: premere questo tasto per dividere la tastiera in due zone. Il suono che si stava usando prima della pressione del tasto Split verrà applicato al lato sinistro della tastiera. Per selezionare un suono per il lato destro, premere il tasto Chord Timbre e inserire un numero per il suono, oppure utilizzare i tasti + e –. Premere nuovamente il tasto Split per disattivare la funzione di suddivisione della tastiera.
29. Keyboard Percussion (percussioni da tastiera): premere questo tasto per suonare il set batteria incorporato e suoni di percussioni. Premere nuovamente questo tasto per disattivare la funzione di percussione della tastiera.
30. Effetto: premere questo tasto per selezionare una delle impostazioni EQ per la riproduzione di musica MP3.
31. Comando volume MP3: regola il volume per la riproduzione di file MP3. 32. Precedente: seleziona la traccia MP3 precedente sulla chiavetta MP3. 33. Successiva: seleziona la traccia MP3 successiva sulla chiavetta USB flash. 34. Play/Pause: effettua la riproduzione o mette in pausa un file MP3 sulla chiavetta USB
flash. 35. Stop: interrompe la riproduzione di un file MP3 sulla chiavetta USB flash. 36. Modalità Playback (di riproduzione): selezionare con questo comando l'ordine di
riproduzione continuo, casuale e singolo.
29
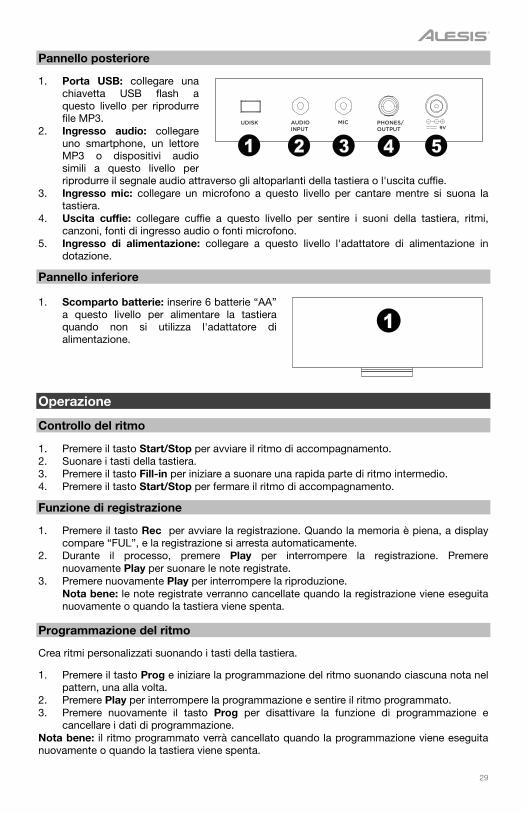
Pannello posteriore
1. Porta USB: collegare una chiavetta USB flash a questo livello per riprodurre file MP3.
2. Ingresso audio: collegare uno smartphone, un lettore MP3 o dispositivi audio simili a questo livello per riprodurre il segnale audio attraverso gli altoparlanti della tastiera o l'uscita cuffie.
3. Ingresso mic: collegare un microfono a questo livello per cantare mentre si suona la tastiera.
4. Uscita cuffie: collegare cuffie a questo livello per sentire i suoni della tastiera, ritmi, canzoni, fonti di ingresso audio o fonti microfono.
5. Ingresso di alimentazione: collegare a questo livello l'adattatore di alimentazione in dotazione.
Pannello inferiore
1. Scomparto batterie: inserire 6 batterie “AA” a questo livello per alimentare la tastiera quando non si utilizza l'adattatore di alimentazione.
Operazione
Controllo del ritmo
1. Premere il tasto Start/Stop per avviare il ritmo di accompagnamento. 2. Suonare i tasti della tastiera. 3. Premere il tasto Fill-in per iniziare a suonare una rapida parte di ritmo intermedio. 4. Premere il tasto Start/Stop per fermare il ritmo di accompagnamento.
Funzione di registrazione
1. Premere il tasto Rec per avviare la registrazione. Quando la memoria è piena, a display compare “FUL”, e la registrazione si arresta automaticamente.
2. Durante il processo, premere Play per interrompere la registrazione. Premere nuovamente Play per suonare le note registrate.
3. Premere nuovamente Play per interrompere la riproduzione. Nota bene: le note registrate verranno cancellate quando la registrazione viene eseguita nuovamente o quando la tastiera viene spenta.
Programmazione del ritmo
Crea ritmi personalizzati suonando i tasti della tastiera.
1. Premere il tasto Prog e iniziare la programmazione del ritmo suonando ciascuna nota nel pattern, una alla volta.
2. Premere Play per interrompere la programmazione e sentire il ritmo programmato. 3. Premere nuovamente il tasto Prog per disattivare la funzione di programmazione e
cancellare i dati di programmazione. Nota bene: il ritmo programmato verrà cancellato quando la programmazione viene eseguita nuovamente o quando la tastiera viene spenta.
1
UDISK AUDIOINPUT
MIC PHONES/OUTPUT 9V
1 2 3 4 5
30
Funzione di insegnamento intelligente Questa funzione è divisa in tre parti che guidano l'utilizzatore che desidera imparare a suonare la tastiera. Servirsi dell'esercizio One-Key per familiarizzare con la melodia e il ritmo di una canzone, dell'esercizio Follow per suonare con precisione le note della canzone e dell'esercizio Ensemble per suonare liberamente con gli altri.
Teaching (insegnamento) 1: One-Key
Quando viene premuto il tasto One-Key, la funzione di insegnamento One-Key è abilitata e sullo schermo compare il numero dell'attuale canzone dimostrativa utilizzata per la lezione. Si può selezionare la canzone da imparare premendo il tasto numerico o premendo + o –. La funzione di insegnamento One-Key consente di fare errori nel suonare le note, ma la tastiera suona sempre le note esatte. La funzione di insegnamento One-Key può essere disattivata premendo nuovamente il tasto One-Key.
Teaching (insegnamento) 2: Follow
Quando viene premuto il tasto Follow, la funzione di insegnamento Follow è abilitata e sullo schermo compare il numero dell'attuale canzone dimostrativa utilizzata per la lezione. Si può selezionare la canzone da imparare premendo il tasto numerico o premendo + o –. Il display mostrerà la nota giusta da suonare e attenderà che venga suonata prima di passare alla nota successiva. Si continuerà in questo modo fino al termine della canzone. La funzione di insegnamento Follow può essere disattivata premendo nuovamente il tasto Follow. Teaching (insegnamento) 3: Ensemble
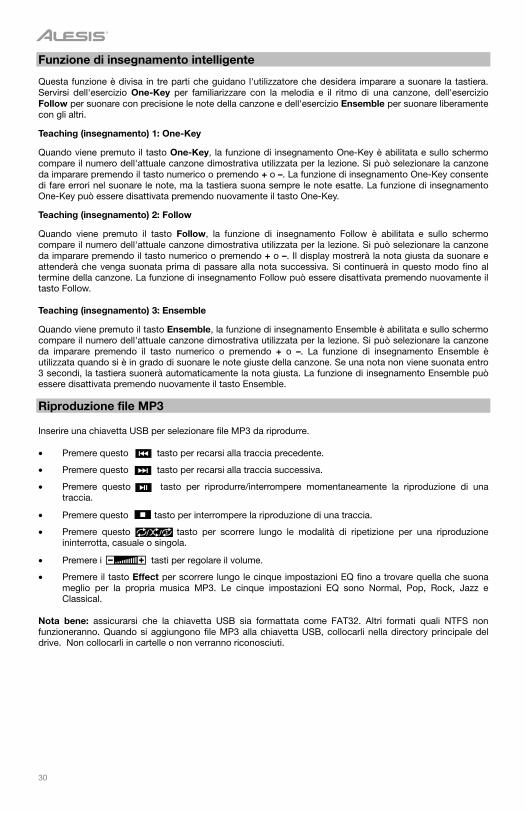
Quando viene premuto il tasto Ensemble, la funzione di insegnamento Ensemble è abilitata e sullo schermo compare il numero dell'attuale canzone dimostrativa utilizzata per la lezione. Si può selezionare la canzone da imparare premendo il tasto numerico o premendo + o –. La funzione di insegnamento Ensemble è utilizzata quando si è in grado di suonare le note giuste della canzone. Se una nota non viene suonata entro 3 secondi, la tastiera suonerà automaticamente la nota giusta. La funzione di insegnamento Ensemble può essere disattivata premendo nuovamente il tasto Ensemble. Riproduzione file MP3 Inserire una chiavetta USB per selezionare file MP3 da riprodurre. • Premere questo tasto per recarsi alla traccia precedente.
• Premere questo tasto per recarsi alla traccia successiva.
• Premere questo tasto per riprodurre/interrompere momentaneamente la riproduzione di una traccia.
• Premere questo tasto per interrompere la riproduzione di una traccia.
• Premere questo tasto per scorrere lungo le modalità di ripetizione per una riproduzione ininterrotta, casuale o singola.
• Premere i tasti per regolare il volume.
• Premere il tasto Effect per scorrere lungo le cinque impostazioni EQ fino a trovare quella che suona meglio per la propria musica MP3. Le cinque impostazioni EQ sono Normal, Pop, Rock, Jazz e Classical.
Nota bene: assicurarsi che la chiavetta USB sia formattata come FAT32. Altri formati quali NTFS non funzioneranno. Quando si aggiungono file MP3 alla chiavetta USB, collocarli nella directory principale del drive. Non collocarli in cartelle o non verranno riconosciuti.
31
Benutzerhandbuch (Deutsch) Einführung Lieferumfang Melody 61
Mikrofon
Kopfhörer
Keyboard-Ständer
Bank
Netzteil
Benutzerhandbuch
Sicherheitshinweise und Garantieinformationen Kundendienst Für die neuesten Informationen zu diesem Produkt (Systemanforderungen, Informationen zur Kompatibilität etc.) und für die Produktregistrierung besuchen Sie alesis.com.
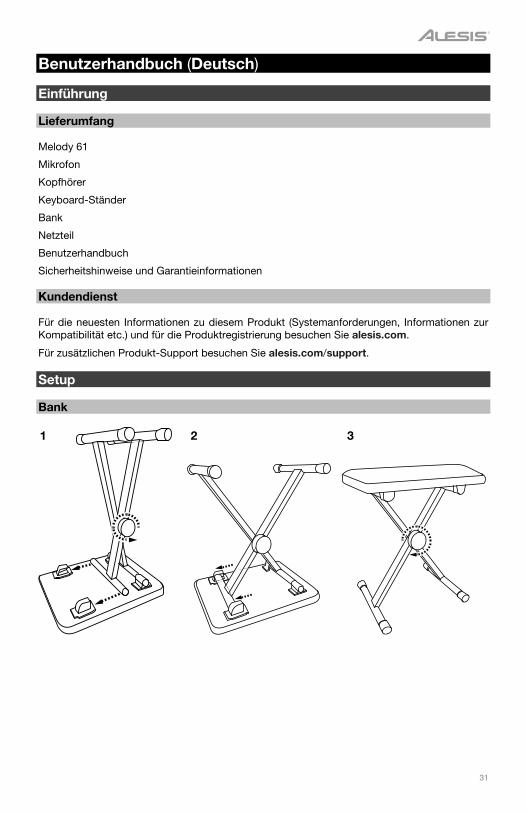
Für zusätzlichen Produkt-Support besuchen Sie alesis.com/support. Setup Bank
1 2 3

32
Ständer
A
B
C (x2) D (x2) E (x2)
F (x8)
C C
D D
H I I H
F F
E E
B
AF F
G (x2)
H (x4)
I (x4)
G G
1
2
3
33
UDISK AUDIOINPUT
MIC PHONES/OUTPUT 9V
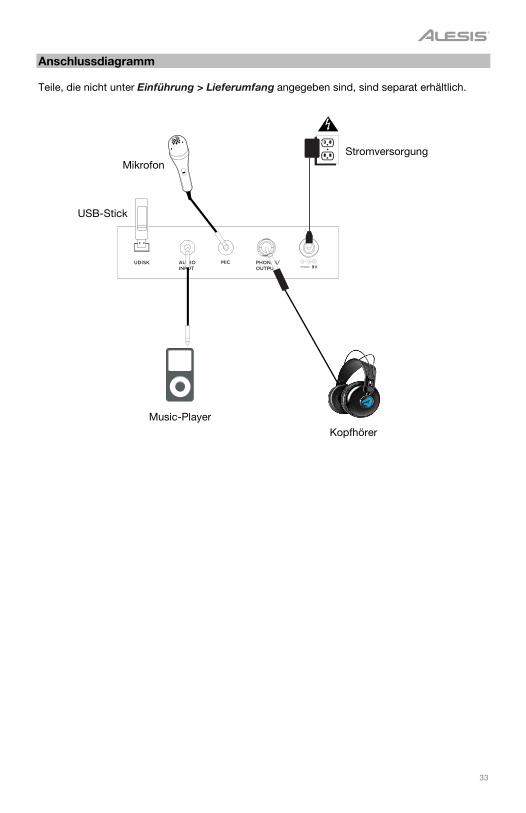
Anschlussdiagramm Teile, die nicht unter Einführung > Lieferumfang angegeben sind, sind separat erhältlich.
Mikrofon Stromversorgung
USB-Stick
Kopfhörer
Music-Player
34
Funktionen
Oberseite
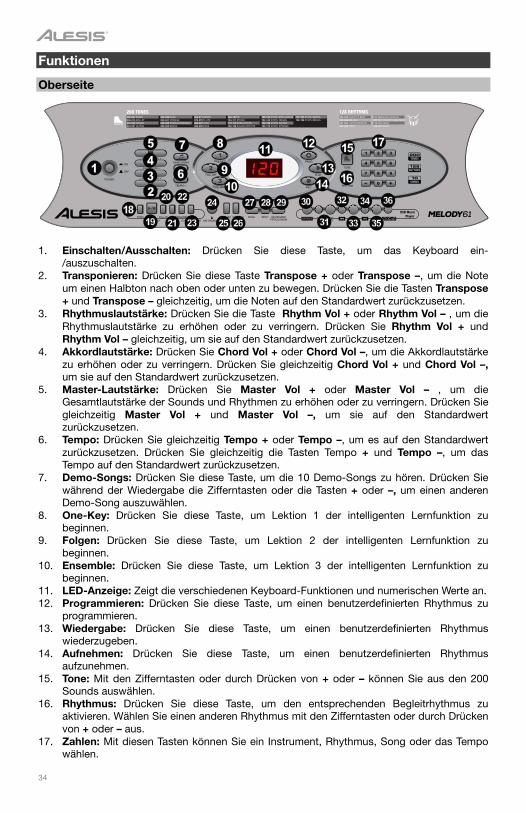
1. Einschalten/Ausschalten: Drücken Sie diese Taste, um das Keyboard ein-/auszuschalten.
2. Transponieren: Drücken Sie diese Taste Transpose + oder Transpose –, um die Note um einen Halbton nach oben oder unten zu bewegen. Drücken Sie die Tasten Transpose + und Transpose – gleichzeitig, um die Noten auf den Standardwert zurückzusetzen.
3. Rhythmuslautstärke: Drücken Sie die Taste Rhythm Vol + oder Rhythm Vol – , um die Rhythmuslautstärke zu erhöhen oder zu verringern. Drücken Sie Rhythm Vol + und Rhythm Vol – gleichzeitig, um sie auf den Standardwert zurückzusetzen.
4. Akkordlautstärke: Drücken Sie Chord Vol + oder Chord Vol –, um die Akkordlautstärke zu erhöhen oder zu verringern. Drücken Sie gleichzeitig Chord Vol + und Chord Vol –, um sie auf den Standardwert zurückzusetzen.
5. Master-Lautstärke: Drücken Sie Master Vol + oder Master Vol – , um die Gesamtlautstärke der Sounds und Rhythmen zu erhöhen oder zu verringern. Drücken Sie gleichzeitig Master Vol + und Master Vol –, um sie auf den Standardwert zurückzusetzen.
6. Tempo: Drücken Sie gleichzeitig Tempo + oder Tempo –, um es auf den Standardwert zurückzusetzen. Drücken Sie gleichzeitig die Tasten Tempo + und Tempo –, um das Tempo auf den Standardwert zurückzusetzen.
7. Demo-Songs: Drücken Sie diese Taste, um die 10 Demo-Songs zu hören. Drücken Sie während der Wiedergabe die Zifferntasten oder die Tasten + oder –, um einen anderen Demo-Song auszuwählen.
8. One-Key: Drücken Sie diese Taste, um Lektion 1 der intelligenten Lernfunktion zu beginnen.
9. Folgen: Drücken Sie diese Taste, um Lektion 2 der intelligenten Lernfunktion zu beginnen.
10. Ensemble: Drücken Sie diese Taste, um Lektion 3 der intelligenten Lernfunktion zu beginnen.
11. LED-Anzeige: Zeigt die verschiedenen Keyboard-Funktionen und numerischen Werte an. 12. Programmieren: Drücken Sie diese Taste, um einen benutzerdefinierten Rhythmus zu
programmieren. 13. Wiedergabe: Drücken Sie diese Taste, um einen benutzerdefinierten Rhythmus
wiederzugeben. 14. Aufnehmen: Drücken Sie diese Taste, um einen benutzerdefinierten Rhythmus
aufzunehmen. 15. Tone: Mit den Zifferntasten oder durch Drücken von + oder – können Sie aus den 200
Sounds auswählen. 16. Rhythmus: Drücken Sie diese Taste, um den entsprechenden Begleitrhythmus zu
aktivieren. Wählen Sie einen anderen Rhythmus mit den Zifferntasten oder durch Drücken von + oder – aus.
17. Zahlen: Mit diesen Tasten können Sie ein Instrument, Rhythmus, Song oder das Tempo wählen.
TONE
USB Music Player
000-007 PIANO008-015 MALLET016-023 ORGAN024-031 GUITAR
032-039 BASS040-047 STRINGS048-055 STRING ENSEMBLE056-063 BRASS
064-071 REEDS072-079 FLUTE080-087 LEAD088-095 PADS
096-103 FX104-111 ETHNIC112-119 PERCUSSION120-128 SOUND EFFECTS
129-133 SYNTH PERCUSSION134-143 SYNTH ORGAN144-159 SYNTH GUITAR160-172 SYNTH STRINGS
173-187 SYNTH REEDS188-199 SYNTH BRASS
000-042 8 BEAT/16 BEAT043-046 BALLAD047-062 JAZZ/EUROPEAN063-100 LATIN
101-106 MARCH/POLKA107-113 COUNTRY/WESTERN114-118 ASIAN119-127 WALTZ
25252525
1
2345
6
7 8
91010
1111 1212
13131414
1515 1717
18181919
2020
2121
2222
2323
1616
2424
2525 2626
2727 2828 2929 3030
3131
3232
3333
3434
3535
3636
35
18. Sync: Drücken Sie die Sync-Taste und spielen dann die Tasten in den unteren beiden
Oktaven (den Akkorden/Noten entsprechend). Die Begleit-Funktion beginnt sofort, wenn Sie eine Taste anschlagen. Sie müssen dazu nicht erst die Start/Stopp-Taste drücken.
19. Start/Stopp: Drücken Sie, um einen Begleitrhythmus zu starten oder zu stoppen. 20. Fill-In: Drücken Sie diese Taste, um einen temporären Rhythmus während des
Begleitrhythmus wiederzugeben. 21. Single: Drücken Sie diese Taste nachdem ein Rhythmus begonnen wurde, um die
automatische Akkordbegleitung zu verwenden und einen einzelnen Akkord mit den Tasten im AUTO BASS CHORD-Bereich der Tastatur (F# und darunter) zu spielen. Sie können durch Drücken einer Taste in diesem Bereich jeden Dur-Akkord spielen. Drücken Sie erneut diese Taste, um die Akkord-Funktion zu deaktivieren.
22. Fingered: Drücken Sie diese Taste nachdem ein Rhythmus begonnen wurde, um die automatische Akkordbegleitung zu verwenden und einen gegriffenen Akkord mit den Tasten im AUTO BASS CHORD-Bereich der Tastatur (F# und darunter) zu spielen. Sie können alle Tasten eines Akkords - einschließlich umgekehrte Akkorde - spielen. Drücken Sie diese Taste erneut, um die Akkord-Funktion zu deaktivieren.
23. Akkord-Timbre: Drücken Sie diese Taste, um den Notenklang des Begleitakkords zu ändern.
24. Metronom: Das Metronom verfügt über vier Tempi: 1/4, 2/4, 3/4 und 4/4. Drücken Sie diese Taste kontinuierlich, um durch die Tempi zu blättern und eine der vier Tempi auszuwählen. Um das Metronom zu deaktivieren, warten Sie 4 Sekunden und drücken dann die Taste erneut.
25. Sustain: Drücken Sie diese Taste, um einen Sustain-Effekt zu aktivieren, der beim Spielen des Keyboards ein Sustain-Pedal simuliert. Drücken Sie erneut auf diese Taste, um den Effekt zu deaktivieren.
26. Vibrato: Drücken Sie diese Taste, um eine pulsierende Änderung der Tonhöhe zu aktivieren, wenn die Klaviatur gespielt wird. Drücken Sie diese Taste erneut, um den Vibrato-Effekt zu deaktivieren.
27. Dual: Drücken Sie diese Taste, um zwei Sounds zu überlagern. Der Sound, den Sie verwendet haben, bevor Sie die Dual-Taste gedrückt haben, wird für einen Teil des Layers verwendet. Um einen anderen Sound für das Layer auszuwählen, drücken Sie die Akkord-Timbre-Taste und geben eine Nummer für den Sound mit den Tasten + und – ein. Drücken Sie erneut die Dual-Taste, um die Dual Tone-Funktion zu deaktivieren.
28. Split: Drücken Sie diese Taste, um das Keyboard in zwei Zonen aufzuteilen. Der Sound, den Sie verwendet haben bevor Sie die Split-Taste gedrückt haben, wird der linken Seite des Keyboards zugewiesen. Um einen anderen Sound für die rechte Seite auszuwählen, drücken Sie die Akkord-Timbre-Taste und geben eine Nummer für den Sound ein oder verwenden die Tasten + und –. Drücken Sie die Split-Taste erneut, um den Keyboard-Split zu deaktivieren.
29. Keyboard-Percussion: Drücken Sie diese Taste, um das eingebaute Drumkit und die Percussion-Sounds zu spielen. Drücken Sie erneut auf diese Taste, um die Keyboard-Percussion-Funktion zu deaktivieren.
30. Effekt: Drücken Sie diese Taste, um aus fünf EQ-Einstellungen für die MP3-Musikwiedergabe zu wählen.
31. MP3-Lautstärkeregler: Regelt die Lautstärke der MP3-Dateiwiedergabe. 32. Zurück: Wählt den vorherigen MP3-Track am USB-Stick aus. 33. Weiter: Wählt den nächsten MP3-Track am USB-Stick aus. 34. Wiedergabe/Pause: Gibt die MP3-Datei am USB-Stick wieder oder pausiert sie. 35. Stopp: Stoppt die Wiedergabe einer MP3-Datei am USB-Stick. 36. Wiedergabemodus: Wählen Sie zwischen der kontinuierlichen, zufälligen oder
einmaligen Wiedergabe.
36
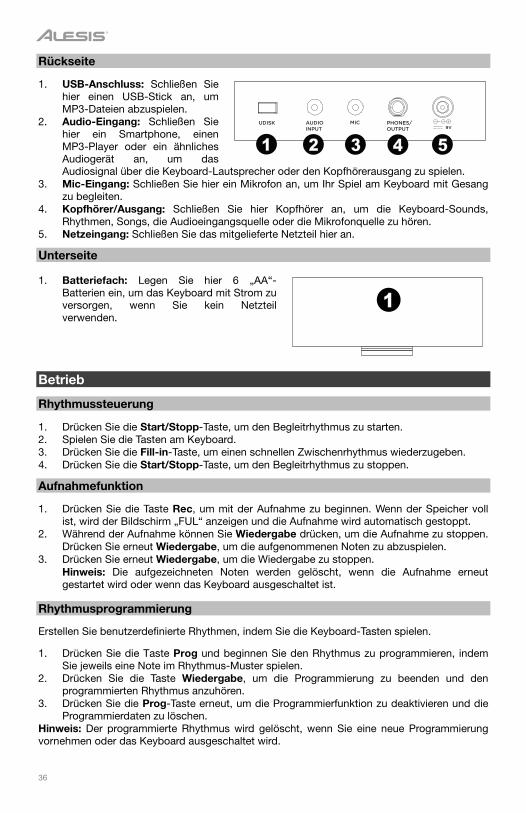
Rückseite
1. USB-Anschluss: Schließen Sie hier einen USB-Stick an, um MP3-Dateien abzuspielen.
2. Audio-Eingang: Schließen Sie hier ein Smartphone, einen MP3-Player oder ein ähnliches Audiogerät an, um das Audiosignal über die Keyboard-Lautsprecher oder den Kopfhörerausgang zu spielen.
3. Mic-Eingang: Schließen Sie hier ein Mikrofon an, um Ihr Spiel am Keyboard mit Gesang zu begleiten.
4. Kopfhörer/Ausgang: Schließen Sie hier Kopfhörer an, um die Keyboard-Sounds, Rhythmen, Songs, die Audioeingangsquelle oder die Mikrofonquelle zu hören.
5. Netzeingang: Schließen Sie das mitgelieferte Netzteil hier an.
Unterseite
1. Batteriefach: Legen Sie hier 6 „AA“-Batterien ein, um das Keyboard mit Strom zu versorgen, wenn Sie kein Netzteil verwenden.
Betrieb
Rhythmussteuerung
1. Drücken Sie die Start/Stopp-Taste, um den Begleitrhythmus zu starten. 2. Spielen Sie die Tasten am Keyboard. 3. Drücken Sie die Fill-in-Taste, um einen schnellen Zwischenrhythmus wiederzugeben. 4. Drücken Sie die Start/Stopp-Taste, um den Begleitrhythmus zu stoppen.
Aufnahmefunktion
1. Drücken Sie die Taste Rec, um mit der Aufnahme zu beginnen. Wenn der Speicher voll ist, wird der Bildschirm „FUL“ anzeigen und die Aufnahme wird automatisch gestoppt.
2. Während der Aufnahme können Sie Wiedergabe drücken, um die Aufnahme zu stoppen. Drücken Sie erneut Wiedergabe, um die aufgenommenen Noten zu abzuspielen.
3. Drücken Sie erneut Wiedergabe, um die Wiedergabe zu stoppen. Hinweis: Die aufgezeichneten Noten werden gelöscht, wenn die Aufnahme erneut gestartet wird oder wenn das Keyboard ausgeschaltet ist.
Rhythmusprogrammierung
Erstellen Sie benutzerdefinierte Rhythmen, indem Sie die Keyboard-Tasten spielen.
1. Drücken Sie die Taste Prog und beginnen Sie den Rhythmus zu programmieren, indem Sie jeweils eine Note im Rhythmus-Muster spielen.
2. Drücken Sie die Taste Wiedergabe, um die Programmierung zu beenden und den programmierten Rhythmus anzuhören.
3. Drücken Sie die Prog-Taste erneut, um die Programmierfunktion zu deaktivieren und die Programmierdaten zu löschen.
Hinweis: Der programmierte Rhythmus wird gelöscht, wenn Sie eine neue Programmierung vornehmen oder das Keyboard ausgeschaltet wird.
1
UDISK AUDIOINPUT
MIC PHONES/OUTPUT 9V
1 2 3 4 5
37
Intelligente Lernfunktion Diese Funktion ist in drei Teile unterteilt, um Ihnen beim Lernen zu helfen. Verwenden Sie die Übung One-Key, um sich mit Melodie und Rhythmus des Songs vertraut zu machen, verwenden Sie die Übung Folgen für ein genaueres Spielen der Liednoten und die Übung Ensemble, um frei mit anderen zu spielen.
Lernfunktion 1: One-Key
Wenn die One-Key-Taste gedrückt wird, wird die One-Key-Lernfunktion aktiviert und das Display zeigt die Nummer des aktuellen Demo-Songs. Sie können den gewünschten Song auswählen, indem Sie die Zifferntaste oder + bzw. – drücken. Die One-Key-Lernfunktion erlaubt Fehler beim Spielen der Tasten, das Keyboard gibt jedoch die korrekten Noten. Die One-Key-Lernfunktion kann durch erneutes Drücken der One-Key-Taste deaktiviert werden.
Lernfunktion 2: Folgen
Wenn die Folgen-Taste gedrückt wird, wird die Folgen-Lernfunktion aktiviert und das Display zeigt die Nummer des aktuellen Demo-Songs. Sie können den gewünschten Song auswählen, indem Sie die Zifferntaste oder + bzw. – drücken. Die Anzeige zeigt dann die zu spielende Note und wartet bis Sie diese angeschlagen haben bevor die nächste Note angezeigt wird. Dies wird bis zum Ende des Songs fortgesetzt. Die Folgen-Lernfunktion kann durch erneutes Drücken der Taste Folgen deaktiviert werden. Lernfunktion 3: Ensemble
Wenn die Ensemble-Taste gedrückt wird, wird die Ensemble-Lernfunktion aktiviert und das Display zeigt die Nummer des aktuellen Demo-Songs. Sie können den gewünschten Song auswählen, indem Sie die Zifferntaste oder + bzw. – drücken. Die Ensemble-Lernfunktion wird verwendet, wenn Sie in der Lage sind, die richtigen Liednoten zu spielen. Wenn eine Note nicht innerhalb von 3 Sekunden angeschlagen wird, spielt das Keyboard automatisch die richtige Note. Die Ensemble-Lernfunktion kann durch erneutes Drücken der Taste Ensemble deaktiviert werden. MP3-Dateiwiedergabe Schließen Sie einen USB-Stick an, um die MP3-Dateien für die Wiedergabe auszuwählen. • Drücken Sie, um zum vorherigen Track zu gelangen.
• Drücken Sie, um zum nächsten Track zu gelangen.
• Drücken Sie, um den Track wiederzugeben oder zu pausieren.
• Drücken Sie, um die Wiedergabe eines Tracks zu stoppen.
• Drücken Sie, um durch die Wiederholungsmodi für kontinuierliche, zufällige oder einzelne Wiedergabe zu blättern.
• Verwenden Sie die Tasten, um die Lautstärke anzupassen.
• Drücken Sie die Taste Effekt, um durch eine von fünf EQ-Einstellungen zu blättern, bis Sie eine finden, die am besten zu Ihrer MP3-Musik passt. Die fünf EQ-Einstellungen sind Normal, Pop, Rock, Jazz und Klassik.
Hinweis: Stellen Sie sicher, dass Ihr USB-Stick als FAT32 formatiert ist. Andere Formate, wie z.B. NTFS, funktionieren nicht. Wenn Sie Ihrem USB-Stick MP3-Dateien hinzufügen, legen Sie sie im Stammverzeichnis des Laufwerks an. Speichern Sie sie nie in irgendwelchen Ordnern, andernfalls werden sie nicht erkannt.
38
Appendix (English)
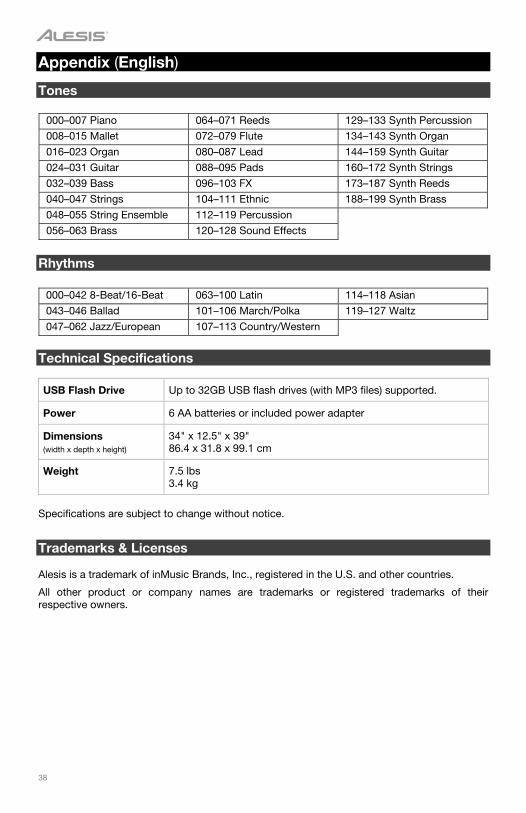
Tones
000–007 Piano 064–071 Reeds 129–133 Synth Percussion
008–015 Mallet 072–079 Flute 134–143 Synth Organ
016–023 Organ 080–087 Lead 144–159 Synth Guitar
024–031 Guitar 088–095 Pads 160–172 Synth Strings
032–039 Bass 096–103 FX 173–187 Synth Reeds
040–047 Strings 104–111 Ethnic 188–199 Synth Brass
048–055 String Ensemble 112–119 Percussion
056–063 Brass 120–128 Sound Effects
Rhythms
000–042 8-Beat/16-Beat
063–100 Latin
114–118 Asian
043–046 Ballad
101–106 March/Polka
119–127 Waltz
047–062 Jazz/European 107–113 Country/Western
Technical Specifications
USB Flash Drive Up to 32GB USB flash drives (with MP3 files) supported.
Power 6 AA batteries or included power adapter
Dimensions (width x depth x height)
34" x 12.5" x 39" 86.4 x 31.8 x 99.1 cm
Weight 7.5 lbs 3.4 kg
Specifications are subject to change without notice.
Trademarks & Licenses Alesis is a trademark of inMusic Brands, Inc., registered in the U.S. and other countries.
All other product or company names are trademarks or registered trademarks of their respective owners.

39
alesis.com
Manual Version 1.0
Related Documents