Greek Vase Painting Project: Procedures Shelby Brown The Archer School for Girls Los Angeles, California Acknowledgements: This project was designed by Shelby Brown (archaeologist) and Susan Sullivan (ceramicist) at The Archer School for Girls, Los Angeles, with advice provided by Jim Sullivan (ceramicist), and revised with the help of Sirida Terk (archaeologist). Introduction Welcome to the world of an ancient Athenian vase painter! You will be working with square tiles of reddish clay (ter- racotta) to re-create the process of making a Black Figure and a Red Figure Greek vase painting. Unlike a Greek vase painter, you will not sit on an armless, backless chair, holding your arm in the air as you paint on curved pot. Instead, you may rest your tile and elbow on the table, and paint on a flat surface! You will divide your tile in two and decorate half in the Black Figure technique and half in Red Figure. Black and Red Figure painting In the sixth century b.c.e., Athenian artists first painted Black Figure images on their reddish clay pottery. From about 525 to 500 b.c.e., they transitioned to Red Figure scenes and the two techniques overlapped. They were sometimes used together on opposite sides of the same vase. After 500 b.c.e., the Athenians chose Red Figure, keeping Black Figure only for certain limited uses (on vases given as victory prizes at games, for example). • In both Black and Red Figure painting, there is a dramatic contrast between the image and the background. Although everyone gets confused about the terms, just remember: Black Figure has . . . black figures! And Red Figure has red figures. In the sixth century b.c.e., Athenian artists painted figures rather awkwardly, in what is called the Archaic style, giving people twisted bodies and stiff poses. A more elegant Classi- cal style developed in the fifth century b.c. when Red Figure was dominant. You will be painting an Archaic image in Black and Red Figure, since this was how artists painted at the time of the transition from Black to Red Figure. • In Black Figure, the figures are painted a deep, shiny black against the red clay background. In creating a Black Fig- ure scene, the artist painted figures as black silhouettes. To indicate the interior lines and details, he then incised (scratched) lines with a needle tool through the black coat down to the red clay below. The black figures with their thin red interior lines stand out strongly against the red background. The final design is “black on red.” Artists often painted purple and white colors on top of the black to add drama to clothing and armor (purple) and indicate female skin and horses’ coats (white). You will probably not be adding color unless your teacher decides to experiment. • In Red Figure, dark and light are reversed; the figures are red, and the background is black. The painter used a brush to paint all the lines of the image in black on the red background, leaving most of the figure red. Then, for contrast, he painted the entire background black. The red figures with their thin black interior lines stand out against the shiny black. The final painting is “red on black.” Your teacher may ask you to practice Red and Black Figure by designing your own Archaic image on paper or by coloring in an image taken from a coloring book of Greek vase paintings. Figure 1. Black Figure (left) and Red Figure (right) created using a black marker on a coloring book image. Painting by Exekias; scene taken from Coloring Book of the Trojan War, vol. 1. Archaeological Institute of America 1 AIA Education Department Greek Vase Painting: Procedures Lesson Plans

Welcome message from author
This document is posted to help you gain knowledge. Please leave a comment to let me know what you think about it! Share it to your friends and learn new things together.
Transcript
Greek Vase Painting Project: ProceduresShelby BrownThe Archer School for GirlsLos Angeles, California
Acknowledgements: This project was designed by Shelby Brown (archaeologist) and Susan Sullivan (ceramicist) at The Archer School for Girls, Los Angeles, with advice provided by Jim Sullivan (ceramicist), and revised with the help of Sirida Terk (archaeologist).
IntroductionWelcome to the world of an ancient Athenian vase painter! You will be working with square tiles of reddish clay (ter-racotta) to re-create the process of making a Black Figure and a Red Figure Greek vase painting. Unlike a Greek vase painter, you will not sit on an armless, backless chair, holding your arm in the air as you paint on curved pot. Instead, you may rest your tile and elbow on the table, and paint on a flat surface! You will divide your tile in two and decorate half in the Black Figure technique and half in Red Figure.
Black and Red Figure paintingIn the sixth century b.c.e., Athenian artists first painted Black Figure images on their reddish clay pottery. From about 525 to 500 b.c.e., they transitioned to Red Figure scenes and the two techniques overlapped. They were sometimes used together on opposite sides of the same vase. After 500 b.c.e., the Athenians chose Red Figure, keeping Black Figure only for certain limited uses (on vases given as victory prizes at games, for example). • In both Black and Red Figure painting, there is a dramatic
contrast between the image and the background. Although everyone gets confused about the terms, just remember: Black Figure has . . . black figures! And Red Figure has red figures.
In the sixth century b.c.e., Athenian artists painted figures rather awkwardly, in what is called the Archaic style, giving people twisted bodies and stiff poses. A more elegant Classi-cal style developed in the fifth century b.c. when Red Figure was dominant. You will be painting an Archaic image in Black and Red Figure, since this was how artists painted at the time of the transition from Black to Red Figure.
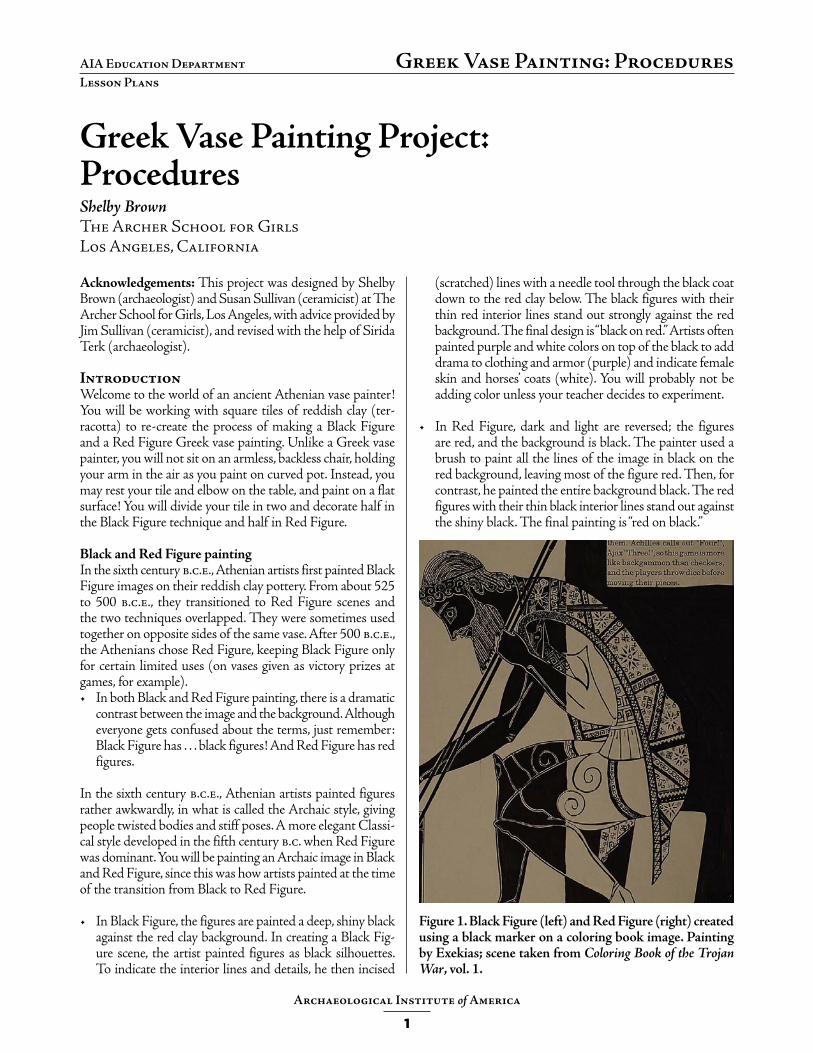
• In Black Figure, the figures are painted a deep, shiny black against the red clay background. In creating a Black Fig-ure scene, the artist painted figures as black silhouettes. To indicate the interior lines and details, he then incised
(scratched) lines with a needle tool through the black coat down to the red clay below. The black figures with their thin red interior lines stand out strongly against the red background. The final design is “black on red.” Artists often painted purple and white colors on top of the black to add drama to clothing and armor (purple) and indicate female skin and horses’ coats (white). You will probably not be adding color unless your teacher decides to experiment.
• In Red Figure, dark and light are reversed; the figures are red, and the background is black. The painter used a brush to paint all the lines of the image in black on the red background, leaving most of the figure red. Then, for contrast, he painted the entire background black. The red figures with their thin black interior lines stand out against the shiny black. The final painting is “red on black.”
Your teacher may ask you to practice Red and Black Figure by designing your own Archaic image on paper or by coloring in an image taken from a coloring book of Greek vase paintings.
Figure 1. Black Figure (left) and Red Figure (right) created using a black marker on a coloring book image. Painting by Exekias; scene taken from Coloring Book of the Trojan War, vol. 1.
Archaeological Institute of America
1
AIA Education Department Greek Vase Painting: ProceduresLesson Plans
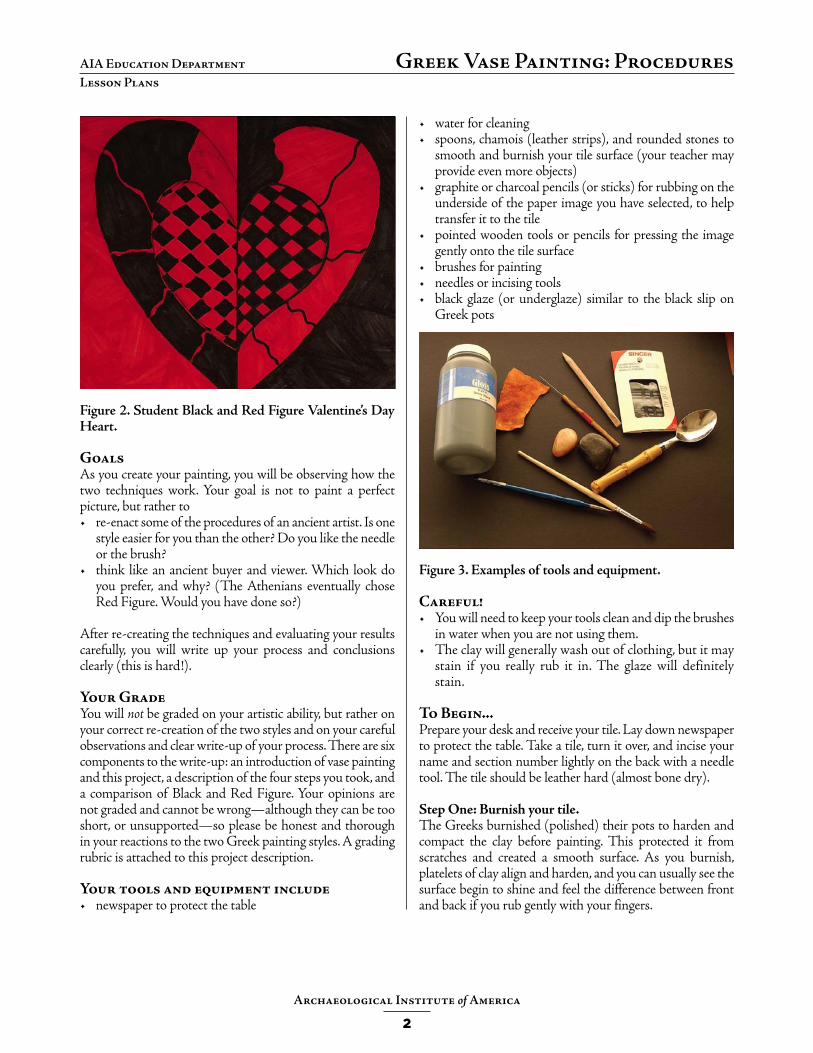
Figure 2. Student Black and Red Figure Valentine’s Day Heart.
GoalsAs you create your painting, you will be observing how the two techniques work. Your goal is not to paint a perfect picture, but rather to• re-enact some of the procedures of an ancient artist. Is one
style easier for you than the other? Do you like the needle or the brush?
• think like an ancient buyer and viewer. Which look do you prefer, and why? (The Athenians eventually chose Red Figure. Would you have done so?)
After re-creating the techniques and evaluating your results carefully, you will write up your process and conclusions clearly (this is hard!).
Your GradeYou will not be graded on your artistic ability, but rather on your correct re-creation of the two styles and on your careful observations and clear write-up of your process. There are six components to the write-up: an introduction of vase painting and this project, a description of the four steps you took, and a comparison of Black and Red Figure. Your opinions are not graded and cannot be wrong—although they can be too short, or unsupported—so please be honest and thorough in your reactions to the two Greek painting styles. A grading rubric is attached to this project description.
Your tools and equipment include• newspaper to protect the table
• water for cleaning• spoons, chamois (leather strips), and rounded stones to
smooth and burnish your tile surface (your teacher may provide even more objects)
• graphite or charcoal pencils (or sticks) for rubbing on the underside of the paper image you have selected, to help transfer it to the tile
• pointed wooden tools or pencils for pressing the image gently onto the tile surface
• brushes for painting • needles or incising tools • black glaze (or underglaze) similar to the black slip on
Greek pots
Figure 3. Examples of tools and equipment.
Careful! • You will need to keep your tools clean and dip the brushes
in water when you are not using them. • The clay will generally wash out of clothing, but it may
stain if you really rub it in. The glaze will definitely stain.
To Begin...Prepare your desk and receive your tile. Lay down newspaper to protect the table. Take a tile, turn it over, and incise your name and section number lightly on the back with a needle tool. The tile should be leather hard (almost bone dry).
Step One: Burnish your tile.The Greeks burnished (polished) their pots to harden and compact the clay before painting. This protected it from scratches and created a smooth surface. As you burnish, platelets of clay align and harden, and you can usually see the surface begin to shine and feel the difference between front and back if you rub gently with your fingers.
Archaeological Institute of America
2
AIA Education Department Greek Vase Painting: ProceduresLesson Plans
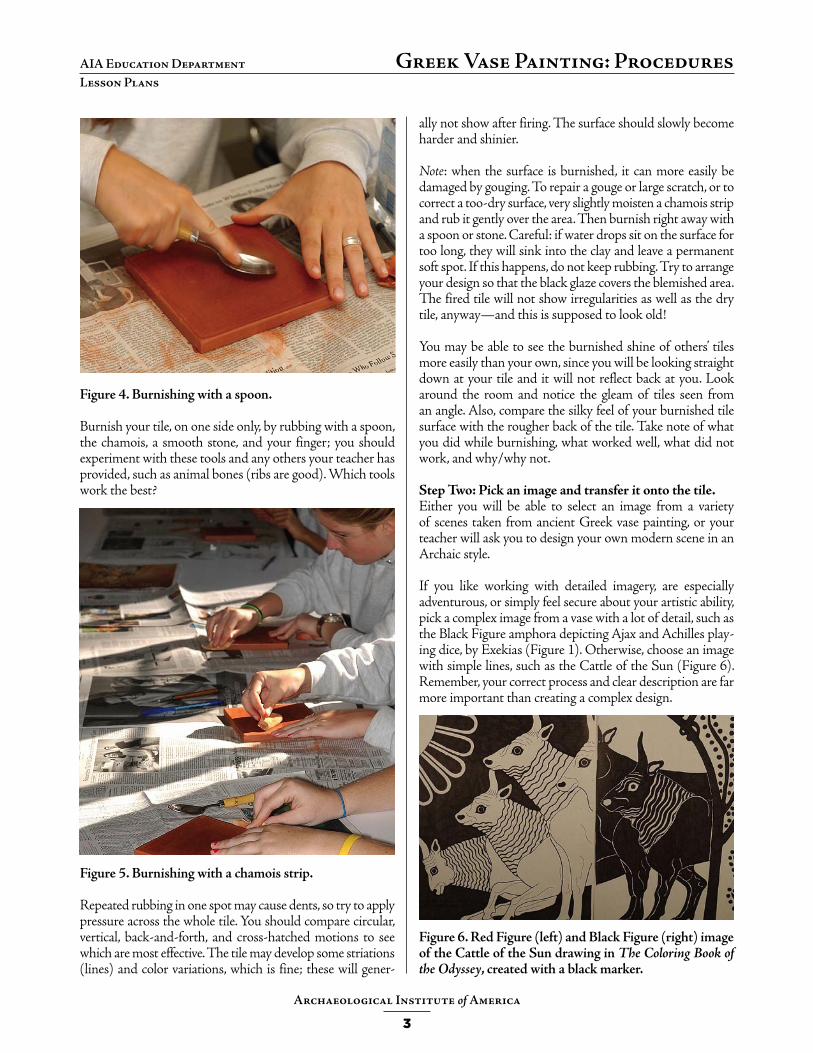
Figure 4. Burnishing with a spoon.
Burnish your tile, on one side only, by rubbing with a spoon, the chamois, a smooth stone, and your finger; you should experiment with these tools and any others your teacher has provided, such as animal bones (ribs are good). Which tools work the best?
Figure 5. Burnishing with a chamois strip.
Repeated rubbing in one spot may cause dents, so try to apply pressure across the whole tile. You should compare circular, vertical, back-and-forth, and cross-hatched motions to see which are most effective. The tile may develop some striations (lines) and color variations, which is fine; these will gener-
ally not show after firing. The surface should slowly become harder and shinier.
Note: when the surface is burnished, it can more easily be damaged by gouging. To repair a gouge or large scratch, or to correct a too-dry surface, very slightly moisten a chamois strip and rub it gently over the area. Then burnish right away with a spoon or stone. Careful: if water drops sit on the surface for too long, they will sink into the clay and leave a permanent soft spot. If this happens, do not keep rubbing. Try to arrange your design so that the black glaze covers the blemished area. The fired tile will not show irregularities as well as the dry tile, anyway—and this is supposed to look old!
You may be able to see the burnished shine of others’ tiles more easily than your own, since you will be looking straight down at your tile and it will not reflect back at you. Look around the room and notice the gleam of tiles seen from an angle. Also, compare the silky feel of your burnished tile surface with the rougher back of the tile. Take note of what you did while burnishing, what worked well, what did not work, and why/why not.
Step Two: Pick an image and transfer it onto the tile.Either you will be able to select an image from a variety of scenes taken from ancient Greek vase painting, or your teacher will ask you to design your own modern scene in an Archaic style.
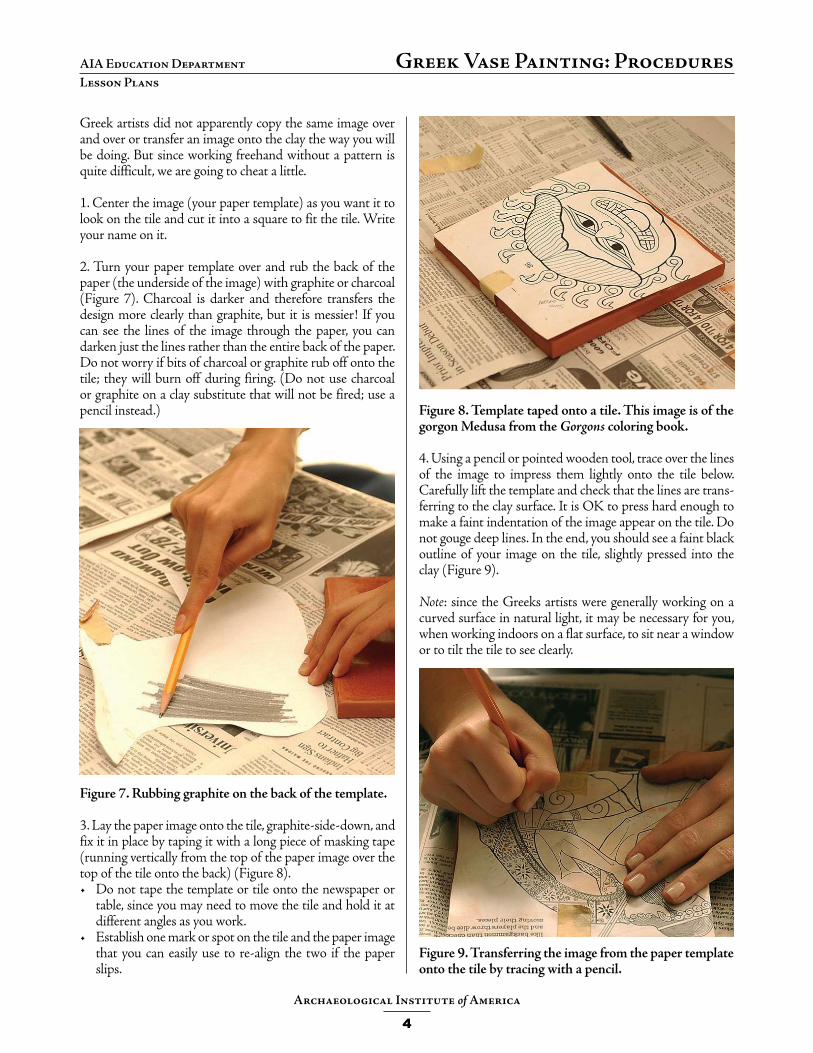
If you like working with detailed imagery, are especially adventurous, or simply feel secure about your artistic ability, pick a complex image from a vase with a lot of detail, such as the Black Figure amphora depicting Ajax and Achilles play-ing dice, by Exekias (Figure 1). Otherwise, choose an image with simple lines, such as the Cattle of the Sun (Figure 6). Remember, your correct process and clear description are far more important than creating a complex design.
Figure 6. Red Figure (left) and Black Figure (right) image of the Cattle of the Sun drawing in The Coloring Book of the Odyssey, created with a black marker.
Archaeological Institute of America
3
AIA Education Department Greek Vase Painting: ProceduresLesson Plans
Greek artists did not apparently copy the same image over and over or transfer an image onto the clay the way you will be doing. But since working freehand without a pattern is quite difficult, we are going to cheat a little.
1. Center the image (your paper template) as you want it to look on the tile and cut it into a square to fit the tile. Write your name on it.
2. Turn your paper template over and rub the back of the paper (the underside of the image) with graphite or charcoal (Figure 7). Charcoal is darker and therefore transfers the design more clearly than graphite, but it is messier! If you can see the lines of the image through the paper, you can darken just the lines rather than the entire back of the paper. Do not worry if bits of charcoal or graphite rub off onto the tile; they will burn off during firing. (Do not use charcoal or graphite on a clay substitute that will not be fired; use a pencil instead.)
Figure 7. Rubbing graphite on the back of the template.
3. Lay the paper image onto the tile, graphite-side-down, and fix it in place by taping it with a long piece of masking tape (running vertically from the top of the paper image over the top of the tile onto the back) (Figure 8).• Do not tape the template or tile onto the newspaper or
table, since you may need to move the tile and hold it at different angles as you work.
• Establish one mark or spot on the tile and the paper image that you can easily use to re-align the two if the paper slips.
Figure 8. Template taped onto a tile. This image is of the gorgon Medusa from the Gorgons coloring book.
4. Using a pencil or pointed wooden tool, trace over the lines of the image to impress them lightly onto the tile below. Carefully lift the template and check that the lines are trans-ferring to the clay surface. It is OK to press hard enough to make a faint indentation of the image appear on the tile. Do not gouge deep lines. In the end, you should see a faint black outline of your image on the tile, slightly pressed into the clay (Figure 9).
Note: since the Greeks artists were generally working on a curved surface in natural light, it may be necessary for you, when working indoors on a flat surface, to sit near a window or to tilt the tile to see clearly.
Figure 9. Transferring the image from the paper template onto the tile by tracing with a pencil.
Archaeological Institute of America
4
AIA Education Department Greek Vase Painting: ProceduresLesson Plans
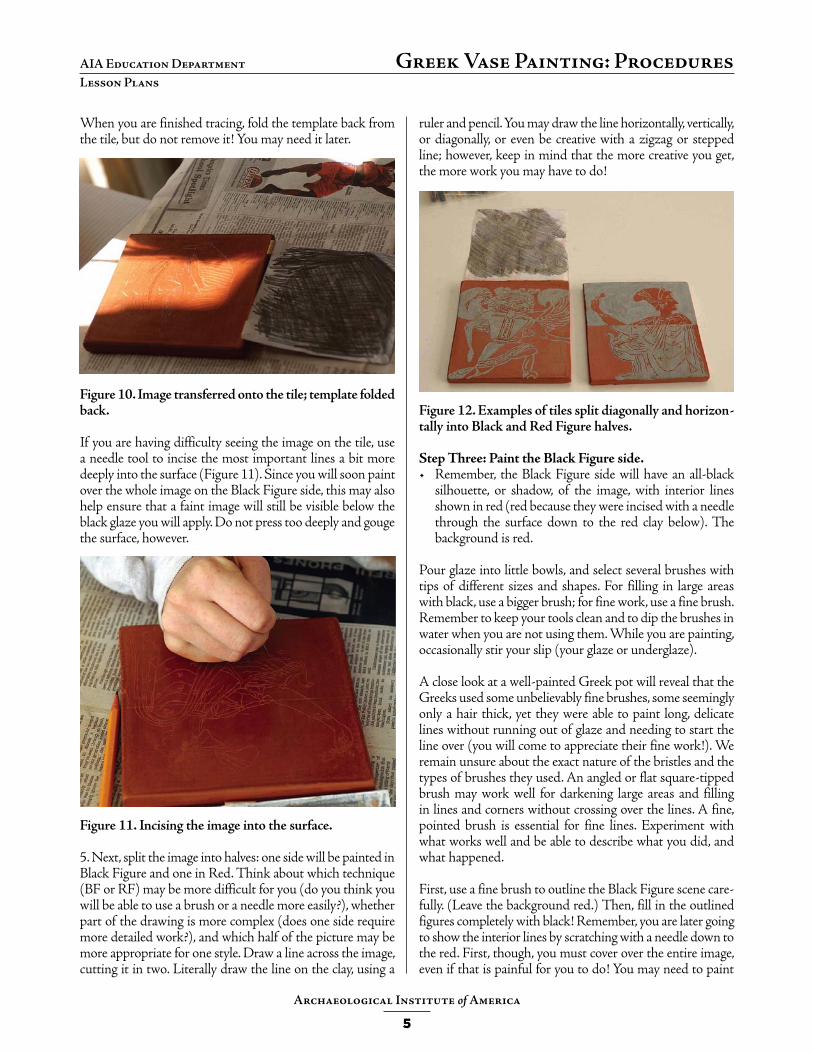
When you are finished tracing, fold the template back from the tile, but do not remove it! You may need it later.
Figure 10. Image transferred onto the tile; template folded back.
If you are having difficulty seeing the image on the tile, use a needle tool to incise the most important lines a bit more deeply into the surface (Figure 11). Since you will soon paint over the whole image on the Black Figure side, this may also help ensure that a faint image will still be visible below the black glaze you will apply. Do not press too deeply and gouge the surface, however.
Figure 11. Incising the image into the surface.
5. Next, split the image into halves: one side will be painted in Black Figure and one in Red. Think about which technique (BF or RF) may be more difficult for you (do you think you will be able to use a brush or a needle more easily?), whether part of the drawing is more complex (does one side require more detailed work?), and which half of the picture may be more appropriate for one style. Draw a line across the image, cutting it in two. Literally draw the line on the clay, using a
ruler and pencil. You may draw the line horizontally, vertically, or diagonally, or even be creative with a zigzag or stepped line; however, keep in mind that the more creative you get, the more work you may have to do!
Figure 12. Examples of tiles split diagonally and horizon-tally into Black and Red Figure halves.
Step Three: Paint the Black Figure side.• Remember, the Black Figure side will have an all-black
silhouette, or shadow, of the image, with interior lines shown in red (red because they were incised with a needle through the surface down to the red clay below). The background is red.
Pour glaze into little bowls, and select several brushes with tips of different sizes and shapes. For filling in large areas with black, use a bigger brush; for fine work, use a fine brush. Remember to keep your tools clean and to dip the brushes in water when you are not using them. While you are painting, occasionally stir your slip (your glaze or underglaze).
A close look at a well-painted Greek pot will reveal that the Greeks used some unbelievably fine brushes, some seemingly only a hair thick, yet they were able to paint long, delicate lines without running out of glaze and needing to start the line over (you will come to appreciate their fine work!). We remain unsure about the exact nature of the bristles and the types of brushes they used. An angled or flat square-tipped brush may work well for darkening large areas and filling in lines and corners without crossing over the lines. A fine, pointed brush is essential for fine lines. Experiment with what works well and be able to describe what you did, and what happened.
First, use a fine brush to outline the Black Figure scene care-fully. (Leave the background red.) Then, fill in the outlined figures completely with black! Remember, you are later going to show the interior lines by scratching with a needle down to the red. First, though, you must cover over the entire image, even if that is painful for you to do! You may need to paint
Archaeological Institute of America
5
AIA Education Department Greek Vase Painting: ProceduresLesson Plans
Archaeological Institute of America
36
AIA Education Department Cargoes from Three ContinentsLesson Plans
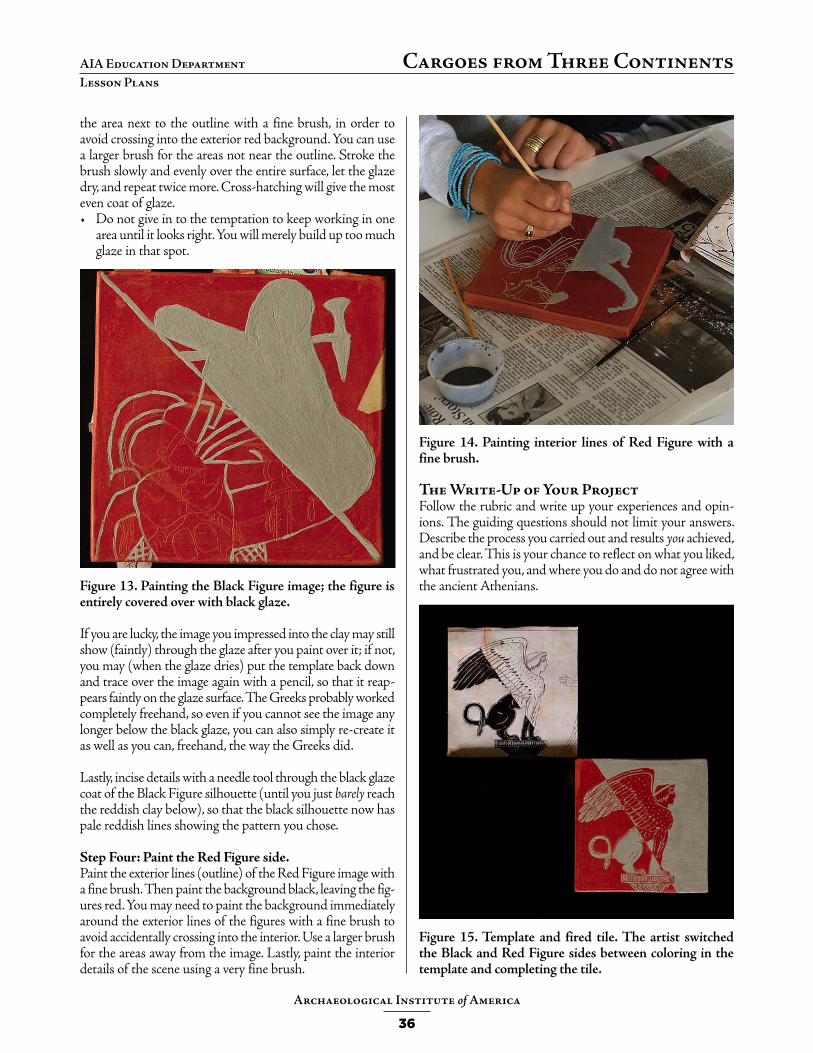
the area next to the outline with a fine brush, in order to avoid crossing into the exterior red background. You can use a larger brush for the areas not near the outline. Stroke the brush slowly and evenly over the entire surface, let the glaze dry, and repeat twice more. Cross-hatching will give the most even coat of glaze. • Do not give in to the temptation to keep working in one
area until it looks right. You will merely build up too much glaze in that spot.
Figure 13. Painting the Black Figure image; the figure is entirely covered over with black glaze.
If you are lucky, the image you impressed into the clay may still show (faintly) through the glaze after you paint over it; if not, you may (when the glaze dries) put the template back down and trace over the image again with a pencil, so that it reap-pears faintly on the glaze surface. The Greeks probably worked completely freehand, so even if you cannot see the image any longer below the black glaze, you can also simply re-create it as well as you can, freehand, the way the Greeks did.
Lastly, incise details with a needle tool through the black glaze coat of the Black Figure silhouette (until you just barely reach the reddish clay below), so that the black silhouette now has pale reddish lines showing the pattern you chose.
Step Four: Paint the Red Figure side.Paint the exterior lines (outline) of the Red Figure image with a fine brush. Then paint the background black, leaving the fig-ures red. You may need to paint the background immediately around the exterior lines of the figures with a fine brush to avoid accidentally crossing into the interior. Use a larger brush for the areas away from the image. Lastly, paint the interior details of the scene using a very fine brush.
Figure 14. Painting interior lines of Red Figure with a fine brush.
The Write-Up of Your ProjectFollow the rubric and write up your experiences and opin-ions. The guiding questions should not limit your answers. Describe the process you carried out and results you achieved, and be clear. This is your chance to reflect on what you liked, what frustrated you, and where you do and do not agree with the ancient Athenians.
Figure 15. Template and fired tile. The artist switched the Black and Red Figure sides between coloring in the template and completing the tile.
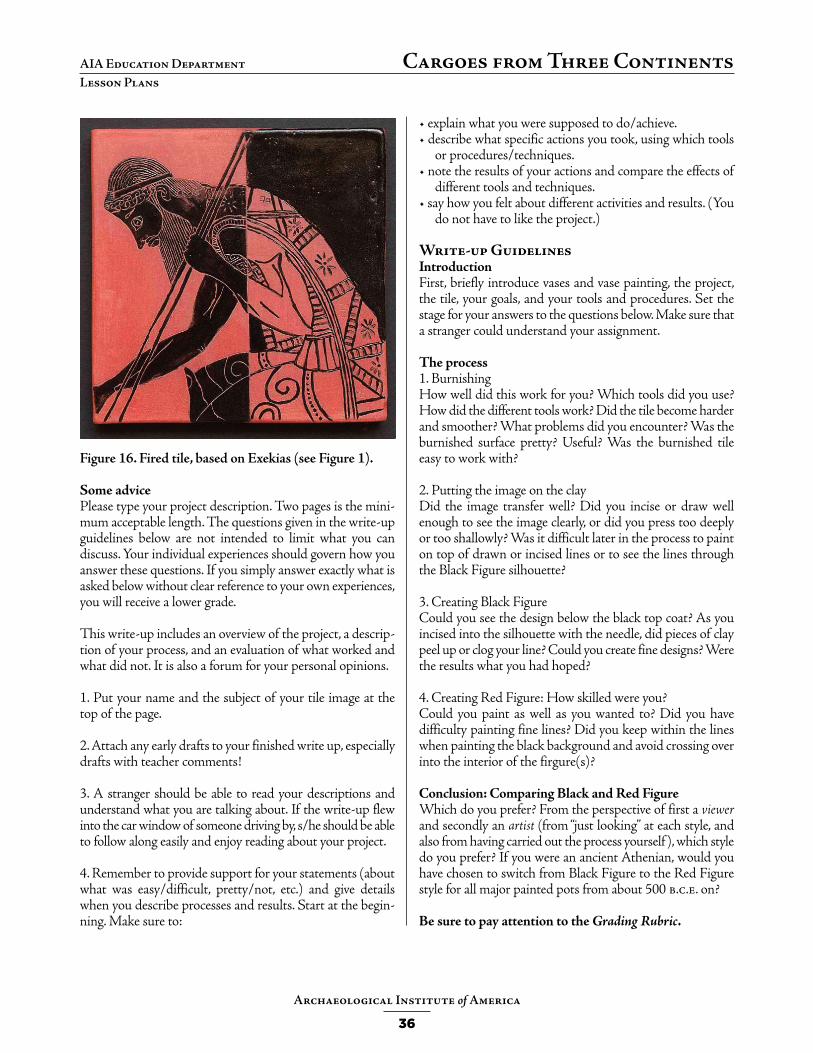
Figure 16. Fired tile, based on Exekias (see Figure 1).
Some advicePlease type your project description. Two pages is the mini-mum acceptable length. The questions given in the write-up guidelines below are not intended to limit what you can discuss. Your individual experiences should govern how you answer these questions. If you simply answer exactly what is asked below without clear reference to your own experiences, you will receive a lower grade.
This write-up includes an overview of the project, a descrip-tion of your process, and an evaluation of what worked and what did not. It is also a forum for your personal opinions.
1. Put your name and the subject of your tile image at the top of the page.
2. Attach any early drafts to your finished write up, especially drafts with teacher comments!
3. A stranger should be able to read your descriptions and understand what you are talking about. If the write-up flew into the car window of someone driving by, s/he should be able to follow along easily and enjoy reading about your project.
4. Remember to provide support for your statements (about what was easy/difficult, pretty/not, etc.) and give details when you describe processes and results. Start at the begin-ning. Make sure to:
• explain what you were supposed to do/achieve.• describe what specific actions you took, using which tools
or procedures/techniques.• note the results of your actions and compare the effects of
different tools and techniques.• say how you felt about different activities and results. (You
do not have to like the project.)
Write-up GuidelinesIntroductionFirst, briefly introduce vases and vase painting, the project, the tile, your goals, and your tools and procedures. Set the stage for your answers to the questions below. Make sure that a stranger could understand your assignment.
The process1. BurnishingHow well did this work for you? Which tools did you use? How did the different tools work? Did the tile become harder and smoother? What problems did you encounter? Was the burnished surface pretty? Useful? Was the burnished tile easy to work with?
2. Putting the image on the clayDid the image transfer well? Did you incise or draw well enough to see the image clearly, or did you press too deeply or too shallowly? Was it difficult later in the process to paint on top of drawn or incised lines or to see the lines through the Black Figure silhouette?
3. Creating Black FigureCould you see the design below the black top coat? As you incised into the silhouette with the needle, did pieces of clay peel up or clog your line? Could you create fine designs? Were the results what you had hoped?
4. Creating Red Figure: How skilled were you?Could you paint as well as you wanted to? Did you have difficulty painting fine lines? Did you keep within the lines when painting the black background and avoid crossing over into the interior of the firgure(s)?
Conclusion: Comparing Black and Red Figure Which do you prefer? From the perspective of first a viewer and secondly an artist (from “just looking” at each style, and also from having carried out the process yourself ), which style do you prefer? If you were an ancient Athenian, would you have chosen to switch from Black Figure to the Red Figure style for all major painted pots from about 500 b.c.e. on?
Be sure to pay attention to the Grading Rubric.
Archaeological Institute of America
36
AIA Education Department Cargoes from Three ContinentsLesson Plans
Related Documents