Germany tutorial Take 2 by Misterbean This tutorial is made with Hearts of Iron III FTM with the 3.05 patch so beware that the map doesn’t match with the map of higher patches On the last page you can find the schedule from Rensslaer back. On this schedule you can see all the aspects that you need to make your army fight on the right way. Chapter One: Introduction. First off, I can’t show you a screenshot of the opening screen. For some reason or other, I get a picture of my desktop. But that’s okay, I’ll just talk you through it. What you see is mostly pretty standard. Single Player and Mulitplayer speak for themselves. The tutorial is actually a bunch of pictures and some silly text. What’s more, it is mostly wrong. Don’t read it, unless you want a quick laugh. What does matter, are the options. Click on it and you will get a little window with tabs. From left to right, these are: Game: gives you the option to set your autosave to weekly, monthly, yearly or never. I set mine at monthly. Video: There shouldn’t be a reason to change the settings, but the checklist at the bottom needs some explaining. Use counters: If you check this, you will see your forces as NATO counters. If you uncheck it, you will get sprites if you zoom in close enough. I only use counters because they give you more information than sprites. Looking at an enemy division, you can see at a glance exactly what you will be facing. The sprites are not always clear enough for that. So check the box to play with counters.

Germany Tutorial Take 2 by Misterbean Changed Colors
Jan 01, 2016
Germany Tutorial Take 2 by Misterbean Changed Colors
Welcome message from author
This document is posted to help you gain knowledge. Please leave a comment to let me know what you think about it! Share it to your friends and learn new things together.
Transcript
Germany tutorial Take 2 by Misterbean This tutorial is made with Hearts of Iron III FTM with the 3.05 patch so
beware that the map doesn’t match with the map of higher patches
On the last page you can find the schedule from Rensslaer back. On this
schedule you can see all the aspects that you need to make your army fight
on the right way.
Chapter One: Introduction. First off, I can’t show you a screenshot of the opening screen. For some reason or other, I get a picture of my desktop. But that’s okay, I’ll just talk you through it. What you see is mostly pretty standard. Single Player and Mulitplayer speak for themselves. The tutorial is actually a bunch of pictures and some silly text. What’s more, it is mostly wrong. Don’t read it, unless you want a quick laugh. What does matter, are the options. Click on it and you will get a little window with tabs. From left to right, these are: Game: gives you the option to set your autosave to weekly, monthly, yearly or never. I set mine at monthly. Video: There shouldn’t be a reason to change the settings, but the checklist at the bottom needs some explaining. Use counters: If you check this, you will see your forces as NATO counters. If you uncheck it, you will get sprites if you zoom in close enough. I only use counters because they give you more information than sprites. Looking at an enemy division, you can see at a glance exactly what you will be facing. The sprites are not always clear enough for that. So check the box to play with counters.
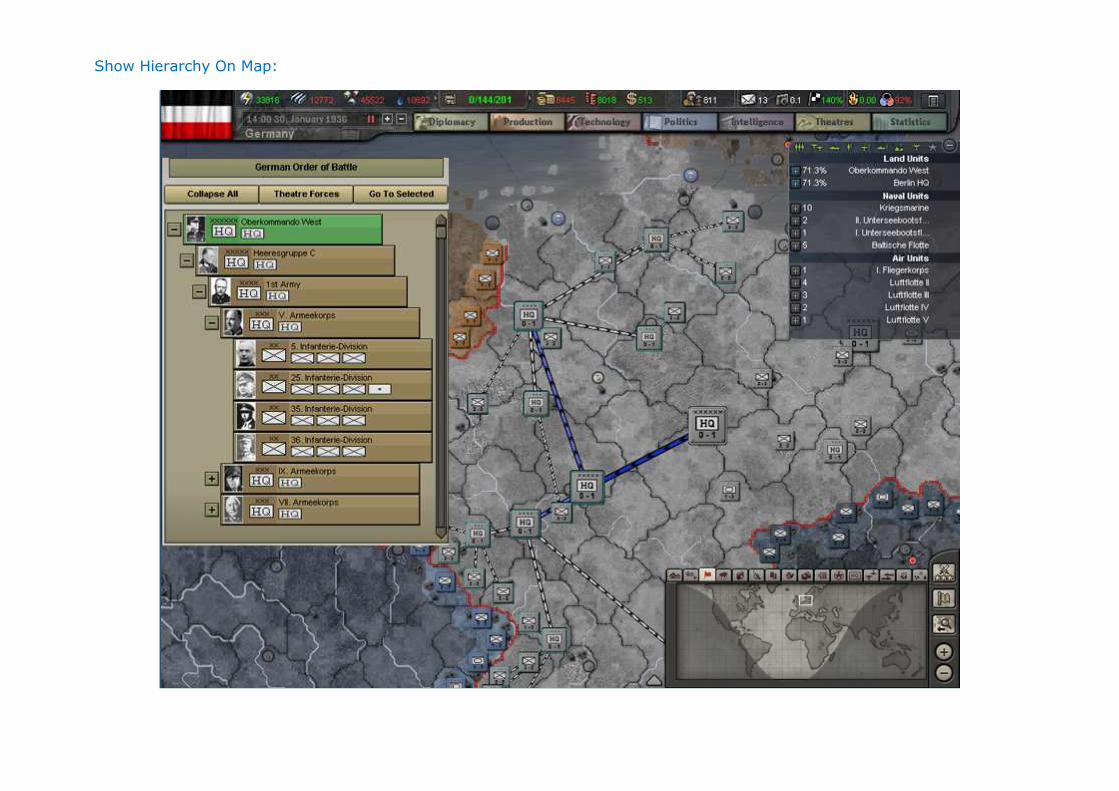
Show Hierarchy On Map:
One of the biggest differences between Hearts Of Iron II and III is the use of an actual military structure. I will get in more detail about it in the appropriate lesson, but checking this box will show lines between, for instance, armies and their subordinate corps and the divisions that it commands. Make sure it is checked, because in a few years time, Germany will have over 100 divisions, all attacking the Soviet Union. The last thing we need is having to figure out whether a given division is part of army A or army B. Thick blue lines show the direct subordinates. Light blue lines show the units below it and white lines show units under that one. Make sure it is checked!
Controls: The only thing here that needs a word, is the “Use Legacy Camera” option. Before FtM, the only way to move to a different part of the map was to mouse over the screen edge. This is the Legacy Camera. If you keep it unchecked, you can now click the middle mouse button (or mouse wheel) and drag the map. Allows for much easier control. Keep it unchecked. The last option in the main menu, “buy Bonus Items”, takes you to the website of Gamersgate, a digital games retailer, where you can buy things like sprites, music or DLCs, provided you enlist first, of course. In the bottom left corner, you will see the version of your game as well as the checksum. This is a combination of letters that is used for multiplayer matchmaking. All involved in a multiplayer game must have the same checksum or the game will not start. Finally, in the bottom right corner, you see “quick start”. This takes you to 4 possible game set-ups for beginners. But we
won’t be using these since it is much better to learn everything properly. Besides, the AI can be a little fickle at times. Click “custom start” to return to the main menu and click Single Player. There, we’ve only covered the first screen, and it’s a full post allready!
Chapter Two: Start Menu. Again, no screenshot, but this one is easy. On the left you can choose between “historical start”, which are the grand campaigns that the game is all about, or battle scenarios, which can be fun little diversions, or to continue from a saved game. We’re interested in the historical start of 1936. This gives us the greatest freedom and the most time to build up an army that can conquer the world.
Choosing a nation can be done in 2 ways. Firstly, you have the Major nations at the bottom: UK, US, Italy, Japan, France, Soviet Union and Germany. Clicking on the appropriate flag will give you control of any one of these. If, however, you want to play as any other nation, you can scroll the map by holding the mouse at the screen’s edge and click the nation of your choosing. This is always the most impressive feature of the game for me. There are few other games out there where you can play literally as ANY nation, down to and including such eminent countries as the Grand Duchy of Luxemburg or Tannu Tuva. Our choice is easy. Click on the German flag at the bottom or Germany on the map. In the top right corner you can now see the form of government for our chosen nation and its Head of State. It will also tell you whether you are at peace or engaged
in war at the start of the game. Below that, you have another list of options. These involve difficulty (normal for our game), and whether or not you want to let the AI control some functions for you. You could let it handle all diplomacy for you, for example, if you don’t like dealing with that sort of thing, and the computer will do an adequate job of keeping you on a historically correct path. But since you don’t learn anything that way, we will keep everything on “Player Control”. One option requires a little explanation. This is the Game Mode. It tells the game how you want to handle supplies. Under
normal, your supplies and resources are first collected in you capital or in Supply Depots for those parts of the nation that don’t have a land connection to your capital. Germany’s East Prussia is an example of this. Once they arrive in your capital, they are then send out by ground or by convoys to where they are needed the most. These are your supply chains. Cut off an enemy’s supply, and watch his offence flounder. Of course, he can do the same to you. If you go with Arcade, all units will teleport the necessary supplies directly from your capital. You don’t have to worry about keeping those bombers off your back, but neither will the enemy. However you do this, it is a double-edged blade. We will play using Normal Game Mode. Finally, there are the Victory Conditions. Playing as the leader of a faction (UK for the Allies, Soviet Union for the Comintern
or Germany for the Axis) will allow us to keep track of the objectives you set for yourself. They will be different for each
faction. The Soviets, for instance, want control of Eastern Europe, Scandinavia and Germany, while the Allies want to maintain the independence of most European nations. The Axis powers want to eliminate the other factions. I never bother with them. I know my objectives: to control as big of a chunck of the world as I can. Leave them as they are and click the start button to load up as Germany on the 1st of January, 1936.
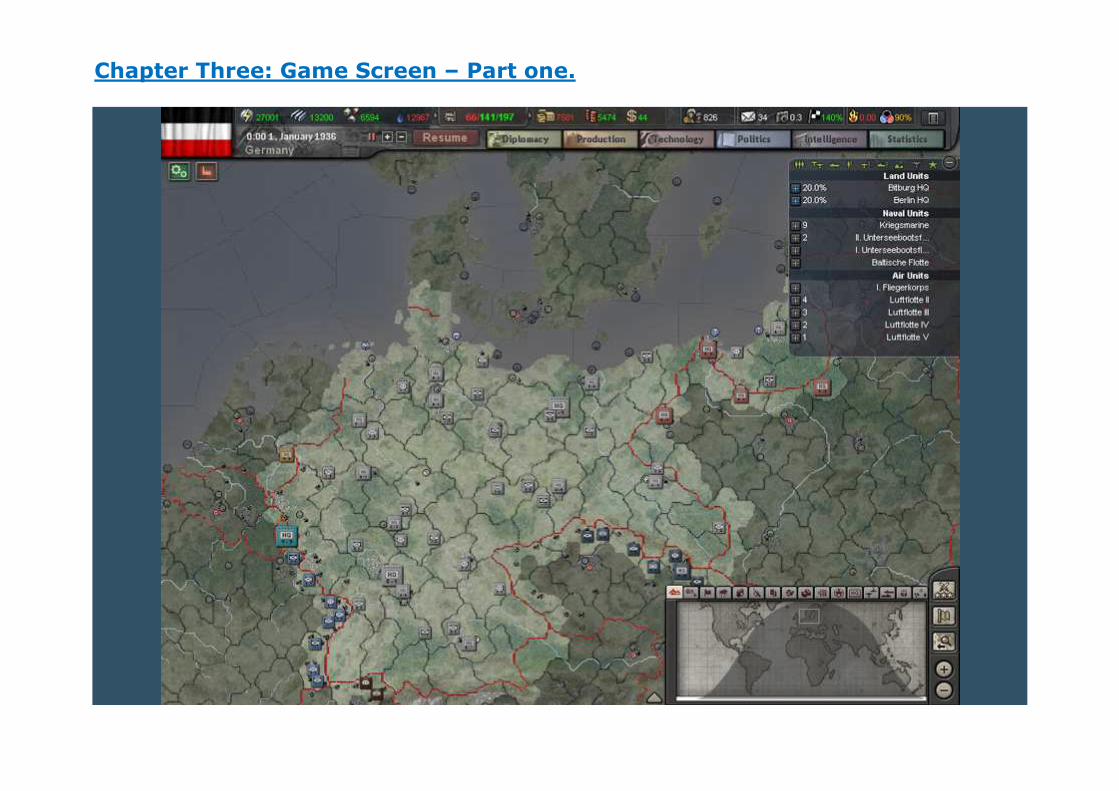
Chapter Three: Game Screen – Part one.
This is what you see when the game begins. This is usually the moment people lose confidence. All those numbers, those provinces, what do I do? Where do I start? Well, not to worry. First we are going to learn the basics. The screen is divided in three parts. The first is the resource bar at the top.
I’m going to start on the left and work my way over to the end. First, we have the flag (in this case the flag of Germany). More than just an ornament, mousing over it will show you a tooltip containing all the temporary strategic modifiers affecting Germany. Currently, there are no such modifiers, but once we
convince Italy to join the Axis, the tooltip will tell us that the Pact of Steel gives us a bonus on supplies and research speed. Very handy when you want to know when a penalty will go away. Next to it are your resources: *) Energy: mostly coal, this keeps your factories going. Each “factory” (or Industrial Capacity, IC for short) requires two points of energy. *)Metal: the steel that you use to build ships and tanks. Each IC requires 1 point of metal.
*)Rare materials: Your rares include rubber, chromium and other hard-to-come-by minerals. Each IC needs ½ pont of rares. *) Crude Oil: this is just the stuff that comes out of the ground. In and by itself, it is completely useless. But it is automatically refined into Fuel for you by the game. If you have a shortcoming, the game will burn energy and turn it into crude for you (like synthetic fuels). *) Industrial Capacity (IC): This comes in three numbers. The first are the number of IC we are not using at the moment (in Germany’s case 66 IC is wasted). The second are the actual factories in Germany. The third is the total of your factories modified by ministers, laws and technology. This is the total amount of IC at our disposal. More details will follow in the
chapter on production.
*) Supplies are next. Supplies don’t come by themselves. They are produced by investing an amount of IC. This is one of the most important ones. They represent uniforms, food, ammo. All the things your army needs to keep up the good fight. As important fuel is to your tanks, infantry can keep going without it. But if they run out of supplies, they suffer dreadful combat penalties. As Patton once put it: “My men can eat their belts, but my tanks gotta have gas!” *) This brings us to Fuel. Derived from Crude Oil, fuel keeps your subs hunting and your planes flying. Lack of fuel was the ultimate downfall of the Luftwaffe in real life.
*) Money. The thing that makes the world go round. Unlike HOI2, you can no longer barter one resource for the other, unless you’re in the Comintern faction. Just like reality, you sell something to make money that you use to buy something else. *) Manpower. Each point here represents about 1,000 men of the right age for you to draft. As you can see, Germany has 826,000 men ready to die for us. We gain a little each month, and we lose a little to replace soldiers that retire, for instance. This number, along with supplies and fuel, determines in most cases what kind of armed force you can build. The USA has a terrible MP shortage during peace time. They have more IC than they know what to do with, however, so they opt to go for expensive, fuel-costly armour and planes that don’t cost a whole lot of MP.
*) Diplomacy Points. As the name suggests, they are used to engage in international diplomacy. Trading, asking for transit rights, signing up with a faction, embargoing a nation you dislike, they all cost a number of diplomacy points. Even Germany, with their “see-want-take” mindset, needs a lot of these to keep our economy going. *) Spies. This is the number of spies we train every day. They can then be used to keep Germany safe and the rest of the world triggerhappy. *) Officer Ratio. Each division, each air wing, each ship you build includes the NCOs used to order the men around. We will
need to keep this above 100% during wartime to make sure we don’t suffer combat penalties. Officers, spies and diplomats are raised with Leadership Points (LP), that we will get into during our talks about research. *)Dissent. The number of people unhappy with your regime. If this number rises above 0, we will have to reduce it as fast as possible or our economy will grind to a halt. What’s more, when dissent is high, soldiers at the front will worry more about their loved ones at home than about the enemy soldiers across the hill and will, again, suffer combat penalties. *)National Unity (NU): This represents the percentage of your generals and politicians and business men to keep going despite the odds. If we capture more Victory Points than the enemy has NU, than he has no choice but to surrender. This one
will cost us or win us the war. Last on the list is the menu button. We will have to make a few adjustments there later, so I’ll show it to you then.
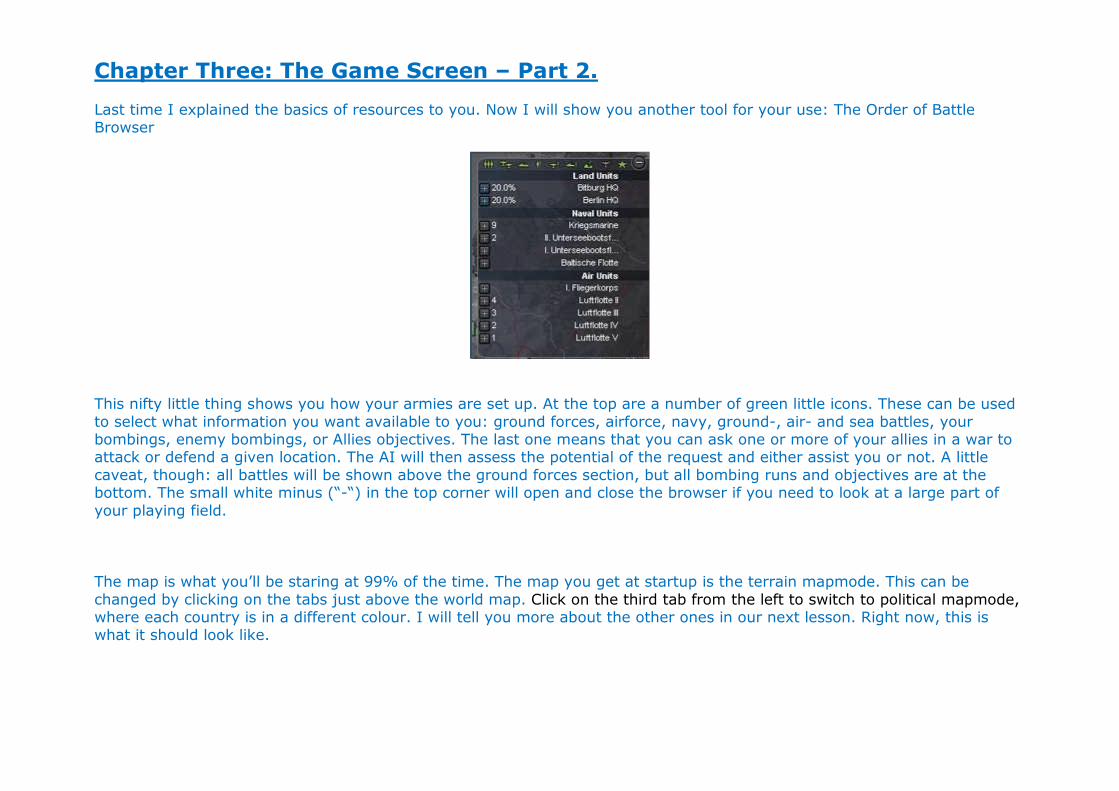
Chapter Three: The Game Screen – Part 2. Last time I explained the basics of resources to you. Now I will show you another tool for your use: The Order of Battle Browser
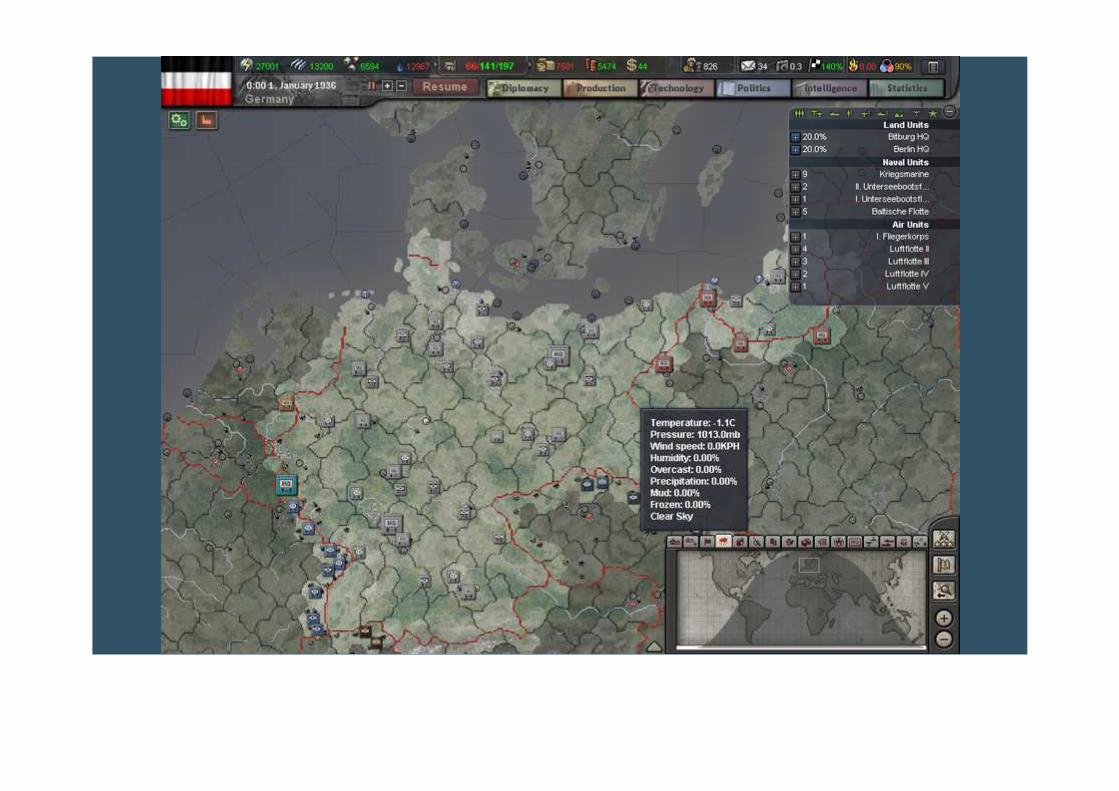
This nifty little thing shows you how your armies are set up. At the top are a number of green little icons. These can be used to select what information you want available to you: ground forces, airforce, navy, ground-, air- and sea battles, your bombings, enemy bombings, or Allies objectives. The last one means that you can ask one or more of your allies in a war to attack or defend a given location. The AI will then assess the potential of the request and either assist you or not. A little caveat, though: all battles will be shown above the ground forces section, but all bombing runs and objectives are at the bottom. The small white minus (“-“) in the top corner will open and close the browser if you need to look at a large part of your playing field. The map is what you’ll be staring at 99% of the time. The map you get at startup is the terrain mapmode. This can be changed by clicking on the tabs just above the world map. Click on the third tab from the left to switch to political mapmode, where each country is in a different colour. I will tell you more about the other ones in our next lesson. Right now, this is what it should look like.
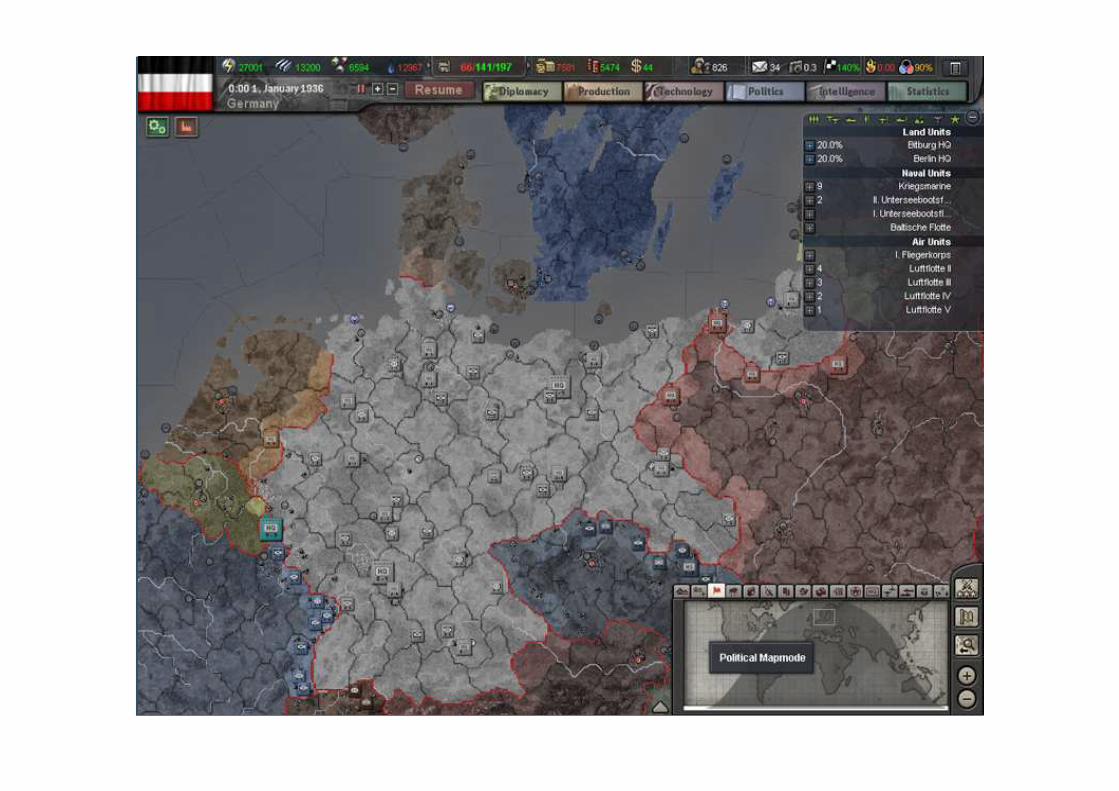
Germany is in grey. Please note East Prussia, seperated from Germany at the end of WWI, and the main reason Germany invaded Poland. The little arrow pointing up next to the world map will open a text box where you can see messages from the game. Next, click on the menu button at the top right of the screen. This will open a window where you can adjust the game options, just like in the main menu, save, go to the main menu or go directly to your desktop. There is one thing I need you to do before I can begin showing you how to begin playing Germany: Message settings. There are a lot of these and they can all be set to pop-up and pauze the game, simply pop-up (not advisable in Single Player games) or to appear in you message box at the bottom. Take your time to get them like mine. Set them all to pauze the game and the game will spam you with anything and everything, including trade deals between countries nobody ever heard or cared about, and you will never get anything done. However, some of them are of course vital and should pauze the game so you can deal with them on a moment’s notice, others are just there to keep an eye out for.
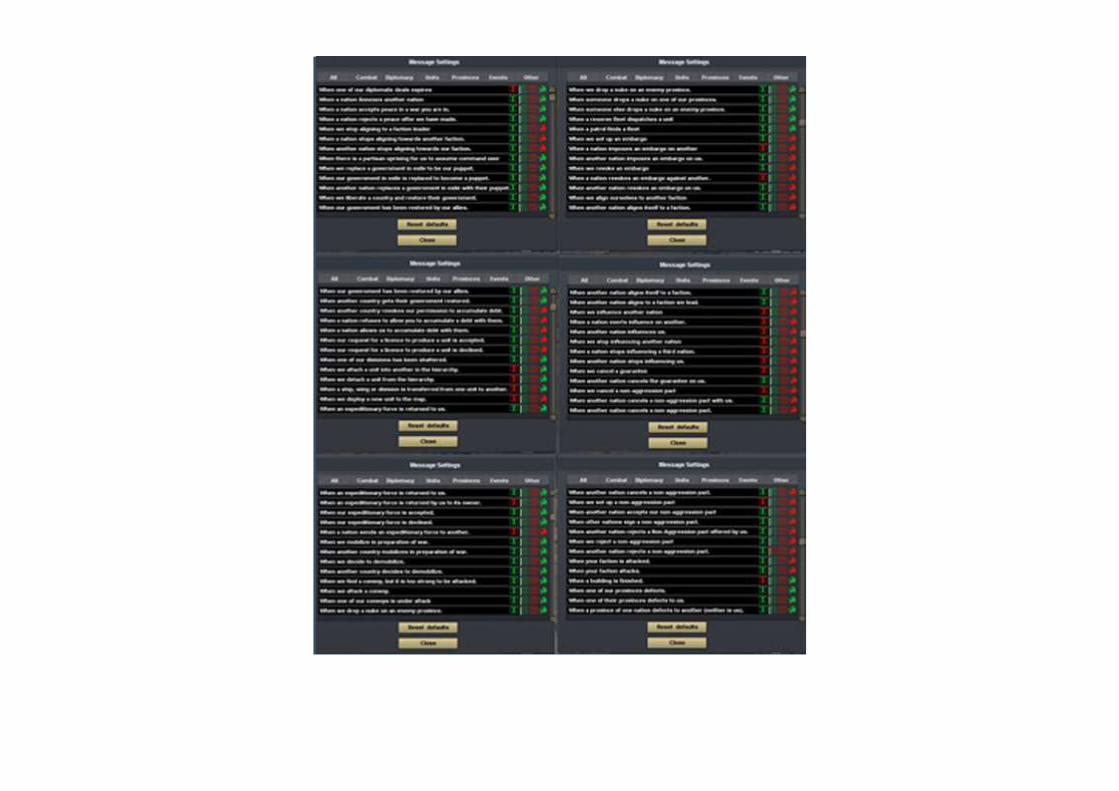
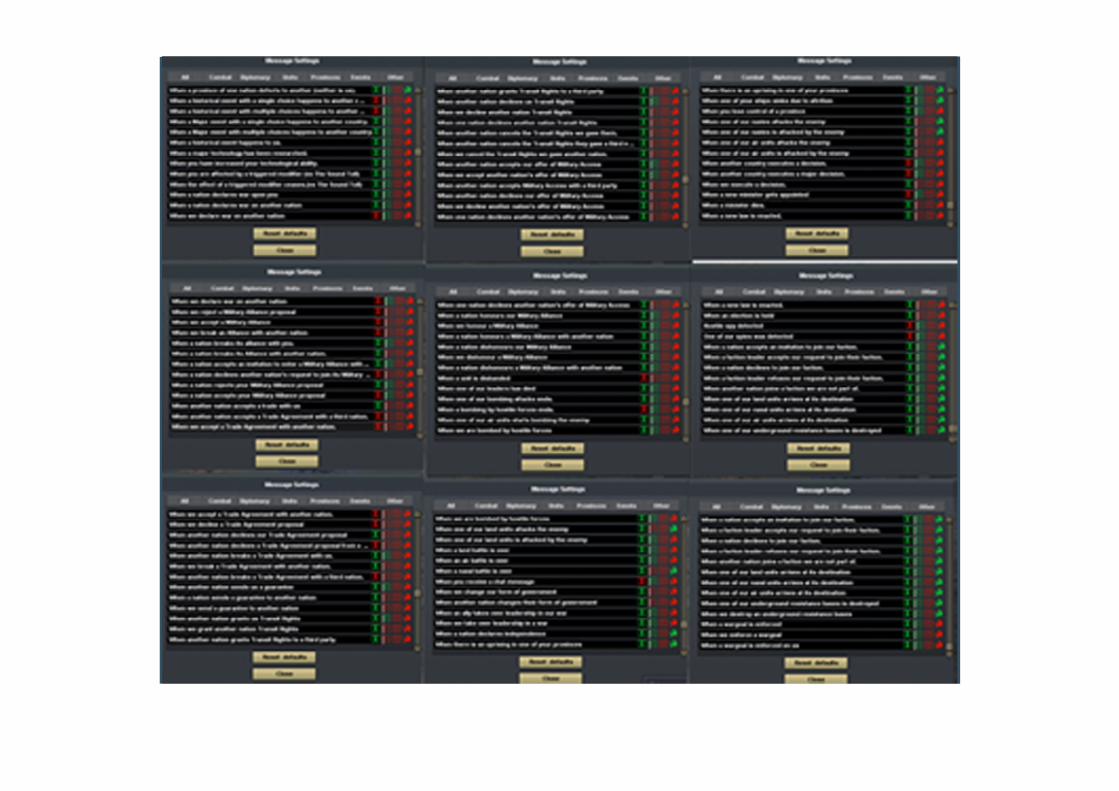
Sorry the pics are so fuzzy. They were either too small or this. Just follow down the list and set the icons on the right side as I did. The first column in pop-up and pauze, the second is appears in the log, the third (the one I have completely in red) is simply pop-up and the fourth is to make it appear as a tiny red dot on the world map. Handy for when you’re playing nations like US or Uk who have interests all over the world. Take your time. There are a lot of them there. When you’re done, click close. Alternately, you could set them all to pop-up and pauze. When one of them appears, either as a pop-up or in the log, you can right-click on it to change the setting. But that would give a whole new meaning to the word “spam”.
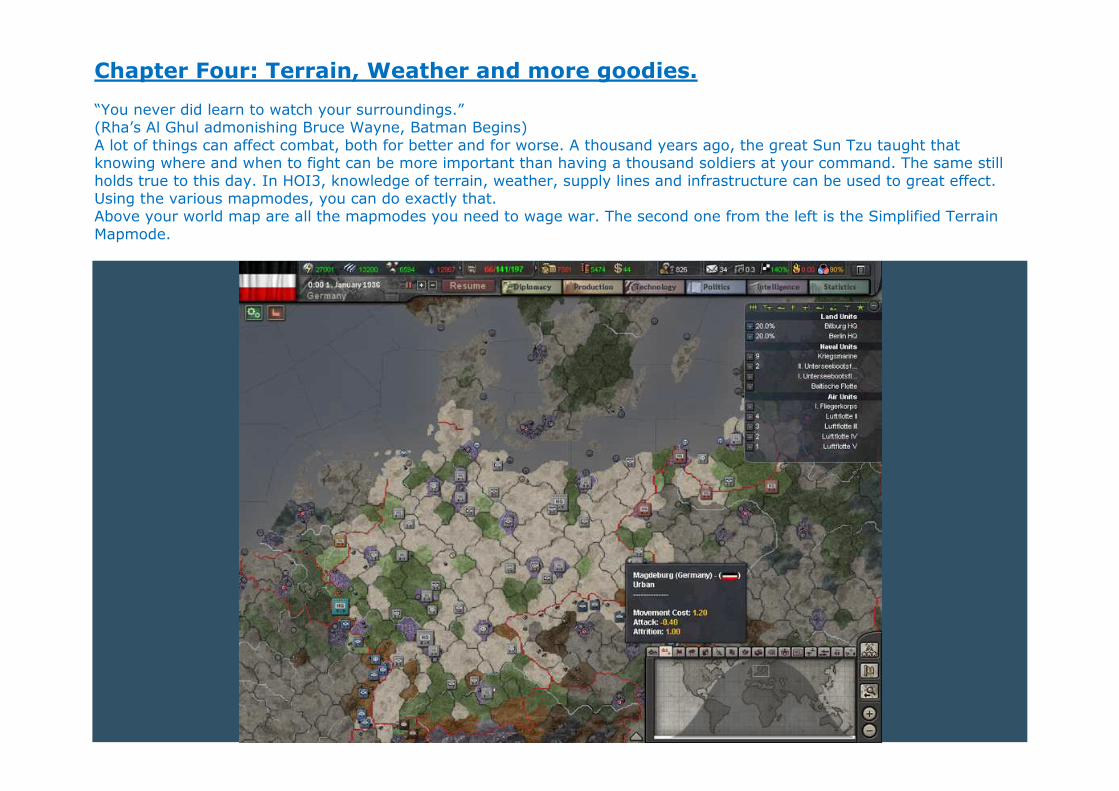
Chapter Four: Terrain, Weather and more goodies. “You never did learn to watch your surroundings.” (Rha’s Al Ghul admonishing Bruce Wayne, Batman Begins) A lot of things can affect combat, both for better and for worse. A thousand years ago, the great Sun Tzu taught that knowing where and when to fight can be more important than having a thousand soldiers at your command. The same still holds true to this day. In HOI3, knowledge of terrain, weather, supply lines and infrastructure can be used to great effect. Using the various mapmodes, you can do exactly that. Above your world map are all the mapmodes you need to wage war. The second one from the left is the Simplified Terrain Mapmode.
It may not be pretty, but it will tell you at a glance where you can find the right terrain to guide your defense or judge the enemy’s defenses. All game modifiers listed for certain types of units are the net result: basic penalty – basic bonus. The various terrains are: *)plains: simple flat, open countryside. No movement or attack penalties. Perfect for fast, mobile troops such as tanks and motorised or mechanised infantry. (white colour) *)woods: lightly forested terrain. 10% movement and attack penalties. (light green) *) forests: dense forests. 20% movement and attack penalties. (green) *) jungle: 30% movement and attack penalties. Note that the Marine brigade has only 5% penalty to both movement and attacking in jungles as well as a 25% defense bonus. (dark green). Anyone fighting in jungles suffers attrition (malaria and other fun stuff killing your soldiers). Attrition can only be countered by researching the right tech. *)river: not exactly a terrain type as such, but attacking across a river suffers an attack penalty (hence the Allies’ plan in 1940 to use the Dyle river as defense against the Germans). Marines only suffer a 10% penalty. *)marshes: 40% attack and movement penalty. In addition, anyone staying in marshes suffers attrition. Marines only suffer a 10% penalty to attack through marshes. (sickly purplish hue) *)hills: low, rolling moutainous terrain: 20% movement and attack penalty. Mountaineers suffer only 10% movement penalty, have a 20% bonus to attack and 10% bonus to defend. (brown) *)mountains: steep, huge mountainous terrain (Himalaya, Alps,…). 40% movement and attack penalties, as well as attrition. Mountaineer brigades have bonuses in these surroundings: 30% penalty to movement, 10% attack bonus, 20% defense bonus. (grey) *)urban: highly industrialised population centers such as Stalingrad. 20% penalty to movement, 40% penalty to attack as well as (some) attrition. Note that any kind of armour suffers additional penalties when attacking urban terrain. (deep purple) *)desert: no penalties, again making it primary armour terrain, but there is attrition. (yellow) *)arctic: like desert terrain, there is only attrition to worry about. Moutaineers have a 50% attack, 20% defense and 20% movement bonus in the arctic. So, if Germany were to get invaded, the primary defenses would force the enemy to attack your urban centers across a river (preferably at night, suffering an additional attack penalty) with his tanks. More info about the various ground forces in a later chapter.
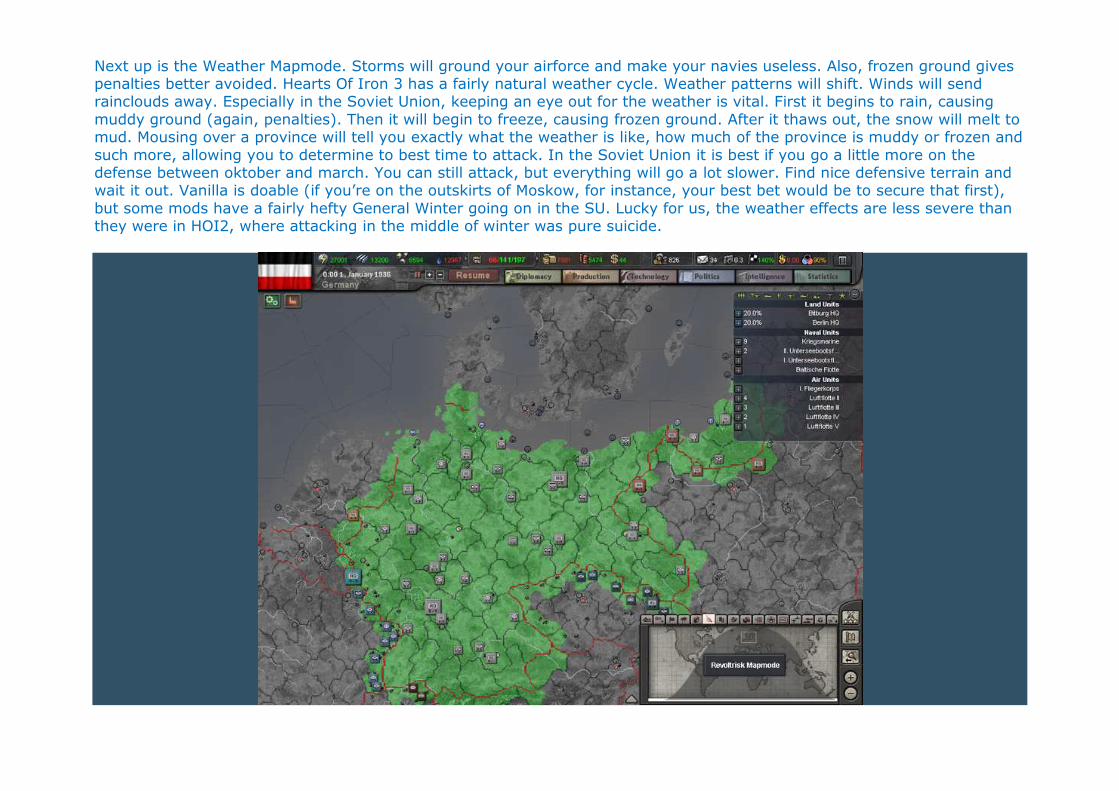
Next up is the Weather Mapmode. Storms will ground your airforce and make your navies useless. Also, frozen ground gives penalties better avoided. Hearts Of Iron 3 has a fairly natural weather cycle. Weather patterns will shift. Winds will send rainclouds away. Especially in the Soviet Union, keeping an eye out for the weather is vital. First it begins to rain, causing muddy ground (again, penalties). Then it will begin to freeze, causing frozen ground. After it thaws out, the snow will melt to mud. Mousing over a province will tell you exactly what the weather is like, how much of the province is muddy or frozen and such more, allowing you to determine to best time to attack. In the Soviet Union it is best if you go a little more on the defense between oktober and march. You can still attack, but everything will go a lot slower. Find nice defensive terrain and wait it out. Vanilla is doable (if you’re on the outskirts of Moskow, for instance, your best bet would be to secure that first), but some mods have a fairly hefty General Winter going on in the SU. Lucky for us, the weather effects are less severe than they were in HOI2, where attacking in the middle of winter was pure suicide.
You never suffer any revoltrisk in your cores (those are provinces Germany considers “their home”), but conquering your neighbours and occupying their land will see a rise of underground resistance. Most of these are simple, lowlevel sabotage activities. These are simulated by the revoltrisk. Green means no revoltrisk, yellow means heightened danger, red provinces could spawn armed rebels. The only way to counter this is by having units present with a high “suppresion” quality, such as garrisons and military police. This is no different from HOI2, but you no longer need a garrison in almost every province. Just keep one in the ones you don’t want to lose to rebels along with some mobile intervention forces to attack any rebels that do crop up. There is a major difference from HOI2, though. When you defeat a nation that is part of a faction or a military alliance, they usually form governments-in-exile. You can’t annex a nation without first defeating the entire cabal of nations arrayed against you. You only occupy the land and can set “Occupation policies”. This determines just how severe you want to repress the local population and loot the land. Severe occupation laws will increase the revoltrisk and make whatever partisans spawn better armed and more determined. ALWAYS GO FOR THE LEAST SEVERE POLICIES DEPENDING ON YOUR MOST URGENT NEEDS (Manpower, IC, resources, leadership, good supply lines)! When you do annex a nation, the revoltrisk will increase astronomically without your garrisons being able to do anything about it. don’t be surprised if you get uprisings every other day or so. Whatever the situation might be, revoltrisk will have one major effect: it will sap your supply lines. Take Poland, for instance. In 1941, we will attack the Soviet Union, starting, obviously, on Polish ground. All your supplies will have to travel from Berlin across Poland and occupied Russia to your frontlines. Having revoltrisk means suffering at the front.
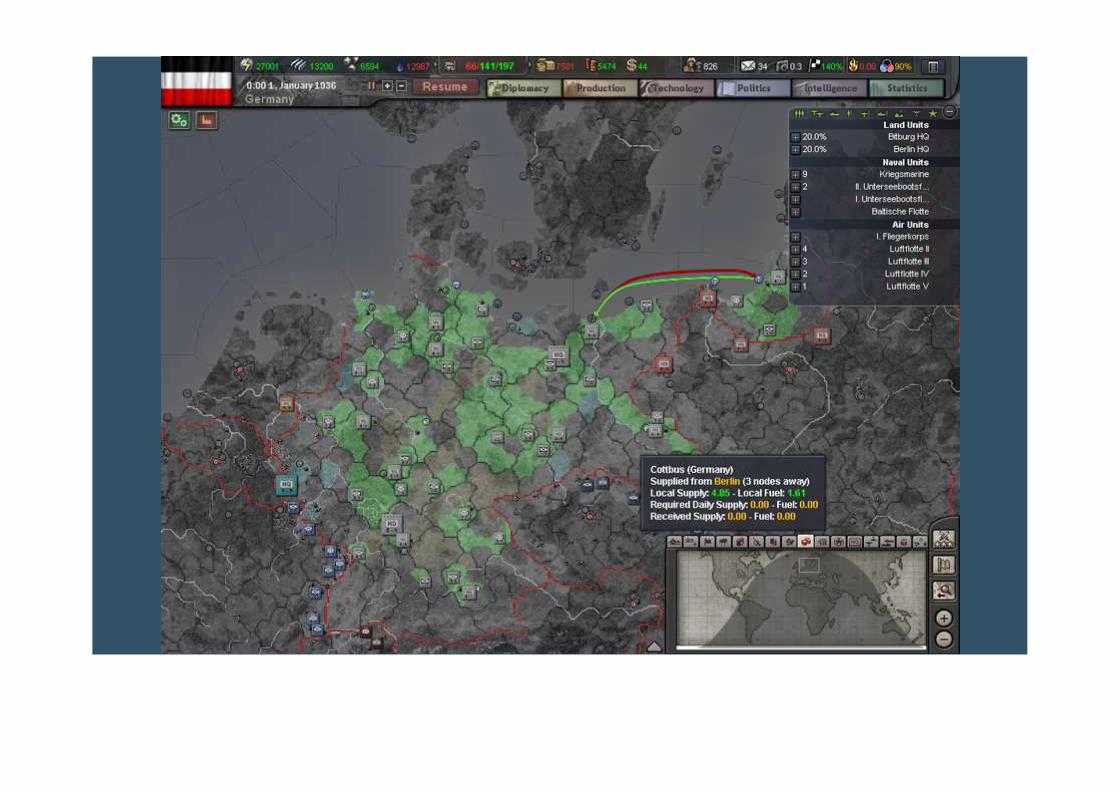
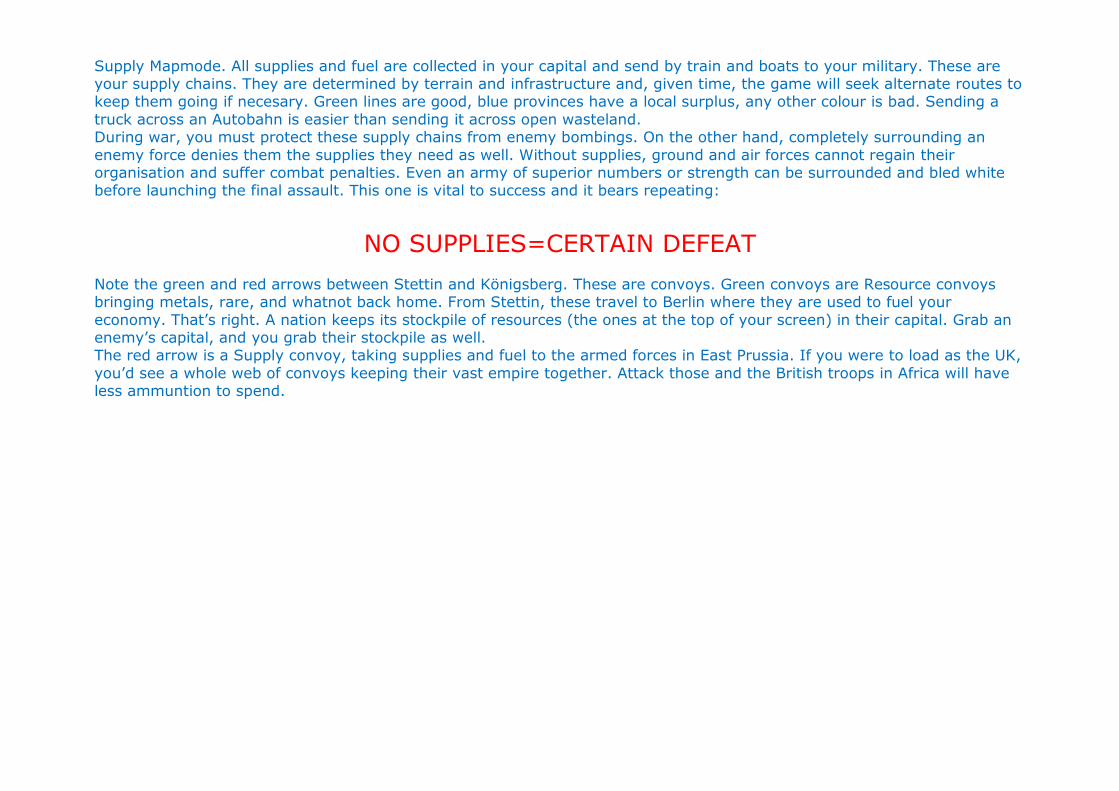
Supply Mapmode. All supplies and fuel are collected in your capital and send by train and boats to your military. These are your supply chains. They are determined by terrain and infrastructure and, given time, the game will seek alternate routes to keep them going if necesary. Green lines are good, blue provinces have a local surplus, any other colour is bad. Sending a truck across an Autobahn is easier than sending it across open wasteland. During war, you must protect these supply chains from enemy bombings. On the other hand, completely surrounding an enemy force denies them the supplies they need as well. Without supplies, ground and air forces cannot regain their organisation and suffer combat penalties. Even an army of superior numbers or strength can be surrounded and bled white before launching the final assault. This one is vital to success and it bears repeating:
NO SUPPLIES=CERTAIN DEFEAT
Note the green and red arrows between Stettin and Königsberg. These are convoys. Green convoys are Resource convoys bringing metals, rare, and whatnot back home. From Stettin, these travel to Berlin where they are used to fuel your economy. That’s right. A nation keeps its stockpile of resources (the ones at the top of your screen) in their capital. Grab an enemy’s capital, and you grab their stockpile as well. The red arrow is a Supply convoy, taking supplies and fuel to the armed forces in East Prussia. If you were to load as the UK, you’d see a whole web of convoys keeping their vast empire together. Attack those and the British troops in Africa will have less ammuntion to spend.
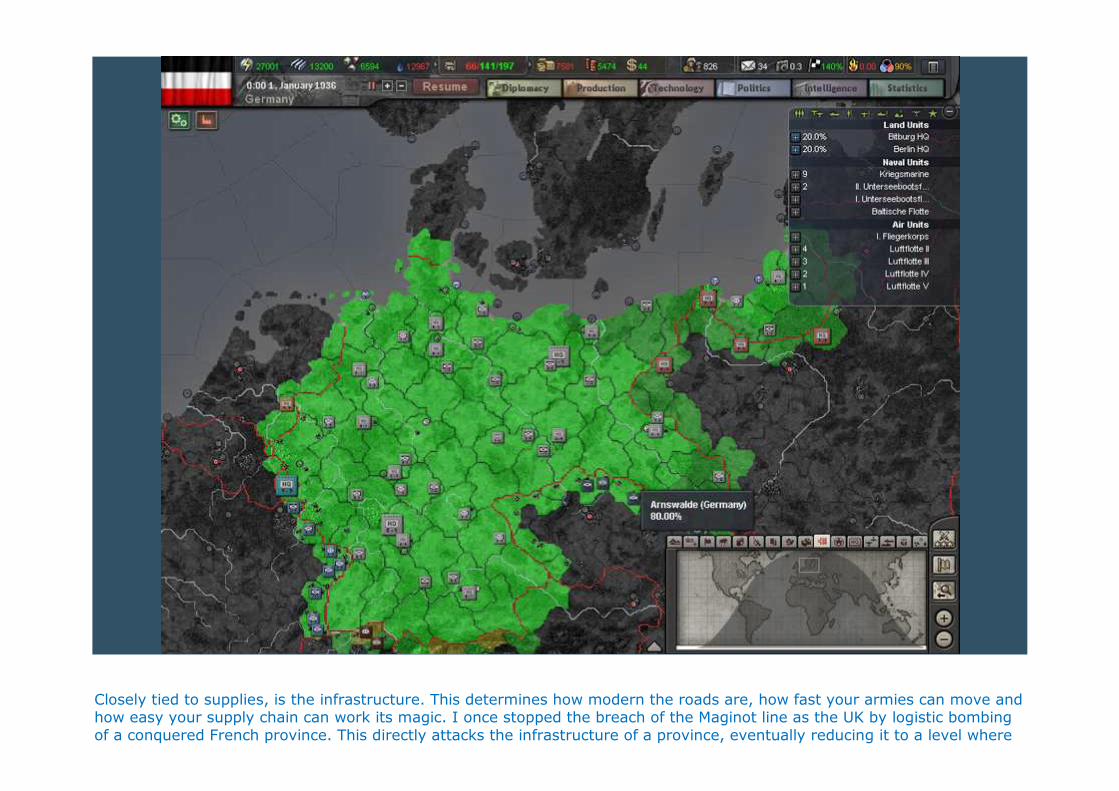
Closely tied to supplies, is the infrastructure. This determines how modern the roads are, how fast your armies can move and how easy your supply chain can work its magic. I once stopped the breach of the Maginot line as the UK by logistic bombing of a conquered French province. This directly attacks the infrastructure of a province, eventually reducing it to a level where

the Germans couldn’t move through anymore. Do this behind their lines and you might sever their supply chain. However, the German army is dependent on rapid maneuver warfare, so we will need to keep as much of the infrastructure intact as possible. Indeed, we will have to improve it in Poland and SU to keep our supplies going. Bright green indicates 100% infra, while lesser greens indicate diminishing infra, eventually leading to black: provinces with an infra of 0 or 1 at most.
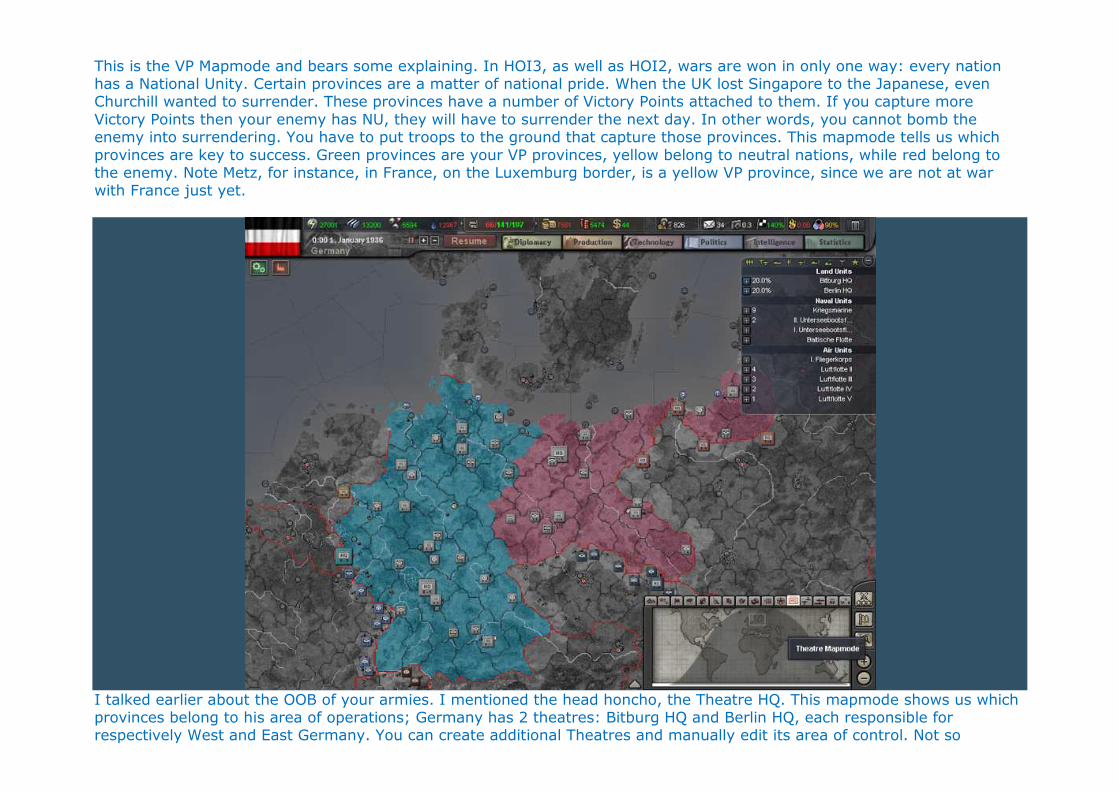
This is the VP Mapmode and bears some explaining. In HOI3, as well as HOI2, wars are won in only one way: every nation has a National Unity. Certain provinces are a matter of national pride. When the UK lost Singapore to the Japanese, even Churchill wanted to surrender. These provinces have a number of Victory Points attached to them. If you capture more Victory Points then your enemy has NU, they will have to surrender the next day. In other words, you cannot bomb the enemy into surrendering. You have to put troops to the ground that capture those provinces. This mapmode tells us which provinces are key to success. Green provinces are your VP provinces, yellow belong to neutral nations, while red belong to the enemy. Note Metz, for instance, in France, on the Luxemburg border, is a yellow VP province, since we are not at war with France just yet.
I talked earlier about the OOB of your armies. I mentioned the head honcho, the Theatre HQ. This mapmode shows us which provinces belong to his area of operations; Germany has 2 theatres: Bitburg HQ and Berlin HQ, each responsible for respectively West and East Germany. You can create additional Theatres and manually edit its area of control. Not so
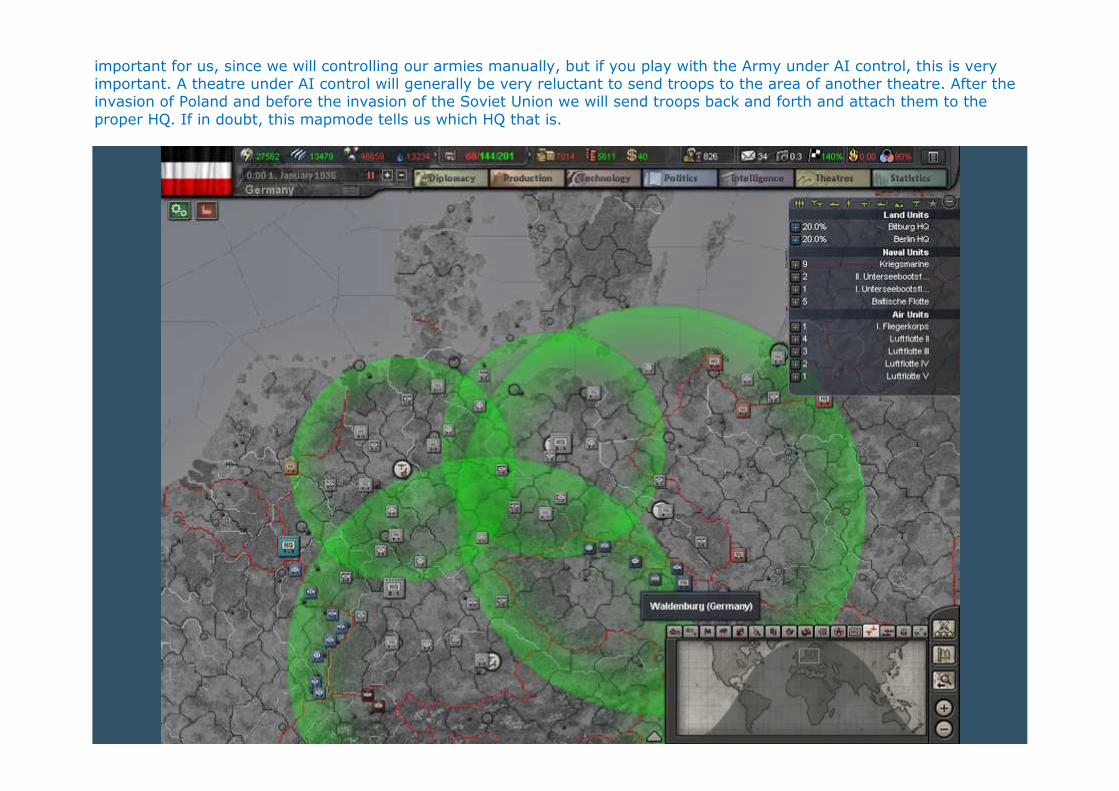
important for us, since we will controlling our armies manually, but if you play with the Army under AI control, this is very important. A theatre under AI control will generally be very reluctant to send troops to the area of another theatre. After the invasion of Poland and before the invasion of the Soviet Union we will send troops back and forth and attach them to the proper HQ. If in doubt, this mapmode tells us which HQ that is.
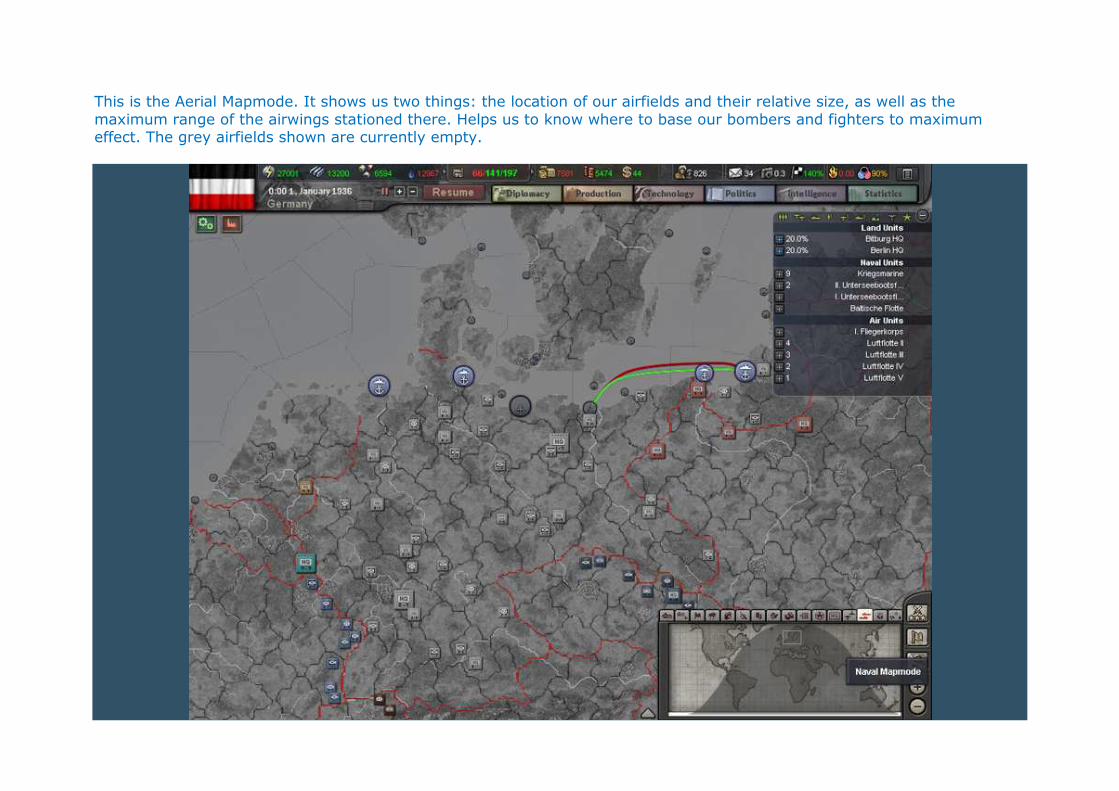
This is the Aerial Mapmode. It shows us two things: the location of our airfields and their relative size, as well as the maximum range of the airwings stationed there. Helps us to know where to base our bombers and fighters to maximum effect. The grey airfields shown are currently empty.
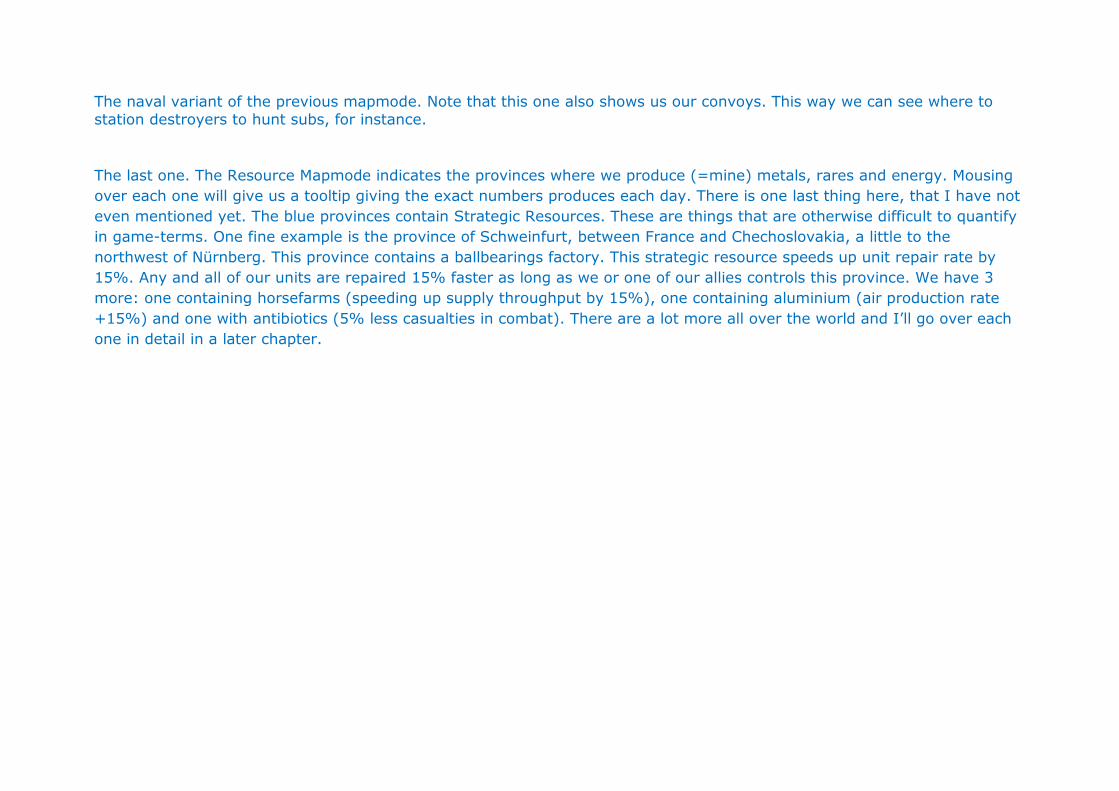
The naval variant of the previous mapmode. Note that this one also shows us our convoys. This way we can see where to station destroyers to hunt subs, for instance. The last one. The Resource Mapmode indicates the provinces where we produce (=mine) metals, rares and energy. Mousing over each one will give us a tooltip giving the exact numbers produces each day. There is one last thing here, that I have not even mentioned yet. The blue provinces contain Strategic Resources. These are things that are otherwise difficult to quantify in game-terms. One fine example is the province of Schweinfurt, between France and Chechoslovakia, a little to the northwest of Nürnberg. This province contains a ballbearings factory. This strategic resource speeds up unit repair rate by 15%. Any and all of our units are repaired 15% faster as long as we or one of our allies controls this province. We have 3 more: one containing horsefarms (speeding up supply throughput by 15%), one containing aluminium (air production rate
+15%) and one with antibiotics (5% less casualties in combat). There are a lot more all over the world and I’ll go over each one in detail in a later chapter.
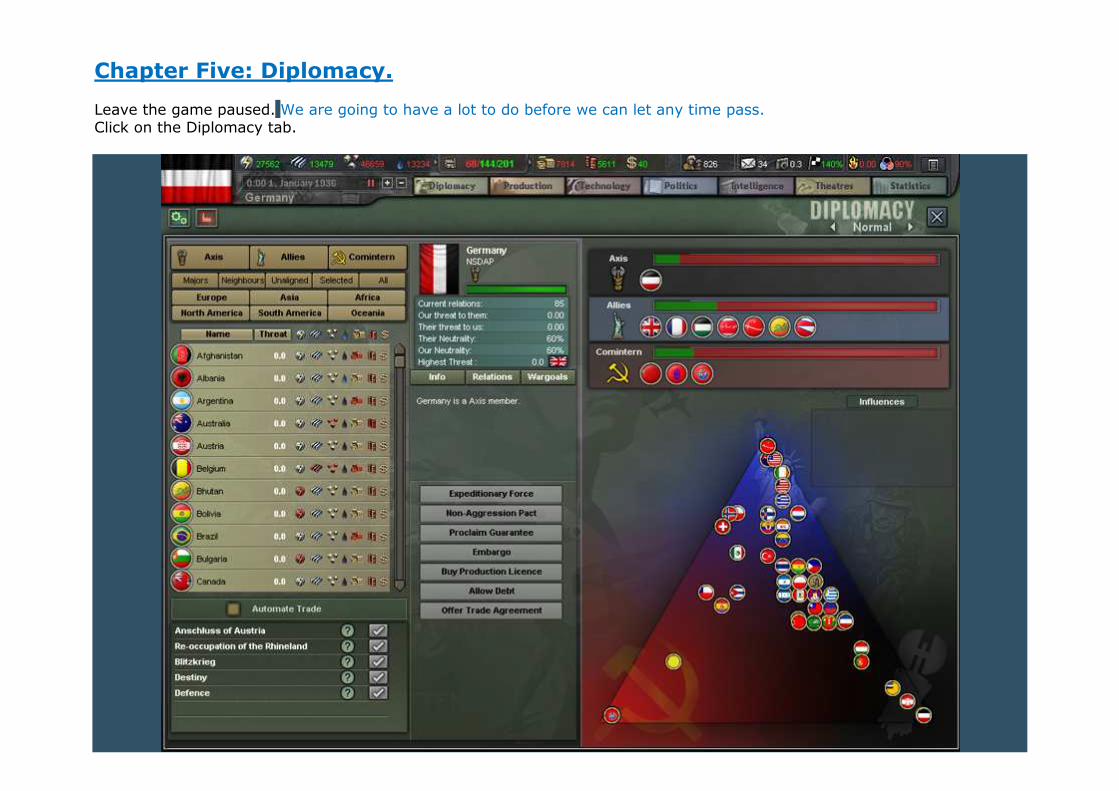
Chapter Five: Diplomacy. Leave the game paused. We are going to have a lot to do before we can let any time pass. Click on the Diplomacy tab.
Busy little baby, isn’t it? It’s not so bad as it looks, once you figure out what’s what here. So first, a little introduction. On this screen, we have the whole world at our fingertips. At the top right are the three factions: Axis, Allies and Comintern. They all have certain advantages the others don’t. Mousing over each of them brings up a tooltip to identify these advantages. Members of the Axis faction (which, right now, consists of only Germany) can initiate a limited war. This is a war where only the one that called it is involved. The other Axis members are considered non-participants and are therefore free to do as they please while remaining at peace. You can later, at a time of your choosing, Call any one from the Axis to Arms. They will analyze the threat and the AI will make an assessment whether to get involved or not. I’ve never known Germany to be turned down when calling someone to arms, (failure to do so would get them booted out of the Axis, I believe) but it may take a couple of days for the AI to shift his forces and respond favorably. When you do this, remember that the AI, while having grown quite adept in and by itself, is still just an AI. It may respond favorably, and then spend the next ten weeks doing nothing. Or it may decide that Copenhagen is nice this time of year and send a million of its troops over there. Those of you playing SF will see more of this irrational behavior than the ones playing FtM, but it may still happen. Forewarned is forearmed. A second Axis privilege is the Territorial Pride. Whenever an Axis nation if fighting on what it feels is its home turf (in the game called Cores, these provinces once belonged or still belong to the nation in question and it wants it back. One fine example is Metz. Before the first World War, Metz belonged to Germany since a late 19th century French-German war. They lost it when they lost the war. Whenever Germany is fighting over control of Metz, in any way, shape or form, they get a 10% combat bonus). Pretty neat, huh? The Allies are a close-knit bunch. When you declare war on one of them, you also declare war on all of them. So you are never “only” at war with France, you are also at war with Bhutan, Iraq, United Kingdom, Nepal and Yemen. Remember that if you ever play a middle-east nation and you decide that Yemen would be nice to have. They may be small, but they have large friends with big guns. The Allies are also democratic nations (by and large). As such they have to pay more IC to keep the people happy. On the other hand, they have to pay less when at war. Keeping them at peace for as long as possible deprives them of a large amount of IC that could otherwise be used to build tanks, planes or warships. The Comintern are a communist faction. They pay less tribute to money and can trade using resources, just like everyone could in HOI2. They can even give each other resources for free. Their soldiers are used to doing more with less, so they spend 33% less on supplies than other nations. And because they are scorned by the rest of the world, they have a highly developed spy network that works 10% better than those of other nations. Lucky for us, the only other Comintern members in 1936, besides the Soviet Union, are its puppets Mongolia and Tannu Tuva (a dwarf state in central Asia) and not worth bothering with. All factions have 2 things in common. War between factions is to the death. There can be no white peace. They fight until total victory is achieved. The 3 factions also each have a Faction Leader. These are the Soviet Union for the Comintern, the UK for the Allies and little
old us for the Axis. Peace offers (a neutral nation at war with the Sovets, for instance) and membership questions are made by the Faction Leader. We will decide who will join the Axis (mind you, a nation’s puppets become members by default) and we could call a halt to the Sino-Japanese war if China begs us to (if Japan, by then, is in the Axis). Click on the Majors button. These are nations with at least 60 base IC (the actual factories before modifiers are used). Each of them has the potential to build large armies and navies spanning the world. The ones with 20-59 base IC are called Regional Powers; their power base is sufficient to get noticed by everyone in the same region (such as Romania in the Balkans). Minor Powers such as Greece, Austria or South Africa have between 10 and 19 Base IC, while Micropowers, such as Luxemburg, have to make do with 9 base IC or less. The other buttons are more filters to quicly find the nation we’re looking for with evident names: our neighbours, nations that have not joined a faction, all of them, or only those with a capital on a certain continent. Then come a scrollable list of all the nations, according to the filter you assigned, as described above, with their name, their threat (we’ll talk about threat a lot more later in this chapter) and their resource gains. On the screenshot you can see Bulgaria suffering from an energy deficit. Mousing over each nation’s resources will show you the net gain or loss at that moment in time. A very important distinction because supplies, for one, are very fickle things that can change from day to day or even from hour to hour based on what is happening in that nation. Under the nations you see a little checkbox “automate trade”. Checking this will let the AI make all your trades for you, but we will not be using it. The AI is quite capable of keeping your economy affloat, especially during peacetime, but it is incapable of seeing the larger picture. For instance, the German AI would happily trade with the US for Rares during wartime, merrily sending German convoys to get slaughtered, along with our National Unity, by the Allies’ fleets. For another thing, the AI is not as devious as a human player. I don’t believe it would keep trading with loss just for the increased relations those trades might bring. Besides, this is still a Tutorial AAR, meaning we have to learn everything ourselves. Right at the bottom on the left-hand side is a box detailing Decisions available to us. Decisions are bigtime, Gamechanging events that are otherwise impossible just playing the game. The Anschluss of Austria is one fine example of this. While Germany could organise a coup of the Austrian government and could Annex it with arms, we could not Annex them by organising a coup. Next to the name of each decision is a question mark. Mousing over it will show us the conditions that have to be met before the decision becomes available. For instance, for the Anschluss, Germany and Austria must both be independent nations, neither can be at war, Germany must have executed the Rhineland Occupation (the next decision in the list) and either the Austrian NSDAP must have a large enough following inside Austrian politics OR Austria must have a political crisis, OR it must at least be march 1938. Once the necessary requisites are met, the checkbox will light up green and we will get a warning icon on the screen telling us there is a decision to make. We don’t have to make a decision. In fact, we could play as a peaceful Germany and try to get Austria into the Axis the normal way, if we so wanted. A decision is always a “yes or no” matter and it is always player’s choice on whether to go through with it. Some decisions will last a long time, others will pass quickly. Given the fact that Decisions are nearly always beneficial for the nation you play, there is usually no reason not to execute it, especially if you’re looking to have a historical game. Sometimes, though, you might want to delay a while for one
reason or other. But they never last. Wait until 1937 and the Rhineland Occupation becomes unavailable to Germany. As time passes, other Decisions will turn up, so it is always good to keep an eye on this screen every once and a while even if you have no diplomacy to perform. The center of the screen is taken up by the nation you selected. Here you can see the relation you have with another nation (200% relations is maximum attainable). Higher relations makes cheaper trade. It also makes them more willing to go along with you, but, contrary to HOI2, 200% relations HAVE NOTHING TO DO WITH JOINING A FACTION!!!! They might be more favorable to do so with high relations, or to defend you during war, but the actual joining is a whole different kettle of fish. There are also the various threat and neutrality levels both you and the selected nation have. (bear with me on those 2 words). Next you can read if they are at war, members of a faction, members of a military alliance (a temporary partner in crime, if you will), if they are or own puppets and more of the things to know about any one nation. Next we have the various diplomatic options available. Buf before we get into that, we first need to explain the trifling matter of… Threat and Neutrality. (suddenly starts shivering until he’s had a long, deep drag of his cigarette. Wipes the sweat from his head, takes a deep,
calming breath before diving in…) Most, if not all of the diplomatic actions you can have with any nation in the world, are dictated by these two words. Understanding these is paramount to understanding how diplomacy works in the game. First, there is Base Neutrality. This is the people’s unwillingness to go to war. High neutrality is usually associated with democratic nations or with nations that just want to be left alone in peace. High neutrality will raise the need for consumer goods. In SF, you can lower your neutrality by using spies at home to rouse the people, but in FtM this is no longer possible. In FtM, your neutrality rises when you end all wars you were previously part of or through certain events and decisions.As you can see, the USA has a Base Neutrality of 100%. They just want to be at peace no matter what, effectively, just like in reality, a sleeping giant. Secondly, there is Threat. Threat is exactly what the name implies: how threatening a nation appears to other nations. Threat is raised whenever you finish building any military unit. In SF, ships and reserve divisions raise a lot less threat than in FtM. Threat is also raised by putting your soldiers on the border with other nations, allowing them to see those divisions get deployed. Threat is also raised by invading another nation. Threat can also be raised by foreign spies working inside your country. We could raise the threat level of Mexico, for instance, to the point where the nations around it start mobilizing, fearing they’re about to be invaded. There is no way to lower threat. Once you have it, you’re stuck with it. Threat has a more profound effect based on physical proximity: our threat level will go up like crazy in a few years time, and will alarm all of Europe, but will barely register in the USA, because they share several Pacific islands with Japan, who will be
doing their own threat raising. If the other experienced players on the forum know anything significant I forgot, please chime in and I will edit this chapter accordingly. Here is a major difference between SF and FtM. In SF, it works like this: the highest threat against you is substracted from your neutrality. As the difference gets smaller, more “militant” diplomatic avenues start opening up. Since you can both lower your own neutrality AND raise your target’s threat using spies, it gets a lot easier to take unhistorically aggressive actions. In FtM, however, the two are still substracted from each other to give you your Effective Neutrality Level. This determines just how aggressive you can be on the diplomatic scene. Since you can no longer lower your neutrality by using spies, it requires a more determined effort on the part of your foreign spies. The effect is still basically the same, but the actual game mechanic to achieve it has been altered. If this sounds like Latin to you, it will get clearer in a moment. For now just remember that Base Neutrality-Threat=Effective Neutrality. How does this work in practice? Going back to the USA, you will see that the diplomatic action to DoW the USA (game term for declaring war on someone) is greyed out. The tooltip says that we cannot DoW the USA because our Effective Neutrality is too high. Our base neutrality at the start of the game is 60. The highest threat against us is 0. You can only DoW someone when your Effective Neutrality is 15. This means that our Neutrality must go down to 15 or someone would need to raise threat with Germany (game term to mean: become threatening to someone) up to a level of 45 or anything in between. To give you an idea in practice: During a recent USA game, Japan had the highest threat in the whole world with the USA, at a level of about 23, after waging war against and annexing or puppeting all the different Chinese warlords for years. With a Base Neutrality, by 1941, of around 85 or something, my Effective Neutrality was 85-23=62, making it impossible to DoW the Axis myself. (I had neglected to raise Japan’s threat with spies, my bad.) Only the attack on Pearl Harbour (a decision for Japan) would have drawn the USA into the war. This did not come, possibly because the Japanese AI felt my Pacific defenses were too great to overcome. (I haven’t played Japan in FtM so I can’t be certain) I could not build an Alliance, ask to join the Allies or even embargo Japan as they all require your Effective Neutrality to be at a certain point between 35 and 15 or lower. For those of you playing SF: the difference between threat and neutrality is still the same, but if my USA game from above had been an SF game, I could have lowered my neutrality manually for 6 years, making it possible to join the Allies before december 1941 and without japanese Dow. Thankfully, the US AI is not in the habit of doing so and I will later describe what you can do to ensure they stay faithful to history. If all this still sounds like Latin to you, in everyday English it basically means that the more any nation feels threatened, the more it is willing to support aggressive politics. It will become self-evident once we start actually using it in-game.
Moving on for now, the diplomatic options are (and each of these will cost a number of diplomatic points, except Influence nation, which costs 2 Leadership points invested as long as the influence lasts) Declare war: this means that Germany will declare war on someone on behalf of the ENTIRE Axis. Declare Limited War: As stated before, only the Axis nations have this choice. A limited war would involve only Germany, in our case. Contrary to HOI2, there is no longer a danger of Germany being sucked into war against China alongside Japan, because it is a limited war. We do have the option later to Call any other Axis nation(s) of our choice to Arms (you can’t see the action button because the USA is not in the Axis). Offer Alliance: If two nations are getting along splendidly and have a common enemy, they can form a military alliance. This is not the same as a faction. It is a temporary, purely military joining of forces. I do believe, however, that a military alliance REQUIRES you to come to your partner’s aid in times of war, so don’t take this lightly. Non-aggression pact: two nations can form a NAP, meaning they promise not to go to war against each other. The terms of the agreement become less sever over time and (in FtM) the game will warn you of a change in NAP status. Proclaim Guarantee: This means to guarantee a nation’s independence. If that nation is under attack, you will be forced to intervene on their behalf. Ask for Transit Rights: Germany can ask to be allowed to move forces (land, air and naval) across the other nation’s country. You cannot subsequently DoW this nation without revoking the transit rights first, and you cannot engage an enemy’s land forces from the recipient nation’s land. For instance, Italy regularly is allowed to move troops through Yugoslavia, but they can’t attack Greece from yugoslavian territory. One slight catch, though: airborne operations and amphibious invasions are still possible. In my Italy example, they could potentially base transport planes and paratroops in Yugoslavia and then launch an airborne invasion from yugoslavia. Give Transit Rights: We could give another nation permission to move their armies through Germany. You will usually see this option between AI nations bordering a much stronger nation because it makes it impossible for the other nation to DoW the weaker one. Invite to Faction: An option available only to Faction Leaders. Under certain conditions, which I will discuss later in this chapter, a faction leader can invite a willing nation to join said faction. Sometimes you will see the option become available but their are other, scripted requirements before the invitee (if that is proper english?) agrees. For instance, Nationalist Spain will not join the Axis under any circumstances unless the British Isles or Gibraltar are in Axis hands first. Embargo: An embargo immediately and permanently ends all trades with the other nation until the embargo is lifted. This was the real-life US action which prompted Japan to attack Pearl Harbour. Buy Production License: Pay money to use another nation’s blueprints, thereby foregoing the need to research the tech yourself. Obviously, this requires a close working relationship with the other nation. Allow Debt: During war, you can allow a nation to trade with you on credit until after the war. Influence Nation/ Align to Faction: The game mechanic is different than HOI2, but the function of this action is still the same: get a nation to become more willing to join your faction. This takes a long time and even then it may not work (see Invite To Faction above). Remember that if you’re not playing a faction leader yourself, yo may still influence a nation, but the ultimate choice on whether to invite or not still lies with the faction leader. As a neutral nation, you can always choose to Align to a faction, making your desire to join known. In time you could then ask to join said faction. Offer Trade Agreement: Exactly what it sounds like. Major difference from HOI2: you either sell resources for money, or you pay money to buy resources. (unless Comintern members trading amongst each other, they can still trade resources just like
in HOI2). Trade becomes cheaper when relations are higher. Thus, it is more advantageous to sell to nations that have a low relation with you and to buy from nations that have a high relation with you. Trade agreements have one other, major function in-game: barring decisions or events, trade agreements are the ONLY way to increase relations with another nation. (HOI2 players beware; influence no longer affects relationship!) Each trade, no matter how big or small, no matter whether you’re selling or buying, will improve relations between the two nations by 15. The maximum attainable relationship is +200. Having close relations with another nation has many advantages. They might be more peaceful to you. Buying from them becomes cheaper. They get a bonus to drift towards a faction when they have good relations with one of its member nations, and a penalty when they have negative relations with them. These modifiers become higher the more your relations improve. In other words: trade a lot with those you want as your friends, but make a few bigtime sales with the ones you don’t care about. We will now engage in a trade with the USA. Click on Offer Trade Agreement.
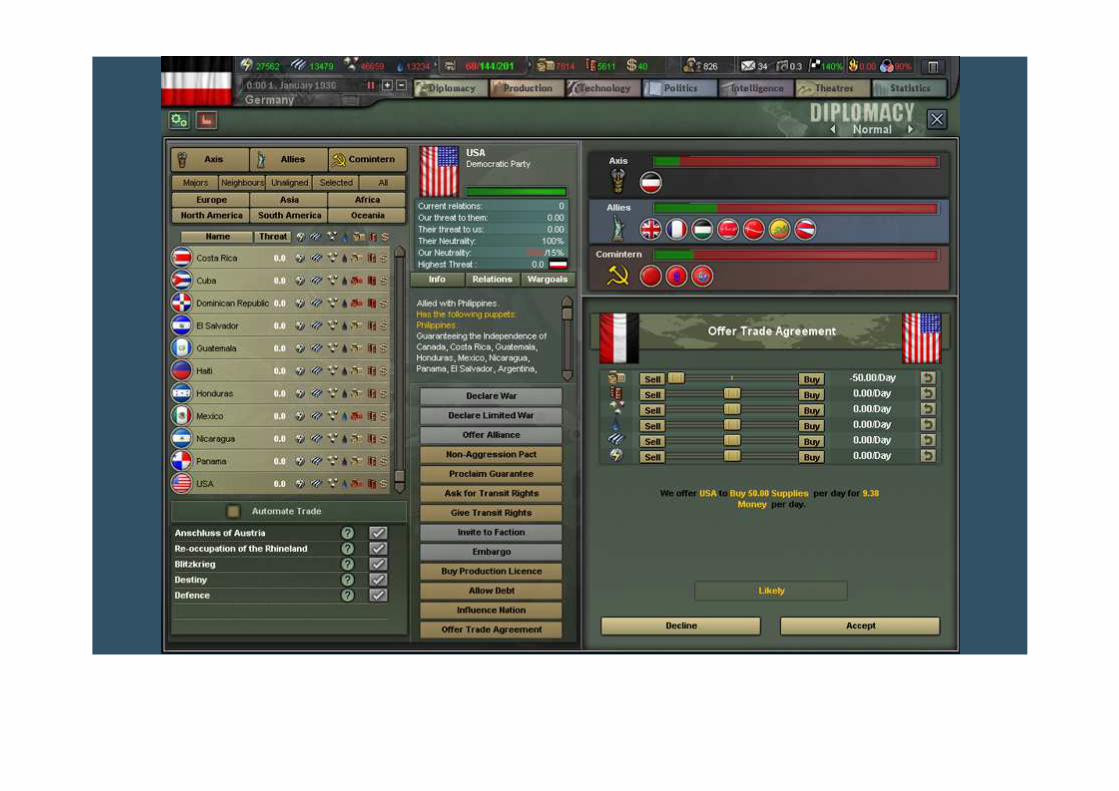
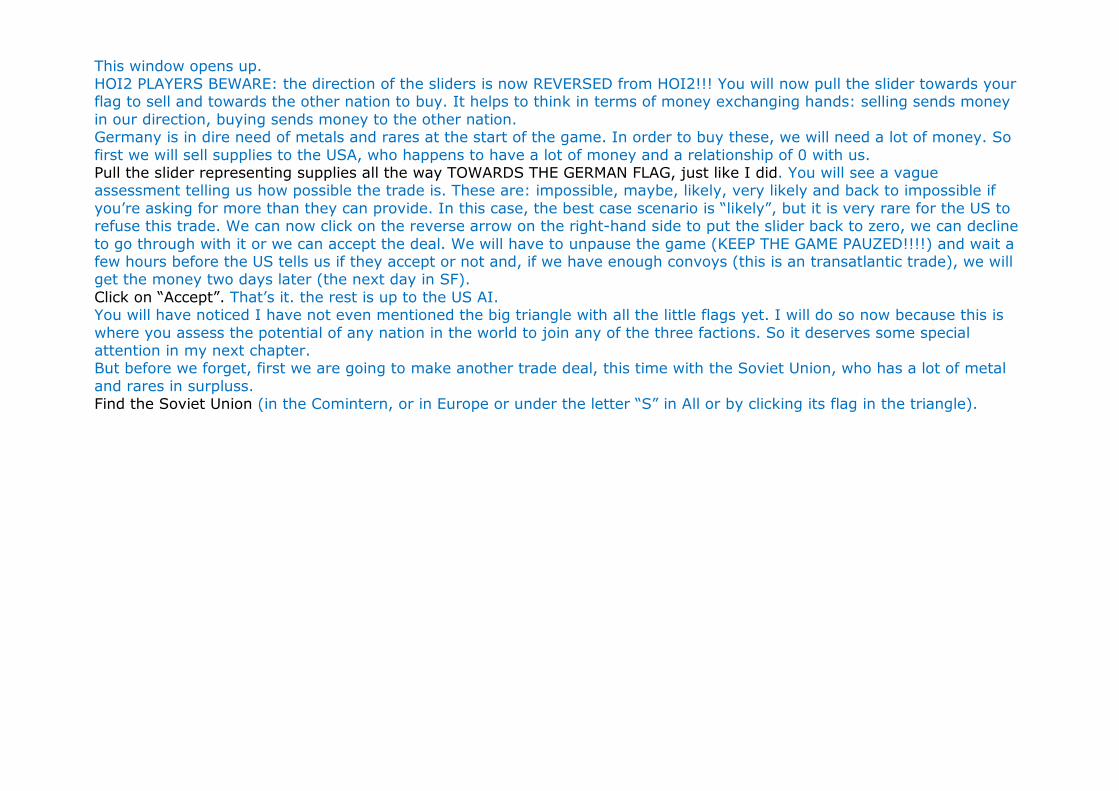
This window opens up. HOI2 PLAYERS BEWARE: the direction of the sliders is now REVERSED from HOI2!!! You will now pull the slider towards your flag to sell and towards the other nation to buy. It helps to think in terms of money exchanging hands: selling sends money in our direction, buying sends money to the other nation. Germany is in dire need of metals and rares at the start of the game. In order to buy these, we will need a lot of money. So first we will sell supplies to the USA, who happens to have a lot of money and a relationship of 0 with us. Pull the slider representing supplies all the way TOWARDS THE GERMAN FLAG, just like I did. You will see a vague assessment telling us how possible the trade is. These are: impossible, maybe, likely, very likely and back to impossible if you’re asking for more than they can provide. In this case, the best case scenario is “likely”, but it is very rare for the US to refuse this trade. We can now click on the reverse arrow on the right-hand side to put the slider back to zero, we can decline to go through with it or we can accept the deal. We will have to unpause the game (KEEP THE GAME PAUZED!!!!) and wait a few hours before the US tells us if they accept or not and, if we have enough convoys (this is an transatlantic trade), we will get the money two days later (the next day in SF). Click on “Accept”. That’s it. the rest is up to the US AI. You will have noticed I have not even mentioned the big triangle with all the little flags yet. I will do so now because this is where you assess the potential of any nation in the world to join any of the three factions. So it deserves some special attention in my next chapter. But before we forget, first we are going to make another trade deal, this time with the Soviet Union, who has a lot of metal and rares in surpluss. Find the Soviet Union (in the Comintern, or in Europe or under the letter “S” in All or by clicking its flag in the triangle).

Push the “metal” and “rare” sliders towards the Soviet union the Soviet Union until both read +10 and the likelyhood of their
accepting is “very likely”. Click Accept. KEEP THE GAME PAUZED!!Why do this now? Mainly because it improves our relations
with them, making future buys cheaper. Also, they have not been able to sell anything just yet, so it won’t get any higher than it is right now. Here’s our trading strategy: in 8 days, we will do the reverse of what we just did: buy metal and rares from the US while selling supplies to the SU. Coupled with buying rares and metals from everyone else who can provide them (Sweden for metal, Italy, UK and Netherlands for rares) we should be set to get our stockpile of both as high as we can get it before the war starts and most of our trading avenues will dry up. Throughout the war, Germany will suffer a shortage of rares. The only way to get through that is by making sure we can last the distance with the stockpile we amass by 1939. One last thing I forgot to mention: after any diplomatic deal, you need to wait 8 days until you can make another one with
the same nation again. So in some games you may have to decide whether to influence a nation first or to trade with it first, for instance. Man, this was one serious wall of text here, wasn’t it? Next chapter will be much shorter, but even more important as we explore the intricacies of the Diplomatic Triangle.
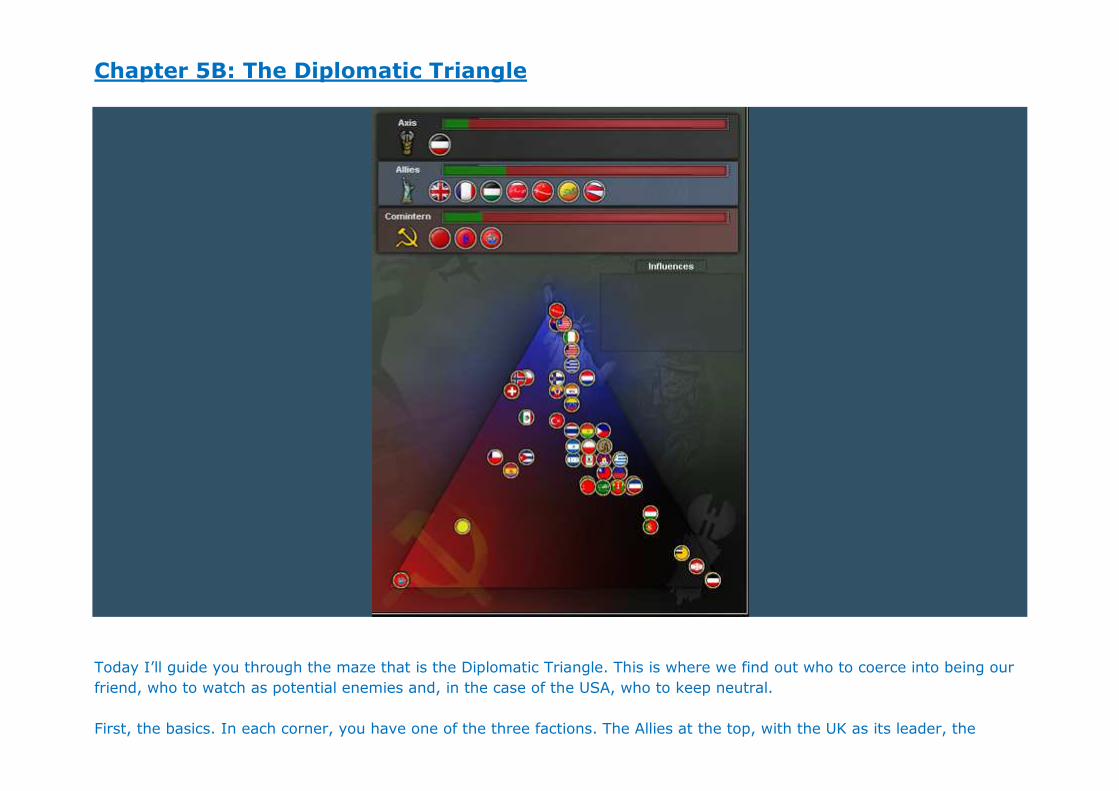
Chapter 5B: The Diplomatic Triangle
Today I’ll guide you through the maze that is the Diplomatic Triangle. This is where we find out who to coerce into being our friend, who to watch as potential enemies and, in the case of the USA, who to keep neutral. First, the basics. In each corner, you have one of the three factions. The Allies at the top, with the UK as its leader, the
Comintern in the lower left corner and the Axis in the lower right. All the nations that belong to a certain faction will lock into place near their faction. Everyone else is considered neutral and will slowly “drift “ towards the faction they like best at that point in time. Look at it like a pond, with the neutral nations being toy boats floating around in that pond. Every time a faction member performs any kind of action that other nations could observe, it is like throwing a pebble in the pond, causing ripples. These ripples will send every boat drifting away towards one of the corners. With a bit of practice, we can learn to “throw our pebble” just right, so that it has the desired effect on certain nations.
Our “pebbles” in this case include: Form of government. The Allies, during peace time, will naturally seem more attractive to democracies and nations interested in maintaining the status quo. Far-left governments would like to be a part of the Comintern and The Axis will draw from autocracies, far-right governments and military-minded nations. We can use spies to get the right kind of government in place, if we want to, so that they will be more receptive to our influence. Relations: Having good relations with a faction member will cause a nation to drift more towards that faction. Hence the importance of trade. Necessity will force us to trade with the Soviets and the UK, but we will try to maintain close relations with those nations that are potential Axis members. At the same time, we will trade with nations, such as the Netherlands,
that provide a potential security hazard when allowed to join a faction, to make them drift back towards the center of our “pond”. Neutrality: take a look at the USA. They are, at the start of the game, close enough to the Allies to join them. They start out with a democratic government and close relations with the UK. However, their neutrality of 100% will prevent them from joining. Other nations included here are, for instance, Nationalist Spain (once they win the Spanish Civil War) who will only join the Axis if the Axis will have control of Gibraltar and/or the British Isles first. This is where threat comes in. As mentioned before, threat lowers neutrality. In layman’s terms, Germany’s rearmament
program will make us seem like a huge threat to our neighbours and they will seek protection from either the Allies or the Comintern. By influencing them, we will set their minds at ease about any warplans we might have. Proximity: This is physical proximity. When we deploy a new panzer division, our neighbours will feel threatened by it, but in the USA, on the other side of the world, it will barely register. On the other hand, we will be using spies in Canada to increase Canada’s threat, making them out to be the worst people since Attila the Hun for the simple reason that Canada is the US’ only major neighbour. Once the war starts, in 99% of my games Canada joins the Allies. Now, those “warmongers” just across the border will have joined the Allies, causing the US to rethink its strategy and drift away from the Allies. The intend is not to get the US to join us, but to keep the Giant asleep as long as possible. Likewise, in about 1 year, Japan
should invade China, increasing their threat by leaps and bounds. Since Japan has many islands in close proximity to US Pacific holdings, as well as their puppet the Phillipines, Japanese threat will drown out all other. Since we’re playing a historic campaign, we will try to get Japan to join the Axis, thereby increasing the Threat of the entire Axis faction when seen by the US. Close relations: Whenever a nation is very closely aligned with a faction, their drift will slow down as they become worried about their independence.
Do you see how it works? By trading with the proper nations, we will increase our relation with them. Our spies will subvert their government and make the other factions seem like a bigger threat than we are. Influencing them at the same time will make them more eager to join the Axis. So here’s our strategy for the next three to four years: We will send spies to France to keep them divided, leaderless (keep their National Unity low to make conquering them easier). We will send spies to the UK and the SU to make them out to be the villains of the story. We will influence central and eastern European nations, thereby securing our southern flank. We will trade with belgium and Holland to keep them as neutral as possible. We could try to get the American National Socialist party (the German-American Bund) in power during the 1940 elections just to keep them off our backs, or even to join the Axis, but that would be not historically correct, which is what we're aiming to do here.
Italy and japan will be enticed to join us at the earliest possibility. We now have all the other majors covered: US: keep them neutral SU: make it almost impossible for them to find new Comintern members UK: likewise make it as hard as possible to get anyone to join them. France: divided Japan and Italy: Axis members.
We will try to get the traditional Axis members together, but some of them require conditions to be met: Finland will only join us when we get ready to invade the Soviet Union. Romania will only join us after losing large parts of their country to Hungary, Bulgaria and the Soviet Union. Hungary is a piece of cake. Questions? Comments? Post them. That’s what this is about, after all. Next time: the extention of diplomacy: Spies!
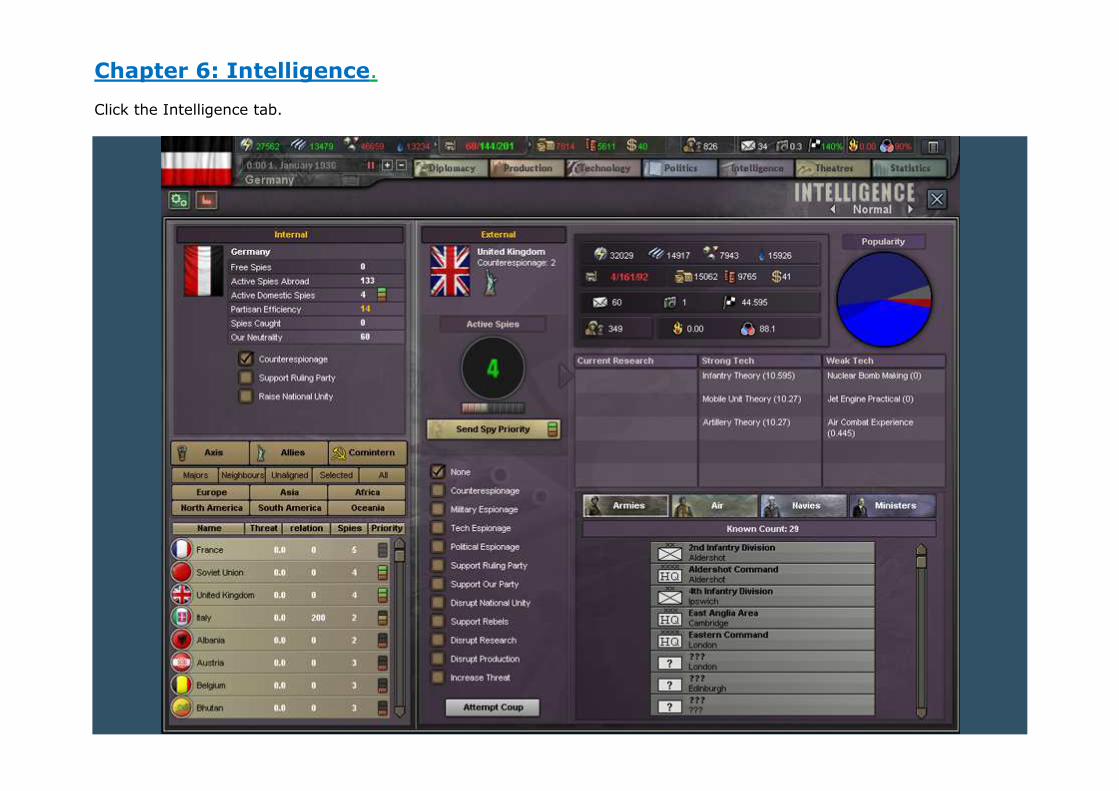
Chapter 6: Intelligence. Click the Intelligence tab.
Here is where we manage our spies, both those working domestically and abroad. There are 4 priority settings for spies: from 0 to 3. The game uses these settings to decide where to send spies. It will first try to keep the ones with the highest setting at the maximum of 10 spies each. Then the second highest, and so on. Changing priorities is easy: each left click on the tri-coloured bar adds one to our priority. When at priority 3, left-clicking will set it back to 0. Right-clicking reduces priority by 1. In the top left corner, we find our domestic spies. Germany’s version of the FBI, if you will. The window will tell you the number of spies that are waiting for assignment (right now we don’t have any leftovers, but at some point we will have a
whole bunch of these.) If you have enough, adding a new nation to the list will send the maximum number (up to 10) all at once. Sending spies takes one day. Right now we have 133 spies in foreign nations and only 4 at home (the default setting when starting a new game). We don’t have rebels in Germany right now, but if we did, they would be at efficiency 14 (as far as I know, efficiency determines what kind of rebels we got, some are easy, just disgruntled rabble, others are partisans like Tito was in Real Life.). The game also lists how many spies we caught in the current month. If the game detects foreign spies working in Germany, it will show up as an exclamation mark (“!”). Mousing over this will tell us where they came from and what they are doing. Some missions (as I will explain in a moment) can be safely ignored, while others are to be dealt with ASAP. It wil also list
our Effective neutrality for ease of reference. There are three missions in FtM we can perform at home (4 in SF): counterespionage (eliminating hostile spies), support
ruling party (which will add to the party’s organisation; more details in the chapter on politics) and raise national
unity (this is exceedingly slow but it will keep our National Unity from decreasing). In Semper Fi, you can also lower your neutrality. When used in conjunction with Increase Threat on another nation, it allows for an early, ahistorical DoW, which we won't do. If you ever play the UK, using the two together is of prime importance to get Great Brittain into the "better" laws a lot sooner. Under normal, peacetime circumstances, Germany doesn’t need to do anything other than counterespionage at home. (of
course, this is single player, things might be different in MP) There is no need to change anything here. Directly below the Domestic Spies window, you will be able to select any and all nations in the world. We are now going to stop sending spies abroad for a couple of days, until we can get the Abwehr at home fully staffed (again, the maximum is 10 spies per nation). Click on “priority”. This will shuffle the nations, listing the high-priority ones first. France will be the first on the list, just like in my screenshot. Then you will go down the list setting every nation at priority 0, just like I described above: left-click to add one, right-click to take one away.
This will take a couple of seconds, but it is important because we need to get our homeland security going ASAP. When you think you’re finished, click the “priority” button again. Any nations you might have missed will now be shown at the top of the list. If not, the nations will be listed alfabetically, starting with Afghanistan. In the middle, we have our spies abroad. At the start of the game, we have 4 spies in the UK and they are on counterespionage (the default setting). We could change the priority here as well. And then , we have a whole slew of spy missions to perform, some of which are interesting, some are actually useful, others are mostly superfluous. The missions are:
None: actually a misnomer. This mission will tell our spies to lay low, but they will still do some random low-level stuff on their own. This is the one to use when you don’t have the maximum of 10 spies there. Counterespionage: If we have spies in a neutral country, this mission will attack their home spies. If we have spies in a faction member, it will HELP THEIR DOMESTIC SPIES. (Spies in Italy, once they join the Axis, would attack any other spy except the Italian ones). There are 3 espionage missions, which are fact-finding missions on the target nation’s military, tech research and politics (For those coming from HOI2, sorry no more stealing blueprints). I’ve never actually used any of these, but if you ever play with AI-control, the AI will use this to gauge the enemy’s advances, I believe. In the diplomacy screen we could see the target nation’s ruling party. Here we can choose to support them, just like we can
with our own. Useful if you want to make certain a nation doesn’t change government when you don’t want them to. Dircelty below that one is support our party. This will strengthen the organisation of the party closest to our own (in this case a National Socialist or, failing that, a fascist party). Disrupt national unity does exactly what the name says: it directly attacks the target’s NU, making them divided and more prone to surrender after losing VP provinces. This is the one we will be using on France for the next 4 years or so. (not yet, though, first we have other things to do). Support rebels: if a nation has an uprising going on, this mission will make them more efficient. Could be useful for the right nation.
We can also choose to disrupt (sabotage) their research or their production. Neither is very helpful for Germany since we’re already ahead of mostly everyone else in the world. The last one is really useful. Increase Threat will make the target nation seem like imperialist warmongers of the worst kind. It will increase the threat they generate to the point where you might see otherwise neutral countries start mobilising in fear of an attack from our target. Makes influencing a sloooooooooooooow process. The right-hand side of this screen shows us the various stats for the target nation, to the best of our spies’ knowledge. In FtM, we can look at the target’s ministers, this option is not available for SF. Note that the number and location of forces is usually wrong and nearly always an underestimate. Well, unless I missed something, this is it for spies. Trust me, we will get back here to light a powder keg under Europe.
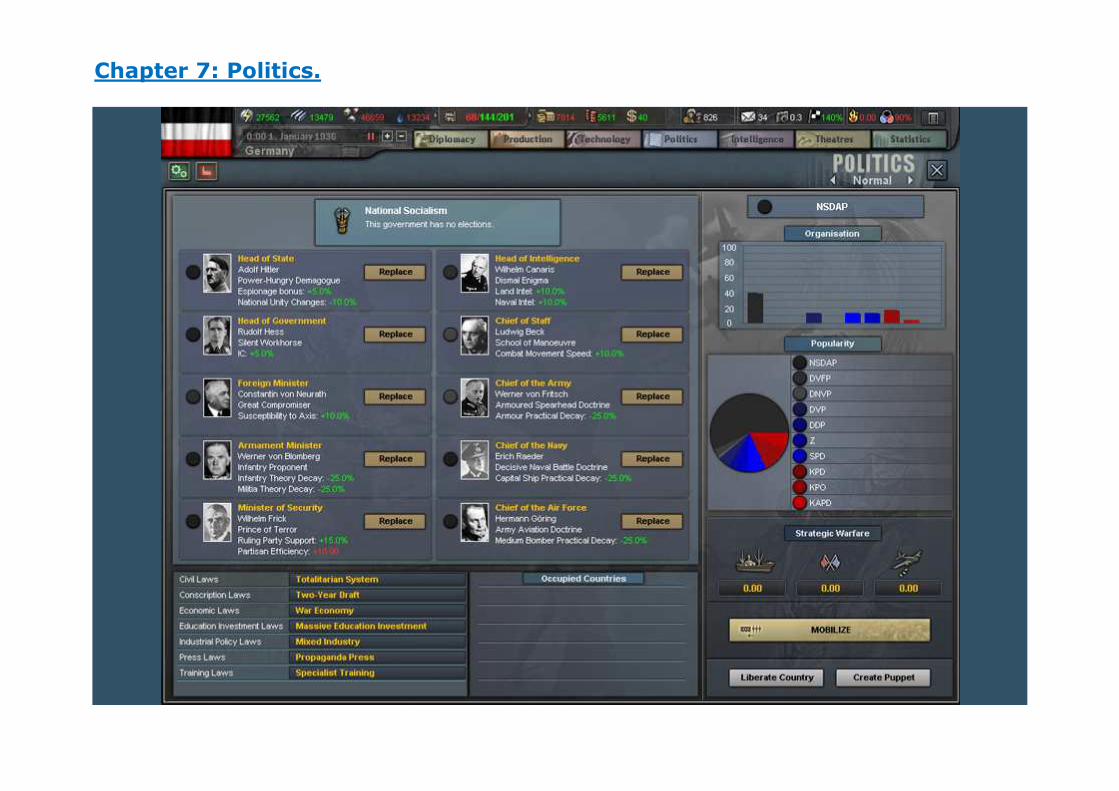
Chapter 7: Politics.
Here is where we change ministers and laws, where we mobilize our armed forces in times of war, and, if we’re playing a democratic nation, where we worry about our party’s popularity. Let’s look at the difficult stuff first. A political party has two game statistics: organisation and popularity, as illustrated by the graphics on the right. Organisation is political cloud. The higher party organisation, the more it is capable of influencing the political landscape. Popularity is simply how popular the party is with the people. Election results are based on popularity. The game uses some formula or other to translate organisation into popularity, which it does at the beginning of each month, as far as I know. In SF, this is as far as it gets. In FtM, however, things are a bit different. For FtM, each 10% popularity gives a party the right for 1 seat in the cabinet. If it doesn’t get those seats, there will be a “fractured government”, which will cost us National Unity. The only way to counter this, is by using home spies to either raise NU or support the ruling party, modifying the party’s organisation, and, thereby, its Popularity. This is how the spy mission ‘support our party” works abroad as well. By changing our party’s org, we hope to change its pop. There is one spy mission I haven’t talked about before, because I wanted to illustrate this mechanic first. In FtM only, there is now the chance for a coup. We can organise a coup in any nation where there is a strong fascist opposition, with a base chance of 10% per eligible government seat. In other words, if the UK’s NS party is eligible for 3 seats in the government, there is a 30% chance for a succesfull coup. This will eliminate all spies in the target nation, however, so make sure you have plenty of replacements first. There are probably other factors at work that I don’t know about, but that is the basic game mechanic. I have never seen the AI use this on other nations, though, but better safe than sorry. Fortunately, in Germany, as long as we have Hitler as head of State (I think he’s responsible), we are immune to the NU hit other nations take for a fractured government. Directly below these graphs, there is a section on Strategic Warfare. The first one, the boat, represents our convoys getting hit. If we loose a lot of those, our NU will take a dive. However, if we manage to intercept the raiders, we show to the people that we are in control of the situation. With enough interceptions, we will actually start to see a rise of our NU. Fortunately for us, Germany doesn’t need convoys once the war starts until after we’ve dealt with the SU and are ready to invade the UK. This is the reason why I don’t envision an invasion of Norway: with our focus on submarine warfare, the Royal Navy’s Home Fleet would have our convoys for breakfast, along with our NU. If this were an ahistorical AAR, we could invade Sweden first, as supplies could then travel across the Danish Strait from Copenhagen to Malmö. We could then invade Norway by land without ever needing a single convoy. But this is an historic path, and we’ll stick to our resolve. The second strategic warfare icon represents war Fatigue. After concluding a war, this represents the people's unwillingness to get involved in another one any time soon (according to the manual; this was never implemented correctly, apparently) The third one, however, will get our full attention. These are Strategic Bombing runs by our enemies. As with convoys, we will suffer NU for unpunished bombings, but get a bonus for engaging them with our interceptors. Lastly we can mobilize our troops in preparation for war, liberate allied nations or create puppets: these are nations, nominally independent, whose government has been chosen by us. They will pay for their limited independence with suplus resources. We will not get any IC or MP or LS from them, but on the plus side, we won’t have to police them against

partisans. Now the left-hand side. At the top, we have our form of government and the time plus the date until the next election. As Germany, our form of government is “national socialism”, and as a totalitarian regime, we don’t have any elections. Next up are the ministers in our cabinet. These can be changed at will. Players coming from HOI2, please note that there is no longer a dissent hit for doing so. The danger, in FtM only, would be the risk of a fractured government leading to the risk of a coup and lost NU. We are going to change some ministers to better suit our needs. Find the armaments minister about halfway in the first column. Click replace.
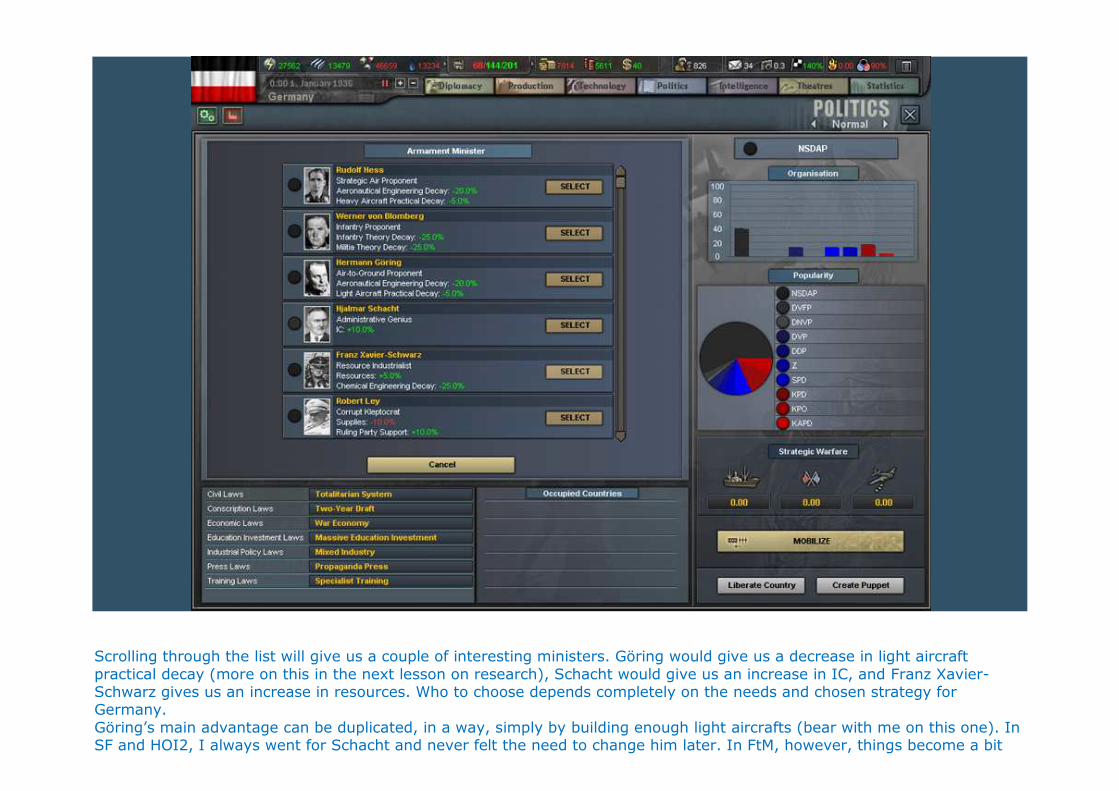
Scrolling through the list will give us a couple of interesting ministers. Göring would give us a decrease in light aircraft practical decay (more on this in the next lesson on research), Schacht would give us an increase in IC, and Franz Xavier-Schwarz gives us an increase in resources. Who to choose depends completely on the needs and chosen strategy for Germany. Göring’s main advantage can be duplicated, in a way, simply by building enough light aircrafts (bear with me on this one). In SF and HOI2, I always went for Schacht and never felt the need to change him later. In FtM, however, things become a bit
more subtle. There are far less resources in general to trade. As stated in the lesson on resources, more IC means more resource consumption. The more IC we conquer, the more explicit Schacht’s advantage will take center stage in Germany’s Number 1 Problem: not enough metal and not enough rare. In that light, and since Germany already has one of the strongest industries in the world, I will go for Schwarz as armaments minister. Coupled with loads of trade, he will help ensure that by 1939 we have the surplus to last us several years. So click on “select” next to Schwarz. Minister of Security is next. There really is only one choice here: dr. Goebbels, who will enhance our LS by 5%, which will feed our spy training, NCO training, diplomacy points and research. Select him. Head of Intelligence: here we will choose Frick over Canaris to get a 5% bonus to espionage. Coupled with Hitler’s own 5% espionage bonus this becomes a 10% bonus in all spymatters! Chief of Staff: We could replace Beck with Bayerlein here. Beck gives us 10% combat movement bonus (in layman’s terms this means that, after succesfully attacking a province, our troops will occupy the target province 10% faster). Bayerlein gives us 10% bonus on supply throughput (each province will be able to send/receive 10% more supplies, making our supply net a lot smoother). Again, its a matter of strategy. Until after the fall of France, we won’t really need the extra throughput. What’s more, I feel that, especially the western Campaign requires speed over supplies to prevent the French from counterattacking and making us fight over the same province twice. So we will keep Beck around until we can visit Paris. Chief of the Army: Von Blomberg gives us a 10% reduction in supply consumption, which translates into quite a lot of freed-up IC over the next 3 years. Select him to head our land forces. The rest can stay as they are. As you can see, the strategic path we chose as our first step in my introduction dictates a lot of our later choices.

This is what your political tab should look like when we’re done. If anything is different, change it. SF players might exchange
Schacht over Schwarz without many problems (more IC, less resources)
In the left bottom corner we find our laws. Again, mousing over each law will give us the effect the current law is giving us. We could (and will) change some laws if we had the money to spare, simply by clicking on the current law and choosing another highlighted one. The laws are divided as follows: Civil Laws: these govern how much individual freedom we allow for the inhabitants of Germany. Stricter laws will provide counterintelligence bonuses as well as a reduction of Consumer Goods needed during wartime. Conscription Laws: Increase our MP and officer ratio at the cost of making reserve divisions more expensive. Economic Laws: Provide a bonus to IC and resources while decreasing Consumer Goods needs during wartime, in exchange
for a rather steep monetary cost. Education laws: more leadership, less money. Industrial laws: An exception to the rule that laws lower on the list are better, this one has 3 possibilities: *)Consumer Product orientation: provides a reduction of CG needs that, for Majors, can be quite substantial, in exchange for 5% slower and more expensive production. Choose this one during peacetime if you’re not expecting to go to war any time soon. *)Mixed industry: the one all nations start with by default (even the ones who aren’t eligible for it), this provides a modest reduction of CG needs both at peace and at war while providing a 5% supply throughput bonus (if you don’t remember what that is, check above when I discussed Chief of Staff). If you’re expecting an invasion within the next year or so, this is the
one to choose. *) Heavy Industry: the increased supply throughput and production bonus make this the law to use when at war (note that Communist governments are the only ones who can choose this law while at peace). Press laws: propaganda press provides us with a bonus on counterespionage and a reduction of NU changes, making it the ideal choice for Germany. Training laws: production of units will take longer, but our divisions will be much more effective in combat. There is one last section that concerns our occupation “laws” (just how much will we exploit occupied nations?), but since
there aren’t any just yet, I’ll get back to this once Poland has been subdued in 1939. That’s about it, I guess. Next chapter: Leadership and research! See you then!
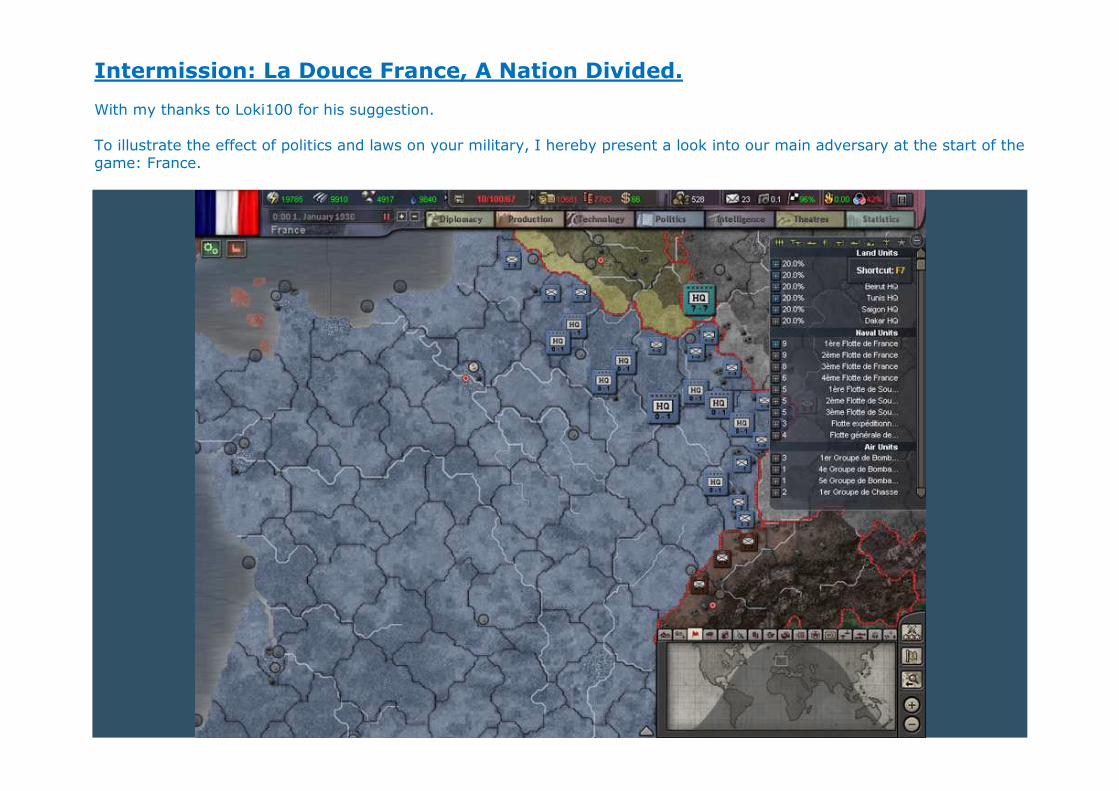
Intermission: La Douce France, A Nation Divided. With my thanks to Loki100 for his suggestion. To illustrate the effect of politics and laws on your military, I hereby present a look into our main adversary at the start of the game: France.
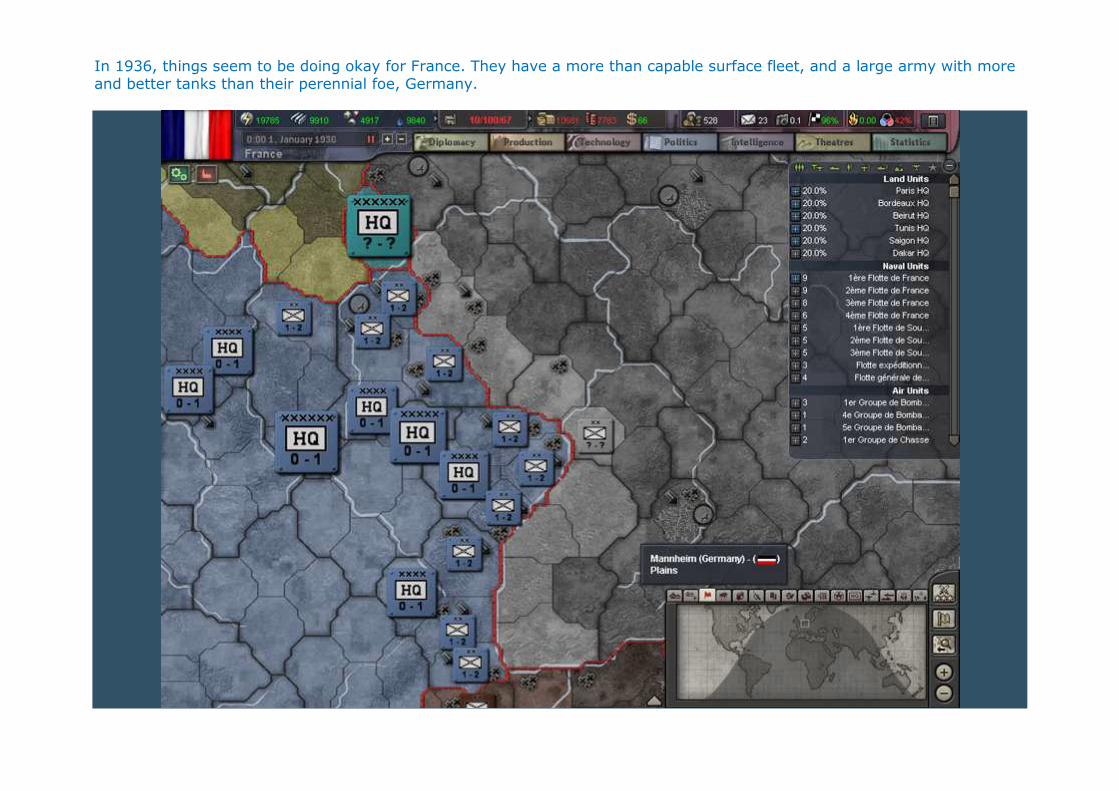
In 1936, things seem to be doing okay for France. They have a more than capable surface fleet, and a large army with more and better tanks than their perennial foe, Germany.

Safely entrenched behind the Maginot line, they can count on the assistance of the most powerful navy in the world, The Royal Navy, and one of the most versatile air forces in the world, the Royal Air Force. Their geographical location allows access to both the Atlantic and the Mediteranean. They have colonies across the world, and their capital, Paris, is the de facto cultural capital of Europe. Everything going perfect. Or is it? Let us take a deeper look inside the nation that, a mere 18 years earlier, stopped the German army and, along with its allies Great Britain and the USA, changed the world. Their neighbours are either too weak (Luxemburg) or too attached to their neutrality (belgium, Switzerland) to be of much use. Italy is untrustworthy and Spain is about to be torn asunder by civil war, the outcome of which lies in the hands of God only.
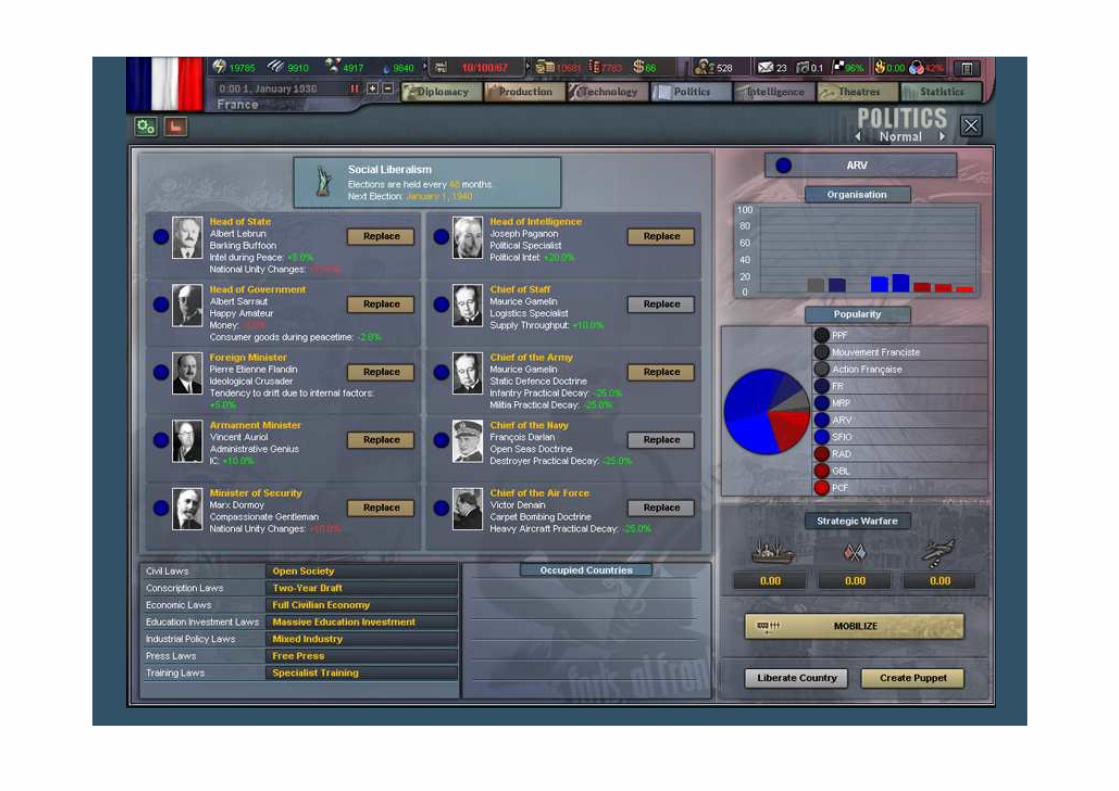
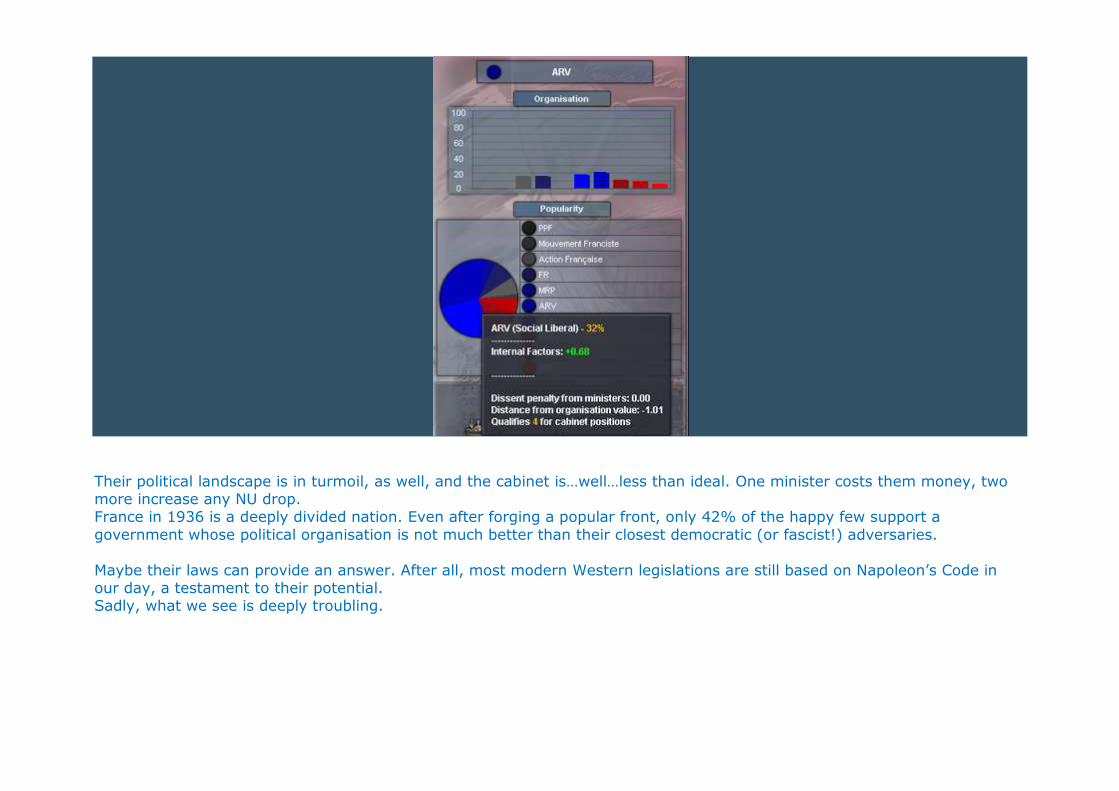
Their political landscape is in turmoil, as well, and the cabinet is…well…less than ideal. One minister costs them money, two more increase any NU drop. France in 1936 is a deeply divided nation. Even after forging a popular front, only 42% of the happy few support a government whose political organisation is not much better than their closest democratic (or fascist!) adversaries. Maybe their laws can provide an answer. After all, most modern Western legislations are still based on Napoleon’s Code in our day, a testament to their potential. Sadly, what we see is deeply troubling.
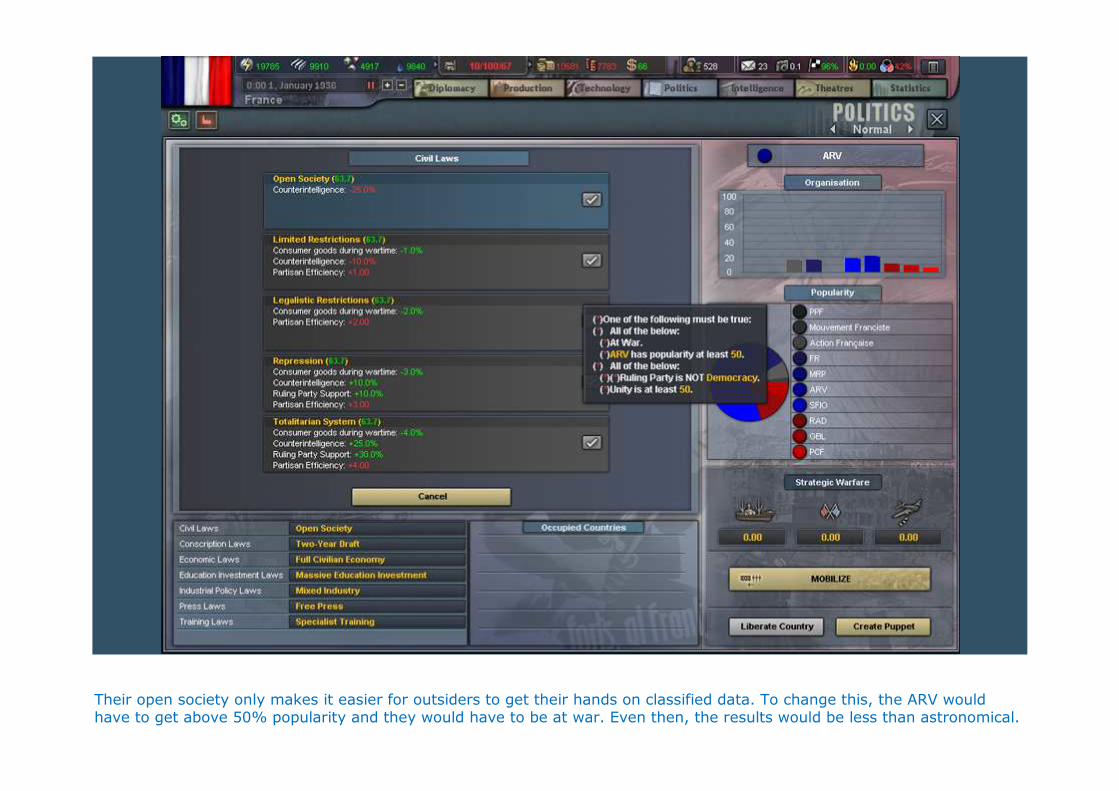
Their open society only makes it easier for outsiders to get their hands on classified data. To change this, the ARV would have to get above 50% popularity and they would have to be at war. Even then, the results would be less than astronomical.

They are stuck with two-year draft as their best conscription option as it is very unlikely that they will ever get the 70% unity required, meaning they forego on getting a bonus on officer ratio and have to spend more manpower on replacements than Germany.
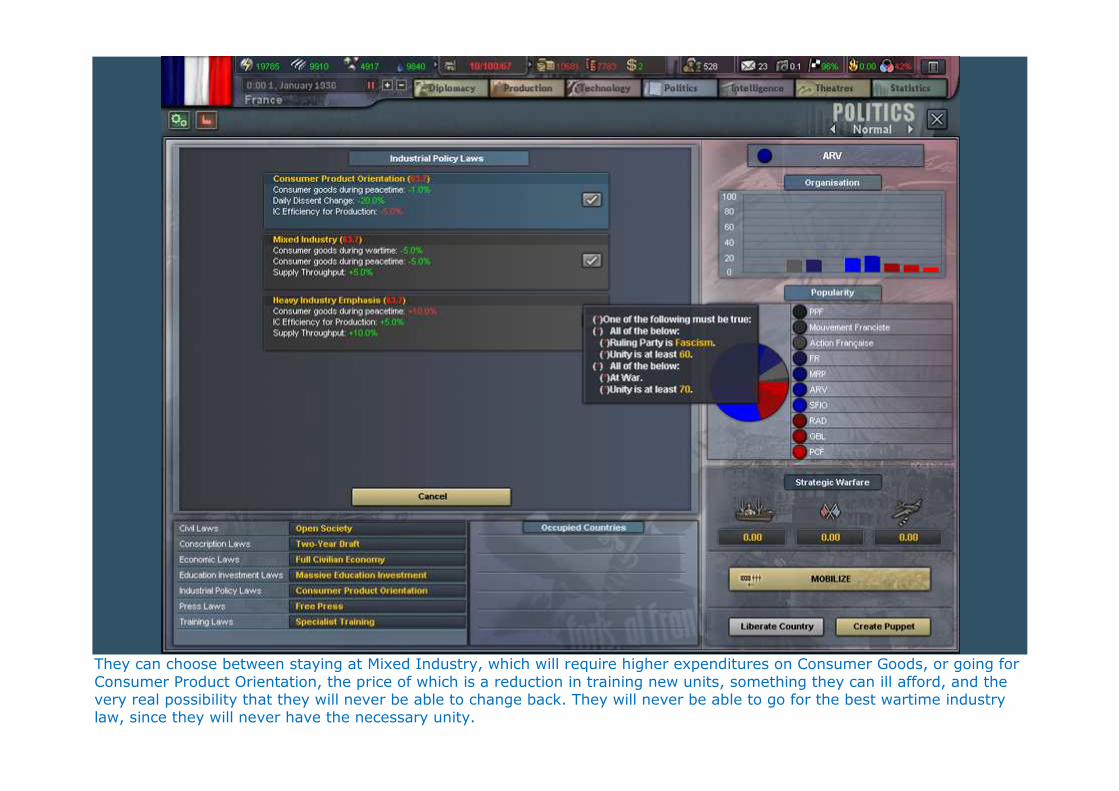
They can choose between staying at Mixed Industry, which will require higher expenditures on Consumer Goods, or going for Consumer Product Orientation, the price of which is a reduction in training new units, something they can ill afford, and the very real possibility that they will never be able to change back. They will never be able to go for the best wartime industry law, since they will never have the necessary unity.
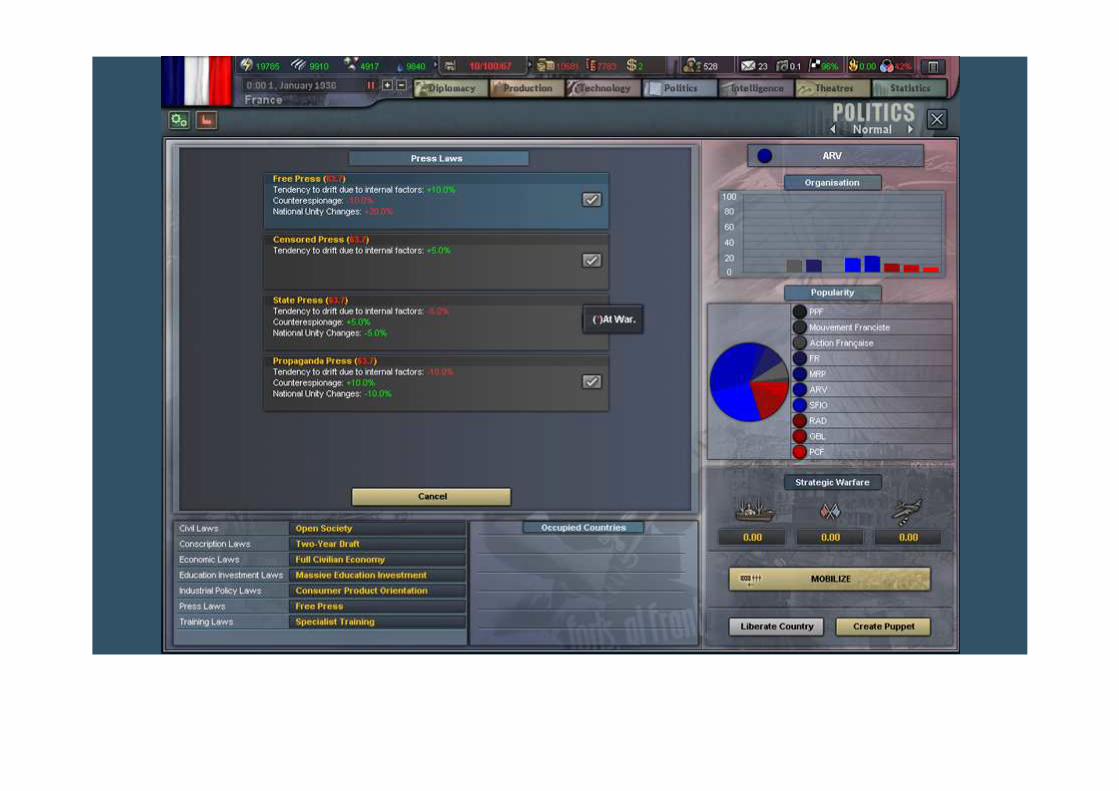
Their free press makes it harder to catch enemy spies and unite the people, since everyone and anyone can publicly voice their pet peeves. What does all this add up to? They pay more to keep the people happy than they should, loosing IC however they turn it (and they already have less IC than Germany). The local industrialists, bankers, and higher military are split in half, with over 50% wishing something would change. Their
army, while large, will never be as efficient as Germany’s. They cannot hide what they’re doing, nor can they stop enemy spies from looking into their affairs. They have only half our leadership, meaning they are dependent on the UK for assistance. Why? Because their lack of National Unity stops them from ever getting the best laws. Even the threat Germany will pose in the next 3 years will change only little. France, as it is in 1936, is doomed. Doomed to be ripped apart by the inherent weaknesses in their society. Doomed to be conquered…by us!
Chapter 8: Leadership and Research.
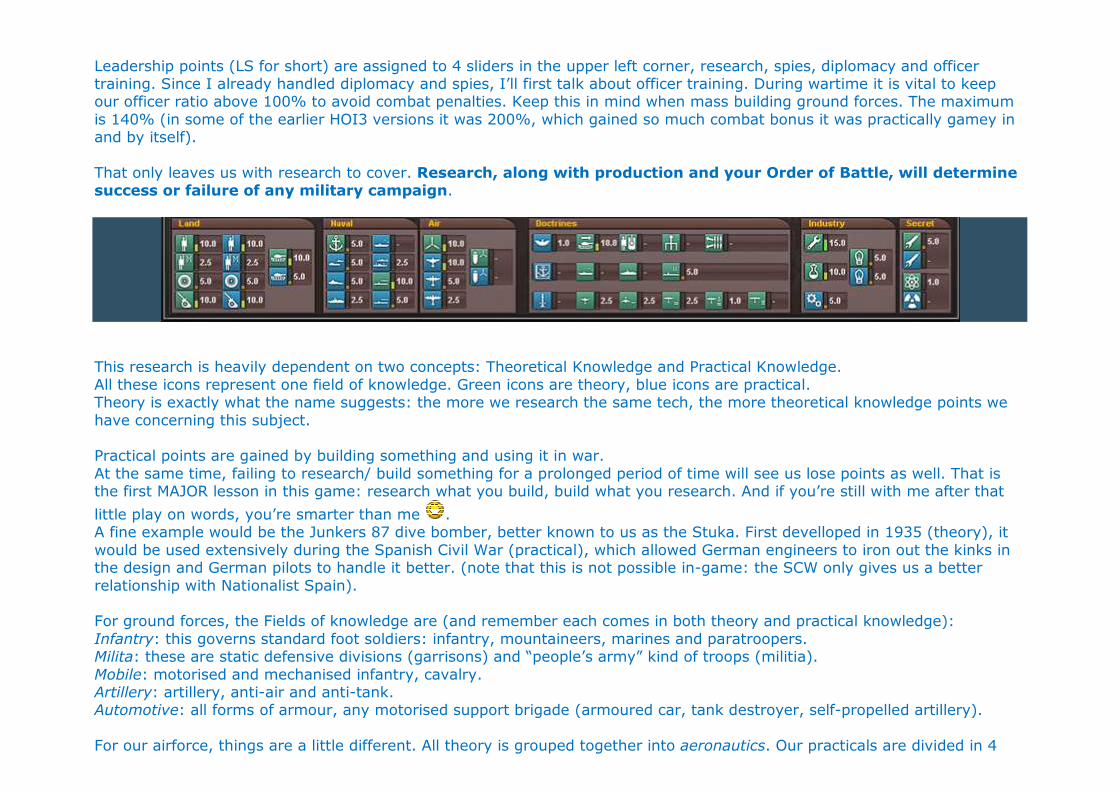
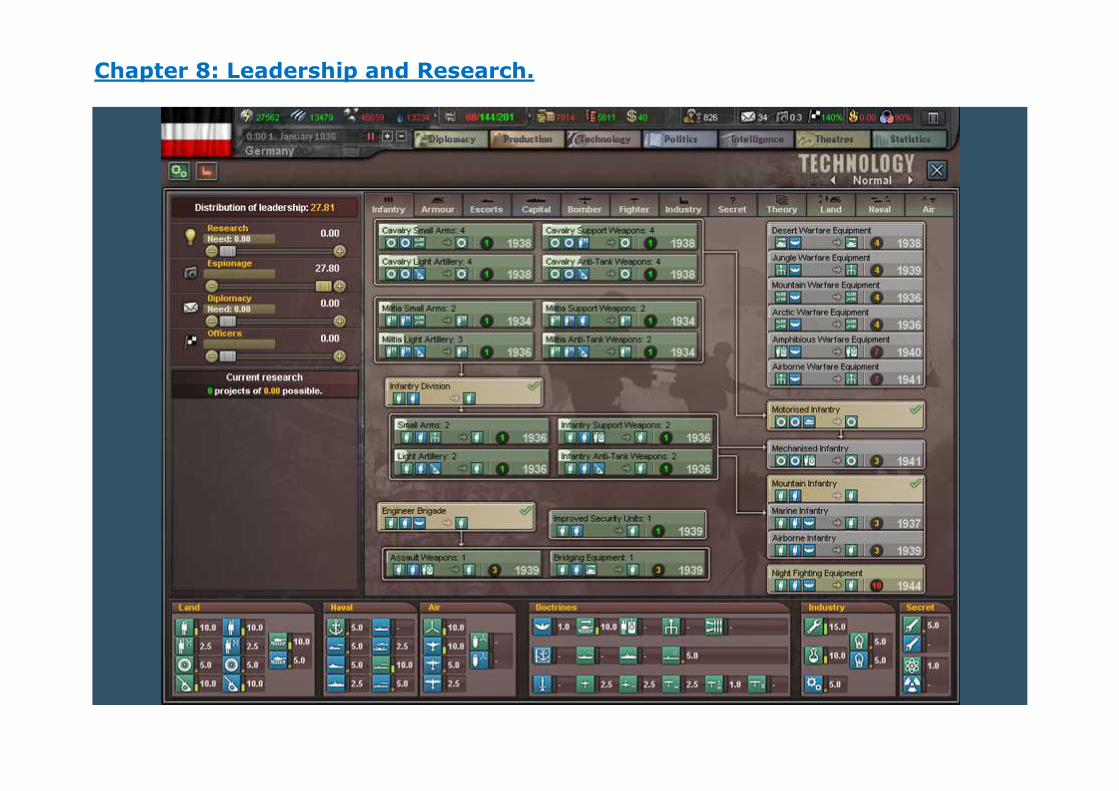
Leadership points (LS for short) are assigned to 4 sliders in the upper left corner, research, spies, diplomacy and officer training. Since I already handled diplomacy and spies, I’ll first talk about officer training. During wartime it is vital to keep our officer ratio above 100% to avoid combat penalties. Keep this in mind when mass building ground forces. The maximum is 140% (in some of the earlier HOI3 versions it was 200%, which gained so much combat bonus it was practically gamey in and by itself). That only leaves us with research to cover. Research, along with production and your Order of Battle, will determine success or failure of any military campaign.
This research is heavily dependent on two concepts: Theoretical Knowledge and Practical Knowledge. All these icons represent one field of knowledge. Green icons are theory, blue icons are practical. Theory is exactly what the name suggests: the more we research the same tech, the more theoretical knowledge points we have concerning this subject. Practical points are gained by building something and using it in war. At the same time, failing to research/ build something for a prolonged period of time will see us lose points as well. That is the first MAJOR lesson in this game: research what you build, build what you research. And if you’re still with me after that
little play on words, you’re smarter than me . A fine example would be the Junkers 87 dive bomber, better known to us as the Stuka. First develloped in 1935 (theory), it would be used extensively during the Spanish Civil War (practical), which allowed German engineers to iron out the kinks in the design and German pilots to handle it better. (note that this is not possible in-game: the SCW only gives us a better relationship with Nationalist Spain). For ground forces, the Fields of knowledge are (and remember each comes in both theory and practical knowledge): Infantry: this governs standard foot soldiers: infantry, mountaineers, marines and paratroopers. Milita: these are static defensive divisions (garrisons) and “people’s army” kind of troops (militia). Mobile: motorised and mechanised infantry, cavalry. Artillery: artillery, anti-air and anti-tank. Automotive: all forms of armour, any motorised support brigade (armoured car, tank destroyer, self-propelled artillery). For our airforce, things are a little different. All theory is grouped together into aeronautics. Our practicals are divided in 4
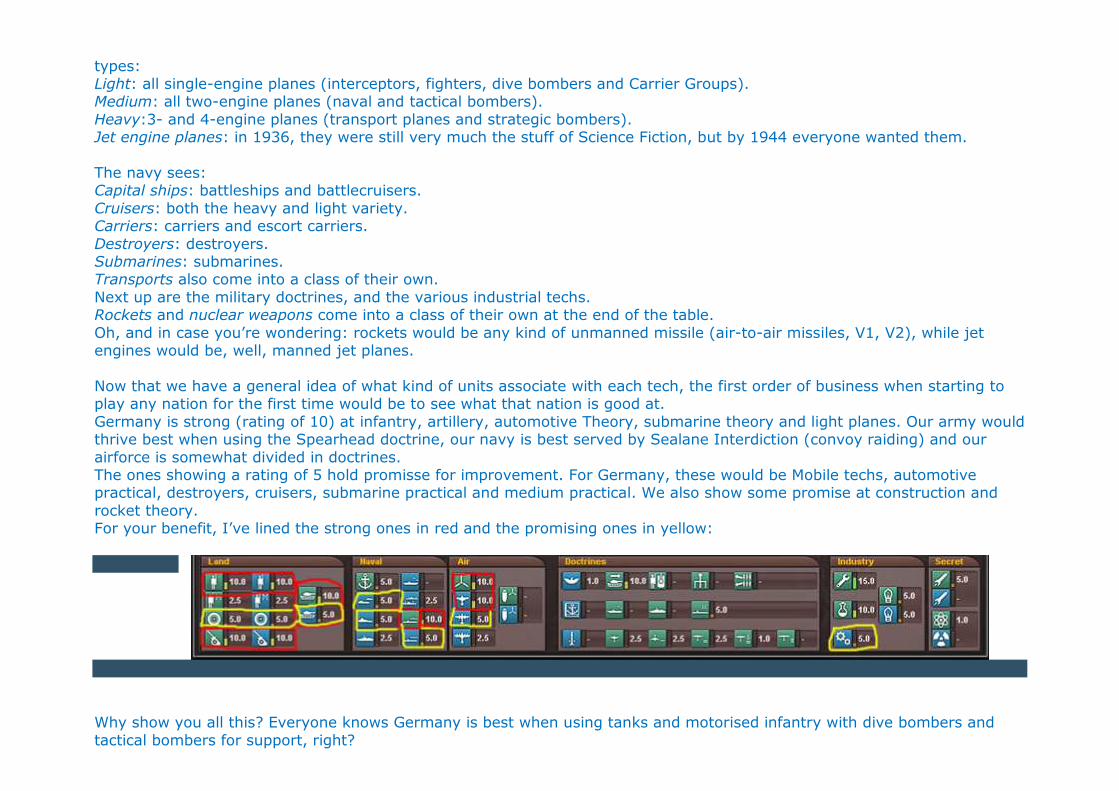
types: Light: all single-engine planes (interceptors, fighters, dive bombers and Carrier Groups). Medium: all two-engine planes (naval and tactical bombers). Heavy:3- and 4-engine planes (transport planes and strategic bombers). Jet engine planes: in 1936, they were still very much the stuff of Science Fiction, but by 1944 everyone wanted them. The navy sees: Capital ships: battleships and battlecruisers. Cruisers: both the heavy and light variety. Carriers: carriers and escort carriers. Destroyers: destroyers. Submarines: submarines. Transports also come into a class of their own. Next up are the military doctrines, and the various industrial techs. Rockets and nuclear weapons come into a class of their own at the end of the table. Oh, and in case you’re wondering: rockets would be any kind of unmanned missile (air-to-air missiles, V1, V2), while jet engines would be, well, manned jet planes. Now that we have a general idea of what kind of units associate with each tech, the first order of business when starting to play any nation for the first time would be to see what that nation is good at. Germany is strong (rating of 10) at infantry, artillery, automotive Theory, submarine theory and light planes. Our army would thrive best when using the Spearhead doctrine, our navy is best served by Sealane Interdiction (convoy raiding) and our airforce is somewhat divided in doctrines. The ones showing a rating of 5 hold promisse for improvement. For Germany, these would be Mobile techs, automotive practical, destroyers, cruisers, submarine practical and medium practical. We also show some promise at construction and rocket theory. For your benefit, I’ve lined the strong ones in red and the promising ones in yellow:
Why show you all this? Everyone knows Germany is best when using tanks and motorised infantry with dive bombers and tactical bombers for support, right?
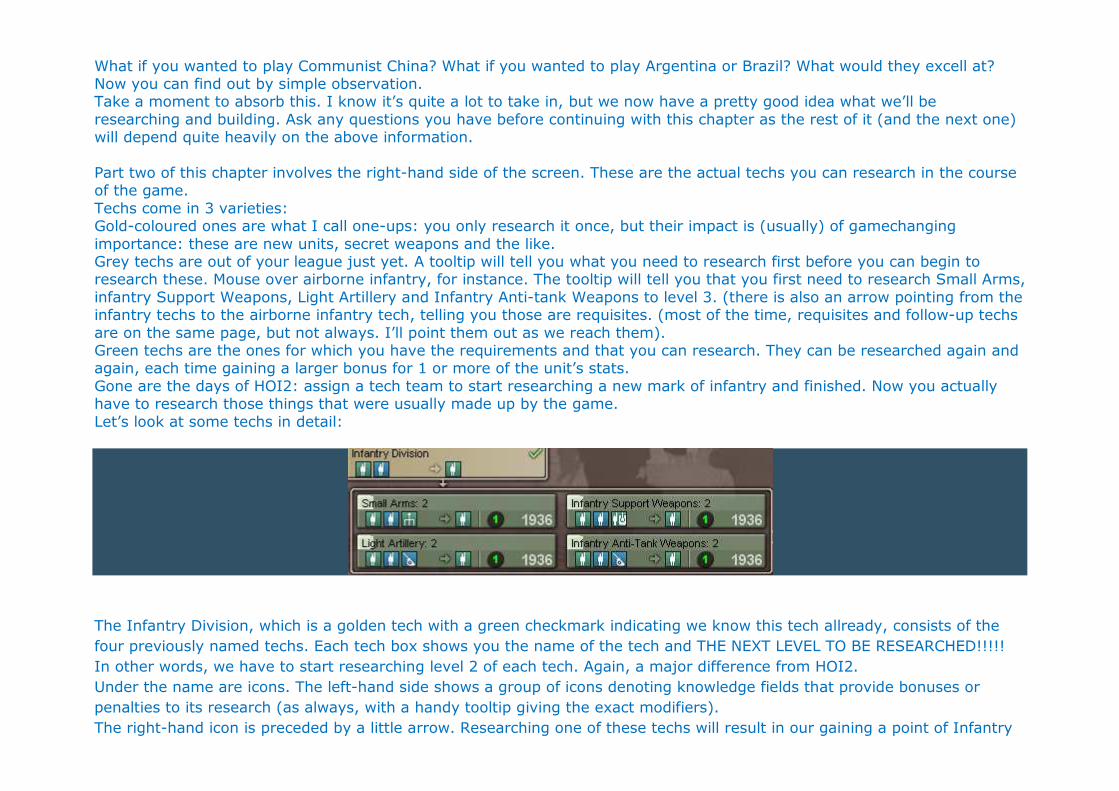
What if you wanted to play Communist China? What if you wanted to play Argentina or Brazil? What would they excell at? Now you can find out by simple observation. Take a moment to absorb this. I know it’s quite a lot to take in, but we now have a pretty good idea what we’ll be researching and building. Ask any questions you have before continuing with this chapter as the rest of it (and the next one) will depend quite heavily on the above information. Part two of this chapter involves the right-hand side of the screen. These are the actual techs you can research in the course of the game. Techs come in 3 varieties: Gold-coloured ones are what I call one-ups: you only research it once, but their impact is (usually) of gamechanging importance: these are new units, secret weapons and the like. Grey techs are out of your league just yet. A tooltip will tell you what you need to research first before you can begin to research these. Mouse over airborne infantry, for instance. The tooltip will tell you that you first need to research Small Arms, infantry Support Weapons, Light Artillery and Infantry Anti-tank Weapons to level 3. (there is also an arrow pointing from the infantry techs to the airborne infantry tech, telling you those are requisites. (most of the time, requisites and follow-up techs are on the same page, but not always. I’ll point them out as we reach them). Green techs are the ones for which you have the requirements and that you can research. They can be researched again and again, each time gaining a larger bonus for 1 or more of the unit’s stats. Gone are the days of HOI2: assign a tech team to start researching a new mark of infantry and finished. Now you actually have to research those things that were usually made up by the game. Let’s look at some techs in detail:
The Infantry Division, which is a golden tech with a green checkmark indicating we know this tech allready, consists of the four previously named techs. Each tech box shows you the name of the tech and THE NEXT LEVEL TO BE RESEARCHED!!!!! In other words, we have to start researching level 2 of each tech. Again, a major difference from HOI2. Under the name are icons. The left-hand side shows a group of icons denoting knowledge fields that provide bonuses or penalties to its research (as always, with a handy tooltip giving the exact modifiers). The right-hand icon is preceded by a little arrow. Researching one of these techs will result in our gaining a point of Infantry
Theory. Next we have a number in a black circle denoting the difficulty of the tech, with 1 being the easiest. Difficulty will have an effect on the time needed to research the stuff, as will the date next to it. This tech date is very important. When deciding what to research, and when, always compare the date shown to the current date. Researching things ahead of time will take longer to finish. For example, the current year is 1936. As these infantry techs are 1936 technology, we will not incur a penalty. If the tech date were 1937 or later, we would see it taking more time to finish. Any tech 3 years or more ahead of time is considered inefficient by the game engine and will show an alert on the game
screen. Night-fighting equipment, for example, is a 1944 tech. Researching it now would be a massive waste of LS, no matter how useful the tech really is. Now, there are as many opinions on research strategy as there are players on the forum. Some just research the techs they want and to hell with the date. Some just research as much as they have leadership invested, others line up techs for the next 2 years. My strategy, for better or worse, is not to research ahead of time EXCEPT IN A FEW SELECT INSTANCES. These instances depend wholly on what nation i’m playing. As the UK, for example, I always research the anti-submarine techs as fast as I can, regardless of tech date. For Germany, it is the doctrine tech that reduces attack delay (an advanced concept I’ll explain in a later chapter on combat). I will line up the techs that I’m hoping to finish in 1 year and delete the ones that are done
from the queu so that I always have a neat overlook on what’s left to be done. You can, by and large, barring research ahead of time, get about 2 to 3 techs done per year for each point of LS constantly invested. As we will not be doing any actual research just yet (we need all our LS focused on something else for the next couple of days first), I will tell you what to research when we get there. The real reason we came here is to fiddle with our sliders. You can set sliders in two ways: by holding down on the “-“ and “+” buttons on each slider. As we do so, the points are redistributed automatically. Another method, and the one we will use right now is to click on the “need” under the slider’s name. You can lock a slider in place by right-clicking the slider button (or
however it’s called). So here’s what I want you to do: set the sliders for research, diplomacy and officer training to zero (0) and lock them in place like I just told you. When you’re done, the screen should be the same as the one at the top of this chapter.
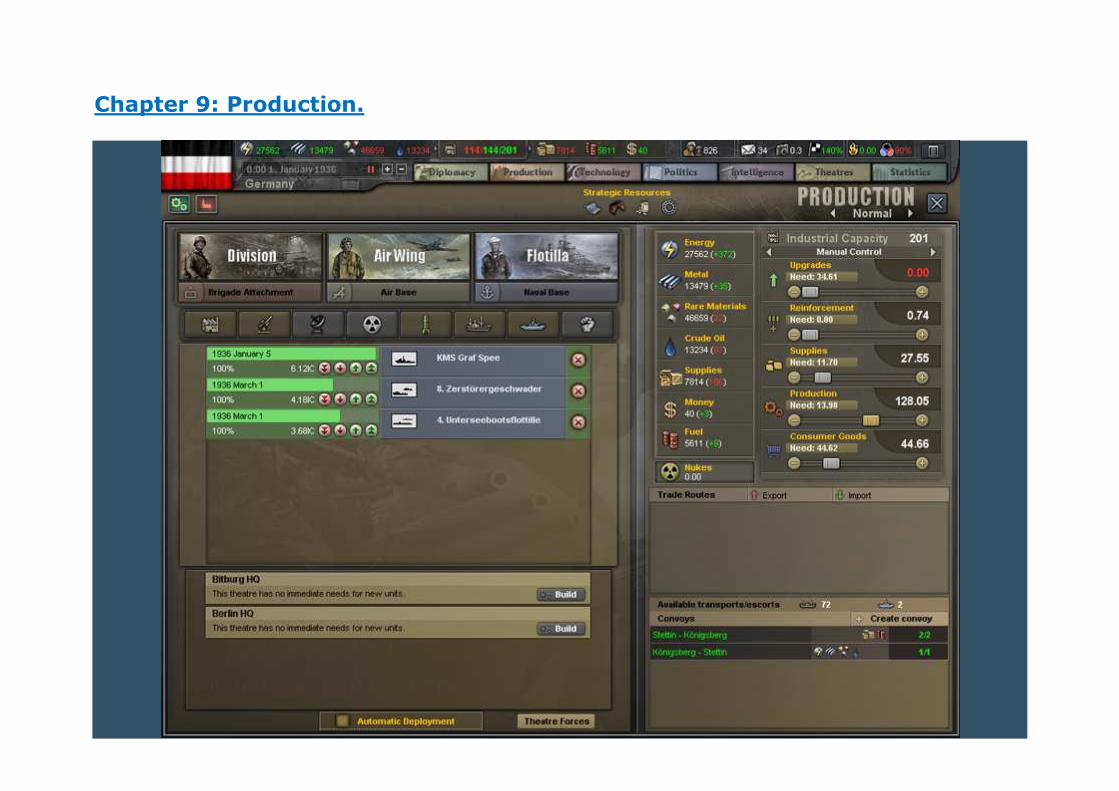
Chapter 9: Production.

This is one of the screens where you’ll be spending a lot of time. In the production tab we build all our military stuff and manage our economy. Looking at the top of the screen, we can see something I’ve mentioned before: strategic resources. What are these? (these don’t exist in SF) basically, they provide nationwide bonuses. There are too many to mention here, but the ones we have right now are: Aluminium: Germany’s aluminium factories shorten the time needed to build planes by 15%. Horsefarms: These give us a bonus on supply throughput, giving an improvement of our supply net. Antibiotics: as long as we own these, 5% of our casualties from battle and attrition will return to duty due to proper medical care. Ballbearings: in RL, the ballbearing plants in Schweinfurt were a major target of Allied bombing because they allow all repairs to finish faster. In case you’re wondering: these are actual, physical resources in the provinces shown in the tooltip and, as
such, are vulnerable to strategic bombing! Each strategic resource provides 1 bonus. Having two horsefarms, for instances, will still yield only the same bonus we have now. However, having two or more of the same strategic resource will provide an added protection from bombing or invasions. If we have 2 antibiotics facilities, losing the one in Frankfurt will not hinder us in the slightest. The statistics screen has a page showing all strategic resources in the world, along with the provinces where they can be found. One more important fact about these: any nation that is closely aligned to a faction will, in times of war, provide their strategic resources (if any) to the faction leader, even if they are neutral and at peace themselves. Spain, for instance, has tungsten. They cannot join the Axis until certain conditions have been met. However, the access to Tungsten is enough to keep them closely aligned to the Axis. So let’s hope that Franco’s men will win the civil war. The alignment triangle in the Diplomatic screen has tooltips for each nation, telling you which ones have strategic resources and what those are. In SF, these don’t exist. They are not gamebreaking in their absence, and diplomacy becomes a lot less strategic. It is still sound practice in SF to ensure the proper nations will align to the Axis, though, if only to ensure they don’t join the enemy.But we’re here to talk about production. Let’s first focus on the right-hand side of the screen. In the upper right corner, we have our IC sliders. First comes the total IC available to us (204). Just below it is the word “manual control” and some arrows. Clicking these will allow the AI to manage our sliders for us, giving it instructions to prioritize upgrades, reinforcements or production. During peace-time, I prefer keeping it under manual control. The AI does a reasonable job of handling the sliders, but it will deposit wasted IC in the production slider, which is not always what we want. It also produces supplies up to a certain point (I’m guessing it calculates how long it can manage without producing any supplies) at which point it will set the supllies slider to 0. Not really what I want. Barbarossa will eat supplies like you can’t imagine. It is vital that we get as high a surplus as we can manage. So keep it at manual control. Our total available IC is divided between a number of sliders:
Upgrades: when we research more advanced tech, we can upgrade our divisions and planes (i.e. give the troops better guns, mortars, whatever). Just like in HOI2, it is relatively cheaper and faster to skip a few techs before upgrading begins. So we will wait until 1939 before upgrading everything. (note that this is not always desirable; if you expect an enemy invasion by 1937, or are playing a ahistorical path it may be better to upgrade what you have first). We can manipulate these sliders the same way we did in the tech screen. Set upgrades to 0 and lock it by right-clicking the slider button. All army and planes will upgrade to the next tech level. Ships will only upgrade radar, AA, and ASW (anti-sub weapons). What you build is what you end up with for the rest of the game. Reinforcements: unlike HOI2, there is always some need for reinforcements, due to training accidents, retirement, and such like. During peacetime, this is a minor thing, but when we change laws, we may have to adjust this slider to account for the changes. Set this slider to 0.75 and lock it. This is plenty to keep it running smoothly without having to adjust it every day. Supplies: this slider determines how many bullets and food we produce for our soldiers. Right now we need 11.70 supplies produced daily for our armed forces, but we will be selling a lot of supplies to provide money for resources and changing laws. Set it at around 27.5 for now. We can always adjust it later as needed. Note that, if your supply network is running smoothly, our divisions will have enough supplies with them to last a while. So we can (and will at some point) get into the red for a few weeks before the need becomes dire. After all, this screen is first and foremost about producing enough divisions, planes and ships to win the war. Consumer Goods: the IC we invest here is used to keep the people happy and docile. By keeping this slider at 0.05 above the need, we ensure domestic calm at all times. Why 0.05 above need? Why not just put it equal to the need? Because, more so in past incarnations of the game, there was an issue with “creeping sliders”. What you see on the screen is the computer rounding the actual numbers down or up. As the needs changed, the sliders would move on their own. You might be running a deficit here without realising it until you suddenly find yourself with dissent. As I told you before, dissent is one of the big “no no’s” of the game. By putting it a little higher than needed, we make sure this does not happen. So set it at 0.05 above need and lock it in place. As you can see, the rest of our available IC has now been dumped into the production slider. This is the IC we have to actually work with. In a few days we will change a few laws that will drastically lower the CG slider, giving us more IC. We will reduce the supply needs by building a proper OOB, freeing up even more IC. So we now have 128 IC to work with, some of which will be used to finish the ships already in the queue. The remainder (about 114 IC) will be put to good use later on in this chapter. Next to the sliders we have our resources, again with a mouse tooltip to give us the necessary details. These are not the actual numbers. The game needs 1 day to calculate the actual gains/deficits. Under those two we have our trade routes. Right now we don’t have any trades. The ones we initiated earlier have yet to be accepted or denied by the US and the SU. This may be different for you since you’re probably playing from a saved game as you follow along, in which case you may already have some trades in here. Trading or supplying troops across oceans and seas will require convoys. The bottom of the screen is used for our merchant navy: convoys to ferry resources, supplies and fuel back and forth and escorts for protecting them from convoy raiders. Right now we only have 2 convoys going: the one from Stettin to Köningsberg supplying East Prussia and the one ferrying resources towards mainland Germany (they are assembled in our capital, remember?).
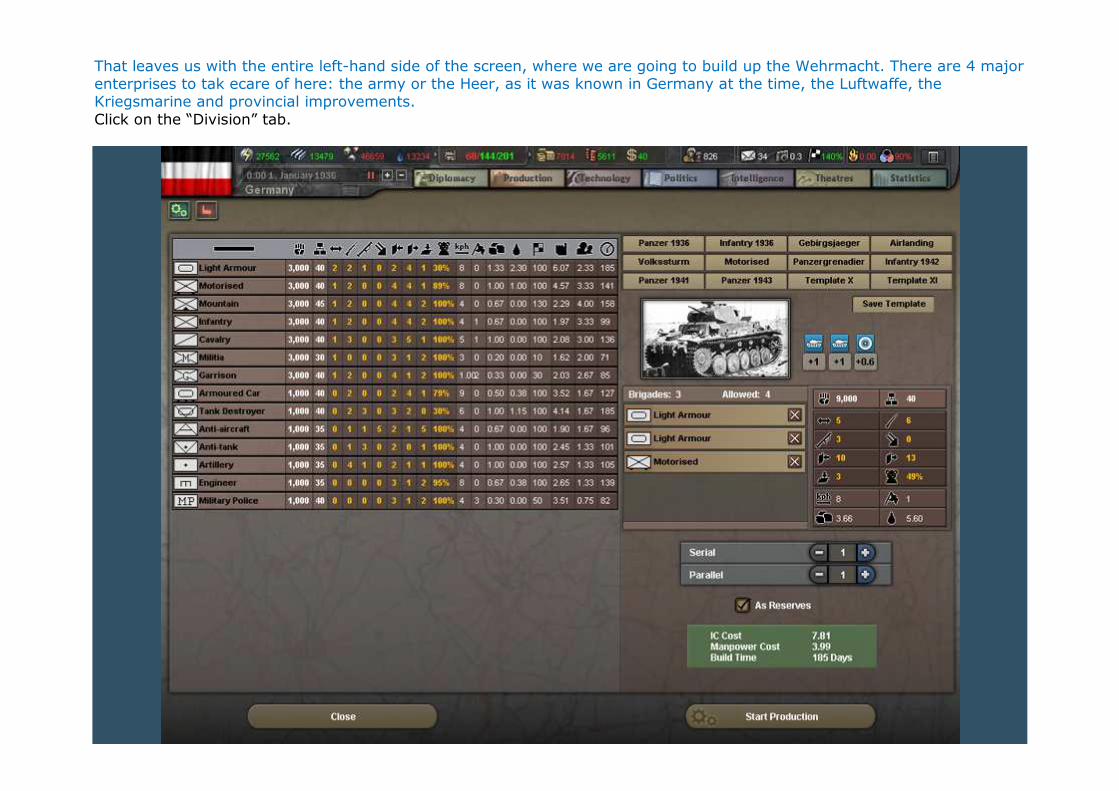
That leaves us with the entire left-hand side of the screen, where we are going to build up the Wehrmacht. There are 4 major enterprises to tak ecare of here: the army or the Heer, as it was known in Germany at the time, the Luftwaffe, the Kriegsmarine and provincial improvements. Click on the “Division” tab.
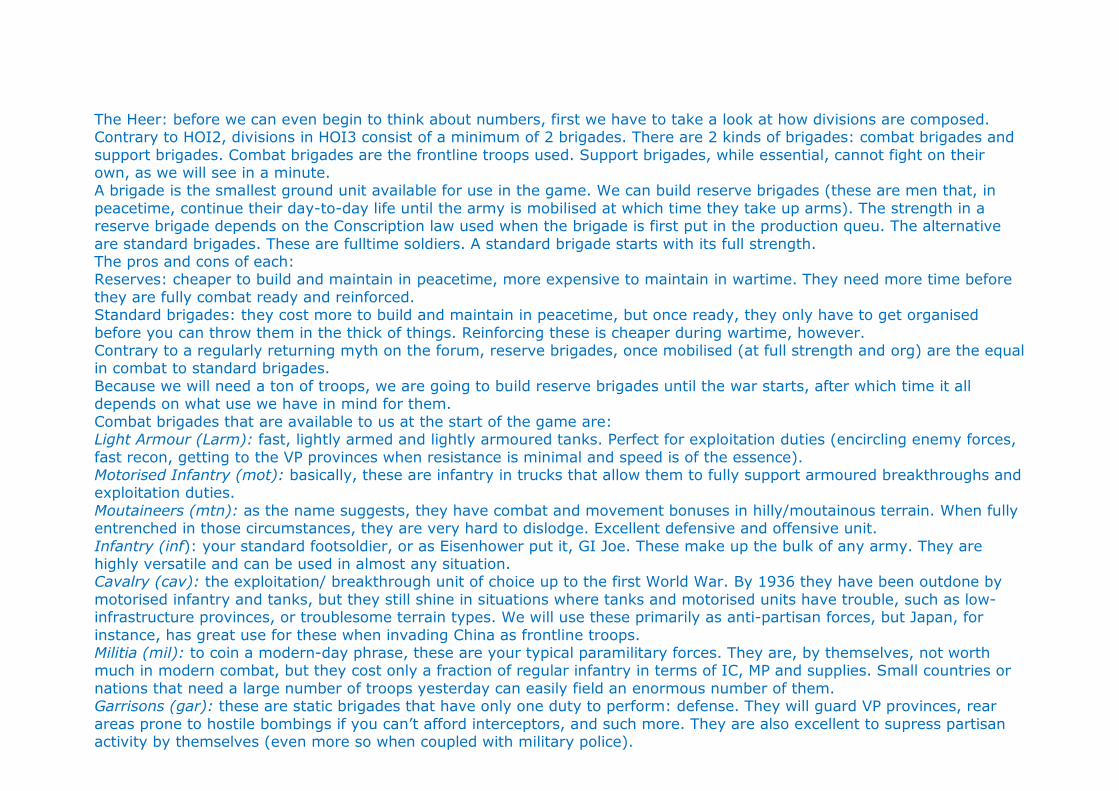
The Heer: before we can even begin to think about numbers, first we have to take a look at how divisions are composed. Contrary to HOI2, divisions in HOI3 consist of a minimum of 2 brigades. There are 2 kinds of brigades: combat brigades and support brigades. Combat brigades are the frontline troops used. Support brigades, while essential, cannot fight on their own, as we will see in a minute. A brigade is the smallest ground unit available for use in the game. We can build reserve brigades (these are men that, in peacetime, continue their day-to-day life until the army is mobilised at which time they take up arms). The strength in a reserve brigade depends on the Conscription law used when the brigade is first put in the production queu. The alternative are standard brigades. These are fulltime soldiers. A standard brigade starts with its full strength. The pros and cons of each: Reserves: cheaper to build and maintain in peacetime, more expensive to maintain in wartime. They need more time before they are fully combat ready and reinforced. Standard brigades: they cost more to build and maintain in peacetime, but once ready, they only have to get organised before you can throw them in the thick of things. Reinforcing these is cheaper during wartime, however. Contrary to a regularly returning myth on the forum, reserve brigades, once mobilised (at full strength and org) are the equal in combat to standard brigades. Because we will need a ton of troops, we are going to build reserve brigades until the war starts, after which time it all depends on what use we have in mind for them. Combat brigades that are available to us at the start of the game are: Light Armour (Larm): fast, lightly armed and lightly armoured tanks. Perfect for exploitation duties (encircling enemy forces, fast recon, getting to the VP provinces when resistance is minimal and speed is of the essence). Motorised Infantry (mot): basically, these are infantry in trucks that allow them to fully support armoured breakthroughs and exploitation duties. Moutaineers (mtn): as the name suggests, they have combat and movement bonuses in hilly/moutainous terrain. When fully entrenched in those circumstances, they are very hard to dislodge. Excellent defensive and offensive unit. Infantry (inf): your standard footsoldier, or as Eisenhower put it, GI Joe. These make up the bulk of any army. They are highly versatile and can be used in almost any situation. Cavalry (cav): the exploitation/ breakthrough unit of choice up to the first World War. By 1936 they have been outdone by motorised infantry and tanks, but they still shine in situations where tanks and motorised units have trouble, such as low-infrastructure provinces, or troublesome terrain types. We will use these primarily as anti-partisan forces, but Japan, for instance, has great use for these when invading China as frontline troops. Militia (mil): to coin a modern-day phrase, these are your typical paramilitary forces. They are, by themselves, not worth much in modern combat, but they cost only a fraction of regular infantry in terms of IC, MP and supplies. Small countries or nations that need a large number of troops yesterday can easily field an enormous number of them. Garrisons (gar): these are static brigades that have only one duty to perform: defense. They will guard VP provinces, rear areas prone to hostile bombings if you can’t afford interceptors, and such more. They are also excellent to supress partisan activity by themselves (even more so when coupled with military police).
Highly desirable combat brigades that we have to research first would be: Armour (arm): your standard tank brigade: slower than Larm, but more powerful in combat. These will make up the bulk of our armoured forces. Heavy Armour (Harm): personally, I don’t like them very much: they cost a ton to produce and supply and only move slightly faster than an infantry brigade. I will freely admit, though, that a fully mobilised Harm division can be rather scary on the battlefield if you don’t have a lot of anti-tank capability present. Tiger tanks are Harm. Mechanised Infantry (mech): among the most powerful units in the game. They are expensive, but they pack one heck of a punch, are very fast, equally good in offense as defense. Just make sure you have enough supplies and fuel. Marines (mar): Experts in amphibious, jungle and marsh combat. Every nation that expects to deal with these situations should build at least a few of these. AFAIK, the USA, RL, “only” needed 5 of these, along with a number of infantry divisons, to clear out the Pacific against Japan. Airborne Infantry (para): experts at airborne operations. One of the most famous World War II Divisions worldwide were paratroopers: the 101st Airborne. Excellent defensive unit with parachute capability that allow them to bypass forts, can go places no other unit can ever hope to reach. Easy to abuse in gamey ways. No player in his right mind would ever devote even an ounce of effort on: Super Heavy Armour (SHarm): google “maus panzer” and you’ll know why. Ridiculously expensive, can hardly move at all. Don’t ever try them (unless you’re in a REALLY experimenting mood and for laughs)! Support Brigade types are: Armoured Cars (AC): think of these as lightly armoured jeeps with machineguns, if you will. They provide some measure of added combat ability. Among the fastest brigades in the game. Can be used for Combined Arms divisions (I will get to this later in the chapter), exploitation divisions and, when paired with a cavalry brigade, can be excellent to combat partisan uprisings. Tank Destroyers (TD): armoured vehicles designed to combat tanks. Can be used in conjunction with motorised infantry to create Combined Arms Divisions. Highly desirable when facing the Soviet Union. Anti-Aircraft (AA): They are only marginally more useful than they were in HOI2. These can be used for, obviously, AA duty when interceptors are out of reach for the nation you’ve chosen, or to protect HQs from bombardment. When properly teched up, however, they make reasonably effective anti-tank weapons in an emergency, but there is no way in a Vanilla game to turn these into the fearsome Flak-88 that the German army was so fond of RL. Anti-Tank (AT): given the fact that the majority of your enemies will be “soft” targets (again, I’ll explain later), and given the fact that their “soft attack” is negligable, they are largely useless. If you must have anti-tank ability in your infantry forces, AA would serve you better for their potential dual role. Artillery (art): Even with the big terrain penalties they face in any terrain (I believe they even have -10% attack in plains!), artillery is still, for many, the premier support brigade for infantry. There is simply no other brigade that provides better firepower per MP invested. Contrary to HOI2, they now have the same speed as infantry and will no longer slow you forces down. Engineers (eng): In FtM their defensive bonuses could be (are?) bugged and don’t work as designed. That being said, they still provide movement bonuses for cross-river movement and attack bonuses against forts. Military Police (pol): As you could expect, these brigades are used only for defensive, anti-partisan duties. Excellent in the
latter role when paired with garrison brigades. There are three types of support brigade we can’t build yet: Self-Propelled Artillery (Spart): The motorised/lightly armoured version of artillery, these will provide an excellent addition to any armour type division. If you really want to go historical with your motorised infantry, you could forego the TD and go for this one in stead. Bear in mind, however, that the Combined Arms bonus is the single largest combat bonus you can have. Rocket Artillery: somewhat less sever terrain penalties (and slightly faster) than artillery, they cost more supplies and come somewhat late in the game. Plus they require 2 more techs to be researched. HOI2 players: don’t combine them with mountaineers as they will diffuse the bonuses mtn have in hills and mountains. Self-propelled Rocket Artillery: Are to Spart what Rocket art is to art. I hold the same basic objections to them personally as I do to Rocket Art. Unless I missed something, I have now covered all brigades. How do we turn them into divisions? That’s easy. A proper division will have at least 1 combat brigade and/or 1 support brigade. But first you need to know their stats. So here comes another list ;-) Strength: As I said before, strength depends on whether they are Reserve or standard brigades and on your Conscription Laws. A fully mobilised combat brigade as a strength of 3,000 men, while Support brigades have only 1,000 men. Think of this as your division’s “Health”. An division that is at 0 Strength will cease to exist (the game term is “shatter”). Organisation: This simulates your brigade’s ability to keep fighting when the going gets tough. When your divisions reach 0 org (usually sooner than that), they cannot continue fighting and must retreat to the nearest friendly province when on defense. When they are completely surrounded and cannot retreat, they will shatter. A division on the offense that reaches 0 org, simply calls off the attack and must first be allowed to reorganise. The amount of org they have depends on the type of division and your military doctrines. Combat Width: I will explain this in all detail in the chapter on combat, but the basics are like this: assume that each battle consists of 10 squares. Combat Width determines how many of these squares your brigade occupies. Armour brigades start out with a combat width of 2, which can later be researched to become 1. All other combat brigades have a combat width of 1 and support brigades have a combat width of 0. This is one of the biggest changes from HOI2. You can only fit in so many brigades in those 10 squares before getting stacking penalties. As support brigades do not take up any space whatsoever (0 width, remember?), you can have a whole series of brigades involved in any single combat. Soft Attack: These are the number of shots fired at the “soft” unarmoured portion of the division every 1-hour “turn”. Hard Attack: These are the number of shots fired at the “hard” armoured portion of the division. Air Attack: These are the number of shots fired against attacking enemy planes. Defensiveness: These are the number of shots avoided when under attack. Toughness: These are the number of shots avoided when attacking. Air Defense: These are the number of shots avoided from enemy bombers. Softness: This stat has a lot of meaning in combat. It determines the softness or hardness of the division. For instance, a Light Armour brigade has a softness of 30%. This means that of all the enemy’s soft attacks, only 30% will hit something before calculating the effect of defensiveness or toughness. Since most brigades have more soft attacks than hard attacks, it means the best policy would be to get softness as low as possible. But I have previously mentioned Combined Arms Divisions. When a division has a total softness of anywhere between 33% and 66%, they are considered such a division and they get a
whopping 20% base combat bonus. If said division is commanded by a general with the Panzer Leader trait, they get another +10% bonus (even more so if the superior HQs also have a general with this trait) (as we will see in the next chapter). If the Combined Arms tech in the military Superior Firepower tree is researched, the division gets another 10%. It is therefore obvious that the most powerful divisions in combat have a softness between 33% and 66%. Speed: in Kilometers Per Hour under ideal circumstances. Mobile brigades have had their speed decreased for game balance reasons. Suppresion: When we win a war, and the conquered nation is in an alliance or a faction, it usually forms a government in exile in the faction leader’s capital. We then occupy the conquered territory. A brigade’s suppression ability allows it to decrease the partisan revolt risk in the province it occupies and the surrounding, adjoining provinces. (There is a minimum risk that the conquered nation will simply give up and we will Annex the nation instead. Annexed nations have an increased risk of revolt and suppression no longer has any effect on it) Supplies: this is how many supplies the brigade needs per day. Fuel: This is how much fuel the brigade needs per day. Officers: every army brigade needs 100 officers. Mountaineers need 130, militia, garrisons and Military Police need significantly less. These are taken from your Officer Pool when the brigade or division is finished and deployed anywhere on the map. Build cost: this is how much IC the brigade costs to build per day. Manpower cost: this is how much Mp the brigade needs. Manpower is taken from your MP pool when the brigade or division is first put into the production queu. Production Time: This is how many days a brigade requires before it is finished, given current practical levels. I know. It’s a lot to take in. What’s more, throughout the campaign, we will have to take all these things into account whenever we start a new army production. Thankfully, you’re not alone. The Paradox forum is incredibly helpful in giving advice to whoever needs it. Unfortunately, there are as many opinions on what constitutes the “best” divisions as there are players on the forum. One thing everyone agrees on: there are no “one-size-fits-all” divisions. It all depends on your use for them, on the nation you play, on your potential targets, and so on. For this tutorial, I’m going to go with some of the most used compositions. But first (HOI2 players beware!) I need to talk about serial and parallell builds. Parallell builds mean you build them at the same time. Serial builds mean you finish one and then start on the next one. For a variety of reasons, serial builds are no longer the holy grail of production. Practicals make them less interesting. In HOI2, it was quite common to produce 5 parallell divions*99 serial. That would give you 99 times 5 divisions coming off the line at the same time, all of them costing the same amount of IC. In HOI3, however, the first parallell build finishes and it modifies the cost of the next division. The second division would have a different cost, and so on and so forth. For this reason, serial building is used primarily for those things that you would otherwise thend to forget. In my case, I tend to forget transport ships, for instance. So I always build transports in serials. How do we build a division? First, obviously, we need to determine what we need. In the previous chapter, we saw that our Armour Theory is at 10%,
while our Armour practical is only at 5%. We need to boost this, so we are going to build an armoured division. Thankfully, the game provides us with some ready-made templates to the right. Click on the “panzer 1936” button. You can now see the total stats for the division as assembled. The IC cost is a little over 15. Click on the chockbox marked “reserve division”. The IC cost has now been halved, as have the MP costs. This division is made up of 2 Larm brigades and 1 mot, giving them Combined Arms bonus (CA for short). A division can consist of up to 4 brigades (5 if we research the Superior Firepower Tech). We could add a brigade, but bear in mind that this division already has a combat width of 5 (2 for each Larm brigade and 1 for the mot brigade). Adding another combat brigade would make it take up too much space on the battlefield (10 squares, remember?). So we could add a support brigade. Which one? The division always moves at the speed of its slowest brigade, so it would have to be a brigade of somewhat equal speed. On the Left-hand side, the “brigade side” of the puzzle, click on the KPH heading. All brigades are now arranged from fastest to slowest. Clicking it again would make it from slowest to fastest and vice versa. Our division has a speed of 8. That only leaves Armoured Car or Engineers. Neither of them would force the division out of the “Golden” CA zone. Armoured Cars would make them a little tougher, but engineers would enable them to cross rivers faster and have an easier time attacking forts. Click the engineer brigade. You can see that it has been added to the Panzer division on the right and that its stats have already been figured into the total. All you have to do now is click “start production”. There we go. Our first division is being build. Now click on infantry 1936. Click on the artillery brigade (left-hand side of the screen). Click on “save template”. The game will now always give us 1936 infantry as 3inf+1art. (and I fully expect some comments on this one)This will be our regular infantry division. Click on “start production”. We’re doing this to keep our infantry practicals warm while we concentrate on other, more urgent needs. Such as our Kriegsmarine, which is, frankly, a shambles. Even when focusing on convoy raiding and submarine warfare, we need at least some kind of surface fleet worthy of that name. Click on the Flotilla folder. Click on the Battlecruiser and then start a parallell build of 2. Why BC? Because they have been researched to 1936 level allready and share practicals with Battleships. They take 2 years to finish. In a few months, when we have researched 1936 Battleship techs, we will commence building 2 Battleships. When the BCs finish, they will add their practicals to the BBs ALREADY IN THE QUEU. Besides, BCs are fast and powerful enough to stand up to almost anything (excepting Battleships and carriers). We will use the Battleships to bombard the shores of Baltic Soviet Union and protect our shores from enemy invasion fleets. Start building 1 Light Cruiser and 3 submarines. That’s all we can afford to spend on our navy for now. Click on the small rocket in the middle, just below the airforce folder. Start building one rocket test center. We will need this if we ever hope to research and build jet engines. It takes a lot of IC and a long time to finish, so its best to get it up and going right now.
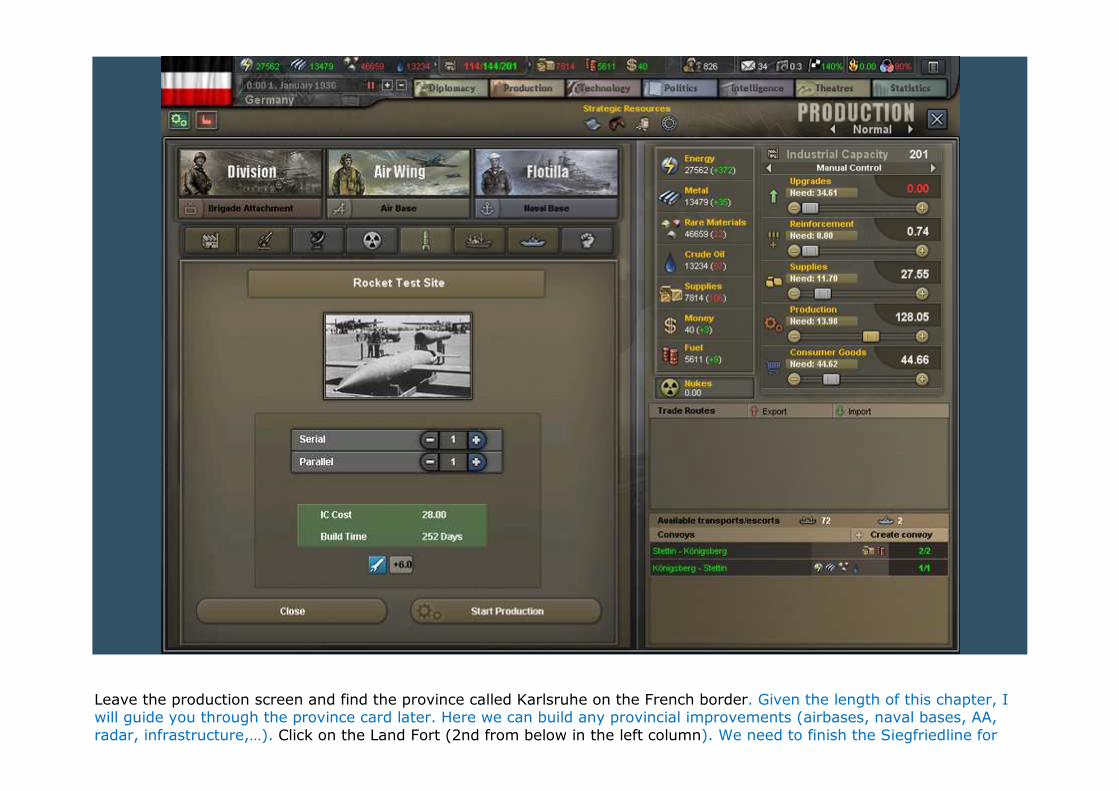
Leave the production screen and find the province called Karlsruhe on the French border. Given the length of this chapter, I will guide you through the province card later. Here we can build any provincial improvements (airbases, naval bases, AA, radar, infrastructure,…). Click on the Land Fort (2nd from below in the left column). We need to finish the Siegfriedline for
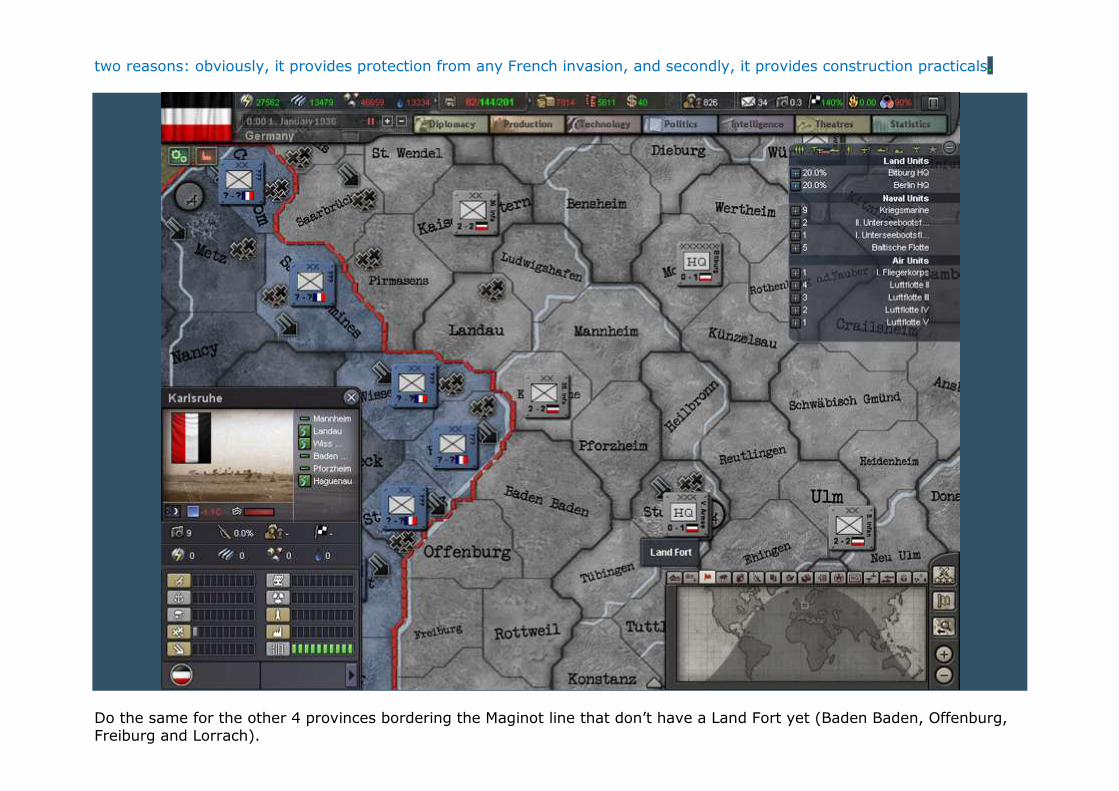
two reasons: obviously, it provides protection from any French invasion, and secondly, it provides construction practicals.
Do the same for the other 4 provinces bordering the Maginot line that don’t have a Land Fort yet (Baden Baden, Offenburg, Freiburg and Lorrach).
We still have 15 IC left. Find the province of Wilhelmshaven (west of Denmark) and start building a coastal fort there. That leaves us with about 10 IC. Go to the airforce folder and start a production of 1 interceptor. As you can see, we are running a couple of IC short. Take just enough IC from supplies to put production at 0.02 above need. (creeping sliders, remember?) And that’s it. We are building armour, infantry, a bunch of ships, a rocket test center, forts and an interceptor wing. Here is our complete production:
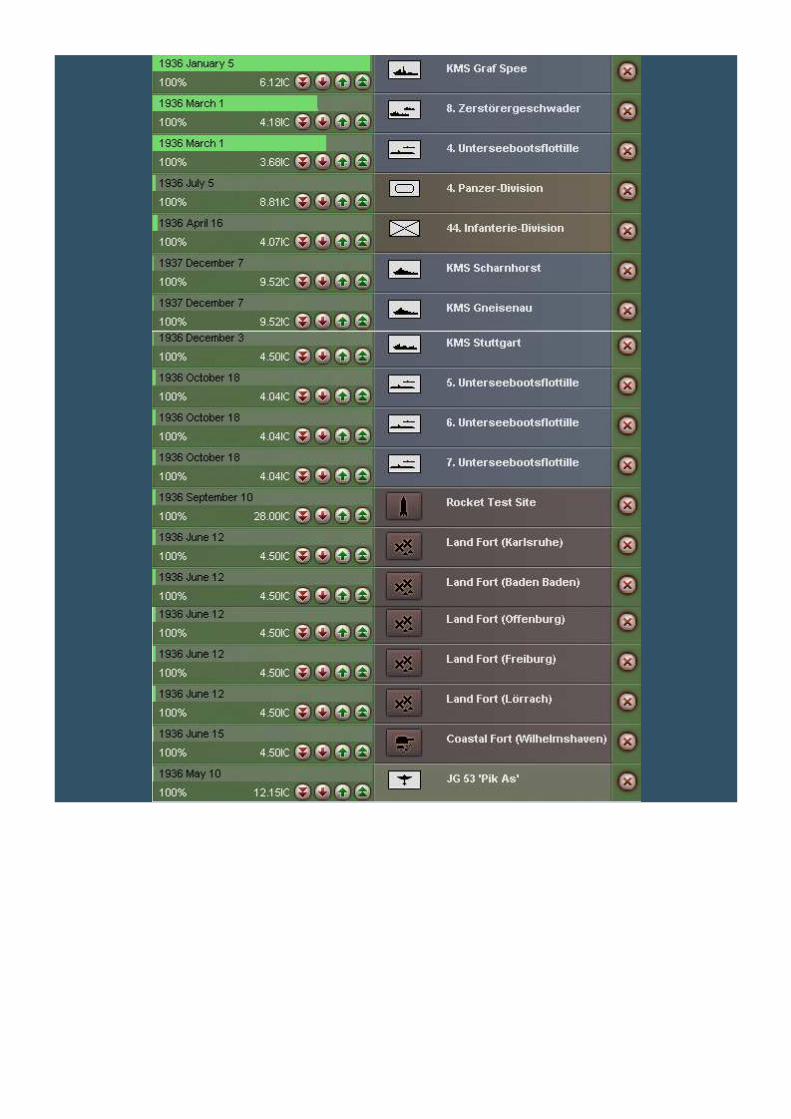
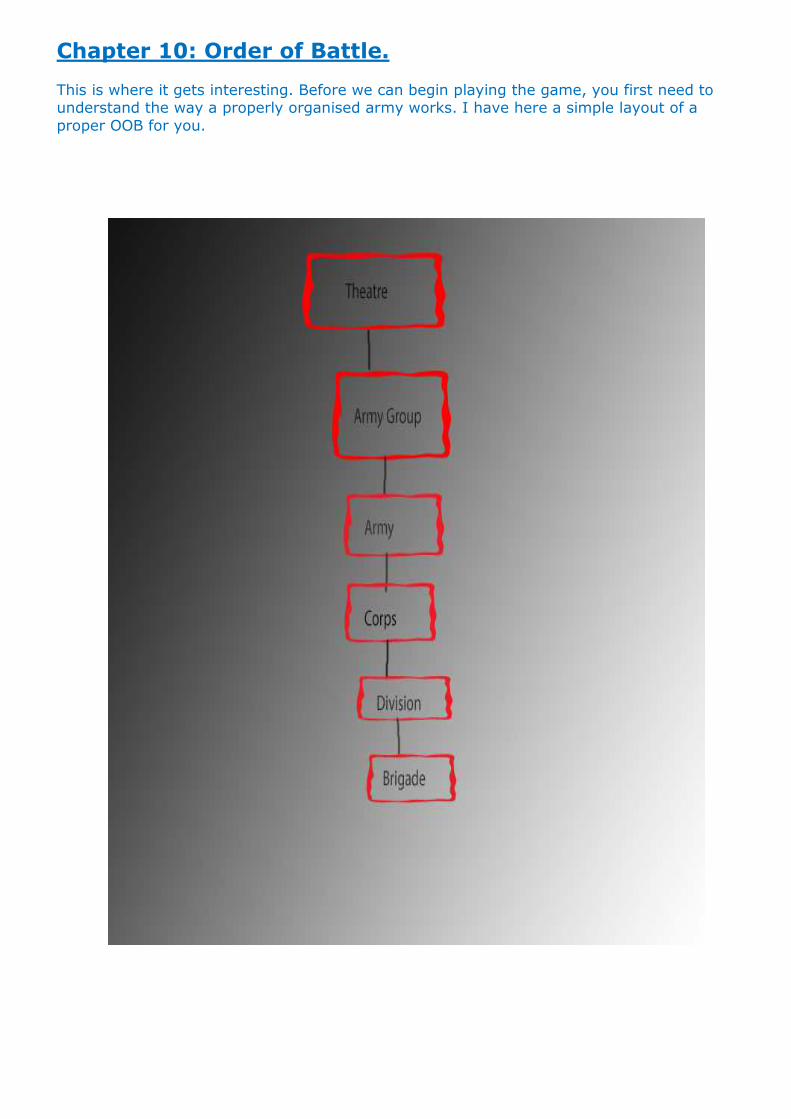
Chapter 10: Order of Battle. This is where it gets interesting. Before we can begin playing the game, you first need to understand the way a properly organised army works. I have here a simple layout of a proper OOB for you.
Let’s look at each section to learn how it works. Skills and Traits: Each commander has a skill level and most have traits (such as being good at defensive operations, or being an expert with armoured forces). A Commander’s skill will always have full effect on all troops under its command. Units and their commanding officer will gain experience when in combat. Lower-level units will gain more experience, while higher-ups will gain gradually less xp. When a commander reaches 100 xp, he will gain a skill level. Each commander has a maximum skill level (this can only be found in the game files, not in the actual game itself). Contrary to HOI2, you will no longer lose skill levels when promoting commanders. During wartime, however, you lose experience when demoting a commander, which may lead to a reduction in skill level. His trait will be halved for each subordinate level: a theatre commander’s traits have full effect on any army groups under its command, ½ effect on armies controlled by the army group, ¼ for all corps HQs that comprise the army in question and 1/8 effect on the divisions or brigades that make up the corps.The various traits for army generals are: Commando: When out of supply, the effects are lessened by 20%. Defensive doctrine: 10% combat bonus when defending. Engineer: 10% combat bonus to attack across river. Contrary to HOI2, you no longer need to put them in a division with an engineer brigade. Fortress buster: 10% combat bonus to attack forts (both land- and coastal versions, apparently). Logistics wizard: 25% reduction on supply consumption. Offensive doctrine: 10% combat bonus when attacking. Panzer Leader: 10% Combined Arms bonus. Trickster: 10% chance to surprise enemy when combat begins. Winter Specialist: 50% bonus to stave off the effects of arctic attrition. An example is in order here. A commander with Logistics wizard trait gives 25% reduction on supply consumption for the division he commands. If we give this guy command of a Theatre, any Army Groups under it will get 25% reduction, the armies within the army group will get 12.5% reduction, the corps will get 6.25% reduction, the divisions will get 3.125% reduction. (yes, this means ALL armed forces in the entire theatre, including airforce and navy.) At the top, we have a Theatre HQ. These are usually defined by a geographical area of operations. In this area, all forces should respond to the proper Theatre. As Germany we have 2 Theatres at the start of the game: the Bitburg HQ, which is charge of the Western half of Germany, and the Berlin HQ, in charge of the Eastern half. We can create additional Theatres later on as the need develops and manually assign a number of provinces for it to control. A Theatre has a range of 2000 km. This means that all forces under its command should be within 2000 km of the Theatre to profit from the Theatre commander’s traits and stacking bonus.
Theatres are commanded by a Field Marshall and reduce the stacking penalty incurred when attacking with too many divisions by 1% for each skill level they have. Since we will try to avoid stacking penalties anyway, the best commander for a theatre is a logistics wizard (see the above example) He will give a 3% reduction on supply consumption for ALL forces in that theatre. The cumulative effect of this can be awesome indeed. It can command any number of army, airforce or navy forces, but usually up to 5 Army Groups is plenty. Directly subordinate to the Theatre is the Army Group. An Army Group groups up to 5 armies that have a common directive. For instance, when we start Barbarossa (the invasion of the Soviet Union), The Berlin HQ will have an Army Group taking care of security in Poland and east Germany, another attacking north SU, one attacking central SU and one attacking south SU. Or you could create an Army Group consisting solely of Aircrafts to protect western Germany. Army Groups have a range of 600 km. They too are commanded by a Field marshall who reduces supply consumption for all units under its command by 5% per skill level. It is therefore wise to have a commander with skill 5 at this level (that’s a reduction of 25% total to the entire Army Group) who has the right trait for the job you need it to do. Next up are Armies. Consisting of up to 5 corps, they are the basis for your strategic planning. (“Army A will do this, while Army B covers their flank,etc.”). Armies have a range up 400 km. They are commanded by generals. In a proper OOB, every division in an army has increased organisation, dependend on the general’s skill. Again, care should be taken to take full advantage of the general’s traits to give him the job he’s best suited for. A Corps is commanded by a lieutenant general and makes up part of the forces under army command. Corps HQ radio range is 200 km. They improve the odds of reserves moving forwards in battle by their skill level. Having the right trait is more important here than skill level. Divisions: consist of at least 2 brigades and (with proper research) up to 5. These are the guys doing the actual fighting and, as such, their Major Generals will gain experience the fastest. Their skill level improves combat efficiency, so it should not be overlooked. However, traits are what matter at this level: having a full 10% combat bonus is superb! Brigades: you can field single brigades as well, but their Brigadier Generals are not supported by the game. They will thus lack divisional bonuses above and beyond lacking manpower. What does this mean in practice for assigning commanders? Theatre: logistics wizards Army Group: highest skill levels you have available (Germany has several lvl-5 commanders at game start). Army: High skill with proper traits Corps: traits, with some skill Divisions: traits. Brigade: none.
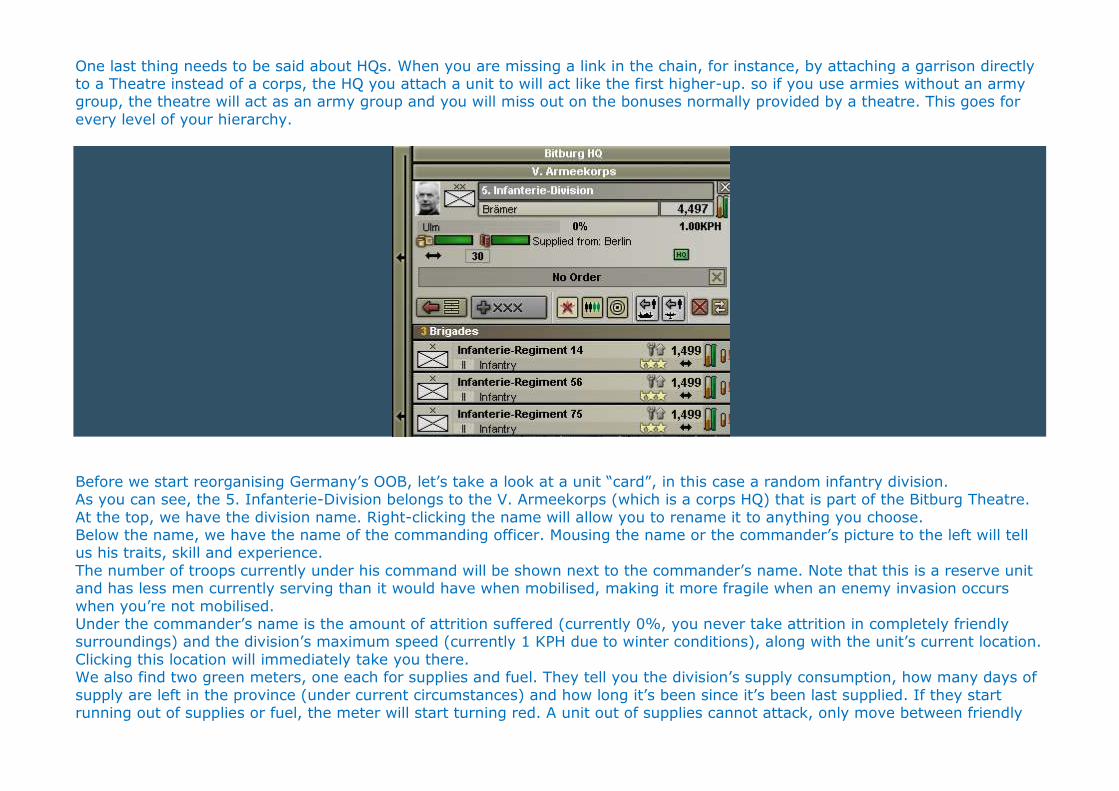
One last thing needs to be said about HQs. When you are missing a link in the chain, for instance, by attaching a garrison directly to a Theatre instead of a corps, the HQ you attach a unit to will act like the first higher-up. so if you use armies without an army group, the theatre will act as an army group and you will miss out on the bonuses normally provided by a theatre. This goes for every level of your hierarchy.
Before we start reorganising Germany’s OOB, let’s take a look at a unit “card”, in this case a random infantry division. As you can see, the 5. Infanterie-Division belongs to the V. Armeekorps (which is a corps HQ) that is part of the Bitburg Theatre. At the top, we have the division name. Right-clicking the name will allow you to rename it to anything you choose. Below the name, we have the name of the commanding officer. Mousing the name or the commander’s picture to the left will tell us his traits, skill and experience. The number of troops currently under his command will be shown next to the commander’s name. Note that this is a reserve unit and has less men currently serving than it would have when mobilised, making it more fragile when an enemy invasion occurs when you’re not mobilised. Under the commander’s name is the amount of attrition suffered (currently 0%, you never take attrition in completely friendly surroundings) and the division’s maximum speed (currently 1 KPH due to winter conditions), along with the unit’s current location. Clicking this location will immediately take you there. We also find two green meters, one each for supplies and fuel. They tell you the division’s supply consumption, how many days of supply are left in the province (under current circumstances) and how long it’s been since it’s been last supplied. If they start running out of supplies or fuel, the meter will start turning red. A unit out of supplies cannot attack, only move between friendly
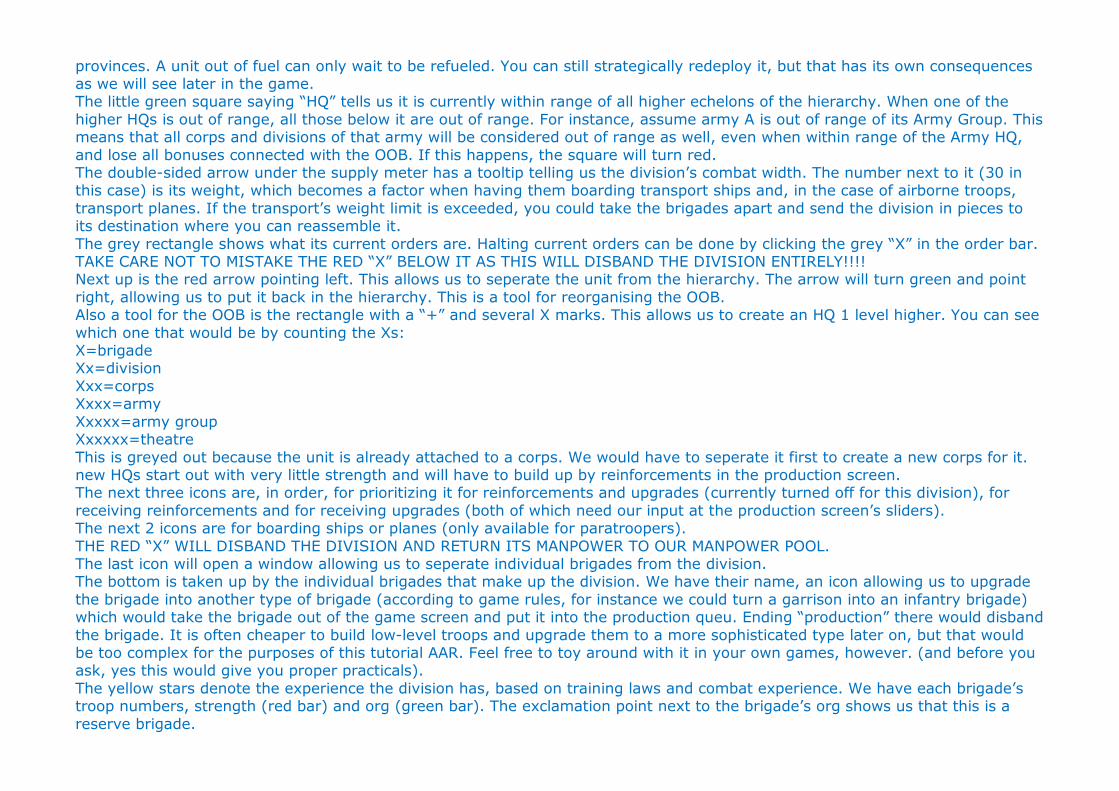
provinces. A unit out of fuel can only wait to be refueled. You can still strategically redeploy it, but that has its own consequences as we will see later in the game. The little green square saying “HQ” tells us it is currently within range of all higher echelons of the hierarchy. When one of the higher HQs is out of range, all those below it are out of range. For instance, assume army A is out of range of its Army Group. This means that all corps and divisions of that army will be considered out of range as well, even when within range of the Army HQ, and lose all bonuses connected with the OOB. If this happens, the square will turn red. The double-sided arrow under the supply meter has a tooltip telling us the division’s combat width. The number next to it (30 in this case) is its weight, which becomes a factor when having them boarding transport ships and, in the case of airborne troops, transport planes. If the transport’s weight limit is exceeded, you could take the brigades apart and send the division in pieces to its destination where you can reassemble it. The grey rectangle shows what its current orders are. Halting current orders can be done by clicking the grey “X” in the order bar. TAKE CARE NOT TO MISTAKE THE RED “X” BELOW IT AS THIS WILL DISBAND THE DIVISION ENTIRELY!!!! Next up is the red arrow pointing left. This allows us to seperate the unit from the hierarchy. The arrow will turn green and point right, allowing us to put it back in the hierarchy. This is a tool for reorganising the OOB. Also a tool for the OOB is the rectangle with a “+” and several X marks. This allows us to create an HQ 1 level higher. You can see which one that would be by counting the Xs: X=brigade Xx=division Xxx=corps Xxxx=army Xxxxx=army group Xxxxxx=theatre This is greyed out because the unit is already attached to a corps. We would have to seperate it first to create a new corps for it. new HQs start out with very little strength and will have to build up by reinforcements in the production screen. The next three icons are, in order, for prioritizing it for reinforcements and upgrades (currently turned off for this division), for receiving reinforcements and for receiving upgrades (both of which need our input at the production screen’s sliders). The next 2 icons are for boarding ships or planes (only available for paratroopers). THE RED “X” WILL DISBAND THE DIVISION AND RETURN ITS MANPOWER TO OUR MANPOWER POOL. The last icon will open a window allowing us to seperate individual brigades from the division. The bottom is taken up by the individual brigades that make up the division. We have their name, an icon allowing us to upgrade the brigade into another type of brigade (according to game rules, for instance we could turn a garrison into an infantry brigade) which would take the brigade out of the game screen and put it into the production queu. Ending “production” there would disband the brigade. It is often cheaper to build low-level troops and upgrade them to a more sophisticated type later on, but that would be too complex for the purposes of this tutorial AAR. Feel free to toy around with it in your own games, however. (and before you ask, yes this would give you proper practicals). The yellow stars denote the experience the division has, based on training laws and combat experience. We have each brigade’s troop numbers, strength (red bar) and org (green bar). The exclamation point next to the brigade’s org shows us that this is a reserve brigade.

Clicking on the brigade will show you its stats. Man, you never appreciate just how much info they cram into that little thing until you start explaining it all! I think we are just about ready to have fun. Time to build our own first Order of Battle! The first thing you should do is to remove all commanders from their current assignments. That way, we can see who is the most skilled, who has the best traits, etc. Fortunately, this is easy to do.
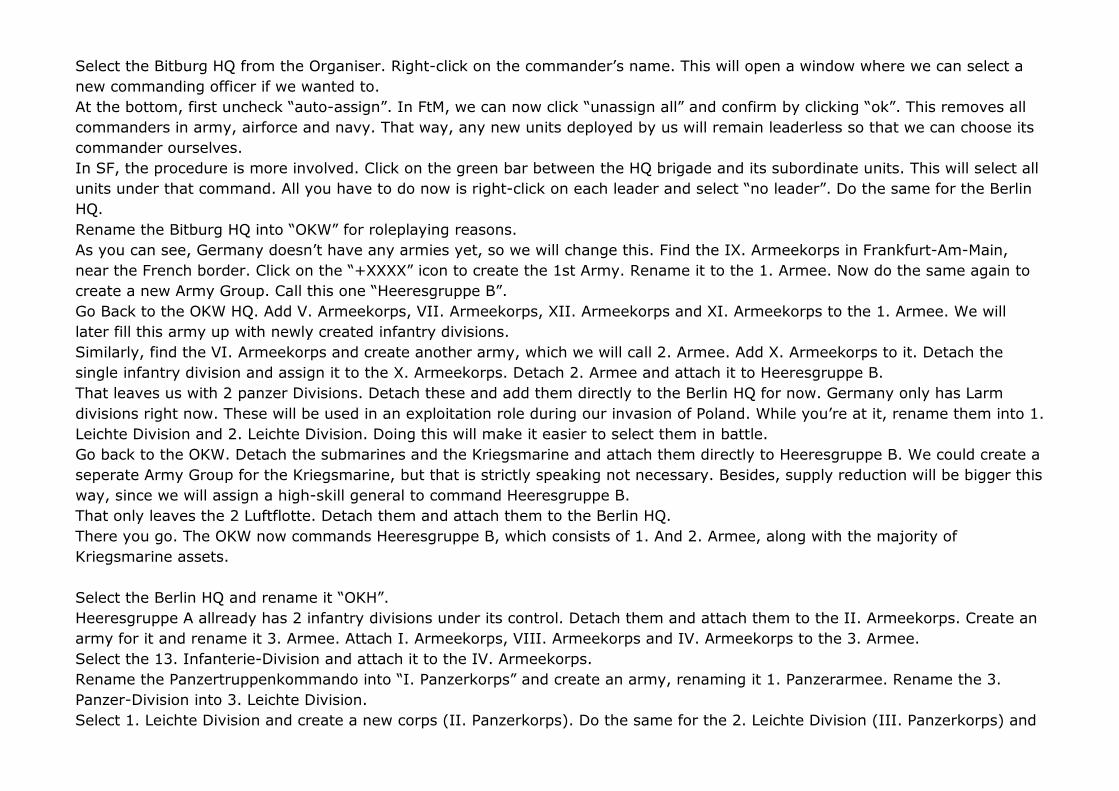
Select the Bitburg HQ from the Organiser. Right-click on the commander’s name. This will open a window where we can select a new commanding officer if we wanted to. At the bottom, first uncheck “auto-assign”. In FtM, we can now click “unassign all” and confirm by clicking “ok”. This removes all commanders in army, airforce and navy. That way, any new units deployed by us will remain leaderless so that we can choose its commander ourselves. In SF, the procedure is more involved. Click on the green bar between the HQ brigade and its subordinate units. This will select all units under that command. All you have to do now is right-click on each leader and select “no leader”. Do the same for the Berlin HQ.
Rename the Bitburg HQ into “OKW” for roleplaying reasons. As you can see, Germany doesn’t have any armies yet, so we will change this. Find the IX. Armeekorps in Frankfurt-Am-Main, near the French border. Click on the “+XXXX” icon to create the 1st Army. Rename it to the 1. Armee. Now do the same again to create a new Army Group. Call this one “Heeresgruppe B”. Go Back to the OKW HQ. Add V. Armeekorps, VII. Armeekorps, XII. Armeekorps and XI. Armeekorps to the 1. Armee. We will later fill this army up with newly created infantry divisions. Similarly, find the VI. Armeekorps and create another army, which we will call 2. Armee. Add X. Armeekorps to it. Detach the single infantry division and assign it to the X. Armeekorps. Detach 2. Armee and attach it to Heeresgruppe B. That leaves us with 2 panzer Divisions. Detach these and add them directly to the Berlin HQ for now. Germany only has Larm
divisions right now. These will be used in an exploitation role during our invasion of Poland. While you’re at it, rename them into 1. Leichte Division and 2. Leichte Division. Doing this will make it easier to select them in battle. Go back to the OKW. Detach the submarines and the Kriegsmarine and attach them directly to Heeresgruppe B. We could create a seperate Army Group for the Kriegsmarine, but that is strictly speaking not necessary. Besides, supply reduction will be bigger this way, since we will assign a high-skill general to command Heeresgruppe B. That only leaves the 2 Luftflotte. Detach them and attach them to the Berlin HQ. There you go. The OKW now commands Heeresgruppe B, which consists of 1. And 2. Armee, along with the majority of Kriegsmarine assets.
Select the Berlin HQ and rename it “OKH”. Heeresgruppe A allready has 2 infantry divisions under its control. Detach them and attach them to the II. Armeekorps. Create an army for it and rename it 3. Armee. Attach I. Armeekorps, VIII. Armeekorps and IV. Armeekorps to the 3. Armee. Select the 13. Infanterie-Division and attach it to the IV. Armeekorps. Rename the Panzertruppenkommando into “I. Panzerkorps” and create an army, renaming it 1. Panzerarmee. Rename the 3. Panzer-Division into 3. Leichte Division. Select 1. Leichte Division and create a new corps (II. Panzerkorps). Do the same for the 2. Leichte Division (III. Panzerkorps) and
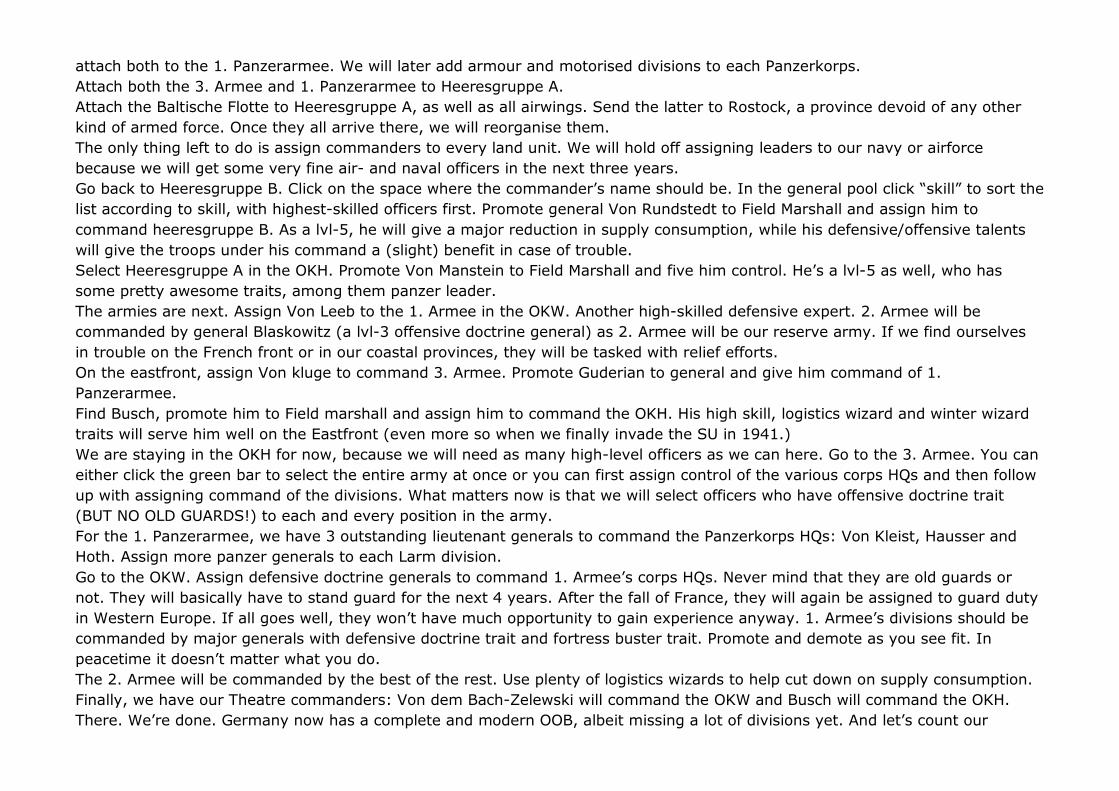
attach both to the 1. Panzerarmee. We will later add armour and motorised divisions to each Panzerkorps. Attach both the 3. Armee and 1. Panzerarmee to Heeresgruppe A. Attach the Baltische Flotte to Heeresgruppe A, as well as all airwings. Send the latter to Rostock, a province devoid of any other kind of armed force. Once they all arrive there, we will reorganise them. The only thing left to do is assign commanders to every land unit. We will hold off assigning leaders to our navy or airforce because we will get some very fine air- and naval officers in the next three years. Go back to Heeresgruppe B. Click on the space where the commander’s name should be. In the general pool click “skill” to sort the list according to skill, with highest-skilled officers first. Promote general Von Rundstedt to Field Marshall and assign him to
command heeresgruppe B. As a lvl-5, he will give a major reduction in supply consumption, while his defensive/offensive talents will give the troops under his command a (slight) benefit in case of trouble. Select Heeresgruppe A in the OKH. Promote Von Manstein to Field Marshall and five him control. He’s a lvl-5 as well, who has some pretty awesome traits, among them panzer leader. The armies are next. Assign Von Leeb to the 1. Armee in the OKW. Another high-skilled defensive expert. 2. Armee will be commanded by general Blaskowitz (a lvl-3 offensive doctrine general) as 2. Armee will be our reserve army. If we find ourselves in trouble on the French front or in our coastal provinces, they will be tasked with relief efforts. On the eastfront, assign Von kluge to command 3. Armee. Promote Guderian to general and give him command of 1. Panzerarmee.
Find Busch, promote him to Field marshall and assign him to command the OKH. His high skill, logistics wizard and winter wizard traits will serve him well on the Eastfront (even more so when we finally invade the SU in 1941.) We are staying in the OKH for now, because we will need as many high-level officers as we can here. Go to the 3. Armee. You can either click the green bar to select the entire army at once or you can first assign control of the various corps HQs and then follow up with assigning command of the divisions. What matters now is that we will select officers who have offensive doctrine trait (BUT NO OLD GUARDS!) to each and every position in the army. For the 1. Panzerarmee, we have 3 outstanding lieutenant generals to command the Panzerkorps HQs: Von Kleist, Hausser and Hoth. Assign more panzer generals to each Larm division.
Go to the OKW. Assign defensive doctrine generals to command 1. Armee’s corps HQs. Never mind that they are old guards or not. They will basically have to stand guard for the next 4 years. After the fall of France, they will again be assigned to guard duty in Western Europe. If all goes well, they won’t have much opportunity to gain experience anyway. 1. Armee’s divisions should be commanded by major generals with defensive doctrine trait and fortress buster trait. Promote and demote as you see fit. In peacetime it doesn’t matter what you do. The 2. Armee will be commanded by the best of the rest. Use plenty of logistics wizards to help cut down on supply consumption. Finally, we have our Theatre commanders: Von dem Bach-Zelewski will command the OKW and Busch will command the OKH. There. We’re done. Germany now has a complete and modern OOB, albeit missing a lot of divisions yet. And let’s count our

blessings that I didn’t decide to give you a tutorial on the Soviet Union. Trust me, if you can manage that one, you can manage any army in the world. Okay, before I close off, let’s run down a little checklist. Did we start trade with US and SU? Did we change ministers? Did we delete all spies abroad? Did we put all our Leadership on spies? Did we start the proper building programs and change our production sliders?
If all answers are “yes”, save the game. If not, go back to the proper chapter in the tutorial to do so now. Then save. And let the games begin!

OOB Pictures at the start of the game
And in response to an earlier question, my complete OOB.
This is the OKW, in charge of defense in the West.
And this is the OKH, in charge of defense in the East. Obviously, both are incomplete and there is little point of an actual screenshot, since I haven't moved anything yet and everybody is still out of position. Suffice to say, 1. Armee are all the Armeekorps in SW Germany, charged with manning the Siegfriedline. 2. Armee are 2 Armeekorps in the NW of Germany, charged with defense of the ports on the Northsea. 3. Armee and 1. Panzerarmee will be used to invade Poland in 1939.
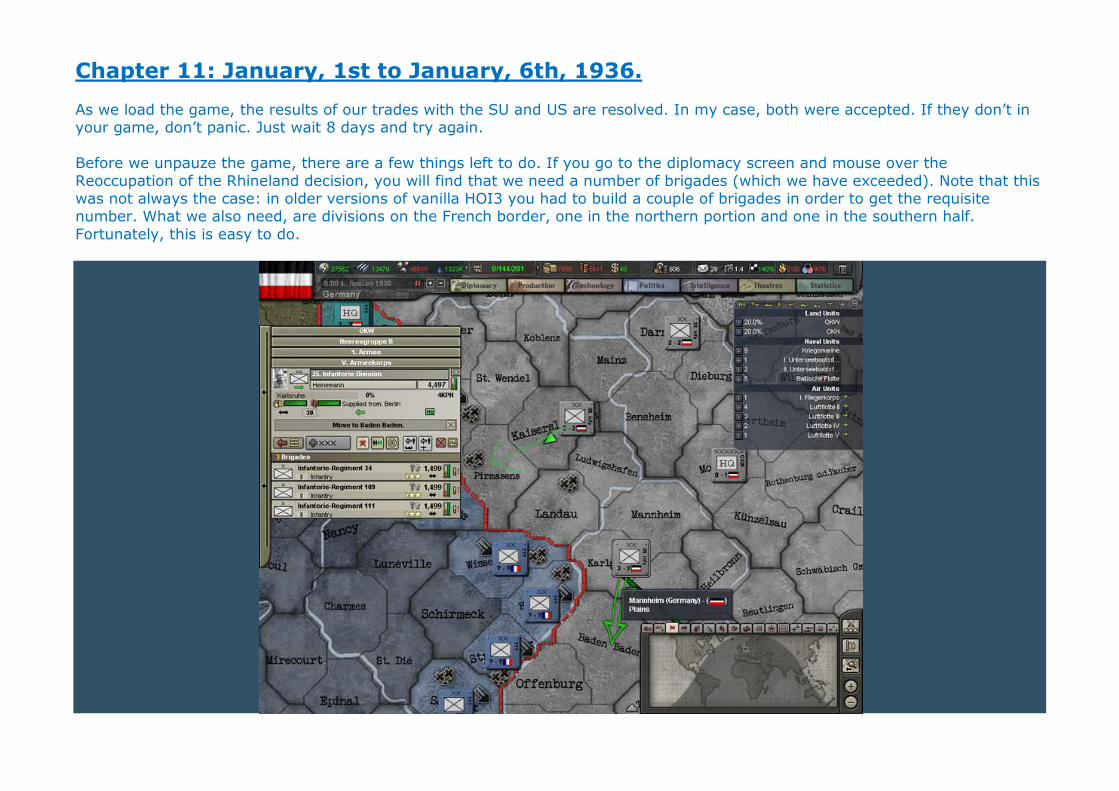
Chapter 11: January, 1st to January, 6th, 1936. As we load the game, the results of our trades with the SU and US are resolved. In my case, both were accepted. If they don’t in your game, don’t panic. Just wait 8 days and try again. Before we unpauze the game, there are a few things left to do. If you go to the diplomacy screen and mouse over the Reoccupation of the Rhineland decision, you will find that we need a number of brigades (which we have exceeded). Note that this was not always the case: in older versions of vanilla HOI3 you had to build a couple of brigades in order to get the requisite number. What we also need, are divisions on the French border, one in the northern portion and one in the southern half. Fortunately, this is easy to do.
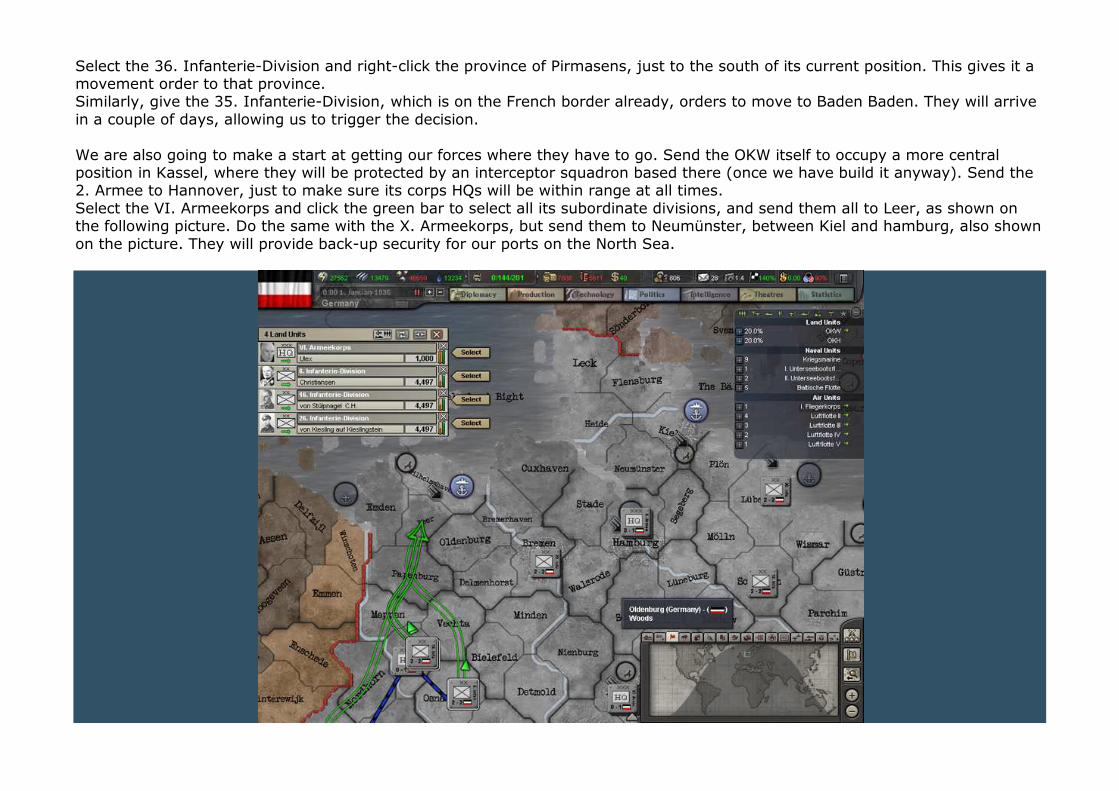
Select the 36. Infanterie-Division and right-click the province of Pirmasens, just to the south of its current position. This gives it a movement order to that province. Similarly, give the 35. Infanterie-Division, which is on the French border already, orders to move to Baden Baden. They will arrive in a couple of days, allowing us to trigger the decision. We are also going to make a start at getting our forces where they have to go. Send the OKW itself to occupy a more central position in Kassel, where they will be protected by an interceptor squadron based there (once we have build it anyway). Send the 2. Armee to Hannover, just to make sure its corps HQs will be within range at all times. Select the VI. Armeekorps and click the green bar to select all its subordinate divisions, and send them all to Leer, as shown on the following picture. Do the same with the X. Armeekorps, but send them to Neumünster, between Kiel and hamburg, also shown on the picture. They will provide back-up security for our ports on the North Sea.
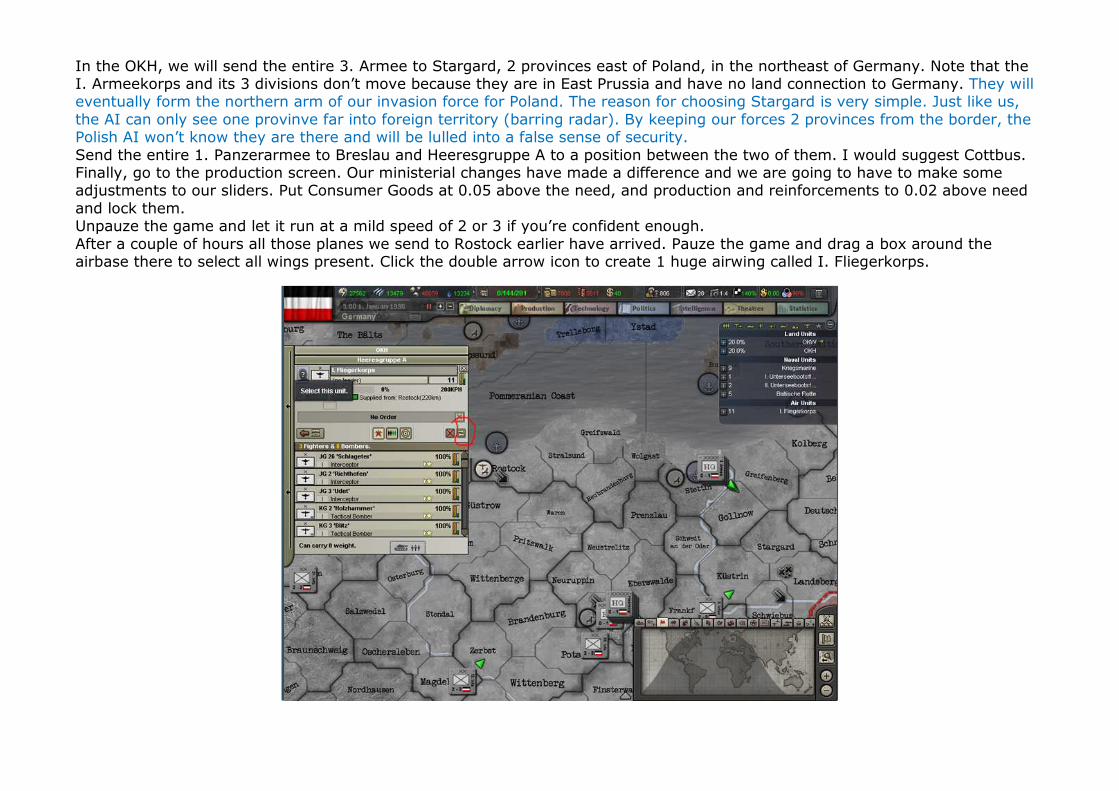
In the OKH, we will send the entire 3. Armee to Stargard, 2 provinces east of Poland, in the northeast of Germany. Note that the I. Armeekorps and its 3 divisions don’t move because they are in East Prussia and have no land connection to Germany. They will eventually form the northern arm of our invasion force for Poland. The reason for choosing Stargard is very simple. Just like us, the AI can only see one provinve far into foreign territory (barring radar). By keeping our forces 2 provinces from the border, the Polish AI won’t know they are there and will be lulled into a false sense of security. Send the entire 1. Panzerarmee to Breslau and Heeresgruppe A to a position between the two of them. I would suggest Cottbus. Finally, go to the production screen. Our ministerial changes have made a difference and we are going to have to make some adjustments to our sliders. Put Consumer Goods at 0.05 above the need, and production and reinforcements to 0.02 above need and lock them. Unpauze the game and let it run at a mild speed of 2 or 3 if you’re confident enough. After a couple of hours all those planes we send to Rostock earlier have arrived. Pauze the game and drag a box around the airbase there to select all wings present. Click the double arrow icon to create 1 huge airwing called I. Fliegerkorps.
Click the double arrow icon I have circled on the screenshot. This opens a window for reorganising our wing. Select each bomber wing to occupy a newly created airwing holding all 8 tactical bombers. Call this Luftflotte I. Select this new wing and repeat, to create another airwing, this time with 5 bombers. Call it LuftflotteII. Select Luftflotte II and create a 3rd bomber wing, this time with 2 tactical bombers. Rename this Luftflotte III. The reason for having 3 bombers per wing instead of 4, as was the habit in HOI2, is that stacking penalties make large airwings less deadly. (for every bomber beyond the first, they get a -10% penalty if they are fighters. Bombers get a -10% even from the 1st bomber itself). Besides, having a lot of smaller wings allows to more easily spread them around as needed. Send I. Fliegerkorps and Luftflotte I to Berlin. Send Luftflotte II to Breslau. Send Luftflotte III to Stettin for now. Once they have received their 3rd bomber, they will be send to Koningsberg. Let the game run and pauze at midnight january,2nd. The computer has now calculated the exact resources for every nation and we can now start doing a bunch of trades. Our first set of trades are destined to give us a ton of money to buy rares and metals with. My usual strategy here is to never ask for more than half their money except in certain cases, which I will tell you. Go to the diplomacy screen. Select Europe in the list of nations. When the war starts, UK naval blockades will sink every convoy we send, so its easier to focus primarily on European nations right from the start as they don’t require convoys. Click on the energy symbol above the list of nations. This will sort the list according to energy gain, with the biggest gains at the top of the list. Click the energy symbol again to reverse the order. Now all nations in Europe have been sorted with the ones needing energy most at the top. These will be our trading partners for now. Trade energy to Italy, netherlands, Hungay, Sweden, Bulgaria, Portugal, Romania and belgium. Always ask for about half their money, which you can see by mousing over each nation’s money resource. Sell 50 energy to the UK. Yes, the UK. We are not at war yet and each trade increases relations by +15. The UK is a major rares producer. We are going to buy rares from them in a couple of days. By first selling to them, our subsequent buys become cheaper due to the increased relationship. We have used up all but 1 of our diplomacy points. Keep the game pauzed and go to the technology screen. Put all leadership, which we had in spies, in diplomacy instead for 1 day. Unpauze. Let it run until midnight of January, 3rd. We now have enough diplomacy points again, so go to the tech screen and put all leadership back into generating spies. Go to the diplomacy screen and make some more energy trades. Trade 50 energy to France. If the AI gives you any kind of trade proposal of its own, the rule is: accept buying metal, rares and oil. Never sell any of these three. Only accept selling supplies and energy if you’re certain you enough of a surplus to be able to handle the trade. Let the game run until the 4th. By this time, our 2 divisions will have ended their maneuvers around the French border and we will get an alert icon telling us there is a decisions to be triggered.
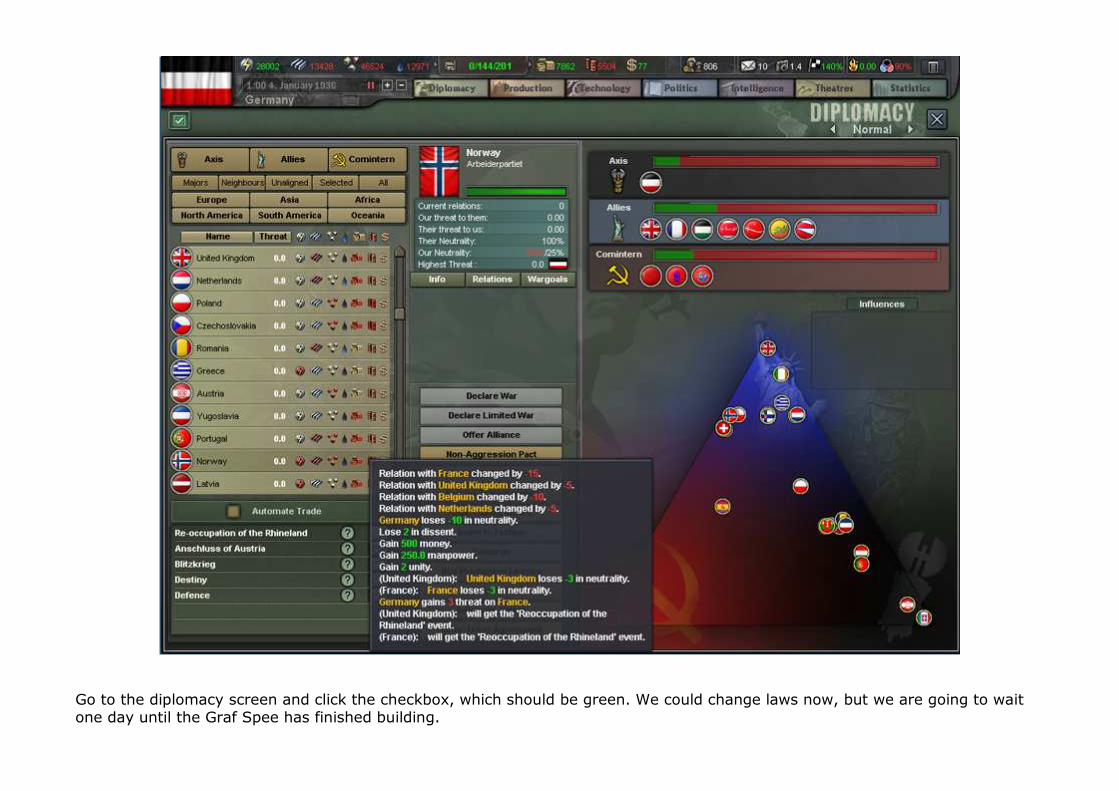
Go to the diplomacy screen and click the checkbox, which should be green. We could change laws now, but we are going to wait one day until the Graf Spee has finished building.
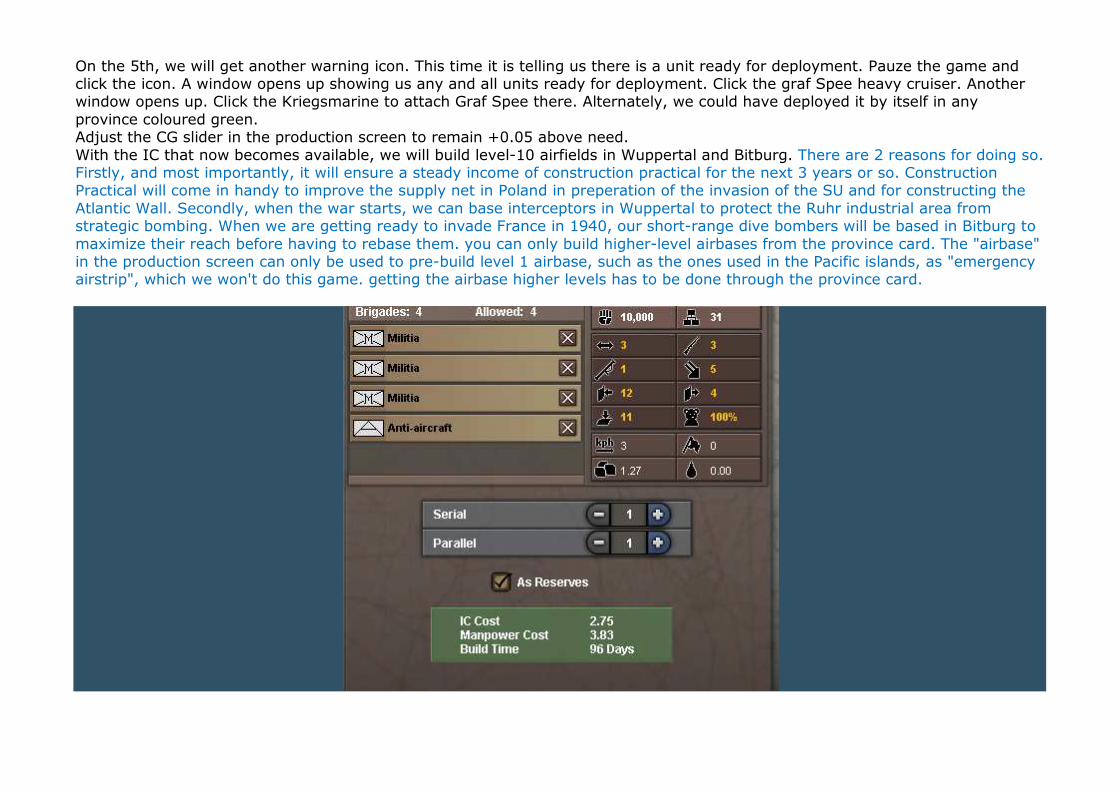
On the 5th, we will get another warning icon. This time it is telling us there is a unit ready for deployment. Pauze the game and click the icon. A window opens up showing us any and all units ready for deployment. Click the graf Spee heavy cruiser. Another window opens up. Click the Kriegsmarine to attach Graf Spee there. Alternately, we could have deployed it by itself in any province coloured green. Adjust the CG slider in the production screen to remain +0.05 above need. With the IC that now becomes available, we will build level-10 airfields in Wuppertal and Bitburg. There are 2 reasons for doing so. Firstly, and most importantly, it will ensure a steady income of construction practical for the next 3 years or so. Construction Practical will come in handy to improve the supply net in Poland in preperation of the invasion of the SU and for constructing the Atlantic Wall. Secondly, when the war starts, we can base interceptors in Wuppertal to protect the Ruhr industrial area from strategic bombing. When we are getting ready to invade France in 1940, our short-range dive bombers will be based in Bitburg to maximize their reach before having to rebase them. you can only build higher-level airbases from the province card. The "airbase" in the production screen can only be used to pre-build level 1 airbase, such as the ones used in the Pacific islands, as "emergency airstrip", which we won't do this game. getting the airbase higher levels has to be done through the province card.
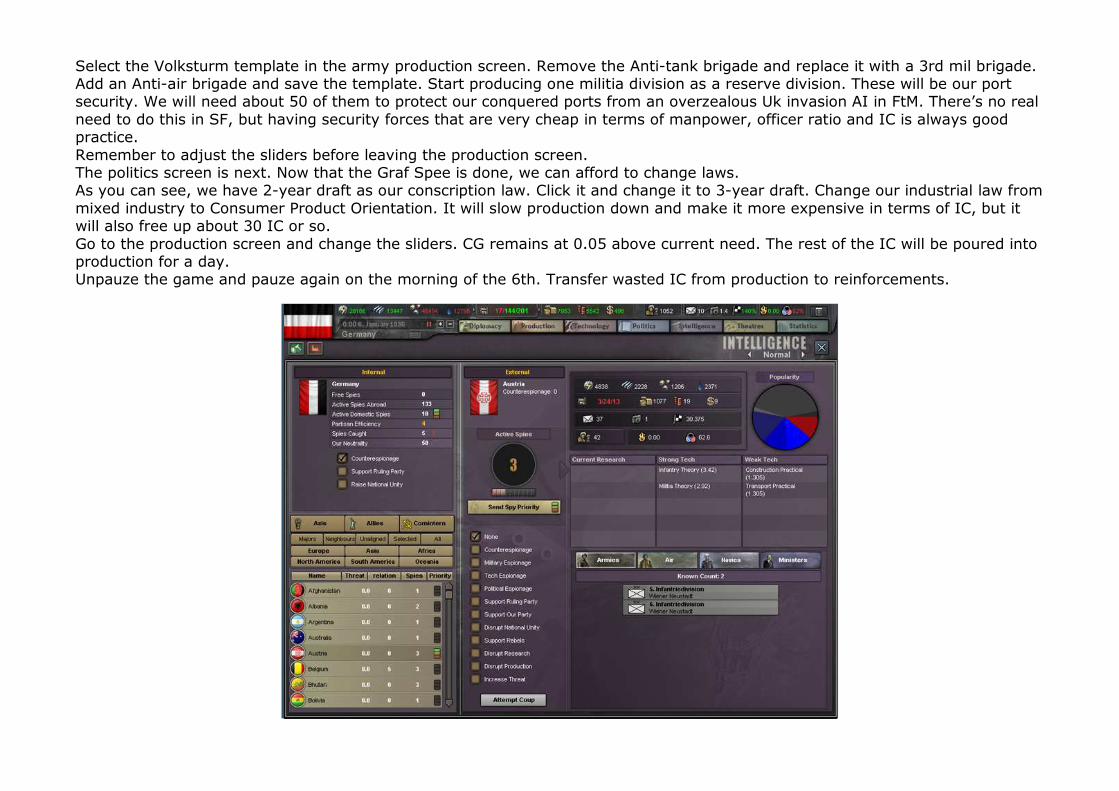
Select the Volksturm template in the army production screen. Remove the Anti-tank brigade and replace it with a 3rd mil brigade. Add an Anti-air brigade and save the template. Start producing one militia division as a reserve division. These will be our port security. We will need about 50 of them to protect our conquered ports from an overzealous Uk invasion AI in FtM. There’s no real need to do this in SF, but having security forces that are very cheap in terms of manpower, officer ratio and IC is always good practice. Remember to adjust the sliders before leaving the production screen. The politics screen is next. Now that the Graf Spee is done, we can afford to change laws. As you can see, we have 2-year draft as our conscription law. Click it and change it to 3-year draft. Change our industrial law from mixed industry to Consumer Product Orientation. It will slow production down and make it more expensive in terms of IC, but it will also free up about 30 IC or so. Go to the production screen and change the sliders. CG remains at 0.05 above current need. The rest of the IC will be poured into production for a day. Unpauze the game and pauze again on the morning of the 6th. Transfer wasted IC from production to reinforcements.
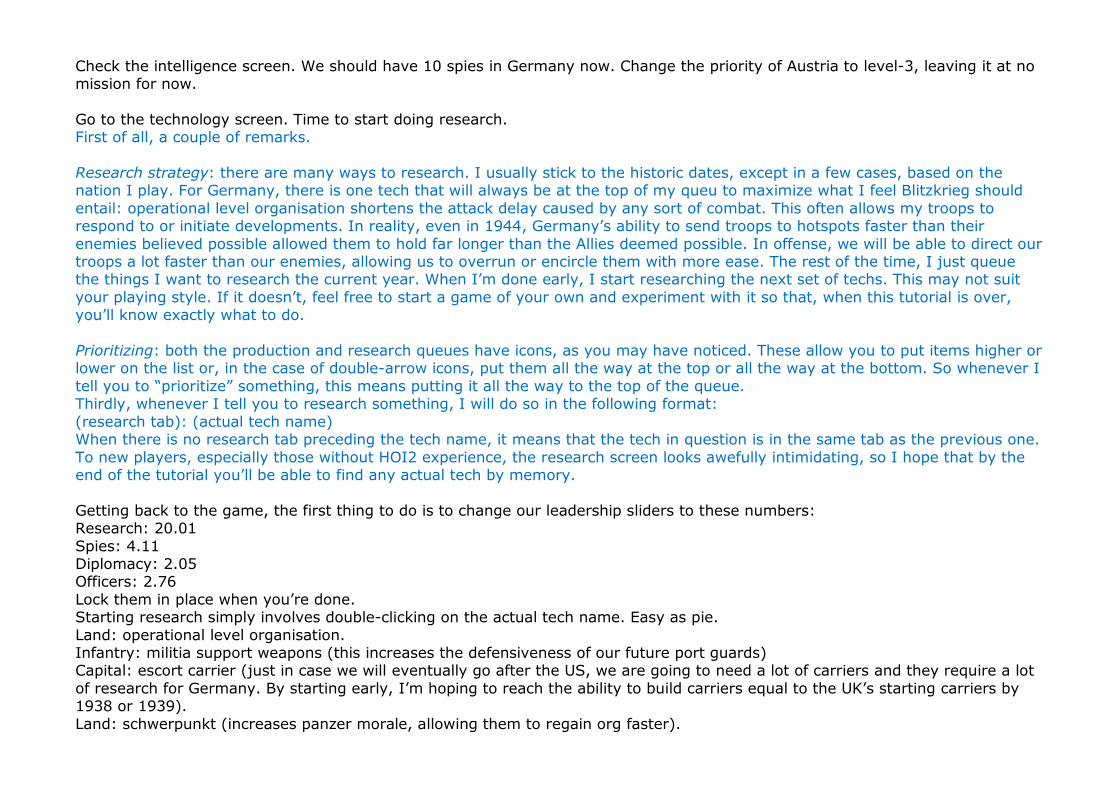
Check the intelligence screen. We should have 10 spies in Germany now. Change the priority of Austria to level-3, leaving it at no mission for now. Go to the technology screen. Time to start doing research. First of all, a couple of remarks. Research strategy: there are many ways to research. I usually stick to the historic dates, except in a few cases, based on the nation I play. For Germany, there is one tech that will always be at the top of my queu to maximize what I feel Blitzkrieg should entail: operational level organisation shortens the attack delay caused by any sort of combat. This often allows my troops to respond to or initiate developments. In reality, even in 1944, Germany’s ability to send troops to hotspots faster than their enemies believed possible allowed them to hold far longer than the Allies deemed possible. In offense, we will be able to direct our troops a lot faster than our enemies, allowing us to overrun or encircle them with more ease. The rest of the time, I just queue the things I want to research the current year. When I’m done early, I start researching the next set of techs. This may not suit your playing style. If it doesn’t, feel free to start a game of your own and experiment with it so that, when this tutorial is over, you’ll know exactly what to do. Prioritizing: both the production and research queues have icons, as you may have noticed. These allow you to put items higher or lower on the list or, in the case of double-arrow icons, put them all the way at the top or all the way at the bottom. So whenever I tell you to “prioritize” something, this means putting it all the way to the top of the queue. Thirdly, whenever I tell you to research something, I will do so in the following format: (research tab): (actual tech name) When there is no research tab preceding the tech name, it means that the tech in question is in the same tab as the previous one. To new players, especially those without HOI2 experience, the research screen looks awefully intimidating, so I hope that by the end of the tutorial you’ll be able to find any actual tech by memory. Getting back to the game, the first thing to do is to change our leadership sliders to these numbers: Research: 20.01 Spies: 4.11 Diplomacy: 2.05 Officers: 2.76 Lock them in place when you’re done. Starting research simply involves double-clicking on the actual tech name. Easy as pie. Land: operational level organisation. Infantry: militia support weapons (this increases the defensiveness of our future port guards) Capital: escort carrier (just in case we will eventually go after the US, we are going to need a lot of carriers and they require a lot of research for Germany. By starting early, I’m hoping to reach the ability to build carriers equal to the UK’s starting carriers by 1938 or 1939). Land: schwerpunkt (increases panzer morale, allowing them to regain org faster).
Air: port strike tactics(this and the following ones are useful for tac and cas as well), Naval strike tactics, Naval air targeting, Naval tactics. Inf: small arms, infantry support weapons, infantry anti-tank weapons, infantry light artillery. Armour: light tank gun, light tank engine, light tank armour, light tank reliability, artillery barrel and ammo, artillery carriage and sights, anti-air barrel and ammo, anti-air carriage and sights. Bomber: basic medium fuel tank, basic bomb. Escorts: destroyer armament, destroyer antiaircraft, destroyer engine, destroyer armour, light cruiser armament, light cruiser antiaircraft, light cruiser armour (not light cruiser engine as this is a 1938 tech!). Capital: heavy cruiser anti-air, battlecruiser anti-air, battleship anti-air, battleship engine. Land: operational level command structure, special forces, assault concentration. Naval: fleet auxiliary carrier doctrine (to unlock the light cruiser and radar doctrines at the very least). Air: logistics strike, installation strike (these 2 will complete our tac bombers’ doctrine), fighter ground control (to maximize the combat bonuses received from radar), NAV pilot training, NAV ground crew training (affects both naval bombers and carrier air groups). For your reference, here is the complete list in order:
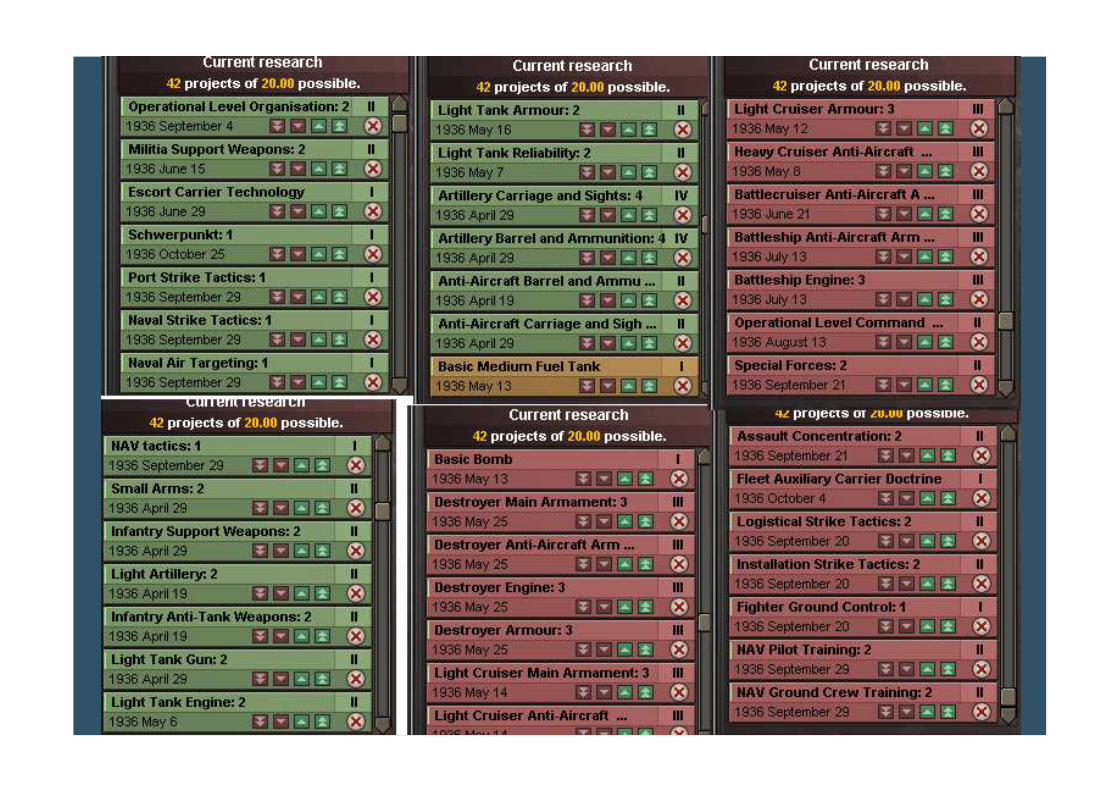

When you’re done, save the game. We’ve barely started and allready we’re making good progress. Just the way it has to be!
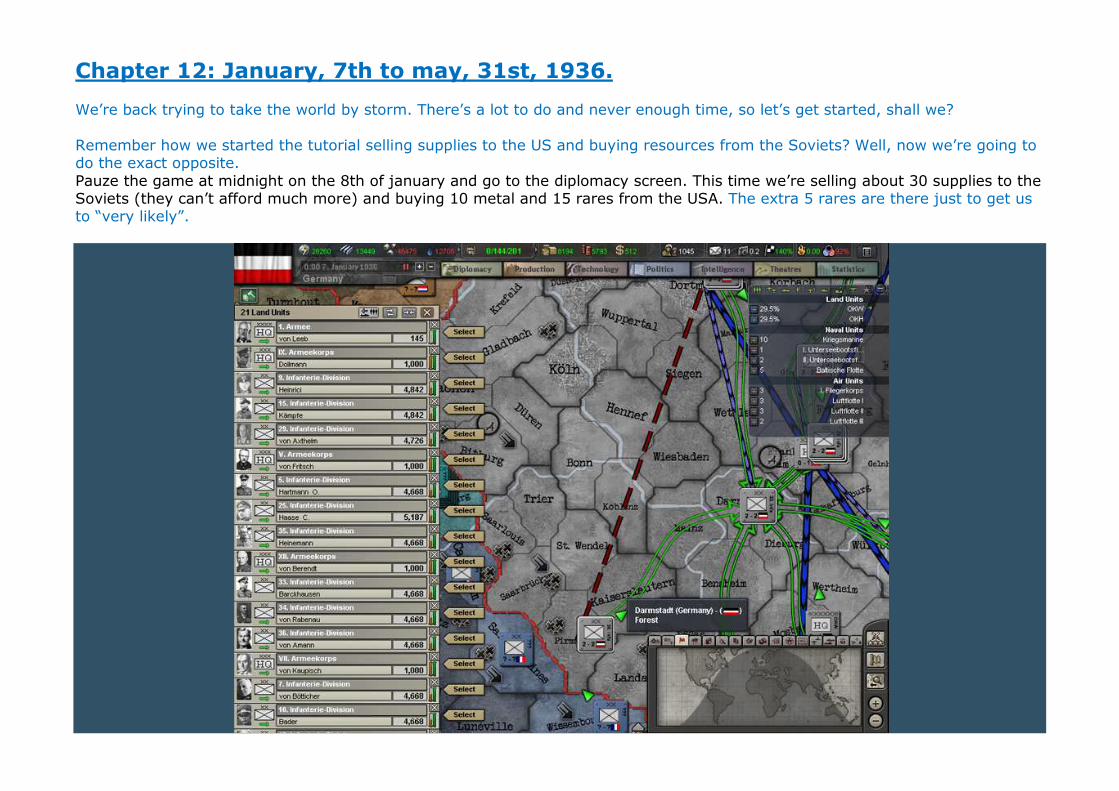
Chapter 12: January, 7th to may, 31st, 1936. We’re back trying to take the world by storm. There’s a lot to do and never enough time, so let’s get started, shall we? Remember how we started the tutorial selling supplies to the US and buying resources from the Soviets? Well, now we’re going to do the exact opposite. Pauze the game at midnight on the 8th of january and go to the diplomacy screen. This time we’re selling about 30 supplies to the Soviets (they can’t afford much more) and buying 10 metal and 15 rares from the USA. The extra 5 rares are there just to get us to “very likely”.
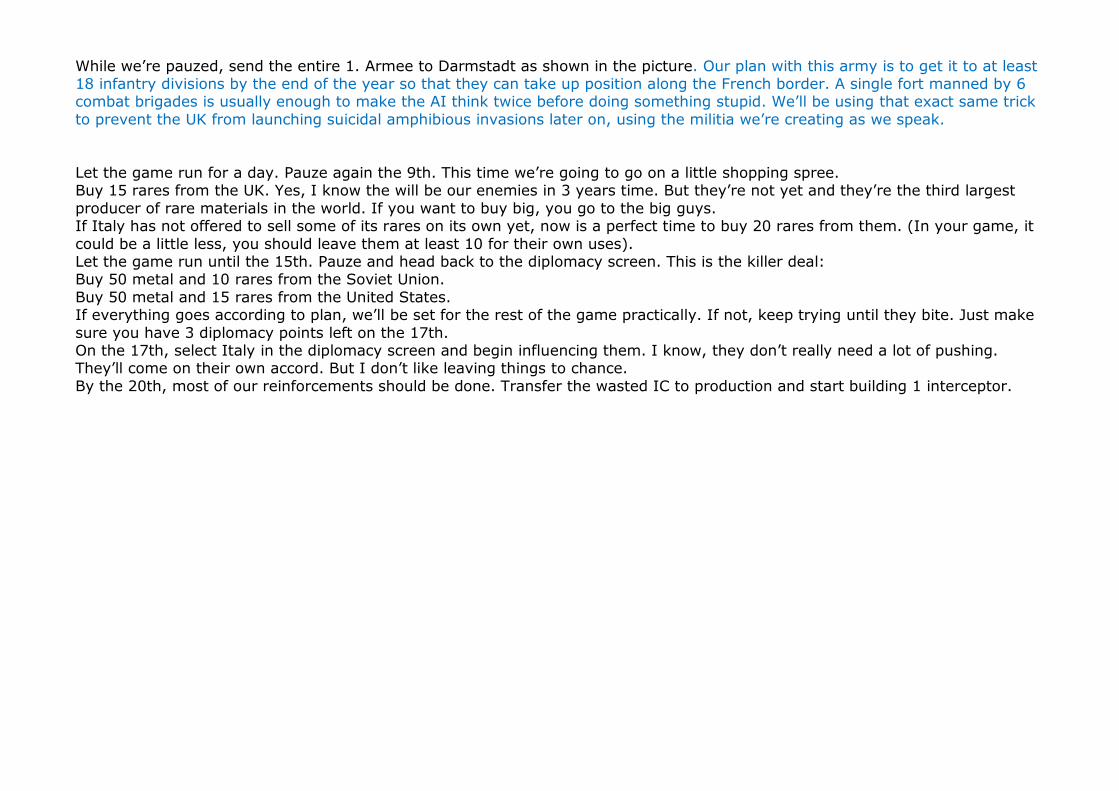
While we’re pauzed, send the entire 1. Armee to Darmstadt as shown in the picture. Our plan with this army is to get it to at least 18 infantry divisions by the end of the year so that they can take up position along the French border. A single fort manned by 6 combat brigades is usually enough to make the AI think twice before doing something stupid. We’ll be using that exact same trick to prevent the UK from launching suicidal amphibious invasions later on, using the militia we’re creating as we speak. Let the game run for a day. Pauze again the 9th. This time we’re going to go on a little shopping spree. Buy 15 rares from the UK. Yes, I know the will be our enemies in 3 years time. But they’re not yet and they’re the third largest producer of rare materials in the world. If you want to buy big, you go to the big guys. If Italy has not offered to sell some of its rares on its own yet, now is a perfect time to buy 20 rares from them. (In your game, it could be a little less, you should leave them at least 10 for their own uses). Let the game run until the 15th. Pauze and head back to the diplomacy screen. This is the killer deal: Buy 50 metal and 10 rares from the Soviet Union. Buy 50 metal and 15 rares from the United States. If everything goes according to plan, we’ll be set for the rest of the game practically. If not, keep trying until they bite. Just make sure you have 3 diplomacy points left on the 17th. On the 17th, select Italy in the diplomacy screen and begin influencing them. I know, they don’t really need a lot of pushing. They’ll come on their own accord. But I don’t like leaving things to chance. By the 20th, most of our reinforcements should be done. Transfer the wasted IC to production and start building 1 interceptor.
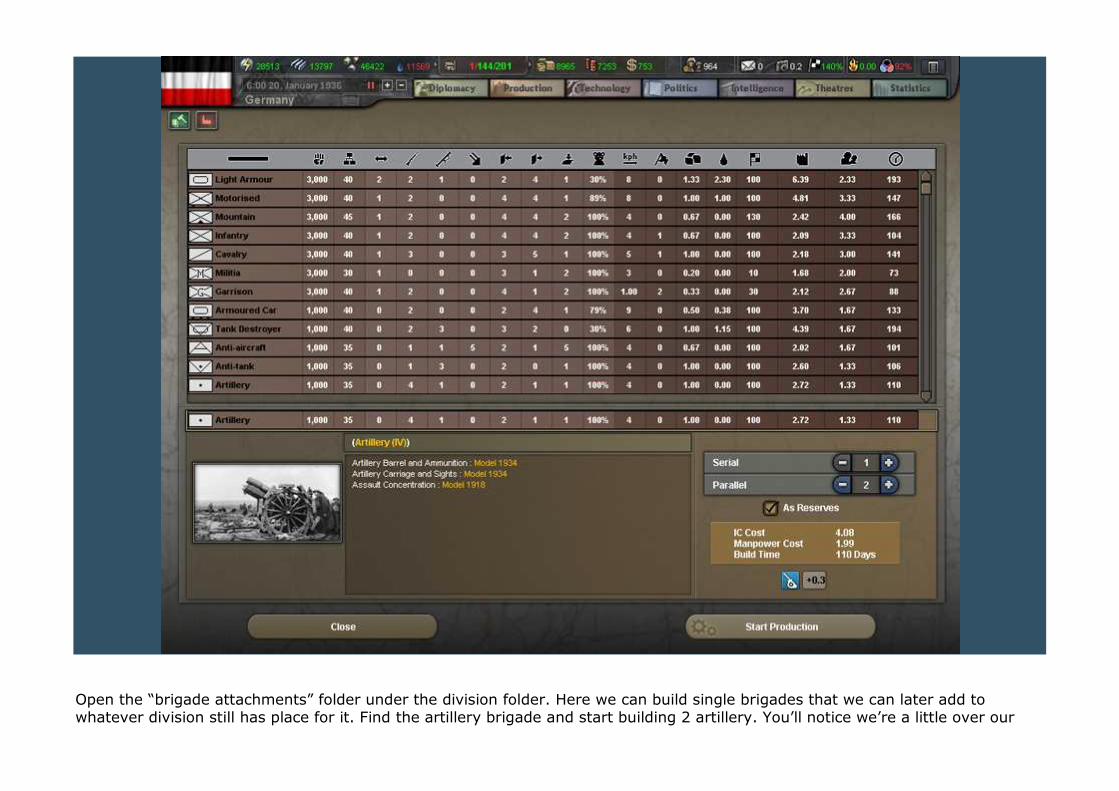
Open the “brigade attachments” folder under the division folder. Here we can build single brigades that we can later add to whatever division still has place for it. Find the artillery brigade and start building 2 artillery. You’ll notice we’re a little over our
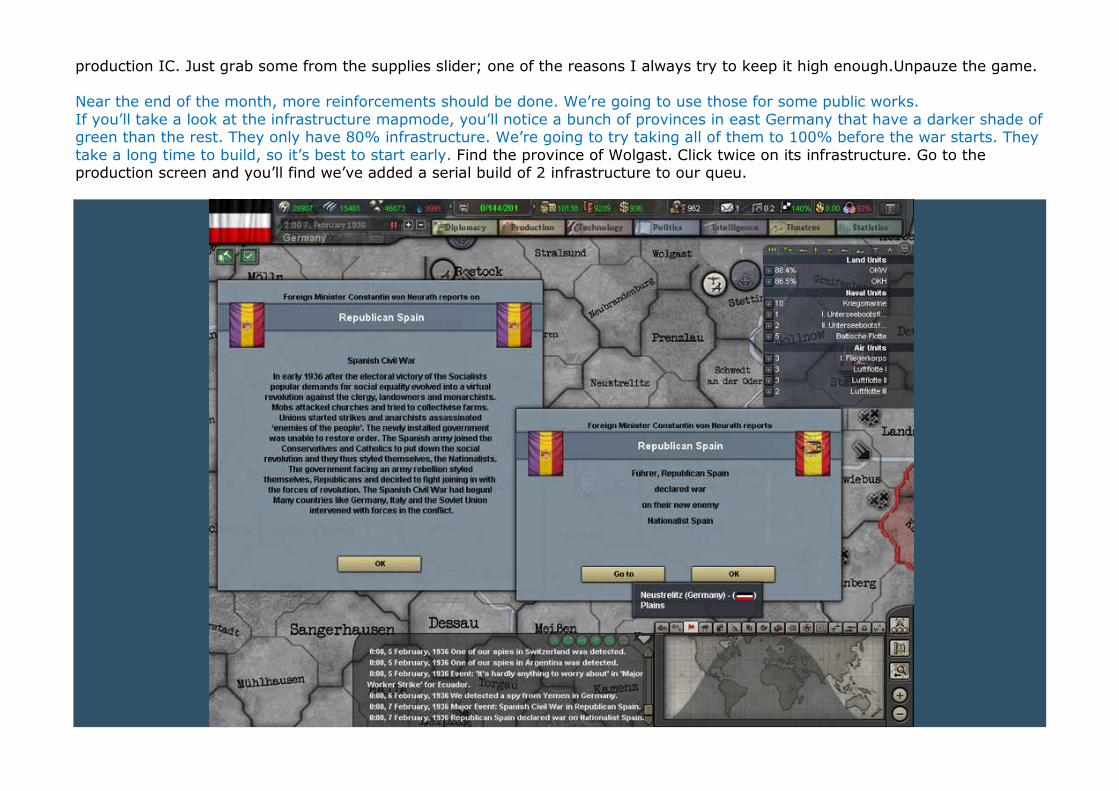
production IC. Just grab some from the supplies slider; one of the reasons I always try to keep it high enough.Unpauze the game. Near the end of the month, more reinforcements should be done. We’re going to use those for some public works. If you’ll take a look at the infrastructure mapmode, you’ll notice a bunch of provinces in east Germany that have a darker shade of green than the rest. They only have 80% infrastructure. We’re going to try taking all of them to 100% before the war starts. They take a long time to build, so it’s best to start early. Find the province of Wolgast. Click twice on its infrastructure. Go to the production screen and you’ll find we’ve added a serial build of 2 infrastructure to our queu.
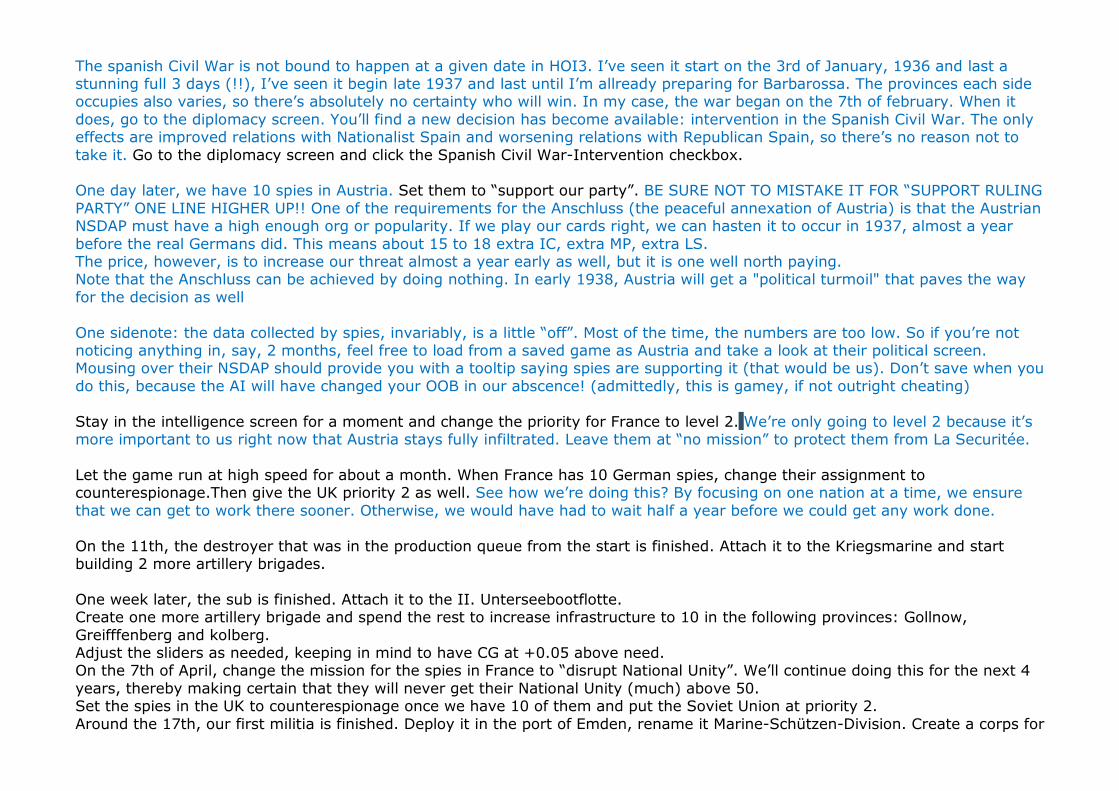
The spanish Civil War is not bound to happen at a given date in HOI3. I’ve seen it start on the 3rd of January, 1936 and last a stunning full 3 days (!!), I’ve seen it begin late 1937 and last until I’m allready preparing for Barbarossa. The provinces each side occupies also varies, so there’s absolutely no certainty who will win. In my case, the war began on the 7th of february. When it does, go to the diplomacy screen. You’ll find a new decision has become available: intervention in the Spanish Civil War. The only effects are improved relations with Nationalist Spain and worsening relations with Republican Spain, so there’s no reason not to take it. Go to the diplomacy screen and click the Spanish Civil War-Intervention checkbox. One day later, we have 10 spies in Austria. Set them to “support our party”. BE SURE NOT TO MISTAKE IT FOR “SUPPORT RULING PARTY” ONE LINE HIGHER UP!! One of the requirements for the Anschluss (the peaceful annexation of Austria) is that the Austrian NSDAP must have a high enough org or popularity. If we play our cards right, we can hasten it to occur in 1937, almost a year before the real Germans did. This means about 15 to 18 extra IC, extra MP, extra LS. The price, however, is to increase our threat almost a year early as well, but it is one well north paying. Note that the Anschluss can be achieved by doing nothing. In early 1938, Austria will get a "political turmoil" that paves the way for the decision as well One sidenote: the data collected by spies, invariably, is a little “off”. Most of the time, the numbers are too low. So if you’re not noticing anything in, say, 2 months, feel free to load from a saved game as Austria and take a look at their political screen. Mousing over their NSDAP should provide you with a tooltip saying spies are supporting it (that would be us). Don’t save when you do this, because the AI will have changed your OOB in our abscence! (admittedly, this is gamey, if not outright cheating) Stay in the intelligence screen for a moment and change the priority for France to level 2. We’re only going to level 2 because it’s more important to us right now that Austria stays fully infiltrated. Leave them at “no mission” to protect them from La Securitée. Let the game run at high speed for about a month. When France has 10 German spies, change their assignment to counterespionage.Then give the UK priority 2 as well. See how we’re doing this? By focusing on one nation at a time, we ensure that we can get to work there sooner. Otherwise, we would have had to wait half a year before we could get any work done. On the 11th, the destroyer that was in the production queue from the start is finished. Attach it to the Kriegsmarine and start building 2 more artillery brigades. One week later, the sub is finished. Attach it to the II. Unterseebootflotte. Create one more artillery brigade and spend the rest to increase infrastructure to 10 in the following provinces: Gollnow, Greifffenberg and kolberg. Adjust the sliders as needed, keeping in mind to have CG at +0.05 above need. On the 7th of April, change the mission for the spies in France to “disrupt National Unity”. We’ll continue doing this for the next 4 years, thereby making certain that they will never get their National Unity (much) above 50. Set the spies in the UK to counterespionage once we have 10 of them and put the Soviet Union at priority 2. Around the 17th, our first militia is finished. Deploy it in the port of Emden, rename it Marine-Schützen-Division. Create a corps for
it, that we will call “I. Sicherungskorps”. Then give that corps an army, renaming that one “1. Reserve Armee” and attaching it to heeresgruppe B. The plan is to have 8 such divisions before the show starts, 2 in each of 4 ports liable to risk UK invasions: Emden, Wilhelmshaven, Hamburg and Kiel. We then have to create about 40 more to cover all the ports in the Netherlands,
Belgium and France. (just to let you know I’m not kidding about having a lot of work ) before invading them in spring of 1940. Anyway, make sure you give it a level-1 Old guard as commander, as well as its corps and army (Level-1 Logistics wizards would be my choice for the latter two). Start a new milita division before unpauzing. Near the end of april our research is starting to finish. As it does, here is what I want you to do: When any tech is researched, go to the research screen. If it is a green tech (the ones that can be researched multiple times), it is important to know that these are not closed when finished. In stead, they are added to the bottom of the queu to be researched again later on. If the tech’s date has only become the current year (i.e. 1936), just let it run at the bottom of the queu. However, when the new date is ahead of time (e.g. it’s now a 1938 tech in 1936), shut it down manually. You can either double-click the tech itself to close it, or you can go to the bottom of the queu to click the red “x” to close it. Incidentally, a new projected end date (projected because theoretical knowledge degrades as well as practical ones) can be seen there as well, so in your own games, you could decide to let it run, prioritize it, or shut it down, based on the strategy you have in mind. I will let you know which techs to prioritize and why when we get to them. Some techs require other stuff to be researched first. The game will let you know when a new tech has become available, like so:
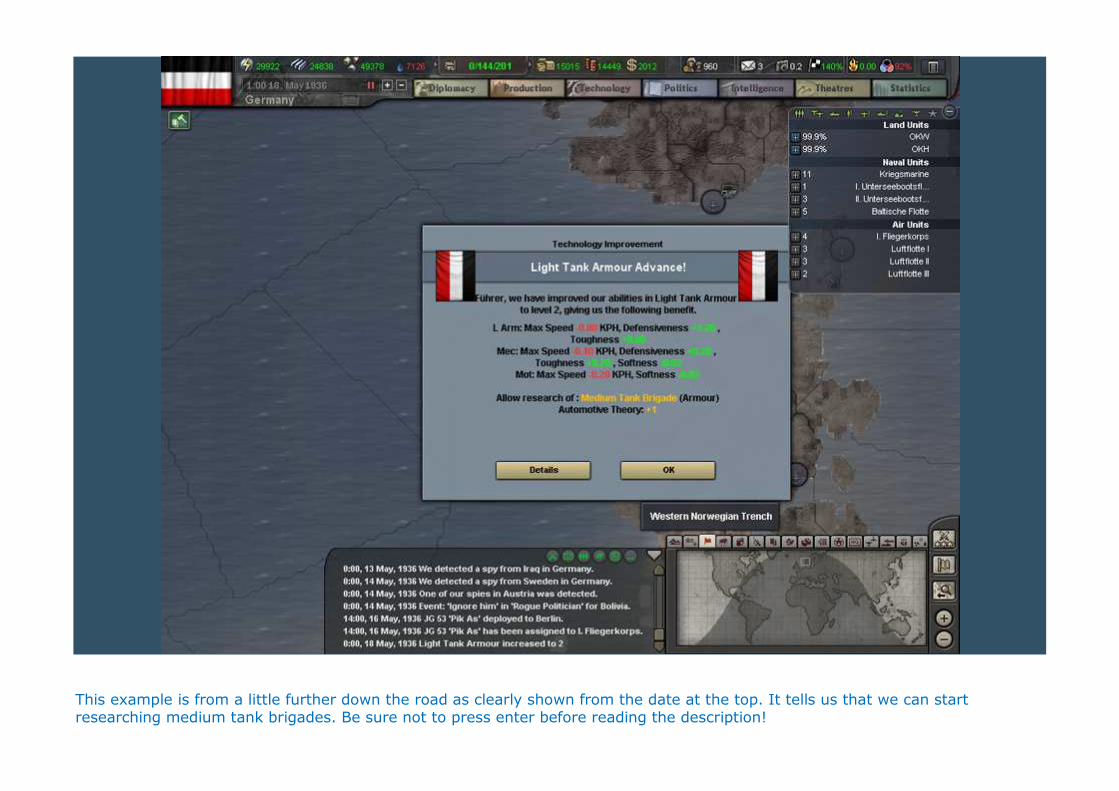
This example is from a little further down the road as clearly shown from the date at the top. It tells us that we can start researching medium tank brigades. Be sure not to press enter before reading the description!
And of course, I’ll be there the whole way to guide you as well. On the 22nd, our first infantry division is finished. Pauze the game and attach it to 1. Armee, specifically to one of the Armeekorps with only 3 divisions. The idea is to have 4 corps of 4 divs each and 1 corps of 2 divs for a total of 18 divs. Remember to give it a commander with Defensive Doctrine and/or Fortress buster traits. Start training a new infantry division before unpauzing, adjusting the sliders as needed. On the 28th, all 4 basic infantry techs are done. We can now research two more techs: Infantry: mountain warfare equipment and arctic warfare equipment. Notice they are golden techs (only need to research it once)? So you might wander, “why bother? They only give us 1% reduction.” True, but that is 1% less attrition for EVERY German division ANYWHERE IN THE WORLD, that finds itself in those circumstances. Believe me, that is a lot of MP saved, considering where we’re going in ’41.
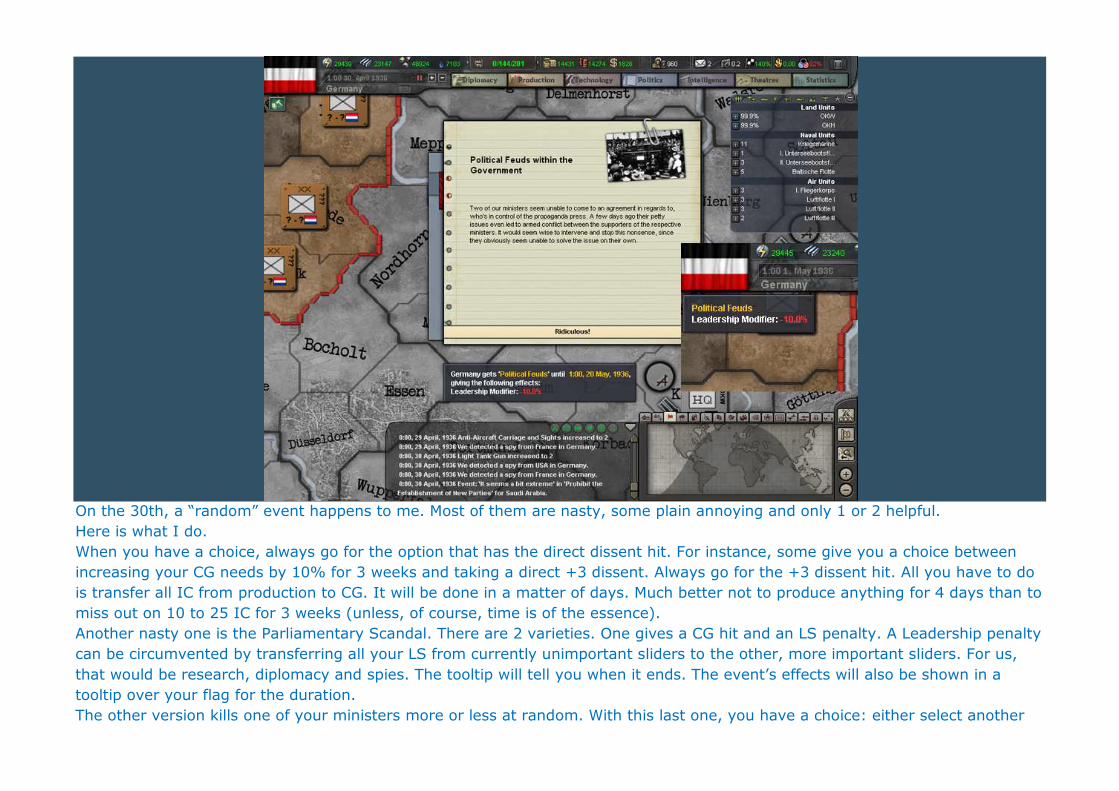
On the 30th, a “random” event happens to me. Most of them are nasty, some plain annoying and only 1 or 2 helpful. Here is what I do. When you have a choice, always go for the option that has the direct dissent hit. For instance, some give you a choice between increasing your CG needs by 10% for 3 weeks and taking a direct +3 dissent. Always go for the +3 dissent hit. All you have to do is transfer all IC from production to CG. It will be done in a matter of days. Much better not to produce anything for 4 days than to miss out on 10 to 25 IC for 3 weeks (unless, of course, time is of the essence). Another nasty one is the Parliamentary Scandal. There are 2 varieties. One gives a CG hit and an LS penalty. A Leadership penalty can be circumvented by transferring all your LS from currently unimportant sliders to the other, more important sliders. For us,
that would be research, diplomacy and spies. The tooltip will tell you when it ends. The event’s effects will also be shown in a tooltip over your flag for the duration. The other version kills one of your ministers more or less at random. With this last one, you have a choice: either select another

minister with the same traits, go with what you have left or reload. I have had games where I lost Hitler (!) to this event. Pretty neat, when you want to go ahistorical. But since we are following history, reload if this event causes you to loose someone you can’t easily replace. (Von Blomberg, for instance, is unique in his supply bonus until 1937 or ’38) If it’s the start of a new month (and your autosave is set to monthly) and you really can’t be bothered with it, just reload the game. It may be gamey, but we can’t see what you’re doing at home. Fun overrides rules in this case. In this case, I am given no say in the matter. I loose 10% LS for 3 weeks. Bummer. On the 9th of may, go to the intelligence screen.
Set your spies in the UK to “increase threat”, the ones in France, if you haven’t done so yet, to disrupt National Unity, and the ones in the Soviet Union to counterespionage. Remember to stop researching stuff that’s ahead of time. On the 11th, the UK ended the trade deal (buying energy) with me. If they do, check your monetary gain to see if the reduced income will hurt you. If it does, try to trade with someone. (the Soviets are always looking for supplies) About +5$ would be sufficient for the most urgent needs. Our first artillery brigade has finished on the same day. There are three major ways of deploying them: The first is deploying it somewhere on the map, far away from any battlefronts, move the division that’s meant to have it to that
same province and merge the two. This is the safest method if the division is in combat when the brigade is finished. It is also what the Germans did in real life, which is why there were more SS-divisions in Arnhem than there should have been during operation Market Garden. The second is by clicking on the brigade in the deployment queu, and in the follow-up window click on the target division. Fastest method if your army is small. The third is new to FtM. Sf players will not be able to do this, unfortunately. Click the alert icon at the top of the screen. Then click the theater and open the OOB browser by clicking the left-hand side of the unit card. You can now drag the brigade where you want it to go. Incidentally, you can even do this if the division in question has no land connection to your capital (such as the ones
in East Prussia). This is my preferred method if there are a lot finishing on the same day. Attach the brigade to any infantry division and start a new artillery brigade in the production screen. On the 16th, we have a new interceptor. Attach it to the I. Fliegerkorps and build a new one. Also on the 16th, the last of our Light tank techs finishes. Go to the research screen and begin research of: Armour: Medium Tank Brigade. Find it at the bottom of the research queu and click the double arrow pointing upwards, prioritizing it as it is of major importance to Germany.
On the 31st, another interceptor finished building. Deploy it to Wilhelmshaven and rename it “II. Fliegerkorps”. Begin building another interceptor. Our accumulated practicals from various sources has given us enough of a discount by now that we can afford to begin building a new artillery brigade. Do so now. Then go to the intelligence screen. Increase threat in the Soviet Union to begin making Romania nervous. find Romania itself and chance its priority to level 2 as well.
Chapter 13: June –December 1936. When we last left off, we had started building up our practicals. We will continue to do so for the rest of the year and much of 1937, by which time we will start to really focus on the really important stuff: infantry, armour, motorised infantry, interceptors, tactical and support bombers. If you keep an eye on your production sliders, you will start to notice a series of drops in CG need. This is due to our increasing the threat of the Soviets and British. If you see this happen, transfer your wasted IC from CG needs to supplies. And now, let’s play Hearts of Iron III. Let the game run until 17th of June. When Militia Support Weapons gets researched, let it run. We are now researching 1936 tech.
As the militia are there only as a deterrent, not as an actual fighting force, they only need a boost in their defensiveness. On the 29th, the forts we started building on day 1 finish. Pause the game and build coastal forts in Emden, Hamburg and Kiel. Use the rest of the free IC to start producing our first Close Air Support bomber (the infamous German Stuka). Just like we did before, start a serial run of 2 infrastructure in Köslin, Rügenwalde, Stolp, Lauenburg, Belgard, Neustettin, Deutsche krone and Schneidemuhl. If you go to the infrastructure map mode, they are easy to find: the darker green provinces in the NE of mainland Germany. Click each province and add 2 bars to the province’s infrastructure. We have enough left for an extra artillery brigade. Use the remainder to adjust the sliders. Keep an eye on the Intelligence screen from time to time. When Romania has 10 German spies, give them a mission of “support our party”. This will slow down their drift towards the other factions. Whenever an artillery brigade is finished, attach it to an infantry division and build the same amount of artillery brigades, adjusting sliders as you go. We will also start a new interceptor, infantry and militia whenever one gets done. On the 3rd of July, we finish researching Escort Carrier technology. Go to the research screen and immediately start researching Aircraft Carrier Technology in the Capital tab. Go to the bottom of the research queu and click the double arrows pointing up to prioritize the research. Escort carriers and Aircraft Carriers (also known as fleet carriers) have a couple of major distinctions. First, escort carriers (CVE) only have 1 Carrier Air Group (CAG), while Carriers (CV) have two. Secondly, while the CAG of an escort carrier gain doctrine research, the CVE does not. In other words, while they seem a lot cheaper and thus more interesting for a land-based nation such as Germany, they cannot hope to win against a CV. We will, later on, build 1 or 2 CVE to escort our eventual invasion fleets, but our focus should be on CV, commonly accepted as the single most powerful warship in the game. The ones we could build now, are basically the kind of carriers the UK and USA started building during WWI. In other words, we are still 20 years behind the times. The only way to make up for it is by tech rushing it: keeping the techs at the top of the research queu at all times until they are ahead of the time. Near the end of the month, our Light Armour finished. Deploy it to Breslau and create a corps for it. Rename this “IV. Panzerkorps” and attach it to the 1. Panzerarmee, making sure to give both the corps and the division a panzer general for maximum effect. Go to the poduction screen. Find the motorised infantry template in the division tab. Add 2 Tank destroyer brigades and save the template. Doing this will make them a combined arms division, as evidenced by their softness dropping to between 33 and 66%. Start building 1 motorised division before unpausing. Put the rest of the IC in supplies for now. A few days later, we finish a militia div. deploy it to Emden and rename it “2. Marine-Schützen-Division” for ease of reference. Attach it to the I. sicherungskorps we created earlier and give it a commander with skill 1 (not a logistics wizard, though, these will command the corps and armies we will build later). Sometime in august, an infantry gets done. Attach it to an armeekorps in the 1. Armee that has only 3 divisions.
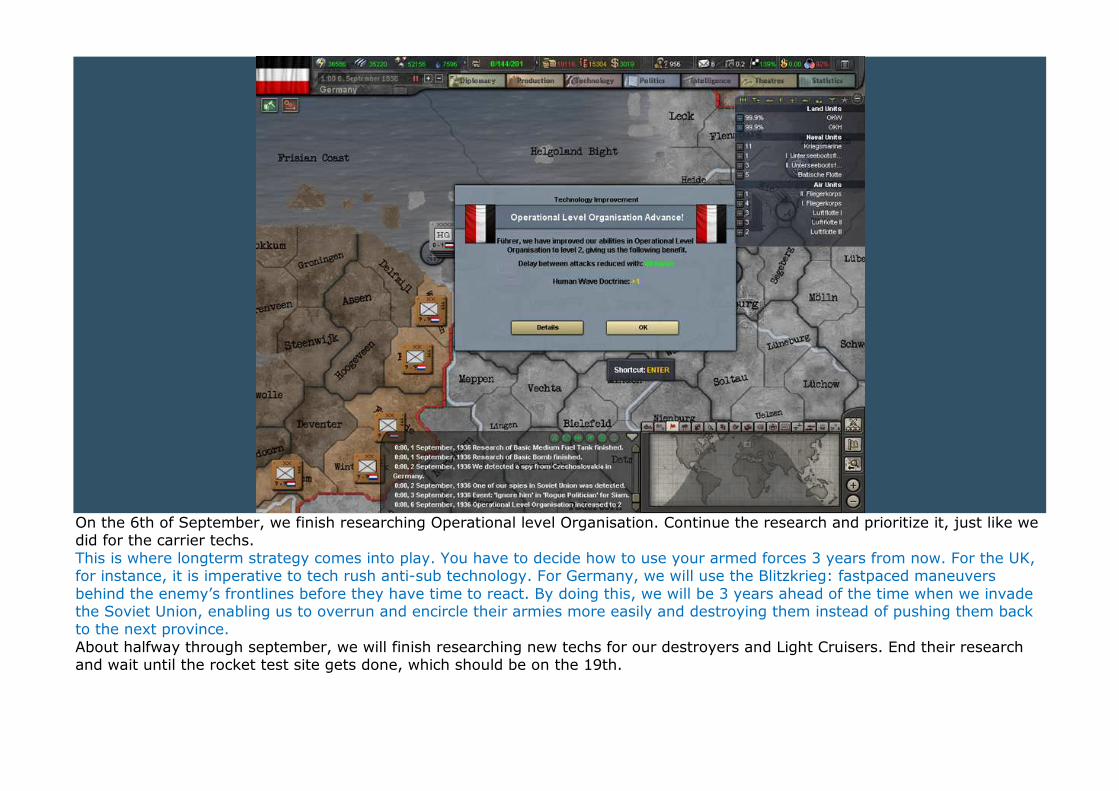
On the 6th of September, we finish researching Operational level Organisation. Continue the research and prioritize it, just like we did for the carrier techs. This is where longterm strategy comes into play. You have to decide how to use your armed forces 3 years from now. For the UK, for instance, it is imperative to tech rush anti-sub technology. For Germany, we will use the Blitzkrieg: fastpaced maneuvers behind the enemy’s frontlines before they have time to react. By doing this, we will be 3 years ahead of the time when we invade the Soviet Union, enabling us to overrun and encircle their armies more easily and destroying them instead of pushing them back to the next province. About halfway through september, we will finish researching new techs for our destroyers and Light Cruisers. End their research and wait until the rocket test site gets done, which should be on the 19th.
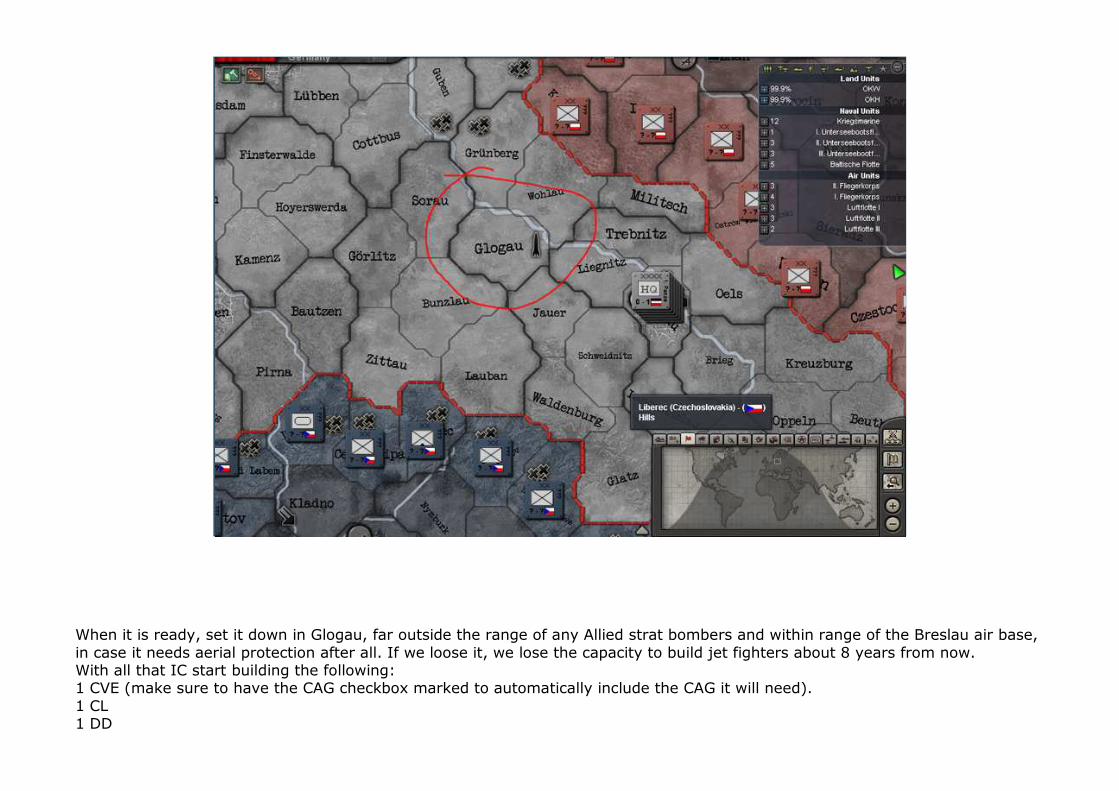
When it is ready, set it down in Glogau, far outside the range of any Allied strat bombers and within range of the Breslau air base, in case it needs aerial protection after all. If we loose it, we lose the capacity to build jet fighters about 8 years from now. With all that IC start building the following: 1 CVE (make sure to have the CAG checkbox marked to automatically include the CAG it will need). 1 CL 1 DD
1 BB (until our carrier fleets will be up to strength, we will have to rely on other capital ships to protect our shores. Plus battleships have awesome shore bombardment capability). Two days later, an interceptor gets done. Attach it to the II. Fliegerkorps in Wilhelmshaven and start a new interceptor. On the 28th, we finish researching medium tank brigade. Start researching the Medium Tank gun, armour, engine and reliability and prioritize them. We could have saved the IC from the Rocket Test Center for building Medium Armour divisions, but I feel it is more important to start building up some kind of Kriegsmarine while we can. (alternately, we could have started a couple of new subs instead, if convoy raiding was to be our main naval focus) Or we could have gone for the highly priced transport planes, that allow us to air supply our troops. Again, it is a matter of strategic choice. I usually go for the Transport Wing, but I’ve found I always forget I have them when I need them. So in my case, I might as well strengthen the navy instead, without whom any invasion of Great Brittain is doomed from the start. The UK and France will eventually both cancel the trade deals we offered them early on in the game. When they do, check your monetary gain. If it is still above +3$ per day, you can safely wait until the SU comes to us to buy supplies (why spend Diplomacy points when we don’t have to?). However, if you find yourself going under the +3$ per day limit, try trading energy or supplies to anyone willing to pay. In oktober, we finish another interceptor wing. Attach it to the II. Fliegerkorps and start building another one. On the 2nd of november, our subs are done. Deploy them to Wilhelmshaven, rename them III. Unterseebootflotte and start building 3 more. A lot of you are interested in submarine warfare, so I decided to give in to a certain degree, just to show you what to expect in your own games. On the 6th, a new militia gets done. Deploy it to Wilhelmshaven, rename it and attach it to the I. Sicherungskorps. Start a new one before unpausing. Just before the end of the month, the last infantry division for the 1. Armee is done. Attach it to the only Armeekorps in the 1. Armee that only has 3 divisions. Make sure you have 4 corps with 4 infantry divisions per corps and 1 corps with only 1 divisions. Also make sure that they are all commanded by either defensive generals or fortress busters. Start building a new infantry division. In the first week of december, our CAS finishes. Deploy it to Berlin, rename it “Stuka 1” and start building a new CAS. One day later, the coastal forts are done. Ensure yourself that Emden, Wilhelmshaven, Hamburg and Kiel all have one. Go to the infrastructure mapmode. In the SE of Germany, we will find another 6 provinces that have only 80% infrastructure. Build them up
to level-10 (most of our panzers will strike Poland from here, so good infrastructure is essential here, more so than in the north.) With the rest of the IC start building 4 artillery brigades. On the 16th, we can deploy KMS Stuttgart to the Kriegsmarine and use the IC for 2 more artillery brigades. The rest will go into supplies.
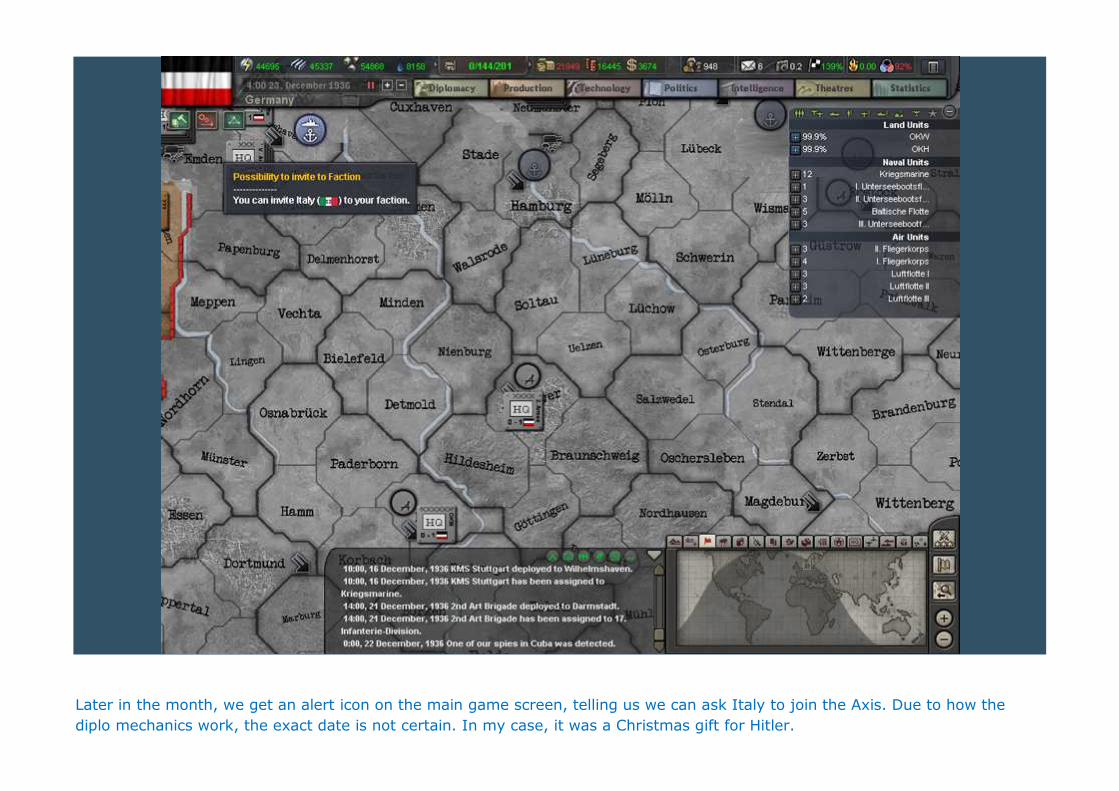
Later in the month, we get an alert icon on the main game screen, telling us we can ask Italy to join the Axis. Due to how the
diplo mechanics work, the exact date is not certain. In my case, it was a Christmas gift for Hitler.
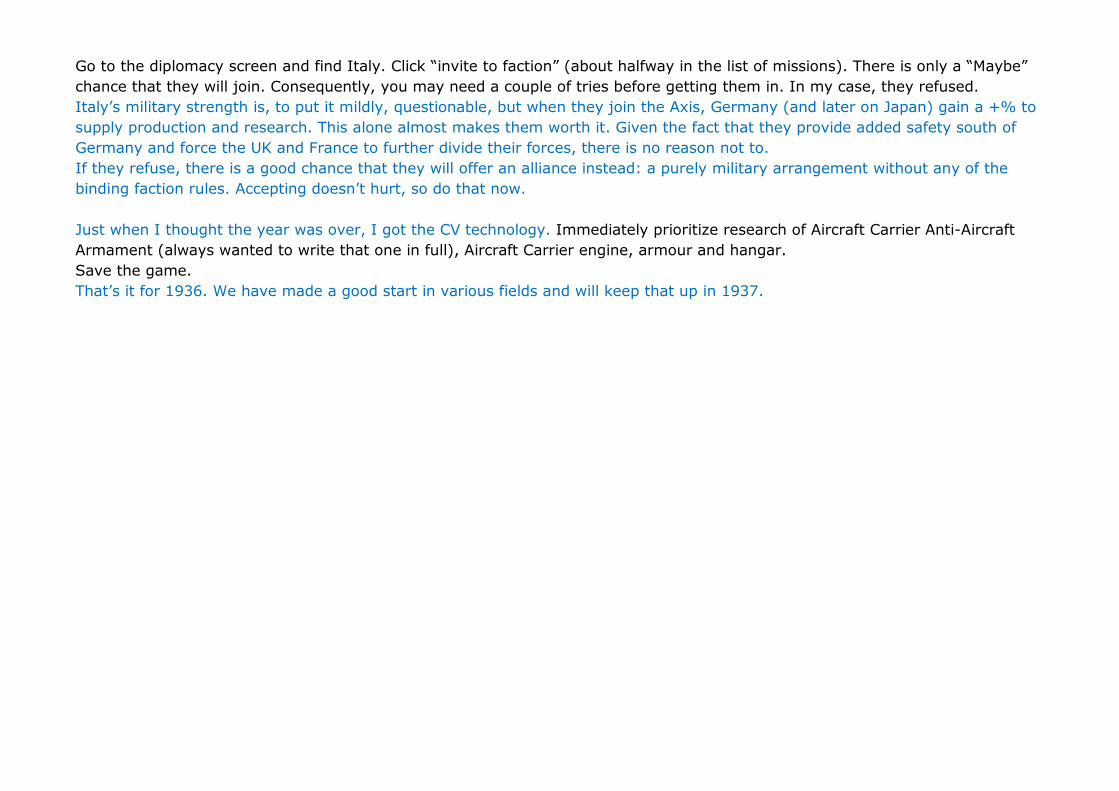
Go to the diplomacy screen and find Italy. Click “invite to faction” (about halfway in the list of missions). There is only a “Maybe” chance that they will join. Consequently, you may need a couple of tries before getting them in. In my case, they refused. Italy’s military strength is, to put it mildly, questionable, but when they join the Axis, Germany (and later on Japan) gain a +% to supply production and research. This alone almost makes them worth it. Given the fact that they provide added safety south of Germany and force the UK and France to further divide their forces, there is no reason not to. If they refuse, there is a good chance that they will offer an alliance instead: a purely military arrangement without any of the binding faction rules. Accepting doesn’t hurt, so do that now.
Just when I thought the year was over, I got the CV technology. Immediately prioritize research of Aircraft Carrier Anti-Aircraft Armament (always wanted to write that one in full), Aircraft Carrier engine, armour and hangar. Save the game. That’s it for 1936. We have made a good start in various fields and will keep that up in 1937.
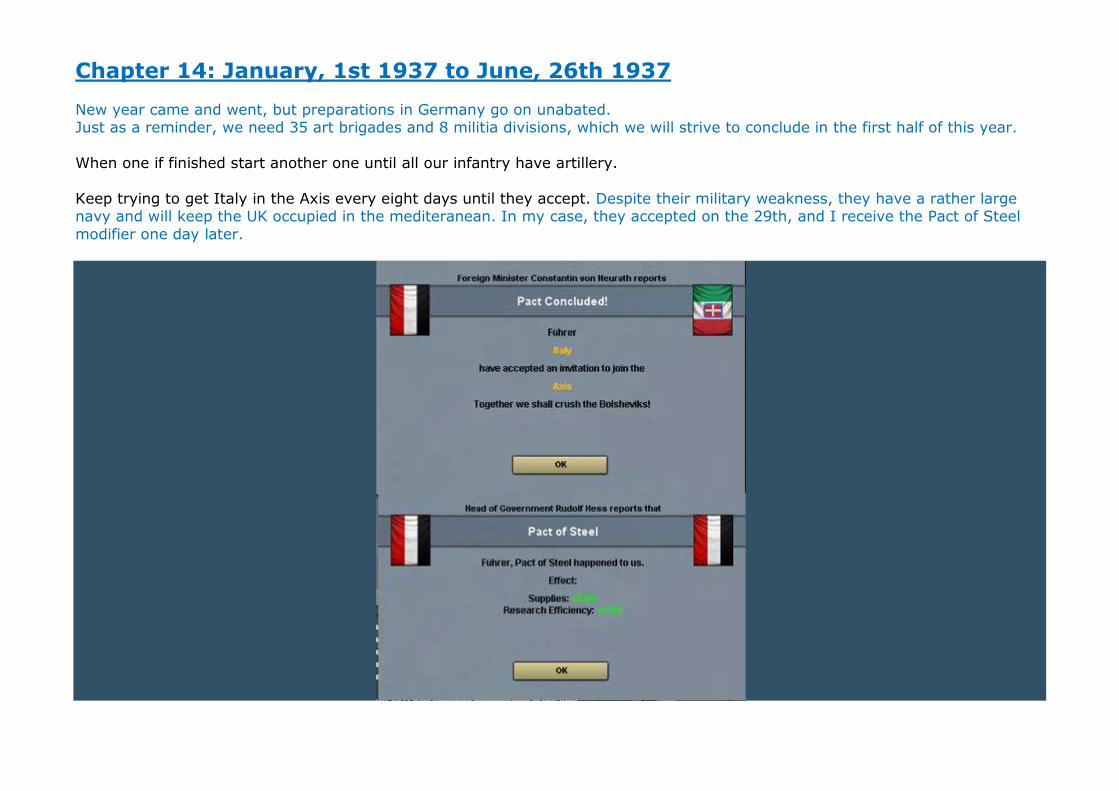
Chapter 14: January, 1st 1937 to June, 26th 1937 New year came and went, but preparations in Germany go on unabated. Just as a reminder, we need 35 art brigades and 8 militia divisions, which we will strive to conclude in the first half of this year. When one if finished start another one until all our infantry have artillery. Keep trying to get Italy in the Axis every eight days until they accept. Despite their military weakness, they have a rather large navy and will keep the UK occupied in the mediteranean. In my case, they accepted on the 29th, and I receive the Pact of Steel modifier one day later.

As soon as they do, start influencing Romania, for their all-important oil refinery. They don’t have to be part of the Axis, just aligned closely enough. The tooltip in the diplomatic triangle will tell you when this happens. When an interceptor finished building, use it to finish the II. Fliegerkorps and build another one. On the 31st, we finish a motorised infantry division. Attach it to the I. Panzerkorps. We could start another one, or get to work on medium armour, but we will wait until that research is done. In the meantime, we might as well start building 4 artillery brigades and a militia division. Put the wasted IC into supplies. About a week later, another art is done. Attach it to infantry and build a militia division. Two days later, 2 more art are done. Again, start building a militia division. On the 10th, another interceptor is build. Deploy it to Kassel and rename it III. Fliegerkorps, which we will also attach to Heeresgruppe B. Start building a new int. On the 12th and the 14th, we will receive another art and mil, respectively. Use the IC to start production of the last 2 mil divisions. The mil that is in the deployment queue now will be send to Wilhelmshaven and attached to the I. Sicherungskorps. On the 15th, I get another one of those annoying random events, forcing me to adjust my sliders to account for the increased CG need. This might alter my timing according to yours somewhat. On the 24th, Japan accepts an invitation to the Axis. As I have told you, they will not drag us into their war against China. Of course, fighting an Axis member, every Chinese warlord will start aligning to the Allies when the Marco Polo event fires, but those are the choices we make. Japan’s navy and large army will also force the Uk to send troops to India and Malaya, further pushing them to spread themselves thin. (and in case you’re wondering, I believe the Pact of Steel modifier extends to Japan as well). The Spanish Civil War ended in my game in the 12th of March with a victory for Franco’s forces. We could try to get them into the Axis but until we manage to grab Gibraltar, they will always refuse membership. (By that point, however, we won’t need them anymore anyway). Things might be different in your game. Republican Spain might win, in which case you need to keep a close eye every once in a while on their diplomatic drift. They are no threat to us, but if they join the Allies, it would complicate things. Try to get some trade going with them if you can (probably not, but it’s worth a shot to improve relations). If you have to, stop whatever influencing your doing and influence them away from the top half of the diplomatic triangle. If the attraction of the Allies is too strong (if happens), give it up. They usually stay neutral all throughout the war anyway. In my case, with a Nationalist victory, they will naturally gravitate towards the Axis. Both Spain and Portugal will provide us with Tungsten, a strategic resource that increases hard attacks. Spain will often ask for energy. When they do, and you can afford it, accept the trade. make sure your relations with Nationalist Spain stay at +200. This will ensure that the UK, who will try to lure
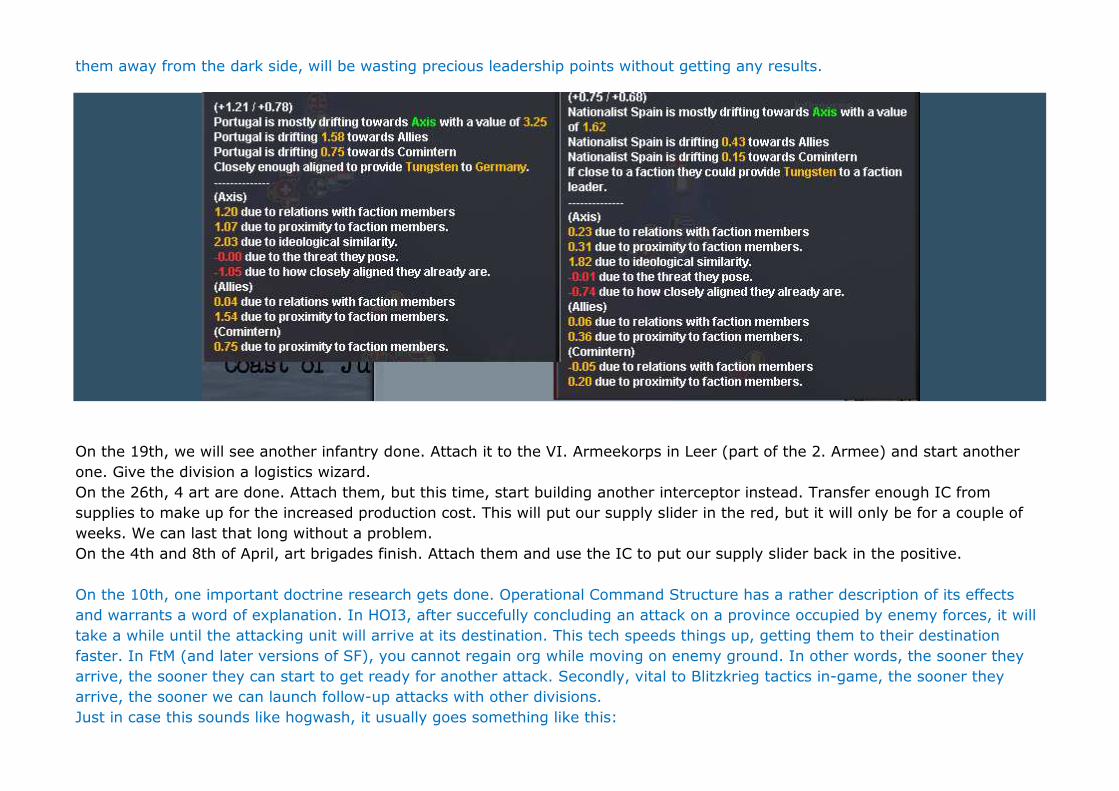
them away from the dark side, will be wasting precious leadership points without getting any results.
On the 19th, we will see another infantry done. Attach it to the VI. Armeekorps in Leer (part of the 2. Armee) and start another one. Give the division a logistics wizard. On the 26th, 4 art are done. Attach them, but this time, start building another interceptor instead. Transfer enough IC from supplies to make up for the increased production cost. This will put our supply slider in the red, but it will only be for a couple of weeks. We can last that long without a problem. On the 4th and 8th of April, art brigades finish. Attach them and use the IC to put our supply slider back in the positive.
On the 10th, one important doctrine research gets done. Operational Command Structure has a rather description of its effects and warrants a word of explanation. In HOI3, after succefully concluding an attack on a province occupied by enemy forces, it will take a while until the attacking unit will arrive at its destination. This tech speeds things up, getting them to their destination faster. In FtM (and later versions of SF), you cannot regain org while moving on enemy ground. In other words, the sooner they arrive, the sooner they can start to get ready for another attack. Secondly, vital to Blitzkrieg tactics in-game, the sooner they arrive, the sooner we can launch follow-up attacks with other divisions. Just in case this sounds like hogwash, it usually goes something like this:
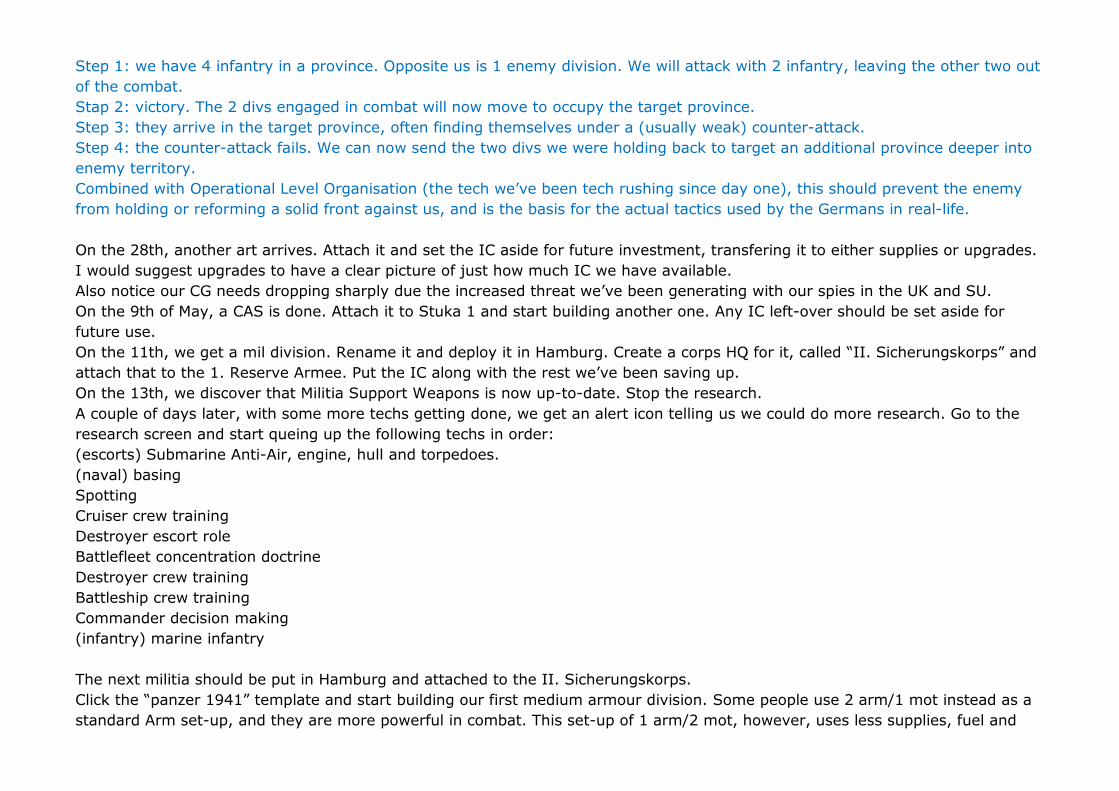
Step 1: we have 4 infantry in a province. Opposite us is 1 enemy division. We will attack with 2 infantry, leaving the other two out of the combat. Stap 2: victory. The 2 divs engaged in combat will now move to occupy the target province. Step 3: they arrive in the target province, often finding themselves under a (usually weak) counter-attack. Step 4: the counter-attack fails. We can now send the two divs we were holding back to target an additional province deeper into enemy territory. Combined with Operational Level Organisation (the tech we’ve been tech rushing since day one), this should prevent the enemy from holding or reforming a solid front against us, and is the basis for the actual tactics used by the Germans in real-life.
On the 28th, another art arrives. Attach it and set the IC aside for future investment, transfering it to either supplies or upgrades. I would suggest upgrades to have a clear picture of just how much IC we have available. Also notice our CG needs dropping sharply due the increased threat we’ve been generating with our spies in the UK and SU. On the 9th of May, a CAS is done. Attach it to Stuka 1 and start building another one. Any IC left-over should be set aside for future use. On the 11th, we get a mil division. Rename it and deploy it in Hamburg. Create a corps HQ for it, called “II. Sicherungskorps” and attach that to the 1. Reserve Armee. Put the IC along with the rest we’ve been saving up. On the 13th, we discover that Militia Support Weapons is now up-to-date. Stop the research.
A couple of days later, with some more techs getting done, we get an alert icon telling us we could do more research. Go to the research screen and start queing up the following techs in order: (escorts) Submarine Anti-Air, engine, hull and torpedoes. (naval) basing Spotting Cruiser crew training Destroyer escort role Battlefleet concentration doctrine
Destroyer crew training Battleship crew training Commander decision making (infantry) marine infantry The next militia should be put in Hamburg and attached to the II. Sicherungskorps. Click the “panzer 1941” template and start building our first medium armour division. Some people use 2 arm/1 mot instead as a standard Arm set-up, and they are more powerful in combat. This set-up of 1 arm/2 mot, however, uses less supplies, fuel and

IC. Adjust the sliders according to the new demands. The 17th will see another mil appear. Deploy it to Kiel and attach it to the II. Sicherungskorps. Get to work on the final 3 art brigades and start building a transport ship (at the bottom of the naval tab in the production screen). We will only need 2 of these prior to war. At the end of the month, the final mil is done. Put it in Kiel and attach it to the II. Sicherungskorps. The rest of our MIL divisions will have to wait until late 1939. We have other, more pressing matters to attend to first. Such as tac bombers. Start building one, but leave it underfunded; at the bottom of the queue with insufficient IC assigned to it.
On the 1st of June, the tech called Fleet Auxiliary Carrier Doctrine gets done. Go to the research screen and start researching (naval) light cruiser escort role Carrier group doctrine Light cruiser crew training Carrier crew training. If we’re on the same page, you should have 29 techs in the queu. We also get another interceptor. Attach it to the III. Fliegerkorps. Don’t build another one just yet. Left-over IC should be set apart for now.
On the 16th, another one can be attached to the III. Fliegerkorps. This time use the usual practice of starting a new int right away. Adjust sliders as needed. On the 23rd, a destroyer gets commisioned. Assign it to the Kriegsmarine and set the IC apart.
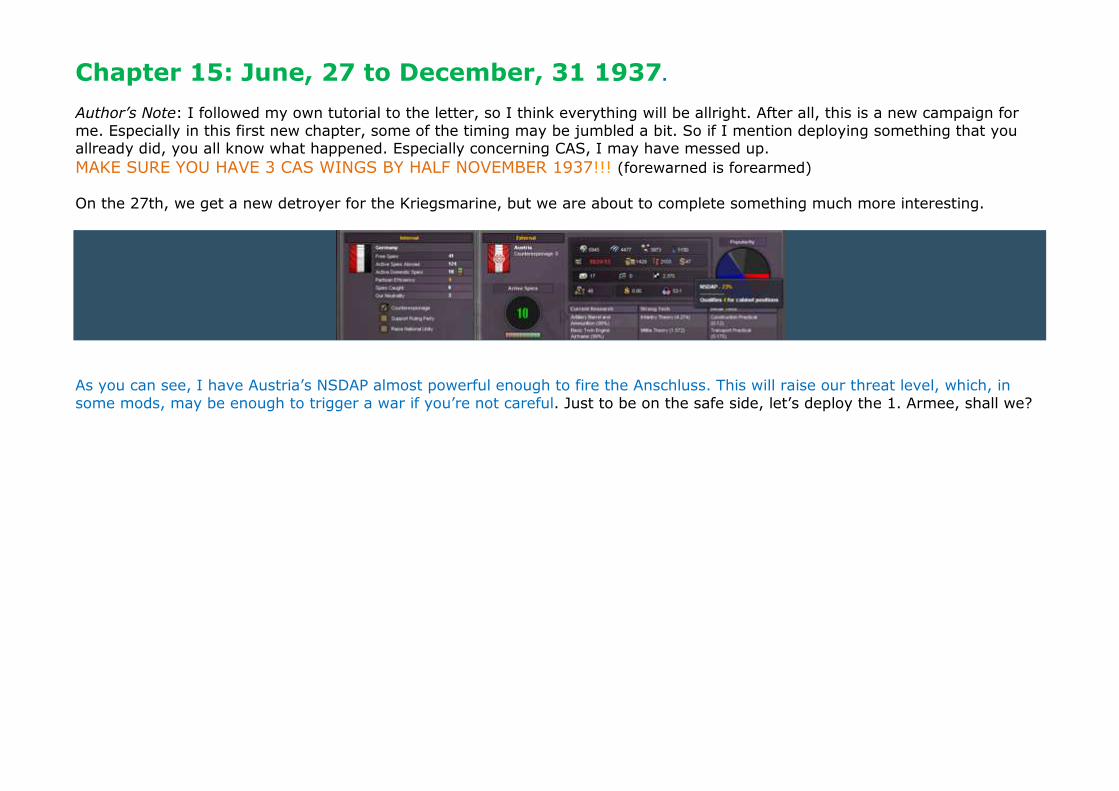
Chapter 15: June, 27 to December, 31 1937. Author’s Note: I followed my own tutorial to the letter, so I think everything will be allright. After all, this is a new campaign for me. Especially in this first new chapter, some of the timing may be jumbled a bit. So if I mention deploying something that you allready did, you all know what happened. Especially concerning CAS, I may have messed up. MAKE SURE YOU HAVE 3 CAS WINGS BY HALF NOVEMBER 1937!!! (forewarned is forearmed) On the 27th, we get a new detroyer for the Kriegsmarine, but we are about to complete something much more interesting.
As you can see, I have Austria’s NSDAP almost powerful enough to fire the Anschluss. This will raise our threat level, which, in some mods, may be enough to trigger a war if you’re not careful. Just to be on the safe side, let’s deploy the 1. Armee, shall we?
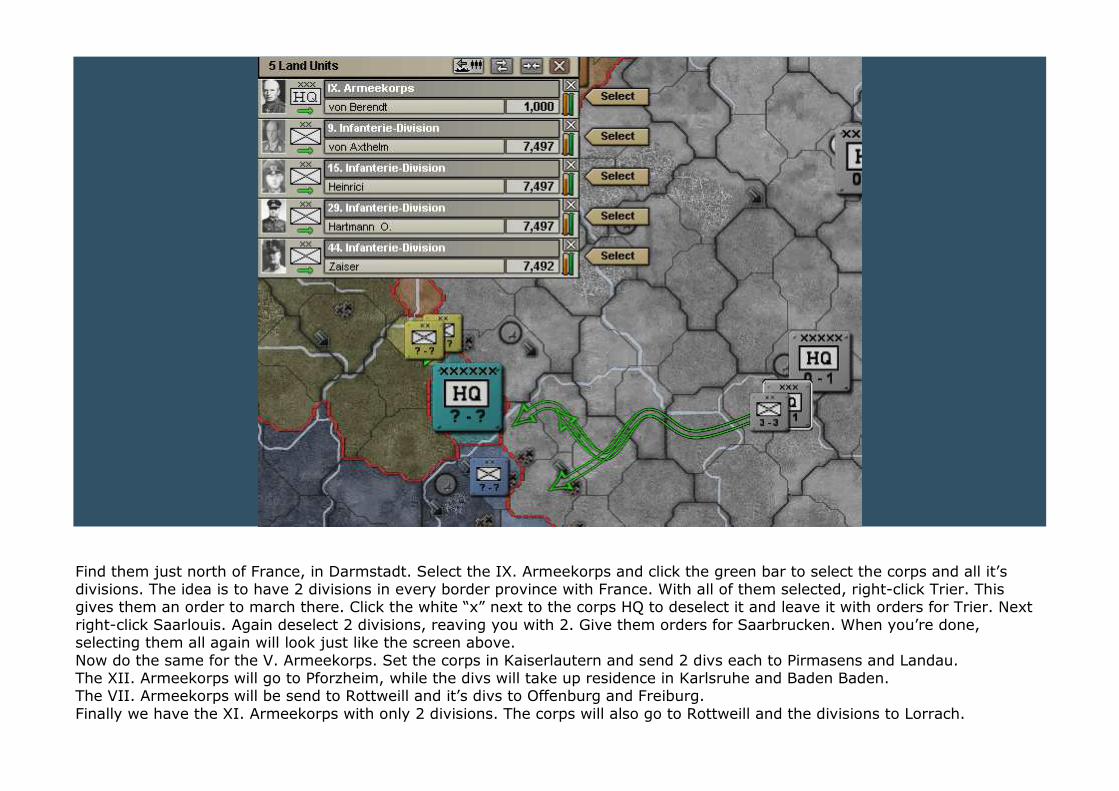
Find them just north of France, in Darmstadt. Select the IX. Armeekorps and click the green bar to select the corps and all it’s divisions. The idea is to have 2 divisions in every border province with France. With all of them selected, right-click Trier. This gives them an order to march there. Click the white “x” next to the corps HQ to deselect it and leave it with orders for Trier. Next right-click Saarlouis. Again deselect 2 divisions, reaving you with 2. Give them orders for Saarbrucken. When you’re done, selecting them all again will look just like the screen above. Now do the same for the V. Armeekorps. Set the corps in Kaiserlautern and send 2 divs each to Pirmasens and Landau. The XII. Armeekorps will go to Pforzheim, while the divs will take up residence in Karlsruhe and Baden Baden. The VII. Armeekorps will be send to Rottweill and it’s divs to Offenburg and Freiburg. Finally we have the XI. Armeekorps with only 2 divisions. The corps will also go to Rottweill and the divisions to Lorrach.

When you’re done, selecting the entire 1. Armee should look like this:
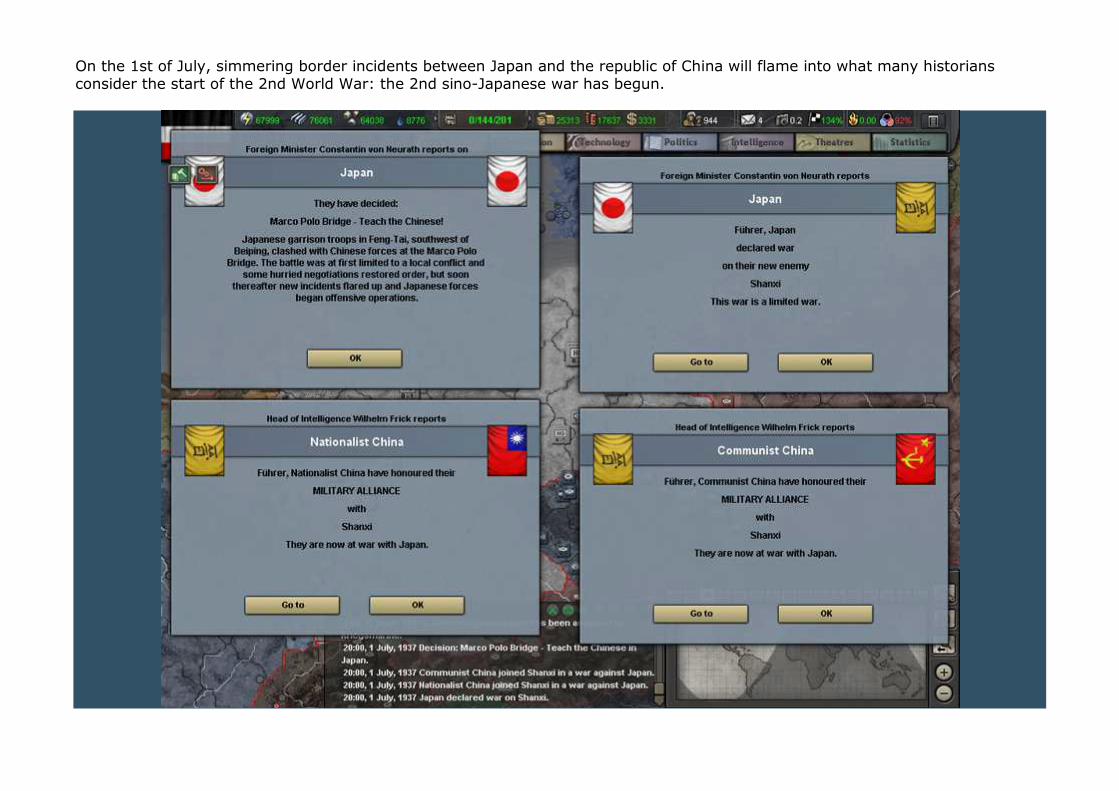
On the 1st of July, simmering border incidents between Japan and the republic of China will flame into what many historians consider the start of the 2nd World War: the 2nd sino-Japanese war has begun.
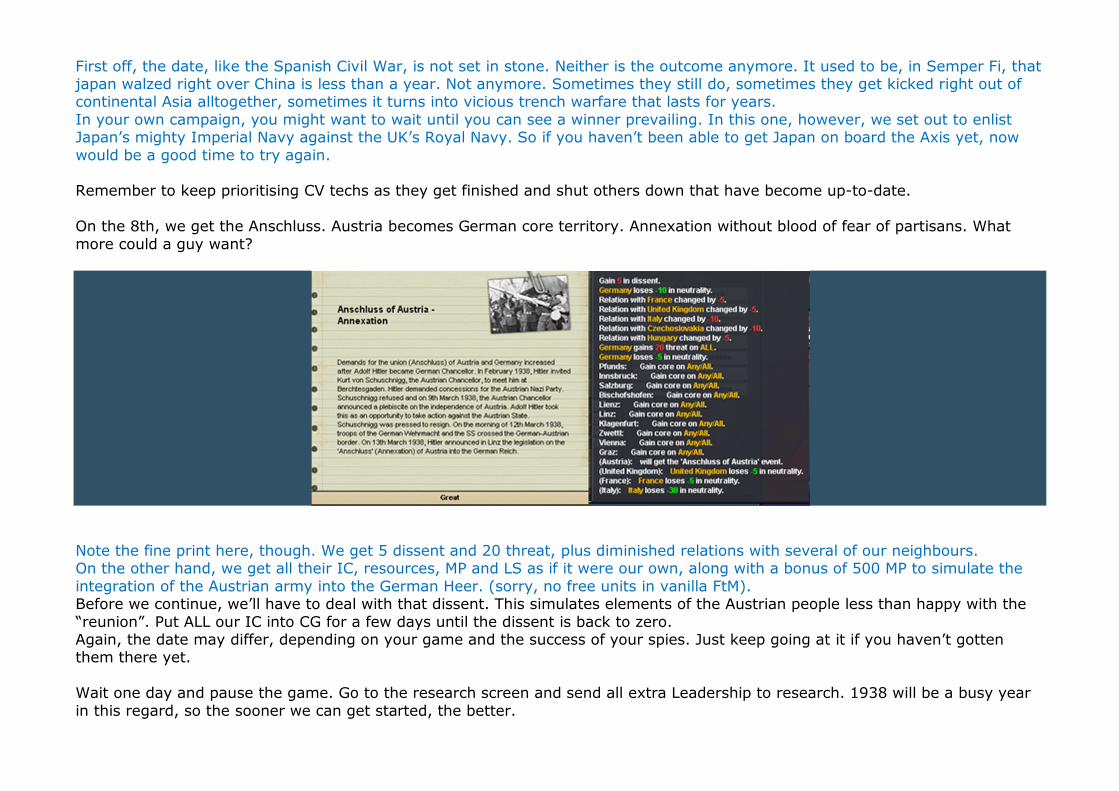
First off, the date, like the Spanish Civil War, is not set in stone. Neither is the outcome anymore. It used to be, in Semper Fi, that japan walzed right over China is less than a year. Not anymore. Sometimes they still do, sometimes they get kicked right out of continental Asia alltogether, sometimes it turns into vicious trench warfare that lasts for years. In your own campaign, you might want to wait until you can see a winner prevailing. In this one, however, we set out to enlist Japan’s mighty Imperial Navy against the UK’s Royal Navy. So if you haven’t been able to get Japan on board the Axis yet, now would be a good time to try again. Remember to keep prioritising CV techs as they get finished and shut others down that have become up-to-date. On the 8th, we get the Anschluss. Austria becomes German core territory. Annexation without blood of fear of partisans. What more could a guy want?
Note the fine print here, though. We get 5 dissent and 20 threat, plus diminished relations with several of our neighbours. On the other hand, we get all their IC, resources, MP and LS as if it were our own, along with a bonus of 500 MP to simulate the integration of the Austrian army into the German Heer. (sorry, no free units in vanilla FtM). Before we continue, we’ll have to deal with that dissent. This simulates elements of the Austrian people less than happy with the “reunion”. Put ALL our IC into CG for a few days until the dissent is back to zero. Again, the date may differ, depending on your game and the success of your spies. Just keep going at it if you haven’t gotten them there yet. Wait one day and pause the game. Go to the research screen and send all extra Leadership to research. 1938 will be a busy year in this regard, so the sooner we can get started, the better.
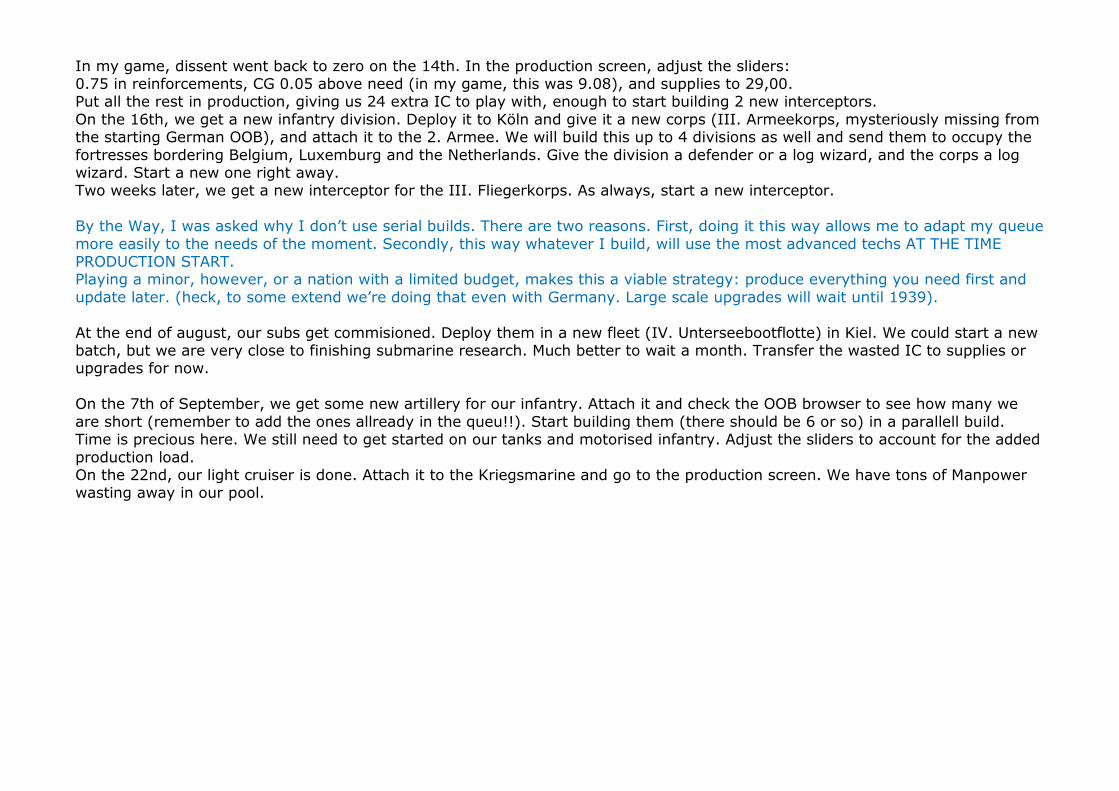
In my game, dissent went back to zero on the 14th. In the production screen, adjust the sliders: 0.75 in reinforcements, CG 0.05 above need (in my game, this was 9.08), and supplies to 29,00. Put all the rest in production, giving us 24 extra IC to play with, enough to start building 2 new interceptors. On the 16th, we get a new infantry division. Deploy it to Köln and give it a new corps (III. Armeekorps, mysteriously missing from the starting German OOB), and attach it to the 2. Armee. We will build this up to 4 divisions as well and send them to occupy the fortresses bordering Belgium, Luxemburg and the Netherlands. Give the division a defender or a log wizard, and the corps a log wizard. Start a new one right away. Two weeks later, we get a new interceptor for the III. Fliegerkorps. As always, start a new interceptor. By the Way, I was asked why I don’t use serial builds. There are two reasons. First, doing it this way allows me to adapt my queue more easily to the needs of the moment. Secondly, this way whatever I build, will use the most advanced techs AT THE TIME PRODUCTION START. Playing a minor, however, or a nation with a limited budget, makes this a viable strategy: produce everything you need first and update later. (heck, to some extend we’re doing that even with Germany. Large scale upgrades will wait until 1939). At the end of august, our subs get commisioned. Deploy them in a new fleet (IV. Unterseebootflotte) in Kiel. We could start a new batch, but we are very close to finishing submarine research. Much better to wait a month. Transfer the wasted IC to supplies or upgrades for now. On the 7th of September, we get some new artillery for our infantry. Attach it and check the OOB browser to see how many we are short (remember to add the ones allready in the queu!!). Start building them (there should be 6 or so) in a parallell build. Time is precious here. We still need to get started on our tanks and motorised infantry. Adjust the sliders to account for the added production load. On the 22nd, our light cruiser is done. Attach it to the Kriegsmarine and go to the production screen. We have tons of Manpower wasting away in our pool.
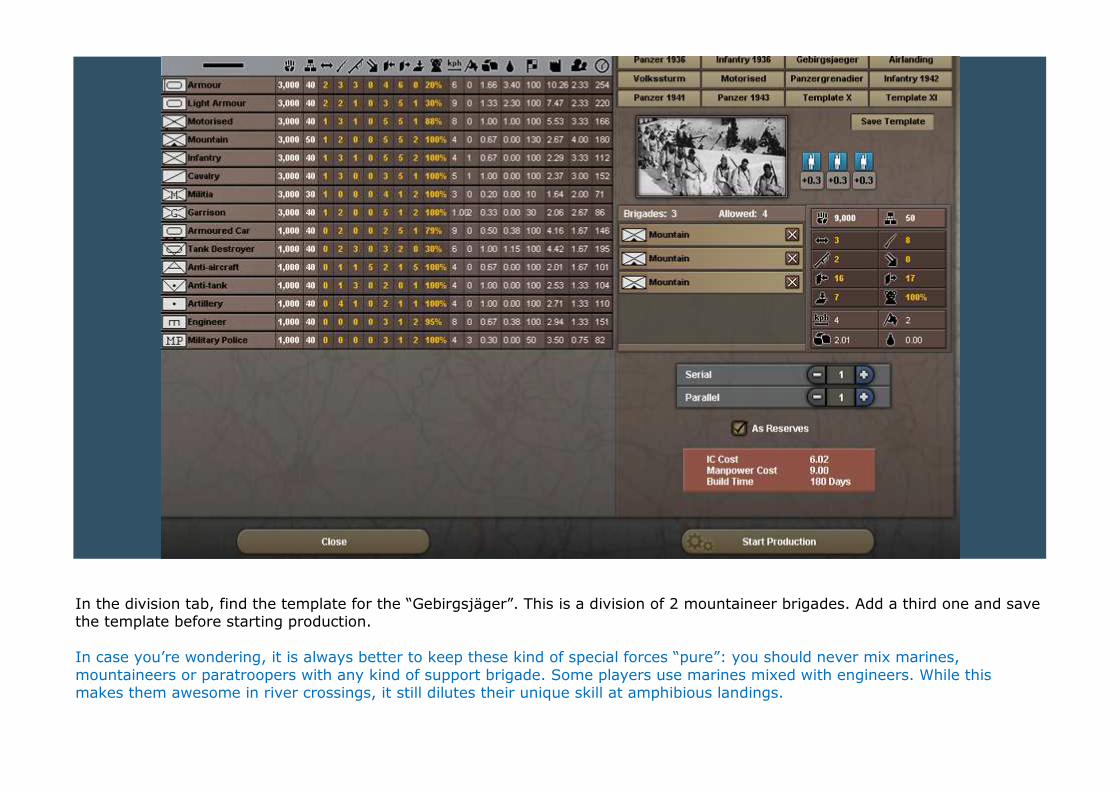
In the division tab, find the template for the “Gebirgsjäger”. This is a division of 2 mountaineer brigades. Add a third one and save the template before starting production. In case you’re wondering, it is always better to keep these kind of special forces “pure”: you should never mix marines, mountaineers or paratroopers with any kind of support brigade. Some players use marines mixed with engineers. While this makes them awesome in river crossings, it still dilutes their unique skill at amphibious landings.
On the 24th, the final sub tech, Submarine Hull, gets finished. It gives us the opportunity to start 1938 research: Industry: agriculture, education, industrial production, industrial efficiency, decryption machine (in the case of the UK, should you ever start a game with them, this one is part of the key to catching those rotten subs faster), oil refining and supply production. Theory: Supply transportation, supply organisation. Infantry: small arms, infantry support weapons, light artillery, infantry anti-tank weapons, desert warfare equipment. Armour: all Light Armour, Armour, artillery and anti-air techs. Escorts: all Destroyer and Light Cruiser techs. Capital: all 3 Battleship techs, capital ship main armament, heavy cruiser anti-air, battlecruiser anti-air. Fighter: multi-role. Essentially, this gives us an interceptor with decreased combat power and increased range and ground-attack potential. Perfect for taking out isolated enemy bombers at the edge of the front. Just don’t expect them to win against the Uk’s Interceptors. Land: mobile warfare, operational level command structure, elastic defense, blitzkrieg, infantry warfare, special forces, assault concentration, integrated support. Air: all fighter, CAS and Tac pilot traing and ground crew training, interception tactics, ground attack tactics, Interdiction Tactics, Tactical Air Command, all naval plane techs (note that there is still one naval tech researching 1936 technology; leave that one alone). You should now have a total of 77 techs in the queu, to be finished (hopefully) by the start of 1939. Hence my choice to drop militia support weapns and some of the tactical mission techs (log strike, intallation strike and runway cratering). While we’re here, we might as well make a little change. Check the number of idle spies in the intelligence screen. If you have over 50 of them, you can sefely decrease the leadership spend on spies by a full point and transfer that point to research instead. Research: 23.01 Spies: 3.11 Diplo: 2.05 Officer training: 2.19. Leave the game paused and go to the production screen to start building 3 shining, brand new long-range submarines. (these babies can reach halfway the Atlantic from Kiel). Adjust your sliders to match before unpausing. Let the game run until you get a new infantry division. Attach it to the III. Armeekorps, but DON’T START A NEW ONE. In stead, we are going to begin building up the thing that made Germany so feared in real life: the panzers. In the production screen start production of 1 armour division, consisting of 1 arm and 2 mot brigades. Alternately, you could use 2 arm and 1 mot for added combat prowess, but they use more supplies and fuel. Precious commodities deep inside the Soviet Union. Adjust the sliders to match. Our supplies will turn red, but that’s ok. We can handle a few weeks of shortcoming here thanks to our careful stockpiling in the last 2 years. On the 10th of November, NAV tactics gets researched. It is now 38 tech. Leave it at the bottom along with the rest of the air
doctrine stuff. Because I messed up in recreating the tutorial from scratch, I get a 3rd CAS in november. Attach it to stuka 1 and send the IC to supplies to make up for our shortchanging it these past weeks. You may have gotten this one sooner. Or not. The important thing is that by now you should have 3 CAS in the field by half november. One day later, we get 2 new interceptors. Deploy them in Stuttgardt and rename them into “IV. Fliegerkorps”. Attach them to Heeresgruppe B and start work on 2 new ones. Also start training a new mountain division. On the 26th, I get a message that Japan conquered Shanxi (the green Chinese warlord in the north of China). While this does not concern us directly, there is one reason to keep an eye on it every once in a while. If Japan can conquer all of China by 1940, they usually puppet it, leaving them with a handful of idle Army Groups that could be used to help keeping British attention away from us. I’ve seen them take India for us by 1942 in some games. The next interceptor should go to the IV. Fliegerkorps and a new one should be started. On the 14th of December, our 1st CAG gets done. This wing will eventually be stationed on board the escort Carrier KMS Weser. Contrary to HOI2, you can station CAGs on regular airbases and use them as short-range naval bombers (no that’s not an excuse to go for gamey tactics, they never get the kind of hitting power a real Naval bomber has), but where they really shine is in CAG duty, protecting the carrier from enemy fleets. Note that a CAG can only be attached to a Carrier. Never to a land-based HQ by itself. For those of you interested in history, it should be noted that a CAG strike on an enemy naval base out of range of your land-based bombers, such as Force H’s strike against the Italian base of Taranto, is possible. I plan to give a more indepth look at naval and aerial matters once we’ve reached january, 1939. So bear with me. Station the CAG in Stettin and rename it “I. Trägergruppe” (or is that Tragergruppe without umlaut? Germans help me out here). Transfer the IC to supplies. 20 December sees a bunch of infrastructure works get done (finally!). Set supplies to 30 and transfer any wasted IC to upgrades for now as this will give us a clearer view of how much we have left. CV techs should still be prioritised when finished. Our last artillery shoud get done by the end of the month. Attach them and don’t forget the 3 divisions in East Prussia. How you do it without troop transports is the following: 1) Click the deployment queue once. 2) Click the OKH. 3) Open the OOB browser by clicking the edge of the OKH card. 4) You can now drag the art over to the division and drop it in place. (also very neat for those micromanagers among us)
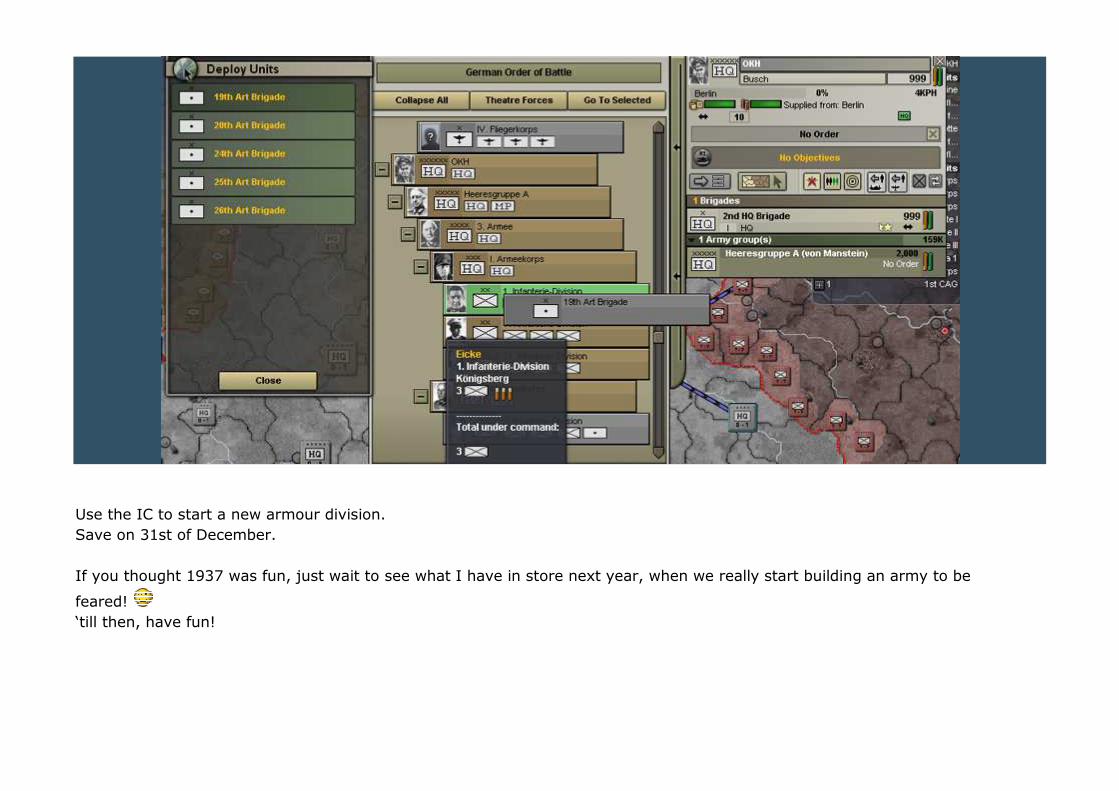
Use the IC to start a new armour division. Save on 31st of December.
If you thought 1937 was fun, just wait to see what I have in store next year, when we really start building an army to be
feared! ‘till then, have fun!
Chapter 16: 1938. For the UK, France and Germany, 1938 is a decisive year in their pre-war build-up. By the end of the year, you should be able to determine whether you will have enough ground-, air- and/or naval forces for the coming struggle. As a reminder, we will need at least 18 infantry divisions guarding France (which we have), a back-up force in case things don’t stay quiet on the Western Front (which we are building), and at least 26 divisions to invade Poland. Why 26? Simple. There will be 26 provinces bordering Poland (including East Prussia and Slovakia, which doesn’t exist yet). The make-up of these forces will, of course, depend wholely on your chosen strategy and doctrine. In a perfect situation, we need at least 3 fighter groups in the west to guard against Allied bombing (check) and 2 or 3 to insure air superiority in Poland. We will need plenty of bombers to support our advance (building) in Poland and preferably 1 bomber wing in the west, just to be certain. For Germany, strictly speaking, we don’t need much in the way of a navy prior to 1940. Some subs to keep the Allies hopping are, of course, useful (we already have more than the RL Germans did in 1939).
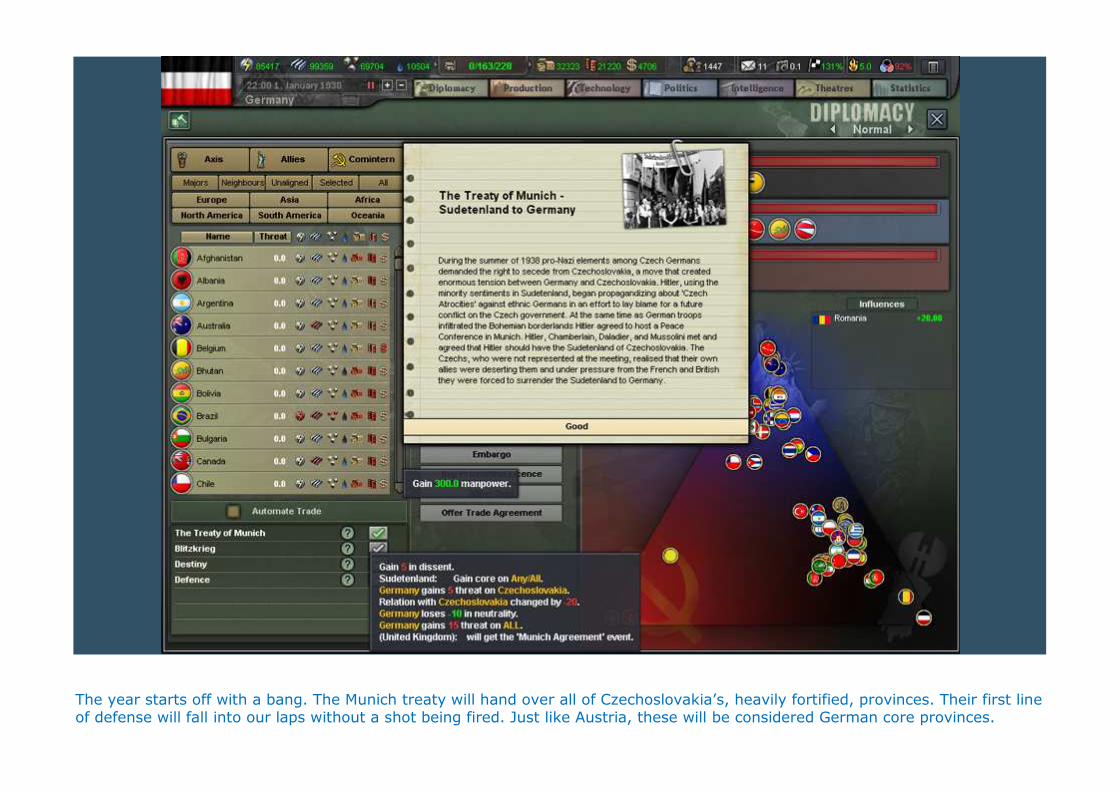
The year starts off with a bang. The Munich treaty will hand over all of Czechoslovakia’s, heavily fortified, provinces. Their first line of defense will fall into our laps without a shot being fired. Just like Austria, these will be considered German core provinces.
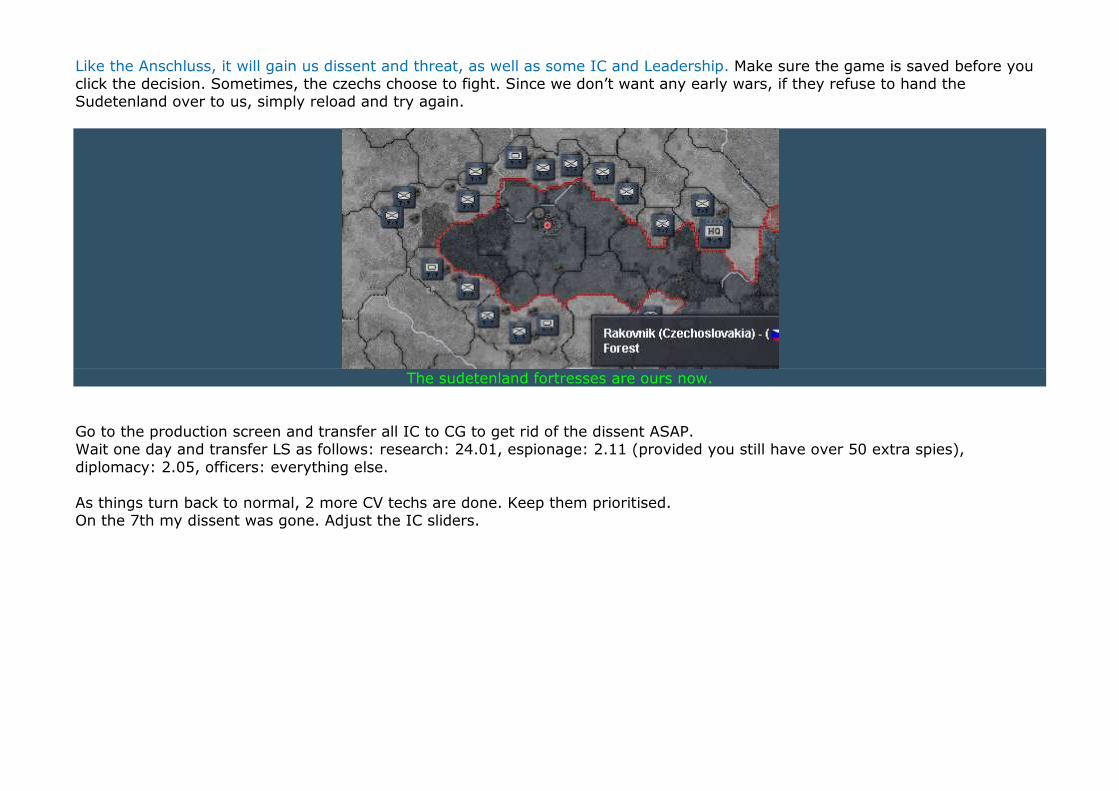
Like the Anschluss, it will gain us dissent and threat, as well as some IC and Leadership. Make sure the game is saved before you click the decision. Sometimes, the czechs choose to fight. Since we don’t want any early wars, if they refuse to hand the Sudetenland over to us, simply reload and try again.
The sudetenland fortresses are ours now.
Go to the production screen and transfer all IC to CG to get rid of the dissent ASAP. Wait one day and transfer LS as follows: research: 24.01, espionage: 2.11 (provided you still have over 50 extra spies), diplomacy: 2.05, officers: everything else. As things turn back to normal, 2 more CV techs are done. Keep them prioritised. On the 7th my dissent was gone. Adjust the IC sliders.
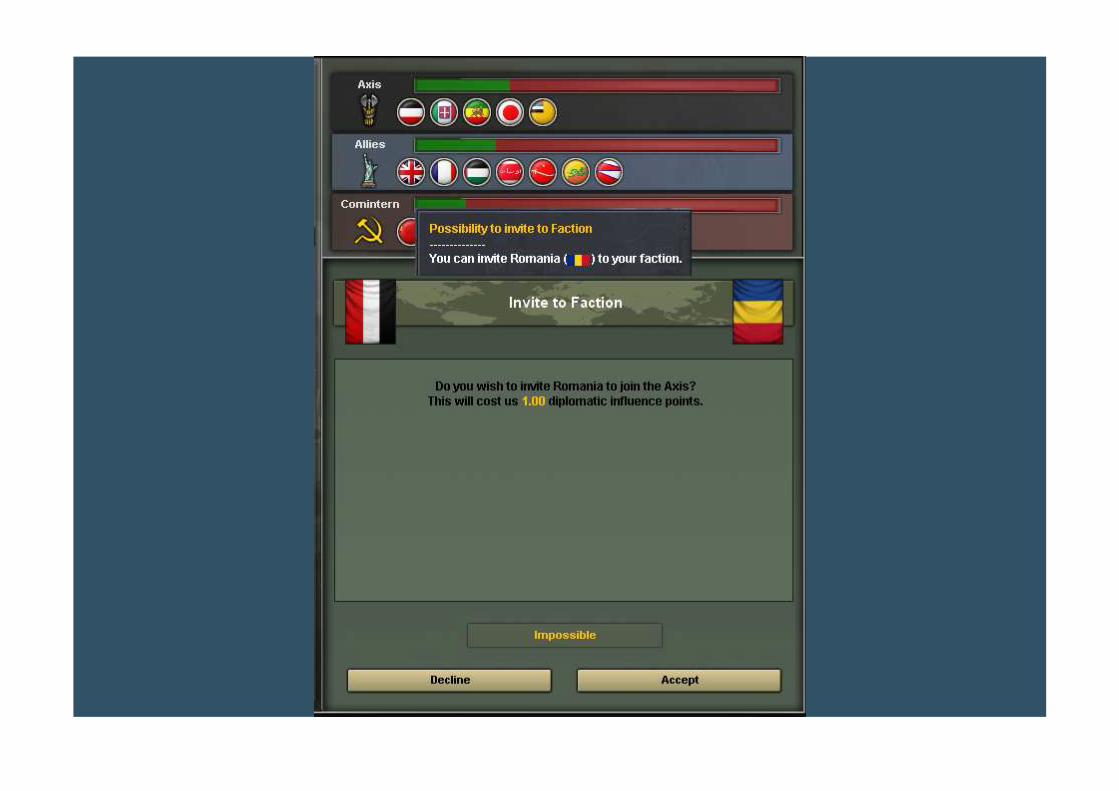
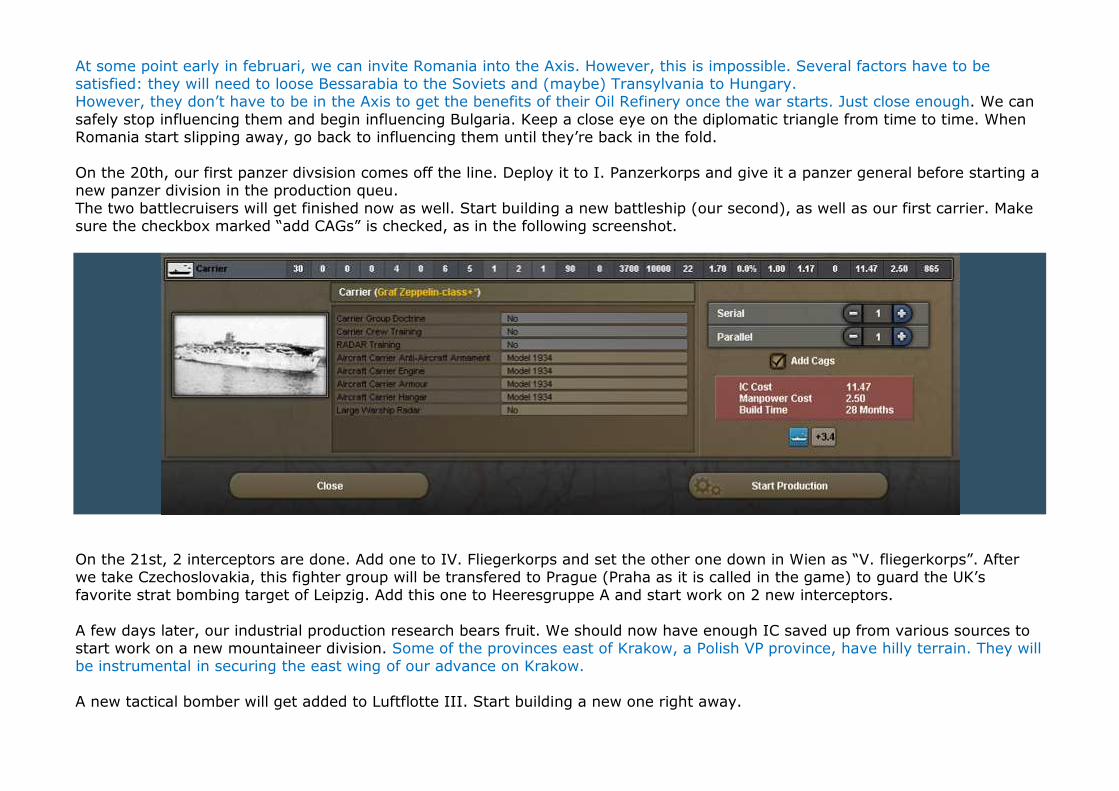
At some point early in februari, we can invite Romania into the Axis. However, this is impossible. Several factors have to be satisfied: they will need to loose Bessarabia to the Soviets and (maybe) Transylvania to Hungary. However, they don’t have to be in the Axis to get the benefits of their Oil Refinery once the war starts. Just close enough. We can safely stop influencing them and begin influencing Bulgaria. Keep a close eye on the diplomatic triangle from time to time. When Romania start slipping away, go back to influencing them until they’re back in the fold. On the 20th, our first panzer divsision comes off the line. Deploy it to I. Panzerkorps and give it a panzer general before starting a new panzer division in the production queu. The two battlecruisers will get finished now as well. Start building a new battleship (our second), as well as our first carrier. Make sure the checkbox marked “add CAGs” is checked, as in the following screenshot.
On the 21st, 2 interceptors are done. Add one to IV. Fliegerkorps and set the other one down in Wien as “V. fliegerkorps”. After we take Czechoslovakia, this fighter group will be transfered to Prague (Praha as it is called in the game) to guard the UK’s favorite strat bombing target of Leipzig. Add this one to Heeresgruppe A and start work on 2 new interceptors. A few days later, our industrial production research bears fruit. We should now have enough IC saved up from various sources to start work on a new mountaineer division. Some of the provinces east of Krakow, a Polish VP province, have hilly terrain. They will be instrumental in securing the east wing of our advance on Krakow. A new tactical bomber will get added to Luftflotte III. Start building a new one right away.
Our first mountaineer division will come off the line at the end of march. Deploy it in Dresden. Give it a new corps HQ called “I. Gebirgsjägerkorps” and attach it to the 4. Armee, which will be the southern wing of our invasion force. There are some excellent commando leaders in the German officer pool. Give Dietl control of the division and Schörner control of the corps HQ (he will have to be promoted to Lieutenant General first). Start a new panzer division, leaving supplies in the red. Around the same time we will get a new dive bomber. Deploy it in Breslau, call it “Stuka 2” and attach it to heeresgruppe A. this is our fourth dive bomber. Start a new one. Sometime in early april a bunch of infrastructure works are finished. Start a new armour division and transfer the rest of the wasted IC to supplies. A few days later, we get a new interceptor for the V. Fliegerkorps. On the 5th of May, our escort carrier is done. Deploy it in Stettin and rename it Weserflotte.
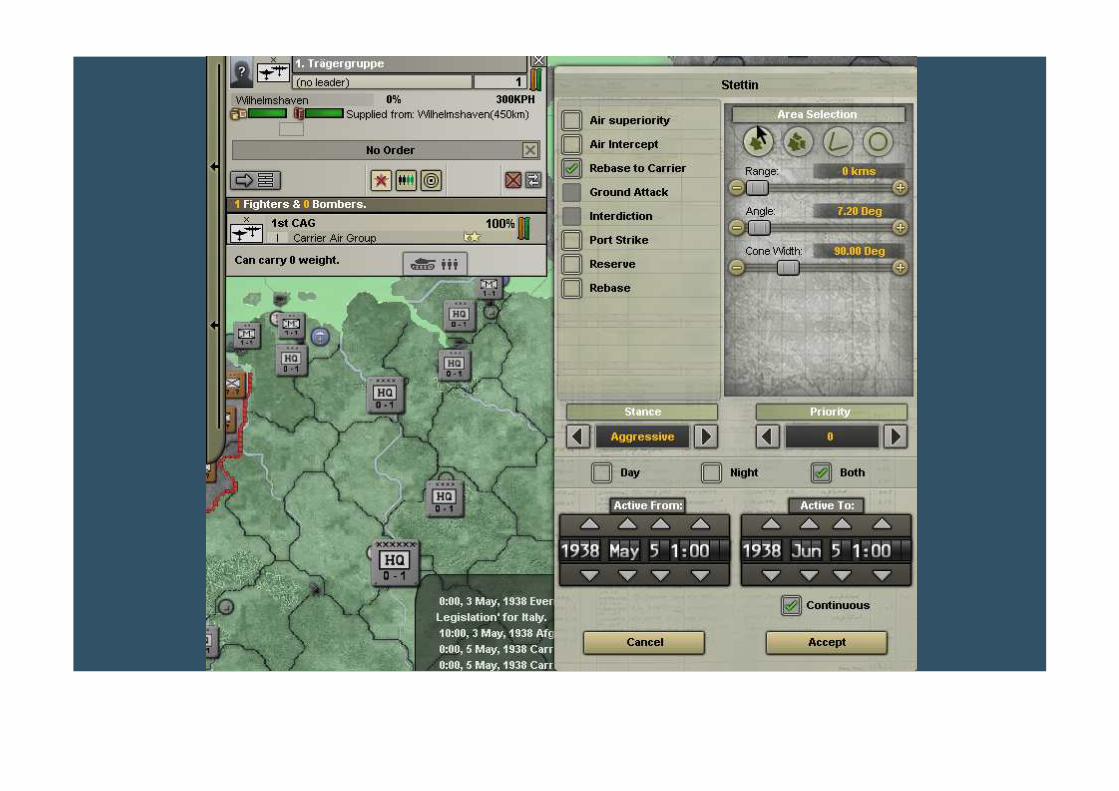
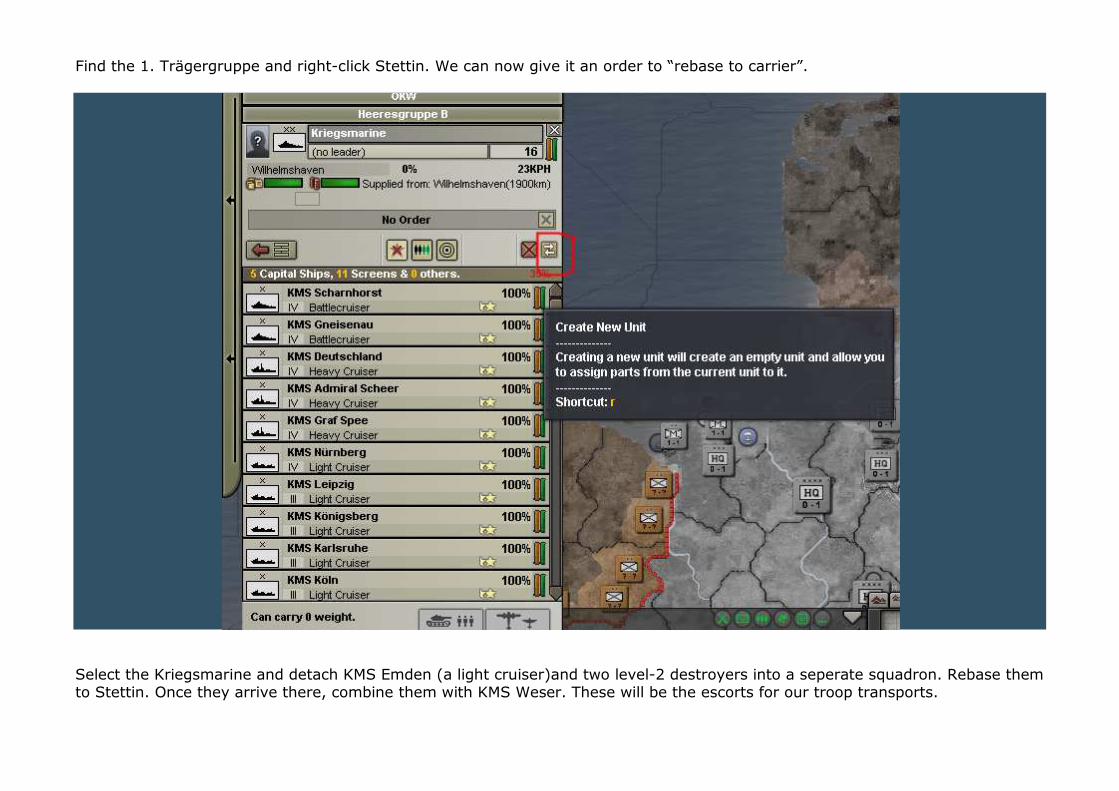
Find the 1. Trägergruppe and right-click Stettin. We can now give it an order to “rebase to carrier”.
Select the Kriegsmarine and detach KMS Emden (a light cruiser)and two level-2 destroyers into a seperate squadron. Rebase them to Stettin. Once they arrive there, combine them with KMS Weser. These will be the escorts for our troop transports.
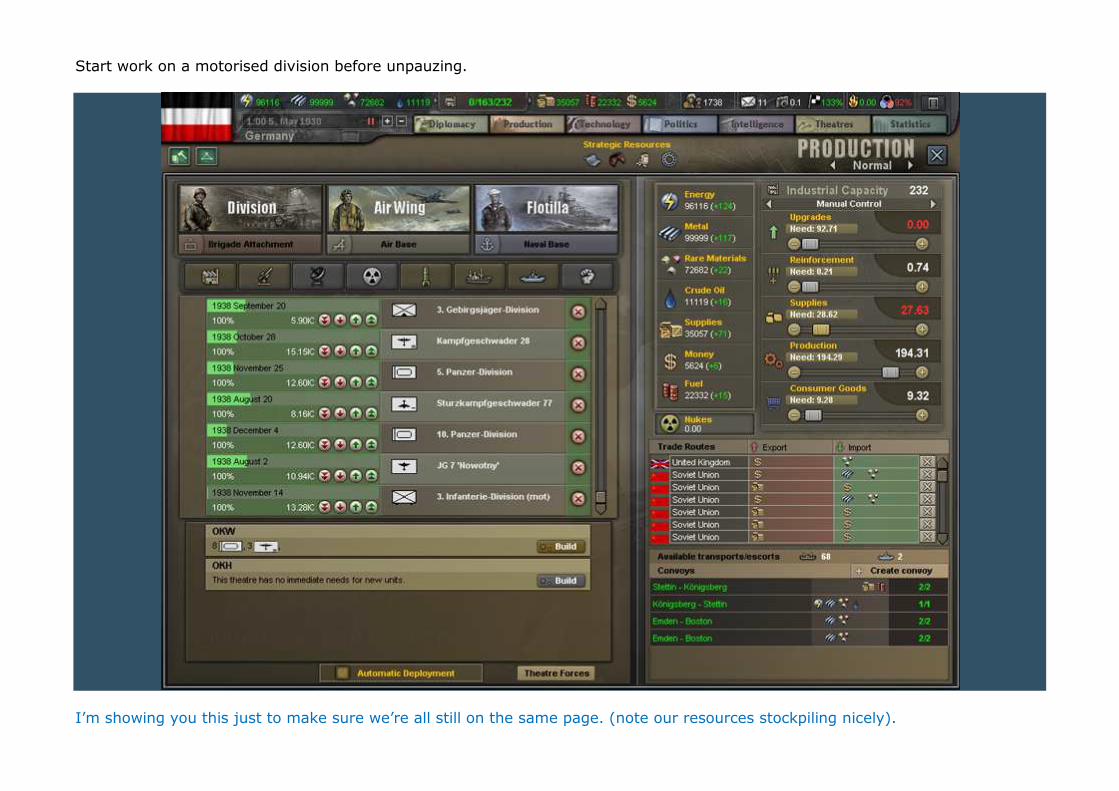
Start work on a motorised division before unpauzing.
I’m showing you this just to make sure we’re all still on the same page. (note our resources stockpiling nicely).
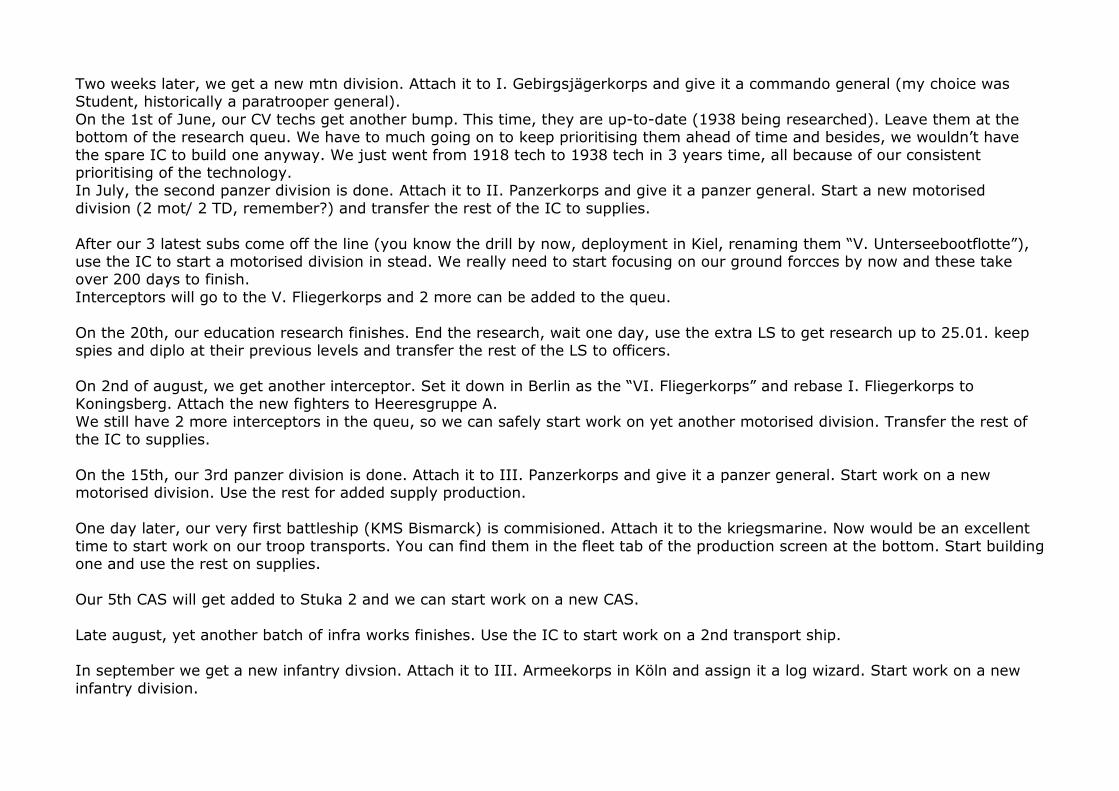
Two weeks later, we get a new mtn division. Attach it to I. Gebirgsjägerkorps and give it a commando general (my choice was Student, historically a paratrooper general). On the 1st of June, our CV techs get another bump. This time, they are up-to-date (1938 being researched). Leave them at the bottom of the research queu. We have to much going on to keep prioritising them ahead of time and besides, we wouldn’t have the spare IC to build one anyway. We just went from 1918 tech to 1938 tech in 3 years time, all because of our consistent prioritising of the technology. In July, the second panzer division is done. Attach it to II. Panzerkorps and give it a panzer general. Start a new motorised division (2 mot/ 2 TD, remember?) and transfer the rest of the IC to supplies. After our 3 latest subs come off the line (you know the drill by now, deployment in Kiel, renaming them “V. Unterseebootflotte”), use the IC to start a motorised division in stead. We really need to start focusing on our ground forcces by now and these take over 200 days to finish. Interceptors will go to the V. Fliegerkorps and 2 more can be added to the queu. On the 20th, our education research finishes. End the research, wait one day, use the extra LS to get research up to 25.01. keep spies and diplo at their previous levels and transfer the rest of the LS to officers. On 2nd of august, we get another interceptor. Set it down in Berlin as the “VI. Fliegerkorps” and rebase I. Fliegerkorps to Koningsberg. Attach the new fighters to Heeresgruppe A. We still have 2 more interceptors in the queu, so we can safely start work on yet another motorised division. Transfer the rest of the IC to supplies. On the 15th, our 3rd panzer division is done. Attach it to III. Panzerkorps and give it a panzer general. Start work on a new motorised division. Use the rest for added supply production. One day later, our very first battleship (KMS Bismarck) is commisioned. Attach it to the kriegsmarine. Now would be an excellent time to start work on our troop transports. You can find them in the fleet tab of the production screen at the bottom. Start building one and use the rest on supplies. Our 5th CAS will get added to Stuka 2 and we can start work on a new CAS. Late august, yet another batch of infra works finishes. Use the IC to start work on a 2nd transport ship. In september we get a new infantry divsion. Attach it to III. Armeekorps in Köln and assign it a log wizard. Start work on a new infantry division.
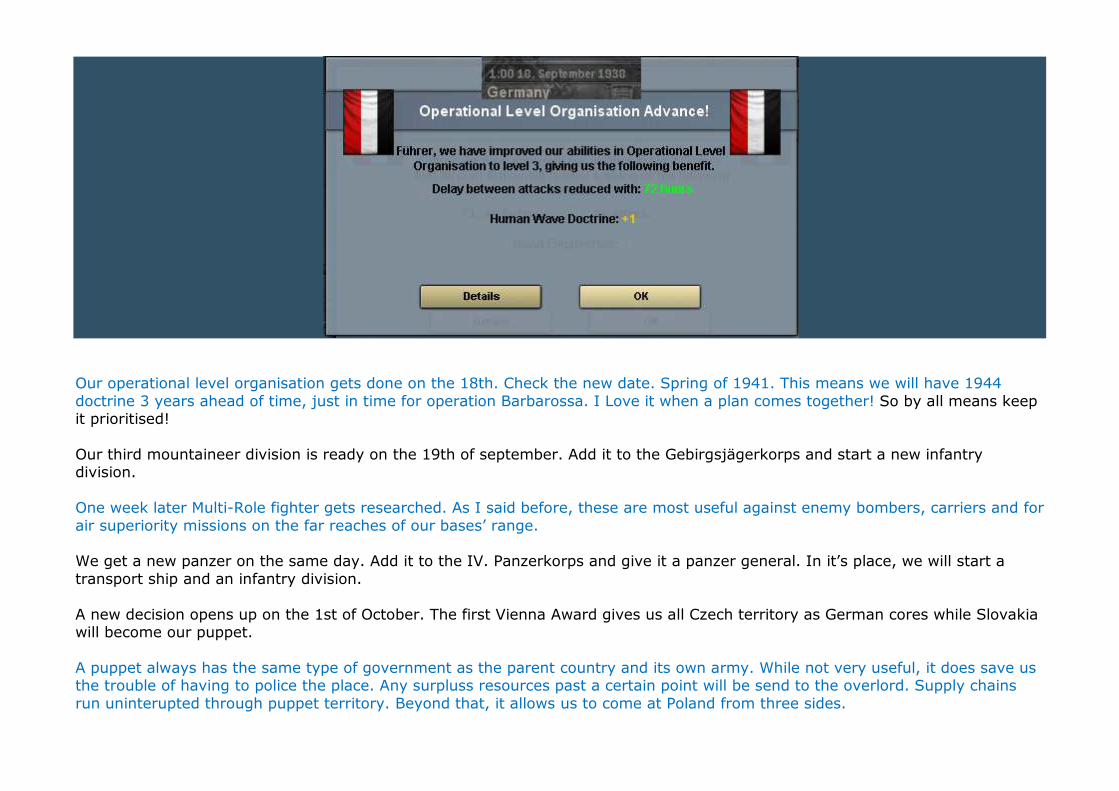
Our operational level organisation gets done on the 18th. Check the new date. Spring of 1941. This means we will have 1944 doctrine 3 years ahead of time, just in time for operation Barbarossa. I Love it when a plan comes together! So by all means keep it prioritised! Our third mountaineer division is ready on the 19th of september. Add it to the Gebirgsjägerkorps and start a new infantry division. One week later Multi-Role fighter gets researched. As I said before, these are most useful against enemy bombers, carriers and for air superiority missions on the far reaches of our bases’ range. We get a new panzer on the same day. Add it to the IV. Panzerkorps and give it a panzer general. In it’s place, we will start a transport ship and an infantry division. A new decision opens up on the 1st of October. The first Vienna Award gives us all Czech territory as German cores while Slovakia will become our puppet. A puppet always has the same type of government as the parent country and its own army. While not very useful, it does save us the trouble of having to police the place. Any surpluss resources past a certain point will be send to the overlord. Supply chains run uninterupted through puppet territory. Beyond that, it allows us to come at Poland from three sides.

As before, use all IC to reduce dissent as fast as possible. After one day, use the extra LS to get our research slider to 27.01.
This is it, boys and girls. This little decision on the part of the UK makes World War II inevitable. Past this point, there is no return. Within less than a year, we will be at war until the end.
Stop influencing Bulgaria and influence Hungary in stead to get them within Axis distance in days. As it turns out, on the 5th of October (in my game; dates may vary here) I can enlist Hungary into the Axis. Whatever else happens, our southern border is, for the time being anyway, fully secure. Keep an eye on the date when you can send a new diplomatic envoy to Hungary. As soon as you can, stop influencing them. Take a look at the diplomatic triangle. Belgium, Netherlands, Sweden and Norway all have interesting strategic resources and they are all close enough to the Allies to provide UK with their benefits. I chose to influence

Sweden, hoping to get them far enough away from the top triangle before the balloon goes up. You must decide who to influence. These things are not set in stone and you may find another nation more useful or more dangerous. If you’re not sure, post a screenshot of your diplo triangle and I’ll try to advice you. A few days later, dissent is gone. Adjust the sliders and use the extra IC to start work on a new Light Cruiser, a Destroyer and an infantry division.
Take the time to look at this picture. It is a perfect example of the importance of physical proximity (as well as the use of spies) in diplomatic affairs. France, our neighbour, and eternal nemesis, has realised just how dangerous we’ve become. At 78.9, it would only take one slip on our part to have declare war on us. At a neutrality of 0%, they can DoW anyone they want. Across the Channel, the UK seems to have fully fallen for our ruse. Thanks to the excellent spywork in the SU, the leader of the Allies considers Stalin a bigger menace to world peace than us. With a neutrality of 15%, they should be running at the best peacetime laws: war economy and three-year draft. Beware, however, that we are only trailing the Soviets by about 1.5 threat. On the other side of the big pond, the only nation on earth we should really fear, the US, is barely aware of our rearmament. They still think we adhere to the Versailles treaty, and seem content to let things be as they might. Now that Praha is ours, we can redeploy the V. Fliegerkorps from Vienna to the airbase in the former Czech capital. The rest of the year is fairly quiet. We will see 2 new panzers (one for I. Panzerkorps ande the other for II. Panzerkorps) and a tact bomber for Luftflotte IV. For each of the panzers start an infantry division, while for the tactical bomber, we will start a new tac bomber and an infantry division.
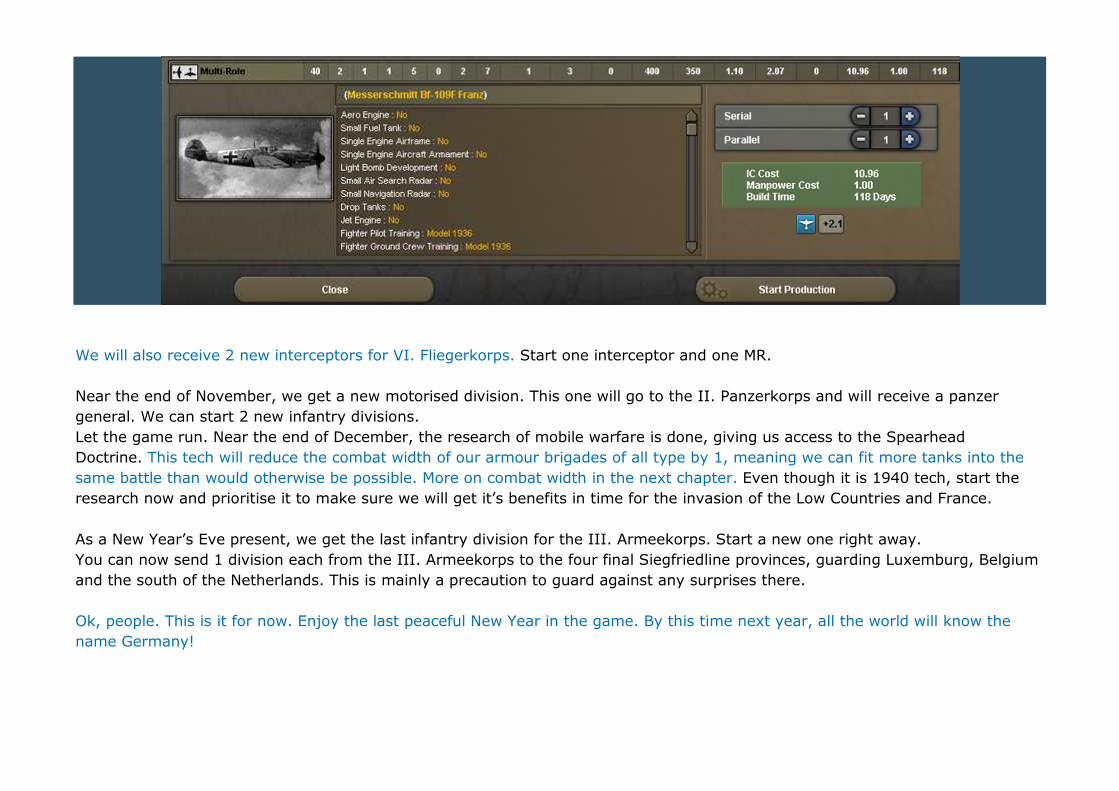
We will also receive 2 new interceptors for VI. Fliegerkorps. Start one interceptor and one MR. Near the end of November, we get a new motorised division. This one will go to the II. Panzerkorps and will receive a panzer general. We can start 2 new infantry divisions. Let the game run. Near the end of December, the research of mobile warfare is done, giving us access to the Spearhead Doctrine. This tech will reduce the combat width of our armour brigades of all type by 1, meaning we can fit more tanks into the same battle than would otherwise be possible. More on combat width in the next chapter. Even though it is 1940 tech, start the research now and prioritise it to make sure we will get it’s benefits in time for the invasion of the Low Countries and France.
As a New Year’s Eve present, we get the last infantry division for the III. Armeekorps. Start a new one right away. You can now send 1 division each from the III. Armeekorps to the four final Siegfriedline provinces, guarding Luxemburg, Belgium and the south of the Netherlands. This is mainly a precaution to guard against any surprises there. Ok, people. This is it for now. Enjoy the last peaceful New Year in the game. By this time next year, all the world will know the name Germany!
Chapter 17: Sic The Dogs Of War
“I love it when a plan comes together!” Since this is a wargame, it would be nice if we all knew exactly what combat entails, wouldn’t it? First of all, this is still a strategy game. You don’t fight, just for the sake of fighting. There must be a reason to fight. Combat experience is all nice and good, but any combat costs Manpower and IC to replace casualties. We should therefor always be mindful of our objectives. Why do we fight? Objectives come in two forms: tactical objectives, where we decide to capture a certain province, and strategic objectives, the reason WHY we need that province. For instance, the historic German invasion of France was composed of two strategic objectives: the destruction of a large portion of France’s defenders, and the capture of Paris and other important cities. These two shaped what we know as “Von Manstein’s Sickle Cut.” The way we achieve strategic objectives is through tactical ones. Let’s look at each one in detail. Germany knew most of French troops and the British B.E.F. were situated along the border with Belgium, ready to jump into the fray should Germany have any plans like WWI (attack through Belgium first). This became the cornerstone of German planning. Any assault into Belgium and Holland would be met with force. There was nothing Germany could do to stop that. But one man had a briljant thought: “how about we use it?”
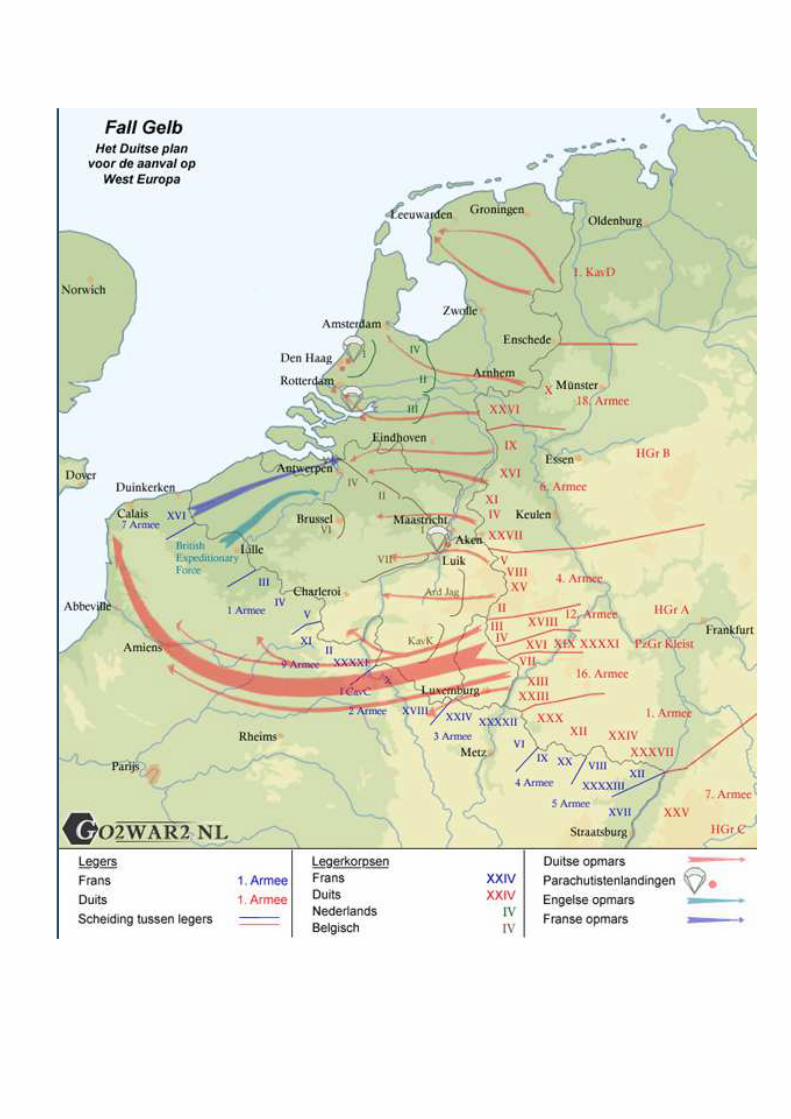
Army group B, consisting of the 18th and the 6th Army, would invade the Netherlands . At the same time, Army Group A would launch a powerful feint into belgium, using the 4th Army. This would be enough to convince the Allies that the main assault had begun. They would send their men North to stop the fieldgray tide…and into the trap. (tactical objective 1) Army Group B. The 18th Army was tasked with pacifying the Netherlands. The 6th Army was instructed to close any path north into Holland, preventing the French and British from reaching Rotterdam or
Amsterdam. They would try to break through, hopefully not looking over their shoulder until it was too late. Army Group A. The 4th Army would launch a powerful attack into Belgium, aiming for the belgian coast. At the same time, Panzergruppe Kleist would launch a quick, all-out race to the coast, cutting off retreat to France. (tactical objective 2) The 12th Army would cover their southern flank, while the 16th Army would cover their rear. If succesful, a huge portion of Allied soldiers would be trapped between the 6th Army to the North, the 4th Army to the west and the Panzers to the south…and
destroyed, thus fullfilling the first strategic objective. While all this was going on, Army Group C, guarding Germany’s border with France, would launch attacks against the powerful French fortifications known as the Maginot Line, designed NOT to win the fight. Their purpose would be to pin the French army in place, preventing it from a coordinated counterstrike. With at least 75% of their armies cut off or destroyed, the Allies would not be able to stop Germany any longer from achieving their second strategic objective: the surrender of France. Why this elaborate example?
Because it is vital in the midst of war not to lose sight of who is supposed to be doing what. In the above example, it would be very easy, in the confusion of manually ordering about 100 divisions around, to send 12th Army forces to help in the fall of Brussels (Belgium’s capital). That was not their purpose. Getting back to the game, I’ve found that it helps if we start from the corps level. Clicking a corps’ green bar to select all it’s subordinate commands helps A) to keep the corps HQ within radio range of the divisions (200 km range, remember from our lesson on the OOB?) and B) to keep them focused on a single mission as a unified whole (for instance getting the entire corps to
defend a single province or group of provinces). So if need be, write down on a piece of paper each army’s objective in shorthand (something like this: I. Armeekorps ->Amsterdam, II. Armeekorps ->Nord Holland). Be as detailed or as broad as you need it to be. After a bit of practice, you will find that it becomes increasingly easier to keep most of it stored in your head. Come 1941, we will have an active front from the Baltic Coast all the way down to the Black Sea and beyond. You’ll drive yourself bonkers otherwise. For the longest time, I kept Barbarossa purely on AI control because the sheer magnitude of it all made my head hurt. Germany’s military doctrine stands or falls based on speed of execution and the use of combined arms.
In this context, combined arms means the real-world use of the term: the combination of ground-, air- and naval assets to achieve the greatest possible result in the shortest time, hopefully with the least losses. In HOI3, your armies will attack or defend, while your fighters keep enemy bombers away and your own bombers will decimate the enemy. If your chosen nation has plenty of warships, and the fight is in a coastal province, you could contemplate sending your battleships to bomb the coastline (much like was done during the US’ Pacific island-hopping campaign). Speed of Execution: The two ways to ensure this is by firstly, researching the right doctrines.
Operational Level Command Structure reduces the time needed to occupy an enemy province after a successful attack. In 1936, we researched a 4% increase in attack speed. By the time the war begins, our forces will move 6% faster than normal. This reduces the chances of having to fight for the same province twice (against reinforcements, for example) and increases the chance of succesfully cutting off the enemy’s retreat in some cases. Operational Level Organisation reduces attack delay (the time needed after a fight to treat the wounded and reorganise yourself back into a cohesive fighting force). The basic time needed for this is 165 hours. This is modified by the length of the fight and
other factors, of course. What the tech does is reduce the base amount of hours needed until you can give the division new orders. Our tech-rushing of this doctrine will enable us, by the time Barbarossa starts, to cut Attack Delay by 96 hours. That’s a lot of time between attacks. With the right modifiers, we will be able, in some cases, to just order the division into the next fight without any delay. And let’s not forget the techs that increase a unit’s organisation. Organisation is reduced, along with strength, by sustaining damage in combat. More org means the division can last longer until they need some R&R. Combine this with the two previous ones and we see a division having attacked a province, move at break-neck speed into the enemy province and straight on into
the next one without so much as needing a breather. (Morale, by the way, is the amount of org regained per day) Secondly, speed of execution also depends in no small manner in deploying our troops in the right place and with the right equipment (using engineers to attack forts, having mountaineers ready in hilly terrain, marines in the jungle,…). Stationing your panzers one measly province too far left or right might mean extra hours needed to reach their tactical objectives, or forcing them to advance through less than advantageous terrain. Similary, it also requires us to act proactively: during any attempted breakthrough, the enemy is bound to try a counterattack to
stop us. If he were to succeed, our fast panzers would get stuck on Attack Delay. So make sure to have extra forces present to pin the enemy in place, preventing him from doing the same to you. There’s a neat trick to overcome Attack Delay, known as Leapfrogging. You have an army consisting of, say, 3 corps. You attack with one corps. When they arrive at their destination and are forced to halt, send in the next corps to attack the province behind it. The third corps is send forward, waiting for the second corps’ attack to finish, after which they get their turn. This is where planning comes in, as well as knowledge of enemy strongpoints. Where are his airbases? How can they be neutralised or taken for our own use? Are there any forts they could retreat into? How many divisions are in the strategic reserve,
one or two provinces back where we can’t see them? Questions such as these and finding answers to them are what this game is all about. Luckily, there is two techs of vital importance here: radar and decryption. Powerful, level 10 radar, stationed in Dover, enables a Uk player to watch German forces amass, and picks up Army Group HQ’s as far away as East Prussia. It tells you which air- and naval bases are manned with planes or ships and whether or not they are defended. Decryption gives you more details. If your decryption tech is higher than the enemy’s encryption tech (hiding such things from
enemy intel), you might see that there are heavy armour divisions behind the frontline. Knowledge is power. Knowing where the enemy is weak is the start of strategic planning and the deployment of troops. As you can see, Hearts of iron requires you to think on your feet. What would you do if the situation were reversed, and how could you stop it from happening to you? That’s where the fun is. It is like chess, only with guns and Hitler.
Chapter 18: Combat.
(Frontage graphics courtesy of Surray) Today’s lesson is all about teaching you the ins and outs of ground combat. Obviously, as this is a wargame, it is by far the most important lesson of them all. I will teach you the basics of combat, starting out with a simple attack between two opposing infantry divisions. We will then take it one step farther and see what happens when multiple divisions attack from a single province, followed by what is called “Multiple Axes of Attack” (attacking from several provinces at once). The Ground Rules. Initiating an attack is simple. In HOI3, moving is attacking. You fight to conquer enemy provinces from its defenders.All you have to do, is give the division(s) orders to move to an enemy province. If there are any enemy units in that province, combat is initiated. All combat has an “attacker” (the one who tried to move into enemy territory) and a “defender” (the one trying to prevent them from doing so). The attacker is always shown on the left-hand side of the combat card, the defender is always on the right. Combat is measured in 1-hour “rounds”. Each round is divided in 5 phases: firing, damage, shattering, push back and reorganisation. During the firing phase, each unit randomly targets an enemy unit for the entire round. Each side will choose to use hard attack or soft attack, based on the “softness” of the target: a division with 70% softness has 70% chance of receiving a soft attack and 30% chance of receiving a hard attack. Since most units are on the softer side of the spectrum, this makes AT guns only usefull in certain, limited situations. They will fire a number of shots equal to the attack rating, modified by combat modifiers such as weather, terrain, leader skill, and so on. This is the Attack Effectiveness and can be seen on the combat card when mousing over a unit in combat. A defender under fire will use its defensiveness (also modified) to avoid taking damage. Each point of defensiveness used will give an 80% chance to miss. When all defensiveness points have been used up for that round, any subsequent shots fired will have a 60% chance to miss. Attackers use Toughness for the same purpose: to avoid taking damage while on the offense. Damage phase: Each succesful hit will cause randomly between 1.5 and 3 points of strength damage (actual casualties, as in men wounded and
dying) or an average of 2.25. It will also cause randomly between 0.1 and 0.3 Organisation damage (or an average of 0.2). Shattering phase: After firing, each side’s strength and organisation is checked to see how large the percentage of casualties were. (a 500 strength unit suffering 10 casualties will have 2% strength damage and start next round at 98% strength) When all of a unit’s strength or org is gone, it will shatter (cease to exist) and is rebuild in the nation’s capital if a supply line to that capital exists. If there is no supply connection to the capital, the unit will surrender/die. Pushback phase: When a province is occupied by an attacker, the defender is forced to withdraw to the next province, damaging infrastructure and buildings in the now vacated province. If the province it is moving to is occupied by the enemy before it arrives there, it will halt its movement and remain in place. If, by that time, the attacker has arrived and occupied the target province, the defender is killed. Reorganisation phase: Each combat’s side is divided between frontline troops and reserve troops. The frontline troops are the ones doing the actual fighting. The reserve troops wait until one of the frontline units is too badly damaged to continue. It then uses a complex mathematical formula to calculate the odds of each reserve unit moving forward to take its place, which is modified by the Corps commander's skill level (if within 200 km of said corps). After the fighting is done and the province is occupied or the attack has been stopped, there is an base attack delay of 168 hours. During this time, the unit cannot move or obey any further orders. Any orders given during attack delay will be executed when the delay ends. Attack delay can be reduced by researching Operational Level Organisation. Each level researched reduces attack delay by 24 hours. Every hour of combat reduces attack delay by 1 hour to a minimum of 1 hour. Breakthroughs reduce attack delay, though I’m not certain by how much. In FtM, units on Attack Delay can be recognised by a yellow triangle in the corner of the unit’ on-map counter. Units cannot regain org while moving into enemy territory, so it is up to the player/AI to decide whether to let a division rest after it arrives at its destination or to keep it moving. While there are too many modifiers in combat to possibly relate them all, the most important ones are: Terrain. Weather.
Division Leader Skill (5% combat bonus per skill point) Combat events (resulting from doctrine research, there is a chance each round of getting one, which will sometimes have huge modifiers, such as both 25% attacker bonus and 15% defender bonus). Combined Arms Divisions. A unit with a softness between 33% and 66% gets a base 20% modifier. Researching the Combined Arms doctrine tech gives an additional 10% bonus. A division leader with the panzer general trait gives 10% bonus. A Corps leader with the panzer general trait gives 5% bonus. An army leader with the panzer trait gives 2.5% bonus. An army group leader with the panzer general trait gives 1.25% bonus. A theater leader with the panzer general trait gives 0.6% bonus. And yes, these stack, meaning that under ideal circumstances the maximum bonus is 49.35%, provided every unit is within radio range of its higher-up (as discussed in the chapter on Orders of Battle, 200 km for corps, 400km for armies, 600km for AG, 2000 KM for theaters). This is the single highest bonus in the game. Before you all start building 100 armour divisions, remember that these divisions cost a lot of IC and time to build and they all consume tons of supplies and fuel. Shore bombardment: Whenever you’re fighting over possession of a coastal province, having a fleet in the sea province next to the coastal province (e.g. The English Channel when fighting for Calais) provides a defensive penalty. (just move the fleet into the province by giving it a “move” order). Ground attacks performed by bombers do damage on their own account, and can be considered as mobile artillery stations. Most of the above could, practically speaking, be safely ignored. The game engine takes care of the details. All we need to know is: 1)moving = attacking. 2)when a unit’s Strength or Organisation drops too low, it loses the ability to keep fighting. 3) After a defender loses a fight, he is forced to vacate the province. 4) If it has nowhere left to go, it is destroyed. 5)If both the province it is retreating to and the province it is in right now are occupied by the enemy, it is destroyed. 6) attackers cannot be destroyed or forced to vacate the province they occupy at the time. 7)After a fight, there is an Attack Delay of anything between 1 hour and several days, depending on circumstances, during which time it cannot move. 8) The single most powerful combat modifier is the Combined Arms modifier (softness between 33 and 66%). Combat Width Now it gets tricky. Fights can be lost by not paying attention to stacking or combat width.
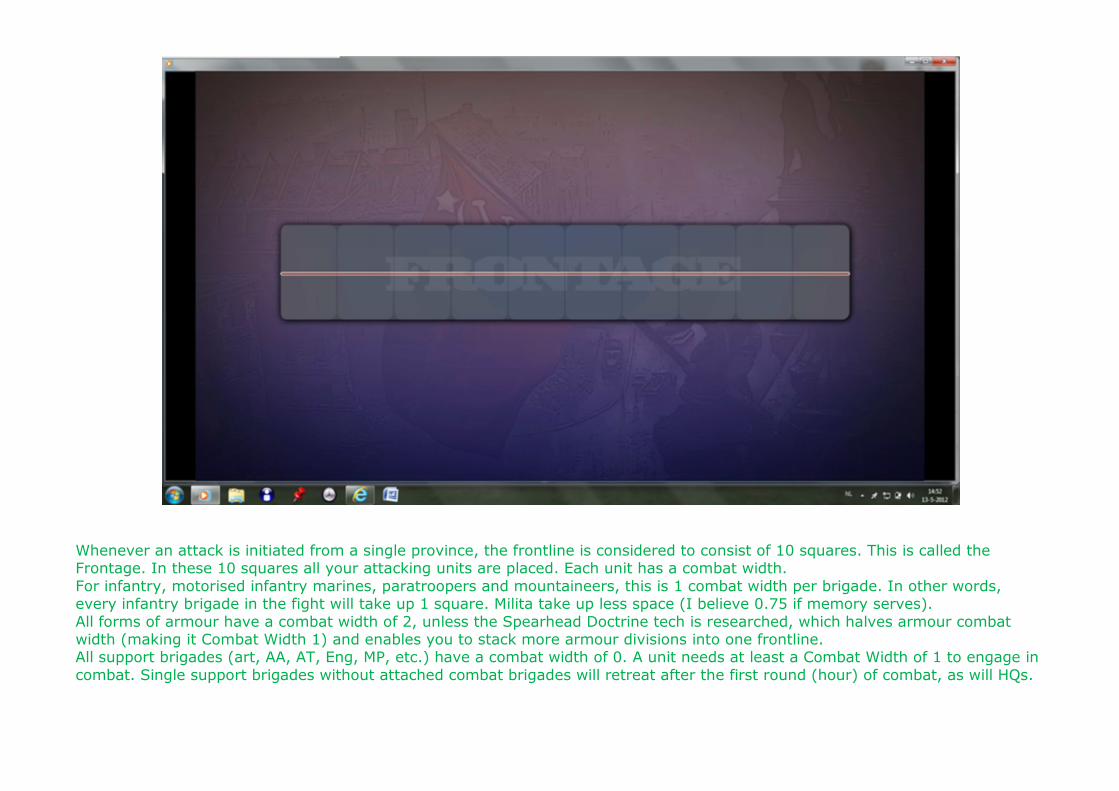
Whenever an attack is initiated from a single province, the frontline is considered to consist of 10 squares. This is called the Frontage. In these 10 squares all your attacking units are placed. Each unit has a combat width. For infantry, motorised infantry marines, paratroopers and mountaineers, this is 1 combat width per brigade. In other words, every infantry brigade in the fight will take up 1 square. Milita take up less space (I believe 0.75 if memory serves). All forms of armour have a combat width of 2, unless the Spearhead Doctrine tech is researched, which halves armour combat width (making it Combat Width 1) and enables you to stack more armour divisions into one frontline. All support brigades (art, AA, AT, Eng, MP, etc.) have a combat width of 0. A unit needs at least a Combat Width of 1 to engage in combat. Single support brigades without attached combat brigades will retreat after the first round (hour) of combat, as will HQs.

In the above example, the “blue” side is using 3 Larm brigades to attack an infantry division (consisting of 2 inf/2art) and an Larm division (consisting of 1 Larm/2 art). Note how the support brigades (the Art) are behind the combat brigades and don’t take up any space in the Frontage. The Red side still has 6 Frontage left to fill, while the Blue side still has 4 Frontage left.
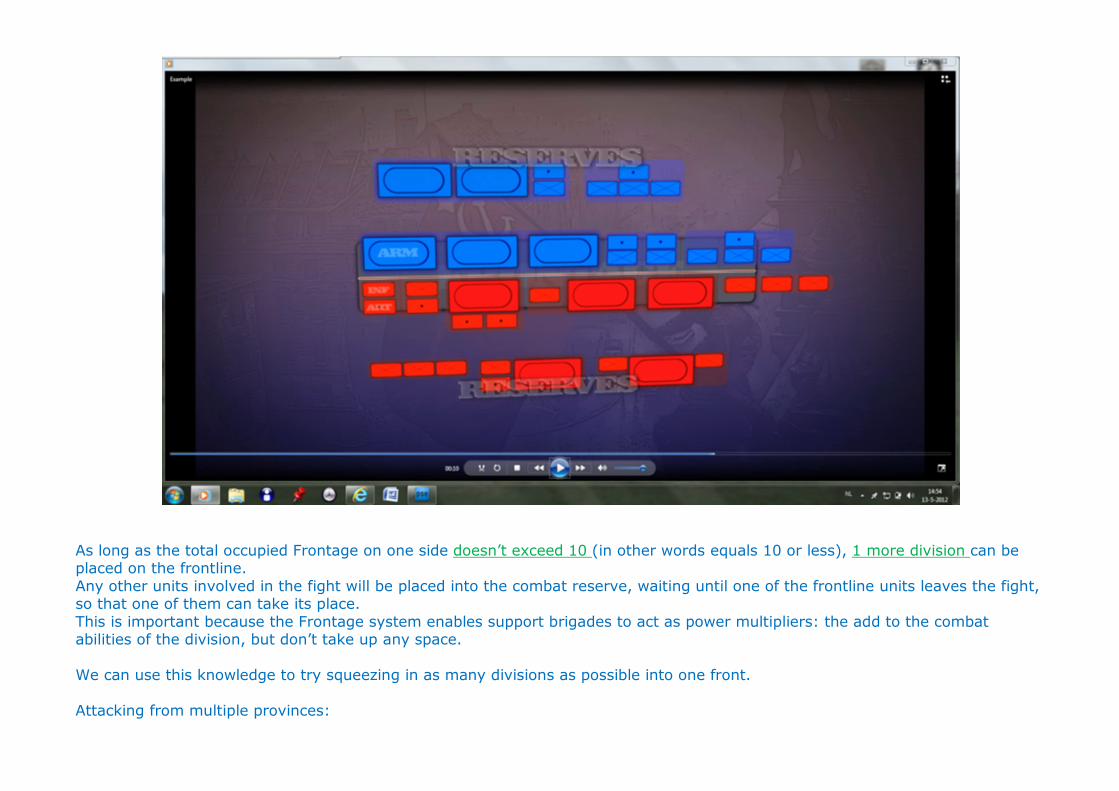
As long as the total occupied Frontage on one side doesn’t exceed 10 (in other words equals 10 or less), 1 more division can be placed on the frontline. Any other units involved in the fight will be placed into the combat reserve, waiting until one of the frontline units leaves the fight, so that one of them can take its place. This is important because the Frontage system enables support brigades to act as power multipliers: the add to the combat abilities of the division, but don’t take up any space. We can use this knowledge to try squeezing in as many divisions as possible into one front. Attacking from multiple provinces:
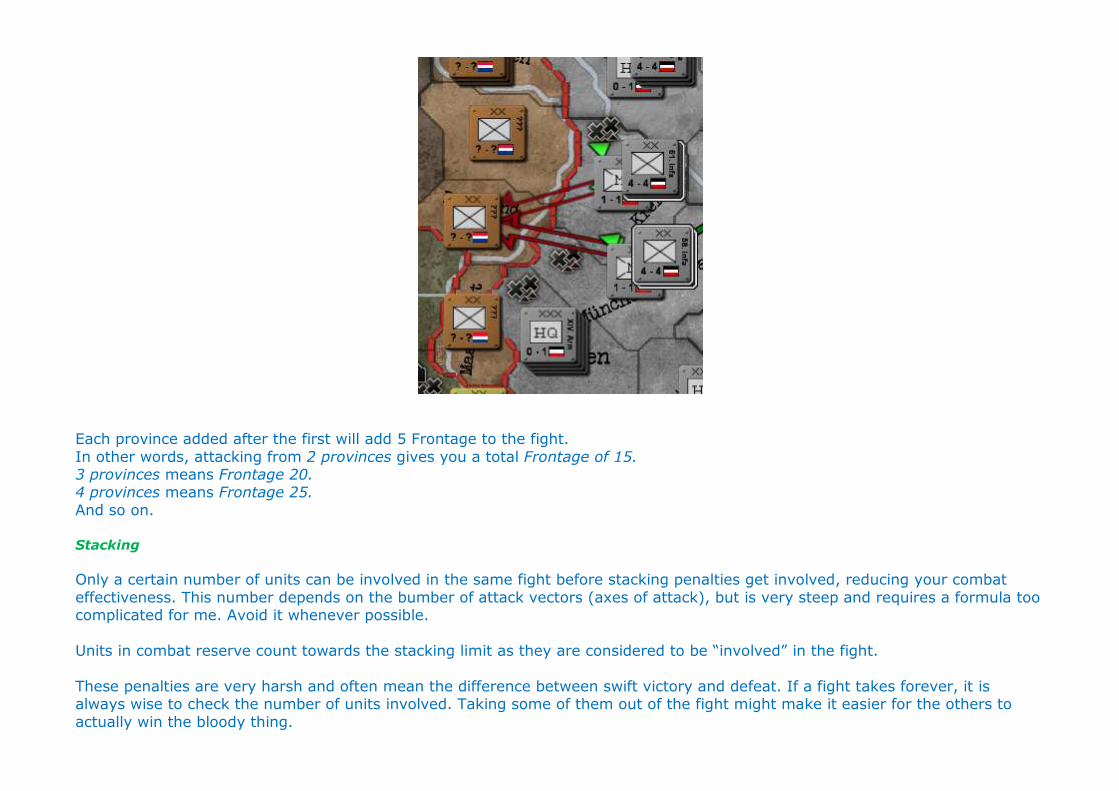
Each province added after the first will add 5 Frontage to the fight. In other words, attacking from 2 provinces gives you a total Frontage of 15. 3 provinces means Frontage 20. 4 provinces means Frontage 25. And so on. Stacking Only a certain number of units can be involved in the same fight before stacking penalties get involved, reducing your combat effectiveness. This number depends on the bumber of attack vectors (axes of attack), but is very steep and requires a formula too complicated for me. Avoid it whenever possible. Units in combat reserve count towards the stacking limit as they are considered to be “involved” in the fight. These penalties are very harsh and often mean the difference between swift victory and defeat. If a fight takes forever, it is always wise to check the number of units involved. Taking some of them out of the fight might make it easier for the others to actually win the bloody thing.
Attacking from a single province gives you a stacking limit nof 4. In other words, 4 divisions can be engaged in the fight without incurring a penalty. Each additional province added beyond the first adds more divisions to the limit according to the following formula: Allowed units in fight = integer (frontage/unit width)+1. Let’s assume standard infantry (3 inf/1art). Attacking from a single province gives you a stacking limit of 4: frontage 10/unit width 3 = 3+1=4 Attacking from 2 provinces gives you a Stacking Limit of 6: frontage 15/ unit width 3 = 5+1=6. Attacking from 3 provinces gives you a Stacking Limit of 7: frontage 20/unit width 3 = 6 +1=7. Attacking from 4 provinces gives you a stacking limit of 9: frontage 25/ unit width 3 = 8+1=9. And so on. In other words: tanks count more towards the stacking limit than infantry as they take up more space unless proper research has been done to reduce their combat width. Amphibious assaults and airborne attacks add one province to the attack, widening the frontage and allowing more units to engage the enemy. (but of course they too count towards the stacking limit). Theater commanders reduce stacking penalties by 1% per skill level. Attacking from multiple angles gives the defender a combat penalty as they are in effect forced to fight on multiple fronts at once. For units that are completely surrounded, this penalty gets harsher, and is compounded by the fact that they are cut off from their supply chain, making it impossible to regain strength and organisation and are entirely dependend on supplies INSIDE the province at the time (surrounded units in a capital never get out of supply because that's where the resource pools are stashed, remember?). Often, a more powerful unit or group of units can be softened up by encircling them and using bombers to soften them up for a few days. And if you’re not a math wizard, all you need to do is memorise the following: Frontage 10 + 5 for each additional province. Stacking limit 4 (1 prov), 6 (2 prov), 7 (3 prov), 9 (4 prov) for regular infantry. Beyond that, it doesn’t really matter anymore. Now that you know how combat works, let’s look at a combat card, shall we?
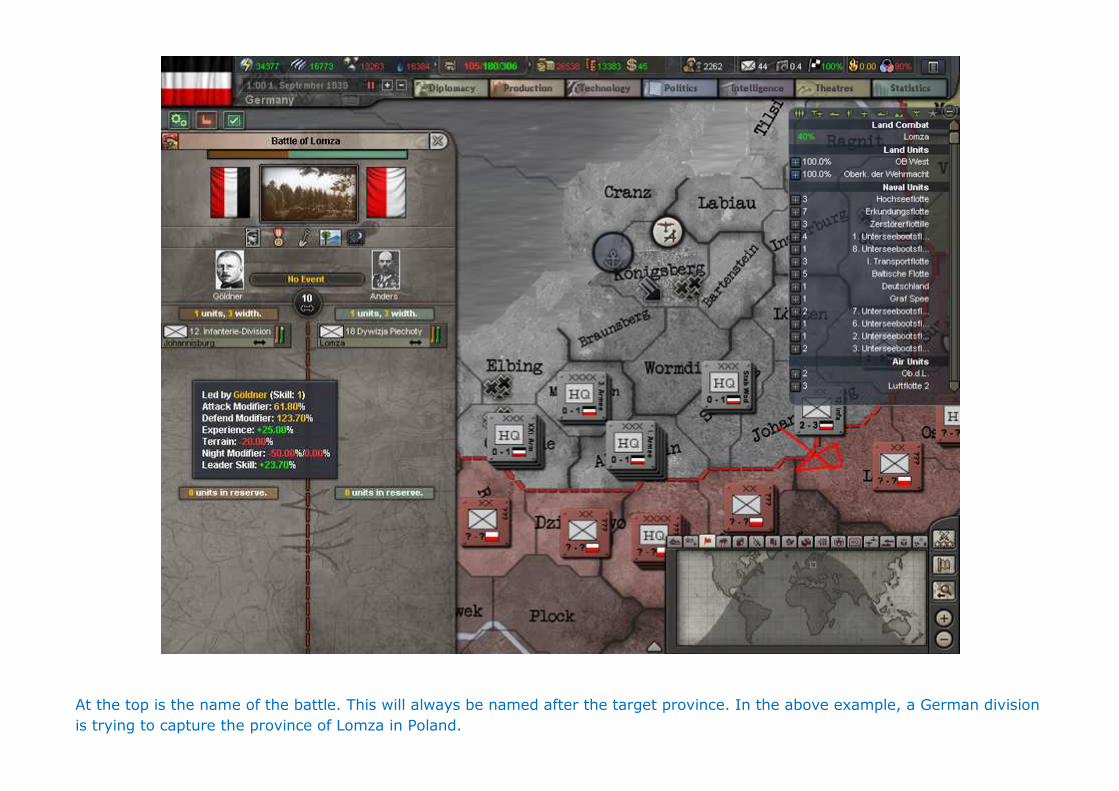
At the top is the name of the battle. This will always be named after the target province. In the above example, a German division
is trying to capture the province of Lomza in Poland.
To the left of the name is a small icon (yellowish with a red arrow). Clicking this enables us to end the fight. Below the name is the surrender progress. As the attacker gains or loses ground, the red will increase or decrease. When the whole line is red, the attacker has won the fight. Mousing over this line will give you a percentage, indicating how the combat is going. Next are the flags of the two nations involved as well as an indicator of the terrain type of the target province.
Below this we have series of small icons indicating combat modifiers. As always, mousing over these will indicate just what they are. Unfortunately, they do not say who is getting which modifier. Some judgement calls will have to be made here. As I said before, the attacker is always on the left (in this case Germany) and the defender on the right (Poland). First we have the commanding officer in charge of the battle. If several divisions are involved, one is appointed by the game to command. His skill level will affect the fight. Any combat events will be shown in the oval between the two portraits. Mousing over the icon that will appear at this time gives
you the details involved. The number “10” in the middle indicates the frontage. Each side’s units will be listed next, giving you type of unit, name, strength, org, province, and combat width. Mousing over each unit gives you all the details affecting this unit. In the above example, the German unit has an Attacking Effectiveness of 61 and a defending effectiveness of 123.70. As you can see, fighting in a forest at night is clearly not a good idea (-20 for fighting in a forest and -50 for fighting at night). If this fight
were occuring on a plain during the day, the Attack Effectiveness would be 131%, more than enough to overcome the Polish Defensive Effectiveness. In this case, there are no units in reserve. If there were, they would be shown in the bottom half, along with a percentage chance for each of them to move up into the frontline. Combat progress will also be shown on the main map as a bubble with a number inside it, pointing towards the defender. The number indicates the surrender progress of the fight, with a colour to denote how the fight is going: green means the fight is going the player’s way, yellow means it could go either way, red means trouble. It may need your attention. (note that most fights
will start red and then turn yellow or green after a few hours, depending on the circumstances). You can also see all combat you’re involved in using the browser on the right of the main map (in this case Lomza 40% in green, indicating we are attacking and have progressed 40% towards capturing the province). If we are defending, this will be listed in red. I think that about covers ground combat. Take the time to really learn this lesson. In a game that is all about World War II, it is the single most important lesson I can give you. You cannot win a war without occupying enemy VP provinces. In order to do so, you need to fight. Knowing what makes for a winning fight is half the work.
Read it a couple of times, and ask me any questions you may have.
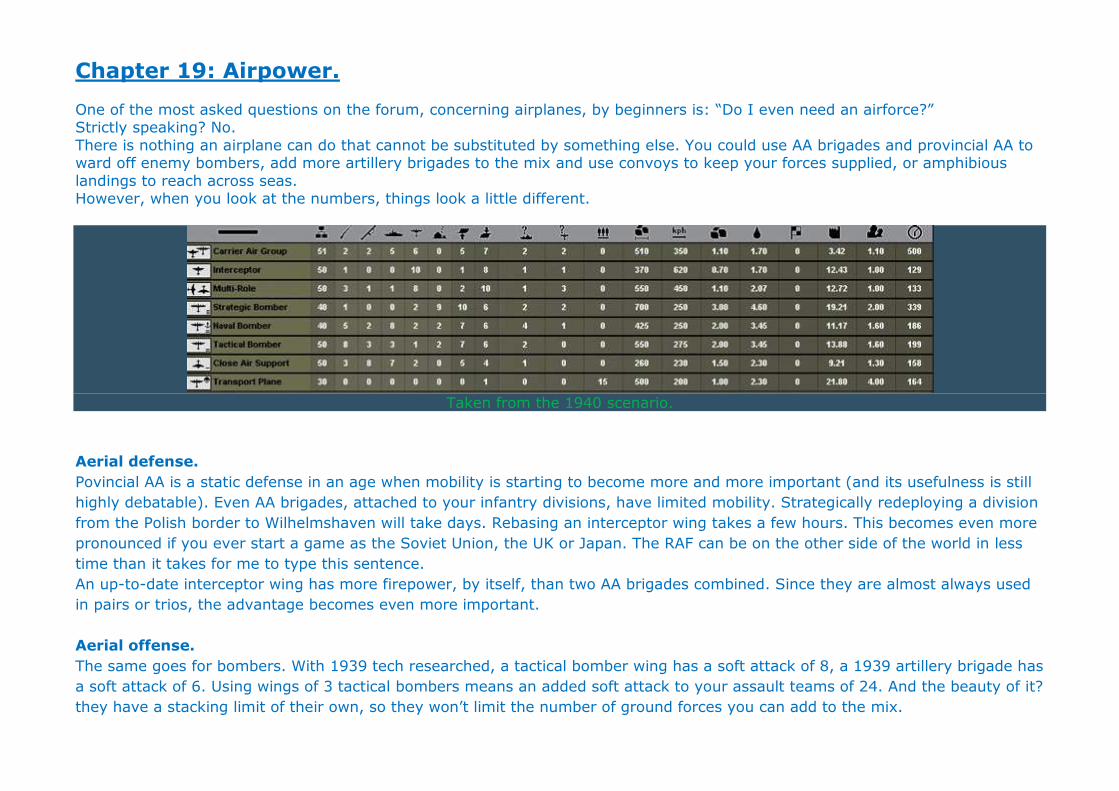
Chapter 19: Airpower. One of the most asked questions on the forum, concerning airplanes, by beginners is: “Do I even need an airforce?” Strictly speaking? No. There is nothing an airplane can do that cannot be substituted by something else. You could use AA brigades and provincial AA to ward off enemy bombers, add more artillery brigades to the mix and use convoys to keep your forces supplied, or amphibious landings to reach across seas. However, when you look at the numbers, things look a little different.
Taken from the 1940 scenario.
Aerial defense.
Povincial AA is a static defense in an age when mobility is starting to become more and more important (and its usefulness is still highly debatable). Even AA brigades, attached to your infantry divisions, have limited mobility. Strategically redeploying a division from the Polish border to Wilhelmshaven will take days. Rebasing an interceptor wing takes a few hours. This becomes even more pronounced if you ever start a game as the Soviet Union, the UK or Japan. The RAF can be on the other side of the world in less time than it takes for me to type this sentence. An up-to-date interceptor wing has more firepower, by itself, than two AA brigades combined. Since they are almost always used in pairs or trios, the advantage becomes even more important. Aerial offense.
The same goes for bombers. With 1939 tech researched, a tactical bomber wing has a soft attack of 8, a 1939 artillery brigade has a soft attack of 6. Using wings of 3 tactical bombers means an added soft attack to your assault teams of 24. And the beauty of it? they have a stacking limit of their own, so they won’t limit the number of ground forces you can add to the mix.
Supply and power projection. Transport planes don’t need a local airbase (which may be damaged in combat) to ship supplies and fuel. They can, with their extended range, drop the stuff right where you need it, without having to wait for your supply chain to catch up. In order to reach secluded islands, you could send in the marines, obviously, but what if the province you need to take is completely land-locked? Historically, Germany used paratroopers to take out the fortress of Eben Emael in the Belgian province of Liège, instantly depriving Belgium of the lynchpin of its entire defense. Paradroppings can be used in the most abusively gamey ways. One AAR proved this by practically winning the war with only paratroopers and transports.
Now that we have established that airforces are useful, let’s explore what types of wings we can produce and their best use in-game. Let’s start with the three basic types of practical: light, medium and heavy planes. Most nations, with a possible exception of the US, can only afford to build up two types of practical at most, and you can get very good mileage out of just one type. Light aircraft consist of interceptors, multi-purpose (fighter/bombers) Carrier Air Groups and Close Air Support. Since you can’t do without fighter-based protection, this one is practically mandatory. Interceptors provide the best defense (high firepower against other planes and excellent protection).
Multi-purpose planes offer firepower for added protection and range. The range benefit is very useful, enabling them to reach spots far outside the range of your interceptors, but it is my experience that they tend to get shot up more during continuous missions where they meet interceptors. They can be used as bombers, both to attack land-based and sea-based targets, but offer none of the outstanding effects each bomber type has. Basically jack-of-all-trades, master of none. Close Air Support planes have very short range and are extremely vulnerable, but they shine when used in an anti-tank role (much like the RAF used a version of the Hawker Hurricane against the Afrika-korps to great effect). Since all of our major
enemies will sport medium and heavy armour, Germany needs at least some of them. Carrier Air Groups shine, obviously, when used to protect their carrier and attack other vessels during naval combat. However, they can be considered to be brigades. As such, they can be detached (I’ll explain more in detail in the naval chapter) and used for port strikes (Pearl Harbour and Taranto come to mind) and naval strikes from airbases. Just keep in mind that naval bombers are much better in this regard. Which brings us to medium planes. These come in two bomber types: tactical and naval bombers.
Tactical bombers are your workhorses, capable to attack enemy ground forces, engage in naval combat (they can even raid convoys), logistic strikes and other strategic missions. More sturdy than the CAS with reasonable ranges, any self-respecting major nation should at least have a few of these. Naval bombers are the masters of the sea where planes are concerned. Offering better naval stats than tactical bombers, their only shortcoming is a slightly reduced mission range. Finally, we have heavy planes. They are basically two oddballs. Strategic planes and transport planes.
Strategic planes (flying fortresses, for example) offer tremedous range and awesome offensive capabilities AGAINST PROVINCIAL TARGETS. Against installations (radar, AA and such), infrastructure, air- and naval bases or your enemy’s industrial centers, there is no other plane in the game that offers this kind of firepower. But that’s it. While the historic B-17 and B-29 strategic bombers could be used to strike fear into the heart of the US’ enemies, the in-game versions of those bombers little to no combat use. Don’t get me wrong. They can be used in various ways. For instance, in one UK game (this was during SF), the French AI panicked during the invasion of the Low Countries and abandonned Wissenbourg (one of their Maginot provinces). Luckily, this one time I actually had UK’s strategic bombers stationed in Paris, bombing German industry. I intervened by log striking the German Saarland, giving me time to use the B.E.F. to plug the gap. Germany still won the day in the end, but that’s another story. That day of French panic, however, general Portal’s strategic bombers were the heroes of the day.
The other “oddball” are transport wings, the only type of unit in the game that can land paratroopers in land-locked provinces behind enemy lines and ferry supplies and fuel across hundreds of miles without needing to rely on the supply chain or nearby naval bases. Each type is, obviously, more expensive to build in terms of both IC and time than the previous one, and requires more fuel and supplies to keep running. In the end, the nation you choose to play determines what your airforce will be made of. If IC and time are limited, light aircraft offer fighers, bombers and naval strike ability across your nation and you can get a whole
lot of mileage out of them, as long as you have airbases near every frontline. If you have both IC and time, however, you can choose to add another practical to the mix. Given their limited use on the battlefield, most players choose to dismiss heavy planes and opt for medium planes. That is what we are doing with Germany: a healthy mix of cheap, light planes and more powerful, extremely versatile tactical bombers. Stacking. It bears repeating: any bomber wing, including the first, will have 10% stacking penalty per bomber (10% for 1 unit, 20% for two, etc.), while fighters suffer 10% per plane starting with the 2nd one (0% for 1 unit, 10% for 2 units, 20% for three units, etc.).
But who will command these airwings? Like ground forces, airwings have generals with a rank, skill and traits. Things work slightly different for aerial units than for armies, though, and the following only talks about airforce officers. A major general can command 4 wings. As you will see later in this chapter, aerial stacking limits make the use of more than 4 wings in one battle highly unpractical. As such, a major general is basically all we need and there should never be a real need to
promote them (with the possible exception of commanding CAGs). A lieutenant general can command up to 8 wings at a time. Whenever situations erupt that require the use of more than 4 wings in one aerial mission, it would be wise to ensure that at least one of the commanding officers is a lieutenant general. Air generals can commando up to 12 wings. Apart from roleplaying, there is never any real need to promote anyone to this position. Having this many planes in one area makes them all virtually useless. Skill works exactly the same as for divisional commanders in your army. No need to waste more time on it than needed.
Traits, however, are of vital importance in assigning the right man for the right type of wing. These are: Carpet Bombers: they offer 10% bonus during strategic attacks and should be reserved for, obviously, strategic planes and tactical bombers lined up for extended duty in this area. Fleet Destroyers: offering 10% in naval attacks, they are perfect for naval bombers and CAGs.
Night Flyers: with 10% bonus on night attacks, they offer some use when planning to fly nighttime missions. I often use these for my interceptors if I have to defend myself from a lot of nightly bombing runs. Superior Tactician: they offer a 10% bonus for “tactical attacks”. Nobody, as far as I know, understands the term, but Paradox has assured forumites to use these for your tactical bombers, interceptors and fighter/bombers. Spotters have 10% bonus to their ability to detect enemy forces. I believe this extends to all enemies. Can also be used for
interceptors and bombers. Tank Busters make it 20% more likely that your plane will target the enemy with its soft attack. They should be used whenever you are facing armoured opposition on the ground. I assigned the following commanders to my various wings: Luftflotte I: Kesselring
Luftflotte II: Sperrle Luftflotte III: Von Greim Luftflotte IV: Von Richthofen Stuka 1: Udet Stuka 2: Löhr I. Fliegerkorps: Sommé II. Fliegerkorps: heilingbrunner
III. Fliegerkorps: Kitzinger IV. Fliegerkorps: Lörzer V. Fliegerkorps: Milch VI. Fliegerkorps: Felmy This concludes the chapter on Airpower. As always, don’t be afraid to ask questions or pose constructive criticism. Next: Kriegsmarine.
EDIT: It is NOT the type of plane that gives an extra 10% stacking penalty, but the type of mission!!!!! Using fighter airplanes on any kind of bombing mission (for whatever reason)gives 10% stacking that you don't have when using intercept/superiority missions!!!!!!!!!
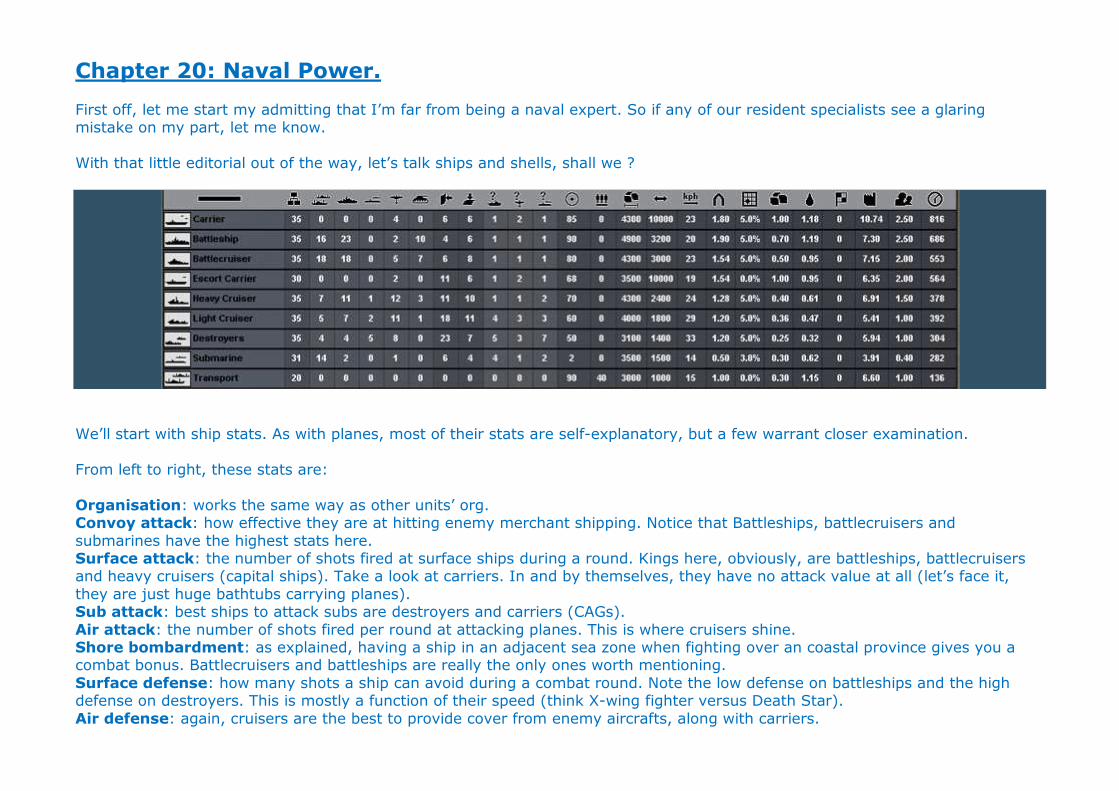
Chapter 20: Naval Power. First off, let me start my admitting that I’m far from being a naval expert. So if any of our resident specialists see a glaring mistake on my part, let me know. With that little editorial out of the way, let’s talk ships and shells, shall we ?
We’ll start with ship stats. As with planes, most of their stats are self-explanatory, but a few warrant closer examination. From left to right, these stats are: Organisation: works the same way as other units’ org. Convoy attack: how effective they are at hitting enemy merchant shipping. Notice that Battleships, battlecruisers and submarines have the highest stats here. Surface attack: the number of shots fired at surface ships during a round. Kings here, obviously, are battleships, battlecruisers and heavy cruisers (capital ships). Take a look at carriers. In and by themselves, they have no attack value at all (let’s face it, they are just huge bathtubs carrying planes). Sub attack: best ships to attack subs are destroyers and carriers (CAGs). Air attack: the number of shots fired per round at attacking planes. This is where cruisers shine. Shore bombardment: as explained, having a ship in an adjacent sea zone when fighting over an coastal province gives you a combat bonus. Battlecruisers and battleships are really the only ones worth mentioning. Surface defense: how many shots a ship can avoid during a combat round. Note the low defense on battleships and the high defense on destroyers. This is mostly a function of their speed (think X-wing fighter versus Death Star). Air defense: again, cruisers are the best to provide cover from enemy aircrafts, along with carriers.
The next three are the detection values: higher stats here make it tougher to surprise the ship during first contact. Destroyers have the best detection values in the game. Visibility: low visibility makes it easier to sneak up on the enemy. Trying to surprise someone with a submarine is one thing, doing the same with a battleship is just plain silly. Transport capacity: a transport ship can carry a weight of 40. Mission max range: how far out to sea you can send them (in kilometers; 1 mile=1.6 km). Beyond this range would require you to rebase the ship to another naval base. Notice how battlecruisers and heavy cruisers have the same range. Firing Range: somewhat confusingly shown. Carriers have a firing range of 100 km (this is the combat range of the CAG, actually), battleships 32 km, battlecruisers 30, heavy cruisers 24, light cruisers 18, destroyers 14, subs 15 and transports 10 km. (more on this stat later). Speed: how fast the ship moves. Of primal importance during naval combat, as we will see later on. Subs are extremely slow and, as such, not suitable for combat. Again notice the synergy between the 3 types of cruisers, but the speed demon here is the destroyer. Hull: this stat has 2 functions in-game. Firstly, it determines how much damage it can take. Secondly, it determines how many ships you can cram into one squadron before you get penalties (again, more on this in the combat section) Positioning: due to our evenly distributed research of naval doctrines, all our ships have a 5% positioning bonus (except escort carriers and transports). This stat determines how well placed the ship is to hit its target. Low positioning will mean less hits and an increased chance of Friendly Fire. (yeah, that’s right; with bad positioning you could end up sinking your own screens!) The rest of their stats you know. What does this mean, in practice? Carriers are priceless. By far the most powerful ship in the game and the most versatile as well, due to the CAGs’ extreme firing range. Battleships are brute force. Pure and simple. Big guns, heavy armour but too slow and too hulking to survive on their own. Battlecruisers were supposed to be able to outshoot anything they could catch and outrun anything that could outshoot them. While this didn’t turn out as hoped, battlecruisers ARE fast, and when coupled with other cruiser types, this means all ships would be able to bring their guns to bear. Compare this to a squadron consisting of battleships (firing range 32 km) and destroyers (firing range 14 km). The battleships would be firing allready while the destroyers would still be trying to close in. In fact, in HOI2 there was an exploit called the Cruizerg fleet; massed cruisers all combining to fire at once, overpowering the battleship’s defenses. Escort carriers seve only one function, really. As the name suggests, they are meant to escort transports and convoys. Period. If you’re looking to go the carrier route, it is best to focus on pure carriers mostly. Heavy cruisers are labeled as capital ships in the game, while in reality they were used mostly in a screen function (again, more details later). They lack the stamina to go up against other capital ships, but they can add some much-needed aerial defense if
you’re going up against an enemy with carriers and land-based bombers and they can serve as damage soaks for your battleships. Light cruisers are sturdy screening vessels with bigger range, but they lack the anti-sub ability, detection values and speed of destroyers. Destroyers are fast, cheap to build and maintain, with excellent detection and anti-sub values, but they are not build for pitched battle. Submarines have two functions: convoy raiding and stealthy recon. Transports are…well…transports. (duh) So how do you go about assembling a fleet?
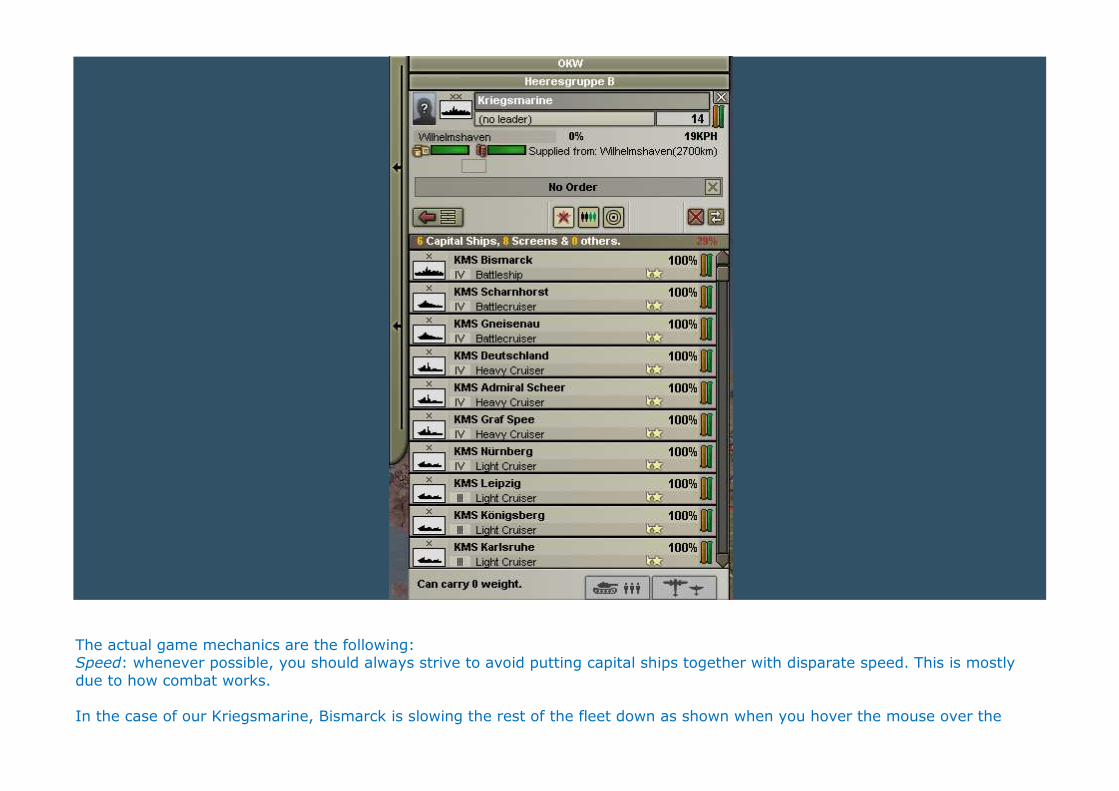
The actual game mechanics are the following: Speed: whenever possible, you should always strive to avoid putting capital ships together with disparate speed. This is mostly due to how combat works. In the case of our Kriegsmarine, Bismarck is slowing the rest of the fleet down as shown when you hover the mouse over the
fleet's speed in the upper right corner. Hull. The hull values of all the ships in the squadron are added together. If the total is bigger than 10, you get positioning penalties in combat (they get in each other’s way). This penalty is 4% per point over 10 hull. So in theory, a total hull value of 10 or less would be ideal. In practice, however, things look a bit different. A naval commander’s skill provides 10% positioning bonus per skill point. Raeder and Donitz, for instance, have skill 4 and 5 respectively, and provide 40% and 50% bonus, enabling you to offset the penalty to a large degree. In the case of the Kriegsmarine, we have a total hull of 18.42 (not shown; I calculated it adding together each ship’s hull value) and give us a 29% penalty. If we give Raeder command, his 40% bonus more than outweighs the penalty. A reasonable hull rate per ship squadron would be somewhere between 10 and 15. In other words, we’re going to have to trim it down a little. Capital vs. Screen ratio. You need to have at least 1 screening ship per capital ship or suffer a combat penalty. Screens are Light cruisers and destroyers and primarily exist to protect the capital ships. Capitals are heavy cruisers, battlecruisers, battleships, escort carriers and carriers. In the case of our kriegsmarine, we have 6 capitals and 8 screens. Remember that we are still building a battleship, a carrier, a light cruiser and a destoyer. I would seperate the battlecruisers, along with 2 heavy cruiser, giving us 4 capital ships. So we need at least 4 screens to go with it. Add the destroyer and three of the level-3 light cruisers.
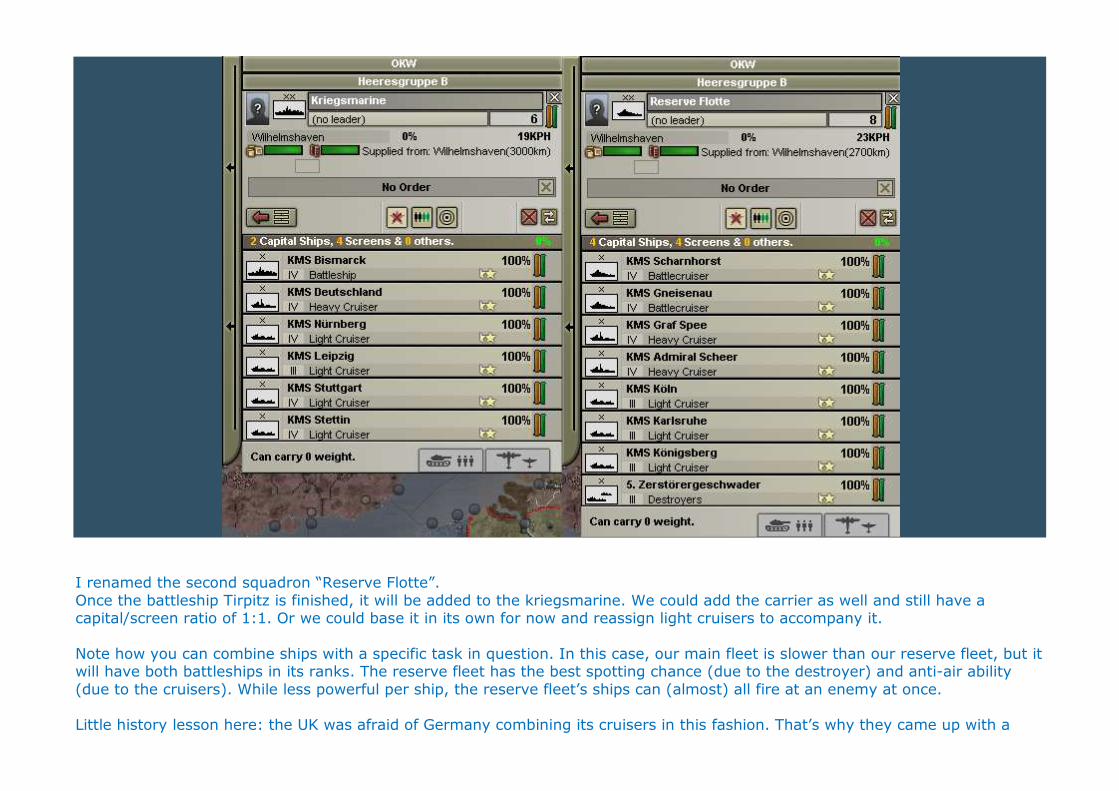
I renamed the second squadron “Reserve Flotte”. Once the battleship Tirpitz is finished, it will be added to the kriegsmarine. We could add the carrier as well and still have a capital/screen ratio of 1:1. Or we could base it in its own for now and reassign light cruisers to accompany it. Note how you can combine ships with a specific task in question. In this case, our main fleet is slower than our reserve fleet, but it will have both battleships in its ranks. The reserve fleet has the best spotting chance (due to the destroyer) and anti-air ability (due to the cruisers). While less powerful per ship, the reserve fleet’s ships can (almost) all fire at an enemy at once. Little history lesson here: the UK was afraid of Germany combining its cruisers in this fashion. That’s why they came up with a
naval agreement limiting Germany’s shipbuilding capacity. I once experimented with Germany’s real-life 1934 “cruizerg” building program, and found that it works, at least early on in the war, but the ships got banged up due to a lack of “stamina” and had to spend weeks in drydock after each encounter. For those of you interested in experimenting on your own, I refer you to this awesome threat: http://forum.paradoxplaza.com/forum/...l-Powers/page1 Concerning carriers, most people, including myself, keep them seperate from other capital ship types for a simple reason: any warship in combat will try to close on the enemy in order to fire its guns. A Carrier, however, will try to stay at the extreme range of 100 km, far outside the firing range of any other ship type. When you combine them with other capitals, they will be “sucked in” closer, where their lack of armament will only serve to hinder them. The most common type of fleet would be: Surface Action Group (SAG): a squadron composed of battleships or battlecruisers with screens (mostly light cruisers) , intended primarily for naval combat. Carrier Task Force (CTF): as the name suggests, the only capitals here will be carriers, accompanied by destroyers or light cruisers. When accompanied by destroyers, it is an excellent weapon against enemy submarines: the destroyers will find the wolfpack and the CAGs will sink them. And this type of fleet is fast enough to outrun anything else they might run into. (also known as an ASW-squadron) When accompanied by Light Cruisers, it is usually intended for pitched battle, as the cruisers can take more of a beating than destroyers. Invasion fleet: a number of troop transports, along with a couple of screens for protection and maybe a carrier or an escort carrier, for use in amphibious invasion. Coastal patrols: mostly older screens and a heavy cruiser or two for routine patrole duty outside the frontlines. Submarines: as we’ve seen, their main asset is stealth to sink enemy shipping or to explore enemy coastlines for potential invasion sites. But what happens when two fleets collide? First of all, unlike ground forces, naval squadrons cannot see into the adjacent sea zone. They can only see to the edge of their current sea zone. (due to the ranges involved; sea zones are much larger than ground provinces).
So your ships enter a sea zone where an enemy squadron is present. What happens? First, the game rolls dice to see whether they spot each other (like the doctrine tech spotting). If one side doesn’t notice the other one, they start out farther from their ideal positioning. If one of the clashing fleets consists of submarines, those have a 50% chance to surprise the enemy, gaining 300% attack bonus for the first 3 hours of the engagement. (naval bombers, by the way, have 25% chance to surprise the enemy and gaining 75% attacking bonus.) When neither notices the other fleet, both sail on in happy ignorance. When they see each other, what then? Merry greetings and well wishes? Well…not really.
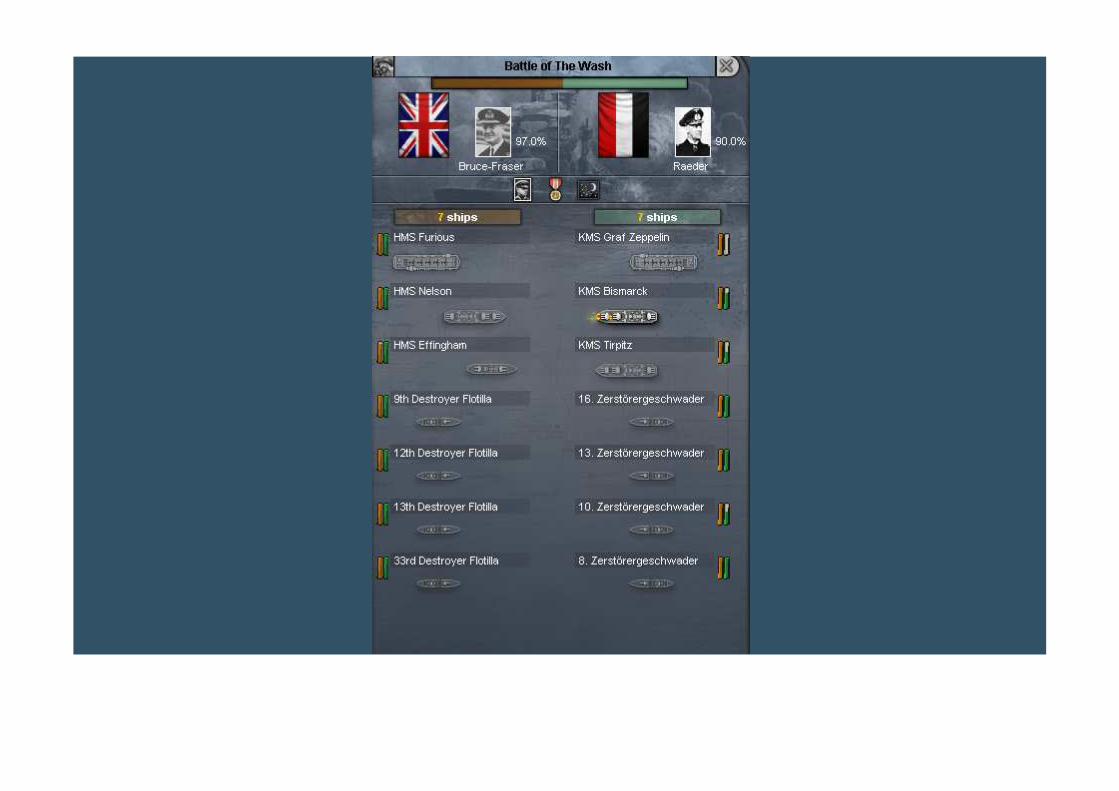
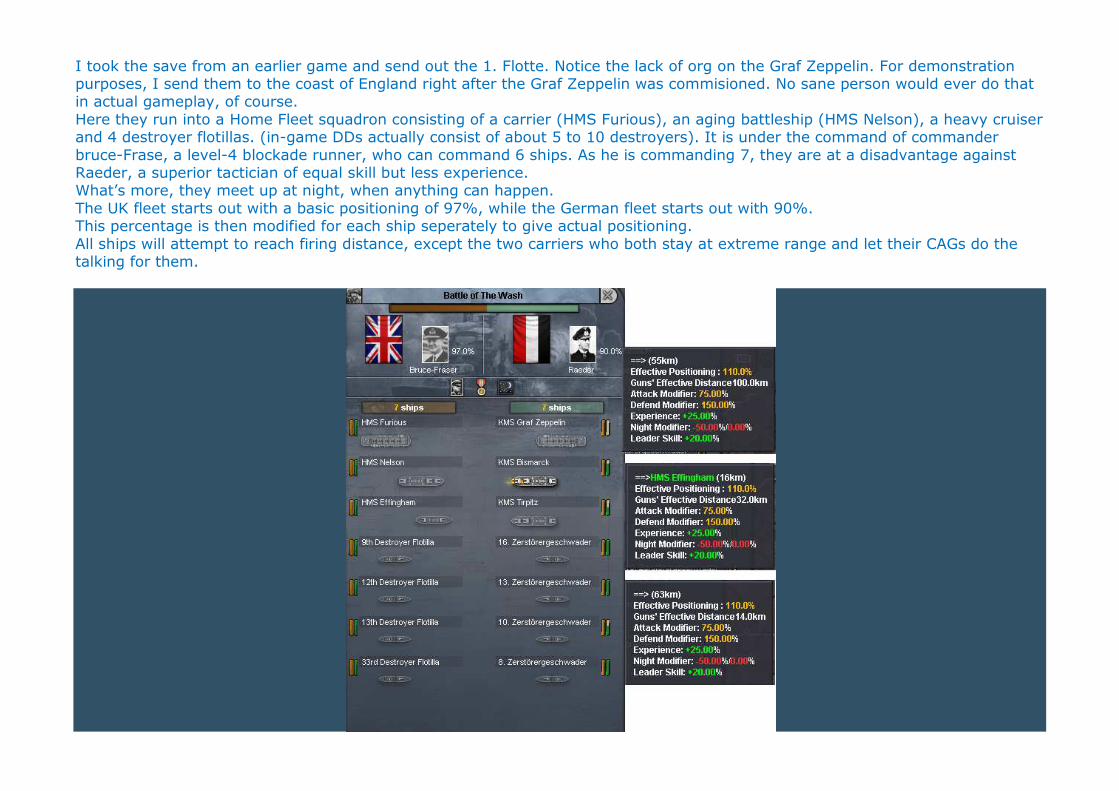
I took the save from an earlier game and send out the 1. Flotte. Notice the lack of org on the Graf Zeppelin. For demonstration purposes, I send them to the coast of England right after the Graf Zeppelin was commisioned. No sane person would ever do that in actual gameplay, of course. Here they run into a Home Fleet squadron consisting of a carrier (HMS Furious), an aging battleship (HMS Nelson), a heavy cruiser and 4 destroyer flotillas. (in-game DDs actually consist of about 5 to 10 destroyers). It is under the command of commander bruce-Frase, a level-4 blockade runner, who can command 6 ships. As he is commanding 7, they are at a disadvantage against Raeder, a superior tactician of equal skill but less experience. What’s more, they meet up at night, when anything can happen. The UK fleet starts out with a basic positioning of 97%, while the German fleet starts out with 90%. This percentage is then modified for each ship seperately to give actual positioning. All ships will attempt to reach firing distance, except the two carriers who both stay at extreme range and let their CAGs do the talking for them.
Graf Zeppelin is at 55 km more than far enough to launch its planes. The attack and defense values are then calculated and shots fired. Bismarck is at 16 km distance from HMS Effingham and fires a salvo, while my destroyers are lagging behind at 64km, well outside their firing range. (notice how Bismarck’s forward guns are shown firing?) The British ships are still trying to close in on the Germans and have not fired a single shot, relying only on HMS Furious’ CAGs. (none of them is shown with blazing guns).
After shots have been fired, damage is calculated if a hit was scored. Bismarck has a sea attack rating of 23. This is multiplied by it’s current strength (still undamaged) of 100% and divided by Effingham’s Hull Rating of about 1.3 or so (educated guess here) for a total of 17.7 damage (rounded up). What’s that? A lot of damage? Yeah, naval combat is hell! What’s more, there’s base 10% chance of scoring a critical hit, multilpying damage by 10 (!!) (the equivalent of a lucky shot in the enemy’s ammo hold). Oh, and when an enemy fleet completely sinks, it takes its commanding officer with it, contrary to air- and ground units). When looking at an unpauzed naval engagement, you will see ships trying to steer away (they will move towards their edge of the combat card). You can choose to disengage by clicking the little icon in the upper left coner or let nature run its course. After all ships have been
driven off, the result will be displayed. The loser is always the one who is “driven off the edge of the combat card”, as it were, regardless of actual sinking. (sometimes you will get a loss when you sank 3 battleships or something, or a win while the only ship remaining is a lone destroyer). It can be over in the blink of an eye, as this one was (I didn’t even get a chance to take a second screenshot), or it can last for days (think Midway and Mariana Turkey Shoot). The defeated side will retreat into the next, random sea zone, hoping to reach a friendly port for repairs. (I once had a US Task Force in the Western Channel and a UK SAG in the Eastern channel play tennis with one of my fleets. They got defeated and ran into the other squadron, who defeated them in turn and send them back where they came from…into the
waiting hands of the CTF!) Naval Combat is fast, furious, exciting and unpredictable and should never be entered into lightly. So unless your chosen strategy is to whittle down the RN’s presence, keep them in port under the watchful eye of an interceptor wing. You never know who is going to come for a friendly visit.

And that leaves me with only thing to add. Naval Commanders. You have: -commanders: able to command up to 6 ships. -rear admirals: able to command up to 12 ships. -vice admirals: can command up to 18 ships. -admirals: can command up to 30 ships (by which time any hull value will have long since become a thing of the past). Note that if two squadrons find themselves in the same fight, the total number of ships counts towards stacking/positioning and
command limit!! As stated before, each skill point they possess, provides a 10% positioning bonus. Traits: Blockade Runner: reduces the time needed to disengage from a fight, thereby improving the odds that the fleet will survive. Best suited for transport fleets. Sea Wolf: improves convoy raiding by 20%. (mostly used for submarines) Spotter: increases the chance of finding an enemy fleet by 10%. Best suited for anti-sub duty and for blockading enemy straights. Superior Tactician: increases the range by which ships can engage by 10%. Obviously to be used for your combat squadrons.
And of course there’s the omni-present Old Guard, who reduces experience gain by 50%. In our tutorial, I am going to give admiral Raeder command of Kriegsmarine, while Donitz can be promoted to rear admiral to command the reserve fleet. (I am loathe to send a skill-5 leader to almost certain death onboard a submarine). Weserflotte: Carls, a high-level Blockade Runner, is perfect for the job. Baltische Flotte: Saalwachter can set for command here. The submarines will be commanded by sea wolves. Start by assigning the least-skilled one command of I. Unterseebootflotte (I believe Claesen, a skill-1 commander), and work your way up the ladder, thereby ensuring that the best and most modern subs
are commanded by the best commanders.
Kriegsmarine Order of Battle on 1/9/1939: Kriegsmarine (commanded by Raeder): Bismarck (BB) Deutschland (CA) Nürnberg (CL) Stuttgart (CL) Stettin (CL)
5. Zerstörergeschwader (DD) 6. Zerstörergeschwader (DD) All are lvl-4, except 5. Zerstörergeschwader, which is lvl-3 Erkundungsflotte (Dönitz) Scharnhorst (BC) Gneisenau (BC) Admiral Scheer (CA)
Graf Spee (CA) Köningsberg (CL) Karlsruhe (CL) Köln (CL) Leipzig (CL) Baltische Flotte (Saalwächter) Schlesig-Holstein (BC)
Schlesien (BC) 1. Zerstörergeschwader (DD) 2. Zerstörergeschwader (DD) 3. Zerstörergeschwader (DD) all are lvl-1 Weserflotte (Carls)
Weser (CVE) Emden (CL) 4. Zerstörergeschwader (DD) 8. Zerstörergeschwader (DD) are are lvl-1 subs: 1 lvl-1, commanded by Claasen
3 lvl-2, commanded by Sobe 6 lvl-3 in 2 squadrons, commanded by Von Heimburg and Krause 3 lvl-4, commanded by Wolf Still in the queu: Tirpitz, commision date 30/9/1939 (BB) Graf Zeppelin, commision date 9/5/1940 (CV) Dresden, commision date 21/11/1939 (CL)
Kriegsmarine and subs based in Wilhelmshaven, Erkundungsflotte based in Kiel, weserflotte based in Stettin, Baltische Flotte based in Köningsberg.
Chapter 21: 1939; last year of peace. First thing you should notice are two new decisions. One of those is the MR-pact, which ensures that Germany can take care of France without having to worry (too much) about the big red bear in their back. However, since it gives the Allies a big reduction in neutrality, it would enable them to go to the best peace-time laws available. We want to deny them the opportunity, so we will not be taking it just yet. Only in August, when we are fully ready to start the big show, will we propose it. The other one, Claims on Memel, will be Germany’s last peaceful “acquisition”. Besides the minor level-1 naval base, it also gives a -5 dissent because it was a German province pre-WWI. So there’s really no reason to wait. Take the decision before unpauzing the game. While we’re still paused, there’s a better person available to command the OKW. Click the OKW and find Paulus, a level-4 with traits of logistical training and defensive doctrine. If you don’t find him by sorting the general list by name, you may have allready put him in place. Don’t panic. Finding someone in the army is easier than you might think. Open the statistics tab. As you can see, it consists of an entire book of pages that give you every trivia right at your fingertips. (ok, maybe I should have informed you of this much earlier, but you don’t need it all that much.) Anyway. on page 20, you find a list of every general, complete with their current assignment.
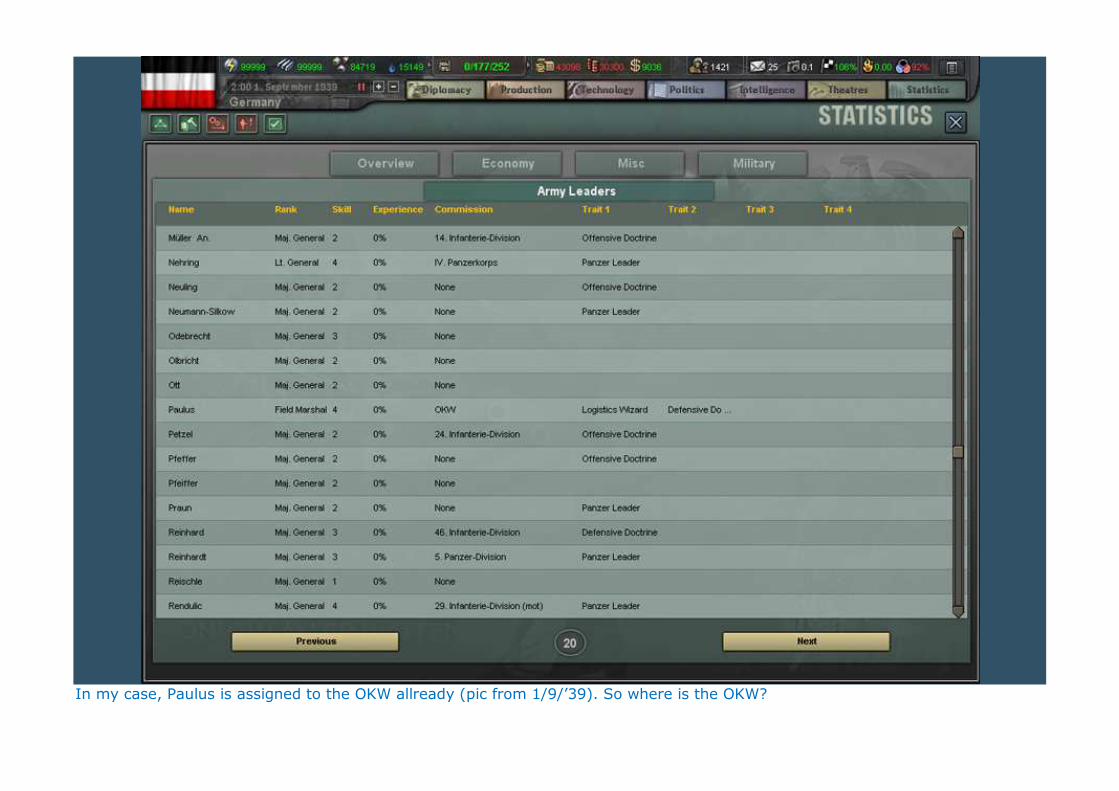
In my case, Paulus is assigned to the OKW allready (pic from 1/9/’39). So where is the OKW?
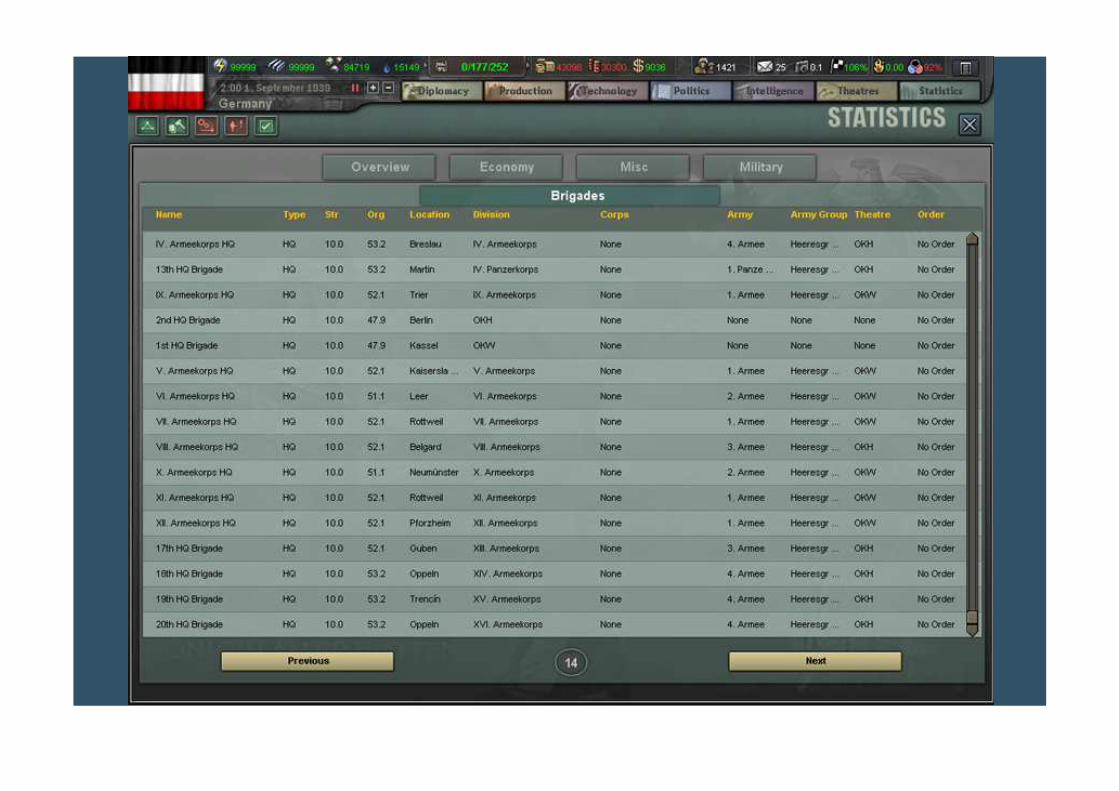
On page 14, you can sort the list by division. It then becomes a simple thing to scroll down to the OKW HQ and see where it is. Go to that province and change the leader as you want. So you should now have Paulus assigned to the OKW. Unpauze the game. Wait a few days until the 5th. A transport ship finishes building. Assign it to the Weserflotte and start a new transport ship. On the 16th, we get a stuka and a transport ship. Assign the stuka to stuka 2 and the transport ship to the Weserflotte. In their place, start working on 2 new infantry divisions. We have tons of manpower sitting idle in out pool. One day later, we get another infantry. Assign them to the VIII. Armeekorps, give it a general with offensive doctrine and start a new division. The next infantry can be set down in Stargard province and given a new corps HQ (XIII. Armeekorps), which we will also attach to the 3. Armee. Of course, we will start a new division (but you knew I was going to say that, right?). Now that we have at least one transport ship, we can make preparations to send some more troops over to East Prussia. Send the II. Armeekorps, along with its 4 infantry divisions, to Stettin, but don’t send them over just yet. We will have more transports soon enough. Grab the entire 4. Armee, such as it is, and send it to Oppeln, south of Breslau, for now. On the 26th and the 29th, we get 2 motorised divisions. These both go to the III. Panzerkorps and get panzer generals for command. We also get an infantry division for the XIII. Armeekorps. Extra IC can be set aside for now. I would put it in upgrades. On the 4th of February, our 3rd transport is done. Start building an infantry division and attach the transport to the Weserflotte. We can now start shipping the II. Armeekorps to East Prussia. Drag a box around the stack in Stettin and click the grey “x” next to each division until the icon depicting a boat lights up. This means the weight selected is now sufficient for the transportfleet. Click the icon and the troops selected now board the ships. As such, they are vulnerable to attacks targeting the transports! Sinking transports will drown troops onboard!!! 1 infantry-type division per ship or 1 panzer division per two ships is usually a good way of knowing how many transports you need. In an emergency, you could detach individual brigades and send them over 1 at a time, reassembling the division upon
arrival. Note that when you do this, if a fight ensues, the individual brigades are far weaker than when joined together, and you cannot attach brigades that are locked in combat, as far as I know. An alternative mission for this is the “rebase” mission. During this mission, the transportfleet will deposit whatever troops is has onboard and stay put, considering the new province its home base. This would require a new “rebase” mission to send them back from where they came. The UK, with its colonies worldwide, has to do this a lot (simply a matter of distances involved). Right-click Koningsberg and select the “transport” mission type. The fleet will deposit the troops on board in Koningsberg and return to Stettin. You can now send the rest over. Along with the I. Armeekorps, it will defend East Prussia during our invasion of Poland and advance on the Polish capital of Warsaw. On the 16th, we receive a motorised division. This one goes to the IV. Panzerkorps. In stead, we will begin building a new infantry division and put the wasted IC in upgrades. On the 23rd and 24th, we get 2 infantry, rounding out XIII. Armeekorps (which should now have 4 divisions). Send it, along with its subordinate divisions, to Guben. Our last pre-war motorised division will end training on the 27th. Attach it to the IV. Panzerkorps. We now have sufficient mobile troops to last us for a while and can focus on training more infantry divisions. Start one now and transfer the rest of the IC to upgrades. The next infantry, two days later, can be set down in Oppeln. Give it a corps (XIV. Armeekorps) and attach that one to the 4. Armee. Any leftover IC will, once again, to to upgrades. On the 1st of March, Romania’s drift forced me to stop influencing Sweden and get back to influencing them instead. I suggest you keep them influenced from now on, as their Oil Refinery strategic asset is of paramount importance to Germany. On the 11th, we get a new interceptor, rounding out the VI. Fliegerkorps. We can now refocus our efforts on building a long-range strike force. Start a new Multi-role, making sure to transfer IC needed from upgrades, keeping production at 0.02 above need, as always. We have enough IC to start a new, and expensive, build. Transport planes. These long-range heavy planes, as discussed in the chapter on airpower, have enough use even without using paratroopers. The cost a ton and take forever. I prefer having at least 2 on hand by the time I hit France to keep the assault from stalling from lack on fuel or supplies. Speaking of multi-roles, our first one is build on the 14th. Drop it in Wuppertal and rename it “Zerstörergruppe 1”. I gave command to Keller, who has both tankbuster and superior tactician traits. One day later, 2 new infantry are done. These will also go to the XIV. Armeekorps in Oppeln and receive an offensive general. Use the IC to start building a second transport plane. Let the game run for about a month. Keep an eye on your spies and a periodic eye on whatever nation UK is influencing, just to be
safe. When the last of our Light Armour techs (around the 14th of April) are done, this unlocks a new tech: Self-Propelled Artillery bigades. As regulare arty is too slow for armour and motorised divisions, this tech will allow us to build artillery on an armour chassis, fast enough to keep up with our mobile forces. Their presence will add a tremendous amount of firepower without adding to the frontage. you should always use support brigades that are about as fast as the combat brigades they are destined for. One possible exception to this are engineers, whose special river-crossing and fortress busting talents make them interesting even for slow-moving infantry. Start researching the Self-Propelled Artillery tech (in the Armour tab) and prioritise it, so we can build and attach them during the Sitzkrieg. On the 18th, we have an opening in our research queu. Time to start 1939 tech: Industry: radar (prioritised; invaluable as both spying and defense tool). Infantry: airborne (prioritised: I like having some by early 1940 at least). Bombers: air-launched torpedo, twin-engine armament, medium fuel tank, twin-engine airframe, light bomb, medium bomb, cargo hold (you need at least 1 update for 1 transport plane to hold 1 3-brigade para division). Fighter: aero engine, small fuel tank, single-engine airframe, single engine armament Industry: combat medicine, first aid, rocket engine Theory: civil defense (will speed up provincial repairs) Land: mechanised offensive (requirement for combined arms warfare tech, which gives 10% CA bonus) Naval: light cruiser escort role, carrier group doctrine, light cruiser crew training, carrier crew training, fire control systems training, commander decision making, trade interdiction submarine doctrine (should be prioritised if you’re serious about sub commitments, which we will not do here), submarine crew training, spotting, basing. We should now have 53 techs queued up. If you look at the naval techs, someone asked me if we were going to make a choice about our doctrine path. This is it. Carriers are the future of naval warfare and with Germany’s IC and enough time, we can build up a carrier force to be reckoned with. But until we do, we will have to make do with what we’ve got and turn standard surface warships into the best we possibly can. On the other hand, playing the US, for instance, makes the choice exceedingly easy. Some techs should always be researched: spotting (makes finding enemy ships easier), basing (increases the storage potential of all your naval bases worldwide), fire control systems training and commander decision making (makes hitting the right targets go a lot smoother).
One last note about submarine warfare. If you’re dead set in your own games to use them, there is only one thing to add: build. Build. Build. At least 33% will get sunk within the first few months of the war. Make sure to have plenty of reserves and start researching the submarine techs right out of the gate. They may be a year ahead of time in 1936, but having subs that can go 3500 miles instead of just 2000 makes all the difference between hunting the Atlantic and the Bay of Biscay (off the coast of France, right under the eye of the more than respectable French Navy) or the coast of Portugal (within easy reach of planes and ships based in Gibraltar). Staying deep into the Atlantic will at least reduce the risk of coming across a carrier task force (at least 4 carriers between the French and Royal Navies, usually 5 to 6 by 1939-1940). On the 1st of May, the Danzig or War decision becomes available. You could start WWII a few months ahead of time, meaning more time to dubdue France. However, there are two major reasons why we’re not doing this. Firstly, we set out to follow a historic path as much as possible, and secondly, our army is not ready yet. So we will wait until the 1st of September before using this decision. This means we now have 2 decisions armed and ready: the Molotov-Ribbentrop pact and Danzig or War. When the time comes, make sure to use the right one. On the 6th of May, two infantry are ready. Deploy them in Oppeln, give them an HQ (XV. Armeekorps) and attach that one to the 4. Armee. Set the rest of the IC to upgrades. On the 10th, we get a transport ship for the Weserflotte and an infantry division for the XV. Armeekorps. If we look at our list of available generals, we find that the highest offensive doctrine generals are now skill-2. Feel free to add other high-skill generals with other traits (winter specialists would be useful to gain experience prior to Barbarossa). On the 15th, we receive 2 CAGS. Combine them into a single air unit and base them in Kiel for now. Remember that they CAN be used the same way as Naval Bombers or even for aerial defense but they are weaker and really only shine onboard Carriers. Use them in any other way with extreme caution. Interceptors will have CAGs for breakfast and ask for seconds! As infantry finish building, attach them to the 4. Armee into XVI. Armeekorps. On the 5th of June, a new tac bomber is done. Attach it to Luftflotte IV and start a new one. On the 12th, we get an infantry division. Attach it to the XVI. Armeekorps. This one should now house 4 divisions. Our invasion force is now ready for deployment. We should still have one last infantry division in the queu. This one will go the western front. Set it down in the province Leck, next to the Danish border and attach it to the X. Armeekorps. Time to start preparations for World War II. We will start with our western defenses. As the AI sometimes likes to land troops in undefended provinces next to ports, we will have to deny them the opportunity. My instructions will be to list the theater first, army group next, then army and corps. If I just list a corps HQ, this means it’s part of the same army as the previous one. If I only mention a corps and don’t make any mention of divisions, it means to include both the corps HQ and all subordinate divisions.
OKW: Heeresgruppe B: 2. Armee: X. Armeekorps: send 1 infantry each to the provinces of Plön and Flensburg. VI. Armeekorps: likewise: send 1 inf to Bremerhaven and 1 to Bremen. OKH: Heeresgruppe A: 3. Armee: I. Armeekorps:send it to Mohrungen II. Armeekorps: send it to Lötzen VIII. Armeekorps: send it to Stargard (SE of Danzig) 1. Panzerarmee: I. panzerkorps: send it to Sorau, shift-right click Küstrin and shift-right click Stargard. III. Panzerkorps: send it to Breslau. IV. Panzerkorps: send it to Sorau, shift-right click Priestany (Slovakia), shift-right click Prievidza (Slovakia). 4. Armee: IV. Armeekorps: Breslau. XV. Armeekorps: Sumperk, shift-right click Priestany (Slovakia), shift-right click Trencin (Slovakia). I. Gebirgsjägerkorps: Sumperk, shift-right click Priestany(slovakia), shift-right click Ruzomberok(Slovakia). Take the time to get it right. Remember to use the province finder. Key here is to let the target (Poland) in the dark about our troop movements. Not that they have the means to stop us, but practice makes perfect. If you start moving armour right under the nose of, say, the Soviet Union, chances are that you might find them facing stronger opposition than you would otherwise. You could do worse than making a habit of this. Once you get the hang, it’s surprisingly easy. When you're done, this is what it should look like:
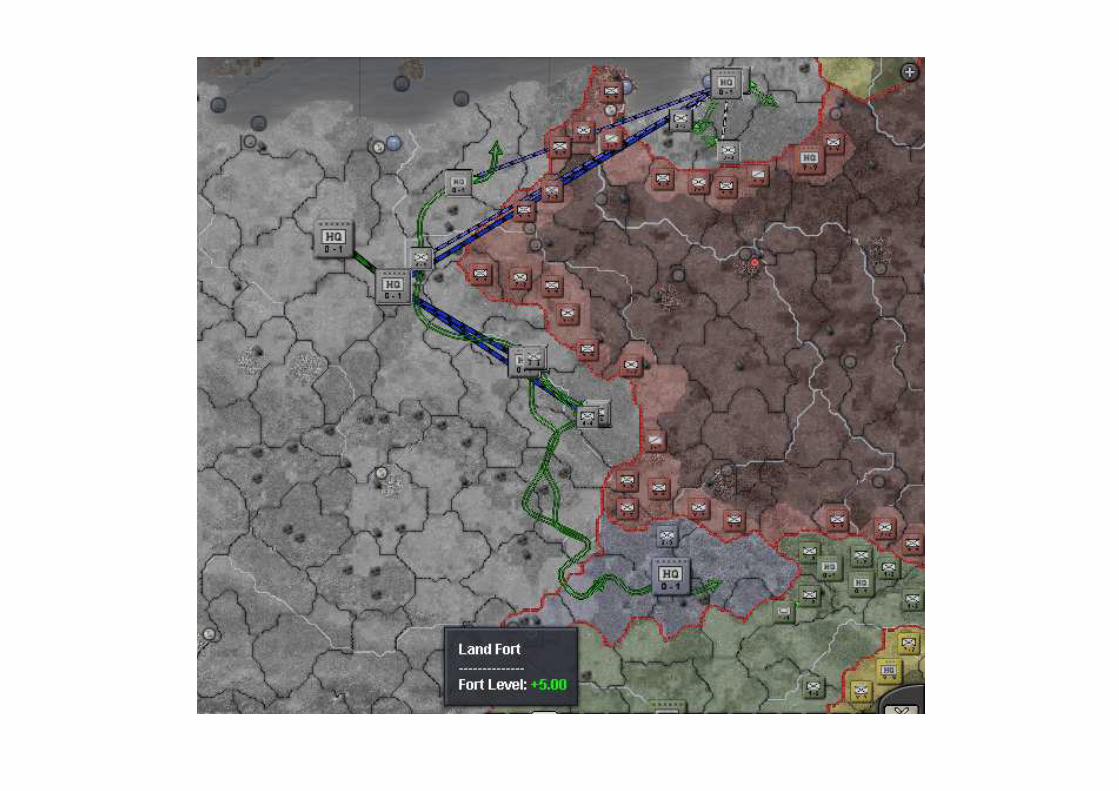
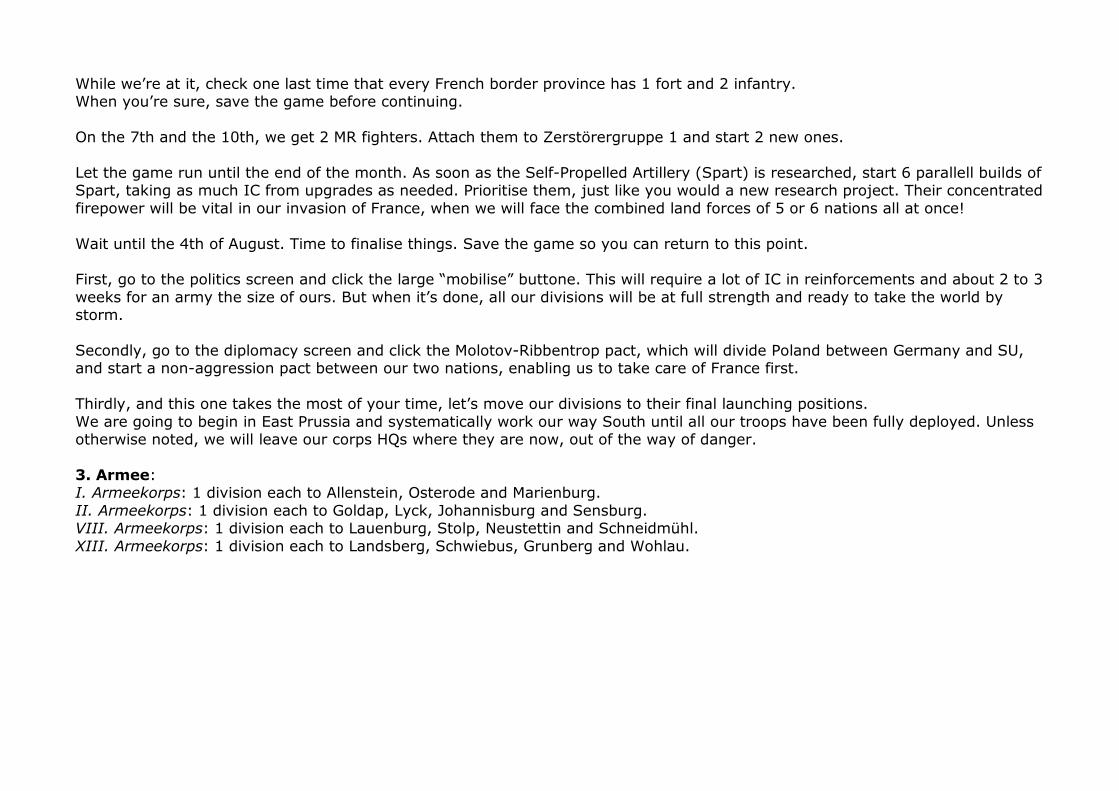
While we’re at it, check one last time that every French border province has 1 fort and 2 infantry. When you’re sure, save the game before continuing. On the 7th and the 10th, we get 2 MR fighters. Attach them to Zerstörergruppe 1 and start 2 new ones. Let the game run until the end of the month. As soon as the Self-Propelled Artillery (Spart) is researched, start 6 parallell builds of Spart, taking as much IC from upgrades as needed. Prioritise them, just like you would a new research project. Their concentrated firepower will be vital in our invasion of France, when we will face the combined land forces of 5 or 6 nations all at once! Wait until the 4th of August. Time to finalise things. Save the game so you can return to this point. First, go to the politics screen and click the large “mobilise” buttone. This will require a lot of IC in reinforcements and about 2 to 3 weeks for an army the size of ours. But when it’s done, all our divisions will be at full strength and ready to take the world by storm. Secondly, go to the diplomacy screen and click the Molotov-Ribbentrop pact, which will divide Poland between Germany and SU, and start a non-aggression pact between our two nations, enabling us to take care of France first. Thirdly, and this one takes the most of your time, let’s move our divisions to their final launching positions. We are going to begin in East Prussia and systematically work our way South until all our troops have been fully deployed. Unless otherwise noted, we will leave our corps HQs where they are now, out of the way of danger. 3. Armee: I. Armeekorps: 1 division each to Allenstein, Osterode and Marienburg. II. Armeekorps: 1 division each to Goldap, Lyck, Johannisburg and Sensburg. VIII. Armeekorps: 1 division each to Lauenburg, Stolp, Neustettin and Schneidmühl. XIII. Armeekorps: 1 division each to Landsberg, Schwiebus, Grunberg and Wohlau.
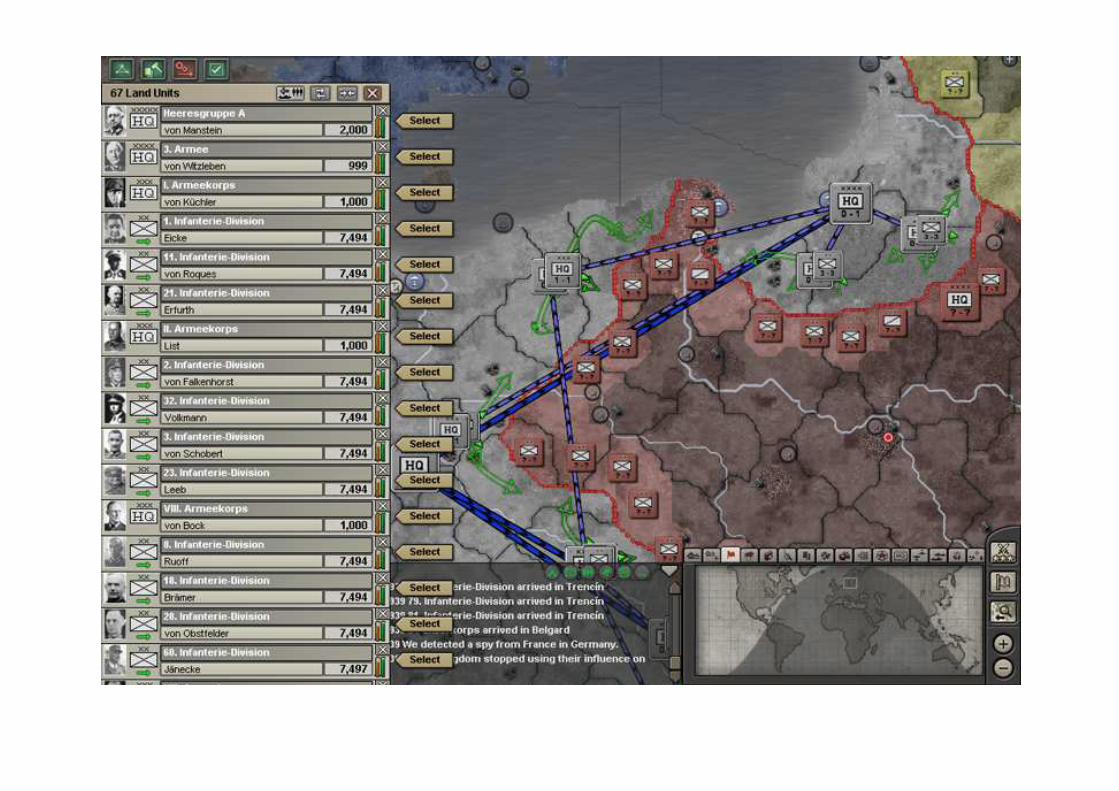
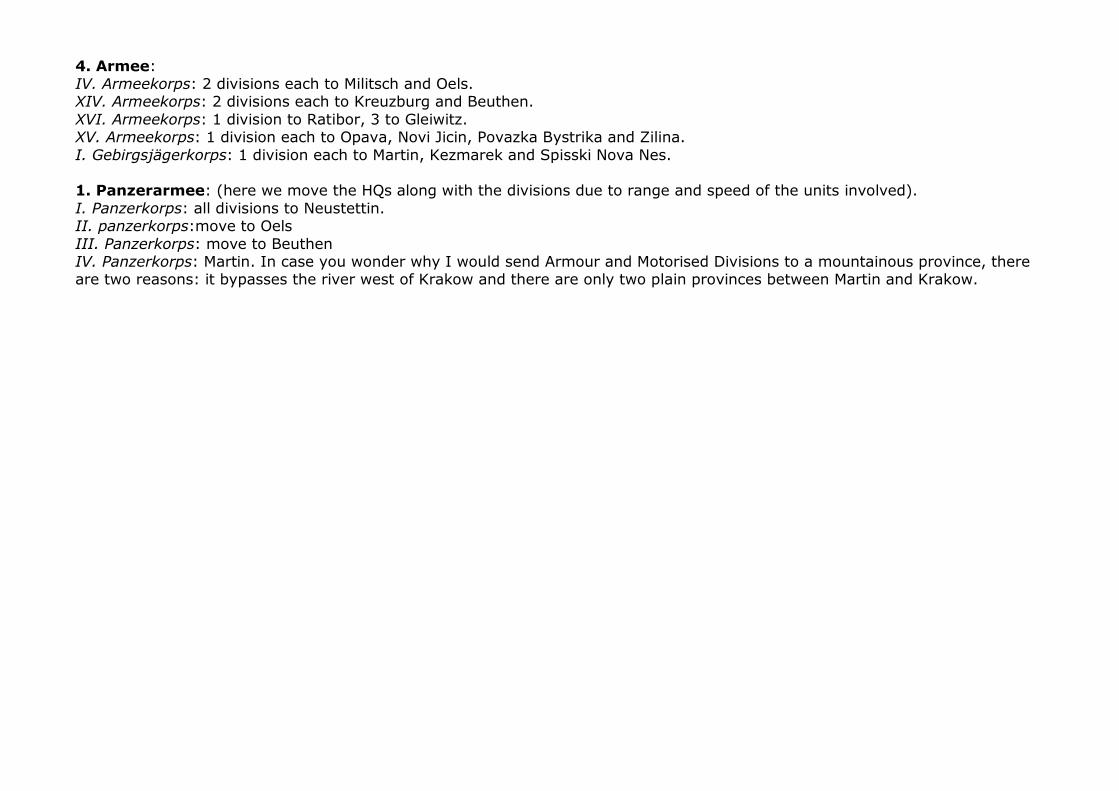
4. Armee: IV. Armeekorps: 2 divisions each to Militsch and Oels. XIV. Armeekorps: 2 divisions each to Kreuzburg and Beuthen. XVI. Armeekorps: 1 division to Ratibor, 3 to Gleiwitz. XV. Armeekorps: 1 division each to Opava, Novi Jicin, Povazka Bystrika and Zilina. I. Gebirgsjägerkorps: 1 division each to Martin, Kezmarek and Spisski Nova Nes. 1. Panzerarmee: (here we move the HQs along with the divisions due to range and speed of the units involved). I. Panzerkorps: all divisions to Neustettin. II. panzerkorps:move to Oels III. Panzerkorps: move to Beuthen IV. Panzerkorps: Martin. In case you wonder why I would send Armour and Motorised Divisions to a mountainous province, there are two reasons: it bypasses the river west of Krakow and there are only two plain provinces between Martin and Krakow.
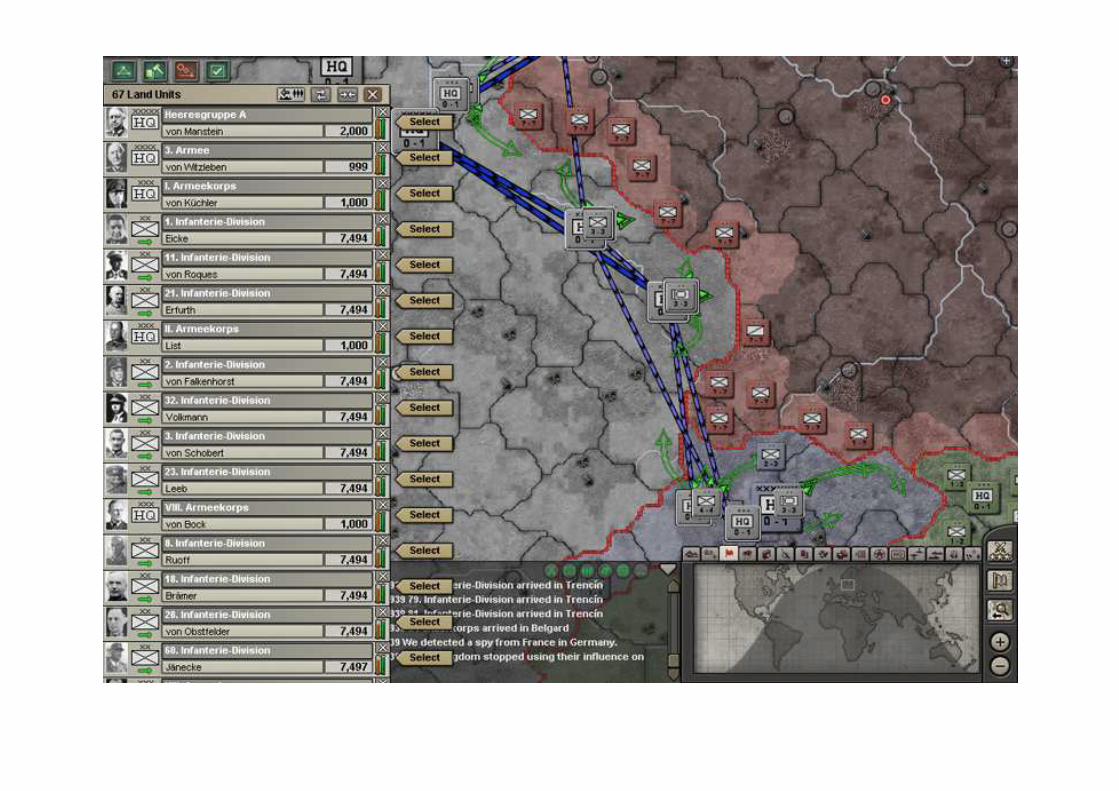
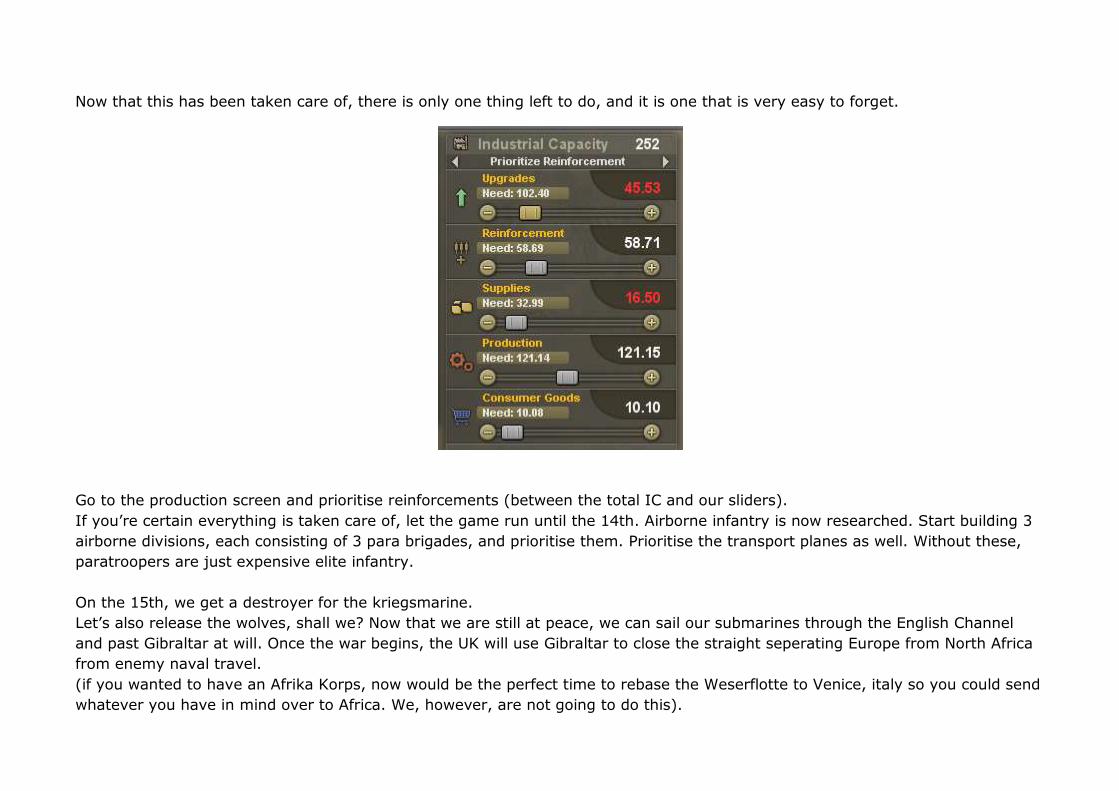
Now that this has been taken care of, there is only one thing left to do, and it is one that is very easy to forget.
Go to the production screen and prioritise reinforcements (between the total IC and our sliders).
If you’re certain everything is taken care of, let the game run until the 14th. Airborne infantry is now researched. Start building 3 airborne divisions, each consisting of 3 para brigades, and prioritise them. Prioritise the transport planes as well. Without these, paratroopers are just expensive elite infantry. On the 15th, we get a destroyer for the kriegsmarine. Let’s also release the wolves, shall we? Now that we are still at peace, we can sail our submarines through the English Channel and past Gibraltar at will. Once the war begins, the UK will use Gibraltar to close the straight seperating Europe from North Africa from enemy naval travel.
(if you wanted to have an Afrika Korps, now would be the perfect time to rebase the Weserflotte to Venice, italy so you could send whatever you have in mind over to Africa. We, however, are not going to do this).
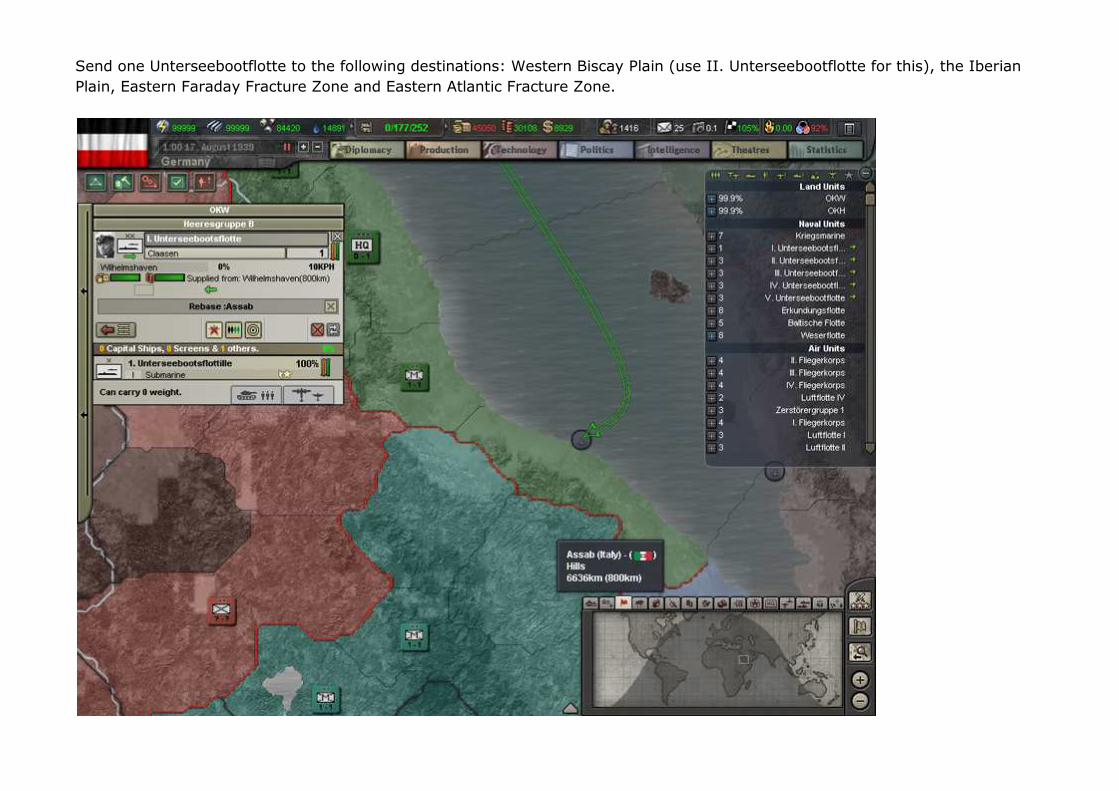
Send one Unterseebootflotte to the following destinations: Western Biscay Plain (use II. Unterseebootflotte for this), the Iberian Plain, Eastern Faraday Fracture Zone and Eastern Atlantic Fracture Zone.
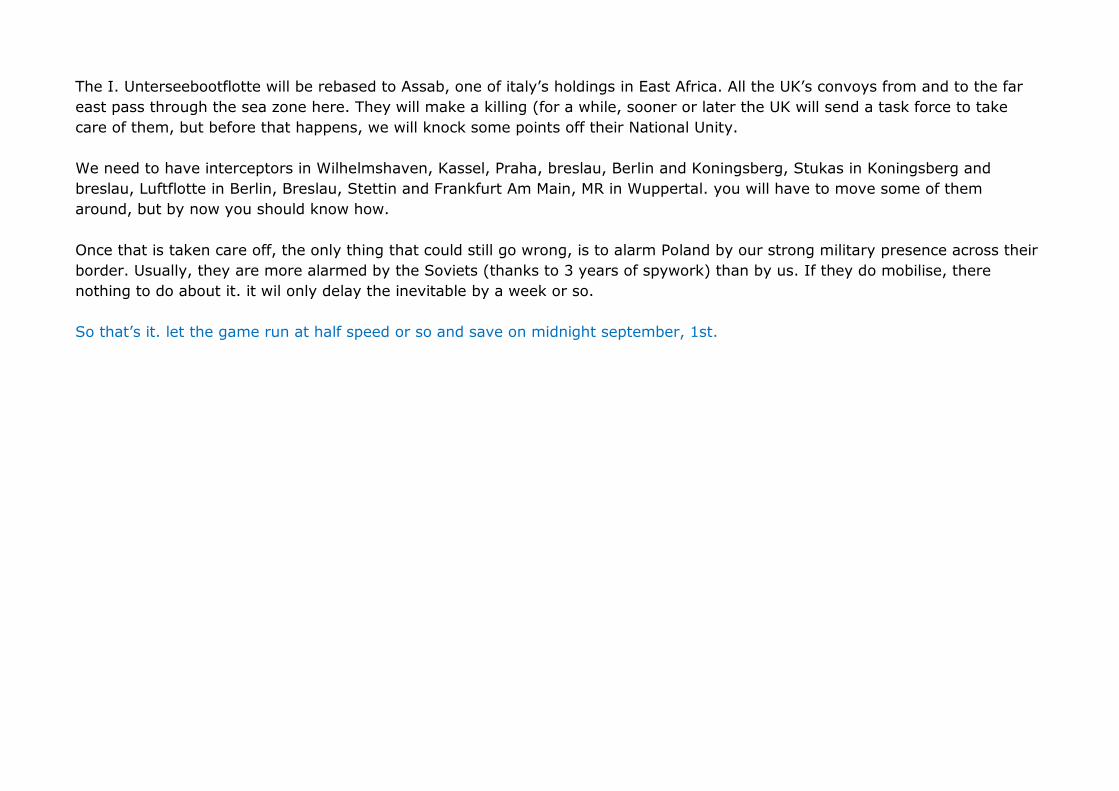
The I. Unterseebootflotte will be rebased to Assab, one of italy’s holdings in East Africa. All the UK’s convoys from and to the far east pass through the sea zone here. They will make a killing (for a while, sooner or later the UK will send a task force to take care of them, but before that happens, we will knock some points off their National Unity. We need to have interceptors in Wilhelmshaven, Kassel, Praha, breslau, Berlin and Koningsberg, Stukas in Koningsberg and breslau, Luftflotte in Berlin, Breslau, Stettin and Frankfurt Am Main, MR in Wuppertal. you will have to move some of them around, but by now you should know how.
Once that is taken care off, the only thing that could still go wrong, is to alarm Poland by our strong military presence across their border. Usually, they are more alarmed by the Soviets (thanks to 3 years of spywork) than by us. If they do mobilise, there nothing to do about it. it wil only delay the inevitable by a week or so. So that’s it. let the game run at half speed or so and save on midnight september, 1st.
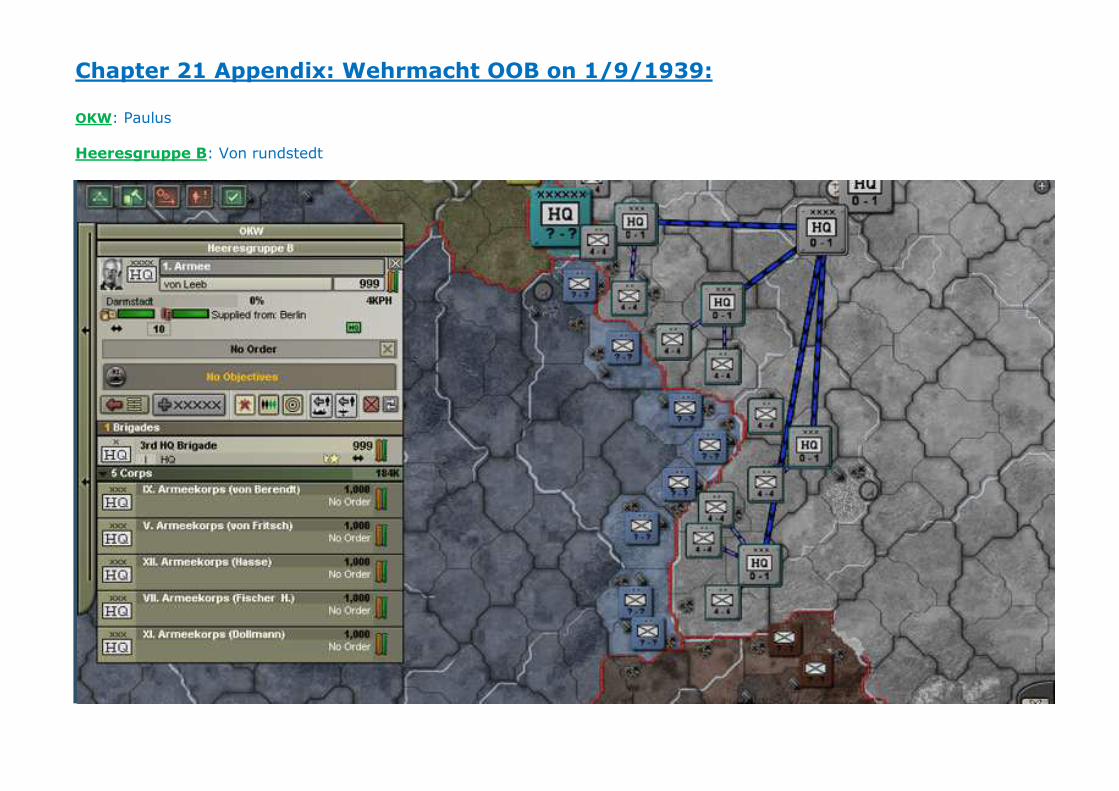
Chapter 21 Appendix: Wehrmacht OOB on 1/9/1939: OKW: Paulus Heeresgruppe B: Von rundstedt
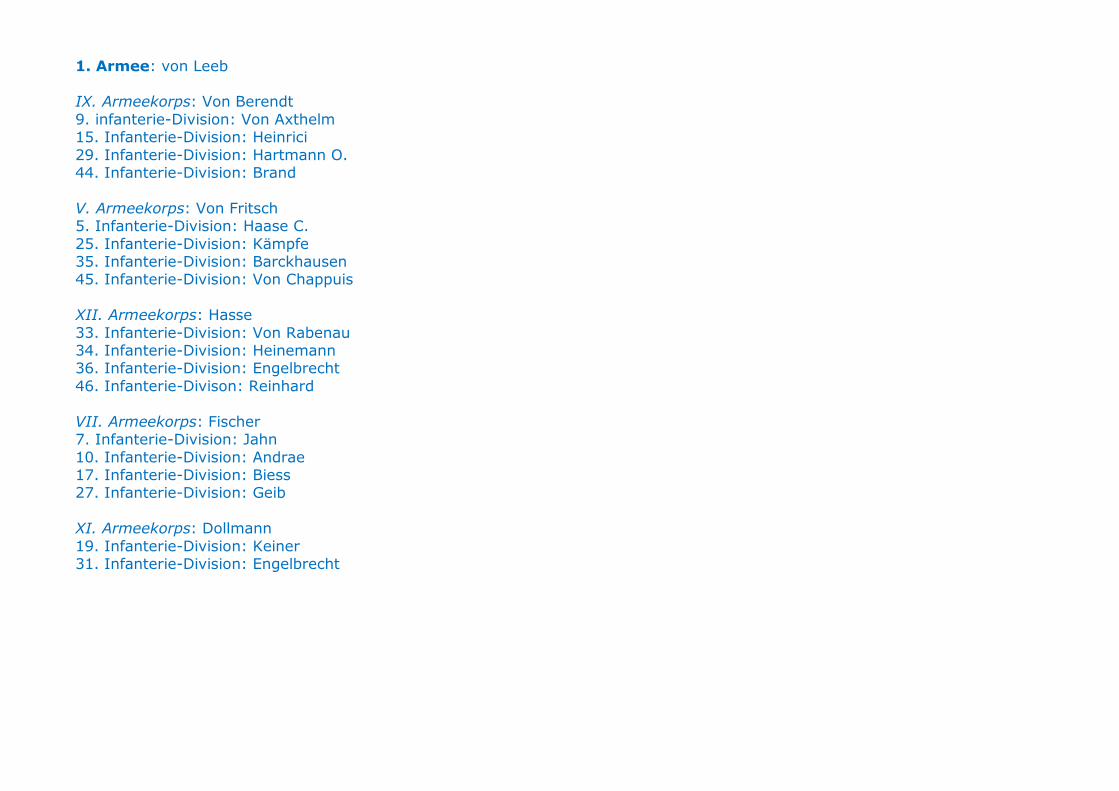
1. Armee: von Leeb IX. Armeekorps: Von Berendt 9. infanterie-Division: Von Axthelm 15. Infanterie-Division: Heinrici 29. Infanterie-Division: Hartmann O. 44. Infanterie-Division: Brand V. Armeekorps: Von Fritsch 5. Infanterie-Division: Haase C. 25. Infanterie-Division: Kämpfe 35. Infanterie-Division: Barckhausen 45. Infanterie-Division: Von Chappuis XII. Armeekorps: Hasse 33. Infanterie-Division: Von Rabenau 34. Infanterie-Division: Heinemann 36. Infanterie-Division: Engelbrecht 46. Infanterie-Divison: Reinhard VII. Armeekorps: Fischer 7. Infanterie-Division: Jahn 10. Infanterie-Division: Andrae 17. Infanterie-Division: Biess 27. Infanterie-Division: Geib XI. Armeekorps: Dollmann 19. Infanterie-Division: Keiner 31. Infanterie-Division: Engelbrecht
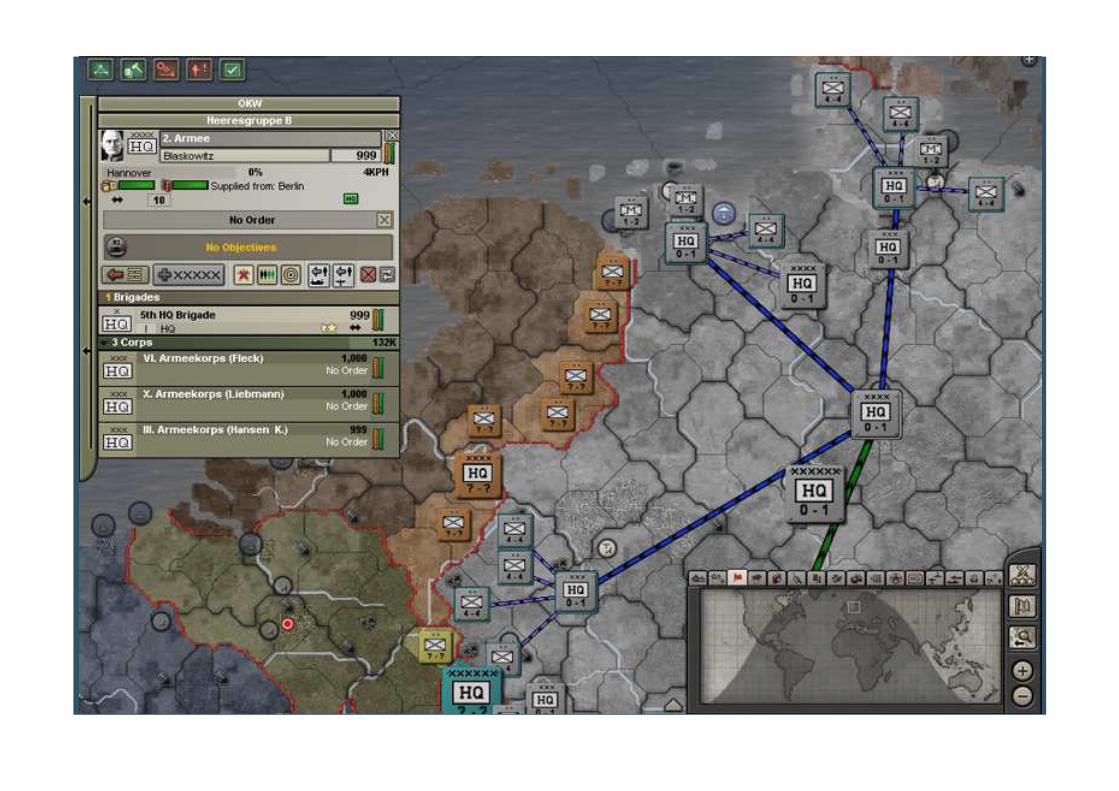
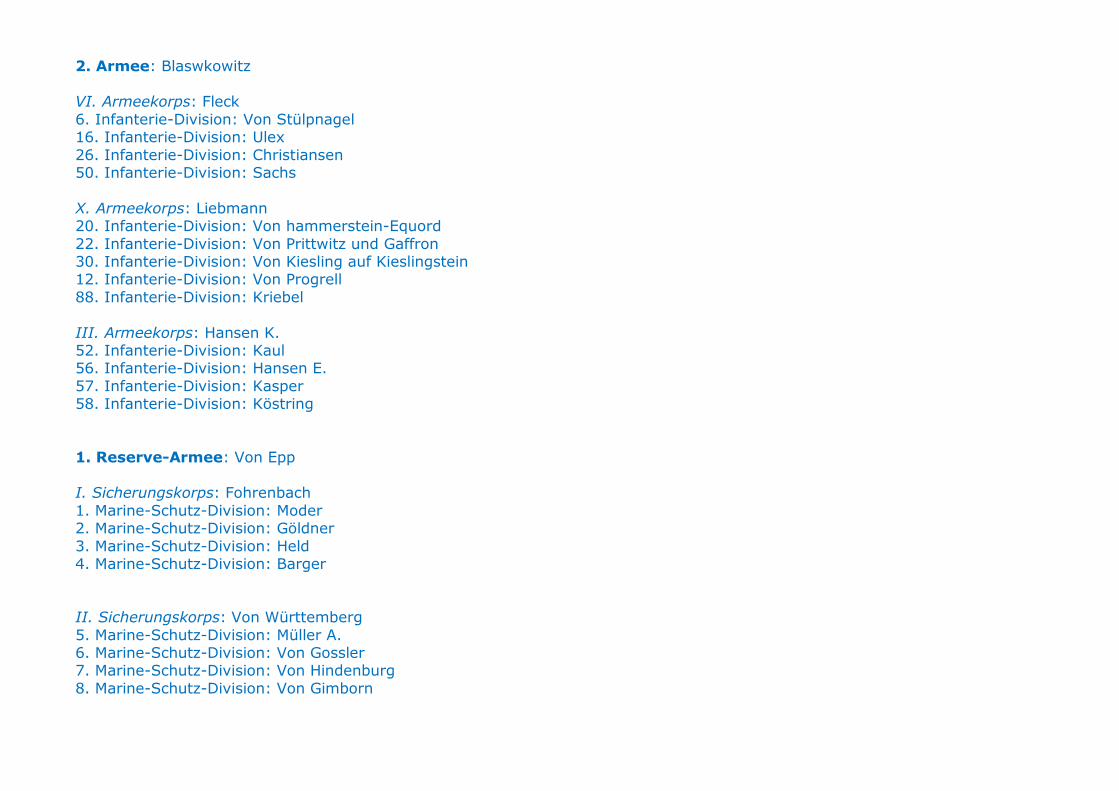
2. Armee: Blaswkowitz VI. Armeekorps: Fleck 6. Infanterie-Division: Von Stülpnagel 16. Infanterie-Division: Ulex 26. Infanterie-Division: Christiansen 50. Infanterie-Division: Sachs X. Armeekorps: Liebmann 20. Infanterie-Division: Von hammerstein-Equord 22. Infanterie-Division: Von Prittwitz und Gaffron 30. Infanterie-Division: Von Kiesling auf Kieslingstein 12. Infanterie-Division: Von Progrell 88. Infanterie-Division: Kriebel III. Armeekorps: Hansen K. 52. Infanterie-Division: Kaul 56. Infanterie-Division: Hansen E. 57. Infanterie-Division: Kasper 58. Infanterie-Division: Köstring 1. Reserve-Armee: Von Epp I. Sicherungskorps: Fohrenbach 1. Marine-Schutz-Division: Moder 2. Marine-Schutz-Division: Göldner 3. Marine-Schutz-Division: Held 4. Marine-Schutz-Division: Barger II. Sicherungskorps: Von Württemberg 5. Marine-Schutz-Division: Müller A. 6. Marine-Schutz-Division: Von Gossler 7. Marine-Schutz-Division: Von Hindenburg 8. Marine-Schutz-Division: Von Gimborn
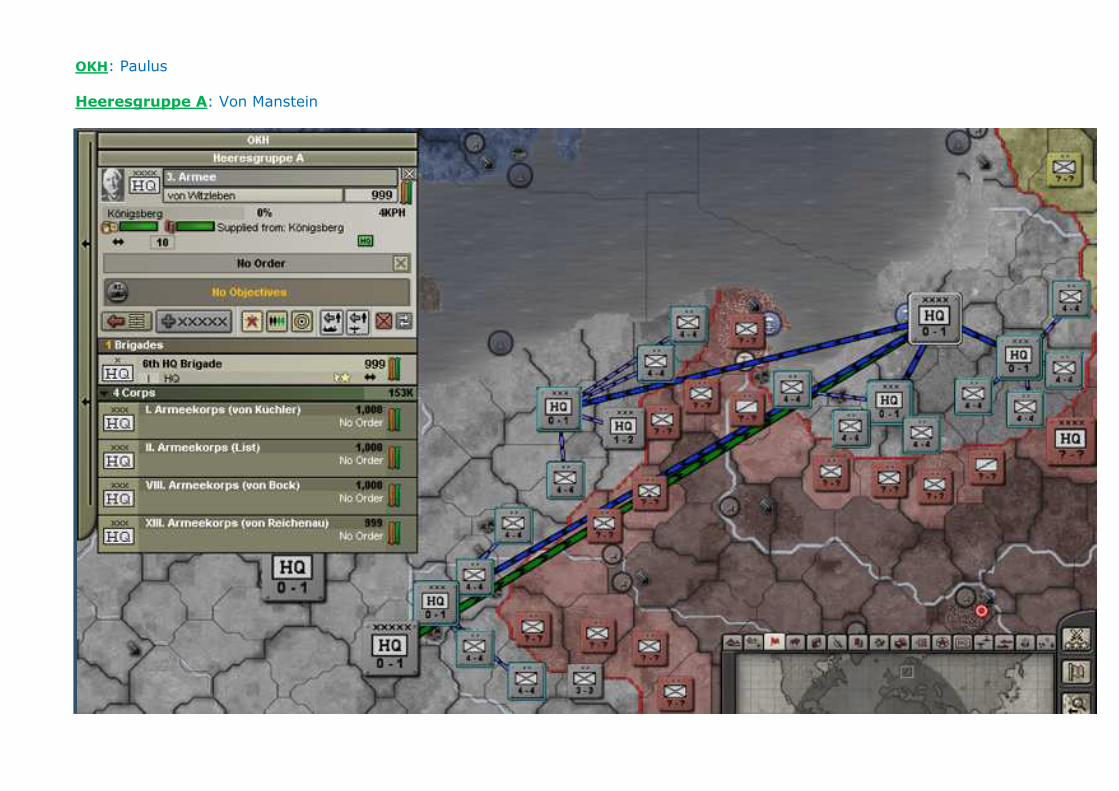
OKH: Paulus Heeresgruppe A: Von Manstein
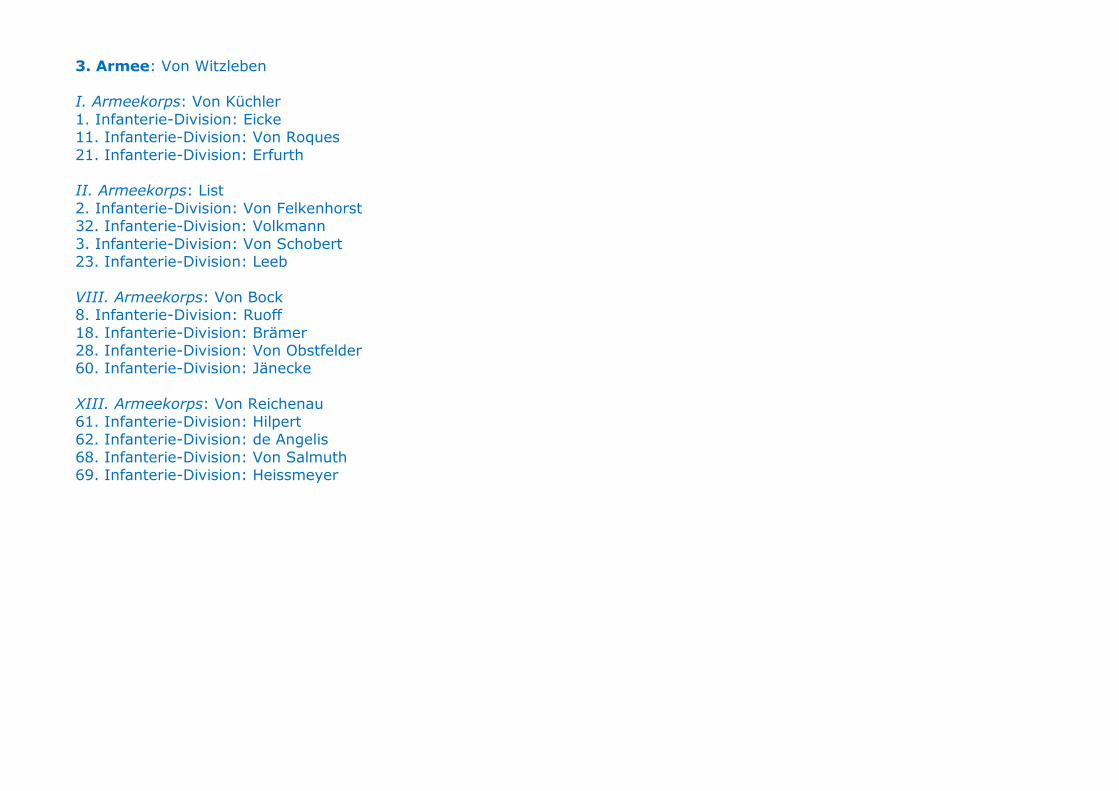
3. Armee: Von Witzleben I. Armeekorps: Von Küchler 1. Infanterie-Division: Eicke 11. Infanterie-Division: Von Roques 21. Infanterie-Division: Erfurth II. Armeekorps: List 2. Infanterie-Division: Von Felkenhorst 32. Infanterie-Division: Volkmann 3. Infanterie-Division: Von Schobert 23. Infanterie-Division: Leeb VIII. Armeekorps: Von Bock 8. Infanterie-Division: Ruoff 18. Infanterie-Division: Brämer 28. Infanterie-Division: Von Obstfelder 60. Infanterie-Division: Jänecke XIII. Armeekorps: Von Reichenau 61. Infanterie-Division: Hilpert 62. Infanterie-Division: de Angelis 68. Infanterie-Division: Von Salmuth 69. Infanterie-Division: Heissmeyer
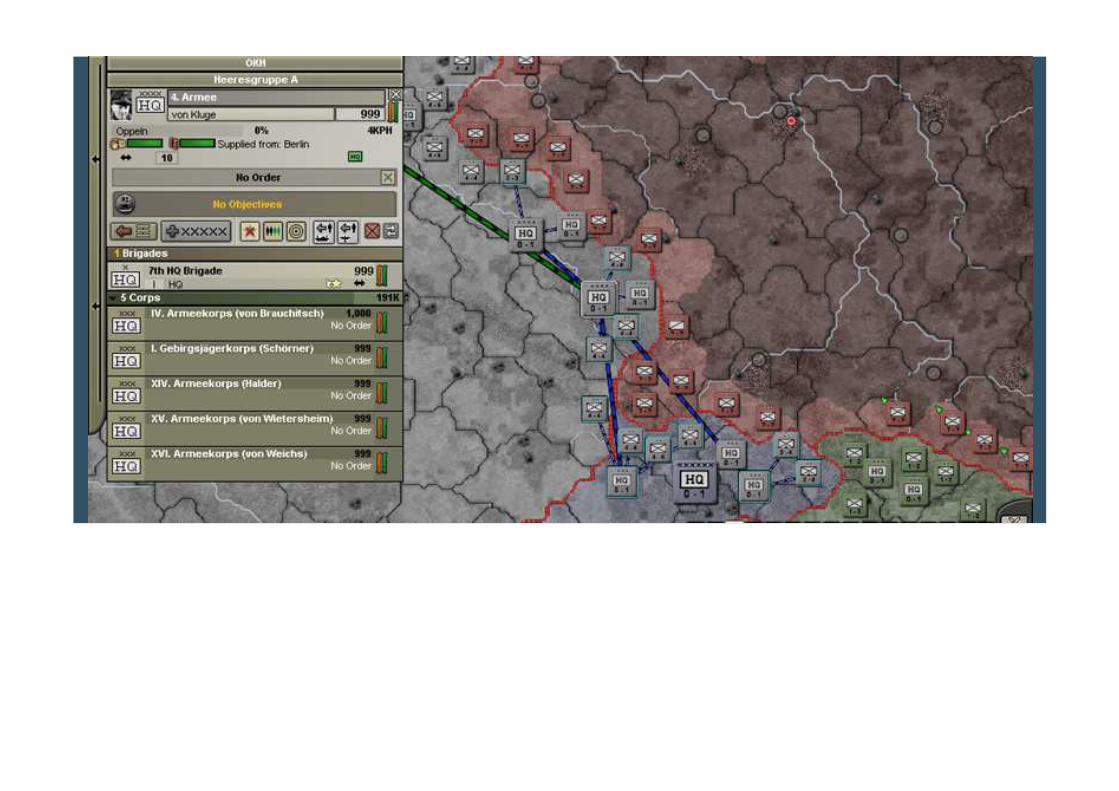
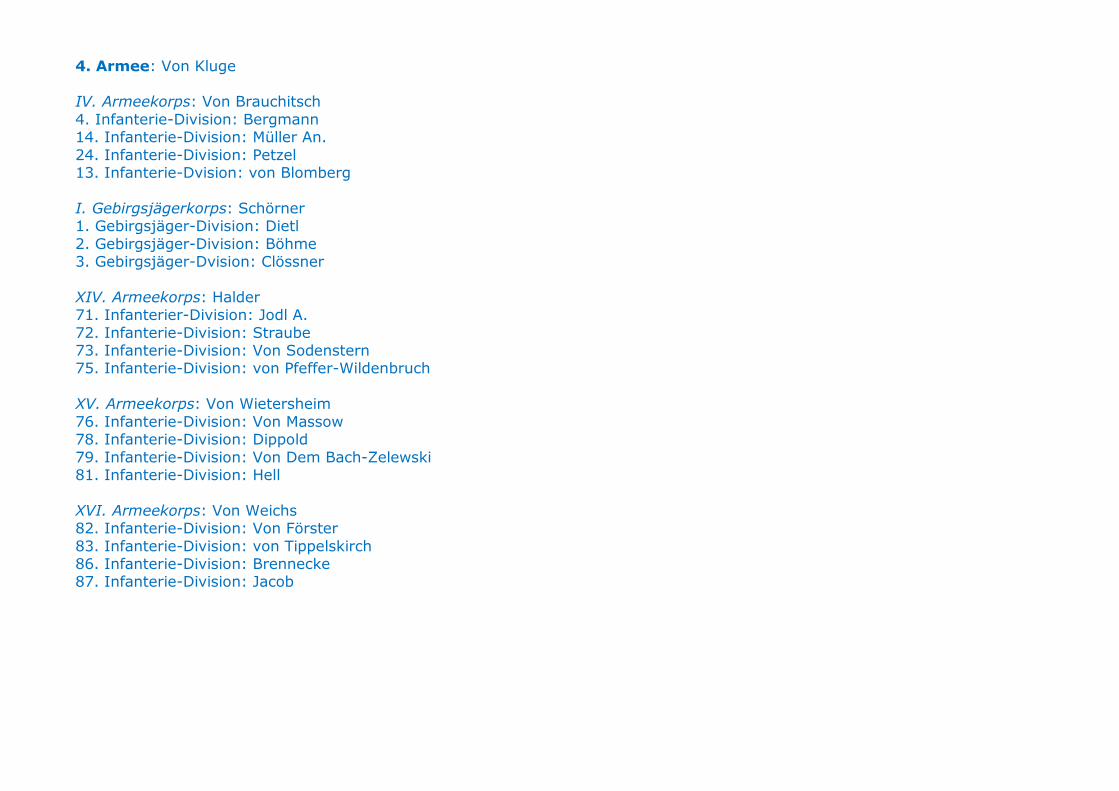
4. Armee: Von Kluge IV. Armeekorps: Von Brauchitsch 4. Infanterie-Division: Bergmann 14. Infanterie-Division: Müller An. 24. Infanterie-Division: Petzel 13. Infanterie-Dvision: von Blomberg I. Gebirgsjägerkorps: Schörner 1. Gebirgsjäger-Division: Dietl 2. Gebirgsjäger-Division: Böhme 3. Gebirgsjäger-Dvision: Clössner XIV. Armeekorps: Halder 71. Infanterier-Division: Jodl A. 72. Infanterie-Division: Straube 73. Infanterie-Division: Von Sodenstern 75. Infanterie-Division: von Pfeffer-Wildenbruch XV. Armeekorps: Von Wietersheim 76. Infanterie-Division: Von Massow 78. Infanterie-Division: Dippold 79. Infanterie-Division: Von Dem Bach-Zelewski 81. Infanterie-Division: Hell XVI. Armeekorps: Von Weichs 82. Infanterie-Division: Von Förster 83. Infanterie-Division: von Tippelskirch 86. Infanterie-Division: Brennecke 87. Infanterie-Division: Jacob
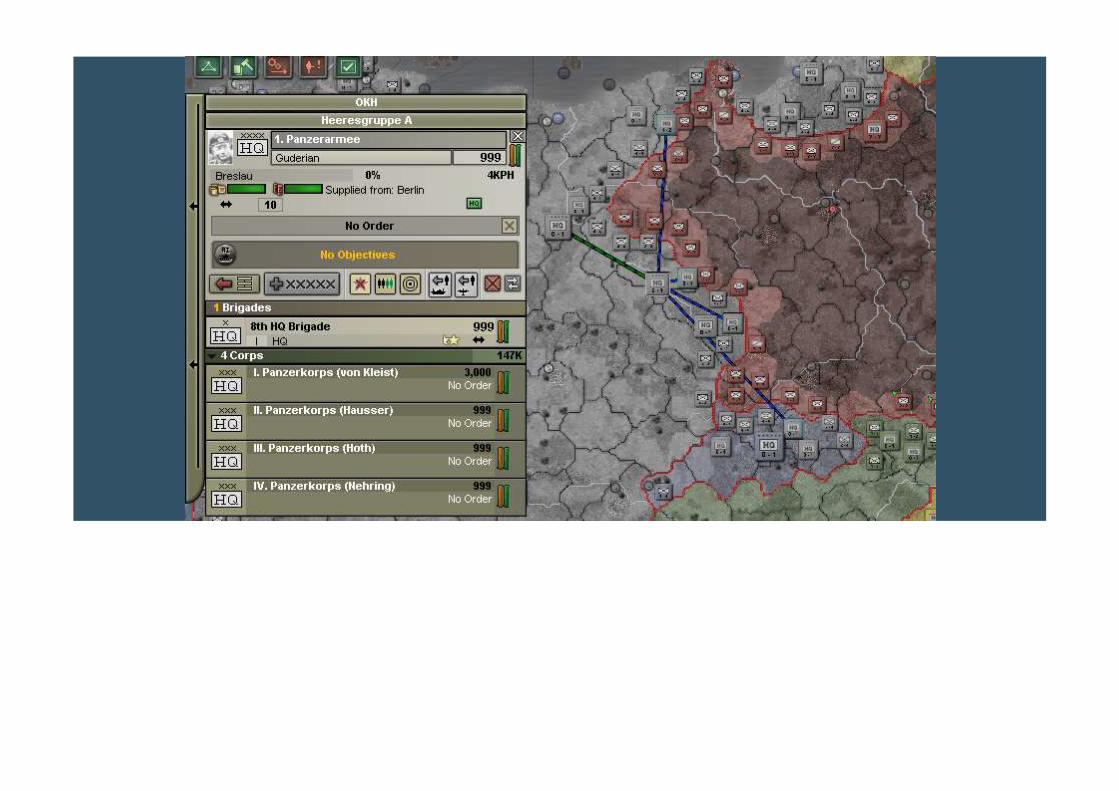
1. Panzerarmee: Guderian I. Panzerkorps: von Kleist 1. Leichte Division: Dietrich 2. Infanterie-Division (mot): Senger und Etterlin 1. Panzer-Division: Model 5. Panzer-Division: Reinhardt
II . Panzerkorps: Hausser 2. Leichte Division: Höpner 2. Panzer-Division: Von Mackensen 10. Panzer-Division: Veiel 3. Infanterie-Division(mot): Stumme III. Panzerkorps: Hoth 3. Leichte Division: Geyr von Schweppenburg 3. Panzer-Division: Rommel
13. Infanterie-Division(mot): von Arnim 20. Infanterie-Division (mot): Steiner IV. Panzerkorps: Nehring 4. Leichte Division: Schmidt R. 4. Panzer-Division: von Hubicki 29. Infanterie-Division(mot): Rendulic 60. Infanterie-Division (mot): Von Vietinghoff-Scheel
Kriegsmarine: (these are all attached to Heeresgruppe B, except the Baltische Flotte and Weserflotte) Kriegsmarine: Raeder Reserve Flotte: Dönitz Baltische Flotte: Saalwächter Weserflotte: Carls I. Unterseebootflotte: Classen II. Unterseebootflotte: Sobe III. Unterseebootflotte: Von Heimburg
IV. Unterseebootflotte: Krause V. Unterseebootflotte: Wolff Luftwaffe: Luftflotte I: Kesselring (berlin, Heeresgruppe A) Luftlotte II: Sperrle (Breslau, Heeresgruppe A) Luftflotte III: Von Greim (Stettin, Heeresgruppe A) Luftflotte IV: Von Richthofen (Frankfurt am main, Heeresgruppe B)
Stuka 1: Udet (köningsberg, Heeresgruppe A) Stuka 2: Löhr (Breslau, Heeresgruppe A) I. Fliegerkorps: Sommé (Köningsberg, Heeresgruppe A) II. Fliegerkorps: Heilingbrunner (Wilhelmshaven, Heeresgruppe B) III. Fliegerkorps: Kitzinger (Kassel, Heeresgruppe B) IV. Fliegerkorps: Lörzer (Breslau, Heeresgruppe A)
V. Fliegerkorps: Milch (Praha, Heeresgruppe A) VI. Fliegerkorps: Felmy (Berlin, Heeresgruppe A) Zerstörergruppe 1: Keller (Wuppertal, Heeresgruppe B) 1. Trägergruppe: Dörstling (onboard Weserflotte, 1 CAG) 2. Tragergruppe: Stumpff (Kiel, unatttached, 2 CAG)
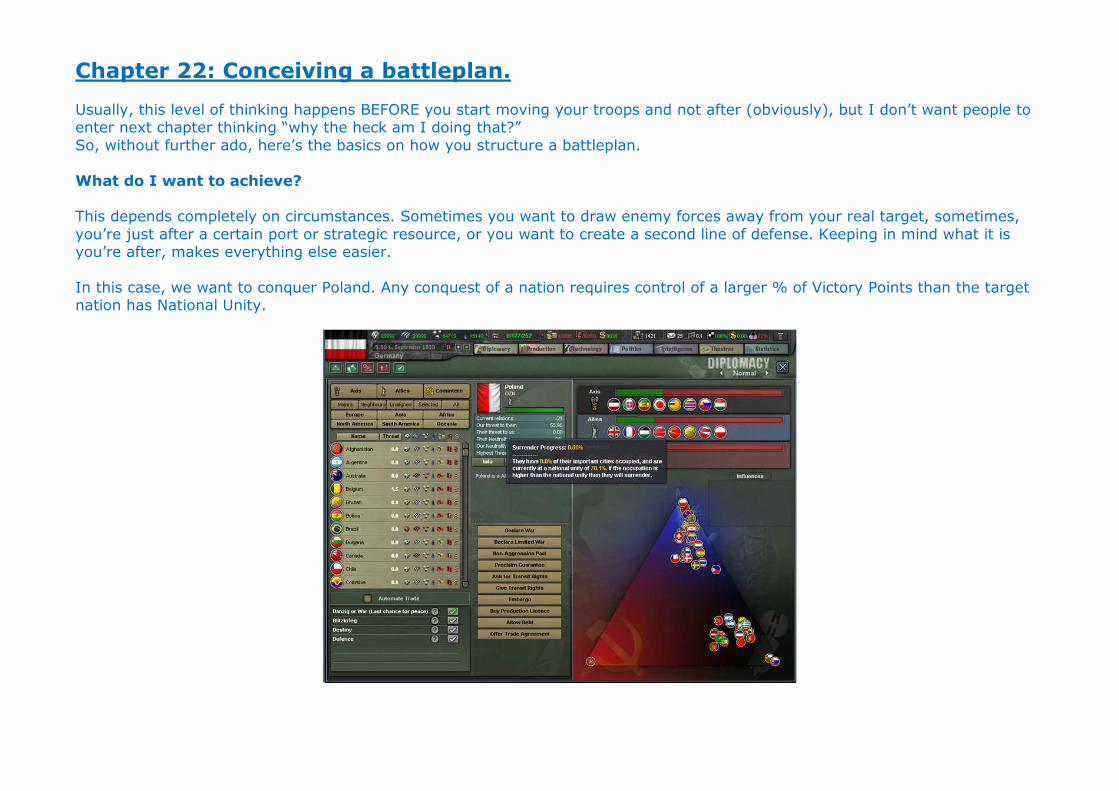
Chapter 22: Conceiving a battleplan. Usually, this level of thinking happens BEFORE you start moving your troops and not after (obviously), but I don’t want people to enter next chapter thinking “why the heck am I doing that?” So, without further ado, here’s the basics on how you structure a battleplan. What do I want to achieve? This depends completely on circumstances. Sometimes you want to draw enemy forces away from your real target, sometimes, you’re just after a certain port or strategic resource, or you want to create a second line of defense. Keeping in mind what it is you’re after, makes everything else easier. In this case, we want to conquer Poland. Any conquest of a nation requires control of a larger % of Victory Points than the target nation has National Unity.
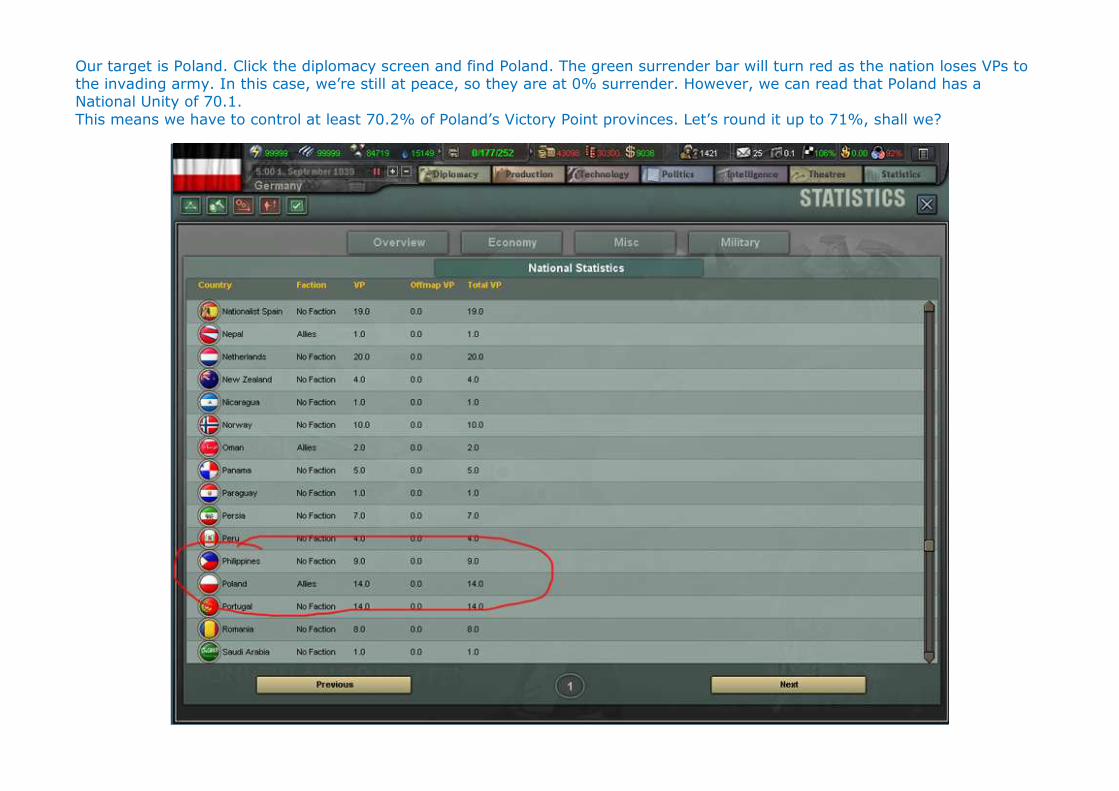
Our target is Poland. Click the diplomacy screen and find Poland. The green surrender bar will turn red as the nation loses VPs to the invading army. In this case, we’re still at peace, so they are at 0% surrender. However, we can read that Poland has a National Unity of 70.1. This means we have to control at least 70.2% of Poland’s Victory Point provinces. Let’s round it up to 71%, shall we?
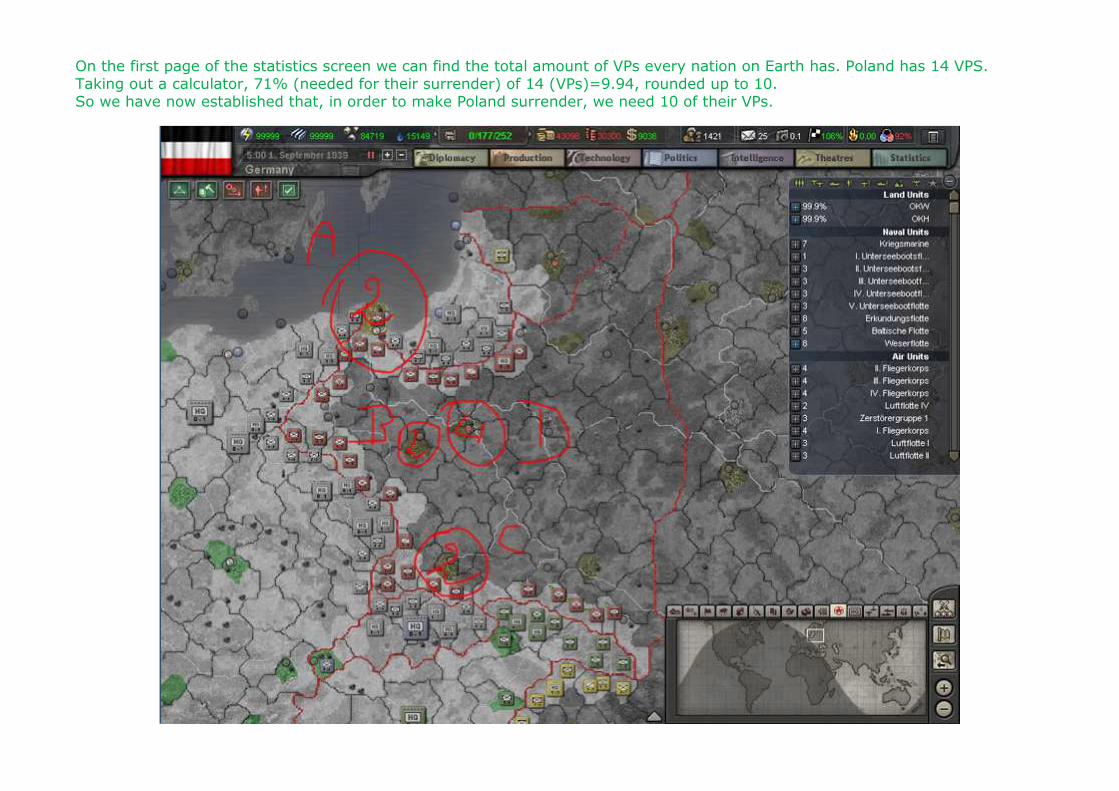
On the first page of the statistics screen we can find the total amount of VPs every nation on Earth has. Poland has 14 VPS. Taking out a calculator, 71% (needed for their surrender) of 14 (VPs)=9.94, rounded up to 10. So we have now established that, in order to make Poland surrender, we need 10 of their VPs.
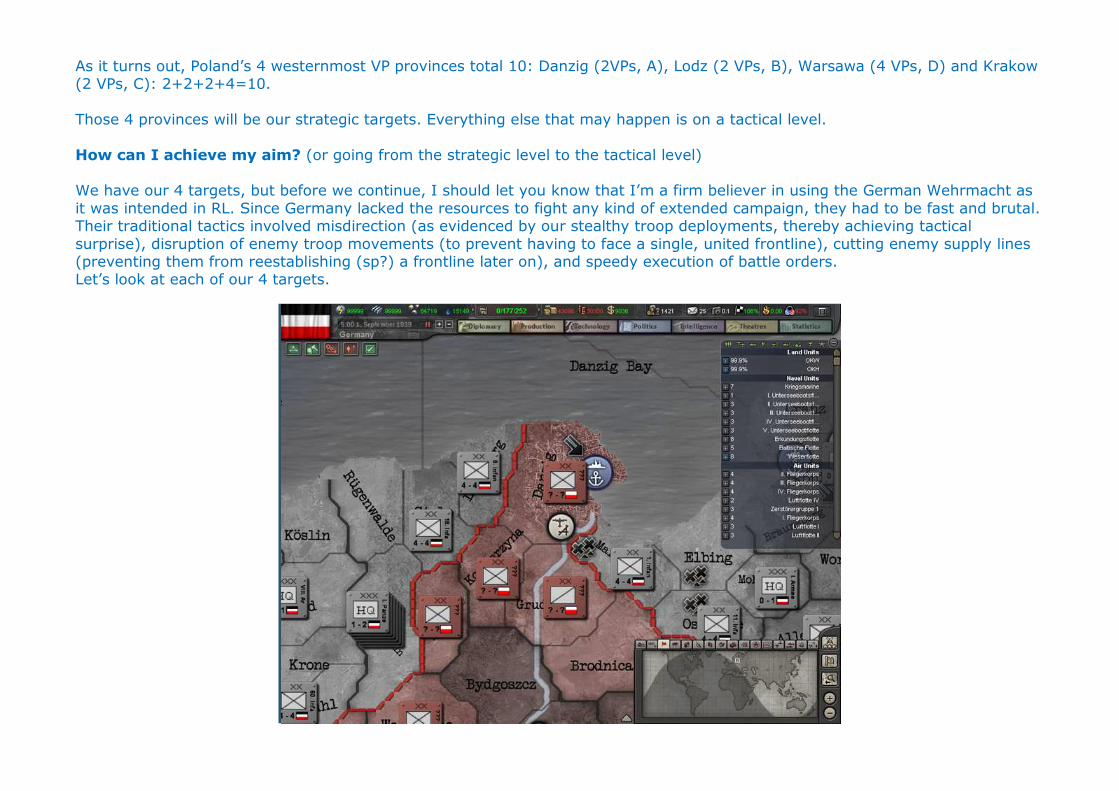
As it turns out, Poland’s 4 westernmost VP provinces total 10: Danzig (2VPs, A), Lodz (2 VPs, B), Warsawa (4 VPs, D) and Krakow (2 VPs, C): 2+2+2+4=10. Those 4 provinces will be our strategic targets. Everything else that may happen is on a tactical level. How can I achieve my aim? (or going from the strategic level to the tactical level) We have our 4 targets, but before we continue, I should let you know that I’m a firm believer in using the German Wehrmacht as it was intended in RL. Since Germany lacked the resources to fight any kind of extended campaign, they had to be fast and brutal. Their traditional tactics involved misdirection (as evidenced by our stealthy troop deployments, thereby achieving tactical surprise), disruption of enemy troop movements (to prevent having to face a single, united frontline), cutting enemy supply lines (preventing them from reestablishing (sp?) a frontline later on), and speedy execution of battle orders. Let’s look at each of our 4 targets.
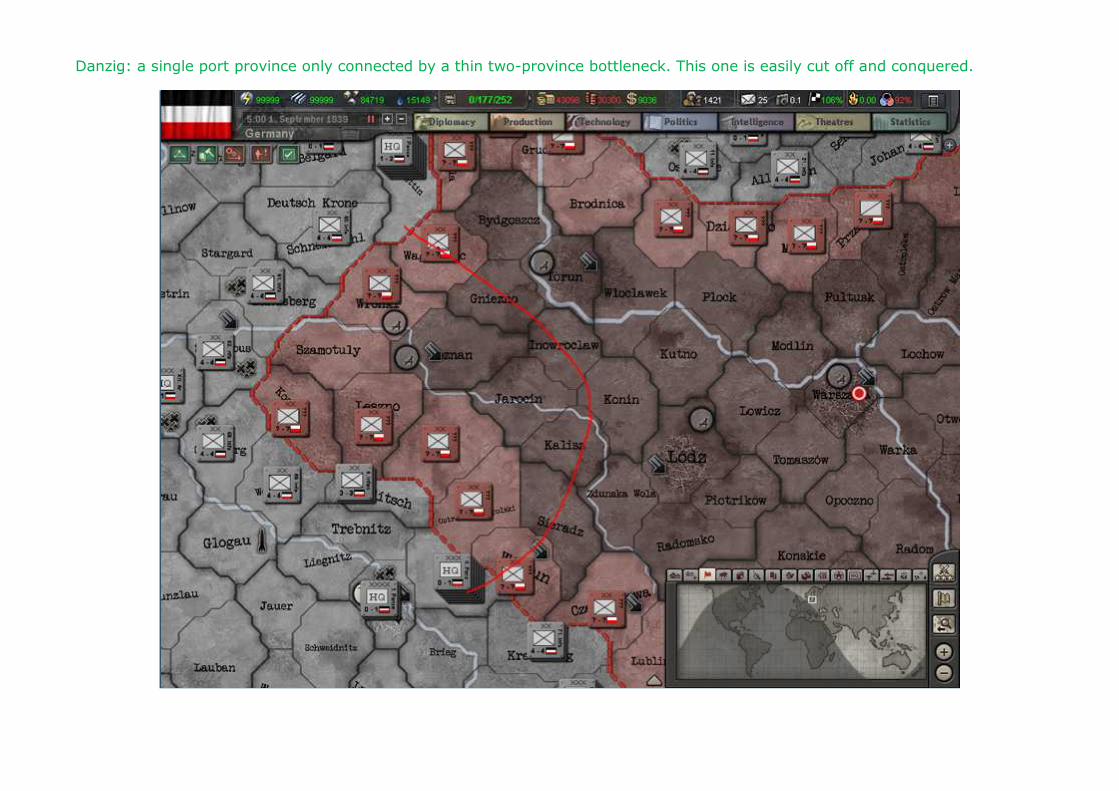
Danzig: a single port province only connected by a thin two-province bottleneck. This one is easily cut off and conquered.
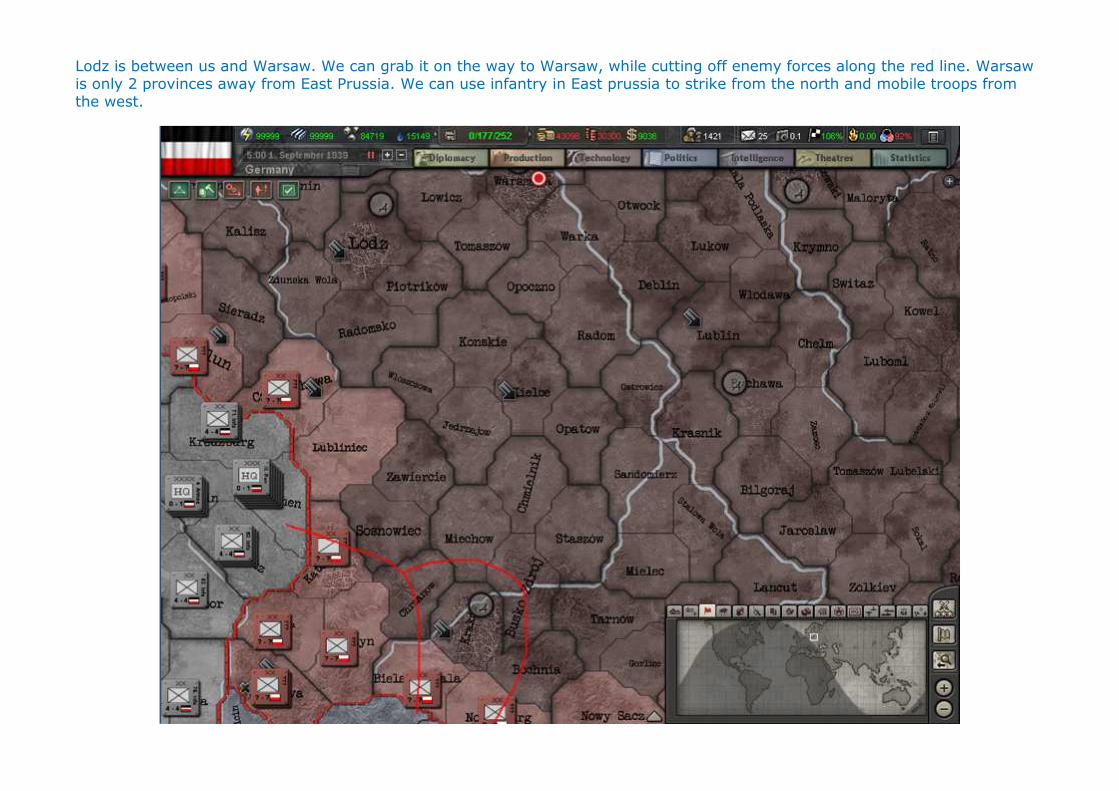
Lodz is between us and Warsaw. We can grab it on the way to Warsaw, while cutting off enemy forces along the red line. Warsaw is only 2 provinces away from East Prussia. We can use infantry in East prussia to strike from the north and mobile troops from the west.
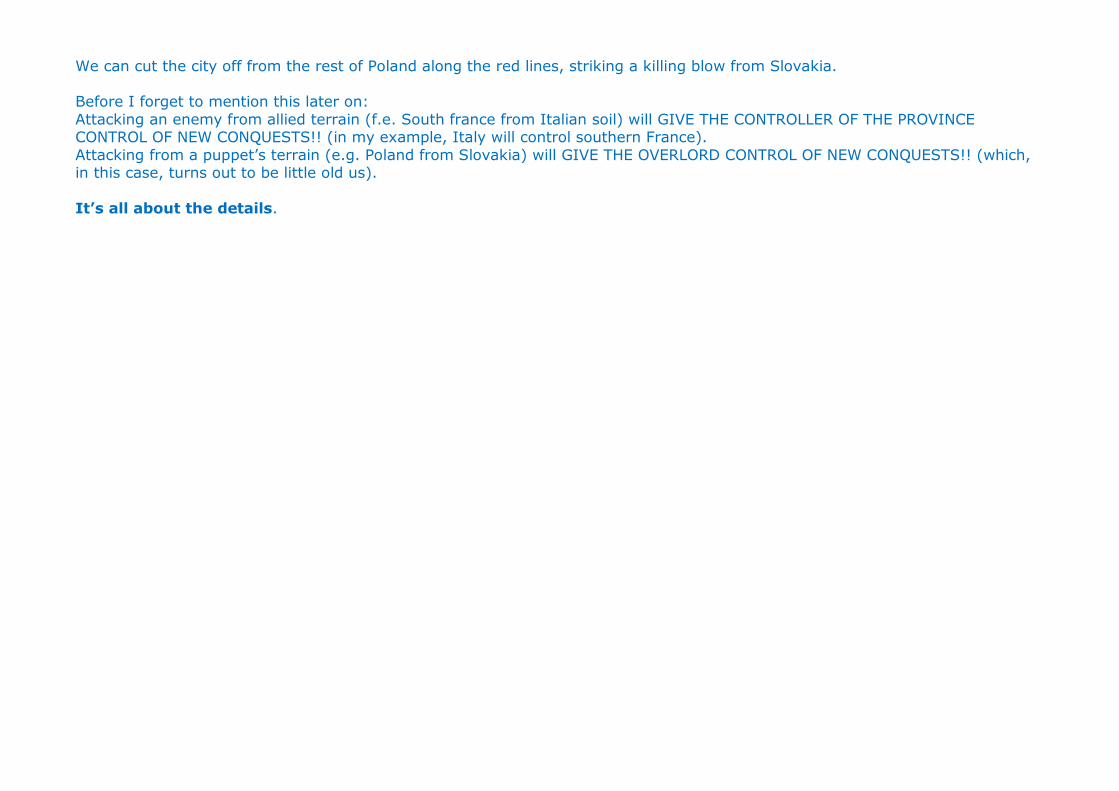
We can cut the city off from the rest of Poland along the red lines, striking a killing blow from Slovakia. Before I forget to mention this later on: Attacking an enemy from allied terrain (f.e. South france from Italian soil) will GIVE THE CONTROLLER OF THE PROVINCE CONTROL OF NEW CONQUESTS!! (in my example, Italy will control southern France). Attacking from a puppet’s terrain (e.g. Poland from Slovakia) will GIVE THE OVERLORD CONTROL OF NEW CONQUESTS!! (which, in this case, turns out to be little old us). It’s all about the details.
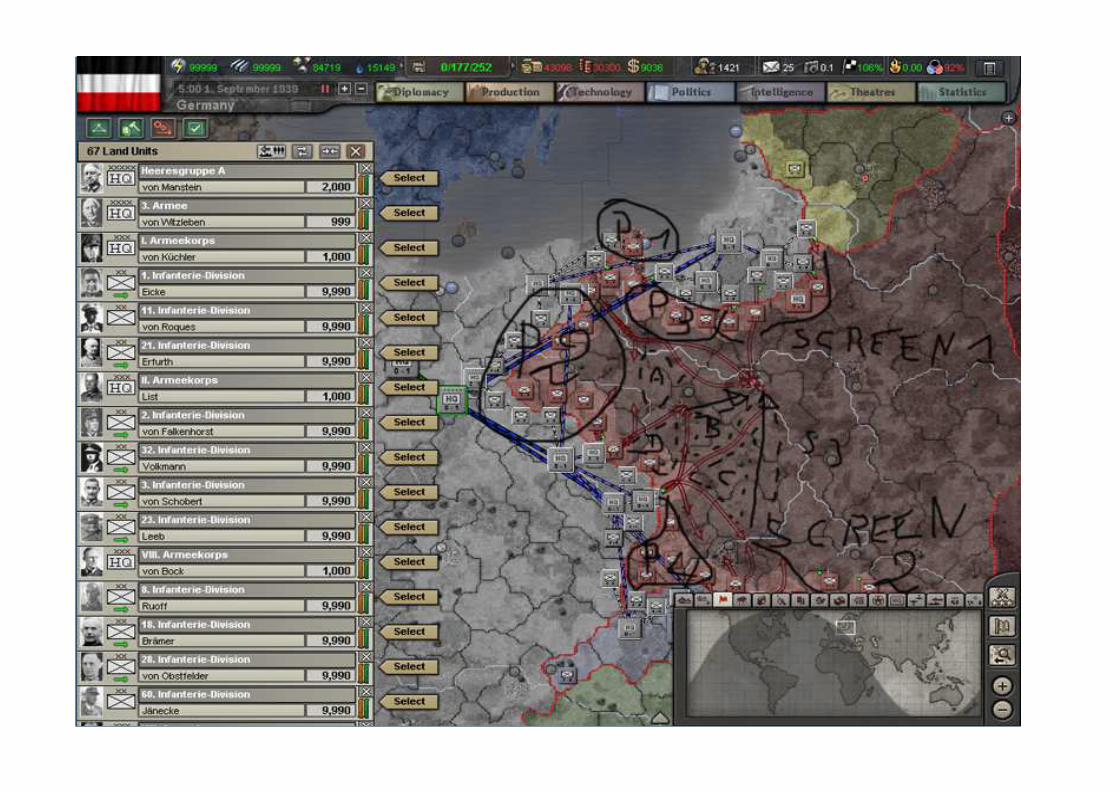
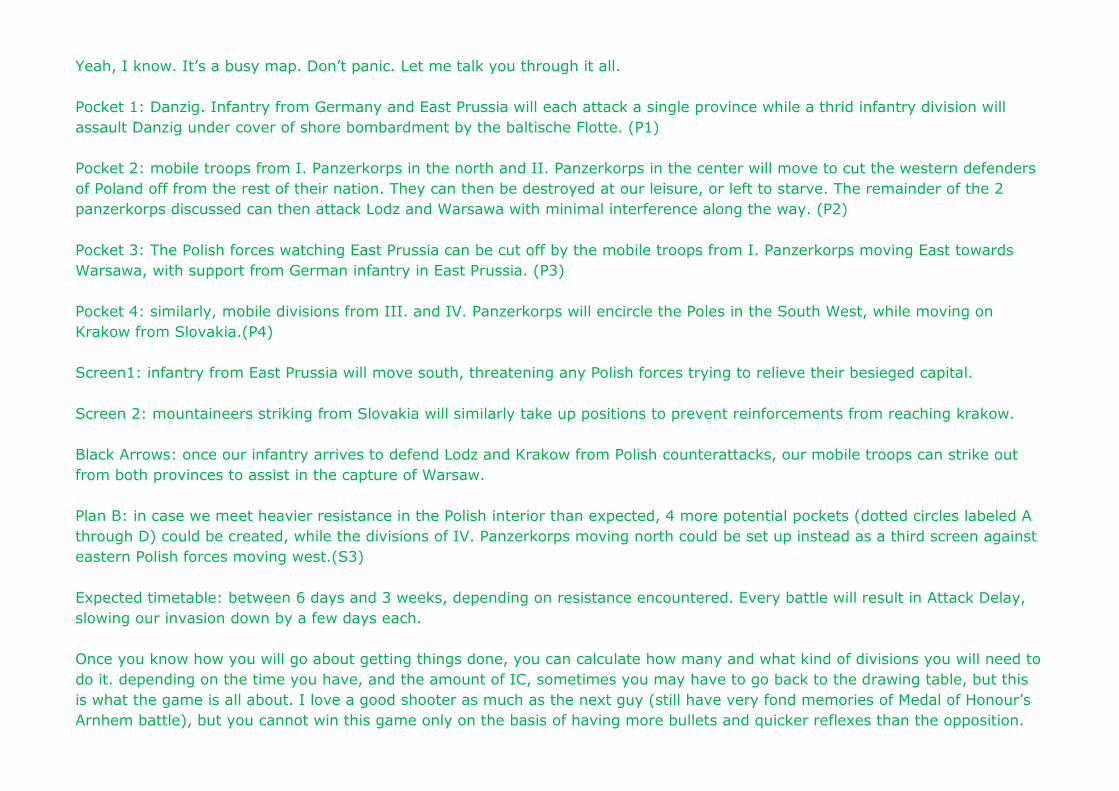
Yeah, I know. It’s a busy map. Don’t panic. Let me talk you through it all. Pocket 1: Danzig. Infantry from Germany and East Prussia will each attack a single province while a thrid infantry division will assault Danzig under cover of shore bombardment by the baltische Flotte. (P1) Pocket 2: mobile troops from I. Panzerkorps in the north and II. Panzerkorps in the center will move to cut the western defenders of Poland off from the rest of their nation. They can then be destroyed at our leisure, or left to starve. The remainder of the 2 panzerkorps discussed can then attack Lodz and Warsawa with minimal interference along the way. (P2)
Pocket 3: The Polish forces watching East Prussia can be cut off by the mobile troops from I. Panzerkorps moving East towards Warsawa, with support from German infantry in East Prussia. (P3) Pocket 4: similarly, mobile divisions from III. and IV. Panzerkorps will encircle the Poles in the South West, while moving on Krakow from Slovakia.(P4) Screen1: infantry from East Prussia will move south, threatening any Polish forces trying to relieve their besieged capital.
Screen 2: mountaineers striking from Slovakia will similarly take up positions to prevent reinforcements from reaching krakow. Black Arrows: once our infantry arrives to defend Lodz and Krakow from Polish counterattacks, our mobile troops can strike out from both provinces to assist in the capture of Warsaw. Plan B: in case we meet heavier resistance in the Polish interior than expected, 4 more potential pockets (dotted circles labeled A through D) could be created, while the divisions of IV. Panzerkorps moving north could be set up instead as a third screen against eastern Polish forces moving west.(S3)
Expected timetable: between 6 days and 3 weeks, depending on resistance encountered. Every battle will result in Attack Delay, slowing our invasion down by a few days each. Once you know how you will go about getting things done, you can calculate how many and what kind of divisions you will need to do it. depending on the time you have, and the amount of IC, sometimes you may have to go back to the drawing table, but this is what the game is all about. I love a good shooter as much as the next guy (still have very fond memories of Medal of Honour’s Arnhem battle), but you cannot win this game only on the basis of having more bullets and quicker reflexes than the opposition.
This is a thinking man’s game. Fight your way out of trouble (or into it) by using your brains, not your brawn, and you will eventually dominate the planet.
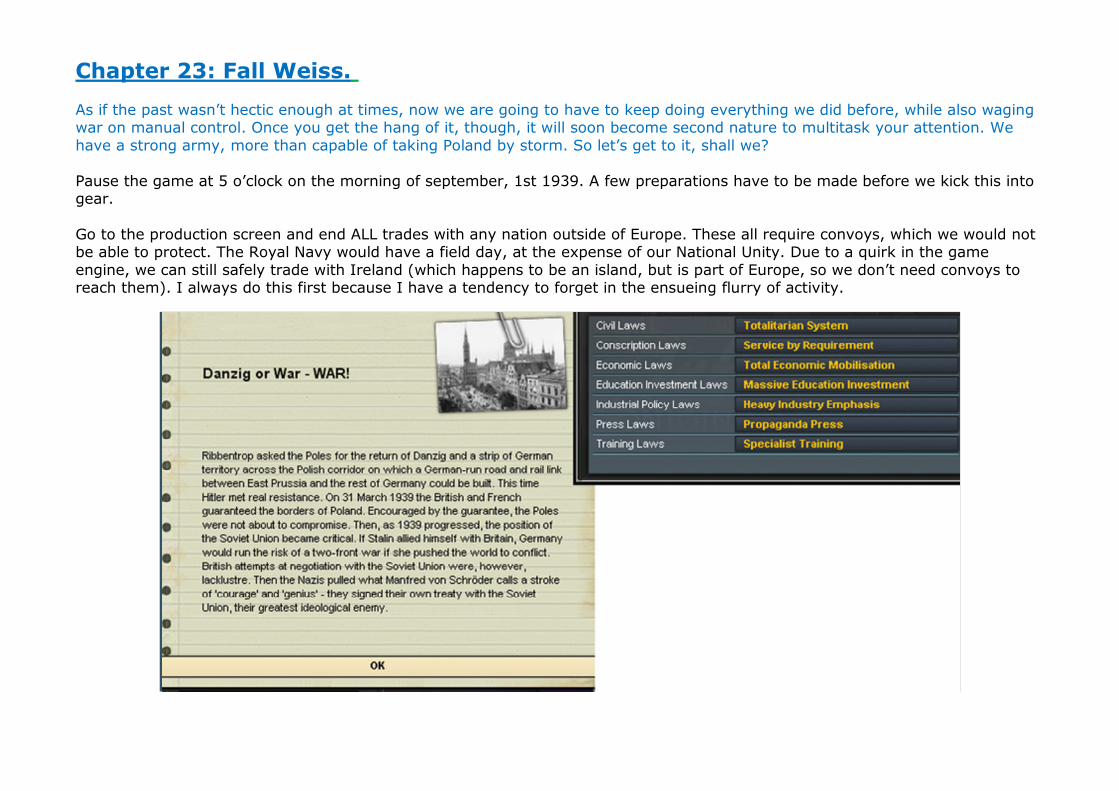
Chapter 23: Fall Weiss. As if the past wasn’t hectic enough at times, now we are going to have to keep doing everything we did before, while also waging war on manual control. Once you get the hang of it, though, it will soon become second nature to multitask your attention. We have a strong army, more than capable of taking Poland by storm. So let’s get to it, shall we? Pause the game at 5 o’clock on the morning of september, 1st 1939. A few preparations have to be made before we kick this into gear. Go to the production screen and end ALL trades with any nation outside of Europe. These all require convoys, which we would not be able to protect. The Royal Navy would have a field day, at the expense of our National Unity. Due to a quirk in the game engine, we can still safely trade with Ireland (which happens to be an island, but is part of Europe, so we don’t need convoys to reach them). I always do this first because I have a tendency to forget in the ensueing flurry of activity.

Secondly, go to the Diplomacy screen and click the “Danzig or War” decision, putting us at war with the Allies. We can now “vote in” a few new laws in the politics screen. As conscription law, select “service by requirement” to increase our MP gain. As economic law, select “total economic mobilisation” to increase our IC. As industrial law, select heavy industry emphasis. You will notice the immediate effect on our CG slider (dissent has turned red). Go to the production screen, switch slider control back to manual control and immediately switch it back to “prioritise reinforcements” to adjust the sliders. Note that we could enact “blitzkrieg” decision as well. However, we will wait until Warsaw is about to fall to make the effect last as long as possible, preferably until after we have overrun the Low Countries next year. Next up are our U-boats, which have been in position for some time now. Select each one in turn and right-click the sea zone they are in. Select “convoy raiding” as mission. At the bottom of the mission screen, choose “passive stance”, making them try to avoid any and all fights. Their purpose, after all, is not to engage the Royal Navy, but to sink their merchant navy.
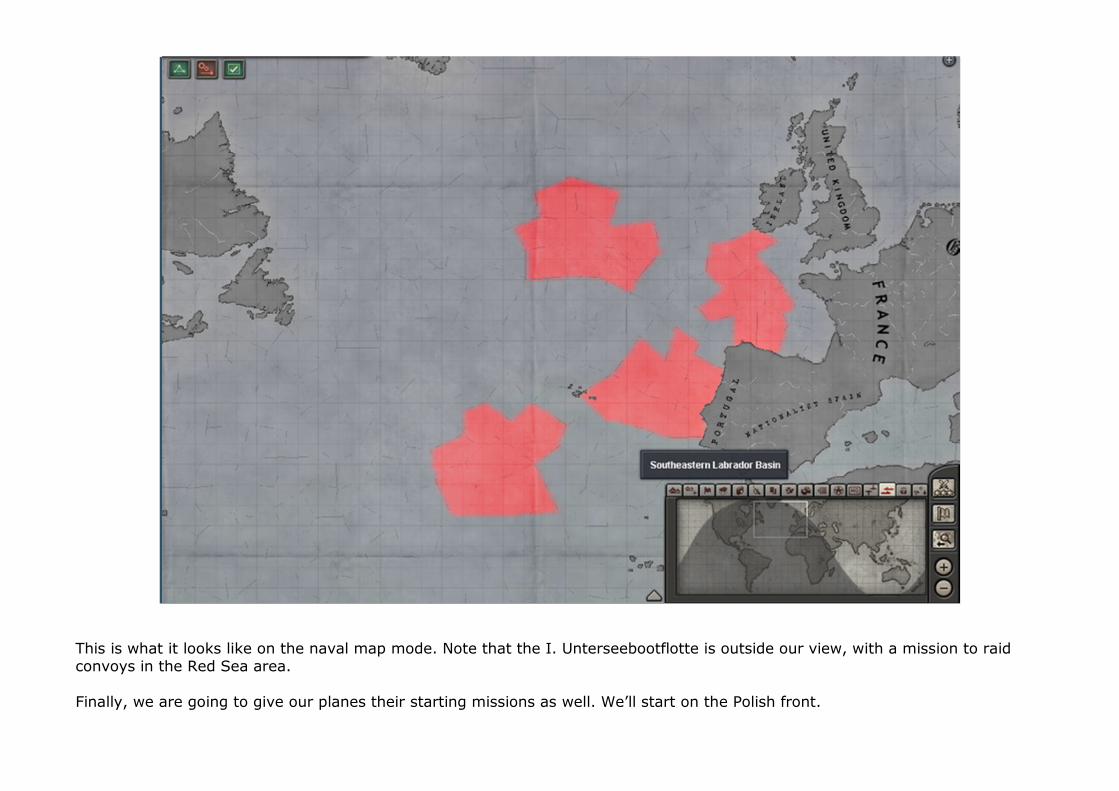
This is what it looks like on the naval map mode. Note that the I. Unterseebootflotte is outside our view, with a mission to raid convoys in the Red Sea area. Finally, we are going to give our planes their starting missions as well. We’ll start on the Polish front.
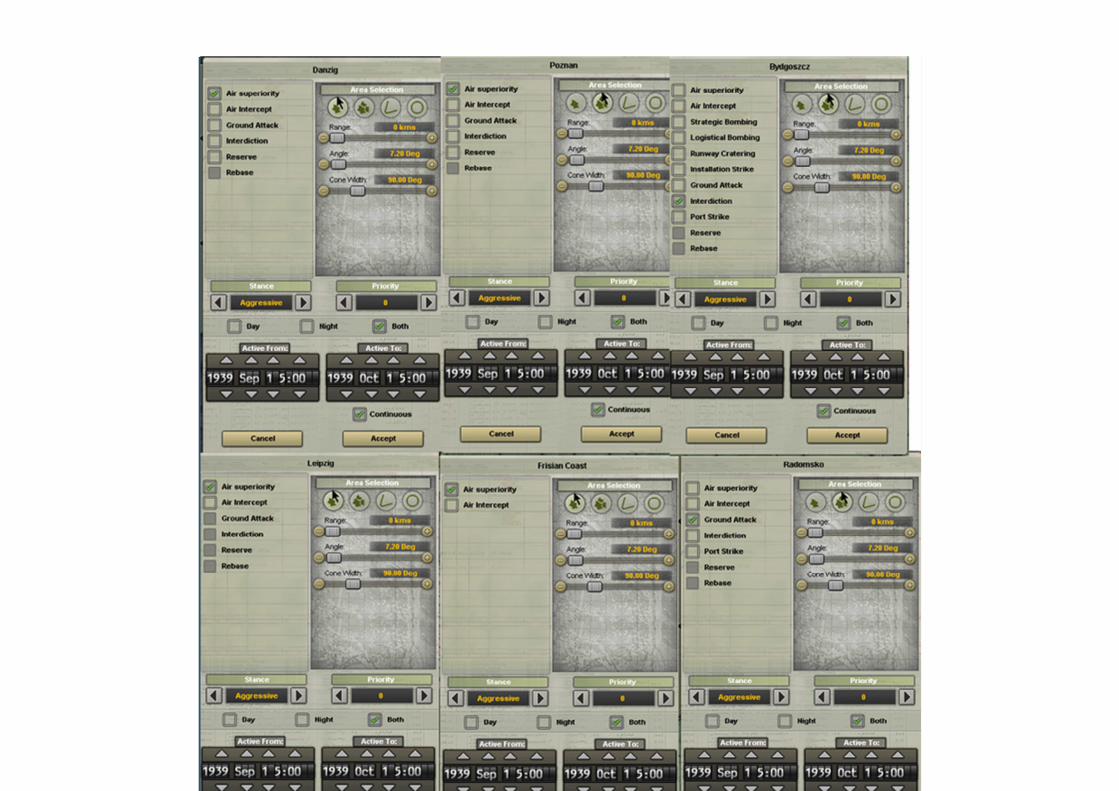
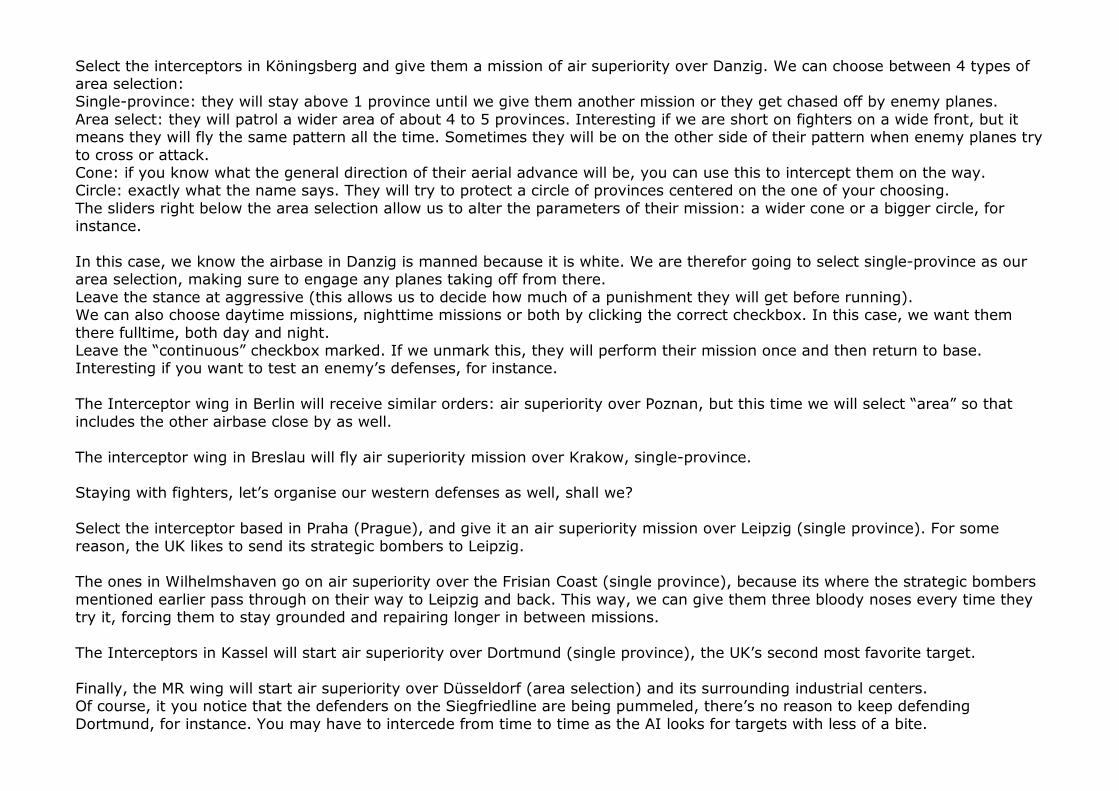
Select the interceptors in Köningsberg and give them a mission of air superiority over Danzig. We can choose between 4 types of area selection: Single-province: they will stay above 1 province until we give them another mission or they get chased off by enemy planes. Area select: they will patrol a wider area of about 4 to 5 provinces. Interesting if we are short on fighters on a wide front, but it means they will fly the same pattern all the time. Sometimes they will be on the other side of their pattern when enemy planes try to cross or attack. Cone: if you know what the general direction of their aerial advance will be, you can use this to intercept them on the way. Circle: exactly what the name says. They will try to protect a circle of provinces centered on the one of your choosing. The sliders right below the area selection allow us to alter the parameters of their mission: a wider cone or a bigger circle, for instance. In this case, we know the airbase in Danzig is manned because it is white. We are therefor going to select single-province as our area selection, making sure to engage any planes taking off from there. Leave the stance at aggressive (this allows us to decide how much of a punishment they will get before running). We can also choose daytime missions, nighttime missions or both by clicking the correct checkbox. In this case, we want them there fulltime, both day and night. Leave the “continuous” checkbox marked. If we unmark this, they will perform their mission once and then return to base. Interesting if you want to test an enemy’s defenses, for instance. The Interceptor wing in Berlin will receive similar orders: air superiority over Poznan, but this time we will select “area” so that includes the other airbase close by as well. The interceptor wing in Breslau will fly air superiority mission over Krakow, single-province. Staying with fighters, let’s organise our western defenses as well, shall we? Select the interceptor based in Praha (Prague), and give it an air superiority mission over Leipzig (single province). For some reason, the UK likes to send its strategic bombers to Leipzig. The ones in Wilhelmshaven go on air superiority over the Frisian Coast (single province), because its where the strategic bombers mentioned earlier pass through on their way to Leipzig and back. This way, we can give them three bloody noses every time they try it, forcing them to stay grounded and repairing longer in between missions. The Interceptors in Kassel will start air superiority over Dortmund (single province), the UK’s second most favorite target. Finally, the MR wing will start air superiority over Düsseldorf (area selection) and its surrounding industrial centers. Of course, it you notice that the defenders on the Siegfriedline are being pummeled, there’s no reason to keep defending Dortmund, for instance. You may have to intercede from time to time as the AI looks for targets with less of a bite.
Now, our bombers. Send the Stuka wing stationed in East Prussia on ground attack mission against the Polish province of Przasnysz (just across the border) (area selection to include the province behind it). Ground attack will be used to support ground combat. The Stukas in Breslau will fly ground attack missions (area), centered on Radomsko. The Luftflotte in Stettin will use “interdiction” (area), centered on Bydgoszcz, to support the panzers in their encirclement. Interdiction, BTW, should target moving ground targets first, targets in combat second and stationary targets last. So it’s a good way of slowing enemy movement down. The Luftflotte from Berlin will use the same mission type (also area), centered on Sieradz while the last one will center its (area) interdiction on Nowy Targ (targeting almost all Polish forces between Slovakia and Krakow). Before we start moving troops, make sure message settings are set to pop-up and pauze when: -one of our land units arrives at its destination (nothing worse than loosing two days because we forgot and watching all those divisions slip out of the noose) -we are being bombed. (in case they change their tactics) -a land battle is over. (to see in what state our divisions are) -one of our navies is under attack. (to retreat at first sign) -a naval battle is over. (to rebase them to repair) -an air battle is over. (to make sure our planes can continue their mission) When this is all set, you may want to save the game, just in case things go horribly wrong. The actual invasion.
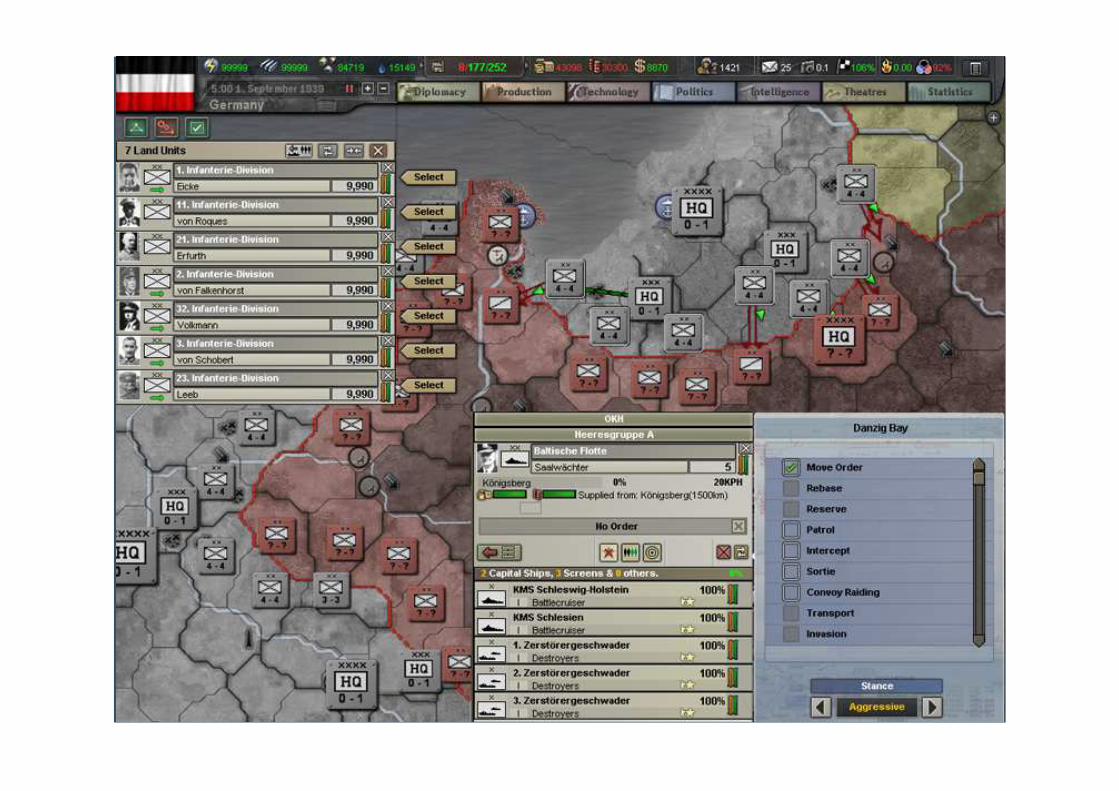
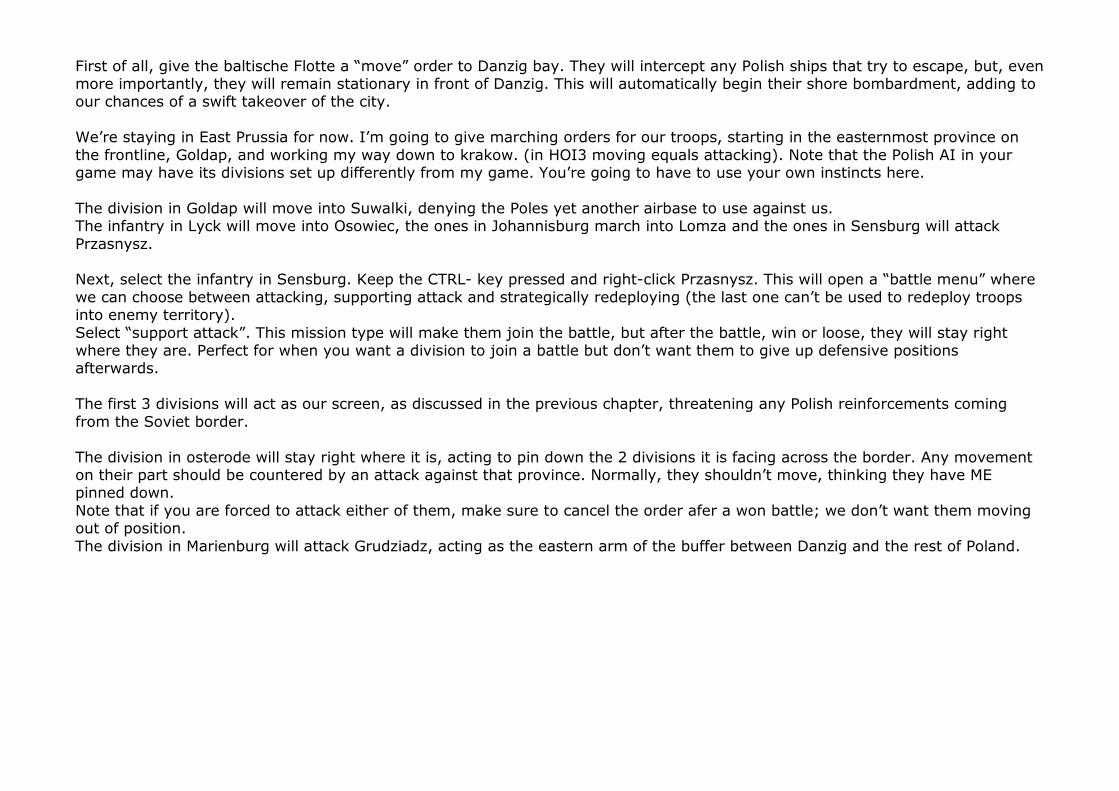
First of all, give the baltische Flotte a “move” order to Danzig bay. They will intercept any Polish ships that try to escape, but, even more importantly, they will remain stationary in front of Danzig. This will automatically begin their shore bombardment, adding to our chances of a swift takeover of the city. We’re staying in East Prussia for now. I’m going to give marching orders for our troops, starting in the easternmost province on the frontline, Goldap, and working my way down to krakow. (in HOI3 moving equals attacking). Note that the Polish AI in your game may have its divisions set up differently from my game. You’re going to have to use your own instincts here. The division in Goldap will move into Suwalki, denying the Poles yet another airbase to use against us. The infantry in Lyck will move into Osowiec, the ones in Johannisburg march into Lomza and the ones in Sensburg will attack Przasnysz. Next, select the infantry in Sensburg. Keep the CTRL- key pressed and right-click Przasnysz. This will open a “battle menu” where we can choose between attacking, supporting attack and strategically redeploying (the last one can’t be used to redeploy troops into enemy territory). Select “support attack”. This mission type will make them join the battle, but after the battle, win or loose, they will stay right where they are. Perfect for when you want a division to join a battle but don’t want them to give up defensive positions afterwards. The first 3 divisions will act as our screen, as discussed in the previous chapter, threatening any Polish reinforcements coming from the Soviet border. The division in osterode will stay right where it is, acting to pin down the 2 divisions it is facing across the border. Any movement on their part should be countered by an attack against that province. Normally, they shouldn’t move, thinking they have ME pinned down. Note that if you are forced to attack either of them, make sure to cancel the order afer a won battle; we don’t want them moving out of position. The division in Marienburg will attack Grudziadz, acting as the eastern arm of the buffer between Danzig and the rest of Poland.
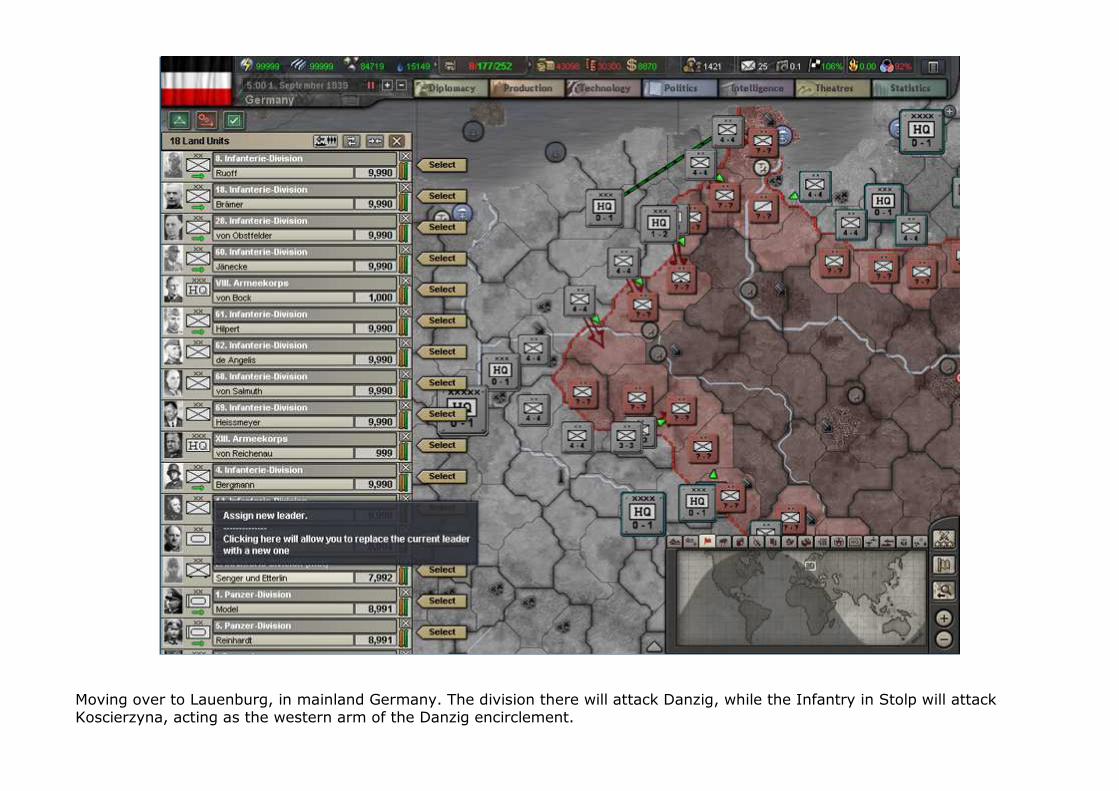
Moving over to Lauenburg, in mainland Germany. The division there will attack Danzig, while the Infantry in Stolp will attack Koscierzyna, acting as the western arm of the Danzig encirclement.
Now we are going to stage our first breakthrough of the war. A breakthrough is an attempt to break through the enemy lines into his (hopefully weakly protected) rear and is a necessary first step in most encirclements. Whenever you try this, make sure to concentrate as much firepower as needed to achieve a quick result. You must, however, keep enough (and the right kind of) divisions out of the fight to exploit the breakthrough. If you use them all, they will all suffer from Attack Delay. Keeping some divisions out of the initial battle will keep them fresh to pour through the open gap in the enemy’s defenses and wreak havoc there. You must also make sure to engage enemy divisions in all provinces bordering the breakthrough province (this is your “Schwerpunkt”; the focus of your attack.) to prevent counterattacks. Use the Infantry in Schneidmuhl to attack Wronki. Now things get a little complicated. First, drag a box around the divisions in Neustettin, thereby selecing any and all land forces present there. Click “x” next to the I. panzerkorps’ HQ to deselect it (HQs don’t fight, remember?). Attack Tuchola with the rest of the forces there. Now click the “x” next to the infantry division, deselecting it and leaving it with orders to attack Tuchola. This leaves us with the divisions belonging to the I. Panzerkorps. Attack Wagrowiec with them. Using the method described above, deselect the 2 panzer divisions. They will now attack Wagrowiec, leaving us with 1 Leichte Division and 1 motorised division. Right-click Neustettin itself. This will cancel their orders and leave them doing absolutely nothing. See how we’re doing this? We’re making a breakthrough in Wagrowiec using the sheer power of our panzers, while pinning down the enemy divisions to the left and the right of them, and keeping 2 fast divisions on standby to exploit the gap. In my game, the Polish AI left a frontline province, Szamotuly, empty. This province has 2 German divisions facing it. BIG MISTAKE! (against human players, this might actually be a trap, but the AI is not smart enough to do this on purpose). I choose to send the division from Landsberg into Szamotuly with no other purpose than to break up the cohesion of their frontline. Depending on what I find on arrival, I may send in the second division as well. For now, I’m keeping it back as strategic reserve in case of Polish counterattack.
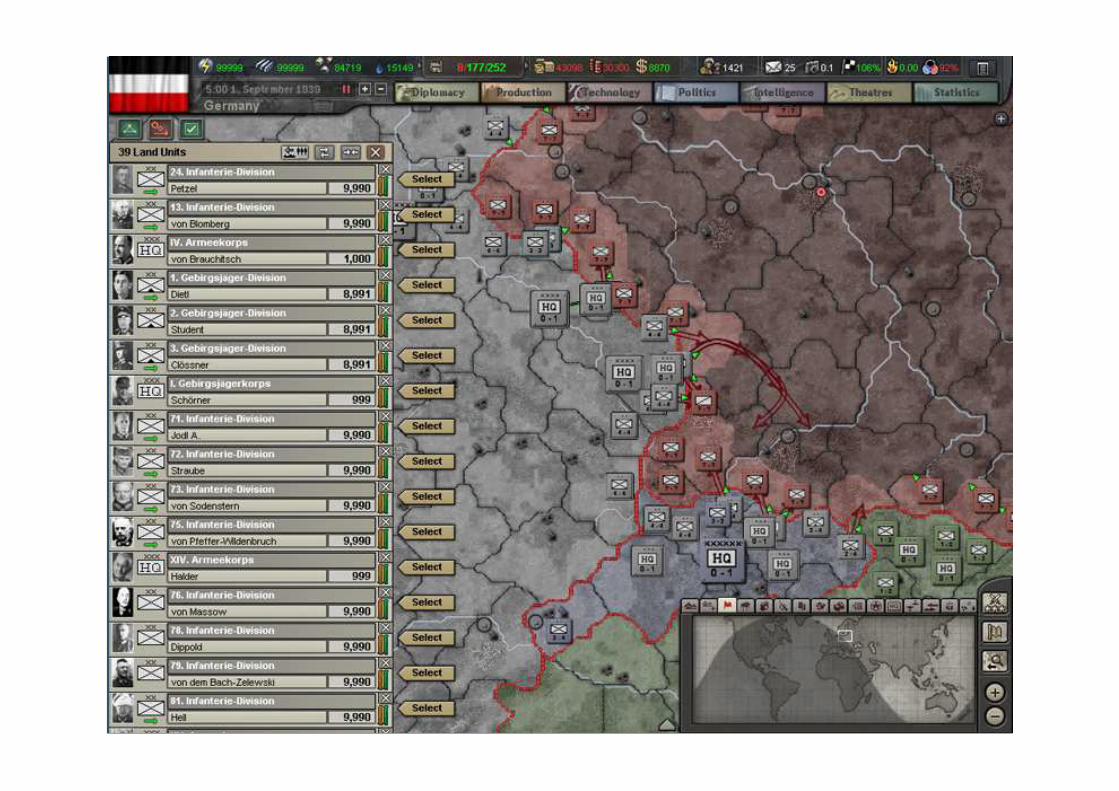
Time to set up the southern arm of our encirclement. Select the division in Militsch and set it to attack Rawicz, pinning them down. Drag a box around the divisions in Oels. We are going to do something like before. Deselect the HQ. Attack Wielun with the rest of the forces and deselect 1 infantry division to keep it with those orders, while we strike down the middle. Attack Ostrow Wielkopolski. Deselect the 2nd infantry and 1 panzer. The rest (1 panzer, a Leichte Division and a motorised division) will be our exploit force. Right-click Oels to cancel their orders. Why we leave a panzer sitting around doing nothing? Simple. These guys will have to join up eventually with the divisions coming from Neustettin, while moving on Lodz at the same time. This requires at least 3 fast divisions. Now, for the southern part of our invasion First, select 1 infantry in Kreuzburg to move into Lubliniec, while the other one attacks Czestochowa. Drag a box around the stack of divisions in Beuthen and deselect the HQ. Attack Katowice and deselect both infantry divisions. Katowice is an urban province, very hard to take and very easy to hold. With the rest selected, right-click Lubliniec and shift-right click Zawiercie, thereby ordering all of them to head straight for Zawiercie (the infantry division coming up behind them will secure the gate behind them). Deselect the panzer. Shift-right click Miechow and deselect a motorised division. Shift-right click Chrzanow and deselect the other mot. This leaves us with the Leichte Division. WITHOUT HOLDING THE SHIFT-KEY(!!!!!!!), give it orders to head straight for Busko Zdroj (on the far side of Krakow). Use one division from Gleiwitz to also attack Katowice. Like I said, urban warfare is hell and the more firepower involved on our side, the better. The other divisions in Germany proper will be on standby to engage the Poles facing them as soon as the encirclements close. Moving into Slovakia, send the infantry in Zilina to attack Cieszyn. Drag a box around the divisions in Martin. Deselect the HQ and attack Nowy Targ. Deselect the mountain division. Attack Bielsko Biala. Deselect the Panzer. Right-click Martin to cancel the Leichte and 2 Motorised divisions’ orders.
The mountaineers in Spisska Nova Ves will move into Nowy Sacz. Feel free to add “support attack” from the mountaineer division next to them if they face stiff opposition, but I’d rather keep them back as strategic reserve for later. You know what you’re facing in your game. You decide. Before we unpauze, remember: no battleplan survives enemy contact! Things may evolve differently on your end. All you have to do is stick to the plan: Tactical objectives: encircle as many of Poland’s western defenders as possible, while cutting Danzig off from the rest of Poland. Strategic objectives: Danzig, Lodz, Krakow and Warsaw. Everything else is of secondary concern. And the best friend you have in an emergency is the pause-button. Take the time to see what went wrong, decide how to straighten things out, finding idle or less-important units nearby, and where to send them. When you’re ready, unpause the game and let it run as fast or as slow as you feel comfortable with. Especially for players who have never faced war on manual control, speed 2 would be plenty, I think.
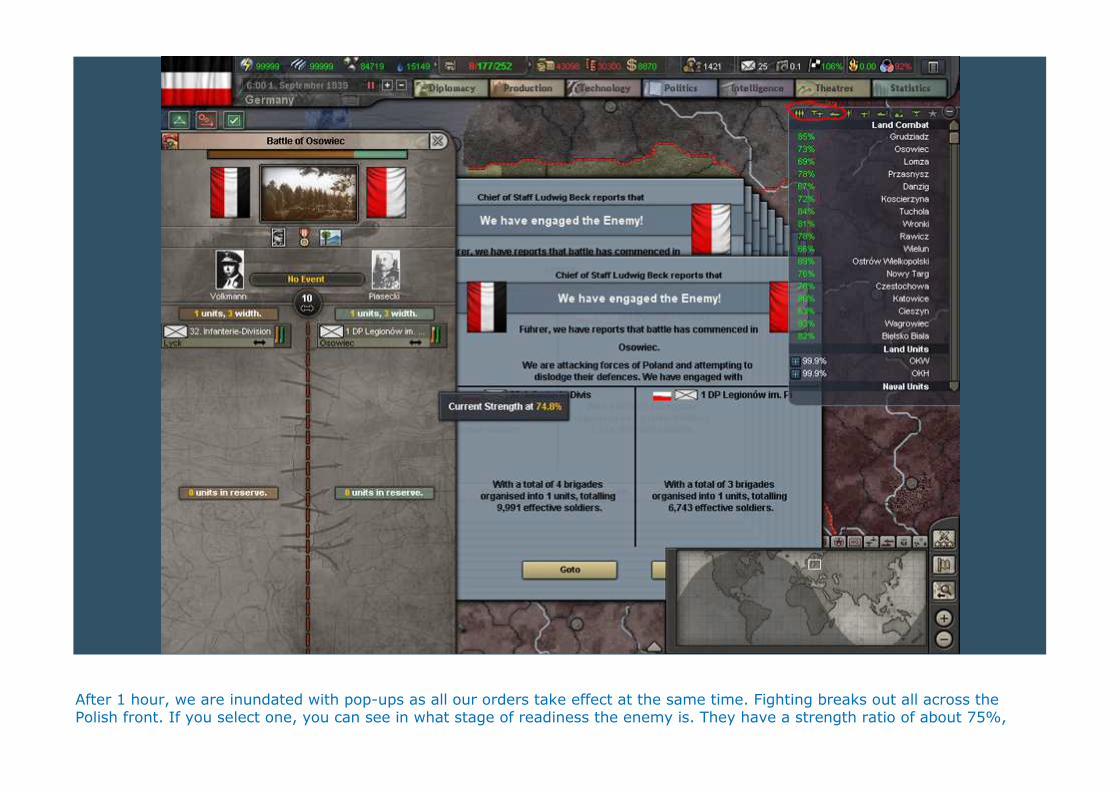
After 1 hour, we are inundated with pop-ups as all our orders take effect at the same time. Fighting breaks out all across the Polish front. If you select one, you can see in what stage of readiness the enemy is. They have a strength ratio of about 75%,
meaning they are either half-mobilised or under 3-year duty law. (the latter is the more probable) The also have an organisation of about 25, which is half of our organisation. This matters even more than strength. It means we should be able to win most, if not all, fights. You will notice that all combats can be seen in the OOB browser on your right. Ground combat will always be at the top, while air and naval combat will be at the bottom, including bombing runs against us. In order to have them all in one view, just click the icons at the top of the browser titled “land units”, “air units” and “naval units” (the ones I circled in red). They are no longer shown until you click them again. All combat results are now at our fingertips. What’s important is the encirclements. They should advance pretty rapidly. If they are taking too long, consider sending in a bomber unit to add more destruction in our enemy’s ranks and speed up their defeat. Within a matter of hours, the Soviet Union will start the Winter War against Finland, while the USA will start gearing up for war (don’t worry, they are nowhere near interventionist enough to interfere). Before too long, you will get messages of battles being won. All we can do now is wait until the divisions have reached their destination. On the 2nd of september, pause the game. Our resources are re-calculated. As you can see, we are now suffering from a shortage of rares. This will stay with us for the remainder of the game, but due to our hamstering we will be about 4 years before things will get critical. If you look at the capitals (and their stockpiles we will plunder), we can easily last until the end if we must. What is also re-calculated is our IC total. What is most important, right now, in terms of production, are infantry. We are going to need a hell of a lot more troops than we have right now.Start a new production of infantry: 2 serial, 18 parallell. Yes, serial. This is simply to make sure we will have what we need by about april 1940 to deal with France and the Low countries, while also maintaining forces in Denmark. At the very least, 36 more infantry will do nicely. You can use the red double arrows pointing down to put the tactical bomber, MR and ships at the bottom of the queu, along with the airbase in Wuppertal. Leave the transport planes at the top, though. They will be done before the month is over and free up a lot of IC, which will be needed to upgrade the army. What happens next depends on the game. It is impossible to determine when things will take place in your game. Just refer to what I do, regardless of the date, and act accordingly. First off, when Polish fighters intercept your bombers, rebase them and replace them with interceptors of your own until the fight in the air is won before sending the bombers back in.
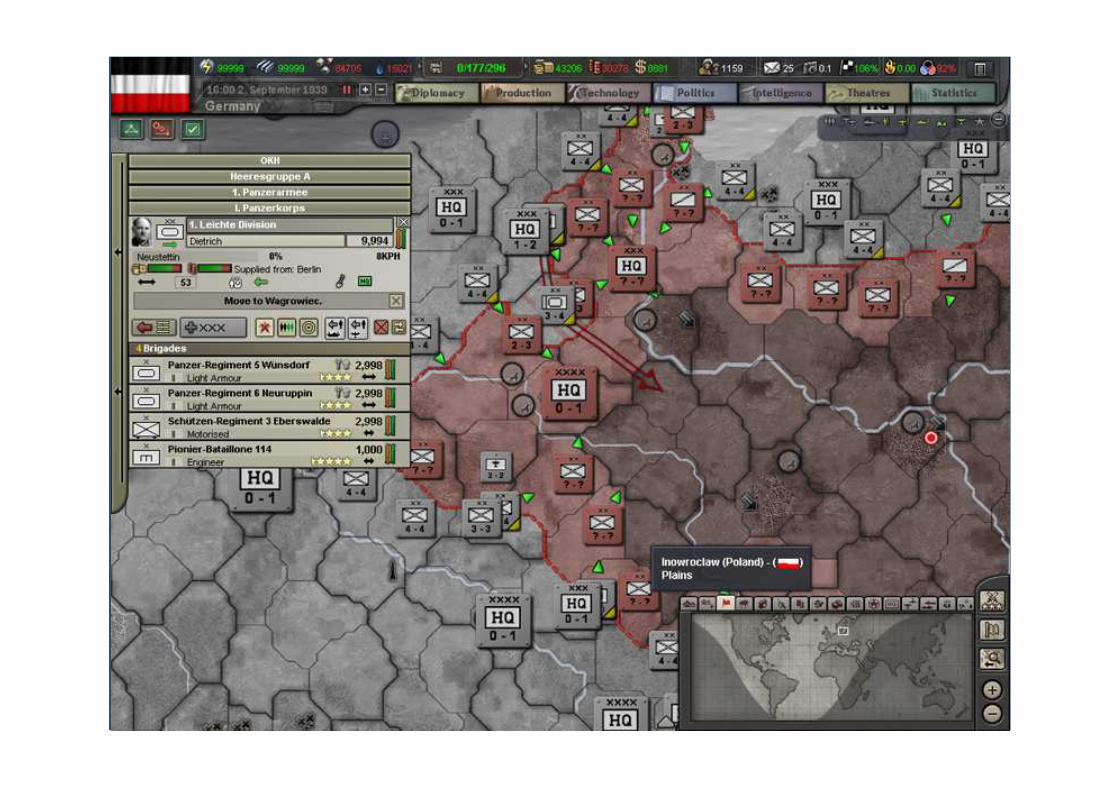
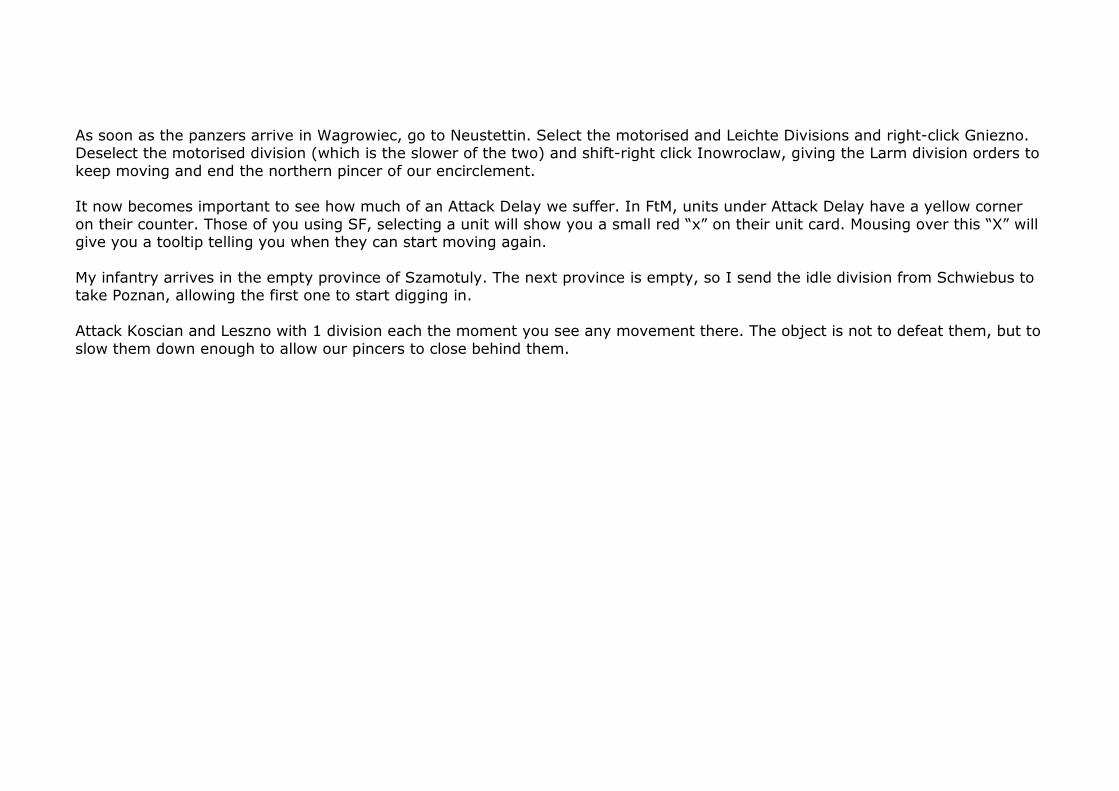
As soon as the panzers arrive in Wagrowiec, go to Neustettin. Select the motorised and Leichte Divisions and right-click Gniezno. Deselect the motorised division (which is the slower of the two) and shift-right click Inowroclaw, giving the Larm division orders to keep moving and end the northern pincer of our encirclement. It now becomes important to see how much of an Attack Delay we suffer. In FtM, units under Attack Delay have a yellow corner on their counter. Those of you using SF, selecting a unit will show you a small red “x” on their unit card. Mousing over this “X” will give you a tooltip telling you when they can start moving again. My infantry arrives in the empty province of Szamotuly. The next province is empty, so I send the idle division from Schwiebus to take Poznan, allowing the first one to start digging in. Attack Koscian and Leszno with 1 division each the moment you see any movement there. The object is not to defeat them, but to slow them down enough to allow our pincers to close behind them.
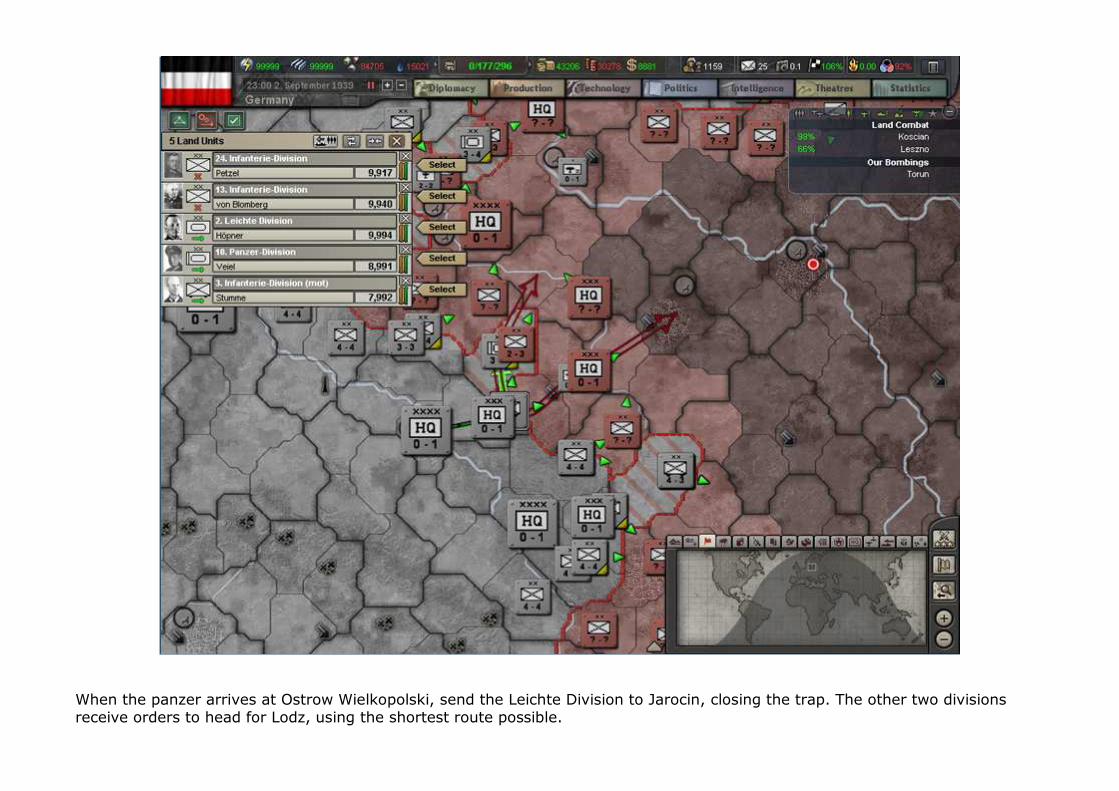
When the panzer arrives at Ostrow Wielkopolski, send the Leichte Division to Jarocin, closing the trap. The other two divisions receive orders to head for Lodz, using the shortest route possible.
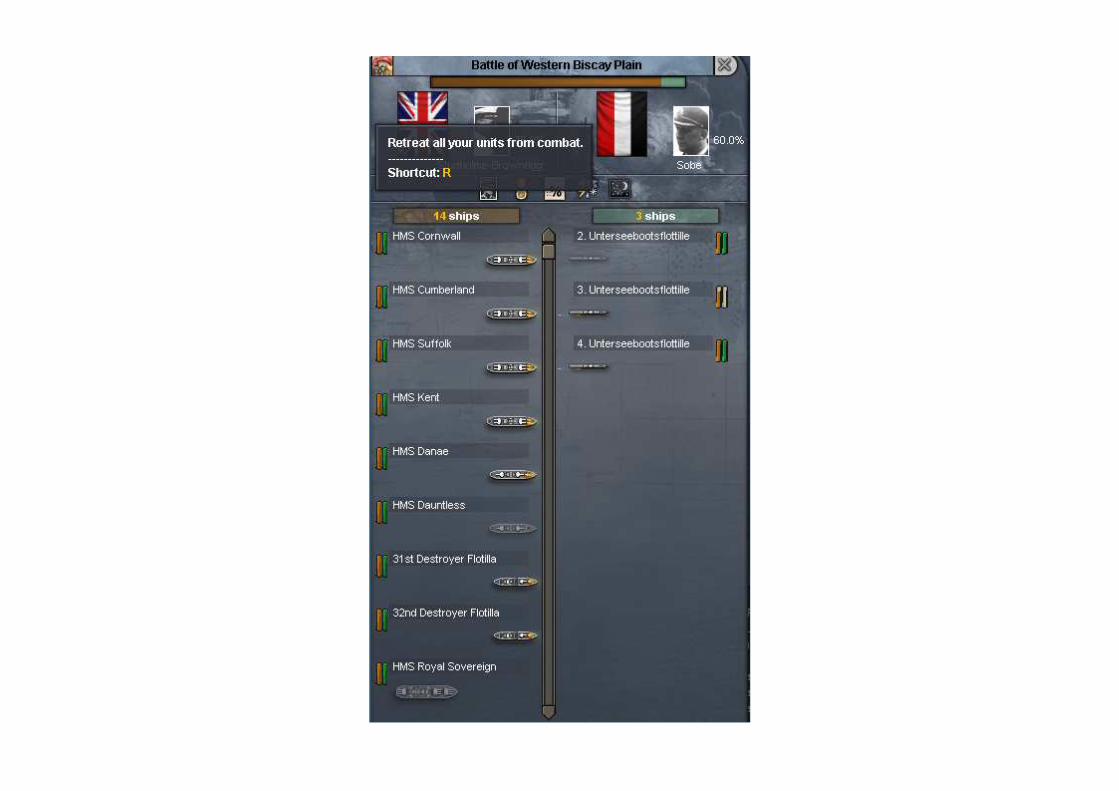
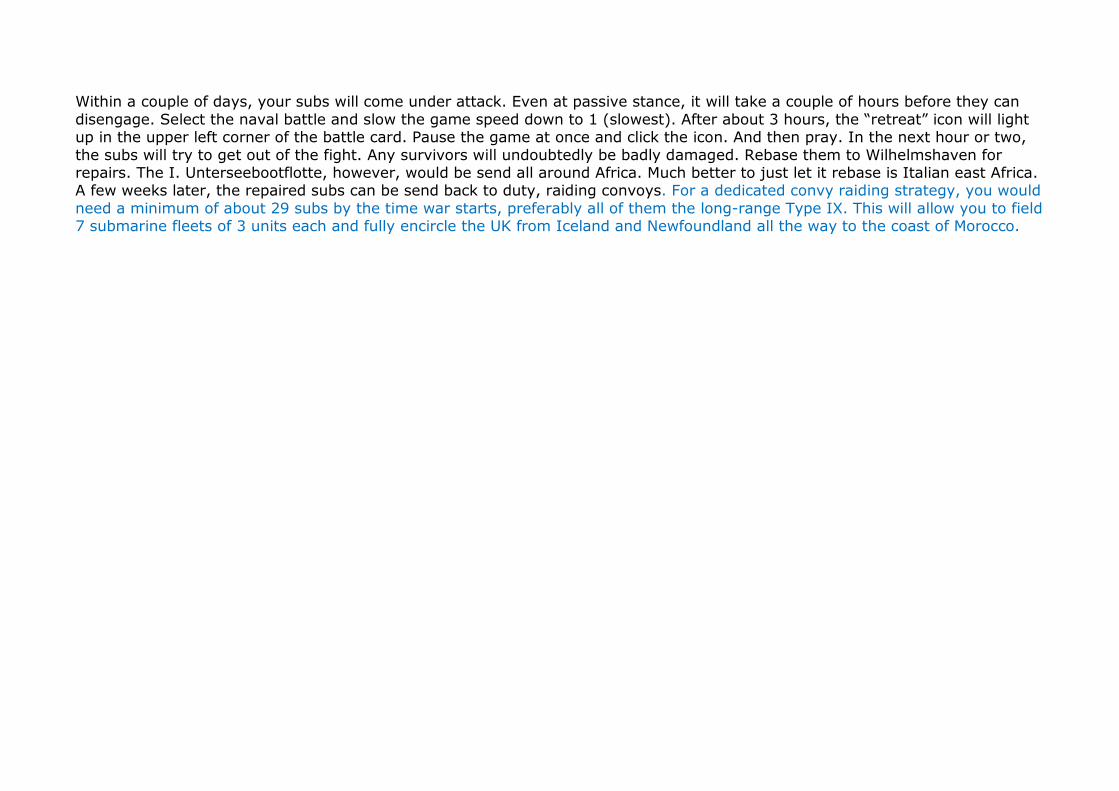
Within a couple of days, your subs will come under attack. Even at passive stance, it will take a couple of hours before they can disengage. Select the naval battle and slow the game speed down to 1 (slowest). After about 3 hours, the “retreat” icon will light up in the upper left corner of the battle card. Pause the game at once and click the icon. And then pray. In the next hour or two, the subs will try to get out of the fight. Any survivors will undoubtedly be badly damaged. Rebase them to Wilhelmshaven for repairs. The I. Unterseebootflotte, however, would be send all around Africa. Much better to just let it rebase is Italian east Africa. A few weeks later, the repaired subs can be send back to duty, raiding convoys. For a dedicated convy raiding strategy, you would need a minimum of about 29 subs by the time war starts, preferably all of them the long-range Type IX. This will allow you to field 7 submarine fleets of 3 units each and fully encircle the UK from Iceland and Newfoundland all the way to the coast of Morocco.
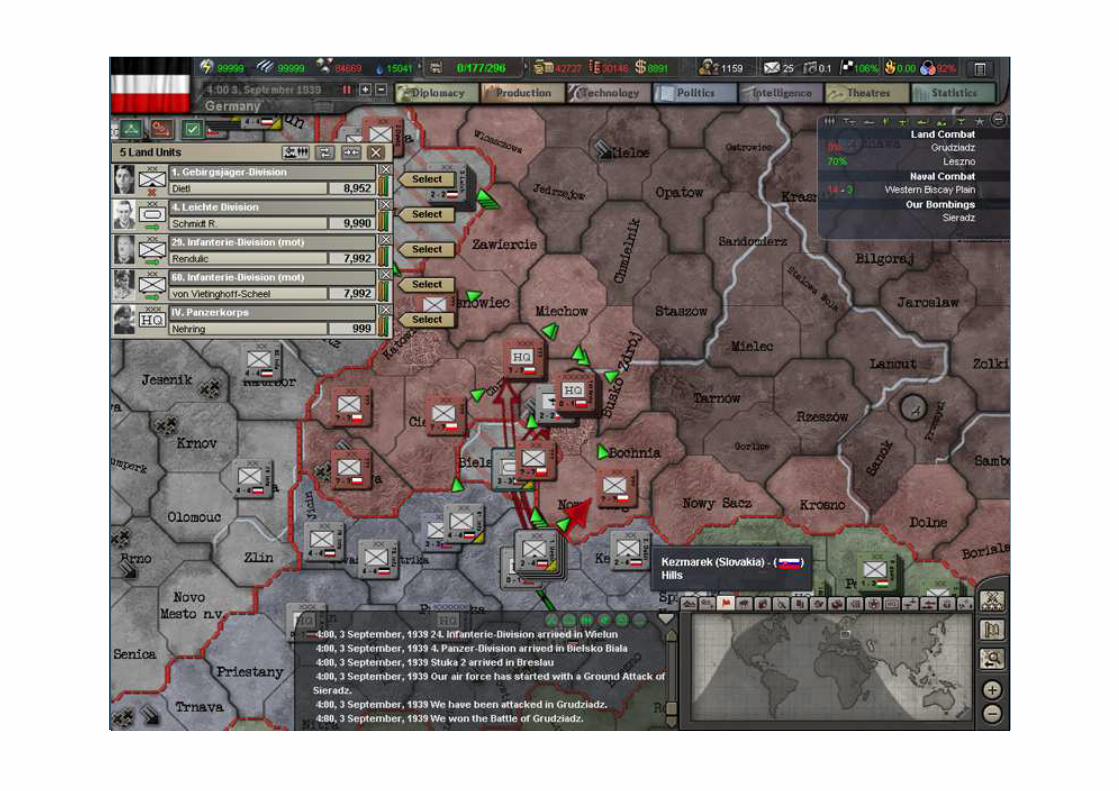
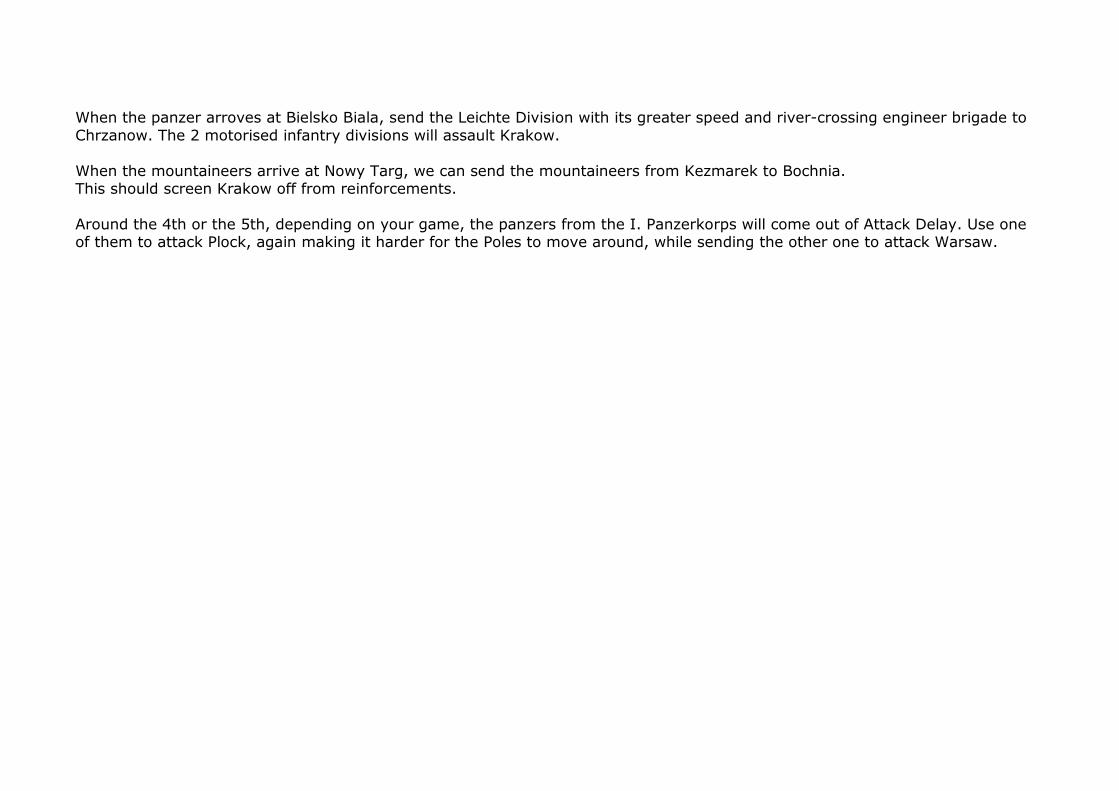
When the panzer arroves at Bielsko Biala, send the Leichte Division with its greater speed and river-crossing engineer brigade to Chrzanow. The 2 motorised infantry divisions will assault Krakow. When the mountaineers arrive at Nowy Targ, we can send the mountaineers from Kezmarek to Bochnia. This should screen Krakow off from reinforcements. Around the 4th or the 5th, depending on your game, the panzers from the I. Panzerkorps will come out of Attack Delay. Use one of them to attack Plock, again making it harder for the Poles to move around, while sending the other one to attack Warsaw.
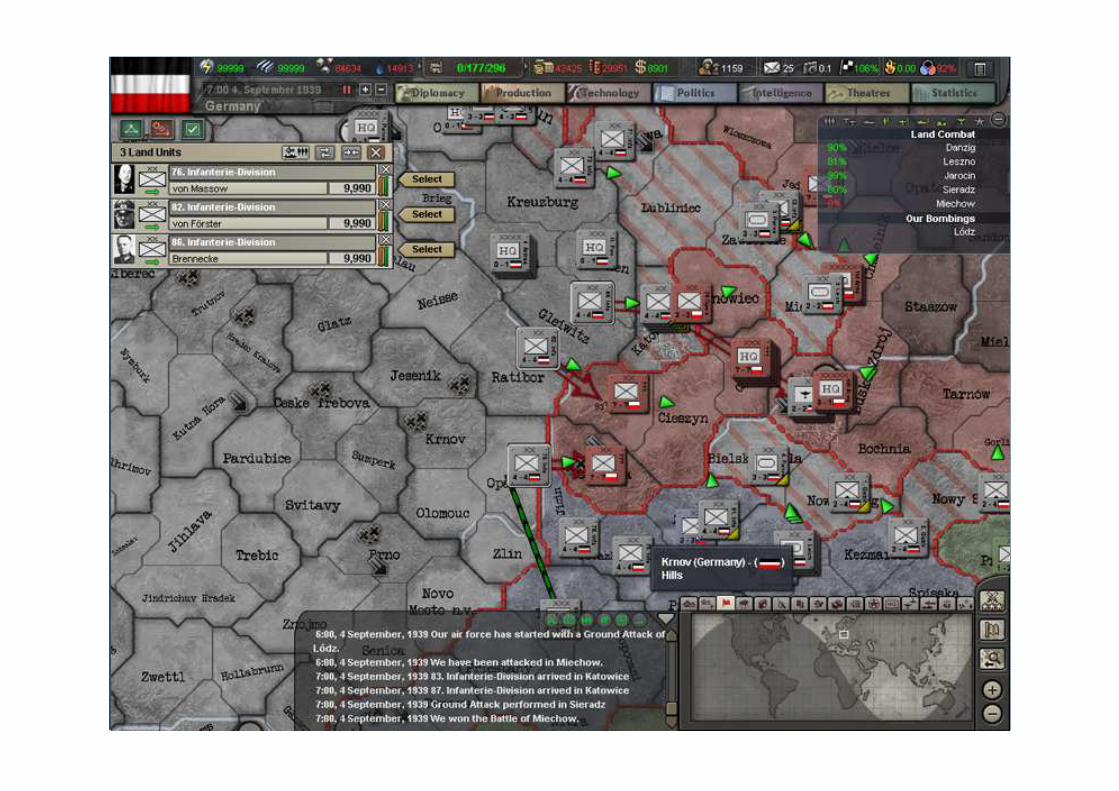
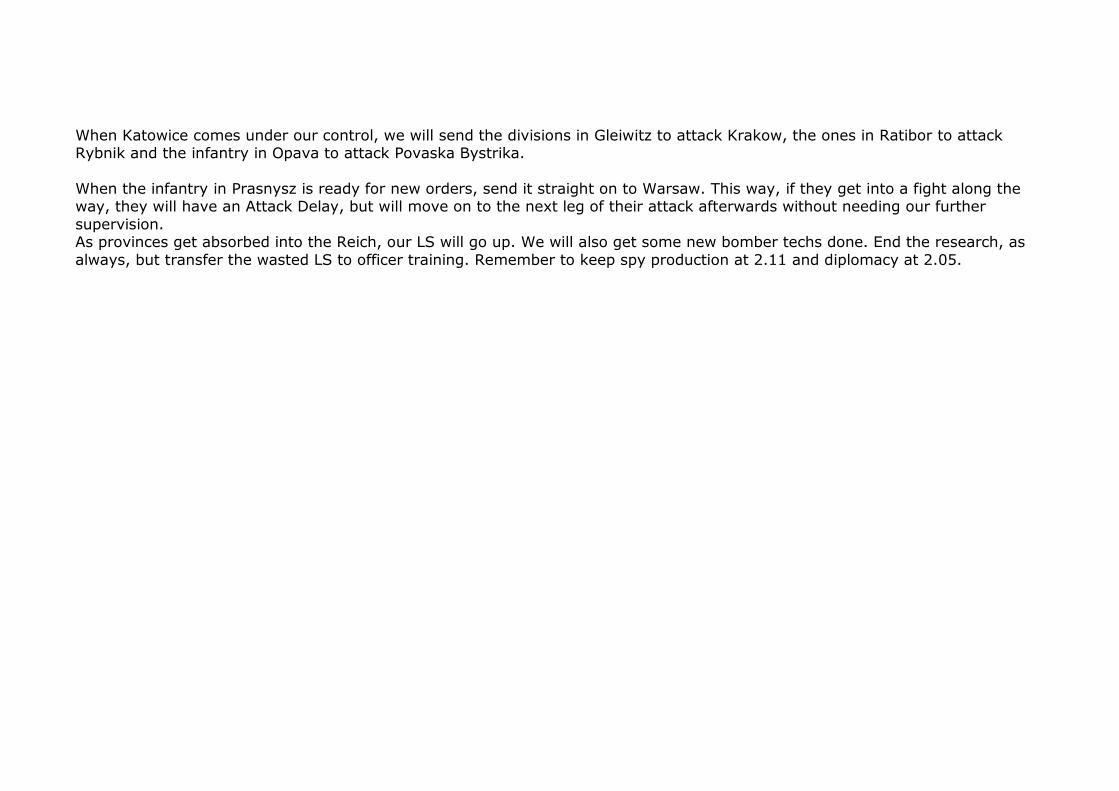
When Katowice comes under our control, we will send the divisions in Gleiwitz to attack Krakow, the ones in Ratibor to attack Rybnik and the infantry in Opava to attack Povaska Bystrika. When the infantry in Prasnysz is ready for new orders, send it straight on to Warsaw. This way, if they get into a fight along the way, they will have an Attack Delay, but will move on to the next leg of their attack afterwards without needing our further supervision. As provinces get absorbed into the Reich, our LS will go up. We will also get some new bomber techs done. End the research, as always, but transfer the wasted LS to officer training. Remember to keep spy production at 2.11 and diplomacy at 2.05.
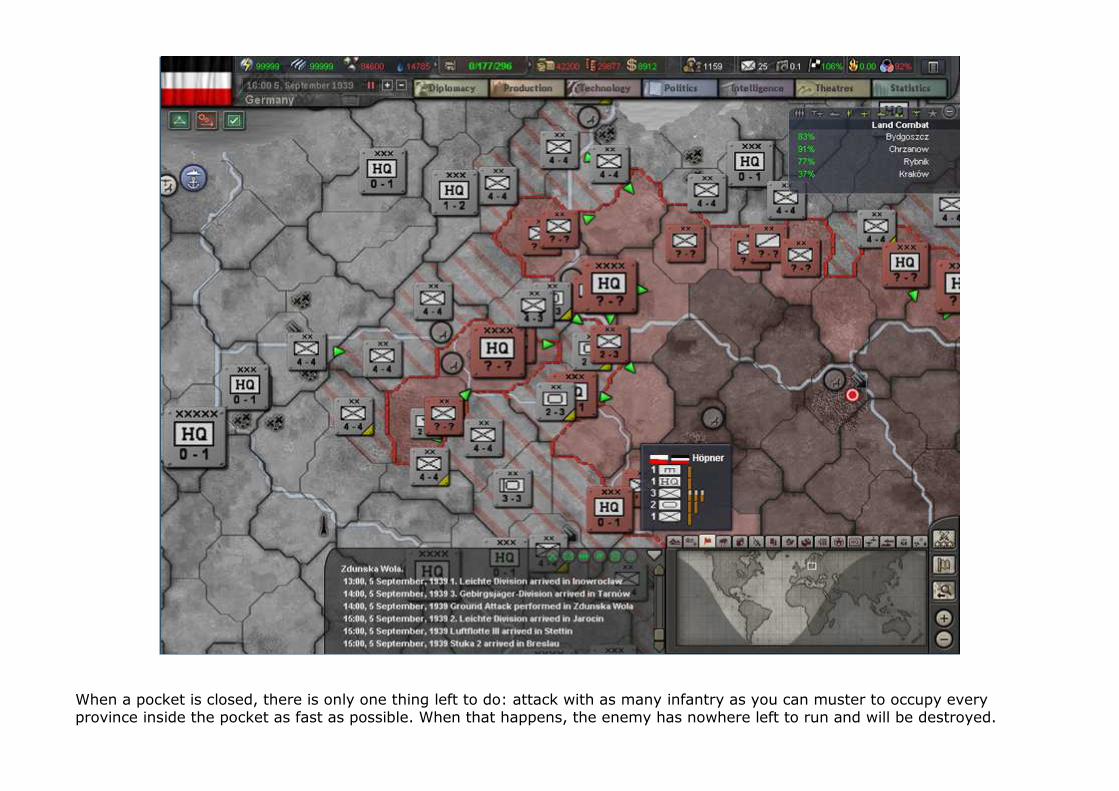
When a pocket is closed, there is only one thing left to do: attack with as many infantry as you can muster to occupy every province inside the pocket as fast as possible. When that happens, the enemy has nowhere left to run and will be destroyed.
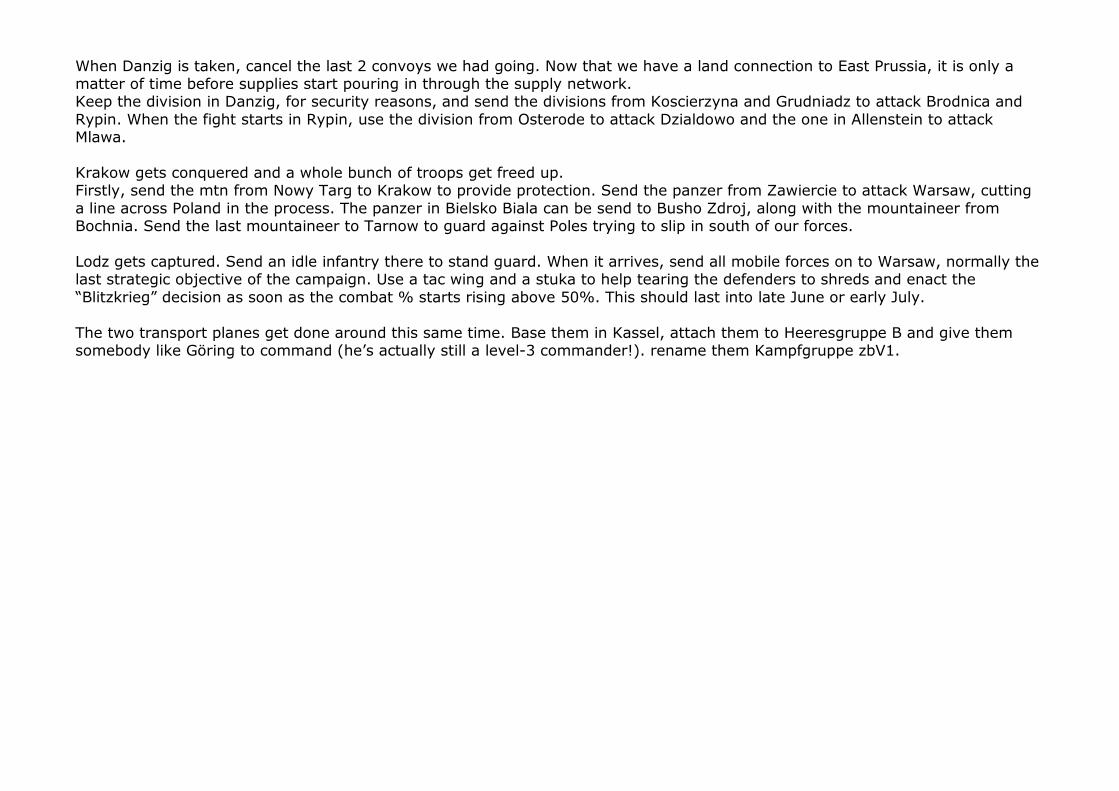
When Danzig is taken, cancel the last 2 convoys we had going. Now that we have a land connection to East Prussia, it is only a matter of time before supplies start pouring in through the supply network. Keep the division in Danzig, for security reasons, and send the divisions from Koscierzyna and Grudniadz to attack Brodnica and Rypin. When the fight starts in Rypin, use the division from Osterode to attack Dzialdowo and the one in Allenstein to attack Mlawa. Krakow gets conquered and a whole bunch of troops get freed up. Firstly, send the mtn from Nowy Targ to Krakow to provide protection. Send the panzer from Zawiercie to attack Warsaw, cutting a line across Poland in the process. The panzer in Bielsko Biala can be send to Busho Zdroj, along with the mountaineer from Bochnia. Send the last mountaineer to Tarnow to guard against Poles trying to slip in south of our forces. Lodz gets captured. Send an idle infantry there to stand guard. When it arrives, send all mobile forces on to Warsaw, normally the last strategic objective of the campaign. Use a tac wing and a stuka to help tearing the defenders to shreds and enact the “Blitzkrieg” decision as soon as the combat % starts rising above 50%. This should last into late June or early July. The two transport planes get done around this same time. Base them in Kassel, attach them to Heeresgruppe B and give them somebody like Göring to command (he’s actually still a level-3 commander!). rename them Kampfgruppe zbV1.
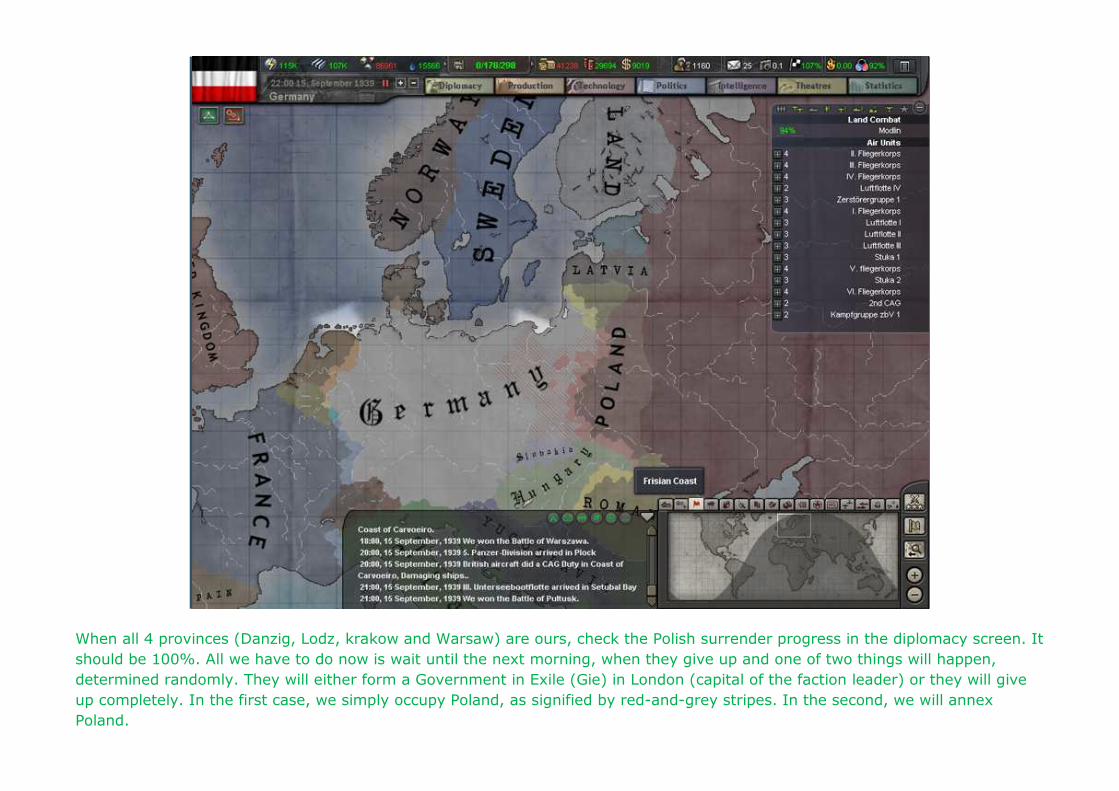
When all 4 provinces (Danzig, Lodz, krakow and Warsaw) are ours, check the Polish surrender progress in the diplomacy screen. It should be 100%. All we have to do now is wait until the next morning, when they give up and one of two things will happen, determined randomly. They will either form a Government in Exile (Gie) in London (capital of the faction leader) or they will give up completely. In the first case, we simply occupy Poland, as signified by red-and-grey stripes. In the second, we will annex Poland.
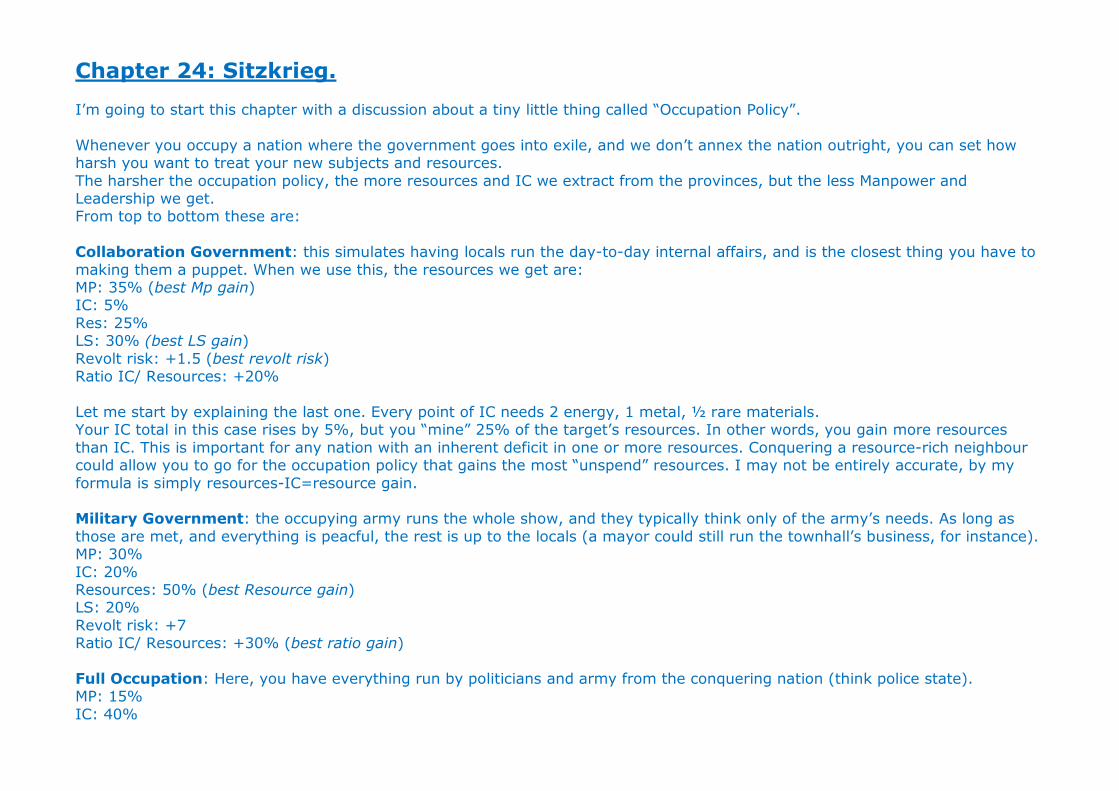
Chapter 24: Sitzkrieg. I’m going to start this chapter with a discussion about a tiny little thing called “Occupation Policy”. Whenever you occupy a nation where the government goes into exile, and we don’t annex the nation outright, you can set how harsh you want to treat your new subjects and resources. The harsher the occupation policy, the more resources and IC we extract from the provinces, but the less Manpower and Leadership we get. From top to bottom these are: Collaboration Government: this simulates having locals run the day-to-day internal affairs, and is the closest thing you have to making them a puppet. When we use this, the resources we get are: MP: 35% (best Mp gain) IC: 5% Res: 25% LS: 30% (best LS gain) Revolt risk: +1.5 (best revolt risk) Ratio IC/ Resources: +20% Let me start by explaining the last one. Every point of IC needs 2 energy, 1 metal, ½ rare materials. Your IC total in this case rises by 5%, but you “mine” 25% of the target’s resources. In other words, you gain more resources than IC. This is important for any nation with an inherent deficit in one or more resources. Conquering a resource-rich neighbour could allow you to go for the occupation policy that gains the most “unspend” resources. I may not be entirely accurate, by my formula is simply resources-IC=resource gain. Military Government: the occupying army runs the whole show, and they typically think only of the army’s needs. As long as those are met, and everything is peacful, the rest is up to the locals (a mayor could still run the townhall’s business, for instance). MP: 30% IC: 20% Resources: 50% (best Resource gain) LS: 20% Revolt risk: +7 Ratio IC/ Resources: +30% (best ratio gain) Full Occupation: Here, you have everything run by politicians and army from the conquering nation (think police state). MP: 15% IC: 40%
Resources: 65% LS: 10% Revolt risk: +11 Ratio IC/resources: +25% Note that this entry has neither good nor bad results and will mostly leave you with a little of everything. Total Exploitation: People don’t have rights. The conquered nation is just a tool to enrich the fatherland. Period. It borders on things I can’t talk about due to strict forum rules. MP: 5% (worst Mp gain) IC: 60% (best IC gain) Resources: 75% (best resource gain, but see ratio) LS: 1% (worst LS gain) Revolt risk: +19 (worst revolt risk) Ratio IC/ resources: +15% (worst ratio, not counting annexation) Annexed non-core territory: annexing a province that doesn’t historically belong to you (you don’t have a “core” on it), regardless of what anyone else says or thinks. MP:25% (second best) IC: 50% (second best) Resources: 50% (second best) LS: 20% (second best) Revolt risk: 6% (additionally, it can’t be decreased by the suppression ability of your troops, and the game files seem to indicate the risk rises dramatically over time; expect an armed revolt every couple of weeks or months; without a doubt the worst result in terms of revolt risk). Ratio IC/ Resources: 0% (good averages all round but worst ratio; absolutely zero gain in the ratio to acquire better resource gains) Conclusion: if you’re nice to the locals, they like you better and more people would be willing to join the army of the new overlord, but they expect to maintain a certain standard of living and you can’t use as many factories for producing ammo and other things that go “boom”. However, the stricter you are, the more they hide what they have from you and conspire to revolt (ungrateful lot…). What you do in your own games largely depends on both your own nation’s economy and the target’s economy. Short on MP but get hold of an MP-rich nation? Go for the occupation policy that offers the most MP. Need more IC to build up your forces but you have a large surpluss of resources? Bingo! So, what do we need most? For any German campaign, Manpower is the really limiting factor. If Germany looses too much MP, especially against France, they will run out before reaching Moscow. Game over. Considering that we have an army about half the size we really need against the SU, what we need are two things: Manpower to
fuel the expansion of our army, and Leadership to train the officers needed in that expanded army. Even our rares stockpile is high enough to last us a couple of years before things turn critical (and this does not even take into account that every capital we conquer will add their stockpile to ours). By this reckoning, looking over the occupation policies, staying at the default Occupation Policy of Collaboration Government seems the wisest course of action. When you start your own campaign, your reasoning may be very different and require a different occupation strategy and you may want to write the best and worst gains down for future reference, but for now we will keep things the way they are. Occupation Policies, by the way, are in the Politics screen, under the ministers and next to the laws. They work the same way that laws do and can be set differently for every occupied nation. Enough theory. Back to the game! First thing we are going to do is detach 1 infantry division (I would suggest one with a level-3 or 2 major general) and attach it directly to the OKH. Send it to Warsaw. Right now, the Soviets are least likely to be in an aggressive mood, but we might need it in case of an uprising in one of our new provinces. If this happens, move or Strategically Redeploy it (depending on how far away it happens) to engage the revolting province. When the fight is over, send the division back to Warsaw.
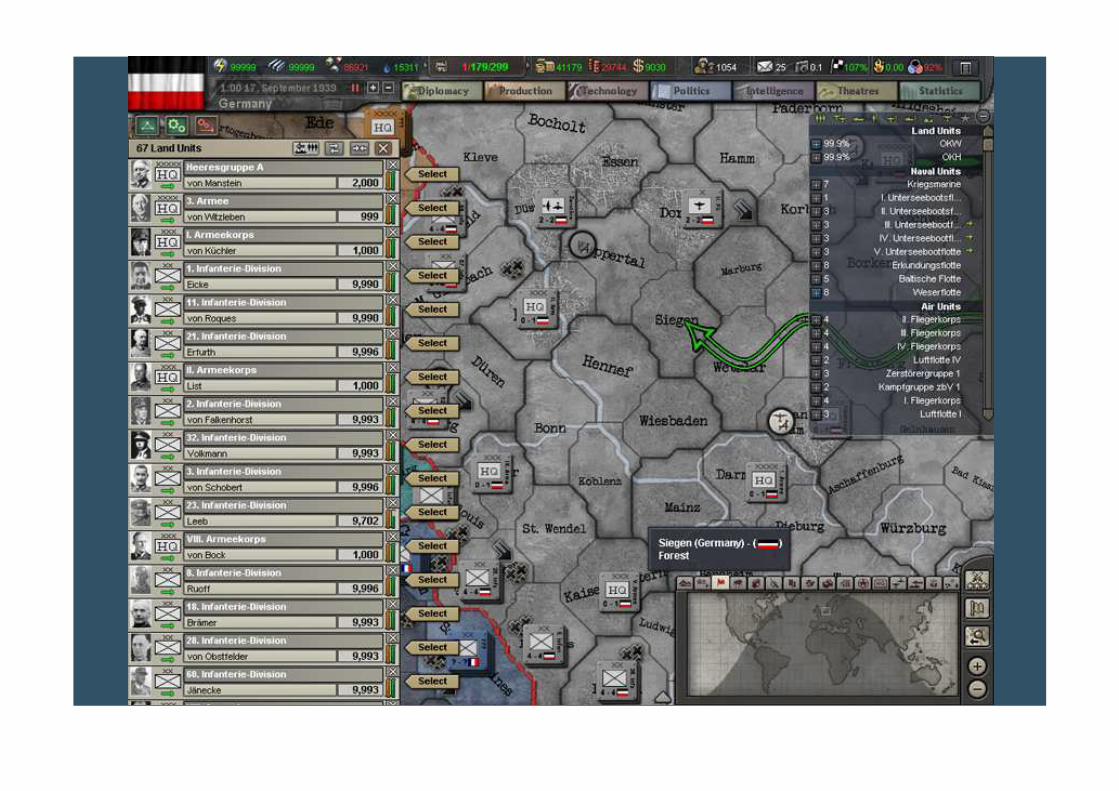
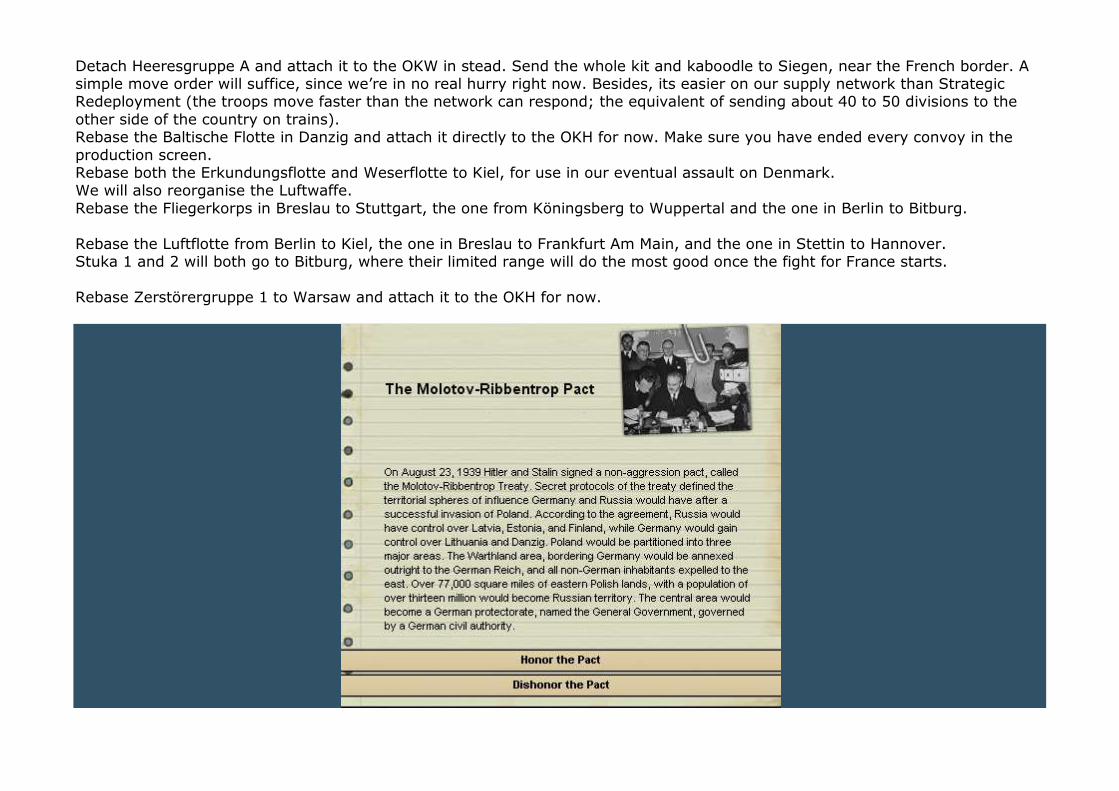
Detach Heeresgruppe A and attach it to the OKW in stead. Send the whole kit and kaboodle to Siegen, near the French border. A simple move order will suffice, since we’re in no real hurry right now. Besides, its easier on our supply network than Strategic Redeployment (the troops move faster than the network can respond; the equivalent of sending about 40 to 50 divisions to the other side of the country on trains). Rebase the Baltische Flotte in Danzig and attach it directly to the OKH for now. Make sure you have ended every convoy in the production screen. Rebase both the Erkundungsflotte and Weserflotte to Kiel, for use in our eventual assault on Denmark. We will also reorganise the Luftwaffe. Rebase the Fliegerkorps in Breslau to Stuttgart, the one from Köningsberg to Wuppertal and the one in Berlin to Bitburg. Rebase the Luftflotte from Berlin to Kiel, the one in Breslau to Frankfurt Am Main, and the one in Stettin to Hannover. Stuka 1 and 2 will both go to Bitburg, where their limited range will do the most good once the fight for France starts. Rebase Zerstörergruppe 1 to Warsaw and attach it to the OKH for now.
Wait a few days until the Soviets come asking for their share in the spoils. You could refuse, but that would likely result in a very grumpy Stalin. Not something we want to contemplate at this point. Much safer to “honour the pact”. Wait until midnight the following day, when the game has recalculated for losing half of Poland. Go to the research screen. We are building 36 infantry divisions right now, along with 6 mobile artillery brigades. While Manpower is deducted from the pool when you start training (building) the division, officer ratio is deducted at the end, when the unit is deployed on the map. We don’t want to find ourselves with an officer ratio below 100% come april, do we? To stay positive, here are the adjustments we need to make to our sliders: Research: 20.01 Espionage: 0.31 (going from the assumption that we still have a large enough reserve of spies available; if not keep espionage at 2.11 and lower research accordingly) Diplomacy: 2.05 Officer training: 13.24 (we will need a daily gain of at least 78 officers to break even) Let the game run until you get an opening in your research queu, which should be around the 4th of October. Keep an eye out for any strategic bombing runs by the Royal Air Force and engage them if they deviate from Leipzig or Dortmund. Watch your subs and pull them out of every fight at the earliest convenience, rebasing them in Wilhelmshaven for repairs. After a few weeks you could reorganise them so you have 3-unit submarine fleets again and send them back out. Or not. Your choice. Every convoy sunk without retaliation will lower the nation’s National Unity, so it would not be completely pointless. On the 4th, you can start 1940 research: Infantry: small arms, infantry support weapons, light artillery, infantry anti-tank weapons. (assault weapons and bridging equipment would make our engineers deadlier, but we have to cut corners somewhere). Armour: all 4 Larm techs, all 4 Arm techs, both artillery techs. Escorts: all 4 CL techs. Capitals: all 4 CV techs. Industry: agriculture, industrial efficiency, mechanical computing machine, decryption machine, encryption machine, supply production, nuclear research. Theory: suppy transportation, supply organisation. Land: mobile warfare, operational level command structure, elastic defense, blitzkrieg, infantry warfare, special forces, assault concentration. Air: fighter pilot training, fighter ground crew training, interception tactics, fighter ground control, CAS pilot training, CAS ground crew training, ground attack tactics, Tac pilot training, tac ground crew training, interdiction tactics, tactical air command, all naval air techs. Total: 75 projects. We may not be able to finish all of them before the end of 1940, but you never know.
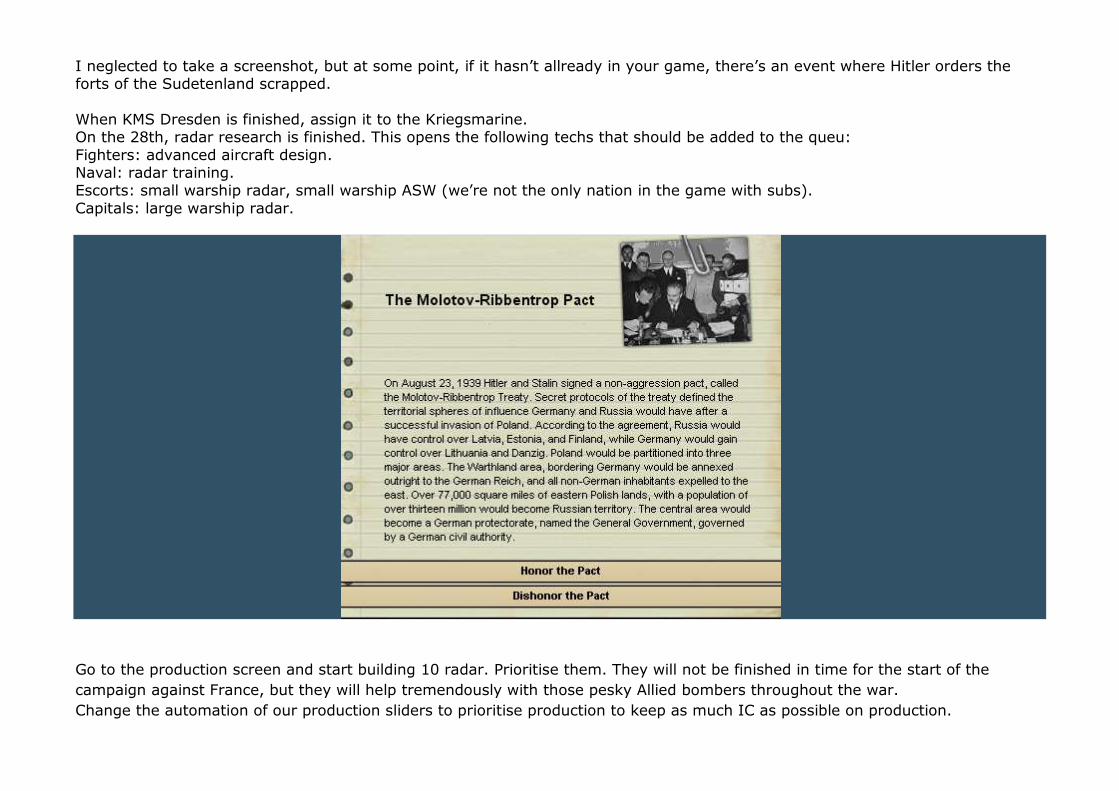
I neglected to take a screenshot, but at some point, if it hasn’t allready in your game, there’s an event where Hitler orders the forts of the Sudetenland scrapped. When KMS Dresden is finished, assign it to the Kriegsmarine. On the 28th, radar research is finished. This opens the following techs that should be added to the queu: Fighters: advanced aircraft design. Naval: radar training. Escorts: small warship radar, small warship ASW (we’re not the only nation in the game with subs). Capitals: large warship radar.
Go to the production screen and start building 10 radar. Prioritise them. They will not be finished in time for the start of the campaign against France, but they will help tremendously with those pesky Allied bombers throughout the war. Change the automation of our production sliders to prioritise production to keep as much IC as possible on production.
The beginning of november will see the birth of a new MR wing. Deploy it in Berlin and rename it “Zerstörergruppe 2”, attaching it to OKH. (I’m using both of them as emergency back-ups, just in case). I assigned Klepke to command the new wing. Two days later, KMS Tirpitz is commisioned. Add it to the Kriegsmarine’s roster. A couple of days later, we get our (temporarily) last MR wing. Add it to Zerstörergruppe 2. Eventually, an event will appear called “the Fate of France”, giving us a choice between the historical path and an alternative of our own choosing. Since we are going historical, select “sounds like a good idea”. When we attack France later on, the French surrender will start Vichy France.
On the 13th of December, we get a whole bunch of infantry divisions. Begin by making sure every Armeekorps in Heeresgruppe A has 4 divisions, including the I. Gebirgsjägerkorps. You should know how to do this by now without needing me to hold your hand. Keep the game paused. Time to make a few changes in the Heer. Detach the Armeekorps from the 2. Armee that is watching Belgium, Luxemburg and southern Netherlands and give it a new army: 5. Armee. Add this new army to Heeresgruppe A.They will eventually move into France in the wake of the 1. Panzerarmee. Use the rest of the new infantry divisions to give the 5. Armee a total of 5 Armeekorps, each with 4 infantry divisions to command. Select level-3 guys to command. Note that we are actually coming up short 1 division to have a complete army. Find Von Küchler (if you followed my OOB, he should be in command of the I. Armeekorps, part of 3. Armee. Promote him to
general and give him command of the 3. Armee. Don’t forget to replace him with another lieutenant general!!) Von Witzleben will command 5. Armee instead. When the last tactical bomber gets finished, add it to Luftflotte IV. We are still under automated sliders, so the IC should be used for something else right away without our interference. Around the 18th, we get the Self-Propelled Artillery brigades. Attach them to each of our 6 medium armour divisions (the Panzer divisions).
Sometime later, we get the 3 airborne divisions. Deploy them in Kassel, where we have our transport planes, and attach them directly to the OKW so you can find them more easily later. Go to the I. Gebirgsjägerkorps and replace Student with Ringel, a new excellent commando leader. Student will command 1. Fallschirmjäger-Division. Assign other commando leaders to the other 2 para divisions. At the start of February, it’s time to start setting things up. Move 2. Armee to Neumünster, the Armeekorps with 4 divisions to Kiel (including the actual divisions) and the one with 5 to Heide. Send 2 of its divisions to Flensburg and 3 to Leck (the 2 provinces bordering Denmark).
On the 13th, we develop a rocket engine. However, we are still very far away from jet fighters and ICBMs. What it does, is open 2 new research projects: Industry: theoretical jet engine Secret: strategic rocket development. As I write this, I can’t help but wonder: has anyone of my more experienced readers ever seen the AI develop jetplanes on its own?
Not much left to do now but wait until the rest of our infantry gets finished. Give the 5. Armee its last division. Find the infantry we left in Warsaw and give it an Armeekorps, an army (6. Armee) and an army group (Heeresgruppe C). Send the division and armeekorps to the southernmost province bordering Soviet Union. Line the rest of the new divisions along the border from south to north, 1 division per province. Organise the lot of them along the same lines we are used to: 4 divs per corps, all corps attached to the 6. Armee.
Attach the Baltische Flotte and our 2 MR wings to Heeresgruppe C as well. Assign the following generals: Find Dollmann in the 1. Armee. Promote him to general and give him command of 1. Armee. Don’t forget to replace him with
someone suitable if he was commanding an armeekorps(a defender or a fortress buster)!! Promote Von Leeb to Field Marshall and give him command of Heeresgruppe C.
A new major general can be found in the list, called Höhne. He’s a skill-3 logistics wizard/defensive expert. Excellent! Promote him to general and give him command of 6. Armee. We now have the troops to take down France, and at least a token resistance against any possible Soviet aggression. I would really like to continue building our infantry, but other things take precedence: like security inside Poland and our still-behind-schedule upgrades. Send the whole 3. Armee to Münster.
Send the 4. Armee and the 1. Panzerarmee to Düren (right behind Bitburg). Send the 5. Armee to Trier. Wait about 2 weeks, until everybody is in place and make the final adjustments: 3. Armee. Send one Armeekorps to cover Emden, Papenburg, Meppen and Nordhorn with 1 division each. Another Armeekorps will cover Bocholt and Kleve with 2 divisions each.
Send an entire armeekorps to Krefeld and the last one to München Gladbach (on the Dutch border, not to be confused with the capital of Bavaria). 4. Armee. Send 3 full armeekorps to Aachen and 2 to Bitburg. Make sure the I. Gebirgsjägerkorps is send to Bitburg. 5. Armee. Send 3 full armeekorps to Bitburg and 2 to Saarlouis.
Send the complete 1. Panzerarmee to Bitburg. They should all be in place by the start of May at the latest. Start building 5 garrison divisions, each consisting of 2 gar/1 MP. These will be our stationary defense of important locations in Poland. On the 31st of March, KMS Graf Zeppelin is ready. Attach it to the Kriegsmarine. Find the 2-wing cag (which should be in Rostock) and right-click Wilhelmshaven. In the mission window, select “Rebase to Carrier”
as mission. When they arrive, they will automatically start defending the fleet from aerial attacks. In its stead, start building 3 cavalry divisions, each consisting 2 cavalry brigades. These guys will be our rapid intervention squads in case of an uprising in Poland. When that’s done, save the game. The Sitzkrieg is over!
Chapter 25: Denmark and the plans for taking down France. This will be a busy year for the Wehrmacht. We are going to start with an invasion of Denmark, during which I will give you a primer on how to conduct amphibious invasions, and end the chapter with the planning for the fall of France. Before you do anything else, make sure to have both Weserflotte AND Erkungdungsflotte based in Kiel. If not, do so now. If you’re starting from a loaded save, like me, let the game run for a day to get the sliders working correctly. Take quick look at Denmark using the VP mapmode. Denmark has 3 VPs: Arhus, Odense and Copenhagen. Arhus poses no problem since it has a land connection with Germany. The other 2, however, are across a straight, which is controlled by the nation that controls Copenhagen. We could try to take them fully by land, but Denmark could easily close the straight for us and slow us down, increasing the chances for an Allied intervention. A much better solution is using an amphibious invasion of Odense and Copenhagen. Due to how the engine works, we have to send out our fleets before DoWing Denmark or they will be unable to leave Kiel.
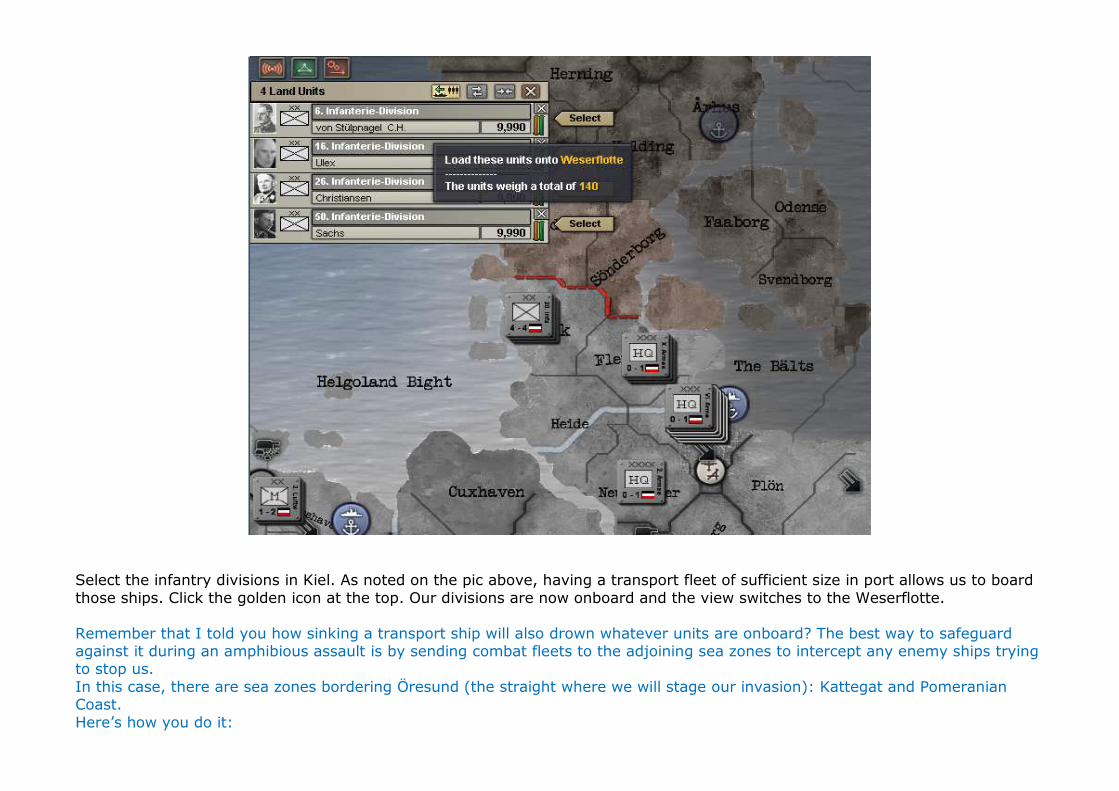
Select the infantry divisions in Kiel. As noted on the pic above, having a transport fleet of sufficient size in port allows us to board those ships. Click the golden icon at the top. Our divisions are now onboard and the view switches to the Weserflotte. Remember that I told you how sinking a transport ship will also drown whatever units are onboard? The best way to safeguard against it during an amphibious assault is by sending combat fleets to the adjoining sea zones to intercept any enemy ships trying to stop us. In this case, there are sea zones bordering Öresund (the straight where we will stage our invasion): Kattegat and Pomeranian Coast. Here’s how you do it:
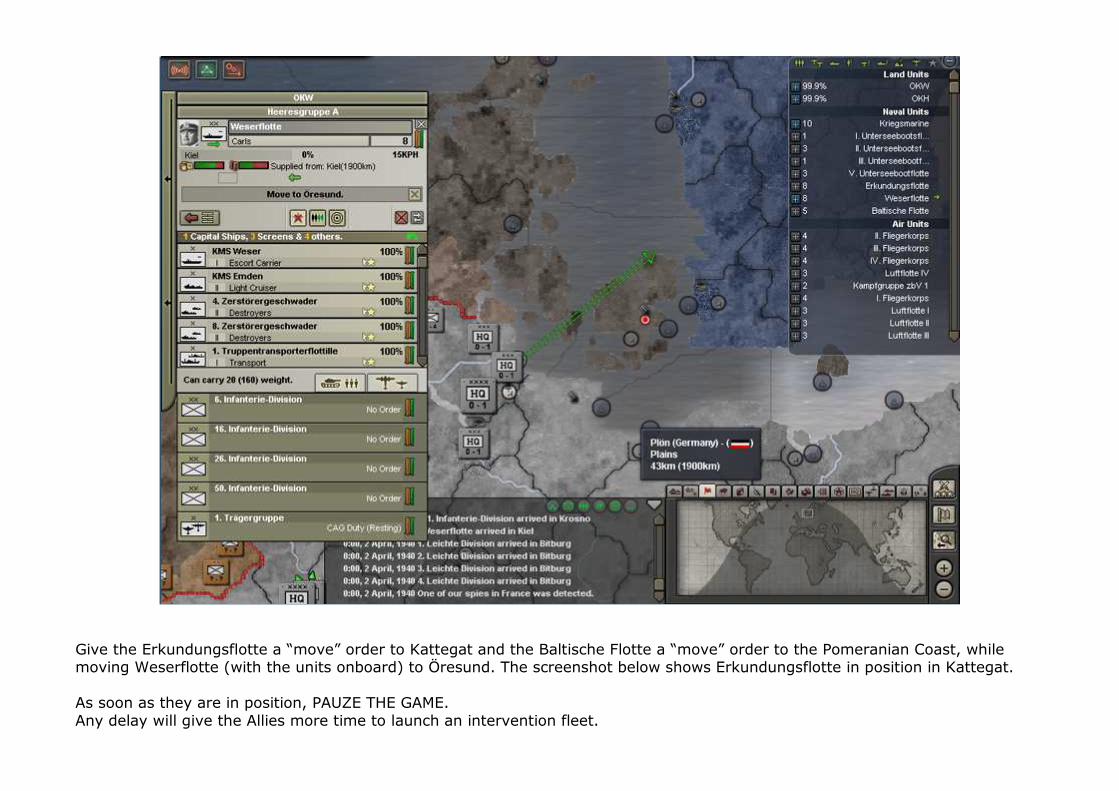
Give the Erkundungsflotte a “move” order to Kattegat and the Baltische Flotte a “move” order to the Pomeranian Coast, while moving Weserflotte (with the units onboard) to Öresund. The screenshot below shows Erkundungsflotte in position in Kattegat. As soon as they are in position, PAUZE THE GAME. Any delay will give the Allies more time to launch an intervention fleet.
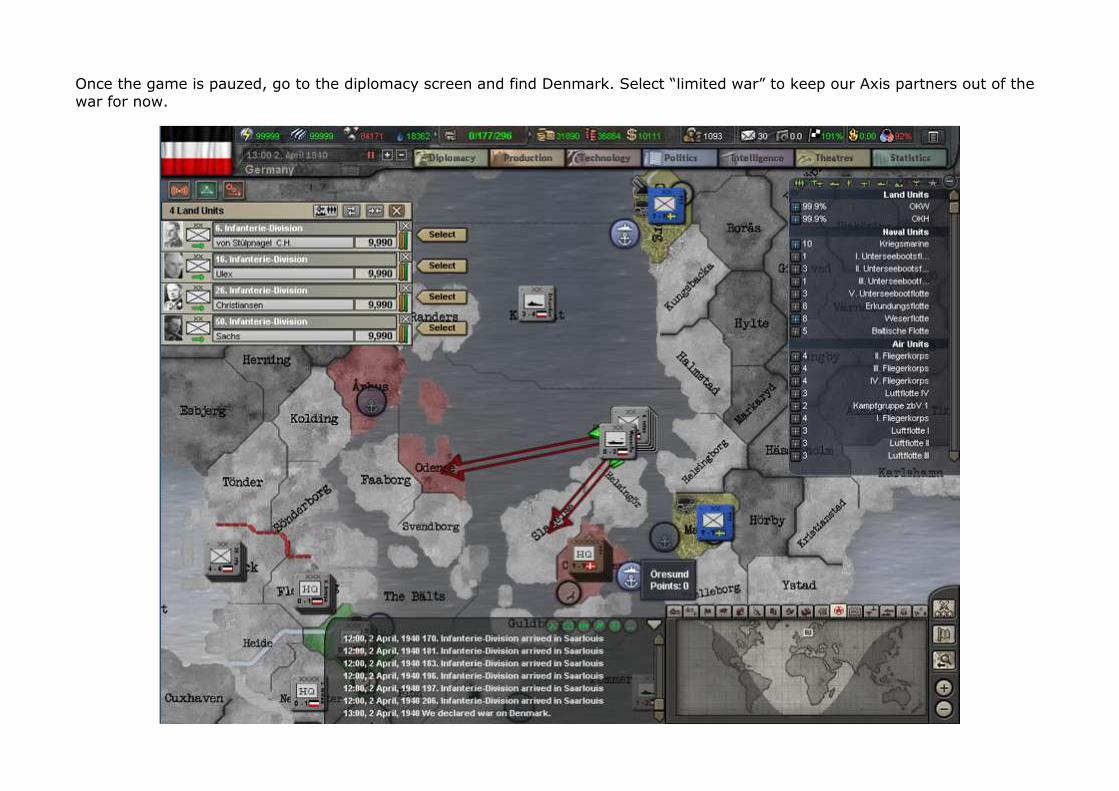
Once the game is pauzed, go to the diplomacy screen and find Denmark. Select “limited war” to keep our Axis partners out of the war for now.
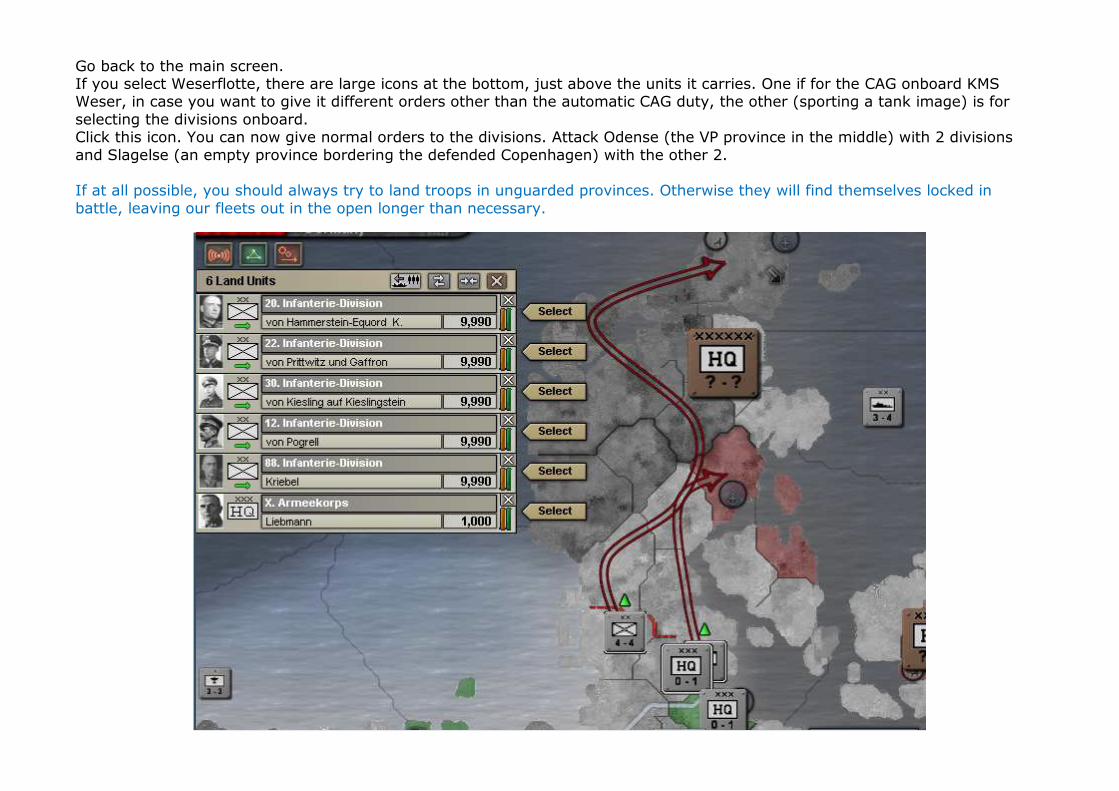
Go back to the main screen. If you select Weserflotte, there are large icons at the bottom, just above the units it carries. One if for the CAG onboard KMS Weser, in case you want to give it different orders other than the automatic CAG duty, the other (sporting a tank image) is for selecting the divisions onboard. Click this icon. You can now give normal orders to the divisions. Attack Odense (the VP province in the middle) with 2 divisions and Slagelse (an empty province bordering the defended Copenhagen) with the other 2. If at all possible, you should always try to land troops in unguarded provinces. Otherwise they will find themselves locked in battle, leaving our fleets out in the open longer than necessary.
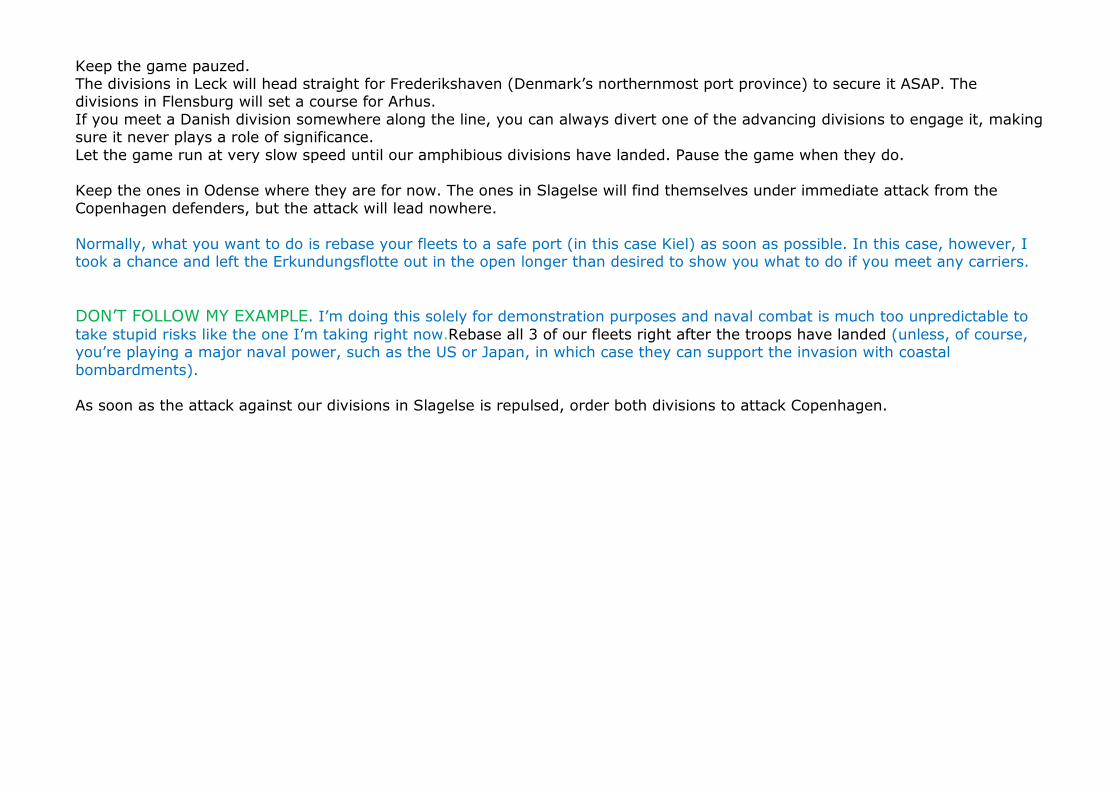
Keep the game pauzed. The divisions in Leck will head straight for Frederikshaven (Denmark’s northernmost port province) to secure it ASAP. The divisions in Flensburg will set a course for Arhus. If you meet a Danish division somewhere along the line, you can always divert one of the advancing divisions to engage it, making sure it never plays a role of significance. Let the game run at very slow speed until our amphibious divisions have landed. Pause the game when they do. Keep the ones in Odense where they are for now. The ones in Slagelse will find themselves under immediate attack from the Copenhagen defenders, but the attack will lead nowhere. Normally, what you want to do is rebase your fleets to a safe port (in this case Kiel) as soon as possible. In this case, however, I took a chance and left the Erkundungsflotte out in the open longer than desired to show you what to do if you meet any carriers. DON’T FOLLOW MY EXAMPLE. I’m doing this solely for demonstration purposes and naval combat is much too unpredictable to take stupid risks like the one I’m taking right now.Rebase all 3 of our fleets right after the troops have landed (unless, of course, you’re playing a major naval power, such as the US or Japan, in which case they can support the invasion with coastal bombardments). As soon as the attack against our divisions in Slagelse is repulsed, order both divisions to attack Copenhagen.
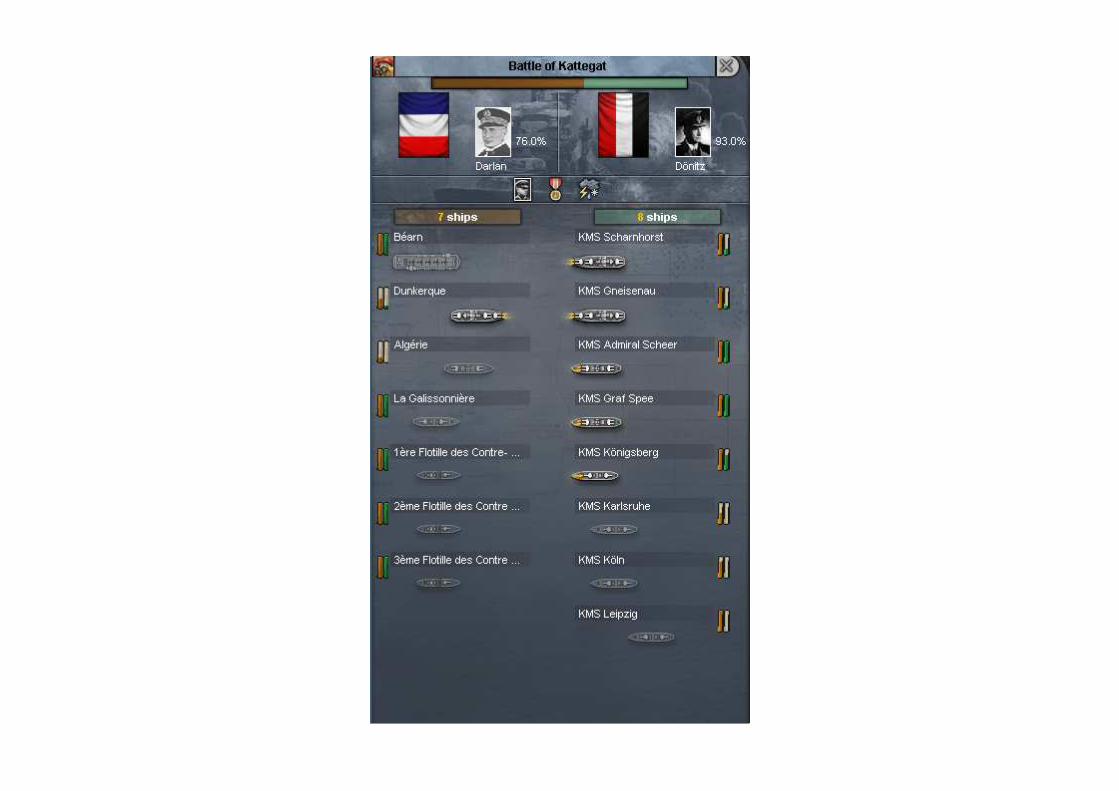
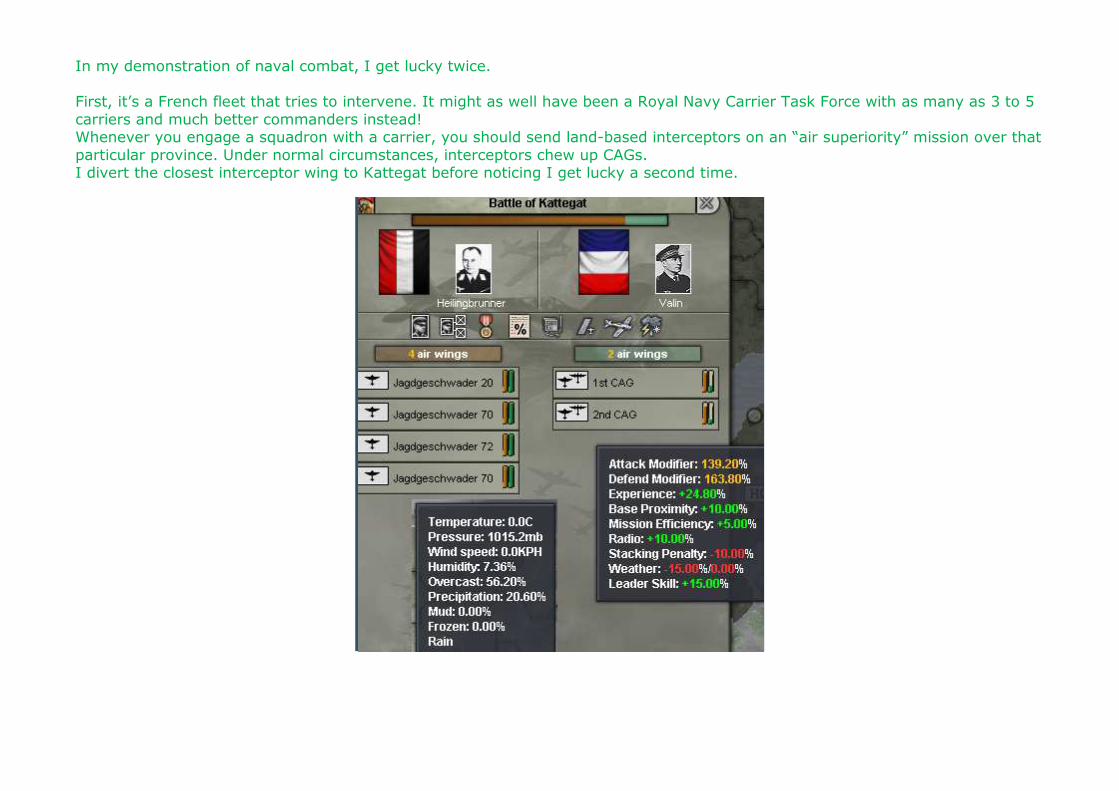
In my demonstration of naval combat, I get lucky twice. First, it’s a French fleet that tries to intervene. It might as well have been a Royal Navy Carrier Task Force with as many as 3 to 5 carriers and much better commanders instead! Whenever you engage a squadron with a carrier, you should send land-based interceptors on an “air superiority” mission over that particular province. Under normal circumstances, interceptors chew up CAGs. I divert the closest interceptor wing to Kattegat before noticing I get lucky a second time.
There is a stormfront north of my position and the downpour makes any aerial mission useless. The same applies to my planes, of course, but I’m only defending my fleet, not trying to sink enemy vessels. This is why it pays to keep a look out for the weather whenever trying to pull a naval stunt. 15% penalty in naval combat will kill you! The French squadron soon makes a hasty withdrawal, but is intercepted by the kriegsmarine on their way out. End result: scratch one French heavy cruiser and one French battlecruiser. Most of my ships will spend some time in drydock under repairs, which, under the circumstances, is a testament to the power of carriers. Of course, I beat a hasty retreat myself, before running into the Home Fleet’s capitals. If you ever run into a carrier task force without any carriers of your own or without having land-based wings nearby to protect your own ships, there is only one other option: RUN! Even battleships and battlecruisers are no match for the power and speed of carriers, who can stay out of your gunnery range easily enough. After this little sideshow of mine, which, I must stress again, you SHOULD NOT FOLLOW, we’re getting back to the game. Denmark has only one major strategic value. Controlling Copenhagen allows us to seal off the Baltic from enemy ships. Any French or British subs still there when we take control of Denmark’s capital will be closed in. The same thing goes for the Mediteranean, by the way. Control of both Suez and Gibraltar makes it impossible for any enemies to send additional ships there. If you ever play Italy, this should be a major objective before trying to engage the UK’s Mediteranean Fleet. Right, getting back to the game. As soon as you have 7 free IC, build a militia division. Keep building them (we need 38 more of these guys to cover all ports on the North Sea and Atlantic Ocean), but make sure to leave the AI with something between 2 and 5 IC to work with, since we still have our sliders on autocontrol, with production prioritised. Feed the extra leadership to training officers for now. Around the 7th, we successfully research Mechanised Offensive. Go to the Research Screen and start researching Combined Arms Warfare in the Land tab. This will give us an extra 10% CA bonus by the time we hit the Soviet Union. Let the game run until all 3 VPs are taken and Denmark surrenders. A nice, short campaign and an easy victory. When Denmark surrenders, keep the game pauzed for a bit. We need to secure our new holdings ASAP to guard ourselves against British invasions. Strategically Redeploy 2 infantry to Frederikshaven if they haven’t gotten there yet and keep 1 division centrally located on the large peninsula, like the province of Herning and keep 2 infantry divsions in Arhus. The guys in Herning will be our troubleshooters
in case of a revolt or anything like that, so we don’t have to take men off guarding the ports. Send the 2. Armee HQ to Flensburg and move 1 Armeekorps to Copenhagen and the other to Silkeborg. All we have to do now is wait until may comes rolling around. Technically, we could launch the assault on the Low Countries right now, but I like to wait to get as many upgrades done as possible. Remember, whenever you get wasted IC, build more militia, but leave the slider AI a couple of IC to play with. If you get a new research project finished, while you have enough free IC, wait 1 day to let the game reassign enough IC to cover the added upgrades. On the 25th, I stopped building any more new militia. This gives me two weeks to save plenty of IC to use for reinforcements in the fight to come. And while we wait, let me fill you in on how we’re going to do it. I typically use the standard RL battleplan, since it works best for me. Alternatives would be to hit Switzerland instead and come at them from the south, but if you look closely, those are forts on the border provinces. That’s right. Forts on top of the Alps, guarded, most likely, by at least 1 mountain brigade. It would slow us down and allow the french plenty of time to redeploy a bunch of troops to hit those western forts before we could reach them. I once saw an AAR where the player hit France through Italy, but that would involve calling them to war, and I like them nice and neutral for now. On top of that, Italian logistics is not exactly the best in the world. Attacking through the Maginot Line would be suicidal in terms of Manpower. That leaves us with an attack through the Low Countries. Two options present themselves. The first is the Von Schliefen-plan used by Germany in the Great War: attack Belgium, advance through the plains in the western half of the country (Flanders) and make a right hook towards Paris. The AI is pumped for that option. I know some experienced players swear by it (correctly using better logistics and plains terrain as main arguments), but I can never get it to work. I get bogged down and it turns into a serious bloodletting that we cannot afford with uncle Joe Stalin as our next-door neighbour. So that leaves me with only one viable option. The Von Manstein-plan.
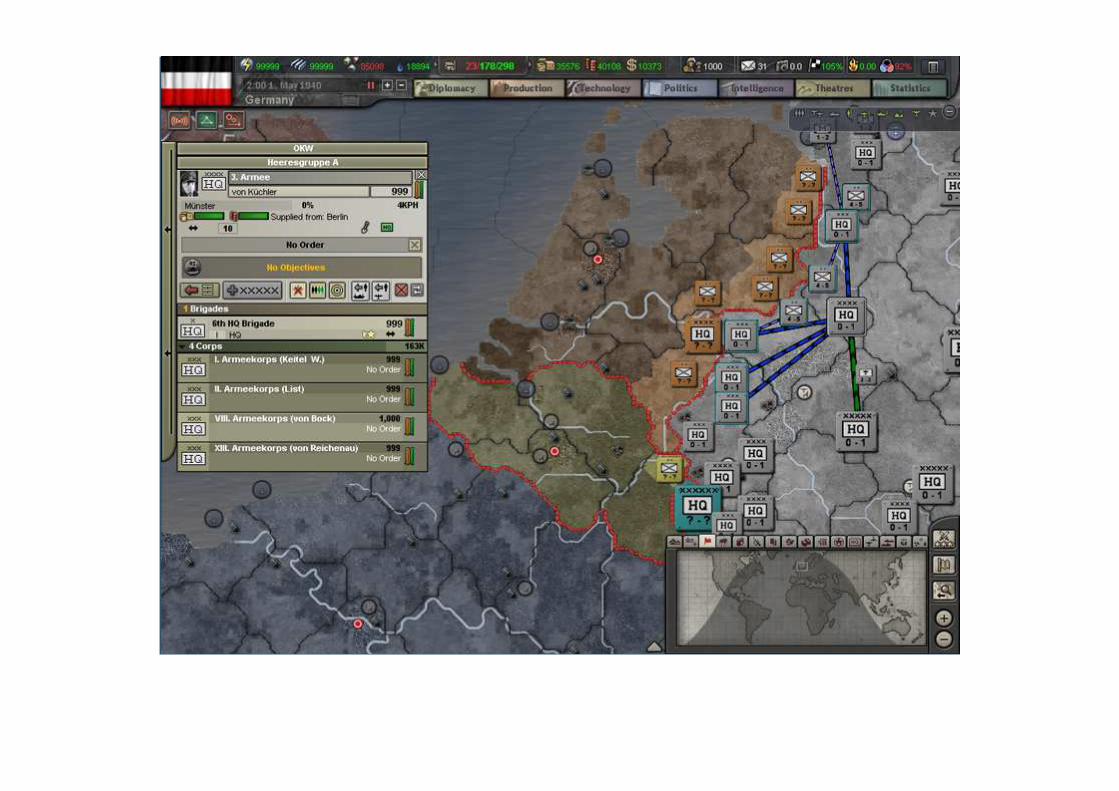
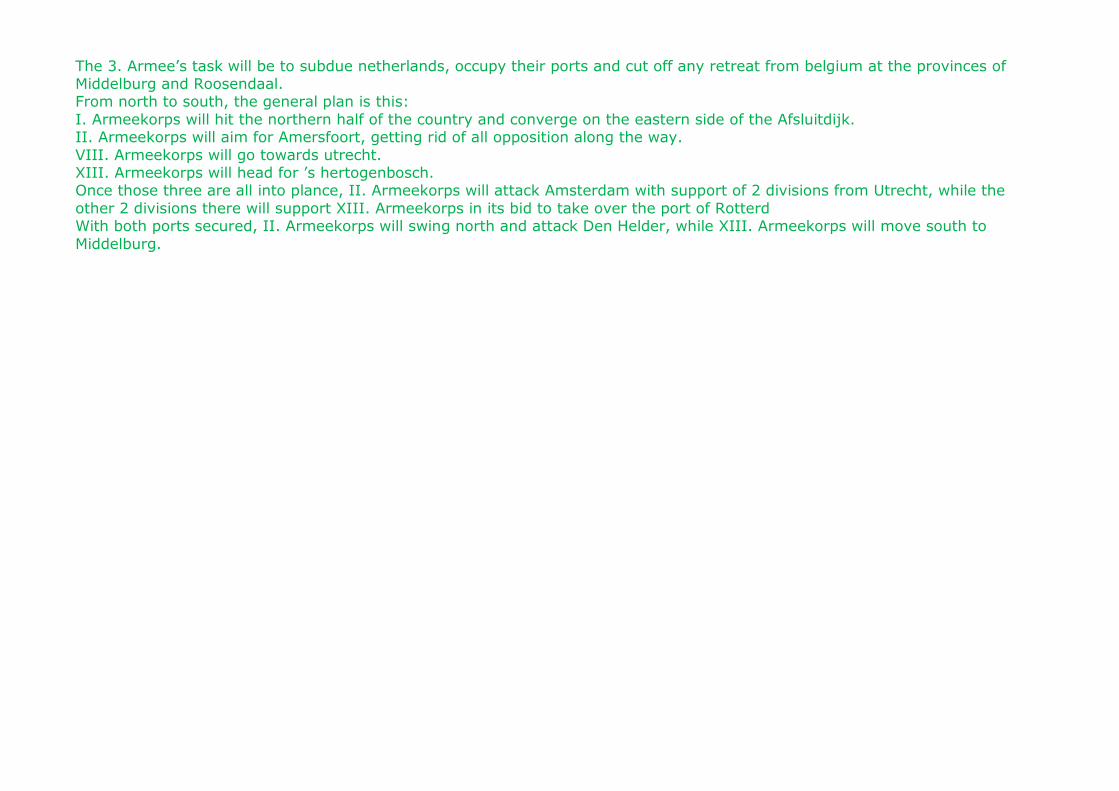
The 3. Armee’s task will be to subdue netherlands, occupy their ports and cut off any retreat from belgium at the provinces of Middelburg and Roosendaal. From north to south, the general plan is this: I. Armeekorps will hit the northern half of the country and converge on the eastern side of the Afsluitdijk. II. Armeekorps will aim for Amersfoort, getting rid of all opposition along the way. VIII. Armeekorps will go towards utrecht. XIII. Armeekorps will head for ’s hertogenbosch. Once those three are all into plance, II. Armeekorps will attack Amsterdam with support of 2 divisions from Utrecht, while the other 2 divisions there will support XIII. Armeekorps in its bid to take over the port of Rotterd With both ports secured, II. Armeekorps will swing north and attack Den Helder, while XIII. Armeekorps will move south to Middelburg.
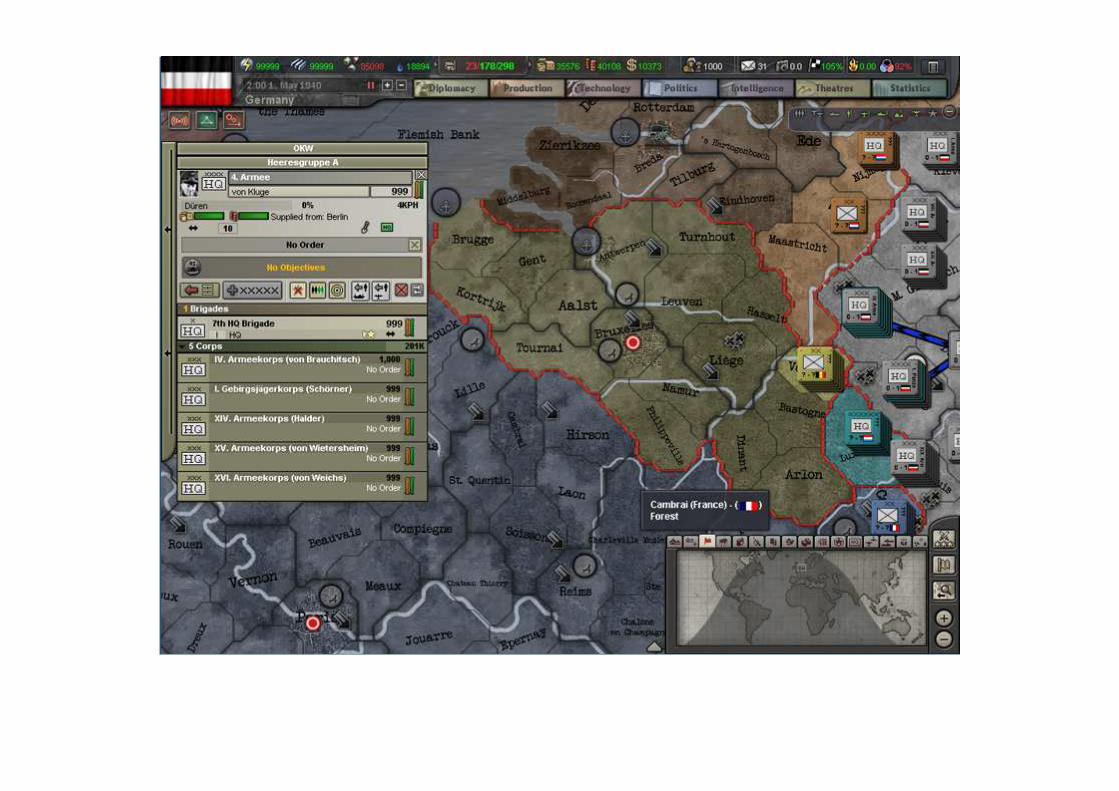
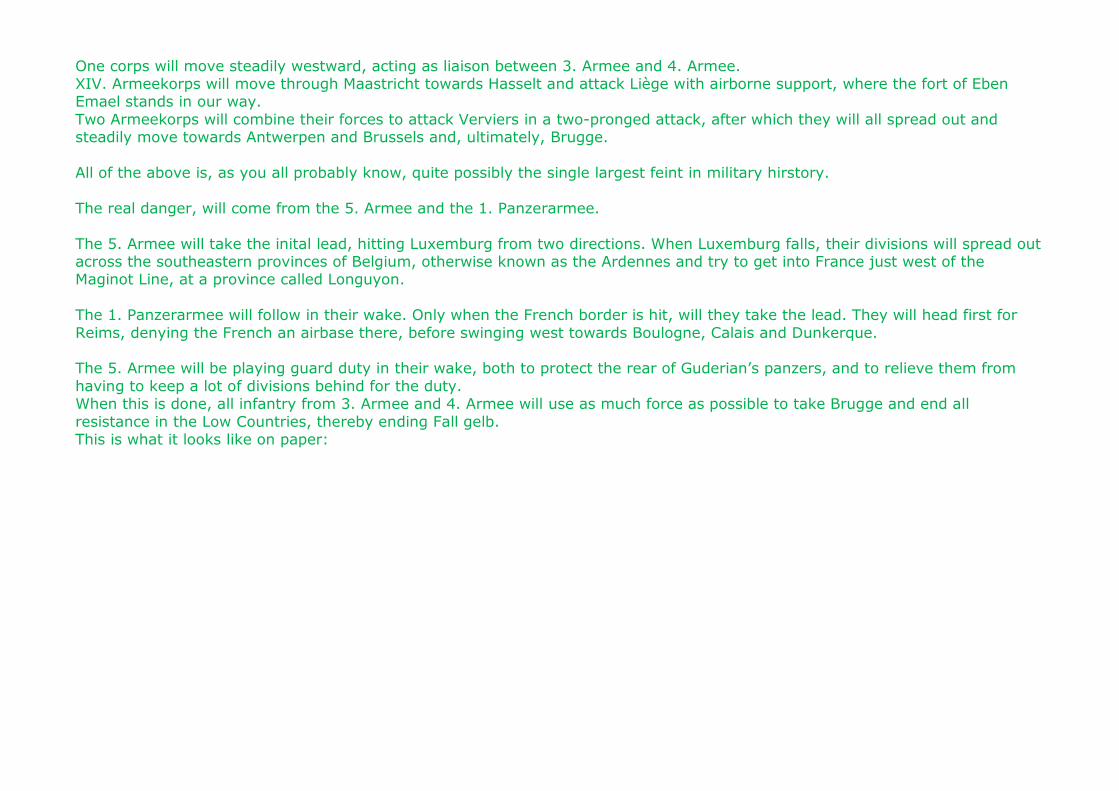
One corps will move steadily westward, acting as liaison between 3. Armee and 4. Armee. XIV. Armeekorps will move through Maastricht towards Hasselt and attack Liège with airborne support, where the fort of Eben Emael stands in our way. Two Armeekorps will combine their forces to attack Verviers in a two-pronged attack, after which they will all spread out and steadily move towards Antwerpen and Brussels and, ultimately, Brugge. All of the above is, as you all probably know, quite possibly the single largest feint in military hirstory. The real danger, will come from the 5. Armee and the 1. Panzerarmee. The 5. Armee will take the inital lead, hitting Luxemburg from two directions. When Luxemburg falls, their divisions will spread out across the southeastern provinces of Belgium, otherwise known as the Ardennes and try to get into France just west of the Maginot Line, at a province called Longuyon. The 1. Panzerarmee will follow in their wake. Only when the French border is hit, will they take the lead. They will head first for Reims, denying the French an airbase there, before swinging west towards Boulogne, Calais and Dunkerque. The 5. Armee will be playing guard duty in their wake, both to protect the rear of Guderian’s panzers, and to relieve them from having to keep a lot of divisions behind for the duty. When this is done, all infantry from 3. Armee and 4. Armee will use as much force as possible to take Brugge and end all resistance in the Low Countries, thereby ending Fall gelb. This is what it looks like on paper:
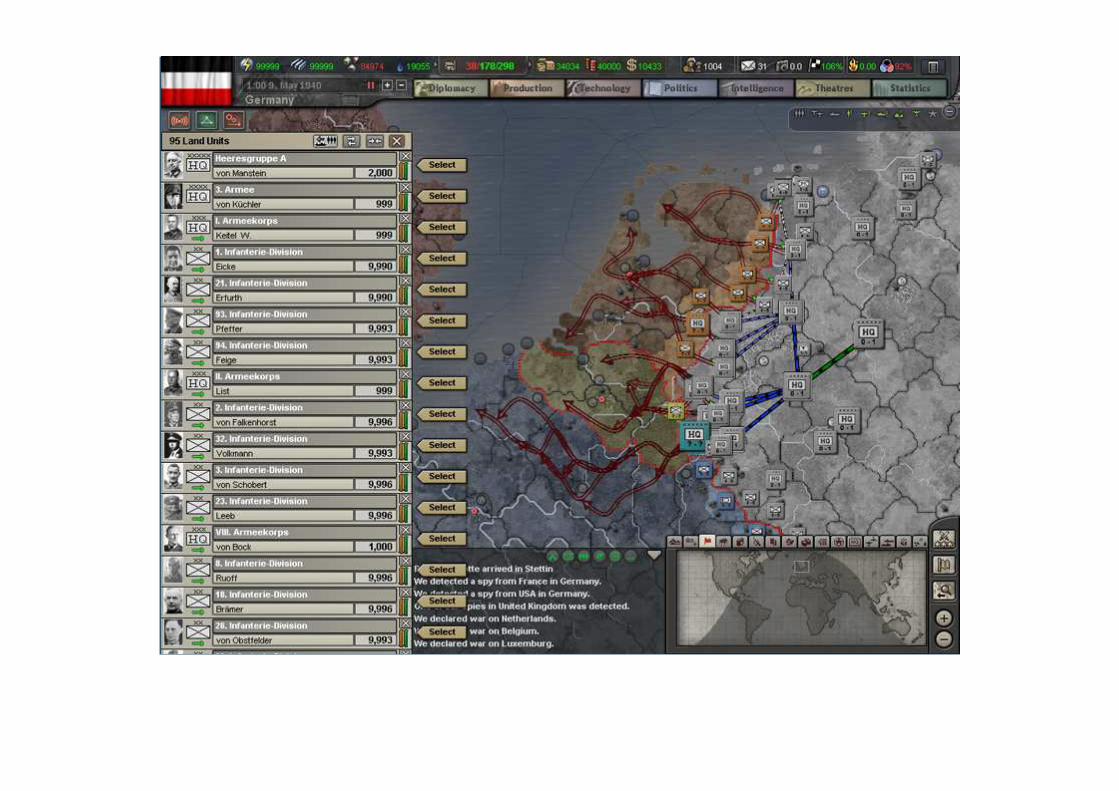
This wil start the second part of the offensive, Fall Rot. 3. Armee and 4. Armee will take up position on the western half of the frontline in France, allowing us to reassign the panzers to a more central location, where they can surround Paris and send it burning, while 5. Armee will try to cut off the French stationed in the Maginot Line. If necessary, we can then send the panzers on a VP killing spree in the French provence. Pauze the game and save at midnight on the 9th of May. That way, if something goes horribly wrong, you don’t have to start
completely over.
Chapter 26: The Fall of France Before we dive in, you have to know that this campaign more or less decides the course of the war. If you get bogged down in Belgium, the Allies can bleed Germany too much for the invasion of the Soviet Union to ever succeed. We can’t invade the UK until the SU is gone, and the SU WILL declare war on us when they feel they are ready. Speed is of the essence here. Get to the Atlantic coast of France quickly, cut off the enemy and destroy them before they can escape our trap. I cannot predict whether everything will go according to plan on your end, but you’ve fought 2 battles now. You know how to move troops, and I trust that you are starting to get a sense of tactics and strategy, or you wouldn’t be here. you will notice I jump from one end of the front to the other seemingly at random. This is not to confuse people, but it's the nature of such large-scale offensives to have to respond to all kinds of stuff at the same time. The sooner we get used to it, the better armed we'll be for when we attack the Soviet Union. And if all else fails, there is always a save game to fall back on. One more thing I should mention. You have to move the corps and army HQs forwards periodically, ideally keeping the corps about 2 provinces behind their associated divisions and the army HQ a couple of provinces further behind to avoid loosing the bonuses provided by our carefully arranged OOB. Whatever else happens, we are looking at about 2 months of fighting if all goes according to plan. So, let’s get to it, shall we? Go to the diplomacy screen and declare Limited War on Netherlands, Belgium and Luxemburg. 3. Armee: Have the infantry from Emden attack Winschoten. MAKE SURE YOU DON’T INCLUDE THE MILITIA! The infantry from Meppen will attack Emmen. The one in Nordhorn will attack Enschede. 2 infantry from Bocholt attack Winterswijk. 2 infantry from Kleve attack Arnhem. 2 infantry from Krefeld attack Nijmegen. 2 infantry from Munchen Gladbach attack Venlo. 4. Armee: 3 infantry from Aachen will support attack on Verviers. 4 infantry from Aachen will move through Maastricht and attack Hasselt. 2 infantry from Aachen will attack Eindhoven, while the other two from the same Armeekorps will attack Turnhout. The Gebirgsjägerkorps from Bitburg will attack Verviers.
We are keeping one Armeekorps on standby to follow up with a push towards Liège once Verviers falls. 5. Armee: 3 infantry from Bitburg will support attack on Luxemburg. 4 infantry from Saarlouis will attack Luxemburg. The 1. Panzerarmee will play cheerleader for now. The Luftwaffe. Aerial support is essential to the speed and success of our drive. Set up a fighter screen behind the enemy frontlines across the Netherlands and Belgium using area selection. You know how by now. Make sure to have fighter defense over Luxemburg and the Ardennes. Use tactical bombers on ground attack missions (singe province) in Verviers and Luxemburg. A third Luftflotte will use Interdiction (area selection) centered on Liège to hamper enemy movement. If you have tons of free IC, go to the production screen and start building some more militia divisions, but make sure there’s plenty leftover for reinforcements. Unpauze the game. Usually the French will try an attack on Saarlouis. It will go nowhere and will only provide some minor hindrance. They may have bomber support, however, so feel free to divert an interceptor wing temporarily to defend the troops. At some point, things will start happening all at the same time, and not neccessarily in the order presented here. Be methodical. If you’re not sure, double-check which unit belongs to which army and refer the the general battleplan I provided last chapter to know what they are supposed to be doing. When our infantry arrive in Luxemburg, use 1 entire Armeekorps each from the 5. Armee to attack Bastogne, Arlon and Dinant simultaneously. In the netherlands, as provinces get taken, use the troops left idle to attack the province behind it, driving the Dutch defenders back or, better yet, overrunning them so they have nowhere left to go and are destroyed. When Verviers is taken, send the entire idle Armeekorps from Bitburg to attack Liège. If the units have arrived in Hasselt by this time, send 2 of them to attack Leuven, while the other 2 also attack Liège. Keep the game pauzed so we can send in our Fallschirmjägers as well. Paradroppings ignore forts for defensive purposes.
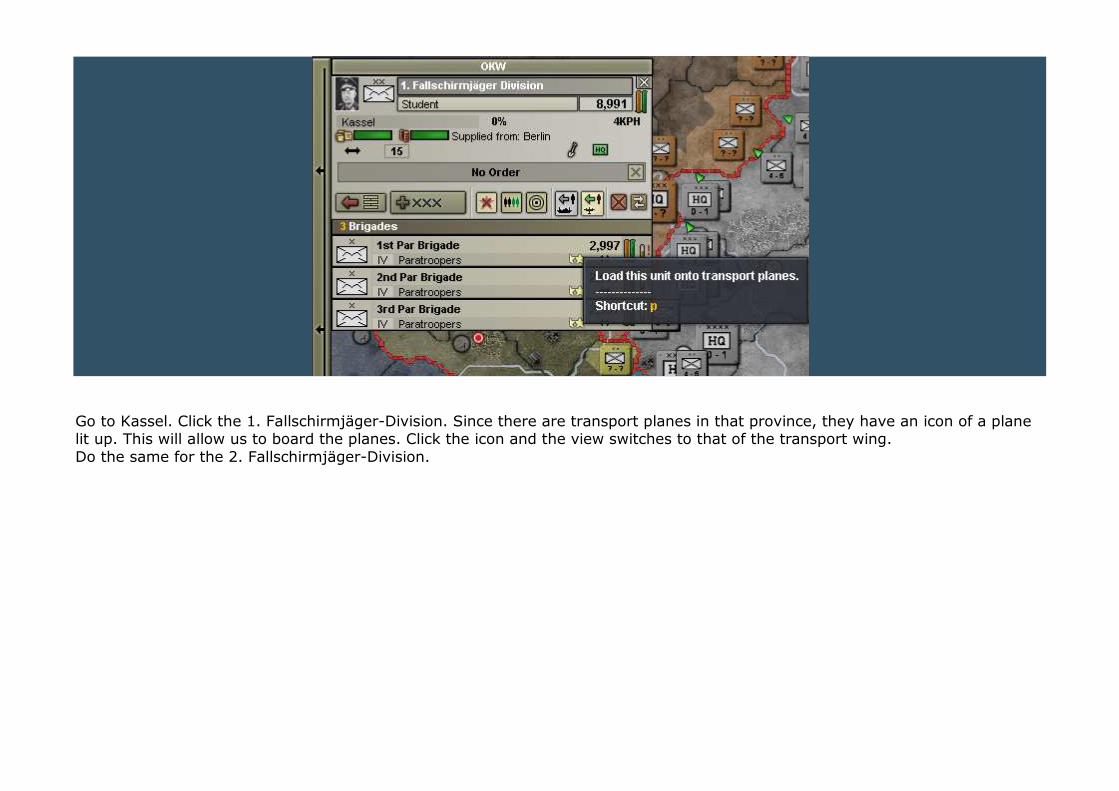
Go to Kassel. Click the 1. Fallschirmjäger-Division. Since there are transport planes in that province, they have an icon of a plane lit up. This will allow us to board the planes. Click the icon and the view switches to that of the transport wing. Do the same for the 2. Fallschirmjäger-Division.
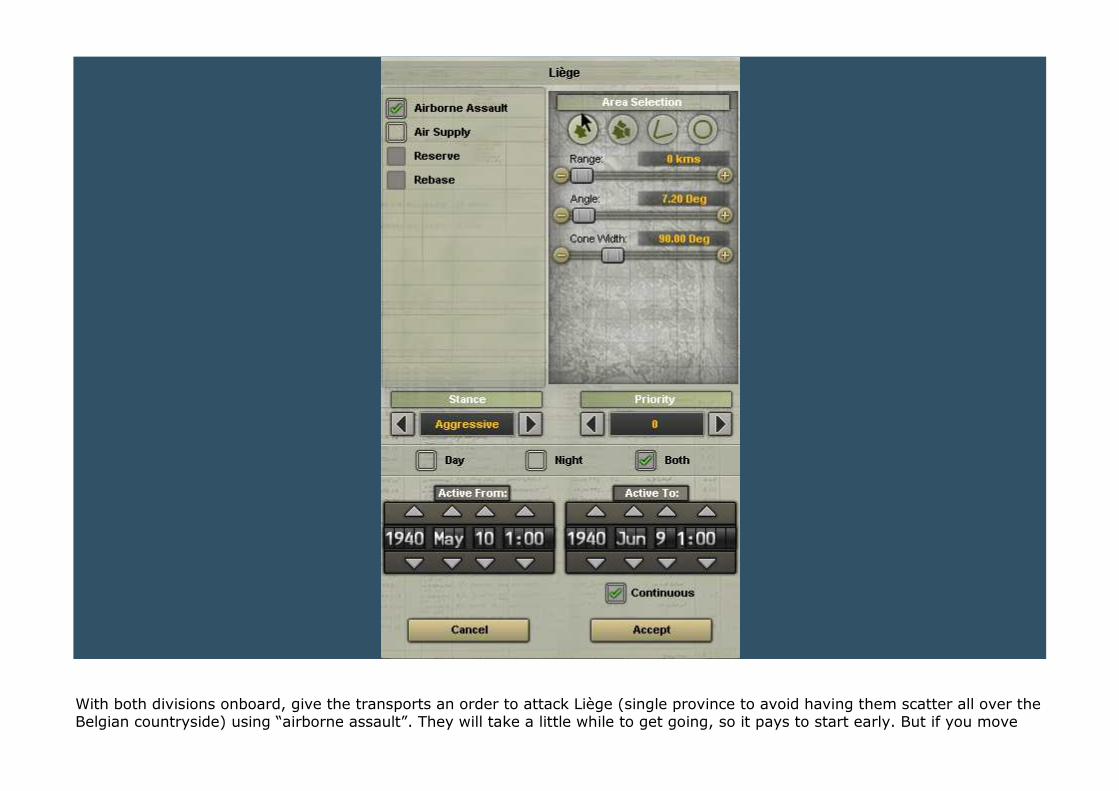
With both divisions onboard, give the transports an order to attack Liège (single province to avoid having them scatter all over the Belgian countryside) using “airborne assault”. They will take a little while to get going, so it pays to start early. But if you move
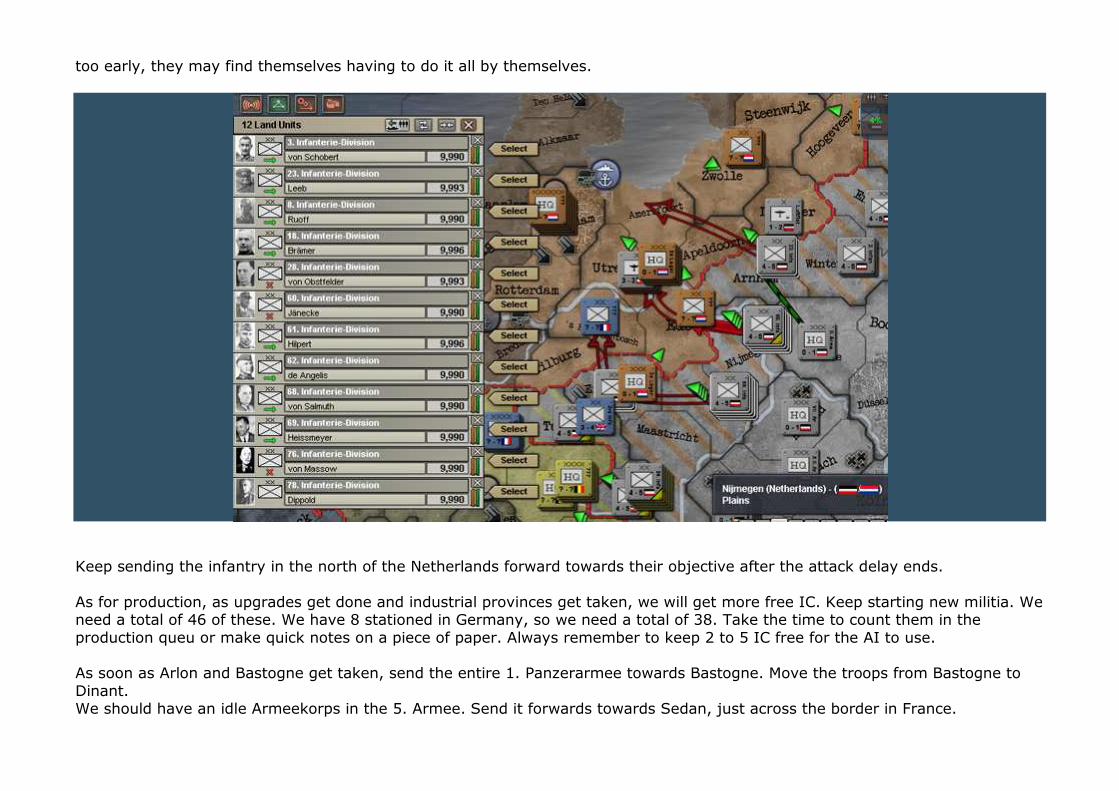
too early, they may find themselves having to do it all by themselves.
Keep sending the infantry in the north of the Netherlands forward towards their objective after the attack delay ends. As for production, as upgrades get done and industrial provinces get taken, we will get more free IC. Keep starting new militia. We need a total of 46 of these. We have 8 stationed in Germany, so we need a total of 38. Take the time to count them in the production queu or make quick notes on a piece of paper. Always remember to keep 2 to 5 IC free for the AI to use. As soon as Arlon and Bastogne get taken, send the entire 1. Panzerarmee towards Bastogne. Move the troops from Bastogne to Dinant. We should have an idle Armeekorps in the 5. Armee. Send it forwards towards Sedan, just across the border in France.
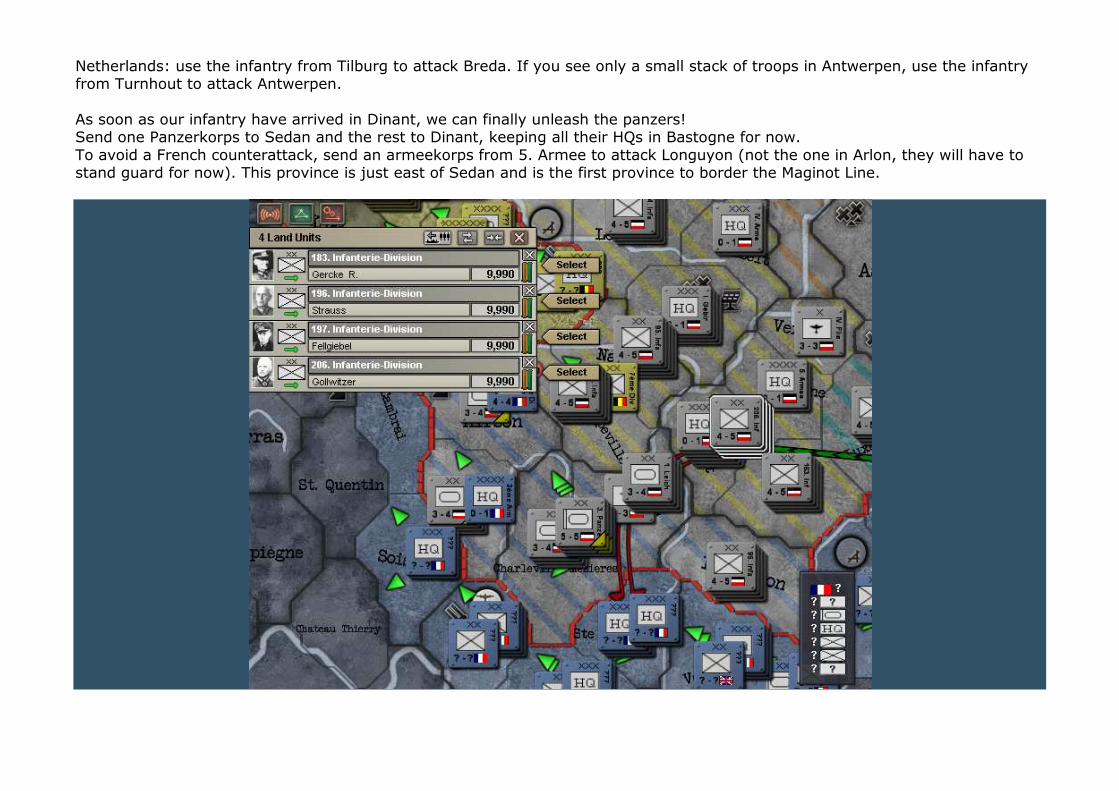
Netherlands: use the infantry from Tilburg to attack Breda. If you see only a small stack of troops in Antwerpen, use the infantry from Turnhout to attack Antwerpen. As soon as our infantry have arrived in Dinant, we can finally unleash the panzers! Send one Panzerkorps to Sedan and the rest to Dinant, keeping all their HQs in Bastogne for now. To avoid a French counterattack, send an armeekorps from 5. Armee to attack Longuyon (not the one in Arlon, they will have to stand guard for now). This province is just east of Sedan and is the first province to border the Maginot Line.
The main reason for this is to shorten the front. If you look closely, you will notice that by grabbing a couple of French provinces we can reduce our frontline from 3 provinces to 2, freeing up an armeekorps. The other reason it to make it harder on the french to reinforce their line, forcing them to move further south than they would otherwise. And it will get the French AI a little worried. At some point, it will start to panic. When it does, it usually leaves at least 1 Maginot province unguarded for some hours. Keep an occasional eye on that. When you see it, try to squeeze at least 1 infantry division in that gap to further break them up (just make sure you don’t acciddentally leave yourself open to a counteroffensive behind your back). Take a look at your interceptors. If any of them are starting to get a little banged up, replace them with the MR wings stationed in east Germany and send them away from the front for repairs. The same goes for the tactical bombers. Ideally, use 2 tac wings and keep the other 2 for replacements. If you run into any French armoured divisions, send a CAS wing to hit them. At some point, we will conquer Liège. When we do, keep the paratroopers there for now as a strategic reserve. Send 4 infantry divisions to Namur, 4 to Phillippeville and 3 Tournai. Netherlands: while the I. Armeekorps mops up to the north, send the various other corps to their destination: One full armeekorps to Amersfoort, one to Utrecht and one to ’s Hertogenbosch. When all 3 are in place, here’s what I want you to do: The ones in Amersfoort will attack Amsterdam along with 2 divisions from utrecht. The ones in ’s Hertogenbosch will attack Rotterdam along with the other 2 divisions from Utrecht. If the attack on Namur gets bogged down, use an infantry division from Dinant to support attack on Namur. IMPORTANT!!!!!!!!!!!!!!!!!!!!! When any port province is taken, detach 2 infantry from the OOB to keep them there until the militia divisions we are building are ready to take over. Things are hectic enough as it is. You don’t want the UK to land a dozen divisions in Rotterdam or Amsterdam to wreak havoc on our battleplan. Use the infantry in Longuyon to support attack on Sedan if necessary. Once the first panzers arrive in Sedan, send the rest into the fray.
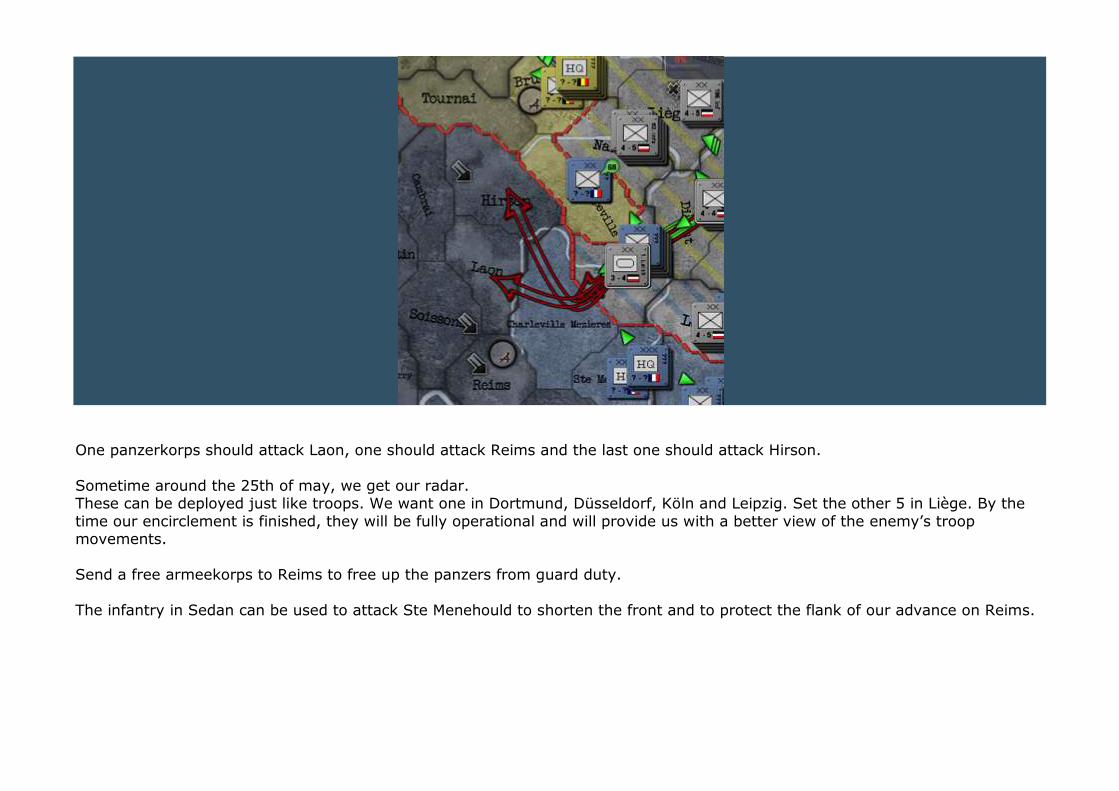
One panzerkorps should attack Laon, one should attack Reims and the last one should attack Hirson. Sometime around the 25th of may, we get our radar. These can be deployed just like troops. We want one in Dortmund, Düsseldorf, Köln and Leipzig. Set the other 5 in Liège. By the time our encirclement is finished, they will be fully operational and will provide us with a better view of the enemy’s troop movements. Send a free armeekorps to Reims to free up the panzers from guard duty. The infantry in Sedan can be used to attack Ste Menehould to shorten the front and to protect the flank of our advance on Reims.
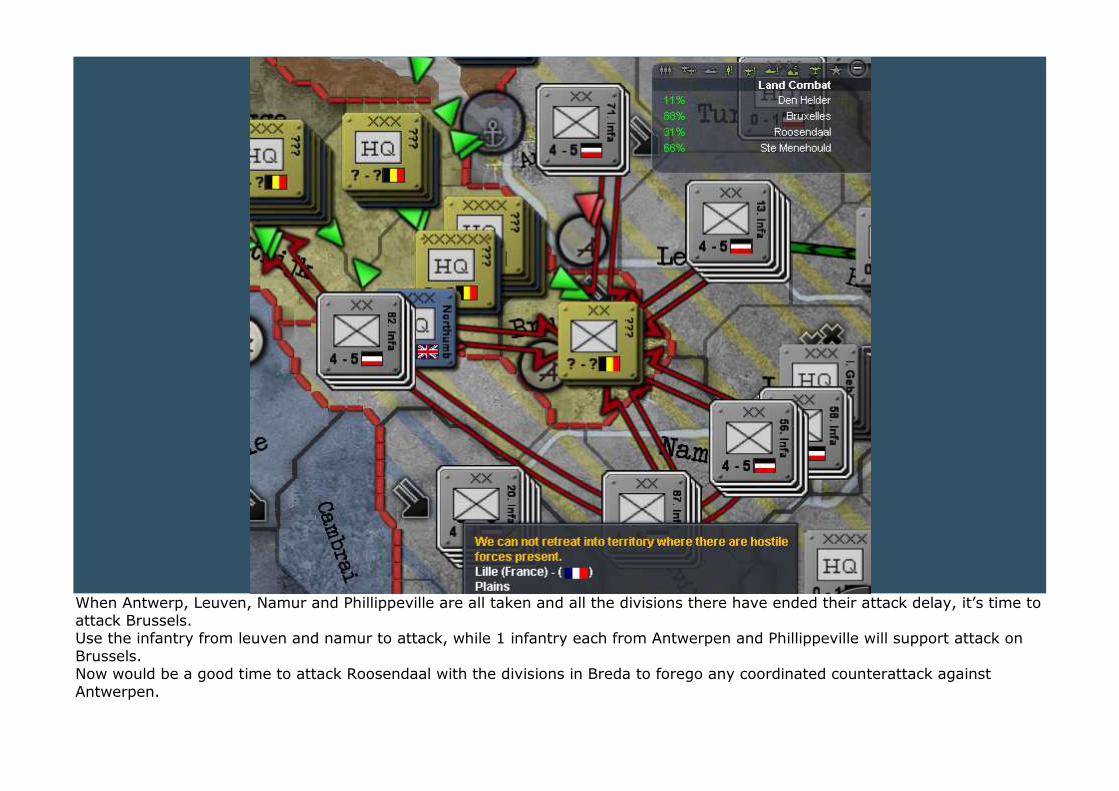
When Antwerp, Leuven, Namur and Phillippeville are all taken and all the divisions there have ended their attack delay, it’s time to attack Brussels. Use the infantry from leuven and namur to attack, while 1 infantry each from Antwerpen and Phillippeville will support attack on Brussels. Now would be a good time to attack Roosendaal with the divisions in Breda to forego any coordinated counterattack against Antwerpen.
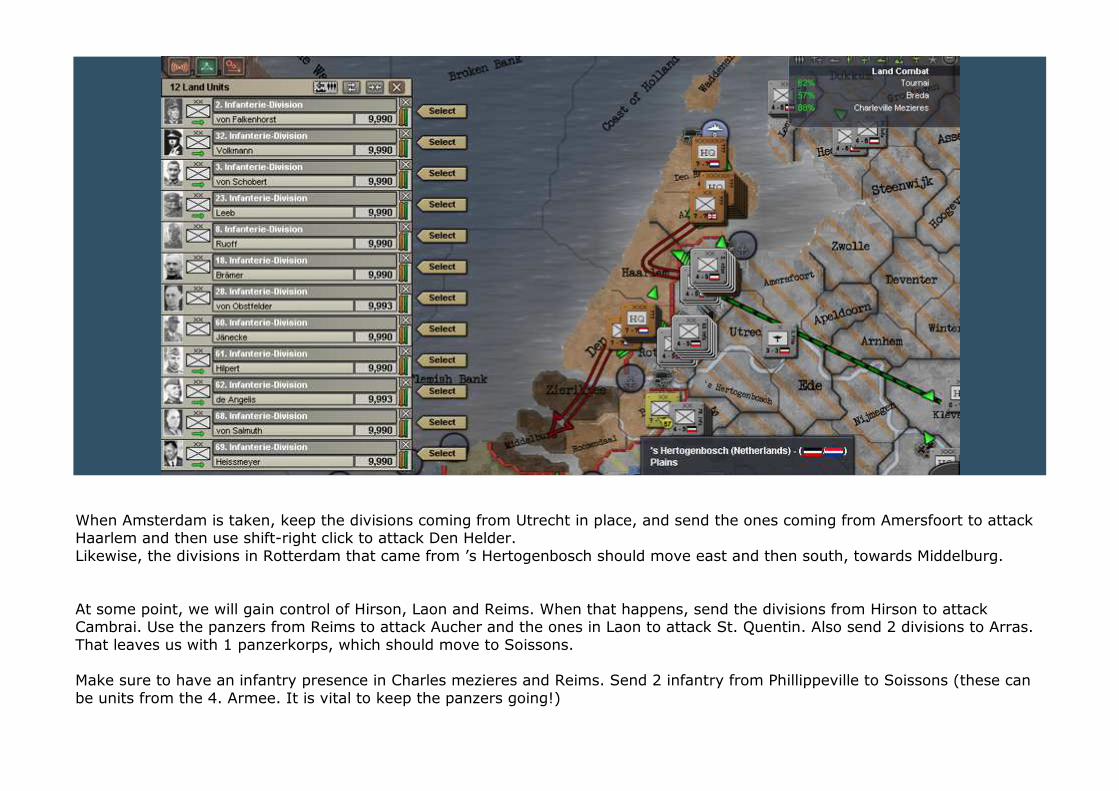
When Amsterdam is taken, keep the divisions coming from Utrecht in place, and send the ones coming from Amersfoort to attack Haarlem and then use shift-right click to attack Den Helder. Likewise, the divisions in Rotterdam that came from ’s Hertogenbosch should move east and then south, towards Middelburg. At some point, we will gain control of Hirson, Laon and Reims. When that happens, send the divisions from Hirson to attack Cambrai. Use the panzers from Reims to attack Aucher and the ones in Laon to attack St. Quentin. Also send 2 divisions to Arras. That leaves us with 1 panzerkorps, which should move to Soissons. Make sure to have an infantry presence in Charles mezieres and Reims. Send 2 infantry from Phillippeville to Soissons (these can be units from the 4. Armee. It is vital to keep the panzers going!)

As you can see, we are drawing a grey-striped scar across the north of France. Make sure to have 2 divisions at all times in those provinces and keep drawing a straight line towards Boulogne, using the river there to protect the southern flank. Panzers from Cambrai should go to Lille. Another airbase for us to use. Rebase fighters there if you have to . When Brussels is taken, send 3 divisions to Gent and 3 to Kortrijk. Any leftover should attack Aalst. If our panzers come under attack from inside the forming ring, use nearby infantry to counterattack and spoil their chances of success. Just make sure to cancel the move after the fight is won. Don’t let the infantry move out of position unless you’re certain you can get away with it. Wait until Boulogne is under our control before sending 2 divisions from Aucher to St. Omer. When their attack delay ends, send them to attack Dunkerque while the panzers from Boulogne should simultaneously attack Calais. At the same time, use as many infantry from as many provinces as possible to attack Brugge, which should be the last stop to full control of the Low Countries. Around the same time, my garrisons are finally finished. Deploy them in Danzig, Lodz, Krakow, Warsawa and Koningsberg. Attach them all directly to the OKH and give them some skill-1 commander.
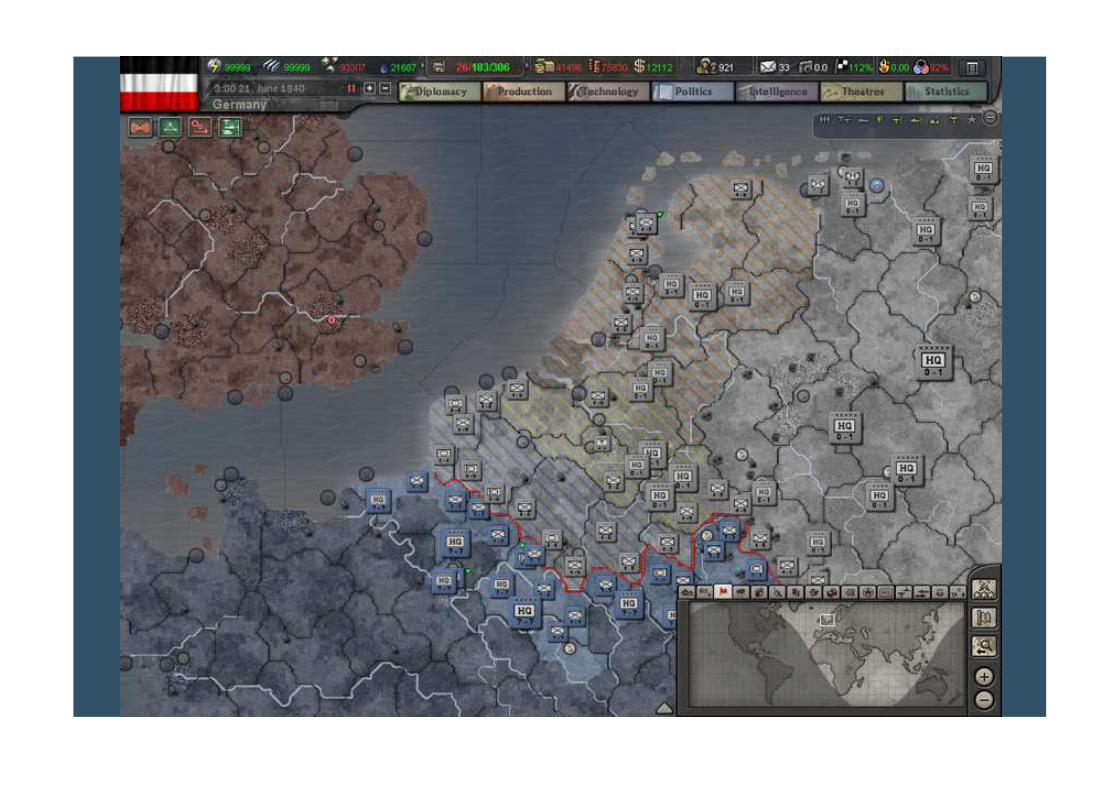
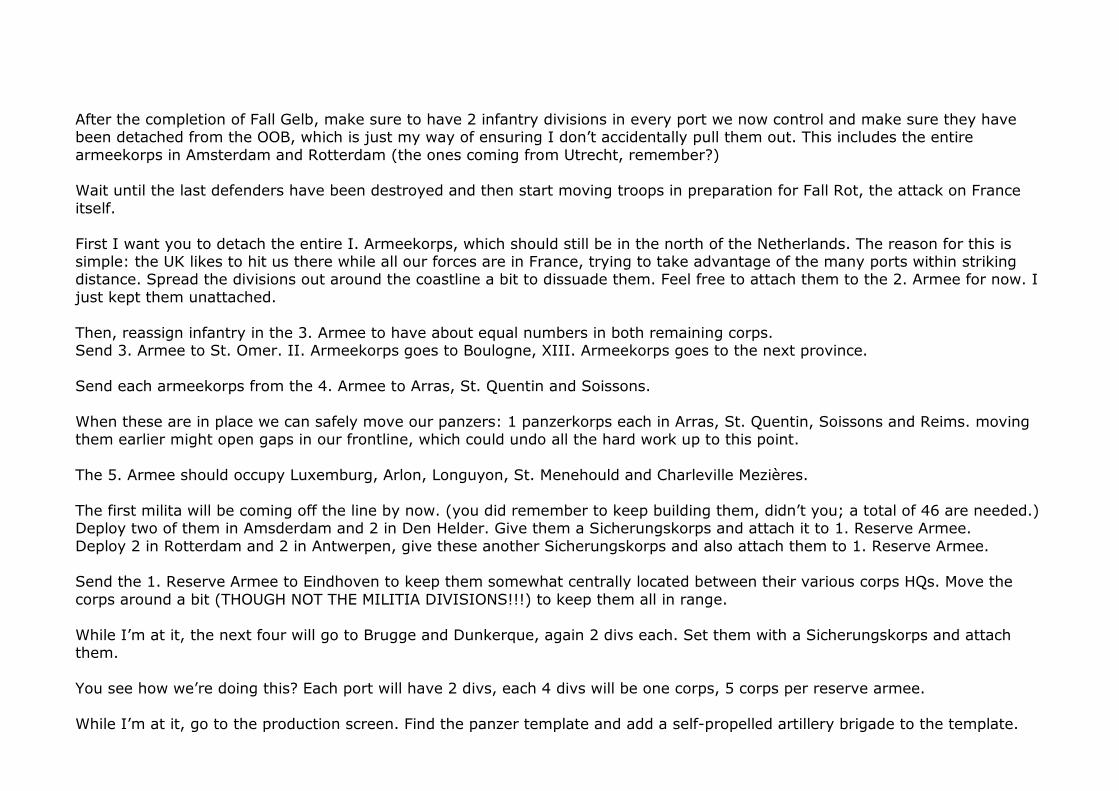
After the completion of Fall Gelb, make sure to have 2 infantry divisions in every port we now control and make sure they have been detached from the OOB, which is just my way of ensuring I don’t accidentally pull them out. This includes the entire armeekorps in Amsterdam and Rotterdam (the ones coming from Utrecht, remember?) Wait until the last defenders have been destroyed and then start moving troops in preparation for Fall Rot, the attack on France itself. First I want you to detach the entire I. Armeekorps, which should still be in the north of the Netherlands. The reason for this is simple: the UK likes to hit us there while all our forces are in France, trying to take advantage of the many ports within striking distance. Spread the divisions out around the coastline a bit to dissuade them. Feel free to attach them to the 2. Armee for now. I just kept them unattached. Then, reassign infantry in the 3. Armee to have about equal numbers in both remaining corps. Send 3. Armee to St. Omer. II. Armeekorps goes to Boulogne, XIII. Armeekorps goes to the next province. Send each armeekorps from the 4. Armee to Arras, St. Quentin and Soissons. When these are in place we can safely move our panzers: 1 panzerkorps each in Arras, St. Quentin, Soissons and Reims. moving them earlier might open gaps in our frontline, which could undo all the hard work up to this point. The 5. Armee should occupy Luxemburg, Arlon, Longuyon, St. Menehould and Charleville Mezières. The first milita will be coming off the line by now. (you did remember to keep building them, didn’t you; a total of 46 are needed.) Deploy two of them in Amsderdam and 2 in Den Helder. Give them a Sicherungskorps and attach it to 1. Reserve Armee. Deploy 2 in Rotterdam and 2 in Antwerpen, give these another Sicherungskorps and also attach them to 1. Reserve Armee. Send the 1. Reserve Armee to Eindhoven to keep them somewhat centrally located between their various corps HQs. Move the corps around a bit (THOUGH NOT THE MILITIA DIVISIONS!!!) to keep them all in range. While I’m at it, the next four will go to Brugge and Dunkerque, again 2 divs each. Set them with a Sicherungskorps and attach them. You see how we’re doing this? Each port will have 2 divs, each 4 divs will be one corps, 5 corps per reserve armee. While I’m at it, go to the production screen. Find the panzer template and add a self-propelled artillery brigade to the template.
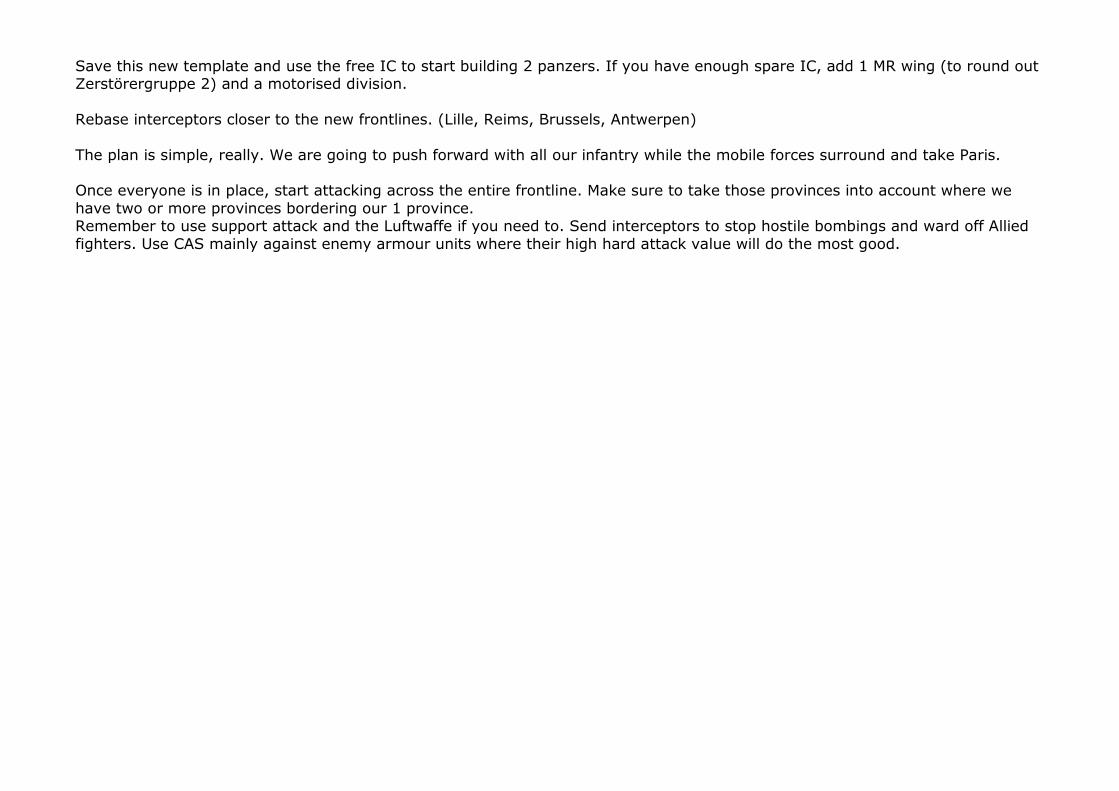
Save this new template and use the free IC to start building 2 panzers. If you have enough spare IC, add 1 MR wing (to round out Zerstörergruppe 2) and a motorised division. Rebase interceptors closer to the new frontlines. (Lille, Reims, Brussels, Antwerpen) The plan is simple, really. We are going to push forward with all our infantry while the mobile forces surround and take Paris. Once everyone is in place, start attacking across the entire frontline. Make sure to take those provinces into account where we have two or more provinces bordering our 1 province. Remember to use support attack and the Luftwaffe if you need to. Send interceptors to stop hostile bombings and ward off Allied fighters. Use CAS mainly against enemy armour units where their high hard attack value will do the most good.
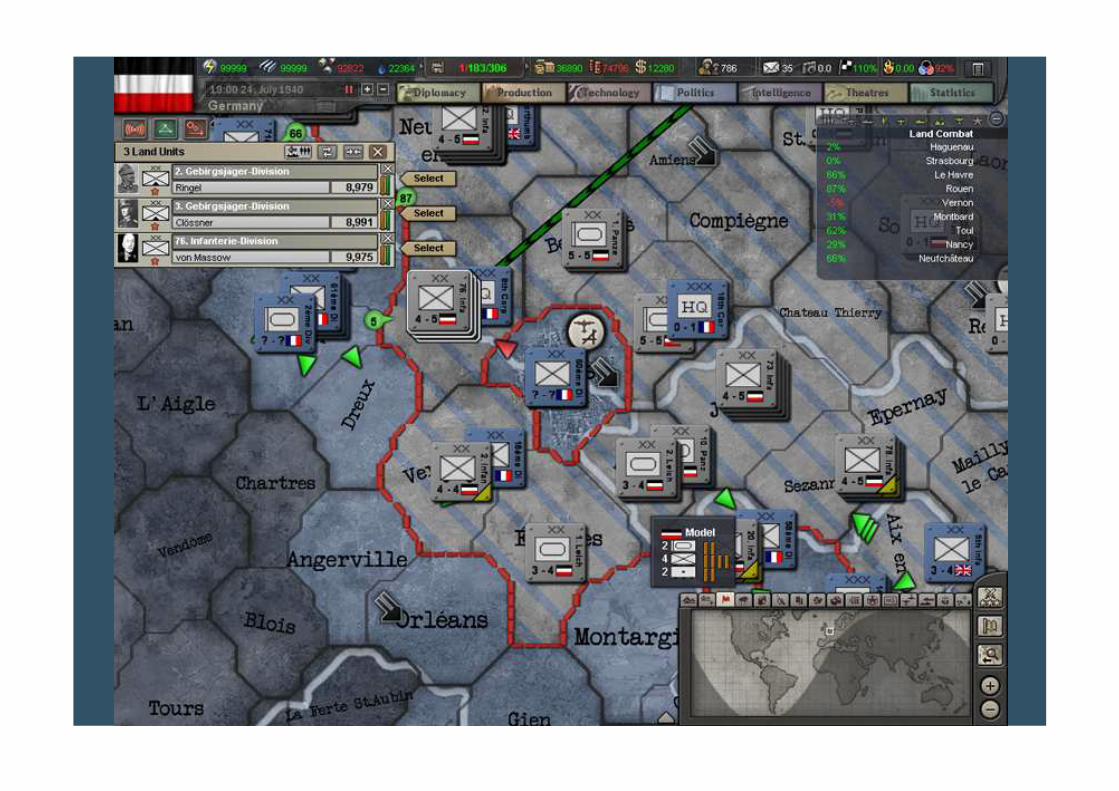
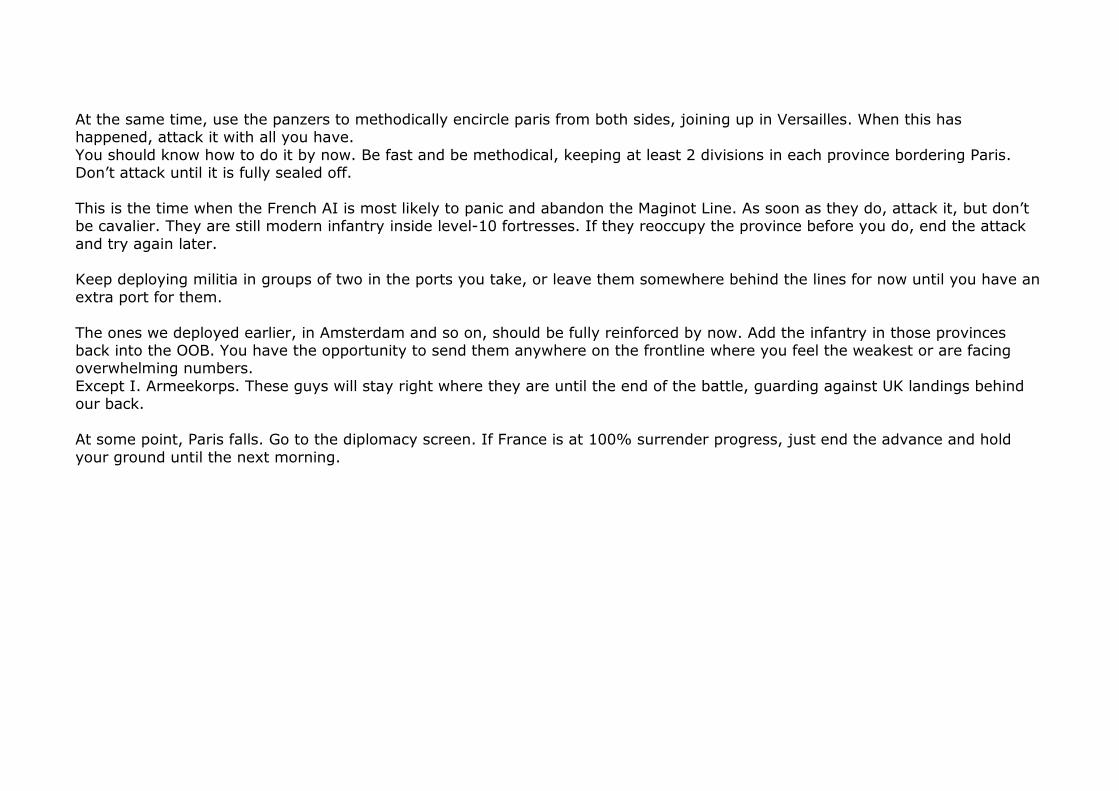
At the same time, use the panzers to methodically encircle paris from both sides, joining up in Versailles. When this has happened, attack it with all you have. You should know how to do it by now. Be fast and be methodical, keeping at least 2 divisions in each province bordering Paris. Don’t attack until it is fully sealed off. This is the time when the French AI is most likely to panic and abandon the Maginot Line. As soon as they do, attack it, but don’t be cavalier. They are still modern infantry inside level-10 fortresses. If they reoccupy the province before you do, end the attack and try again later. Keep deploying militia in groups of two in the ports you take, or leave them somewhere behind the lines for now until you have an extra port for them. The ones we deployed earlier, in Amsterdam and so on, should be fully reinforced by now. Add the infantry in those provinces back into the OOB. You have the opportunity to send them anywhere on the frontline where you feel the weakest or are facing overwhelming numbers. Except I. Armeekorps. These guys will stay right where they are until the end of the battle, guarding against UK landings behind our back. At some point, Paris falls. Go to the diplomacy screen. If France is at 100% surrender progress, just end the advance and hold your ground until the next morning.
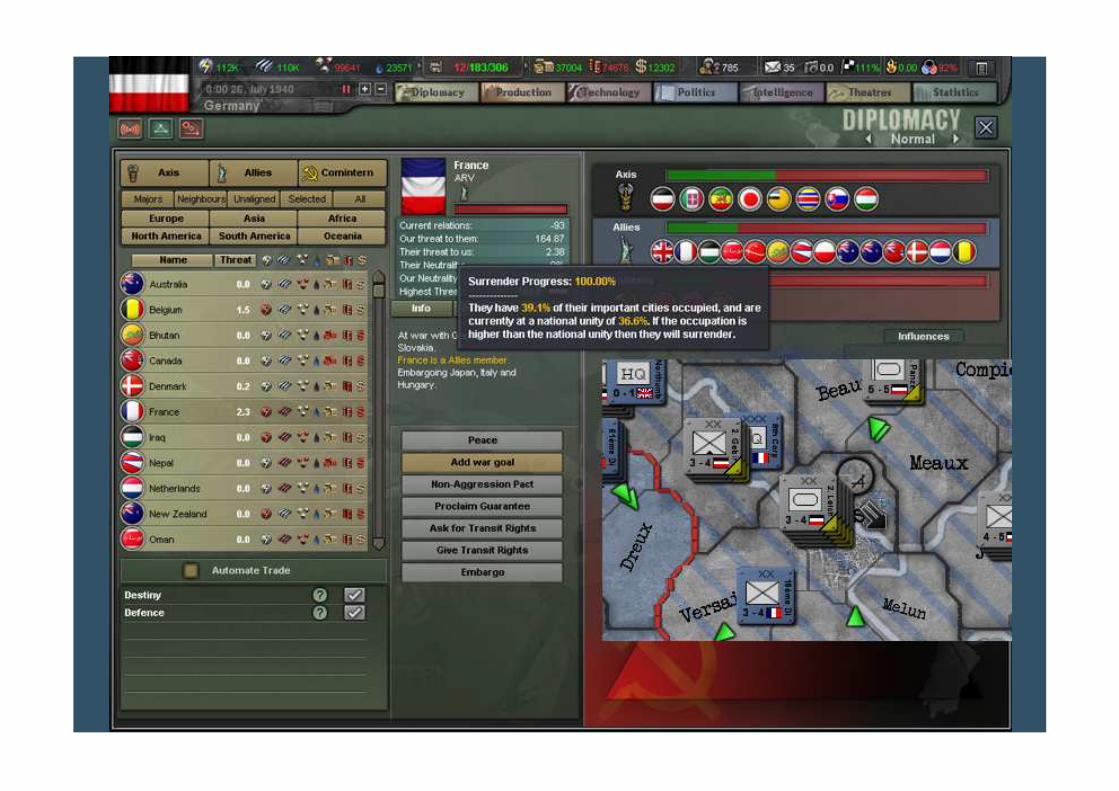
If not, have 1 or 2 divisions stand guard in Paris, just to be certain we don’t lose it again, and go to the VP mapmode. There are a bunch of VP provinces west and south of Paris. Send the panzers there and have the infantry follow them. At some point they have to give in. The creation of Vichy France ends France’s existence as a major power and a European nation, relegating them to some of their
African holdings. Save the game and sit back. You did it. Germany’s paternal arch enemy has bitten the dust, never to rise again. Relax and bask in a joy of a job well-done!
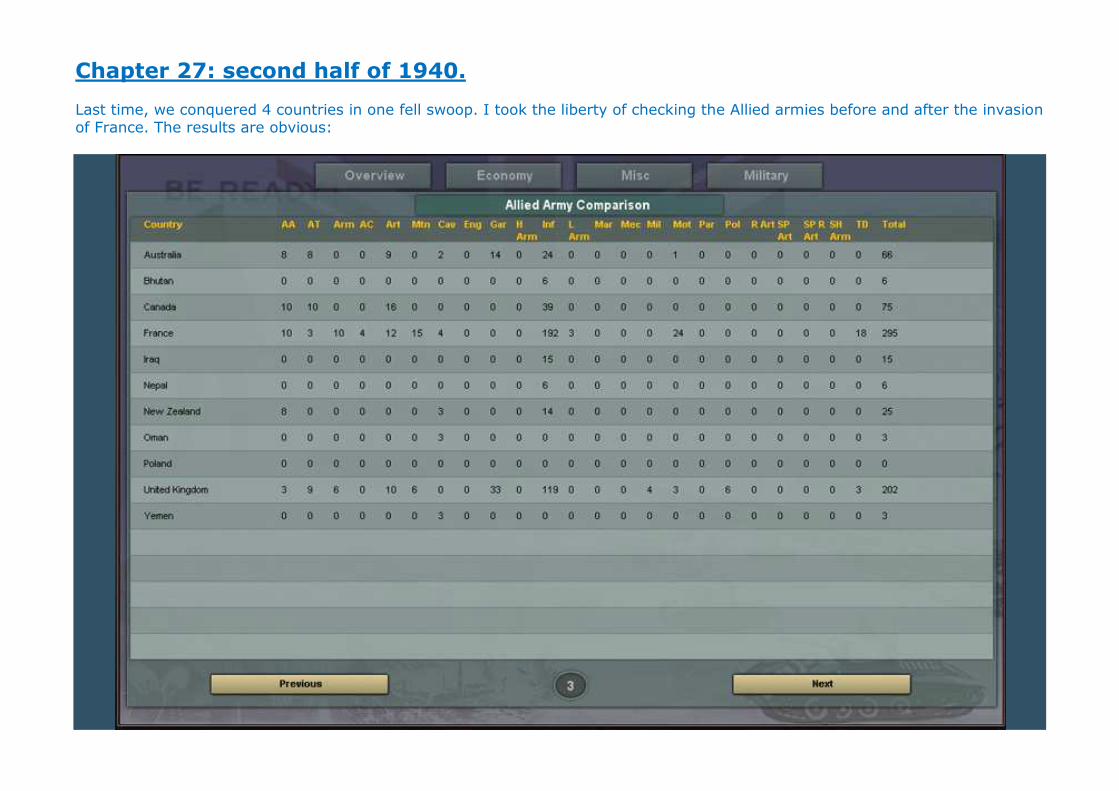
Chapter 27: second half of 1940. Last time, we conquered 4 countries in one fell swoop. I took the liberty of checking the Allied armies before and after the invasion of France. The results are obvious:
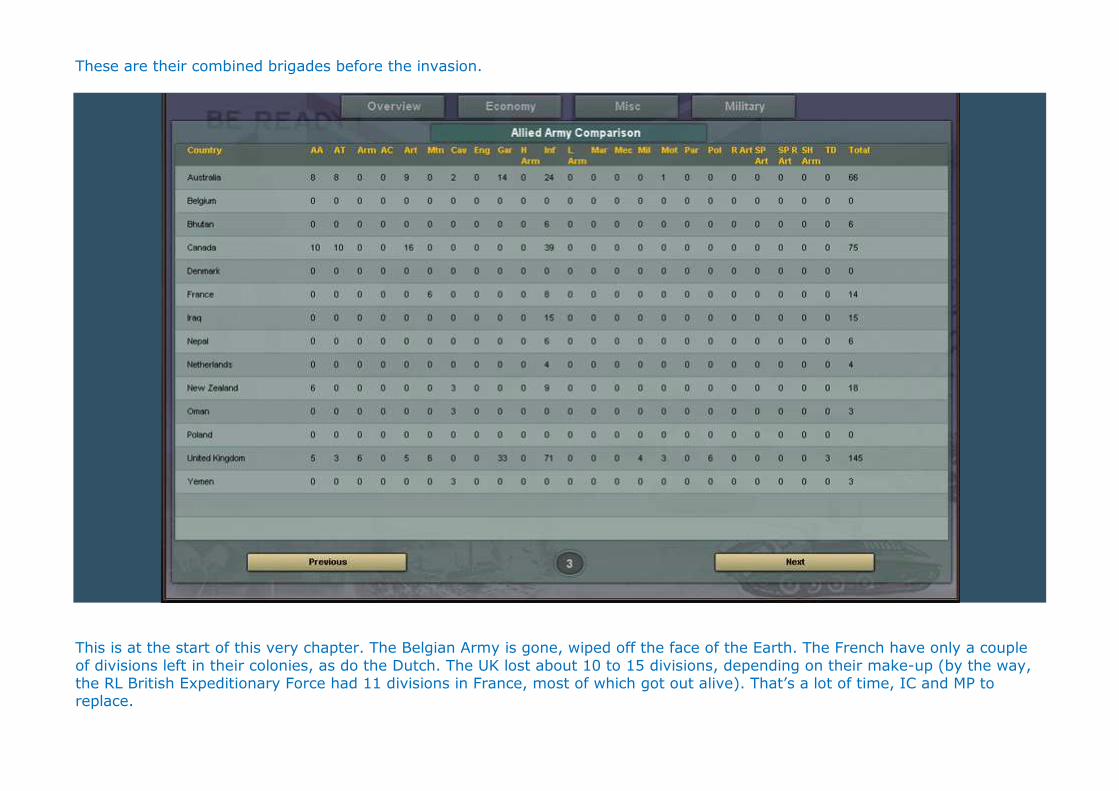
These are their combined brigades before the invasion.
This is at the start of this very chapter. The Belgian Army is gone, wiped off the face of the Earth. The French have only a couple of divisions left in their colonies, as do the Dutch. The UK lost about 10 to 15 divisions, depending on their make-up (by the way, the RL British Expeditionary Force had 11 divisions in France, most of which got out alive). That’s a lot of time, IC and MP to replace.
We are now going to get ready to laste waste to the Soviet Union, but first, we have to secure our new border from the UK who will invade with as many forces as they can muster. If you want to be gamey, you can lure them in by keeping a huge force nearby an unguarded port. They WILL invade in a matter of days/weeks. Take the port back and destroy them when they have nowhere to turn. But, like I said, that is gamey, and we’re not going to do this. Besides, it’s a waste of Manpower. Keep the game pauzed and strategically redeploy 2 divisions each to every port that is now unguarded. Forget about keeping them in radio range for a moment. Speed is of the essence, right now. I used the 4. and 5. Armee for this, along with some panzers, because they were stationed in the French interior. Several units of the 3. Armee were guarding a port allready and I didn’t want to risk taking the wrong units away. Wait a day to let the game reset its statistics and go to the intelligence screen. France is no longer a threat to us. Reduce their spy priority to 1 and set them on standby. Similarly, events will now all but force Romania into the Axis. Reduce their spy priority to 1 as well. Our main target now is the Soviet Union. Increase their priority to 3 and set our spies in Moscow to disrupt National Unity. Remember to keep adding 2 militia to each port as they come off the queu. Organise them 4 divisions per Sicherungskorps, 5 Sicherungskorps per Reserve Armee. We will need 2 full Reserve Armees and a couple of corps extra) On the 28th, go to the research screen. Our Officer Ratio is now back into the 120% or so. We can safely reduce the Leadership being pumped into it and we really need to keep up with the research. Set the Leadership sliders as follows: research: 25,01 spies: 2,11 diplomacy: 2,05 officers: 10.45 Nothing left now but wait. Make sure to have interceptors over Leipzig and the Ruhr area. The latter ones can be set on “intercept” mission in stead of air superiority to save up on fuel. With our brand spanking new radars, they will shut any British strategic bombing down in no time, leaving them as only a minor nuisance. Time to put our OOB back into order. Reattach the I. Armeekorps to the 3. Armee. Add 2 divisions to the 1. Armee, which should have an armeekorps with only 2 divisions, bringing them up to 20. These will be our security forces in the west. Send 1 armeekorps to take the place of the I. Armeekorps in north Holland.
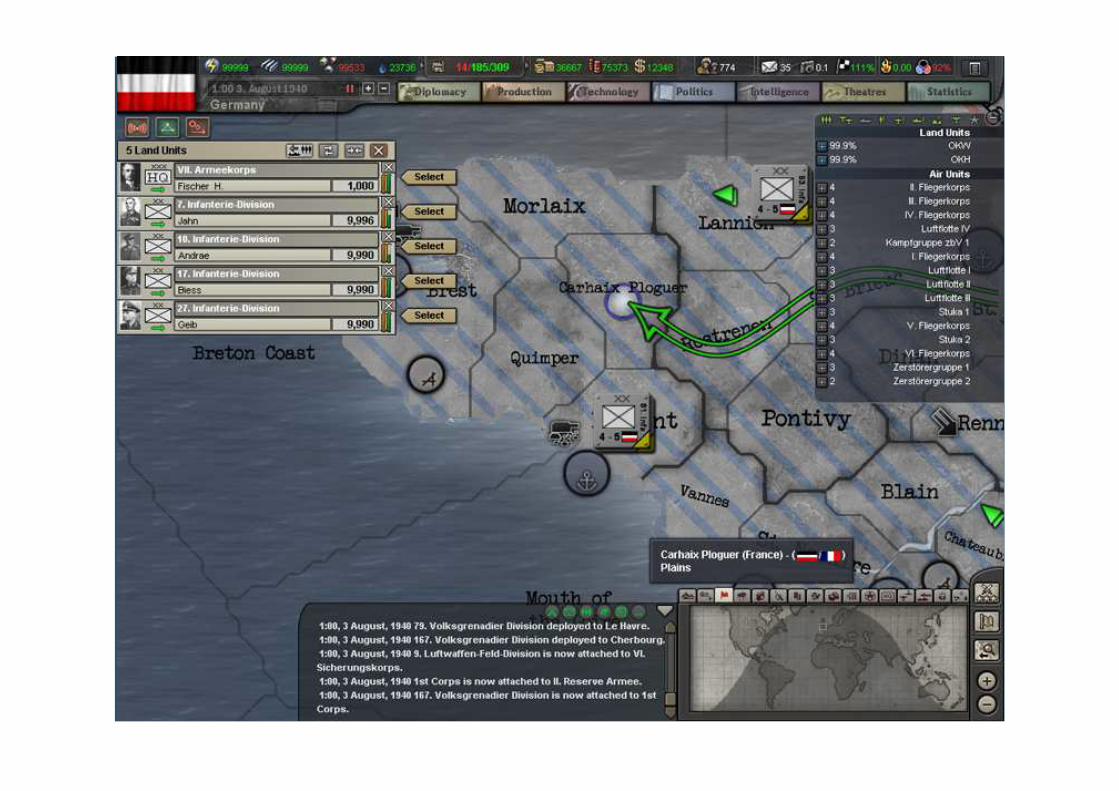
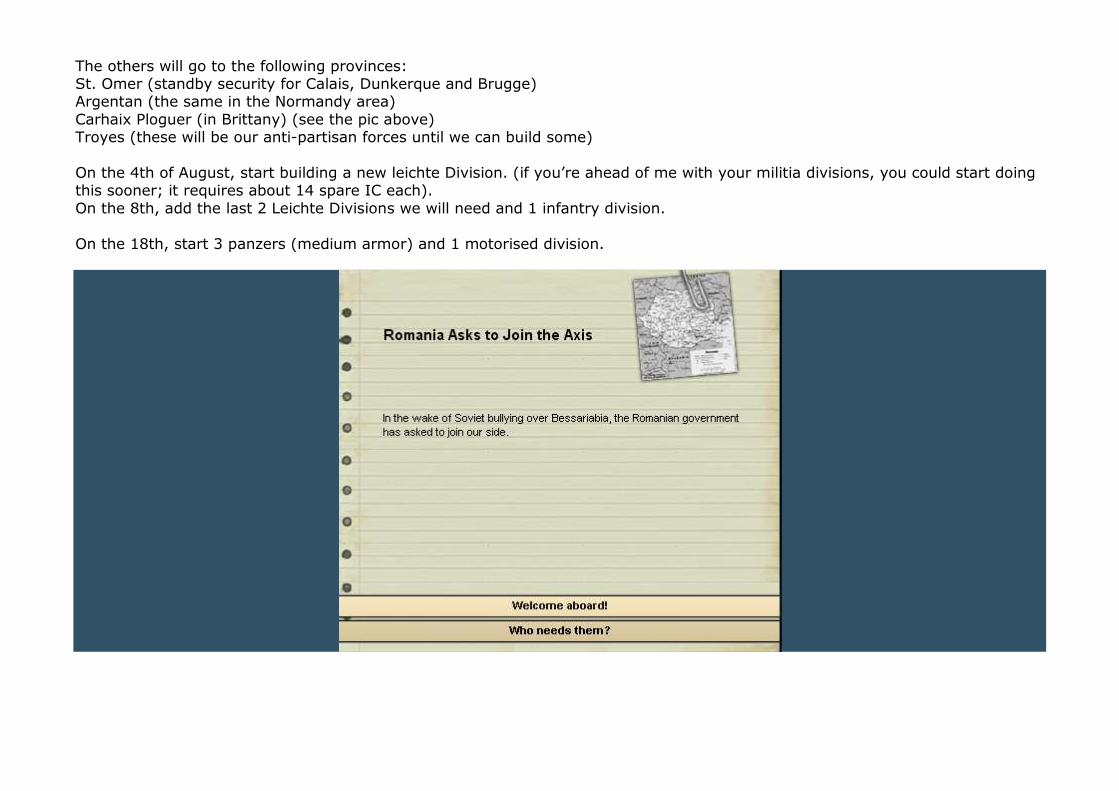
The others will go to the following provinces: St. Omer (standby security for Calais, Dunkerque and Brugge) Argentan (the same in the Normandy area) Carhaix Ploguer (in Brittany) (see the pic above) Troyes (these will be our anti-partisan forces until we can build some) On the 4th of August, start building a new leichte Division. (if you’re ahead of me with your militia divisions, you could start doing this sooner; it requires about 14 spare IC each). On the 8th, add the last 2 Leichte Divisions we will need and 1 infantry division. On the 18th, start 3 panzers (medium armor) and 1 motorised division.
After being pushed around by all their neighbours, the Romanian government has had enough. They ask to join the Axis. Permit it, of course. You can now start influencing Bulgaria, if you wish, just for historic RP purposes. On the 2nd of september, add another panzer to the production queu. I got the last of the militia in the first week of oktober. There should be 2 militia left with all our ports in France and the Low Countries secured. Base these in Frederikshaven in Denmark, thereby freeing 2 infantry divisions. Detach those 2 from the OOB, give them offensive generals and use them to flesh out the 3. Armee, which should be 2 divisions short of a full OOB. CHECK TO MAKE SURE THERE ARE 2 MILITIA IN EVERY PORT!!! When you’re sure it’s secure, attach the entire Heeresgruppe A to the OKH and send them to Berlin. No need to SR them; we have plenty of time. With all those militia coming off the line, we now have a ton of IC wasted. Use it to start building 3 more panzers. On the 5th of November, our MR wing will come off the line. Attach it to Zerstörergruppe 2. Go to the production screen and set the sliders of manual control. Adjust the sliders manually to ensure full coverage of production, reinforcements and upgrades. As we will not be doing any fighting in the next couple of months, we only need to adjust the reinforcement slider after every British bombing run. Set the supplies slider down to 0 if you have to. Yes, this will send our supplies spiraling down, but if we do this now, we can recover in time for the invasion of the SU. The automated sliders are good enough under most circumstances, but I don’t want to risk it taking IC away from production. As upgrades get done, we can put the wasted IC back into supplies to reduce the damage as much as possible.

On the 26th of November, we get the research done for Operational level Organisation. We now have 1944 tech in 1940. Check the new end date for the next level (1948 tech). This is 1943. By this time, we should already be on our way to the US. You can now end the research. While we’re waiting, we might as well reorganise the Luftwaffe as well.
Send 1 Fliegerkorps each to Memel, Suwalki and Wien (the latter to support the upcoming invasion of Yugoslavia). Rebase Zerstörergruppe 1 to Warsaw and Zerstörergruppe 2 to Krakow. 1 Stuka wing goes to Memel, the other one to Bychawa. Three luftflotte will support the invasion of the SU. One from Köningsberg, the second from Lodz and the last one from Krakow.
Keep Luftflotte IV in western Europe, just in case the UK decides to come out to play after all. My researchers have decided to give me a Christmas present. On the 25th, we get our first free slot in research. Time to queu up next year’s research:
(bomber) air-launched torpedo, twin-engine armament, medium fuel tank, twin-engine airframe, light bomb and medium bomb. (fighter) aero-engine, small fuel tank, single engine airframe, singe engine armament. (industry) education, electronic computing machine. (naval) light cruiser escort role, carrier group doctrine, light cruiser crew training, carrier crew training, radar training, fire control
system training, commander decision making, spotting and basing. (infantry) amphibious warfare equipment, airborne warfare equipment, mechanised infantry. (land) mechanised offensive. This should add up to 48 projects total. I will end the chapter here. It might seem a little short, but there’s plenty left to do in 1941, including an invasion. Adding it all
here would make the update too long, I think. Don’t worry, though, we will be masters of Europe soon enough!
Chapter 28: Unternehmen Marita. I’m going to start this chapter with a massive reorganisation of the armed forces we will be using for our invasion of the Soviet Union. First, rename Heeresgruppe A into “Heeresgruppe Nord”. Detach 4. Armee, 5. Armee and 1. Panzerarmee. Detach I. Gebirgsjägerkorps from 4. Armee and 1 Armeekorps from 5. Armee. Attach the mountaineers to the 5. Armee and the armeekorps to the 4. Armee. The reason for this is simply because the 5. Armee will be moving south, towards the Caucasus mountains. Rename Heeresgruppe C into “Heeresgruppe Mitte”. Attach 4. Armee to Heeresgruppe Mitte. Find List, who is probably commanding an armeekorps. Promote him to general and give him command of 6. Armee. Don’t forget to replace him with another officer (either a logistics wizard or an offensive general). Give 5. Armee an new army group. Name this “Heeresgruppe Süd” and attach it to the OKH. Guderian, who is currently commanding 1. Panzerarmee, will be promoted to Field marshall and given command of Heeresgrupp Mitte. Find Model and also promote him to field marshall. Give him command of Heeresgruppe Süd. You may have noticed that we get a whole bunch of new high-skill panzer leaders. So we are going to remove all the leaders from the 1. Panzerarmee. Detach III. Panzerkorps and IV. Panzerkorps. Combine these two into 2. Panzerarmee. Remove 1 motorised division each from III. Panzerkorps and IV. Panzerkorps. Give them both a corps, V. Panzerkorps and VI. Panzerkorps. Combine these two new panzerkorps into 3. Panzerarmee. Promote Rommel, Hausser and Von Kleist to generals.
Give Rommel command of 1. Panzerarmee, Hausser command of 2. Panzerarmee and Von Kleist command of 3. Panzerarmee. Also promote Geyr Von Schweppenburg to general. He will command 4. Panzerarmee which we ar’e building as we speak. Now assign panzerleaders to each and every panzerarmee. (those of you interested in following me as closely as possible will be happy to know that I will be posting my OOB as an appendix to this chapter). I would suggest placing panzerleaders who have a second trait as logistics wizards at the corps level to have the entire corps benefit from reduced supply needs. Place 1. Panzerarmee under Heeresgruppe Süd and the other 2 panzer armies to Heeresgruppe Mitte. Send Heeresgruppe Nord to Köningsberg and Heeresgruppe Mitte to Warsaw. Heeresgruppe Süd will move to Wien, where they will be used to subjugate Yugoslavia. Go to the diplomacy screen. If you are still influencing another nation, end it now. We will need the Leadership elsewhere. Go to the technology screen. Reduce the slider for diplomacy to 0.05, increase research to 26.01 and officer training to 11.46. There almost done. There is only one more thing we need to do. Go to the politics screen. Replace the armaments minister with Franz Seldte, who will offer us +20% supply production, and the army Chief of Staff with Fritz Bayerlein, who will increase supply throughput with 10%. Unpauze the game. On the 4th of January, we get a new motorised division. Deploy it to Köningsberg and give it a new corps, VII. Panzerkorps. Give this corps an army, 4. Panzerarmee. Assign Von Schweppenburg to command the 4. Panzerarmee. Assign panzerleaders and attach it to Heeresgruppe Nord. Put the IC to work in upgrades, reinforcements and supplies. On the 7th, we get a new Larm division. Deploy it in Warsaw and rename it 5. Leichte Division. Attach it to 5. Panzerkorps. Start producing 2 new infantry divisions and place the rest of the wasted IC into supplies. One day later, 4 divisions come off the line. The two medium armour divisions will be placed in Warsaw and placed in III. panzerkorps and IV. Panzerkorps. 1 Larm division will also be placed in Warsaw and attached to VI. Panzerkorps. As always, rename it into 6. Leichte Division.
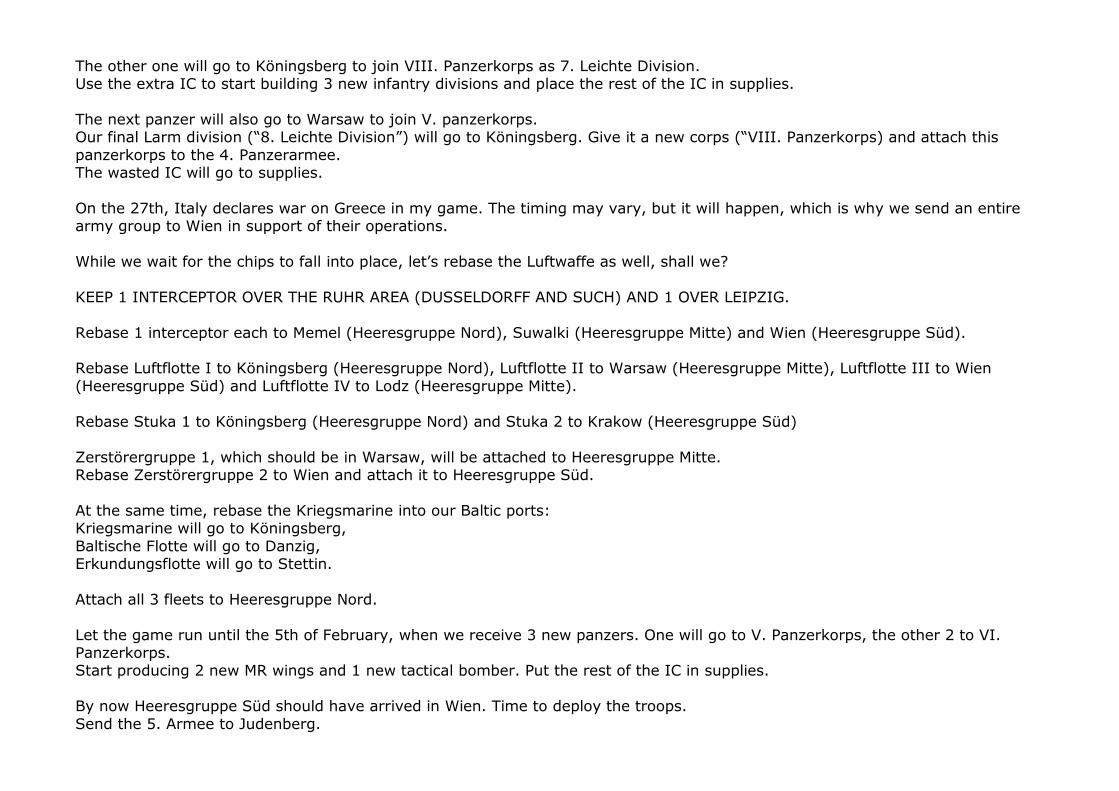
The other one will go to Köningsberg to join VIII. Panzerkorps as 7. Leichte Division. Use the extra IC to start building 3 new infantry divisions and place the rest of the IC in supplies. The next panzer will also go to Warsaw to join V. panzerkorps. Our final Larm division (“8. Leichte Division”) will go to Köningsberg. Give it a new corps (“VIII. Panzerkorps) and attach this panzerkorps to the 4. Panzerarmee. The wasted IC will go to supplies. On the 27th, Italy declares war on Greece in my game. The timing may vary, but it will happen, which is why we send an entire army group to Wien in support of their operations. While we wait for the chips to fall into place, let’s rebase the Luftwaffe as well, shall we? KEEP 1 INTERCEPTOR OVER THE RUHR AREA (DUSSELDORFF AND SUCH) AND 1 OVER LEIPZIG. Rebase 1 interceptor each to Memel (Heeresgruppe Nord), Suwalki (Heeresgruppe Mitte) and Wien (Heeresgruppe Süd). Rebase Luftflotte I to Köningsberg (Heeresgruppe Nord), Luftflotte II to Warsaw (Heeresgruppe Mitte), Luftflotte III to Wien (Heeresgruppe Süd) and Luftflotte IV to Lodz (Heeresgruppe Mitte). Rebase Stuka 1 to Köningsberg (Heeresgruppe Nord) and Stuka 2 to Krakow (Heeresgruppe Süd) Zerstörergruppe 1, which should be in Warsaw, will be attached to Heeresgruppe Mitte. Rebase Zerstörergruppe 2 to Wien and attach it to Heeresgruppe Süd. At the same time, rebase the Kriegsmarine into our Baltic ports: Kriegsmarine will go to Köningsberg, Baltische Flotte will go to Danzig, Erkundungsflotte will go to Stettin. Attach all 3 fleets to Heeresgruppe Nord. Let the game run until the 5th of February, when we receive 3 new panzers. One will go to V. Panzerkorps, the other 2 to VI. Panzerkorps. Start producing 2 new MR wings and 1 new tactical bomber. Put the rest of the IC in supplies. By now Heeresgruppe Süd should have arrived in Wien. Time to deploy the troops. Send the 5. Armee to Judenberg.
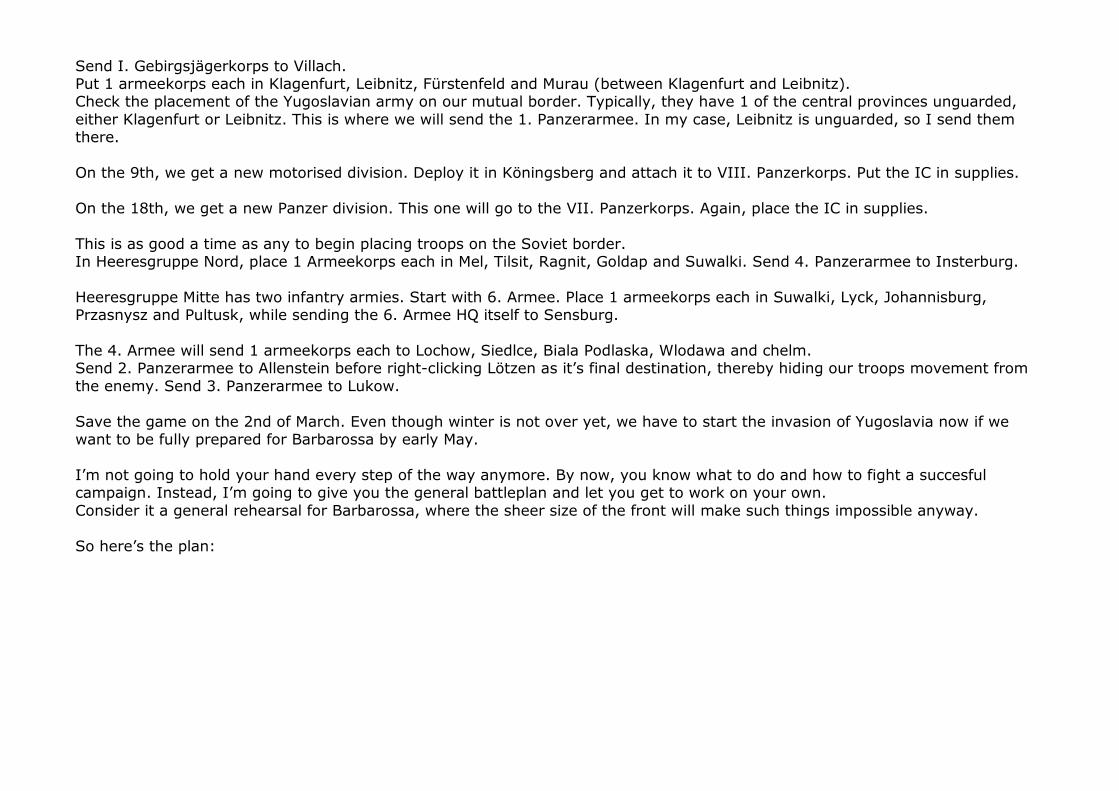
Send I. Gebirgsjägerkorps to Villach. Put 1 armeekorps each in Klagenfurt, Leibnitz, Fürstenfeld and Murau (between Klagenfurt and Leibnitz). Check the placement of the Yugoslavian army on our mutual border. Typically, they have 1 of the central provinces unguarded, either Klagenfurt or Leibnitz. This is where we will send the 1. Panzerarmee. In my case, Leibnitz is unguarded, so I send them there. On the 9th, we get a new motorised division. Deploy it in Köningsberg and attach it to VIII. Panzerkorps. Put the IC in supplies. On the 18th, we get a new Panzer division. This one will go to the VII. Panzerkorps. Again, place the IC in supplies. This is as good a time as any to begin placing troops on the Soviet border. In Heeresgruppe Nord, place 1 Armeekorps each in Mel, Tilsit, Ragnit, Goldap and Suwalki. Send 4. Panzerarmee to Insterburg. Heeresgruppe Mitte has two infantry armies. Start with 6. Armee. Place 1 armeekorps each in Suwalki, Lyck, Johannisburg, Przasnysz and Pultusk, while sending the 6. Armee HQ itself to Sensburg. The 4. Armee will send 1 armeekorps each to Lochow, Siedlce, Biala Podlaska, Wlodawa and chelm. Send 2. Panzerarmee to Allenstein before right-clicking Lötzen as it’s final destination, thereby hiding our troops movement from the enemy. Send 3. Panzerarmee to Lukow. Save the game on the 2nd of March. Even though winter is not over yet, we have to start the invasion of Yugoslavia now if we want to be fully prepared for Barbarossa by early May. I’m not going to hold your hand every step of the way anymore. By now, you know what to do and how to fight a succesful campaign. Instead, I’m going to give you the general battleplan and let you get to work on your own. Consider it a general rehearsal for Barbarossa, where the sheer size of the front will make such things impossible anyway. So here’s the plan:
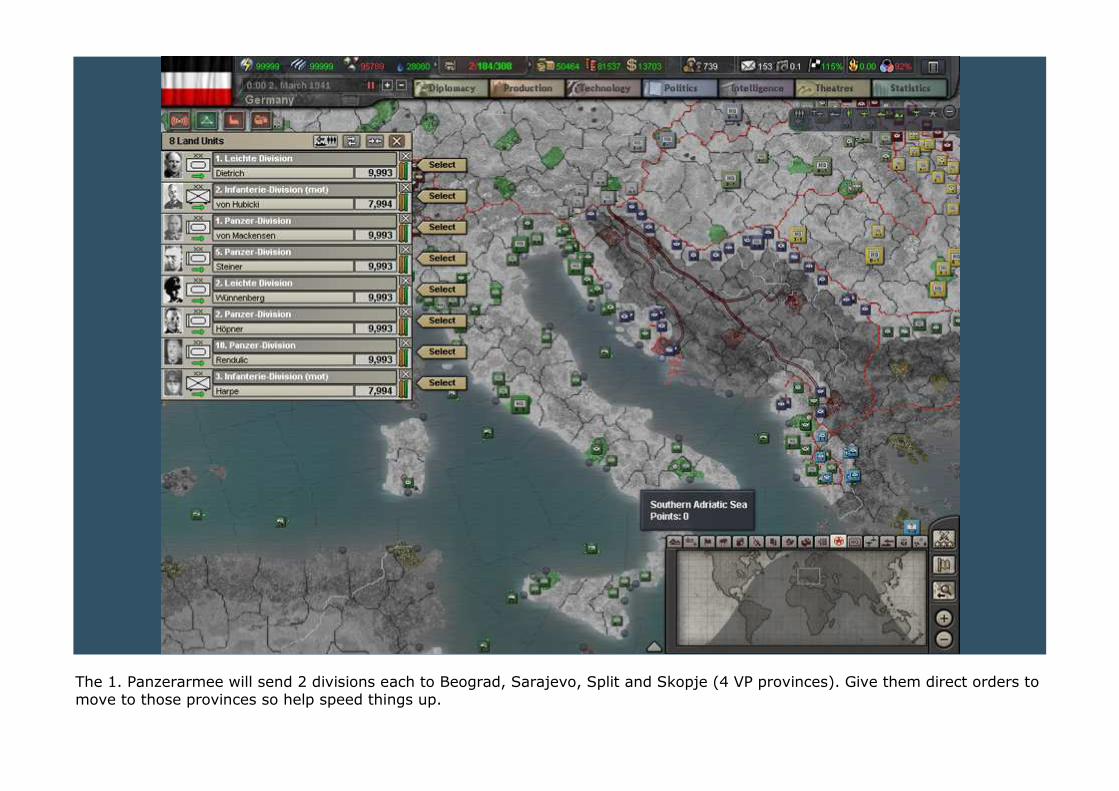
The 1. Panzerarmee will send 2 divisions each to Beograd, Sarajevo, Split and Skopje (4 VP provinces). Give them direct orders to move to those provinces so help speed things up.
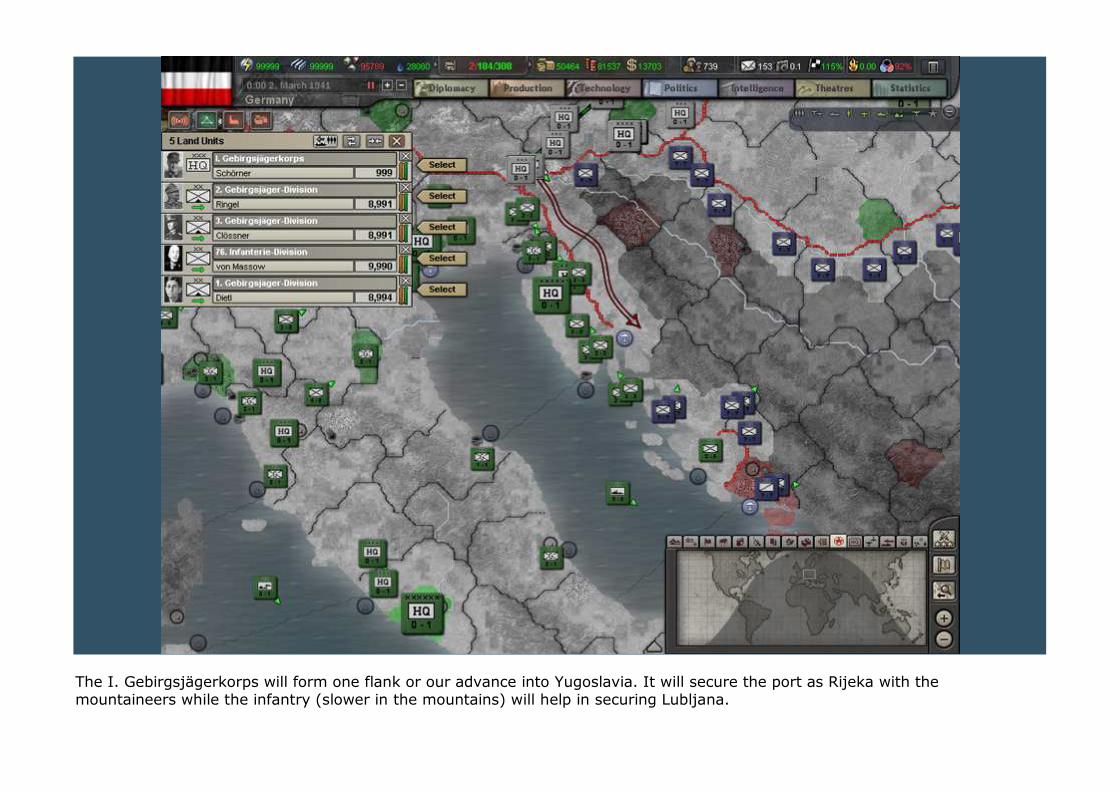
The I. Gebirgsjägerkorps will form one flank or our advance into Yugoslavia. It will secure the port as Rijeka with the mountaineers while the infantry (slower in the mountains) will help in securing Lubljana.
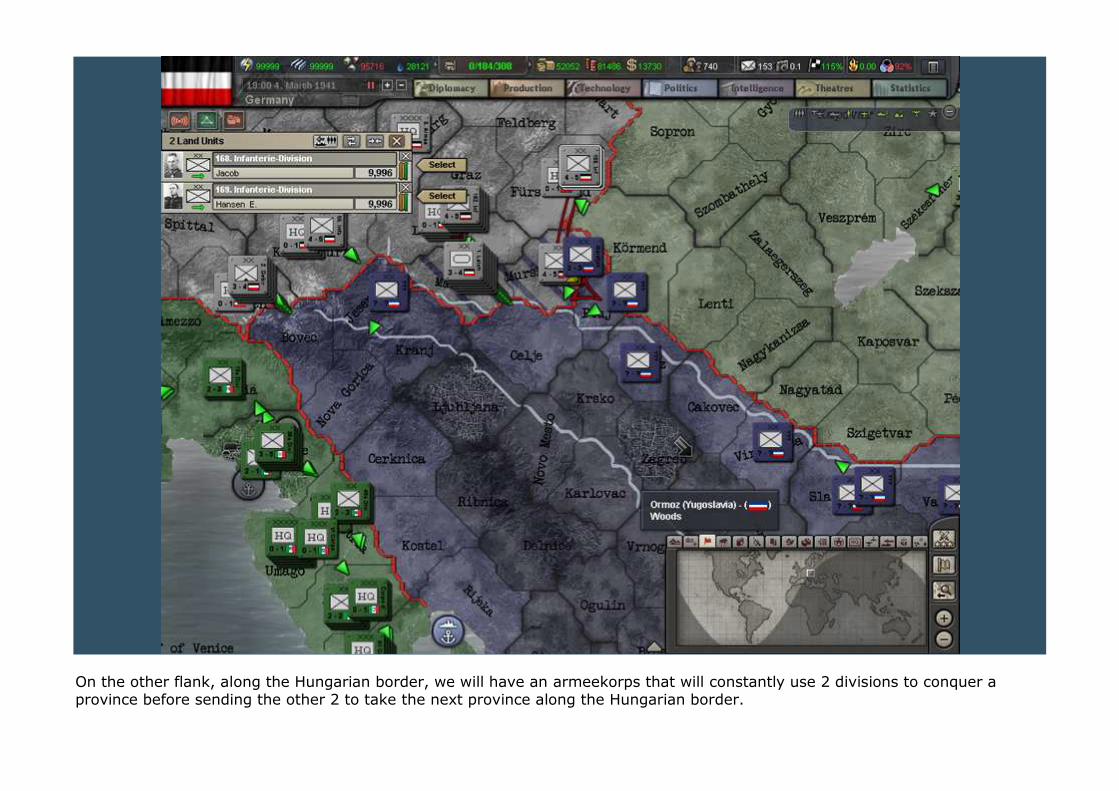
On the other flank, along the Hungarian border, we will have an armeekorps that will constantly use 2 divisions to conquer a province before sending the other 2 to take the next province along the Hungarian border.
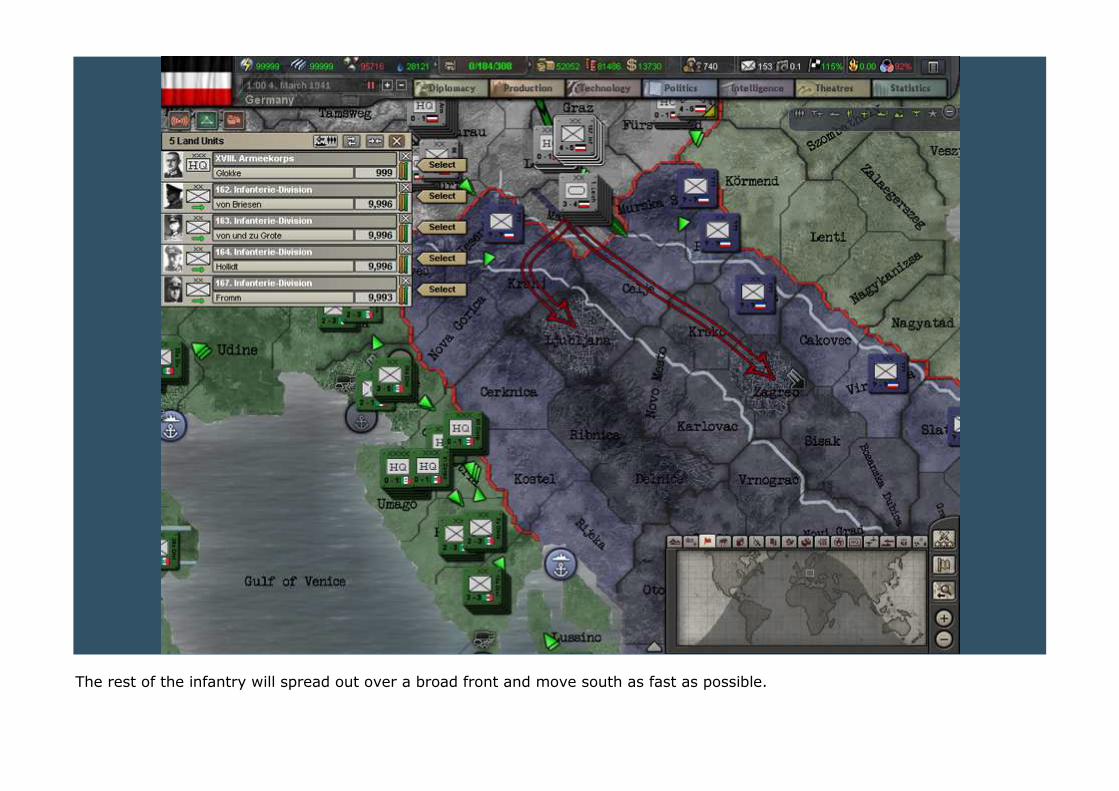
The rest of the infantry will spread out over a broad front and move south as fast as possible.
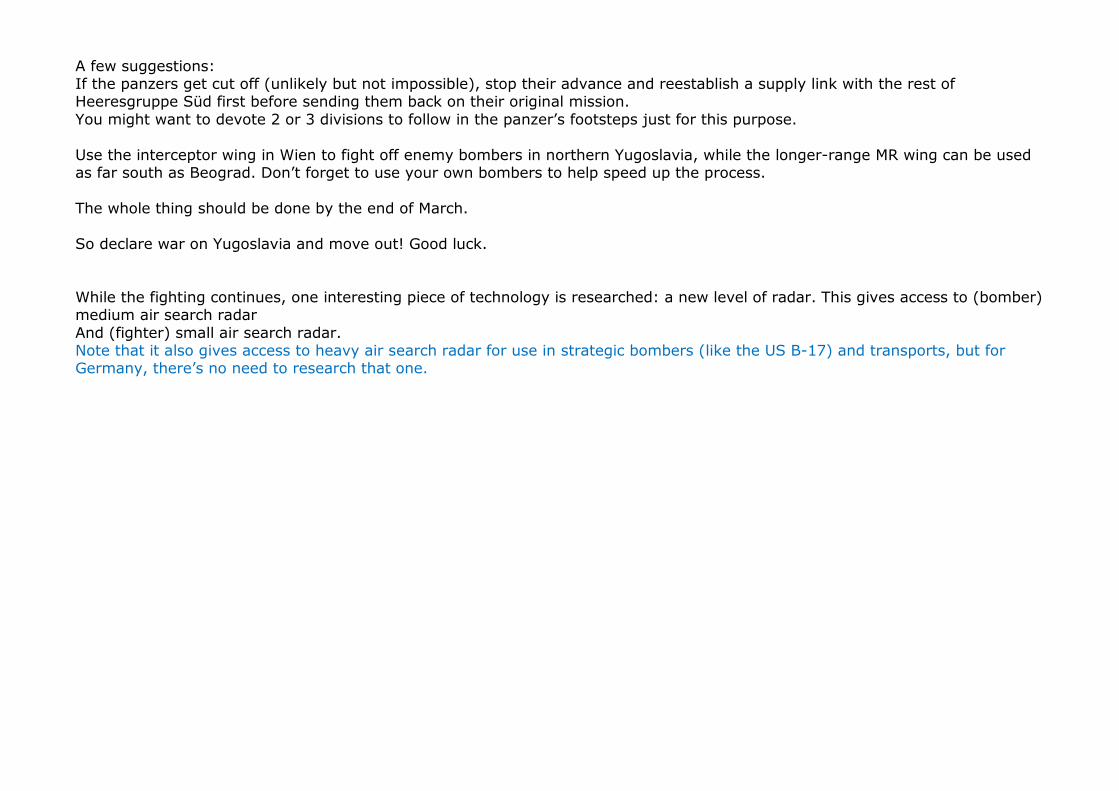
A few suggestions: If the panzers get cut off (unlikely but not impossible), stop their advance and reestablish a supply link with the rest of Heeresgruppe Süd first before sending them back on their original mission. You might want to devote 2 or 3 divisions to follow in the panzer’s footsteps just for this purpose. Use the interceptor wing in Wien to fight off enemy bombers in northern Yugoslavia, while the longer-range MR wing can be used as far south as Beograd. Don’t forget to use your own bombers to help speed up the process. The whole thing should be done by the end of March. So declare war on Yugoslavia and move out! Good luck. While the fighting continues, one interesting piece of technology is researched: a new level of radar. This gives access to (bomber) medium air search radar And (fighter) small air search radar. Note that it also gives access to heavy air search radar for use in strategic bombers (like the US B-17) and transports, but for Germany, there’s no need to research that one.
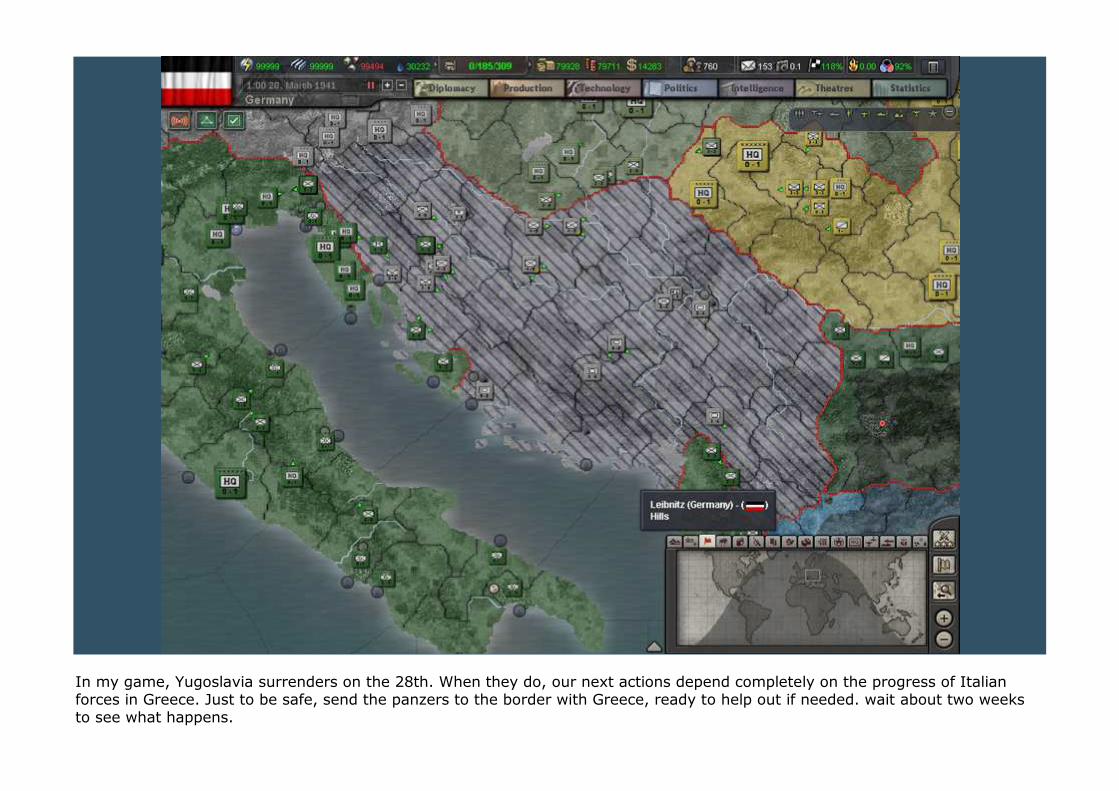
In my game, Yugoslavia surrenders on the 28th. When they do, our next actions depend completely on the progress of Italian forces in Greece. Just to be safe, send the panzers to the border with Greece, ready to help out if needed. wait about two weeks to see what happens.
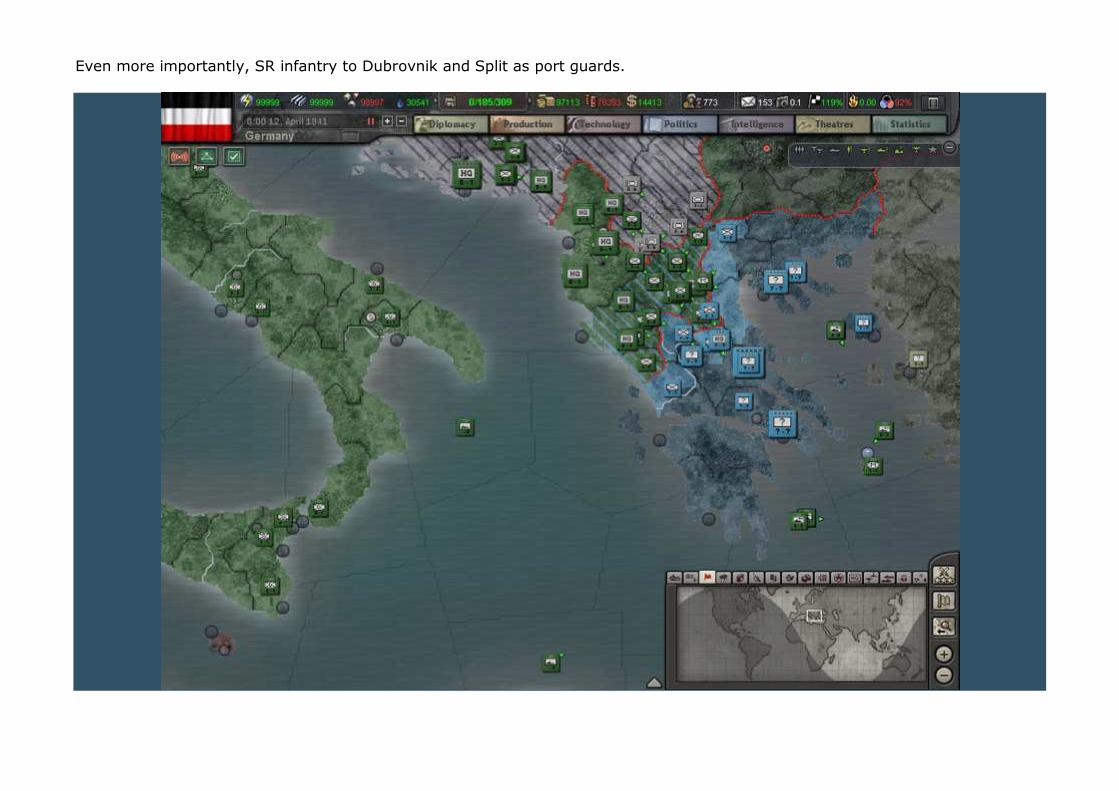
Even more importantly, SR infantry to Dubrovnik and Split as port guards.
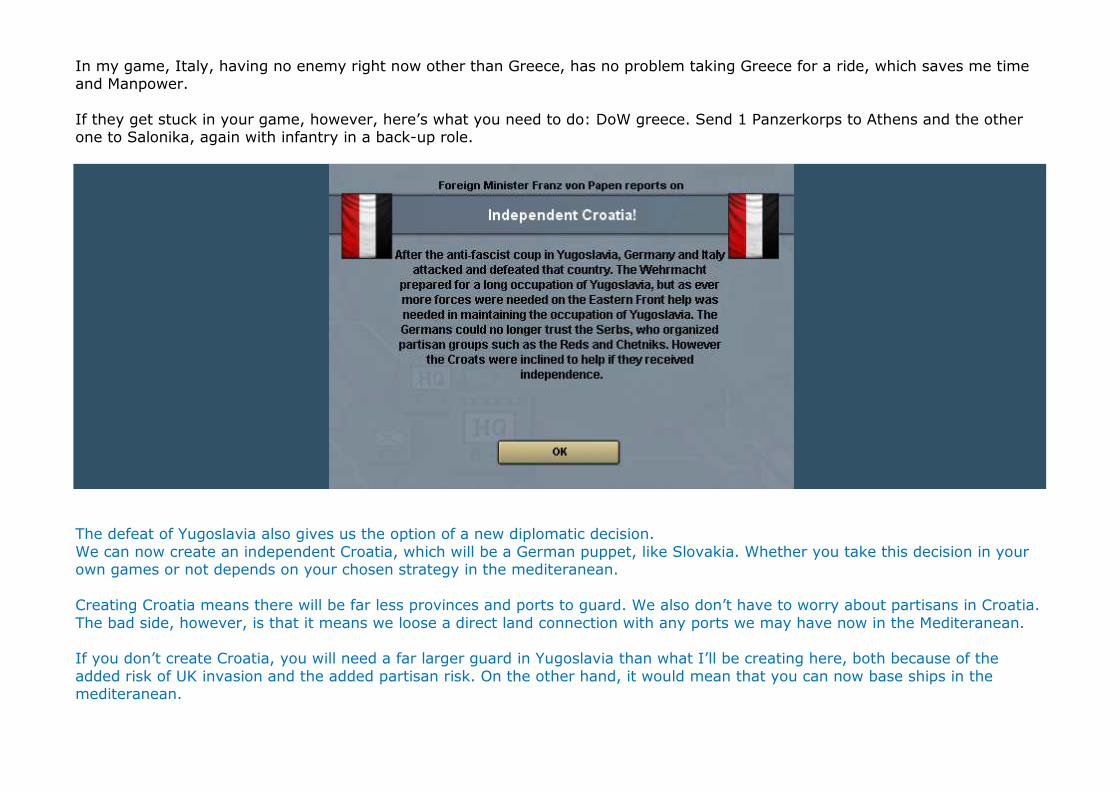
In my game, Italy, having no enemy right now other than Greece, has no problem taking Greece for a ride, which saves me time and Manpower. If they get stuck in your game, however, here’s what you need to do: DoW greece. Send 1 Panzerkorps to Athens and the other one to Salonika, again with infantry in a back-up role.
The defeat of Yugoslavia also gives us the option of a new diplomatic decision. We can now create an independent Croatia, which will be a German puppet, like Slovakia. Whether you take this decision in your own games or not depends on your chosen strategy in the mediteranean. Creating Croatia means there will be far less provinces and ports to guard. We also don’t have to worry about partisans in Croatia. The bad side, however, is that it means we loose a direct land connection with any ports we may have now in the Mediteranean. If you don’t create Croatia, you will need a far larger guard in Yugoslavia than what I’ll be creating here, both because of the added risk of UK invasion and the added partisan risk. On the other hand, it would mean that you can now base ships in the mediteranean.

After the first of April, when the war against Yugoslavia is over 1 month old, there is an additional possibility. You could add as additional wargoal against Yugoslavia to puppet them. This would mean that they would become another German puppet AFTER WE WIN THE WAR AGAINST THE ALLIES, a few years from now. Since wargoals still don’t really work as designed in FtM3.05, I hardly ever use them. I set out along historic paths, so I will be following this course. Take the option to create an “independent” Croatia. Go to the production screen and start building 6 garrisons, 2 cavalry divisions and 2 infantry divisions, who will become our occupation force in the occupied remainder of Yugoslavia. Detach the 2 infantry in Split and keep them there as port guards for now.
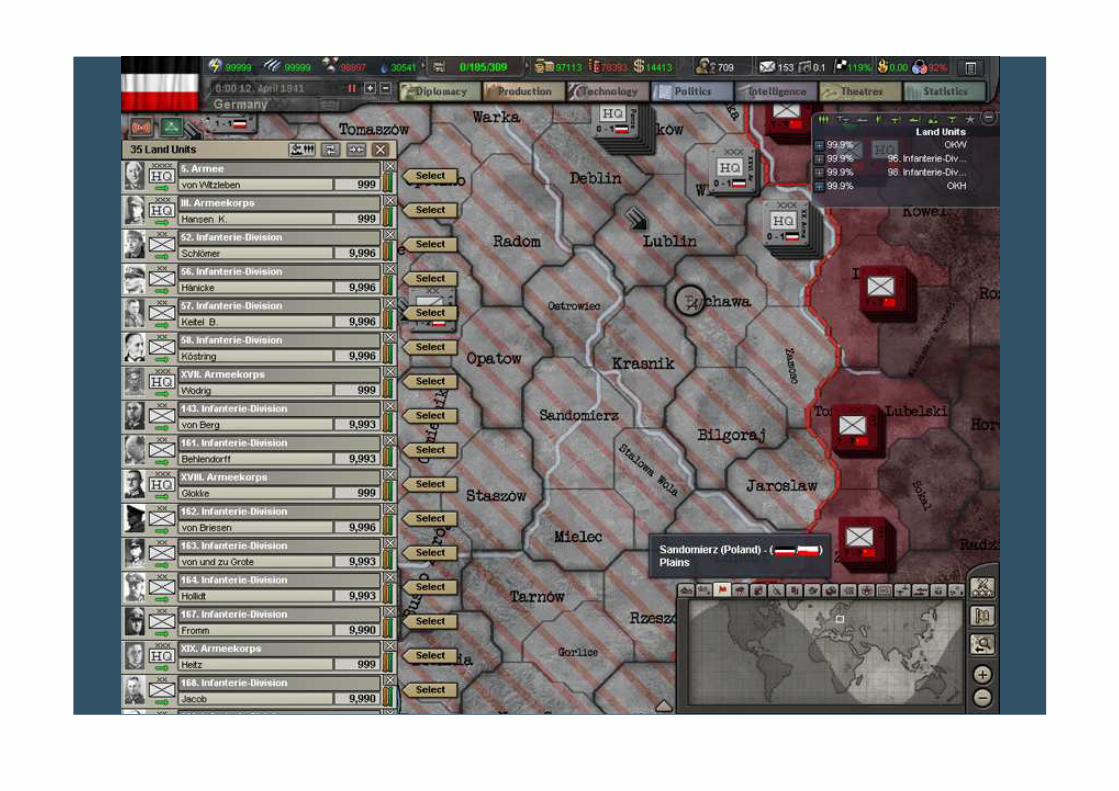
SR Heeresgruppe Süd to Krakow, 5. Armee to Sandomierz, and each of this army’s corps to the final 5 provinces bordering the SU. Take care to place the corps that now only has 2 divisions left in Jaroslaw. SR the entire 1. Panzerarmee to Bilgoray. On the 15th of April, we get a new panzer for the VII. Panzerkorps and 2 infantry. The infantry will be attached to the corps in 6. Armee that only has 2 divisions. Go to the production screen and start a parallell build of 6 transport ships in preperation of our invasion of the UK (hopefully about
a year from now). Make sure to divert enough IC from supplies to cover the added production needs. On the 16th, we get 3 infantry. There is an armeekorps in 4. Armee with only 1 division. Place them there to fill this one out as well. Go to the production screen and start building 1 carrier and 1 light cruiser. Again make sure to divert IC from supplies as needed. One day later we get a new panzer. This one will go to the VIII. Panzerkorps in the north. Start building another carrier. Adjust the sliders to max out upgrades, reinforcements and production.
That same day, we get an opening in our research queu. Time to start next year’s batch of research projects: First, adjust the LS sliders: Research: 28.01 Espionaga: 2.11 Diplomacy: 0.05 Officer training: 11.55
The projects I want you to start are: (infantry) small arms, infantry support weapons, light artillery, infantry anti-tank weapons. (armour) artillery barrel and ammo, artillery carriage and sights, all 4 Light Armour techs and all 4 Armour techs. (escorts) all 4 light cruiser techs.

(capital) all 4 carrier techs. (industry) combat medicine, first aid, agriculture, industrial efficiency, supply production and radar. (theory) supply transportation, supply organisation, civil defense. (land) mobile warfare, operational level command structure, schwerpunkt, elastic defense, blitzkrieg, infantry warfare, special forces, assault concentration.
(air) fighter pilot training, fighter ground crew training, interception tactics, fighter ground control, CAS pilot training, CAS ground crew training, ground attack tactics, tac pilot training, tac ground crew training, interdiction tactics, tactical air command, NAV pilot training, NAV ground crew training, port strike tactics, naval strike tactics, naval air targeting, nav tactics. (total: 83 projects).
On the 20th, we get our very last panzer division. Deploy it as part of VIII. Panzerkorps. Check to make sure that every panzerkorps has the following units: 1 Leichte Division 1 motorised division 2 Panzer divisions. When the attack delay from strategically redeploying Heeresgruppe Süd is completely gone, we can send the panzers to their final launching points:
1. panzerarmee: Jaroslaw 2. panzerarmee: Suwalki 3. Panzerarmee: Biala Podlaska 4. Panzerarmee: Ragnit
On the 3rd of may, we finish our nuclear research. Go to the technology screen and start: (industry) isotope seperation. All we have to do now is wait until everyone is in place. By the 5th of May, this is done and our supplies have maxed out. This may seem as overkill, but it’s not. We will need every drop of it we can get for the rest of the year.
We are ready for the largest invasion ever known in human history. Our armies have fought long and hard to get here and we have the most experienced army in Europe, if not the world. We know how to use how armed forces to achieve complete victory over Germany’s most hated foe. Save the game. When we return, we are going to give the universe another Big Bang!!
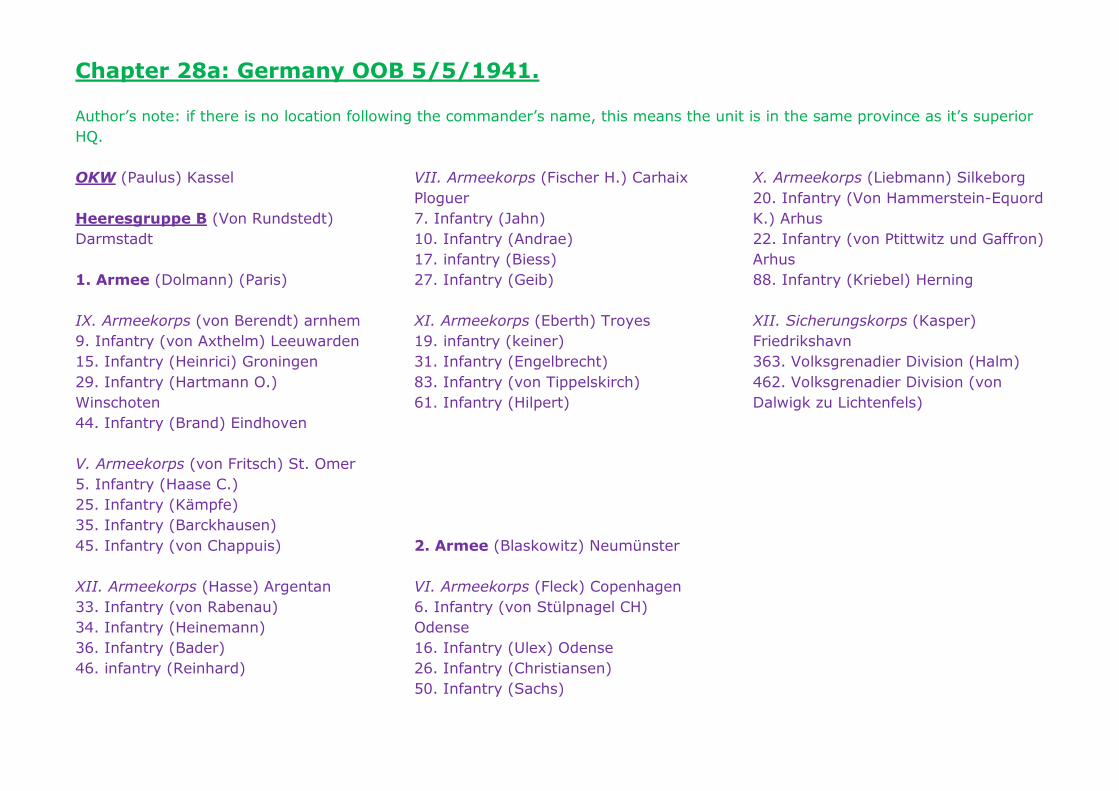
Chapter 28a: Germany OOB 5/5/1941. Author’s note: if there is no location following the commander’s name, this means the unit is in the same province as it’s superior HQ. OKW (Paulus) Kassel
Heeresgruppe B (Von Rundstedt) Darmstadt 1. Armee (Dolmann) (Paris) IX. Armeekorps (von Berendt) arnhem 9. Infantry (von Axthelm) Leeuwarden 15. Infantry (Heinrici) Groningen
29. Infantry (Hartmann O.) Winschoten 44. Infantry (Brand) Eindhoven V. Armeekorps (von Fritsch) St. Omer 5. Infantry (Haase C.) 25. Infantry (Kämpfe) 35. Infantry (Barckhausen)
45. Infantry (von Chappuis) XII. Armeekorps (Hasse) Argentan 33. Infantry (von Rabenau) 34. Infantry (Heinemann) 36. Infantry (Bader) 46. infantry (Reinhard)
VII. Armeekorps (Fischer H.) Carhaix
Ploguer 7. Infantry (Jahn) 10. Infantry (Andrae) 17. infantry (Biess) 27. Infantry (Geib) XI. Armeekorps (Eberth) Troyes 19. infantry (keiner) 31. Infantry (Engelbrecht)
83. Infantry (von Tippelskirch) 61. Infantry (Hilpert)
2. Armee (Blaskowitz) Neumünster VI. Armeekorps (Fleck) Copenhagen 6. Infantry (von Stülpnagel CH) Odense 16. Infantry (Ulex) Odense 26. Infantry (Christiansen) 50. Infantry (Sachs)
X. Armeekorps (Liebmann) Silkeborg
20. Infantry (Von Hammerstein-Equord K.) Arhus 22. Infantry (von Ptittwitz und Gaffron) Arhus 88. Infantry (Kriebel) Herning XII. Sicherungskorps (Kasper) Friedrikshavn 363. Volksgrenadier Division (Halm)
462. Volksgrenadier Division (von Dalwigk zu Lichtenfels)
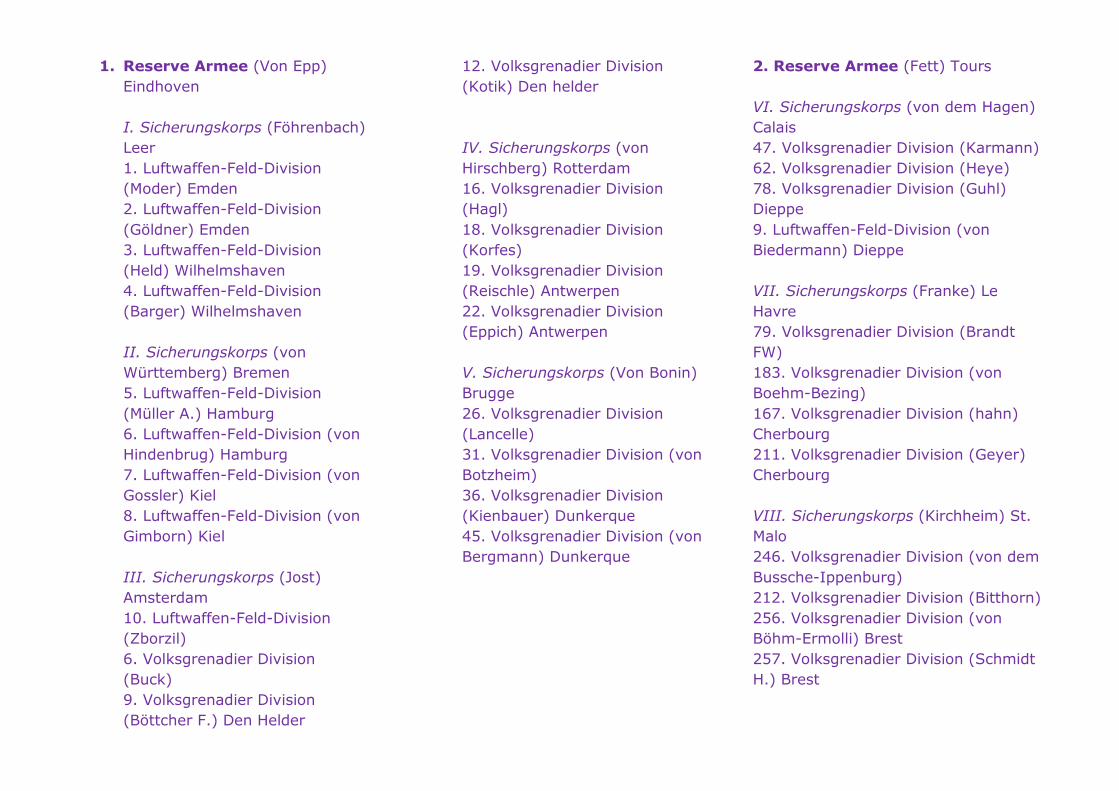
1. Reserve Armee (Von Epp) Eindhoven I. Sicherungskorps (Föhrenbach) Leer 1. Luftwaffen-Feld-Division (Moder) Emden 2. Luftwaffen-Feld-Division
(Göldner) Emden 3. Luftwaffen-Feld-Division (Held) Wilhelmshaven 4. Luftwaffen-Feld-Division (Barger) Wilhelmshaven II. Sicherungskorps (von Württemberg) Bremen 5. Luftwaffen-Feld-Division
(Müller A.) Hamburg 6. Luftwaffen-Feld-Division (von Hindenbrug) Hamburg 7. Luftwaffen-Feld-Division (von Gossler) Kiel 8. Luftwaffen-Feld-Division (von Gimborn) Kiel
III. Sicherungskorps (Jost) Amsterdam 10. Luftwaffen-Feld-Division (Zborzil) 6. Volksgrenadier Division (Buck) 9. Volksgrenadier Division (Böttcher F.) Den Helder
12. Volksgrenadier Division (Kotik) Den helder
IV. Sicherungskorps (von Hirschberg) Rotterdam 16. Volksgrenadier Division (Hagl)
18. Volksgrenadier Division (Korfes) 19. Volksgrenadier Division (Reischle) Antwerpen 22. Volksgrenadier Division (Eppich) Antwerpen V. Sicherungskorps (Von Bonin) Brugge
26. Volksgrenadier Division (Lancelle) 31. Volksgrenadier Division (von Botzheim) 36. Volksgrenadier Division (Kienbauer) Dunkerque 45. Volksgrenadier Division (von Bergmann) Dunkerque
2. Reserve Armee (Fett) Tours VI. Sicherungskorps (von dem Hagen) Calais 47. Volksgrenadier Division (Karmann) 62. Volksgrenadier Division (Heye) 78. Volksgrenadier Division (Guhl) Dieppe
9. Luftwaffen-Feld-Division (von Biedermann) Dieppe VII. Sicherungskorps (Franke) Le Havre 79. Volksgrenadier Division (Brandt FW) 183. Volksgrenadier Division (von Boehm-Bezing)
167. Volksgrenadier Division (hahn) Cherbourg 211. Volksgrenadier Division (Geyer) Cherbourg VIII. Sicherungskorps (Kirchheim) St. Malo 246. Volksgrenadier Division (von dem
Bussche-Ippenburg) 212. Volksgrenadier Division (Bitthorn) 256. Volksgrenadier Division (von Böhm-Ermolli) Brest 257. Volksgrenadier Division (Schmidt H.) Brest
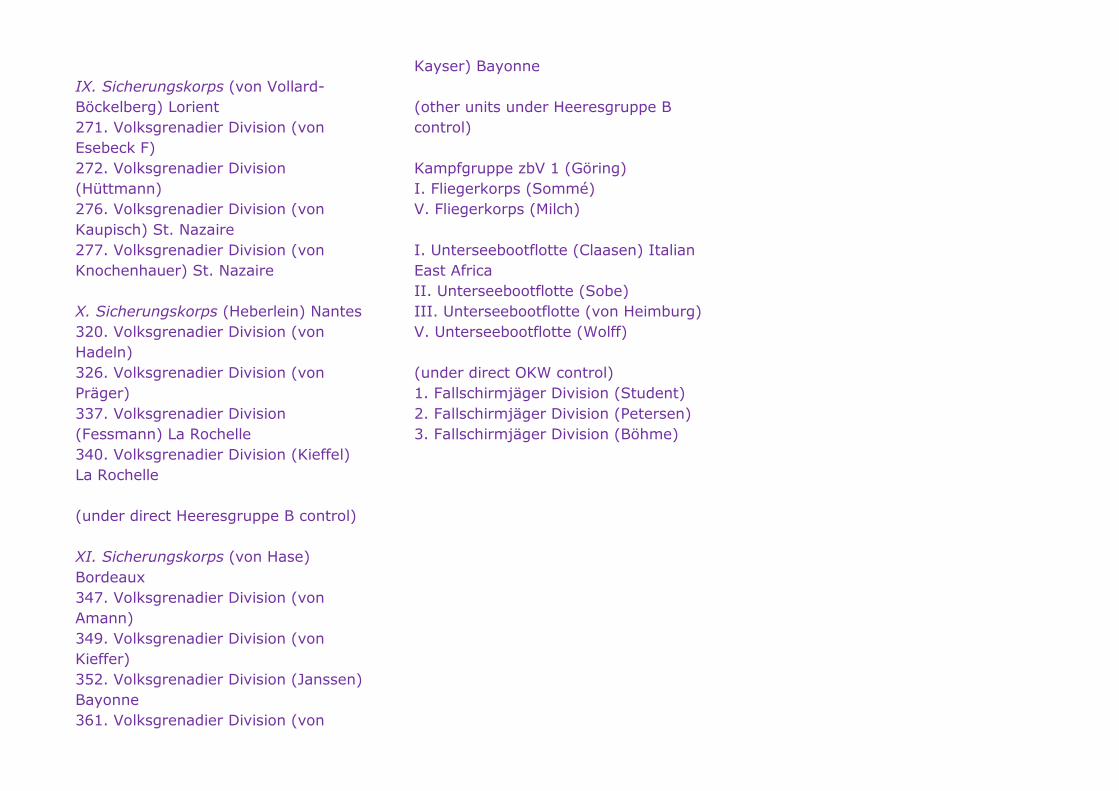
IX. Sicherungskorps (von Vollard-Böckelberg) Lorient 271. Volksgrenadier Division (von Esebeck F) 272. Volksgrenadier Division (Hüttmann) 276. Volksgrenadier Division (von
Kaupisch) St. Nazaire 277. Volksgrenadier Division (von Knochenhauer) St. Nazaire X. Sicherungskorps (Heberlein) Nantes 320. Volksgrenadier Division (von Hadeln) 326. Volksgrenadier Division (von Präger)
337. Volksgrenadier Division (Fessmann) La Rochelle 340. Volksgrenadier Division (Kieffel) La Rochelle (under direct Heeresgruppe B control) XI. Sicherungskorps (von Hase)
Bordeaux 347. Volksgrenadier Division (von Amann) 349. Volksgrenadier Division (von Kieffer) 352. Volksgrenadier Division (Janssen) Bayonne 361. Volksgrenadier Division (von
Kayser) Bayonne (other units under Heeresgruppe B control) Kampfgruppe zbV 1 (Göring) I. Fliegerkorps (Sommé) V. Fliegerkorps (Milch)
I. Unterseebootflotte (Claasen) Italian East Africa II. Unterseebootflotte (Sobe) III. Unterseebootflotte (von Heimburg) V. Unterseebootflotte (Wolff) (under direct OKW control) 1. Fallschirmjäger Division (Student)
2. Fallschirmjäger Division (Petersen) 3. Fallschirmjäger Division (Böhme)
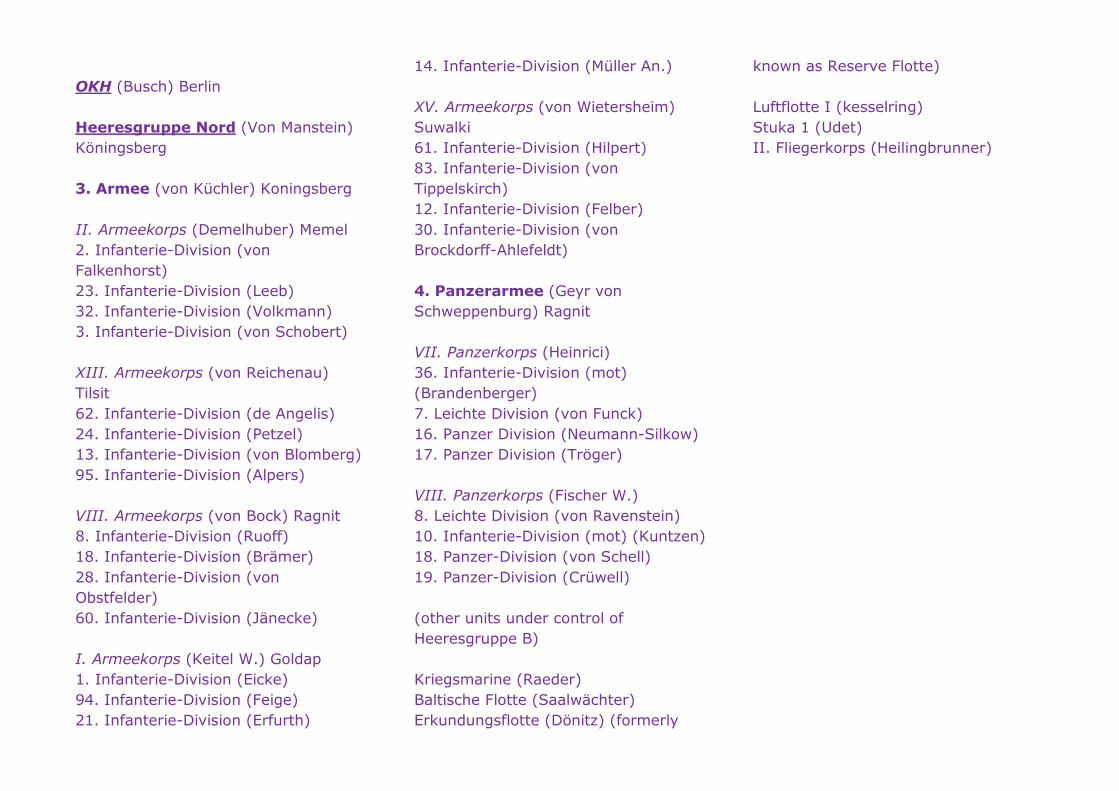
OKH (Busch) Berlin Heeresgruppe Nord (Von Manstein) Köningsberg 3. Armee (von Küchler) Koningsberg
II. Armeekorps (Demelhuber) Memel 2. Infanterie-Division (von Falkenhorst) 23. Infanterie-Division (Leeb) 32. Infanterie-Division (Volkmann) 3. Infanterie-Division (von Schobert) XIII. Armeekorps (von Reichenau) Tilsit
62. Infanterie-Division (de Angelis) 24. Infanterie-Division (Petzel) 13. Infanterie-Division (von Blomberg) 95. Infanterie-Division (Alpers) VIII. Armeekorps (von Bock) Ragnit 8. Infanterie-Division (Ruoff) 18. Infanterie-Division (Brämer)
28. Infanterie-Division (von Obstfelder) 60. Infanterie-Division (Jänecke) I. Armeekorps (Keitel W.) Goldap 1. Infanterie-Division (Eicke) 94. Infanterie-Division (Feige) 21. Infanterie-Division (Erfurth)
14. Infanterie-Division (Müller An.) XV. Armeekorps (von Wietersheim) Suwalki 61. Infanterie-Division (Hilpert) 83. Infanterie-Division (von Tippelskirch) 12. Infanterie-Division (Felber)
30. Infanterie-Division (von Brockdorff-Ahlefeldt) 4. Panzerarmee (Geyr von Schweppenburg) Ragnit VII. Panzerkorps (Heinrici) 36. Infanterie-Division (mot) (Brandenberger)
7. Leichte Division (von Funck) 16. Panzer Division (Neumann-Silkow) 17. Panzer Division (Tröger) VIII. Panzerkorps (Fischer W.) 8. Leichte Division (von Ravenstein) 10. Infanterie-Division (mot) (Kuntzen) 18. Panzer-Division (von Schell)
19. Panzer-Division (Crüwell) (other units under control of Heeresgruppe B) Kriegsmarine (Raeder) Baltische Flotte (Saalwächter) Erkundungsflotte (Dönitz) (formerly
known as Reserve Flotte) Luftflotte I (kesselring) Stuka 1 (Udet) II. Fliegerkorps (Heilingbrunner)
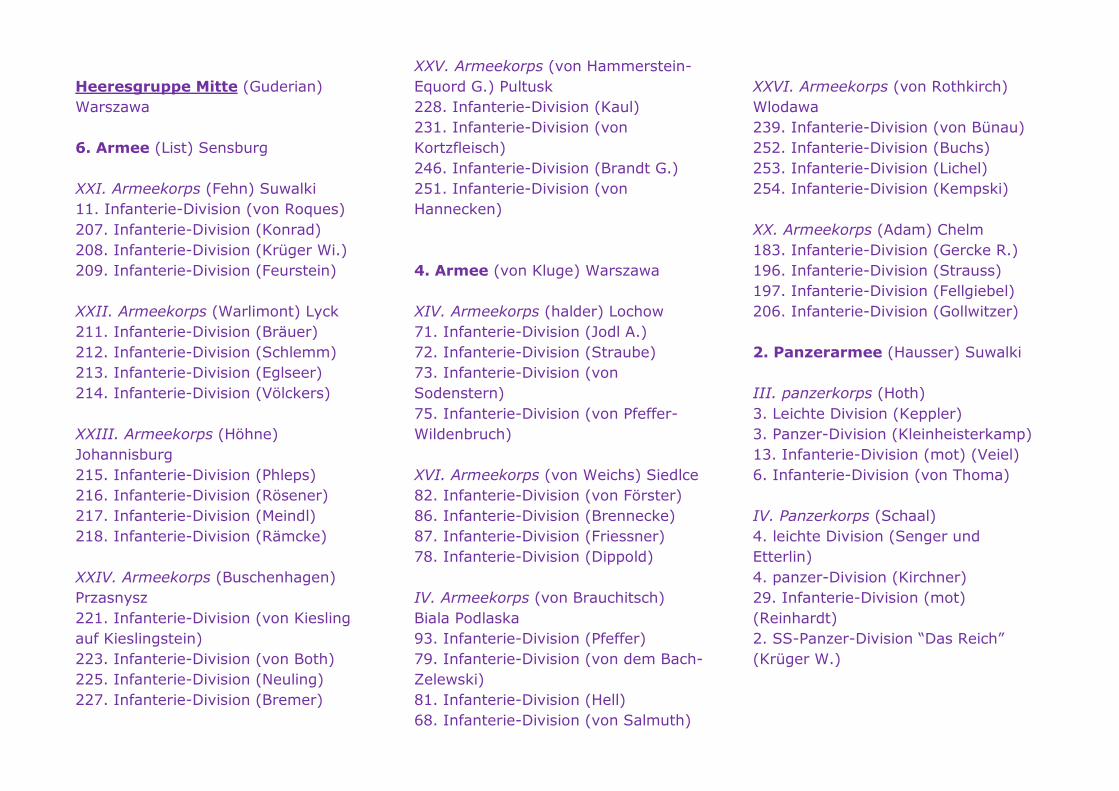
Heeresgruppe Mitte (Guderian) Warszawa 6. Armee (List) Sensburg XXI. Armeekorps (Fehn) Suwalki 11. Infanterie-Division (von Roques)
207. Infanterie-Division (Konrad) 208. Infanterie-Division (Krüger Wi.) 209. Infanterie-Division (Feurstein) XXII. Armeekorps (Warlimont) Lyck 211. Infanterie-Division (Bräuer) 212. Infanterie-Division (Schlemm) 213. Infanterie-Division (Eglseer) 214. Infanterie-Division (Völckers)
XXIII. Armeekorps (Höhne) Johannisburg 215. Infanterie-Division (Phleps) 216. Infanterie-Division (Rösener) 217. Infanterie-Division (Meindl) 218. Infanterie-Division (Rämcke)
XXIV. Armeekorps (Buschenhagen) Przasnysz 221. Infanterie-Division (von Kiesling auf Kieslingstein) 223. Infanterie-Division (von Both) 225. Infanterie-Division (Neuling) 227. Infanterie-Division (Bremer)
XXV. Armeekorps (von Hammerstein-Equord G.) Pultusk 228. Infanterie-Division (Kaul) 231. Infanterie-Division (von Kortzfleisch) 246. Infanterie-Division (Brandt G.) 251. Infanterie-Division (von Hannecken)
4. Armee (von Kluge) Warszawa XIV. Armeekorps (halder) Lochow 71. Infanterie-Division (Jodl A.) 72. Infanterie-Division (Straube) 73. Infanterie-Division (von Sodenstern)
75. Infanterie-Division (von Pfeffer-Wildenbruch) XVI. Armeekorps (von Weichs) Siedlce 82. Infanterie-Division (von Förster) 86. Infanterie-Division (Brennecke) 87. Infanterie-Division (Friessner) 78. Infanterie-Division (Dippold)
IV. Armeekorps (von Brauchitsch) Biala Podlaska 93. Infanterie-Division (Pfeffer) 79. Infanterie-Division (von dem Bach-Zelewski) 81. Infanterie-Division (Hell) 68. Infanterie-Division (von Salmuth)
XXVI. Armeekorps (von Rothkirch) Wlodawa 239. Infanterie-Division (von Bünau) 252. Infanterie-Division (Buchs) 253. Infanterie-Division (Lichel) 254. Infanterie-Division (Kempski)
XX. Armeekorps (Adam) Chelm 183. Infanterie-Division (Gercke R.) 196. Infanterie-Division (Strauss) 197. Infanterie-Division (Fellgiebel) 206. Infanterie-Division (Gollwitzer) 2. Panzerarmee (Hausser) Suwalki III. panzerkorps (Hoth)
3. Leichte Division (Keppler) 3. Panzer-Division (Kleinheisterkamp) 13. Infanterie-Division (mot) (Veiel) 6. Infanterie-Division (von Thoma) IV. Panzerkorps (Schaal) 4. leichte Division (Senger und Etterlin)
4. panzer-Division (Kirchner) 29. Infanterie-Division (mot) (Reinhardt) 2. SS-Panzer-Division “Das Reich” (Krüger W.)
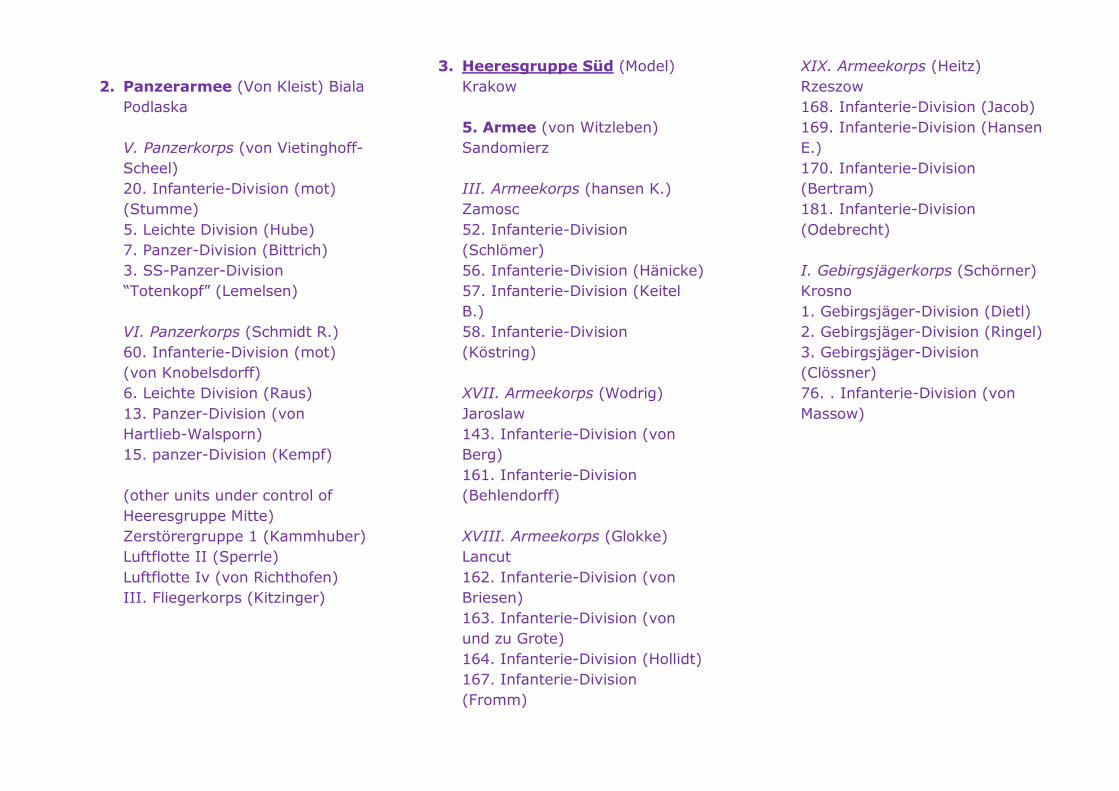
2. Panzerarmee (Von Kleist) Biala Podlaska V. Panzerkorps (von Vietinghoff-Scheel) 20. Infanterie-Division (mot) (Stumme)
5. Leichte Division (Hube) 7. Panzer-Division (Bittrich) 3. SS-Panzer-Division “Totenkopf” (Lemelsen) VI. Panzerkorps (Schmidt R.) 60. Infanterie-Division (mot) (von Knobelsdorff) 6. Leichte Division (Raus)
13. Panzer-Division (von Hartlieb-Walsporn) 15. panzer-Division (Kempf) (other units under control of Heeresgruppe Mitte) Zerstörergruppe 1 (Kammhuber) Luftflotte II (Sperrle)
Luftflotte Iv (von Richthofen) III. Fliegerkorps (Kitzinger)
3. Heeresgruppe Süd (Model) Krakow 5. Armee (von Witzleben) Sandomierz III. Armeekorps (hansen K.) Zamosc
52. Infanterie-Division (Schlömer) 56. Infanterie-Division (Hänicke) 57. Infanterie-Division (Keitel B.) 58. Infanterie-Division (Köstring) XVII. Armeekorps (Wodrig)
Jaroslaw 143. Infanterie-Division (von Berg) 161. Infanterie-Division (Behlendorff) XVIII. Armeekorps (Glokke) Lancut
162. Infanterie-Division (von Briesen) 163. Infanterie-Division (von und zu Grote) 164. Infanterie-Division (Hollidt) 167. Infanterie-Division (Fromm)
XIX. Armeekorps (Heitz) Rzeszow 168. Infanterie-Division (Jacob) 169. Infanterie-Division (Hansen E.) 170. Infanterie-Division (Bertram) 181. Infanterie-Division
(Odebrecht) I. Gebirgsjägerkorps (Schörner) Krosno 1. Gebirgsjäger-Division (Dietl) 2. Gebirgsjäger-Division (Ringel) 3. Gebirgsjäger-Division (Clössner) 76. . Infanterie-Division (von
Massow)
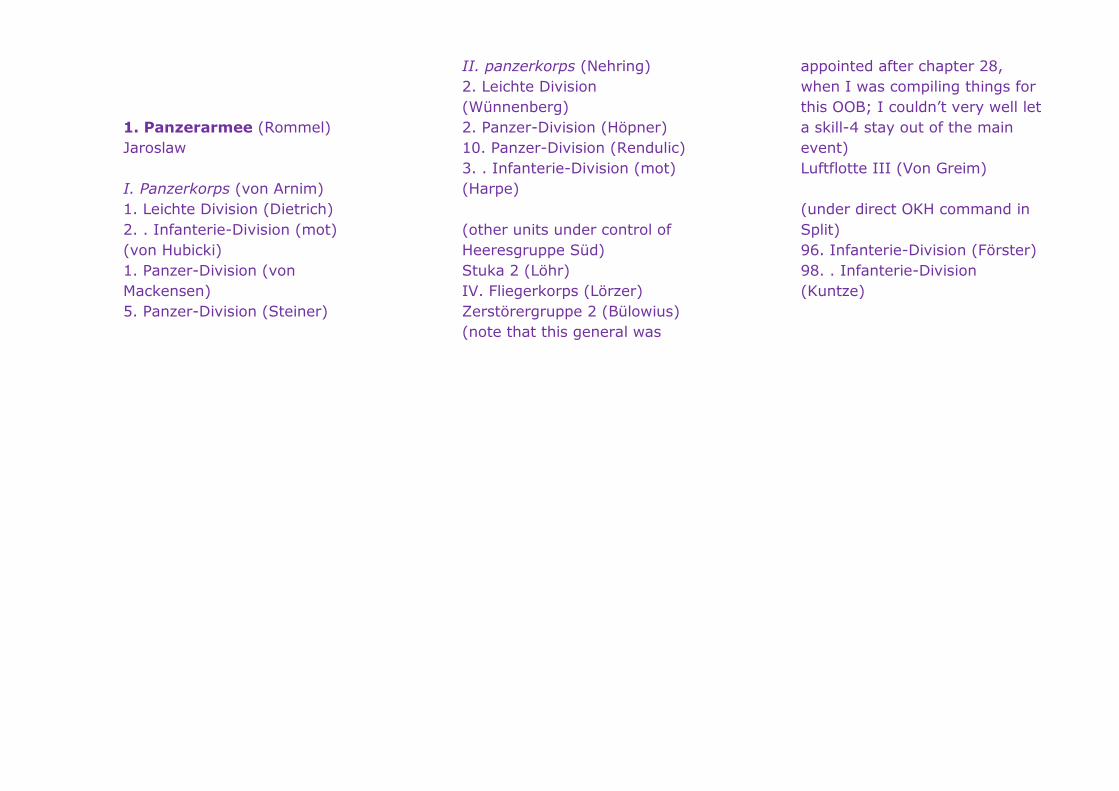
1. Panzerarmee (Rommel) Jaroslaw I. Panzerkorps (von Arnim) 1. Leichte Division (Dietrich)
2. . Infanterie-Division (mot) (von Hubicki) 1. Panzer-Division (von Mackensen) 5. Panzer-Division (Steiner)
II. panzerkorps (Nehring) 2. Leichte Division (Wünnenberg) 2. Panzer-Division (Höpner) 10. Panzer-Division (Rendulic) 3. . Infanterie-Division (mot) (Harpe)
(other units under control of Heeresgruppe Süd) Stuka 2 (Löhr) IV. Fliegerkorps (Lörzer) Zerstörergruppe 2 (Bülowius) (note that this general was
appointed after chapter 28, when I was compiling things for this OOB; I couldn’t very well let a skill-4 stay out of the main event) Luftflotte III (Von Greim) (under direct OKH command in
Split) 96. Infanterie-Division (Förster) 98. . Infanterie-Division (Kuntze)
Chapter 29: Barbarossa General Battle Plan. Before I go into the full details, a few general remarks about the invasion in general. First, and most importantly, let there be no mistake: this is a war of annihilation. The Soviet union has the capability to face us with up to 200 divisions if they want to. And you can count on most of their army techs to be up-to-date. They have a huge airforce, with more fighters than we can launch against them, and tons of medium-range bombers. They also have a huge advantage in the terrain and infrastructure of their vast nation. If we give them the time to build more troops, in six months time we will be swamped. Much like the RL German army faced after the winter of ’42. The only chance we have, is by destroying more divisions than they can produce in as short a time as possible. In Poland and France, you learned about encirclements. In France and Yugoslavia, you learned about overrunning the enemy. Now, we are going to use both of these to wipe the Red Army (or at least a huge chunck of it) off the map, making it impossible for them to offer meaningful resistance in our final drive on their biggest VP provinces: Leningrad, Moscow and Stalingrad. A secondary focus should be to conquer ports (for supplies) and airbases (to prevent their Air Force being used against us). Soviet Union has one huge strategic defensive ace: the Pripyet Marshes, which lie right in the middle of their nation between us and Moscow, where fighting is deadly and advances are measured in miles per day. This will have to be circumvented before we can even think about a broad front approach. The huge size of the Soviet Union means this invasion will have to be performed in 3 stages. The first stage is what I call “evening the odds”. This means securing ports for supplies and getting past the Pripyet marshes while destroying Red Army Units. The second stage is the general drive deep into their heartlands. Here we will focus on a broad front approach and conquering VP provinces while continuing to overrun their forces. The third stage is “mopping up”, which, in the case of the SU, is a relative term. In my experience, this usually means two of our main objectives will have been met: leningrad and Moscow. By this time, Heeresgruppe Süd will be struggling to catch up with the other two. We can ease this struggle by assigning extra armies to the army group, while the other two army groups will focus on defense and grabbing other nearby VPs.
Each Heeresgruppe will move on to the next stage independent of where the other two are at that moment (within reason, of course). This means keeping a cool head and maintaining focus. Don’t be afraid to write things down on a piece of paper so you will have a nice, clear resume of what you want each army to do at that point. Which brings me to the next point, also related to the size of the nation. The front, at the start of the operations, is, if I counted correctly, 19 provinces wide. This front will increase exponentially as we make progress. Keep the army groups together! This is where many new players loose the war, I think. Before you know it, you have panzers belonging to Heeresgruppe Nord fighting for control of Rostok-na-Don on the Black Sea and infantry from Heeresgruppe Mitte trying to reach Murmansk right next to the arctic circle. If you feel yourself slipping, the best thing to do is save before things get out of hand and continue at a later time when you have your clear focus back. After all, at this fase in the game, we are singlehandedly doing what, in real life, took the combined talents of hundreds, if not thousands of people in seconds where they had days or weeks. There is no shame in admitting to yourself that you are starting to get overwhelmed. It happens to me every time. A fresh mind is your strongest weapon. Remember that.
Now that I have you thoroughly worried , let me fill you in on the general outline.

Stage 1. Heeresgruppe Nord.
The 4. Panzerarmee will make a beeline towards Riga, trapping all the units between themselves and the Baltic Sea. It will first secure the airfield at Kaunas, and then cross the river north of Riga to prevent Soviet forces from digging in behind it. The 3. Armee will methodically overrun all opposition before moving on Riga, along with elements of the panzerarmee. Heeresgruppe Nord will end stage 1 by reestablishing a proper OOB for the next fase of operations.
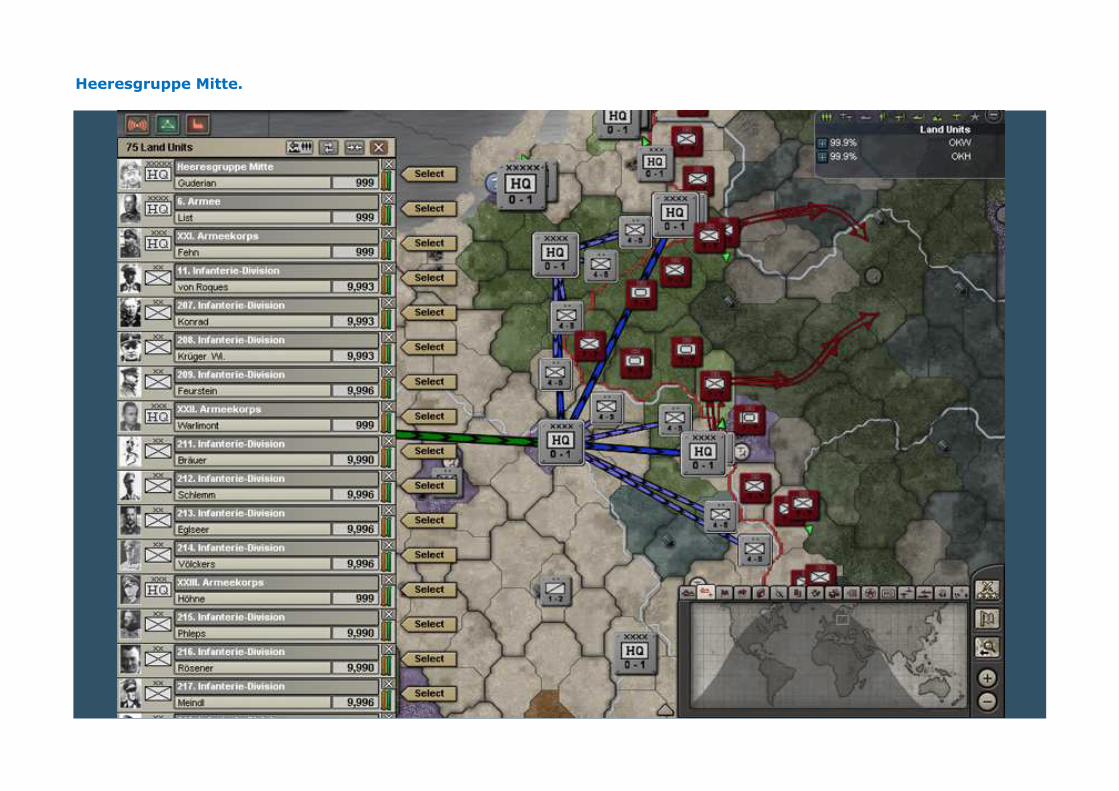
Heeresgruppe Mitte.
2. Panzerarmee will strike out from Suwalki towards Nowogrodec. 3. Panzerarmee will head for Slonim from the south. 6. and 4. Armee will destroy and overrun all units inside the pocket thus formed while securing the panzers’ flanks. We will then attack Minsc. Heeresgruppe Mitte will end stage 1 by lining up behind the river, linking up with Heeresgruppe Nord.
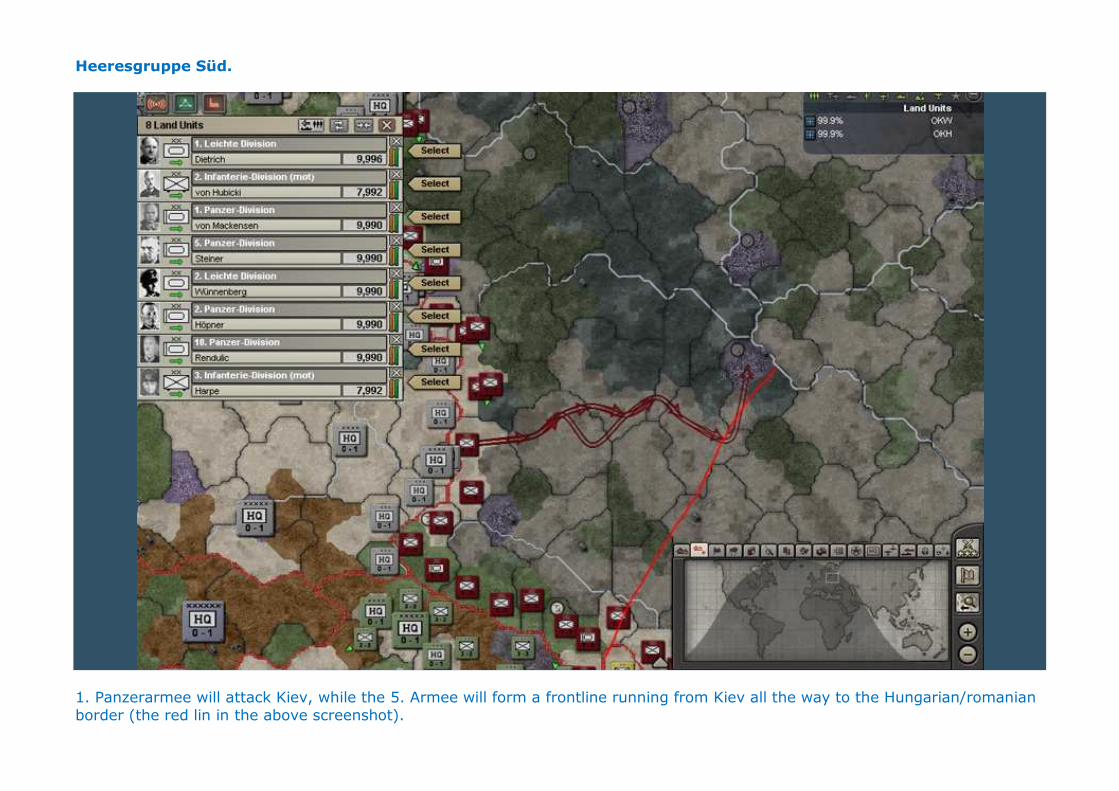
Heeresgruppe Süd.
1. Panzerarmee will attack Kiev, while the 5. Armee will form a frontline running from Kiev all the way to the Hungarian/romanian border (the red lin in the above screenshot).
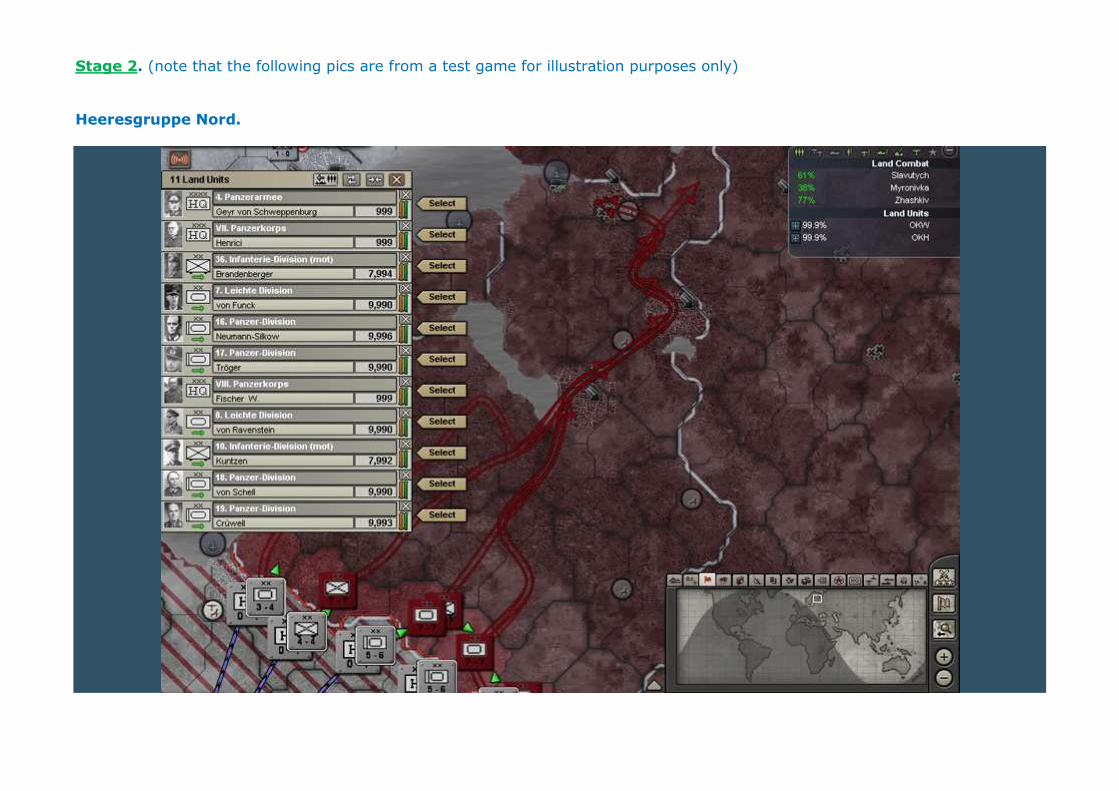
Stage 2. (note that the following pics are from a test game for illustration purposes only) Heeresgruppe Nord.
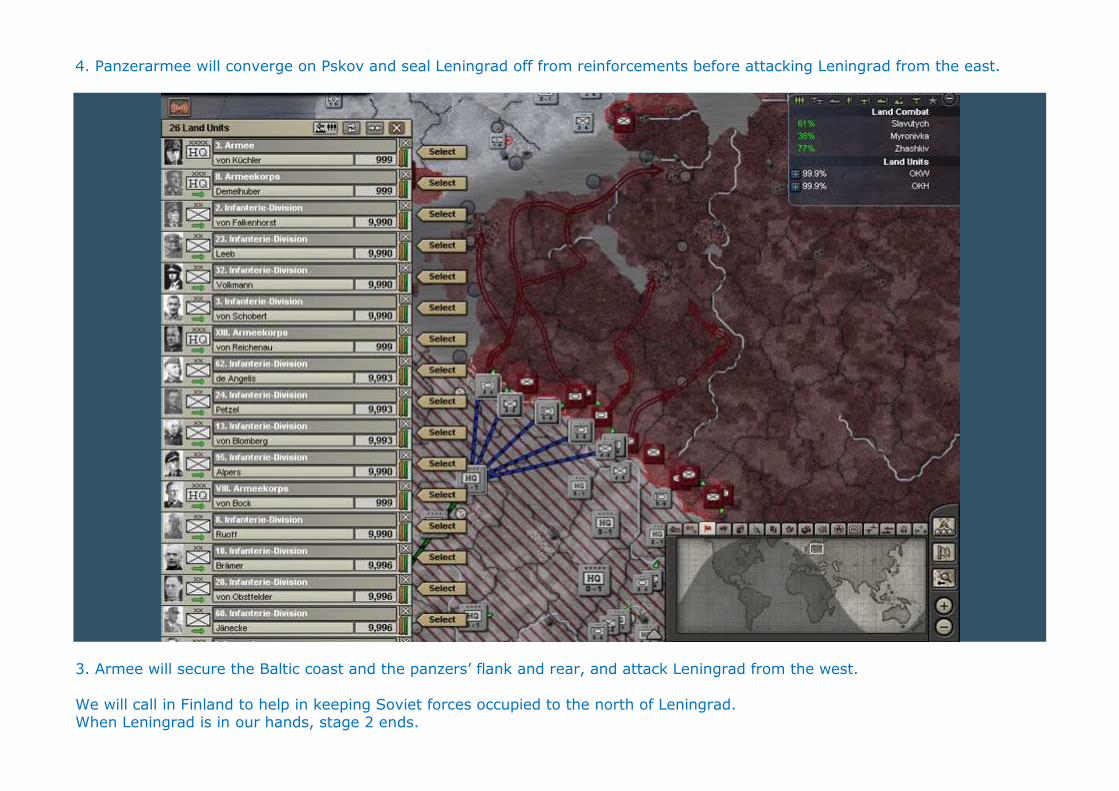
4. Panzerarmee will converge on Pskov and seal Leningrad off from reinforcements before attacking Leningrad from the east.
3. Armee will secure the Baltic coast and the panzers’ flank and rear, and attack Leningrad from the west. We will call in Finland to help in keeping Soviet forces occupied to the north of Leningrad. When Leningrad is in our hands, stage 2 ends.
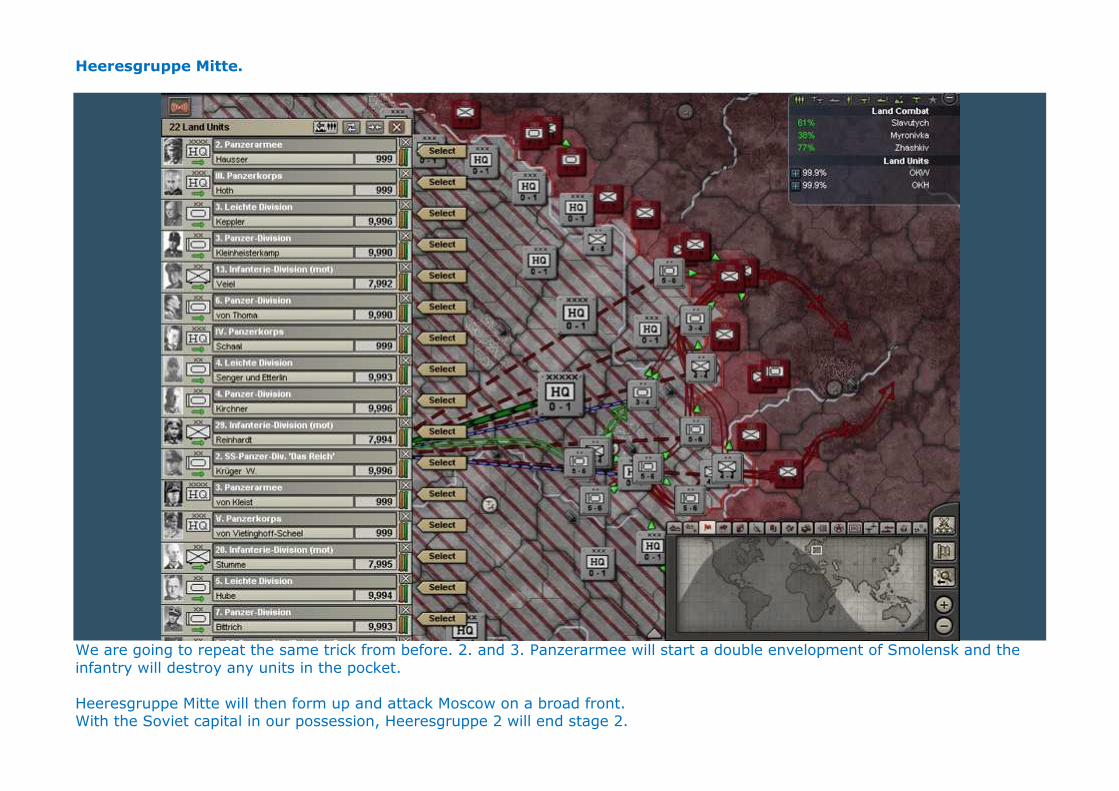
Heeresgruppe Mitte.
We are going to repeat the same trick from before. 2. and 3. Panzerarmee will start a double envelopment of Smolensk and the infantry will destroy any units in the pocket. Heeresgruppe Mitte will then form up and attack Moscow on a broad front. With the Soviet capital in our possession, Heeresgruppe 2 will end stage 2.

Heeresgruppe Süd.
The panzers will secure the flanks behind the river, while the infantry advances on a broad front towards the Black Sea and the port province of Rostov-Na-Don. We will at this stage also call our Hungarian and Romanian allies to assist us.
Stage 3. Heeresgruppe Nord. They will focus on defense while advancing towards Archangelsk further northeast. If necessary, they can now spare units to help Heeresgruppe Mitte if that army group is having trouble reaching Moscow. Heeresgruppe Mitte. They will only attack other nearby VPs, maintaining defense at all times. They could now spare a panzerarmee to assist Heeresgruppe Süd.
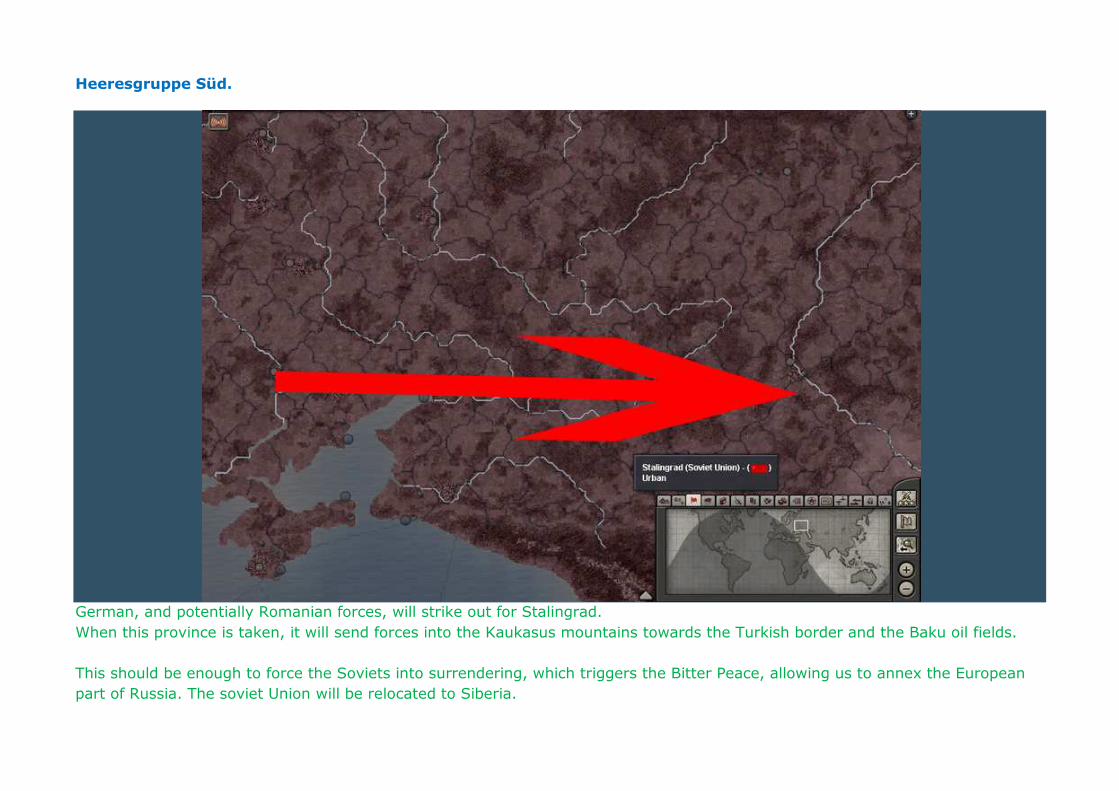
Heeresgruppe Süd.
German, and potentially Romanian forces, will strike out for Stalingrad.
When this province is taken, it will send forces into the Kaukasus mountains towards the Turkish border and the Baku oil fields. This should be enough to force the Soviets into surrendering, which triggers the Bitter Peace, allowing us to annex the European part of Russia. The soviet Union will be relocated to Siberia.
Chapter 30: Barbarossa-Part 1 (10/5 – 28/5). Okay, people. This is it. The largest invasion in human history is about to begin. Given the size of the frontlines and the nature of the terrain, it is vital to find a lull in the battles to get your corps back together. You’d be amazed how far you can venture off course if you’re not careful here. Other than that, there is only one thing I have to add: the Red Airforce is huge. In the game I played, they had about 40 interceptors and MR, and over 20 CAS and Tac at one point. There is simply no way to cover the whole front with your fighters. Stay alert for pop-ups telling you where there is a large number of enemy bombing going on and put the closest fighter-type wing on it. give them time to rest whenever possible as they tend to get battered from too many fights. Switch them around with a fighter wing from the west if necessary. I am going to start with very precise starting orders, but as the campaign progresses, what you may encounter will be different from mine, so that will not be possible later on. Whenever possible, use support attack to make the fights as short as possible. Our Attack Delay is a lot shorter than theirs, so we will be able to give new instructions before they can. If you get in trouble, trust your instincts to react to anything you find, stick to the general battleplan discussed earlier and you should be fine. Let’s get to it, shall we? First, go to the production screen and prioritize reinforcements, if you haven’t already.
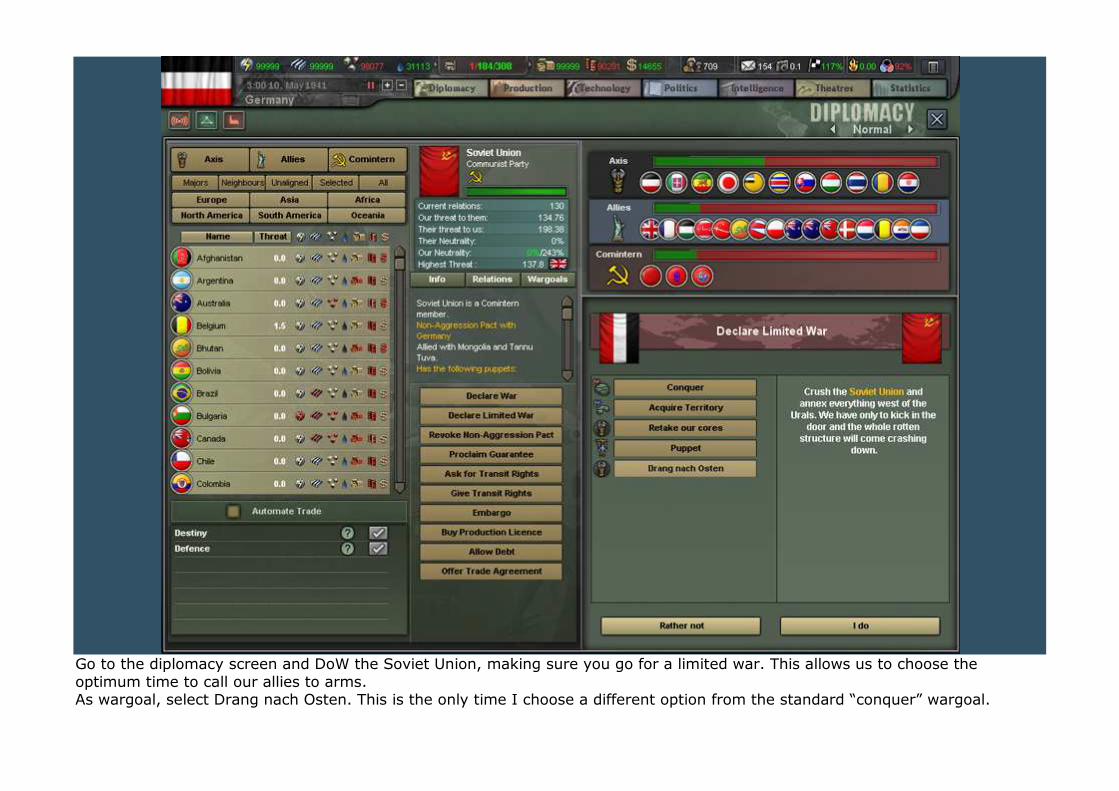
Go to the diplomacy screen and DoW the Soviet Union, making sure you go for a limited war. This allows us to choose the optimum time to call our allies to arms. As wargoal, select Drang nach Osten. This is the only time I choose a different option from the standard “conquer” wargoal.
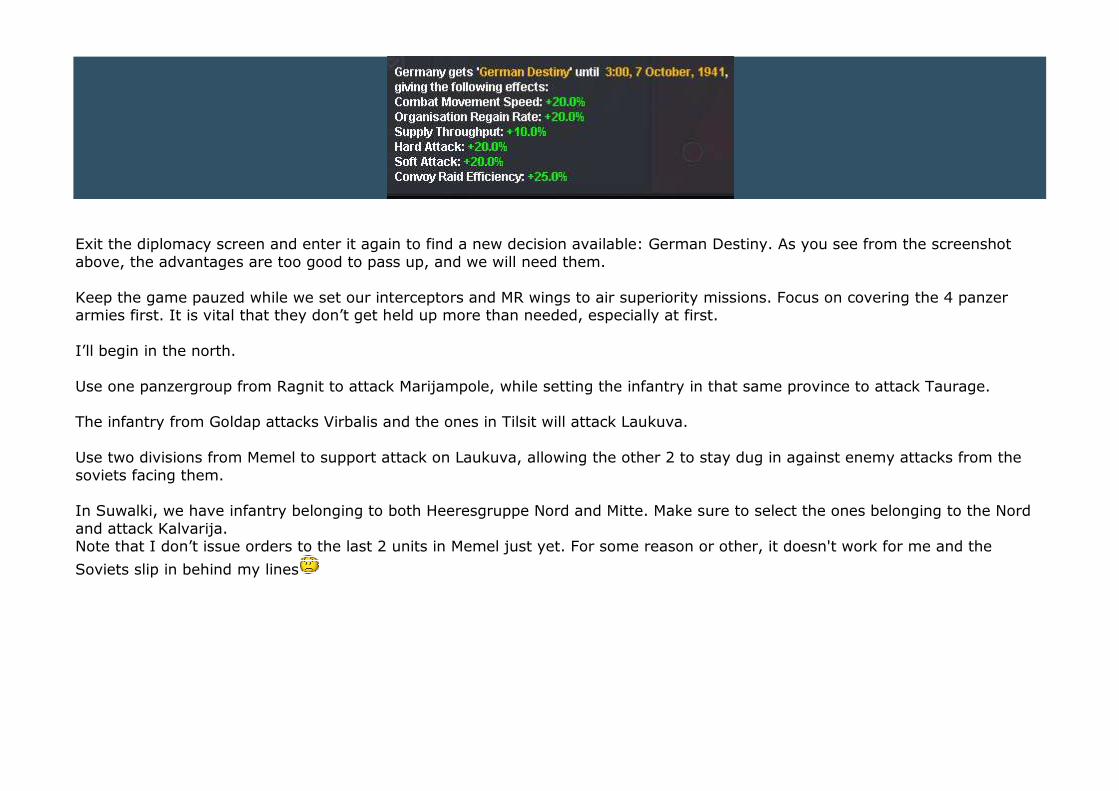
Exit the diplomacy screen and enter it again to find a new decision available: German Destiny. As you see from the screenshot above, the advantages are too good to pass up, and we will need them. Keep the game pauzed while we set our interceptors and MR wings to air superiority missions. Focus on covering the 4 panzer armies first. It is vital that they don’t get held up more than needed, especially at first. I’ll begin in the north. Use one panzergroup from Ragnit to attack Marijampole, while setting the infantry in that same province to attack Taurage. The infantry from Goldap attacks Virbalis and the ones in Tilsit will attack Laukuva. Use two divisions from Memel to support attack on Laukuva, allowing the other 2 to stay dug in against enemy attacks from the soviets facing them. In Suwalki, we have infantry belonging to both Heeresgruppe Nord and Mitte. Make sure to select the ones belonging to the Nord and attack Kalvarija. Note that I don’t issue orders to the last 2 units in Memel just yet. For some reason or other, it doesn't work for me and the
Soviets slip in behind my lines
Heeresgruppe Mitte: 1 panzerkorps from Suwalki attacks Augustow. Infantry from Lyck attacks Osowiec. Infantry from Johannisburg attacks Lomza. Use 2 divisions from Przasnysz to support the attack on Lomza. The infantry from Siedlce attacks Zambrow, the ones in Biala Podlaski will attack Brzesc Litewski (use stuka’s if you find soviet armour here as you’re trying to cross a river into urban, fortified terrain.). The other two armeekorps will each attack Krymno and Switaz respectively. That leaves the panzerarmee in Biala Podlaski, who must send a panzerkorps to attack Bielsk Podlaski (confusing names, but there you have it).
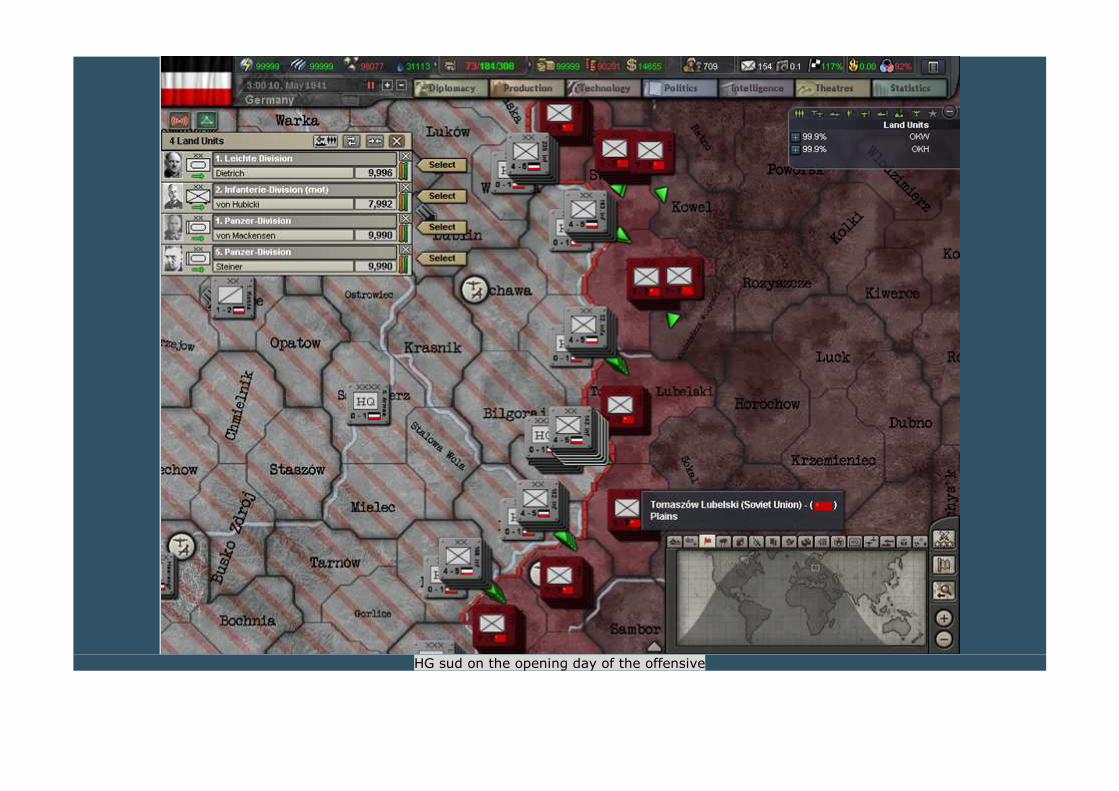
HG sud on the opening day of the offensive
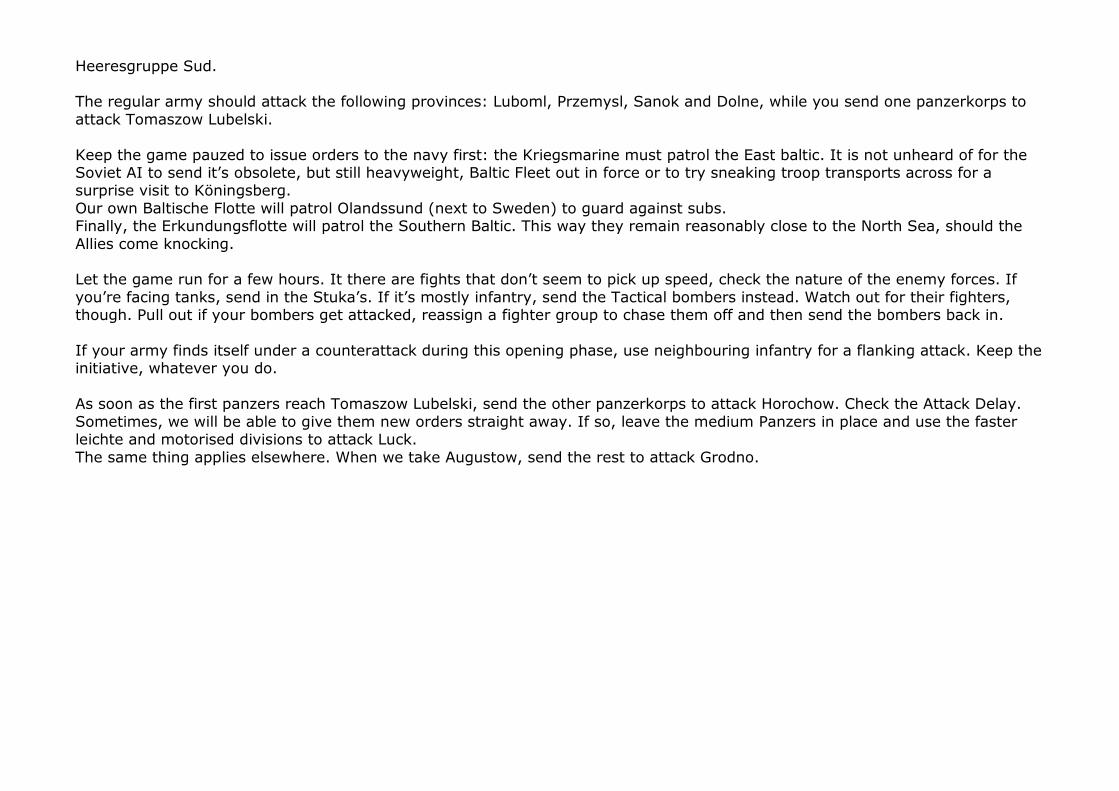
Heeresgruppe Sud. The regular army should attack the following provinces: Luboml, Przemysl, Sanok and Dolne, while you send one panzerkorps to attack Tomaszow Lubelski. Keep the game pauzed to issue orders to the navy first: the Kriegsmarine must patrol the East baltic. It is not unheard of for the Soviet AI to send it’s obsolete, but still heavyweight, Baltic Fleet out in force or to try sneaking troop transports across for a surprise visit to Köningsberg. Our own Baltische Flotte will patrol Olandssund (next to Sweden) to guard against subs. Finally, the Erkundungsflotte will patrol the Southern Baltic. This way they remain reasonably close to the North Sea, should the Allies come knocking. Let the game run for a few hours. It there are fights that don’t seem to pick up speed, check the nature of the enemy forces. If you’re facing tanks, send in the Stuka’s. If it’s mostly infantry, send the Tactical bombers instead. Watch out for their fighters, though. Pull out if your bombers get attacked, reassign a fighter group to chase them off and then send the bombers back in. If your army finds itself under a counterattack during this opening phase, use neighbouring infantry for a flanking attack. Keep the initiative, whatever you do. As soon as the first panzers reach Tomaszow Lubelski, send the other panzerkorps to attack Horochow. Check the Attack Delay. Sometimes, we will be able to give them new orders straight away. If so, leave the medium Panzers in place and use the faster leichte and motorised divisions to attack Luck. The same thing applies elsewhere. When we take Augustow, send the rest to attack Grodno.
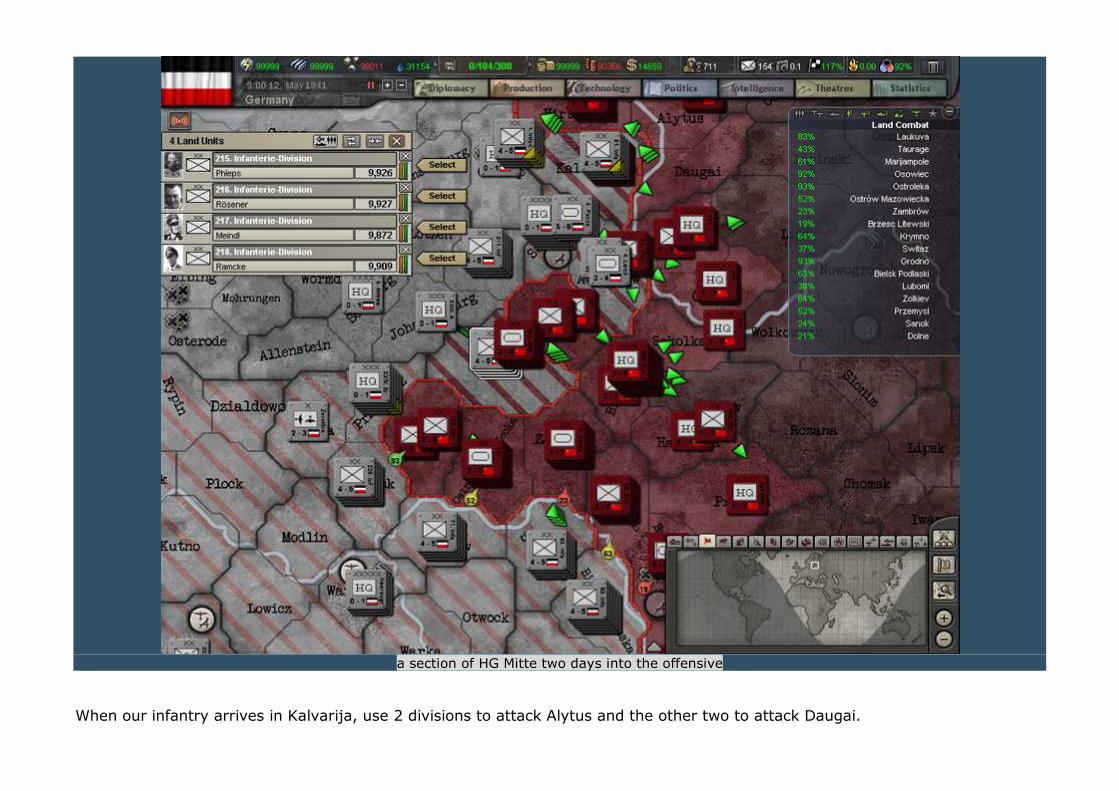
a section of HG Mitte two days into the offensive
When our infantry arrives in Kalvarija, use 2 divisions to attack Alytus and the other two to attack Daugai.
At some point, Finland will get the decision of Continuation War. This makes them join the Axis, but not the war. They will wait for our signal to retake the cores stolen from them during the Winter War in the winter of 1939-1940. We will call them to arms when we get close to Leningrad. If your infantry arrives in Lomza, we have the opportunity for an encirclement. Attack Bialystok with 2 divisions, while the other 2 support the attack against Zambrow, if necessary. Be sure to use your bombers to ensure success against Bialystok because it gives you a strategic benefit (or penalty if you fail). Infantry arriving in Virbalis should support the attack on the neighbouring provinces. Panzers arriving in Marijampole should attack Kaunas. The other panzerkorps should use their panzers to guard Marijampole and their Leichte and motorised divisions to attack Panevezys. Infantry in Krymno should support the attack on brezesc Litewski. Infantry in Laukuva can be spread out a bit: use 1 division each to support attack on Taurage and Palange while the other 2 will attack Plunge. While keeping the game pauzed, now is the perfect moment to use the infantry still fiddling their thumbs in Memel for an attack on Palanga. Leave 2 panzers in Horochow, use 2 others to attack Kiwerce. Similarly, leave 2 in Bielsk Podlaski, use 2 others to attack Pruzana. If you open the terrain mapmode, you will see the Pripyet marshes in the middle of the frontline. We are carefully guiding our panzers around the marshes, which are too inhospitable for infantry, let alone armour divisions, towards Minsk. As infantry divisions arrive at their destination, keep checking the progress on either side and use support attack whenever necessary to keep the frontline moving east at a steady pace, thereby saving manpower. Remember the armeekorps still standing in Suwalki? Now that the panzers have shifted a few provinces east, we can use those infantry divisions to attack Sokolka, just south of the northern pincer of Heeresgruppe Mitte. Speaking of pincers, the intent of our double envelopment is to keep 2 panzers or motorised divisions in every province. So if you capture Grodno, find a province where you have 3 or 4 mobile divisions. Keep sending them forward in numbers of 2. In the case of Grodno, attack Wolkowysk with 2 divisions from Augustow. Support the attack on dolne with the infantry arriving in Sanok. When Switaz is taken, use 2 divisions each to attack Kowel and Ratno. By now the panzers attached to Heeresgruppe Nord, should have taken Kaunas. Send 1 division ahead to Pasvalis. Resistance
here tends to be somewhat lighter and the path towards Riga is too long to keep more than 1 division per province. Units from Luboml should continue on to Wlodzimierz Wolynski. Panzers from Tomaszow Lubelski should attack Sokal next. Remember to keep checking your planes periodically. If they get too banged up, let them rest for a while, rebasing them further west if necessary to find an empty airbase. Just don’t forget where you put them and get them back in the action when they have been fully repaired. Spread the infantry arriving in Taurage out to cover Jurbakas, Raseiniai, and Kelme. When Kiwerce is taken, use 1 division from Horochow and one from Luck to attack Rowne. When Jurbakas is ours, use 1 division each (some will have to come from further back) to attack the following provinces: Airkraukle, Ergli, Sigulda and Bauski. When Zambrow is conquered, use infantry from Ostrow Mazowiecki to attack Narew and Hajinovski. If you come across divisions that are out of Organisation, let them stay put for a few days to a week. You can’t win combats withour Org, and this provides you with emergency strategic reserves. Panzers from Pruzana must attack Chomski and Slonim to complete the southern pincer in Heeresgruppe Mitte. By now, the northern pincer should be able to focus on Nowogrodek. In the south, 1. Panzerarmee should have Rowne. When they do, use 1 division each to attack Berezne, Korets’ and Bila Tserkva, drawing ever closer to Kiyv.
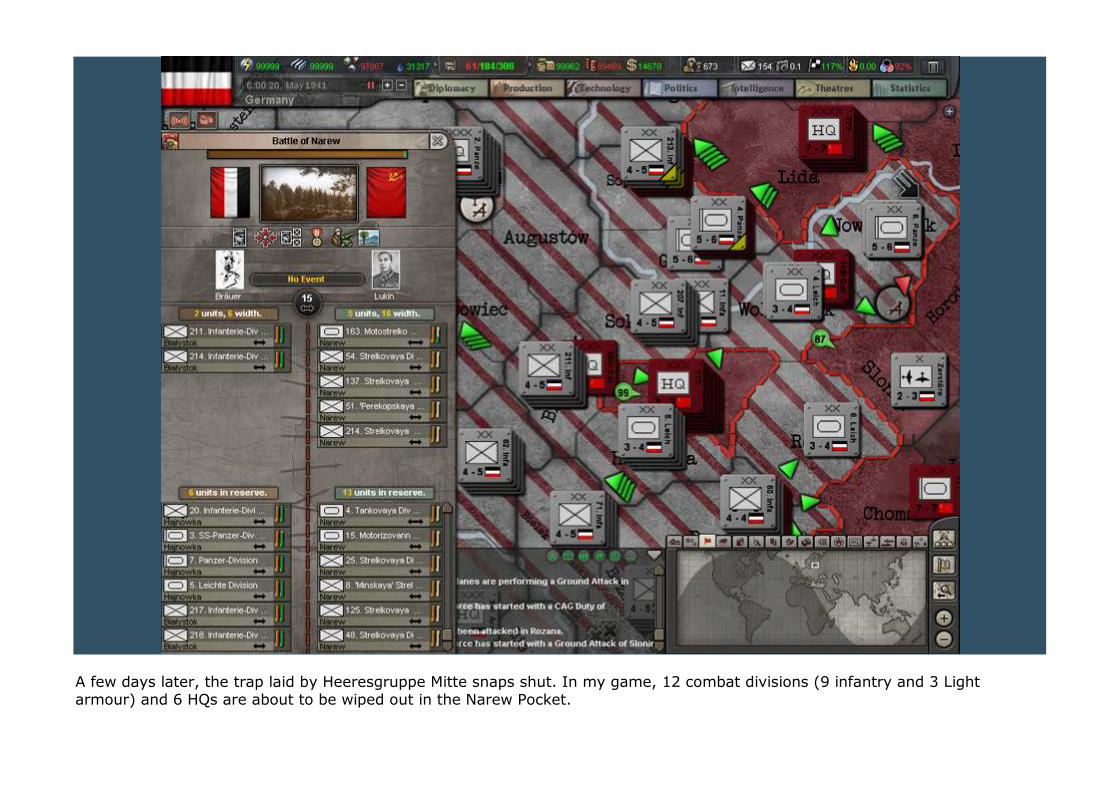
A few days later, the trap laid by Heeresgruppe Mitte snaps shut. In my game, 12 combat divisions (9 infantry and 3 Light armour) and 6 HQs are about to be wiped out in the Narew Pocket.
This is prove why I don’t want a lot of armour fighting in swamps. Even infantry has a 60% terrain penalty! By this time, we have advanced significantly. Especially is the Soviet Union, it is vital to keep the HQs in range of their subordinates. Take the time from a paused game to move EVERY HQ to within a few provinces of the frontline. Yes, it is tedious, but it is vital, especially in the Soviet Union, to keep the fighting forces at full operative strength, ensuring that these units maintain the benefits of our carefully arranged OOB throughout the campaign. While we’re at it, check the aerial wings. Ground those that need it, put those that have been repaired back in the air. At some point the Soviet AI will start pulling units away from the Hungarian and Romanian border to add to the greater threat posed by the advancing Heeresgruppe Süd. When they do, wait a few days until they have only 1 or 2 divisions in every border province. When they do, go to the diplomacy screen. Select both nations and click “Call to Arms”. This is not a selective thing: the nations you Call to Arms, will now find themselves at war with ALL our enemies, including the Allies. As we advance, we will make sure to avoid sending units through provinces that have been taken by our allies to avoid crashing their less stable supply network (they have less IC to work with). When our panzers in the north are in position, attack Riga. This has both a naval base (for supply convoys) and an airbase. As soon as it is taken, you can rebase some aerial units closer to the frontline. Just make sure not to overload the airbase. If your northern infantry has been stalling, now would be a great moment for an all-out offensive towards the Baltic coast. Drive those Soviets into the sea and end Heeresgruppe North’s first stage of the offensive. When everything is coloured grey, save the game and rejoice in a job well done. We are halfway to Leningrad, one of the SU’s major VP provinces. Heeresgruppe Mitte is on its way to Minsk and Heeresgruppe Süd is on the outskirts to Kiyv. I’m going to leave you with screenshots of my advance up to this point for your reference.
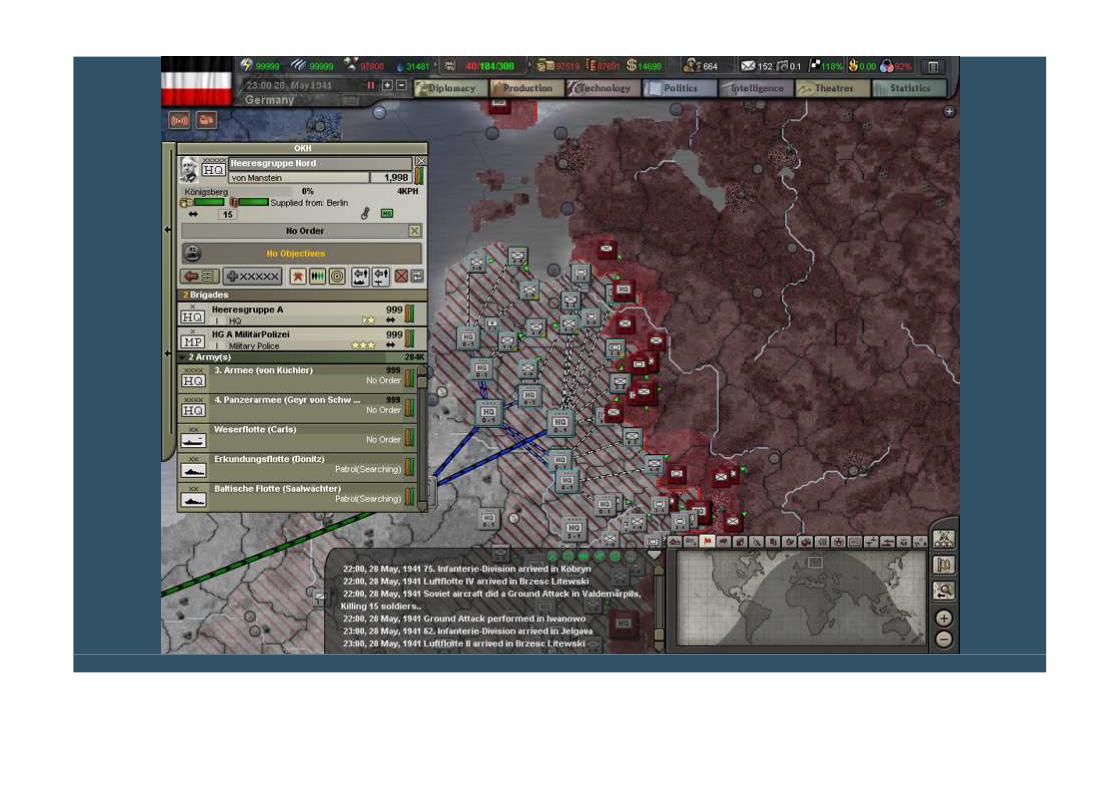
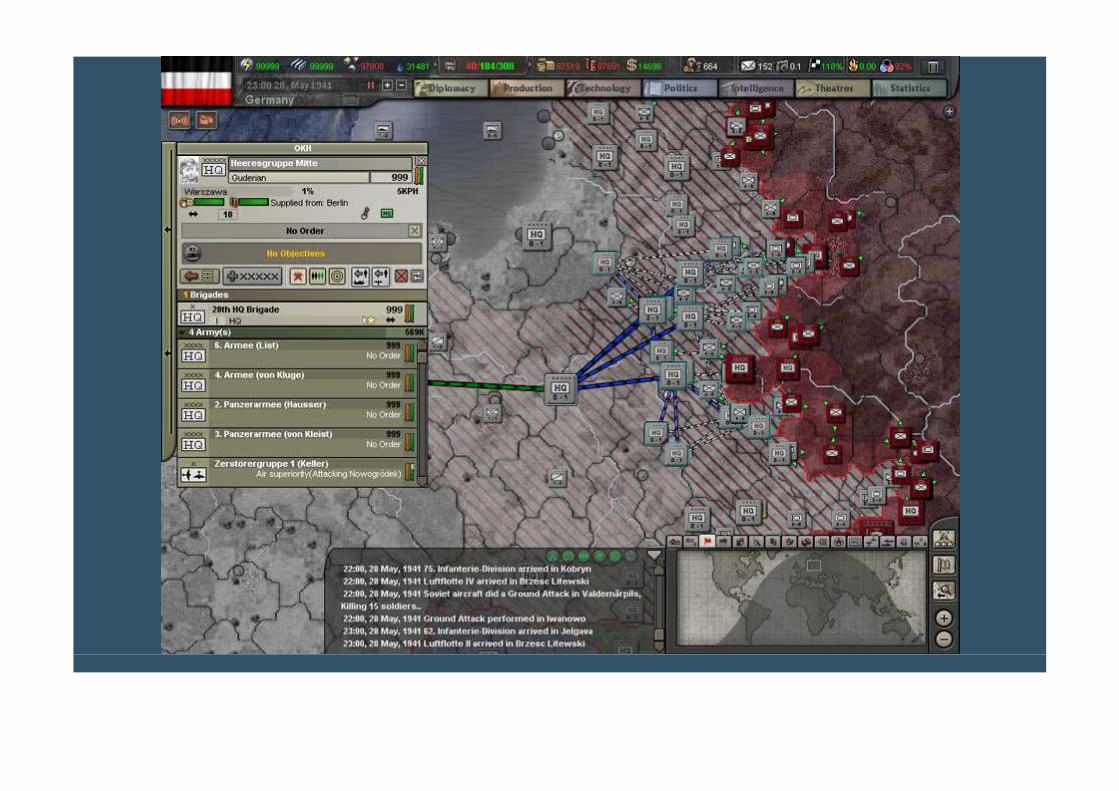

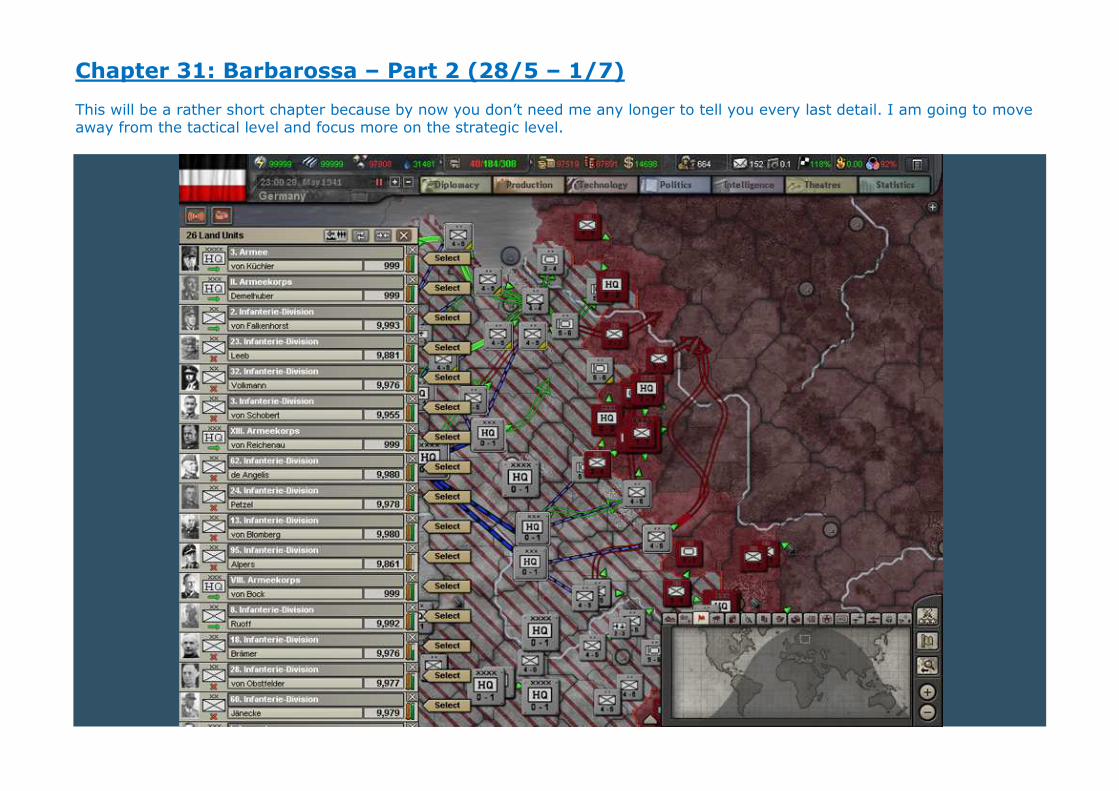
Chapter 31: Barbarossa – Part 2 (28/5 – 1/7) This will be a rather short chapter because by now you don’t need me any longer to tell you every last detail. I am going to move away from the tactical level and focus more on the strategic level.
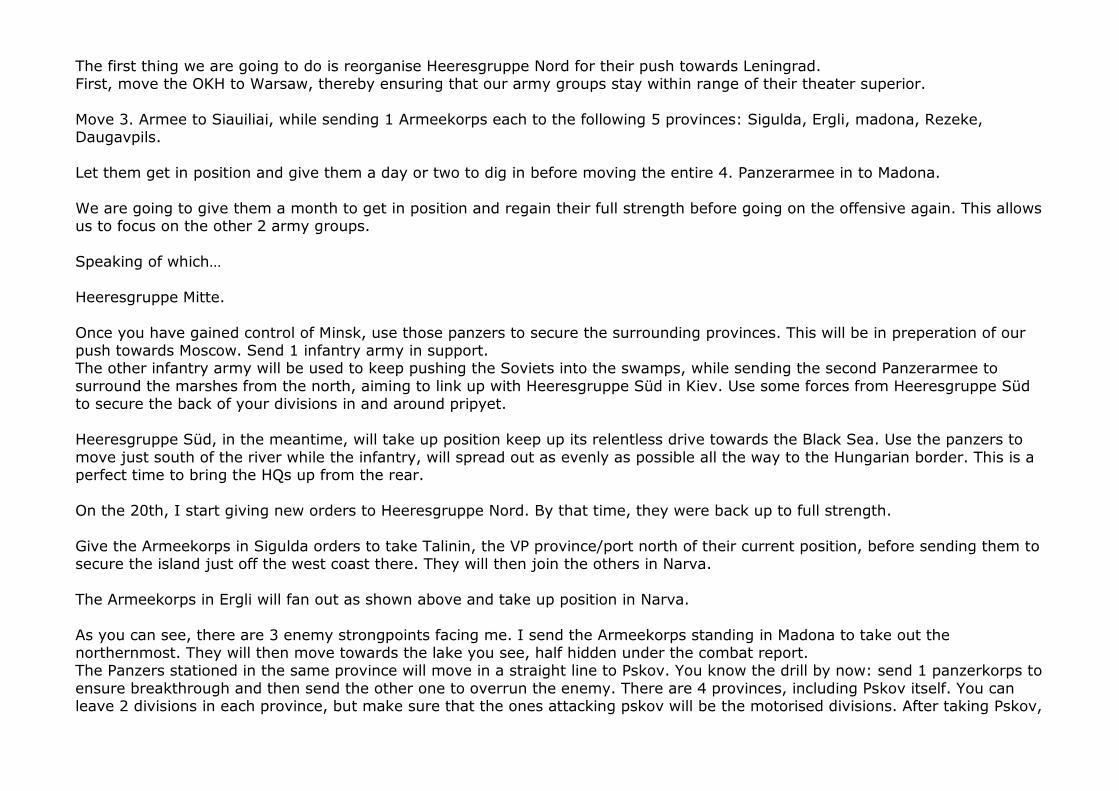
The first thing we are going to do is reorganise Heeresgruppe Nord for their push towards Leningrad. First, move the OKH to Warsaw, thereby ensuring that our army groups stay within range of their theater superior. Move 3. Armee to Siauiliai, while sending 1 Armeekorps each to the following 5 provinces: Sigulda, Ergli, madona, Rezeke, Daugavpils. Let them get in position and give them a day or two to dig in before moving the entire 4. Panzerarmee in to Madona. We are going to give them a month to get in position and regain their full strength before going on the offensive again. This allows us to focus on the other 2 army groups. Speaking of which… Heeresgruppe Mitte. Once you have gained control of Minsk, use those panzers to secure the surrounding provinces. This will be in preperation of our push towards Moscow. Send 1 infantry army in support. The other infantry army will be used to keep pushing the Soviets into the swamps, while sending the second Panzerarmee to surround the marshes from the north, aiming to link up with Heeresgruppe Süd in Kiev. Use some forces from Heeresgruppe Süd to secure the back of your divisions in and around pripyet. Heeresgruppe Süd, in the meantime, will take up position keep up its relentless drive towards the Black Sea. Use the panzers to move just south of the river while the infantry, will spread out as evenly as possible all the way to the Hungarian border. This is a perfect time to bring the HQs up from the rear. On the 20th, I start giving new orders to Heeresgruppe Nord. By that time, they were back up to full strength. Give the Armeekorps in Sigulda orders to take Talinin, the VP province/port north of their current position, before sending them to secure the island just off the west coast there. They will then join the others in Narva. The Armeekorps in Ergli will fan out as shown above and take up position in Narva. As you can see, there are 3 enemy strongpoints facing me. I send the Armeekorps standing in Madona to take out the northernmost. They will then move towards the lake you see, half hidden under the combat report. The Panzers stationed in the same province will move in a straight line to Pskov. You know the drill by now: send 1 panzerkorps to ensure breakthrough and then send the other one to overrun the enemy. There are 4 provinces, including Pskov itself. You can leave 2 divisions in each province, but make sure that the ones attacking pskov will be the motorised divisions. After taking Pskov,
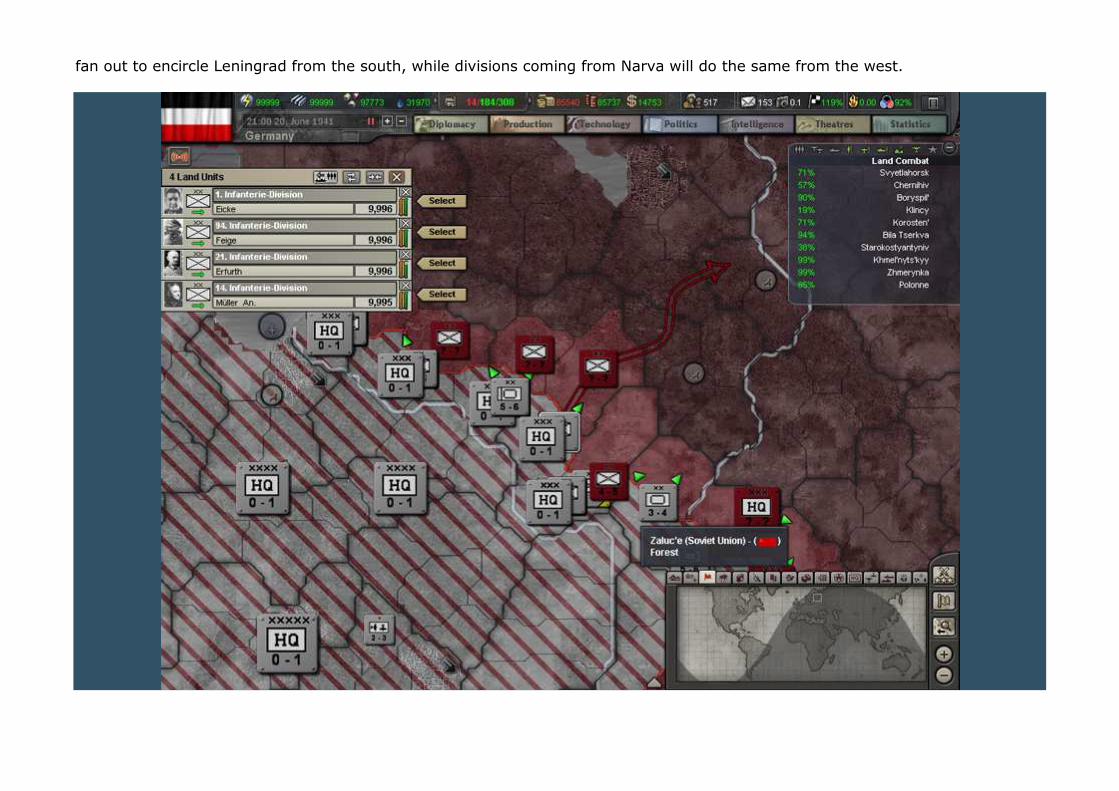
fan out to encircle Leningrad from the south, while divisions coming from Narva will do the same from the west.
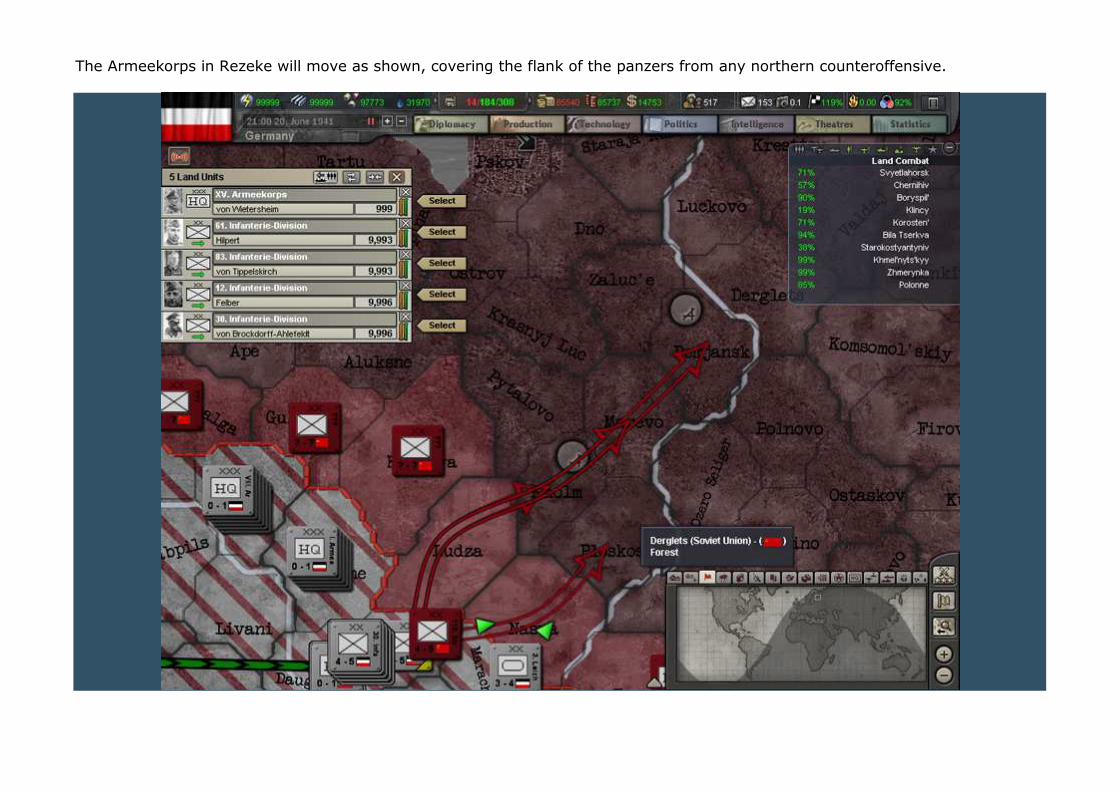
The Armeekorps in Rezeke will move as shown, covering the flank of the panzers from any northern counteroffensive.

The ones in Daugavpils will take up position behind the river, protecting our advance from any counterattack from the west. Make sure to get the two airbases shown. Keep the game paused for a moment and go to the production screen first. We have a ton of new VP provinces to secure from partisans, so start building 16 garisons and 10 cavalry divisions. At this stage, curiosity got the better of me. I loaded as the SU to take a look at the number of brigades they still had. They had gone from 896 on the 10th of May to just 625 of the 20th of June. This meant I had destroyed 271 brigades, or something like 75 to 80 divisions. That is 3 to 4 full armies, or (almost) an entire army group. Can you imagine what would have happened had we not been so obsessed with reducing our Attack Delay and overrunning/encircling the enemy? Those 75 or more divisions would have retreated and would still have been around to hinder us, slowing us down to a crawl all over the front.
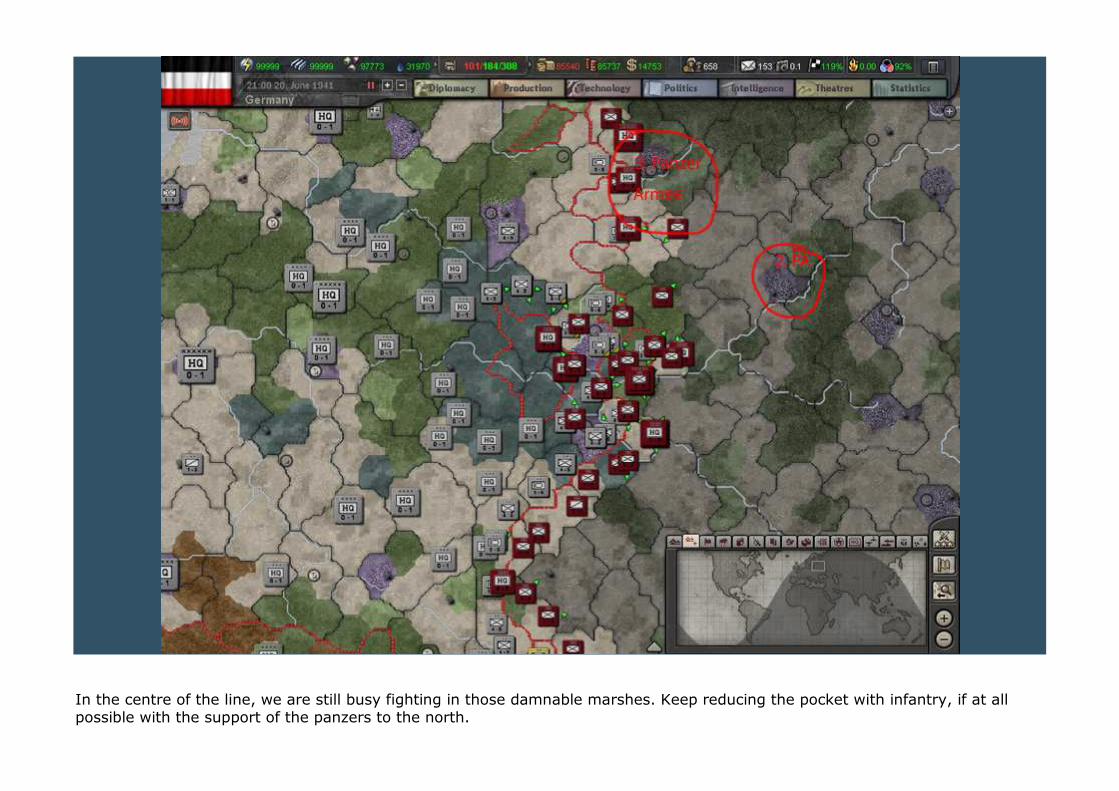
In the centre of the line, we are still busy fighting in those damnable marshes. Keep reducing the pocket with infantry, if at all possible with the support of the panzers to the north.
As you can see on the screenshot, I have temporarily kept units from heeresgruppe Süd in positions behind the infantry fighting in the swamps. If I hadn’t, those Soviet divisions you see would have tried to break their comrades out and would have cost us vital Manpower and time. You can use these to push those Red Army units back and keep up the pressure. Never give these guys time to get their act together! It will be slow going in and by itself to take the entire pocket. Be patient. Moscow isn’t going anywhere. There is a fine line between speed and recklessness. You can use the other Panzerarmee and infantry army to begin preperations for the push on Moscow. Start by sending them to secure the provinces between the two red circles I have drawn on the map. After the last defenders in the Pripyet pocket have been killed, send 1 panzerarmee to each of the two circles. The infantry should fan out between them. Make sure to get 1 Armeekorps to secure the outside flanks of our launch positions. Don’t forget to keep heeresgruppe Süd moving as fast as humanly possible. I don’t talk about it a lot, because here we have a simple advance across a broad front against some stiff opposition. Don’t let up and keep aiming towards Dnipropetrovsk (try typing that one fast three times!). Give units that are worn out time to recover before sending them back into the fray.
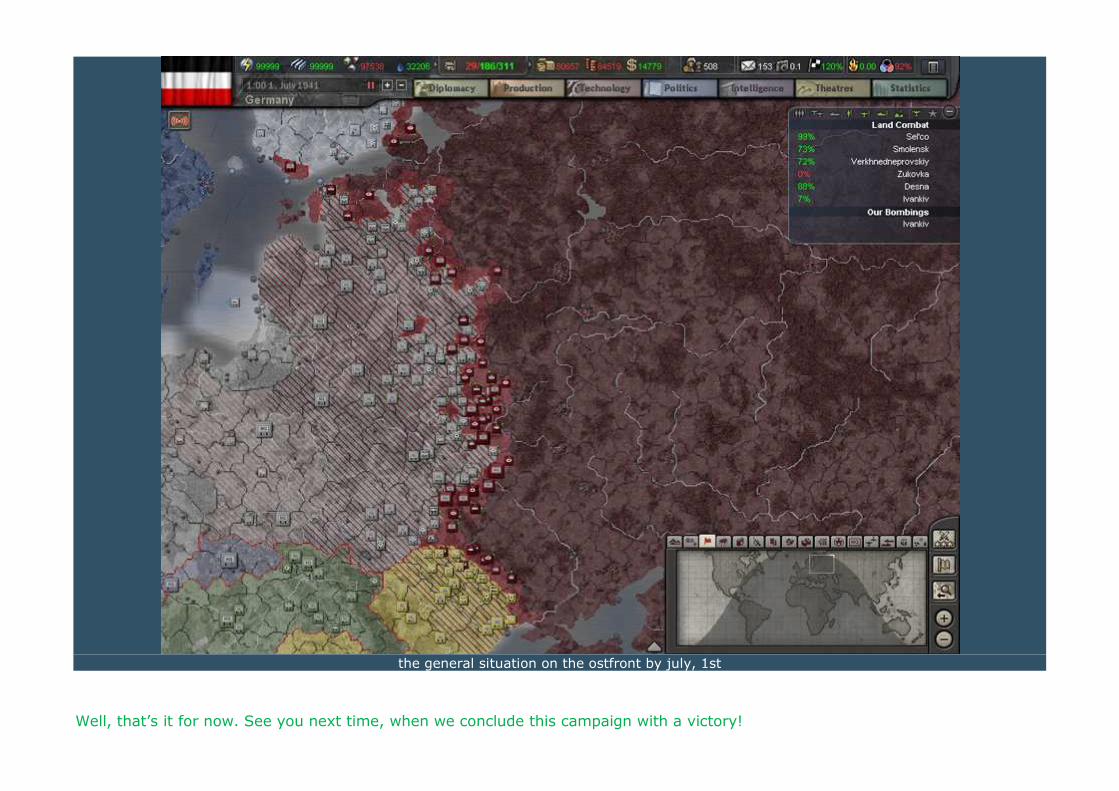
the general situation on the ostfront by july, 1st
Well, that’s it for now. See you next time, when we conclude this campaign with a victory!
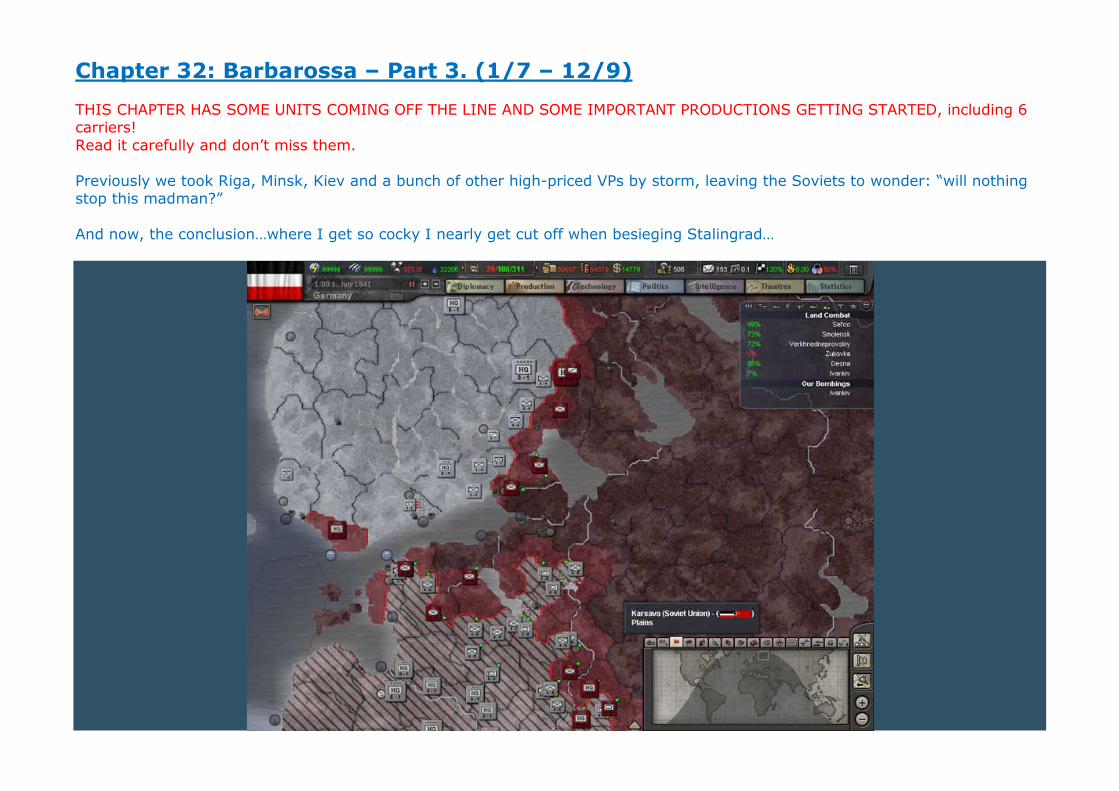
Chapter 32: Barbarossa – Part 3. (1/7 – 12/9) THIS CHAPTER HAS SOME UNITS COMING OFF THE LINE AND SOME IMPORTANT PRODUCTIONS GETTING STARTED, including 6 carriers! Read it carefully and don’t miss them. Previously we took Riga, Minsk, Kiev and a bunch of other high-priced VPs by storm, leaving the Soviets to wonder: “will nothing stop this madman?” And now, the conclusion…where I get so cocky I nearly get cut off when besieging Stalingrad…
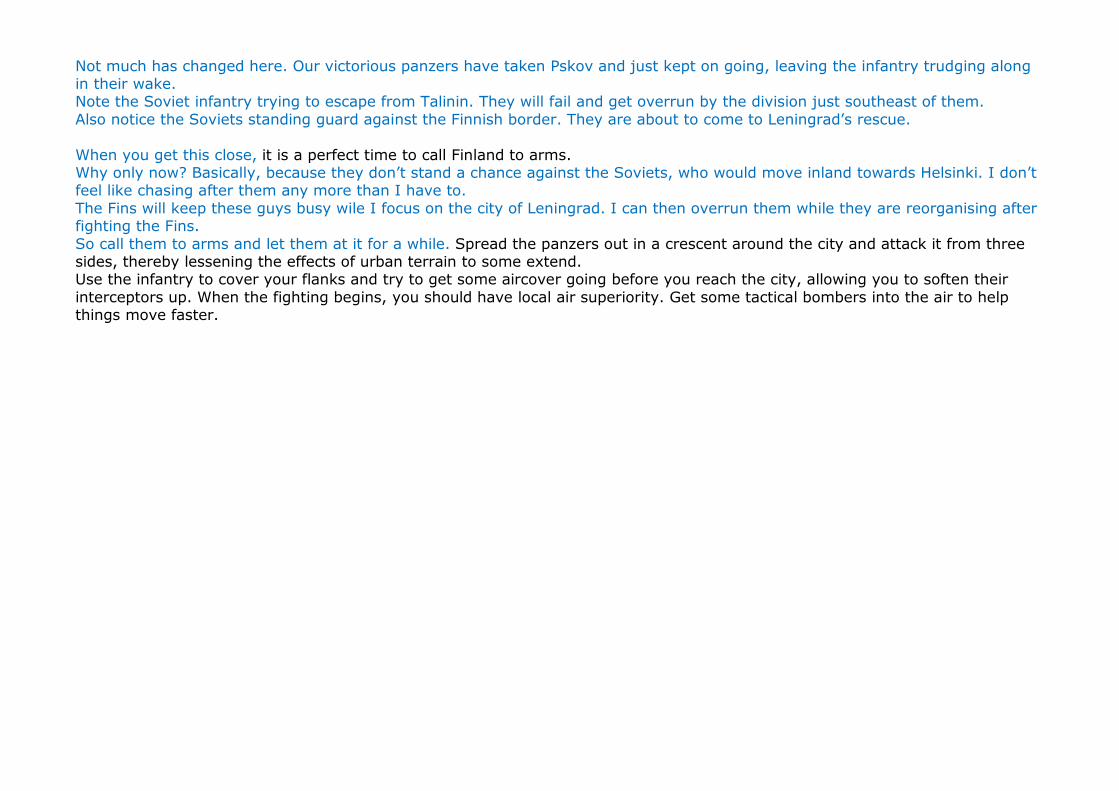
Not much has changed here. Our victorious panzers have taken Pskov and just kept on going, leaving the infantry trudging along in their wake. Note the Soviet infantry trying to escape from Talinin. They will fail and get overrun by the division just southeast of them. Also notice the Soviets standing guard against the Finnish border. They are about to come to Leningrad’s rescue. When you get this close, it is a perfect time to call Finland to arms. Why only now? Basically, because they don’t stand a chance against the Soviets, who would move inland towards Helsinki. I don’t feel like chasing after them any more than I have to. The Fins will keep these guys busy wile I focus on the city of Leningrad. I can then overrun them while they are reorganising after fighting the Fins. So call them to arms and let them at it for a while. Spread the panzers out in a crescent around the city and attack it from three sides, thereby lessening the effects of urban terrain to some extend. Use the infantry to cover your flanks and try to get some aircover going before you reach the city, allowing you to soften their interceptors up. When the fighting begins, you should have local air superiority. Get some tactical bombers into the air to help things move faster.
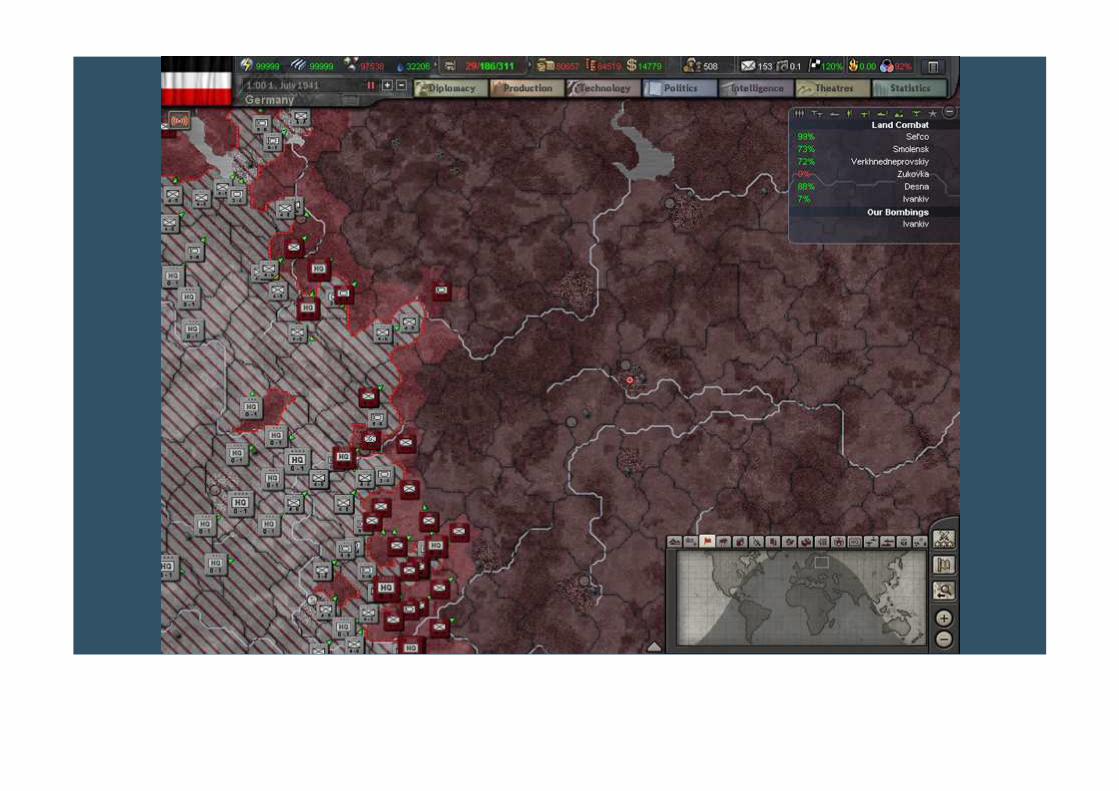

After destroying the enemy forces in the Pripyet marshes, Heeresgruppe Mitte is in the process of reassembling itself. As discussed previously, panzers north and south, infantry in the middle, with some divisions on the outside to cover their flanks. What I did here, is the reason why, from the very start in Poland, I taught you how to use shift-right click to set waypoints. I gave every corps a destination 5 or 6 provinces deep and just let them run. You have to be careful when doing this, though. Make sure to cover every province between your current position and the final destination or you risk skipping some, potentially with a an entire Soviet tank army present. You don’t want those behind your lines. Also, only do this when you’re absolutely certain to win whatever fight crops up. In this case, the Soviets had been given a beating allready. Most of those you see are the ones that slipped out of the marshes before I managed to close the trap. So their Org is near zero and my divisions are still in perfect fighting shape. They will kill whatever they come across and just keep going for some easy overruns. In the middle of the screen, you can see Moscow getting ever closer. Before I get to Heeresgruppe Süd, on the 5th I receive new MR planes. Base them in Berlin and rename them Zerstörergruppe 3. Start new ones before unpausing. Three days later, the garisons I started a few months back have finished. These are destined for former yugoslavia. Deploy one of them in Ljubljana and the rest in Krsko. Give them skill-1 nobodies to command and strategically deploy two of them to Split. The rest will be SR’ed to Beograd, Skopje and Pristina. Attach them to the OKH for now. When the garrisons arrive in Split, we can Strategically Redeploy the two infantry divisions that were guarding the port back to the armeekorps in the 5. Armee they belong to. With all that new territory will come a whole bunch of partisans. Time to start building our police force. With all that free IC, we can really indulge ourselves. Go to the production screen and start building 16 garrisons and 10 cavalry divsions. More will follow later on. By now Talinnin has fallen and the fleet stationed there will have made a getaway. Chances are they ran across the Kriegsmarine. This would be a good point to rebase them here.
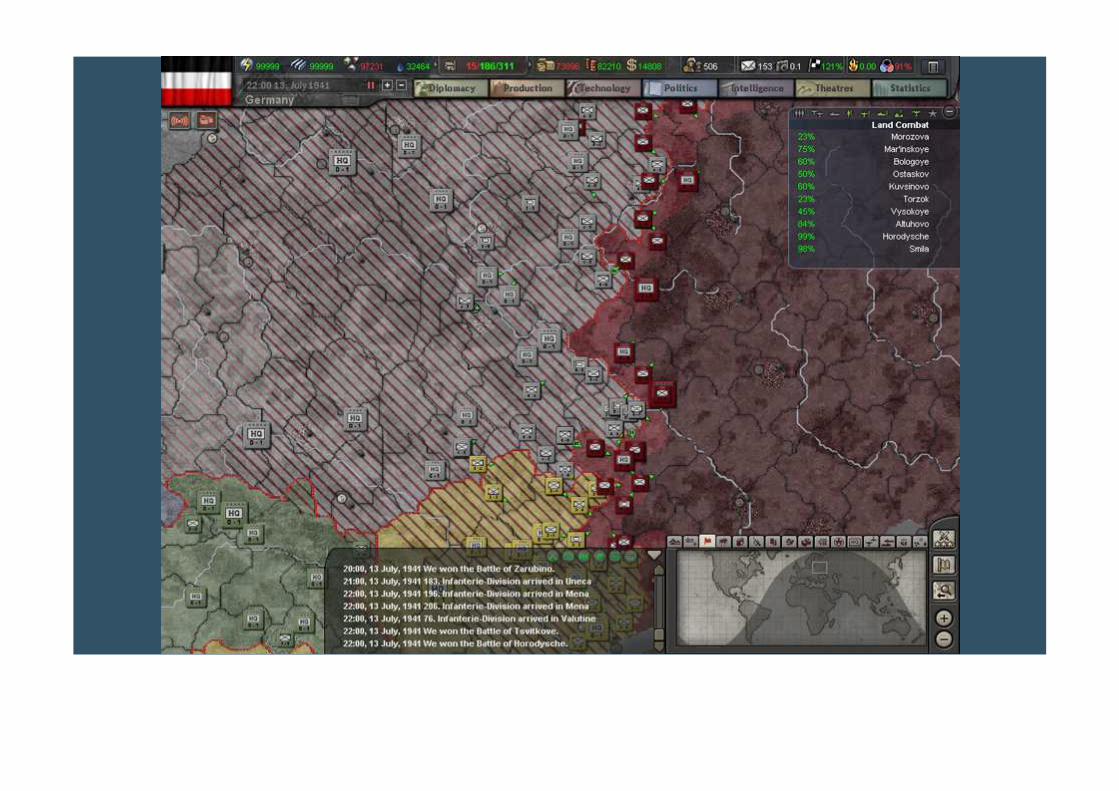
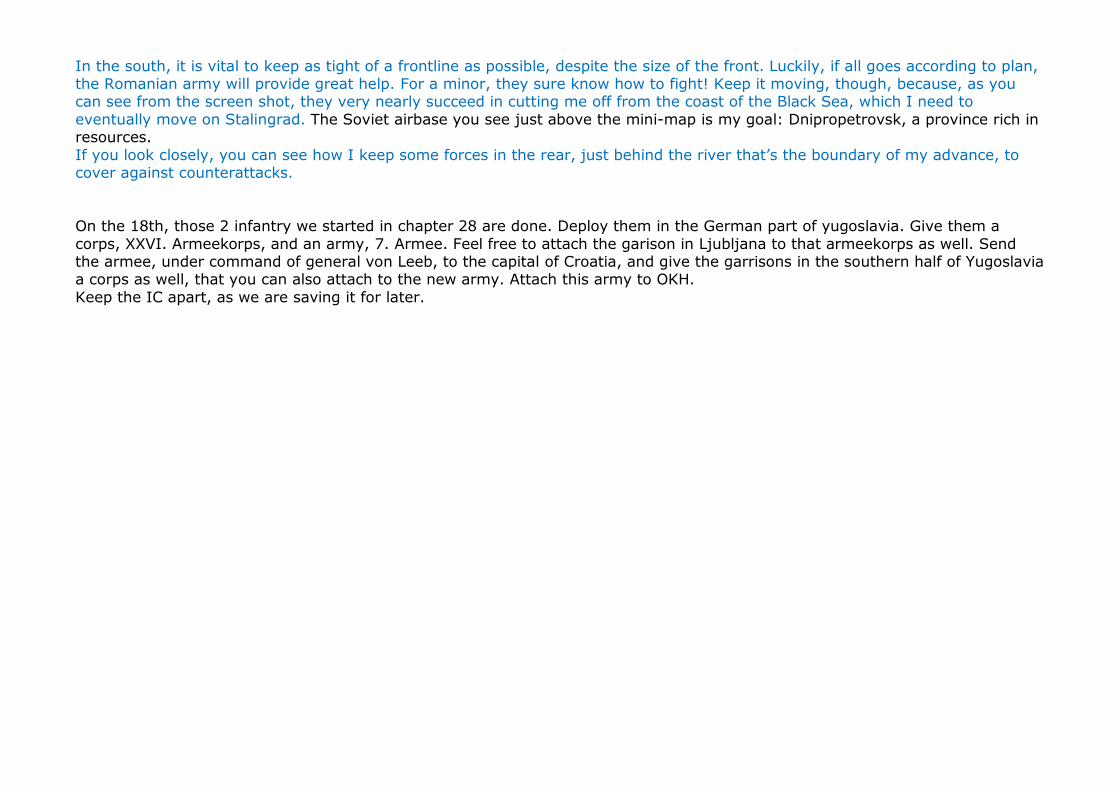
In the south, it is vital to keep as tight of a frontline as possible, despite the size of the front. Luckily, if all goes according to plan, the Romanian army will provide great help. For a minor, they sure know how to fight! Keep it moving, though, because, as you can see from the screen shot, they very nearly succeed in cutting me off from the coast of the Black Sea, which I need to eventually move on Stalingrad. The Soviet airbase you see just above the mini-map is my goal: Dnipropetrovsk, a province rich in resources. If you look closely, you can see how I keep some forces in the rear, just behind the river that’s the boundary of my advance, to cover against counterattacks. On the 18th, those 2 infantry we started in chapter 28 are done. Deploy them in the German part of yugoslavia. Give them a corps, XXVI. Armeekorps, and an army, 7. Armee. Feel free to attach the garison in Ljubljana to that armeekorps as well. Send the armee, under command of general von Leeb, to the capital of Croatia, and give the garrisons in the southern half of Yugoslavia a corps as well, that you can also attach to the new army. Attach this army to OKH. Keep the IC apart, as we are saving it for later.
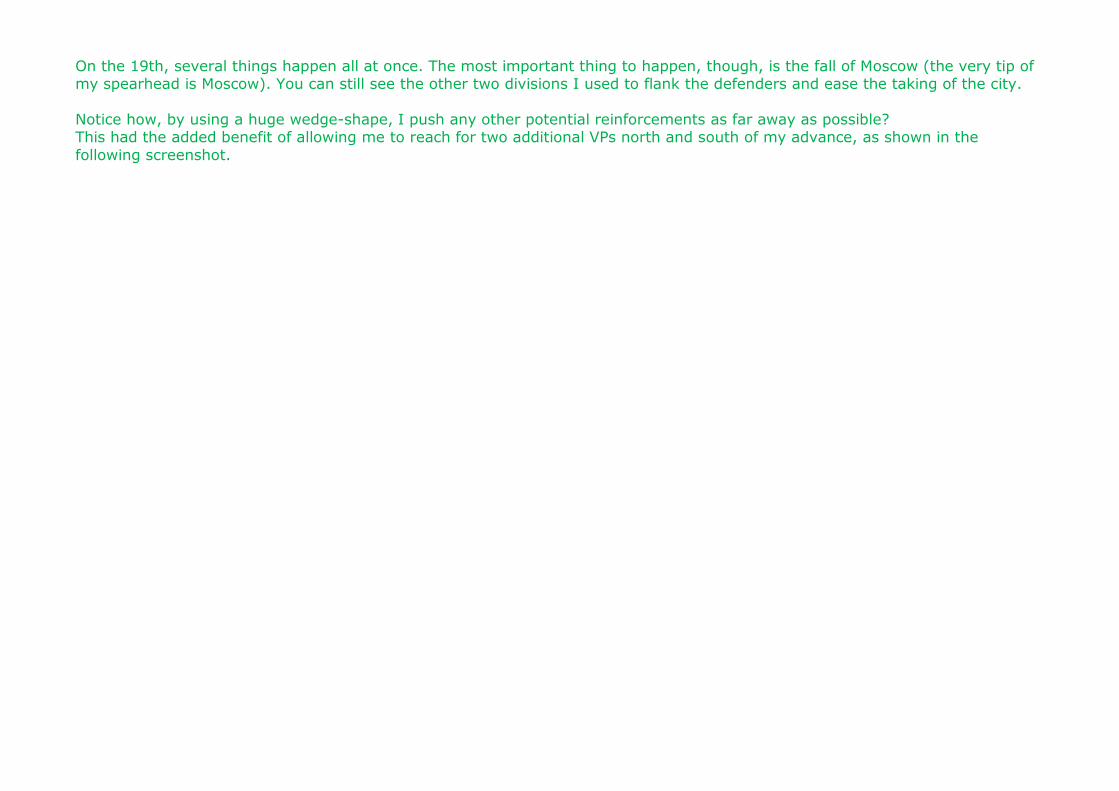
On the 19th, several things happen all at once. The most important thing to happen, though, is the fall of Moscow (the very tip of my spearhead is Moscow). You can still see the other two divisions I used to flank the defenders and ease the taking of the city. Notice how, by using a huge wedge-shape, I push any other potential reinforcements as far away as possible? This had the added benefit of allowing me to reach for two additional VPs north and south of my advance, as shown in the following screenshot.
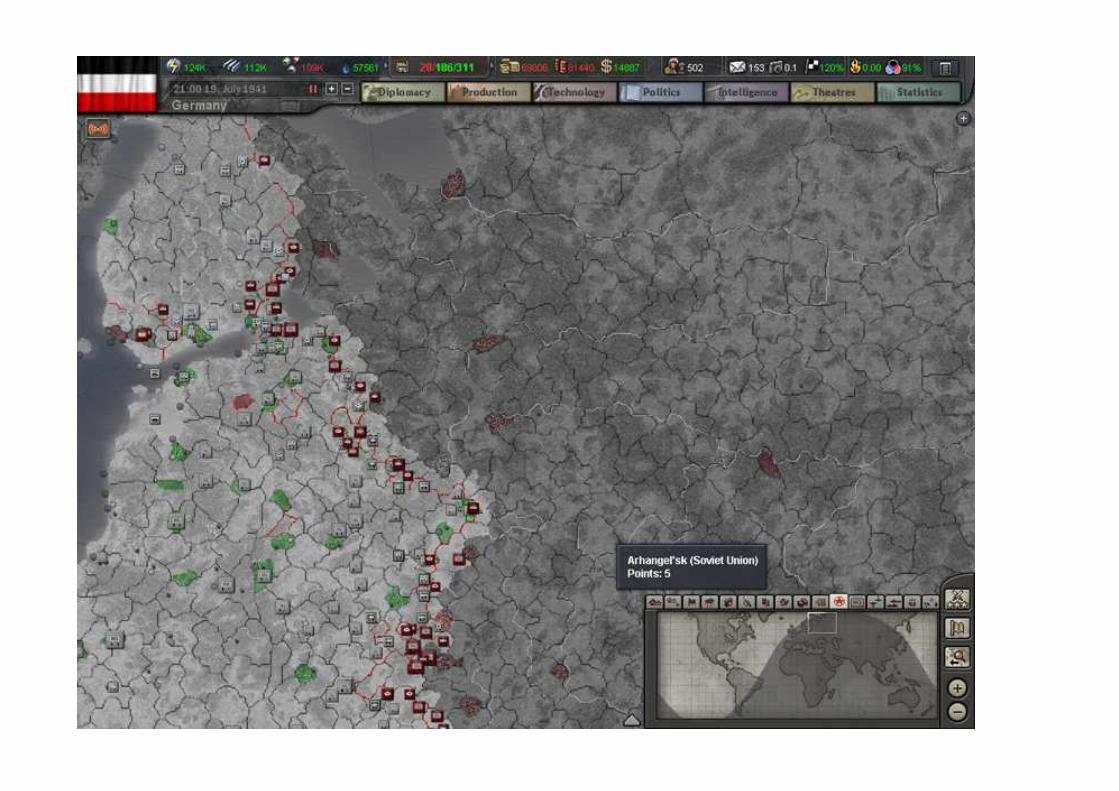
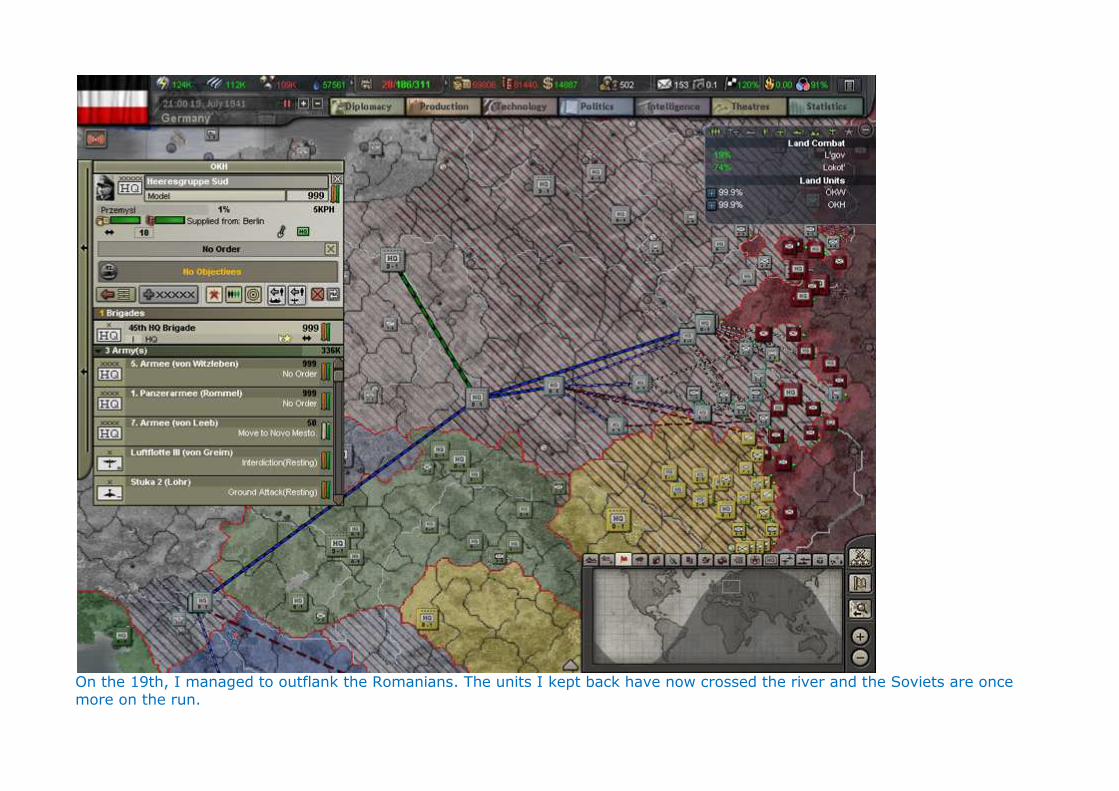
On the 19th, I managed to outflank the Romanians. The units I kept back have now crossed the river and the Soviets are once more on the run.
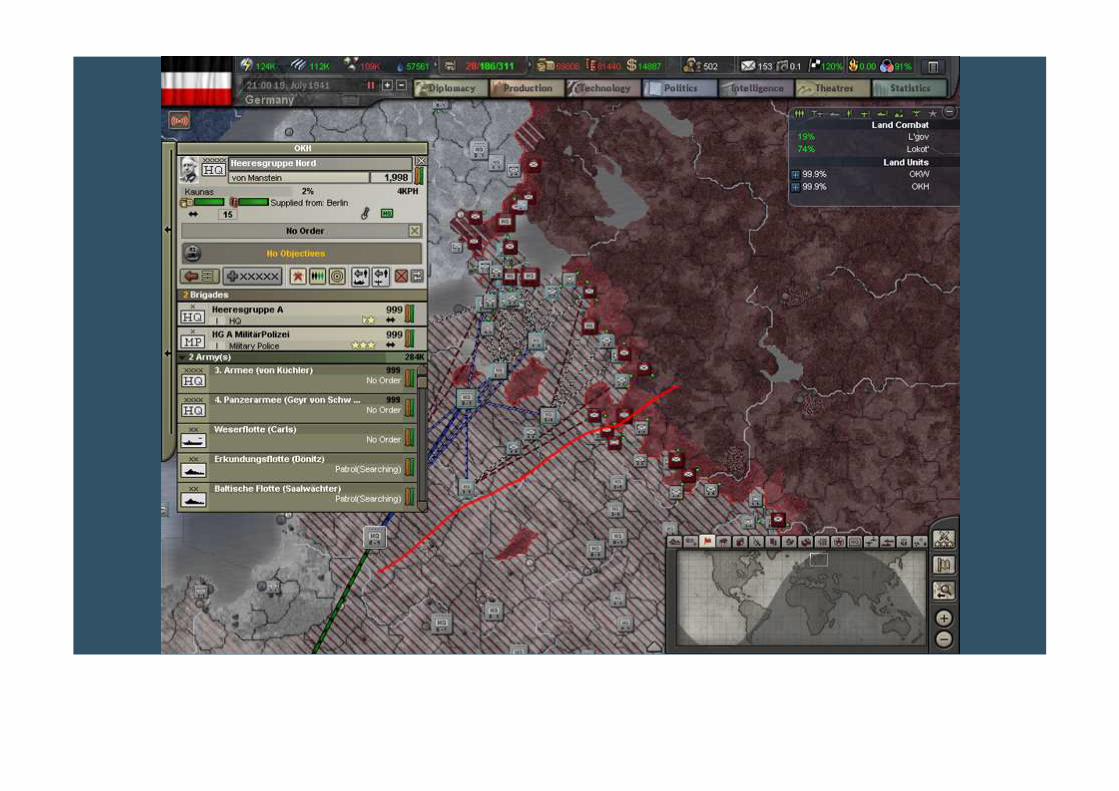
I was too busy fighting to remember taking a picture for the fall of Leningrad. This one is taken a few days later. As you can see, I am busy here clearing the area of red and coming to the rescue of my allies, who really are no match for the Soviets. By this time, you can send the panzers towards Archangelsk. Since the infantry will be busy linking up with the Fins, it might be a good idea to use your panzers and motorised divisions on a wider base. This is a little slower, but offers more security under the circumstances.If you look closely near the center of the screen, I almost managed to trap some more Soviet divisions, but they got out too fast. It also shows how to keep the two army groups connected, if only by a single division (the red line is the boundary between Heeresgruppe Nord and Heeresgruppe Mitte). After the fall of Moscow, I checked the Soviet numbers again. By this time, they only had a total of about 404 brigades left, including the ones guarding Manchukuo, all the way on the other side of Siberia.
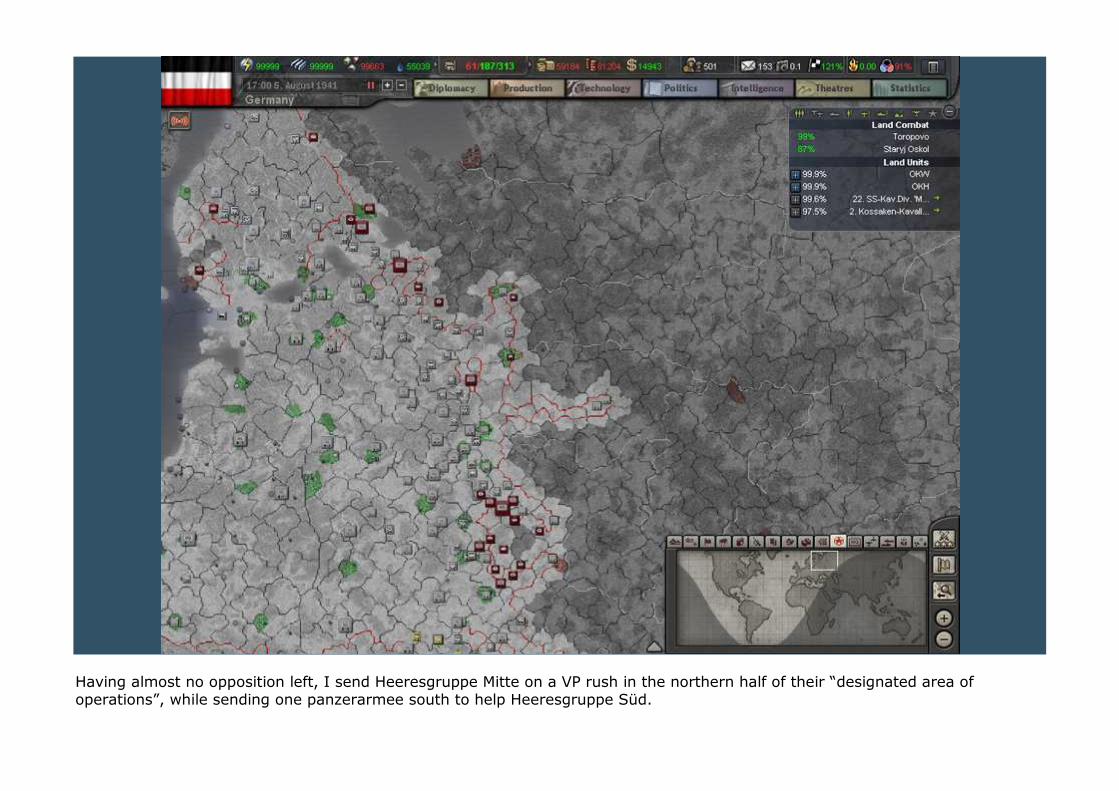
Having almost no opposition left, I send Heeresgruppe Mitte on a VP rush in the northern half of their “designated area of operations”, while sending one panzerarmee south to help Heeresgruppe Süd.
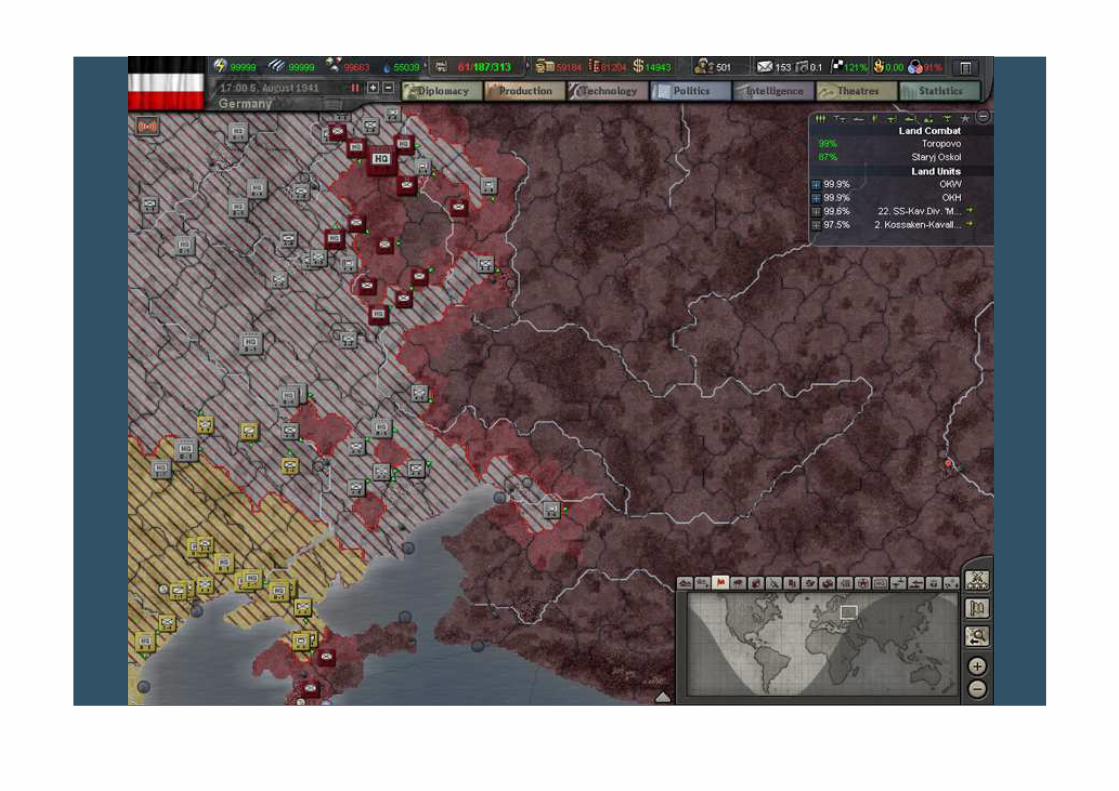
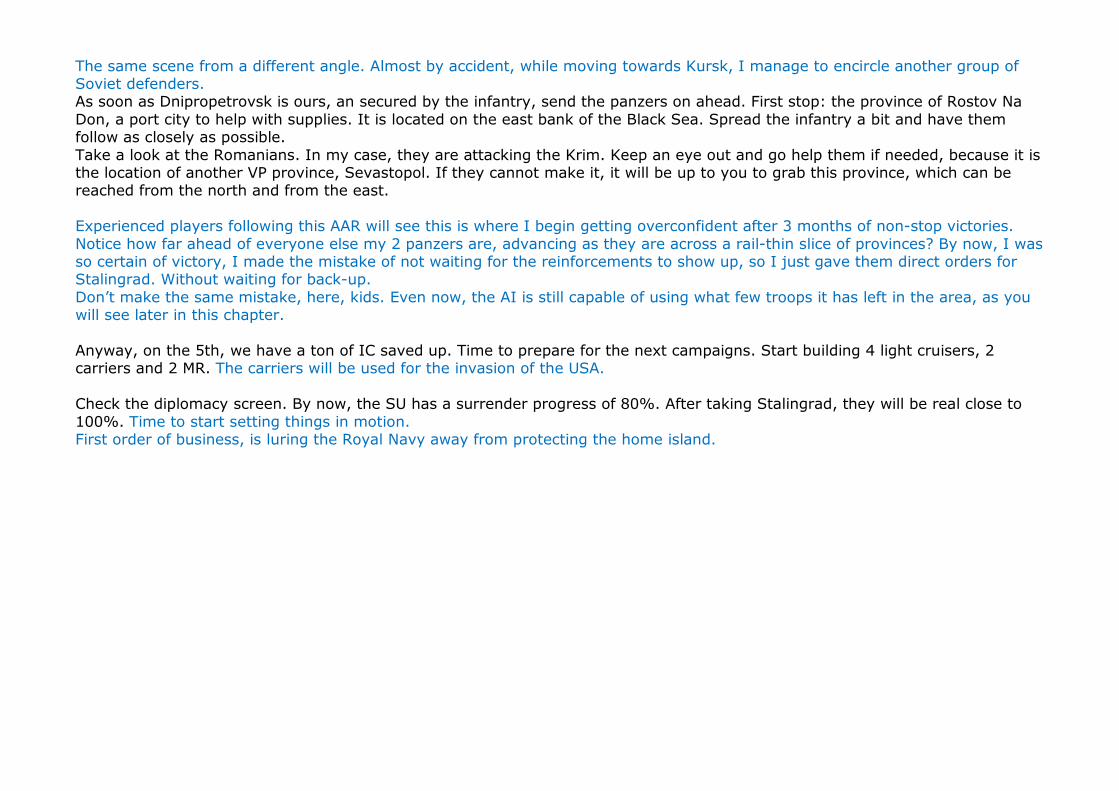
The same scene from a different angle. Almost by accident, while moving towards Kursk, I manage to encircle another group of Soviet defenders. As soon as Dnipropetrovsk is ours, an secured by the infantry, send the panzers on ahead. First stop: the province of Rostov Na Don, a port city to help with supplies. It is located on the east bank of the Black Sea. Spread the infantry a bit and have them follow as closely as possible. Take a look at the Romanians. In my case, they are attacking the Krim. Keep an eye out and go help them if needed, because it is the location of another VP province, Sevastopol. If they cannot make it, it will be up to you to grab this province, which can be reached from the north and from the east. Experienced players following this AAR will see this is where I begin getting overconfident after 3 months of non-stop victories. Notice how far ahead of everyone else my 2 panzers are, advancing as they are across a rail-thin slice of provinces? By now, I was so certain of victory, I made the mistake of not waiting for the reinforcements to show up, so I just gave them direct orders for Stalingrad. Without waiting for back-up. Don’t make the same mistake, here, kids. Even now, the AI is still capable of using what few troops it has left in the area, as you will see later in this chapter. Anyway, on the 5th, we have a ton of IC saved up. Time to prepare for the next campaigns. Start building 4 light cruisers, 2 carriers and 2 MR. The carriers will be used for the invasion of the USA. Check the diplomacy screen. By now, the SU has a surrender progress of 80%. After taking Stalingrad, they will be real close to 100%. Time to start setting things in motion. First order of business, is luring the Royal Navy away from protecting the home island.
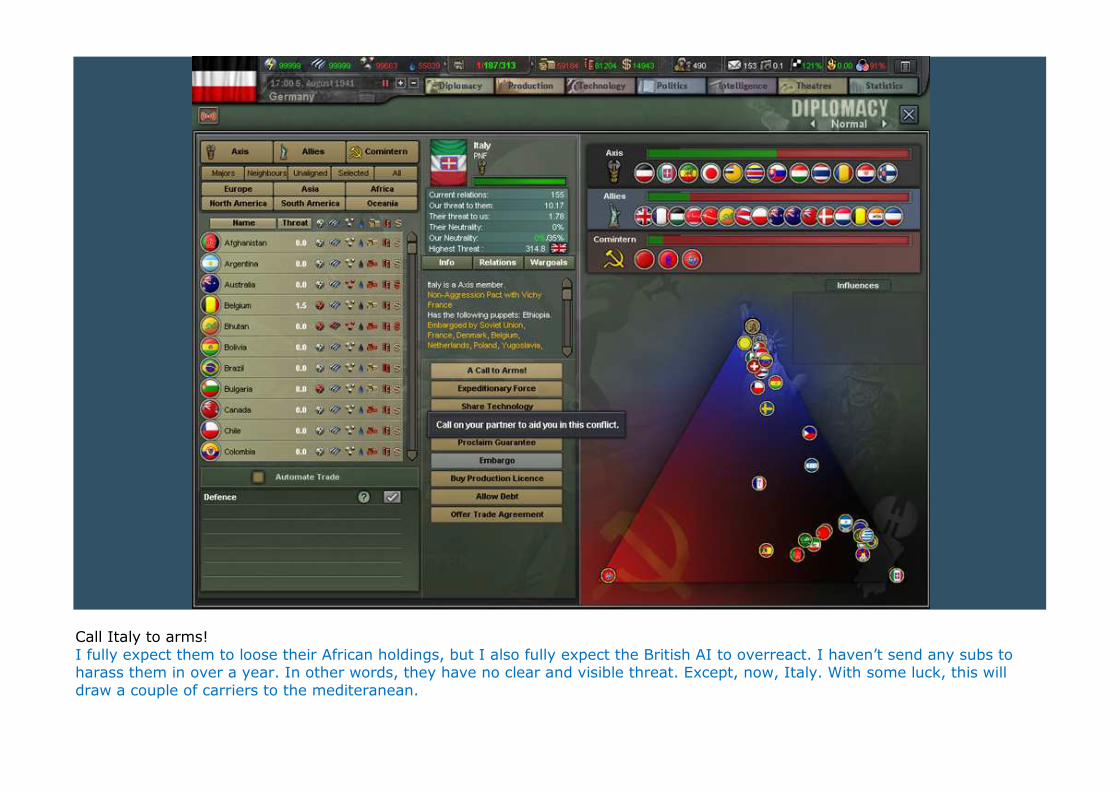
Call Italy to arms! I fully expect them to loose their African holdings, but I also fully expect the British AI to overreact. I haven’t send any subs to harass them in over a year. In other words, they have no clear and visible threat. Except, now, Italy. With some luck, this will draw a couple of carriers to the mediteranean.
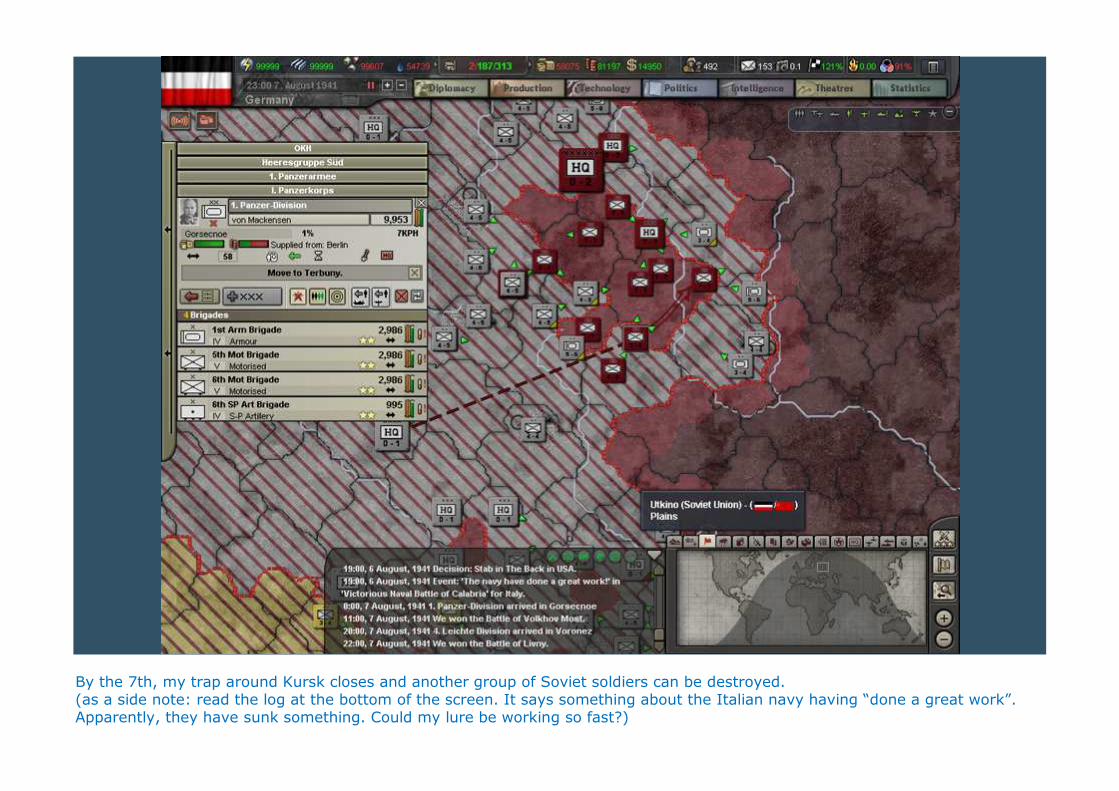
By the 7th, my trap around Kursk closes and another group of Soviet soldiers can be destroyed. (as a side note: read the log at the bottom of the screen. It says something about the Italian navy having “done a great work”. Apparently, they have sunk something. Could my lure be working so fast?)
At some point during the month, we get the transports we started building in chapter 28 as well. Add them to the Weserflotte and promote Carls if you have to. When our garrisons are finished, start by placing one in Moscow. With 30 VPs, this is the last place we want to loose to partisans. The rest of them will cover ports and VPs that we have “liberated” from the Soviets. Give them old guards and low level commanders without traits an attach them directly to the OKH. With the IC, start building some new parallell builds: 10 radar, 4 CV and 4 CL. The radar will be used to scout the British defenses, while the carriers and light cruisers will also be used for the invasion of the USA. On the 21st, Stalingrad falls to the might of German panzers after a mercifully brief skirmish. Check the Soviet surrender progress. For me, it was 94.40%. send the infantry to grab as many VPs as possible. Several are to be had near the Black Sea. And then, all we have to do is wait for Heeresgruppe Nord to finally reach Archangelsk. We receive a new Tactical bomber. Base it in paris and rename it “Luftflotte V”. I assigned Bülowius to command it, being a level-4 commander. Attach it to Heeresgruppe B and start building a new one right away.

While Heeresgruppe Nord has more trouble fighting the environment than the Soviets in reaching Archangelsk, in the center all resistance has melted away. My panzers can strike distant VPs at will. Again notice the total and complete absence of any back-up. If there had been any Soviets halfway there while I was grabbing VPs, those valuable divisions might have been lost. Not really what you’d expect in a tutorial AAR, right? I thought about replaying the last month later on, but then I figured we learn more from what goes wrong than from everything working like a charm. Think back to how I set things up way back in preperation for the assault in Poland. How I purposely kept the Panzers two provinces behind the border to hide them from the Poles? The same thing applies here. For all I knew, there could have been a dozen or more heavy armour divisions (try googling KV-1) less than 50 km from where I was passing through and I wouldn’t know it until it was too late. NEVER EVER GO ON A VP RUSH WITHOUT SENDING SOME BACKUP ALONG WITH IT!!!!!!!!!!! Unless you are on a desperate race against time (which I wasn't) or have totally eliminated every last defender there is, that is (which I knew I hadn't).
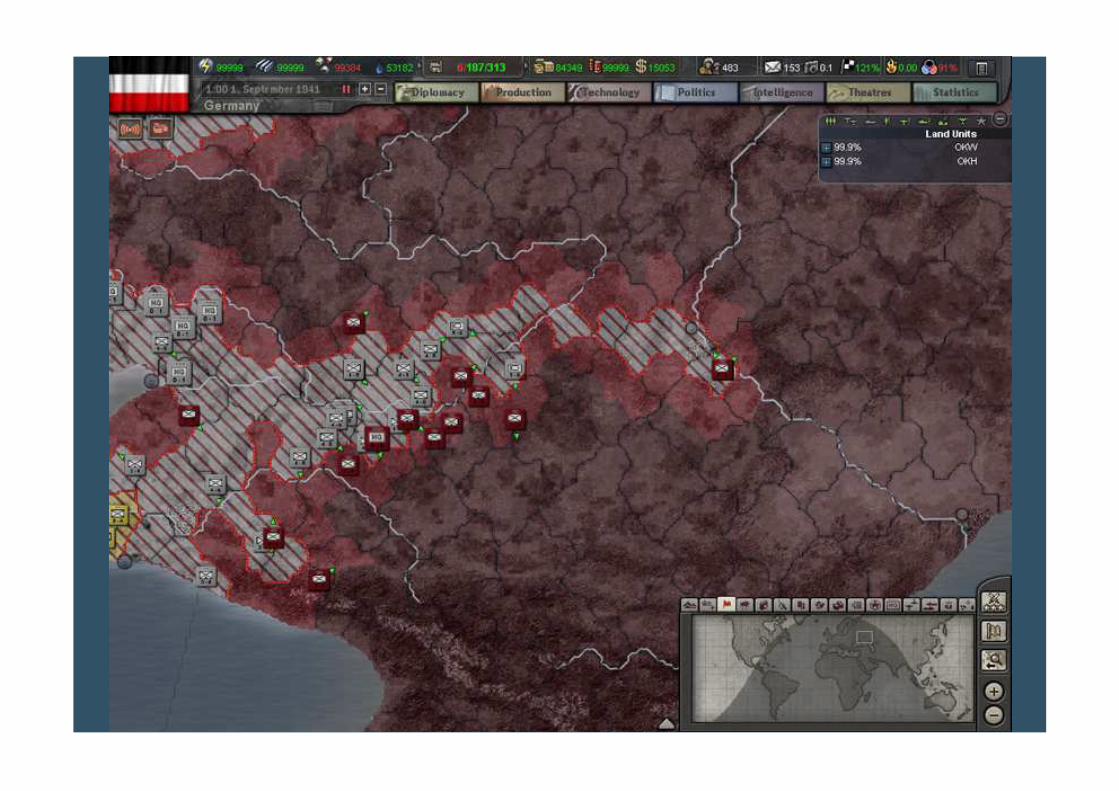
What happened was that the Soviet AI had pulled a bunch of troops off the Turkish border. They managed to slice the supply line between Heeresgruppe Süd and the panzers in Stalingrad. I got lucky. The Leichte Division used in the attack, came out of Attack Delay almost at once and managed to restore the connection. However they were alone against 8 or more Soviets and I couldn’t pull the medium armour out of Stalingrad because of the lingering defender you see hovering over the city. The proverbial cavalry in the form of tanks and infantry arrived barely in the nick of time and it took some seriously panicking maneuvres from yours truly to get a grip on the situation. By this time, the crisis has passed, but you can still see how close I came to almost losing 2 tank divisions. A lesson learned, shall we say? Never assume it is over until the fat lady sings, as the proverb goes.
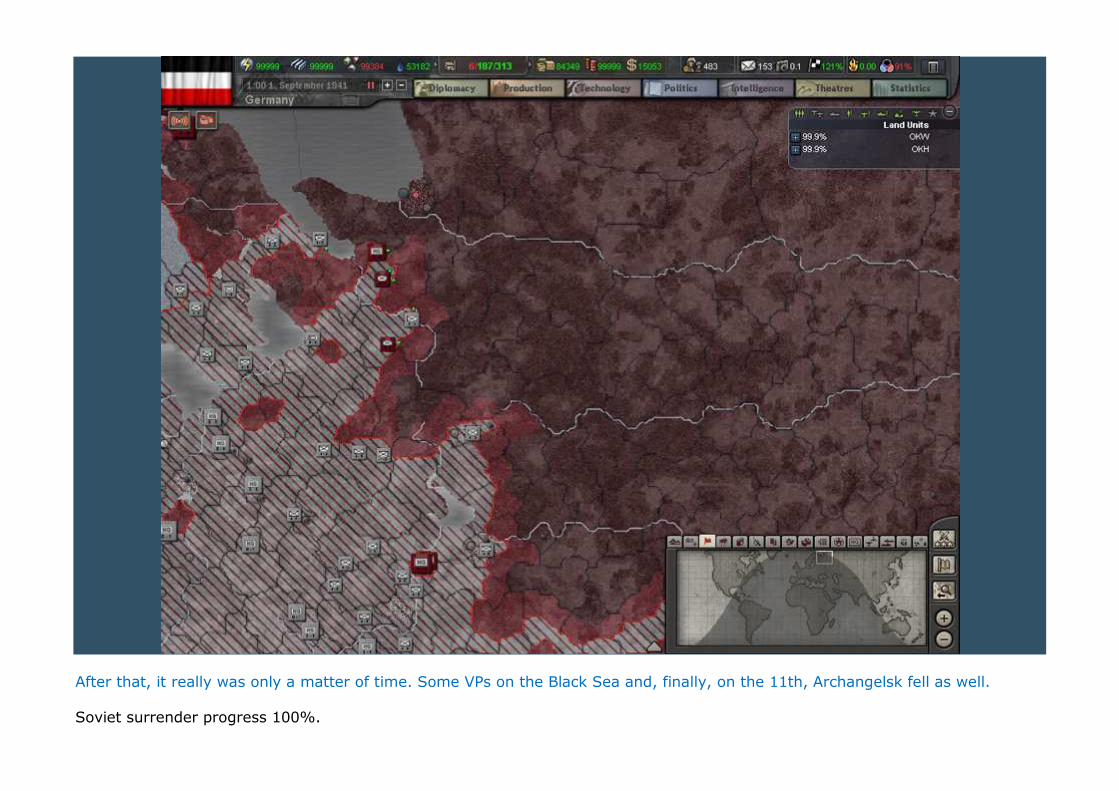
After that, it really was only a matter of time. Some VPs on the Black Sea and, finally, on the 11th, Archangelsk fell as well. Soviet surrender progress 100%.
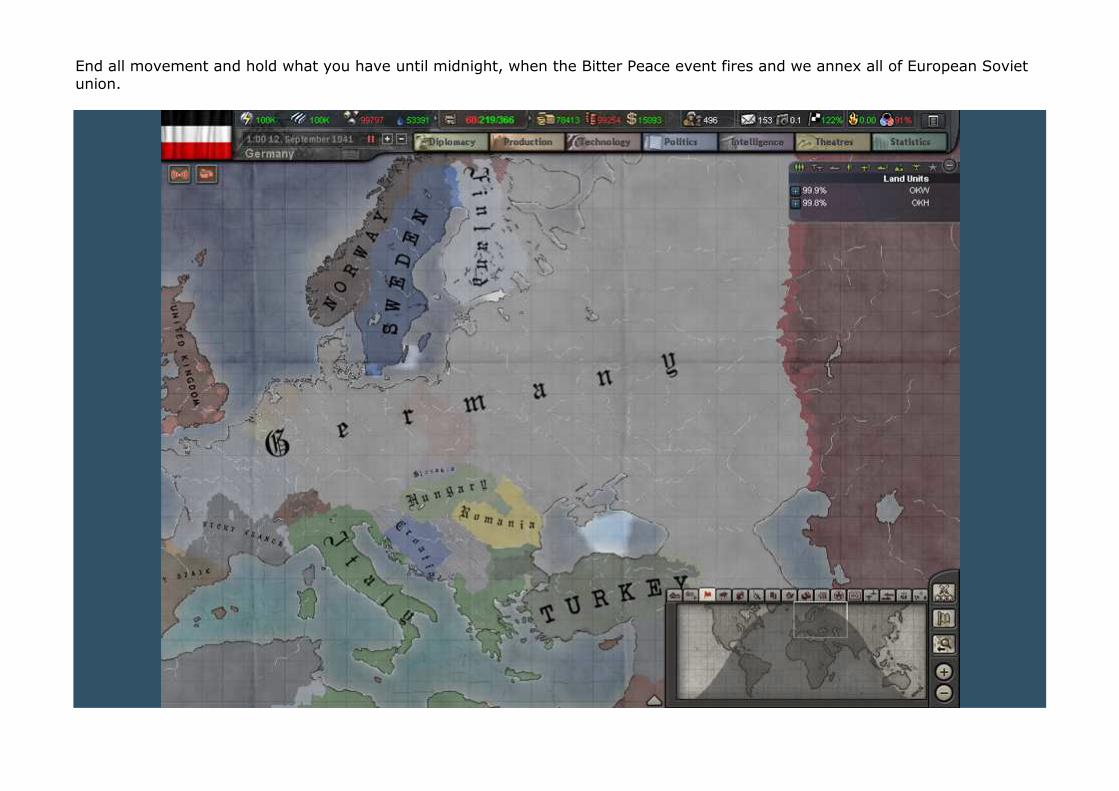
End all movement and hold what you have until midnight, when the Bitter Peace event fires and we annex all of European Soviet union.
I checked the Soviets one last time. Final tally: started with 896 brigades on 10/5/1941. Ended on 12/9/1941 with 155 brigades. That’s 741 brigades destroyed in 4 months almost to the day. Divided by 3.5, to account for the divisions it begins with (the AI never builds support brigades for these divisions), that means about 211 divisions!!!
Save the game. Save it again, just to be sure. The most important campaign of the game is over. We now have enough IC to build whatever we want, with leadership to match. Lean back and take a moment to revel in the glory of a successful Barbarossa. Congratulations for getting here! Next: only 2 majors left with a chance to disrupt our plans!
Chapter 33: Seelöwe. Ok, it’s official now. We’ve gone beyond anything Germany achieved in real life. So where do we go from here? For me, it is really simple. There are only two nations on Earth left that pose a threat to Germany: UK and USA. Taking out the UK right now, would ensure security. There is no way an-AI led US would be able to stage an invasion of Europe without having the British isles as launching platform. What do we need? We need an infantry army, a bunch of panzers, the entire Kriegsmarine and most of the Luftwaffe. And some luck. Make no mistake. Conquering the isles is really simple. The hard part will be getting there. More on that later. First, some major reorganisation is needed. Find the 4. Armee in Heeresgruppe Mitte and detach it. Give it a new army group HQ, that we will rename Heeresgruppe E. Find 1. Panzerarmee, in Heeresgruppe Süd and attach it to Heeresgruppe E. I chose those two because they have the most experience of all our armies and because they have the most talented officers combined. Give Rommel a much deserved promotion to Field Marshall and give him command of Heeresgruppe E. Find Hausser and give him command of 1. Panzerarmee. Switch von Manstein and Paulus around so that von Manstein will command OKW and Paulus will command Heeresgruppe Mitte. Promote Hoth to command the Panzerarmee in his stead and another panzer general to command the Panzerkorps. Attach all panzerarmies to Heeresgruppe Nord, commanded by Guderian. Attach Heeresgruppe E to the OKW and Strategically Redeploy them all the way to Amsterdam. They will be the invasion force for the UK. SR Heeresgruppe Nord to Berlin. (this should include 1 infantry army and 3 panzer armies). We are now going to create 2 new Theaters. One for the northern part of Russia, the other for the Ukraine and the Caucasus. Detach Heeresgruppe Mitte from the OKH and create a higher HQ. This will be “OK Russland”. Find an Old Guard/Logistics Wizard,
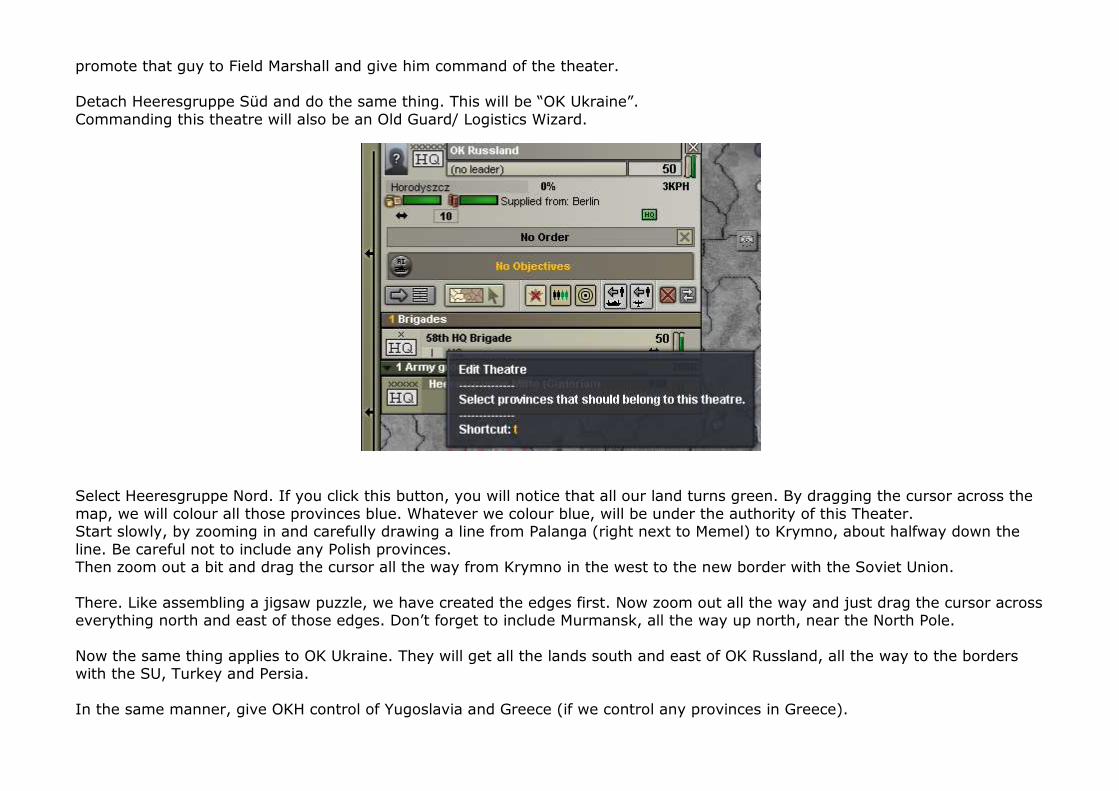
promote that guy to Field Marshall and give him command of the theater. Detach Heeresgruppe Süd and do the same thing. This will be “OK Ukraine”. Commanding this theatre will also be an Old Guard/ Logistics Wizard.
Select Heeresgruppe Nord. If you click this button, you will notice that all our land turns green. By dragging the cursor across the map, we will colour all those provinces blue. Whatever we colour blue, will be under the authority of this Theater. Start slowly, by zooming in and carefully drawing a line from Palanga (right next to Memel) to Krymno, about halfway down the line. Be careful not to include any Polish provinces. Then zoom out a bit and drag the cursor all the way from Krymno in the west to the new border with the Soviet Union. There. Like assembling a jigsaw puzzle, we have created the edges first. Now zoom out all the way and just drag the cursor across everything north and east of those edges. Don’t forget to include Murmansk, all the way up north, near the North Pole. Now the same thing applies to OK Ukraine. They will get all the lands south and east of OK Russland, all the way to the borders with the SU, Turkey and Persia. In the same manner, give OKH control of Yugoslavia and Greece (if we control any provinces in Greece).
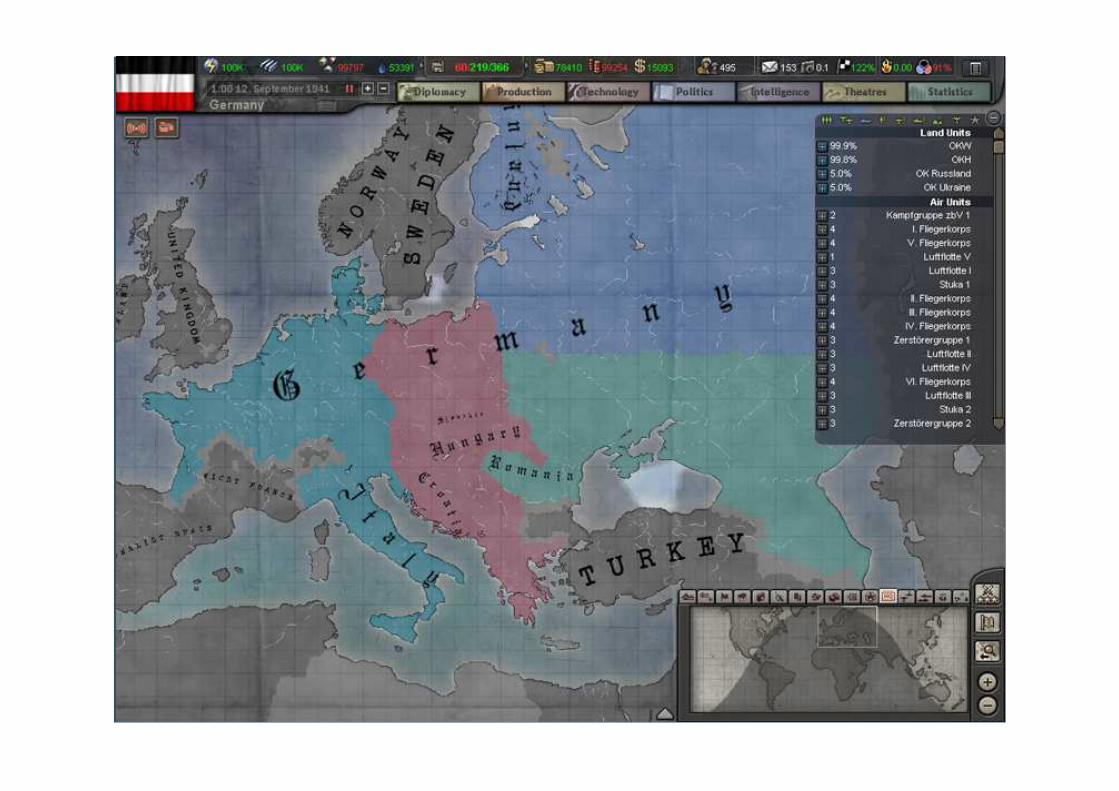
When you’re done, this is what it should look like. Take the time to get it right. Nothing more frustrating than watching all your forces assembling in Split when you really want them cutting down partisans in the Caucasus, right? Make sure all your garrisons as well as the cavalry in Poland are still attached directly to the OKH. Attach the 7. Armee (the one in yugoslavia) to the OkH as well. Any new garrisons coming up will be attached to OKH, regardless of their actual location. This ensure us that they will stay exactly where we want them: guarding VPS and ports. Check to make sure that both OK Russland and OK Ukraine each have 1 Army group with 1 infantry army. Once our cavalry divisions start coming off the line, we will attach them to the proper theatre to use as anti-partisan forces. Now, all that is left to do is the Luftwaffe and the Kriegsmarine. Send 1 Tac wing to Sevastopol. If there is a convoy raider trying to intercept our shipping between Ukraine and Yugoslavia, send this wing on “naval strike” missions to dissuade them. Attach it to the OKH, to make sure the AI doesn’t do something stupid with it. Send 1 interceptor wing to T’bilisi, where it will ward off strategic bombing attempts by the UK. Attach this one to the OKH as well. All the other planes, as well as all our surface fleets, should be attached to Heeresgruppe E. Rebase the Zerstörergruppen to Brest, Amsterdam and Antwerpen. Rebase interceptors to Cherbourg, Lille and Amsterdam. MAKE SURE TO KEEP THE INTERCEPTORS IN WÜPPERTAL AND LEIPZIG WHERE THEY ARE!!!! The tactical wings should go to Paris, Amsterdam and Brussel. The Stukas will rebase in Cherbourg and Amsterdam. Make sure to attach Kriegsmarine, Erkundungsflotte and Weserflotte to Heeresgruppe E. Rebase all 3 to Amsterdam. Once you’re certain that the only thing both new theatres have left are infantry, click the black, round button to automate them. The theater will now turn green in the browser on the right. Note that in order to automate a theatre, you have to assign it at least 1 province to control. You might as well rebase the Baltische Flotte in Danzig and attach it to the OkH.
One last thing I did to clean things up, was to rename Heeresgruppen Mitte, Nord and Süd back into Heeresgruppe A, Heeresgruppe C and Heeresgruppe D. Send 1. And 2. Fallschirmjäger-Divisions to Lille. Rebase the transport planes. These will come in handy later on. There. All done. Go to the production screen and produce 16 garrisons. Let the game run for a day and pause. Go to the Research screen and adjust the LS sliders: Research: 37.01 Spies: 2.11 Diplomacy: 0 (hey, I have over 150 Diplomacy points, more than I will ever need). Officer training: 10.40 All we can do now is let the game run until our Sealion forces have arrived in Amsterdam. While we wait, we get some now techs as well. Medium and Small Air Search Radar give access to Medium and Small navigation Radar respectively. When the cavalry is ready, spread them out somewhat evenly across the Russian interior and attach them directly to their proper theater (Russland or Ukraine, depending on location). The AI will take over and deploy them as needed. Start 10 new cavs before unpauzing. By this time, Heeresgruppe E should be arriving in Amsterdam. While we wait for their Attack Delay to wear off, there is one thing we can do. Use one single sub to recon the UK’s defenses. Move it across the British coastline, using the “move” order. Don’t give it any other order to avoid attracting attention to it. This is the one thing subs excell at: using the move order, a single sub is almost impossible to detect unless the enemy has radar stations. As your single sub arrives, mouse over the occupied air- and naval bases it can see. Make a note of where each ship squadron in stationed and their general make-up (this depends on having up-to-date decryption techs at the very least).
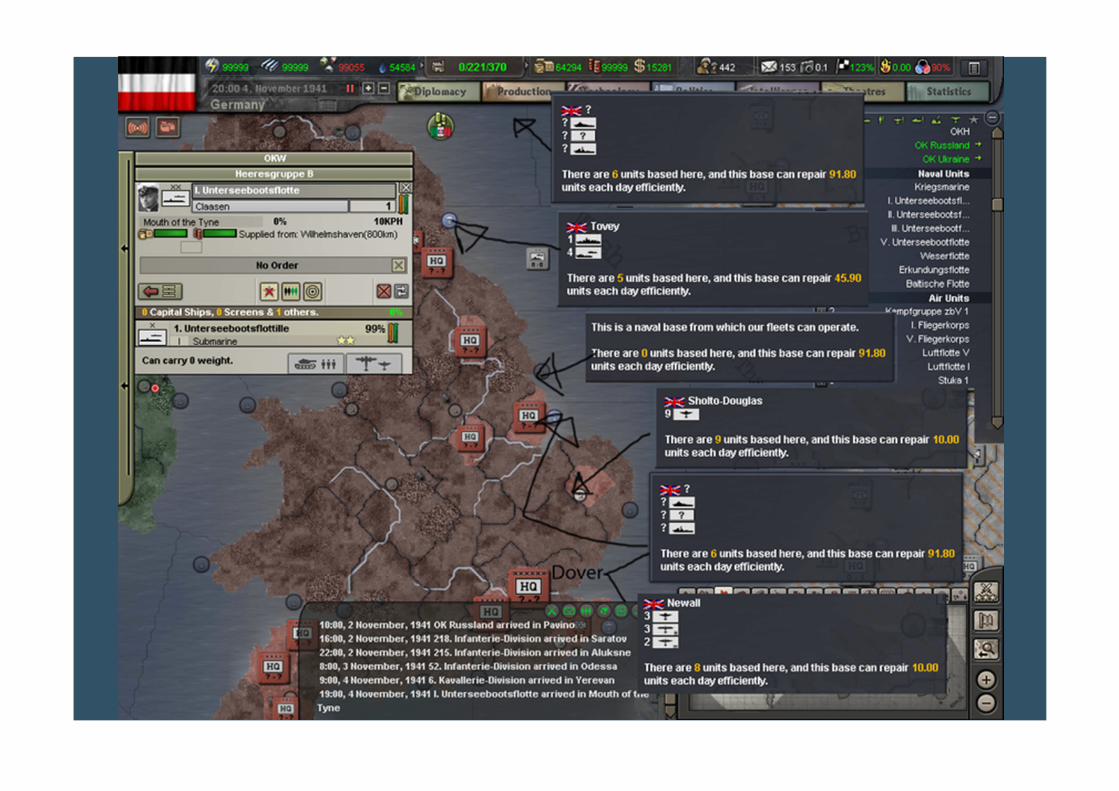
In my game, this is what I saw: The port province in Lowesoft is empty. It doesn’t even include a garrison. Given its small size, it is not unreasonable to assume that it would be incapable of sustaining a large-scale invasion force, plus there is a squadron in Grimsby, right next to it, that has at least 1 battleship. On the other hand, Lowesoft is real close to London, only a short jog away from larger ports, and there is an airbase in Norwich that we could use for our own planes. This airbase currently houses 9 interceptors. Dover is right out of the question. It is protected by a garrison, a squadron of 6 ships and several bomber wings. Hull is empty as well. Located ideally, somewhat in the middle of England, dividing the country in half before raising hell south would be child’s play. However, it would mean a longer trip to make it. the more time spent on ferrying troops to England, the longer our combat fleets would need to remain stationary guarding the flanks of the transport fleet. Portmsouth, in the center of the Uk’s south coast, is impossible as well. We would be running the gauntlet of the best defenses the UK has to offer. There is, after all, a reason why it is called the English Channel, and not the French Channel. Doing it here would give future generations the name “Channel Turkey Shoot”. Just ask any Japanese about the Marrianas. So, I’m going to invade Lowesoft. It may well be that, in your game, Lowesoft is housing a couple of UK carriers. You may have to adjust the landing site accordingly. The prime criteria for any successful amphibious invasion: There must be a weakly protected or empty port, preferably with other (large) ports just a few provinces over. It must be reasonably close to your launch point: your transport fleet must be able to ferry in reinforcements ASAP after the chosen port is yours. You must be certain, up to a point, that your combat fleets can keep any and all other ships away from the transports. Any that get through, could drown a substantial number of troops that you were counting on for the invasion. Of course, the more transport ships sink, the fewer weight the fleet can carry and the more trips you have to make, further endangering your combat ships. There should, ideally, be an airbase close enough to use long-range fighter/bombers as protection (our MR). If all those criteria are met, you are good to go. Say a prayer (or, better yet, save the game) and go for the biggest gamble in the game as far as Germany at this point in time is concerned. Will our small, but modern fleet be able to fight off the large, old but still hugely dangerous, Royal Navy? Whatever else happens, by this point, the only things that matter are getting those troops across and making sure the Graf Zeppelin does not sink. Bismarck and Tirpitz could be missed, if they had to be. But carriers are the future of naval operations. Sinking one of those would set us back a lot.
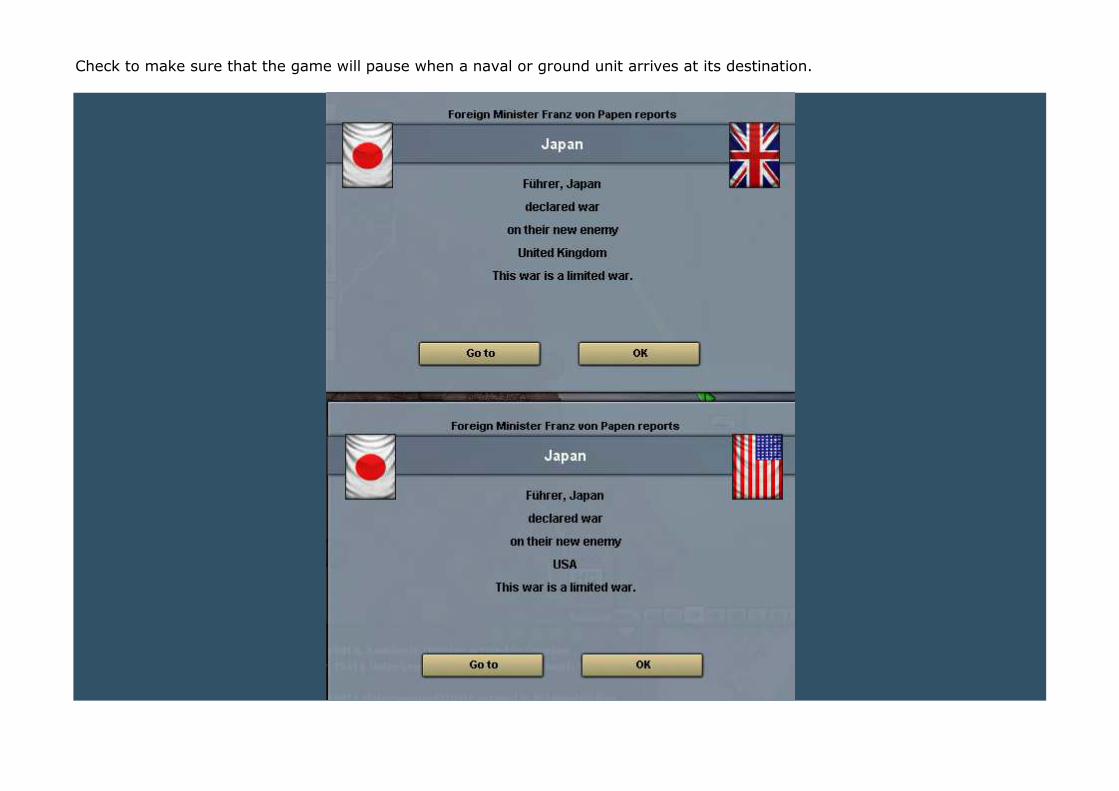
Check to make sure that the game will pause when a naval or ground unit arrives at its destination.
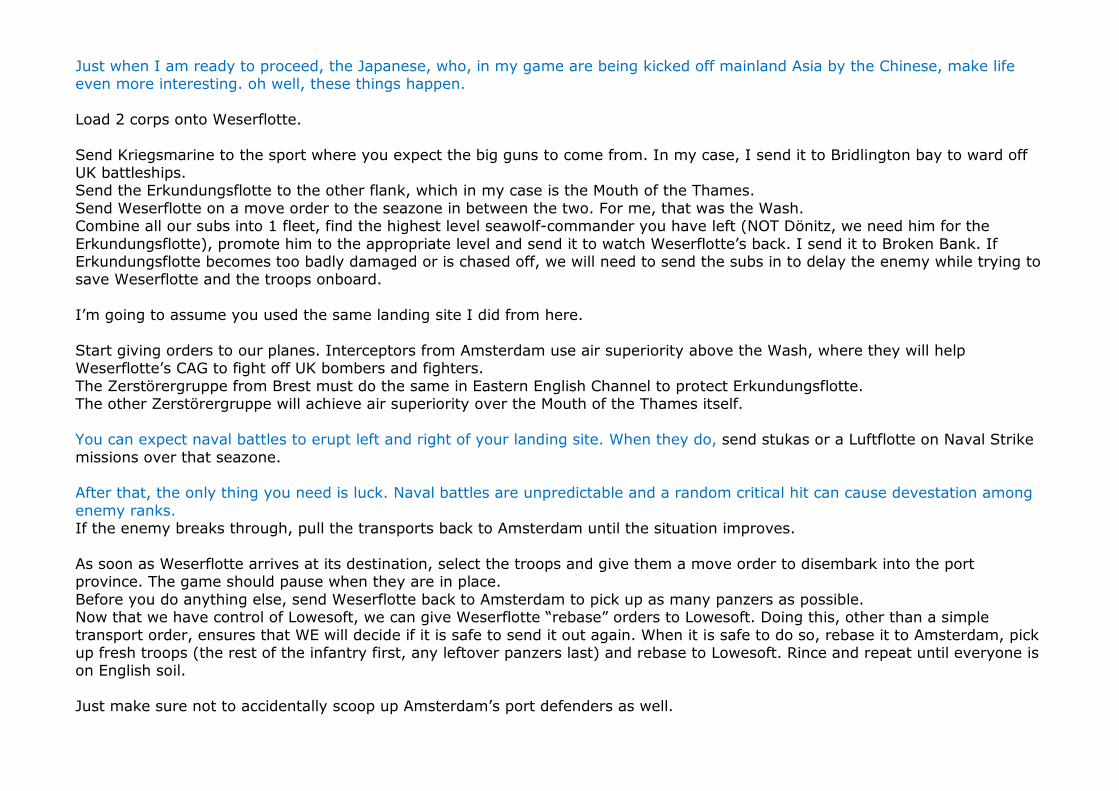
Just when I am ready to proceed, the Japanese, who, in my game are being kicked off mainland Asia by the Chinese, make life even more interesting. oh well, these things happen. Load 2 corps onto Weserflotte. Send Kriegsmarine to the sport where you expect the big guns to come from. In my case, I send it to Bridlington bay to ward off UK battleships. Send the Erkundungsflotte to the other flank, which in my case is the Mouth of the Thames. Send Weserflotte on a move order to the seazone in between the two. For me, that was the Wash. Combine all our subs into 1 fleet, find the highest level seawolf-commander you have left (NOT Dönitz, we need him for the Erkundungsflotte), promote him to the appropriate level and send it to watch Weserflotte’s back. I send it to Broken Bank. If Erkundungsflotte becomes too badly damaged or is chased off, we will need to send the subs in to delay the enemy while trying to save Weserflotte and the troops onboard. I’m going to assume you used the same landing site I did from here. Start giving orders to our planes. Interceptors from Amsterdam use air superiority above the Wash, where they will help Weserflotte’s CAG to fight off UK bombers and fighters. The Zerstörergruppe from Brest must do the same in Eastern English Channel to protect Erkundungsflotte. The other Zerstörergruppe will achieve air superiority over the Mouth of the Thames itself. You can expect naval battles to erupt left and right of your landing site. When they do, send stukas or a Luftflotte on Naval Strike missions over that seazone. After that, the only thing you need is luck. Naval battles are unpredictable and a random critical hit can cause devestation among enemy ranks. If the enemy breaks through, pull the transports back to Amsterdam until the situation improves. As soon as Weserflotte arrives at its destination, select the troops and give them a move order to disembark into the port province. The game should pause when they are in place. Before you do anything else, send Weserflotte back to Amsterdam to pick up as many panzers as possible. Now that we have control of Lowesoft, we can give Weserflotte “rebase” orders to Lowesoft. Doing this, other than a simple transport order, ensures that WE will decide if it is safe to send it out again. When it is safe to do so, rebase it to Amsterdam, pick up fresh troops (the rest of the infantry first, any leftover panzers last) and rebase to Lowesoft. Rince and repeat until everyone is on English soil. Just make sure not to accidentally scoop up Amsterdam’s port defenders as well.
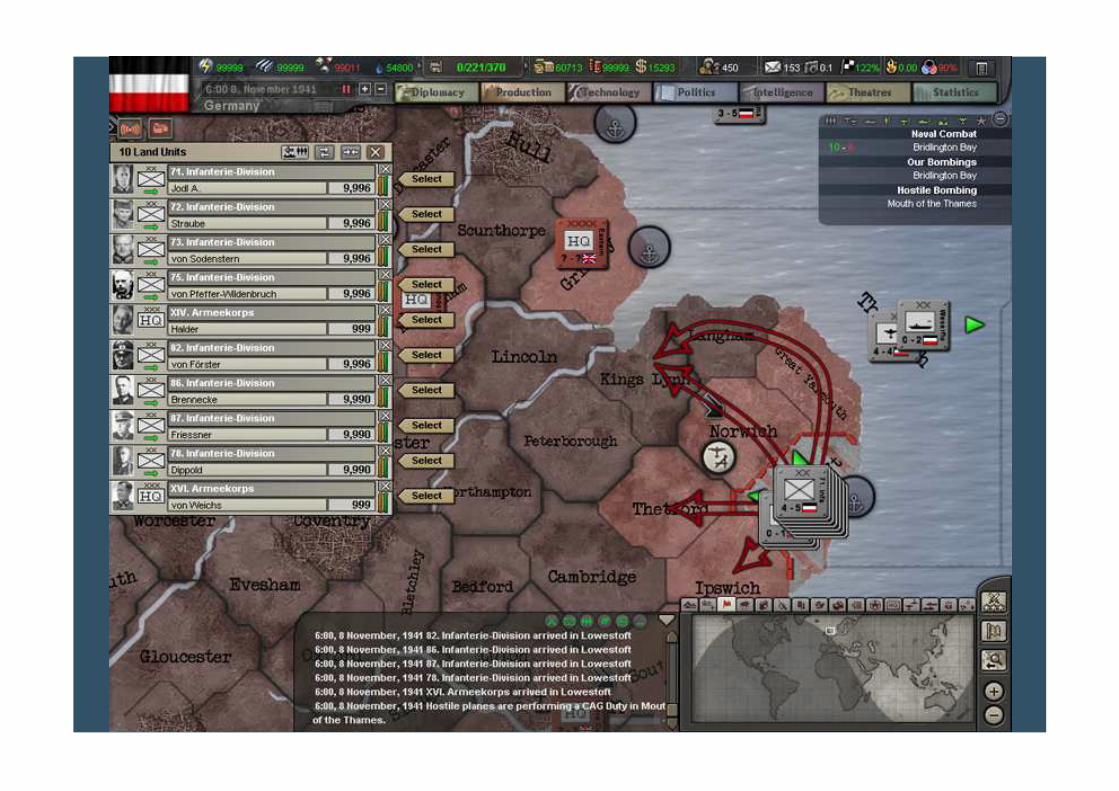
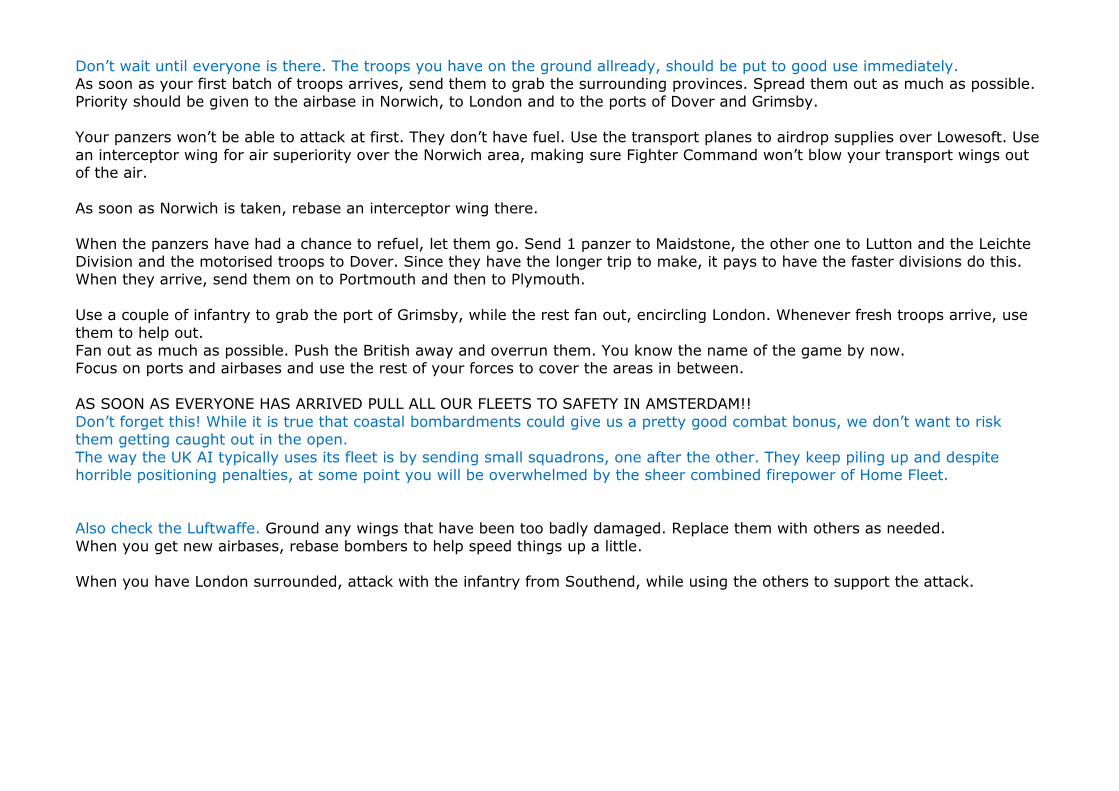
Don’t wait until everyone is there. The troops you have on the ground allready, should be put to good use immediately. As soon as your first batch of troops arrives, send them to grab the surrounding provinces. Spread them out as much as possible. Priority should be given to the airbase in Norwich, to London and to the ports of Dover and Grimsby. Your panzers won’t be able to attack at first. They don’t have fuel. Use the transport planes to airdrop supplies over Lowesoft. Use an interceptor wing for air superiority over the Norwich area, making sure Fighter Command won’t blow your transport wings out of the air. As soon as Norwich is taken, rebase an interceptor wing there. When the panzers have had a chance to refuel, let them go. Send 1 panzer to Maidstone, the other one to Lutton and the Leichte Division and the motorised troops to Dover. Since they have the longer trip to make, it pays to have the faster divisions do this. When they arrive, send them on to Portmouth and then to Plymouth. Use a couple of infantry to grab the port of Grimsby, while the rest fan out, encircling London. Whenever fresh troops arrive, use them to help out. Fan out as much as possible. Push the British away and overrun them. You know the name of the game by now. Focus on ports and airbases and use the rest of your forces to cover the areas in between. AS SOON AS EVERYONE HAS ARRIVED PULL ALL OUR FLEETS TO SAFETY IN AMSTERDAM!! Don’t forget this! While it is true that coastal bombardments could give us a pretty good combat bonus, we don’t want to risk them getting caught out in the open. The way the UK AI typically uses its fleet is by sending small squadrons, one after the other. They keep piling up and despite horrible positioning penalties, at some point you will be overwhelmed by the sheer combined firepower of Home Fleet. Also check the Luftwaffe. Ground any wings that have been too badly damaged. Replace them with others as needed. When you get new airbases, rebase bombers to help speed things up a little. When you have London surrounded, attack with the infantry from Southend, while using the others to support the attack.
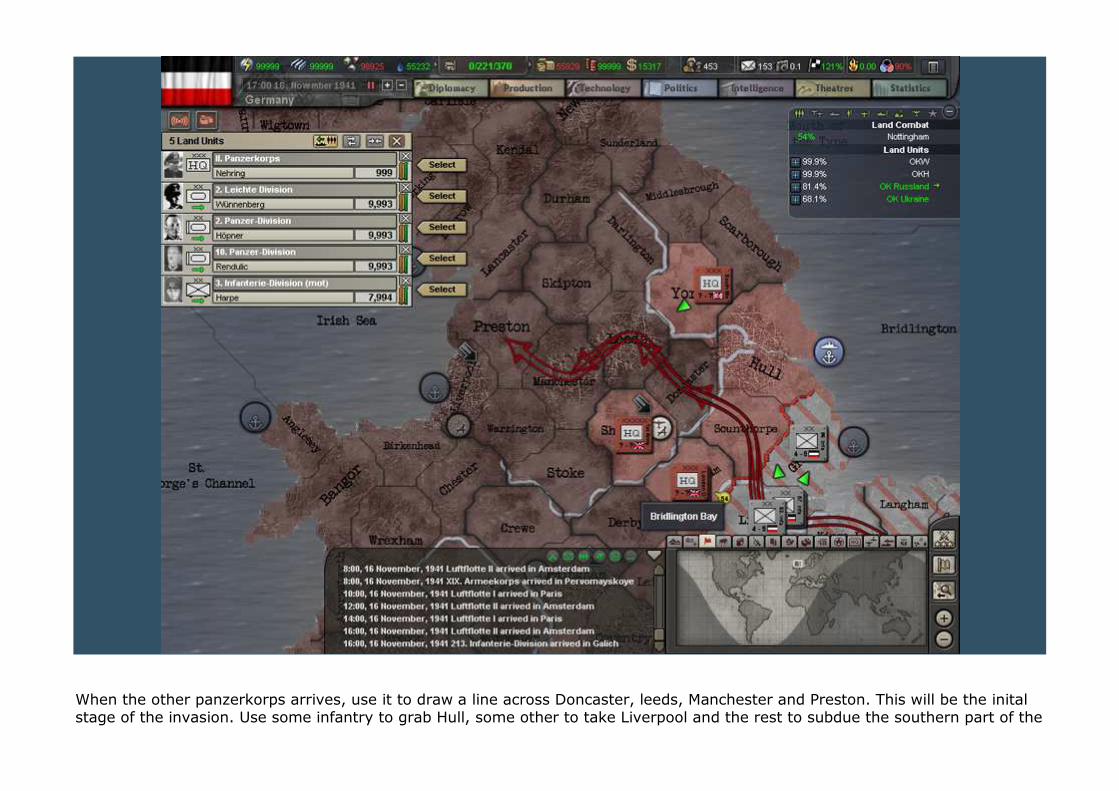
When the other panzerkorps arrives, use it to draw a line across Doncaster, leeds, Manchester and Preston. This will be the inital stage of the invasion. Use some infantry to grab Hull, some other to take Liverpool and the rest to subdue the southern part of the
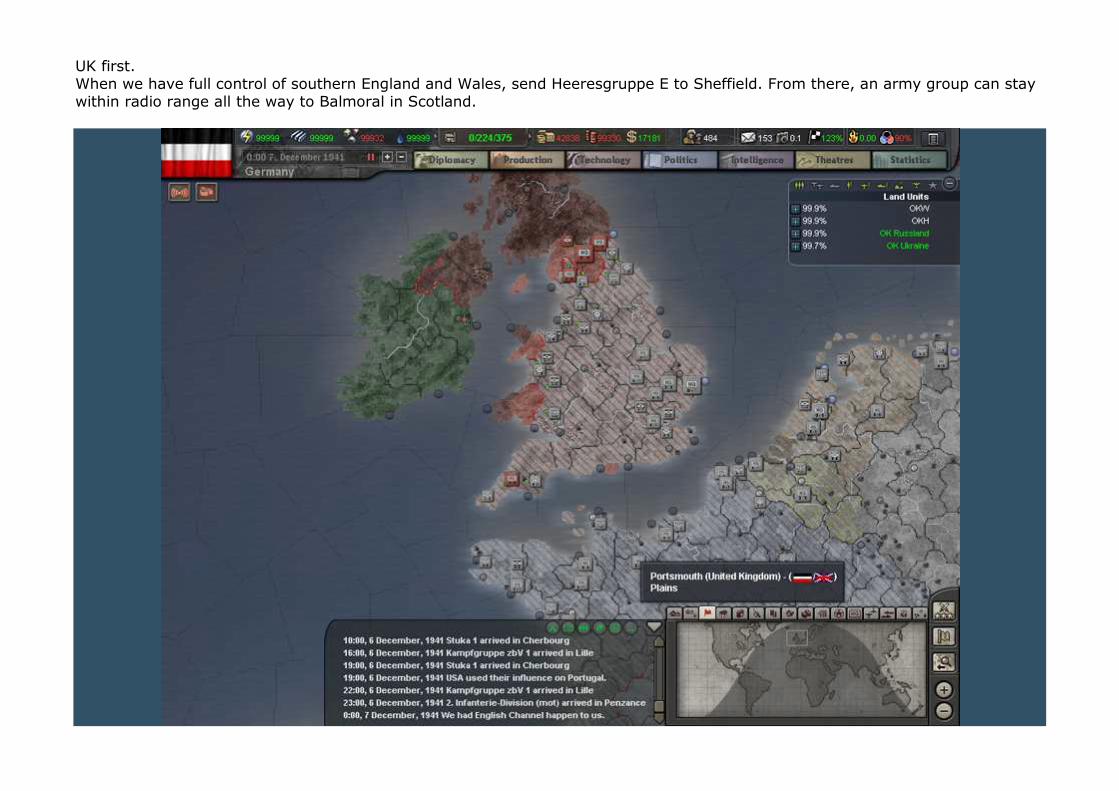
UK first. When we have full control of southern England and Wales, send Heeresgruppe E to Sheffield. From there, an army group can stay within radio range all the way to Balmoral in Scotland.
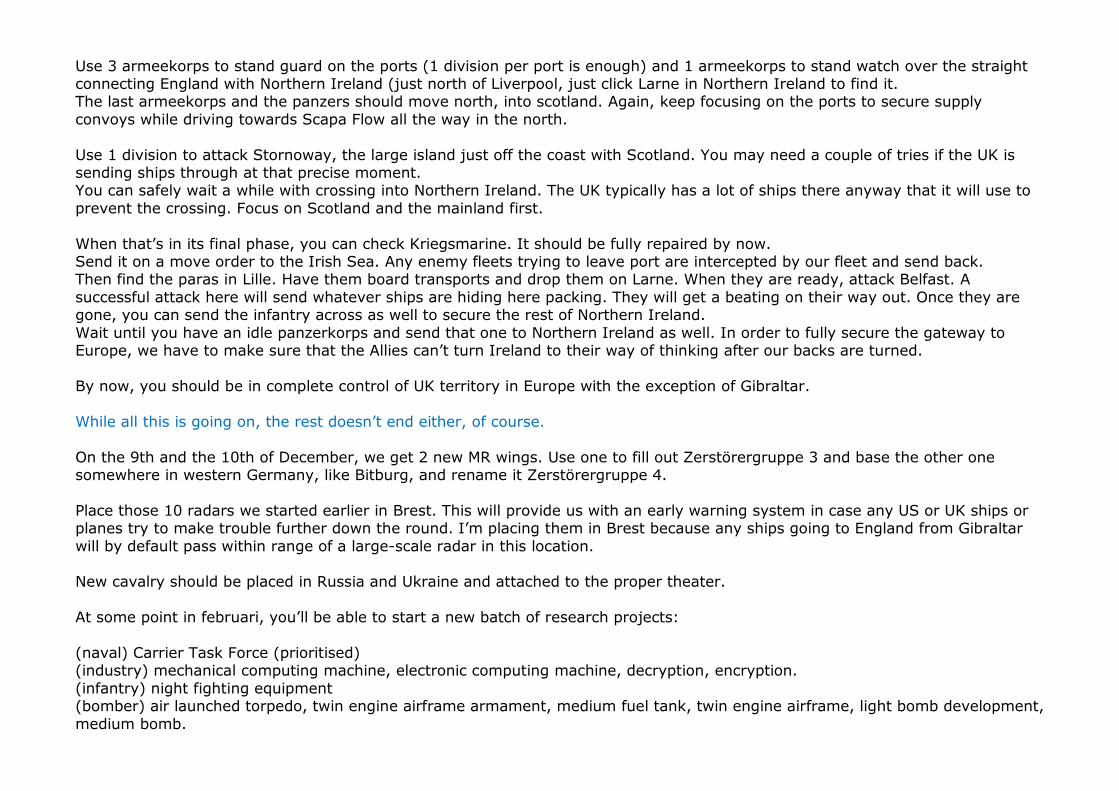
Use 3 armeekorps to stand guard on the ports (1 division per port is enough) and 1 armeekorps to stand watch over the straight connecting England with Northern Ireland (just north of Liverpool, just click Larne in Northern Ireland to find it. The last armeekorps and the panzers should move north, into scotland. Again, keep focusing on the ports to secure supply convoys while driving towards Scapa Flow all the way in the north. Use 1 division to attack Stornoway, the large island just off the coast with Scotland. You may need a couple of tries if the UK is sending ships through at that precise moment. You can safely wait a while with crossing into Northern Ireland. The UK typically has a lot of ships there anyway that it will use to prevent the crossing. Focus on Scotland and the mainland first. When that’s in its final phase, you can check Kriegsmarine. It should be fully repaired by now. Send it on a move order to the Irish Sea. Any enemy fleets trying to leave port are intercepted by our fleet and send back. Then find the paras in Lille. Have them board transports and drop them on Larne. When they are ready, attack Belfast. A successful attack here will send whatever ships are hiding here packing. They will get a beating on their way out. Once they are gone, you can send the infantry across as well to secure the rest of Northern Ireland. Wait until you have an idle panzerkorps and send that one to Northern Ireland as well. In order to fully secure the gateway to Europe, we have to make sure that the Allies can’t turn Ireland to their way of thinking after our backs are turned. By now, you should be in complete control of UK territory in Europe with the exception of Gibraltar. While all this is going on, the rest doesn’t end either, of course. On the 9th and the 10th of December, we get 2 new MR wings. Use one to fill out Zerstörergruppe 3 and base the other one somewhere in western Germany, like Bitburg, and rename it Zerstörergruppe 4. Place those 10 radars we started earlier in Brest. This will provide us with an early warning system in case any US or UK ships or planes try to make trouble further down the round. I’m placing them in Brest because any ships going to England from Gibraltar will by default pass within range of a large-scale radar in this location. New cavalry should be placed in Russia and Ukraine and attached to the proper theater. At some point in februari, you’ll be able to start a new batch of research projects: (naval) Carrier Task Force (prioritised) (industry) mechanical computing machine, electronic computing machine, decryption, encryption. (infantry) night fighting equipment (bomber) air launched torpedo, twin engine airframe armament, medium fuel tank, twin engine airframe, light bomb development, medium bomb.
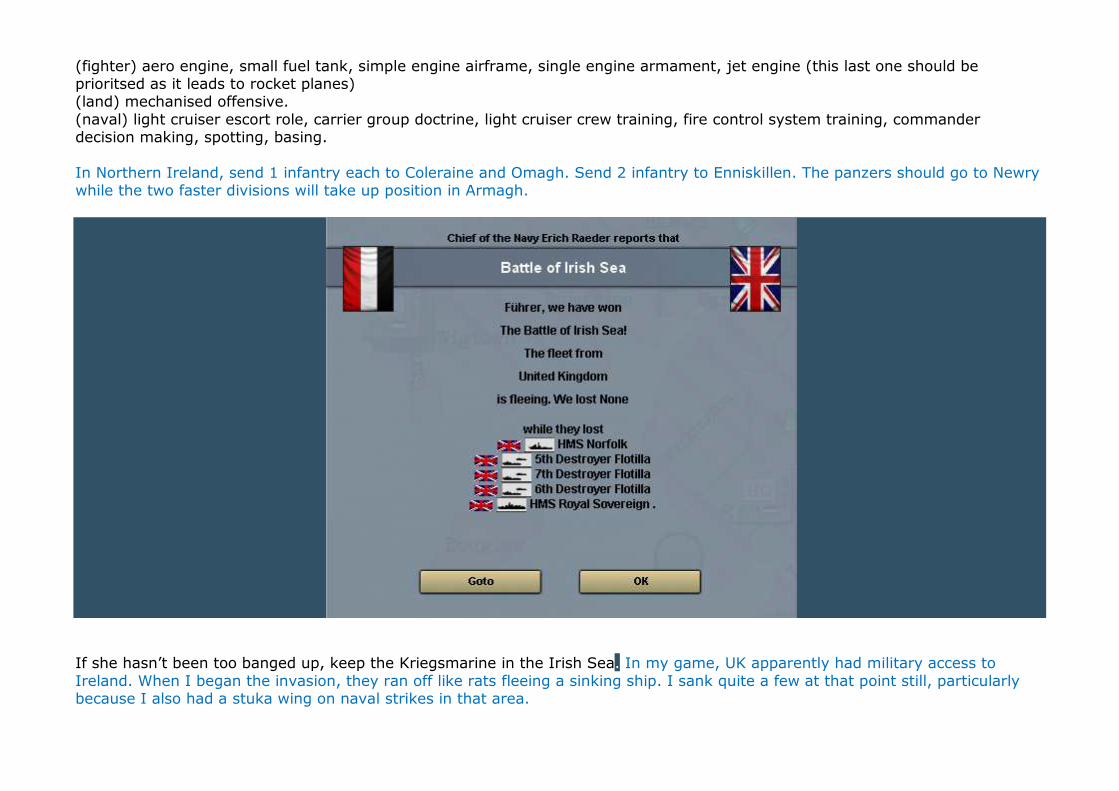
(fighter) aero engine, small fuel tank, simple engine airframe, single engine armament, jet engine (this last one should be prioritsed as it leads to rocket planes) (land) mechanised offensive. (naval) light cruiser escort role, carrier group doctrine, light cruiser crew training, fire control system training, commander decision making, spotting, basing. In Northern Ireland, send 1 infantry each to Coleraine and Omagh. Send 2 infantry to Enniskillen. The panzers should go to Newry while the two faster divisions will take up position in Armagh.
If she hasn’t been too banged up, keep the Kriegsmarine in the Irish Sea. In my game, UK apparently had military access to Ireland. When I began the invasion, they ran off like rats fleeing a sinking ship. I sank quite a few at that point still, particularly because I also had a stuka wing on naval strikes in that area.
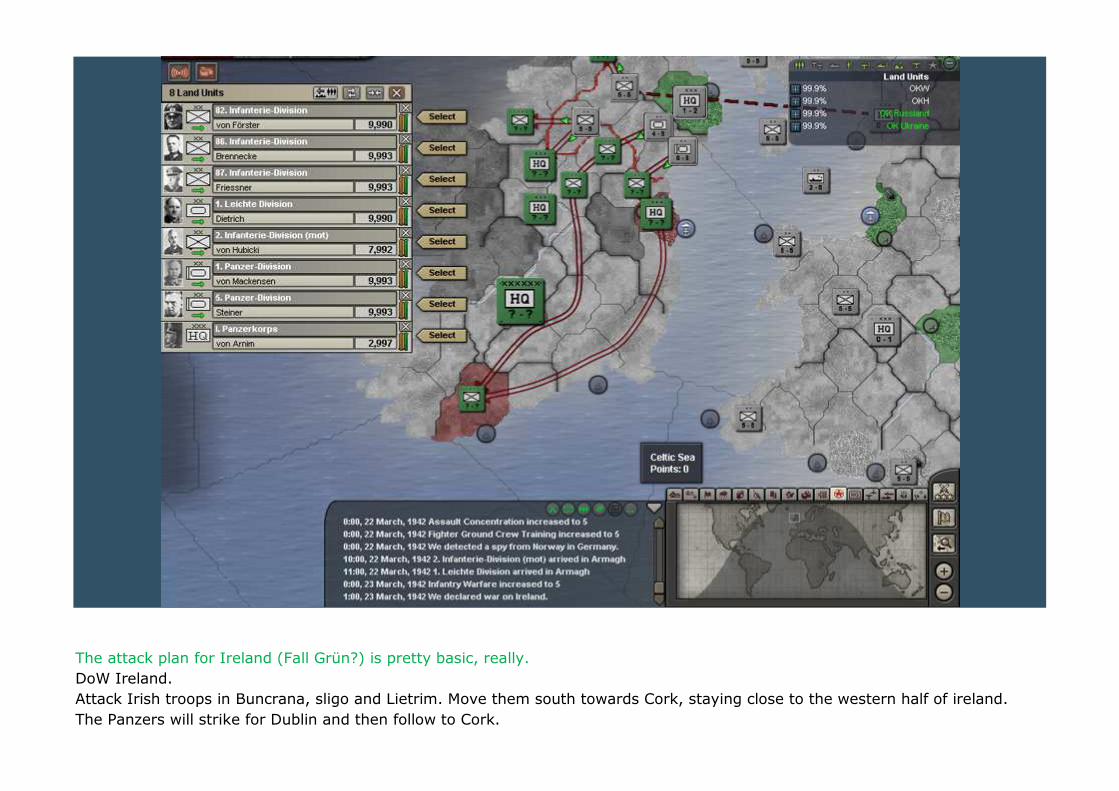
The attack plan for Ireland (Fall Grün?) is pretty basic, really. DoW Ireland. Attack Irish troops in Buncrana, sligo and Lietrim. Move them south towards Cork, staying close to the western half of ireland.
The Panzers will strike for Dublin and then follow to Cork.
The Leichte and motorised divisions will make a straight line towards Cork. The Irish military weakness, coupled with our reduced Attack Delay, will make this a very short walk in the park. While you’re taking that stroll down the beautiful Irish landscape, send the paratroopers to Liverpool, along with the transport wing. Rebase them in Scapa Flow. There is one last British island to go: Lerwick. Just paradrop those two divisions on top of it and wait until all resistance has ended. At some point, you will have a bunch of free IC. There is one thing I haven’t mentioned before. It is possible to upgrade one type
of unit into another, related type: for instance you can take an infantry brigade and upgrade it into a marine brigade or a mountaineer. The brigade will be removed from the game and placed into your production queu, where it will cost IC and time, to transform it. when it is done and the division it originally belonged to is still alive and (I believe) has a land connection to your capital, it is automatically replaced into that very division. Since it will take over a year before the carriers are done, how you do that is simple: Select the division, for instance, a Leichte Division in Berlin. Notice the little screwdriver icon next to each brigade? Clickin it will give you a list of brigade type options that you can turn this into.
Click on the motorised brigade’s screwdriver. The list shows that you can only upgrade a motorised brigade into a mechanised infantry. Click the “mechanised” option. Go into the production queu. There, right at the bottom, you will find the brigade, along with a reference of which division it belong to. IF YOU CLICK TO END THE “PRODUCTION” AT THIS POINT, IT WILL DELETE THE BRIGADE. THIS IS A ONE WAY STREET!You cannot later change your mind and change it back.
Given enough time and IC (both of which you have) it should be possible to transform every motorised brigade into mechanised. They will cost a lot more supplies and fuel than motorised, but they are nearly as powerful as our panzers (if not more so) and they are, along with Larm, Armoured Cars and Self-Propelled Rocket Artillery, the fastest units in the game. That is basically my last lesson for you. I have nothing more to teach you. Now you, the true masters of Europe, have the power and the experience you need to forge your own destiny.
Epilogue: Where do we go from here? So, here we are. We have spend 3 years preparing for war and seducing 2 major nations to our way of thinking. In the 3 years that followed, we conquered Poland, Denmark, Netherlands, Belgium, Luxemburg, France, Yugoslavia, Soviet Union and finally Great britain, the hub of the largest empire in human history.
Only one threat remains. Only one nation on earth has the power and the industrial capability to stand between us and global domination. The USA. What do you need to conquer the most powerful nation on the planet? Apart from some luck, there are 3 things you need. First, you need to be certain that everything will be quiet back home. The UK still has substantial numbers of troops, ships and planes. Conceivably, they could try to invade through Italy. They can be dealt with while you wait for the other 2 things to arrive, about 16 months from now.
India, the jewel in the crown, is the embodiment of British power and resources. India could be reached by first invading Persia, the gateway to Asia. Leave the panzers at home. They won’t be much good to you there. Mountaineers, infantry and, perhaps, marines for jungle-fighting will be all it takes. After that, take a look at China. In my game, it threw the Japanese off the continent. You could keep going until you reach Shanghai. Expect awefull terrain and catastrophic infrastructure, coupled with the fact that your supplies now have to travel all the way from Berlin, through the Ukraine, Persia and India. Taking this route would be an epic endgame by itself.
The Italians are probably busy losing their African holdings, just like they do in 90% of the games. You could help them out. Invade Turkey, connect your holdings by taking Bulgaria, while you’re at it, and you find yourself in the middle east. The Arabic peninsula, Palestine, and Egypt. Taking these will ensure that the Mediteranean will become an Axis playground. But what about Europe itself? Doesn’t that tiny speck called Switzerland bug you from time to time? How about Sweden and Norway? Reaching Gibraltar through the conquest of Spain while you’re fighting your way through the middle east will close the Mediteranean from any and all enemy shipping.

While you’re doing all that, your carrier fleets are being build. To take out the USA, you need at least 9 carriers and 18 light cruisers in 3 fleets of 3 carriers and 6 light crusiers each. Moer carriers are good. The US Navy may be old, but it is still very dangerous and typically has a ton of more modern carriers and escort carriers, along with a dozen or more battleships. What you also need is an invasion fleet large enough to carry an entire army group at once. 24 transports should do it. Don't forget to build additional convoys and convoy escorts.
When all that is in place, gather the army groups that took out the Soviets. These are your most experienced soldiers. Reorganise it so that the very best generals are in command. Step 1: take Iceland. Transport all three of your army groups there. Step 2: once they are there, take Newfoundland (the eastern edge of Canada). Again, move all three army groups there first. Step 3: take Boston. Send 1 army group there and use one combat fleet to ensure naval security. Step 4: take New York. Again, 1 army group and 1 carrier taks force. Step 5: take Washington DC. Same deal. Step 6: connect those three beachheads while moving south to grab Norfolk.
You now have 4 level-10 ports to supply the invasion. Step 7: rebase as many fighters and bombers as you’re able. Expect the US to have a large armour force and a huge air force. With some luck, they are still busy in the Pacific, but they are still quite dangerous. Once those army groups are connected and you have a theater HQ in place for the American adventure, advance all the way to the west coast. This will be a year-long jog.
After that, you again have 2 choices: pacify the whole continent first (tons of manpower to be had, or so they say) or use the large invasion fleet to travel to Hawaii, the Pacific and, finally, Australia and New Zealand, before landing in South Africa. After that, it is game over. If you still have time, you might want to consider any other nations that haven’t gotten the message yet of who’s in charge now. Make the whole world see reason. German-style! As you see, there’s plenty yet to keep you busy. A lot to discover and explore.
I know some of you were hoping for an indepth exposé about the US invasion, but once you make it, all by yourself, conquering all your enemies, eliminating the entire Allies-faction through your determination, your skill and your strategy, will make it the highlight of your gaming carreer and something to look back on with satisfaction even months or years from now. Alternate paths. Just because I chose to follow history, not counting Norway, doesn’t mean you should. Maybe you know a bit about history and you think: “hey, what would happen if Hitler died in 1936 and Goebbels took over?”
“what if I went to war in 1936?” “what if, playing the UK, I choose NOT to sign the Munich agreement and declare war on Germany in 1938?” “what if the Soviet Union took over Germany in 1939 and went to war against the Allies?” “what if I want to conquer the world as Lithuania?” (don’t laugh, there’s an AAR about abusing the game rules to make it, and another one using Portugal in a less-gamey sort of way)
“what if…?” That question fuels my imagination and challenges me to come up with a viable way to make it happen. And, no, I never conquered the world as Albania. I leave that to players who are much better at it than me. Dream a little and then, come back to the game (and the forum for questions). Rewrite history and watch your boldest, and darkest nightmares come to life.
In the end, when all is said and done, only HOI3 gives you that amount of freedom. Some things in the game could be better implemented. Some things have a history in the franchise of breaking down, no matter what the people at PI try. (yes, Pacific War, I’m looking at you!) But the freedom to act as you choose, using whatever means you choose to use, is what make this the greatest game I have ever known.
So, my last assignment to all my adoring pupils, is to go out there and dream a little.
PDF File created by Davy
Special thanks goes to Misterbean by writing such a great AAR-tutorial.
When you follow this to the end I personaly think that you have seen al
the aspects of the game
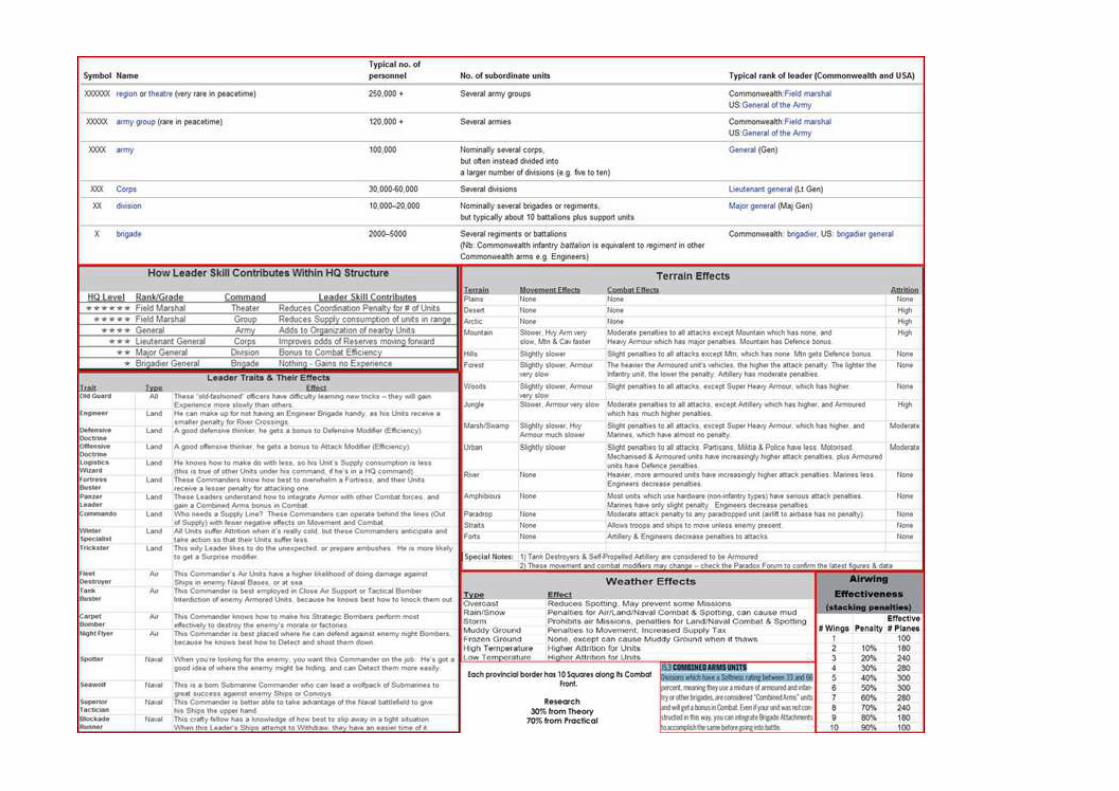
Related Documents