Forensic Photography for the Crime Scene Technician NOTE: This is the student outline for the Crime Scene Photography course in the Crime Scene Investigation Certificate Program at the University of California at Riverside. Instructor: Steven Staggs. For information on this course see: Crime Scene Investigation Certificate Program I. TECHNICAL PHOTOGRAPHY A. Basic equipment for crime scene photography 1. Camera(s) 2. Normal lens 3. Wide angle lens 4. Close-up lenses or accessories 5. Filters 6. Electronic flash(s) 7. Remote or sync cord for electronic flash(s) 8. Extra camera and flash batteries 9. Locking cable release 10. Tripod 11. Film 12. Owner's manuals for camera and flash 13. Notebook and pen 14. Ruler 15. Gray card 16. Index cards and felt pen 17. Flashlight B. Lenses 1. Normal lens 2. Wide angle lens 3. Other lenses C. Care and maintenance of crime scene photography equipment 1. Cleaning lens and camera 2. Camera repair 3. Protection from extreme heat and cold 4. Protection from rain D.Film 1. Color vs. black and white 2. Print film vs. slide film 3. Film speed 4. Matching film to the light source II. CRIME SCENE PHOTOGRAPHY IS TECHNICAL PHOTOGRAPHY. A. Photographs must be correctly exposed, have maximum depth

Forensic Photography for The
Dec 23, 2015
photo
Welcome message from author
This document is posted to help you gain knowledge. Please leave a comment to let me know what you think about it! Share it to your friends and learn new things together.
Transcript

Forensic Photography for theCrime Scene Technician
NOTE: This is the student outline for the Crime Scene Photography course in the Crime Scene Investigation Certificate Program at the University of California at Riverside. Instructor: Steven Staggs. For information on this course see: Crime Scene Investigation Certificate Program
I. TECHNICAL PHOTOGRAPHY A. Basic equipment for crime scene photography 1. Camera(s) 2. Normal lens 3. Wide angle lens 4. Close-up lenses or accessories 5. Filters 6. Electronic flash(s) 7. Remote or sync cord for electronic flash(s) 8. Extra camera and flash batteries 9. Locking cable release 10. Tripod 11. Film 12. Owner's manuals for camera and flash 13. Notebook and pen 14. Ruler 15. Gray card 16. Index cards and felt pen 17. Flashlight B. Lenses 1. Normal lens 2. Wide angle lens 3. Other lenses C. Care and maintenance of crime scene photography equipment 1. Cleaning lens and camera 2. Camera repair 3. Protection from extreme heat and cold 4. Protection from rain D.Film 1. Color vs. black and white 2. Print film vs. slide film 3. Film speed 4. Matching film to the light source
II. CRIME SCENE PHOTOGRAPHY IS TECHNICAL PHOTOGRAPHY. A. Photographs must be correctly exposed, have maximum depth of field, be free from distortion and be in sharp focus 1. Correctly exposed a. Exposure is controlled by the shutter speed and lens aperture b. Automated camera exposure systems and automatic flash units can be fooled and give incorrect exposures c. Front, side and back lighting d. Light meters
e. Flair f. Using gray card g. Bracketing exposures 2. Maximum depth of field a. Depth of field is the area in a photograph in which objects are in sharp focus b. How to control depth of field c. Zone focusing (1) Preview depth of field 3. Free from distortion (must have good perspective) a. Use a normal focal length lens when ever possible b. Keep the camera as level as possible c. Photograph with the camera at eye level when ever possible 4. Sharp focus a. Keep the camera steady b. Focus carefully and use maximum depth of field c. Look at the frame of your scene
III. FLASH AND NIGHT PHOTOGRAPHY A. Types of flash illumination 1. Manual flash a. Set f/stop for the flash-to-subject distance 2. Automatic flash a. Uses distance ranges b. A change to a new range requires a change in f/stop c. Never work an automatic flash at its maximum range, especially in less than ideal conditions d. When in automatic flash, make sure the shutter speed dial is set to the flash synchronization speed e. When photographing a high key scene (light or reflective background) bracket <197> opening up one or two f/stops 3. Dedicated flash a. Sets correct flash synchronization speed when the flash is in operation. Still uses automatic sensor and ranges. The photographer must set the appropriate f/stop for the distance range OR b. Sets the correct flash synchronization speed and f/stop for the automatic range selected 4. Dedicated TTL (Through-the-lens) a. Uses a sensor inside the camera b. Use smaller f/stops for short distances and larger f/stops for long distances c. For compensation or bracketing use the exposure compensation dial B. Problems with electronic flash 1. Flash synchronization 2. Coverage a. Distances -- inverse square law of light b. Long distances when outdoors at night or at arson scenes
3. Reflective surfaces a. Automatic flash units can shut off too soon due to reflected light 4. Rain C. Lighting techniques 1. Electronic flash (NOTE:Disregard the light meter in the camera when using electronic flash) a. Flash mounted on camera b. Flash off camera c. Bounce flash (1) Bounce off a white or light colored surface (2) Manual flash: add the distance up and down for the flash-to-subject distance then figure in the absorbance loss (one to three f/stops) (3) Automatic flash with sensor facing the subject: use a range for two times or more times the actual flash-to-subject distance d. Multiple flash (1) Distance the flash units to provide the same f/stop for each flash 2. Available light (no electronic flash) 3. Painting with light a. The shutter is left open while the light source is moved around until all of the scene is properly illuminated b. Procedure (1) Mount the camera on a sturdy tripod (2) Equip the camera with a lens shade (if available) (3) Screw a locking cable release into the camera shutter release (4) Set the shutter speed dial to B (bulb) (5) Determine the f/stop based on the flash to subject distance (not the camera to subject distance) (6) Focus carefully (7) Depress the cable release and lock it to hold the shutter open (8) Fire the electronic flash to light areas of the scene. The number of flashes and angle of the flashes will depend on the size and character of the scene. Do not point the flash directly at the camera and keep yourself out of the view of the camera (9) Unlock the cable release and allow the shutter to close (10) Advance the film
IV. CRIME SCENE PHOTOGRAPHY A. Purpose of Crime Scene Photography 1. To record the original scene and related areas 2. To record the initial appearance of physical evidence 3. It will provide investigators and others with this
permanent visual record of the scene for later use 4. Photographs are also used in court trials and hearings B. Admissibility of photographic evidence 1. Three major points of qualification of a photograph in court a. Object pictured must be material or relevant to the point in issue b. The photograph must not appeal to the emotions or tend to prejudice the court or jury c. The photograph must be free from distortion and not misrepresent the scene or the object it purports to reproduce 2. You do not need to be an expert in photography to take crime scene photographs or testify about them
V. GENERAL CRIME SCENE PHOTOGRAPHY A. Photographs are one way to record a crime scene 1. Field notes 2. Photographs 3. Sketches B. Photographs 1. What photographs can show 2. What photographs do not show C. Five steps in recording the crime scene 1. Secure the scene 2. Take preliminary notes 3. Take overview photographs 4. Make a basic sketch 5. Record each item of evidence D. Taking overview photographs 1. Purpose a. To show the scene exactly as it was when you first saw it (1) If something was moved before you arrived, don't try to reconstruct the scene as it was. The photographs should show the scene as you found it 2. Major crime photography a. First discuss the crime, evidence and photographs needed with other investigators at the scene b. Be careful not to destroy any evidence while taking the photographs c. Outside the scene (1) Exterior of the building where the crime occurred and in some cases the whole locale (2) Aerial photographs of the scene and the surrounding area can be useful in some types of cases (3) Original series of photographs should also show all doors, windows and other means of entrance or exit d. Inside the scene (1) Begin with a view of the entrance (2) Then photograph the scene as it appears
when you first step into the room (3) Next, move around the room to get photographs of all the walls (a) These photographs should also show the positions of any potential items of evidence (4) Include photographs of other rooms connected with the actual crime scene 3. Using video to record the crime scene a. Frequently valuable to show an overview of the scene E. Photographs to record items of evidence 1. Take two photographs of each item of evidence a. One should be an orientation (midrange) shot to show how the item is related to its surroundings b. The second photograph should be a close-up to bring out the details of the object itself 2. Measuring and marking devices a. Take two photographs if a marking or measuring device is used (1) One photograph without the device, the other with the device (2) So the defence can't claim that the scene was altered or that the device was concealing anything important
VI. PHOTOGRAPHING SPECIFIC CRIME SCENES Note:Each crime scene has unique characteristics and the type of photographs needed will be determined at the scene by the investigator familiar with the crime. A. Homicide 1. Use color film 2. Photographs (example: homicide inside a residence) a. Exterior of the building b. Evidence outside the building c. Entrance into the scene d. Room in which the body was found e. Adjoining rooms, hallways, stairwells f. Body from five angles g. Close-up of body wounds h. Weapons i. Trace evidence j. Signs of activity prior to the homicide k. Evidence of a struggle l. View from positions witnesses had at time of the crime (1) Use a normal lens m. Autopsy B. Suicide, other dead body calls 1. If there is any doubt, photograph the scene as a homicide C. Burglaries 1. Photographs (residential or commercial burglaries) a. Exterior of building b. Point of entry c. Entrance into scene
d. Interior views e. Area from which valuable articles were removed f. Damage to locks, safe, doors, toolmarks g. Articles or tools left at the scene by the suspect h. Trace evidence i. Other physical evidence D. Assaults, injuries 1. Photographing injuries a. Face of victim in the photographs b. Bruises c. Bite marks (1) Orientation shot (2) Close-up at 90 degree angle to avoid distortion (3) Ruler in same plane as bite mark (4) Focus carefully (5) Bracket exposures 2. Equipment a. Always use color film and no filter b. Use color charts and rulers c. Flash unit with diffused lighting E. Traffic Accidents and Hit and Run Cases 1. Photographs at the accident scene a. Where the vehicles came to rest and in what position (1) Photographs should show the relationship of each vehicle with each other b. Damage to vehicles (1) Technical photographs of damage to a vehicle (a) Do not take any oblique or corner photographs to show damage for reconstruction purposes because they are not aligned with the axis of the vehicle. They tend to conceal the amount and direction of the damage. (b) Take six photographs. Two from each side in line with the axles. Take one of each end of the vehicle, straight on. If possible take one more from overhead (c) Use electronic flash to fill in shadows within the damage c. Debris or marks on the roadway d. View each driver had approaching the key point of the accident. e. View from the point a witness observed the accident, at witness' eye level f. Evidence to identify hit and run vehicles 2. Night photography a. Use multiple flash, paint with light or available light for extra long skidmarks or to show two vehicles some distance apart
VII. USING FLASH FILL
A. Steps 1. Set the shutter speed to the camera's flash synchronization speed (usually 1/60 second) 2. Use the camera's light meter to determine the correct f/stop. Set that f/stop on your lens. 3. With the flash on manual, find the flash to subject distance for the above f/stop. 4. Position the flash unit at that distance and take the photograph.
VIII. PHOTOGRAPHING EVIDENCE A. Fingerprints 1. When to photograph fingerprints a. Before lifting on major cases or if the latent may be destroyed when lifting b. To bring out detail in a latent 2. Equipment a. 1:1 cameras and copy cameras b. 35mm cameras with macro or close-up lens attachments c. Gray card for available light exposures 3. Films a. Well defined fingerprints can be photographed with color film but black and white film provides more contrast and is preferred for latent print photography (1) Kodak T-MAX film. Develop in T-MAX developer while increasing the development time by 25% for increased contrast. (2) Kodak TECHNICAL PAN 2415 film has a variable contrast range between high and low and a variable speed of ISO 25 to 320. (a) For high contrast expose at ISO 100 and develop in HC-110 (3) Kodak KODALITH film for highest contrast (a) Packaged as Kodak Ektagraphic HC Slide Film (HCS 135-36) and has an approximate ISO of 8. (b) If developed in D-76 or HC-110 there will be a limited gray scale. (4) Ilford XP-2 black and white film can be processed in color processors (a) ISO 400, fine grain with good sharpness & resolution can be processed in C-41 color chemistry 4. Filters a. Color filters, when used in black and white photography, can be used to build contrast by either lightening or darkening the subject (latent print) or by lightening or darkening the background (background drop-out) (1) To lighten a color, the color filter closest to the color is used (2) To darken a color, the opposite color filter is used (3) See Filter Chart for examples 5. Procedures
a. Establish the location of the latent b. Close-up to show detail (1) A 1:1 camera or device must be used, or (2) A scale must be included in the photograph on the same plane as the latent (3) Photograph with the film plane parallel to the latent surface (4) Get as much depth of field as possible, especially for curved surfaces c. Exposure (1) Available light exposures of latents with normal contrast can be metered using a gray card (2) Bracketing may reveal more detail in "low contrast" latents. (a) Underexposing the film will separate the steps on the white end of the gray scale. Overexposure will separate the steps on the black end of the gray scale. (b) The latitude for black and white film is generally two stops underexposure and six stops overexposure. d. Specific types of fingerprint subjects (1) Normal, dusted prints (a) Usually can be photographed with no problem (2) Impressions in soft substances (wax, putty, clay, adhesive tape, grease, etc.) or in dust (a) Use cross lighting at an oblique angle (b) Preview with flashlight lighting (3) Porous surfaces (a) May need to use close to a 90 degree lighting angle (b) Preview with flashlight lighting (4) Glass and mirrors (a) Glass -- place white card or cloth behind glass, use low oblique angle of light (5) Perspiration prints on glass (a) Use back (transmitted) lighting and diffusion screen (6) Ninhydrin fingerprint (a) Use normal black and white film (T-MAX or PLUS-X) with a green filter and increase development time 25% B. Impressions 1. Footprints and tire tracks a. Procedure (1) Take an orientation photograph to show where in the scene the impression is located (2) Take a close-up for detail (a) Use a scale on the same plane as the impression (b) Keep the film plane parallel to the

plane of the impression (c) Block out ambient light and use a strong light source at different angles to find the light angle(s) that shows the best detail in the impression -- then put the electronic flash or light source at that angle for the photograph (3) Photograph tire impressions in sections showing one circumference of the tire (a) Use a tape measure for overlapping photographs C. Bloodstain photography 1. Use color film 2. Orientation photographs to show locations of bloodstain evidence at the scene 3. Close-up photographs to show detail a. Use a scale on the same plane as the bloodstain b. Keep the film parallel to the plane of the bloodstain c. Use a low oblique light angle D. Toolmarks E. Serial numbers F. Small items, copying, etc. 1. Close-up lenses and devices 2. Lighting
The Admissibility ofDigital Photographs in Court
by Steven B. Staggs
When digital imaging is considered for law enforcement, the concern of the admissibility of digital photographic evidence in court is often raised. The fact that digital photographs are more easily altered than film-based photographs is usually cited. Some even believe digital photographs are not admissible in court.
This article is presented in the hope of clearing up some of the confusion and misinformation about this issue. We will begin with the rules of evidence regarding digital evidence.
The Federal Level
Federal Rules of Evidence, Article X (Contents of Writings, Recordings and Photographs), Rule 101(1) defines writings and recordings to include magnetic, mechanical or electronic recordings. Rule 101(3) states that if data are stored in a computer or similar device, any printout or other output readable by sight, shown to reflect the data accurately, is an "original". Rule 101(4) states that a duplicate is a counterpart produced by the same impression as the original�by mechanical or electronic re-recording, � or by other equivalent techniques which accurately reproduces the original. And Rule 103 (Admissibility of Duplicates) states a duplicate is admissible to the same extent as an original unless (1) a genuine question is raised as to the authenticity of the original or (2) in the circumstances it would be unfair to
admit the duplicate in lieu of the original. This means a photograph can be stored digitally in a computer, that a digital photograph stored in a computer is considered an original, and any exact copy of the digital photograph is admissible as evidence.
The State Level
Check your state's rules of evidence for specifics on the admissibility of digital photographs. Most states have laws that apply to digital evidence.
As an example, California Evidence Code Section 1500.6(a) (Admissibility of Printed Representation of Images Stored on Video or Digital Media to Prove Existence and Content of Image) states a printed representation of an image stored on video or digital media shall be admissible to prove the existence and content of the image stored on the video or digital media. Images stored on video or digital media, or copies of images stored on video or digital media, shall not be rendered inadmissible by the best evidence rule. Printed representation of images stored on video or digital media shall be presumed to be accurate representations of the images that they purport to represent.
Photographs as Evidence
The principal requirements to admit a photograph (digital or film-based) into evidence are relevance and authentication. Unless the photograph is admitted by the stipulation of both parties, the party attempting to admit the photograph into evidence must be prepared to offer testimony that the photograph is an accurate representation of the scene. This usually means someone must testify that the photograph accurately portrays the scene as viewed by that witness.
Guidelines for Ensuring Your Digital Photographs Are Admissible
Develop a Standard Operating Procedure (SOP), Department Policy, or General Order on the use of digital imaging. The SOP should include when digital imaging is used, chain of custody, image security, image enhancement, and release and availability of digital images. The SOP should not apply just to digital, but should also include film-based and video applications as well.
Most importantly, preserve the original digital image. This can be done a variety of ways including saving the image file to a hard drive or recording the image file to a CD. Some agencies elect to use image security software.
Digital images should be preserved in their original file formats. The saving of a file in some file formats subject the image to lossy compression. If lossy compression is used critical image information may be lost and artifacts introduced as a result of the compression process.
If images are stored on a computer workstation or server, and several individuals would have access to the image files, make the files read-only for all but your evidence or photo lab staff. As an example, detectives could view any image files but they would not have rights to delete or overwrite those files.
If an image is to be analyzed or enhanced the new image files created should be saved as new file names. The original file must not be replaced (overwritten) with a new file.
Check with Your Legal Advisor
When beginning a new procedure for collecting evidence or recording a crime scene, it is always prudent to check with your legal advisor. Consider the Federal Rules of Evidence, your state's rules of evidence, and other court decisions. Two court decisions regarding digital images include:
State of Washington vs. Eric Hayden, 1995: A homicide case was taken through a Kelly-Frye hearing in which the defense specifically objected on the grounds that the digital images were manipulated. The court authorized the use of digital imaging and the defendant was found guilty. In 1998 the Appellate Court upheld the case on appeal.
State of California vs. Phillip Lee Jackson, 1995: The San Diego (CA) Police Department used digital image processing on a fingerprint in a double homicide case. The defense asked for a Kelly-Frye hearing, but the court ruled this unnecessary on the argument that digital processing is a readily accepted practice in forensics and that new information was not added to the image.
About the Author
Steven Staggs is a forensic photography Instructor and has instructed over 3,000 crime scene technicians and detectives in crime scene and evidence photography over the past 17 years. He is a police manager having been in law enforcement for the past 29 years and is the author of the book, Crime Scene and Evidence Photographer's Guide.
Digital Photography:
An In Depth Analysis of an Emerging Trend within the Computer Age
Robert B. Fried
What do manufacturers such as Agfa, Canon, Epson, Fuji film, Kodak and Olympus have in common? They are only a small fraction of the rapidly growing list of companies involved in the new era spawning within the imaging industry, specifically in the digital realm. Digital photography is an emerging trend, although the concept has been around for nearly two decades.
Digital cameras have been on the market for quite some time. In fact, "people in the computer industry have been talking about digital photography for years, even before Apple introduced the first digital camera for consumers, the QuickTake 100, early in 1994" (Alsop, 220). A digital camera is just one aspect of digital photography. Although you need the camera, in order to capture the image, there are many different tools and equipment that encompass the overall concept of digital
photography. In fact, in order to develop a complete digital photography solution, "what was needed was a system of products that would work together to help one take, store, manage, and display pictures, both on PCs and in familiar snapshot form" (Alsop, 220). Thanks to advancements in technology this system is available today. It is essentially comprised of a digital camera, a scanner, a photo-quality printer, photo-editing software and a digital photo album (Alsop 220-221).
In order to understand many of the new innovations being developed in this field, it is important to grasp the concept of digital photography and how it differs from conventional film photography. Conventional photography has been around for many years. Essentially "in the 1840s, William Henry Fox Talbot, combined light, paper, a few chemicals and a wooden box to produce a photographic print, laying the foundation for modern film photography" (King, 01). This process of making a photograph has been revised over the course of time; however, the concept has remained the same. Technological advancements and innovations such as the computer have allowed photography to advance from a chemical process to one that entails the involvement of merely bytes of information.
Digital photography, as previously stated is not all that different from conventional film photography. In fact, like traditional film cameras, "digital cameras also use light to create images, but instead of film, digital cameras capture images using an imaging array, which is a fancy way of saying 'light sensitive computer chips'" (King, 24). Referred to as Charged Coupled Device (CCD) and Complementary Metal Oxide Semi-Conductor (CMOS), these computer chips, once the shutter has been released and the lens is finished projecting the image, separate "the image into thousands of 'pixels' or picture elements, each with an electrical charge." Following this, "circuits in the camera convert each pixels charge into a number representing digitized information." "The more pixels, the sharper the image" (Folkers, 77). CCD and CMOS chips however, have many distinct features, therefore, manufacturers have to decide which chip is most advantageous to the consumers they plan on marketing their product to (King, 24).
Charged coupled device (CCD) chips have several advantages over complimentary metal oxide semi-conductor (CMOS) chips. Essentially, CCD chips "offer more lifelike color, greater tonal range and the contrast and brightness of traditional quality photographs" (Lawrence, 60). However, there are several reasons that may lead an individual to choose a CMOS chip rather than a CCD chip. CMOS chips are generally more cost effective than CCD chips, therefore, reducing the target price for the camera itself. Furthermore, CMOS chips are more energy efficient than CCD chips. As a result, more battery life is gained. Moreover, CMOS chips outperform CCD chips in respect to taking pictures of lustrous objects containing sparkles or objects that are very bright. Although both chips have their own distinct features, CCD chips are found in a majority of the digital cameras on the market. CMOS chips are gradually increasing their presence on the market. As a result of the growing demand for more affordable digital cameras in this day and age, CMOS chips are sure to catch up to CCD chips in quality and performance (King, 46).
If it is still somewhat costly to purchase digital camera, why are they gaining so much attention? Furthermore, why is that if digital photography has just recently gained popularity that "US consumers will buy as many as 850,000 digital camera at $1,000 or less this year, and falling prices should push sales even higher" (Folkers, 77)? Personal computers are partially responsible. With streaming speeds, better performance, and a greater focus on multimedia, the average computer user is able to do more and know less. With a simple connection and a click of a mouse,

processes happen quicker than a blink of an eye. People want things quick, and now with a digital camera, one can take a picture and obtain immediate results. Stewart Alsop, an information technology columnist for Fortune Magazine is even fascinated with how digital cameras are changing the way people think about photography. He states:
"I remember when my father brought home his new Polaroid instant camera." "It was a thrill when he snapped a picture and pulled out the film." "The kids would fight over who got to hold the film's covering while it developed." "We'd time 60 seconds, rip off the cover of the pack, and watch the picture emerge before our eyes." He continues by saying, "One thing I have absolutely loved about spending the past 15 years involved the computer industry is how often I've been able to feel that kind of thrill." "It's happening again with digital photography, which is about a lot more than the ability to see a snapshot develop right after you've snapped it" (220).
What Alsop is essentially implying here, is that the way in which digital cameras operate is slightly more sophisticated than traditional film photography. However, he suggests what is easier to comprehend is the overwhelming impact this new technology will have in regards to the photo industry. He believes that eventually "digital photography will eliminate the need for photo processing, a multibillion-dollar business, and will change the way people buy cameras since how a camera integrates with a PC will be more important than which Japanese company has mastered the industrial art of grinding lenses" (220).
What exactly are the benefits of digital cameras? For starters, a digital camera offers the user more flexibility in regards to the picture quality of the image. Much of the photo editing and enhancements are done after the picture has been taken. This feature is an advantage over a traditional film camera. With a traditional film camera, the user has to manually and properly adjust all the settings prior to taking the desired picture. A digital camera offers the ability to correct almost all aspects of a picture once it has been imported into a computer and the proper imaging software has been loaded. Furthermore, all that is really needed to adequately use a digital camera is for the user to know how to 'point and shoot' (King, 13).
Another advantage in using a digital camera as opposed to a traditional film camera is the instantaneous appearance of the picture just photographed without spending a dime. "Digital cameras are fantastic for instant gratification," says industry analyst Kristy Holch, principal of Infotends Research group" (Folkers 77). In fact, you can even "send an image to friends, family members, and clients almost instantaneously by attaching it to an email message." According to Julie Adair King, author of Digital Photography for Dummies, digital photography is enormously helpful to people in mass media that now have the ability to quickly send electronic mail with attachments to their editors within seconds of taking a picture. Furthermore, salespeople now have the ability to present their products to potential buyers anywhere in the world (King 15).
More and more businesses are seeing the benefits of utilizing digital cameras. Many businesses are attracted to the benefits of the digital photography age because it has the great potential of expanding their target markets. Business analysts assert that "the biggest demand is coming from those users who want computerized photos for World Wide Web sites, engineering projects, real estate estimates and police work" (Dillon, 53). Jim Verrall, MIS operations manager at Brandt Engineering Co. in Dallas and an owner of three digital cameras states that, when you shoot with film it might
sit in your pocket for two days, and then professional processing usually takes another day. Verrall, continues, "with the pictures saved to a floppy disk we can print them out and incorporate them into WordPerfect documents in five minutes" (Dillon, 56). Not only is time saved here but also is money that can be redistributed within the business.
Businesses are also finding that digital photography can benefit them in ways other than saving time and money. Digital cameras can also aid in helping to create a virtual database of information for clientele and sales associates. By importing images into such things as databases and spreadsheets individuals can look at images of products being offered. Therefore, clientele can have a better understanding and idea as to what the product they are researching or perusing looks like. Furthermore, sales associates can have an easier time describing products to clients and also be able to pull up what a particular item looks like if they are unsure (King 16).
Much of the fun in digital photography comes from imaging software used in manipulating the photograph that has been taken. Photo editing software allows an individual to add a little spice to a presentation or have fun distorting an image and such. With the use of photo-editing software (i.e., Adobe PhotoDeluxe and Photoshop) special effects can be added to any image that has been imported into the computer via email, computer cable (USB, serial or parallel), scanner, diskette or Smart-Card. The possibilities are enormous. Many photo editing software packages exist on the market appealing to the most novice of users to those who are considered most savvy (King 16).
Digital cameras are also gaining popularity within the field of forensic science. "For forensics technologies collecting evidence at crime scenes, digital camera preview screens can help prevent errors." Warren Stewart, a forensics investigator at Alabama Department of Forensics Science, states, "they give us the capability to see if we have the exact images we need on the spot" (Dillon 56). However, there are still some drawbacks to the utilization of digital cameras within forensic science casework. One issue of concern is the quality and the authenticity of images. If an image is not a true and accurate depiction of a crime scene, it may not be deemed admissible in a court of law. As the technology gradually becomes more advanced the notion of digital photography will be further explored. "Until video quality and cost match, or become superior to film photography, the traditional photograph will continue to be the standard" (Miller 137).
Although there are wide arrays of benefits to digital photography, there are also drawbacks. One of the major drawbacks is the amount of time it requires to take multiple snapshots. The delay is can be in the range of two to fifteen seconds. Essentially, "that is the time necessary for the light sensor to read the scene and either adjust the diaphragm opening (f/stop) or change the shutter speed, check the auto focus (if so equipped), and trigger the flash (if also equipped) (Miller 132). It also takes several seconds for the camera to perform several other processes once the image has been taken. In fact, "there is usually a four to nine second delay when the camera is converting the image into digital form, compressing and saving the image, and recycling the flash" (Miller 132). As a result of such time delays, sports events or other activities involving motion may be difficult to photograph. Although, some digital cameras offer continuous capture mode to try and resolve such matters, the pictures taken are usually of a low resolution or lack the use of a flash. For scenarios like these, a traditional camera, rather than a digital camera should always be used (King, 18).
Another disadvantage to digital cameras are their inability to perform as well as traditional film cameras. Although, the technology may be fascinating, traditional cameras developed years prior, generally produce sharper, crisper and clearer pictures than digital cameras. Essentially, "the CCD chips in most digital cameras break up an image into 640 pixels horizontally and 480 vertically, or a total of slightly more than 300,000 pixels." Furthermore, "if the grains of silver halide on 35-mm film were pixels, one frame of sharp film would contain 100 million." "No wonder digital pictures with 0.3 percent as many pixels, are comparatively crude" (Folkers, 77).
Another drawback to the concept of digital photography is the resolution of the images that are taken. Digital cameras are fairly inexpensive. However, if an impressive image is what one is looking for, it usually won't be found for under $300. In fact, "Feature-laden digital cameras built on the shells of professional 35mm models, have at least 1.5 million pixel CCDs; and they cost $3,500 to $10,000 (Folkers, 77). When comparing a traditional camera to a digital camera in the price range of $300, it will usually be the case that the traditional camera will be far superior in quality and performance (King, 18).
One of the major problems with digital photography is that as a digital photograph is enlarged, the quality of the image gets reduced considerably. In fact, "when a digital image is enlarged beyond 4x6 inches, the prints may become 'pixelated' (broken up into blocky squares)". "This is a problem with digital cameras with resolutions of 640x480 or less" (Miller, 133). Furthermore, many digital cameras are faced with the problem of producing images that lack color balance and latitude temperature control. As a result of this, images taken in different lighting may appear unclear or distorted (Miller 133). Moreover, "digital cameras can record two states of tone and color - light or dark - while film can capture a range of continuous tones and colors" (Miller 133).
Lack of camera accessories is also a major drawback to digital photography. The majority of digital cameras on the market have fixed or permanent lenses. Furthermore, many lack the presence of macro, telephoto, or close-up lens attachments. Moreover, many digital cameras lack filter or even electronic flash attachments. Such accessories are often only available on higher end digital cameras that retail for approximately $3000 to $5000 (Miller 135). In regards to traditional 35mm film cameras within this price range, the array of accessories for such cameras is enormous.
A small but notable disadvantage to many digital cameras is their inefficiency in regards to battery life. Most digital cameras can be regarded as hogs when it comes to sucking the life out of batteries. Between the light sensitive computer chips within the camera, the flash (if equipped), the LCD screen (if equipped) and such, batteries do not last longer than approximately 60 pictures. As a result of this the cost of utilizing a digital camera increases. One way to remedy the situation is to always carry spare batteries when operating the camera. Furthermore, an investment in a rechargeable battery pack may be worthwhile (Folkers, 78).
Digital cameras have different ways of storing images. Cameras such as the Sony Mavica use a standard 3.5" floppy diskette, or most recently - a cd-rom. Other digital cameras store images within the internal memory of the camera. Newly designed digital cameras utilize small sized devices known as Smart Cards to store data. Smart Cards vary in capacity unlike the memory of a standard 3.5" diskette or the camera's internal memory (usually a fixed capacity). Smart Cards therefore, offer a slight advantage over the other two forms of storage. With high capacity smart cards, more
images can be taken and of a higher resolution. Cameras utilizing such things, as the standard 3.5" diskette and a camera's internal memory are often limited in the amount and resolution of the images they can hold.
Once a digital image has been generated on the camera, manipulated as need be with photo-editing software, it often needs to be printed. The process of printing digital images also contains several drawbacks. Detail is often lost when a digital image is printed. This is often true regardless of the performance or cost of the printer being utilized. In fact, "at this point in the evolution of digital photography, matching the degree of detail provided by film is simply unaffordable" (Folkers, 77).
Many companies have manufactured printers that have attempted to produce digital photographs that come very close to a photograph taken by a traditional camera. Among such companies are Hewlett Packard, Epson and Alps. Although these companies have produced printers that come very close to achieving their goal, the cost of such units and the additional supplies and equipment needed are of no comparison or competition to traditional film photography (Alsop, 220).
Photo quality printers like the Hewlett Packard Photo Smart series retails for ~$399. In addition to the printer, black and color ink cartridges constantly need replacement. The black ink cartridge retails for ~$35, while the color cartridge retails for ~$50. The printer can handle standard 24lb copying paper; however, to achieve optimal performance glossy or photo quality printer paper should be utilized. Photo paper retails for ~$1 to ~$2 a sheet. Other than the fact that such units are expensive and their supplies are costly, they also tend to be rather bulky (Alsop 221). Although photo printers are good products, "once some company figures out how to make a real photo printer (a small one that's cheap to buy and operate), we will finally have a usable digital photography system" (Alsop, 221).
Despite the drawbacks, digital photography is continuing to gain popularity and making groundbreaking advancements with each passing day. Manufacturers are working hard to refine digital cameras. They are not holding back from producing digital cameras with all the latest bells and whistles. Some of the new features that have recently hit the market include: optical zoom, improved CCD technology, 5.2-megapixels (among the highest resolutions an image can obtain on today's digital cameras), 340mb Smart Cards (storage capacity of a whopping 518 images), NiMH rechargeable battery packs (long term shooting), add-on dedicated flash (for supplemental lighting), add-on lenses and filters, rapid-fire shooting, various exposure modes (programmed aperture and shutter priority and manual settings give control of exposure metering), exposure compensation, multiple resolution modes (different ways to handle file compression) and USB connection (now, the faster and easier way to connect camera to the personal computer)(Lawrence, 60-64).
With all these new advancements and features, it is just going to be a matter of time until this emerging trend becomes a standard. However, Julie Adair Kings, author of Digital Photography for Dummies, provides an excellent word to the wise when she says:
"Whether or not digital will completely replace film as the foremost photographic medium remains to be seen." "In all likelihood, the two mediums will each secure their niche in the image world." "So make a place for your new digital camera in your camera bag, but don't stick your film camera in the back of the closet just yet." Digital photography and film each offer unique
advantages and disadvantages, and choosing one option to the exclusion of the other limits your creative flexibility" (19).
Works Cited
Ensure Admissibility of Digital Images
Richard KammenHerbert Blitzer
Digital imaging tools, such as digital cameras, photo CD discs and image handling software, can be important assets to the police department as it gathers and presents evidence. But as with any other tools, you must have standard operating procedures (SOPs) in place to ensure that evidence you gather and present will be accepted by courts of law.
Standard operating procedures governing the use of digital imaging technology need to incorporate five key elements.
1. Images must be recorded in an unalterable, archival form soon after the records are created.
A digital imaging technology that supports this requirement is writable CD. Writable CDs are CD-ROM discs that are formatted to allow images, text and video clips to be written to the discs using CD writers and read using standard CD-ROM computer drives.
Writable CDs are ideal for storing images or information about evidence because they are a non-erasable media. You can append data to writable CDs as long as sufficient space remains. However, it is not possible to remove or write over images that are already on the discs. Writable CD images are created by permanently altering the disc's dye layer with a laser light beam. CD writers cannot undo previous laser marks.
Some CDs have engraved serial numbers as well, which eliminates the possibility that altered discs might be substituted for originals. Writable CDs are being used today in law enforcement to archive images and to display them in court.
2. The images should include information regarding their creation.
This requirement is also supported by today's digital imaging technology. For example, some digital cameras generate a uniquely
written data file each time an image is captured. The file records information such as the camera's make, model and serial number, camera settings, and the date and time the image was captured. When you save the image, the data file can be stored as well.
If you write the image and data to a writable CD soon after image capture and prior to any image enhancement, you will have created an archival reference copy.
3. The agency must control custody of all image records at all times.
This requirement ensures someone can testify about who had access to any images used to support testimony as evidence.
There are a number of procedures you can put into place to satisfy this requirement. For example, determine which computer or computers will be used for medium- or long-term storage of image files. Then password-protect sensitive computer files stored on those computers. Keep the computers and any archival media, such as CDs, in secure locations.
The use of unalterable media for storage, along with a separately managed index for each unit, helps ensure the integrity of information.
You should also establish procedures for the management of any files stored temporarily on portable computers. For example, you may want to specify how frequently those files will be removed from the portables and archived.
4. All agency personnel who prepare exhibits for court should be trained in digital image processing and should understand which images might require a special notation to show that the changes are not prejudicial.
Certain procedures for enhancing digital imaging files are analogous to using basic darkroom techniques to enhance film images. They are applied generally to an entire image. Digital imaging software can, for example, be used to control the contrast of images or to enlarge them.
Other digital processing procedures are potentially more problematic. These are applied to certain parts of an image. For example, you can use software to "morph" an image of a person's face to show how the person would look if he or she were older or several pounds heavier. In these cases, it may be necessary for the staff to document how the changes were made.
There is also a gray area between these two types of image processing. Selective color removal or fast fourier transformation can be used to clean up the background or a latent fingerprint. Special procedures should be established to support expert witnesses as they testify concerning any of these image processing techniques.
In some cases, you can implement image processing SOPs using computer-based tools. For example, it is possible to record the keystrokes used to perform a computer operation in a file called a "macro." When a macro is replayed, it will re-execute the keystrokes in their original sequence. This technique could be used to document how a particular image alteration was accomplished.
5. The agency must establish rigorous procedures for entering work-in-progress into proper file systems.
Digital technology can help agencies document how and when images were captured, processed or stored. However, additional procedures must be used to create a complete audit trail of how the computer files have been managed. Uniquely identifiable, unalterable media can make this much easier.
Digital imaging technology has brought new tools to law enforcement. Today, digital images appear in courts with increasing frequency, and the uncertainty about how they may be used is dwindling. In fact, in some ways digital images may prove more secure than conventional images.
For example, using today's technology it is relatively easy to alter an image scanned from a roll of film, create a new roll that includes the phony image, and then replace the original with the altered roll. However, if you use writable CDs which come with embedded serial numbers, and if you record an index of disc contents along with their serial numbers as part of your standard operating procedures, it would be virtually impossible to replace originals with altered discs.
The key is to select technology carefully and to put standard operating procedures into place that are derived from an understanding of operational requirements and the technology.
Richard Kammen is a partner at McClure McClure & Kammen in Indianapolis. Herbert Blitzer is executive director of the Indiana Crime Lab Institute.

Back to Iowa I.A.I. homepage
Video Guidelines for Evidence Scenes
Peter William ThomasSenior Sergeant 4891
Video Support UnitMaylands
BEFORE SETTING OUT
CONSIDER
Do I have all the equipment I need? Is camera & lens combination sufficient? Lights - spare bulbs - correct leads - mounts? Batteries - fully charged - spares? Battery charger, if going on a long trip? Sufficient tapes and labels? Radio mike, headphones & leads - are they there and working? Is tripod fitted with correct shoe for camera? Is there any other non-standard equipment I might need for this particular
job?
WHEN ON CALL - CHECK THAT ALL GEAR IS IN THE KITS AND IT IS WORKING PROPERLY!!!)
JOB DETAILS
CONSIDER
Do I have sufficient job details? Do I know where to go? What are the circumstances of the scene? Do I need protective clothing or camouflage? Do I need to approach with caution? Is there a meeting point away from the scene - if so when and where? Who do I report to on arrival?
AT THE SCENE
REMEMBER YOU ARE PART OF A TEAM SO ENSURE YOU INTEGRATE WITH IT EFFECTIVELY. OTHER TEAM MEMBERS COULD INCLUDE:
Forensic personnel. Investigators. Police crowd and/or traffic controllers. Fire Brigade. Ambulance. T.R.G.
S.E.S. B.A.S.I.
IF FORENSIC PERSONNEL ARE IN ATTENDANCE - REPORT TO THEIR SENIOR OFFICER AND FOLLOW HIS DIRECTIONS AT ALL TIMES.
IF THEY ARE ON THEIR WAY - WAIT FOR THEIR ARRIVAL UNLESS COMMON SENSE & CIRCUMSTANCES DICTATE EARLIER ACTION.
UNLESS the scene is still being created, e.g. fire burning, offence still in progress, etc. DO NOT just take out camera and start shooting.
INSTEAD
Get a good and accurate concept of the scene and its history (e.g. how did the scene/crime unfold, what are its boundaries, why is the body a long way from the weapon, is there more than one seat of fire, etc. etc.).
Make written notes in an official notebook showing:o Time & date of arrival.o Location details.o Victim details (name, etc.)o Names of other team members.o Times of new events.o Brief details of these events.
PLAN THE APPROACH
Plan how you will record your evidence, using a systematic approach. Is it safe to enter scene - will that wall collapse, the ceiling fall in, the charred
boat hull give way, is it booby trapped, etc. etc.? Am I appropriately dressed - hard hat, overalls, safety boots, gloves,
camouflage, etc.? Which way in (and out) - liaise with O.I.C. Forensic?
IN THE SCENE
Watch for and take care not to disturb:
Shoe impressions. Tyre tracks. Blood. Fibres. Fingerprints. Clothing. Bedding. Impacted vehicles/aircraft. Debris. Any other object with potential evidential value.
Always use the agreed safety route into and out of the scene.
DO NOT be sidetracked into other tasks by investigators without first consulting with the Forensic team O.I.C..
UNLESS URGENT finish off your systematic evidence gathering run before being diverted to other tasks. This includes the note taking process.
CAMERA TECHNIQUES Check lighting - is it daylight, artificial or a mixture? Should the scene be lit - if so how? Select appropriate camera filter and ALWAYS WHITE BALANCE! Do not mix light of different colour temperature unless absolutely
unavoidable! Consider using blue filter over artificial light to match daylight! Every shot is important - shoot it as if it is the most important of the series. Take your time - plan your pan - don't chase focus or subject. Don't scrub the scene (i.e. pan side to side, up and down). One clean sweep is
much more professional. Before zooming to close up during a take, zoom, focus and pull back first -
then do the take. This will avoid the awful spectacle of zooming out of focus. Always take an exterior GV (General View) or 'establisher' shot of the location
(house, factory, boat, caravan, etc.). This will leave no doubt as to where the scene is located.
Before (or after) showing a BCU (Big Close Up) of an object, do a LS (Long Shot) or MS (Mid Shot) of it to establish its location in relation to other parts of the scene.
When covering a long narrow section of a scene (e.g. road, corridor, rail track, etc.), consider a slow zoom from a tripod - pulling focus if necessary; rather than clumsily walking along it (Dolly Shot) with the inevitable, disconcerting sway and judder.
If perspective has to change (i.e. you have to see behind objects or demonstrate their separation from each other), then use of a "Dolly Shot" may be unavoidable. In this case use the lens at its widest possible angle (to minimise sway and judder) and move as smoothly as possible. Again plan your shot - route - focusing points - etc., before moving off.
In small rooms or spaces (toilets, bathrooms, caves, etc.) use of a high camera angle from a corner will give the maximum coverage of the area.
High camera angles are also useful when separation of objects on similar plains is required.
Don't be dissuaded from using a tripod when necessary. It may take more time but your shots will be more professional. DON'T use it if there is any risk of contaminating or disturbing a scene, or interfering with the duties of other team members.
AIM FOR quality - not quantity! A lot of ground can be covered with a few well planned shots. Unnecessarily repeating or prolonging shots will only bore or confuse, and won't enhance the evidential value of the video.
THINK LIKE AN EDITOR AS YOU SHOOT!
REMEMBER
YOU ARE A PROFESSIONAL - PEOPLE COME TO YOU BECAUSE YOU CAN DO THE JOB BETTER THAN THEM. ENSURE YOUR TECHNIQUES DEMONSTRATE THIS SUPERIORITY OTHERWISE IT WON'T BE LONG BEFORE THEY DO THE JOB FOR THEMSELVES.
LET TECHNIQUE MASTER TECHNOLOGY - DON'T LET TECHNOLOGY BECOME YOUR MASTER. THE BEST EQUIPMENT IN THE WORLD WILL NEVER REPLACE CREATIVITY AND REASONING.
Crime Scene Photography Requirements of Criminal Investigative Analysis
Behavioral Science Investigative Support UnitFBI AcademyQuantico, Virginia 22135
This paper reflects on currents approaches to crime scene photography described in numerous photographic publications but also includes the observations and suggestions of profilers and photographic examiners who analyze these photographs for behavioral and forensic evidence.
For purpose of criminal investigative analysis (profiling), it is important to record much more than those areas in which acts of violence took place. Photographs can be instrumental in recording the victim's lifestyle and personality; the topography and socioeconomic conditions surrounding the crime scene; and much more which is important to any investigator or analyst who is unable to visit the crime scene.
When photographing violent crime scenes, the aim should be to record a maximum of useful information which will enable the viewer to understand where and how the crime was committed. The term "crime scene" refers not only to the immediate locality where the crime took place, but adjacent areas where important acts occurred immediately before or after the commission of the crime. Long range, medium range and close-up photographs should be taken to enable the viewer to gain a clear concept of where each object or area interrelates to another. Aerial photographs are particularly important in serial rape or murder investigations since they geographically link crime scenes together.
Overlapping photographs should be taken of the exterior of the crime scene to show its locale in relation to the rest of the neighborhood. Place the camera on a tripod or hold it steady at eye level so the horizon line is constant for each shot. The photograph can be cut and pasted together to create a panoramic view of the scene. Also photograph any crowds which gather at a crime scene and the license plates of vehicles parked in the vicinity, since the killer may still be in the area observing the investigation.
The point of entry and exit should be shown in such a manner that the marks of force will be shown clearly. A scale should also be visible but
never place a suspect tool into the tool mark because it may alter the evidence.
When photographing the interiors of room with a 35mm camera, use a normal lens (45mm to 55mm) in stead of a wide angle lens. A wide angle lens creates distortion, especially when close up photographs are taken. (the distance between objects appears to be greater than it actually is).
The camera should be held with a vertical format and overlapping photographs should be obtained. A vertical format insures that the scene will be observed from the top of the walls to the floor. Once again, a composite photograph can be created. Photograph every room in the residence but overlapping photographs need only be taken at the crime scene itself.
Interior photographs should depict the conditions of the room, articles left at the scene, trace evidence such as cigarette butts, tool marks and impressions of shoe prints. The location of fingerprints should be photographed and in all instances, some notation should be made in the photo log or on the photograph explaining what the photograph is showing.
Signs of activity prior to the occurrence, such as the telephone receiver off the hook or wires cut, playing cards orderly stacked or scattered, TV and lights turned on, food in cooking stages, coffee cups, drinking glasses or liquor bottles, time watch and clock stopped should be recorded on film. In general, articles apparently in use immediately prior to the commission of the crime or which appear to have been disturbed from their customary position should be photographed.
During a rape investigation, the purpose of the photographic record is to record information on signs of any struggle at the scene where the attack occurred, or indications of the victim's effort to resist attack; such as bruises, black and blue marks, torn clothing, etc. Bite marks should be photographed using oblique lighting, with and without a measuring device at the crime scene and also the morgue.
In a rape-homicide investigation, infrared ultraviolet photography of the body may detect latent bite marks since hemorrhaging can occur in tissue under the skin. The location of foreign hairs and fibers, biological fluids and stains should be depicted. If alive, permission from the victim to photograph her body should be obtained and if the victim was a minor, written permission from the parent or guardian. It is recommended that the victim's physician be present when such photographs are made. Blood spatter on walls should be photographed

with the lens parallel to the stain so that directionally (the direction the blood flowed can be determined.
In sexual exploitation of children cases, every room in a suspect's residence should be photographed even if no physical evidence (such as photographs or video tapes) are found during a crime scene search. Chances are the suspect has concealed this material at another location. Rarely will these photographs be discarded since they represent a trophy or remembrance of the conquest. When these photographs are recovered, they may be compared with the crime scene photos to prove they were taken in the suspect's dwelling.
Occasionally, a suspect will place his own camera on a tripod and by using a cable release, will photograph himself with his victims. Usually, he will compose the photograph so his face is not seen. However, if the photograph is sharp enough, the suspect may still be identified through body characteristics such as scars, marks, wrinkles, etc.
In death due to asphyxia as a result of a hanging, doubt sometimes exits as to whether the occurrence is murder, suicide, or an accident. photograph the original position of the body to help in determining the manner of death. Overall view of the body and rope should be taken at torso and foot level. Show the height of the body above ground; a murderer usually tries to raise the body completely, while the suicide victim frequently never gets his feet off the ground and is sometimes found in a sitting position or half-prone position. Photographs should be made to show the relative position of any object, such as a chair or stool, which appears to have been kicked from under the feet of the deceased.
Subjects for close-up shots are the knot, its size, type and location on the neck; depth and location of the grooves in the neck; black-and-white marks around the edge of the groove (here, color film is especially helpful); signs of violence about he neck, suggesting prior strangulation; protrusions of the tongue, binding of hands and feet, etc.
In drowning cases, the body is usually the sole object of interest. But did the deceased actually die of drowning or was he thrown into the water after death from some other cause? The photographic operation should be directed towards those facts which will help to resolve this question. Color film is exceptionally useful here since many of the significant clues may be matters of discoloration. Photograph the whole body, both from the position of standing observer and from the ground level. The latter view will show any distention of the body. Close-ups should include any foam about the mouth; wounds, peculiar

markings, bruises, or unusual discoloration’s; articles, such as seaweed, grasped in the hand; and any rope or wire bindings. Many of these views can be made at the morgue before autopsy.
The videotaping of crime scene has become common practice in many jurisdictions, however, it should never replace still photography. Common errors committed when videotaping a crime scene include panning the camera rapidly, poor focusing and lighting and improper use of the zoom feature of the cameras. The cameraman should describe on tape each room and view of the crime scene and insure that other investigators and crime scene technician are silent during the taping.
If done properly, crime scene photography greatly assists the profiler in developing a psychological and behavioral profile of the offender.
How Crime Scene Photography Worksby Sarah Dowdey
Print Cite
Feedback Share
Recommend
Inside this Article1. Introduction to How Crime Scene Photography Works 2. Types of Crime Scene Photos 3. Crime Scene Photography Equipment 4. Crime Scene Photographs as Art 5. Lots More Information 6. See all Forensic Science articles
Chemistry of Innovations Videos
More Science Videos »
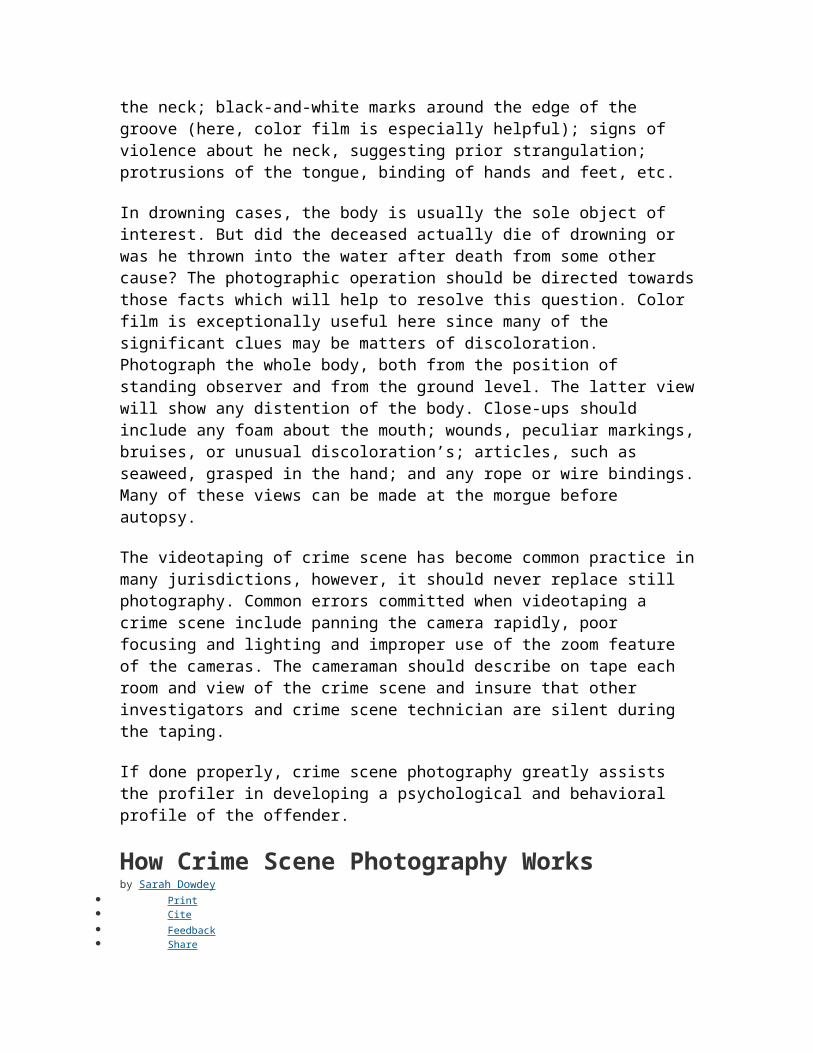
Philippe Huguen/AFP/Getty ImagesA forensic photographer captures images in London after a 2005 bus bombing.
In detective movies or TV shows like "CSI," photogr aphers swarm in and take countless pictures
of a crime scene. They twist and turn their cameras haphazardly as agents discuss leads over the
background hum of the photographs' flash explosions. But how does crime scene
photography really go down? Since its purpose is to record evidence that will be admissible in
court, it's hardly a haphazard operation.Crime scene photography, also called forensic photography, has been around almost as long as the camera itself. Criminologists quickly realized that such technology could freeze time -- creating a supposedly incontestable record of a crime scene, a piece of evidence or even a body. The 19th century French photographer Alphonse Bertillon was the first to approach a crime scene with the systematic methods of an investigator. He'd capture images at various distances and take both ground level and overhead shots.
Up Next How CSI Works
How Fingerprinting
Works
Discovery.com:
Forensics and the JFK
Murder
Today, forensic photographs are essential for investigating and prosecuting a crime. This is
because most evidence is transitory: Fingerprints must be lifted; bodies must be taken away and
examined; and homes or businesses must be returned to their normal state. Photographs help
preserve not only the most fleeting evi dence -- like the shape of a blood stain that will soon be
mopped up -- but als o the placement of items in a room and the relation of evidence to other
objects. Such images can prove vital to investigators long after the crime scene is gone.
So how do crime scene photographers go about their business? Find out in the next se
Types of Crime Scene Photos
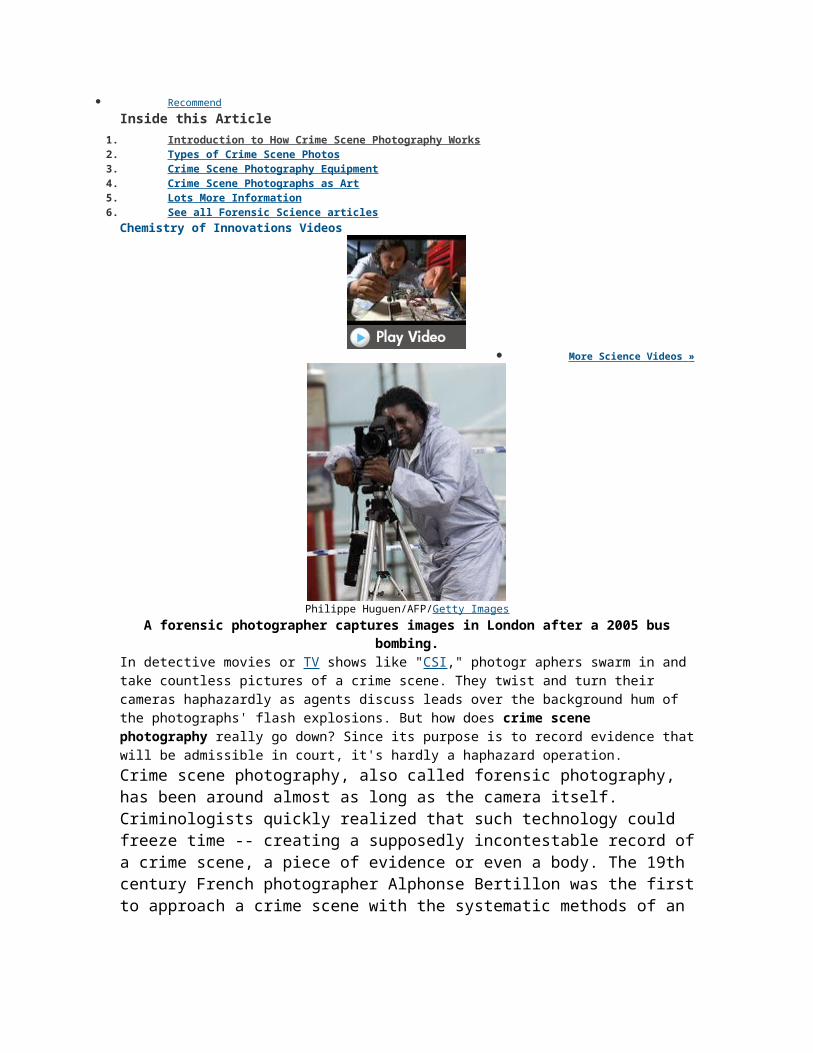
Peter Macdiarmid/Getty ImagesA forensic photographer takes a close-up image of a container's door in Bexley, England.
Police had just discovered millions of pounds stolen in a bank heist.
Crime scene photographers must be methodical in their work. They can't afford to leave out an
important piece of evidence or produce photographs that could be considered misleading in court.
But they also have the press ure of the entire operation behind them. Before other CSIs can
touch or move any of the evidence and even before the medical examiner can remove the body,
the forensic photographer must document the scene.
There are three classifications of forensic photos -- overviews, mid-range and close-ups.
If the crime took place inside, overviews include photos of the outside of the building, its
entrances and exits as well as images that place the building in relation to its surroundings.
Photos of spectators at the scene can later help locate witnesses or suspects. Overviews also
include images of all rooms, taken from overhead and from each corner.
The forensic photographer then hones in on key pieces of evidence and captures images of them in the context. These mid-range photos might picture a piece of evidence, like a knife, but at enough of a distance to show its relation to furniture, a blood stain or the rest of the room. Mid-range images establish the distance of object from surrounding objects.
The Mug ShotAlphonse Bertillon didn't just establish the ground rules for crime scene photography -- he also invented the mug shot. Bertillon was influenced by eugenics, a then-common form of scientific racism. He believed that a person's character could be read through his or her genetic features and he used the standardized mug shot as an attempt to validate this theory.
Finally, the photographer thoroughly documents evidence with close-up images. Close-ups
include identifying marks like scars on a corpse or serial numbers on a bloodied piece of
electronic equipment. A photographer will often include a ruler in the shot to establish scale but
always takes a duplicate image without the measuring device. In court, the defense could claim
the device covered something important.
And of course, pictures are of no value unless they're in context. A forensic photographer keeps a
photo log that includes every relevant detail, the photo number, any filters applied, the time and
date and the location and a description of the object. The advent of digital photography has
helped to make some aspects of recording the time and date simpler and more verifiable.
What does a forensic photographer need to document the scene? And what makes a photograph
admissible in court? Find out next.
Crime Scene Photography Equipment
Early detectives used to sketch the scene of a crime. Photography introduced a way to produce
images that were more true-to-life and credible than drawings. And while an honest and
technically sound photograph can record the ori ginal state of a crime scene, it's simple enough to
manipulate a photograph or record an image that's drastically different from reality.
William Vanderson/Fox Photos/Getty Images
A camera always helps: A police officer trains with his new camera in 1935.
A good photograph of a crime scene must meet certain technical specifications: correct exposure,
sharp focus and maximum depth of field, the portion of the photograph that appears sharp. The
image must also be free from distortion. Such technical standards produce photos that will
actually aid agents in their investigation of a crime.
But there are additional qualities that make a photo admissible in court. The image pictured
cannot alter the scene or evidence -- say through strategic blocking with a measuring device or
an intentionally shallow depth of field. The image must also be relevant to the case and should be
composed with technical precision in mind, not emotional appeal.
Photographers might vary their kit based on personal preferences or the type of crime scene but
most carry certain basics: a camera, obviously, and maybe even multiple cameras; filters;
electronic flashes; various lenses for wide-angle, mid-range and close-up shots; a tripod; a
measuring device; a gray card, which when combined with a light meter helps produce correctly
exposed photographs; and a way to protect equipment from rain or extreme heat or cold.Crime scene photographers usually use color images although black and white can be useful when documenting evidence that relies more on texture than color like latent fingerprints.
Digital Get DownForensic photographers first began using digital imaging technology in 1992 [source: Wireless News]. But until recently,
there was no uniform system of teaching digital processing, treatment and analysis. As most digital work is performed on the graphics editor Photoshop, the 2007 manual "Photoshop CS3 for Forensics Professionals: A Complete Digital Imaging Course for Investigators" aims to clarify the process of correcting and archiving forensic images. The book even throws in asides rarely found in an editor's manual, such as tips on providing testimony in court
But do photographs of crime scenes serve any other purposes? Find out about a more artistic
side of utilitarian images in the next section.
Crime Scene Photographs as Art
In 2001, police officers and artists uncovered a treasure trove in a city records warehouse. They
found a stockpile of forensic photo negatives from the Los Angeles Police Department -- some
dating back to the 1920s. The images include every-day crimes, as well as the most infamous
murders and biggest busts in the city's history.
Weegee (Arthur Fellig)/International Centre of Photography/Getty ImagesWeegee's famous photograph "Their First Murder" shows a crowd with mixed emotions
gathered after a murder in Williamsburg in New York City.
Struck by many of the images' captivating, almost movie-like quality, the artists and officers
launched an effort to preserve the negatives, some of which were beginning to decompose. They
also launched an exhibition of the archive and sent it around the United States. A lieutenant who
helped present the archive explained that the images' morbid artistic quality was a result of less-
scrupulous forensics standards in times past. The photographers were sometimes willing to fiddle
with a crime scene in order to produce the best shot. Consequently, the photos, though they still
functioned as evidence, look more like art than modern crime scene shots.However, art and crime scene photography have long been linked. The New York City freelance press photographer Weegee made a name for himself by capturing images of

crime scenes, news sites and movie premiers with equal frankness and occasional irony. In 1941, he staged a solo exhibition at the Photo League in New York entitled "Weegee: Murder is my Business."
Why Weegee?Austrian-born Arthur Fellig took on the name Weegee after observers compared his keen sense for arriving early at a crime scene to a Ouija board. His phonetic spelling of the word produced the name Weegee [source: Getty]
While the photographer credited this sixth sense to an itchy feeling
in his elbows, he was also likely aided by his proximity to police
headquarters, his paid informants and his special police radio. In
addition to his freelance photography, Weegee worked as a
consultant in Hollywood and compiled the 1945 photo essay,
"Naked City" which inspired the 1947 movie, "The Naked City."
But it's not terribly surprising that people display a fascination with crime scene photography. The
often grisly images are set in such normal locations -- the steak house, the parlor or the street --
and subsequently elicit a morbid curiosity. They're strangely like everyday life, yet entirely
different and wholly unsettling.
"Picture" is the more generic term, and includes any kind of visual representation, whether it is drawn, painted, photographed or produced by some other means. You could even call a naturally produced image a "picture". The word picture can even refer to a memory or mental process that is by nature completely immaterial."Photograph" virtually always refers to a physical image created with chemical or digital imaging technology.
Read more: http://wiki.answers.com/Q/What_is_the_difference_between_a_picture_and_a_photograph#ixzz1L6ogCuFg
Any pictures that are carved out of wood or rock, or made of mud or clay or anything similar,
are all forbidden if they are images of living creatures that have souls because of their
imitation of the Creation of Allah – the Mighty and Majestic. And in the authentic hadith is that
the Messenger of Allah cursed the image-makers, and to be cursed is to be expelled and far-
removed from the Mercy of Allah. And in the hadith qudsi also is that Allah – the Exalted – said:
“And who is more oppressive than the one who went and created as I have Created!
So, let them create an atom, or let them create a mustard seed, or let them create a
fiber.”
And also, in the authentic hadith: “The people who will be tortured most on the Day of
Resurrection are the image-makers who imitate the Creation of Allah. It will be said to them:
‘Bring life to what you have made.’”
And the proofs for this are many, and from the image-making that this warning applies to –
according to the strongest opinion – is that which takes place when a human being draws an
image of a creature with a soul by hand. This falls under the image-making that is warned
against, and it is a sin from amongst the major sins.
As for the image-making that takes place using instant cameras, this does not appear to fall
under this, because the photographer does not draw out or try to imitate the Creation of Allah.
Because of this, if some people are presented with a photograph that has been taken, you will
not find them saying: ‘How good is this photographer! How excellent is he!’ But, if they are
presented with a hand-drawn picture that closely resembles what was being drawn, they will
say: ‘How good is this artist! How excellent is he!’ So, this proves that there is a difference
between drawing the picture by hand and taking it using a camera.
And this is also proven by the fact that if a person writes something by hand and a photocopy
is made of it, the people will not ascribe this writing to the one who made the photocopy of it.
Rather, they will ascribe it to the one who originally wrote it, and people still preserve
copyrights in this manner. They would not say that this person who made the photocopy did a
good job of copying the writing precisely using this innovative technology. In fact, a blind man
can be given this task, or a man can perform this task in the dark.
However, if a man copies the handwriting of the original writer by hand so that the people
think that it was the original writing itself, the people would then say: ‘How innovative he is!
How excellent he is! How did he copy this handwriting so precisely?’ And with the likes of these
examples, it becomes clear that photographic imagery is not image-making that can be truly
ascribed to the one who took the picture, and it cannot be said that this is imitation of the
Creation of Allah because he did not create anything.
And to in order to say that photographs are allowed, a condition must be met that they do not
lead to what is forbidden, because the permissible things that lead to the forbidden are in turn
forbidden. The means have the ruling of the ends. So, for example, we do not see that it is
allowed for a person to take these pictures in order to preserve memories because of what this
contains of possession of a picture that we fear might fall under the saying of the Prophet:
“The Angels do not enter a house in which there is a picture.”
Source
Share this:
Digg
StumbleUpon
This entry was posted on June 28, 2010 at 11:14 AM and is filed underMiscellaneous with
tags Difference, image, photograph, photographs,picture, pictures, uthaymeen, uthaymin, Video. You can
follow any responses to this entry through the RSS 2.0 feed You can skip to the end and leave a response.
Pinging is currently not allowed.
LikeBe the first to like this post.
3 Responses to “The Difference Between A Picture And A Photograph, Ibn ‘Uthaymeen”
1.
TheAuthenticBase Says: June 28, 2010 at 11:44 AM
10
Rate This
Assalaamu ‘alaykum,
However one should note that there is a difference of opinion amongst our scholars on this point.
Some allow photography (Ibn Uthaymeen), some don’t (Bin Baaz & Al-Albaani).
Some allow video recording of living beings (Bin Baaz & Ibn Uthaymeen), and some don’t (Al-
Albaani?).
Some say it is impermissible to record videos, but it is okay for da’wah purposes (Al-Albaani is
apparently of this opinion).
Some say it is haraam fullstop.
The noble scholar, shaykh Saalih Al-Fawzaan is of this last opinion.
He was asked: “What is the ruling on recording lessons and seminars on video for the purpose of
Islaamic propagation and benefit?”
Shaykh Saalih Al Fawzaan responded:
“Since the time of the Prophets, the Islaamic propagation has been established without the use
of photography. Consequently, there is no need for photography and propagation takes place
without it. It is not permissible to use that which is prohibited for the purpose of propagation.”
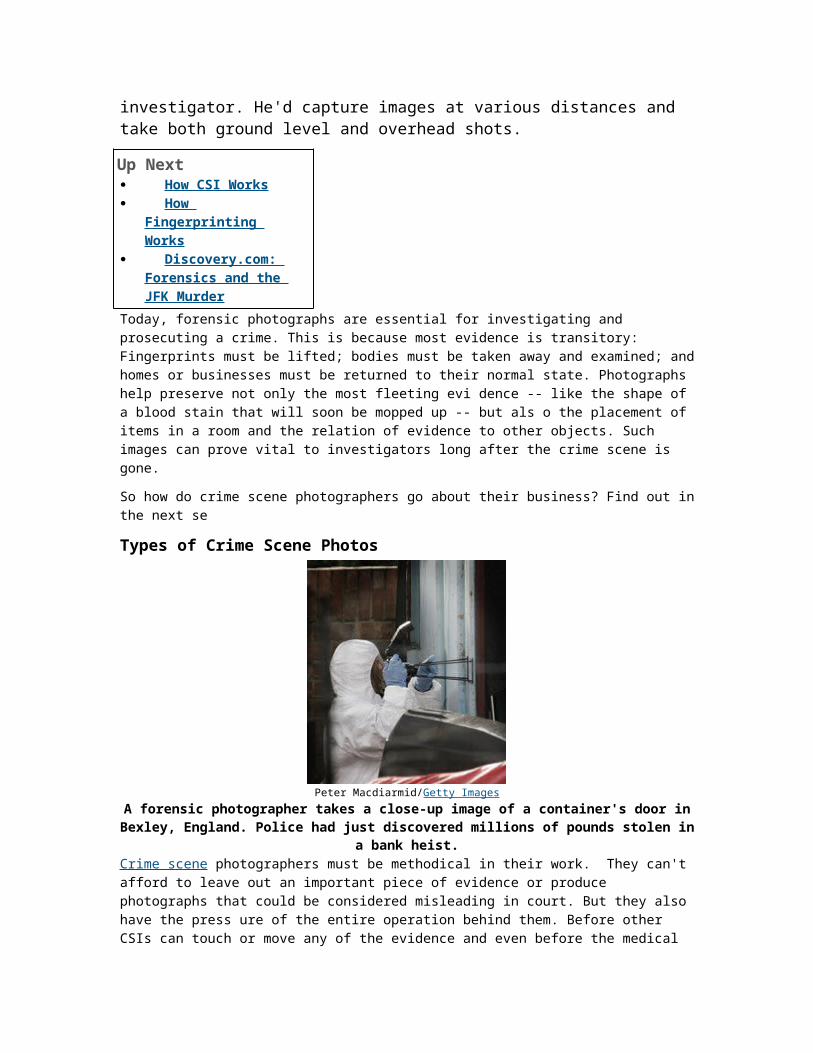
[Audio found at http://www.alfawzan.ws ]
As for sisters posting their pictures online, then no doubt this is haraam, so this fatwa (of Ibn
Uthaymeen in the above post) is NOT promoting that… And fear Allaah, The One Swift in
reckoning, so that you may attain success.
Reply
o
Amatullah Says: July 16, 2010 at 7:12 PM
00
Rate This
What is the proof on saying that video recording is allowed for dawah purpose?!!! If a
thing is such a serious sin like making living beings as hadeeth states , “The people who
will be tortured most on the Day of Resurrection are the image-makers who imitate the
Creation of Allah. It will be said to them: ‘Bring life to what you have made.’” , then how
can it be ALLOWED for dawah purpose? If it was then the hadeeth would say ‘except for
spreading Islam’ or word to that effect. Isn’t it common sense?!!! I agree with shaykh
Fawjan that if it is haram then haram on everything fullstop !
Reply
2.
Kamran Khalid Says: June 30, 2010 at 1:48 PM
00
Rate This
This is a simple difference in understanding and as muslims we are required to teach our selves
that much religion and sharia that we can understand each thing and clearly follow it. Now I
would disagree with the Mr. Saalih Ali Fawzaan on being that strict and stringent but then his
point of view is also correct on the grounds that a thing is prohibited for the purpose of
propagation.
Reply
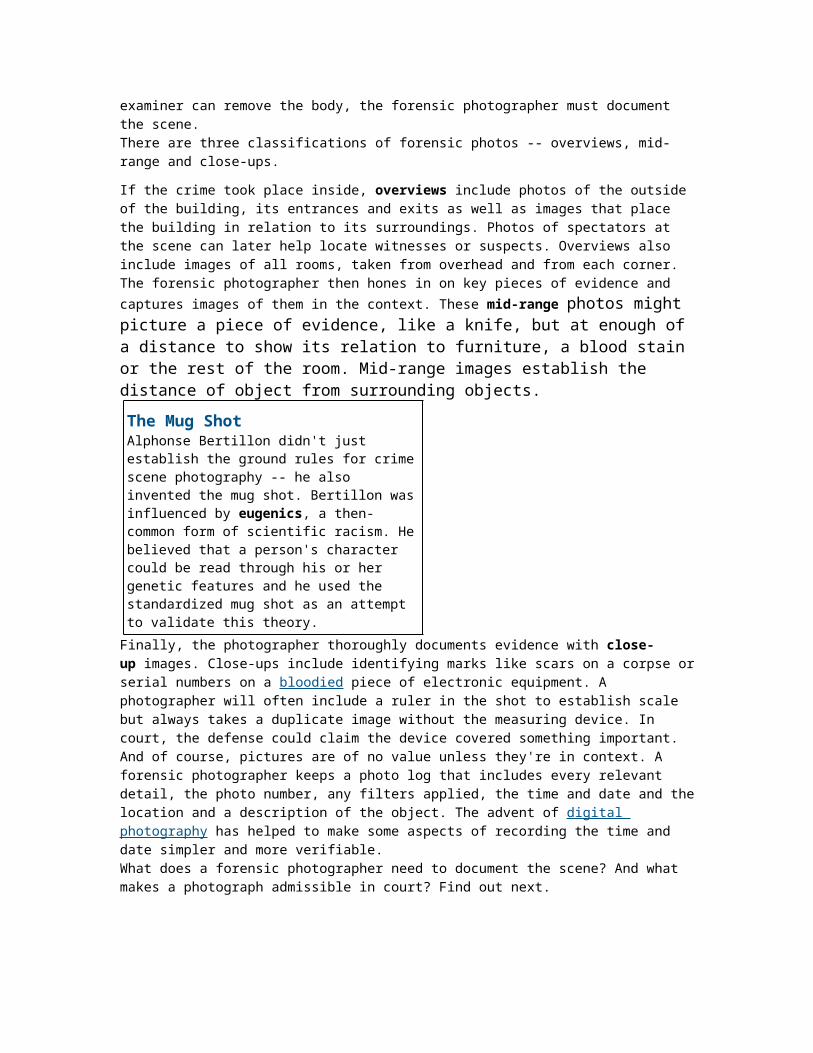
Digital photographyFrom Wikipedia, the free encyclopedia
Nikon D700 — a 12.1 megapixel full-frame DSLR
The Canon EOS 350D
The Canon PowerShot A95
Digital photography is a form of photography that uses an array of light sensitive sensors to capture
the image focused by the lens, as opposed to an exposure on light sensitive film. The captured image
is then stored as a digital file ready for digital processing (colour correction, sizing, cropping, etc.),
viewing or printing.
Until the advent of such technology, photographs were made by exposing light sensitivephotographic
film and used chemical photographic processing to develop and stabilize the image. By
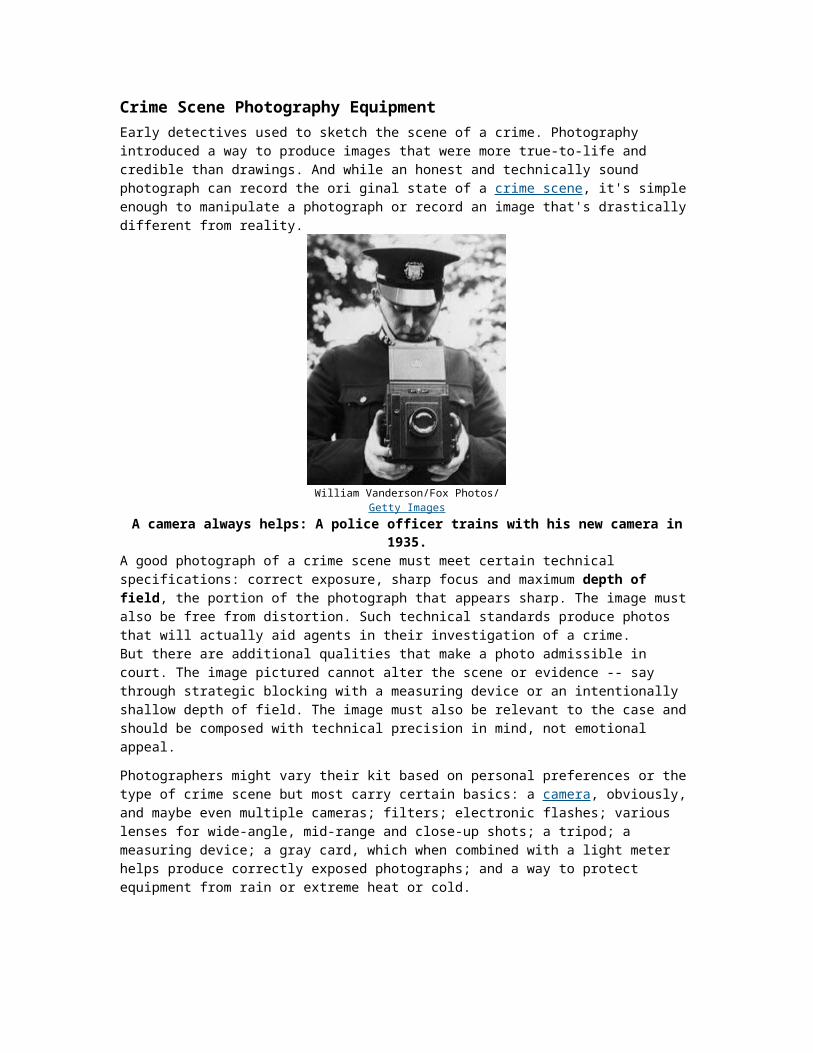
contrast, digital photographs can be displayed, printed, stored, manipulated, transmitted, and archived
using digital and computer techniques, without chemical processing.
Digital photography is one of several forms of digital imaging. Digital images are also created by non-
photographic equipment such as computer tomography scanners and radio telescopes. Digital images
can also be made by scanning conventional photographic images.
Contents
[hide]
1 History
2 Sensors and storage
3 Multifunctionality and connectivity
4 Performance metrics
o 4.1 Pixel counts
o 4.2 Dynamic range
5 Applications and considerations
6 Sensor size and angle of view
7 Storage
8 Digital camera backs
9 Comparison with film photography
o 9.1 Advantages of consumer digital cameras
o 9.2 Advantages of professional digital cameras
o 9.3 Disadvantages of digital cameras
o 9.4 Equivalent features
o 9.5 A comparison of frame aspect ratios
10 Market impact
11 Social impact
12 Recent research and innovation
13 See also
14 References
15 External links
[edit]History
Main article: History of the camera#Digital Cameras
This section requires expansion.

[edit]Sensors and storage
Image sensors read the intensity of light, and digital memory devices store the digital image
information as RGB color space or as raw data.
There are two main types of sensors:
charge-coupled device (CCD) – photocharge is shifted to a central charge-to-voltage
converter
CMOS sensors ("Active pixel sensor")
Nearly all digital cameras use built-in and/or removable solid state flash memory. Digital tapeless
camcorders that double as a digital still camera use flash memory, discs and internal hard drives.
Certain 20th century digital cameras such as the Sony Mavica range used floppy disks and mini-CDs.
[edit]Multifunctionality and connectivity
Except for some linear array type of cameras at the highest-end and simple web cams at the lowest-
end, a digital memory device (usually amemory card; floppy disks and CD-RWs are less common) is
used for storing images, which may be transferred to a computer later.
Digital cameras can take pictures, and may also record sound and video. Some can be used
as webcams, some can use the PictBridgestandard to connect to a printer without using a computer,
and some can display pictures directly on a television set. Similarly, manycamcorders can take still
photographs, and store them on videotape or on flash memorycards with the same functionality
as digital cameras.
[edit]Performance metrics
The quality of a digital image is a composite of various factors, many of which are similar to those of
film cameras. Pixel count (typically listed in megapixels, millions of pixels) is only one of the major
factors, though it is the most heavily marketed figure of merit. Digital camera manufacturers advertise
this figure because consumers can use it to easily compare camera capabilities. It is not, however, the
major factor in evaluating a digital camera for most applications. The processing system inside the
camera that turns the raw data into a color-balanced and pleasing photograph is usually more critical,
which is why some 4+ megapixel cameras perform better than higher-end cameras.
Resolution in pixels is not the only measure of image quality. A larger sensor with the same number of
pixels generally produces a better image than a smaller one. One of the most important differences is
an improvement in image noise. This is one of the advantages of digital SLR cameras, which have
larger sensors than simpler cameras of the same resolution.
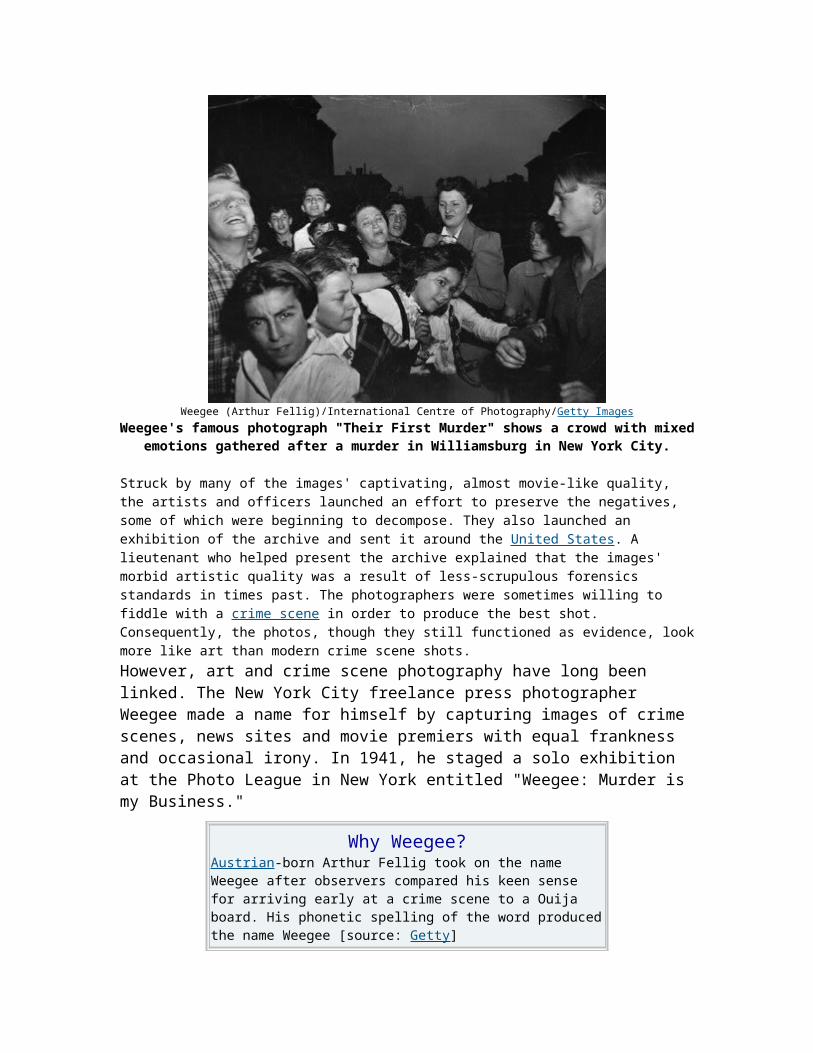
Lens quality: resolution, distortion, dispersion (see Lens (optics))
Capture medium: CMOS, CCD, negative film, reversal film etc.
Capture format: pixel count, digital file type (RAW, TIFF, JPEG), film format (135 film, 120
film, 5x4, 10x8).
Processing: digital and / or chemical processing of 'negative' and 'print'.
[edit]Pixel counts
The number of pixels n for a given maximum resolution (w horizontal pixels by h vertical pixels) is the
product n = w × h. This yields e. g. 1.92 megapixels (1,920,000 pixels) for an image of 1600 × 1200.
The majority of compact as well as some DSLR digital cameras have a 4:3aspect ratio, i.e. w/h = 4/3.
[1] According to Digital Photography Review, the 4:3 ratio is because "computer monitors are 4:3 ratio,
old CCD's always had a 4:3 ratio, and thus digital cameras inherited this aspect ratio."[1]
The pixel count quoted by manufacturers can be misleading as it may not be the number of full-colour
pixels. For cameras using single-chipimage sensors the number claimed is the total number of single-
colour-sensitive photosensors, whether they have different locations in the plane, as with the Bayer
sensor, or in stacks of three co-located photosensors as in the Foveon X3 sensor. However, the
images have different numbers of RGB pixels: Bayer-sensor cameras produce as many RGB pixels as
photosensors via demosaicing (interpolation), while Foveon sensors produce uninterpolated image
files with one-third as many RGB pixels as photosensors. It is difficult to compare the resolutions
based on the megapixel ratings of these two types of sensors, and therefore sometimes subject of
dispute.[2]
The relative increase in detail resulting from an increase in resolution is better compared by looking at
the number of pixels across (or down) the picture, rather than the total number of pixels in the picture
area. For example, a sensor of 2560 × 1600 sensor elements is described as "4 megapixels" (2560 ×
1600 = 4,096,000). Increasing to 3200 × 2048 increases the pixels in the picture to 6,553,600 (6.5
megapixels), a factor of 1.6, but the pixels per cm in the picture (at the same image size) increases by
only 1.25 times. A measure of the comparative increase in linear resolution is the square root of the
increase in area resolution, i.e., megapixels in the entire image.
[edit]Dynamic range
Practical imaging systems, digital and film, have a limited "dynamic range": the range of luminosity that
can be reproduced accurately.Highlights of the subject that are too bright are rendered as white, with
no detail; shadows that are too dark are rendered as black. The loss of detail is not abrupt with film, or
in dark shadows with digital sensors: some detail is retained as brightness moves out of the dynamic
range. "Highlight burn-out" of digital sensors, however, can be abrupt, and highlight detail may be lost.
And as the sensor elements for different colors saturate in turn, there can be gross hue or saturation
shift in burnt-out highlights.
Some digital cameras can show these blown highlights in the image review, allowing the photographer
to re-shoot the picture with a modified exposure. Others compensate for the total contrast of a scene
by selectively exposing darker pixels longer. A third technique is used by Fujifilm in its FinePix S3
Pro digital SLR. The image sensor contains additional photodiodes of lower sensitivity than the main
ones; these retain detail in parts of the image too bright for the main sensor.
High dynamic range imaging (HDR) addresses this problem by increasing the dynamic range of
images by either
increasing the dynamic range of the image sensor or
by using exposure bracketing and post-processing the separate images to create a single
image with a higher dynamic range.
HDR images curtail burn-outs and black-outs.
Further information: Exposure
[edit]Applications and considerations
The Presidential Portrait of Barack Obamawas the first official U.S. Presidential Portrait to be taken with a digital
camera.

With the acceptable image quality and the other advantages of digital photography (particularly the
time pressures of daily newspapers) the majority of professional news photographers capture their
images with digital cameras.
Digital photography has also been adopted by many amateur snapshot photographers, who take
advantage of the convenience of sending images by email, placing them on the World Wide Web, or
displaying them in digital picture frames. The majority of cameras are camera phones integrated
into cell phones but their usual small, poor quality lenses and sensors render most of them unsuitable
for making even moderate size prints.
Some commercial photographers, and some amateurs interested in artistic photography, have been
resistant to using digital rather than film cameras because they believe that the image quality available
from a digital camera is still inferior to that available from a film camera, and the quality of images
taken on medium format film was thought to be impossible to match with a digital camera. Some have
expressed a concern that changing computer technology may make digital photographs inaccessible
in the future. A related concern in a specialized application is the use of digital photographs in court
proceedings, with the added difficulty of demonstrating an image's authenticity. Some high-end film
can also still be projected for viewing at a much higher optical resolution than even the best digital
projectors. Some professional photographers resist the use of Digital Cameras because they are poor
performers when it comes to speed for multiple shots. Storing an 8MP image takes a lot of time and
therefore some applications Digital Cameras are not currently appropriate.
Other commercial photographers, and many amateurs, have enthusiastically embraced digital
photography because they believe that its flexibility and lower long-term costs outweigh its initial price
disadvantages. Almost all of the cost of digital photography is capital cost, meaning that the cost is for
the equipment needed to store and copy the images, and once purchased requires virtually no further
expense outlay. Film photography requires continuous expenditure of funds for supplies and
developing, although the equipment itself does not outdate so quickly and has a longer service life.
Some commercial photographers have also begun moving to digital technology because of the
tremendous editing capabilities now offered on computers. The photographer is able to color-balance
and otherwise manipulate the image in ways that traditional darkroom techniques cannot offer, or are
far more laborious in the darkroom. With fully color-balanced systems from the camera to the monitor
to the printer, the photographer can now supply, either as a print or as a computer display, what is
actually seen on the photographer's screen. Film users can use a film scanner, thus mixing the two
technologies. Rapid advances in the technologies have resulted in many specialised abbreviations and
initialisms being freely used in publications and internet discussions.
However, digital cameras require batteries that need to be recharged or replaced frequently, and this
means that a photographer needs access to electrical outlets. Digital cameras also tend to be much
more sensitive to moisture and extreme cold. For this reason, photographers who work in remote
areas may favour film SLR cameras, though many higher-end DSLRs are now equipped with weather-
resistant bodies. Medium- and large-format film cameras are also still preferred by publications
insisting on the very highest detail and resolution.
Digital photography was used in astrophotography long before its use by the general public and had
almost completely displaced photographic plates by the early 1980s. CCDs are more sensitive to light
than plates, and have a much more uniform and predictable response. The CCDs used in astronomy
are similar to those used by the general public, but are generally monochrome. Many of those used
in infrared astronomy are cooled with liquid nitrogen so as to reduce the image noise caused by heat.
Many astronomical instruments have arrays of many CCDs, sometimes totaling almost a billion pixels.
Amateur astronomers also commonly use digital cameras, including the use of webcams for speckle
imaging or "video astronomy".
[edit]Sensor size and angle of view
Cameras with digital image sensors that are smaller than the typical 35mm film size has a smaller field
or angle of view when used with a lens of the same focal length. This is because angle of view is a
function of both focal length and the sensor or film size used.
If a sensor smaller than the full-frame 35mmfilm format is used, such as the use ofAPS-C-sized digital
sensors in DSLRs, then the field of view is cropped by the sensor to smaller than the 35mm full-frame
format's field of view. This narrowing of the field of view is often described in terms of afocal length
multiplier or crop factor, a factor by which a longer focal length lens would be needed to get the same
field of view on a full-frame camera.

If the digital sensor has approximately the same resolution (effective pixels per unit area) as the 35mm
film surface (24 x 36 mm), then the result is similar to taking the image from the film camera and
cutting it down (cropping) to the size of the sensor. For an APS-C size sensor, this would be a
reduction to the center 62.5% of the image. The cheaper, non-SLR models of digital cameras typically
use much smaller sensor sizes and the reduction would be greater.
If the digital sensor has a higher or lower density of pixels per unit area than the film equivalent, then
the amount of information captured differs correspondingly. While resolution can be estimated in pixels
per unit area, the comparison is complex since most types of digital sensor record only a single colour
at each pixel location, and different types of film have different effective resolutions. There are various
trade-offs involved, since larger sensors are more expensive to manufacture and require larger lenses,
while sensors with higher numbers of pixels per unit area are likely to suffer higher noise levels.
For these reasons, it is possible to obtain cheap digital cameras with sensor sizes much smaller than
35mm film, but with high pixel counts, that can still produce high-resolution images. Such cameras are
usually supplied with lenses that would be classed as extremely wide angle on a 35mm camera, and
that can also be smaller size and less expensive, since there is a smaller sensor to illuminate. For
example, a camera with a 1/1.8" sensor has a 5.0x field of view crop, and so a hypothetical 5-50mm
zoom lens produces images that look similar (again the differences mentioned above are important) to
those produced by a 35mm film camera with a 25–250mm lens, while being much more compact than
such a lens for a 35mm camera since the imaging circle is much smaller.
This can be useful if extra telephoto reach is desired, as a certain lens on an APS sensor produces an
image equivalent to a significantly longer lens on a 35mm film camera shot at the same distance from
the subject, the equivalent length of which depends on the camera's field of view crop. This is
sometimes referred to as the focal length multiplier, but the focal length is a physical attribute of the
lens and not the camera system itself. The disadvantage of this is that wide angle photography is
made somewhat more difficult, as the smaller sensor effectively and undesirably reduces the captured
field of view. Some methods of compensating for this or otherwise producing much wider digital
photographs involve using a fisheye lens and "defishing" the image in post processing to simulate
a rectilinear wide angle lens.
Full-frame digital SLRs, that is, those with sensor size matching a frame of 35mm film, include Canon
1Ds and 5D series, Kodak Pro DCS-14n, Nikon D3 line and Contax N Digital. There are very few
digital cameras with sensors that can approach the resolution of larger-format film cameras, with the
possible exception of the Mamiya ZD (22MP) and the Hasselblad H3D series of DSLRs (22 to 39 MP).
Common values for field of view crop in DSLRs include 1.3x for some Canon (APS-H) sensors, 1.5x
for Sony APS-C sensors used by Nikon,Pentax and Konica Minolta and for Fujifilm sensors, 1.6 (APS-
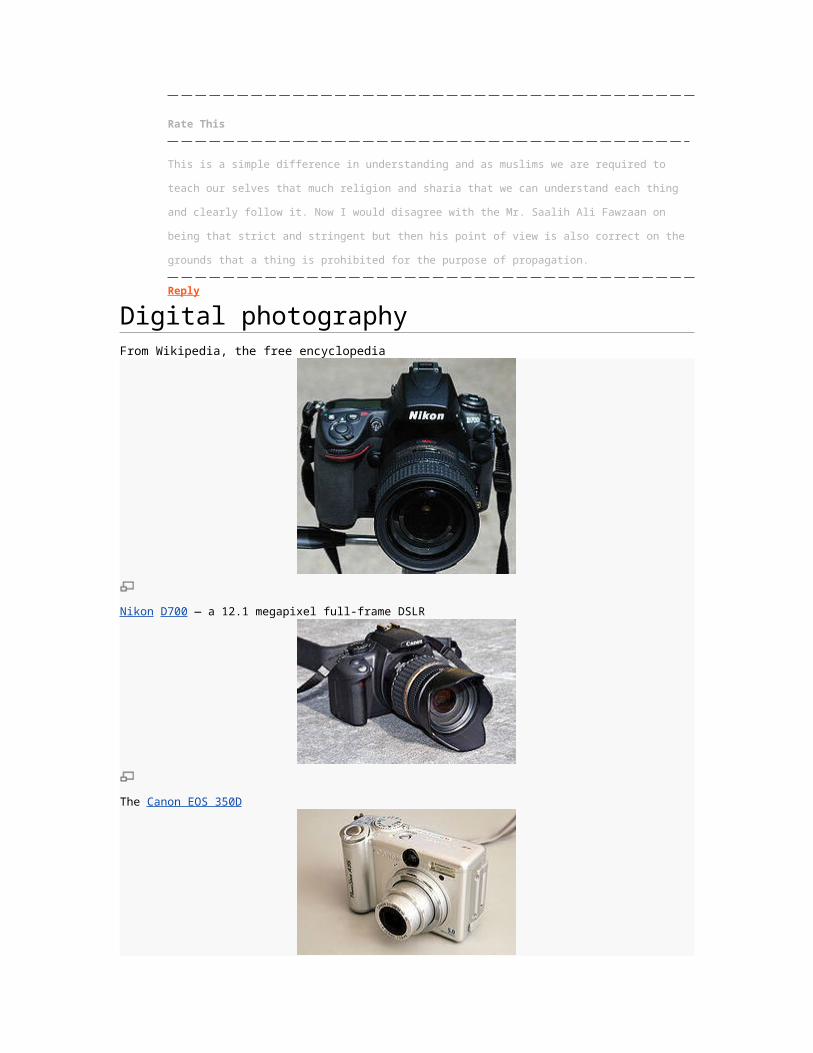
C) for most Canon sensors, ~1.7x for Sigma's Foveon sensors and 2x forKodak and Panasonic 4/3"
sensors currently used by Olympus and Panasonic. Crop factors for non-SLR consumer compact
and bridgecameras are larger, frequently 4x or more.
Further information: Image sensor format
Relative sizes of sensors used in most current digital cameras.
Table of sensor sizes [3]
Type Width (mm) Height (mm) Size (mm²)
1/3.6" 4.00 3.00 12.0
1/3.2" 4.54 3.42 15.5
1/3" 4.80 3.60 17.3
1/2.7" 5.37 4.04 21.7
1/2.5" 5.76 4.29 24.7

1/2" 6.40 4.80 30.7
1/1.8" 7.18 5.32 38.2
1/1.7" 7.60 5.70 43.3
2/3" 8.80 6.60 58.1
1" 12.8 9.6 123
4/3" 18.0 13.5 243
APS-C 25.1 16.7 419
35 mm 36 24 864
Back 48 36 1728
[edit]Storage
Main article: Digital camera#Storage
Storage for digital cameras has increased in size and technology with time, from magnetic tape
(Steven Sasson's 1975 prototype) to floppy disks to flash memory.
[edit]Digital camera backs
Main article: digital camera back
Most digital cameras are built to operate as a self-contained unit. This is especially so at the lower-
end, for these cameras usually includezoom lens and flashes that cannot be changed. However, at the
highest-end, some digital cameras are nothing but a sophisticated light-sensing unit. Experienced
photographers attach these digital "camera backs" to their professional medium format SLR cameras,
such as aMamiya.
Area array

CCD
CMOS
Linear array
CCD (monochrome)
3-strip CCD with color filters
Linear array cameras are also called scan backs.
Single-shot
Multi-shot (three-shot, usually)
Scanning and multi-shot camera backs are usually used only in studios to take pictures of still objects.
Most earlier digital camera backs used linear array sensors that could take seconds or even minutes
for a complete high-resolution scan. The linear array sensor acts like its counterpart in a flatbed image
scanner by moving vertically to digitize the image.
Many early such cameras could only capture grayscale images. To take a color picture, it required
three separate scans done with a rotating colored filter. These are called multi-shot backs. Some other
camera backs use CCD arrays similar to typical cameras. These are called single-shot backs.
Since it is much easier to manufacture a high-quality linear CCD array with only thousands of pixels
than a CCD matrix with millions, very high resolution linear CCD camera backs were available much
earlier than their CCD matrix counterparts. For example, you could buy an (albeit expensive) camera
back with over 7,000 pixel horizontal resolution in the mid-1990s. However, as of 2004, it is still difficult
to buy a comparable CCD matrix camera of the same resolution. Rotating line cameras, with about
10,000 color pixels in its sensor line, are able, as of 2005, to capture about 120,000 lines during one
full 360 degree rotation, thereby creating a single digital image of 1,200 Megapixels.
Most modern digital camera backs use very large CCD matrices. This eliminates the need for
scanning. For example, Phase One produces a 39 million pixel digital camera back with a 49.1 x
36.8 mm CCD in 2008. This CCD array is a little smaller than a frame of 120 film and much larger than
a 35 mm frame (36 x 24 mm). In comparison, a consumer digital camera usually uses a much smaller
1/2.5 inch or 7.176 x 5.329 mm (~ 1/1.8 inch) CCD sensor. Further, the 1/2.5 or 1/1.8 inch diagonal
measurement is the size of the entire CCD chip- the actual photo-sensitive area is much smaller.
At present, there are relatively few complete digital SLR cameras with sensors large enough to
compete with medium to large format film cameras. Phase One and Mamiya manufacture medium
format digital devices that can capture 16MP up to 39MP.[4] The units tend to be quite large and

expensive. Additionally, because of their high build quality and lack of moving parts tend to be quite
long lasting and are prominent on the used market.[5]
[edit]Comparison with film photography
Main article: Digital versus film photography
[edit]Advantages of consumer digital cameras
The advantages of digital photography over traditional film include:
Instant review of pictures, with no wait for the film to be developed: if there's a problem with a
picture, the photographer can immediately correct the problem and take another picture
Minimal ongoing costs for those wishing to capture hundreds of photographs for digital uses,
such as computer storage and e-mailing, but not printing
If one already owns a newer computer, permanent storage on digital media is considerably
cheaper than film
Photos may be copied from one digital medium to another without any degradation
Pictures do not need to be scanned before viewing them on a computer
Ability to print photos using a computer and consumer-grade printer
Ability to embed metadata within the image file, such as the time and date of the photograph,
model of the camera, shutter speed, flash use, and other similar items, to aid in the reviewing and
sorting of photographs. Film cameras have limited ability to handle metadata, though many film
cameras can "imprint" a date over a picture by exposing the film to an internal LED array (or other
device) that displays the date.
Ability to capture and store hundreds of photographs on the same media device within the
digital camera; by contrast, a film camera would require regular changing of film (typically after
every 24 or 36 shots)
Many digital cameras now include an AV-out connector (and cable) to allow the reviewing of
photographs to an audience using a television
Anti-shake functionality (increasingly common in inexpensive cameras) allow taking sharper
hand-held pictures where previously a tripod was required
Ability to change ISO speed settings more conveniently in the middle of shooting, for example
when the weather changes from bright sunlight to cloudy. In film photography, film must be
unloaded and new film with desired ISO speed loaded.
Smaller sensor format, compared to 35mm film frame, allows for smaller lenses, wider zoom
ranges, and greater depth of field.
Ability to use the same device to capture video as well as still images.
Ability to convert the same photo from color to sepia to black & white

[edit]Advantages of professional digital cameras
The Golden Gate Bridge retouched for painterly light effects
Immediate image review and deletion is possible; lighting and composition can be assessed
immediately, which ultimately conserves storage space.
Faster workflow: Management (colour and file), manipulation and printing tools are more
versatile than conventional film processes. However, batch processing of RAW files can be time
consuming, even on a fast computer.
Digital manipulation: A digital image can be modified and manipulated much easier and faster
than with traditional negative and print methods. The digital image to the right was captured in
RAW format, processed and output in 3 different ways from the source RAW file, then merged and
further processed for color saturation and other special effects to produce a more dramatic result
than was originally captured with the RAW image.
Recent manufacturers such as Nikon and Canon have promoted the adoption of digital single-lens
reflex cameras (DSLRs) by photojournalists. Images captured at 2+ megapixels are deemed of
sufficient quality for small images in newspaper or magazine reproduction. Eight to 24 megapixel
images, found in modern digital SLRs, when combined with high-end lenses, can approximate the
detail of film prints from 35 mm film based SLRs, and the latest 16 megapixel models can produce
detailed images that are thought better than 35mm film images and the majority of medium
format cameras.[6]
[edit]Disadvantages of digital cameras
Whereas film cameras can have manual backups for electronic and electrical features, digital
cameras are entirely dependent on an electrical supply (usually batteries but sometimes power
cord when in 'tethered' mode).

Many digital sensors have less dynamic range than color print film. However, some newer
CCDs such as Fuji's Super CCD, which combines diodes of different sensitivity, have improved
upon this issue.
When highlights burn out, they burn to white without details, while film cameras retain a
reduced level of detail, as discussed above.
High ISO image noise may manifest as multicolored speckles in digital images, rather than the
less-objectionable "grain" of high-ISO film. While this speckling can be removed by noise-
reduction software, either in-camera or on a computer, this can have a detrimental effect on image
quality as fine detail may be lost in the process.
Aliasing may add patterns to images that do not exist and would not appear in film.
The possibility that in the future certain digital file formats (for example, JPEG) may become
obsolete/replaced.
Dust particles can adhere to the cover glass of the image sensor in digital cameras, resulting
in persisting dust spots in images. Film cameras use a fresh piece of film for each shot, so dust
does not build up on the film. Digital image sensors may be cleaned with a simple cleaning kit or
professionally, and some digital cameras have built-in sensor cleaning mechanisms, mitigating
this problem.
For most consumers in prosperous countries such as the United States and Western Europe, the
advantages of digital cameras outweigh their disadvantages. However, some professional
photographers still prefer film. Much of the post-shooting work done by a photo lab for film is done by
the photographer himself for digital images. Concerns that have been raised by professional
photographers include: editing and post-processing of RAW files can take longer than 35mm film,
downloading a large number of images to a computer can be time-consuming, shooting in remote sites
requires the photographer to carry a number of batteries and add to the load to carry, equipment
failure—while all cameras may fail, some film camera problems (e.g., meter or rangefinder problems,
failure of only some shutter speeds) can be worked around. As time passes, it is expected that more
professional photographers will switch to digital.
In some cases where very high-resolution digital images of good quality are needed it may be
advantageous to take large-format film photographs and digitise them. This allows the creation of very
large computer files without speed or capacity disadvantages at picture-taking time.[7]
[edit]Equivalent features
Image noise / grain
Noise in a digital camera's image is remarkably similar to film grain in a film camera. At high ISO levels
(film speed) the grain/noise becomes more apparent in the final image. Although film ISO levels can be

lower than digital ISO levels (25 and 50 respectively), digital settings can be changed quickly
according to requirements, while film must be physically replaced and protected from all light during
such replacement. Additionally, image noise reduction techniques can be used to remove noise from
digital images and film grain is fixed. From an artistic point of view, film grain and image noise may be
desirable when creating a specific mood for an image. Modern digital cameras have comparable
noise/grain at the same ISO as film cameras. Some digital cameras though, do exhibit a pattern in
the digital noise that is not found on film.
Speed of use
Previously digital cameras had a longer start-up delay compared to film cameras, i.e., the delay from
when they are turned on until they are ready to take the first shot, but this is no longer the case for
modern digital cameras with start-up times under 1/4 second (0.15 seconds for the Nikon D90).
[8] Similarly, the amount of time needed to write the data for a digital picture to the memory card is now
comparable to the amount of time it takes to wind the film on a film camera, at least with modern digital
cameras and modern fast memory cards.[citation needed]Both digital cameras and film cameras have a small
delay between when the shutter button is pressed and when the picture is taken – this is the time
necessary to autofocus the lens and compute and set the exposure. (This shutter delay is practically
zero for SLR and the best DSLR cameras.)
Frame rate
The Nikon D3 can take still photographs at 11 frames per second; the fastest film SLR could shoot 14
frames per second (Canon F1-n with a super high speed motor, but fewer than 100 were constructed
for the 1984 Summer Olympics[citation needed]). The Nikon F5 is limited to 36 continuous frames (the length
of the film) while the Canon EOS-1D Mark III is able to take about 110 high definition JPEG images
before itsbuffer must be cleared and the remaining space on the storage media can be used.
Even Bridge camera such as Fujifilm FinePix HS10 has burst mode 10fps and Panasonic Lumix DMC-
FZ100 has 11fps.[9][10] Moreover FinePix HS10 can take movies at 1000 fps at 224x64 pixels with no
sound.[11]
Image longevity
Film and prints can fade, but digital images can potentially last unchanged forever. However, the
media on which the digital images are stored can decay or become corrupt, leading to a loss of image
integrity. Film and digital media should be stored under archival conditions for maximum longevity.
Without backup it is easier to lose huge amounts of digital data, for example by accidental deletion of
folders, or by failure of a mass storage device. In comparison, each generation of copies of film
negatives and transparencies is degraded compared to its parent. Film images can easily be
converted to digital (by using a digital film scanner for example) with some possible loss of quality.
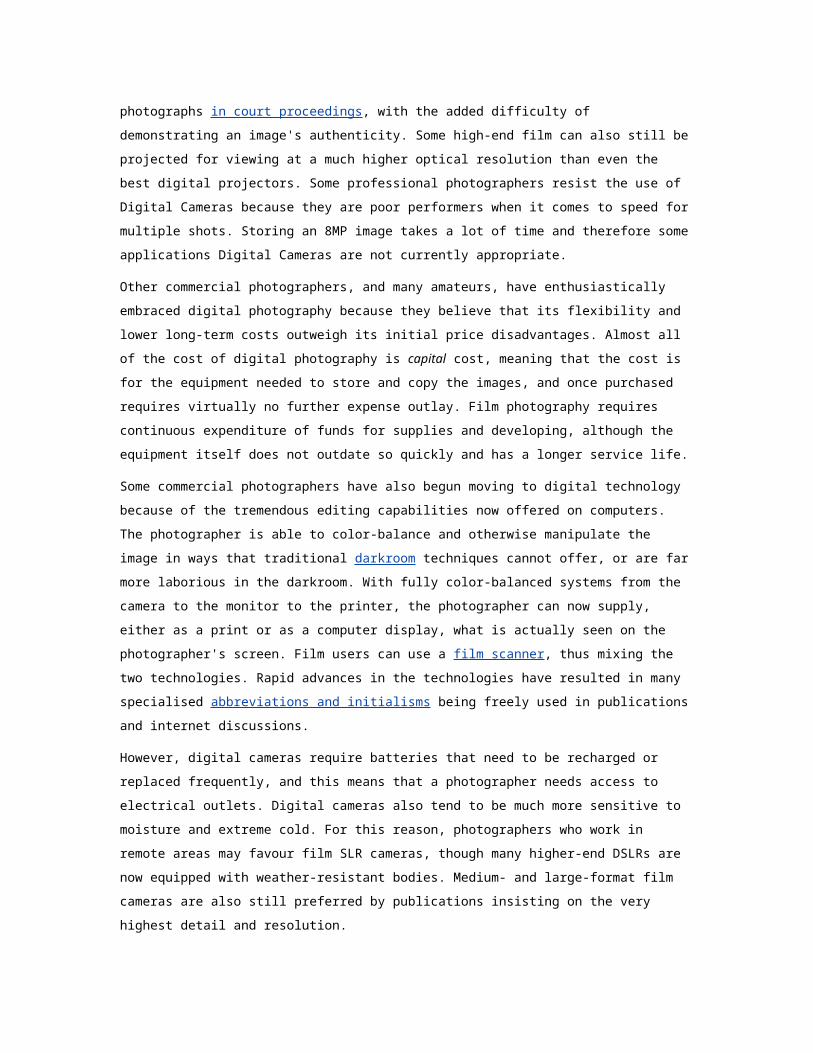
Colour reproduction
Colour reproduction (gamut) is dependent on the type and quality of film or sensor used and the
quality of the optical system and film processing. Different films and sensors have different color
sensitivity; the photographer needs to understand his equipment, the light conditions, and the media
used to ensure accurate colour reproduction. Many digital cameras offer RAW format (sensor data),
which makes it possible to choose color space in the development stage regardless of camera
settings; in effect the scene itself is stored as far as the sensor allows, and can to some extent be
"rephotographed" with different color balance, exposure, etc. Although RAW format can be used, the
sensor and the cameras dynamics can only capture in the GAMUT that the system will allow, and
when that image is transferred for reproduction on any device the best possible gamut that the person
viewing the image will see is the gamut of the end device for a monitor it would be the screens gamut,
for a photgraphic print it will be the gamut of the device that printed the image on the paper. Color
Gamut or Color Space is an abstract term for describing an area where points of color fit in a three
dimensional space. You might more easily picture this as different shaped/sized boxes whereby one
box may not fit into another and therefore what does not fit gets clipped off.
[edit]A comparison of frame aspect ratios
A typical digital camera's aspect ratio is 1.33 (4:3), the same as today's NTSC or PAL/SECAM TVs or
earliest movies. However, a 35 mmpicture's aspect ratio is 1.5 (3:2). Several new digital cameras take
photos in either ratio, and nearly all digital SLRs take pictures in a 3:2 ratio as they usually use lenses
designed for 35 mm film (Olympus and Panasonic digital SLRs are notable exceptions). Some photo
labs print photos on 4:3 ratio paper, as well as the existing 3:2. In 2005 Panasonic launched the first
consumer camera with a native aspect ratio of 16:9, matching HDTV. This is similar to a 7:4 aspect
ratio, which was a common size for APS film. Different aspect ratios is one of the reasons consumers
have cropping issues when printing digital photos, or film photos. Moreover, the majority of digital
cameras take an aspect ratio of 4:3, which translates to a size of 4.5" x 6.0". This translates into losing
a half an inch when printing on the "standard" size of 4" x 6", an aspect ratio of 3:2. Similar cropping
occurs when printing on other sizes, i.e., 5"x7", 8"x10", or 11"x14". The easy way to see if the aspect
ratio you want fits is to divide the length and width. If these match, there is no cropping of the original
image. For example, an 8"x12" has the same aspect ratio as a 4"x6" or a 12"x18", because 12 divided
by 8 is 1.5, the same aspect ratio as a 4"x6", which is also 1.5.
[edit]Market impact
In late 2002, 2 megapixel cameras were available in the United States for less than $100, with some 1
megapixel cameras for under $60. At the same time, many discount stores with photo labs introduced
a "digital front end", allowing consumers to obtain true chemical prints (as opposed to ink-jet prints) in
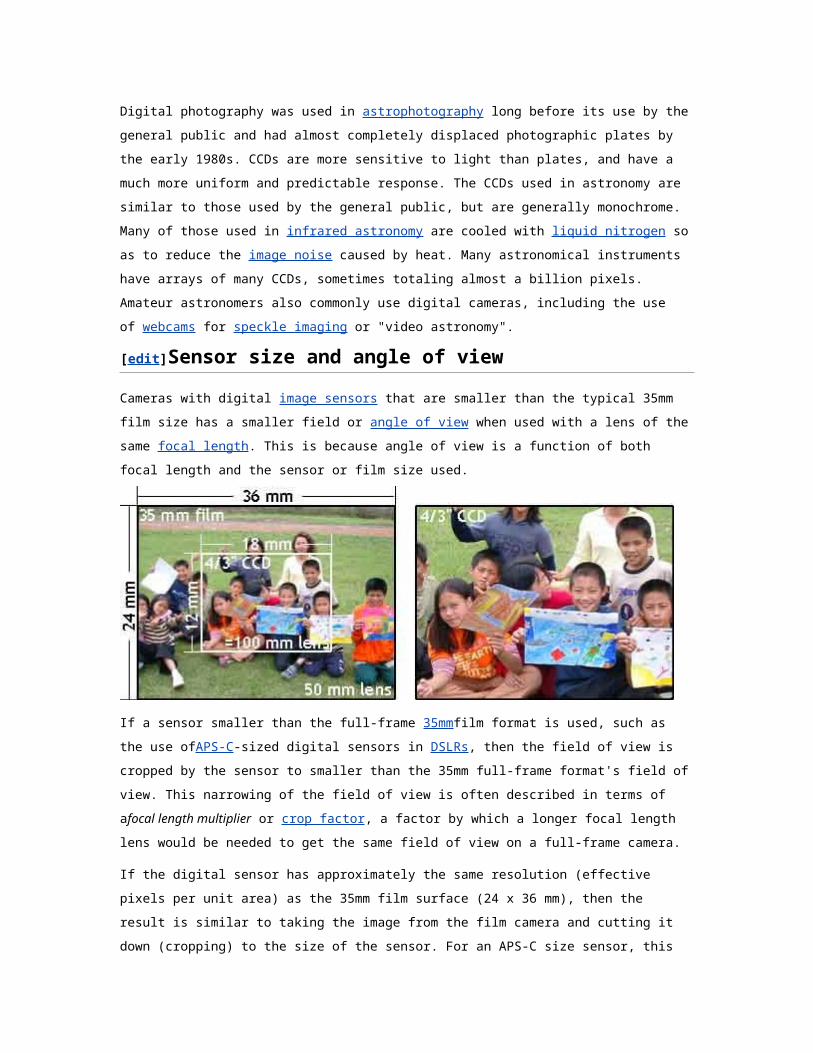
an hour. These prices were similar to those of prints made from film negatives. However, because
digital images have a different aspect ratio than 35 mm film images, people have started to realize that
4x6 inch prints crop some of the image off the print. Some photofinishers have started offering prints
with the same aspect ratio as the digital cameras record.
In July 2003, digital cameras entered the disposable camera market with the release of the Ritz
Dakota Digital, a 1.2 megapixel (1280 x 960) CMOS-based digital camera costing only $11 (USD).
Following the familiar single-use concept long in use with film cameras, the Dakota Digital was
intended to be used by a consumer one time only. When the pre-programmed 25 picture limit is
reached, the camera is returned to the store, and the consumer receives back prints and a CD-ROM
with their photos. The camera is then refurbished and resold. Since the introduction of the Dakota
Digital, a number of similar single-use digital cameras have appeared. Most of the various single-use
digital cameras are nearly identical to the original Dakota Digital regarding specifications and
functionality, although a few include superior specifications and more advanced functions (such as
higher image resolutions and LCD screens). Most, if not all, of these single-use digital cameras cost
less than $20 (USD), not including processing fees. However, the huge demand for complex digital
cameras at competitive prices has often resulted in manufacturing shortcuts, evidenced by a large
increase in customer complaints over camera malfunctions, high parts prices, and short service life.
Some digital cameras offer only a 90-day warranty.
Prices of 35mm compact cameras have dropped with manufacturers further outsourcing to countries
such as China. Kodak announced in January 2004 that they would no longer sell Kodak-branded film
cameras in the developed world.[12] In January 2006, Nikon followed suit and announced they would
stop production of all but two models of their film cameras. They will continue to produce the low-end
Nikon FM10, and the high-end Nikon F6. In the same month, Konica Minolta announced it was pulling
out of the camera business altogether. The price of 35mm and APS compact cameras have dropped,
probably due to direct competition from digital and the resulting growth of the offer of second-hand film
cameras.[13] Pentax have reduced production of film cameras but not halted it.[14] The technology has
improved so rapidly that one of Kodak's film cameras was discontinued before it was awarded a
"camera of the year" award later in the year.
Since 2002, digital cameras have outsold film cameras. However, the use of 35mm cameras is greater
in developing countries.[15] In Guatemala, for example, extremely high import duties on all digital
products serves to encourage sales and use of film cameras.
The decline in film camera sales has also led to a decline in purchases of film for such cameras. In
November 2004, a German division ofAgfa-Gevaert, AgfaPhoto, split off. Within six months it filed for
bankruptcy . Konica Minolta Photo Imaging, Inc. ended production of Color film and paper worldwide
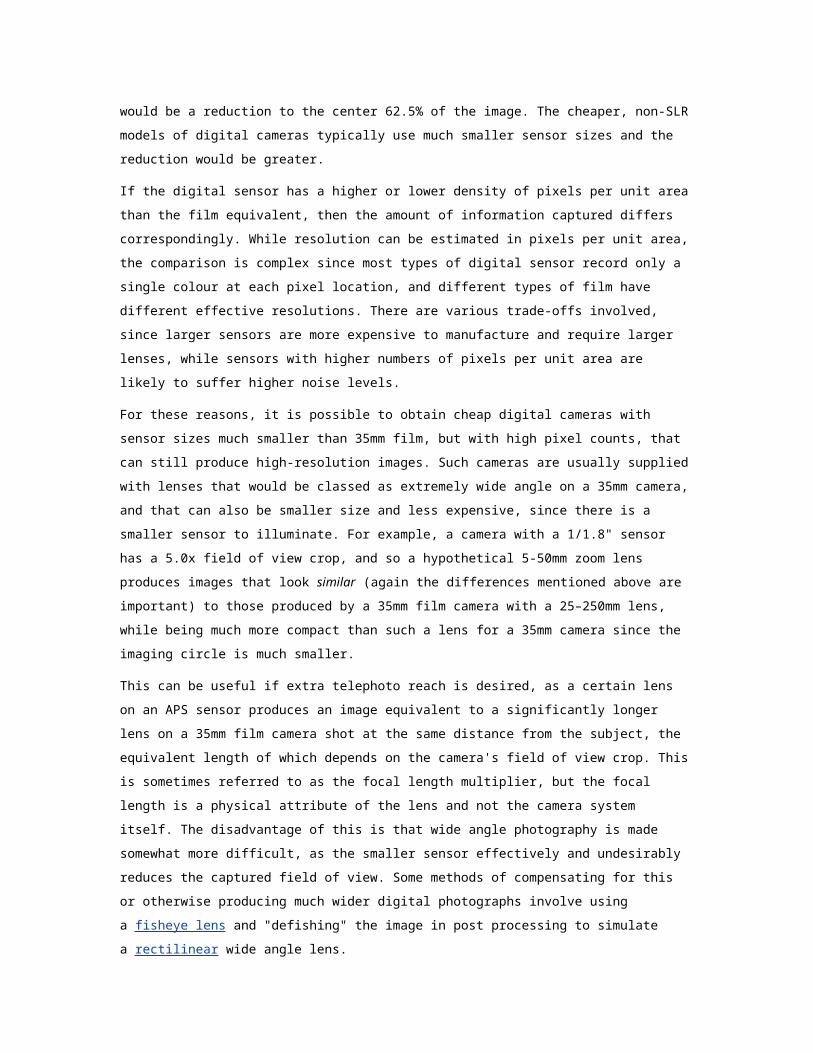
by March 31, 2007. In addition, by 2005, Kodak employed less than a third of the employees it had
twenty years earlier. It is not known if these job losses in the film industry have been offset in the digital
image industry.
In addition, digital photography has resulted in some positive market impacts as well. The increasing
popularity of products such as digital photo frames and canvas prints is a direct result of the increasing
popularity of digital photography.
An example of digital photography. This photo was taken and made into a digital print in less than 5 minutes.
[edit]Social impact
This section may contain original research. Pleaseimprove it by verifying the claims made and addingreferences. Statements consisting only of original research may be removed. More details may be available on the talk page. (January 2009)
Throughout the history of photography, technological advances in optics, camera production,
developing, and imaging have had an effect on the way people view images. Up until 1960, most
printed photographs were black and white. Cameras that could print colour film began to be popular in
the 1960s, particularly with the introduction of the Polaroid camera invented by Edwin Land, which
could print out a colour film print directly from the camera, within a few minutes of taking the picture.
Up until the advent of the digital camera, amateur photographers could either buy print film for their
camera, or slide film. If they purchased slide film, the resulting slides could be viewed using a slide
projector. Digital photography began to be available in the early 2000s. The simultaneous increased
use of the Internet and email, relatively cheap computers and digital cameras led to a tremendous
increase in the number of photographic images in digital formats.
In the early part of the 21st century, the dominant method of viewing still images has been on
computers and, to a lesser extent, on cellular phones (although people still make and look at prints).
These factors have led to a decrease in film and film camera sales and film processing, and has had a
dramatic effect on companies such as Fuji, Kodak, and Agfa. In addition, many stores that used to

offer photofinishing services or sell film no longer do, and those that do have seen a tremendous
decline.
Photographic images have always been prone to fading and loss of image quality due to sun exposure
or improper storage of film negatives, slides, and prints. Since digital images are stored as data on a
computer, the image never loses visual quality, detail, or fidelity as long as the digital media remains
intact. The only way to ruin a digital image is to delete the image file, corrupt or re-write some of the
image file's data, or damage or destroy the electronic storage media (hard drive, disk, CD-ROM, flash
card, etc.) that contains the file. As with all computer files, making backups is the most effective way of
ensuring a digital image can be recovered.
Of growing concern for both archivists and historians is the relative non-permanence or transitory
nature of digital media. Unlike film and print, which are tangible and immediately accessible to a
person, storage of digital images is ever-changing with old media and decoding software becoming
obsoleted or inaccessible by new technologies. Historians are concerned that we are creating a
historical void where information and details about a given decade or era will have been lost within
either failed or inaccessible digital media. It is recommended that both professional and amateur users
develop strategies for migrating stored digital images from old technologies to new.[16] Scrapbookers
who may have used film for creating artistic and personal memoirs may need to modify their approach
to digital photobooks in order to personalise them and retain the special qualities of traditional photo
albums.
It is likely that film will never again be purchased and used on the scale it was for most of the 20th
century. However, it probably will not disappear altogether. At its advent in the early 19th century,
many believed photography would supplant the painting of portraits andlandscapes. In the same way
that acrylic and oil paint are still dominant media in use by artists and hobbyists, it is likely that
photographic film and equipment will remain an option for enthusiasts. It is also important to note that
the differences between film and digital photography are far less significant than the differences
between painting and film photography.
The web has been a popular medium for storing and sharing photos ever since the first photograph
was published on the web by Tim Berners-Lee in 1992 (an image of the CERN house band Les
Horribles Cernettes). Today popular sites such as Flickr, Picasa and PhotoBucket are used by millions
of people to share their pictures.
[edit]Recent research and innovation
GENERAL CONSIDERATIONS IN FIELD PHOTOGRAPHY

Time is an essential factor. Photography frequently will preempt, or come before, other aspects of the investigation. Objects cannot be moved or examined with thoroughness until they have been photographed from all necessary angles. Because there are situations in which the object of interest undergoes significant change with the passage of time, it is very important that photographic equipment be in a constant state of readiness.
All camera positions should be recorded on the crime scene sketch. This can be done by measuring the distance from immovable objects to a vertical line extending downward from the camera lens. Photographs of the interior scenes, intended to depict the area as a whole, should be taken as overlapping segments in one direction around the room area. In making such photographs, it is best to keep the camera at about eye level, unless a tripod is used.
The most important element in police photography is maintaining perspective. Proper photographic perspective produces the same impression of relative position and size of visible objects as the actual objects do when viewed from a particular point. Any significant distortion in the perspective will reduce, or destroy altogether, its evidentiary value.
As a second rule, natural perspective can best be maintained by shooting pictures with the camera aimed so that a 90-degree angle is formed with opposite walls, or if outdoors, with fixed objects such as trees or the landscape.

Different Crime Scene Photography Ranges
As a general rule there are three main ranges of crime scene photography. The first is long range. Long range photos consist of your overall photo shots of your scene to your overall room shots inside. For example, at a burglary scene long range photo shots answer several questions needed to complete or help with the investigation. You would want to include the address of the residence connected to the residence itself. Is the residence secluded or in a residential area? Are there any fences or gates on the property where the crime occurred? Long-range photos also show the approximate time of day it is during the investigation, and the condition of the weather at the time of the investigation. Remember to take long range photos from all angles or directions of the crime scene, this is very important in order to show what is surrounding the residence.
The second type of photo range is medium range photography. Medium range photography consist of any range of photos that show more detail than long range, but not enough detail to accurately describe any items in the scene. Remember to take these photos from a distance that they are not too close to the items in the scene, but not too far either. The key concept to this range of photos is to tie together all evidence in the crime scene. Use this range of photos to show tools used in the burglary in relation to the item(s) it was used on. To show the widow that was broken and the pattern of broken glass that was left by the
suspect(s). Or show the items that are missing from the scene that the suspect(s) took (i.e. VCR, T.V.)
The final range of crime scene photography are the close-up photos. Close-up photography allows you to establish the magnification rate and size of the subject(s) in the crime scene. Close-up photos also show the specific details of the evidence in the scene in order to write a more accurate report, and to help, you the officer, remember the case two years down the road when the case finally reaches the courtroom. One important thing to remember with this range is to always take one picture without a scale or ruler, and take another picture of the same item from the same place with a scale or ruler, this will help if the picture ever needs any enlargements made or computer enhancements. Use this range of photos to show the detailed pry marks left on the back door of the residence. Any finger and/or palm prints at the scene. Any items that are going to be collected for processing back at the office. Finally, this range of photos are real useful in taking pictures of tire and shoe impressions left by the suspect(s).
Crime Scene Photography
The photographs taken at a crime scene are critical to an investigation. I am often asked how many photographs should actually be taken at a crime scene? There is no magic number when it comes to properly documenting the scene through photographs. It will actually depend on an
investigators opinion as to when he/she feels enough photos have been taken to properly preserve the state of the scene in its original condition upon his/her arrival.
The purpose of crime scene photographs are to give a documented record of the scene as it is observed. There is a special skill and technique to crime scene photography. Therefore it takes training and practice for the investigator to be proficient in the task. The investigator should first become familiar with the camera equipment used by his/her agency or department. That equipment should include the flash system as well as the lenses and a tripod. The time to become familiar with a particular piece of equipment is not during a major case when it is taken out of the vehicle.
Most training classes available to the investigator in crime scene photography or forensic photography deal with bench or close up photography using special lighting techniques. These are good courses to begin with since these are the areas that present the most difficulty to the photographer in the early career or training stages. In the field the investigator will find that these techniques are generally used less than a third of their time.
The investigator should begin taking photographs of the scene as soon as possible after arriving on the scene. This will assure that the scene is depicted as it is observed in its original uninterrupted state. Nothing should be touched, moved, or initiated into the scene until it has been thoroughly photographed and documented.
In crime scene photography there are three (3) general positions or views which are necessary. Those views consist of overall photographs showing the entire scene, mid-range photographs showing a relationship of the items, and a close up photograph of the items of evidence themselves.
When taking general photographs of a home, business, or vehicle make sure to take photographs showing the windows, doors or all entry locations. If a numerical location is displayed on the outside of a structure or on a mailbox make sure it is photographed.
As an example of the number of photographs which may be taken at a particular scene, take a standard bedroom, the investigator may choose to take an overall from each wall as well as from each corner of the room. That gives eight (8) different overall view points in the room. The mid-range and close up photographs would be dependant on the associations or relationships of items that might be needed as well as a particular piece of evidence in the room that may need to be documented.
At an outdoor scene where you have a nearby balcony or stairwell, take a few photographs from the highest point showing the overall scene. The investigator is only going to be limited to his/her imagination.
If you are asked to photograph a particular item of evidence make sure you use a neutral background. First you want a contrasting background, second you do not use a red or
dark red background that might be considered inflammatory and not be allowed into court.
When taking photographs of a vehicle for documentation, make sure to do an overall from each side, front, back, all four (4) corners of the vehicle. Included the license plate, V.I.N, any decals, custom accessories, any damage, inside the trunk, the front and rear interior, glove box, ignition area, and the instrument panel of the vehicle.
Another tool in crime scene photography that is very important which is rarely covered in lectures or taught and is often overlooked is special techniques photography with the use of resources like cones depicting a trail of blood, photographic numbers and letters depicting areas and items of evidence, Dow rods and string depicting pathways of projectiles, stick on numbers or letters depicting the bullet holes in a door or ricochet marks on a wall or vehicle, etc. The use of this systematic approach in photographing the scene creates an excellent tool for telling the scene story through photography of the conditions and locations of evidence at the scene. Make sure that everything is consistently organized and corresponds with the crime scene sketch. Have all of the letters and markers facing the same direction for the photographs. All of these tasks make for a professional looking presentation at a briefing and allows for a user friendly or clearly understandable presentation during a trial or court room proceeding. Again the limitations that you have as an investigator are your own imagination.
Practice and knowledge of the equipment is the key to gaining the confidence in properly documenting the crime scene through photography. Good luck!
PHOTOGRAPHING AN ARSON SCENE
When photographing the arson scene, complete coverage of the damage is important. But perhaps of even greater importance are objects or areas that are suspected to have been the point or points of initiation of the fire. Close-up photographs should be made of all such objects or areas. In addition, to the photographic requirements stated in "Critical Photographic Requirements" there are several other critical points or items of interest in an arson scene that should be photographed:
Exterior views of all structures involved in the fire.
Interior views that give a complete representation of the damaged areas and any undamaged areas immediately adjacent.
Once items of evidence are collected for processing, take pictures of where these items where laying, showing the surfaces underneath.
PHOTOGRAPHING A BURGLARY SCENE
The photographic requirements already cited in "Critical Photographic Requirements" apply to the burglary of a habitation and/or building situation. In addition, particular attention should be paid to:
The interior and exterior of the building/residence
Damaged areas, particularly those around the points of entry and exit used by the criminal.
Close-ups range photos of damaged containers that were the target of the suspect(s) – safes, jewel boxes, etc.
Tool marks both close-up photos and medium-range photos, in order to show a perspective that will allow the position of the mark with respect to the general scene to be noted.
Fingerprints. Although fingerprints are a major interest to all types of investigations, they are of particular value in a burglary investigation. Finger and/or Palm prints are photographed mainly, when they are visible without development and when they cannot be lifted after they have been developed. On rare occasions finger and/or palm prints are photographed before lifting them, in case they are destroyed in the lifting process.
IPS FOR MAKING IDENTIFICATION PHOTOGRAPHS
Camera and Lenses: Use a 35mm single-lens-reflex with a lens within an 80 to 100mm focal length. Head and shoulder photographs (with the camera held vertically) can be made at an approximate distance of seven feet.
Subject and Background: Position the subject two feet forward of a neutral, light colored wall that is non-shiny. Avoid white or black walls or polished paneling.

Camera Height and Aiming: The camera lens is at a height equal to the subject’s nose and is aimed level. Don’t look downward at short subjects or upward for tall subjects.
Suggested Views: Front and side views are made from the same distance. Full length views are made (where mode of dress is significant) by using a 50mm lens at a distance of ten feet.
Film Choice: Conventional color negative films are often used so that color prints can be made. Instant print material, in black and white or color, are ideal when immediate prints are needed. Color slides are not often used for ID photos, unless they are being used in a slide-projected "line-up" system.
Using electronic flash: A single flash unit placed two feet above the camera (aimed down towards the subject) can be used.
Better lighting is produced by positioning the flash unit 45 degrees off to one side and elevating it. This produces a more dominant lighting effect revealing the person’s features.
A large white card (24" by 30") is placed on the shadow side of the subject to reflect light into the shadows.
Beware of reflection (glare) problems on the shadow side of the subject to reflect light into the shadows.
OTF autoflash can provide for proper exposure. Flash units whit sensors on them will produce proper exposure when the flash is on or near the viewing axis of the camera.
When used from a distance of 7 feet, a typical exposure with a flash unit that has a guide number of 160 (full power) with ISO 400 film, isf/11when used at ½ power output or with one layer of white handkerchief when used at full power.
In Daylight:
Select a location with a non-distracting blank and neutral background. Look for a light quality that is bright, soft and directional (bright, open shadow areas). Harsh sunlight is not desirable unless fill-in flash is used.
Built-in metering will provide for proper exposure if the background reflects an average amount of light.
Bright open shadow areas usually require an exposure of 1/250 @ f/11 with an ISO 400 film. ISO 100 films call for 1/125 @ f/8.
Critical Photographic Requirements
Basic Photograph Shots Needed at All Major Crimes
Approaches to the Scene (Long Range)
The interior and exterior of the building
Surrounding areas (the yard of a house in which the crime occurred, the general area surrounding an outdoor crime scene, and so forth)
Medium Range photographs should be taken of the entrance and exit to the scene, or those most likely to have been used if these are not obvious.
Damaged areas, particularly those around the points of entry and exits used by the criminal.
A general scenario shot showing the location of the evidence and its position in the relation to the room or area in which it was found (Medium Range)
As many close-up and medium range of the evidence should be taken as needed to show pry marks, blood pattern, tools laying on floor, and the immediate surroundings.
After the evidence is collected the area underneath them should be photographed if there is any marks, stains, or other apparent change.
All finger and palm prints, which do not need further development or cannot be lifted, should be photographed. Areas in which fingerprints were discovered are photographed to show the location if this area was not included in other photographs.
Any other photographs you, as the officer, feel is necessary to complete the scene.
PHOTOGRAPHING LIVE VICTIMS AND SUSPECTS
Photographs that show area of the body which usually are not visible when the person is clothed should be taken ONLY under the direct supervision of the examining physician or nurse, whose testimony the photographs are intended to illustrate. Thus, it is unusual that this type of photograph will be taken on a crime scene.
Before photographing any part of the female body normally covered by clothing, written consent of the subject must be obtained. If the subject is a minor, the written consent of the parent is needed and the photography must be done with witnesses present.
REMEMBER: Only take photographs of the area that needs to be
documented.
BRAZORIA COUNTY SHERIFF'S DEPARTMENT

IDENTIFICATION DIVISION
[A] [B] [C] [D] [E] [F] [G] [H] [I-J] [K-L] [M] [N] [O] [P-Q] [R] [S] [T] [U] [V] [W-Z]
A
ACETIC ACID – A relatively mild acid used, in highly diluted form, as
the rinse bath (shortstop) which follows the developer in the normal film and paper developing processes. The acid in vinegar.
ADAPTER RINGS – Narrow metal rings, threaded on the outside to
fit most popular lens, and threaded on the inside to accept accessories of other than normal lens diameter. Step-up rings adapt a lens for use with larger-than-normal accessories; step-down rings permit the use of slightly smaller accessories than the lens will normally accept.
ADJECTABLE CAMERA – A camera with manually adjustable
distance settings, lens opening, and/or shutter speeds.
AGITATION – The process of stirring, swirling, or otherwise causing
a liquid to move freely over the surface of film or paper during processing. Agitation helps to speed and achieve even development and prevent spotting or staining.

ANGLE OF VIEW – The portion of scene that is covered through a
camera lens. The width of this wedge-shaped portion is determined by the focal length of the lens. A wide-angle (short-focal-length) lens includes more of the scene – a wider angle of view – than does a normal (normal-focal-length) or telephoto (long-focal-length) lens.
APERTURE – The opening in a diaphragm of a lens through which
light passes, expressed as a fraction of the focal length. The f/number.
APERTURE PRIORITY – A camera feature that lets you select the
desired aperture, and the camera sets the shutter speed for proper exposure. When you change the aperture or when the light level changes, the shutter speed changes accordingly.
AUTOFOCUS – The camera focuses automatically on the subject in
the center of the viewfinder when you press the shutter release.
AUTOMATIC EXPOSURE (AE) – A system whereby the camera
selects and sets an exposure based on prevailing conditions without intervention by the photographer.
ARTIFICIAL LIGHT – Any light other than produced by the nature
(sun, moon, stars, phosphorescence, etc). Electric lights are the principal artificial light source in photography.
AVAILABLE LIGHT – The light condition which the photographer
finds existing at the subject position. The term usually implies an indoor or nighttime light condition of low intensity requiring fast film, large lens aperture, and slow shutter speed.
AVAILABLE LIGHT PHOTOGRAPH – Photography without
supplementary illumination even under poor lighting conditions.
B
B – (BULB) – A marked setting on most shutters which permits the
shutter to be held open for an indefinite period by continued pressure on the shutter release.
BACK – That portion of a camera which contains the film;
specifically, the complete assembly attached to the rear standard view camera (and usually removable) which includes the focusing screen, and which accepts the film holders.
BACK LIGHT – Illumination from a source beyond the subject, as
seen from the camera position, which tends to silhouette the subject, also called Back Lighting.
BASE – The transparent sheet material, usually acetate or polyester,
upon which film emulsion is coated.
BASEBOARD – The large, flat board, usually plywood, to which the
enlarger column is attached, and on which the enlarger easel is normally placed.
BASE FOG – Any uniform fog produced when an unexposed
emulsion is developed.
BASE-PLUS-FOG-DENSITY – The density of an unexposed area of
a developed film (negative or positive).
BELLOWS – The center section of a view camera which connects
the front and back standards. The bellows is usually made of leather, cloth, or plastic, is accordion-pleated for flexibility and is, of course, light tight.
BELLOWS EXTENSION – A term often used to refer either to the
total bellows length or to the additional extension of the
bellows (beyond that required for infinity focus) necessary for focusing at close subject distances.
BELLOWS EXTENSION FACTOR – A number (multiplier) indicating
the exposure increase required for correct exposure.
BETWEEN-THE-LENS SHUTTER – A shutter designed to operate in
a space between the elements of the lens.
BLIND – An emulsion not sensitive to certain colors; color blind.
BLUE-SENSITIVE – The sensitivity of an ordinary silver emulsion;
red and green blind.
BOUNCE FLASH – Directing light from a flash gun toward a ceiling,
wall or other large reflecting surface to obtain the contrast softening effect of a diffused light source spread over a larger area of the subject.
BOUNCE LIGHT – Light reflected onto the subject from surrounding
surfaces rather than directly on the subject.
BRACKET – To make a number of exposures (some greater and
some less than one considered to be normal) in addition to the "normal" one, with the intent of getting one near-perfect exposure.
BURNING-IN -- The process of allowing some relatively small image
area to receive more than the normal exposure by shielding most of the printing paper surface from the light.
BURNED-OUT – Describes an area of the print image in which
highlight detail has not been recorded, usually because of severe overexposure of the negative.
CABLE RELEASE – A flexible outer casing containing a stiff wire
which can be attached to the shutter release on a camera. Depressing the plunger at the end of the wire release the shutter while minimizing risk of camera movement during exposure.
CAMERA MOVEMENTS – Adjustments typically provided on
technical and view camera to (1) enable the optical axis of the lens to be displaced relative to the center of the image while keeping the axis perpendicular to the image plane. (2) Position the lens plane and image plane at an angle to each other (swings and tilts). These adjustments may be provided as a swing front lens panel or a hinged camera back (swing back) or both. They are used for control of perspective and sharpness distribution in the image plane.
CHEMICAL FOG – Fog on negatives or prints appearing, during
development, in the unexposed areas.
CLEAR – The appearance of a negative after the fixing bath has
removed all visible traces of undeveloped silver halide.
CLEARING TIME – The length of time required to clear a negative. It
depends on the strength, temperature, and agitation of the fixing bath and the kind of emulsion being used.
CLOSE-UP – Photograph made of an object to show greater detail.
A photograph made with a reproduction ratio greater than 1:10.
CLOSE-UP LENS – A positive supplementary lens which, when
placed over a camera lens, shortens its focal length and thereby permits closer-than-normal focusing.
CLOSE-UP PHOTOGRAPHY – The techniques and practice of using
supplementary lenses, extension tubes, bellows units, etc. to take pictures at closer ranges than the normal focusing adjustment of an ordinary hand-camera will allow. Refers to image magnification ratios of up to perhaps, 2x, and therefore overlaps "Photomacrography".
COLOR BLANCE – The ability of a film to reproduce the colors of a
scene. Color films are balanced in manufacture for exposure to light of a certain color quality; daylight, tungsten, etc. Color balance also refers to the reproduction of colors in color prints, which can be altered during the printing process.
COLORBLIND – Descriptive of the partial or total inability to
recognize or distinguish chromatic emulsion is sensitive
only to blue, violet, and ultraviolet light.
COLOR HEAD – An enlarger light source containing adjustable
dichroic filters which can be set to provide light of any color for color printing.
COLOR TEMPERATURE – A numerical rating given to the color
qualities of a light source. Expressed in degrees Kelvin. The lower the color temperature, the greater the ratio of yellow/red light. Daylight is considered to be 5000 – 5500 degrees Kelvin.
COMPEMEMTARY COLORS – Any two colors in the subtractive
system which, when mixed in the proper proportion, produce black or dark neutral gray. In the additive system, any two colors whose mixture results in white light.
CONCAVE – Hollowed out. The side of spherical surface seen from
the center of the sphere.
CONDENSER ENLARGER – An enlarger with sharp, undiffused light
that produces high contrast and high definition in a print. Scratches and blemishes in the negative are emphasized.
CONTACT PAPER – Relatively slow development paper for making
positives by contact printing.
CONTACT PRINTING – A method of printing in which the negative is
placed in contact with the printing paper, emulsion to emulsion, and held in that position in a printing frame. The exposure is made by exposing the frame to raw light so that the paper emulsion is exposed by light passing through the negative densities.
CONTINUOUS TONE – Describes an image containing a gradation
of grays as well as black and white extremes.
CONTRAST – The difference in tones from the lightest to the darkest
areas of negatives and positives.
CONTRAST GRADE – A number or descriptive term assigned to a
particular printing emulsion which identifies its contrast characteristic. In the range from zero through five, a normal contrast paper is usually considered to be two, with the lower numbers indicating a tendency toward lower contrast. Printing filters for use with variable contrast papers are numbered similarly. In some cases low contrast is indicated by the term "soft" while high contrast paper are labeled "hard".
CONTRASTY – higher than-normal contrast. The range of density in
a negative or print is higher than it was in the original scene.
CONVERTER – An optical unit which can be interposed between the
camera body and lens to effectively double or triple the lens focal length; usually, but not always, with some loss of image quality, and always with a substantial loss of lens speed. Sometimes called an Extender.
COPY – To reproduce via photography. An original which is
subjected to photographic reproduction.
COVERAGE – The area of the image (formed by a lens) which is of
useful quality. Also, the area of the subject which the lens can record as an image of useful quality.
CROPPING – Printing only part of the image that is in the negative or
slide.
CROSS LIGHT – Light striking the subject from one side.
CURTAIN SHUTTER – A shutter variety in which slit or opening in a
strip of metal or cloth is made to travel past the film surface to effect the exposure.
CURVATURE OF FIELD – The tendency of a simple lens to form its
image on a spherical, rather than flat, plane.
D
DARK SLIDE – The black plastic or fiber sheet which is inserted into
a FILM HOLDER through a light tight slot to seal the film chamber against light.
DAYLIGHT – Sunlight or skylight or any mixture of the two. For the
purposes of color photography, daylight is considered to have a color temperature of from about 5500 degree K. to 6000 degrees K. and this condition is likely to exist when the sun is high and slightly overcast. Under other conditions the color of daylight is likely to be quite different from the "norm" and must be filtered if "normal" color rendition is desired.
DENSE – Descriptive of a negative which is dark overall, or of an
area of a negative which has a heavy sliver deposit and therefore transmits only a little light.
DENSITOMETER – An instrument designed to measure the amount
of light transmitted by individual small areas of a negative, thus appraising the density of the areas.
DENSITY RANGE – The range of densities represented by, for
example, a negative image. It is found by subtracting the lowest density value from the highest, and is expressed numerically.
DEPTH OF FIELD – The region of acceptable sharp focus around
the subject position, extending toward the camera and away from it, from the plane of sharpest focus. The boundaries of the depth of field are referred to as the neat limit and the far limit. Depth of field depends on the lens opening, the focal length of the lens, and the distance from the lens to the subject.
DEPTH OF FIELD SCALE -- A calibrated scale, ring or chart, often a
part of the camera lens mount, on which the depth of field for any distance and aperture setting is indicated.
DEPTH OF FOCUS -- The distance range over which the film could
be shifted at the film plane inside the camera and still have the subject appear in sharp focus; often misused to mean depth of field.
DEVELOPER – Chemical solution used to covert a latent image to a
visible image. Converts exposed silver halide into metallic silver.
DEVELOPMENT – The process of chemically treating a
photographic material to produce a visible image. Sometimes used to include the fixing and washing operations.
DEVELOPMENT FOG – Fog formed by the partial development of
unexposed grains of emulsion; caused by developing the sensitized material under unsuitable conditions.
DIAPHRAGM – The assembly of thin metal leaves, usually
incorporated into the lens barrel or shutter assembly, which can be adjusted to control the size of the lens aperture.
DICHROIC FILTER – A filter, usually of glass coated with a thin film
of some durable material, which has the unique ability to transmit certain colors while reflecting the rest of the spectrum. Because the transmitted and reflected colors are complementary the filter appears to change color in certain lights, hence the "dichroic." Dichroic filters are highly resistant to heat and fading and are therefore especially suitable for use in color printing applications.
DIFFUSER – Any light-scattering medium placed in the path of
a beam of light to soften its character, such as matt white reflectors behind or frosted or opal glass in front of the light source.
DIFFUSION – The scattering of light in all directions by reflection
from a rough surface or passage through a translucent medium.
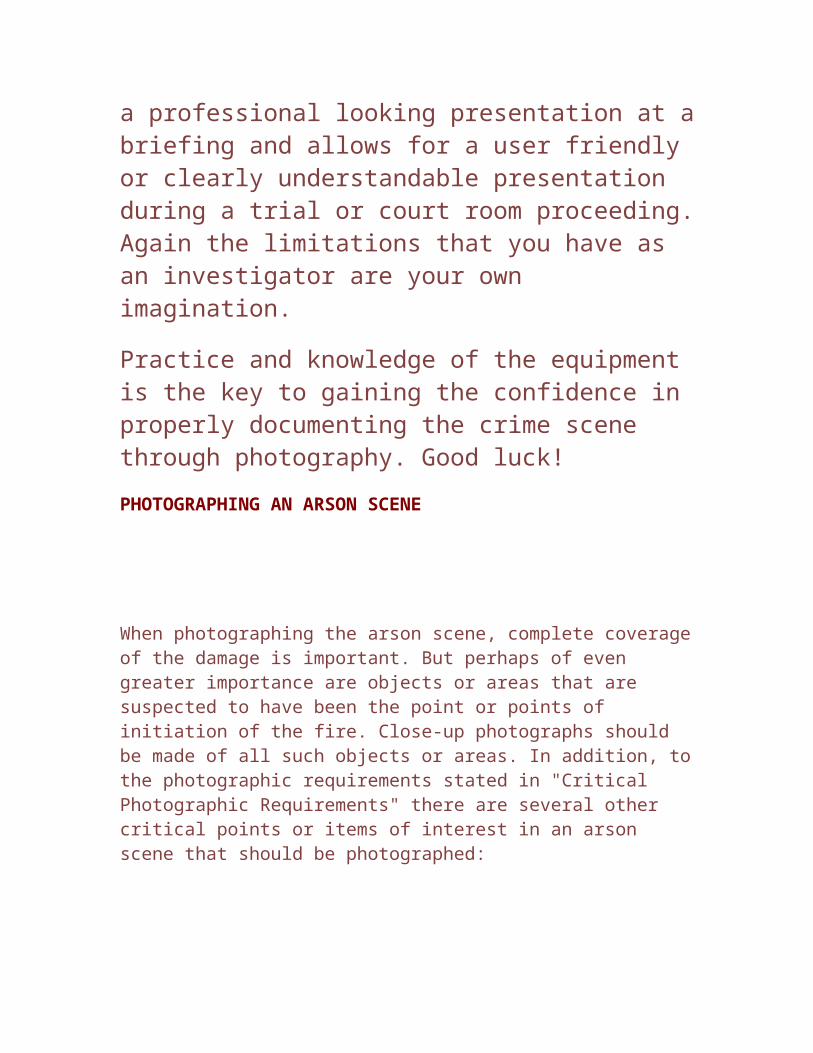
DIFFUSION-CONDENSER ENLARGER – An enlarger that combines
diffuse light with a condenser system, producing more contrast and sharper detail than a diffusion enlarger but less contrast and blemish emphasis than a condenser enlarger.
DIFFUSION ENLARGER – An enlarger that scatters light before it
strikes the negative, distributing light evenly on the negative. Detail is not as sharp as with a condenser enlarger; negative blemishes are minimized.
DIOPTER – An optician’s term which identifies the power of a lens. It
expresses the reciprocal of the lens focal length in meters and is usually preceded by a plus or minus sign to indicate whether the lens is positive (converging) or negative (diverging). Thus, a close-up (positive) lens having a focal length of 50 cm (1/2 meter) would be labeled a +2 lens.
DISTORTION – Sometimes referred to as linear distortion or
curvilinear distortion, it is an aberration of the lens which is characterized by variable magnification of the image. The effect increases toward the edges of the image area and will cause straight lines near the edges of the subject field to be formed near the image margins as curved lines. Two forms are identified, Pincushion and Barrel distortion.
DODGE – To shade a portion of a print during exposure.
DODING – Holding back the image forming light from a part of the
image projected on an enlarger easel during the part of the basic exposure time to make that area of the print lighter.
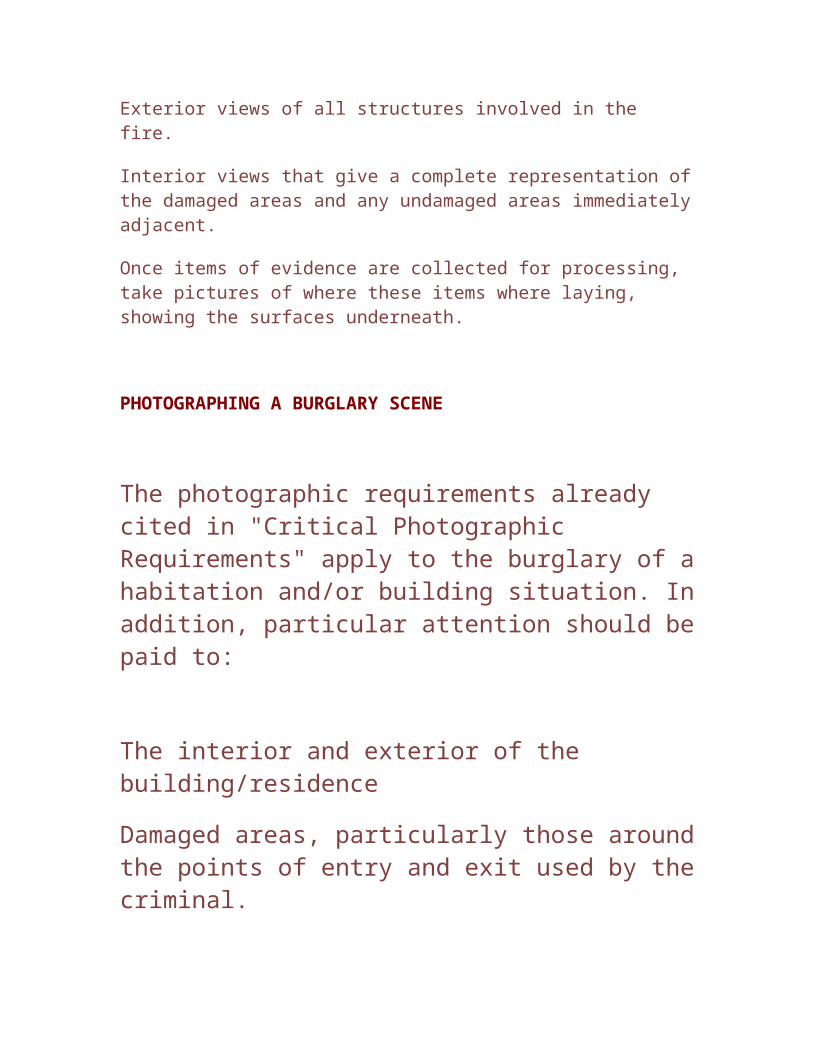
DOUBLE EXPOSURE – Two pictures taken on one frame of film, or
two images printed on one piece of photographic paper.
DRY-MOUNTING – A method of mounting prints on cardboard or
similar sheet materials. Dry-mounting tissue placed between the print and mount board is softened by the heat of a dry-mounting press to effect the bond.
DRY-MOUNTING PRESS – A machine for dry-mounting prints. It
has a large flat metal pressure plate which can apply uniform pressure and thermostatically controlled heat on the prints to be mounted.
DRY-MOUNTING TISSUE – A thin tissue paper impregnated with
shellac or some similar material, which, when heated sufficiently, softens to become an effective adhesive for paper.
DX CODE – A system of encoding ISO speeds onto 35mm film
cassettes. A DX coded camera can read the code and set the film speed automatically.
E
EASEL – A device to hold photographic paper flat during exposure,
usually equipped with an adjustable metal mask for framing.
EMULSION – A thin coating of light-sensitive material, usually silver
halide in gelatin, in which the image is formed on film and photographic papers.
EMULSION SIDE – The side of the film coated with emulsion. In
contact-printing and enlarging, the emulsion side of the film - dull side - should fact the emulsion side of the photo paper - shiny side.
ENLARGEMENT – A print that is larger than the negative or slide:
blowup.
ENLARGER – A device consisting of light source, a negative holder,
and a lens, and means of adjusting these to project an enlarged image from a negative onto a sheet of photographic paper.
EXHAUSTION – Inactive state of a solution caused by depletion of
its chemical components.
EXISTING LIGHT – Available light. Strictly speaking, existing light
covers all natural lighting from moonlight to sunshine. For photographic purposes, existing light is the light that is already on the scene or project and includes room lamps, fluorescent lamps, spotlights, neon signs, candles, daylight through windows, outdoor scenes at twilight or in moonlight, and scenes artificially illuminated after dark.
EXPOSE – To subject a material to the action of light.
EXPOSURE – The quantity of light allowed to act on a photographic
material; a product of the intensity (controlled by the lens opening) and the duration (controlled by the shutter speed or enlarging time) of light striking the film or paper.
EXPOSURE DETERMINATION – Measuring or estimating the
brightness of parts or the whole of a subject by exposure meters.
EXPOSURE FACTOR – Figure by which the exposure indicated for
an average subject and/or processing should be multiplied to allow for non-average conditions. Usually applied to filters, sometimes to lighting or processing.
EXPOSURE INDEX – Number assigned to a photographic material.
Based on emulsion speed and latitude, exposure meter characteristics and technique, and proposed conditions of processing. Used to determine the appropriate exposure under different lighting conditions when using correspondingly calibrated exposure meters. It is identical with the working speed of the material as specified by international standards.
EXPOSURE LATITUDE – The range of camera exposures, from
underexposure to overexposure, that will produce acceptable pictures from a specific film.
EXPOSURE METER – An instrument with a light - sensitive cell that
measures the light reflected from or falling on a subject; used as an aid to selecting the exposure setting. The same as a light meter.
EXPOSURE SETTING – The lens opening plus shutter speed
selected to expose the film.
EXTENSION TUBE – Hollow tube with male and female lens mount
fittings on either end. Used to extend the lens from the film plane in close-up photography.
F
FACTOR – A number by which the duration or effect of some action
or process must, for some reason, be multiplied.
FAST – A term used to describe lenses of large relative aperture
or films of high sensitive. Sometimes also applied to unusually sensitive papers.
FILM – A photographic emulsion coated on a flexible,
transparent, plastic base.
FILM HOLDER – Thin container of plastic, metal, or wood, usually
black, designed to hold two sheets of film in separate compartments, back to back.
FILM SPEED – The sensitivity of a given film to light, indicated by a
number such as ISO 200; the higher the number, the more sensitive or faster the film.
FILTER FACTOR – The number by which an exposure given through
a filter must be multiplied to compensate for the absorption of light by the filter.
FIX – To make the film insensitive to further exposure to light,
usually by bathing the emulsion with a solution containing Hypo or some other effective silver halide solvent. Such a solution is called a fixing bath.
FIXING BATH – A solution that removes any light sensitive silver
halide crystals not acted upon by light or developer, leaving a black - and - white negative or print unalterable by further action of light.
FLASH – A brief, intense burst of light from a flashbulb or an
electronic flash unit, usually used where the lighting on the scene is inadequate for picture taking.
FLAT – Too low in contrast. The range in density in a negative or
print is too short.
FOCAL LENGTH – The distance from the optical center of the lens to
Its focused image, when the lens is focused at infinity.
FOCAL PLANE – Plane through the principal focus of a lens and
perpendicular to its optical axis. To record a sharp image the emulsion surface of the film in a camera must be positioned in the focal plane of the taking lens. That plane in the camera where the sharply focused image is formed.
FOCUS – To adjust the lens/image plane separation to obtain a
sharp image of an object at a specified distance in front of the camera.
FOGGING – Darkening or discoloring of a negative or print or lighting
or discoloring of a slide caused by: (1) exposure to non-image forming light to which the photographic material is sensitive, (2) too much handling in air during development, (3) over-development, (4) outdated film or paper, or (5) storage of film or paper in a hot, humid place.
f/STOP – The numerical expression of the aperture diameter of a
lens as a fraction of the focal length. Number indicating the light-passing power of a lens.
G
GRAIN – The visible granular texture of the silver image, caused by
apparent clumping of the individual silver particles, viewed under magnification.
GRAININESS – The sand like or granular appearance of a negative,
print, or slide resulting from the clumping of silver grains during development of the film. Graininess becomes more pronounced with faster film, increased density in the negative, and degree of enlargement.
GRAY CARD – A card of known reflectance, usually 18 percent,
intended to be placed in the subject area and used as a meter target in the determination of exposure. Also used in color photography to establish a neutral reference for the adjustment of print color.
GRAY SCALE – The gradation of an image. A strip of film or paper
displaying individually uniform areas of density ranging from light to dark in a series of steps. Also sometimes called step tables, they are used in testing the sensitivity and contrast characteristics of photographic materials.
GUIDE NUMBER – Figure allocated to a light source, usually flash,
representing the product of lens aperture and light-to-subject distance required for correct exposure under average conditions using a specified photographic material.
H
HYPO – The common name for sodium thiosulfate, also used by
photographers when speaking of the complete fixing bath.
I - J
ILLUMINATION – The distribution of light from one or more sources
over the subject being photographed and over the
surface of the sensitive material.
IMAGE – The photographic representation of the subject
photographed. The visible result of exposing and developing a photographic emulsion.
INCIDENT LIGHT – The light reaching the subject from any and all
sources.
INCIDENT LIGHT METER – Exposure meter designed to integrate
the light reaching it over a very wide acceptance angle and used to measure the light intensity falling on a scene rather than that reflected from it. The usual form is a photoelectric meter with a diffusing screen or cone over the face of the cell. It is pointed toward the camera from the subject position.
INFINITY – In photography, lens setting position on the focusing
scale of a camera (indicated by the symbol of a lazy eight) which results in a sharp image of distant objects.
INVERSE SQUARE LAW – A statement to the effect that
"Illumination intensity on a surface will vary inversely with the square of the distance from the light source to the illuminated surface".
ISO – International Standards Organization. An organization
whose major purpose is to gather, correlate, and standardize information about photographic material, processes, and equipment. In 1974 the ISO adopted a standard for determining film speeds that, in effect, combined out existing ASA system with the German DIN system. ISO film speeds, as presently used in this country, include both, so that, for example, Plus-X film is now rated ISO 125.22` – the degree sign indicating the DIN logarithmic value.
ISO EXPOSURE INDEX – A numerical value assigned to film by the
International Standards Organization to indicate its speed and for use in computing correct exposure.
K-L
LATENT IMAGE – The invisible impression on the sensitized
emulsion produced by exposure to light in the development-out processes. Development converts the latent image to a visible one.
LEAF SHUTTER – A type of shutter, usually operating in the space
between the major lens components or immediately behind the lens, which consists of a number of then metal leaves or blades, arranged
concentrically around the lens axis, pivoted so that they can either form an opening for the passage of light or overlap to block it.
LENS SPEED – Maximum light-transmitting power of a lens. The
term is often used when referring to the maximum working aperture of a lens (its smallest f number)
LIGHTING TENT – Enclosure of translucent material inside of which
subjects such as glass, silverware and jewelry are sometimes photographed, the camera lens projecting through a hole in one wall. Light entering the tent is so diffused that it is substantially shadowless and there is no reflected image of the camera from polished surfaces.
LIGHT METER – An instrument which measures light intensity. If
supplied with a suitable computing scale, it becomes an exposure meter. The term is commonly used interchangeable with exposure meter. See exposure.
LIGHT TIGHT – Describes a container, room or space which light
cannot enter or leave, or a door or baffle or aperture which light cannot penetrate.
LINE NEGATIVE – Negative consisting of two tones only, clear
transparent lines or letter against a maximum density background, with no intermediate densities.
M
MACRO LENS – Camera lenses (typically interchangeable lenses on
35mm cameras) fitted with an extended focusing mount to permit focusing from infinity to same size reproductions. Camera lens specially corrected for optimum definition at same size reproduction.
MAGNIGICATION – Relationship between the size of the object
photographed and the image of it formed by the lens.
MAXIMUM APERTURE – The largest useful opening of the lens.
Wide open.
N
NEGATIVE – A photographic image in which the tones of the subject
have been recorded in reverse.
NEGATIVE CARRIER – The frame of glass or metal which holds the
negative in printing position in the enlarger.
NITROGEN BURST – Method of agitating processing solutions by
introducing nitrogen gas into the bottom of the processing rank through a distributor nozzle. The bubbles of gas rising through the liquid form an effective and harmless stirring device.
NORMAL LENS – Any lens whose focal length is approximately
equal to the diagonal measurement of the film frame.
O
OBLIQUE LIGHTING – Light striking the subject from the side
relative to the position of the camera; produces shadows and highlights to create modeling on the subject.
OPAL GLASS – A translucent glass having a milky or "opal-scent"
appearance, used to diffuse light.
OPAQUE – Incapable of transmitting light. A special fine-ground
tempera paint, usually brick-red or black, for use in blocking out unwanted areas of the negative image prior to printing.
OPEN FLASH – Method of taking pictures with flash in which the
shutter is opened on time or blub and the flash is fired manually.
ORTHO – Abbreviation of orthochromatic.
ORTHOCHROMATIC – Photographic materials sensitive to all colors
except the orange and red regions of the spectrum. Type of emulsion which is sensitive to visible blue and green, but not to red.
OVERDEVELOPMENT – Excessively long development of
photographic material which results in very dense and contrasty negatives or fogged and stained prints.
OVEREXPOSURE – Excessive amount of light falling on the
sensitized material during exposure resulting in dense negative with opaque highlights or prints with blocked up shadows and veiled highlights.
P
PAN – It describes a type of emulsion, "panchromatic" which is
sensitive to all colors of the visible spectrum
PANCHROMATIC – Describes an emulsion sensitive to blue, green
and some, or all, of the red region of the spectrum.
PAPER NEGATIVE – A negative image on a paper base, prepared
either by exposing the paper directly in a camera or by printing from a positive transparency.
PERSPECTIVE – The apparent relation between the shape, visual
scale and position of visible objects.
PERSPECTIVE DISTORTION – Change in the shape and
foreshortening of the three-dimensional objects in a
picture, resulting from the use of a wide-angle lens.
PHOTOMACROGRAPHY – Small objects photographed at greater
than life size by the use of long bellows and short focal length lens on the camera.
PRIMARY COLORS – Three colors of light, Blue, Green, and Red,
which when mixed in equal amounts, produce white light.
PRINT – In photography, the term is generally used to identify and
image on paper, produced by photographic means. It is usually understood to mean a positive image, and implies a final image rather than an intermediate one in some longer process.
PRINTING FRAME – A shallow, rectangular frame of wood or metal
equipped with a removable front glass and a separate folding back which can be fastened to the frame with leaf springs so as to hold a negative and a sheet of printing paper against the glass smoothly and tightly. In use, light is allowed to shine through the front glass and through the intervening negative to reach the printing emulsion. Also called a contract printing frame.
PRINTING PAPER – Paper coated with a light-sensitive substance,
to be used for making photographic images.
POSITIVE – An image in which the tones or colors are similar to
those of the subject.
PROCESS – To subject photographic films or papers to chemical
treatment, such as, for example, development. The sequence of chemical steps required to produce the desired image or result.
PUSH PROCESSING – Increasing the development time of a film to
increase its effective speed (raising the ISO number for initial exposure) for low-light situations; forced development.
R
RECIPROCITY FAILURE – When the product of light intensity and
time of exposure remains constant there is a relative loss of sensitivity of photographic emulsion at very low or high intensities for correspondingly longer or shorter exposures.
REFLECTANE – Describes the ability of a surface to reflect light.

REFLECTED LIGHT METER – Exposure meter used to measure the
light reflected from a scene as distinct from incident light meters which measure light falling on the subject. Most meters built into cameras are reflected light meters and indicated exposures on the assumption that the proportion of light to dark areas in most scenes is roughly constant.
REFLECTION – Re-direction of light or other radiation by a surface.
Reflection may be specular if the surface is polished, each light ray being thrown back in the direction from which it came. If the surface is matted, reflection becomes more or less diffuse, the light being scattered in all forward directions.
REFLECTOR – A surface used to reflect light. Photographic
reflectors are usually sheets of cardboard, plywood, masonite, or stretched fabric, painted white or covered with metal foil.
RELATIVE APERTURE – The relationship between the diameter of
the lens opening and the focal length of the lens. It is found by dividing the focal length by the diameter and is, strictly speaking, the number so found-as distinguished from the Aperture which included the prefix f .
RESIN COATED PAPER – RC Paper. Printing papers employing a
special base material treated during manufacture with a "Resin Coating" which, by limiting water absorption, allows for very rapid processing and reduces drying time.
RETICULATION – Cracking or distorting of the emulsion during
processing, usually caused by wide temperature or chemical activity difference between the solutions.
REVERSAL – (1) Process of exposing or processing a normally
negative working photographic material to obtain a positive instead of a negative image. (2) Effect in which a negative image is converted locally or entirely into a positive or vice verso under particular conditions of exposure or processing.
REVERSED NEGATIVE – Negative in which the image is reversed
left to right by either photographing the original through a right angled (reversing) prism or mirror or by stripping and laterally reversing the emulsion. The final print is a lateral inversion of the negative.
REVOLVING BACK – Technical or studio large format camera
feature which permits the film holder to be rotated in its plane so that the long dimension of the negative material is either vertical or horizontal.
RISING FRONT – Camera lens panel or frame constructed so that it
can be moved vertically to allow the lens to be raised above -or dropped below- the normal position. Used when photographing objects such as tall buildings from a near viewpoint with the camera pointing at an upward angle, while keeping the camera back vertical to ensure parallel rendering of vertical lines.
ROLL FILM – Film supplied in rolls rather than sheets, but especially
those films protected from light by paper leaders rather than those supplied in protective cartridges of metal or plastic.
S
SAFELIGHT – Illumination, used in various darkroom processed,
which is of color and intensity which will not appreciable affect the emulsions being handled. Blue sensitive emulsions can be handled in a yellow safelight and orthochromatic emulsions are generally unaffected by orange or red safelight. Image density resulting from excessive exposure to safelight or to an inappropriate safelight color, is known as safelight fog.
SCALE – In image formation, the liner ratio of image size to object
size. If this ratio is greater than one the result is magnification. In a photographic enlargement the image is the projected image and the negative is the object. When subject and image are the same size the scale is 1/1 usually indicated by s/s (same size). Because the scale is linear it must be in squares to give the area. A linear magnification of 4x is equal to an area magnification of 16x.
SENSITIVITY – In photography, the susceptibility of an emulsion to
alteration by light energy.
SEPARATION – The visual quality of any image area which makes it
visible against its background.
SHADOW AREA – Any region of a photographic image which
corresponds to an area of shade or shadow in the original subject.
SHARP – Term used to denote the distinctness of detail in
photograph or the focused image on the ground glass of a camera.
SHEET FILM – Film supplied in individual pieces; also called cut film.
SHEET FILM HOLDER – See Film Holder.
SHELF LIFE – Period of time before deterioration results in an
appreciable loss of speed or growth of fog in an unexposed, properly wrapped and stored sensitized material. Refrigerated storage increases the useful working life of most types of photo-sensitive material.
SHIFTS AND SWINGS – The various adjustments of the front and
rear standards of a view camera, provided for the purpose of facilitating framing, control of perspective, and the efficient use of the available depth of field.
SHUTTER – A device installed in front, behind, or between the
elements of a lens, or at the focal plane of the camera, to control the duration of exposure.
SHUTTER PRIORITY – A camera feature that lets you select the
desired shutter speed, and the camera sets the aperture for proper exposure. When you change the shutter speed or when the light level changes, the aperture changes accordingly.
SHUTTER RELEASE – The lever or plunger which, when pressed
allows the shutter mainspring to operate the shutter mechanism and make the exposure.
SHUTTER SPEED – (1) The duration of the interval of exposure. (2)
The marked settings on a shutter dial. The numbers represent the denominators of fractions of which 1 is the numerator.
SLOW – A term used to describe the linger exposure intervals
provided by the shutter, as "one-half second is a slow speed." Also applied to relatively insensitive emulsions, as a slow film.
SOFT – Describes an image which is not sharp; that is, one which
is blurred, diffused, or not accurately focused. Photographic emulsions, specifically printing papers, which tend to produce images of lower-than-normal contrast; for example, the paper grades 0 and 1, and some others of similar characteristics, are called soft papers.
SPLIT-IMAGE RANGEFINDER – A variety of rangefinder in which
the opposite halves of the image are displaced along a dividing line when the instrument is not properly focused. Correct distance is indicated when the image halves are adjusted to match.
SPOT METER – An exposure meter which measures reflected light
or luminance, over a field of only a degree or two.
STOP – The aperture or f/number of lens. A change in exposure,
from any cause, which doubles or halves the preceding one.
STOP BATH – A weak acid solution used immediately after
development and before fixing, to stop the action of developer and prolong the life of the fixer.
STOP DOWN – To reduce the size of the aperture of a lens.
SWING BACK – On a screen focusing camera a hinged back which
can be turned at an angle to the vertical to improve the perspective of the image and extend the depth of field covered.
SWING FRONT – Lens panel of a camera hinged about its axis so
that it can be used, in conjunction with the swing back, to control perspective and/or relocate the plane of maximum sharpness producing a similar result to an increase the depth of field.
T
TACKING IRON – A small electrically heated, thermostatically
controlled tool used to tack or attach dry-mounting tissue to the back of a print or to the mount board, so as to hold it in place while the print is being trimmed and heated in the dry-mount press.
TANK – A small, light tight container, in which film is placed for
processing.
TELEPHOTO LENS – A lens that makes a subject appear larger on
film than does a normal lens at the same camera-to-subject distance. A telephoto lens has a longer focal length and narrower field of view than a normal lens.
TENT LIGHTING – Lighting technique that involves isolating the
subject in a plain environment or "tent", so that surface reflections and lighting effects can be closely controlled.
THIN – describes the appearance of a transparency image
(usually the negative) of low overall density.
THIN NEGATIVE – A negative that is under exposed or
underdeveloped (or both). A thin negative appears less
dense than a normal negative.
TIME – One of the marked speeds on some shutters. A shutter
set on (T) time will open when the shutter release is pressed and will remain open until the release is pressed again. It is a convenient setting for exposure intervals of more than a few seconds.
TIME EXPOSURE – A comparatively long exposure made in
seconds or minutes.
TRANSLUCENT – Describes a diffusing material which will transmit
light, but not focused light. A very thin translucent
surface is used on screens for back projection and back
lighting of objects.
TRANSPARENCY – A positive photographic image on film, viewed
or projected by transmitted light (light shining through film).
TRIPOD – A three-legged stand, usually adjustable in height and
provided with a tilting and swiveling head, on which a camera can be fastened for support and stability during use.
TUNGSTEN LIHGT – Generally, the light emitted by a heated
tungsten filament such as is contained in conventional electric light bulbs. Sometimes used to refer specifically to the light of special photographic tungsten filament bulbs which are designed to burn at either 3200K or 3400K. Also often used loosely to apply to artificial light in general, as distinguished from daylight.
TTL – Through-the-lens; describes a type of exposure meter,
incorporated in the structure of a camera, which reads the
Intensity of the image light transmitted by a lens.
TYPE L FILM – Color sheet or roll film balanced for 3200K lamps and
exposure time of 1/10 to 60 seconds. L indicates that the
film is designed to show minimum reciprocity failure at the
relatively long exposure times.
TYPE S FILM – Color sheer or roll film balanced for daylight,
electronic flash or blue flash bulbs and exposure times of 1/10 second or shorter, S standing for short exposure time.
U
UNDEREXPOSURE – A condition in which too little light reaches the
film, producing a thin negative, S standing for short exposure time.
resentation TranscriptCHEMICAL PROCESS:CHEMICAL PROCESS By WILFREDO R. BERALDE
Slide2:Basically, all the images recorded on the sensitized materials by the action of light are INVISIBLE. These latent images are still temporary and can be ruined when accidentally exposed to lights.
Slide3:To make the latent image visible and permanent, chemical processing is necessary. This processing is known as the DEVELOPMENT PROCESS of the films that makes the latent image visible and permanent. The developed image is the reverse of the original objects photographed and called NEGATIVE.
Slide4:There are several factors to be considered in the development process of the sensitized materials. DENSITY is the degree of darkness of the images developed. It can either be too dark or too light, depending upon the amount of the metallic silver formed. On the other hand, CONTRAST is the difference between one tone and another, which is so apparent when the density of the image is viewed, contrast affect the tonal value of the photograph
Slide5:During the development process of the sensitized materials, the silver halide where the latent is recorded will be developed and turned to metallic silver that formed the image on the
negative. The details of the images developed will determine whether the sensitized materials are accurately processed or not.
a. CHEMICAL BASIS:a. CHEMICAL BASIS Light-sensitive materials that undergo physical and chemical changes in reaction to light provide the technological basis of all photography.
Slide7:A complex photo-technology has been created to use such changes to record images formed by light – in other words, to make photographs. Modern photo-technology includes a wide variety of materials and methods for improving the sensitivity and other qualities of light-sensitive materials, for making the images permanent, and for reproducing and modifying the images when they are produced.
b. FILM PROCESSING:b. FILM PROCESSING Behind nearly every successful photographic print is a properly exposed and correctly processed negative. The processing of any film, black and white, and color is a simple sequence which, IF FOLLOWED CORRECTLY will always lead to predictable, and consequently successful results. And yet, there is still considerable scope for varied and individual treatments.
Slide9:The fundamental approaches to processing black and white and color films are very similar. There are one or two extra stages in the process of colored films, and the timing, temperature control traditionally needed to be much more precise than for black and white. However, recent developments in the filed of color processing and printing have simplified matters considerably and it is now almost as simple to work with color materials as it always has been with black and white.
c. Black and White Film Processing:c. Black and White Film Processing There are four basic steps to produce a black and white negative from exposed film, they are: DEVELOPMENT STOP BATH FIXING WASHING AND DRYING
Development :Development The purpose of development is to convert the latent image in the exposed film to a real image. When the picture is taken, the silver halide crystals exposed to light change, but the change is invisible. Development converts these changed crystals to black silver, eventually bringing the dormant image to life. The way in which the image develops depends on the fine balance between the intensity of development (governed by developer strength and temperature) and the film.
Slide12:An amateur police photographer may ask the photo supplier of the best camera, film, and developer suitable for black and white development. The most common developer is the Universal developer whose instruction for using is shown in its container, like the mixing of the working solution and the ideal temperature for both film and printing process.
Stop Bath:Stop Bath For complete control ovr development time, many photographers use a “stop bath” after development to cut short the process abruptly. The stop bath neutralizes the developer and also helps prevent the contamination of the third bath, the fixer, helping to prolong its active life.
Fixing :Fixing Even development, the image is not actually visible. This is because the unexposed silver halides are still present in the emulsion, which now has an opaque milky appearance. The fixing baths loosens these unexposed halides and makes them soluble in water so that they can be washed away to leave the visible silver image.
Washing and Drying:Washing and Drying The final washing of the film removes any traces of unwanted halides and residual chemicals. Most photographers prefer to add a small quantity of wetting agent, at this stage to reduce drying marks on the film.
Slide16:Films are usually hung up to dry in a dust free place, sometimes using warm air to speed up the process. A weighted clip on the bottom end of the film keeps it straight during drying. Without a weight, the film will curl and this can cause problems at the printing stage.
d. Factors Affecting Development:d. Factors Affecting Development Concentration of strength of the working solution Temperature of the chemical involved in the development process Time element required Agitation of the sensitized materials during the development process.
e. Sequence of Developing Film:e. Sequence of Developing Film LOADING THE TANK. A stainless steel or plastic tank has a spiral reel where the film is being carefully rolled outward, if possible without touching each other. Winding the film on this kind of reel takes some practice. The investigator should try it out with a spoiled film in the light before making an actual winding of the film inside the darkroom. It takes time to practice and familiarize this kind of work, but a little patience will make one a good photographer someday.
Slide19:DEVELOPMENT. The temperature of the developing or working solution must be tested with the thermometer. The time of development is properly observed (if possible written and posted at the front of the photographer for him to be familiarized with) and the timer is readied but not started. When the developer is poured in at the hole of the developing tank, the clock is started as quickly as possible.
Slide20:The cap is put on the pouring hole and the tank is then turned upside down to wet the film. The tank is now brought back and slammed down sharply on the table. This is the only way to loosen the tiny bubbles that may be formed during the shaking of the tank. If these bubbles will not loosen, the portion of the film where said bubbles formed will not be affected by the developer and therefore will not be developed.
Slide21:AGITATION. The chemicals in the developer that are close to the film get used up quickly. It is necessary to mix the solution from time to time to bring fresh solution in contact. This is called agitation, but it is not done all the time as the word might suggest. It is done at even, regular intervals, usually every 30 seconds (where 5 seconds of this is reserved for tapping the top of the tank to let bubbles goes up) until the developing time ends.
Slide22:RINSING. About 10 or 15 seconds before the end of the correct time, the developer is poured off into a container (do not mix it with the unused developing solution) and the tank is filled with water (or stop bath also known as hardener) – if this is used it is allowed to act for the required time and then poured off and thrown away. The tank is rinsed once with pure water before pouring in the fixing solution and this must be done twice or thrice, then fixing solution is poured in.
Slide23:FIXING AND WASHING. The hypo is allowed to act for not more than five minutes. It is poured off and the tank can now be opened. The tank is put under faucet of running water and rinsed for five minutes.
Slide24:Hypo eliminator may be used and allowed to act for five minutes before rinsing the film thoroughly within 10 minutes. Where there is a scarcity of water, the tank is used by filling and emptying it five times while the film is still inside. The water is allowed to stand for two
minutes. Before drying, a wetting agent may be applied so that drying is faster, no heating is required in drying the negatives and avoid dust at this stage.
Slide25:DRYING. The film should be allowed to dry naturally and thoroughly in a place free from dust.
Slide26:MARKING AND FILING. Keeping track of a lot of negatives can be a problem unless some system is used. Different police departments have policies about where to store films and how to mark them. Negatives and prints are not stored as one. They are stored separately and are given an assigned numbers for easier identification.
Slide27:Single sheets of cut films are numbered with the system adopted by a particular police station. If films are cut, each group of films taken at the same time on the same case get an “identification number.” All the negatives from one group or roll are placed in one filing envelope. Some police photographers get a proof of sheet by making a contact print on an 8 x 10 enlarging paper of all the films before storing it after making a general statement for evidential purpose.
Slide28:Others opt to use the Data Card. A data card is prepared for each photograph taken. All information should be recorded to allow proper interpretation of the photograph and dispel any questions of improper techniques or processing procedures. The completed data card should be filed with negative. Certain information should be furnished on the back of each print to identify and clarify it. A data outline may be stamped on the reverse side of the print and the appropriate information entered upon completion.
Slide29:Whatever scheme applied in filing and marking, care should be exercised in writing on the reverse side of the prints so that the emulsion of the print that was developed is not damaged.
f. Enlarging and Printing:f. Enlarging and Printing Black and white prints are essentially photographs made in a darkroom, and the process has many similarities to taking a photograph in a camera and processing the film. The negative is projected unto light sensitive printing paper by an enlarger. The image is then focused, exposure is calculated, and the paper is exposed. The exposed paper, bearing a latent image, is then developed to turn the exposed silver halides in the paper emulsion to black, forming a positive image.
Slide31:Any unexposed silver halides are dissolved in a fixing bath, leaving a permanent representation of the original subject in tones of gray ranging from black through white. Because the whole darkroom is normally the camera (though special enclosed enlarger do exists) the process must be carried out in semi-darkness.
Slide32:An ENLARGER is used for this purpose. It looks like a projector whose function is to project the miniature negative image onto a larger sheet of printing paper to produce a reasonable viewable image. This is done by placing a selected (film) negative to be enlarged in the negative holder and projects it on a clean white sheet paper until the desired size and contrast is achieved. Use some measuring instrument to mark the position of the paper used because this is the very place of the printing paper.
Slide33:Under a safelight, expose the negative using the enlarger and develop it using the same working solution as in developing the film. But the time elements for enlarging and printing is quite shorter than the required time for processing film. As a common practice most of the investigators and photographers make a series of sample ranging from 90 seconds, 2 minutes, or even higher than this, then compared the results of the photographs before the final copy of enlargement is processed.
Slide34:In this process, the police photographer will use developing trays instead of developing tank.
Things Needed for Darkroom:Things Needed for Darkroom A table or bench large enough for an enlarger and trays. Plastic bucket for mixing chemicals Photographic thermometer Developing tanks and reel Plastic bottles Large plastic funnel Safelight for printing and enlarging
Slide36:Clock or interval timer Developing trays Contact printer Graduated cylinder Film clips/plastic clothespin Photographic enlarger Miscellaneous supplies Water for washing
hotographic processing is the chemical means by which photographic film and paper is treated
after photographic exposure to produce a negative or positive image. Photographic processing
transforms the latent image into a visible image, makes this permanent and renders it insensitive
to light.
All processes based upon the gelatin-silver process are similar, regardless of the film or paper's
manufacturer. Exceptional variations include instant films such as Polaroid and thermally
developed films. Kodachrome required Kodak's proprietary K-14 process. Kodachrome film
production ceased in 2009, and K-14 processing is no longer available as of December 30th,
2010. [1] Ilfochrome materials use the dye destruction process.
Contents
[hide]
1 Common processes
o 1.1 Black and white negative processing
o 1.2 Black and white reversal processing
o 1.3 Colour processing
2 Further processing
3 Processing apparatus
o 3.1 Small scale processing
o 3.2 Commercial processing
4 Environmental and safety issues
5 References
6 See also
7 External links
[edit]Common processes
A black-and-white image showing a (monochrome) photograph being developed.
All film and paper is treated in a series of chemical baths, which are closely monitored and
maintained at a specific temperature and treatment time. Developer baths are most sensitive to
deviations from the standard time and temperature of treatment; other baths are less sensitive.
[edit]Black and white negative processing
1. The film may be soaked in water to swell the gelatin layer.
2. The developer converts the latent image to metallic silver.[1]
3. A stop bath, typically a dilute solution of acetic acid or citric acid, halts the action of the
developer. A rinse with clean water may be substituted.
In modern automatic processing machines, this step is replaced by mechanical squeegee or
pinching rollers. These treatments remove much of the carried-over alkaline developer, and the
acid, when used, neutralizes the alkalinity to reduce the contamination of the fixing bath with the
developer.
The fixer makes the image permanent and light-resistant by dissolving any
remaining silver halide salts. Fixer is sometimes called hypo, a misnomer originating from
casually shortened form of the alchemist's name hyposulphite.
Neither hyposulphite, hyposulfite, nor hypo is used to mean thiosulfate in modern chemistry.[2]
Washing in clean water removes any remaining fixer. Residual fixer can corrode the
silver image, leading to discolouration, staining and fading. The washing time can be reduced
and the fixer more completely removed if a hypo clearing agent is used after the fixer.
Film may be rinsed in a dilute solution of a non-ionic wetting agent to assist uniform
drying, which eliminates drying marks caused byhard water. (In very hard water areas, a pre-
rinse in distilled water may be required - otherwise the final rinse wetting agent can cause
residual ionic calcium on the film to drop out of solution, causing spotting on the negative.)
Film is then dried in a dust-free environment, cut and placed into protective sleeves.
Once the film is processed, it is then referred to as a negative. The next step in
photographic processing is to enlarge the negative.
The negative will be placed in an enlarger and mirrored onto a sheet of photo paper.
There are many different techniques that can be used during the enlargement process. Two
examples of enlargement techniques are dodging and burning.
[edit]Black and white reversal processing
This process has three additional stages:
1. Following the stop bath, the film is bleached to remove the developed negative image.
The film then contains a latent positive image formed from unexposed and undeveloped
silver halide salts.
2. The film is fogged, either chemically or by exposure to light.
3. The remaining silver halide salts are developed in the second developer, converting them
into a positive image.
4. Finally, the film is fixed, washed, dried and cut.[3]
[edit]Colour processing
Chromogenic materials use dye couplers to form colour images. Modern colour negative film is
developed with the C-41 process and colour negative print materials with the RA-4 process.
These processes are very similar, with differences in the first chemical developer.
The C-41 and RA-4 processes consist of the following steps:
1. The colour developer develops the silver negative image, and byproducts activate the
dye couplers to form the colour dyes in each emulsion layer.
2. A rehalogenising bleach converts the developed silver image into silver halides.
3. A fixer removes the silver salts.
4. The film is washed, stabilised, dried and cut.[4]

In the RA-4 process, the bleach and fix are combined. This is optional, and reduces the number
of processing steps.[5]
Transparency films, except Kodachrome, are developed using the E-6 process, which has the
following stages:
1. A black and white developer develops the silver in each image layer.
2. Development is stopped with a rinse or a stop bath.
3. The film is fogged in the reversal step.
4. The fogged silver halides are developed and exhausted developing agents couple with
the dye couplers in each layer.
5. The film is bleached, fixed, stabilised and dried as described above.[4]
In some old processes, the film emulsion was hardened during the process, typically before the
bleach. Such a hardening bath often used aldehydes, such as formaldehyde and glutaraldehyde.
In modern processing, these hardening steps are unnecessary because the film emulsion is
sufficiently hardened to withstand the processing chemicals.
[edit]Further processing
See also: photographic print toning
Black and white emulsions both negative and positive, may be further processed. The image
silver may be reacted with elements such asselenium or sulphur to increase image permanence
and for aesthetic reasons. This process is known as toning.
In selenium toning, the image silver is changed to silver selenide; in sepia toning, the image is
converted to silver sulphide. These chemicals are more resistant to atmospheric oxidising
agents than silver.
If colour negative film is processed in conventional black and white developer, and fixed and then
bleached with a bath containing hydrochloric acid and potassium dichromate solution, the
resultant film, once exposed to light, can be redeveloped in colour developer to produce an
unusual pastel colour effect.[citation needed]
[edit]Processing apparatus
Before processing, the film must be removed from the camera and from its cassette, spool or
holder in a light-proof room or container.
[edit]Small scale processing
A cut-away illustration of a typical light-trap tank used in small scale developing.
In amateur processing, the film is removed from the camera and wound onto a reel in complete
darkness (usually inside a darkroom with the safelight turned off or a lightproof bag with arm
holes). The reel holds the film in a spiral shape, with space between each successive loop so the
chemicals may flow freely across the film's surfaces. The reel is placed in a specially designed
light-proof tank (called daylight processing tank or a light-trap tank) where it is retained until final
washing is complete.
Sheet films can be processed in trays, in hangers (which are used in deep tanks), or rotary
processing drums. Each sheet can be developed individually for special requirements. Stand
development, long development in dilute developer without agitation, is occasionally used.
[edit]Commercial processing
In commercial processing, the film is removed automatically or by an operator handling the film in
a light proof bag from which it is fed into the processing machine. The processing machinery is
generally run on a continuous basis with films spliced together in a continuous line. All the
processing steps are carried out within a single processing machine with automatically controlled
time, temperature and solution replenishment rate. The film or prints emerge washed and dry and
ready to be cut by hand. Some modern machines also cut films and prints automatically,
sometimes resulting in negatives cut across the middle of the frame where the space between
frames is very thin or the frame edge is indistinct, as in an image taken in low light.
[edit]Environmental and safety issues
This section does not cite any references or sources.Please help improve this article by adding citations to reliable sources. Unsourced material may be challenged andremoved. (January 2009)
Many photographic solutions have high chemical and biological oxygen demand (COD and BOD).
These chemical wastes are often treated with ozone, peroxide or aeration to reduce the COD in
commercial laboratories.
Exhausted fixer and to some extent rinse water contain silver thiosulfate complex ions. They are
far less toxic than free silver ion, and they become silver sulfide sludge in the sewer pipes or
treatment plant. However, the maximum silver concentration in discharge is very often tightly
regulated. Silver is also a somewhat precious resource. Therefore, in most large scale processing
establishments, exhausted fixer is collected for silver recovery and disposal.
Many photographic chemicals use non-biodegradable compounds, such
as EDTA, DTPA, NTA and borate. EDTA, DTPA, and NTA are very often used as chelating
agents in all processing solutions, particularly in developers and washing aid solutions. EDTA and
other polyamine polycarboxylic acids are used as iron ligands in color bleach solutions. These are
relatively nontoxic, and in particular EDTA is approved as a food additive. However, due to poor
biodegradability, these chelating agents are found in alarmingly high concentrations in some
water sources from which municipal tap water is taken[citation needed]. Water containing these
chelating agents can leach metal from water treatment equipment as well as pipes. This is
becoming an issue in Europe and some parts of the world[citation needed].
Another non-biodegradable compound in common use is surfactant. A common wetting agent for
even drying of processed film uses Union Carbide/Dow Triton X-100 or octylphenol ethoxylate.
This surfactant is also found to have estrogenic effect and possibly other harms to organisms
including mammals[citation needed].
Development of more biodegradable alternatives to the EDTA and other bleaching agent
constituents were sought by major manufacturers, until the industry became less profitable when
the digital era began.
In most amateur darkrooms, a popular bleach is potassium ferricyanide. This compound
decomposes in the waste water stream to liberatecyanide gas.[citation needed] Other popular bleach
solutions use potassium dichromate (a hexavalent chromium) or permanganate. Both ferricyanide
and dichromate are tightly regulated for sewer disposal from commercial premises in some areas.
Borates, such as borax (sodium tetraborate), boric acid and sodium metaborate, are toxic to
plants, even at a concentration of 100 ppm. Many film developers and fixers contain 1 to 20 g/L of
these compounds at working strength. Most non-hardening fixers from major manufacturers are
now borate-free, but many film developers still use borate as the buffering agent. Also, some, but
not all, alkaline fixer formulae and products contain a large amount of borate. New products

should phase out borates, because for most photographic purposes, except in acid hardening
fixers, borates can be substituted with a suitable biodegradable compound.
Developing agents are commonly hydroxylated benzene compounds or aminated benzene
compounds, and they are harmful to humans and experimental animals. Some are mutagens.
They also have a large chemical oxygen demand (COD). Ascorbic acid and its isomers, and other
similar sugar derived reductone reducing agents are a viable substitute for many developing
agents. Developers using these compounds were actively patented in the US, Europe and Japan,
until 1990s but the number of such patents is very low since late-1990s, when the digital era
began.
[edit]References
1. ^ Wall, 1890, p. 30–63
2. ^ Wall, 1890, p. 88–89
3. ^ Photographic Almanac, 1956, p. 149–155
4. ^ a b Langford, Michael (2000). Basic Photography. Oxford: Focal Press. pp. 210; 215–216. ISBN 0
240 51592 7.
5. ^ Photographic Almanac, 1956, p. 429–423
Wall, E.J. (1890). Dictionary of Photography. London: Hassel, Watson and Viney Ltd.
The British Journal (1956). Photographic Almanac. London: Henry Greenwood and Co Ltd.
[edit]See also
List of photographic processes
Fogging
Darkroom
Cross processing
[edit]External links
Processing manuals
The Massive Dev Chart - film development times
Stand Development Site
Links film developing recipes to photos on Flickr
Ilford guide to processing black &
MARYLAND ACCIDENT LAWYER ANALYSIS OF MASON V. LYNCH, 388 MD. 37, 878 A.2D 588 (2005)
Background
There has long been argument among personal injury attorneys in Maryland and around
the country as to the circumstances under which photographs of the vehicles involved in a
car accident may be admitted at trial. From the perspective of the Maryland attorney
representing personal injury victims, the answer is that it depends. Certainly, in most car
accident cases our lawyers handle, the property damage is such that we are seeking to
admit the damages to the vehicles to underscore the violence of the accident so that the jury
might appreciate why the injuries were what they were and, even more importantly, the
trauma of such a violent hit is a component of Plaintiff's claim for pain and suffering. But our
attorneys also handle cases where the property damage is less significant if we believe the
Plaintiff has suffered a real injury.
In Davis v. Maute, 770 A.2d 36 (2001), the Delaware Supreme Court ruled in a landmark
case on this issue that a parties in car accident personal injury cases may not contend there
is a correlation between the damage to the vehicles in the car accident and the extent the
Plaintiff's injuries caused by the accident unless expert testimony is proffered supporting the
correlation. Accordingly, a Delaware auto accident lawyer seeking to introduce photographs
may not rely on photographs of the cars involved in an auto accident to indirectly accomplish
the same purpose. The Davis court decided that in Delaware "absent such expert testimony,
any inference by the jury that minimal damage to the
plaintiffs car translates into minimal personal injuries to the
plaintiff would necessarily amount to unguided speculation."
In Mason v. Lynch, the Maryland Court of Appeals weighed
in on this issue.
Mason v. Lynch, 388 Md. 37, 878 A.2d 588 (2005)
In this case, the Plaintiff stopped her car for traffic on the
Woodrow Wilson bridge inPrince George's County and was
hit in the rear, a classic rear-end accident. Plaintiff contended
that she had a closed head injury, cervical strain and a
temporomandibular joint disorder. She sought medical
expenses, lost wages, and compensation for her pain and suffering. The trial court allowed
admission of the photos of plaintiff's vehicle and let the defendant offer the "common sense"
argument: how could these injuries have occurred given this amount of damage to the
vehicles? The jury then awarded no money to the Plaintiff.
A split Maryland Court of Appeals affirmed that the trial judge's has discretion to allow
into evidence photographs that allegedly illustrate the inconsistencies between the Plaintiff's
injuries in the car accident and the property damage sustained by the vehicles involved even
in the absence of expert testimony that establishes a correlation between property damage
as illustrated in a photograph and the Plaintiff's injuries. Writing on behalf of the majority,
retired Judge John C. Eldridge wrote that "It is ordinarily within the discretion of the trial court
to weigh the degree of relevance against any unfair prejudice which might arise from the
admission of the photographs.... [accordingly], the trial court's ruling on admissibility will not
be overturned on appeal absent a clear abuse of discretion." In so holding, the court
considered and then rejected the Davis v. Maute holding that required expert testimony must
first establish a causal link between the damages to the vehicles and the injuries to one of
the drivers in order for photographs of the accident to become admissible. The dissenting
opinion written by Judge Irma S. Raker pointed to the scientific literature that shows there is
no positive correlation between property damage and extend of injury, arguing that "[t]here is
no way that, based merely on the extent of property damage, a fact finder could assess the
injury of a party and particularly, whether a party had a preexisting injury that was
exacerbated by the impact. A review of the scientific literature expresses the view that there
can be a strong inverse correlation between injury levels and measurable vehicle crush,
especially in low speed, rear-impact collisions."
Take Home Message for Maryland Personal Injury Attorneys and Victims
Our lawyers have received a good deal of local and national exposure for getting
exceptional verdicts in personal injury cases in Maryland where the Plaintiff significant
personal injury in the absence of extensive (or even any) property damage. In every case
where there is not graphic property damage, Maryland lawyer defending
auto accident cases have vigorously attacked the credibility of the
plaintiff's personal injury claims of soft-tissue injury with pictures of
property damage. Our cases were no exception. In spite of the
our motions in limine to exclude such photographs that argued logic
similar to Davis v. Maute, the defense attorneys were permitted to admit
the photographs.
Typically, the defense attorneys display large blow-up photographs
of the Plaintiff's car and argue that the lack of visible damage means
that the plaintiff could not have been seriously hurt in the accident. (And have their client
testify that the impact was extremely minor) If there is an objective finding, such as
a herniated disc, the defense attorneys argued that the condition was preexisting or that the
plaintiff's doctors were not properly reading the diagnostic findings.
Our attorneys' response to this defense lawyer's tactic is always the same. First, we warn
the jury in opening statements that they can expect to see the photographs blown up and
pointed to time and time again. This prepares the jury for the evidence. More importantly, we
do not run from the photographs. Our lawyers admit that there was minimal property
damage. But instead of pointing endlessly to the literature that demonstrates a lack of a
correlation, literature that bores a jury to tears and, while well-founded is counterintuitive to
many jurors, we point out sometimes extraordinary injuries sometimes happen in ordinary
accidents. While such an occurrence is rare, our lawyers correctly explain it is often the rare
cases that make it to the jury (as any first year law student knows from the remarkable cases
that find their way into their textbooks). From there, assuming the plaintiff is credible and has
quality medical evidence to support his/her case, there is an excellent chance that a
Maryland jury will award fair compensation for Plaintiff's injuries.
Personal injury attorneys in Maryland should also remember that Mason does not stand
for the proposition that pictures are automatically admitted into evidence under Maryland
Rule 5-701. Rather, it is up to the judge's discretion in each individual case to determine
whether the pictures would be of assistance to the trier of fact. Accordingly, you should still
file a motion in limine to exclude photographs to the vehicles when appropriate.
Maryland Law Update (more Maryland cases of signifcance to personal injury
lawyers)
o Romero v. Brenes (2009 Maryland CSA opinion that touches on Myers v.
Brightthat includes sample deposition testmony)
Maryland Personal Injury Attorney Help Center (help center for accident lawyers)
Our Maryland Appellate Practice
DMISSIBILITY OF DIGITAL IMAGES
Cases
Few cases directly address the admissibility of digital photographs in courts of law. In fact, the author found only one court in the U.S. federal and state systems that tackled the issue head-on. The many courts that have yet to address the subject largely must extrapolate from opinions pertaining to other issues concerning digital imaging.
[ILLUSTRATION OMITTED]
The Georgia Supreme Court case of Almond v. State dealt directly with the admissibility of digital photographs. (14) In that case, a jury found Mastro Almond guilty of malice murder and the sale of cocaine. On appeal, Almond raised the issue of digital images as evidence at his trial. The court stated that because the record showed "that the pictures were introduced only after the prosecution properly authenticated them as fair and truthful representations of what they purported to depict," they were properly admissible. (15) The Georgia Supreme Court did not provide any other guidelines for determining the admissibility of digital photographs. In fact, the court went on to say that "[W]e are aware of no authority, and appellant cites none, for the
proposition that the procedure for admitting pictures should be any different when they were taken by a digital camera." (16)
Although no other court has dealt directly with the admissibility of digital photographs, opinions exist that can offer insight as to where many will stand on the issue. For example, in People v. Rodriquez, the New York Supreme Court, Appellate Division, stated that the trial "court properly exercised its discretion in admitting bank surveillance videotapes, and photographs made from those tapes, withoutexpert testimony about the digitizing process used at the FBI laboratory to slow the tapes down and make still photos from them, since a bank employee responsible for making the original tapes at the bank testified that he compared the original and slowed-down tapes and that what was represented therein was identical except for speed." (17) The People v. Rodriquez holding indicates that the court seeks to ensure that an individual with first-hand knowledge of the photographed scene attests to the picture's accuracy. Again, this demonstrates that for admissibility, photographs must be relevant and authenticated.
The Washington Court of Appeals case of State v. Hayden represents an additional example that provides insight into how another state may rule on the admissibility of digital photographs. (18) The case mainly focused on the admissibility of digital imaging used to enhance latent fingerprints and palm prints. The court held that "[b]ecause there does not appear to be a significant dispute among qualified experts as to the validity of enhanced digital imaging performed by qualified experts using appropriate software, we conclude that the process is generally accepted in the relevant scientific community." (19)
Although State v. Hayden dealt with the admissibility of digital enhancement technology under the Frye Test--used to determine the admissibility of novel scientific evidence--the court made four important points that support the admissibility of digital photographs in general: 1) digital photography is not a novel process; (20) 2) the high cost may have contributed to the delay of digital image enhancement in forensic science; (21) 3) the court opined that digital photographs have an advantage over analog film photographs because they "can capture approximately 16 million different colors and can differentiate between 256 shades of gray"; (22) and 4) like film photographs, digital images work with light sensitivity, except that the "computer uses a chip and a hard drive in place of the camera's film." (23) Based upon the dicta provided, Washington courts seemingly would rule on the side of admissibility concerning digital photographs.
Recently, the Court of Appeals in California addressed the use of digital imaging to enhance a shoe print in a criminal case. (24) In People v. Perez, the court of appeals accepted the trial court's statement that a particular brand of software "is not a scientific technique" but represents "just an easier way of developing film, developing a picture. And it does it by means of digital imaging of pixels. Digital imaging ... is accepted scientifically and has been for decades." (25) After reading People v. Perez and in light of the previous cases mentioned, courts in California seemingly would consider digital photographs admissible.
Legislation
Alternatively, a legislator sponsored Wisconsin Assembly Bill 584, which "prohibits the introduction of a photograph ... of a person, place, document ... or event to prove the content ... if that photograph ... is created or stored by data in the form of numerical digits." (26) The legislator apparently "became upset when high school students manipulated a digital photograph by putting heads on bodies of the opposite sex." (27) If this bill becomes law, digital photographs will not be admissible in Wisconsin courts.
Legislators in Hawaii also have concern about the admissibility of digital photographs. However, rather than taking the extreme position of seeking a ban in courts, the legislature directed the Hawaii Supreme Court to establish written procedures governing police use of digital photography in traffic accident reconstructions. The directions to the Hawaii Supreme Court are contained in Hawaii House Bill 1309, which states, "[a]lthough current rules do not preclude the admission of
digital photographs as evidentiary material, such admissibility is contingent upon the basic data and collection technique meeting a threshold requirement of reliability that has not yet been established by the Hawaii Supreme Court's Standing Committee on the Rules of Evidence." (28)
Legal Commentary
Many individuals in the legal community remain largely unreceptive to allowing the admission of digital photographs under the current rules of evidence. One author stated that "[a]lthough photographs may be manipulated, the potential for making subtle but significant alterations to digital images gives cause for concern that digital images may be unfit for use as evidence in a court of law" (29) and proposed amending the current evidentiary system specifically to deal with digital imaging.
In another article voicing concern over the admissibility of digital photographs under current evidentiary systems, the authors stated, "As noted, current principles of authentication have developed partly in response to certain assumptions about the inherent limitations of traditional media technologies. The degree to which these assumptions are appropriate in the context of today's highly sophisticated multimedia tools is an open question posing challenges for advocates, judges, experts, and legislative bodies alike." (30) And, another author noted that "[w]hile advances in technology are generally viewed as positive within society as a whole, the potential for incredible abuse associated with electronic photography is, or should be, troubling to the legal profession in particular." (31)
A final author nicely summed up such concerns among those in the legal community by saying, "As the conventional photograph goes the way of the horse-drawn carriage and the vinyl phonograph record, courts and legislatures will have to establish procedures to assure the accuracy and integrity of visual evidence admitted into legal proceedings. If existing doctrines cannot rise to the task, new doctrines will have to develop." (32)
[ILLUSTRATION OMITTED]
As evidenced by these statements, not everyone in the legal community agrees with any court decision admitting digital photographs under the current Rules of Evidence. At its October 18, 2002, meeting in Seattle, Washington, the Advisory Committee on the Federal Rules of Evidence considered the concerns of commentators who argue that digital photographs should not be admitted under current evidentiary rules. The committee held a preliminary discussion on whether to amend Rule 901, the authentication requirement, or if a new rule proved necessary to deal with digital photographs. Ultimately, the committee members were skeptical of the necessity of a new rule and felt that Rule 901 "was flexible enough to allow the judge to exercise discretion to assure that digital photographs are authentic and have not been altered." (33) However, the committee did direct its reporter to "prepare a background memorandum on the use of digital photographs as evidence" so that it could consider changes to the rules in the fu-ture due to its "interest in assur-ing that the rules are updated when necessary to accommodate technological changes." (34)
As for the requirements of the Best Evidence Rule, a logical reading indicates that digital photographs are admissible under that rule. Generally, it requires the original to prove the content of a writing, recording, or photograph. (35) Under the Best Evidence Rule, "[i]f data are stored in a computer or similar device, any printout or other output readable by sight, shown to reflect the data accurately, is an 'original.'" (36) Therefore, a digital image downloaded to a computer and subsequently printed would seem to qualify. (37)
RECOMMENDATIONS
At a minimum, agencies should establish standard operating procedures that focus on two goals that will ensure the admissibility of their digital photographs in court: 1) preserve the original and
2) follow a reliable process demonstrating the integrity of the image. Ideally, departments will concentrate on "chain of custody, image security, image enhancement, and release and availability of digital images." (38)
When attempting to preserve the original, unmanipulated image, agencies should store it on a compact disc that can be written to only once and then is only readable (i.e., a CDR, rather than aCD-RW). This ensures that no one can remove or alter the data without copying the original. After capturing an image, agencies should immediately transfer it to a CD-R and label the disc with the date, time, and place the picture was taken; the individual who captured the image; and other important information associated with the photo.
Additionally, agencies should preserve the digital image in its original file format, (39) rather than compressing it for storage. This allows the camera to capture and store the most information possible. When departments must enhance a picture, they should create a new image file, saving it separately and not writing over the original.
When establishing reliable procedures that demonstrate the integrity of images from creation to admission into evidence, agencies must limit access to the files. As one commentator stated, "[i]mage handling procedures should be standardized and access to digital images should be strictly controlled." (40) The process used "should be able to demonstrate: who took the picture and when, where and how the image was stored, who had access to the image from the time it was taken through the time it is introduced in court, and any details on whether or not the image has been altered and how." (41)
In this regard, reliable procedures will help prevent challenges to admissibility by defense counsel. Also, they will allow agencies to track who had access to the photographs and what, if anything, was done with them. Of course, any reliable procedures must begin with preserving the original.
Also worthy of note, some law enforcement agencies use commercial photo labs for developing and processing film. Following such a procedure opens up possible challenges when departments seek to admit these pictures in court. (42) In this regard, digital images prove superior to film-based photographs because no one outside the department handles them.
CONCLUSION
Digital photographs serve as powerful, efficient tools for law enforcement. The ability to take a picture and instantly view and distribute it helps officials in their efforts to serve and protect their communities. Agencies should not become hindered by those in the legal system reluctant to stay in step with advances in technology. As one commentator stated, "Fear about manipulation of digital images is exaggerated, perhaps because of the perceived novelty of the technology. We often fear what is or seems new. Certainly, this fear has made many forget a secret of analogue photography [traditional film-based photographs], namely that conventional photographs may be manipulated to alter reality and at worst to fabricate false evidence." (43)
The trend in case law points to the admissibility of digital photographs as evidence, although many in the legal community rightfully suggest that digital photographs are subject to abuses. To alleviate those fears, law enforcement agencies should attempt to establish standard operating procedures that, at least, include the preservation of and accountability for the original image from creation to admission into evidence. Like so much in law enforcement, the admissibility of digital photographs will depend on the veracity and integrity of the authenticating official.
Ultimately, to help prevent the abuse of digital photographs, judges and attorneys on both sides of the courtroom must become aware of the potential abuses and familiar with the associated technology. As a result, the underlying fears will dissipate, and, in those rare cases where a dishonest person may falsely alter an image, the judicial system will recognize and effectively
address the problem.
Endnotes
(1) Judge Victor E. Bianchini and Harvey Bass, Perspective, A Paradigm for the Authentication of Photographic Evidence in the Digital Age, 20 T. Jefferson L. Rev. 303, 306 (1998).
(2) Id. at 303, 308.
(3) Id.
(4) "Suggested Procedures for Preservation of Digital Crime Scene Photographs"; retrieved from http://www.policecentral.com/wp-crimescene.htm.
(5) Supra note 1 at 303, 309.
(6) See, e.g., Federal Rules of Evidence Rule 401, Rule 402, and Rule 901; see also M. L. Cross,Annotation, Authentication or Verification of Photograph as Basis for Introduction in Evidence, 9 A.L.R. 2d 899.
(7) See, e.g., Federal Rules of Evidence Rule 1001 and Rule 1002.
(8) Supra note 1 at 303, 311-312 ("However, modern technology has tossed another monkey wrench into the evidentiary gearbox. Traditional emulsive photography always had a traceable origin to rely upon. The courts or opposing counsel could always demand, 'Show me the negative.' However, it is now possible to create a photograph digitally without a negative and no traceable parentage.").
(9) Wesley M. Baden, "Digital Photographs as Evidence in Utah Courts"; retrieved from http://www.utahbarjournal.com/html/march_2004_2.html.
(10) Id.
(11) Christina Shaw, "Admissibility of Digital Photographic Evidence: Should It Be Any Different Than Traditional Photography," American Prosecutors Research Institute 15, no. 10 (2002); retrieved from http://www.ndaa-apri.org/publications/newsletters/update_volume_15_number10_2002.html.
(12) Jill Witkowski, Can Juries Really Believe What They See? New Foundational Requirements for the Authentication of Digital Images, 10 Wash. U.J.L. & POL'Y 267, 270 (2002); see also William W.Camp, Practical Uses of Digital Photography in Litigation, 2 Ann. 2000 ATLA-CLE 1463 (2000). ("Image quality in digital photography commonly refers to the amount of compression, if any, that is used to store the electronic digital image.")
(13) Supra note 12 (Witkowski).
(14) 274 Ga. 348, 553 S.E. 2d 803 (2001).
(15) 274 Ga. 348, 349, 553 S.E. 2d 803, 805 (2001).
(16) Id. (citing Ray v. State, 266 Ga. 896, 897(1), 471 S.E. 2d 887 (1996) (videotapes admissible with the same limitations and on same grounds as photographs)).
(17) 264 A.D. 2d 690, 691, 698 N.Y.S. 2d 1 (1st Dept., 1999).
(18) 90 Wash. App. 100, 950 P.2d 1024 (Wash. Ct. App. 1998).
(19) 90 Wash. App. 100, 109, 950 P.2d 1024, 1028 (Wash. Ct. App. 1998).
(20) 90 Wash. App. 100, 106, 950 P.2d 1024, 1027 (Wash. Ct. App. 1998).
(21) Id.
(22) 90 Wash. App. 100, 108, 950 P.2d 1024, 1028 (Wash. Ct. App. 1998), but see Michael Cherry, Informal Opinion, 27-JUL Champion 42 (July 2003) ("The Iowa International Association for Identification (IAI) Web site highlights State v. Hayden, 950 P.2d 1024 (Wash. App. 1998), where the Washington Court of Appeals noted experts' claims that digital photographs are superior to regular film photographs because digital photographs can pick up and differentiate between many more colors and shades of gray than film photographs. Unfortunately this is not true, forensic quality film offers at least as many colors and more shades of gray than digital images.").
(23) 90 Wash. App. 100, 108, 950 P.2d 1024, 1028 (Wash. Ct. App. 1998).
(24) 2003 WL 22683442 (Cal. Ct. App. 2003) (not an officially published opinion).
(25) Id. at 4.
(26) 2003 WI A.B. 584; and supra note 9.
(27) Supra note 9.
(28) Hawaii House Bill 1309; and supra note 9.
(29) Supra note 12 (Witkowski) at 267, 273.
(30) William Sloan Coats and Gabriel Ramsey, Fair, Accurate, and True? Authenticating Evidence in the Age of Digital Manipulation, 11 No. 1 Prac. Litigator 31, 32 (2000).
(31) Christine A. Guilshan, A Picture Is Worth a Thousand Lies: Electronic Imaging and the Future of the Admissibility of Photographs into Evidence, 18 Rutgers Computer & Tech L.J. 365, 373-374 (1992).
(32) Roderick T. McCarvel, "You Won't Believe Your Eyes: Digital Photography as Legal Evidence"; retrieved from http://www.seanet.com/~rod/digiphot.html.
(33) Advisory Committee on Evidence Rules, Minutes of the Meeting of October 18, 2002, 11; retrieved from http://www.uscourts.gov/rules/Minutes/1002EVMin.pdf.
(34) Id.
(35) See, e.g., Federal Rules of Evidence Rule 1002.
(36) See, e.g., Federal Rules of Evidence Rule 1001(3).
(37) Supra note 12 (Camp) ("Arguably, a photograph taken by a digital camera of a particular event ... is an 'original' photograph as defined by Federal Rules of Evidence 1001(3) ..."); but see Roderick T. McCarvel, "You Won't Believe Your Eyes: Digital Photography as Legal Evidence," retrieved from http://www.seanet.com/~rod/digiphot.html ("Worse yet is any incarnation of the best evidence rule, which follows the Federal Rules of Evidence in defining a printout as an 'original' for purposes of the rule.").

(38) Steven B.Staggs, "The Admissibility of Digital Photographs in Court"; retrieved from http://www.crime-scene-investigator.net/admissibilityofdigital.html.
(39) Id.
(40) Supra note 11.
Photographs in Evidence.J.C.M.
1. It is, of course, well settled now that photographs, when properly verified, are admissible in evidence for a variety of purposes. As stated by the court in State v. Miller, 43 Oregon 325, "Generally, they may be used to identify persons, places, and things; to exhibit particular locations or objects where it is important that the jury should have a clear idea thereof, and the situation may thus be better indicated than by testimony of witnesses, or where they will conduce to a better or clearer understanding of such testimony. They may also be employed to detect forgeries, and to prove documents where the original cannot be readily produced."
2. Photographs are also admissible for the purpose of proving or disproving a resemblance between persons where the question of such resemblance is pertinent to the issues involved in a case. One of the purposes for which they are frequently used is to illustrate and make clearer the testimony of handwriting experts. They are also used frequently to show the scenes of accidents and tragedies in order to give juries a better understanding of the appearance of localities than they would be able to get from the unaided testimony of the eyewitnesses. When used for the last purpose, a photograph is a convenient and economical substitute for a view by the jury of the locus in quo.
3. That the usefulness of photographs as evidence is not confined to the purposes we have enumerated is, however, abundantly shown by the reports. The brief summary which we give below of cases in which photographs were admitted, and of cases in which they were offered but excluded, affords striking evidence of the ingenuity and resourcefulness of our trial lawyers, and of their disposition to overlook nothing that would tend to strengthen their cases.
4. In Com. v. Morgan, 159 Mass. 375, it was held proper to admit a photograph for the purpose of showing that when it was taken the defendant wore side whiskers, and thus of contradicting witnesses who had testified to the contrary.
5. In Com. v. Fielding, 184 Mass. 484, where the defendant was charged with having burned an insured building, with intent to defraud the
insurer, it was held that photographs were admissible under the following circumstances: " At the trial, photographs representing the building that was burned, after having been properly verified, were put in evidence by the Commonwealth. Two of them also included a dwelling house owned and occupied by the defendant, that had been partially destroyed by fire some time previous to the burning of the building which was the subject of the indictment. They also showed two dwelling houses adjoining the premises, from which witnesses at the trial testified that they had observed certain acts of the defendant at or about the time of the fire. The location of these houses in reference to the burnt building became important, as showing the opportunity for observation of the witnesses who had described the movements and conduct of the defendant, and the photographs would materially aid the jury in understanding the case."
6. In a prosecution for murder, it was held that a photograph of the deceased was admissible for the purpose of showing the nature and location of the wounds inflicted by the murdered. (Franklin v. State, 69 Ga. 36.) And in Smith v. Territory, (Okla. 1902) 69 Pac. Rep. 805, it was held that a similar photograph was admissible, though it was taken after the body of the deceased had been removed from the scene of the homicide to the residence of a relative. In State v. Miller, 43 Oregon 325, however, it was held erroneous to admit a photograph which did not accurately reproduce the appearance of the wounds, and which presented a gruesome spectacle of a disfigured and mangled corpse, very well calculated to arouse indignation in the jury.
7. It is true not only in criminal prosecutions, but also in civil actions for personal injuries, that a photograph is inadmissible when it is neither necessary nor instructive, and is offered merely for the purpose of inflaming the sympathies of the jury. (Cirello v. Metropolitan Exp. Co., 88 N.Y. Supp. 932.) For instance, in an action by a husband for personal injuries sustained by his wife, where the damages recoverable were limited to the husband's loss of his wife's services and society, and to expenses for nursing and medical attendance, it was held erroneous to admit photographs which showed the injured member in various aspects. as they were calculated to divert the minds of the jury from the legitimate elements of recovery to thoughts of the mental and physical suffering which the wife had endured. (Selleck v. Janesville, 104 Wis. 570.)
8. In Guhl v. Whitcomb, 109 Wis. 69, which was an action for personal injuries sustained by a nineteen-year-old girl, the court scathingly rebuked the trial court for permitting the introduction of "photographs
showing rear views of the plaintiff's person, nude from below the shoulder to mid-thigh." The reason for the rebuke was, of course, that if the condition of the plaintiff's private parts was material to any of the issues involved in the trial, it should have been made the subject of expert testimony, after a private examination made out of court by experts.
9. It has been held several times that a photograph of the scene of a tragedy, taken after the occurrence thereof, made and offered in good faith, is not rendered inadmissible by the fact that it contains human figures to indicate the respective positions of the principals, provided its accuracy is proved. (Straw v. State, 83 Ga. 92; State v. O'Reilly, 126 Mo. 597. See, also, State v. Kelley, 46 S. Car. 55.) Indeed, it was held in People v. Jackson, 111 N.Y. 362, that such a photograph was admissible, though "the arrangement was not exact " but was mere "matter of description and served to indicate in a general way the impression left on the mind of the witness." It has been held, on the other hand, that the photographic reproduction of a tableau, planned to heighten the dramatic effect of the testimony of a witness in a murder trial, is inadmissible. In deciding that the admission of photographs of this nature was reversible error, as being injurious to the defendant, the court said, in Fore v. State, 75 Miss. 727: "The photographs, and all the evidence touching them, should have been excluded. They were not simply reproductions of the scene of homicide. They were photographic representations of tableaux vivants carefully arranged by the chief witness of the State, whereby his version of the tragical occurrence should be brought vividly before the mind's eye of the jury, and be impressed upon the jury as the view of the actual occurrence, and not as the mere statement of the facts of that occurrence as detailed by the witness. Their effect, if not their purpose, was, by photographic processes, to strengthen and bring out in striking and captivating fashion the version of the difficulty as given the jury in this witness's evidence." And in an action for personal injuries, where the defendant offered in evidence certain photographs of the scene of the accident, the appellate court, in holding that they were properly excluded by the trial court, said: " To be admissible, photographs should simply show conditions existing at the time in question. But photographs taken to show more than this, with men in various assumed postures, and things in various assumed situations, in order to illustrate the claims and contentions of the parties, should not be admitted. An examination of the excluded photographs shows that they fall within the latter class. They would serve merely to
illustrate certain theories of the defendant as to how the accident happened." (Babb v. Oxford Paper Co., 99 Me. 298.)
10.Not the least interesting of the cases are those which relate to the use of photographs to prove the physical appearance and condition of human beings. In a prosecution against the secretary of a benevolent institution for injuring by neglect the health of a child who was an inmate of the institution, it was held admissible to introduce photographs of the child taken before he went to the institution and two weeks after he left it. (Cowley v. People, 83 N. Y. 464.) On the trial of an indictment for murder, where the plea was self-defense, a photograph of the deceased was admitted for the purpose of showing his physical characteristics. In holding that the evidence was admissible, the appellate court said: "Where self-defense is the plea, the physical characteristics of the slain are, obviously, a proper matter of proof. Whether he was a man of a large and powerful physique or an athlete, or puny and feeble or inferior in size and strength, it was a material fact to strengthen or rebut, according to the nature of the evidence, the claim of the defendant that he believed he was in great danger of bodily harm when he was assailed." (People v. Webster, 139 N. Y. 73.) And in Com. v. Keller, 191 Pa. St. 122, it was held that a full-length photograph of the deceased was admissible for the purpose of rebutting testimony that the prisoner was a smaller man than the deceased, the witness who identified the photograph and testified to its accuracy being represented in it standing by the side of the deceased. In an action on an insurance policy, where it appeared that the insured died suddenly about ten days after making her application for insurance, it was held competent to introduce, for the purpose of showing her healthy appearance, a photograph of her which was verified as accurately representing her appearance at the time of the application. (Schaible v. Washington L. Ins. Co., 9 Phila. (Pa.) 136.) In Brown v. Metropolitan L. Ins. Co., 65 Mich. 307, it was held, on the other hand, that a photograph of the insured was not admissible for the purpose of showing her "healthy appearance." It may be that the decision upholding the admissibility of the photograph was correct, as the effect of the evidence was merely to show the healthy appearance of a person at a definite time. It would seem, however, that the use permitted in Taylor, etc., R. Co. v. Weaver, 88 Tex. 642, was unjustifiable. In that case, which was an action for negligently causing the death of a child seven years old, a photograph showing his physical development at the age of five was admitted, as tending to show the probabilities of future growth and further development It is still harder to understand the reasons which actuated the court in Pritchard v. Austin, 69 N. H. 367,
where, in an action to set aside a will because of undue influence exercised on the testator by his wife, photographs of both were admitted, as tending to show the "character, vigor, temperament, and disposition" of each. Possibly, though, in that case, the court, on inspection and comparison of the photographs, concluded that they told a story graphically that mere words could express but feebly.
J.C.M.
Related Documents


