Euro X The

Welcome message from author
This document is posted to help you gain knowledge. Please leave a comment to let me know what you think about it! Share it to your friends and learn new things together.
Transcript
Euro XThe
EuroX.QXD 17/5/06 3:53 pm Page 1
GBE
UR
OX
GBE
UR
OX
About your
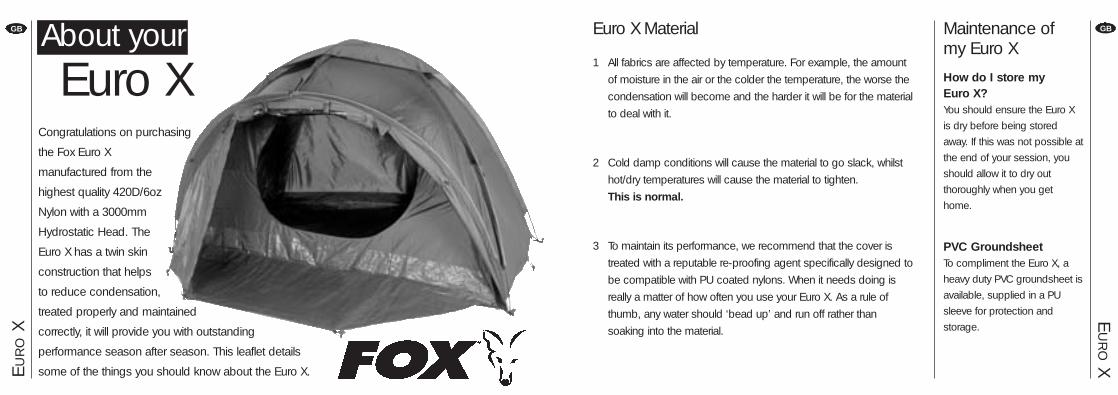
Congratulations on purchasing
the Fox Euro X
manufactured from the
highest quality 420D/6oz
Nylon with a 3000mm
Hydrostatic Head. The
Euro X has a twin skin
construction that helps
to reduce condensation,
treated properly and maintained
correctly, it will provide you with outstanding
performance season after season. This leaflet details
some of the things you should know about the Euro X.
Euro X Material
1 All fabrics are affected by temperature. For example, the amount
of moisture in the air or the colder the temperature, the worse the
condensation will become and the harder it will be for the material
to deal with it.
2 Cold damp conditions will cause the material to go slack, whilst
hot/dry temperatures will cause the material to tighten.
This is normal.
3 To maintain its performance, we recommend that the cover is
treated with a reputable re-proofing agent specifically designed to
be compatible with PU coated nylons. When it needs doing is
really a matter of how often you use your Euro X. As a rule of
thumb, any water should ‘bead up’ and run off rather than
soaking into the material.
Maintenance ofmy Euro X
How do I store myEuro X?You should ensure the Euro X
is dry before being stored
away. If this was not possible at
the end of your session, you
should allow it to dry out
thoroughly when you get
home.
PVC GroundsheetTo compliment the Euro X, a
heavy duty PVC groundsheet is
available, supplied in a PU
sleeve for protection and
storage.
Euro X
EuroX.QXD 17/5/06 3:53 pm Page 2
GBE
UR
OX
GBE
UR
OX
InstructionsAssembly
(A)
(D)
(D)
(B)
(C)
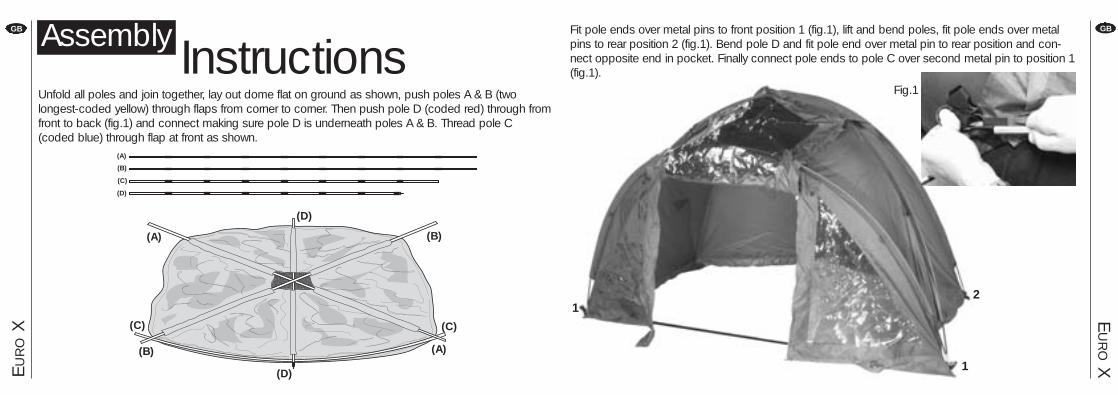
Unfold all poles and join together, lay out dome flat on ground as shown, push poles A & B (twolongest-coded yellow) through flaps from corner to corner. Then push pole D (coded red) through fromfront to back (fig.1) and connect making sure pole D is underneath poles A & B. Thread pole C(coded blue) through flap at front as shown.
(A)
(B)
(C)
(A)
(B)
(C)
(D)
Fig.1
1
12
Fit pole ends over metal pins to front position 1 (fig.1), lift and bend poles, fit pole ends over metalpins to rear position 2 (fig.1). Bend pole D and fit pole end over metal pin to rear position and con-nect opposite end in pocket. Finally connect pole ends to pole C over second metal pin to position 1(fig.1).
EuroX.QXD 17/5/06 3:53 pm Page 4
GBE
UR
OX
GBE
UR
OX
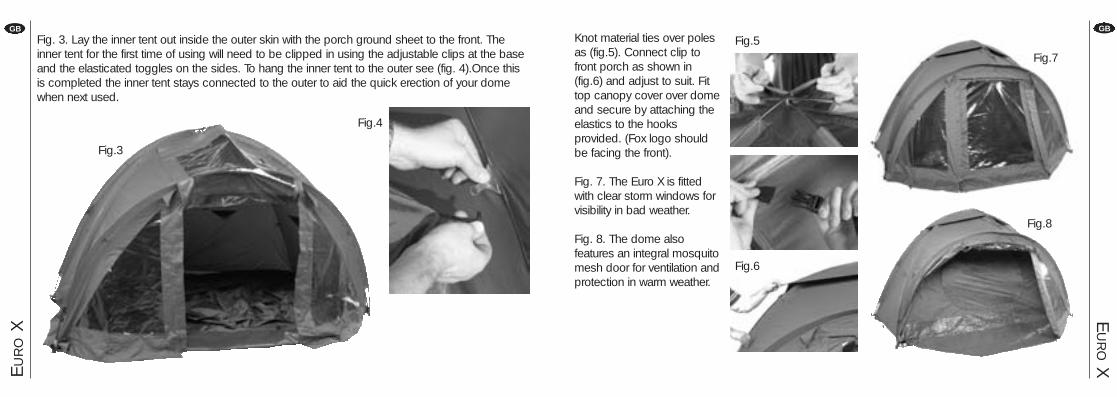
Fig. 3. Lay the inner tent out inside the outer skin with the porch ground sheet to the front. Theinner tent for the first time of using will need to be clipped in using the adjustable clips at the baseand the elasticated toggles on the sides. To hang the inner tent to the outer see (fig. 4).Once thisis completed the inner tent stays connected to the outer to aid the quick erection of your domewhen next used.
Knot material ties over polesas (fig.5). Connect clip tofront porch as shown in(fig.6) and adjust to suit. Fittop canopy cover over domeand secure by attaching theelastics to the hooks provided. (Fox logo shouldbe facing the front).
Fig. 7. The Euro X is fittedwith clear storm windows forvisibility in bad weather.
Fig. 8. The dome alsofeatures an integral mosquitomesh door for ventilation andprotection in warm weather.
Fig.3
Fig.4
Fig.7Fig.5
Fig.6
Fig.8
EuroX.QXD 17/5/06 3:53 pm Page 6
EU
RO
XFF
EU
RO
XVotre
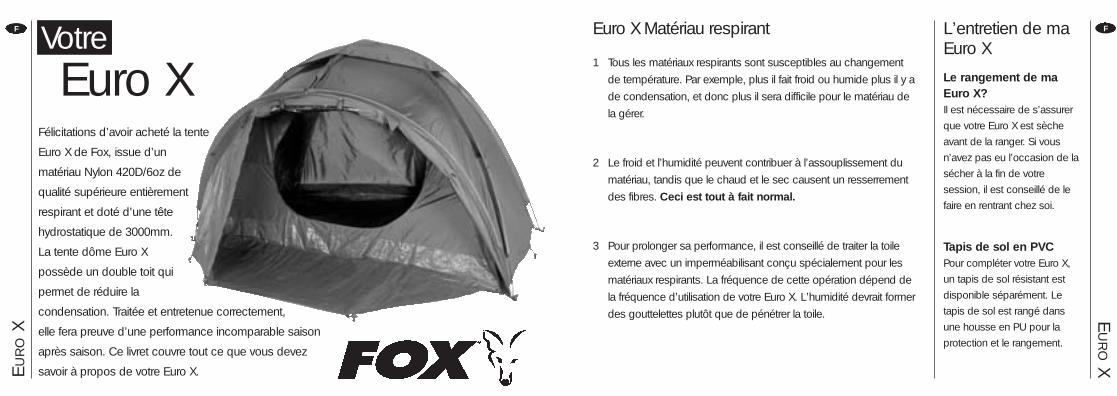
Félicitations d’avoir acheté la tente
Euro X de Fox, issue d’un
matériau Nylon 420D/6oz de
qualité supérieure entièrement
respirant et doté d’une tête
hydrostatique de 3000mm.
La tente dôme Euro X
possède un double toit qui
permet de réduire la
condensation. Traitée et entretenue correctement,
elle fera preuve d’une performance incomparable saison
après saison. Ce livret couvre tout ce que vous devez
savoir à propos de votre Euro X.
Euro XEuro X Matériau respirant
1 Tous les matériaux respirants sont susceptibles au changement
de température. Par exemple, plus il fait froid ou humide plus il y a
de condensation, et donc plus il sera difficile pour le matériau de
la gérer.
2 Le froid et l’humidité peuvent contribuer à l’assouplissement du
matériau, tandis que le chaud et le sec causent un resserrement
des fibres. Ceci est tout à fait normal.
3 Pour prolonger sa performance, il est conseillé de traiter la toile
externe avec un imperméabilisant conçu spécialement pour les
matériaux respirants. La fréquence de cette opération dépend de
la fréquence d’utilisation de votre Euro X. L’humidité devrait former
des gouttelettes plutôt que de pénétrer la toile.
L’entretien de maEuro X
Le rangement de maEuro X?Il est nécessaire de s’assurer
que votre Euro X est sèche
avant de la ranger. Si vous
n’avez pas eu l’occasion de la
sécher à la fin de votre
session, il est conseillé de le
faire en rentrant chez soi.
Tapis de sol en PVC Pour compléter votre Euro X,
un tapis de sol résistant est
disponible séparément. Le
tapis de sol est rangé dans
une housse en PU pour la
protection et le rangement.
EuroX.QXD 17/5/06 3:53 pm Page 8
EU
RO
XFF
EU
RO
X
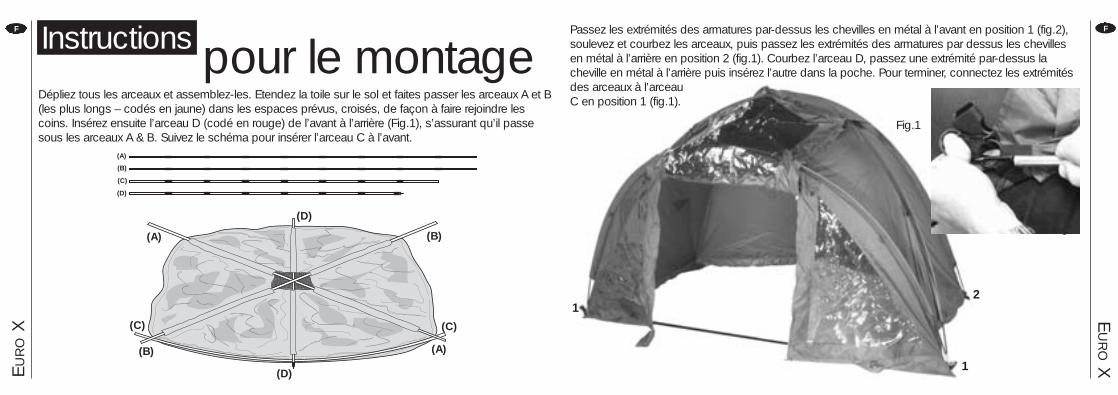
pour le montageInstructions
(A)
(D)
(D)
(B)
(C)
Dépliez tous les arceaux et assemblez-les. Etendez la toile sur le sol et faites passer les arceaux A et B(les plus longs – codés en jaune) dans les espaces prévus, croisés, de façon à faire rejoindre lescoins. Insérez ensuite l’arceau D (codé en rouge) de l’avant à l’arrière (Fig.1), s’assurant qu’il passesous les arceaux A & B. Suivez le schéma pour insérer l’arceau C à l’avant.
(A)
(B)
(C)
(A)
(B)
(C)
(D)
Fig.1
1
12
Passez les extrémités des armatures par-dessus les chevilles en métal à l’avant en position 1 (fig.2),soulevez et courbez les arceaux, puis passez les extrémités des armatures par dessus les chevillesen métal à l’arrière en position 2 (fig.1). Courbez l’arceau D, passez une extrémité par-dessus lacheville en métal à l’arrière puis insérez l’autre dans la poche. Pour terminer, connectez les extrémitésdes arceaux à l’arceau C en position 1 (fig.1).
Fig.1
EuroX.QXD 17/5/06 3:53 pm Page 10
EU
RO
XFF
EU
RO
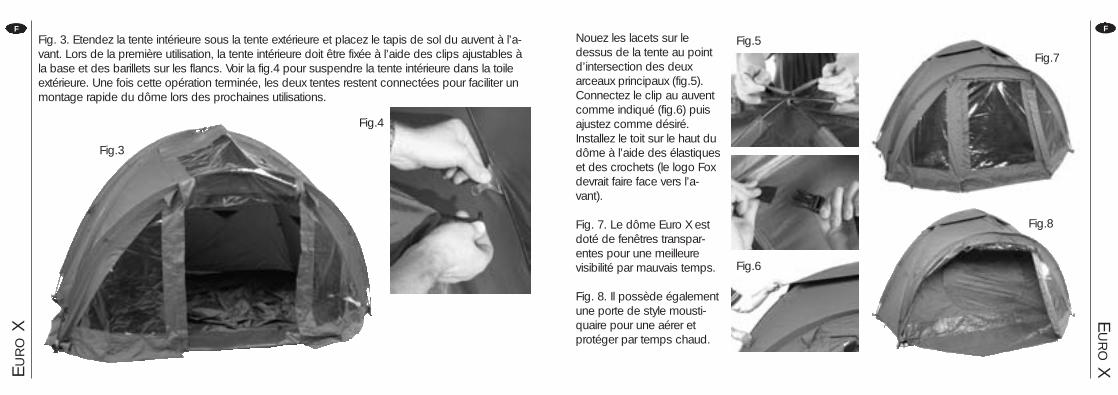
XFig. 3. Etendez la tente intérieure sous la tente extérieure et placez le tapis de sol du auvent à l’a-vant. Lors de la première utilisation, la tente intérieure doit être fixée à l’aide des clips ajustables àla base et des barillets sur les flancs. Voir la fig.4 pour suspendre la tente intérieure dans la toileextérieure. Une fois cette opération terminée, les deux tentes restent connectées pour faciliter unmontage rapide du dôme lors des prochaines utilisations.
Fig.3
Fig.4
Nouez les lacets sur ledessus de la tente au pointd’intersection des deuxarceaux principaux (fig.5).Connectez le clip au auventcomme indiqué (fig.6) puisajustez comme désiré.Installez le toit sur le haut dudôme à l’aide des élastiqueset des crochets (le logo Foxdevrait faire face vers l’a-vant).
Fig. 7. Le dôme Euro X estdoté de fenêtres transpar-entes pour une meilleurevisibilité par mauvais temps.
Fig. 8. Il possède égalementune porte de style mousti-quaire pour une aérer etprotéger par temps chaud.
Fig.7Fig.5
Fig.6
Fig.8
EuroX.QXD 17/5/06 3:53 pm Page 12
EU
RO
XNLNL
EU
RO
XOver uw
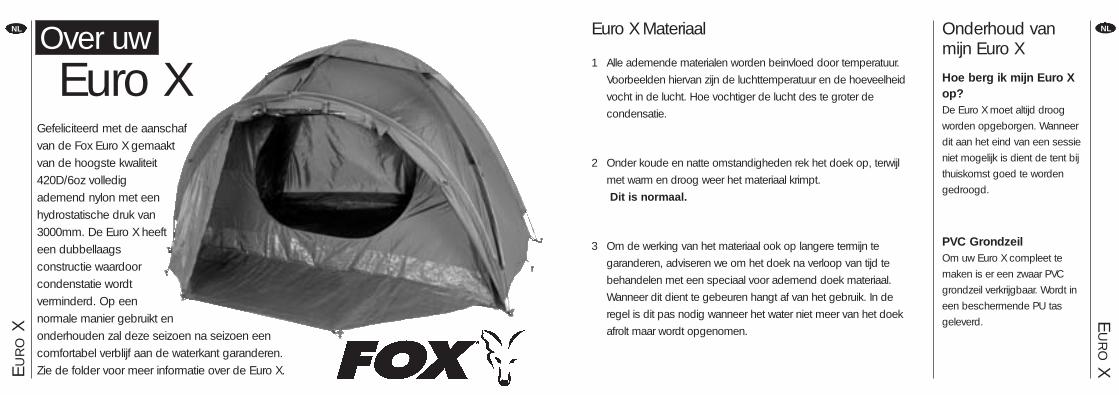
Gefeliciteerd met de aanschafvan de Fox Euro X gemaaktvan de hoogste kwaliteit420D/6oz volledigademend nylon met eenhydrostatische druk van3000mm. De Euro X heefteen dubbellaagsconstructie waardoorcondenstatie wordtverminderd. Op eennormale manier gebruikt enonderhouden zal deze seizoen na seizoen eencomfortabel verblijf aan de waterkant garanderen.Zie de folder voor meer informatie over de Euro X.
Euro X Materiaal
1 Alle ademende materialen worden beinvloed door temperatuur.
Voorbeelden hiervan zijn de luchttemperatuur en de hoeveelheid
vocht in de lucht. Hoe vochtiger de lucht des te groter de
condensatie.
2 Onder koude en natte omstandigheden rek het doek op, terwijl
met warm en droog weer het materiaal krimpt.
Dit is normaal.
3 Om de werking van het materiaal ook op langere termijn te
garanderen, adviseren we om het doek na verloop van tijd te
behandelen met een speciaal voor ademend doek materiaal.
Wanneer dit dient te gebeuren hangt af van het gebruik. In de
regel is dit pas nodig wanneer het water niet meer van het doek
afrolt maar wordt opgenomen.
Onderhoud vanmijn Euro X
Hoe berg ik mijn Euro Xop?De Euro X moet altijd droog
worden opgeborgen. Wanneer
dit aan het eind van een sessie
niet mogelijk is dient de tent bij
thuiskomst goed te worden
gedroogd.
PVC GrondzeilOm uw Euro X compleet te
maken is er een zwaar PVC
grondzeil verkrijgbaar. Wordt in
een beschermende PU tas
geleverd.
Euro X
EuroX.QXD 17/5/06 3:53 pm Page 14
EU
RO
XNLNL
EU
RO
X
InstructiesMontage
(A)
(D)
(D)
(B)
(C)
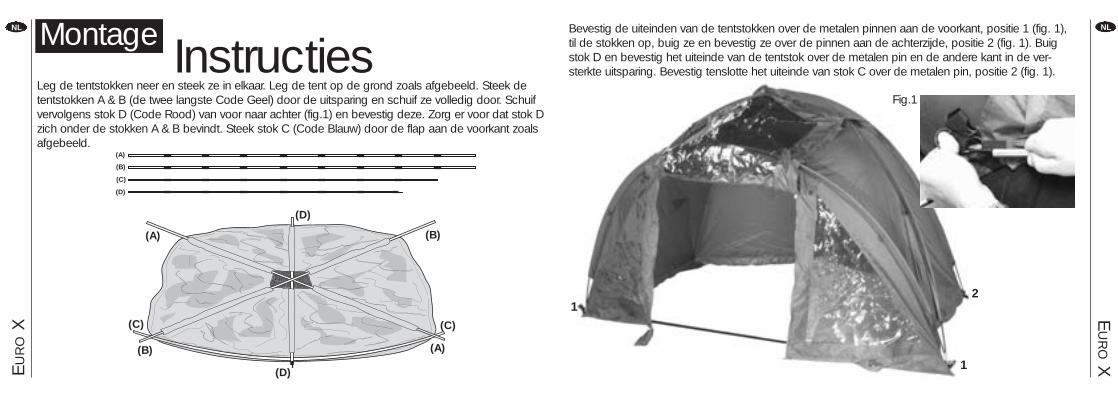
Leg de tentstokken neer en steek ze in elkaar. Leg de tent op de grond zoals afgebeeld. Steek detentstokken A & B (de twee langste Code Geel) door de uitsparing en schuif ze volledig door. Schuifvervolgens stok D (Code Rood) van voor naar achter (fig.1) en bevestig deze. Zorg er voor dat stok Dzich onder de stokken A & B bevindt. Steek stok C (Code Blauw) door de flap aan de voorkant zoalsafgebeeld.
(A)
(B)
(C)
(A)
(B)
(C)
(D)
Fig.1
1
12
Bevestig de uiteinden van de tentstokken over de metalen pinnen aan de voorkant, positie 1 (fig. 1),til de stokken op, buig ze en bevestig ze over de pinnen aan de achterzijde, positie 2 (fig. 1). Buigstok D en bevestig het uiteinde van de tentstok over de metalen pin en de andere kant in de ver-sterkte uitsparing. Bevestig tenslotte het uiteinde van stok C over de metalen pin, positie 2 (fig. 1).
EuroX.QXD 17/5/06 3:53 pm Page 16
EU
RO
XNLNL
EU
RO
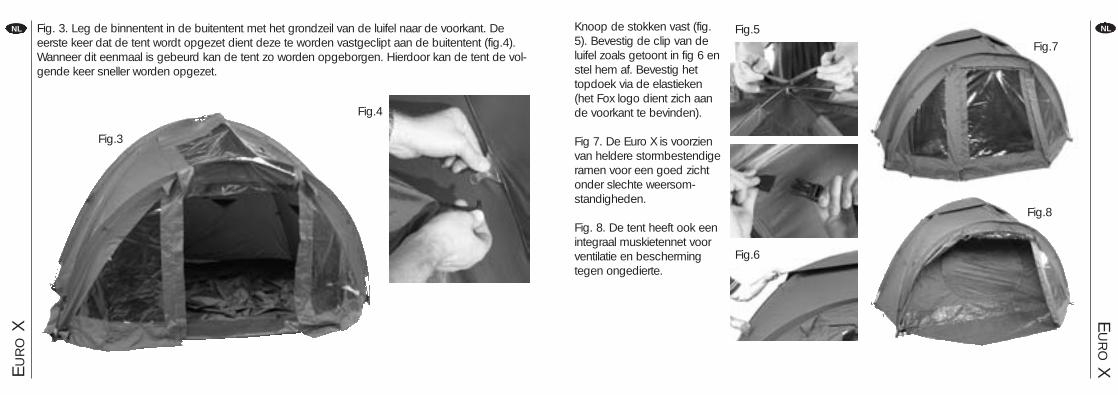
XFig. 3. Leg de binnentent in de buitentent met het grondzeil van de luifel naar de voorkant. Deeerste keer dat de tent wordt opgezet dient deze te worden vastgeclipt aan de buitentent (fig.4).Wanneer dit eenmaal is gebeurd kan de tent zo worden opgeborgen. Hierdoor kan de tent de vol-gende keer sneller worden opgezet.
Knoop de stokken vast (fig.5). Bevestig de clip van deluifel zoals getoont in fig 6 enstel hem af. Bevestig hettopdoek via de elastieken(het Fox logo dient zich aande voorkant te bevinden).
Fig 7. De Euro X is voorzienvan heldere stormbestendigeramen voor een goed zichtonder slechte weersom-standigheden.
Fig. 8. De tent heeft ook eenintegraal muskietennet voorventilatie en beschermingtegen ongedierte.
Fig.3
Fig.4
Fig.7Fig.5
Fig.6
Fig.8
EuroX.QXD 17/5/06 3:53 pm Page 18
EU
RO
XDD
EU
RO
X
Über Ihr
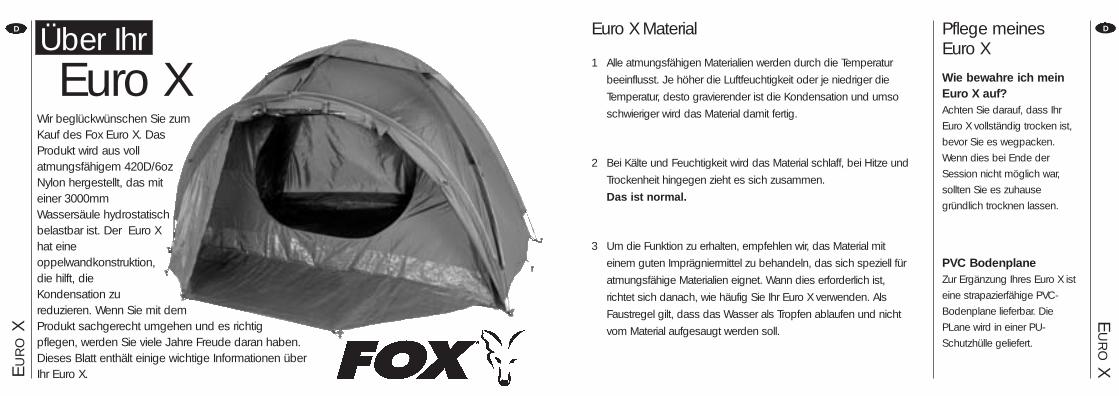
Wir beglückwünschen Sie zumKauf des Fox Euro X. DasProdukt wird aus vollatmungsfähigem 420D/6ozNylon hergestellt, das miteiner 3000mmWassersäule hydrostatischbelastbar ist. Der Euro Xhat eineoppelwandkonstruktion,die hilft, dieKondensation zureduzieren. Wenn Sie mit demProdukt sachgerecht umgehen und es richtigpflegen, werden Sie viele Jahre Freude daran haben.Dieses Blatt enthält einige wichtige Informationen überIhr Euro X.
Euro X Material
1 Alle atmungsfähigen Materialien werden durch die Temperatur
beeinflusst. Je höher die Luftfeuchtigkeit oder je niedriger die
Temperatur, desto gravierender ist die Kondensation und umso
schwieriger wird das Material damit fertig.
2 Bei Kälte und Feuchtigkeit wird das Material schlaff, bei Hitze und
Trockenheit hingegen zieht es sich zusammen.
Das ist normal.
3 Um die Funktion zu erhalten, empfehlen wir, das Material mit
einem guten Imprägniermittel zu behandeln, das sich speziell für
atmungsfähige Materialien eignet. Wann dies erforderlich ist,
richtet sich danach, wie häufig Sie Ihr Euro X verwenden. Als
Faustregel gilt, dass das Wasser als Tropfen ablaufen und nicht
vom Material aufgesaugt werden soll.
Pflege meinesEuro X
Wie bewahre ich mein Euro X auf?Achten Sie darauf, dass Ihr
Euro X vollständig trocken ist,
bevor Sie es wegpacken.
Wenn dies bei Ende der
Session nicht möglich war,
sollten Sie es zuhause
gründlich trocknen lassen.
PVC BodenplaneZur Ergänzung Ihres Euro X ist
eine strapazierfähige PVC-
Bodenplane lieferbar. Die
PLane wird in einer PU-
Schutzhülle geliefert.
Euro X
EuroX.QXD 17/5/06 3:53 pm Page 20
EU
RO
XDD
EU
RO
X
AnleitungAufbau
(A)
(D)
(D)
(B)
(C)
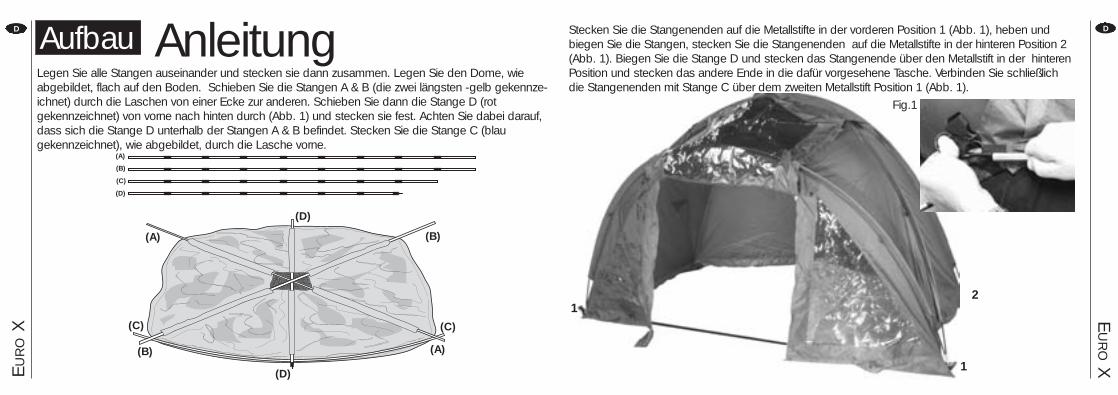
Legen Sie alle Stangen auseinander und stecken sie dann zusammen. Legen Sie den Dome, wieabgebildet, flach auf den Boden. Schieben Sie die Stangen A & B (die zwei längsten -gelb gekennze-ichnet) durch die Laschen von einer Ecke zur anderen. Schieben Sie dann die Stange D (rotgekennzeichnet) von vorne nach hinten durch (Abb. 1) und stecken sie fest. Achten Sie dabei darauf,dass sich die Stange D unterhalb der Stangen A & B befindet. Stecken Sie die Stange C (blaugekennzeichnet), wie abgebildet, durch die Lasche vorne.
(A)
(B)
(C)
(A)
(B)
(C)
(D)
Fig.1
1
12
Stecken Sie die Stangenenden auf die Metallstifte in der vorderen Position 1 (Abb. 1), heben undbiegen Sie die Stangen, stecken Sie die Stangenenden auf die Metallstifte in der hinteren Position 2(Abb. 1). Biegen Sie die Stange D und stecken das Stangenende über den Metallstift in der hinterenPosition und stecken das andere Ende in die dafür vorgesehene Tasche. Verbinden Sie schließlichdie Stangenenden mit Stange C über dem zweiten Metallstift Position 1 (Abb. 1).
EuroX.QXD 17/5/06 3:53 pm Page 22
EU
RO
XDD
EU
RO
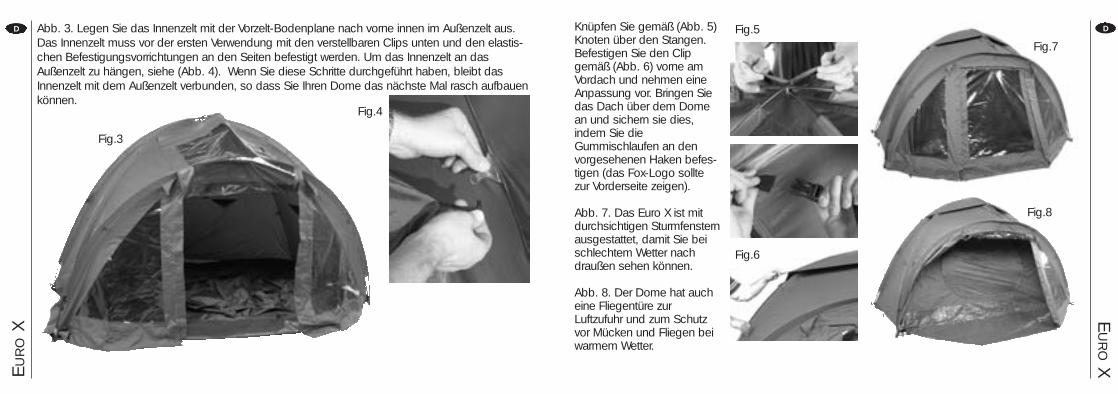
XAbb. 3. Legen Sie das Innenzelt mit der Vorzelt-Bodenplane nach vorne innen im Außenzelt aus.Das Innenzelt muss vor der ersten Verwendung mit den verstellbaren Clips unten und den elastis-chen Befestigungsvorrichtungen an den Seiten befestigt werden. Um das Innenzelt an dasAußenzelt zu hängen, siehe (Abb. 4). Wenn Sie diese Schritte durchgeführt haben, bleibt dasInnenzelt mit dem Außenzelt verbunden, so dass Sie Ihren Dome das nächste Mal rasch aufbauenkönnen.
Knüpfen Sie gemäß (Abb. 5)Knoten über den Stangen.Befestigen Sie den Clipgemäß (Abb. 6) vorne amVordach und nehmen eineAnpassung vor. Bringen Siedas Dach über dem Domean und sichern sie dies,indem Sie dieGummischlaufen an denvorgesehenen Haken befes-tigen (das Fox-Logo solltezur Vorderseite zeigen).
Abb. 7. Das Euro X ist mitdurchsichtigen Sturmfensternausgestattet, damit Sie beischlechtem Wetter nachdraußen sehen können.
Abb. 8. Der Dome hat aucheine Fliegentüre zurLuftzufuhr und zum Schutzvor Mücken und Fliegen beiwarmem Wetter.
Fig.3
Fig.4
Fig.7Fig.5
Fig.6
Fig.8
EuroX.QXD 17/5/06 3:53 pm Page 24
EU
RO
XITIT
EU
RO
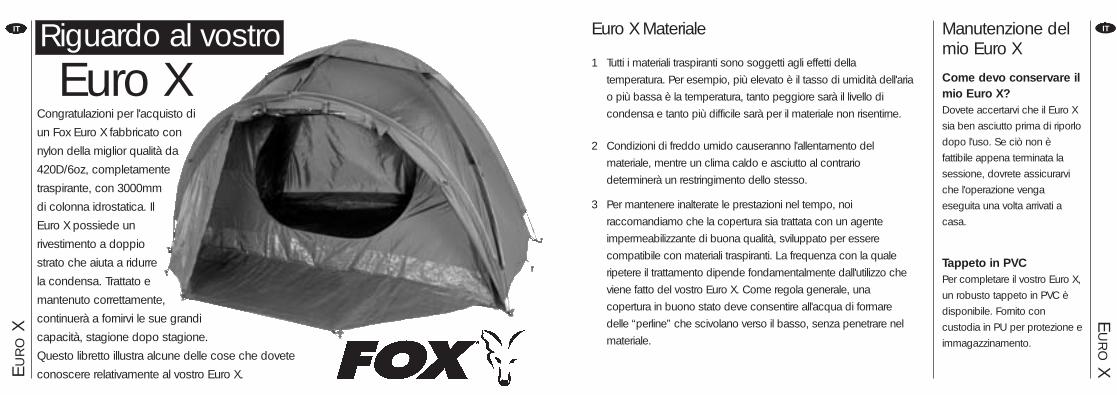
XRiguardo al vostro
Congratulazioni per l'acquisto di
un Fox Euro X fabbricato con
nylon della miglior qualità da
420D/6oz, completamente
traspirante, con 3000mm
di colonna idrostatica. Il
Euro X possiede un
rivestimento a doppio
strato che aiuta a ridurre
la condensa. Trattato e
mantenuto correttamente,
continuerà a fornirvi le sue grandi
capacità, stagione dopo stagione.
Questo libretto illustra alcune delle cose che dovete
conoscere relativamente al vostro Euro X.
Euro X Materiale
1 Tutti i materiali traspiranti sono soggetti agli effetti della
temperatura. Per esempio, più elevato è il tasso di umidità dell'aria
o più bassa è la temperatura, tanto peggiore sarà il livello di
condensa e tanto più difficile sarà per il materiale non risentirne.
2 Condizioni di freddo umido causeranno l'allentamento del
materiale, mentre un clima caldo e asciutto al contrario
determinerà un restringimento dello stesso.
3 Per mantenere inalterate le prestazioni nel tempo, noi
raccomandiamo che la copertura sia trattata con un agente
impermeabilizzante di buona qualità, sviluppato per essere
compatibile con materiali traspiranti. La frequenza con la quale
ripetere il trattamento dipende fondamentalmente dall'utilizzo che
viene fatto del vostro Euro X. Come regola generale, una
copertura in buono stato deve consentire all'acqua di formare
delle “perline” che scivolano verso il basso, senza penetrare nel
materiale.
Manutenzione delmio Euro X
Come devo conservare ilmio Euro X?Dovete accertarvi che il Euro X
sia ben asciutto prima di riporlo
dopo l'uso. Se ciò non è
fattibile appena terminata la
sessione, dovrete assicurarvi
che l'operazione venga
eseguita una volta arrivati a
casa.
Tappeto in PVCPer completare il vostro Euro X,
un robusto tappeto in PVC è
disponibile. Fornito con
custodia in PU per protezione e
immagazzinamento.
Euro X
EuroX.QXD 17/5/06 3:53 pm Page 26
ITE
UR
OX E
UR
OX
IT
MontaggioIstruzioni di
(A)
(D)
(D)
(B)
(C)
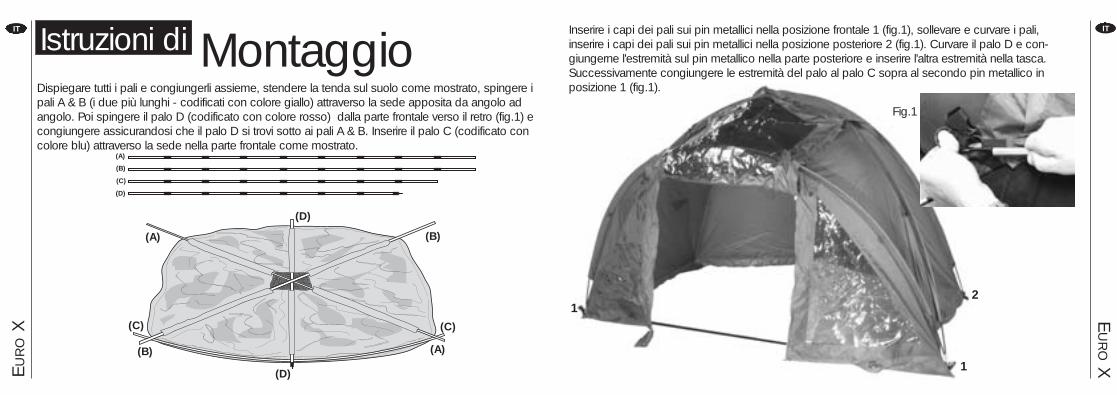
Dispiegare tutti i pali e congiungerli assieme, stendere la tenda sul suolo come mostrato, spingere ipali A & B (i due più lunghi - codificati con colore giallo) attraverso la sede apposita da angolo adangolo. Poi spingere il palo D (codificato con colore rosso) dalla parte frontale verso il retro (fig.1) econgiungere assicurandosi che il palo D si trovi sotto ai pali A & B. Inserire il palo C (codificato concolore blu) attraverso la sede nella parte frontale come mostrato.
(A)
(B)
(C)
(A)
(B)
(C)
(D)
Fig.1
1
12
Inserire i capi dei pali sui pin metallici nella posizione frontale 1 (fig.1), sollevare e curvare i pali,inserire i capi dei pali sui pin metallici nella posizione posteriore 2 (fig.1). Curvare il palo D e con-giungerne l'estremità sul pin metallico nella parte posteriore e inserire l'altra estremità nella tasca.Successivamente congiungere le estremità del palo al palo C sopra al secondo pin metallico inposizione 1 (fig.1).
EuroX.QXD 17/5/06 3:53 pm Page 28
EU
RO
XITIT
EU
RO
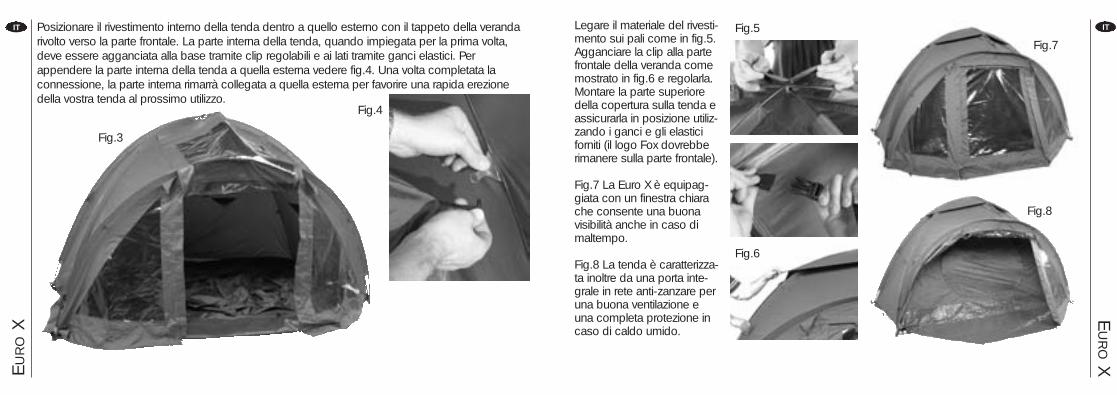
XPosizionare il rivestimento interno della tenda dentro a quello esterno con il tappeto della verandarivolto verso la parte frontale. La parte interna della tenda, quando impiegata per la prima volta,deve essere agganciata alla base tramite clip regolabili e ai lati tramite ganci elastici. Perappendere la parte interna della tenda a quella esterna vedere fig.4. Una volta completata laconnessione, la parte interna rimarrà collegata a quella esterna per favorire una rapida erezionedella vostra tenda al prossimo utilizzo.
Legare il materiale del rivesti-mento sui pali come in fig.5.Agganciare la clip alla partefrontale della veranda comemostrato in fig.6 e regolarla.Montare la parte superioredella copertura sulla tenda eassicurarla in posizione utiliz-zando i ganci e gli elasticiforniti (il logo Fox dovrebberimanere sulla parte frontale).
Fig.7 La Euro X è equipag-giata con un finestra chiarache consente una buonavisibilità anche in caso dimaltempo.
Fig.8 La tenda è caratterizza-ta inoltre da una porta inte-grale in rete anti-zanzare peruna buona ventilazione euna completa protezione incaso di caldo umido.
Fig.3
Fig.4
Fig.7Fig.5
Fig.6
Fig.8
EuroX.QXD 17/5/06 3:53 pm Page 30
Fox International Ltd.Fowler Road, Hainault Industrial Estate, Hainault, Essex, 1G6 3UT
www.foxint.comFox International reserve the right to modify or alter specifications in any respect without prior notice.
Technical data and specification correct at time of going to press.All weights and dimensions are approximate.
E.& O.E ©Copyright reserved.ISSUE; DC/06/05
EuroX.QXD 17/5/06 3:53 pm Page 32
Related Documents