Operating & Installation Instructions Fully Automatic Washing Machine Model SF-240XWV / 200XWV / 180XWV EN Thank you for purchasing a Hitachi fully automatic washing machine. ■ Please read these operating & installation instructions carefully for proper operation of the machine. ■ Please keep these operating & installation instructions for future reference. Contents Environmentally Friendly Waste Disposal 2 Hints and Tips for Eco-friendly Washing 2 Safety Instructions 3 Parts and Accessories 5 Control Panel and Display 6 Before You Start Washing 8 How to Use the Washing Machine 9 List of Programs 14 Partial Operations Using the Fuzzy Program 18 In Case of Power Outage 21 Care and Maintenance 21 Troubleshooting 23 Error Codes 24 How to Install the Washing Machine 25 Customer Service 30 Specifications 30

Welcome message from author
This document is posted to help you gain knowledge. Please leave a comment to let me know what you think about it! Share it to your friends and learn new things together.
Transcript

Operating & Installation InstructionsFully Automatic Washing MachineModel SF-240XWV / 200XWV / 180XWV
EN
Thank you for purchasing a Hitachi fully automatic washing machine.
■ Please read these operating & installation instructions carefully for proper operation of the machine. ■ Please keep these operating & installation instructions for future reference.
Contents
Environmentally Friendly Waste Disposal 2
Hints and Tips for Eco-friendly Washing 2
Safety Instructions 3
Parts and Accessories 5
Control Panel and Display 6
Before You Start Washing 8
How to Use the Washing Machine 9
List of Programs 14
Partial Operations Using the Fuzzy Program 18
In Case of Power Outage 21
Care and Maintenance 21
Troubleshooting 23
Error Codes 24
How to Install the Washing Machine 25
Customer Service 30
Specifi cations 30
2
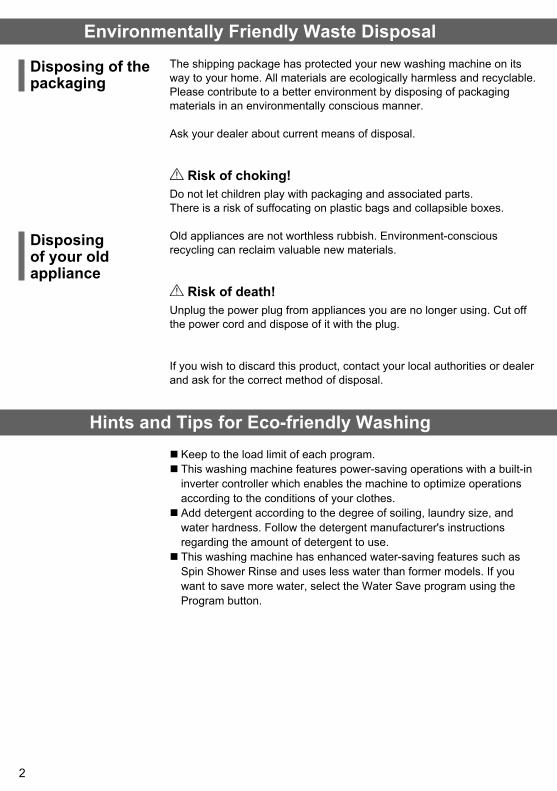
Environmentally Friendly Waste Disposal
Disposing of the packaging
The shipping package has protected your new washing machine on its way to your home. All materials are ecologically harmless and recyclable. Please contribute to a better environment by disposing of packaging materials in an environmentally conscious manner.
Ask your dealer about current means of disposal.
Risk of choking!Do not let children play with packaging and associated parts.There is a risk of suffocating on plastic bags and collapsible boxes.
Old appliances are not worthless rubbish. Environment-conscious recycling can reclaim valuable new materials.
Risk of death!Unplug the power plug from appliances you are no longer using. Cut off the power cord and dispose of it with the plug.
If you wish to discard this product, contact your local authorities or dealer and ask for the correct method of disposal.
Hints and Tips for Eco-friendly Washing ■ Keep to the load limit of each program. ■ This washing machine features power-saving operations with a built-in inverter controller which enables the machine to optimize operations according to the conditions of your clothes. ■ Add detergent according to the degree of soiling, laundry size, and water hardness. Follow the detergent manufacturer's instructions regarding the amount of detergent to use. ■ This washing machine has enhanced water-saving features such as Spin Shower Rinse and uses less water than former models. If you want to save more water, select the Water Save program using the Program button.
Disposing of your old appliance
3
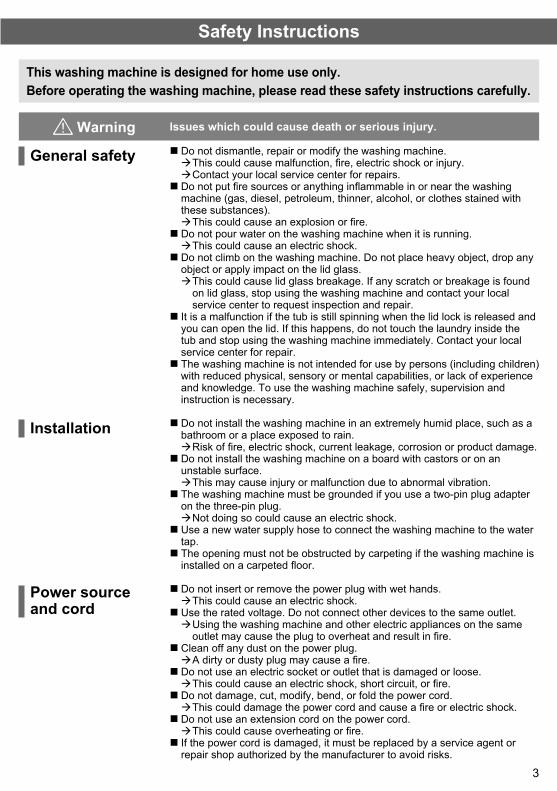
General safety
Safety Instructions
This washing machine is designed for home use only. Before operating the washing machine, please read these safety instructions carefully.
Warning Issues which could cause death or serious injury.
Power source and cord
Installation
■ Do not dismantle, repair or modify the washing machine. This could cause malfunction, fi re, electric shock or injury. Contact your local service center for repairs.
■ Do not put fi re sources or anything infl ammable in or near the washing machine (gas, diesel, petroleum, thinner, alcohol, or clothes stained with these substances).
This could cause an explosion or fi re. ■ Do not pour water on the washing machine when it is running.
This could cause an electric shock. ■ Do not climb on the washing machine. Do not place heavy object, drop any object or apply impact on the lid glass.
This could cause lid glass breakage. If any scratch or breakage is found on lid glass, stop using the washing machine and contact your local service center to request inspection and repair.
■ It is a malfunction if the tub is still spinning when the lid lock is released and you can open the lid. If this happens, do not touch the laundry inside the tub and stop using the washing machine immediately. Contact your local service center for repair. ■ The washing machine is not intended for use by persons (including children) with reduced physical, sensory or mental capabilities, or lack of experience and knowledge. To use the washing machine safely, supervision and instruction is necessary.
■ Do not install the washing machine in an extremely humid place, such as a bathroom or a place exposed to rain.
Risk of fi re, electric shock, current leakage, corrosion or product damage. ■ Do not install the washing machine on a board with castors or on an unstable surface.
This may cause injury or malfunction due to abnormal vibration. ■ The washing machine must be grounded if you use a two-pin plug adapter on the three-pin plug.
Not doing so could cause an electric shock. ■ Use a new water supply hose to connect the washing machine to the water tap. ■ The opening must not be obstructed by carpeting if the washing machine is installed on a carpeted fl oor.
■ Do not insert or remove the power plug with wet hands. This could cause an electric shock.
■ Use the rated voltage. Do not connect other devices to the same outlet. Using the washing machine and other electric appliances on the same outlet may cause the plug to overheat and result in fi re.
■ Clean off any dust on the power plug. A dirty or dusty plug may cause a fi re.
■ Do not use an electric socket or outlet that is damaged or loose. This could cause an electric shock, short circuit, or fi re.
■ Do not damage, cut, modify, bend, or fold the power cord. This could damage the power cord and cause a fi re or electric shock.
■ Do not use an extension cord on the power cord. This could cause overheating or fi re.
■ If the power cord is damaged, it must be replaced by a service agent or repair shop authorized by the manufacturer to avoid risks.
4
Safety Instructions ■ Keep packaging out of reach of children and infants.
Danger of suffocation. ■ Do not let children climb onto the washing machine or to get into the tub. Do not leave boxes or chairs near the washing machine that children could use to climb onto it.
This may cause injury. ■ Children should be supervised to ensure that they do not play with the washing machine.
■ If there is a water outage or you remove the water supply hose and reattach it, close the tap and press the Start/Pause button, then wait 40 seconds and slowly open the tap.
Air pressure from a large amount of air in the water pipes could damage the washing machine.
■ Periodically check that the union nut on the water supply hose is tight. A loose nut may cause a water leak.
■ Remove the power plug from the outlet and close the water tap if you will not use the washing machine for a long time.
■ All packaging materials must be removed before using the washing machine.
This could cause malfunction or abnormal vibration. ■ Check inside the tub before operating the washing machine.
Check that no pets or small animals are in the tub. ■ Do not wash items, such as raincoats, wet suits, ski suits, sleeping bags, cushions, pillows, shoes, shower curtain or other things, through which water does not fl ow easily.
The washing machine may not work properly, or it could cause injury or damage the washing machine.
■ Do not fold and stack large items together, such as blankets, when washing them. ■ Do not use a laundry net that is larger than 40 cm on a side.
The clothes may become off balance and cause abnormal vibration during the spin cycle.
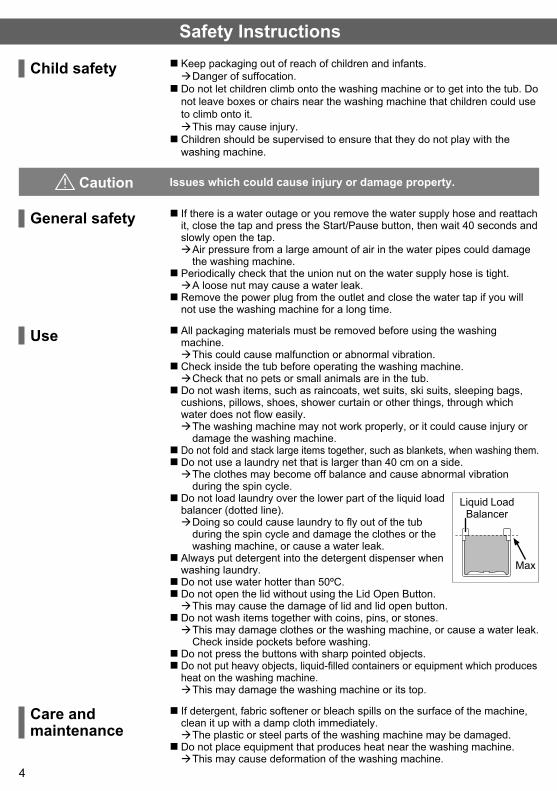
■ Do not load laundry over the lower part of the liquid load balancer (dotted line).
Doing so could cause laundry to fl y out of the tub during the spin cycle and damage the clothes or the washing machine, or cause a water leak.
■ Always put detergent into the detergent dispenser when washing laundry. ■ Do not use water hotter than 50ºC. ■ Do not open the lid without using the Lid Open Button.
This may cause the damage of lid and lid open button. ■ Do not wash items together with coins, pins, or stones.
This may damage clothes or the washing machine, or cause a water leak. Check inside pockets before washing.
■ Do not press the buttons with sharp pointed objects. ■ Do not put heavy objects, liquid-fi lled containers or equipment which produces heat on the washing machine.
This may damage the washing machine or its top.
■ If detergent, fabric softener or bleach spills on the surface of the machine, clean it up with a damp cloth immediately.
The plastic or steel parts of the washing machine may be damaged. ■ Do not place equipment that produces heat near the washing machine.
This may cause deformation of the washing machine.
Liquid Load Balancer
Max
Care and maintenance
Child safety
General safety
Use
Caution Issues which could cause injury or damage property.
5
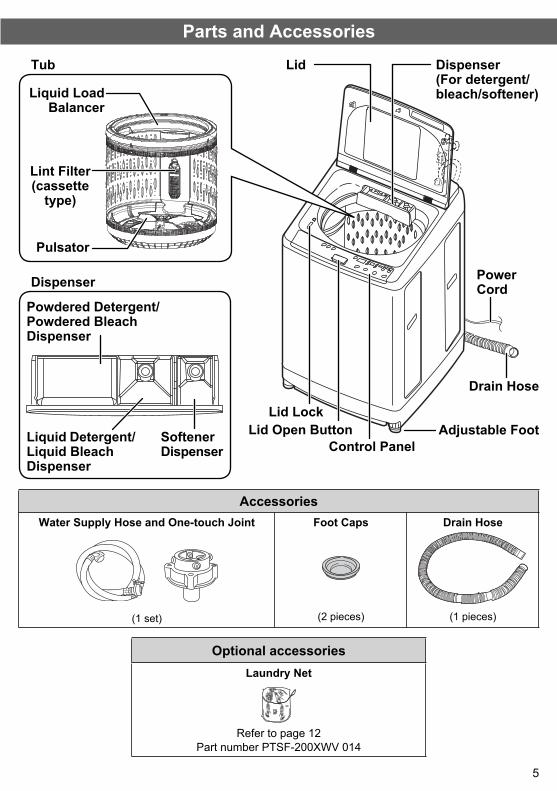
Parts and Accessories
AccessoriesWater Supply Hose and One-touch Joint
(1 set)
Foot Caps
(2 pieces)
Drain Hose
(1 pieces)
Optional accessoriesLaundry Net
Refer to page 12Part number PTSF-200XWV 014
Drain Hose
Lid Dispenser (For detergent/bleach/softener)
Dispenser
Pulsator
Lid LockLid Open Button
Lint Filter (cassette
type)
Adjustable Foot
Power Cord
Tub
Control Panel
Liquid Load Balancer
Powdered Detergent/Powdered Bleach Dispenser
Liquid Detergent/Liquid Bleach Dispenser
Softener Dispenser
6
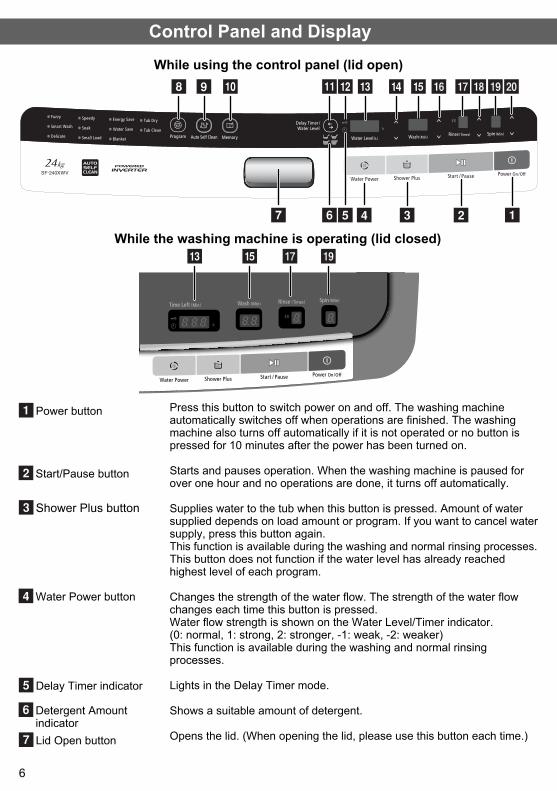
Control Panel and Display
Press this button to switch power on and off. The washing machine automatically switches off when operations are fi nished. The washing machine also turns off automatically if it is not operated or no button is pressed for 10 minutes after the power has been turned on.
Starts and pauses operation. When the washing machine is paused for over one hour and no operations are done, it turns off automatically.
Supplies water to the tub when this button is pressed. Amount of water supplied depends on load amount or program. If you want to cancel water supply, press this button again.This function is available during the washing and normal rinsing processes.This button does not function if the water level has already reached highest level of each program.
Changes the strength of the water fl ow. The strength of the water fl ow changes each time this button is pressed.Water fl ow strength is shown on the Water Level/Timer indicator.(0: normal, 1: strong, 2: stronger, -1: weak, -2: weaker)This function is available during the washing and normal rinsing processes.
Lights in the Delay Timer mode.
Shows a suitable amount of detergent.
Opens the lid. (When opening the lid, please use this button each time.)
Power button
Start/Pause button
Water Power button
Delay Timer indicator
Detergent Amount indicator Lid Open button
Shower Plus button
While using the control panel (lid open)
While the washing machine is operating (lid closed)
7
Lid Lock indicator
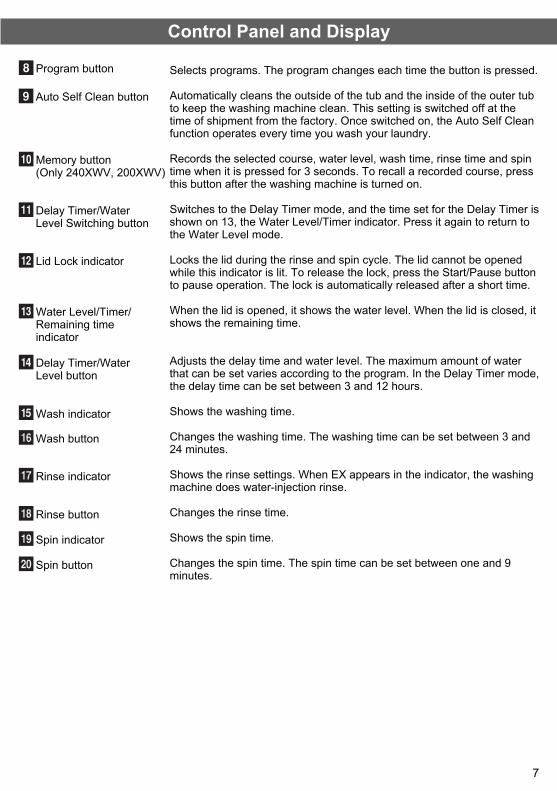
Selects programs. The program changes each time the button is pressed.
Automatically cleans the outside of the tub and the inside of the outer tub to keep the washing machine clean. This setting is switched off at the time of shipment from the factory. Once switched on, the Auto Self Clean function operates every time you wash your laundry.
Records the selected course, water level, wash time, rinse time and spin time when it is pressed for 3 seconds. To recall a recorded course, press this button after the washing machine is turned on.
Switches to the Delay Timer mode, and the time set for the Delay Timer is shown on 13, the Water Level/Timer indicator. Press it again to return to the Water Level mode.
Locks the lid during the rinse and spin cycle. The lid cannot be opened while this indicator is lit. To release the lock, press the Start/Pause button to pause operation. The lock is automatically released after a short time.
When the lid is opened, it shows the water level. When the lid is closed, it shows the remaining time.
Adjusts the delay time and water level. The maximum amount of water that can be set varies according to the program. In the Delay Timer mode, the delay time can be set between 3 and 12 hours.
Shows the washing time.
Changes the washing time. The washing time can be set between 3 and 24 minutes.
Shows the rinse settings. When EX appears in the indicator, the washing machine does water-injection rinse.
Changes the rinse time.
Shows the spin time.
Changes the spin time. The spin time can be set between one and 9 minutes.
Control Panel and Display
Program button
Auto Self Clean button
Delay Timer/Water Level Switching button
Memory button(Only 240XWV, 200XWV)
Water Level/Timer/Remaining time indicator
Delay Timer/Water Level button
Wash indicator
Wash button
Rinse indicator
Rinse button
Spin indicator
Spin button
8
Before You Start Washing ■ Remove any foreign objects (coins, safety pins, etc.). ■ Put delicate clothes (knits, lingerie, etc.) in a net. ■ Remove large lumps of lint, mud, sand, hair, and pet hair from laundry. ■ Tie strings and close fasteners.
■ Sort laundry according to the type of fabric and care label symbols (cottons, blended fabrics, synthetics, wool, hand washable items, etc.). ■ Do not wash extremely small loads, such as only a pair of jeans.
The clothes may become off balance and cause abnormal vibration during the spin cycle.
■ Separate colored and white items.
Risk of injury! Do not wash the following items, through which water does not fl ow easily, because doing so creates abnormal vibration during the spin cycle and could cause injury or malfunction.
– Waterproof items, such as a wet suit, ski suit, shower curtain, etc. – Items with non-slip rubber backing, such as door mats. – Cushions, pillows, shoes, etc.
■ Use an appropriate amount of detergent according to the Detergent indicator on the washing machine.The type and amount of detergent depend on the type of fabric, volume, load size, degree of soiling, and hardness of the water used.Use less detergent if:
– The load is small. – The laundry is not very dirty.
■ Too much detergent can result in excess foam, which reduces rinse effi ciency or may cause a water leak. ■ Depending on the detergent brand, detergent may not dissolve completely in the detergent tray if the water pressure is low or the water is too cold.
Page 22: Care and Maintenance ■When using softeners or bleaches, follow the instructions on the package.
Preparation of the laundry
Sorting the laundry
Detergents and additives
9
How to Use the Washing Machine
1 Sort the laundry
2 Press the Power button to turn on the power
3 Select and adjust the program
4 Press the Start/Pause button
■ Sort the laundry according to the type of fabric, care label symbol, and degree of soiling. Page 8: Preparation of the laundry
■ Do not exceed the maximum load. ■ Laundry shall not exceed this line. Otherwise, laundry may jump out from the wash tub while spinning and it may cause damage.
Max
■ If no program is selected within 10 minutes, the washing machine automatically switches itself off. Press the Power button again to turn on the power.
■ Select a program with the Program button. Page 14: List of Programs
■ You can change the combination or settings of wash, rinse, and spin operations with the Wash, Rinse, and Spin buttons. ■ You can switch on the Auto Self Clean function with the Auto Self Clean button.
Page 11: How to use the Auto Self Clean function Once switched on, the Auto Self Clean function operates every time you do your laundry. Press the Auto Self Clean button again while the power is on to deactivate the function.
■ Before operation starts, the laundry is weighed, and the amount of detergent and water appear on the display.
10
How to Use the Washing Machine
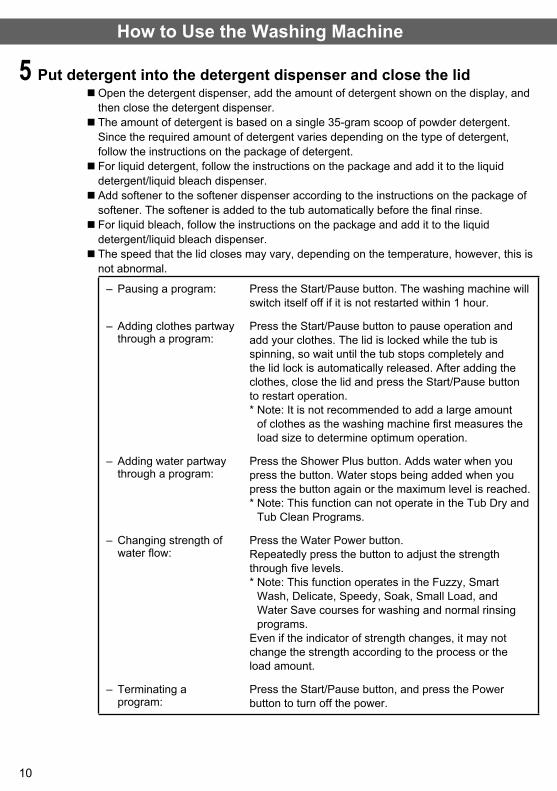
5 Put detergent into the detergent dispenser and close the lid ■Open the detergent dispenser, add the amount of detergent shown on the display, and then close the detergent dispenser. ■ The amount of detergent is based on a single 35-gram scoop of powder detergent. Since the required amount of detergent varies depending on the type of detergent, follow the instructions on the package of detergent. ■ For liquid detergent, follow the instructions on the package and add it to the liquid detergent/liquid bleach dispenser. ■ Add softener to the softener dispenser according to the instructions on the package of softener. The softener is added to the tub automatically before the fi nal rinse. ■ For liquid bleach, follow the instructions on the package and add it to the liquid detergent/liquid bleach dispenser. ■ The speed that the lid closes may vary, depending on the temperature, however, this is not abnormal.
– Pausing a program: Press the Start/Pause button. The washing machine will switch itself off if it is not restarted within 1 hour.
– Adding clothes partway through a program:
Press the Start/Pause button to pause operation and add your clothes. The lid is locked while the tub is spinning, so wait until the tub stops completely and the lid lock is automatically released. After adding the clothes, close the lid and press the Start/Pause button to restart operation.* Note: It is not recommended to add a large amount
of clothes as the washing machine fi rst measures the load size to determine optimum operation.
– Adding water partway through a program:
Press the Shower Plus button. Adds water when you press the button. Water stops being added when you press the button again or the maximum level is reached.* Note: This function can not operate in the Tub Dry and
Tub Clean Programs.
– Changing strength of water fl ow:
Press the Water Power button.Repeatedly press the button to adjust the strength through fi ve levels.* Note: This function operates in the Fuzzy, Smart
Wash, Delicate, Speedy, Soak, Small Load, and Water Save courses for washing and normal rinsing programs.
Even if the indicator of strength changes, it may not change the strength according to the process or the load amount.
– Terminating a program:
Press the Start/Pause button, and press the Power button to turn off the power.
11
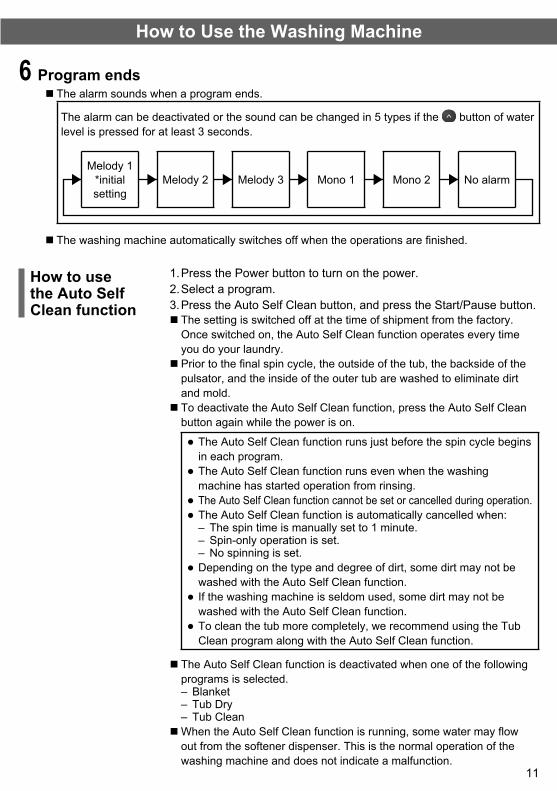
6 Program ends
How to Use the Washing Machine
1. Press the Power button to turn on the power.2. Select a program.3. Press the Auto Self Clean button, and press the Start/Pause button.
■ The setting is switched off at the time of shipment from the factory. Once switched on, the Auto Self Clean function operates every time you do your laundry. ■ Prior to the fi nal spin cycle, the outside of the tub, the backside of the pulsator, and the inside of the outer tub are washed to eliminate dirt and mold. ■ To deactivate the Auto Self Clean function, press the Auto Self Clean button again while the power is on.
● The Auto Self Clean function runs just before the spin cycle begins in each program.
● The Auto Self Clean function runs even when the washing machine has started operation from rinsing.
● The Auto Self Clean function cannot be set or cancelled during operation. ● The Auto Self Clean function is automatically cancelled when:
– The spin time is manually set to 1 minute. – Spin-only operation is set. – No spinning is set.
● Depending on the type and degree of dirt, some dirt may not be washed with the Auto Self Clean function.
● If the washing machine is seldom used, some dirt may not be washed with the Auto Self Clean function.
● To clean the tub more completely, we recommend using the Tub Clean program along with the Auto Self Clean function.
■ The Auto Self Clean function is deactivated when one of the following programs is selected.
– Blanket – Tub Dry – Tub Clean
■When the Auto Self Clean function is running, some water may fl ow out from the softener dispenser. This is the normal operation of the washing machine and does not indicate a malfunction.
How to use the Auto Self Clean function
■ The alarm sounds when a program ends.
The alarm can be deactivated or the sound can be changed in 5 types if the button of water level is pressed for at least 3 seconds.
Melody 1*initial setting
Melody 2 Melody 3 Mono 1 Mono 2 No alarm
■ The washing machine automatically switches off when the operations are fi nished.
12
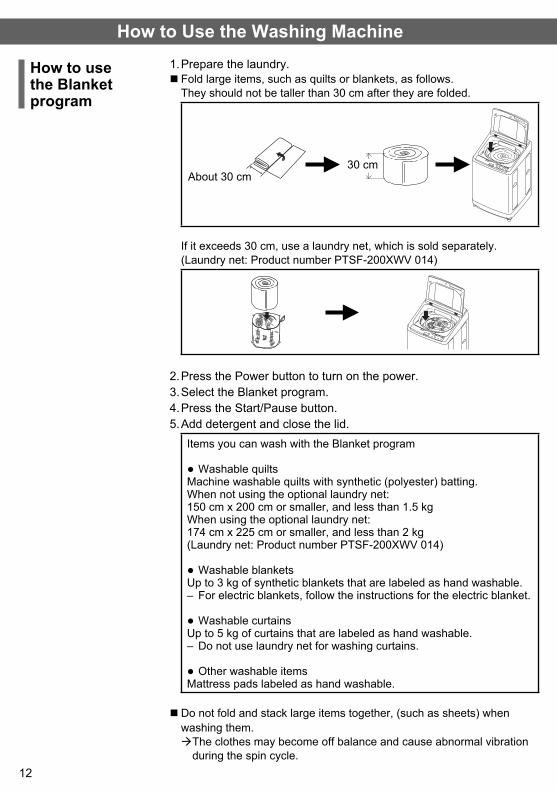
How to Use the Washing Machine
How to use the Blanket program
1. Prepare the laundry. ■ Fold large items, such as quilts or blankets, as follows.They should not be taller than 30 cm after they are folded.
About 30 cm30 cm
If it exceeds 30 cm, use a laundry net, which is sold separately.(Laundry net: Product number PTSF-200XWV 014)
2. Press the Power button to turn on the power.3. Select the Blanket program.4. Press the Start/Pause button.5. Add detergent and close the lid.
Items you can wash with the Blanket program
● Washable quiltsMachine washable quilts with synthetic (polyester) batting.When not using the optional laundry net:150 cm x 200 cm or smaller, and less than 1.5 kgWhen using the optional laundry net:174 cm x 225 cm or smaller, and less than 2 kg(Laundry net: Product number PTSF-200XWV 014)
● Washable blanketsUp to 3 kg of synthetic blankets that are labeled as hand washable.
– For electric blankets, follow the instructions for the electric blanket.
● Washable curtainsUp to 5 kg of curtains that are labeled as hand washable.
– Do not use laundry net for washing curtains.
● Other washable itemsMattress pads labeled as hand washable.
■ Do not fold and stack large items together, (such as sheets) when washing them.
The clothes may become off balance and cause abnormal vibration during the spin cycle.
13
How to Use the Washing Machine ■ Use this program separately from other washing programs. (Do not put laundry into the tub.)
1. Press the Power button to turn on the power.2. Select the Tub Dry program.3. Close the lid and press the Start/Pause button.
■ The tub spins quickly the same as the regular spin cycle to remove the water from the tub.
■ Use this program separately from other washing programs. (Do not put laundry into the tub.)
1. Press the Power button to turn on the power.2. Select the Tub Clean program.
■ The Tub Clean program can be set to 3 or 11 hours. At fi rst, 3 hours is set. Press the Program button again to set 11 hours.
3. Press the Start/Pause button. The washing machine starts pouring water into the tub.
4. Add tub cleaner, according to the package, to the tub. (Liquid peroxide-based bleach is also effective as a tub cleaner. Since the required amount of bleach varies depending on the type of bleach, follow the instructions on the package of bleach.)
5. Close the lid. ■Water is added to the maximum level to wash away dirt you cannot see on the tub and outer tub. After that, Normal Rinse is performed twice to fl ush out any remaining dirt or tub cleaner.
1. Press the Power button to turn on the power.2. Select a program.3. Press the Delay Timer/Water Level Switching button and select the
time to finish washing. Each press of the button subtracts an hour starting from 12 hours to 3 hours later.
4. Press the Start/Pause button.5. Add detergent and close the lid. The power turns off after a short
time.6. Operations finish at the set time.
■ The Delay Timer is unavailable for the Blanket, Tub Dry, and Tub Clean programs. ■ To change the setting, press the Power button and do the settings again. ■ If there is a power outage while the timer is set, the timer setting is cancelled. If this happens, press the Power button again and reset the timer. ■ To prevent your laundry from wrinkling, remove it as soon as possible after washing is done.
How to use the Delay Timer
How to use the Tub Clean program
How to use the Tub Dry program
14
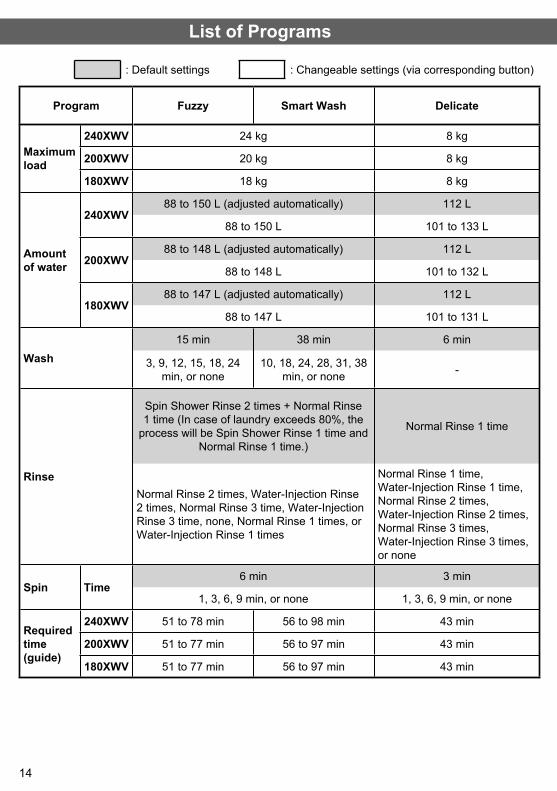
List of Programs
Program Fuzzy Smart Wash Delicate
Maximum load
240XWV 24 kg 8 kg
200XWV 20 kg 8 kg
180XWV 18 kg 8 kg
Amount of water
240XWV88 to 150 L (adjusted automatically) 112 L
88 to 150 L 101 to 133 L
200XWV88 to 148 L (adjusted automatically) 112 L
88 to 148 L 101 to 132 L
180XWV88 to 147 L (adjusted automatically) 112 L
88 to 147 L 101 to 131 L
Wash15 min 38 min 6 min
3, 9, 12, 15, 18, 24 min, or none
10, 18, 24, 28, 31, 38 min, or none -
Rinse
Spin Shower Rinse 2 times + Normal Rinse 1 time (In case of laundry exceeds 80%, the
process will be Spin Shower Rinse 1 time and Normal Rinse 1 time.)
Normal Rinse 1 time
Normal Rinse 2 times, Water-Injection Rinse 2 times, Normal Rinse 3 time, Water-Injection Rinse 3 time, none, Normal Rinse 1 times, or Water-Injection Rinse 1 times
Normal Rinse 1 time, Water-Injection Rinse 1 time, Normal Rinse 2 times, Water-Injection Rinse 2 times, Normal Rinse 3 times, Water-Injection Rinse 3 times, or none
Spin Time6 min 3 min
1, 3, 6, 9 min, or none 1, 3, 6, 9 min, or none
Required time (guide)
240XWV 51 to 78 min 56 to 98 min 43 min
200XWV 51 to 77 min 56 to 97 min 43 min
180XWV 51 to 77 min 56 to 97 min 43 min
: Default settings : Changeable settings (via corresponding button)
15
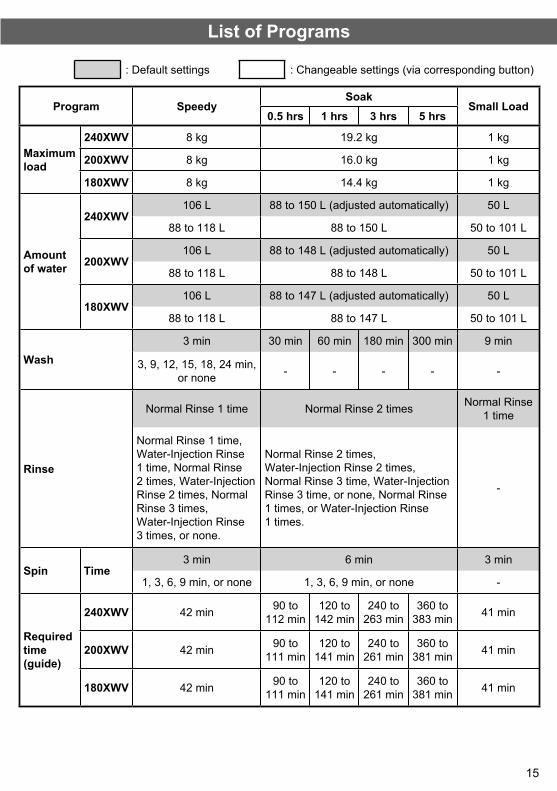
List of Programs
Program SpeedySoak
Small Load0.5 hrs 1 hrs 3 hrs 5 hrs
Maximum load
240XWV 8 kg 19.2 kg 1 kg
200XWV 8 kg 16.0 kg 1 kg
180XWV 8 kg 14.4 kg 1 kg
Amount of water
240XWV106 L 88 to 150 L (adjusted automatically) 50 L
88 to 118 L 88 to 150 L 50 to 101 L
200XWV106 L 88 to 148 L (adjusted automatically) 50 L
88 to 118 L 88 to 148 L 50 to 101 L
180XWV106 L 88 to 147 L (adjusted automatically) 50 L
88 to 118 L 88 to 147 L 50 to 101 L
Wash3 min 30 min 60 min 180 min 300 min 9 min
3, 9, 12, 15, 18, 24 min, or none - - - - -
Rinse
Normal Rinse 1 time Normal Rinse 2 times Normal Rinse 1 time
Normal Rinse 1 time, Water-Injection Rinse 1 time, Normal Rinse 2 times, Water-Injection Rinse 2 times, Normal Rinse 3 times, Water-Injection Rinse 3 times, or none.
Normal Rinse 2 times, Water-Injection Rinse 2 times, Normal Rinse 3 time, Water-Injection Rinse 3 time, or none, Normal Rinse 1 times, or Water-Injection Rinse 1 times.
-
Spin Time3 min 6 min 3 min
1, 3, 6, 9 min, or none 1, 3, 6, 9 min, or none -
Required time (guide)
240XWV 42 min 90 to 112 min
120 to 142 min
240 to 263 min
360 to 383 min 41 min
200XWV 42 min 90 to 111 min
120 to 141 min
240 to 261 min
360 to 381 min 41 min
180XWV 42 min 90 to 111 min
120 to 141 min
240 to 261 min
360 to 381 min 41 min
: Default settings : Changeable settings (via corresponding button)
16
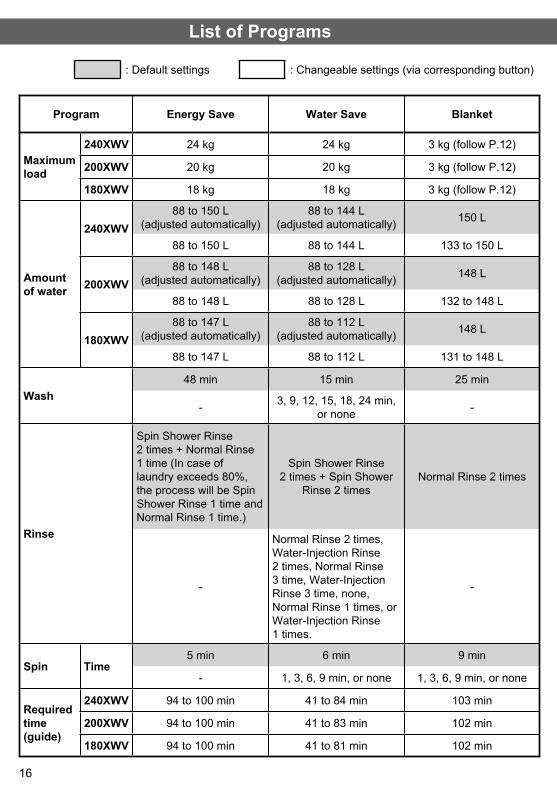
List of Programs
Program Energy Save Water Save Blanket
Maximum load
240XWV 24 kg 24 kg 3 kg (follow P.12)
200XWV 20 kg 20 kg 3 kg (follow P.12)
180XWV 18 kg 18 kg 3 kg (follow P.12)
Amount of water
240XWV88 to 150 L
(adjusted automatically)88 to 144 L
(adjusted automatically) 150 L
88 to 150 L 88 to 144 L 133 to 150 L
200XWV88 to 148 L
(adjusted automatically)88 to 128 L
(adjusted automatically) 148 L
88 to 148 L 88 to 128 L 132 to 148 L
180XWV88 to 147 L
(adjusted automatically)88 to 112 L
(adjusted automatically) 148 L
88 to 147 L 88 to 112 L 131 to 148 L
Wash48 min 15 min 25 min
- 3, 9, 12, 15, 18, 24 min, or none -
Rinse
Spin Shower Rinse 2 times + Normal Rinse 1 time (In case of laundry exceeds 80%, the process will be Spin Shower Rinse 1 time and Normal Rinse 1 time.)
Spin Shower Rinse 2 times + Spin Shower
Rinse 2 timesNormal Rinse 2 times
-
Normal Rinse 2 times, Water-Injection Rinse 2 times, Normal Rinse 3 time, Water-InjectionRinse 3 time, none, Normal Rinse 1 times, or Water-Injection Rinse 1 times.
-
Spin Time5 min 6 min 9 min
- 1, 3, 6, 9 min, or none 1, 3, 6, 9 min, or none
Required time (guide)
240XWV 94 to 100 min 41 to 84 min 103 min
200XWV 94 to 100 min 41 to 83 min 102 min
180XWV 94 to 100 min 41 to 81 min 102 min
: Default settings : Changeable settings (via corresponding button)
17
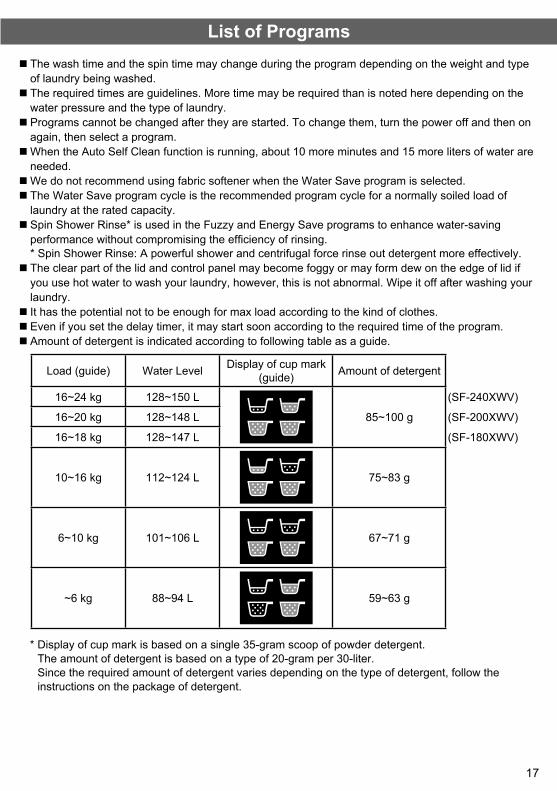
■ The wash time and the spin time may change during the program depending on the weight and type of laundry being washed. ■ The required times are guidelines. More time may be required than is noted here depending on the water pressure and the type of laundry. ■ Programs cannot be changed after they are started. To change them, turn the power off and then on again, then select a program. ■When the Auto Self Clean function is running, about 10 more minutes and 15 more liters of water are needed. ■We do not recommend using fabric softener when the Water Save program is selected. ■ The Water Save program cycle is the recommended program cycle for a normally soiled load of laundry at the rated capacity. ■ Spin Shower Rinse* is used in the Fuzzy and Energy Save programs to enhance water-saving performance without compromising the effi ciency of rinsing.* Spin Shower Rinse: A powerful shower and centrifugal force rinse out detergent more effectively. ■ The clear part of the lid and control panel may become foggy or may form dew on the edge of lid if you use hot water to wash your laundry, however, this is not abnormal. Wipe it off after washing your laundry. ■ It has the potential not to be enough for max load according to the kind of clothes. ■ Even if you set the delay timer, it may start soon according to the required time of the program. ■ Amount of detergent is indicated according to following table as a guide.
List of Programs
* Display of cup mark is based on a single 35-gram scoop of powder detergent.The amount of detergent is based on a type of 20-gram per 30-liter.Since the required amount of detergent varies depending on the type of detergent, follow the instructions on the package of detergent.
Load (guide) Water Level Display of cup mark (guide) Amount of detergent
16~24 kg 128~150 L
85~100 g
(SF-240XWV)
16~20 kg 128~148 L (SF-200XWV)
16~18 kg 128~147 L (SF-180XWV)
10~16 kg 112~124 L 75~83 g
6~10 kg 101~106 L 67~71 g
~6 kg 88~94 L 59~63 g
18
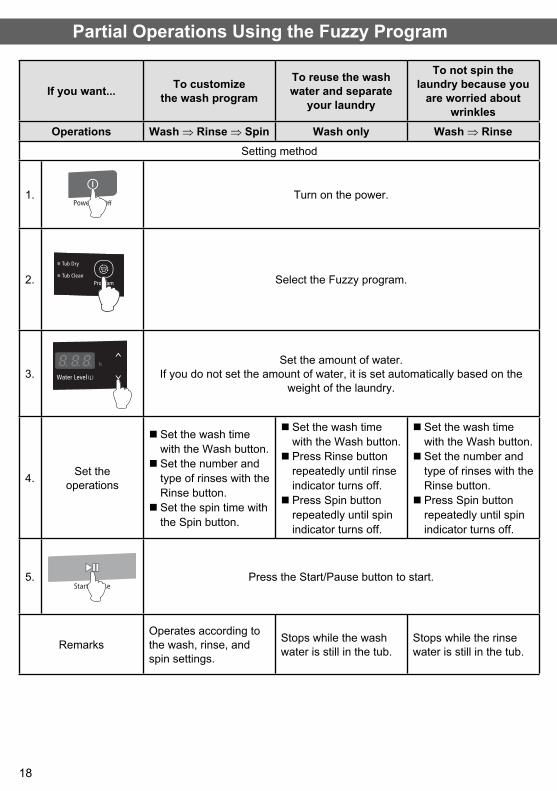
Partial Operations Using the Fuzzy Program
If you want... To customize the wash program
To reuse the wash water and separate
your laundry
To not spin the laundry because you
are worried about wrinkles
Operations Wash ⇒ Rinse ⇒ Spin Wash only Wash ⇒ RinseSetting method
1. Turn on the power.
2. Select the Fuzzy program.
3.Set the amount of water.
If you do not set the amount of water, it is set automatically based on the weight of the laundry.
4. Set the operations
■ Set the wash time with the Wash button. ■ Set the number and type of rinses with the Rinse button. ■ Set the spin time with the Spin button.
■ Set the wash time with the Wash button. ■ Press Rinse button repeatedly until rinse indicator turns off. ■ Press Spin button repeatedly until spin indicator turns off.
■ Set the wash time with the Wash button. ■ Set the number and type of rinses with the Rinse button. ■ Press Spin button repeatedly until spin indicator turns off.
5. Press the Start/Pause button to start.
RemarksOperates according to the wash, rinse, and spin settings.
Stops while the wash water is still in the tub.
Stops while the rinse water is still in the tub.
19
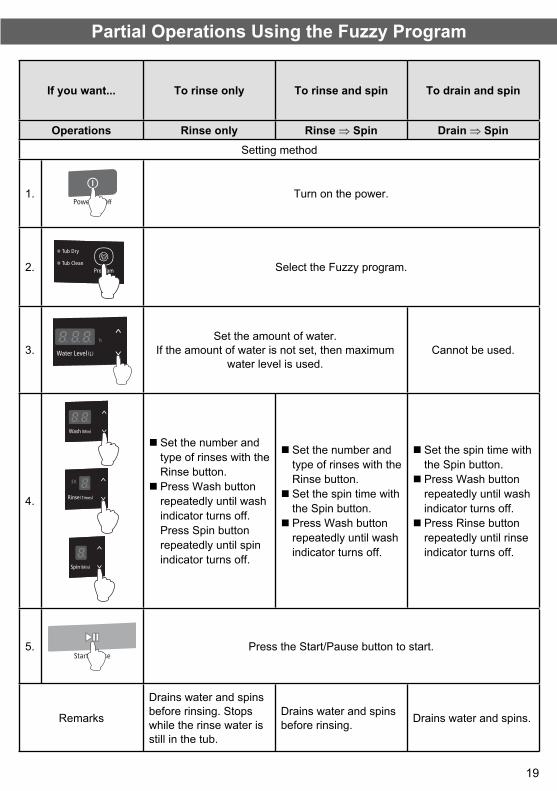
Partial Operations Using the Fuzzy Program
If you want... To rinse only To rinse and spin To drain and spin
Operations Rinse only Rinse ⇒ Spin Drain ⇒ SpinSetting method
1. Turn on the power.
2. Select the Fuzzy program.
3.Set the amount of water.
If the amount of water is not set, then maximum water level is used.
Cannot be used.
4.
■ Set the number and type of rinses with the Rinse button. ■ Press Wash button repeatedly until wash indicator turns off. Press Spin button repeatedly until spin indicator turns off.
■ Set the number and type of rinses with the Rinse button. ■ Set the spin time with the Spin button. ■ Press Wash button repeatedly until wash indicator turns off.
■ Set the spin time with the Spin button. ■ Press Wash button repeatedly until wash indicator turns off. ■ Press Rinse button repeatedly until rinse indicator turns off.
5. Press the Start/Pause button to start.
Remarks
Drains water and spins before rinsing. Stops while the rinse water is still in the tub.
Drains water and spins before rinsing. Drains water and spins.
20
Partial Operations Using the Fuzzy Program
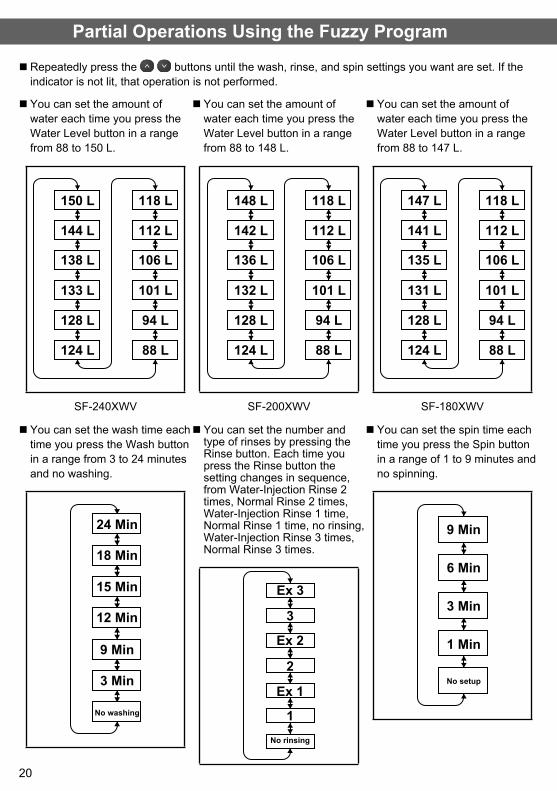
■ Repeatedly press the buttons until the wash, rinse, and spin settings you want are set. If the indicator is not lit, that operation is not performed.
■ You can set the amount of water each time you press the Water Level button in a range from 88 to 150 L.
150 L
144 L
138 L
133 L
128 L
124 L 88 L
94 L
101 L
106 L
112 L
118 L
SF-240XWV
■ You can set the amount of water each time you press the Water Level button in a range from 88 to 148 L.
148 L
142 L
136 L
132 L
128 L
124 L 88 L
94 L
101 L
106 L
112 L
118 L
SF-200XWV
■ You can set the amount of water each time you press the Water Level button in a range from 88 to 147 L.
147 L
141 L
135 L
131 L
128 L
124 L 88 L
94 L
101 L
106 L
112 L
118 L
SF-180XWV
■ You can set the spin time each time you press the Spin button in a range of 1 to 9 minutes and no spinning.
No setup
9 Min
6 Min
3 Min
1 Min
■ You can set the wash time each time you press the Wash button in a range from 3 to 24 minutes and no washing.
24 Min
18 Min
15 Min
12 Min
9 Min
3 Min
No washing
■ You can set the number and type of rinses by pressing the Rinse button. Each time you press the Rinse button the setting changes in sequence, from Water-Injection Rinse 2 times, Normal Rinse 2 times, Water-Injection Rinse 1 time, Normal Rinse 1 time, no rinsing, Water-Injection Rinse 3 times, Normal Rinse 3 times.
3
Ex 2
Ex 3
1
2
No rinsing
Ex 1
21
In Case of Power Outage
If there is a power outage
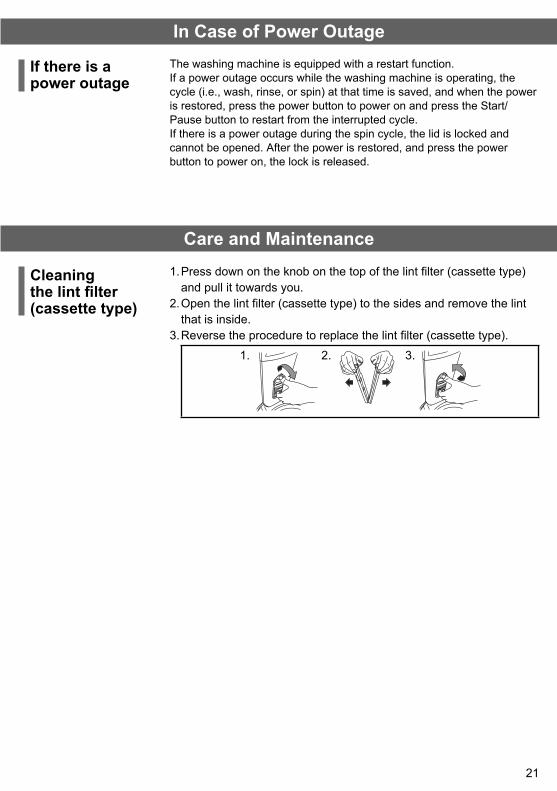
The washing machine is equipped with a restart function.If a power outage occurs while the washing machine is operating, the cycle (i.e., wash, rinse, or spin) at that time is saved, and when the power is restored, press the power button to power on and press the Start/Pause button to restart from the interrupted cycle.If there is a power outage during the spin cycle, the lid is locked and cannot be opened. After the power is restored, and press the power button to power on, the lock is released.
Care and Maintenance
Cleaning the lint fi lter (cassette type)
1. Press down on the knob on the top of the lint filter (cassette type) and pull it towards you.
2. Open the lint filter (cassette type) to the sides and remove the lint that is inside.
3. Reverse the procedure to replace the lint filter (cassette type).
1. 2. 3.
22
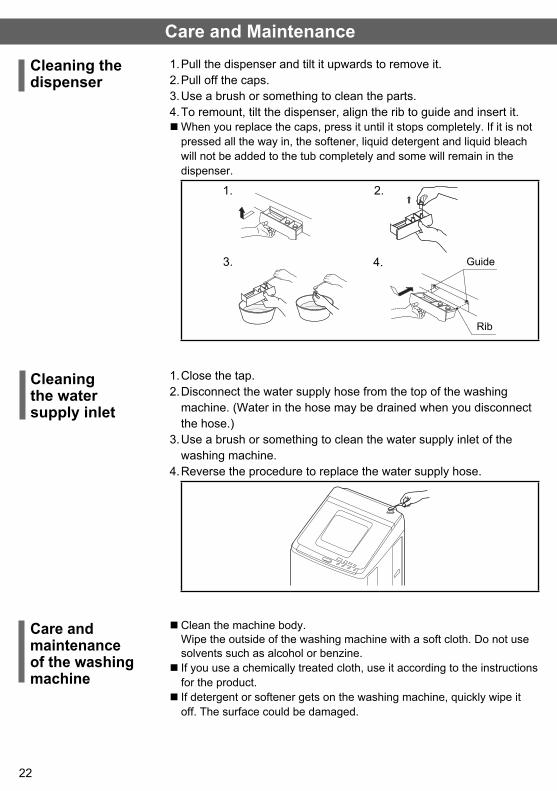
Cleaning the dispenser
Care and maintenance of the washing machine
1. Pull the dispenser and tilt it upwards to remove it.2. Pull off the caps.3. Use a brush or something to clean the parts.4. To remount, tilt the dispenser, align the rib to guide and insert it.
■ When you replace the caps, press it until it stops completely. If it is not pressed all the way in, the softener, liquid detergent and liquid bleach will not be added to the tub completely and some will remain in the dispenser.
3. 4. Guide
Rib
2.1.
1. Close the tap.2. Disconnect the water supply hose from the top of the washing
machine. (Water in the hose may be drained when you disconnect the hose.)
3. Use a brush or something to clean the water supply inlet of the washing machine.
4. Reverse the procedure to replace the water supply hose.
■ Clean the machine body.Wipe the outside of the washing machine with a soft cloth. Do not use solvents such as alcohol or benzine. ■ If you use a chemically treated cloth, use it according to the instructions for the product. ■ If detergent or softener gets on the washing machine, quickly wipe it off. The surface could be damaged.
Care and Maintenance
Cleaning the water supply inlet
23
Troubleshooting
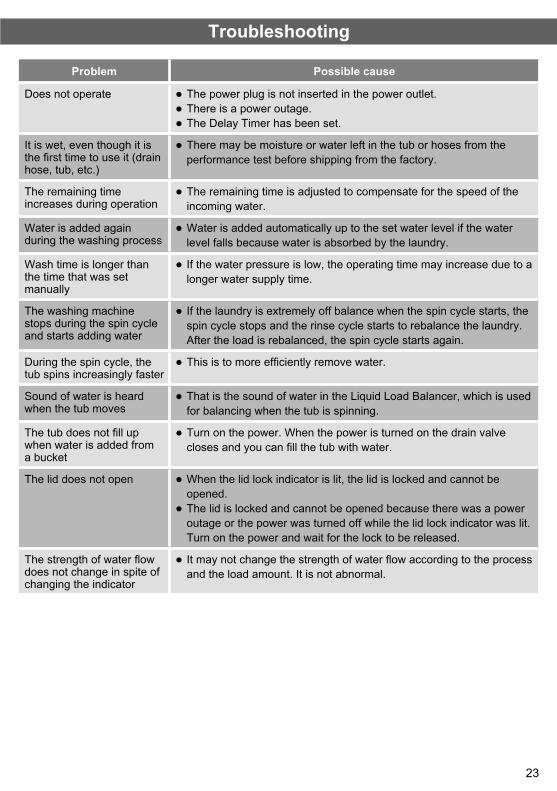
Problem Possible cause
Does not operate ● The power plug is not inserted in the power outlet. ● There is a power outage. ● The Delay Timer has been set.
It is wet, even though it is the fi rst time to use it (drain hose, tub, etc.)
● There may be moisture or water left in the tub or hoses from the performance test before shipping from the factory.
The remaining time increases during operation
● The remaining time is adjusted to compensate for the speed of the incoming water.
Water is added again during the washing process
● Water is added automatically up to the set water level if the water level falls because water is absorbed by the laundry.
Wash time is longer than the time that was set manually
● If the water pressure is low, the operating time may increase due to a longer water supply time.
The washing machine stops during the spin cycle and starts adding water
● If the laundry is extremely off balance when the spin cycle starts, the spin cycle stops and the rinse cycle starts to rebalance the laundry. After the load is rebalanced, the spin cycle starts again.
During the spin cycle, the tub spins increasingly faster
● This is to more effi ciently remove water.
Sound of water is heard when the tub moves
● That is the sound of water in the Liquid Load Balancer, which is used for balancing when the tub is spinning.
The tub does not fi ll up when water is added from a bucket
● Turn on the power. When the power is turned on the drain valve closes and you can fi ll the tub with water.
The lid does not open ● When the lid lock indicator is lit, the lid is locked and cannot be opened.
● The lid is locked and cannot be opened because there was a power outage or the power was turned off while the lid lock indicator was lit. Turn on the power and wait for the lock to be released.
The strength of water fl ow does not change in spite of changing the indicator
● It may not change the strength of water fl ow according to the process and the load amount. It is not abnormal.
24
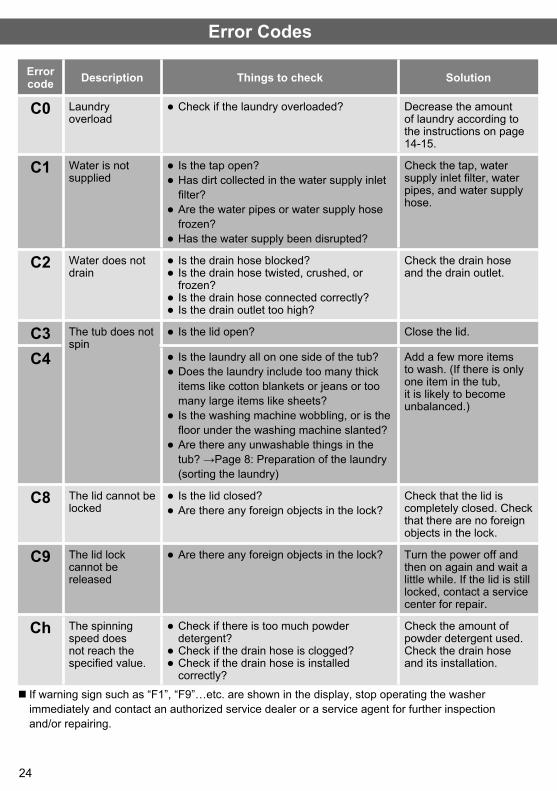
Error Codes
Error code Description Things to check Solution
C0 Laundry overload
● Check if the laundry overloaded? Decrease the amount of laundry according to the instructions on page 14-15.
C1 Water is not supplied
● Is the tap open? ● Has dirt collected in the water supply inlet fi lter?
● Are the water pipes or water supply hose frozen?
● Has the water supply been disrupted?
Check the tap, water supply inlet fi lter, water pipes, and water supply hose.
C2 Water does not drain
● Is the drain hose blocked? ● Is the drain hose twisted, crushed, or frozen?
● Is the drain hose connected correctly? ● Is the drain outlet too high?
Check the drain hose and the drain outlet.
C3 The tub does not spin
● Is the lid open? Close the lid.
C4 ● Is the laundry all on one side of the tub? ● Does the laundry include too many thick items like cotton blankets or jeans or too many large items like sheets?
● Is the washing machine wobbling, or is the fl oor under the washing machine slanted?
● Are there any unwashable things in the tub? →Page 8: Preparation of the laundry (sorting the laundry)
Add a few more items to wash. (If there is only one item in the tub, it is likely to become unbalanced.)
C8 The lid cannot be locked
● Is the lid closed? ● Are there any foreign objects in the lock?
Check that the lid is completely closed. Check that there are no foreign objects in the lock.
C9 The lid lock cannot be released
● Are there any foreign objects in the lock? Turn the power off and then on again and wait a little while. If the lid is still locked, contact a service center for repair.
Ch The spinning speed does not reach the specifi ed value.
● Check if there is too much powder detergent?
● Check if the drain hose is clogged? ● Check if the drain hose is installed correctly?
Check the amount of powder detergent used. Check the drain hose and its installation.
■ If warning sign such as “F1”, “F9”…etc. are shown in the display, stop operating the washer immediately and contact an authorized service dealer or a service agent for further inspection and/or repairing.
25
How to Install the Washing Machine
Safety precautions
■ Do not use a damaged power plug, doing so is dangerous. Contact a repair center that is certifi ed by the manufacturer to replace the plug. ■ If the outlet you are using is a 2-pin outlet, use an adapter to change from three pins to two pins. If you do this, be sure to connect an earth wire. There is a risk of electric shock if you do not connect an earth wire. ■ Do not connect an earth wire to a gas pipe, telephone wire, water pipe, or lightning rod. Remove the power plug from the electric outlet when you are attaching an earth wire. ■ You do not need to attach an earth wire if the electric outlet is a 3-pin type with earth terminal.
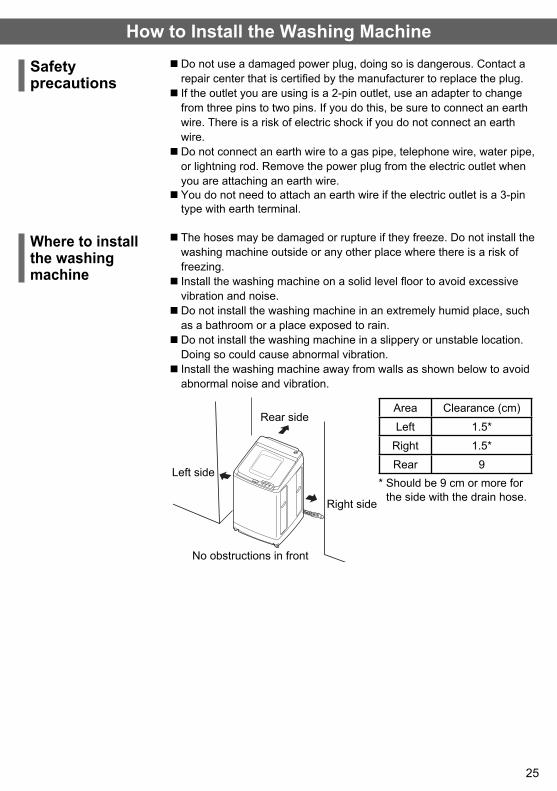
■ The hoses may be damaged or rupture if they freeze. Do not install the washing machine outside or any other place where there is a risk of freezing. ■ Install the washing machine on a solid level fl oor to avoid excessive vibration and noise. ■ Do not install the washing machine in an extremely humid place, such as a bathroom or a place exposed to rain. ■ Do not install the washing machine in a slippery or unstable location. Doing so could cause abnormal vibration. ■ Install the washing machine away from walls as shown below to avoid abnormal noise and vibration.
Rear side
Left side
Right side
No obstructions in front
Area Clearance (cm)
Left 1.5*
Right 1.5*
Rear 9* Should be 9 cm or more for
the side with the drain hose.
Where to install the washing machine
26
How to Install the Washing Machine
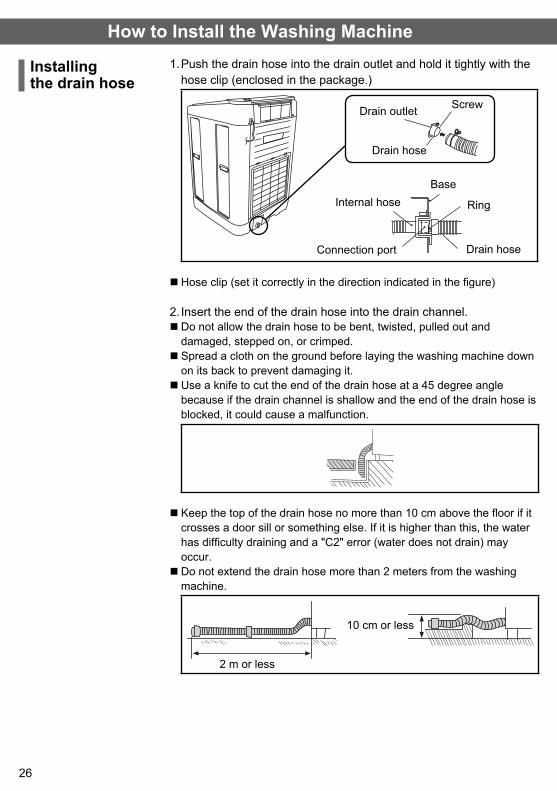
Installing the drain hose
1. Push the drain hose into the drain outlet and hold it tightly with the hose clip (enclosed in the package.)
Drain outlet
Drain hose
Screw
Drain hose
Internal hose
Connection port
Base
Ring
■ Hose clip (set it correctly in the direction indicated in the fi gure)
2. Insert the end of the drain hose into the drain channel. ■ Do not allow the drain hose to be bent, twisted, pulled out and damaged, stepped on, or crimped. ■ Spread a cloth on the ground before laying the washing machine down on its back to prevent damaging it. ■ Use a knife to cut the end of the drain hose at a 45 degree angle because if the drain channel is shallow and the end of the drain hose is blocked, it could cause a malfunction.
■ Keep the top of the drain hose no more than 10 cm above the fl oor if it crosses a door sill or something else. If it is higher than this, the water has diffi culty draining and a "C2" error (water does not drain) may occur. ■ Do not extend the drain hose more than 2 meters from the washing machine.
2 m or less
10 cm or less
27
How to Install the Washing Machine
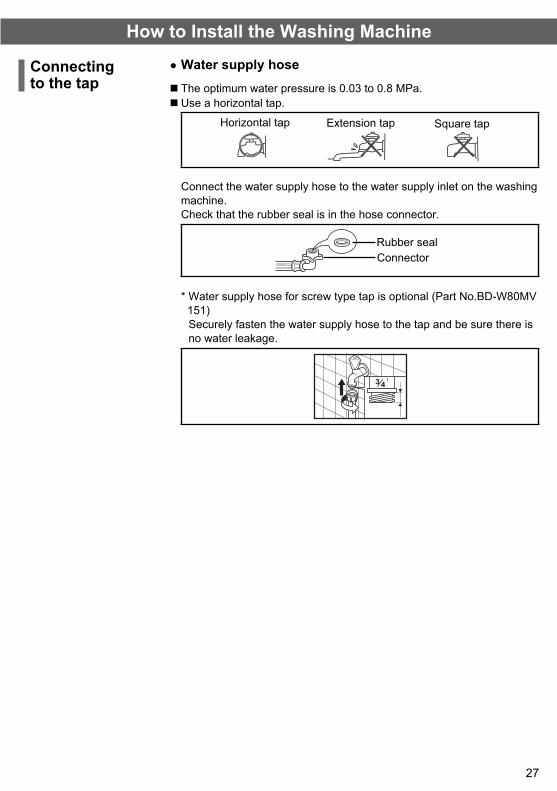
Connecting to the tap
● Water supply hose ■ The optimum water pressure is 0.03 to 0.8 MPa. ■ Use a horizontal tap.
Horizontal tap Extension tap Square tap
Connect the water supply hose to the water supply inlet on the washing machine.Check that the rubber seal is in the hose connector.
Rubber sealConnector
* Water supply hose for screw type tap is optional (Part No.BD-W80MV 151)
Securely fasten the water supply hose to the tap and be sure there is no water leakage.
28
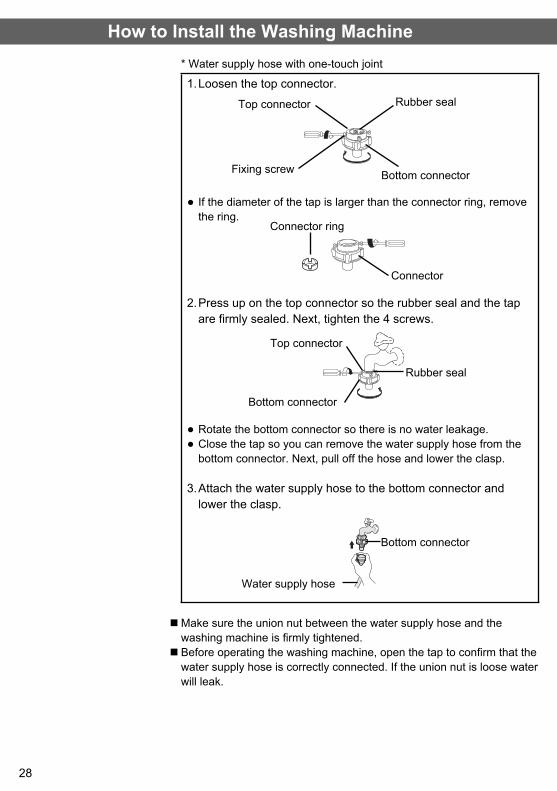
* Water supply hose with one-touch joint
1. Loosen the top connector.
Top connector Rubber seal
Fixing screw Bottom connector
● If the diameter of the tap is larger than the connector ring, remove the ring.
Connector ring
Connector
2. Press up on the top connector so the rubber seal and the tap are firmly sealed. Next, tighten the 4 screws.
Rubber seal
Top connector
Bottom connector
● Rotate the bottom connector so there is no water leakage. ● Close the tap so you can remove the water supply hose from the bottom connector. Next, pull off the hose and lower the clasp.
3. Attach the water supply hose to the bottom connector and lower the clasp.
Bottom connector
Water supply hose
■Make sure the union nut between the water supply hose and the washing machine is fi rmly tightened. ■ Before operating the washing machine, open the tap to confi rm that the water supply hose is correctly connected. If the union nut is loose water will leak.
How to Install the Washing Machine
29
How to Install the Washing Machine ■ Connect the washing machine correctly to a grounded AC power supply. ■ The voltage of the power supply must match the voltage rating of the washing machine. ■ Do not use extension cords or overload the power outlet by using power strips.
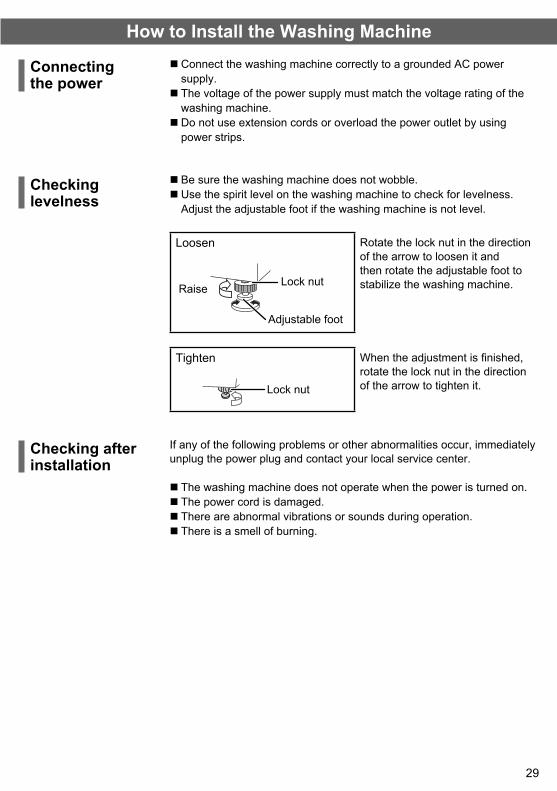
■ Be sure the washing machine does not wobble. ■ Use the spirit level on the washing machine to check for levelness. Adjust the adjustable foot if the washing machine is not level.
Loosen
Lock nut
Adjustable foot
Raise
Rotate the lock nut in the direction of the arrow to loosen it and then rotate the adjustable foot to stabilize the washing machine.
Tighten
Lock nut
When the adjustment is fi nished, rotate the lock nut in the direction of the arrow to tighten it.
If any of the following problems or other abnormalities occur, immediately unplug the power plug and contact your local service center.
■ The washing machine does not operate when the power is turned on. ■ The power cord is damaged. ■ There are abnormal vibrations or sounds during operation. ■ There is a smell of burning.
Connecting the power
Checking levelness
Checking after installation
30
Customer ServiceIf the washing machine malfunctions, check the Operating & Installation Instructions thoroughly before you call for repairs.
If you are unable to identify or solve the problem, contact your local service center.When you call the service center, you will need to tell them the model of the washing machine, describe the malfunction, and give them your address and phone number.
Specifi cations
Model SF-240XWV
Power supply See the rating plate on the back of the washing machine.
Standard water level 150 L (maximum water level)
Standard amount of water used 268 L (Fuzzy program operation)
Water pressure 0.03 to 0.8 MPa (0.3 to 8 Kgf/cm2)
Dimensions Width 724 mm x Depth 744 mm x Height 1109 mm
Weight 68 kg
Model SF-200XWV
Power supply See the rating plate on the back of the washing machine.
Standard water level 148 L (maximum water level)
Standard amount of water used 260 L (Fuzzy program operation)
Water pressure 0.03 to 0.8 MPa (0.3 to 8 Kgf/cm2)
Dimensions Width 724 mm x Depth 744 mm x Height 1094 mm
Weight 67 kg
Model SF-180XWV
Power supply See the rating plate on the back of the washing machine.
Standard water level 147 L (maximum water level)
Standard amount of water used 255 L (Fuzzy program operation)
Water pressure 0.03 to 0.8 MPa (0.3 to 8 Kgf/cm2)
Dimensions Width 724 mm x Depth 744 mm x Height 1094 mm
Weight 67 kg
31
Memo

3WPL102611
Related Documents

![HITACHI CAPITAL CORPORATION HITACHI … the purposes of Directive 2004/39/EC ... HITACHI CAPITAL CORPORATION HITACHI CAPITAL (UK) PLC HITACHI CAPITAL AMERICA CORP. [[] [] ...](https://static.cupdf.com/doc/110x72/5ad063b27f8b9a1d328e3da3/hitachi-capital-corporation-hitachi-the-purposes-of-directive-200439ec-.jpg)