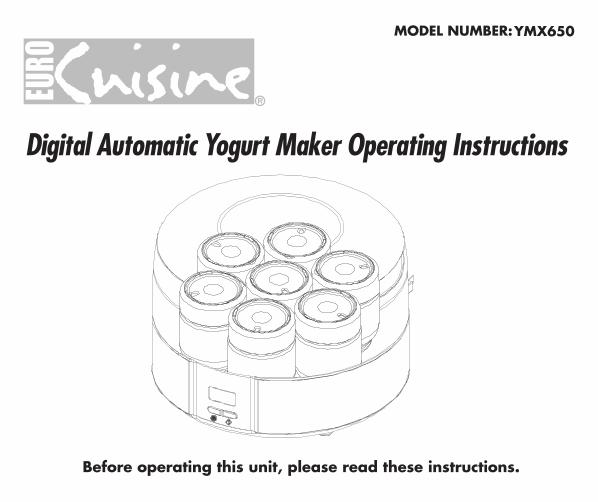
YMX650 Digital Automatic Yogurt Maker Operating Instructions ®

Welcome message from author
This document is posted to help you gain knowledge. Please leave a comment to let me know what you think about it! Share it to your friends and learn new things together.
Transcript
YMX650
Digital Automatic Yogurt Maker Operating Instructions
®

CHARACTERISTICS MEASUREMENTSDimensions:........... 6 3/4“ High x 9 1/2" Diameter 17cm High x 24cm DiameterJar Capacity:..........6 oz (170g) 120V – 13 watts
ACCESSORIES7 glass jars
IMPORTANT SAFEGUARDSBecause we are interested in your safety while using this fine Euro-Cuisine product, we have included these general safeguards; please take the time to carefully read them. They provideimportant information regarding safe use and maintenance of the appliance. Nonobservance of these safeguards may compromise the safety of the appliance, result in injury, and/or void the warranty.
READ THE INSTRUCTIONS1. Keep this booklet safe for future reference.2. To protect against risk of electrical shock, do not put the appliance or cord in water or other liquid. If appliance or cord falls into liquid, unplug the cord from the outlet immediately. Do not reach into the liquid.3. To avoid accidental injury, close supervision is necessary when any appliance is used by or near children.4. Unplug from the outlet when not in use, before taking parts off and before cleaning. To unplug, grasp plug and pull from the electrical outlet. Never pull cord. Allow it to cool before putting on or taking off parts.
SAVE THESE INSTRUCTIONS
5. Do not operate any appliance with damaged cord or plug, or after appliance malfunctions, or after the appliance has been dropped or damaged in any way. Return appliance to and authorized service center for examination and repair.6. The use of attachments not recommended or sold by the manufacturer may cause fire, electrical shock, or injury.7. This appliance is designed for household use. Do not use outdoors8. Do not let cord hang over edge of table or counter, or touch hot surfaces.9. Do not place on or near a hot gas or electric burner, or in a heated oven. Do not place any parts in the microwave oven.10. Do not operate this or any other appliance while under the influence of alcohol or other substances that affect your reaction time or perception.11. Do not touch the parts that are not intended for manipulation.12. Never move the appliance when it is working.13. Do not use the appliance while barefoot. Do not touch the appliance with wet or damp hands.14. After each use, clean all parts that have had contact with food by following the cleaning instructions in this booklet.15. Store the appliance and all of its parts out of the reach of children.16. Plug cord into the wall outlet. To disconnect remove plug from wall outlet.17. Do not use appliance for other than intended uses.18. After unpacking the appliance, check that it is undamaged and that no parts are missing. If you are in any doubt, consult your local service dealer.19. Before connecting, check that the supply voltage details marked on the appliance agree with those of the electrical supply. The label with this information may be found on the bottom of the appliance.20. Household electrical installation must be carried out in accordance with manufacturer's instructions. The manufacturer is not responsible for damage or injuries to persons, animals or objects caused by incorrect installation.21. Do not put on top of a vibrating surface such as the top of a refrigerator or exposed to drafts.
22. Do not keep yogurt in the refrigerator for more than 8-10 days.23. Never put the appliance in the refrigerator.24.Do not touch hot surfaces. Use handles or knobs.25. Extreme caution must be used when moving an appliance containing hot oil or other hot liquids.26. Always attach plug to appliance first, then plug cord into the wall outlet. To disconnect, turn any control to “off”, then remove plug from wall outlet.
Before using your yogurt maker for the first time, remove all packaging. Wash the jars and lids in warm soapy water. Rinse and dry the jars and lids completely. Now your yogurt maker is ready to use. Note: disconnect from power supply after use. Always ensure that the appliance is completely cool before cleaning and storage. Always disconnect from power supply and clean thoroughly before storage. This appliance must be used for the purpose for which it was designed, namely for making yogurt. Any other use must be considered improper and therefore dangerous. The manufacturer cannot be held responsible for any injuries and damage resulting from improper use.
SAVE THESE INSTRUCTIONSNOTICE: This appliance has a polarized plug (one blade is wider than other). As a Safety feature, this plug will fit in a polarized outlet only one way. If the plug does not fit fully in the outlet, reverse the plug. If it still does not fit, contact a qualified electrician. Do not attempt to defeat this safety feature. a A short power-supply cord (or detachable power-supply cord) should be used to reduce the risk
resulting from becoming entangled in or tripping over a longer cord. b) Longer detachable power-supply cords or extension cords are available and may be used if care
is exercised in their use. c) If a longer detachable power-supply cord or extension cord is used: 1) The marked electrical rating of the cord set or extension cord should be at least as great as the
electrical rating of the appliance; and 2) The cord should be arranged so that it will not drape over the countertop or tabletop where it
can be pulled on by children or tripped over unintentionally.If the appliance is of the grounded type, the extension cord should be grounding-type 3-wire cord.
FOR HOUSEHOLD USE ONLY.

NOTES
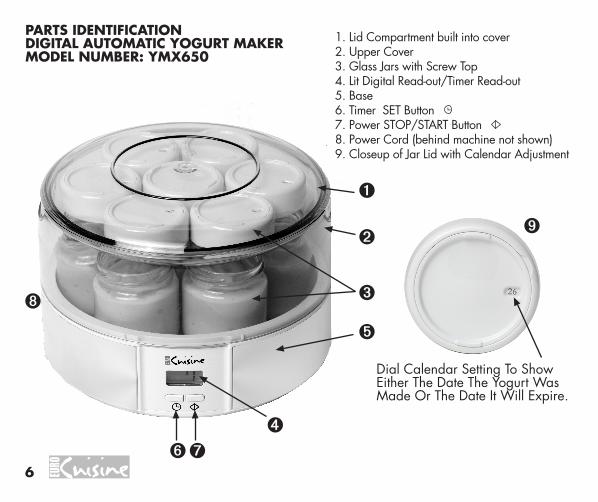
PARTS IDENTIFICATIONDIGITAL AUTOMATIC YOGURT MAKERMODEL NUMBER: YMX650
1. Lid Compartment built into cover2. Upper Cover3. Glass Jars with Screw Top4. Lit Digital Read-out/Timer Read-out5. Base6. Timer SET Button7. Power STOP/START Button8. Power Cord (behind machine not shown)9. Closeup of Jar Lid with Calendar Adjustment
Dial Calendar Setting To Show Either The Date The Yogurt Was Made Or The Date It Will Expire.
MAINTENANCE1. Before cleaning, unplug the appliance.2. Clean the base and the cover with a damp cloth and avoid abrasives.3. Do not immerse the cord, plug or appliance in water or other liquids.4. The Glass Jars are dishwasher safe.
BEFORE FIRST TIME USE1. Remove any labels or stickers from appliance.2. Before first use or after periods of prolonged storage, thoroughly wash cover, glass jars and white lids in warm, soapy water then rinse and dry completely.3. Wipe the inside of Yogurt maker with a damp cloth.
INSTRUCTIONS FOR USE1. Prepare following utensils: a high sided saucepan, a pitcher, and a whisk.2. Ensure all these utensils are thoroughly washed with warm water and soap and they are dry before start making yogurt.3. To make yogurt, pour 7 glass jars (equal to1.3 liter or 42oz) of fresh, pasteurized milk (it can be either whole milk, skimmed or semi-skimmed) into a high-sided saucepan.4. Heat the milk until it boils (82°C or180°F), for 1 to 2 minutes and starts to climb the side of the Saucepan.5. Remove the saucepan from heat and allow the milk to cool to lukewarm (43°C or 110°F). To accelerate the cooling down, place the saucepan in cold water.6. Stir in one glass jar (equal to 170g or 6oz) full of plain yogurt with some of the milk in a separate bowl until the yogurt is dissolved and you have a smooth mixture. (The plain yogurt can either be purchased from a store or from a previous batch of homemade yogurt. If you
use the homemade yogurt, please repeat only 1 time. Freeze-dried Yogurt Starter can be used instead of yogurt. Follow the directions on the Yogurt Starter package).7. Mix the room temperature milk very well with the smooth mixture as prepared above.8. Pour the Mixture into the seven jars of the yogurt maker9. Place the jars - without the white lids - in the yogurt maker.10. Cover the yogurt maker with its clear cover.
Boiling ensures a firmer yogurt familiar to most American tastes.
For Softer Yogurt Without Boiling: You do not have to boil the pasteurized milk; however you must make sure that the milk is at room temperature before pouring it into the glass jars, andyou need to increase the time to 8 hours for whole milk, 10 hours for 2% milk, and up to 12 hours for skim milk.
For Firmer Yogurt Without Boiling: Just add 10 tablespoons of powdered milk to the room temperature pasteurized milk before pouring it into the glass jars.
TO OPERATE1. Plug in the Euro Cuisine Yogurt Maker. 00 is shown on the LCD Display and the 00 is
blinking, the blue light will remain off.
2. Press SET (the left button ) to choose the number of hours for the unit to stay on. Each beep sound represents one hour increase. The timer goes up to 15 hours. In order to advance the timer faster, press SET (the left button ) and hold the button down until the desired time is reached on the display. It will take about 7 hours to make yogurt with whole milk, 9 hours with 2% milk and up to 10 hours with skimmed Milk.
3. After selecting the number of hours, press STOP/START (the right button ) and you will hear a beep sound, this is when the yogurt maker starts working. The blue light will turn on. Make sure that you hear the beep sound, and the blue light is on otherwise the unit is not turned on properly. Once the unit has started, the timer will countdown every hour. A blinking 00 will appear and the blue light will go off on the LCD Display at the end of the cycle, this means that the yogurt maker has finished. Once the cycle is finished the machine will sound 3 beeps every 5 seconds five times, letting you know that the unit has turned off automatically.
3. After selecting the number of hours, press STOP/START (the right button ) and you will hear a beep sound, this is when the yogurt maker starts working. The blue light will turn on. Make sure that you hear the beep sound, and the blue light is on otherwise the unit is not turned on properly. Once the unit has started, the timer will countdown every hour. A blinking 00 will appear and the blue light will go off on the LCD Display at the end of the cycle, this means that the yogurt maker has finished. Once the cycle is finished the machine will sound 3 beeps every 5 seconds five times, letting you know that the unit has turned off automatically.
Please note: Every time that you press the button you will hear a beep sound, if you don’t hear press again.
4. Water may condense on the clear lid of the yogurt maker. When you remove the clear lid, take care not to drip any accumulated water into the finished yogurt.
5. Set the calendar setting on the white lids with the date you made the yogurt or with the date the yogurt will expire (10 days). Cover the individual jars with the white lids and chill them in the refrigerator for a minimum of three hours before eating.
THE YOGURT MAKER SHOULD REMAIN PERFECTLY STILL DURING THE MATURING PROCESS. DO NOT MOVE THE APPLIANCE OR REMOVE ANY GLASS JARS AS THIS WILL AFFECT THE FIRMNESS OF THE YOGURT.
3. After selecting the number of hours, press STOP/START (the right button ) and you will hear a beep sound, this is when the yogurt maker starts working. The blue light will turn on. Make sure that you hear the beep sound, and the blue light is on otherwise the unit is not turned on properly. Once the unit has started, the timer will countdown every hour. A blinking 00 will appear and the blue light will go off on the LCD Display at the end of the cycle, this means that the yogurt maker has finished. Once the cycle is finished the machine will sound 3 beeps every 5 seconds five times, letting you know that the unit has turned off automatically.
CHOOSING THE MILKThe following types of milk may be used:1. Pasteurized milk of any fat content (full, 2%, 1% or fat-free)2. Powdered milk3. Long-life UHT sterilized milk4. Soy Milk. Be sure to use UHT soy milk which contains one of the following ingredients: fructose, honey or malt. These ingredients are necessary for fermentation and you will not succeed if none are available in the milk.Fresh milk must be boiled and, if necessary, filtered prior to use. The taste and texture of yogurt varies according to the milk and yogurt starter selected. For best results do not use: 1. Expired milk; 2. Expired yogurt; or 3. Yogurt with flavoring, fruit, or other ingredients.
RECIPESThe Euro-Cuisine yogurt maker can be used to make different types of yogurt:
UNFLAVORED YOGURTThe taste and texture of yogurt varies according to the milk and yogurt starter selected. Yogurtmay be made with milk of any fat content, even nonfat milk. You should experiment with milkof various fat contents to determine which you prefer.
YOGURT FLAVORED AFTER COOKINGYou may choose to make flavored yogurt and add sugar, honey, flavorings, fruit, or otheringredients to taste just prior to eating.
YOGURT FLAVORED WITH PRESERVED FRUITIngredients:• 1/2 cup chopped preserved fruit• 5 tablespoons of the syrup in which the fruit was preserved• 5 tablespoons of unflavored yogurt or 1 tablespoon of culture• 1 quart or 1 liter of milkHeat the milk until it boils (82°C -180°F), for 1 to 2 minutes and starts to climb the side of the Saucepan. Remove the saucepan from heat and allow the milk to cool to lukewarm(43°C -110°F). To accelerate the cooling down, place the saucepan in cold water. Stir together the culture and milk until smooth. Add the syrup while stirring. Stir in the chopped fruit. Divide the mixture between the seven jars. Place the jars - without the white lids - in the yogurt maker. Cover the yogurt maker with its clear cover. Turn machine on.
YOGURT FLAVORED WITH JAM OR JELLYIngredients:• 4-5 tablespoons of jam or jelly• 5 tablespoons of unflavored yogurt or 1 tablespoon of culture• 1 quart or 1 liter of milkHeat the milk until it boils (82°C -180°F), for 1 to 2 minutes and starts to climb the side of the Saucepan. Remove the saucepan from heat and allow the milk to cool to lukewarm (43°C -110°F). To accelerate the cooling down, place the saucepan in cold water. Warm the jam or jelly in a pan over low heat. Add half of the milk and stir until smooth; let cool again to (43°C -110°F), stir together the culture, jam or jelly, and remaining milk until smooth. Add the Jam or Jelly while stirring. Divide the mixture between the seven jars. Place the jar- without the white lids - in the yogurt maker. Cover the yogurt maker with its clear cover. Turn machine on.
12
YOGURT FLAVORED WITH SYRUPIngredients:• 4-5 tablespoons of concentrated syrup (e.g. orange, lemon, pomegranate, strawberry, etc.)• 5 tablespoons of unflavored yogurt or 1 tablespoon of culture• 1 quart or 1 liter of milkHeat the milk until it boils (82°C -180°F), for 1 to 2 minutes and starts to climb the side of the Saucepan. Remove the saucepan from heat and allow the milk to cool to lukewarm (43°C-110°F). To accelerate the cooling down, place the saucepan in cold water. Stir together the culture and milk until smooth. Add the syrup while stirring. Divide the mixture between the seven jars. Place the jars - without the white lids - in the yogurt maker. Cover the yogurt maker with its clear cover. Turn machine on.
YOGURT FLAVORED WITH FRESH FRUITIngredients:• 1/2 cup chopped fresh fruit• 4-5 tablespoons of sugar or to taste• 1-3 cup water• 5 tablespoons of unflavored yogurt or 1 tablespoon of culture• 1 quart or 1 liter of milkHeat the milk until it boils (82°C -180°F), for 1 to 2 minutes and starts to climb the side of the Saucepan. Remove the saucepan from heat and allow the milk to cool to lukewarm (43°C-110°F). To accelerate the cooling down, place the saucepan in cold water. Cook the fruit in the sugar and water over low heat for 10-15 minutes or until thickened. Let cool again to (43°C-110°F). Stir together the culture and milk until smooth. Stir in the chopped fruit. Divide the mixture between the seven jars. Place the jars - without the white lids - in the yogurt maker. Cover the yogurt maker with its clear cover. Turn machine on.
RECIPES
Euro-Cuisine, IncP.O. Box 351208
Los Angeles, CA 90035Tel: 323-278-1111Fax: 323-278-1117
e-mail: [email protected]
YOGURT FLAVORED WITH COFFEEIngredients:• 2 tablespoons of sugar or to taste• 1 tablespoon of instant coffee• 5 tablespoons of unflavored yogurt or 1 tablespoon of culture• 1 quart or 1 liter of milkHeat the milk until it boils (82°C -180°F), for 1 to 2 minutes and starts to climb the side of the Saucepan. Remove the saucepan from heat and allow the milk to cool to lukewarm(43°C -110°F). To accelerate the cooling down, place the saucepan in cold water. Dissolve the sugar and coffee with the milk. Stir together the culture and milk until smooth. Divide the mixture between the seven jars. Place the jars - without the white lids - in the yogurt maker. Cover the yogurt maker with its clear cover. Turn machine on.
Euro-Cuisine Is A Registered Trademark of Euro-Cuisine, Inc.
13
MODELE: YMX650
Guide d’utilisation et directives de la yaourtière
Lire attentivement les directives avant d’utiliser cet appareil
®

Dimensions et capacitéHauteur : …………………17cm (6.75_ pouces)Diamètre : ………………..24cm (9.5 _ pouces)Bocal : ……………………6 onces (170 g) 120V – 13 wattsAccessoires7 bocaux de verre
Mesures de sécuritéAyant à cœur votre sécurité lors de l’utilisation de cet article de premier choix Euro-Cuisine, nous incluons ces mesures de sécurité courantes. Veuillez prendre le temps de bien les lire. Elles fournissent des renseignements importants quant à l’utilisation préventive et l’entretien de l’appareil. Ne pas prendre connaissance de ces mesures de sécurité pourrait compromettre la sûreté de l’appareil, occasionner des blessures, et/ou annuler la garantie.
LIRE LES DIRECTIVES1. Gardez cette brochure en lieu sûr pour références ultérieures.2. Ne plongez pas l’appareil ou le cordon d’alimentation dans l’eau, ou autre liquide, afin de vous prémunir d’un risque de décharge électrique. Si l’appareil ou le cordon tombe dans du liquide, débranchez immédiatement le cordon de la prise. Ne pas chercher à retirer le cordon du liquide.3. Exercez une surveillance accrue lorsque les enfants utilisent l’appareil, ou s’ils sont à proximité, afin d’éviter toutes blessures accidentelles.4. Débranchez l’appareil de la prise de courant lorsque hors fonction, avant d’enlever les pièces et de le nettoyer. Lors du débranchement, saisissez la fiche et retirez de la prise électrique. Ne jamais tirer le cordon. Laissez refroidir l’appareil avant d’enlever ou replacer les pièces.
15
5. N’utilisez pas un appareil avec un cordon ou une fiche endommagée ou lorsque l’appareil ne fonctionne pas bien, ou s’il est tombé sur le sol ou endommagé d’une manière quelconque. Retournez l’appareil dans un centre de service autorisé pour un examen et une réparation.6. Utiliser des accessoires qui ne sont pas recommandés ou vendus par le fabricant peut provoquer un incendie, une décharge électrique, ou des blessures.7. Cet appareil est conçu pour un usage domestique. Ne vous en servez pas à l’extérieur.8. Ne laissez pas le cordon pendre au bord de la table ou toucher à des surfaces chaudes.9. Ne déposez pas à proximité ou sur un brûleur à gaz, un élément de la cuisinière ou au four. Ne mettez aucune pièce dans le four à micro-ondes.10. N’utilisez pas cet appareil ou tout autre sous l’effet de l’alcool ou d’autres substances qui peuvent influer sur votre temps de réaction ou perception.11. Ne manipulez pas les pièces pour autre utilisation.12. Ne déplacez jamais l’appareil en marche.13. Ne vous servez pas de l’appareil, si vous êtes nu-pieds, si vos mains sont trempées ou humides.14. Nettoyez toutes les pièces ayant servies à la préparation, d’après les directives dans cette brochure et ce après chaque utilisation.15. Rangez l’appareil et toutes les pièces inclusives hors de la portée des enfants.16. Branchez le cordon dans la prise murale. Lors de la mise hors circuit, retirez la fiche de la prise murale.17. Branchez le cordon dans la prise murale. Lors de la mise hors circuit, retirez la fiche de la prise murale.18. N’utilisez cet appareil qu’aux fins destinées.19. Déballez l’appareil. Vérifiez qu’il ne soit pas endommagé et qu’aucune pièce ne manque. Dans le doute, consultez le département de service chez votre fournisseur le plus près.20. Avant de procéder à la connexion, vérifiez que le degré de tension (voltage) précisé sur l’appareil soit en conformité avec celui de votre alimentation en électricité. Cette information se trouve sur l’étiquette au-dessous de l’appareil.
16
21. Les installations électriques domestiques doivent être conformes aux directives du fabricant. Celui-ci ne peut être tenu responsable des dommages matériels ou blessures corporelles à des individus ou à des animaux, résultant d’une mauvaise installation.22. Ne le mettez pas sur une surface en vibration, telle que le dessus d’un réfrigérateur, ou exposé aux courants d’air.23. Ne conservez pas le yogourt plus de 8 à 10 jours dans le réfrigérateur.24. Ne pas toucher aux surfaces chaudes. Utiliser les poignées ou les boutons.25. Soyez extrêmement prudent si vous devez déplacer un appareil électrique contenant de l’huile chaude ou tout autre liquide chaud.26. Toujours fixer en premier le cordon d’alimentation à l’appareil puis brancher celui-ci dans la prise de courant murale. Avant de retirer le cordon d’alimentation de la prise de courant murale, mettre l’appareil en positions « arrêt » avec le bouton.
Retirez tout l’emballage avant l’utilisation initiale de votre yaourtière. Lavez les bocaux et couvercles dans une eau chaude savonneuse. Rincez et séchez les bocaux et couvercles. Votre yaourtière est maintenant prête à utiliser. Remarque : Débranchez de l’alimentation après utilisation. Assurez-vous toujours que l’appareil soit entièrement refroidi, avant de nettoyer et de ranger. Débranchez de l’alimentation et nettoyez à fond avant de ranger. Cet appareil doit servir aux fins pour lesquelles il a été conçu, c’est-à-dire à la préparation de yogourt. Tout autre fin sera considérée abusive et, par conséquent, dangereuse. Le fabricant ne peut être tenu responsable pour les blessures et dommages suite à une utilisation inconvenante.
17
18
CONSERVEZ CES DIRECTIVESAVERTISSEMENT : Cet appareil est muni d’une fiche polarisée (une lame plus large que l’autre). De par sa caractéristique de sûreté, cette fiche s’insère dans une prise polarisée à sens unique. Dans le cas où celle-ci ne s’insérerait pas complètement dans la prise, mettez-là dans l’autre sens. Si cela ne fonctionne toujours pas, communiquez avec un électricien. Ne tentez pas de déjouer cette caractéristique de sûreté. a) Un court fil d’alimentation (ou un court fil d’alimentation détachable) doit être utilisé au
lieu d’un fil plus long afin de réduire les risques de s’entortiller et/ou de trébucher. b) De plus longs fils d’alimentation ou de rallonges sont disponibles et peuvent être utilisés
tout respectant les normes d’utilisations de ces fils. c) Si un plus long fil d’alimentation ou une rallonge est utilisé: 1) Le calibrage du fil d’alimentation ou de la rallonge doit être le même que celui de
l’appareil ou supérieur; et 2) Ne pas laisser le cordon pendre du bout d’un comptoir ou d’une table afin que les
enfants ne puissent tirer dessus par inadvertance ou trébucher dessus. Si l’appareil est équipé d’un cordon à 3 fils reliés à la terre (fiche à 3 bornes) la rallonge doit
être aussi équipée d’un cordon à 3 fils reliés à la terre.
POUR USAGE DOMESTIQUE SEULEMENT
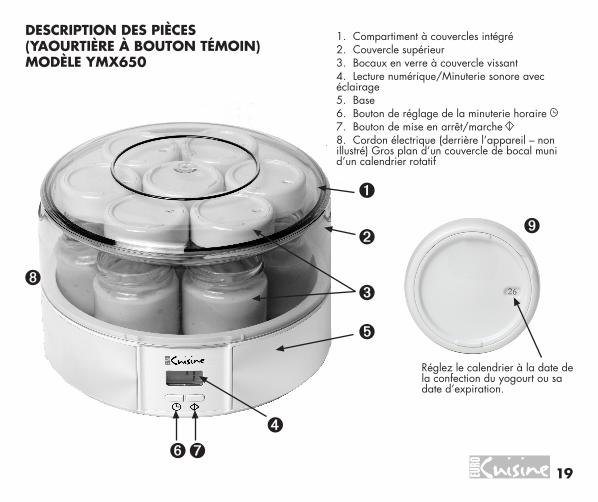
DESCRIPTION DES PIÈCES(YAOURTIÈRE À BOUTON TÉMOIN)MODÈLE YMX650
1. Compartiment à couvercles intégré2. Couvercle supérieur3. Bocaux en verre à couvercle vissant4. Lecture numérique/Minuterie sonore avec éclairage5. Base6. Bouton de réglage de la minuterie horaire7. Bouton de mise en arrêt/marche8. Cordon électrique (derrière l’appareil – non illustré) Gros plan d’un couvercle de bocal muni d’un calendrier rotatif
Réglez le calendrier à la date de la confection du yogourt ou sa date d’expiration.
19

ENTRETIEN1. Débranchez l’appareil avant de nettoyer.2. Nettoyez la base et le couvercle avec un linge humide. Évitez les abrasifs.3. Ne submergez pas le cordon, la fiche ou l’appareil dans l’eau ou autres liquides.4. Les bocaux de verre sont sans risque dans le lave-vaisselle.
AVANT L’UTILISATION INITIALE1. Retirez toutes les étiquettes ou autocollants de l’appareil.2. Lavez à fond le couvercle, les bocaux de verre et les couvercles blancs dans l’eau chaude savonneuse, puis rincez et séchez.3. Essuyez l’intérieur de la yaourtière avec un linge humide.
Mode d’emploi1. Ayez à portée de la main les ustensiles suivants : une casserole profonde, un pichet et un fouet.2. Assurez-vous que tous ces ustensiles soient lavés à fond avec de l’eau chaude et du savon et qu’ils soient secs avant de procéder à la préparation du yogourt.3. Confection de yogourt : versez une quantité égale à 7 bocaux (1.3 litre / 42 onces) de lait pasteurisé frais (homogénéisé, écrémé ou partiellement écrémé) dans une casserole profonde.4. Chauffez le lait jusqu’à ébullition (82°C/180°F) pendant 1 à 2 minutes.5. Retirez la casserole de l’élément et laissez refroidir jusqu’à (43°C or 110°F). Déposez la casserole dans l’eau froide afin d’accélérer le refroidissement.6. Dans un bol à part, combiner tout en remuant la quantité d’un bocal rempli de yogourt (égal à 170g/6 onces) à une portion de lait passé au tamis jusqu’à ce que le yogourt soit dissout et donne une consistance homogène. (Le yogourt nature peut très bien être acheté en magasin ou être fait maison. Si c’est un yogourt maison alors veuillez répéter une fois seulement. La culture lyophilisée peut remplacer le yogourt. Suivre le mode de préparation sur l’emballage de la culture.)
20
7. Ajoutez le reste du lait à température ambiante au mélange ci-haut et bien mélanger.8. Versez le mélange dans les sept bocaux de la yaourtière.9. Placez les bocaux - sans les couvercles blancs - dans la yaourtière. Recouvrez la yaourtière de son couvercle transparent.
L’ébullition assure un yogourt plus ferme familier au goût de la plupart des Américains.
Pour un yogourt à consistance molle sans ébullition : Vous n’avez pas à faire bouillir le lait pasteurisé, cependant vous devez vous assurer que le lait est à température ambiante avant de le transvider dans les bocaux en verre et vous devez prévoir une augmentation de temps dans la durée du processus soit : jusqu’à 8 heures pour le lait entier, 10 heures pour le lait 2 % et jusqu’à 12 heures pour le lait écrémé.
Pour un yogourt plus ferme sans ébullition : Ajoutez simplement 10 cuillères à table de lait en poudre au lait pasteurisé à température ambiante avant de le transvider dans les bocaux en verre.
INSTRUCTIONS1. Branchez la yaourtière Euro Cuisine. L’écran ACL affiche la lecture 00 en clignotant et la
lumière bleue s’éteint.2. Appuyez sur réglage (le bouton à gauche ) afin de choisir le nombre d’heures que
l’appareil doit rester en marche. Chaque timbre sonore (bip-bip) signifie une heure de plus. La minuterie a une durée de 15 heures. Appuyez sur le réglage (le bouton à gauche ) et tenir afin de programmer la minuterie plus rapidement. Le temps de fabrication du yogourt avec le lait entier prendra environ 7 heures, 9 heures avec le lait 2% et jusqu’à 10 heures avec le lait écrémé.
21
3. Appuyez sur la mise en arrêt/marche (le bouton à droite ) après avoir sélectionner le nombre d’heures. Un timbre sonore (bip-bip) retentira lorsque la yaourtière démarre. La lumière bleue s’allumera. Assurez-vous de bien entendre le timbre sonore (bip-bip) et que la lumière bleue s’allume sinon c’est que l’étape du démarrage n’a pas été effectuée correctement. La minuterie fera le décompte des heures dès que le démarrage est amorcé. Lorsque la yaourtière termine son cycle, une lecture 00 en clignotant apparaît et la lumière bleue s’éteint à l’écran ACL Ceci fait, un timbre sonore retentira à 3 reprises (3 fois bip-bip) à chaque 5 secondes et cette séquence se fera 5 fois de suite, vous avisant que la yaourtière s’est automatiquement placée en position d’arrêt.
Remarque :Chaque fois que vous pressez sur le bouton vous entendrez un timbre sonore (bip-bip), sinon pressez de nouveau.
4. Une condensation peut se former dans le couvercle transparent de la yaourtière. Lorsque vous retirerez le couvercle transparent, prenez garde de ne pas laisser égoutter l’accumulation d’eau dans le yogourt.
5. Régler le calendrier sur chaque couvercles blancs d’après la date de la confection ou sa date d’expiration (10 jours). Couvrir les bocaux individuels avec les couvercles blancs et refroidir au moins 3 heures au réfrigérateur avant de déguster.
LA YAOURTIÈRE DOIT RESTER IMMOBILE AU MOMENT DU PROCESSUS D’INCUBATION. NE DÉPLACEZ PAS L’APPAREIL ET/OU NE RETIREZ PAS LES BOCAUX EN VERRE AUQUEL CAS LA FERMETÉ DU YOGOURT S’EN TROUVERA COMPROMISE.
22
SÉLECTION DU LAITThe following types of milk may be used:Choisir son lait parmi la liste ci-dessous.1. Lait pasteurisé de toute sorte (homogénéisé, 2%, 1% ou écrémé (sans gras).2. Lait en poudre.3. Lait stérilisé U.H.T. – à longue conservation.4. Lait de soya. Assurez-vous d’utiliser du lait de soya U.H.T. contenant un des ingrédients suivants : fructose, miel ou malt. Ces ingrédients sont indispensables à une fermentation. Si aucun ne se retrouve dans le lait, vous subirez un échec.Le lait frais doit être bouilli et, si nécessaire, filtré avant l’utilisation. Le goût et la texture du yogourt varie selon la sélection du lait et de la culture de yogourt choisie. Pour de meilleurs résultats, n’utilisez pas : 1. Lait périmé. 2. Yogourt périmé. 3. Yogourt à saveur, avec fruits, ou autres ingrédients.
RECETTESLa yaourtière Euro-Cuisine peut être utilisée pour fabriquer différentes saveurs de yogourt.
YOGOURT NATURELe goût et la consistance du yogourt diffère selon le choix du lait et de la culture. Le yogourt peut être fait à partir de n’importe quel lait car le pourcentage de gras n’altère pas la qualité du yogourt, même écrémé. Tentez l’expérience afin de mieux savoir lequel donnera le meilleur résultat escompté.
YOGOURT PARFUMÉ APRÈS CUISSONUn choix de yogourt à saveur ajoutée s’offre à vous soit en ajoutant du sucre, miel, parfums, fruits, ou autres ingrédients pour rehausser juste avant de manger.
23
RECETTESYOGOURT AUX FRUITS EN CONSERVEIngrédients :� tasse de fruits en conserve hachés� 5 c. à table de sirop des fruits en conserve� 5 c. à table de yogourt nature ou 1 c. à table de culture� 1 litre de laitChauffez le lait jusqu’à ébullition (82°C / 180°F), 1 à 2 minutes, jusqu’à ce que le lait monte sur les parois de la casserole. Retirez la casserole du feu et laissez tiédir le lait jusqu’à (43° / 110°F). Mettez la casserole dans l’eau froide afin d’accélérer le processus. Mélangez ensemble la culture et le lait jusqu’à consistance homogène. Ajoutez le sirop et continuez de mélanger. Ajoutez en remuant les fruits. Divisez la préparation entre les 7 bocaux. Placez les bocaux - sans les couvercles blancs – dans la yaourtière. Fixez le couvercle supérieur transparent sur la yaourtière. Mettez l’appareil en marche.
YOGOURT À LA CONFITURE OU GELÉE� 4 – 5 c. à table de confiture ou gelée� 5 c. à table de yogourt nature ou 1 c. à table de culture� 1 litre de laitChauffez le lait jusqu’à ébullition (82°C / 180°F), 1 à 2 minutes, jusqu’à ce que le lait monte sur les parois de la casserole. Retirez la casserole du feu et laissez tiédir le lait jusqu’à (43°C / 110°F). Mettez la casserole dans l’eau froide afin d’accélérer le processus. Réchauffez la confiture ou gelée dans une poêle à feu doux. Ajoutez une demie portion de lait (1/2 litre) et remuez jusqu’à consistance homogène. Laissez tiédir jusqu’à (43°C / 110°F). Mélanger ensemble la culture, la confiture ou la gelée et le reste du lait jusqu’à consistance homogène. Ajoutez la confiture ou la gelée tout en brassant. Divisez la préparation entre les 7 bocaux. Placez les bocaux - sans les couvercles blancs – dans la yaourtière. Fixez le couvercle supérieur transparent sur la yaourtière. Mettez l’appareil en marche.
24
YOGOURT AU SIROPIngrédients : � 4 – 5 c. à table de sirop concentré (orange, citron, pomme grenade, fraise, etc.)� 5 c. à table de yogourt nature ou 1 c. à table de culture� 1 litre de laitChauffez le lait jusqu’à ébullition (82°C / 180°F), 1 à 2 minutes, jusqu’à ce que le lait monte sur les parois de la casserole. Retirez la casserole du feu et laissez tiédir le lait jusqu’à (43°C / 110°F). Mettez la casserole dans l’eau froide afin d’accélérer le processus. Mélangez ensemble la culture et le lait jusqu’à consistance homogène. Ajoutez le sirop tout en mélangeant. Divisez la préparation entre les 7 bocaux. Placez les bocaux - sans les couvercles blancs - dans la yaourtière. Fixez le couvercle supérieur transparent sur la yaourtière. Mettez l’appareil en marche.
YOGOURT AU FRUIT FRAISIngrédients :� tasse de fruit frais haché� 4 – 5 c. à table de sucre ou au goût� 1 – 3 tasses d’eau� 5 c. à table de yogourt nature ou 1 c. à table de culture� 1 litre de laitChauffez le lait jusqu’à ébullition (82°C / 180°F), 1 à 2 minutes, jusqu’à ce que le lait monte sur les parois de la casserole. Retirez la casserole du feu et laissez tiédir le lait jusqu’à (43°C / 110°F). Mettez la casserole dans l’eau froide afin d’accélérer le processus. Chauffez le(s) fruit(s) dans le sucre et l’eau à feu doux pour une durée de 10 – 15 minutes ou jusqu’à épaississement. Laissez tiédir jusqu’à (43°C / 110°F). Mélangez ensemble la culture et le lait jusqu’à consistance homogène. Ajoutez les fruits hachés tout en remuant. Divisez la préparation entre les 7 bocaux. Placez les bocaux - sans les couvercles blancs - dans la yaourtière. Fixez le couvercle supérieur transparent sur la yaourtière. Mettez l’appareil en marche.
25
RECETTES

YOGOURT À SAVEUR DE CAFÉIngrédients : � 2 c. à table de sucre ou au goût� 1 c. à table de café instantané� 5 c. à table de yogourt nature ou 1 c. à table de culture� 1 litre de laitChauffez le lait jusqu’à ébullition (82°C / 180°F), 1 à 2 minutes, jusqu’à ce que le lait monte sur les parois de la casserole. Retirez la casserole du feu et laissez tiédir le lait jusqu’à (43°C / 110°F). Mettez la casserole dans l’eau froide afin d’accélérer le processus. Dissolvez le sucre et le café dans le lait. Mélangez ensemble la culture et le lait jusqu’à consistance homogène. Divisez la préparation entre les 7 bocaux. Placez les bocaux - sans les couvercles blancs - dans la yaourtière. Fixez le couvercle supérieur transparent sur la yaourtière. Mettez l’appareil en marche.
RECETTES
26

NOTES:
27
28
Euro-Cuisine, Inc.P.O.Box 351208
Los Angeles, Californie 90035Téléphone : 1 (323) 278-1111Télécopieur : 1 (323) 278-1117Courriel : [email protected]
�www.eurocuisine.net
Euro-cuisine est une marque déposée de Euro-Cuisine, Inc.
Related Documents