Creating a PrestaShop module Table of content Creating a PrestaShop module What is a PrestaShop module? Technical principles behind a module Modules' operating principles The PrestaShop file structure Modules folder About the cache Organizing your module Creating a first module The install() and uninstall() methods The Configuration object The Shop object The icon file Appearance in the "Modules" page About the config.xml file Implementing hooks Displaying content Embedding a template in the theme Using Smarty Adding a configuration page The getContent() method Displaying the form Module translation Troubleshooting PrestaShop official forum Our bug-tracker Official PrestaShop websites Creating a PrestaShop module What is a PrestaShop module? PrestaShop's extensibility revolves around modules, which are small programs that make use of PrestaShop's functionality and changes them or add to them in order to make PrestaShop easier to use or more customized. Technical principles behind a module A PrestaShop module consists of a main PHP file with as many other PHP file as needed, and all the image and TPL files necessary to display the information. Let's see an example with PrestaShop's module: blockuserinfo

Welcome message from author
This document is posted to help you gain knowledge. Please leave a comment to let me know what you think about it! Share it to your friends and learn new things together.
Transcript
Creating a PrestaShop module
Table of content
Creating a PrestaShop moduleWhat is a PrestaShop module?
Technical principles behind a moduleModules' operating principlesThe PrestaShop file structureModules folderAbout the cache
Organizing your moduleCreating a first moduleThe install() and uninstall() methodsThe Configuration objectThe Shop objectThe icon fileAppearance in the "Modules" page
About the config.xml fileImplementing hooks
Displaying contentEmbedding a template in the theme
Using SmartyAdding a configuration page
The getContent() methodDisplaying the form
Module translationTroubleshooting
PrestaShop official forumOur bug-trackerOfficial PrestaShop websites
Creating a PrestaShop module
What is a PrestaShop module?
PrestaShop's extensibility revolves around modules, which are small programs that make use of PrestaShop's functionality and changes them or add to them in order to make PrestaShop easier to use or more customized.
Technical principles behind a module
A PrestaShop module consists of a main PHP file with as many other PHP file as needed, and all the image and TPL files necessary to display the information.
Let's see an example with PrestaShop's module:blockuserinfo
Any PrestaShop module, once installed on an online shop, can interact with one or more "hooks". Hooks enable you to "hook" your code to the current View at the time of the code parsing (i.e., when displaying the cart or the product sheet, when displaying the current stock...). Specifically, a hook is a shortcut to the various methods available from the Module object, as assigned to that hook.
Modules' operating principles
Modules are the ideal way to let your talent and imagination as a developer express themselves, as the creative possibilities are many.
They can display a variety of content (blocks, text, etc.), perform many tasks (batch update, import, export, etc.), interface with other tools...
Modules can be made as configurable as necessary; the more configurable it is, the easier it will be to use, and thus will be able to address the need of a wider range of users.
One of the main advantages of a module is to add functionalities to PrestaShop without having to edit its core files, thus making it easier to perform an update without having the transpose all core changes. Indeed, you should always strive to stay away from core files when building a module, even though this can prove hard to do in some situations...
The PrestaShop file structure
The PrestaShop developers have done their best to clearly and intuitively separate the various parts of the software.
Here is how the files are organized:
/admin: contains all the PrestaShop files pertaining to the back-office. When accessing this folder with your browser, you will be asked to provide proper identification, for security reasons. : you should make sure to protect that folder with a or file!Important .htaccess .htpasswd/cache: contains temporary folders that are generated and re-used in order to alleviate the server's load./classes: contains all the files pertaining to PrestaShop's object model. Each file represents (and contains) a PHP class, and its methods/properties./config: contains all of PrestaShop's configuration files. Unless asked to, you should edit them, as they are directly handled by neverPrestaShop's installer and back-office./controllers: contains all the files pertaining to PrestaShop controllers – as in Model-View-Controller (or MVC), the software architecture used by PrestaShop. Each file controls a specific part of PrestaShop./css: contains all CSS files that are not attached to themes – hence, these are mostly used by the PrestaShop back-office./docs: contains some documentation. : it should be deleted in a production environment.Note/download: contains your digital products, which can be downloaded: PDFs, MP3s, etc./img: contains all of PrestaShop's default images, icons and picture files – that, those that do not belong to the theme. This is where you can find the pictures for product categories ( sub-folder, those for the products ( sub-folder) and those for the back-office itself ( sub-folder)./c /p /admin/install: contains all the files related to PrestaShop's installer. You will be required to delete it after installation, in order to increase security./js: contains all JavaScript files that are not attached to themes. Most of them belong to the back-office. This is also where you will find the jQuery framework./localization: contains all of PrestaShop's localization files – that is, files that contain local information, such as currency, language, tax rules and tax rules groups, states and the various units in use in the chosen country (i.e., volume in liter, weight in kilograms, etc.)./log: contains the log files generated by PrestaShop at various stages, for instance during the installation process./mails: contains all HTML and text files related to e-mails sent by PrestaShop. Each language has its specific folder, where you can manually edit their content if you wish./modules: contains all of PrestaShop's modules, each in its own folder. If you wish to definitely remove a module, first uninstall it from the back-office, then only can you delete its folder./override: this is a special folder that appeared with PrestaShop 1.4. By using PrestaShop's regular folder/filename convention, it is possible to create files that override PrestaShop's default classes or controllers. This enables you to change PrestaShop core behavior without touching to the original files, keeping them safe for the next update./pdf: contains all the template files ( ) pertaining to the PDF file generation (invoice, delivery slips, etc.). Change these files in order to .tplchange the look of the PDF files that PrestaShop generates./themes: contains all the currently-installed themes, each in its own folder./tools: contains external tools that were integrated into PrestaShop. For instance, this were you'll find Smarty (template/theme engine), FPDF (PDF file generator), Swift (mail sender), PEAR XML Parser (PHP tool)./translations: contains a sub-folder for each available language. However, if you wish to change the translation, you must do so using the PrestaShop internal tool, and edit them directly in this folder.not/upload: contains the files that would be uploaded by clients for customizable products (for instance, a picture that a client wants printed on a mug).
/webservice: contains files that enable third-party applications to access PrestaShop through its API.
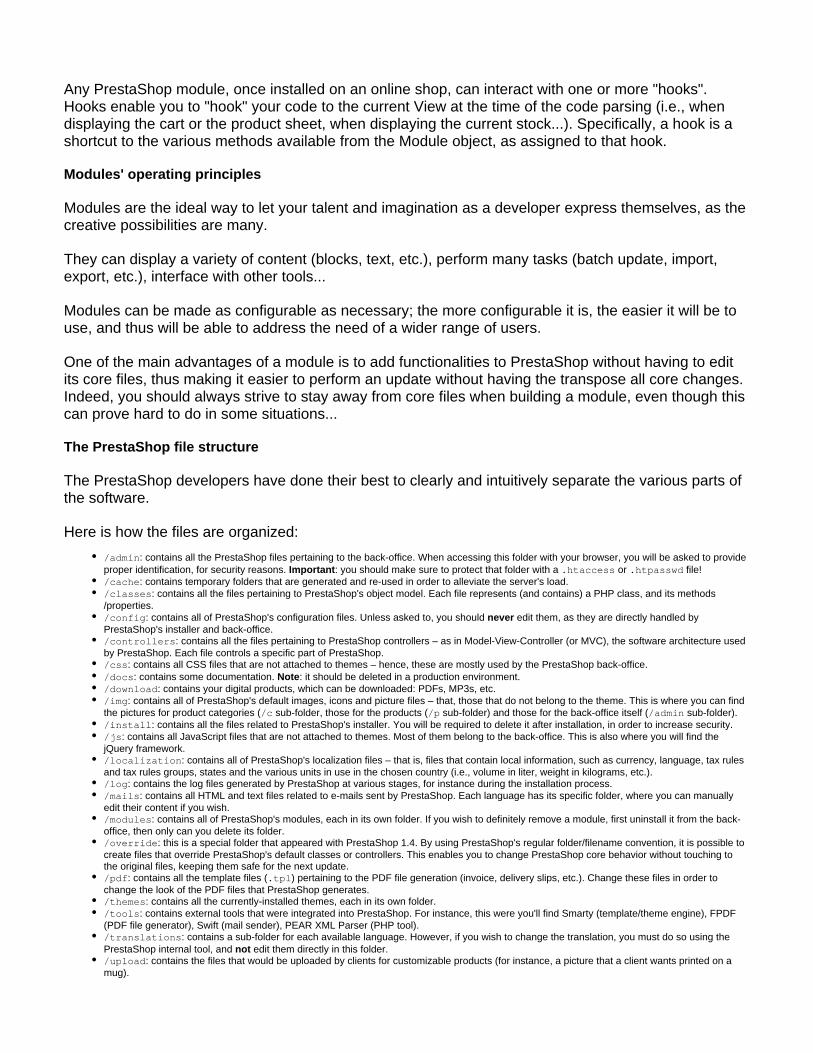
Modules folder
PrestaShop's modules are most often found in the folder, which is /modulesat the root of the PrestaShop main folder. This is true for both default modules (provided with PrestaShop) and 3rd-party modules that are subsequently installed.Modules can also be part of a theme if they are really specific to it. In that case, they would be in the theme's own folder, and therefore under /modulesthe following path: /themes/mytheme/modules
Each module has its own sub-folder inside the folder: , /modules /bankwire, etc./birthdaypresent
About the cache
The file contains the link between the class and /cache/Class_index.phpthe declaration file. It can be safely deleted.
The folder contains the list of all the base modules./cache/xml
When the store's front-end doesn't quite reflect your changes and emptying the browser's cache is not effective, you should try emptying the following folders:
/cache/smarty/cache/cache/smarty/compile
Organizing your module
A module is made of a lot of files, all stored in a folder that bears the same name as the module, that folder being in turn stored in the folder at the root of the main PrestaShop folder: /modules /modules
./name_of_the_module/
/views/templates/css
Sub-folder for CSS files used.
If the module needs to work with PrestaShop 1.4, the CSS files should be placed in a folder at the /cssroot of the module's folder.
/views/templates/js
Sub-folder for JavaScript files.
If the module needs to work with PrestaShop 1.4, the JavaScript files should be placed in a folder /jsat the root of the module's folder.
/views/templates/img
Sub-folder for image files.
If the module needs to work with PrestaShop 1.4, the image files should be placed in a folder at /imgthe root of the module's folder.
Default files and folders for a PrestaShop 1.5 module:
Main file: . This PHP file should have the same name as its root folder.name_of_the_module.phpCache configuration file (generated by PrestaShop): config.xml.View files: JavaScript, images, CSS files, template files, etc. They can be placed in folders within the module's main folder:
/views/css folder for CSS files. If the module needs to work with PrestaShop 1.4, the CSS files should be placed in a folder at /cssthe root of the module's folder./views/img folder for image files. If the module needs to work with PrestaShop 1.4, the images files should be placed in an /imgfolder at the root of the module's folder./views/js folder for JavaScript files. If the module needs to work with PrestaShop 1.4, the JS files should be placed in a folder at /jsthe root of the module's folder./views/templates/admin sub-folder for files used by the module's admin controller./views/templates/front sub-folder for files used by the module's front controller./views/templates/hook sub-folder for files used by the module's hooks.
Module-specific controllers, all in the sub-folder. /controllersClass-overriding code, all in the sub-folder (automatic install/uninstall using copy or merge)./overrideTwo icon files representing this module in the back-office.
One file for PrestaShop 1.4: or , 16*16 pixels.logo.gif logo.jpg
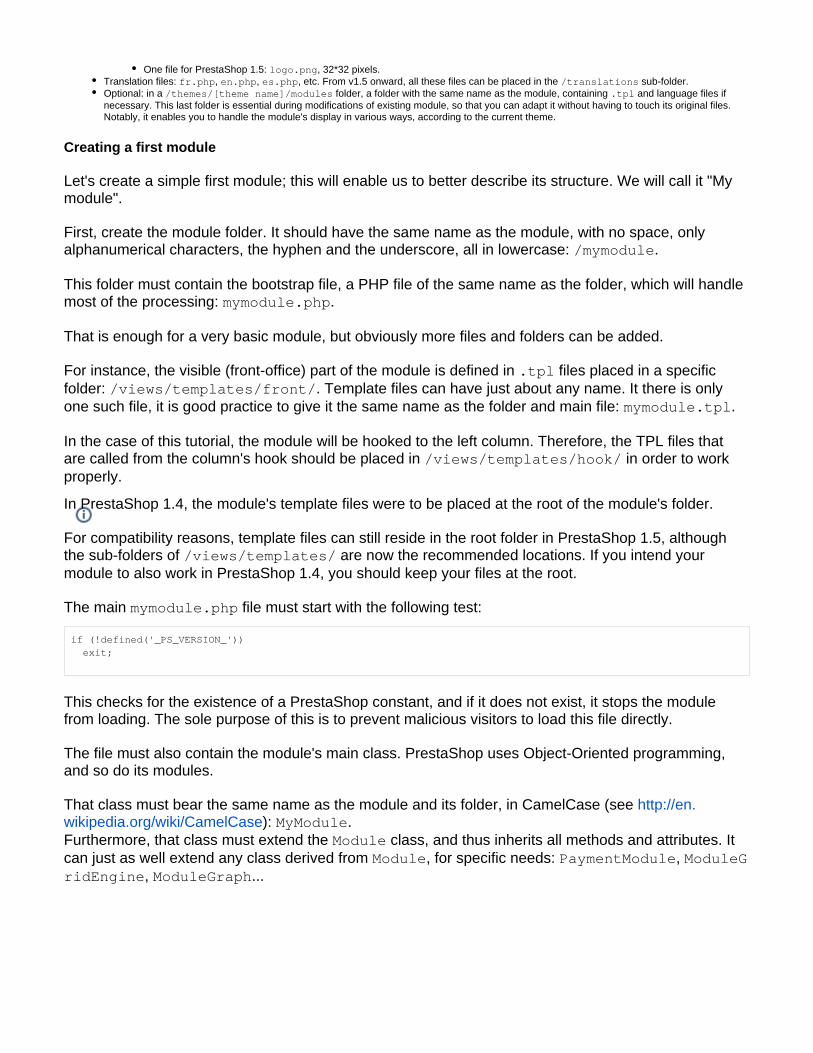
One file for PrestaShop 1.5: , 32*32 pixels.logo.pngTranslation files: , , , etc. From v1.5 onward, all these files can be placed in the sub-folder.fr.php en.php es.php /translationsOptional: in a folder, a folder with the same name as the module, containing and language files if /themes/[theme name]/modules .tplnecessary. This last folder is essential during modifications of existing module, so that you can adapt it without having to touch its original files. Notably, it enables you to handle the module's display in various ways, according to the current theme.
Creating a first module
Let's create a simple first module; this will enable us to better describe its structure. We will call it "My module".
First, create the module folder. It should have the same name as the module, with no space, only alphanumerical characters, the hyphen and the underscore, all in lowercase: ./mymodule
This folder must contain the bootstrap file, a PHP file of the same name as the folder, which will handle most of the processing: .mymodule.php
That is enough for a very basic module, but obviously more files and folders can be added.
For instance, the visible (front-office) part of the module is defined in files placed in a specific .tplfolder: . Template files can have just about any name. It there is only /views/templates/front/one such file, it is good practice to give it the same name as the folder and main file: .mymodule.tpl
In the case of this tutorial, the module will be hooked to the left column. Therefore, the TPL files that are called from the column's hook should be placed in in order to work /views/templates/hook/properly.
In PrestaShop 1.4, the module's template files were to be placed at the root of the module's folder.
For compatibility reasons, template files can still reside in the root folder in PrestaShop 1.5, although the sub-folders of are now the recommended locations. If you intend your /views/templates/module to also work in PrestaShop 1.4, you should keep your files at the root.
The main file must start with the following test:mymodule.php
if (!defined('_PS_VERSION_')) exit;
This checks for the existence of a PrestaShop constant, and if it does not exist, it stops the module from loading. The sole purpose of this is to prevent malicious visitors to load this file directly.
The file must also contain the module's main class. PrestaShop uses Object-Oriented programming, and so do its modules.
That class must bear the same name as the module and its folder, in CamelCase (see http://en.): .wikipedia.org/wiki/CamelCase MyModule
Furthermore, that class must extend the class, and thus inherits all methods and attributes. It Modulecan just as well extend any class derived from , for specific needs: , Module PaymentModule ModuleG
, ...ridEngine ModuleGraph
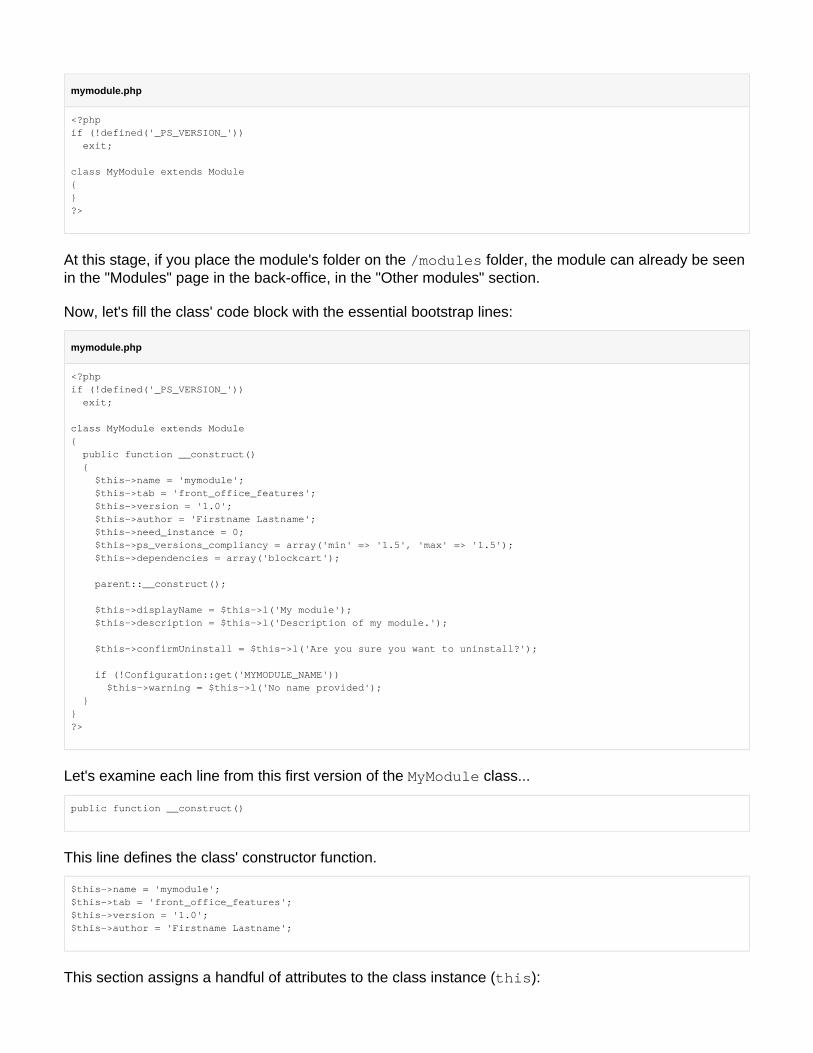
mymodule.php
<?phpif (!defined('_PS_VERSION_')) exit;
class MyModule extends Module{}?>
At this stage, if you place the module's folder on the folder, the module can already be seen /modulesin the "Modules" page in the back-office, in the "Other modules" section.
Now, let's fill the class' code block with the essential bootstrap lines:
mymodule.php
<?phpif (!defined('_PS_VERSION_')) exit;
class MyModule extends Module{ public function __construct() { $this->name = 'mymodule'; $this->tab = 'front_office_features'; $this->version = '1.0'; $this->author = 'Firstname Lastname'; $this->need_instance = 0; $this->ps_versions_compliancy = array('min' => '1.5', 'max' => '1.5'); $this->dependencies = array('blockcart');
parent::__construct();
$this->displayName = $this->l('My module'); $this->description = $this->l('Description of my module.');
$this->confirmUninstall = $this->l('Are you sure you want to uninstall?');
if (!Configuration::get('MYMODULE_NAME')) $this->warning = $this->l('No name provided'); }}?>
Let's examine each line from this first version of the class...MyModule
public function __construct()
This line defines the class' constructor function.
$this->name = 'mymodule';$this->tab = 'front_office_features';$this->version = '1.0';$this->author = 'Firstname Lastname';
This section assigns a handful of attributes to the class instance ( ):this

'name' attribute. This attributes serves as an internal identifier, so try your best to make it unique, without special characters or spaces, and keep it lower-case. In effect, the value MUST be the name of the module's folder.'tab' attribute. The title for the section that shall contain this module in PrestaShop's back-office modules list. You may use an existing name, such as , or , or a custom one. In this last case, a new section will be created with your seo front_office_features analytics_statsidentifier. We chose " " because this first module will mostly have an impact on the front-end.front_office_features
Here is the list of available "Tab" attributes, and their corresponding section in the "Modules" page:
"Tab" attribute Module section
administration Administration
advertising_marketing Advertising & Marketing
analytics_stats Analytics & Stats
billing_invoicing Billing & Invoices
checkout Checkout
content_management Content Management
emailing E-mailing
export Export
front_office_features Front Office Features
i18n_localization I18n & Localization
market_place Market Place
merchandizing Merchandizing
migration_tools Migration Tools
mobile Mobile
others Other Modules
payments_gateways Payments & Gateways
payment_security Payment Security
pricing_promotion Pricing & Promotion
quick_bulk_update Quick / Bulk update
search_filter Search & Filter
seo SEO
shipping_logistics Shipping & Logistics
slideshows Slideshows
smart_shopping Smart Shopping
social_networks Social Networks
'version' attribute. The version number for the module, displayed in the modules list. It is a string, so that you may use such variation as "1.0b", "3.07 beta 3" or "0.94 (not for production use)".'author' attribute. This is displayed as is in the PrestaShop modules list.
Let's continue with the next line in this block of code:
$this->need_instance = 0;$this->ps_versions_compliancy = array('min' => '1.5', 'max' => '1.5'); $this->dependencies = array('blockcart');
This section handles the relationship with the module and its environment (namely, PrestaShop):
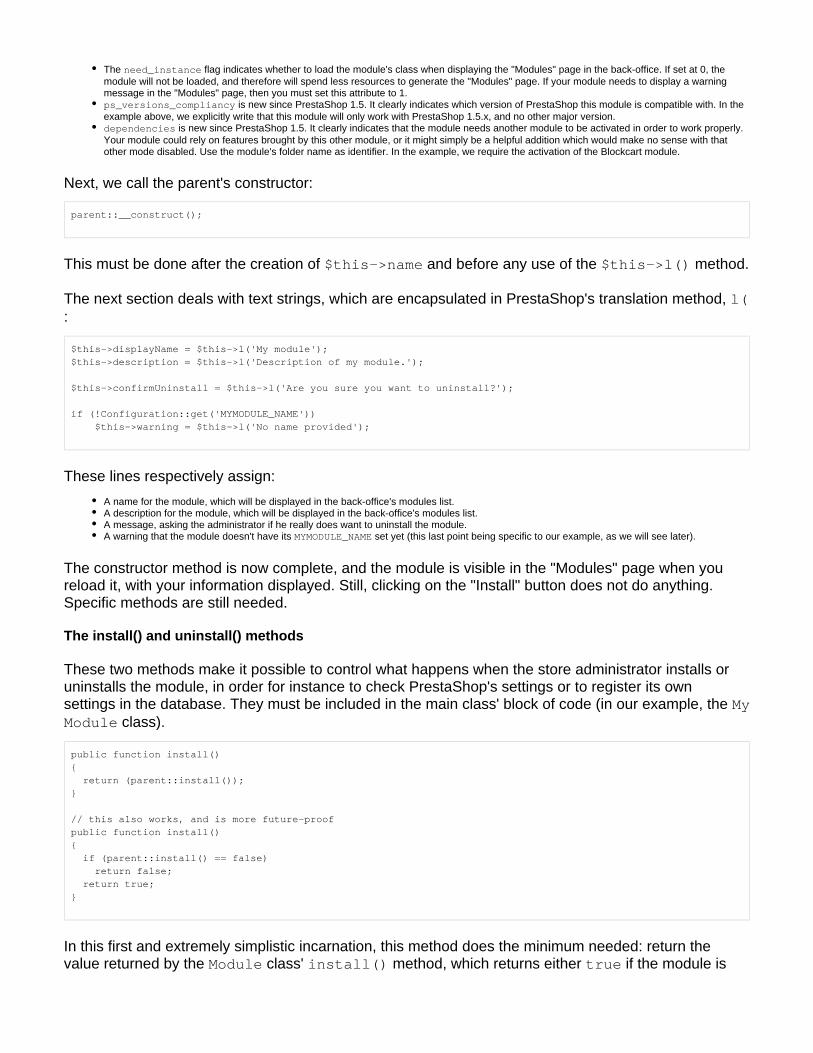
The flag indicates whether to load the module's class when displaying the "Modules" page in the back-office. If set at 0, the need_instancemodule will not be loaded, and therefore will spend less resources to generate the "Modules" page. If your module needs to display a warning message in the "Modules" page, then you must set this attribute to 1.ps_versions_compliancy is new since PrestaShop 1.5. It clearly indicates which version of PrestaShop this module is compatible with. In the example above, we explicitly write that this module will only work with PrestaShop 1.5.x, and no other major version.dependencies is new since PrestaShop 1.5. It clearly indicates that the module needs another module to be activated in order to work properly. Your module could rely on features brought by this other module, or it might simply be a helpful addition which would make no sense with that other mode disabled. Use the module's folder name as identifier. In the example, we require the activation of the Blockcart module.
Next, we call the parent's constructor:
parent::__construct();
This must be done after the creation of and before any use of the method.$this->name $this->l()
The next section deals with text strings, which are encapsulated in PrestaShop's translation method, l():
$this->displayName = $this->l('My module');$this->description = $this->l('Description of my module.');
$this->confirmUninstall = $this->l('Are you sure you want to uninstall?');
if (!Configuration::get('MYMODULE_NAME')) $this->warning = $this->l('No name provided');
These lines respectively assign:
A name for the module, which will be displayed in the back-office's modules list.A description for the module, which will be displayed in the back-office's modules list.A message, asking the administrator if he really does want to uninstall the module.A warning that the module doesn't have its set yet (this last point being specific to our example, as we will see later).MYMODULE_NAME
The constructor method is now complete, and the module is visible in the "Modules" page when you reload it, with your information displayed. Still, clicking on the "Install" button does not do anything. Specific methods are still needed.
The install() and uninstall() methods
These two methods make it possible to control what happens when the store administrator installs or uninstalls the module, in order for instance to check PrestaShop's settings or to register its own settings in the database. They must be included in the main class' block of code (in our example, the My
class).Module
public function install(){ return (parent::install());}
// this also works, and is more future-proofpublic function install(){ if (parent::install() == false) return false; return true;}
In this first and extremely simplistic incarnation, this method does the minimum needed: return the value returned by the class' method, which returns either if the module is Module install() true

correctly installed, or otherwise. As it is, if we had not created that method, the superclass' falsemethod would have been called instead anyway, making the end result identical.Nevertheless, we must mention this method, because it will be very useful once we have to perform checks and actions during the module's installation process: creating SQL tables, copying files, creation configuration variables, etc.
It is possible to expand the method as much as needed. In the following example, we install()perform the following tasks during installation:
Check that the module is indeed installed.Check that the module is tied to the hook.leftColumnCheck that the module is tied to the hook.headerCreate the configuration setting, setting its value to "my friend".MYMODULE_NAME
public function install(){ if (Shop::isFeatureActive()) Shop::setContext(Shop::CONTEXT_ALL);
return parent::install() && $this->registerHook('leftColumn') && $this->registerHook('header') && Configuration::updateValue('MYMODULE_NAME', 'my friend'); }}
If any of these lines fail, the installation does not happen.
For its part, the uninstallation method simply deletes the configuration setting.MYMODULE_NAME
public function uninstall(){ return parent::uninstall() && Configuration::deleteByName('MYMODULE_NAME');}
// ...which is just a shorter way of writing the following:
public function uninstall(){ if (!parent::uninstall() || !Configuration::deleteByName('MYMODULE_NAME')) return false; return true;}
If your module does create SQL data, whether in its own MySQL tables or in an existing table, ps_then it should also feature an method, so as to have a custom uninstallation process, uninstall()which would delete the SQL data when called. This method could look like so:
public function uninstall(){ if (!parent::uninstall()) Db::getInstance()->Execute('DELETE FROM `'._DB_PREFIX_.'mymodule`'); parent::uninstall();}
The Configuration object
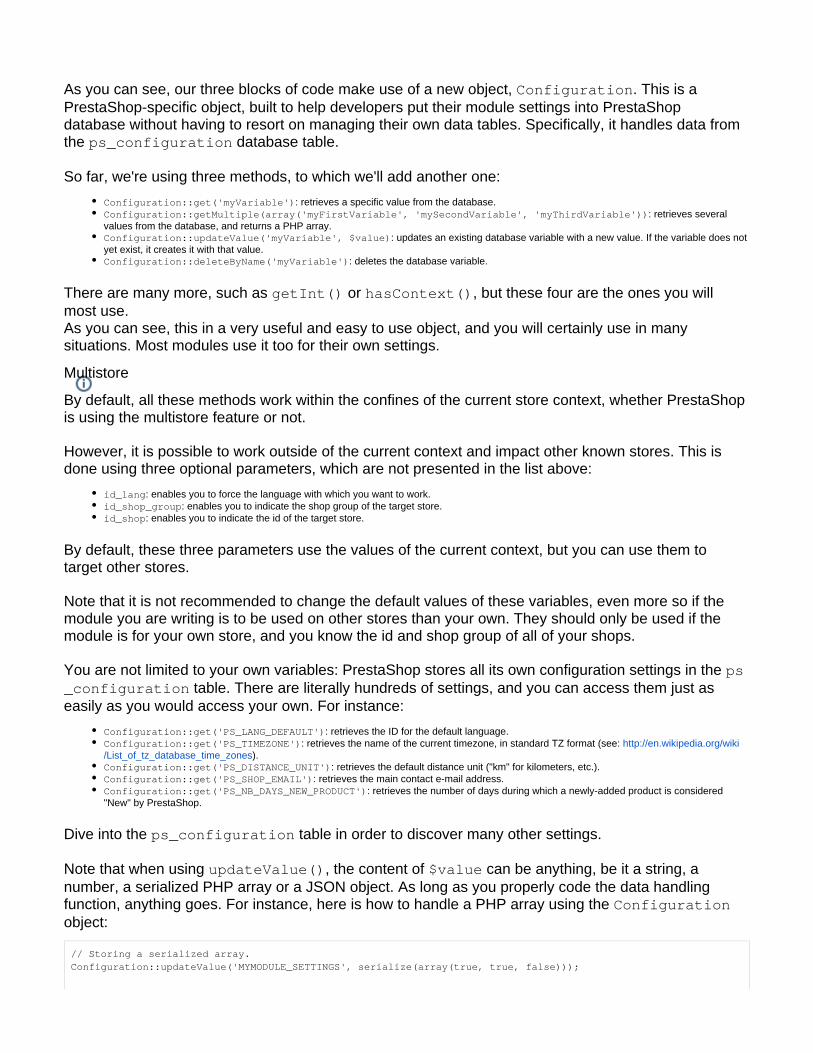
As you can see, our three blocks of code make use of a new object, . This is a ConfigurationPrestaShop-specific object, built to help developers put their module settings into PrestaShop database without having to resort on managing their own data tables. Specifically, it handles data from the database table.ps_configuration
So far, we're using three methods, to which we'll add another one:
Configuration::get('myVariable'): retrieves a specific value from the database.Configuration::getMultiple(array('myFirstVariable', 'mySecondVariable', 'myThirdVariable')): retrieves several values from the database, and returns a PHP array.Configuration::updateValue('myVariable', $value): updates an existing database variable with a new value. If the variable does not yet exist, it creates it with that value.Configuration::deleteByName('myVariable'): deletes the database variable.
There are many more, such as or , but these four are the ones you will getInt() hasContext()most use. As you can see, this in a very useful and easy to use object, and you will certainly use in many situations. Most modules use it too for their own settings.
Multistore
By default, all these methods work within the confines of the current store context, whether PrestaShop is using the multistore feature or not.
However, it is possible to work outside of the current context and impact other known stores. This is done using three optional parameters, which are not presented in the list above:
id_lang: enables you to force the language with which you want to work.id_shop_group: enables you to indicate the shop group of the target store.id_shop: enables you to indicate the id of the target store.
By default, these three parameters use the values of the current context, but you can use them to target other stores.
Note that it is not recommended to change the default values of these variables, even more so if the module you are writing is to be used on other stores than your own. They should only be used if the module is for your own store, and you know the id and shop group of all of your shops.
You are not limited to your own variables: PrestaShop stores all its own configuration settings in the ps table. There are literally hundreds of settings, and you can access them just as _configuration
easily as you would access your own. For instance:
Configuration::get('PS_LANG_DEFAULT'): retrieves the ID for the default language.Configuration::get('PS_TIMEZONE'): retrieves the name of the current timezone, in standard TZ format (see: http://en.wikipedia.org/wiki
)./List_of_tz_database_time_zonesConfiguration::get('PS_DISTANCE_UNIT'): retrieves the default distance unit ("km" for kilometers, etc.).Configuration::get('PS_SHOP_EMAIL'): retrieves the main contact e-mail address.Configuration::get('PS_NB_DAYS_NEW_PRODUCT'): retrieves the number of days during which a newly-added product is considered "New" by PrestaShop.
Dive into the table in order to discover many other settings.ps_configuration
Note that when using , the content of can be anything, be it a string, a updateValue() $valuenumber, a serialized PHP array or a JSON object. As long as you properly code the data handling function, anything goes. For instance, here is how to handle a PHP array using the Configurationobject:
// Storing a serialized array.Configuration::updateValue('MYMODULE_SETTINGS', serialize(array(true, true, false)));
// Retrieving the array.$configuration_array = unserialize(Configuration::get('MYMODULE_SETTINGS'));
The Shop object
Another of 's lines is thus:install()
if (Shop::isFeatureActive()) Shop::setContext(Shop::CONTEXT_ALL);
The Shop object is a new addition to PrestaShop 1.5, which helps you manage the multistore feature. We will not dive in the specifics here, but will simply present the two methods that are used in this sample code:
Shop::isFeatureActive(): This simply checks whether the multistore feature is active or not, and if at least two stores are presently activated.Shop::setContext(Shop::CONTEXT_ALL): This changes the context in order to apply coming changes to all existing stores instead of only the current store.
The Context is another new feature from version 1.5 of PrestaShop. It is explained in more details in the "Using the Context Object" chapter of this Developer Guide.
The icon file
To put the finishing touch to this basic module, you should add an icon, which will be displayed next to the module's name in the back-office modules list. In case your module is made for a prominent service, having that service's logo visible brings trust.Make sure you do not use a logo already used by one of the native modules.
The icon file must respect these requirements:
It must be placed on the module's main folder.In order to work with PrestaShop 1.4:
16*16 image.GIF format.Named .logo.gifTip: FamFamFam's free Silk icon set is probably the best there is .http://www.famfamfam.com/lab/icons/silk/
In order to work with PrestaShop 1.5:32*32 image.PNG format.Named .logo.pngTip: There are many free 32*32 icon libraries available. Here are a few: (very close to the http://www.fatcow.com/free-iconsFamFamFam one) or (Danish Royalty Free),http://www.iconarchive.com/show/danish-royalty-free-icons-by-jonas-rask.html
Appearance in the "Modules" page
Now that all basics are in place, reload the back-office's "Modules" pages, in the "Front-office features" section, you should find your module. Install it (or reset it if it is already installed).
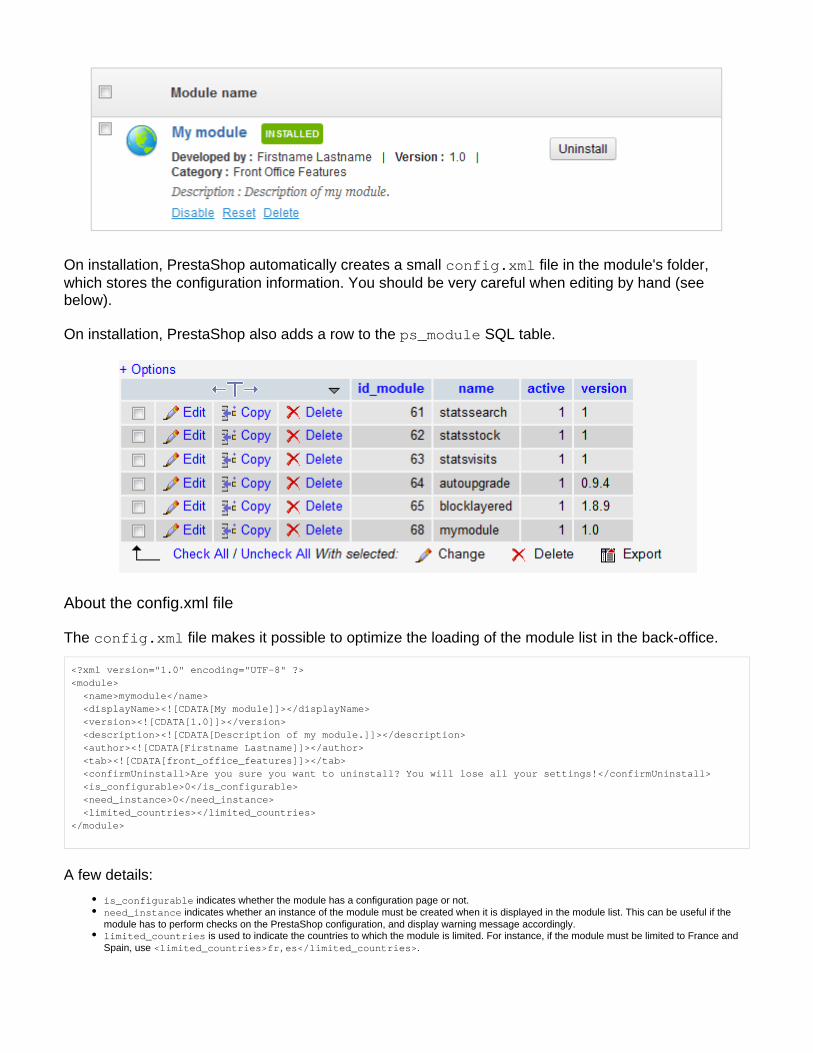
On installation, PrestaShop automatically creates a small file in the module's folder, config.xmlwhich stores the configuration information. You should be very careful when editing by hand (see below).
On installation, PrestaShop also adds a row to the SQL table.ps_module
About the config.xml file
The file makes it possible to optimize the loading of the module list in the back-office.config.xml
<?xml version="1.0" encoding="UTF-8" ?><module> <name>mymodule</name> <displayName><![CDATA[My module]]></displayName> <version><![CDATA[1.0]]></version> <description><![CDATA[Description of my module.]]></description> <author><![CDATA[Firstname Lastname]]></author> <tab><![CDATA[front_office_features]]></tab> <confirmUninstall>Are you sure you want to uninstall? You will lose all your settings!</confirmUninstall> <is_configurable>0</is_configurable> <need_instance>0</need_instance> <limited_countries></limited_countries></module>
A few details:
is_configurable indicates whether the module has a configuration page or not.need_instance indicates whether an instance of the module must be created when it is displayed in the module list. This can be useful if the module has to perform checks on the PrestaShop configuration, and display warning message accordingly.limited_countries is used to indicate the countries to which the module is limited. For instance, if the module must be limited to France and Spain, use .<limited_countries>fr,es</limited_countries>
Implementing hooks
As it is, the module does not do much. In order to display something on the front-office, we have to add support for a few hooks. This is done by implementing the hooks' methods, and that was actually done in the method we wrote earlier, using the method:install() registerHook()
public function install(){ if (Shop::isFeatureActive()) Shop::setContext(Shop::CONTEXT_ALL);
return parent::install() && $this->registerHook('leftColumn') && $this->registerHook('header') && Configuration::updateValue('MYMODULE_NAME', 'my friend');}
As you can see, we make it so that the module is hooked to the " " and " " hooks. leftColumn headerIn addition to this, we will add code for the " " hook.rightColumn
Attaching code to a hook requires a specific method for each:
hookDisplayLeftColumn(): will hook code into the left column – in our case, it will fetch the module setting and display the MYMODULE_NAMEmodule's template file, , which must be located in the folder.mymodule.tpl /views/templates/hook/hookDisplayRightColumn(): will simply do the same as , but for the right column.hookDisplayLeftColumn()hookDisplayHeader(): will add a link to the module's CSS file, /css/mymodule.css
public function hookDisplayLeftColumn($params){ $this->context->smarty->assign( array( 'my_module_name' => Configuration::get('MYMODULE_NAME'), 'my_module_link' => $this->context->link->getModuleLink('mymodule', 'display') ) ); return $this->display(__FILE__, 'mymodule.tpl');} public function hookDisplayRightColumn($params){ return $this->hookDisplayLeftColumn($params);} public function hookDisplayHeader(){ $this->context->controller->addCSS($this->_path.'css/mymodule.css', 'all');}
In addition to that, we are using the Context to change a Smarty variable: the method assign()makes it possible for us to set the template's name variable with the value of the MYMODULE_NAMEsetting stored in the configuration database table.
The hook is not a visual header, but enables us to put code in the tag of the resulting header <head>HTML file. This is very useful for JavaScript or CSS files. To add a link to our CSS file in the page's header, we use the method, which generates the correct tag to the CSS file addCSS() <link>indicated in parameters.
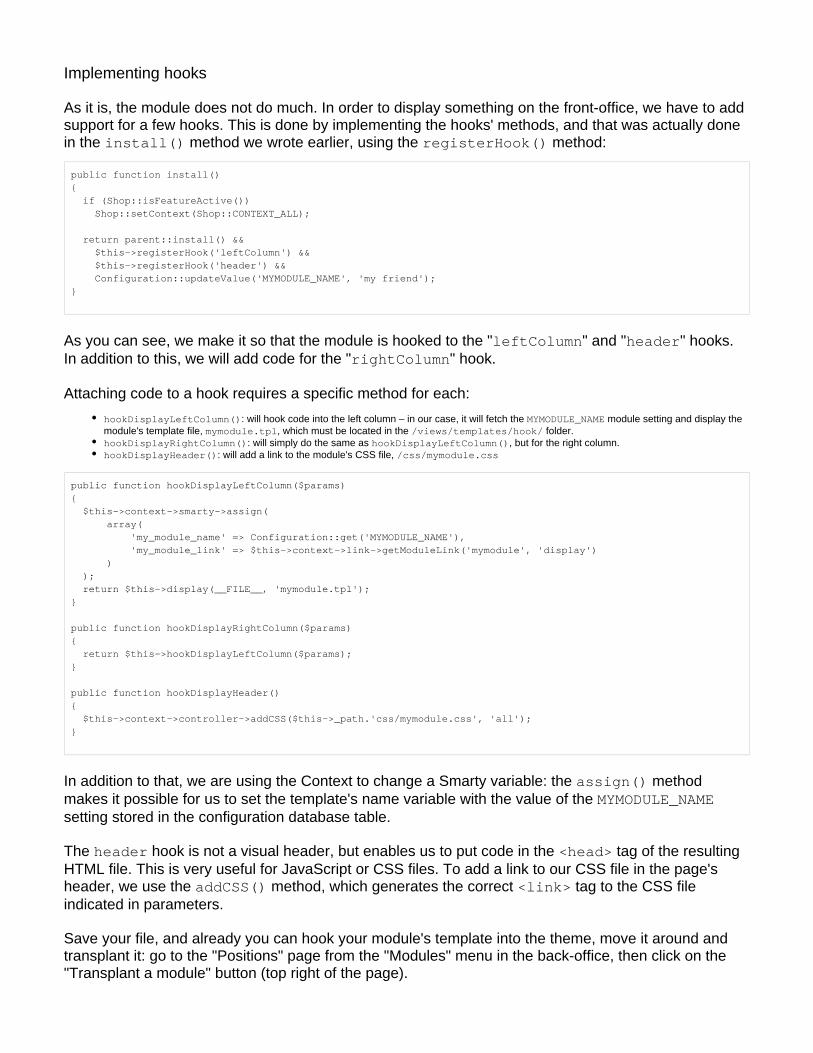
Save your file, and already you can hook your module's template into the theme, move it around and transplant it: go to the "Positions" page from the "Modules" menu in the back-office, then click on the "Transplant a module" button (top right of the page).
1. 2. 3.
In the transplantation form:
Find "My module" in the "Module" drop-down list.Choose "Left column blocks" in the "Hook into" drop-down list.Save.
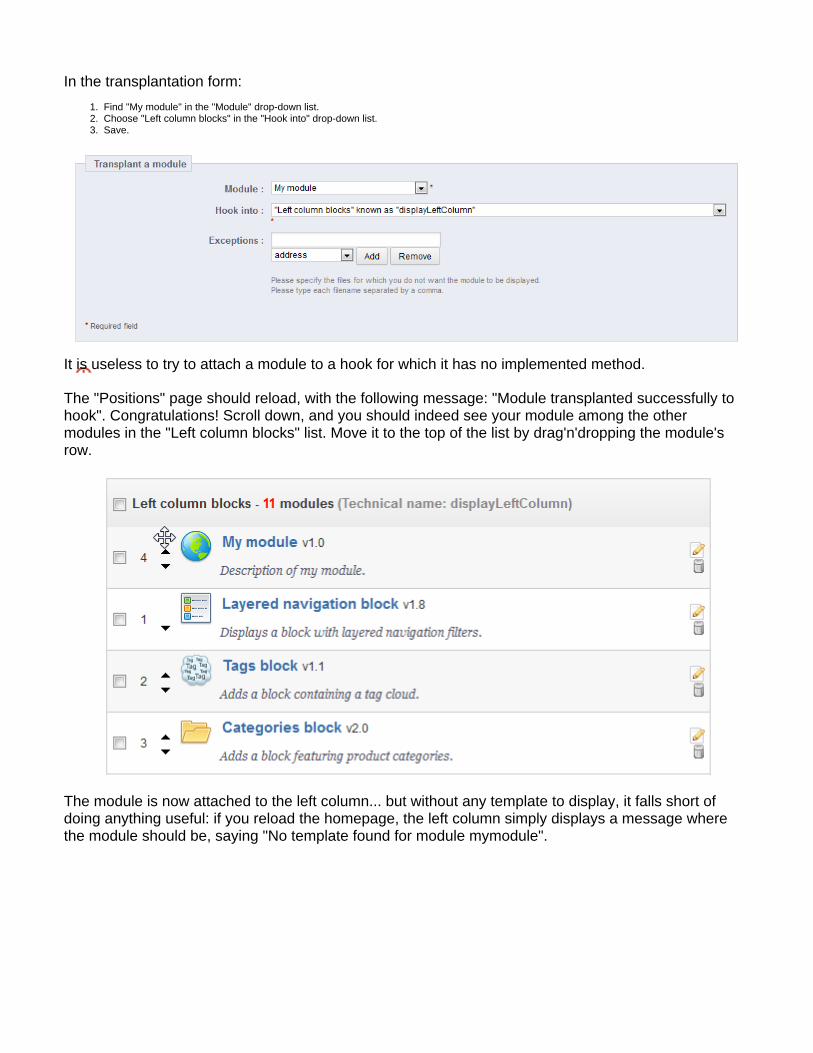
It is useless to try to attach a module to a hook for which it has no implemented method.
The "Positions" page should reload, with the following message: "Module transplanted successfully to hook". Congratulations! Scroll down, and you should indeed see your module among the other modules in the "Left column blocks" list. Move it to the top of the list by drag'n'dropping the module's row.
The module is now attached to the left column... but without any template to display, it falls short of doing anything useful: if you reload the homepage, the left column simply displays a message where the module should be, saying "No template found for module mymodule".
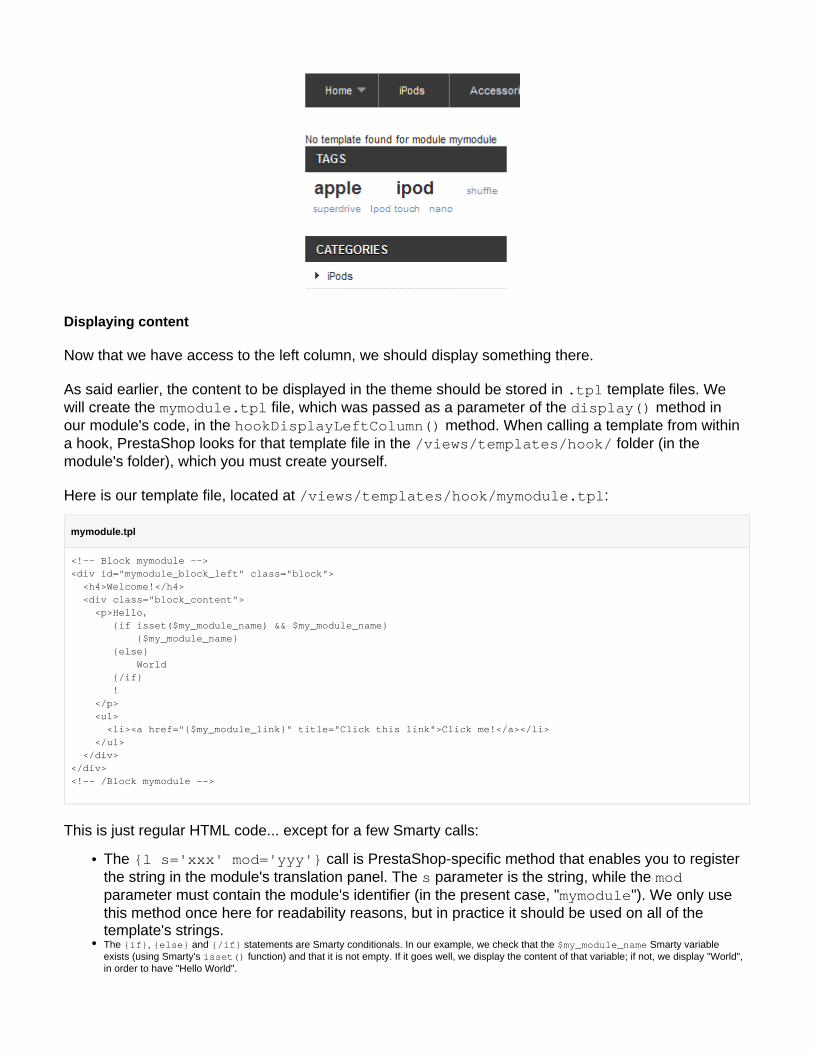
Displaying content
Now that we have access to the left column, we should display something there.
As said earlier, the content to be displayed in the theme should be stored in template files. We .tplwill create the file, which was passed as a parameter of the method in mymodule.tpl display()our module's code, in the method. When calling a template from within hookDisplayLeftColumn()a hook, PrestaShop looks for that template file in the folder (in the /views/templates/hook/module's folder), which you must create yourself.
Here is our template file, located at :/views/templates/hook/mymodule.tpl
mymodule.tpl
<!-- Block mymodule --><div id="mymodule_block_left" class="block"> <h4>Welcome!</h4> <div class="block_content"> <p>Hello, {if isset($my_module_name) && $my_module_name} {$my_module_name} {else} World {/if} ! </p> <ul> <li><a href="{$my_module_link}" title="Click this link">Click me!</a></li> </ul> </div></div><!-- /Block mymodule -->
This is just regular HTML code... except for a few Smarty calls:
The call is PrestaShop-specific method that enables you to register {l s='xxx' mod='yyy'}the string in the module's translation panel. The parameter is the string, while the s modparameter must contain the module's identifier (in the present case, " "). We only use mymodulethis method once here for readability reasons, but in practice it should be used on all of the template's strings.The , and statements are Smarty conditionals. In our example, we check that the Smarty variable {if} {else} {/if} $my_module_nameexists (using Smarty's function) and that it is not empty. If it goes well, we display the content of that variable; if not, we display "World", isset()in order to have "Hello World".
The variable in the link's attribute: this is a Smarty variable that we will create later on, which will point to {$my_module_link} hrefPrestaShop's root directory.
In addition to that, we are going to create a CSS file, and save it as in the /css/mymodule.cssmodule's folder (or any sub-folder you like to keep you CSS in):
div#mymodule_block_left p { font-size: 150%; font-style:italic;}
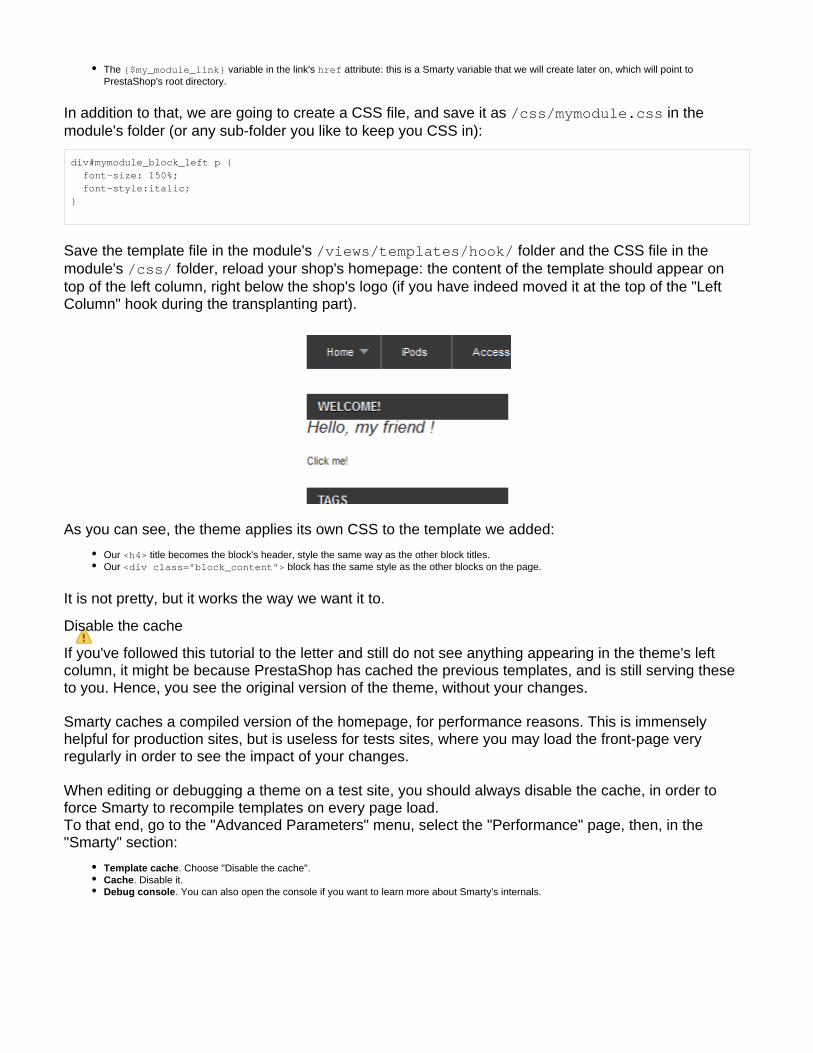
Save the template file in the module's folder and the CSS file in the /views/templates/hook/module's folder, reload your shop's homepage: the content of the template should appear on /css/top of the left column, right below the shop's logo (if you have indeed moved it at the top of the "Left Column" hook during the transplanting part).
As you can see, the theme applies its own CSS to the template we added:
Our title becomes the block's header, style the same way as the other block titles.<h4>Our block has the same style as the other blocks on the page.<div class="block_content">
It is not pretty, but it works the way we want it to.
Disable the cache
If you've followed this tutorial to the letter and still do not see anything appearing in the theme's left column, it might be because PrestaShop has cached the previous templates, and is still serving these to you. Hence, you see the original version of the theme, without your changes.
Smarty caches a compiled version of the homepage, for performance reasons. This is immensely helpful for production sites, but is useless for tests sites, where you may load the front-page very regularly in order to see the impact of your changes.
When editing or debugging a theme on a test site, you should always disable the cache, in order to force Smarty to recompile templates on every page load. To that end, go to the "Advanced Parameters" menu, select the "Performance" page, then, in the "Smarty" section:
Template cache. Choose "Disable the cache".Cache. Disable it.Debug console. You can also open the console if you want to learn more about Smarty's internals.

Do NOT disable the cache or enable the debug console on a production site, as it severely slows everything down! You should always perform all your tests in a test site, ideally on your own computer rather than online.
Embedding a template in the theme
The link that the module displays does not lead anywhere for now. Let's create the file display.phpthat it targets, with a minimal content, and put it in the module's root folder.
display.php
Welcome to this page!
Click the "Click me!" link: the resulting page is just that raw text, without anything from the theme. We would like to have this text embedded in the theme, so let's see how to do just that.
As you would expect, we have to create a template file in order to use the theme's style. Let's create the file, which will contain the basic " " line, and will be called display.tpl Welcome to my shop!by . That file will be rewritten into a front-end controller in order to display.php display.phpproperly embed our basic template within the theme's header, footer, columns, etc.
You should strive to use explicit and recognizable names for your template files, so that you can find them quickly in the back-office – which is a must when using the translation tool.
Here are our two files:
display.php
<?phpclass mymoduledisplayModuleFrontController extends ModuleFrontController{ public function initContent() { parent::initContent(); $this->setTemplate('display.tpl'); }}
display.tpl
Welcome to my shop!
Let's explore , our first PrestaShop front-end controller, stored in the display.php /controllers folder of the module's main folder:/front
A front-end controller must be a class that extends the class.ModuleFrontControllerThat controller must have one method: , which calls the parent class' method...initContent() initContent()...which then calls the method with our file.setTemplate() display.tpl
setTemplate() is the method that will take care of embedding our one-line template into a full-blown page, with proper header, footer and sidebars.
Until PrestaShop 1.4, developers who wanted to embed a template file into the site's theme had to use PHP's calls to include each portion of the page. Here is the equivalent code for include() display.
:php
display.php
<?php// This file must be placed at the root of the module's folder.global $smarty;include('../../config/config.inc.php');include('../../header.php');
$smarty->display(dirname(__FILE__).'/display.tpl');
include('../../footer.php');?>
As you can see, this is not necessary anymore since PrestaShop 1.5: you can and should use a front-end controller, and both the controller (Controller) and its template (View) should share the same name: is tied to .display.php display.tpl
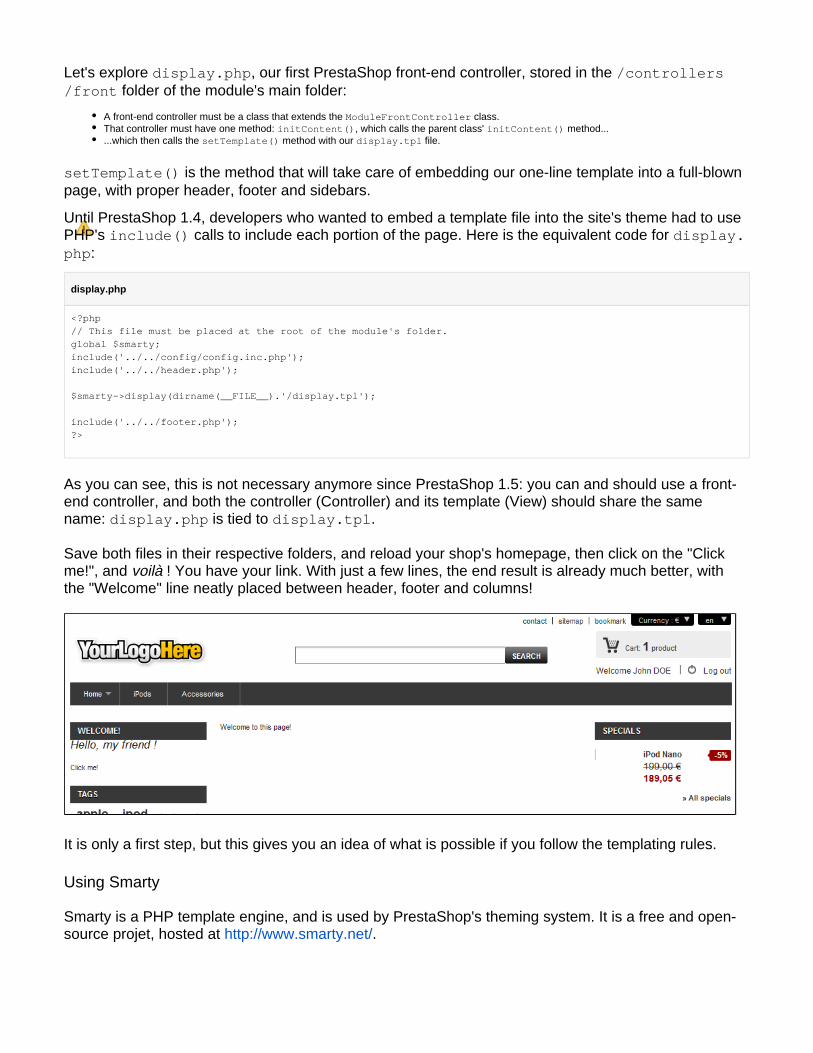
Save both files in their respective folders, and reload your shop's homepage, then click on the "Click me!", and ! You have your link. With just a few lines, the end result is already much better, with voilàthe "Welcome" line neatly placed between header, footer and columns!
It is only a first step, but this gives you an idea of what is possible if you follow the templating rules.
Using Smarty
Smarty is a PHP template engine, and is used by PrestaShop's theming system. It is a free and open-source projet, hosted at .http://www.smarty.net/
It parses template files, looking for dynamic elements to replace with their contextual equivalents, .tplthen send the generated result to the browser. Those dynamic elements are indicated with curly brackets: . Programmers can create new variables and use them in TPL files; PrestaShop { ... }adds its own set of variables.
For instance, we can create the variable in PHP right in the $my_module_message hookDisplayLef method, and have it displayed by our template file:tColumn()
mymodule.php
public function hookDisplayLeftColumn($params){ $this->context->smarty->assign( array( 'my_module_name' => Configuration::get('MYMODULE_NAME'), 'my_module_link' => $this->context->link->getModuleLink('mymodule', 'display'), 'my_module_message' => $this->l('This is a simple text message') // Do not forget to enclose your strings in the l() translation method ) ); return $this->display(__FILE__, 'mymodule.tpl');}
From there on, we can ask Smarty to display the content of this variable in our TPL file.
mymodule.tpl
{$my_module_message}
PrestaShop adds its own set of variables. For instance, will be replaced with {$hook_left_column}the content for the left column, meaning the content from all the modules that have been attached to the left column's hook.
All Smarty variables are global. You should therefore pay attention not to name your own variable with the name of an existing Smarty variable, in order to avoid overwriting it. It is good practice to avoid overly simple names, such as , and to prefix it with your module's name, or even your {products}own name or initials, such as: {$henryb_mymodule_products}.
Here is a list of Smarty variables that are common to all pages:
File / folder Description
img_ps_dir URL for PrestaShop's image folder.
img_cat_dir URL for the categories images folder.
img_lang_dir URL for the languages images folder.
img_prod_dir URL for the products images folder.
img_manu_dir URL for the manufacturers images folder.
img_sup_dir URL for the suppliers images folder.
img_ship_dir URL for the carriers (shipping) images folder.
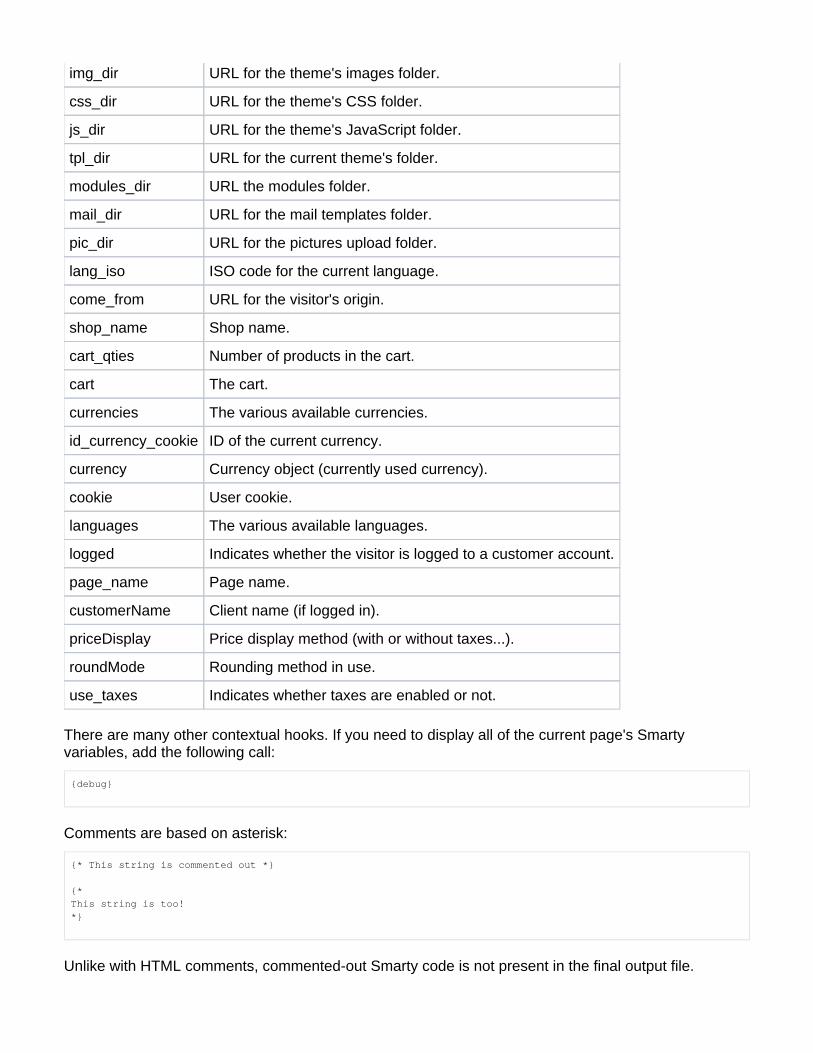
img_dir URL for the theme's images folder.
css_dir URL for the theme's CSS folder.
js_dir URL for the theme's JavaScript folder.
tpl_dir URL for the current theme's folder.
modules_dir URL the modules folder.
mail_dir URL for the mail templates folder.
pic_dir URL for the pictures upload folder.
lang_iso ISO code for the current language.
come_from URL for the visitor's origin.
shop_name Shop name.
cart_qties Number of products in the cart.
cart The cart.
currencies The various available currencies.
id_currency_cookie ID of the current currency.
currency Currency object (currently used currency).
cookie User cookie.
languages The various available languages.
logged Indicates whether the visitor is logged to a customer account.
page_name Page name.
customerName Client name (if logged in).
priceDisplay Price display method (with or without taxes...).
roundMode Rounding method in use.
use_taxes Indicates whether taxes are enabled or not.
There are many other contextual hooks. If you need to display all of the current page's Smarty variables, add the following call:
{debug}
Comments are based on asterisk:
{* This string is commented out *}
{*This string is too!*}
Unlike with HTML comments, commented-out Smarty code is not present in the final output file.
1.
2.
3.
4.
Adding a configuration page
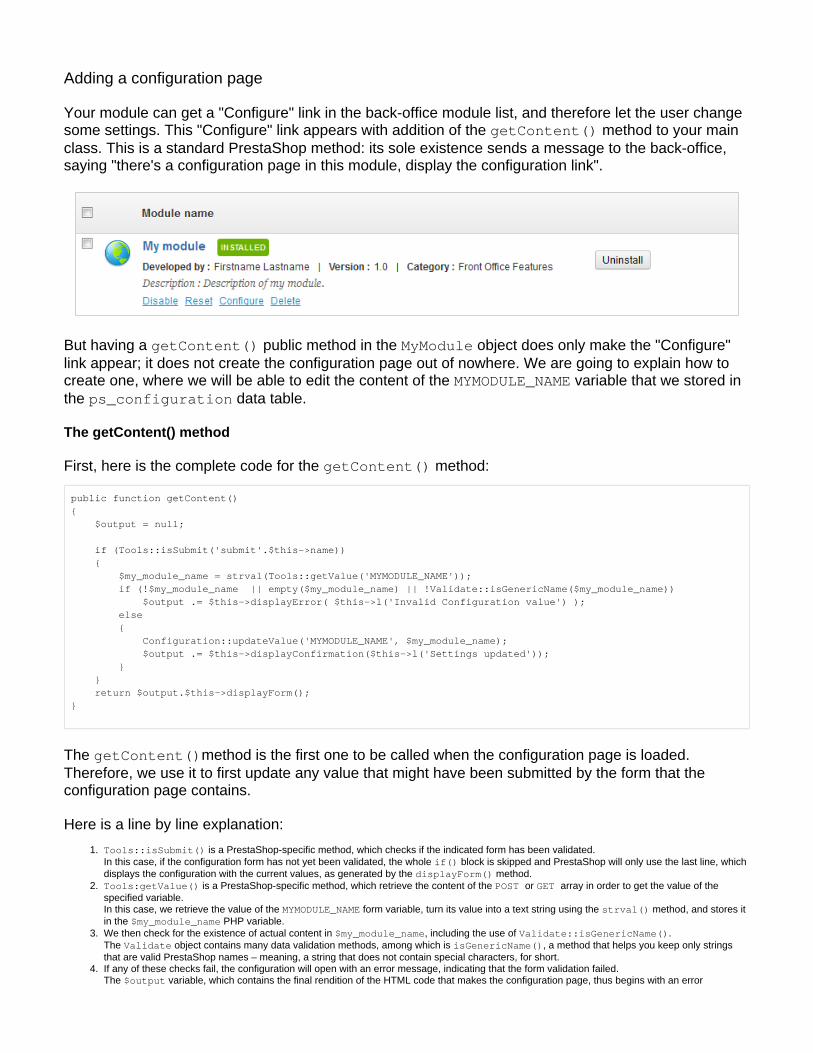
Your module can get a "Configure" link in the back-office module list, and therefore let the user change some settings. This "Configure" link appears with addition of the method to your main getContent()class. This is a standard PrestaShop method: its sole existence sends a message to the back-office, saying "there's a configuration page in this module, display the configuration link".
But having a public method in the object does only make the "Configure" getContent() MyModulelink appear; it does not create the configuration page out of nowhere. We are going to explain how to create one, where we will be able to edit the content of the variable that we stored in MYMODULE_NAMEthe data table.ps_configuration
The getContent() method
First, here is the complete code for the method:getContent()
public function getContent(){ $output = null;
if (Tools::isSubmit('submit'.$this->name)) { $my_module_name = strval(Tools::getValue('MYMODULE_NAME')); if (!$my_module_name || empty($my_module_name) || !Validate::isGenericName($my_module_name)) $output .= $this->displayError( $this->l('Invalid Configuration value') ); else { Configuration::updateValue('MYMODULE_NAME', $my_module_name); $output .= $this->displayConfirmation($this->l('Settings updated')); } } return $output.$this->displayForm();}
The method is the first one to be called when the configuration page is loaded. getContent()Therefore, we use it to first update any value that might have been submitted by the form that the configuration page contains.
Here is a line by line explanation:
Tools::isSubmit() is a PrestaShop-specific method, which checks if the indicated form has been validated. In this case, if the configuration form has not yet been validated, the whole block is skipped and PrestaShop will only use the last line, which if()displays the configuration with the current values, as generated by the method.displayForm()Tools:getValue() is a PrestaShop-specific method, which retrieve the content of the or array in order to get the value of the POST GET specified variable.In this case, we retrieve the value of the form variable, turn its value into a text string using the method, and stores it MYMODULE_NAME strval()in the PHP variable.$my_module_nameWe then check for the existence of actual content in , including the use of . $my_module_name Validate::isGenericName()The object contains many data validation methods, among which is , a method that helps you keep only strings Validate isGenericName()that are valid PrestaShop names – meaning, a string that does not contain special characters, for short.If any of these checks fail, the configuration will open with an error message, indicating that the form validation failed.The variable, which contains the final rendition of the HTML code that makes the configuration page, thus begins with an error $output
4.
5.
6.
message, created using PrestaShop's method. This method returns the correct HTML code for our need, and since that code displayError()is first in , this means the configuration will open with that message.$outputIf all these checks are successful, this means we can store the value in our database.As we saw earlier in this tutorial, the object has just the method we need: will store the new value for Configuration updateValue() MYMODU
in the configuration data table.LE_NAMETo that, we add a friendly message to the user, indicating that the value has indeed been saved: we use PrestaShop's displayConfirmation()method to add that message as the first data in the variable – and therefore, at the top of the page.$outputFinally, we use the custom method (which we are going to create and explain in the next section) in order to add content to displayForm() $ou
(whether the form was submitted or not), and return that content to the page.tputNote that we could have included the code for right within , but chose to separate the two for readability and displayForm() getContent()separation of concerns.
This form-validation code is nothing new for PHP developers, but uses some of the PrestaShop methods that you will very regularly use.
Displaying the form
The configuration form itself is displayed with the method. Here is its code, which we displayForm()are going to explain after the jump:
public function displayForm(){ // Get default Language $default_lang = (int)Configuration::get('PS_LANG_DEFAULT'); // Init Fields form array $fields_form[0]['form'] = array( 'legend' => array( 'title' => $this->l('Settings'), ), 'input' => array( array( 'type' => 'text', 'label' => $this->l('Configuration value'), 'name' => 'MYMODULE_NAME', 'size' => 20, 'required' => true ) ), 'submit' => array( 'title' => $this->l('Save'), 'class' => 'button' ) ); $helper = new HelperForm(); // Module, t oken and currentIndex $helper->module = $this; $helper->name_controller = $this->name; $helper->token = Tools::getAdminTokenLite('AdminModules'); $helper->currentIndex = AdminController::$currentIndex.'&configure='.$this->name; // Language $helper->default_form_language = $default_lang; $helper->allow_employee_form_lang = $default_lang; // Title and toolbar $helper->title = $this->displayName; $helper->show_toolbar = true; // false -> remove toolbar $helper->toolbar_scroll = true; // yes - > Toolbar is always visible on the top of the screen. $helper->submit_action = 'submit'.$this->name; $helper->toolbar_btn = array( 'save' => array( 'desc' => $this->l('Save'), 'href' => AdminController::$currentIndex.'&configure='.$this->name.'&save'.$this->name. '&token='.Tools::getAdminTokenLite('AdminModules'), ),
1.
2.
3. 4.
'back' => array( 'href' => AdminController::$currentIndex.'&token='.Tools::getAdminTokenLite('AdminModules'), 'desc' => $this->l('Back to list') ) ); // Load current value $helper->fields_value['MYMODULE_NAME'] = Configuration::get('MYMODULE_NAME'); return $helper->generateForm($fields_form);}
While this might look like a huge block of code for a single value to change, this block actually uses some of PrestaShop's method to make it easier to build forms, most notably the object.HelperForm
Diving in displayForm()
Let's run down that method:
Using the method, we retrieve the value of the currently chosen language (" "). For security Configuration::get() PS_LANG_DEFAULTreasons, we cast the variable into an integer using .(int)
In preparation for the generation of the form, we must build an array of the various titles, textfields and other form specifics.To that end, we create the variable, which will contain a multidimensional array. $fields_formEach of the arrays it features contains the detailed description of the tags the form must contain. From this variable, PrestaShop will render the HTML form as it is described. In this example, we define three tags ( , and ) and their attributes <legend> <input> <submit>using arrays. The format is quite easy to get: the legend and submit arrays simply contain the attributes to each tag, while the input contains as many tags are needed, each being in <input>turn an array which contains the necessary attributes. For instance:
'input' => array( array( 'type' => 'text', 'label' => $this->l('Configuration value'), 'name' => 'MYMODULE_NAME', 'size' => 20, 'required' => true ))
...generates the following HTML tags:
<label>Configuration value </label><div class="margin-form"> <input id="MYMODULE_NAME" class="" type="text" size="20" value="my friend" name="MYMODULE_NAME"> <sup>*</sup><div class="clear"></div>
As you can see, PrestaShop is quite clever, and generates all the code that is needed to obtain a useful form.Note that the value of the main array is actually retrieved later in the form generation code.We then create an instance of the class. This section of the code is explained in the next section of this chapter.HelperFormOnce the settings are all in place, we generate the form based on the content of the variable.HelperForm $fields_form
Using HelperForm
HelperForm is one of the helper methods that were added with PrestaShop 1.5, along with HelperOp, , and . They enable you to generate standard tions HelperList HelperView HelperHelpAccess
HTML elements for the back-office as well as for module configuration pages.You can get more information about Helper classes in the "Helpers" chapter of this developer guide, with a page dedicated to .HelperForm
Here is our sample code, as a reminder:
$helper = new HelperForm();
// Module, Token and currentIndex$helper->module = $this;$helper->name_controller = $this->name;$helper->token = Tools::getAdminTokenLite('AdminModules');$helper->currentIndex = AdminController::$currentIndex.'&configure='.$this->name;
// Language$helper->default_form_language = $default_lang;$helper->allow_employee_form_lang = $default_lang;
// title and Toolbar$helper->title = $this->displayName;$helper->show_toolbar = true; // false -> remove toolbar$helper->toolbar_scroll = true; // yes - > Toolbar is always visible on the top of the screen.$helper->submit_action = 'submit'.$this->name;$helper->toolbar_btn = array( 'save' => array( 'desc' => $this->l('Save'), 'href' => AdminController::$currentIndex.'&configure='.$this->name.'&save'.$this->name. '&token='.Tools::getAdminTokenLite('AdminModules'), ), 'back' => array( 'href' => AdminController::$currentIndex.'&token='.Tools::getAdminTokenLite('AdminModules'), 'desc' => $this->l('Back to list') ));
// Load current value$helper->fields_value['MYMODULE_NAME'] = Configuration::get('MYMODULE_NAME');
return $helper->generateForm($fields_form);
Our example uses several of 's attributes: they need to be set before we generate the HelperFormform itself from the variable:$fields_form
$helper->module: requires the instance of the module that will use the form.$helper->name_controller: requires the name of the module.$helper->token: requires a unique token for the module. helps us generate one.getAdminTokenLite()$helper->currentIndex:$helper->default_form_language: requires the default language for the shop.$helper->allow_employee_form_lang: requires the default language for the shop.$helper->title: requires the title for the form.$helper->show_toolbar: requires a boolean value – whether the toolbar is displayed or not.$helper->toolbar_scroll: requires a boolean value – whether the toolbar is always visible when scrolling or not.$helper->submit_action: requires the action attribute for the form's tag.<submit>$helper->toolbar_btn: requires the buttons that are displayed in the toolbar. In our example, the "Save" button and the "Back" button.$helper->fields_value[]: this is where we can define the value of the named tag.
Finally, after all is set and done, we can call the method, which will take care of generateForm()putting it all together and, as its name says, generate the form that the user will use to configure the module's settings.
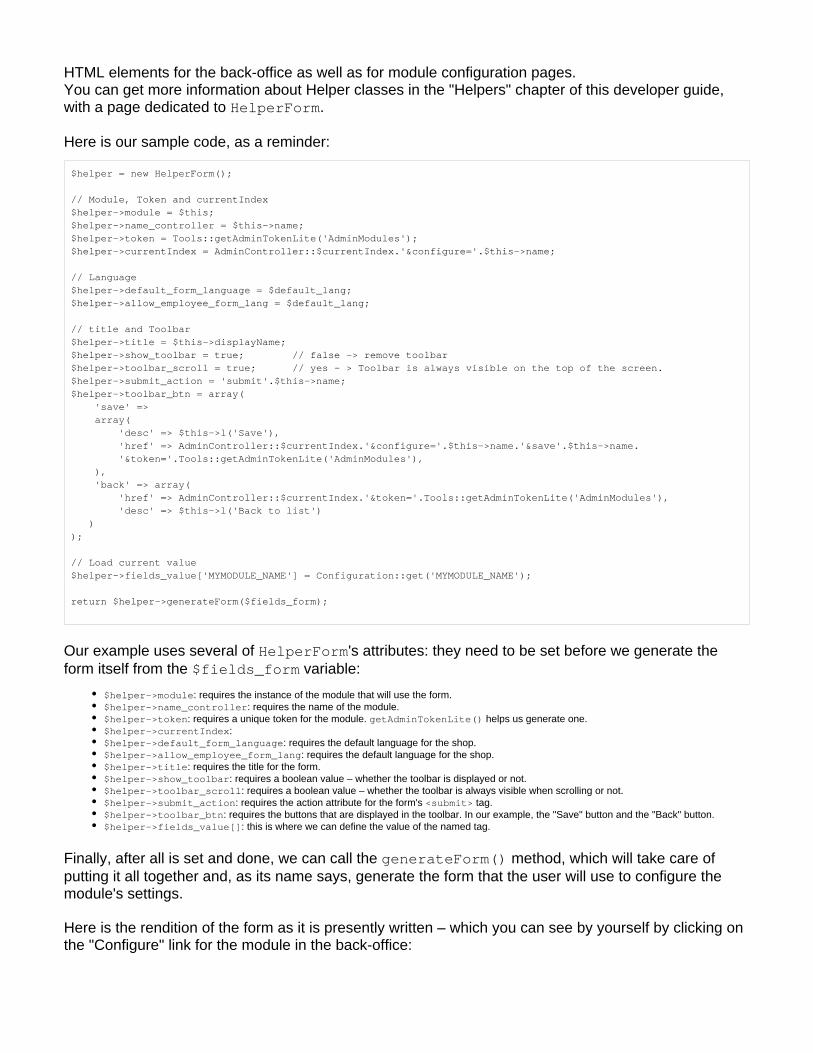
Here is the rendition of the form as it is presently written – which you can see by yourself by clicking on the "Configure" link for the module in the back-office:
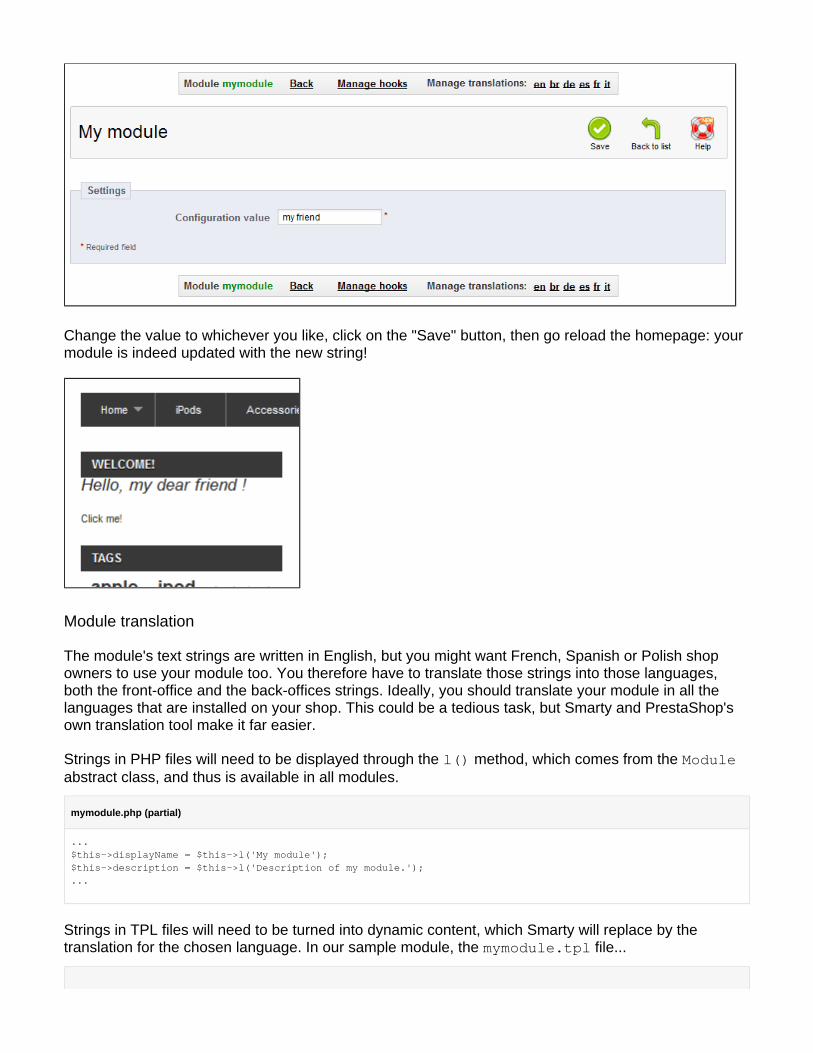
Change the value to whichever you like, click on the "Save" button, then go reload the homepage: your module is indeed updated with the new string!
Module translation
The module's text strings are written in English, but you might want French, Spanish or Polish shop owners to use your module too. You therefore have to translate those strings into those languages, both the front-office and the back-offices strings. Ideally, you should translate your module in all the languages that are installed on your shop. This could be a tedious task, but Smarty and PrestaShop's own translation tool make it far easier.
Strings in PHP files will need to be displayed through the method, which comes from the l() Moduleabstract class, and thus is available in all modules.
mymodule.php (partial)
...$this->displayName = $this->l('My module');$this->description = $this->l('Description of my module.');...
Strings in TPL files will need to be turned into dynamic content, which Smarty will replace by the translation for the chosen language. In our sample module, the file...mymodule.tpl
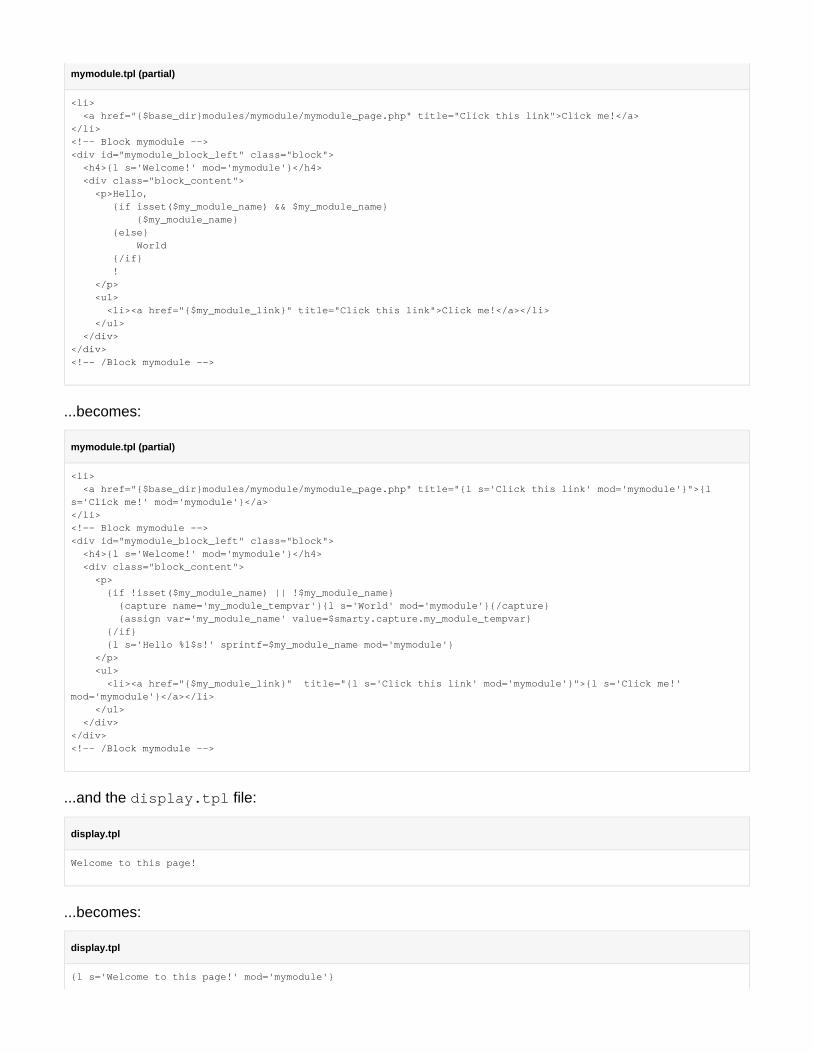
mymodule.tpl (partial)
<li> <a href="{$base_dir}modules/mymodule/mymodule_page.php" title="Click this link">Click me!</a></li><!-- Block mymodule --><div id="mymodule_block_left" class="block"> <h4>{l s='Welcome!' mod='mymodule'}</h4> <div class="block_content"> <p>Hello, {if isset($my_module_name) && $my_module_name} {$my_module_name} {else} World {/if} ! </p> <ul> <li><a href="{$my_module_link}" title="Click this link">Click me!</a></li> </ul> </div></div><!-- /Block mymodule -->
...becomes:
mymodule.tpl (partial)
<li> <a href="{$base_dir}modules/mymodule/mymodule_page.php" title="{l s='Click this link' mod='mymodule'}">{l s='Click me!' mod='mymodule'}</a></li><!-- Block mymodule --><div id="mymodule_block_left" class="block"> <h4>{l s='Welcome!' mod='mymodule'}</h4> <div class="block_content"> <p> {if !isset($my_module_name) || !$my_module_name} {capture name='my_module_tempvar'}{l s='World' mod='mymodule'}{/capture} {assign var='my_module_name' value=$smarty.capture.my_module_tempvar} {/if} {l s='Hello %1$s!' sprintf=$my_module_name mod='mymodule'} </p> <ul> <li><a href="{$my_module_link}" title="{l s='Click this link' mod='mymodule'}">{l s='Click me!' mod='mymodule'}</a></li> </ul> </div></div><!-- /Block mymodule -->
...and the file:display.tpl
display.tpl
Welcome to this page!
...becomes:
display.tpl
{l s='Welcome to this page!' mod='mymodule'}
Translating complex code
As we can see, the basis of template file translation is to enclose them in the {l s='The string' . The changes in and in 's link and mod='name_of_the_module'} display.tpl mymodule.tpl
title texts are thus easy to understand. But added a trickier block of code for the "Hello World!" string: an / / clause, and a text variable. Let's explore this code:if else then
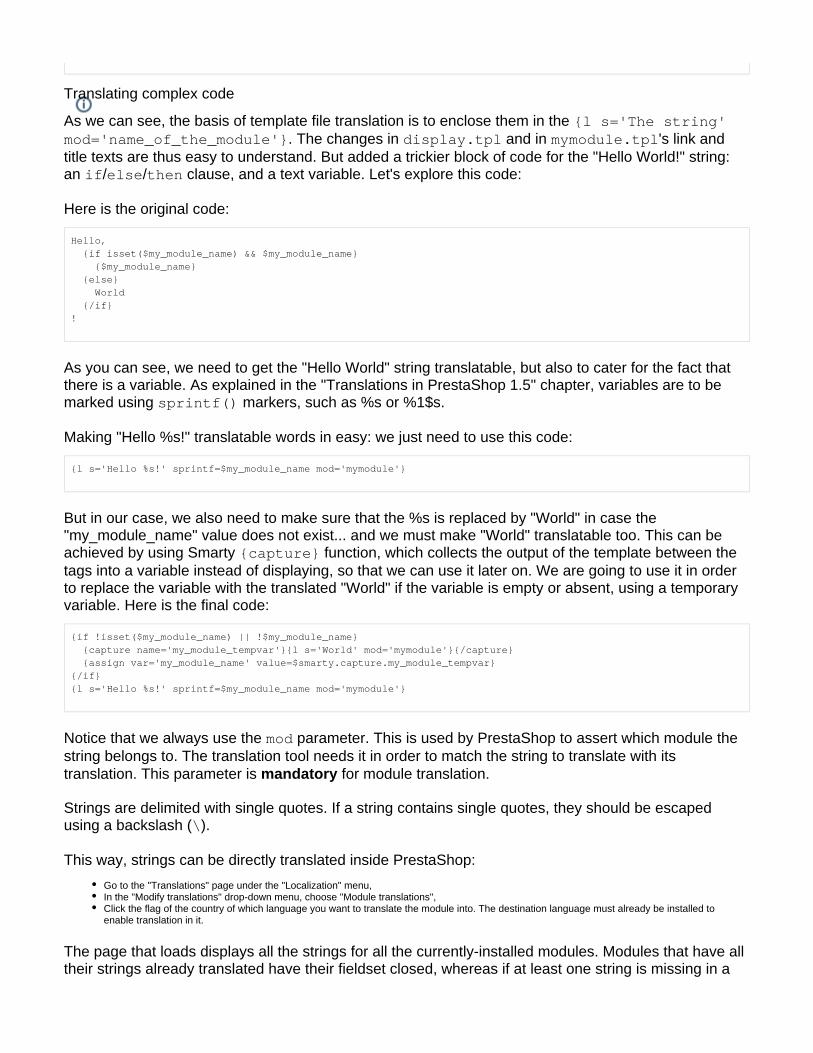
Here is the original code:
Hello, {if isset($my_module_name) && $my_module_name} {$my_module_name} {else} World {/if}!
As you can see, we need to get the "Hello World" string translatable, but also to cater for the fact that there is a variable. As explained in the "Translations in PrestaShop 1.5" chapter, variables are to be marked using markers, such as %s or %1$s.sprintf()
Making "Hello %s!" translatable words in easy: we just need to use this code:
{l s='Hello %s!' sprintf=$my_module_name mod='mymodule'}
But in our case, we also need to make sure that the %s is replaced by "World" in case the "my_module_name" value does not exist... and we must make "World" translatable too. This can be achieved by using Smarty function, which collects the output of the template between the {capture}tags into a variable instead of displaying, so that we can use it later on. We are going to use it in order to replace the variable with the translated "World" if the variable is empty or absent, using a temporary variable. Here is the final code:
{if !isset($my_module_name) || !$my_module_name} {capture name='my_module_tempvar'}{l s='World' mod='mymodule'}{/capture} {assign var='my_module_name' value=$smarty.capture.my_module_tempvar}{/if}{l s='Hello %s!' sprintf=$my_module_name mod='mymodule'}
Notice that we always use the parameter. This is used by PrestaShop to assert which module the modstring belongs to. The translation tool needs it in order to match the string to translate with its translation. This parameter is for module translation.mandatory
Strings are delimited with single quotes. If a string contains single quotes, they should be escaped using a backslash ( ).\
This way, strings can be directly translated inside PrestaShop:
Go to the "Translations" page under the "Localization" menu,In the "Modify translations" drop-down menu, choose "Module translations",Click the flag of the country of which language you want to translate the module into. The destination language must already be installed to enable translation in it.
The page that loads displays all the strings for all the currently-installed modules. Modules that have all their strings already translated have their fieldset closed, whereas if at least one string is missing in a
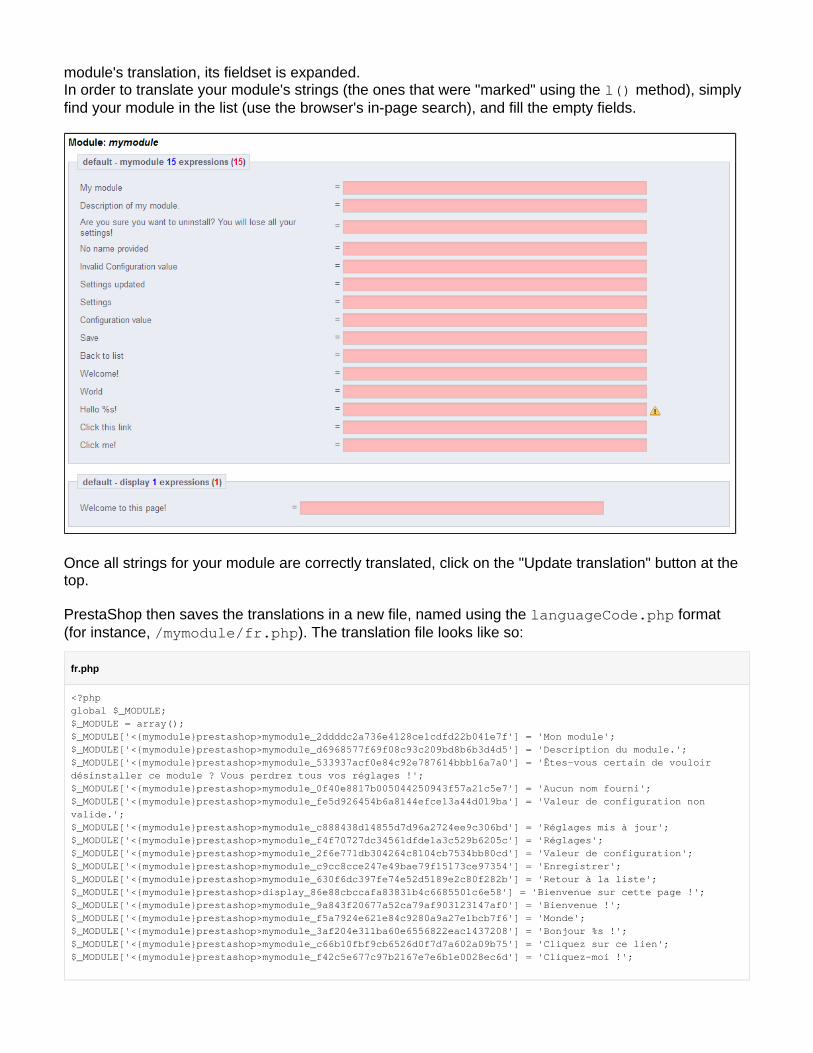
module's translation, its fieldset is expanded.In order to translate your module's strings (the ones that were "marked" using the method), simply l()find your module in the list (use the browser's in-page search), and fill the empty fields.
Once all strings for your module are correctly translated, click on the "Update translation" button at the top.
PrestaShop then saves the translations in a new file, named using the format languageCode.php(for instance, ). The translation file looks like so:/mymodule/fr.php
fr.php
<?phpglobal $_MODULE;$_MODULE = array();$_MODULE['<{mymodule}prestashop>mymodule_2ddddc2a736e4128ce1cdfd22b041e7f'] = 'Mon module';$_MODULE['<{mymodule}prestashop>mymodule_d6968577f69f08c93c209bd8b6b3d4d5'] = 'Description du module.';$_MODULE['<{mymodule}prestashop>mymodule_533937acf0e84c92e787614bbb16a7a0'] = 'Êtes-vous certain de vouloir désinstaller ce module ? Vous perdrez tous vos réglages !';$_MODULE['<{mymodule}prestashop>mymodule_0f40e8817b005044250943f57a21c5e7'] = 'Aucun nom fourni';$_MODULE['<{mymodule}prestashop>mymodule_fe5d926454b6a8144efce13a44d019ba'] = 'Valeur de configuration non valide.';$_MODULE['<{mymodule}prestashop>mymodule_c888438d14855d7d96a2724ee9c306bd'] = 'Réglages mis à jour';$_MODULE['<{mymodule}prestashop>mymodule_f4f70727dc34561dfde1a3c529b6205c'] = 'Réglages';$_MODULE['<{mymodule}prestashop>mymodule_2f6e771db304264c8104cb7534bb80cd'] = 'Valeur de configuration';$_MODULE['<{mymodule}prestashop>mymodule_c9cc8cce247e49bae79f15173ce97354'] = 'Enregistrer';$_MODULE['<{mymodule}prestashop>mymodule_630f6dc397fe74e52d5189e2c80f282b'] = 'Retour à la liste';$_MODULE['<{mymodule}prestashop>display_86e88cbccafa83831b4c6685501c6e58'] = 'Bienvenue sur cette page !';$_MODULE['<{mymodule}prestashop>mymodule_9a843f20677a52ca79af903123147af0'] = 'Bienvenue !';$_MODULE['<{mymodule}prestashop>mymodule_f5a7924e621e84c9280a9a27e1bcb7f6'] = 'Monde';$_MODULE['<{mymodule}prestashop>mymodule_3af204e311ba60e6556822eac1437208'] = 'Bonjour %s !';$_MODULE['<{mymodule}prestashop>mymodule_c66b10fbf9cb6526d0f7d7a602a09b75'] = 'Cliquez sur ce lien';$_MODULE['<{mymodule}prestashop>mymodule_f42c5e677c97b2167e7e6b1e0028ec6d'] = 'Cliquez-moi !';
This file be edited manually! It can only be edited through the PrestaShop translation tool.must not
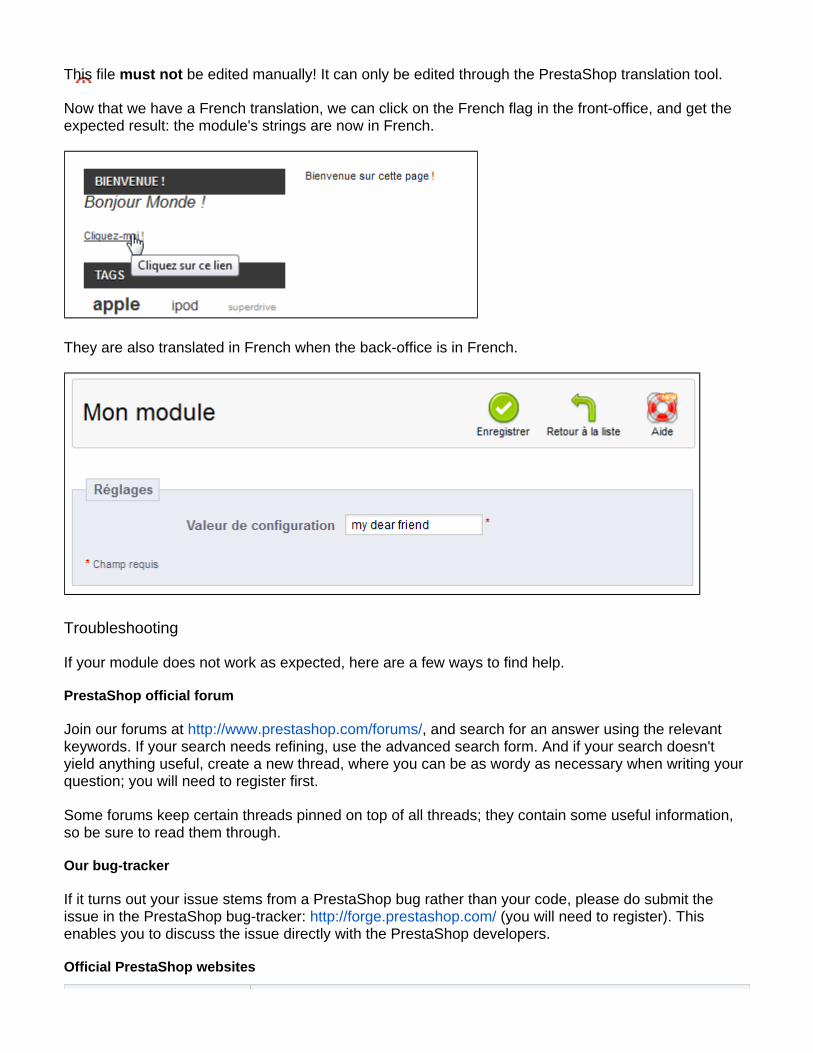
Now that we have a French translation, we can click on the French flag in the front-office, and get the expected result: the module's strings are now in French.
They are also translated in French when the back-office is in French.
Troubleshooting
If your module does not work as expected, here are a few ways to find help.
PrestaShop official forum
Join our forums at , and search for an answer using the relevant http://www.prestashop.com/forums/keywords. If your search needs refining, use the advanced search form. And if your search doesn't yield anything useful, create a new thread, where you can be as wordy as necessary when writing your question; you will need to register first.
Some forums keep certain threads pinned on top of all threads; they contain some useful information, so be sure to read them through.
Our bug-tracker
If it turns out your issue stems from a PrestaShop bug rather than your code, please do submit the issue in the PrestaShop bug-tracker: (you will need to register). This http://forge.prestashop.com/enables you to discuss the issue directly with the PrestaShop developers.
Official PrestaShop websites
URL Description
http://www.prestashop.com
Official website for the PrestaShop tool, its community, and the company behind it.
http://addons.prestashop.com
Marketplace for themes and modules.
http://www.prestabox.com Host your shop with us!
Related Documents