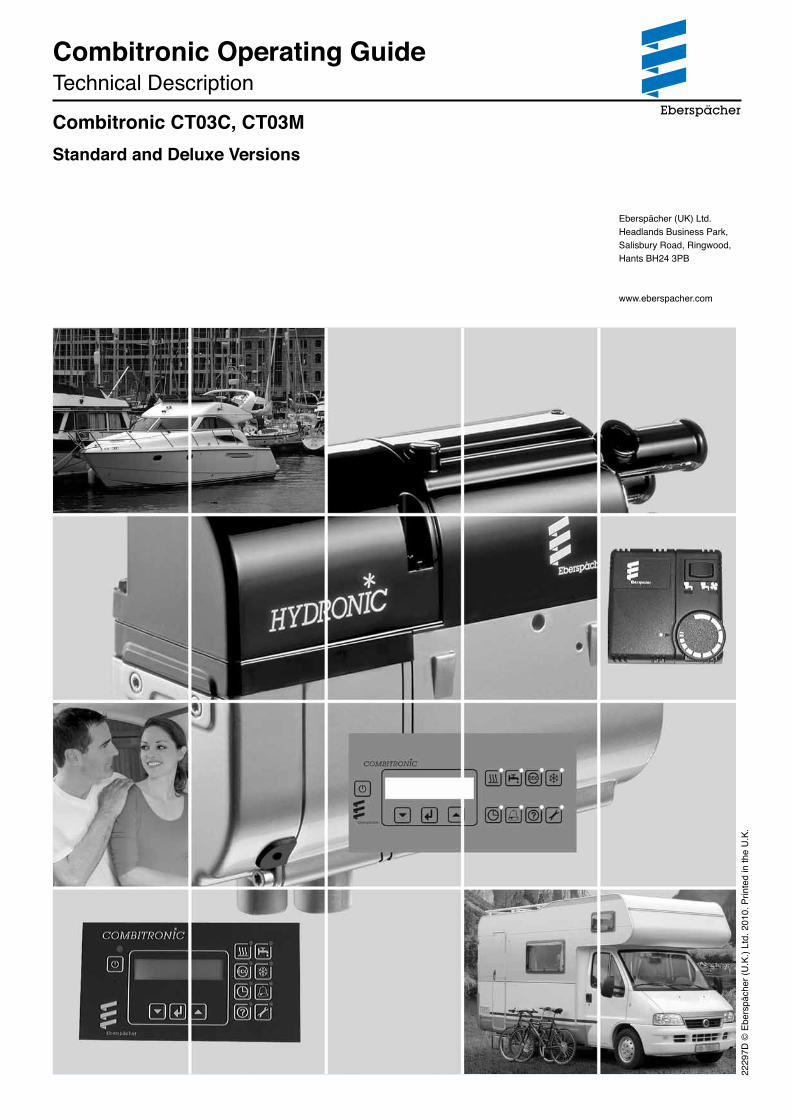
Eberspächer Combitronic CT03C, CT03M Standard and Deluxe Versions 22297D © Eberspächer (U.K.) Ltd. 2010. Printed in the U.K. Combitronic Operating Guide Technical Description Eberspächer (UK) Ltd. Headlands Business Park, Salisbury Road, Ringwood, Hants BH24 3PB www.eberspacher.com

Combitronic Ct03c m Operating 22297
Apr 07, 2016
opis
Welcome message from author
This document is posted to help you gain knowledge. Please leave a comment to let me know what you think about it! Share it to your friends and learn new things together.
Transcript
Eberspächer
Combitronic operating guideTechnical description
Combitronic CT03C, CT03MStandard and Deluxe Versions
2229
7D ©
Ebe
rspä
cher
(U.K
.) Lt
d. 2
010.
Prin
ted
in th
e U
.K.
Combitronic Operating GuideTechnical Description
Eberspächer (UK) Ltd. Headlands Business Park, Salisbury Road, Ringwood, Hants BH24 3PB
www.eberspacher.com


Introduction
3
1
Concept of this Manual
1 Introduction 3B Operating Instructions - Mk.2 Panel
2 Technical Description 3C Operating Instructions - Deluxe Panel
3 Operating Instructions- Standard Version 4 Service and Maintenance
- Conditions of Guarantee
3A Operating Instructions - Mk.1 Deluxe Panel 5 Notes
This manual aims to provide all the necessary information to assist with the operation of Eberspächer Combitronic CT03C and CT03M heaters.
The manual also includes warranty and technical information for future reference.
This manual has been divided into chapters for quick and easy reference as listed below.
Please Note!
Additional safety and statutory information is to be found within the technical description and operating instruction manuals that accompany this manual. If you require information specific to your installation, which is not included in our manuals, please contact your local Eberspächer dealer.
Introduction
4
1
Special Text Structure, Presentation and Picture Symbols
This manual uses special text structures and picture symbols to emphasise different contents. Please refer to the examples below for the corresponding meanings and associated actions.
Picture Symbols
§ Regulation!
This picture symbol with the remark “Regulation” refers to a statutory regulation. Failure to comply with this regulation results in expiry of the type of permit for the heater and preclusion of any Guarantee and liability claims on J. Eberspächer GmbH & Co, KG.
! Danger!
This picture symbol with the remark “Danger!” refers to the risk of a fatal danger to life and limb. Failure to comply with these instructions can result in severe injuries or even death under certain circumstances.
! Caution!
This picture symbol with the remark “Caution!” refers to a dangerous situation for a person and/or the product. Failure to comply with these instructions can result in injury to people and/or damage to machinery.
Please Note!
These remarks contain application recommendations and useful tips for installation of the heater.
Safety Instructions for Installation and Operation!
! Caution!
• Only the control elements approved by Eberspächer must be used to operate the heater. The use of other control elements can cause malfunctions.
• Repairs by unauthorised third-parties or with non original spare parts, are dangerous and therefore not allowed.
• The following measures are not allowed: – Changes to components relevant to the heater; – Use of third party components not approved by Eberspächer; – Nonconformities in installation or operation from the statutory regulations, safety instructions or specifications relevant to safe operation, as stated in the installation instructions and operating instructions. This applies in particular to the electrical wiring, fuel supply, combustion air system and exhaust system.
• Only original accessories and original spare parts must be used during installation or repairs.
• When carrying out electric welding, the battery should be disconnected to protect the controller.
• The heater must not be operated where there is a risk of an accumulation of flammable vapours or dust.
• The battery isolator switch must not be turned off until the heater has completed its cooling cycle.
• The heater must be switched off when refuelling.
• Exhaust gases exit the heater at very high temperatures and therefore any combustable material that may come into contact with the heater exhaust must be removed.
Introduction
5
1
Please read carefully the following instructions, these have been compiled to assist you with every aspect of operating your heater. Special attention is required to the Safety or Caution areas, which are found at the end of each section.
To ensure maximum performance from your heater and for your own safety, please adhere to the following instructions closely, being aware that in the unlikely event of a heater failure during the warranty period, that warranty may be rejected if the heater is not installed or operated in accordance with these instructions.
When installing the heater, for your own safety, please use all necessary personal protection/safety equipment where required.
Technical Description
6
1
The Combitronic range of heaters are diesel fuelled blown hot air and hot water heating systems. With varying outputs, control options and 230v AC devices there will be a product within the range to suit your heating needs.
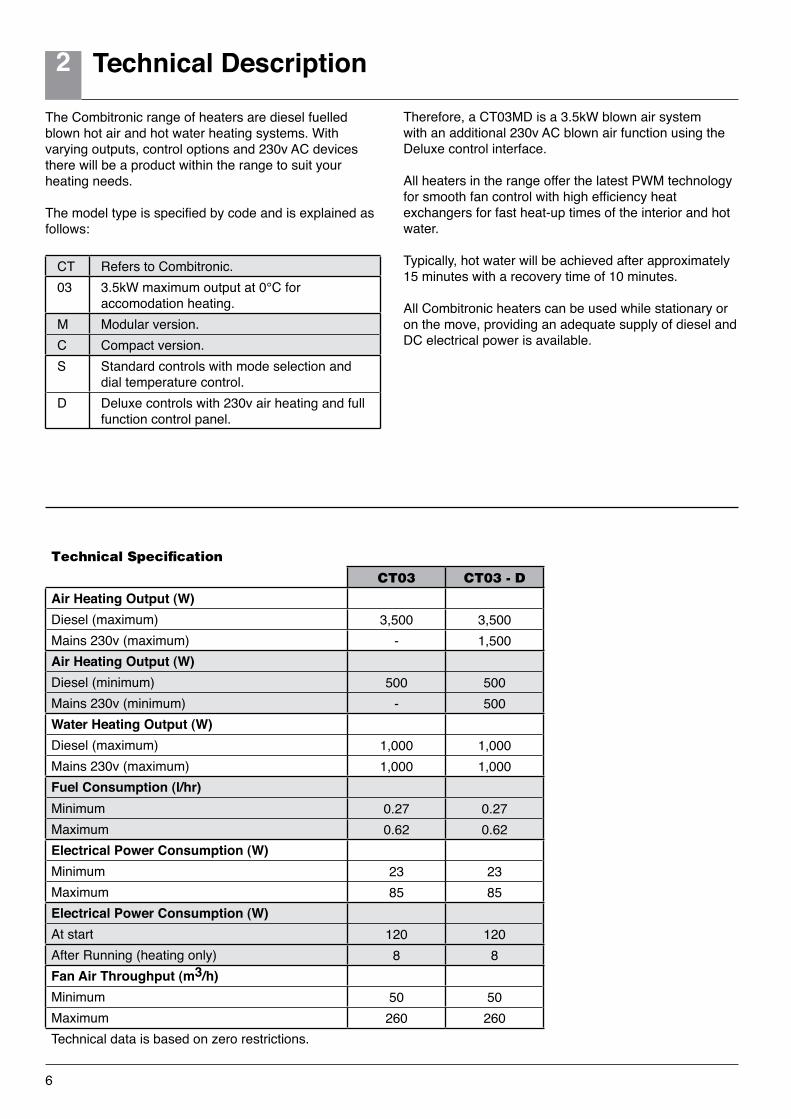
The model type is specified by code and is explained as follows:
CT Refers to Combitronic.03 3.5kW maximum output at 0°C for
accomodation heating.M Modular version.C Compact version.S Standard controls with mode selection and
dial temperature control.D Deluxe controls with 230v air heating and full
function control panel.
2
Therefore, a CT03MD is a 3.5kW blown air system with an additional 230v AC blown air function using the Deluxe control interface.
All heaters in the range offer the latest PWM technology for smooth fan control with high efficiency heat exchangers for fast heat-up times of the interior and hot water.
Typically, hot water will be achieved after approximately 15 minutes with a recovery time of 10 minutes.
All Combitronic heaters can be used while stationary or on the move, providing an adequate supply of diesel and DC electrical power is available.
Technical Specification
CT03 CT03 - DAir Heating Output (W)Diesel (maximum) 3,500 3,500Mains 230v (maximum) - 1,500Air Heating Output (W)Diesel (minimum) 500 500Mains 230v (minimum) - 500Water Heating Output (W)Diesel (maximum) 1,000 1,000Mains 230v (maximum) 1,000 1,000Fuel Consumption (l/hr)Minimum 0.27 0.27Maximum 0.62 0.62Electrical Power Consumption (W)Minimum 23 23Maximum 85 85Electrical Power Consumption (W)At start 120 120After Running (heating only) 8 8Fan Air Throughput (m3/h)Minimum 50 50Maximum 260 260Technical data is based on zero restrictions.
Operating Instructions – Standard Version
7
1
Eberspächer
3
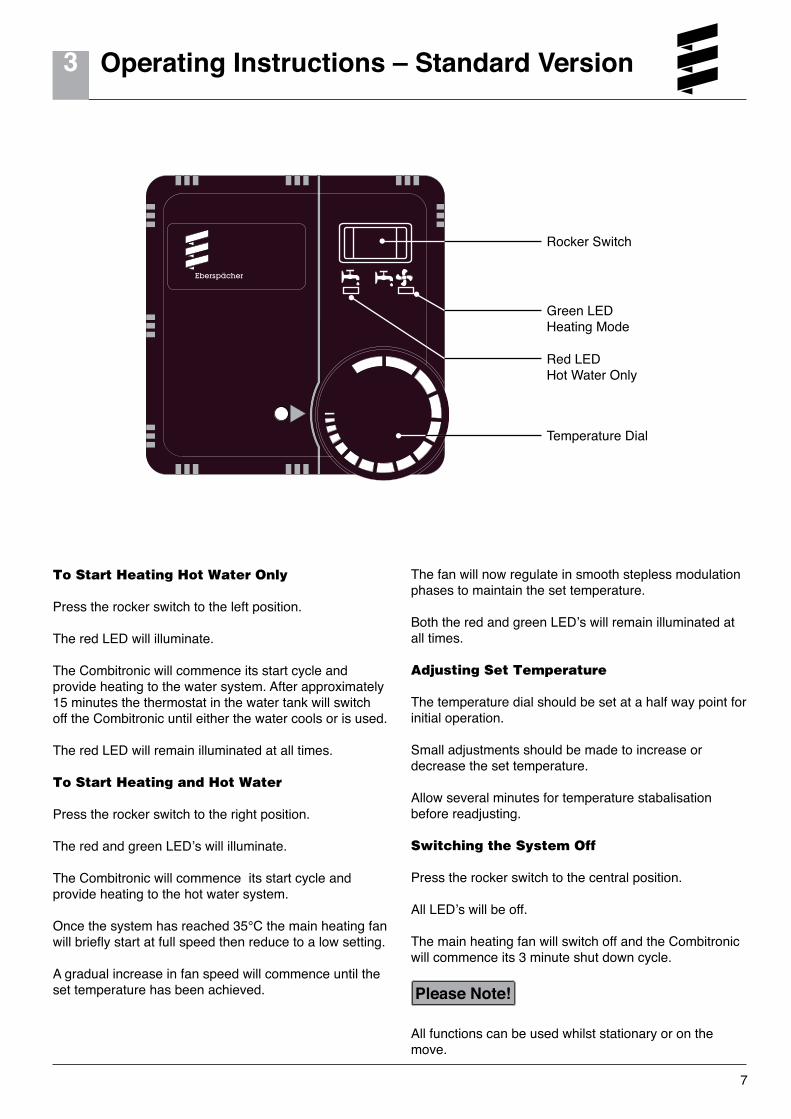
To Start Heating Hot Water Only
Press the rocker switch to the left position.
The red LED will illuminate.
The Combitronic will commence its start cycle and provide heating to the water system. After approximately 15 minutes the thermostat in the water tank will switch off the Combitronic until either the water cools or is used.
The red LED will remain illuminated at all times.
To Start Heating and Hot Water
Press the rocker switch to the right position.
The red and green LED’s will illuminate.
The Combitronic will commence its start cycle and provide heating to the hot water system.
Once the system has reached 35°C the main heating fan will briefly start at full speed then reduce to a low setting.
A gradual increase in fan speed will commence until the set temperature has been achieved.
The fan will now regulate in smooth stepless modulation phases to maintain the set temperature.
Both the red and green LED’s will remain illuminated at all times.
Adjusting Set Temperature
The temperature dial should be set at a half way point for initial operation.
Small adjustments should be made to increase or decrease the set temperature.
Allow several minutes for temperature stabalisation before readjusting.
Switching the System Off
Press the rocker switch to the central position.
All LED’s will be off.
The main heating fan will switch off and the Combitronic will commence its 3 minute shut down cycle.
Please Note!
All functions can be used whilst stationary or on the move.
Standard Version
Rocker Switch
Green LEDHeating Mode
Temperature Dial
Red LEDHot Water Only
Operating Instructions – Mk.1 Deluxe Panel
8
13A
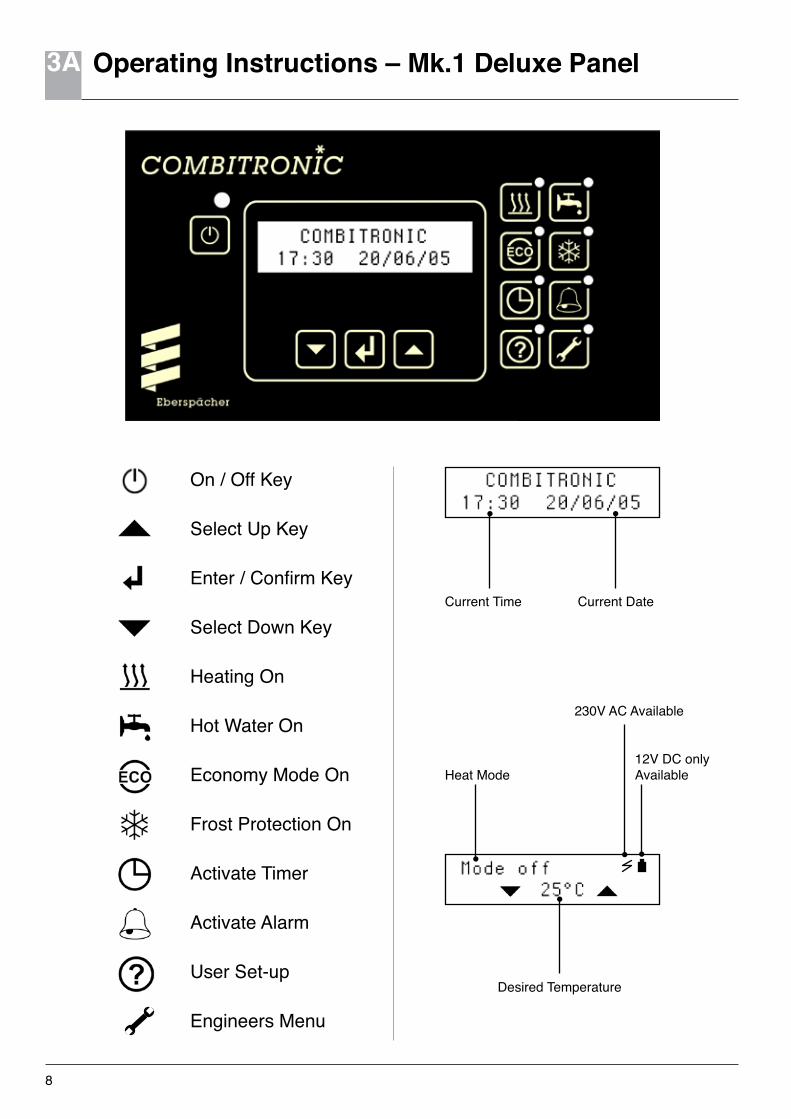
On / Off Key
Select Up Key
Enter / Confirm Key
Select Down Key
Heating On
Hot Water On
Economy Mode On
Frost Protection On
Activate Timer
Activate Alarm
User Set-up
Engineers Menu
Current Time Current Date
Heat Mode
Desired Temperature
230V AC Available
12V DC only Available
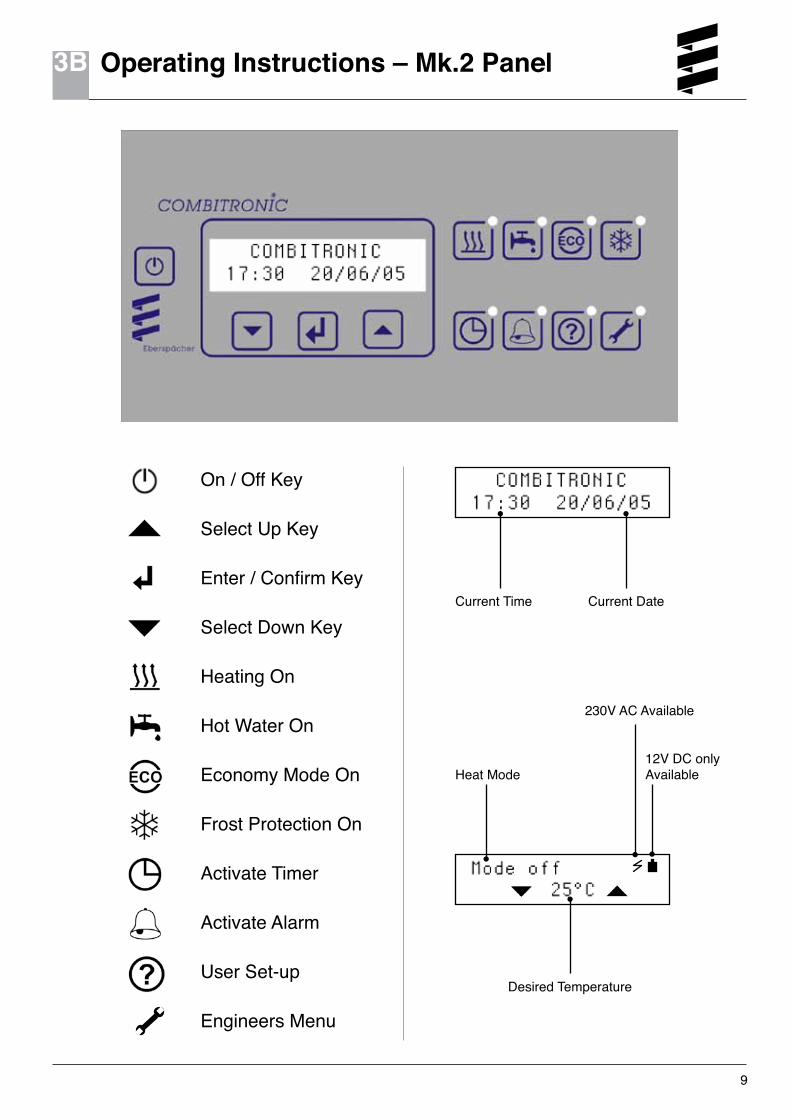
Operating Instructions – Mk.2 Panel
9
13B
On / Off Key
Select Up Key
Enter / Confirm Key
Select Down Key
Heating On
Hot Water On
Economy Mode On
Frost Protection On
Activate Timer
Activate Alarm
User Set-up
Engineers Menu
Current Time Current Date
Heat Mode
Desired Temperature
230V AC Available
12V DC only Available
Operating Instructions – Deluxe Panel
10
1
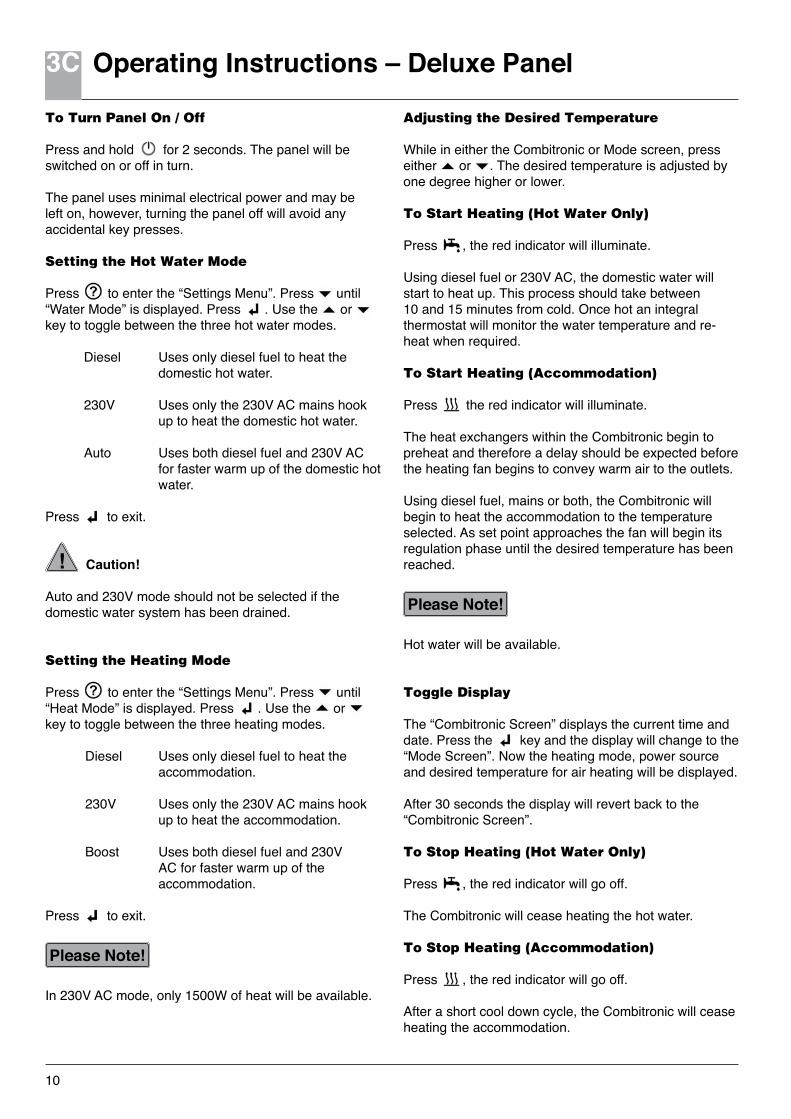
To Turn Panel On / Off
Press and hold for 2 seconds. The panel will be switched on or off in turn.
The panel uses minimal electrical power and may be left on, however, turning the panel off will avoid any accidental key presses.
Setting the Hot Water Mode
Press to enter the “Settings Menu”. Press until “Water Mode” is displayed. Press . Use the or key to toggle between the three hot water modes.
Diesel Uses only diesel fuel to heat the domestic hot water.
230V Uses only the 230V AC mains hook up to heat the domestic hot water.
Auto Uses both diesel fuel and 230V AC for faster warm up of the domestic hot water.
Press to exit.
! Caution!
Auto and 230V mode should not be selected if the domestic water system has been drained.
Setting the Heating Mode
Press to enter the “Settings Menu”. Press until “Heat Mode” is displayed. Press . Use the or key to toggle between the three heating modes.
Diesel Uses only diesel fuel to heat the accommodation.
230V Uses only the 230V AC mains hook
up to heat the accommodation.
Boost Uses both diesel fuel and 230V AC for faster warm up of the accommodation.
Press to exit.
Please Note!
In 230V AC mode, only 1500W of heat will be available.
Adjusting the Desired Temperature
While in either the Combitronic or Mode screen, press either or . The desired temperature is adjusted by one degree higher or lower. To Start Heating (Hot Water Only)
Press , the red indicator will illuminate.
Using diesel fuel or 230V AC, the domestic water will start to heat up. This process should take between 10 and 15 minutes from cold. Once hot an integral thermostat will monitor the water temperature and re-heat when required.
To Start Heating (Accommodation)
Press the red indicator will illuminate.
The heat exchangers within the Combitronic begin to preheat and therefore a delay should be expected before the heating fan begins to convey warm air to the outlets.
Using diesel fuel, mains or both, the Combitronic will begin to heat the accommodation to the temperature selected. As set point approaches the fan will begin its regulation phase until the desired temperature has been reached.
Please Note!
Hot water will be available.
Toggle Display
The “Combitronic Screen” displays the current time and date. Press the key and the display will change to the “Mode Screen”. Now the heating mode, power source and desired temperature for air heating will be displayed.
After 30 seconds the display will revert back to the “Combitronic Screen”.
To Stop Heating (Hot Water Only)
Press , the red indicator will go off.
The Combitronic will cease heating the hot water.
To Stop Heating (Accommodation)
Press , the red indicator will go off.
After a short cool down cycle, the Combitronic will cease heating the accommodation.
3C
Operating Instructions – Deluxe Panel
11
1
Economy Mode
Ideal as a night time mode, the economy mode turns off the diesel heating and uses mains only to try to maintain the desired temperature.
The reduced heating power may make it impossible to reach the desired temperature, however, a comfortable level of background heating will be provided.
Press , the red indicator will illuminate.
Please Note!
The Economy Mode is a MAINS & DIESEL FUNCTION.
Frost Mode
Should the internal temperature fall to 0°C or less the Combitronic will operate. The internal temperature will be kept above 5°C and the hot water heated periodically to prevent it freezing.
Press , the red indicator will illuminate.
Please Note!
The Frost Mode is a MAINS ONLY FUNCTION.
! Caution!
230V AC must be available and this mode should only be used if the domestic water system has not been drained.
Setting the Current Time
Press to enter the “Settings Menu”.
Press .
Use the or key until “Time Set” appears on the display.
Press .
Use the or to toggle 12 / 24 hour clock mode.
Press .
Use the or to toggle hours.
Press .
Use the or to toggle minutes.
Press to exit.
Setting the Current Date
Press to enter the “Settings Menu”.
Press .
Use the or key until “Date Set” appears on the display.
Press .
Use the or to adjust the day of the week.
Press .
Use the or to adjust the month.
Press .
Use the or to adjust the calendar day.
Press .
Use the or to adjust the year.
Press to exit.
Setting the Timer
Press to enter the “Settings Menu”.
Press .
Use the or key until “Timer Set” appears on the display.
Press .
Use the or to adjust the Time ON hours.
Press .
Use the or to adjust the Time ON minutes.
Press .
Use the or to adjust the Time OFF hours.
Press .
Use the or to adjust the Time OFF minutes.
Press to exit.
3C
Operating Instructions – Deluxe Panel
12
1
Activating the Timer
Press , the red indicator will illuminate.
Select heating, hot water or both using .
The heating will now operate at the pre set times.
To stop the timer function press .
Setting the Alarm Time
Press to enter the “Settings Menu”.
Press .
Use the or key until “Alarm Set” appears on the display.
Press .
Use the or to adjust the hours.
Press .
Use the or to adjust the minutes.
Press to exit.
Activating the Alarm
Press the red indicator will illuminate.
When the current time is the same as the alarm time, the alarm will sound.
To stop the alarm, press any key.
The red indicator will go out.
Turning the Button Beeps On / Off
Press to enter the “Settings Menu”.
Press .
Use the or key until “Button Beeps” appears on the display.
Press .
Use the or to select on or off.
Press to exit.
Changing the Display Settings – Contrast / Brightness
Press to enter the “Settings Menu”.
Press .
Use the or key until “Display” appears on the display.
Press .
Use the or key until “Contrast” appears on the display.
Press .
Press and HOLD the or key to adjust the display contrast.
Press to exit.
Changing the Display Settings – Backlight Time Delay
The Backlight time delay is the amount of time that the screen will remain illuminated after any button press.
Press to enter the “Settings Menu”.
Press .
Use the or key until “Display” appears on the display.
Press .
Use the or key until “Backlight” appears on the display.
Press .
Use the or key to adjust the delay between 15 seconds, 30 seconds, 1 minute and 2 minutes.
Press to exit.
3C

Operating Instructions – Deluxe Panel
13
1
Changing the Display Settings – Timeout Delay
The Timeout delay is the amount of time before the display reverts back to the “Combitronic Screen”.
Press to enter the “Settings Menu”.
Press .
Use the or key until “Display” appears on the display.
Press .
Use the or key until “Timeout” appears on the display.
Press .
Use the or key to adjust the delay between Never, 30 seconds, 1 minute and 3 minutes.
Press to exit.
Draining the Domestic Water from the Panel
An OPTIONAL valve can be installed by your motorhome or Eberspächer dealer that will allow the domestic water to be drained from the panel.
Ensure the water pump is switched on.
Press to enter the “Settings Menu”.
Press .
Use the or key until “Purge” appears on the display.
Press .
Press and HOLD key to open the drain valve.
Keep the button pressed until the sound from the pump changes.
Press to exit.
Please Note!
No drain valve options have been fitted by motorhome manufacturers.
3C
Service and Maintenance
14
1
Eberspächer (UK) Limited guarantee their heaters and associated parts for a period of twelve months to include parts and labour. The period of guarantee starts with the date of original purchase, the date of installing the heater into an original equipment machine or the date which the new vehicle is registered, licensed or placed in service. Glow pins carry a twelve month guarantee.
Guarantee will be honoured only if the installation has been carried out according to the Eberspächer instructions in force at the time and that the installation is carried out by an authorised Eberspächer distributor/dealer or recognised original equipment manufacturer or their agent. It is appreciated that to assist with warranty records the guarantee material enclosed with each heater is completed and copies returned to Eberspächer (UK) Limited for completion of internal records.
Heater and parts guarantee is conditional on the appliance being used only in those conditions for which it was originally designed and will not take account of problems experienced through a shortage of D.C. electrical power, fuel or disregard to the installation or operating instructions.
The guarantee covers exclusively only those parts of delivery by Eberspächer (UK) Limited.
Change of ownership of the appliance does not affect the guarantee obligation. These obligations do not exist, however when the fault originally developed was connected with:
• A user or customer not having given notice at once that a fault had developed and providing Eberspächer (UK) Limited or their distributors/dealers the opportunity of rectification.
• Failure of the unit through fair wear and tear applying primarily to fuses.
• Failure of the appliance through abuse, unreasonable treatment or the use for which the appliance was not designed.
• Installation of parts into or in conjunction with the appliance which are not approved or sanctioned by the manufacturer or his distributors/dealers and agents.
• Changes in the appliance in a way which the manufacture has not agreed or sanctioned.
• Installation faults which conflict with Eberspächer (UK) Limited specifications.
Please note the guarantee does not cover fair wear and tear and no liability will be accepted for defects caused or service required through such use.
The information detailed within our conditions of guarantee does not effect your statutory rights.
Eberspächer recommend the Combitronic should be serviced every 12 months.
It is also advisable to operate the system every few months to prevent seizure of moving parts.
Eberspächer will cover parts and labour during the warranty period. Eberspächer will not cover wear and tear items such as fuses and filters or dealer / customer travel costs (see Conditions of Guarantee).
Eberspächer (UK) Ltd.Conditions of Guarantee for Eberspächer Heaters
4
Notes
15
15

Eberspächer
Eberspächer (UK) Ltd.Headlands Business Park,Salisbury Road, Ringwood
Hampshire, BH24 3PB
© Eberspächer (UK) Ltd. 2010No part of this manual may be copied or reproduced in any form
without the express permission of Eberspächer (UK) Ltd.
This publication was correct at the time of going to print however, Eberspächer (UK) Ltd have a policy of continuous improvement and reserve the right to
amend any specifications without prior notice.
Related Documents