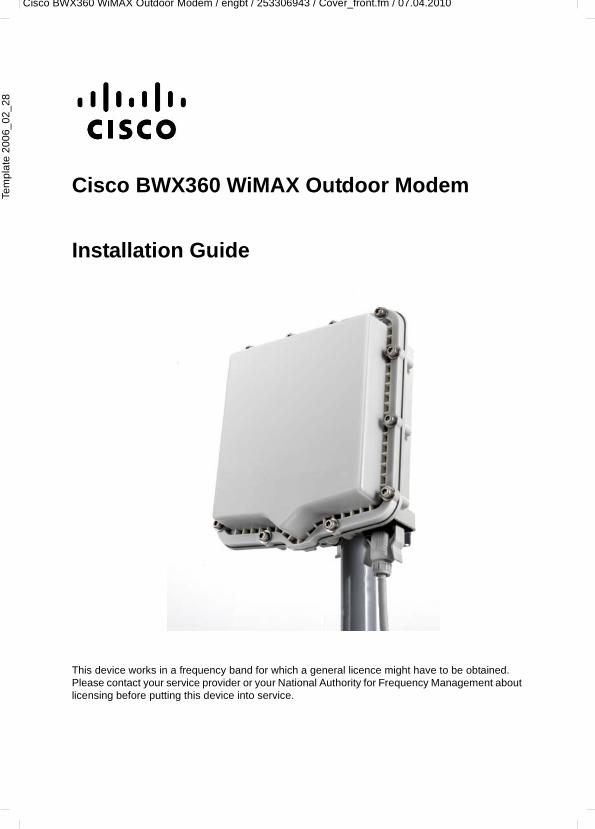
Cisco BWX360 WiMAX Outdoor Modem / engbt / 253306943 / Cover_front.fm / 07.04.2010 Template 2006_02_28 Cisco BWX360 WiMAX Outdoor Modem Installation Guide This device works in a frequency band for which a general licence might have to be obtained. Please contact your service provider or your National Authority for Frequency Management about licensing before putting this device into service.

Welcome message from author
This document is posted to help you gain knowledge. Please leave a comment to let me know what you think about it! Share it to your friends and learn new things together.
Transcript
Cisco BWX360 WiMAX Outdoor Modem / engbt / 253306943 / Cover_front.fm / 07.04.2010Te
mpl
ate
2006
_02_
28
Cisco BWX360 WiMAX Outdoor Modem
Installation Guide
This device works in a frequency band for which a general licence might have to be obtained. Please contact your service provider or your National Authority for Frequency Management about licensing before putting this device into service.

1
Contents
Cisco BWX360 WiMAX Outdoor Modem / engbt / 253306943 / SE680WiMAXIVZ.fm / 07.04.2010S
chab
lone
200
6_02
_28
ContentsFor your safety . . . . . . . . . . . . . . . . . . . . . . . . . . . . . . . . . . . . 2Safety precautions . . . . . . . . . . . . . . . . . . . . . . . . . . . . . . . . . . . . . . . . . . . . . . . . . . 2
Notes on assembly instructions . . . . . . . . . . . . . . . . . . . . . . 3The Cisco BWX360 WiMAX Outdoor Modem . . . . . . . . . . . . 4Scope of delivery . . . . . . . . . . . . . . . . . . . . . . . . . . . . . . . . . . . . . . . . . . . . . . . . . . . 4Connectors and LEDs . . . . . . . . . . . . . . . . . . . . . . . . . . . . . . . . . . . . . . . . . . . . . . . . 6
Installing the Cisco BWX360 WiMAX Outdoor Modem . . . . 8Choosing locations . . . . . . . . . . . . . . . . . . . . . . . . . . . . . . . . . . . . . . . . . . . . . . . . . . 9Setting up the antenna mast . . . . . . . . . . . . . . . . . . . . . . . . . . . . . . . . . . . . . . . . . . 10Protecting the mast against lightning . . . . . . . . . . . . . . . . . . . . . . . . . . . . . . . . . . . 10Assembling the outdoor modem . . . . . . . . . . . . . . . . . . . . . . . . . . . . . . . . . . . . . . . 12Connecting the indoor unit . . . . . . . . . . . . . . . . . . . . . . . . . . . . . . . . . . . . . . . . . . . 15Preparing to use the Cisco BWX360 WiMAX Outdoor Modem . . . . . . . . . . . . . . . 17Launching the user interface . . . . . . . . . . . . . . . . . . . . . . . . . . . . . . . . . . . . . . . . . . 18Connecting to the WiMAX network and the Internet . . . . . . . . . . . . . . . . . . . . . . . . 19Precisely aligning the antenna . . . . . . . . . . . . . . . . . . . . . . . . . . . . . . . . . . . . . . . . 21Finishing off the assembly . . . . . . . . . . . . . . . . . . . . . . . . . . . . . . . . . . . . . . . . . . . 22
Appendix . . . . . . . . . . . . . . . . . . . . . . . . . . . . . . . . . . . . . . . . 23Troubleshooting . . . . . . . . . . . . . . . . . . . . . . . . . . . . . . . . . . . . . . . . . . . . . . . . . . . 23Specifications . . . . . . . . . . . . . . . . . . . . . . . . . . . . . . . . . . . . . . . . . . . . . . . . . . . . . 23Sources . . . . . . . . . . . . . . . . . . . . . . . . . . . . . . . . . . . . . . . . . . . . . . . . . . . . . . . . . . 24Federal Communications Commission (FCC) Statements . . . . . . . . . . . . . . . . . . . 26
Index . . . . . . . . . . . . . . . . . . . . . . . . . . . . . . . . . . . . . . . . . . . 27
2
For your safety
Cisco BWX360 WiMAX Outdoor Modem / engbt / 253306943 / Safety.fm / 07.04.2010Te
mpl
ate
2006
_02_
28
For your safetyPlease read the safety instructions carefully before assembly and before putting into service.
Safety precautions
General safety instructions◆ Only pass on the Cisco BWX360 WiMAX Outdoor Modem to third parties with this
user guide and the assembly instructions.◆ The Cisco BWX360 WiMAX Outdoor Modem must only be installed and put into use
by a qualified electrician in accordance with the supplied installation instructions.◆ National laws and regulations must be considered before putting the device into
service.◆ These devices are professional IT equipment. Keep the devices beyond the reach
of children.
Safety instructions for connection◆ Only use undamaged original accessories. ◆ The outdoor modem must only be installed by a qualified electrician in accordance
with the assembly instructions.
Safety precautions for the Cisco BWX360 WiMAX Outdoor Modem◆ The operation of medical appliances may be affected. Be aware of the technical
conditions in your particular environment, e.g. doctor's surgery.◆ The Cisco BWX360 WiMAX Outdoor Modem can interfere with the functioning of
medical devices such as pacemakers. Keep at least 20 cm between the devices and the pacemaker. For more information consult your doctor.
◆ Do not operate the indoor unit under the influence of direct heat sources (e.g. directly in the sun).
◆ The Cisco BWX360 WiMAX Outdoor Modem complies with the regulations on lim-iting the effect of electromagnetic fields on the general population.
◆ Do not use the devices in environments with a potential explosion hazard, e.g. auto paint shops or in a humid environment (bathroom etc.).
◆ Only clean the Cisco BWX360 WiMAX Outdoor Modem with a soft anti-static cloth.
3
Notes on assembly instructions
Cisco BWX360 WiMAX Outdoor Modem / engbt / 253306943 / Safety.fm / 07.04.2010Te
mpl
ate
2006
_02_
28
Notes on assembly instructionsThese assembly instructions describe the assembly and operation of the individual components of the Cisco BWX360 WiMAX Outdoor Modem. The configuration of the fully installed system is discussed in the user guide that you received with the Cisco BWX360 WiMAX Outdoor Modem.
◆ Please read the assembly instructions carefully before using the devices for the first time.
4
The Cisco BWX360 WiMAX Outdoor Modem
Cisco BWX360 WiMAX Outdoor Modem / engbt / 253306943 / Product_intro.fm / 07.04.2010Te
mpl
ate
2006
_02_
28
The Cisco BWX360 WiMAX Outdoor Modem
Scope of delivery
◆ 1 outdoor modem with integrated antennas◆ Assembly equipment:
– Distance piece for elevation setting– Mast bracket with fastening clamps, fastening screws and brackets
◆ Assembly accessories:– 1 RJ45 plug (Phoenix connector VS-08-RJ45-5-Q/IP67 BK) to connect the
Ethernet cable to the outdoor modem ◆ 1 indoor unit
– 1 Ethernet cable for the internal connection to the PC, 1.8 m – 1 power supply unit
◆ 1 assembly instructions◆ 1 user guide
Tools and equipment required
You will require the following tools and equipment for assembly:
◆ Antenna mast with assembly equipment (for mounting on a mast); the antenna mast must have a diameter of 2–3 inches (50.8 mm–76.2 mm) and be designed for assembling this kind of antenna.
◆ Sealing material for the wall, window or roof duct◆ Ethernet cable (non-assembled) for the Ethernet connection to the indoor unit. For
the connection of the outdoor modem to the indoor unit only use a round Ethernet cable (Ø 6.0-8.5 mm), which is approved for the outdoor use. We recommend to contact one of the manufacturers which are mentioned in the chapter "Ethernet cable" on page 24.
◆ RJ45 plug (Phoenix) for the connections required indoors. Also a standard CAT5e Ethernet cable for connecting indoor units to the PC or router.
◆ LSA+ wall connection socket, feeder tool and standard CAT5e Ethernet cable, if you wish to connect the Ethernet cable from outside to a wall connection socket.
◆ Cable clamps and cable ties for attaching the Ethernet cable to the antenna mast, the wall bracket and other outdoor and indoor areas
◆ Ground cable for earthing (grounding) the metal casing of the outdoor modem (wire: stranded, green, #6 AWG, ROHS; lug: CONN, one-hole #6, ROHS)
Depending on the installation conditions and customer requirements, you can also connect the Ethernet cable from the IN connector of the indoor unit to a standard LAN socket, and RJ45 plug (e.g. Phoenix connector VS-08-RJ45-5-Q/IP20 BK, see "Sources" on page 24) or a patch panel.
5
The Cisco BWX360 WiMAX Outdoor Modem
Cisco BWX360 WiMAX Outdoor Modem / engbt / 253306943 / Product_intro.fm / 07.04.2010Te
mpl
ate
2006
_02_
28
Product overview
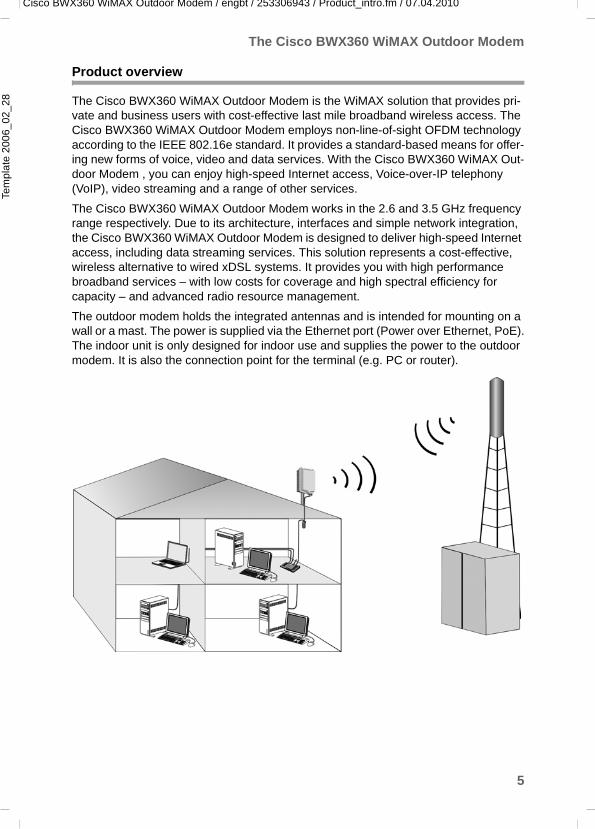
The Cisco BWX360 WiMAX Outdoor Modem is the WiMAX solution that provides pri-vate and business users with cost-effective last mile broadband wireless access. The Cisco BWX360 WiMAX Outdoor Modem employs non-line-of-sight OFDM technology according to the IEEE 802.16e standard. It provides a standard-based means for offer-ing new forms of voice, video and data services. With the Cisco BWX360 WiMAX Out-door Modem , you can enjoy high-speed Internet access, Voice-over-IP telephony (VoIP), video streaming and a range of other services.
The Cisco BWX360 WiMAX Outdoor Modem works in the 2.6 and 3.5 GHz frequency range respectively. Due to its architecture, interfaces and simple network integration, the Cisco BWX360 WiMAX Outdoor Modem is designed to deliver high-speed Internet access, including data streaming services. This solution represents a cost-effective, wireless alternative to wired xDSL systems. It provides you with high performance broadband services – with low costs for coverage and high spectral efficiency for capacity – and advanced radio resource management.
The outdoor modem holds the integrated antennas and is intended for mounting on a wall or a mast. The power is supplied via the Ethernet port (Power over Ethernet, PoE).The indoor unit is only designed for indoor use and supplies the power to the outdoor modem. It is also the connection point for the terminal (e.g. PC or router).
6
The Cisco BWX360 WiMAX Outdoor Modem
Cisco BWX360 WiMAX Outdoor Modem / engbt / 253306943 / Product_intro.fm / 07.04.2010Te
mpl
ate
2006
_02_
28
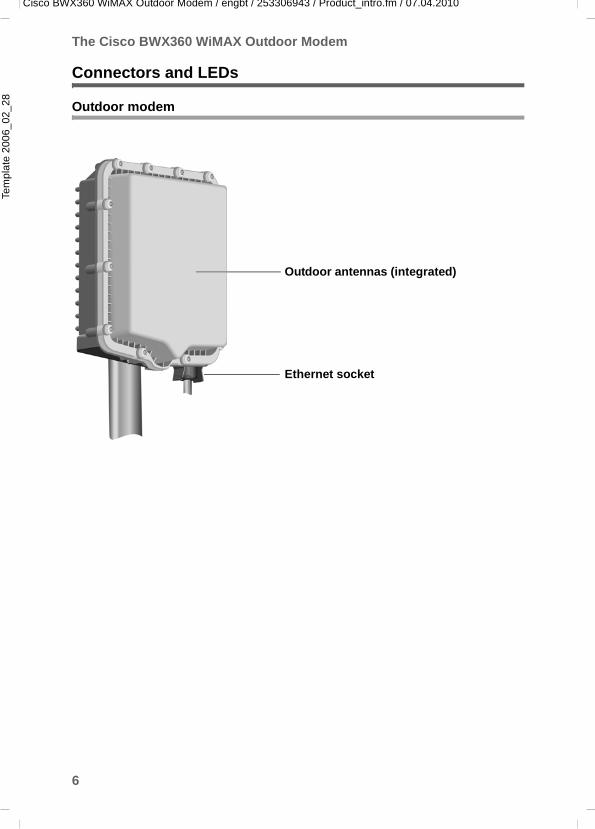
Connectors and LEDs
Outdoor modem
Ethernet socket
Outdoor antennas (integrated)
7
The Cisco BWX360 WiMAX Outdoor Modem
Cisco BWX360 WiMAX Outdoor Modem / engbt / 253306943 / Product_intro.fm / 07.04.2010Te
mpl
ate
2006
_02_
28
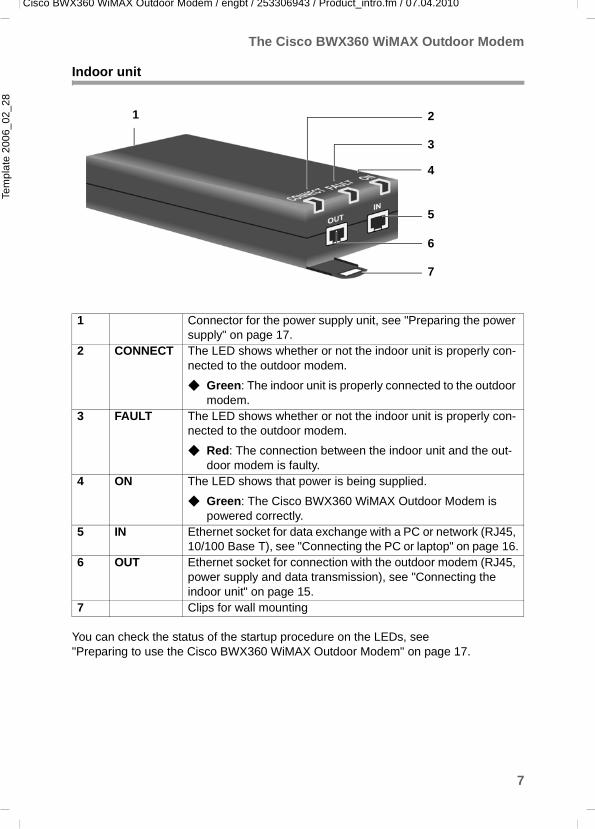
Indoor unit
You can check the status of the startup procedure on the LEDs, see "Preparing to use the Cisco BWX360 WiMAX Outdoor Modem" on page 17.
1 Connector for the power supply unit, see "Preparing the power supply" on page 17.
2 CONNECT The LED shows whether or not the indoor unit is properly con-nected to the outdoor modem.
◆ Green: The indoor unit is properly connected to the outdoor modem.
3 FAULT The LED shows whether or not the indoor unit is properly con-nected to the outdoor modem.
◆ Red: The connection between the indoor unit and the out-door modem is faulty.
4 ON The LED shows that power is being supplied.
◆ Green: The Cisco BWX360 WiMAX Outdoor Modem is powered correctly.
5 IN Ethernet socket for data exchange with a PC or network (RJ45, 10/100 Base T), see "Connecting the PC or laptop" on page 16.
6 OUT Ethernet socket for connection with the outdoor modem (RJ45, power supply and data transmission), see "Connecting the indoor unit" on page 15.
7 Clips for wall mounting
1 2
3
4
5
6
7
8
Installing the Cisco BWX360 WiMAX Outdoor Modem
Cisco BWX360 WiMAX Outdoor Modem / engbt / 253306943 / Installation.fm / 07.04.2010Te
mpl
ate
2006
_02_
28
Installing the Cisco BWX360 WiMAX Outdoor ModemFor installing the Cisco BWX360 WiMAX Outdoor Modem you have to perform the fol-lowing steps:
1. Choosing locations (see page 9)
2. Setting up the antenna mast (see page 10).
3. Protecting the mast against lightning (see page 10)
4. Assembling the outdoor modem (see page 12)
5. Connecting the indoor unit (see page 15)
When the installation is completed you have to perform the following steps in order to put your Cisco BWX360 WiMAX Outdoor Modem into operation:
1. Preparing to use the Cisco BWX360 WiMAX Outdoor Modem (see page 17)
2. Launching the user interface (see page 18)
3. Connecting to the WiMAX network and the Internet (see page 19)
4. Precisely aligning the antenna (see page 21)
5. Finishing off the assembly (see page 22)
The Cisco BWX360 WiMAX Outdoor Modem must be assembled and put into service by a qualified electrician.
Only commence the outdoor work once you have taken all the neces-sary steps to make the location safe. Be sure to observe the safety precautions.
9
Installing the Cisco BWX360 WiMAX Outdoor Modem
Cisco BWX360 WiMAX Outdoor Modem / engbt / 253306943 / Installation.fm / 07.04.2010Te
mpl
ate
2006
_02_
28
Choosing locations
When choosing locations, please note the following:
1. First choose the location for the indoor unit:
– When choosing the location, note the specified temperature range of the indoor unit (see "Specifications" on page 23).
– The indoor unit is only suitable for indoor use. – The indoor unit can be operated either on a horizontal surface or mounted on a
wall. Always make sure the connections cannot become loose once the system has been put into service and check that the LEDs are clearly visible.
– Power supply: Power is supplied to the Cisco BWX360 WiMAX Outdoor Modem via the indoor unit. Therefore, the location must be close to a suitable mains connection (cable length of the supplied power supply unit).
– Wall duct: To connect to the outdoor modem, the corresponding Ethernet cable must be fed through the wall to the outside of the building. It must be possible to make a suit-able wall duct at or close to the indoor unit. Please note that the maximum permitted cable length is 50 m.
– PC or network: Establishing a connection between the indoor unit and a PC or network-switch should ideally be possible from the location via the Ethernet cable. If the PC is moved from its original place, the indoor unit should still be able to be reached simply by using standard cable lengths.
2. Please note the following when setting up the antenna mast/modem:
– There should not be any obstructions (walls, trees etc.) in front of the antenna. The best results will be obtained if the outdoor modem is in sight of the WiMAX base station. If necessary, you can also reflect the radio waves off neighbouring buildings.
– The antenna mast must be structurally secure. Check how secure the various attachments are.
– The antenna mast must be within reach of the cable. Ideally, the Ethernet cable should be protected outside (from frost, sun, unauthorised and mechanical influ-ences etc.).
– The antenna mast should be positioned near a lightning conductor. A suitable lightning conductor must be installed where necessary.
10
Installing the Cisco BWX360 WiMAX Outdoor Modem
Cisco BWX360 WiMAX Outdoor Modem / engbt / 253306943 / Installation.fm / 07.04.2010Te
mpl
ate
2006
_02_
28
Setting up the antenna mast
Information on how to install the antenna mast is not included in these installation instructions. Please observe all the safety provisions and other notes contained in the assembly instructions for the antenna mast. In particular, make sure the antenna mast has sufficient load capacity. If you are installing the mast on the roof, make sure the roof is fully sealed again afterwards.
If necessary, you can attach the mast brackets to the mast when you install it.
Protecting the mast against lightning
Preparation
◆ The outdoor modem is not designed to withstand being struck directly by lightning and must be protected accordingly. The antenna must therefore be installed in areas that are protected against lightning (Lightning Protection Zone 0B). The cor-responding separation distance (IEC 62305) must be complied with. Earthing (grounding) and lightning protection work may only be carried out by elec-tricians specifically qualified for such work.
◆ The appropriate earthing (grounding) clamps must be used to create an equipoten-tial bonding between a cable shield and an equipotential bonding bar that complies with regulations (for sources see "Earthing (gounding) clamps" on page 25).
11
Installing the Cisco BWX360 WiMAX Outdoor Modem
Cisco BWX360 WiMAX Outdoor Modem / engbt / 253306943 / Installation.fm / 07.04.2010Te
mpl
ate
2006
_02_
28
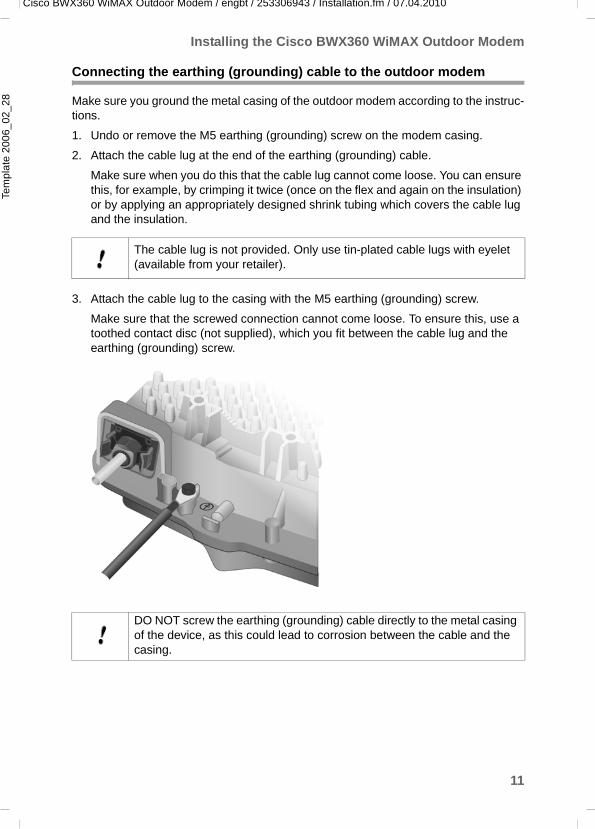
Connecting the earthing (grounding) cable to the outdoor modem
Make sure you ground the metal casing of the outdoor modem according to the instruc-tions.
1. Undo or remove the M5 earthing (grounding) screw on the modem casing.
2. Attach the cable lug at the end of the earthing (grounding) cable.
Make sure when you do this that the cable lug cannot come loose. You can ensure this, for example, by crimping it twice (once on the flex and again on the insulation) or by applying an appropriately designed shrink tubing which covers the cable lug and the insulation.
3. Attach the cable lug to the casing with the M5 earthing (grounding) screw.
Make sure that the screwed connection cannot come loose. To ensure this, use a toothed contact disc (not supplied), which you fit between the cable lug and the earthing (grounding) screw.
The cable lug is not provided. Only use tin-plated cable lugs with eyelet (available from your retailer).
DO NOT screw the earthing (grounding) cable directly to the metal casing of the device, as this could lead to corrosion between the cable and the casing.
12
Installing the Cisco BWX360 WiMAX Outdoor Modem
Cisco BWX360 WiMAX Outdoor Modem / engbt / 253306943 / Installation.fm / 07.04.2010Te
mpl
ate
2006
_02_
28
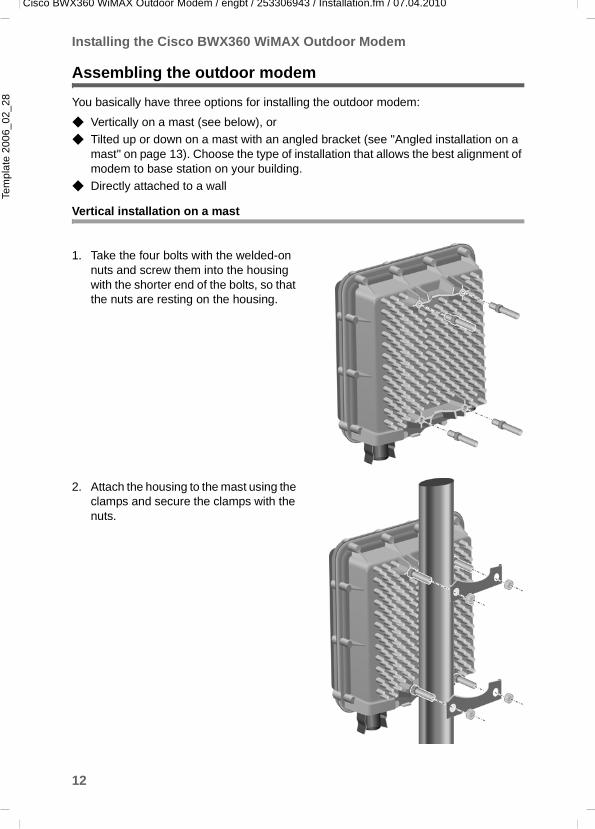
Assembling the outdoor modem
You basically have three options for installing the outdoor modem:
◆ Vertically on a mast (see below), or◆ Tilted up or down on a mast with an angled bracket (see "Angled installation on a
mast" on page 13). Choose the type of installation that allows the best alignment of modem to base station on your building.
◆ Directly attached to a wall
Vertical installation on a mast
1. Take the four bolts with the welded-on nuts and screw them into the housing with the shorter end of the bolts, so that the nuts are resting on the housing.
2. Attach the housing to the mast using the clamps and secure the clamps with the nuts.
13
Installing the Cisco BWX360 WiMAX Outdoor Modem
Cisco BWX360 WiMAX Outdoor Modem / engbt / 253306943 / Installation.fm / 07.04.2010Te
mpl
ate
2006
_02_
28
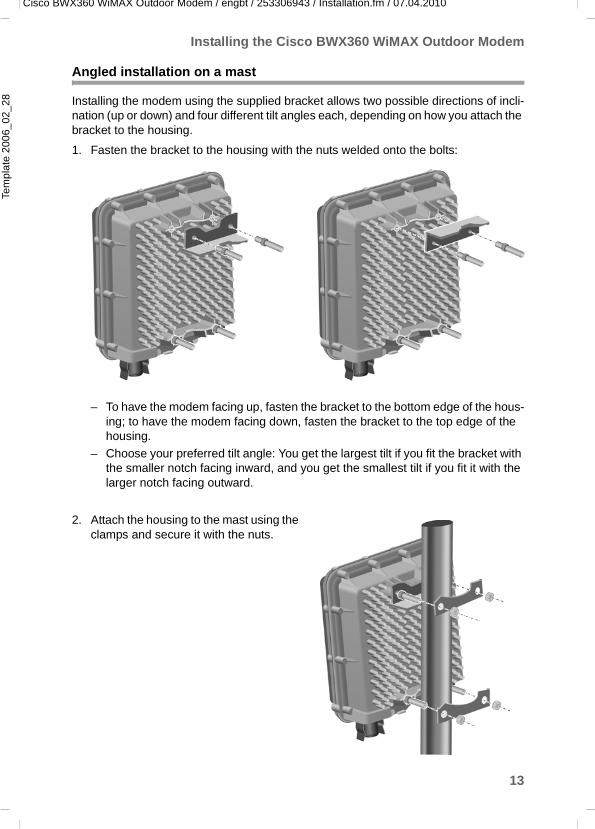
Angled installation on a mast
Installing the modem using the supplied bracket allows two possible directions of incli-nation (up or down) and four different tilt angles each, depending on how you attach the bracket to the housing.
1. Fasten the bracket to the housing with the nuts welded onto the bolts:
– To have the modem facing up, fasten the bracket to the bottom edge of the hous-ing; to have the modem facing down, fasten the bracket to the top edge of the housing.
– Choose your preferred tilt angle: You get the largest tilt if you fit the bracket with the smaller notch facing inward, and you get the smallest tilt if you fit it with the larger notch facing outward.
2. Attach the housing to the mast using the clamps and secure it with the nuts.
14
Installing the Cisco BWX360 WiMAX Outdoor Modem
Cisco BWX360 WiMAX Outdoor Modem / engbt / 253306943 / Installation.fm / 07.04.2010Te
mpl
ate
2006
_02_
28
Preparing to connect to the indoor unit
To connect the indoor unit to the outdoor modem you perform the following steps:
1. Making a wall duct.
2. Provisionally laying the Ethernet cable.
3. Checking connection options in the house.
4. Connecting an Ethernet cable to the outdoor modem.
Making a wall duct 1. Note how close you are to the indoor unit.
2. Check what types of wall ducts are suitable (wall or window duct) and make one.
Provisionally laying the Ethernet cableThe cable must satisfy the following conditions:
◆ For connecting the outdoor modem to the indoor unit, only use a round Ethernet cable which is approved for outdoor use.
◆ The outer diameter of the cable must correspond to the clamping area of the con-nector plug. This permitted diameter range is 5 mm to 8.5 mm.
◆ The cable must satisfy the requirements for cables used outdoors at the relevant installation location.The following influencing factors in particular must be taken into account:
– Ambient temperature– Rain, water vapour or accumulation of water– Presence of corrosive, contaminative or other chemical substances– Mechanical stresses (e.g. compression stress, tensile loading, torsional load,
bending stress, alternating stress etc.)– Animals (e.g. damage caused by rodents or insects)– Plants (e.g. mildew)– Radiation (e.g. UV radiation)
◆ The maximum permitted cable length is 50 m.◆ To comply with regulations, it may be necessary to ground the cable shield.◆ To protect the connected IT installation from power surges, you may need to use a
surge protection box (see "Surge protection box" on page 24).
Proceede as follows:1. Feed the non-assembled cable through the wall duct from inside to outside.
2. Lay the cable along the rough path it should take and, if possible, provisionally po-sition fixings.
Local building codes must be followed when constructing a wall duct or whatever method of wall penetration is used to pass the ethernet cable into the building.
15
Installing the Cisco BWX360 WiMAX Outdoor Modem
Cisco BWX360 WiMAX Outdoor Modem / engbt / 253306943 / Installation.fm / 07.04.2010Te
mpl
ate
2006
_02_
28
Checking connection options in the houseChoose one of the following options for connecting the Ethernet cable in the house:
1. Fix the wall connection socket (LSA+ technology) in place and connect the cable from outside to it. For this you will require a corresponding connection socket and possibly a feeder tool for the LSA+ terminal. Feed an Ethernet cable with RJ45 plugs from the wall connection socket to the indoor unit (standard CAT5e, available from your retailer in various lengths).
2. Connect the cable from outside directly to the indoor unit. For indoor use, you need an RJ45 plug, see "Sources" on page 24. Feed an Ethernet cable with an RJ45 plug from the indoor unit to a PC or router (standard CAT5e, available from your retailer in various lengths).
Connecting an Ethernet cable to the outdoor modem 1. Slip the support sleeve over the unassembled cable to be screwed in later.
2. Attach a Phoenix connector to the end of the Ethernet cable that is outside. Please read the instructions that come with the plug.
3. Insert the RJ45 plug of the assembled cable into the Ethernet socket of the outdoor modem.
4. Slide the sleeve over the connected RJ45 plug and screw this into the Ethernet socket. Make sure the connection is water-tight.
5. Use cable clamps to attach the cable to the mast. Please note that the cable must be long enough to turn the antenna at a later stage.
6. Lay and attach the cable from the antenna mast along a path on which its function-ality is not affected by external influences.
Connecting the indoor unit
Wall mounting (optional)
The indoor unit is fitted with two clips for wall mounting. Wall mounting is not absolutely necessary, but is recommended to make the cable connections mechanically secure.
◆ Use screw fittings, anchor fittings and cable clamps to mount the indoor unit on a wall.
◆ Make sure the LEDs are easily visible.
16
Installing the Cisco BWX360 WiMAX Outdoor Modem
Cisco BWX360 WiMAX Outdoor Modem / engbt / 253306943 / Installation.fm / 07.04.2010Te
mpl
ate
2006
_02_
28
Establishing the cable connections
Connecting the outdoor modem 1. Shorten the cable to the length required for connecting it to the indoor unit:
– If there is any surplus cable, pull this inside through the wall duct. – Lay the inside section of the cable up to the location of the indoor unit or the wall
connection socket and attach the cable professionally. – Fit an Ethernet plug to the cable end.
First shorten the cable to a length that allows the indoor unit or the wall connec-tion socket to be easily reached.
2. Connect the RJ45 plug of the Ethernet cable from the outdoor modem to the OUT connector of the indoor unit.
Or 1. Connect the RJ45 plug of the Ethernet cable of the outdoor modem to the wall con-
nection socket.
2. Connect the wall connection socket and the indoor unit using an Ethernet cable (CAT5e).
Connecting the PC or laptop
1. Connect the supplied, pre-assembled Ethernet cable to the IN connector on the in-door unit.
2. Then connect the Ethernet cable to the Ethernet socket on the PC or laptop that you are using for putting the system into service for the first time. The PC or laptop with the special settings can be on and ready for use, but this is not obligatory.
The indoor unit should not be considered as an Ethernet terminal. The full length of the Ethernet cable from the outdoor modem to the Ethernet ter-minal (e.g. a router or a PC) must not exceed 100 m. The maximum per-mitted cable length between indoor unit and outdoor modem is 50 m. If you utilise this completely the cable length between Ethernet terminal and indoor unit must also not exceed 50 m.
When the Cisco BWX360 WiMAX Outdoor Modem has been assembled and is put into service, it is connected to the PC or the customer's network via the IN connector of the indoor unit.
When you first put the system into service, it is recommended that you first connect a laptop that has the appropriate settings for this purpose. For information on what settings to make on the laptop, please read the sup-plied user guide.
17
Installing the Cisco BWX360 WiMAX Outdoor Modem
Cisco BWX360 WiMAX Outdoor Modem / engbt / 253306943 / Installation.fm / 07.04.2010Te
mpl
ate
2006
_02_
28
Preparing the power supply 1. Check that all of the assembly steps and connections up to this point have been
made correctly and in full.
2. Connect the supplied power supply unit to the POWER connector of the indoor unit.
3. Begin putting the system into service. As soon as you have connected the indoor unit to the mains power supply, the sys-tem is started up.
Preparing to use the Cisco BWX360 WiMAX Outdoor Modem
1. Start up the connected PC or laptop and make any necessary settings. You will find the preconditions for the PC in the user guide for the Cisco BWX360 WiMAX Out-door Modem.
2. If you are sure you have connected everything up correctly, connect the indoor unit to a power socket that is ready for use via the power supply unit. The system starts up and performs a self-test.
After the self-test, the Cisco BWX360 WiMAX Outdoor Modem continually attempts to register with a base station. Registration with the base station may be successful immediately. If not, registration will take place when the Cisco BWX360 WiMAX Outdoor Modem is being configured (see "Connecting to the WiMAX network and the Internet" on page 19)
Only use the Cisco BWX360 WiMAX Outdoor Modem with the supplied power supply unit.
Part number: C39280-Z4-C584 Input: 100-240 V, 0.95 A ACOutput: 56 V, 0.55 A DC
The connection technology between the outdoor modem and the indoor unit complies with the "PoE" standard. This means the DC power is supplied via the Ethernet cable (Pins 4/5 = Power +, Pins 7/8 = Power - ) The DC voltage supplied to the indoor unit is 56 V with a maximum deviation of 4%.
As part of the standard, a self-test is performed to check the voltage between the connected devices is correct. The indoor unit only releases its supply voltage once the outdoor modem and the indoor unit have accepted the correct voltage.
If the activation is not successful, check whether the connections have been correctly assembled.
18
Installing the Cisco BWX360 WiMAX Outdoor Modem
Cisco BWX360 WiMAX Outdoor Modem / engbt / 253306943 / Installation.fm / 07.04.2010Te
mpl
ate
2006
_02_
28
3. During the startup procedure, check the LED display on the indoor unit (see "Indoor unit" on page 7). The following signify a successful system start:
– The ON power supply LED lights up green, and the Cisco BWX360 WiMAX Out-door Modem starts a self-test.
– The FAULT LED (red) and the CONNECT LED (green) light up for approximately 1 second and then go out.
– If the connection to the outdoor modem is then found to be free from errors, the CONNECT LED is continuously lit up green. If an error occurs, the FAULT and CONNECT LEDs start to flash alternately at regular intervals.
Launching the user interface
1. Open your Web browser.
2. Enter the IP address of the Cisco BWX360 WiMAX Outdoor Modem in the browser's address field:
http://192.168.2.1
3. Press Enter (Return).
Login If a system password has been set up on the Cisco BWX360 WiMAX Outdoor Modem, the login screen will now open.
1. Enter the system password supplied by your provider in the text box and clickOk.
The start page of the user interface opens, in which you can change the language if necessary.
If no system password has been set up on your Cisco BWX360 WiMAX Outdoor Modem, a security warning will appear first. You should then assign a system pass-word as soon as possible.
2. Confirm the security warning with Ok.
The user interface start page opens.
If the login screen does not open:Check the connections and the PC configuration. For details, refer to the user guide for the Cisco BWX360 WiMAX Outdoor Modem.
If you use a firewall it must allow connection to the Cisco BWX360 WiMAX Outdoor Modem. For details, refer to the user guide for your firewall. If necessary, deactivate the firewall while you configure the Cisco BWX360 WiMAX Outdoor Modem.
19
Installing the Cisco BWX360 WiMAX Outdoor Modem
Cisco BWX360 WiMAX Outdoor Modem / engbt / 253306943 / Installation.fm / 07.04.2010Te
mpl
ate
2006
_02_
28
Setting the languageThe user interface can be displayed in several languages, such as German, English, French and Spanish. If your provider has not preconfigured default settings, the lan-guage when you first call up the user interface is English.
If you wish to set your language, click on the Language button and select your lan-guage.
Connecting to the WiMAX network and the Internet
If there is a connection between the PC or laptop and the outdoor modem, the Internet connection must be configured and a radio connection must be established with the base station. You do this in the Basic Setup Wizard.1. Click the Basic Setup Wizard tab.
2. Click Next.3. If you need help for a particular page, click the question mark button.
Entering the access data for the WiMAX network
On this page you enter the data for authentication of your device on the WiMAX base station. You will need the access data supplied by your WiMAX operator for this.
Enter the access data and click Next.
Setting up Internet access
To allow users in your local network access to the Internet, set up the Internet connec-tion of your device using the information supplied by your Internet provider.
Enter the access data and click Next.
Adjusting the antenna
1. Turn your Cisco BWX360 WiMAX Outdoor Modem towards the base station.
2. Click Next.
Establishing a radio connection with a WiMAX base station
The Basic Setup Wizard now scans the frequencies. This establishes an initial radio connection with a WiMAX base station.
The frequency scan starts automatically. A progress bar indicates how far the fre-quency scan has already progressed. In addition you will see in the Remaining time area roughly how much time is still needed for the complete scan. Depending on how the Cisco BWX360 WiMAX Outdoor Modem was preconfigured by the provider, the first scan to establish a radio connection can take several minutes.
During the scan, the antenna must not be moved; this is the only way to guarantee a complete scan with the current antenna alignment.

20
Installing the Cisco BWX360 WiMAX Outdoor Modem
Cisco BWX360 WiMAX Outdoor Modem / engbt / 253306943 / Installation.fm / 07.04.2010Te
mpl
ate
2006
_02_
28
As soon as a radio connection has been established with a WiMAX base station, the scan will end. The progress bar is fully filled in and the display in the Remaining time area jumps to 0 seconds.
If the scan was successful, continue reading from "Precisely aligning the antenna" on page 21.
If the scan was not successful:The integrated antenna is directional. This means it must be pointing roughly in the direction of a WiMAX base station in order to establish a radio connection. The access data must also have been entered correctly.
1. First check your access data by going back to the WiMAX configuration page.
2. Turn the modem approx. 20° and restart the scan. You may need to turn the anten-na several times.
The best results will be obtained if the outdoor modem is in sight of the WiMAX base station.
If a line of sight is not possible, you can reflect the radio waves off neighbouring buildings. For this, direct the antenna at the building it is to reflect off and not at the base station.
21
Installing the Cisco BWX360 WiMAX Outdoor Modem
Cisco BWX360 WiMAX Outdoor Modem / engbt / 253306943 / Installation.fm / 07.04.2010Te
mpl
ate
2006
_02_
28
Precisely aligning the antenna
Once you have established a wireless connection to a WiMAX base station, align the antenna precisely using the Basic Setup Wizard. For this it can be useful if an assistant follows the alignment on the PC. Please ask the customer for support. If this is not pos-sible, read "Aligning the antenna with the acoustic response" on page 21.
1. Turn the antenna step by step and have the assistant watch the connection status on the PC.
2. When a connection to a WiMAX base station has been established, the assistant clicks on Next to make fine adjustments to the antenna.
The quality of the radio connection can be seen in the Signal quality area. The signal quality bar graph indicates the quality of the connection. You will also see the signal quality shown as a percentage as well as an assessment of the connection quality:
Turn the antenna a little at a time and have the assistant observe the signal strength display. Use this to move the antenna to the position with the best signal strength.
Excellent The wireless connection is at the highest level. Very good The wireless connection is very good. You can attempt to
improve the connection still further by turning the antenna slightly; however, this is not necessary.
Good The wireless connection is already good. Turn the antenna slightly to further improve the connection.
Sufficient The wireless connection has been established. Turn the antenna a little at a time to improve the connection.
No connection If you have turned or moved the antenna too far the wireless con-nection to the WiMAX base station will break up. Return the antenna to the position it was in when the connection was suc-cessfully established. The wireless connection to the WiMAX base station will be restored immediately.
Aligning the antenna with the acoustic responseIf neither you nor the assistant are able to check the signal strength on screen while the antenna is being aligned, you can monitor it via a radio system. To do this you will need, for example, two cordless phones, mobile phones or radio devices:
1. Activate Audible feedback on the configuration PC.
2. Establish an internal connection between the two handsets and switch on the loudspeaker on both devices.
3. Leave one handset next to the configuration PC and carry the other with you (belt clip).
You will now be informed of the signal strength by means of beeps. The closer together the sequence of beeps, the better the connection quality.
22
Installing the Cisco BWX360 WiMAX Outdoor Modem
Cisco BWX360 WiMAX Outdoor Modem / engbt / 253306943 / Installation.fm / 07.04.2010Te
mpl
ate
2006
_02_
28
When the antenna is precisely aligned:Click on End.
Finishing off the assembly
1. Tighten the screw fixings.Please be aware of local laws. Installation should be performed by a qualified per-son.
2. Attach the Ethernet cable with cable clamps and cable ties. Make sure the cable is protected against the effects of pressure.
3. Brief the user on what to do if they have any problems or if they need to upgrade the system etc.
23
Appendix
Cisco BWX360 WiMAX Outdoor Modem / engbt / 253306943 / Appendix.fm / 07.04.2010Te
mpl
ate
2006
_02_
28
Appendix
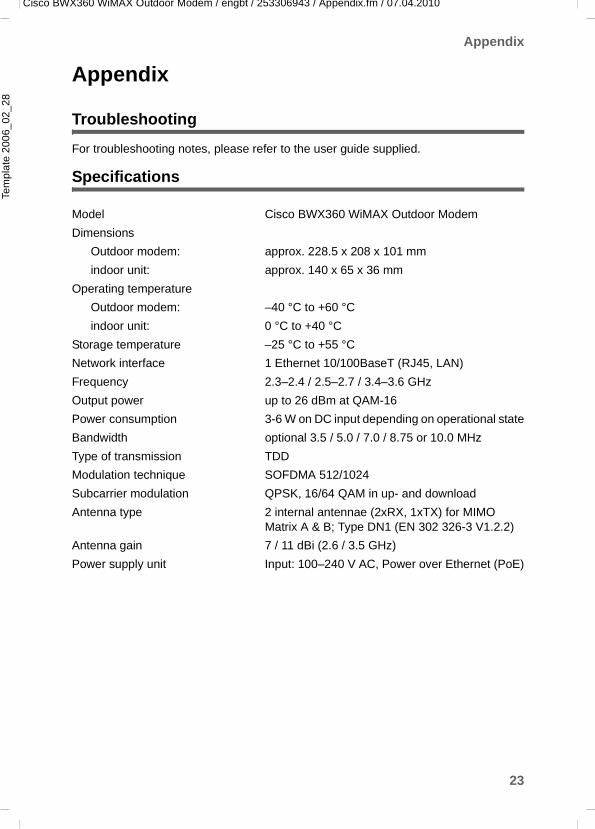
Troubleshooting
For troubleshooting notes, please refer to the user guide supplied.
Specifications
Model Cisco BWX360 WiMAX Outdoor Modem Dimensions
Outdoor modem: approx. 228.5 x 208 x 101 mmindoor unit: approx. 140 x 65 x 36 mm
Operating temperatureOutdoor modem: –40 °C to +60 °C indoor unit: 0 °C to +40 °C
Storage temperature –25 °C to +55 °CNetwork interface 1 Ethernet 10/100BaseT (RJ45, LAN) Frequency 2.3–2.4 / 2.5–2.7 / 3.4–3.6 GHz Output power up to 26 dBm at QAM-16Power consumption 3-6 W on DC input depending on operational stateBandwidth optional 3.5 / 5.0 / 7.0 / 8.75 or 10.0 MHzType of transmission TDDModulation technique SOFDMA 512/1024Subcarrier modulation QPSK, 16/64 QAM in up- and downloadAntenna type 2 internal antennae (2xRX, 1xTX) for MIMO
Matrix A & B; Type DN1 (EN 302 326-3 V1.2.2)Antenna gain 7 / 11 dBi (2.6 / 3.5 GHz) Power supply unit Input: 100–240 V AC, Power over Ethernet (PoE)
24
Appendix
Cisco BWX360 WiMAX Outdoor Modem / engbt / 253306943 / Appendix.fm / 07.04.2010Te
mpl
ate
2006
_02_
28
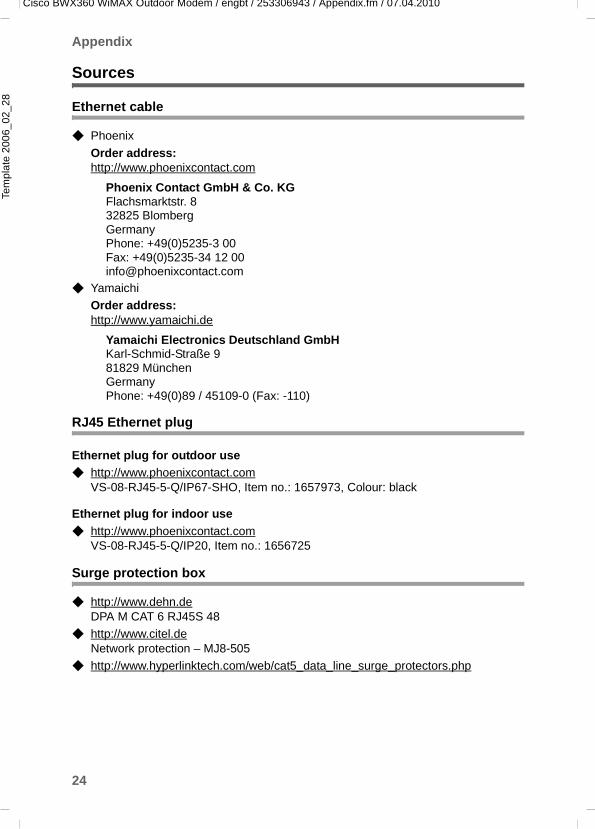
Sources
Ethernet cable
◆ PhoenixOrder address:http://www.phoenixcontact.com
Phoenix Contact GmbH & Co. KGFlachsmarktstr. 832825 Blomberg GermanyPhone: +49(0)5235-3 00Fax: +49(0)5235-34 12 [email protected]
◆ YamaichiOrder address: http://www.yamaichi.de
Yamaichi Electronics Deutschland GmbH Karl-Schmid-Straße 9 81829 München GermanyPhone: +49(0)89 / 45109-0 (Fax: -110)
RJ45 Ethernet plug
Ethernet plug for outdoor use◆ http://www.phoenixcontact.com
VS-08-RJ45-5-Q/IP67-SHO, Item no.: 1657973, Colour: black
Ethernet plug for indoor use◆ http://www.phoenixcontact.com
VS-08-RJ45-5-Q/IP20, Item no.: 1656725
Surge protection box
◆ http://www.dehn.de DPA M CAT 6 RJ45S 48
◆ http://www.citel.de Network protection – MJ8-505
◆ http://www.hyperlinktech.com/web/cat5_data_line_surge_protectors.php
25
Appendix
Cisco BWX360 WiMAX Outdoor Modem / engbt / 253306943 / Appendix.fm / 07.04.2010Te
mpl
ate
2006
_02_
28
Earthing (gounding) clamps
◆ Ground cable for earthing (grounding) the metal casing of the outdoor modem (wire: stranded, green, #6 AWG, ROHS; lug: CONN, one-hole #6, ROHS)
Notes on putting into service
This device will only operate on Sprint or Clearwire's U.S. WiMAX network. It is not intended for use on any other network.
Please observe the legal provisions and local restrictions when putting the device into service. Please ask your service provider for further information.
The cable shield can be connected to the equipotential bonding by means of a copper band. You must ensure the cable is sealed against moisture, e.g. with standard bitumen tape.
26
Appendix
Cisco BWX360 WiMAX Outdoor Modem / engbt / 253306943 / Appendix.fm / 07.04.2010Te
mpl
ate
2006
_02_
28
Federal Communications Commission (FCC) Statements
This device complies with Part 15 of the FCC Rules. Operation is subject to the follow-ing two conditions:
(1) This device may not cause harmful interference, and
(2) This device must accept any interference received, including interference that may cause undesired operation.
Radio Frequency Interference Statement
Note: This equipment has been tested and found to comply with the limits for a Class B digital device, pursuant to Part 15 of the FCC Rules. These limits are designed to pro-vide reasonable protection against harmful interference in a residential installation. This equipment generates, uses and can radiate radio frequency energy and, if not installed and used in accordance with the instructions, may cause harmful interference to radio communications. However, there is no guarantee that interference will not occur in a particular installation. If this equipment does cause harmful interference to radio or television reception, which can be determined by turning the equipment off and on, the user is encouraged to try to correct the interference by one or more of the fol-lowing measures:
1. Reorient or relocate the receiving antenna.
2. Increase the separation between the equipment and receiver.
3. Connect the equipment into an outlet on a circuit different from that to which the re-ceiver is connected.
4. Consult the dealer or an experienced radio/TV technician for help.
Radiation Exposure Statement
This equipment complies with FCC radiation exposure limits set forth for an uncon-trolled environment. This transmitter must not be co-located or operating in conjunction with any other antenna or transmitter.
The installation of the base unit should allow at least 8 inches between the base and persons to be in compliance with FCC RF exposure guidelines.
Modifications
You are cautioned that changes or modifications not expressly approved by the party responsible for compliance could void your authority to operate the equipment.
27
Index
Cisco BWX360 WiMAX Outdoor Modem / engbt / 253306943 / SE680WiMAXSIX.fm / 07.04.2010S
chab
lone
200
6_02
_28
Index
AAligning the antenna . . . . . . . . . . 19, 21Antenna mast . . . . . . . . . . . . . . . . . . 10Appendix . . . . . . . . . . . . . . . . . . . . . 23
CE declaration. . . . . . . . . . . . . . . . 26sources . . . . . . . . . . . . . . . . . . . . . 24technical data . . . . . . . . . . . . . . . . 23troubleshooting . . . . . . . . . . . . . . . 23
Assemblingoutdoor modem . . . . . . . . . . . . . . . 12
Assembling outdoor modem . . . . . . . 12
BBasic settings
setting up Internet access . . . . . . . 19Basic Setup Wizard . . . . . . . . . . . . . 19
starting . . . . . . . . . . . . . . . . . . . . . 19BWX360 WiMAX Outdoor Modem
putting into service . . . . . . . . . . . . 17
CChoosing locations . . . . . . . . . . . . . . . 9
EEarthing cable . . . . . . . . . . . . . . . . . 11Ethernet cable
connecting to outdoor modem . . . . 15provisionally laying . . . . . . . . . . . . 14
FFCC Statements . . . . . . . . . . . . . . . . 26
GGrounding cable . . . . . . . . . . . . . . . . 11Grounding see Earthing
IIndoor unit . . . . . . . . . . . . . . . . . . . . . 7
cable connections . . . . . . . . . . . . . 16connecting . . . . . . . . . . . . . . . . . . 15connecting PC or laptop. . . . . . . . . 16power supply. . . . . . . . . . . . . . . . . 17wall bracket . . . . . . . . . . . . . . . . . . 15
Installation. . . . . . . . . . . . . . . . . . . . . . 8Installing
aligning the antenna . . . . . . . . . . . . 21antenna mast . . . . . . . . . . . . . . . . . 10assembling . . . . . . . . . . . . . . . . . . 12choosing locations . . . . . . . . . . . . . .9connecting to indoor unit. . . . . . . . . 14earthing cable, grounding cable . . . 11lightning protection . . . . . . . . . . . . . 10
Internet accesssetting up . . . . . . . . . . . . . . . . . . . . 19
LLEDs during startup. . . . . . . . . . . . . . 18Lightning protection . . . . . . . . . . . . . . 10
earthing cable, grounding cable . . . 11
MMounting . . . . . . . . . . . . . . . . . . . . . . 10
modem with antenna . . . . . . . . . . . 15
NNotes on assembly instructions . . . . . .3
OOutdoor modem . . . . . . . . . . . . . . . . .6
assembling . . . . . . . . . . . . . . . . . . 12
PPower over Ethernet, PoE . . . . . . . . . .5
SSafety . . . . . . . . . . . . . . . . . . . . . . . . . 2
notes on assembly instructions . . . . .3Safety precautions. . . . . . . . . . . . . . . .2Setting the language . . . . . . . . . . . . . 19Setting up Internet access . . . . . . . . . 19Sources . . . . . . . . . . . . . . . . . . . . . . 24Specifications . . . . . . . . . . . . . . . . . . 23
TTroubleshooting. . . . . . . . . . . . . . . . . 23
28
Index
Cisco BWX360 WiMAX Outdoor Modem / engbt / 253306943 / SE680WiMAXSIX.fm / 07.04.2010S
chab
lone
200
6_02
_28
UUser interface, setting the language . 19
WWeb browser
launching user interface . . . . . . . . . 18WiMAX network
access data . . . . . . . . . . . . . . . . . . 19
Related Documents


![WiMAX Outdoor Compact BTS E9230 Quick Installation Guide R1[1].0(201010)](https://static.cupdf.com/doc/110x72/5520c7264979598e2f8b4dea/wimax-outdoor-compact-bts-e9230-quick-installation-guide-r110201010.jpg)