BX3620 2014-17 Subaru XV Crosstrek 2015-16 Subaru Impreza 2015-18 Subaru WRX Installation Instructions Reference your vehicle owner’s manual for manufacturer’s towing specifications. ! Failure to read and follow these instructions could result in separation of the towed vehicle from the tow bar, causing property damage, loss of towed vehicle, personal injury or death. WARNING Attachment Tab Height: 12” Attachment Tab Width: 20-1/2” Please read BOTH these Installation Instructions and the General Information prior to installing or operating this equipment. XV Crostrek Impreza WRX 1. Blue Ox ® towing products and accessories are intended to be installed by Blue Ox ® Dealers who are familiar with our products and have the equipment and knowledge necessary to do “ it work”. 2. Many Blue Ox ® baseplates are designed to use existing holes and hardware to mount the baseplate to the towed vehicle. Even though bolts are there, do not assume they are adequate for baseplate mounting. Always use the hardware supplied in the hardware kit and existing hardware as speci ied in the installation instructions.

Welcome message from author
This document is posted to help you gain knowledge. Please leave a comment to let me know what you think about it! Share it to your friends and learn new things together.
Transcript
BX36202014-17 Subaru XV Crosstrek
2015-16 Subaru Impreza2015-18 Subaru WRXInstallation Instructions
Reference your vehicle owner’s manual for manufacturer’s towing specifications.
!Failure to read and follow these instructions
could result in separation of the towed vehicle from the tow bar, causing property damage,
loss of towed vehicle, personal injury or death.
WARNING
Attachment Tab Height: 12”
Attachment Tab Width: 20-1/2”
Please read BOTH these Installation Instructions and the General Information prior to installing or operating this equipment.
XV Crostrek
Impreza
WRX
1. Blue Ox® towing products and accessories are intended to be installed by Blue Ox® Dealers who are familiar with our products and have the equipment and knowledge necessary to do “ it work”.
2. Many Blue Ox® baseplates are designed touse existing holes and hardware to mount the baseplate to the towed vehicle. Even though bolts are there, do not assume they are adequate for baseplate mounting. Always use the hardware supplied in the hardware kit and existing hardware as speci ied in the installation instructions.
BX36202014-17 Subaru XV Crosstrek
2015-16 Subaru Impreza2015-18 Subaru WRXInstallation Instructions
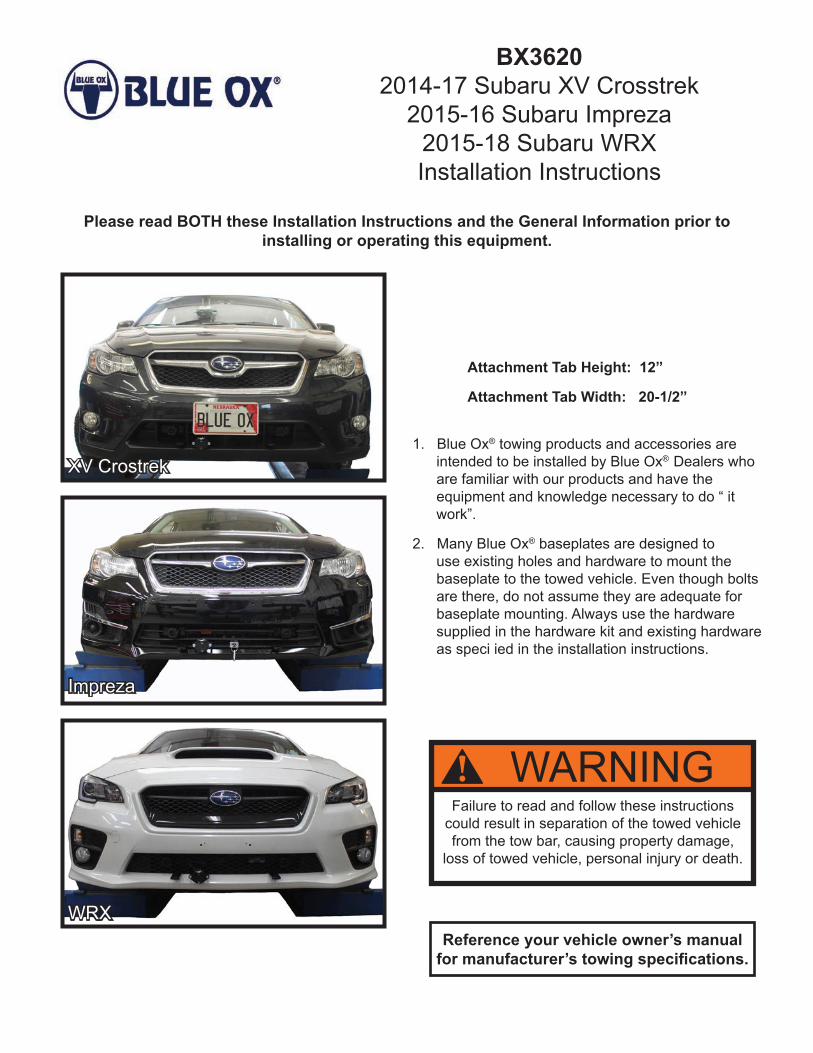
Instruction Notes: The fascia, windshield washer fluid reservoir, frame brace and bumper are removed and reinstalled for the baseplate installation. Some drilling and trimming is required.Place all components that are removed on a flat, sturdy surface. All items will be reinstalled unless otherwise noted after the baseplate is installed. The dimensional variations between otherwise identical vehicles can be considerable. While the baseplate was designed for easy installation, it may be necessary to tailor the baseplate slightly to compensate for vehicle manufacturer’s tolerances.
The BX8869 Tail Light Wiring Kit is recommended for this vehicle.
Drill a hole according to the tail light wiring kit instructions.
NOTICE• Handling of some cosmetic parts when installing this product may require the use of protective
covers, rags, specialty tools, etc. to prevent damage.• When using power drills be aware of the dangers of torque and drill bit length.• When using a reciprocating saw be aware of objects behind the cutting surface.• Use a good quality paint to spray cut edges of frame to prevent rusting.• Be sure that ALL electrical connections are plugged in and accessories are functioning properly before
reinstalling the fascia.• The baseplate is computer tested to your vehicle’s GVWR, exceeding this weight will void the
manufacturer’s warranty.• Be sure to use a sufficient amount of Loctite® Red on all bolt threads before tightening. Tighten all bolts
according to the torque chart provided.• Dealer or installer be certain the user receives these instruction sheets.• If the baseplate is in an accident, it must be replaced. DO NOT use it again! An accident can cause
unseen damage and using it again could result in more damage or serious injury. DO NOT use thebaseplate if it is damaged or missing parts.
Bolt Size Grade 5 Grade 81/4” 10 145/16” 19 293/8” 33 477/16” 54 781/2” 78 1195/8” 154 2303/4” 257 380
Bolt Torque Specifications Torque in Foot-Pounds for Inch Bolts
Bolt Torque Specifications Torque in Foot-Pounds for Metric Bolts
Bolt Size Grade 8.8 Grade 10.96MM 6 88MM 16 22
10MM 31 4012MM 54 7014MM 89 11716MM 161 23018MM 222 318
BX36202014-17 Subaru XV Crosstrek
2015-16 Subaru Impreza2015-18 Subaru WRXInstallation Instructions
9
152
1216
17
117
14
13
8
10
65
1
BREAKAWAY SWITCH
4 PIN CONNECTOR
6 PIN CONNECTOR
ITEM #10 IS USED IF NEEDED TO RELOCATEEXISTING ELECTRICALPART ON SOME MODELS
BX3620, BASEPLATE, 2014 SUBARU XV CROSSTREKEC # 4475; PROJECT # R411620-1/2" DISTANCE BETWEEN TAB CENTERS; 12" HIGHVIN# JFZGPACC2E9283284; GVWR 4343 lbs
EC # 4697 ADDS BOLT, NUT & WASHER TO REPOSITION HORN BRACKET
ITEMS ASSOCIATED WITH THIS HOLE ARE FOR REPOSITIONING THE HORN BRACKET ON SOME MODELS
ITEMS ASSOCIATED WITH THIS HOLE ARE FOR REPOSITIONING THE WASHER RESERVOIR
3
4
EC # 4933 , REPLACES (2) 107-1753 WITH (2) 61-7855
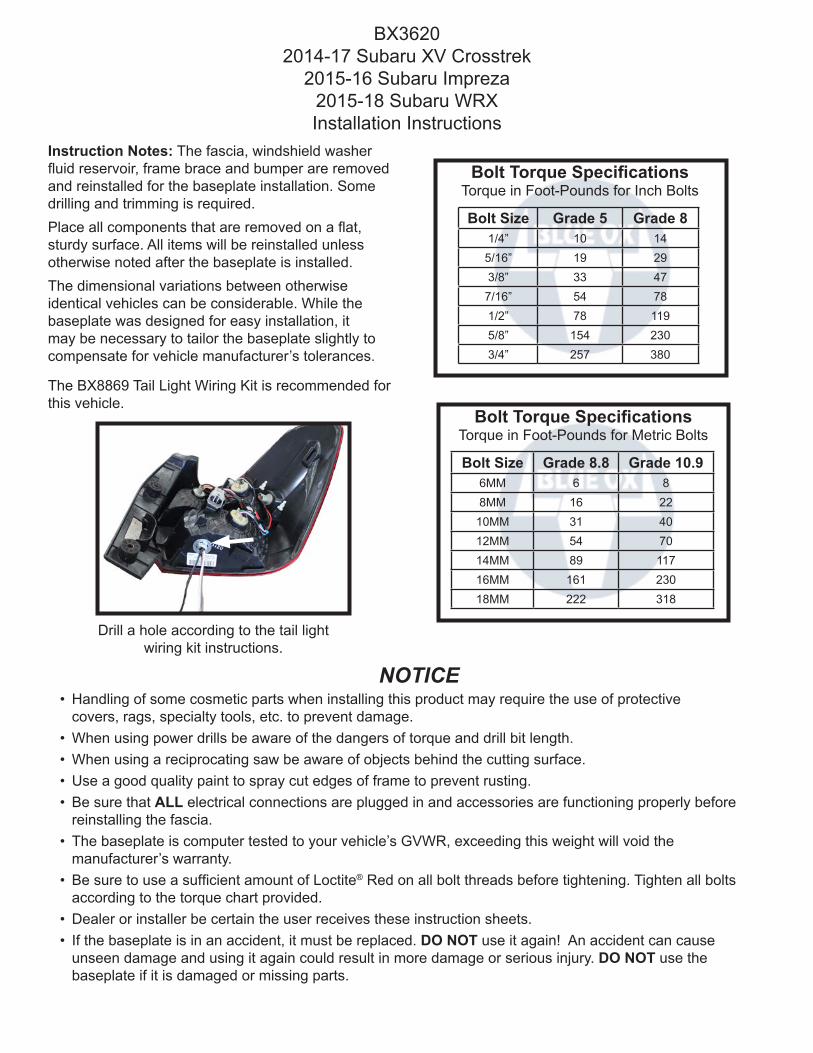
ITEM NO. PART NUMBER DESCRIPTION QTY.1 61-5208 WLD, NUT PLATE, 1/4 X 1 X 1, (3/8-16) W / 14" WIRE 62 61-7288 WLDM'T, BP, BX 3620 13 61-7855 WLDM'T, SPACER, TUBE, BX3620 24 62-3468 ATT TAB ASSY, REM, SF/SB, 1 HOLE 25 101-8390 BREAKAWAY BRACKET, BX3620 16 201-0050 1/4-20 X 3/4 HEX BOLT, GRD. 5, ZP 37 201-0192 #10-32-1/2" SLOT, ROUND HEAD SCREW 28 201-0440 3/8-16 X 1 1/2" HEX BOLT, GRD. 5, ZP 49 201-0444 3/8-16 X 2 HEX BOLT GRADE 5 ZP 2
10 201-0654 #10-16 X 1" SELF DRILLING SCREW, ZP 111 201-0979 #12-14 X 1" SELF DRILLING SCREW, ZP 212 202-0047 #10-32 HEX NUT 213 202-0102 1/4-20 HEX NYL NUT, ZP 314 203-0001 WASHER, 1/4 FLAT, ZP 215 203-0010 WASHER, 3/8 LOCK, ZP 616 203-0054 WASHER, #10 LOCK 217 299-0685 ELECTRICAL BRACKET, ZP 118 226-0046 BASEPLATE SAFETY CABLE, 36" CL III ( NOT SHOWN) 219 229-0359 QUICKLINK, 3/8", ZP (NOT SHOWN) 220 290-0437 RECEIVER, CAP PLUG (BLK) (NOT SHOWN) 221 293-1339 SWITCH, BREAKAWAY (2010-S) (NOT PROVIDED) 122 294-0805 CONNECTOR, 4 PIN, LPP6010700 (NOT PROVIDED) 123 294-0902 CONNECTOR 6 PIN, BLK PLASTIC (NOT PROVIDED) 1
Item No. Part No. Description Qty.1.................................61-5208 .............................3/8”-16 Nut Plate w/ 14” Wire ..........................................62.................................61-7288 .............................BX3620 Baseplate ...........................................................13.................................61-7855 .............................Spacer Tube ....................................................................24.................................62-3468 .............................Attachment Tab Assembly with Hole ...............................25.................................101-8390 ...........................Breakaway Bracket .........................................................16.................................201-0050 ...........................1/4”-20 x 3/4” Hex Head Bolt, Grade 5, ZP .....................37.................................201-0192 ...........................#10-32 1/2” Round Slotted Head Screw ..........................28.................................201-0440 ...........................3/8”-16 x 1-1/2” Hex Head Bolt, Grade 5, ZP ..................49.................................201-0444 ...........................3/8”-16 x 2” Hex Head Bolt, Grade 5, ZP ........................210...............................201-0654 ...........................#10-16 x 1” Self Drilling Screw, ZP ..................................111 ...............................201-0979 ...........................#12-14 x 1” Se;f Drilling Screw, ZP ..................................212...............................202-0047 ...........................#10-32 Hex Nut ...............................................................213...............................202-0102 ...........................1/4”-20 Hex Nylon Nut, ZP ..............................................314...............................203-0001 ...........................1/4” Flat Washer, ZP ........................................................215...............................203-0010 ...........................3/8” Lock Washer, ZP ......................................................616...............................203-0054 ...........................#10 Lock Washer, ZP ......................................................217...............................299-0685 ...........................Electrical Bracket, ZP ......................................................118...............................226-0046(not shown) ........Class III Safety Cables ....................................................219...............................229-0512(not shown) ........1/2” Quicklink, ZP ............................................................220...............................290-0437(not shown) ........Black Cap Plug Receiver .................................................2
Tools Required
Flat Screwdriver Utility KnifePhillips Screwdriver Torque Wrench Reciprocating Saw Tape MeasureDrill Loctite® RED1/4” Drill Bit 3/8” Drill Bit10MM Socket 12MM Socket14MM Socket 9/16” Socket9/16” Wrench 5/16” Nut Driver
Important:Use only genuine factory replacement parts on your baseplate. Do NOT substitute homemade or non-typical parts. If a bolt is lost or in need of replacement, for your safety and the preservation of your baseplate, be sure to use a replacement bolt of the same grade (In most cases it will be Grade 5, please reference the parts list above). Replacement parts may be ordered through your nearest Blue Ox® Dealer or Distributor. Failing to follow and/or altering these installation instructions in either installation or required equipment will void the manufacturer’s warranty. Towing behind a non-motorized vehicle will void the warranty.
BX36202014-17 Subaru XV Crosstrek
2015-16 Subaru Impreza2015-18 Subaru WRXInstallation Instructions
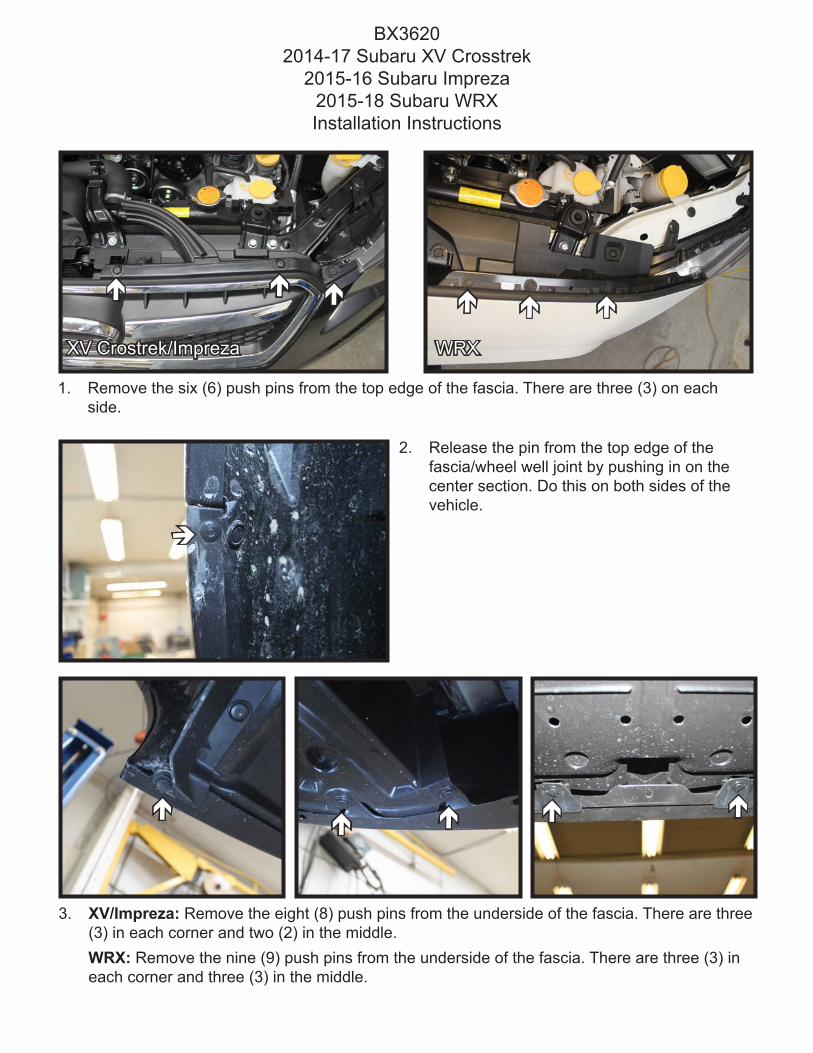
1. Remove the six (6) push pins from the top edge of the fascia. There are three (3) on eachside.
2. Release the pin from the top edge of thefascia/wheel well joint by pushing in on thecenter section. Do this on both sides of thevehicle.
3. XV/Impreza: Remove the eight (8) push pins from the underside of the fascia. There are three(3) in each corner and two (2) in the middle.WRX: Remove the nine (9) push pins from the underside of the fascia. There are three (3) in each corner and three (3) in the middle.
XV Crostrek/Impreza WRX
BX36202014-17 Subaru XV Crosstrek
2015-16 Subaru Impreza2015-18 Subaru WRXInstallation Instructions
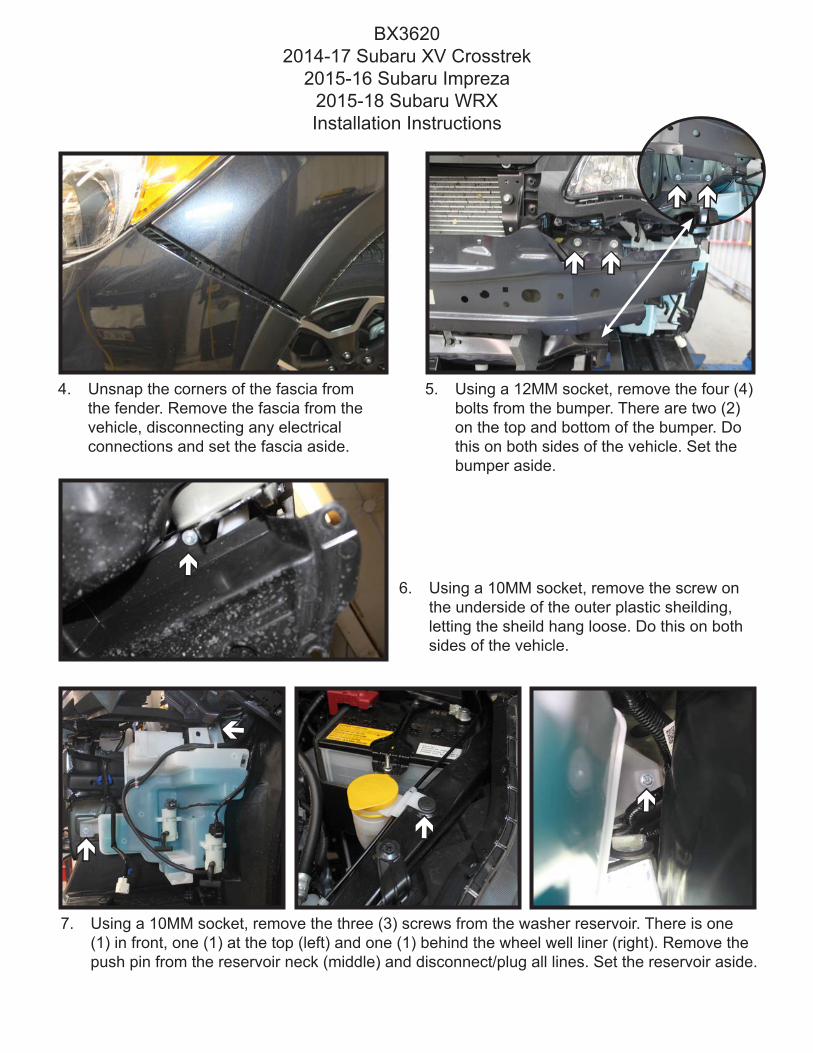
4. Unsnap the corners of the fascia fromthe fender. Remove the fascia from thevehicle, disconnecting any electricalconnections and set the fascia aside.
5. Using a 12MM socket, remove the four (4)bolts from the bumper. There are two (2)on the top and bottom of the bumper. Dothis on both sides of the vehicle. Set thebumper aside.
7. Using a 10MM socket, remove the three (3) screws from the washer reservoir. There is one(1) in front, one (1) at the top (left) and one (1) behind the wheel well liner (right). Remove thepush pin from the reservoir neck (middle) and disconnect/plug all lines. Set the reservoir aside.
6. Using a 10MM socket, remove the screw onthe underside of the outer plastic sheilding,letting the sheild hang loose. Do this on bothsides of the vehicle.
BX36202014-17 Subaru XV Crosstrek
2015-16 Subaru Impreza2015-18 Subaru WRXInstallation Instructions
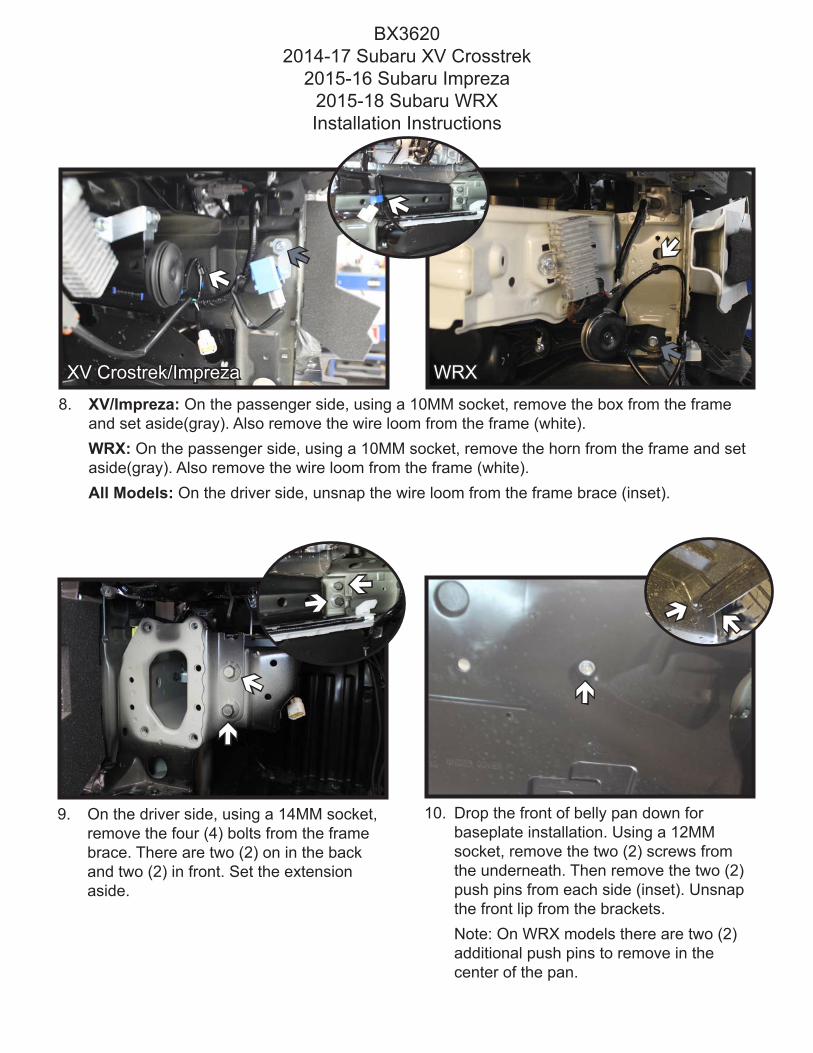
9. On the driver side, using a 14MM socket,remove the four (4) bolts from the framebrace. There are two (2) on in the backand two (2) in front. Set the extensionaside.
8. XV/Impreza: On the passenger side, using a 10MM socket, remove the box from the frameand set aside(gray). Also remove the wire loom from the frame (white).WRX: On the passenger side, using a 10MM socket, remove the horn from the frame and setaside(gray). Also remove the wire loom from the frame (white).All Models: On the driver side, unsnap the wire loom from the frame brace (inset).
XV Crostrek/Impreza WRX
10. Drop the front of belly pan down forbaseplate installation. Using a 12MMsocket, remove the two (2) screws fromthe underneath. Then remove the two (2)push pins from each side (inset). Unsnapthe front lip from the brackets.Note: On WRX models there are two (2)additional push pins to remove in thecenter of the pan.
BX36202014-17 Subaru XV Crosstrek
2015-16 Subaru Impreza2015-18 Subaru WRXInstallation Instructions
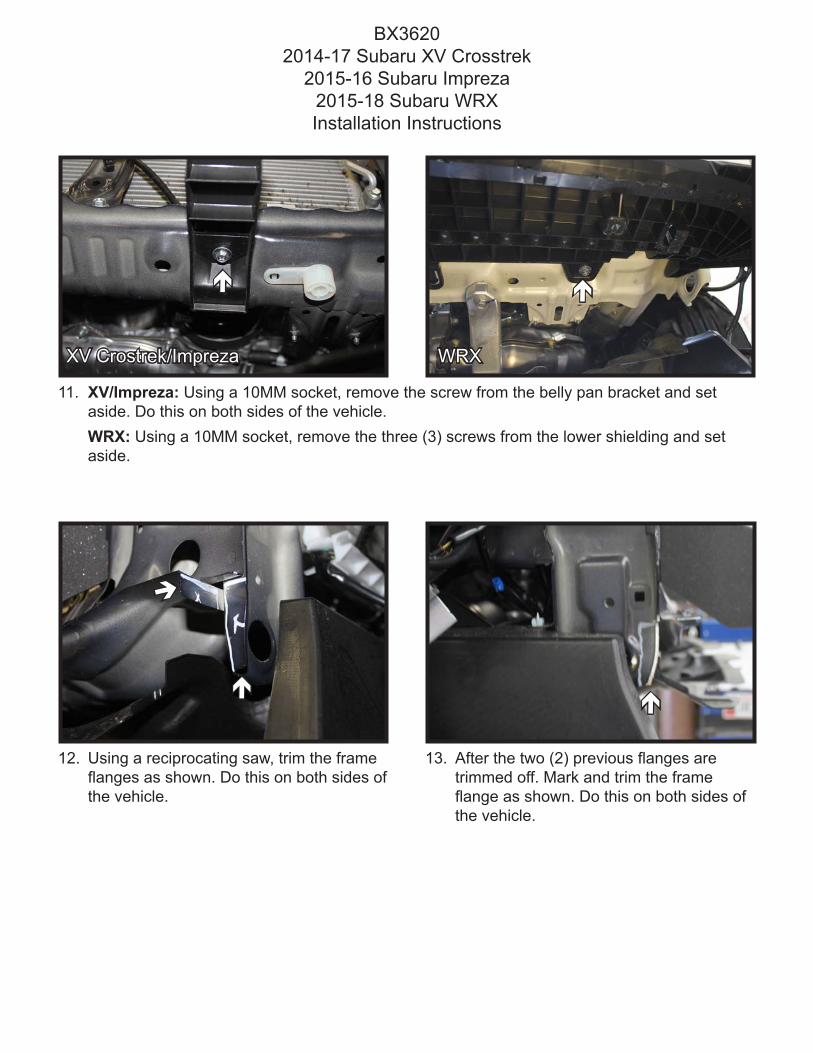
12. Using a reciprocating saw, trim the frameflanges as shown. Do this on both sides ofthe vehicle.
13. After the two (2) previous flanges aretrimmed off. Mark and trim the frameflange as shown. Do this on both sides ofthe vehicle.
11. XV/Impreza: Using a 10MM socket, remove the screw from the belly pan bracket and setaside. Do this on both sides of the vehicle.WRX: Using a 10MM socket, remove the three (3) screws from the lower shielding and setaside.
XV Crostrek/Impreza WRX

BX36202014-17 Subaru XV Crosstrek
2015-16 Subaru Impreza2015-18 Subaru WRXInstallation Instructions
16. Position the baseplate onto the frame.Install a 3/8”-16 x 1-1/2” bolt with 3/8” lockwasher into the pre-drilled hole and a 3/8”nut plate on the inside of the frame. Dothis on both sides of the vehicle.Level the baseplate and fully tighten allhardware.
** Use Loctite® Red on all bolt threads and tighten all bolts to the appropriate torque.
17. Using a 3/8” drill bit, drill the remainingtwo (2) holes thru the frame. Install 3/8”-16 x 1-1/2” bolt with 3/8” lock washer intothe top hole (white) and a 3/8”-16 x 2”bolt with 3/8” lock washer into the bottomhole (gray). Using 3/8” nut plates on theinside of the frame. On the lower holeuse the provided spacer tube in betweenthe baseplate and frame. Do this onboth sides of the vehicle. Fully tighten allhardware.
** Use Loctite® Red on all bolt threads and tighten all bolts to the appropriate torque.
14. Using a reciprocating saw, trim off thecorner or bend down (gray). Do this onboth sides of the vehicle.On the passenger side only, trim out anotch in the lower corner of the frame faceto allow the baseplate to slide onto theframe (white).
15. Using a 3/8” drill bit, drill out the factoryholes on both driver and passenger side.
BX36202014-17 Subaru XV Crosstrek
2015-16 Subaru Impreza2015-18 Subaru WRXInstallation Instructions
20. Attach the permanent baseplate safetycables to the provided convenience link onthe baseplate. The photo above shows therecommended installation of the cables toframe of vehicle. Additional options mayinterfere with suggested mounting; in thiscase, secure the cables to a solid piece ofthe frame as described in the instructionsincluded with the permanent baseplate safetycables. Be sure the safety cables do not rubagainst any hoses or moving parts. Do thison BOTH sides of the vehicle.
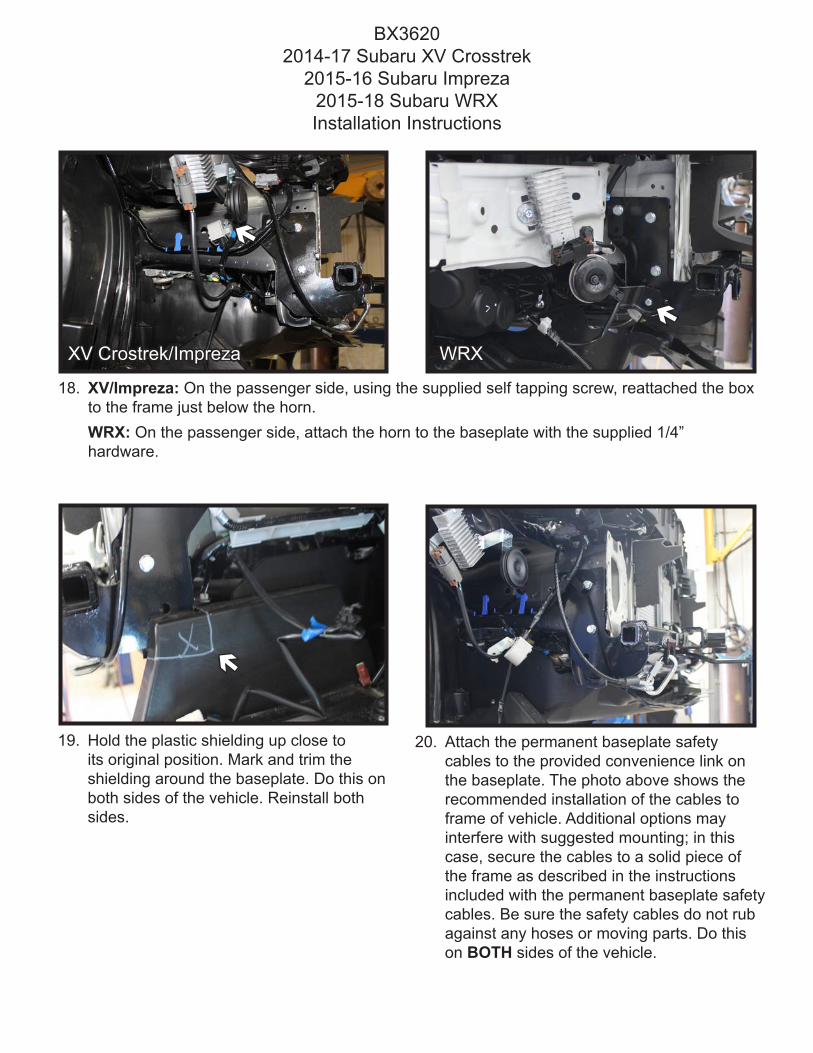
18. XV/Impreza: On the passenger side, using the supplied self tapping screw, reattached the boxto the frame just below the horn.WRX: On the passenger side, attach the horn to the baseplate with the supplied 1/4”hardware.
19. Hold the plastic shielding up close toits original position. Mark and trim theshielding around the baseplate. Do this onboth sides of the vehicle. Reinstall bothsides.
XV Crostrek/Impreza WRX
BX36202014-17 Subaru XV Crosstrek
2015-16 Subaru Impreza2015-18 Subaru WRXInstallation Instructions
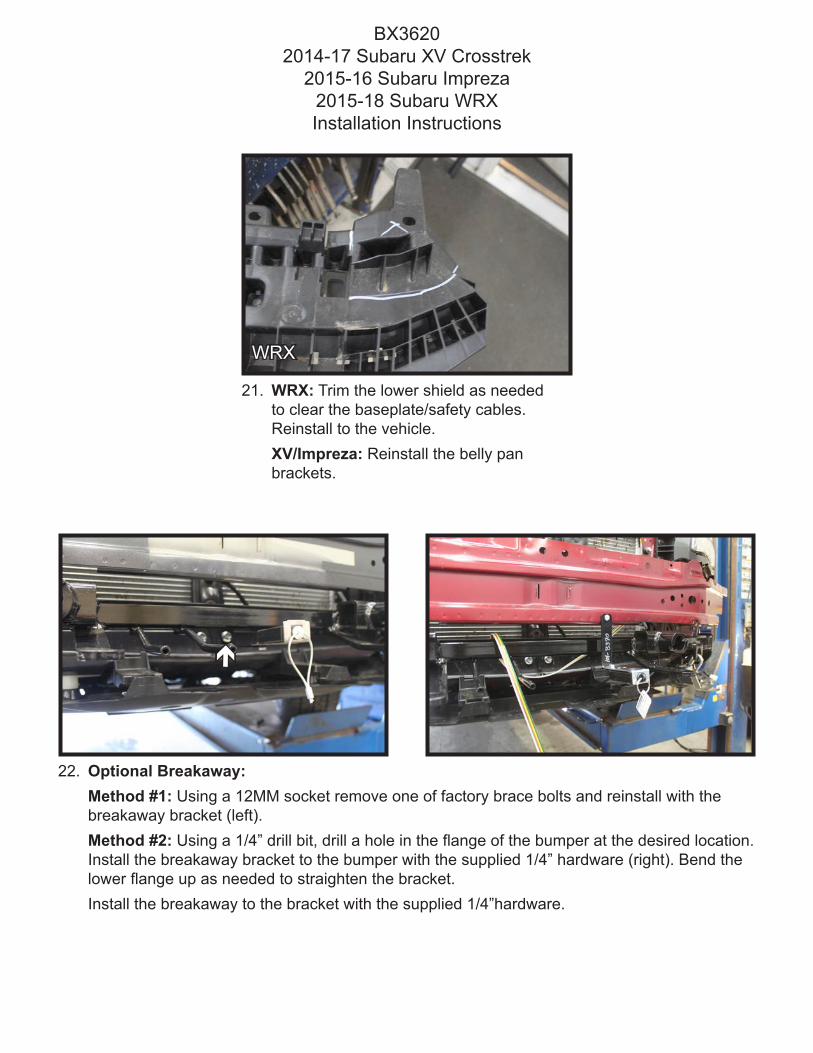
21. WRX: Trim the lower shield as neededto clear the baseplate/safety cables.Reinstall to the vehicle.XV/Impreza: Reinstall the belly panbrackets.
WRX
22. Optional Breakaway:Method #1: Using a 12MM socket remove one of factory brace bolts and reinstall with thebreakaway bracket (left).Method #2: Using a 1/4” drill bit, drill a hole in the flange of the bumper at the desired location.Install the breakaway bracket to the bumper with the supplied 1/4” hardware (right). Bend thelower flange up as needed to straighten the bracket.Install the breakaway to the bracket with the supplied 1/4”hardware.
BX36202014-17 Subaru XV Crosstrek
2015-16 Subaru Impreza2015-18 Subaru WRXInstallation Instructions
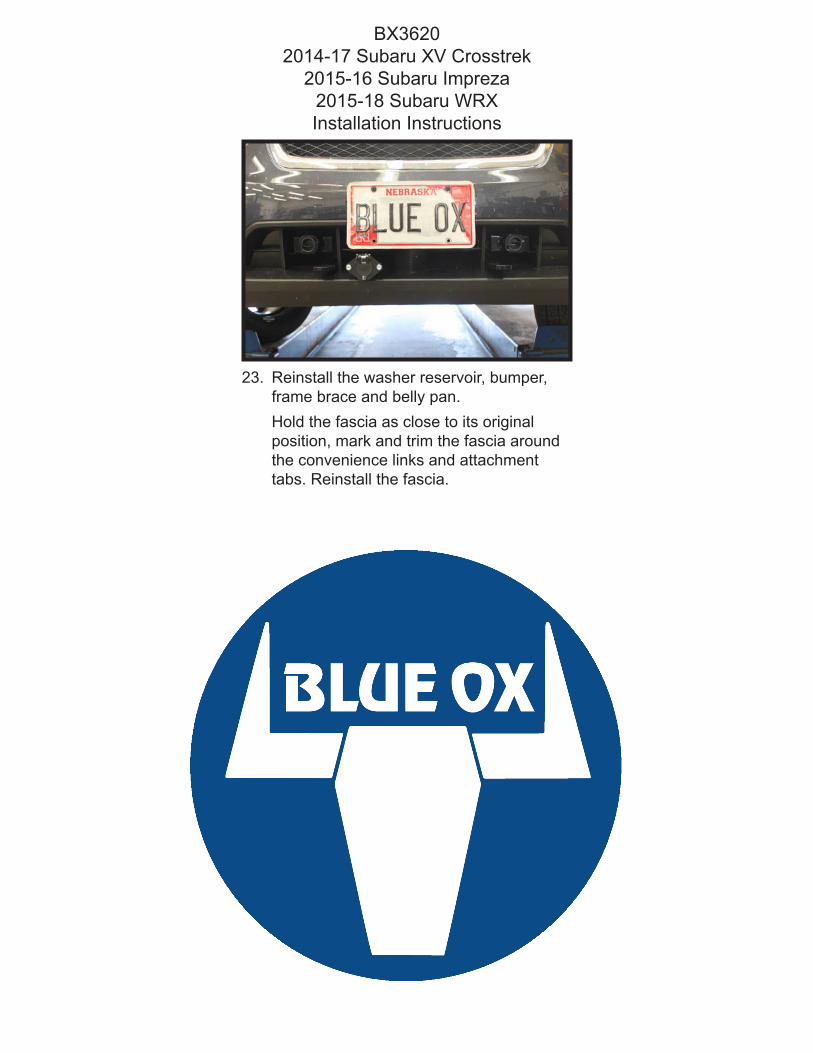
23. Reinstall the washer reservoir, bumper,frame brace and belly pan.Hold the fascia as close to its originalposition, mark and trim the fascia aroundthe convenience links and attachmenttabs. Reinstall the fascia.
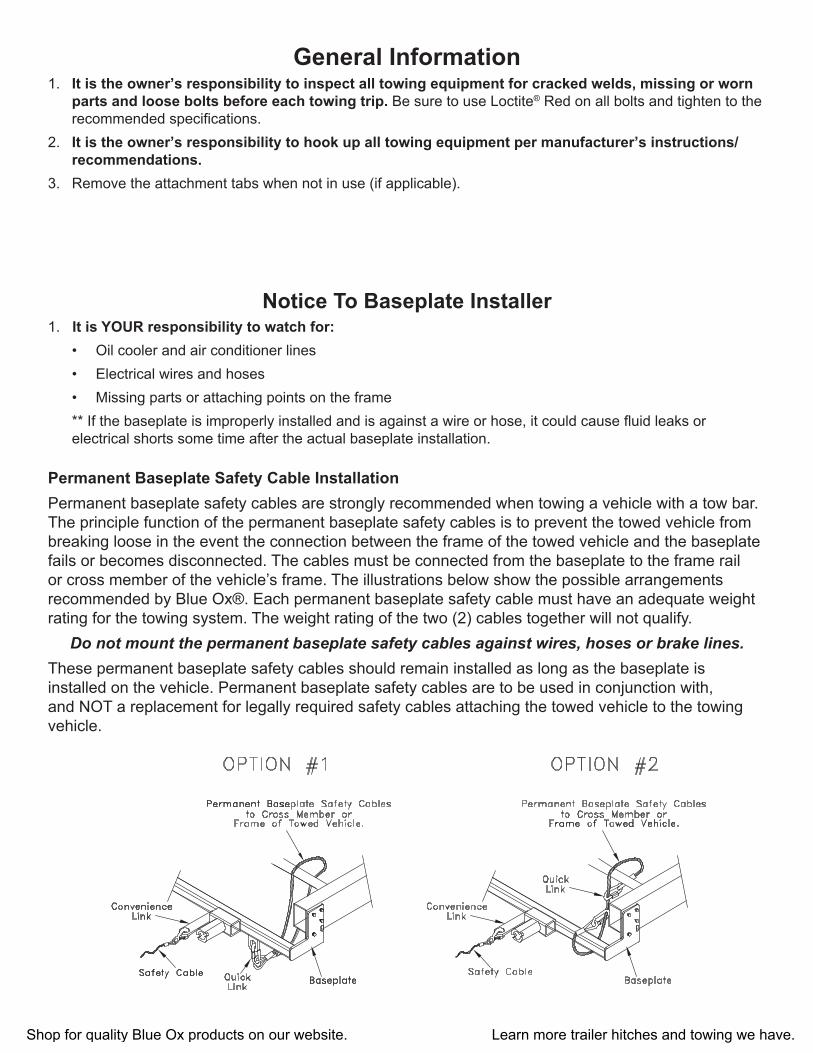
Permanent Baseplate Safety Cable InstallationPermanent baseplate safety cables are strongly recommended when towing a vehicle with a tow bar. The principle function of the permanent baseplate safety cables is to prevent the towed vehicle from breaking loose in the event the connection between the frame of the towed vehicle and the baseplate fails or becomes disconnected. The cables must be connected from the baseplate to the frame rail or cross member of the vehicle’s frame. The illustrations below show the possible arrangements recommended by Blue Ox®. Each permanent baseplate safety cable must have an adequate weight rating for the towing system. The weight rating of the two (2) cables together will not qualify.
Do not mount the permanent baseplate safety cables against wires, hoses or brake lines.These permanent baseplate safety cables should remain installed as long as the baseplate is installed on the vehicle. Permanent baseplate safety cables are to be used in conjunction with, and NOT a replacement for legally required safety cables attaching the towed vehicle to the towing vehicle.
Notice To Baseplate Installer1. It is YOUR responsibility to watch for:
• Oil cooler and air conditioner lines• Electrical wires and hoses• Missing parts or attaching points on the frame** If the baseplate is improperly installed and is against a wire or hose, it could cause fluid leaks or electrical shorts some time after the actual baseplate installation.
General Information1. It is the owner’s responsibility to inspect all towing equipment for cracked welds, missing or worn
parts and loose bolts before each towing trip. Be sure to use Loctite® Red on all bolts and tighten to the recommended specifications.
2. It is the owner’s responsibility to hook up all towing equipment per manufacturer’s instructions/recommendations.
3. Remove the attachment tabs when not in use (if applicable).
Shop for quality Blue Ox products on our website. Learn more trailer hitches and towing we have.
Related Documents