AUDIOFIRE2 TM AUDIOFIRE4 TM AUDIOFIRE8 TM AUDIOFIREPre8 TM AUDIOFIRE12 TM

AudioFire Windows Manual v2.2
Nov 25, 2014
Welcome message from author
This document is posted to help you gain knowledge. Please leave a comment to let me know what you think about it! Share it to your friends and learn new things together.
Transcript

AUDIOFIRE2TM
AUDIOFIRE4TM
AUDIOFIRE8TM
AUDIOFIREPre8TM
AUDIOFIRE12TM

Owner’s Manual Version 2.2 for Windows
Important Safety Instructions 1. Read Instructions – Be sure to read all of the safety and operating instructions before operating this product. 2. Retain Instructions – The safety instructions and owner's manual should be retained for future reference. 3. Heed Warnings – All warnings on your Echo product and in the Owner's Manual should be followed. 4. Follow Instructions – All operating and use instructions should be followed. 5. Moisture – Water and moisture are detrimental to the continued good health of your Echo product. Do not install or operate your Echo product near sources of water or moisture such as sinks, damp basements, leaky roofs, etc. 6. Heat – Your Echo product should be situated away from sources of heat such as heaters or radiators. 7. Power Sources – This unit should be operated only from the type of power source indicated in this documentation or on your Echo product. If you are unsure about the type of power at your location, contact your local power company. 8. Grounding – Precautions should be taken so that the grounding capabilities of the unit are not undermined. The AudioFire 8, AudioFire Pre8 and AudioFire 12 are provided with a cord with an equipment grounding conductor and grounding plug. This plug must be plugged into an outlet that is properly installed and grounded in accordance with all local rules and ordinances. Do not modify the plug provided with the equipment. If the plug will not fit into your outlet, have a proper outlet installed by a qualified electrician. 9. Power Cord Protection – Power supply cords should be routed so that they are unlikely to be walked on or pinched by items placed upon or against them. Pay particular attention to protecting the plugs, outlets, and the point at which the cord exits your Echo product. 10. Servicing – Do not attempt to service this unit yourself, as opening the case will expose you to hazardous voltage or other dangers. All servicing should be referred to qualified service personnel.
11. Damage Requiring Service – Unplug this unit and refer it to a qualified service technician when any of the following occur:
a) Objects have fallen or liquid has spilled into the unit b) The product has been exposed to rain or water c) The product does not operate normally or when a marked change in performance is noticed d) The product has been dropped or damaged in any way
Registering your product online at http://www.echoaudio.com/support/register.php allows us to register key information so that we may handle problems faster and inform you of advance information on upgrades and other news. Thank you in advance for registering. We hope you enjoy your Echo product.
Limited Warranty Echo Digital Audio Corporation warrants this product, when purchased at an Authorized Echo Dealer in the United States of America, to be free of defects in materials and manufacturing workmanship for a period of one year from the date of original purchase. During the warranty period Echo shall, at its option, either repair or replace any product that proves to be defective upon inspection by Echo. Final determination of warranty coverage lies solely with Echo. Echo reserves the right to update any unit returned for repair, and reserves the right to change or improve the design of the product at any time without notice. This is your sole warranty. Echo does not authorize any third party, including any dealer or sales representative, to assume any liability on behalf of Echo or to make any warranty for Echo. Service and repairs of Echo products are to be performed only at the factory (see below) unless otherwise authorized in advance by the Echo Service Department. Unauthorized service, repair or modification will void this warranty. To obtain factory service: Contact Echo Digital Audio Corporation at (805) 684-4593, 9AM to 4PM Monday through Friday (Pacific Time). If necessary, you will be given a return authorization number. Products returned without an RA number will be refused. Echo may, at its option, require proof of the original date of purchase in the form of a dated copy of the original authorized dealer’s invoice or sales receipt. Pack the product in its original shipping carton and attach a description of the problem along with your name and a phone number where Echo can contact you if necessary. Ship the product insured and freight prepaid to:
Echo Digital Audio Corporation 6450 Via Real
Carpinteria, CA 93013
DISCLAIMER AND LIMITATION OF WARRANTY Echo makes no other warranties, express, implied, or otherwise, regarding Echo products, and specifically disclaims any warranty for merchantability or fitness for a particular purpose. The exclusion of implied warranties is not permitted in some states and the exclusions specified herein may not apply to you. This warranty provides you with specific legal rights. There may be other rights that you have which vary from state to state. In no event will Echo be liable for any lost profits, or for any consequential, direct or indirect damages, however caused and on any theory of liability, arising from this warranty and sale.

©2009 by Echo Digital Audio Corporation 6450 Via Real Carpinteria, CA 93013 Echo® and AudioFire™ are trademarks of Echo Digital Audio Corporation. FireWire® is a trademark of Apple Computer, Inc. Windows®, Windows XP®, Windows Vista® and Windows 7® are registered trademarks of Microsoft, Inc.
INTRODUCTION....................................................................................................9 WHAT YOU SHOULD HAVE RECEIVED IN THE BOX .................................................9 SYSTEM REQUIREMENTS .......................................................................................10
INSTALLATION ...................................................................................................11
LOG IN AS ADMINISTRATOR ..................................................................................11 IMPORTANT — CHECK THE ECHO WEBSITE FOR SOFTWARE UPDATES .................11 INSTALLING THE AUDIOFIRE HARDWARE AND SOFTWARE ...................................12 CONNECTING TO THE AUDIO INTERFACE...............................................................14
CONSOLE ..............................................................................................................25
RUNNING THE CONSOLE........................................................................................25 AUTOMATIC FLASH UPDATE .................................................................................25 CONSOLE WINDOW ...............................................................................................25 BUS SELECT TABS.................................................................................................26 MASTER OUTPUT BUS CONTROL...........................................................................27 PLAYBACK CONTROLS ..........................................................................................27 ANALOG INPUTS....................................................................................................28 DIGITAL INPUTS (AUDIOFIRE 2, AUDIOFIRE 4, AUDIOFIRE 8 AND AUDIOFIRE PRE8) ....................................................................................................................30
Adjusting Playback Volume .............................................................................31 Nominal Levels.................................................................................................32
SETTINGS TAB.......................................................................................................32 Sample Rate in XP............................................................................................33 Core Audio Sample Rate - Windows Vista/Windows 7....................................34 Clock Source ....................................................................................................34 Digital Mode (AudioFire 8 and AudioFire Pre8)............................................34 S/PDIF Format ................................................................................................35 Wave Devices ...................................................................................................35 Buffer Size ........................................................................................................35
ABOUT DIALOGUE BOX.........................................................................................36 Version Information .........................................................................................36 Copy Version Information to Clipboard..........................................................36 Flash Update....................................................................................................37
AUDIOFIRE 2 AND AUDIOFIRE 4 PLAYBACK ROUTING..........................................37 SYSTEM TRAY ICON ..............................................................................................38 CONSOLE SESSIONS...............................................................................................39 CONSOLE SETTINGS AND STAND-ALONE MODE....................................................39 CORE AUDIO .........................................................................................................40 ASIO AND WINDOWS VISTA/WINDOWS 7.............................................................41
SURROUND SOUND PLAYBACK..............................................................................41 Stereo versus surround sound modes...............................................................41 Windows XP configuration ..............................................................................42 Windows Vista/Windows 7 configuration........................................................42 Application configuration ................................................................................42
MULTI-CLIENT AUDIO...........................................................................................43 FIREWIRE ANALYZER ...........................................................................................44
Status ................................................................................................................44 Playback...........................................................................................................44 Record ..............................................................................................................44 ASIO wakeup....................................................................................................45 ASIO host .........................................................................................................45 Firmware..........................................................................................................45 Buffer offset ......................................................................................................46 Things to watch for ..........................................................................................46 Saving a report.................................................................................................46
CONTACTING ECHO CUSTOMER SERVICE ..............................................50
APPENDIX A: GENERAL TROUBLESHOOTING GUIDE ..........................51
APPENDIX B: AUDIO SOFTWARE GUIDE...................................................55
APPENDIX C: AN INTRODUCTION TO DIGITAL RECORDING.............56
INDEX.....................................................................................................................63
Introduction
9 Introduction
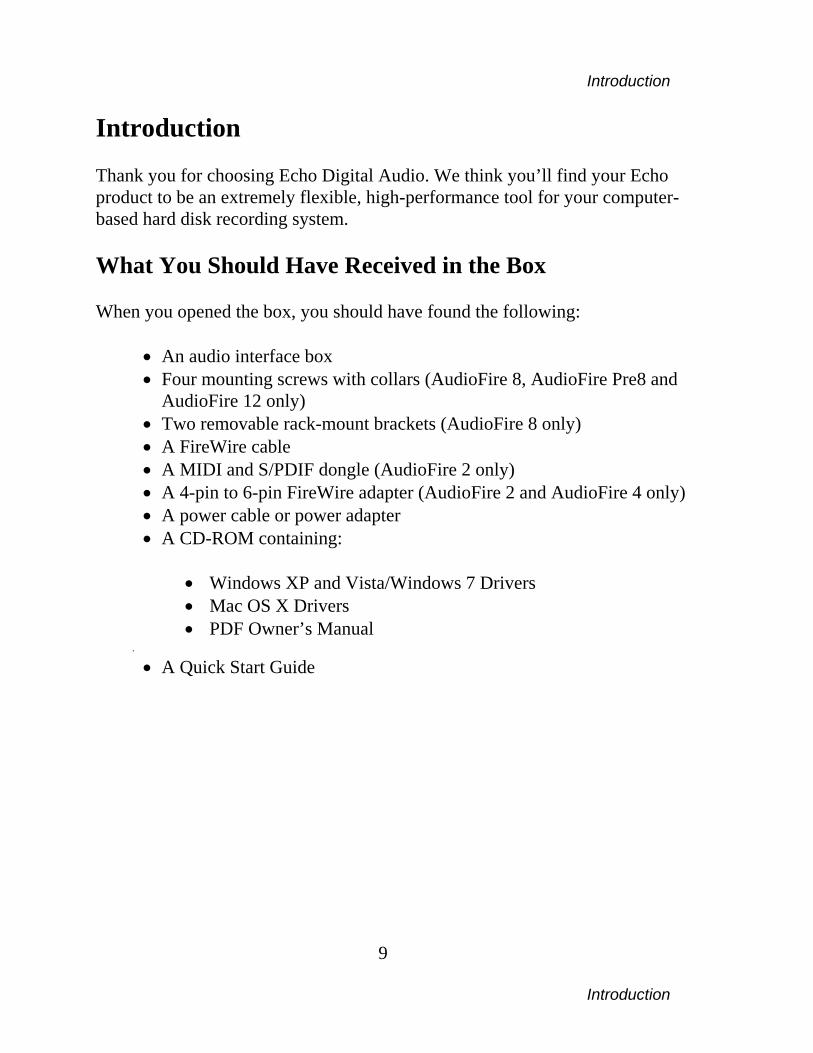
Introduction Thank you for choosing Echo Digital Audio. We think you’ll find your Echo product to be an extremely flexible, high-performance tool for your computer-based hard disk recording system. What You Should Have Received in the Box When you opened the box, you should have found the following:
• An audio interface box • Four mounting screws with collars (AudioFire 8, AudioFire Pre8 and
AudioFire 12 only) • Two removable rack-mount brackets (AudioFire 8 only) • A FireWire cable • A MIDI and S/PDIF dongle (AudioFire 2 only) • A 4-pin to 6-pin FireWire adapter (AudioFire 2 and AudioFire 4 only) • A power cable or power adapter • A CD-ROM containing:
• Windows XP and Vista/Windows 7 Drivers • Mac OS X Drivers • PDF Owner’s Manual
. • A Quick Start Guide
Introduction
10 Introduction
System Requirements In order to use AudioFire 2, AudioFire 4, AudioFire 8, AudioFire Pre8 or AudioFire 12 you’ll need the following:
• A desktop or laptop computer with:
• Windows XP Service Pack 3 or newer operating system • An unused FireWire port • A minimum 256Mb of RAM (512Mb highly recommended) • A fast, high-capacity IDE, SATA, or FireWire hard disk drive
• Peripheral audio equipment, such as a mixer, microphones, studio monitors,
musical instruments, etc.

Installation
11 Installation
Installation Complete installation consists of logging in as an administrator, installing the Windows drivers into your system, connecting the audio interface to a FireWire port and then connecting your AudioFire to any other peripheral audio equipment. Log In as Administrator To install your Echo product you must be logged into your computer as an Administrator. You can either log in with the account called “Administrator” or with any other account that has administrative privileges. Otherwise, you will not be able to install the hardware and drivers. Important — Check the Echo Website for Software Updates You should always check our website (www.echoaudio.com) for the latest driver updates before installing your AudioFire product. Just go to the driver downloads area and find the AudioFire section. If there is a new driver then you should use it instead of the one on the AudioFire CDROM. Just compare the version number to the version shown on the AudioFire CDROM installation screen to be sure. You should also check the website periodically in the future in case new drivers are released at a later date.
Installation
12 Installation
Installing the AudioFire Hardware and Software Now that you have logged in as an administrator you are ready to install your AudioFire product in your computer. 1. Install the drivers. You should do this before connecting the AudioFire
interface to the FireWire port on your computer. Insert the AudioFire Install CD-ROM into your machine. The main install window should automatically appear. If it does not, simply go to “My Computer,” and double-click on your CD-ROM drive icon. Now, select “Install AudioFire Driver,” and follow the on-screen directions. If you found a newer driver on our website, then you will want to install that instead of the one on the AudioFire CDROM. (To install the downloaded driver, double-click on the icon and follow the instructions.)
2. Once you have installed the Windows driver, locate the audio interface box, the
power cable or power adapter, and the FireWire cable. If you are installing an AudioFire 8, AudioFire Pre8 or AudioFire 12, securely mount the interface into your equipment rack. If you will not be mounting the box in a rack, then be sure to place the interface box in a secure location.
3. If you have AudioFire 8, AudioFire Pre8 or AudioFire 12, plug the power
cable firmly into the interface and a power socket, and then turn on the interface by pressing the power button. If you have AudioFire 2 or AudioFire 4 and your computer’s FireWire port has a 6-pin connector, your AudioFire can be powered directly through FireWire. No external power supply is needed. If your computer’s FireWire port has a 4-pin connector or if you use your AudioFire in stand-alone mode, plug the included power adapter firmly into the interface and a power socket.
4. Plug one end of the FireWire cable into the FireWire connector on the rear of
the AudioFire interface. Attach the other end of the FireWire cable to an open FireWire port on your computer. (If the connector does not match the port on your computer then you will need to get an adapter – included with the AudioFire 2 and AudioFire 4.)
Installation
13 Installation
5. Windows should find new hardware called “AudioFire” and begin to install the drivers. You should select the options “No, not this time,” “Install the software automatically,” and then click the “Continue anyway” and “Finish” buttons. This is done automatically in Vista/Windows 7.
Note: Microsoft has not digitally signed this version of the WDM driver. You will need to confirm that you want to install an unsigned driver in Windows XP. The Driver has been signed for Windows Vista/Windows 7. 6. You can now attach external audio devices to the connectors on the AudioFire
interface box. Information on attaching external devices to the audio interface box may be found in the following section: “Connecting to the Audio Interface”.
7. Next, run the AudioFire Console. The console is located in the Start Menu
under Echo Digital Audio and AudioFire. The first time you run the console, it will check that your AudioFire has the latest firmware. If it doesn’t, click “Yes” to flash the latest firmware. IMPORTANT — Do not turn off or unplug your AudioFire while the firmware is being flashed! Once the firmware update is complete you will need to reboot your AudioFire to load the new flash.

Connecting to the Audio Interface
14 Connecting to the Audio Interface
Connecting to the Audio Interface The AudioFire 2, AudioFire 4, AudioFire 8, AudioFire Pre8 and AudioFire 12 audio interfaces contain a wide variety of connections that allow great flexibility in operation. For optimal performance, it is critical to use the appropriate cabling and connectors. Analog Inputs and Outputs – AudioFire 2
AudioFire 2’s front panel has two analog line inputs (1 – 2), an amber power indicator light, and an 1/8” stereo headphone output jack, with a corresponding volume knob, which monitors analog outputs 3 and 4, labeled “Headphones” in the AudioFire Console. The analog inputs operate with an input impedance of 10Kohms.
AudioFire 2 has two analog line outputs on the rear panel. The input and output connections can be used with balanced or unbalanced cables via the ¼” connectors. By default, the inputs and outputs are set to receive or send a +4dBu signal.
You can switch between +4dBu and –10dBV for each individual input and output via the console software (see section below).
Connecting to the Audio Interface
15 Connecting to the Audio Interface
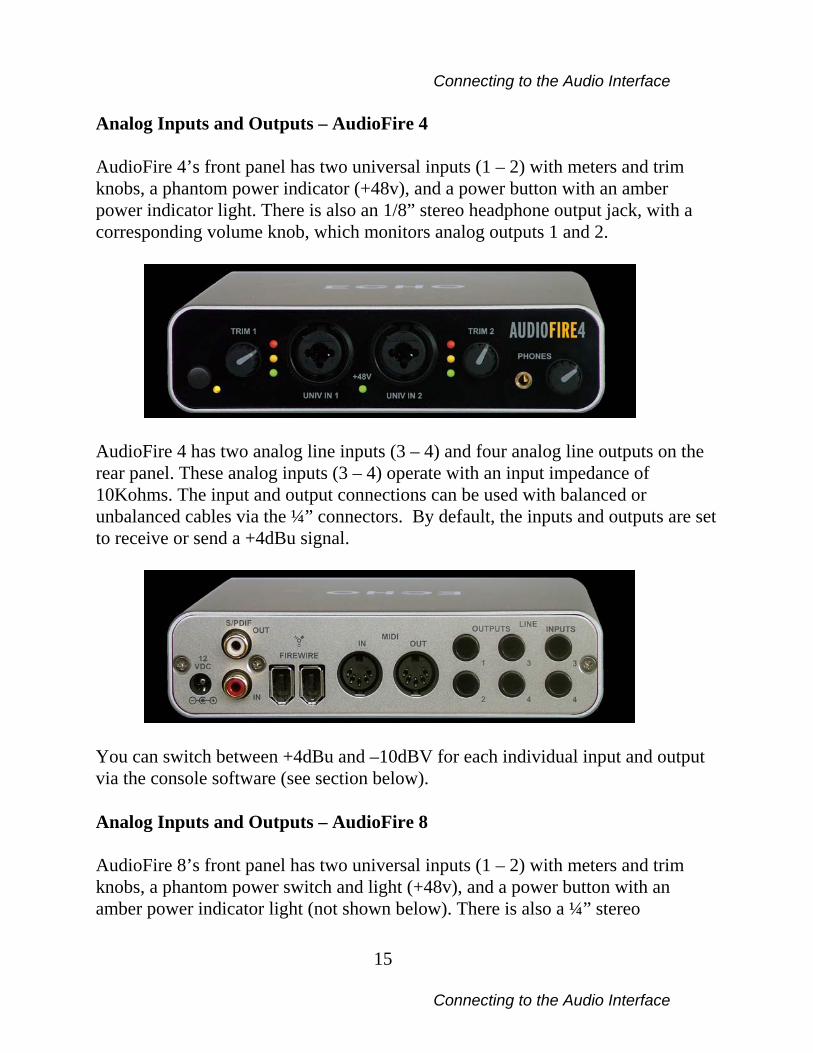
Analog Inputs and Outputs – AudioFire 4
AudioFire 4’s front panel has two universal inputs (1 – 2) with meters and trim knobs, a phantom power indicator (+48v), and a power button with an amber power indicator light. There is also an 1/8” stereo headphone output jack, with a corresponding volume knob, which monitors analog outputs 1 and 2.
AudioFire 4 has two analog line inputs (3 – 4) and four analog line outputs on the rear panel. These analog inputs (3 – 4) operate with an input impedance of 10Kohms. The input and output connections can be used with balanced or unbalanced cables via the ¼” connectors. By default, the inputs and outputs are set to receive or send a +4dBu signal.
You can switch between +4dBu and –10dBV for each individual input and output via the console software (see section below). Analog Inputs and Outputs – AudioFire 8
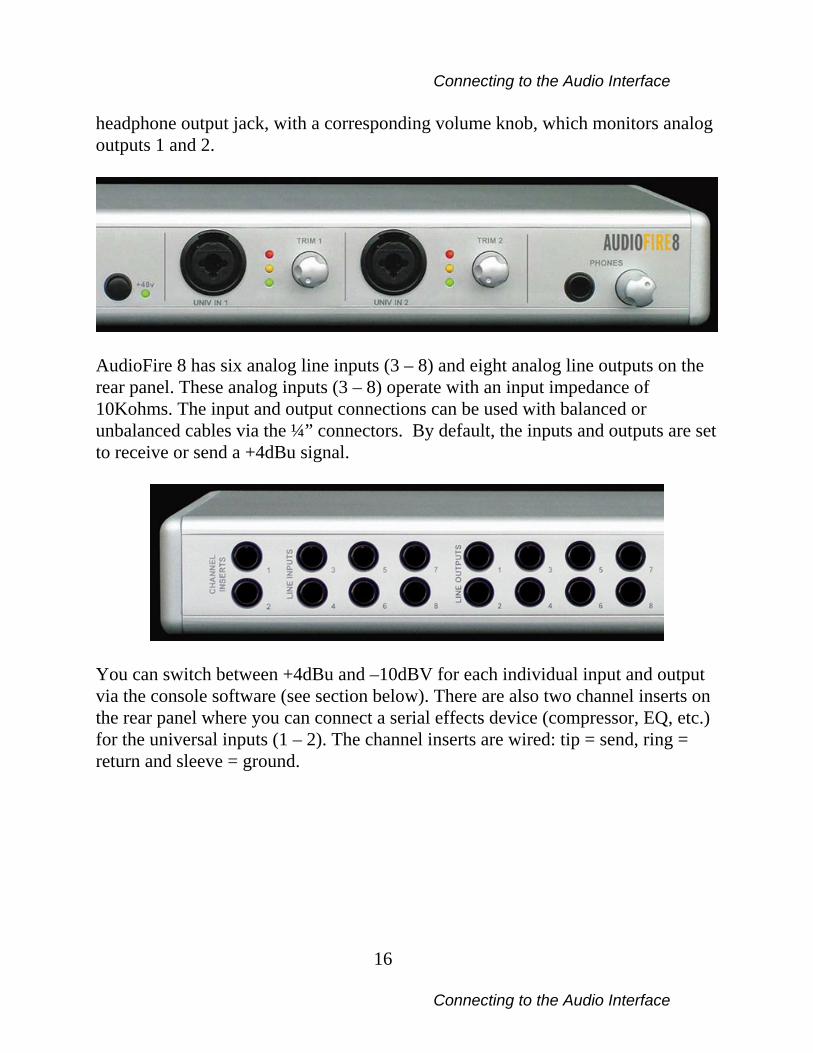
AudioFire 8’s front panel has two universal inputs (1 – 2) with meters and trim knobs, a phantom power switch and light (+48v), and a power button with an amber power indicator light (not shown below). There is also a ¼” stereo
Connecting to the Audio Interface
16 Connecting to the Audio Interface
headphone output jack, with a corresponding volume knob, which monitors analog outputs 1 and 2.
AudioFire 8 has six analog line inputs (3 – 8) and eight analog line outputs on the rear panel. These analog inputs (3 – 8) operate with an input impedance of 10Kohms. The input and output connections can be used with balanced or unbalanced cables via the ¼” connectors. By default, the inputs and outputs are set to receive or send a +4dBu signal.
You can switch between +4dBu and –10dBV for each individual input and output via the console software (see section below). There are also two channel inserts on the rear panel where you can connect a serial effects device (compressor, EQ, etc.) for the universal inputs (1 – 2). The channel inserts are wired: tip = send, ring = return and sleeve = ground.
Connecting to the Audio Interface
17 Connecting to the Audio Interface
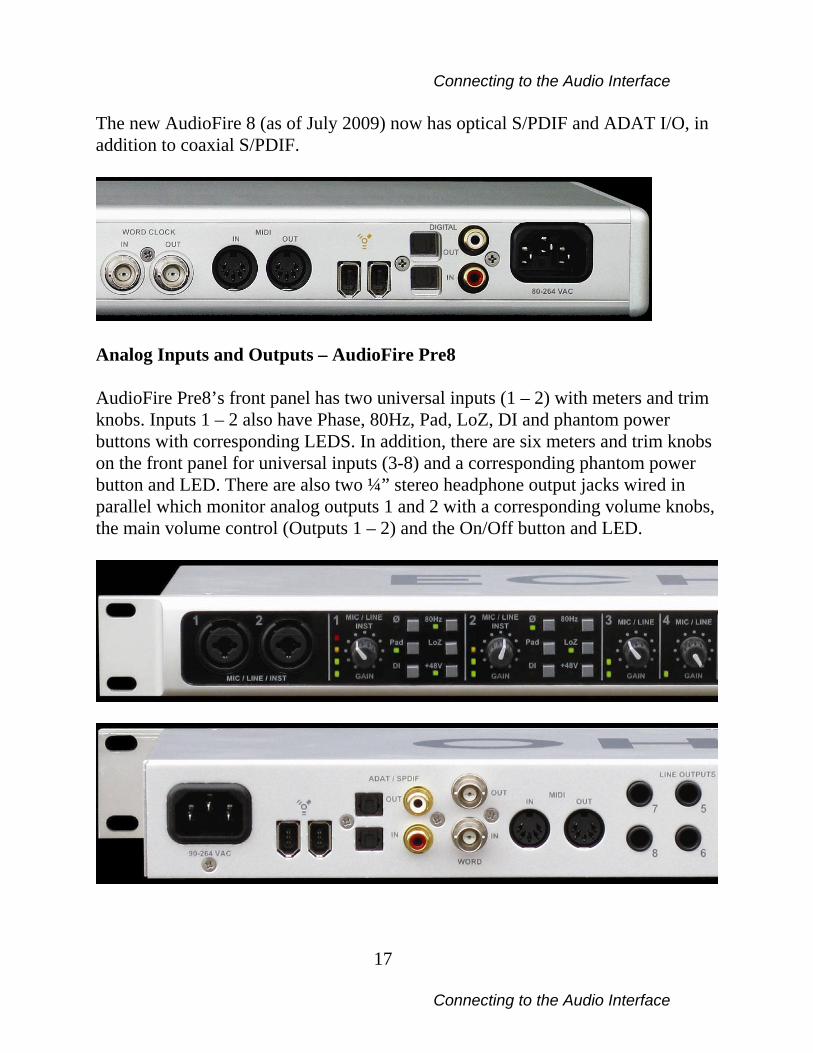
The new AudioFire 8 (as of July 2009) now has optical S/PDIF and ADAT I/O, in addition to coaxial S/PDIF.
Analog Inputs and Outputs – AudioFire Pre8 AudioFire Pre8’s front panel has two universal inputs (1 – 2) with meters and trim knobs. Inputs 1 – 2 also have Phase, 80Hz, Pad, LoZ, DI and phantom power buttons with corresponding LEDS. In addition, there are six meters and trim knobs on the front panel for universal inputs (3-8) and a corresponding phantom power button and LED. There are also two ¼” stereo headphone output jacks wired in parallel which monitor analog outputs 1 and 2 with a corresponding volume knobs, the main volume control (Outputs 1 – 2) and the On/Off button and LED.
Connecting to the Audio Interface
18 Connecting to the Audio Interface
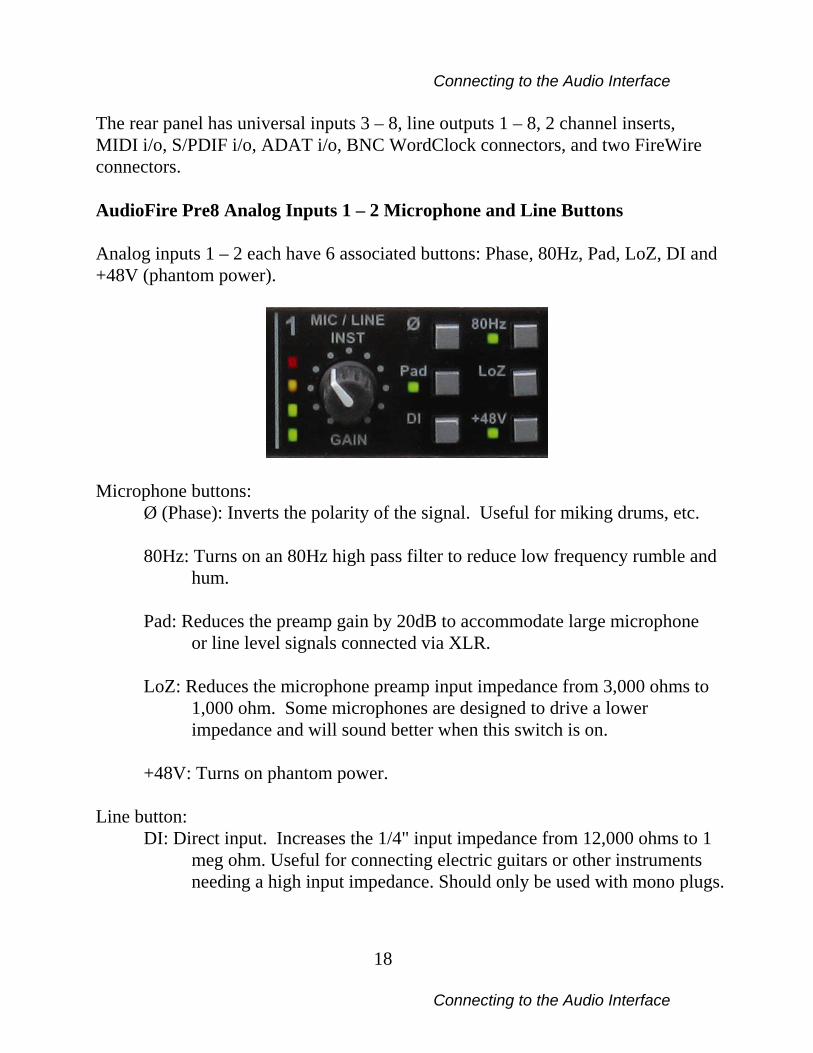
The rear panel has universal inputs 3 – 8, line outputs 1 – 8, 2 channel inserts, MIDI i/o, S/PDIF i/o, ADAT i/o, BNC WordClock connectors, and two FireWire connectors. AudioFire Pre8 Analog Inputs 1 – 2 Microphone and Line Buttons Analog inputs 1 – 2 each have 6 associated buttons: Phase, 80Hz, Pad, LoZ, DI and +48V (phantom power).
Microphone buttons: Ø (Phase): Inverts the polarity of the signal. Useful for miking drums, etc.
80Hz: Turns on an 80Hz high pass filter to reduce low frequency rumble and hum.
Pad: Reduces the preamp gain by 20dB to accommodate large microphone
or line level signals connected via XLR.
LoZ: Reduces the microphone preamp input impedance from 3,000 ohms to 1,000 ohm. Some microphones are designed to drive a lower impedance and will sound better when this switch is on.
+48V: Turns on phantom power.
Line button:
DI: Direct input. Increases the 1/4" input impedance from 12,000 ohms to 1 meg ohm. Useful for connecting electric guitars or other instruments needing a high input impedance. Should only be used with mono plugs.
Connecting to the Audio Interface
19 Connecting to the Audio Interface
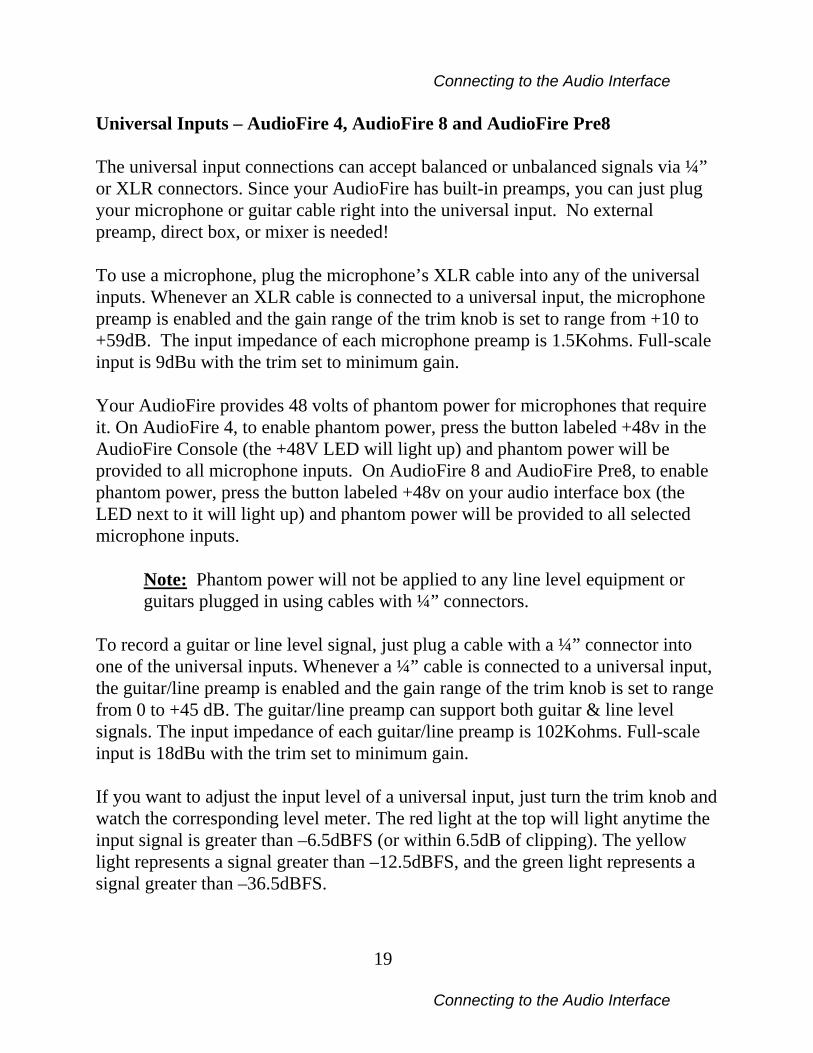
Universal Inputs – AudioFire 4, AudioFire 8 and AudioFire Pre8 The universal input connections can accept balanced or unbalanced signals via ¼” or XLR connectors. Since your AudioFire has built-in preamps, you can just plug your microphone or guitar cable right into the universal input. No external preamp, direct box, or mixer is needed! To use a microphone, plug the microphone’s XLR cable into any of the universal inputs. Whenever an XLR cable is connected to a universal input, the microphone preamp is enabled and the gain range of the trim knob is set to range from +10 to +59dB. The input impedance of each microphone preamp is 1.5Kohms. Full-scale input is 9dBu with the trim set to minimum gain. Your AudioFire provides 48 volts of phantom power for microphones that require it. On AudioFire 4, to enable phantom power, press the button labeled +48v in the AudioFire Console (the +48V LED will light up) and phantom power will be provided to all microphone inputs. On AudioFire 8 and AudioFire Pre8, to enable phantom power, press the button labeled +48v on your audio interface box (the LED next to it will light up) and phantom power will be provided to all selected microphone inputs.
Note: Phantom power will not be applied to any line level equipment or guitars plugged in using cables with ¼” connectors.
To record a guitar or line level signal, just plug a cable with a ¼” connector into one of the universal inputs. Whenever a ¼” cable is connected to a universal input, the guitar/line preamp is enabled and the gain range of the trim knob is set to range from 0 to +45 dB. The guitar/line preamp can support both guitar & line level signals. The input impedance of each guitar/line preamp is 102Kohms. Full-scale input is 18dBu with the trim set to minimum gain. If you want to adjust the input level of a universal input, just turn the trim knob and watch the corresponding level meter. The red light at the top will light anytime the input signal is greater than –6.5dBFS (or within 6.5dB of clipping). The yellow light represents a signal greater than –12.5dBFS, and the green light represents a signal greater than –36.5dBFS.

Connecting to the Audio Interface
20 Connecting to the Audio Interface
For optimal audio quality, you should adjust the input trim knob so that your loudest recorded signal lights up the yellow light, but not the red. When the red meter light shines extra bright – you’ve clipped! If the signal level ever exceeds 0dBFS the signal will be “clipped” and you will hear a “pop” or “tick” in the recording. This is a very bad thing, and clipping should be avoided at all costs! There is enough headroom so that you can be conservative in this area, and there is no need to push the input levels right up to the edge of clipping. Analog Inputs and Outputs – AudioFire 12 AudioFire 12’s front panel has meters for the twelve analog inputs and outputs, indicator lights for sample rate and clock synchronization, and a power button with an amber power indicator light (not shown below).
AudioFire 12 has twelve analog line inputs and twelve analog line outputs on the rear panel. The analog inputs operate with an input impedance of 10Kohms. The input and output connections can be used with balanced or unbalanced cables via the ¼” connectors.
Connecting to the Audio Interface
21 Connecting to the Audio Interface
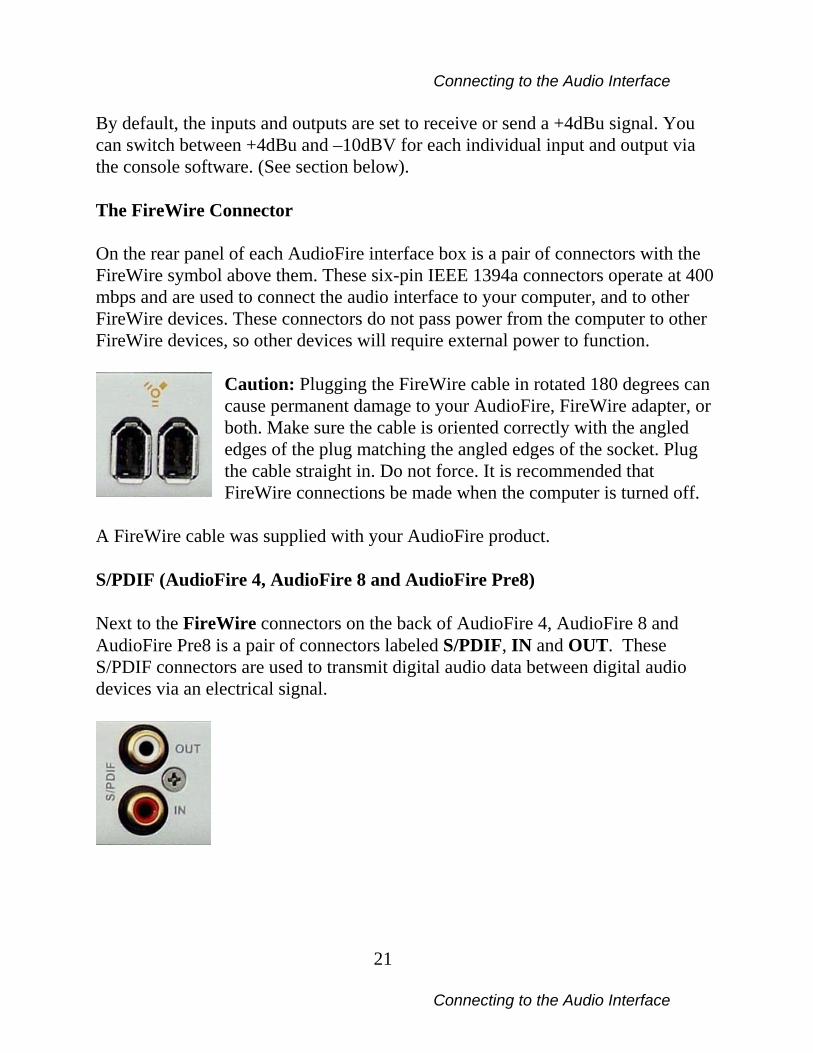
By default, the inputs and outputs are set to receive or send a +4dBu signal. You can switch between +4dBu and –10dBV for each individual input and output via the console software. (See section below). The FireWire Connector On the rear panel of each AudioFire interface box is a pair of connectors with the FireWire symbol above them. These six-pin IEEE 1394a connectors operate at 400 mbps and are used to connect the audio interface to your computer, and to other FireWire devices. These connectors do not pass power from the computer to other FireWire devices, so other devices will require external power to function.
Caution: Plugging the FireWire cable in rotated 180 degrees can cause permanent damage to your AudioFire, FireWire adapter, or both. Make sure the cable is oriented correctly with the angled edges of the plug matching the angled edges of the socket. Plug the cable straight in. Do not force. It is recommended that FireWire connections be made when the computer is turned off.
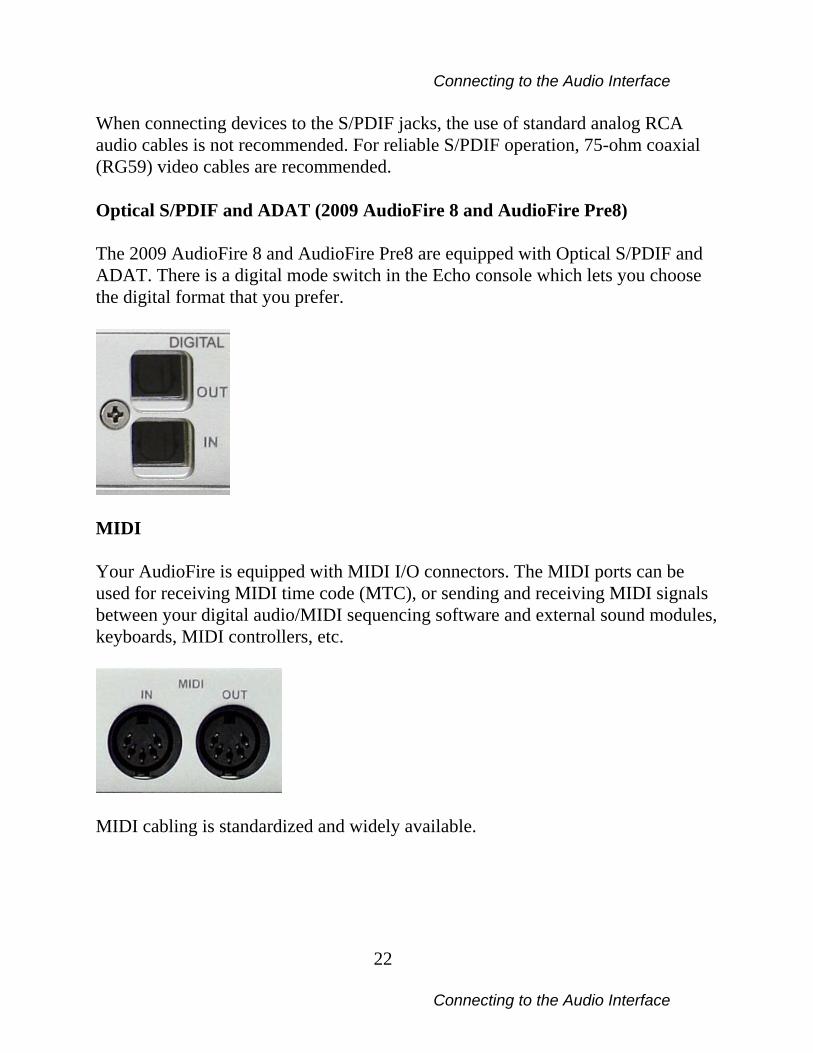
A FireWire cable was supplied with your AudioFire product. S/PDIF (AudioFire 4, AudioFire 8 and AudioFire Pre8) Next to the FireWire connectors on the back of AudioFire 4, AudioFire 8 and AudioFire Pre8 is a pair of connectors labeled S/PDIF, IN and OUT. These S/PDIF connectors are used to transmit digital audio data between digital audio devices via an electrical signal.
Connecting to the Audio Interface
22 Connecting to the Audio Interface
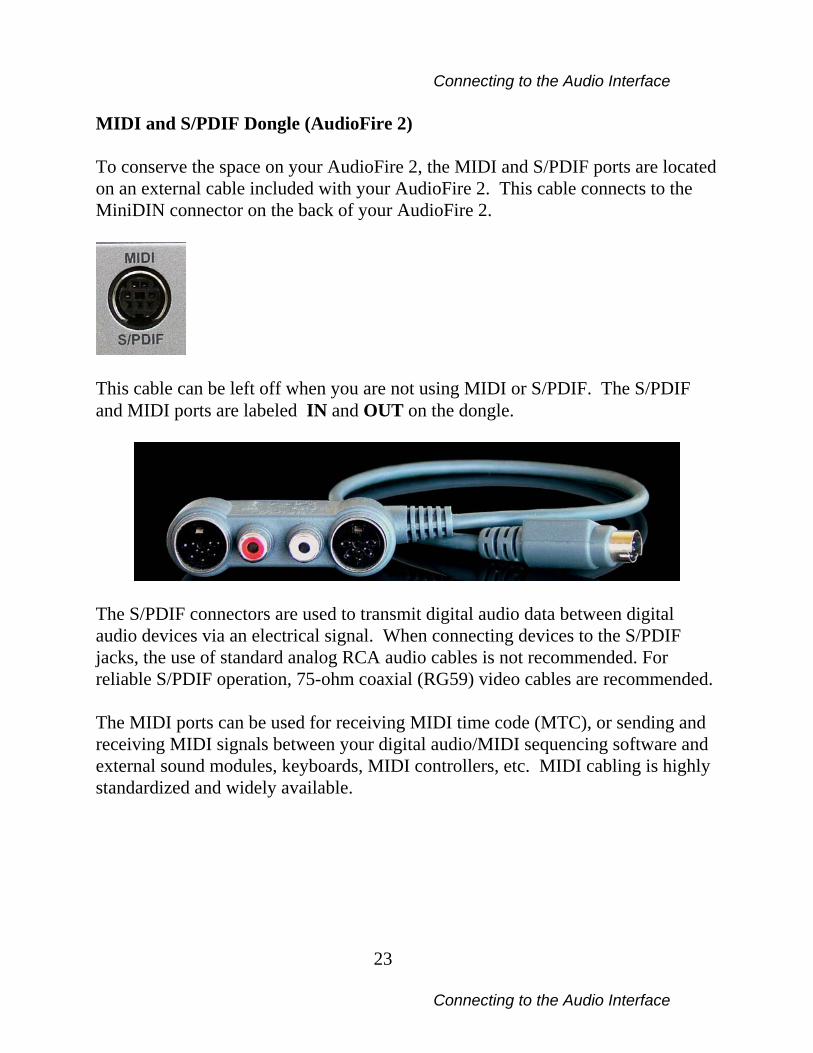
When connecting devices to the S/PDIF jacks, the use of standard analog RCA audio cables is not recommended. For reliable S/PDIF operation, 75-ohm coaxial (RG59) video cables are recommended. Optical S/PDIF and ADAT (2009 AudioFire 8 and AudioFire Pre8) The 2009 AudioFire 8 and AudioFire Pre8 are equipped with Optical S/PDIF and ADAT. There is a digital mode switch in the Echo console which lets you choose the digital format that you prefer.
MIDI Your AudioFire is equipped with MIDI I/O connectors. The MIDI ports can be used for receiving MIDI time code (MTC), or sending and receiving MIDI signals between your digital audio/MIDI sequencing software and external sound modules, keyboards, MIDI controllers, etc.
MIDI cabling is standardized and widely available.
Connecting to the Audio Interface
23 Connecting to the Audio Interface
MIDI and S/PDIF Dongle (AudioFire 2) To conserve the space on your AudioFire 2, the MIDI and S/PDIF ports are located on an external cable included with your AudioFire 2. This cable connects to the MiniDIN connector on the back of your AudioFire 2.
This cable can be left off when you are not using MIDI or S/PDIF. The S/PDIF and MIDI ports are labeled IN and OUT on the dongle.
The S/PDIF connectors are used to transmit digital audio data between digital audio devices via an electrical signal. When connecting devices to the S/PDIF jacks, the use of standard analog RCA audio cables is not recommended. For reliable S/PDIF operation, 75-ohm coaxial (RG59) video cables are recommended. The MIDI ports can be used for receiving MIDI time code (MTC), or sending and receiving MIDI signals between your digital audio/MIDI sequencing software and external sound modules, keyboards, MIDI controllers, etc. MIDI cabling is highly standardized and widely available.
Connecting to the Audio Interface
24 Connecting to the Audio Interface
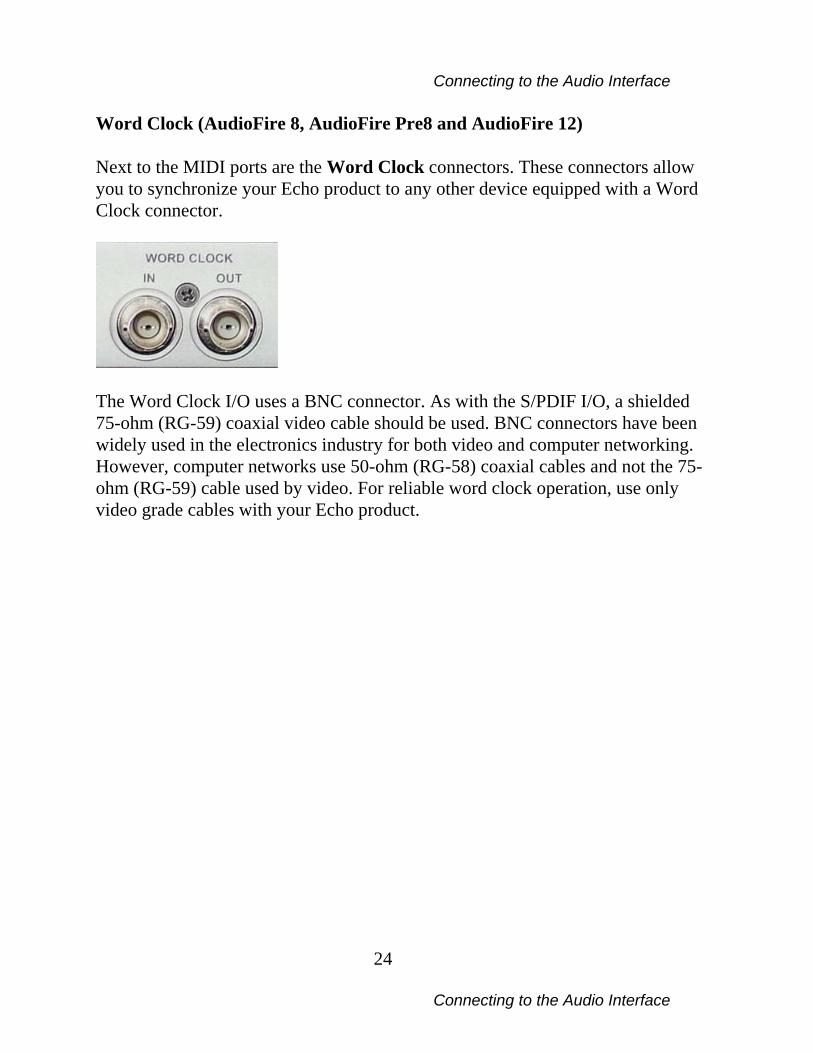
Word Clock (AudioFire 8, AudioFire Pre8 and AudioFire 12) Next to the MIDI ports are the Word Clock connectors. These connectors allow you to synchronize your Echo product to any other device equipped with a Word Clock connector.
The Word Clock I/O uses a BNC connector. As with the S/PDIF I/O, a shielded 75-ohm (RG-59) coaxial video cable should be used. BNC connectors have been widely used in the electronics industry for both video and computer networking. However, computer networks use 50-ohm (RG-58) coaxial cables and not the 75-ohm (RG-59) cable used by video. For reliable word clock operation, use only video grade cables with your Echo product.
Console Software
25
Console Software
Console A “virtual control surface” application called Console is installed with the driver. The console allows you to control the audio I/O and clocking functions of your Echo product, and it brings these controls to a single easy-to-use location. From the console you can control the output levels, select synchronization clocks and digital mode, and adjust input monitoring. The examples in this section will be for AudioFire 8. The controls for AudioFire 2, AudioFire 4, AudioFire Pre8 and AudioFire 12 are similar. Running the Console Once you have run the installer, you will find the console under your “Start” menu. To run the AudioFire Console application go to the “AudioFire” folder in the “Echo Digital Audio” group and click “AudioFire Console.” Automatic Flash Update As the console starts up, it checks the firmware that is loaded in each AudioFire. If the AudioFire is running old firmware, a dialog will come up requesting your confirmation to update the firmware. If you click “Yes” the firmware will be updated to the latest version and you will need to restart your AudioFire before continuing. Console Window The basic metaphor for the console interface is a digital mixing board, and it works in terms of output busses. An output bus represents a pair of outputs on your AudioFire hardware. For example, analog outputs 1 and 2 are an output bus. The console window allows you to select an output bus and control what is mixed and sent to that output bus. Audio played through the selected channels by an application, any analog input, and any digital input may be mixed to an output bus.
Console Software
26
Console Software
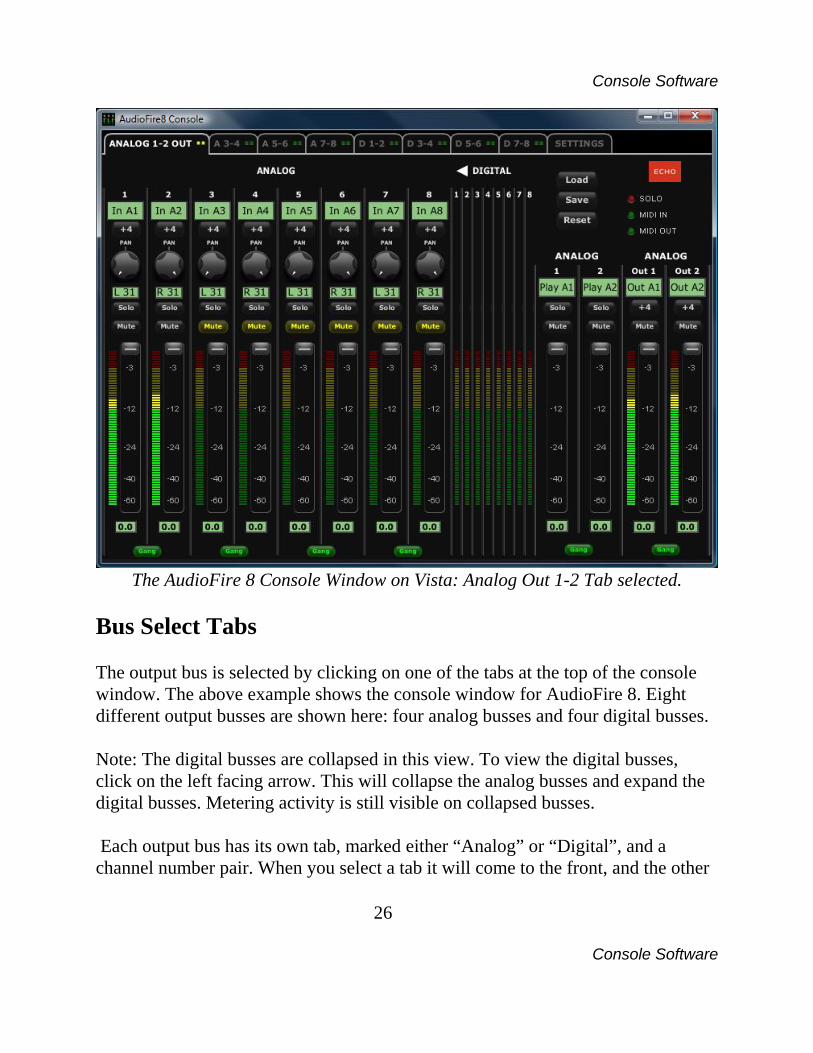
The AudioFire 8 Console Window on Vista: Analog Out 1-2 Tab selected.
Bus Select Tabs The output bus is selected by clicking on one of the tabs at the top of the console window. The above example shows the console window for AudioFire 8. Eight different output busses are shown here: four analog busses and four digital busses. Note: The digital busses are collapsed in this view. To view the digital busses, click on the left facing arrow. This will collapse the analog busses and expand the digital busses. Metering activity is still visible on collapsed busses. Each output bus has its own tab, marked either “Analog” or “Digital”, and a channel number pair. When you select a tab it will come to the front, and the other
Console Software
27
Console Software
tab titles will be gray. In this case “Analog 1-2” is the currently selected output bus. Clicking on an output bus tab simply selects the settings that are displayed. This means all input monitor parameters such as volume, pan, and mute only apply to the audio coming out analog outputs 1 and 2 of AudioFire 8. To select, view and change the input monitoring and playback settings for another set of outputs you must select a different output bus by clicking on one of the other output bus tabs. AudioFire 12 does not have S/PDIF, so it does not have a digital output bus; it has 6 analog output bus tabs instead. Master Output Bus Control The master bus control is the area on the far right of the console window. At the top are the labels “ANALOG”, “Out 1”, and “Out 2.” This indicates you are currently controlling everything mixed to analog outputs 1 and 2. These channels correspond to the currently selected output bus tab. Beneath the labels are two green label fields that can be changed by clicking in them and typing. Below the green label fields are nominal level buttons, mute buttons, level meters and faders. The mute buttons and faders affect everything being mixed to this bus. Thus, pulling the fader down will make both the input monitors and playback quieter. The level meters display the amount of signal being sent out of the selected outputs. The gang button sets the gang mode. If you are in gang mode, the mute buttons will work together for the left and right channels; for example, clicking the mute on one channel activates the mute button on the other channel. Also, ganging ties the faders together so they will maintain their relative placement in regard to each other. Playback Controls The playback controls are to the left of the master output controls and are similarly labeled, except instead of “Out” they are labeled “Play”. The playback controls affect the level of audio being played by an application out the currently selected
Console Software
28
Console Software
output bus. These controls operate the same as the input monitor controls, except there are no pan knobs, solo buttons, or level meters. Analog Inputs The controls for the analog inputs are on the left side of the console and have the labels “ANALOG” and “1” through “8” at the top. There is one strip, or input channel, corresponding to each of AudioFire 8’s eight physical analog inputs. The input level meters remain visible at all times, whereas the input monitor controls (pan, solo, mute, faders and gang) that you see will change depending on which output bus is currently selected. The input monitor controls are a little complicated. Basically, there is a different set of input monitor controls for each output bus, but only one set is visible and changeable at a time. In the example above, the only set of input monitor controls that is visible and changeable is the one for the output bus called “Analog 1-2". To see and change a different set of input monitor controls you will need to select a different output bus (see the “Bus Select” section above). The level meters do not change when a different output bus is selected. They always reflect the signal level being received on the inputs. For example, if you adjust the input faders to -6, this will decrease the amount the input signal that is being sent to analog outputs 1-2. Thus the signal level on the ANALOG Out 1-2 meters will be less than that on the input meters. If the Analog 3-4 tab is selected the console would appear as in the example below.
Console Software
29
Console Software
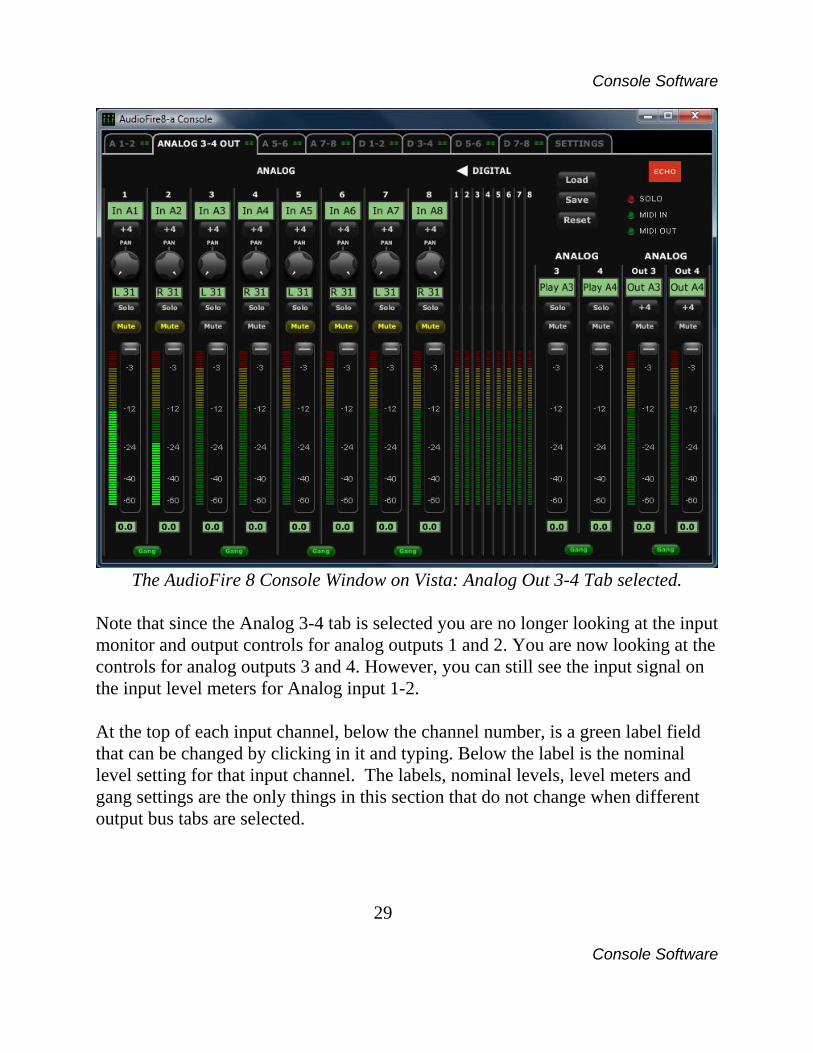
The AudioFire 8 Console Window on Vista: Analog Out 3-4 Tab selected.
Note that since the Analog 3-4 tab is selected you are no longer looking at the input monitor and output controls for analog outputs 1 and 2. You are now looking at the controls for analog outputs 3 and 4. However, you can still see the input signal on the input level meters for Analog input 1-2. At the top of each input channel, below the channel number, is a green label field that can be changed by clicking in it and typing. Below the label is the nominal level setting for that input channel. The labels, nominal levels, level meters and gang settings are the only things in this section that do not change when different output bus tabs are selected.
Console Software
30
Console Software
Moving down the input channel strip you find the input monitor controls, starting with the input monitor pan knob. This knob changes how the input channel is monitored between the two channels of the currently selected output bus. Holding the Ctrl key and clicking on a pan knob will set it to the center position. Below each pan knob is a non-selectable green field that tells you the current setting of the pan knob. Note that adjusting the pan knob will not affect your recording, as the input monitor controls only affect how the input signal is sent to (or monitored on) the outputs. Below the pan knob are the monitor solo and mute buttons. Activating the solo button will make sure that the selected output bus only monitors the inputs that are soloed. Activating the mute button on an input channel will prevent it from being monitored by the currently selected output bus. Again, this does not affect recording. These are followed by the monitor fader, which controls the input monitor level. Like the pan, solo, and mute controls, this does not affect your recording level. The faders also have gang buttons, and their operation is the same as the gang button for the master output bus controls. Digital Inputs (AudioFire 2, AudioFire 4, AudioFire 8 and
AudioFire Pre8) The controls for the digital inputs can found to the right of the analog input controls and have the labels “Digital” 1-8 at the top. Their operation is identical to the analog inputs. Note: Even though 8 Digital Input channels are always visible, they are not always available depending in which Digital Mode you are using. S/PDIF coax and S/PDIF optical only use inputs 1-2. ADAT optical at 44.1K or 48K uses inputs 1-8 and ADAT optical at 88.2 or 96K uses inputs 1-4. When you are using ADAT at 88.2K or 96K, the data is transmitted in the S/MUX format.
Console Software
31
Console Software
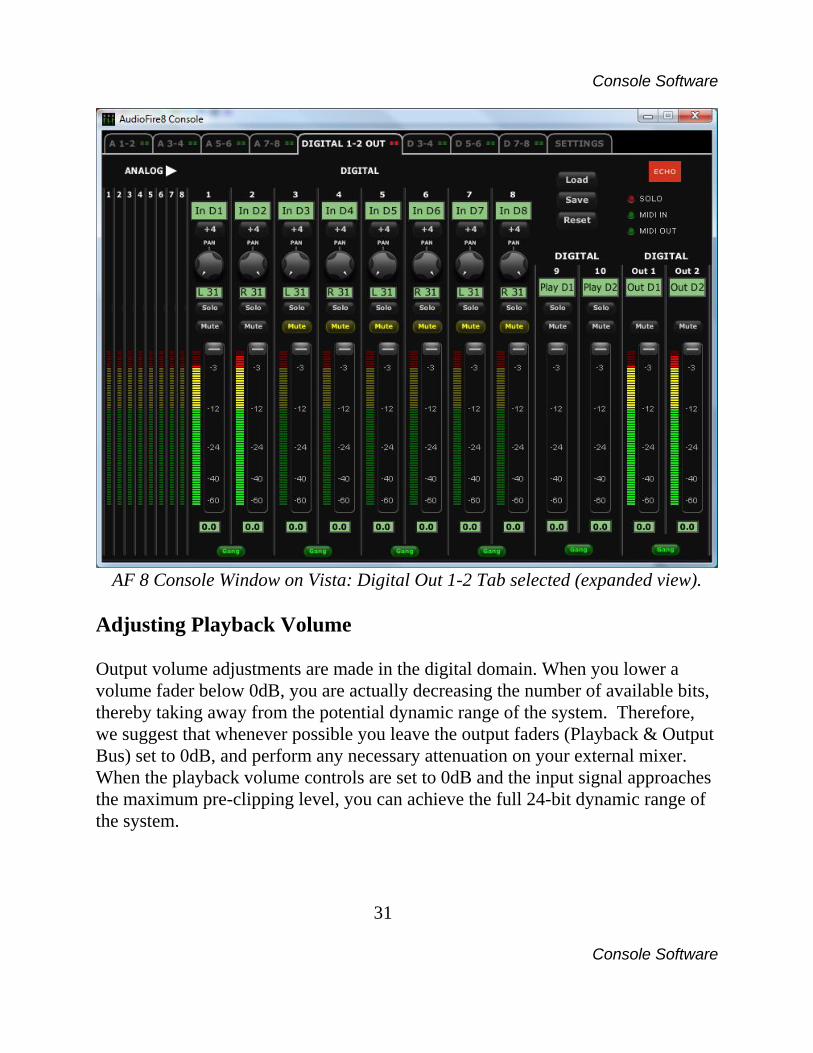
AF 8 Console Window on Vista: Digital Out 1-2 Tab selected (expanded view).
Adjusting Playback Volume Output volume adjustments are made in the digital domain. When you lower a volume fader below 0dB, you are actually decreasing the number of available bits, thereby taking away from the potential dynamic range of the system. Therefore, we suggest that whenever possible you leave the output faders (Playback & Output Bus) set to 0dB, and perform any necessary attenuation on your external mixer. When the playback volume controls are set to 0dB and the input signal approaches the maximum pre-clipping level, you can achieve the full 24-bit dynamic range of the system.

Console Software
32
Console Software
Nominal Levels The console buttons that are labeled “+4” or “-10” are nominal level buttons. These buttons allow you to change the nominal level settings for the analog inputs and outputs. By default, the levels are set to send a +4dBu signal. You can switch between +4dBu (professional level) and –10dBV (consumer level) for each analog output and input by clicking on the appropriate button. This feature allows you to connect either professional or consumer gear to each input and output. Selecting the -10 level provides a digital boost after the converters. For universal inputs with an analog trim knob you should leave the nominal level in the +4 default position. Unless you need a boost for the digital inputs, you should also leave them in the +4 nominal setting. Settings Tab Clicking the “Settings” tab allows you to access settings for controlling your AudioFire hardware. The Settings page includes the Sample rate, Core Audio sample rate (Vista/Windows 7 only), Clock source, Digital mode, S/PDIF format, Wave devices, Buffer size and the About button.
Console Software
33
Console Software
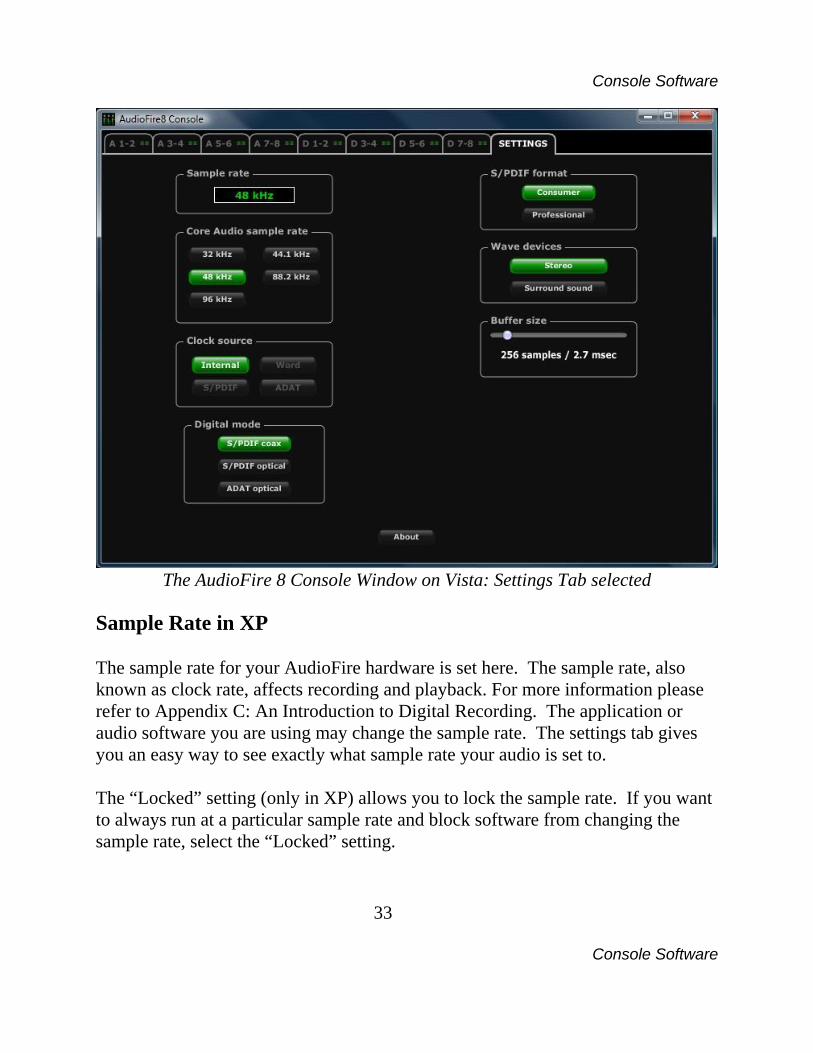
The AudioFire 8 Console Window on Vista: Settings Tab selected
Sample Rate in XP The sample rate for your AudioFire hardware is set here. The sample rate, also known as clock rate, affects recording and playback. For more information please refer to Appendix C: An Introduction to Digital Recording. The application or audio software you are using may change the sample rate. The settings tab gives you an easy way to see exactly what sample rate your audio is set to. The “Locked” setting (only in XP) allows you to lock the sample rate. If you want to always run at a particular sample rate and block software from changing the sample rate, select the “Locked” setting.

Console Software
34
Console Software
Core Audio Sample Rate - Windows Vista/Windows 7 On Windows Vista, the console displays the current sample rate as set by audio software. You can also select the sample rate used by Vista/Windows 7 Core Audio. Note that setting the sample rate for Vista/Windows 7 Core Audio will not actually change the sample rate until an audio application begins to play or record. Setting the sample rate for Vista/Windows 7 Core Audio will not affect ASIO. Clock Source Under clock source you may select the input clock source. The clock source setting is used to synchronize your AudioFire hardware to another piece of audio hardware. If a given synchronization source (input clock) is not detected, that clock source will be grayed out. You will only be allowed to select input clocks that are currently connected. For more information please refer to “Synchronizing Multiple Devices” later in this manual. If an external clock is selected and that clock is disconnected, the button will turn red. You will either need to reconnect the clock source or select the internal clock button. Digital Mode (AudioFire 8 and AudioFire Pre8) There are three different digital modes: S/PDIF coax, S/PDIF optical and ADAT optical. Click on the mode that best suits your needs. For instance, if you want to sync to ADAT, you will need to click on the ADAT optical button. Note: At 44.1K and 48K there are 8 channels of ADAT available. At 88.2K and 96K there are only 4 channels of ADAT available.
Console Software
35
Console Software
S/PDIF Format AudioFire 2, AudioFire 4, AudioFire 8 and AudioFire Pre8 can transmit digital information in two formats: “professional” or “consumer.” The primary difference between the two is in the implementation of the SCMS copy protection bit, which, in the Consumer format, prevents the user from making digital copies of a digital copy. The S/PDIF output defaults to the Consumer format. If you are recording from your AudioFire 8 into a professional DAT deck, CD recorder, or Mini Disc recorder, the device may not be able to recognize the signal until you switch the output to Consumer. Select the appropriate format for your DAT, CD recorder, or Mini Disc recorder (if you don’t know which one to use and are having difficulties, simply try the one that is not currently checked).
Note: No Echo hardware transmits the SCMS bit, regardless of which format is selected.
Wave Devices Use this but to switch between Stereo and Surround sound mode. See section on Surround sound below. Buffer Size This slider sets the buffer size for all audio software that works with your AudioFire hardware. Select the value here that provides the best tradeoff between performance and reliability. In other words, using a smaller buffer size will decrease latency thus improving performance but reducing reliability. A larger buffer size will increase reliability but reduce performance. The buffer size is universal and will be used for WDM, ASIO and GSIF applications.
Console Software
36
Console Software
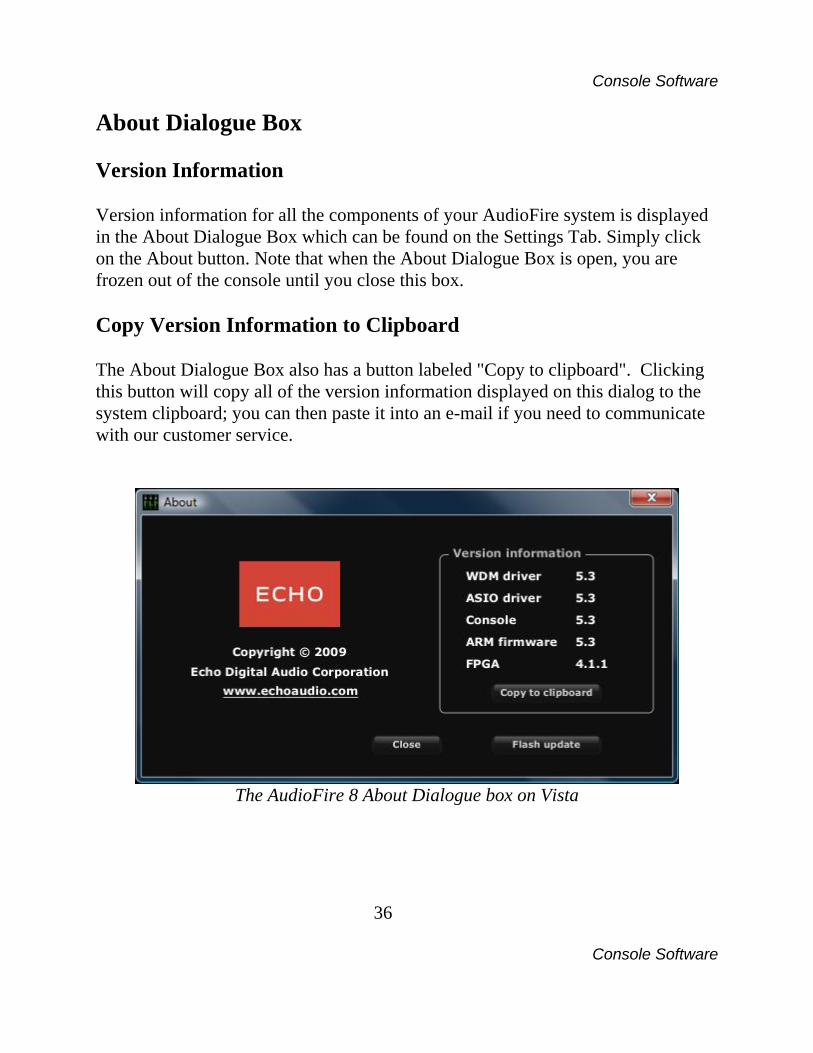
About Dialogue Box Version Information Version information for all the components of your AudioFire system is displayed in the About Dialogue Box which can be found on the Settings Tab. Simply click on the About button. Note that when the About Dialogue Box is open, you are frozen out of the console until you close this box. Copy Version Information to Clipboard The About Dialogue Box also has a button labeled "Copy to clipboard". Clicking this button will copy all of the version information displayed on this dialog to the system clipboard; you can then paste it into an e-mail if you need to communicate with our customer service.
The AudioFire 8 About Dialogue box on Vista
Console Software
37
Console Software
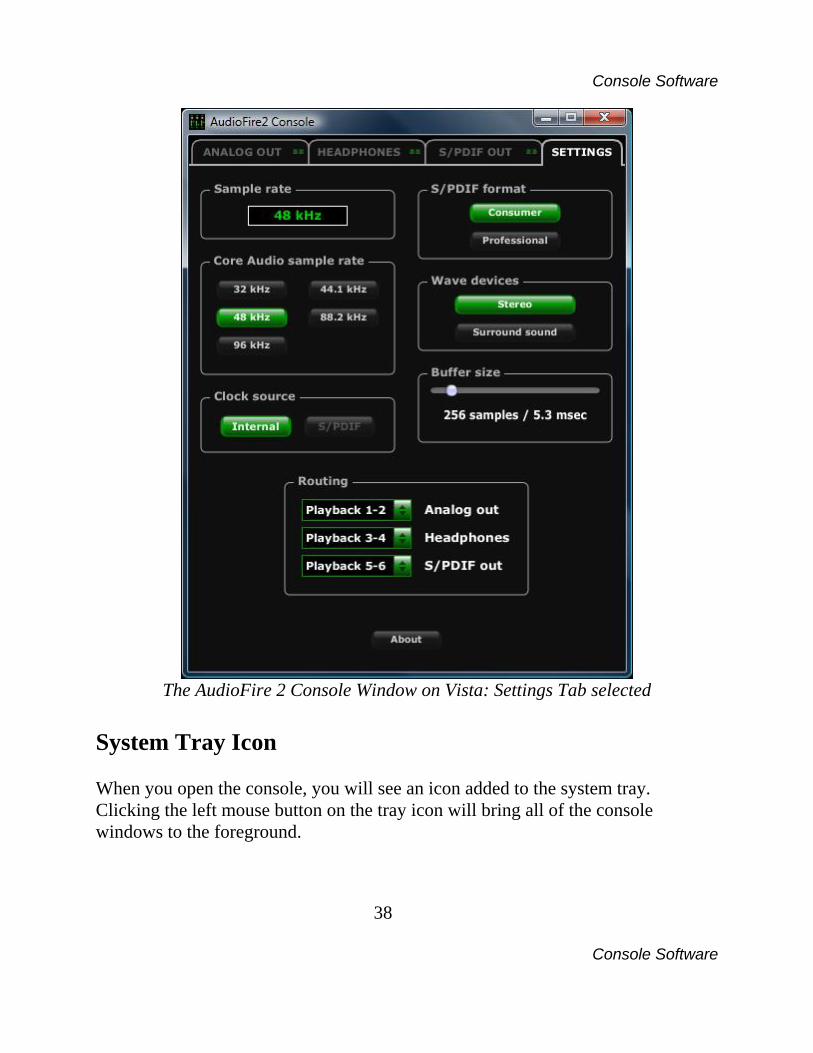
Flash Update The console will automatically update your firmware. If you want to re-flash your hardware to this release of the firmware, click on "Flash update". When you click this button, the console will load the current version of the firmware into the box. Note that this will also erase any settings you have saved to the flash memory. AudioFire 2 and AudioFire 4 Playback Routing The AudioFire 2 and AudioFire 4 now support routing playback from the computer to different physical outputs. Audio applications see the AudioFire’s outputs listed as "Playback 1" through "Playback 6". Using the console, you can then route the playback channels to either the analog outputs, headphones (AudioFire 2 only), or digital outputs. Each playback pair can be independently routed to any of the outputs. You can also duplicate playback pairs so the same audio goes to more than one set of outputs. To change the routing, open the AudioFire Console. Select the Settings tab; near the bottom of the window you will see the new routing control.
Console Software
38
Console Software
The AudioFire 2 Console Window on Vista: Settings Tab selected
System Tray Icon When you open the console, you will see an icon added to the system tray. Clicking the left mouse button on the tray icon will bring all of the console windows to the foreground.

Console Software
39
Console Software
Clicking the right mouse button on the tray icon will display a pop-up menu that will let you select individual console windows, show or hide all of the console windows, or arrange the console windows in the middle of your monitor. Console Sessions The AudioFire console supports saving and loading the state of the AudioFire device to a file, called a “session”. Sessions are stored in the “(My) Documents” folder in a sub-folder named after the device. For example, AudioFire 8 sessions are stored in a folder named “AudioFire 8 sessions”. To save or load a session, select one of the audio output tabs at the top of the console window and click the appropriate button. To restore the device to its default state, click the “Reset” button. The “Gang” buttons, the “Phantom power” button, “Clock source” buttons, the “Sample rate” buttons, the “Locked” sample rate button, and “Buffer size” do not reset. The “Locked” sample rate button, and “Buffer size” do not save. Console Settings and Stand-Alone Mode When the console is closed, all the console mixer settings for your AudioFire are saved to flash memory in the AudioFire. So, these settings will be recalled when you reboot your AudioFire or move it to another computer. Your AudioFire need not be connected to a computer to operate. This is called stand-alone mode. Simply set the mixer setting as you desire in the console and close the console to save those settings to flash memory. Then, when you turn on your AudioFire, those settings will automatically be loaded into the AudioFire’s internal mixer.
Console Software
40
Console Software
Core Audio Core Audio is the name for Windows Vista/Windows 7’s new audio system. You can set the sample rate and format used by Core Audio in the Sound control panel. If you open the Sound control panel, you should see one or more playback and recording devices for your Echo hardware. For Echo hardware, each of these playback and recording devices share a common physical audio clock – in other words, if you have your analog outputs set for 48 kHz, your digital or headphone outputs are also running at 48 kHz. However, Core Audio does not recognize this concept. Therefore, rather than setting the Core Audio sample rate from the Sound control panel, you can set the Core Audio sample rate from the Echo PCI console. Be aware that setting the Core Audio sample rate from the console will cause the current playback and recording devices to be removed and new ones created in their place; this ensures that the sample rate is consistent. The downside is that this will stop any applications that are currently playing or recording. We therefore recommend that you only change the Core Audio sample rate when you are not playing or recording. If you set your audio software to play or record at a different format or sample rate than that specified for the Core Audio sample rate, Windows Vista/Windows 7 will automatically perform format conversion. Note that none of this applies to audio software that uses ASIO. Setting the Core Audio sample rate has no effect on the sample rates available to or used by ASIO.
Console Software
41
Console Software
ASIO and Windows Vista/Windows 7 The ASIO driver now supports Windows Vista/Windows 7’s multimedia thread scheduler (also known as MMCSS). The practical result of this is more reliable, lower latency performance. The ASIO driver will automatically use the new scheduler. Should you wish to not use the new scheduler, you can disable it by opening the ASIO control panel for the driver. There you will see two new settings:
• Use Vista/Windows 7 multimedia priority boost: If this box is checked, the ASIO driver will use the new scheduler.
• Lower Vista/Windows 7 window manager primary: If this box is checked, the ASIO driver will instruct Vista/Windows 7 to prioritize audio over drawing windows on the screen.
Surround Sound Playback Stereo versus surround sound modes When you first install it, the AudioFire driver sets up the Windows wave devices in surround sound mode – the driver examines your hardware and automatically creates multichannel wave input and wave output devices depending on your hardware. Some audio applications are set up to use multiple stereo wave devices instead of a single multichannel wave device; if you are using such an application, please open the AudioFire console and select the Settings tab. Under “Wave device configuration”, select “Stereo”. To apply the change, please disconnect and reconnect your AudioFire from the computer. Alternatively, turn your AudioFire off and back on again.
Console Software
42
Console Software
Windows XP configuration For surround sound to work correctly, you need to set the speaker configuration in the Windows control panel. Select Start/Control Panel and open the “Sounds and Audio Devices” control panel. Select the “Audio” tab; from here you can view the list of currently available audio devices. Under “Sound playback”, select the analog outputs for your AudioFire. Click the “Advanced” button – you will be presented with the Advanced Audio Properties dialog. Select the speaker configuration that best describes your setup. Windows Vista/Windows 7 configuration Speaker configuration in Windows Vista/Windows 7 is not necessary. Application configuration If you are using Windows XP, please be sure to configure your audio software to use the same speaker configuration you selected in the Windows control panel. Please note that audio software that uses ASIO is unaffected by the wave device or speaker configuration.
Console Software
43
Console Software
Multi-client Audio Multi-client audio allows multiple apps to record and playback at the same time. When using multi-client audio, be sure that all your audio applications are set to the same sample rate. You may wish to use the sample rate lock feature on the console; this prevents applications from changing the sample rate. Audio inputs are shared; any number of applications may record from the same audio input at the same time. Different applications must use different audio outputs; you will need to configure each individual audio application accordingly. Troubleshooting tips:
• Turn off system sounds • Make sure all applications are set to the same sample rate, including
the preferred sample rate for all AudioFire devices in the Vista/Windows 7 “Sound” control panel.
• Ensure that your audio software does not have “Microsoft GS
Wavetable SW Synth” selected as a MIDI playback device. • Ensure that “Microsoft GS Wavetable SW Synth” is not selected as
the default Windows MIDI output device in the “Sounds and Audio Devices” control panel.
• Try setting a different audio device as your default Windows audio
playback device.
Console Software
44
Console Software
FireWire Analyzer The FireWire Analyzer (formerly the ASIO Analyzer) is a utility included with Echo’s AudioFire drivers. It provides detailed timing information about how ASIO applications perform with your AudioFire device. To use the analyzer, simply select “FireWire Analyzer” from the Windows Start menu (under Echo Digital Audio/AudioFire). Leave the analyzer running as you use your ASIO-compatible audio software. While you are using your audio software, the FireWire analyzer will display timing and status information. Status The upper area of the FireWire Analyzer window displays your current sample rate and buffer size, as selected in the AudioFire console or an audio application. Immediately below that is the expected buffer time in milliseconds. Playback The playback section shows the number of buffers sent to the hardware, the maximum buffer time, and the average buffer time. If you are running off of internal clock, the average buffer time should be close to the expected buffer time. If you are running off of an external clock such as word clock or S/PDIF, the times may not match. The important thing here is that the average playback buffer time should be close to the average record buffer time. Record This is similar to the playback section. The average buffer time here will tell you how fast your hardware is actually running and should closely match the playback time.
Console Software
45
Console Software
ASIO wakeup The ASIO wakeup statistics shows how quickly the ASIO driver is responding to the hardware. Essentially, this measures how long it takes to inform an audio application that new audio data is available. For low-latency ASIO performance, this number should be as low as possible. If the wakeup time is more than a few tenths of a millisecond, then another driver in your system is hogging the processor and preventing your audio app from running in a timely manner. Unfortunately, there’s no straightforward way to isolate which driver is responsible. Try going into Device Manager and disabling any hardware that you don’t absolutely need. For example, one test machine had a USB camera hooked up. With the camera hooked up and running, the maximum ASIO wakeup time was several milliseconds. Disconnecting the camera brought the ASIO wakeup time back down to a normal range. ASIO host The ASIO host statistics show you how long an audio application is taking to process each buffer. Firmware The firmware statistics display the internal state of the device. The analyzer will periodically query the device and show the results. Since the act of querying the device may have a negative impact on audio performance, you can enable or disable the live update of the firmware statistics by clicking the “Update” button.
Console Software
46
Console Software
Buffer offset These values only apply if you are using more than one AudioFire and/or RIP. This displays the buffer arrival time difference between multiple devices. Normally this should be between 0 and -.5 milliseconds. Things to watch for If you are getting glitches in your audio, use the analyzer to see if:
• The average playback time is substantially different from the average record time
• The ASIO wakeup time is too long. • The ASIO host time is too long.
To get glitch-free playback, the wakeup time plus the host time must be less than the average buffer time. If the wakeup time is long (more than a few tenths of a second), it’s probably another hardware device in your system hogging the computer (see above). If your ASIO host time is too long, try running fewer tracks or fewer plugins in your audio software. Saving a report Clicking the “Save” button will write a report containing all of this information to your “My Documents” folder on Windows XP or your “Documents” folder on Windows Vista/Windows 7.
Console Software
47
Console Software
Synchronizing External Devices Your AudioFire is designed to work alongside other audio equipment. If you are planning on using your AudioFire with other audio equipment, please note the following: You can use your AudioFire product with other audio devices outside of your computer, but in order for accurate synchronization to occur, the other audio product(s) must support a synchronization mode that is compatible with your AudioFire hardware. Without such synchronization, the individual pieces of equipment will act independently of each other. This scenario may be fine for some musical applications; however, it is not appropriate for situations where sample-accurate synchronization is required. Let’s take a brief look at the various synchronization types. Word Clock – The Word Clock connectors can be found on the back panel of AudioFire, AudioFire Pre8 and AudioFire 12. When your AudioFire product is set to “Internal” this synchronization clock runs at the AudioFire product’s selected sample rate. Think of it as a kind of electronic metronome, which clicks back and forth at the digital sample rate. It is one of the most widely used forms of synchronization in digital audio. Your AudioFire product is always generating Word Clock on its Word Clock output BNC connector. Although it can generate Word Clock at any sample rate it is set to, your AudioFire product can only sync to Word Clock if the master device is set to a sample rate between 30kHz and 100kHz (200kHz for AudioFire 12). Otherwise you will get noise and/or loss of sync. ADAT – The Alesis ADAT optical interface can send and receive up to 8 simultaneous channels of digital audio data over fiber optic cables. Unlike wire cables, fiber optic cables do not add noise or interference. The 2009 AudioFire 8 and the AudioFire Pre8 can send out (or “master”) ADAT clock as well as slave to it. If you want your AudioFire 8 to slave to an ADAT clock, just set the input clock to the ADAT setting. Your AudioFire 8 and AudioFire Pre8 can only sync to ADAT clock if the master device is set to a sample rate between 30kHz and 100kHz. Otherwise you will get noise and/or loss of sync.
Console Software
48
Console Software
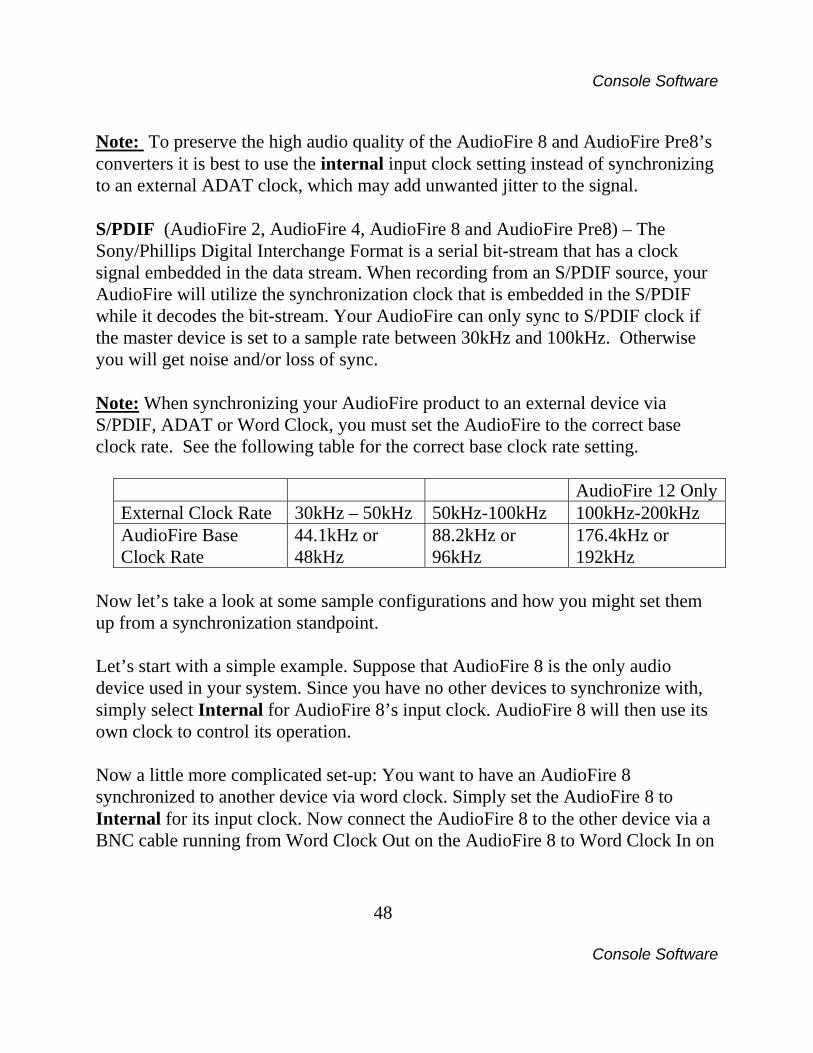
Note: To preserve the high audio quality of the AudioFire 8 and AudioFire Pre8’s converters it is best to use the internal input clock setting instead of synchronizing to an external ADAT clock, which may add unwanted jitter to the signal. S/PDIF (AudioFire 2, AudioFire 4, AudioFire 8 and AudioFire Pre8) – The Sony/Phillips Digital Interchange Format is a serial bit-stream that has a clock signal embedded in the data stream. When recording from an S/PDIF source, your AudioFire will utilize the synchronization clock that is embedded in the S/PDIF while it decodes the bit-stream. Your AudioFire can only sync to S/PDIF clock if the master device is set to a sample rate between 30kHz and 100kHz. Otherwise you will get noise and/or loss of sync. Note: When synchronizing your AudioFire product to an external device via S/PDIF, ADAT or Word Clock, you must set the AudioFire to the correct base clock rate. See the following table for the correct base clock rate setting.
AudioFire 12 OnlyExternal Clock Rate 30kHz – 50kHz 50kHz-100kHz 100kHz-200kHz AudioFire Base Clock Rate
44.1kHz or 48kHz
88.2kHz or 96kHz
176.4kHz or 192kHz
Now let’s take a look at some sample configurations and how you might set them up from a synchronization standpoint. Let’s start with a simple example. Suppose that AudioFire 8 is the only audio device used in your system. Since you have no other devices to synchronize with, simply select Internal for AudioFire 8’s input clock. AudioFire 8 will then use its own clock to control its operation. Now a little more complicated set-up: You want to have an AudioFire 8 synchronized to another device via word clock. Simply set the AudioFire 8 to Internal for its input clock. Now connect the AudioFire 8 to the other device via a BNC cable running from Word Clock Out on the AudioFire 8 to Word Clock In on

Console Software
49
Console Software
other device. Now select Word for the other device’s input sync. The other device will slave to your AudioFire 8 and they will now operate in unison. No matter how many devices you are synchronizing, the concept is essentially the same. You are merely “daisy-chaining” devices together using compatible clocks. One device will operate as the source of the master clock, with each successive device using that clock to sync. Multiple Consoles and Channel Names When you install additional AudioFires to your system, a letter will be appended to the name of each AudioFire to give it a unique name. For example, when you install a second AudioFire 8, it will be named “AudioFire 8-a”. The third AudioFire 8 will be “AudioFire 8-b”. This name will be seen on the console title bar, in WDM device selection, ASIO device selection and GigaStudio device selection. With multiple AudioFires, multiple console windows will open when you open the console. Each console will be identified by the AudioFire’s unique name. If one console window is closed, all windows will have to be closed and re-opened in order to restore it.
Customer Service
50
Customer Service
Contacting Echo Customer Service If you experience any trouble with your Echo hardware please go to the support area of our website at www.echoaudio.com, and check out the “QuickTips” & FAQ’s we have there. If you can’t find a solution to your problem there, please contact technical support via email. There is an example form that can be copied and sent to our technical support staff, and they will respond to you quickly. Please fill in all the details completely. The best way to get the help you need is by giving us plenty of detailed information about your computer system, your audio software and hardware, and the problem you are having. We do ask you to please read through this manual and the support area of our website before contacting us. Also, you may find an answer to your problem in the Appendices of this document – starting on the next page. Thank you for buying an Echo product!

Appendix A: Troubleshooting Guide
51
Appendix A: Troubleshooting Guide
Appendix A: General Troubleshooting Guide Problem: You are unable to install your AudioFire product under Windows 95/98/ME/2000. Solution: There is no driver support for the AudioFire products under Windows 95/98/ME/2000. As stated in the system requirements, you will need Windows XP or Mac OS X (10.3.9 or later) to use your AudioFire product. Problem: When you try to install the drivers from the CDROM, Windows gives you an error message. Solution: You must be logged in as an Administrator to be able to install the Windows drivers. Please see the “Installation” section of this manual for details. Or you may have a ASIO application open in the background. Close all audio applications and attempt to install the driver again. Problem: Your computer spontaneously reboots on you. Solution: If you are running Windows 2000, XP, or Vista/Windows 7 and your computer spontaneously reboots on you, you probably have experienced what Microsoft calls a “bug check”, but what everyone else calls the Blue Screen of Death (BSOD). The default setting for the BSOD is not to show the BSOD, but to reboot the computer. This isn’t very helpful for tracking down problems. If you are experiencing blue screens, here’s how you can help us track it down: Select Start/Control Panel/System Go to the Advanced tab and click on “Startup and Recovery” Uncheck “Automatically reboot” Set the memory dump to “Small Memory Dump”
Appendix A: Troubleshooting Guide
52
Appendix A: Troubleshooting Guide
Now, next time you get a blue screen, look at it. See if the crash occurred in echo1394.sys; if it did, it may be something we need to fix. Restart your computer and find the most recent .dmp file – this is the memory dump. It’s probably in a folder called “minidump” under your main Windows folder. Zip up this .dmp file and send it to [email protected] along with a description of how it happened. Problem: When you connect a bus powered FireWire device to your AudioFire product it does not receive power. Solution: Your AudioFire product does not pass power from the computer on its FireWire connector. Use a FireWire device with an external power adapter. Problem: You are unable to get your DAT recorder to recognize the S/PDIF output from AudioFire 2, AudioFire 4 or AudioFire 8. Solution: Digital information is transmitted in either of two modes, “professional” or “consumer.” The professional mode is usually implemented in devices that are likely to be used in professional recording environments, whereas the consumer mode is commonly implemented on equipment designed for home use in the consumer market. The primary difference between the two modes is in the implementation of the SCMS copy protection bit, which, in the consumer format, prevents the user from making digital copies of a digital copy. In most professional equipment, this copy-protection bit can be turned off or on according to the user’s needs. In consumer products, the SCMS bit is always enabled. Unfortunately there is no way for the transmitting device to automatically detect which format the receiving device is able to accept. If you have a DAT deck that is not able to read the S/PDIF output from your AudioFire, chances are it is transmitting in the mode that the deck is not equipped to handle.
Appendix A: Troubleshooting Guide
53
Appendix A: Troubleshooting Guide
We have provided a software switch in the driver that allows you to select which mode AudioFire 8 transmits. To access this switch go to the console. Click on the Settings tab. In the window that appears you’ll see a pair of radio buttons in an area labeled S/PDIF Format; one radio button is labeled Consumer and the other Professional. Select the appropriate format for your DAT (if you don’t know which one to use, simply select the one that is not currently checked). Now click the Close button and again try recording to your DAT.
Note: AudioFire never transmits the SCMS bit; regardless of which mode is selected.
Problem: When you play an audio file, it plays at an altered pitch. Solution: When your AudioFire product is set to synchronize with an external device, it will play back at the rate generated by that device. For example, if the sound you are playing was sampled at 44.1kHz, but you are synchronized with a device running at 96kHz, the sound will play back at this faster rate. You have four choices - ignore the altered pitch, switch to your AudioFire product’s internal clock, change the sample rate of the external device, or use a different device for the sound playback. Problem: Your AudioFire product doesn’t seem to recognize the synchronization clock to which it is connected. Solution: Although it may seem obvious, the first thing to check is that there is a physical connection between the device generating the clock and your AudioFire product. Just because multiple devices are connected to the same computer doesn’t mean they are synchronized. Next, be sure that you have selected the desired input clock source in the console for your AudioFire product and that the sample rate matches the incoming clock.
Appendix A: Troubleshooting Guide
54
Appendix A: Troubleshooting Guide
Problem: You’re syncing to an external device and suddenly you’ve lost sync. Solution: Whenever your AudioFire product is syncing to an external device and you change the sample rate in that device, you may need to reset the input clock setting in the AudioFire Console software. Just click on the appropriate input clock button to reset it. Problem: Recordings made using the S/PDIF input contain occasional pops or skips. Solution: When recording with the S/PDIF input, you must manually select the S/PDIF clock as the input clock. This can be done from the console. Problem: You’re syncing to an external device and suddenly you’ve lost sync. Solution: Whenever your AudioFire product is syncing to an external device and you change the sample rate in that device, you may need to reset the input clock setting in the Echo Console software. Just click on the appropriate input clock button to reset it. Problem: The sound cuts in and out, or the left or right channel doesn’t work. Solution: You may have a bad audio cable. Try using a different cable in the problem channel. Problem: There is no sound unless I pull the audio plug out a little. Solution: Not all ¼” plugs are made to the exact same dimensions. Try a plug/cable from a different manufacturer.
Appendix B: Audio Software Guide
55
Appendix B: Audio Software Guide
Appendix B: Audio Software Guide You can use your AudioFire product with any audio software that supports WDM, ASIO or GSIF. That’s a lot of audio software! For most of them, all you need to do is read the software manual to learn how to use them with your AudioFire product. In general, ASIO is preferred for your AudioFire product. ASIO Software Here is a partial list of pro audio software that supports ASIO:
• ACID 4 or higher • Audition 2.0 or higher • Cubase • Kontakt • Logic Audio • Nuendo • Reaktor • Reason • Rebirth • SONAR 2.2 or higher • Sound Forge 8 or higher • Tracktion • Vegas 4 or higher • Wavelab
Appendix C: An Introduction to Digital Recording
56
Appendix C: An Introduction to Digital Recording
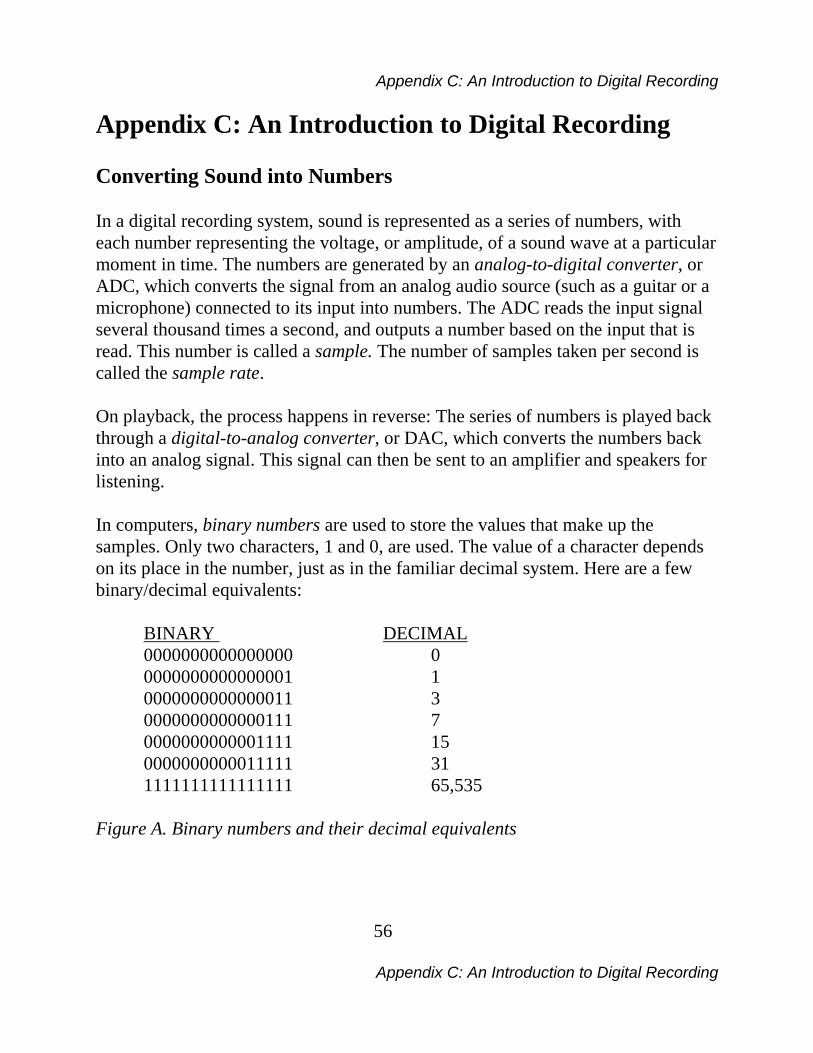
Appendix C: An Introduction to Digital Recording Converting Sound into Numbers In a digital recording system, sound is represented as a series of numbers, with each number representing the voltage, or amplitude, of a sound wave at a particular moment in time. The numbers are generated by an analog-to-digital converter, or ADC, which converts the signal from an analog audio source (such as a guitar or a microphone) connected to its input into numbers. The ADC reads the input signal several thousand times a second, and outputs a number based on the input that is read. This number is called a sample. The number of samples taken per second is called the sample rate. On playback, the process happens in reverse: The series of numbers is played back through a digital-to-analog converter, or DAC, which converts the numbers back into an analog signal. This signal can then be sent to an amplifier and speakers for listening. In computers, binary numbers are used to store the values that make up the samples. Only two characters, 1 and 0, are used. The value of a character depends on its place in the number, just as in the familiar decimal system. Here are a few binary/decimal equivalents: BINARY DECIMAL 0000000000000000 0 0000000000000001 1 0000000000000011 3 0000000000000111 7 0000000000001111 15 0000000000011111 31 1111111111111111 65,535 Figure A. Binary numbers and their decimal equivalents
Appendix C: An Introduction to Digital Recording
57
Appendix C: An Introduction to Digital Recording
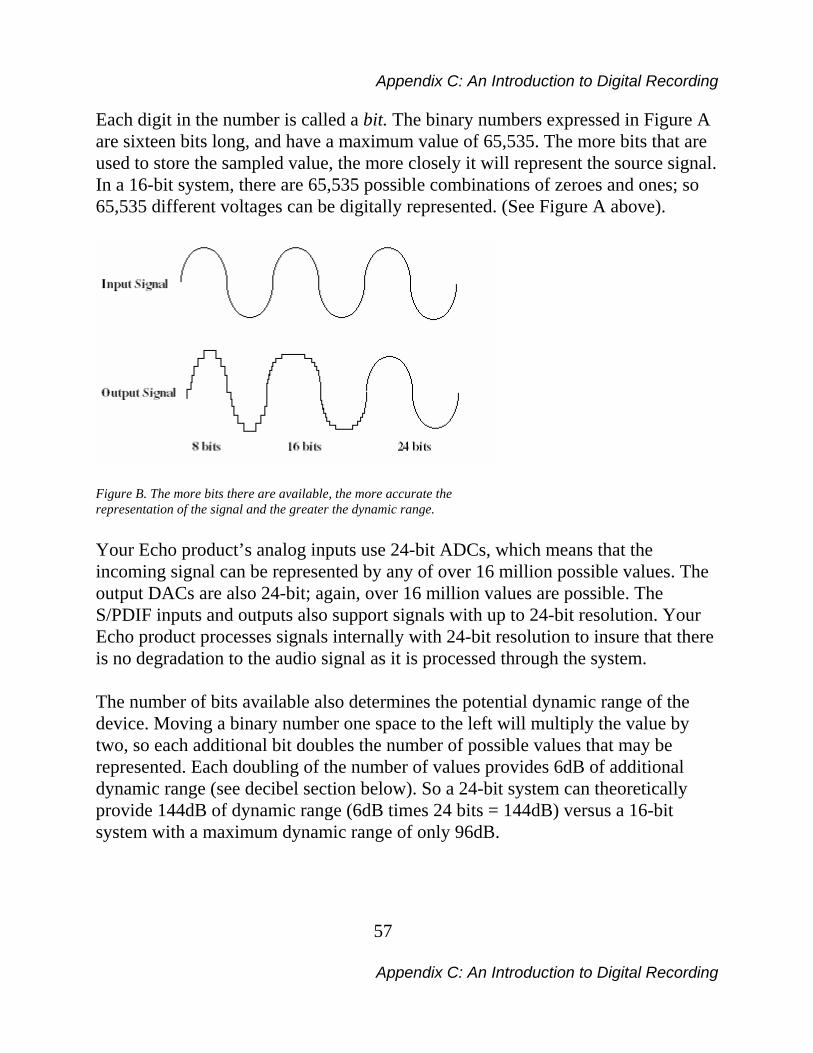
Each digit in the number is called a bit. The binary numbers expressed in Figure A are sixteen bits long, and have a maximum value of 65,535. The more bits that are used to store the sampled value, the more closely it will represent the source signal. In a 16-bit system, there are 65,535 possible combinations of zeroes and ones; so 65,535 different voltages can be digitally represented. (See Figure A above).
Figure B. The more bits there are available, the more accurate the representation of the signal and the greater the dynamic range. Your Echo product’s analog inputs use 24-bit ADCs, which means that the incoming signal can be represented by any of over 16 million possible values. The output DACs are also 24-bit; again, over 16 million values are possible. The S/PDIF inputs and outputs also support signals with up to 24-bit resolution. Your Echo product processes signals internally with 24-bit resolution to insure that there is no degradation to the audio signal as it is processed through the system. The number of bits available also determines the potential dynamic range of the device. Moving a binary number one space to the left will multiply the value by two, so each additional bit doubles the number of possible values that may be represented. Each doubling of the number of values provides 6dB of additional dynamic range (see decibel section below). So a 24-bit system can theoretically provide 144dB of dynamic range (6dB times 24 bits = 144dB) versus a 16-bit system with a maximum dynamic range of only 96dB.
Appendix C: An Introduction to Digital Recording
58
Appendix C: An Introduction to Digital Recording
Also important to the quality of a digital recording is the frequency with which the samples are stored, called the sample rate. In order for a waveform to be faithfully digitized, it must be sampled at a minimum of twice the highest frequency to be stored. Failure to sample frequently enough results in a kind of distortion called aliasing. (If you like technical issues, do some research on the Nyquist Theorem, which explains why this happens). In addition to aliasing, sampling too slowly will result in reduced high frequency reproduction. Your Echo product allows you to sample sound at up to 96,000 times per second (192,000 with AudioFire 12). Once the waveform has been transformed into digital bits, it must be stored. When sampling in stereo at 96kHz using a 24-bit word size, the system has to accommodate 4,608,000 bits per second. In the past, storing this vast amount of data was problematic. Today, computer-based digital recording systems record the data directly to the computer’s hard disk. Today’s hard disks are capable of storing large amounts of data, though the performance of hard drives can vary substantially. The speed and size of your hard drive will be a major determining factor in how many tracks of audio you will be able to simultaneously record and playback. Decibels Audio signal levels are generally expressed in units called “decibels” which are abbreviated as “dB”. This is a “logarithmic” scale where each doubling of signal level is represented by an increase of 6dB. Therefore a signal of 6dB is twice as big as a 0dB signal and a signal of 12dB is four times as big as a 0dB signal. Since digital audio signals are represented by binary data, each bit of audio information represents 6dB. A 16-bit number can represent a total range of 96dB and a 24-bit number can represent a total range of 144dB (6 times the number of bits). It’s much easier to say that one signal is 72dB less than another instead of saying it is 1/4096 the size of the other one. It also more accurately represents the way we hear sounds, since the smaller signal in the above example will still be audible and not appear to be only 1/4096 as loud when we listen to it. Just as there are different types of degrees used to represent temperature (Fahrenheit, Celsius, etc), there are different types of decibels used to represent the
Appendix C: An Introduction to Digital Recording
59
Appendix C: An Introduction to Digital Recording
level of analog audio signals. The most common are dBu and dBV decibels. Both of these represent voltage levels and still double for every increase of 6dB. It is only the reference point, or 0dB level that is different. A 0dBV signal has a voltage level of 1.0 volts. A 0dBu signal has a voltage level of .775 volts. Since .775 is approximately 2dB less than 1.0, converting dBV levels into dBu levels is as simple as subtracting 2dB (2.21 to be exact). Signals are also occasionally represented with units of dBm. This is an older unit that measures power instead of voltage levels with 0dBm representing 1 milliwatt. Earlier tube-based audio equipment used standardized input and output impedances of 600 ohms, so a 0dBm signal was produced with a voltage of .775 volts. Since most of today’s equipment uses impedances other than 600 ohms, it is more useful to represent signals by voltages rather than power and the dBu unit was introduced. A signal level of 0dBu is identical to a level of 0dBm. Digital signals, after they are recorded, no longer directly represent any physical quantity such as voltage or power and 0dB is generally used to represent a “full-scale” or maximum signal level. All other signal levels are lower and are expressed as negative decibels. Most meters on digital equipment have 0dB at the top and range downward from there. A signal that is 30dB below full scale would simply be referred to as a –30dB signal. Nominal Signal Levels and Headroom Today’s equipment is generally referred to as +4dBu equipment (professional) or –10dBV equipment (consumer). These levels are the typical or “nominal” signal levels you can expect to see with professional (studio) equipment such as mixers or with consumer equipment such as home stereos and CD players. A +4dBu signal has a voltage level of 1.23 volts and a –10dBV signal has a voltage level of .316 volts.
Appendix C: An Introduction to Digital Recording
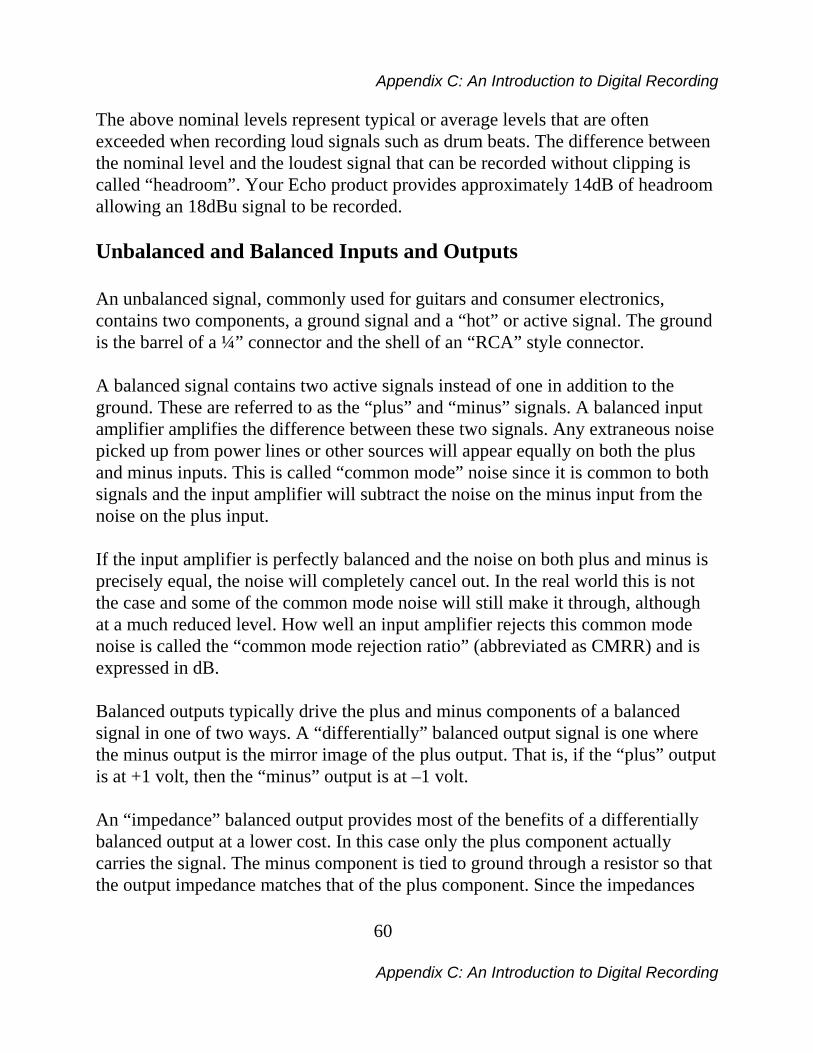
60
Appendix C: An Introduction to Digital Recording
The above nominal levels represent typical or average levels that are often exceeded when recording loud signals such as drum beats. The difference between the nominal level and the loudest signal that can be recorded without clipping is called “headroom”. Your Echo product provides approximately 14dB of headroom allowing an 18dBu signal to be recorded. Unbalanced and Balanced Inputs and Outputs An unbalanced signal, commonly used for guitars and consumer electronics, contains two components, a ground signal and a “hot” or active signal. The ground is the barrel of a ¼” connector and the shell of an “RCA” style connector. A balanced signal contains two active signals instead of one in addition to the ground. These are referred to as the “plus” and “minus” signals. A balanced input amplifier amplifies the difference between these two signals. Any extraneous noise picked up from power lines or other sources will appear equally on both the plus and minus inputs. This is called “common mode” noise since it is common to both signals and the input amplifier will subtract the noise on the minus input from the noise on the plus input. If the input amplifier is perfectly balanced and the noise on both plus and minus is precisely equal, the noise will completely cancel out. In the real world this is not the case and some of the common mode noise will still make it through, although at a much reduced level. How well an input amplifier rejects this common mode noise is called the “common mode rejection ratio” (abbreviated as CMRR) and is expressed in dB. Balanced outputs typically drive the plus and minus components of a balanced signal in one of two ways. A “differentially” balanced output signal is one where the minus output is the mirror image of the plus output. That is, if the “plus” output is at +1 volt, then the “minus” output is at –1 volt. An “impedance” balanced output provides most of the benefits of a differentially balanced output at a lower cost. In this case only the plus component actually carries the signal. The minus component is tied to ground through a resistor so that the output impedance matches that of the plus component. Since the impedances
Appendix C: An Introduction to Digital Recording
61
Appendix C: An Introduction to Digital Recording
are matched, any noise added to the minus component will still be approximately the same as that picked up by the plus component and will be subtracted out by the input amplifier. Your Echo product uses this type of output. Balanced signals connect with either XLR connectors or TRS (tip, ring, sleeve) connectors. Your Echo product uses XLR connectors for microphones and TRS connectors for connecting balanced (and unbalanced) line level signals.
The three sections of a TRS connector are used to transmit the three components of a balanced signal (T = plus, R = minus, S = ground). Dynamic Range Dynamic range represents the difference between the maximum signal that can be recorded and the “noise floor”, or level of noise with no signal present. A system with a high dynamic range will be quieter than one with a lower dynamic range. Dynamic range is a very important specification, and your echo product uses converters that have very high dynamic range. Theoretically, a 24-bit system has a dynamic range of 144dB and a 16-bit system has a dynamic range of 96dB. Two questions immediately come to mind:
1) Why does my Echo product only have a dynamic range of 110 to 114dB? 2) For mastering 16-bit CDs with a dynamic range of 96dB, isn’t anything
more than 96dB just overkill? First, today’s analog-to-digital converters typically produce a full-scale input voltage with an input of +7dBu. If they were to have 144dB of dynamic range, they would have to be capable of resolving signals as small as –137dBu (7dBu – 144dBu) or approximately 10 nano-volts. That’s 10 one-billionths of a volt! Transistors and resistors produce noise in this range just by having electrons moving around due to heat. Even if the converters could be perfectly designed to
Appendix C: An Introduction to Digital Recording
62
Appendix C: An Introduction to Digital Recording
read these levels, the low noise requirements of the surrounding circuitry such as power supplies and amplifiers would be so stringent that they would either be impossible or too expensive to build. In answering the second question, consider the fact that music is often compressed or amplified after it is recorded, and that some headroom is necessary when recording to avoid clipping. The only way that 96dB would be adequate is if all music were recorded so that the peaks were just under full-scale and no compression or amplification was going to be applied after recording. Any time recorded music is amplified, so is the noise at the low end. Your Echo product has enough dynamic range to allow sufficient headroom and post-processing to be applied while still keeping the noise either off the recording completely or down as far as possible.

Index
63
Index
Index A ADAT.............................................. 47 adjusting playback levels ................ 31 analog-to-digital converter.............. 56 B balanced........................................... 60 buffer size........................................ 35 C CD-ROM contents ............................ 9 clock settings................................... 34 console sessions .............................. 39 consumer mode ............................... 52 contacting customer service ............ 50 contents ............................................. 9 D decibels............................................ 58 digital data....................................... 58 digital recording .............................. 56 digital-to-analog converter.............. 56 dynamic range ................................. 61 E Echo Console .................................. 25 I input level meters ............................ 19 input trims ....................................... 20 installation ................................. 11, 12
M microphone preamp .........................19 MIDI ................................................22 MIDI time code......................... 22, 23 MTC.......................................... 22, 23 P phantom power ................................19 professional mode............................52 S S/PDIF .............. 21, 23, 35, 48, 52, 54 S/PDIF settings ................................35 safety instructions ..............................3 sample rate .......................................56 SCMS copy-protection ....................52 stand-alone mode.............................39 synchronization......................... 47, 53 synchronizing multiple devices .......47 system requirements ........................10 T technical support..............................50 troubleshooting guide ....................51 TRS ..................................................61 U unbalanced .......................................60 W website .............................................50 Word clock................................ 24, 47
Related Documents