:Apogee Impose An Integrated Module of :Apogee Prepress 7 Tutorial doc. version: 7.1.5 - Sample This tutorial is only a preview of the full basic tutorial. If you would like to obtain the full version of this tutorial or a training on this subject, please contact your local Agfa sales or service representative. Worldwide addresses of our local Agfa representatives can be found on our Agfa Graphics website: http://www.agfagraphics.com/global/en/maings/about_us/ worldwide/index.jsp

Welcome message from author
This document is posted to help you gain knowledge. Please leave a comment to let me know what you think about it! Share it to your friends and learn new things together.
Transcript
:Apogee Impose
An Integrated Module of :Apogee Prepress 7
Tutorial
doc. version: 7.1.5
- Sample
This tutorial is only a preview of the full basic tutorial.
If you would like to obtain the full version of this tutorial ora training on this subject, please contact your local Agfa sales
or service representative.Worldwide addresses of our local Agfa representatives can
be found on our Agfa Graphics website:http://www.agfagraphics.com/global/en/maings/about_us/
worldwide/index.jsp
Sample
2
:Apogee Impose Tutorial
Trademarks and Copyright
Agfa and the Agfa rhombus are trademarks of Agfa-Gevaert N.V. or its affiliates.
:APOGEE is a trademark of Agfa Graphics N.V.
Those names and product names not mentioned here are trademarks or registered trademarks of their respective owners.
For more information about Agfa Graphics products, visit www.agfa.com or contact us at the following address:
Date of Issue: September 2011
Copyright © 2011 Agfa Graphics N.V., Belgium
All software and hardware described in this document are subject to change without notice.
Agfa Graphics N.V.Septestraat 27B-2640 Mortsel, BelgiumTel: (+)32 3 444 2111
3
Contents
About This Tutorial ................................................................................................................. 7
Lesson 1 Creating a Basic :Apogee Impose Job ................................................. 11
How to create the Job and Product ...................................................................... 12 How to edit the imposition ...................................................................................... 13 How to define the Press for an imposition job ................................................. 14 How to browse the Press Sheet view ................................................................... 14 How to use the View Options palette .................................................................. 18 How to use the Inspector ......................................................................................... 19 How to save your changes to the imposition ................................................... 20 How to complete the job set-up ............................................................................ 20 How to process documents for your job ............................................................. 21
Lesson 2 Introduction to Marks ................................................................................................ 23
How to place a Mark Set manually ...................................................................... 24 How to add the Text Mark to a Mark Set ............................................................ 26 How to add a Page Text Mark to all pages ........................................................ 26 How to edit a colorbar File Mark in Press Sheet view ................................... 27
Lesson 3 Creating a Job with Several Press Sheets ....................................... 29
How to create the Job and Product ...................................................................... 30 How to define the imposition and Marks for the first block ....................... 31 How to repeat the imposition for multiple Press Sheets ............................. 33 How to complete the job set-up ............................................................................ 34 How to input documents for your job .................................................................. 35
Lesson 4 Making Custom Folding Schemes ............................................................. 37
How to duplicate and customize a Folding Scheme (System Overview) 38 How to apply a Folding Scheme to a job. .......................................................... 40 How to create and customize a Folding Scheme (in Product view) ......... 42
Sample
4
:APOGEE IMPOSE Tutorial
Lesson 5 Press Sheet Layout Rules and Binding Options ....................... 47
How to specify Binding Options in System Overview .................................... 48 How to specify Press Sheet Layout Rules in System Overview ................. 49 How to create the Job and Product ...................................................................... 49 How to complete the job set-up ............................................................................ 54 How to input documents for your job .................................................................. 55
Lesson 6 Multiple Fold Sheets on a Press Sheet ............................................... 57
How to create a job with a Partial Book Signature ......................................... 58 How to repeat the same Fold Sheet on a Press Sheet .................................. 60 How to reduce the number of plates with Work & Turn ............................... 63
Lesson 7 More about Marks .......................................................................................................... 67
How to create the More about Marks Job .......................................................... 68 How to change the knock-out and color of a mark ........................................ 72 How to define pens and using them to create marks .................................... 73 How to place marks on the front and back of a Press Sheet ...................... 78 How to clip marks ........................................................................................................ 80 How to handle mark conflicts (Snag List) ........................................................... 82 How to use layers to solve conflicts ..................................................................... 84 How to place registration marks ............................................................................ 87 How to place collation marks ................................................................................. 89 How to place Fold Sheet cut marks ...................................................................... 91 How to manage marks with the Mark Sets Inspector .................................... 93 How to reset a manually modified mark ............................................................ 94 How to re-apply modified Mark Sets .................................................................... 95 How to re-apply Mark Sets and keep/reset on/off states ........................... 99
Lesson 8 Setting Folding Schemes for Auto Impose .....................................101
How to set your Folding Scheme as top pick ...................................................102 How to apply Folding Schemes with Auto Impose .........................................103
Lesson 9 Setting Auto Impose Rules .................................................................................109
How to set your Auto Impose Rules .....................................................................110 How to apply your Auto Impose Rule ..................................................................112
Lesson 10 Imposing Multi-Part Jobs Interactively ...............................................119
How to create Mark Sets for placing different colorbars ..............................120 How to create the Job with Cover and Body Parts ..........................................122
5
:APOGEE IMPOSE Tutorial
How to input documents for your job ..................................................................127
Lesson 11 Auto-Imposing Multi-Part Jobs .....................................................................129
How to create the Job with Cover and Body Parts .........................................130 How to input documents for your job ..................................................................134
Lesson 12 Applying Shingling ........................................................................................................137
How to shift inner and outer pages for shingling (manual) .........................138 How to disable shingling ..........................................................................................140 How to scale inner and outer pages for shingling (manual) .......................142 How to set up automatic shingling ......................................................................144
Lesson 13 Creating Unbound Jobs ...........................................................................................149
How to create a job for an Unbound Product ...................................................150 How to create a Margin resource ..........................................................................151 How to adapt the page size of Parts to match uploaded documents .....153 How to place Elements for an Unbound Job interactively ...........................154 How to place Elements using Manual Arrangement .....................................161 How to override inner margins in Manual Arrangement ..............................165 How to place Elements using the Positioning Palette ..................................167 How to override inner margins when using the Repeat Tool .....................173
Lesson 14 Number-Up Binding .....................................................................................................179
How to create a 32-page job with 2-up imposition .......................................184 How to create a 32-page job with 2-up Come & Go imposition ...............190
Lesson 15 Fold Sheet Fitting .........................................................................................................195
To create a job with no Sheet Fitting (default) .................................................196 How to apply Horizontal Sheet Fitting ................................................................198 How to apply Vertical Sheet Fitting .....................................................................203
Sample
6
:APOGEE IMPOSE Tutorial 7
About This TutorialIn this Tutorial you learn how to create a variety of basic imposition jobs with :Apogee Impose, first in interactive mode and subsequently in automatic mode with the Auto Impose feature.
Tutorial Objectives
This Tutorial is divided into a series of lessons. In these lessons, you will learn how to:
create basic imposition jobs with the default resources
edit and place text marks and a colorbar
create custom Folding Schemes
review Press Sheet Layout Rules and Binding Options
assign multiple Fold Sheets to a Press Sheet
place marks using layers
use the Auto Impose feature to apply impositions automatically
impose multi-part jobs
apply shingling
create an unbound job and fill a Press Sheet with different elements
create number-up jobs, including Come and Go
redistribute unused space on a Press Sheet
Who Should Follow this Tutorial
This tutorial has been prepared for Administrators and Operators who want to learn about the :Apogee Impose module by performing step-by-step procedures.
This tutorial is only a preview of the full basic tutorial.
If you would like to obtain the full version of this tutorial ora training on this subject, please contact your local Agfa sales
or service representative.Worldwide addresses of our local Agfa representatives can
be found on our Agfa Graphics website:http://www.agfagraphics.com/global/en/maings/about_us/
worldwide/index.jsp
Sample 7
About This TutorialIn this Tutorial you learn how to create a variety of basic imposition jobs with :Apogee Impose, first in interactive mode and subsequently in automatic mode with the Auto Impose feature.
Tutorial Objectives
This Tutorial is divided into a series of lessons. In these lessons, you will learn how to:
create basic imposition jobs with the default resources
edit and place text marks and a colorbar
create custom Folding Schemes
review Press Sheet Layout Rules and Binding Options
assign multiple Fold Sheets to a Press Sheet
place marks using layers
use the Auto Impose feature to apply impositions automatically
impose multi-part jobs
apply shingling
create an unbound job and fill a Press Sheet with different elements
create number-up jobs, including Come and Go
redistribute unused space on a Press Sheet
Who Should Follow this Tutorial
This tutorial has been prepared for Administrators and Operators who want to learn about the :Apogee Impose module by performing step-by-step procedures.
Sample
8
:Apogee Impose Tutorial
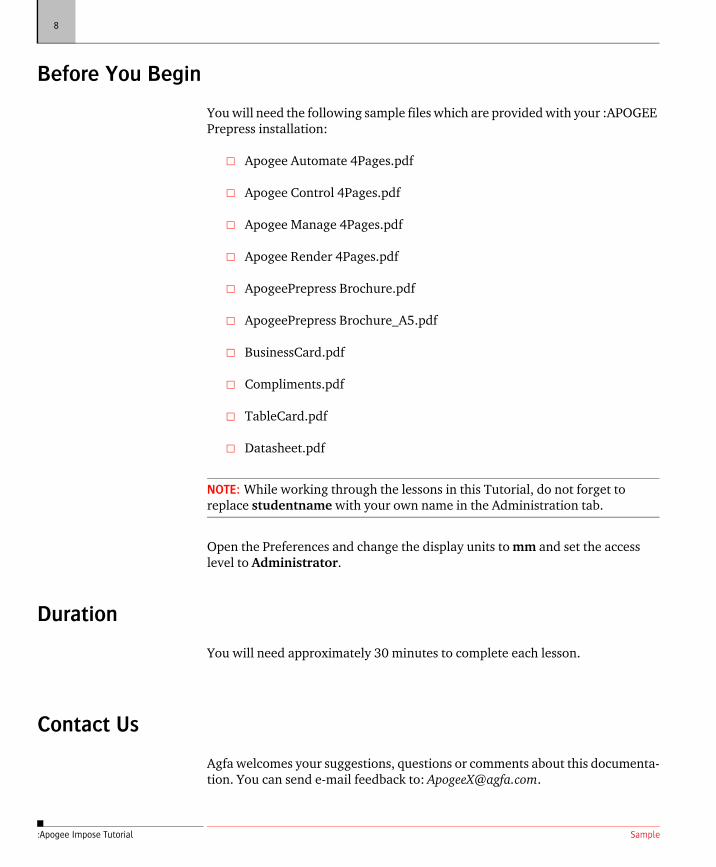
Before You Begin
You will need the following sample files which are provided with your :APOGEE Prepress installation:
Apogee Automate 4Pages.pdf
Apogee Control 4Pages.pdf
Apogee Manage 4Pages.pdf
Apogee Render 4Pages.pdf
ApogeePrepress Brochure.pdf
ApogeePrepress Brochure_A5.pdf
BusinessCard.pdf
Compliments.pdf
TableCard.pdf
Datasheet.pdf
NOTE: While working through the lessons in this Tutorial, do not forget to replace studentname with your own name in the Administration tab.
Open the Preferences and change the display units to mm and set the access level to Administrator.
Duration
You will need approximately 30 minutes to complete each lesson.
Contact Us
Agfa welcomes your suggestions, questions or comments about this documenta-tion. You can send e-mail feedback to: [email protected].
9
:Apogee Impose Tutorial
Using the Online Help
:APOGEE Prepress includes context-sensitive Online Help. This is a reference that offers you both theoretical information on all topics and links to relevant procedures.
When :APOGEE Prepress is running, you can access the Online Help by doing one of the following:
Press F1
Choose Help > :APOGEE Prepress Help
Context-click the icon or pane in the interface for which you want informa-tion and select Help from the context menu. The relevant Online Help page for this item appears.
Some dialog boxes have a question mark button (?) to open the Online Help.
The :APOGEE Prepress Online Help also contains overviews of all icons, short-cuts and variables that are used throughout the application.
To view and print the icon, shortcut and variable overviews
1 Choose Help > Icons.
A new Help window opens, containing an overview of all icons.
2 Click the Print button in the top right corner.
You can use the printed version of the Icon Overview as a Quick Reference Card. It is recommended to print the overview on a color printer.
You can use this same procedure to view and print the Keyboard Shortcuts and Variables overviews.
NOTE: Some Tutorials are also available in HTML format. Choose Help > Tutorial.
Sample
8
:Apogee Impose Tutorial
Before You Begin
You will need the following sample files which are provided with your :APOGEE Prepress installation:
Apogee Automate 4Pages.pdf
Apogee Control 4Pages.pdf
Apogee Manage 4Pages.pdf
Apogee Render 4Pages.pdf
ApogeePrepress Brochure.pdf
ApogeePrepress Brochure_A5.pdf
BusinessCard.pdf
Compliments.pdf
TableCard.pdf
Datasheet.pdf
NOTE: While working through the lessons in this Tutorial, do not forget to replace studentname with your own name in the Administration tab.
Open the Preferences and change the display units to mm and set the access level to Administrator.
Duration
You will need approximately 30 minutes to complete each lesson.
Contact Us
Agfa welcomes your suggestions, questions or comments about this documenta-tion. You can send e-mail feedback to: [email protected].
9
:Apogee Impose Tutorial
Using the Online Help
:APOGEE Prepress includes context-sensitive Online Help. This is a reference that offers you both theoretical information on all topics and links to relevant procedures.
When :APOGEE Prepress is running, you can access the Online Help by doing one of the following:
Press F1
Choose Help > :APOGEE Prepress Help
Context-click the icon or pane in the interface for which you want informa-tion and select Help from the context menu. The relevant Online Help page for this item appears.
Some dialog boxes have a question mark button (?) to open the Online Help.
The :APOGEE Prepress Online Help also contains overviews of all icons, short-cuts and variables that are used throughout the application.
To view and print the icon, shortcut and variable overviews
1 Choose Help > Icons.
A new Help window opens, containing an overview of all icons.
2 Click the Print button in the top right corner.
You can use the printed version of the Icon Overview as a Quick Reference Card. It is recommended to print the overview on a color printer.
You can use this same procedure to view and print the Keyboard Shortcuts and Variables overviews.
NOTE: Some Tutorials are also available in HTML format. Choose Help > Tutorial.
Sample
10
:Apogee Impose Tutorial
Keyboard Conventions
All key names are shown in capital letters. For example, the Control key is shown as CTRL.
Keys are frequently used in combinations or sequences as shortcut keys. For example, SHIFT+F3 means to hold down the SHIFT key while pressing F3.
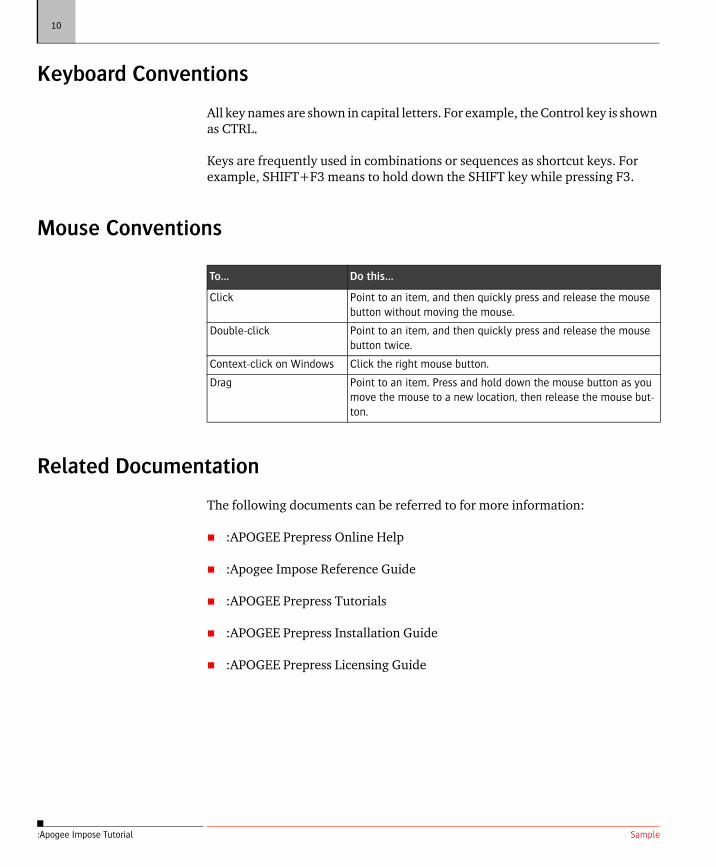
Mouse Conventions
Related Documentation
The following documents can be referred to for more information:
:APOGEE Prepress Online Help
:Apogee Impose Reference Guide
:APOGEE Prepress Tutorials
:APOGEE Prepress Installation Guide
:APOGEE Prepress Licensing Guide
To... Do this...
Click Point to an item, and then quickly press and release the mouse button without moving the mouse.
Double-click Point to an item, and then quickly press and release the mouse button twice.
Context-click on Windows Click the right mouse button.
Drag Point to an item. Press and hold down the mouse button as you move the mouse to a new location, then release the mouse but-ton.
Sample
10
:Apogee Impose Tutorial
Keyboard Conventions
All key names are shown in capital letters. For example, the Control key is shown as CTRL.
Keys are frequently used in combinations or sequences as shortcut keys. For example, SHIFT+F3 means to hold down the SHIFT key while pressing F3.
Mouse Conventions
Related Documentation
The following documents can be referred to for more information:
:APOGEE Prepress Online Help
:Apogee Impose Reference Guide
:APOGEE Prepress Tutorials
:APOGEE Prepress Installation Guide
:APOGEE Prepress Licensing Guide
To... Do this...
Click Point to an item, and then quickly press and release the mouse button without moving the mouse.
Double-click Point to an item, and then quickly press and release the mouse button twice.
Context-click on Windows Click the right mouse button.
Drag Point to an item. Press and hold down the mouse button as you move the mouse to a new location, then release the mouse but-ton.
11
LESSON
1 Creating a Basic :Apogee Impose Job
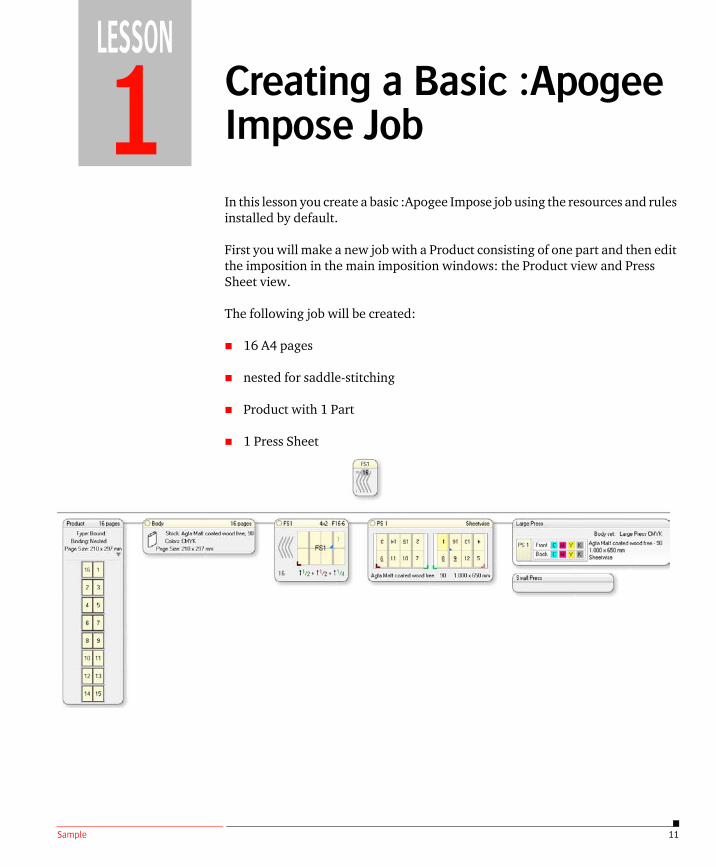
In this lesson you create a basic :Apogee Impose job using the resources and rules installed by default.
First you will make a new job with a Product consisting of one part and then edit the imposition in the main imposition windows: the Product view and Press Sheet view.
The following job will be created:
16 A4 pages
nested for saddle-stitching
Product with 1 Part
1 Press Sheet
Sample
12
:Apogee Impose Tutorial
How to create the Job and Product
1 Create a new Job Ticket by choosing File > New from Templates and then the Apogee Impose template from the Tutorial category.
2 In the Quick Fill pane, enter:
Order number: studentname-impose-0001
Job Name: basic
Number of Pages: 16
3 Click Open.
The Job Ticket opens in the Product tab because the Impose Task Processor is set to Apogee Impose.
At this stage you will see an error notification indicating that there are 2 problems with the Job Ticket.
4 Click the error icon to open the Problem Report.
The Product Definition and the Press Sheet Layout are both incom-plete.These errors will be resolved after the Product has been defined in the following steps.
5 Close the Problem Report and go to the Product tab to complete the Product for this job.
Some fields are in red because they are required in :Apogee Impose mode and this template job is set for :Apogee Impose. If the job is in another mode, these fields would be blue because the Product has not been defined.
6 Click in the Product drop-down list and select Bound Nested Matt Coated A4.
This is a predefined Product definition for a bound, saddle-stitched product whose final size will be A4 and which is to be printed on matt coated paper.
In the Product pane, the settings for the Part are now changed to those of the predefined Product definition and they are now displayed in black and no longer in red.
7 In the Imposition pane, choose Center Bottom from the Press Sheet Layout drop-down list.
This option positions the Fold Sheet in the center of the Press Sheet and aligned along the bottom.
The error icon is no longer displayed.
1 CREATING A BASIC :APOGEE IMPOSE JOB 13
:Apogee Impose Tutorial
How to edit the imposition
1 Now that the Product is defined, click the Edit Imposition button.
The main imposition window, or Product view, is displayed.
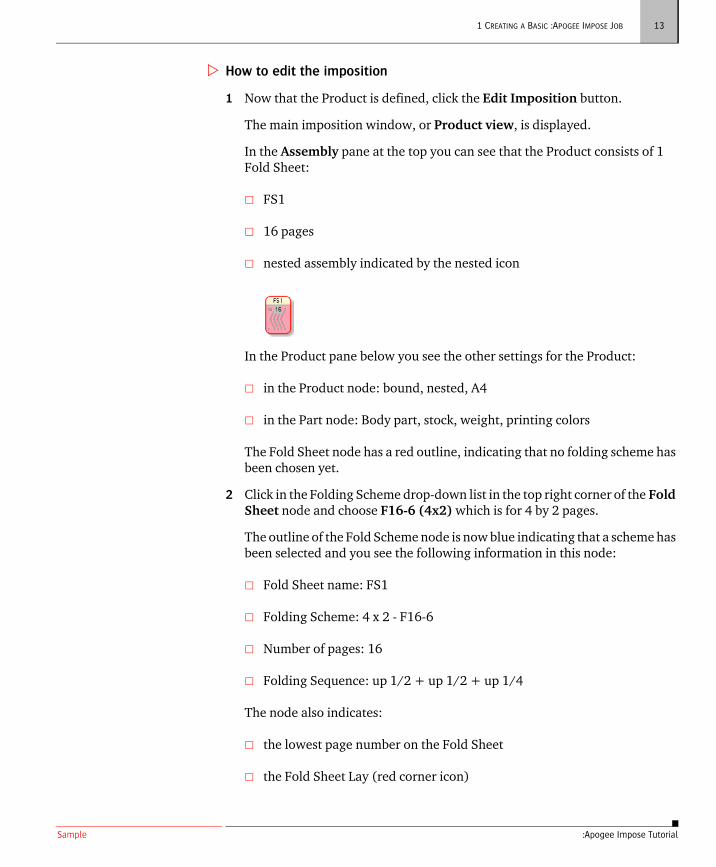
In the Assembly pane at the top you can see that the Product consists of 1 Fold Sheet:
FS1
16 pages
nested assembly indicated by the nested icon
In the Product pane below you see the other settings for the Product:
in the Product node: bound, nested, A4
in the Part node: Body part, stock, weight, printing colors
The Fold Sheet node has a red outline, indicating that no folding scheme has been chosen yet.
2 Click in the Folding Scheme drop-down list in the top right corner of the Fold Sheet node and choose F16-6 (4x2) which is for 4 by 2 pages.
The outline of the Fold Scheme node is now blue indicating that a scheme has been selected and you see the following information in this node:
Fold Sheet name: FS1
Folding Scheme: 4 x 2 - F16-6
Number of pages: 16
Folding Sequence: up 1/2 + up 1/2 + up 1/4
The node also indicates:
the lowest page number on the Fold Sheet
the Fold Sheet Lay (red corner icon)
Sample
12
:Apogee Impose Tutorial
How to create the Job and Product
1 Create a new Job Ticket by choosing File > New from Templates and then the Apogee Impose template from the Tutorial category.
2 In the Quick Fill pane, enter:
Order number: studentname-impose-0001
Job Name: basic
Number of Pages: 16
3 Click Open.
The Job Ticket opens in the Product tab because the Impose Task Processor is set to Apogee Impose.
At this stage you will see an error notification indicating that there are 2 problems with the Job Ticket.
4 Click the error icon to open the Problem Report.
The Product Definition and the Press Sheet Layout are both incom-plete.These errors will be resolved after the Product has been defined in the following steps.
5 Close the Problem Report and go to the Product tab to complete the Product for this job.
Some fields are in red because they are required in :Apogee Impose mode and this template job is set for :Apogee Impose. If the job is in another mode, these fields would be blue because the Product has not been defined.
6 Click in the Product drop-down list and select Bound Nested Matt Coated A4.
This is a predefined Product definition for a bound, saddle-stitched product whose final size will be A4 and which is to be printed on matt coated paper.
In the Product pane, the settings for the Part are now changed to those of the predefined Product definition and they are now displayed in black and no longer in red.
7 In the Imposition pane, choose Center Bottom from the Press Sheet Layout drop-down list.
This option positions the Fold Sheet in the center of the Press Sheet and aligned along the bottom.
The error icon is no longer displayed.
1 CREATING A BASIC :APOGEE IMPOSE JOB 13
:Apogee Impose Tutorial
How to edit the imposition
1 Now that the Product is defined, click the Edit Imposition button.
The main imposition window, or Product view, is displayed.
In the Assembly pane at the top you can see that the Product consists of 1 Fold Sheet:
FS1
16 pages
nested assembly indicated by the nested icon
In the Product pane below you see the other settings for the Product:
in the Product node: bound, nested, A4
in the Part node: Body part, stock, weight, printing colors
The Fold Sheet node has a red outline, indicating that no folding scheme has been chosen yet.
2 Click in the Folding Scheme drop-down list in the top right corner of the Fold Sheet node and choose F16-6 (4x2) which is for 4 by 2 pages.
The outline of the Fold Scheme node is now blue indicating that a scheme has been selected and you see the following information in this node:
Fold Sheet name: FS1
Folding Scheme: 4 x 2 - F16-6
Number of pages: 16
Folding Sequence: up 1/2 + up 1/2 + up 1/4
The node also indicates:
the lowest page number on the Fold Sheet
the Fold Sheet Lay (red corner icon)
Sample
14
:Apogee Impose Tutorial
3 Click once in the Press Sheet node which is next to the Fold Sheet node.
Here you see how the Fold Sheet is positioned on the Press Sheet and the size of the Press Sheet (1000 x 650 mm).
NOTE: The smallest press sheet size on which the Fold Sheet fits is selected automatically by :Apogee Impose.
The node also indicates:
the Sheetwise workstyle
Front and Back of the Press Sheet with page numbers
the Fold Sheet Lay (red corner icon)
the Press Sheet Lay (green corner icon)
The Press Sheet also contains an error.
4 Click the red error icon in the bottom right corner to open the Snag List.
The error indicates that a Press has not been assigned.
5 Close the Snag List.
How to define the Press for an imposition job
In the Product view, click in the Press Sheet node title bar (PS 1) and drag the Press Sheet to the Large Press to assign the Press Sheet to this press.
The Press Sheet turns blue with a Parameter Set automatically selected. Now that the Press Sheet has been assigned, all the nodes, from Product to Press, are connected with a grey line and error indication is no longer displayed.
You will now open the Press Sheet view to examine the Press Sheet in more detail.
How to browse the Press Sheet view
1 In the Product view, double-click the title bar of the Press Sheet node PS1 or one of the two sides.
The Press Sheet view is displayed.
1 CREATING A BASIC :APOGEE IMPOSE JOB 15
:Apogee Impose Tutorial
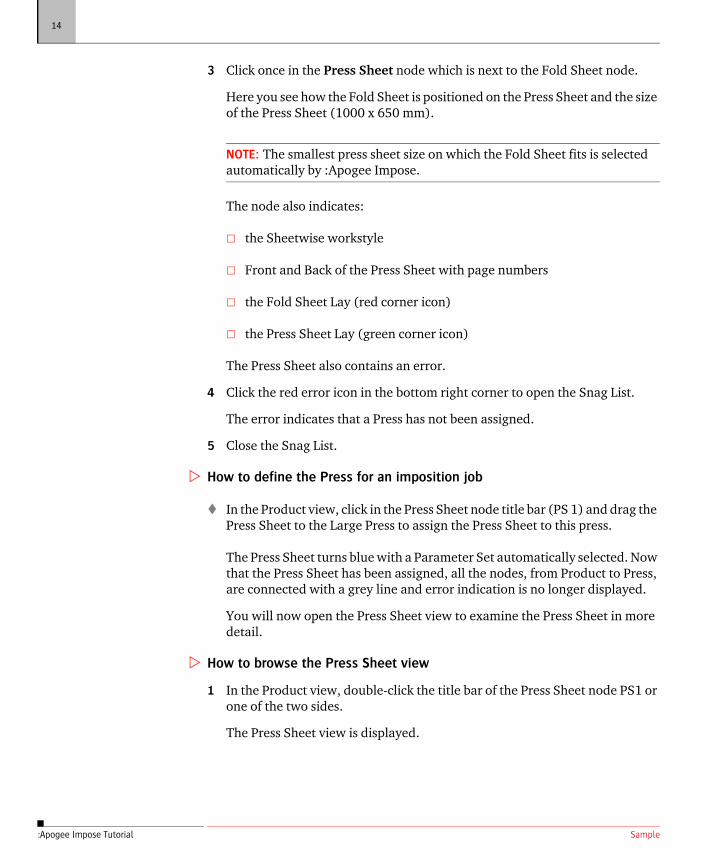
2 Click in the outer, white area to select the Press Sheet.
The whole Press Sheet is highlighted in light blue.
3 Click the next inner box and then choose FS1 on PS1 to select the Fold Sheet.
Sample
14
:Apogee Impose Tutorial
3 Click once in the Press Sheet node which is next to the Fold Sheet node.
Here you see how the Fold Sheet is positioned on the Press Sheet and the size of the Press Sheet (1000 x 650 mm).
NOTE: The smallest press sheet size on which the Fold Sheet fits is selected automatically by :Apogee Impose.
The node also indicates:
the Sheetwise workstyle
Front and Back of the Press Sheet with page numbers
the Fold Sheet Lay (red corner icon)
the Press Sheet Lay (green corner icon)
The Press Sheet also contains an error.
4 Click the red error icon in the bottom right corner to open the Snag List.
The error indicates that a Press has not been assigned.
5 Close the Snag List.
How to define the Press for an imposition job
In the Product view, click in the Press Sheet node title bar (PS 1) and drag the Press Sheet to the Large Press to assign the Press Sheet to this press.
The Press Sheet turns blue with a Parameter Set automatically selected. Now that the Press Sheet has been assigned, all the nodes, from Product to Press, are connected with a grey line and error indication is no longer displayed.
You will now open the Press Sheet view to examine the Press Sheet in more detail.
How to browse the Press Sheet view
1 In the Product view, double-click the title bar of the Press Sheet node PS1 or one of the two sides.
The Press Sheet view is displayed.
1 CREATING A BASIC :APOGEE IMPOSE JOB 15
:Apogee Impose Tutorial
2 Click in the outer, white area to select the Press Sheet.
The whole Press Sheet is highlighted in light blue.
3 Click the next inner box and then choose FS1 on PS1 to select the Fold Sheet.
Sample
16
:Apogee Impose Tutorial
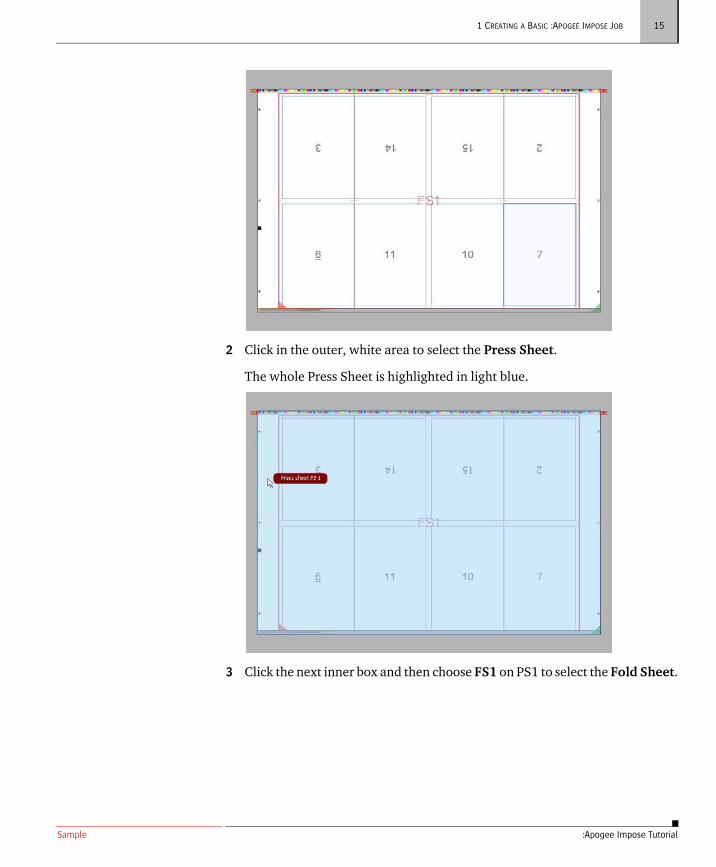
TIP: Click any of the red balloons to select a component that may be on top or under the selected component.
The Fold Sheet is highlighted in light blue and you see that it is centered along the bottom edge of the Press Sheet, as specified in the Press Sheet Layout rules in the Product tab.
4 Click an individual page to select a Page.
The Page is highlighted in light blue.
5 Now increase the zoom factor so the Press Sheet fills your screen and you can take a closer look at the various elements on the Press Sheet:
Sample
16
:Apogee Impose Tutorial
TIP: Click any of the red balloons to select a component that may be on top or under the selected component.
The Fold Sheet is highlighted in light blue and you see that it is centered along the bottom edge of the Press Sheet, as specified in the Press Sheet Layout rules in the Product tab.
4 Click an individual page to select a Page.
The Page is highlighted in light blue.
5 Now increase the zoom factor so the Press Sheet fills your screen and you can take a closer look at the various elements on the Press Sheet:
1 CREATING A BASIC :APOGEE IMPOSE JOB 17
:Apogee Impose Tutorial
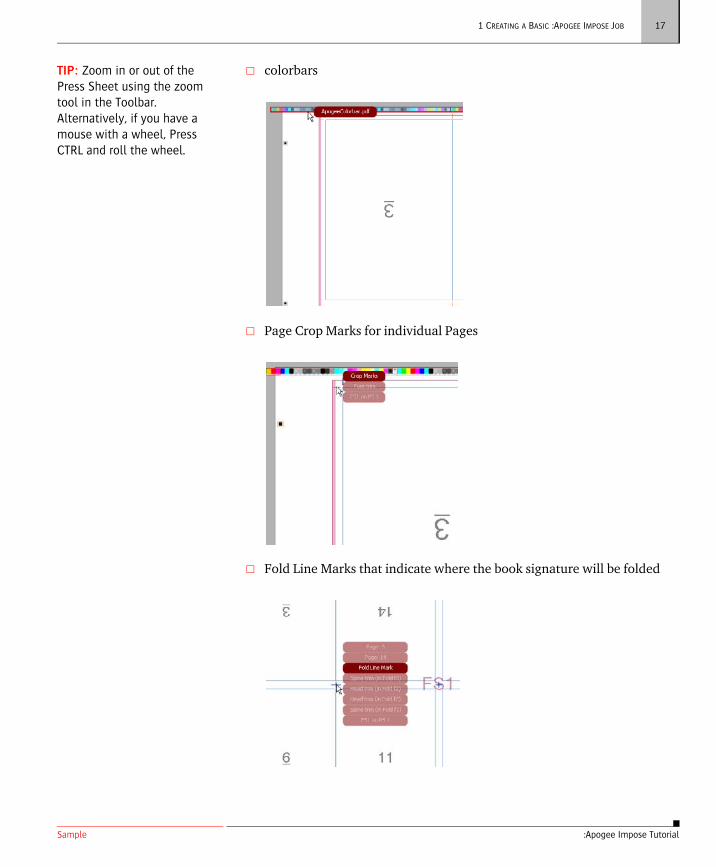
TIP: Zoom in or out of the Press Sheet using the zoom tool in the Toolbar. Alternatively, if you have a mouse with a wheel, Press CTRL and roll the wheel.
colorbars
Page Crop Marks for individual Pages
Fold Line Marks that indicate where the book signature will be folded
Sample
18
:Apogee Impose Tutorial
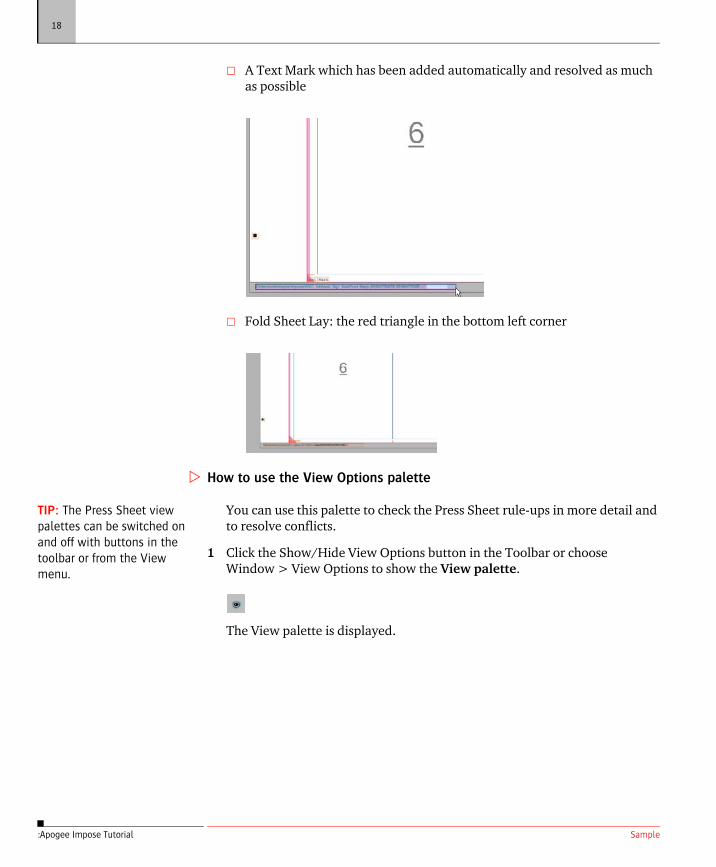
A Text Mark which has been added automatically and resolved as much as possible
Fold Sheet Lay: the red triangle in the bottom left corner
How to use the View Options palette
TIP: The Press Sheet view palettes can be switched on and off with buttons in the toolbar or from the View menu.
You can use this palette to check the Press Sheet rule-ups in more detail and to resolve conflicts.
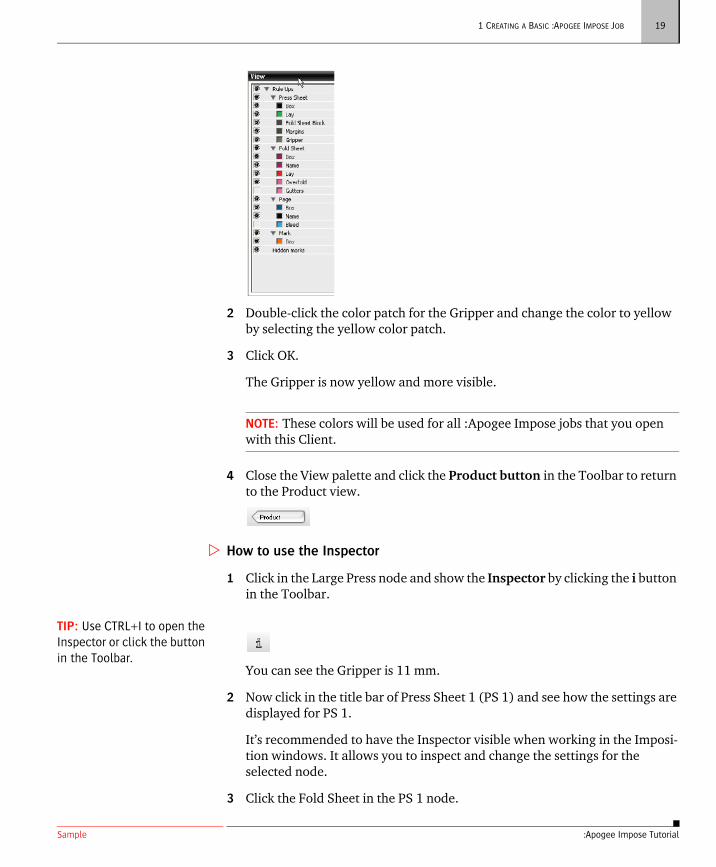
1 Click the Show/Hide View Options button in the Toolbar or choose Window > View Options to show the View palette.
The View palette is displayed.
Sample
18
:Apogee Impose Tutorial
A Text Mark which has been added automatically and resolved as much as possible
Fold Sheet Lay: the red triangle in the bottom left corner
How to use the View Options palette
TIP: The Press Sheet view palettes can be switched on and off with buttons in the toolbar or from the View menu.
You can use this palette to check the Press Sheet rule-ups in more detail and to resolve conflicts.
1 Click the Show/Hide View Options button in the Toolbar or choose Window > View Options to show the View palette.
The View palette is displayed.
1 CREATING A BASIC :APOGEE IMPOSE JOB 19
:Apogee Impose Tutorial
2 Double-click the color patch for the Gripper and change the color to yellow by selecting the yellow color patch.
3 Click OK.
The Gripper is now yellow and more visible.
NOTE: These colors will be used for all :Apogee Impose jobs that you open with this Client.
4 Close the View palette and click the Product button in the Toolbar to return to the Product view.
How to use the Inspector
1 Click in the Large Press node and show the Inspector by clicking the i button in the Toolbar.
TIP: Use CTRL+I to open the Inspector or click the button in the Toolbar.
You can see the Gripper is 11 mm.
2 Now click in the title bar of Press Sheet 1 (PS 1) and see how the settings are displayed for PS 1.
It’s recommended to have the Inspector visible when working in the Imposi-tion windows. It allows you to inspect and change the settings for the selected node.
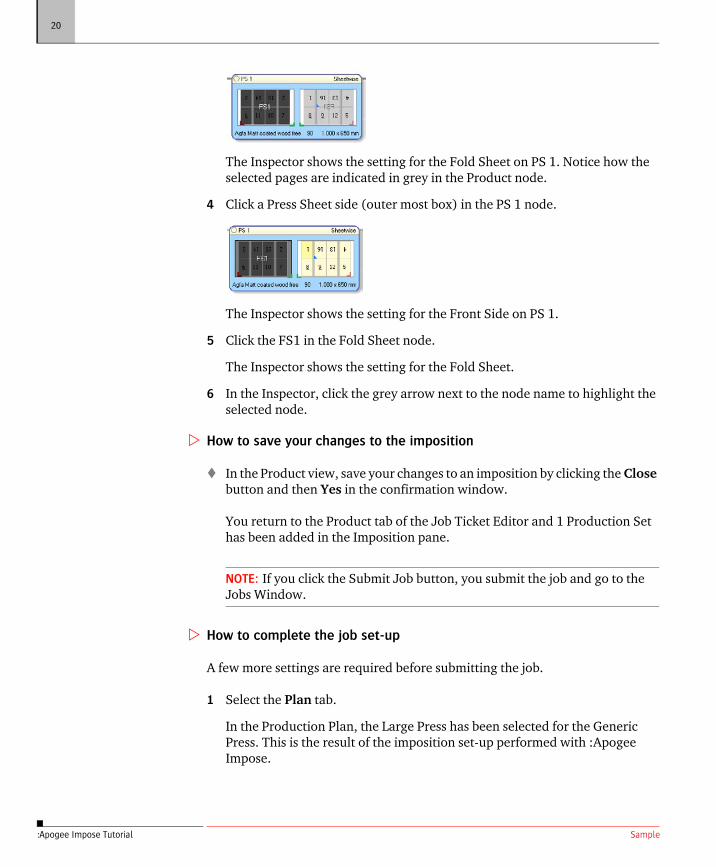
3 Click the Fold Sheet in the PS 1 node.
Sample
20
:Apogee Impose Tutorial
The Inspector shows the setting for the Fold Sheet on PS 1. Notice how the selected pages are indicated in grey in the Product node.
4 Click a Press Sheet side (outer most box) in the PS 1 node.
The Inspector shows the setting for the Front Side on PS 1.
5 Click the FS1 in the Fold Sheet node.
The Inspector shows the setting for the Fold Sheet.
6 In the Inspector, click the grey arrow next to the node name to highlight the selected node.
How to save your changes to the imposition
In the Product view, save your changes to an imposition by clicking the Close button and then Yes in the confirmation window.
You return to the Product tab of the Job Ticket Editor and 1 Production Set has been added in the Imposition pane.
NOTE: If you click the Submit Job button, you submit the job and go to the Jobs Window.
How to complete the job set-up
A few more settings are required before submitting the job.
1 Select the Plan tab.
In the Production Plan, the Large Press has been selected for the Generic Press. This is the result of the imposition set-up performed with :Apogee Impose.
1 CREATING A BASIC :APOGEE IMPOSE JOB 21
:Apogee Impose Tutorial
2 In the Generic Press settings, select the Type tab and you see the following settings as defined with :Apogee Impose:
Sheet lay: right
Gripper width: 11 mm
Distance plate to sheet edge: 20 mm
You don’t need to change anything here.
3 Select the correct plate size and imaging size for the TIFF Platesetter - Output and Imaging:
Parameter set: 1130 x 907
4 Submit the Job Ticket.
How to process documents for your job
1 Drag and drop the following PDF files onto the job you just created in the Jobs List or in the Page Store in the Pages tab:
Apogee Automate 4Pages.pdf
Apogee Control 4Pages.pdf
Apogee Manage 4Pages.pdf
Apogee Render 4Pages.pdf
2 In the Pages tab, wait until the documents are uploaded and drag them to the Run List.
3 Submit the Job and check how the files are rendered in the Results tab.
4 Open PS 1 Front in Raster Preview.
5 Open the Rules Ups palette (Window > Palettes) and select the Expected Page Size and Press Sheet Size.
You see the following:
The Press Sheet width is less than the available plate width.
At the bottom, the Press Sheet is offset 20 mm from the edge of the plate as defined by the ‘Distance plate to sheet edge’ setting.
Sample
22
:Apogee Impose Tutorial
6 Close Raster Preview.
Congratulations, you have completed this tutorial lesson.
This tutorial is only a preview of the full basic tutorial.
If you would like to obtain the full version of this tutorial ora training on this subject, please contact your local Agfa sales
or service representative.Worldwide addresses of our local Agfa representatives can
be found on our Agfa Graphics website:http://www.agfagraphics.com/global/en/maings/about_us/
worldwide/index.jsp
Sample
22
:Apogee Impose Tutorial
6 Close Raster Preview.
Congratulations, you have completed this tutorial lesson.
23
LESSON
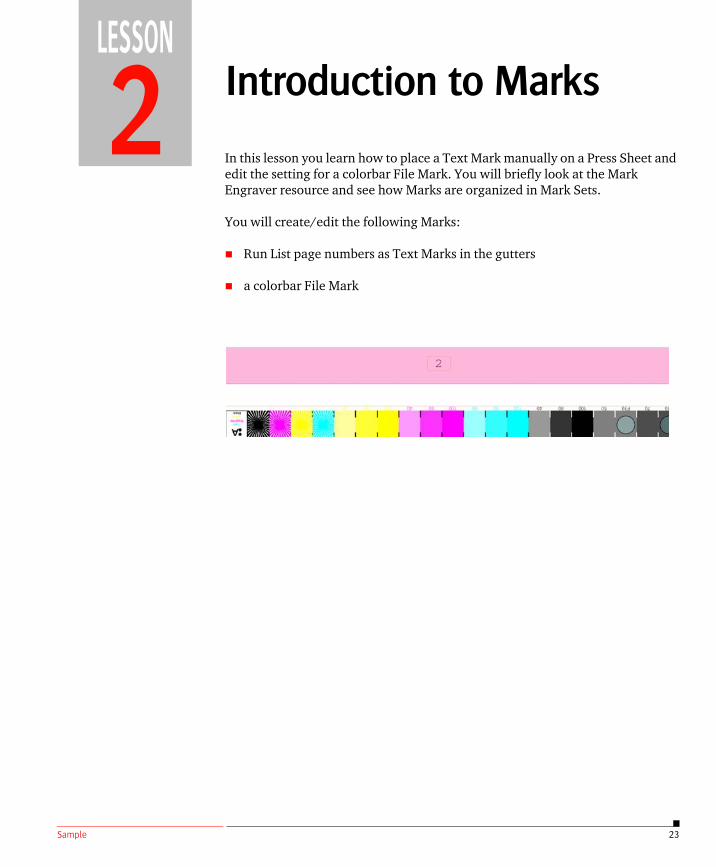
2 Introduction to Marks
In this lesson you learn how to place a Text Mark manually on a Press Sheet and edit the setting for a colorbar File Mark. You will briefly look at the Mark Engraver resource and see how Marks are organized in Mark Sets.
You will create/edit the following Marks:
Run List page numbers as Text Marks in the gutters
a colorbar File Mark
Sample
24
:Apogee Impose Tutorial
How to place a Mark Set manually
1 In the Jobs List, context-click the Basic job that we created in a previous lesson.
2 Select Edit Imposition to open the Product view imposition window.
TIP: Select a job and press CTRL+SHIFT+Enter to jump to the imposition Product view.
3 Double-click the PS 1 Press Sheet to open the Press Sheet view.
4 Zoom into the bottom left corner of the Press Sheet.
5 Open the Marks palette by clicking the button in the toolbar.
The Marks palette is displayed with three categories of marks:
Page
Fold Sheet
Press Sheet
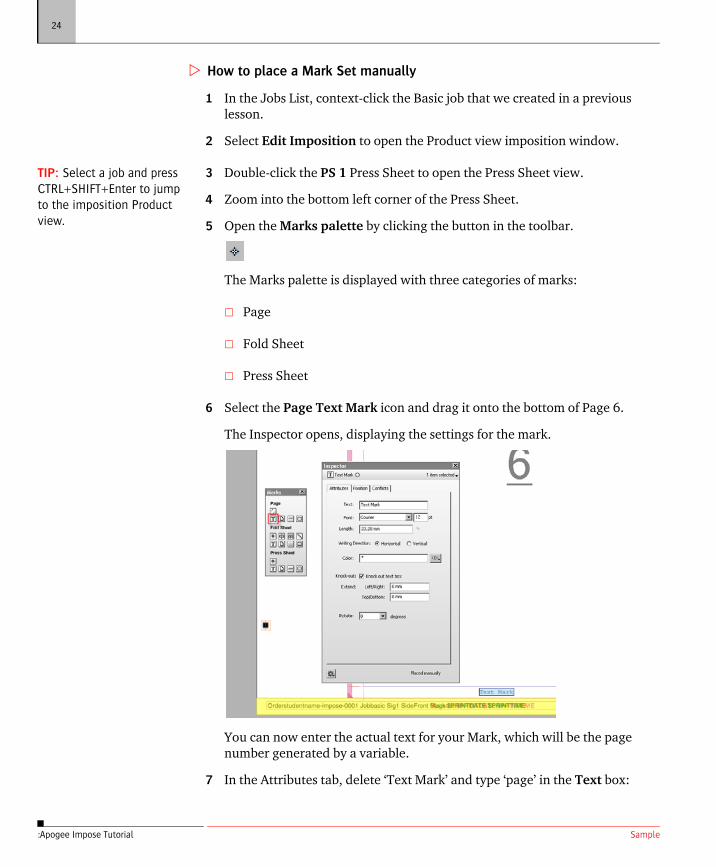
6 Select the Page Text Mark icon and drag it onto the bottom of Page 6.
The Inspector opens, displaying the settings for the mark.
You can now enter the actual text for your Mark, which will be the page number generated by a variable.
7 In the Attributes tab, delete ‘Text Mark’ and type ‘page’ in the Text box:
2 INTRODUCTION TO MARKS 25
:Apogee Impose Tutorial
As you type, all the available variables that contain ‘page’ appear in the drop-down list.
TIP: The variables in :Apogee Impose have a different structure than the other :APOGEE Prepress variables. Refer to the Online Help for a list of the variables.
8 Scroll down to the bottom of the list using the arrow and select:
$page.rlpage
This variable is added to the Text box and will generate the Run List page number.
9 Change the font size to 8 pt. Do not change the other options in the Attributes tab and select the Position tab to set the position of the Mark relative to a Page.
10 As Anchor Point, choose the top centre position (T) and for Target choose:
Reference: Page
Horizontal: 0 mm, Right of Center
Vertical: 2 mm Below Bottom Edge
TIP: Page Mark settings are similar to the Mark settings in the Border resource.
The position of the mark changes immediately as you modify these settings.
NOTE: The initial values for Vertical and Horizontal depend on where you dragged and placed the mark on the Press Sheet.
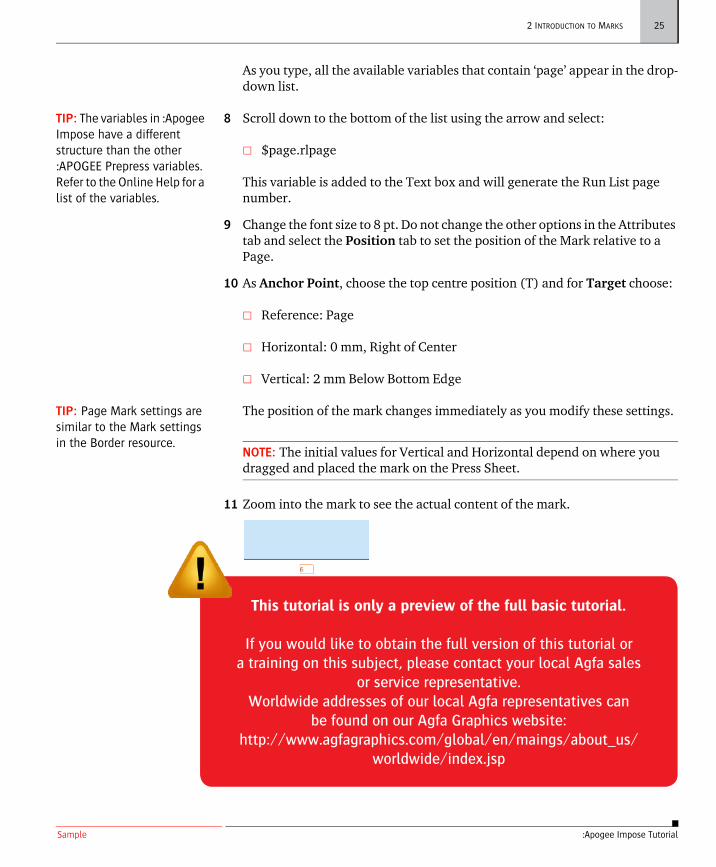
11 Zoom into the mark to see the actual content of the mark.
12 Zoom out of the Press Sheet so it fits into the window again by clicking the button to the left of the slider or pressing CTRL+0.
13 Click the Conflicts tab to see the other settings for this mark.
This tab defines what will happen in the event of conflicts with other marks or rule-ups. Leave the settings as is for this exercise.
Sample
24
:Apogee Impose Tutorial
How to place a Mark Set manually
1 In the Jobs List, context-click the Basic job that we created in a previous lesson.
2 Select Edit Imposition to open the Product view imposition window.
TIP: Select a job and press CTRL+SHIFT+Enter to jump to the imposition Product view.
3 Double-click the PS 1 Press Sheet to open the Press Sheet view.
4 Zoom into the bottom left corner of the Press Sheet.
5 Open the Marks palette by clicking the button in the toolbar.
The Marks palette is displayed with three categories of marks:
Page
Fold Sheet
Press Sheet
6 Select the Page Text Mark icon and drag it onto the bottom of Page 6.
The Inspector opens, displaying the settings for the mark.
You can now enter the actual text for your Mark, which will be the page number generated by a variable.
7 In the Attributes tab, delete ‘Text Mark’ and type ‘page’ in the Text box:
2 INTRODUCTION TO MARKS 25
:Apogee Impose Tutorial
As you type, all the available variables that contain ‘page’ appear in the drop-down list.
TIP: The variables in :Apogee Impose have a different structure than the other :APOGEE Prepress variables. Refer to the Online Help for a list of the variables.
8 Scroll down to the bottom of the list using the arrow and select:
$page.rlpage
This variable is added to the Text box and will generate the Run List page number.
9 Change the font size to 8 pt. Do not change the other options in the Attributes tab and select the Position tab to set the position of the Mark relative to a Page.
10 As Anchor Point, choose the top centre position (T) and for Target choose:
Reference: Page
Horizontal: 0 mm, Right of Center
Vertical: 2 mm Below Bottom Edge
TIP: Page Mark settings are similar to the Mark settings in the Border resource.
The position of the mark changes immediately as you modify these settings.
NOTE: The initial values for Vertical and Horizontal depend on where you dragged and placed the mark on the Press Sheet.
11 Zoom into the mark to see the actual content of the mark.
12 Zoom out of the Press Sheet so it fits into the window again by clicking the button to the left of the slider or pressing CTRL+0.
13 Click the Conflicts tab to see the other settings for this mark.
This tab defines what will happen in the event of conflicts with other marks or rule-ups. Leave the settings as is for this exercise.
This tutorial is only a preview of the full basic tutorial.
If you would like to obtain the full version of this tutorial ora training on this subject, please contact your local Agfa sales
or service representative.Worldwide addresses of our local Agfa representatives can
be found on our Agfa Graphics website:http://www.agfagraphics.com/global/en/maings/about_us/
worldwide/index.jsp
Sample
40
:Apogee Impose Tutorial
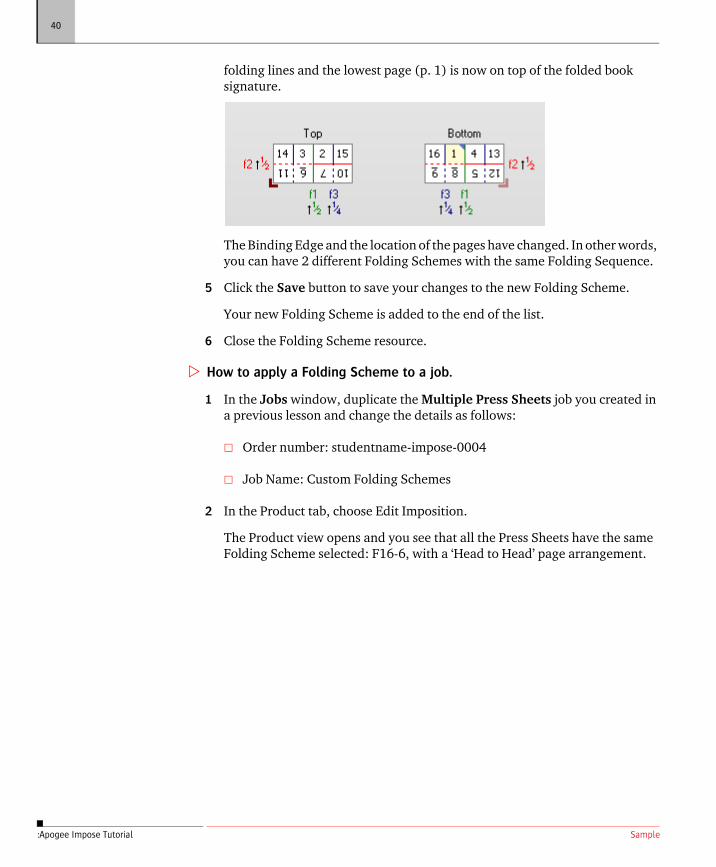
folding lines and the lowest page (p. 1) is now on top of the folded book signature.
The Binding Edge and the location of the pages have changed. In other words, you can have 2 different Folding Schemes with the same Folding Sequence.
5 Click the Save button to save your changes to the new Folding Scheme.
Your new Folding Scheme is added to the end of the list.
6 Close the Folding Scheme resource.
How to apply a Folding Scheme to a job.
1 In the Jobs window, duplicate the Multiple Press Sheets job you created in a previous lesson and change the details as follows:
Order number: studentname-impose-0004
Job Name: Custom Folding Schemes
2 In the Product tab, choose Edit Imposition.
The Product view opens and you see that all the Press Sheets have the same Folding Scheme selected: F16-6, with a ‘Head to Head’ page arrangement.
4 MAKING CUSTOM FOLDING SCHEMES 41
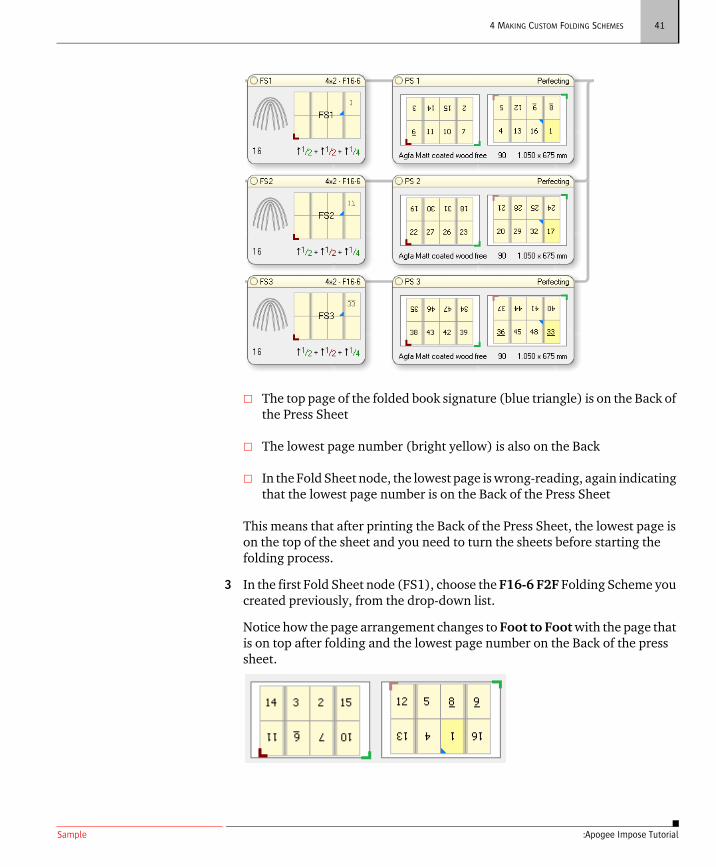
:Apogee Impose Tutorial
The top page of the folded book signature (blue triangle) is on the Back of the Press Sheet
The lowest page number (bright yellow) is also on the Back
In the Fold Sheet node, the lowest page is wrong-reading, again indicating that the lowest page number is on the Back of the Press Sheet
This means that after printing the Back of the Press Sheet, the lowest page is on the top of the sheet and you need to turn the sheets before starting the folding process.
3 In the first Fold Sheet node (FS1), choose the F16-6 F2F Folding Scheme you created previously, from the drop-down list.
Notice how the page arrangement changes to Foot to Foot with the page that is on top after folding and the lowest page number on the Back of the press sheet.
Sample
4 MAKING CUSTOM FOLDING SCHEMES 41
:Apogee Impose Tutorial
The top page of the folded book signature (blue triangle) is on the Back of the Press Sheet
The lowest page number (bright yellow) is also on the Back
In the Fold Sheet node, the lowest page is wrong-reading, again indicating that the lowest page number is on the Back of the Press Sheet
This means that after printing the Back of the Press Sheet, the lowest page is on the top of the sheet and you need to turn the sheets before starting the folding process.
3 In the first Fold Sheet node (FS1), choose the F16-6 F2F Folding Scheme you created previously, from the drop-down list.
Notice how the page arrangement changes to Foot to Foot with the page that is on top after folding and the lowest page number on the Back of the press sheet.
Sample
60
:Apogee Impose Tutorial
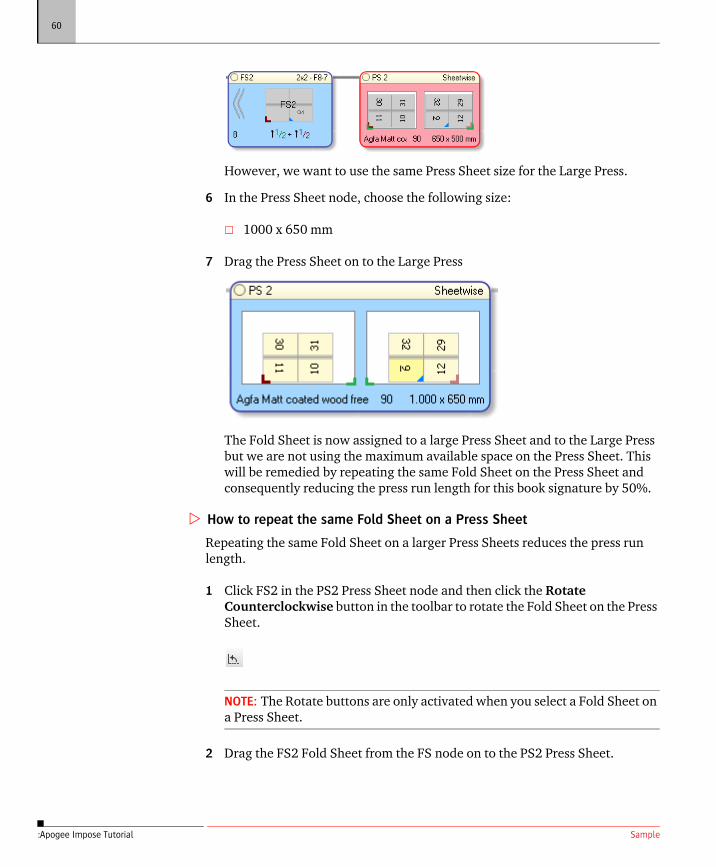
However, we want to use the same Press Sheet size for the Large Press.
6 In the Press Sheet node, choose the following size:
1000 x 650 mm
7 Drag the Press Sheet on to the Large Press
The Fold Sheet is now assigned to a large Press Sheet and to the Large Press but we are not using the maximum available space on the Press Sheet. This will be remedied by repeating the same Fold Sheet on the Press Sheet and consequently reducing the press run length for this book signature by 50%.
How to repeat the same Fold Sheet on a Press Sheet
Repeating the same Fold Sheet on a larger Press Sheets reduces the press run length.
1 Click FS2 in the PS2 Press Sheet node and then click the Rotate Counterclockwise button in the toolbar to rotate the Fold Sheet on the Press Sheet.
NOTE: The Rotate buttons are only activated when you select a Fold Sheet on a Press Sheet.
2 Drag the FS2 Fold Sheet from the FS node on to the PS2 Press Sheet.
6 MULTIPLE FOLD SHEETS ON A PRESS SHEET 61
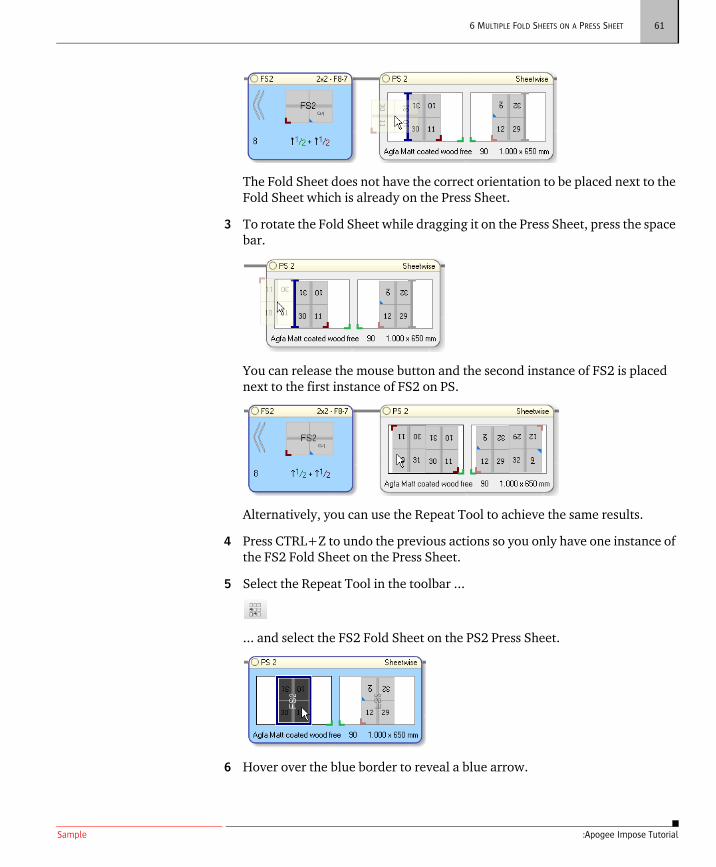
:Apogee Impose Tutorial
The Fold Sheet does not have the correct orientation to be placed next to the Fold Sheet which is already on the Press Sheet.
3 To rotate the Fold Sheet while dragging it on the Press Sheet, press the space bar.
You can release the mouse button and the second instance of FS2 is placed next to the first instance of FS2 on PS.
Alternatively, you can use the Repeat Tool to achieve the same results.
4 Press CTRL+Z to undo the previous actions so you only have one instance of the FS2 Fold Sheet on the Press Sheet.
5 Select the Repeat Tool in the toolbar ...
... and select the FS2 Fold Sheet on the PS2 Press Sheet.
6 Hover over the blue border to reveal a blue arrow.
Sample
60
:Apogee Impose Tutorial
However, we want to use the same Press Sheet size for the Large Press.
6 In the Press Sheet node, choose the following size:
1000 x 650 mm
7 Drag the Press Sheet on to the Large Press
The Fold Sheet is now assigned to a large Press Sheet and to the Large Press but we are not using the maximum available space on the Press Sheet. This will be remedied by repeating the same Fold Sheet on the Press Sheet and consequently reducing the press run length for this book signature by 50%.
How to repeat the same Fold Sheet on a Press Sheet
Repeating the same Fold Sheet on a larger Press Sheets reduces the press run length.
1 Click FS2 in the PS2 Press Sheet node and then click the Rotate Counterclockwise button in the toolbar to rotate the Fold Sheet on the Press Sheet.
NOTE: The Rotate buttons are only activated when you select a Fold Sheet on a Press Sheet.
2 Drag the FS2 Fold Sheet from the FS node on to the PS2 Press Sheet.
6 MULTIPLE FOLD SHEETS ON A PRESS SHEET 61
:Apogee Impose Tutorial
The Fold Sheet does not have the correct orientation to be placed next to the Fold Sheet which is already on the Press Sheet.
3 To rotate the Fold Sheet while dragging it on the Press Sheet, press the space bar.
You can release the mouse button and the second instance of FS2 is placed next to the first instance of FS2 on PS.
Alternatively, you can use the Repeat Tool to achieve the same results.
4 Press CTRL+Z to undo the previous actions so you only have one instance of the FS2 Fold Sheet on the Press Sheet.
5 Select the Repeat Tool in the toolbar ...
... and select the FS2 Fold Sheet on the PS2 Press Sheet.
6 Hover over the blue border to reveal a blue arrow.
Sample
80
:Apogee Impose Tutorial
Inspect the other side of the Press Sheet with the Light Table tool and you see that the color patches change position because the content of the mark is not mirrored.
8 Now select the Mirror Content on back check box.
Inspect the other side of the Press Sheet with the Light Table tool and you see that the color patches no longer change position which means the content of this mark has been mirrored on the other side of the Press Sheet.
9 Clear the Mirror Content on back check box again to reset the mark.
How to clip marks
You may want to clip a mark, for example so it does not run off the Press Sheet. We’ll look at the line marks you created earlier to explain this.
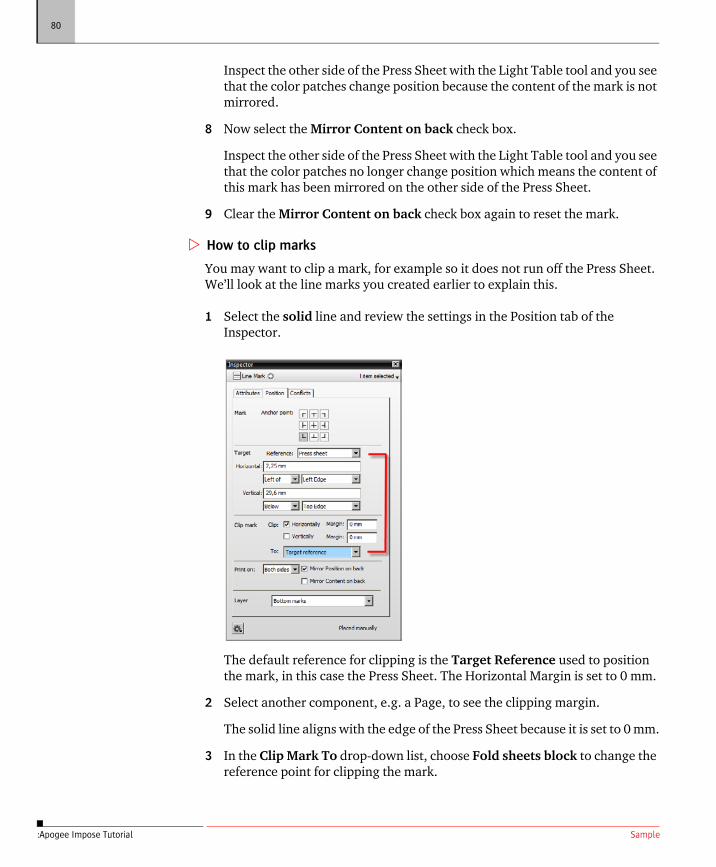
1 Select the solid line and review the settings in the Position tab of the Inspector.
The default reference for clipping is the Target Reference used to position the mark, in this case the Press Sheet. The Horizontal Margin is set to 0 mm.
2 Select another component, e.g. a Page, to see the clipping margin.
The solid line aligns with the edge of the Press Sheet because it is set to 0 mm.
3 In the Clip Mark To drop-down list, choose Fold sheets block to change the reference point for clipping the mark.
7 MORE ABOUT MARKS 81
:Apogee Impose Tutorial
NOTE: The area of the Fold Sheets Block is the same as the area of the Fold Sheet if you only have a single Fold Sheet on your Press Sheet.
4 Select another component, e.g. a Page, to see how the clipping margin has changed
The solid line now aligns with the Fold Sheet Block.
TIP: Show/hide Hidden Marks in the View palette to better view the clippings.
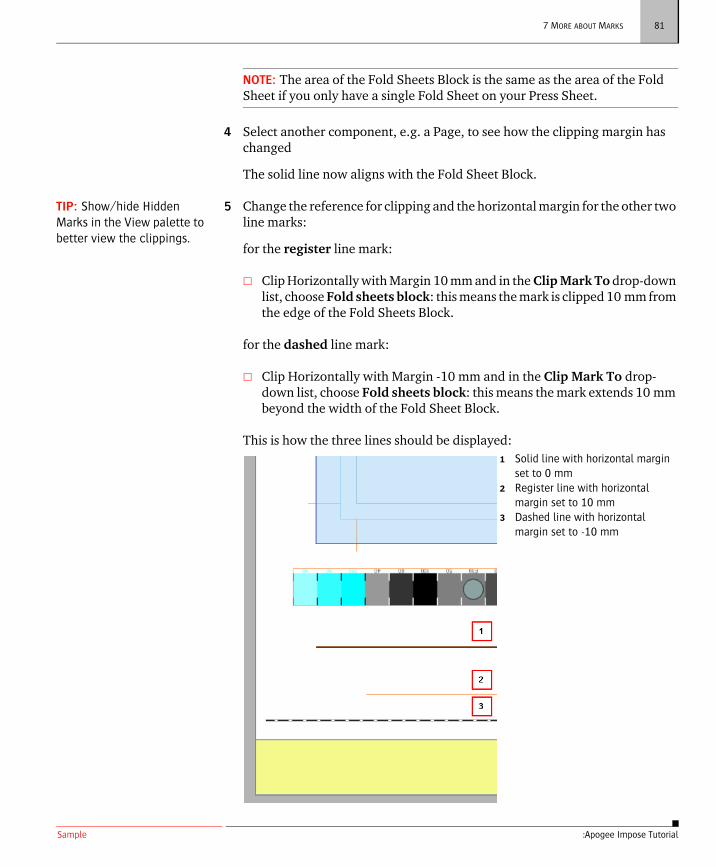
5 Change the reference for clipping and the horizontal margin for the other two line marks:
for the register line mark:
Clip Horizontally with Margin 10 mm and in the Clip Mark To drop-down list, choose Fold sheets block: this means the mark is clipped 10 mm from the edge of the Fold Sheets Block.
for the dashed line mark:
Clip Horizontally with Margin -10 mm and in the Clip Mark To drop-down list, choose Fold sheets block: this means the mark extends 10 mm beyond the width of the Fold Sheet Block.
This is how the three lines should be displayed:1 Solid line with horizontal margin
set to 0 mm2 Register line with horizontal
margin set to 10 mm3 Dashed line with horizontal
margin set to -10 mm
Sample
7 MORE ABOUT MARKS 81
:Apogee Impose Tutorial
NOTE: The area of the Fold Sheets Block is the same as the area of the Fold Sheet if you only have a single Fold Sheet on your Press Sheet.
4 Select another component, e.g. a Page, to see how the clipping margin has changed
The solid line now aligns with the Fold Sheet Block.
TIP: Show/hide Hidden Marks in the View palette to better view the clippings.
5 Change the reference for clipping and the horizontal margin for the other two line marks:
for the register line mark:
Clip Horizontally with Margin 10 mm and in the Clip Mark To drop-down list, choose Fold sheets block: this means the mark is clipped 10 mm from the edge of the Fold Sheets Block.
for the dashed line mark:
Clip Horizontally with Margin -10 mm and in the Clip Mark To drop-down list, choose Fold sheets block: this means the mark extends 10 mm beyond the width of the Fold Sheet Block.
This is how the three lines should be displayed:1 Solid line with horizontal margin
set to 0 mm2 Register line with horizontal
margin set to 10 mm3 Dashed line with horizontal
margin set to -10 mm
Sample
120
:Apogee Impose Tutorial
How to create Mark Sets for placing different colorbars
With this procedure you create a Mark Set that automatically places a CMYK colorbar on the Press Sheet of 4-color parts and one that places a grayscale colorbar on single-color parts.
1 In the System Overview, open the Marks resource of the Impose task processor.
2 Click the Import button and browse to the following colorbar file:
ApogeeColorbar_Gray.pdf
NOTE: This file is not provided but you can use a colorbar file of your choice.
3 Click Open to add this grayscale colorbar to your Marks resource list and then close the Marks resource.
4 Open the Mark Engraver and choose the 1000x650 Mark Set in the Press Sheet Marks category.
Take a closer look at this Mark Set:
Condition: automatically applied when the Large Press is chosen
5 Select the ApogeeColorbar.pdf mark in the Marks column and in the Attributes tab you can see that this is a colorbar for CMYK jobs
6 Now select the 1000x650 Mark Set again and extend the condition so that the Mark Set is only applied for CMYK jobs; click the + button and add the following condition:
$press_sheet.side.process_colors: can be selected in the drop-down list
equals
4
10 IMPOSING MULTI-PART JOBS INTERACTIVELY 121
:Apogee Impose Tutorial
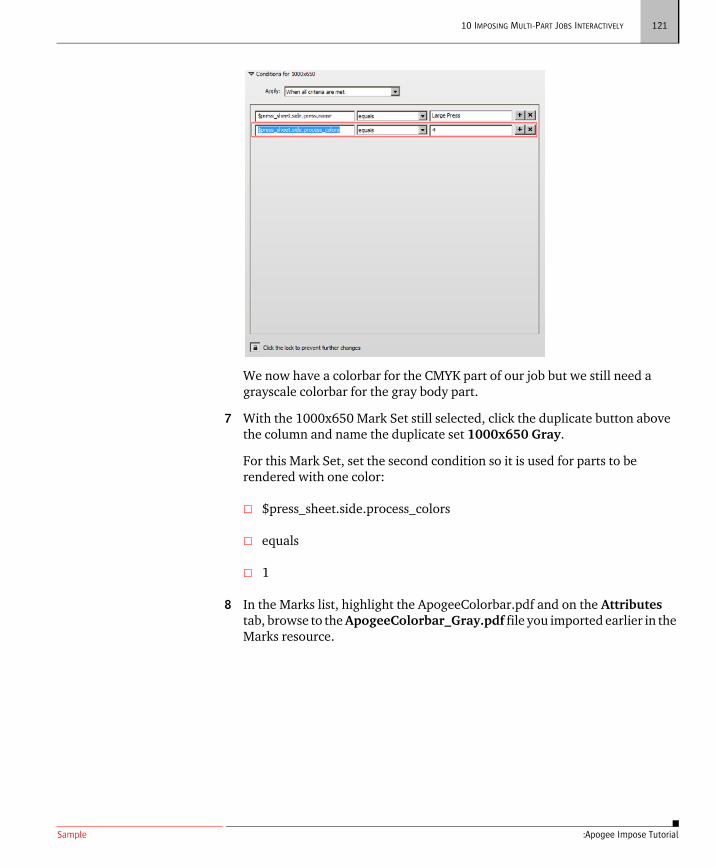
We now have a colorbar for the CMYK part of our job but we still need a grayscale colorbar for the gray body part.
7 With the 1000x650 Mark Set still selected, click the duplicate button above the column and name the duplicate set 1000x650 Gray.
For this Mark Set, set the second condition so it is used for parts to be rendered with one color:
$press_sheet.side.process_colors
equals
1
8 In the Marks list, highlight the ApogeeColorbar.pdf and on the Attributes tab, browse to the ApogeeColorbar_Gray.pdf file you imported earlier in the Marks resource.
Sample
180
:Apogee Impose Tutorial
Understanding Number-Up Binding Options
When you choose a number-up binding option, :Apogee Impose automatically flows the pages onto bindery signatures that consist of several book signatures. The number-up option you choose depends on your folding and binding equipment.
The bindery signature produced for a number-up imposition may contain identical book signatures (regular number-up) or different book signatures (Come & Go). In both cases, the bindery signatures are first folded, bound along a common edge, assembled, and subsequently cut to create multiple units of the same product.
With :Apogee Impose you can have 2 or 3 book signatures on a single bindery signature and also choose the page arrangement, Foot to Foot, or Head to Head. In addition, you can choose a reversed Come & Go binding if the lowest page of the book signature is not to be positioned along the closed, jogging edge of the signature.
You can create the Folding Scheme manually from a folding dummy or choose a standard folding sequence. In these lessons we use standard Folding Schemes.
14 NUMBER-UP BINDING 181
:Apogee Impose Tutorial
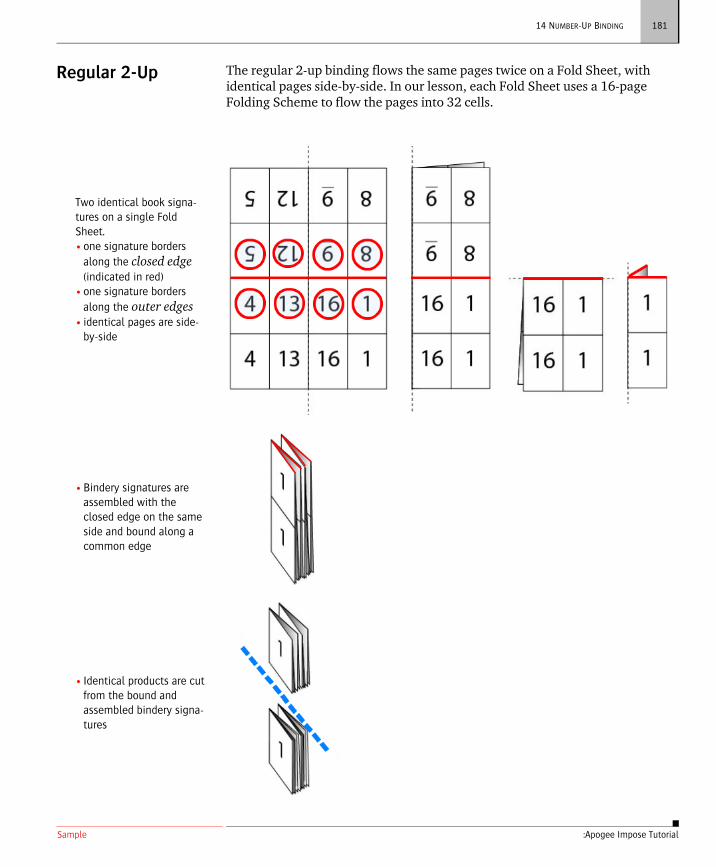
Regular 2-Up The regular 2-up binding flows the same pages twice on a Fold Sheet, with identical pages side-by-side. In our lesson, each Fold Sheet uses a 16-page Folding Scheme to flow the pages into 32 cells.
Two identical book signa-tures on a single Fold Sheet.• one signature borders
along the closed edge (indicated in red)
• one signature borders
along the outer edges• identical pages are side-
by-side
•Bindery signatures are assembled with the closed edge on the same side and bound along a common edge
• Identical products are cut from the bound and assembled bindery signa-tures
Sample
202
:Apogee Impose Tutorial
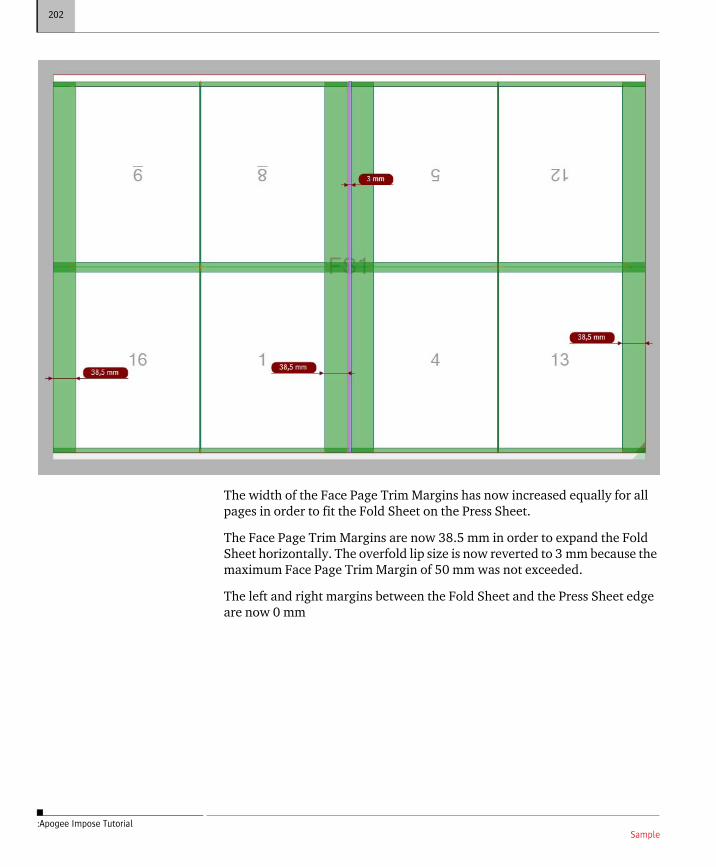
The width of the Face Page Trim Margins has now increased equally for all pages in order to fit the Fold Sheet on the Press Sheet.
The Face Page Trim Margins are now 38.5 mm in order to expand the Fold Sheet horizontally. The overfold lip size is now reverted to 3 mm because the maximum Face Page Trim Margin of 50 mm was not exceeded.
The left and right margins between the Fold Sheet and the Press Sheet edge are now 0 mm
Sample
15 FOLD SHEET FITTING 203
:Apogee Impose Tutorial
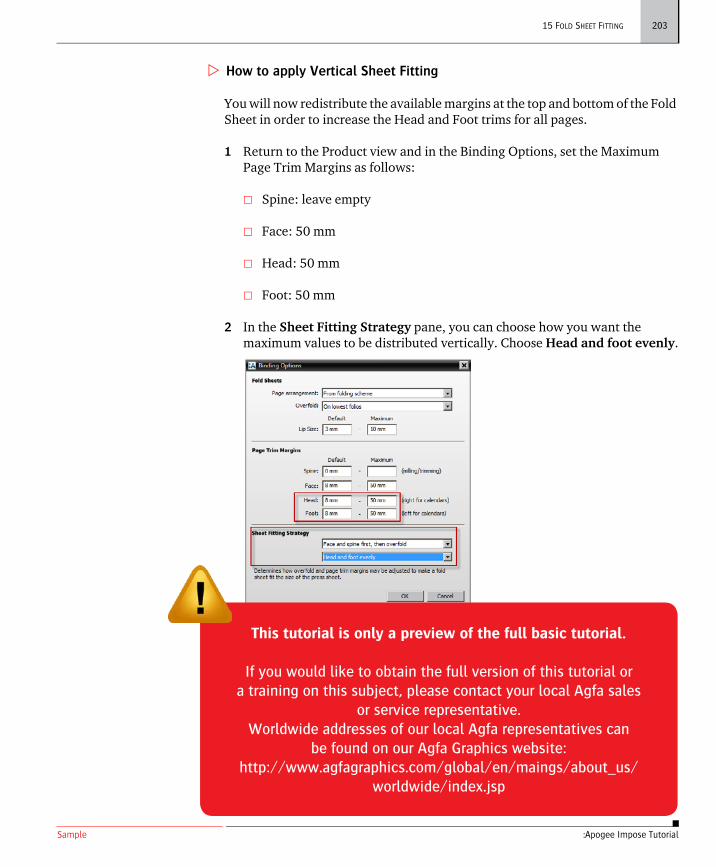
How to apply Vertical Sheet Fitting
You will now redistribute the available margins at the top and bottom of the Fold Sheet in order to increase the Head and Foot trims for all pages.
1 Return to the Product view and in the Binding Options, set the Maximum Page Trim Margins as follows:
Spine: leave empty
Face: 50 mm
Head: 50 mm
Foot: 50 mm
2 In the Sheet Fitting Strategy pane, you can choose how you want the maximum values to be distributed vertically. Choose Head and foot evenly.
This means the Head and Foot Page Trim Margins will be increased evenly until the Fold Sheet fills the Press Sheet and until the maximum Head and Foot Page Trim Margins are reached.
3 Click OK.
4 With the Press Sheet selected, click the grey arrow in the Press Sheet Layout pane of the Inspector to edit the vertical alignment of your custom rule.
In this rule you see that the Vertical Alignment is still set to center the Fold Sheet to the Center of the Press Sheet.
This tutorial is only a preview of the full basic tutorial.
If you would like to obtain the full version of this tutorial ora training on this subject, please contact your local Agfa sales
or service representative.Worldwide addresses of our local Agfa representatives can
be found on our Agfa Graphics website:http://www.agfagraphics.com/global/en/maings/about_us/
worldwide/index.jsp
Related Documents


![Spécifications prépresse Recommandations techniques · 2019. 12. 5. · • Agfa Apogee Prepress 10 [Mac + PC] Imposition • Kodak Preps 5 [Mac] • Agfa Impose 10 [PC] Liste du](https://static.cupdf.com/doc/110x72/609cbf47bdeb626a47090e84/spcifications-prpresse-recommandations-techniques-2019-12-5-a-agfa-apogee.jpg)