4-Stroke engine Dismantling, Maintaining, Repairing and assembling operation (1) Lubrication system (2) Engine dismantling (3) Install Engine (4) Drive pulley, starter, clutch, driven pulley (5) Cylinder head and valve (6) Cylinder and piston (7) AC generator (8) Final transmission mechanism (9) Crankcase, crank shaft (10) Carburetor

Welcome message from author
This document is posted to help you gain knowledge. Please leave a comment to let me know what you think about it! Share it to your friends and learn new things together.
Transcript

4-Stroke engine Dismantling, Maintaining, Repairing and assembling operation
(1) Lubrication system
(2) Engine dismantling
(3) Install Engine
(4) Drive pulley, starter, clutch, driven pulley
(5) Cylinder head and valve
(6) Cylinder and piston
(7) AC generator
(8) Final transmission mechanism
(9) Crankcase, crank shaft
(10) Carburetor
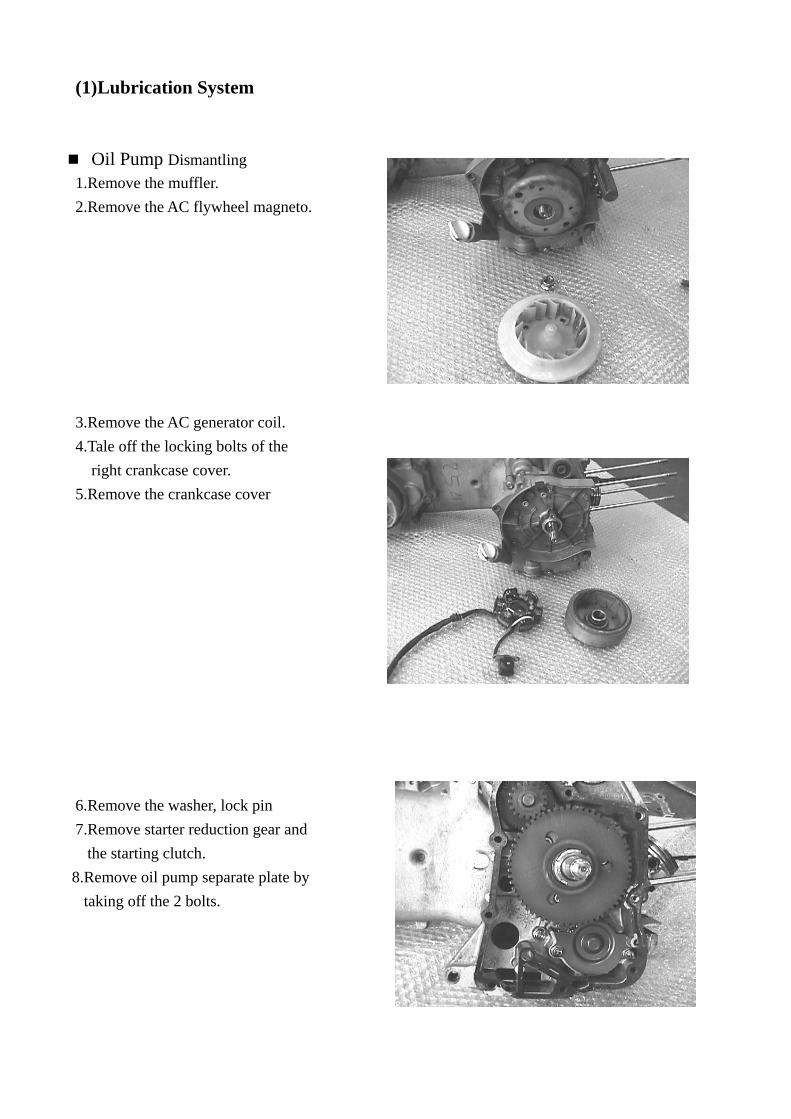
(1) Lubrication System Oil Pump Dismantling 1.Remove the muffler. 2.Remove the AC flywheel magneto. 3.Remove the AC generator coil. 4.Tale off the locking bolts of the right crankcase cover. 5.Remove the crankcase cover 6.Remove the washer, lock pin 7.Remove starter reduction gear and
the starting clutch. 8.Remove oil pump separate plate by
taking off the 2 bolts.

9.Remove the bolts from oil pump driving gear
10.Take off the driving gear and chain. 11.Remove the oil pump by taking off the locking bolt of the oil pump.
Oil pump Assembly 1.Install the inner and outer of the oil pump. 2.Install the oil pump shaft. 3.Install the lock pin. 4.Match the lock pin hole to the pump cover
and install the oil pump cover. 5.Put on the screws and tighten them. 6.After installing, turn the shaft lightly to assure installation. 7.Place the oil pump into the crankcase. 8.Tighten the oil pump after installation.
Note: The notch of the oil pump shaft should complyWith the notch of the inner gear.
Note: When installing, the arrow on the oil pump body should be pointed upwards. Then fill in the recommended oil before the installation.
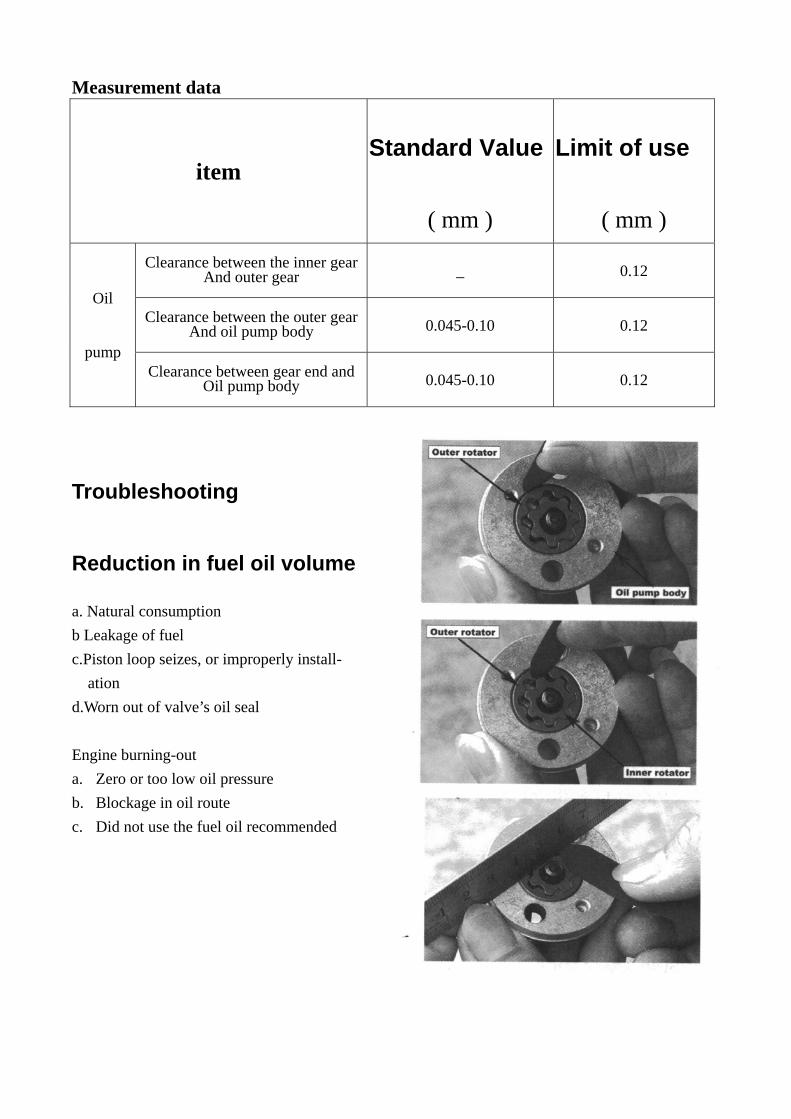
Measurement data
item Standard Value
( mm )
Limit of use
( mm )
Clearance between the inner gearAnd outer gear _ 0.12
Clearance between the outer gearAnd oil pump body 0.045-0.10 0.12
Oil
pump Clearance between gear end and
Oil pump body 0.045-0.10 0.12
Troubleshooting
Reduction in fuel oil volume
a. Natural consumption b Leakage of fuel c.Piston loop seizes, or improperly install- ation d.Worn out of valve’s oil seal Engine burning-out a. Zero or too low oil pressure b. Blockage in oil route c. Did not use the fuel oil recommended
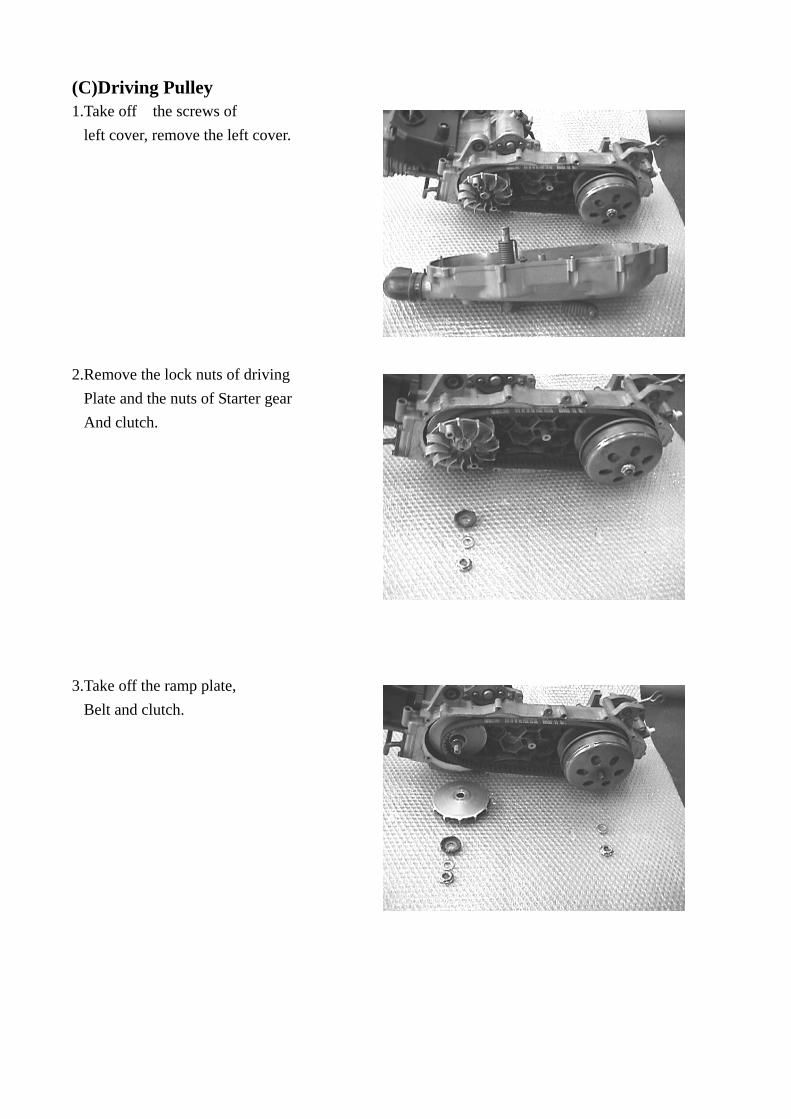
(C)Driving Pulley 1.Take off the screws of
left cover, remove the left cover. 2.Remove the lock nuts of driving
Plate and the nuts of Starter gear And clutch.
3.Take off the ramp plate,
Belt and clutch.
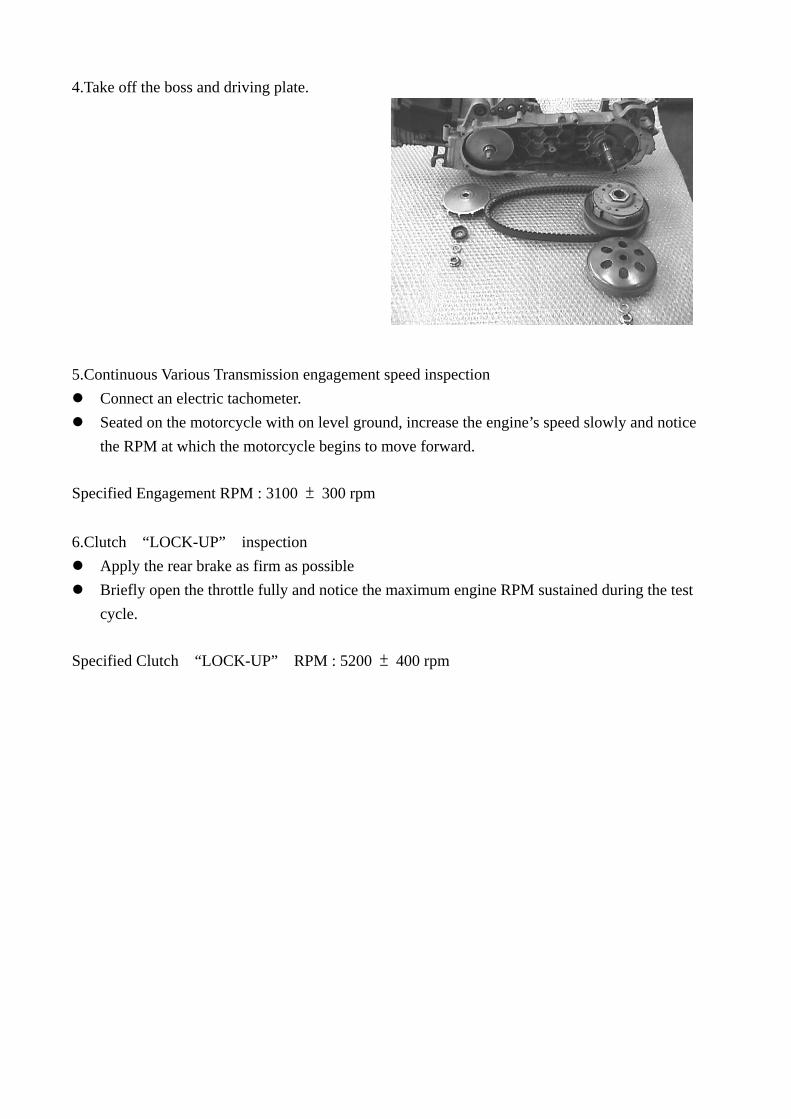
4.Take off the boss and driving plate. 5.Continuous Various Transmission engagement speed inspection
Connect an electric tachometer. Seated on the motorcycle with on level ground, increase the engine’s speed slowly and notice
the RPM at which the motorcycle begins to move forward. Specified Engagement RPM : 3100 ± 300 rpm 6.Clutch “LOCK-UP” inspection
Apply the rear brake as firm as possible Briefly open the throttle fully and notice the maximum engine RPM sustained during the test
cycle. Specified Clutch “LOCK-UP” RPM : 5200 ± 400 rpm
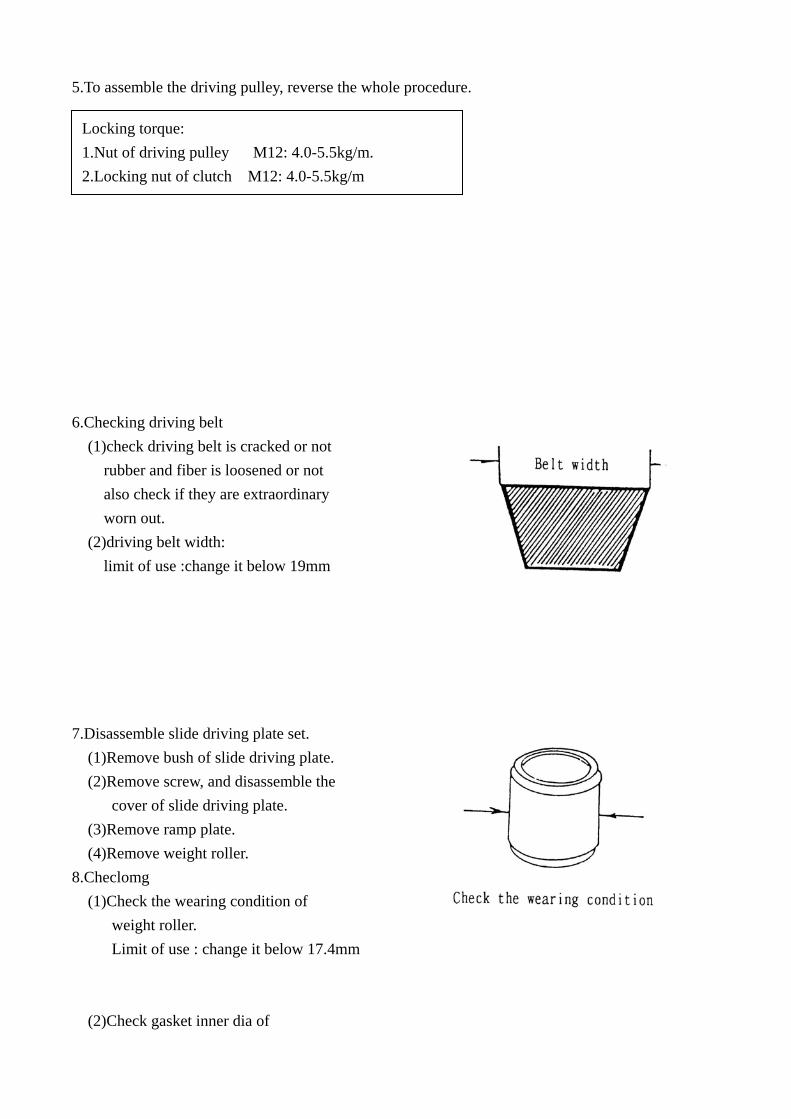
5.To assemble the driving pulley, reverse the whole procedure. 6.Checking driving belt (1)check driving belt is cracked or not rubber and fiber is loosened or not also check if they are extraordinary worn out. (2)driving belt width: limit of use :change it below 19mm 7.Disassemble slide driving plate set.
(1)Remove bush of slide driving plate. (2)Remove screw, and disassemble the cover of slide driving plate.
(3)Remove ramp plate. (4)Remove weight roller. 8.Checlomg
(1)Check the wearing condition of weight roller. Limit of use : change it below 17.4mm
(2)Check gasket inner dia of
Locking torque: 1.Nut of driving pulley M12: 4.0-5.5kg/m. 2.Locking nut of clutch M12: 4.0-5.5kg/m
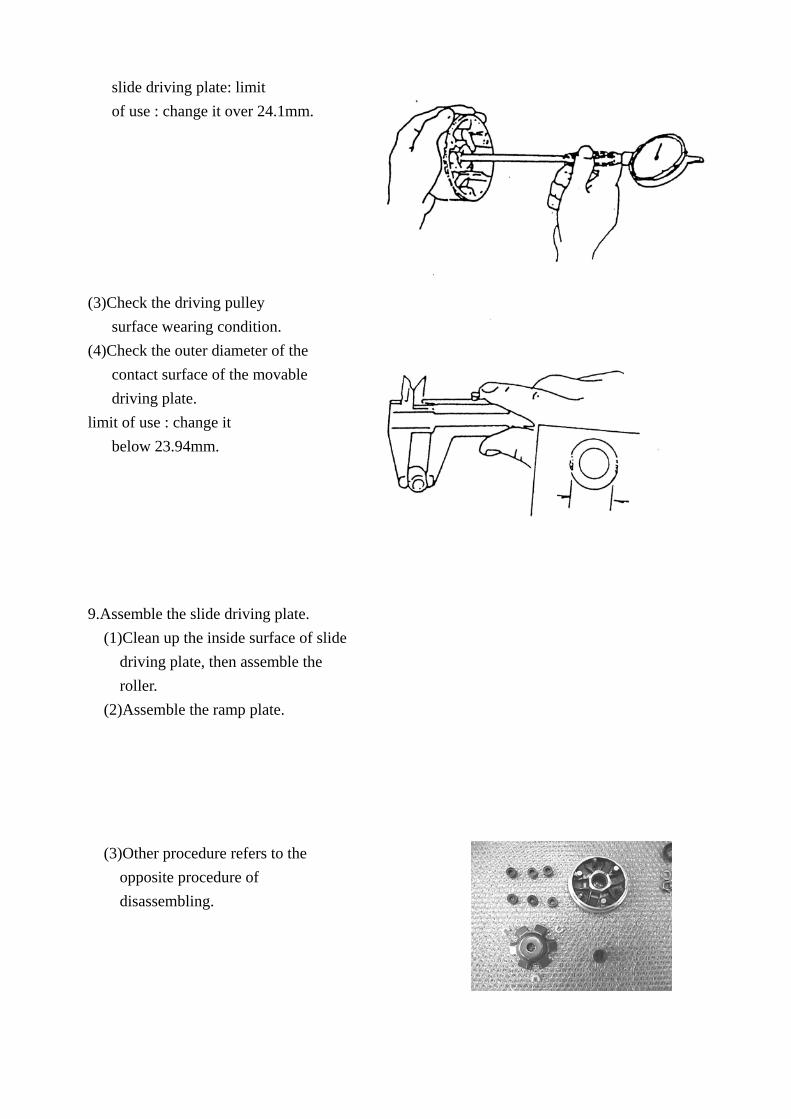
slide driving plate: limit of use : change it over 24.1mm. (3)Check the driving pulley surface wearing condition. (4)Check the outer diameter of the contact surface of the movable driving plate. limit of use : change it below 23.94mm. 9.Assemble the slide driving plate. (1)Clean up the inside surface of slide driving plate, then assemble the roller. (2)Assemble the ramp plate. (3)Other procedure refers to the opposite procedure of disassembling.
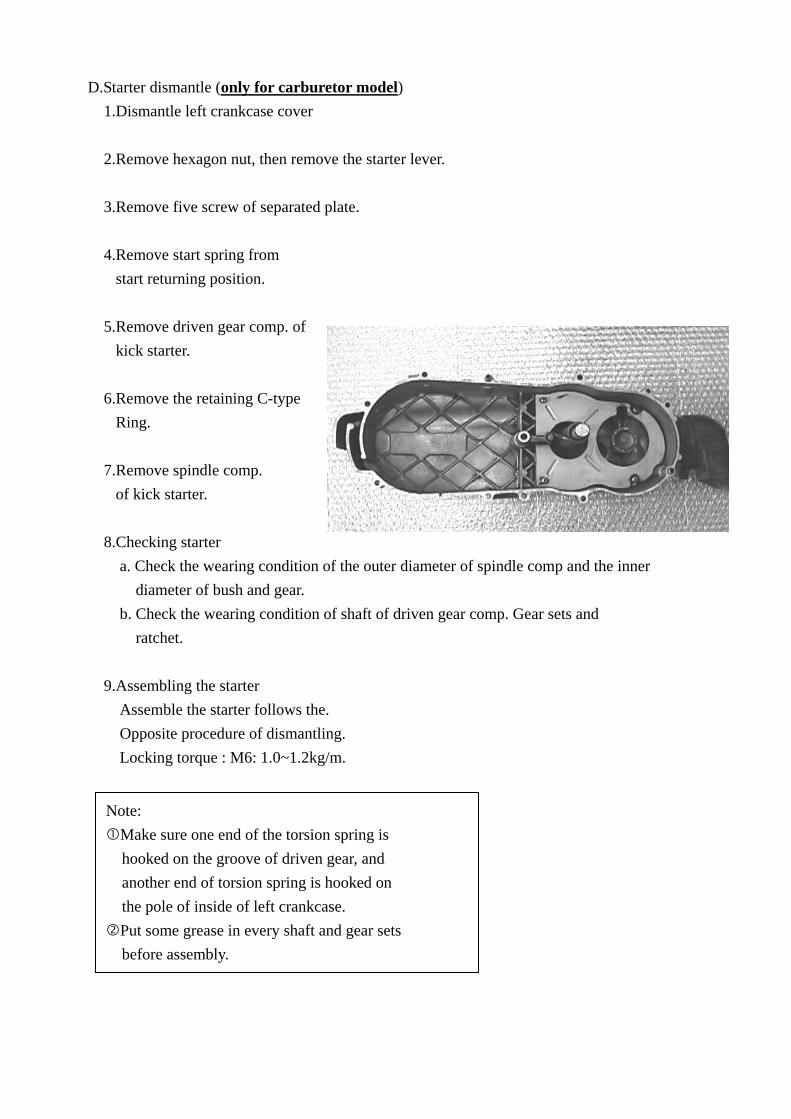
D.Starter dismantle (only for carburetor model) 1.Dismantle left crankcase cover 2.Remove hexagon nut, then remove the starter lever.
3.Remove five screw of separated plate.
4.Remove start spring from
start returning position.
5.Remove driven gear comp. of kick starter.
6.Remove the retaining C-type
Ring.
7.Remove spindle comp. of kick starter.
8.Checking starter
a. Check the wearing condition of the outer diameter of spindle comp and the inner diameter of bush and gear. b. Check the wearing condition of shaft of driven gear comp. Gear sets and ratchet. 9.Assembling the starter Assemble the starter follows the. Opposite procedure of dismantling. Locking torque : M6: 1.0~1.2kg/m.
Note: Make sure one end of the torsion spring is
hooked on the groove of driven gear, and another end of torsion spring is hooked on the pole of inside of left crankcase.
Put some grease in every shaft and gear sets before assembly.
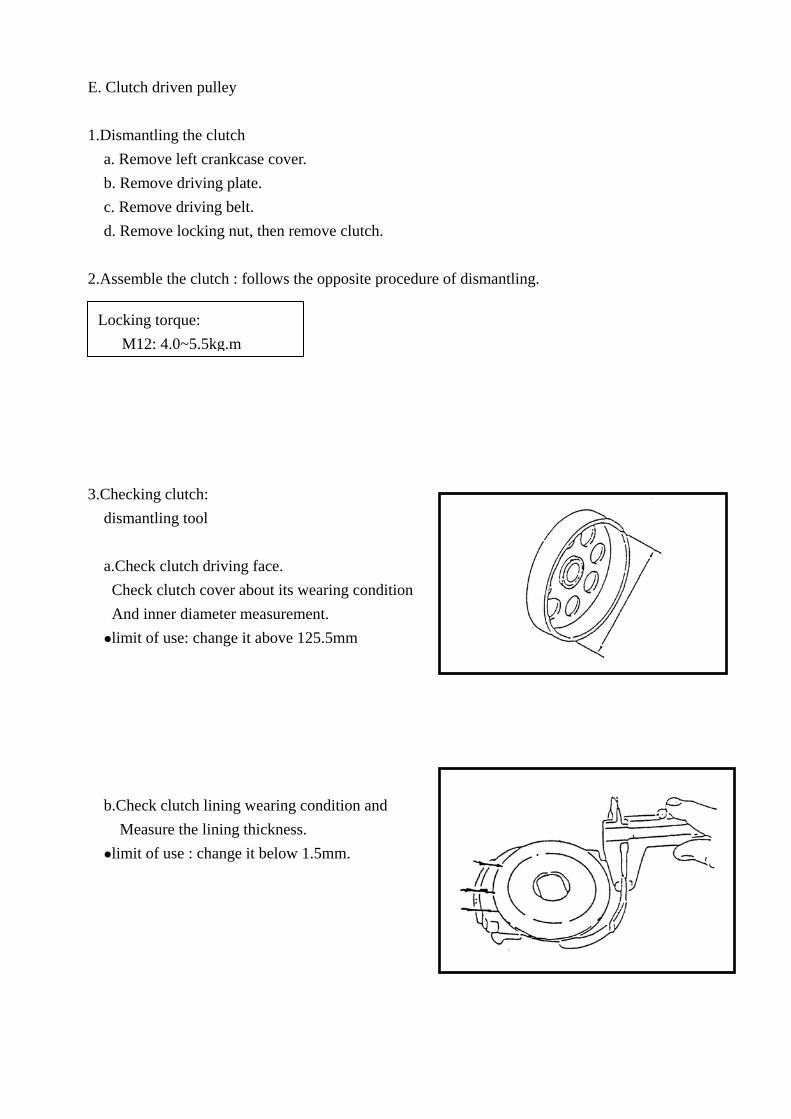
E. Clutch driven pulley 1.Dismantling the clutch a. Remove left crankcase cover. b. Remove driving plate. c. Remove driving belt. d. Remove locking nut, then remove clutch. 2.Assemble the clutch : follows the opposite procedure of dismantling. 3.Checking clutch: dismantling tool a.Check clutch driving face. Check clutch cover about its wearing condition And inner diameter measurement. limit of use: change it above 125.5mm b.Check clutch lining wearing condition and Measure the lining thickness. limit of use : change it below 1.5mm.
Locking torque: M12: 4.0~5.5kg.m
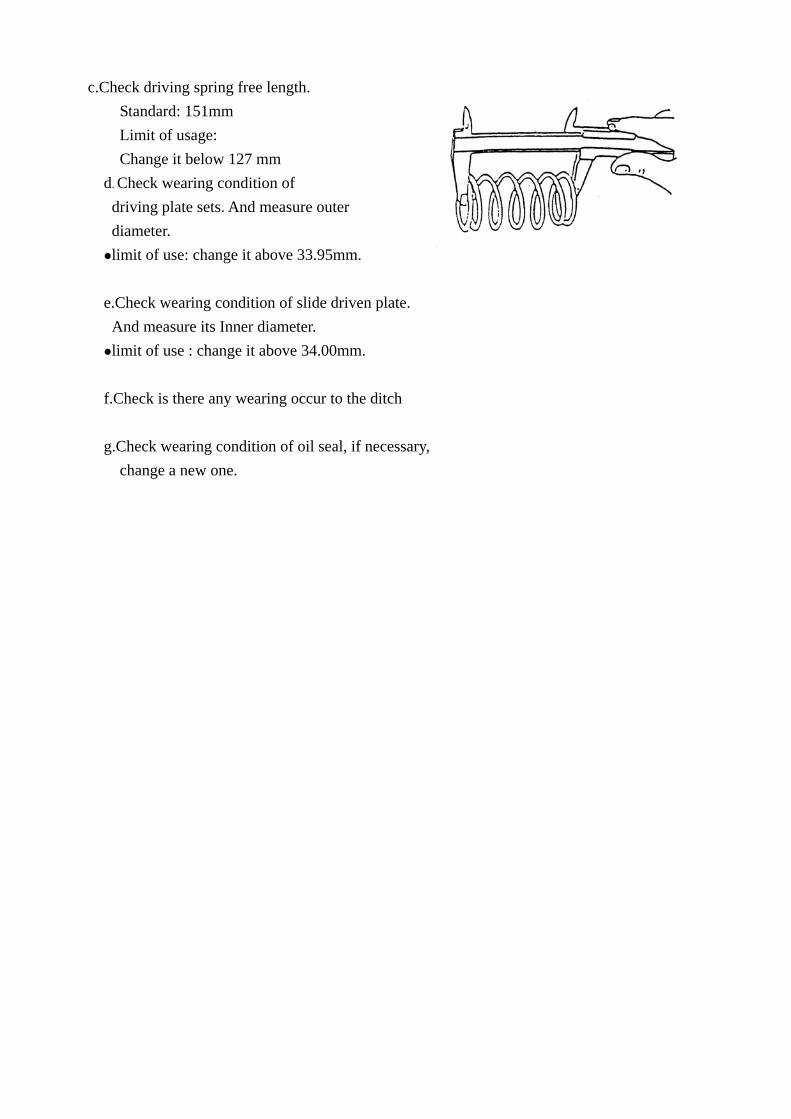
c.Check driving spring free length. Standard: 151mm Limit of usage: Change it below 127 mm
d. Check wearing condition of driving plate sets. And measure outer diameter. limit of use: change it above 33.95mm. e.Check wearing condition of slide driven plate. And measure its Inner diameter. limit of use : change it above 34.00mm. f.Check is there any wearing occur to the ditch g.Check wearing condition of oil seal, if necessary, change a new one.

Cylinder head and valve A.Troubleshooting B.The operation data information C.Dismantling and installing
Cylinder head and valve (BF-150/BF2-150)
1 HEAD COMP. CYLINDER 19 "CAM,SHAFT ASSY." 2 "GUIDE,EXH VALVE " 20 "SHAFT,EX.ROCKER ARM" 3 O-RING 21 VALVE RXKER ARM 4 "GUIDE,IN VALVE " 22 SCREW TOPPED ADJUSTER 5 VALVE EXHAUST 23 HEXAGON NUT 6 VALVE INLET 24 "SHAFT,EX.ROCKER ARM " 7 GASKET HEAD CYL. 25 LOCK PIN 8 LOCK PIN (D10*14L) 26 CAMSHAFT HOLDER 9 HEXAGON FLANGE BOLT 27 PLAIN WASHER 10 STUD BOLT 28 HEXAGON FLANGE NUT 11 STUD BOLT 29 CYL.HEAD COVER COMP. 12 INSULATOR CARB GASKET 30 CYL.HEAD COVER 13 INSULATOR CARB 31 "PACKING,CYL. HEAD COVER " 14 IGNITION PLUG 32 HEXAGON FLANGE BOLT 15 PLAIN WASHER 33 VALVE SEAL 16 "SPRING,VALVE " 34 CLIP 17 RETAIER VALVE SPRING 35 TUBE CYL. COMP. 18 COTTER VALVE
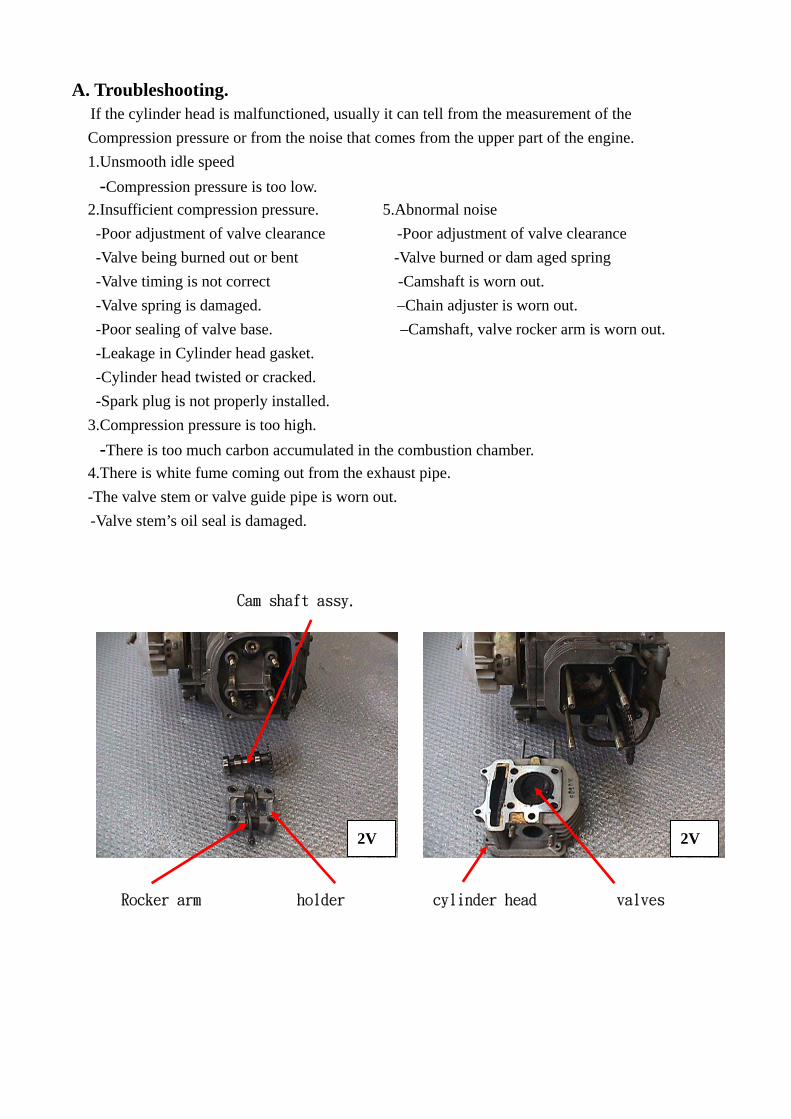
A. Troubleshooting. If the cylinder head is malfunctioned, usually it can tell from the measurement of the Compression pressure or from the noise that comes from the upper part of the engine. 1.Unsmooth idle speed -Compression pressure is too low. 2.Insufficient compression pressure. 5.Abnormal noise -Poor adjustment of valve clearance -Poor adjustment of valve clearance -Valve being burned out or bent -Valve burned or dam aged spring -Valve timing is not correct -Camshaft is worn out. -Valve spring is damaged. –Chain adjuster is worn out. -Poor sealing of valve base. –Camshaft, valve rocker arm is worn out. -Leakage in Cylinder head gasket. -Cylinder head twisted or cracked. -Spark plug is not properly installed. 3.Compression pressure is too high. -There is too much carbon accumulated in the combustion chamber. 4.There is white fume coming out from the exhaust pipe. -The valve stem or valve guide pipe is worn out. -Valve stem’s oil seal is damaged.
Cam shaft assy.
Rocker arm holder cylinder head valves
2V 2V
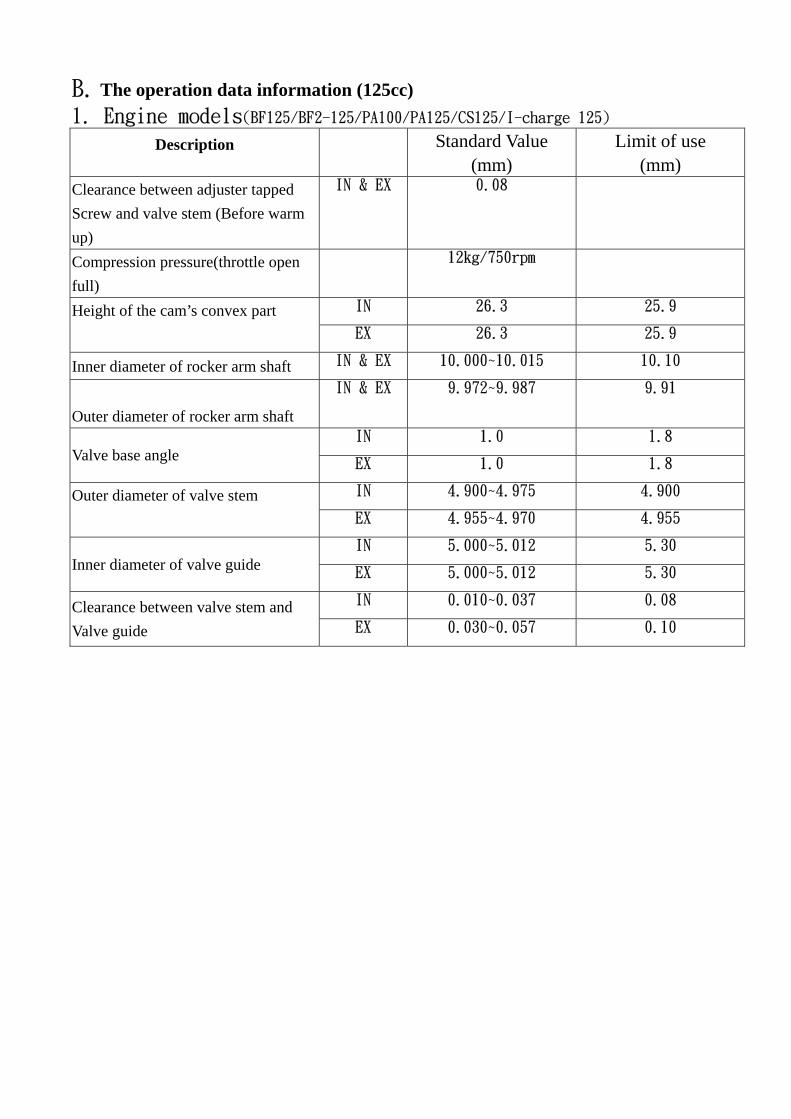
B. The operation data information (125cc) 1. Engine models(BF125/BF2-125/PA100/PA125/CS125/I-charge 125)
Description Standard Value (mm)
Limit of use (mm)
Clearance between adjuster tapped Screw and valve stem (Before warm up)
IN & EX 0.08
Compression pressure(throttle open full)
12kg/750rpm
IN 26.3 25.9 Height of the cam’s convex part EX 26.3 25.9
Inner diameter of rocker arm shaft IN & EX 10.000~10.015 10.10
Outer diameter of rocker arm shaft
IN & EX 9.972~9.987 9.91
IN 1.0 1.8 Valve base angle
EX 1.0 1.8
IN 4.900~4.975 4.900 Outer diameter of valve stem EX 4.955~4.970 4.955
IN 5.000~5.012 5.30 Inner diameter of valve guide EX 5.000~5.012 5.30
IN 0.010~0.037 0.08 Clearance between valve stem and Valve guide EX 0.030~0.057 0.10

2. Engine models(M2-150-2V / CP150)
Description Standard Value (mm)
Limit of use (mm)
Clearance between adjuster tapped Screw and valve stem (Before warm up)
IN & EX 0.08
Compression pressure(throttle open full)
11kg/650rpm
IN 26.625 26.230 Height of the cam’s convex part EX 26.530 26.130
Inner diameter of rocker arm shaft IN & EX 10.000~10.015 10.10
Outer diameter of rocker arm shaft
IN & EX 9.972~9.987 9.91
IN 1.0 1.8 Valve base angle
EX 1.0 1.8
IN 4.900~4.975 4.900 Outer diameter of valve stem EX 4.955~4.970 4.955
IN 5.000~5.012 5.30 Inner diameter of valve guide EX 5.000~5.012 5.30
IN 0.010~0.037 0.080 Clearance between valve stem and Valve guide EX 0.030~0.057 0.100
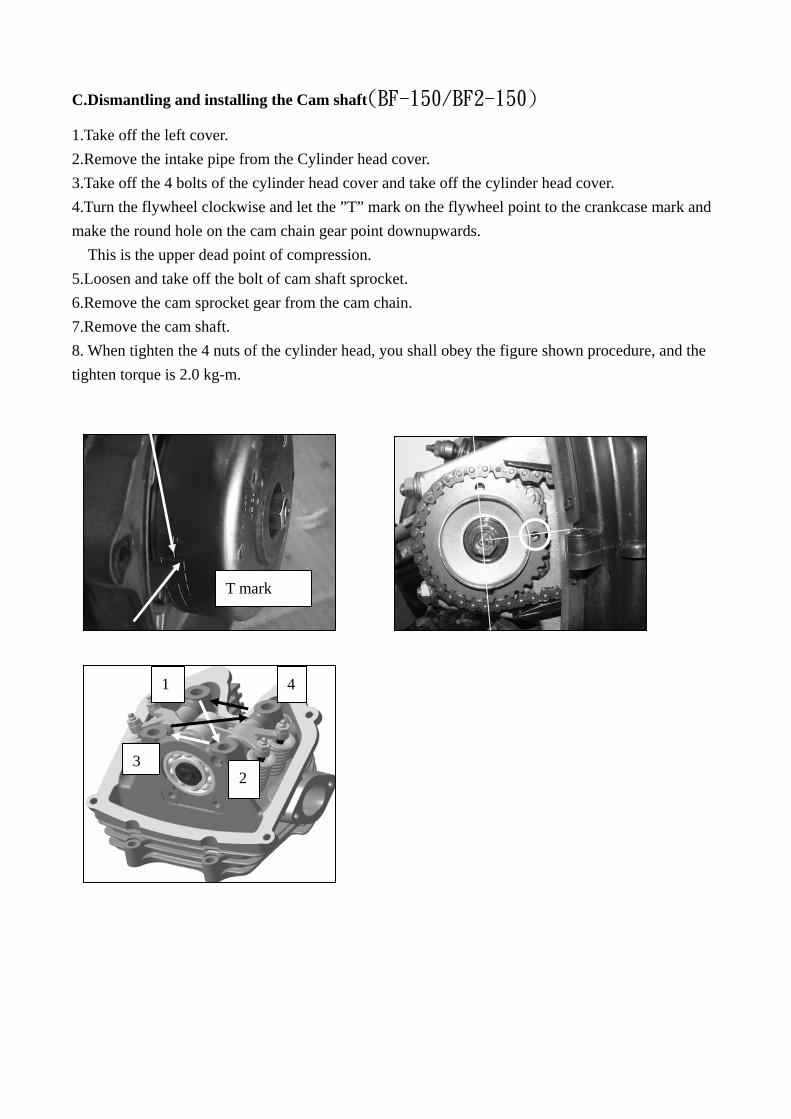
C.Dismantling and installing the Cam shaft(BF-150/BF2-150)
1.Take off the left cover. 2.Remove the intake pipe from the Cylinder head cover. 3.Take off the 4 bolts of the cylinder head cover and take off the cylinder head cover. 4.Turn the flywheel clockwise and let the ”T” mark on the flywheel point to the crankcase mark and make the round hole on the cam chain gear point downupwards. This is the upper dead point of compression. 5.Loosen and take off the bolt of cam shaft sprocket. 6.Remove the cam sprocket gear from the cam chain. 7.Remove the cam shaft. 8. When tighten the 4 nuts of the cylinder head, you shall obey the figure shown procedure, and the tighten torque is 2.0 kg-m.
1
23
4
T mark
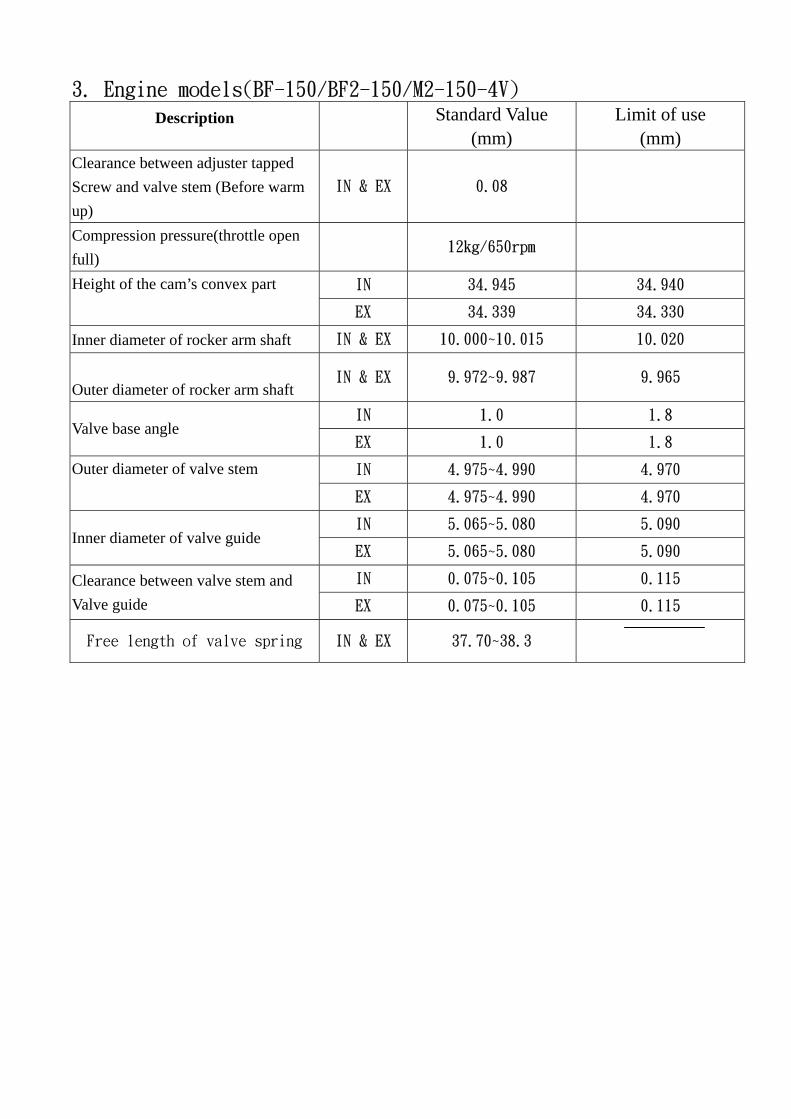
3. Engine models(BF-150/BF2-150/M2-150-4V)
Description Standard Value (mm)
Limit of use (mm)
Clearance between adjuster tapped Screw and valve stem (Before warm up)
IN & EX 0.08
Compression pressure(throttle open full)
12kg/650rpm
IN 34.945 34.940 Height of the cam’s convex part
EX 34.339 34.330
Inner diameter of rocker arm shaft IN & EX 10.000~10.015 10.020
Outer diameter of rocker arm shaft
IN & EX 9.972~9.987 9.965
IN 1.0 1.8 Valve base angle
EX 1.0 1.8
IN 4.975~4.990 4.970 Outer diameter of valve stem EX 4.975~4.990 4.970
IN 5.065~5.080 5.090 Inner diameter of valve guide
EX 5.065~5.080 5.090
IN 0.075~0.105 0.115 Clearance between valve stem and Valve guide EX 0.075~0.105 0.115
Free length of valve spring IN & EX 37.70~38.3

(6)Cylinder and piston
A.Trouble shooting
B.The Operation notice
C.Data
D.Dismaniling cylinder, piston
E.Installing cylinder, piston
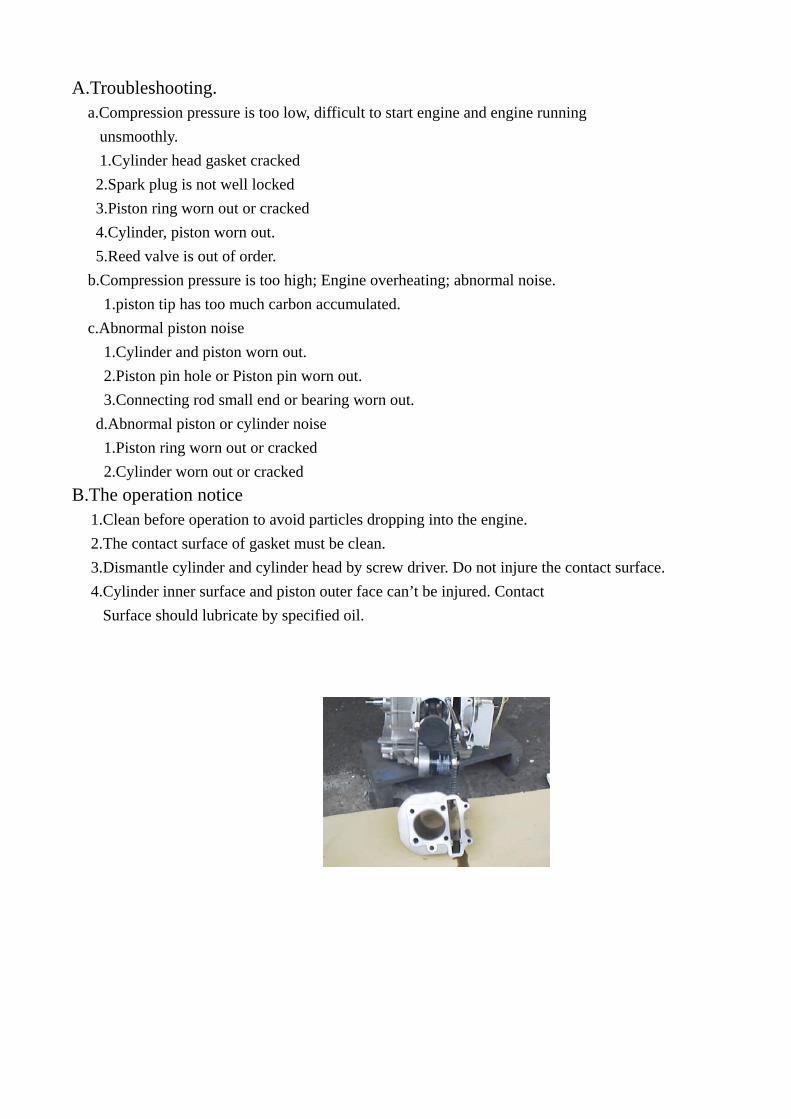
A.Troubleshooting. a.Compression pressure is too low, difficult to start engine and engine running unsmoothly. 1.Cylinder head gasket cracked 2.Spark plug is not well locked 3.Piston ring worn out or cracked 4.Cylinder, piston worn out. 5.Reed valve is out of order. b.Compression pressure is too high; Engine overheating; abnormal noise. 1.piston tip has too much carbon accumulated. c.Abnormal piston noise 1.Cylinder and piston worn out. 2.Piston pin hole or Piston pin worn out. 3.Connecting rod small end or bearing worn out. d.Abnormal piston or cylinder noise 1.Piston ring worn out or cracked 2.Cylinder worn out or cracked B.The operation notice
1.Clean before operation to avoid particles dropping into the engine. 2.The contact surface of gasket must be clean. 3.Dismantle cylinder and cylinder head by screw driver. Do not injure the contact surface. 4.Cylinder inner surface and piston outer face can’t be injured. Contact
Surface should lubricate by specified oil.
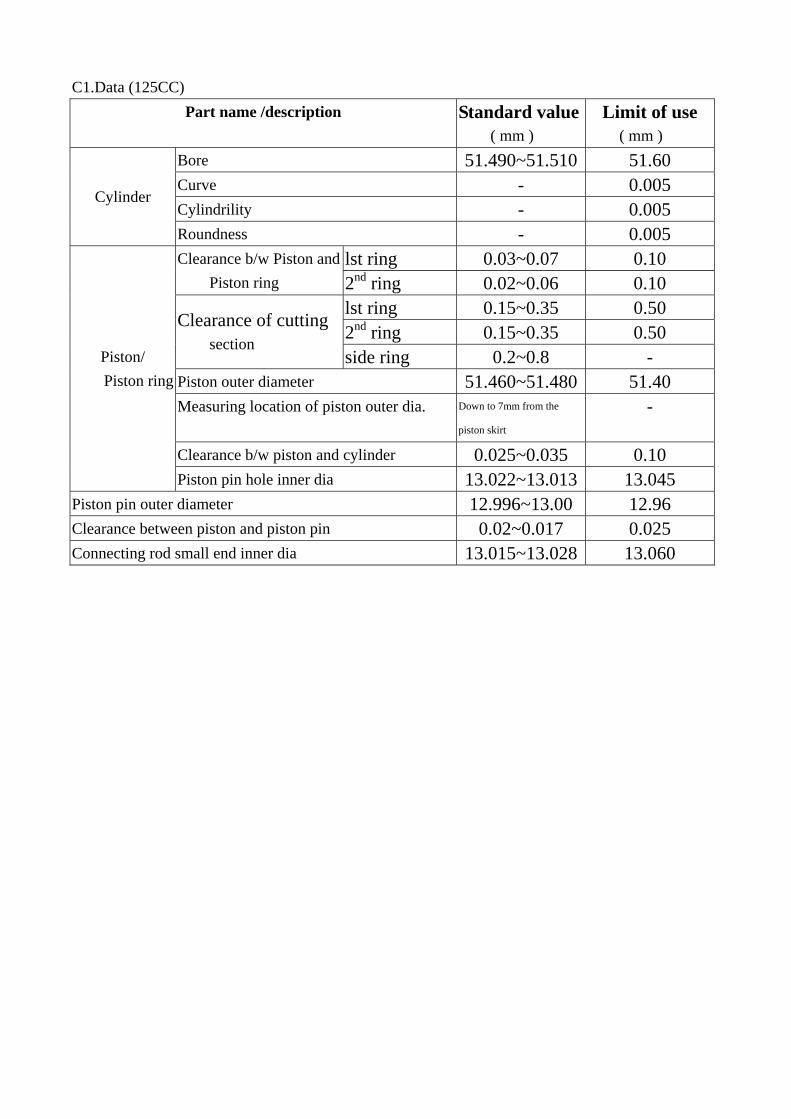
C1.Data (125CC) Part name /description Standard value
( mm ) Limit of use
( mm ) Bore 51.490~51.510 51.60 Curve - 0.005 Cylindrility - 0.005
Cylinder
Roundness - 0.005 lst ring 0.03~0.07 0.10 Clearance b/w Piston and
Piston ring 2nd ring 0.02~0.06 0.10 lst ring 0.15~0.35 0.50 2nd ring 0.15~0.35 0.50
Clearance of cutting section
side ring 0.2~0.8 - Piston outer diameter 51.460~51.480 51.40 Measuring location of piston outer dia. Down to 7mm from the
piston skirt
-
Clearance b/w piston and cylinder 0.025~0.035 0.10
Piston/ Piston ring
Piston pin hole inner dia 13.022~13.013 13.045 Piston pin outer diameter 12.996~13.00 12.96 Clearance between piston and piston pin 0.02~0.017 0.025 Connecting rod small end inner dia 13.015~13.028 13.060
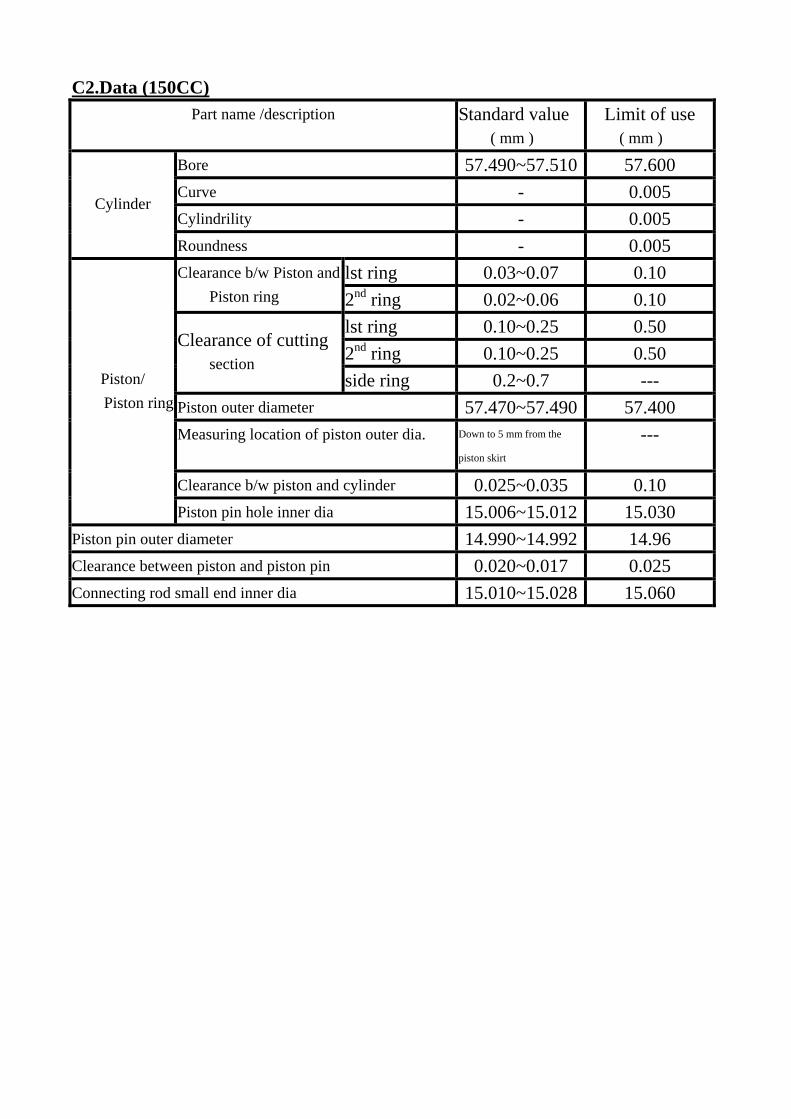
C2.Data (150CC) Part name /description Standard value
( mm ) Limit of use
( mm )
Bore 57.490~57.510 57.600 Curve - 0.005 Cylindrility - 0.005
Cylinder
Roundness - 0.005 lst ring 0.03~0.07 0.10 Clearance b/w Piston and
Piston ring 2nd ring 0.02~0.06 0.10 lst ring 0.10~0.25 0.50 2nd ring 0.10~0.25 0.50
Clearance of cutting section
side ring 0.2~0.7 --- Piston outer diameter 57.470~57.490 57.400 Measuring location of piston outer dia. Down to 5 mm from the
piston skirt
---
Clearance b/w piston and cylinder 0.025~0.035 0.10
Piston/ Piston ring
Piston pin hole inner dia 15.006~15.012 15.030 Piston pin outer diameter 14.990~14.992 14.96 Clearance between piston and piston pin 0.020~0.017 0.025 Connecting rod small end inner dia 15.010~15.028 15.060
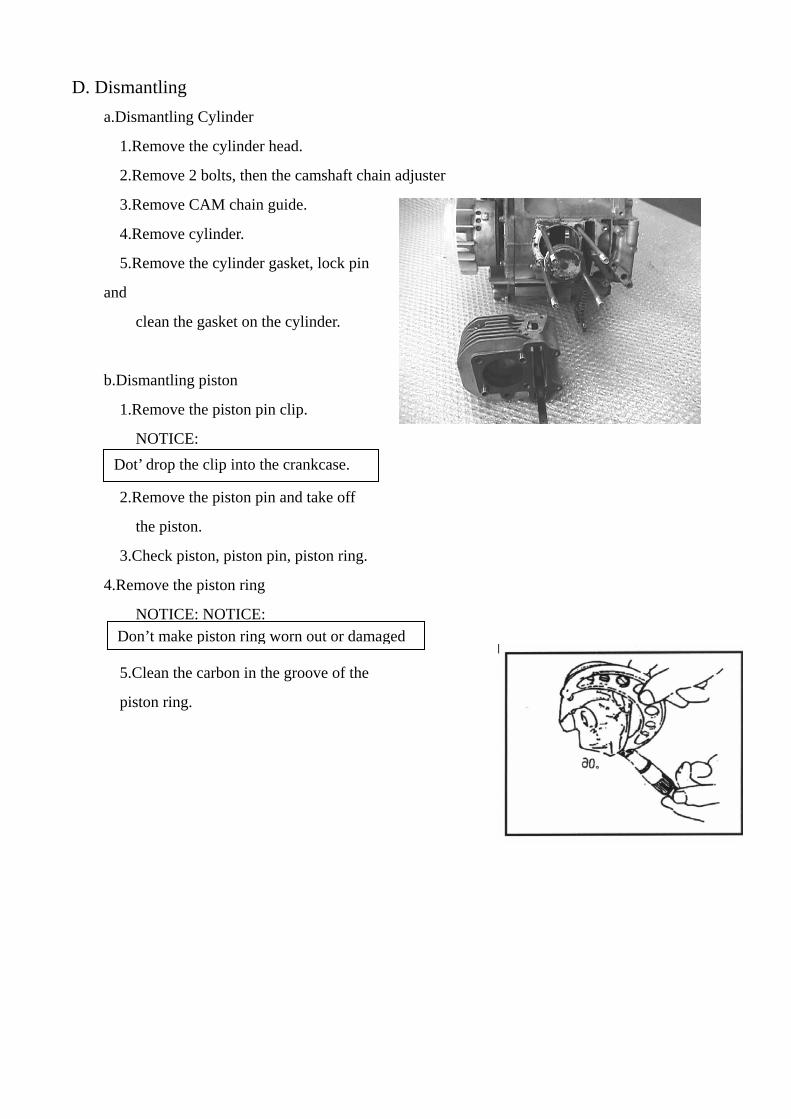
D. Dismantling a.Dismantling Cylinder
1.Remove the cylinder head.
2.Remove 2 bolts, then the camshaft chain adjuster
3.Remove CAM chain guide.
4.Remove cylinder.
5.Remove the cylinder gasket, lock pin
and
clean the gasket on the cylinder.
b.Dismantling piston
1.Remove the piston pin clip.
NOTICE:
2.Remove the piston pin and take off
the piston.
3.Check piston, piston pin, piston ring.
4.Remove the piston ring
NOTICE: NOTICE:
5.Clean the carbon in the groove of the
piston ring.
Dot’ drop the clip into the crankcase.
Don’t make piston ring worn out or damaged
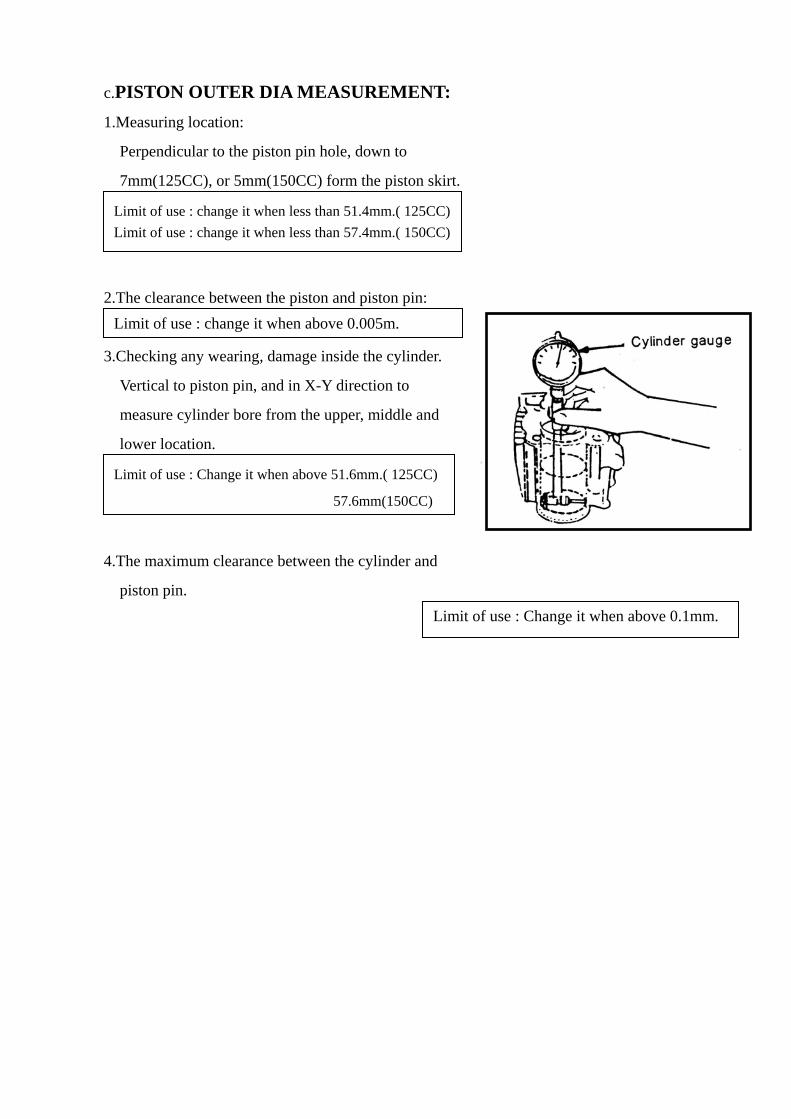
c.PISTON OUTER DIA MEASUREMENT: 1.Measuring location:
Perpendicular to the piston pin hole, down to
7mm(125CC), or 5mm(150CC) form the piston skirt.
2.The clearance between the piston and piston pin:
3.Checking any wearing, damage inside the cylinder.
Vertical to piston pin, and in X-Y direction to
measure cylinder bore from the upper, middle and
lower location.
4.The maximum clearance between the cylinder and
piston pin.
Limit of use : change it when less than 51.4mm.( 125CC)Limit of use : change it when less than 57.4mm.( 150CC)
Limit of use : change it when above 0.005m.
Limit of use : Change it when above 51.6mm.( 125CC)
57.6mm(150CC)
Limit of use : Change it when above 0.1mm.
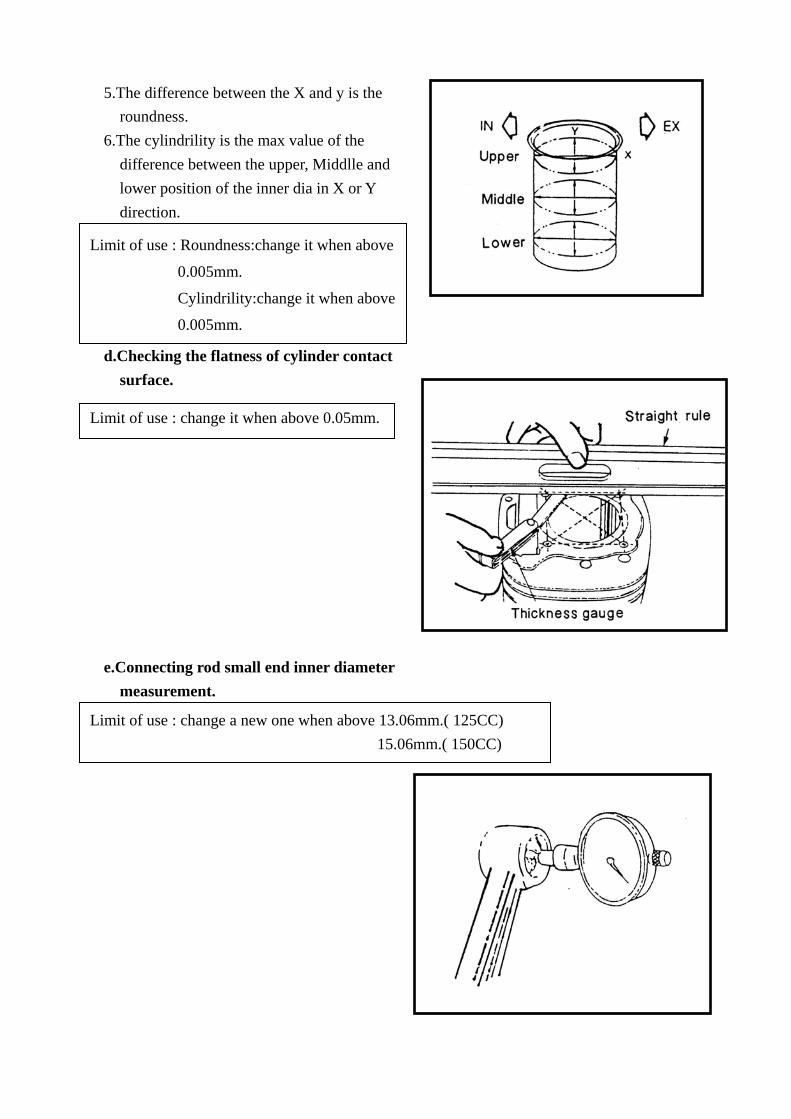
5.The difference between the X and y is the roundness. 6.The cylindrility is the max value of the difference between the upper, Middlle and lower position of the inner dia in X or Y direction. d.Checking the flatness of cylinder contact surface. e.Connecting rod small end inner diameter measurement.
Limit of use : Roundness:change it when above
0.005mm.
Cylindrility:change it when above
0.005mm.
Limit of use : change it when above 0.05mm.
Limit of use : change a new one when above 13.06mm.( 125CC) 15.06mm.( 150CC)

E.Installing Cylinder and piston a.Installing piston and piston rings 1.Lubricate the piston rings by motor oil. NOTICE: a.Be careful not to scratch the piston and not to break the piston ring. b.The mark (on the ring) should be
upward when installing. c.after installing, the ring should be
smoothly rotated. 2.Clean up the residual gasket on the crankcase. 3.Assembly the piston, piston pin and piston pin clip. b.Installing piston 1.Fix the lock pin and gasket on the crankcase. 2.Lubricate the Cylinder inner surface, piston and piston rings by Motor Oil. 3.Install the piston ring into the cylinder carefully.
NOTICE: Do not drop other objects into the crankcase.
NOTICE: a.The mark “IN” on the piston tip should face to the INLET side. b.Do not drop the piston pin clip into the crankcase and to clog the crankcase with rags.
NOTICE: a.The piston ring cannot be damaged or cracked. b.The cutting section of three rings must be arranged at intervals of 120°
Final transmission mechanism
A. Troubleshooting.
B. Dismantle the final transmission mechanism.
C. Check the final transmission mechanism.
D. Assemble the final transmission mechanism. A. Troubleshooting Engine can be started, but the vehicle doesn’t move.
1.Gear worn-out or cracked. 2.Gear burnt out. Noise occur when running.
1.Gear worn out, burnt or gear surface. 2.Bearing worn out of loosen. Oil leakage
1.Too much oil 2.Seal worn out or damaged.
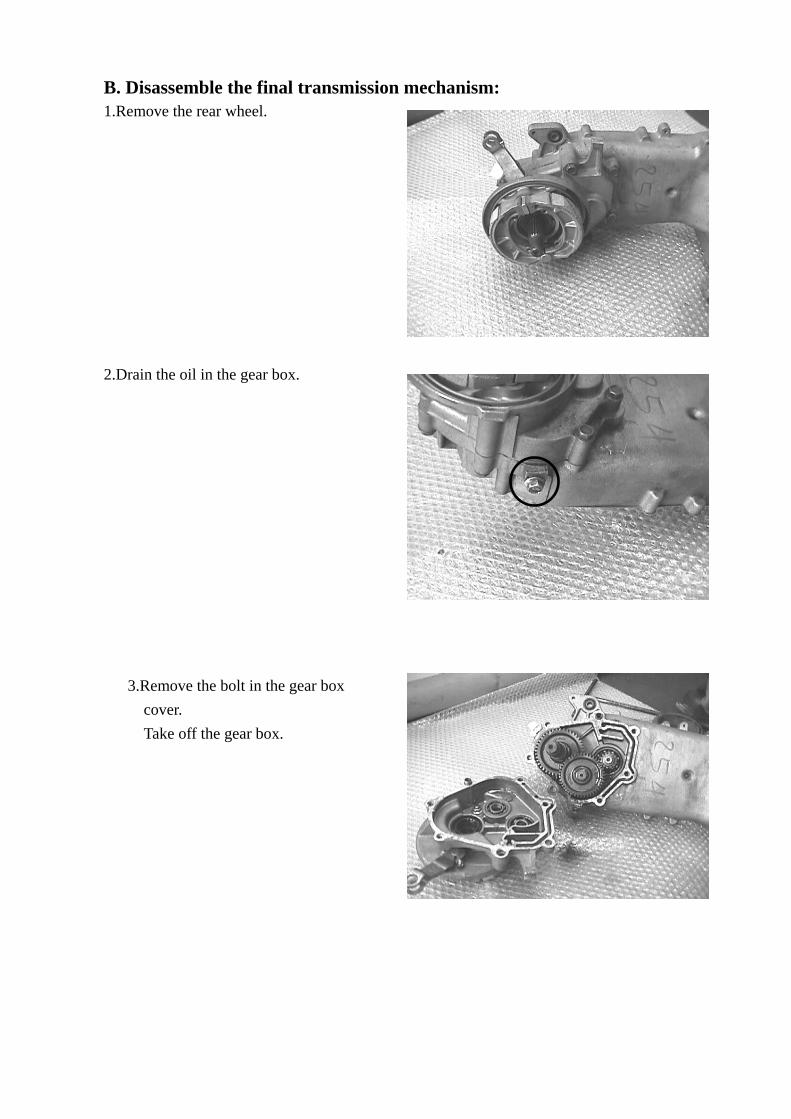
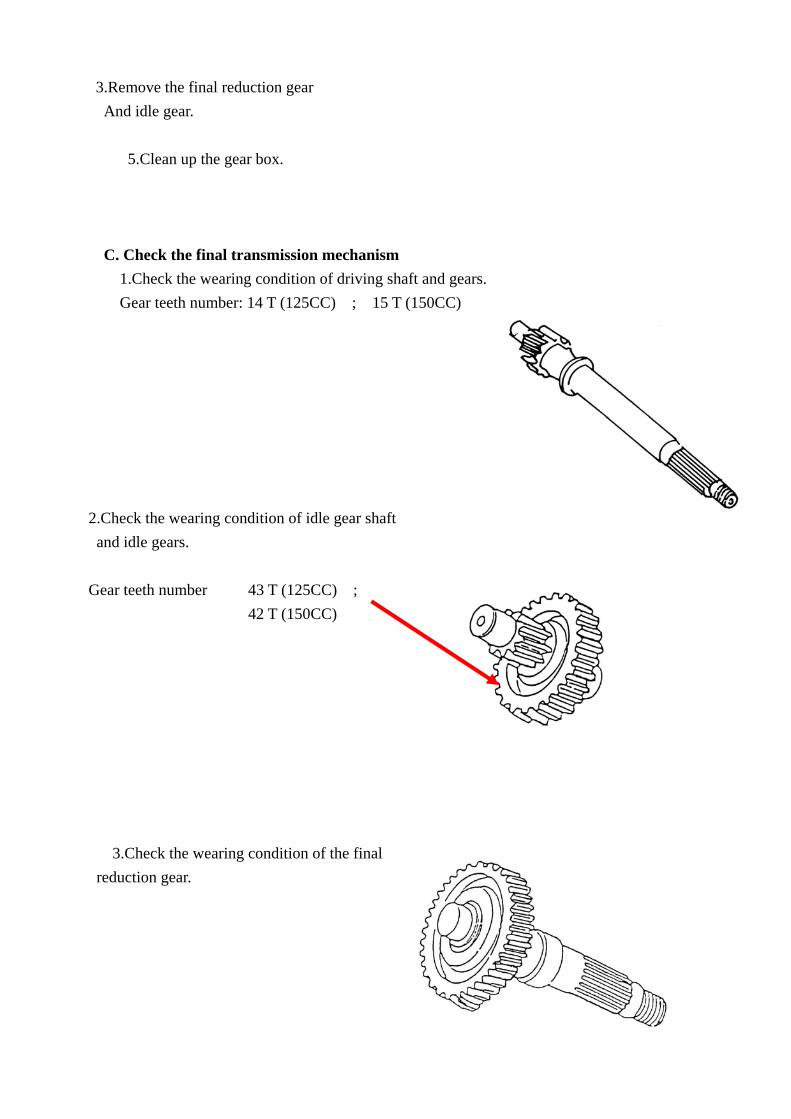
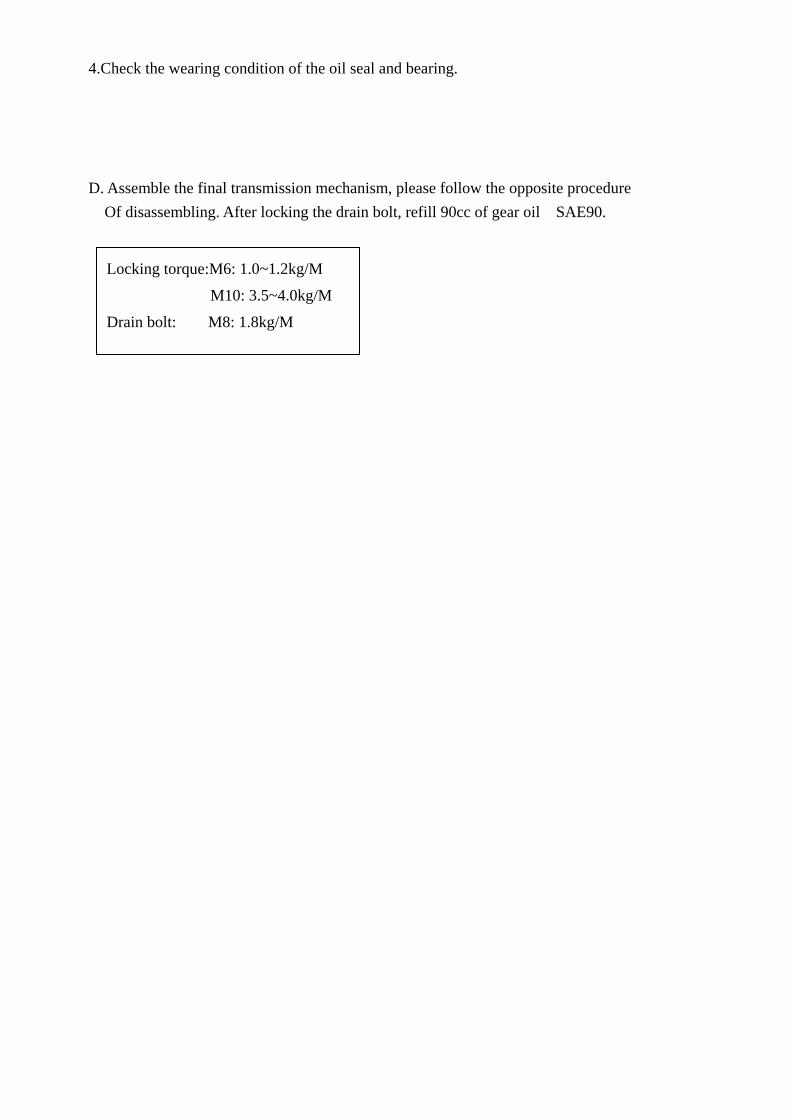
B. Disassemble the final transmission mechanism: 1.Remove the rear wheel. 2.Drain the oil in the gear box. 3.Remove the bolt in the gear box cover. Take off the gear box.
3.Remove the final reduction gear And idle gear. 5.Clean up the gear box. C. Check the final transmission mechanism
1.Check the wearing condition of driving shaft and gears. Gear teeth number: 14 T (125CC) ; 15 T (150CC)
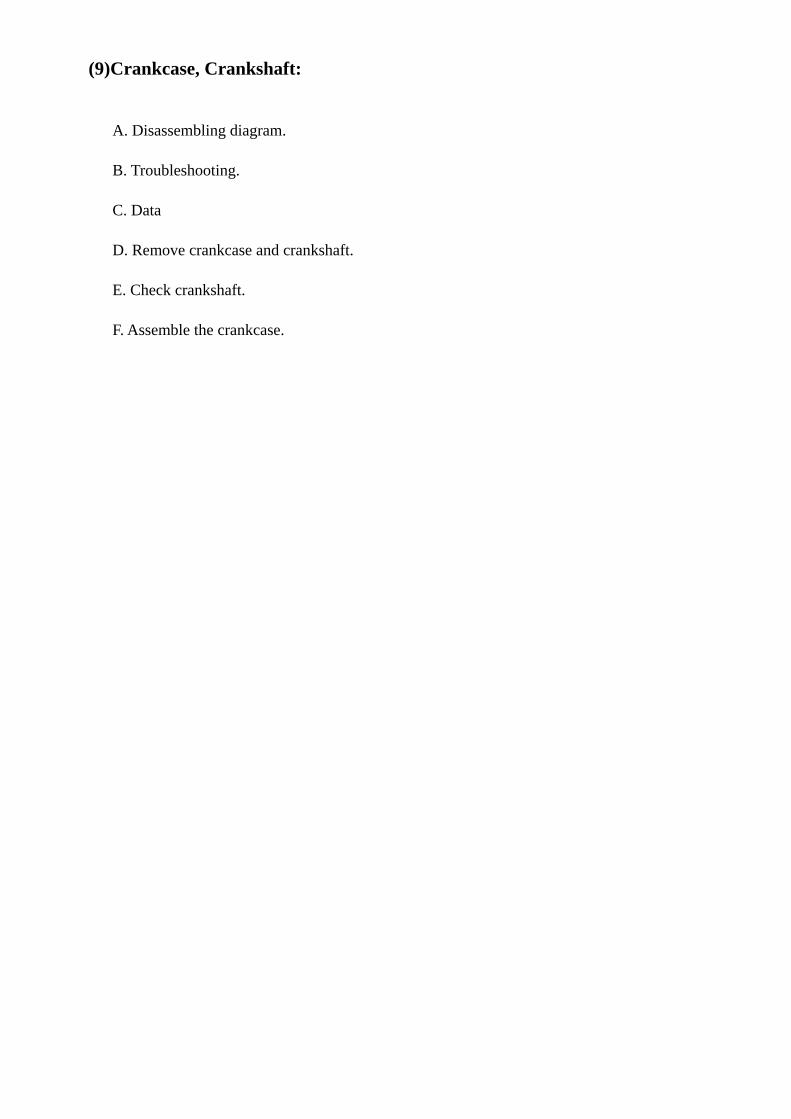
2.Check the wearing condition of idle gear shaft and idle gears. Gear teeth number 43 T (125CC) ;
42 T (150CC) 3.Check the wearing condition of the final reduction gear.
4.Check the wearing condition of the oil seal and bearing. D. Assemble the final transmission mechanism, please follow the opposite procedure Of disassembling. After locking the drain bolt, refill 90cc of gear oil SAE90.
Locking torque:M6: 1.0~1.2kg/M
M10: 3.5~4.0kg/M
Drain bolt: M8: 1.8kg/M
(9)Crankcase, Crankshaft:
A. Disassembling diagram.
B. Troubleshooting.
C. Data
D. Remove crankcase and crankshaft.
E. Check crankshaft.
F. Assemble the crankcase.
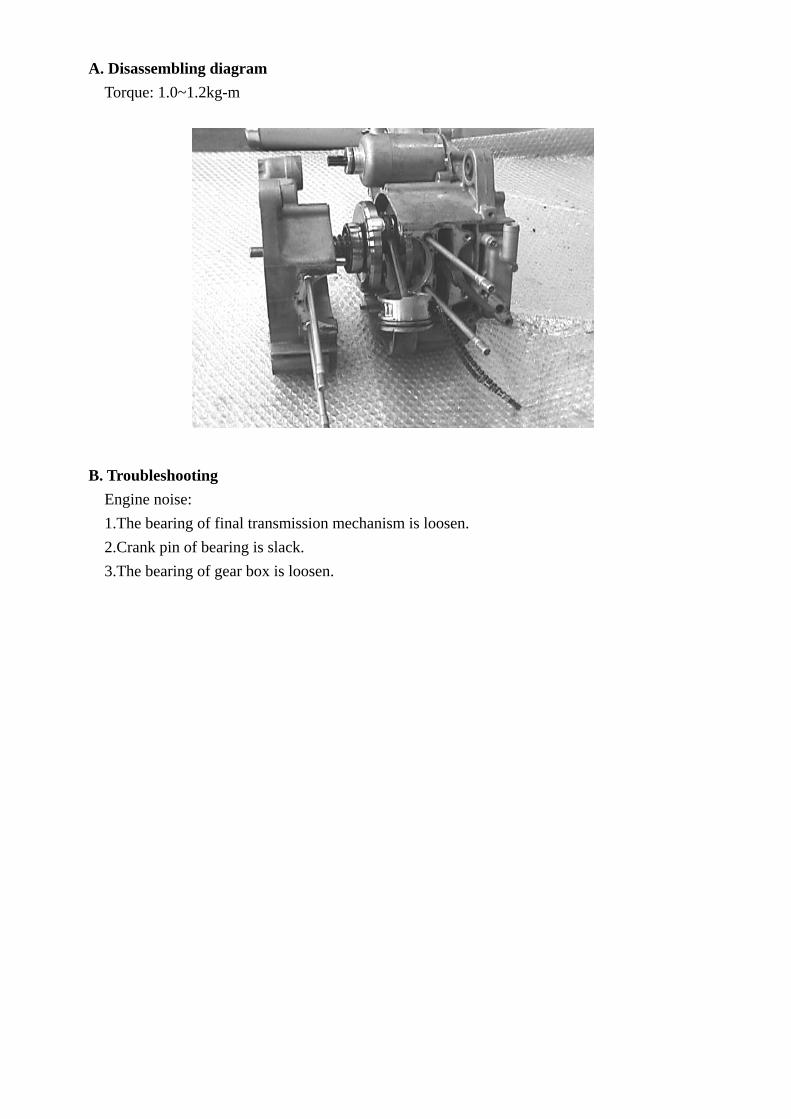
A. Disassembling diagram Torque: 1.0~1.2kg-m B. Troubleshooting Engine noise:
1.The bearing of final transmission mechanism is loosen. 2.Crank pin of bearing is slack. 3.The bearing of gear box is loosen.
C.Data
Item Standard
value(mm)
Limit of use.(mm)
Clearance of connecting rod big end
axle direction
0.10~0.35 0.55
Clearance of connecting rod big end
vertical direction.
- 0.04
Swingness of the crank shaft journal. 0.03 0.10
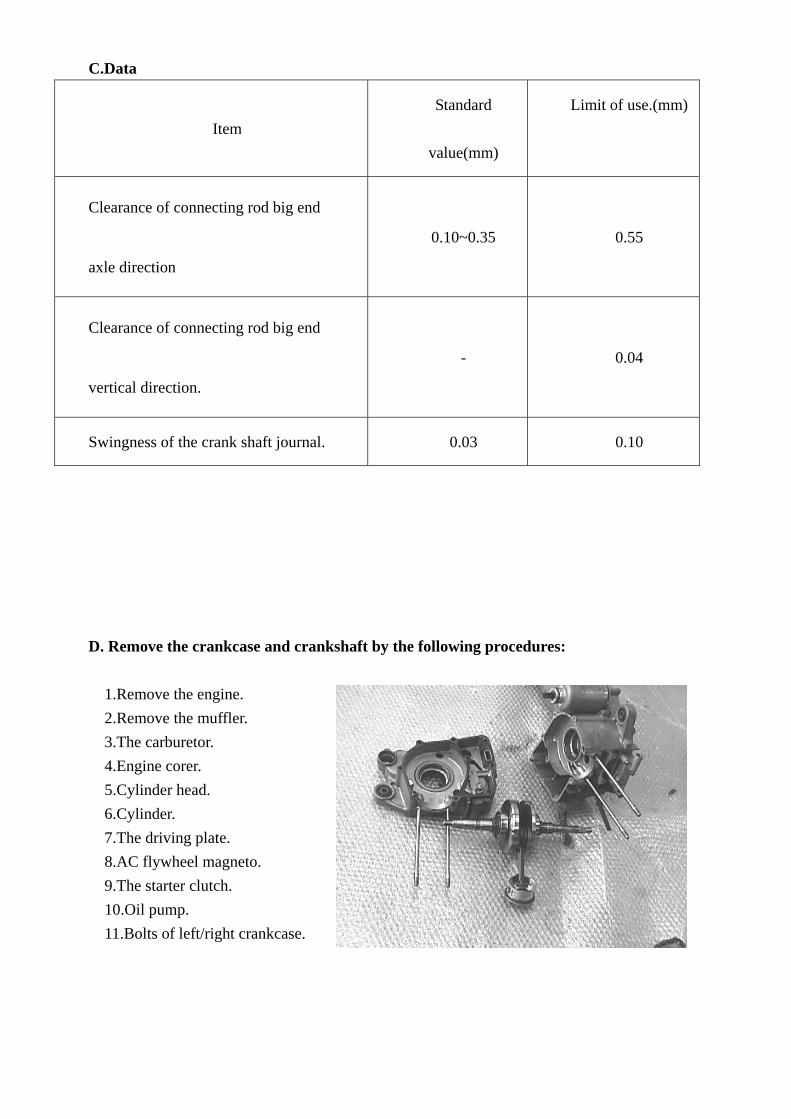
D. Remove the crankcase and crankshaft by the following procedures: 1.Remove the engine. 2.Remove the muffler. 3.The carburetor. 4.Engine corer. 5.Cylinder head. 6.Cylinder. 7.The driving plate. 8.AC flywheel magneto. 9.The starter clutch. 10.Oil pump. 11.Bolts of left/right crankcase.
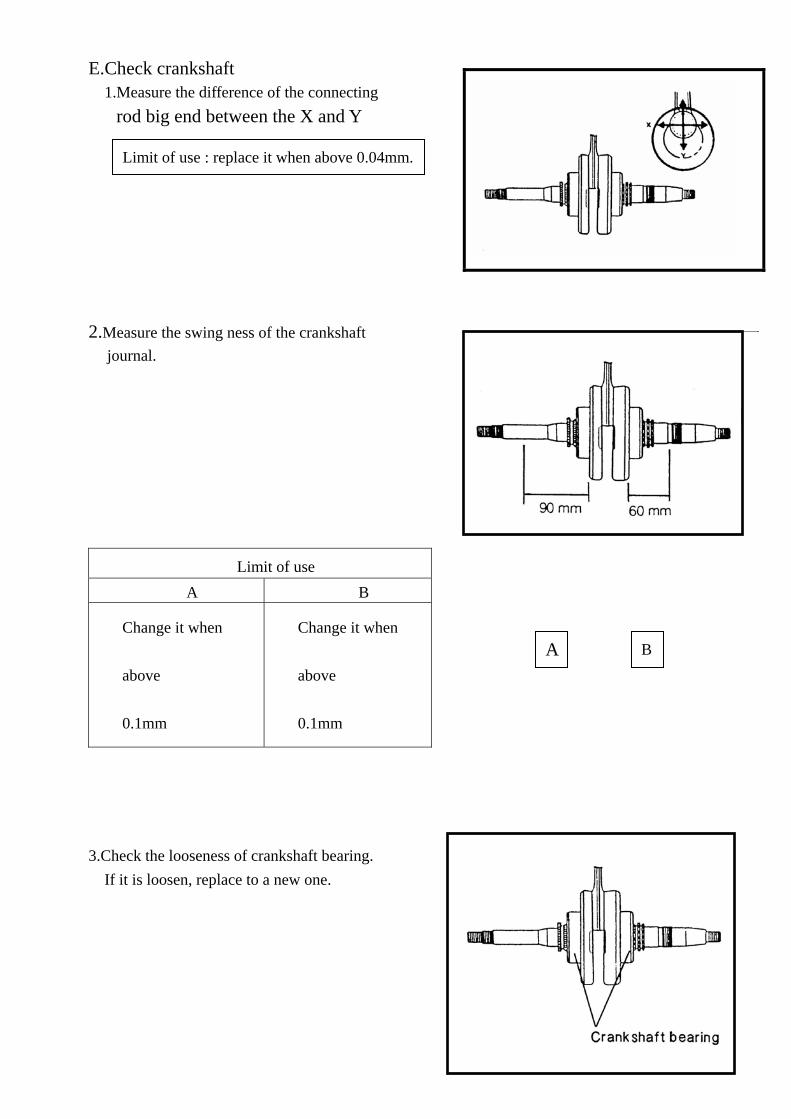
E.Check crankshaft 1.Measure the difference of the connecting rod big end between the X and Y 2.Measure the swing ness of the crankshaft journal.
Limit of use A B
Change it when
above
0.1mm
Change it when
above
0.1mm
3.Check the looseness of crankshaft bearing. If it is loosen, replace to a new one.
Limit of use : replace it when above 0.04mm.
A B

F.Assemble crankcase: 1.assemble crankcase according to the opposite procedure of disassembling. 2.The locking torque of bolts and nuts are described in previous chapter please refer.
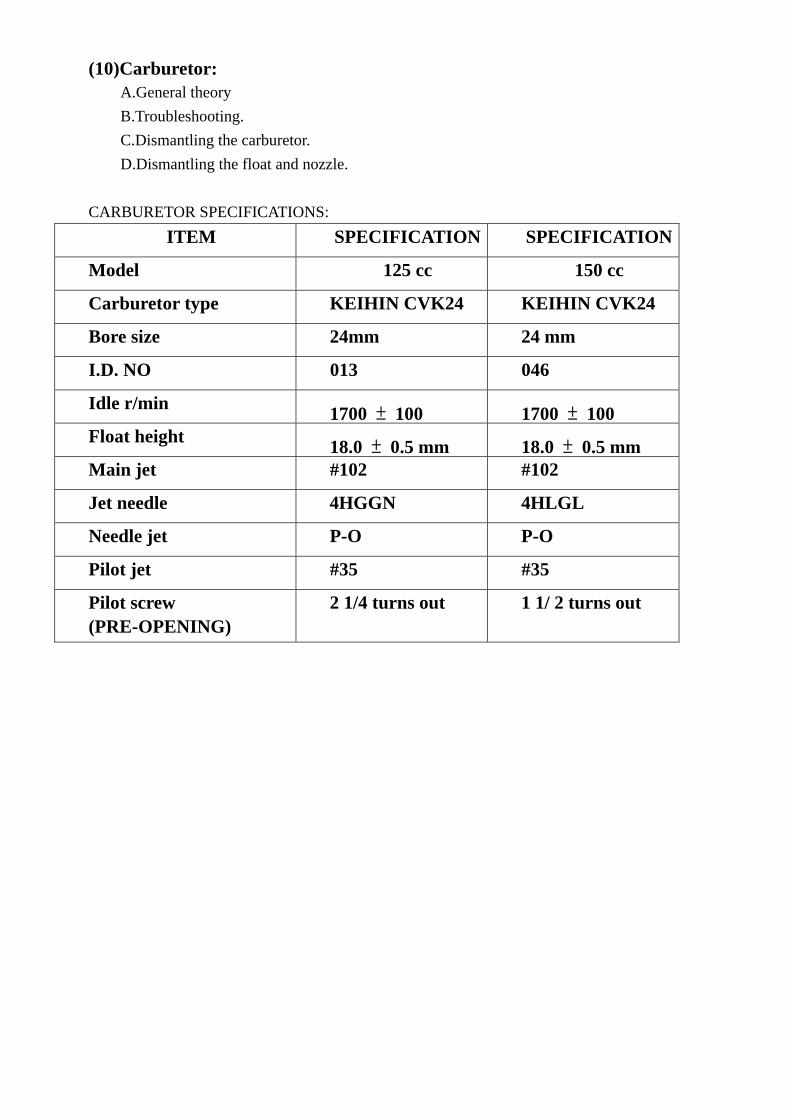
(10)Carburetor: A.General theory B.Troubleshooting. C.Dismantling the carburetor. D.Dismantling the float and nozzle. CARBURETOR SPECIFICATIONS:
ITEM SPECIFICATION SPECIFICATION
Model 125 cc 150 cc
Carburetor type KEIHIN CVK24 KEIHIN CVK24
Bore size 24mm 24 mm
I.D. NO 013 046
Idle r/min 1700 ± 100 1700 ± 100 Float height 18.0 ± 0.5 mm 18.0 ± 0.5 mm Main jet #102 #102
Jet needle 4HGGN 4HLGL
Needle jet P-O P-O
Pilot jet #35 #35
Pilot screw (PRE-OPENING)
2 1/4 turns out 1 1/ 2 turns out
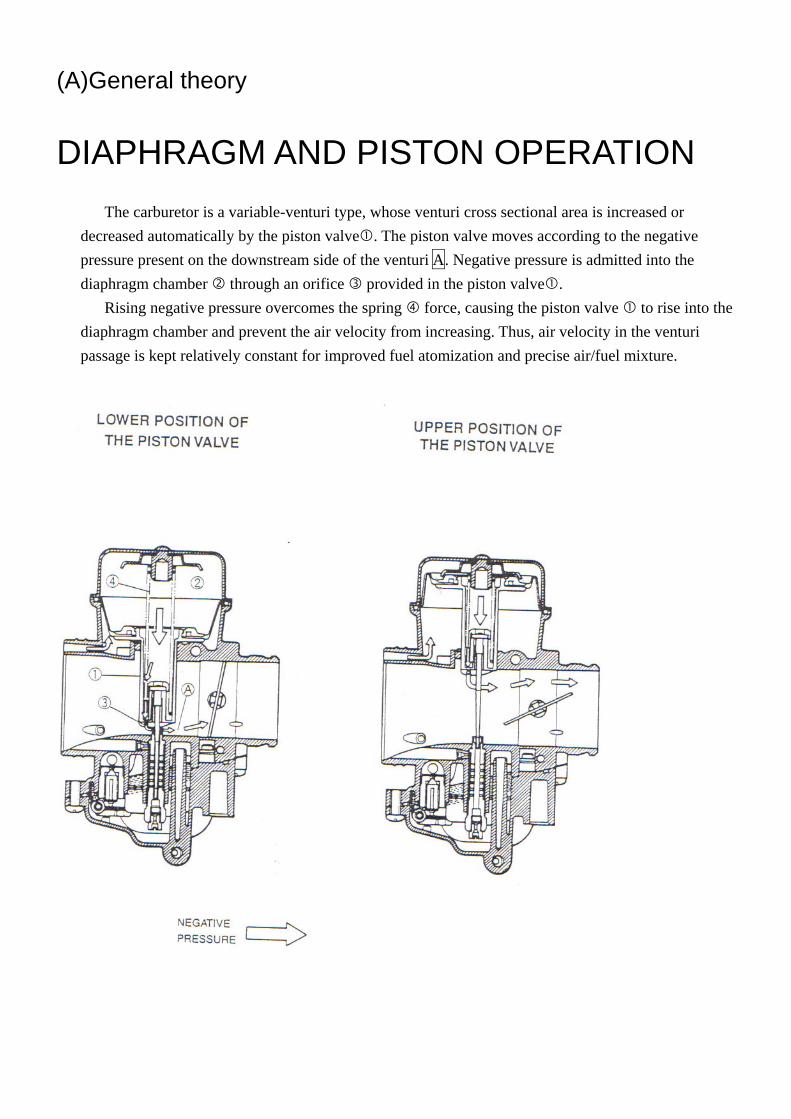
(A)General theory
DIAPHRAGM AND PISTON OPERATION The carburetor is a variable-venturi type, whose venturi cross sectional area is increased or
decreased automatically by the piston valve . The piston valve moves according to the negative pressure present on the downstream side of the venturi A. Negative pressure is admitted into the diaphragm chamber through an orifice provided in the piston valve .
Rising negative pressure overcomes the spring force, causing the piston valve to rise into the diaphragm chamber and prevent the air velocity from increasing. Thus, air velocity in the venturi passage is kept relatively constant for improved fuel atomization and precise air/fuel mixture.
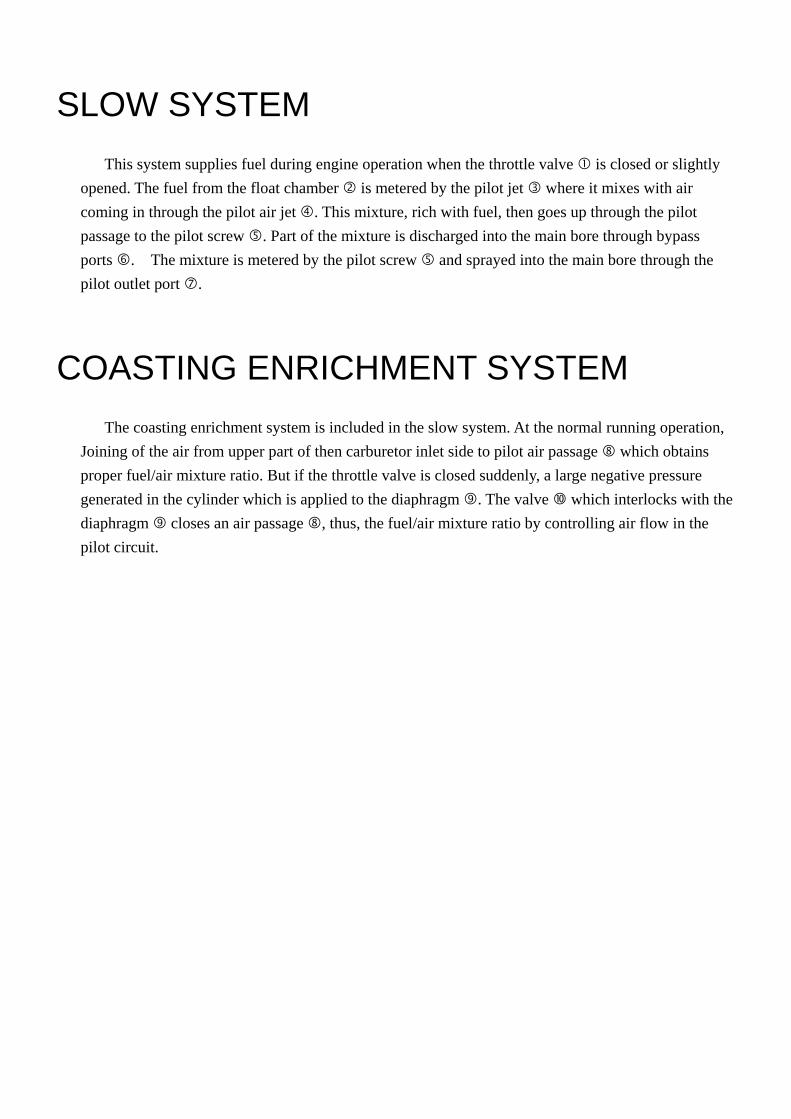
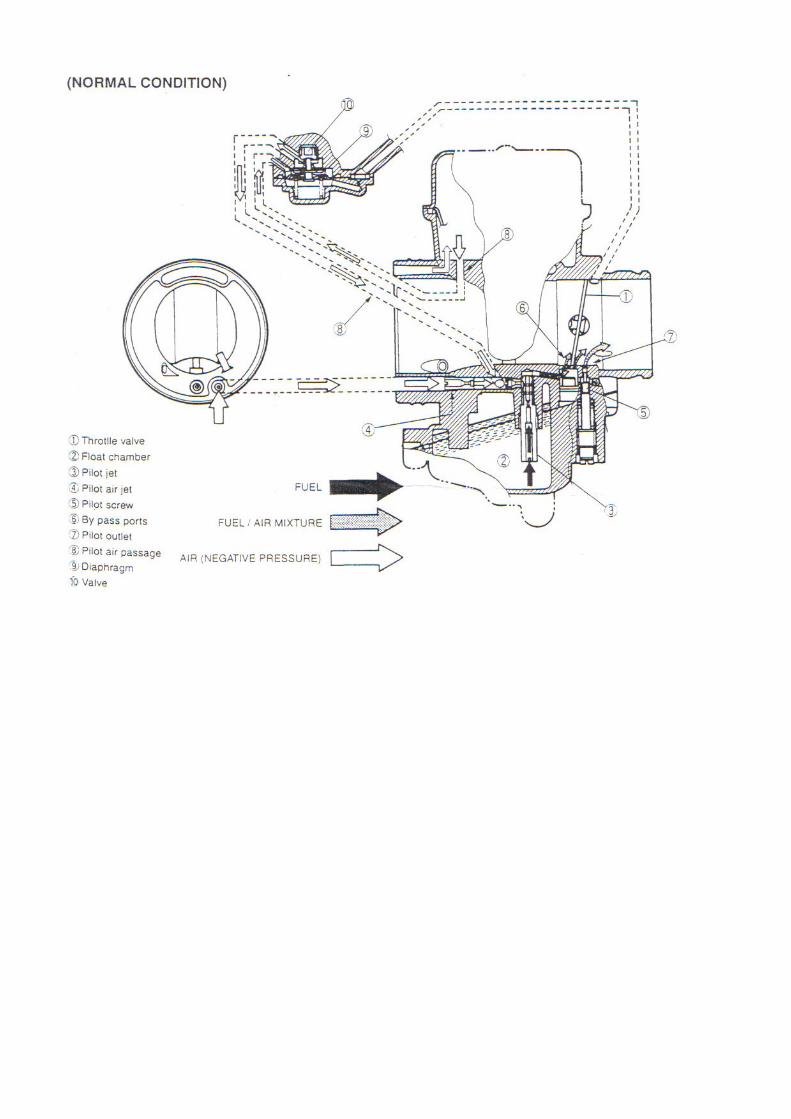
SLOW SYSTEM This system supplies fuel during engine operation when the throttle valve is closed or slightly
opened. The fuel from the float chamber is metered by the pilot jet where it mixes with air coming in through the pilot air jet . This mixture, rich with fuel, then goes up through the pilot passage to the pilot screw . Part of the mixture is discharged into the main bore through bypass ports . The mixture is metered by the pilot screw and sprayed into the main bore through the pilot outlet port .
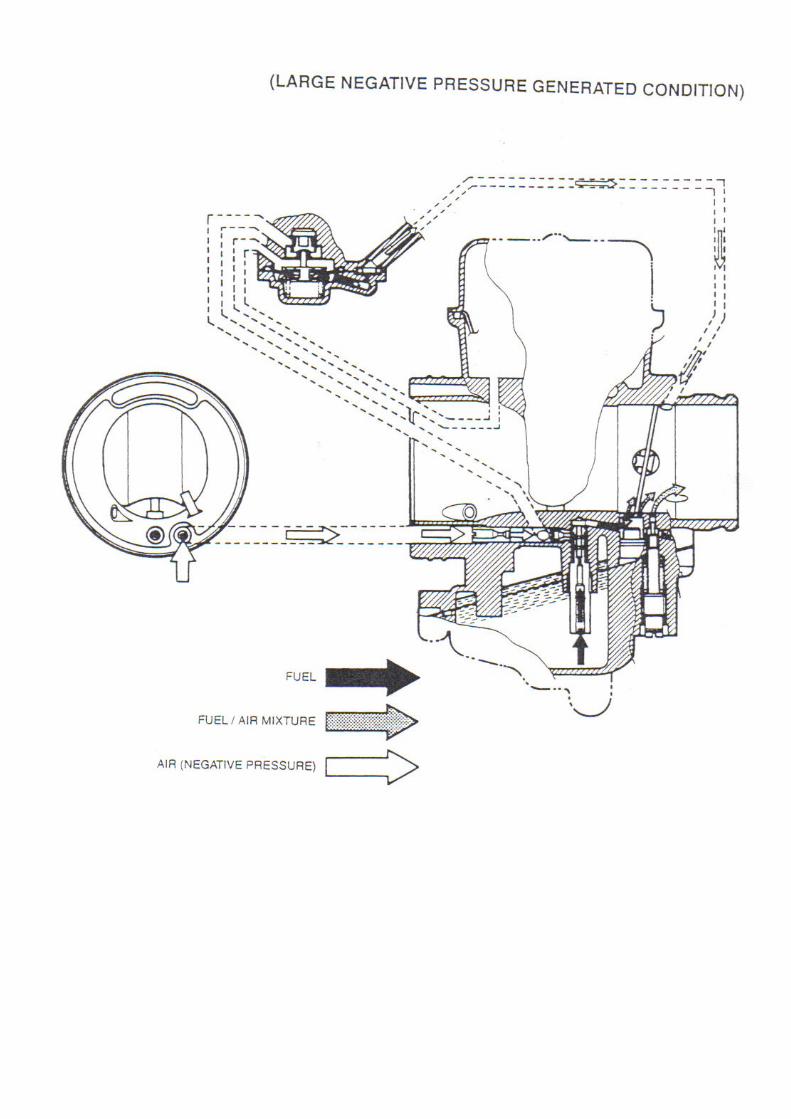
COASTING ENRICHMENT SYSTEM The coasting enrichment system is included in the slow system. At the normal running operation,
Joining of the air from upper part of then carburetor inlet side to pilot air passage which obtains proper fuel/air mixture ratio. But if the throttle valve is closed suddenly, a large negative pressure generated in the cylinder which is applied to the diaphragm . The valve which interlocks with the diaphragm closes an air passage , thus, the fuel/air mixture ratio by controlling air flow in the pilot circuit.
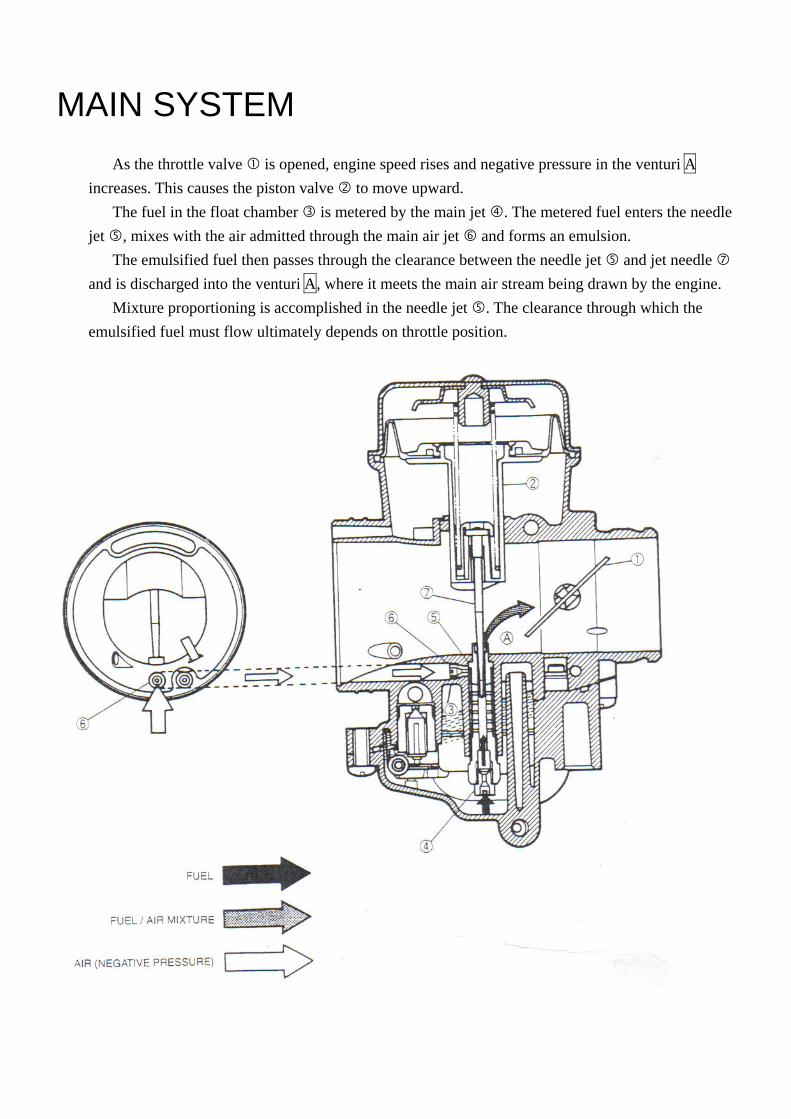
MAIN SYSTEM As the throttle valve is opened, engine speed rises and negative pressure in the venturi A
increases. This causes the piston valve to move upward. The fuel in the float chamber is metered by the main jet . The metered fuel enters the needle
jet , mixes with the air admitted through the main air jet and forms an emulsion. The emulsified fuel then passes through the clearance between the needle jet and jet needle
and is discharged into the venturi A, where it meets the main air stream being drawn by the engine. Mixture proportioning is accomplished in the needle jet . The clearance through which the
emulsified fuel must flow ultimately depends on throttle position.
AUTO-ENRICHENER (AUTO-CHOKE)
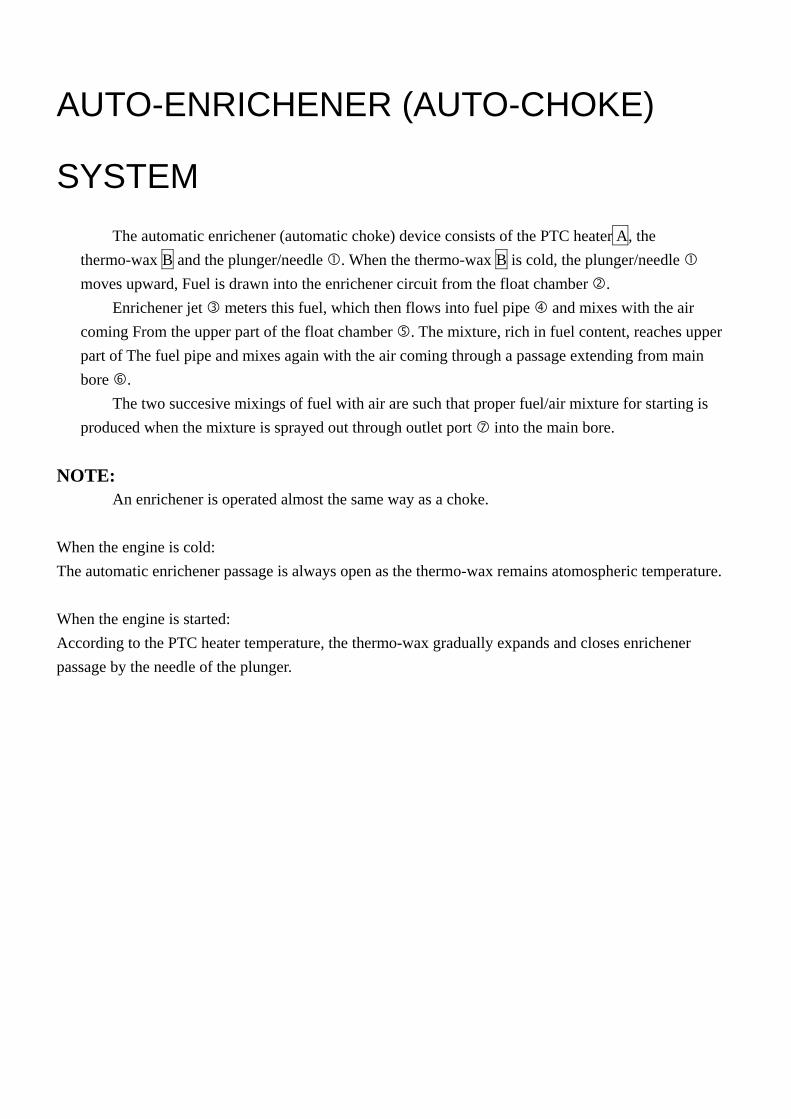
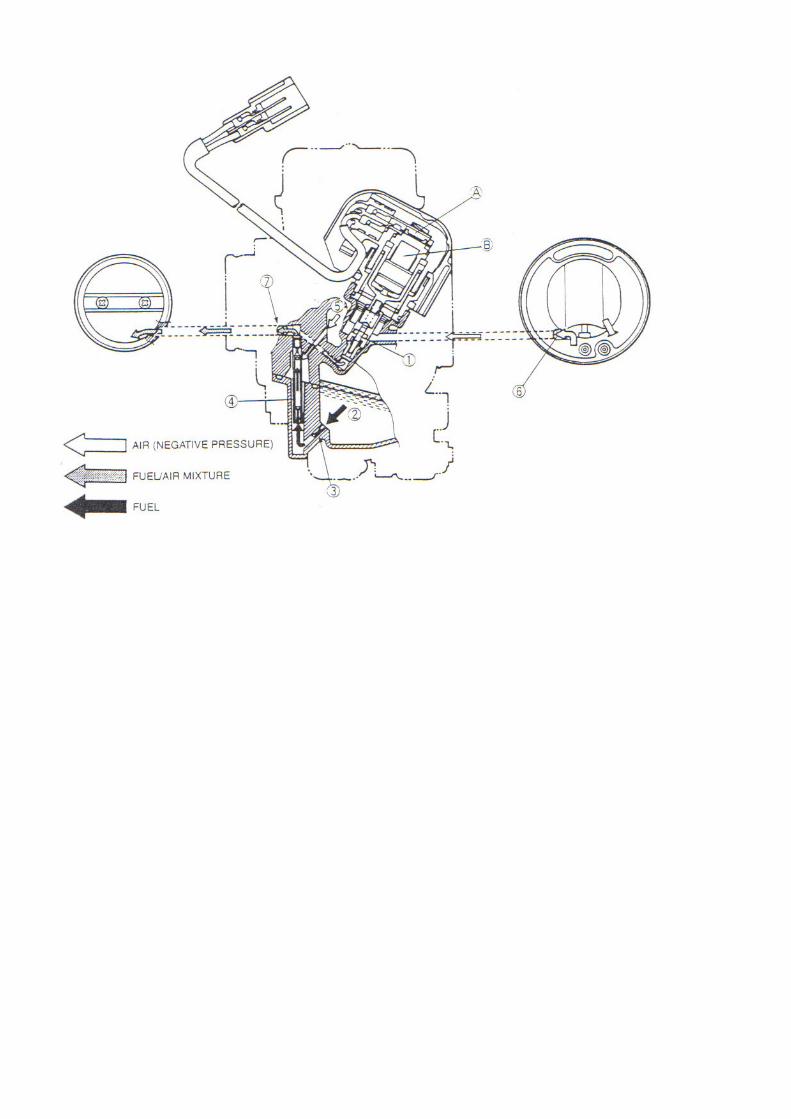
SYSTEM The automatic enrichener (automatic choke) device consists of the PTC heater A, the
thermo-wax B and the plunger/needle . When the thermo-wax B is cold, the plunger/needle moves upward, Fuel is drawn into the enrichener circuit from the float chamber .
Enrichener jet meters this fuel, which then flows into fuel pipe and mixes with the air coming From the upper part of the float chamber . The mixture, rich in fuel content, reaches upper part of The fuel pipe and mixes again with the air coming through a passage extending from main bore .
The two succesive mixings of fuel with air are such that proper fuel/air mixture for starting is produced when the mixture is sprayed out through outlet port into the main bore.
NOTE:
An enrichener is operated almost the same way as a choke. When the engine is cold: The automatic enrichener passage is always open as the thermo-wax remains atomospheric temperature. When the engine is started: According to the PTC heater temperature, the thermo-wax gradually expands and closes enrichener passage by the needle of the plunger.
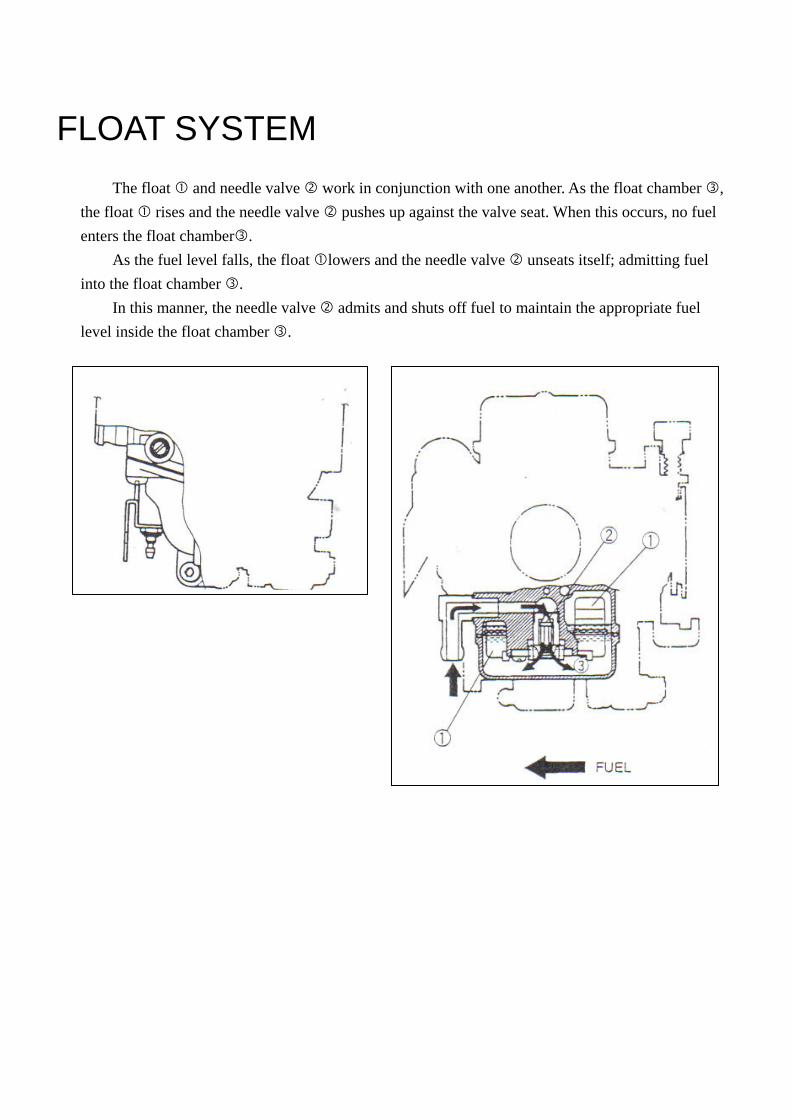
FLOAT SYSTEM The float and needle valve work in conjunction with one another. As the float chamber ,
the float rises and the needle valve pushes up against the valve seat. When this occurs, no fuel enters the float chamber .
As the fuel level falls, the float lowers and the needle valve unseats itself; admitting fuel into the float chamber .
In this manner, the needle valve admits and shuts off fuel to maintain the appropriate fuel level inside the float chamber .
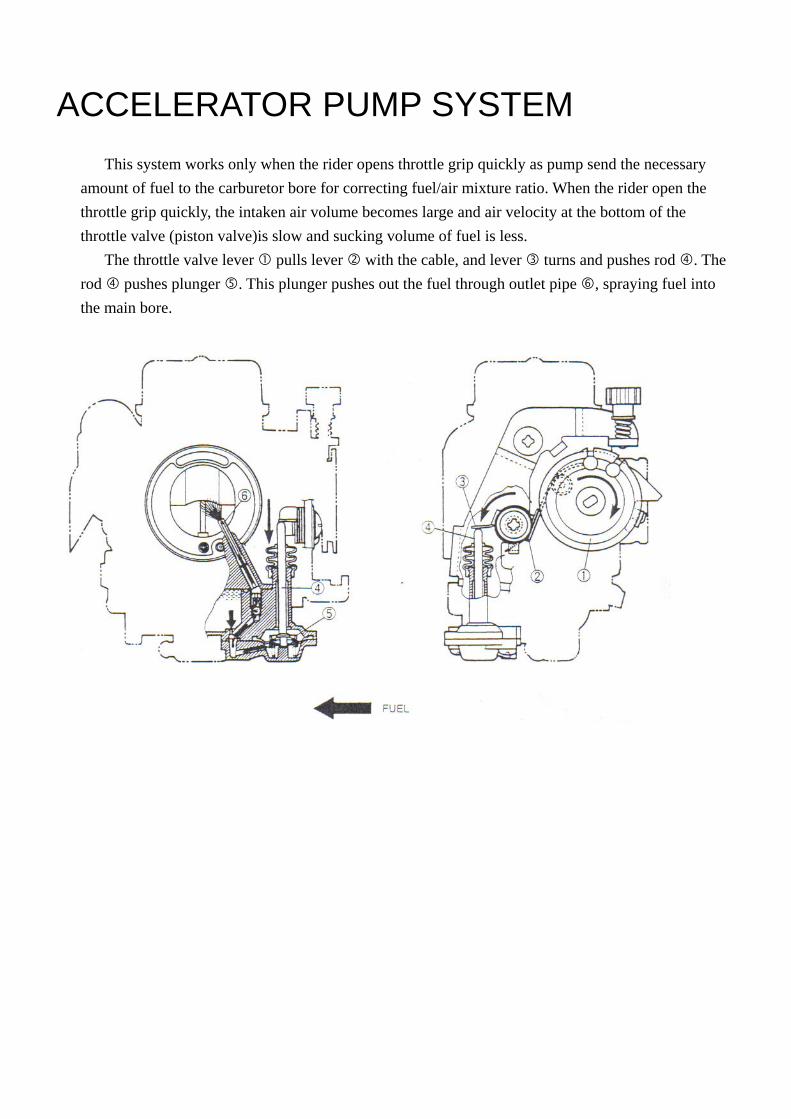
ACCELERATOR PUMP SYSTEM This system works only when the rider opens throttle grip quickly as pump send the necessary
amount of fuel to the carburetor bore for correcting fuel/air mixture ratio. When the rider open the throttle grip quickly, the intaken air volume becomes large and air velocity at the bottom of the throttle valve (piston valve)is slow and sucking volume of fuel is less.
The throttle valve lever pulls lever with the cable, and lever turns and pushes rod . The rod pushes plunger . This plunger pushes out the fuel through outlet pipe , spraying fuel into the main bore.
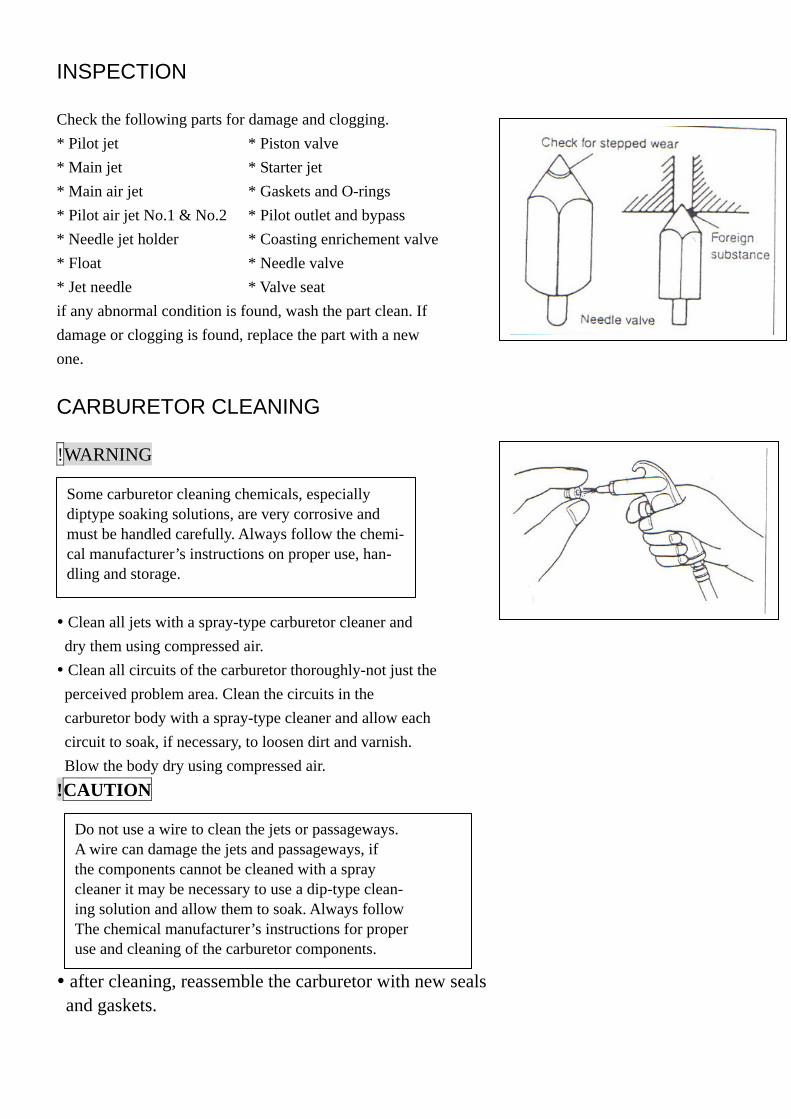
INSPECTION
Check the following parts for damage and clogging. * Pilot jet * Piston valve * Main jet * Starter jet * Main air jet * Gaskets and O-rings * Pilot air jet No.1 & No.2 * Pilot outlet and bypass * Needle jet holder * Coasting enrichement valve * Float * Needle valve * Jet needle * Valve seat if any abnormal condition is found, wash the part clean. If damage or clogging is found, replace the part with a new one.
CARBURETOR CLEANING
!WARNING Clean all jets with a spray-type carburetor cleaner and
dry them using compressed air. Clean all circuits of the carburetor thoroughly-not just the
perceived problem area. Clean the circuits in the carburetor body with a spray-type cleaner and allow each circuit to soak, if necessary, to loosen dirt and varnish. Blow the body dry using compressed air. !CAUTION after cleaning, reassemble the carburetor with new seals
and gaskets.
Some carburetor cleaning chemicals, especially diptype soaking solutions, are very corrosive and must be handled carefully. Always follow the chemi-cal manufacturer’s instructions on proper use, han- dling and storage.
Do not use a wire to clean the jets or passageways. A wire can damage the jets and passageways, if the components cannot be cleaned with a spray cleaner it may be necessary to use a dip-type clean- ing solution and allow them to soak. Always follow The chemical manufacturer’s instructions for proper use and cleaning of the carburetor components.
AUTO-ENRICHENER INSPECTION Disconnect the lead wire coupler . Remove the cover . Connect the positive ♁ terminal of a 12V battery to
Yellow/white lead and the negative Θ terminal to Black/ White. Check that the auto-enrichener section (PTC heater
built-in area)is heated in 5 minutes after the battery has been connected. NOTE: To inspect the function, check for change of temperature from the cold condition. !CAUTION
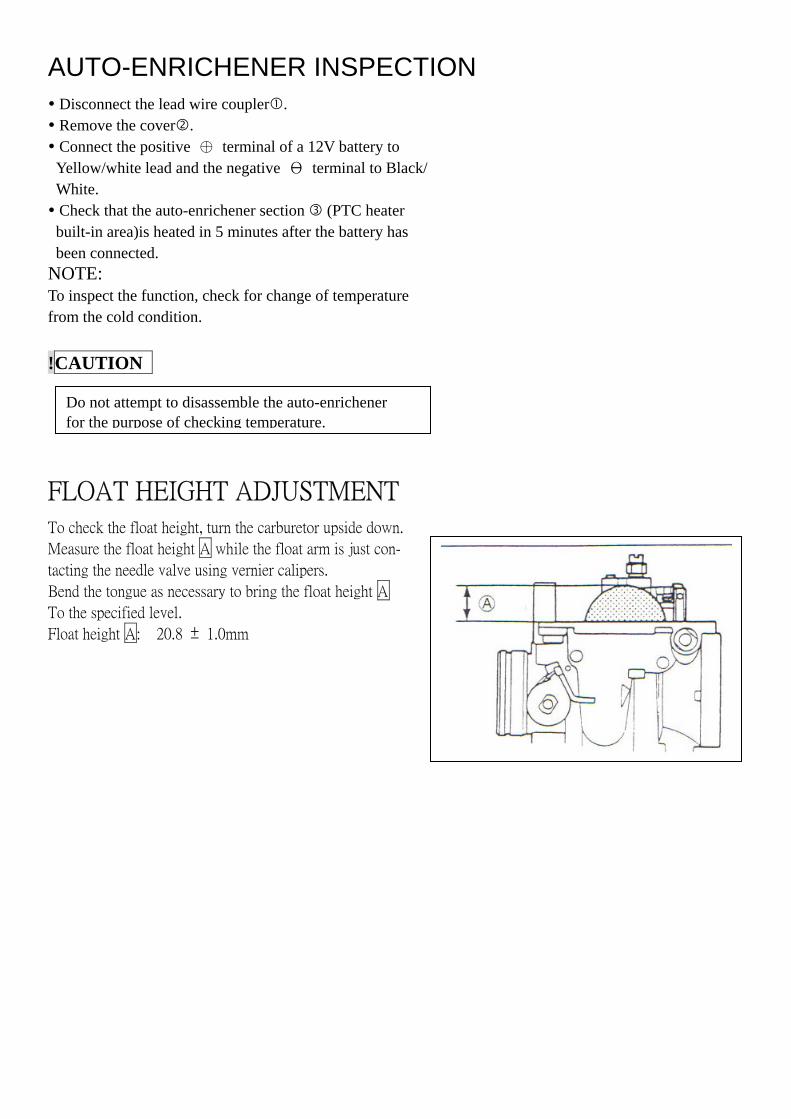
FLOAT HEIGHT ADJUSTMENT
To check the float height, turn the carburetor upside down.
Measure the float height A while the float arm is just con-
tacting the needle valve using vernier calipers.
Bend the tongue as necessary to bring the float height A
To the specified level.
Float height A: 20.8 ± 1.0mm
Do not attempt to disassemble the auto-enrichener for the purpose of checking temperature.
(B) Troubleshooting Difficult to start
1.No sparking in spark plug. 2.Compression pressure too low. 3.No fuel in the carburetor
-air cleaner blocked -oil pipe blocked -bad adjustment of the fuel level float valve is jell
Mixed air too dilute 1.Main jet blocked 2.Float valve blocked 3.Fuel level too low 4.Fuel system blocked 5.Second air sucked into intake system 6.Bat vacuums during piston movement 7.Throttle valve malfunction
Too much fuel in the engine 1.Air cleaner blocked 2.Mixed air is too dilute in the idle system
Sparking unsteady while increasing speed 1.Ignition system malfunction. 2.Air mixture is too dilute
Difficult to start, Ignition off, Unstable idling 1.Fuel system blocked 2.Ignition system malfunction 3.Air mixture is too dilute or too thick 4.Fuel deterioration 5.Second air sucked into intake system. 6.Bad idle adjustment 7.Bad fuel volume adjustment 8.Idle system or fueling system blocked 9.Bad adjustment of fuel level
Mixture air too thick 1.Auto chock system malfunction 2.Float valve malfunction 3.Fuel level is too high 4.Air route blocked 5.Dirty air cleaner 6.Fuel overwhelming in carburetor
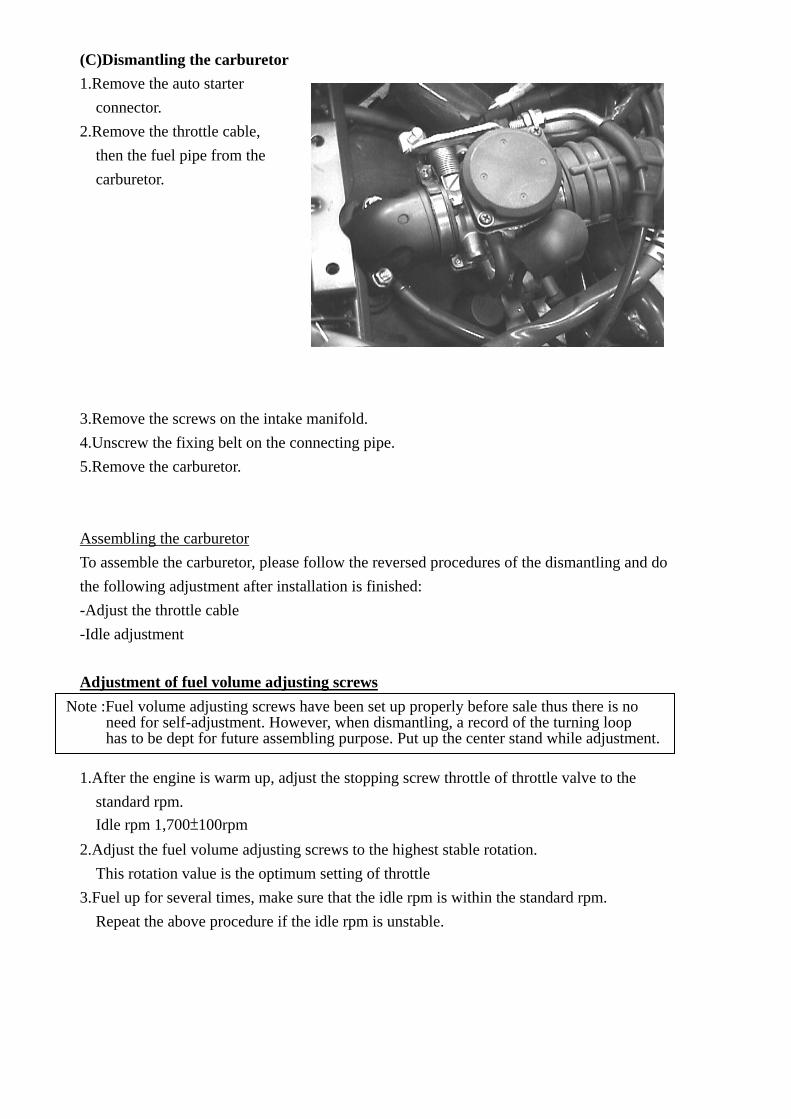
(C)Dismantling the carburetor 1.Remove the auto starter connector. 2.Remove the throttle cable, then the fuel pipe from the carburetor. 3.Remove the screws on the intake manifold. 4.Unscrew the fixing belt on the connecting pipe. 5.Remove the carburetor. Assembling the carburetor To assemble the carburetor, please follow the reversed procedures of the dismantling and do the following adjustment after installation is finished: -Adjust the throttle cable -Idle adjustment Adjustment of fuel volume adjusting screws 1.After the engine is warm up, adjust the stopping screw throttle of throttle valve to the standard rpm. Idle rpm 1,700±100rpm 2.Adjust the fuel volume adjusting screws to the highest stable rotation. This rotation value is the optimum setting of throttle 3.Fuel up for several times, make sure that the idle rpm is within the standard rpm. Repeat the above procedure if the idle rpm is unstable.
Note :Fuel volume adjusting screws have been set up properly before sale thus there is no need for self-adjustment. However, when dismantling, a record of the turning loop has to be dept for future assembling purpose. Put up the center stand while adjustment.
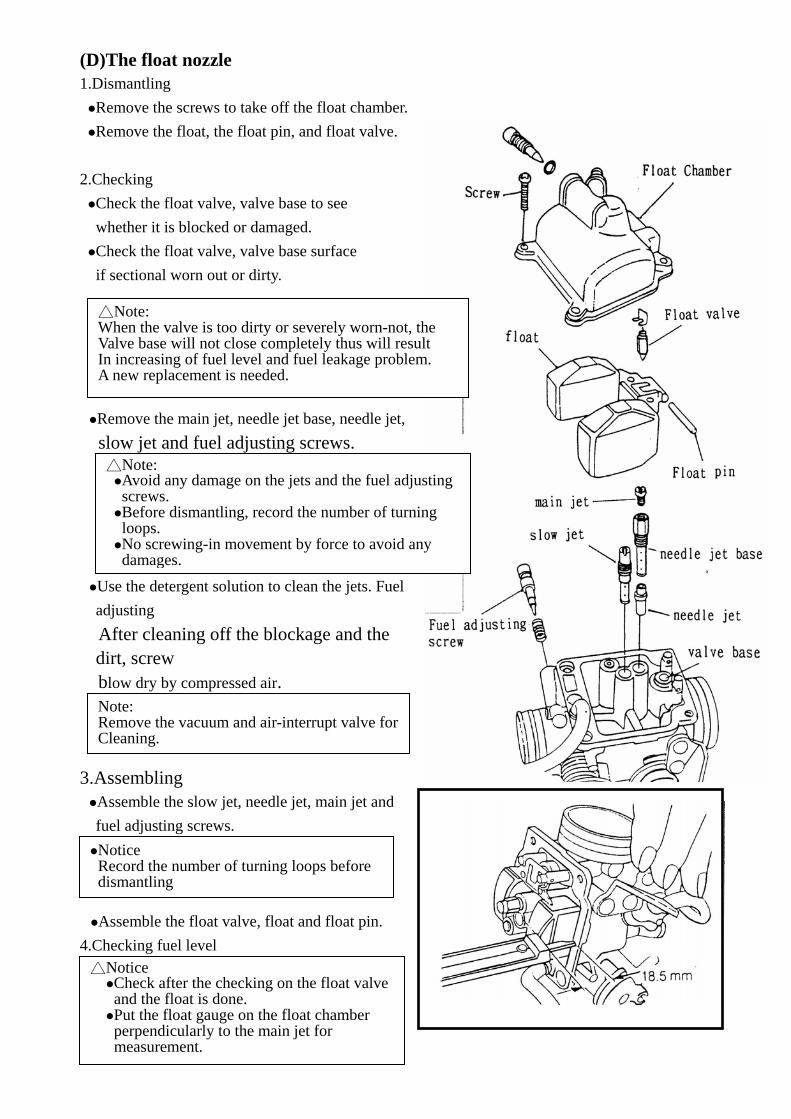
(D)The float nozzle 1.Dismantling Remove the screws to take off the float chamber. Remove the float, the float pin, and float valve. 2.Checking Check the float valve, valve base to see whether it is blocked or damaged. Check the float valve, valve base surface if sectional worn out or dirty. Remove the main jet, needle jet base, needle jet, slow jet and fuel adjusting screws. Use the detergent solution to clean the jets. Fuel
adjusting After cleaning off the blockage and the
dirt, screw blow dry by compressed air. 3.Assembling Assemble the slow jet, needle jet, main jet and fuel adjusting screws. Assemble the float valve, float and float pin. 4.Checking fuel level
△Note: When the valve is too dirty or severely worn-not, the Valve base will not close completely thus will result In increasing of fuel level and fuel leakage problem. A new replacement is needed.
△Note: Avoid any damage on the jets and the fuel adjusting screws. Before dismantling, record the number of turning loops. No screwing-in movement by force to avoid any damages.
Note: Remove the vacuum and air-interrupt valve forCleaning.
Notice Record the number of turning loops before dismantling
△Notice Check after the checking on the float valve and the float is done. Put the float gauge on the float chamber perpendicularly to the main jet for measurement.

Related Documents


![Welcome [thesandswhatson.files.wordpress.com]...The Sands Owners Corporation is responsible for managing, administering, repairing and maintaining all the common property within the](https://static.cupdf.com/doc/110x72/60655155019a2616922831af/welcome-the-sands-owners-corporation-is-responsible-for-managing-administering.jpg)